Integration Guide - SailPoint Compass
256
SailPoint Version 7.2 Integration Guide
-
Upload
khangminh22 -
Category
Documents
-
view
0 -
download
0
Transcript of Integration Guide - SailPoint Compass

SailPoint Version 7.2
Integration Guide

Copyright © 2016 SailPoint Technologies, Inc., All Rights Reserved.
SailPoint Technologies, Inc. makes no warranty of any kind with regard to this manual, including, but not limited to, the implied warranties of merchantability and fitness for a particular purpose. SailPoint Technologies shall not be liable for errors contained herein or direct, indirect, special, incidental or consequential damages in connection with the furnishing, performance, or use of this material.
Restricted Rights Legend. All rights are reserved. No part of this document may be published, distributed, reproduced, publicly displayed, used to create derivative works, or translated to another language, without the prior written consent of SailPoint Technologies. The information contained in this document is subject to change without notice.
Use, duplication or disclosure by the U.S. Government is subject to restrictions as set forth in subparagraph (c) (1) (ii) of the Rights in Technical Data and Computer Software clause at DFARS 252.227-7013 for DOD agencies, and subparagraphs (c) (1) and (c) (2) of the Commercial Computer Software Restricted Rights clause at FAR 52.227-19 for other agencies.
Regulatory/Export Compliance. The export and re-export of this software is controlled for export purposes by the U.S. Government. By accepting this software and/or documentation, licensee agrees to comply with all U.S. and foreign export laws and regulations as they relate to software and related documentation. Licensee will not export or re-export outside the United States software or documentation, whether directly or indirectly, to any Prohibited Party and will not cause, approve or otherwise intentionally facilitate others in so doing. A Prohibited Party includes: a party in a U.S. embargoed country or country the United States has named as a supporter of international terrorism; a party involved in proliferation; a party identified by the U.S. Government as a Denied Party; a party named on the U.S. Government's Specially Designated Nationals (SDN) List; a party prohibited from participation in export or re-export transactions by a U.S. Government General Order; a party listed by the U.S. Government's Office of Foreign Assets Control as ineligible to participate in transactions subject to U.S. jurisdiction; or any party that licensee knows or has reason to know has violated or plans to violate U.S. or foreign export laws or regulations. Licensee shall ensure that each of its software users complies with U.S. and foreign export laws and regulations as they relate to software and related documentation.
Copyright and Trademark Notices. Copyright © 2016 SailPoint Technologies, Inc. All Rights Reserved. All logos, text, content, including underlying HTML code, designs, and graphics used and/or depicted on these written materials or in this Internet web site are protected under United States and international copyright and trademark laws and treaties, and may not be used or reproduced without the prior express written permission of SailPoint Technologies, Inc.
“SailPoint Technologies & Design,” “IdentityIQ,” “IdentityNow,” “AccessIQ,” “Identity Cube,” “Managing the Business of Identity” and the SailPoint logo are registered trademarks of SailPoint Technologies, Inc. “SecurityIQ,” “SailPoint,” “Identity is Everything” and “The Power of Identity” are trademarks of SailPoint Technologies, Inc. None of the foregoing marks may be used without the prior express written permission of SailPoint Technologies, Inc. All other trademarks shown herein are owned by the respective companies or persons indicated.
TableofContentsChapter1:Overview.............................................................. 1WhatisSailPointIdentityIQ? .........................................................................1SailPointIntegrationGuideOverview ................................................................1HealthcareIntegrationModule ....................................... 3Chapter2:SailPointEpicIntegrationModule...................................... 5Overview............................................................................................5
Important consideration . . . . . . . . . . . . . . . . . . . . . . . . . . . . . . . . . . . . . . . . . . . . . . . . . . . . . . . . . . . . . . . .5Supported features . . . . . . . . . . . . . . . . . . . . . . . . . . . . . . . . . . . . . . . . . . . . . . . . . . . . . . . . . . . . . . . . . . . .6Supported Managed System . . . . . . . . . . . . . . . . . . . . . . . . . . . . . . . . . . . . . . . . . . . . . . . . . . . . . . . . . . . . .6Pre-requisites . . . . . . . . . . . . . . . . . . . . . . . . . . . . . . . . . . . . . . . . . . . . . . . . . . . . . . . . . . . . . . . . . . . . . . . .6Administrator permissions . . . . . . . . . . . . . . . . . . . . . . . . . . . . . . . . . . . . . . . . . . . . . . . . . . . . . . . . . . . . . .7Configurationparameters ............................................................................7SchemaAttributes ...................................................................................7Account attributes . . . . . . . . . . . . . . . . . . . . . . . . . . . . . . . . . . . . . . . . . . . . . . . . . . . . . . . . . . . . . . . . . . . . .7Group attributes . . . . . . . . . . . . . . . . . . . . . . . . . . . . . . . . . . . . . . . . . . . . . . . . . . . . . . . . . . . . . . . . . . . . . .9ProvisioningPolicyattributes ........................................................................9Troubleshooting.................................................................................... 11
EnterpriseResourcePlanningIntegrationModules..................13Chapter3:SailPointSAPIntegrationModule.....................................15Overview........................................................................................... 15
Supported features . . . . . . . . . . . . . . . . . . . . . . . . . . . . . . . . . . . . . . . . . . . . . . . . . . . . . . . . . . . . . . . . . . .15Supported Managed Systems . . . . . . . . . . . . . . . . . . . . . . . . . . . . . . . . . . . . . . . . . . . . . . . . . . . . . . . . . . .16Pre-requisites . . . . . . . . . . . . . . . . . . . . . . . . . . . . . . . . . . . . . . . . . . . . . . . . . . . . . . . . . . . . . . . . . . . . . . .16Administrator permissions . . . . . . . . . . . . . . . . . . . . . . . . . . . . . . . . . . . . . . . . . . . . . . . . . . . . . . . . . . . . .17Configurationparameters ........................................................................... 21Schemaattributes................................................................................... 23Account attributes . . . . . . . . . . . . . . . . . . . . . . . . . . . . . . . . . . . . . . . . . . . . . . . . . . . . . . . . . . . . . . . . . . . .23Group attributes . . . . . . . . . . . . . . . . . . . . . . . . . . . . . . . . . . . . . . . . . . . . . . . . . . . . . . . . . . . . . . . . . . . . .27Schema extension and custom attributes . . . . . . . . . . . . . . . . . . . . . . . . . . . . . . . . . . . . . . . . . . . . . . . . . .28 Upgrade considerations . . . . . . . . . . . . . . . . . . . . . . . . . . . . . . . . . . . . . . . . . . . . . . . . . . . . . . . . . . . . . . .28ProvisioningPolicyattributes ....................................................................... 28Create account attributes . . . . . . . . . . . . . . . . . . . . . . . . . . . . . . . . . . . . . . . . . . . . . . . . . . . . . . . . . . . . . . .29Additionalinformation .............................................................................. 29Entitlement validity period . . . . . . . . . . . . . . . . . . . . . . . . . . . . . . . . . . . . . . . . . . . . . . . . . . . . . . . . . . . . .29CUA support . . . . . . . . . . . . . . . . . . . . . . . . . . . . . . . . . . . . . . . . . . . . . . . . . . . . . . . . . . . . . . . . . . . . . . . .29Entitlement Data . . . . . . . . . . . . . . . . . . . . . . . . . . . . . . . . . . . . . . . . . . . . . . . . . . . . . . . . . . . . . . . . . . . . .29Password Change . . . . . . . . . . . . . . . . . . . . . . . . . . . . . . . . . . . . . . . . . . . . . . . . . . . . . . . . . . . . . . . . . . . .29Logon and Communication Language attributes . . . . . . . . . . . . . . . . . . . . . . . . . . . . . . . . . . . . . . . . . . . .31Delta Aggregation . . . . . . . . . . . . . . . . . . . . . . . . . . . . . . . . . . . . . . . . . . . . . . . . . . . . . . . . . . . . . . . . . . . .31Partitioning Aggregation . . . . . . . . . . . . . . . . . . . . . . . . . . . . . . . . . . . . . . . . . . . . . . . . . . . . . . . . . . . . . .34Troubleshooting.................................................................................... 34

Chapter4:SailPointOracleE-BusinessSuiteIntegrationModule .................39Overview........................................................................................... 39Supported features . . . . . . . . . . . . . . . . . . . . . . . . . . . . . . . . . . . . . . . . . . . . . . . . . . . . . . . . . . . . . . . . . . .39Supported Managed Systems . . . . . . . . . . . . . . . . . . . . . . . . . . . . . . . . . . . . . . . . . . . . . . . . . . . . . . . . . . .40Pre-requisites . . . . . . . . . . . . . . . . . . . . . . . . . . . . . . . . . . . . . . . . . . . . . . . . . . . . . . . . . . . . . . . . . . . . . . .40Administrator permissions . . . . . . . . . . . . . . . . . . . . . . . . . . . . . . . . . . . . . . . . . . . . . . . . . . . . . . . . . . . . .40Configurationparameters ........................................................................... 43Additional configuration parameter . . . . . . . . . . . . . . . . . . . . . . . . . . . . . . . . . . . . . . . . . . . . . . . . . . . . . .44Schemaattributes................................................................................... 44Account attributes . . . . . . . . . . . . . . . . . . . . . . . . . . . . . . . . . . . . . . . . . . . . . . . . . . . . . . . . . . . . . . . . . . . .44Group attributes . . . . . . . . . . . . . . . . . . . . . . . . . . . . . . . . . . . . . . . . . . . . . . . . . . . . . . . . . . . . . . . . . . . . .45ProvisioningPolicyattributes ....................................................................... 46Create account attributes . . . . . . . . . . . . . . . . . . . . . . . . . . . . . . . . . . . . . . . . . . . . . . . . . . . . . . . . . . . . . . .46Create group attributes . . . . . . . . . . . . . . . . . . . . . . . . . . . . . . . . . . . . . . . . . . . . . . . . . . . . . . . . . . . . . . . .47Additionalinformation .............................................................................. 47Upgrade considerations . . . . . . . . . . . . . . . . . . . . . . . . . . . . . . . . . . . . . . . . . . . . . . . . . . . . . . . . . . . . . . .47Troubleshooting.................................................................................... 48
Chapter5:SailPointSAPPortal-UserManagementWebServiceIntegrationModule49 Overview........................................................................................... 49
Supported features . . . . . . . . . . . . . . . . . . . . . . . . . . . . . . . . . . . . . . . . . . . . . . . . . . . . . . . . . . . . . . . . . . .50Supported Managed Systems . . . . . . . . . . . . . . . . . . . . . . . . . . . . . . . . . . . . . . . . . . . . . . . . . . . . . . . . . . .50Pre-requisite . . . . . . . . . . . . . . . . . . . . . . . . . . . . . . . . . . . . . . . . . . . . . . . . . . . . . . . . . . . . . . . . . . . . . . . .50Administrator permission . . . . . . . . . . . . . . . . . . . . . . . . . . . . . . . . . . . . . . . . . . . . . . . . . . . . . . . . . . . . . .51Configurationparameters ........................................................................... 51Schemaattributes................................................................................... 52Account attributes . . . . . . . . . . . . . . . . . . . . . . . . . . . . . . . . . . . . . . . . . . . . . . . . . . . . . . . . . . . . . . . . . . . .52Group attributes . . . . . . . . . . . . . . . . . . . . . . . . . . . . . . . . . . . . . . . . . . . . . . . . . . . . . . . . . . . . . . . . . . . . .53ProvisioningPolicyattributes ....................................................................... 53Create account attributes . . . . . . . . . . . . . . . . . . . . . . . . . . . . . . . . . . . . . . . . . . . . . . . . . . . . . . . . . . . . . . .53Create Group attributes . . . . . . . . . . . . . . . . . . . . . . . . . . . . . . . . . . . . . . . . . . . . . . . . . . . . . . . . . . . . . . . .54Additionalinformation .............................................................................. 55Undeploy .sda file . . . . . . . . . . . . . . . . . . . . . . . . . . . . . . . . . . . . . . . . . . . . . . . . . . . . . . . . . . . . . . . . . . . .55
Chapter6:SailPointPeopleSoftIntegrationModule..............................57Overview........................................................................................... 57Supported features . . . . . . . . . . . . . . . . . . . . . . . . . . . . . . . . . . . . . . . . . . . . . . . . . . . . . . . . . . . . . . . . . . .57Supported Managed Systems . . . . . . . . . . . . . . . . . . . . . . . . . . . . . . . . . . . . . . . . . . . . . . . . . . . . . . . . . . .58Pre-requisites . . . . . . . . . . . . . . . . . . . . . . . . . . . . . . . . . . . . . . . . . . . . . . . . . . . . . . . . . . . . . . . . . . . . . . .58Administrator permission . . . . . . . . . . . . . . . . . . . . . . . . . . . . . . . . . . . . . . . . . . . . . . . . . . . . . . . . . . . . . .58Configurationparameters ........................................................................... 58Schemaattributes................................................................................... 59Account attributes . . . . . . . . . . . . . . . . . . . . . . . . . . . . . . . . . . . . . . . . . . . . . . . . . . . . . . . . . . . . . . . . . . . .59Group attributes . . . . . . . . . . . . . . . . . . . . . . . . . . . . . . . . . . . . . . . . . . . . . . . . . . . . . . . . . . . . . . . . . . . . .61Additionalinformation .............................................................................. 61Performance improvement . . . . . . . . . . . . . . . . . . . . . . . . . . . . . . . . . . . . . . . . . . . . . . . . . . . . . . . . . . . . .61Partitioning Aggregation . . . . . . . . . . . . . . . . . . . . . . . . . . . . . . . . . . . . . . . . . . . . . . . . . . . . . . . . . . . . . .61Creating the Component Interfaces . . . . . . . . . . . . . . . . . . . . . . . . . . . . . . . . . . . . . . . . . . . . . . . . . . . . . .61Creating the Component interface jar file . . . . . . . . . . . . . . . . . . . . . . . . . . . . . . . . . . . . . . . . . . . . . . . . .61Configuring the Component Interface Security . . . . . . . . . . . . . . . . . . . . . . . . . . . . . . . . . . . . . . . . . . . . .62Troubleshooting.................................................................................... 63

Chapter7:SailPointSiebelIntegrationModule ...................................65Overview........................................................................................... 65Supported features . . . . . . . . . . . . . . . . . . . . . . . . . . . . . . . . . . . . . . . . . . . . . . . . . . . . . . . . . . . . . . . . . . .65Supported Managed Systems . . . . . . . . . . . . . . . . . . . . . . . . . . . . . . . . . . . . . . . . . . . . . . . . . . . . . . . . . . .66Pre-requisites . . . . . . . . . . . . . . . . . . . . . . . . . . . . . . . . . . . . . . . . . . . . . . . . . . . . . . . . . . . . . . . . . . . . . . .66Administrator permission . . . . . . . . . . . . . . . . . . . . . . . . . . . . . . . . . . . . . . . . . . . . . . . . . . . . . . . . . . . . . .66Configurationparameters ........................................................................... 66Schemaattributes................................................................................... 68Account attributes . . . . . . . . . . . . . . . . . . . . . . . . . . . . . . . . . . . . . . . . . . . . . . . . . . . . . . . . . . . . . . . . . . . .68Account Group attributes . . . . . . . . . . . . . . . . . . . . . . . . . . . . . . . . . . . . . . . . . . . . . . . . . . . . . . . . . . . . . .68Adding new custom attributes in schema . . . . . . . . . . . . . . . . . . . . . . . . . . . . . . . . . . . . . . . . . . . . . . . . . .69Provisioningpolicyattributes....................................................................... 69Troubleshooting.................................................................................... 70
Chapter8:SailPointNetSuiteIntegrationModule ................................71Overview........................................................................................... 71Supported features . . . . . . . . . . . . . . . . . . . . . . . . . . . . . . . . . . . . . . . . . . . . . . . . . . . . . . . . . . . . . . . . . . .71Supported Managed Systems . . . . . . . . . . . . . . . . . . . . . . . . . . . . . . . . . . . . . . . . . . . . . . . . . . . . . . . . . . .72Administrator permissions . . . . . . . . . . . . . . . . . . . . . . . . . . . . . . . . . . . . . . . . . . . . . . . . . . . . . . . . . . . . .72Configurationparameters ........................................................................... 72Schemaattributes................................................................................... 73Account attributes . . . . . . . . . . . . . . . . . . . . . . . . . . . . . . . . . . . . . . . . . . . . . . . . . . . . . . . . . . . . . . . . . . . .73Group attributes . . . . . . . . . . . . . . . . . . . . . . . . . . . . . . . . . . . . . . . . . . . . . . . . . . . . . . . . . . . . . . . . . . . . .74Schema extension and custom attributes . . . . . . . . . . . . . . . . . . . . . . . . . . . . . . . . . . . . . . . . . . . . . . . . . .74ProvisioningPolicyattributes ....................................................................... 75Additionalinformation .............................................................................. 76NetSuite Application Program Interface (API) . . . . . . . . . . . . . . . . . . . . . . . . . . . . . . . . . . . . . . . . . . . . .76
MainframeIntegrationModules .....................................77Chapter9:SailPointRACFIntegrationModule....................................79Overview........................................................................................... 79Supportedfeatures ................................................................................. 79InstallingRACFIntegrationModule ................................................................. 79Chapter10:SailPointCA-TopSecretIntegrationModule .........................81Overview........................................................................................... 81Supportedfeatures ................................................................................. 81InstallingCA-TopSecretIntegrationModule......................................................... 81Chapter11:SailPointCA-ACF2IntegrationModule ...............................83Overview........................................................................................... 83Supportedfeatures ................................................................................. 83InstallingCA-ACF2IntegrationModule .............................................................. 83Chapter12:SailPointRACFLDAPIntegrationModule ............................85Overview........................................................................................... 85
Supported features . . . . . . . . . . . . . . . . . . . . . . . . . . . . . . . . . . . . . . . . . . . . . . . . . . . . . . . . . . . . . . . . . . .85Supported Managed Systems . . . . . . . . . . . . . . . . . . . . . . . . . . . . . . . . . . . . . . . . . . . . . . . . . . . . . . . . . . .86Pre-requisites . . . . . . . . . . . . . . . . . . . . . . . . . . . . . . . . . . . . . . . . . . . . . . . . . . . . . . . . . . . . . . . . . . . . . . .86Administrator permissions . . . . . . . . . . . . . . . . . . . . . . . . . . . . . . . . . . . . . . . . . . . . . . . . . . . . . . . . . . . . .87Configurationparameters ........................................................................... 87SchemaAttributes .................................................................................. 88
Account attributes . . . . . . . . . . . . . . . . . . . . . . . . . . . . . . . . . . . . . . . . . . . . . . . . . . . . . . . . . . . . . . . . . . . .88Group attributes . . . . . . . . . . . . . . . . . . . . . . . . . . . . . . . . . . . . . . . . . . . . . . . . . . . . . . . . . . . . . . . . . . . . .90ProvisioningPolicyAttributes....................................................................... 91Additionalinformation .............................................................................. 92Support for PassPhrase . . . . . . . . . . . . . . . . . . . . . . . . . . . . . . . . . . . . . . . . . . . . . . . . . . . . . . . . . . . . . . . .92Support for Connection Attributes . . . . . . . . . . . . . . . . . . . . . . . . . . . . . . . . . . . . . . . . . . . . . . . . . . . . . . .92Implementing Secured Communication to RACF LDAP Server . . . . . . . . . . . . . . . . . . . . . . . . . . . . . . . .92Partitioning Aggregation . . . . . . . . . . . . . . . . . . . . . . . . . . . . . . . . . . . . . . . . . . . . . . . . . . . . . . . . . . . . . .95Troubleshooting.................................................................................... 96
Chapter13:SailPointTopSecretLDAPIntegrationModule .......................97Overview........................................................................................... 97Supported features . . . . . . . . . . . . . . . . . . . . . . . . . . . . . . . . . . . . . . . . . . . . . . . . . . . . . . . . . . . . . . . . . . .97Supported Managed Systems . . . . . . . . . . . . . . . . . . . . . . . . . . . . . . . . . . . . . . . . . . . . . . . . . . . . . . . . . . .98Administrator permissions . . . . . . . . . . . . . . . . . . . . . . . . . . . . . . . . . . . . . . . . . . . . . . . . . . . . . . . . . . . . .98Configurationparameters ........................................................................... 98SchemaAttributes .................................................................................. 99Account attributes . . . . . . . . . . . . . . . . . . . . . . . . . . . . . . . . . . . . . . . . . . . . . . . . . . . . . . . . . . . . . . . . . . . .99TopSecretProfile attributes . . . . . . . . . . . . . . . . . . . . . . . . . . . . . . . . . . . . . . . . . . . . . . . . . . . . . . . . . . . .101TopSecretGroup attributes . . . . . . . . . . . . . . . . . . . . . . . . . . . . . . . . . . . . . . . . . . . . . . . . . . . . . . . . . . . .102ProvisioningPolicyAttributes......................................................................102Additionalinformation .............................................................................103Support for PassPhrase . . . . . . . . . . . . . . . . . . . . . . . . . . . . . . . . . . . . . . . . . . . . . . . . . . . . . . . . . . . . . . .103Implementing Secured Communication to Top Secret LDAP Server . . . . . . . . . . . . . . . . . . . . . . . . . . . . . 103Partitioning Aggregation . . . . . . . . . . . . . . . . . . . . . . . . . . . . . . . . . . . . . . . . . . . . . . . . . . . . . . . . . . . . .103
ServiceDeskIntegrationModules..................................123Chapter14:SailPointServiceNowServiceIntegrationModule ..................105Overview..........................................................................................105Supportedfeatures ................................................................................105Supportedplatforms ...............................................................................106Pre-requisites......................................................................................106
Service Request . . . . . . . . . . . . . . . . . . . . . . . . . . . . . . . . . . . . . . . . . . . . . . . . . . . . . . . . . . . . . . . . . . . .106Incident and Change Request . . . . . . . . . . . . . . . . . . . . . . . . . . . . . . . . . . . . . . . . . . . . . . . . . . . . . . . . . .107Basicconfiguration ................................................................................108Basic flow of Service Request . . . . . . . . . . . . . . . . . . . . . . . . . . . . . . . . . . . . . . . . . . . . . . . . . . . . . . . . .109Basic configuration of Service Request . . . . . . . . . . . . . . . . . . . . . . . . . . . . . . . . . . . . . . . . . . . . . . . . . .109ConfiguringIdentityIQtointegratewithServiceNow ...............................................110IntegrationConfig XML files for Service Request, Incident and Change Request . . . . . . . . . . . . . . . . .113Configuration procedure . . . . . . . . . . . . . . . . . . . . . . . . . . . . . . . . . . . . . . . . . . . . . . . . . . . . . . . . . . . . . .116Retryable mechanism . . . . . . . . . . . . . . . . . . . . . . . . . . . . . . . . . . . . . . . . . . . . . . . . . . . . . . . . . . . . . . . .117Upgrade...........................................................................................118Samplescenario ...................................................................................118Troubleshooting...................................................................................119
Chapter15:SailPointHPServiceManagerServiceIntegrationModule .........125Overview..........................................................................................125Supportedfeatures ................................................................................125Supportedplatforms ...............................................................................126Pre-requisites......................................................................................126ConfiguringHPServiceManagerforIdentityIQIntegration .........................................129Retryable mechanism . . . . . . . . . . . . . . . . . . . . . . . . . . . . . . . . . . . . . . . . . . . . . . . . . . . . . . . . . . . . . . . .136

Additionalinformation .............................................................................136Creating New Service Request Catalog Item . . . . . . . . . . . . . . . . . . . . . . . . . . . . . . . . . . . . . . . . . . . . . .137Exporting user details from HP Service Manager . . . . . . . . . . . . . . . . . . . . . . . . . . . . . . . . . . . . . . . . . .137Importing user details from HP Service Manager to IdentityIQ . . . . . . . . . . . . . . . . . . . . . . . . . . . . . . .137Troubleshooting...................................................................................138
Chapter16:SailPointBMCRemedyServiceDeskServiceIntegrationModule ...141Overview..........................................................................................141Supportedfeatures ................................................................................141Supportedplatforms ...............................................................................141Pre-requisites......................................................................................142Basicconfiguration ................................................................................142ConfiguringBMCRemedyARSystemforIdentityIQIntegration .....................................143ConfiguringIdentityIQforBMCRemedyActionRequestSystemIntegration.........................145BMC Remedy Action Request System Integration . . . . . . . . . . . . . . . . . . . . . . . . . . . . . . . . . . . . . . . . .145Creating multiple tickets in Remedy System . . . . . . . . . . . . . . . . . . . . . . . . . . . . . . . . . . . . . . . . . . . . . .149Samplescenario ...................................................................................150
GRCIntegrationModule ...........................................151Chapter17:SailPointSAPGRCIntegrationModule.............................153Introduction.......................................................................................153Supportedfeatures ................................................................................154Supportedplatforms ...............................................................................155Pre-requisites......................................................................................155
SAP GRC Server Settings . . . . . . . . . . . . . . . . . . . . . . . . . . . . . . . . . . . . . . . . . . . . . . . . . . . . . . . . . . . .155SAP Connector changes for supporting SAP GRC integration . . . . . . . . . . . . . . . . . . . . . . . . . . . . . . . .156Creating IdentityIQ application of type SAP GRC . . . . . . . . . . . . . . . . . . . . . . . . . . . . . . . . . . . . . . . . .156SAP GRC workflows . . . . . . . . . . . . . . . . . . . . . . . . . . . . . . . . . . . . . . . . . . . . . . . . . . . . . . . . . . . . . . . .158MinimumpermissionsrequiredforSAPGRCuser ..................................................160CustomworkflowsprovidedforSAPGRCintegration ...............................................161SAP GRC Data Generator . . . . . . . . . . . . . . . . . . . . . . . . . . . . . . . . . . . . . . . . . . . . . . . . . . . . . . . . . . . .161SAP GRC Request Executor . . . . . . . . . . . . . . . . . . . . . . . . . . . . . . . . . . . . . . . . . . . . . . . . . . . . . . . . . .163ImportingSAPGRCApplicationRule ...............................................................164Viewingthereports ................................................................................165Upgradeconsiderations ............................................................................165Additionalinformation .............................................................................166Creating a RFC Connection on SAP GRC system . . . . . . . . . . . . . . . . . . . . . . . . . . . . . . . . . . . . . . . . . .166Configuring cross system on SAP GRC . . . . . . . . . . . . . . . . . . . . . . . . . . . . . . . . . . . . . . . . . . . . . . . . . .167(Optional) Support for additional parameters . . . . . . . . . . . . . . . . . . . . . . . . . . . . . . . . . . . . . . . . . . . . . .168Troubleshooting...................................................................................170
ServiceManagementIntegrationModule(ServiceCatalog) .........173Chapter18:SailPointServiceNowServiceCatalogIntegration ..................175Overview..........................................................................................175Supportedfeatures ................................................................................176Supportedplatforms ...............................................................................177Pre-requisites......................................................................................177InstallationandconfigurationinServiceNow .......................................................177
Installation . . . . . . . . . . . . . . . . . . . . . . . . . . . . . . . . . . . . . . . . . . . . . . . . . . . . . . . . . . . . . . . . . . . . . . . .177Configuration . . . . . . . . . . . . . . . . . . . . . . . . . . . . . . . . . . . . . . . . . . . . . . . . . . . . . . . . . . . . . . . . . . . . . .180ConfigurationinSailPointIdentityIQ ...............................................................181

Troubleshooting...................................................................................181ProvisioningIntegrationModules .................................183Chapter19:SailPointOracleIdentityManagerProvisioningIntegrationModule 185Overview..........................................................................................185Supportedfeatures ................................................................................185Supportedplatforms ...............................................................................186InstallingtheOIMIntegrationWebApplication .....................................................186TestingtheOIMIntegrationWebApplication .......................................................186
Properties that can be defined in xellerate.properties . . . . . . . . . . . . . . . . . . . . . . . . . . . . . . . . . . . . . . . .187ConfigurationforOIMapplication ..................................................................188Testing the OIM Integration Client . . . . . . . . . . . . . . . . . . . . . . . . . . . . . . . . . . . . . . . . . . . . . . . . . . . . .188AggregatingfromOIM..............................................................................189Known/Openissues................................................................................189
Chapter20:SailPointIBMSecurityProvisioningIntegrationModule ...........191Overview..........................................................................................191Supportedfeatures ................................................................................191Supportedplatforms ...............................................................................191Generalconfiguration ..............................................................................192ConfigurationforAggregation ......................................................................192ConfigurationforProvisioning.....................................................................192Troubleshooting...................................................................................194MobileDeviceManagementIntegrationModules...................195Chapter21:SailPointAirWatchMobileDeviceManagementIntegrationModule 197Overview..........................................................................................197Supportedfeatures ................................................................................197Supportedplatforms ...............................................................................198Pre-requisites......................................................................................198Configuration ......................................................................................198
Application configuration . . . . . . . . . . . . . . . . . . . . . . . . . . . . . . . . . . . . . . . . . . . . . . . . . . . . . . . . . . . . .199Operation specific configuration . . . . . . . . . . . . . . . . . . . . . . . . . . . . . . . . . . . . . . . . . . . . . . . . . . . . . . .199
Chapter22:SailPointMobileIronMobileDeviceManagementIntegrationModule ..201Overview..........................................................................................201Supportedfeatures ................................................................................201Supportedplatforms ...............................................................................202Pre-requisites......................................................................................202Configuration ......................................................................................202
Application configuration . . . . . . . . . . . . . . . . . . . . . . . . . . . . . . . . . . . . . . . . . . . . . . . . . . . . . . . . . . . . .202Operation specific configuration . . . . . . . . . . . . . . . . . . . . . . . . . . . . . . . . . . . . . . . . . . . . . . . . . . . . . . .203
Chapter23:SailPointGoodTechnologyMobileDeviceManagementIntegrationMod-ule.............................................................................205Overview..........................................................................................205Supportedfeatures ................................................................................205Supportedplatform ................................................................................206Pre-requisites......................................................................................206Configuration ......................................................................................206

Application configuration . . . . . . . . . . . . . . . . . . . . . . . . . . . . . . . . . . . . . . . . . . . . . . . . . . . . . . . . . . . . .206Operation specific configuration . . . . . . . . . . . . . . . . . . . . . . . . . . . . . . . . . . . . . . . . . . . . . . . . . . . . . . .207
ITSecurityIntegrationModule ....................................209Chapter24:SailPointHPArcSightIntegrationModule..........................211Overview..........................................................................................211
Common Event Format (CEF) . . . . . . . . . . . . . . . . . . . . . . . . . . . . . . . . . . . . . . . . . . . . . . . . . . . . . . . . .211Supportedfeatures ................................................................................212Supportedplatforms ...............................................................................212Pre-requisites......................................................................................212Configuration ......................................................................................212Configuration to export IdentityIQ Data to ArcSight . . . . . . . . . . . . . . . . . . . . . . . . . . . . . . . . . . . . . . . .212Configuration to Import HP ArcSight CEF Flat File to SailPoint IdentityIQ . . . . . . . . . . . . . . . . . . . . .216
Appendix ..........................................................219Appendix A: Common Identity Management Integration Configuration . . . . . . . . . . . . 221Overview..........................................................................................221CreatingtheIntegrationConfigObject ..............................................................221Provisioning.......................................................................................226Appendix B: Component Interface . . . . . . . . . . . . . . . . . . . . . . . . . . . . . . . . . . . . . . . . . . . . 229CreatingcomponentinterfaceforPeopleSoftfinancials.............................................229
Basic structure of Custom Component (CI) from USERMAINT component for Users . . . . . . . . . . . . .229Basic structure of Custom Component (CI) from ROLEMAINT component for Roles . . . . . . . . . . . . .234Basic structure of Custom Component (CI) from PURGE_USR_PROFILE component for Delete User 236Basic structure of Component Interface (CI) from PURGE_ROLEDEFN component for Delete Role .237Deletingthecomponentinterface ..................................................................238


What is SailPoint IdentityIQ?
Chapter1:OverviewThe following topics are discussed in this chapter:What is SailPoint IdentityIQ? . . . . . . . . . . . . . . . . . . . . . . . . . . . . . . . . . . . . . . . . . . . . . . . . . . . . . . . . . . . . . . . . . . 1SailPoint Integration Guide Overview . . . . . . . . . . . . . . . . . . . . . . . . . . . . . . . . . . . . . . . . . . . . . . . . . . . . . . . . . . . 2
WhatisSailPointIdentityIQ?
SailPoint IdentityIQ is an identity and access management solution for enterprise customers that delivers a wide variety of IAM processes-including automated access certifications, policy management, access request and provisioning, password management, and identity intelligence. Furthermore, IdentityIQ has a flexible connectivity model that simplifies the management of applications running in the datacenter or the cloud.
Compliance Manager: IdentityIQ Compliance Manager automates access certifications, policy management, and audit reporting through a unified governance framework. This enables you to streamline compliance processes and improve the effectiveness of identity governance-all while lowering costs.
Lifecycle Manager: IdentityIQ Lifecycle Manager manages changes to access through user-friendly self-service request and password management interfaces and automated lifecycle events. It provides a flexible, scalable provisioning solution for addressing the constantly evolving access needs of your business in a way that's both efficient and compliant.
Privileged Account Management Module: IdenitityIQ Privileged Account Management module provides a standardized approach for extending critical identity governance processes and controls to highly privileged accounts, allowing IdentityIQ to be used as a central platform to govern standard and privileged accounts.
Connectors and Integration Modules: IdentityIQ offers Integration Modules that support the extended enterprise IT infrastructure. Third party provisioning and service desk integration enable multiple sources of fulfillment to access change. Service catalog integration supports a unified service request experience with integrated governance and fulfillment. Mobile device management integration mitigates risk posed by mobile devices through centralized visibility, control and automation. And IdentityIQ's IT security integration provides enhanced security with improved responsiveness and controls.
Open Identity Platform: SailPoint's Open Identity Platform lays the foundation for effective and scalable IAM within the enterprise. It establishes a common framework that centralizes identity data, captures business policy, models roles, and takes a risk-based, proactive approach to managing users and resources. The Open Identity Platform is fully extensible, providing robust analytics which transforms disparate and technical identity data into relevant business information, resource connectivity that allows organizations to directly connect IdentityIQ to applications running in the datacenter or in the cloud, and APIs and a plugin framework to allow customers and partners to extend IdentityIQ to meet a wide array of needs. An open platform allows organizations to build a single preventive and detective control model that supports all identity business processes, across all applications-in the datacenter and the cloud. SailPoint IdentityIQ applies consistent governance across compliance, provisioning and access management processes, maximizing investment and eliminating the need to buy and integrate multiple products.
Password Manager: IdentityIQ Password Manager delivers a simple-to-use solution for managing user passwords across cloud and on-premises applications policies from any desktop browser or mobile device. By providing intuitive self-service and delegated administration options to manage passwords while enforcing enterprise-grade password, IdentityIQ enables businesses to reduce operational costs and boost productivity.
SailPoint Integration Guide 1
SailPoint Integration Guide Overview
SailPointIntegrationGuideOverview
SailPoint Integration Modules deliver extended value from standard IdentityIQ deployments. SailPoint is committed to providing design, configuration, troubleshooting and best practice information to deploy and maintain strategic integrations. SailPoint has modified the structure of this document to aid customers and partner deployments. The focus of this document is product configuration and integration. For more details on design, troubleshooting and deployment best practices, refer to the Connector and Integration Deployment Center in Compass, SailPoint’s Online customer portal.
This document provides a guide to the integration between the following products and IdentityIQ:• “Healthcare Integration Module”
- SailPoint Epic Integration Module• “Enterprise Resource Planning Integration Modules”
- SailPoint PeopleSoft Integration Module
- SailPoint SAP Portal-User Management Web Service Integration Module
- SailPoint Siebel Integration Module
- SailPoint SAP Integration Module
- SailPoint Oracle E-Business Suite Integration Module
- SailPoint NetSuite Integration Module• “Mainframe Integration Modules”
- SailPoint RACF Integration Module
- SailPoint CA - Top Secret Integration Module
- SailPoint CA - ACF2 Integration Module
- SailPoint RACF LDAP Integration Module
- SailPoint Top Secret LDAP Integration Module• “Service Desk Integration Modules”
- SailPoint BMC Remedy Service Desk Service Integration Module
- SailPoint HP Service Manager Service Integration Module
- SailPoint ServiceNow Service Integration Module• “Service Management Integration Module (Service Catalog)”
- SailPoint ServiceNow Service Catalog Integration• “Provisioning Integration Modules”
- SailPoint Oracle Identity Manager Provisioning Integration Module
- SailPoint IBM Security Provisioning Integration Module• “Mobile Device Management Integration Modules”
- SailPoint AirWatch Mobile Device Management Integration Module
- SailPoint MobileIron Mobile Device Management Integration Module
- SailPoint Good Technology Mobile Device Management Integration Module
2 SailPoint Integration Guide

SailPoint Integration Guide Overview
• “IT Security Integration Module”
- SailPoint HP ArcSight Integration Module• “GRC Integration Module”
- SailPoint SAP GRC Integration Module
This document is intended for the above products and IdentityIQ System Administrators and assumes a high degree of technical knowledge.
SailPoint Integration Guide 3

SailPoint Integration Guide Overview
4 SailPoint Integration Guide

HealthcareIntegrationModuleThis section contains information on the following section:
• "SailPoint Epic Integration Module" on page 5
Note: For customers entitled to the SailPoint Healthcare Integration Module, the following requirements must be met: - access to the API of the Electronic Medical Record (EMR) system so that SailPoint Connector can connect to the EMR system - access to the EMR system's user interface or console to view results of any action performed by the SailPoint Connector through user interface or console This EMR access is required to support ongoing development, test and maintenance of SailPoint Healthcare Integration Module.

4 SailPoint Integration Guide

Overview
Chapter2:SailPointEpicIntegrationModule
The following topics are discussed in this chapter:Overview. . . . . . . . . . . . . . . . . . . . . . . . . . . . . . . . . . . . . . . . . . . . . . . . . . . . . . . . . . . . . . . . . . . . . . . . . . . . . . . . . . . 5
Important consideration . . . . . . . . . . . . . . . . . . . . . . . . . . . . . . . . . . . . . . . . . . . . . . . . . . . . . . . . . . . . . . . . . . 5Supported features . . . . . . . . . . . . . . . . . . . . . . . . . . . . . . . . . . . . . . . . . . . . . . . . . . . . . . . . . . . . . . . . . . . . . . 6Supported Managed System . . . . . . . . . . . . . . . . . . . . . . . . . . . . . . . . . . . . . . . . . . . . . . . . . . . . . . . . . . . . . . . 6Pre-requisites . . . . . . . . . . . . . . . . . . . . . . . . . . . . . . . . . . . . . . . . . . . . . . . . . . . . . . . . . . . . . . . . . . . . . . . . . . . 6Administrator permissions . . . . . . . . . . . . . . . . . . . . . . . . . . . . . . . . . . . . . . . . . . . . . . . . . . . . . . . . . . . . . . . . 7
Configuration parameters . . . . . . . . . . . . . . . . . . . . . . . . . . . . . . . . . . . . . . . . . . . . . . . . . . . . . . . . . . . . . . . . . . . . . 7Schema Attributes . . . . . . . . . . . . . . . . . . . . . . . . . . . . . . . . . . . . . . . . . . . . . . . . . . . . . . . . . . . . . . . . . . . . . . . . . . . 7
Account attributes . . . . . . . . . . . . . . . . . . . . . . . . . . . . . . . . . . . . . . . . . . . . . . . . . . . . . . . . . . . . . . . . . . . . . . . 7Group attributes. . . . . . . . . . . . . . . . . . . . . . . . . . . . . . . . . . . . . . . . . . . . . . . . . . . . . . . . . . . . . . . . . . . . . . . . . 9
Provisioning Policy attributes . . . . . . . . . . . . . . . . . . . . . . . . . . . . . . . . . . . . . . . . . . . . . . . . . . . . . . . . . . . . . . . . . . 9Troubleshooting. . . . . . . . . . . . . . . . . . . . . . . . . . . . . . . . . . . . . . . . . . . . . . . . . . . . . . . . . . . . . . . . . . . . . . . . . . . . 11
Overview
Epic is a privately held health care software company. Epic offers an integrated suite of health care software centered on a MUMPS database. Their applications support functions related to patient care such as follows:
• including registration and scheduling• clinical systems for doctors, nurses, emergency personnel, and other care providers• systems for lab technicians, pharmacists, and radiologists• billing systems for insurers
SailPoint Epic Integration Module supports managing Epic accounts (EMP records), linked templates, linked sub-templates and InBasketClassifications.
Importantconsideration
For customers entitled to the SailPoint Healthcare Integration Module, the following requirements must be met:• access to the API of the Electronic Medical Record (EMR) system so that SailPoint Connector can connect
to the EMR system• access to the EMR system's user interface or console to view results of any action performed by the
SailPoint Connector through user interface or console
This EMR access is required to support ongoing development, test and maintenance of SailPoint Healthcare Integration Module.
SailPoint Integration Guide 5
Overview
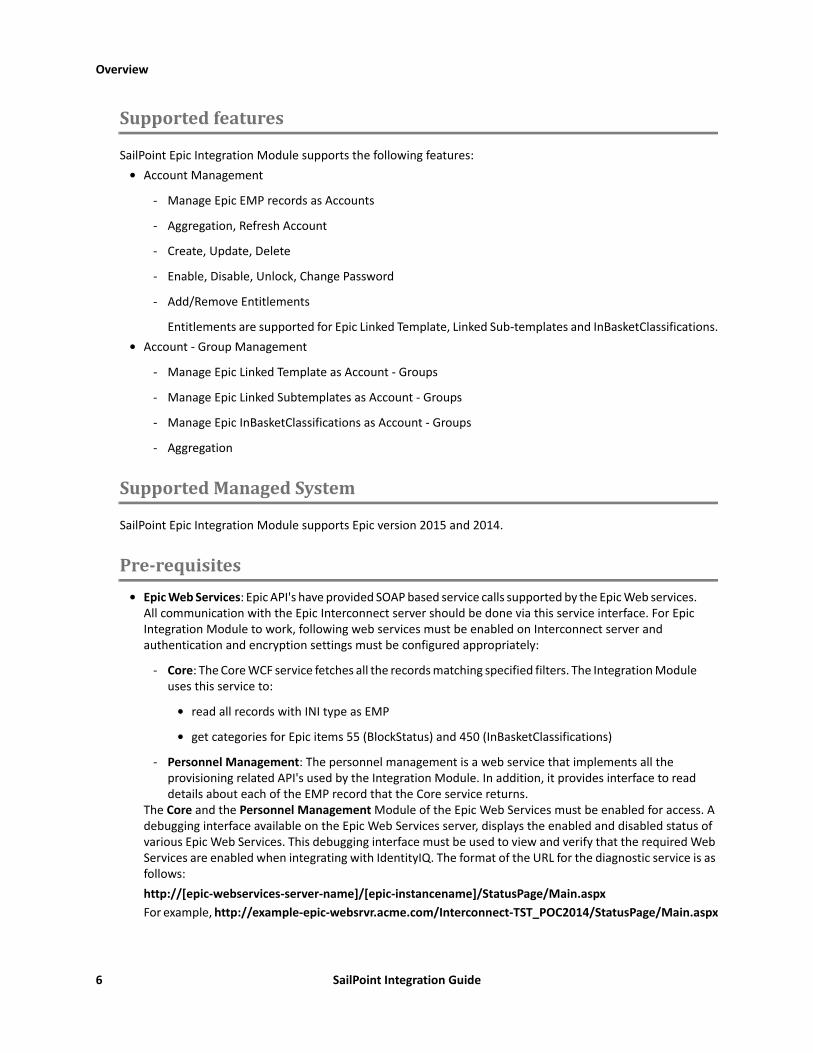
Supportedfeatures
SailPoint Epic Integration Module supports the following features:• Account Management
- Manage Epic EMP records as Accounts
- Aggregation, Refresh Account
- Create, Update, Delete
- Enable, Disable, Unlock, Change Password
- Add/Remove Entitlements
Entitlements are supported for Epic Linked Template, Linked Sub-templates and InBasketClassifications.• Account - Group Management
- Manage Epic Linked Template as Account - Groups
- Manage Epic Linked Subtemplates as Account - Groups
- Manage Epic InBasketClassifications as Account - Groups
- Aggregation
SupportedManagedSystem
SailPoint Epic Integration Module supports Epic version 2015 and 2014.
Pre-requisites• Epic Web Services: Epic API's have provided SOAP based service calls supported by the Epic Web services.
All communication with the Epic Interconnect server should be done via this service interface. For Epic Integration Module to work, following web services must be enabled on Interconnect server and authentication and encryption settings must be configured appropriately:
- Core: The Core WCF service fetches all the records matching specified filters. The Integration Module uses this service to:
• read all records with INI type as EMP
• get categories for Epic items 55 (BlockStatus) and 450 (InBasketClassifications)
- Personnel Management: The personnel management is a web service that implements all the provisioning related API's used by the Integration Module. In addition, it provides interface to read details about each of the EMP record that the Core service returns.
The Core and the Personnel Management Module of the Epic Web Services must be enabled for access. A debugging interface available on the Epic Web Services server, displays the enabled and disabled status of various Epic Web Services. This debugging interface must be used to view and verify that the required Web Services are enabled when integrating with IdentityIQ. The format of the URL for the diagnostic service is as follows:http://[epic-webservices-server-name]/[epic-instancename]/StatusPage/Main.aspx For example, http://example-epic-websrvr.acme.com/Interconnect-TST_POC2014/StatusPage/Main.aspx
6 SailPoint Integration Guide
Configuration parameters
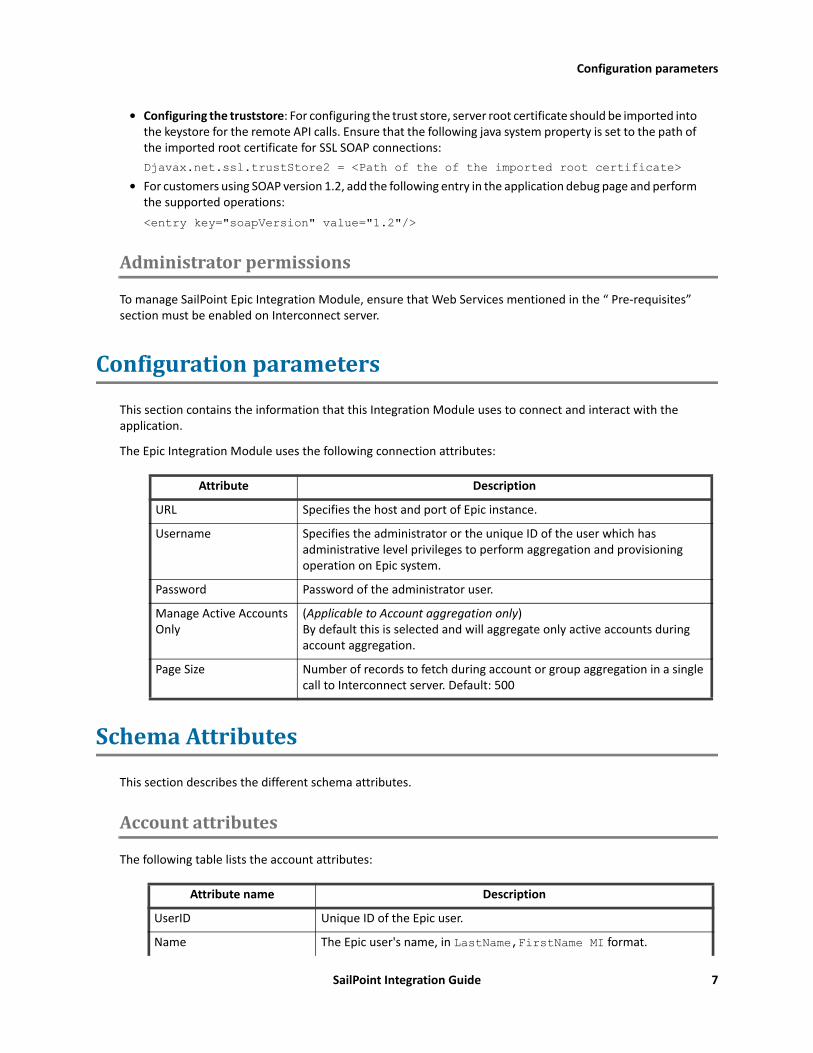
• Configuring the truststore: For configuring the trust store, server root certificate should be imported into the keystore for the remote API calls. Ensure that the following java system property is set to the path of the imported root certificate for SSL SOAP connections:Djavax.net.ssl.trustStore2 = <Path of the of the imported root certificate>
• For customers using SOAP version 1.2, add the following entry in the application debug page and perform the supported operations:<entry key="soapVersion" value="1.2"/>
Administratorpermissions
To manage SailPoint Epic Integration Module, ensure that Web Services mentioned in the “ Pre-requisites” section must be enabled on Interconnect server.
Configurationparameters
This section contains the information that this Integration Module uses to connect and interact with the application.
The Epic Integration Module uses the following connection attributes:
SchemaAttributes
This section describes the different schema attributes.
Accountattributes
The following table lists the account attributes:
Attribute Description
URL Specifies the host and port of Epic instance.
Username Specifies the administrator or the unique ID of the user which has administrative level privileges to perform aggregation and provisioning operation on Epic system.
Password Password of the administrator user.
Manage Active Accounts Only
(Applicable to Account aggregation only) By default this is selected and will aggregate only active accounts during account aggregation.
Page Size Number of records to fetch during account or group aggregation in a single call to Interconnect server. Default: 500
Attribute name Description
UserID Unique ID of the Epic user.
Name The Epic user's name, in LastName,FirstName MI format.
SailPoint Integration Guide 7
Schema Attributes
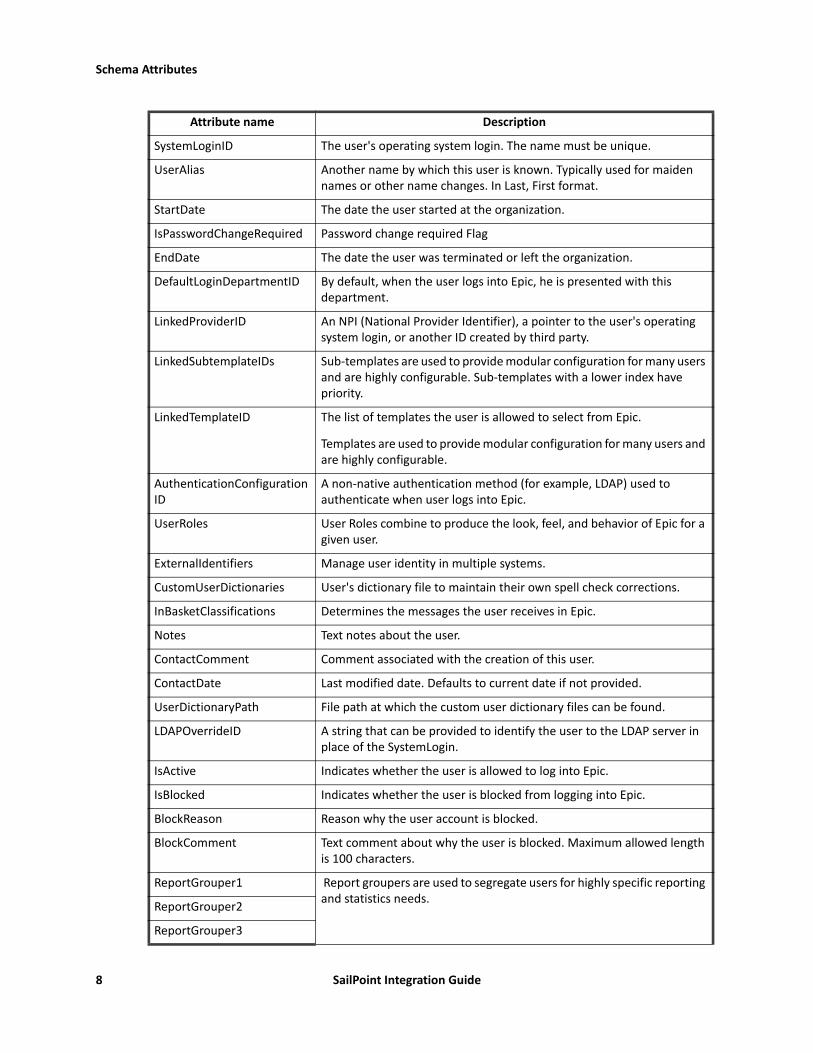
SystemLoginID The user's operating system login. The name must be unique.
UserAlias Another name by which this user is known. Typically used for maiden names or other name changes. In Last, First format.
StartDate The date the user started at the organization.
IsPasswordChangeRequired Password change required Flag
EndDate The date the user was terminated or left the organization.
DefaultLoginDepartmentID By default, when the user logs into Epic, he is presented with this department.
LinkedProviderID An NPI (National Provider Identifier), a pointer to the user's operating system login, or another ID created by third party.
LinkedSubtemplateIDs Sub-templates are used to provide modular configuration for many users and are highly configurable. Sub-templates with a lower index have priority.
LinkedTemplateID The list of templates the user is allowed to select from Epic.
Templates are used to provide modular configuration for many users and are highly configurable.
AuthenticationConfigurationID
A non-native authentication method (for example, LDAP) used to authenticate when user logs into Epic.
UserRoles User Roles combine to produce the look, feel, and behavior of Epic for a given user.
ExternalIdentifiers Manage user identity in multiple systems.
CustomUserDictionaries User's dictionary file to maintain their own spell check corrections.
InBasketClassifications Determines the messages the user receives in Epic.
Notes Text notes about the user.
ContactComment Comment associated with the creation of this user.
ContactDate Last modified date. Defaults to current date if not provided.
UserDictionaryPath File path at which the custom user dictionary files can be found.
LDAPOverrideID A string that can be provided to identify the user to the LDAP server in place of the SystemLogin.
IsActive Indicates whether the user is allowed to log into Epic.
IsBlocked Indicates whether the user is blocked from logging into Epic.
BlockReason Reason why the user account is blocked.
BlockComment Text comment about why the user is blocked. Maximum allowed length is 100 characters.
ReportGrouper1 Report groupers are used to segregate users for highly specific reporting and statistics needs.ReportGrouper2
ReportGrouper3
Attribute name Description
8 SailPoint Integration Guide
Provisioning Policy attributes
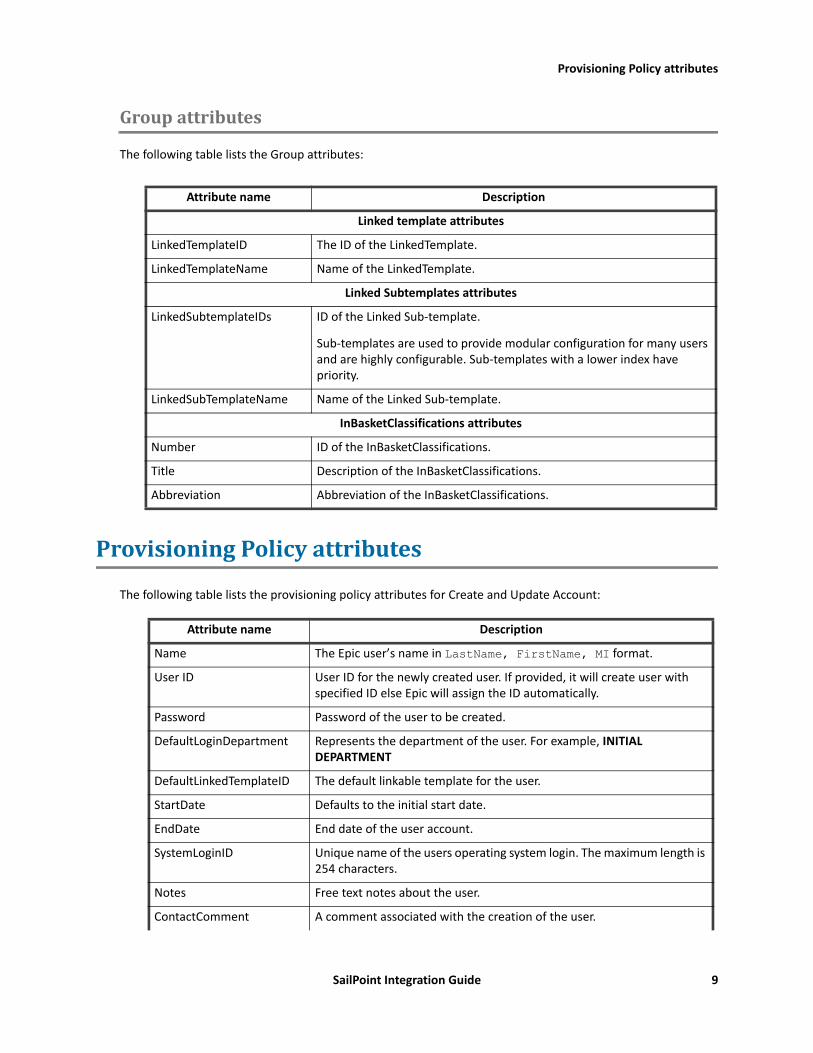
Groupattributes
The following table lists the Group attributes:
ProvisioningPolicyattributes
The following table lists the provisioning policy attributes for Create and Update Account:
Attribute name Description
Linked template attributes
LinkedTemplateID The ID of the LinkedTemplate.
LinkedTemplateName Name of the LinkedTemplate.
Linked Subtemplates attributes
LinkedSubtemplateIDs ID of the Linked Sub-template.
Sub-templates are used to provide modular configuration for many users and are highly configurable. Sub-templates with a lower index have priority.
LinkedSubTemplateName Name of the Linked Sub-template.
InBasketClassifications attributes
Number ID of the InBasketClassifications.
Title Description of the InBasketClassifications.
Abbreviation Abbreviation of the InBasketClassifications.
Attribute name Description
Name The Epic user’s name in LastName, FirstName, MI format.
User ID User ID for the newly created user. If provided, it will create user with specified ID else Epic will assign the ID automatically.
Password Password of the user to be created.
DefaultLoginDepartment Represents the department of the user. For example, INITIAL DEPARTMENT
DefaultLinkedTemplateID The default linkable template for the user.
StartDate Defaults to the initial start date.
EndDate End date of the user account.
SystemLoginID Unique name of the users operating system login. The maximum length is 254 characters.
Notes Free text notes about the user.
ContactComment A comment associated with the creation of the user.
SailPoint Integration Guide 9

Provisioning Policy attributes
LDAPOverrideID A string that can be provided to identify the user to the LDAP server in place of the SystemLogin.
UserDictionaryPath File path at which custom user dictionary files can be found.
AuthenticationConfigurationID
If a non-native authentication method is used authenticate user when he logs into Epic.
CustomUserDictionary_index_0
A number that indicates the priority of the value. Lower order numbers are given more priority.
CustomUserDictionary_value_0
The string being stored at the indexed position.
CustomUserDictionary_index_1
A number that indicates the priority of the value. Lower order numbers are given more priority.
CustomUserDictionary_value_1
The string being stored at the indexed position.
ExternalIdentifier_id_0 The external ID to be set for this user.
ExternalIdentifier_type_0 Type of this ID - that is, for what kind of system it is valid.
ExternalIdentifier_password_0
Password to set for specific external ID.
ExternalIdentifier_isActive_0
Value must be set to true in case this ID must be marked as active, that is, if the user can use it in the external system; else false.
ExternalIdentifier_id_1 External ID to be set for this user.
ExternalIdentifier_type_1 Type of this ID - that is, for what kind of system it is valid.
ExternalIdentifier_password_1
Password to set for this external ID.
ExternalIdentifier_isActive_1
Value must be set to true in case this ID must be marked as active, that is, if the user can use it in the external system; else false.
Optional attributes
If required user can add the following attributes manually to Provisioning Policy after upgrading to IdentityIQ version 7.2
IsActive Indicates whether the user is allowed to log into Epic.
IsBlocked Indicates whether the user is blocked from logging into Epic.
BlockReason Reason why the user account is blocked.
BlockComment Text comment about why the user is blocked. Maximum allowed length is 100 characters.
Attribute name Description
10 SailPoint Integration Guide
Troubleshooting
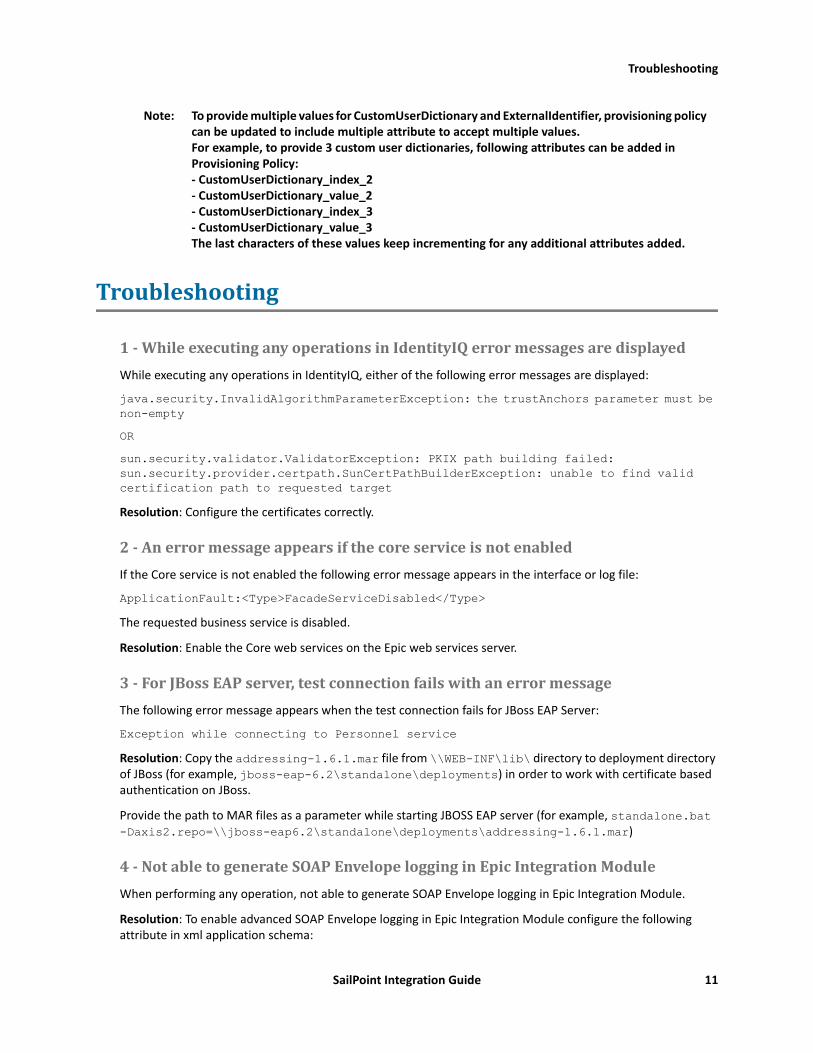
Note: To provide multiple values for CustomUserDictionary and ExternalIdentifier, provisioning policy can be updated to include multiple attribute to accept multiple values. For example, to provide 3 custom user dictionaries, following attributes can be added in Provisioning Policy: - CustomUserDictionary_index_2 - CustomUserDictionary_value_2 - CustomUserDictionary_index_3 - CustomUserDictionary_value_3 The last characters of these values keep incrementing for any additional attributes added.
Troubleshooting
1-WhileexecutinganyoperationsinIdentityIQerrormessagesaredisplayedWhile executing any operations in IdentityIQ, either of the following error messages are displayed:
java.security.InvalidAlgorithmParameterException: the trustAnchors parameter must be non-emptyOR sun.security.validator.ValidatorException: PKIX path building failed: sun.security.provider.certpath.SunCertPathBuilderException: unable to find valid certification path to requested targetResolution: Configure the certificates correctly.
2-AnerrormessageappearsifthecoreserviceisnotenabledIf the Core service is not enabled the following error message appears in the interface or log file:
ApplicationFault:<Type>FacadeServiceDisabled</Type> The requested business service is disabled.
Resolution: Enable the Core web services on the Epic web services server.
3-ForJBossEAPserver,testconnectionfailswithanerrormessageThe following error message appears when the test connection fails for JBoss EAP Server:
Exception while connecting to Personnel serviceResolution: Copy the addressing-1.6.1.mar file from \\WEB-INF\lib\ directory to deployment directory of JBoss (for example, jboss-eap-6.2\standalone\deployments) in order to work with certificate based authentication on JBoss.
Provide the path to MAR files as a parameter while starting JBOSS EAP server (for example, standalone.bat -Daxis2.repo=\\jboss-eap6.2\standalone\deployments\addressing-1.6.1.mar)
4-NotabletogenerateSOAPEnvelopelogginginEpicIntegrationModuleWhen performing any operation, not able to generate SOAP Envelope logging in Epic Integration Module.
Resolution: To enable advanced SOAP Envelope logging in Epic Integration Module configure the following attribute in xml application schema:
SailPoint Integration Guide 11

Troubleshooting
<entry key="logSOAPEnvelop" value ="true"/>Note: Download the sailpoint_epic_connector_axis2.xml file from
IdentityIQ.zip/integration directory and copy it into identityiq\WEB-INF\classes directory in order to generate SOAP logs.
5-AccountAggregationTaskentersintoanendlessloopAccount Aggregation Task enters into an endless loop when GetRecords API enters into endless loop.
Resolution: To avoid the GetRecords API call getting into an endless loop, a GetRecordsCallsthreshold parameter is used. The default value of GetRecordsCallsthreshold is 5000. To increase the count of GetRecordsCallsthreshold, enter the following key in Epic application xml:
<entry key="getRecordsCallsThreshold" value="value"/>
where, value is the maximum number of calls that would be made to Interconnect server.
6-UnabletoperformTestConnection/AccountAggregationfortrailingbackslashThe following message appears when unable to perform the Test Connection/Account Aggregation for trailing backslash:
ERROR http-nio-8080-exec-8 apache.axis2.engine.AxisEngine:219 - The [action] cannot be processed at the receiverResolution: Provide a link as follows without the trailing backslash at the end:
http://example-epic-websrvr.acme.com/Interconnect-TST_POC2014
12 SailPoint Integration Guide

EnterpriseResourcePlanning IntegrationModules
This section contains information on the following sections:• “SailPoint PeopleSoft Integration Module”• “SailPoint SAP Portal-User Management Web Service Integration Module”• “SailPoint Siebel Integration Module”• “SailPoint SAP Integration Module”• “SailPoint Oracle E-Business Suite Integration Module”• “SailPoint NetSuite Integration Module”

14 SailPoint Integration Guide
Overview
Chapter3:SailPointSAPIntegrationModule
The following topics are discussed in this chapter:Overview. . . . . . . . . . . . . . . . . . . . . . . . . . . . . . . . . . . . . . . . . . . . . . . . . . . . . . . . . . . . . . . . . . . . . . . . . . . . . . . . . . 15
Supported features . . . . . . . . . . . . . . . . . . . . . . . . . . . . . . . . . . . . . . . . . . . . . . . . . . . . . . . . . . . . . . . . . . . . . 15Supported Managed Systems . . . . . . . . . . . . . . . . . . . . . . . . . . . . . . . . . . . . . . . . . . . . . . . . . . . . . . . . . . . . . 16Pre-requisites . . . . . . . . . . . . . . . . . . . . . . . . . . . . . . . . . . . . . . . . . . . . . . . . . . . . . . . . . . . . . . . . . . . . . . . . . . 16Administrator permissions . . . . . . . . . . . . . . . . . . . . . . . . . . . . . . . . . . . . . . . . . . . . . . . . . . . . . . . . . . . . . . . 17
Configuration parameters . . . . . . . . . . . . . . . . . . . . . . . . . . . . . . . . . . . . . . . . . . . . . . . . . . . . . . . . . . . . . . . . . . . . 21Schema attributes . . . . . . . . . . . . . . . . . . . . . . . . . . . . . . . . . . . . . . . . . . . . . . . . . . . . . . . . . . . . . . . . . . . . . . . . . . 23
Account attributes . . . . . . . . . . . . . . . . . . . . . . . . . . . . . . . . . . . . . . . . . . . . . . . . . . . . . . . . . . . . . . . . . . . . . . 23Group attributes. . . . . . . . . . . . . . . . . . . . . . . . . . . . . . . . . . . . . . . . . . . . . . . . . . . . . . . . . . . . . . . . . . . . . . . . 27Schema extension and custom attributes . . . . . . . . . . . . . . . . . . . . . . . . . . . . . . . . . . . . . . . . . . . . . . . . . . . 28Upgrade considerations. . . . . . . . . . . . . . . . . . . . . . . . . . . . . . . . . . . . . . . . . . . . . . . . . . . . . . . . . . . . . . . . . . 28
Provisioning Policy attributes . . . . . . . . . . . . . . . . . . . . . . . . . . . . . . . . . . . . . . . . . . . . . . . . . . . . . . . . . . . . . . . . . 28Create account attributes . . . . . . . . . . . . . . . . . . . . . . . . . . . . . . . . . . . . . . . . . . . . . . . . . . . . . . . . . . . . . . . . 29
Additional information . . . . . . . . . . . . . . . . . . . . . . . . . . . . . . . . . . . . . . . . . . . . . . . . . . . . . . . . . . . . . . . . . . . . . . 29Entitlement validity period . . . . . . . . . . . . . . . . . . . . . . . . . . . . . . . . . . . . . . . . . . . . . . . . . . . . . . . . . . . . . . . 29CUA support . . . . . . . . . . . . . . . . . . . . . . . . . . . . . . . . . . . . . . . . . . . . . . . . . . . . . . . . . . . . . . . . . . . . . . . . . . . 29Entitlement Data . . . . . . . . . . . . . . . . . . . . . . . . . . . . . . . . . . . . . . . . . . . . . . . . . . . . . . . . . . . . . . . . . . . . . . . 29Password Change . . . . . . . . . . . . . . . . . . . . . . . . . . . . . . . . . . . . . . . . . . . . . . . . . . . . . . . . . . . . . . . . . . . . . . . 29Logon and Communication Language attributes. . . . . . . . . . . . . . . . . . . . . . . . . . . . . . . . . . . . . . . . . . . . . . 31Delta Aggregation. . . . . . . . . . . . . . . . . . . . . . . . . . . . . . . . . . . . . . . . . . . . . . . . . . . . . . . . . . . . . . . . . . . . . . . 31Partitioning Aggregation . . . . . . . . . . . . . . . . . . . . . . . . . . . . . . . . . . . . . . . . . . . . . . . . . . . . . . . . . . . . . . . . . 34
Troubleshooting. . . . . . . . . . . . . . . . . . . . . . . . . . . . . . . . . . . . . . . . . . . . . . . . . . . . . . . . . . . . . . . . . . . . . . . . . . . . 34
Overview
SAP Enterprise Resource Planning software solution is an integrated software solution that incorporates the key business functions of the organization.
The SAP Integration Module aggregates and provisions all the users along with their roles/profiles of the SAP system.
SailPoint SAP Integration Module supports provisioning to a standalone SAP system as well as SAP Central User Administration (CUA) system.
Supportedfeatures
SailPoint SAP Integration Module supports the following features:• Account Management
- Manages SAP users as Accounts
- Aggregation, Partitioning Aggregation, Delta Aggregation, Refresh Accounts, Pass Through Authentication
SailPoint Integration Guide 15
Overview
For more information on Delta Aggregation and Partitioning Aggregation, see “Additional information” on page 29.Note: SAP Integration Module aggregates Generated Profile associated to Role as a part of
Account-Group Aggregation.
- Create, Update, Delete
- Enable, Disable, Unlock
- Change PasswordNote: For “Change password in Permanent Mode” ensure that the SNC is configured on SAP
server. The log on session during which a productive password is set must be secured using Secure Network Communications (SNC).
Note: SAP recommends that setting of productive passwords is more risky than setting an initial one, therefore additional security checks must be applied as follows: - The log on session during which a productive password is set must be secured using Secure Network Communications (SNC). - The user needs an additional authorization to set a productive password (authorization object: S_USER_GRP, activity: 'PP' - Set Productive) For more information, see SAP note https://service.sap.com/sap/support/notes/1287410 (SAP Service marketplace login required)
- Add/Remove Entitlements
Entitlements are Roles (for user), Profiles (for user), UserGroup (User group of the user).
- Add /Remove Contractual User Type ID• Account - Group Management
- Manages SAP Roles as Account-Groups
- Manages SAP Profiles as Account-GroupsNote: Few system composite profiles might have child profiles which are not present in SAP
system. For example, for each release composite profile SAP_NEW contains a single profile SAP_NEW_<rel>, (for example, SAP_NEW_21D). This profiles holds its release status. Profiles like SAP_NEW_<rel> may not be aggregated.
- Aggregation, Refresh GroupsNote: In Account-Group aggregation for SAP CUA landscape, SAP Integration Module will not
fetch child roles, child profiles of any composite role and profile, as CUA system does not maintain child level roles and profile details for child subsystems. Same way it will not fetch TCodes and Generated Profile for group object type.
SupportedManagedSystems
Following versions of SAP NetWeaver system are supported by the SAP Integration Module:• SAP NetWeaver 7.5, 7.4, 7.31, 7.3, 7.2, 7.1 and 7.0
Note: SailPoint SAP Integration Module manages ABAP users. For more information, see "Supported features" on page 15.
Pre-requisites
SAP JCO version 3.0.x libraries, along with sapjco3.dll (on Microsoft Windows) or libsapjco3.so (on UNIX), must be present in the java.library.path directory on the host. The JCO libraries (JCO Release 3.0.x) must
16 SailPoint Integration Guide

Overview
be downloaded from the SAP website by navigating to the customer service marketplace and download the Java Integration Module.
Administratorpermissions
The following table lists the required permissions for the specific operations mentioned below in this section:
The role assigned to the SAP Administrative user must have the following Authorization Objects as mentioned in the tables below.
Table 1— Operation specific required permissions
Operation Required permissions
Test Connection Test Connection
Account Aggregation Test Connection and Account Aggregation
Note: For Account Aggregation of CUA systems, additional permissions must be executed as specified in the “ Account Aggregation” section.
Group Aggregation Test Connection and Group Aggregation
Note: For Group Aggregation of CUA systems, additional permissions must be executed as specified in the “ Group Aggregation” section.
Delta Aggregation Test Connection, Account Aggregation and Delta Aggregation
Create Account Test Connection, Account Aggregation and Create Account
Note: For Create Account of CUA systems or SNC network, additional permissions must be executed as specified in the “ Create Account (Create user with assign role and profiles)” section.
Enable/Disable/Unlock Account Test Connection, Account Aggregation and Enable/Disable/Unlock Account
Delete Account Test Connection, Account Aggregation and Delete Account
Add/Remove Entitlement Test Connection, Account Aggregation and Add/Remove Entitlement
Change Password Test Connection, Account Aggregation and Change Password
Note: For Change Password of SNC network, additional permissions must be executed as specified in the “ Add/Remove Entitlements and Change Password” section.
SailPoint Integration Guide 17
Overview
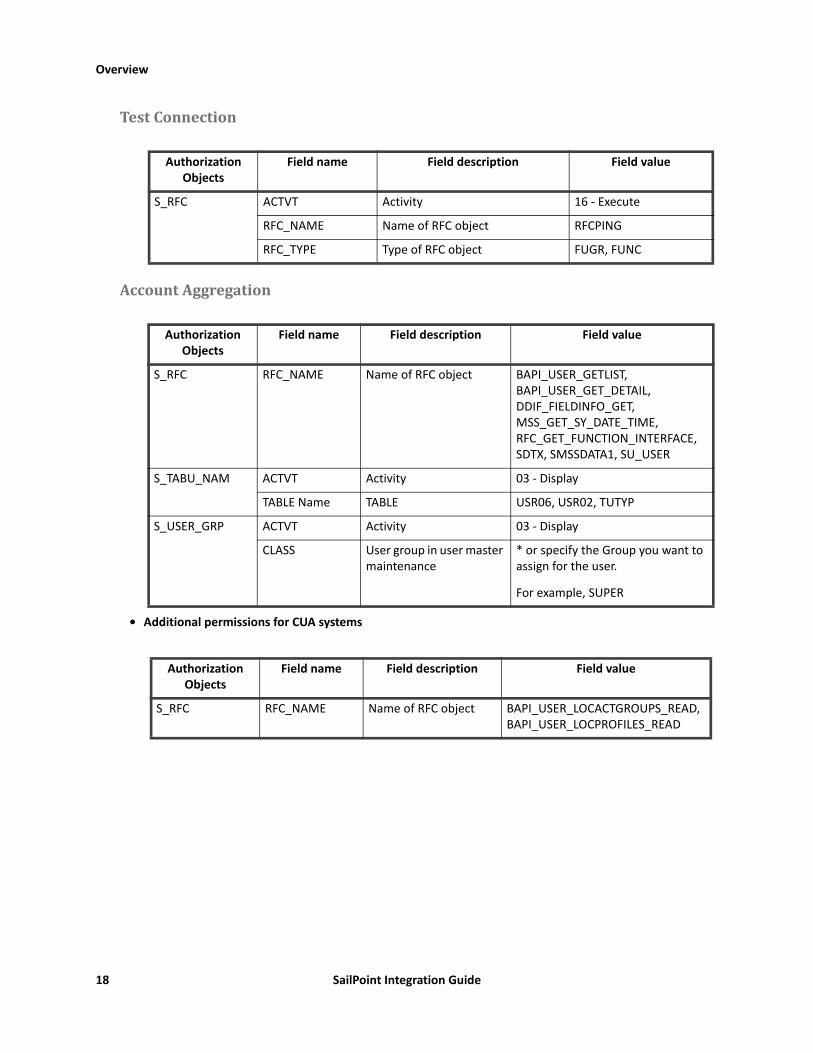
TestConnection
AccountAggregation
• Additional permissions for CUA systems
Authorization Objects
Field name Field description Field value
S_RFC ACTVT Activity 16 - Execute
RFC_NAME Name of RFC object RFCPING
RFC_TYPE Type of RFC object FUGR, FUNC
Authorization Objects
Field name Field description Field value
S_RFC RFC_NAME Name of RFC object BAPI_USER_GETLIST, BAPI_USER_GET_DETAIL, DDIF_FIELDINFO_GET, MSS_GET_SY_DATE_TIME, RFC_GET_FUNCTION_INTERFACE, SDTX, SMSSDATA1, SU_USER
S_TABU_NAM ACTVT Activity 03 - Display
TABLE Name TABLE USR06, USR02, TUTYP
S_USER_GRP ACTVT Activity 03 - Display
CLASS User group in user master maintenance
* or specify the Group you want to assign for the user.
For example, SUPER
Authorization Objects
Field name Field description Field value
S_RFC RFC_NAME Name of RFC object BAPI_USER_LOCACTGROUPS_READ, BAPI_USER_LOCPROFILES_READ
18 SailPoint Integration Guide

Overview
GroupAggregation
• Additional permissions for CUA systems
DeltaAggregation
Authorization Objects
Field name Field description Field value
S_RFC ACTVT Activity 03 - Display
RFC_NAME Name of RFC object BAPI_HELPVALUES_GET, PRGN_ACTIVITY_GROUPS_LOAD_RFC, PRGN_EXCHANGE, COLL_ACTGROUPS_GET_ACTGROUPS, DDIF_FIELDINFO_GET, MSS_GET_SY_DATE_TIME, PRGN_COLLECTIVE_ACTGROUPS, RFC_GET_FUNCTION_INTERFACE, SDTX, SMSSDATA1
S_TABU_NAM TABLE Name TABLE AGR_FLAGS, AGR_PROF, AGR_TCODES, AGR_TEXTS (Roles), USR11, UST10C (Profiles)
Authorization Objects
Field name Field description Field value
S_TABU_NAM TABLE Name TABLE • (Profiles) USRSYSPRF, USRSYSPRFT• (Roles) USRSYSACTT, USRSYSACT
Authorization Objects
Field name Field description Field value
S_RFC RFC_NAME Name of RFC object /SAILPOIN/USR_CHANGE_DOC_USERS, /SAILPOIN/IDENTITYIQ_FUGR, /SAILPOIN/USR_CHANGE_DOC_ROLES
S_TABU_NAM TABLE Name TABLE USBAPILINK
S_USER_GRP ACTVT Activity 08 - Display change document
SailPoint Integration Guide 19

Overview
CreateAccount(Createuserwithassignroleandprofiles)
• For SNC (Secure Network Communication)
Enable/Disable/UnlockAccount
DeleteAccount
Authorization Objects
Field name Field description Field value
S_USER_GRP ACTVT Activity 01 - Create or generate
S_RFC RFC_NAME Name of RFC object SDIFRUNTIME
S_USER_SAS ACTVT Activity 22 - Enter, Include, Assign, 01 - Create
ACT_GROUP Role name * or you can specify role name for which you have assigned
CLASS User group in user master maintenance
* or specify the Group you want to assign for the user.
For example, SUPER
PROFILE Auth. profile in user master maintenance
* or you can specify Profile for which you have assigned
SUBSYSTEM Receiving system for central user administration
* or specify the system you are targeting.
Authorization Objects
Field name Field description Field value
S_USER_GRP ACTVT Activity PP – Set Productive
Authorization Objects Field name Field description Field value
S_USER_GRP ACTVT Activity 05 - Lock
Authorization Objects Field name Field description Field value
S_USER_GRP ACTVT Activity 06 - Delete
20 SailPoint Integration Guide

Configuration parameters
Add/RemoveEntitlementsandChangePassword
- (For Change Password only) For SNC (Secure Network Communication)
Configurationparameters
The following table lists the configuration parameters of SAP Integration Module:
Authorization Objects
Field name Field description Field value
S_USER_GRP ACTVT Activity 02 - Change, 05 - Lock
S_RFC RFC_NAME Name of RFC object SDIFRUNTIME
S_USER_SAS ACTVT Activity 22 - Enter, Include, Assign
ACT_GROUP Role name * or you can specify role name for which you have assigned
CLASS User group in user master maintenance
* or specify the Group you want to assign for the user.
For example, SUPER
PROFILE Auth. profile in user master maintenance
* or you can specify Profile for which you have assigned
SUBSYSTEM Receiving system for central user administration
* or specify the system you are targeting.
Authorization Objects
Field name Field description Field value
S_USER_GRP ACTVT Activity PP – Set Productive
Parameters Description
SAP Host* Host on which the SAP Server is running
System Number* 2-digit SAP system number (Default: 00)
Client Number* 3-digit SAP client number (Default: 001)
Client Language* 2-letter SAP client language (Default: EN)
Username* SAP Administrator user
Password* SAP Administrator user password
CUA system For CUA system detection
JCO RFC Trace If checked, enables SAP JCO RFC trace
Unlock on Password Change If checked, the account would be unlocked while changing password.
Note: Account will be unlocked at the time of set password only if the account is locked by incorrect password attempts.
SailPoint Integration Guide 21

Configuration parameters
Note: Attributes marked with * sign are the mandatory attributes.
Partition Enabled Check box to determine if partition aggregation is required.
Partition Statements Criteria to specify the range of users to be downloaded.
For example, If the range is specified as A-M, then this specifies that all the users whose User ID’s are between A and M (including A and M) would be treated as one partition and downloaded.
To specify more than one partition the entries should be separated using a new line character. For more information, see “Partitioning Aggregation” on page 34.
SNC Configuration parameters
SNC Mode Represents Secure Network Connection which also internally signifies jco.client.snc_mode in SAP. SNC will be enabled if the mode is selected as ON whose value is 1. If SNC is off, the value will be 0.
SNC Level of Security Represents the quality of protection level (QOP) which is defined as follows:
1 — Apply authentication only2 — Apply integrity protection (authentication)3 — Apply privacy protection (integrity and authentication)8 — Apply the default protection9 — Apply the maximum protection
In SAP, it relates to jco.client.snc_qop. Default: 1
SNC Partner Name Represents SNC partner.
For example, provide input as p:CN=R3, O=XYZ-INC, C=EN in SAP. If SNC is configured, it relates to jco.client.snc_partnername.
SNC Name Represent SNC name which internally signifies jco.client.snc_myname. It overrides default SNC partner.
SNC Library Path to library which provides SNC service. It internally signifies jco.client.snc_lib.
For example, the value to be passed:• on Microsoft Windows: C:/sapcryptolib/sapcrypto.dll (the location of the cryptographic library)
• on UNIX: /opt/sailpoint/lib/custom/libsapcrypto.so (the location of the cryptographic library)
SAP GRC Settings parameters
Enable SAP GRC Enables the application for SAP GRC policy violation checks.
SAP GRC Connector Name SAP GRC Connector name which is configured on GRC server for this application.
Note: For more information on SAP GRC configuration, see SailPoint IdentityIQ Integration Guide.
Parameters Description
22 SailPoint Integration Guide

Schema attributes
Schemaattributes
This section describes the different schema attributes.
Accountattributes
The following table lists the account attributes:
Attributes Description
Academic Title (Address) Academic title of the user.
Academic Title 2 (Address) 2nd Academic title of the user.
Addr Number (Address) Address number of the user.
Alias (Logon Data) Alias name.
Birth Name (Address) Name at birth.
Building (Address) Name of the building.
Building 2 (Address) Name 2 of the building.
Building Long (Address) Long name of the building.
Care of (Address) Care of name.
Check Status (Address) Check status for the user.
City (Address) Name of the city.
City Number (Address) Number of the city.
Code (Address) Signature initials
Communication Language (Address) Communication language of the user.
Note: The different values to be set for this attribute are mentioned in “Logon and Communication Language attributes” on page 31.
Communication type (Address) Communication method for the user.
Company (Address) Name of the company.
Company Address (Address) Address of the company.
Company Address 2 (Address) Address 2 of the company.
Company Address 3 (Address) Address 3 of the company.
Company Address 4 (Address) Address 4 of the company.
Contractual User Type ID Contractual user types associated with user.
Note: For more information, see “Upgrade considerations” on page 28.
Country (Address) Name of the country.
Country ISO (Address) ISO name of the country.
SailPoint Integration Guide 23

Schema attributes
Delivery District (Address) Delivery district name.
Department (Address) Department name.
District (Address) District name.
District Number (Address) District number for the user.
E-Mail (Address) E-mail address.
E-Mail List (Address) E-mail address list.
Employee Number (Address) Employee number of the user.
Fax (Address) Fax number.
Fax Extension (Address) Fax extension number
Fax List (Address) Fax number list
First name (Address) First name of the user
Floor (Address) Floor number
Floor 2 (Address) Floor 2 number
Format (Address) Format name
Full Name (Address) Full name of the user
Full Name 2 (Address) Full name 2 of the user
Function (Address) Function of the user
GUI Flag Unsecured communication permitted.
House Number 2 (Address) House number 2 of the user
House Number (Address) House number of the user
House Number 3 (Address) House number 3 of the user
Inhouse ML (Address) Inhouse mail of the user
Initials (Address) Initials of the user
Language CR P (Address) CR P language of the user
Language ISO (Address) ISO language of the user
Language UCP ISO (Address) CP ISO language of the user
Language UP ISO (Address) P ISO language of the user
Last Name (Address) Last name of the user
Location (Address) Location name
Logon Language (Defaults) Logon language for the user.
Note: The different values to be set for this attribute are mentioned in “Logon and Communication Language attributes” on page 31.
Middle Name (Address) Middle name of the user
Attributes Description
24 SailPoint Integration Guide

Schema attributes
Name Country (Address) Name of the country
Nickname (Address) Nickname of the user
Notes (Address) Notes for the user
Other City (Address) Name of the other city
Other City Number (Address) Number of the other city
Pager/SMS List (Address) Pager or SMS number list in the format pager_type#pager_number
Parameter List (Parameters) Parameter list in the format prameter_ID=parameter_value
Pboxcity Number (Address) Pbox number of the city
PCODE 1 Ext (Address) Postal code 1 extension
PCODE 2 Ext (Address) Postal code 2 extension
PCODE 3 Ext (Address) Postal code 3 extension
PO Box (Address) PO box number
PO Box City (Address) PO box number of the city
PO Box City ISO (Address) PO box number of the ISO city
PO Box Country (Address) PO box number of the country
PO Box Region (Address) PO box number of the region
PO Box Without Number (Address) PO box without number
Postal Code (Address) Postal code of the user
Postal Code 2 (Address) 2nd postal code of the user
Postal Code 3 (Address) 3rd postal code of the user
Prefix 1 (Address) 1st prefix
Prefix 2 (Address) 2nd prefix
Print Immediately (Defaults) Print immediately flag for the user
Printer List (Address) Print destination list
Region (Address) Name of the region
Region Group (Address) Group name of the region
Remote Communication List (Address)
Communication notes list
Remote Function Call List (Address) Remote function call destination list
Remote Mail List (Address) Remote mail list of the user
Room Number (Address) Room number of the user
Room Number 2 (Address) 2nd room number of the user
Reference User Reference user name.
Search Term 2 P (Address) 2nd search term P for the user
Attributes Description
SailPoint Integration Guide 25

Schema attributes
Search Term P (Address) Search term P for the user
Search Term 1 (Address) 1st search term for the user
Search Term 2 (Address) 2nd search term for the user
Second Name (Address) Second name of the user
Start Menu (Defaults) Start menu for the user
Street Abbreviation (Address) Street abbreviation for the user
Street Address (Address) Street address of the user
Street Address 2 (Address) Street address 2 of the user
Street Address 3 (Address) Street address 3 of the user
Street Address 4 (Address) Street address 4 of the user
Street Number (Address) Street number of the user
SNC Name SNC name.
Tax Jurisdiction Code (Address) Tax jurisdiction code of the user
Telephone (Address) Telephone number
Telephone Extension (Address) Telephone extension number
Telephone List (Address) Telephone number list
Teletex List (Address) Teletex number list
Telex List (Address) Telex number list
Time Format (Defaults) Time format of the user
Time Zone (Address) System time zone.
Title (Address) Title of the user
Title SPPL (Address) Title SPPL of the user
Transportation Zone (Address) Transportation zone of the user
TZone (Defaults) Personal time zone.
URL (Homepage) List (Address) URL (Homepage) address list in the format URI_type#URI_name
User Last Logon Time User last log in time.
User Last Logon Date User last log in date.
Productive Password User password set in permanent mode.
User Name User Name.
User Title (Address) Title of the user
User Type (Logon Data) Type of the user
User Valid From (Logon Data) Valid from date for the user
User Valid To (Logon Data) Valid to date for the user.
User Group (Groups) User group of the user
Attributes Description
26 SailPoint Integration Guide

Schema attributes
Groupattributes
The following table lists the different group attributes:
X.400 List (Address) Organization name list
Roles Roles for user.
Note: The Account Aggregation fetches the active roles (composite /simple) assigned directly to the user.
Profiles Profiles for user.
Attributes Description
Group Object Type = Role
Name Role name.
Type Role type.
Description Role description.
Child Roles Sub Role list.
Note: The child roles will display the child roles of composite roles in the Group object properties of Entitlement Catalog. For existing applications which are getting upgraded, mark entitlement as true to display the child roles in Entitlement grid of Group object properties.
Long Description Role long description.
Subsystem System name for CUA System Aggregation.
Generated Profile System generated profile associated to Role which has authorizations.
TCodes Transaction code list.
Group Object Type = Profile
ID Profile name along with the description.
Name Profile name.
Type Profile type.
Description Profile description.
Subsystem System name for CUA System Aggregation.
Child Profiles Sub profile list.
Attributes Description
SailPoint Integration Guide 27
Provisioning Policy attributes
Schemaextensionandcustomattributes
The schema can be extended up to the extent of the fields within the structures provisioned by the SAP standard BAPI. The fields in the following structures will be provisioned:
• ADDRESS• ALIAS• COMPANY• DEFAULTS• LOGONDATA• PASSWORD
Note: No custom attributes will be supported during provisioning.
Upgradeconsiderations
While upgrading to IdentityIQ version 7.2, perform the following changes at schema level:• Ensure that in Role schema, following attributes are added with appropriate properties:
- Generated Profile
- TCodes (Entitlement, Multi-Valued)• In order to achieve the profile aggregation functionality for an existing application in previous releases it
is recommended to perform the following procedure:
- Add Profile schema under the Settings tab in the application page
- In Account Schema the schemaObjectType attribute of Profiles must be changed to profile.• To skip the inactive roles assignment during aggregation, add the following line in the application debug
page:<entry key="skipInactiveRoles" value="true"/>Note: When upgrading IdentityIQ from version 6.x to 7.2, ensure that the ‘Include Permissions’ check
box in Role schema is not selected.• To fetch Contractual user types associated with user after upgrading IdentityIQ to version 7.2, add the
Contractual User Type ID attribute to the application with:
- Property: Multi-Valued
- Data Type: string
Note: Only the active Contractual User ID assigned to the user would be aggregated.
ProvisioningPolicyattributes
This section lists the different policy attributes of SAP Integration Module.
Note: The attributes marked with * sign are the required attributes.
28 SailPoint Integration Guide

Additional information
Createaccountattributes
The following table lists the provisioning policy attributes for Create Account:
Additionalinformation
This section describes the additional information related to the SAP Integration Module.
Entitlementvalidityperiod
The user can be assigned a SAP Role with Start Date and an End Date. The ability to select or specify the same, while requesting an entitlement for an account, is available in IdentityIQ by creating custom Provisioning Plan.
CUAsupport
By default the SAP Integration Module would not download data from CUA configured SAP System. In order to override this behavior, the CUASystem configuration parameter must be checked in configuration parameter list.
EntitlementData
The aggregated entitlement data consists of the following:• SAP Roles (Simple and Composite)• SAP Profiles (Simple and Composite)
PasswordChange
The following change password policy must be added to set password as productive using administrative change password request.
<Form name="con_prov_policy_user_create_username" objectType="account"type="ChangePassword"> <Attributes> <Map> <entry key="IIQTemplateOwnerDefinition"> <value> <DynamicValue value=""/> </value> </entry> </Map> </Attributes> <Field displayName="Productive Password" filterString=""
Attributes Description
User Name* Name of the user to create.
password Password for the user.
Last Name* Last name of the user.
SailPoint Integration Guide 29

Additional information
helpKey="ProductivePasswordFlag" name="Productive Password" required="true"type="string" value="true"> <AllowedValuesDefinition> <Value> <List> <String>true</String> <String>false</String> </List> </Value> </AllowedValuesDefinition> </Field> </Form>
30 SailPoint Integration Guide

Additional information
LogonandCommunicationLanguageattributes
The different values for Logon and Communication Language fields are as follows:• Serbian=0• Chinese=1• Thai=2• Korean=3• Romanian=4• Slovenian=5• Croatian=6• Malay=7• Ukrainian=8• Estonian=9• Afrikaans=a• Icelandic=b• Catalan=c• Serbian (Latin)=d• Indonesian=i• Arabic=A• Hebrew=B• Czech=C• German=D• English=E• French=F• Greek=G• Hungarian=H• Italian=I• Japanese=J• Danish=K• Polish=L• Chinese traditional=M• Dutch=N• Norwegian=O• Portugese=P• Slovak=Q• Russian=R• Spanish=S• Turkish=T• Finnish=U• Swedish=V• Bulgarian=W• Lithuanian=X• Latvian=Y• Customer reserve=Z
DeltaAggregation
This section describes the procedure for configuring the SAP Connector for Delta Aggregation.
SailPoint Integration Guide 31
Additional information
SupportedattributesThe SAP Direct Connector supports Delta Aggregation for the following attributes:
• User created• User deleted• Password• User Type• Administrator lock set // IdentityIQ Disabled• Administrator lock released // IdentityIQ Enabled• Incorrect logon lock set // IdentityIQ Locked• Incorrect logon lock released // IdentityIQ Unlocked• Validity Period• Account Number• User Group• SAP Profile(s) Assigned• SAP Profile(s) Deleted• Security Policy
ImportingtheBAPI’sThis section describes how to import the transport request that contains the non - certified function modules used by SAP Connector to achieve the delta aggregation functionality.
Function modules are imported using one of the following methods:• Using the Transport Control program manually• Using the menu-driven administration of Transport Requests via SAP GUI
Pre-requisites
Copy the API Transport files to SAP. Use the following procedure to unpack and import the transport files function modules:
1. Copy the transport files.Transport request is contained in the ImportSAPDirect.TAR compressed file.The compressed file for each release contains the following files:
- RrequestNumber.sapId- KrequestNumber.sapId
Using WinZip or a similar utility, uncompress and copy each file from the appropriate compressed file to the subdirectory of the local transport directory of the target SAP system as follows:
- Copy the RrequestNumber.sapId file to the sapHomeDir\trans\data\RrequestNumber.sapId directory.
- Copy the KrequestNumber.sapId file to the sapHomeDir\trans\cofiles\KrequestNumber.sapId directory.Note: The values of requestNumber and sapId. These values are required later.
32 SailPoint Integration Guide
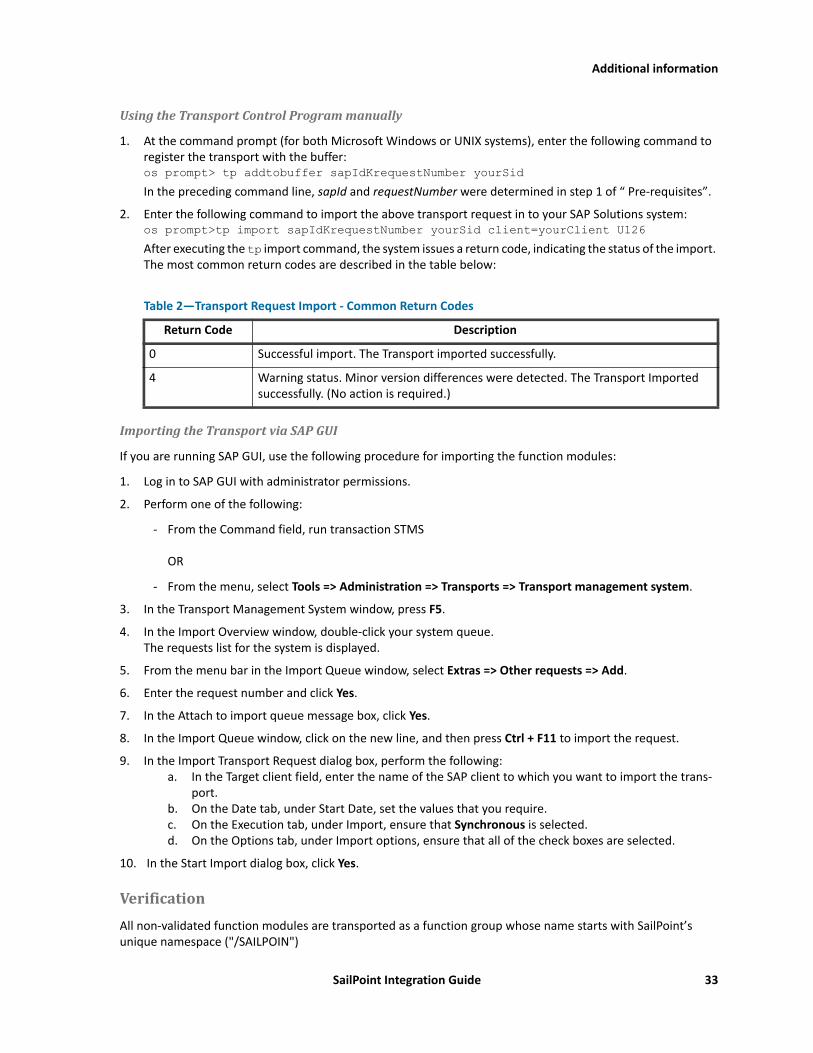
Additional information
UsingtheTransportControlProgrammanually
1. At the command prompt (for both Microsoft Windows or UNIX systems), enter the following command to register the transport with the buffer:os prompt> tp addtobuffer sapIdKrequestNumber yourSidIn the preceding command line, sapId and requestNumber were determined in step 1 of “ Pre-requisites”.
2. Enter the following command to import the above transport request in to your SAP Solutions system:os prompt>tp import sapIdKrequestNumber yourSid client=yourClient U126After executing the tp import command, the system issues a return code, indicating the status of the import. The most common return codes are described in the table below:
ImportingtheTransportviaSAPGUI
If you are running SAP GUI, use the following procedure for importing the function modules:
1. Log in to SAP GUI with administrator permissions.
2. Perform one of the following:
- From the Command field, run transaction STMS OR
- From the menu, select Tools => Administration => Transports => Transport management system.
3. In the Transport Management System window, press F5.
4. In the Import Overview window, double-click your system queue.The requests list for the system is displayed.
5. From the menu bar in the Import Queue window, select Extras => Other requests => Add.
6. Enter the request number and click Yes.
7. In the Attach to import queue message box, click Yes.
8. In the Import Queue window, click on the new line, and then press Ctrl + F11 to import the request.
9. In the Import Transport Request dialog box, perform the following:a. In the Target client field, enter the name of the SAP client to which you want to import the trans-
port.b. On the Date tab, under Start Date, set the values that you require.c. On the Execution tab, under Import, ensure that Synchronous is selected.d. On the Options tab, under Import options, ensure that all of the check boxes are selected.
10. In the Start Import dialog box, click Yes.
VerificationAll non-validated function modules are transported as a function group whose name starts with SailPoint’s unique namespace ("/SAILPOIN")
Table 2—Transport Request Import - Common Return Codes
Return Code Description
0 Successful import. The Transport imported successfully.
4 Warning status. Minor version differences were detected. The Transport Imported successfully. (No action is required.)
SailPoint Integration Guide 33
Troubleshooting
To verify that the required function modules have been imported in to the SAP system, perform the following:
1. In the SAP system, execute SE37 transaction.
2. Enter: /SAILPOIN/* in the Function Module field.
3. Press the F4 key.This displays the Repository Info System window that lists all the imported functional modules currently available on the SAP system as follows:
- SAILPOIN/USR_CHANGE_DOC_ROLES- SAILPOIN/USR_CHANGE_DOC_USERS
PartitioningAggregation
To use the partitioning aggregation feature in ERP Integration Modules, perform the following:
1. Select the Partition Enabled check box.
2. Specify the criteria for partitioning in the Partition Statements textbox of the configuration parameter.SAP Integration Module accepts multiple characters in partition statement. For example, -AZ, -MZ, KA-RL, SA-SZ and ABG-ASHIThe AL- and K- values are not accepted in the partition statement.To specify more than one partition the entries must be separated using a newline character.
Troubleshooting
1-DistributionofausertoSAPCUASubsystemIn a SAP CUA landscape, a SAP role or profile requires a SUBSYSTEM to distribute the user to. The facility to select or specify the same, while requesting an entitlement for an account, is absent in IdentityIQ.
Workaround: The subsystem name is prepended to the Account-Group while aggregating account-groups from a SAP CUA system. As a result, only a limited subset of subsystem and account-group combinations will be available while requesting entitlements, and thus distributing users, in a SAP CUA landscape.
2-RemovedEntitlementsarepresentinCurrentaccesspageEven after the execution of Refresh Entitlement Correlation the entitlements are not getting deleted from the current access page.
Workaround: Execute the Perform Identity Request Maintenance task to remove those entitlements. Ensure that the Verify provisioning for requests option is selected for this task.
3-PasswordnotsetinpermanentmodeAfter upgrade to the existing application, the password is not set in permanent mode, even when the user is created with the Password in permanent mode attribute selected.
This behavior occurs since the attribute name has changed from Password in permanent mode to Productive Password.
34 SailPoint Integration Guide

Troubleshooting
Workaround: In the debug page rename Password in permanent mode to Productive Password in schema and provisioning plan.
4-Fewattributesarenotworkingafterupgradingtoversion7.2Few attributes are not working after upgrading from version 6.0 patch 7 and version 6.1 to version 7.2.
Resolution: Open the application debug page of version 6.4 and use the following corresponding parameters:
5-LoginfailsfornonaggregatedaccountswhenpassthroughisenabledLogin fails for non aggregated accounts when passthrough is enabled.
In SAP-Direct Integration Module the SAPJCO libraries are used, which need permission to make connection with SAP Server. The user who does not have these permissions will not be able to log in and will not be a valid member of the authentication process.
Resolution: Perform the following to add the administrator permissions:
1. Run the PFCG transaction (Profile generator, maintain your roles, authorizations, and profiles) and enter the role name.
2. Click on Single and save the Role created.
3. Click on Authorization Tab => Display Authorization Data. Template will appear, cancel the template.
4. Click on Manual tab and add the following:
- S_RFC (All Activities)
- S_USER_AGR (Activities: 02, 03, 22, 36, 78)
- S_USER_GRP (Activities: 01, 02, 03, 05, 06, 22, 78)
- S_USER_PRO (Activities: 01, 02, 03, 06, 07, 22)
- S_USER_AUT (Activities : 03, 08)
- S_USER_SAS (Activities : 01, 06, 22)
- S_TABU_DIS (Activities: All Activities)(Additionally for SAP CUA System) S_USER_SYS (Activities: 03, 59, 68, 78)
- Click on the Generate (Shift+F5) icon.
- Click on the Save (Ctrl+S) icon.
- Click on Back (F3) icon.
Parameters used in version 6.0 patch 7/6.1 Parameters to be used in version 7.2
Password in permanent mode Productive Password
Deactivate Password Deactivated
LASTNAME Last name
Reference User Name Reference User
User Last Login User Last Logon Time
SailPoint Integration Guide 35

Troubleshooting
5. Click on the Generate (Shift+F5) icon and assign the above created role to a SAP user who must be an administrator.
6. Run the PFCG transaction.
7. Provide the role name which the customer has created.
8. Click on USER tab => User Comparison.
6-WhenperformingDeltaAggregationafterupgrade,anerrormessageappearsWhen performing Delta Aggregation after upgrade, the following error message appears:
Aggregation date needs to be set in configuration.Resolution: Open the SAP-Direct application debug page and set the following parameters:
<entry key="lastAggregationDate" value="2014-06-21"/><entry key="lastAggregationTime" value="20:54:34"/>In the above parameters the format of Date and Time are as follows:
• Date: yyyy-MM-dd (the date should be the current date of the SAP server)• Time: HH:mm:ss (the time should be the current time of the SAP server)
7-ChangepasswordfeatureisnotworkingwithSNC,whenPRODUCITVE_PWDattributeisXChange password feature is not working with SNC, when PRODUCITVE_PWD attribute is X.
Resolution: Define the productivePasswordValue attribute in debug pages as follows:
<entry key="productivePasswordValue" value="1">By default the code would consider the value as X.
8-Aggregationfailswitherror'NOTAUTHORIZATION'Aggregation fails with the following error due to not having proper authorization of authorization object 'S_TABU_DIS (Activities: All Activities)'.
Resolution: Provide the authorization of authorization object ‘S_TABU_DIS (Activities: All Activities)’
Activities-AllTable Authorization Group-* (means all)Or skip aggregation of license data of the user by adding the following entry key in debug pages of the application:
<entry key="skipLicenseData"> <value> <Boolean>true</Boolean> </value></entry>
9-TestconnectionfailswithanerrormessageTest connection fails with the following error message:
com.sap.conn.rfc.driver.CpicDirver
36 SailPoint Integration Guide

Troubleshooting
Resolution: Download the latest SAPJCO.jar and SAPJCO.dll files from SAP Marketplace and then use that SAPJCO Jar file with the latest downloaded SAPJCO dll file.
10-RoleandProfiledescriptioninalanguageotherthanEnglishResolution: In Account-Group Aggregation, if the Role and Profile Description is required in a language other than English language, add the descriptionLanguage parameter with the correct value.
For example, <entry key="descriptionLanguage" value="D"/>In the above example, the value 'D' is the language code for Dutch language supported by SAP.
If the descriptionLanguage parameter is not provided, the descriptions displayed are in English language.
11-LogintoIdentityIQfailsforusernameandpasswordwithutf8charactersThe following error message appears when login to IdentityIQ for username and password with utf8 characters:
ERROR http-8080-1 sailpoint.server.Authenticator:323 - sailpoint.connector.AuthenticationFailedExcept com.sap.conn.jco.JCoException: (109) RFC_ERROR_CANCELLED: Handle close pendingResolution: Add the following entry in the application debug page:
<entry key="jco.client.codepage" value="4110"/>
12-Testconnection/aggregationfailswithanerrormessageTest connection / aggregation fails with the following error message:
Bad username or password. com.sap.conn.jco.JCoException: (109)RFC_ERROR_CANCELLED: Handle close pending Resolution: Ensure that the administrator user specified in application has sufficient rights on the SAP systems as mentioned in the “Administrator permissions” on page 17 section.
13-Testconnection/aggregationfailsifusernameorpasswordcontainUTF-8characterResolution: Add the following entry in the application debug page:
<entry key="jco.client.pcs" value="2"/>
SailPoint Integration Guide 37

Troubleshooting
38 SailPoint Integration Guide

Overview
Chapter4:SailPointOracleE-BusinessSuiteIntegrationModule
The following topics are discussed in this chapter:Overview. . . . . . . . . . . . . . . . . . . . . . . . . . . . . . . . . . . . . . . . . . . . . . . . . . . . . . . . . . . . . . . . . . . . . . . . . . . . . . . . . . 39
Supported features . . . . . . . . . . . . . . . . . . . . . . . . . . . . . . . . . . . . . . . . . . . . . . . . . . . . . . . . . . . . . . . . . . . . . 39Supported Managed Systems . . . . . . . . . . . . . . . . . . . . . . . . . . . . . . . . . . . . . . . . . . . . . . . . . . . . . . . . . . . . . 40Pre-requisites . . . . . . . . . . . . . . . . . . . . . . . . . . . . . . . . . . . . . . . . . . . . . . . . . . . . . . . . . . . . . . . . . . . . . . . . . . 40Administrator permissions . . . . . . . . . . . . . . . . . . . . . . . . . . . . . . . . . . . . . . . . . . . . . . . . . . . . . . . . . . . . . . . 40
Configuration parameters . . . . . . . . . . . . . . . . . . . . . . . . . . . . . . . . . . . . . . . . . . . . . . . . . . . . . . . . . . . . . . . . . . . . 43Additional configuration parameter . . . . . . . . . . . . . . . . . . . . . . . . . . . . . . . . . . . . . . . . . . . . . . . . . . . . . . . . 44
Schema attributes . . . . . . . . . . . . . . . . . . . . . . . . . . . . . . . . . . . . . . . . . . . . . . . . . . . . . . . . . . . . . . . . . . . . . . . . . . 44Account attributes . . . . . . . . . . . . . . . . . . . . . . . . . . . . . . . . . . . . . . . . . . . . . . . . . . . . . . . . . . . . . . . . . . . . . . 44Group attributes. . . . . . . . . . . . . . . . . . . . . . . . . . . . . . . . . . . . . . . . . . . . . . . . . . . . . . . . . . . . . . . . . . . . . . . . 45
Provisioning Policy attributes . . . . . . . . . . . . . . . . . . . . . . . . . . . . . . . . . . . . . . . . . . . . . . . . . . . . . . . . . . . . . . . . . 46Create account attributes . . . . . . . . . . . . . . . . . . . . . . . . . . . . . . . . . . . . . . . . . . . . . . . . . . . . . . . . . . . . . . . . 46Create group attributes . . . . . . . . . . . . . . . . . . . . . . . . . . . . . . . . . . . . . . . . . . . . . . . . . . . . . . . . . . . . . . . . . . 47
Additional information . . . . . . . . . . . . . . . . . . . . . . . . . . . . . . . . . . . . . . . . . . . . . . . . . . . . . . . . . . . . . . . . . . . . . . 47Troubleshooting. . . . . . . . . . . . . . . . . . . . . . . . . . . . . . . . . . . . . . . . . . . . . . . . . . . . . . . . . . . . . . . . . . . . . . . . . . . . 48
Overview
The Oracle E-Business Suite is an integrated suite of development, runtime, and system management tools. It also includes Forms, JDeveloper, Single Sign-On, Oracle Internet Directory, Portal, Discoverer, Web Cache, Integration, Oracle BPEL Process Manager.
SailPoint Oracle E-Business Suite Integration Module controls the activities related to account/groups by signing in managed system. SailPoint Oracle E-Business Suite Integration Module will manage the following entities of Oracle E-Business Suite:
• User• Group (Responsibility, Role)
Supportedfeatures
SailPoint Oracle E-Business Suite Integration Module supports the following features:• Account Management
- Manages Oracle E-Business Suite users
- Aggregation, Refresh Accounts, Discover Schema
- Create, Update
- Enable, Disable, Change Password
- Add/Remove Entitlements
SailPoint Integration Guide 39

Overview
• Account - Group ManagementSupports multiple group functionality.
- Manages Oracle E-Business Suite groups as RESPONSIBILITY
• Aggregation, Refresh Groups
• Aggregation, Refresh Groups
The following versions represent the respective responsibilities:
• 4: Oracle Applications
• W: Oracle Self-Service Web Applications
• M: Oracle Mobile Applications
Oracle E-Business Integration Module aggregates responsibilities of only type ‘4’ ‘W’ and ‘M’. Hence Account-Group aggregation fetches only responsibilities of type ‘Oracle Applications’ ‘Self-Service Web Applications’ and ‘Oracle Mobile Application’.
For more information on upgraded application of IdentityIQ, see “Upgrade considerations” on page 47.
• Create, Update
- Manages Oracle E-Business Suite groups as ROLE
• Aggregation, Refresh Groups
SupportedManagedSystems
Following versions of Oracle E-Business Suite are supported by the Integration Module: • Oracle E-Business Suite 12.2.x• Oracle E-Business Suite 12.1.x
Pre-requisites• The compatible JDBC drivers must be used in the classpath of IdentityIQ for connecting to Oracle Server.
For example, ojdbc6.jar. • During Account Aggregation task, Detect Deleted Accounts must always be unchecked.
Administratorpermissions
Note: (For Invoker rights only) If the packages are already invoked, then no need to invoke the packages after upgrading IdentityIQ from any previous version to current version of IdentityIQ.
1. Rights present on Oracle packages:Enter the following command to find the rights present on the Oracle packages:SELECT dbo.object_name, (DECODE(SIGN(bitand(options,16)),1,'INVOKER','DEFINER')) "authid" FROM dba_objects dbo, sys.PROCEDURE$ p WHERE p.obj# = dbo.object_id AND dbo.object_type = 'PACKAGE'
40 SailPoint Integration Guide

Overview
AND dbo.object_name = 'xxx' AND dbo.owner = 'APPS';Where xxx package is FND_USER_PKG, FND_RESPONSIBILITY_PKG, WF_LOCAL_SYNCH, FND_WEB_SEC, or FND_GLOBAL.Sample example:Enter the following command to find the rights present on the FND_USER_PKG: SELECT dbo.object_name,(DECODE(SIGN(bitand(options,16)),1,'INVOKER','DEFINER')) "authid"FROM dba_objects dbo, sys.PROCEDURE$ pWHERE p.obj# = dbo.object_idAND dbo.object_type = 'PACKAGE'AND dbo.object_name = 'FND_USER_PKG'AND dbo.owner = 'APPS';
2. If xxx package has Invoker rights, perform the following:Copy the package scripts from identityiq\integration\OracleEBS\iiqIntegration-OracleEBS.zip directory to the OracleHome\bin directory and rename the type of scripts from *.txt to *.sqlUsing SQL*Plus, log in to the Oracle database as APPS and run the following:Run the @SP_xxx package script using SQL*PlusSample example: If FND_USER_PKG has invoker rights, run the @SP_FND_USER _PKG script using SQL*PlusPerform this step for all xxx packages.
3. Log in to the Oracle database as database administrator for creating the new administrator user account using SQL*Plus as follows: create role ${new role};create user ${new user} identified by ${password};grant create session to ${new user};grant create synonym to ${new user};grant ${new role} to ${new user};Grant permissions to the new role created in the above step (${new role}):grant select on APPS.FND_PRODUCT_GROUPS to ${new role};grant select on APPS.FND_USER to ${new role};grant select on SYS.DBA_USERS to ${new role};grant select on APPS.FND_RESPONSIBILITY_VL to ${new role};grant select on APPS.FND_APPLICATION_VL to ${new role};grant select on APPS.FND_DATA_GROUPS to ${new role};grant select on APPS.FND_USER_RESP_GROUPS_ALL to ${new role};grant select on DUAL to ${new role};grant select on APPS.PER_ALL_PEOPLE_F to ${new role};grant select on APPS.RA_CUSTOMERS to ${new role};grant select on APPS.FND_MENUS to ${new role};grant select on APPS.FND_REQUEST_GROUPS to ${new role};grant select on APPS.FND_APPLICATION to ${new role};grant select on APPS.FND_DATA_GROUP_UNITS to ${new role};grant select on APPS.FND_APPLICATION_TL to ${new role};grant select on APPS.FND_RESPONSIBILITY to ${new role};grant select on APPS.WF_ROLES to ${new role};grant select on APPS.WF_USER_ROLES to ${new role};
SailPoint Integration Guide 41
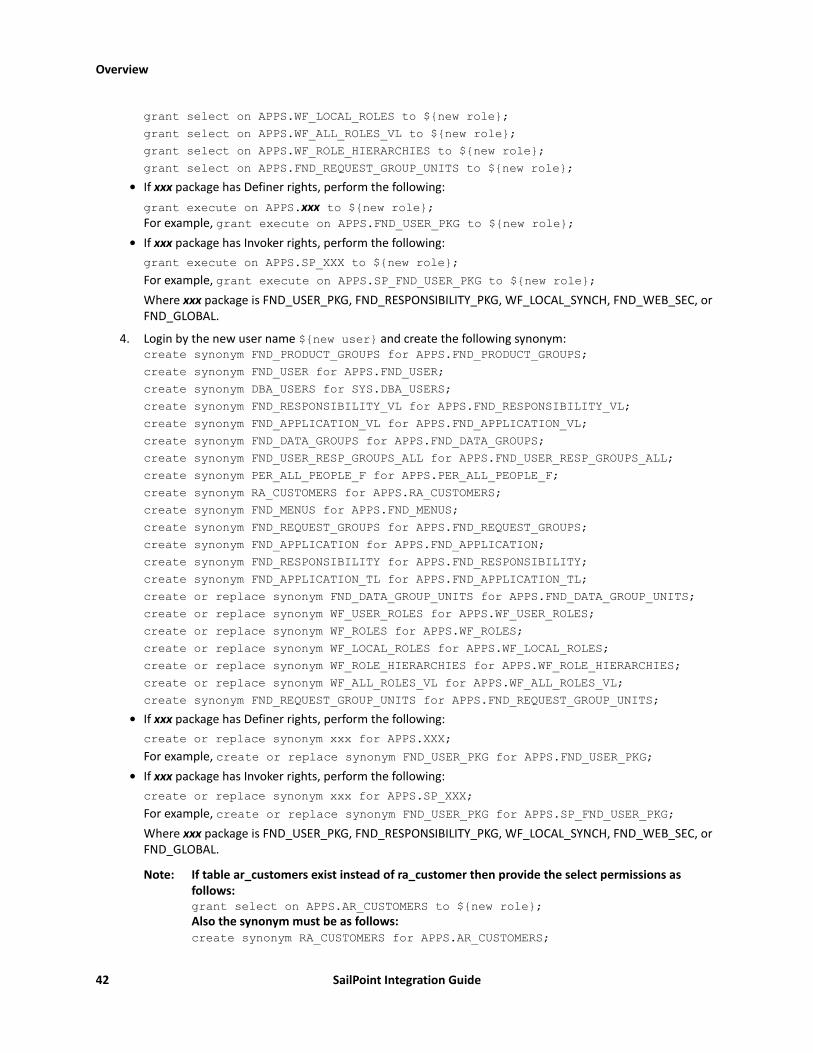
Overview
grant select on APPS.WF_LOCAL_ROLES to ${new role};grant select on APPS.WF_ALL_ROLES_VL to ${new role};grant select on APPS.WF_ROLE_HIERARCHIES to ${new role};grant select on APPS.FND_REQUEST_GROUP_UNITS to ${new role};
• If xxx package has Definer rights, perform the following:grant execute on APPS.xxx to ${new role}; For example, grant execute on APPS.FND_USER_PKG to ${new role};
• If xxx package has Invoker rights, perform the following:grant execute on APPS.SP_XXX to ${new role};For example, grant execute on APPS.SP_FND_USER_PKG to ${new role};Where xxx package is FND_USER_PKG, FND_RESPONSIBILITY_PKG, WF_LOCAL_SYNCH, FND_WEB_SEC, or FND_GLOBAL.
4. Login by the new user name ${new user} and create the following synonym:create synonym FND_PRODUCT_GROUPS for APPS.FND_PRODUCT_GROUPS;create synonym FND_USER for APPS.FND_USER;create synonym DBA_USERS for SYS.DBA_USERS;create synonym FND_RESPONSIBILITY_VL for APPS.FND_RESPONSIBILITY_VL;create synonym FND_APPLICATION_VL for APPS.FND_APPLICATION_VL;create synonym FND_DATA_GROUPS for APPS.FND_DATA_GROUPS;create synonym FND_USER_RESP_GROUPS_ALL for APPS.FND_USER_RESP_GROUPS_ALL;create synonym PER_ALL_PEOPLE_F for APPS.PER_ALL_PEOPLE_F;create synonym RA_CUSTOMERS for APPS.RA_CUSTOMERS;create synonym FND_MENUS for APPS.FND_MENUS;create synonym FND_REQUEST_GROUPS for APPS.FND_REQUEST_GROUPS;create synonym FND_APPLICATION for APPS.FND_APPLICATION;create synonym FND_RESPONSIBILITY for APPS.FND_RESPONSIBILITY;create synonym FND_APPLICATION_TL for APPS.FND_APPLICATION_TL;create or replace synonym FND_DATA_GROUP_UNITS for APPS.FND_DATA_GROUP_UNITS;create or replace synonym WF_USER_ROLES for APPS.WF_USER_ROLES;create or replace synonym WF_ROLES for APPS.WF_ROLES;create or replace synonym WF_LOCAL_ROLES for APPS.WF_LOCAL_ROLES;create or replace synonym WF_ROLE_HIERARCHIES for APPS.WF_ROLE_HIERARCHIES;create or replace synonym WF_ALL_ROLES_VL for APPS.WF_ALL_ROLES_VL;create synonym FND_REQUEST_GROUP_UNITS for APPS.FND_REQUEST_GROUP_UNITS;
• If xxx package has Definer rights, perform the following:create or replace synonym xxx for APPS.XXX;For example, create or replace synonym FND_USER_PKG for APPS.FND_USER_PKG;
• If xxx package has Invoker rights, perform the following:create or replace synonym xxx for APPS.SP_XXX;For example, create or replace synonym FND_USER_PKG for APPS.SP_FND_USER_PKG;Where xxx package is FND_USER_PKG, FND_RESPONSIBILITY_PKG, WF_LOCAL_SYNCH, FND_WEB_SEC, or FND_GLOBAL.
Note: If table ar_customers exist instead of ra_customer then provide the select permissions as follows: grant select on APPS.AR_CUSTOMERS to ${new role}; Also the synonym must be as follows: create synonym RA_CUSTOMERS for APPS.AR_CUSTOMERS;
42 SailPoint Integration Guide

Configuration parameters
Configurationparameters
The following table lists the configuration parameters of Oracle E-Business Suite Integration Module:
Note: Attributes marked with * sign are the mandatory attributes.
Attributes Type
Connection User* The Oracle EBS Login name through which we want to connect Oracle EBS. For example, APPS
Password* The authentication details of login.
Database URL* The url to connect to the database. The format is jdbc:oracle:thin:@<HOST>:<PORT>:<SID>
For example jdbc:oracle:thin:@xxx.xx.xx.xx:xxxx:ORCL url consist of • jdbc:oracle:thin:@: This is common part which states that the
connection is made using thin driver.• xxx.xx.xx.xx: server Name or IP of the oracle server• 1521: The port number of the oracle server. This port number should
be known by the oracle server administrator. • ORCL: The SID of the oracle server.
JDBC Driver* It is the name of the Driver class supported by JDBC Type 4. For example, oracle.jdbc.driver.OracleDriver
E-Business Proxy User
(Optional) E-Business Proxy User for Audit purpose. This user must be created in Oracle E-Business Suite Portal. Audit records would be created/updated with this user for all provisioning operations done for Oracle E-Business through IdentityIQ.
If not provided an error would be displayed on Oracle E-Business Portal when user tries to view Record History for any user and his/her assigned entitlements.
Note: Set the following permissions as mentioned in the "Administrator permissions” on page 40 when ‘E-Business Proxy User’ parameter is not set:
• Under Grant Permissions: grant select on SYS.DBA_USERS to ${new role};
• Creating the synonym: create synonym DBA_USERS for SYS.DBA_USERS
SailPoint Integration Guide 43

Schema attributes
Additionalconfigurationparameter
Schemaattributes
This section describes the different schema attributes.
Accountattributes
The following table lists the account attributes:
Parameter Description
aggregateActiveAccounts For aggregating disabled accounts, set the value of the aggregateActiveAccounts parameter to false in the application debug page as follows:
<entry key="aggregateActiveAccounts"> <value> <Boolean>false</Boolean> </value></entry>
Attributes Description
USER_NAME Application username (what a user types in at the Oracle Applications sign-on screen).
USER_ID Application user identifier.
START_DATE The date the user name becomes active.
END_DATE The date the user name becomes inactive.
DESCRIPTION Description.
PASSWORD_DATE The date the current password was set.
PASSWORD_EXPR The number of accesses left for the password.
PASSWORD_NO_OF_DAYS The number of accesses allowed for the password.
EMAIL_ADDRESS The electronic mail address for the user.
FAX The fax number for the user.
EMPLOYEE_ID Identifier of employee to whom the application username is assigned.
EMPLOYEE_NUMBER Unique number of the employee.
FULL_NAME Full name of the user.
CUSTOMER_ID Customer contact identifier. If the AOL user is a customer contact, this value is a foreign key to the corresponding customer contact.
44 SailPoint Integration Guide

Schema attributes
CustomattributesPerform the following to support the custom attributes in Oracle E-Business Suite Integration Module:
• Add the custom attribute name in the account schema by clicking Add attribute button.• Add the following lines in the application debug page:
<entry key = "customAttribute" > <value> <List> <String>custom1</String> <String>custom2</String> </List> </value></entry>
Groupattributes
This section describes the different group attributes.
ResponsibilityGroupObjectTypeattributesThe following table lists the Responsibility GroupObjectType attributes:
CUSTOMER_NAME Customer name.
RESPONSIBILITIES Responsibilities assigned to a user.
ROLES Roles assigned to a user.
Attributes Description
RESPONSIBILITY_ID Responsibility identifier.
RESPONSIBILITY_NAME Name of the responsibility.
RESPONSIBILITY_KEY Internal developer name for responsibility.
START_DATE The date the responsibility becomes active.
END_DATE The date the responsibility expires.
DESCRIPTION Description
STATUS Shows status of the responsibility.
VERSION Version
WEB_HOST_NAME IP address or alias of the computer where the Webserver is running. Defaults to the last agent.
WEB_AGENT_NAME Name of Oracle Web Agent. Defaults to the last agent.
DATA_GROUP_APPL_NAME Name of the data group application.
REQUEST_GROUP_APPL_NAME Request Group Application name.
DATA_GROUP_ID Identifier of data group.
Attributes Description
SailPoint Integration Guide 45

Provisioning Policy attributes
RoleGroupObjectTypeattributesThe following table lists the Role GroupObjectType attributes:
ProvisioningPolicyattributes
This section lists the single provisioning policy attributes of Oracle E-Business Suite Integration Module that allows you to select the type of user/group to create.
Note: Attributes marked with * sign are the mandatory attributes.
Createaccountattributes
The following table lists the provisioning policy attributes for Create Accounts:
DATA_GROUP_NAME Name of the Data Group.
MENU_NAME Name of the menu.
REQUEST_GROUP_NAME Request group name.
Attributes Description
NAME An internal name for the role.
DISPLAY_NAME The display name of the role.
DESCRIPTION Description
START_DATE The date at which the role becomes valid.
EXPIRATION_DATE The date at which the role is no longer valid in the directory service.
APPLICATION_NAME Application that owns the information for the role.
STATUS The availability of the Role to participate in a workflow process.
SUBORDINATE_ROLES Subordinate roles for a role.
SUBORDINATE_RESPONSIBILITIES Subordinate responsibilities for a role.
Attributes Description
Name* Name of the login user.
Password* Password of the login user.
Description Description.
Start Date* The date from which login user becomes active.
End Date The date from which login user becomes inactive.
Password Expiration Type Type of the password to expire.
Number of Days Days after which user password will expire.
Attributes Description
46 SailPoint Integration Guide

Additional information
Creategroupattributes
The following table lists the provisioning policy attributes for Create Group (Responsibility):
Additionalinformation
This section describes the additional information related to the Oracle E-Business Suite Integration Module.
Upgradeconsiderations
(Optional) Perform the following for provisioning of a responsibility of type other than ‘Oracle Applications’:
1. Navigate to Provisioning Policies ==> Create Group.
2. Click on Edit icon of Responsibility Version field and in Edit Options ==> Settings, modify the name from PASSWORD_EXPR to VERSION.
3. Click on Edit Options ==> Value settings in the Allowed Values field enter Oracle Mobile Application and click on + icon.
4. Click on Apply and Save the provisioning policy.
5. Click Save on the next screen and save the Application.
Permanent Mode In permanent mode change of password on first login is not required.
Attributes Description
Responsibility Name* Name of the responsibility.
Application Name* Name of the application.
Description Description
Responsibility Key* Internal developer name for responsibility.
Start Date* The date the responsibility becomes active.
End Date The date the responsibility expires.
Responsibility Version* Responsibility version.
Data Group Name* Name of the data group.
Data Group Application Name* Name of the data group application.
Menu Name* Name of the menu.
Request Group Name Request group name.
Request Group Application Name Request group application name.
Attributes Description
SailPoint Integration Guide 47
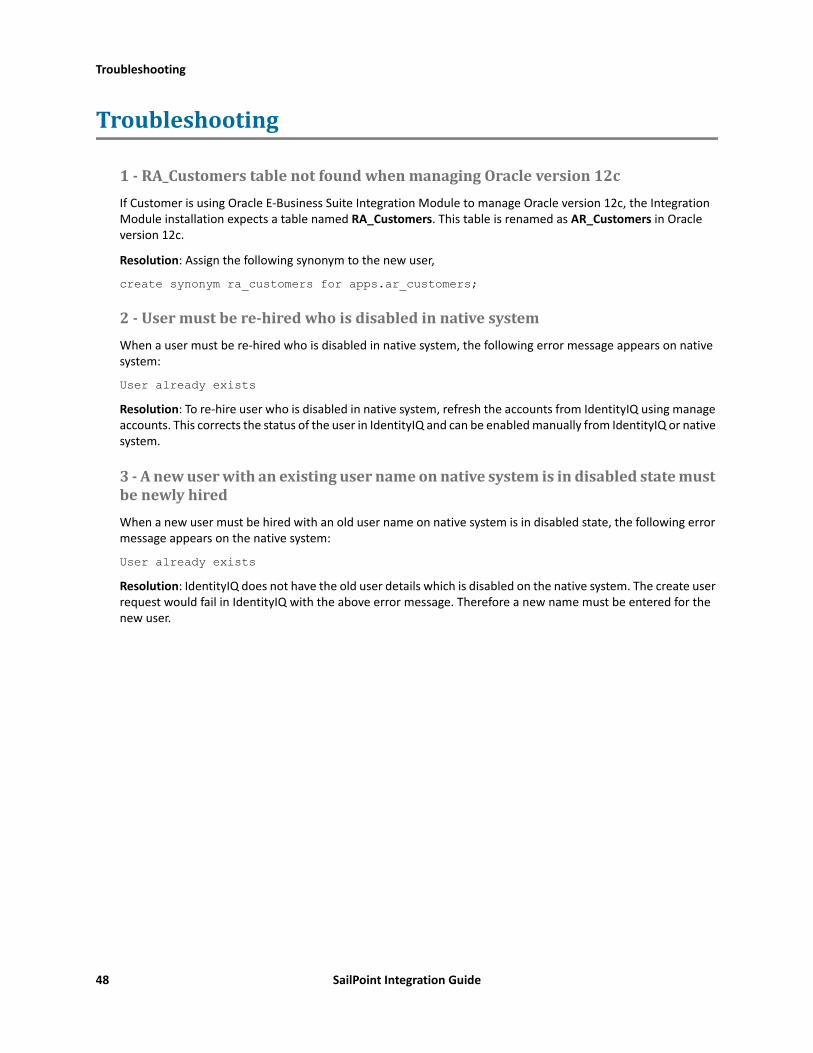
Troubleshooting
Troubleshooting
1-RA_CustomerstablenotfoundwhenmanagingOracleversion12cIf Customer is using Oracle E-Business Suite Integration Module to manage Oracle version 12c, the Integration Module installation expects a table named RA_Customers. This table is renamed as AR_Customers in Oracle version 12c.
Resolution: Assign the following synonym to the new user,
create synonym ra_customers for apps.ar_customers;
2-Usermustbere-hiredwhoisdisabledinnativesystemWhen a user must be re-hired who is disabled in native system, the following error message appears on native system:
User already existsResolution: To re-hire user who is disabled in native system, refresh the accounts from IdentityIQ using manage accounts. This corrects the status of the user in IdentityIQ and can be enabled manually from IdentityIQ or native system.
3-AnewuserwithanexistingusernameonnativesystemisindisabledstatemustbenewlyhiredWhen a new user must be hired with an old user name on native system is in disabled state, the following error message appears on the native system:
User already existsResolution: IdentityIQ does not have the old user details which is disabled on the native system. The create user request would fail in IdentityIQ with the above error message. Therefore a new name must be entered for the new user.
48 SailPoint Integration Guide

Overview
Chapter5:SailPointSAPPortal-UserManagementWebServiceIntegrationModule
The following topics are discussed in this chapter:Overview. . . . . . . . . . . . . . . . . . . . . . . . . . . . . . . . . . . . . . . . . . . . . . . . . . . . . . . . . . . . . . . . . . . . . . . . . . . . . . . . . . 49
Supported features . . . . . . . . . . . . . . . . . . . . . . . . . . . . . . . . . . . . . . . . . . . . . . . . . . . . . . . . . . . . . . . . . . . . . 50Supported Managed Systems . . . . . . . . . . . . . . . . . . . . . . . . . . . . . . . . . . . . . . . . . . . . . . . . . . . . . . . . . . . . . 50Pre-requisite . . . . . . . . . . . . . . . . . . . . . . . . . . . . . . . . . . . . . . . . . . . . . . . . . . . . . . . . . . . . . . . . . . . . . . . . . . . 50Administrator permission . . . . . . . . . . . . . . . . . . . . . . . . . . . . . . . . . . . . . . . . . . . . . . . . . . . . . . . . . . . . . . . . 51
Configuration parameters . . . . . . . . . . . . . . . . . . . . . . . . . . . . . . . . . . . . . . . . . . . . . . . . . . . . . . . . . . . . . . . . . . . . 51Schema attributes . . . . . . . . . . . . . . . . . . . . . . . . . . . . . . . . . . . . . . . . . . . . . . . . . . . . . . . . . . . . . . . . . . . . . . . . . . 52
Account attributes . . . . . . . . . . . . . . . . . . . . . . . . . . . . . . . . . . . . . . . . . . . . . . . . . . . . . . . . . . . . . . . . . . . . . . 52Group attributes. . . . . . . . . . . . . . . . . . . . . . . . . . . . . . . . . . . . . . . . . . . . . . . . . . . . . . . . . . . . . . . . . . . . . . . . 53
Provisioning Policy attributes . . . . . . . . . . . . . . . . . . . . . . . . . . . . . . . . . . . . . . . . . . . . . . . . . . . . . . . . . . . . . . . . . 53Additional information . . . . . . . . . . . . . . . . . . . . . . . . . . . . . . . . . . . . . . . . . . . . . . . . . . . . . . . . . . . . . . . . . . . . . . 55
Overview
SAP Enterprise Portal integrates information and applications across the enterprise to provide an integrated single point of access to information, enterprise applications, and services both inside and outside an organization. SAP Enterprise Portal Integration Module uses the UME service to perform user management. The User Management Engine (UME) provides a centralized user management for all Java applications and can be configured to work with user management data from multiple data sources.
The UME can be configured to read and write user-related data from and to multiple data sources, such as Lightweight Directory Access Protocol (LDAP) directories, the system database of the AS Java, and user management of an AS ABAP.
SailPoint SAP Portal-User Management Web Service Integration Module manages the following entities of SAP User Management Engine (UME):
• User• Role (UME and Portal)
SailPoint Integration Guide 49
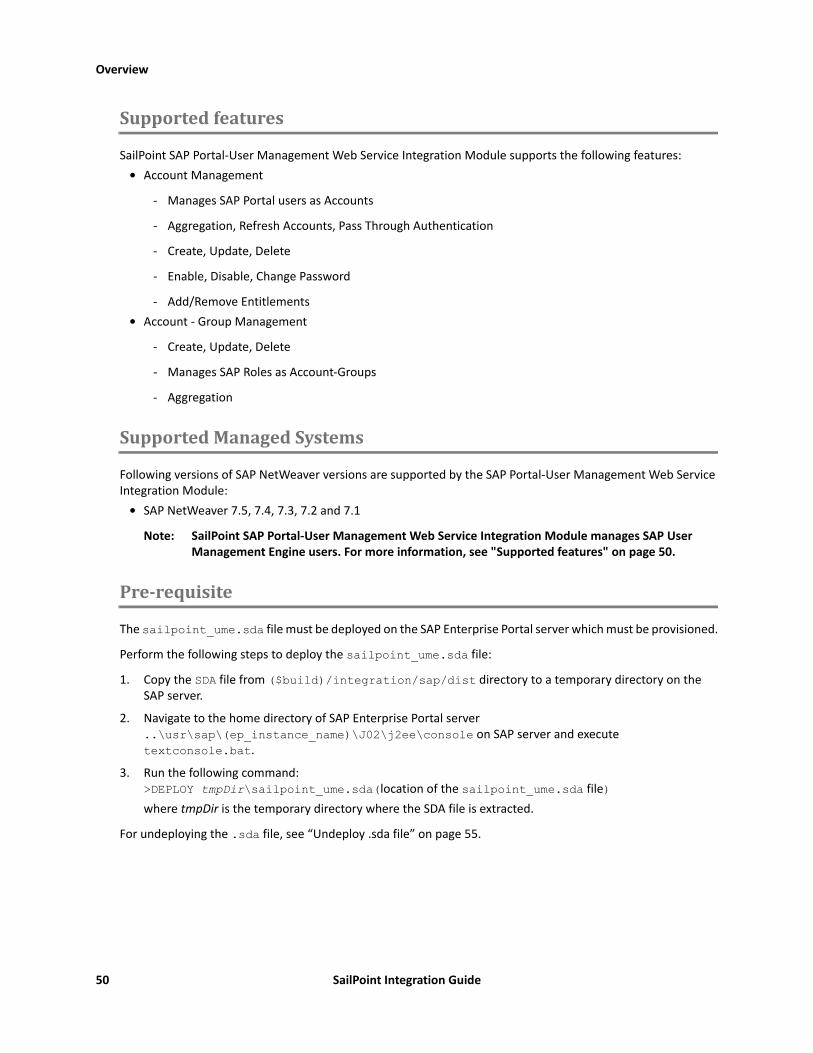
Overview
Supportedfeatures
SailPoint SAP Portal-User Management Web Service Integration Module supports the following features:• Account Management
- Manages SAP Portal users as Accounts
- Aggregation, Refresh Accounts, Pass Through Authentication
- Create, Update, Delete
- Enable, Disable, Change Password
- Add/Remove Entitlements• Account - Group Management
- Create, Update, Delete
- Manages SAP Roles as Account-Groups
- Aggregation
SupportedManagedSystems
Following versions of SAP NetWeaver versions are supported by the SAP Portal-User Management Web Service Integration Module:
• SAP NetWeaver 7.5, 7.4, 7.3, 7.2 and 7.1
Note: SailPoint SAP Portal-User Management Web Service Integration Module manages SAP User Management Engine users. For more information, see "Supported features" on page 50.
Pre-requisite
The sailpoint_ume.sda file must be deployed on the SAP Enterprise Portal server which must be provisioned.
Perform the following steps to deploy the sailpoint_ume.sda file:
1. Copy the SDA file from ($build)/integration/sap/dist directory to a temporary directory on the SAP server.
2. Navigate to the home directory of SAP Enterprise Portal server..\usr\sap\(ep_instance_name)\J02\j2ee\console on SAP server and execute textconsole.bat.
3. Run the following command:>DEPLOY tmpDir\sailpoint_ume.sda(location of the sailpoint_ume.sda file)where tmpDir is the temporary directory where the SDA file is extracted.
For undeploying the .sda file, see “Undeploy .sda file” on page 55.
50 SailPoint Integration Guide
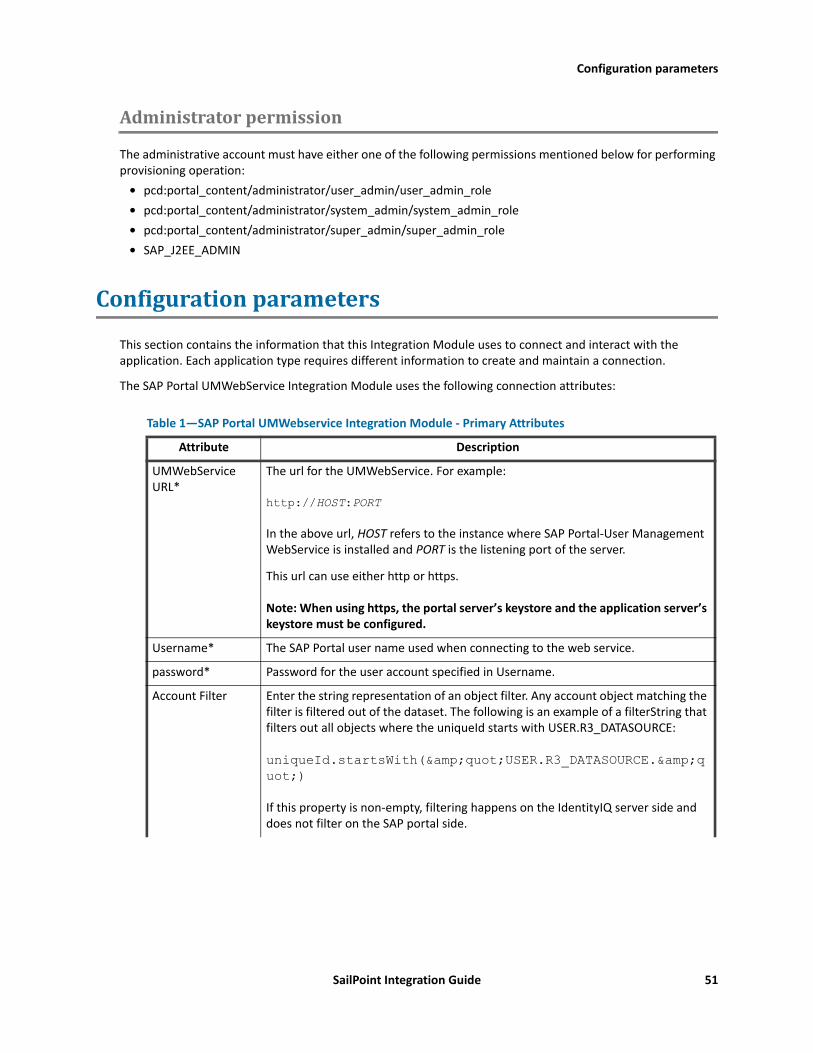
Configuration parameters
Administratorpermission
The administrative account must have either one of the following permissions mentioned below for performing provisioning operation:
• pcd:portal_content/administrator/user_admin/user_admin_role• pcd:portal_content/administrator/system_admin/system_admin_role• pcd:portal_content/administrator/super_admin/super_admin_role• SAP_J2EE_ADMIN
Configurationparameters
This section contains the information that this Integration Module uses to connect and interact with the application. Each application type requires different information to create and maintain a connection.
The SAP Portal UMWebService Integration Module uses the following connection attributes:
Table 1—SAP Portal UMWebservice Integration Module - Primary Attributes
Attribute Description
UMWebService URL*
The url for the UMWebService. For example: http://HOST:PORT In the above url, HOST refers to the instance where SAP Portal-User Management WebService is installed and PORT is the listening port of the server.
This url can use either http or https. Note: When using https, the portal server’s keystore and the application server’s keystore must be configured.
Username* The SAP Portal user name used when connecting to the web service.
password* Password for the user account specified in Username.
Account Filter Enter the string representation of an object filter. Any account object matching the filter is filtered out of the dataset. The following is an example of a filterString that filters out all objects where the uniqueId starts with USER.R3_DATASOURCE: uniqueId.startsWith(&quot;USER.R3_DATASOURCE.&quot;) If this property is non-empty, filtering happens on the IdentityIQ server side and does not filter on the SAP portal side.
SailPoint Integration Guide 51
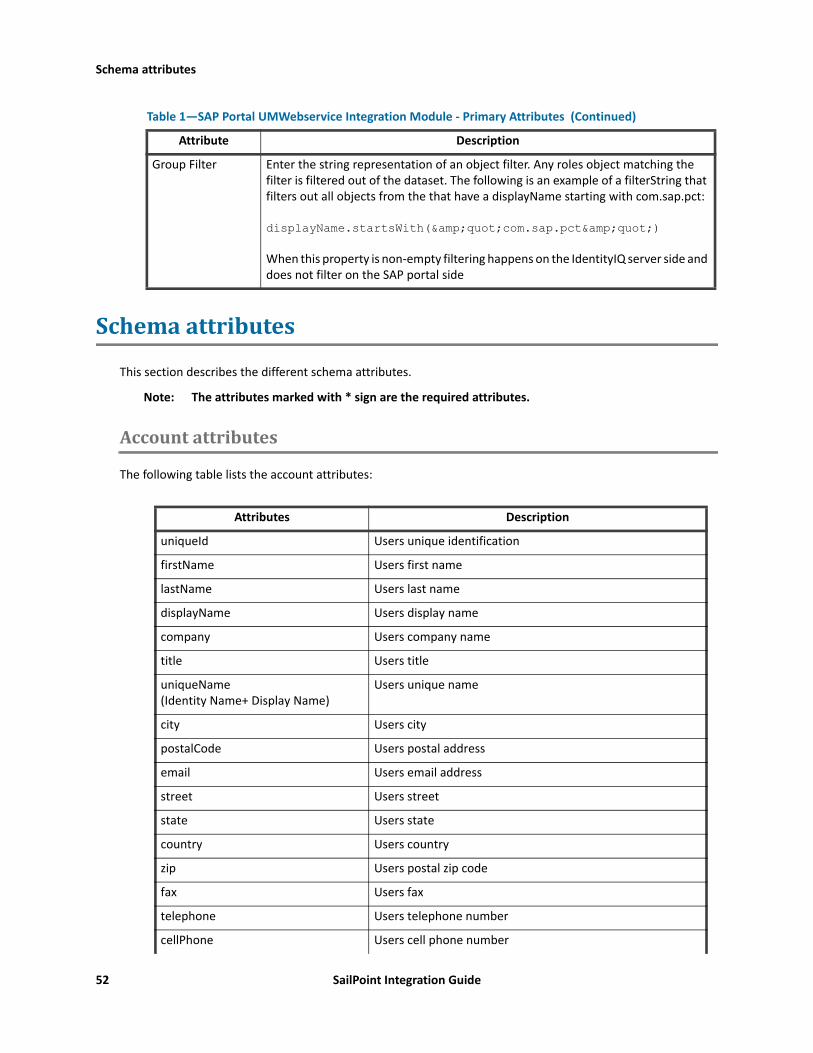
Schema attributes
Schemaattributes
This section describes the different schema attributes.
Note: The attributes marked with * sign are the required attributes.
Accountattributes
The following table lists the account attributes:
Group Filter Enter the string representation of an object filter. Any roles object matching the filter is filtered out of the dataset. The following is an example of a filterString that filters out all objects from the that have a displayName starting with com.sap.pct: displayName.startsWith(&quot;com.sap.pct&quot;) When this property is non-empty filtering happens on the IdentityIQ server side and does not filter on the SAP portal side
Attributes Description
uniqueId Users unique identification
firstName Users first name
lastName Users last name
displayName Users display name
company Users company name
title Users title
uniqueName (Identity Name+ Display Name)
Users unique name
city Users city
postalCode Users postal address
email Users email address
street Users street
state Users state
country Users country
zip Users postal zip code
fax Users fax
telephone Users telephone number
cellPhone Users cell phone number
Table 1—SAP Portal UMWebservice Integration Module - Primary Attributes (Continued)
Attribute Description
52 SailPoint Integration Guide

Provisioning Policy attributes
Groupattributes
The following table lists the group attributes:
ProvisioningPolicyattributes
This section lists the different policy attributes of SAP Portal-User Management WebService Integration Module.
Note: The attributes marked with * sign are the required attributes.
Createaccountattributes
The following table lists the provisioning policy attributes for Create Account:
department Users department assigned
salutation Users salutation
jobTitle Users job title
timeZone Timezone of the user
language Language of the user
securityType Users's security type
lockStatus User is locked or open
roles Role assigned to the user
groups Groups assigned to the user
validFrom Valid from date
validTo Valid to date
Attributes Description
displayName is Display name of the role
uniqueName identity Attribute Unique name of the role
uniqueId Unique ID of the role
description Description of the role
userMembers Users associated to the role
groupMembers Groups associated to the role
Attributes Description
uniqueId Users unique identification
Attributes Description
SailPoint Integration Guide 53

Provisioning Policy attributes
CreateGroupattributes
The following table lists the provisioning policy attributes for Update Account:
First Name Users first name
Last Name* Users last name
Display Name Users display name
company Users company name
Department Users department assigned
Unique Name* Users unique name
Password* Users password
City Users city
Street Users street
Email Users email address
State Users state
Country Users country
Zip Users postal zip code
Fax Users fax
Tele Phone Users telephone number
Cell Phone Users cell phone number
Salutation Users salutation
JobTitle Users job title
Language Language of the user
Security Type Users's security type
Lock Status User is locked or open
Password Change Required To create a new account in SAP Portal Server with productive password.
Values are as follows:• True: Does not sets the password as productive• False: Sets the password as productive.
Note: User must add “changePasswordRequired” attribute in schema and create provisioning policy and set the required display name (for example, “Password Change Required”).
Attributes Description
54 SailPoint Integration Guide

Additional information
Additionalinformation
This section describes the additional information related to the SAP Portal-User Management Web Service Integration Module.
Undeploy.sdafile
Perform the following steps to undeploy the .sda file:
1. From the command prompt browse the following location:..\usr\sap\(SAPEP instance)\J02\j2ee\console
2. Run the following file:textconsole.bat
3. At the query prompt enter the following command:>UNDEPLOY name=SailpointSapEPArchive vendor=sailpoint.com
Attributes Description
Role Name* Display name of the role
Description Description of the role
User Members Users associated to the role
Group Members Groups associated to the role
SailPoint Integration Guide 55

Additional information
56 SailPoint Integration Guide
Overview
Chapter6:SailPointPeopleSoftIntegrationModule
The following topics are discussed in this chapter:Overview. . . . . . . . . . . . . . . . . . . . . . . . . . . . . . . . . . . . . . . . . . . . . . . . . . . . . . . . . . . . . . . . . . . . . . . . . . . . . . . . . . 57
Supported features . . . . . . . . . . . . . . . . . . . . . . . . . . . . . . . . . . . . . . . . . . . . . . . . . . . . . . . . . . . . . . . . . . . . . 57Supported Managed Systems . . . . . . . . . . . . . . . . . . . . . . . . . . . . . . . . . . . . . . . . . . . . . . . . . . . . . . . . . . . . . 58Pre-requisites . . . . . . . . . . . . . . . . . . . . . . . . . . . . . . . . . . . . . . . . . . . . . . . . . . . . . . . . . . . . . . . . . . . . . . . . . . 58Administrator permission . . . . . . . . . . . . . . . . . . . . . . . . . . . . . . . . . . . . . . . . . . . . . . . . . . . . . . . . . . . . . . . . 58
Configuration parameters . . . . . . . . . . . . . . . . . . . . . . . . . . . . . . . . . . . . . . . . . . . . . . . . . . . . . . . . . . . . . . . . . . . . 58Schema attributes . . . . . . . . . . . . . . . . . . . . . . . . . . . . . . . . . . . . . . . . . . . . . . . . . . . . . . . . . . . . . . . . . . . . . . . . . . 59
Account attributes . . . . . . . . . . . . . . . . . . . . . . . . . . . . . . . . . . . . . . . . . . . . . . . . . . . . . . . . . . . . . . . . . . . . . . 59Group attributes. . . . . . . . . . . . . . . . . . . . . . . . . . . . . . . . . . . . . . . . . . . . . . . . . . . . . . . . . . . . . . . . . . . . . . . . 61
Additional information . . . . . . . . . . . . . . . . . . . . . . . . . . . . . . . . . . . . . . . . . . . . . . . . . . . . . . . . . . . . . . . . . . . . . . 61Performance improvement . . . . . . . . . . . . . . . . . . . . . . . . . . . . . . . . . . . . . . . . . . . . . . . . . . . . . . . . . . . . . . . 61Partitioning Aggregation . . . . . . . . . . . . . . . . . . . . . . . . . . . . . . . . . . . . . . . . . . . . . . . . . . . . . . . . . . . . . . . . . 63Creating the Component Interfaces . . . . . . . . . . . . . . . . . . . . . . . . . . . . . . . . . . . . . . . . . . . . . . . . . . . . . . . . 63Creating the Component interface jar file . . . . . . . . . . . . . . . . . . . . . . . . . . . . . . . . . . . . . . . . . . . . . . . . . . . 63Configuring the Component Interface Security . . . . . . . . . . . . . . . . . . . . . . . . . . . . . . . . . . . . . . . . . . . . . . . 64
Troubleshooting. . . . . . . . . . . . . . . . . . . . . . . . . . . . . . . . . . . . . . . . . . . . . . . . . . . . . . . . . . . . . . . . . . . . . . . . . . . . 65
Overview
The SailPoint PeopleSoft Integration Module manages the administrative entities of PeopleSoft server (User Profiles and Roles). The PeopleSoft Integration Module communicates to the PeopleSoft server through component interfaces.
Supportedfeatures
SailPoint PeopleSoft Integration Module supports the following features:• Account Management
- Manages PeopleSoft users as Accounts
- Aggregation, Partitioning Aggregation, Refresh Accounts, Discover Schema
For more information on partitioning aggregation, see “Partitioning Aggregation” on page 63.
- Create, Update, Delete
- Enable, Disable, Change Password
- Add/Remove Entitlements • Account - Group Management
- Manages PeopleSoft roles as Account-Groups
- Aggregation, Refresh Groups
SailPoint Integration Guide 57

Configuration parameters
SupportedManagedSystems
SailPoint PeopleSoft Integration Module supports the following managed systems:• PeopleTools version 8.55, 8.54, 8.53• PeopleSoft Server version 9.2, 9.1
Pre-requisites
To use the PeopleSoft Integration Module, you must first configure the component interfaces on PeopleSoft. This requires the following steps:
1. Creating the Component Interfaces
2. Creating the Component interface jar file
3. Configuring the Component Interface Security
The following files must be present on the computer where the Integration Module is installed:• psjoa.jar (found on PeopleSoft server at %PS_HOME%\class where %PS_HOME% is the location where
PeopleSoft is installed)• iiqPeopleSoftCompInt.jar (See Creating the Component interface jar file)
Administratorpermission
The PeopleSoft user who must act as an administrator for proper functioning of the Integration Module must have access to the related Component Interfaces. For more information, see Configuring the Component Interface Security.
Configurationparameters
This section contains the information that this Integration Module uses to connect and interact with the application. Each application type requires different information to create and maintain a connection.
The PeopleSoft Integration Module uses the following connection attributes:
Attribute Description
Host* The hostname of the PeopleSoft server.
Port* The Jolt port (Jolt Server Listener Port) on which the PeopleSoft server is listening. Default: 9000
User* The user name used to login to PeopleSoft.
Password* The password to use to login to PeopleSoft.
User Component Interface* The name of the PeopleSoft component interface to use to read PeopleSoft User Profile.
58 SailPoint Integration Guide
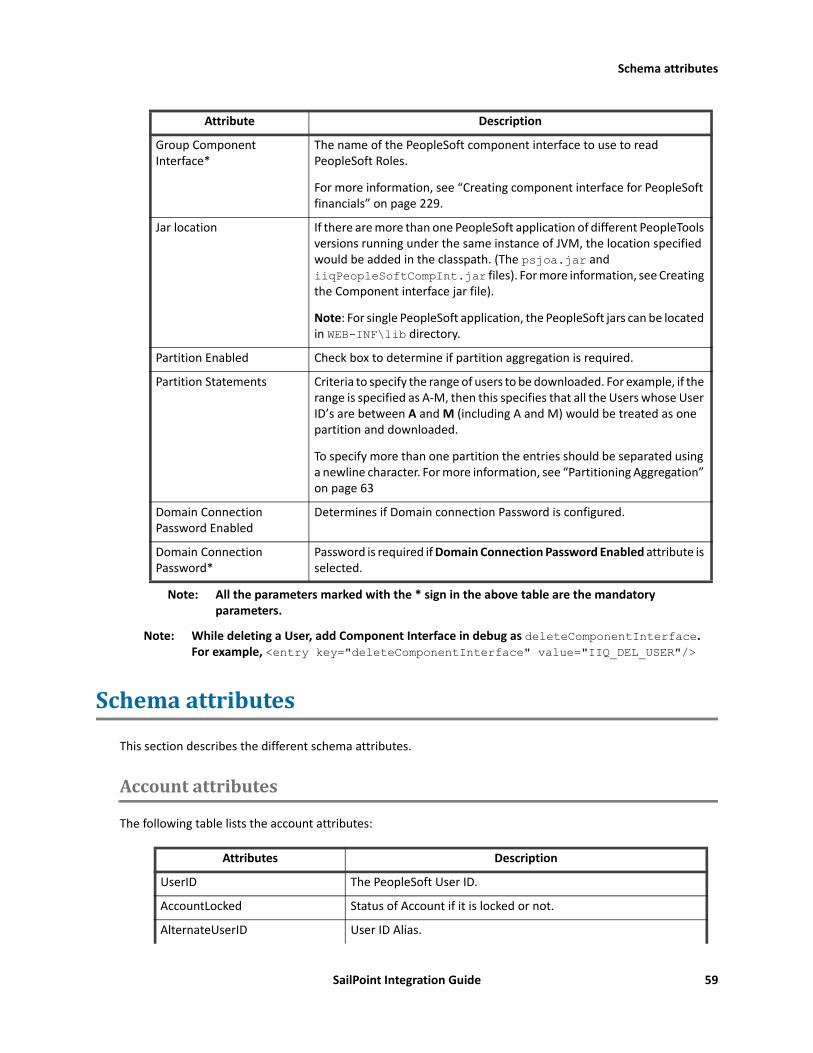
Schema attributes
Note: All the parameters marked with the * sign in the above table are the mandatory parameters.
Note: While deleting a User, add Component Interface in debug as deleteComponentInterface. For example, <entry key="deleteComponentInterface" value="IIQ_DEL_USER"/>
Schemaattributes
This section describes the different schema attributes.
Accountattributes
The following table lists the account attributes:
Group Component Interface*
The name of the PeopleSoft component interface to use to read PeopleSoft Roles.
For more information, see “Creating component interface for PeopleSoft financials” on page 229.
Jar location If there are more than one PeopleSoft application of different PeopleTools versions running under the same instance of JVM, the location specified would be added in the classpath. (The psjoa.jar and iiqPeopleSoftCompInt.jar files). For more information, see Creating the Component interface jar file).
Note: For single PeopleSoft application, the PeopleSoft jars can be located in WEB-INF\lib directory.
Partition Enabled Check box to determine if partition aggregation is required.
Partition Statements Criteria to specify the range of users to be downloaded. For example, if the range is specified as A-M, then this specifies that all the Users whose User ID’s are between A and M (including A and M) would be treated as one partition and downloaded.
To specify more than one partition the entries should be separated using a newline character. For more information, see “Partitioning Aggregation” on page 63
Domain Connection Password Enabled
Determines if Domain connection Password is configured.
Domain Connection Password*
Password is required if Domain Connection Password Enabled attribute is selected.
Attributes Description
UserID The PeopleSoft User ID.
AccountLocked Status of Account if it is locked or not.
AlternateUserID User ID Alias.
Attribute Description
SailPoint Integration Guide 59

Schema attributes
CurrencyCode Currency code of the user.
DefaultMobilePage Default mobile page.
EffectiveDateFrom Workflow attribute - from date.
EffectiveDateTo Workflow attribute - to date.
EmailAddresses Email address of the user.
EmailUser Routing preferences - email user. It is a multivalued attribute.
ExpertEntry Enable expert entry.
FailedLogins Number of failed logins.
IDTypes User ID types and values.
LanguageCode Language code.
LastUpdateDateTime Last update date/time.
LastUpdateUserID Last update user ID.
MultiLanguageEnabled Multi-language enabled.
NavigatorHomePermissionList Default navigator home page permission list.
Opertype Use external authentication.
PasswordExpired Is password expired.
PrimaryEmailAddress Primary email address.
PrimaryPermissionList Primary permission list.
ProcessProfilePermissionList Process profile permission list.
roleNames Roles assigned to the user are treated as entitlements.
RowSecurityPermissionList Row security permission list.
SymbolicID Used to map the User Id to Access ID.
UserDescription Description of the user.
Roles Roles consists of permissions and can be assigned to user profile.
Encrypted Encrypted
ReassignWork Reassign work to alternate user.
ReassignUserID Reassigned user’s UserID.
RowSecurityPermissionList Row Security Permissions.
SupervisingUserID Supervisor’s User Id.
UserIDAlias Alias of the user.
WorkListEntriesCount Count of worklist entries.
WorklistUser Displays user workflow.
Attributes Description
60 SailPoint Integration Guide
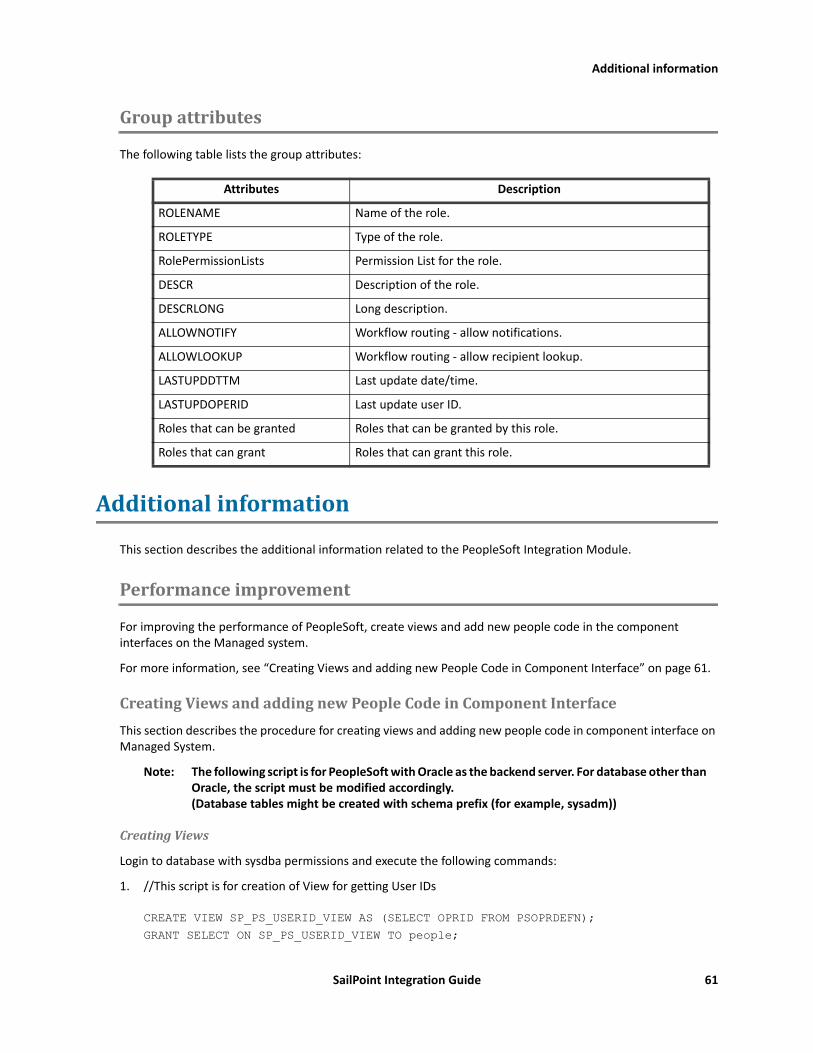
Additional information
Groupattributes
The following table lists the group attributes:
Additionalinformation
This section describes the additional information related to the PeopleSoft Integration Module.
Performanceimprovement
For improving the performance of PeopleSoft, create views and add new people code in the component interfaces on the Managed system.
For more information, see “Creating Views and adding new People Code in Component Interface” on page 61.
CreatingViewsandaddingnewPeopleCodeinComponentInterfaceThis section describes the procedure for creating views and adding new people code in component interface on Managed System.
Note: The following script is for PeopleSoft with Oracle as the backend server. For database other than Oracle, the script must be modified accordingly. (Database tables might be created with schema prefix (for example, sysadm))
CreatingViews
Login to database with sysdba permissions and execute the following commands:
1. //This script is for creation of View for getting User IDs
CREATE VIEW SP_PS_USERID_VIEW AS (SELECT OPRID FROM PSOPRDEFN);GRANT SELECT ON SP_PS_USERID_VIEW TO people;
Attributes Description
ROLENAME Name of the role.
ROLETYPE Type of the role.
RolePermissionLists Permission List for the role.
DESCR Description of the role.
DESCRLONG Long description.
ALLOWNOTIFY Workflow routing - allow notifications.
ALLOWLOOKUP Workflow routing - allow recipient lookup.
LASTUPDDTTM Last update date/time.
LASTUPDOPERID Last update user ID.
Roles that can be granted Roles that can be granted by this role.
Roles that can grant Roles that can grant this role.
SailPoint Integration Guide 61
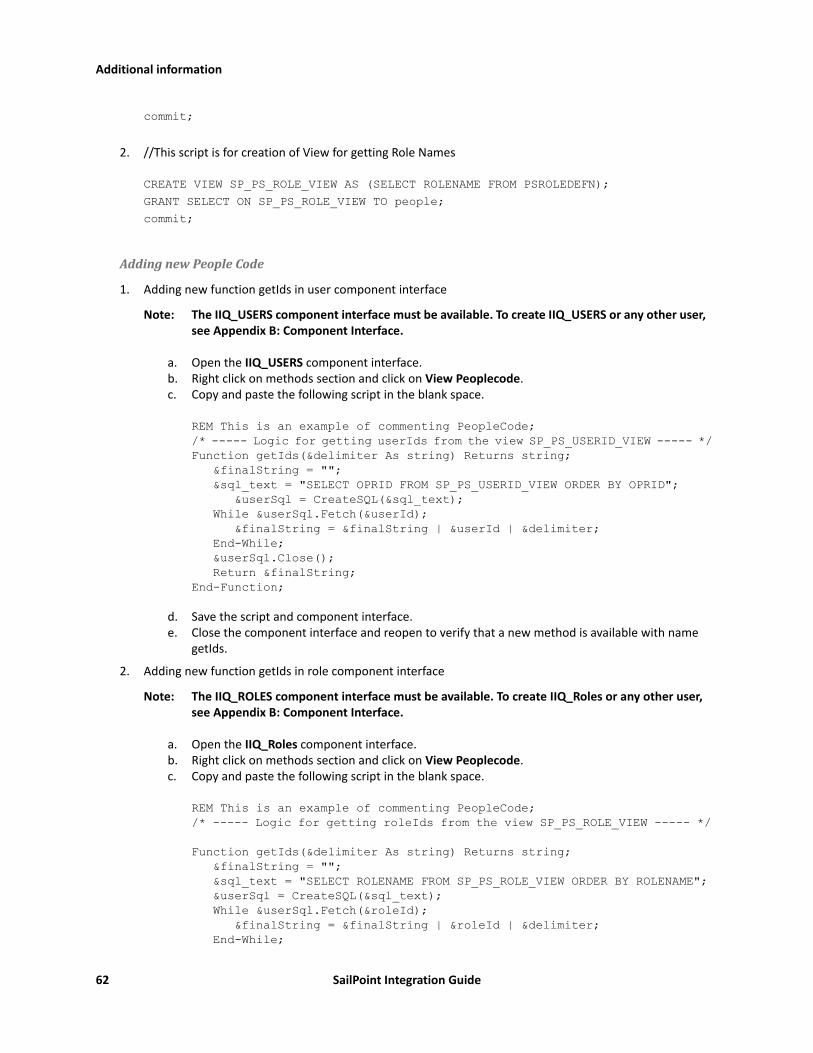
Additional information
commit;
2. //This script is for creation of View for getting Role Names
CREATE VIEW SP_PS_ROLE_VIEW AS (SELECT ROLENAME FROM PSROLEDEFN);GRANT SELECT ON SP_PS_ROLE_VIEW TO people;commit;
AddingnewPeopleCode
1. Adding new function getIds in user component interface
Note: The IIQ_USERS component interface must be available. To create IIQ_USERS or any other user, see Appendix B: Component Interface.
a. Open the IIQ_USERS component interface.b. Right click on methods section and click on View Peoplecode.c. Copy and paste the following script in the blank space.
REM This is an example of commenting PeopleCode; /* ----- Logic for getting userIds from the view SP_PS_USERID_VIEW ----- */ Function getIds(&delimiter As string) Returns string; &finalString = ""; &sql_text = "SELECT OPRID FROM SP_PS_USERID_VIEW ORDER BY OPRID"; &userSql = CreateSQL(&sql_text); While &userSql.Fetch(&userId); &finalString = &finalString | &userId | &delimiter; End-While; &userSql.Close(); Return &finalString;End-Function;
d. Save the script and component interface.e. Close the component interface and reopen to verify that a new method is available with name
getIds.
2. Adding new function getIds in role component interface
Note: The IIQ_ROLES component interface must be available. To create IIQ_Roles or any other user, see Appendix B: Component Interface.
a. Open the IIQ_Roles component interface.b. Right click on methods section and click on View Peoplecode.c. Copy and paste the following script in the blank space.
REM This is an example of commenting PeopleCode; /* ----- Logic for getting roleIds from the view SP_PS_ROLE_VIEW ----- */
Function getIds(&delimiter As string) Returns string; &finalString = ""; &sql_text = "SELECT ROLENAME FROM SP_PS_ROLE_VIEW ORDER BY ROLENAME"; &userSql = CreateSQL(&sql_text); While &userSql.Fetch(&roleId); &finalString = &finalString | &roleId | &delimiter; End-While;
62 SailPoint Integration Guide

Additional information
&userSql.Close(); Return &finalString;End-Function;
d. Save the script and component interface.e. Close the component interface and reopen to verify that a new method is available with new name
getIds.
PartitioningAggregation
To use the partitioning aggregation feature in ERP Integration Module, perform the following:
1. Select the Partition Enabled check box.
2. Specify the criteria for partitioning in the Partition Statements textbox of the configuration parameter.For example, download all the PeopleSoft User Profiles from A to M (including A and M) (the statement A-M would be treated as one partition)To specify more than one partition the entries must be separated using a newline character.
CreatingtheComponentInterfaces
For creating the component interfaces, see Appendix B: Component Interface.
CreatingtheComponentinterfacejarfile
The iiqPeopleSoftCompInt.jar file contains the PeopleSoft Component Interface java classes. It must be generated from the respective PeopleSoft resource and then copied into the IdentityIQ classpath.
Perform the following steps to create the iiqPeopleSoftCompInt.jar file from the Component interface java files.
1. Logon to PeopleSoft Application Designer in two tier mode.
2. Open the Component Interface project and open all the component interfaces by double clicking each com-ponent interface. For example, IIQ_USERS
3. From the menu select Build ==> PeopleSoft APIs.The Build PeopleSoft API Bindings window appears.
4. From the Build PeopleSoft API Bindings window, select the Build check box in the java Classes frame and clear the COM Type Library and C Header Files Build check boxes.In the Select APIs to Build drop down menu, select the following options:
- CompIntfc.CompIntfcPropertyInfo
- CompIntfc.CompIntfcPropertyInfoCollection
- PeopleSoft.* (all Component Interfaces that begin with the prefix PeopleSoft)
- CompIntfc.IIQ_* (all Component Interfaces that begin with the prefix CompIntfc.IIQ_)
Note: If you need to generate Component Interface Java files for the entire group of Component Interfaces click ALL.
Create a directory to deploy the Java files. For example, if you specify C:\CI as the file path, then the Component Interface Java files are generated in C:\CI\PeopleSoft\Generated\CompIntfc.
SailPoint Integration Guide 63

Additional information
6. Compile the JAVA files by performing the following steps:a. Open the command prompt and change directories to the folder where the generated JAVA files are
located. For example, C:\CI.b. Navigate to the PeopleSoft\Generated\CompIntfc\ directory.c. Run the following command:
javac -classpath %PS_HOME%\class\psjoa.jar *.java Where %PS_HOME% is the location that PeopleSoft is installed. Important: Ensure that the JAVA compiler used for compiling the generated JAVA files is compatible with the JAVA provided with the PeopleSoft installation that needs to be managed.
d. (Optional) You can delete all the generated java files from the existing directory, however, do not delete the .class files.
7. Perform the following steps to package the compiled files as the iiqPeopleSoftCompInt.jar file:a. Open the Command prompt and navigate to the newly created directory. For example, C:\CIb. Run the command: jar -cvf iiqPeopleSoftCompInt.jar *
8. Copy the generated iiqPeopleSoftCompInt.jar and %PS_HOME%\class\psjoa.jar files to the computer where IdentityIQ is running.
ConfiguringtheComponentInterfaceSecurity
Before using the Integration Module, you must allow the PeopleSoft user, for whom the Integration Module is configured, to access the generated component interfaces.
To set security for the PeopleTools project, perform the following:
1. Log into the PeopleSoft web interface.Default: http://<server-name>:<port-number>/psp/ps
2. Navigate to PeopleTools ==> Security ==> Permissions & Roles ==> Permission Lists.
3. Click Add a New Value to create a new permission list. Type New_Name as the name of the permission list, then click Add.
4. Click the Component Interfaces tab and add the created component interface. For more information, see “Creating component interface for PeopleSoft financials” on page 229.For example,
- IIQ_DEL_ROLE
- IIQ_DEL_USER
- IIQ_ROLES
- IIQ_USERS
5. For each added component interface, click Edit ==> Full Access (All), then click OK.
6. Click Save to save the new permission list.
7. Navigate to PeopleTools ==> Security ==> Permissions & Roles ==> Roles.
8. Click Add a New Value to create a new role. Type New_Name as the name and then click Add. For example, IIQ_ROLE.
9. Enter the description as IdentityIQ Role.
64 SailPoint Integration Guide

Troubleshooting
10. Click the Permission Lists tab and add the permission list created in Step <$elemparanumonly3. Click Save to save the role.
11. Navigate to PeopleTools ==> Security ==> User Profiles, and select the user (for whom the permissions must be provided) that is being used in the Integration Module.
12. Click the Roles tab and add the role created in Step <$elemparanumonly10. Click Save to add the role to the user.
Troubleshooting
1-WhenthesupportedplatformversionisJava1.6anerrormessageappearsWhen the supported platform version is Java version 1.6, the following error message appears:
java.lang.UnsupportedClassVersionError: psft/pt8/joa/API : Unsupported major.minor version 51.0 (unable to load class psft.pt8.joa.API)Resolution: Ensure that the supported platform version is Java 1.7.
2-(OnlyforPeopleToolsversion8.54)ConnectiontoServernotestablishedWhen testing the CI (Component Interface) Java APIs after upgrading to PeopleTools version 8.54, the connection to the application server fails with the following error message appears:
openconnector.ConnectorExpception: Connection to server not established Resolution: Navigate to the location where PeopleSoft is installed. For example, C:\PS_CFG_HOME\webserv\peoplesoft\applications\peoplesoft\PORTAL.war\WEB-INF\classes.
Copy all the files from this directory into the WEB_INF\classes directory of IdentityIQ.
Now you will be able to successfully connect to the server. This solution is documented in the following knowledge base article on the Oracle support site:
E-CI: Java API Connection Fails With "java.lang.NoClassDefFoundError: com/peoplesoft/pt/management/runtime/pia/JoltSessionMXBean" Error(1947124.1)
SailPoint Integration Guide 65

Troubleshooting
66 SailPoint Integration Guide

Overview
Chapter7:SailPointSiebelIntegrationModule
The following topics are discussed in this chapter:Overview. . . . . . . . . . . . . . . . . . . . . . . . . . . . . . . . . . . . . . . . . . . . . . . . . . . . . . . . . . . . . . . . . . . . . . . . . . . . . . . . . . 65
Supported features . . . . . . . . . . . . . . . . . . . . . . . . . . . . . . . . . . . . . . . . . . . . . . . . . . . . . . . . . . . . . . . . . . . . . 65Supported Managed Systems . . . . . . . . . . . . . . . . . . . . . . . . . . . . . . . . . . . . . . . . . . . . . . . . . . . . . . . . . . . . . 66Pre-requisites . . . . . . . . . . . . . . . . . . . . . . . . . . . . . . . . . . . . . . . . . . . . . . . . . . . . . . . . . . . . . . . . . . . . . . . . . . 66Administrator permission . . . . . . . . . . . . . . . . . . . . . . . . . . . . . . . . . . . . . . . . . . . . . . . . . . . . . . . . . . . . . . . . 66
Configuration parameters . . . . . . . . . . . . . . . . . . . . . . . . . . . . . . . . . . . . . . . . . . . . . . . . . . . . . . . . . . . . . . . . . . . . 66Schema attributes . . . . . . . . . . . . . . . . . . . . . . . . . . . . . . . . . . . . . . . . . . . . . . . . . . . . . . . . . . . . . . . . . . . . . . . . . . 68
Account attributes . . . . . . . . . . . . . . . . . . . . . . . . . . . . . . . . . . . . . . . . . . . . . . . . . . . . . . . . . . . . . . . . . . . . . . 68Account Group attributes . . . . . . . . . . . . . . . . . . . . . . . . . . . . . . . . . . . . . . . . . . . . . . . . . . . . . . . . . . . . . . . . 68Adding new custom attributes in schema . . . . . . . . . . . . . . . . . . . . . . . . . . . . . . . . . . . . . . . . . . . . . . . . . . . 69
Provisioning policy attributes . . . . . . . . . . . . . . . . . . . . . . . . . . . . . . . . . . . . . . . . . . . . . . . . . . . . . . . . . . . . . . . . . 69Troubleshooting. . . . . . . . . . . . . . . . . . . . . . . . . . . . . . . . . . . . . . . . . . . . . . . . . . . . . . . . . . . . . . . . . . . . . . . . . . . . 70
Overview
The SailPoint Siebel Integration Module manages entities in Oracle's Siebel CRM. Here Employee is managed as Accounts and Position as Account Groups. By default, the Siebel Integration Module uses the Employee Siebel business component of the Employee Siebel business object for account provisioning. For Account Group provisioning Position business component of Position business object is used by Integration Module. However, the Integration Module can be configured to manage other Siebel Business Object/Component in the Account/Account Group provisioning. The Integration Module manages both single and multi-valued attributes of Siebel system. The Integration Module schema can be modified to manage attributes other than Schema that comes by default with Integration Module.
Supportedfeatures
SailPoint Siebel Integration Module provides support for the following features:• Account Management
- Manages Employee as Accounts
- Aggregation, Refresh Accounts
- Create, Update, Delete
- Enable, Disable, Change Password
- Add/Remove Entitlements
Note: Enable Account operation sets the Employment Status attribute to Active while it is set to Terminated for Disable Account operation.
SailPoint Integration Guide 65
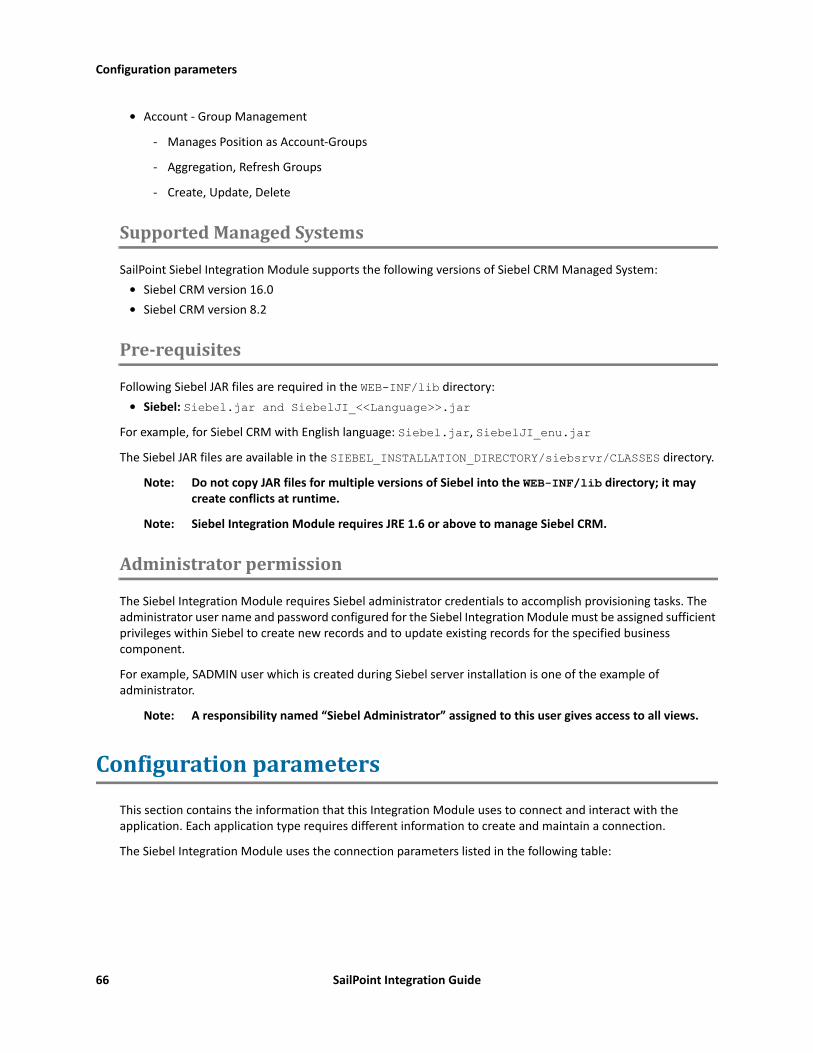
Configuration parameters
• Account - Group Management
- Manages Position as Account-Groups
- Aggregation, Refresh Groups
- Create, Update, Delete
SupportedManagedSystems
SailPoint Siebel Integration Module supports the following versions of Siebel CRM Managed System:• Siebel CRM version 16.0• Siebel CRM version 8.2
Pre-requisites
Following Siebel JAR files are required in the WEB-INF/lib directory:• Siebel: Siebel.jar and SiebelJI_<<Language>>.jar
For example, for Siebel CRM with English language: Siebel.jar, SiebelJI_enu.jarThe Siebel JAR files are available in the SIEBEL_INSTALLATION_DIRECTORY/siebsrvr/CLASSES directory.
Note: Do not copy JAR files for multiple versions of Siebel into the WEB-INF/lib directory; it may create conflicts at runtime.
Note: Siebel Integration Module requires JRE 1.6 or above to manage Siebel CRM.
Administratorpermission
The Siebel Integration Module requires Siebel administrator credentials to accomplish provisioning tasks. The administrator user name and password configured for the Siebel Integration Module must be assigned sufficient privileges within Siebel to create new records and to update existing records for the specified business component.
For example, SADMIN user which is created during Siebel server installation is one of the example of administrator.
Note: A responsibility named “Siebel Administrator” assigned to this user gives access to all views.
Configurationparameters
This section contains the information that this Integration Module uses to connect and interact with the application. Each application type requires different information to create and maintain a connection.
The Siebel Integration Module uses the connection parameters listed in the following table:
66 SailPoint Integration Guide

Configuration parameters
Table 1—Configuration parameters
Parameter Description
Transport Protocol Transport protocol while communicating with Siebel server. Select TCPIP or NONE. Default: TCPIP
Encryption Data Encryption method. Select RSA or NONE. Default: NONE
Compression Data Compression technique. Select ZLIB or NONE. Default: ZLIB
Siebel Server Host Host Name where Siebel server is installed.
SCB Port Listening port number for the Siebel Connection Broker (alias SCBroker). Sample value: 2321
Siebel Enterprise Name Name of Siebel Enterprise. Sample value: SBA_82
Siebel Object Manager Name of Siebel Application Object Manager. Sample value: SCCObjMgr
Admin User Name User ID of the target system user account that you want to use for Integration Module operations. Sample value: SADMIN
Password Password of the target system user account that you want to use for Integration Module operations. Sample value: sadmin
Language Language in which the text on the UI is displayed. Specify any one of the following values:
• For English: ENU• For Brazilian Portuguese: PTB• For French: FRA• For German: DEU• For Italian: ITA• For Japanese: JPN• For Korean: KOR• For Simplified Chinese: CHS• For Spanish: ESP• For Traditional Chinese: CHT
Account Business Object Business Object for Account. Default value: Employee
Account Business Component Business Component for Account. Default value: Employee
Entitlement Business Object Business Object for Entitlement. Default value: Position
Entitlement Business Component Business Component for Entitlement. Default value: Position
Siebel URL Siebel server connection string. The server is connected using connection string. Specific parameters defined in the form are ignored. For example: siebel.transport.encryption.compression://host:port/EnterpriseServer/AppObjMgr_lang" lang="lang_code"
SailPoint Integration Guide 67

Schema attributes
Schemaattributes
By default the following mentioned set of attributes are managed:
Accountattributes
The following table lists the account attributes (Siebel Employee attributes):
AccountGroupattributes
The following table lists the Account Group attributes (Siebel Position attributes):
Attributes Description
Login Name Employee’s login name.
First Name Employee’s first name.
Last Name Employee’s Last name.
Position Multi-value attribute that contains a list of all positions assigned to employee.
Primary Position Employee’s primary position.
Responsibility Multi-value attribute that contains a list of all responsibilities of employee.
Primary Responsibility Id Employee’s Primary responsibility ID.
Division Division
Employment Status Employment Status
Street Address Street Address
Job Title Job Title
Phone Number Phone Number
Fax Number Fax Number
Hire Date Hire date
Alias Alias
State State
Availability Status Availability status of employee.
ManagerLogin Employee’s Manager login.
Attributes Description
Id Unique Id for Position Entity.
Name Name of Position.
Last Name Last Name of Employees having this Position.
Division Division of Position.
Role Role
68 SailPoint Integration Guide
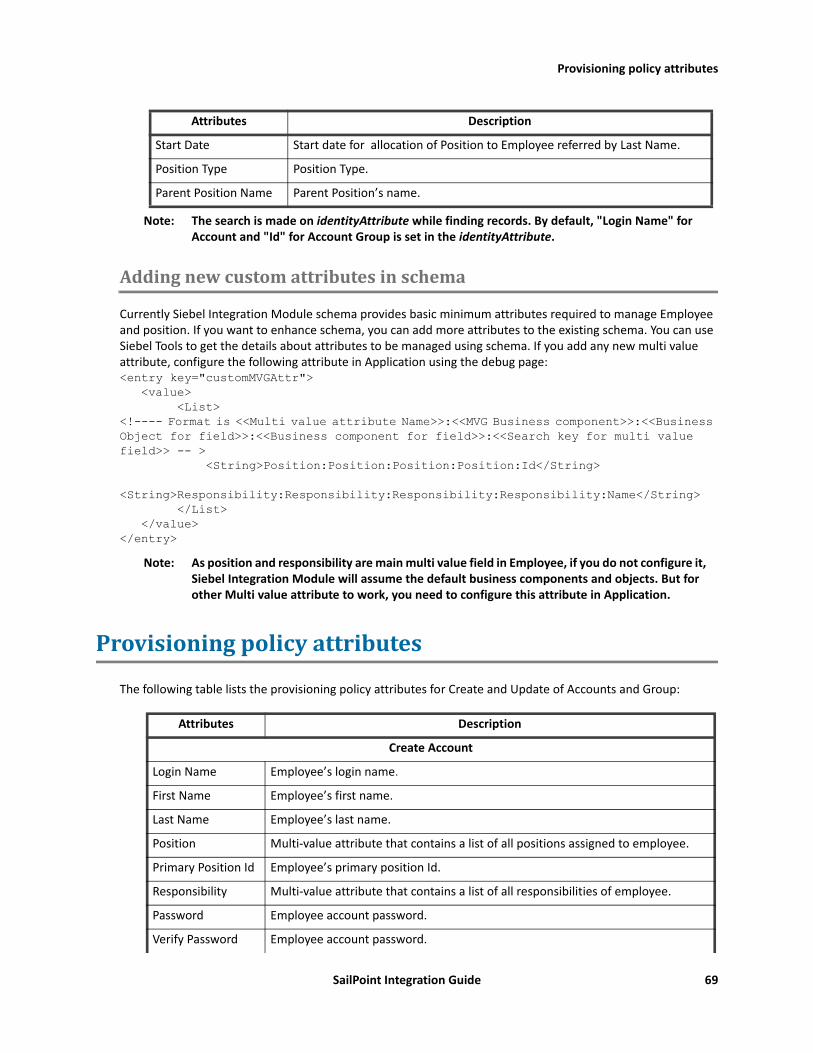
Provisioning policy attributes
Note: The search is made on identityAttribute while finding records. By default, "Login Name" for Account and "Id" for Account Group is set in the identityAttribute.
Addingnewcustomattributesinschema
Currently Siebel Integration Module schema provides basic minimum attributes required to manage Employee and position. If you want to enhance schema, you can add more attributes to the existing schema. You can use Siebel Tools to get the details about attributes to be managed using schema. If you add any new multi value attribute, configure the following attribute in Application using the debug page:<entry key="customMVGAttr"> <value> <List><!---- Format is <<Multi value attribute Name>>:<<MVG Business component>>:<<Business Object for field>>:<<Business component for field>>:<<Search key for multi value field>> -- > <String>Position:Position:Position:Position:Id</String> <String>Responsibility:Responsibility:Responsibility:Responsibility:Name</String> </List> </value></entry>
Note: As position and responsibility are main multi value field in Employee, if you do not configure it, Siebel Integration Module will assume the default business components and objects. But for other Multi value attribute to work, you need to configure this attribute in Application.
Provisioningpolicyattributes
The following table lists the provisioning policy attributes for Create and Update of Accounts and Group:
Start Date Start date for allocation of Position to Employee referred by Last Name.
Position Type Position Type.
Parent Position Name Parent Position’s name.
Attributes Description
Create Account
Login Name Employee’s login name.
First Name Employee’s first name.
Last Name Employee’s last name.
Position Multi-value attribute that contains a list of all positions assigned to employee.
Primary Position Id Employee’s primary position Id.
Responsibility Multi-value attribute that contains a list of all responsibilities of employee.
Password Employee account password.
Verify Password Employee account password.
Attributes Description
SailPoint Integration Guide 69
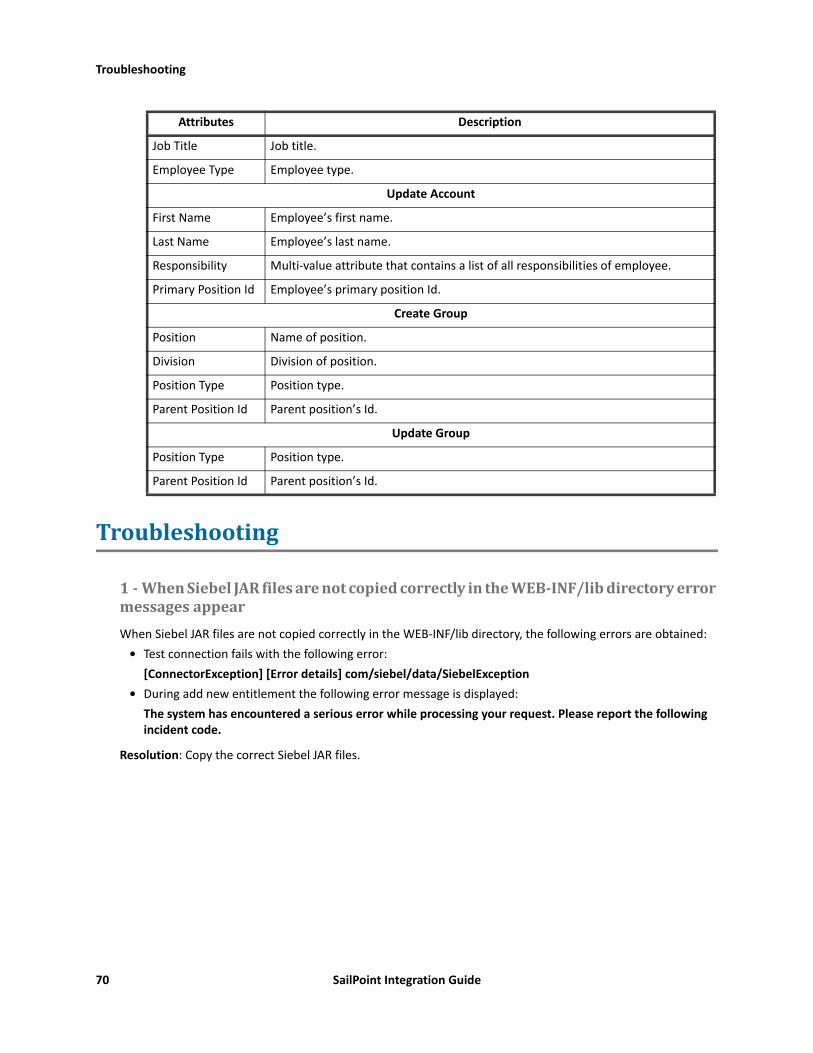
Troubleshooting
Troubleshooting
1-WhenSiebelJARfilesarenotcopiedcorrectlyintheWEB-INF/libdirectoryerrormessagesappearWhen Siebel JAR files are not copied correctly in the WEB-INF/lib directory, the following errors are obtained:
• Test connection fails with the following error:[ConnectorException] [Error details] com/siebel/data/SiebelException
• During add new entitlement the following error message is displayed:The system has encountered a serious error while processing your request. Please report the following incident code.
Resolution: Copy the correct Siebel JAR files.
Job Title Job title.
Employee Type Employee type.
Update Account
First Name Employee’s first name.
Last Name Employee’s last name.
Responsibility Multi-value attribute that contains a list of all responsibilities of employee.
Primary Position Id Employee’s primary position Id.
Create Group
Position Name of position.
Division Division of position.
Position Type Position type.
Parent Position Id Parent position’s Id.
Update Group
Position Type Position type.
Parent Position Id Parent position’s Id.
Attributes Description
70 SailPoint Integration Guide

Overview
Chapter8:SailPointNetSuiteIntegrationModule
The following topics are discussed in this chapter:Overview. . . . . . . . . . . . . . . . . . . . . . . . . . . . . . . . . . . . . . . . . . . . . . . . . . . . . . . . . . . . . . . . . . . . . . . . . . . . . . . . . . 71
Supported features . . . . . . . . . . . . . . . . . . . . . . . . . . . . . . . . . . . . . . . . . . . . . . . . . . . . . . . . . . . . . . . . . . . . . 71Supported Managed Systems . . . . . . . . . . . . . . . . . . . . . . . . . . . . . . . . . . . . . . . . . . . . . . . . . . . . . . . . . . . . . 72Administrator permissions . . . . . . . . . . . . . . . . . . . . . . . . . . . . . . . . . . . . . . . . . . . . . . . . . . . . . . . . . . . . . . . 72
Configuration parameters . . . . . . . . . . . . . . . . . . . . . . . . . . . . . . . . . . . . . . . . . . . . . . . . . . . . . . . . . . . . . . . . . . . . 72Schema attributes . . . . . . . . . . . . . . . . . . . . . . . . . . . . . . . . . . . . . . . . . . . . . . . . . . . . . . . . . . . . . . . . . . . . . . . . . . 73
Account attributes . . . . . . . . . . . . . . . . . . . . . . . . . . . . . . . . . . . . . . . . . . . . . . . . . . . . . . . . . . . . . . . . . . . . . . 73Group attributes. . . . . . . . . . . . . . . . . . . . . . . . . . . . . . . . . . . . . . . . . . . . . . . . . . . . . . . . . . . . . . . . . . . . . . . . 74Schema extension and custom attributes . . . . . . . . . . . . . . . . . . . . . . . . . . . . . . . . . . . . . . . . . . . . . . . . . . . 74
Provisioning Policy attributes . . . . . . . . . . . . . . . . . . . . . . . . . . . . . . . . . . . . . . . . . . . . . . . . . . . . . . . . . . . . . . . . . 75Additional information . . . . . . . . . . . . . . . . . . . . . . . . . . . . . . . . . . . . . . . . . . . . . . . . . . . . . . . . . . . . . . . . . . . . . . 76
NetSuite Application Program Interface (API) . . . . . . . . . . . . . . . . . . . . . . . . . . . . . . . . . . . . . . . . . . . . . . . . 76
Overview
NetSuite is cloud-based Software-as-a-Service integrated business management software. NetSuite's cloud business management system includes ERP/accounting, order management/inventory, CRM, Professional Services Automation (PSA) and E-commerce.
Enterprise Resource Planning (ERP) in NetSuite encompasses several areas of your business, including accounting, inventory, order management, project management, and employee management.
For more information, see http://www.netsuite.com/portal/products/main.shtml
NetSuite Integration Module will manage the employee data in the NetSuite ERP system. This Integration Module is a write-capable Integration Module which manages the following entities:
• Employee Account• Employee Role• Employee Entitlement
Supportedfeatures
SailPoint NetSuite Integration Module support s the following features:• Account Management
- Manages NetSuite users as Accounts
- Aggregation, Refresh Accounts, Pass Through Authentication
- Create, Update, Delete
- Enable, Disable, Change Password
- Add/Remove Entitlements
SailPoint Integration Guide 71

Configuration parameters
Note: For Pass through Authentication, the account should have at least one role assigned with permissions required to perform the operation. Also this role needs to be Web Service enabled role as displayed in the following figure:
• Account - Group Management
- Manages NetSuite groups as Account-Groups
- Aggregation, Refresh Groups
SupportedManagedSystems
SailPoint NetSuite Integration Module supports the following managed system:• NetSuite 2015.2• Netsuite 2012_1
Administratorpermissions
The NetSuite Integration Module administrator must be able to perform the following operations on NetSuite employee data:
• Search• Create• Update• Delete• Access Custom Attributes
Hence a role is required which has the permissions to the above operations. We need to create a role in NetSuite.
Configurationparameters
This section contains the information that this Integration Module uses to connect and interact with the application. Each application type requires different information to create and maintain a connection.
72 SailPoint Integration Guide

Schema attributes
The NetSuite Integration Module uses the following connection parameters:
Schemaattributes
The following schema attributes are defined:• Account schema• Group schema• Custom attributes
Accountattributes
The following table lists the account schema:
Parameters Description
Account ID* the account number assigned to an organization by NetSuite. This account number must be provided by each login request. This can be found by navigating to Setup => Integration => Web Services Preferences.
Role ID When logging in using Web Services provide a role id along with your credentials. The role defined here must be a valid role contained in the Employee record of the given user. If no role id is provided, then the user’s default role is used. If neither the request nor the Web Services default role is set, then the user’s default UI role is used, provided it has the Web Services permission. For security reasons, it is recommended that you restrict permissions levels and access allowing only the most restricted permissions necessary to perform a given set of operations. For more information about the permissions, see “Administrator permissions” on page 72.
Administrator Email*
Email of the Account in Employee package having provisioning privileges.
Administrator Password*
Password of the employee Account.
Page Size Limit to fetch number of accounts or groups per iteration through NetSuite Integration Module. If the value is not set then the default value is 50.
Attribute Name Description
EmpID (Display Attribute) Employee ID
InternalID (Identity Attribute) Auto generated Internal ID of the employee
EmployeeStatus The status of employee
Email Email ID of employee
Initial The initials of first name and last name
OfficePhoneNumber Office phone number of employee
HomePhoneNumber Home phone number of employee
MobilePhoneNumber Mobile number of employee
SailPoint Integration Guide 73
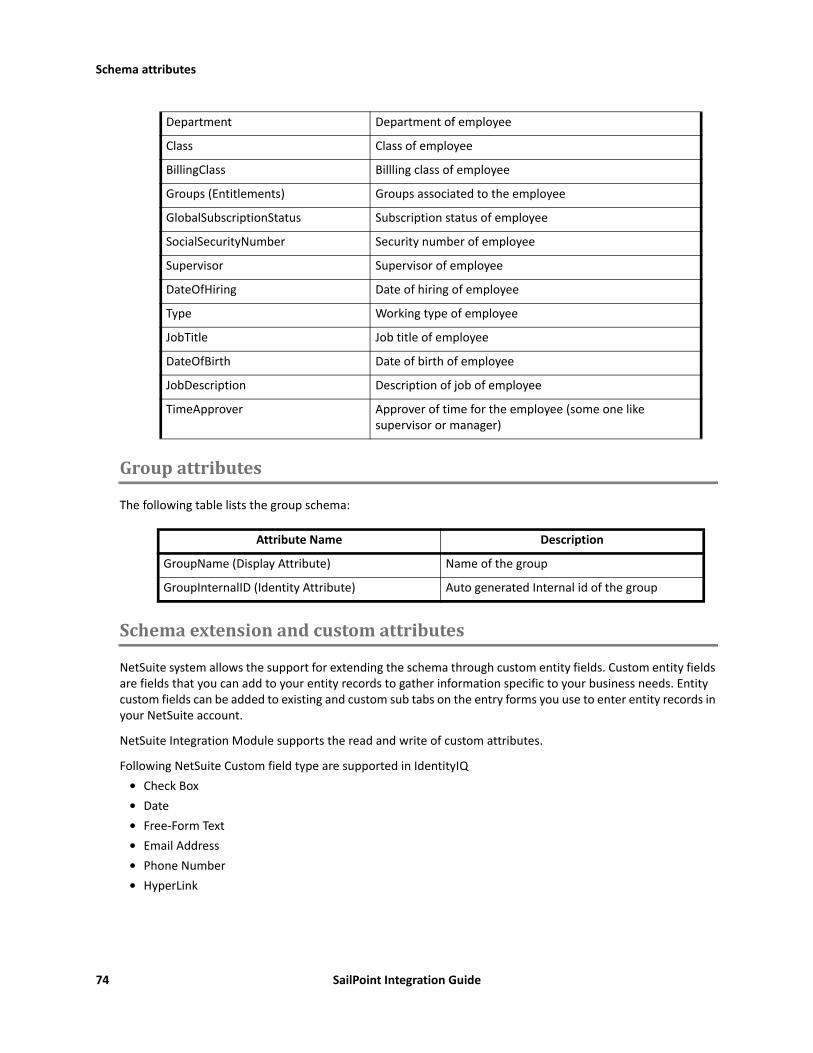
Schema attributes
Groupattributes
The following table lists the group schema:
Schemaextensionandcustomattributes
NetSuite system allows the support for extending the schema through custom entity fields. Custom entity fields are fields that you can add to your entity records to gather information specific to your business needs. Entity custom fields can be added to existing and custom sub tabs on the entry forms you use to enter entity records in your NetSuite account.
NetSuite Integration Module supports the read and write of custom attributes.
Following NetSuite Custom field type are supported in IdentityIQ• Check Box• Date• Free-Form Text• Email Address• Phone Number• HyperLink
Department Department of employee
Class Class of employee
BillingClass Billling class of employee
Groups (Entitlements) Groups associated to the employee
GlobalSubscriptionStatus Subscription status of employee
SocialSecurityNumber Security number of employee
Supervisor Supervisor of employee
DateOfHiring Date of hiring of employee
Type Working type of employee
JobTitle Job title of employee
DateOfBirth Date of birth of employee
JobDescription Description of job of employee
TimeApprover Approver of time for the employee (some one like supervisor or manager)
Attribute Name Description
GroupName (Display Attribute) Name of the group
GroupInternalID (Identity Attribute) Auto generated Internal id of the group
74 SailPoint Integration Guide

Provisioning Policy attributes
SupportingofcustomattributesPerform the following to support the custom attributes from IdentityIQ:
• Add the custom attribute name in the schema by clicking Add attribute button.• Add the following lines in the application debug page:
<entry key = "customAttribute" ><value><List><String>custom1</String><String>custom2</String></List></value></entry>Note: No code change would be required while adding new custom attributes in schema. This is
applicable only for custom attributes.
ProvisioningPolicyattributes
The NetSuite Integration Module is pre-configured with an account creation provisioning policy that includes the commonly-used attributes that need to be set when creating an account. This field list can be modified as required.
The attributes listed in the following table are required for creating an user.
In the above table, EmpID is the minimum parameter which is required to create a user on NetSuite server. But in IdentityIQ a user can only be created after assigning a role to it.
In NetSuite when a role is assigned to a user, the user requires UserName, Email and password as mandatory parameter for accessing the NetSuite server.
Note: The field list can also be extended by adding custom attributes provided the attributes are defined in the application schema. For more information, see “Schema extension and custom attributes” on page 74.
Attribute Name Description
EmpID (Entity ID)* Employee name
*password* Password for the employee
Email* Email of the employee
OfficePhoneNumber Office phone number for the employee
Fax Fax for the employee
SailPoint Integration Guide 75

Additional information
Additionalinformation
This section describes the additional information related to the NetSuite Integration Module.
NetSuiteApplicationProgramInterface(API)
SuiteTalk exposes NetSuite as a data source for programmatic access. The following operations supported in SuiteTalk would be used by NetSuite Integration Module
Note: For more information, see NetSuite SuiteTalk (Web Services) Platform Guide.
Operation/API Summary
add Use to add record into the system. The system returns a NetSuite identifier (internalId) that is unique for each record created within a record type.
changePasswordOrEmail Use to change a user’s email or password
get Use to query the system for one record. You must provide either the internal or external ID and the record type for each query item.
getCustomizationId Use to retrieve the internalIds, externalIds, and/or scriptIds of all custom objects of a specified type.
login Use to login into NetSuite. This operation is similar to the NetSuite UI and requires you to provide a valid username, password, role, and account number.
logout Use to logout from the system. The logout operation invalidates the current session.
search Use to search for a set of records based on specific search criteria. This operation supports pagination, so that large result sets can be retrieved in smaller sets.
searchMore Used to retrieve more records after an initial search operation is invoked.
update Use to update existing record in the system by providing new values for the fields to be updated for each record. The records to be updated are identified by either the internal or external ID and the record type.
delete Use to delete an existing record in the system by providing the internal id and record type.
76 SailPoint Integration Guide

MainframeIntegrationModulesThis section contains information on the following sections:
• “SailPoint RACF Integration Module”• “SailPoint CA-Top Secret Integration Module”• “SailPoint CA-ACF2 Integration Module”• “SailPoint RACF LDAP Integration Module”• “SailPoint Top Secret LDAP Integration Module”

78 SailPoint Integration Guide
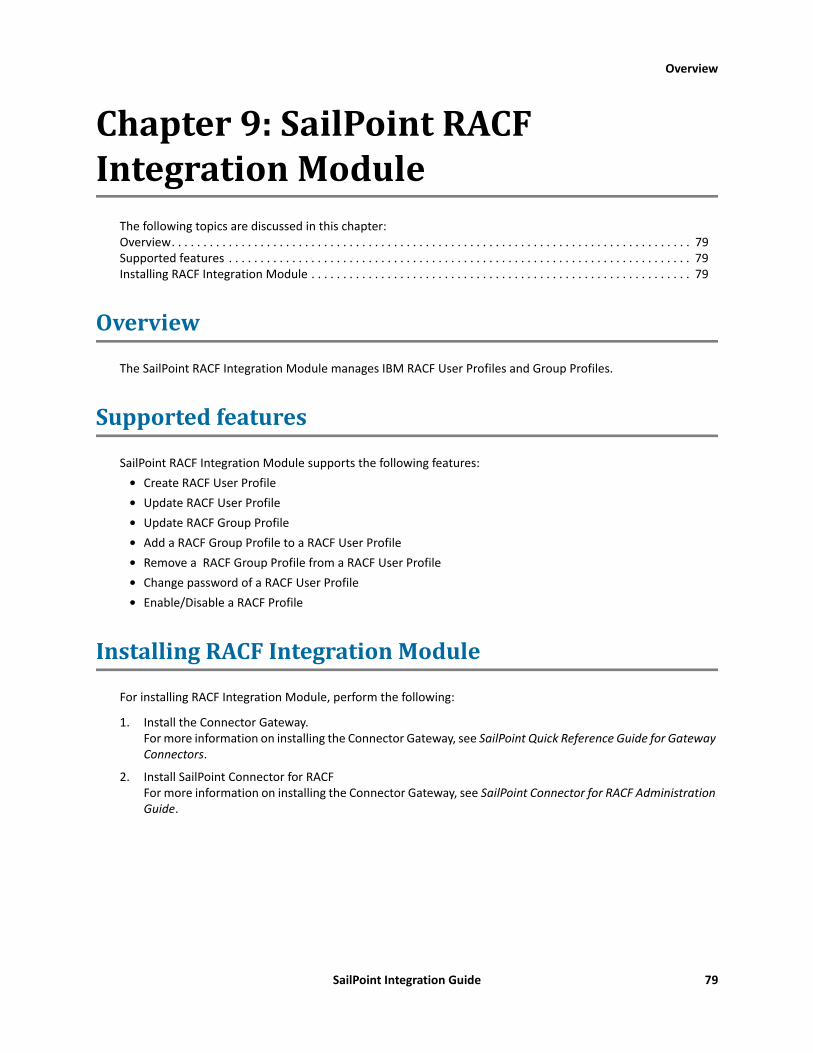
Overview
Chapter9:SailPointRACFIntegrationModule
The following topics are discussed in this chapter:Overview. . . . . . . . . . . . . . . . . . . . . . . . . . . . . . . . . . . . . . . . . . . . . . . . . . . . . . . . . . . . . . . . . . . . . . . . . . . . . . . . . . 79Supported features . . . . . . . . . . . . . . . . . . . . . . . . . . . . . . . . . . . . . . . . . . . . . . . . . . . . . . . . . . . . . . . . . . . . . . . . . 79Installing RACF Integration Module . . . . . . . . . . . . . . . . . . . . . . . . . . . . . . . . . . . . . . . . . . . . . . . . . . . . . . . . . . . . 79
Overview
The SailPoint RACF Integration Module manages IBM RACF User Profiles and Group Profiles.
Supportedfeatures
SailPoint RACF Integration Module supports the following features:• Create RACF User Profile• Update RACF User Profile• Update RACF Group Profile• Add a RACF Group Profile to a RACF User Profile• Remove a RACF Group Profile from a RACF User Profile• Change password of a RACF User Profile• Enable/Disable a RACF Profile
InstallingRACFIntegrationModule
For installing RACF Integration Module, perform the following:
1. Install the Connector Gateway. For more information on installing the Connector Gateway, see SailPoint Quick Reference Guide for Gateway Connectors.
2. Install SailPoint Connector for RACF For more information on installing the Connector Gateway, see SailPoint Connector for RACF Administration Guide.
SailPoint Integration Guide 79

Installing RACF Integration Module
80 SailPoint Integration Guide
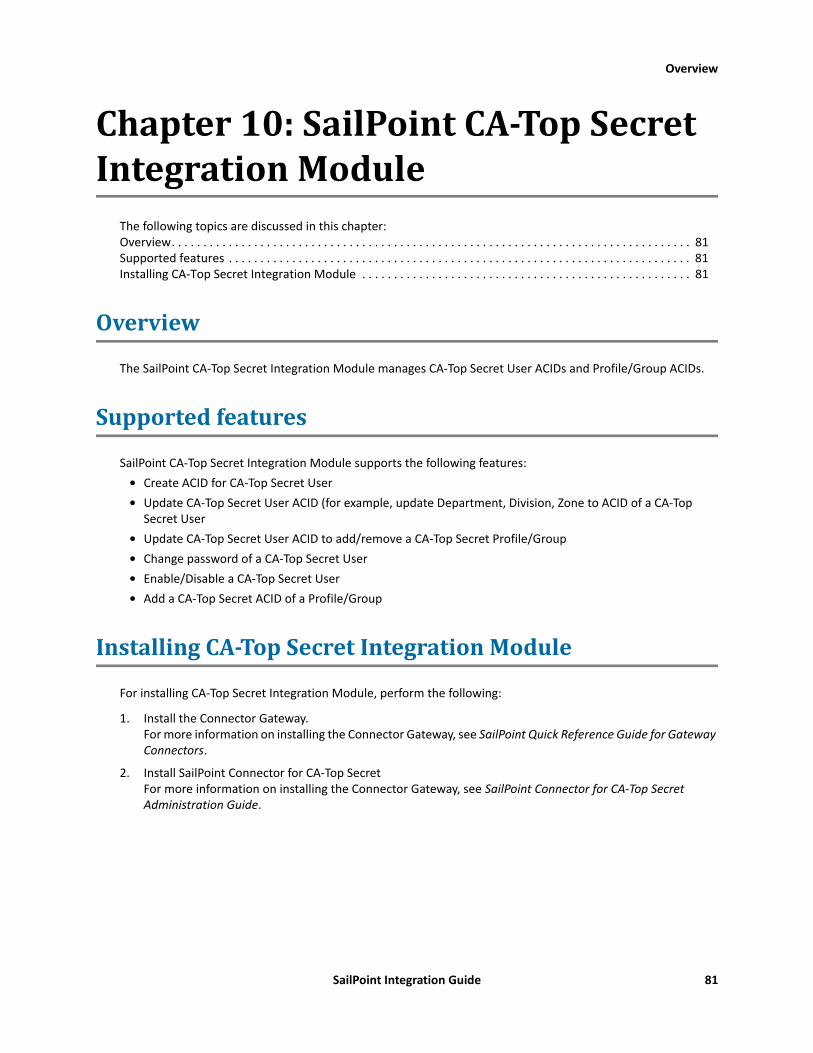
Overview
Chapter10:SailPointCA-TopSecretIntegrationModule
The following topics are discussed in this chapter:Overview. . . . . . . . . . . . . . . . . . . . . . . . . . . . . . . . . . . . . . . . . . . . . . . . . . . . . . . . . . . . . . . . . . . . . . . . . . . . . . . . . . 81Supported features . . . . . . . . . . . . . . . . . . . . . . . . . . . . . . . . . . . . . . . . . . . . . . . . . . . . . . . . . . . . . . . . . . . . . . . . . 81Installing CA-Top Secret Integration Module . . . . . . . . . . . . . . . . . . . . . . . . . . . . . . . . . . . . . . . . . . . . . . . . . . . . 81
Overview
The SailPoint CA-Top Secret Integration Module manages CA-Top Secret User ACIDs and Profile/Group ACIDs.
Supportedfeatures
SailPoint CA-Top Secret Integration Module supports the following features:• Create ACID for CA-Top Secret User• Update CA-Top Secret User ACID (for example, update Department, Division, Zone to ACID of a CA-Top
Secret User• Update CA-Top Secret User ACID to add/remove a CA-Top Secret Profile/Group• Change password of a CA-Top Secret User• Enable/Disable a CA-Top Secret User• Add a CA-Top Secret ACID of a Profile/Group
InstallingCA-TopSecretIntegrationModule
For installing CA-Top Secret Integration Module, perform the following:
1. Install the Connector Gateway. For more information on installing the Connector Gateway, see SailPoint Quick Reference Guide for Gateway Connectors.
2. Install SailPoint Connector for CA-Top Secret For more information on installing the Connector Gateway, see SailPoint Connector for CA-Top Secret Administration Guide.
SailPoint Integration Guide 81

Installing CA-Top Secret Integration Module
82 SailPoint Integration Guide

Overview
Chapter11:SailPointCA-ACF2IntegrationModule
The following topics are discussed in this chapter:Overview. . . . . . . . . . . . . . . . . . . . . . . . . . . . . . . . . . . . . . . . . . . . . . . . . . . . . . . . . . . . . . . . . . . . . . . . . . . . . . . . . . 83Supported features . . . . . . . . . . . . . . . . . . . . . . . . . . . . . . . . . . . . . . . . . . . . . . . . . . . . . . . . . . . . . . . . . . . . . . . . . 83Installing CA-ACF2 Integration Module . . . . . . . . . . . . . . . . . . . . . . . . . . . . . . . . . . . . . . . . . . . . . . . . . . . . . . . . . 83
Overview
The SailPoint CA-ACF2 Integration Module manages users and UIDs (implemented as Groups) in CA-ACF2.
Supportedfeatures
SailPoint CA-ACF2 Integration Module supports the following features:• Create Users in CA-ACF2• Update Users in CA-ACF2• Connect User to Group by updating the UID string of user in CA-ACF2• Disconnect User from Group by updating the UID string of user in CA-ACF2• Create and update groups in IdentityIQ for the CA-ACF2 Users• Change password of a CA-ACF2 User
InstallingCA-ACF2IntegrationModule
For installing CA-ACF2 Integration Module, perform the following:
1. Install the Connector Gateway. For more information on installing the Connector Gateway, see SailPoint Quick Reference Guide for Gateway Connectors.
2. Install SailPoint Connector for CA-ACF2 For more information on installing the Connector Gateway, see SailPoint Connector for CA-ACF2 Administration Guide.
SailPoint Integration Guide 83

Installing CA-ACF2 Integration Module
84 SailPoint Integration Guide
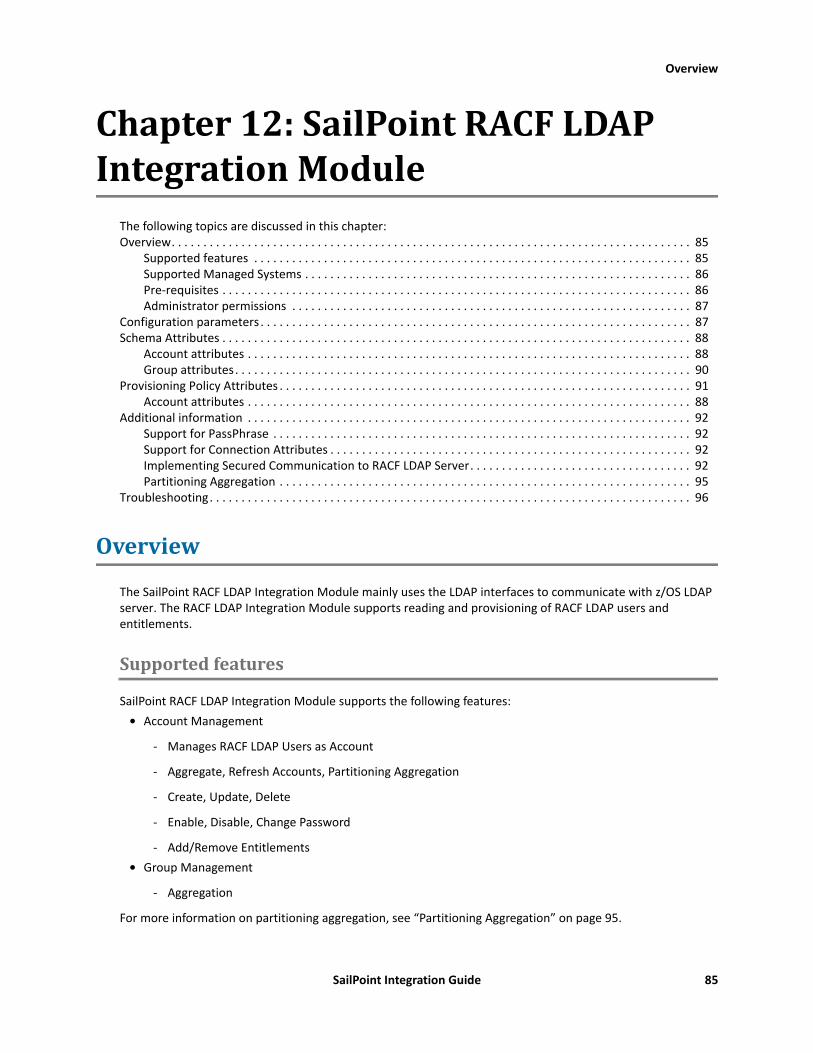
Overview
Chapter12:SailPointRACFLDAPIntegrationModule
The following topics are discussed in this chapter:Overview. . . . . . . . . . . . . . . . . . . . . . . . . . . . . . . . . . . . . . . . . . . . . . . . . . . . . . . . . . . . . . . . . . . . . . . . . . . . . . . . . . 85
Supported features . . . . . . . . . . . . . . . . . . . . . . . . . . . . . . . . . . . . . . . . . . . . . . . . . . . . . . . . . . . . . . . . . . . . . 85Supported Managed Systems . . . . . . . . . . . . . . . . . . . . . . . . . . . . . . . . . . . . . . . . . . . . . . . . . . . . . . . . . . . . . 86Pre-requisites . . . . . . . . . . . . . . . . . . . . . . . . . . . . . . . . . . . . . . . . . . . . . . . . . . . . . . . . . . . . . . . . . . . . . . . . . . 86Administrator permissions . . . . . . . . . . . . . . . . . . . . . . . . . . . . . . . . . . . . . . . . . . . . . . . . . . . . . . . . . . . . . . . 87
Configuration parameters . . . . . . . . . . . . . . . . . . . . . . . . . . . . . . . . . . . . . . . . . . . . . . . . . . . . . . . . . . . . . . . . . . . . 87Schema Attributes . . . . . . . . . . . . . . . . . . . . . . . . . . . . . . . . . . . . . . . . . . . . . . . . . . . . . . . . . . . . . . . . . . . . . . . . . . 88
Account attributes . . . . . . . . . . . . . . . . . . . . . . . . . . . . . . . . . . . . . . . . . . . . . . . . . . . . . . . . . . . . . . . . . . . . . . 88Group attributes. . . . . . . . . . . . . . . . . . . . . . . . . . . . . . . . . . . . . . . . . . . . . . . . . . . . . . . . . . . . . . . . . . . . . . . . 90
Provisioning Policy Attributes . . . . . . . . . . . . . . . . . . . . . . . . . . . . . . . . . . . . . . . . . . . . . . . . . . . . . . . . . . . . . . . . . 91Account attributes . . . . . . . . . . . . . . . . . . . . . . . . . . . . . . . . . . . . . . . . . . . . . . . . . . . . . . . . . . . . . . . . . . . . . . 88
Additional information . . . . . . . . . . . . . . . . . . . . . . . . . . . . . . . . . . . . . . . . . . . . . . . . . . . . . . . . . . . . . . . . . . . . . . 92Support for PassPhrase . . . . . . . . . . . . . . . . . . . . . . . . . . . . . . . . . . . . . . . . . . . . . . . . . . . . . . . . . . . . . . . . . . 92Support for Connection Attributes . . . . . . . . . . . . . . . . . . . . . . . . . . . . . . . . . . . . . . . . . . . . . . . . . . . . . . . . . 92Implementing Secured Communication to RACF LDAP Server. . . . . . . . . . . . . . . . . . . . . . . . . . . . . . . . . . . 92Partitioning Aggregation . . . . . . . . . . . . . . . . . . . . . . . . . . . . . . . . . . . . . . . . . . . . . . . . . . . . . . . . . . . . . . . . . 95
Troubleshooting. . . . . . . . . . . . . . . . . . . . . . . . . . . . . . . . . . . . . . . . . . . . . . . . . . . . . . . . . . . . . . . . . . . . . . . . . . . . 96
Overview
The SailPoint RACF LDAP Integration Module mainly uses the LDAP interfaces to communicate with z/OS LDAP server. The RACF LDAP Integration Module supports reading and provisioning of RACF LDAP users and entitlements.
Supportedfeatures
SailPoint RACF LDAP Integration Module supports the following features:• Account Management
- Manages RACF LDAP Users as Account
- Aggregate, Refresh Accounts, Partitioning Aggregation
- Create, Update, Delete
- Enable, Disable, Change Password
- Add/Remove Entitlements• Group Management
- Aggregation
For more information on partitioning aggregation, see “Partitioning Aggregation” on page 95.
SailPoint Integration Guide 85

Overview
SupportedManagedSystems
SailPoint RACF LDAP Integration Module supports the following managed systems:• IBM Tivoli Directory Server for z/OS 2.2 with SDBM LDAP back end• IBM Tivoli Directory Server for z/OS 2.1 with SDBM LDAP back end
TLScommunicationbetweenIdentityIQandRACFLDAPServerIf you want secure TLS connection for RACF LDAP, TLS communication must be enabled between IdentityIQ and RACF LDAP Server. For a Java client to connect using TLS and self-signed certificates, install the certificate into the JVM keystore.
Systemrequirements• The following respective components for z/OS versions must be installed for TLS communication:
• The CSF started task must be active.
CreatingTLScommunicationbetweenIdentityIQandRACFLDAPServer
To create TLS communication between IdentityIQ and RACF LDAP Server, perform the following:
1. Implement z/OS Secured Communication to RACF LDAP Server.For more information on implementing the secured communication to RACF LDAP Server, see “Implementing Secured Communication to RACF LDAP Server” on page 92.
2. Export server CA certificate and copy the exported .cer file to the Java client computer (IdentityIQ com-puter).
3. At the client computer execute the following command from the bin directory of JDK:keytool -importcerts –trustcacert –alias aliasName –file <absolute path of certificate> -keystore <JAVA_HOME>/jre/lib/security/cacertsIn the preceding command line, aliasName is the name of the alias.
4. Login to IdentityIQ.
5. Create the application for RACF LDAP, use TLS and provide all the required values.
6. Click on Test Connection and save the application.
Pre-requisites
Ensure that the following pre-requisites are satisfied for the directory servers:• Set the value of the LDAP_COMPAT_FLAGS environment variable to 1
The SDBM attributes which are in DN format are by default returned in Uppercase format. This causes duplicate entry of entitlement in IdentityIQ due to the difference in the cases of group DN fetched while aggregation and group DN fetched while group membership provisioning operation.
z/OS version Cryptographic Services z/OS Security Level 3
z/OS 2.1 System SSL Base: FMID HCPT410 System SSL Security Level: FMID: JCPT411
z/OS 2.2 System SSL Base: FMID HCPT420 System SSL Security Level: FMID JCPT421
86 SailPoint Integration Guide

Configuration parameters
To avoid the mentioned issue, the LDAP_COMPAT_FLAGS environment variable is set to 1 which would return the values for the mentioned attributes in mixed case format that is in the same format as of group DN returned during aggregation.The LDAP_COMPAT_FLAGS environment variable value can be specified in LDAP server environment variables file. By default, the file name is /etc/ldap/ds.envvars.
• RACF restriction on amount of outputWhen processing certain LDAP search requests, SDBM uses the RACF R_admin run command interface to issue RACF search commands. The R_admin run command interface limits the number of records in its output to 4096. This means that the RACF search command output might be incomplete if you have many users, groups, connections, or resources.To avoid the mentioned search limit issue, Partition must defined to retrieve all requested objects. Partitions must be created in such a way that each Partition must not exceed the default or specified search limit. For more information on defining Partitions, see “Partitioning Aggregation” on page 95.
Administratorpermissions
The service account configured for SailPoint RACF LDAP Integration Module must have the read/write privileges over the RACF directory information tree in order to manage the RACF data, that is, the administrator user must have SPECIAL attribute to be able to manage all RACF entries. In order to limit the scope of service account, group-SPECIAL user can be created as per the requirement. Administrator user must not be a PROTECTED user that is, administrator user must have password.
Configurationparameters
This section contains the information that this Integration Module uses to connect and interact with the application. Each application type requires different information to create and maintain a connection.
The RACF LDAP Integration Module uses the following configuration parameters:
Parameters Description
RACF LDAP Configuration Parameters
useSSL Specifies if the connection is over TLS.
authorizationType The authorization type to use when connecting to the server.
user* User to connect as a DN string such as Administrator.
password Password for the administrator account.
port* Port number through which the server is listening.
host* Host of the LDAP server.
racfConnectProfileDN*
Connect Profile type DN used during group membership provisioning.
setGroupAsConnectionOwner
Sets the RACF Group as the owner of the RACF connection when connecting a RACF User to a RACF Group.
provisionPropertiesToAllConnections
Sets the RACF connection properties defined in Provisioning Policy to all the RACF connections when multiple RACF Groups are requested in single operation.
SailPoint Integration Guide 87
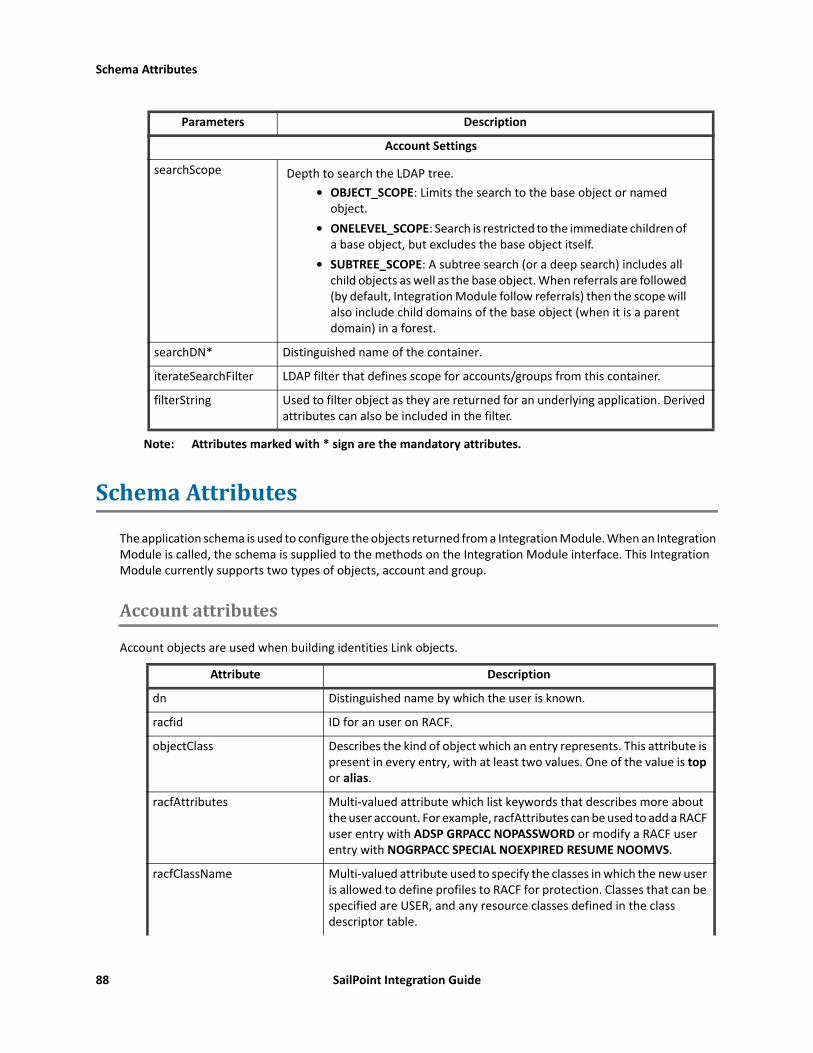
Schema Attributes
Note: Attributes marked with * sign are the mandatory attributes.
SchemaAttributes
The application schema is used to configure the objects returned from a Integration Module. When an Integration Module is called, the schema is supplied to the methods on the Integration Module interface. This Integration Module currently supports two types of objects, account and group.
Accountattributes
Account objects are used when building identities Link objects.
Account Settings
searchScope Depth to search the LDAP tree.• OBJECT_SCOPE: Limits the search to the base object or named
object.• ONELEVEL_SCOPE: Search is restricted to the immediate children of
a base object, but excludes the base object itself.• SUBTREE_SCOPE: A subtree search (or a deep search) includes all
child objects as well as the base object. When referrals are followed (by default, Integration Module follow referrals) then the scope will also include child domains of the base object (when it is a parent domain) in a forest.
searchDN* Distinguished name of the container.
iterateSearchFilter LDAP filter that defines scope for accounts/groups from this container.
filterString Used to filter object as they are returned for an underlying application. Derived attributes can also be included in the filter.
Attribute Description
dn Distinguished name by which the user is known.
racfid ID for an user on RACF.
objectClass Describes the kind of object which an entry represents. This attribute is present in every entry, with at least two values. One of the value is top or alias.
racfAttributes Multi-valued attribute which list keywords that describes more about the user account. For example, racfAttributes can be used to add a RACF user entry with ADSP GRPACC NOPASSWORD or modify a RACF user entry with NOGRPACC SPECIAL NOEXPIRED RESUME NOOMVS.
racfClassName Multi-valued attribute used to specify the classes in which the new user is allowed to define profiles to RACF for protection. Classes that can be specified are USER, and any resource classes defined in the class descriptor table.
Parameters Description
88 SailPoint Integration Guide

Schema Attributes
racfDefaultGroup Represents the default group associated with the user.
racfConnectGroupName List of groups of which this person is a member.
Example: “Sales” or “Engineering”
racfLastAccess Information about last date-time user logged in to system.
racfProgrammerName Users name associated with the user ID.
racfPasswordChangeDate Last date the user changed his password.
racfPasswordInterval Number of days during which a user's password and password phrase (if set) remain valid.
racfHavePasswordEnvelope Information whether users password is enveloped.
racfPassPhraseChangeDate Last date the user changed his password phrase.
racfHavePassPhraseEnvelope Information whether users password phrase is enveloped.
racfResumeDate Starting date when user will be allowed to access the system again.
racfRevokeDate Starting date when user will be disallowed to access the system.
racfSecurityLabel Users default security label.
racfSecrityLevel Users default security level.
racfSecurityCategoryList Multi-valued attribute contains one or more names of installation-defined security categories.
racfLogonDays A multi-valued attribute which specifies the days of the week when the user is allowed to access the system from a terminal.
racfLogonTime Hours in the day when the user is allowed to access the system from a terminal.
racfAuthorizationDate Date when user was defined to RACF system.
racfInstallationData Installation data associated the user.
racfDatasetModel Discrete data set profile name that is used as a model when new data set profiles are created that have userid as the high-level qualifier.
racfOwner Distinguished name of the owner of the user.
racfOperatorClass Multi-valued attribute contains classes assigned to this operator to which BMS (basic mapping support) messages are to be routed - CICS segment.
racfOperatorIdentification Operator ID for use by BMS - CICS segment.
racfOperatorPriority Number from 0 - 255 that represents the priority of the operator - CICS segment.
racfTerminaltimeout Time, in hours and minutes, that the operator is allowed to be idle before being signed off - CICS segment.
racfOperatorReSignon Specifies whether the user is signed off by CICS when an XRF takeover occurs - CICS segment.
Attribute Description
SailPoint Integration Guide 89

Schema Attributes
Groupattributes
The group schema is used when building AccountGroup objects which are used to hold entitlements shared across identities.
SAFAccountNumber Users default TSO account number when logging on through the TSO/E logon panel - TSO segment.
SAFDefaultCommand Specifies the command run during TSO logon - TSO segment.
SAFDestination Specifies the default destination to which the system routes dynamically-allocated SYSOUT data sets - TSO segment.
SAFHoldClass Specifies the users default hold class. The specified value must be 1 alphanumeric character, excluding national characters - TSO segment.
SAFJobClass Specifies the users default job class. The specified value must be 1 alphanumeric character, excluding national characters - TSO segment.
SAFMessageClass Specifies the users default message class. The specified value must be 1 alphanumeric character, excluding national characters - TSO segment.
SAFTsoSecurityLabel Specifies the users Security label entered or used during TSO LOGON - TSO segment.
SAFDefaultSysoutClass Specifies the users default SYSOUT class - TSO segment.
SAFDefaultUnit Specifies the default name of a device or group of devices that a procedure uses for allocations - TSO segment.
SAFDefaultLoginProc Specifies the name of the users default logon procedure when logging on through the TSO/E logon panel - TSO segment.
SAFLogonSize Specifies the default or requested region size during TSO logon - TSO segment.
SAFMaximumRegionSize Specifies the maximum region size the user can request at logon - TSO segment.
SAFUserdata Specifies the optional installation data defined for the user. The specified value must be 4 EBCDIC characters. Valid characters are 0 - 9 and A - F - TSO segment
Attribute Description
dn Distinguished name by which the Group is known.
racfid ID for group on RACF.
objectClass The values of the objectClass attribute describe the kind of object which an entry represents. The objectClass attribute is present in every entry, with at least two values. One of the values is either “top” or “alias”.
racfAuthorizationDate Date when group was defined to RACF system.
racfInstallationData Installation data associated the group.
Attribute Description
90 SailPoint Integration Guide
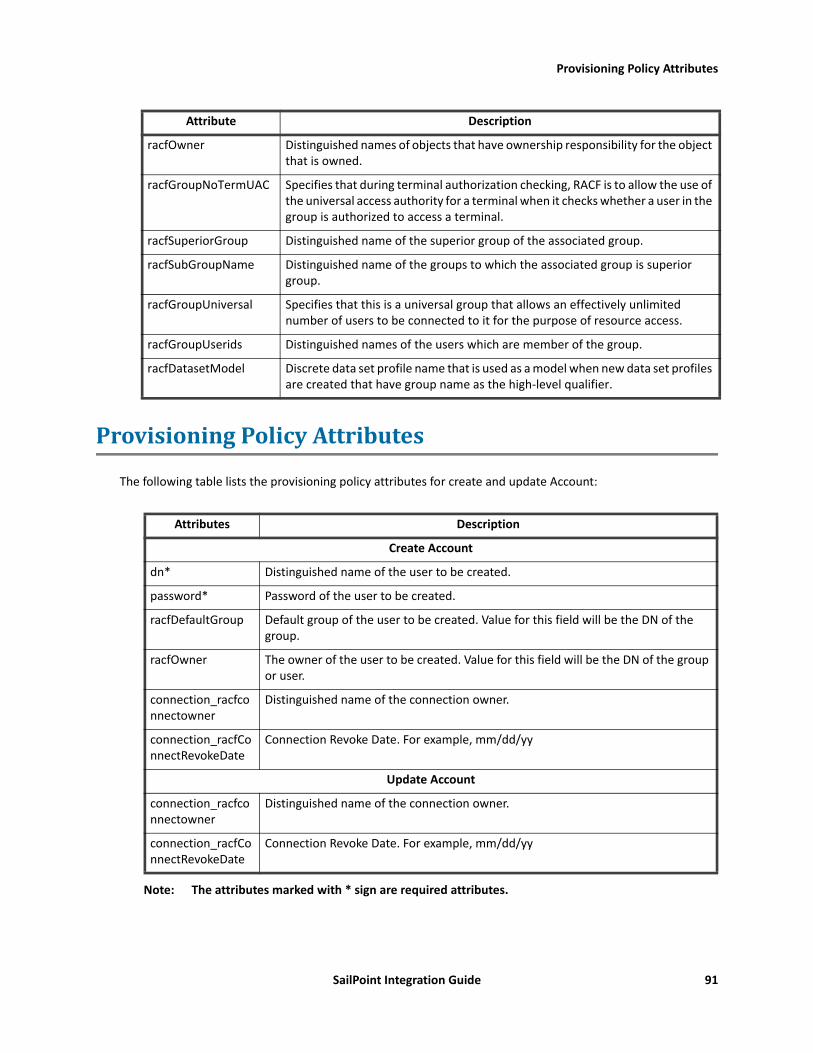
Provisioning Policy Attributes
ProvisioningPolicyAttributes
The following table lists the provisioning policy attributes for create and update Account:
Note: The attributes marked with * sign are required attributes.
racfOwner Distinguished names of objects that have ownership responsibility for the object that is owned.
racfGroupNoTermUAC Specifies that during terminal authorization checking, RACF is to allow the use of the universal access authority for a terminal when it checks whether a user in the group is authorized to access a terminal.
racfSuperiorGroup Distinguished name of the superior group of the associated group.
racfSubGroupName Distinguished name of the groups to which the associated group is superior group.
racfGroupUniversal Specifies that this is a universal group that allows an effectively unlimited number of users to be connected to it for the purpose of resource access.
racfGroupUserids Distinguished names of the users which are member of the group.
racfDatasetModel Discrete data set profile name that is used as a model when new data set profiles are created that have group name as the high-level qualifier.
Attributes Description
Create Account
dn* Distinguished name of the user to be created.
password* Password of the user to be created.
racfDefaultGroup Default group of the user to be created. Value for this field will be the DN of the group.
racfOwner The owner of the user to be created. Value for this field will be the DN of the group or user.
connection_racfconnectowner
Distinguished name of the connection owner.
connection_racfConnectRevokeDate
Connection Revoke Date. For example, mm/dd/yy
Update Account
connection_racfconnectowner
Distinguished name of the connection owner.
connection_racfConnectRevokeDate
Connection Revoke Date. For example, mm/dd/yy
Attribute Description
SailPoint Integration Guide 91

Additional information
Additionalinformation
This section describes the additional information related to the RACF LDAP Integration Module.
SupportforPassPhrase
SailPoint RACF LDAP Integration Module supports PassPhrase feature as follows:
For password change operation on RACF managed system, racfPassword or racfPassPhrase is supported. If the length of password provided is less than or equal to 8 characters then password attribute used would be racfPassword and if the length of password provided is greater than 8 characters then password attribute used would be racfPassPhrase.
SupportforConnectionAttributes
SailPoint RACF LDAP Integration Module supports provisioning of racfConnectionOwner and racfConnectRevokeDate while provisioning entitlements. For a single entitlement request along with connection attribute values, the values of the attributes are assigned to the connection.
• Provision Properties to All Connections: Select to provision same set of connection attributes values to all requested entitlements.
• Set Group As Connection Owner: Select to set requested entitlement as connection owner.When Set Group As Connection Owner is not selected connection owner value can be specified through provisioning policy. To specify the connection owner value as racfConnectOwner must be included in update/create provisioning policy.
ImplementingSecuredCommunicationtoRACFLDAPServer
Secured communication to RACF LDAP Server must be implemented using one of the following methods:• LDAP SSL: Communication must be implemented on a port defined to LDAP as secured (ldaps).
For more information, see “Implementing LDAP TLS”.• AT-TLS policy: Communication must be implemented on a port defined to LDAP as non-secured (ldap).
The TLS processing is done by TCPIP and is transparent to RACF LDAP Server.For more information, see “Implementing AT-TLS policy for RACF LDAP communication”.
The secured communication is implemented using server authentication.
Commonimplementationprocedure1. A valid server certificate with its associated server private key must be defined. This certificate must be
signed by a trusted Certificate Authority's (CA).
2. The server certificate and the CA certificate must be connected to a key ring.
3. The CA certificate must be exported to a file, transferred (using FTP with ASCII mode) to the client and installed there to be used for certificate verification by the TLS handshake process.
Note: For testing purposes, a local CA can be defined for signing the server certificate.
92 SailPoint Integration Guide

Additional information
ImplementingLDAPTLSFor detailed information about implementing LDAP TLS, see “Setting up for SSL/TLS” chapter of z/OS IBM Tivoli Directory Server Administration and Use for z/OS IBM manual.
Note: RACF LDAP server must be granted with permission to access the key ring containing the RACF LDAP server certificate and the CA certificate.
ImplementingAT-TLSpolicyforRACFLDAPcommunicationFor detailed information about implementing AT-TLS policy, see “Application Transparent Transport Layer Security data protection” chapter of z/OS Communications Server IP Configuration Guide.
The required policy attributes for AT-TLS policy are: • Local Port Range – ports defined in LDAP as non-secured • Direction = Inbound• TLS Enabled = On• TLS v1.1 = On• TLS v1.2 = On • Handshake Role = Server• Client Authorization Type = PassThru• Application Controlled = Off• Secondary Map = Off• The name of the certificate created for the secured communication and the name of the key ring to which
the server certificate and the CA certificate are connected, should be specified.
Note: TCPIP must be granted permission to access the key ring to which the RACF LDAP server certificate and the CA certificate are connected.
SamplefileforAT-TLSpolicy # RULE for LDAP GLDSRV ####################################################TTLSRule LDAP { LocalAddr ALL RemoteAddr ALL LocalPortRange 389 Direction Inbound Priority 255 # highest priority rule Userid GLDSRV TTLSGroupActionRef GrpAct_LDAP TTLSEnvironmentActionRef GrpEnv_LDAP TTLSConnectionActionRef GrpCon_LDAP } TTLSGroupAction GrpAct_LDAP { TTLSEnabled On Trace 7 }
TTLSEnvironmentAction GrpEnv_LDAP {
SailPoint Integration Guide 93

Additional information
Trace 7 HandshakeRole Server EnvironmentUserInstance 0 TTLSKeyringParmsRef PrmKeyRing_LDAP TTLSEnvironmentAdvancedParmsRef PrmEnvAdv_LDAP } TTLSEnvironmentAdvancedParms PrmEnvAdv_LDAP { TLSv1.1 On TLSv1.2 On ClientAuthType PassThru } TTLSConnectionAction GrpCon_LDAP { HandshakeRole Server TTLSCipherParmsRef PrmCipher_LDAP TTLSConnectionAdvancedParmsRef PrmConAdv_LDAP CtraceClearText Off Trace 7 } TTLSConnectionAdvancedParms PrmConAdv_LDAP { ApplicationControlled Off CertificateLabel GLDSRV SecondaryMap Off } TTLSCipherParms PrmCipher_LDAP { # supported cipher suites - we used a wide list, that should be decreased according # to specific needs V3CipherSuites TLS_DH_DSS_WITH_DES_CBC_SHA V3CipherSuites TLS_DH_RSA_WITH_DES_CBC_SHA V3CipherSuites TLS_NULL_WITH_NULL_NULL V3CipherSuites TLS_RSA_WITH_NULL_MD5 V3CipherSuites TLS_RSA_WITH_NULL_SHA V3CipherSuites TLS_RSA_EXPORT_WITH_RC4_40_MD5 V3CipherSuites TLS_RSA_EXPORT_WITH_RC2_CBC_40_MD5 V3CipherSuites TLS_RSA_WITH_DES_CBC_SHA V3CipherSuites TLS_DHE_DSS_WITH_DES_CBC_SHA V3CipherSuites TLS_DHE_RSA_WITH_DES_CBC_SHA V3CipherSuites TLS_RSA_WITH_AES_256_CBC_SHA256 V3CipherSuites TLS_RSA_WITH_AES_256_CBC_SHA V3CipherSuites TLS_ECDHE_ECDSA_WITH_AES_128_CBC_SHA256 V3CipherSuites TLS_ECDHE_RSA_WITH_AES_128_CBC_SHA256 V3CipherSuites TLS_RSA_WITH_AES_128_CBC_SHA256 V3CipherSuites TLS_ECDH_ECDSA_WITH_AES_128_CBC_SHA256 V3CipherSuites TLS_ECDH_RSA_WITH_AES_128_CBC_SHA256 V3CipherSuites TLS_DHE_RSA_WITH_AES_128_CBC_SHA256 V3CipherSuites TLS_DHE_DSS_WITH_AES_128_CBC_SHA256 V3CipherSuites TLS_ECDHE_ECDSA_WITH_AES_128_CBC_SHA V3CipherSuites TLS_ECDHE_RSA_WITH_AES_128_CBC_SHA V3CipherSuites TLS_RSA_WITH_AES_128_CBC_SHA V3CipherSuites TLS_ECDH_ECDSA_WITH_AES_128_CBC_SHA V3CipherSuites TLS_ECDH_RSA_WITH_AES_128_CBC_SHA V3CipherSuites TLS_DHE_RSA_WITH_AES_128_CBC_SHA
94 SailPoint Integration Guide

Additional information
V3CipherSuites TLS_DHE_DSS_WITH_AES_128_CBC_SHA V3CipherSuites TLS_ECDHE_ECDSA_WITH_AES_128_GCM_SHA256 V3CipherSuites TLS_ECDHE_RSA_WITH_AES_128_GCM_SHA256 V3CipherSuites TLS_RSA_WITH_AES_128_GCM_SHA256 V3CipherSuites TLS_ECDH_ECDSA_WITH_AES_128_GCM_SHA256 V3CipherSuites TLS_ECDH_RSA_WITH_AES_128_GCM_SHA256 V3CipherSuites TLS_DHE_RSA_WITH_AES_128_GCM_SHA256 V3CipherSuites TLS_DHE_DSS_WITH_AES_128_GCM_SHA256 V3CipherSuites TLS_ECDHE_ECDSA_WITH_3DES_EDE_CBC_SHA V3CipherSuites TLS_ECDHE_RSA_WITH_3DES_EDE_CBC_SHA V3CipherSuites TLS_ECDH_ECDSA_WITH_3DES_EDE_CBC_SHA V3CipherSuites TLS_ECDH_RSA_WITH_3DES_EDE_CBC_SHA } TTLSKeyringParms PrmKeyRing_LDAP { Keyring GLDRING }
PartitioningAggregation
RACF LDAP Integration Module supports Partitioning Aggregation feature to enable faster retrieval of RACF data.
In RACF LDAP Integration Module, objects can be retrieved by means of a searchDN, searchFilter and searchScope. RACF LDAP Integration Module partition entries are the application configuration searchDNs list with each entry of the list treated as a single partition.
Typically, the partitions can be defined as the searchDNs list as follows:
<entry key="searchDNs"> <value> <List> <Map> <entry key="iterateSearchFilter" value="(racfid=a*)"/> <entry key="searchDN" value="profiletype=USER,cn=SDBM"/> <entry key="searchScope" value="SUBTREE"/> </Map> <Map> <entry key="iterateSearchFilter" value="(racfid=b*)"/> <entry key="searchDN" value="profiletype=USER,cn= SDBM "/> <entry key="searchScope" value="SUBTREE"/> </Map> <Map> <entry key="iterateSearchFilter" value="(racfid=c*)"/> <entry key="searchDN" value="profiletype=USER,cn= SDBM "/> <entry key="searchScope" value="ONELEVEL_SCOPE"/> </Map> <Map> <entry key="iterateSearchFilter" value="(racfid=d*)"/> <entry key="searchDN" value="profiletype=USER,cn= SDBM "/> <entry key="searchScope" value="SUBTREE"/> </Map>……..…..…..…… <Map> <entry key="iterateSearchFilter" value="(racfid=z*)"/>
SailPoint Integration Guide 95

Troubleshooting
<entry key="searchDN" value="profiletype=USER,cn= SDBM "/> <entry key="searchScope" value="SUBTREE"/> </Map> </List> </value> </entry>
Note: Each specified partition has to be unique by way of the iterateSearchFilter value. If not, the first partition would get aggregated skipping the subsequent duplicate ones. Partitions must be created in such a way that each partition must not exceed the default or specified search limit.
Troubleshooting
1-Whensettingpassword/passphrasewith9-13charactersanerrormessageisdisplayedWhen setting password/passphrase with 9 - 13 characters, the following error message is displayed:
Invalid PasswordResolution: Passphrase can be 9 - 100 characters if KDFAES or ICHPWX11 encryption algorithm is present on the server. If KDFAES or ICHPWX11 encryption algorithm is not present on the server then the allowed number of characters for passphrase are 14 - 100.
2-ChangePasswordoperationfailswithanerrorWhen performing a self change password operation for an account and if any one of the connection is revoked, the following error message is displayed:
[LDAP:error code 1 - R000208 Unexpected racroute error safRC=8 racfRC=36 racfReason=0(srv_authenticate_native_passsword:3567)]Resolution: For change password operation, connections of the accounts must not be revoked.
96 SailPoint Integration Guide

Overview
Chapter13:SailPointTopSecretLDAPIntegrationModule
The following topics are discussed in this chapter:Overview. . . . . . . . . . . . . . . . . . . . . . . . . . . . . . . . . . . . . . . . . . . . . . . . . . . . . . . . . . . . . . . . . . . . . . . . . . . . . . . . . . 97
Supported features . . . . . . . . . . . . . . . . . . . . . . . . . . . . . . . . . . . . . . . . . . . . . . . . . . . . . . . . . . . . . . . . . . . . . 97Supported Managed Systems . . . . . . . . . . . . . . . . . . . . . . . . . . . . . . . . . . . . . . . . . . . . . . . . . . . . . . . . . . . . . 98Administrator permissions . . . . . . . . . . . . . . . . . . . . . . . . . . . . . . . . . . . . . . . . . . . . . . . . . . . . . . . . . . . . . . . 98
Configuration parameters . . . . . . . . . . . . . . . . . . . . . . . . . . . . . . . . . . . . . . . . . . . . . . . . . . . . . . . . . . . . . . . . . . . . 98Schema Attributes . . . . . . . . . . . . . . . . . . . . . . . . . . . . . . . . . . . . . . . . . . . . . . . . . . . . . . . . . . . . . . . . . . . . . . . . . . 99
Account attributes . . . . . . . . . . . . . . . . . . . . . . . . . . . . . . . . . . . . . . . . . . . . . . . . . . . . . . . . . . . . . . . . . . . . . . 99TopSecretProfile attributes . . . . . . . . . . . . . . . . . . . . . . . . . . . . . . . . . . . . . . . . . . . . . . . . . . . . . . . . . . . . . . 101TopSecretGroup attributes . . . . . . . . . . . . . . . . . . . . . . . . . . . . . . . . . . . . . . . . . . . . . . . . . . . . . . . . . . . . . . 102
Provisioning Policy Attributes . . . . . . . . . . . . . . . . . . . . . . . . . . . . . . . . . . . . . . . . . . . . . . . . . . . . . . . . . . . . . . . . 102Account attributes . . . . . . . . . . . . . . . . . . . . . . . . . . . . . . . . . . . . . . . . . . . . . . . . . . . . . . . . . . . . . . . . . . . . . . 99
Additional information . . . . . . . . . . . . . . . . . . . . . . . . . . . . . . . . . . . . . . . . . . . . . . . . . . . . . . . . . . . . . . . . . . . . . 103Support for PassPhrase . . . . . . . . . . . . . . . . . . . . . . . . . . . . . . . . . . . . . . . . . . . . . . . . . . . . . . . . . . . . . . . . . 103Implementing Secured Communication to Top Secret LDAP Server . . . . . . . . . . . . . . . . . . . . . . . . . . . . . 103Partitioning Aggregation . . . . . . . . . . . . . . . . . . . . . . . . . . . . . . . . . . . . . . . . . . . . . . . . . . . . . . . . . . . . . . . . 106
Overview
The SailPoint Top Secret LDAP Integration Module mainly uses the LDAP interfaces to communicate with CA LDAP server. The Top Secret LDAP Integration Module supports reading and provisioning of Top Secret LDAP users and entitlements.
Supportedfeatures
SailPoint Top Secret LDAP Integration Module supports the following features:• Account Management
- Manages Top Secret LDAP Users as Account
- Aggregate, Refresh Accounts, Partitioning Aggregation
- Create, Update
- Enable, Disable, Unlock, Change Password
- Add/Remove Entitlements• Group Management
- Aggregation
For more information on partitioning aggregation, see “Partitioning Aggregation” on page 106.
SailPoint Integration Guide 97

Configuration parameters
SupportedManagedSystems
SailPoint Top Secret LDAP Integration Module supports the following managed system:• CA LDAP Server for z/OS Release 15.1.00 with CATSS_UTF back end
TLScommunicationbetweenIdentityIQandTopSecretLDAPServerIf you want secure TLS connection for Top Secret LDAP, TLS communication must be enabled between IdentityIQ and Top Secret LDAP Server. For a Java client to connect using TLS and self-signed certificates, install the certificate into the JVM keystore.
CreatingTLScommunicationbetweenIdentityIQandTopSecretLDAPServer
To create TLS communication between IdentityIQ and Top Secret LDAP Server, perform the following:
1. Implement z/OS Secured Communication to Top Secret LDAP Server. For more information on implementing the secured communication to Top Secret LDAP, see “Implementing Secured Communication to Top Secret LDAP Server” on page 103.
2. Export server CA certificate and copy the exported .cer file to the Java client computer (IdentityIQ com-puter).
3. At the client computer execute the following command from the bin directory of JDK:keytool -importcerts –trustcacert –alias aliasName –file <absolute path of certificate> -keystore <JAVA_HOME>/jre/lib/security/cacertsIn the preceding command line, aliasName is the name of the alias.
4. Login to IdentityIQ.
5. Create the application for Top Secret LDAP, use TLS and provide all the required values.
6. Click on Test Connection and save the application.
Administratorpermissions
The service account configured for SailPoint Top Secret LDAP Integration Module must have the read/write privileges over the Top Secret directory information tree in order to manage the Top Secret data.
Configurationparameters
This section contains the information that this Integration Module uses to connect and interact with the application. Each application type requires different information to create and maintain a connection.
The Top Secret LDAP Integration Module uses the following configuration parameters:
Parameters Description
Host* Host of the LDAP server.
Port* Port number through which the server is listening.
Use TLS Specifies if the connection is over TLS.
User* User to connect as a DN string such as Administrator.
98 SailPoint Integration Guide

Schema Attributes
Note: Attributes marked with * sign are the mandatory attributes.
SchemaAttributes
The application schema is used to configure the objects returned from a Integration Module. When an Integration Module is called, the schema is supplied to the methods on the Integration Module interface. This Integration Module currently supports three types of objects account, TopSecretProfile and TopSecretGroup.
Accountattributes
Account objects are used when building identities Link objects.
Password Password for the administrator account.
Suffix* Distinguished name of the container.
Account Filter LDAP filter that defines scope for accounts from this container.
Attribute Description
dn Distinguished name of the Top Secret User.
ACCESSORID Top Secret User ID.
objectClass Top Secret User Object Classes.
AACID Authority levels at which ACID can manage ACIDs within scope.
AdminListData Authority to list Security File information
Misc1 Authority to perform one or more administrative functions (LCF, INSTDATA, USER, LTIME, SUSPEND, NOATS, RDT, TSSSIM, ALL)
Misc2 Authority to perform one or more administrative functions (ALL, SMS, TSO, NDT, DLF, APPCLU, WOR)
Misc3 Authority to perform one or more administrative functions (ALL, SDT, PTOK)
Misc8 Authority to list the contents of the RDT, FDT or STC or to use the ASUSPEND administrative function (LISTRDT, LISTSTC, LISTAPLU, LISTSDT, MCS, NOMVSDF, PWMAINT, REMASUSP, ALL)
Misc9 Authority to perform one or more high-level administrative functions (BYPASS, TRACE, CONSOLE, MASTFAC, MODE, STC, GLOBAL, GENERIC, ALL)
ASUSPEND Account is suspended due to administrator action.
NODSNCHK CA Top Secret bypasses all data set access security checks for this ACID.
SITRAN CICS transaction CA Top Secret automatically executes after an ACID successfully signs on to a facility.
OPCLASS CICS operator classes.
OPIDENT CICS operator identification value equal to the ACID OPIDENT entry in the CICS SNT (Signon Table).
Parameters Description
SailPoint Integration Guide 99

Schema Attributes
OPPRTY CICS operator priority of associated ACID.
SCTYKEY CICS security keys an ACID may use.
CONSOLE Ability to modify control options by ACID.
CREATED Date ACID was created.
DEPT Department ACID.
DIVISION Division ACID.
EXPIRE Expiration date of ACID.
GROUPS List of Groups a TSS User is a member.
XSUSPEND Account is suspended due to CA-Top Secret Installation exit.
LAST-COUNT Number of times the ACID has been used (logon times since user was defined).
MASTFAC Multi-user facility name.
MCSAUTH Authorize the operator commands that can be entered from the console.
PROFILES List of Profiles a Top Secret User is a member.
MODIFIED Last date and time when ACID was updated.
NAME Name of ACID.
NOPWCHG Prevent ACID from changing passwords at signon or initiation.
OIDCARD Prompt ACID to insert identification cards into a batch reader whenever signing on to TSO.
DFLTGRP Default group to an ACID operating under OpenEdition MVS.
HOME Subdirectory of ACID under OMVS.
UID Numeric UID value for security within USS.
PSUSPEND Account is suspended due to password violation.
PHYSKEY Physical security key to support external authentication devices.
TSOHCLASS Default hold class for TSO-generated JCL for TSO users.
TSOJCLASS Job class for TSO generated job cards from TSO users.
TSOLACCT TSO Default account number.
TSOCOMMAND Default command issued at TSO logon.
TSOLPROC Default procedure used for TSO logon.
TSOMSIZE Maximum region size (in kilobytes) that a TSO user may specify at logon.
TSOMCLASS Default message class for TSO generated JCL for TSO users.
TSOMPW Support multiple TSO UADS passwords, on a user-by-user basis.
TSOOPT Default options that a TSO user may specify at logon
TSODEST Default destination identifier for TSO generated JCL for TSO users.
TSODEFPRFG Default TSO performance group.
Attribute Description
100 SailPoint Integration Guide

Schema Attributes
TopSecretProfileattributes
The following table lists the profile attributes.
TSOLSIZE Default region size (in kilobytes) for TSO.
TSOSCLASS Default SYSOUT class for TSO generated JCL for TSO users.
TSOUNIT Default unit name for dynamic allocations under TSO.
TSOUDATA Site-defined data field to a TSO user.
USER User defined classes and resources.
PASSEXPD Expiration date of password.
PASSINTV Number of days during which password remains valid.
TYPE ACID type (MSCA,LSCA,SCA,ZCA,VCA,MCA,USER).
VSUSPEND Account is suspended due to access violation.
ZONE Zone ACID.
Attribute Description
dn Distinguished name of Top Secret Profile.
ACCESSORID Top Secret Profile Id.
objectClass Top Secret Profile Object Classes.
AUDIT Allow an audit of ACID activity.
CREATED Date ACID was created.
DEPT DEPT ACID.
DIVISION Division ACID.
GAP Globally administered profile.
MODIFIED Last date and time when ACID was updated.
NAME Name of ACID.
NOPWCHG Prevent ACID from changing passwords at signon or initiation.
OIDCARD Prompt ACID to insert identification cards into a batch reader whenever signing on to TSO.
GID Group identification for OMVS.
SOURCE Source reader or terminal prefixes through which the associated ACID may enter the system.
LTIME How long (in minutes) until terminal of ACID locks if CA Top Secret does not detect activity at that terminal.
TYPE ACID type.
ZONE Zone ACID.
Attribute Description
SailPoint Integration Guide 101

Provisioning Policy Attributes
TopSecretGroupattributes
The following table lists the group attributes.
ProvisioningPolicyAttributes
The following table lists the provisioning policy attributes for create Account:
Attribute Description
dn Distinguished name of Top Secret Profile.
ACCESSORID Top Secret Group Id.
objectClass Top Secret Group Object Classes.
AUDIT Allow an audit of ACID activity.
CREATED Date ACID was created.
DEPT DEPT ACID.
DIVISION Division ACID.
GAP Globally administered profile.
MODIFIED Last date and time when ACID was updated.
NAME Name of ACID.
NOPWCHG Prevent ACID from changing passwords at signon or initiation.
OIDCARD Prompt ACID to insert identification cards into a batch reader whenever signing on to TSO.
GID Group identification for OMVS.
SOURCE Source reader or terminal prefixes through which the associated ACID may enter the system.
LTIME How long (in minutes) until terminal of ACID locks if CA Top Secret does not detect activity at that terminal.
TYPE ACID type.
ZONE Zone ACID.
Attributes Description
USER DN* Distinguished name of the user to be created.
Password* Password of the user to be created.
Full Name* Name of the Top Secret user to be created
Department* DEPT of which the user would be a part.
Facilities Permit an ACID to have access to a resource through the specified facility.
TSOLPROC Default procedure used for TSO logon.
102 SailPoint Integration Guide

Additional information
Note: The attributes marked with * sign are required attributes.
Additionalinformation
This section describes the additional information related to the Top Secret LDAP Integration Module.
SupportforPassPhrase
SailPoint Top Secret LDAP Integration Module supports PassPhrase feature as follows:
For password change operation on Top Secret LDAP managed system, userPassword or PassPhrase is supported. If the length of password provided is less than or equal to 8 characters then password attribute used would be userPassword and if the length of password provided is greater than 8 characters then password attribute used would be PassPhrase. To support self change password or passphrase on Top Secret, then appropriate logon option must be specified that is., only password or only passphrase or both.
ImplementingSecuredCommunicationtoTopSecretLDAPServer
Secured communication to Top Secret LDAP Server must be implemented using one of the following methods:• LDAP SSL: Communication must be implemented on a port defined to LDAP as secured (ldaps).
For more information, see “Implementing LDAP TLS”.• AT-TLS policy: Communication must be implemented on a port defined to LDAP as non-secured (ldap).
The TLS processing is done by TCPIP and is transparent to Top Secret LDAP Server.For more information, see “Implementing AT-TLS policy for Top Secret LDAP communication”.
The secured communication is implemented using server authentication.
Commonimplementationprocedure1. A valid server certificate with its associated server private key must be defined. This certificate must be
signed by a trusted Certificate Authority's (CA).
2. The server certificate and the CA certificate must be connected to a key ring.
3. The CA certificate must be exported to a file, transferred (using FTP with ASCII mode) to the client and installed there to be used for certificate verification by the TLS handshake process.
Note: For testing purposes, a local CA can be defined for signing the server certificate.
ImplementingLDAPTLSFor detailed information about implementing LDAP TLS, see CA LDAP Server for z/OS Product Guide.
Note: Top Secret LDAP server must be granted with permission to access the key ring containing the Top Secret LDAP server certificate and the CA certificate.
CONSOLE Ability to modify control options by ACID.
Attributes Description
SailPoint Integration Guide 103

Additional information
ImplementingAT-TLSpolicyforTopSecretLDAPcommunicationFor detailed information about implementing AT-TLS policy, see “Application Transparent Transport Layer Security data protection” chapter of z/OS Communications Server IP Configuration Guide.
The required policy attributes for AT-TLS policy are: • Local Port Range – ports defined in LDAP as non-secured • Direction = Inbound• TLS Enabled = On• TLS v1.1 = On• TLS v1.2 = On • Handshake Role = Server• Client Authorization Type = PassThru• Application Controlled = Off• Secondary Map = Off• The name of the certificate created for the secured communication and the name of the key ring to which
the server certificate and the CA certificate are connected, should be specified.
Note: TCPIP must be granted permission to access the key ring to which the Top Secret LDAP server certificate and the CA certificate are connected.
SamplefileforAT-TLSpolicy # RULE for LDAP GLDSRV ####################################################TTLSRule LDAP { LocalAddr ALL RemoteAddr ALL LocalPortRange 389 Direction Inbound Priority 255 # highest priority rule Userid GLDSRV TTLSGroupActionRef GrpAct_LDAP TTLSEnvironmentActionRef GrpEnv_LDAP TTLSConnectionActionRef GrpCon_LDAP } TTLSGroupAction GrpAct_LDAP { TTLSEnabled On Trace 7 }
TTLSEnvironmentAction GrpEnv_LDAP { Trace 7 HandshakeRole Server EnvironmentUserInstance 0 TTLSKeyringParmsRef PrmKeyRing_LDAP TTLSEnvironmentAdvancedParmsRef PrmEnvAdv_LDAP } TTLSEnvironmentAdvancedParms PrmEnvAdv_LDAP
104 SailPoint Integration Guide
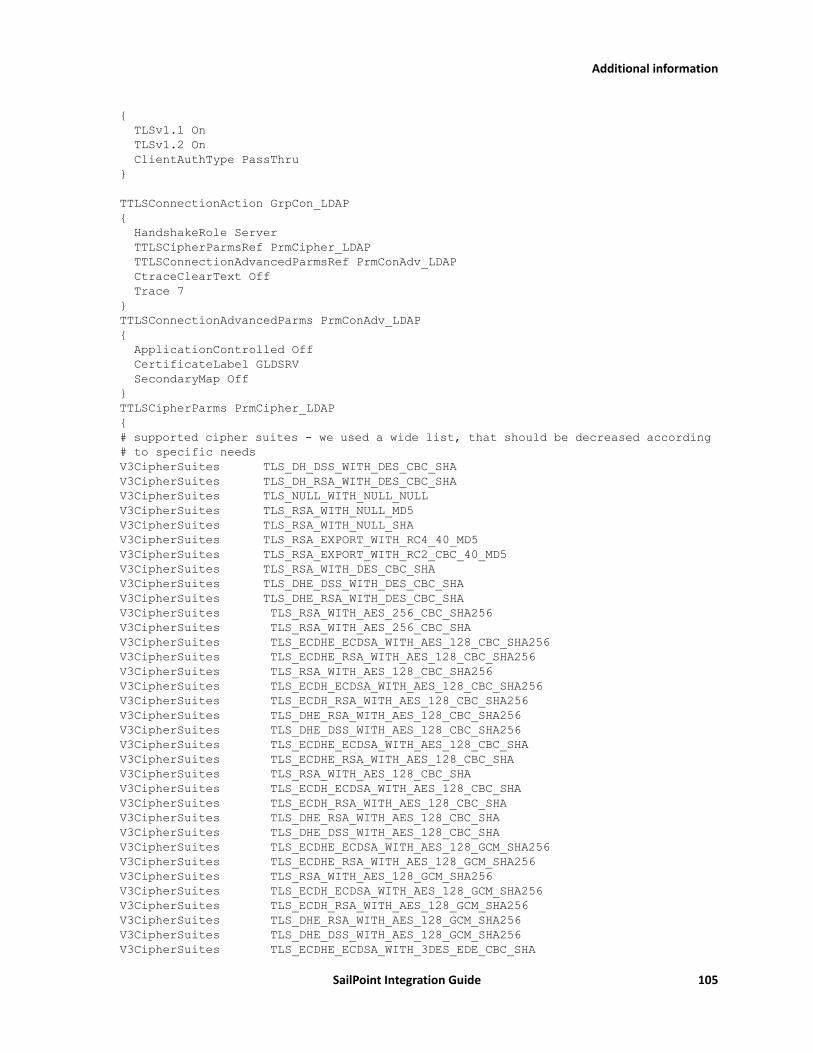
Additional information
{ TLSv1.1 On TLSv1.2 On ClientAuthType PassThru } TTLSConnectionAction GrpCon_LDAP { HandshakeRole Server TTLSCipherParmsRef PrmCipher_LDAP TTLSConnectionAdvancedParmsRef PrmConAdv_LDAP CtraceClearText Off Trace 7 } TTLSConnectionAdvancedParms PrmConAdv_LDAP { ApplicationControlled Off CertificateLabel GLDSRV SecondaryMap Off } TTLSCipherParms PrmCipher_LDAP { # supported cipher suites - we used a wide list, that should be decreased according # to specific needs V3CipherSuites TLS_DH_DSS_WITH_DES_CBC_SHA V3CipherSuites TLS_DH_RSA_WITH_DES_CBC_SHA V3CipherSuites TLS_NULL_WITH_NULL_NULL V3CipherSuites TLS_RSA_WITH_NULL_MD5 V3CipherSuites TLS_RSA_WITH_NULL_SHA V3CipherSuites TLS_RSA_EXPORT_WITH_RC4_40_MD5 V3CipherSuites TLS_RSA_EXPORT_WITH_RC2_CBC_40_MD5 V3CipherSuites TLS_RSA_WITH_DES_CBC_SHA V3CipherSuites TLS_DHE_DSS_WITH_DES_CBC_SHA V3CipherSuites TLS_DHE_RSA_WITH_DES_CBC_SHA V3CipherSuites TLS_RSA_WITH_AES_256_CBC_SHA256 V3CipherSuites TLS_RSA_WITH_AES_256_CBC_SHA V3CipherSuites TLS_ECDHE_ECDSA_WITH_AES_128_CBC_SHA256 V3CipherSuites TLS_ECDHE_RSA_WITH_AES_128_CBC_SHA256 V3CipherSuites TLS_RSA_WITH_AES_128_CBC_SHA256 V3CipherSuites TLS_ECDH_ECDSA_WITH_AES_128_CBC_SHA256 V3CipherSuites TLS_ECDH_RSA_WITH_AES_128_CBC_SHA256 V3CipherSuites TLS_DHE_RSA_WITH_AES_128_CBC_SHA256 V3CipherSuites TLS_DHE_DSS_WITH_AES_128_CBC_SHA256 V3CipherSuites TLS_ECDHE_ECDSA_WITH_AES_128_CBC_SHA V3CipherSuites TLS_ECDHE_RSA_WITH_AES_128_CBC_SHA V3CipherSuites TLS_RSA_WITH_AES_128_CBC_SHA V3CipherSuites TLS_ECDH_ECDSA_WITH_AES_128_CBC_SHA V3CipherSuites TLS_ECDH_RSA_WITH_AES_128_CBC_SHA V3CipherSuites TLS_DHE_RSA_WITH_AES_128_CBC_SHA V3CipherSuites TLS_DHE_DSS_WITH_AES_128_CBC_SHA V3CipherSuites TLS_ECDHE_ECDSA_WITH_AES_128_GCM_SHA256 V3CipherSuites TLS_ECDHE_RSA_WITH_AES_128_GCM_SHA256 V3CipherSuites TLS_RSA_WITH_AES_128_GCM_SHA256 V3CipherSuites TLS_ECDH_ECDSA_WITH_AES_128_GCM_SHA256 V3CipherSuites TLS_ECDH_RSA_WITH_AES_128_GCM_SHA256 V3CipherSuites TLS_DHE_RSA_WITH_AES_128_GCM_SHA256 V3CipherSuites TLS_DHE_DSS_WITH_AES_128_GCM_SHA256 V3CipherSuites TLS_ECDHE_ECDSA_WITH_3DES_EDE_CBC_SHA
SailPoint Integration Guide 105

Additional information
V3CipherSuites TLS_ECDHE_RSA_WITH_3DES_EDE_CBC_SHA V3CipherSuites TLS_ECDH_ECDSA_WITH_3DES_EDE_CBC_SHA V3CipherSuites TLS_ECDH_RSA_WITH_3DES_EDE_CBC_SHA } TTLSKeyringParms PrmKeyRing_LDAP { Keyring GLDRING }
PartitioningAggregation
Top Secret LDAP Integration Module supports Partitioning Aggregation feature to enable faster retrieval of Top Secret data.
In Top Secret LDAP Integration Module, objects can be retrieved by means of a searchDN and searchFilter. Top Secret LDAP Integration Module partition entries are the application configuration searchDNs list with each entry of the list treated as a single partition.
Typically, the partitions can be defined as the searchDNs list as follows:
<entry key="searchDNs"> <value> <List> <Map> <entry key="iterateSearchFilter" value="(tssacid=a*)"/> <entry key="searchDN" value="host=SYSB,o=SAILPOINT,c=us"/> </Map> <Map> <entry key="iterateSearchFilter" value="(tssacid=b*)"/> <entry key="searchDN" value="host=SYSB,o=SAILPOINT,c=us "/> </Map> <Map> <entry key="iterateSearchFilter" value="(tssacid=c*)"/> <entry key="searchDN" value="host=SYSB,o=SAILPOINT,c=us "/> </Map> <Map> <entry key="iterateSearchFilter" value="(tssacid=d*)"/> <entry key="searchDN" value="host=SYSB,o=SAILPOINT,c=us "/> </Map> …….. ….. ….. …… <Map>
106 SailPoint Integration Guide

Additional information
<entry key="iterateSearchFilter" value="(tssacid=z*)"/> <entry key="searchDN" value="host=SYSB,o=SAILPOINT,c=us "/> </Map> </List> </value></entry>
SailPoint Integration Guide 107

Additional information
108 SailPoint Integration Guide

ServiceDeskIntegrationModulesThis section contains information on the following sections:
• “SailPoint BMC Remedy Service Desk Service Integration Module”• “SailPoint HP Service Manager Service Integration Module”• “SailPoint ServiceNow Service Integration Module”

124 SailPoint Integration Guide
Overview
Chapter14:SailPointServiceNowServiceIntegrationModule
The following topics are discussed in this chapter:Overview. . . . . . . . . . . . . . . . . . . . . . . . . . . . . . . . . . . . . . . . . . . . . . . . . . . . . . . . . . . . . . . . . . . . . . . . . . . . . . . . . 105Supported features . . . . . . . . . . . . . . . . . . . . . . . . . . . . . . . . . . . . . . . . . . . . . . . . . . . . . . . . . . . . . . . . . . . . . . . . 105Supported platforms . . . . . . . . . . . . . . . . . . . . . . . . . . . . . . . . . . . . . . . . . . . . . . . . . . . . . . . . . . . . . . . . . . . . . . . 106Pre-requisites . . . . . . . . . . . . . . . . . . . . . . . . . . . . . . . . . . . . . . . . . . . . . . . . . . . . . . . . . . . . . . . . . . . . . . . . . . . . . 106
Service Request . . . . . . . . . . . . . . . . . . . . . . . . . . . . . . . . . . . . . . . . . . . . . . . . . . . . . . . . . . . . . . . . . . . . . . . 106Incident and Change Request . . . . . . . . . . . . . . . . . . . . . . . . . . . . . . . . . . . . . . . . . . . . . . . . . . . . . . . . . . . . 107
Basic configuration . . . . . . . . . . . . . . . . . . . . . . . . . . . . . . . . . . . . . . . . . . . . . . . . . . . . . . . . . . . . . . . . . . . . . . . . 108Basic flow of Service Request . . . . . . . . . . . . . . . . . . . . . . . . . . . . . . . . . . . . . . . . . . . . . . . . . . . . . . . . . . . . 109Basic configuration of Service Request. . . . . . . . . . . . . . . . . . . . . . . . . . . . . . . . . . . . . . . . . . . . . . . . . . . . . 109
Configuring IdentityIQ to integrate with ServiceNow. . . . . . . . . . . . . . . . . . . . . . . . . . . . . . . . . . . . . . . . . . . . . 110IntegrationConfig XML files for Service Request, Incident and Change Request . . . . . . . . . . . . . . . . . . . 113Configuration procedure . . . . . . . . . . . . . . . . . . . . . . . . . . . . . . . . . . . . . . . . . . . . . . . . . . . . . . . . . . . . . . . . 115Retryable mechanism . . . . . . . . . . . . . . . . . . . . . . . . . . . . . . . . . . . . . . . . . . . . . . . . . . . . . . . . . . . . . . . . . . 117
Upgrade . . . . . . . . . . . . . . . . . . . . . . . . . . . . . . . . . . . . . . . . . . . . . . . . . . . . . . . . . . . . . . . . . . . . . . . . . . . . . . . . . 118Sample scenario . . . . . . . . . . . . . . . . . . . . . . . . . . . . . . . . . . . . . . . . . . . . . . . . . . . . . . . . . . . . . . . . . . . . . . . . . . . 118Troubleshooting. . . . . . . . . . . . . . . . . . . . . . . . . . . . . . . . . . . . . . . . . . . . . . . . . . . . . . . . . . . . . . . . . . . . . . . . . . . 119
Overview
The integration between SailPoint and ServiceNow enables customers to create service requests, incidents, and change requests in ServiceNow for the configured operations (for example, creating account, removing/deleting access and other operations) for the configured application. The seamless integration of SailPoint and ServiceNow Service Integration Module eliminates the need to build and maintain a custom integration, and reduces time-to-deployment.
Supportedfeatures
SailPoint ServiceNow Service Integration Module supports the following features:• Creating ticket for all provisioning operations• Syncing ticket status between the two systems• Retry Mechanism for Create Ticket request failure
SailPoint Integration Guide 105
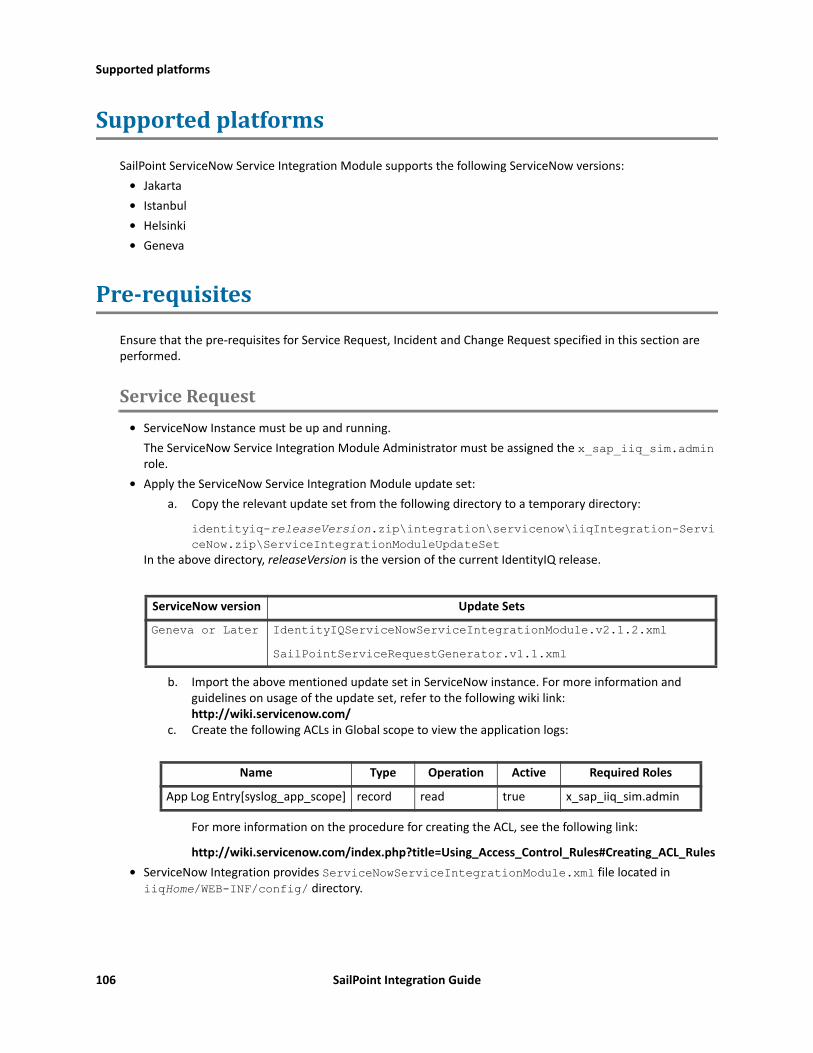
Supported platforms
Supportedplatforms
SailPoint ServiceNow Service Integration Module supports the following ServiceNow versions:• Jakarta• Istanbul• Helsinki• Geneva
Pre-requisites
Ensure that the pre-requisites for Service Request, Incident and Change Request specified in this section are performed.
ServiceRequest• ServiceNow Instance must be up and running.
The ServiceNow Service Integration Module Administrator must be assigned the x_sap_iiq_sim.admin role.
• Apply the ServiceNow Service Integration Module update set:a. Copy the relevant update set from the following directory to a temporary directory:
identityiq-releaseVersion.zip\integration\servicenow\iiqIntegration-ServiceNow.zip\ServiceIntegrationModuleUpdateSet
In the above directory, releaseVersion is the version of the current IdentityIQ release.
b. Import the above mentioned update set in ServiceNow instance. For more information and guidelines on usage of the update set, refer to the following wiki link: http://wiki.servicenow.com/
c. Create the following ACLs in Global scope to view the application logs:
For more information on the procedure for creating the ACL, see the following link:
http://wiki.servicenow.com/index.php?title=Using_Access_Control_Rules#Creating_ACL_Rules• ServiceNow Integration provides ServiceNowServiceIntegrationModule.xml file located in
iiqHome/WEB-INF/config/ directory.
ServiceNow version Update Sets
Geneva or Later IdentityIQServiceNowServiceIntegrationModule.v2.1.2.xmlSailPointServiceRequestGenerator.v1.1.xml
Name Type Operation Active Required Roles
App Log Entry[syslog_app_scope] record read true x_sap_iiq_sim.admin
106 SailPoint Integration Guide

Pre-requisites
IncidentandChangeRequest• ServiceNow Instance must be up and running.
The ServiceNow Service Integration Module Administrator must be assigned the x_sapo_iiq_sim.admin role.
• Apply the ServiceNow Service Integration Module update set:a. Copy the relevant update set from the following directory to a temporary directory:
identityiq-releaseVersion.zip\integration\servicenow\iiqIntegration-ServiceNow.zip\ServiceIntegrationModuleUpdateSet
In the above directory, releaseVersion is the version of the current IdentityIQ release.
b. Import the above mentioned update set in ServiceNow instance. For more information and guidelines on usage of the update set, refer to the following wiki link: http://wiki.servicenow.com/
• Ensure that ServiceNowIntegrationExecutor is being called: ServiceNowIntegrationExecutor class is responsible for creating and sending SOAP requests to ServiceNow. You can add a simple System.out.println statement in ServiceNowServiceIntegration rule to ensure that this is being called when a provisioning request is submitted for this integration.
• ServiceNow Integration provides ServiceNowSIMForIncidentAndChange.xml file located in iiqHome/WEB-INF/config/ directory.When integrating with the following service operations, open and modify the respective sections in the above files and import in IdentityIQ:
- for Incident: #INCIDENT
For Helsinki or later uncomment the following entry in the statusMap:
<entry key='8' value='failure'/>- for Change Request: #CHANGE REQUEST
a. For Helsinki or later, replace <state>1</state> with <state>-5</state> in the soap-mes-sage.
b. For Helsinki or later, replace the stausMap with the following:<entry key='statusMap'> <value> <Map> <entry key='-5' value='inProcess'/> <entry key='-4' value='inProcess'/> <entry key='-3' value='inProcess'/> <entry key='-2' value='inProcess'/> <entry key='-1' value='inProcess'/> <entry key='0' value='inProcess'/> <entry key='3' value='committed'/> <entry key='4' value='failure'/> </Map> </value></entry>
For more information, see “Configuring IdentityIQ to integrate with ServiceNow” on page 110.
ServiceNow version Update Sets
Geneva or Later IdentityIQServiceNowServiceIntegrationModuleForIncidentAndChange.v1.2.xml
SailPoint Integration Guide 107

Basic configuration
Note: If the field is a reference field and the reference value is other than those available, then ServiceNow implicitly creates those reference records. If you do not want to allow creation of reference records, then set Choice action to ignore in the transform map for the reference field.
Basicconfiguration
The integrated solution speeds the detection and remediation of identity management issues that increase the risk of compliance violations or security breaches, such as orphaned accounts, policy violations, and inappropriate access privileges. Organizations can take advantage of a centralized approach spanning thousands of users and hundreds of resources to strengthen IT controls and provide proof of compliance to auditors and executive management. The seamless integration of SailPoint and ServiceNow eliminates the need to build and maintain a custom integration, and speeds time-to-deployment.
For any IT resources managed by ServiceNow Service Desk, IdentityIQ automatically creates a trouble ticket within ServiceNow Service Desk, passing along all relevant identity data and reviewer comments to populate the ticket.
To ensure revocation requests get delivered and implemented, IdentityIQ manages all remediation and revocation requests within a guaranteed delivery model.
To determine the status of user accounts, IdentityIQ performs closed-loop audits on remediation requests and compares the actual state of user privileges with the original change request. If the request is still open, an alert will be sent to the reviewer for prompt action and closure.
The integration itself has been designed to be quick to install and easy to use. It makes use of Web Services for communications between the SailPoint server and the ServiceNow. On the backside of a user recertification, policy remediation action or access request action, the IdentityIQ server will direct provisioning and service desk requests to the configured implementers. Based on the IntegrationConfig configured for each target application, service desk request are issues to a given remediation/implementation point. Once the IntegrationConfig file for ServiceNow has been loaded into the IdentityIQ server, all change/remediation actions result in the creation of new service desk request as shown in Figure 1—Basic configuration.
The SailPoint ServiceNow Service Integration Module generates tickets for provisioning requests. These tickets generate service requests on sc_request and sc_req_item table, incidents on incident table, or change requests on the change_request table. The module fetches the status of ticket by using the direct web services of target tables that is, sc_req_item, incident or change_request and updates the SailPoint IdentityIQ database with the status.
108 SailPoint Integration Guide
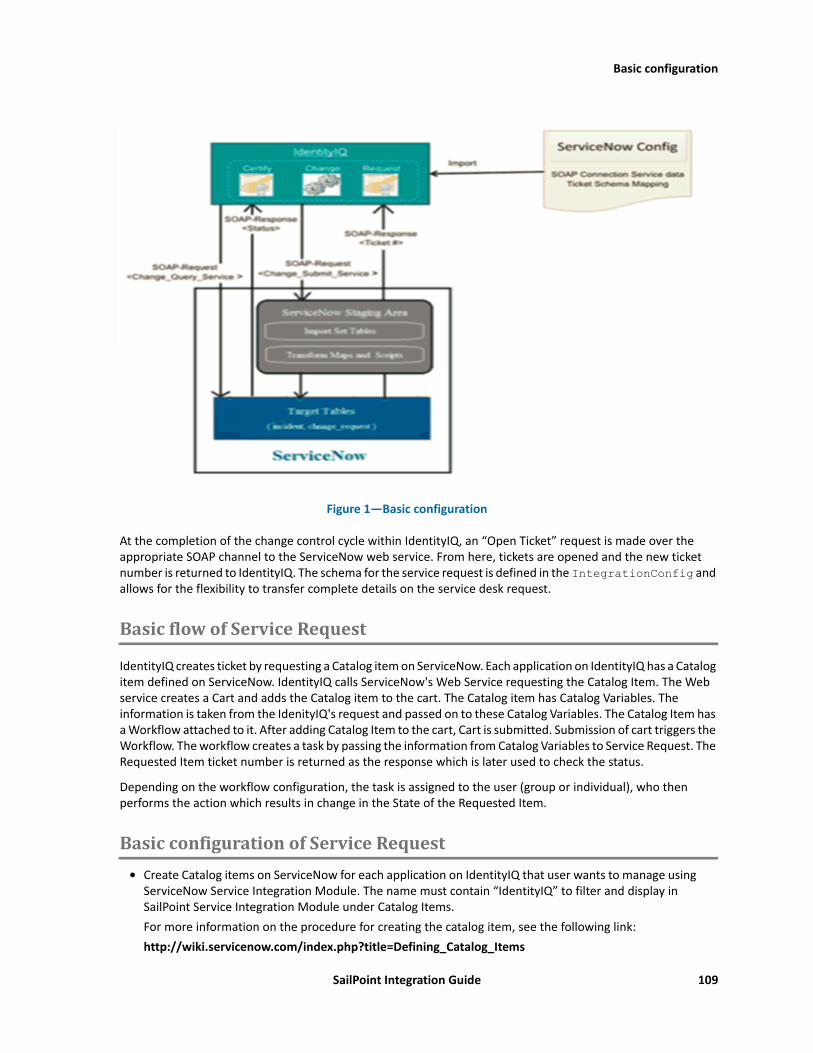
Basic configuration
Figure 1—Basic configuration
At the completion of the change control cycle within IdentityIQ, an “Open Ticket” request is made over the appropriate SOAP channel to the ServiceNow web service. From here, tickets are opened and the new ticket number is returned to IdentityIQ. The schema for the service request is defined in the IntegrationConfig and allows for the flexibility to transfer complete details on the service desk request.
BasicflowofServiceRequest
IdentityIQ creates ticket by requesting a Catalog item on ServiceNow. Each application on IdentityIQ has a Catalog item defined on ServiceNow. IdentityIQ calls ServiceNow's Web Service requesting the Catalog Item. The Web service creates a Cart and adds the Catalog item to the cart. The Catalog item has Catalog Variables. The information is taken from the IdenityIQ's request and passed on to these Catalog Variables. The Catalog Item has a Workflow attached to it. After adding Catalog Item to the cart, Cart is submitted. Submission of cart triggers the Workflow. The workflow creates a task by passing the information from Catalog Variables to Service Request. The Requested Item ticket number is returned as the response which is later used to check the status.
Depending on the workflow configuration, the task is assigned to the user (group or individual), who then performs the action which results in change in the State of the Requested Item.
BasicconfigurationofServiceRequest• Create Catalog items on ServiceNow for each application on IdentityIQ that user wants to manage using
ServiceNow Service Integration Module. The name must contain “IdentityIQ” to filter and display in SailPoint Service Integration Module under Catalog Items.For more information on the procedure for creating the catalog item, see the following link:http://wiki.servicenow.com/index.php?title=Defining_Catalog_Items
SailPoint Integration Guide 109

Configuring IdentityIQ to integrate with ServiceNow
Note: Refer to the default Catalog Items provided in the update set.• Catalog Variables must be created for each element defined in SOAP message in ServiceNow Integration
Configuration file. The name of the Catalog variable must be same as the respective SOAP element in the SOAP message.For more information on the procedure for creating the catalog variable, see the following link:http://wiki.servicenow.com/index.php?title=Using_Service_Catalog_Variables
• Catalog variable must be created with name tracking_id of type Single Line Text for each newly created Catalog item. This field is used to update Request Item (RITM) number on the IdentityIQ Access Request items.
• The opened_by and requested_for fields receives values using the default Rule in ServiceNow Configuration file. Modify the rule as per requirement to populate the fields.For example, see requested_for catalog variable in the default Catalog item (IdentityIQ Access Request).
Note: If the user is not present on ServiceNow, then ‘opened_by’ and ‘requested_for’ fields will display default ServiceNow Administrator.
• Provide the mapping between Application and Catalog item in the catalogItem field in ServiceNow Integration Configuration file.For example, <entry key="Active_Directory" value="IdentityIQ Access Request"/> <entry key="Procurement_System" value="IdentityIQ Access Request"/>Note: The Catalog item name is case sensitive.
• Verify the default mapping between ServiceNow’s Request Item (RITM) Status field and IdentityIQ status in ServiceNow Integration Configuration file. This is used to update the status of IdentityIQ line item.
• Create and publish a workflow and attach it to the respective Catalog Item to handle the Requested Item (RITM). The name must contain “IdentityIQ” to filter and display in SailPoint Service Integration Module under Workflow versions.The workflow must be able to create a Catalog Task. For more information on procedure for creating the workflow, see the following link:http://wiki.servicenow.com/index.php?title=Creating_a_Workflow
Note: Refer the default workflow given in the update set. Login with the Admin user or user with ‘workflow_admin’ to create or update workflow.
• The default workflow, in the Run Script activity has a scripting logic to get values from Catalog Variables and assign to the fields of Service Request and Requested Item. Use that or modify accordingly. Configure the Workflow as per requirement.
• The State of Requested Item (RITM) changes when the State field of the Task changes due to the Workflow defined on the Catalog Item. The Request State on the Service Request changes due to the default ‘Service Catalog Request’ workflow.
• If some records or columns are not displayed with Minimum permission user, add the specific ACLs to view the records.For more information on procedure for creating the ACL, see the following link:http://wiki.servicenow.com/index.php?title=Using_Access_Control_Rules#Creating_ACL_Rules
ConfiguringIdentityIQtointegratewithServiceNow
This section provides the required information for configuring IdentityIQ to integrate with ServiceNow.
110 SailPoint Integration Guide

Configuring IdentityIQ to integrate with ServiceNow
This is intended as an introduction to the configuration needed to integrate IdentityIQ with ServiceNow. It outlines some examples that must be used as a reference point for implementation. Some changes may be required to meet specific use case and expertise around both systems are a must for the successful implementations.
SailPoint provides a default ServiceNow configuration. This configuration implements the integration between IdentityIQ and the ServiceNow to fulfill creation of tickets based on IdentityIQ access certification remediation events.
The default configuration is located in the following directory, where iiqHome is the location where IdentityIQ was installed:
• Service Request: iiqHome/WEB-INF/config/ServiceNowServiceIntegrationModule.xml• Incident and Change Request: iiqHome/WEB-INF/ServiceNowSIMForIncidentAndChange.xml
This section explains the various entries that are specific for this integration. For more information of the entries in the IntegrationConfig file, see Appendix: A: Common Identity Management Integration Configuration.
The integration configuration must include the following entries:• endpoint: URL to the web service
• namespace: namespace of the XML returned by the web service• prefix: prefix associated with the namespace
The integration configuration includes the following entries if the web service side of the integration is configured for authentication using the SOAP authentication specifications:
• username (Can be blank if Require basic authorization for incoming SOAP requests is not selected on ServiceNow side)
• password (Can be blank if Require basic authorization for incoming SOAP requests is not selected on ServiceNow side)
• authentication • locale• timeZone• statusMap
Endpoint task Service operation Geneva or Later
ServiceNow endpoint to create a ticket
Service Request https://demo.service-now.com/ScRequestGenerator.do?SOAP
Incident https://demo.service-now.com/x_sapo_iiq_sim_incident.do?SOAP
Change Request https://demo.service-now.com/x_sapo_iiq_sim_change_request.do?SOAP
ServiceNow endpoint to get ticket status
Service Request https://demo.service-now.com/sc_req_item.do?SOAP
Incident https://demo.service-now.com/incident.do?SOAP
Change Request https://demo.service-now.com/change_request.do?SOAP
SailPoint Integration Guide 111
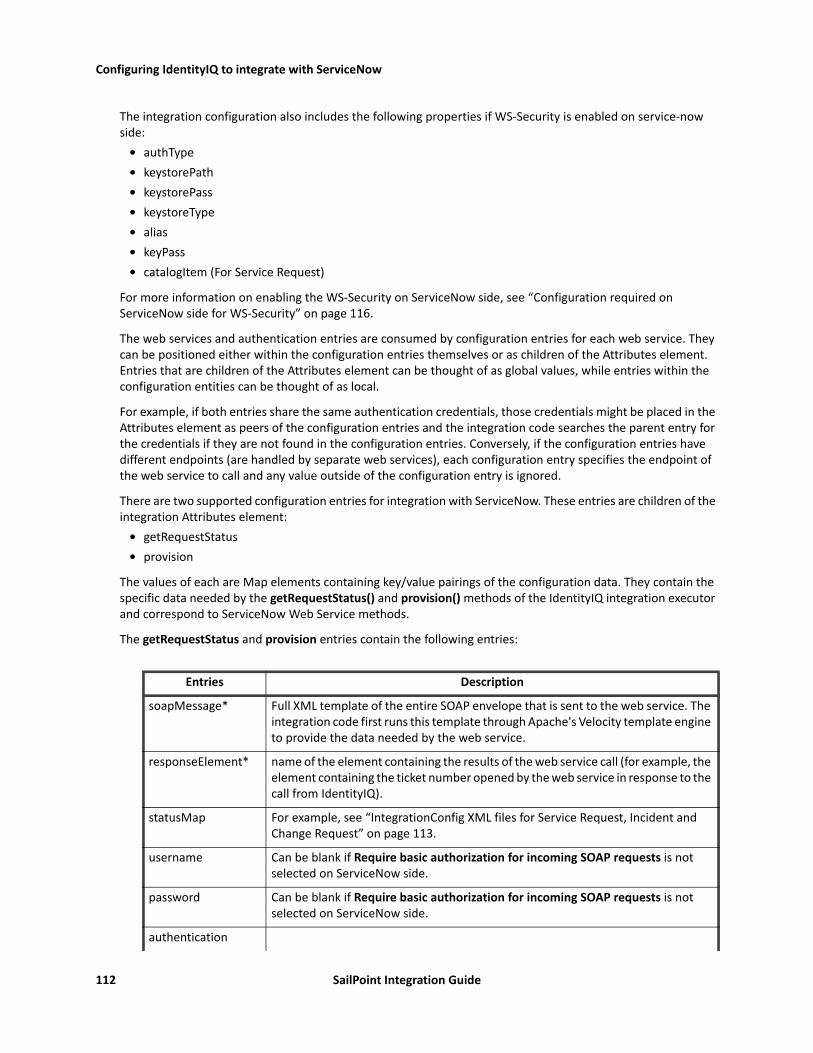
Configuring IdentityIQ to integrate with ServiceNow
The integration configuration also includes the following properties if WS-Security is enabled on service-now side:
• authType• keystorePath• keystorePass• keystoreType• alias• keyPass• catalogItem (For Service Request)
For more information on enabling the WS-Security on ServiceNow side, see “Configuration required on ServiceNow side for WS-Security” on page 116.
The web services and authentication entries are consumed by configuration entries for each web service. They can be positioned either within the configuration entries themselves or as children of the Attributes element. Entries that are children of the Attributes element can be thought of as global values, while entries within the configuration entities can be thought of as local.
For example, if both entries share the same authentication credentials, those credentials might be placed in the Attributes element as peers of the configuration entries and the integration code searches the parent entry for the credentials if they are not found in the configuration entries. Conversely, if the configuration entries have different endpoints (are handled by separate web services), each configuration entry specifies the endpoint of the web service to call and any value outside of the configuration entry is ignored.
There are two supported configuration entries for integration with ServiceNow. These entries are children of the integration Attributes element:
• getRequestStatus• provision
The values of each are Map elements containing key/value pairings of the configuration data. They contain the specific data needed by the getRequestStatus() and provision() methods of the IdentityIQ integration executor and correspond to ServiceNow Web Service methods.
The getRequestStatus and provision entries contain the following entries:
Entries Description
soapMessage* Full XML template of the entire SOAP envelope that is sent to the web service. The integration code first runs this template through Apache's Velocity template engine to provide the data needed by the web service.
responseElement* name of the element containing the results of the web service call (for example, the element containing the ticket number opened by the web service in response to the call from IdentityIQ).
statusMap For example, see “IntegrationConfig XML files for Service Request, Incident and Change Request” on page 113.
username Can be blank if Require basic authorization for incoming SOAP requests is not selected on ServiceNow side.
password Can be blank if Require basic authorization for incoming SOAP requests is not selected on ServiceNow side.
authentication
112 SailPoint Integration Guide

Configuring IdentityIQ to integrate with ServiceNow
Before a template is sent to the web service, it is processed by the Velocity template engine. The integration code provides different data objects to Velocity for evaluation based on the integration method.
The provision call passes the following objects to Velocity:• config: the integration configuration for provision, represented as a Map• provisioningPlan: the data model of the provision request
The getRequestStatus call passes the following objects to Velocity:• config: the integration configuration for getRequestStatus, represented as a Map• requestID: the string ID of the request whose status is being queried
Both calls have access to a timestamp variable containing a current Date object and a dateFormatter object. The dateFormatter is built using an optional dateFormat attribute from the config object. If the dateFormat attribute does not exist, the formatter defaults to the pattern EEE, d MMM yyyy HH:mm:ss z.
Note: Do not modify the provisioningPlan using the "ServiceNowServiceIntegration" default rule in the ServiceNow Configuration file.
IntegrationConfigXMLfilesforServiceRequest,IncidentandChangeRequest
The entries contained in the Map are the only required entries. Any authentication information required by this integration is inherited from the parent Attributes element.
locale (Optional)
timeZone (Optional)
endpoint (Optional)
namespace (Optional)
prefix (Optional)
authType (Optional) Use “WS-Security” if WS Security is enabled on service-now side. Otherwise leave it blank.
keystorePath (Optional) Full path of keystore.
keystorePass (Optional) Password of keystore.
keystoreType (Optional) Type of keystore. For example, jks
alias (Optional) The alias of certificate in keystore.
keyPass (Optional) The password of alias.
catalogItem (For Service Request only) Map of Catalog items on ServiceNow defined for IdentityIQ applications.
Entries Description
SailPoint Integration Guide 113

Configuring IdentityIQ to integrate with ServiceNow
For more information and examples of the sample files, see the following sample files:• Service Request: ServiceNowServiceIntegrationModule.xml• Incident and Change Request: ServiceNowSIMForIncidentAndChange.xml
The IntegrationConfig.xml file provides configuration for the following ServiceNow service operations:• Service Request• Incident• Change Request
Note: The IdentityIQ integration for 'Service Request' service operation uses Requested Item (RITM) based approach.
If any changes required in the mapping, change the default value/key values in statusMap and statusMapCloserCode as mentioned in the following tables:
• statusMap for Service Request:
Entry key (ServiceNow) Value (IdentityIQ)
-5 inProcess
1 inProcess
2 inProcess
4 failure
7 failure
3 committed
114 SailPoint Integration Guide

Configuring IdentityIQ to integrate with ServiceNow
• statusMap and statusMapCloserCode for Incident
• statusMap for Change Request
Configurationprocedure
The following steps should be performed to modify the default ServiceNow integration configuration for a specific ServiceNow instance.
Entry key (ServiceNow) Values (IdentityIQ)
statusMap
1 inProcess
2 inProcess
3 inProcess
4 inProcess
5 inProcess
6 committed
7 committed
8 (For Helsinki or later) failure
statusMapCloserCode
Solved (Work Around) committed
Solved (Permanently) committed
Solved Remotely (Work Around) committed
Solved Remotely (Permanently) committed
Closed/Resolved by Caller committed
Not Solved (Not Reproducible) failure
Not Solved (Too Costly) failure
Entry key (ServiceNow) Value (IdentityIQ)
-5 inProcess
-4 inProcess
-3 inProcess
-2 inProcess
-1 inProcess
0 inProcess
3 committed
4 failure
SailPoint Integration Guide 115
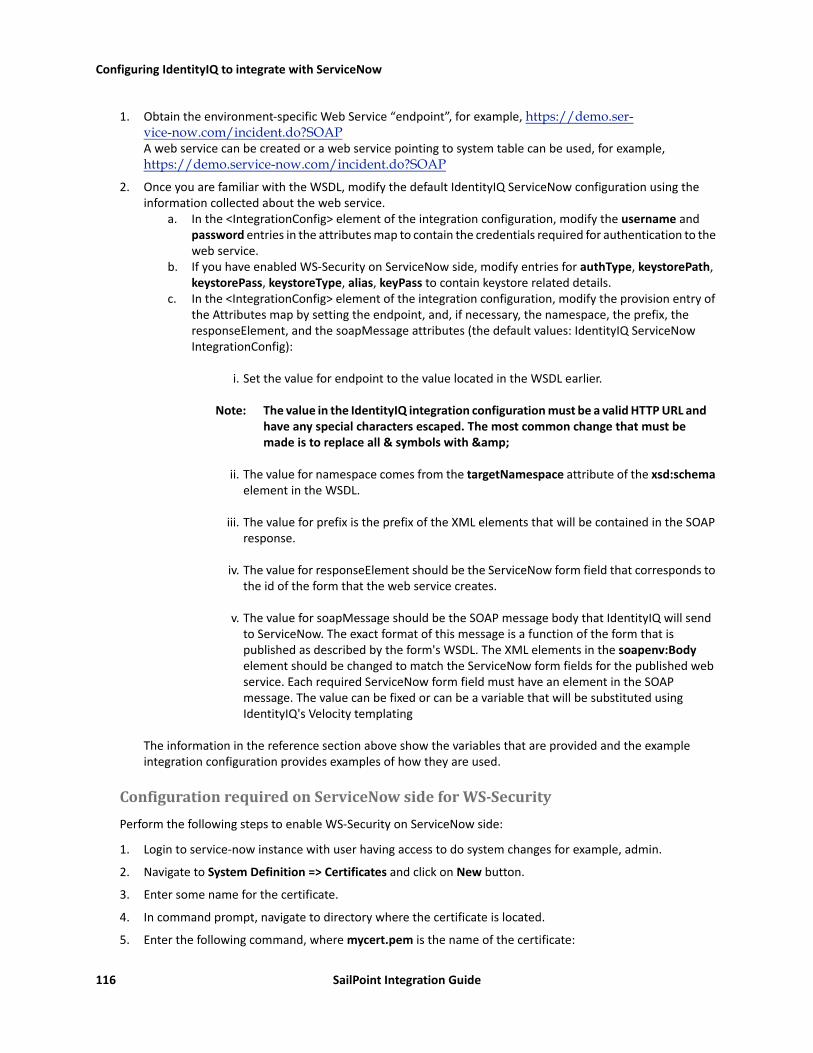
Configuring IdentityIQ to integrate with ServiceNow
1. Obtain the environment-specific Web Service “endpoint”, for example, https://demo.ser-vice-now.com/incident.do?SOAP A web service can be created or a web service pointing to system table can be used, for example, https://demo.service-now.com/incident.do?SOAP
2. Once you are familiar with the WSDL, modify the default IdentityIQ ServiceNow configuration using the information collected about the web service.
a. In the <IntegrationConfig> element of the integration configuration, modify the username and password entries in the attributes map to contain the credentials required for authentication to the web service.
b. If you have enabled WS-Security on ServiceNow side, modify entries for authType, keystorePath, keystorePass, keystoreType, alias, keyPass to contain keystore related details.
c. In the <IntegrationConfig> element of the integration configuration, modify the provision entry of the Attributes map by setting the endpoint, and, if necessary, the namespace, the prefix, the responseElement, and the soapMessage attributes (the default values: IdentityIQ ServiceNow IntegrationConfig):
i. Set the value for endpoint to the value located in the WSDL earlier.
Note: The value in the IdentityIQ integration configuration must be a valid HTTP URL and have any special characters escaped. The most common change that must be made is to replace all & symbols with &
ii. The value for namespace comes from the targetNamespace attribute of the xsd:schema element in the WSDL.
iii. The value for prefix is the prefix of the XML elements that will be contained in the SOAP response.
iv. The value for responseElement should be the ServiceNow form field that corresponds to the id of the form that the web service creates.
v. The value for soapMessage should be the SOAP message body that IdentityIQ will send to ServiceNow. The exact format of this message is a function of the form that is published as described by the form's WSDL. The XML elements in the soapenv:Body element should be changed to match the ServiceNow form fields for the published web service. Each required ServiceNow form field must have an element in the SOAP message. The value can be fixed or can be a variable that will be substituted using IdentityIQ's Velocity templating
The information in the reference section above show the variables that are provided and the example integration configuration provides examples of how they are used.
ConfigurationrequiredonServiceNowsideforWS-SecurityPerform the following steps to enable WS-Security on ServiceNow side:
1. Login to service-now instance with user having access to do system changes for example, admin.
2. Navigate to System Definition => Certificates and click on New button.
3. Enter some name for the certificate.
4. In command prompt, navigate to directory where the certificate is located.
5. Enter the following command, where mycert.pem is the name of the certificate:
116 SailPoint Integration Guide
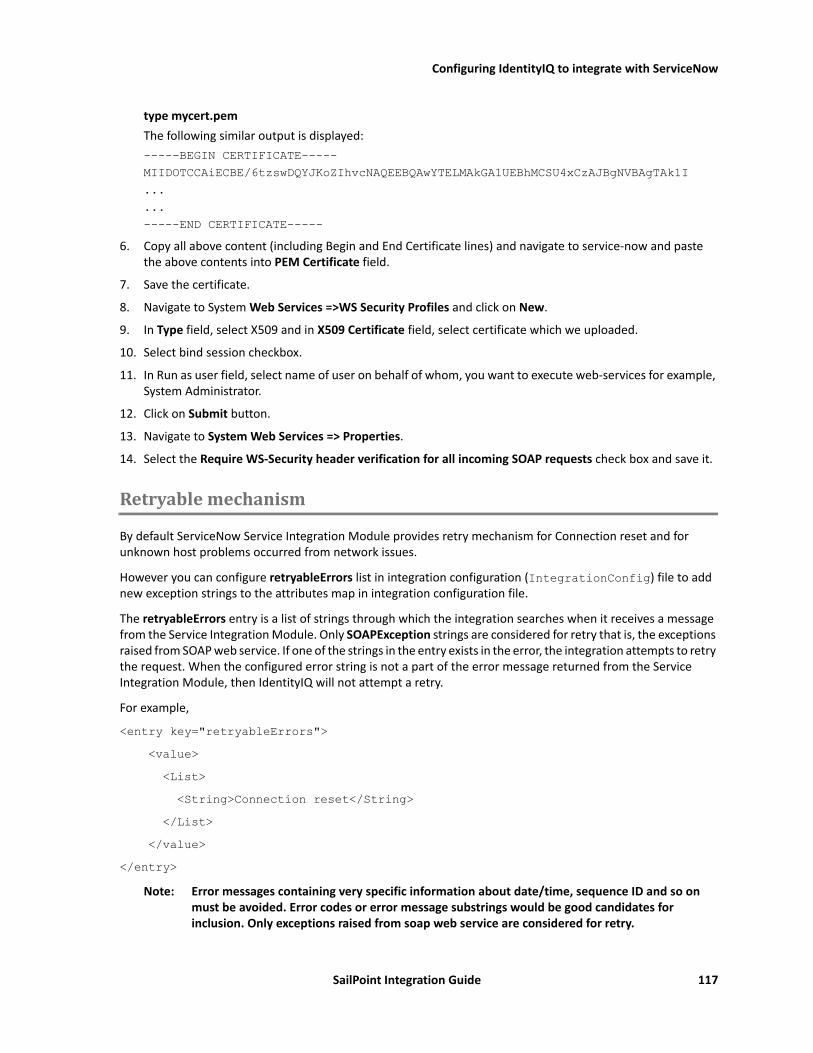
Configuring IdentityIQ to integrate with ServiceNow
type mycert.pem The following similar output is displayed:-----BEGIN CERTIFICATE-----MIIDOTCCAiECBE/6tzswDQYJKoZIhvcNAQEEBQAwYTELMAkGA1UEBhMCSU4xCzAJBgNVBAgTAk1I......-----END CERTIFICATE-----
6. Copy all above content (including Begin and End Certificate lines) and navigate to service-now and paste the above contents into PEM Certificate field.
7. Save the certificate.
8. Navigate to System Web Services =>WS Security Profiles and click on New.
9. In Type field, select X509 and in X509 Certificate field, select certificate which we uploaded.
10. Select bind session checkbox.
11. In Run as user field, select name of user on behalf of whom, you want to execute web-services for example, System Administrator.
12. Click on Submit button.
13. Navigate to System Web Services => Properties.
14. Select the Require WS-Security header verification for all incoming SOAP requests check box and save it.
Retryablemechanism
By default ServiceNow Service Integration Module provides retry mechanism for Connection reset and for unknown host problems occurred from network issues.
However you can configure retryableErrors list in integration configuration (IntegrationConfig) file to add new exception strings to the attributes map in integration configuration file.
The retryableErrors entry is a list of strings through which the integration searches when it receives a message from the Service Integration Module. Only SOAPException strings are considered for retry that is, the exceptions raised from SOAP web service. If one of the strings in the entry exists in the error, the integration attempts to retry the request. When the configured error string is not a part of the error message returned from the Service Integration Module, then IdentityIQ will not attempt a retry.
For example,
<entry key="retryableErrors"> <value> <List> <String>Connection reset</String> </List> </value></entry>
Note: Error messages containing very specific information about date/time, sequence ID and so on must be avoided. Error codes or error message substrings would be good candidates for inclusion. Only exceptions raised from soap web service are considered for retry.
SailPoint Integration Guide 117

Upgrade
Upgrade
Perform the following procedure for upgrading IdentityIQ ServiceNow Service Integration Module for Service Request from version 7.1 to 7.2:
1. IdentityIQ ServiceNow Service Integration Module update set for Service Request must be applied on Servi-ceNow instance.For more information, see “Pre-requisites” on page 106.
2. Ensure that the ServiceNow Service Integration Module user must be assigned the appropriate Service Integration Module Administrator role. For more information, see “Pre-requisites” on page 106.
3. Delete the earlier IntegrationConfig object for ‘ServiceNow Integration’ from IdentityIQ debug pages.
4. On the IdentityIQ side the ServiceNow Service Integration Module Integration Configuration file for Service Request must be re-imported after performing the corresponding changes.For more information about the Integration Configuration files, see “Configuring IdentityIQ to integrate with ServiceNow” on page 110.
5. On the ServiceNow side, navigate to the newly retrieved application that is, SailPoint Service Integration Module ==> Scripted Web Services and inactive the old scripted web services that is, ScRequestGenerator (https://demo.service-now.com/x_sapo_iiq_sim_ScRequestGenerator.do?WSDL)
Samplescenario
The sample integration scenario is built around a sample system as shown in the following figure:
In the sample scenario SailPoint IdentityIQ will be issuing change request to ServiceNow based on the results of a scheduled user entitlement and access review. As a result of managing user access process, IdentityIQ will open ServiceNow tickets to control the flow of the manual fulfillment process.
118 SailPoint Integration Guide

Troubleshooting
Scenario1. The LifeCycleManager request for the access of an employee (Identity) on business critical applications.
2. IdentityIQ evaluates the provisioning plan to enact the access requests required for the user:a. IdentityIQ policy describes the integration execution path for LDAP as being via an automated pro-
visioning system. b. IdentityIQ policy describes the integration execution path for RDBMS as being via an automated
ServiceNow Service Integration Module.
3. IdentityIQ creates a ticket in ServiceNow: a. IdentityIQ uses the provision interface to open a ticket within ServiceNow, passing in details of the
changes required to the RDBMS system. b. ServiceNow responds with the ticket number. c. IdentityIQ stores the ticket number under the Access Request for later audit and review.
4. IdentityIQ synchronizes ticket status:a. The ticket is assigned to the appropriate ServiceDesk user/ group in the ServiceNow.b. The status of ticket in ServiceNow is updated by ServiceDesk user/ group.c. IdentityIQ synchronizes the status of ticket from ServiceNow and update the access request items
status.
Troubleshooting
This section provides the resolutions for the following errors that may be encountered while setting up and configuring ServiceNow Service integration Module.
Note: Enter the following command to enable log4j tracing on ServiceNow component: log4j.logger.sailpoint.integration.servicenow=debug,file
1-‘AuthorizationRequired’errormessagesThe following type of error messages appear when the authorization data is not sent to ServiceNow:
Caused by: org.apache.axis2.AxisFault: Transport error: 401 Error: Authorization RequiredResolution: Verify the procedure to configure appropriate authorization mechanism. For more information on the procedure, see “Configuration procedure” on page 115.
2-ForcertificatebasedauthenticationtheIdentityIQServerandServiceNowinstancemusthavecorrecttimeset.For certificate based authentication, ensure that the IdentityIQ Server and ServiceNow instance have the correct date, time, and timezone set.
3-WhentheTestConnectionfailserrormessagesaredisplayedinIdentityIQandlogfileofWebSphereThe following error message is displayed in IdentityIQ:
Unable to engage module: rampartThe following error message is displayed in the log file of WebSphere:
SailPoint Integration Guide 119
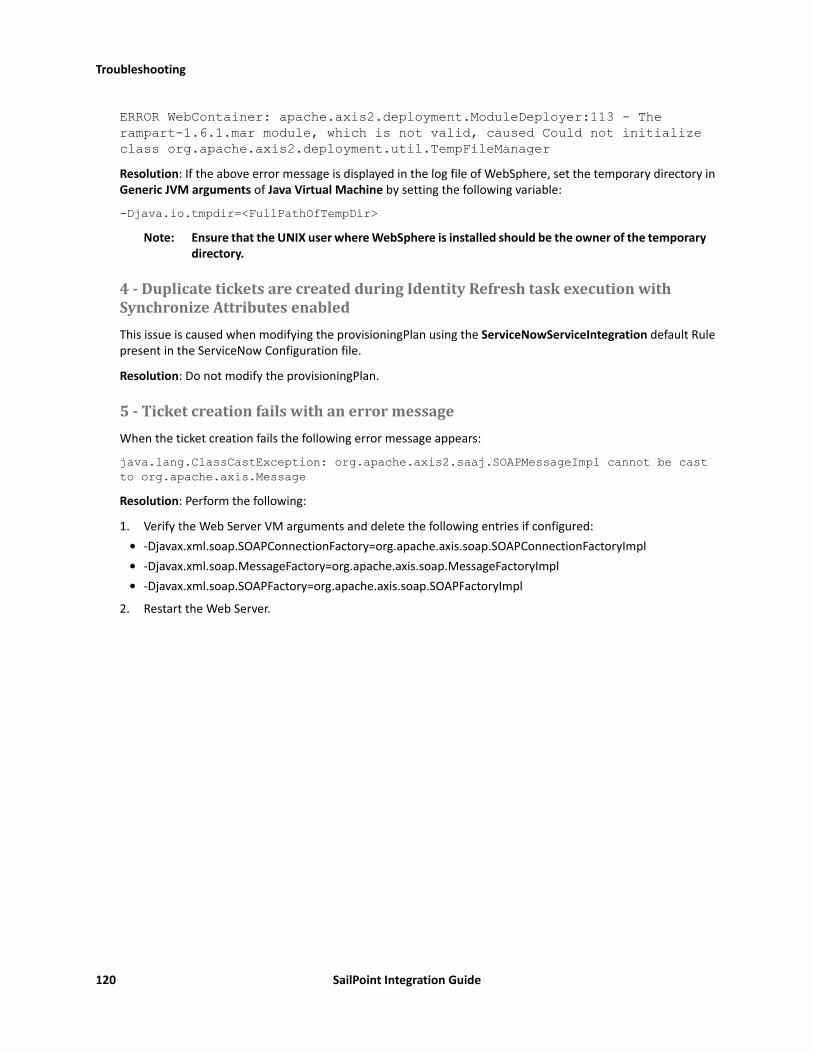
Troubleshooting
ERROR WebContainer: apache.axis2.deployment.ModuleDeployer:113 - The rampart-1.6.1.mar module, which is not valid, caused Could not initialize class org.apache.axis2.deployment.util.TempFileManagerResolution: If the above error message is displayed in the log file of WebSphere, set the temporary directory in Generic JVM arguments of Java Virtual Machine by setting the following variable:
-Djava.io.tmpdir=<FullPathOfTempDir>Note: Ensure that the UNIX user where WebSphere is installed should be the owner of the temporary
directory.
4-DuplicateticketsarecreatedduringIdentityRefreshtaskexecutionwithSynchronizeAttributesenabledThis issue is caused when modifying the provisioningPlan using the ServiceNowServiceIntegration default Rule present in the ServiceNow Configuration file.
Resolution: Do not modify the provisioningPlan.
5-TicketcreationfailswithanerrormessageWhen the ticket creation fails the following error message appears:
java.lang.ClassCastException: org.apache.axis2.saaj.SOAPMessageImpl cannot be cast to org.apache.axis.MessageResolution: Perform the following:
1. Verify the Web Server VM arguments and delete the following entries if configured:• -Djavax.xml.soap.SOAPConnectionFactory=org.apache.axis.soap.SOAPConnectionFactoryImpl• -Djavax.xml.soap.MessageFactory=org.apache.axis.soap.MessageFactoryImpl• -Djavax.xml.soap.SOAPFactory=org.apache.axis.soap.SOAPFactoryImpl
2. Restart the Web Server.
120 SailPoint Integration Guide
Overview
Chapter15:SailPointHPServiceManagerServiceIntegrationModule
The following topics are discussed in this chapter:Overview. . . . . . . . . . . . . . . . . . . . . . . . . . . . . . . . . . . . . . . . . . . . . . . . . . . . . . . . . . . . . . . . . . . . . . . . . . . . . . . . . 125Supported features . . . . . . . . . . . . . . . . . . . . . . . . . . . . . . . . . . . . . . . . . . . . . . . . . . . . . . . . . . . . . . . . . . . . . . . . 125Supported platforms . . . . . . . . . . . . . . . . . . . . . . . . . . . . . . . . . . . . . . . . . . . . . . . . . . . . . . . . . . . . . . . . . . . . . . . 126Pre-requisites . . . . . . . . . . . . . . . . . . . . . . . . . . . . . . . . . . . . . . . . . . . . . . . . . . . . . . . . . . . . . . . . . . . . . . . . . . . . . 126Configuring HP Service Manager for IdentityIQ Integration . . . . . . . . . . . . . . . . . . . . . . . . . . . . . . . . . . . . . . . 129
Retryable mechanism . . . . . . . . . . . . . . . . . . . . . . . . . . . . . . . . . . . . . . . . . . . . . . . . . . . . . . . . . . . . . . . . . . 136Additional information . . . . . . . . . . . . . . . . . . . . . . . . . . . . . . . . . . . . . . . . . . . . . . . . . . . . . . . . . . . . . . . . . . . . . 136Troubleshooting. . . . . . . . . . . . . . . . . . . . . . . . . . . . . . . . . . . . . . . . . . . . . . . . . . . . . . . . . . . . . . . . . . . . . . . . . . . 138
Overview
This Integration Module creates Service Requests, Incidents and Change Requests in HP Service Manager for the configured operations (for example, Change Password, Request Entitlement and so on) for the configured application.
Supportedfeatures
HP Service Manager Service Integration Module supports the following features:• Creates the following types of tickets in HP Service Manger through provisioning request in IdentityIQ:
- Service Request
- Incident
- Change • Support for Service Catalog, Incident Management and Change Management Modules in HP Service
Manager.Note: For Service Catalog Module, following options of the Connector drop down list are
supported: - Open New Request - Open an Incident - Open a Change
• Fetching the status of Service Request, Incident or Change from HP Service Manager and update the status of the respective Access Requests in IdentityIQ.
• Retry mechanism for Create Ticket request failure
SailPoint Integration Guide 125

Supported platforms
Supportedplatforms
SailPoint HP Service Manager Service Integration Module supports the following version of Service Manager:• HP Service Manager version 9.5• HP Service Manager version 9.4• HP Service Manager version 9.3
Pre-requisites• Ensure that the (one of the) following WSDL is accessible:
- For Service Request: http://<host>:<port>/SM/7/SM/7/ServiceCatalogAPI.wsdl
- For Incident Request: http://<host>:<port>/SM/7/IncidentManagement.wsdl
- For Change Request: http://<host>:<port>/SM/7/ChangeManagement.wsdl
Where <host> is the host name of the system where HP Service Manager is setup and <port> is port number configured for the above web services on HP Service Manager setup.Alternatively, use a Soap UI tool to submit a simple request (for example, incident). For convenience you can use the basic authentication mechanism for authorization with SOAP UI tool to confirm that the web service layer is functional.
• (Only for Service Request)
- To enable Service Request and perform any operation, you must create a Catalog Item in Service Catalog module. For more information on the procedure for creating a Catalog Item, see “Creating New Service Request Catalog Item” on page 137.
- If Identity Name on IdentityIQ does not match the Contact Name on HP Service Manager, perform the steps mentioned in “Exporting user details from HP Service Manager” on page 137 and “Importing user details from HP Service Manager to IdentityIQ” on page 137.
PermissionforHPServiceManagerUserTo obtain the minimum permission required for a HP Service Manager User, perform the following:
1. Create a new contact as follows:
- On HP Service Manager page, navigate to System Administration ==> Base System Configuration ==> Scheduled Maintenance ==> Contacts
Under the Contact tab, enter Contact Name and Full Name. Click on Add button on the top of the page.
2. Create new operators as follows:
- On the left page, navigate to System Administration ==> Ongoing Maintenance ==> Operators
- Enter the following details and click on Add.
• Login Name
• Full Name
• Contact ID
• Default Company
126 SailPoint Integration Guide
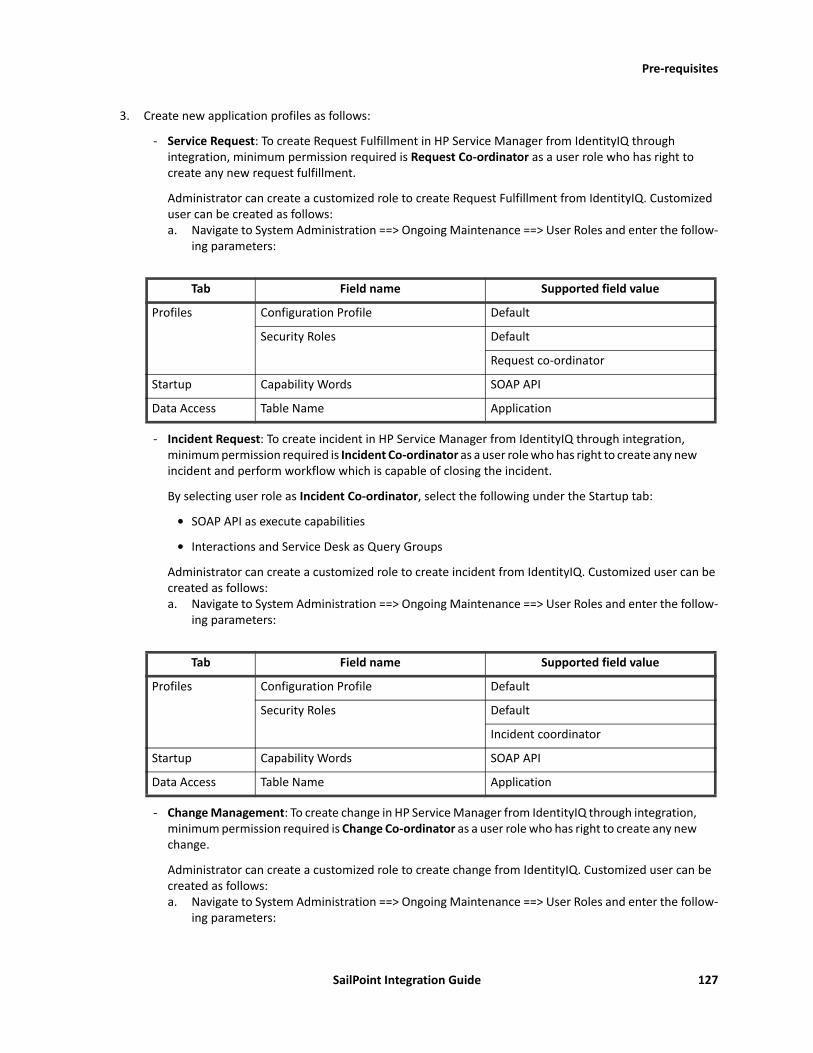
Pre-requisites
3. Create new application profiles as follows:
- Service Request: To create Request Fulfillment in HP Service Manager from IdentityIQ through integration, minimum permission required is Request Co-ordinator as a user role who has right to create any new request fulfillment.
Administrator can create a customized role to create Request Fulfillment from IdentityIQ. Customized user can be created as follows:a. Navigate to System Administration ==> Ongoing Maintenance ==> User Roles and enter the follow-
ing parameters:
- Incident Request: To create incident in HP Service Manager from IdentityIQ through integration, minimum permission required is Incident Co-ordinator as a user role who has right to create any new incident and perform workflow which is capable of closing the incident.
By selecting user role as Incident Co-ordinator, select the following under the Startup tab:
• SOAP API as execute capabilities
• Interactions and Service Desk as Query Groups
Administrator can create a customized role to create incident from IdentityIQ. Customized user can be created as follows:a. Navigate to System Administration ==> Ongoing Maintenance ==> User Roles and enter the follow-
ing parameters:
- Change Management: To create change in HP Service Manager from IdentityIQ through integration, minimum permission required is Change Co-ordinator as a user role who has right to create any new change.
Administrator can create a customized role to create change from IdentityIQ. Customized user can be created as follows:a. Navigate to System Administration ==> Ongoing Maintenance ==> User Roles and enter the follow-
ing parameters:
Tab Field name Supported field value
Profiles Configuration Profile Default
Security Roles Default
Request co-ordinator
Startup Capability Words SOAP API
Data Access Table Name Application
Tab Field name Supported field value
Profiles Configuration Profile Default
Security Roles Default
Incident coordinator
Startup Capability Words SOAP API
Data Access Table Name Application
SailPoint Integration Guide 127
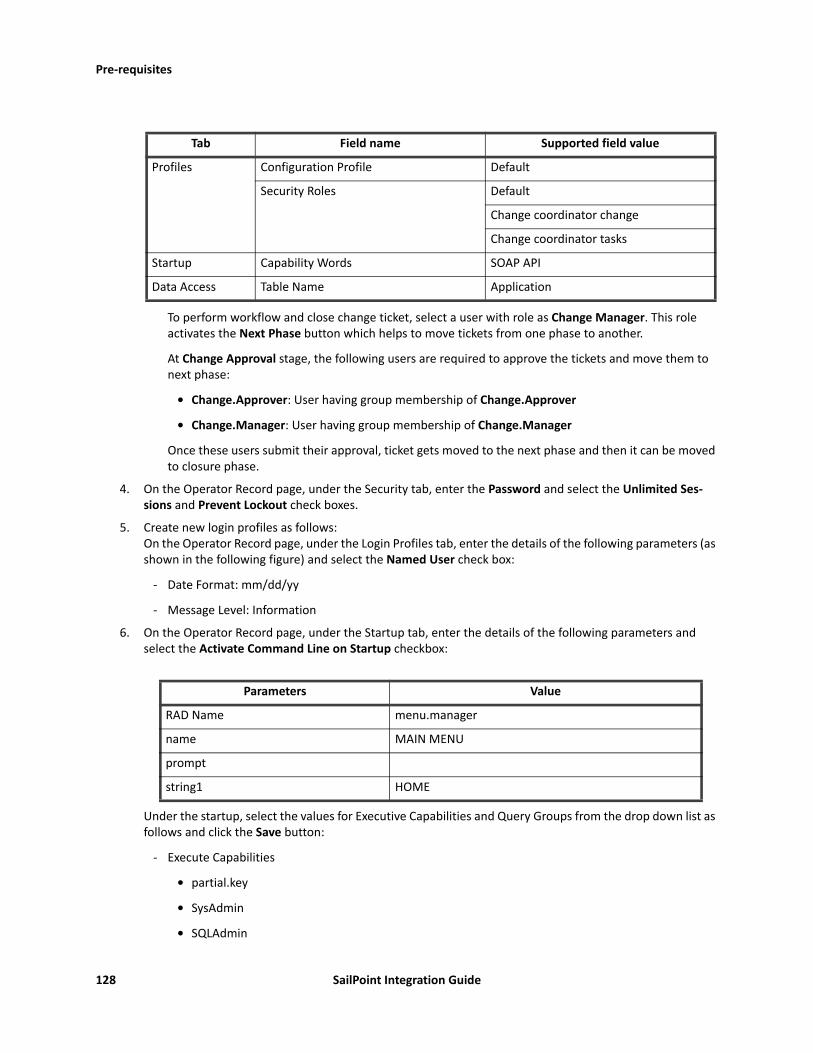
Pre-requisites
To perform workflow and close change ticket, select a user with role as Change Manager. This role activates the Next Phase button which helps to move tickets from one phase to another.
At Change Approval stage, the following users are required to approve the tickets and move them to next phase:
• Change.Approver: User having group membership of Change.Approver
• Change.Manager: User having group membership of Change.Manager
Once these users submit their approval, ticket gets moved to the next phase and then it can be moved to closure phase.
4. On the Operator Record page, under the Security tab, enter the Password and select the Unlimited Ses-sions and Prevent Lockout check boxes.
5. Create new login profiles as follows:On the Operator Record page, under the Login Profiles tab, enter the details of the following parameters (as shown in the following figure) and select the Named User check box:
- Date Format: mm/dd/yy
- Message Level: Information
6. On the Operator Record page, under the Startup tab, enter the details of the following parameters and select the Activate Command Line on Startup checkbox:
Under the startup, select the values for Executive Capabilities and Query Groups from the drop down list as follows and click the Save button:
- Execute Capabilities
• partial.key
• SysAdmin
• SQLAdmin
Tab Field name Supported field value
Profiles Configuration Profile Default
Security Roles Default
Change coordinator change
Change coordinator tasks
Startup Capability Words SOAP API
Data Access Table Name Application
Parameters Value
RAD Name menu.manager
name MAIN MENU
prompt
string1 HOME
128 SailPoint Integration Guide

Configuring HP Service Manager for IdentityIQ Integration
• SOAP API
• user.favorites
- Query Groups
• Service Desk
• Interactions
ConfiguringHPServiceManagerforIdentityIQIntegration
This section provides the required information for configuring IdentityIQ to integrate with HP Service Manager. This integration enables IdentityIQ to create tickets for requested revocations, track ticket numbers in association with revocation tasks, and update IdentityIQ with the status of current tickets.
SailPoint provides a default HP Service Manager Service Integration configuration. This configuration implements the integration between IdentityIQ and the HP to fulfill creation of tickets based on IdentityIQ access certification remediation events.
Configuration• The default configuration is located in iiqHome/WEB-INF/config/ directory, where iiqHome is the
location where IdentityIQ was installed.• When integrating with the following requests, modify the respective config files and import in IdentityIQ:
For more information, refer to the “Sample XML files for Service, Incident and Change Request” on page 131 section.
• The integration configuration must include the following entries:
- endpoint: URL to the web service
- namespace: namespace of the XML returned by the web service
- prefix: prefix associated with the namespaceNote: For more information of the entries in the IntegrationConfig file, see Appendix: A:
Common Identity Management Integration Configuration.
Request XML files
Service Request HPServiceManagerIntegrationConfigForRequest.xmlIncident Request HPServiceManagerIntegrationConfigForIncident.xmlChange Request HPServiceManagerIntegrationConfigForChange.xml
SailPoint Integration Guide 129

Configuring HP Service Manager for IdentityIQ Integration
• The integration configuration includes the following entries if the web service side of the integration is configured for authentication using the SOAP authentication specifications:
- username
- password
- statusMap
- statusMapClosureCodeThe web services and authentication entries are consumed by configuration entries for each web service. They can be positioned either within the configuration entries themselves or as children of the Attributes element. Entries that are children of the Attributes element can be thought of as global values, while entries within the configuration entities can be thought of as local.For example, if both entries share the same authentication credentials, those credentials might be placed in the Attributes element as peers of the configuration entries and the integration code searches the parent entry for the credentials if they are not found in the configuration entries. Conversely, if the configuration entries have different endpoints (are handled by separate web services), each configuration entry specifies the endpoint of the web service to call and any value outside of the configuration entry is ignored.
• Following are the supported configuration entries for integration with HP Service Manager. These entries are children of the integration Attributes element:
- provision
- getRequestStatusThe values of each are Map elements containing key/value pairings of the configuration data. They contain the specific data needed by the provision() and getRequestStatus() methods of the IdentityIQ integration executor and correspond to HP Service Manager Web Service methods.The provision and getRequestStatus entries contain the following entries:
Note: The (asterisk) * sign represents the required entries. Before a template is sent to the web service, it is processed by the Velocity template engine. The integration code provides different data objects to Velocity for evaluation based on the integration method.
Entries Description
soapMessage* Full XML template of the entire SOAP envelope that is sent to the web service. The integration code first runs this template through Apache's Velocity template engine to provide the data needed by the web service.
responseElement* Name of the element containing the results of the web service call (for example, the element containing the ticket number opened by the web service in response to the call from IdentityIQ).
SOAPAction* SOAP requests action
endpoint* HP Service Manager endpoint to send create and get ticket status
namespace* Namespace of the XML returned by the web service
prefix* Prefix associated with the namespace
130 SailPoint Integration Guide

Configuring HP Service Manager for IdentityIQ Integration
The following calls pass the respective objects to Velocity:
Both calls have access to a timestamp variable containing a current Date object and a dateFormatter object. The dateFormatter is built using an optional dateFormat attribute from the config object. If the dateFormat attribute does not exist, the formatter defaults to the pattern EEE, d MMM yyyy HH:mm:ss z.
SampleXMLfilesforService,IncidentandChangeRequestIf any changes required in the mapping, change the value/key values in “statusMap” and “statusMapClosureCode” as mentioned in the following tables for Service, Incident and Change Request:
Call Objects Description
provision config The integration configuration for provision, represented as a Map
provisioninPlan The data model of the provision request
getRequestStatus config The integration configuration for getRequestStatus, represented as a Map
requestID The string ID of the request whose status is being queried
SailPoint Integration Guide 131
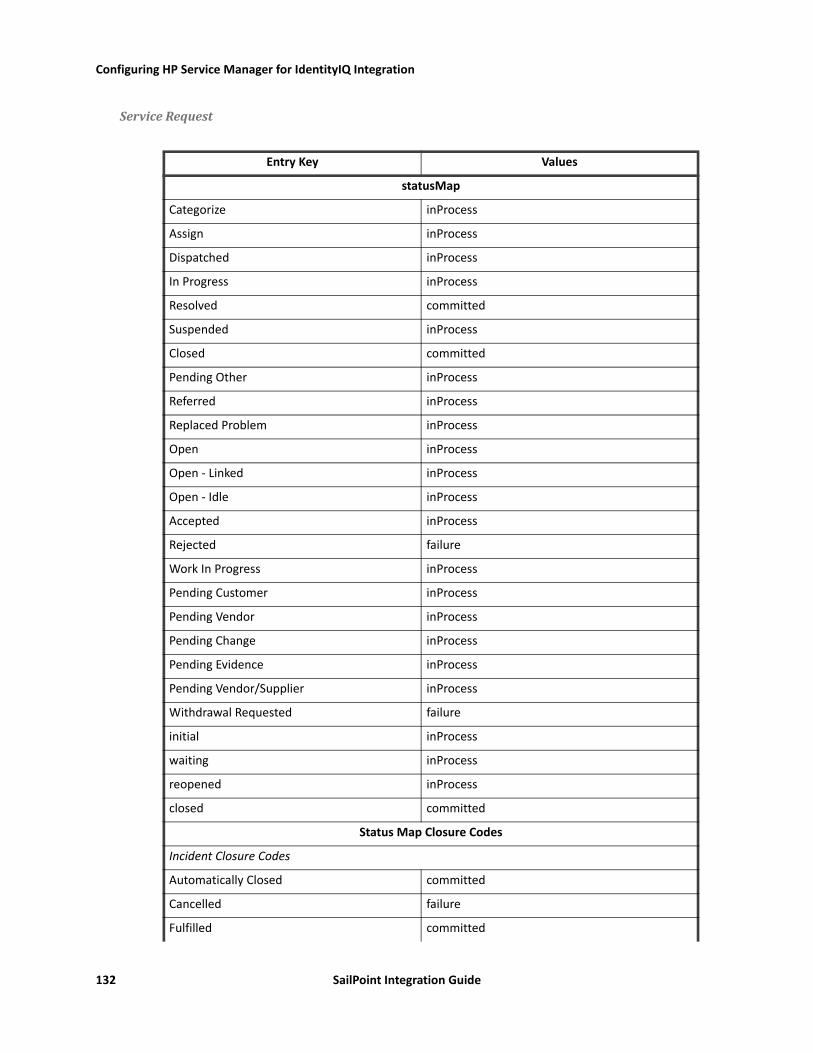
Configuring HP Service Manager for IdentityIQ Integration
ServiceRequest
Entry Key Values
statusMap
Categorize inProcess
Assign inProcess
Dispatched inProcess
In Progress inProcess
Resolved committed
Suspended inProcess
Closed committed
Pending Other inProcess
Referred inProcess
Replaced Problem inProcess
Open inProcess
Open - Linked inProcess
Open - Idle inProcess
Accepted inProcess
Rejected failure
Work In Progress inProcess
Pending Customer inProcess
Pending Vendor inProcess
Pending Change inProcess
Pending Evidence inProcess
Pending Vendor/Supplier inProcess
Withdrawal Requested failure
initial inProcess
waiting inProcess
reopened inProcess
closed committed
Status Map Closure Codes
Incident Closure Codes
Automatically Closed committed
Cancelled failure
Fulfilled committed
132 SailPoint Integration Guide

Configuring HP Service Manager for IdentityIQ Integration
IncidentRequest
Not Reproducible committed
Out of Scope committed
Request Rejected failure
Solved by Change/Service Request committed
Solved by User Instruction committed
Solved by Workaround committed
Unable to solve failure
Withdrawn by User failure
Invalid failure
Request Fulfilment Closure Codes
1 - Successful committed
2 - Successful (with problems) committed
3 - Failed failure
4 - Rejected (financial) failure
5 - Rejected (technical) failure
6 - Rejected (security) failure
7 - Withdrawn failure
8 - Withdrawal requested by customer failure
9 - Cancelled failure
10 - Denied request fulfillment failure
11 - Automatically Closed committed
Change Request Closure Codes
1 committed
2 committed
3 failure
4 failure
5 failure
6 failure
Entry key Values
statusMap
Closed committed
Pending Other inProcess
Entry Key Values
SailPoint Integration Guide 133

Configuring HP Service Manager for IdentityIQ Integration
ChangeRequest
Referred inProcess
Replaced Problem inProcess
Resolved committed
Open inProcess
Accepted inProcess
Rejected failure
Work In Progress inProcess
Pending Customer inProcess
Pending Vendor inProcess
Pending Change inProcess
Status Map Closure Codes
Automatically Closed committed
Not Reproducible committed
Out of Scope committed
Request Rejected committed
Solved by Change/Service Request committed
Solved by User Instruction committed
Solved by Workaround committed
Unable to solve failure
Withdrawn by User failure
Diagnosed Successfully committed
No Fault Found committed
No User Response failure
Resolved Successfully committed
Entry Key Values
statusMap
initial inProcess
waiting inProcess
reopened inProcess
closed committed
Status Map Closure Codes
1 - Successful committed
Entry key Values
134 SailPoint Integration Guide
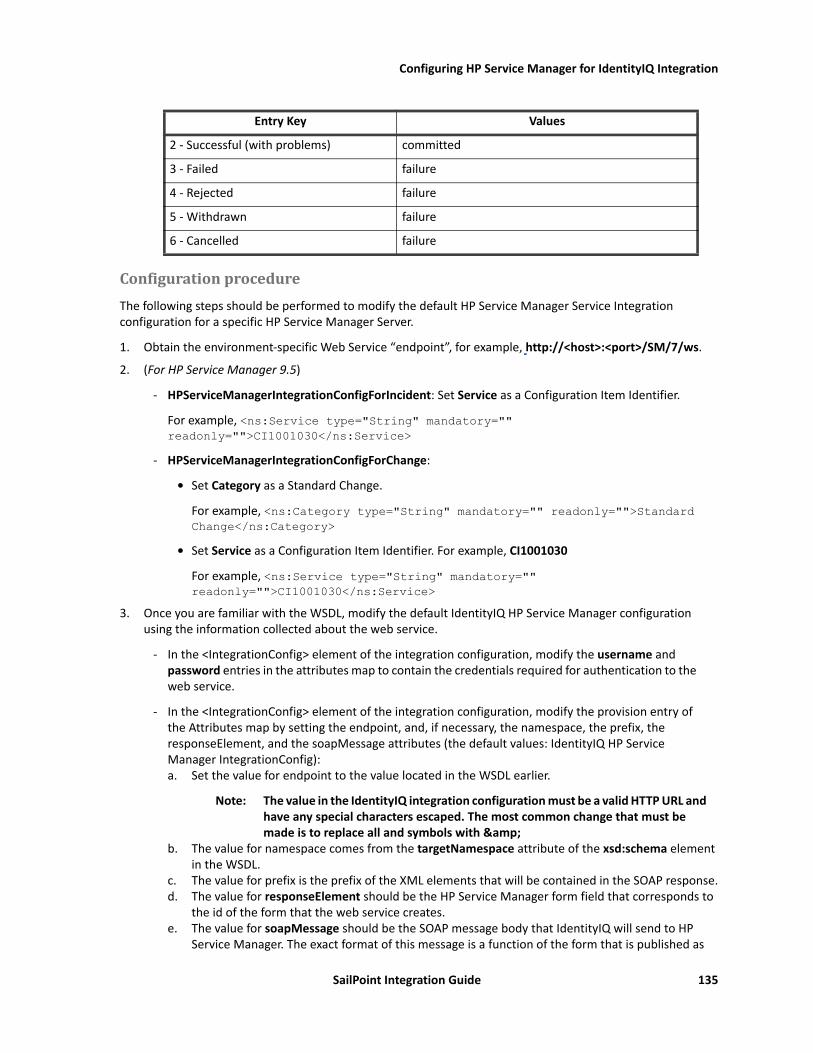
Configuring HP Service Manager for IdentityIQ Integration
ConfigurationprocedureThe following steps should be performed to modify the default HP Service Manager Service Integration configuration for a specific HP Service Manager Server.
1. Obtain the environment-specific Web Service “endpoint”, for example, http://<host>:<port>/SM/7/ws.
2. (For HP Service Manager 9.5)
- HPServiceManagerIntegrationConfigForIncident: Set Service as a Configuration Item Identifier.
For example, <ns:Service type="String" mandatory="" readonly="">CI1001030</ns:Service>
- HPServiceManagerIntegrationConfigForChange:
• Set Category as a Standard Change.
For example, <ns:Category type="String" mandatory="" readonly="">Standard Change</ns:Category>
• Set Service as a Configuration Item Identifier. For example, CI1001030
For example, <ns:Service type="String" mandatory="" readonly="">CI1001030</ns:Service>
3. Once you are familiar with the WSDL, modify the default IdentityIQ HP Service Manager configuration using the information collected about the web service.
- In the <IntegrationConfig> element of the integration configuration, modify the username and password entries in the attributes map to contain the credentials required for authentication to the web service.
- In the <IntegrationConfig> element of the integration configuration, modify the provision entry of the Attributes map by setting the endpoint, and, if necessary, the namespace, the prefix, the responseElement, and the soapMessage attributes (the default values: IdentityIQ HP Service Manager IntegrationConfig):a. Set the value for endpoint to the value located in the WSDL earlier.
Note: The value in the IdentityIQ integration configuration must be a valid HTTP URL and have any special characters escaped. The most common change that must be made is to replace all and symbols with &
b. The value for namespace comes from the targetNamespace attribute of the xsd:schema element in the WSDL.
c. The value for prefix is the prefix of the XML elements that will be contained in the SOAP response.d. The value for responseElement should be the HP Service Manager form field that corresponds to
the id of the form that the web service creates. e. The value for soapMessage should be the SOAP message body that IdentityIQ will send to HP
Service Manager. The exact format of this message is a function of the form that is published as
2 - Successful (with problems) committed
3 - Failed failure
4 - Rejected failure
5 - Withdrawn failure
6 - Cancelled failure
Entry Key Values
SailPoint Integration Guide 135

Additional information
described by the form's WSDL. The XML elements in the soapenv:Body element should be changed to match the HP Service Manager form fields for the published web service. Each required HP Service Manager form field must have an element in the SOAP message. The value can be fixed or can be a variable that will be substituted using IdentityIQ's Velocity templating
Note: For more information on <ManagedResources> in the IntegrationConfig file, see Appendix: A: Common Identity Management Integration Configuration.
4. (Only for Service Request) In the <IntegrationConfig> element of the integration configuration, modify the catalogItem entry of attributes map. Provide key as Managed Application name and value as Request Item Name. This request item must be present on HP Service Manager’s Service Request. For example, <entry key=”Demo App1” value=”Identity Access Request Item”/>
5. (Only for Service Request) Modify the Rule for applicationName and provide its value same as that of appli-cation created while importing HP Users in IdentityIQ.
Note: In Rule, the ‘attributeName’ represents the Application's link attribute and is used to populate the ‘requestedFor’ field in Service Request.
The information in the reference section above show the variables that are provided and the example integration configuration provides examples of how they are used.
Retryablemechanism
By default HP Service Manager Service Integration Module provides retry mechanism for Connection reset and for unknown host problems occurred from network issues.
However you can configure retryableErrors list in integration configuration (IntegrationConfig) file to add new exception strings to the attributes map in integration configuration file.
The retryableErrors entry is a list of strings through which the integration searches when it receives a message from the Service Integration Module. Only SOAPException strings are considered for retry that is, the exceptions raised from SOAP web service. If one of the strings in the entry exists in the error, the integration attempts to retry the request. When the configured error string is not a part of the error message returned from the Service Integration Module, then IdentityIQ will not attempt a retry.
For example,
<entry key="retryableErrors"> <value> <List> <String>Connection reset</String> </List> </value></entry>
Note: Error messages containing very specific information about date/time, sequence ID and so on must be avoided. Error codes or error message substrings would be good candidates for inclusion. Only exceptions raised from soap web service are considered for retry.
Additionalinformation
This section describes the additional information related to HP Service Manager Integration Module.
136 SailPoint Integration Guide
Additional information
CreatingNewServiceRequestCatalogItem
1. Log on to HP Service Manager as an administrator.
2. (Only for 9.5) Navigate to Service Catalog => Administration => Manage Items and click on Add New Ser-vice Item link.(Only for 9.4 and 9.3) Navigate to Service Catalog => Administration => Manage Catalog and click on Add New Service Catalog Item link.
3. Mention the mandatory details and click Next.
4. Select the Connector as Open New Request.
5. Select Service Desk as the option from the In Category as drop down and click Next.
6. (Only for 9.4 and 9.5) Provide appropriate values to the following fields and click Next:
- Request Category
- Request SubCategory
- Department
- Request ModelSelect appropriate values from the drop down of Urgency, Impact and Assignment.
7. (Only for 9.3) Provide appropriate value for Request Category.
8. Click Finish.
ExportinguserdetailsfromHPServiceManager
1. Log on to HP Service Manager as an Administrator.
2. Navigate to System Administration => Base System Configuration => Contacts and click on Search. All user contact list must be displayed.
3. Navigate to More => Export to Text File and select the check box for Export Column Headers.
4. Select the radio button for Comma Separated Value (CSV) in the Delimiter selection.
5. Click on OK.
6. A file with name export.csv will get downloaded to your location.
ImportinguserdetailsfromHPServiceManagertoIdentityIQ
1. Navigate to application definition and click on Add New Application button.
2. Enter the application name in the Name field and select the owner.
3. Select the application type as DelimitedFile.
4. Mention the File Path details under the Configuration tab and list the column names under the Columns section in the same order as that present in the export.csv file.
5. Insert the value as ‘,’ in the Delimiter field.
6. Under the Schema tab click on Discover Schema Attributes and mention Identity attribute as Contact Name.
7. Click on Preview and Save the application.
SailPoint Integration Guide 137

Troubleshooting
Note: For more information on correlating the users on HP Service Manager with identities on IdentityIQ, see “SailPoint Delimited Connector” chapter of the SailPoint Direct Connectors Administration and Configuration Guide.
Troubleshooting
This section provides the resolutions for the following errors that may be encountered while setting up and configuring HP Service Manager Service Integration Module.
1-‘AuthorizationRequired’errormessagesThe following type of error messages appear when the authorization data is not sent to HP Service Manager:
Caused by: org.apache.axis2.AxisFault: Transport error: 401 Error: Authorization RequiredResolution: Verify the procedure to configure appropriate authorization mechanism. For more information on the procedure, see “Configuration procedure” on page 135.
2-DocumentTypeDeclaration(DTD)parsingerrorsThe DTD parsing errors appear when the following JVM arguments are not defined for your application server:
• -Djavax.xml.soap.SOAPConnectionFactory=org.apache.axis2.saaj.SOAPConnectionFactoryImpl
• -Djavax.xml.soap.MessageFactory=org.apache.axis2.saaj.MessageFactoryImpl• -Djavax.xml.soap.SOAPFactory=org.apache.axis2.saaj.SOAPFactoryImpl
Resolution: Ensure that the application is pointing to the correct java runtime (that is, 1.6) and the above mentioned JVM arguments are defined for application server.
3-MaxsessionexceedederrorWhen multiple requests are in open state and IdentityIQ tries to fetch the latest status with those requests, the following error message is displayed:
Max session exceeded error Resolution: Perform the following:
1. Increase the shared memory in sm.ini file to twice or thrice the size.
2. Add the following attributive to sm.ini file:threadsperprocess:50
4-ChangeTicketstatusgetscommittedonIdentityIQeventhoughticketisopenonHPServiceManager.Resolution: Perform the following:
1. On HP Service Manager navigate to Tailoring => Web Services => Format control and search for cm3r name.
138 SailPoint Integration Guide
Troubleshooting
2. Delete the following parameter line from Initialization Expressions of cm3r:
- HP Service Manager 9.5:
if (jscall("ProcessDesignerEnablement.isChangeEnabled")=true and jscall("ProcessDesignerEnablement.isMigratedWorkflowUsed", "cm3r", category in $file)=false and null(completion.code in $file)) then (completion.code in $file=1)
- HP Service Manager 9.4 or 9.3:
if (jscall("ProcessDesignerEnablement.isChangeEnabled")=true and null(completion.code in $file)) then (completion.code in $file=1)
3. Click Save.
5-Whenperforminganyprovisioningactionanerrormessageisdisplayed.The following error message is displayed, when performing any of the provisioning actions:
sailpoint.integration.hpservicemanager.HPServiceManagerSoapIntegration$MissingResponseElementException: Unable to find a response element matching qname {http://schemas.hp.com/SM/7}CartItemId. Check the integration config.Resolution: Ensure that the user is present on HP Service Manager for which the ticket is being created.
6-ChangeTicketstatusdisplayspendingstatusonIdentityIQevenwhenticketisclosedonHPServiceManager.When HP status and closure code are not mapped in integration configuration file, change ticket status displays pending status on IdentityIQ even when ticket is closed on HP Service Manager.
For example,
In 2016-08-02 16:52:48,870 ERROR Workflow Event Thread 1 sailpoint.integration.AbstractIntegrationExecutor:380 - Unknown request status: 1 - Successful is retryablejava.lang.Exception: Unknown request status: 1 - SuccessfulResolution: Map HP status code with corresponding IdentityIQ status code in statusMap or statusMapCloserCode in Integration configuration file.
<entry key="1 - Successful " value="committed" />
7-TicketdoesnotexistonHPServiceManagerWhen IdentityIQ access request is updated with ticket number, ticket does not exist on HP Service Manager version 9.5.
Resolution: For HP Service Manager version 9.5 there are changes in Incident and Change configuration files. Ensure that the configuration steps mentioned in the “Configuring HP Service Manager for IdentityIQ Integration” on page 129 for Incident and Change Requests are performed appropriately.
SailPoint Integration Guide 139

Troubleshooting
140 SailPoint Integration Guide

Overview
Chapter16:SailPointBMCRemedyServiceDeskServiceIntegrationModule
The following topics are discussed in this chapter:Overview. . . . . . . . . . . . . . . . . . . . . . . . . . . . . . . . . . . . . . . . . . . . . . . . . . . . . . . . . . . . . . . . . . . . . . . . . . . . . . . . . 141Supported features . . . . . . . . . . . . . . . . . . . . . . . . . . . . . . . . . . . . . . . . . . . . . . . . . . . . . . . . . . . . . . . . . . . . . . . . 141Supported platforms . . . . . . . . . . . . . . . . . . . . . . . . . . . . . . . . . . . . . . . . . . . . . . . . . . . . . . . . . . . . . . . . . . . . . . . 141Pre-requisites . . . . . . . . . . . . . . . . . . . . . . . . . . . . . . . . . . . . . . . . . . . . . . . . . . . . . . . . . . . . . . . . . . . . . . . . . . . . . 142Basic configuration . . . . . . . . . . . . . . . . . . . . . . . . . . . . . . . . . . . . . . . . . . . . . . . . . . . . . . . . . . . . . . . . . . . . . . . . 142Configuring BMC Remedy AR System for IdentityIQ Integration. . . . . . . . . . . . . . . . . . . . . . . . . . . . . . . . . . . . 143Configuring IdentityIQ for BMC Remedy Action Request System Integration . . . . . . . . . . . . . . . . . . . . . . . . . 145Sample scenario . . . . . . . . . . . . . . . . . . . . . . . . . . . . . . . . . . . . . . . . . . . . . . . . . . . . . . . . . . . . . . . . . . . . . . . . . . . 150
Overview
The integration between SailPoint and BMC Remedy Service Desk enables customers to create incidents and change requests in BMC Remedy Service Desk for the configured operations (for example, Change Password, Request Entitlement and so on) for the configured application. The seamless integration of SailPoint and BMC Remedy Service Desk Service Integration Module eliminates the need to build and maintain a custom integration, and speeds time-to-deployment.
Note: Enter the following command to enable log4j tracing on BMC Remedy Service Integration Module component: log4j.logger.sailpoint.integration.SOAPIntegration=trace,file
Supportedfeatures
BMC Remedy Service Integration Module supports the following features:• creating ticket for all provisioning operations that can be performed on Target Application accounts• getting the status of the created tickets• creating multiple tickets in Remedy System via IdentityIQ
Supportedplatforms
SailPoint BMC Remedy Service Desk Service Integration Module supports the following versions of BMC Remedy AR System:
• BMC Remedy AR System 9.1.00• BMC Remedy AR System 9.0.00
SailPoint Integration Guide 141

Pre-requisites
Pre-requisites• BMC Remedy Change Management Application must be installed• Ensure that the following softwares are operating correctly:
- BMC Remedy AR System
- BMC Remedy Change Management Application
Basicconfiguration
The integrated solution speeds the detection and remediation of identity management issues that increase the risk of compliance violations or security breaches, such as orphaned accounts, policy violations, and inappropriate access privileges. Organizations can take advantage of a centralized approach spanning thousands of users and hundreds of resources to strengthen IT controls and provide proof of compliance to auditors and executive management. The seamless integration of SailPoint and BMC Remedy eliminates the need to build and maintain a custom integration, and speeds time-to-deployment.
For any IT resources managed by BMC Remedy Service Desk, IdentityIQ automatically creates a trouble ticket within Remedy Service Desk, passing along all relevant identity data and reviewer comments to populate the ticket.
To ensure revocation requests get delivered and implemented, IdentityIQ manages all remediation and revocation requests within a guaranteed delivery model.
To determine the status of user accounts, IdentityIQ performs closed-loop audits on remediation requests and compares the actual state of user privileges with the original change request. If the request is still open, an alert will be sent to the reviewer for prompt action and closure.
The integration itself has been designed to be quick to install and easy to use. It makes use of Web Services via the Remedy Mid Tier to broker communications between the SailPoint server and the AR System server. On the backside of a user recertification, policy remediation action or access request action, the IdentityIQ server will direct provisioning and service desk requests to the configured implementers. Based on the IntegrationConfig configured for each target application, service desk request are issues to a given remediation/implementation point. Once the IntegrationConfig for Remedy has been loaded into the IdentityIQ server, all change/remediation actions result in the creation of new service desk request.
At the completion of the change control cycle within IdentityIQ, an “Open Ticket” request is made over the appropriate SOAP channel to the Mid Tier. From here change request tickets are opened and the new ticket number is returned to IdentityIQ. The schema for the service request is defined in the IntegrationConfig and allows for the flexibility to transfer complete details on the service desk request. The default settings will create a basic ticket as shown in the following figure (Figure 1—Change request).
142 SailPoint Integration Guide
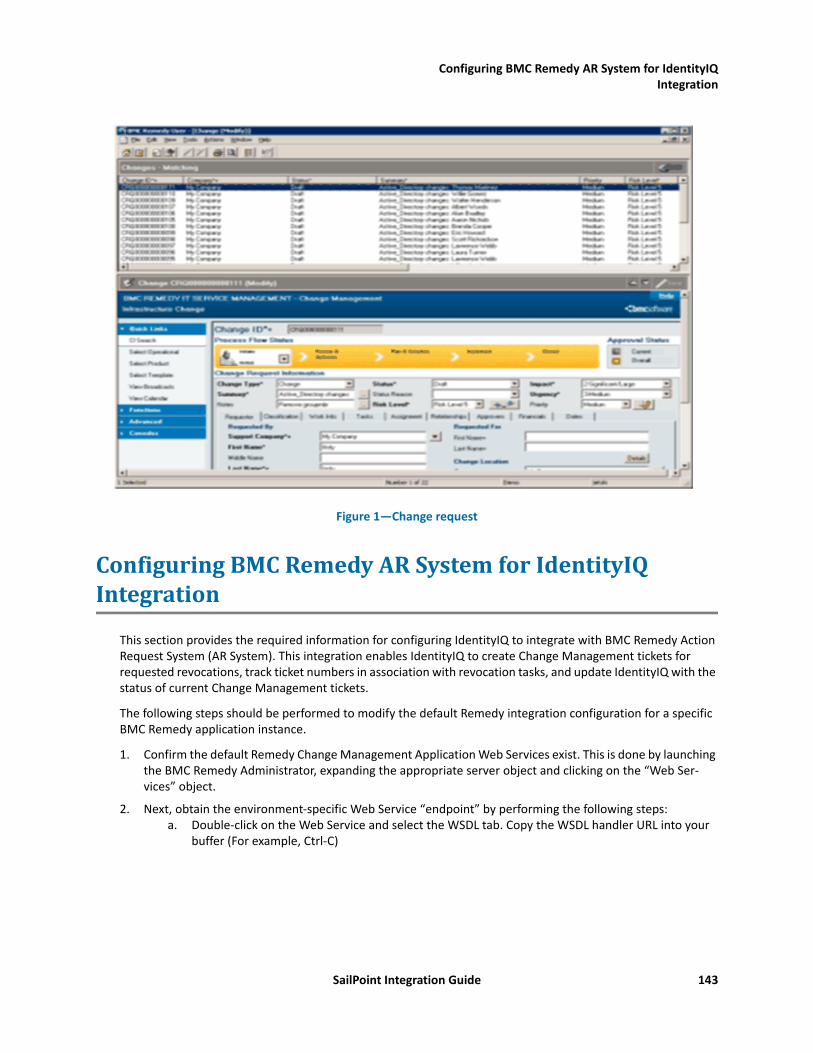
Configuring BMC Remedy AR System for IdentityIQ Integration
Figure 1—Change request
ConfiguringBMCRemedyARSystemforIdentityIQIntegration
This section provides the required information for configuring IdentityIQ to integrate with BMC Remedy Action Request System (AR System). This integration enables IdentityIQ to create Change Management tickets for requested revocations, track ticket numbers in association with revocation tasks, and update IdentityIQ with the status of current Change Management tickets.
The following steps should be performed to modify the default Remedy integration configuration for a specific BMC Remedy application instance.
1. Confirm the default Remedy Change Management Application Web Services exist. This is done by launching the BMC Remedy Administrator, expanding the appropriate server object and clicking on the “Web Ser-vices” object.
2. Next, obtain the environment-specific Web Service “endpoint” by performing the following steps:a. Double-click on the Web Service and select the WSDL tab. Copy the WSDL handler URL into your
buffer (For example, Ctrl-C)
SailPoint Integration Guide 143
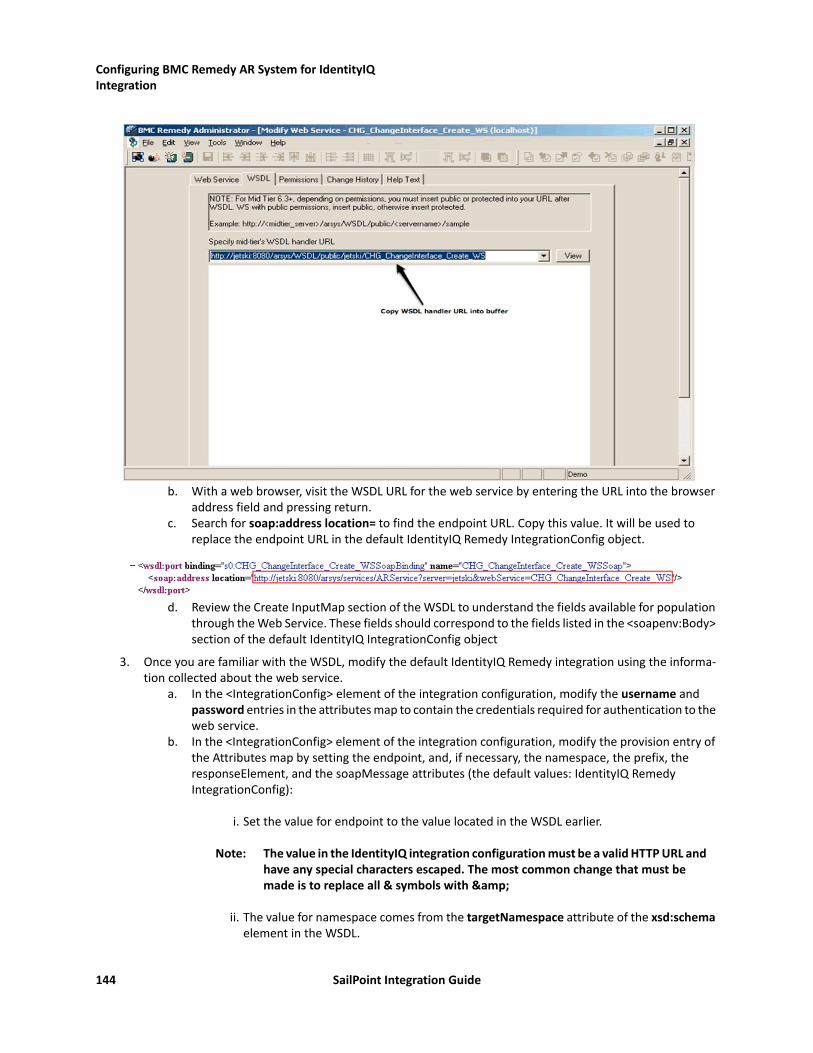
Configuring BMC Remedy AR System for IdentityIQ Integration
b. With a web browser, visit the WSDL URL for the web service by entering the URL into the browser address field and pressing return.
c. Search for soap:address location= to find the endpoint URL. Copy this value. It will be used to replace the endpoint URL in the default IdentityIQ Remedy IntegrationConfig object.
d. Review the Create InputMap section of the WSDL to understand the fields available for population through the Web Service. These fields should correspond to the fields listed in the <soapenv:Body> section of the default IdentityIQ IntegrationConfig object
3. Once you are familiar with the WSDL, modify the default IdentityIQ Remedy integration using the informa-tion collected about the web service.
a. In the <IntegrationConfig> element of the integration configuration, modify the username and password entries in the attributes map to contain the credentials required for authentication to the web service.
b. In the <IntegrationConfig> element of the integration configuration, modify the provision entry of the Attributes map by setting the endpoint, and, if necessary, the namespace, the prefix, the responseElement, and the soapMessage attributes (the default values: IdentityIQ Remedy IntegrationConfig):
i. Set the value for endpoint to the value located in the WSDL earlier.
Note: The value in the IdentityIQ integration configuration must be a valid HTTP URL and have any special characters escaped. The most common change that must be made is to replace all & symbols with &
ii. The value for namespace comes from the targetNamespace attribute of the xsd:schema element in the WSDL.
144 SailPoint Integration Guide

Configuring IdentityIQ for BMC Remedy Action Request System Integration
iii. The value for prefix is the prefix of the XML elements that will be contained in the SOAP response sent by the mid tier server.
iv. The value for responseElement should be the ARS form field that corresponds to the id of the form that the web service creates.
v. The value for soapMessage should be the SOAP message body that IdentityIQ will send to ARS. The exact format of this message is a function of the form that is published as described by the form's WSDL. The XML elements in the soapenv:Body element should be changed to match the ARS form fields for the published web service. Each required ARS form field must have an element in the SOAP message. The value can be fixed or can be a variable that will be substituted using IdentityIQ's Velocity templating.
The information in the reference section above show the variables that are provided and the example integration configuration provides examples of how they are used.
ConfiguringIdentityIQforBMCRemedyActionRequestSystemIntegration
This is intended as an introduction to the configuration needed to integrate IdentityIQ with the BMC Remedy Action Request System. This integration enables IdentityIQ to interact with many of the product solutions that are built on top of the AR System Server including BMC Remedy Change Management, BMC Remedy IT Service Management Suite, and BMC Remedy Service Desk.
BMCRemedyActionRequestSystemIntegration
SailPoint provides a default Remedy integration configuration. This configuration implements the integration between IdentityIQ and the Remedy Change Management Application to fulfill creation of tickets based on IdentityIQ access certification remediation events.
The default configuration is located in iiqHome/WEB-INF/config/remedy-Integration.xml directory, where iiqHome is the location where IdentityIQ was installed.
This section explains the various entries that are specific for this integration. For more information of the entries in the IntegrationConfig file, see Appendix A: Common Identity Management Integration Configuration.
The integration configuration must include the following entries:• endpoint: URL to the web service• namespace: namespace of the XML returned by the web service• prefix: prefix associated with the namespace
The integration configuration includes the following entries if the web service side of the integration is configured for authentication using the SOAP authentication specifications:
• username• password• authentication• locale• timeZone• statusMap
SailPoint Integration Guide 145

Configuring IdentityIQ for BMC Remedy Action Request System Integration
The integration configuration includes the following entries if the http authentication is configured:• basicAuthType: if http authentication is configured the value of basicAuthType is true.• httpUserName• httpUserPass
User must modify remedy integration configuration file with the following entries to create incident in BMC Remedy Action Request System:
• endpoint• responseElement key • SOAP envelop and body details• status mapping
The web services and authentication entries are consumed by configuration entries for each web service. They can be positioned either within the configuration entries themselves or as children of the Attributes element. Entries that are children of the Attributes element can be thought of as global values, while entries within the configuration entities can be thought of as local.
For example, if both entries share the same authentication credentials, those credentials might be placed in the Attributes element as peers of the configuration entries and the integration code searches the parent entry for the credentials if they are not found in the configuration entries. Conversely, if the configuration entries have different endpoints (are handled by separate web services), each configuration entry specifies the endpoint of the web service to call and any value outside of the configuration entry is ignored.
There are two supported configuration entries for integration with Remedy. These entries are children of the integration Attributes element:
• getRequestStatus• provision
The values of each are Map elements containing key/value pairings of the configuration data. They contain the specific data needed by the getRequestStatus()and provision() methods of the IdentityIQ integration executor and correspond to Remedy Web Service methods.
The getRequestStatus and provision entries contain the following entries:• soapMessage (required): full XML template of the entire SOAP envelope that is sent to the web service.
The integration code first runs this template through Apache's Velocity template engine to provide the data needed by the web service.
• responseElement (required): name of the element containing the results of the web service call (for example, the element containing the ticket number opened by the web service in response to the call from IdentityIQ).
• statusMap (optional, see “Sample getRequestStatus entry” on page 147 for an example)• username (optional)• password (optional)• authentication (optional)• locale (optional)• timeZone (optional)• endpoint (optional)• namespace (optional)• prefix (optional)
Before a template is sent to the web service, it is processed by the Velocity template engine. The integration code provides different data objects to Velocity for evaluation based on the integration method.
146 SailPoint Integration Guide

Configuring IdentityIQ for BMC Remedy Action Request System Integration
The provision call passes the following objects to Velocity:• config: the integration configuration for provision, represented as a Map• provisioningPlan: the data model of the provision request
The getRequestStatus call passes the following objects to Velocity:• config: the integration configuration for getRequestStatus, represented as a Map• requestID: the string ID of the request whose status is being queried
Both calls have access to a timestamp variable containing a current Date object and a dateFormatter object. The dateFormatter is built using an optional dateFormat attribute from the config object. If the dateFormat attribute does not exist, the formatter defaults to the pattern EEE, d MMM yyyy HH:mm:ss z.
SamplegetRequestStatusentry
Note: The entries contained in the Map are the only required entries. Any authentication information required by this integration is inherited from the parent Attributes element.
<entry key="getRequestStatus"> <value> <Map> <entry key="responseElement" value="Status"/> <entry key="soapMessage"> <!-- XML template – DO NOT add line breaks before the CDATA! --> <value><String><![CDATA[<?xml version="1.0" encoding="UTF-8"?><soapenv:Envelope xmlns:soapenv="http://schemas.xmlsoap.org/soap/envelope/" xmlns:xsd="http://www.w3.org/2001/XMLSchema" xmlns:xsi="http://www.w3.org/2001/XMLSchema-instance">#if ($config.username)<soapenv:Header><ns1:AuthenticationInfo xmlns:ns1="urn:AuthenticationInfo"> <ns1:userName>$config.username</ns1:userName> <ns1:password>$config.password</ns1:password> #if ($config.authentication) <ns1:authorization>$config.authentication</ns1:password>#end#if ($config.locale) <ns1:locale>$config.locale</ns1:password>#end#if ($config.timeZone) <ns1:timeZone>$config.timeZone</ns1:password>#end</ns1:AuthenticationInfo></soapenv:Header>#end<soapenv:Body> <iiq:Get xmlns:iiq="urn:GetAgreementWebService"> <iiq:Issue_ID>$requestID</iiq:Issue_ID> </iiq:Get> </soapenv:Body></soapenv:Envelope>]]> </value> </entry> </Map> </value></entry>
SailPoint Integration Guide 147
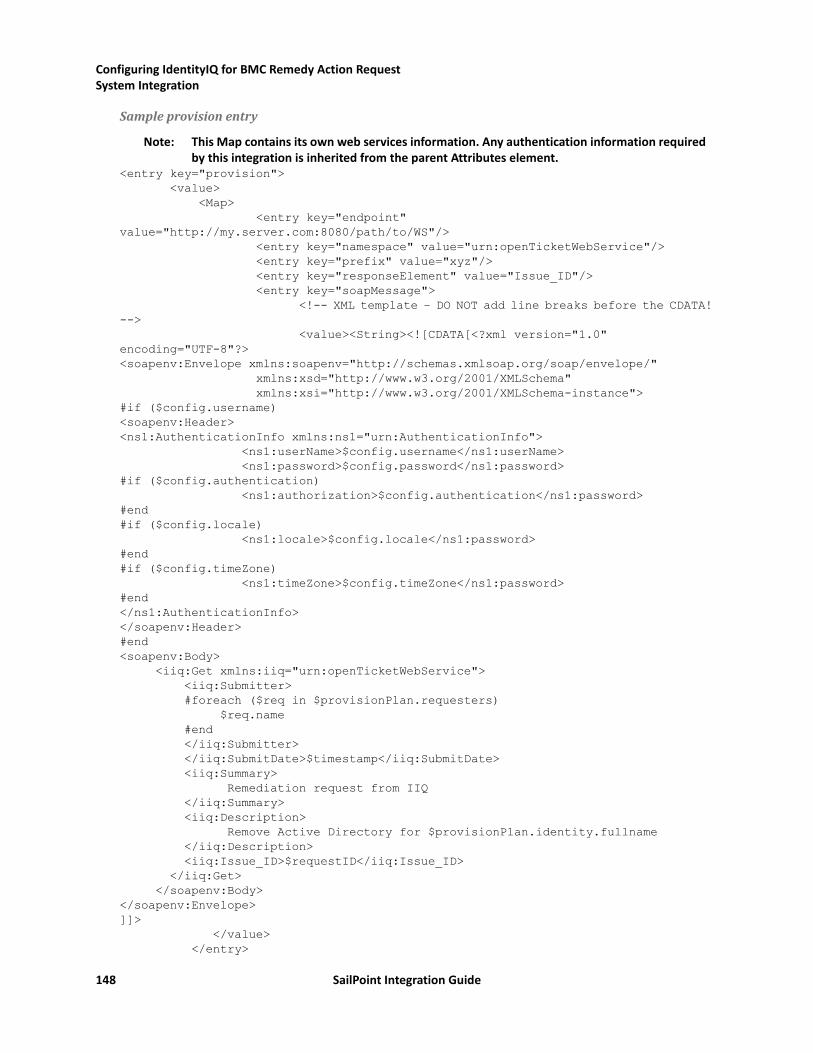
Configuring IdentityIQ for BMC Remedy Action Request System Integration
Sampleprovisionentry
Note: This Map contains its own web services information. Any authentication information required by this integration is inherited from the parent Attributes element.
<entry key="provision"> <value> <Map> <entry key="endpoint" value="http://my.server.com:8080/path/to/WS"/> <entry key="namespace" value="urn:openTicketWebService"/> <entry key="prefix" value="xyz"/> <entry key="responseElement" value="Issue_ID"/> <entry key="soapMessage"> <!-- XML template – DO NOT add line breaks before the CDATA! --> <value><String><![CDATA[<?xml version="1.0" encoding="UTF-8"?><soapenv:Envelope xmlns:soapenv="http://schemas.xmlsoap.org/soap/envelope/" xmlns:xsd="http://www.w3.org/2001/XMLSchema" xmlns:xsi="http://www.w3.org/2001/XMLSchema-instance">#if ($config.username)<soapenv:Header><ns1:AuthenticationInfo xmlns:ns1="urn:AuthenticationInfo"> <ns1:userName>$config.username</ns1:userName> <ns1:password>$config.password</ns1:password>#if ($config.authentication) <ns1:authorization>$config.authentication</ns1:password>#end#if ($config.locale) <ns1:locale>$config.locale</ns1:password>#end#if ($config.timeZone) <ns1:timeZone>$config.timeZone</ns1:password>#end</ns1:AuthenticationInfo></soapenv:Header>#end<soapenv:Body> <iiq:Get xmlns:iiq="urn:openTicketWebService"> <iiq:Submitter> #foreach ($req in $provisionPlan.requesters) $req.name #end </iiq:Submitter> </iiq:SubmitDate>$timestamp</iiq:SubmitDate> <iiq:Summary> Remediation request from IIQ </iiq:Summary> <iiq:Description> Remove Active Directory for $provisionPlan.identity.fullname </iiq:Description> <iiq:Issue_ID>$requestID</iiq:Issue_ID> </iiq:Get> </soapenv:Body></soapenv:Envelope>]]> </value> </entry>
148 SailPoint Integration Guide
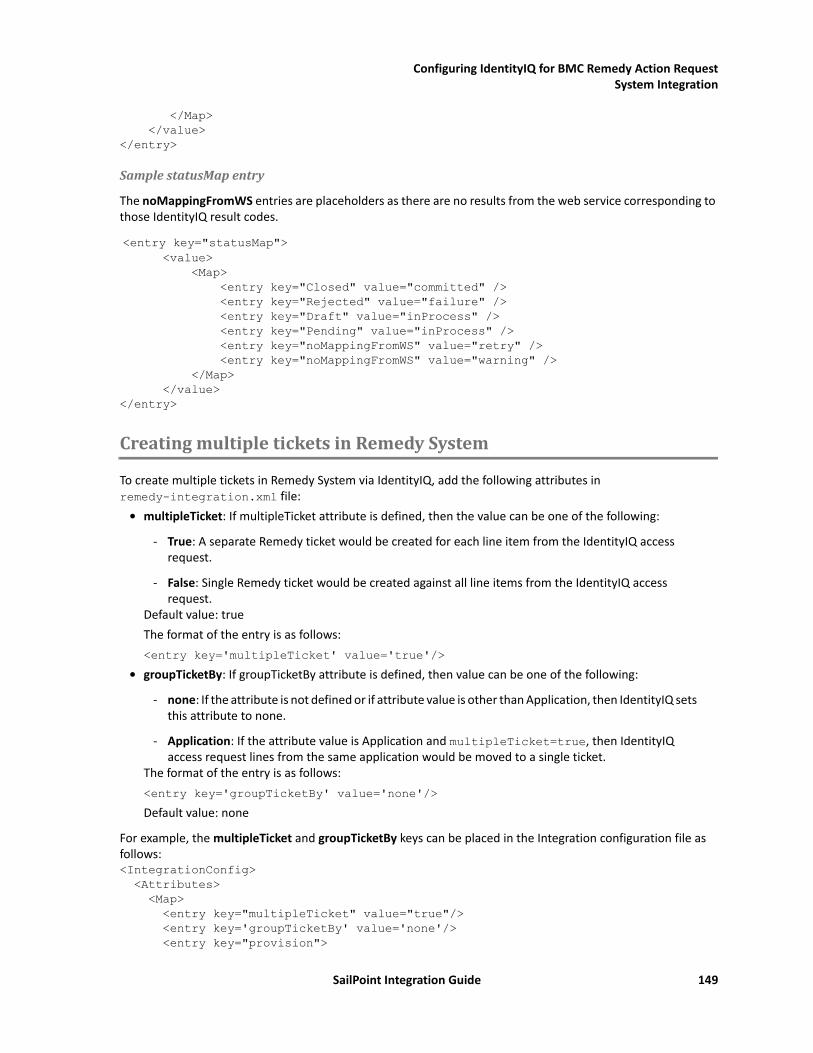
Configuring IdentityIQ for BMC Remedy Action Request System Integration
</Map> </value></entry>
SamplestatusMapentry
The noMappingFromWS entries are placeholders as there are no results from the web service corresponding to those IdentityIQ result codes.
<entry key="statusMap"> <value> <Map> <entry key="Closed" value="committed" /> <entry key="Rejected" value="failure" /> <entry key="Draft" value="inProcess" /> <entry key="Pending" value="inProcess" /> <entry key="noMappingFromWS" value="retry" /> <entry key="noMappingFromWS" value="warning" /> </Map> </value></entry>
CreatingmultipleticketsinRemedySystem
To create multiple tickets in Remedy System via IdentityIQ, add the following attributes in remedy-integration.xml file:
• multipleTicket: If multipleTicket attribute is defined, then the value can be one of the following:
- True: A separate Remedy ticket would be created for each line item from the IdentityIQ access request.
- False: Single Remedy ticket would be created against all line items from the IdentityIQ access request.
Default value: trueThe format of the entry is as follows:<entry key='multipleTicket' value='true'/>
• groupTicketBy: If groupTicketBy attribute is defined, then value can be one of the following:
- none: If the attribute is not defined or if attribute value is other than Application, then IdentityIQ sets this attribute to none.
- Application: If the attribute value is Application and multipleTicket=true, then IdentityIQ access request lines from the same application would be moved to a single ticket.
The format of the entry is as follows:<entry key='groupTicketBy' value='none'/>Default value: none
For example, the multipleTicket and groupTicketBy keys can be placed in the Integration configuration file as follows:<IntegrationConfig> <Attributes> <Map> <entry key="multipleTicket" value="true"/> <entry key='groupTicketBy' value='none'/> <entry key="provision">
SailPoint Integration Guide 149

Sample scenario
<value> <Map> <entry key="endpoint" value="%%REMEDY_REQ_TICKET_ENDPOINT%%"/> ... ... ... </Map> </value> </entry> </Map> </Attributes><IntegrationConfig>
Samplescenario
The sample integration scenario is built around a sample system. In the sample scenario SailPoint (IIQ) would be issuing a change request to BMC Remedy Change Management (RCM) based on the results of a scheduled user entitlement and access review. As a result of remediation actions in this account recertification process, IdentityIQ would open change requests to control the flow of the manual remediation process.
Scenario1. The ComplianceManager1 schedules an access review for a business critical application:
a. The certification is scheduled and assigned to ApplicationOwner1.b. ApplicationOwner1 receives an email with a link to the Online certification process as scheduled.
The link is followed to the open certification.c. ApplicationOwner1 decides that GroupA on system LDAP should be removed.d. ApplicationOwner1 decides that RoleA on system RDBMS should be removed.e. ApplicationOwner1 completes the certification and signs off the process.
2. IdentityIQ evaluates the provisioning plan to enact the remediation requests from the certification:a. IdentityIQ policy describes the integration execution path for LDAP as being via an automated pro-
visioning system.b. IdentityIQ policy describes the integration execution path for RDBMS as being via an automated
RCM integration.
3. IdentityIQ creates a service request in RCM:a. IdentityIQ uses the provision interface to open a service request within Remedy, passing in details
of the changes required to the RDBMS system. b. RCM responds with the service request number. c. IdentityIQ stores the service request number for later audit and review.
150 SailPoint Integration Guide

GRCIntegrationModuleThis section contains information on the following section:
• “SailPoint SAP GRC Integration Module”
Note: A minority of SailPoint customers have deployed the Integration Modules in this section. SailPoint will provide assistance during the deployment of these integrations. Additional troubleshooting, diagnostic, and best practice information beyond what is contained in this document will be provided on Compass, SailPoint's Online customer portal. In some instances, SailPoint will guide the deployment team and actively participate in the design, configuration, and testing of the integration to the managed system. For more specific information, refer to the Connector and Integration Deployment Center on Compass.

152 SailPoint Integration Guide

Introduction
Chapter17:SailPointSAPGRCIntegrationModule
The following topics are discussed in this chapter:Introduction . . . . . . . . . . . . . . . . . . . . . . . . . . . . . . . . . . . . . . . . . . . . . . . . . . . . . . . . . . . . . . . . . . . . . . . . . . . . . . 153Supported features . . . . . . . . . . . . . . . . . . . . . . . . . . . . . . . . . . . . . . . . . . . . . . . . . . . . . . . . . . . . . . . . . . . . . . . . 154Supported platforms . . . . . . . . . . . . . . . . . . . . . . . . . . . . . . . . . . . . . . . . . . . . . . . . . . . . . . . . . . . . . . . . . . . . . . . 155Pre-requisites . . . . . . . . . . . . . . . . . . . . . . . . . . . . . . . . . . . . . . . . . . . . . . . . . . . . . . . . . . . . . . . . . . . . . . . . . . . . . 155
SAP GRC Server Settings . . . . . . . . . . . . . . . . . . . . . . . . . . . . . . . . . . . . . . . . . . . . . . . . . . . . . . . . . . . . . . . . 155SAP Connector changes for supporting SAP GRC integration. . . . . . . . . . . . . . . . . . . . . . . . . . . . . . . . . . . 156Creating IdentityIQ application of type SAP GRC . . . . . . . . . . . . . . . . . . . . . . . . . . . . . . . . . . . . . . . . . . . . 156SAP GRC workflows . . . . . . . . . . . . . . . . . . . . . . . . . . . . . . . . . . . . . . . . . . . . . . . . . . . . . . . . . . . . . . . . . . . . 158
Minimum permissions required for SAP GRC user . . . . . . . . . . . . . . . . . . . . . . . . . . . . . . . . . . . . . . . . . . . . . . . 160Custom workflows provided for SAP GRC integration . . . . . . . . . . . . . . . . . . . . . . . . . . . . . . . . . . . . . . . . . . . . 161
SAP GRC Data Generator . . . . . . . . . . . . . . . . . . . . . . . . . . . . . . . . . . . . . . . . . . . . . . . . . . . . . . . . . . . . . . . . 161SAP GRC Request Executor . . . . . . . . . . . . . . . . . . . . . . . . . . . . . . . . . . . . . . . . . . . . . . . . . . . . . . . . . . . . . . 163
Importing SAP GRC Application Rule . . . . . . . . . . . . . . . . . . . . . . . . . . . . . . . . . . . . . . . . . . . . . . . . . . . . . . . . . . 164Viewing the reports . . . . . . . . . . . . . . . . . . . . . . . . . . . . . . . . . . . . . . . . . . . . . . . . . . . . . . . . . . . . . . . . . . . . . . . . 165Upgrade considerations . . . . . . . . . . . . . . . . . . . . . . . . . . . . . . . . . . . . . . . . . . . . . . . . . . . . . . . . . . . . . . . . . . . . 165Additional information . . . . . . . . . . . . . . . . . . . . . . . . . . . . . . . . . . . . . . . . . . . . . . . . . . . . . . . . . . . . . . . . . . . . . 166
Creating a RFC Connection on SAP GRC system . . . . . . . . . . . . . . . . . . . . . . . . . . . . . . . . . . . . . . . . . . . . . 166Configuring cross system on SAP GRC . . . . . . . . . . . . . . . . . . . . . . . . . . . . . . . . . . . . . . . . . . . . . . . . . . . . . 167(Optional) Support for additional parameters . . . . . . . . . . . . . . . . . . . . . . . . . . . . . . . . . . . . . . . . . . . . . . . 168
Troubleshooting. . . . . . . . . . . . . . . . . . . . . . . . . . . . . . . . . . . . . . . . . . . . . . . . . . . . . . . . . . . . . . . . . . . . . . . . . . . 169
Introduction
This chapter provides a guide to the integration between SAP GRC (Governance, Risk and Compliance) and IdentityIQ. This integration is used to leverage SAP GRC's ability to perform SOD (Separation of Duties) checks and take remediation or mitigation decisions within the SAP GRC. The mitigation decision must be taken in SAP GRC so that SAP GRC is aware of the mitigation controls which is applied on risks and would not report these risks till the time mitigation is applicable.
SailPoint SAP GRC Integration Module uses the SAP GRC Access Risk Analysis (ARA) and Access Request Management (ARM) web services which must be enabled before using the integration.
SailPoint Integration Guide 153

Supported features
Figure 1—SAP GRC Integration Module with IdentityIQ
SailPoint SAP GRC Integration Module (Figure 1 ) enables checking for risk in the request placed in IdentityIQ (containing SAP Direct Roles and Profiles) in the following method:
1. Request will be sent to the SAP GRC for proactive check.
2. ARA Web Service will check for the risk present in the request, if no risk is returned then IdentityIQ will con-tinue provisioning the request.
3. If ARA Web Service returns the risk in the request, then corresponding request is created in SAP GRC using the ARM Web Service.
4. IdentityIQ will continue with polling the request until response issued by SAP GRC.
5. On the basis of the response returned in step 4 above (approval or rejection by SAP GRC), IdentityIQ will continue with provisioning or rejection of the request.
Supportedfeatures
The SAP GRC Integration Module performs Risk Analysis for new and change account requests using Lifecycle Compliance Manager (LCM).
154 SailPoint Integration Guide
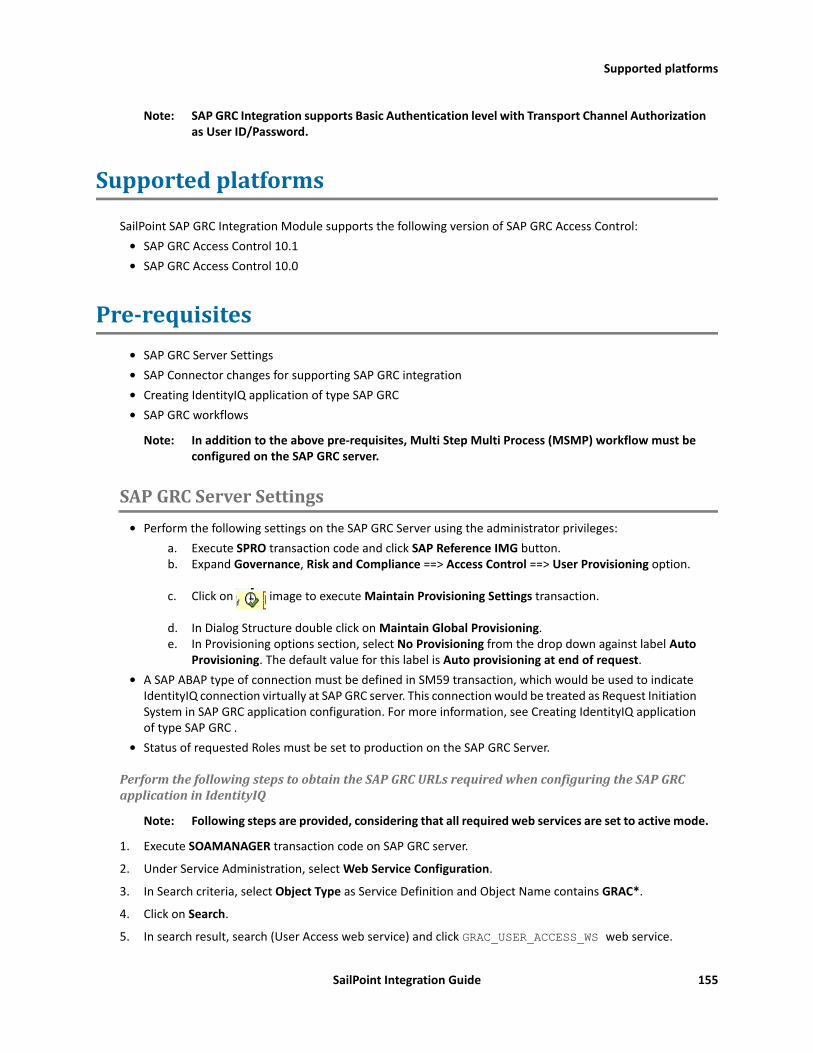
Supported platforms
Note: SAP GRC Integration supports Basic Authentication level with Transport Channel Authorization as User ID/Password.
Supportedplatforms
SailPoint SAP GRC Integration Module supports the following version of SAP GRC Access Control:• SAP GRC Access Control 10.1 • SAP GRC Access Control 10.0
Pre-requisites• SAP GRC Server Settings• SAP Connector changes for supporting SAP GRC integration• Creating IdentityIQ application of type SAP GRC • SAP GRC workflows
Note: In addition to the above pre-requisites, Multi Step Multi Process (MSMP) workflow must be configured on the SAP GRC server.
SAPGRCServerSettings• Perform the following settings on the SAP GRC Server using the administrator privileges:
a. Execute SPRO transaction code and click SAP Reference IMG button.b. Expand Governance, Risk and Compliance ==> Access Control ==> User Provisioning option.
c. Click on image to execute Maintain Provisioning Settings transaction.
d. In Dialog Structure double click on Maintain Global Provisioning.e. In Provisioning options section, select No Provisioning from the drop down against label Auto
Provisioning. The default value for this label is Auto provisioning at end of request.• A SAP ABAP type of connection must be defined in SM59 transaction, which would be used to indicate
IdentityIQ connection virtually at SAP GRC server. This connection would be treated as Request Initiation System in SAP GRC application configuration. For more information, see Creating IdentityIQ application of type SAP GRC .
• Status of requested Roles must be set to production on the SAP GRC Server.
PerformthefollowingstepstoobtaintheSAPGRCURLsrequiredwhenconfiguringtheSAPGRCapplicationinIdentityIQ
Note: Following steps are provided, considering that all required web services are set to active mode.
1. Execute SOAMANAGER transaction code on SAP GRC server.
2. Under Service Administration, select Web Service Configuration.
3. In Search criteria, select Object Type as Service Definition and Object Name contains GRAC*.
4. Click on Search.
5. In search result, search (User Access web service) and click GRAC_USER_ACCESS_WS web service.
SailPoint Integration Guide 155
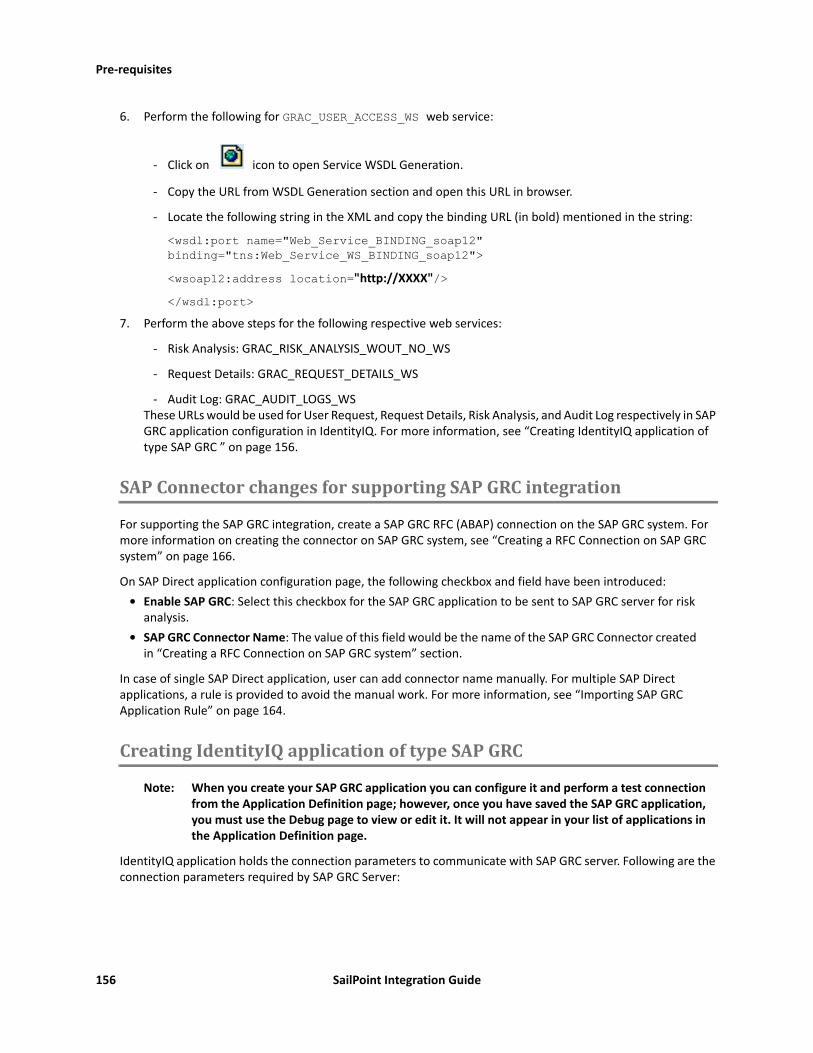
Pre-requisites
6. Perform the following for GRAC_USER_ACCESS_WS web service:
- Click on icon to open Service WSDL Generation.
- Copy the URL from WSDL Generation section and open this URL in browser.
- Locate the following string in the XML and copy the binding URL (in bold) mentioned in the string:
<wsdl:port name="Web_Service_BINDING_soap12" binding="tns:Web_Service_WS_BINDING_soap12"><wsoap12:address location="http://XXXX"/></wsdl:port>
7. Perform the above steps for the following respective web services:
- Risk Analysis: GRAC_RISK_ANALYSIS_WOUT_NO_WS
- Request Details: GRAC_REQUEST_DETAILS_WS
- Audit Log: GRAC_AUDIT_LOGS_WS These URLs would be used for User Request, Request Details, Risk Analysis, and Audit Log respectively in SAP GRC application configuration in IdentityIQ. For more information, see “Creating IdentityIQ application of type SAP GRC ” on page 156.
SAPConnectorchangesforsupportingSAPGRCintegration
For supporting the SAP GRC integration, create a SAP GRC RFC (ABAP) connection on the SAP GRC system. For more information on creating the connector on SAP GRC system, see “Creating a RFC Connection on SAP GRC system” on page 166.
On SAP Direct application configuration page, the following checkbox and field have been introduced:• Enable SAP GRC: Select this checkbox for the SAP GRC application to be sent to SAP GRC server for risk
analysis.• SAP GRC Connector Name: The value of this field would be the name of the SAP GRC Connector created
in “Creating a RFC Connection on SAP GRC system” section.
In case of single SAP Direct application, user can add connector name manually. For multiple SAP Direct applications, a rule is provided to avoid the manual work. For more information, see “Importing SAP GRC Application Rule” on page 164.
CreatingIdentityIQapplicationoftypeSAPGRC
Note: When you create your SAP GRC application you can configure it and perform a test connection from the Application Definition page; however, once you have saved the SAP GRC application, you must use the Debug page to view or edit it. It will not appear in your list of applications in the Application Definition page.
IdentityIQ application holds the connection parameters to communicate with SAP GRC server. Following are the connection parameters required by SAP GRC Server:
156 SailPoint Integration Guide

Pre-requisites
Field names Description
SAP GRC Connection Settings
Username* User Name from SAP GRC Server which have minimum permissions.
For more information on minimum permissions required by the SAP GRC user, see “Minimum permissions required for SAP GRC user” on page 160.
Password* Login Password.
Request Initiation System * Name of the connector configured in SAP GRC server which is treated as Request Initiation System. This connector is configured in SPRO define connectors or in SM59 transaction code.
For more information, see “Creating a RFC Connection on SAP GRC system” on page 166.
Polling interval Polling interval in minutes (Range 1 to 360).
Web Service URL Details
User Access * End Point URL for SAP GRC User Access Web Service.
Format of URL would be as follows:
http://<SAP GRC Host Name>/sap/bc/srt/rfc/sap/GRAC_user_acces_ws<WebService Binding URL>
Risk Analysis* End Point URL for SAP GRC Access Risk Analysis Web Service.
Format of URL would be as follows:
http://<SAP GRC Host Name>/sap/bc/srt/rfc/sap/GRAC_risk_analysis_wout_no_ws<WebService Binding URL>
Request Details * End Point URL for SAP GRC Request Detail Web Service.
Format of URL would be as follows:
http://<SAP GRC Host Name>/sap/bc/srt/rfc/sap/GRAC_request_details_ws<WebService Binding URL>
Audit Log End Point URL for SAP GRC Audit Log Web Service.
To get Mitigation details in IdentityIQ, audit log URL can be provided. This detail can be viewed in Interaction section of Access Request Page.
Format of URL would be as follows:
http://<SAP GRC Host Name>/sap/bc/srt/rfc/sap/GRAC_audit_logs_ws<WebService Binding URL>
SailPoint Integration Guide 157
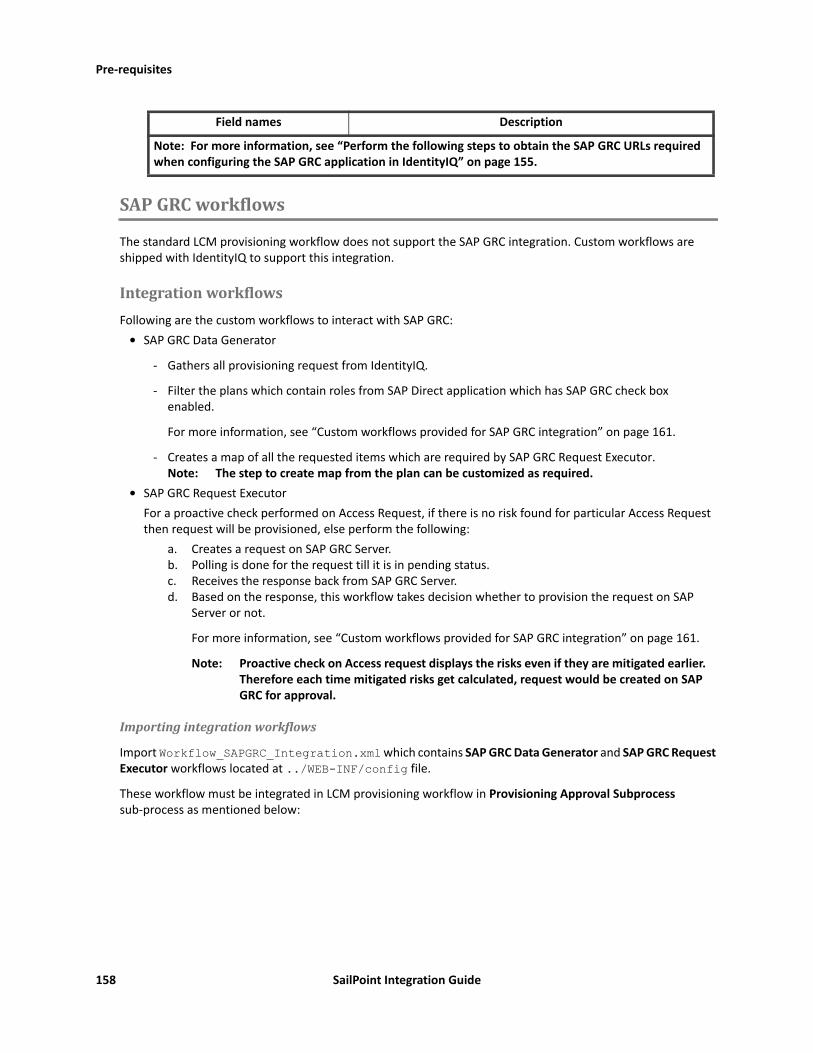
Pre-requisites
SAPGRCworkflows
The standard LCM provisioning workflow does not support the SAP GRC integration. Custom workflows are shipped with IdentityIQ to support this integration.
IntegrationworkflowsFollowing are the custom workflows to interact with SAP GRC:
• SAP GRC Data Generator
- Gathers all provisioning request from IdentityIQ.
- Filter the plans which contain roles from SAP Direct application which has SAP GRC check box enabled.
For more information, see “Custom workflows provided for SAP GRC integration” on page 161.
- Creates a map of all the requested items which are required by SAP GRC Request Executor. Note: The step to create map from the plan can be customized as required.
• SAP GRC Request ExecutorFor a proactive check performed on Access Request, if there is no risk found for particular Access Request then request will be provisioned, else perform the following:
a. Creates a request on SAP GRC Server.b. Polling is done for the request till it is in pending status.c. Receives the response back from SAP GRC Server.d. Based on the response, this workflow takes decision whether to provision the request on SAP
Server or not.
For more information, see “Custom workflows provided for SAP GRC integration” on page 161.
Note: Proactive check on Access request displays the risks even if they are mitigated earlier. Therefore each time mitigated risks get calculated, request would be created on SAP GRC for approval.
Importingintegrationworkflows
Import Workflow_SAPGRC_Integration.xml which contains SAP GRC Data Generator and SAP GRC Request Executor workflows located at ../WEB-INF/config file.
These workflow must be integrated in LCM provisioning workflow in Provisioning Approval Subprocess sub-process as mentioned below:
Note: For more information, see “Perform the following steps to obtain the SAP GRC URLs required when configuring the SAP GRC application in IdentityIQ” on page 155.
Field names Description
158 SailPoint Integration Guide

Pre-requisites
1. Change Provisioning Approval Subprocess as mentioned below:
- Navigate to process designer and click on Add A Step.
- Select Stop.
- Drag and drop the Stop step (in Auto Layout) after the end step.
- Right click on end step and select Change Icon.
- Select Generic and click on Save.
- Right click on end and click Edit Step.
Provide the following values in the Details section:
• Name: Invoke SAP GRC Data Generator
• Subprocess: (select under Action section) SAP GRC Data Generator.
Save the form.
- Right click on Stop step, click Edit Step and in Details section provide the name as end.
Save and close the workflow.
- Right click on Invoke SAP GRC Data Generator step and perform the following:a. Start the transition and end that transition on end step.b. Save the changes.
- Open the Provisioning Approval Subprocess and right click on Invoke SAP GRC Data Generator and edit the step.
In Arguments section of this step search for identityName, identityDisplayName, project, approvalSet and enter the values as identityName, identityDisplayName, project and approvalSet respectively for Reference fields. Save the changes.
- Save the changes.
SailPoint Integration Guide 159
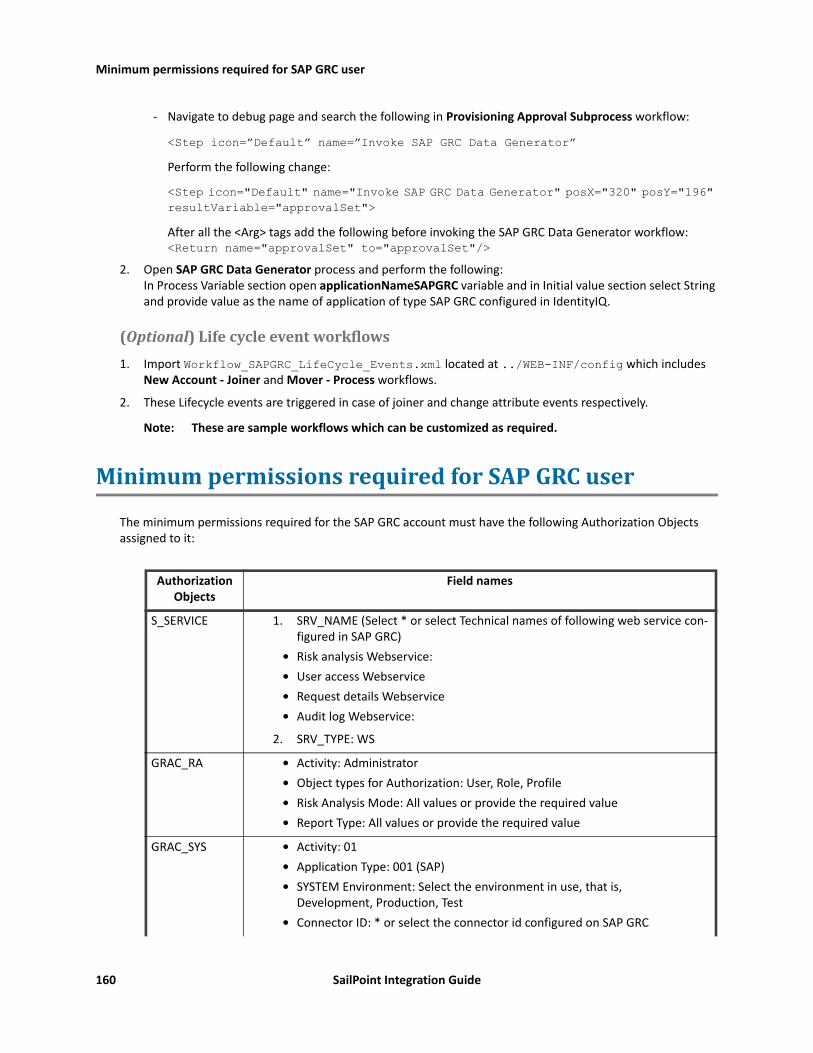
Minimum permissions required for SAP GRC user
- Navigate to debug page and search the following in Provisioning Approval Subprocess workflow:
<Step icon=”Default” name=”Invoke SAP GRC Data Generator”Perform the following change:
<Step icon="Default" name="Invoke SAP GRC Data Generator" posX="320" posY="196" resultVariable="approvalSet">After all the <Arg> tags add the following before invoking the SAP GRC Data Generator workflow: <Return name="approvalSet" to="approvalSet"/>
2. Open SAP GRC Data Generator process and perform the following:In Process Variable section open applicationNameSAPGRC variable and in Initial value section select String and provide value as the name of application of type SAP GRC configured in IdentityIQ.
(Optional)Lifecycleeventworkflows1. Import Workflow_SAPGRC_LifeCycle_Events.xml located at ../WEB-INF/config which includes
New Account - Joiner and Mover - Process workflows.
2. These Lifecycle events are triggered in case of joiner and change attribute events respectively.
Note: These are sample workflows which can be customized as required.
MinimumpermissionsrequiredforSAPGRCuser
The minimum permissions required for the SAP GRC account must have the following Authorization Objects assigned to it:
Authorization Objects
Field names
S_SERVICE 1. SRV_NAME (Select * or select Technical names of following web service con-figured in SAP GRC)
• Risk analysis Webservice:• User access Webservice• Request details Webservice • Audit log Webservice:
2. SRV_TYPE: WS
GRAC_RA • Activity: Administrator• Object types for Authorization: User, Role, Profile• Risk Analysis Mode: All values or provide the required value• Report Type: All values or provide the required value
GRAC_SYS • Activity: 01• Application Type: 001 (SAP)• SYSTEM Environment: Select the environment in use, that is,
Development, Production, Test • Connector ID: * or select the connector id configured on SAP GRC
160 SailPoint Integration Guide

Custom workflows provided for SAP GRC integration
CustomworkflowsprovidedforSAPGRCintegration
SAPGRCDataGenerator
This workflow fetches following information from IdentityIQ:• Details of user for whom access is requested.• Details of user who is requesting for access.• Details of access which are requested.
SAP GRC Data Generator subprocess has a custom script to fetch the values which can be changed by user as per his requirements.
InputstoSAPGRCDataGeneratorworkflow
GRAC_REQ • Activity: 01• Request Type: 001,002• Business Process: * or provide the required values• Functional Area: * or provide the required functional areas• Request for single or multiple: All values or provide the required value• Request Information: All values or provide the required value
GRAC_ROLED • Activity: 03• Business Process: * or provide the required values• Connector Group: * or select the connector group configured on SAP GRC• Role Sensitivity: 000• Role Type: BUS, COM, CUA, PRF, SIN• Role Name: * or provide the required value
Field names Description
identityName Name of the identity object being modified.
plan A master provisioning plan object required for building transient approval set for SAP GRC response.
project A ProvisioningProject object describing the modifications to the identity. This may include a list of Question objects which will cause the generation of a Form and a WorkItem to solicit additional information necessary for provisioning.
identityDisplayName Display name for identity.
applicationNameSAPGRC Name of the application created of type SAPGRC.
Authorization Objects
Field names
SailPoint Integration Guide 161
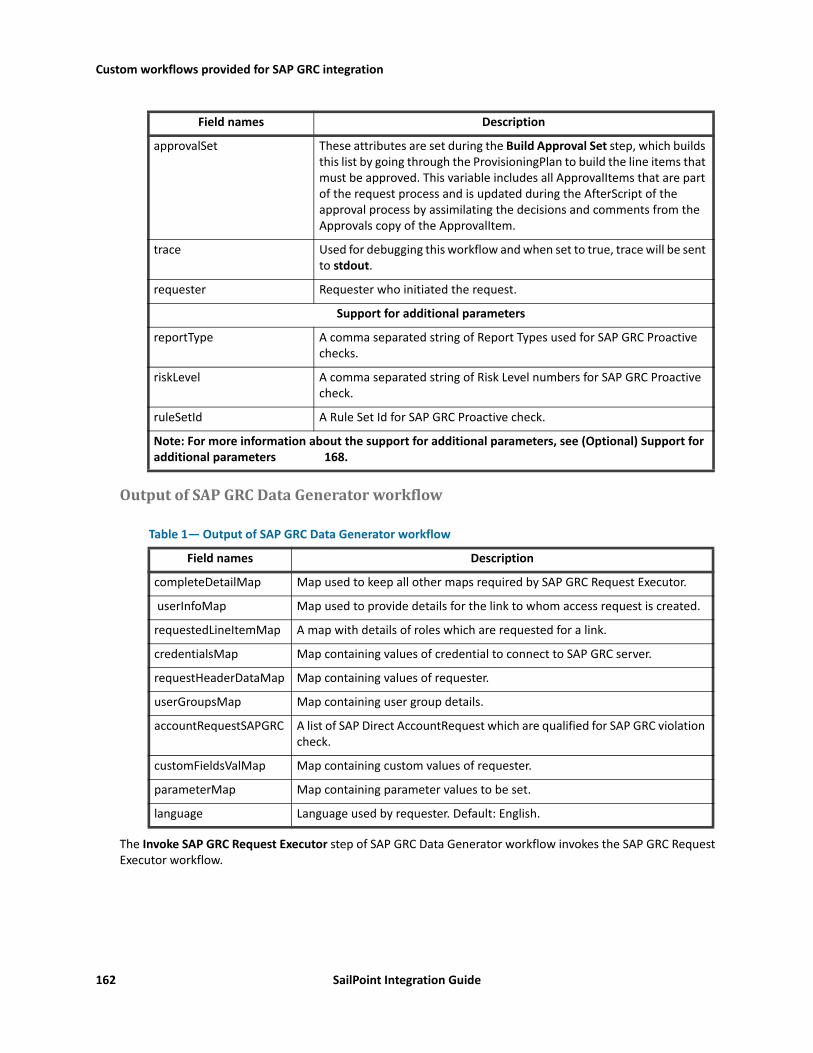
Custom workflows provided for SAP GRC integration
OutputofSAPGRCDataGeneratorworkflow
The Invoke SAP GRC Request Executor step of SAP GRC Data Generator workflow invokes the SAP GRC Request Executor workflow.
approvalSet These attributes are set during the Build Approval Set step, which builds this list by going through the ProvisioningPlan to build the line items that must be approved. This variable includes all ApprovalItems that are part of the request process and is updated during the AfterScript of the approval process by assimilating the decisions and comments from the Approvals copy of the ApprovalItem.
trace Used for debugging this workflow and when set to true, trace will be sent to stdout.
requester Requester who initiated the request.
Support for additional parameters
reportType A comma separated string of Report Types used for SAP GRC Proactive checks.
riskLevel A comma separated string of Risk Level numbers for SAP GRC Proactive check.
ruleSetId A Rule Set Id for SAP GRC Proactive check.
Note: For more information about the support for additional parameters, see (Optional) Support for additional parameters 168.
Table 1— Output of SAP GRC Data Generator workflow
Field names Description
completeDetailMap Map used to keep all other maps required by SAP GRC Request Executor.
userInfoMap Map used to provide details for the link to whom access request is created.
requestedLineItemMap A map with details of roles which are requested for a link.
credentialsMap Map containing values of credential to connect to SAP GRC server.
requestHeaderDataMap Map containing values of requester.
userGroupsMap Map containing user group details.
accountRequestSAPGRC A list of SAP Direct AccountRequest which are qualified for SAP GRC violation check.
customFieldsValMap Map containing custom values of requester.
parameterMap Map containing parameter values to be set.
language Language used by requester. Default: English.
Field names Description
162 SailPoint Integration Guide

Custom workflows provided for SAP GRC integration
SAPGRCRequestExecutor
The SAP GRC Request Executor workflow pro-actively checks for Access Request Risk with SAP GRC, if risk is found then it creates the request on SAP GRC server and regularly checks the status of the request in asynchronous manner. As this workflow checks status of the response at regular interval, variables related to such polling are defined here. User can change those variables as per requirement.
InputstoSAPGRCRequestExecutorworkflow
Field names Description
numberOfRetries The number of retries that will be attempted before failure of the provisioning activities.
retriableErrors A comma separated string that specifies errors which will be retried while getting the status of the request.
approvalSet This attribute is set during the Build Approval Set step, which builds this list by going through the ProvisioningPlan to build the line items that must be approved. This variable includes all ApprovalItems that are part of the request process and are updated during the AfterScript of the approval process by assimilating the decisions and comments from the Approvals copy of the ApprovalItem.
plan A master provisioning plan object required for building transient approval set for SAP GRC response.
identityDisplayName Display name for identity.
userGroupsMap The map containing UserGroup data required as an input for SAP GRC User Access Web service.
customFieldsValMap The map containing CustomFieldsVal data required as an input for SAP GRC User Access Web service.
parameterMap A list containing Parameter data required as an input for SAP GRC User Access Web service.
requestHeaderDataMap A map containing RequestHeaderData required as an input for SAP GRC User Access Web service.
credentialsMap A map to store credential information which is gathered from SAP GRC application.
requestedLineItemMap A list containing RequestedLineItem data required as an input for SAP GRC User Access Web service.
userInfoMap A list containing UserInfo data required as an input for SAP GRC User Access Web service.
language SAP System Language.
requestStatusMap The request status map containing the status information of the request received from the Request Detail Web service.
connectionTimeout The Axis2 timeout for the Web service connection timeout. This field accepts the value in minutes.
SailPoint Integration Guide 163

Importing SAP GRC Application Rule
OutputofSAPGRCRequestExecutorworkflow
ImportingSAPGRCApplicationRule
The IdentityIQ Rule is required for populating IdentityIQ SAP application configuration parameter with SAP GRC Connector name.
Perform the following steps to import and execute the SAP GRC application rule:
1. Create sapGrcApplications.csv file which contains the following columns separated by comma:• IdentityIQ Application name• Respective SAP GRC Server side Connector name
For example: SAPAPPLICATION1, SAPGRCCONNECTOR
Note: Comments can be provided in the sapGrcApplications.csv file using # symbol at the beginning of the line. For example column headers.
Note: If second column name is not provided than IdentityIQ application name would be treated as SAP GRC Connector name.
2. Create sapGrcRuleParameters.xml file which will contain the following map of arguments that are required to pass externally to the rule:
• path: path of the sapGrcApplications.csv file• separator: separator used in sapGrcApplications.csv file, to separate the IdentityIQ application
name and respective SAP GRC Server side Connector name.For example, <Map>
requestNumber The request number received after successful execution of the User Access Web service. This Request number is used by Request Detail Web service for polling.
pollingInterval The polling interval in minutes to check the status of the request.
trace Used for debugging this workflow and when set to true, trace will be sent to stdout.
requestStubDetailsMap Holding user information and headerinfo to generate request detail stub.
Field names Description
approvalSet This attribute is set during the Build Approval Set step, which builds this list by going through the ProvisioningPlan to build the line items that must be approved. This variable includes all ApprovalItems that are part of the request process and is updated during the AfterScript of the approval process by assimilating the decisions and comments from the Approvals copy of the ApprovalItem.
requestStatusMap
The request status map containing the status information of the request received from the Request Detail Web service.
auditLog Audit Log for the particular request.
Field names Description
164 SailPoint Integration Guide

Viewing the reports
<entry key='path' value='E://SAPGRCApplications.csv'/> <entry key='separator' value=','/></Map>
3. Import sapGrcApplicationsRule.xml IdentityIQ Rule which populates IdentityIQ SAP application con-figuration parameter with SAP GRC Connector name.
• The sapGrcApplicationsRule.xml file is present in WEB-INF/config folder.• From console run the following commands:
import sapGrcApplicationsRule.xmlrule “Mapping GRC Connector Name to SAP based Application” <path of sapGrcRuleParameters.xml file>For example, rule “Mapping GRC Connector Name to SAP based application” “E://sapGreRuleParameters.xml”
Following figure displays the output of the above performed steps:
LoggingfortheRule-
Enter the following line to set logging for the rule in log4j.properties file:
log4j.logger.SAPGRC.sapGrcApplicationsRule=debug
Viewingthereports
SAP GRC related transaction in access request status report will be displayed against Comments with External GRC System-SAP GRC string, which is located at Intelligence => Reports => Category:Lifecycle Manager Reports => Access Request Status Report.
Upgradeconsiderations
Note: Any customizations done on SAP GRC before upgrading to IdentityIQ version 7.1 will not be reflected in SAP GRC after upgrading to IdentityIQ version 7.2.
To support proactive check and SAP CUA integration in SAP GRC, import Workflow_SAPGRC_Integration.xml file while upgrading to IdentityIQ version 7.2.
Note: Perform Step 2. of “Importing integration workflows” section.
SailPoint Integration Guide 165

Additional information
Additionalinformation
This section describes the additional information related to the SAP GRC integration.
CreatingaRFCConnectiononSAPGRCsystem
The following steps are used to create RFC connection which can be used as Request Initiation System to indicate IdentityIQ connection virtually at SAP GRC server:
1. Execute TCODE SM59 or navigate to SPRO ==> SAP Reference IMG ==>Governance Risk and Compliance ==> Common Component Settings ==> Integration Framework ==> Create Connectors and execute it.The Configuration of RFC Connections page is displayed.
2. Navigate to ABAP Connections and click on the create icon.
3. Give a name to the RFC Destination in new screen and provide connection type as 3 means ABAP connec-tion.
4. Enter the details on Technical Settings, Logon & Security tabs accordingly and click on Test connection and save the changes.
5. Navigate to SPRO ==> SAP Reference IMG ==> Governance Risk and Compliance ==> Common Component Settings ==> Integration Framework ==> Maintain Connectors and Connection Types and execute it.
6. In new screen click on Define Connectors. In right hand section with name Connection type definition click on SAP and double click on Define Connectors again in the left hand side section.
7. In new screen click on New Entries.
8. Select the Target Connector from the drop down box which is defined in Step 3. The name of the Source Connector and Logical Port must be same as that of Target Connector. Select the Connection Type as SAP.
9. Select the created new entry and click on Define Connector Groups in the left hand section. Click on New Entries.
10. Provide name for new connector group in column Conn Group in the screen at left side.
11. Provide any Connector Group Text and Con. Type as SAP and save it.
12. Select the created Define Connector Group and double click on Assign Connector Group to Group Types in the left side of the same screen.
13. In the new screen, click on New Entries and provide the Connector Group Type as Logical Group on the right hand side of the screen.
14. Select the created Connector Group Type and double click on Assign Connectors to Connector Group sec-tion in left side of the screen.
15. In the new screen, click on New Entries and provide same name which was defined in Step 3. under column Target Connector in right side screen. Provide Connection Type as SAP in the same screen and save it.
16. Navigate to SPRO ==> SAP Reference IMG ==> Governance Risk and Compliance ==> Common Component Settings ==> Integration Framework ==> Maintain Connection Setting and execute it.
17. A new window (Determine Work Area Entry) will be displayed. In this window select the Integration Sce-nario as Auth and click on Continue (Enter).
18. Select Sub-Scenario as AUTH and double click on Scenario-Connector Link in the left hand side screen.
19. Click on New Entries. In the new screen on right side, select Target Connector name which is same as that mentioned in Step 3.
166 SailPoint Integration Guide

Additional information
20. In Same Screen, select Conn. Type as SAP.
21. Repeat Step 16. to Step 20. for selecting the different Integration Scenario types as PROV, ROLMG, SUPMG.
22. Navigate to SPRO ==> SAP Reference IMG ==> Governance Risk and Compliance ==> Access Control ==> Maintain Connection Settings and execute it.
23. Select Maintain Connector Settings select New Entries.
24. In right hand side screen select Target Connector as the name defined in Step 3. and select App Type as 1. Select the Environment as required and PATH ID as B012.
25. Navigate to SPRO ==> SAP Reference IMG ==> Governance Risk and Compliance ==> Access Control ==> Maintain Mapping for Actions and Connector Groups and execute it.
26. Select Maintain Connector Group Status and click on New Entries in left side screen.
27. In new screen in right side provide Conn. Group as the same name defined in Step 10. Select Appl Type as 001 and enable the Active check box for the respective Conn.Group.
28. In left hand screen double click on Assign Default Connector To Connector Group and click on New Entries.
29. Select Conn.Group as defined in Step 10. Select the Target Connector as defined in Step 3. Enable the Default check box.
Note: Perform the above step for all the actions and save it.30. To verify whether connector is added successfully or not, navigate to SPRO ==> SAP Reference IMG ==>
Governance Risk and Compliance ==> Access Control ==> Synchronization Job ==> Authorization Sync and see whether this new connector is listed in the drop-down of connector or not.
ConfiguringcrosssystemonSAPGRC
SAP GRC integration can be used to verify the risk for the request placed for cross system configuration containing SAP Role for multiple SAP Direct applications.
Perform the following steps to configure cross system on SAP GRC:
1. Create connectors for all the SAP Direct applications as mentioned in the “Creating a RFC Connection on SAP GRC system” on page 166.
2. Navigate to SPRO ==> SAP Reference IMG ==> Governance Risk and Compliance ==> Common Component Settings ==> Integration Framework ==> Maintain Connector and Connection Types and execute it.
3. In new screen click on Define Connectors. In right hand section with name Connection type definition click on SAP.
4. In new screen click on New Entries and enter the value of Conn.Group as CROSS_SYST and Connector Group Text as Cross_System_Group. Save it.
5. Select Cross System and on the left hand side double click Assign Connector Group to Group Types.
6. Click on New Entries and in the New screen select Connector Group Type as Cross_System_Group.
7. Select CROSS_SYST group and double click on Assign Connectors To Connector Groups.
8. Click on New Entries and add the connector Names configured in Step 1.
SailPoint Integration Guide 167

Additional information
(Optional)Supportforadditionalparameters
SAP GRC Integration has been enhanced to provide support of the following additional parameters in the SAP GRC Data Generator workflow:
• RiskLevel• RuleSetId• ReportType
Perform the following steps to specify the value of the above parameters:
1. Navigate to Menu ==> Setup ==> Business Processes and click and open SAP GRC Data Generator workflow.
2. Navigate to Process Variables tab.
3. Expand the required Variable (that is, RiskLevel, RuleSetId or ReportType) and initialize the values by select-ing type as String and add single/multiple values separated by comma in textbox.
UpgradesettingsFor the user upgrading to IdentityIQ version 7.2, perform the following changes in SAP GRC Data Generator workflow to specify the values for riskLevel, reportType and ruleSetId:
1. In between the following lines add the following workflow process variables marked in bold:"<Variable initializer="false" name="trace"> <Description>Used for debugging this workflow and when set to true trace will be sent to stdout.</Description> </Variable>" <Variable input="true" name="reportType"> <Description>A comma separated string of Report Type values used for SAP GRC Proactive checks.</Description> </Variable> <Variable input="true" name="riskLevel"> <Description>A comma separated string of Risk Level values used for SAP GRC Proactive check.</Description></Variable> <Variable input="true" name="ruleSetId"> <Description>A comma separated string of Rule Set Id values used for SAP GRC Proactive check.</Description> </Variable> "<Description> This subprocess is used in "Provision and Approval" subprocess."
2. At Invoke SAP GRC Request Executor step, add the following arguments and return structures: <Arg name="reportType"/> <Arg name="riskLevel"/> <Arg name="ruleSetId"/>
<Return name="riskLevel" to="riskLevel"/> <Return name="ruleSetId" to="ruleSetId"/> <Return name="reportType" to="reportType"/>
168 SailPoint Integration Guide
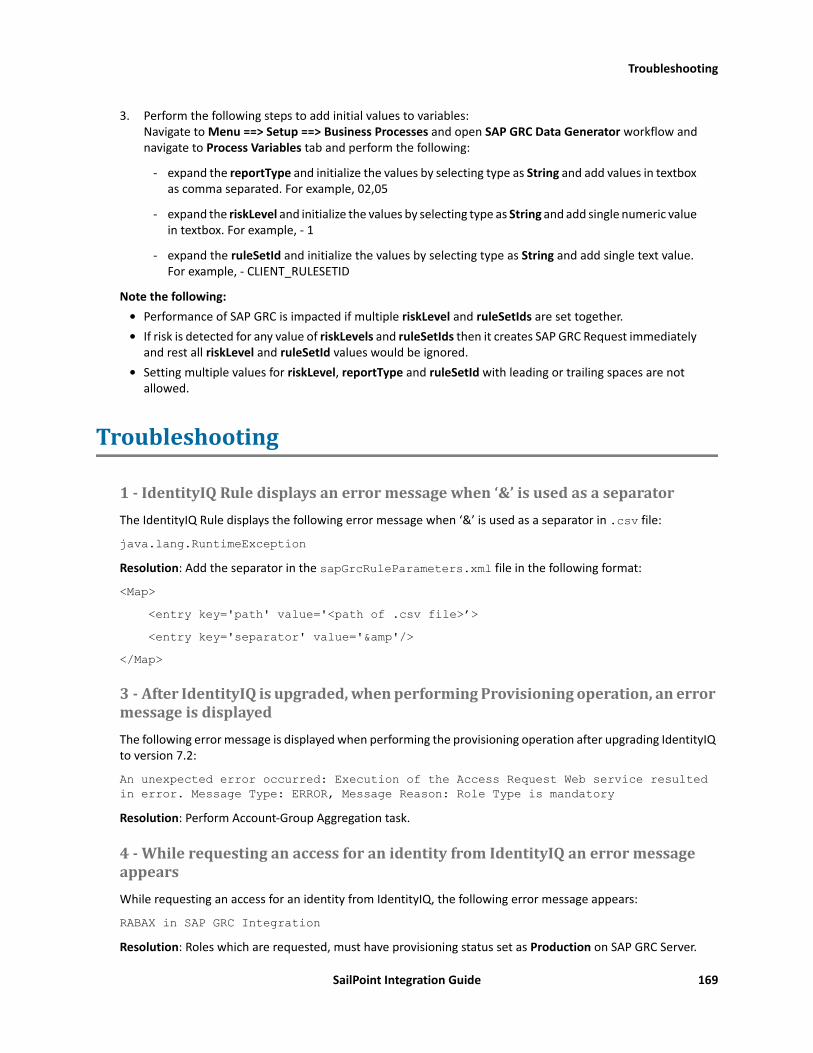
Troubleshooting
3. Perform the following steps to add initial values to variables:Navigate to Menu ==> Setup ==> Business Processes and open SAP GRC Data Generator workflow and navigate to Process Variables tab and perform the following:
- expand the reportType and initialize the values by selecting type as String and add values in textbox as comma separated. For example, 02,05
- expand the riskLevel and initialize the values by selecting type as String and add single numeric value in textbox. For example, - 1
- expand the ruleSetId and initialize the values by selecting type as String and add single text value. For example, - CLIENT_RULESETID
Note the following:• Performance of SAP GRC is impacted if multiple riskLevel and ruleSetIds are set together.• If risk is detected for any value of riskLevels and ruleSetIds then it creates SAP GRC Request immediately
and rest all riskLevel and ruleSetId values would be ignored.• Setting multiple values for riskLevel, reportType and ruleSetId with leading or trailing spaces are not
allowed.
Troubleshooting
1-IdentityIQRuledisplaysanerrormessagewhen‘&’isusedasaseparatorThe IdentityIQ Rule displays the following error message when ‘&’ is used as a separator in .csv file:
java.lang.RuntimeExceptionResolution: Add the separator in the sapGrcRuleParameters.xml file in the following format:
<Map> <entry key='path' value='<path of .csv file>’> <entry key='separator' value='&'/></Map>
3-AfterIdentityIQisupgraded,whenperformingProvisioningoperation,anerrormessageisdisplayedThe following error message is displayed when performing the provisioning operation after upgrading IdentityIQ to version 7.2:
An unexpected error occurred: Execution of the Access Request Web service resulted in error. Message Type: ERROR, Message Reason: Role Type is mandatoryResolution: Perform Account-Group Aggregation task.
4-WhilerequestinganaccessforanidentityfromIdentityIQanerrormessageappearsWhile requesting an access for an identity from IdentityIQ, the following error message appears:
RABAX in SAP GRC IntegrationResolution: Roles which are requested, must have provisioning status set as Production on SAP GRC Server.
SailPoint Integration Guide 169

Troubleshooting
To set the status of role as Production, the Role maintenance quick link from the section Role Management can be used in NWBC user interface.
5-RequestgetsprovisionedevenifthereisariskintherequestRequest gets provisioned even if there is a risk in the request which may occur due to the following reasons:
1. GRAC_RISK_ANALYSIS_WOUT_NO_WS web service was not returning an error message if correct permis-sions were not given to the service account.Resolution: To resolve this issue implement the following SAP Note in the SAP GRC Server:2187803 - GRAC_RISK_ANALYSIS_WOUT_NO_WS does not return correct error message
2. GRAC_RISK_ANALYSIS_WOUT_NO_WS web service not returning risk as the report format value input is different as per different SP level of SAP GRC.Resolution:
- For user on SAP GRC 10.1 SP level SP-Level 0010 or lower: initialize the value of REPORT_FORMAT to DETAILED in the SAP GRC DATA generator workflow under ‘Initialize Detail Map’ step as follows:
private static final String REPORT_FORMAT = "DETAILED";- For user on SAP GRC 10.1 SP level SP-Level 0011 or above: initialize the value of REPORT_FORMAT
to 2 in the SAP GRC DATA generator workflow under ‘Initialize Detail Map’ step as follows:
private static final String REPORT_FORMAT = "2";Add requestLineDataMap.put ("ReportFormat", REPORT_FORMAT); statement for the location specified below:
• Search for requestLineDataMap.put("ProvItemType", PROVISIONING_ITEM_TYPE_ROL); and add the following line:
requestLineDataMap.put("ReportFormat",REPORT_FORMAT);Perform the above for all occurrences of requestLineDataMap.put("ProvItemType", PROVISIONING_ITEM_TYPE_ROL); line.
The final code view would be as follows:requestLineDataMap.put("ProvItemType", PROVISIONING_ITEM_TYPE_ROL);requestLineDataMap.put("ReportFormat",REPORT_FORMAT);
• Search for requestLineDataMap.put("ProvItemType", PROVISIONING_ITEM_TYPE_PRF); and add the following line:
requestLineDataMap.put("ReportFormat",REPORT_FORMAT);Perform the above for all occurrences of requestLineDataMap.put("ProvItemType", PROVISIONING_ITEM_TYPE_PRF); line.
The final code view would be as follows:
requestLineDataMap.put("ProvItemType", PROVISIONING_ITEM_TYPE_PRF);requestLineDataMap.put("ReportFormat",REPORT_FORMAT);
3. GRAC_RISK_ANALYSIS_WOUT_NO_WS web service not returning risk for the Critical roles /profiles Resolution: Implement the following SAP Note in the SAP GRC Server:2409002 - Critical role/profile shows no result for GRAC_RISK_ANALYSIS_WOUT_NO_WS
170 SailPoint Integration Guide

Troubleshooting
6-MitigationcommentsarenotdisplayedinAccessRequestStatusreport When the Account name for the identity is in lower case, mitigation comments are not displayed in Access Request Status report.
Resolution: Account Name (User Name) should always be in upper case letters
7-UnabletorequestSAPdirectprofilesthroughGRCIntegrationWhile requesting the profile, the following error message is displayed:
An unexpected error occurred: Undefined argument: startDate: at Line: 166Resolution: Implement the following SAP Note in the SAP GRC server:
2194063 - UAM: Request status IDM service doesn't return reqstatus and reqstatus_txt and request detail service doesn't return comment, approvers and correct
8-IncorrectSAPGRCConnectornameIf incorrect SAP GRC Connector name is provided, request gets provisioned even if there is a risk in the request.
Resolution: Implement the following SAP Note in the SAP GRC Server:
2399698 - Validation changes in GRAC_RISK_ANALYSIS_WOUT_NO_WS webservice
9-RiskisnotdetectedforCriticalrole/profileIf Critical role/profile gets provisioned even if there is a risk in the request.
Resolution: Implement the following SAP Note in the SAP GRC Server:
2409002 - Critical role/profile shows no result for GRAC_RISK_ANALYSIS_WOUT_NO_WS
SailPoint Integration Guide 171

Troubleshooting
172 SailPoint Integration Guide

Service Management Integration Module(ServiceCatalog)
This section contains information on the following section:• “SailPoint ServiceNow Service Catalog Integration”

174 SailPoint Integration Guide
Overview
Chapter18:SailPointServiceNowServiceCatalogIntegration
The following topics are discussed in this chapter:Overview. . . . . . . . . . . . . . . . . . . . . . . . . . . . . . . . . . . . . . . . . . . . . . . . . . . . . . . . . . . . . . . . . . . . . . . . . . . . . . . . . 175Supported features . . . . . . . . . . . . . . . . . . . . . . . . . . . . . . . . . . . . . . . . . . . . . . . . . . . . . . . . . . . . . . . . . . . . . . . . 176Supported platforms . . . . . . . . . . . . . . . . . . . . . . . . . . . . . . . . . . . . . . . . . . . . . . . . . . . . . . . . . . . . . . . . . . . . . . . 177Pre-requisites . . . . . . . . . . . . . . . . . . . . . . . . . . . . . . . . . . . . . . . . . . . . . . . . . . . . . . . . . . . . . . . . . . . . . . . . . . . . . 177Installation and configuration in ServiceNow . . . . . . . . . . . . . . . . . . . . . . . . . . . . . . . . . . . . . . . . . . . . . . . . . . . 177Configuration in SailPoint IdentityIQ . . . . . . . . . . . . . . . . . . . . . . . . . . . . . . . . . . . . . . . . . . . . . . . . . . . . . . . . . . 180Troubleshooting. . . . . . . . . . . . . . . . . . . . . . . . . . . . . . . . . . . . . . . . . . . . . . . . . . . . . . . . . . . . . . . . . . . . . . . . . . . 181
Overview
SailPoint Service Catalog Integration is an integration between ServiceNow and SailPoint IdentityIQ. This allows users of both systems to easily navigate from ServiceNow into IdentityIQ, and gives users a "one stop shop" to request all IT related items.
The integration between SailPoint and ServiceNow gives mutual customers a complementary identity access governance and service management solution that works together to ensure strong controls are in place to meet ever stringent security and compliance requirements around user access to sensitive applications. The integration also allows users to perform other activities (such as password changes, approve access, manage account) that are configured within the system.
The chapter describe the implementation approach and configuration of the SailPoint Service Catalog Integration in ServiceNow. The following information enables administrators to deploy and maintain the integration.
The flow of SailPoint Service Catalog Integration in ServiceNow is as follows: • User logs in to ServiceNow.• The SailPoint Service Catalog Integration application is available to the logged in user.• Click on any of the links mentioned in the request section of SailPoint Service Catalog Integration
Application. Request flows to IdentityIQ and IdentityIQ page is opened in ServiceNow.• Complete the request in IdentityIQ page opened in ServiceNow and Ticket would be generated in
ServiceNow for the same request. Initially the status of ServiceNow ticket would be open or openNoApproval.
• Once the request is approved in IdentityIQ, ServiceNow ticket’s status would be updated.• Once the provisioning of request is done on IdentityIQ side, the ticket’s status would be updated (closed)
in ServiceNow.
SailPoint Integration Guide 175
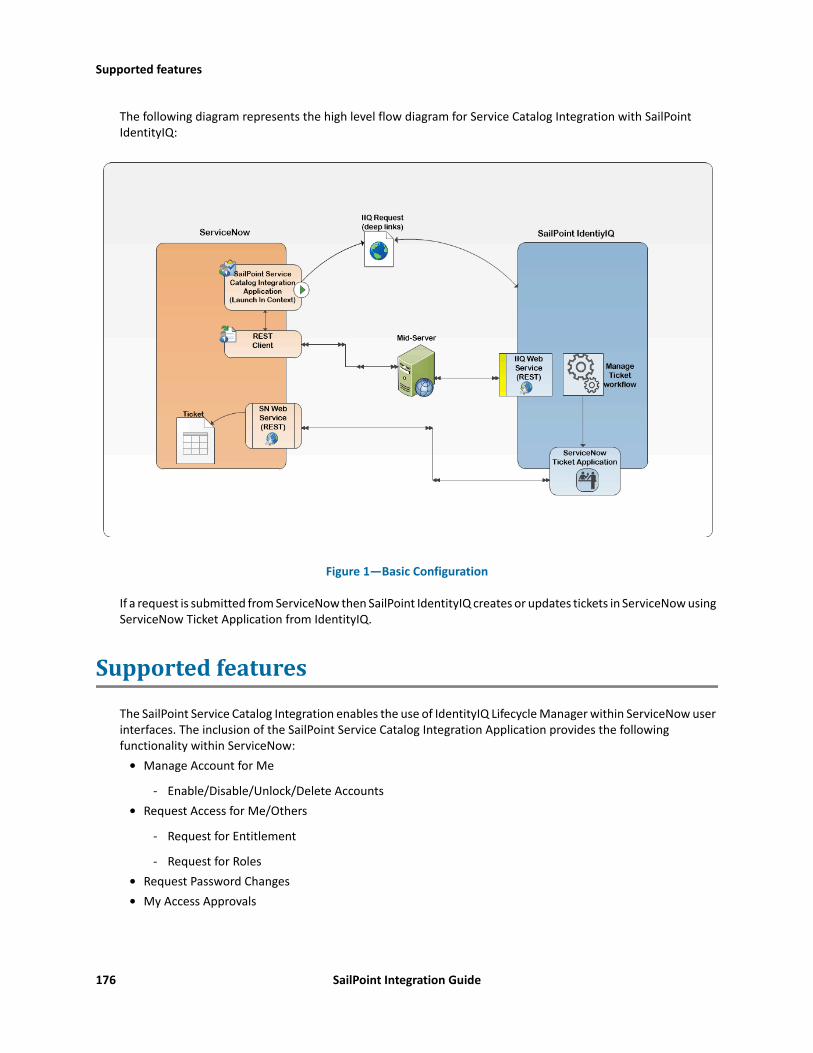
Supported features
The following diagram represents the high level flow diagram for Service Catalog Integration with SailPoint IdentityIQ:
Figure 1—Basic Configuration
If a request is submitted from ServiceNow then SailPoint IdentityIQ creates or updates tickets in ServiceNow using ServiceNow Ticket Application from IdentityIQ.
Supportedfeatures
The SailPoint Service Catalog Integration enables the use of IdentityIQ Lifecycle Manager within ServiceNow user interfaces. The inclusion of the SailPoint Service Catalog Integration Application provides the following functionality within ServiceNow:
• Manage Account for Me
- Enable/Disable/Unlock/Delete Accounts• Request Access for Me/Others
- Request for Entitlement
- Request for Roles• Request Password Changes• My Access Approvals
176 SailPoint Integration Guide

Supported platforms
• Track My Requests
- Get Request Status
- Get complete details of request Item
Supportedplatforms
SailPoint Service Catalog Integration supports the following ServiceNow instance versions:• Jakarta• Istanbul• Helsinki• Geneva
Pre-requisites• For the integration to successfully authenticate the user, the ServiceNow accounts (users) must have
correlated identities in IdentityIQ.• ServiceNow Mid Server must be installed. See “Mid server installation” on page 179.
Note: Ensure that the WebServer hosting IdentityIQ must be SSL enabled.
InstallationandconfigurationinServiceNow
This section describes the installation and configuration procedures for SailPoint IdentityIQ ServiceNow Service Catalog Integration.
Following roles on ServiceNow can be assigned to the user:• x_sapo_iiq_catalog.spnt_admin: SailPoint Service Catalog Integration Administrator Role. The user with
this role can access all the modules of the application.• x_sapo_iiq_catalog.spnt_manager: SailPoint Service Catalog Integration Manager Role.The user with
this role can access all modules except Setup.• x_sapo_iiq_catalog.spnt_user: SailPoint Service Catalog Integration User Role. The user with this role
does not have access to Setup module and can request only for himself.
Installation
This section describes the installation procedure.
InstallupdatesetinServiceNowApply the IdentityIQ ServiceNow Service Catalog Integration update set:
1. Copy the relevant update set from the following directory to a temporary directory:identityiq-releaseVersion.zip\integration\servicenow\iiqIntegration-ServiceNow.zip\ServiceCatalogUpdateSet
SailPoint Integration Guide 177

Installation and configuration in ServiceNow
In the above directory, releaseVersion is the version of the current IdentityIQ release.
2. Import relevant update set in ServiceNow instance. For more information and guidelines on usage of the update set, refer to the following wiki link: http://wiki.servicenow.com/index.php?title=Saving_Customizations_in_a_Single_XML_FileIn the above link, refer to section 3 “Loading Customizations from a Single XML File”.After successfully applying the update set in ServiceNow the SailPoint Service Catalog Integration application is created.
3. After committing the update set for SailPoint Service Catalog Integration, add read operation ACL’s on sys-log_app_scope and sys_script_include tables as mentioned in the following steps:
a. Login to ServiceNow instance with administrator credentials.b. Ensure that, the Global application is selected.c. Create wildcard field rules (*) ACL for syslog_app_scope table for Read operation with required
x_sapo_iiq_catalog.spnt_admin role.d. Create wildcard field rules (*) ACL for sys_script_include table for Read operation with required
x_sapo_iiq_catalog.spnt_admin role.
Overview“SailPointIdentityIQServiceNowServiceCatalogIntegration”ApplicationThe SailPoint IdentityIQ ServiceNow Service Catalog Integration provides easy access to IdentityIQ Services, Access Requests and Access Approvals.
Note: The SailPoint Service Catalog Integration application is available only to those users who have the x_sapo_iiq_catalog.spnt_user role assigned.
1. My Access Requests
- Displays a list of access requests which include the Access Requests Opened By or Requests for the current user logged in.
- By clicking into the IdentityIQ request, a user can see the Request information, as well as all of the Request Items with a brief description of what the Request Item entailed.
- By clicking on the View Detail button a user can view the details of this Request in IdentityIQ.
2. My Access Approvals
- Allows user to view the pending approvals in IdentityIQ for the logged in user. In addition to this, the module shows number of pending approvals for the logged in user with count next to link.
- The My Access Approvals link does not display the number of pending approvals on ServiceNow Geneva or later version.
3. Request Access for Me
- Allows user to request application access.
- The Request Access for Me directly links to the request access page, allowing currently logged in user to request entitlements and roles.
4. Request Access for Others
- The Request Access for Others link displays a dialog box so that the current user can select a different user to request access on their behalf. Once a user is selected, this links to the request access page.
ServiceNow version Update Sets
Geneva or later IdentityIQServiceNowServiceCatalog.v1.2.2.xml
178 SailPoint Integration Guide
Installation and configuration in ServiceNow
Note: The “Request Access for Others” requires either the ServiceNow admin or the x_sapo_iiq_catalog.spnt_manager role to display. The above role is the custom role created to give to managers of other users from IdentityIQ in ServiceNow.
5. Change Password
- Manages password for different accounts managed in IdentityIQ.
- The Change Password link directs the link to the logged in users to manage the passwords in IdentityIQ.
6. Manage Accounts for Me
- The Manage Accounts for Me opens the manage accounts page in IdentityIQ.
7. Track My Request
- Allows user to check status regarding a recent access request.
- Track My Requests opens the Access Request page in IdentityIQ.
8. Properties
- Provides the form for logging in to the IdentityIQ API and performing a REST request to the MID SERVER and writing debug inform action to the Log.
9. Logs
- Allows to view debugging, error and general information messages as they are written to the Log.
10. Customer Support
- Allows the user to navigate to a support page located at Customer Support.
MidserverinstallationFor an overview and installation instructions on setting up the mid server, see the following ServiceNow wiki:
http://wiki.servicenow.com/index.php?title=MID_Server
Geneva and Helsinki version have additional installation steps of mid server validation. For more information, see the following ServiceNow wiki:
• (For Geneva) https://docs.servicenow.com/bundle/geneva-it-operations-management/page/product/mid_server/task/t_ValidateAMIDServer.html
• (For Helsinki or later) https://docs.servicenow.com/bundle/helsinki-it-operations-management/page/product/mid-server/task/t_ValidateAMIDServer.html
Configuration
Set“SailPointServiceCatalogIntegration”ApplicationpropertiesinServiceNowtopointtotheSailPointIdentityIQinstanceOpen the Properties module from SailPoint Service Catalog Integration Application and modify the following properties:
Note: The properties module from SailPoint Service Catalog Integration application is available only to those user who have the x_sapo_iiq_catalog.spnt_admin role in ServiceNow.
SailPoint Integration Guide 179

Configuration in SailPoint IdentityIQ
• Use Single-Sign On for IdentityIQ Requests: Determines whether SailPoint IdentityIQ is setup for Single Sign On.
- True: ServiceNow assumes no authentication is required when opening direct links into IdentityIQ.
- False: ServiceNow uses the remoteLogin web service to retrieve a one-time use authentication token to login the current user.
• IdentityIQ Instance Endpoint URL: URL specifying the SailPoint IdentityIQ endpoint. • User to login to the IdentityIQ API: Username for authentication during REST Requests to IdentityIQ.
Note: This user must have WebServices Executor Permission in IdentityIQ.• Password to login to the IdentityIQ API: Password for authenticating during REST Requests to IdentityIQ.• Mid Server to use to make REST requests to IdentityIQ: The name of the Mid Server to make REST
Requests through to IdentityIQ.• IdentityIQ Log Level: The SailPoint Service Catalog Integration application’s properties module contains
the following new properties related to logger:
- Logging Level: The default value for this property is warn.
- Logging Destination: The default value for this property is DB.
If DB is selected, then logs will be transformed to system tables.
If FILE is selected, then logs will be transformed to system node files.• Interval in which to poll for approvals: Identifies the interval in which the approvals on the server side
are verified. Default: 15 minutes. If the IdentityIQ Approval record for the user logged in has not been updated within 15 minutes, the user is logged out to IdentityIQ to request an update of the number of approvals outstanding.
• Application Name within IdentityIQ for the ServiceNow Integration: Application Name within IdentityIQ for the ServiceNow Integration. Default: SailPointServiceCatalog
• IdentityIQ ServiceNow Application Name: ServiceNow users are aggregated in IdentityIQ through ServiceNow connector application.
• ServiceNow username for Ticket creation: The username used to create ticket in ServiceNow as configured in the SailPointServiceCatalog ticketing application.
MidserverSetupThe Mid Server must be setup with a polling time lower than normal. This allows the shortest lag time when loading IdentityIQ pages when ServiceNow must request a remoteLogin token.
MID Server poll time: Sets the MID Server polling interval (in seconds). Type: integer (seconds) Default value: 15 mid.poll.time
Note: It is suggested to set the “MID Server poll time” property to 5 seconds, to increase the rate in which REST Message Requests will be picked up and processed.
Note: ServiceNow and IdentityIQ instance must be accessible to Mid-server.
ConfigurationinSailPointIdentityIQ
Perform the following procedure to create Application in IdentityIQ to manipulate Tickets in ServiceNow:
180 SailPoint Integration Guide

Troubleshooting
1. Create SailPointServiceCatalog ticketing application using default configuration file located in iiqHome/WEB-INF/config/SailPointServiceCatalog.xml directory.In the above directory, iiqHome is the location where IdentityIQ is installed.This creates SailPointServiceCatalogIntegration rule in IdentityIQ.
2. Modify the following parameters:
- url: Service Now JSON API endpoint
https://<servicenow-base-url>/x_sapo_iiq_catalog_processor.do?action=POST
- username: ServiceNow user who has x_sapo_iiq_catalog.spnt_admin role
- password: Password of the ServiceNow user
3. Modify the following parameter in the SailPointServiceCatalogIntegration rule:
- connectorAppName: Provide the ServiceNow connector application name through which ServiceNow users are aggregated in IdentityIQ. The value for this parameter must be the name of the Connector Application pointing to ServiceNow instance where ServiceNow Catalog Integration is configured. Default value is null
Note: - If the rule name is changed in Step 1. then change the value for ticketDataGenerationRule entry in SailPointServiceCatalog.xml file. - If Application Name is changed in SailPoint Identity Access Request Application properties then change name in SailPointServiceCatalog.xml file.
4. Enable iFrame option in IdentityIQ by performing the following steps:a. Navigate to IdentityIQ debug page.b. Select System Configuration from Configuration Objects.c. Find the key allowiFrame and set the value to true.d. Save the System Configuration.
Troubleshooting
1-EnableTracesforSailPointServiceCatalogIntegrationapplicationinServiceNowResolution: To enable the traces in SailPoint Service Catalog Integration application set the following property to debug:
Logging Level (x_sapo_iiq_catalog.logging.verbosity)
2-EnableStackTracingforIdentityIQResolution: Set the workflow Trace attribute to true when configuring the ServiceNow Service Catalog Integration application parameters to enable logging. This enables any IdentityIQ provisioning actions traceable.
SailPoint Integration Guide 181

Troubleshooting
182 SailPoint Integration Guide

ProvisioningIntegrationModulesThis section contains information on the following sections:
• “SailPoint Oracle Identity Manager Provisioning Integration Module”• "SailPoint IBM Security Provisioning Integration Module" on page 191

184 SailPoint Integration Guide

Overview
Chapter19:SailPointOracleIdentityManagerProvisioningIntegrationModule
The following topics are discussed in this chapter:Overview. . . . . . . . . . . . . . . . . . . . . . . . . . . . . . . . . . . . . . . . . . . . . . . . . . . . . . . . . . . . . . . . . . . . . . . . . . . . . . . . . 185Supported features . . . . . . . . . . . . . . . . . . . . . . . . . . . . . . . . . . . . . . . . . . . . . . . . . . . . . . . . . . . . . . . . . . . . . . . . 185Supported platforms . . . . . . . . . . . . . . . . . . . . . . . . . . . . . . . . . . . . . . . . . . . . . . . . . . . . . . . . . . . . . . . . . . . . . . . 186Installing the OIM Integration Web Application . . . . . . . . . . . . . . . . . . . . . . . . . . . . . . . . . . . . . . . . . . . . . . . . . 186Testing the OIM Integration Web Application. . . . . . . . . . . . . . . . . . . . . . . . . . . . . . . . . . . . . . . . . . . . . . . . . . . 186Configuration for OIM application . . . . . . . . . . . . . . . . . . . . . . . . . . . . . . . . . . . . . . . . . . . . . . . . . . . . . . . . . . . . 188Aggregating from OIM. . . . . . . . . . . . . . . . . . . . . . . . . . . . . . . . . . . . . . . . . . . . . . . . . . . . . . . . . . . . . . . . . . . . . . 189Known/Open issues . . . . . . . . . . . . . . . . . . . . . . . . . . . . . . . . . . . . . . . . . . . . . . . . . . . . . . . . . . . . . . . . . . . . . . . . 189
Overview
This chapter provides a guide to the integration between Oracle Identity Manager (OIM) and IdentityIQ. This chapter is intended for Oracle and IdentityIQ System Administrators and assumes a high degree of technical knowledge.
The integration is achieved by deploying a small web application in the application server that hosts OIM. IdentityIQ communicates with the web services contained in this application to read and write account information. Configuration of the OIM integration requires the username and password of the OIM administrator or another user with sufficient permissions.
Supportedfeatures
The Oracle Identity Manager Provisioning Integration Module supports the following functions:• Account Management
- Oracle Identity Manager user aggregation along with the connected child accounts and application
- Create, Update, Delete
- Enable, Disable, Unlock
- Add/Remove Entitlements operations for Oracle Identity Manager connected child accounts• User Management
- Manages Oracle Identity Manager Users as Accounts
- Create, Update, Delete
- Enable, Disable, Unlock
- Add/Remove Entitlements operations for Oracle Identity Manager Users
SailPoint Integration Guide 185
Supported platforms
Supportedplatforms
SailPoint Oracle Identity Manager Provisioning Integration Module supports the following versions of Oracle Identity Manager:
• Oracle Identity Manager 11g R2• Oracle Identity Manager 11g R1
InstallingtheOIMIntegrationWebApplication
You must first deploy the OIM Integration Servlet web application to the application server hosting the OIM application. The iiq.war file for this web application is contained in the IdentityIQ distribution as $INSTALLDIR/integration/OIM/iiqIntegration-OIM.jar or in the distribution for an IdentityIQ patch in a .jar file named Integration-oim-<version>.jar.
The iiqIntegration-OIM.jar file contains iiq.war file. You can customize the iiq.war file in many ways before being deployed into the application server hosting OIM.
Note: Ensure that if you are deploying web application as war file, it should be named as iiq.war. If you are deploying the web application from a directory, then directory should be named as iiq.
The following are the required customization steps:
1. Configure access to OIM by modifying WEB-INF/classes/xellerate.properties to set.• XL.HomeDir: the full path to the directory where OIM is installed• userName: the OIM administrator that has the appropriate permission to read and write user and
account data• password: the password for the OIM administrator
For more information on the other properties that need to be set in xellerate.properties file, see “Properties that can be defined in xellerate.properties” on page 187.
2. Copy OIM_ORACLE_HOME/designconsole/lib/oimclient.jar API implementation file from the OIM installation into the WEB-INF/lib directory of the integration application.
TestingtheOIMIntegrationWebApplication
Verify if the installation was successful using the following steps:
Note: For each test URL throughout this document, change the host name and port to match your OIM Server instance.
1. From any browser enter the following URL:http://localhost:8080/iiq/resources/pingThe following response is displayed:OIM integration readyFailure to get a ping response indicates a problem with the deployment of the servlet.
2. Verify the integration servlet can communicate with OIM by entering the following URL:http//localhost:8080/iiq/resources/users
186 SailPoint Integration Guide
Testing the OIM Integration Web Application
You should see a response containing the names of all OIM users. This might take a while to assemble depending on the number of users. To view details of a particular user, enter the following URL where <OMIUSER> is the name of a user in your OIM instance:http://localhost:8080/iiq/resources/user/<OIMUSER>
To see additional diagnostic information for of a particular user, enter the following URL where <OMIUSER> is the name of a user in your OIM instance:
http://localhost:8080/iiq/resources/debug/<OIMUSER>If you are unable to request user information, there may be a problem with the credentials you entered in the xellerate.properties file. For more information, see “Properties that can be defined in xellerate.properties” on page 187.
Propertiesthatcanbedefinedinxellerate.properties
1. Add a ManagedResource definition in the ManagedResource list for an each OIM resource. For each resource, define a property prefix by adding a property whose name is the prefix and whose value isthe OIM resource name.For example: AD=AD UserOracle=Oracle DB UserThis declares that any property that begins with ERP is related to the OIM resource named ERP Central Component.
2. For each ManagedResource, define the account attribute that represents the unique account identifier. The names used here must be the resource names used by OIM. The identityAttribute must have the internal form field name containing the account identifier. Use the OIM Design Console application to find the pro-cess form for each resource and view the field names. The example below gives two typical names, one used by the connector for Oracle database users and the other for the Active Directory connector.AD.id=UD_ADUSER_UIDOracle.id=UD_DB_ORA_U_USERNAME
3. Define the names of the child forms that support multiple attributes. The value is a CSV of the internal child form names:AD.childForms=UD_ADUSRCOracle.childForms=UD_DB_ORA_RIn this example UD_ADUSRC is the internal name for the child form AD User Group Details and UD_DB_ORA_R is the internal name for the child form DBUM Grant/Revoke Roles.
4. Each child form name in the Oracle.childForms property there is another property whose value is a CSV of the child form fields to return and the order in which they will appear in IdentityIQ.Oracle.UD_DB_ORA_R=UD_DB_ORA_R_ROLE,UD_DB_ORA_R_ADMIN_OPTIONIn the previous example, we will return two fields from the child form UD_DB_ORA_R. The first field has the Role name and the second has the Role Admin option.
5. Following is the configuration for resource with child forms: ERP Central Component:ERP=ERP Central ComponentERP.id=UD_ECC_USER_IDERP.childForms=UD_ECC_PRO,UD_ECCRLERP.UD_ECC_PRO=UD_ECC_PRO_SYSTEMNAME,UD_ECC_PRO_USERPROFILEERP.UD_ECCRL=UD_ECCRL_SYSTEMNAME,UD_ECCRL_USERROLE
SailPoint Integration Guide 187

Configuration for OIM application
Note: Before IdentityIQ 6.0 there was a parameter in xellerate.properties file as oldChildFormNames which was used for the resources who have only one field in the childform, for example, Active Directory resource. For IdentityIQ version 6.0 onwards, the value must be set to true if the user wants to support oldChildFormNames where field returned would be form name + field name (For example, UD_ADUSRC:UD_ADUSRC_GROUPNAME field in Active directory).
6. To aggregate all the active and disabled OIM users in IdentityIQ, add a new parameter OIM_USER_TYPE in xelerate.properties file with the value as ALL. If OIM_USER_TYPE parameter is removed from the xelerate.properties file then only the active OIM users will be aggregated. By default only active OIM user are aggregated.
ConfigurationforOIMapplication
Perform the following steps to create an IdentityIQ application for OIM:
1. Navigate to the IdentityIQ Define=>Application page.
2. Create a new application of type Oracle Identity Manager.
3. On the Attributes tab, enter the Oracle Identity Manager Host and Oracle Identity Manager Port.
4. Click Test Connection to verify the connection to OIM.
Note: You can make use of the “OIM Application creator” task to discover all the resources present in OIM environment. The input for this task would be an newly created application of type “Oracle Identity Manager” and executing this task would result in the creation of all multiplexed resources.
TestingtheOIMIntegrationClient
While any IdentityIQ feature that generates a provisioning request such as a certification remediation, a role assignment, or a Lifecycle Manager request can be used to test the integration, it is sometimes useful to test at the provisioning layer using the IdentityIQ integration console.
Launch the console by using the IdentityIQ script in the INSTALLDIR/WEB-INF/bin directory of the IdentityIQ installation to run iiq integration.
From the console command prompt, use the list command to display the names of all Application objects created in the system. Using the example in the previous section, verify an Application object of type Oracle Identity Manager exits.
Use the following command:
use OIMApplicationNameUse the ping command to initiate a test connection message with OIM. A successful connection will return the following message:
Response: Connection test successfulIf any problem occurs in the communication of this application with the OIM Integration Web Application, troubleshoot this application by viewing the application server logs for both the IdentityIQ and OIM application servers. You can enable log4j tracing on both sides by using the following:
log4j.logger.sailpoint.integration=debuglog4j.logger.sailpoint.connector=debug
188 SailPoint Integration Guide

Aggregating from OIM
This lets you see if the requests are transmitting over the network, and how they are processed.
If the OIM servlet is deployed on Weblogic 11g, tracing can be enabled on it by adding an entry to the logging file on the Weblogic server. Following is the logging file:
<DOMAIN_HOME>/config/fmwconfig/servers/oim_server1/logging.xmlFollowing is the entry that needs to be added:
<logger name="SailPoint.integration.oim" level="TRACE:32"/>For more information on enabling system logging in OIM is included in the Oracle Identity Manager Administrator Guide.
AggregatingfromOIM
To aggregate OIM users and resource accounts, create and execute an IdentityIQ Account Aggregation task. Include the OIM application in the applications to scan list.
When the aggregation is complete from the OIM application, a new application is created for every resource in OIM. The application schema includes attributes seen in the resource accounts. All users in OIM have an account created that is associated with the OIM application and includes all of the standard and extended user attributes of those users. Additionally, all of the resource accounts are aggregated and associated with the newly created applications.
Once the initial aggregation from the OIM application is completed, you can aggregate from it again to read in information for all managed systems.
Note: You can make use of the “OIM Application Creator task” to discover all of the Resources present in the OIM environment. The input for this task is an application of type Oracle Identity Manager. Executing this task results in the creation of all multiplexed Resource applications.
Known/Openissues
Following is the known/open issue of Oracle Identity Manager:• You cannot perform provisioning operations simultaneously on the OIM server from IdentityIQ and the
OIM console. This is a class loading issue observed with OIM 11g, after deploying iiq servlet(iiq.war) on Weblogic OIM Managed Server. Workaround for this issue: Create another, empty WLS(Weblogic)Managed server next to the OIM Managed Server and only deploy the IIQ Servlet. Also, update the Xellerate.properties file by un-commenting the attribute java.naming.provider.url. This Url needs the host name of the host where OIM managed server is deployed and the listening port of the OIM managed server.
• Create OIM user and Update OIM user operations are not working with Oracle Identity Manager 11g R2.
SailPoint Integration Guide 189

Known/Open issues
190 SailPoint Integration Guide

Overview
Chapter20:SailPointIBMSecurityProvisioningIntegrationModule
The following topics are discussed in this chapter:Overview. . . . . . . . . . . . . . . . . . . . . . . . . . . . . . . . . . . . . . . . . . . . . . . . . . . . . . . . . . . . . . . . . . . . . . . . . . . . . . . . . 191Supported features . . . . . . . . . . . . . . . . . . . . . . . . . . . . . . . . . . . . . . . . . . . . . . . . . . . . . . . . . . . . . . . . . . . . . . . . 191Supported platforms . . . . . . . . . . . . . . . . . . . . . . . . . . . . . . . . . . . . . . . . . . . . . . . . . . . . . . . . . . . . . . . . . . . . . . . 191General configuration . . . . . . . . . . . . . . . . . . . . . . . . . . . . . . . . . . . . . . . . . . . . . . . . . . . . . . . . . . . . . . . . . . . . . . 192Configuration for Aggregation . . . . . . . . . . . . . . . . . . . . . . . . . . . . . . . . . . . . . . . . . . . . . . . . . . . . . . . . . . . . . . . 192Configuration for Provisioning . . . . . . . . . . . . . . . . . . . . . . . . . . . . . . . . . . . . . . . . . . . . . . . . . . . . . . . . . . . . . . . 192Troubleshooting. . . . . . . . . . . . . . . . . . . . . . . . . . . . . . . . . . . . . . . . . . . . . . . . . . . . . . . . . . . . . . . . . . . . . . . . . . . 194
Overview
This chapter is designed to provide the necessary procedures, configuration steps, and general product guidelines to successfully integrate IBM Security® Identity Manager (ISIM) into your SailPoint production environment.
This chapter is intended for ISIM and IdentityIQ System Administrators and assumes a high degree of technical knowledge of these systems.
Supportedfeatures
The IBM Security Identity Manager Provisioning Integration Module provides the ability to provision Target Application accounts from IdentityIQ.
The Security Provisioning Integration Module supports the following functions:• User Management
- Manages IBM Security Identity Manager Users as Accounts
- Aggregating Users • Target Application Accounts Management
- Manages Target Application Accounts as Accounts
- Aggregating Target Accounts directly
- Create, Update, Delete
- Enable, Disable, Reset Password
Supportedplatforms
SailPoint IBM Security Provisioning Integration Module supports version 6.0 of IBM Security Identity Manager.
SailPoint Integration Guide 191

General configuration
Generalconfiguration
The installation steps for ISIM integrations vary based on the functions you wish to perform. IdentityIQ in conjunction with ISIM allows the following functionality:
• Aggregation• Provisioning Entitlements in ISIM
ConfigurationforAggregation
Aggregating from IBM Security Identity Manager involves configuring the ISIM application settings within the IdentityIQ user interface.
ISIM has two types of objects that can be aggregated; people and accounts. IdentityIQ refers to these as identities and accounts (or links). To aggregate from ISIM, perform the following:
1. Create An ISIM Application: Create a new application using the IBM Security Identity Manager connector and fill in the required parameters following the steps provided in the IdentityIQ User’s Guide. Use the tenant DN search base. For example, erglobalid=00000000000000000000,ou=example,dc=com Leave the search filter blank. This is auto-generated correctly during aggregation. This application is used to aggregate ISIM person objects.
2. Setup Correlation Attribute: Create an identity attribute that is sourced from the erglobalid on the ISIM application and mark it as searchable. This is used to correlate ISIM accounts to this identity.
3. Create ISIM Account Applications: Run the ITIM Application Creator task to inspect ISIM and retrieve infor-mation about the ISIM services (applications). This task auto-generates an application for each service defined in ISIM.
4. Setup Correlation on the ISIM Account Applications: Set the correlation rule on the generated applications to Correlation - ISIM Account. This correlates the account to the identity using the erglobalid. If the rule is not listed by default, import it from the $ISIM_INTEGRATION_PACKAGE/samples/ITIM-Account-CorrelationRule.xml location.
5. Aggregate: Run aggregation for the ISIM application first and then for each ISIM account application.
ConfigurationforProvisioning
Provisioning entitlements and role assignments in ISIM requires the installation of IdentityIQ’s ISIM integration web application in WebSphere with ISIM. This process varies slightly depending on the version of WebSphere.
IdentityIQ roles are queued and pushed in ISIM on a schedule. This is accomplished by using the Synchronize Roles task.
1. Prepare the WAR: The iiqIntegration-ITIM.war file contains a properties file named itim.proper-ties with information about how to connect using ISIM. In order to execute, this must be edited to include appropriate information about the ISIM installation. Additionally, the .war file does not include any of the required jar files of ISIM files since these can change depending on the version and fixpack level of ISIM. These need to be copied out of the ISIM lib directory and added to the .war file.
a. Expand the iiqIntegration-ITIM.war file in a temporary directory.
192 SailPoint Integration Guide

Configuration for Provisioning
b. Edit the WEB-INF/classes/itim.properties file and change the properties match your environment. Save the file with your changes. The following can be changed:
• PLATFORM_URL: URL to use to communicate with ISIM. The format of the URL must be same as the value of enrole.appServer.url from enRole.properties located under <ISIM-HOME>/data directory.
• PLATFORM_PRINCIPAL: The administrator user who can login to the administrator Console of WAS.
• PLATFORM_CREDENTIALS: Password of the principal. Encrypting password is supported.
• TENANT_DN: The root DN of the ISIM tenant.c. Copy the required jar files of ISIM into the lib directory. These .jar files are located in the deployed
ISIM ear directory.
(For ISIM 6.0): Example ISIM ear directory: $WAS_HOME/profiles/<app server>/installedApps/<cell>/ITIM.ear Following are the required files:
• api_ejb.jar• isim_api.jar• isim_server_api.jar
d. Update the iiqIntegration-ITIM.war file to include the updated itim.properties and required jar files of ISIM.
For example, jar uvf iiqIntegration-ISIM.war WEB-INF/classes/itim.properties \ WEB-INF/lib/api_ejb.jar WEB-INF/lib/isim_api.jar \ WEB-INF/lib/isim_common.jar WEB-INF/lib/isim_server_api.jar \ WEB-INF/lib/jlog.jar
2. Install the IdentityIQ ISIM Integration Web Application: In the WebSphere Administrative Console, navi-gate to Enterprise Applications and select Install.
a. Select iiqIntegration-ITIM.war as the application to install and type iiqisim as the context root.b. Continue through the rest of the installation wizard accepting the defaults.c. When completed, click Save to save the changes to the master configuration.
3. Setup the Integration Config: The IntegrationConfig object holds information about how to connect Iden-tityIQ to ISIM and all of the configuration requirements for various functions. ISIM supports dual role push mode, which means that both detectable and assignable roles can be used. An example can be found in the ISIM integration folder within your IdentityIQ installation directory in the $INSTALLDIR/integra-tion/ITIM/samples/exampleIntegration.xml directory.The main properties that need to be set are:
- executor: sailpoint.integration.isim.ISIMIntegrationExecutor
- ApplicationRef: The reference to the ISIM application
- Attributes=> URL: The URL to the IIQ web service on the ISIM server. For example, https://myisim.example.com:9080/iiqisim/resources
SailPoint Integration Guide 193

Troubleshooting
Note: SailPoint recommends that you use SSL when transmitting sensitive electronic information.
- Attributes=> username: ISIM user's credentials used for basic HTTP authentication.
- Attributes=> password: ISIM user's password used for basic HTTP authentication.
- ManagedResources map: Mappings of local IdentityIQ applications to ISIM services, including mappings of local IdentityIQ attribute names to ISIM service attribute names.
For more information, see Appendix: A: Common Identity Management Integration Configuration.
4. Verify: Be certain that the integration has been installed correctly by using the ping command in the inte-gration console. If successful, this should respond and list version information about the ISIM jar files that were put into the iiqIntegration-ISIM.war file. Compare this version information against the version of the ISIM server to ensure correct operation.
5. Role Requests: Set the roleSyncStyle to dual in the IntegrationConfig file as follows:<IntegrationConfig executor="sailpoint.integration.isim.ISIMIntegrationExecutor" name="ISIM 5.1 Integration" roleSyncStyle="dual">Other than this, the role should be assignable (for example, a business role) and the name has to match the name of the role in ISIM.
Troubleshooting
1-Anerrormessageappearswhentheurlformatinitim.propertiesisnotvalidThe following error messages appear when the url format in itim.properties is not valid:
• java.lang.NoClassDefFoundError: com.ibm.cv.CVProxyExceptionWorkaround: Copy com.ibm.cv.kmip.ext.jar file to <WAS-HOME>/profiles/<App server>/classes directory and restart the application server.
• java.util.MissingResourceException: Can't find resource for bundle tmsMessages Workaround: Copy tmsMessages.properties and tmsMessages_en.properties file from <ISIM-HOME>/data to <WAS-HOME>/profiles/<App server>/classes directory and restart the application server.
194 SailPoint Integration Guide

Mobile Device Management IntegrationModules
Mobile Device Management Integration Module (MIM) manages Devices enrolled in Mobile Device Management
(MDM) System. MIM also manages Users/Administrators of MDM System. Following is an architecture diagram of MIM:
MDM systems import users from a central directory server or maintains its own repository. Operations to be performed on devices are sent to the respective MDM System which then performs the specified action on the target device. MIM does not communicate with the devices directly.
MIM uses two separate applications to manage users and devices. Main MIM application manages users in the MDM System and the proxy MIM application manages devices in the MDM System. In some cases there is one application which manages devices.
This section contains information on the following:• "SailPoint AirWatch Mobile Device Management Integration Module" on page 197• "SailPoint MobileIron Mobile Device Management Integration Module" on page 201• "SailPoint Good Technology Mobile Device Management Integration Module" on page 205

196 SailPoint Integration Guide
Overview
Chapter21:SailPointAirWatchMobileDeviceManagementIntegrationModule
The following topics are discussed in this chapter:Overview. . . . . . . . . . . . . . . . . . . . . . . . . . . . . . . . . . . . . . . . . . . . . . . . . . . . . . . . . . . . . . . . . . . . . . . . . . . . . . . . . 197Supported features . . . . . . . . . . . . . . . . . . . . . . . . . . . . . . . . . . . . . . . . . . . . . . . . . . . . . . . . . . . . . . . . . . . . . . . . 197Supported platforms . . . . . . . . . . . . . . . . . . . . . . . . . . . . . . . . . . . . . . . . . . . . . . . . . . . . . . . . . . . . . . . . . . . . . . . 198Pre-requisites . . . . . . . . . . . . . . . . . . . . . . . . . . . . . . . . . . . . . . . . . . . . . . . . . . . . . . . . . . . . . . . . . . . . . . . . . . . . . 198Configuration . . . . . . . . . . . . . . . . . . . . . . . . . . . . . . . . . . . . . . . . . . . . . . . . . . . . . . . . . . . . . . . . . . . . . . . . . . . . . 198
Application configuration . . . . . . . . . . . . . . . . . . . . . . . . . . . . . . . . . . . . . . . . . . . . . . . . . . . . . . . . . . . . . . . 199Operation specific configuration. . . . . . . . . . . . . . . . . . . . . . . . . . . . . . . . . . . . . . . . . . . . . . . . . . . . . . . . . . 199
Overview
This document provides a guide to the AirWatch Mobile Device Management (AirWatch) integration and configuration for your enterprise.
Using this integration, IdentityIQ can retrieve the devices managed by AirWatch, perform operations on them, and manage AirWatch's user account. These entities are managed in IdentityIQ using separate applications named as follows:
• AirWatch Mobile Device Management (MDM) Application (referred to as User Application in this document) for managing AirWatch user accounts
• Device Application (containing the prefix -Devices) is created by IdentityIQ during aggregation and is used for managing devices.
Supportedfeatures
The AirWatch MDM Integration Module supports the following features:• Account Management
- Account Aggregation on the user application to bring in AirWatch user accounts
- Account Aggregation on the device application to bring in devices managed in AirWatch MDM
- Delete, Unlock devicesThe following table represents what each of the above operation implies to IdentityIQ and AirWatch MDM:
SailPoint Integration Guide 197

Supported platforms
• Account - Group Management
- Device Group Aggregation where device profiles are addressed as groups.
- Add and remove entitlement (profile) from device.
Supportedplatforms
SailPoint AirWatch Mobile Device Management Integration Module supports the following version of AirWatch: • AirWatch Platform Services 8.4.7.0
Pre-requisites
Administrator user configured for AirWatch MDM Application must have the following role for provisioning activities:
• REST API Devices Read • REST API Devices Write• REST API Devices Execute• REST API Devices Delete• REST API Devices Advanced
Note: IfAirWatch MDM application is behind proxy server, see the “Special Java Considerations” section of the SailPoint IdentityIQ Installation Guide.
Configuration
This section describes the application and additional operation specific configurations.
IdentityIQ operation Resulting change on AirWatch
Account aggregation on user application
The AirWatch user accounts are brought into IdentityIQ.
Account aggregation on device application
The devices that are managed by the AirWatch MDM are retrieved into IdentityIQ.
Delete account for AirWatch device application
Enterprise/Device Wipe and Delete device is triggered on the device via AirWatch MDM system. For more information, see “Operation specific configuration” on page 199.
Unlock account for AirWatch device application
Unlock device is triggered on the device via AirWatch MDM system.
Adding entitlements to account Adding profiles to device from AirWatch system.
Deleting entitlements from account Removing profiles from AirWatch system.
198 SailPoint Integration Guide
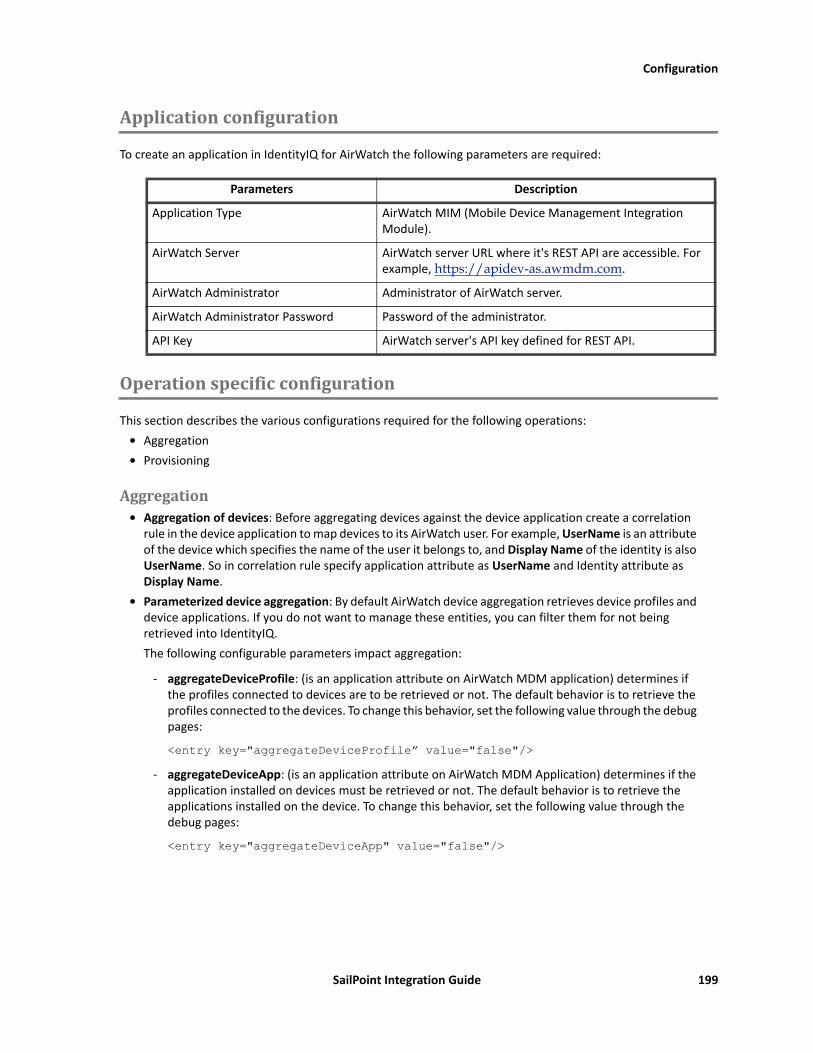
Configuration
Applicationconfiguration
To create an application in IdentityIQ for AirWatch the following parameters are required:
Operationspecificconfiguration
This section describes the various configurations required for the following operations:• Aggregation• Provisioning
Aggregation• Aggregation of devices: Before aggregating devices against the device application create a correlation
rule in the device application to map devices to its AirWatch user. For example, UserName is an attribute of the device which specifies the name of the user it belongs to, and Display Name of the identity is also UserName. So in correlation rule specify application attribute as UserName and Identity attribute as Display Name.
• Parameterized device aggregation: By default AirWatch device aggregation retrieves device profiles and device applications. If you do not want to manage these entities, you can filter them for not being retrieved into IdentityIQ.The following configurable parameters impact aggregation:
- aggregateDeviceProfile: (is an application attribute on AirWatch MDM application) determines if the profiles connected to devices are to be retrieved or not. The default behavior is to retrieve the profiles connected to the devices. To change this behavior, set the following value through the debug pages:
<entry key="aggregateDeviceProfile” value="false"/>- aggregateDeviceApp: (is an application attribute on AirWatch MDM Application) determines if the
application installed on devices must be retrieved or not. The default behavior is to retrieve the applications installed on the device. To change this behavior, set the following value through the debug pages:
<entry key="aggregateDeviceApp" value="false"/>
Parameters Description
Application Type AirWatch MIM (Mobile Device Management Integration Module).
AirWatch Server AirWatch server URL where it's REST API are accessible. For example, https://apidev-as.awmdm.com.
AirWatch Administrator Administrator of AirWatch server.
AirWatch Administrator Password Password of the administrator.
API Key AirWatch server's API key defined for REST API.
SailPoint Integration Guide 199

Configuration
ProvisioningThe following provisioning operations are available in IdentityIQ when integrating with AirWatch:
• Delete device
Deletedevice• Delete Device operation from LCM: In addition to Delete Device, you will be prompted to select Entire
Device Wipe or Enterprise Wipe Only options before deleting the device.• Delete Device operation from Certification: The default wipe operation will be the Enterprise Wipe
Only. To change this default behavior to Entire Device Wipe add the following entry in the application debug of the device application:<entry key="defaultWipeFromCertification" value="Entire Device Wipe"/>Note: If the AirWatch application is already created, update the delete provisioning policy with new
field, name as SecurityPIN and type as String.
200 SailPoint Integration Guide
Overview
Chapter22:SailPointMobileIronMobileDeviceManagementIntegrationModule
The following topics are discussed in this chapter:Overview. . . . . . . . . . . . . . . . . . . . . . . . . . . . . . . . . . . . . . . . . . . . . . . . . . . . . . . . . . . . . . . . . . . . . . . . . . . . . . . . . 201Supported features . . . . . . . . . . . . . . . . . . . . . . . . . . . . . . . . . . . . . . . . . . . . . . . . . . . . . . . . . . . . . . . . . . . . . . . . 201Supported platforms . . . . . . . . . . . . . . . . . . . . . . . . . . . . . . . . . . . . . . . . . . . . . . . . . . . . . . . . . . . . . . . . . . . . . . . 202Pre-requisites . . . . . . . . . . . . . . . . . . . . . . . . . . . . . . . . . . . . . . . . . . . . . . . . . . . . . . . . . . . . . . . . . . . . . . . . . . . . . 202Configuration . . . . . . . . . . . . . . . . . . . . . . . . . . . . . . . . . . . . . . . . . . . . . . . . . . . . . . . . . . . . . . . . . . . . . . . . . . . . . 202
Application configuration . . . . . . . . . . . . . . . . . . . . . . . . . . . . . . . . . . . . . . . . . . . . . . . . . . . . . . . . . . . . . . . 202Operation specific configuration. . . . . . . . . . . . . . . . . . . . . . . . . . . . . . . . . . . . . . . . . . . . . . . . . . . . . . . . . . 203
Overview
SailPoint IdentityIQ manages MobileIron devices. It does not handle MobileIron users because MobileIron has not provided the supporting User API. It manages these MobileIron entities using the MobileIron REST API's over HTTPS. All the devices are aggregated under MobileIron Mobile Device Management (MDM) Application.
Supportedfeatures
The SailPoint MobileIron MDM Connector provides the ability to provision MobileIron devices from IdentityIQ.
The MobileIron MDM Connector supports the following functions:• Account Management
- Device aggregation which include device Attribute, Group Attribute - Labels and Entitlements - Apps, Labels.
- MobileIron MIM support Create, Delete and unlock operations where Create is Registering a Device, Delete is Retire a Device along with Device Wipe that will wipe all the existing device applications and Unlock means unlocking a device by removing a PIN if Set.
• Account - Group Management
- Device Group Aggregation where groups are Labels in MobileIron.
The following table displays a comparison between operations from IdentityIQ and resultant operations in MobileIron MDM:
IdentityIQ operation Resulting change on MobileIron
Account aggregation on MobileIron application
The devices that are managed by the MobileIron MDM are retrieved into IdentityIQ with the label attribute represented as the entitlement for that device.
SailPoint Integration Guide 201
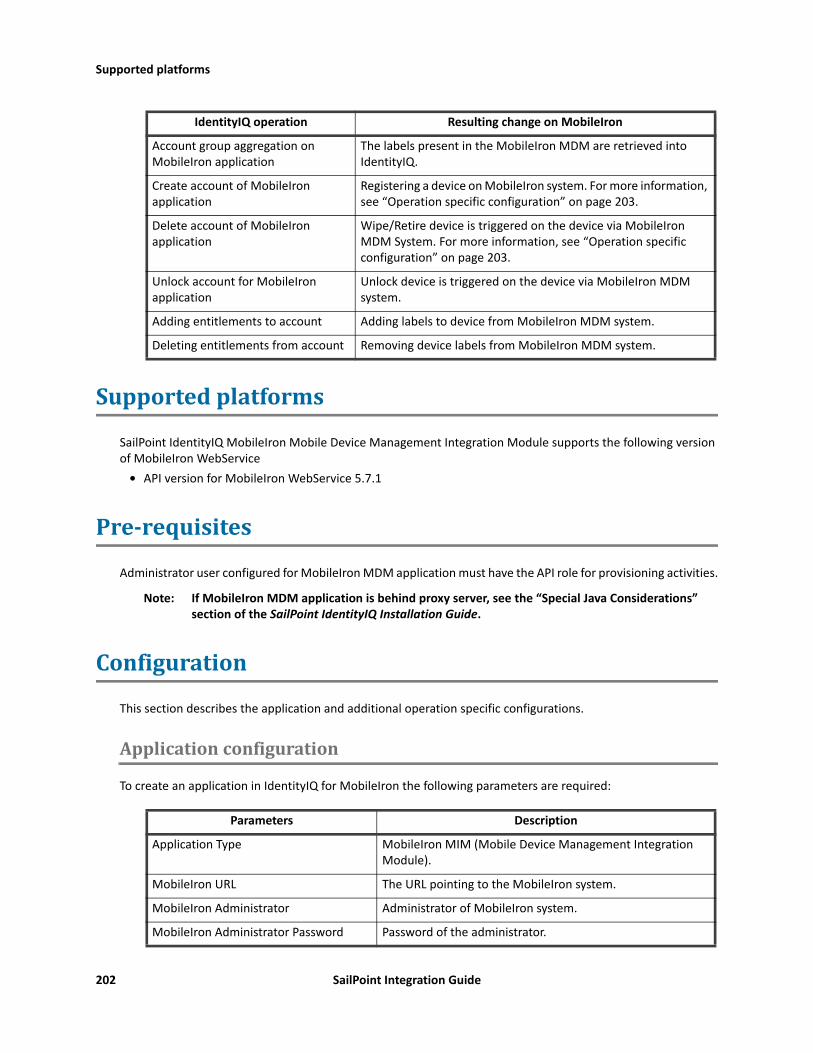
Supported platforms
Supportedplatforms
SailPoint IdentityIQ MobileIron Mobile Device Management Integration Module supports the following version of MobileIron WebService
• API version for MobileIron WebService 5.7.1
Pre-requisites
Administrator user configured for MobileIron MDM application must have the API role for provisioning activities.
Note: If MobileIron MDM application is behind proxy server, see the “Special Java Considerations” section of the SailPoint IdentityIQ Installation Guide.
Configuration
This section describes the application and additional operation specific configurations.
Applicationconfiguration
To create an application in IdentityIQ for MobileIron the following parameters are required:
Account group aggregation on MobileIron application
The labels present in the MobileIron MDM are retrieved into IdentityIQ.
Create account of MobileIron application
Registering a device on MobileIron system. For more information, see “Operation specific configuration” on page 203.
Delete account of MobileIron application
Wipe/Retire device is triggered on the device via MobileIron MDM System. For more information, see “Operation specific configuration” on page 203.
Unlock account for MobileIron application
Unlock device is triggered on the device via MobileIron MDM system.
Adding entitlements to account Adding labels to device from MobileIron MDM system.
Deleting entitlements from account Removing device labels from MobileIron MDM system.
Parameters Description
Application Type MobileIron MIM (Mobile Device Management Integration Module).
MobileIron URL The URL pointing to the MobileIron system.
MobileIron Administrator Administrator of MobileIron system.
MobileIron Administrator Password Password of the administrator.
IdentityIQ operation Resulting change on MobileIron
202 SailPoint Integration Guide
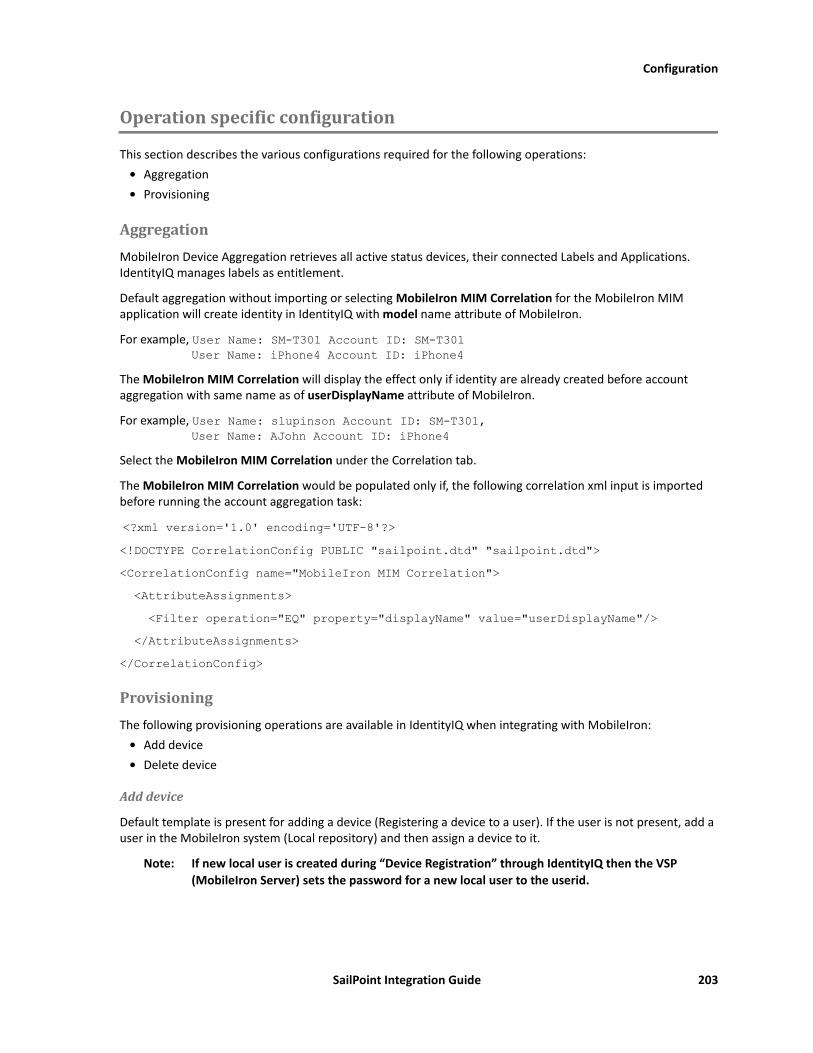
Configuration
Operationspecificconfiguration
This section describes the various configurations required for the following operations:• Aggregation• Provisioning
AggregationMobileIron Device Aggregation retrieves all active status devices, their connected Labels and Applications. IdentityIQ manages labels as entitlement.
Default aggregation without importing or selecting MobileIron MIM Correlation for the MobileIron MIM application will create identity in IdentityIQ with model name attribute of MobileIron.
For example, User Name: SM-T301 Account ID: SM-T301 User Name: iPhone4 Account ID: iPhone4The MobileIron MIM Correlation will display the effect only if identity are already created before account aggregation with same name as of userDisplayName attribute of MobileIron.
For example, User Name: slupinson Account ID: SM-T301, User Name: AJohn Account ID: iPhone4Select the MobileIron MIM Correlation under the Correlation tab.
The MobileIron MIM Correlation would be populated only if, the following correlation xml input is imported before running the account aggregation task:
<?xml version='1.0' encoding='UTF-8'?><!DOCTYPE CorrelationConfig PUBLIC "sailpoint.dtd" "sailpoint.dtd"><CorrelationConfig name="MobileIron MIM Correlation"> <AttributeAssignments> <Filter operation="EQ" property="displayName" value="userDisplayName"/> </AttributeAssignments></CorrelationConfig>
ProvisioningThe following provisioning operations are available in IdentityIQ when integrating with MobileIron:
• Add device• Delete device
Adddevice
Default template is present for adding a device (Registering a device to a user). If the user is not present, add a user in the MobileIron system (Local repository) and then assign a device to it.
Note: If new local user is created during “Device Registration” through IdentityIQ then the VSP (MobileIron Server) sets the password for a new local user to the userid.
SailPoint Integration Guide 203
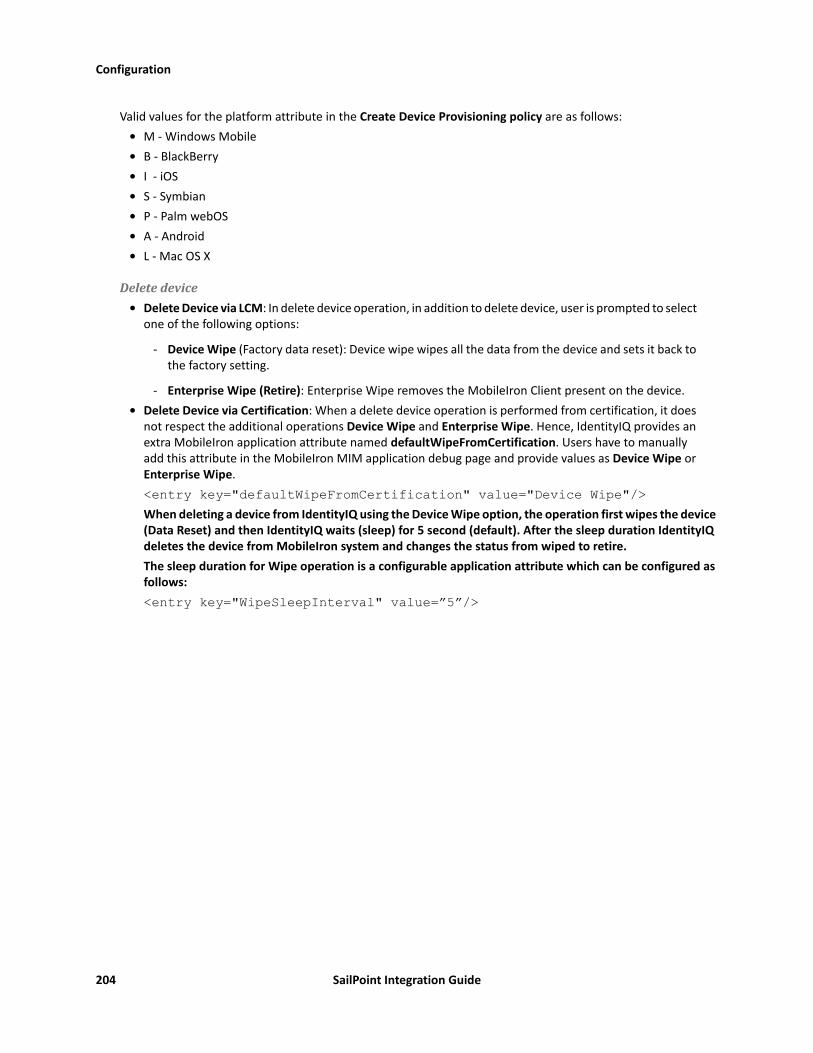
Configuration
Valid values for the platform attribute in the Create Device Provisioning policy are as follows:• M - Windows Mobile • B - BlackBerry • I - iOS • S - Symbian • P - Palm webOS • A - Android • L - Mac OS X
Deletedevice• Delete Device via LCM: In delete device operation, in addition to delete device, user is prompted to select
one of the following options:
- Device Wipe (Factory data reset): Device wipe wipes all the data from the device and sets it back to the factory setting.
- Enterprise Wipe (Retire): Enterprise Wipe removes the MobileIron Client present on the device. • Delete Device via Certification: When a delete device operation is performed from certification, it does
not respect the additional operations Device Wipe and Enterprise Wipe. Hence, IdentityIQ provides an extra MobileIron application attribute named defaultWipeFromCertification. Users have to manually add this attribute in the MobileIron MIM application debug page and provide values as Device Wipe or Enterprise Wipe.<entry key="defaultWipeFromCertification" value="Device Wipe"/>When deleting a device from IdentityIQ using the Device Wipe option, the operation first wipes the device (Data Reset) and then IdentityIQ waits (sleep) for 5 second (default). After the sleep duration IdentityIQ deletes the device from MobileIron system and changes the status from wiped to retire. The sleep duration for Wipe operation is a configurable application attribute which can be configured as follows: <entry key="WipeSleepInterval" value=”5”/>
204 SailPoint Integration Guide

Overview
Chapter23:SailPointGoodTechnologyMobileDeviceManagementIntegrationModule
The following topics are discussed in this chapter:Overview. . . . . . . . . . . . . . . . . . . . . . . . . . . . . . . . . . . . . . . . . . . . . . . . . . . . . . . . . . . . . . . . . . . . . . . . . . . . . . . . . 205Supported features . . . . . . . . . . . . . . . . . . . . . . . . . . . . . . . . . . . . . . . . . . . . . . . . . . . . . . . . . . . . . . . . . . . . . . . . 205Supported platform . . . . . . . . . . . . . . . . . . . . . . . . . . . . . . . . . . . . . . . . . . . . . . . . . . . . . . . . . . . . . . . . . . . . . . . . 206Pre-requisites . . . . . . . . . . . . . . . . . . . . . . . . . . . . . . . . . . . . . . . . . . . . . . . . . . . . . . . . . . . . . . . . . . . . . . . . . . . . . 206Configuration . . . . . . . . . . . . . . . . . . . . . . . . . . . . . . . . . . . . . . . . . . . . . . . . . . . . . . . . . . . . . . . . . . . . . . . . . . . . . 206
Application configuration . . . . . . . . . . . . . . . . . . . . . . . . . . . . . . . . . . . . . . . . . . . . . . . . . . . . . . . . . . . . . . . 206Operation specific configuration. . . . . . . . . . . . . . . . . . . . . . . . . . . . . . . . . . . . . . . . . . . . . . . . . . . . . . . . . . 207
Overview
This document provides a guide to the Good Technology Mobile Device Management (MDM) integration and configuration for your enterprise.
Using this integration, IdentityIQ can retrieve the devices managed by Good Technology and perform few operations on them. In addition, this integration also enables IdentityIQ to manage Good Technology's devices. These entities are managed in IdentityIQ using separate applications, named as follows:
• Good Technology MDM Application (referred to as User Application in this document) for managing Good Technology user accounts.
• Device Application (containing the suffix - Devices) is created by IdentityIQ during user aggregation and is used for managing devices.
Supportedfeatures
The Good Technology MDM Integration Module supports the following features:• Account Management
- Account Aggregation on the user application to bring in Good technology role member
- Device Aggregation on the device application to bring in devices managed in Good Technology MDM
- Add, Unlock Delete devices• Account-Group Management:
- Account Group Aggregation on the user application to bring in Good Technology roles
- Account Group Aggregation on the device application to bring in policy sets managed in Good Technology MDM
- Adding/ Removing Entitlement (Policy Set) to device account.
SailPoint Integration Guide 205
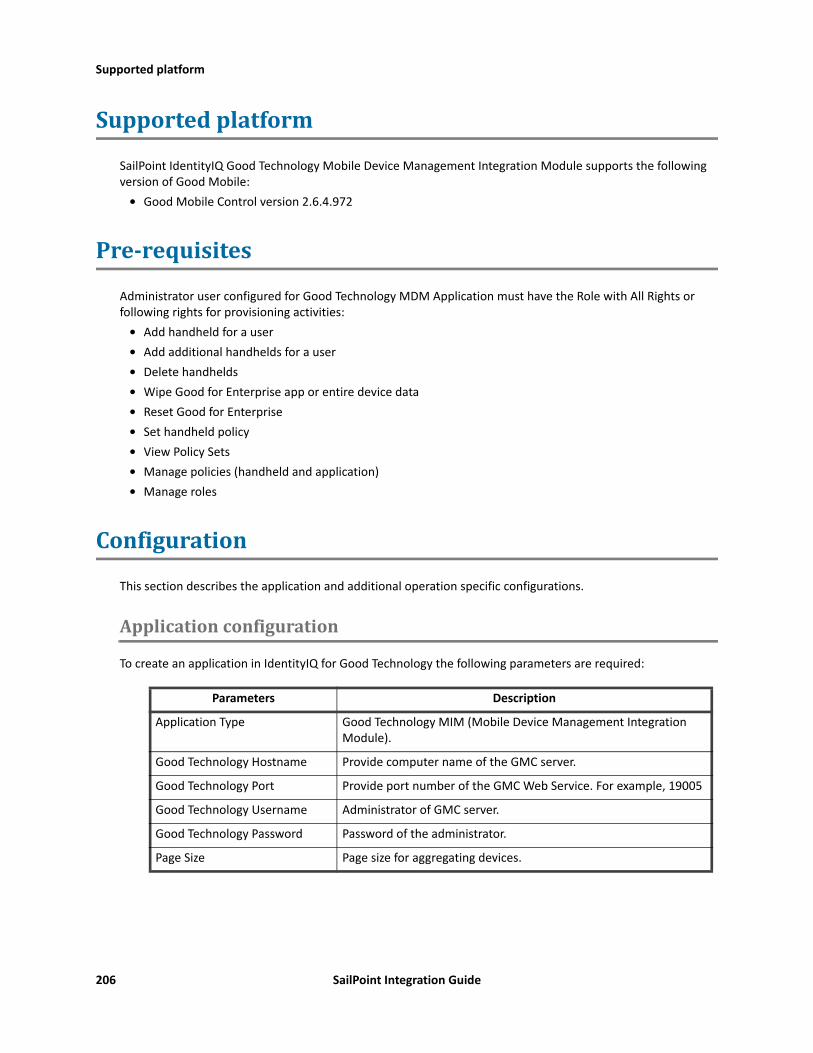
Supported platform
Supportedplatform
SailPoint IdentityIQ Good Technology Mobile Device Management Integration Module supports the following version of Good Mobile:
• Good Mobile Control version 2.6.4.972
Pre-requisites
Administrator user configured for Good Technology MDM Application must have the Role with All Rights or following rights for provisioning activities:
• Add handheld for a user• Add additional handhelds for a user• Delete handhelds• Wipe Good for Enterprise app or entire device data• Reset Good for Enterprise• Set handheld policy• View Policy Sets• Manage policies (handheld and application)• Manage roles
Configuration
This section describes the application and additional operation specific configurations.
Applicationconfiguration
To create an application in IdentityIQ for Good Technology the following parameters are required:
Parameters Description
Application Type Good Technology MIM (Mobile Device Management Integration Module).
Good Technology Hostname Provide computer name of the GMC server.
Good Technology Port Provide port number of the GMC Web Service. For example, 19005
Good Technology Username Administrator of GMC server.
Good Technology Password Password of the administrator.
Page Size Page size for aggregating devices.
206 SailPoint Integration Guide

Configuration
Operationspecificconfiguration
This section describes the various configurations required for the following operations:• Aggregation• Provisioning
AggregationAggregation of devices: Good Technology device aggregation retrieves all devices, their connected Policy Set and applications on the device. IdentityIQ manages Policy Set as entitlement.
Default aggregation without creating a correlation rule for the Good Technology Mobile Device Management Integration Module (MIM) application will create identity in IdentityIQ with Display Attribute (Device Model by default) of Good Technology.
For example, • Name: iPhone 4 (GSM, Rev. A) Account ID: phone 4 (GSM, Rev. A)
The correlation rule will display the effect only if identity is already created before account aggregation with same name as of correlation attribute of Identity.
• Name: "Demo User1” Account ID: iPhone 4 (GSM, Rev. A)Import the following correlation xml which correlates devices to Identity based on name of a user in Good Technology and display name of an Identity:<?xml version='1.0' encoding='UTF-8'?><!DOCTYPE CorrelationConfig PUBLIC "sailpoint.dtd" "sailpoint.dtd"><CorrelationConfig name="Good Technology Device Correlation"><AttributeAssignments><Filter operation="EQ" property="displayName" value="Name"/></AttributeAssignments></CorrelationConfig>
ProvisioningThe following provisioning operations are available in IdentityIQ when integrating with Good Technology:
• Add device• Unlock device• Delete device
Adddevice
While adding a device from IdentityIQ, default provisioning policy accepts the following fields:• User DN: DN of a user present in Good Technology User repository. This is a mandatory field.• Messaging Server: Name of the Good Messaging server. If this field is left blank, IdentityIQ will locate a
single GMM server if present. If multiple GMM servers exist, you must provide a value for this field else, the add operation will fail.
Unlockdevice
While Unlocking device from IdentityIQ, default provisioning policy accepts Unlock Code displayed on the device. Upon successful reset password, temporary unlock code is generated and it will be saved in Provisioning Request ID field in Unlock Access Request in IdentityIQ.
SailPoint Integration Guide 207

Configuration
Deletedevice• Delete Device operation from LCM: In addition to delete device, you will be prompted to select Entire
Device or Enterprise Data Only options before deleting the device.• Delete Device operation from Certification: The default wipe operation will be the Enterprise Data Only.
To change this default behavior to Entire Device add the following entry in the application debug of the device application:<entry key="defaultWipeFromCertification" value="Entire Device"/>
208 SailPoint Integration Guide
ITSecurityIntegrationModuleThis section contains information on the following section:
• “SailPoint HP ArcSight Integration Module”

210 SailPoint Integration Guide
Overview
Chapter24:SailPointHPArcSightIntegrationModule
The following topics are discussed in this chapter:Overview. . . . . . . . . . . . . . . . . . . . . . . . . . . . . . . . . . . . . . . . . . . . . . . . . . . . . . . . . . . . . . . . . . . . . . . . . . . . . . . . . 211Supported features . . . . . . . . . . . . . . . . . . . . . . . . . . . . . . . . . . . . . . . . . . . . . . . . . . . . . . . . . . . . . . . . . . . . . . . . 212Supported platforms . . . . . . . . . . . . . . . . . . . . . . . . . . . . . . . . . . . . . . . . . . . . . . . . . . . . . . . . . . . . . . . . . . . . . . . 212Pre-requisites . . . . . . . . . . . . . . . . . . . . . . . . . . . . . . . . . . . . . . . . . . . . . . . . . . . . . . . . . . . . . . . . . . . . . . . . . . . . . 212Configuration . . . . . . . . . . . . . . . . . . . . . . . . . . . . . . . . . . . . . . . . . . . . . . . . . . . . . . . . . . . . . . . . . . . . . . . . . . . . . 212
Configuration to export IdentityIQ Data to ArcSight. . . . . . . . . . . . . . . . . . . . . . . . . . . . . . . . . . . . . . . . . . 212Configuration to Import HP ArcSight CEF Flat File to SailPoint IdentityIQ. . . . . . . . . . . . . . . . . . . . . . . . . 216
Overview
HP ArcSight ESM is a Universal log management solution that helps enterprises identify and prioritize current and potential security threats. SailPoint IdentityIQ collects the security event information such as Audit information. The SailPoint IdentityIQ integration with HP ArcSight allows both end systems to take remediation action in case of security threats.
IdentityIQ integration with ArcSight enables the following scenarios:
1. IdentityIQ data (Identity, Account, Audit, and Syslog) stored in IdentityIQ can be exported to ArcSight. Arc-Sight administrator can store this data in an ArcSight Active List. IdentityIQ data can be exported to ArcSight for correlation, such as successful provisioning of privileged accounts, password changes, login failure and so on. For more information on ways to export data, see “Export from IdentityIQ to ArcSight” point in “Supported features” section.
2. IdentityIQ can import filtered activity event data from ArcSight; based on which activity-based remediation processing can be triggered. Event records are expected in standard ArcSight Common Event Format (CEF).Events received are matched with users held within the IdentityIQ warehouse, and used to trigger activity policies when certain types of event are recognized. These triggers result in a business process being executed which generates a full re-certification for the affected user, and also causes a re-calculation of the user's risk score and update of risk reports and dashboard content to highlight the activity.
Note: Creating an ArcSight Active Channel or Active List is outside the scope of this document. This document assumes the ArcSight administrator is familiar with steps to create an ArcSight Active Channel or Active List. It provides the IdentityIQ information an ArcSight administrator will require to create an ArcSight Active Channel or Active List.
CommonEventFormat(CEF)
CEF is an extensible, text-based, high-performance format designed to support multiple device types in the simplest manner possible. CEF defines syntax for log records comprised of a standard header and a variable extension, formatted as key-value pairs. CEF uses syslog as a transport mechanism and the following format, comprised of a syslog prefix, a header and an extension, as shown below:
For example,
SailPoint Integration Guide 211
Supported features
Jan 18 11:07:53 host CEF:Version|Device Vendor|Device Product|Device Version|Signature ID|Name|Severity|[Extension]Dec 19 08:31:10 host CEF:0|Security|threatmanager|1.0|101|out of hours workstation login|10|suser=hbutler src=activedirectorydomain ip=10.1.76.224
Supportedfeatures• Export from IdentityIQ to ArcSight: The IdentityIQ data can be exported in:
- Flat file in CEF: Using Advanced Analytics we can export Identity, Account, Audit and Syslog data in CEF.
- Database tables: The ArcSight Data Export task enables you to export Identity (which includes account and identity data) and Audit data to external tables.
• Import into IdentityIQ from ArcSight: This integration supports including event logging data from ArcSight and associate it to Identities in IdentityIQ so that potential policy violations can be triggered or provide greater visibility as part of access reviews as to any suspicious or error prone access a user may have.
Supportedplatforms
SailPoint HP ArcSight Integration Module supports the following versions of HP ArcSight Enterprise Security Manager:
• HP ArcSight Enterprise Security Manager version 6.9• HP ArcSight Enterprise Security Manager version 6.8
Pre-requisites
(Applicable for import of ArcSight Events into SailPoint IdentityIQ) At least one application must be configured in SailPoint IdentityIQ and Users/Groups aggregated into SailPoint IdentityIQ system.
Note: Users present in HP ArcSight must also be present in SailPoint IdentityIQ.
Configuration
This section describes the general, operation specific configurations and the steps that must be performed to configure the HP ArcSight Integration Module
ConfigurationtoexportIdentityIQDatatoArcSight
The Identity, Account and Audit information from SailPoint IdentityIQ can be exported to ArcSight using CEF flat file or database:
1. Export data from SailPoint IdentityIQ to ArcSight tables.
2. Export data from SailPoint IdentityIQ to Flat file in Common Event Format.
212 SailPoint Integration Guide
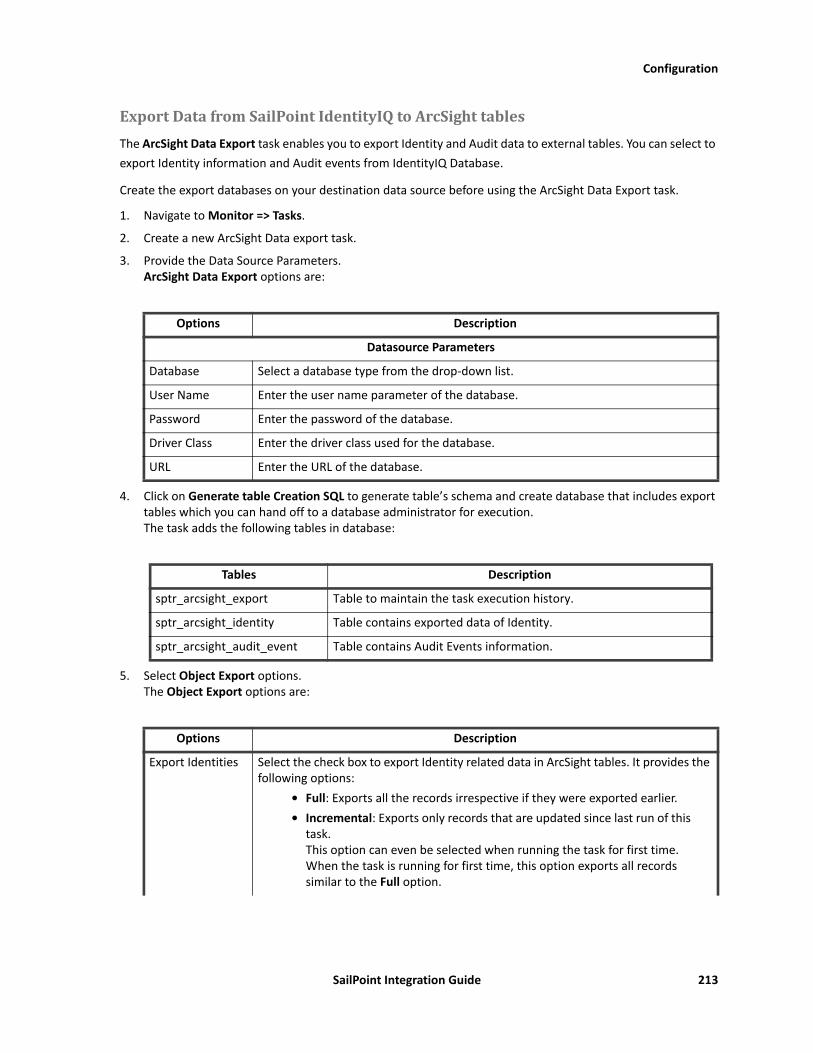
Configuration
ExportDatafromSailPointIdentityIQtoArcSighttablesThe ArcSight Data Export task enables you to export Identity and Audit data to external tables. You can select to export Identity information and Audit events from IdentityIQ Database.
Create the export databases on your destination data source before using the ArcSight Data Export task.
1. Navigate to Monitor => Tasks.
2. Create a new ArcSight Data export task.
3. Provide the Data Source Parameters.ArcSight Data Export options are:
4. Click on Generate table Creation SQL to generate table’s schema and create database that includes export tables which you can hand off to a database administrator for execution. The task adds the following tables in database:
5. Select Object Export options.The Object Export options are:
Options Description
Datasource Parameters
Database Select a database type from the drop-down list.
User Name Enter the user name parameter of the database.
Password Enter the password of the database.
Driver Class Enter the driver class used for the database.
URL Enter the URL of the database.
Tables Description
sptr_arcsight_export Table to maintain the task execution history.
sptr_arcsight_identity Table contains exported data of Identity.
sptr_arcsight_audit_event Table contains Audit Events information.
Options Description
Export Identities Select the check box to export Identity related data in ArcSight tables. It provides the following options:
• Full: Exports all the records irrespective if they were exported earlier. • Incremental: Exports only records that are updated since last run of this
task. This option can even be selected when running the task for first time. When the task is running for first time, this option exports all records similar to the Full option.
SailPoint Integration Guide 213

Configuration
6. After completing the customizing report options, click Save for later use or Save and Execute to save the report and run it immediately.
ConfiguringHPArcSightTasktopopulatehostnameorIPThe value of column application_host can be populated by adding a map arcsightAppNameHostMap. Adding the arcsightAppNameHostMap map the administrator configuring this integration can define the hostname (or IP address) which must be used for an Account. It is recommended this hostname (or IP address) is same as the configured in the ArcSight configuration.
The arcsightAppNameHostMap map must be defined in the ArcSight Data Export Task created above. The key in the map should be name of the application defined in IdentityIQ and value should be hostname, IP, or any string that ArcSight administrator understands.
1. To add the map, navigate to debug page, navigate to TaskDefinition and open the ArcSight task configured above.
2. Add the entry as key = Name of Application defined in IdentityIQ and value as the string to identify host of Account like Hostname or IP.
3. Save the task definition. For example:<entry key="arcsightAppNameHostMap"> <value> <Map> <entry key="LinuxApp1" value="linux01.sailpoint.com"/> <entry key="LinuxApp2" value="127.15.19.21"/> <entry key="ADDirectApp" value="AD.sailpoint.com"/> <entry key="ServiceNowApp" value="https://sailpoint.service-now.com"/> <entry key="ACF2App" value="ACF2-Mainframe"/> </Map> </value></entry> Note: If the application name is not defined in the map the host field will be blank.As mentioned above, this document provides the information an ArcSight administrator requires to create an ArcSight Active List or Active Channel. The information below provides the same. Following fields are added in export table:
Export Audits Select the check box to export Audit Events in ArcSight table. It provides the following options:
• Full: Exports all the records irrespective if they were exported earlier. • Incremental: Exports only records that are updated since last run of this
task. This option can even be selected when running the task for first time. When the task is running for first time, this option exports all records similar to the Full option.
Options Description
214 SailPoint Integration Guide

Configuration
Table 1—IdentityIQ sptr_arcsight_identity export table
Fields Description
linkid Primary key for Link table in IdentityIQ database. This field will be copied from spt_link table id field. This will be the primary key for export table.
identityid Primary key in Identity table. This field will be copied from spt_Identity table.
modified_dt Populates timestamp when the record will be exported in export table. The field can be referred while configuring time based ArcSight database connector.
identity_display_name Represents Display Name of Identity which will be copied from spt_identity table field (display_name).
identity_firstname Represents first name of Identity which will be copied from spt_identity table field (firstname).
identity_lastname Represents last name of Identity which will be copied from spt_identity table field (lastname).
application_type Populates the type of Account which is connected to the Identity like ActiveDirectory – Direct, ACF2 – Full, Box, Cloud Gateway, ServiceNow and so on.
application_host The host name, IP, or any string which can be used by ArcSight administrator to identify the host of link/account uniquely. Customer can enter any string which can be sent to ArcSight to identify the host of link.
This field can be populated as explained in “Configuring HP ArcSight Task to populate host name or IP” on page 214.
application_name Populates the name of Application of the Account connected to the Identity.
link_display_name The account connected to the identity which will be copied from spt_link table, field display_name.
entitlements Represents comma separated list of entitlements to the link of Identity.
risk_score Represents the composite risk score of Identity.
Table 2—IdentityIQ sptr_arcsight_audit_event export table
Fields Description
auditid The audit ID which is primary key for the export Audit table. The field will be copied from spt_audit_event table id field.
created_dt Populates timestamp when the record will be exported in export table. The field can be referred while configuring time based ArcSight database connector.
owner Describes the Owner of the audit generated.
source Provides more details to help ArcSight administrator determine the source of audit.
action Describes the action taken on entity.
target Provides target details.
application Describes the name of application the target belongs to.
SailPoint Integration Guide 215
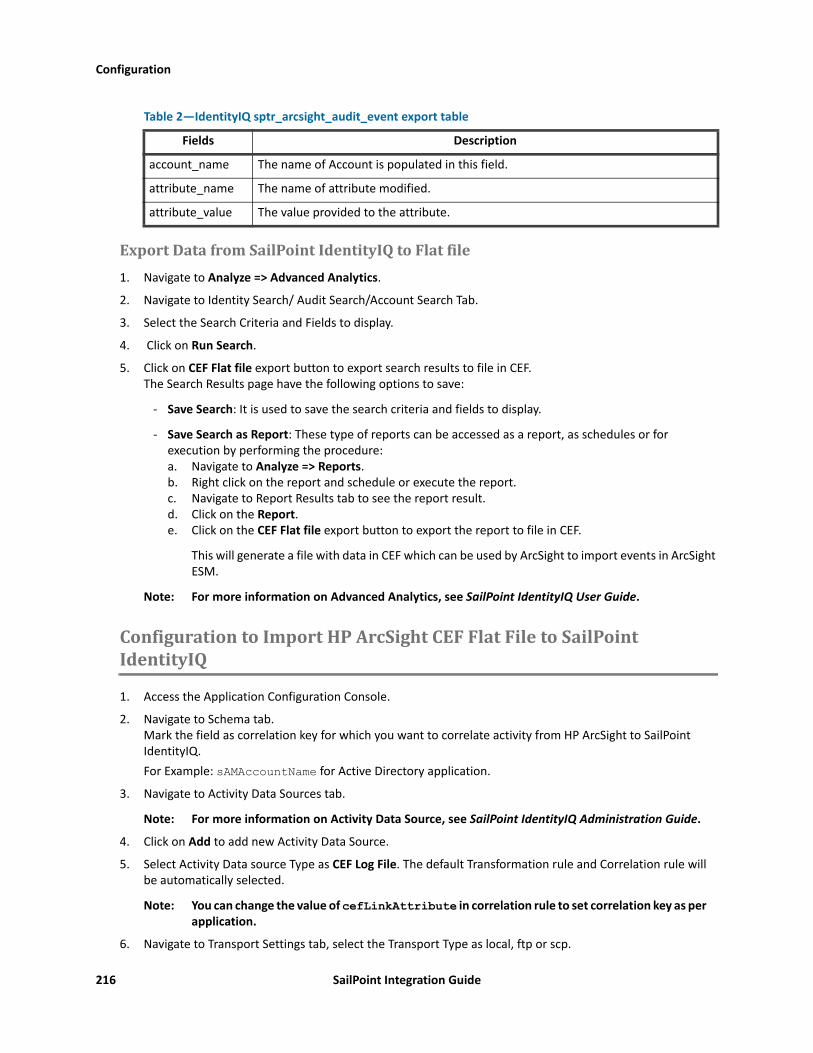
Configuration
ExportDatafromSailPointIdentityIQtoFlatfile1. Navigate to Analyze => Advanced Analytics.
2. Navigate to Identity Search/ Audit Search/Account Search Tab.
3. Select the Search Criteria and Fields to display.
4. Click on Run Search.
5. Click on CEF Flat file export button to export search results to file in CEF.The Search Results page have the following options to save:
- Save Search: It is used to save the search criteria and fields to display.
- Save Search as Report: These type of reports can be accessed as a report, as schedules or for execution by performing the procedure:a. Navigate to Analyze => Reports.b. Right click on the report and schedule or execute the report.c. Navigate to Report Results tab to see the report result.d. Click on the Report.e. Click on the CEF Flat file export button to export the report to file in CEF.
This will generate a file with data in CEF which can be used by ArcSight to import events in ArcSight ESM.
Note: For more information on Advanced Analytics, see SailPoint IdentityIQ User Guide.
ConfigurationtoImportHPArcSightCEFFlatFiletoSailPointIdentityIQ
1. Access the Application Configuration Console.
2. Navigate to Schema tab. Mark the field as correlation key for which you want to correlate activity from HP ArcSight to SailPoint IdentityIQ.For Example: sAMAccountName for Active Directory application.
3. Navigate to Activity Data Sources tab.
Note: For more information on Activity Data Source, see SailPoint IdentityIQ Administration Guide.4. Click on Add to add new Activity Data Source.
5. Select Activity Data source Type as CEF Log File. The default Transformation rule and Correlation rule will be automatically selected.
Note: You can change the value of cefLinkAttribute in correlation rule to set correlation key as per application.
6. Navigate to Transport Settings tab, select the Transport Type as local, ftp or scp.
account_name The name of Account is populated in this field.
attribute_name The name of attribute modified.
attribute_value The value provided to the attribute.
Table 2—IdentityIQ sptr_arcsight_audit_event export table
Fields Description
216 SailPoint Integration Guide

Configuration
7. Navigate to Log File Settings tab and in the File name provide the exact path of the CEF Flat file. For exam-ple, C:\ArcSight\activedirectory.csv
8. Click on Save button to save activity data source configuration.
9. Click on Save button to save the application.If the correlation key is not marked and aggregation of account for that application is already performed, then perform the following:
- Access the Application Configuration console.
- Navigate to the Correlation tab.
- Click on New button to create a new Account Correlation.
- Click on next button and provide the name of the configuration.
- Select the Application Attributes and Identity Attributes and click on Add button.
- Click on Save.
- Click on Save to save the application.
After the correlation configuration is done, execute the account aggregation (with optimization turned off to pick up the existing accounts) again.
10. Navigate to Define => Identities.
11. Click on the identity for which you want to enable Activity monitoring and import data from ArcSight.
12. Navigate to Activity Tab.
13. Select the Activity Monitoring checkbox.
14. Save the Identity.
15. Navigate to Monitor => Tasks.
16. Create a new Activity Aggregation Task.
17. Select an activity data source which is configured above in Step 8.
18. Save and execute the task.
- To see the result of the task executed in previous step navigate to Task Results tab and click on the task.
- To see the correlated events navigate to Define => Identities. Select the identity for which you have correlated the event. Navigate to Activity Tab. Check the Recent Activities section.
Note: After correlating the HP ArcSight event to Identity, the Policy Violation and Certification can be created and used to notify for any activity for that identity using the workflow.
SailPoint Integration Guide 217

Configuration
218 SailPoint Integration Guide

AppendixThis section contains information on the following:
• "A: Common Identity Management Integration Configuration" on page 221• "B: Component Interface" on page 229

220 SailPoint Integration Guide
Overview
AppendixA:Common IdentityMan-agementIntegrationConfiguration
This appendix describes the following information.Overview. . . . . . . . . . . . . . . . . . . . . . . . . . . . . . . . . . . . . . . . . . . . . . . . . . . . . . . . . . . . . . . . . . . . . . . . . . . . . . . . . 221Creating the IntegrationConfig Object . . . . . . . . . . . . . . . . . . . . . . . . . . . . . . . . . . . . . . . . . . . . . . . . . . . . . . . . . 221Provisioning . . . . . . . . . . . . . . . . . . . . . . . . . . . . . . . . . . . . . . . . . . . . . . . . . . . . . . . . . . . . . . . . . . . . . . . . . . . . . . 226
Overview
This appendix describes configuration process for integrations with identity management (IDM) systems and the places in IdentityIQ that use the integrations. It does not describe the details of a specific integration only the general framework common to all integrations.
CreatingtheIntegrationConfigObject
The first step in configuring an integration is designing an instance of the IntegrationConfig object. There is currently no user interface for editing these objects, you must write them in XML and import them. The IntegrationConfig defines the following things:
• Java class that handles communication with the IDM system• Connection parameters such as host name, user name, and password• IdentityIQ Application object that represents the IDM system in aggregations• List of the applications that are managed by the IDM system• Resource and attribute name mappings• Role synchronization style• Methods for selecting roles to synchronize
Here is an example of IntegrationConfig file that has all of the options:
<IntegrationConfig name='Example Integration' executor='sailpoint.integration.ExampleIntegration' roleSyncStyle='it'>
<!-- Application representing the IDM system in IIQ--><ApplicationRef> <Reference class='Application' name='Example Integration'/></ApplicationRef>
<!-- Connection parameters needed by the executor.-->
<Attributes> <Map>
SailPoint Integration Guide 221

Creating the IntegrationConfig Object
<entry key='url' value='http://somehost:8080/rest/iiq'/> <entry key='username' value='jlarson'/> <entry key='password' value='1:987zxd9872970293874'/> </Map></Attributes>
<!-- Definitions of managed resources and name mappings.--><ManagedResources> <ManagedResource name='LDAP 42'> <ApplicationRef> <Reference class='Application' name='Corporate Directory'/> </ApplicationRef> <ResourceAttributes> <ResourceAttribute name='memberOf' localName='groups'/> </ResourceAttributes> </ManagedResource></ManagedResources>
<!-- Synchronized role list. In practice you will never have a SynchronizedRoles with the RoleSyncFilter or RoleSyncContainer elements. All three are shown only as an example.--><SynchronizedRoles> <Reference class='Bundle' name='role1'/> <Reference class='Bundle' name='role2'/></SynchronizedRoles>The executor attribute has the name of a class that implements the sailpoint.object.IntegrationExecutor interface. This class is conceptually similar to a Connector class in that it does the work specific to a particular integration. Each integration package will come with an example IntegrationConfig that contains the executor class name.
The roleSyncStyle attribute defines how roles are synchronized between IdentityIQ and the IDM system. The possible values are:
• none: roles are not synchronized• detectable: detectable (IT) roles are synchronized• assignable: assignable (business) roles are synchronized• dual: both detectable and assignable roles are synchronized
If this attribute has no value the default is none. More information on the role synchronization process is found in the Role Synchronization section.
ApplicationRefSome integrations support identity aggregation. In these cases there is a sailpoint.object.Application object defined to represent the IDM system and an implementation of the sailpoint.connector.Connector interface that handles communication with the IDM system. This is normally a multiplexed connector that returns objects representing the IDM system account as well as accounts on managed resources. Links in the identity cube are created for the managed resource accounts as well as the IDM system account.
<ApplicationRef> <Reference class='Application' name='Example Integration'/>
222 SailPoint Integration Guide
Creating the IntegrationConfig Object
</ApplicationRef>The documentation of each integration must describe the supported configuration attributes.
The following attributes are reserved and can only be used for the purposes defined here. • roleSyncHistory: list of objects containing a history of previous synchronizations• universalManager: enables the integration as a manager of all applications
The roleSyncHistory attribute contains a list of sailpoint.object.IntegrationConfig.RoleSyncHistory objects that have information about roles previously synchronized with this integration. This includes the name of the role and the date it was synchronized. This list can be used by the role synchronization task to optimize communication with the IDM system by sending only the roles that have changed since the last synchronization.
The universalManager attribute is set to the string true to enable this integration as a manager for all IdentityIQ applications without a ManagedResources list. This can be helpful in test environments to validate deployment configuration as well as environments where all provisioning must be fulfilled by a single integration.
ManagedResourcesIf the integration supports provisioning, it must define a list of managed resources that corresponding to applications defined in IdentityIQ. This determines how provisioning plans created during certification or role assignment are divided and sent to each integration.
<!-- Definitions of managed resources and name mappings. --> <ManagedResources> <ManagedResource name='LDAP 42'> <ApplicationRef> <Reference class='Application' name='Corporate Directory'/> </ApplicationRef> <ResourceAttributes> <ResourceAttribute name='memberOf' localName='groups'/> </ResourceAttributes> </ManagedResource> </ManagedResource>The ManagedResources element contains a list of ManagedResource elements. A ManagedResource element must contain an ApplicationRef that defines the associated IdentityIQ application. The ManagedResource element might have an optional name attribute that defines the name of the resource within the IDM system. If the name is not specified it is assumed that the resource name is the same as the IdentityIQ application name.
The ManagedResource element might also contain a ResourceAttributes element that contains one or more ResourceAttribute elements. ResourceAttribute is used to define mappings between attribute names in the IDM system and IdentityIQ. ResourceAttribute has the following XML attributes.
• name: attribute name in the IDM system• localName: attribute name in the IdentityIQ application schema
If a provisioning plan is sent to this integration with attributes that are not in the ResourceAttributes list it is assumed that the name in IdentityIQ is the same as the name in the IDM system.
The ResourceAttributes list does not define a filter for attributes sent to the IDM system it only defines name mappings. When an integration has an IdentityIQ application in the ManagedResource list it is assumed that all attribute requests for that application are sent to that integration. You cannot have more than one integration managing different sets of attributes for the same application.
SailPoint Integration Guide 223

Creating the IntegrationConfig Object
There is a special attribute that can be defined in Attributes that declares the integration as the manager of all applications in IdentityIQ regardless of the content of the ManagedResources element. You can still use ManagedResources to define name mappings for certain applications when necessary.
SynchronizedRolesThe SynchronizedRoles element is used to define a concrete list of roles to consider when roles are synchronized. When this is included in an IntegrationConfig object it has priority over both RoleSyncFiler and RoleSyncContainer elements if they are also included.
<SynchronizedRoles> <Reference class='Bundle' name='role1'/> <Reference class='Bundle' name='role2'/></SynchronizedRoles>This can be used to synchronize simple integrations with a small set of roles that does not change often. If the set of roles is large or frequently changing, it is better to use RoleSyncFilter or RoleSyncContainer.
RoleSyncFilterThe RoleSyncFilter element contains a filter that is used to identify the roles to consider for synchronization.
<RoleSyncFilter> <Filter property='syncFlag' operation='EQ' value='true'/></RoleSyncFilter>
<RoleSyncFilter> <Filter property='name' operation='LIKE' matchMode='START'value='Sync'/></RoleSyncFilter>Synchronization filters typically used extended role attributes. In the first example an extended attribute syncFlag must be configured and have a value of true for the role to be synchronized.
Naming conventions can also be used to identify synchronized roles. In the second example any role whose name starts with Sync is synchronized.
A RoleSyncFilter can be combined with a RoleSyncContainer. If both are specified the intersection of the two role sets is considered for synchronization.
RoleSyncContainerThe RoleSyncContainer element defines the set of roles to be considered for synchronization by identifying an inherited role.
In this example, any role that directly or indirectly inherits the role named Roles To Synchronize is synchronized. This is typically a container role that has no function other than organizing other roles.
Specifying roles with inheritance has the advantage of creating a node in the modeler tree for Roles To Synchronize that you can expand to quickly see all of the synchronized roles.
A RoleSyncContainer can be combined with a RoleSyncFilter. If both are specified the intersection of the two role sets are synchronized.
Note: If an IntegrationConfig does not have any SynchronizedRoles, RoleSyncFilter, or RoleSyncContainer elements and the roleSyncStyle element has a value other than none, it is assumed that all roles are considered for synchronization.
224 SailPoint Integration Guide

Creating the IntegrationConfig Object
AggregationSome integrations support feeds of identity information through the normal aggregation process. In these cases the integration package will have a SailPoint.connector.Connector implementation class and an example SailPoint.object.Application object in XML.
IDM connectors are usually multiplexed connectors that return objects representing the IDM system account as well as accounts on all managed resources.
When an aggregation application is defined a reference to it should be placed in the IntegrationConfig. This enables provisioning operations to obtain the account name in the IDM system that corresponds to an identity in IdentityIQ.
RoleSynchronizationRole synchronization is performed by running the standard system task named Synchronize Roles. This task is defined in the file tasksRunnable.xml and is created during the normal initialization and upgrade processes.
The task normally attempts synchronization with every IntegrationConfig stored in the repository. The task has one hidden input argument, integrations, that can be set to a CSV of names of IntegrationConfig objects. Use this to restrict the synchronization to a particular set of integrations.
Each IntegrationConfig has a roleSyncStyle attribute that determines how roles are synchronized. If this attribute is missing or set to none, role synchronization is disabled.
When synchronization is enabled, the task first determines the set of candidate roles by evaluating the filtering options defined in the IntegrationConfig. If there is a SynchronizedRoles element it defines the concrete list of candidate roles. Otherwise the RoleSyncFilter and RoleSyncContainer are evaluated and intersected to produce the set of candidate roles.
Note: Candidate roles are not necessarily the ones that are sent to the IDM system. The roles sent are further constrained by the synchronization style.
roleSyncStyle=detectableWhen the synchronization style is detectable the candidate role list is filtered to contain only detectable roles as defined by the role type.
For each candidate role a simplified representation of the role is built using the SailPoint.integration.RoleDefinition class, this is called the target role.
Entitlements for the target role are extracted from the candidate in one of two ways. If the candidate role has a provisioning plan, the plan defines the resources and attribute values that are included in the target role. If the candidate role has no provisioning plan, a set of resource attributes is derived by analyzing the profile filters in the candidate role.
To give a role a provisioning plan, design an instance of the SailPoint.object.ProvisioningPlan as an XML and place it inside the XML for the SailPoint.object.Bundle object representing the role.
Using provisioning plans gives you more control over the contents of the target role. Profile filters might be ambiguous or result in more attribute values for the role than are necessary, but for relatively simple filters it can be easier than defining provisioning plans.
To derive target roles, first build a list of candidate profiles. If the role option or Profiles is false, than all profiles defined in the role become candidates. If the or Profiles option is true, then only the first profile in the role is a candidate. Then iterate over each filter in each candidate profile applying this algorithm:
if the filter is EQ or CONTAINS_ALL
SailPoint Integration Guide 225

Provisioning
add the values for this attribute comparison to the roleif the filter is OR recurs for the first child filter termif the filter is AND recurs for all child filter termsIf the role inherits other roles, the hierarchy is flattened and inherited entitlements are merged into the target role. The same process described above is applied to every role in the inheritance hierarchy.
roleSyncStyle=assignableWhen the synchronization style is assignable the candidate role list is filtered to contain only assignable roles as defined by the role type.
For each candidate role, build a simplified representation of the role using the SailPoint.integration.RoleDefinition class, this is called the target role.
Entitlements for the target role are extracted from the candidate by first applying the process described in roleSyncStyle=detectable to the candidate role. This might not have any effect since assignable roles do not normally have provisioning plans or profiles.
Next the roleSyncStyle=detectable process is applied to each of the required roles referenced by the candidate role. This is typically where most of the entitlements are found.
roleSyncStyle=dualThis is a hybrid of the assignable and detectable styles used only by the IBM Security Provisioning Integration Module.
First detectable roles are synchronized as defined in the “roleSyncStyle=detectable” on page 225 section.
Next assignable roles are synchronized. Instead of entitlements the roles have an extended attribute containing the names of all roles that were on the required list. The integration executor might further annotate the role definition with rules for automated assignment.
Provisioning
Provisioning can be performed in several ways.• After role assignment from the IdentityIQ identity edit page• After role assignment from the Access Request Manager• During certification to handle revocations and role completions• In a background reconciliation task• During aggregation
Both IdentityIQ and the Access Request Manager (ARM) launch workflows with provisioning being done at the end. This provides the opportunity to insert an approval step before provisioning. The default workflow for IdentityIQ identity edits is named Identity Update. By default it has no approvals but does attempt provisioning. The example workflow for ARM requests is named ARM Role Approval Example.
Certifications can do provisioning to remove entitlements and roles that were revoked as well as add missing entitlements that are necessary to satisfy a role assignment.
A reconciliation task is an instance of the Identity Refresh task template with the provisioning argument set to true. This argument is visible in the configuration page for the refresh task. Reconciliation compares the assigned
226 SailPoint Integration Guide

Provisioning
roles with the detected entitlements and automatically provisioning any missing entitlements. Entitlements might be missing due to either changes in role assignments for an identity, or changes to the definition of roles already assigned to an identity.
Reconciliation is intended to replace the IdentityIQ Provisioning. The old provisioning page was role oriented, monitored changes to roles, and sent provisioning requests for users assigned to modified roles. It did not detect changes to the assigned roles list of identities, however. The reconciliation task is identity oriented and calculates all changes necessary to make an identity's entitlements match the currently assigned roles.
Since reconciliation is now part of the core set of identity refresh options, it can also be done during aggregation. This is less common, but aggregation could change account attributes that are used by role assignment rules resulting in changes to the assigned and detected role lists. With provisioning enabled, the aggregation could trigger the provisioning of missing entitlements for the assigned roles. A common use case for this would be aggregating from an application representing a HR system with HR attributes determining assigned business roles.
Note: Automated provisioning done by the reconciliation task or within workflows typically does not remove entitlements, it only adds missing entitlements. Removal of unnecessary entitlements is expected to be done in a certification where a user has more control. While it is possible to enable removals during automated provisioning, it is potentially dangerous and should not be done without careful consideration.
ProvisioningwithSynchronizedRolesThe provisioning sub-system works with the role synchronization sub-system to determine how role assignments are provisioned. If roles are not being synchronized, the raw entitlements needed by that role are compiled and sent to the integration executors. If an integration supports role synchronization, requests are compiled to the IDM system itself to add or remove native role assignments.
There might be median cases where an integration does role synchronization, but only manages a subset of the possible applications. In these cases plans are compile with both IDM system role assignments and as raw entitlements for the entitlements that are not covered by a native role assignment.
SailPoint Integration Guide 227

Provisioning
228 SailPoint Integration Guide

Creating component interface for PeopleSoft financials
AppendixB:ComponentInterfaceThis appendix describes the following information.Creating component interface for PeopleSoft financials . . . . . . . . . . . . . . . . . . . . . . . . . . . . . . . . . . . . . . . . . . 229
Basic structure of Custom Component (CI) from USERMAINT component for Users . . . . . . . . . . . . . . . 229Basic structure of Custom Component (CI) from ROLEMAINT component for Roles. . . . . . . . . . . . . . . . 234Basic structure of Custom Component (CI) from PURGE_USR_PROFILE component for Delete User . . 236Basic structure of Component Interface (CI) from PURGE_ROLEDEFN component for Delete Role . . . 237
Deleting the component interface . . . . . . . . . . . . . . . . . . . . . . . . . . . . . . . . . . . . . . . . . . . . . . . . . . . . . . . . . . . . 238
CreatingcomponentinterfaceforPeopleSoftfinancials
This section describes the procedure for creating the basic structure of a new Component Interface (CI) for PeopleSoft financial from USERMAINT and ROLEMAINT components.
BasicstructureofCustomComponent(CI)fromUSERMAINTcomponentforUsers
This section describes the creation of basic structure of CI from USERMAINT component, changing GETKEYS, FINDKEYS and CREATEKEYS for the newly created CI, and verification of the newly created CI’s.
CreatingCI1. Log on to Application Designer and click on File => New.
A new dialog box named New Definition is displayed.
2. Select Component Interface => OK.A new dialog box named Select source Component for Component Interface is opened.
3. Enter the name as USERMAINT under the Selection Criteria tab and click Select.A dialog box appears with the following message:Do you want to default the properties based on the underlying component definition
4. Click Yes.
SailPoint Integration Guide 229
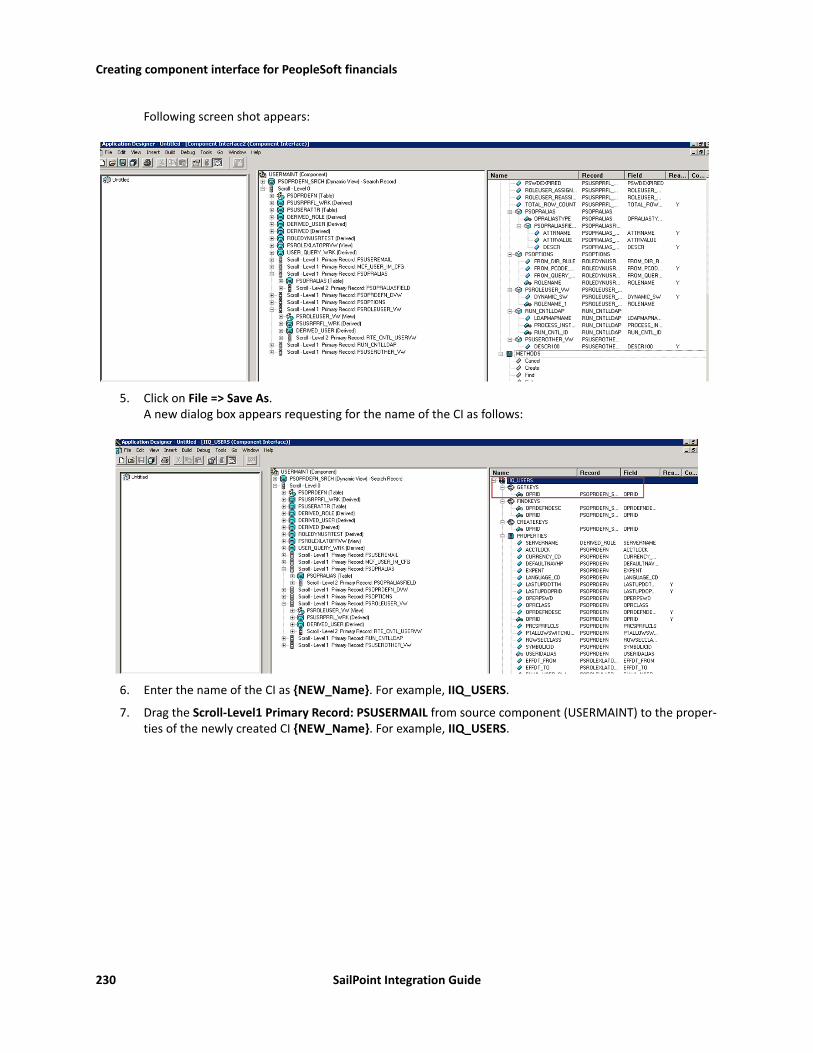
Creating component interface for PeopleSoft financials
Following screen shot appears:
5. Click on File => Save As. A new dialog box appears requesting for the name of the CI as follows:
6. Enter the name of the CI as {NEW_Name}. For example, IIQ_USERS.
7. Drag the Scroll-Level1 Primary Record: PSUSERMAIL from source component (USERMAINT) to the proper-ties of the newly created CI {NEW_Name}. For example, IIQ_USERS.
230 SailPoint Integration Guide

Creating component interface for PeopleSoft financials
After dragging and dropping the Scroll-Level1 Primary Record: PSUSERMAIL attribute, a new property is listed in the PROPERTIES of the newly created CI.
ChangingGETKEYS,FINDKEYSandCREATEKEYSforthenewlycreatedCI1. Expand FINDKEYS and click on OPRID. Right click on OPRID and select Edit Name to change the attribute
name to UserID.
Similarly change the name of OPRDEFNDESC attribute to UserDescription.
2. Expand GETKEYS and change the name of OPRID to UserID.
3. Expand CREATEKEYS and change the name of OPRID to UserID.
4. After changing the keys for GETKEYS, FINDKEYS and CREATEKEYS, change the PROPERTIES.• Changing Single attribute
a. Expand PROPERTIES.b. Select the attribute and right click on Edit Name to change the name of the attribute. Provide the
names mentioned in the following table for the respective attributes:
SailPoint Integration Guide 231

Creating component interface for PeopleSoft financials
Original attribute name Changed attribute name
OPRID UserID
OPRDEFNDESC UserDescription
OPRCLASS PrimaryPermissionList
ROWSECCLASS RowSecurityPermissionList
OPERPSWD Password
SYMBOLICID SymbolicID
LANGUAGE_CD LanguageCode
CURRENCY_CD CurrencyCode
ACCTLOCK AccountLocked
PRCSPRFLCLS ProcessProfilePermissionList
DEFAULTNAVHP NavigatorHomePermissionList
EXPENT ExpertEntry
USERIDALIAS UserIDAlias
LASTUPDDTTM LastUpdateDateTime
PTALLOWSWITCHUSER AllowSwitchUser
OPERPSWDCONF ConfirmPassword
TOTAL_ROW_COUNT WorkListEntriesCount
ROLEUSER_REASSIGN ReassignUserID
ROLEUSER_ASSIGN_SW ReassignWork
NO_SYMBID_WARN NoSymbolicIDWarning
PSWDEXPIRED PasswordExpired
MPDEFAULMP DefaultMobilePage
WORKLIST_USER_SW WorkListUser
EMAIL_USER_SW EmailUser
LASTUPDOPRID LastUpdateUserID
ROLEUSER_ALT AlternateUserID
ROLEUSER_SUPR SupervisingUserID
EFFDT_FROM EffectiveDateFrom
EFFDT_TO EffectiveDateTo
CHANGE_PWD_BTN ChangePassword
Note: This attribute is applicable only for PeopleTools version 8.55 and above.
232 SailPoint Integration Guide

Creating component interface for PeopleSoft financials
c. Delete the SERVERNAME property attribute.• Changing collection attribute
a. Some attributes when expanded, have other attributes under them. Such attributes are called as collection attributes.
b. Select the collection attribute name => right click on the attribute => click on Edit Name and change the name of that attribute.
c. Expand the Attribute. Change the internal Attribute names also in similar manner. The following table mentions the attribute names to be modified:
d. After renaming property attributes as mentioned in the above table, delete the following attributes:
• PSOPTIONS
• RUN_CNTLLDAP
• PSUSEROTHER_VW
VerificationofthestandardmethodsforthenewlycreatedCI1. Right click on the name of the CI => click on Component Interface Properties => Click on Standard Meth-
ods.where CI is the Component Interface created as mentioned in “Creating component interface for PeopleSoft financials” on page 229.
2. Verify all properties (cancel, create, find, get, save) are selected.
Original collection at-tribute name
Changed collection at-tribute name
Original child attribute name
Changed child attri-bute name
PSUSEREMAIL EmailAddresses EMAILID EmailAddress
EMAILTYPE EmailType
PRIMARY_EMAIL PrimaryEmail
OPRID OPRID
PSOPRALIAS IDTypes OPRALIASTYPE IDType
PSOPRALIASFIELD Attributes
ATTRNAME AttributeName
ATTRVALUE AttributeValue
DESCR DESCR
PSROLEUSER_VW Roles DYNAMIC_SW Dynamic
ROLENAME_1 RoleName_1
SailPoint Integration Guide 233

Creating component interface for PeopleSoft financials
The new CI is ready to be used. For example, IIQ_USERS
BasicstructureofCustomComponent(CI)fromROLEMAINTcomponentforRoles
This section describes the creation of basic structure of CI from ROLEMAINT component.
CreatingCI1. Log on to Application Designer and click on File => New.
A new dialog box named New Definition is displayed.
2. Select Component Interface => OK.A new dialog box named Select Source Component for Component Interface is opened.
3. Enter the name as ROLEMAINT under the Selection Criteria tab and click Select.A dialog box appears with the following message:Do you want to default the properties based on the underlying component definition
4. Click Yes.
234 SailPoint Integration Guide
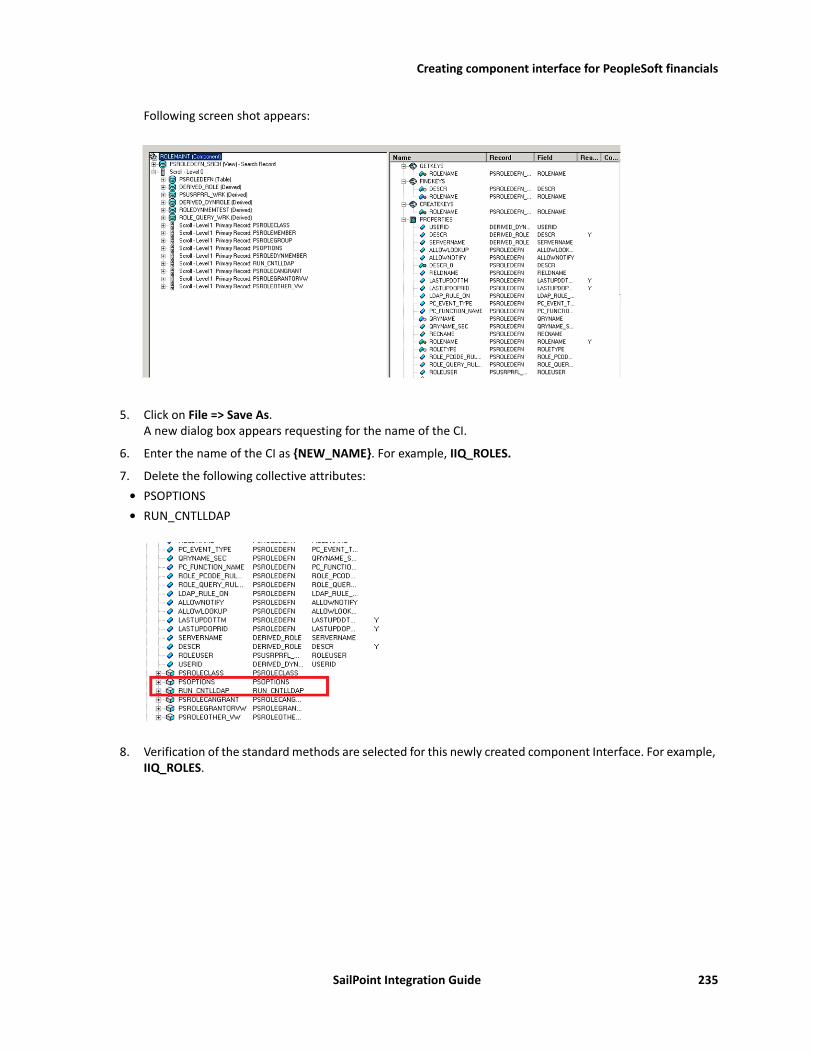
Creating component interface for PeopleSoft financials
Following screen shot appears:
5. Click on File => Save As. A new dialog box appears requesting for the name of the CI.
6. Enter the name of the CI as {NEW_NAME}. For example, IIQ_ROLES.7. Delete the following collective attributes:
• PSOPTIONS• RUN_CNTLLDAP
8. Verification of the standard methods are selected for this newly created component Interface. For example, IIQ_ROLES.
SailPoint Integration Guide 235
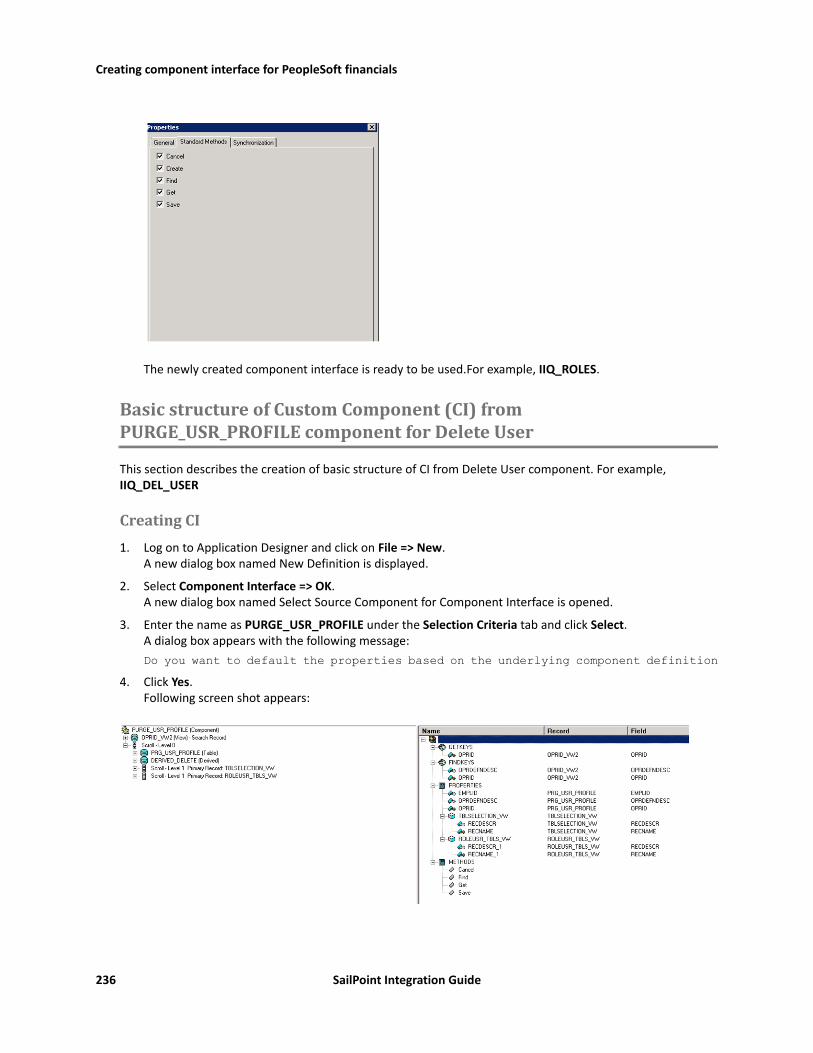
Creating component interface for PeopleSoft financials
The newly created component interface is ready to be used.For example, IIQ_ROLES.
BasicstructureofCustomComponent(CI)fromPURGE_USR_PROFILEcomponentforDeleteUser
This section describes the creation of basic structure of CI from Delete User component. For example, IIQ_DEL_USER
CreatingCI1. Log on to Application Designer and click on File => New.
A new dialog box named New Definition is displayed.
2. Select Component Interface => OK.A new dialog box named Select Source Component for Component Interface is opened.
3. Enter the name as PURGE_USR_PROFILE under the Selection Criteria tab and click Select.A dialog box appears with the following message:Do you want to default the properties based on the underlying component definition
4. Click Yes.Following screen shot appears:
236 SailPoint Integration Guide
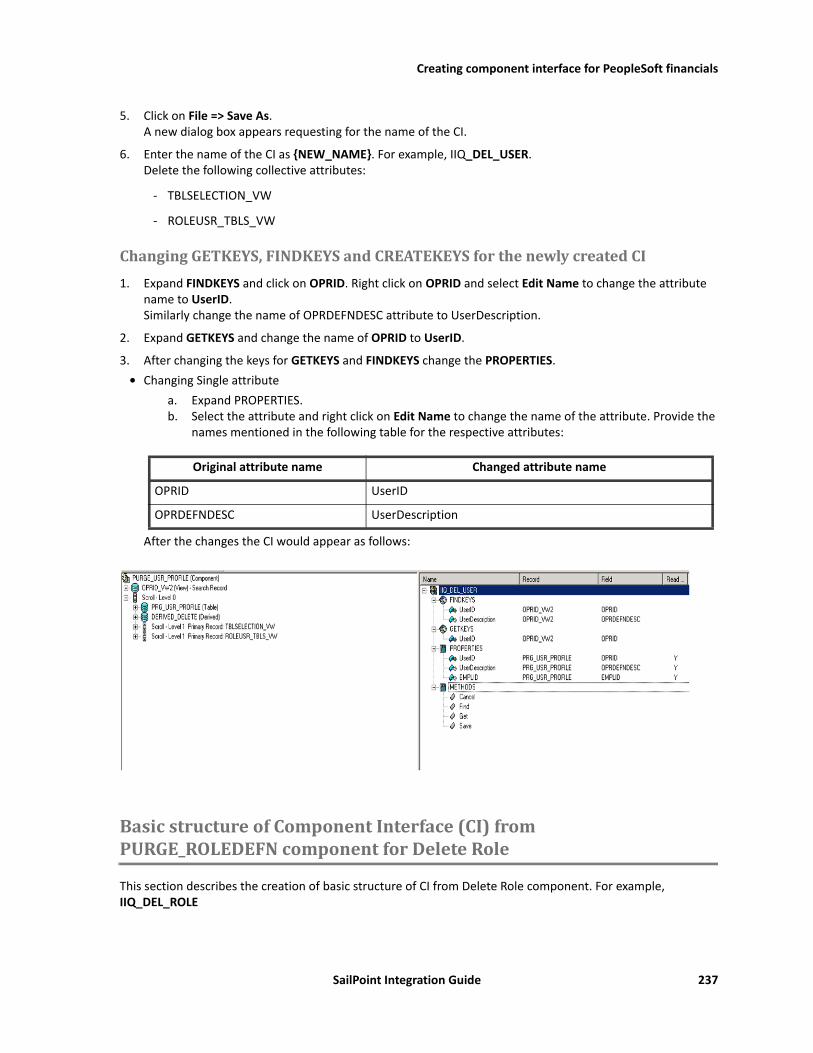
Creating component interface for PeopleSoft financials
5. Click on File => Save As.A new dialog box appears requesting for the name of the CI.
6. Enter the name of the CI as {NEW_NAME}. For example, IIQ_DEL_USER.Delete the following collective attributes:
- TBLSELECTION_VW
- ROLEUSR_TBLS_VW
ChangingGETKEYS,FINDKEYSandCREATEKEYSforthenewlycreatedCI1. Expand FINDKEYS and click on OPRID. Right click on OPRID and select Edit Name to change the attribute
name to UserID.Similarly change the name of OPRDEFNDESC attribute to UserDescription.
2. Expand GETKEYS and change the name of OPRID to UserID.
3. After changing the keys for GETKEYS and FINDKEYS change the PROPERTIES.• Changing Single attribute
a. Expand PROPERTIES.b. Select the attribute and right click on Edit Name to change the name of the attribute. Provide the
names mentioned in the following table for the respective attributes:
After the changes the CI would appear as follows:
BasicstructureofComponentInterface(CI)fromPURGE_ROLEDEFNcomponentforDeleteRole
This section describes the creation of basic structure of CI from Delete Role component. For example, IIQ_DEL_ROLE
Original attribute name Changed attribute name
OPRID UserID
OPRDEFNDESC UserDescription
SailPoint Integration Guide 237

Deleting the component interface
CreatingCI1. Log on to Application Designer and click on File => New.
A new dialog box named New Definition is displayed.
2. Select Component Interface => OK.A new dialog box named Select Source Component for Component Interface is opened.
3. Enter the name as PURGE_ROLEDEFN under the Selection Criteria tab and click Select.A dialog box appears with the following message:Do you want to default the properties based on the underlying component definition
4. Click Yes.Following screen shot appears:
5. Click on File => Save As.A new dialog box appears requesting for the name of the CI.
6. Enter the name of the CI as {NEW_NAME}. For example, IIQ_DEL_ROLE.Delete the ROLE_TABLES_VW collective attribute.
7. Click Save.
Deletingthecomponentinterface
Perform the following procedure to delete the Component interface:
1. Open Application Developer => Files => Delete.The Delete Definition window appears. as follows:
238 SailPoint Integration Guide

Deleting the component interface
2. Select Definition as the name of the CI you want to delete and click on Delete.The required Component Interface is deleted.
SailPoint Integration Guide 239

Deleting the component interface
240 SailPoint Integration Guide