Instruction Manual - Naxa Electronics
46
7” Bluetooth ® DVD Boombox with TV NDL-287 Instruction Manual Please read carefully before use and keep for future reference.
-
Upload
khangminh22 -
Category
Documents
-
view
5 -
download
0
Transcript of Instruction Manual - Naxa Electronics
7” Bluetooth® DVD Boombox with TV NDL-287
Instruction ManualPlease read carefully before use and keep for future reference.
Dava
图章
Page 2 Naxa Electronics
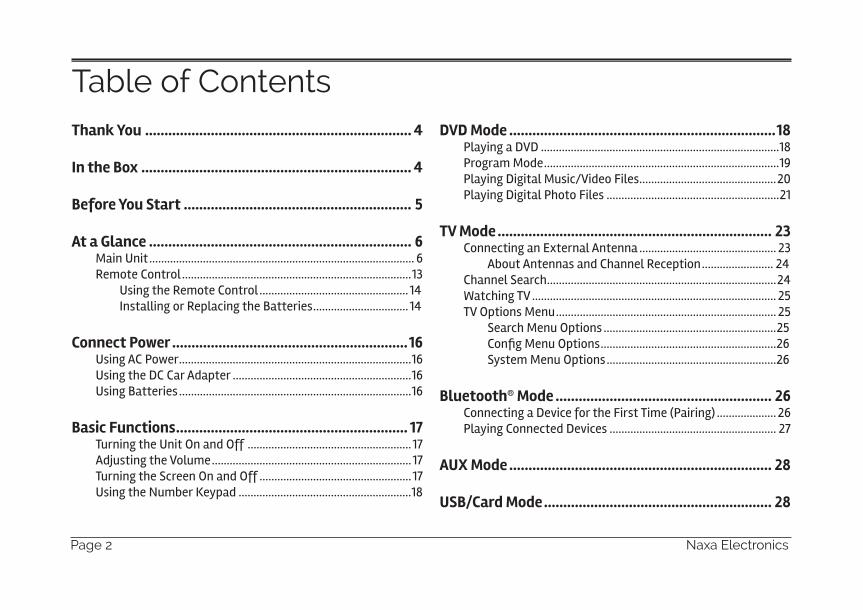
Table of ContentsThank You ..................................................................... 4
In the Box ...................................................................... 4
Before You Start ........................................................... 5
At a Glance .................................................................... 6Main Unit ......................................................................................... 6Remote Control .............................................................................13
Using the Remote Control .................................................. 14Installing or Replacing the Batteries ................................ 14
Connect Power .............................................................16Using AC Power ..............................................................................16Using the DC Car Adapter ............................................................16Using Batteries ..............................................................................16
Basic Functions ............................................................ 17Turning the Unit On and Off ....................................................... 17Adjusting the Volume ................................................................... 17Turning the Screen On and Off ................................................... 17Using the Number Keypad ..........................................................18
DVD Mode .....................................................................18Playing a DVD ................................................................................18Program Mode ...............................................................................19Playing Digital Music/Video Files ..............................................20Playing Digital Photo Files ..........................................................21
TV Mode ....................................................................... 23Connecting an External Antenna .............................................. 23
About Antennas and Channel Reception ........................ 24Channel Search .............................................................................24Watching TV .................................................................................. 25TV Options Menu .......................................................................... 25
Search Menu Options ..........................................................25����������� ���� ...........................................................26System Menu Options .........................................................26
Bluetooth® Mode ........................................................ 26Connecting a Device for the First Time (Pairing) .................... 26Playing Connected Devices ........................................................ 27
AUX Mode .................................................................... 28
USB/Card Mode ........................................................... 28
www.naxa.com Page 3
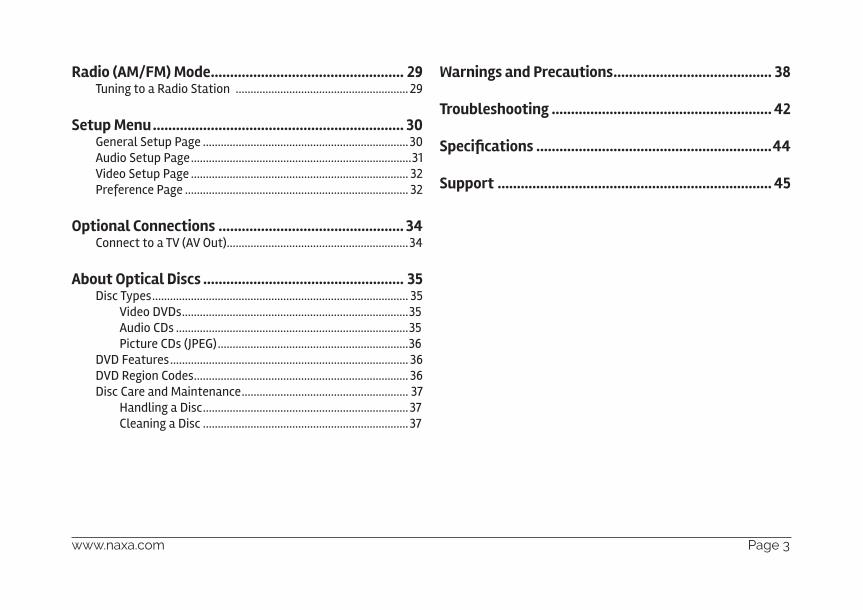
Radio (AM/FM) Mode .................................................. 29Tuning to a Radio Station .......................................................... 29
Setup Menu ................................................................. 30General Setup Page .....................................................................30Audio Setup Page ..........................................................................31Video Setup Page ......................................................................... 32Preference Page ........................................................................... 32
Optional Connections ................................................ 34Connect to a TV (AV Out).............................................................34
About Optical Discs .................................................... 35Disc Types ...................................................................................... 35
Video DVDs ............................................................................35Audio CDs ..............................................................................35Picture CDs (JPEG) ................................................................36
DVD Features ................................................................................ 36DVD Region Codes ........................................................................ 36Disc Care and Maintenance ........................................................ 37
Handling a Disc .....................................................................37Cleaning a Disc .....................................................................37
Warnings and Precautions ......................................... 38
Troubleshooting ......................................................... 42
����������� .............................................................44
Support ....................................................................... 45
Page 4 Naxa Electronics
Thank YouWe know you have many choices when it comes to technology; thank you for choosing us here at Naxa Electronics. Established in 2001 in Los Angeles, Califor-nia, we are dedicated to delivering products that en-tertain and delight.
We trust that you will be happy with your purchase. Please read this manual carefully and save it for refer-�������������������� ���� � ����������� � �����and other product material at our website. Come visit us on the web at www.naxa.com and see all that we have to offer!
In the BoxPlease take a moment to make sure that you have ev-erything in the list below. Although we make every ef-fort to ensure that each Naxa device is securely packed and sealed, we know a lot can happen in between us and you. If anything is missing, check back with your local retailer to get immediate assistance. If they can-not help you, please contact our Naxa Support team at www.naxa.com/naxa_support.
� NDL-287
� AC power cable
� DC car adapter cable
� A/V cable
� TV antenna
� Remote control
� User manual
www.naxa.com Page 5
Before You StartPlease take note of the following before you start.
� Do not block the ventilation openings or holes.
� Avoid installing the unit in locations described be-low:
� Places exposed to direct sunlight or close to heat radiating appliances (such as electric heaters, or on top of other stereo equipment that radiate heat).
� Places lacking ventilation or dusty places.
� Places subject to constant vibration.
� Places that are humid or moist.
� Operate turning controls and switches as instruct-ed in manual.
� ���"� "�������� ����#"���"� ���"� � ������$�sure that the power cord is properly installed.
� Store your DVDs and CDs in a cool area to avoid damage from heat.
CAUTION: TO REDUCE THE RISK OF ELECTRIC SHOCK, DO DOT REMOVE COVER (OR BACK). NO USER SER-%&�'��*'�+�<=>�&?>&@'��<'�'<�>'<%&�&?Q�=���X�*&-FIED SERVICE PERSONNEL.
WARNING: The battery used in this device may pres-� ����"��"���������Y"�������� "� ���@���� ������-semble, incinerate, or heat the battery. Do not leave the battery in a place subject to direct sunlight, or in a car with its windows closed.
Page 6 Naxa Electronics
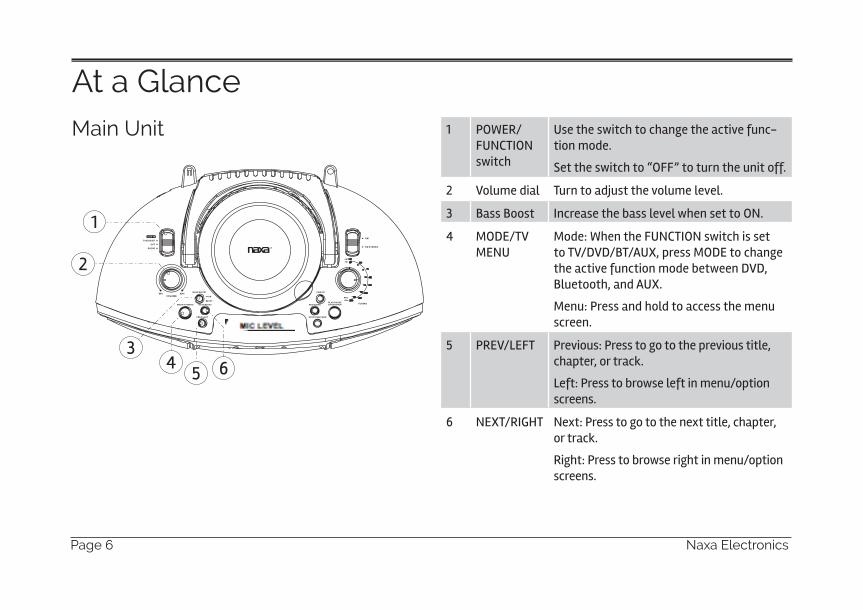
At a GlanceMain Unit 1 POWER/
FUNCTION switch
Use the switch to change the active func-tion mode.
Set the switch to “OFF” to turn the unit off.
2 Volume dial Turn to adjust the volume level.
3 Bass Boost Increase the bass level when set to ON.
4 MODE/TV MENU
Mode: When the FUNCTION switch is set to TV/DVD/BT/AUX, press MODE to change the active function mode between DVD, Bluetooth, and AUX.
Menu: Press and hold to access the menu screen.
5 PREV/LEFT Previous: Press to go to the previous title, chapter, or track.
Left: Press to browse left in menu/option screens.
6 NEXT/RIGHT Next: Press to go to the next title, chapter, or track.
Right: Press to browse right in menu/option screens.
Dava
图章
www.naxa.com Page 7
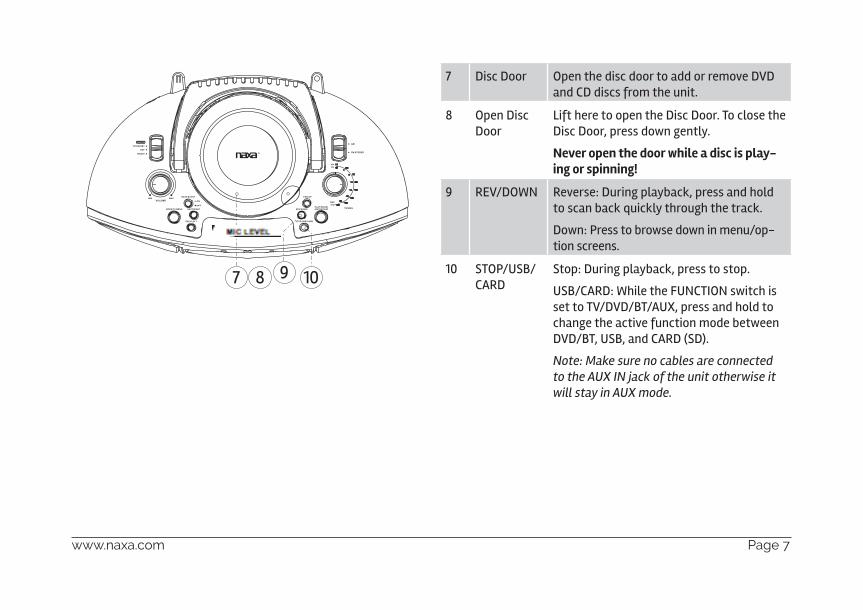
7 Disc Door Open the disc door to add or remove DVD and CD discs from the unit.
8 Open Disc Door
Lift here to open the Disc Door. To close the Disc Door, press down gently.
Never open the door while a disc is play-ing or spinning!
9 REV/DOWN Reverse: During playback, press and hold to scan back quickly through the track.
Down: Press to browse down in menu/op-tion screens.
10 STOP/USB/CARD
Stop: During playback, press to stop.
USB/CARD: While the FUNCTION switch is set to TV/DVD/BT/AUX, press and hold to change the active function mode between DVD/BT, USB, and CARD (SD).
Note: Make sure no cables are connected to the AUX IN jack of the unit otherwise it will stay in AUX mode.
Dava
图章
Dava
线条
Dava
线条
Dava
线条
Page 8 Naxa Electronics
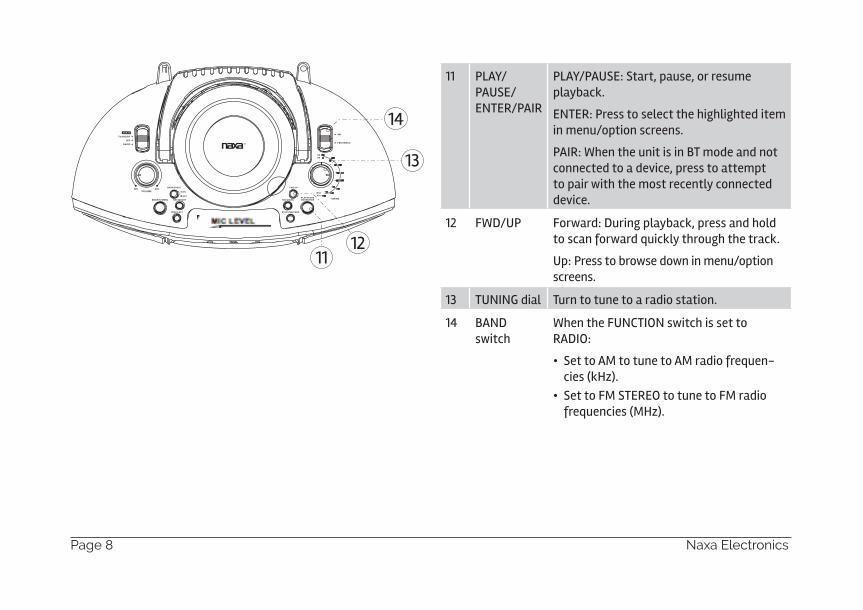
11 PLAY/PAUSE/ENTER/PAIR
PLAY/PAUSE: Start, pause, or resume playback.
ENTER: Press to select the highlighted item in menu/option screens.
PAIR: When the unit is in BT mode and not connected to a device, press to attempt to pair with the most recently connected device.
12 FWD/UP Forward: During playback, press and hold to scan forward quickly through the track.
Up: Press to browse down in menu/option screens.
13 TUNING dial Turn to tune to a radio station.
14 BAND switch
When the FUNCTION switch is set to RADIO:
�� Set to AM to tune to AM radio frequen-cies (kHz).
�� Set to FM STEREO to tune to FM radio frequencies (MHz).
Dava
图章
www.naxa.com Page 9
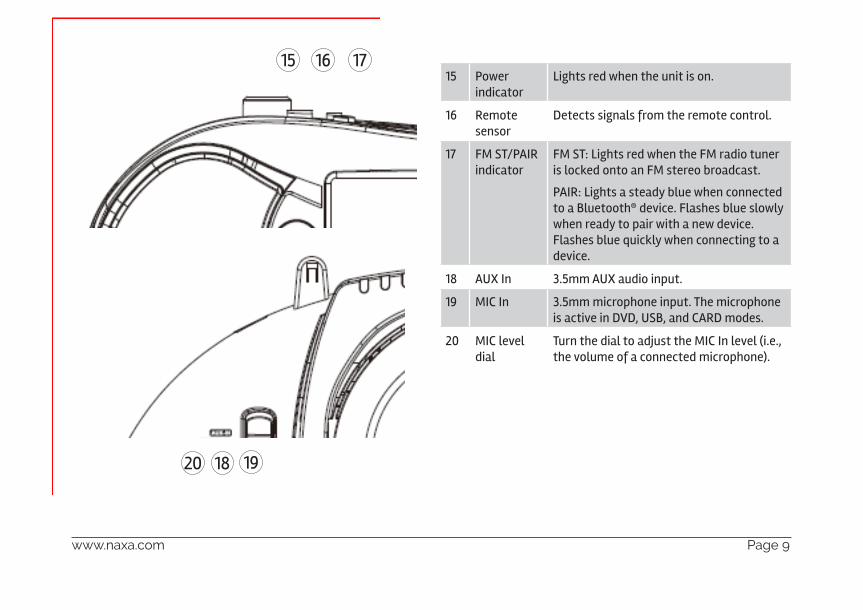
15 Power indicator
Lights red when the unit is on.
16 Remote sensor
Detects signals from the remote control.
17 FM ST/PAIR indicator
FM ST: Lights red when the FM radio tuner is locked onto an FM stereo broadcast.
PAIR: Lights a steady blue when connected to a Bluetooth® device. Flashes blue slowly when ready to pair with a new device. Flashes blue quickly when connecting to a device.
18 AUX In 3.5mm AUX audio input.
19 MIC In 3.5mm microphone input. The microphone is active in DVD, USB, and CARD modes.
20 MIC level dial
Turn the dial to adjust the MIC In level (i.e., the volume of a connected microphone).
Dava
图章
Dava
图章
Dava
线条
Dava
线条
Dava
线条
Dava
线条
Dava
线条
Dava
线条
Dava
矩形
Page 10 Naxa Electronics
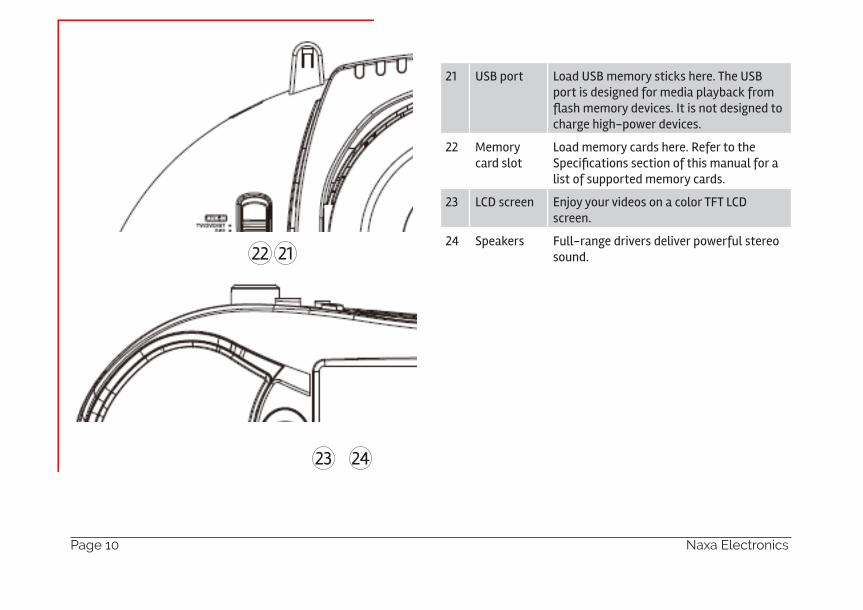
21 USB port Load USB memory sticks here. The USB port is designed for media playback from \�������"���]�����& ������ �������� ��charge high-power devices.
22 Memory card slot
Load memory cards here. Refer to the >������ ������� ������� ������������"���list of supported memory cards.
23 LCD screen Enjoy your videos on a color TFT LCD screen.
24 Speakers Full-range drivers deliver powerful stereo sound.
Dava
图章
Dava
图章
Dava
线条
Dava
线条
Dava
线条
Dava
线条
Dava
矩形
www.naxa.com Page 11
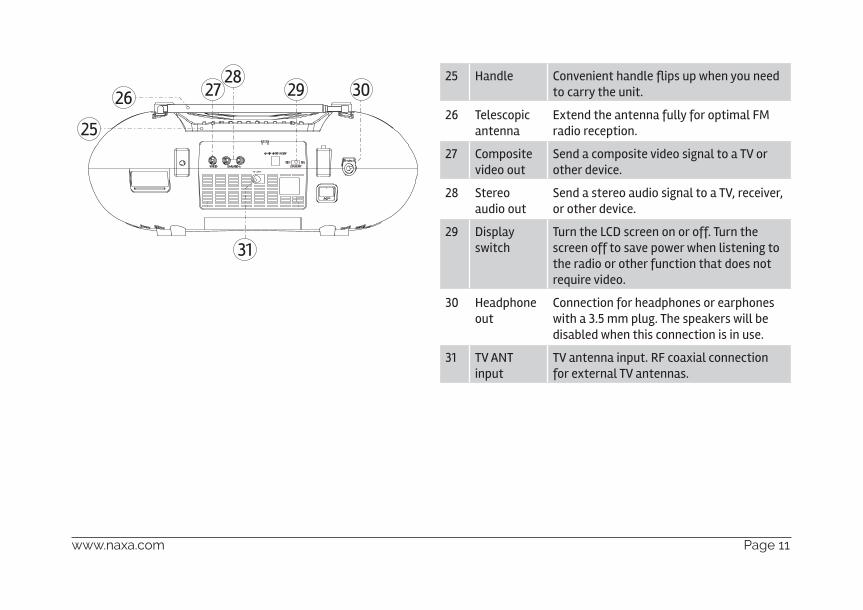
25 Handle ���]��� �������\������#���������to carry the unit.
26 Telescopic antenna
Extend the antenna fully for optimal FM radio reception.
27 Composite video out
Send a composite video signal to a TV or other device.
28 Stereo audio out
Send a stereo audio signal to a TV, receiver, or other device.
29 Display switch
Turn the LCD screen on or off. Turn the screen off to save power when listening to the radio or other function that does not require video.
30 Headphone out
Connection for headphones or earphones with a 3.5 mm plug. The speakers will be disabled when this connection is in use.
31 TV ANT input
TV antenna input. RF coaxial connection for external TV antennas.

Page 12 Naxa Electronics
32 Vents Do not obstruct the vents. The vents pro-vide air circulation to prevent overheating.
33 DC power in DC power socket for use with the included DC power cable.
34 AC power in AC power socket for use with the included AC power cable.
35 Battery compart-ment cover
The unit can run on eight (8) C size batter-ies. Slide the cover in the direction of the arrow to remove it. When loading batter-ies, make sure to match their positive (+) and negative (-) poles with the markings found inside the battery compartment.
www.naxa.com Page 13
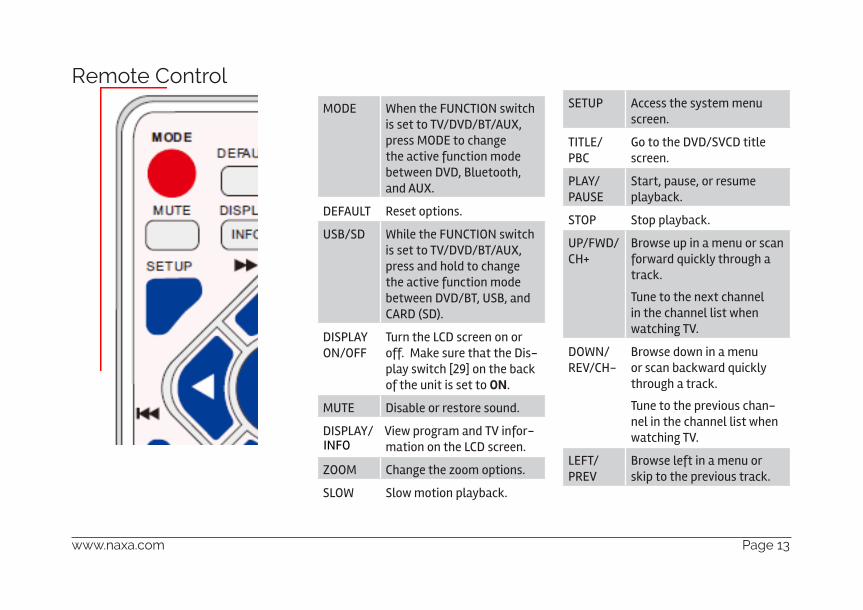
Remote ControlMODE When the FUNCTION switch
is set to TV/DVD/BT/AUX, press MODE to change the active function mode between DVD, Bluetooth, and AUX.
DEFAULT Reset options.
USB/SD While the FUNCTION switch is set to TV/DVD/BT/AUX, press and hold to change the active function mode between DVD/BT, USB, and CARD (SD).
DISPLAY ON/OFF
Turn the LCD screen on or off. Make sure that the Dis-play switch [29] on the back of the unit is set to ON.
MUTE Disable or restore sound.
DISPLAY/ View program and TV infor-mation on the LCD screen.
ZOOM Change the zoom options.
SLOW Slow motion playback.
SETUP Access the system menu screen.
TITLE/PBC
Go to the DVD/SVCD title screen.
PLAY/PAUSE
Start, pause, or resume playback.
STOP Stop playback.
UP/FWD/CH+
Browse up in a menu or scan forward quickly through a track.
Tune to the next channel in the channel list when watching TV.
DOWN/REV/CH-
Browse down in a menu or scan backward quickly through a track.
Tune to the previous chan-nel in the channel list when watching TV.
LEFT/PREV
Browse left in a menu or skip to the previous track.
INFO
Dava
图章
Dava
矩形
Dava
矩形
Page 14 Naxa Electronics
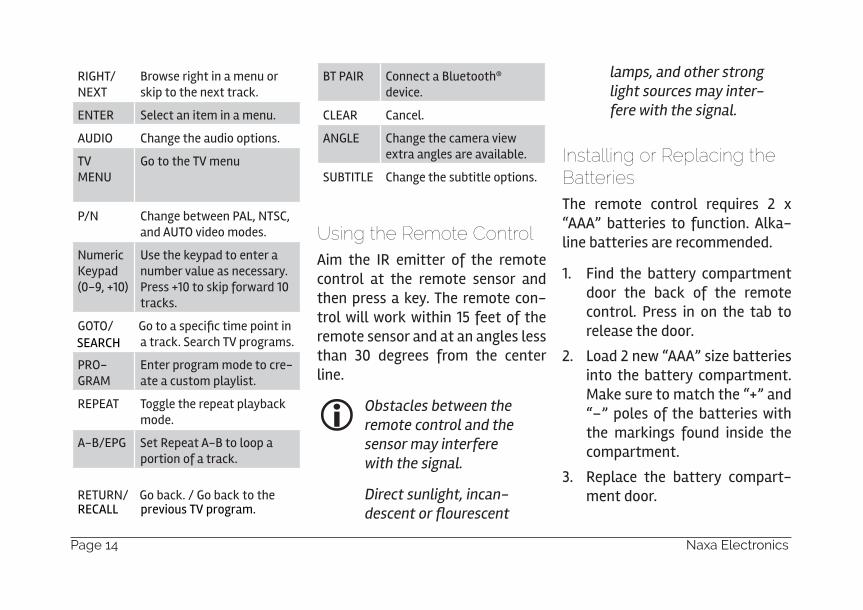
RIGHT/NEXT
Browse right in a menu or skip to the next track.
ENTER Select an item in a menu.
AUDIO Change the audio options.
TV MENU
Go to the TV menu
P/N Change between PAL, NTSC, and AUTO video modes.
Numeric Keypad (0-9, +10)
Use the keypad to enter a number value as necessary. Press +10 to skip forward 10 tracks.
GOTO/ Q�� ����������� ������� ����a track. Search TV programs.
PRO-GRAM
Enter program mode to cre-ate a custom playlist.
REPEAT Toggle the repeat playback mode.
A-B/EPG Set Repeat A-B to loop a portion of a track.
RETURN/ Go back. / Go back to the
BT PAIR Connect a Bluetooth® device.
CLEAR Cancel.
ANGLE Change the camera view extra angles are available.
SUBTITLE Change the subtitle options.
Using the Remote ControlAim the IR emitter of the remote control at the remote sensor and then press a key. The remote con-trol will work within 15 feet of the remote sensor and at an angles less than 30 degrees from the center line.
��Obstacles between the remote control and the sensor may interfere with the signal.
Direct sunlight, incan-������������������
lamps, and other strong light sources may inter-fere with the signal.
Installing or Replacing the BatteriesThe remote control requires 2 x “AAA” batteries to function. Alka-line batteries are recommended.
1. Find the battery compartment door the back of the remote control. Press in on the tab to release the door.
2. Load 2 new “AAA” size batteries into the battery compartment. Make sure to match the “+” and “–” poles of the batteries with the markings found inside the compartment.
3. Replace the battery compart-ment door.
SEARCH
RECALL previous TV program.
Dava
矩形
Dava
矩形
Dava
文本框
Show the TV program list.
Dava
文本框
Dava
矩形
Dava
矩形
www.naxa.com Page 15
�� Use only the size and type of batteries � �������
Be sure to match the positive and negative poles of the battery with the positive and negative terminals of the battery compart-ment. Reversed or other improper instal-lation can damage the device and other property.
Do not install different types of batteries together (e.g., alkaline with carbon-zinc or nickel metal hydride). Do not install old batteries together with new ones.
If the device will not be in use for a long time, remove the batteries prevent battery leakage. Battery leakage can cause injury and damage to your device and property.
Always follow directions provided by the battery manufacturer. Do not charge bat-teries that are not intended to be re-charged; doing so can cause the batteries to overheat and rupture.
Do not incinerate batteries or otherwise ap-ply heat to them; they may explode or leak.
Page 16 Naxa Electronics
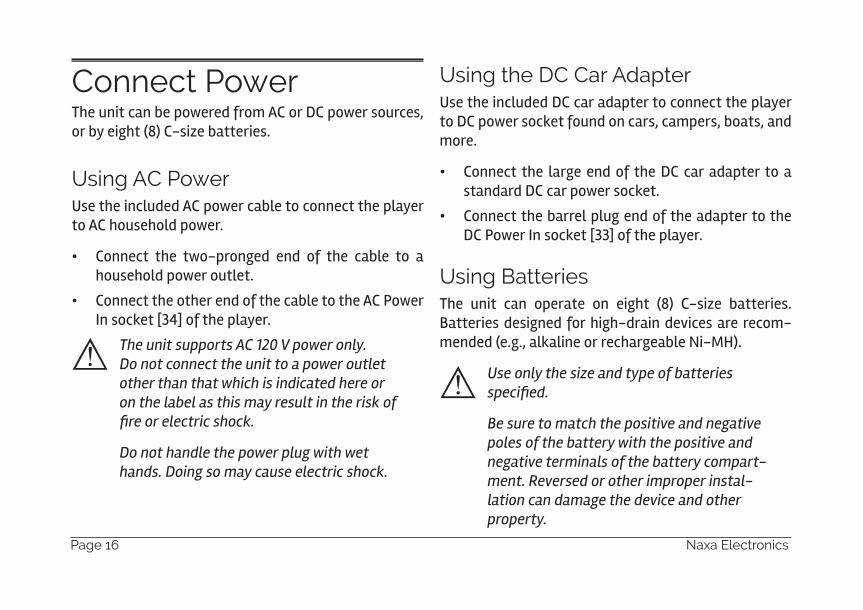
Connect PowerThe unit can be powered from AC or DC power sources, or by eight (8) C-size batteries.
Using AC PowerUse the included AC power cable to connect the player to AC household power.
� Connect the two-pronged end of the cable to a household power outlet.
� Connect the other end of the cable to the AC Power In socket [34] of the player.
�� The unit supports AC 120 V power only. Do not connect the unit to a power outlet other than that which is indicated here or on the label as this may result in the risk of �����������������
Do not handle the power plug with wet hands. Doing so may cause electric shock.
Using the DC Car AdapterUse the included DC car adapter to connect the player to DC power socket found on cars, campers, boats, and more.
� Connect the large end of the DC car adapter to a standard DC car power socket.
� Connect the barrel plug end of the adapter to the DC Power In socket [33] of the player.
Using BatteriesThe unit can operate on eight (8) C-size batteries. Batteries designed for high-drain devices are recom-mended (e.g., alkaline or rechargeable Ni-MH).
�� Use only the size and type of batteries � �������
Be sure to match the positive and negative poles of the battery with the positive and negative terminals of the battery compart-ment. Reversed or other improper instal-lation can damage the device and other property.
www.naxa.com Page 17
Do not install different types of batteries together (e.g., alkaline with carbon-zinc or nickel metal hydride). Do not install old batteries together with new ones.
If the device will not be in use for a long time, remove the batteries prevent battery leakage. Battery leakage can cause injury and damage to your device and property.
Always follow directions provided by the battery manufacturer. Do not charge bat-teries that are not intended to be re-charged; doing so can cause the batteries to overheat and rupture.
Do not incinerate batteries or otherwise ap-ply heat to them; they may explode or leak.
Basic Functions�������������� ������ ��To turn the unit on, set the POWER/FUNCTION switch [1] to any position other than OFF. The Power indicator [15] will light red.
To turn the unit off, set the POWER/FUNCTION switch to the OFF position. The Power indicator will darken.
Adjusting the Volume � Turn the Volume dial [2] clockwise to increase the
volume. Turn it counter-clockwise to decrease the volume.
� Press the MUTE key on the remote to disable sound output completely. Press the MUTE key again to restore sound output.
����������������� ������ �You can turn the LCD screen off to conserve power.
Page 18 Naxa Electronics
� Press the LCD ON/OFF key [10] to turn the screen off. Press it again to turn it back on again.
��You may want to turn the LCD screen off when listening to music or whenever you are not watching video.
The LCD screen consumes a lot of power. You can prolong the lifetime of your batteries if you avoid using the LCD screen.
Using the Number KeypadUse the number keypad (1-0, 9) on the remote to input a value when prompted on a menu or option screen.
For instance, to go to track 15:
1. Press the “1” key.
2. Press the “5” key.
3. Press the ENTER key.
DVD ModeTo set the active source mode to DVD, set the FUNC-TION switch [1] to TV/DVD/BT/AUX.
Playing a DVDLoad a DVD disc in the disc compartment. The player will automatically attempt to read the disc.
� Press PLAY/PAUSE/ENTER/PAIR [11] to start, pause, or resume playback.
� Press STOP/USB/CARD [10] to stop playback.
� Press TV MENU on the remote to show the root menu screen of the DVD. (This function will only work with DVDs that have been mastered with a main menu.)
� Press the TITLE key on the remote to select a title to play. (This function will only work with DVDs that have been mastered with titles or chapters.)
Dava
矩形
www.naxa.com Page 19
During playback:
PREV/LEFT Press to return to the beginning of the chapter. Continue pressing to skip to the previous chap-ter or until you have reached the beginning of the disc.
NEXT/RIGHT Press to skip to the next chapter.
FWD/UP (FORWARD)
Press to change the rate of forward playback (2x, 4x, 8x, 16x, 32x). Press PLAY/PAUSE/EN-TER/PAIR to resume playback at normal speed (1x).
REV/DOWN (REVERSE)
Press to change the rate of reverse playback (2x, 4x, 8x, 16x, 32x). Press PLAY/PAUSE/EN-TER/PAIR to resume playback at normal speed (1x).
STOP Press to stop playback. The player will remem-ber the point where you stopped the disc and resume playback from there.
Press again while playback is stopped to clear the saved timepoint from memory.
REPEAT Using the remote, press to repeat the current chapter/track, title, or to repeat the entire disc.
Program ModeUse program mode to create a custom playlist of up to 20 titles, chapters, or tracks.
Press PROGRAM on the remote to display the program menu. (Press PROGRAM again to cancel and exit Pro-gram mode.)
� Use the arrow keys of the remote to change Pro-gram slots.
� Use the Number keypad of the remote to enter a title/track/chapter number in each of the Program slots.
� Single digit numbers must be preceded with a “0” (e.g., press “0” then “6” to enter track “6” ).
� To start Program playback, use the arrow keys to highlight START and then press the ENTER key.
� To stop Program playback, press the STOP key. To clear the program list, press the STOP key again while play is stopped.
Dava
文本框
Program Mode Use program mode to create a custom playlist of up to 16 titles, chapters, or tracks. Press PROGRAM on the remote to display the program menu. (Press PROGRAM again to cancel and exit Program mode.) Programming DVD Tracks • Use the arrow keys of the remote to change Program slots. • Use the Number keypad of the remote to enter a title/track/chapter number in each of the Program slots. Programming CD and MP3 Tracks • Use the arrow keys of the remote to select the desired program track, then press ENTER key to add it to the program list. • To start Program playback, use the arrow keys to highlight PLAY and then press the ENTER key. • To stop Program playback, press the STOP key. To clear the program list, press the STOP key again while play is stopped.
Dava
矩形
Page 20 Naxa Electronics
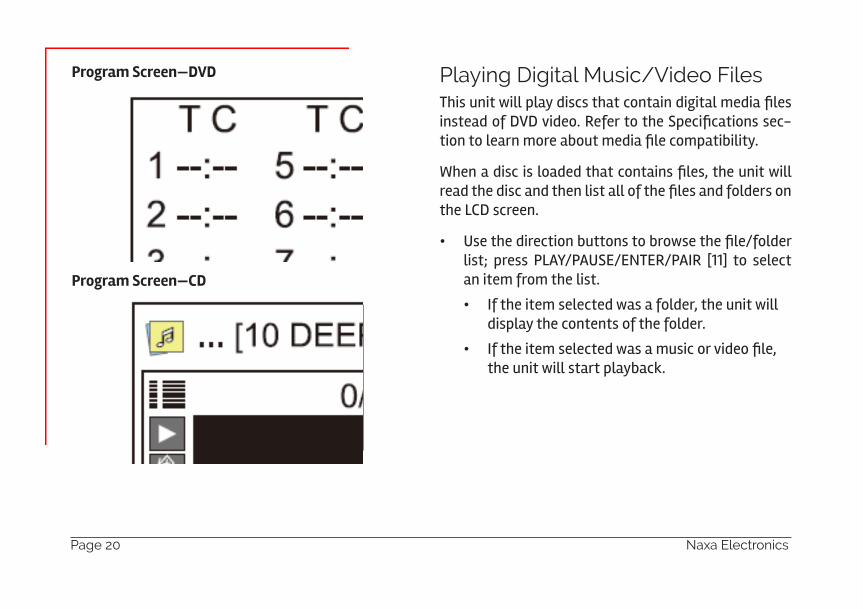
Program Screen—DVD
Program Screen—CD
Playing Digital Music/Video Files=������ �#��������������� �� ���� �������� ��������������� ������@%@�]�����<�"� �� ��>������ �������- ���� ����"����"��Y� �������������� �Y��� ��
|������������������� �� ���� ���������� ���� �#����"��� ����������� ������ �������� ��������������"�����the LCD screen.
� X�� ����"� ����Y ���� ��Y"�#�� ����}����"�list; press PLAY/PAUSE/ENTER/PAIR [11] to select an item from the list.
� If the item selected was a folder, the unit will display the contents of the folder.
� &�� ��� ����� ��#�����������"�]��������the unit will start playback.
Dava
图章
Dava
图章
Dava
矩形
www.naxa.com Page 21
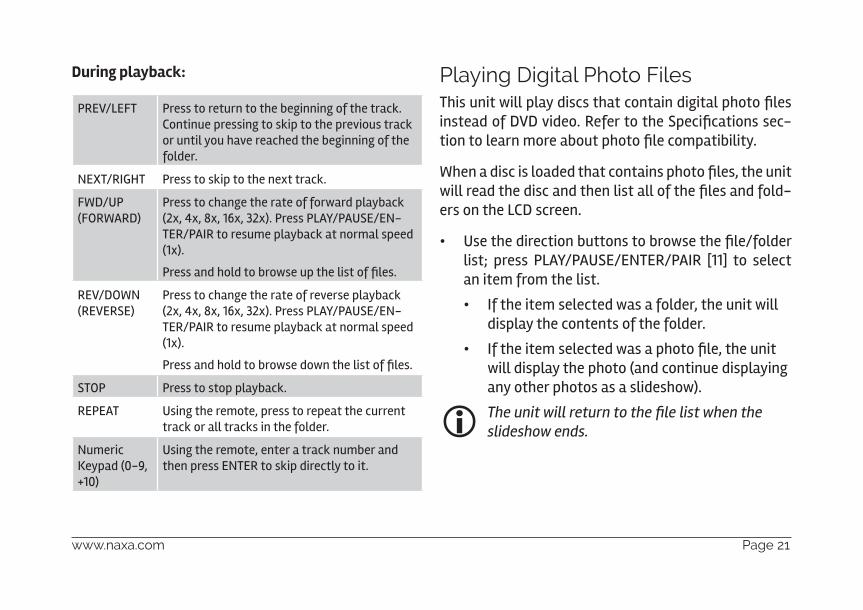
During playback:
PREV/LEFT Press to return to the beginning of the track. Continue pressing to skip to the previous track or until you have reached the beginning of the folder.
NEXT/RIGHT Press to skip to the next track.
FWD/UP (FORWARD)
Press to change the rate of forward playback (2x, 4x, 8x, 16x, 32x). Press PLAY/PAUSE/EN-TER/PAIR to resume playback at normal speed (1x).
+"������������ ��Y"�#���� ����� ��������
REV/DOWN (REVERSE)
Press to change the rate of reverse playback (2x, 4x, 8x, 16x, 32x). Press PLAY/PAUSE/EN-TER/PAIR to resume playback at normal speed (1x).
+"������������ ��Y"�#����#�� ����� ��������
STOP Press to stop playback.
REPEAT Using the remote, press to repeat the current track or all tracks in the folder.
Numeric Keypad (0-9, +10)
Using the remote, enter a track number and then press ENTER to skip directly to it.
Playing Digital Photo Files=������ �#��������������� �� ���� �������� ������ ��������� ������@%@�]�����<�"� �� ��>������ �������- ���� ����"����"��Y� ���� ���������� �Y��� ��
|������������������� �� ���� �������� ������� ���� �#����"��� ����������� ������ �������� ��������������-ers on the LCD screen.
� X�� ����"� ����Y ���� ��Y"�#�� ����}����"�list; press PLAY/PAUSE/ENTER/PAIR [11] to select an item from the list.
� If the item selected was a folder, the unit will display the contents of the folder.
� &�� ��� ����� ��#�������� ������ ���� �will display the photo (and continue displaying any other photos as a slideshow).
���������������������������������������������slideshow ends.
Page 22 Naxa Electronics
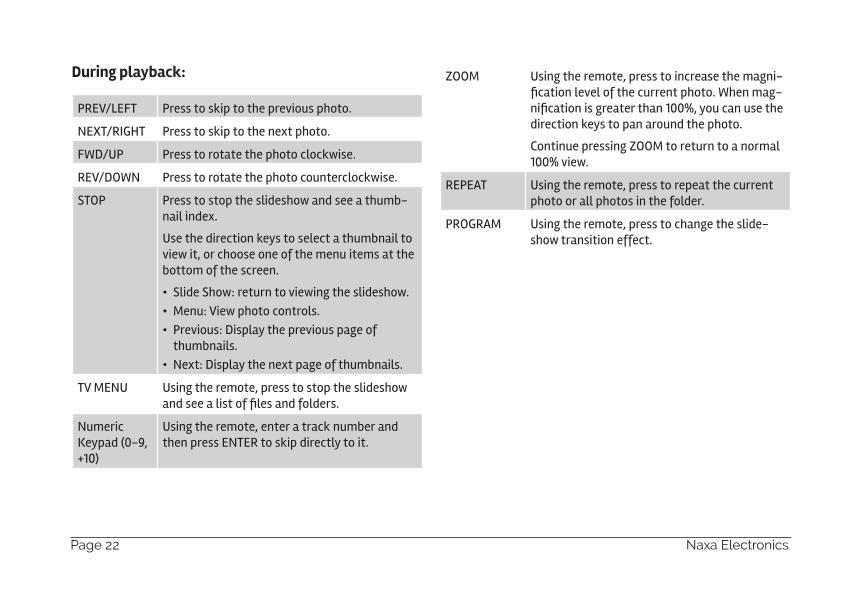
During playback:
PREV/LEFT Press to skip to the previous photo.
NEXT/RIGHT Press to skip to the next photo.
FWD/UP Press to rotate the photo clockwise.
REV/DOWN Press to rotate the photo counterclockwise.
STOP Press to stop the slideshow and see a thumb-nail index.
Use the direction keys to select a thumbnail to view it, or choose one of the menu items at the bottom of the screen.
�� Slide Show: return to viewing the slideshow.�� Menu: View photo controls.�� Previous: Display the previous page of
thumbnails.�� Next: Display the next page of thumbnails.
TV MENU Using the remote, press to stop the slideshow ����������� ����������������"��
Numeric Keypad (0-9, +10)
Using the remote, enter a track number and then press ENTER to skip directly to it.
ZOOM Using the remote, press to increase the magni-��� �����]����� ���""� ���� ���|������-����� ��������"� "� ����~�������������� ��direction keys to pan around the photo.
Continue pressing ZOOM to return to a normal ~����]�#�
REPEAT Using the remote, press to repeat the current photo or all photos in the folder.
PROGRAM Using the remote, press to change the slide-show transition effect.
Dava
矩形
www.naxa.com Page 23
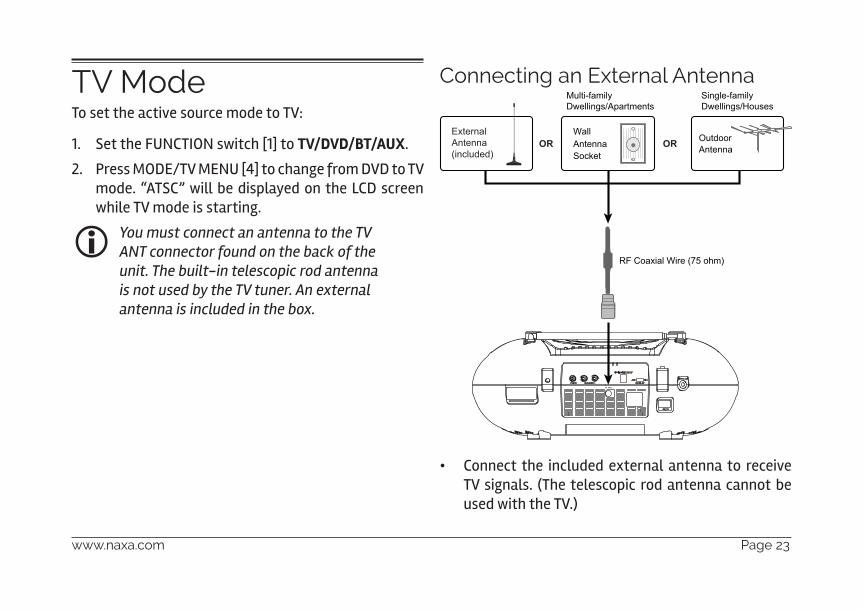
TV ModeTo set the active source mode to TV:
1. Set the FUNCTION switch [1] to TV/DVD/BT/AUX.
2. Press MODE/TV MENU [4] to change from DVD to TV mode. “ATSC” will be displayed on the LCD screen while TV mode is starting.
��You must connect an antenna to the TV ANT connector found on the back of the unit. The built-in telescopic rod antenna is not used by the TV tuner. An external antenna is included in the box.
Connecting an External Antenna
� Connect the included external antenna to receive TV signals. (The telescopic rod antenna cannot be used with the TV.)
Page 24 Naxa Electronics
� You may also connect to a 75 ohm coaxial cable an-tenna line from a wall socket or outdoor antenna. Larger antennas, powered antennas, and/or out-door antennas will improve the TV signal.
About Antennas and Channel ReceptionTV channel reception can be affected by several things, including:
� Distance between the unit and the broadcaster
� Terrain and obstacles between the unit and broad-caster
� Interference from other devices or the weather
If you are having trouble receiving channels, you may need a larger antenna.
The Consumer Electronics Association and National Association of Broadcasters have established a web-site to help you learn about antenna types that may be suitable for your location and viewing preferences. Please visit www.antennaweb.org to learn more.
Channel SearchSearch for available channels and add them to the Channel list. You will need to add channels to the Chan-nel list before using the TV.
1. Press and hold MODE/TV MENU to access the TV Menu. (The TV menu will automatically be dis-��������� ������� ���"� � �������"������ ��=%�or if there are no channels in the Channel list.)
2. Press FWD/UP or REV/DOWN to select Search Menu; press PLAY/PAUSE/ENTER/PAIR to enter.
3. Press FWD/UP or REV/DOWN to select Country; press PREV/LEFT or NEXT/RIGHT to change the lo-cation (e.g., USA).
4. Press FWD/UP or REV/DOWN to select Auto Search; press PLAY/PAUSE/ENTER/PAIR to enter.
5. |�� � ��"� �� �� � �� � ��� ������� ���� ���� � �-tion within reception range and to save them to the Channel list. Press and hold MODE/TV MENU to exit the TV Menu.
��Perform a new channel search when you change the location of the unit.
www.naxa.com Page 25
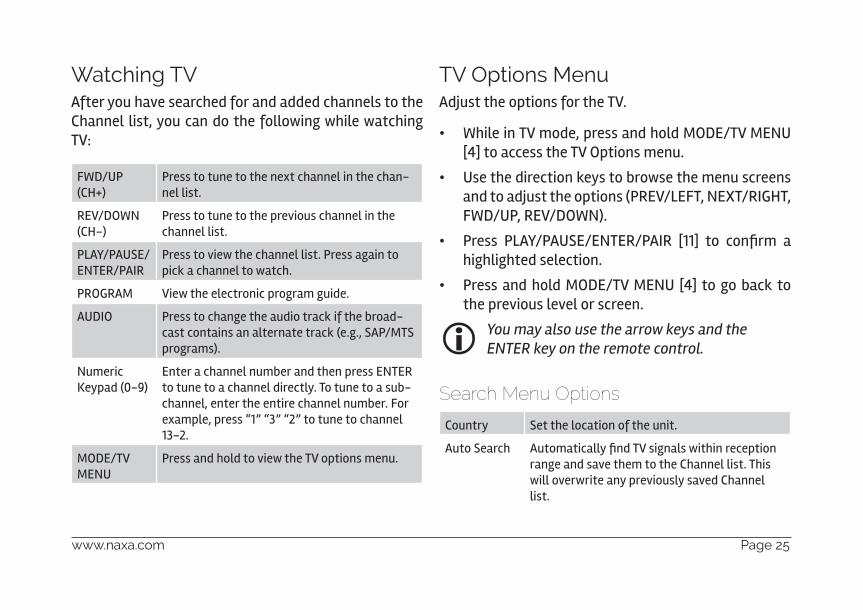
Watching TVAfter you have searched for and added channels to the Channel list, you can do the following while watching TV:
FWD/UP (CH+)
Press to tune to the next channel in the chan-nel list.
REV/DOWN (CH-)
Press to tune to the previous channel in the channel list.
PLAY/PAUSE/ENTER/PAIR
Press to view the channel list. Press again to pick a channel to watch.
PROGRAM View the electronic program guide.
AUDIO Press to change the audio track if the broad-cast contains an alternate track (e.g., SAP/MTS programs).
Numeric Keypad (0-9)
Enter a channel number and then press ENTER to tune to a channel directly. To tune to a sub-channel, enter the entire channel number. For example, press “1” “3” “2” to tune to channel 13-2.
MODE/TV MENU
Press and hold to view the TV options menu.
TV Options MenuAdjust the options for the TV.
� While in TV mode, press and hold MODE/TV MENU [4] to access the TV Options menu.
� Use the direction keys to browse the menu screens and to adjust the options (PREV/LEFT, NEXT/RIGHT, FWD/UP, REV/DOWN).
� +"��� +*��}+�X>'}'?='<}+�&<� �~~�� �� ����"�� ��highlighted selection.
� Press and hold MODE/TV MENU [4] to go back to the previous level or screen.
��You may also use the arrow keys and the ENTER key on the remote control.
Search Menu Options
Country Set the location of the unit.
Auto Search � ��� �����������=%���������#� ����"�� ����range and save them to the Channel list. This will overwrite any previously saved Channel list.

Page 26 Naxa Electronics
Manual Search
��������������=%���������
����������� ����
Picture Adjust the aspect ratio and format of the TV broadcast.
Caption Adjust closed caption display options.
OSD Language
Adjust the language used by the TV menus and display items.
System Menu Options
Software Update
��"���Y����������"]����"������������
Information Display system diagnostic information.
Restore Fac-tory Default
Return all of the TV options to their default settings.
Bluetooth® ModeTo set the active source mode to Bluetooth (BT):
1. Set the FUNCTION switch [1] to TV/DVD/BT/AUX.
2. Press MODE/TV MENU [4] to change from DVD to BT mode. The FM ST/PAIR indicator [17] will light up blue.
Use this mode to stream audio wirelessly from play-ers with Bluetooth. Bluetooth devices may include lap-tops, tablets, smartphones, and more. Make sure that the device has its Bluetooth radio enabled and that it is set to be discoverable.
Connecting a Device for the First Time (Pairing)Before using a wireless device with Bluetooth, you will need to establish a connection between it and the Boombox. This process is called “pairing” and you will only have to do it once. Once two devices are paired, they will automatically connect when they detect each other.
www.naxa.com Page 27
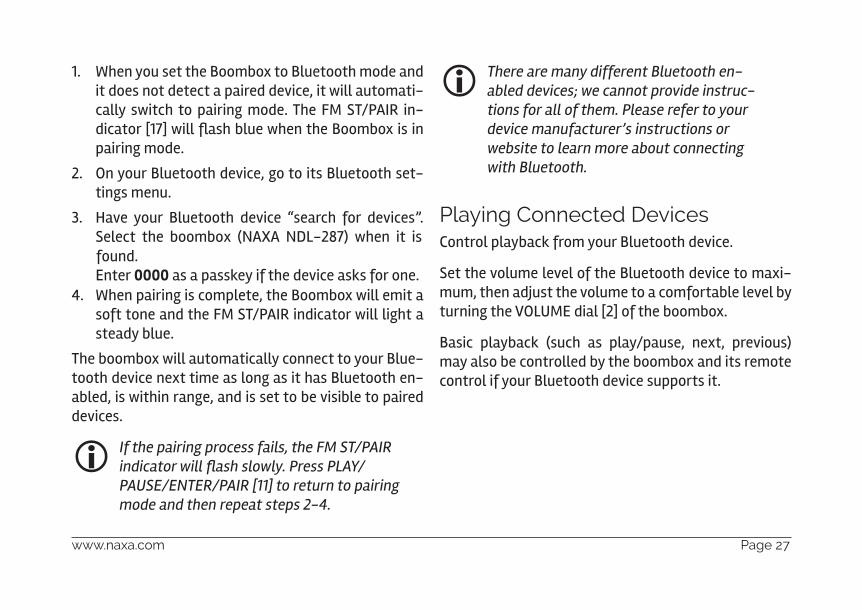
1. When you set the Boombox to Bluetooth mode and it does not detect a paired device, it will automati-cally switch to pairing mode. The FM ST/PAIR in-���� �"��~���#����\����Y��#��� ������Y���������pairing mode.
2. On your Bluetooth device, go to its Bluetooth set-tings menu.
3. Have your Bluetooth device “search for devices”. Select the boombox (NAXA NDL-287) when it is
4. When pairing is complete, the Boombox will emit a soft tone and the FM ST/PAIR indicator will light a steady blue.
The boombox will automatically connect to your Blue-tooth device next time as long as it has Bluetooth en-abled, is within range, and is set to be visible to paired devices.
��If the pairing process fails, the FM ST/PAIR �����������������������������������PAUSE/ENTER/PAIR [11] to return to pairing mode and then repeat steps 2-4.
��There are many different Bluetooth en-abled devices; we cannot provide instruc-tions for all of them. Please refer to your device manufacturer’s instructions or website to learn more about connecting with Bluetooth.
Playing Connected DevicesControl playback from your Bluetooth device.
Set the volume level of the Bluetooth device to maxi-mum, then adjust the volume to a comfortable level by turning the VOLUME dial [2] of the boombox.
Basic playback (such as play/pause, next, previous) may also be controlled by the boombox and its remote control if your Bluetooth device supports it.
Enter 0000 as a passkey if the device asks for one.found.
Page 28 Naxa Electronics
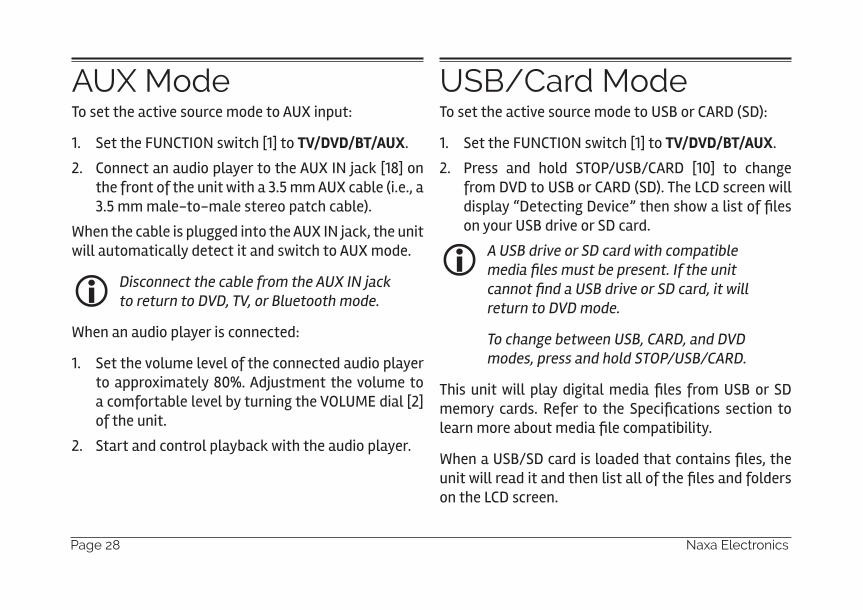
AUX ModeTo set the active source mode to AUX input:
1. Set the FUNCTION switch [1] to TV/DVD/BT/AUX.
2. Connect an audio player to the AUX IN jack [18] on the front of the unit with a 3.5 mm AUX cable (i.e., a 3.5 mm male-to-male stereo patch cable).
When the cable is plugged into the AUX IN jack, the unit will automatically detect it and switch to AUX mode.
��Disconnect the cable from the AUX IN jack to return to DVD, TV, or Bluetooth mode.
When an audio player is connected:
1. Set the volume level of the connected audio player �����"����� ������������ �� � ��]���� ��a comfortable level by turning the VOLUME dial [2] of the unit.
2. Start and control playback with the audio player.
USB/Card ModeTo set the active source mode to USB or CARD (SD):
1. Set the FUNCTION switch [1] to TV/DVD/BT/AUX.
2. Press and hold STOP/USB/CARD [10] to change from DVD to USB or CARD (SD). The LCD screen will ���������@ � ����@]���� ������#������ ��������on your USB drive or SD card.
��A USB drive or SD card with compatible ������������������� ��������!����������������������"#$���%���#&����'���������return to DVD mode.
To change between USB, CARD, and DVD modes, press and hold STOP/USB/CARD.
=���� �� �#���� ����� ���� ��� ����� �����"��� X>�� �"� >@����"�� ��"���� <�"� �� �� >������ ����� �� ���� ����"����"��Y� �������������� �Y��� ��
|�����X>�}>@���"����������� �� ���� ���������� ���� �#����"���� ����� ������ �������� ��������������"��on the LCD screen.
www.naxa.com Page 29
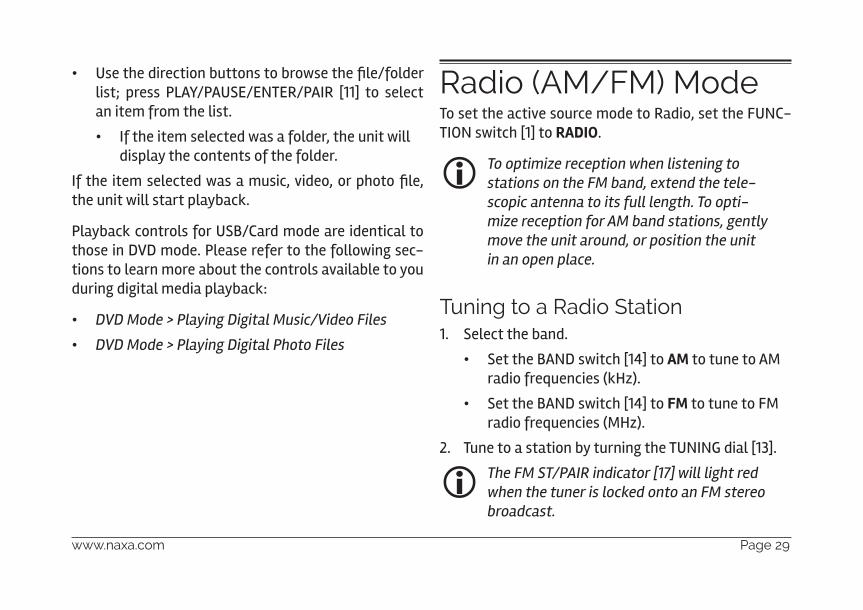
� X�� ����"� ����Y ���� ��Y"�#�� ����}����"�list; press PLAY/PAUSE/ENTER/PAIR [11] to select an item from the list.
� If the item selected was a folder, the unit will display the contents of the folder.
&�� �� � ����� ��#�����������]������"���� ������the unit will start playback.
Playback controls for USB/Card mode are identical to those in DVD mode. Please refer to the following sec-tions to learn more about the controls available to you during digital media playback:
� DVD Mode > Playing Digital Music/Video Files
� DVD Mode > Playing Digital Photo Files
Radio (AM/FM) ModeTo set the active source mode to Radio, set the FUNC-TION switch [1] to RADIO.
��To optimize reception when listening to stations on the FM band, extend the tele-scopic antenna to its full length. To opti-mize reception for AM band stations, gently move the unit around, or position the unit in an open place.
Tuning to a Radio Station 1. Select the band.
� Set the BAND switch [14] to AM to tune to AM radio frequencies (kHz).
� Set the BAND switch [14] to FM to tune to FM radio frequencies (MHz).
2. Tune to a station by turning the TUNING dial [13].
��The FM ST/PAIR indicator [17] will light red when the tuner is locked onto an FM stereo broadcast.
Page 30 Naxa Electronics
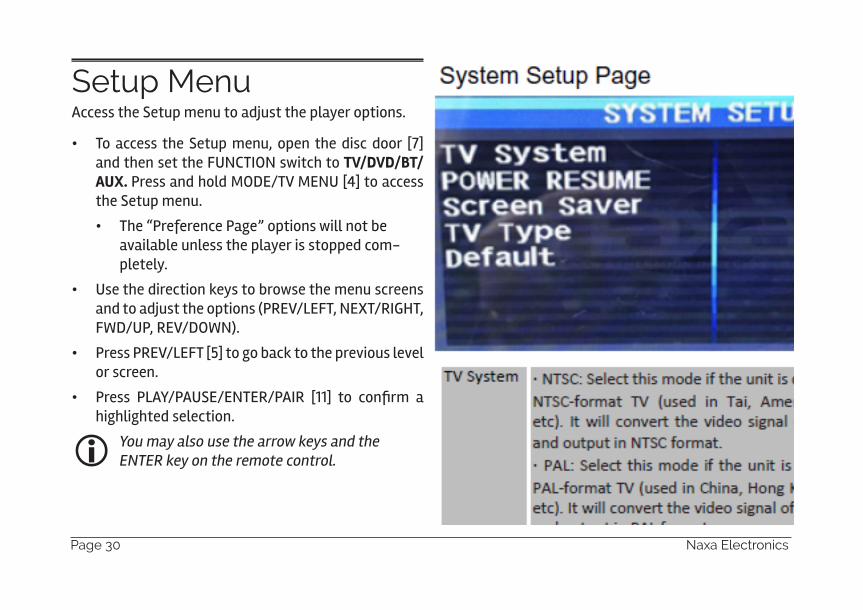
Setup MenuAccess the Setup menu to adjust the player options.
� To access the Setup menu, open the disc door [7] and then set the FUNCTION switch to TV/DVD/BT/AUX. Press and hold MODE/TV MENU [4] to access the Setup menu.
� The “Preference Page” options will not be available unless the player is stopped com-pletely.
� Use the direction keys to browse the menu screens and to adjust the options (PREV/LEFT, NEXT/RIGHT, FWD/UP, REV/DOWN).
� Press PREV/LEFT [5] to go back to the previous level or screen.
� +"��� +*��}+�X>'}'?='<}+�&<� �~~�� �� ����"�� ��highlighted selection.
��You may also use the arrow keys and the ENTER key on the remote control.
General Setup Page
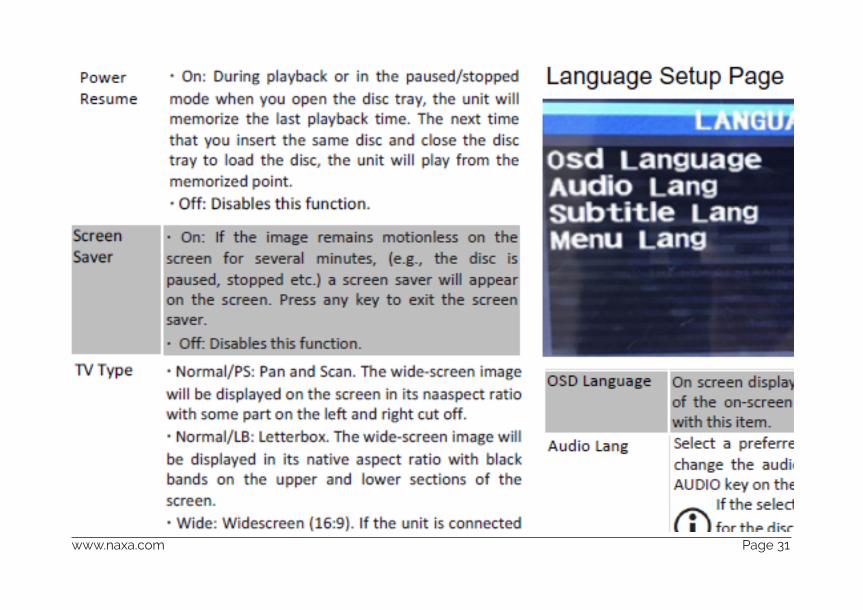
TV Display �� Normal/PS: Pan and Scan. The wide-screen image will be displayed on the screen in its na-tive aspect ratio with some part on the left and right cut off.
�� Normal/LB: Letterbox. The wide-screen image will be displayed in its native aspect ratio with black bands on the upper and lower sections of the screen.
�� Wide: Widescreen (16:9). If the unit is connected to a widescreen TV set, select this option. The widescreen image will be displayed in full screen in its native aspect ratio while the 4:3 image will Y�� " ����� ���"���� ����� ��� ���� ����"��
Dava
图章
www.naxa.com Page 31
Angle Mark
On: An angle mark is displayed on screen when an additional camera angle is available. While the angle mark is on screen, press the ANGLE key on the remote to cycle through the available camera angles.
Off: Disables this function.
��This function only works with those discs mastered with multiple camera angles.
OSD Lang On screen display language. Set the language of the on-screen display and system menus with this item.
Captions On: Displays captions on screen when they are available.
Off: Disables this function.
Screen Saver
�� On: If the image remains motionless on the screen for several minutes, (e.g., the disc is paused, stopped etc.) a screen saver will appear on the screen. Press any key to exit the screen saver.
�� Off: Disables this function.
Last Memory
�� On: During playback or in the paused/stopped mode when you open the disc tray, the unit will memorize the last playback time. The next time that you insert the same disc and close the disc tray to load the disc, the unit will play from the memorized point.
�� Off: Disables this function.
Audio Setup Page
Speaker Setup �� Downmix > LT/RT: Rear surround audio is mixed together and output through both left and right speakers.
�� Downmix > Stereo: Rear surround audio is kept in separate channels. Rear left audio is output through the left speaker; rear right audio is output through the right speaker.
Dava
图章

Page 32 Naxa Electronics
Video Setup Page
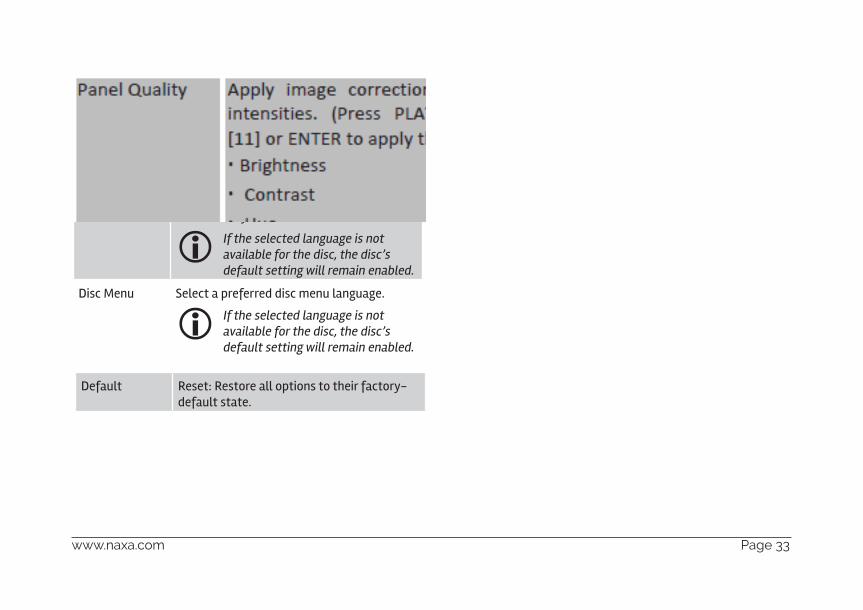
+�������� � Apply image correction options in varying intensities. (Press PLAY/PAUSE/ENTER/PAIR [11] or ENTER to apply the image correction.)
�� Sharpness�� Brightness�� Contrast�� Hue�� Saturation
Preference Page
TV Type �� PAL: Select this mode if the unit is con-nected to a PAL-format TV (used in China, Hong Kong, Europe, etc). It will convert the video signal of an NTSC disc and output in PAL format.
�� AUTO: Select this mode to have the system detect the video signal of the disc and match the video signal output format to it.
�� NTSC: Select this mode if the unit is con-nected to an NTSC-format TV (used in Tai-wan, America, Canada, etc). It will convert the video signal of a PAL disc and output in NTSC format.
Dava
图章
www.naxa.com Page 33
Audio Select a preferred audio language. You can change the audio language by pressing the AUDIO key on the remote control.
��If the selected language is not available for the disc, the disc’s default setting will remain enabled.
Subtitle Select a preferred subtitle language. You can change the subtitle language by pressing the SUBTITLE key on the remote control.
��If the selected language is not available for the disc, the disc’s default setting will remain enabled.
Disc Menu Select a preferred disc menu language.
��If the selected language is not available for the disc, the disc’s default setting will remain enabled.
Default Reset: Restore all options to their factory-default state.
Dava
图章
Dava
文本框

Page 34 Naxa Electronics
Optional ConnectionsConnect to a TV (AV Out)Use your DVD boombox at home with a TV! The TV will need to be able to accept a composite video signal.
With the included AV cable:
1. Connect the yellow plug of the cable to the yellow composite video input of the TV.
2. Connect the red plug of the cable to the red audio input (right) of the TV.
3. Connect the white plug of the cable to the white audio input (left) of the TV.
4. Connect the yellow, red, and white plugs on the other end of the cable to the A/V Out jacks on the back of the unit (i.e., Composite video out [27] (yel-low) and Stereo audio out [28] (red and white)).
5. Turn the TV and the unit on.
6. Set the TV to display the composite video source. You will see the unit’s output on the screen when the source is set correctly.
��Please refer to the owner’s manual pro-vided with the TV to learn how to set the display source.
www.naxa.com Page 35
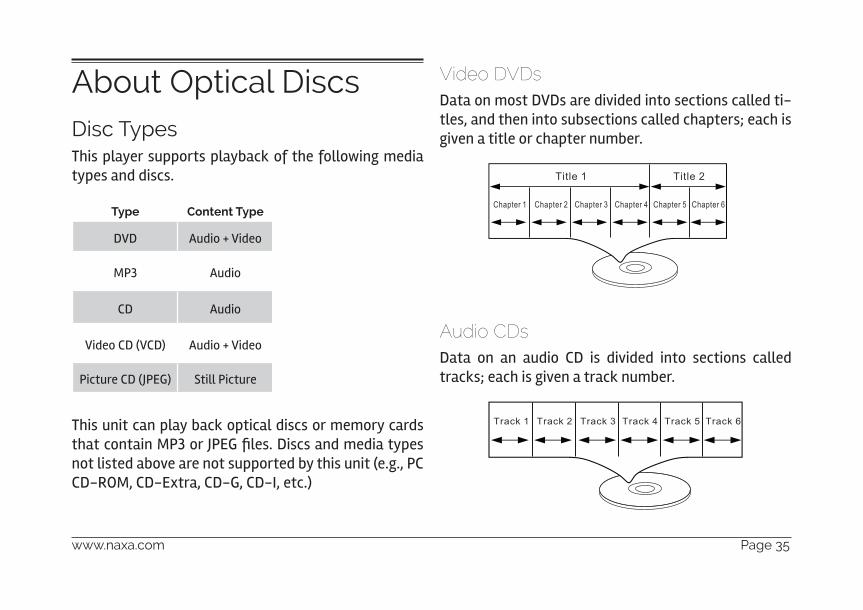
About Optical DiscsDisc TypesThis player supports playback of the following media types and discs.
Type Content Type
DVD Audio + Video
MP3 Audio
CD Audio
Video CD (VCD) Audio + Video
Picture CD (JPEG) Still Picture
This unit can play back optical discs or memory cards �� ���� �����+���"��+'Q������@�������������� ����not listed above are not supported by this unit (e.g., PC CD-ROM, CD-Extra, CD-G, CD-I, etc.)
Video DVDsData on most DVDs are divided into sections called ti-tles, and then into subsections called chapters; each is given a title or chapter number.
Audio CDsData on an audio CD is divided into sections called tracks; each is given a track number.
Page 36 Naxa Electronics
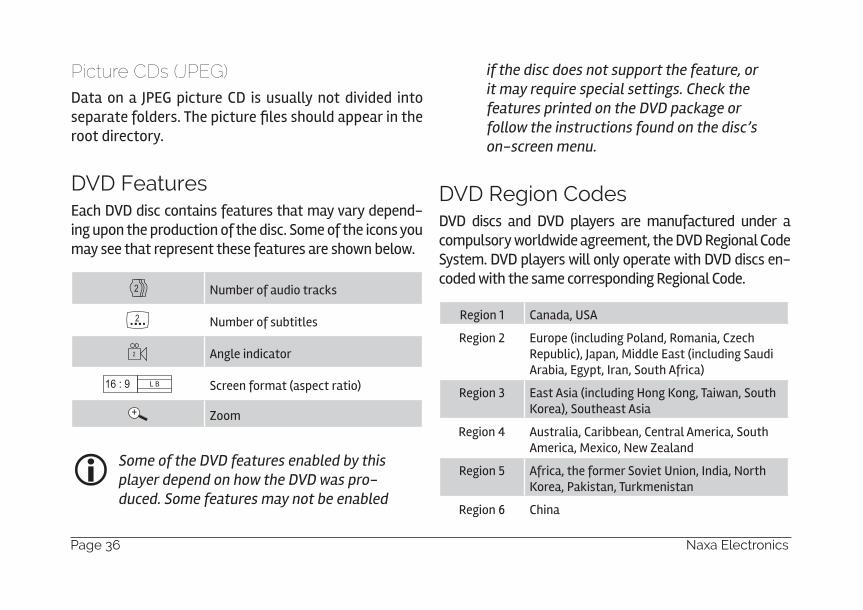
Picture CDs (JPEG)Data on a JPEG picture CD is usually not divided into ���"� �����"���=����� "���������������"���� ��root directory.
DVD FeaturesEach DVD disc contains features that may vary depend-ing upon the production of the disc. Some of the icons you may see that represent these features are shown below.
Number of audio tracks
Number of subtitles
Angle indicator
Screen format (aspect ratio)
Zoom
��Some of the DVD features enabled by this player depend on how the DVD was pro-duced. Some features may not be enabled
if the disc does not support the feature, or it may require special settings. Check the features printed on the DVD package or follow the instructions found on the disc’s on-screen menu.
DVD Region CodesDVD discs and DVD players are manufactured under a compulsory worldwide agreement, the DVD Regional Code System. DVD players will only operate with DVD discs en-coded with the same corresponding Regional Code.
Region 1 Canada, USA
Region 2 Europe (including Poland, Romania, Czech Republic), Japan, Middle East (including Saudi Arabia, Egypt, Iran, South Africa)
Region 3 East Asia (including Hong Kong, Taiwan, South Korea), Southeast Asia
Region 4 Australia, Caribbean, Central America, South America, Mexico, New Zealand
Region 5 Africa, the former Soviet Union, India, North Korea, Pakistan, Turkmenistan
Region 6 China
www.naxa.com Page 37
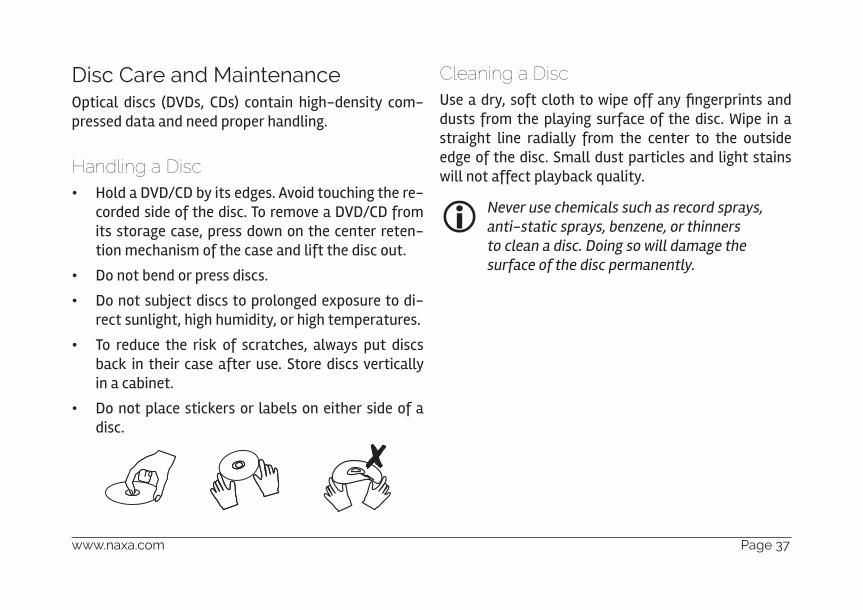
Disc Care and MaintenanceOptical discs (DVDs, CDs) contain high-density com-pressed data and need proper handling.
Handling a Disc � Hold a DVD/CD by its edges. Avoid touching the re-
corded side of the disc. To remove a DVD/CD from its storage case, press down on the center reten-tion mechanism of the case and lift the disc out.
� Do not bend or press discs.
� Do not subject discs to prolonged exposure to di-rect sunlight, high humidity, or high temperatures.
� To reduce the risk of scratches, always put discs back in their case after use. Store discs vertically in a cabinet.
� Do not place stickers or labels on either side of a disc.
Cleaning a DiscX�����"������ ���� �� ��#��������������"�"�� ������dusts from the playing surface of the disc. Wipe in a straight line radially from the center to the outside edge of the disc. Small dust particles and light stains will not affect playback quality.
��Never use chemicals such as record sprays, anti-static sprays, benzene, or thinners to clean a disc. Doing so will damage the surface of the disc permanently.
Page 38 Naxa Electronics
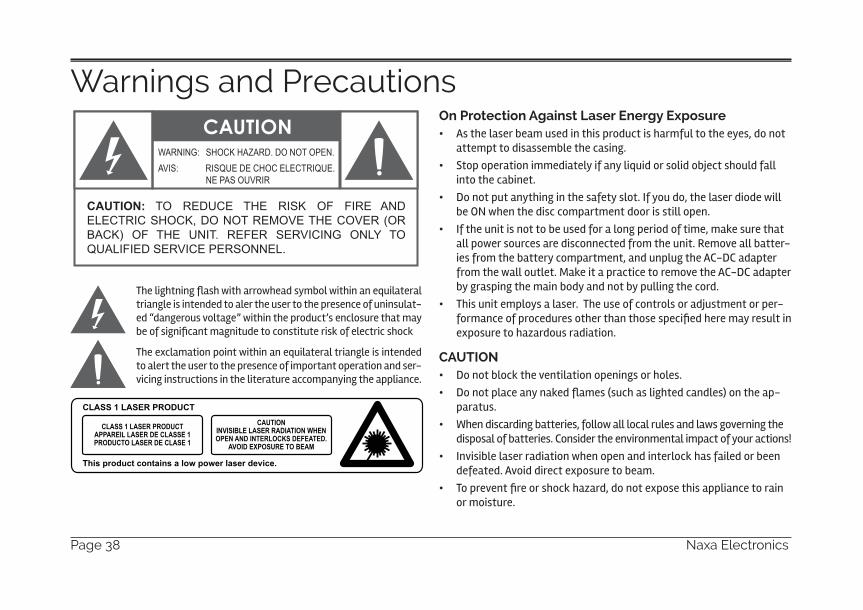
Warnings and Precautions
=������ �����\����#� ���""�#�������Y���#� ����������� "���triangle is intended to aler the user to the presence of uninsulat-ed “dangerous voltage” within the product’s enclosure that may Y������������� ������ �� ������ � �"��$������ "�������$
The exclamation point within an equilateral triangle is intended to alert the user to the presence of important operation and ser-vicing instructions in the literature accompanying the appliance.
On Protection Against Laser Energy Exposure �� As the laser beam used in this product is harmful to the eyes, do not
attempt to disassemble the casing.�� Stop operation immediately if any liquid or solid object should fall
into the cabinet.�� Do not put anything in the safety slot. If you do, the laser diode will
be ON when the disc compartment door is still open.�� If the unit is not to be used for a long period of time, make sure that
all power sources are disconnected from the unit. Remove all batter-ies from the battery compartment, and unplug the AC-DC adapter from the wall outlet. Make it a practice to remove the AC-DC adapter by grasping the main body and not by pulling the cord.
�� This unit employs a laser. The use of controls or adjustment or per-��"���������"���"��� �"� ���� ������������"�����"�� ����exposure to hazardous radiation.
CAUTION�� Do not block the ventilation openings or holes.�� @���� ������������$��\���������������� ������������� ����-
paratus.�� When discarding batteries, follow all local rules and laws governing the
disposal of batteries. Consider the environmental impact of your actions!�� Invisible laser radiation when open and interlock has failed or been
defeated. Avoid direct exposure to beam.�� =���"]� ��"��"�����$�����"�������� ������ ������������� ��"����
or moisture.

www.naxa.com Page 39
Important Safety Information1. Read Instructions: All the safety and operating instructions should be
read before the product is operated.2. Retain Instructions: The safety and operating instructionshould be
retained for future reference.3. Heed Warnings: All warnings on the product and in the operating in-
structions should be adhered to.4. Follow Instructions: All operating and usage instructions should be
followed.5. Cleaning: Unplug this product from the wall outlet before cleaning.
Do not use liquid cleaners or aerosol cleaners. Use a damp cloth for cleaning.
6. Attachments: Use only attachments recommended by the manufac-turer. Use of other attachments may be hazardous.
7. Water and Moisture: Do not use this product near water (e.g., near a bathtub, washbowl, kitchen sink, laundry tub, in wet basements, or near a swimming pool and the like).
8. Accessories: Do not place this product on an unstable cart, stand, tripod, bracket, or table. Use only with carts, stands, tripods, brack-ets, or tables recommended by the manufacturer or sold with the product. Any mounting of the product should follow the manufacturer’s instructions and should use a mounting accessory recommended by the manufacturer. A product and cart com-Y��� ���� ������ Y� ��]��#� �� ��"�� ���$� � �����excessive force, and uneven surfaces may cause the product and cart combination to overturn.
9. Ventilation: Slots and openings in the cabinet are provided for ven-tilation to ensure reliable operation of the product and to protect it from overheating. These openings should never be blocked by placing
the product on a bed, sofa, rug, or other similar surface. This product should not be placed in a built-in installation such as a bookcase or rack unless proper ventilation is provided or the manufacturer in-structions have been adhered to.
10. Power Sources: This product should be operated only from the type of power source indicated on the rating label. If you are not sure of the type of power supply to your home, consult your product dealer or local power company. For products intended to operate from battery power or other sources, refer to the operating instructions.
11. Grounding or Polarization: This product may be equipped with a po-larized alternating-current line plug that has one blade wider than ��� �"��=��������#���������� ��� �� ����#"�� � ���������"� �����This is a safety feature. If you are unable to insert the plug fully into the outlet, try reversing the direction of the plug. If the plug should � ��������� ��� ����� �� ������ "������ ��"����� ���Y��� �� � ��@��not defeat the safety purpose of the polarized plug.
12. Power-Cord Protection: Power supply cords should be routed so that they are not likely to be walked on or pinched by items placed upon or against them, paying particular attention to cords at plugs, conve-nience receptacles, and at the point which they exit from the product.
13. Protective Attachment Plug: The product may be equipped with an at-tachment plug with overload protection. This is a safety feature. See the operating instructions for replacement or directions to reset the protective device. If replacement of the plug is required, be sure the service technician has used a replacement plug that has the same over-������"� � ������� ���"���������������������Y�� �������� ""�
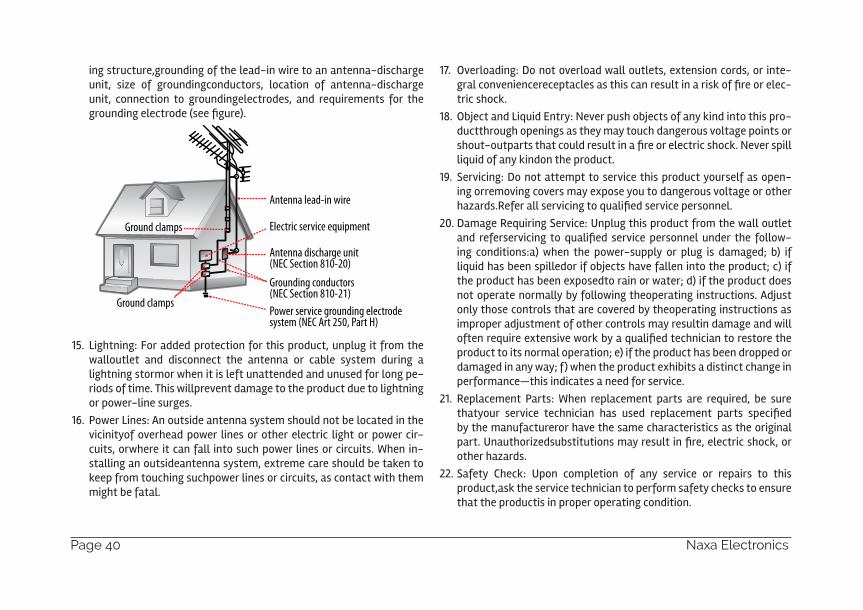
14. Outdoor Antenna Grounding: If an outside antenna is connected to the product, be sure the antenna system is grounded so as to provide some protection against voltage surges and built-up static charges.Article 810 of the NationalElectrical Code, ANS/NFPA70 provides in-formation withregard to proper grounding ofthe mast and support-
Page 40 Naxa Electronics
ing structure,grounding of the lead-in wire to an antenna-discharge unit, size of groundingconductors, location of antenna-discharge unit, connection to groundingelectrodes, and requirements for the �"��������� "��������"��
15. Lightning: For added protection for this product, unplug it from the walloutlet and disconnect the antenna or cable system during a lightning stormor when it is left unattended and unused for long pe-riods of time. This willprevent damage to the product due to lightning or power-line surges.
16. Power Lines: An outside antenna system should not be located in the vicinityof overhead power lines or other electric light or power cir-cuits, orwhere it can fall into such power lines or circuits. When in-stalling an outsideantenna system, extreme care should be taken to keep from touching suchpower lines or circuits, as contact with them might be fatal.
17. Overloading: Do not overload wall outlets, extension cords, or inte-�"������]����"�� �������� ��������"�� ������"��$�����"��"���-tric shock.
18. Object and Liquid Entry: Never push objects of any kind into this pro-ductthrough openings as they may touch dangerous voltage points or ��� �� ��" �� �� ������"�� �������"��"��� "�������$��?]"�������liquid of any kindon the product.
19. Servicing: Do not attempt to service this product yourself as open-ing orremoving covers may expose you to dangerous voltage or other ����"���<�"������"]������ ����������"]����"������
20. Damage Requiring Service: Unplug this product from the wall outlet ���� "�"�"]������ �� ������� �"]��� �"������ ��"� �� �����#-ing conditions:a) when the power-supply or plug is damaged; b) if liquid has been spilledor if objects have fallen into the product; c) if the product has been exposedto rain or water; d) if the product does not operate normally by following theoperating instructions. Adjust only those controls that are covered by theoperating instructions as improper adjustment of other controls may resultin damage and will �� ��"��"�� ���]�#�"$�Y����������� ��������� ��"� �"� ��product to its normal operation; e) if the product has been dropped or damaged in any way; f) when the product exhibits a distinct change in performance—this indicates a need for service.
21. Replacement Parts: When replacement parts are required, be sure �� ��"� �"]��� ��������� ���� ��� "������ � ��" �� �������by the manufactureror have the same characteristics as the original ��" ��X�� ��"����Y� � ���������"�� �����"���� "�������$���"�other hazards.
22. Safety Check: Upon completion of any service or repairs to this product,ask the service technician to perform safety checks to ensure that the productis in proper operating condition.

www.naxa.com Page 41
23. Wall or Ceiling Mounting: The product should be mounted to a wall or ceiling only as recommended by the manufacturer.
24. Heat: The product should be situated away from heat sources such as radiators,heat registers, stoves, or other products (including ampli-�"��� �� �"������ �
FCC NOTICEThis device complies with Part 15 of the FCC Rules. Operation is subject to the following two conditions: (1) this device may not cause harmful interference, and (2) this device must accept any interference received, including interference that may cause undesired operation.
Note: This equipment has been tested and found to comply with the lim-its for a Class B digital device, pursuant to Part 15 of the FCC Rules. These limits are designed to provide reasonable protection against harmful in-terference in a residential installation. This equipment generates, uses and can radiate radio frequency energy and, if not installed and used in accordance with the instructions, may cause harmful interference to ra-dio communications. However, there is no guarantee that interference will not occur in a particular installation. If this equipment does cause harmful interference to radio or television reception, which can be de-termined by turning the equipment off and on, the user is encouraged to try to correct the interference by one or more of the following measures:
�� Reorient or relocate the receiving antenna.�� Increase the separation between the equipment and receiver.�� Connect the equipment into an outlet on a circuit different from that
to which the receiver is connected.�� Consult the dealer or an experienced radio/TV technician for help.
CAUTION ON MODIFICATIONS������������"�������� ������� ���"��������"�]��Y�� ���"�� ����this device may void the authority granted by the FCC to operate the equipment.
WARNING:This product contains lead, a chemical known to the State of California to cause cancer and birth defects or other reproductive harm. Wash hands after handling.
Page 42 Naxa Electronics
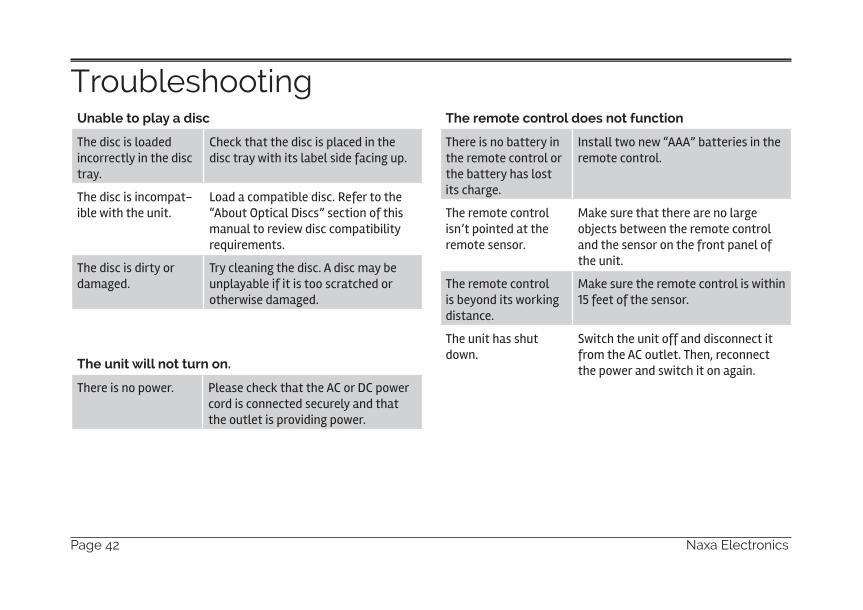
TroubleshootingUnable to play a disc
The disc is loaded incorrectly in the disc tray.
Check that the disc is placed in the disc tray with its label side facing up.
The disc is incompat-ible with the unit.
Load a compatible disc. Refer to the “About Optical Discs” section of this manual to review disc compatibility requirements.
The disc is dirty or damaged.
Try cleaning the disc. A disc may be unplayable if it is too scratched or otherwise damaged.
The unit will not turn on.
There is no power. Please check that the AC or DC power cord is connected securely and that the outlet is providing power.
The remote control does not function
There is no battery in the remote control or the battery has lost its charge.
Install two new “AAA” batteries in the remote control.
The remote control isn’t pointed at the remote sensor.
Make sure that there are no large objects between the remote control and the sensor on the front panel of the unit.
The remote control is beyond its working distance.
Make sure the remote control is within 15 feet of the sensor.
The unit has shut down.
Switch the unit off and disconnect it from the AC outlet. Then, reconnect the power and switch it on again.
www.naxa.com Page 43
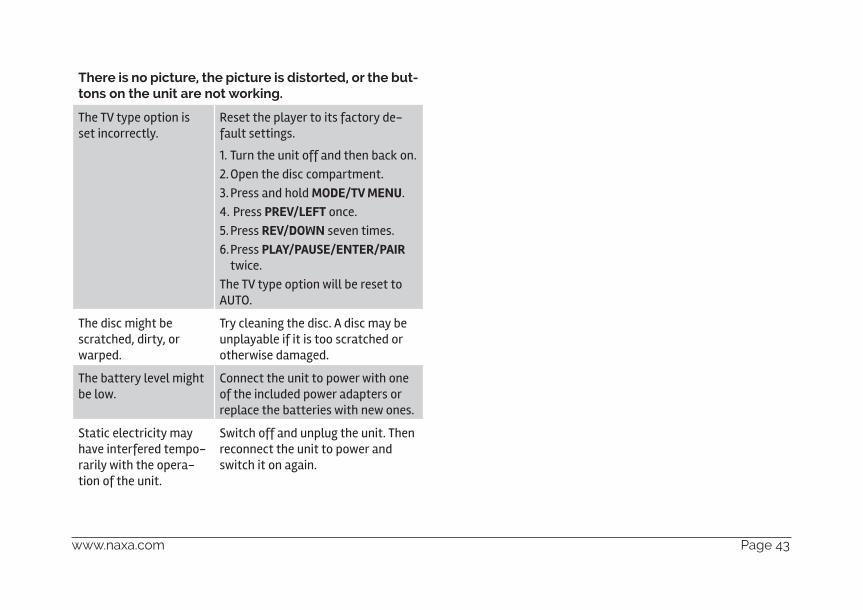
There is no picture, the picture is distorted, or the but-tons on the unit are not working.
The TV type option is set incorrectly.
Reset the player to its factory de-fault settings.
1. Turn the unit off and then back on.2. Open the disc compartment.3. Press and hold MODE/TV MENU.4. Press PREV/LEFT once.5. Press REV/DOWN seven times.6. Press PLAY/PAUSE/ENTER/PAIR
twice.The TV type option will be reset to AUTO.
The disc might be scratched, dirty, or warped.
Try cleaning the disc. A disc may be unplayable if it is too scratched or otherwise damaged.
The battery level might be low.
Connect the unit to power with one of the included power adapters or replace the batteries with new ones.
Static electricity may have interfered tempo-rarily with the opera-tion of the unit.
Switch off and unplug the unit. Then reconnect the unit to power and switch it on again.
Page 44 Naxa Electronics
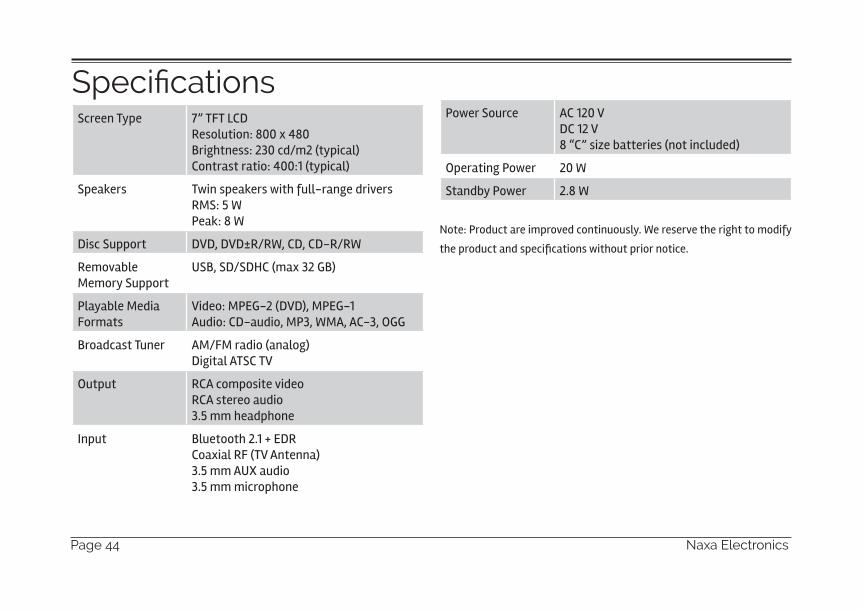
������������Screen Type 7” TFT LCD
Resolution: 800 x 480Brightness: 230 cd/m2 (typical)Contrast ratio: 400:1 (typical)
Speakers Twin speakers with full-range driversRMS: 5 WPeak: 8 W
Disc Support DVD, DVD±R/RW, CD, CD-R/RW
Removable Memory Support
USB, SD/SDHC (max 32 GB)
Playable Media Formats
Video: MPEG-2 (DVD), MPEG-1Audio: CD-audio, MP3, WMA, AC-3, OGG
Broadcast Tuner AM/FM radio (analog)Digital ATSC TV
Output RCA composite videoRCA stereo audio3.5 mm headphone
Input Bluetooth 2.1 + EDRCoaxial RF (TV Antenna)3.5 mm AUX audio3.5 mm microphone
Power Source AC 120 VDC 12 V8 “C” size batteries (not included)
Operating Power 20 W
Standby Power 2.8 W
Note: Product are improved continuously. We reserve the right to modify
���"��� ������������ �����#� �� ��"��"��� ���
www.naxa.com Page 45
SupportIf you have problems with your device, please consult the instructions in this manual. Please also visit us on the web at www.naxa.com to get up to the minute news, alerts, and documentation for your device. For additional assistance, please contact Naxa Technical Support.
NAXA Technical Support 2320 East 49th St. Vernon, CA 90058 http://www.naxa.com/naxa_support/