Implementing and Using Clock In Clock Out in Time Tracking
48
Implementation Guide | PUBLIC Document Version: 2H 2021 – 2022-03-15 Implementing and Using Clock In Clock Out in Time Tracking © 2022 SAP SE or an SAP affiliate company. All rights reserved. THE BEST RUN
-
Upload
khangminh22 -
Category
Documents
-
view
5 -
download
0
Transcript of Implementing and Using Clock In Clock Out in Time Tracking

Implementation Guide | PUBLICDocument Version: 2H 2021 – 2022-03-15
Implementing and Using Clock In Clock Out in Time Tracking
© 2
022
SAP
SE o
r an
SAP affi
liate
com
pany
. All r
ight
s re
serv
ed.
THE BEST RUN
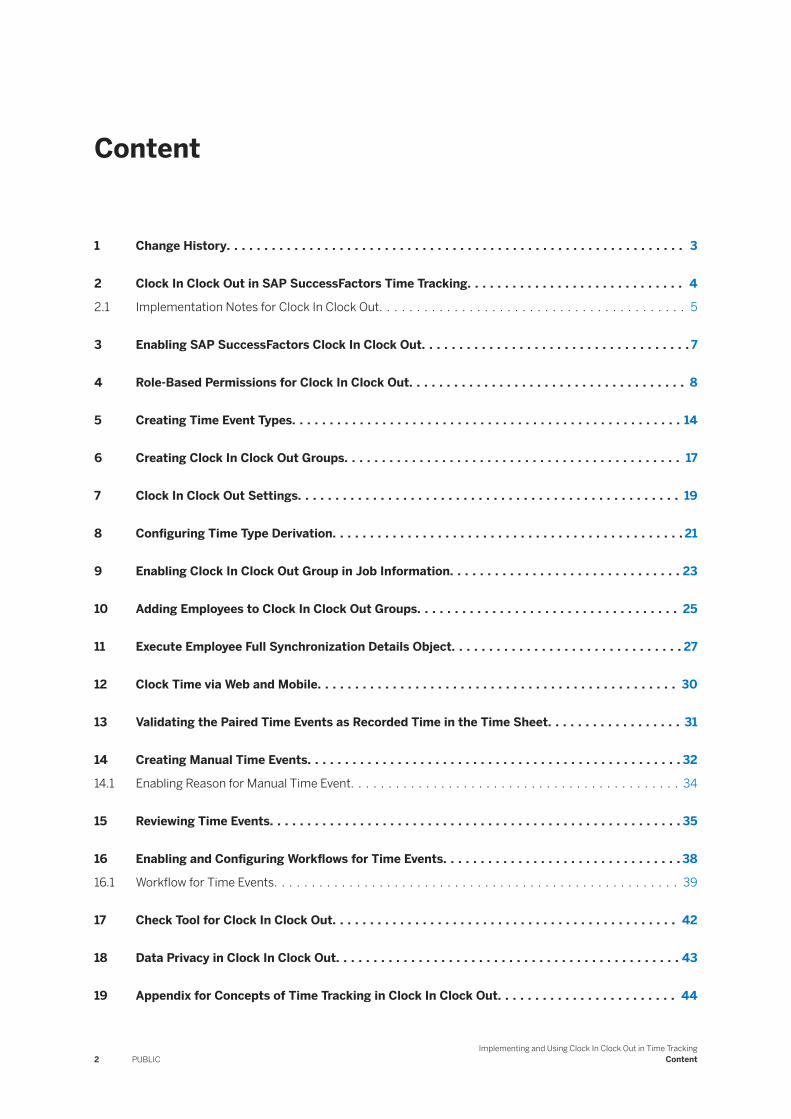
Content
1 Change History. . . . . . . . . . . . . . . . . . . . . . . . . . . . . . . . . . . . . . . . . . . . . . . . . . . . . . . . . . . . . 3
2 Clock In Clock Out in SAP SuccessFactors Time Tracking. . . . . . . . . . . . . . . . . . . . . . . . . . . . . 4
2.1 Implementation Notes for Clock In Clock Out. . . . . . . . . . . . . . . . . . . . . . . . . . . . . . . . . . . . . . . . . 5
3 Enabling SAP SuccessFactors Clock In Clock Out. . . . . . . . . . . . . . . . . . . . . . . . . . . . . . . . . . . . 7
4 Role-Based Permissions for Clock In Clock Out. . . . . . . . . . . . . . . . . . . . . . . . . . . . . . . . . . . . . 8
5 Creating Time Event Types. . . . . . . . . . . . . . . . . . . . . . . . . . . . . . . . . . . . . . . . . . . . . . . . . . . . 14
6 Creating Clock In Clock Out Groups. . . . . . . . . . . . . . . . . . . . . . . . . . . . . . . . . . . . . . . . . . . . . 17
7 Clock In Clock Out Settings. . . . . . . . . . . . . . . . . . . . . . . . . . . . . . . . . . . . . . . . . . . . . . . . . . . 19
8 Configuring Time Type Derivation. . . . . . . . . . . . . . . . . . . . . . . . . . . . . . . . . . . . . . . . . . . . . . . 21
9 Enabling Clock In Clock Out Group in Job Information. . . . . . . . . . . . . . . . . . . . . . . . . . . . . . . 23
10 Adding Employees to Clock In Clock Out Groups. . . . . . . . . . . . . . . . . . . . . . . . . . . . . . . . . . . 25
11 Execute Employee Full Synchronization Details Object. . . . . . . . . . . . . . . . . . . . . . . . . . . . . . . 27
12 Clock Time via Web and Mobile. . . . . . . . . . . . . . . . . . . . . . . . . . . . . . . . . . . . . . . . . . . . . . . . 30
13 Validating the Paired Time Events as Recorded Time in the Time Sheet. . . . . . . . . . . . . . . . . . 31
14 Creating Manual Time Events. . . . . . . . . . . . . . . . . . . . . . . . . . . . . . . . . . . . . . . . . . . . . . . . . . 32
14.1 Enabling Reason for Manual Time Event. . . . . . . . . . . . . . . . . . . . . . . . . . . . . . . . . . . . . . . . . . . . 34
15 Reviewing Time Events. . . . . . . . . . . . . . . . . . . . . . . . . . . . . . . . . . . . . . . . . . . . . . . . . . . . . . . 35
16 Enabling and Configuring Workflows for Time Events. . . . . . . . . . . . . . . . . . . . . . . . . . . . . . . . 38
16.1 Workflow for Time Events. . . . . . . . . . . . . . . . . . . . . . . . . . . . . . . . . . . . . . . . . . . . . . . . . . . . . . 39
17 Check Tool for Clock In Clock Out. . . . . . . . . . . . . . . . . . . . . . . . . . . . . . . . . . . . . . . . . . . . . . 42
18 Data Privacy in Clock In Clock Out. . . . . . . . . . . . . . . . . . . . . . . . . . . . . . . . . . . . . . . . . . . . . . 43
19 Appendix for Concepts of Time Tracking in Clock In Clock Out. . . . . . . . . . . . . . . . . . . . . . . . 44
2 PUBLICImplementing and Using Clock In Clock Out in Time Tracking
Content

1 Change History
Learn about changes to the documentation for Clock In Clock Out in SAP SuccessFactors Time Tracking in recent releases.
2H 2021
Type of Change Description More Info
November 19
New We've added details about Clock Time quick action from the Latest Home Page.
Clock Time via Web and Mobile [page 30]
Changed We've added details about the updated role-based permissions for Clock In Clock Out.
Role-Based Permissions for Clock In Clock Out [page 8]
Changed We've updated the Clock In Clock Out settings page to enable pairing of time events of the same time event type, workflow process, and so on.
Clock In Clock Out Settings [page 19]
Changed We've added details about changes to employee synchronization.
Execute Employee Full Synchronization Details Object [page 27]
Changed We've added details about new fields for manual time event creation.
Creating Manual Time Events [page 32]
New We've added details about the workflow support for approval of time events.
Enabling and Configuring Workflows for Time Events [page 38]
New We've added details about Check Tool support for Clock In Clock Out
Check Tool for Clock In Clock Out [page 42]
New We've added details about Data purge and Change Audit Log.
Data Privacy in Clock In Clock Out [page 43]
1H 2021
Type of Change Description More Info
April 9
New Initial publication Clock In Clock Out in SAP SuccessFactors Time Tracking [page 4]
Implementing and Using Clock In Clock Out in Time TrackingChange History PUBLIC 3

2 Clock In Clock Out in SAP SuccessFactors Time Tracking
Clock In Clock Out helps you track employees' time when they use the swipe machine or any external time tracking service like a terminal. It automatically records the duration of time events in the SAP SuccessFactors Time Sheet.
Clock In Clock Out integrates the external time events coming from the time tracking services to the Time Sheet. Time events are the time stamps for an employee’s entry and exit from work. When employees enter the designated office of work, they swipe the card or punch the badge, and the external time events are created.
When you implement Clock In Clock Out, these time events come from the time tracking system to the SAP SuccessFactors Time Sheet through time event pairing.
Figure 1: Overview of the Clock In Clock Out Process
Below is a time-line of an employee's day at work and different time events on the same day.Figure 2: Various time events for an employee's day at work
NoteIn the example, the break is unpaid, there can be scenarios with paid breaks.
Time Event Pairing Logic
4 PUBLICImplementing and Using Clock In Clock Out in Time Tracking
Clock In Clock Out in SAP SuccessFactors Time Tracking
For time valuation, we convert time events of specific Time Event Types into time event pairs. The process of combining two time events like clock-in and clock-out into one time event pair is called Pairing. For automated pairing, the Event attribute in the Time Event Type is important. A Time Event Type can be defined as Start (starting an activity) or Stop (ending an activity). With the two basic categories, we have these pairing rules for incoming time events:
● Start following Stop: this is the standard clock-in event. A new period of attendance starts and no pairing occurs.
● Start following Start: the person is still at work, but the nature of attendance has changed; this implies the end of the previous attendance resulting in pairing of the previous attendance period.
● Stop following Start: this is the standard clock-out event. The previous attendance period ends and results in pairing of the attendance period that ended.
● Stop following Stop: this is an incoming event and cannot be used for pairing. This requires manual intervention.
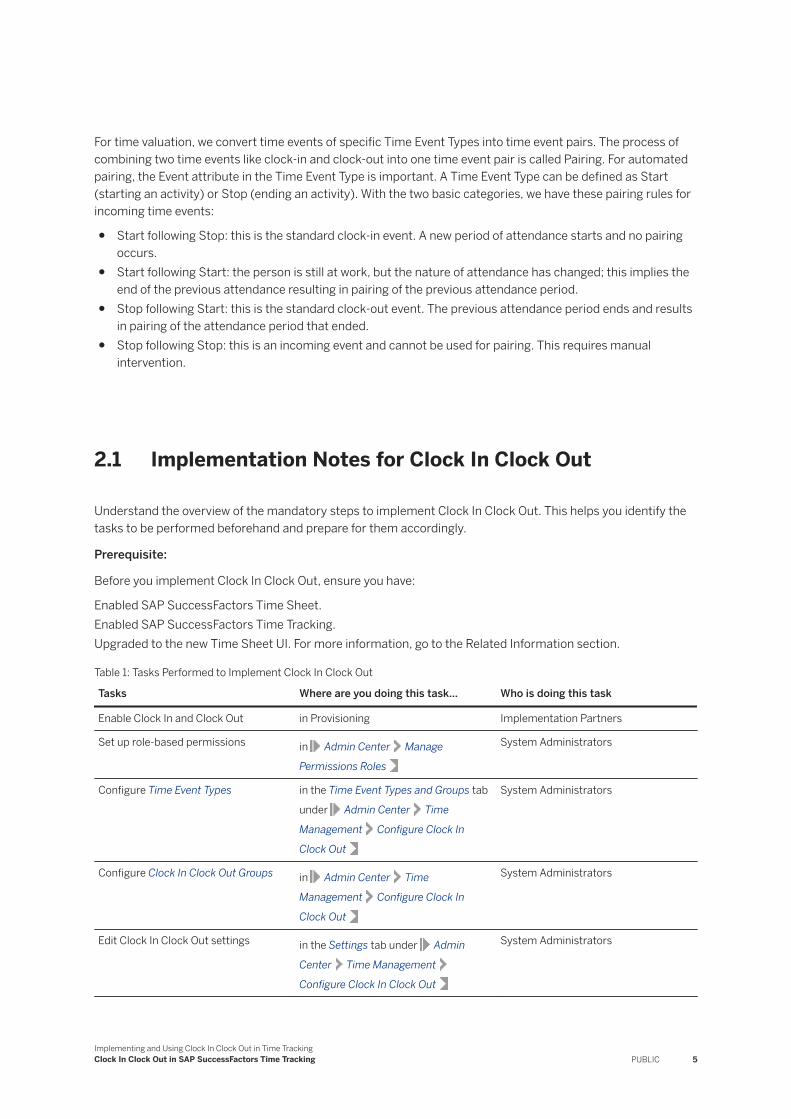
2.1 Implementation Notes for Clock In Clock Out
Understand the overview of the mandatory steps to implement Clock In Clock Out. This helps you identify the tasks to be performed beforehand and prepare for them accordingly.
Prerequisite:
Before you implement Clock In Clock Out, ensure you have:
Enabled SAP SuccessFactors Time Sheet.Enabled SAP SuccessFactors Time Tracking.Upgraded to the new Time Sheet UI. For more information, go to the Related Information section.
Table 1: Tasks Performed to Implement Clock In Clock Out
Tasks Where are you doing this task... Who is doing this task
Enable Clock In and Clock Out in Provisioning Implementation Partners
Set up role-based permissions in Admin Center Manage
Permissions Roles
System Administrators
Configure Time Event Types in the Time Event Types and Groups tab
under Admin Center Time
Management Configure Clock In
Clock Out
System Administrators
Configure Clock In Clock Out Groups in Admin Center Time
Management Configure Clock In
Clock Out
System Administrators
Edit Clock In Clock Out settings in the Settings tab under Admin
Center Time Management
Configure Clock In Clock Out
System Administrators
Implementing and Using Clock In Clock Out in Time TrackingClock In Clock Out in SAP SuccessFactors Time Tracking PUBLIC 5

Tasks Where are you doing this task... Who is doing this task
Configure Clock In Clock Out Time Type Derivation
in Admin Center Manage Data System Administrators
Enable Clock In Clock Out Group in employee's Job Information
in jobInfo under Admin Center
Manage Business Configurations
System Administrators
Add employees to the Clock In Clock Out Groups
in Employee Profile Employee's
Job Information
Manager or Human Resource Administrator. Perform this task whenever a new employee is hired or becomes a Clock In Clock Out employee.
Execute Clock In Clock Out Employee Full Synchronization Details object
in Admin Center Manage Data System Administrators
View paired time events as recorded time on the Time Sheet.
in Time Sheet Manager or Human Resource Administrator. Perform this task whenever there’s a discrepancy in time records, as the time records are the result of time event pairing and visible on the Time Sheet.
Table 2: Basic Persona in SAP SuccessFactors Clock In Clock Out
With Clock In and Clock Out... Can...
Employee Get paid based on time recorded through Clock In Clock Out reflecting recorded hours on the Time Sheet.
System Administrator and Implementation Partner
Implement and manage Clock In Clock Out System.
Manager or Human Resource Administrator
● View and manage time events for employees.● Add employees to Clock In Clock Out Groups.
Related Information
New Time Sheet UI
6 PUBLICImplementing and Using Clock In Clock Out in Time Tracking
Clock In Clock Out in SAP SuccessFactors Time Tracking

3 Enabling SAP SuccessFactors Clock In Clock Out
SAP SuccessFactors Clock In Clock Out is a feature to track when employees are clocking in and clocking out from work. It automatically shows their recorded time in the Time Sheet.
Prerequisites
The Clock In Clock Out solution can be enabled only in Provisioning.
RememberAs a customer, you don't have access to Provisioning. To complete tasks in Provisioning, contact your implementation partner. If you're no longer working with an implementation partner, contact Product Support.
Before you enable Clock In Clock Out, ensure you have:
Enabled SAP SuccessFactors Time Sheet.Enabled SAP SuccessFactors Time Tracking.Upgraded to the new Time Sheet UI.
Context
Enable SAP SuccessFactors Clock In Clock Out in your SAP SuccessFactors instance.
Procedure
1. Log in to Provisioning and select your company instance.2. In Edit Company Settings, choose Company Settings .3. Enable Clock In Clock Out.
Results
You’ve enabled SAP SuccessFactors Clock In Clock Out successfully.
Implementing and Using Clock In Clock Out in Time TrackingEnabling SAP SuccessFactors Clock In Clock Out PUBLIC 7

4 Role-Based Permissions for Clock In Clock Out
After enabling Clock In Clock Out, Admins can assign the necessary role-based permissions to users, and set up object-level permissions.
Following table lists all the permissions available for enabling, managing, and using Clock In Clock Out. You can find the permissions for Clock In Clock Out when you create a permission role using Admin Center Manage Permission Roles Manage Roles for Clock In Clock Out .
NoteThe latest role-based permissions for Clock In Clock Out has a new user interface. To know more and to learn about assigning roles, go to the Related Information section.
Table 3: List of role-based permissions for configuring and managing Clock In Clock Out
Solution Component
Who's this permission for? Admin or User
Permission Location Permission Name Result
SAP SuccessFactors Time Tracking
Clock In Clock Out User Clock In Clock Out User Permissions
Access Clock Time Allows you to access Clock Time from the Quick Actions menu on the latest home page.
NoteView Time Events permission is required for the employees to view their recent activities.
SAP SuccessFactors Time Tracking
Clock In Clock Out Admin Manage Clock In Clock Out
Configure Clock In Clock Out
Allows you to access Configure Clock In Clock Out.
Go to Admin
Center ToolsTime Management
Configure Clock
In Clock Out .
8 PUBLICImplementing and Using Clock In Clock Out in Time Tracking
Role-Based Permissions for Clock In Clock Out

Solution Component
Who's this permission for? Admin or User
Permission Location Permission Name Result
SAP SuccessFactors Time Tracking
Clock In Clock Out Admin Manage Clock In Clock Out
View Settings Allows you to view the Settings for Clock In Clock Out.
Go to Admin
Center ToolsConfigure Clock In
Clock Out
Settings .
SAP SuccessFactors Time Tracking
Clock In Clock Out Admin Manage Clock In Clock Out
Edit Settings Allows you to edit the settings for Clock In Clock Out
from Admin
Center ToolsConfigure Clock In
Clock Out
Settings .
SAP SuccessFactors Time Tracking
Clock In Clock Out Admin Manage Clock In Clock Out
View Time Event Types
Allows you to view the Time Event Type from
Admin Center
Tools Configure Clock In Clock Out
Time Event Types and Groups
Time Event
Types .
SAP SuccessFactors Time Tracking
Clock In Clock Out Admin Manage Clock In Clock Out
Create Time Event Types
Allows you to create a Time Event Type from
Admin Center
Tools Configure Clock In Clock Out
Time Event Types and Groups
Time Event
Types .
Implementing and Using Clock In Clock Out in Time TrackingRole-Based Permissions for Clock In Clock Out PUBLIC 9

Solution Component
Who's this permission for? Admin or User
Permission Location Permission Name Result
SAP SuccessFactors Time Tracking
Clock In Clock Out Admin Manage Clock In Clock Out
Modify Time Event Types
Allows you to edit a Time Event Type
from Admin
Center ToolsConfigure Clock In
Clock Out Time Event Types and
Groups Time
Event Types .
SAP SuccessFactors Time Tracking
Clock In Clock Out Admin Manage Clock In Clock Out
Delete Time Event Types
Allows you to delete a Time Event Type from
Admin Center
Tools Configure Clock In Clock Out
Time Event Types and Groups
Time Event
Types .
SAP SuccessFactors Time Tracking
Clock In Clock Out Admin Manage Clock In Clock Out
View Clock In Clock Out Groups
Allows you to view the Clock In Clock Out Groups from
Admin Center
Tools Configure Clock In Clock Out
Time Event Types and Groups
Clock In Clock
Out Groups .
SAP SuccessFactors Time Tracking
Clock In Clock Out Admin Manage Clock In Clock Out
Create Clock In Clock Out Groups
Allows you to create the Clock In Clock Out Groups
from Admin
Center ToolsConfigure Clock In
Clock Out Time Event Types and
Groups Clock In Clock Out
Groups .
10 PUBLICImplementing and Using Clock In Clock Out in Time Tracking
Role-Based Permissions for Clock In Clock Out

Solution Component
Who's this permission for? Admin or User
Permission Location Permission Name Result
SAP SuccessFactors Time Tracking
Clock In Clock Out Admin Manage Clock In Clock Out
Modify Clock In Clock Out Groups
Allows you to edit the Clock In Clock Out Groups from
Admin Center
Tools Configure Clock In Clock Out
Time Event Types and Groups
Clock In Clock
Out Groups .
SAP SuccessFactors Time Tracking
Clock In Clock Out Admin Manage Clock In Clock Out
Delete Clock In Clock Out Groups
Allows you to delete the Clock In Clock Out Groups
from Admin
Center ToolsConfigure Clock In
Clock Out Time Event Types and
Groups Clock In Clock Out
Groups .
SAP SuccessFactors Time Tracking
Clock In Clock Out Admin and User Manage Clock In Clock Out
Manage Clock In Clock Out
Allows you to access the Clock In Clock Out tile from home page.
SAP SuccessFactors Time Tracking
Clock In Clock Out Admin and User Manage Clock In Clock Out
View Time Events Allows you to view Time Events.
SAP SuccessFactors Time Tracking
Clock In Clock Out Admin and User Manage Clock In Clock Out
Create Manual Time Events
Allows you to create Time Events from Manage Clock In Clock Out or Time Sheet.
Implementing and Using Clock In Clock Out in Time TrackingRole-Based Permissions for Clock In Clock Out PUBLIC 11

Solution Component
Who's this permission for? Admin or User
Permission Location Permission Name Result
SAP SuccessFactors Time Tracking
Clock In Clock Out Admin and User Manage Clock In Clock Out
Delete Time Events (Do not use)
This permission is no longer used. To specify the delete permissions, please use the following as per your requirement:
● Delete Time Events created using Terminal
● Delete Time Events created manually
● Delete Time Events created using Clock Time
SAP SuccessFactors Time Tracking
Clock In Clock Out Admin and User Manage Clock In Clock Out
Delete Time Events created using Terminal
Allows you to delete Time Events created using a Terminal.
SAP SuccessFactors Time Tracking
Clock In Clock Out Admin and User Manage Clock In Clock Out
Delete Time Events created manually
Allows you to delete Time Events created using Manage Clock In Clock Out or Time Sheet
SAP SuccessFactors Time Tracking
Clock In Clock Out Admin and User Manage Clock In Clock Out
Delete Time Events created using Clock Time
Allows you to delete Time Events created using Clock Time.
Time Management Object Permissions
Table 4: List of role-based permissions for enabling Time Management Object Permissions for Clock In Clock Out
Solution Component
Who's this permission for? Admin or User
Permission Location Permission Name Result
SAP SuccessFactors Time Tracking
Clock In Clock Out Admin Time Management Object Permissions
Clock In Clock Out Employee Full Synchronization Details
Allows you to view and modify the Clock In Clock Out Employee Full Synchronization Details object.
12 PUBLICImplementing and Using Clock In Clock Out in Time Tracking
Role-Based Permissions for Clock In Clock Out

Solution Component
Who's this permission for? Admin or User
Permission Location Permission Name Result
SAP SuccessFactors Time Tracking
Clock In Clock Out Admin Time Management Object Permissions
Clock In Clock Out Time Type Derivation Configuration
Allows you to view and modify the Clock In Clock Out Time Type Derivation Configuration object.
SAP SuccessFactors Time Tracking
Clock In Clock Out Admin Time Management Object Permissions
Synchronized Clock In Clock Out Group
Allows you to view the Synchronized Clock In Clock Out Group object.
SAP SuccessFactors Time Tracking
Clock In Clock Out Admin Time Management Object Permissions
Synchronized Time Event Type
Allows you to view the Synchronized Time Event Type object.
SAP SuccessFactors Time Tracking
Clock In Clock Out Admin Time Management Object Permissions
Manual Time Event Allows you to view and modify the Manual Time Event object.
SAP SuccessFactors Time Tracking
Clock In Clock Out Admin Time Management Object Permissions
Reason for Manual Time Event
Allows you to view and modify the Reason for Manual Time Event object.
SAP SuccessFactors Time Tracking
Clock In Clock Out Admin Check Tool Allow Check Tool Allows users to access the tool.
SAP SuccessFactors Time Tracking
Clock In Clock Out Admin Check Tool Allow Configuration Export
Allows users to attach configuration information to a ticket.
SAP SuccessFactors Time Tracking
Clock In Clock Out Admin Check Tool Allow Check Tool Quick Fix
Allows users to run the quick fix.
Effective Dated Entities
To enable the Clock In Clock Out Group in the Employee Central Job Information page, enable the Clock in Clock Out Group with relevant permissions under Employee Central Effective Dated Entities.
Related Information
The Latest Role-Based Permissions for Clock In Clock OutEnabling Clock In Clock Out Group in Job Information [page 23]Execute Employee Full Synchronization Details Object [page 27]Configuring Time Type Derivation [page 21]
Implementing and Using Clock In Clock Out in Time TrackingRole-Based Permissions for Clock In Clock Out PUBLIC 13

5 Creating Time Event Types
Create Time Event Types to identify the employee's activities like the start of work, that you can refer to as "clock in" or the end of work, that you can refer to as "clock out". Similarly there can be activities like "lunch", "break", "client meeting", and so on.
Prerequisites
● Enable the Configure Clock In Clock Out permission to see the Configure Clock In Clock Out page.● Enable the Create Time Event Types permission.● To edit and delete time event types, enable Edit Time Event Types and Delete Time Event Types
permissions.
Context
Create the time event types to capture the different employee activities, which constitute the time events. For example, to record the activity of employees entering their workplace, you can create "Clock In" or "In" as the time event type. You can also set up the time event types like "in", "out", "start break", "end break", "start lunch", "end lunch", and so on; depending on your business needs to implement Clock In Clock Out for your organization.
Procedure
1. Go to Admin Center Time Management Configure Clock In Clock Out , and choose Time Event Types and Groups.
You are on the Time Event Types and Groups page.2. Go to Time Event Types and choose Create.3. In the Create Time Event Type page, create the Time Event Type as follows:
In this field... Enter or choose...
Code This is a unique code based on what is configured in Employee Central. It can be an alphanumeric code, for example, P10, P20, P30.
14 PUBLICImplementing and Using Clock In Clock Out in Time Tracking
Creating Time Event Types

In this field... Enter or choose...
NoteIf this code is already in use for an existing time event type, then you can’t create a time event type using the same code. On selecting Create, you get an error.
Title The name for the time event type based on your requirement. For example, "In" or "Clock In", "Out" or "Clock Out", "Lunch", "Break", and so on.
Description The description of each Time Event Type. This field is for your reference. Provide the description to differentiate between various time event types.
Event Start or Stop to denote the impact of the activity.
NoteTo indicate that the employee is starting one activity, choose Start and to indicate that the employee's activity is halted or completed, choose Stop. Also, a start activity will stop the preceding activity.
Status Active is set by default. Active means that the time event type is in use. Choose Inactive, if you want to stop the use of this time event type.
4. Choose Create.
The Time Event Types and Groups page appears with a confirmation message that the time event type is created.
Results
You’ve created a Time Event Type. You can view the created time event types. You can also edit and delete the existing time event types, by choosing the corresponding (Edit) and (Delete) options respectively.
● Edit allows you to:○ rename the Time Event Type○ update its description○ update the Event○ change the status of the Time Event Type
● Delete to remove a Time Event Type, which is no longer needed or has an incorrect or outdated code. You can't delete a time event type if it is in use by a time event or a Clock In Clock Out Group.
Related Information
Appendix for Concepts of Time Tracking in Clock In Clock Out [page 44]
Implementing and Using Clock In Clock Out in Time TrackingCreating Time Event Types PUBLIC 15

Role-Based Permissions for Clock In Clock Out [page 8]
16 PUBLICImplementing and Using Clock In Clock Out in Time Tracking
Creating Time Event Types

6 Creating Clock In Clock Out Groups
Create Clock In Clock Out Groups so that you can add the employees to specific groups. Clock In Clock Out Groups is the combination of Time Event Types that can be used for the employees assigned to this group.
Prerequisites
● Enable the Configure Clock In Clock Out permission to see the Configure Clock In Clock Out page.● Enable the Create Clock In Clock Out Groups permission.● To edit and delete clock in clock out groups, enable Edit Clock In Clock Out Groups and Delete Clock In
Clock Out Groups permissions.
Context
Clock In Clock Out Groups is the combinations of Time Event Types and employees are assigned to these groups based on their designation, assignment, and responsibility. For example, one group has permission to the Time Event Types In, Out, and Lunch, and another group has permission to In, Out, Lunch, and Business Trip. Create the Clock In Clock Out Groups and assign employees to them.
Procedure
1. Go to Admin Center Time Management Configure Clock In Clock Out , and choose Time Event Types and Groups.
You're on the Time Event Types and Groups page.2. Go to Clock In Clock Out Groups and choose Create.
Create Clock In Clock Out Group window appears.3. Define the group you want to create.
In this field... Enter or choose...
Code A unique code of your choice for the Clock In Clock Out Group. It can be an alphanumeric code. For example, TEMP1, TEMP 2, PERM1, SHIFT1.
NoteYou can’t reuse a clock in clock out group code. Each code must be unique. Otherwise, you get an error.
Implementing and Using Clock In Clock Out in Time TrackingCreating Clock In Clock Out Groups PUBLIC 17

In this field... Enter or choose...
Title The name of the group so that you can identify the group easily.
Time Event Type The Time Event Types that belonged to this Clock In Clock Out Group.
4. Choose Create.
The Time Event Types and Groups page appears with a confirmation message that the Clock In Clock Out Group is created.
Results
You've created the Clock In Clock Out Groups. You can add employees to these groups. You can also edit and delete the existing Clock In Clock Out Groups, by choosing the corresponding (Edit) and (Delete) options.
● Edit to update Time Event Types or the Title of the Clock In Clock Out Group.● Delete the groups, which are no longer in use. You can't delete Clock In Clock Out Groups that are assigned
to one or more employees.
Related Information
Appendix for Concepts of Time Tracking in Clock In Clock Out [page 44]Role-Based Permissions for Clock In Clock Out [page 8]
18 PUBLICImplementing and Using Clock In Clock Out in Time Tracking
Creating Clock In Clock Out Groups

7 Clock In Clock Out Settings
Clock In Clock Out Settings page allows you to manage the various aspects of Time Events and also enable the Workflow Process.
Prerequisites
● Enable the Configure Clock In Clock Out permission to see the Configure Clock In Clock Out page.● Enable View Settings and Edit Settings permissions.
Context
The Settings page allows you to edit the settings for the following:
● Time Events Pairing● Overdue Time Events● Workflow Process● Time Events Creation
Procedure
1. Go to Admin Center Time Management Configure Clock In Clock Out Settings .2. On the Settings page, choose Edit to modify these Clock In Clock Out settings:
In this field... Enter or choose...
Time Events Pairing Select this option to enable pairing of time events of the same time event type. For example, when you enable this setting, two time events of the same time event type that are recorded one after the other are paired together to form a Time Event pair.
NoteIf this option is not selected, the pairing will not happen and is highlighted as an error on the Manage Clock In Clock Out page and the Time Sheet UI.
Overdue Time Events Set the duration after which a time event of the time event type Start that has failed to pair with a valid time event is
Implementing and Using Clock In Clock Out in Time TrackingClock In Clock Out Settings PUBLIC 19
In this field... Enter or choose...
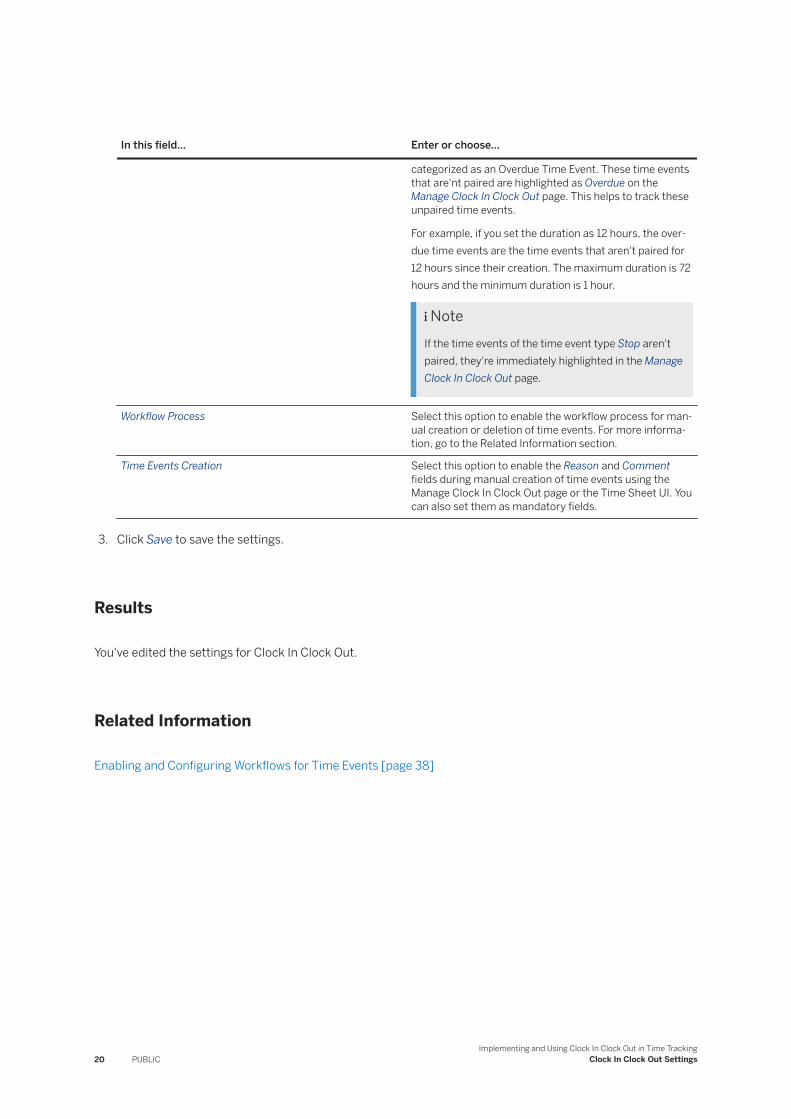
categorized as an Overdue Time Event. These time events that are'nt paired are highlighted as Overdue on the Manage Clock In Clock Out page. This helps to track these unpaired time events.
For example, if you set the duration as 12 hours, the overdue time events are the time events that aren't paired for 12 hours since their creation. The maximum duration is 72 hours and the minimum duration is 1 hour.
NoteIf the time events of the time event type Stop aren't paired, they're immediately highlighted in the Manage Clock In Clock Out page.
Workflow Process Select this option to enable the workflow process for manual creation or deletion of time events. For more information, go to the Related Information section.
Time Events Creation Select this option to enable the Reason and Comment fields during manual creation of time events using the Manage Clock In Clock Out page or the Time Sheet UI. You can also set them as mandatory fields.
3. Click Save to save the settings.
Results
You've edited the settings for Clock In Clock Out.
Related Information
Enabling and Configuring Workflows for Time Events [page 38]
20 PUBLICImplementing and Using Clock In Clock Out in Time Tracking
Clock In Clock Out Settings

8 Configuring Time Type Derivation
To define the Time Type that is used for pairing of time events, you can configure the Clock In Clock Out Time Type Derivation Configuration object.
Prerequisites
● Enable permissions to view and edit for Clock In Clock Out Time Type Derivation Configuration in Manage Permission Roles Time Management Object Permissions .
● Ensure you have configured Time Event Types.
Context
You can derive a specific time type for the pairing of time events. For example, a time event pair with starting time event type Break is mapped with Time Type Break. Whenever two time events are paired in Clock In Clock Out, the corresponding time event pair is saved as external time data in Employee Central. This is an optional step and if not configured, all the external time data created from Clock In Clock Out will use the Default Import Attendance Time Type defined in the Time Profile of the employee.
NoteCreate this MDF object with the external code: TIME_TYPE_DERIVATION_CONFIG.
Procedure
1. Go to Admin Center Tools Manage Data .2. On the Manage Data page, go to the Create New section and enter Clock In Clock Out Time Type Derivation
Configuration.3. In the screen to create the object, use this table to provide the values:
In this field... Enter or choose...
External Code TIME_TYPE_DERIVATION_CONFIG.
Time Event Type The Time Event Type that is used in the start event of the time event pair. Based on this time event type the corresponding Time Type is derived. If you leave it blank, this setting will be used for all the time event pairs, which don't find a matching time event type.
Implementing and Using Clock In Clock Out in Time TrackingConfiguring Time Type Derivation PUBLIC 21

In this field... Enter or choose...
Time Type The time type that is used in the external time data of the employee, if this time type derivation item matches.
Category The category that is used in the external time data of the employee, if this time type derivation item matches.
NoteYou only need to specify the category if you haven't entered a value in the Time Type field. If you set the value as Attendance, the system uses the Default Import Attendance Time Type from the time profile assigned to the user. If you set the value as Break, the system uses the Main Break Time Type from the time profile assigned to the user.
Note○ If the start event of the time event pair had a time type already set, this time type is always used
regardless of the time type derivation configuration.
○ If no time type can be derived, the Default Import Attendance Time Type from the users Job Information Time Profile will be used.
4. Choose Save. You’ve now configured the Time Type derivation.
Results
You have saved default Time Types for specific time events. You can set more derivation rules as per your requirements.
22 PUBLICImplementing and Using Clock In Clock Out in Time Tracking
Configuring Time Type Derivation

9 Enabling Clock In Clock Out Group in Job Information
To add the employees to the specific Clock In Clock Out Group, you have to assign Clock In Clock Out Group for Job Information in employee's profile.
Prerequisites
Ensure you have permissions for Manage Business Configuration in Manage Permission Roles
Context
Only those employees that are assigned to a Clock In Clock Out Group can record time events. Clock In Clock Out Groups are the combinations of time event types to which employees are assigned based on their designation, assignment, and responsibility. For example, one group can access the time event types "In", "Out", and "Lunch" while another group can access "In", "Out", "Lunch", and "Business Trip". Once you’ve configured the Clock In Clock Out Groups, you can add employees to them.
Procedure
1. Go to Admin Center Tools Manage Business Configuration .2. From the HRIS Elements section, select jobInfo. Enter the values for the fields as explained:
In this field... Choose...
Identifier time-event-type-group-id from the dropdown.
Label Enter any name for this field. Clock In Clock Out Group is entered by default. This name appears on the Job Information where you want to assign the Clock In Clock Out Group.
Section Time Information option of job information.
Enabled Yes to assign Clock In Clock Out Group in Job Information.
NoteIf you have configured Configure New Person Type and there is a jobInfo_employee entry, ensure to set the time-event-type-group-id entry in jobInfo_employee and jobInfo.
Implementing and Using Clock In Clock Out in Time TrackingEnabling Clock In Clock Out Group in Job Information PUBLIC 23

Results
You've added Clock In Clock Out Group in Job Information.
Next Steps
Enable the user permission for Clock In Clock Out Group in Manage Permission Roles Employee Central Effective Dated Entities Job Information .
Related Information
Role-Based Permissions for Clock In Clock Out [page 8]Creating Clock In Clock Out Groups [page 17]Adding Employees to Clock In Clock Out Groups [page 25]
24 PUBLICImplementing and Using Clock In Clock Out in Time Tracking
Enabling Clock In Clock Out Group in Job Information

10 Adding Employees to Clock In Clock Out Groups
As a manager or a Human Resource administrator, you can add the employees to Clock In Clock Out. These employees can use Clock In Clock out with the defined Time Event Types of their assigned Clock In Clock Out Group.
Prerequisites
● Ensure you’ve enabled the View permission for Synchronized Clock In Clock Out Group under Time Management Object Permissions.
● Ensure you’ve enabled the Edit permission for Clock In Clock Out Group under Employee Central Effective Dated Entities Job Information .
Context
Clock In Clock Out Groups are the combinations of Time Event Types to which employees are assigned based on their designation, assignment, and responsibility. After you’ve configured the Clock In Clock Out Groups, you can assign employees to these groups.
Employees are hired or moved to new roles based on their assignments. Therefore, you add employees to the specific Clock In Clock Out Groups often.
Adding each employee takes a lot of time when you already have a group of employees. Follow the instructions of Managing Mass Changes topic to add the entire group to Clock In Clock Out in one go.
Procedure
1. Search for an existing employee.
The employee's profile appears.
2. Go to Employment Information Job Information .3. Choose Edit Job Information. Fill in the date for the field When would you like your changes to take effect?.
The date must be either same as or later than the first Job Information creation date.4. Go to Time Information and choose Clock In Clock Out Group.5. Choose a positive time recording profile from the Time Recording Profile list. If you select any other value,
the external time data processing fails. For more information, read Adjusting Time Recording Profiles from the Related Information section.
Implementing and Using Clock In Clock Out in Time TrackingAdding Employees to Clock In Clock Out Groups PUBLIC 25
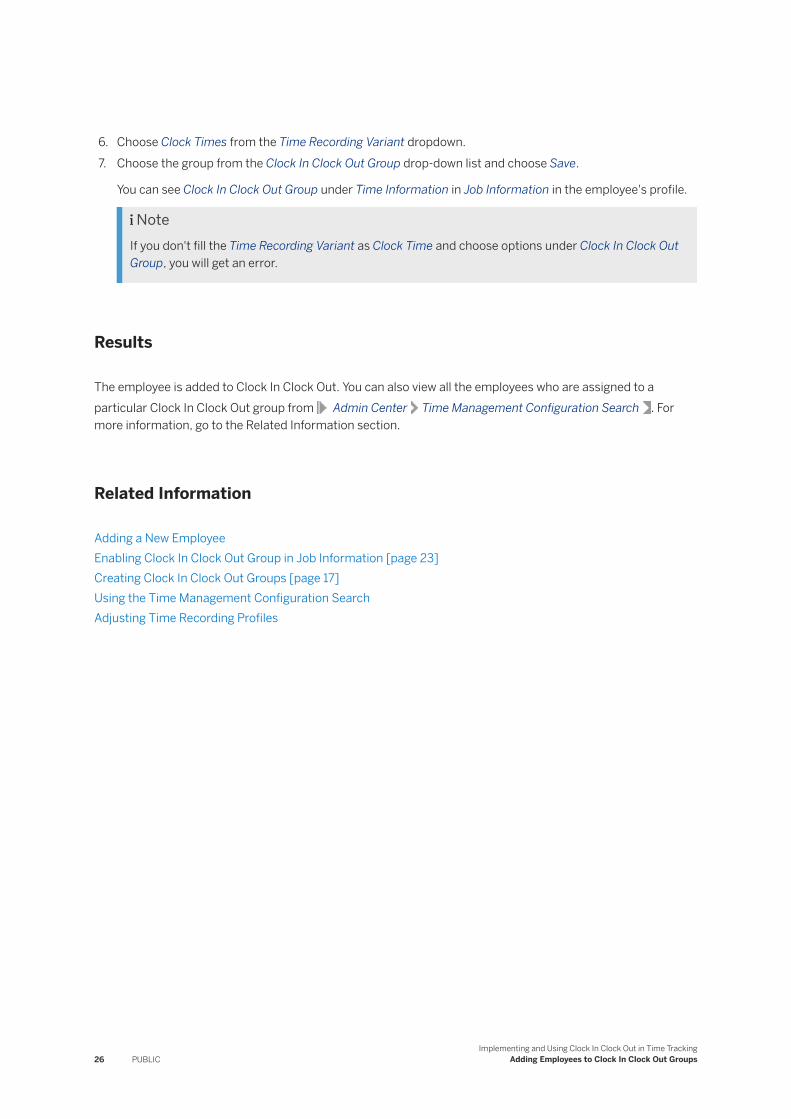
6. Choose Clock Times from the Time Recording Variant dropdown.7. Choose the group from the Clock In Clock Out Group drop-down list and choose Save.
You can see Clock In Clock Out Group under Time Information in Job Information in the employee's profile.
NoteIf you don't fill the Time Recording Variant as Clock Time and choose options under Clock In Clock Out Group, you will get an error.
Results
The employee is added to Clock In Clock Out. You can also view all the employees who are assigned to a particular Clock In Clock Out group from Admin Center Time Management Configuration Search . For more information, go to the Related Information section.
Related Information
Adding a New EmployeeEnabling Clock In Clock Out Group in Job Information [page 23]Creating Clock In Clock Out Groups [page 17]Using the Time Management Configuration SearchAdjusting Time Recording Profiles
26 PUBLICImplementing and Using Clock In Clock Out in Time Tracking
Adding Employees to Clock In Clock Out Groups
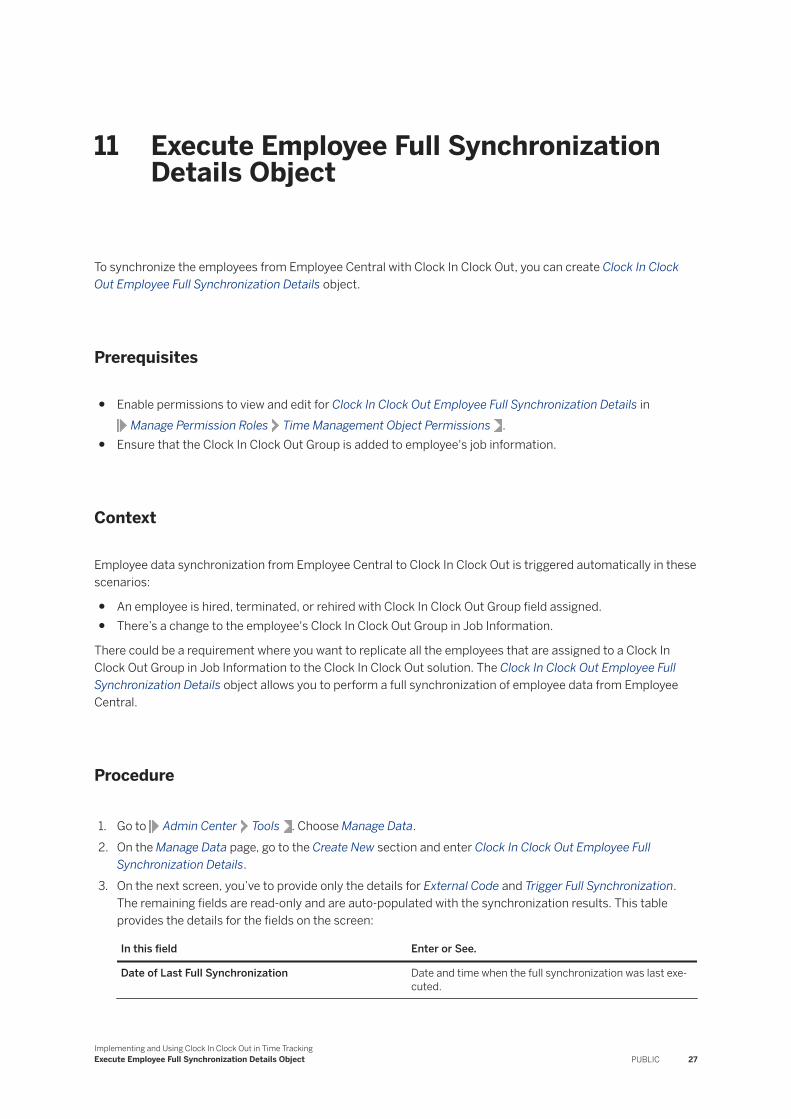
11 Execute Employee Full Synchronization Details Object
To synchronize the employees from Employee Central with Clock In Clock Out, you can create Clock In Clock Out Employee Full Synchronization Details object.
Prerequisites
● Enable permissions to view and edit for Clock In Clock Out Employee Full Synchronization Details in Manage Permission Roles Time Management Object Permissions .
● Ensure that the Clock In Clock Out Group is added to employee's job information.
Context
Employee data synchronization from Employee Central to Clock In Clock Out is triggered automatically in these scenarios:
● An employee is hired, terminated, or rehired with Clock In Clock Out Group field assigned.● There’s a change to the employee's Clock In Clock Out Group in Job Information.
There could be a requirement where you want to replicate all the employees that are assigned to a Clock In Clock Out Group in Job Information to the Clock In Clock Out solution. The Clock In Clock Out Employee Full Synchronization Details object allows you to perform a full synchronization of employee data from Employee Central.
Procedure
1. Go to Admin Center Tools . Choose Manage Data.2. On the Manage Data page, go to the Create New section and enter Clock In Clock Out Employee Full
Synchronization Details.3. On the next screen, you’ve to provide only the details for External Code and Trigger Full Synchronization.
The remaining fields are read-only and are auto-populated with the synchronization results. This table provides the details for the fields on the screen:
In this field Enter or See.
Date of Last Full Synchronization Date and time when the full synchronization was last executed.
Implementing and Using Clock In Clock Out in Time TrackingExecute Employee Full Synchronization Details Object PUBLIC 27

In this field Enter or See.
Last Synchronization Success Yes or No based on whether the last synchronization was successful.
Number of Employees Synchronized Number of employees who are synchronized in the last successful full synchronization run. This number can differ from the currently replicated employees in Clock In Clock Out as employees are replicated automatically when any change happens in an employee's job information resulting in updates to the Clock In Clock Out process.
Error Details Error message if the last job run wasn’t successful.
External Code (Required) Enter EMPLOYEE_SYNC_CONFIGURATION.
Trigger Full Synchronization Choose Yes if you want to synchronize all employees who are assigned to a Clock In Clock Out Group with the Clock In Clock Out system.
NoteIf you choose Yes, the system deletes and re-creates previously synchronized employee data in Clock In Clock Out. Choose Yes, if there are discrepancies in data between Employee Central and Clock In Clock Out.
This action is asynchronous, and you'll see the results in this object after the synchronization is complete and after you've refreshed the page. After the save of this object, this field is automatically set to No.
4. Choose Save to save the Clock In Clock Out Employee Full Synchronization Details object.
Results
You’ve created Clock In Clock Out Employee Full Synchronization Details object. Use this object to execute the full synchronization. This task helps in synchronizing the employee information from Employee Central with Clock In Clock Out.
Whenever you add, remove, or update the Clock In Clock Out Group information in Job Information of the employees in Employee Central, the employee data is synchronized automatically to Clock In Clock Out. Prior to this release, you had to wait for the Synchronize Clock In Clock Out Employee Data job in Provisioning to run so that the synchronization would complete and the employee data becomes available for Clock In Clock Out activities. However, this automatic synchronization of employee data does not work when Global Assignment or Concurrent Employment is added to the job information of the Clock In Clock Out employee. In such scenarios, we recommend you perform a full synchronization of employee data from Employee Central. You should also run a full synchronization whenever there is a change to the employee name in Employee Central that has been replicated to Clock In Clock Out.
28 PUBLICImplementing and Using Clock In Clock Out in Time Tracking
Execute Employee Full Synchronization Details Object

NoteTo find any inconsistencies in the replicated Clock In Clock Out employee data, you can run the Check Tool check Clock In Clock Out employees are synchronized under Clock In Clock Out Employee Synchronization .
Related Information
Using the Check Tool
Implementing and Using Clock In Clock Out in Time TrackingExecute Employee Full Synchronization Details Object PUBLIC 29

12 Clock Time via Web and Mobile
Employees can clock their time using Web and Mobile through the SuccessFactors application.
Prerequisites
● Ensure you have configured Time Event Types and Clock In Clock Out Groups in Configure Clock In Clock Out page.
● Ensure that the employees are assigned to the respective Clock In Clock Out Groups. When recording their time, employees can view only those Time Event Types that are configured with their associated Clock In Clock Out Group.
Context
Employees can record their time events using the Quick Action for Clock Time on the Latest Home Page.
Procedure
1. Provide the Access Clock Time permission to a set of employees that are part of a Clock In Clock Out Group. On having the Access Clock Time permission, employees can view the Clock Time Quick Action on both Web and Mobile.
NoteThe Clock Time quick action cannot be restricted to either Web or Mobile. On having the permission, the quick action is available in both Web and Mobile.
2. Ensure that the View Time Events permission is provided to those employees who will clock time via Web and Mobile, so that the employees can view their recently recorded time events in the Recent Activity section on Web and Mobile. View Time Events permission also makes the Time Events section visible for the employees in the Time Sheet UI.
30 PUBLICImplementing and Using Clock In Clock Out in Time Tracking
Clock Time via Web and Mobile

13 Validating the Paired Time Events as Recorded Time in the Time Sheet
Verify the employee's paired time events in the Time Sheet UI to ensure that Clock In Clock Out is configured properly and working as expected.
Context
When Clock In Clock Out is implemented, the time event pairs are sent to the Time Sheet as external time data. However, to configure Clock In Clock Out based on your requirement, you need to follow all the steps of implementation.
Procedure
1. Go to the employee's Time Sheet.2. Check the paired time events on the specified date on which the events have been entered on employee's
Time Sheet.
Results
The employee's clocked time is visible on the Time Sheet. For example, if the employee has clocked in at 11 AM and clocked out at 6 PM, the Time Sheet reflects 7 hours.
Implementing and Using Clock In Clock Out in Time TrackingValidating the Paired Time Events as Recorded Time in the Time Sheet PUBLIC 31

14 Creating Manual Time Events
Administrators or Managers can create manual time events using the Manage Clock In Clock Out page when the Clock In Clock Out employees fail to record their time events.
Prerequisites
● Ensure you have permissions for Manage Clock In Clock Out to view the Clock In Clock Out page.● Ensure you have permissions to View Time Events and Create Manual Time Events.● Ensure that the Target Population is chosen for your employees for View Time Events and Create Time
Events permissions.
Context
Create a manual time event in the following scenarios:
NoteAs an employee, you can create manual time events using the Time Sheet UI. For more information, go to the Related Information section.
● When there’s an issue with the terminal and the employees are unable to clock in or clock out.● When the employee failed to swipe at the terminal for clock in or clock out.
Procedure
1. Go to the home page and choose Clock In Clock Out.2. On the Clock In Clock Out page, click Create.3. Alternately, you can also search the time event for an employee by entering the Employee Name, From Date
and Time, and To Date and Time details. Ensure that the time event you’re creating doesn't already exist in the system.
4. In the Create Time Event window, provide the details as follows:
In this field... Enter or choose...
Employee The name of the employee.
Time Event Type The time event types from the available drop-down list. This defines the start or stop activity for the employee.
32 PUBLICImplementing and Using Clock In Clock Out in Time Tracking
Creating Manual Time Events

In this field... Enter or choose...
NoteThe list includes all the time event types that were created while implementing Clock In Clock Out. It may include time event types that you do not have permissions to use.
Date and Time Date and time of the time event.
Time Offset An amount of time subtracted from or added to Coordinated Universal Time (UTC) time to get the current civil time, whether it's standard time or Daylight Saving Time (DST).
Reason A reason for you to create this manual time event. The reasons in the drop-down list are those defined in the Reason for Manual Time Event MDF object. The Reason field can be enabled and set as mandatory from Clock In Clock Out Settings. For more information, go to the Related Information section.
Comment Enter a comment to provide additional details as to why you’re creating the time event. The Comment field can be enabled and set as mandatory from Clock In Clock Out Settings.
5. Choose Create.
The time event is created. A confirmation message appears. If this time event already exists, you see an error. The time events created by you can be viewed on the Manage Clock In Clock Out page, the Time Sheet UI, and the Clock Time quick action on the latest home page. All time events that you create using the Manage Clock In Clock Out page or the Time Sheet UI are saved with the Entry Type as Manual. These manual time events can trigger a workflow if configured.
Results
You’ve created the time event. You can also delete the existing time events by choosing the corresponding (Delete) option.
Related Information
Managing Time Events Using the New Time Sheet UIRole-Based Permissions for Clock In Clock Out [page 8]Enabling Reason for Manual Time Event [page 34]
Implementing and Using Clock In Clock Out in Time TrackingCreating Manual Time Events PUBLIC 33
14.1 Enabling Reason for Manual Time Event
The Reason for Manual Time Event object allows you to define the reasons for creating a manual time event.
Context
The Reason for Manual Time Event object should be first configured via Object Definition for it to be available in Manage Permission Roles. You can then enable this in Clock In Clock Out Settings, so that employees can enter a reason when creating a manual time event.
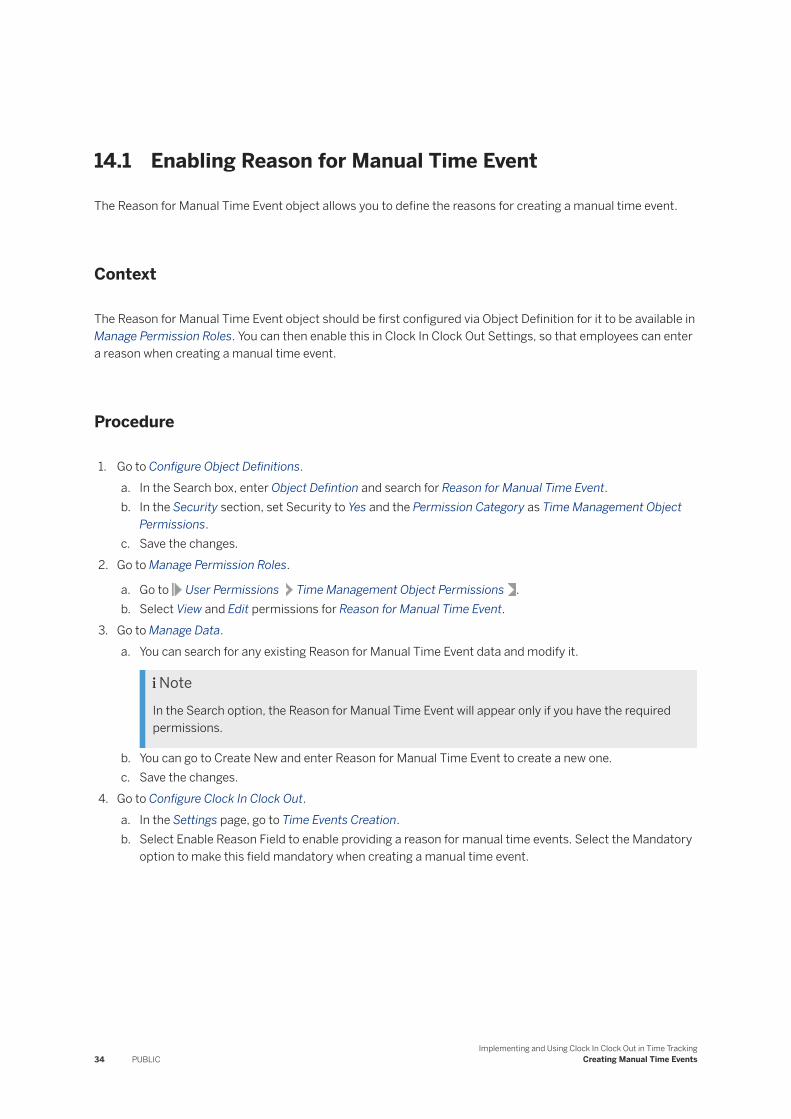
Procedure
1. Go to Configure Object Definitions.a. In the Search box, enter Object Defintion and search for Reason for Manual Time Event.b. In the Security section, set Security to Yes and the Permission Category as Time Management Object
Permissions.c. Save the changes.
2. Go to Manage Permission Roles.
a. Go to User Permissions Time Management Object Permissions .b. Select View and Edit permissions for Reason for Manual Time Event.
3. Go to Manage Data.a. You can search for any existing Reason for Manual Time Event data and modify it.
NoteIn the Search option, the Reason for Manual Time Event will appear only if you have the required permissions.
b. You can go to Create New and enter Reason for Manual Time Event to create a new one.c. Save the changes.
4. Go to Configure Clock In Clock Out.a. In the Settings page, go to Time Events Creation.b. Select Enable Reason Field to enable providing a reason for manual time events. Select the Mandatory
option to make this field mandatory when creating a manual time event.
34 PUBLICImplementing and Using Clock In Clock Out in Time Tracking
Creating Manual Time Events

15 Reviewing Time Events
You can review Time Events in the Clock In Clock Out page to validate that the time events are correctly paired and reflects the correct time data on the Time Sheet.
Prerequisites
● Ensure you have permissions for Manage Clock In Clock Out to view the Clock In Clock Out page, and permission for View Time Events.
● Your employees are assigned to the Clock In Clock Out Groups.
Context
There are a number of use cases to validate the time events:
● To verify if the employees have logged in at the assigned hour.● To check for employees who haven't logged in for the day and are supposed to be at work.● To check and validate the duration of work for an employee, when the employee is actually clocking in and
clocking out.
Procedure
1. Go to the Action search field and enter Manage Clock In Clock Out.2. On the Clock In Clock Out page, you can use these filters to view the time events for the employees. Use
Adapt Filters to customize these filtering options:
In this field... Choose...
Validation Status Filter based on the validation status.○ Success View the time events that are validated suc
cessfully.○ Error View the time events that aren’t successfully va
lidated.○ All View all the time events.
Pairing Status Filter based on the pairing status.○ Paired if you want to see the paired time events.○ Not Paired if you want to see the time events that
aren't paired.○ All if you want to see all the time events.
Implementing and Using Clock In Clock Out in Time TrackingReviewing Time Events PUBLIC 35

In this field... Choose...
Employee Look up the name of the employee for whom you want to view the time events.
From Date and Time Choose the date and time from when you want to view the employee's time events.
To Date and Time Choose the date and time until which you want to view the employee's time events.
Time Event Type Filter based on the Time Event Type that was used in the time event.
Approval Status The time event approval status. You can filter based on these values:○ All - Lists all the time events.○ Approved - Lists only the approved time events.○ Cancelled - Lists only the cancelled time events.○ Declined - Lists only the declined time events.○ Pending - Lists only the time events for which a work
flow is triggered and an action is yet to be taken.○ Pending Deletion - Lists only the approved time
events that are set for deletion and a workflow is triggered for the same.
3. Select Go to execute the filters. You can see the results with these fields. You can use the settings option on this page to set the fields you want to view on the results page.
In this field... See...
Employee Name The name of the employee.
Time Event Type The Time Event Type used while creating the time event. For example, clock in or in, clock out or out, break, lunch, business trip and so on.
Date and Time The date and time when the time event occurred.
Time Offset The time in relevance to UTC time.
Validation Status If a time event is valid or not. For example, if this time event is by a valid Clock In Clock Out employee, the recorded time event type exists and is part of a Clock In Clock Out Group, and so on.
Pairing Status Indicates if a time event is paired or not. If you see an entry as Not Paired, you can read the Error Details and then take an action accordingly for the time event.
Error Details Detailed message explaining why a time event needs attention. There could be a validation error about pairing or messages indicating how long a time event isn't paired.
Scenarios for pairing errors:○ A time event can't be paired with the next time event
if they’re recorded within the same minute. For exam
36 PUBLICImplementing and Using Clock In Clock Out in Time Tracking
Reviewing Time Events
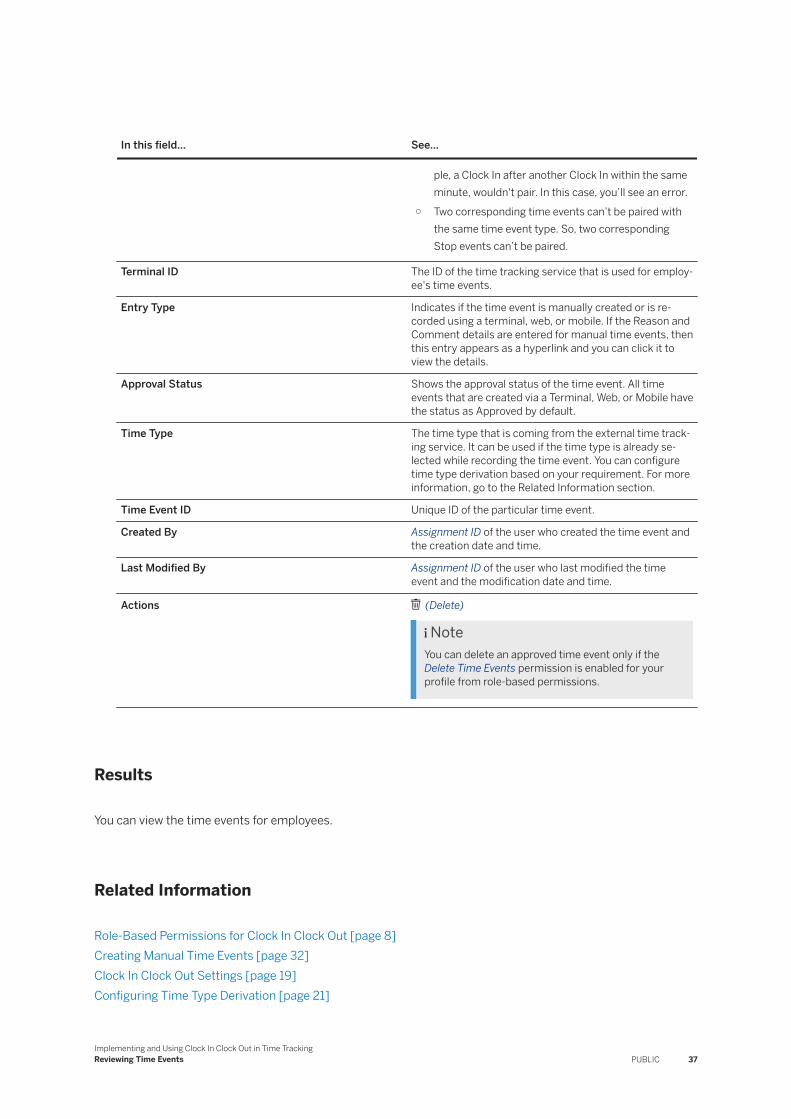
In this field... See...
ple, a Clock In after another Clock In within the same minute, wouldn't pair. In this case, you’ll see an error.
○ Two corresponding time events can’t be paired with the same time event type. So, two corresponding Stop events can’t be paired.
Terminal ID The ID of the time tracking service that is used for employee's time events.
Entry Type Indicates if the time event is manually created or is recorded using a terminal, web, or mobile. If the Reason and Comment details are entered for manual time events, then this entry appears as a hyperlink and you can click it to view the details.
Approval Status Shows the approval status of the time event. All time events that are created via a Terminal, Web, or Mobile have the status as Approved by default.
Time Type The time type that is coming from the external time tracking service. It can be used if the time type is already selected while recording the time event. You can configure time type derivation based on your requirement. For more information, go to the Related Information section.
Time Event ID Unique ID of the particular time event.
Created By Assignment ID of the user who created the time event and the creation date and time.
Last Modified By Assignment ID of the user who last modified the time event and the modification date and time.
Actions (Delete)
NoteYou can delete an approved time event only if the Delete Time Events permission is enabled for your profile from role-based permissions.
Results
You can view the time events for employees.
Related Information
Role-Based Permissions for Clock In Clock Out [page 8]Creating Manual Time Events [page 32]Clock In Clock Out Settings [page 19]Configuring Time Type Derivation [page 21]
Implementing and Using Clock In Clock Out in Time TrackingReviewing Time Events PUBLIC 37

16 Enabling and Configuring Workflows for Time Events
You can trigger workflows for managing manually created time events and for deletion of any time event in Clock In Clock Out.
Context
Usually, an employee records time events by means of a physical terminal or a web or mobile application. In these scenarios, the employee can’t specify the date and time as the time event is recorded the moment there’s a swipe or a clock in done by the employee. We don’t need a workflow in these scenarios.
However, there could be circumstances where the employee couldn’t record the time event. This could be because of issues like a broken terminal, or forgot to swipe in when coming into work. In these situations, the employee or the administrator has to create a manual time event so that time events can be paired and the time recording can happen. These manual time events can be configured to trigger a workflow for approval.
You can also trigger workflows for deletion of a time event. Let us consider a scenario, where an employee clocks out twice by mistake. Now, one of the clock out actions will remain unpaired and can be deleted.
Procedure
1. Ensure to enable Workflow Process. Go to Configure Clock In Clock Out Settings Workflow ProcessEnable Workflow Process for manual creation or deletion of Time Events . This doesn’t trigger workflows for time events, but it allows you to trigger workflows for time events if necessary.
2. Create workflows that you want to trigger for manual creation or deletion of time events. Go to Admin Center Manage Organization, Pay and Job Structures Create Workflow . For more details, go to the Related Information section.
3. Define a business rule to trigger the workflows. Go to Admin Center Configure Business Rules Create New Rule and select Metadata Framework. Set the Rules for MDF Based Objects with the Base Object as Manual Time Event and the Purpose as Workflow. For more details, go to the Related Information section.
4. Assign the business rule created in the previous step to Save Rules. Go to Admin Center Configure Object Definitions Object Definition Manual Time Event MDF object. Anytime you create a manual time event or delete a time event, the MDF object executes this business rule.
38 PUBLICImplementing and Using Clock In Clock Out in Time Tracking
Enabling and Configuring Workflows for Time Events

Results
You can now trigger workflows for manual creation or deletion of time events.
Related Information
Creating an Individual WorkflowCreating Business RulesWorkflow for Time Events [page 39]
16.1 Workflow for Time Events
You can trigger workflows for manual creation or deletion of time events. All the time events that are created via Terminal, Web, or Mobile won’t trigger a workflow and will have the Approval Status as Approved by default.
You can define a workflow for approving a time event. This image provides an overview of all the states that a time event can go through during its approval process:
● 1 - No workflow is triggered for the creation of the manual time event. The manual time event is approved automatically and goes to the Approved status.
● 2 - A workflow is triggered for the creation of manual time event. The manual time event goes to Pending status.
● 3 - The approver declines the workflow for the manual time event that is in Pending status. The manual time event status changes to Declined.
● 4 - The employee cancels the workflow for the manual time event that is in Pending status. The manual time event status changes to Cancelled.
NoteA time event that is in Cancelled or in Declined status can’t be deleted. They can only be purged from the system.
Implementing and Using Clock In Clock Out in Time TrackingEnabling and Configuring Workflows for Time Events PUBLIC 39

● 5 - The approver approves the workflow for the manual time event that is in Pending status. The manual time event status changes to Approved.
● 6 - The employee deletes the approved time event and no workflow is triggered. The time event is deleted from the system.
● 7 - The employee deletes the approved time event and a workflow is triggered to approve the deletion. The status of the time event changes to Pending Deletion.
● 8 - The approver declines the workflow for the time event that is in Pending Deletion status or the employee cancels or declines the workflow for the time event that is in Pending Deletion status. The time event status reverts to Approved status for further actions.
● 9 - The approver approves the workflow for the deletion of the time event that is in Pending Deletion status. The time event is deleted from the system.
Using Business Rules to Trigger Workflows
Using a business rule, you can decide if you want to trigger a workflow and also which workflow to trigger based on the If-Condition on Time Event fields. Some of the examples of workflow rules are listed here:
● Triggering the same workflow for any manual creation or deletion of time events. The rule can look as follows:
● Triggering different workflows for manual creation of time events and for deletion of time events that were created via a terminal. The rule can look as follows:
40 PUBLICImplementing and Using Clock In Clock Out in Time Tracking
Enabling and Configuring Workflows for Time Events

● Trigger a workflow only for deletion of time events that are successfully validated and were created on or before the previous working day of the employee. The rule can look as follows:
Related Information
Enabling and Configuring Workflows for Time Events [page 38]
Implementing and Using Clock In Clock Out in Time TrackingEnabling and Configuring Workflows for Time Events PUBLIC 41

17 Check Tool for Clock In Clock Out
Check Tool feature identifies and highlights errors and data inconsistency issues in Clock In Clock Out.
As an administrator, you can check for any data synchronization issues in Clock In Clock Out. The Check Tool for Clock In Clock Out runs on a daily basis to identify any errors or data synchronization issues. You can fix any inconsistencies that you come across using the Quick Fix feature. Currently, these checks are available in Check Tool for the Clock In Clock Out application:
● Time Event Types are synchronized - This check is available under Clock In Clock Out Configuration . The Time Event Types should be replicated to Employee Central. The source is always Clock In Clock Out. Any fix would result in creation, updation, or deletion of Synchronized Time Event Types in Employee Central.
● Clock In Clock Out Groups are synchronized - This check is available under Clock In Clock OutConfiguration . The Clock In Clock Out Groups should be replicated to Employee Central. The source is always Clock In Clock Out. Any fix would result in creation, updation, or deletion of Synchronized Clock In Clock Out Groups in Employee Central.
● Clock In Clock Out Employees are synchronized - This check is available under Clock In Clock OutEmployee Synchronization . The Clock In Clock Out Employees from Employee Central should be replicated to Clock In Clock Out. The source is always Employee Central. Any fix would result in creation, updation, or deletion of employees in Clock In Clock Out.
Related Information
Using the Check Tool
42 PUBLICImplementing and Using Clock In Clock Out in Time Tracking
Check Tool for Clock In Clock Out

18 Data Privacy in Clock In Clock Out
SAP SuccessFactors Clock In Clock Out stores the time events for an employee that is created manually using the Manage Clock In Clock Out page or the time events recorded via a Terminal, Web, or Mobile.
Data Purge
Data purge with Data Retention Management (DRTM) allows you to:
● Purge data based on specified retention time - Run a partial purge of specific data, for either active or inactive users, based on a retention time configured for that type of data.
● Audit Purge - Run a purge of all audit data for all users, both active and inactive, based on a different retention time for each type of audit data.
● Full Purge - Run a full purge of inactive users, along with all their data, based on a single, common retention time.
NoteEnsure to enable the DRTM Clock In Clock Out Data Purge permission in Data Retention Management under User Permissions.
For information about purging Clock In Clock Out data, see Setting Up and Using Data Protection and Privacy from the Related Information section.
Change Audit Log
You can store the audit logs of the time events of your employees. All the audit logs created by an employee with relevant permissions are available in the Change Audit Report. Any modification done to an employee's Clock In Clock Out time events is recorded in the Change Audit Report.
NoteThe Workflow status, Reason, and Comments section of a time event is not tracked as part of Change Audit.
Related Information
DRTM Purge Request TypesChange AuditData Included in the DRTM Clock In Clock Out Purge
Implementing and Using Clock In Clock Out in Time TrackingData Privacy in Clock In Clock Out PUBLIC 43

19 Appendix for Concepts of Time Tracking in Clock In Clock Out
There are several Time Tracking concepts used in Clock In Clock Out. Here is the glossary for you to understand them.
Time Concept Definition
Start and Stop event Start Time Event Types are time event types, which the employees use when they’re working on a task in an organization. Examples are clock in, break (paid break), business trip, and so on.
Stop Time Event Types are time event types, which the employees use when they have stopped working on a task in an organization. Examples are clock out, lunch, unpaid lunch, and so on.
A time event pairs if the previous time event is valid, and from event Start. For example, a clock in (Start) pairs with the following clock out (Stop) at the same time with the following break (Start). If a clock in (Start) follows a clock out (Stop), the clock in stays in unpaired status until it’s ended by another Start or Stop.
Clock In The Time Event Type when an employee enters the work building or logs in to work, or starts any activity related to the work assignment. It’s configurable by the administrator. You can set up clock in, break, customer visit, paid break, and log in based on your business requirement.
Clock Out The Time Event Type when an employee exits the work building or logs off from the workstation. It's also configurable by the administrator. You can set up clock out, end of break, end of customer visit, and log out based on your business requirement.
Time event Time postings are recorded in the time tracking systems and provide information about when an employee starts or finishes work-related activity. The work-related activity can be a break, the customer visit, starting work, ending work, and so on.
Time event pairing An employee’s work duration comprises several time events. These time events are interrelated and create pairing relationships. The chronological time events are paired so that the Time Sheet records the correct time information. For example, John takes a break at 2 PM and returns to work at 2:30 PM. The Clock In Clock Out system records two time events for the break and the clock in related to break and pairs them automatically. The Time Sheet captures the paired time events to record John’s break information.
Overdue time events The time events that are waiting to be paired from the time it started. Set a duration after which an unpaired time event is categorized as an overdue time event. You can use the Clock In Clock Out settings to adjust the duration.
Time type The means of distinguishing between the different kinds of possible time entries. Examples include vacation, sick leave, paid time off, and so on.
External time data Time data that is recorded in a third-party time recording system and imported in SAP SuccessFactors Time Tracking.
Time Event Type The different kinds of time events configured in Clock In Clock Out to record employee time events. Examples are clock in, clock out, break, business trip, and so on.
44 PUBLICImplementing and Using Clock In Clock Out in Time Tracking
Appendix for Concepts of Time Tracking in Clock In Clock Out

Time Concept Definition
Clock in clock out group It’s the combination of Time Event Types to which employees are assigned based on their designation, assignment, and responsibility. For example, one group can record the Time Event Types like In, Out, and Lunch, while another group can record In, Out, Lunch, and Business trip.
Terminal A device that allows manual swiping of a badge to track time. Terminal provides information about entry and exit times of employees at their workplace.
Error Details In the Manage Clock In Clock Out page, unpaired time event scenarios are captured in the Error Details column. You can take corrective action, as required.
Related Information
Clock In Clock Out Settings [page 19]
Implementing and Using Clock In Clock Out in Time TrackingAppendix for Concepts of Time Tracking in Clock In Clock Out PUBLIC 45

Important Disclaimers and Legal Information
HyperlinksSome links are classified by an icon and/or a mouseover text. These links provide additional information.About the icons:
● Links with the icon : You are entering a Web site that is not hosted by SAP. By using such links, you agree (unless expressly stated otherwise in your agreements with SAP) to this:
● The content of the linked-to site is not SAP documentation. You may not infer any product claims against SAP based on this information.● SAP does not agree or disagree with the content on the linked-to site, nor does SAP warrant the availability and correctness. SAP shall not be liable for any
damages caused by the use of such content unless damages have been caused by SAP's gross negligence or willful misconduct.
● Links with the icon : You are leaving the documentation for that particular SAP product or service and are entering a SAP-hosted Web site. By using such links, you agree that (unless expressly stated otherwise in your agreements with SAP) you may not infer any product claims against SAP based on this information.
Videos Hosted on External PlatformsSome videos may point to third-party video hosting platforms. SAP cannot guarantee the future availability of videos stored on these platforms. Furthermore, any advertisements or other content hosted on these platforms (for example, suggested videos or by navigating to other videos hosted on the same site), are not within the control or responsibility of SAP.
Beta and Other Experimental FeaturesExperimental features are not part of the officially delivered scope that SAP guarantees for future releases. This means that experimental features may be changed by SAP at any time for any reason without notice. Experimental features are not for productive use. You may not demonstrate, test, examine, evaluate or otherwise use the experimental features in a live operating environment or with data that has not been sufficiently backed up.The purpose of experimental features is to get feedback early on, allowing customers and partners to influence the future product accordingly. By providing your feedback (e.g. in the SAP Community), you accept that intellectual property rights of the contributions or derivative works shall remain the exclusive property of SAP.
Example CodeAny software coding and/or code snippets are examples. They are not for productive use. The example code is only intended to better explain and visualize the syntax and phrasing rules. SAP does not warrant the correctness and completeness of the example code. SAP shall not be liable for errors or damages caused by the use of example code unless damages have been caused by SAP's gross negligence or willful misconduct.
Bias-Free LanguageSAP supports a culture of diversity and inclusion. Whenever possible, we use unbiased language in our documentation to refer to people of all cultures, ethnicities, genders, and abilities.
46 PUBLICImplementing and Using Clock In Clock Out in Time Tracking
Important Disclaimers and Legal Information

Implementing and Using Clock In Clock Out in Time TrackingImportant Disclaimers and Legal Information PUBLIC 47

www.sap.com/contactsap
© 2022 SAP SE or an SAP affiliate company. All rights reserved.
No part of this publication may be reproduced or transmitted in any form or for any purpose without the express permission of SAP SE or an SAP affiliate company. The information contained herein may be changed without prior notice.
Some software products marketed by SAP SE and its distributors contain proprietary software components of other software vendors. National product specifications may vary.
These materials are provided by SAP SE or an SAP affiliate company for informational purposes only, without representation or warranty of any kind, and SAP or its affiliated companies shall not be liable for errors or omissions with respect to the materials. The only warranties for SAP or SAP affiliate company products and services are those that are set forth in the express warranty statements accompanying such products and services, if any. Nothing herein should be construed as constituting an additional warranty.
SAP and other SAP products and services mentioned herein as well as their respective logos are trademarks or registered trademarks of SAP SE (or an SAP affiliate company) in Germany and other countries. All other product and service names mentioned are the trademarks of their respective companies.
Please see https://www.sap.com/about/legal/trademark.html for additional trademark information and notices.
THE BEST RUN