
IEEE 802.1X implementation at Janet-connected organisations
43
Published on Jisc community (https://community.jisc.ac.uk ) Home > Advisory services > Wireless Technology Advisory Service > Guides > IEEE 802.1X implementation at Janet- connected organisations IEEE 802.1X implementation at Janet- connected organisations IEEE 802.1X implementation at Janet-connected organisations 022 (04/08) This document was produced to share knowledge, experience and current developments surrounding campus 802.1X implementation within the JANET community. Readers are assumed to have a basic knowledge of networking concepts and preventive security awareness. A companion technical guide Security Matters is available [1]. Scope and Audience Providing network access within large organisations is at best challenging and at worst near impossible. Users want the ability to be able to start up their operating system and have instantaneous network access. However this is usually in conflict with the organisational need to prevent unauthorised access to the network and also to provide accountability of users actions. An IEEE standard 802.1X [2] see provides a mechanism for network port access control and manages the process of authenticating and authorising attached devices by extending the EAP protocol over the network. Network access ports can take various forms such as: a network socket, switch port, or wireless access point. EAP (Extensible Authentication Protocol) is a powerful tool in the network administrator’s tool box for providing flexible network access through authentication, authorisation and accounting. EAP is an authentication framework which provides multiple methods for authentication (Aboba, Blunk, Vollbrecht, Carlson, & Levkowetz, 2004 [3]). Through the use of 802.1X and 802.11i, EAP can be used to provide enterprise network access control (NAC) for both wireless and wired networks. This guide aims to provide a background to the implementation of 802.1X as a network control mechanism on both wired and wireless networks at JANET-connected organisations. Major changes such as the introduction of 802.1X will almost certainly create concerns amongst various people involved in the process. The process of introduction will most likely involve a consultation process with the stakeholders, as it represents a fundamental change
-
Upload
khangminh22 -
Category
Documents
-
view
0 -
download
0
Transcript of IEEE 802.1X implementation at Janet-connected organisations
Published on Jisc community (https://community.jisc.ac.uk)
Home > Advisory services > Wireless Technology Advisory Service > Guides > IEEE 802.1X implementation at Janet-connected organisations
IEEE 802.1X implementation at Janet-connected organisations
IEEE 802.1X implementation at Janet-connected organisations
022 (04/08)
This document was produced to share knowledge, experience and current developments surrounding campus 802.1X implementation within the JANET community.
Readers are assumed to have a basic knowledge of networking concepts and preventive security awareness. A companion technical guide Security Matters is available [1].
Scope and Audience
Providing network access within large organisations is at best challenging and at worst near impossible. Users want the ability to be able to start up their operating system and have instantaneous network access. However this is usually in conflict with the organisational need to prevent unauthorised access to the network and also to provide accountability of users actions.
An IEEE standard 802.1X [2] see provides a mechanism for network port access control and manages the process of authenticating and authorising attached devices by extending the EAP protocol over the network. Network access ports can take various forms such as: a network socket, switch port, or wireless access point.
EAP (Extensible Authentication Protocol) is a powerful tool in the network administrator’s tool box for providing flexible network access through authentication, authorisation and accounting. EAP is an authentication framework which provides multiple methods for authentication (Aboba, Blunk, Vollbrecht, Carlson, & Levkowetz, 2004 [3]). Through the use of 802.1X and 802.11i, EAP can be used to provide enterprise network access control (NAC) for both wireless and wired networks.
This guide aims to provide a background to the implementation of 802.1X as a network control mechanism on both wired and wireless networks at JANET-connected organisations.
Major changes such as the introduction of 802.1X will almost certainly create concerns amongst various people involved in the process. The process of introduction will most likely involve a consultation process with the stakeholders, as it represents a fundamental change
to the way users access the network and is a process which requires planning. Implementing 802.1X in an educational environment is a major undertaking and should not be taken lightly.
History of 802.1X
Initially developed by 3Com, HP and Microsoft®, 802.1X was first recognised by IEEE in January 1999 and was first approved as a standard in June 2001 (IEEE Computer Society, 2001 [4]). It was developed as a mechanism for preventing unauthorised access to a LAN at the switch port level, the goal being to enable organisations to protect networks sockets in public spaces within buildings.
It is important to consider that there are many components to a complete 802.1X implementation and the technologies have evolved over a very short space of time.
EAP is the cornerstone of the 802.1X standard and was originally developed in 1998. The EAP protocol, RFC 2284 [5], has been refined over time until a significant revision in 2004 which lead to the protocol which is familiar to network administrators today.
EAP was originally based upon the Point-to-Point Protocol (PPP) and was associated with Serial and not Ethernet technologies. Within the PPP definition Link Control Protocol is outlined, describing how the link should be established, whilst EAP describes the authentication phase.
RADIUS (Remote Authentication Dial-In Users Service) originated with the Internet Engineering Task Force (IETF) group with a 1994 draft standard submission. In 1997 the first RADIUS RFC was released and then later revised. RFC 2865 [6] was released in June 2000. RADIUS has been expanded with a number of extensions to provide services for modern network deployments. These extensions have largely rendered the proposed replacement for RADIUS, named Diameter [7], redundant.
Using 802.1X to Improve Network Security
Through the use of 802.1X, network security can be improved by reducing unauthorised network access. 802.1X is superior to MAC Address Authentication which may already be implemented; significant weaknesses can be found in the ability to spoof the MAC Address of devices connecting. 802.1X operates at the Data Link Layer, Layer 2, of the OSI model and enables the use of EAPOL (Extensible Authentication Protocol Over LANs).
User or device credentials are encapsulated within an EAPOL packet before it is transmitted onto the network before reaching the authenticator. This is a low weight simple protocol with few different types of packet, mainly: Request Identity and Response packets.
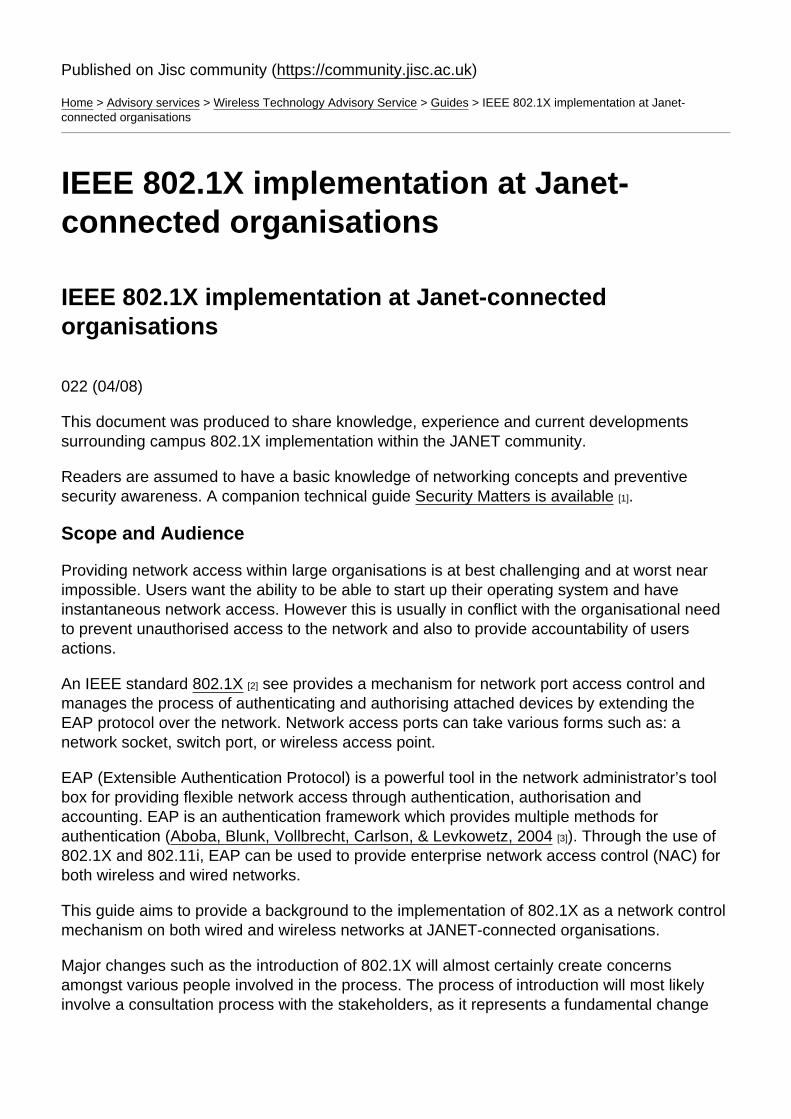
EAPOL is simply a mechanism to encapsulate EAP messages within that of the underlying protocol.
Figure 1: Gaining access to a network using 802.1X
[8]
The operation of 802.1X is covered in detail within Chapter 2 of this Technical Guide. The device running the 802.1X supplicant and the network port secured by 802.1X is referred to as Port Access Entity (PAE).
Preventing Unauthorised Network Access
The very purpose of 802.1X is to control port access and prevent unauthorised users from using your network. How can this behaviour benefit your organisation?
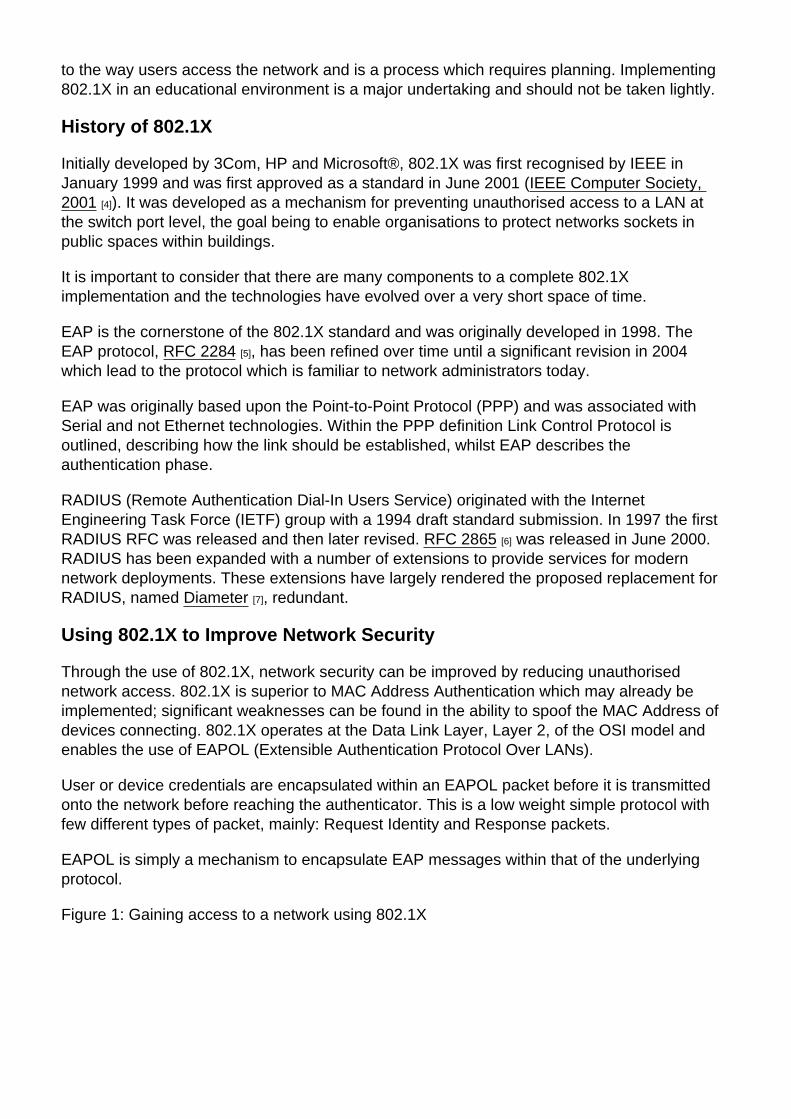
The obvious advantage is that people who are not members of your organisation or authorised visitors will be denied access to your network. This is a valuable tool in preventing electronic crime as it is often very difficult to secure every socket that a visitor could gain access to. However, stopping unknown users is not where the 802.1X functionality ends.
Figure 2: Preventing Unauthorised Access with 802.1X
[9]
Viruses and Compromised Computers
Every large network is likely to have seen computers which have been compromised by viruses, worms and trojans. Restricting the network access for these computers is a standard requirement of the IT Service provider at any organisation. 802.1X together with other systems can help by providing the facility to quarantine compromised computers.
802.1X is not a mechanism for detecting compromised computers; this role is undertaken by intrusion detection/prevention systems or anomaly detection systems. It is important that the detection device has a feedback mechanism that can utilise 802.1X as part of the mitigation process, ensuring the client moves to a quarantine VLAN by forcing the client to re-authenticate. Subsequent attempts by the infected client to connect to the network will result
in the same quarantine VLAN being presented.
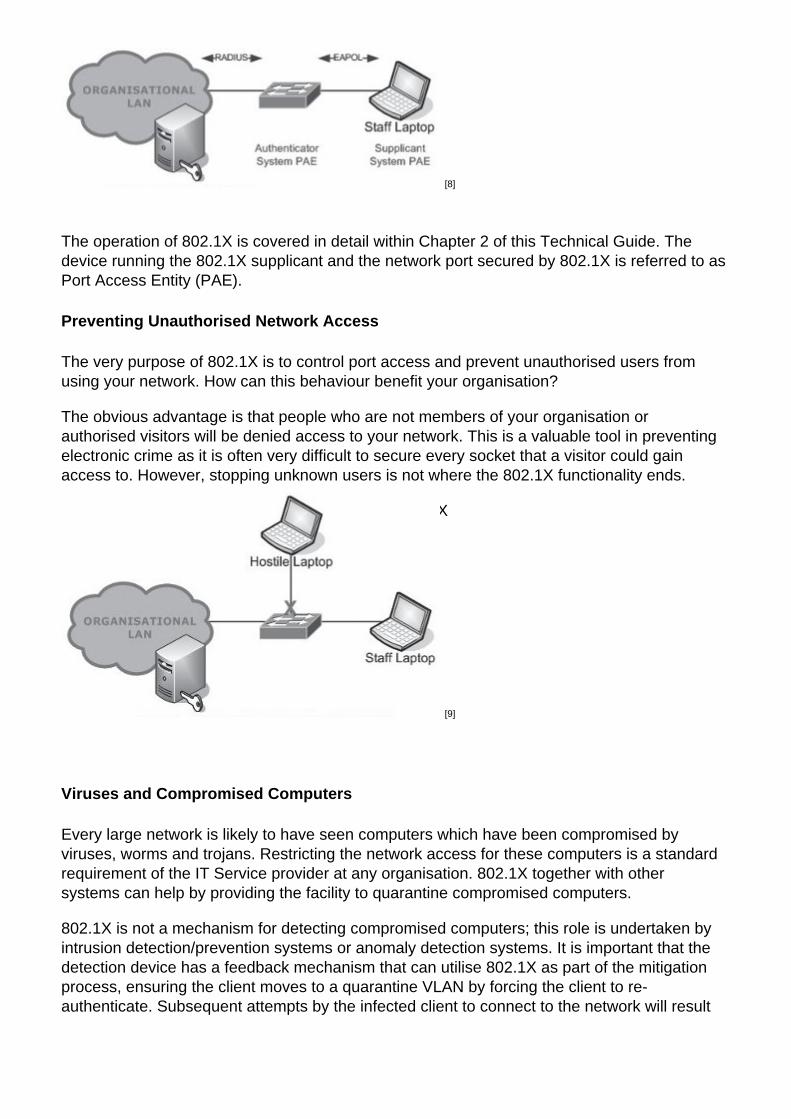
Once a machine has been identified as being compromised, the organisation’s RADIUS servers can be instructed to place a machine, and / or user, onto a quarantine VLAN. The RADIUS server can identify the machine by its active directory credentials, user login details, or by MAC address. In most case you will want to quarantine either the MAC address or the active directory credentials (if machine authentication is being used).
Figure 3: Preventing a worm outbreak with 802.1X and IDS
[10]
Location Aware Networking
Being able to control network access based upon location is very desirable. For example it is common for students to be prohibited from unplugging organisational lab computers and plugging in their own laptops. As 802.1X authentication identifies the point at which the supplicant is trying to access the network, it is very easy to prevent groups of user computers from accessing the network in specific locations.
Furthermore with the accounting and logging provided by authentication servers, attempts to access the network in a prohibited manner can be logged and reported, and if required users can be banned. Other examples include IT Service staff being given appropriate VLANs with elevated access rights.
Per Client Accounting
Using RADIUS servers and 802.1X will provide your organisation with accounting logs for each user on the network. These logs contain information such as: the location; switch port or access point; where the user was connected; the client’s IP Address; the amount of data transferred; and when the session began and ended. This is valuable information when providing audit trials or trying to locate problems. Additionally many IDS/IPS solutions can work in co-operation with RADIUS server accounting to provide enhanced features.
Guest Access
Providing access to visitors poses major security network risks. The traditional approach has been to make sockets available in public locations and then to lock down those sockets and restrict their network functionality. This was usually done in one of the following ways:
DMZ – Sockets in public locations are put onto a restricted VLAN which gives limited web and email access, and is firewalled off from the rest of your organisation’s networkWalled Garden / Captive Portal – Clients using sockets in public locations are redirected to a HTTPS login page. After authenticating in, a hole in the firewall is created for their MAC address and they are able to access the network. This is often combined with a DMZ so that even after logging in visitors are isolated from the rest of the network.
These methods of securing network sockets are simple to implement and work well, but are not without their limitations. Firstly a DMZ offers no ability to restrict who is joining your network. This makes accounting very difficult as you cannot track down who was using a particular MAC address. Captive portals partially address this by denying access until the client logs in; however this is only done by MAC address which can be trivially spoofed.
The 802.1X provision for guest access can offer much greater security and functionality than a captive portal based solution. Firstly 802.1X securely identifies the client using techniques which cannot be spoofed. This means you can identify, with greater certainty, who clients are and you can relax restrictions on VLANs used by visitors. 802.1X also provides the ability to trivially provide different VLANs to different classes of user (or even individual users) through the use of VLAN override options.
VLAN override allows the authentication server to instruct the switch as to which VLAN to put the client on. This is useful as staff who plug into a socket can be given one VLAN, students another, and guests yet another. In advanced deployments VLANs can follow particular individuals around the organisation.
Implementation of 802.1X does not mean existing captive portal based solutions have to be abandoned. 802.1X can happily co-exist with captive portals. In most cases having an alternative solution is preferential as some devices may not be capable of 802.1X authentication. Also a dual system allows for a smoother transition of clients from the old system to 802.1X. To work with a captive portal, switch ports can be configured with a ‘Guest VLAN’; clients which do not attempt to 802.1X authenticate will be given the ‘Guest VLAN’, likewise so will Supplicant PAEs that request the guest VLAN from the Authenticator PAE. This means that clients which do not attempt to 802.1X authenticate can fall through on the existing captive portal based solution. Likewise both visitors who 802.1X authenticate and those who do not can feed a DMZ network.
Using 802.1X, JANET Roaming can easily be provided in areas accessible to visitors from other organisations. When using their JANET Roaming credentials, visitors can authenticate themselves and be provided with your organisation’s Eduroam VLAN for access to the JANET network.
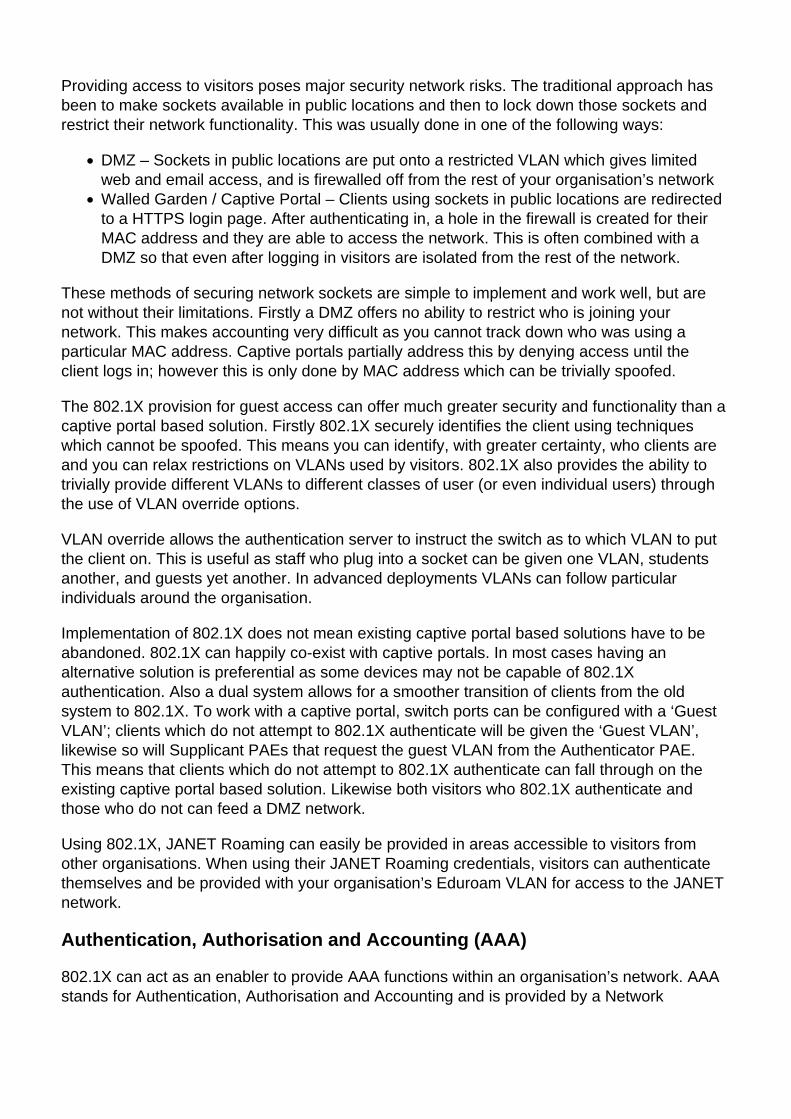
Authentication, Authorisation and Accounting (AAA)
802.1X can act as an enabler to provide AAA functions within an organisation’s network. AAA stands for Authentication, Authorisation and Accounting and is provided by a Network
Authentication Server. This acronym is also sometimes referred to as Triple A and may also include a fourth A, Auditing.
Figure 4: Location of the Network Authentication Server
[11]
The Authentication element of AAA verifies the credentials of users presenting access tickets such as passwords, certificates or hardware keys. The Authorisation element of AAA provides details of the services available to the authenticated user in order that the authenticator system can provide the appropriate level of service. In this case the switch is the authenticator system and the appropriate level of service is a VLAN and other related network access control features.
The Accounting element of AAA provides a log of resource utilisation, typically used in the education sector to provide a log of user authentication. However this can also be used for billing, network trend monitoring and within Management Information Systems.
AAA is a standards-based system which allows interoperability with a large number of systems. AAA servers typically take the form of a RADIUS server. Open Source variants exist like FreeRADIUS as well as software for the Microsoft® platform.
802.1X Overview
802.1X Overview
How 802.1X works
There are three main components in the 802.1X authentication cycle:
Supplicant Port Access Entity (PAE). This is software on the client device which handles the client side of the authentication conversation.Authenticator PAE. This is the device which controls the port access to the network. Supplicant PAE communications are tunnelled through the Authenticator PAE.Network Authentication Server (NAS). This is the server which authenticates the client through EAP authentication conversations with the Supplicant PAE.
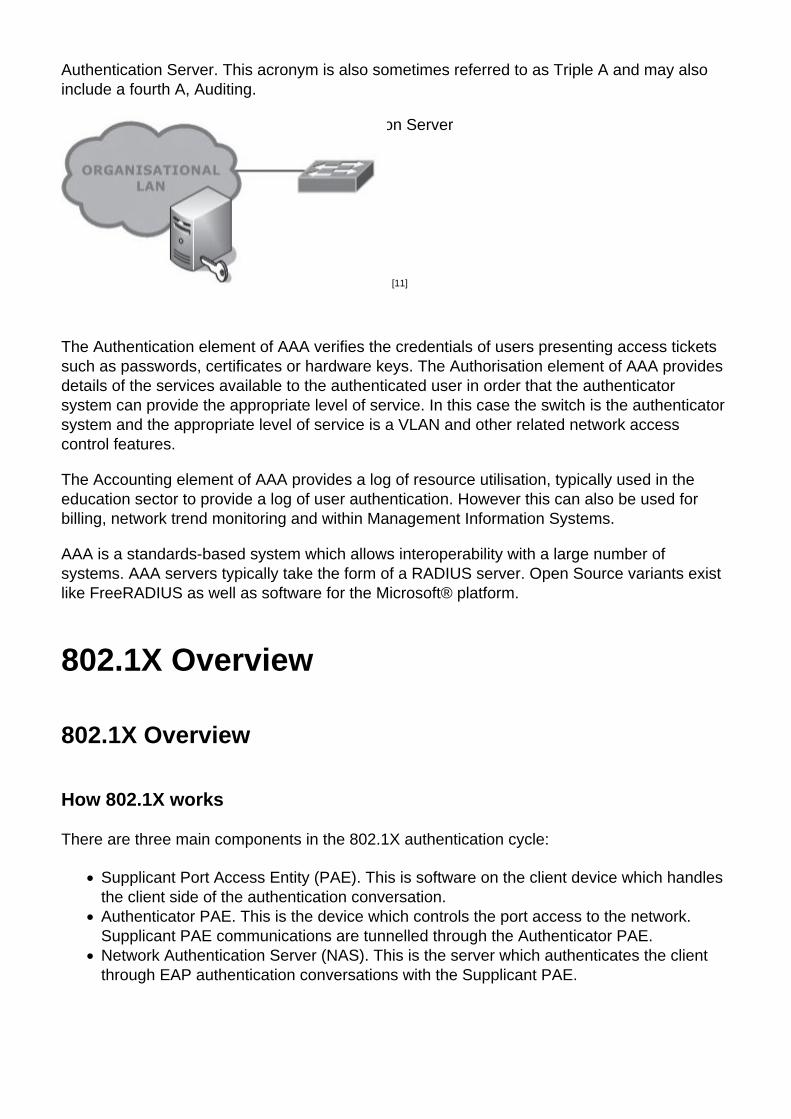
The deployment of 802.1X is over-simplified in the diagrams. However, following the implementation of redundant network authentication servers within the LAN, authenticator systems PAE will form part of the access layer switches.
Figure 5: Three main components of 802.1X
[12]
When a device is connected to a 802.1X enabled switch port, the link physically becomes active and both the 802.1X supplicant on the client and the switch detect the presence of a device at the either end of the link.
Modern switches are fairly complex and there are a number of stages before full connectivity is established. This is important for the debugging of the connection stage as many problems can cause 802.1X to fail including: a badly configured supplicant, faulty cable, network card or switch configuration file.
1. Initially when a client connects to the network, the Authenticator PAE (the switch or AP) initiates an authentication conversation by sending an EAP-Request. If the Authenticator PAE does not receive a response it will time-out and set the port into an unauthorised state.
Figure 6: Initial client connection to the network
[13]
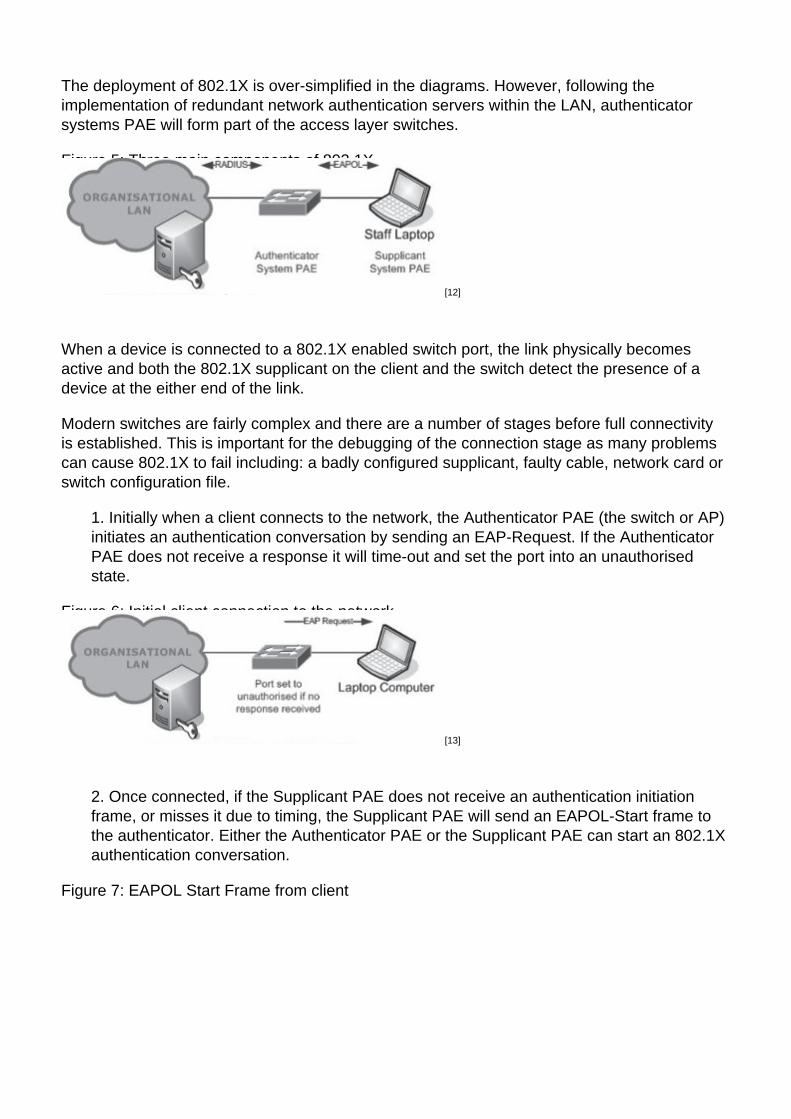
2. Once connected, if the Supplicant PAE does not receive an authentication initiation frame, or misses it due to timing, the Supplicant PAE will send an EAPOL-Start frame to the authenticator. Either the Authenticator PAE or the Supplicant PAE can start an 802.1X authentication conversation.
Figure 7: EAPOL Start Frame from client
[14]
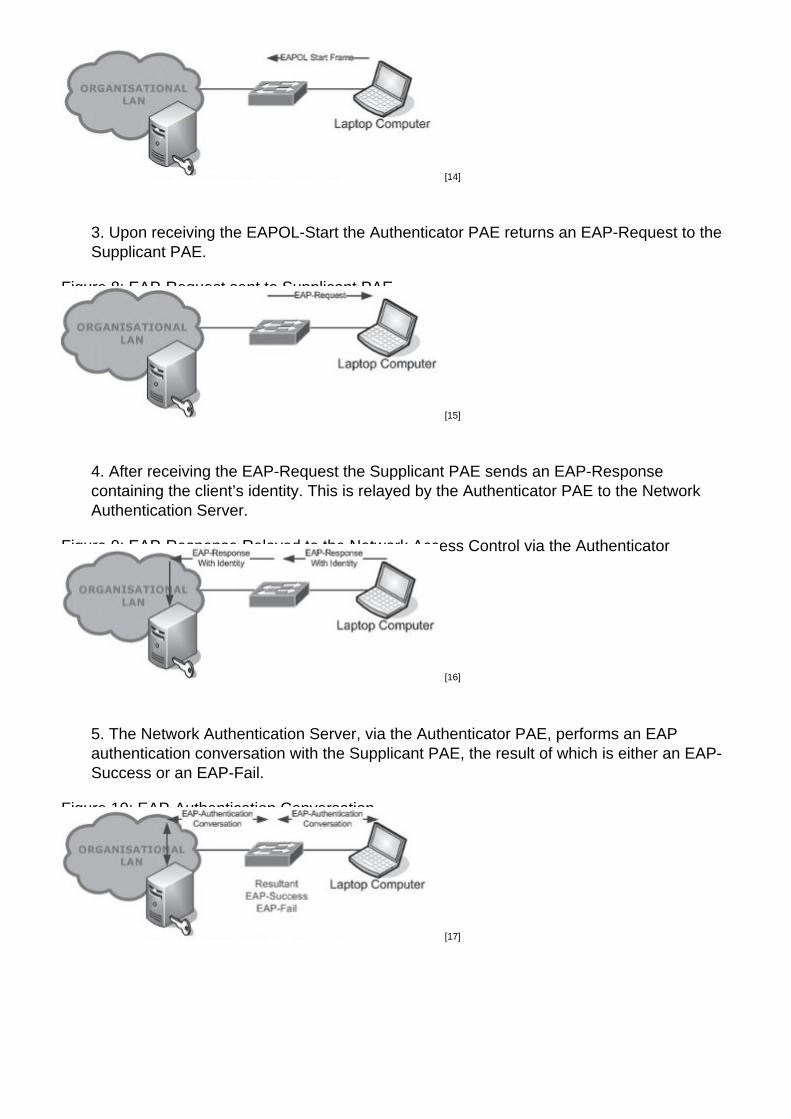
3. Upon receiving the EAPOL-Start the Authenticator PAE returns an EAP-Request to the Supplicant PAE.
Figure 8: EAP-Request sent to Supplicant PAE
[15]
4. After receiving the EAP-Request the Supplicant PAE sends an EAP-Response containing the client’s identity. This is relayed by the Authenticator PAE to the Network Authentication Server.
Figure 9: EAP-Response Relayed to the Network Access Control via the Authenticator
[16]
5. The Network Authentication Server, via the Authenticator PAE, performs an EAP authentication conversation with the Supplicant PAE, the result of which is either an EAP-Success or an EAP-Fail.
Figure 10: EAP-Authentication Conversation
[17]
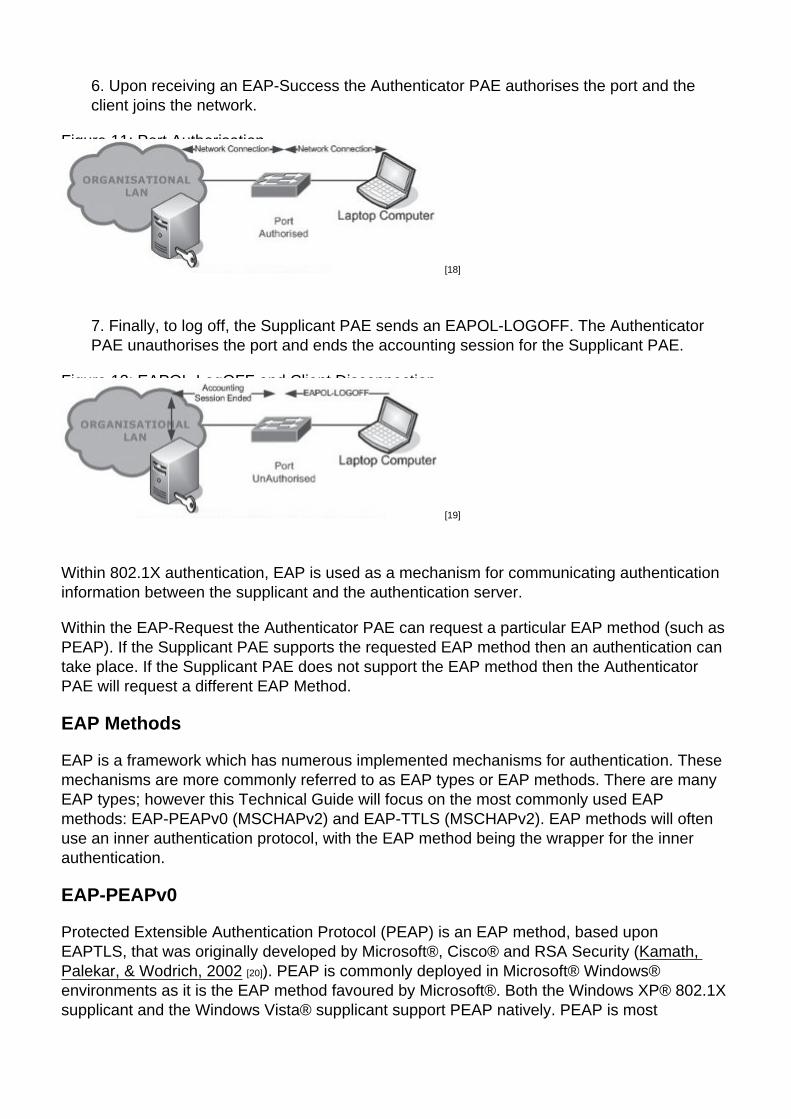
6. Upon receiving an EAP-Success the Authenticator PAE authorises the port and the client joins the network.
Figure 11: Port Authorisation
[18]
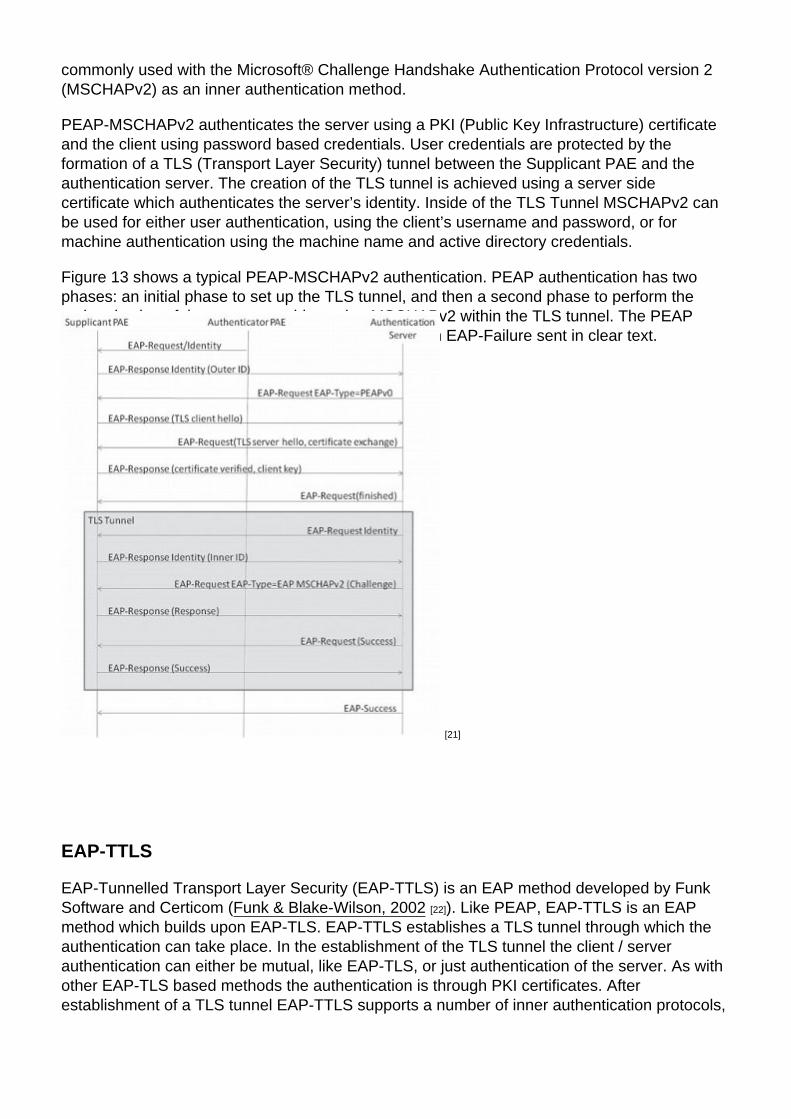
7. Finally, to log off, the Supplicant PAE sends an EAPOL-LOGOFF. The Authenticator PAE unauthorises the port and ends the accounting session for the Supplicant PAE.
Figure 12: EAPOL-LogOFF and Client Disconnection
[19]
Within 802.1X authentication, EAP is used as a mechanism for communicating authentication information between the supplicant and the authentication server.
Within the EAP-Request the Authenticator PAE can request a particular EAP method (such as PEAP). If the Supplicant PAE supports the requested EAP method then an authentication can take place. If the Supplicant PAE does not support the EAP method then the Authenticator PAE will request a different EAP Method.
EAP Methods
EAP is a framework which has numerous implemented mechanisms for authentication. These mechanisms are more commonly referred to as EAP types or EAP methods. There are many EAP types; however this Technical Guide will focus on the most commonly used EAP methods: EAP-PEAPv0 (MSCHAPv2) and EAP-TTLS (MSCHAPv2). EAP methods will often use an inner authentication protocol, with the EAP method being the wrapper for the inner authentication.
EAP-PEAPv0
Protected Extensible Authentication Protocol (PEAP) is an EAP method, based upon EAPTLS, that was originally developed by Microsoft®, Cisco® and RSA Security (Kamath, Palekar, & Wodrich, 2002 [20]). PEAP is commonly deployed in Microsoft® Windows® environments as it is the EAP method favoured by Microsoft®. Both the Windows XP® 802.1X supplicant and the Windows Vista® supplicant support PEAP natively. PEAP is most
commonly used with the Microsoft® Challenge Handshake Authentication Protocol version 2 (MSCHAPv2) as an inner authentication method.
PEAP-MSCHAPv2 authenticates the server using a PKI (Public Key Infrastructure) certificate and the client using password based credentials. User credentials are protected by the formation of a TLS (Transport Layer Security) tunnel between the Supplicant PAE and the authentication server. The creation of the TLS tunnel is achieved using a server side certificate which authenticates the server’s identity. Inside of the TLS Tunnel MSCHAPv2 can be used for either user authentication, using the client’s username and password, or for machine authentication using the machine name and active directory credentials.
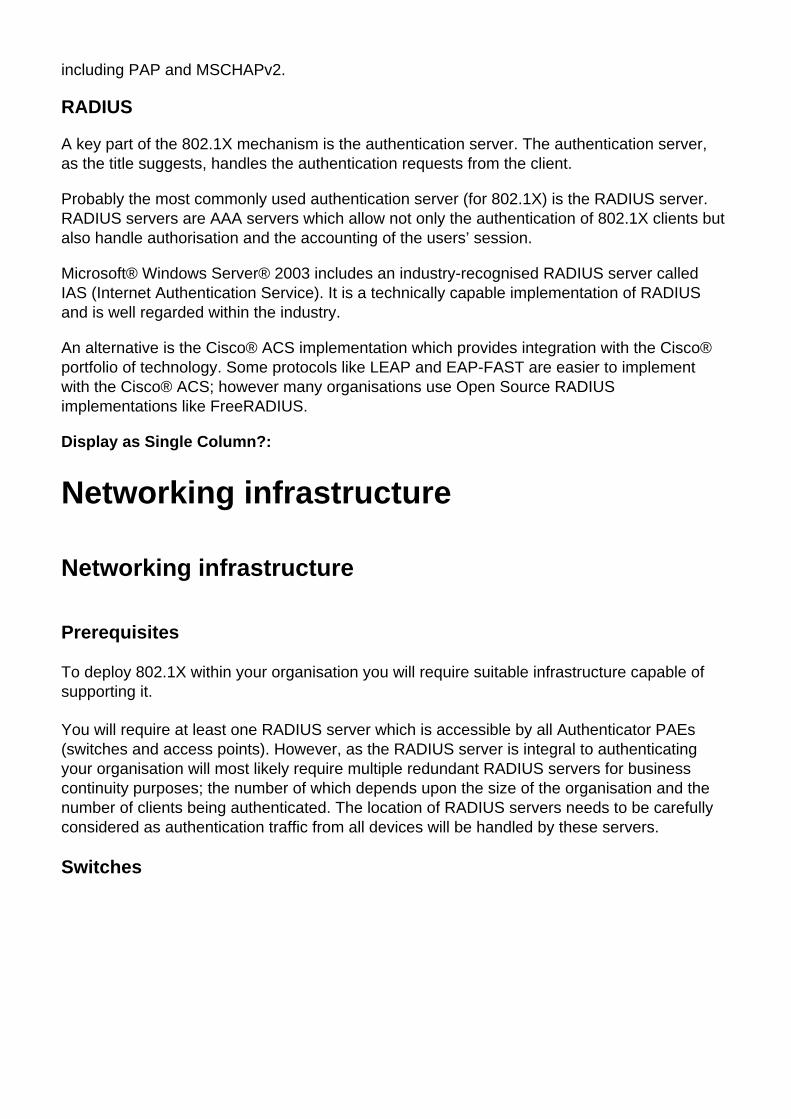
Figure 13 shows a typical PEAP-MSCHAPv2 authentication. PEAP authentication has two phases: an initial phase to set up the TLS tunnel, and then a second phase to perform the authentication of the user or machine using MSCHAPv2 within the TLS tunnel. The PEAP authentication ends with either an EAP-Success or an EAP-Failure sent in clear text.
Figure 13: Example PEAP-MSCHAPv2 Conversation
[21]
EAP-TTLS
EAP-Tunnelled Transport Layer Security (EAP-TTLS) is an EAP method developed by Funk Software and Certicom (Funk & Blake-Wilson, 2002 [22]). Like PEAP, EAP-TTLS is an EAP method which builds upon EAP-TLS. EAP-TTLS establishes a TLS tunnel through which the authentication can take place. In the establishment of the TLS tunnel the client / server authentication can either be mutual, like EAP-TLS, or just authentication of the server. As with other EAP-TLS based methods the authentication is through PKI certificates. After establishment of a TLS tunnel EAP-TTLS supports a number of inner authentication protocols,
including PAP and MSCHAPv2.
RADIUS
A key part of the 802.1X mechanism is the authentication server. The authentication server, as the title suggests, handles the authentication requests from the client.
Probably the most commonly used authentication server (for 802.1X) is the RADIUS server. RADIUS servers are AAA servers which allow not only the authentication of 802.1X clients but also handle authorisation and the accounting of the users’ session.
Microsoft® Windows Server® 2003 includes an industry-recognised RADIUS server called IAS (Internet Authentication Service). It is a technically capable implementation of RADIUS and is well regarded within the industry.
An alternative is the Cisco® ACS implementation which provides integration with the Cisco® portfolio of technology. Some protocols like LEAP and EAP-FAST are easier to implement with the Cisco® ACS; however many organisations use Open Source RADIUS implementations like FreeRADIUS.
Display as Single Column?:
Networking infrastructure
Networking infrastructure
Prerequisites
To deploy 802.1X within your organisation you will require suitable infrastructure capable of supporting it.
You will require at least one RADIUS server which is accessible by all Authenticator PAEs (switches and access points). However, as the RADIUS server is integral to authenticating your organisation will most likely require multiple redundant RADIUS servers for business continuity purposes; the number of which depends upon the size of the organisation and the number of clients being authenticated. The location of RADIUS servers needs to be carefully considered as authentication traffic from all devices will be handled by these servers.
Switches
To offer 802.1X, your organisation will require edge switches which are capable of providing 802.1X port control. For most organisations with full managed switching architecture this should not be an issue. However older managed switches (incapable of 802.1X), unmanaged switches and hubs will need to be replaced with new modern equipment. Finally the software and firmware on switches may need to be upgraded to the latest versions to provide full compatibility; some older device firmware may only have partial 802.1X support.
Cisco® Catalyst Switches
Cisco® Catalyst switches offer the ability to control edge port access by using 802.1X to authenticate, authorise and provide accounting for the client. This can be configured through a terminal connection to the switch.
Please note: All examples use private IP address ranges; you will need to change these for the relevant network infrastructure at your site.
To configure a Catalyst switch the RADIUS servers must first be defined in the switch configuration together with their shared secrets. An entry must be added for each of your organisation’s RADIUS servers. To do this type:
switch# conf t
switch(config)# radius-server host 192.168.10.50 auth-port 1812 acct-port 1813 key <shared_secret>
After adding RADIUS server definitions, global settings need to be added for the RADIUS servers. Add entries for the timeout between the switch and the server, as well as the maximum number of retries and how many minutes to cease communications to a dead server. Finally instruct the switch to allow the sending of vendor specific attributes for authentication:
switch(config)# radius-server timeout 2
switch(config)# radius-server deadtime 1
switch(config)# radius-server retransmit 0
switch(config)# radius-server vsa send authentication
The next step is to enable AAA login and configure an AAA model for the RADIUS servers:
switch(config)# aaa new-model
switch(config)# aaa group server radius RADIUS-SERVERS
switch(config-sg-radius)# server 192.168.10.50 auth-port 1812
acct-port 1813
switch(config-sg-radius)# aaa authentication dot1x default group RADIUS-SERVERS
switch(config)# aaa authorization network default group RADIUS-SERVERS
switch(config)# aaa accounting dot1x default start-stop group RADIUS-SERVERS
After creating definitions for RADIUS servers and an AAA model, 802.1X can then be enabled on the switch:
switch(config)# dot1x system-auth-control
If required the switch can be configured to allow client supplicants to request a guest VLAN:
switch(config)# dot1x guest-vlan supplicant
After configuring the global settings for the switch individual, port settings need to be applied. First 802.1X needs to be enabled per port, and the switch configured to initiate an 802.1X authentication when a client plugs in and not wait for the client to initiate an authentication:
switch(config)# int range fa0/1 – 48
switch(config-if-range)# dot1x pae authenticator
switch(config-if-range)# dot1x port-control auto
The next option to set is the behaviour of an authenticated port. This will set whether the switch will allow multiple devices or a single device (or a multi domain) to connect:
switch(config-if-range)# dot1x host-mode single-host
To configure periodic reauthentication and set the number of times the switch will request authentication from the client. The final line will set the switch to honour the session timeout value set by the RADIUS server:
switch(config-if-range)# dot1x max-req 1
switch(config-if-range)# dot1x max-reauth-req 1
switch(config-if-range)# dot1x reauthentication
switch(config-if-range)# dot1x timeout reauth-period server
To set the guest and authentication failure VLANs:
switch(config-if-range)# dot1x guest-vlan 301
switch(config-if-range)# dot1x auth-fail vlan 301
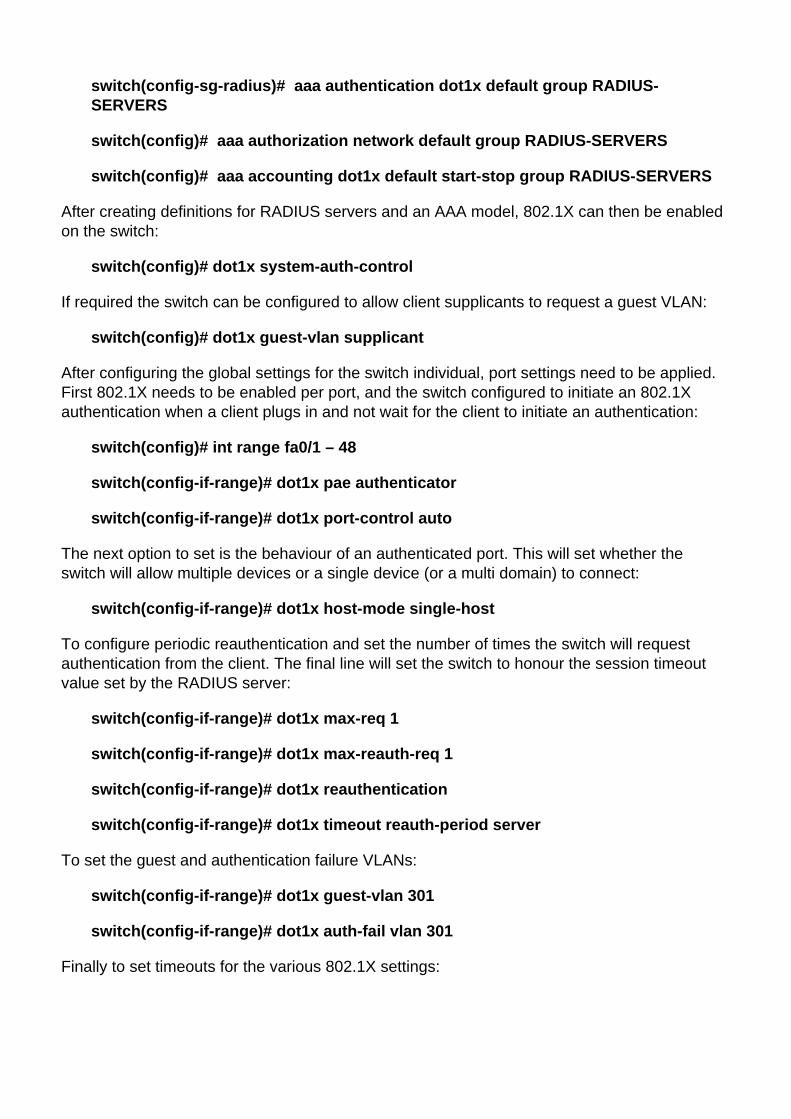
Finally to set timeouts for the various 802.1X settings:
switch(config-if-range)# dot1x timeout quiet-period 5
switch(config-if-range)# dot1x timeout server-timeout 5
switch(config-if-range)# dot1x timeout tx-period 5
switch(config-if-range)# dot1x timeout supp-timeout 5
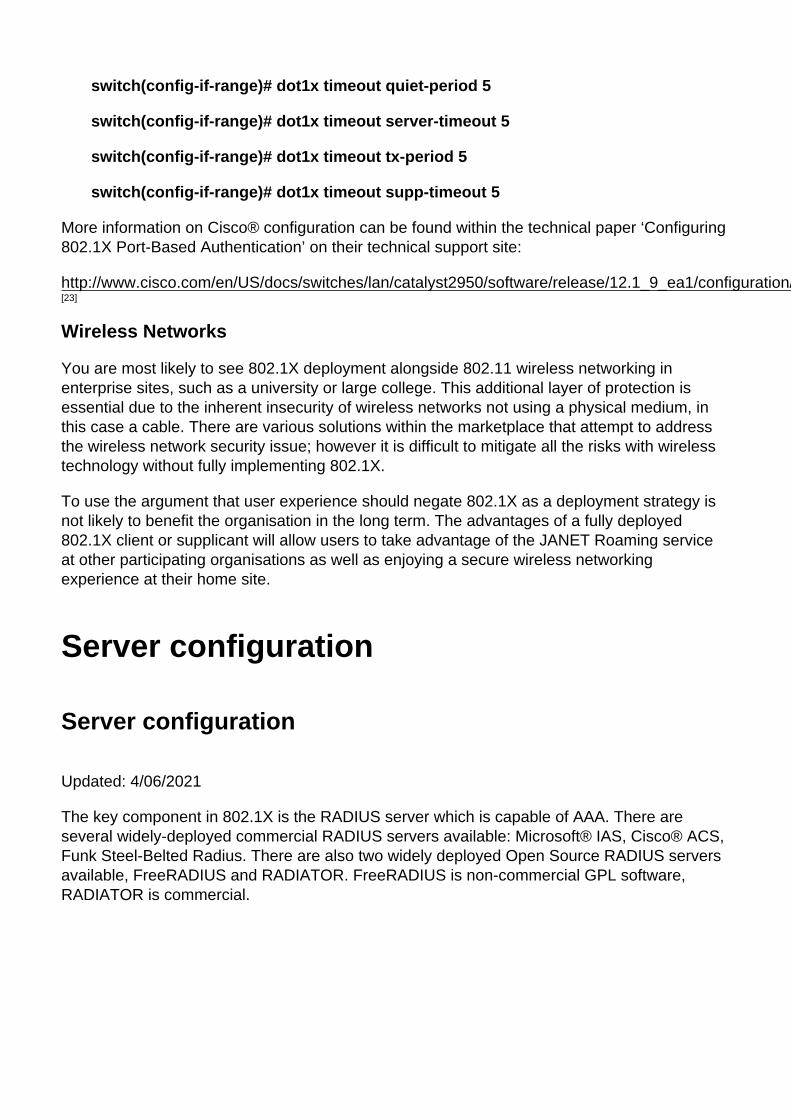
More information on Cisco® configuration can be found within the technical paper ‘Configuring 802.1X Port-Based Authentication’ on their technical support site:
http://www.cisco.com/en/US/docs/switches/lan/catalyst2950/software/release/12.1_9_ea1/configuration/guide/Sw8021x.html[23]
Wireless Networks
You are most likely to see 802.1X deployment alongside 802.11 wireless networking in enterprise sites, such as a university or large college. This additional layer of protection is essential due to the inherent insecurity of wireless networks not using a physical medium, in this case a cable. There are various solutions within the marketplace that attempt to address the wireless network security issue; however it is difficult to mitigate all the risks with wireless technology without fully implementing 802.1X.
To use the argument that user experience should negate 802.1X as a deployment strategy is not likely to benefit the organisation in the long term. The advantages of a fully deployed 802.1X client or supplicant will allow users to take advantage of the JANET Roaming service at other participating organisations as well as enjoying a secure wireless networking experience at their home site.
Server configuration
Server configuration
Updated: 4/06/2021
The key component in 802.1X is the RADIUS server which is capable of AAA. There are several widely-deployed commercial RADIUS servers available: Microsoft® IAS, Cisco® ACS, Funk Steel-Belted Radius. There are also two widely deployed Open Source RADIUS servers available, FreeRADIUS and RADIATOR. FreeRADIUS is non-commercial GPL software, RADIATOR is commercial.
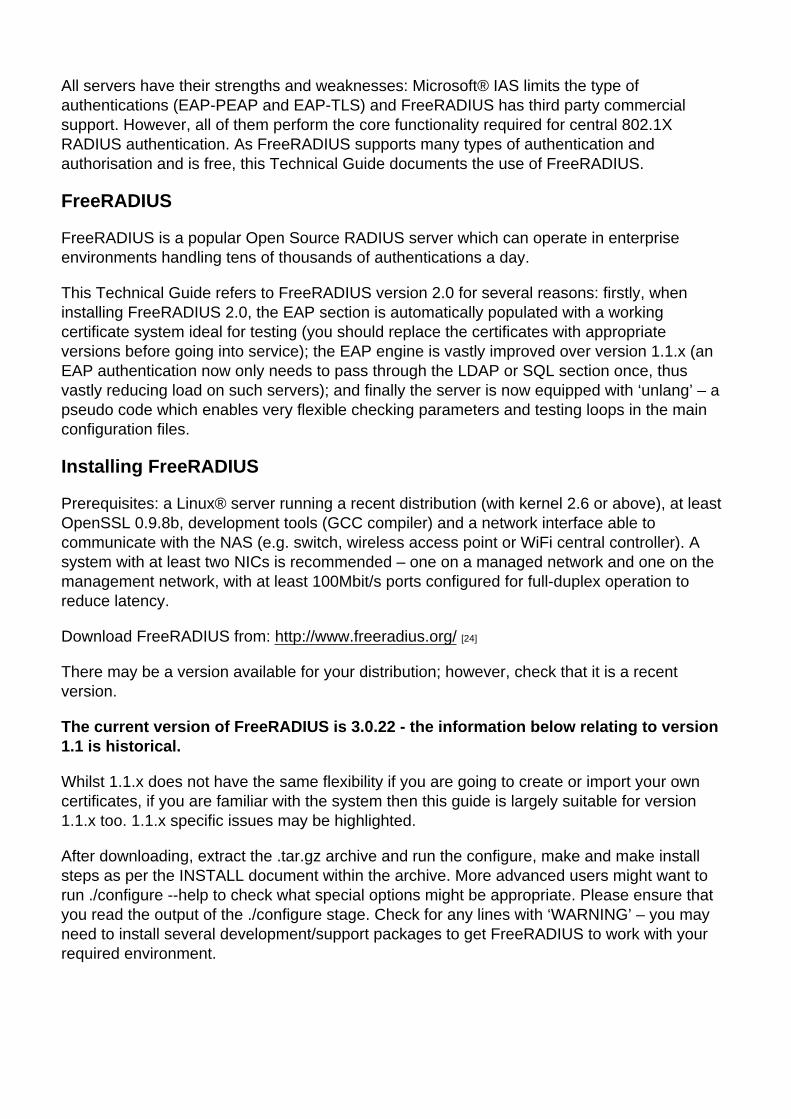
All servers have their strengths and weaknesses: Microsoft® IAS limits the type of authentications (EAP-PEAP and EAP-TLS) and FreeRADIUS has third party commercial support. However, all of them perform the core functionality required for central 802.1X RADIUS authentication. As FreeRADIUS supports many types of authentication and authorisation and is free, this Technical Guide documents the use of FreeRADIUS.
FreeRADIUS
FreeRADIUS is a popular Open Source RADIUS server which can operate in enterprise environments handling tens of thousands of authentications a day.
This Technical Guide refers to FreeRADIUS version 2.0 for several reasons: firstly, when installing FreeRADIUS 2.0, the EAP section is automatically populated with a working certificate system ideal for testing (you should replace the certificates with appropriate versions before going into service); the EAP engine is vastly improved over version 1.1.x (an EAP authentication now only needs to pass through the LDAP or SQL section once, thus vastly reducing load on such servers); and finally the server is now equipped with ‘unlang’ – a pseudo code which enables very flexible checking parameters and testing loops in the main configuration files.
Installing FreeRADIUS
Prerequisites: a Linux® server running a recent distribution (with kernel 2.6 or above), at least OpenSSL 0.9.8b, development tools (GCC compiler) and a network interface able to communicate with the NAS (e.g. switch, wireless access point or WiFi central controller). A system with at least two NICs is recommended – one on a managed network and one on the management network, with at least 100Mbit/s ports configured for full-duplex operation to reduce latency.
Download FreeRADIUS from: http://www.freeradius.org/ [24]
There may be a version available for your distribution; however, check that it is a recent version.
The current version of FreeRADIUS is 3.0.22 - the information below relating to version 1.1 is historical.
Whilst 1.1.x does not have the same flexibility if you are going to create or import your own certificates, if you are familiar with the system then this guide is largely suitable for version 1.1.x too. 1.1.x specific issues may be highlighted.
After downloading, extract the .tar.gz archive and run the configure, make and make install steps as per the INSTALL document within the archive. More advanced users might want to run ./configure --help to check what special options might be appropriate. Please ensure that you read the output of the ./configure stage. Check for any lines with ‘WARNING’ – you may need to install several development/support packages to get FreeRADIUS to work with your required environment.
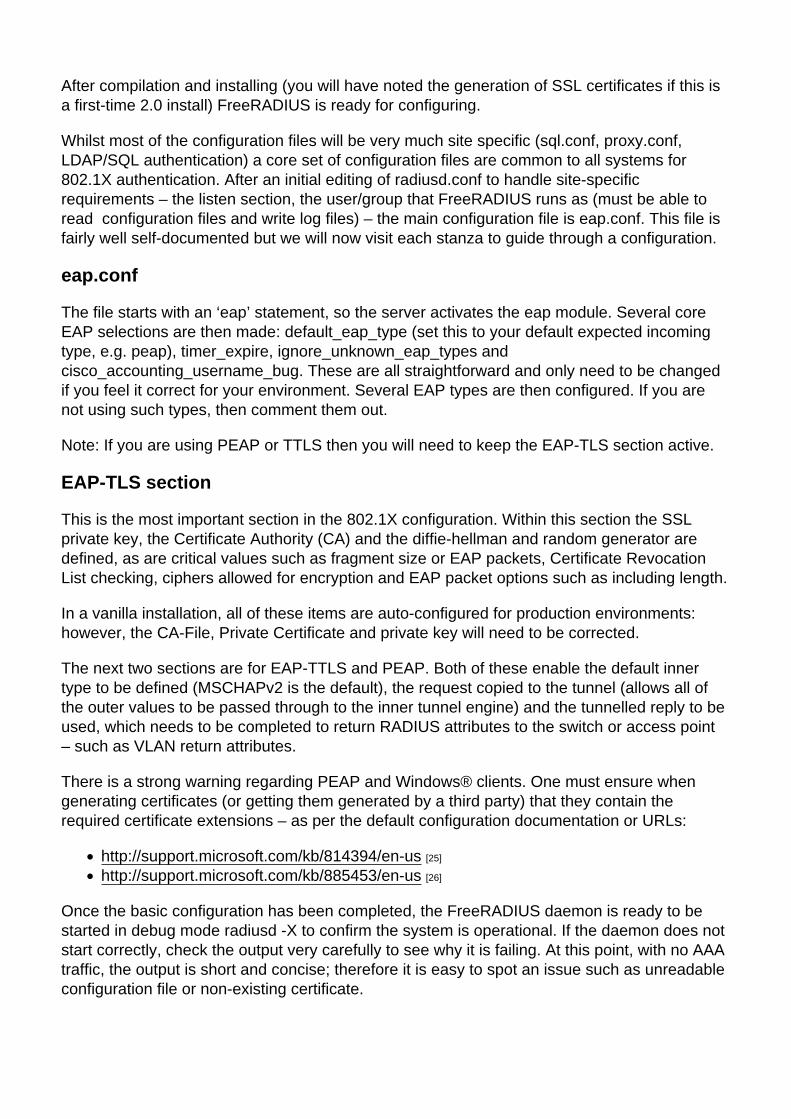
After compilation and installing (you will have noted the generation of SSL certificates if this is a first-time 2.0 install) FreeRADIUS is ready for configuring.
Whilst most of the configuration files will be very much site specific (sql.conf, proxy.conf, LDAP/SQL authentication) a core set of configuration files are common to all systems for 802.1X authentication. After an initial editing of radiusd.conf to handle site-specific requirements – the listen section, the user/group that FreeRADIUS runs as (must be able to read configuration files and write log files) – the main configuration file is eap.conf. This file is fairly well self-documented but we will now visit each stanza to guide through a configuration.
eap.conf
The file starts with an ‘eap’ statement, so the server activates the eap module. Several core EAP selections are then made: default_eap_type (set this to your default expected incoming type, e.g. peap), timer_expire, ignore_unknown_eap_types and cisco_accounting_username_bug. These are all straightforward and only need to be changed if you feel it correct for your environment. Several EAP types are then configured. If you are not using such types, then comment them out.
Note: If you are using PEAP or TTLS then you will need to keep the EAP-TLS section active.
EAP-TLS section
This is the most important section in the 802.1X configuration. Within this section the SSL private key, the Certificate Authority (CA) and the diffie-hellman and random generator are defined, as are critical values such as fragment size or EAP packets, Certificate Revocation List checking, ciphers allowed for encryption and EAP packet options such as including length.
In a vanilla installation, all of these items are auto-configured for production environments: however, the CA-File, Private Certificate and private key will need to be corrected.
The next two sections are for EAP-TTLS and PEAP. Both of these enable the default inner type to be defined (MSCHAPv2 is the default), the request copied to the tunnel (allows all of the outer values to be passed through to the inner tunnel engine) and the tunnelled reply to be used, which needs to be completed to return RADIUS attributes to the switch or access point – such as VLAN return attributes.
There is a strong warning regarding PEAP and Windows® clients. One must ensure when generating certificates (or getting them generated by a third party) that they contain the required certificate extensions – as per the default configuration documentation or URLs:
http://support.microsoft.com/kb/814394/en-us [25]
http://support.microsoft.com/kb/885453/en-us [26]
Once the basic configuration has been completed, the FreeRADIUS daemon is ready to be started in debug mode radiusd -X to confirm the system is operational. If the daemon does not start correctly, check the output very carefully to see why it is failing. At this point, with no AAA traffic, the output is short and concise; therefore it is easy to spot an issue such as unreadable configuration file or non-existing certificate.
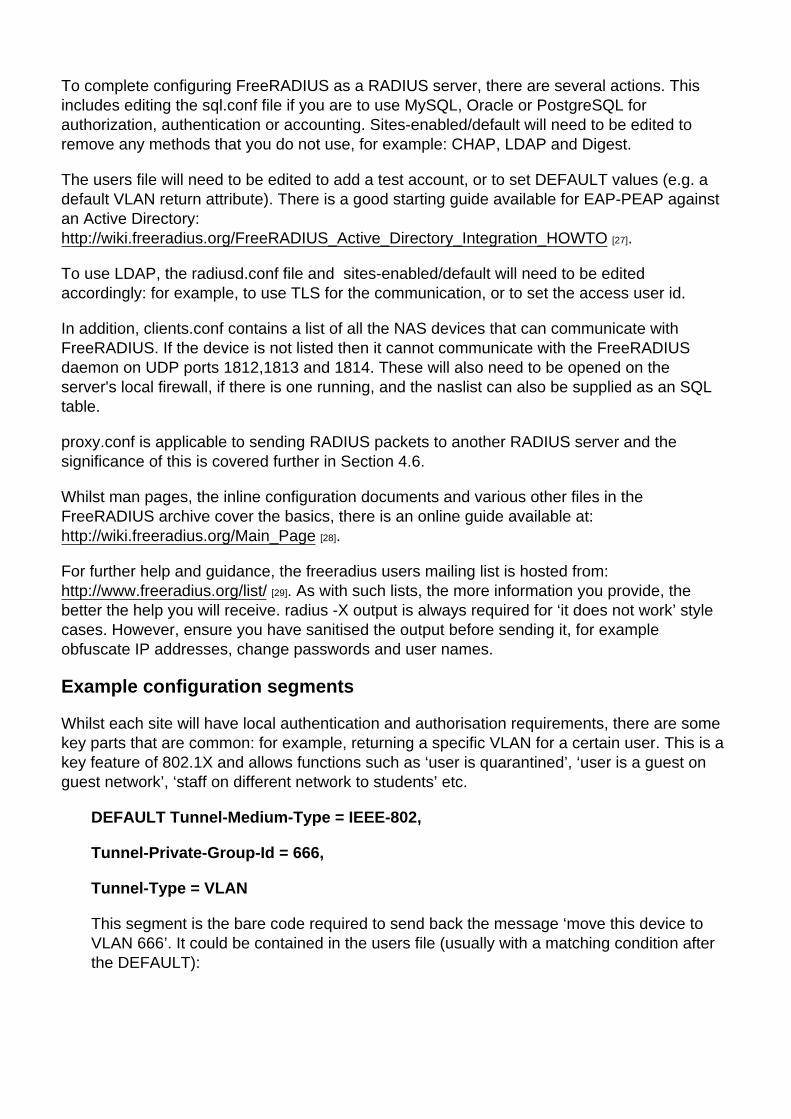
To complete configuring FreeRADIUS as a RADIUS server, there are several actions. This includes editing the sql.conf file if you are to use MySQL, Oracle or PostgreSQL for authorization, authentication or accounting. Sites-enabled/default will need to be edited to remove any methods that you do not use, for example: CHAP, LDAP and Digest.
The users file will need to be edited to add a test account, or to set DEFAULT values (e.g. a default VLAN return attribute). There is a good starting guide available for EAP-PEAP against an Active Directory: http://wiki.freeradius.org/FreeRADIUS_Active_Directory_Integration_HOWTO [27].
To use LDAP, the radiusd.conf file and sites-enabled/default will need to be edited accordingly: for example, to use TLS for the communication, or to set the access user id.
In addition, clients.conf contains a list of all the NAS devices that can communicate with FreeRADIUS. If the device is not listed then it cannot communicate with the FreeRADIUS daemon on UDP ports 1812,1813 and 1814. These will also need to be opened on the server's local firewall, if there is one running, and the naslist can also be supplied as an SQL table.
proxy.conf is applicable to sending RADIUS packets to another RADIUS server and the significance of this is covered further in Section 4.6.
Whilst man pages, the inline configuration documents and various other files in the FreeRADIUS archive cover the basics, there is an online guide available at: http://wiki.freeradius.org/Main_Page [28].
For further help and guidance, the freeradius users mailing list is hosted from: http://www.freeradius.org/list/ [29]. As with such lists, the more information you provide, the better the help you will receive. radius -X output is always required for ‘it does not work’ style cases. However, ensure you have sanitised the output before sending it, for example obfuscate IP addresses, change passwords and user names.
Example configuration segments
Whilst each site will have local authentication and authorisation requirements, there are some key parts that are common: for example, returning a specific VLAN for a certain user. This is a key feature of 802.1X and allows functions such as ‘user is quarantined’, ‘user is a guest on guest network’, ‘staff on different network to students’ etc.
DEFAULT Tunnel-Medium-Type = IEEE-802,
Tunnel-Private-Group-Id = 666,
Tunnel-Type = VLAN
This segment is the bare code required to send back the message ‘move this device to VLAN 666’. It could be contained in the users file (usually with a matching condition after the DEFAULT):
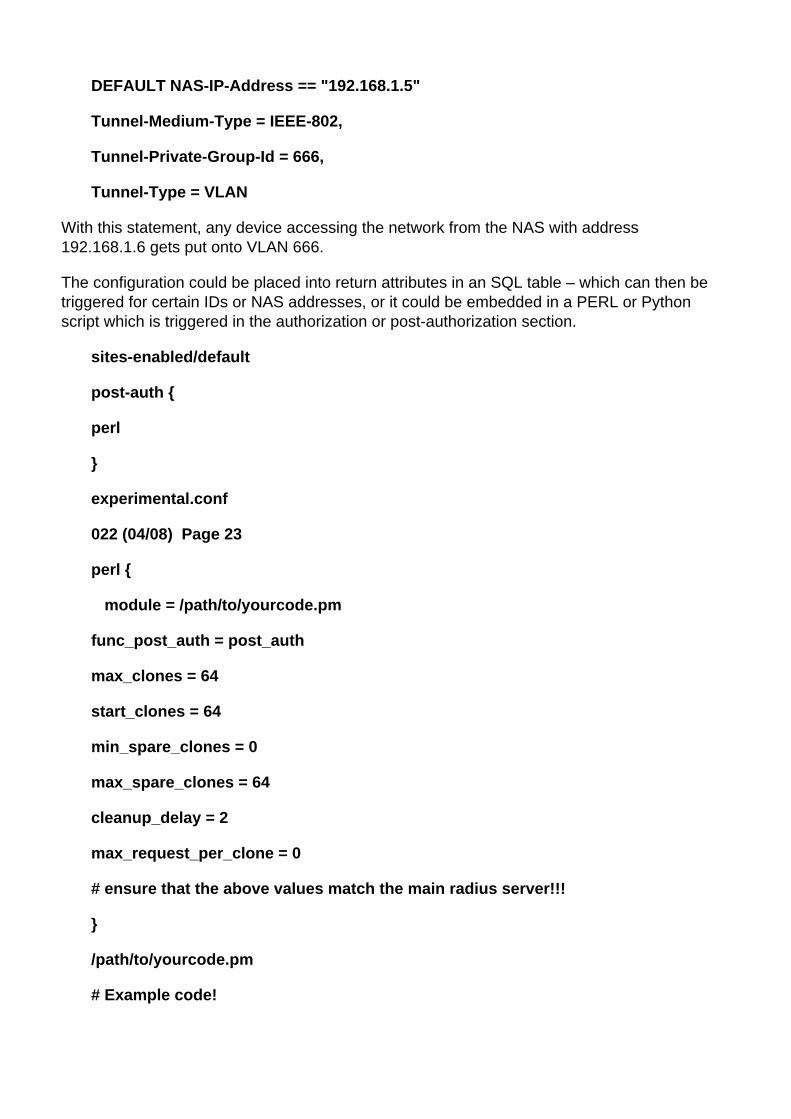
DEFAULT NAS-IP-Address == "192.168.1.5"
Tunnel-Medium-Type = IEEE-802,
Tunnel-Private-Group-Id = 666,
Tunnel-Type = VLAN
With this statement, any device accessing the network from the NAS with address 192.168.1.6 gets put onto VLAN 666.
The configuration could be placed into return attributes in an SQL table – which can then be triggered for certain IDs or NAS addresses, or it could be embedded in a PERL or Python script which is triggered in the authorization or post-authorization section.
sites-enabled/default
post-auth {
perl
}
experimental.conf
022 (04/08) Page 23
perl {
module = /path/to/yourcode.pm
func_post_auth = post_auth
max_clones = 64
start_clones = 64
min_spare_clones = 0
max_spare_clones = 64
cleanup_delay = 2
max_request_per_clone = 0
# ensure that the above values match the main radius server!!!
}
/path/to/yourcode.pm
# Example code!
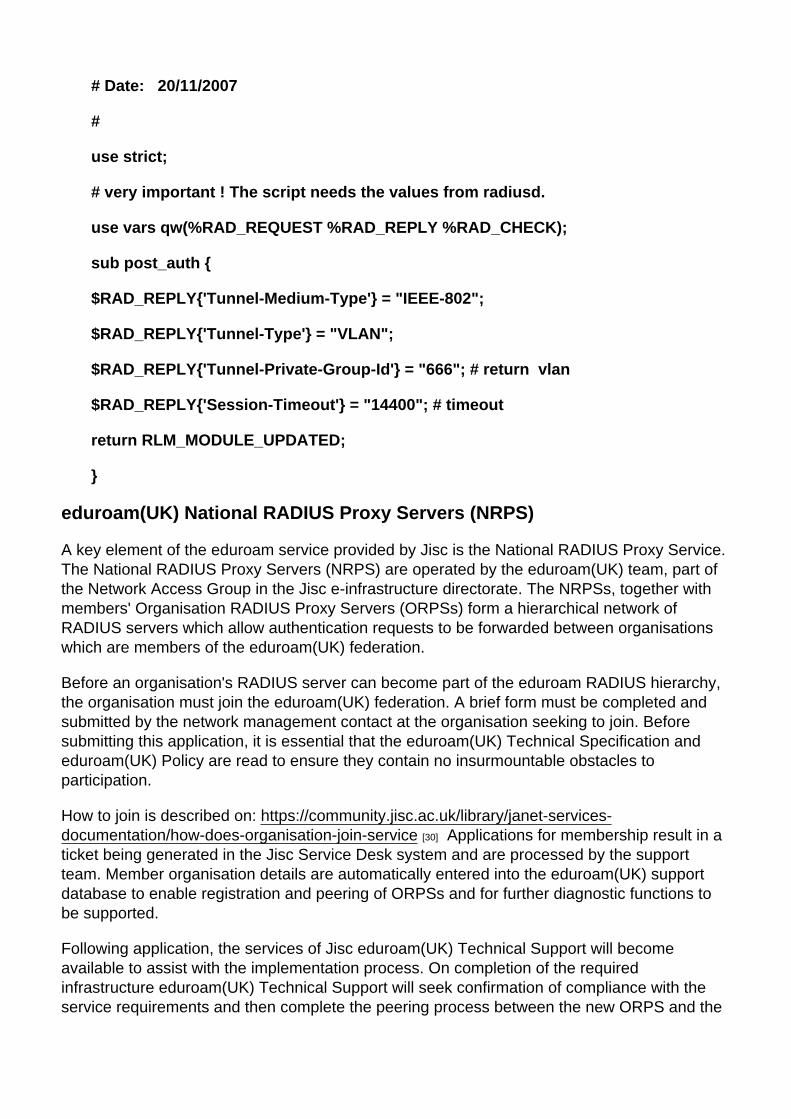
# Date: 20/11/2007
#
use strict;
# very important ! The script needs the values from radiusd.
use vars qw(%RAD_REQUEST %RAD_REPLY %RAD_CHECK);
sub post_auth {
$RAD_REPLY{'Tunnel-Medium-Type'} = "IEEE-802";
$RAD_REPLY{'Tunnel-Type'} = "VLAN";
$RAD_REPLY{'Tunnel-Private-Group-Id'} = "666"; # return vlan
$RAD_REPLY{'Session-Timeout'} = "14400"; # timeout
return RLM_MODULE_UPDATED;
}
eduroam(UK) National RADIUS Proxy Servers (NRPS)
A key element of the eduroam service provided by Jisc is the National RADIUS Proxy Service. The National RADIUS Proxy Servers (NRPS) are operated by the eduroam(UK) team, part of the Network Access Group in the Jisc e-infrastructure directorate. The NRPSs, together with members' Organisation RADIUS Proxy Servers (ORPSs) form a hierarchical network of RADIUS servers which allow authentication requests to be forwarded between organisations which are members of the eduroam(UK) federation.
Before an organisation's RADIUS server can become part of the eduroam RADIUS hierarchy, the organisation must join the eduroam(UK) federation. A brief form must be completed and submitted by the network management contact at the organisation seeking to join. Before submitting this application, it is essential that the eduroam(UK) Technical Specification and eduroam(UK) Policy are read to ensure they contain no insurmountable obstacles to participation.
How to join is described on: https://community.jisc.ac.uk/library/janet-services-documentation/how-does-organisation-join-service [30] Applications for membership result in a ticket being generated in the Jisc Service Desk system and are processed by the support team. Member organisation details are automatically entered into the eduroam(UK) support database to enable registration and peering of ORPSs and for further diagnostic functions to be supported.
Following application, the services of Jisc eduroam(UK) Technical Support will become available to assist with the implementation process. On completion of the required infrastructure eduroam(UK) Technical Support will seek confirmation of compliance with the service requirements and then complete the peering process between the new ORPS and the
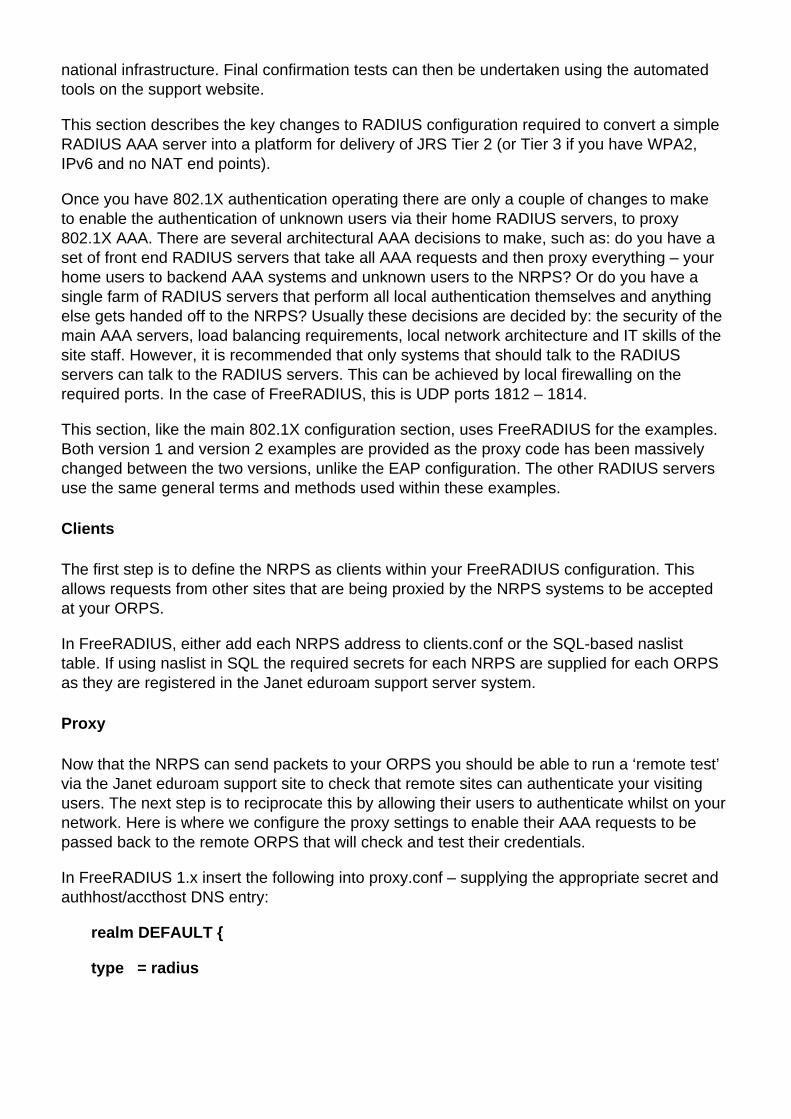
national infrastructure. Final confirmation tests can then be undertaken using the automated tools on the support website.
This section describes the key changes to RADIUS configuration required to convert a simple RADIUS AAA server into a platform for delivery of JRS Tier 2 (or Tier 3 if you have WPA2, IPv6 and no NAT end points).
Once you have 802.1X authentication operating there are only a couple of changes to make to enable the authentication of unknown users via their home RADIUS servers, to proxy 802.1X AAA. There are several architectural AAA decisions to make, such as: do you have a set of front end RADIUS servers that take all AAA requests and then proxy everything – your home users to backend AAA systems and unknown users to the NRPS? Or do you have a single farm of RADIUS servers that perform all local authentication themselves and anything else gets handed off to the NRPS? Usually these decisions are decided by: the security of the main AAA servers, load balancing requirements, local network architecture and IT skills of the site staff. However, it is recommended that only systems that should talk to the RADIUS servers can talk to the RADIUS servers. This can be achieved by local firewalling on the required ports. In the case of FreeRADIUS, this is UDP ports 1812 – 1814.
This section, like the main 802.1X configuration section, uses FreeRADIUS for the examples. Both version 1 and version 2 examples are provided as the proxy code has been massively changed between the two versions, unlike the EAP configuration. The other RADIUS servers use the same general terms and methods used within these examples.
Clients
The first step is to define the NRPS as clients within your FreeRADIUS configuration. This allows requests from other sites that are being proxied by the NRPS systems to be accepted at your ORPS.
In FreeRADIUS, either add each NRPS address to clients.conf or the SQL-based naslist table. If using naslist in SQL the required secrets for each NRPS are supplied for each ORPS as they are registered in the Janet eduroam support server system.
Proxy
Now that the NRPS can send packets to your ORPS you should be able to run a ‘remote test’ via the Janet eduroam support site to check that remote sites can authenticate your visiting users. The next step is to reciprocate this by allowing their users to authenticate whilst on your network. Here is where we configure the proxy settings to enable their AAA requests to be passed back to the remote ORPS that will check and test their credentials.
In FreeRADIUS 1.x insert the following into proxy.conf – supplying the appropriate secret and authhost/accthost DNS entry:
realm DEFAULT {
type = radius
authhost = roamingX.ja.net:1812
accthost = roamingX.ja.net:1813
secret = secret
nostrip
}
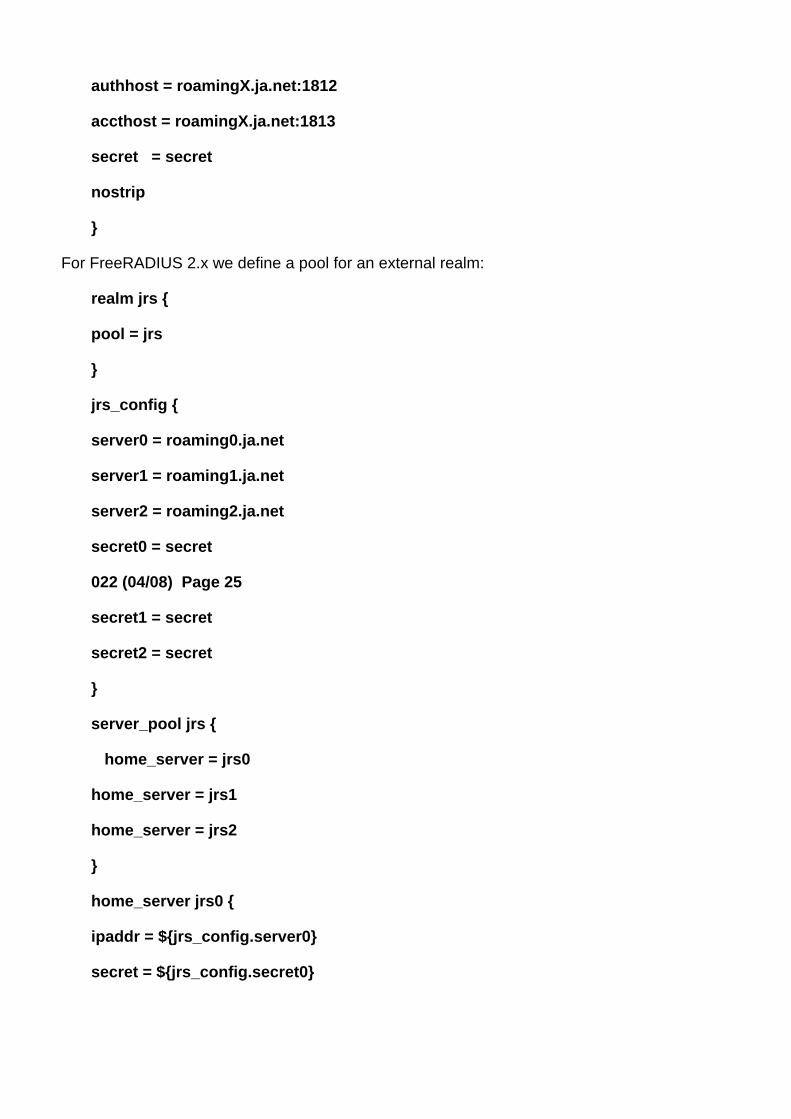
For FreeRADIUS 2.x we define a pool for an external realm:
realm jrs {
pool = jrs
}
jrs_config {
server0 = roaming0.ja.net
server1 = roaming1.ja.net
server2 = roaming2.ja.net
secret0 = secret
022 (04/08) Page 25
secret1 = secret
secret2 = secret
}
server_pool jrs {
home_server = jrs0
home_server = jrs1
home_server = jrs2
}
home_server jrs0 {
ipaddr = ${jrs_config.server0}
secret = ${jrs_config.secret0}
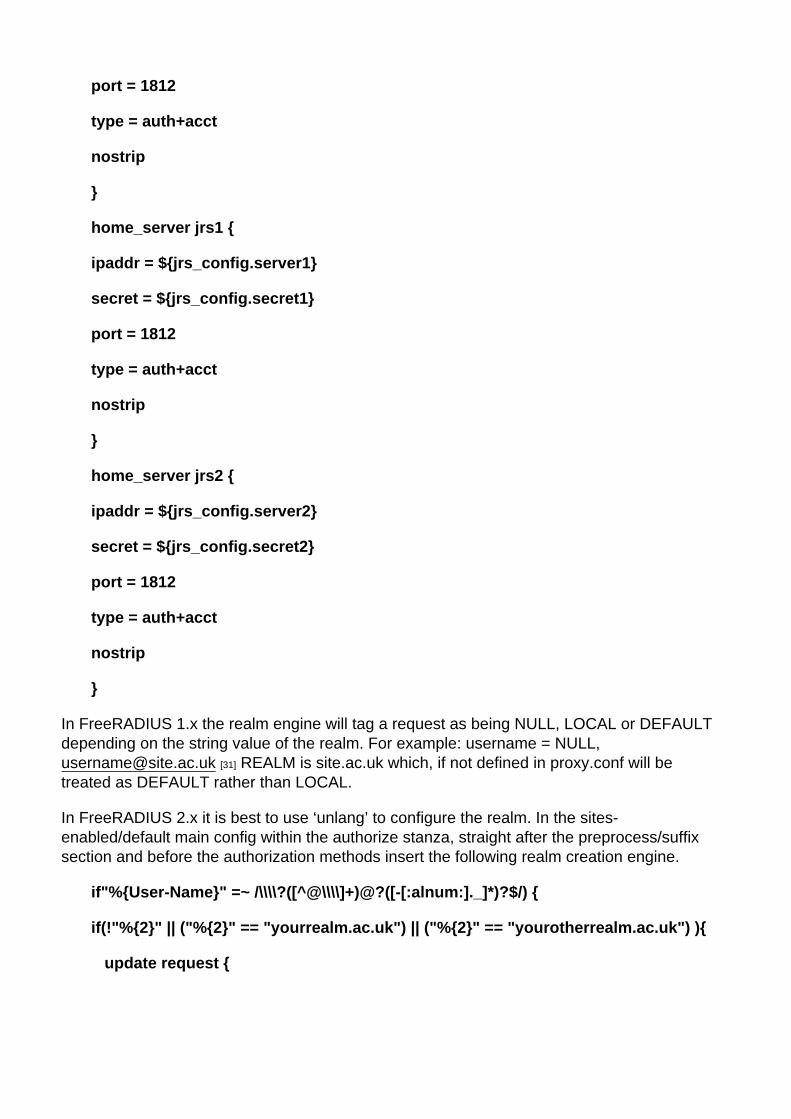
port = 1812
type = auth+acct
nostrip
}
home_server jrs1 {
ipaddr = ${jrs_config.server1}
secret = ${jrs_config.secret1}
port = 1812
type = auth+acct
nostrip
}
home_server jrs2 {
ipaddr = ${jrs_config.server2}
secret = ${jrs_config.secret2}
port = 1812
type = auth+acct
nostrip
}
In FreeRADIUS 1.x the realm engine will tag a request as being NULL, LOCAL or DEFAULT depending on the string value of the realm. For example: username = NULL, [email protected] [31] REALM is site.ac.uk which, if not defined in proxy.conf will be treated as DEFAULT rather than LOCAL.
In FreeRADIUS 2.x it is best to use ‘unlang’ to configure the realm. In the sites-enabled/default main config within the authorize stanza, straight after the preprocess/suffix section and before the authorization methods insert the following realm creation engine.
if"%{User-Name}" =~ /\\\\?([^@\\\\]+)@?([-[:alnum:]._]*)?$/) {
if(!"%{2}" || ("%{2}" == "yourrealm.ac.uk") || ("%{2}" == "yourotherrealm.ac.uk") ){
update request {
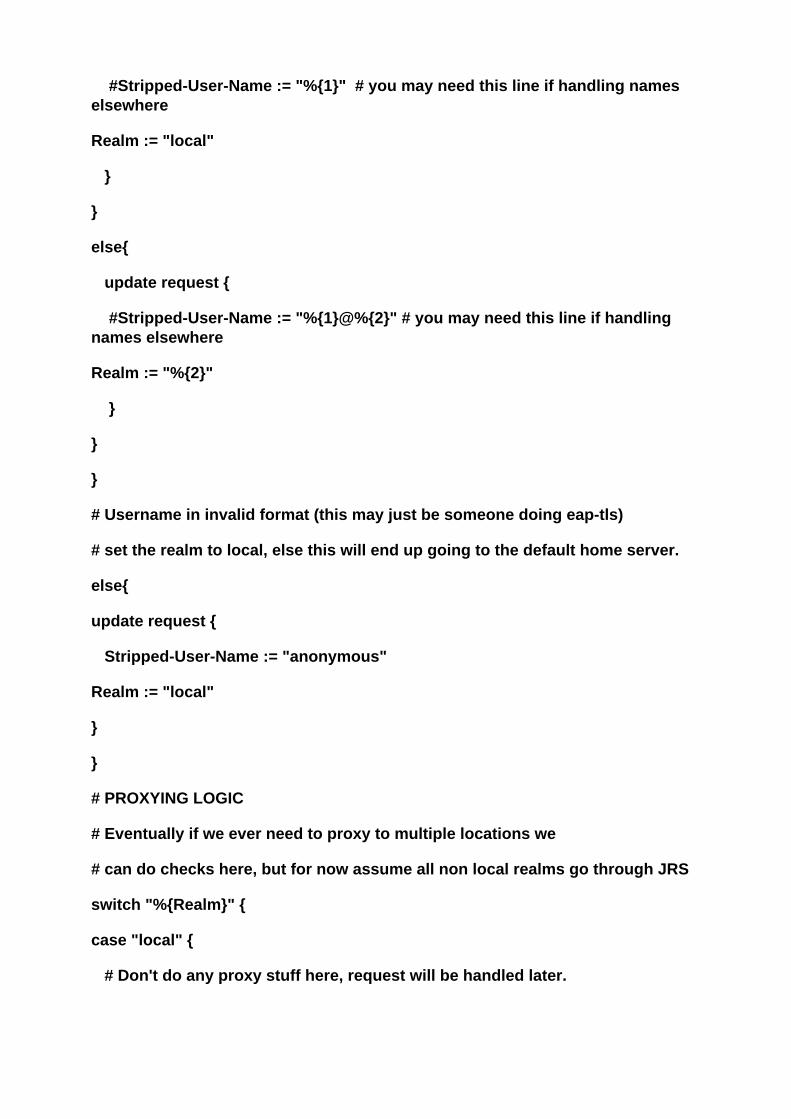
#Stripped-User-Name := "%{1}" # you may need this line if handling names elsewhere
Realm := "local"
}
}
else{
update request {
#Stripped-User-Name := "%{1}@%{2}" # you may need this line if handling names elsewhere
Realm := "%{2}"
}
}
}
# Username in invalid format (this may just be someone doing eap-tls)
# set the realm to local, else this will end up going to the default home server.
else{
update request {
Stripped-User-Name := "anonymous"
Realm := "local"
}
}
# PROXYING LOGIC
# Eventually if we ever need to proxy to multiple locations we
# can do checks here, but for now assume all non local realms go through JRS
switch "%{Realm}" {
case "local" {
# Don't do any proxy stuff here, request will be handled later.
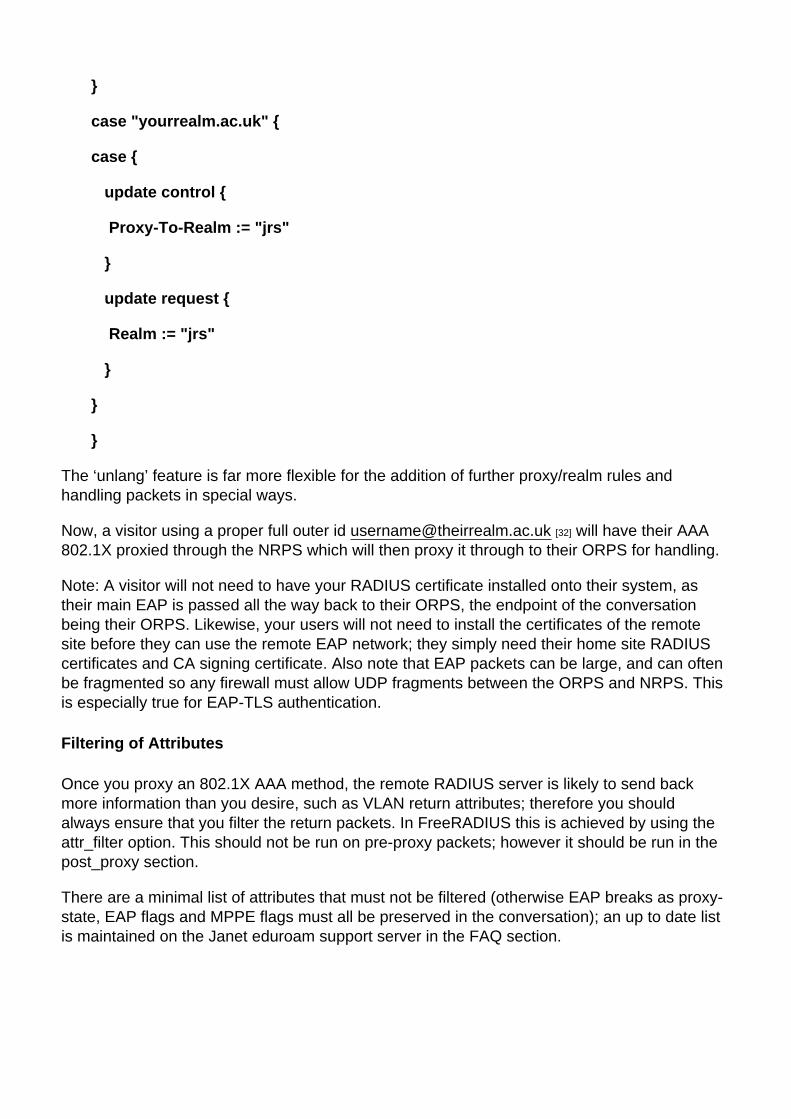
}
case "yourrealm.ac.uk" {
case {
update control {
Proxy-To-Realm := "jrs"
}
update request {
Realm := "jrs"
}
}
}
The ‘unlang’ feature is far more flexible for the addition of further proxy/realm rules and handling packets in special ways.
Now, a visitor using a proper full outer id [email protected] [32] will have their AAA 802.1X proxied through the NRPS which will then proxy it through to their ORPS for handling.
Note: A visitor will not need to have your RADIUS certificate installed onto their system, as their main EAP is passed all the way back to their ORPS, the endpoint of the conversation being their ORPS. Likewise, your users will not need to install the certificates of the remote site before they can use the remote EAP network; they simply need their home site RADIUS certificates and CA signing certificate. Also note that EAP packets can be large, and can often be fragmented so any firewall must allow UDP fragments between the ORPS and NRPS. This is especially true for EAP-TLS authentication.
Filtering of Attributes
Once you proxy an 802.1X AAA method, the remote RADIUS server is likely to send back more information than you desire, such as VLAN return attributes; therefore you should always ensure that you filter the return packets. In FreeRADIUS this is achieved by using the attr_filter option. This should not be run on pre-proxy packets; however it should be run in the post_proxy section.
There are a minimal list of attributes that must not be filtered (otherwise EAP breaks as proxy-state, EAP flags and MPPE flags must all be preserved in the conversation); an up to date list is maintained on the Janet eduroam support server in the FAQ section.
In FreeRADIUS 1.x add attr_filter to the authorize and post-proxy stanzas in radiusd.conf. In FreeRADIUS 2.x, add the attr_filter.post-proxy to the post-proxy section in your active servers in sites-enabled.
attrs file in both cases should contain:
DEFAULT
Service-Type == Framed-User,
Service-Type == Login-User,
Login-Service == Telnet,
Login-Service == Rlogin,
Login-Service == TCP-Clear,
Login-TCP-Port <= 65536,
Framed-IP-Address == 255.255.255.254,
Framed-IP-Netmask == 255.255.255.255,
Framed-Protocol == PPP,
Framed-Protocol == SLIP,
Framed-Compression == Van-Jacobson-TCP-IP,
Framed-MTU >= 576,
Framed-Filter-ID =* ANY,
Reply-Message =* ANY,
Proxy-State =* ANY,
EAP-Message =* ANY,
MS-MPPE-Recv-Key =* ANY,
MS-MPPE-Send-Key =* ANY,
MS-CHAP-MPPE-Keys =* ANY,
State =* ANY,
Message-Authenticator =* ANY,
Session-Timeout <= 28800,
Idle-Timeout <= 600,
Port-Limit <= 2
It is left to individual site policy what other attributes are filtered. Sites may require other REALM identities to be added to this file and allow such realms to be able to send specific attributes through the proxy. For example Tunnel-Medium-Type or Tunnel-Private-Group-Id filtering can be undertaken to ensure that the values are only what you expect: e.g. TunnelPrivate-Group-Id == 666.
Failover and Load Balancing
Whilst the load-balancing behaviour of FreeRADIUS is improving, you cannot load balance EAP such that parts of the conversation go through different NRPS. The conversation must pass through a single NRPS; it is therefore recommended to configure the NRPS as fail_over.
In FreeRADIUS 1.x this is using the ldflag; in FreeRADIUS 2.x you define type = fail_over in the pool section. See the config inline documentation in both cases.
RADIATOR has some load-balancing methods which are able to keep each EAP conversation to a single NRPS. If a site is using RADIATOR it is worth investigating this method further.
Display as Single Column?:
Client configuration
Client configuration
Operating System Support
Currently client devices pose the largest potential problem when deploying 802.1X.
Whilst modern operating systems such as Microsoft® Windows Vista/XP®, Mac OS X® 10.4/10.5 and Linux® natively support 802.1X, older OS such as Microsoft® Windows 98/ME® do not. Additionally there are many other devices on the network which do not support 802.1X such as printers, network music player, desktop hubs/switches, and the current iPhone (Firmware 1.1.4.). Workarounds must be found if these devices are to continue functioning on the network.
All devices which support 802.1X will need to be configured. As introducing 802.1X is a major undertaking, completely changing the way in which users connect to the network, ensuring that client devices are configured correctly is a high priority task.
Ensuring all devices are correctly configured will require planning, documentation and configuration tools. IT Support staff may also need training in 802.1X to deal with related
problems and configuration issues.
Supplicants
A supplicant is an application on the client device which authenticates the client with the authentication server and maintains the client side of 802.1X session. Most operating systems have 802.1X supplicants built-in by default; however the configuration and EAP methods supported vary widely between the supplicants. In addition to the default supplicants there are a number of third party supplicants which can be either purchased or downloaded freely. Manufacturers of wireless network interface cards will often include a supplicant in the software package distributed with their hardware.
The most common supplicants for Windows XP® are:
Intel supplicant MD5, TLS, TTLS, PEAP, FAST, LEAP
Cisco® Secure Services Client (formerly AEGIS Meeting House) MD5, TLS, TTLS, PEAP, FAST, LEAP
Microsoft® 802.1X Authentication Client TLS, PEAP
Juniper Odyssey Access Client (Formerly Funk) MD5, TLS, TTLS, PEAP, FAST, LEAP, SIM
SecureW2 Client TTLS
OpenSEA
OpenSEA (Open Secure Edge Access) is an alliance promoting and developing XSupplicant (a.k.a. Open1X), a robust, open source 802.1X supplicant for multiple platforms. OpenSEA’s primary aim is to promote the IEEE 802.1X standard for controlling network access. Support for OpenSEA has been steadily growing and the alliance now consists of a number of large vendors working in the 802.1X networking field.
JANET(UK) is a member of the OpenSEA alliance and is currently investigating the potential of XSupplicant as a standardised supported supplicant for UK educational organisations: http://www.openseaalliance.org [33].
Configuring XSupplicant
XSupplicant splits the configuration into three parts:
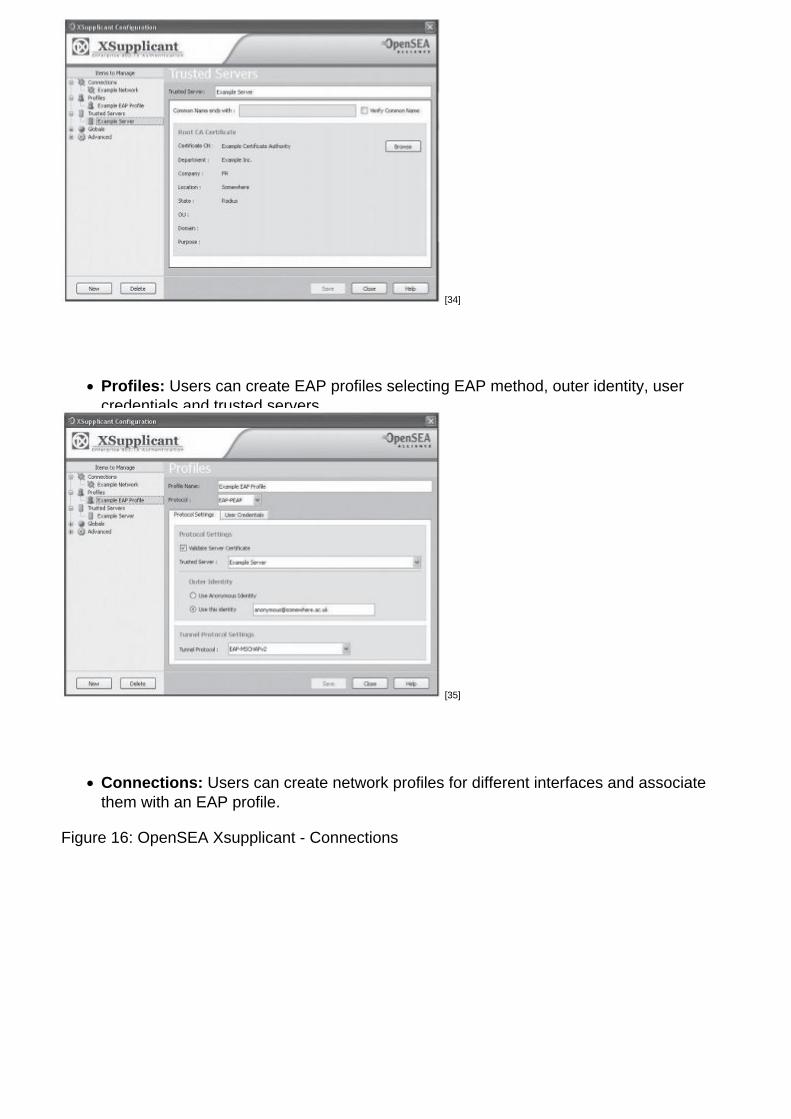
Trusted Servers: Users can add their trusted certificate authorities and server certificates either by importing or selecting from the list of installed certificates.
Figure 14: OpenSEA Xsupplicant - Trusted Servers
[34]
Profiles: Users can create EAP profiles selecting EAP method, outer identity, user credentials and trusted servers.
Figure 15: OpenSEA Xsupplicant - Profiles
[35]
Connections: Users can create network profiles for different interfaces and associate them with an EAP profile.
Figure 16: OpenSEA Xsupplicant - Connections
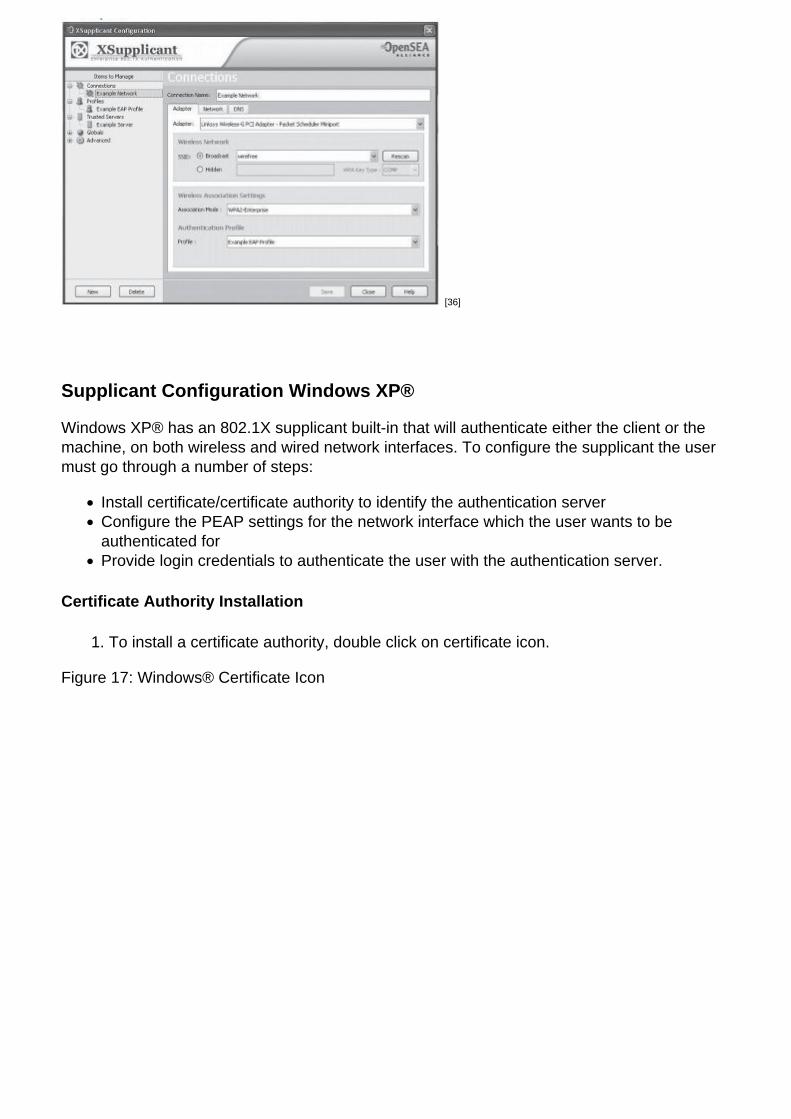
[36]
Supplicant Configuration Windows XP®
Windows XP® has an 802.1X supplicant built-in that will authenticate either the client or the machine, on both wireless and wired network interfaces. To configure the supplicant the user must go through a number of steps:
Install certificate/certificate authority to identify the authentication serverConfigure the PEAP settings for the network interface which the user wants to be authenticated forProvide login credentials to authenticate the user with the authentication server.
Certificate Authority Installation
1. To install a certificate authority, double click on certificate icon.
Figure 17: Windows® Certificate Icon

[37]
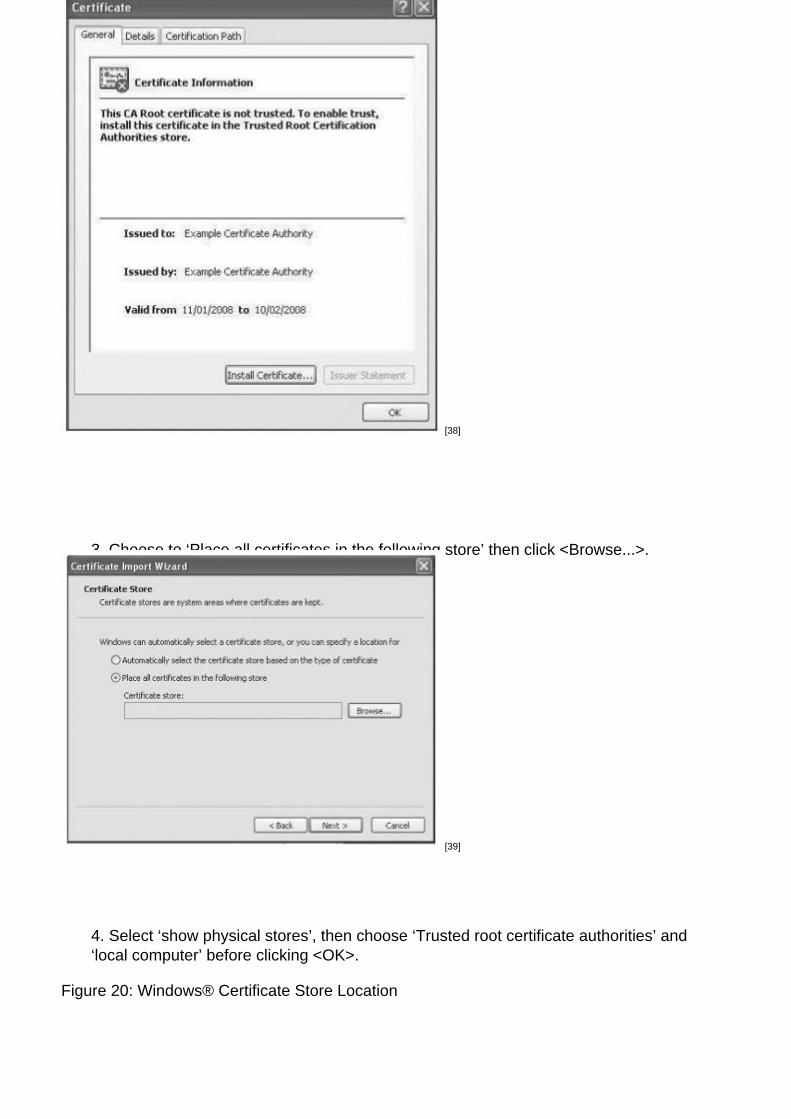
2. Click on <Install Certificate...> in the Certificate Window.
Figure 18: Windows® Certificate General Details
[38]
3. Choose to ‘Place all certificates in the following store’ then click <Browse...>.
Figure 19: Windows® Certificate Import Wizard
[39]
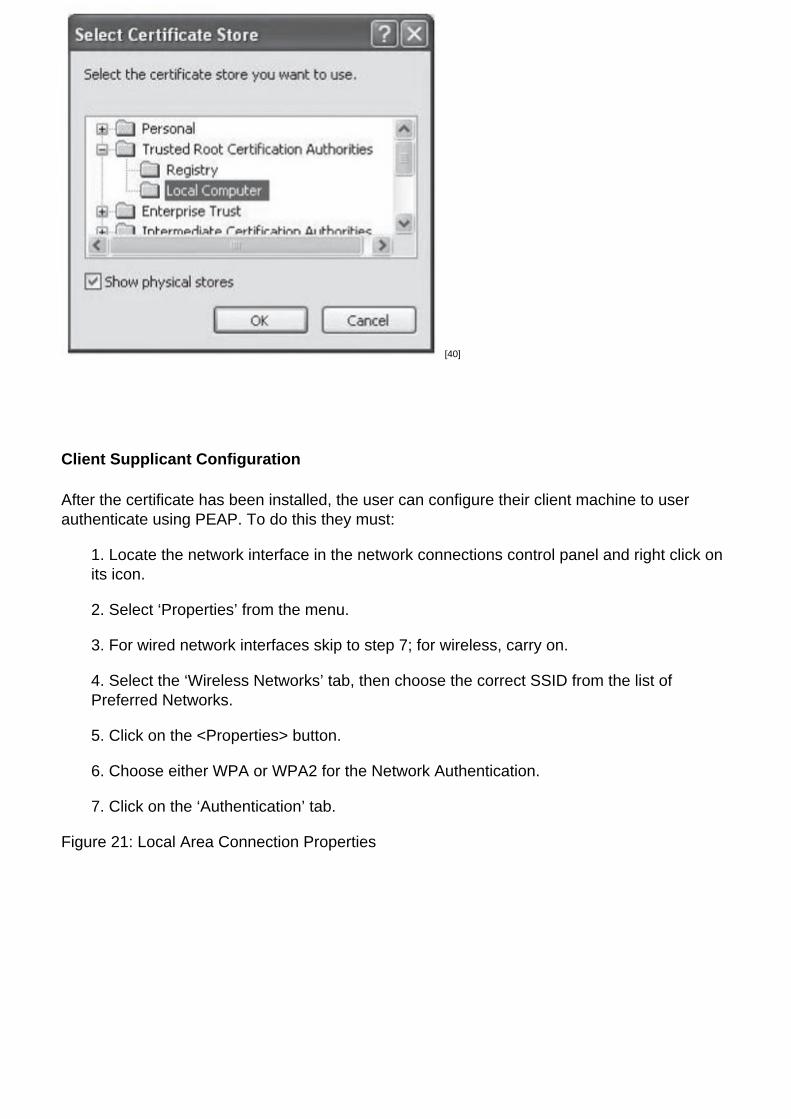
4. Select ‘show physical stores’, then choose ‘Trusted root certificate authorities’ and ‘local computer’ before clicking <OK>.
Figure 20: Windows® Certificate Store Location
[40]
Client Supplicant Configuration
After the certificate has been installed, the user can configure their client machine to user authenticate using PEAP. To do this they must:
1. Locate the network interface in the network connections control panel and right click on its icon.
2. Select ‘Properties’ from the menu.
3. For wired network interfaces skip to step 7; for wireless, carry on.
4. Select the ‘Wireless Networks’ tab, then choose the correct SSID from the list of Preferred Networks.
5. Click on the <Properties> button.
6. Choose either WPA or WPA2 for the Network Authentication.
7. Click on the ‘Authentication’ tab.
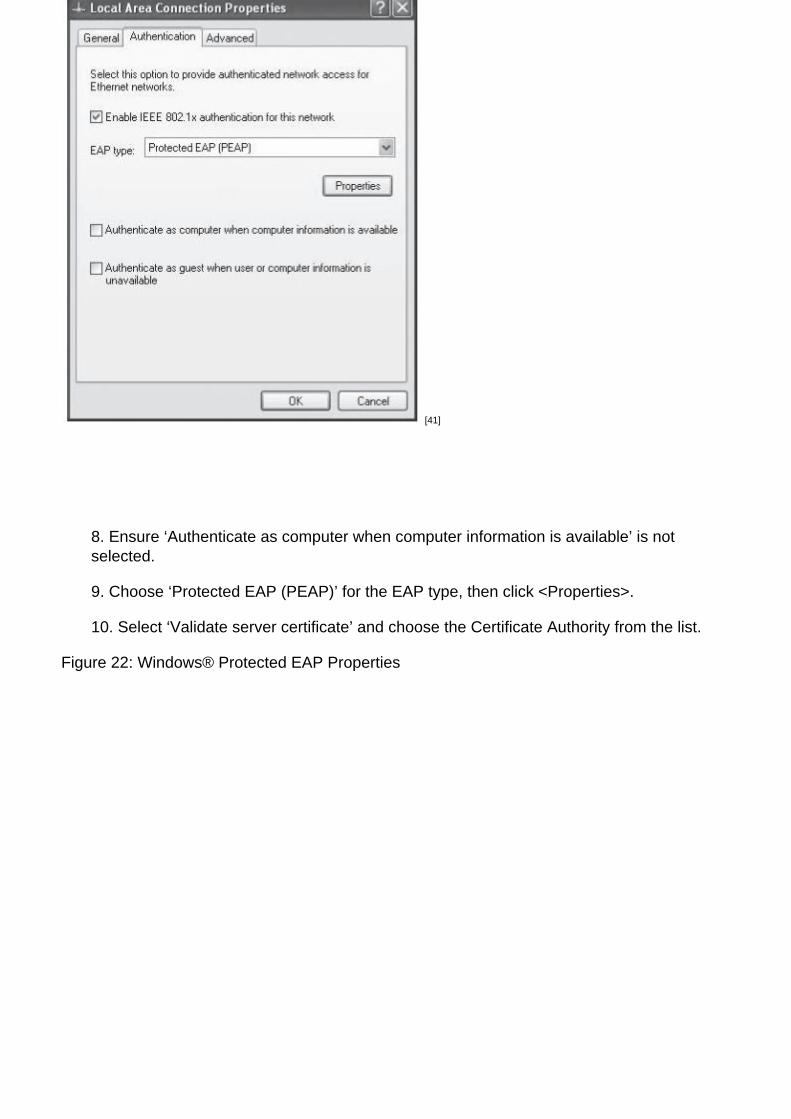
Figure 21: Local Area Connection Properties
[41]
8. Ensure ‘Authenticate as computer when computer information is available’ is not selected.
9. Choose ‘Protected EAP (PEAP)’ for the EAP type, then click <Properties>.
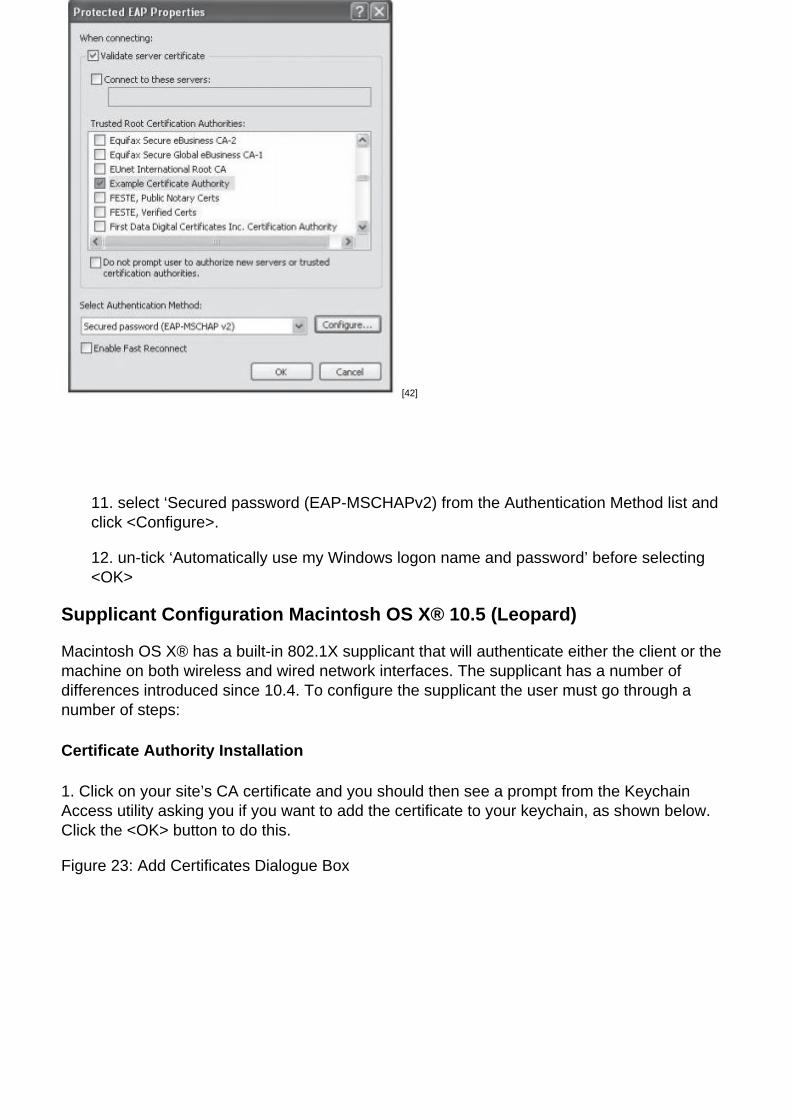
10. Select ‘Validate server certificate’ and choose the Certificate Authority from the list.
Figure 22: Windows® Protected EAP Properties
[42]
11. select ‘Secured password (EAP-MSCHAPv2) from the Authentication Method list and click <Configure>.
12. un-tick ‘Automatically use my Windows logon name and password’ before selecting <OK>
Supplicant Configuration Macintosh OS X® 10.5 (Leopard)
Macintosh OS X® has a built-in 802.1X supplicant that will authenticate either the client or the machine on both wireless and wired network interfaces. The supplicant has a number of differences introduced since 10.4. To configure the supplicant the user must go through a number of steps:
Certificate Authority Installation
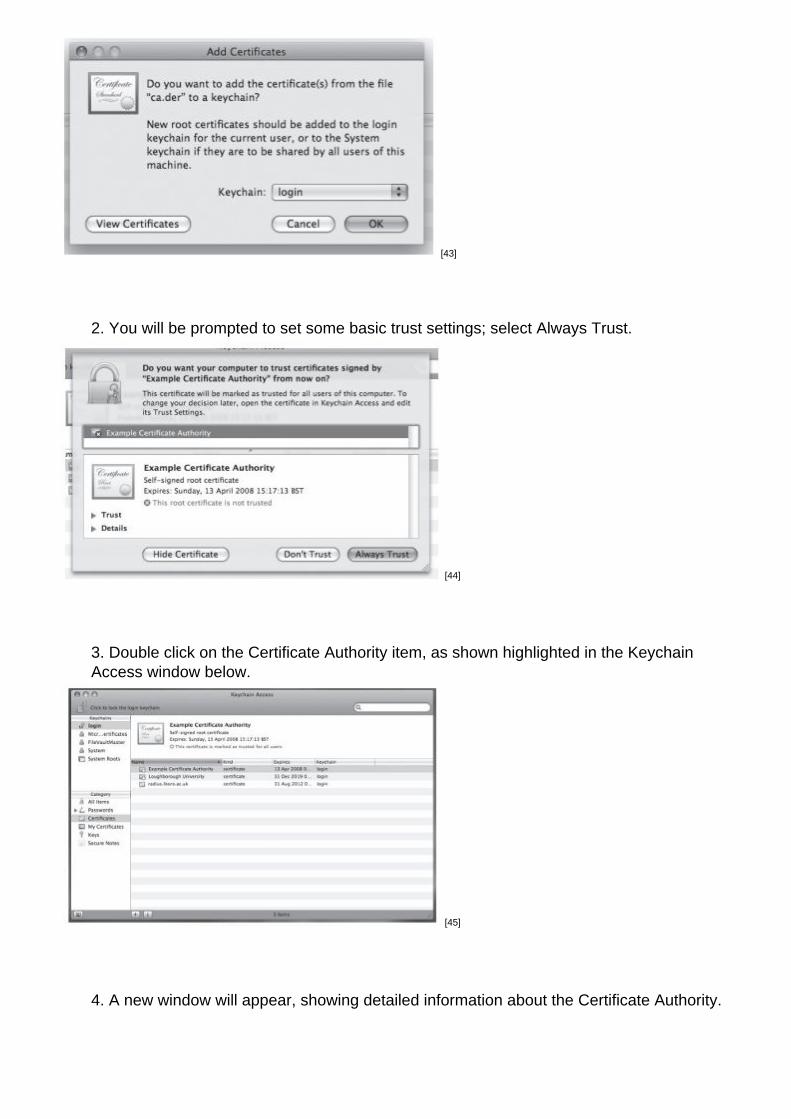
1. Click on your site’s CA certificate and you should then see a prompt from the Keychain Access utility asking you if you want to add the certificate to your keychain, as shown below. Click the <OK> button to do this.
Figure 23: Add Certificates Dialogue Box
[43]
2. You will be prompted to set some basic trust settings; select Always Trust.
Figure 24: Certificate Trust Dialogue Box
[44]
3. Double click on the Certificate Authority item, as shown highlighted in the Keychain Access window below.
Figure 25: Keychain Access Window
[45]
4. A new window will appear, showing detailed information about the Certificate Authority.
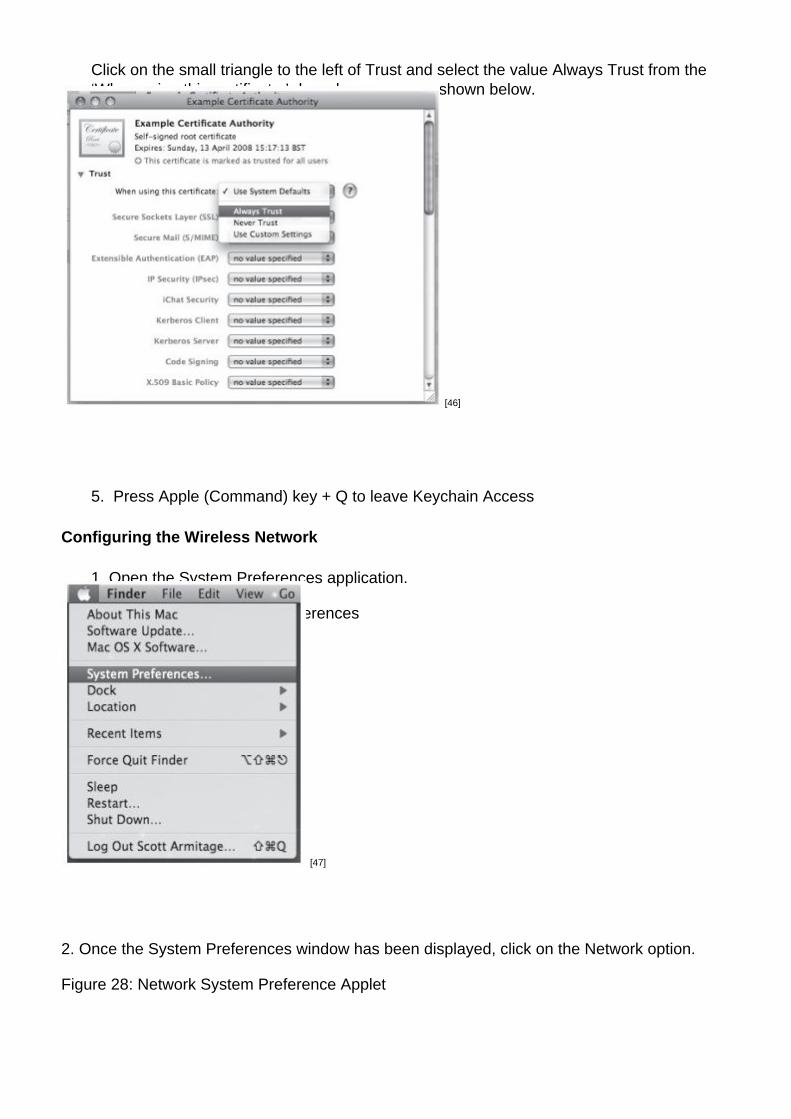
Click on the small triangle to the left of Trust and select the value Always Trust from the ‘When using this certificate:’ drop-down menu as shown below.
Figure 26: Selecting to Always Trust a Certificate
[46]
5. Press Apple (Command) key + Q to leave Keychain Access
Configuring the Wireless Network
1. Open the System Preferences application.
Figure 27: Launching System Preferences
[47]
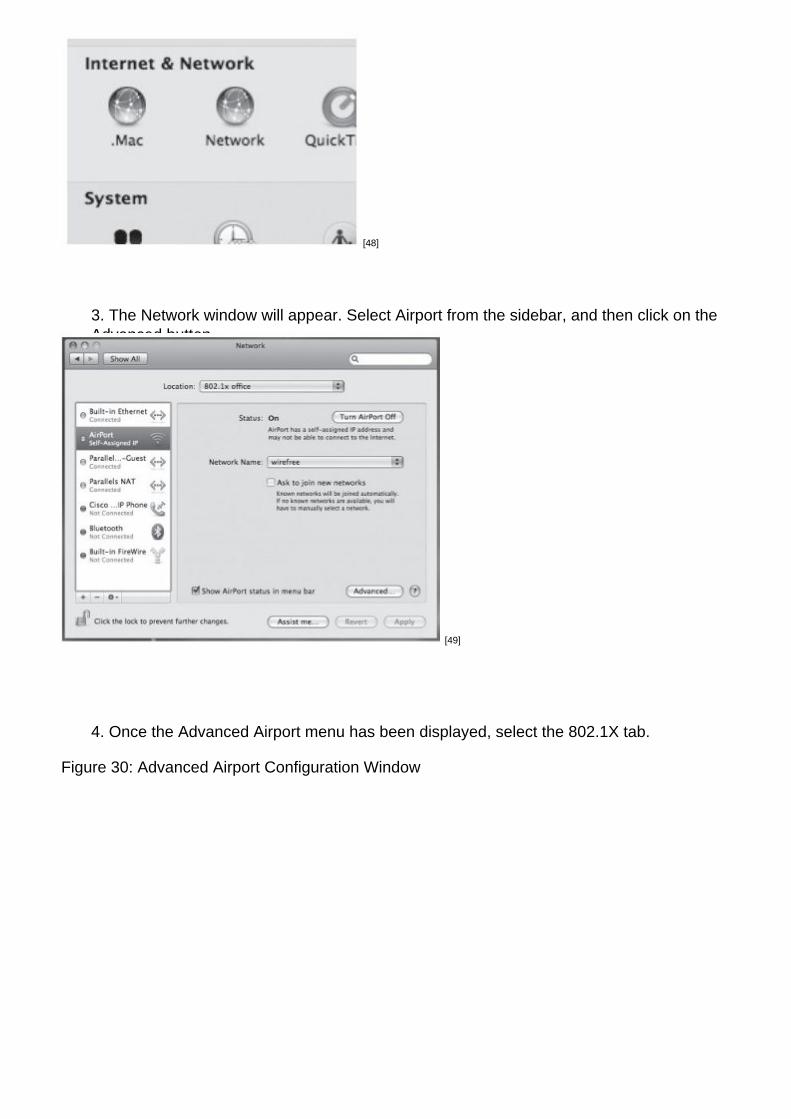
2. Once the System Preferences window has been displayed, click on the Network option.
Figure 28: Network System Preference Applet
[48]
3. The Network window will appear. Select Airport from the sidebar, and then click on the Advanced button.
Figure 29: Network System Preference Window
[49]
4. Once the Advanced Airport menu has been displayed, select the 802.1X tab.
Figure 30: Advanced Airport Configuration Window
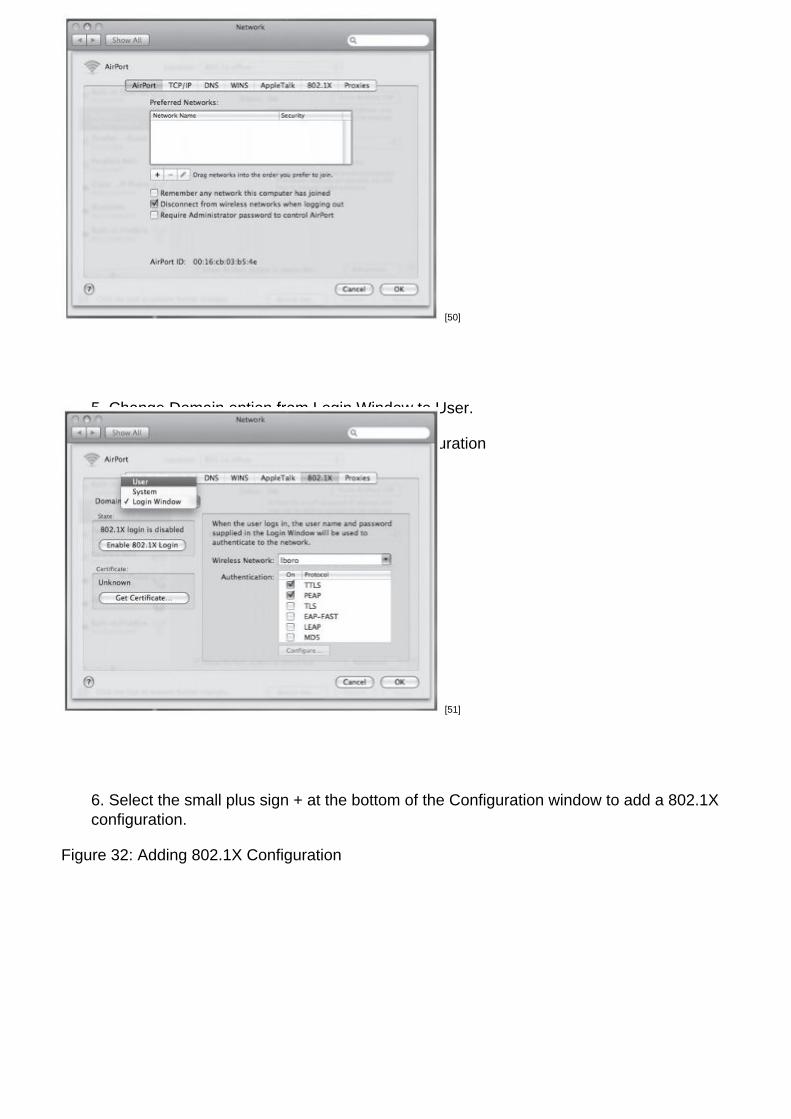
[50]
5. Change Domain option from Login Window to User.
Figure 31: 802.1X tab within Advanced Airport Configuration
[51]
6. Select the small plus sign + at the bottom of the Configuration window to add a 802.1X configuration.
Figure 32: Adding 802.1X Configuration
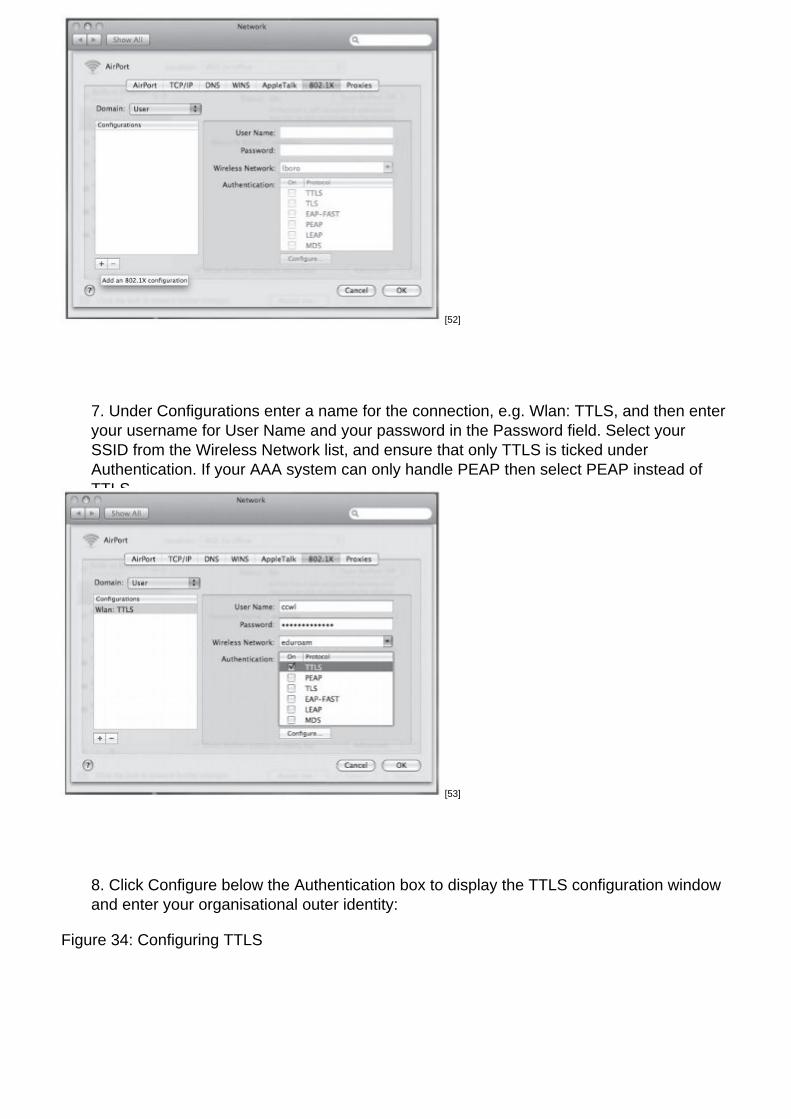
[52]
7. Under Configurations enter a name for the connection, e.g. Wlan: TTLS, and then enter your username for User Name and your password in the Password field. Select your SSID from the Wireless Network list, and ensure that only TTLS is ticked under Authentication. If your AAA system can only handle PEAP then select PEAP instead of TTLS.
Figure 33: 802.1X Configuration Credentials
[53]
8. Click Configure below the Authentication box to display the TTLS configuration window and enter your organisational outer identity:
Figure 34: Configuring TTLS
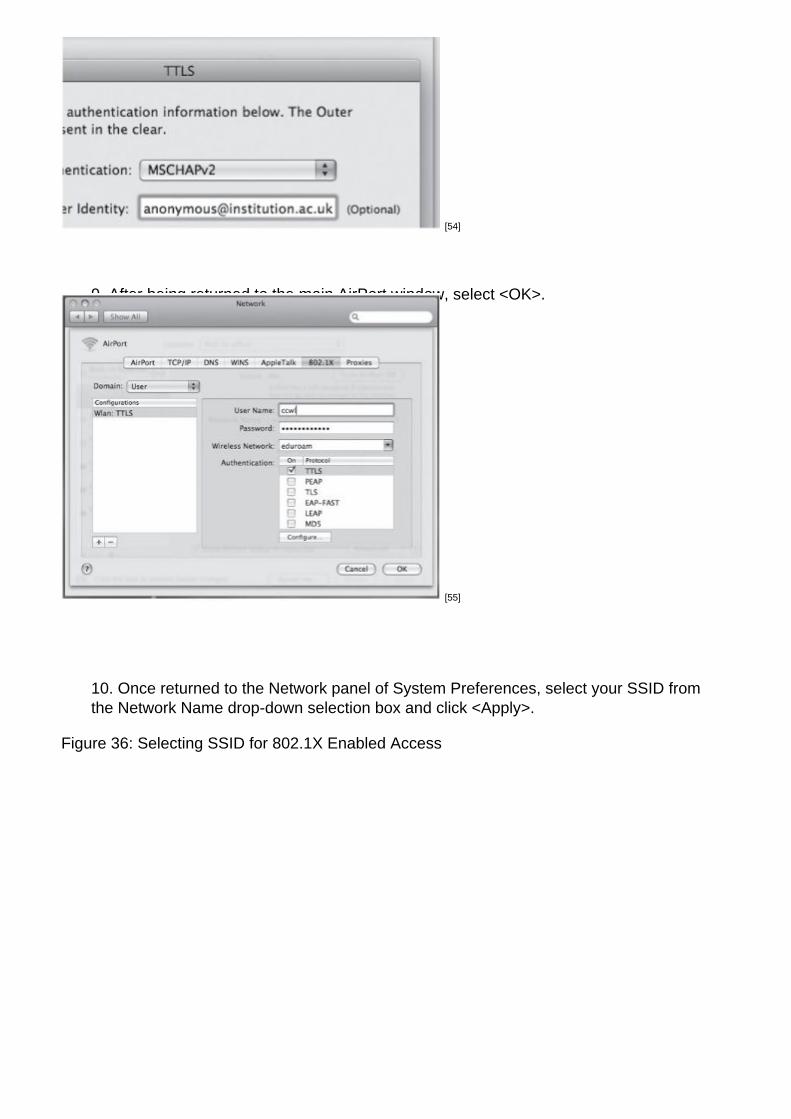
[54]
9. After being returned to the main AirPort window, select <OK>.
Figure 35: Confirming 802.1X Configuration
[55]
10. Once returned to the Network panel of System Preferences, select your SSID from the Network Name drop-down selection box and click <Apply>.
Figure 36: Selecting SSID for 802.1X Enabled Access
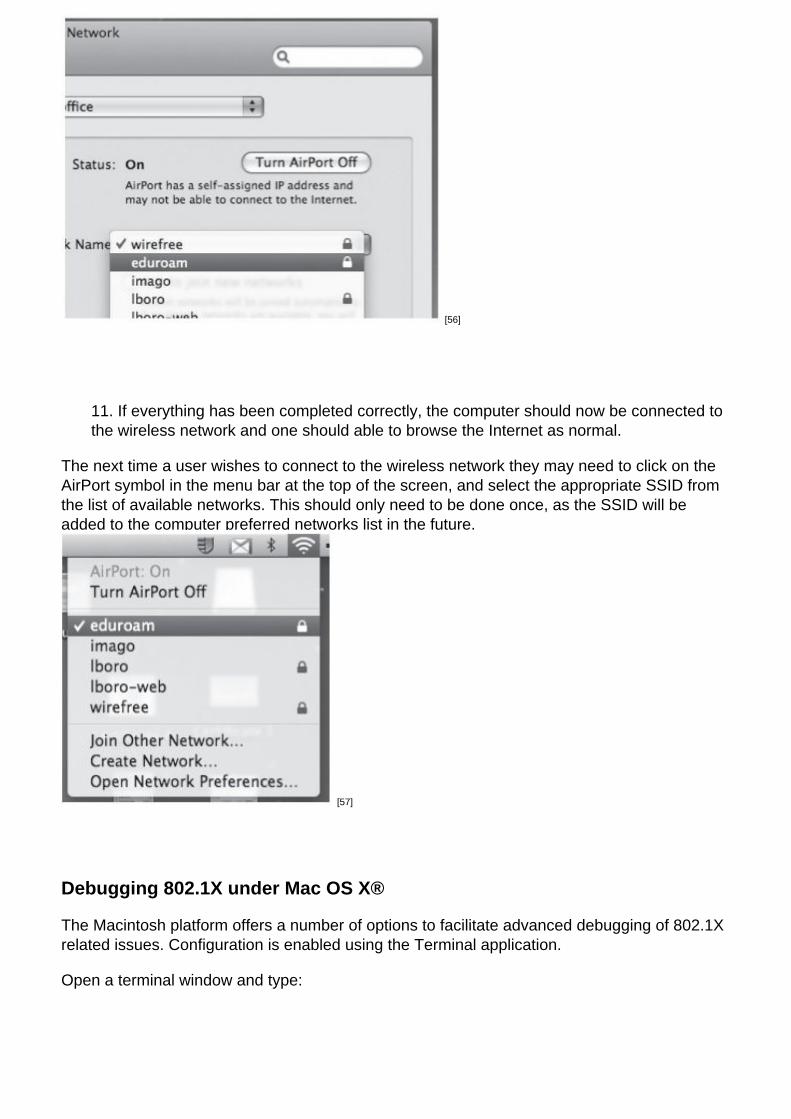
[56]
11. If everything has been completed correctly, the computer should now be connected to the wireless network and one should able to browse the Internet as normal.
The next time a user wishes to connect to the wireless network they may need to click on the AirPort symbol in the menu bar at the top of the screen, and select the appropriate SSID from the list of available networks. This should only need to be done once, as the SSID will be added to the computer preferred networks list in the future.
Figure 37: Airport Selection Menu
[57]
Debugging 802.1X under Mac OS X®
The Macintosh platform offers a number of options to facilitate advanced debugging of 802.1X related issues. Configuration is enabled using the Terminal application.
Open a terminal window and type:
sudo mkdir /var/log/eapolclient
export NSDebugEnabled=YES
Load the Network Connection Application and attempt to connect to the 802.1X (EAP) wireless network. This will generate a log file in /var/log/eapolclient/ which is viewable with pre-installed text editors and will aid debugging of the system.
Authors and contributors
Authors and contributors
Scott Armitage is a member of the IT Services department at Loughborough University and works within the Network & Security Team. Scott has been one of the key people responsible for the deployment and management of wireless networking at Loughborough and is also heavily involved in deploying 802.1X on the wired network. Recently he has also been contracted to JANET(UK) as an advisor for the newly created Wireless Technology Advisory Service (WTAS).
Dr Alan Buxey has more than 17 years of experience in computer technology, building up a fundamental knowledge of IT from an early interest in computing as a teenager. During his time at Sussex University he managed UNIX servers including local networking and built on this at MSSL (UCL) where he was involved in Beowulf projects, Distributed Computing and introductory GRID projects. Alan managed the lead organisation for the East Midlands Metropolitan Area Network (EMMAN) consortium in then-UKERNA’s Location Independent Networking trial project which has become the JANET Roaming service where he works in a national technical support role. Currently entrenched in wireless, 802.1X security and deployment at Loughborough University, he is still an active participant in several key technical mailing lists regarding this sphere of technology.
As Network & Security Manager at Loughborough University, Matthew Cook manages the merged Network & Security team of over ten IT professionals with a remit to provide expert level knowledge and skills in the areas of data networking and security. The team supports the university-wide logical network infrastructure, both wired, wireless and the core networking application level services. As well as driving local networking strategy, he has functional responsibility and oversight for IT Security Policy across all areas of IT Services and the wider university. Matthew has an extensive knowledge of wide ranging operating system and networking technologies and has spoken at many conferences on various security matters.
Source URL: https://community.jisc.ac.uk/library/advisory-services/ieee-8021x-implementation-janet-connected-organisations
Links[1] http://community.ja.net/library/janet-services-documentation/security-matters-technical-guide[2] http://grouper.ieee.org/groups/802/1/[3] http://www.ietf.org/rfc/rfc3748.txt
[4] http://standards.ieee.org/getieee802/[5] http://www.ietf.org/rfc/rfc2284.txt[6] http://www.ietf.org/rfc/rfc2865.txt[7] http://www.ietf.org/rfc/rfc3588.txt[8] http://community.ja.net/system/files/images/tg-ieee8021x-01.jpg[9] http://community.ja.net/system/files/images/tg-ieee8021x-02.jpg[10] http://community.ja.net/system/files/images/tg-ieee8021x-03.jpg[11] http://community.ja.net/system/files/images/tg-ieee8021x-04.jpg[12] http://community.ja.net/system/files/images/tg-ieee8021x-05.jpg[13] http://community.ja.net/system/files/images/tg-ieee8021x-06.jpg[14] http://community.ja.net/system/files/images/tg-ieee8021x-07.jpg[15] http://community.ja.net/system/files/images/tg-ieee8021x-08.jpg[16] http://community.ja.net/system/files/images/tg-ieee8021x-09.jpg[17] http://community.ja.net/system/files/images/tg-ieee8021x-10.jpg[18] http://community.ja.net/system/files/images/tg-ieee8021x-11.jpg[19] http://community.ja.net/system/files/images/tg-ieee8021x-12.jpg[20] http://www.tools.ietf.org/html/draft-kamath-pppext-peapv0-00[21] http://community.ja.net/system/files/images/tg-ieee8021x-13.jpg[22] http://tools.ietf.org/html/draft-funk-eap-ttls-v1-01[23] http://www.cisco.com/en/US/docs/switches/lan/catalyst2950/software/release/12.1_9_ea1/configuration/guide/Sw8021x.html[24] http://www.freeradius.org/[25] http://support.microsoft.com/kb/814394/en-us[26] http://support.microsoft.com/kb/885453/en-us[27] http://wiki.freeradius.org/FreeRADIUS_Active_Directory_Integration_HOWTO[28] http://wiki.freeradius.org/Main_Page[29] http://www.freeradius.org/list/[30] https://community.jisc.ac.uk/library/janet-services-documentation/how-does-organisation-join-service[31] mailto:[email protected][32] mailto:[email protected][33] http://www.openseaalliance.org/[34] http://community.ja.net/system/files/images/tg-ieee8021x-14.jpg[35] http://community.ja.net/system/files/images/tg-ieee8021x-15.jpg[36] http://community.ja.net/system/files/images/tg-ieee8021x-16.jpg[37] http://community.ja.net/system/files/images/tg-ieee8021x-17.jpg[38] http://community.ja.net/system/files/images/tg-ieee8021x-18.jpg[39] http://community.ja.net/system/files/images/tg-ieee8021x-19.jpg[40] http://community.ja.net/system/files/images/tg-ieee8021x-20.jpg[41] http://community.ja.net/system/files/images/tg-ieee8021x-21.jpg[42] http://community.ja.net/system/files/images/tg-ieee8021x-22.jpg[43] http://community.ja.net/system/files/images/tg-ieee8021x-23.jpg[44] http://community.ja.net/system/files/images/tg-ieee8021x-24.jpg[45] http://community.ja.net/system/files/images/tg-ieee8021x-25.jpg[46] http://community.ja.net/system/files/images/tg-ieee8021x-26.jpg[47] http://community.ja.net/system/files/images/tg-ieee8021x-27.jpg[48] http://community.ja.net/system/files/images/tg-ieee8021x-28.jpg[49] http://community.ja.net/system/files/images/tg-ieee8021x-29.jpg[50] http://community.ja.net/system/files/images/tg-ieee8021x-30.jpg[51] http://community.ja.net/system/files/images/tg-ieee8021x-31.jpg[52] http://community.ja.net/system/files/images/tg-ieee8021x-32.jpg[53] http://community.ja.net/system/files/images/tg-ieee8021x-33.jpg[54] http://community.ja.net/system/files/images/tg-ieee8021x-34.jpg[55] http://community.ja.net/system/files/images/tg-ieee8021x-35.jpg[56] http://community.ja.net/system/files/images/tg-ieee8021x-36.jpg[57] http://community.ja.net/system/files/images/tg-ieee8021x-37.jpg