IBM i2 iBase: Administration
332
Version 8 Release 9 IBM i2 iBase Administration IBM SC27-5091-00
-
Upload
khangminh22 -
Category
Documents
-
view
0 -
download
0
Transcript of IBM i2 iBase: Administration

Version 8 Release 9
IBM i2 iBaseAdministration
IBM
SC27-5091-00
Note
Before using this information and the product it supports, read the information in “Notices” on page325.
This edition applies to version 8, release 9, modification 13 of IBM® i2® iBase and to all subsequent releases andmodifications until otherwise indicated in new editions.© Copyright International Business Machines Corporation 1991, 2020.US Government Users Restricted Rights – Use, duplication or disclosure restricted by GSA ADP Schedule Contractwith IBM Corp.

Contents
IBM i2 iBase administration center....................................................................1Administrative tasks in iBase Designer................................................................................................ 1
Getting started with iBase Designer................................................................................................1Security files, users, and groups................................................................................................... 20Create and maintain databases.....................................................................................................51Setting Up iBase.............................................................................................................................97Setting up iBase clients............................................................................................................... 155External Access Control.............................................................................................................. 163
Managing Access Control..................................................................................................................167Setting up iBase clients............................................................................................................... 167Setting and maintaining user access rights................................................................................ 168Physical access to iBase Designer.............................................................................................. 169Logical access to iBase (roles).................................................................................................... 170iBase files on the network (permissions)....................................................................................170SQL Server login and user accounts............................................................................................172Use iBase with other products.................................................................................................... 175
iBase with TextChart.........................................................................................................................176Ways of working with iBase and TextChart................................................................................ 177iBase TextChart security considerations.................................................................................... 178Planning workflows for TextChart ..............................................................................................179Before Starting Data Capture in TextChart................................................................................. 186Data Capture Considerations...................................................................................................... 191Optional schema extensions for TextChart................................................................................ 194Troubleshooting iBase TextChart............................................................................................... 198
iBase Scheduler................................................................................................................................ 206How Scheduler works..................................................................................................................207Installing and configuring Scheduler.......................................................................................... 208The Scheduler Log....................................................................................................................... 230Interpreting the Scheduler Log................................................................................................... 231Scheduler error messages.......................................................................................................... 233
iBase database replication............................................................................................................... 242Project management................................................................................................................... 243For iBase administrators............................................................................................................. 247For SQL Server administrators.................................................................................................... 302
Setting up the Index Service.............................................................................................................320The Index Service configuration installation.............................................................................. 320SQL Server logins and Windows accounts..................................................................................320Logging on....................................................................................................................................321Configuring an iBase database....................................................................................................322Checking that the service is configured successfully.................................................................322Managing the index service.........................................................................................................323Troubleshooting...........................................................................................................................323
Notices.........................................................................................................325Trademarks....................................................................................................................................... 326
iii

iv

IBM i2 iBase administration centerWelcome to the IBM® i2® iBase administration center, where you can find information about how toconfigure and administer IBM i2 iBase.Troubleshooting and supporti2 Analyze support pageIBM Software Support home pageMore informationIBM Security Learning AcademyIBM training
Administrative tasks in iBase DesigneriBase Designer is used to design and administer iBase databases.
Getting started with iBase DesignerBefore you can use iBase Designer, you must first create a security file and database. This documentgives an overview of these steps and introduces you to some of the other tasks that you might need todo in iBase Designer.
What is iBase Designer?IBM i2 iBase is a database solution for capturing, controlling, and analyzing multi-source data in asecure environment. Database administrators and designers use IBM i2 iBase Designer to set up andmaintain the iBase database, and users use iBase to enter data and interact with it.
The differences between iBase and iBase Designer:
iBase Designer iBase
Designers use iBase Designer to perform thefollowing types of task:
• Design databases- this process usuallyinvolves consulting with the intended users todecide exactly what information is to be storedand in what form.
• Create and update databases- includescreating all the required entity and link typesand keeping them up-to-date as requirementschange.
• Configure databases- setting up the featuresthat affect how the database is used, such aspredefined code lists, labeling schemes,auditing, and assign semantic types.
• Administer the database- tasks that are doneregularly, such as adding new users,maintaining passwords, setting security, anddeleting old records.
A user can use iBase to work on the records inthe database:
• Add, modify, and delete records.• Monitor changes to the data by adding alertdefinitions (SQL Server databases only)
• Import and export records.• Create sets and queries to find data of
particular interest.• Analyze the data using various tools.• Create reports or charts based on the data.
How they work on the records, and whichrecords they can access, is controlled by thesecurity administrator using iBase Designer.
Logging changes to the data is done via Auditingand, optionally, Audit History.
© Copyright IBM Corp. 1991, 2020 1

iBase Designer iBase
• Perform tasks that can only be done whenother users are excluded from the database-this type of task includes bulk imports into SQLServer databases and applying schemaupdates.
How you choose to learn about iBase Designer depends on your experience with iBase and the kind oftasks that you perform:
Learn about Refer to...
New features at this release IBM i2 iBase release notes
Basics of iBase Using IBM i2 iBase
Using iBase Designer to administer databases • Creating and Maintaining Databases• Setting Up iBase
Using iBase Designer to administer users andgroups
• Security Files, Users and Groups• External Access Control
Differences between iBase and iBase DesignerIf you are familiar with iBase, then you might be interested to know about the differences betweeniBase and iBase Designer. The following areas highlight the different ways iBase Designer functions.
Logging on
To start a session in iBase or iBase Designer, you need to log on to a security file and then, dependingon the task, open the database:
Session Details
Logged on and database open After you log on with the database open, you cancomplete most aspects of administration ordesign on that database, or create newdatabases.
Logged on If you are logged in, but no database is open, youcan:
• edit the groups and users who are defined inthat security file.
• create new databases or templates.• compact and repair other databases.
Not logged on Without logging on, you can create a newsecurity file (or compact and repair an existingsecurity file), and manage the iBase settings thataffect the local installation (options).
2 IBM i2 iBase: Administration

Working in multiple databases
You can open several databases in iBase Designer at one time, if they are secured by the samesecurity file. As a result, the Status Bar of the application window does not display the databasename.
Each database is opened in a separate window, which displays the name of the database in its titlebar. You can maximize any database window to fill the application window if you want.
When you open multiple databases, iBase Designer commands that affect an open database operateon the active database, the one whose title appears in the title bar of the iBase Designer applicationwindow. The active database also has its window displayed in front of others and its title bar iscolored to show that it is active.
You can see which databases are open by displaying the Window menu, and make any one of thosedatabases active by selecting it from that menu. You can also do this using the menu that appearswhen you right-click on the background of the application window.
You cannot make a different database active while you have any dialog open.
Database windows
Each database window contains two panes: the left pane is similar to the Database Explorer in iBase,and the right pane is a single window that shows the details of the group or object that is selected inthe left pane.
There are differences in the left pane, when compared to iBase:
• There are some items that are shown only in iBase Designer. These include code lists, chartattributes, and standard fields.
• The pane does not include any of the folder objects that are shown in iBase, such as queries,browse definitions, and sets.
Note: There is no Edit menu in iBase Designer, but there is a menu that includes Copy and Paste.Some operations require the source and destination to match, for example when you want to copyand paste field, entity and link type definitions. Right-click on the database object to display themenu.
Data inspection and modification
iBase Designer has only one command for viewing data that is held in entity and link types. TheRecords command, which is also available in iBase.
To show records of a particular type:
• Right-click on the entity or link type, and select Records.
Note: You cannot edit any data within iBase Designer except by importing.
Opening databases in iBase DesignerStart iBase designer, open and close an example database, then log off from the security file.
This is a brief overview of how to:
1. Start iBase Designer.2. Open an example database (after stopping any database services that may be running and waiting
for users to exit from the database).3. Close the database (so allowing other users to open the database).4. Log off from the security file
IBM i2 iBase administration center 3

This section also describes how to check the options that you have in your installation of iBase.
If you already use iBase, there are some similarities and differences. You also need to be aware howyour actions affect other users.
Starting iBase Designer
You should be able to start iBase Designer from the Windows Start menu by selecting: Programs >IBM i2 iBase 8 Tools IBM i2 iBase Designer
Exclusive access to databases
iBase is a multi-user system, allowing many users to work with the same database and perform dataentry or analysis at the same time. This is not true of iBase Designer.
iBase Designer requires exclusive access to open a database, but allows other users access to otherdatabases secured by the same security file. This means that all other users must close a database iniBase, iBase Designer, IBM i2 Analyst’s Notebook®, and any other related applications before you canopen that database in iBase Designer.
Note: iBase Designer can open a security file in use by another copy of iBase Designer but only toallow work on another security file or database. Do not attempt any changes to the groups or userswho are defined in the security file if another administrator is also likely to attempt similar changes.
To gain exclusive access to an SQL Server database, any database services must be stopped. Servicesmight include alerting, index updates, scheduled imports or exports, and database replication. In SQLServer, any tool or product that accesses the iBase database prevents iBase Designer from openingan SQL Server database.
Opening a database
To open a database:
1. From the File menu, select Open Database.2. Choose a database (.idb file) from the Open Database browser, navigating to the correct folder if
necessary. If you do not have any iBase databases, you can copy and open the example UserGuide database. See About the Example User Guide Database for details.
Note: The administrative user name and password for the example database are the same,SYSADMIN.
1. Select a database and click Open.2. For SQL Server databases, you are warned that database services for alerting and indexing will be
shut down; click OK to confirm this. Once the services are shut down, click OK to try and open thedatabase. You are warned if there are any users in the database. In this case, you can choose to tryagain to open the database or you can cancel. Clicking Cancel resumes the suspended services.
3. After you gain exclusive access to the database, the Logon dialog is displayed. See Logging On to aSecurity File for full details.
4. Enter a user name and password.
You can open other databases while this database is open, if those databases are secured by thesame security file and that your computer has sufficient resources, typically memory (RAM).
Note: Depending on the database, you may see various warnings when you open it. For example, youmay be reminded not to change the schema of the database for which an IBM i2 Text Chart templateexists. There are also warnings if you open a replicated database.
4 IBM i2 iBase: Administration

Closing databases
All changes that you make in a database are saved as you work. To close a database:
1. Do one of the following:
• Click Close Window at the upper right of the database window.• Alternatively, make sure that the database is active (that is, its window is displayed in front of
any other open database windows) and, from the File menu, select Close Database.
A message is displayed asking if you want to close the database.
1. Click Yes to close the database. Any services, such as alerting, that were suspended when youopened the database are resumed.
This allows other users to open the database.
Logging on to a security fileThe first step in any iBase Designer session is to log on to a security file. You must create a newsecurity file if no suitable file exists. This section is intended to help you make a quick start - it doesnot contain all the information that you need for creating a security file for an operational database.
What is a security file?
Security information is contained in a security file. Its purpose is to control access to one or moreiBase databases.
The information consists of:
• User groups with permissions to perform certain tasks or access particular data• Users who are assigned to one or more groups. Users have an iBase user name and password if they
are not set up to use single sign-on, and their password must conform to the security policyassociated with the security file
• Optional contact details for users, such as email addresses
All sensitive information in security files is encrypted.
Note: A security file can be in Microsoft Access or SQL Server format.
Logging on when there is no security file
To create a new security file and log on to it:
1. In iBase Designer: Select File > New Security File.2. Browse to the folder for your security file.
Note: You would usually select a folder that is suitable for the database as well. iBase databasesare always created in the same folder as their security file.
3. In the File name box, enter a name for the file and click Save.4. Type a name such as Test.
iBase Designer creates the file and displays a message that says that you are logged on to the newsecurity file as SYSADMIN. (The password for this account is also SYSADMIN.)
Attention: Do not use this user or this password for an operational database. See Creatinga Security File for details.
5. Click OK to dismiss the message and then in the Security Manager dialog, click Close.
IBM i2 iBase administration center 5

Logging on in subsequent sessions
To log on when you have a security file that you found or created:
1. From the File menu in iBase Designer, select Logon.2. In the Security File browser, navigate to the security file you have found or created, select the file,
and click Open.3. In the Logon dialog, enter the user name and password.
When you are logged on, iBase Designer prompts you to either open an existing database or to createa new one. You can open a database that is associated with the security file that you are logged on toonly.
Creating a DatabaseAfter you log on to a security file, you can create a new database. This section is intended to help youmake a quick start, but it does not contain all the information that you must create a databaseintended for operational use.
What is in the database file?
Every iBase database contains several types of information, such as:
Type Description
Database management information This includes information on statistics andaccess control to the database. The statistics areheld within the database. The separate securityfile allows you to make access control unique toone database or consistent across severaldatabases.
Entities and links iBase stores data that is organized as entity andlink types; link types define the relationshipbetween entities. Fields are the basic buildingblocks of the data, and their types vary incomplexity.
Note: Each entity and link type has a separatetable in the database. Entities and links arestored as records in those tables.
Folder objects These are objects that support the use of thedatabase, such as browse definitions, labelingschemes, sets, and queries. These objects aredisplayed as folders within the tree view of theDatabase Explorer window (in iBase only, not iniBase Designer).
Datasheets iBase provides standard dialogs for creating,viewing, and editing records. Optionally, you candefine additional dialogs that are more suited tothe data that the users work on. These are calleddatasheets and they can be used to supplementor replace the standard dialogs.
6 IBM i2 iBase: Administration

Options for creating a database
This section describes how to create an empty database without any entity types, link types, folderobjects, or datasheets.
However, there are various options for creating an iBase database. You can:
• Create an empty database and then define the entity and link types without reference to anyexisting databases.
• Create a database that copies the design of another database. The design is defined by a template.
Some templates are provided and you can define, save, and reuse your own. (You might also beable to obtain templates from your supplier or collaborating organizations.)
• Create a basic database by one of the methods discussed and then copy definitions for fields, entitytypes, and link types from other existing databases.
Starting a suitable session
Before you can create a database, you need to log on to a security file as a user with the right tocreate databases. The default system administration user, SYSADMIN (with password SYSADMIN)has these rights. See Logging On to a Security File for details.
Take care to select the correct security file as all access to the new database will be controlled byusers logging on to the security file that you select at this stage.
When you have logged on, the iBase dialog is displayed. You are now ready to create a new database.
Creating a database
To create an example database:
1. In the iBase dialog, select Create New Database and click OK. The Configuration page of theCreate New Database dialog is displayed.
2. In the Name box, enter a name. The name must be suitable for use as a file name. A simple choiceis Example, possibly adding the initial letters of your name if you are creating the database in ashared folder.
3. In the Database Type drop-down list, select MS Access.
Choosing MS Access simplifies the initial setup of a database. However, you could create an SQLServer database. For an SQL Server database, you must specify how to connect to the machinerunning the database server. If you know these details, you can choose to create an SQL Serverdatabase now. If you do not know these details, create an MS Access database and then convert(upsize) it to SQL Server later.
Regardless of the type of database, as a minimum, you should make the settings described in thefollowing steps.
1. Click the Details tab to display the Details page.2. In the Title box, type iBase Example Database.3. In the Description box, enter, for example, Demonstrates iBase features. Users will see
this text each time they open the database.4. Click OK to close the dialog and create an empty database with the name you have entered.
Note: The remaining pages of the dialog are for specifying a template on which to base the newdatabase, and for defining additional properties of the database.
IBM i2 iBase administration center 7

About the database file and folder
iBase Designer creates a database file with extension .idb in the folder containing the security fileyou logged into before creating the database.
• For Microsoft Access databases, this file is the actual database.• For SQL Server databases, this file is a connection file to the actual database which is managed by
the server. A connection file contains a small amount of administrative information; all data is heldon the server and managed by SQL Server.
The configuration options for security files and databases are described in Configuration Options foran iBase System.
About the database properties
For any open database, in iBase you can view the properties by displaying the Database Propertiesdialog. In iBase Designer, you can change the Title, Description, and the settings displayed on theAdvanced page. See Summary of the Database Properties for details.
Designing an iBase DatabaseThe best design for a database is determined by the type of data you need to capture, and theintended type of analysis.
Before you start to design an iBase database, it is essential to define the requirements for thedatabase, for example:
• What data is to be stored?• How is that data to be entered?• How is the data to be used?• Who will use the database?
An overview of the design process is given below.
Entities and linksThe modeling and analysis facilities in IBM i2 applications are based on the concepts of entities andlinks. Entities are real-world objects, the things that are being represented, such as vehicles, people,and addresses.
Links represent relationships between entities, such as owner, associate, and marital status:
Entities and links are defined iniBase Designer as entity types and link types. The most significant part of defining the database
8 IBM i2 iBase: Administration

requirements is to identify the best entity and link types for the data given the type of analysis that isrequired.
In iBase, each entity and link is represented by a database record.
Gathering database requirements
Consider how the data is entered into the database, as this might influence the database design.There are many ways of adding data to an iBase database, for example:
• Importing• Individual entry• Text Chart• Analyst's Notebook
It is important to consider all the different types of user to find out what tasks they are responsiblefor, and how they complete these tasks. For example, are the users who enter and check the datadifferent from the users who analyze that data? Do all analysts perform the same types of analysis?Designers can make allowance for the different types of user by designing datasheets. A datasheet isa custom form that is tailored to suit the task performed by the user.
If the database is to hold confidential data, you might need to identify specific user types (defined iniBase as user groups) in order to determine what sort of controls are required to protect the data.
Designers need to know what questions the users want to ask of the data, and also what they expectto produce from the database. Users might need to produce:
• Queries• Reports• Charts• Maps• Cubes• Data for export
Knowing how the data is used allows the designer to adapt the schema of the database so that it ispossible to import and export data to third-party applications.
After a designer gathers information about the data to be held in the database, its users, and thetypes of analysis they perform, the designer is ready to define the entity and link types to representthe data. It is important to understand that there is no right or wrong way to do this.
The best design is the one that allows all the relevant data to be entered as quickly as possible, whilstalso allowing users to complete the tasks they specified during the consultation phase of therequirement gathering process.
Selecting entity and link typesAfter a designer gathers information about the data to be held in the database, its users, and thetypes of analysis they perform, the designer is ready to define the entity and link types to representthe data. It is important to understand that there is no right or wrong way to do this.
The best design is the one that allows all the relevant data to be entered as quickly as possible, whilstalso allowing users to complete the tasks they specified during the consultation phase of therequirement gathering process.
IBM i2 iBase administration center 9

Selecting field typesBefore you define the entity and link types, the designer needs to examine the format of the data indetail, and decide which field types are most suitable. It is a good idea to get this right before data isentered into the database as there are some limitations on changing between field types.
There is a wide range of field types, covering:
• Free text (text typed by the user in whatever format they choose)• Fixed text (that is selected from the lists of various types)• Numbers and currencies• Dates and times• Documents on your network, on websites and intranets• Documents and pictures for inclusion in the database• User information (contact details)• Fields for use on charts (such as icons)• Geographical coordinates• Security information (such as Security Classification codes and cases)
Modifying the design of an operational databaseAs the design of a database evolves as a result of testing, reviewing, or through changingrequirements, designers need to add entity types, link types, and fields as well as edit and deleteexisting database objects.
Access controlThere are various internal features of an iBase database that can be used to apply levels of security.All features are optional and can be added as their usefulness becomes apparent.
Auditing is included here but it can have other uses, including review of analysis steps that are takento reach a result. In SQL Server databases, auditing is also used with alerting to give users informationon why an alert is raised.
The need for security
Security has several aspects, which can depend on legislative and operational circumstances.
You might need to apply security for several reasons, such as:
• Restricting access to sensitive data.• Providing a record of how data was added, changed, viewed, or exported to other systems.
The benefits of an appropriate security policy and its implementation can include:
• Assurance that data is protected from deliberate or accidental change.• Assurance that sensitive data is protected from inappropriate viewing or other use.• Simple and appropriate working environments for staff in different functional areas or operational
groups.
Applying security
The fundamentals of computer and database security apply to iBase. The first levels of protection arecontrol of physical access and proper use of login identifiers and passwords. Full information aboutphysical access control is outside the scope of this document, but you should not ignore the need forit.
10 IBM i2 iBase: Administration

User names and passwords
With iBase, you use user names and passwords to control access to databases, either database bydatabase or in groups of databases (controlled by the same security file). You can choose to useWindows user names (single sign-on) or iBase user names.
All user names and passwords are stored in encrypted form, in security files, typically held in thesame folder with the databases that they control.
After a user has access to a database, they might be subject to the following types of security:
• Database permissions, to read or alter data.• Command access or denial, and usage monitoring.• Data access, for viewing or changing records.• Folder objects, to provide private storage of analysis methods.
Each of these types of security is applied through a dedicated type of security group, with a commonmethod of defining their membership. See Types of Group for details.
Groups and their membership are held in the same security files as user identifiers and passwords.
Auditing
A final aspect of security is monitoring the use of databases, user access, and use of commands.iBase supports monitoring through audit logs and provides a dedicated application for viewing andanalyzing logs. For further information, see “Auditing” on page 124.
Comparison of Access and SQL Server databasesYou can use iBase with both SQL Server and Microsoft Access databases. This allows you to work withthe scale of data appropriate to your analysis. iBase automatically recognizes the type of databaseand you can switch between them within an iBase session.
Access should only be used as the supporting database if the number of simultaneous users is five orless. When a database of more than 200 Mb is accessed by a number of users simultaneously thenconsideration should be given to using SQL Server. Using SQL Server increases the size of databasethat can be created and analyzed beyond the theoretical 2 Gb limit of iBase using Access. However,there is no definitive maximum database size because this depends on factors, such as: the nature ofthe data, the configuration of the server, the type of analysis, and acceptable response times. Themost significant factor is the amount of memory on the server.
There are some extra capabilities when the database is stored in SQL Server format. These additionalfeatures are summarized below:
Feature Description
Search 360 Provides extra and more powerful features toWord Search, in particular the ability to searchfor words or phrases, allowing for typing errors,spelling mistakes, missing spaces, and so on.See “Setting Up Search 360” on page 102.
IBM i2 iBase administration center 11

Feature Description
Queries SQL Server databases allow:
• Queries to be run that count the number ofdifferent entities linked to a specific entity(called distinct counts)
• The use of Any Link/Entity queries as source toother queries
• You to run more flexible queries that usesemantic types
Alerting SQL Server databases allow users to set up alertdefinitions to monitor items of interest in thedatabase, such as single records or the results ofqueries, and receive alerts when any changes aredetected. For details, see Setting Up Alerting.
Bulk import SQL Server databases allow you to import largevolumes of data more quickly than using thestandard import mechanism. See Overview ofBulk Import for details.
XML import SQL Server databases allow you to import froman XML data source when you work in iBaseDesigner.
Note: An XML import is a type of bulk import.
XML export SQL Server databases allow users that work iniBase to export data as XML.
Note: An XML export is a type of databasesubset.
Use of Security Classification Codes SQL Server databases allow you to classify eachrecord with a security classification code so thataccess is restricted on a record by record basis.For details, see Using Security ClassificationCodes. This feature requires an Extended AccessControl license.
Use of cases In an SQL Server database, you can partitionyour database by case so that access to data isrestricted on a case by case basis. See What iscase control? for details.
12 IBM i2 iBase: Administration

Feature Description
Audit level 5 This additional audit level allows you to log whenentity and link records are accessed or viewed,without change to the data.
For example, it logs all records which have beenin a human readable form in the session whethercharted, printed, shown, and so on. This featuredoes not necessarily log all records that wererequested. This keeps the audit file smaller andis a more accurate reflection of what the usermay have seen.
Audit history You can audit changes to the data in thedatabase by selecting the Audit History option.This is available regardless of the audit level ofthe database. See Audit History for details.
Configuration options for an iBase systemThere are various ways of configuring the iBase system. The differences between thesesconfigurations are illustrated below.
There are two ways of holding security information:
• In a security file (in Microsoft Access format).• In an SQL Server database, to which you connect at logon time by using a security connection file.
The connection file contains only enough information to allow users access to the security databaseon the server.
Both files are .ids files and users see no difference in how they log on to them.
There are also two ways of holding the user and administrative data for the database:
• In an Microsoft Access database file.• In an SQL Server database that is opened by using a connection file. The connection file contains
only enough information to allow users access to the main database on the server.
Both the database and the database connection file are .idb files, and users see no difference in howthey open them.
Note: The name for the database(s) on the server match, or partially match, the name chosen for theconnection file, subject to naming conventions on the server.
This means that there are various ways of configuring the iBase system. The following sectionsillustrate the differences between these configurations.
IBM i2 iBase administration center 13

Microsoft AccessThe simplest possible arrangement is to have one security file and one database file held in a diskfolder, typically shared to network users. The diagram shows two users: the upper one able to readand write data to the database, the lower one denied all access to the database.
The important points to remember are:
• Users gain access to databases through the security file, by logging on with an appropriate username and password.
• A security file can control access to several databases.• Each database is associated with just one security file.• Each database records which security file is used to access it.
This configuration provides the lowest level of security. The Microsoft Access files are encrypted andpassword protected to resist intrusion from casual users, but might not be proof against attack from adetermined technical person.
This simple configuration can be extended in several ways: by adding many databases, by addingmore users, and by allowing those users different degrees of access to the databases ranging fromfull administration rights, through varying levels of ability to change or inspect data, down to noaccess at all.
It is also possible to create additional security files for other databases provided the security files arein separate folders.
14 IBM i2 iBase: Administration

SQL Server databaseThe simplest possible SQL Server arrangement is an extension of the one shown for an MicrosoftAccess database. There is still a security file, but there is now a connection file in place of thedatabase file, and there is a server to hold the SQL Server database.
From the user’s point of view nothing has changed, because they see a connection file that appears tobe a database. The points to remember are still:
• Users gain access to databases through the security file.• A security file can control access to several databases.• Each database has just one security file associated with it.• Additionally, users can make use of functionality specific to SQL Server databases.
For an administrator, there are differences:
• There is a server running SQL Server, with consequent changes in performance and administration.• There is an opportunity to centralize the operation and administration of multiple databases, and
automate more of the routine administration.• There is an opportunity to operate another level of security between the user and the data.
This configuration is more secure than “Microsoft Access” on page 14.
IBM i2 iBase administration center 15

SQL Server database and securityIn this option, there are now two connection files, one to replace the Microsoft Access security fileand one to replace the Microsoft Access database. There is a server to hold the SQL Server databasesthat contain the security data and the main database.
Of the three options, this is the most secure configuration. However, from the user’s point of viewnothing has changed, because they see connection files that appear to be a security file anddatabase. The points to remember are still:
• Users gain access to databases through the security file regardless of its file type.• A security file can control access to several databases regardless of their file type.• Each database has just one security file associated with it regardless of its file type.
For an administrator, there are differences:
• There is a server running SQL Server, with consequent changes in performance and administration.• There is an opportunity to centralize the operation and administration of multiple databases, and
automate more of the routine administration.• There is an opportunity to operate another level of security between the user and the data.• There is an opportunity to use replication to distribute copies of iBase data and database objects
between servers and keep these synchronized.
This configuration provides the highest level of security.
16 IBM i2 iBase: Administration

Mixed iBase systemsThe similarity in the user view of iBase operating with Microsoft Access and SQL Server database isintentional and real. You can operate iBase with a mixture of database types, even securing Accessand SQL Server databases with the same security file.
When you want to migrate an Microsoft Access database or security file to SQL Server, by upsizing,you can do so in place, so that users need not see a difference until you choose to add features thatare only available in SQL Server databases.
SQL Server clients, servers, and networksYou can run iBase on a system configured in a number of ways.
The system uses a combination of these elements:
• SQL Server database server for managing access to the databases• iBase clients, or,• An application server that is running iBase with thin clients, if you are using Terminal Services/Citrix
The following figures summarize the possible configuration options for iBase.
iBase Standard configuration option 1
iBase Standard configuration option 2
Hardware specifications and supported operating systemsHardware specifications and the supported operating systems for a particular release of iBase aredefined in its system requirements.
Client machines
The client should be sized to suit all the applications that it is intended to run alongside iBase.Mapping products in particular can place heavy demands on the host’s processor and memory
IBM i2 iBase administration center 17

resources. The type of iBase usage that is expected on the client machine should also be taken intoaccount: manual data entry places much lower stress on the client than analytical use or large dataimports.
Server machines
iBase data is stored in database files that are managed by SQL Server. When your administrator firstinstalls Microsoft SQL Server, they are prompted for the location of the program files and the datafiles. The default is that both sets of files are placed on the boot drive of the server. It is important toensure that the data files are stored on the dedicated data partition. Typically this is a dedicated setof disks in a RAID 5 configuration. SQL Server stores the database files created by iBase in the defaultlocation for the database files.
We suggest that your SQL Server administrator use a RAID 1 configuration for the system disks andtransaction logs, and RAID 5 for the data. The major activity in an iBase Standard installation isreading data and RAID 5 offers a performance advantage in reading. RAID 5 requires a minimum ofthree disks. The more disks used, the better the performance.
If the read auditing of activity is turned on, it is advantageous to place files for the iBase Audit Logdatabase, both main data file and transaction log file, on a disk array with good write performancesuch as RAID 1. For maximum performance this should be on a separate disk controller.
Network requirements
Analysts use large amounts of data that must be transferred from the server to the client across thenetwork. For example when starting up, finding, charting, and so on. A measure of the suitability ofthe network is latency: that is how long a packet of data takes to get from the server to the client andvice versa. Most local area networks should have low latency. Poor network performance leads topoor iBase performance when you browse, query, chart, map, and export to Data Miner.
Note: IBM does not support deployment of iBase clients over a wide area network (WAN). Thearchitecture of iBase Standard requires relatively large volumes of network traffic. However, becausethe data flows in relatively small packets, the effect of latency, which is usually higher on WANs ismore pronounced. The effect is that not only would client performance be slow and inconsistent butiBase would also disrupt other services that run over the WAN. As an alternative, IBM offers supportfor iBase WAN deployment using terminal services emulation.
The example user guide databaseAn example database that is called User Guide.idb is installed with iBase. This is a MicrosoftAccess database and demonstrates many of the features of iBase and iBase Designer. Typically eachuser needs a separate copy of the database if used for training purposes. There is a command to resetthe database to its original state.
Some features are specific to SQL Server databases only and you might need to convert (upsize) eachcopy of the database to SQL Server before your users can use these features. Alternatively, usersmight be able to do this for themselves, using the Database Upsize Wizard, if you provide them withdetails of how to connect to the SQL Server machine.
Before users upsize their copy of the database, they must to rename the User Guide.idb file sothat it is unique on the SQL Server instance. For example, they might add their initials to the file name:User Guide EB.idb. They will also need to rename the other files associated with the database(with the suffixes .dot, .doc, .ant, and .idx).
See Upsizing a Database to SQL Server for further details.
18 IBM i2 iBase: Administration

Copying the User Guide database to a user application data area
The User Guide database is copied automatically to the user's application data area when they firstopen the database. This gives each user a separate copy of the database and ensures that thesecurity file is in the correct location.
To copy the database and open it, each user selects from the Programs group on the Windows Startmenu:
IBM i2 iBase 8 Documentation iBase User Guide Database
The first time that they open the database in this way, the Examples folder is copied to theirapplication data area. User Guide.idb is opened from this location, and a shortcut to this locationis added to the user's My Documents folder (or equivalent depending on the version of MicrosoftWindows).
On Windows XP, the database is copied to the C:\Documents and Settings\<user name>\Local Settings\Application Data\i2\i2 iBase <n>\en-us\Examples directory, andusers navigate to the folder that contains the database using the shortcut My Documents\i2\i2iBase <n>\Examples.
On Windows Vista, this is the C:\Users\<user name>\AppData\Local\i2\i2 iBase <n>\en-us\Examples directory, and users navigate to the folder that contains the database using theshortcut Documents\i2\i2 iBase <n>\Examples.
Standard user accounts for the User Guide database
These are the standard user accounts for the User Guide database:
User account Password Role
General General A user with all the permissionsrequired for general use.
SYSADMIN SYSADMIN A full system administrator.
DataEntry DataEntry A Data Entry User withrestricted menu functionalityand access to fewer links.
Analyst Analyst An analytical user with read-only access.
Reverting to a clean copy of the User Guide database
At any point, a user can restore the database to an unmodified state by replacing the database in theirapplication data area (see above) with the database as installed initially. If the database has beenupsized to SQL Server, it restores the Access database but leaves the SQL Server database on theserver.
To revert the database:
1. Select the following from the Programs group on the Windows Start menu:
IBM i2 iBase 8 Tools Reset iBase User Guide Database.2. Click Yes when prompted to reset the database.
Note: Reverting to an unmodified User Guide database means that you lose any changes that youmade to the User Guide database. For example, you delete all entities, links, sets, queries, andother folder objects that you created or modified.
IBM i2 iBase administration center 19

Note: Any files that are created independently, such as export files or Text Chart templatesremain.
Moving the User Guide database to a new location
If you move the User Guide database from the standard location, you need to open it in iBaseDesigner to reregister the location of the security file that controls it.
Security files, users, and groupsA security file controls who is allowed to log on to iBase and, after they have logged on, what they areallowed to do in both iBase and iBase Designer. Permissions are defined by creating user groups andassigning users to those groups.
In iBase, you use a security file to control who has access to an iBase database and the type of accessthey have. There are two formats for this file depending on the degree of security required.
For an introduction to these formats and to the different ways of configuring an iBase system, seeConfiguration Options for an iBase System.
Access to data and to parts of iBase itself is controlled by creating users and assigning them to usergroups. Permissions are defined for user groups and inherited by users according to theirmembership of one or more user groups.
There are different types of group that control:
• Read/write access to records• Commands on the iBase menus• Access to entity types, link types, and fields• Access to Security Classification codes (requires an Extended Access Control license and an SQL
Server database)• Access to named folder control objects; folder control objects include report definitions, importspecifications, queries, and so on
The use of cases also determines how security works at your site. For example, in a database that ispartitioned by case, a user only has access to the data in a case if they are assigned to the case, andthey are prevented from updating that data if the case is closed. For more information on cases, seeCreating and Managing Cases in iBase.
An extra aspect to security is the physical security of the iBase installations and the network, andpermissions to iBase files and folders. For more information on external access control, see ExternalAccess Control.
Security filesThe first step in designing the security for your iBase system is to create a new security file. You usethe security file to control who can access the iBase and iBase Designer applications, and any iBasedatabases secured by the security file.
Note: The security files that are supplied with iBase are examples only. You can inspect the contentsof these files, but you should create a new security file before you implement your own securityscheme and creating databases.
Only users whose details are known to a security file can start an iBase session or open a database.When they log on to a security file, they can only open one of the databases secured by that securityfile. A security file secures access to any database that is created in a session started by logging on tothe security file.
20 IBM i2 iBase: Administration

You should keep the security file in the same folder as the database files that it secures. You canmove both the security file and its databases as required. For more information on moving files, seeMoving and Copying Databases.
Creating a security fileIn order to control access to your iBase database, you must create a security file. You use the securityfile to control who can access the iBase and iBase Designer applications, and any iBase databasessecured by the security file.
About this taskThe first step in designing the security for your iBase system is to create a new security file (.idsfile). You always create the security file as an MS Access file but you can choose to convert it to SQLServer format later.
Try to avoid creating multiple security files. You can provide groups with varied but restricted accessto many databases secured by the same security file.
To create your own security file, you must first create or choose a folder to hold it. Only one securityfile can be created in each folder, but you can create subfolders to hold security files if required.
A good strategy is to create a shared folder on a server machine with high availability to all likelyusers. All users of a database must have access to the folder to log on and open databases.
The default location for the database or the database connection file is the same folder as thesecurity file.
Note:
• For Access databases, you must allow enough disk space to hold the database files (Accessdatabases are limited to 2 Gb).
• For SQL Server databases, the database files that are held in the folder with the security file areconnection files that hold only enough administrative data to allow connection to the SQL Serverdatabase system. These connection files are much smaller than full databases, typically in therange 50 kilobytes through 1 MB. Full use of iBase facilities imposes some other requirements onthe machine that is running SQL Server. For more information, see “Access control” on page 10.
Procedure
To create a security file:1. Start iBase Designer.2. From the File menu, select New Security File. The Create New Security File dialog is displayed.3. Browse to the folder you for your security file.
Note: If you want the security file to be accessible from any machine on the network, you mustuse a UNC path. For example: \\Server1\Databases\Fraud.ids
4. In the File name field, enter a name for the file.5. Click Save.
iBase Designer creates the ids file and displays a message that says that you are logged on to thenew security file as, for example, SYSADMIN (with the password SYSADMIN).
Important: Do not use this user or this password for an operational database. Create another userwith system administration rights, with a different name and password, then delete the SYSADMINuser.
The path that is used to create the security file is displayed in the status area at the bottom of theiBase Designer window.
IBM i2 iBase administration center 21

6. Click OK.
What to do next
Now that the security file is available, you can start the following tasks:
• Create groups and users. For more information, see Creating Groups and Adding Members.• Change the administrative password. See Changing the administrative password.
After you create a security file, you must give authorized users access to it at the Windows level, andalso protect it from accidental deletion. For more information, see This is described in detail in theAdministration Center document, Managing Access Control.
You must also include it in any backup schedules for the database. For more information, see BackingUp iBase Databases.
You can move or copy a security file to a different server machine. For more information, see:
• Moving an Access Database or Security File• Moving an SQL Server Database or Security File
Viewing security settings and propertiesThe security files that are supplied with iBase are examples only. You should inspect the contents ofthese files, but create a new security file before you implement your own security scheme andcreating databases.
Viewing the properties of a security file
Any user can review the properties of the security file:
• In iBase Designer, select File Security File Properties.
The Security File Properties dialog displays the format of the security file and its location. If thesecurity file is SQL Server format, it displays the connection details for the associated SQL Serverdatabase. See Creating an SQL Server Security File for further details.
Viewing the existing security settings
To view the existing settings in the security file:
1. In iBase Designer, log on to the security file for the relevant database. If your installation does notyet have a customized security file, you can view the one supplied with the iBase User Guidedatabase. See About the User Guide Database.
2. Select Security > Security Manager. To display the permissions of a Database Managementgroup, select the group and click Edit.
In an existing security file, other types of group might exist. To display their permissions, select one ofthese commands from the Security menu:
• System Commands Access Control• Data Access Control
You can also produce a Security Design report:
1. Select Security > Security Design report.2. Select the information to include in the report.
22 IBM i2 iBase: Administration

About the settings in a new security file
If you have a newly created a new security file, it has one administrative user called, SYSADMIN (withpassword SYSADMIN). This user has all database management permissions as a result ofmembership of the System Administrators group. The security file also contains a range of databasemanagement groups but no security policy.
Database management groups are necessary to all iBase databases. A user who does not belong toany database management group has only read-only permissions in the database. To grant a useradditional permissions, you must add them as member of a database management group with theextra permissions they need.
There are three default database management groups. In the Security Manager, click the Groups tabto display these. You can display and edit the described permissions to match your own needs:
Group Members of the group...
System Administrators Have full database permissions.
Users Able to create and modify data, and performanalysis by creating and saving sets, queries, andso on.
Guests Cannot modify any data but can create and saveanalysis items.
The default security file also contains optional System Commands Access Control groups. Thefollowing groups are defined (but these are examples only, and can be added to, changed or deletedas required):
Group Members of the group can...
Browse Users Run queries, search text, and chart data toAnalyst's Notebook. In SQL Server databases,they can add alert definitions and view thehistory of records.
Data Entry Commands Can enter records and load data from Text Chart.In SQL Server databases, they can add alertdefinitions and view the history of records.
Read Only Users Perform basic and advanced analysis thatinvolves searching, defining queries, sets, andscored matching. In SQL Server databases, theycan add alert definitions and view the history ofrecords.
Standard Users Perform basic and advanced analysis, createrecords and define reports.
Super Users Perform all iBase tasks (including import, export,and manage cases), apart from destructiveoperations on groups of records: batch edit,batch delete, merging entities, purge, andrestore soft deleted records.
To view these groups, in iBase Designer, select Security > System Commands Access Control.
IBM i2 iBase administration center 23

Logging on and changing your passwordTo complete any security work, you must log on to the security file for the relevant database or groupof databases, with a user account with the Security Administrator role.
About this taskThere are various ways of logging on in iBase Designer:From the menu, select
Procedure
1. Log on to iBase Designer
• If you have a newly created a security file, you are already logged on.• Select File > Open Database and then browse for the database you want to open. If you are
not using single sign-on, you are prompted to enter your iBase user name and password.
You do not need to open a database, but opening a database can be the most convenient wayto identify the security file for that database. You can close the database immediately after youlog on.
2. Change the administrative password:a) Select Security > Security Managerb) Select the user, for example SYSADMIN, and click Edit.
Note: Do not use the user SYSADMIN for an operational database. Create another user withsystem administration rights, with a different name and password and then delete theSYSADMIN user.
c) Change the password as required. If you have just created a new security file, then the defaultpassword for a new SYSADMIN user is the same as the user name.
Note: You can change your own permissions by adding additional group membership orpermissions. The User Permissions dialog shows you the changes to database managementpermissions but, like any other user, you do not see the effect of these changes until you log offand log on again.
Creating an SQL Server security fileYou always create security files in Microsoft Access format and then convert them to SQL Server. Themain reason for converting to this format is to increase the security of your security data.
Before you begin
The conversion leaves a security connection file (the .ids file) in the iBase database folder andcreate an SQL Server database with the name <file>_Sec on the designated server (where <file>is the name of the ids file). Users connect to the SQL Server database by logging on to the connectionfile. The connection file holds just the information necessary to allow the user to connect to the SQLServer instance.
Note: If you copy security connection files to client machines, it might compromise the security ofyour system and adds to the administrative workload. You should keep the connection file, in thesame folder as the database connection file, in a central location. If it becomes necessary to copy it,then the file name and path must be identical on each machine to which you copy it.
About this task
For SQL Server databases, the name of the security file is used to generate the name of the SQLServer database so you might want to discuss the naming convention to use with your SQL Serveradministrator and, if necessary, rename the security file before you upsize it. Although, you can
24 IBM i2 iBase: Administration

always rename a security connection file, you cannot rename the associated SQL Server database.See SQL Server Database Names for details.
Procedure
To upsize a security file:1. Using iBase Designer, log on as a security or system administrator using the Microsoft Access
security file you want to convert.2. Click Cancel at the prompt to create or open a database.3. Select Tools > Database Setup Upsize Security File to SQL Server.4. Click OK when you are informed that a backup has been made. This is a backup of the original
Microsoft Access security file and has the file extension .ids.bak (appended with a number,such as .ids.bak1, if there is already a file with this extension in the folder).
5. In the Upsize Security File dialog, enter the server name. Do not select the Local option from theServer list.
6. Select the security mode as directed by your SQL Server administrator.
Note: For more information on these options, see Access Control for SQL Server Databases.7. Skip the Identifier field - identifiers for security files are only used in iBase database replication.8. Click OK to validate the settings and perform the upsize, then click OK when the upsize is
complete.If you want to review the connection details and ID of the security connection file, select FileSecurity File Properties. The path of the security connection file will also be displayed in thestatus area with (SSE) after the file name to indicate that it is SQL Server format.
9. Back up the connection file (.ids file). If you lose the connection file, you are not able to connectto the SQL Server database.
What to do next
You can protect the SQL Server security connection file by making it read-only or by settingappropriate security permissions. Controlling Access to MS Access Databases suggests suitableWindows permissions for the connection file.
This will allow any user in iBase Designer to view the properties of the connection file but preventsanyone, including iBase administrators, from changing the SQL Server connection details. This appliesto SQL Server files only.
You should also ensure that the security connection file is included in any backup schedules for thedatabase folder. For more information, see Backing Up iBase Databases.
Creating users and groupsThe first step in designing security for your iBase is to identify the groups of administrators and usersthat you want to use. iBase is supplied with some default groups and an administrative user, all ofwhich are created in any new security file.
You can add new groups and users, and modify or remove the supplied groups and users. You mustmodify the administrative user, if only to set a secure password in place of the default. If you do notuse single sign-on, and before you add any users, you might need to define a security policy to controlpasswords and how users log on.
As an administrator, you need to create a user account for each individual who uses iBase, or accessan iBase database from Analyst's Notebook. This allows them to log on to the security file and openthe database with the lowest possible level of access to the data. You define what they can do in
IBM i2 iBase administration center 25

iBase by setting up database management groups with specific permissions and assigning users tothose groups.
Users gain the permissions that are accumulated from all database management groups of whichthey are a member. Further control is possible by creating other types of group.
Note: For information on SQL Server logins for iBase users, see the Administration Center documentManaging Access Control.
Creating a security policyThe security policy specifies rules for adding and changing passwords that apply only to useraccounts with iBase user names. You can create a
About this task
New security files do not have a security policy because by default none of the settings on theSecurity Policy page of the Security Manager are turned on.
The absence of a security policy means that:
• Minimum password length is four-characters• No restriction on the characters that are used to make up passwords• Passwords never expire• No limit to the number of attempts to log on• Last used user name is displayed at the next logon• There is no password history (although a new password cannot be the same as the current
password)
Note: Although a security policy is part of the security file, it is not replicated even if you choose toreplicate the security file. This enables each site that is involved in iBase Database Replication tomaintain their own security policy. However, the password history is replicated as it is possible thatusers might need to log on and change their account details at any of the sites.
Procedure
To view a security policy or change its settings:1. In iBase Designer, Select Security > Security Manager > Security Policy.2. Enter the requirements for new iBase passwords.
Note: The changes you make will not affect existing passwords unless you require users to changetheir passwords when they next log on.
3. Click Apply to save your changes. The changes come into effect when you log off.4. If you change any of the settings that relate to password length, age or complexity, you will be
asked whether you want to force users whose passwords do not conform with the new policy tochange their password when they next log on.
Password settingsThe password settings only apply to accounts with iBase user names and passwords. Someconsiderations are described below.
Note: Turning on a check box next to a password setting selects that setting. If you do not specify asetting, then the standard settings apply as described above. The standard settings are not the valuesdisplayed next to the check boxes.
Password age
26 IBM i2 iBase: Administration

A user cannot change their password until it reaches the minimum password age, unless anadministrator forces the user to reset it (for example, by turning on Reset password at next logon).This helps prevent a user from changing their password back to one previously used.
Password history
Specifies whether a password history is stored to prevent the reuse of old passwords. New passwordsare validated against the user's complete password history unless you enter a specific number ofprevious passwords. If this option is not used, then the new password is only checked against thecurrent password.
Account lock-out
You can choose to unlock the account automatically after a period of time, or you can unlock itmanually using the User dialog in iBase Designer. Administrative user accounts are always reset after30 minutes.
Note: Failed logons that result in an account lock-out are recorded in the audit log.
Creating groups and adding membersYou set the permissions for all users by adding groups and defining the permissions for each group.Users acquire permissions by becoming a member of one or more groups.
Adding groups to a security fileUsers gain the database management permissions that are accumulated from all databasemanagement groups of which they are a member. There is a similar combination of permissions orrestrictions for the user’s membership of each other type of group.
If you are adding many users, you might want to consider this work flow:
1. Identify the different types of user who will use iBase. Each type of user is represented by one ormore Database Management groups, and possibly by other groups of different types depending onthe complexity of your security arrangements.
2. Define the permissions for each of the required groups.3. Define a template user to represent each user type and assign them to the correct groups.4. Finally, create each user and assign permissions by copying the permissions of the appropriate
template user.
Creating groupsYou use groups to grant basic permissions to users. You may find that you want to create a group ofeach type for a particular purpose.
About this task
For example, you might create four groups with Analysts in the names and use these groups to definethe basic database management permissions and, optionally, access to commands, access to data,and grouping of folder objects for analysts.
All groups have users as members. A particular user can be a member of any number of groups, ofany type. The user gains the permissions that are defined for all the groups in which they are amember.
Procedure
1. Select Security > Security Manager > Groups, and expand the group type.2. Click New.
IBM i2 iBase administration center 27

Database Management groupsDatabase Management groups grant permissions to users. For each Database Management group,you define the permissions of the group by turning on one or more check boxes.
Users who become members of the group inherits these permissions:
Permission When turned on When turned off
Add Entity/Link Records • Entity and link records can beadded, either individually orby importing
• Labeling schemes can becreated
Records cannot be created,members can still find, browse,and show the records in thedatabase.
Update Entity/Link Records Records created by the user,can be edited.
Records cannot be changed inany way. This includes batchediting, assigning new icons,and merging.
Delete Entity/Link Records Records created by the user,can be deleted.
Records cannot be deleted,either individually or by usingbatch delete.
Update/Delete Entity/LinkRecords created by other users
Members can edit and delete:
• Any record in the databasethat they can see
• Entries on pick lists• Entries on icon lists
Members cannot edit or deleteany of the items listed opposite.
Add Folder Objects Members can add or save, forexample:
• Sets• Queries• Report definitions• Import and export standard
and batch specifications• Charting schemes (providing
they also have the Add Entity/Link Records permission)
Members can run queries,reports, and so on, either byusing definitions created byothers or by using newdefinitions of their own but theycannot save their owndefinitions.
Update Folder Objects For folder objects created by amember, a member can editexisting objects (see the abovelist). Members can also edit thecontents of existing sets,including appending records toexisting sets.
Once a member has added anew folder object, they cannotedit it.
Delete Folder Objects Members can delete folderobjects that they have added.
Once a member has added anew folder object, they cannotdelete it.
28 IBM i2 iBase: Administration

Permission When turned on When turned off
Update/Delete RestrictedFolder Objects created by otherusers
Members can update and deleterestricted folder objects in thedatabase.
Note: Do not grant thispermission to non-administrative users if it isimportant to preserve folderobject restrictions. See FolderObject Control Groups fordetails.
Members cannot update ordelete restricted folder objectscreated by others. Members canonly update or delete theobjects that they create.
Update/Delete Public FolderObjects created by other users
Members can update and deleteany public folder object in thedatabase.
Members cannot update ordelete public folder objectscreated by others. They canonly update or delete folderobjects that they create.
Database Creator,Database Administrator,Security Administrator
System roles that are only for administrative users. SeeAdministrative Users for details.
Audit Administrator This role allows members of the group to view restricted auditlogs in Audit Viewer. See Restricted Audit Logs for Sensitive Datafor details.
For additional details, see Database Management Groups.
Creating optional groupsTo create a System Commands Access Control group, a Data Access Control group or a Folder ObjectControl group, you first create a group that has no defined permissions. Once the group exists, youcan define the permissions.
Procedure
1. Select Security > Security Manager > Groups, and expand the group type, and click New.2. Define the permissions for the group by using the following commands on the Security menu:
• Systems Command Access Control• Data Access Control
Note: There is no command for defining the permissions for Folder Object Control groups. The useof these groups is defined entirely by the members that belong to it, and are specific to thedatabase. For more information, see Folder Object Control Groups for details.
Adding a user to several groupsYou can use the Security Manager to add a user to multiple groups.
Procedure
To add a user to several groups:1. Select Security > Security Manager > Users.2. Right-click on the user, and select Edit.3. On the Account page, make sure that Account is active is turned on.
IBM i2 iBase administration center 29

4. On the Permissions page, turn on or off the required group check boxes to define the user’smembership of the groups.
Note: You can deny access for this user by turning off the Account is active check box. An inactiveuser is unable to log on to the security file but the security file still holds a record of their passwordand group membership.
5. Click OK to save the details of the new user and then log off from the security file. The users willonly be able to use their new permissions when you log off and when they next log on.
Adding several users to a groupIf you add a group, you can add multiple users at the same time.
Procedure
To add several users to a group:1. Select Security > Security Manager > Groups, and expand the group type.2. Right-click on the group, and select Edit.3. Click the Users tab to list the users defined in the security file.4. Select each user you want to add to the group.5. Click OK.
Note: The users will only be able to use their new permissions when you log off and when theynext log-on.
Reviewing the permissions defined in the security fileThe permissions available to groups and users in a security file can be reviewed by users that havepermission. You can also create reports that detail the information that you need.
About this taskYou can see the permissions that are granted to a database management group or user by:
• On the Groups page of the Security Manager, expand the group type, select the required group, andclick Edit.
• On the Users page, select the group and click Edit > Show User Permissions.. The databasemanagement permissions that are granted to the user by virtue of their membership of one or moregroups are displayed.
Users do not see the effect of any changes to their permissions until they log off and log on again.
Procedure
You can also produce a Security Design report:1. Select Security menu > Security Design report.2. To include information, for example user information in the report, turn on the relevant box.
Creating usersIf you have large numbers of users to create, you might find it easiest to add the security groups first,and then create template users to represent the different types of user in your organization so thatyou can copy their permissions.
Users can use their Windows credentials to automatically log on to iBase if the Windows account isdomain-based and accessible through Active Directory.
30 IBM i2 iBase: Administration
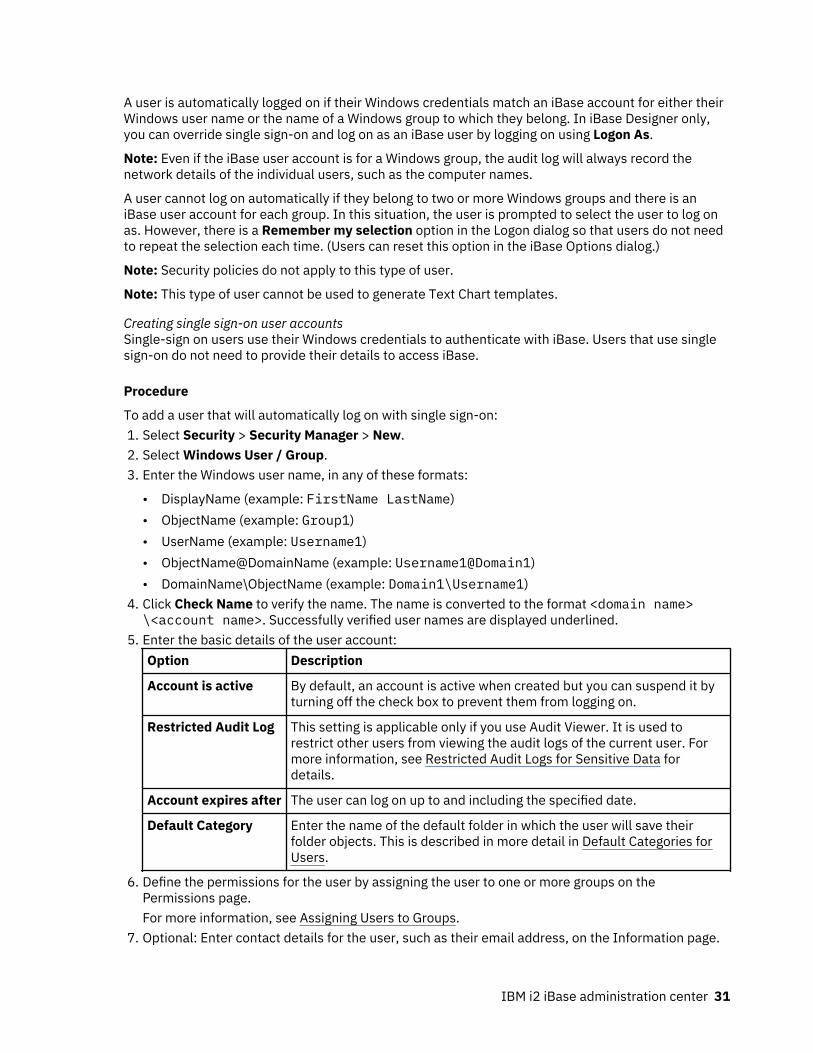
A user is automatically logged on if their Windows credentials match an iBase account for either theirWindows user name or the name of a Windows group to which they belong. In iBase Designer only,you can override single sign-on and log on as an iBase user by logging on using Logon As.
Note: Even if the iBase user account is for a Windows group, the audit log will always record thenetwork details of the individual users, such as the computer names.
A user cannot log on automatically if they belong to two or more Windows groups and there is aniBase user account for each group. In this situation, the user is prompted to select the user to log onas. However, there is a Remember my selection option in the Logon dialog so that users do not needto repeat the selection each time. (Users can reset this option in the iBase Options dialog.)
Note: Security policies do not apply to this type of user.
Note: This type of user cannot be used to generate Text Chart templates.
Creating single sign-on user accountsSingle-sign on users use their Windows credentials to authenticate with iBase. Users that use singlesign-on do not need to provide their details to access iBase.
Procedure
To add a user that will automatically log on with single sign-on:1. Select Security > Security Manager > New.2. Select Windows User / Group.3. Enter the Windows user name, in any of these formats:
• DisplayName (example: FirstName LastName)• ObjectName (example: Group1)• UserName (example: Username1)• ObjectName@DomainName (example: Username1@Domain1)• DomainName\ObjectName (example: Domain1\Username1)
4. Click Check Name to verify the name. The name is converted to the format <domain name>\<account name>. Successfully verified user names are displayed underlined.
5. Enter the basic details of the user account:Option Description
Account is active By default, an account is active when created but you can suspend it byturning off the check box to prevent them from logging on.
Restricted Audit Log This setting is applicable only if you use Audit Viewer. It is used torestrict other users from viewing the audit logs of the current user. Formore information, see Restricted Audit Logs for Sensitive Data fordetails.
Account expires after The user can log on up to and including the specified date.
Default Category Enter the name of the default folder in which the user will save theirfolder objects. This is described in more detail in Default Categories forUsers.
6. Define the permissions for the user by assigning the user to one or more groups on thePermissions page.For more information, see Assigning Users to Groups.
7. Optional: Enter contact details for the user, such as their email address, on the Information page.
IBM i2 iBase administration center 31

For more information, see Contact Details for Users. This topic also describes how contactinformation can be used in iBase.
8. Click OK to create the new user.
Creating iBase user accountsiBase users have specific iBase accounts in addition to their Windows credentials. Users that useiBase user accounts need to provide their details to access iBase.
Procedure
To add a user who will log on by entering an iBase user name and password:1. Select Security > Security Manager > New.2. Enter a name up to 255 characters in length.
Note: For more information, see Unicode support if the name you want to enter contains anyUnicode characters.
3. Select iBase Security.4. Enter and then confirm the password. The requirements that the password must meet are
determined by the security policy.
Note: In iBase, users can change their own passwords by selecting Change Password from theFile menu. If required, you can remove this permission by defining System Commands AccessControl Groups.
5. Enter the remaining details of the user account:Option Description
Account is active By default, an account is active when created but you can suspend itby turning off the check box to prevent them from logging on.
User cannot changepassword
When this option is selected, the user will never be prompted tochange their password regardless of the security policy and, in fact,will be unable to do so. Use this setting for accounts set up for servicessuch as Scheduler.
Restricted Audit Log This setting is applicable only if you use Audit Viewer or Audit History.The audit log generated by this user will have restricted access andonly authorized users will be able to view it. Authorized users will havethe Audit Administrator role. See Restricted Audit Logs for SensitiveData for details.
Account expires after The account will be accessible up to and including the specified date.
Reset password atnext logon
When turned on, it forces the user to change their password when theynext log on. The check box is then turned off after the user has donethis.
Password neverexpires
Turn on to create an account that will not be affected by the securitypolicy of this security file. Use this setting for accounts that will beused for services such as Scheduler.
6. In the Default Category box, enter the name of the default folder in which the user will save theirfolder objects.For more information, see Default Categories for Users
7. Define the permissions for the user by assigning the user to one or more groups on thePermissions page.
32 IBM i2 iBase: Administration

For more information, see Assigning Users to Groups.8. Optional: Enter contact details for the user, such as their email address, on the Information page.
For more information, see Contact Details for Users. This topic also describes how this informationcan be used in iBase.
9. Click OK to create the new user.
Default categories for usersYou can manage the folder objects that users create (such as queries and sets) by requiring them tosave them in specific categories. Categories appear to users as folders, with similar behavior toWindows Explorer folders, and users navigate the folders in a similar way.
About this task
Categories should be organized systematically for each iBase database, for example, by departments,functions or projects. A category can contain several levels of subcategories. If required, each usercan have their own personal category in which their folder objects are saved or it can be shared withother users. If there is no personal category for the user, and the user does not specify a categorywhen saving, then a folder object is saved in the default category specified in the Options dialog.
There are two ways of handling what happens when a user clicks Save:
• Either, you set up iBase to prompt the user to specify a category for each new folder object thatthey save. The category defaults to their default category (or to the General category if the userdoes not have a default category).
• Or, the folder object is automatically saved in their default category (or in the General category if theuser does not have a default category).
Users can move folder objects between categories but they cannot rename existing categories.
Folder objects comprise:
• Browse definitions• Queries and scored matching definitions• Report definitions• Import specifications and import batch specifications• Export specifications and export batch specifications• Charting schemes• Sets• Mapping configurations (if iBase GIS Interfaces are in use)
There are different types of access for folder objects. For more information, see Access to FolderObjects.
Procedure
To define the name of the default category for a user:1. In the Security Manager in iBase Designer, select the user and click Edit.2. In the User dialog, enter the name in the Default Category box. The default category is the value
as specified in the Options dialog if you leave the Default Category box blank.
IBM i2 iBase administration center 33

What to do next
You can edit the name at any point but this will not update existing folder objects in the database. Toapply the new category name to existing folder objects, you need to ask the user to recategorizethem.
Contact details for usersMore details of the user can be recorded to provide contact information for other iBase users whoneed to establish the history of a particular record or modification, or for use by Alerting. Thisinformation is available in the Property dialog of each record, and also in the Show dialog anddatasheets if owner hyperlink fields are added to the entity and link types. This feature is intended forusers who have iBase user accounts rather than users who use single sign-on.
Before you begin
About this taskContact information consists of a user's:
• Full name• Location (which is predefined by the security or system administrator)• Email address (used for email alerts, however, iBase cannot check whether the email address is
valid)• Telephone number• Notes
Contact details are stored in the security file not in the database.
Note: It is simplest to ask your users to add their own details: in iBase, select Change UserInformation from the File menu.
You might want to assign each user a location, such as a site or department, as part of their contactdetails.
You can derive the location from the user name; however, the advantage of using the location field inthe contact details is that the user can keep the same user name even if they move location. Typicallythe location is the physical location of the user rather than the location of the database.
You can structure the location name to facilitate wildcard search in the Audit Viewer.
Procedure
You must predefine the locations by adding contact information for a sample user from each location:1. In the Security Manager in iBase Designer, select an existing user and click Edit.2. Click the Information tab.3. Enter the location name, up to a maximum of 50 characters.4. Click OK.
Note: As a security or system administrator, you can also add and modify location names in theUser Information dialog in iBase.
What to do next
When you add a record or updating an existing one, you can:
34 IBM i2 iBase: Administration

• Make yourself the owner by typing $ (if it is not already displayed); your user name is inserted whenyou save the record.
• Select a different user as the owner:
1. Click Browse next to the "owner" field to display the list of possible owners. If you know the firstfew characters of the name, enter these first - this will then scroll down to that position in thelist.
2. Double-click a name to select that person as the owner and close the dialog.
Users can find out who the owner of a record is when using either the Show dialog or a datasheet.There are two ways of displaying the contact details for the owner of the record:
• Click the user name shown in the owner, or a similarly named, field. The user name is displayed as ahyperlink.
• Click Edit and then double-click the user name.
The record owner might be a different person to the user who created or updated the record. To findout who these users were:
1. Right-click on the record in any record list, and from the menu, select Properties to display theProperties dialog.
2. Click the User Information button to display the contact details for the person who created orupdated the record.
Assigning users to groupsYou set up permissions by adding groups and defining the permissions for each group. Users thenacquire permissions by becoming a member of one or more groups.
Before you begin
For example, users gain database management permissions by accumulating them from all databasemanagement groups of which they are a member. The same principle applies to the other types ofgroup. By default, new users have the lowest level of access defined in the database.
To assign a user to one or more groups:
Procedure
1. Select Security > Security Manager.2. On the Users page, select the user and click Edit.3. Click the Permissions tab.4. Optional: To assign a user to the same groups as another user, click Copy Permissions and then
select an active user with the required permissions. The check boxes display the updated groupmembership.
5. Change the user's group membership by turning on or off the check box for each required group:Option Description
Database management groups allow the user to add, modify, and delete records andfolder objects or administer the database. You must assign the user to at least onedatabase management group. To check which permissions are granted, click Show UserPermissions.
IBM i2 iBase administration center 35

Option Description
Note: A user who does not belong to any database management group has read-onlyaccess to the records in the database, and is unable to create any folder objects.
System Commands Access Control groups deny the user access to specific menucommands or audit their use of specific commands.
The user is automatically made a member of all the Data Access Control groups definedin the database. This means that they automatically acquire the lowest level ofpermissions. Review these groups and, if required, turn off the check boxes to grant theuser additional permissions.
To allow the user to save folder objects in restricted categories, turn on the requiredFolder Object Control check boxes.
Note: At least one administrative user should have membership of all the groups of thistype. This is required for a full view of the restrictions on folder objects and the ability tochange each restriction individually.
6. Click OK to save your changes.
Administrative usersYou can create members of the default system administrators group and grant all administrativepowers to members of that group. Alternatively, you can create new groups that divide administrationinto separate roles.
This section describes the roles, how to give each role to a group, and the common tasks that theroles enable a user to perform.
Roles
When you are editing a database management group, the administrative roles that are shown in theSystem Roles area of the Permissions page of the Group dialog are:
• Database Creator• Database Administrator• Security Administrator
Each of these roles can be given to a group by turning on the relevant check box, along with anywanted data or folder object permissions.
There is another specific role, System Administrator. This role is given to a user only by membershipof a group in which all system roles (apart from Audit Administrator) and database permissions aregiven. That is, the System Administrator requires all the permissions from the Security Managerdialog, not just those in the System Roles area. The System Administrator has a few powers that arenot available to any other combination of roles and database permissions, so is more powerful thanyou could predict by adding the individual roles or permissions.
36 IBM i2 iBase: Administration

There are various other combinations of roles that you can assign by turning on the check boxes formore than one role, but these combinations work exactly as predicted by combination of theindividual roles.
A description of the capabilities of users with assigned system roles, starting with none and endingwith the most powerful, System Administrator is given below.
User with no system roles
Without any system role, anyone with an iBase Designer license can:
• Log on to iBase Designer and log off.• View their current user permissions.• Create a security file.• View the properties of the security file.• Run these commands:
– Repair/Compact Security File, as long as exclusive access is obtained to the file.– MRU List Manager– Plug In Manager, depending on permissions defined in System Commands Access Control
groups and file-level security permissions on the Settings.xml file.– Options, modifying some of the settings in the Options dialog depends on file-level security
permissions on the Settings.xml file.
Users without any system role cannot open the database in iBase Designer.
Audit Administrator role
A user with this permission can view the records that are displayed and modified by other users whoare defined as having a restricted audit log. See Audit History.
Database Creator role
Users with only this system role are not able to administer the new database. Therefore, this role ismost useful when databases are created from templates.
The Database Creator role is required to use iBase Designer to:
• Create templates from databases secured by the current security file.• Create new databases.• Manage templates using the Template Manager, depending on file level security permissions.
The Database Creator role is required to use iBase to:
• Create new databases.• Create database subsets.
Note: The Audit Administrator role is also required to see the audit history of users with restrictedaudit logs, in iBase and in Audit Viewer.
Security Administrator role
Users with only this system role can open the database and view the database schema but theycannot change it or view any records in the database.
The Security Administrator role is required to use iBase Designer to:
IBM i2 iBase administration center 37

• Move a security file.• Modify the properties of the security file, such as the server details and security file identifier, in the
Security File Properties dialog.• Use the Security Manager.• Produce a Security Design report.• Upsize a security file to SQL Server.• Create Database Design reports* and view database statistics*.• Use Data Access Control*.• Use System Commands Access Control.• Open and close databases to allow the security administrator to perform the tasks marked with an
asterisk (*) above.
This system role is also required to:
• View the audit log.
Note: The Audit Administrator role is also required to see the audit history of users with restrictedaudit logs, in iBase and in Audit Viewer.
Database Administrator role
The Database Administrator role is required to use iBase Designer to:
• Open and close databases.• View database properties and database statistics• Upsize an iBase Access database to an SQL Server database.• Check database and data integrity using Schema Integrity Check, Link Integrity Check and Valid End
Types• Work on the database schema, such as add entity types, fields, pick lists, and assign semantic
types.• Create Database Design reports• Run Update Database Schema• View records in iBase Designer• Set up database functions (such as text search)• Activate and run Bulk Import
Note: Extra permissions are required for exporting and importing data (including Bulk Import). Bothexport and import require Add Entity/Link Records, Update Entity/Link Records and Update/DeleteEntity/Link Records. Importing also requires Update/Delete Entity/Link Records created by otherusers
In iBase, this system role allows a user to:
• Purge and restore soft deleted records• Initialize databases for mapping or database subsets• Synchronize database subsets
Note: The Audit Administrator role is also required to see the audit history of users with restrictedaudit logs, in iBase and in Audit Viewer.
38 IBM i2 iBase: Administration

Security Administrator and Database Administrator roles
Both the Security Administrator and Database Administrator roles are required to use iBase Designerto:
• Update specific database properties, such as the audit level SQL Server details, and turn on casecontrol.
• Create, modify, and delete SCC lists.
Note: The Audit Administrator role is also required to see the audit history of users with restrictedaudit logs, in iBase and in Audit Viewer.
System Administrators
A user with all the system roles, apart from Audit Administrator, and all the database managementpermissions is referred to as the System Administrator. This user can use iBase Designer to:
• Import and export data.• Obtain the database password from the Advanced page of the Options dialog.• See statistics for all the cases in a case-controlled database (even if they select a single case).
In iBase, this user can:
• Edit existing text in a Multi-Line Text (Append Only) field.• Delete alert definitions belonging to other users, in particular alert definitions without owners (for
example belonging to deleted users or users removed from cases).• Select any case in a case-controlled database.• See statistics for all the cases in a case-controlled database (even if they select a single case).
Note: The Audit Administrator role is also required to see the audit history of users with restrictedaudit logs, in iBase and in Audit Viewer.
Editing and deleting usersEdit and delete users in the current security file by using the Security Manager.
You manage the users defined in the current security file by using the Security Manager and Userdialogs. For example, you can:
• Change user passwords.• Add and remove users from groups to control users' permissions.• Prevent users from logging on.• Delete unwanted users.• Record personal details.
Editing a user
To edit the details of an existing user:
1. From the Security menu in iBase Designer, select Security Manager.2. In the Security Manager, select the user and click Edit.
You can change any of the details; however the changes are not retrospective. For example, changinga user name does not update the user name shown in any existing records added by that user.
You can also change the user's permissions by changing their membership of the different groups. Forexample, turning on a check box grants the permissions of the group to the user. The user will onlygain these permissions when you log off and they next log on.
IBM i2 iBase administration center 39

You can also:
• Remove or restore the user's access by turning off or on the Account is active check box. Aninactive user is unable to log on to a security file. Their alert definitions are set to expired and can bedeleted by a system administrator; any alerts that are raised by those alert definitions are notdeleted. Inactive users cannot be added as subscribers to new alert definitions.
For information on adding a user to a case, see Giving and Revoking Access to Cases.
Making a user inactive versus deleting a user
You can delete a user if required. However, after you have deleted the user, you are not able to do anyof the following:
• Selectively restore or purge soft deleted records that belong to that user.• Create or validate Text Chart templates using that user name.• View audit log activity, or the audit history, exclusively for that user.• View or modify their alert definitions and any alerts raised by these definitions.
To delete a user:
• In the Security Manager, select a user and click Delete.
Note: Deleting a group does not delete the users within the group. It removes the group membershiponly.
Types of groupThere are four types of group that can be used to control the access that users must data in an iBasedatabase and to the iBase features.
Database Management groupsDatabase Management groups allow you to define groups with basic permissions to affect datarecords or folder objects (sets, queries, and so on), and entire databases or security files.
Database Management groups are defined in the Group dialog:
• From the Security menu in iBase Designer, select Security Manager and, on the Groups page, clickNew.
The Permissions page of the Group dialog divides permissions into these areas:
• Entity/Link Records• Folder Objects• System Roles
Entity/Link Records
In this area of the Group dialog, you can give the group members permission to manipulate entitiesand links. This applies only to records that they create. To allow group members to update or deleterecords that are created by other users, turn on the Update/Delete Records created by other userscheck box.
Typically, you want to give Add and Update permissions to all data entry staff. You might want to giveDelete permission to all data entry staff, which enables them to remove records that they personallycreated, for example to correct mistaken or duplicate entries. In some cases, you might want torestrict both the Delete and Update/Delete data Created by Other Users permissions to supervisoryor senior staff roles.
40 IBM i2 iBase: Administration

Folder Objects
In this area of the Group dialog, you can give the group members permission to manipulate folderobjects (sets, queries, and so on). This applies only to folder objects that they create. To allow groupmembers to update or delete folder objects belonging to other users, turn on these check boxes:
• Update/Delete Restricted Folder Objects created by other users (for details of restricted folderobjects, see Folder Object Control Groups)
• Update/Delete Public Folder Objects created by other users
Note: Even if you give a Database Management group every permission in the Entity/Link Records andFolder Objects area, you can still restrict what a user does by making that user a member of othertypes of group. For example, you can use System Commands Access Control groups to hide some orall of the commands that implement actions of a type enabled in the Database Management group.
System Roles
In this area of the Group dialog, you can give the group members one or more of the administrativeroles, or grant them permission to view restricted audit logs. These roles are not modified in any wayby the other types of iBase security groups. See Administrative Users for details of the administrativeroles.
What users see
In general, users without a particular permission can start iBase and related applications but theaffected commands in menus and shortcut menus appear as unavailable (dimmed or gray).
Some affected menu commands, mostly those linked to folder objects (sets, queries, and so on),remain available but, when selected, these commands display a dialog saying that the user hasinsufficient permissions to continue.
Note: In addition, you can define System Commands Access Control groups and deny commands tohide unavailable commands. See System Commands Access Control Groups.
In the Audit Viewer, users without the Security Administrator system role, see commands as availablebut are unable to open any log.
System Commands Access Control groupsSystem Commands Access Control Groups can be used to deny and hide specific iBase commands tousers.
System Commands Access Control groups allow you to:
• Deny use of iBase commands that would otherwise be available to users because of theirmembership of one or more Database Management groups.
• Hide iBase commands and toolbar buttons that are not available because of a user's membership ofone or more Database Management groups. Where it is not possible to hide these, a message isdisplayed You do not have the necessary permissions to perform this action.
• Record the user's reason for using a particular command.• Log the use of the command in the audit log.
To display the System Commands Access Control dialog:
• Click From the Security menu in iBase Designer, select System Commands Access Control.
Existing security groups are listed in the left of the dialog. See Creating Groups and Adding Members ifthere no groups of this type defined in the security file.
IBM i2 iBase administration center 41

Note: You can also deny use of iBase functionality to all the users of the local machine, rather thanjust to the members of a specific user group.
Access to basic menu commands in iBase
A user with full database management permissions (such as SYSADMIN) always has access to thefollowing menu commands in iBase, even when they are denied access to all the system commandslisted in the following section:
• Find, list, and show records• Use iBase Link charts• Create reports• For links, view the valid end types• Lists sets, add records to sets, and view set membership• List labeling schemes and set a default labeling scheme• Search for duplicate and matching records• Examine their user details and the database properties• Set session defaults and change the settings in the Options dialog• Export data to Microsoft Excel using the Excel Interface• Define folder objects as common folder objects (only of use when there is a Schema Update license)
Denying access to menu commands in iBase
iBase has several hundred commands including some with very similar names, which would makeadministration tricky and tedious if you had to make individual decisions for each command. Toreduce this complexity, the commands are divided into groups.
To deny access to the commands in a command group:
• In the System Commands Access Control dialog, select the group on the left and then turn on therequired check boxes on the Access Denied page to deny access to those commands.
Group Name Description
Advanced Analysis Denies access to Scored Matching, FieldCalculator, starting Analyst's Notebook fromiBase, sending data to Analyst's Notebookcharts, and commands for MappingConfigurations and sending data to maps.
Alerting SQL Server databases only: denies access to thecommands in the Database Explorer for addingalert definitions. Users are still able to receivealerts.
Basic Analysis Denies access to queries, combining sets andanalyzing sets, and the Coordinate Query Builder.
Batch modification Denies access to commands that affect batchesof records: Merge Entities, Batch Edit and BatchDelete.
42 IBM i2 iBase: Administration

Charting Denies access to all the commands on theshortcut menu in Analyst's Notebook that applyto existing records in an iBase database. Forexample: users cannot expand records, use theTimeline Wizard, find common neighbors,populate cards, expand records and so on. It alsoprevents a user from opening Analyst's Notebookwhile iBase is open. It does not restrict the use ofiBase link charts.
Note: Users in Analyst's Notebook can continueto add new records to the iBase database, andadd the records created during the session tosets but cannot expand them.
Charting Schemes Removes or denies access to the commands forcreating, editing, and saving charting schemes,as well to the commands on the shortcut menufor categorizing, listing and renaming them asfolder objects.
Note: Users can still send data to Analyst'sNotebook for charting and are prompted toselect a charting scheme as usual.
Code lists Removes the Code Lists command from theEdit menu so that users cannot change items onpick lists or icon lists.
Create Link/Entity Removes the commands and toolbar buttons foradding new entity or link records whether using astandard dialog, a datasheet or Analyst'sNotebook.
Database Statistics Removes the commands for Database Statistics,Database Design Report, and Security DesignReport.
Define Analysis Users can chart existing queries but they cannotdefine new queries in iBase or Analyst'sNotebook. Also, in iBase, they cannot open,categorize, list or rename queries, or use theCoordinate Query Builder.
Labeling Scheme Users can still list the labeling schemes andselect a default labeling scheme but they cannotadd, delete, edit or rename labeling schemes,alter the contents of a labeling scheme or copythem.
Report Definitions Users can still produce reports but they cannotadd, edit, delete, categorize, list or renamereport definitions.
Soft Delete Removes the commands on the Edit menu forrestoring and purging soft deleted records.
IBM i2 iBase administration center 43

Tools Removes the commands on the Tools menu iniBase for editing the MRU list and activating plug-ins.
View History SQL Server databases only: prevents users fromdisplaying the audit history both in iBase and inAudit Viewer. If alerting is used, it prevents usersfrom displaying the alert details.
You can inspect the detailed definitions of these groups by looking in a supplied, unsecured Accessdatabase, CommandGroups.mdb. This is in the application data area of your installation (seeInstallation and Application Data Folders for details). The command groups, their descriptions, andtheir definitions are in the _CommandGroup table.
Do not attempt to change these definitions, at least not without obtaining advice from your supplier. Ifyou make changes to CommandGroups.mdb, then you need to apply it to the current security file byselecting Database Setup > Update Command Groups from the Tools menu.
Recording the reason for an action
You can require the user to enter a reason for using a particular command in iBase, or an iBasecommand when working in Analyst's Notebook. The reason is recorded in the audit log; however, therecords affected by the command are only recorded if you set the audit level of the database to level5. For further information about audit level 5, see Controlling What is Audited.
To prompt the user to record a reason for an action:
• In the System Commands Access Control dialog, select the group on the left and then turn on therequired check box on the Reason for Action page.
Group Description
Audit Analysis Members of the group are prompted to enter areason whenever they open a database orperform any analysis on iBase records, such as:
• Run a folder object such as a browse definition,report definition, query, import specificationand so on
• Use any iBase command when the database isopen in Analyst's Notebook
• Use any charting commands when in iBase• Use any mapping commands when in iBase• Initialize the database for Data Miner, build
new cubes or examine existing cube definitions• Use the Field Calculator dialog• Copy data to the clipboard• Export data using the Excel Interface dialog• Use the Coordinate Query Builder
44 IBM i2 iBase: Administration

Audit Charting Members of the group are only prompted toenter a reason when they work with iBase dataon charts, specifically:
• Open Analyst's Notebook• Use any iBase command when the database is
open in Analyst's Notebook• Use any charting commands when in iBase
Audit Data Exposure Members of the group are prompted to enter areason when they use any command in iBasethat may result in data being printed (forexample by exporting or reporting); or use iBasedata in Analyst's Notebook, or IBM i2 iBaseGeographic Information System Interfaces.
Data Auditing: create, edit, delete Members of the group must enter a reason foradding, editing, or deleting records before theycan save the record. They are also prompted todo this when merging entities, batch editing anddeleting, assigning icons, and loading from TextChart.
Auditing the commands used
You can record the commands used by a user in the audit log:
• In the System Commands Access Control dialog, select the group on the left and then turn on therequired check box on the Audit page.
The three command groups are identical to the groups on the Reason for Action page. See above fordetails of the commands covered by each group.
What users see
Users do not see the commands that you have denied, so named menus (such as File) and shortcutmenus become shorter, and some submenus might disappear entirely.
Note: Although some command groups deny commands for listing folder objects, users can still seewhich folder objects exist by using the Details window of the Database Explorer.
Data Access Control groupsData Access Control (DAC) groups control permissions related to entity types, link types, fields, andrecords in each database. This allows a very fine control of how individual items of data are madevisible to, or changed by, groups of users.
Among the possibilities are:
• Denying all access or change to all records for a particular entity type or link type. For example, youcould deny access to all witness statements if those statements are stored in a particular entitytype.
• Hiding administrative fields in records or making administrative fields read-only to certain groups ofusers.
• With SQL Server databases only, making selected records of various entity types or link typesinaccessible according to the security classification (SC) code given to each record. For example,
IBM i2 iBase administration center 45

you could create DAC security groups called Public and Security Cleared, then use Data AccessControl to deny the Public group access to records given an SCC level of Secret.
Note: New users are automatically made a member of all the existing Data Access Controls groups.This automatically gives them the lowest level of permissions defined for the database. You shouldreview this default group membership whenever you add new users.
Note: After you make changes to a Data Access Control group in a database that uses alerting, log offand reopen the database as soon as possible, in either iBase or iBase Designer. This applies thesecurity changes to any existing alert definitions.
Implications of using Data Access Control groups
You should consider carefully how you might want to use a scheme using conditional access.
A simple scheme with few combinations of access permissions is likely to work better than a schemethat implements many levels of restriction. Remember each combination of restricted data accesshas potential consequences for users by blocking access to queries using those restricted entities,links, or fields. This is true of all folder objects related to data items, not just queries.
You can start with a simple scheme and increase its complexity if needed.
What the user sees in iBase
The consequences of placing a user in a Data Access Control group can be wide ranging and can meanthat different users see different databases.
A selection of the effects upon a user in a group with each of the possible restrictions:
Restriction Details
Denied tables (entity types and link types) areentirely invisible to the user
This means that the user does not see therecords for those types, and does not see eventhat the entity or link types exist. They are notable to run queries or reports for the deniedentity or link type.
Read-only tables appear as normal, but do nothave editing or creation options
For example a read-only entity does not haveNew command in the shortcut menu and theNew and Edit buttons are unavailable in Showdialogs and data sheets for that entity.
Denied fields are entirely invisible to the user For example, a denied field does not appear inShow dialogs, datasheets or when setting upbrowse definitions.
Read-only fields appear in data entry forms inthe same form as equivalent system orcalculated fields
For example, a read-only text field appears witha gray background even when other fields areeditable.
Denied records (entities and links), deniedbecause of an SC code, are made invisible on arecord by record basis, so other entity and linkrecords remain visible
For example, if there are some Crime entityrecords denied to a user, they may see otherCrime records and they will always see that theCrime entity type exists, even if all records aredenied to them.
For details of further limitations that apply tomatching records and merged entities, see UsingSecurity Classification Codes.
46 IBM i2 iBase: Administration

The effects mentioned previously are direct and predictable. There are also effects that may seemless predictable, but are required to avoid users deducing what is hidden from them:
• All folder objects with references to denied tables become unavailable to the user. For example,users cannot see or use a query that refers to a denied entity or link.
• Users see data sheets, statistics, and design reports that match the entities and links that they see.Denied fields, entities, and links do not appear.
• If there are denied fields, users see a Show dialog without those fields. Users do not have access toa data sheet using a denied field.
What the administrator sees in iBase
You might see the following effects where users do things that are reasonable given their view of thedatabase:
• Duplicate records that are created by users who have entities or links hidden by SCC restrictions.• Users creating private queries to perform related tasks.• Users in different Data Access Control groups see different results from performing the same
analysis.
Creating Data Access Control groups
To create a Data Access Control group:
1. In iBase Designer, log on and open the database for which you want to set up Data Access Control.You do not have to open the database to create the group and add members to it but you do needto open it to define the permissions for the group.
2. Use the Security Manager dialog to create one or more Data Access Control groups, and makeusers into members of those groups. See Creating the optional types of group for details.
3. From the Security menu, select Data Access Control.4. In the Data Access Control dialog, select the group and then define the group's access. You must
repeat these steps in each database that is secured by the security file— the groups are defined inthe security file but the permissions of each group are defined in the database.
The different types of access:
Page Description
Tables Lists the entity and link types in the databaseschema. To hide all records for a specific entityor link type, turn on the check box.
IBM i2 iBase administration center 47

The different types of access:
(continued)
Page Description
Fields Lists the fields of all the entity and link types inthe database schema, including standard fieldsand mandatory fields. To hide a field in records ofa specific entity or link type, turn on theappropriate check box.
Note: You are warned if you deny access to amandatory field (or if you make a denied fieldmandatory). If you choose to deny access to thisfield (or make a denied field mandatory), youprevent members of the group from addingrecords of the entity or link type.
Note: Users who plot data on maps might needwrite access to the fields containing coordinatevalues if an iBase or Microsoft Access geocodingdatabase is used.
Read-Only Tables On this page, records are visible to members ofthe selected security group but are protectedfrom change.
Read-Only Fields On this page, data in the specified field is visibleto members of the selected security group butare protected from change.
Note: Users who plot data on maps need writeaccess to the fields containing coordinate valuesif an iBase or Microsoft Access geocodingdatabase is used, unless a more powerful userpopulates those fields for them.
Security Classification Codes The Security Classification Codes page lists theSC codes defined in the database schema. Turnon check boxes for all classifications that youwish to be denied to members of the selectedsecurity group. If any classification nameappears in more than one SCC list, the denial ofrecords applies to all records with thatclassification regardless of the list in which itappears.
For further information, see Using SecurityClassification Codes.
There is no Security Classification Codes page ifyou open an Access database or if the databaseis case controlled.
48 IBM i2 iBase: Administration

Where Data Access Control groups are stored
The relationship to database contents means that the full definition of a Data Access Control group isstored in two parts. The name and membership of each group is stored in the security file. Therestrictions on members of each group are stored in the database, because it is in the database thatthe restrictions and their linkages to entities, links, and fields are stored.
If you create a new database from a template based on a database with DAC restrictions, the newdatabase has no data access restrictions, but it does have access to the security groups in therelevant security file and any SCC lists in the template. This allows you to reproduce the securitysettings more easily than at first creation.
Folder Object Control groupsYou can use Folder Object Control (FOC) groups to control access to queries, sets, and all other folderobjects that require restricted access. When a member of a FOC group wants to save a reportdefinition, for example, they can choose to restrict access to themselves and other members of thegroup.
They can also choose to save it as a public or private object if they want. For more information, seeAccess to Folder Objects.
The user’s viewpoint
In understanding how this type of group works, it is important to consider the user’s viewpoint:
• A user sees only the Folder Object Control groups in which they are a member. The user can see andchange folder objects that are saved with restrictions based on those groups.
• If there are other FOC groups, the user does not see those groups and cannot directly changeobjects that are saved with restrictions based on those groups. Depending on databasepermissions, the user might be able to make the object public.
Here are some design and management ideas:
• Ensure that at least one administrative user has membership of all FOC groups. This access isrequired for a full view of the restrictions on folder objects and the ability to change each restrictionindividually.
• Do not give the permission Update/Delete Restricted Folder Objects created by other users tonon-administrative users if it is important to preserve folder object restrictions. For moreinformation, see Creating mandatory Database Management groups for details.
Managing Folder Object Control groups
In iBase Designer, you use the Security Manager to create Folder Object Control groups, and todeclare appropriate users as members of those groups. See Creating the optional types of group fordetails. The members of the groups define how the groups are used.
You can also delete FOC groups. If you delete a FOC group, you must use iBase Designer to open eachdatabase that is secured by the security file before the change is fully applied. What happens in thedatabases is that the deleted FOC group is removed from all folder objects to which it has beenapplied. If that FOC group was the only group applied to an object, the object becomes public.
There is no other specific management activity.
Where Folder Object Control groups are stored
The relationship to database contents means that the full definition of a Folder Object Control groupis stored in two parts. The name and membership of each group is stored in the security file. The
IBM i2 iBase administration center 49

restrictions on members of each group are stored in the database because it is in the database thatthe folder objects and their linkage to the groups are stored.
If you create a new database from a template based on a database with FOC restrictions, the newdatabase has no folder object access restrictions, but it does have access to the security groups in therelevant security file and any folder objects in the template. This behavior allows you to reproduce thesecurity settings more easily than at first creation.
Security Classification codesWith SQL Server databases only, you can choose to make selected entity or link records inaccessibleaccording to the security classification (SC) code that is given to each record. Who can access recordswith specific SC codes is determined by membership of a Data Access Control group. Each groupdenies members of the group access to specific SC codes. The system administrator sets up SC codesafter they create the operational database - they cannot be preset and saved in the databasetemplate.
Requirements for using
To apply security on a record by record basis, and allow filtering by SC code:
• Each entity or link type in the database requires a field of type Security Classification Code (SCC).There can only be one SCC field per entity or link type.
• The classification levels that apply to entity and link records are defined as an SCC list, eachclassification level is represented as a security classification (SC) code. There could be several SCClists in the schema if different entity and link types use a different range of classification levels.
• The SCC list must be assigned to the SCC field in the relevant entity and link types.
Security classification codes and cases
If you want to use SC codes to classify your data, then you cannot also use cases. If you decide thatyou need to partition your data by case, then the conversion to case-control removes all the SC codesin your database. For further information about cases, see Creating a Case-Controlled Database.
Restricting SCC lists to accessible items only
By default, an SCC list displays all the SC codes on the list regardless of whether the user entering ormodifying a record has access to records classified with those SC codes. This allows a user to add arecord and select an SC code for it that will later deny that user access to the record they entered orupdated.
Note: The user continues to have access to the record while it remains listed on their screen, forexample in Find, Query or Set dialogs but after the screen is refreshed or a new find, query, or setoperation started the record becomes inaccessible.
You can prevent users from entering records with SC codes that represent security levels that aredenied to them. To do this:
• From the File menu in iBase Designer, select Database Properties, click the Advanced tab andturn on the Restrict SCC lists to accessible items only check box.
SCC limitation in charting merged entities
There is a specific limitation to the use of SC codes that you should consider concerning the chartingof merged entities.
50 IBM i2 iBase: Administration

When a user opens a chart that contains denied entities or links (either on their own or part of amerged entity), all the labels and data records for the merged entity become available, including thelabels and data records for denied entities and links. However, the user is not able to view the entirerecord in iBase. They will see the message This record has been deleted.
Defining access to security classification codesAn SCC field on its own cannot enforce security. You need to add a Data Access Control group foreach of the security classifications (in the Security Manager) and assign users to those groups. Thegroup initially allows access to everything in the database; you must use Data Access Control to denyaccess.
Procedure
1. Create a Data Access Control group and assign users to this group.For more information, see Creating Users and Groups for details.
2. Select Security > Data Access Control.
Note: This menu command requires a license for Extended Access Control.3. Click Security Classification Codes.
Note: If the Security Classification Codes tab is not present, you cannot use SC codes, eitherbecause you are working in an Access database, or the database is case-controlled.
4. Select the group that you defined.5. For the members of the selected group, turn on each Security Classification code that you want to
deny.6. You must repeat these steps in each database that is secured by the security file.
The groups are defined in the security file but the permissions of each group are defined in thedatabase.
Create and maintain databasesYou can create and maintain iBase databases, whether in Microsoft Access or SQL Server format.
Create databasesYou can create different types of iBase database for operational use.
The different types of database include:
• Empty databases without any schema. You must define the schema, or copy and paste it fromanother database.
• Databases that use the schema of another database (the new database is based on a databasetemplate). You can add to the schema, or modify and delete the objects in it.
• Databases that partition their data by case. A database of this type must contain a minimum of onecase and the only access to the data is through the case or cases to which the user is assigned. SeeWhat is case control?.
The database is either MS Access or SQL Server:
• Microsoft Access databases offer most of the database features of iBase and creating eachdatabase is simpler. However, they are only suitable for small amounts of data (up to 2 Gb) andsmall numbers of simultaneous users (up to 5 or 6). For more information, see Before Creating aDatabase.
• SQL Server databases are more suitable for large databases with large numbers of simultaneoususers. They also provide additional features.
IBM i2 iBase administration center 51

Before creating a databaseConsider the following points, at least before you create your first operational database, and thenreview your decisions as you create other databases.
Should the database be SQL Server or Microsoft Access?
Microsoft Access databases offer most of the features of iBase and creating each database is simpler.However, over time and with growing size or numbers of databases, you might find thatadministration becomes difficult.
For personal use, and especially for use with a portable computer, an iBase Access database might bethe best choice. You can always upsize any iBase Access database to SQL Server, allowing astraightforward transfer of all data and folder objects to the new format.
In general, the advantages of SQL Server databases make it the preferred choice:
• The advantages include the ability to work with larger databases, more users, better performancewith large databases, and a higher level of data security with more flexible access control.
• You need to use one or more of the features specific to SQL Server databases. For a summary ofthese features, see Comparison of Access and SQL Server Databases.
The different combinations of Microsoft Access and SQL Server databases and security files aresummarized in Configuration Options for an iBase System.
System requirements
All iBase installations can use Access databases. Multi-user sites need only a shared disk folder on asuitable server.
If you decide to use SQL Server, you need the following before you create an iBase database:
• SQL Server instance on a server or locally• Suitable logins on that server
For more information about SQL Server logins, see “Access control” on page 10.
Identifying other database requirements
There are also some standard decisions to make for each database.
Before you create database records, you should consider the following questions:
• Do you want to identify records in this database uniquely when combined with records from otheriBase databases?
If so, you need to choose a text string, up to 5 characters long, that is unique to this database andthat can be guaranteed to remain unique as new databases are created. (This is mandatory forreplicated iBase databases.)
• Should the data be read-only to users?
For example, this state might be appropriate if the database is used only for analysis of historicaldata collected from other databases. Database administrators can change this setting at any time,but you might prefer to make such a database read-only from the time of creation and change it toan editable state only when necessary for a specific task. Only the data is read-only, users(depending on their permissions) can still add, modify, and delete folder objects, such as queries.
• Should the database be partitioned by case?
52 IBM i2 iBase: Administration
Do you want to restrict access to the records in the database on a case-by-case basis? If so, youneed to create a case-controlled database. However, this setting cannot be changed at a later date.For details of how case control works, see What is case control?
With the exception of case control, most other decisions can be made now or easily modified after thedatabase has been in use for some time. For example:
• What level of auditing is appropriate?
A low or intermediate level of detail is often a good starting point, because it is easy to modifysettings for operational databases.
• Should audit logs contain a cross-reference for records from external data sources?
If you do not have this need, there is nothing to do now. If you want this functionality, the process iscomplex and extends across database design, configuration choices, and auditing. See AuditingRecords from External Databases.
With the answers and information that is prompted by these questions, you are ready to create thedatabase.
Logging on to the correct security file
You must be logged on to the correct security file when you create the database. The new databasecan only be accessed through this security file. In iBase Designer, the name of the security file isdisplayed in the second area from the left of the Status Bar at the bottom of the application window.
Note: Each database shares a unique identifier with the security file used when you create thedatabase. You can only use the database with this security file (or with a copy of the security file).
Database templatesYou can create a new empty database from a template that is created from an existing iBasedatabase. Creating databases in this way reduces the time that is taken to define core components.
Depending on the type of database, the template contains:
• Entity types, link types, fields, and standard fields• Pick lists, icon lists, and SCC lists• Datasheets• Charting and labeling schemes• folder objects such as report definitions and queries• Mapping configurations• common folder objects
The template does not contain anything that relies on the existence of specific records. For example,it does not contain:
• Sets• Alert definitions• Database subset definitions• Data Access Control group permissions• Cases (even if the source database is case-controlled)• Support files, such as Text Chart or Analyst's Notebook templates• Access permissions for folder objects (permissions are always set to Public unless you are using
iBase database replication)
IBM i2 iBase administration center 53

A template is saved with the file extension idt.
It is important to make sure that the template you select for use is up-to-date. It can sometimes bedifficult to change the schema of a database that is in constant use or is off-site. A Schema Updateutility is available to reduce the time that is taken to apply schema changes. For more information,see Updating Database Schemas.
Templates and database formats
You can create templates from both Microsoft Access and SQL Server format databases, and create adatabase of any format from that template.
However, a Microsoft Access database that is created from a template based on an SQL Serverdatabase does not contain any objects that rely on SQL Server. For example:
• Cube definitions• Queries containing semantic conditions or distinct counts• Import specifications and Import Batch specifications
Note: A template that is created from a case-controlled database is also case controlled. You cannever create a Microsoft Access database from this type of template.
Where database templates are stored
Templates are stored in either the Templates or WorkgroupTemplates folder. By default theworkgroup folder contains the database templates that are supplied by IBM and the Templatesfolder contains the ones that are created by the user locally.
Database templates are always created in the Templates folder. To distribute a database templatefor general use, you need to copy it to the WorkgroupTemplates folder. For more information, seeInstallation and Application Data Folders for details of paths.
Any user can change the path of their Templates folder.
Note: To prevent users from moving the templates folder, change the permissions for theSettings.xml file. See Location of Templates, Icons, and other Files for details.
Backing up database templates
Make sure that the folder in which you keep your database templates is included in any backups thatare made of the iBase system.
Creating a database templateWhen you have designed a database, you can use that database to create a template. You can use adatabase template to create databases with set attributes.
Procedure
To create a template from the database:1. In iBase Designer, log on to the security file associated with the database but do not open the
database.2. Select Tools > Database Administration > Template Manager.3. In the Template Manager, click New.4. Click Browse and use the file browser to locate and select your database. You can only create a
template from a database associated with the current security file.
54 IBM i2 iBase: Administration

The name of the security file is displayed in the second area from the left of the status bar at thebottom of the application window.
5. Review the entity and link types listed in the dialog to check that you have selected the correctdatabase.
6. In the Template Name box, enter a name—you may want to include the version number of thetemplate in the file name. For example Crime_v1_0.
7. Click OK to create the template. Templates are always saved in your folder for user templates.
What to do next
You can now create a new database from this template or use it to update the schema of a copy of thedatabase (from which you created the template).
Creating a DatabaseCreate a database in iBase designer.
Before you begin
Before you start to create a database, check that:
• You are logged on to a suitable security file (see Logging on to the correct security file for details).• The security file is stored in the correct folder because iBase Designer creates the new database file
(.idb file) in the same folder as the security file (.ids file).
When you are ready to create the database:
Procedure
1. In iBase Designer, select File > New Database.2. In the Name box, enter a unique name for the database.
When you choose the name, consider:
• Whether the name uniquely identifies the database, not only within your iBase system but alsowhen the database is used with other iBase databases from other organizations, which ispossible if maps and Analyst's Notebook charts are created using data from multiple iBasedatabases.
• For SQL Server databases, the name you choose is used to generate the name of the SQL Serverdatabase so you might want to discuss the naming convention to use with your SQL Serveradministrator. For more information, see SQL Server Database Names.
3. From the Database Type list, select the file type of the database you wish to create:Option Description
MicrosoftAccess
Creates a Microsoft Access database. Click the Details tab to continue.
SQL Server If you have a suitable server available, you can create an SQL Server database. Todo this:
a. From the Database Type drop-down list, select SQL Server.b. Select a suitable server name from the Server drop-down list. Alternatively,
you can enter a name in the box to use a known server or click Refresh tohave iBase Designer search for available servers. Only select the local option,if available, if the database is for personal use.
IBM i2 iBase administration center 55

Option Description
c. Choose how your computer connects to that server, using one of theseoptions:
• If your SQL Server database administrator has given you a login name andpassword for SQL Server, type these items in the Login Name andPassword boxes. Each iBase user connects to the server using this login.
• Turn on the Use Windows Authentication check box if you wish to useintegrated security, where SQL Server accepts the fact that a user haslogged on to a Windows domain as sufficient permission to connect to theserver. If you choose this option, the SQL server login entered above isnever used, and each user that attempts to connect to use the iBasedatabase is validated by the server using their network credentials.
The different methods of authenticating a connection are described in detailin Authenticating Connections to SQL Server.
d. Click the Details tab to display the Details page.
4. On the Details page, add a Title for your database.The title will appear in the title bar of the application window when the database is open in iBase.
5. Optional: Enter a Description of the database.You might want to enter a brief description that is seen by users opening the database. You mightalso want to record the name of its database template and the version number of the schema ortemplate.
6. Set the Audit Level which you want to log changes.
Level 1 means that the audit log collects the lowest level of detail, and level 5 the highest. (If youare creating an Microsoft Access database, the highest setting is 4.) Level 4 and higher collectlarge amounts of data about user activities so you should use these levels with care, and monitorthe size of the log file as the database is used. For more information, see “Auditing” on page 124.
You have now set enough properties to create a blank database. .7. Depending on your requirements:
• Click OK to close the dialog and create the database now.• Specify a template for the database. For more information, see “Creating a database from a
template” on page 57.• Set advanced properties for your database. For more information, see “Setting advanced
properties” on page 57.
What to do next
The final step is to control the type of access allowed to the database folder and its files. By default,Windows users do not have sufficient permissions to log on and open the new database. For moreinformation, see:
• Controlling Access to Microsoft Access Databases• Controlling Access to SQL Server Databases
56 IBM i2 iBase: Administration
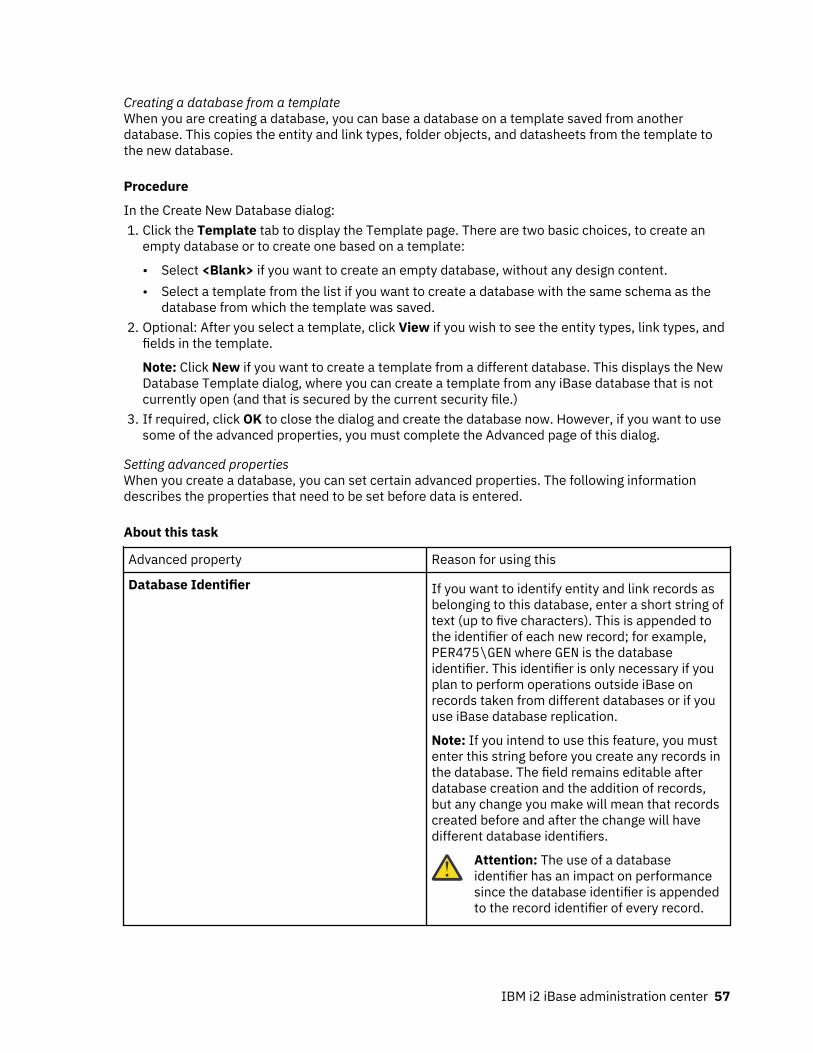
Creating a database from a templateWhen you are creating a database, you can base a database on a template saved from anotherdatabase. This copies the entity and link types, folder objects, and datasheets from the template tothe new database.
Procedure
In the Create New Database dialog:1. Click the Template tab to display the Template page. There are two basic choices, to create an
empty database or to create one based on a template:
• Select <Blank> if you want to create an empty database, without any design content.• Select a template from the list if you want to create a database with the same schema as the
database from which the template was saved.2. Optional: After you select a template, click View if you wish to see the entity types, link types, and
fields in the template.
Note: Click New if you want to create a template from a different database. This displays the NewDatabase Template dialog, where you can create a template from any iBase database that is notcurrently open (and that is secured by the current security file.)
3. If required, click OK to close the dialog and create the database now. However, if you want to usesome of the advanced properties, you must complete the Advanced page of this dialog.
Setting advanced propertiesWhen you create a database, you can set certain advanced properties. The following informationdescribes the properties that need to be set before data is entered.
About this task
Advanced property Reason for using this
Database Identifier If you want to identify entity and link records asbelonging to this database, enter a short string oftext (up to five characters). This is appended tothe identifier of each new record; for example,PER475\GEN where GEN is the databaseidentifier. This identifier is only necessary if youplan to perform operations outside iBase onrecords taken from different databases or if youuse iBase database replication.
Note: If you intend to use this feature, you mustenter this string before you create any records inthe database. The field remains editable afterdatabase creation and the addition of records,but any change you make will mean that recordscreated before and after the change will havedifferent database identifiers.
Attention: The use of a databaseidentifier has an impact on performancesince the database identifier is appendedto the record identifier of every record.
IBM i2 iBase administration center 57

Extra Detail Field for Audit Log If you want the audit log to record the value of aparticular field when recording actions that affectindividual records, enter the name of a field(from this iBase database).
The audit log always records the iBase Record IDso this extra recorded field is a free choice fromdata entered in iBase or imported from anotherdatabase. Typically, the database designer setsup the schema so that the named field orstandard field contains an external referencenumber or some other way of assessing thehistory or validity of a record.
For example, this feature can be used tomaintain an audit log with details of data andrecord identifiers imported from externaldatabases. For details, see Auditing Recordsfrom External Databases.
Standard (SCC) Control Leave the Standard (SCC) Control optionselected. This gives each user access to all therecords in the database, depending on their userpermissions. For details of creating a databasethat is partitioned by case, see Creating a Case-Controlled Database.
Other properties can be set, or changed with caution, at any time during the life of the database. Formore information about all of these properties, see Summary of the Database Properties.
Procedure
To set advanced database properties:1. Click the Advanced tab to display the Advanced page.2. Select the properties that you would like to use.3. Click OK to create the database with the settings you have made.
What to do next
For any open database, you can view the properties by displaying the Database Properties dialog.When viewed in iBase Designer, you can change the Title, Description and, with caution, the settingsdisplayed on the Advanced page.
Summary of the database propertiesThe properties of the database provide detailed information about the database.
At any time you can view the properties of the database in iBase Designer, by selecting File >Database Properties.
Option Description
Title The title for the database, as displayed in theapplication title bar.
58 IBM i2 iBase: Administration

Option Description
Description The description of the database, as displayedwhen any user first opens the database.
File The location of the database (.idb) file.
Version The database version number.
Audit Level The detail level at which the audit log collectsdata on changes to the database and securityfile. You can change the audit level: level 1means that the audit log collects the lowestamount of detail and level 5 collects the highestamount of detail (SQL Server databases only).Level 4 and higher collect large amounts of dataabout user activities so you should use theselevels with care, and monitor the size of the logfile. See Controlling What is Audited.
Audit History In SQL Server databases only, all updates todata, including code lists, are logged and can beviewed either in Audit Viewer or in the iBaseHistory. In a database that is set to audit level 5,records that are viewed but not updated are alsologged.
Note: This property is automatically turned on ifthe database is initialized for alerting and cannotbe turned off while alerting is in use.
You can configure the audit history and disablethe guest account in Configuring Audit History.
Configuration details
The configuration page shows details of the database file and format, and the security mode. You canchange the authentication mode when connecting to the SQL Server instance on this page or by usingthe Database Configuration tool (see Managing SQL Server Connection Settings).
Database Type The file format of the database, either MicrosoftAccess or SQL Server.
Database Name The name of the SQL Server database on theserver. See SQL Server Database Names.
Note: You cannot rename an SQL Serverdatabase in iBase Designer. See SQL ServerDatabase Names for further details.
IBM i2 iBase administration center 59

Server The name of the database server. You canchange to a different server provided that thedatabase exists on that server. Enter a name inthe field to use a known server or click Refreshto search for available servers. Only select the(local) option if the database is for personal use.
Note: This and the following changes do not takeeffect until you reopen the database.
Login Name, Password An SQL Server login name and password isdisplayed if SQL Server authentication is used tosecure access to the SQL Server instance. SeeAuthenticating Connections to SQL Server fordetails.
For security reasons, the login that is used tocreate the database might be different from theone used after creation. After creation, you mightprefer to change the login to one with a lowerlevel of SQL Server permissions. After creation,you might also want to change the authenticationmode by turning on the Use WindowsAuthentication check box.
Use Windows Authentication The Use Windows Authentication check box isturned on if Windows authentication (integratedsecurity) is used to secure access to the SQLServer. Each user that attempts to connect touse the iBase database is validated by the serverusing their network credentials. SeeAuthenticating Connections to SQL Server fordetails.
Advanced properties
The Advanced page displays the current setup of the database, which you can change with caution.For more information, see iBase Designer https://www.ibm.com/support/knowledgecenter/SSXVXZ_latest/com.ibm.i2.ibase.designer.doc/advanced_settings.html
Passwords for Microsoft Access databases
A 20-character password is generated for you when the Microsoft Access database is created. Youshould keep a record of this password. The password is the same for all the Microsoft Accessdatabases created from the same security file.
To see the password, select Tools > Feature Availability > Options > Advanced.
60 IBM i2 iBase: Administration

SQL Server database namesThe names that you choose for the security (ids) file and database (idb) file in iBase are used togenerate the names of the SQL Server databases. For this reason, you might want to discuss thenaming convention to use with your SQL Server administrator.
Main iBase database
A complete logical iBase database (for entity and link data) contains two Microsoft SQL Serverdatabases:
• An iBase database:
Typically the database name is similar to the name of the connection file, but is subject tomodification to comply with SQL Server naming rules.
The database name always contains an underscore ( _ ). For example, if the requested databasename is Intelligence, SQL Server uses the name Intelligence_ and the connection fileremains Intelligence.idb. Additionally, any spaces in database names are replaced byunderscores (_). T
• An Audit Log database:
The Audit Log database is the database name with _log added at the end, for exampleIntelligence__log. (Notice the double underscore in this single-word database name.)
These two databases are always present.
iBase security database
Optionally, iBase security data can be held in an SQL Server database. The SQL Server name followsthe rules for the main iBase database but is appended with _sec. For example, if the name of theAccess security file is Intelligence.ids then the SQL Server name is Intelligence__sec.
Renaming SQL Server databases
To rename an SQL Server database that contains entity and link data (not security data), create a newdatabase in iBase Designer with the wanted name. The name must uniquely identify the databasewithin your iBase system and also when used with third-party iBase databases. You must be loggedon to the correct security file when you do rename a database. The connection file that is required byiBase to connect to the database on the server is also created. To move the data to the new database,your SQL Server administrator must make a backup of the SQL Server database that you want torename and then restore the backup over the new database.
Attention: You cannot rename an SQL Server security database in this way. You lose theconnection between the security file and the databases that it secures and prevent your usersfrom opening the databases.
Creating database subsetsA database subset allows users in the field to work with a small subset of a database (maximum50,000 records). The database subset contains enough information to aid investigations but itsprimary role is to capture new information that, on return to base, is loaded into the main database. Ifrequired, new and updated information can be downloaded to the database subset or the subset canbe marked as expired.
iBase users can use the definitions from which the database subsets are created to export data formultiple entity and link types. The data is exported as XML using an XML schema specific to iBase andthe iBase database.
IBM i2 iBase administration center 61

Note: For details of how to use database subset definitions to export data as XML, see the iBase help.
Advantages of database subsets
• They can be set to expire, which prevents their reuse.• They are easy to set up and synchronize with the main database.• No technical knowledge is needed to use them (unlike database replication).• You can export the data specified in a database subset definition as XML.
Limitations of database subsets
• You cannot create database subsets from a read only database.• You cannot create a database subset from another database subset.• A subset can only be synchronized with the database from which it was created.• When synchronizing databases, you cannot view the records with conflicting changes, or choose to
keep and discard conflicting changes on a record by record basis.• A subset can contain a maximum of 50000 records.
Use this feature with SQL Server databases only, unless you are able to back up the main databasebefore you synchronize with a database subset. The database subsets that are created are inMicrosoft Access format but can be upsized.
Setting up database subsetsThe set-up of database subsets requires three setup phases.
The following information describes the three setup phases:
1. Setting up user permissions and initializing the database.2. Specifying the contents of a database subset, through queries and sets, and saving it as a
database subset definition (a type of folder object).3. Creating the database subset with an identical structure to the main database and populating it
from a database subset definition.
All setup and maintenance is done in iBase rather than iBase Designer.
User permissions
The following user permissions are required to work with database subsets:
• To define the database subset definitions requires permissions to add folder objects.• To initialize the main database, the Database Administrator role is required.• To create database subsets, the Database Creator role is required. If you use Data Access Control
groups, full access to all tables and fields is required.• To synchronize database subsets requires the Database Administrator role and permissions to:
– Add records– Update records– Delete records– Update and delete records created by other users
If you use Data Access Control groups, full access to all tables and fields is required.
62 IBM i2 iBase: Administration

Initializing the database
Before you can create database subsets, you need to initialize the main database:
1. In iBase, log on as a database administrator and open the main database.2. From the Tools menu, select Initialize Database for Database Subsets.
When a database is initialized, the database subset definition folder type is added to the DatabaseExplorer.
2. Defining a database subset
A database subset definition comprises queries, parameterized queries, and sets. Their constituentrecords are copied to the database subset when it is created.
Once added to a definition, the parameterized queries are mandatory because the user is promptedfor values when creating database subsets and during synchronization. Creation and synchronizationis canceled if the user cancels a parameterized query.
Deleting a set or query does not remove it from the subset definition but makes the database subsetdefinition invalid. Invalid definitions cannot be used to create database subsets or to synchronizeexisting subsets that were created from this definition (unless the database subset is to be discardedafter its records are uploaded to the main database).
To define a database subset:
• In the Database Explorer in iBase, right-click on the Database Subset Definitions folder type, andfrom the shortcut menu, select New.
3. Creating database subsets
When iBase creates a database subset, it:
1. Retrieves the records that define the database subset.2. Creates a temporary database template from the main database and saves it in the user templates
folder.3. Creates a security file and system administrator user. (See below for further information about the
security file.)4. Creates an empty database subset as an Microsoft Access database based on the temporary
database template. The database identifier is recorded in the main database, and Soft Delete isswitched on.
5. Deletes the temporary database template.6. Populates the database subset with the data.
Note: The create date/time and the update date/time of each record in the database subset is setto the create date/time of the record from the main database. Similarly, the Create User andUpdate User is set to the Create User of the record in the main database.
To create a database subset:
• Log on to iBase as a user with the Database Creator role and open the main database. From the Filemenu, select Data Database Subsets Create Database Subset. Click Help if you needassistance on using this dialog.
Security files for database subsets
Each database subset has its own security file. The security file has the same name as the databasesubset and is created in the same folder. Do not move the security file to a different location.
IBM i2 iBase administration center 63

You will need to specify a new system administrator user name and password when creating thedatabase subset, which is required later when the database subset is synchronized with the maindatabase.
You need to decide whether this user account is to be reserved for database synchronization orwhether the user of this database should log on as this user to enter data. All records in the databasesubset have the name of the current user as the “Create User” or “Update User” after they areuploaded to the main database.
To add a different user account, you can log on to the new security file in iBase Designer and add auser in the Security Manager. You can change the details of the user accounts without affecting theviability of the database subset because when the database subset is subsequently synchronized, youonly need to enter a system administrator user name and password from the subset security file.
Synchronizing database subsetsDatabase subsets are used remotely, and the records they contain must be synchronized with themain database regularly. Although in most cases, records are modified either in the subset or in themain database, you might need to resolve conflicts that arise.
Before you begin
You must connect to that database as a system administrator of the database subset to ensure thatyou have access to all records in the database subset and the necessary permissions.
During synchronization, you can choose whether the database subset expires after synchronization iscomplete.
About this task
Synchronization begins by identifying the records that are needed to repopulate the database subsetby examining the queries and sets in the database subset definition. If the definition comprises anyparameterized queries, then you are prompted for the parameter values. If you cancel entry of thesevalues, then synchronization is also canceled. This step is not necessary for database subsets that areset to expire.
The main database is then updated in three phases:
1. All newly created records in the database subset are added to the main database, with the samerecord identifiers, create date and time, and the same create user.
2. Any updated records in the database subset are copied to the main database:
• An update to a database subset record is applied to the main database if the main databaserecord is unchanged since the last synchronization.
• If a record is changed in both the main and the subset databases since the last synchronization,then the conflict is resolved by applying the rule that is selected by the user.
• All soft deleted records in the database subset are ignored. They do not delete thecorresponding record in the main database.
3. Finally, either:
• The database subset is updated with the changes and additions that are made in the maindatabase.
• Or, if the database subset is set to expire, then all the entity and link records are deleted, and thedatabase subset is set to read only.
64 IBM i2 iBase: Administration

Procedure
To synchronize a database subset:1. Back up the main database if it is an Microsoft Access database.
This step is unnecessary for SQL Server databases because updates are committed to the maindatabase after each phase of the synchronization process.
2. Log on to iBase as a user with the Database Administrator role, and then open the main database.3. Select FileData Database Subsets Synchronize Database Subset.
What to do next
When a conflicting change is made in the same record (in any field in that record) in both the maindatabase and database subset, you can choose to:
• Keep the changes made to all the main records that are in conflict, and discard all the changes thatare made to the corresponding subset records
• Keep all the changes made to the subset records that are in conflict, and discard all the changesthat are made to the corresponding main records
The user decides without knowing which records are affected or what the conflicts are, and the rulethat is selected applies to all records with conflicting changes.
Note:
• If the main record is deleted, and is changed in the subset, then it is either restored and updated (tomatch the subset record) or re-created (depending on whether it was soft deleted or purged).
• Restoring or re-creating a link always results in its link ends being restored or re-created ifnecessary.
• Restoring or re-creating an entity results in its links being restored or re-created; but only for thoselinks where the other end of the link is still active.
Creating case-controlled databasesIf you need to restrict access to data on a case by case basis, you must to create a case-controlleddatabase. Because you cannot convert a case-controlled database to a standard (SCC) controlleddatabase, consider carefully whether you require this facility.
Note: You cannot use cases and Security Classification (SC) codes in the same database. You cannotuse cases in a replicated database (or if iBase database replication is installed).
What is case control?
All data in a case-controlled database is partitioned by case. Every record belongs to a single case,and each user is assigned to one or more cases. Data cannot be shared between cases - data can onlybe entered, whether by manual entry or by importing, when a single case is selected. However,records from two or more cases can be analyzed together, for example by running queries andreports.
A record in a case-controlled database:
• Belongs to a single case.• Might be duplicated across cases, such as a repeated telephone number, address, vehicle, but with
distinct case ownership - updating one record does not update the other.• Can only be edited or deleted when working in a single case.• Cannot be linked to records in other cases.
IBM i2 iBase administration center 65

• Is always read-only if it belongs to a closed case (but still appears in searches and queries).
A user in a case-controlled database:
• Sees only the records in the cases to which they are assigned.• Sees all the records to which they have access when they work in multi-case analysis mode.• Can only update records (either manually or by importing) in a single, open case. When working in a
case, all reports, queries, browses, and so on, apply just to the records in that case.
Note: Sets are not specific to any case. A set can contain records from all the cases assigned to theuser and, if the access to the set is Public, might also contain records added by other users, fromother cases. However, a user only ever sees the records that belong to the current case (or all theirassigned cases if working in multi-case analysis mode).
The history of each case can be recorded in the audit log. Actions include: Case Added, Case Closed,Case Deleted, Case Name Changed, Case Reopened. For more information, see Controlling What isAudited.
Defining access to cases
All users, including database administrators, must be assigned to one or more cases before they canopen a case-controlled database in iBase.
You do not need to assign system administrators to cases. Any system administrator can, in iBaseDesigner, add cases and assign users to the cases. They can also assign all the users who aremembers of a Data Access Control group.
See Creating and Managing Cases in iBase for details of creating cases and assigning users to them.
Displaying case names
By default, the case name is not displayed as part of the record - to display the case name in iBaseyou need to add a case field to each entity and link type. You might prefer to use a standard field forthis.
A case field is useful to users working in multi-case mode who might want to know which case arecord belongs to. Case fields are less useful to users who work only in one case at a time becausethe name of the case is displayed in the title bar of the iBase window at all times.
Note: It is not possible to change the value of a case field.
Creating a case-controlled databaseYou can create a new case-controlled database. This is similar to creating a standard database.
About this task
In the Create New Database dialog:
1.2.
Procedure
1. In iBase Designer, select File > New Database.2. On the Configuration page, select SQL Server as the database type.3. On the Advanced page, select Case Control.
66 IBM i2 iBase: Administration
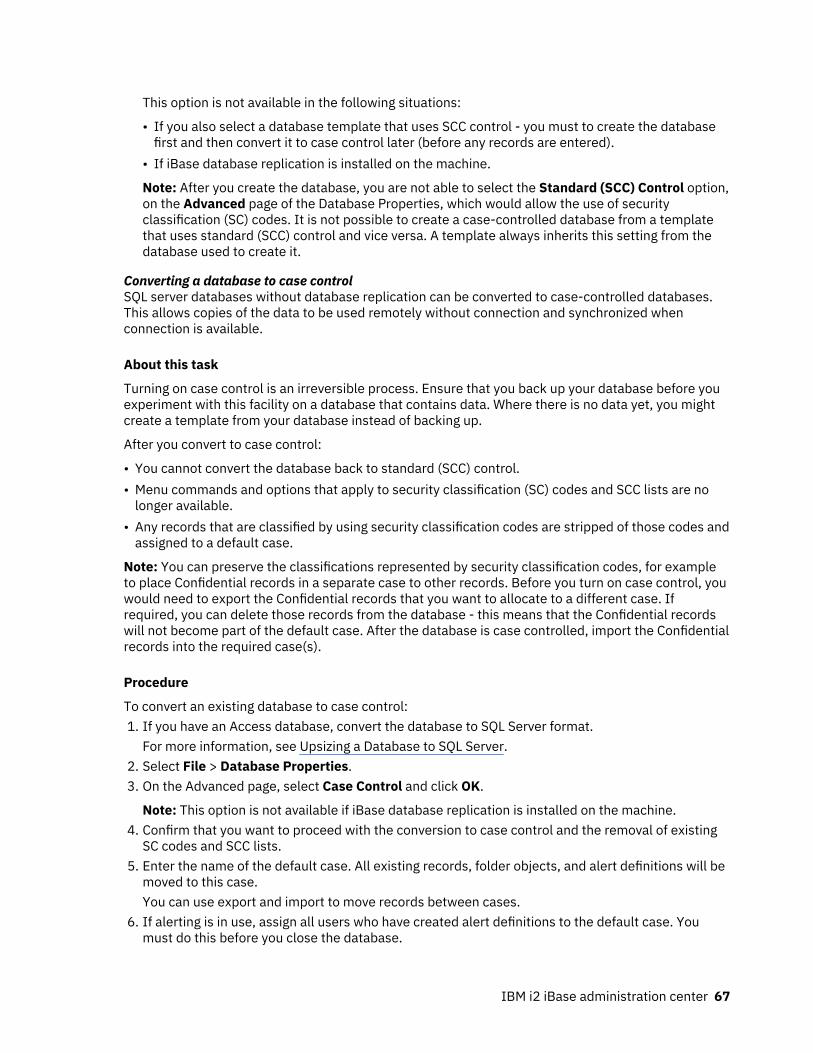
This option is not available in the following situations:
• If you also select a database template that uses SCC control - you must to create the databasefirst and then convert it to case control later (before any records are entered).
• If iBase database replication is installed on the machine.
Note: After you create the database, you are not able to select the Standard (SCC) Control option,on the Advanced page of the Database Properties, which would allow the use of securityclassification (SC) codes. It is not possible to create a case-controlled database from a templatethat uses standard (SCC) control and vice versa. A template always inherits this setting from thedatabase used to create it.
Converting a database to case controlSQL server databases without database replication can be converted to case-controlled databases.This allows copies of the data to be used remotely without connection and synchronized whenconnection is available.
About this task
Turning on case control is an irreversible process. Ensure that you back up your database before youexperiment with this facility on a database that contains data. Where there is no data yet, you mightcreate a template from your database instead of backing up.
After you convert to case control:
• You cannot convert the database back to standard (SCC) control.• Menu commands and options that apply to security classification (SC) codes and SCC lists are no
longer available.• Any records that are classified by using security classification codes are stripped of those codes and
assigned to a default case.
Note: You can preserve the classifications represented by security classification codes, for exampleto place Confidential records in a separate case to other records. Before you turn on case control, youwould need to export the Confidential records that you want to allocate to a different case. Ifrequired, you can delete those records from the database - this means that the Confidential recordswill not become part of the default case. After the database is case controlled, import the Confidentialrecords into the required case(s).
Procedure
To convert an existing database to case control:1. If you have an Access database, convert the database to SQL Server format.
For more information, see Upsizing a Database to SQL Server.2. Select File > Database Properties.3. On the Advanced page, select Case Control and click OK.
Note: This option is not available if iBase database replication is installed on the machine.4. Confirm that you want to proceed with the conversion to case control and the removal of existing
SC codes and SCC lists.5. Enter the name of the default case. All existing records, folder objects, and alert definitions will be
moved to this case.You can use export and import to move records between cases.
6. If alerting is in use, assign all users who have created alert definitions to the default case. Youmust do this before you close the database.
IBM i2 iBase administration center 67

Warning: Alert definitions without owners are deleted when you close the database.
iBase casesCases can be created in either iBase or iBase Designer. Cases can be accessed by people who areassigned to the case.
Before a user can open a case-controlled database, you as a system administrator must assign themto one or more cases. When a user opens a case-controlled database, they then select:
• Either, a single case to obtain read/write access to the case, if the case is not closed and that theybelong to a user group that grants add, modify, and delete permissions. (Some analysts only everrequire read-only access to the data.)
• Or, all their cases (by turning on Multi-Case Analysis) to obtain read-only access to all the casesassigned to them.
Regardless of the type of access, a user who selects all their cases, when they open a database, onlyever has read-only access to their cases.
When no cases are defined, only administrators with the Database Administrator and SecurityAdministrator roles can open the database in iBase; for example, to create a new case. To add data tothe new case, they must select the case by selecting File > Change Case.
Note: To obtain information on the cases in a database, run a Security Design report.
Creating new cases
Cases can be created and updated by any administrator with both Security Administrator andDatabase Administrator roles.
1. To create a new case:
• In iBase Designer: Select New > Case from or in the Database Explorer, right-click on Cases, andselect New.
• In iBase: If required, select a single case on opening the database and select New > Case.Creating a case does not select it. To change to the new case: select File > Change Case. Thename of the current case is shown in the title bar of the application window.
2. Enter the details of the case.3. Assign users to the case.
Giving and revoking access to cases
You authorize users to work on a case when you create or edit it. You can either assign users one at atime or you can assign all the users who are members of a Data Access Control group.
Note: The Users page lists the users who are assigned individually to the case. If a user has access toa case because they belong to a group that is assigned to that case, then they are not listed on theUsers page of the Case.
You do not need to assign system administrators to cases. Administrators (with both the DatabaseAdministration and Security Administration roles) always have access to all cases.
New or amended access to a case only takes effect the next time a user opens the database.
When you revoke access to a case, note:
• If a user has access to a case because they belong to a group that is assigned to a case, then youcan only revoke access by removing the user from the group.
68 IBM i2 iBase: Administration

• If alerting is in use, then the user is removed from any alert definitions that they own. These alertdefinitions remain active for other users. A system administrator can delete the alert definitions ifrequired.
Listing existing cases
You can view a list of all the cases in the database in two places:
• In iBase Designer: Click Cases in the left pane of the Database Explorer to list the cases in the rightpane.
• In iBase: Log on with an account with both the Security Administrator and Database Administratorroles and select a database to open.
To obtain information on who is assigned to which case, run a Security Design report, select Security> Security Design Report.
Modifying cases
In both iBase Designer and iBase, you can modify the description of a case, change who has access toit, and open or close it (see the following sections). You can only change the name of the case in iBaseDesigner. When you change the name, all the records belonging to the case are updated as well.
In iBase, for users with current sessions, the changes take effect next time they open the database.
To modify a case:
• In iBase Designer, right-click on the case in the Database Explorer, and select Edit.• In iBase, select from the Edit menu, select Case. You can only modify the case that you selected
when you opened the database.
Viewing case statistics
You can view statistics by case or by database. To view statistics:
• In iBase Designer, select File > Database Statistics.• In iBase, select File > Properties Database Statistics.
In iBase Designer, record statistics are displayed by case (both open and closed) for the wholedatabase. For example, click the Entity Types by Case tab to see the number of entity records bytype for each case. The number of entity records for the database is displayed on the Entity Typespage.
In iBase, Database Statistics display only the statistics for the cases that are accessible to the user.For example:
• A user who selects a single case sees statistics for that single case.• A user who works with all their cases sees statistics for entities in all their cases on the Entity
Types page, and a breakdown by case on the Entity Types by Case page.• A system administrator always sees statistics for all the cases in the database, even if they select a
single case when opening the database.
You can also print the database statistics with a breakdown by case if required.
Closing and reopening cases
In both iBase Designer and iBase, you can close cases. When you close a case, the closure date isrecorded. The closure date is taken from the date set on the user's machine. If required, you canreopen cases, and the closure date is retained until you close it again.
IBM i2 iBase administration center 69

A closed case is read-only and no one can edit the records that belong to the case. However, any userwho is assigned to the case can select it when they open the database. When more than one case isselected, operations such as finding and querying includes results from both closed and open cases.
To review the complete history of a case, use the audit log.
To close or reopen one or more cases:
• In iBase Designer: in the right pane of the Database Explorer, right-click on a case, and from themenu, select Edit.
• In iBase: log on as an administrator with the Security Administrator and Database Administratorroles, select the case that you want to close or reopen, and select Edit > Case .
You can then change the status of the case on the General page.
Deleting cases
When you delete a case in iBase Designer, you delete all the records that belong to that case, all theentries in the audit log for those records, and all alert definitions.
Before you delete a case:
1. Archive the records in the case. Either by backing up the database, or alternatively, exporting allrecords to text files.
2. Archive the audit log for the case, making sure that you have archives that cover the period of thecase.
To delete a case in iBase Designer:
• In the Database Explorer, right-click on the case, and select Delete.
Routine maintenanceThere are several areas in iBase that require routine maintenance to ensure that your databasecontinues to run correctly. Where possible, you can use tools that are provided in iBase Designer torun maintenance tasks.
The commands for routine database maintenance are available from the Tools menu in iBaseDesigner:
Maintaining database tables and indexesAll databases and security files operate more slowly as deletions and changes increase thefragmentation of the data.
For Microsoft Access databases and security files, use the relevant Tools > DatabaseAdministration > Repair/Compact option.
For more information about maintaining tables and indexes in SQL Server databases, see“Performance Tuning in iBase Designer” on page 96.
Maintaining search indexesDepending on the type of search, the method of maintaining the search index varies:
• For Search 360, ensure that:
– The Index Service is scheduled to run regularly.– The IBaseIndexDB database and Searching Config.xml configuration file are included in
your backup schedule.– The transaction log is monitored, and cleared when it becomes too large
70 IBM i2 iBase: Administration

For more information, see “Managing the Index Service” on page 105.• For Word Search indexes, run Tools > Search > Word Search Indexing each time that you want
to update the index.• For Full-Text Search indexes, you can use Tools > Search > Full-Text Search Indexing to set
up ongoing updates, either with a regular schedule or in response to changes in the databasecontent. On a less regular basis, you might want to respond to user comments or new types ofrecorded data by updating the lists of excluded words or synonyms.
For more information, see “Setting Up Text Search” on page 100.
Check for responsiveness and integrity of the database.If users report slow performance or recurring errors in normal operation, it might indicatefragmented disk files or some kind of corruption.
In iBase Designer, you can use the commands: Repair/Compact Database File, SchemaIntegrity Check, and Link Integrity Check. There might also be causes external to the databasesystem, such as other processes that run on the server or client computers or poor networkconnections.
For more information, see “Checking a database” on page 86.Managing databases that use Soft Delete
In databases using soft deletion of records, purge or restore records as required. For moreinformation, see “Batch delete” on page 73.
Managing databases that use casesIn databases that use cases, add new cases, give and revoke access to cases, and close old casesas required. For more information, see “iBase cases” on page 68.
Monitoring iBase usage
Monitor the following regularly:Audit logs
Use the external iBase Audit Viewer to monitor usage and identify any repeated events such asfailed logons or repeated editing or analysis activities that might indicate user difficulties. Formore information, see “Auditing” on page 124.
Pick listsYou might find that users are frequently typing to supply alternatives to entries suggested in apick list. You can add these entries to the pick list if required.
DatasheetsDatasheets provide alternative ways of creating or viewing records. Their effectiveness mightneed monitoring. For example, you might find that analysts want to view an entity in associationwith selected fields from a particular type of link and linked entity, or that data entry might bemade faster by reordering and regrouping the fields of information.
Select Tools > Datasheet Manager to start editing or creating datasheets.
Reviewing database design, statistics, and security
At any time, you can use iBase Designer to view, or change, the database properties that are chosenwhen you created the database, and view data statistics and a database design report. With defaultaccess control, all users of iBase can view, but not change, database properties, database statistics,and a database design and statistics report. Select the relevant command from File > Properties.
IBM i2 iBase administration center 71

The security design report can have several forms, but always lists security groups, users, and theirconsequent permissions or restrictions. You can choose to include user information if required.
The security design report presents all the information held in the security file to which you are loggedon. The report does this first by group, listing the group's properties (if any) and user membership;then by user, listing the accumulated permissions of the user, possibly gained by membership ofseveral groups, and the groups of which the user is a member.
If you have databases open, the report includes the use made of Data Access Control groups in theactive database.
Note: The security design report does not include details for the use made of Folder Object Controlgroups.
Routine maintenance on the database servers
You need to maintain adequate free space on disk for databases, search indexes, audit logs, and anylinked documents. This is largely a matter of using tools supplied with Windows to monitor both thefree space and the size of the files that are growing most quickly to reduce that free space.
The strategy that you adopt for databases might vary from moving old data to archives with iBasebatch export, batch delete, or creating new databases to hold current data for each year or other timeperiod. For audit logs, the external iBase Audit Viewer provides a way to view, archive, and delete oldaudit records.
You need to maintain adequate backups of the database, security file, and audit logs. You shouldschedule backups for a time when no users are using the database. See Backing Up iBase Databases.
Database backup procedures depend upon the type of database, Microsoft Access or SQL Server.Back up each security file frequently, as a complete file. Back up audit logs using the external iBaseAudit Viewer to identify data for archiving. For further details, see the Audit Viewer help.
Routine maintenance in SQL Server
For large SQL Server databases, disk operations have a significant effect on the performance of thedatabase. To reduce the amount of data that is read from disk during queries, iBase applies indexesto the data. Over time as data is added to and deleted from the database the indexes becomefragmented and larger than they need to be. This reduces performance because more data blocks areread into memory to process a query. Eventually, without corrective action, the result is queries thatrun many times slower than in a newly indexed database.
You need to maintain the indexes of an SQL Server database. The larger the database, the morebenefit comes from regular maintenance of the indexes:
• For databases that use legacy indexing or that are tuned in SQL Server, this is done by your SQLServer administrator.
• For databases that use indexes that are optimized in iBase (and that are not tuned in SQL Server),this can be done in the Performance Tuning dialog in iBase Designer. See Performance Tuning iniBase Designer for details.
The indexes should be rebuilt regularly, at intervals that are determined by your SQL Serveradministrator who is able to measure the fragmentation of the indexes using tools in EnterpriseManager or Management Studio. For example, a database that is updated with imports that use theBulk Import method might require reindexing after each bulk import.
Each rebuild takes some time and should be scheduled to take place when the database is not in use.
72 IBM i2 iBase: Administration

Batch deleteUsers can delete records from the database either individually or in batches. When an entity record isdeleted, all links to that entity are also deleted - the link end entities are not deleted.
Deleting records is a permanent and irreversible operation unless soft delete is enabled for yourdatabase. When soft delete is enabled, deleted records, whether deleted individually or in batches,are removed from the user's view of the database but you have an opportunity to undo the deletion.
You can use Batch Delete with or without soft delete.
Note: You can deny users access to the Batch Delete menu command by using a System CommandsAccess Control group.
Soft delete
Soft deleted records do not appear in search results or in record lists (when listing and browsingrecords), but are not removed from the database.
For system administrators, soft deleted records:
• Can be restored using Restore Deleted Records in iBase.• Can be permanently removed using Purge Deleted Records in iBase.
If soft delete is not enabled, then deleting records is a permanent and irreversible operation.
To check the setting of soft delete:
1. In iBase Designer, select File > Database Properties.2. On the Advanced page, view the Soft Deletesetting.
Batch Delete
To delete batches of records:
• In iBase, select Edit > Batch Delete.
The deletion can take a while to complete if you are deleting many records. The speed of the deletiondepends on several factors:
• Whether Data Access Control is used and is restricting access to the records selected for deletion.• The format of the database (Microsoft Access or SQL Server)• The audit level if the database is in SQL Server format
The following information describes these factors.
Batch Delete and Data Access Control
The actual records that are deleted depend on whether Data Access Control restricts access to therecords selected for deletion.
Consider this example: there are a 1000 telephone entities in the database with many telephone calllinks between them. A user has permission to view all 1000 telephone records but has restrictedaccess to the telephone call links. In fact, of the 1000 telephone entities, only 200 of them haveunrestricted telephone call links. This means that although the user has full access to all thetelephone entities, they can only delete the 200 telephone entities with unrestricted telephone calllinks.
IBM i2 iBase administration center 73

Entity 1
access restriction
Link
access restriction
Entity 2
access restriction
Delete entity 1
and/or link?
None None None Yes
None None Read-only table Yes
None None Hidden table No
None None Record is restricted(using an SC code)
Yes
None Any restriction Any restriction No
Any restriction Any restriction Any restriction No
Note: Any restriction includes making a table or field read-only, hiding a table or field, or applying aSecurity Classification (SC) code to deny access to a record.
If Batch Delete encounters a record with restricted access, iBase skips that record. It does not reportthat it encountered a record that it could not delete. At the end of the operation, it reports on thenumber of records that it successfully deleted.
Batch Delete in Access databases
After batch deletion starts in an Access database, you can press the Esc key to stop the deletion butyou cannot cancel the deletion of records already deleted. A message is then displayed that tells youhow many records have been deleted.
Batch Delete in SQL Server databases
How Batch Delete works in an SQL Server database depends on the audit level of the database. BatchDelete runs fastest with the audit level set to 1, 2 or 3:Audit level 1, 2 or 3
After batch deletion starts, you can press the Esc key to cancel the deletion and, provided thatEsc is pressed before the deletion finishes, no records are deleted.
Audit level 4 or 5After batch deletion starts, you can press the Esc key to stop the deletion— you cannot cancel thedeletion of records that have already been removed. A message is then displayed that tells youhow many records have been deleted. An entry is made in the audit log for each deleted record.
iBase backup policiesIt is important to establish a backup policy that covers all the elements of an iBase installation.
Attention: Backup databases at a time when no users are using the database or services areaccessing it, because some iBase operations can take place over a relatively long time andaffect multiple database records. Examples of such operations are data imports, batch edit,batch delete, merge, or deletion of entities with many links. If the backup was performedduring such an operation, and the database is subsequently restored from the backup, therestore operation restores data on which work was in progress at the time the backup wastaken and is potentially in an incomplete state. It is safest if backups are completed while nousers are performing operations on the database and no services are running.
Folders and databases Description
74 IBM i2 iBase: Administration

Database folder This folder contains, for example:
• Security file (ids file) - this is a connection fileif the security data is held in an SQL Serverdatabase
• Database file (idb file) - this is a connectionfile if the data is held in an SQL Serverdatabase
• Log file (idl file) for Microsoft Accessdatabases only
• Word search index (idx file) for MicrosoftAccess databases only
• Default Analyst's Notebook template for usewith iBase
All Users application data area This folder contains, for example:
• Database templates (although the installationcan be customized so that workgrouptemplates are held in a different folder, see“Setting Up iBase” on page 97 for details)
• Icon lists• Text Chart templates
Note: Users do not write to this folder but totheir own application data area. See Installationand Application Data Folders for details.
SQL Server databases SQL Server databases include, for example:
• The SQL Server database that contains theentity and link data. The name is based on thename of the idb file in the database folder.
• The SQL Server database that contains thesecurity data if it is in SQL Server format. Thedatabase name is based on the name of theids file in the database folder appended with_Sec.
Other For Microsoft Access databases, there might beseparate folders for archive log files (.idla file).
For SQL Server databases, there might beseparate databases that contain archived data.These databases are on a different SQL Servermachine.
In addition to your regular backup cycle, there are other occasions when you should also make abackup. Some examples include:
• Before you upsize a Microsoft Access database (or security file) to SQL Server• Before and after you import data using Bulk Import• Before you delete the records held in a case
IBM i2 iBase administration center 75

• Before you convert a database to case control• Before you use Update Database Schema• Before you synchronize a database subset with an iBase database in Microsoft Access format
Backing up SQL Server databases
SQL Server provides tools for performing the backups and automating them. However, other backuptools can be used if the right files are backed up at suitable intervals.
In an iBase SQL Server database, there are five types of data to back up:
Type of data Description
Main database For each iBase SQL Server database you mustdecide on your backup regime based on how youpopulate the main database:
• Continuous updates
If the iBase database is populated by users thatenter data continuously, then backing up thedatabase is in two parts. You must back up thedata file in which SQL Server keeps its data, andthe file in which it keeps a log of all of thechanges that are made to the database. ThisTransaction Log file can be used by SQL Server torecover changes made between main backups.The Transaction Log itself can be backed upduring the working day.
• Regular bulk updates
If the database is populated by periodicallyloading a set of data such as daily changes then,you can turn off the Transaction Log mechanismin SQL Server and you need only back up the datafile in which SQL Server keeps its data.
Note: Significant data can also be held indatabase subsets on users' own machines.
Security database The security database stores user informationand the group membership information for all theusers in the system. Loss of this information canresult in an inaccessible database until it isrecreated and the user, group and extendedaccess control information is rebuilt. Aftercreated, the information within the securitydatabase rarely changes, so backups of thisdatabase need only be completed when theinformation changes; for example, when alertingis switched on.
76 IBM i2 iBase: Administration

Type of data Description
Audit data If the audit information is vital to yourorganization, for example you are using alerting,then in addition to doing backups of the maindatabase and security database, you must toback up the audit log database and itsTransaction Log file.
Connection files Connection files to the SQL Server security andmain databases store only the configurationdetails that are required to log on to, and accessthe databases on the SQL Server. The loss ofeither of these files and the absence of a backupinvolves a complicated recovery process beforeusers are able to gain access to the iBasedatabase once more.
Report templates, database templates, icons These operating system files will either be storedin the same directory as the iBase databaseconnection file or in a subfolder of the All Usersapplication data area. All the files within thesefolders should be backed up to avoid unexpectedbehavior from iBase if they are inadvertently lost.
Archived audit data Audit information can be archived using iBaseAudit Viewer to a separate SQL Server databaseon a different server machine (a linked server).
Search 360 indexes A separate database, IBaseIndexDB, containsconfiguration information used by the servicethat builds and updates Search 360 indexes. Thismay be on a separate machine used by iBaseadministrators. When you back up this database,you should also back up the configuration file,Searching Config.xml, in the All Usersapplication data folder on the local machine,specifically: C:\Documents and Settings\All Users\Application Data\i2\i2iBase <n>\<language>\Searching
Note: The backup must also include the files holding the search catalogs and indexes used by Full-Text Search. Backup and restoration of these files is separate from SQL Server backup and recovery,but you should coordinate any recovery process of databases and files to ensure synchronization.
For detailed information on backing up SQL Server databases, see the Microsoft SQL Serverdocumentation.
Restoring SQL Server databases and security files
When you back up SQL Server databases, you must always back up the associated connection (.idb)files and, when you restore those databases, you must always restore the corresponding connectionfiles.
This also applies to security (.ids) files which also have connection files if created in SQL Serverformat.
IBM i2 iBase administration center 77

Moving and Copying DatabasesThe procedures used to move and copy databases are slightly different for Microsoft Access and SQLServer databases. The principles of moving a database applies equally to copying a populateddatabase.
An iBase system might contain several related databases, for example copies on laptops of a maindatabase on a central server. In this situation, you might want to define the folder objects that areshared by all the databases before you create or copying the main database. You might also want toconsider Database Subsets as an alternative to copying the database.
Note: For greater control over these folder objects, use the separately-licensed Schema Updateutility; for details, see Handling updates to the schema and folder objects.
There are several reasons why you might need to move, copy, or rename a database and its securityfile. Among these reasons are:
• Migration to a different computer or server• Providing a copy for use at another site or on a laptop
Warning: Consider using database subsets where only a portion of the records is required.
• Routine backup
When you copy or renaming a database, you should select a name that uniquely identifies it withinyour iBase system and also when used with third-party iBase databases.
The procedures for moving or copying a database and its security file are different for MicrosoftAccess and SQL Server databases and are described separately in:
• Moving a Microsoft Access Database or Security File• Moving an SQL Server Database or Security File
You always need both the Windows permissions to move the files, and the ability to log on in iBaseDesigner as an iBase Security Administrator. If you are moving an SQL server database, you alsorequire an SQL Server login name and password for connecting to each of the relevant SQL Serverinstances.
Note: Each database records the location of the security file that protects it. Each database is securedby only one security file but there might be several databases secured by the same security file. Theremust be only one security file in any one folder. The folder should be shared and referenced by a UNCpath.
Handling external files
Databases can make references to, or otherwise use, external files. Many of these files must to bemoved or copied with the database:
External file Description
78 IBM i2 iBase: Administration

Hyperlink fields As file names given in Hyperlink fields withinrecords.
For a database with multi-user access across anetwork, good practice would mean that all suchfiles are held in a shared folder and named in thefield using a UNC path, such as: \\server\sharedfolder\Report99.doc.
• No action is needed if this is true and theshared folder is accessible to users of thedatabase in its new location.
• If UNC names are not used, copy the files to acorresponding drive letter on the destinationcomputer, as discussed next for a single userdatabase.
For a single user database, it is possible that thefiles are held on a local disk and named using adrive letter and local folder names, as in thisexample: C:\Artwork\House.bmp.
You must copy these files to a similar location onthe destination computer. This might not alwaysbe possible if there is a conflicting use of driveletters.
Support files As support files, such as chart and reporttemplates, held in the same disk folder as thedatabase .idb file.
You must copy or move these files if you copy ormove the .idb file so that the files stay togetherin one folder.
Audit log files As a log file with extension .idl, only presentfor an iBase Microsoft Access database.
You can move this file if you want to maintain asingle log file for the database. If you do notmove this file, iBase creates a new log file in thenew location.
Word Search index As a Word Search index with extension .idx,only present for an iBase Microsoft Accessdatabase that uses Word Search.
You do not need to move this file. You can useiBase Designer to create a new index file in thenew location.
You must make and restore true binary copies of all files mentioned in this section, using anyconvenient method supported by Microsoft Windows. If all you do is make copies for backup andoccasionally restore from these copies to the original location, there is no special iBase procedure tofollow. The procedures for handling external files are the same for both Access and SQL Serverdatabases.
IBM i2 iBase administration center 79

Handling updates to the schema and folder objects
If you have a Schema Update license, you can keep the copies of a main database, for example heldon laptops, in step with changes made to the main database. Changes could include the addition ofnew fields, new pick lists, or changes to folder objects such as import specifications.
To facilitate the maintenance of copy databases on laptops, you can mark the folder objects that youwant to be able to update in the future as common folder objects. These objects can then be addedto, updated and deleted from the copy databases— standard folder objects cannot be maintained inthis way.
Common folder objects can also be used to facilitate the updating of data in a copy database. Forexample, you could:
1. Add import specifications and an import batch specification to the main database, and export thedata from the main database to create import files for use with the import batch specification.
2. Mark the import specifications and import batch specification as common folder objects.3. Save a template from the main database to give to your laptop users.4. Each user applies the template to their copy of the database. This adds the specifications to their
database.5. Each user runs the import batch specification to load the new and amended records.
For further information, see Using Common Folder Objects.
After the move
After a database is moved, users must find the new location of any moved files. After users open amoved database, iBase records any change of connection file location in the most recently used(MRU) section of their File menu.
What happens in subsequent use depends on the relative positions of the connection and securityfiles:
• If the security and connection files are in the same folder, users see no change from behaviorbefore the move.
• If the security and connection files are in different folders, users see a Security File browser eachtime that they need to log on and must navigate to the security file. (Where possible, you shouldalways keep the security file and database in the same folder.)
Moving Access databases or security filesMove or rename an Access database or security file.
The necessary iBase database files to move are:
• The security file, with extension .ids• The database file, with extension .idb
Moving or renaming the security file
If you move the security file to another location or rename it, you must open each related database iniBase Designer to update the stored location.
What happens when you open the database depends on the location of the security file. Thepossibilities are:
• If there is a security file in the same folder as the database file, iBase Designer opens that fileimmediately, even if it is the wrong security file.
80 IBM i2 iBase: Administration
• If it is the wrong security file, an error message notifies the user that the database is not associatedwith the current security file.
• If there is no security file, iBase Designer displays a Security File browser for you to locate themoved security file and click Open.
An example message:Incorrect Security FileYou normally connect to this database via a different security file(\\ SERVER\databases\my_security.ids).Are you sure you want to connect via this security file(\\SERVER2\databases2\my_security.ids)?
If you confirm that you want to use the new file, iBase Designer stores the location. You can close thedatabase immediately, or continue working.
If you have other databases that are linked to this security file you can open and close them forupdate now, without needing to log on each time.
Moving or renaming the database file
After a database file is moved or renamed, there is no need to open an Access database in iBaseDesigner if the security file is in its original location.
As mentioned for moved security files, you (and users in iBase) need to confirm the location of asecurity file that is not in the same folder as the database file. However, keep the security file in thesame folder as the databases it secures.
Note: Renaming a database file prevents any existing Analyst's Notebook charts from accessing thatdatabase.
Note: If your organization creates maps or Analyst's Notebook charts that use data from multipleiBase databases, the name of the database must be unique.
What users see
At their next use of each database, users must find the new location of the moved or renamed file.
After users open a moved database, iBase records any change of database location in the recentlyused (MRU) section of their File menu.
What happens in subsequent use depends on the relative positions of the database and security files:
• If the security and database files are in the same folder, users see no change from behavior beforethe move.
• If the security and database files are in different folders, users see a Security File browser eachtime that they need to log on and must locate the security file.
Moving SQL Server databases or security filesMove or rename an SQL Server database or security file.
An iBase SQL Server database consists of:
• The security file, with extension .ids• The database connection file, with extension .idb• The Microsoft SQL Server database that holds the main iBase database• Optionally, extra Microsoft SQL Server databases that hold the iBase audit log, archived audit logs,
and the Search 360 indexes
If the database is secured with an SQL Server security file, it also consists of:
IBM i2 iBase administration center 81

• The security connection file, with extension .ids• The SQL Server database that holds the security data
It is simplest for administrators and users if you keep the security file (or security connection file) inthe same folder as the database connection files that it secures. Share the folder and reference it by aUNC path.
Note: Do not copy connection files to client machines. This might compromise the security of yoursystem and adds to the administrative workload. Keep the connection file, in the same folder as thedatabase connection file, in a central location.
Moving or renaming the security connection file
If you move or rename an SQL Server security connection file, you must open each related databasein iBase Designer to update the stored location.
Note: If you move both the security file and database connection file to the same folder, you canupdate both locations in one operation by opening the database.
What happens when you open the database depends on the location of the security file relative to thedatabase connection file. The possibilities are:
• If there is a security file in the same folder as the database connection file, iBase Designer opensthat file immediately, even if it is the wrong security file.
• If there is no security file, a Security File browser is displayed for you to locate the moved securityfile and click Open.
When you open the database, log on as a user with the Security Administrator role. iBase Designerthen recognizes that the security file is in a new location and asks if you want to store that newlocation in the database.
An example message:Incorrect Security FileYou normally connect to this database via a different security file(\\ SERVER\databases\my_security.ids).Are you sure you want to connect via this security file(\\SERVER2\databases2\my_security.ids)?
If you confirm that you want to use the new file, iBase Designer stores the location. You can close thedatabase immediately, or make any changes that you want.
If you have other database connection files and databases linked to this security file you can openand close them for update now, without needing to log on each time.
Moving or renaming the database connection file
You can move or rename the database or security connection files but you should not copy them toindividual machines.
After you have moved or renamed a database connection file:
• In iBase Designer, open the database connection file in its new location. The new location is storedin the database. There is no accompanying message.
Note: Renaming a database connection file prevents any existing Analyst's Notebook charts fromaccessing that database.
Note: If your organization builds up maps or Analyst's Notebook charts that use data from multipleiBase databases, the name of the database connection file must be unique.
82 IBM i2 iBase: Administration

Moving the SQL Server database
To move a Microsoft SQL Server database to another server:
1. Use Microsoft SQL Server Backup and Restore to copy the database from server to server. Youmust use the same name for the database on the new server as you did on the old server.
Note: It is possible to rename the database if it is the main database containing the entity and linkdata. For details of this, see SQL Server Database Names. You cannot rename the databasecontaining the security data.
2. Use the Database Configuration utility to open the database connection file that connects to thedatabase and update the connection details for the new server. See Managing SQL ServerConnection Settings.
3. If you are using Bulk Import, Alerting or Search 360 for this database, you must to set up the newserver. See:
• “Bulk import” on page 143• Setting Up Alerting• “Setting Up Search 360” on page 102
Note: If you move a full-text indexed database to another server, you must also install the MicrosoftSearch Service on the new server if you want to continue to use Full-Text Search and install AdobePDF iFilter if you want to index the content of PDF documents.
Database schema updatesSchema changes to an operational database on a server are typically made and tested in a temporarycopy of the database before application to the operational database itself. You can use the UpdateDatabase Schema command in iBase Designer to manage this process, making the changes and thenapplying them to the other databases by applying a new database template.
This process is only suitable for compatible databases. A compatible database is any database that iscreated from the same database template or any copy of a database. These databases are compatiblebecause their entity types, link types, fields, and standard fields share underlying table names,column names, and identifiers. For example, you cannot make a database 'compatible' by adding anapparently identical entity type because the entity type might not have the same table ID as the otherdatabases.
A source database becomes incompatible with the other databases if you turn on case control - anyaction that you take must be repeated in all the related databases. Adding, modifying, or deletingentity types, link types, fields or standard fields does not make it incompatible because thesechanges can be updated to the target databases by saving a template.
A target database becomes incompatible if there is a conflict between the identifiers in the sourceand target databases. For example, if you manually add an entity type to the target database that hasthe same identifier as a different entity type in the source database. It also becomes incompatiblewith the source database if you turn on case control when the source database is not case-controlled.
Updating the original schema
Elements of a database schema that can be updated:
• Entity types, link types, fields, and standard fields• Datasheets• Pick lists, icon lists, and SCC lists
IBM i2 iBase administration center 83

• Common folder objects, such as import specifications, report definitions, queries, charting schemesand so on (but not labeling schemes).
You can add to and edit these items as required.
Attention: Removing entity types, link types, fields or standard fields from the schema of anoperational database deletes the data held for those database objects.
For information about updating the schema of replicated databases, see “iBase database replication”on page 242.
Creating a template for a schema update
To create a template that captures the updates to a database schema, including any changes to thecommon folder objects, create a template from the database that contains the required updates. Formore information, see Creating the database template.
You should always test the new template before you apply it to the operational database or any copydatabases. To do this, create a copy of the operational database and apply the update template to it(using the steps in the following section). Only when you verify that the database was updatedcorrectly, should you apply these steps to your operational database.
Note: You can also create new databases from this template if required. Any database created fromthe template contains both the ordinary folder objects and the common folder objects.
Updating the schema of a database from a template
After you create a suitable template, you can apply the new schema to the operational database andto any copies of it. Before you start, make sure that you have:
• A backup of the databases• Permissions to create and delete files in the same folder as the main database .idb file
To apply the schema change:
1. In iBase Designer, log on as a database administrator and open the database.2. From the Tools menu, select Database Design Update Database Schema. An empty Update
Database Schema dialog is displayed.
Note: You cannot display this dialog if you are a member of a Data Access Control group thatdenies access to any tables or fields in the database.
3. Select the template that contains the schema changes.
After you select a template, you can review the entity types, link types, and fields in the template
by clicking .4. On the Additions and Modifications page, and the Deletions page, review the changes that are
listed. For example, the Additions and Modifications page summarizes the changes made to:
• Entity types and their fields• Link types and their fields• Standard fields• Datasheets• Pick lists, icon lists, and SCC lists• Common folder objects (listed separately for each type of folder object)
84 IBM i2 iBase: Administration

• Semantic Type Library (but specific changes are not listed)
5. If required, click to save a list of the schema changes in a file that you can print later.6. Click Update when you are ready to apply the changes. When this is finished, you are warned if
any folder objects were renamed because they have the same name as a common folder object inthe template.
Common folder objectsYou can simplify the administration of several common databases, by defining a core set of folderobjects (common folder objects).
Common folder objects across all the databases:
• Have identical names• Are in the same categories• Have an identical definition• Are set to Public access (unless you are using iBase database replication in which case the original
access setting on the folder object is preserved)
Any authorized user can define folder objects as common items.
There is otherwise no visible difference between an ordinary folder object and a common folderobject. For this reason, you might want to use a naming convention for common folder objects or keepthem in a specific category.
How common folder objects are updated
Common folder objects are updated by running the Schema Update command in iBase Designer.This command applies changes held in a database template to the schema of the database in which itis run.
When a folder object, such as a report definition or a charting scheme, is defined as a common folderobject, it can be:
• Added to databases that do not already contain it• Updated with the changes held in a database template• Removed from a database if it exists in the database but not in the template
Ordinary folder objects remain unchanged (but are renamed if they have the same name as a commonfolder object).
To update a compatible database with the current folder objects, create a template from thedatabase containing the folder objects, and then apply that template to the other database. For moreinformation, see Updating Database Schemas.
Defining a common folder object
To define an existing folder object as a common folder object:
• From the Tools menu in iBase, select Common Folder Objects. The Common Folder Objectsdialog is displayed. Click Help in the dialog for information on how to use the dialog.
• Dependent on a set. Being data-dependent, sets cannot be saved in a template.• Dependent on a folder object that is not selected as a common folder object (or that is deleted).
IBM i2 iBase administration center 85

A folder object cannot be defined as a common folder object if it is:
The settings that are made in the Common Folder Objects dialog are saved in the database.Redisplaying the dialog displays the common folder objects defined in the database.
Any template that is saved from the database, distinguishes between ordinary and common folderobjects.
Effect of adding, modifying, and removing common folder objects
What happens when you define a new folder object as a common folder object in the source databaseon folder objects in the target database is summarized below:
In the source database, add a folder object anddefine it as a common folder object
An identical common folder object is added tothe target database. If any ordinary folder objectwith the same name exists, then the object is notoverwritten but it is renamed by adding anunderscore to the beginning of the name.
Note: The access permission is not copied,unless you are using iBase database replication.
In the source database, modify a common folderobject
The common folder object in the target databaseis updated to match the definition in the sourcedatabase, including any updates to the name orcategory. If the common folder object wasrenamed in the source database, then anyordinary folder object in the target database withthe same name is not overwritten. It is renamedby adding an underscore to the beginning of thename.
Note: The access permission is not copied,unless you are using iBase database replication.
In the source database, make a common folderobject into an ordinary folder object
The common folder object is deleted from thetarget database.
In the source database, delete a common folderobject
The common folder object is deleted from thetarget database.
Note: You are informed if any name changes are made during the update process. The renamedfolder objects are identifiable as they appear at the top of any lists (because of the underscore prefix).
Checking a databaseYou can check a database after upsizing, or after large changes or prolonged editing, or at any timethat you suspect problems.
There are several ways to check a database and, if necessary, repair any inefficiencies or errorsfound. In approximate order of use, you should use these commands:
• Database Statistics (or Database Design Report)• Repair/Compact Database File• Schema Integrity Check• Link Integrity Check
86 IBM i2 iBase: Administration

Except for Database Statistics (or Database Design Report), all these methods work with adatabase that is not open in iBase Designer.
Checking the integrity of the schema
Checking the integrity of the links
Reviewing the database statisticsUse the Database Statistics command to review the database statistics. These statistics provide aquick way of seeing how many entity and link records a database contains.
About this task
One statistics report is only a count of the records, but seeing reports with identical counts, beforeand after any conversion process, provides a quick confidence check that all data is transferred to thenew database.
Procedure
1. Select File > Database Statistics.2. Optional: If you want to make a paper record for later reference, click Print.
Repairing and compacting the database fileUse the Repair/Compact command to reduce the fragmentation of tables in a Microsoft Accessdatabase where many records have been changed or removed. This command removes only thespace that is marked as being unused in the database. For SQL Server databases, it only compacts theconnection file.
About this task
You must be logged on to the relevant security file but have the database closed.
Procedure
1. In iBase Designer, select Tools > Database Administration > Repair/Compact > Database File.2. Check that the result is success.
What to do next
Whether or not you see a successful report, complete the other checks described next:
• “Checking the integrity of the schema” on page 87• “Checking the integrity of the links” on page 88
Checking the integrity of the schemaUse the Schema Integrity Check wizard to check the integrity of the database schema, that is,whether the database structure follows the rules set up in the database design.
About this task
The wizard reports any problems found and offers to fix those that it can repair. Some repairs caninvolve additions to the schema to make them consistent. For example, the wizard might add indexesor fields (that can be blank or use the default field value), or change the size of fields. You can chooseto abandon repairs at any point up to final approval, allowing you to assess what the repairs wouldmean. Eventually, you must repair problems to avoid the possibility of prolonged and greater errors.
IBM i2 iBase administration center 87

Note: Schema Integrity Check is unable to check or repair the indexes if you have run thePerformance Tuning wizard but not yet completed the reindexing process. For further information,see Performance Tuning in iBase Designer.
Procedure
To use this wizard:1. Log on to the relevant security file as a database administrator but do not open the database.2. From the Tools menu in iBase Designer, select Database Administration Schema Integrity
Check. A list of database files is displayed.3. Select a database from the list. If necessary, select More Files to display a file browser where you
can locate the database.4. Click Next. The next page displays a list of all entities and links, together with details of system
and user data for each.
Note: You can expand the list into a tree by clicking the + signs. At first viewing, the All option isselected; showing you all entities, whether or not they have errors. (Any entries without a tick orcheck mark to the right of the check box have an error.)
5. Select the Errors option to see only problems.In a properly functioning database, the list for Errors should be empty. If there are errors, you seea message below the list as you move the mouse pointer over the errors with an X in a red circle.Typical messages include: Incorrect schema size and Index missing.
6. If there are errors, turn on the check box for each of the errors that you want the wizard to repair.7. Click Next. The next page displays a list of all errors that you have selected for repair, and the
corresponding repairs that the wizard will perform. You can click Back to alter your selection orCancel to abandon all changes.
8. Click Finish to perform the listed repairs, if any.9. The wizard performs the repairs and then displays Close. Click Close.
What to do nextThe database is opened, whether or not you asked for any repairs. You may want now to check theintegrity of links.
Checking the integrity of the linksUse the Link Integrity Check wizard to check the integrity of the link records for a database, that is,whether the data held for links is consistent with that held for the entity records at the ends of thelinks. You should check the integrity of the database schema before you check link integrity.
About this task
The Link Integrity Check wizard reports any problems found with links or the entities they referenceand offers to fix those that it can repair. Most repairs are safe and non-destructive, but some repairsmight involve removing invalid data. You see a list of proposed repairs and you can abandon repairsso that you can inspect suspect data and perhaps recover it by other means. After repair, you shouldlook at places where the wizard has added entities and links, possibly with blank mandatory fields,and decide how to make these records usable. Eventually, you must repair problems to avoid thepossibility of misleading analysis based on faulty data.
Procedure
To use the Link Integrity Check wizard:1. Log on to the relevant security file as a database administrator but do not open the database.
88 IBM i2 iBase: Administration

2. In iBase Designer, select Tools > Database Administration > Link Integrity Check.3. Select a database from the list and click Next.4. Any links where there are problems in one of two required link records are displayed. In a properly
functioning database, the list should be empty in this and all following pages. Click Next to displaythe next page if there are no errors reported:
Page Possible repair
Links with missing attribute information If there are errors, turn on the check box foreach attribute error that you want the wizard torepair with blank data, which is the onlypossible repair.
Links missing both of two required link records If there are errors, turn on the check box foreach link that you want the wizard to delete,which is the only possible repair.
Links using end entity records where the entityrecord is missing
If there are problems, turn on the check box foreach entity that you want the wizard to createwith blank data, which is the only possiblerepair.
Links appearing to use more than the two endentity records, which is not meaningful
You must make a note of these links and fix theproblem by other means.
5. A list of any repairs that you have requested in previous steps is displayed. Click:
• Cancel To abandon all repairs.• BackIf you want to select a different set of repairs in earlier pages of the wizard.• FinishTo perform the listed repairs.
6. Click Close. The database is opened, whether or not you asked for any repairs.What you do nextdepends on whether you repaired errors:
• If the wizard did not report errors, the database is ready for use.• If the wizard reported errors and you chose to repair them, close the database and run the
wizard again. (Some errors are only revealed after the wizard has made its first repairs.)7. Run the wizard again until you see no errors. After two uses with repairs performed, the third use
of the wizard should always be error free.
What to do next
After repairs, you might need to add data for any records that are created with blank data fields or toreplace removed entities or links, perhaps by importing data from a suitable source.
Converting to UnicodeConvert the security file and database to Unicode.
Before you begin
Attention: Although iBase 8 supports Unicode, the database might not. If the database doesnot support Unicode then the following must not contain any Unicode characters as thedatabase are unable to store the text correctly:
• Security data, such as user names (these are saved in entity and link records in system fieldssuch as Created By)
IBM i2 iBase administration center 89

• Database schema (including definition names such as set and query names)• Data
About this taskTo avoid possible problems, convert all non-Unicode security files and databases as described in thefollowing information.Security file support for Unicode
The security file supports Unicode in these situations:
• The security file is in Microsoft Access format (the default format)• The SQL Server security file was created for iBase 8• The SQL Server security file was upgraded to iBase 8 and then converted to support Unicode
These types of security file can be used in any locale.
Note: When you convert an SQL Server security file, you must also convert any databases securedby that file.
Database support for Unicode
The database supports Unicode in these situations:
• The database is in Microsoft Access format (the default format)• The SQL Server database was created for iBase 8• The SQL Server database was upgraded to iBase 8 and then converted to support Unicode
These types of database can be used in any locale.
Note: iBase users cannot open non-Unicode databases when the SQL Server security file isconverted to support Unicode. For this reason, you must also convert the database to Unicode.
Attention: Before you convert to Unicode, you should back up your security file and alldatabases secured by this file.
Procedure
To convert a security file to Unicode:1. In iBase Designer, log on but do not open the database.2. Select Tools > Database Setup > Convert to Unicode > Convert Security File to Unicode.
After the conversion is complete, convert all the databases that are secured by the converted file.The conversion of a large database can take several hours, and you cannot interrupt theconversion after it starts:
3. Open the database secured by the converted security file.4. Select Tools > Database Setup > Convert to Unicode > Convert Database to Unicode.
Managing SQL Server databasesiBase provides the capabilities to store data in Microsoft SQL Server databases and Microsoft Accessdatabases. Microsoft Access should be used as the supporting database only if the number ofsimultaneous users is five or less. When a database of more than 200 Mb is accessed by a number ofusers simultaneously then consideration should be given to using SQL Server.
90 IBM i2 iBase: Administration

Upgrading an iBase database to SQL Server
You can use iBase Designer to convert a Microsoft Access database to SQL Server format. The upsizeprocess creates an SQL Server database and an .idb file that contains the connection details. Fordetails of this process, see Upsizing a Database to SQL Server.
Managing the security of the data in an SQL Server database
For detailed information about configuring the security of the overall system, see the AdministrationCenter document Managing Access Control, which provides detailed guidelines on how to controlaccess to iBase.
Populating the SQL Server database
If you need to import very large quantities of data, then you might want to consider using bulk importor XML import. Bulk import makes use of the SQL Server BULK INSERT statement and requires thedatabase and server to be configured before it can be used. For further information, see Overview ofBulk Import.
Optionally, iBase can load data that is extracted and structured from source documents using TextChart. For further information, see the Administration Center document Using iBase with Text Chart.
Attention: You cannot use the general SQL Server tools to populate iBase SQL Serverdatabases. The iBase application must have complete control of the data in the database toensure the integrity of the entities and the links between them. Any data that is not entered orimported by iBase tools can render the whole database corrupted.
Keeping data safe and available (backup)
This is probably the most complex area of managing a database installation, and iBase with SQLServer is no different. SQL Server provides tools for completing the backups and automating them,although your SQL Server administrator might use other backup tools if the right files are backed up atsuitable intervals.
With your SQL Server administrator, you must to decide on your backup regime. This can depend onhow the iBase SQL Server databases are populated: for example, whether the database is populatedby users entering data continuously or by users importing large sets of data. For further information,see Backing Up iBase Databases.
Note: Perform database backups at a time when no users are using the database. This is becausesome iBase operations can take place over a relatively long time and affect multiple databaserecords. Examples of such operations are data imports, batch edit, batch delete, merge, or deletion ofentities with many links. If the backup was performed during such an operation and the database issubsequently restored from the backup the restore operation restores data on which work was inprogress at the time the backup was taken and is therefore potentially in an incomplete state. It issafest if backups are completed when no users are performing operations on the database.
Modifying the database schema
Your SQL Server administrator cannot modify the schema of an iBase SQL Server database using SQL.The schema is part of the structure of iBase, and must remain unchanged to ensure data integrity andthe success of future upgrades. The only way that you can modify the schema is to use iBaseDesigner.
Note: It is possible for an SQL Server administrator to modify the indexes of an iBase database toimprove performance in areas such as querying although there is a tool for doing this in iBaseDesigner— see Performance Tuning in iBase Designer for details. Completing this step manuallyneeds careful planning, and your SQL Server administrator should keep detailed notes and take SQL
IBM i2 iBase administration center 91

scripts of the changes to default indexing. Completing this step manually prevents the use of theiBase Designer Performance Tuning wizard.
Note: Before you modify the indexes, your SQL Server administrator must to stop the MicrosoftSearch service if it is used to continuously update the Full-Text Search indexes in iBase. Otherservices, such as alerting, are stopped automatically when you open the database in iBase Designer.
Performance tuning in SQL Server
The performance of an iBase SQL Server database can be maintained by regular reindexing in SQLServer. A decline in performance might become apparent after the database grows larger than,possibly, 10 – 15 GB, and is most noticeable when you run iBase queries. If you are using a databaseupgraded from iBase 4, then you might be able to improve the performance of queries by optimizingthe database indexes. A tool for doing this is available in iBase Designer— see Performance Tuning fordetails.
If you are already using query-optimized indexes (which is the case for databases created or upsizedin iBase 5) and query performance is still poor, you need to discuss the problem with your SQL Serveradministrator. Setting aside issues with hardware and network infrastructure, the decline inperformance might occur for various reasons in Microsoft SQL Server:
• Frequent data imports caused the data and indexes to become fragmented• Databases that are set to grow/shrink automatically on the same disk became fragmented• Inserting, updating, or deleting large amounts of data caused the SQL Server database statistics to
become out-of-date
There are a number of steps that an SQL Server administrator can take to address these problems:
• Data and index fragmentation can be addressed by rebuilding or defragmenting the indexes on thedatabase tables. An SQL Server administrator can do this while the database is online but, for thebest results, it is preferable to first take the database offline.
• Operating system fragmentation can be resolved by defragmenting the disk files. This can be doneby a server administrator rather than by an SQL Server administrator. It also requires the databaseto be taken offline so that the files can be moved around the physical disk.
• If automatic statistics updating is disabled, an SQL Server administrator can update them manually.
Effect of auditing on performance
Standard auditing of updates and deletions has a low impact on performance. However, the readauditing that can be configured as an option for iBase SQL Server databases does have an impact. Thedesign of this auditing is such that only records, which have been displayed, charted, or reported areaudited. This means that activities such as finding and querying do not run noticeably slower.Activities that result in a revealing a record, such as charting, can take more time to complete. If youintend to use read auditing extensively, it is possible to configure the Audit log database to write tofiles on disks with fast write performance (see Server machines for details).
Read audit places a higher load on the network and so network performance is more important whenusing this option. The read audit logs grow relatively quickly and should be archived regularly.
SQL Server Replication and iBase
For details of how to replicate iBase databases, see the Administration Center document Setting UpiBase database replication. iBase database replication is a separately licensed feature.
For more information on hardware requirements, see SQL Server Clients, Servers and Networks.
92 IBM i2 iBase: Administration

You can use iBase installation to work with data in both SQL Server and Microsoft Access databaseformats. This allows you to work with the scale of data appropriate to your analysis. iBaseautomatically recognizes the type of database and you can switch between them within an iBasesession.
Upsizing a Database to SQL ServerYou can upsize (convert) an iBase Microsoft Access database to SQL Server format. You must have abackup of the original database if you want continued access to the Microsoft Access version of thedatabase.
Before you begin
Before you can upsize a Microsoft Access database, you need:
• An iBase logon for the original database with at least the Database Administrator role.• Exclusive access to the database that you are upsizing.• A backup of the iBase database that you are upsizing, or sufficient space to make a disk copy if you
want the upsize process to make a copy for you.• A printout of the database statistics for the Access database— you might want to compare these
with the statistics of the upsized database.• The identity (network name) of the server on which Microsoft SQL Server is running.• The login name and password of an SQL Server user that belongs to the dbcreator server role. See
the Administration Center document Managing Access Control, for details of SQL Server logins.• Sufficient disk space and time to complete the operation.
Note: The upgraded databases use twice the disk space of the original iBase database.
About this task
The upsize process creates an SQL Server database and an .idb file, which contains the connectiondetails.
Make sure that you have a backup of the database that you intend to upsize. If this is an operationaldatabase, it is a good idea to restore the backup and make sure that you can read the restored versionbefore you complete the upsize.
You can complete the upsize from any iBase client machine. For large databases, however if possible,run this iBase Designer session on the server machine to reduce network traffic.
Note: If you are upsizing any database that is likely to exist already on the server, such as thesupplied example database User Guide.idb, you may need to rename the original database (.idb)file to a name expected to be unique on the server. For example, you might rename the database fileUser Guide.idb to User GuideAB.idb. After the upsize is completed, rename the databaseconnection file created by the upsize back to its original name to make sure that any report templateswork. For example, you would rename the connection file User GuideAB.idb back toUser Guide.idb.
Procedure
1. Start iBase Designer.
Note: Do not open any database.2. Select File > Logon.3. In the Security File browser dialog, navigate to the folder and select the security file used to
secure the database you are upsizing.
IBM i2 iBase administration center 93

4. Click Open.5. When you successfully log on, click Cancel in the IBM i2 iBase dialog. You cannot have the
database open when upsizing.
Note: You might want to open the database briefly, to confirm that you have used the correctsecurity file and, perhaps, from the File menu to select Database Statistics and view orprint the information so that you can compare it with statistics for the database after upsizing.Close the database before you continue.
You are now ready to upsize the database:6. From the Tools menu in iBase Designer, select Database Setup > Upsize > Database to SQL
Server.7. Select a database from the list. If necessary, select the entry More Files and click Next to display
a file browser where you can locate the database.8. Name the backup file or, if you do not want a disk backup file, delete the suggested name to
leave an empty field. Click Next to continue. A backup is created if required.9. Enter the name of the server or select it from the Server list.
Note: Do not use the aliases (local) or '.' because they refer to the client machine when theconnection file is opened remotely.
10. Enter the logon details for the SQL Server instance on the server. Use SQL Server authenticationfor the upsizing, not Windows authentication.See Authenticating Connections to SQL Server for details.
11. Click Next to continue.Your choices are checked and any problems are reported. For example, if the database exists onthe server, you must choose another server, or exit and change the name of the originaldatabase, before you restart the process. Provided there are no problems, the settings for thenew database are displayed.
12. Check that these settings are what you want and click FinishThe upsizing process starts and progress is displayed by listing each stage with a time andsuccess or failure.
13. Click Close.When the upsize process is complete, the iBase database file is overwritten with a file of thesame name and extension. For example, User Guide.idb is now a connection file to an SQLServer database, and it is likely to be significantly smaller than before. The new SQL Serverdatabase is opened automatically.
14. Optional: Close the database and change the name of the connection file back to the originaldatabase name.
15. Before you use the database, check the database properties to see that the settings in theConfiguration and Advanced pages of the Properties dialog are what you expected.
16. If success is reported for all stages of the upsize process, there is no reason to expect problems.It is still wise to check the upsized database as described fully in Checking a Database andsummarized here:a) Select Tools > Database Administration > Schema Integrity Check. Select the new
database and complete each page of the wizard.When you finish the wizard, the database is reopened. Close the database.
b) Select Tools > Database Administration > Link Integrity Check. Select the new databaseand complete each page of the wizard.When you finish the wizard, the database is reopened.
94 IBM i2 iBase: Administration

What to do next
If you want to use Word Search with the upsized database, you must to rebuild the index. Upsizingdoes not convert the original Access index. See Maintaining Word Search Indexes for details.
Note: The original index (.idx) file is no longer be used by the upsized database. However, it mightbe required if you plan to allow continued access to the Microsoft Access version of the database.
Managing SQL Server Connection SettingsYou use the Database Configuration utility (iBaseConfig) to manage SQL Server settings held in aniBase connection file (whether a security connection file or a database connection file).
About this task
You can change:
• The name of the server that holds the database.• The server login name and password for all users if SQL Server authentication is used.• The security mechanism that is used: SQL Server authentication or Windows authentication
(integrated security).
Typically, you use the Database Configuration utility when you have use SQL Server tools to changethe server or login details for existing databases. For example:
• After you create a database, you can change the SQL Server login used by the iBase application toone with fewer permissions.
• After you use backup and restore tools to move a database from one server to another, you canreestablish a connection between iBase and SQL Server.
You can inspect many of these details in the Database Properties dialog within iBase or iBaseDesigner. The advantage of using the Database Configuration utility is that it displays these settingswithout opening the database on the server, allowing you to specify a different server and test theconnection.
Note: You must to update any copies of the connection file(s) held on other machines. Users areunable to connect to the server if the path or file name is different and see the message: The securityfile has failed an integrity check. Access is denied.
Procedure
1. In iBase Database Configuration, enter the following details and then click Next:Option Description
Security FileName
Enter the name of the security (.ids) file or the security connection file thatsecures the database connection file. If you want to change the connectiondetails for a security connection file, leave Database File Name blank.
Database FileName
Enter the name of the database connection (.idb) file. By entering adatabase file name, you change the connection details for the database thatcontains the entity and link data rather than the security data.
User Name,Password
Enter the user name and password of an iBase System Administrator (that is,a member of an iBase database management group with all permissionsgranted).
When you click Next, the connection file is opened, the connection settings are read, and thedatabase and SQL Server information is displayed.
IBM i2 iBase administration center 95

2. You can change many of the settings, for example if you move the database to another server orwant to change the method of login to an existing server. However, you cannot change thedatabase type or database name.Option Description
Server From the Server drop-down list, select the name of the server. Alternativelyif you know the name of your server, enter it in the field. You must enter aname that can be seen from network client computers. If you are working onthe server computer, this means that you cannot choose (local) or itsequivalent presentation as a single period (.).
Note: You may need to click Refresh to make the list display all of theaccessible servers that are running Microsoft SQL Server.
Login Name,Password
After selecting a server, you must choose the authentication method to beused for connection to the SQL Server instance. You can use either SQLServer or Windows authentication:
• To use SQL Server authentication, enter the SQL Server login name andpassword. You can enter the details of any user who has the appropriateaccess rights on the server.
Use WindowsAuthentication
To use Windows authentication, turn on the Use Windows Authenticationcheck box. Each iBase session will log on to the database using the Windowslogin name with which the user started their Windows session.
Note: The Database Name box displays the name of the Microsoft SQL Server database that theconnection file (.idb file) connects to. It is not possible to change this name. This prevents a userfrom connecting to a database where they do not have access by using a connection file for whichthey do have access permissions.
3. Turn on the Test connection check box before you save to be informed if the settings do not work.4. Click Save to update the connection file. A summary of its actions is then displayed. A typical
summary looks like this:
Test connection succeeded.Server NameServer Login NameServer Login PasswordIntegrated Security settingUnicode settingCompleted.
Performance Tuning in iBase DesigneriBase automatically indexes certain system tables when an iBase SQL Server database is created orupsized. It will also index those columns within user-defined tables where the
Before you begin
Running Performance Tuning on an SQL Server database requires VIEW DEFINITION permission onthe SQL Server database. You need to grant this permission to the user mapped to the SQL Server login. You can use an SQL script similar to this:
GRANT VIEW DEFINITION TO username
96 IBM i2 iBase: Administration

For example, if users connect to iBase using Windows authentication, and the user who is runningPerformance Tuning is called iBaseAdmin and is a member of the YourDomain domain:
GRANT VIEW DEFINITION TO [YourDomain\iBaseAdmin]
You should revoke this permission after you run Performance Tuning:
REVOKE VIEW DEFINITION TO username
In addition, if present remove the Full-Text Search index. It is not possible to run the PerformanceTurning wizard while a Full-Text Search index exists. For details of how to do this, see Removing aFull-Text Search Index.
About this taskQuery optimized indexing is of significant benefit even if your database has no user-defined indexes.The index rules are used whenever you:
• Create an SQL Server database.• Upsize an existing database to SQL Server.
Note: Upsizing removes any indexes that were created manually in Microsoft Access.
Procedure
1. In iBase Designer, select Tools > Database Setup > Performance Tuning.
Note: If necessary, you can stop the process and resume it later. However, until you complete thisprocess, the database is only partially indexed and some parts of iBase might perform slowly.Also, certain commands such as Schema Integrity Check do not display, check, or repair theindexes.
2. You can use the Schema Integrity Check to restore missing indexes on user-defined tables in anSQL Server database. In iBase Designer, log on as a database administrator but do not open thedatabase, and from the Tools menu, select Database Administration > Schema Integrity Check.For information on using this dialog, see Checking the integrity of the schema.If the database uses the original iBase index rules, the command restores the indexes to conformto those rules. If the database uses the query optimized index rules, the command restores theindexes to conform to the query optimized rules.
Setting Up iBaseHow to set up the following features in iBase.
Setting Up AlertingAlerting is available in SQL Server databases only. When you initialize an SQL Server database foralerting, you turn on Audit History and create SQL Server triggers and jobs to raise and process alerts.The iBase help describes in detail the type of actions that raise alerts.
To correctly process results, the audit generates queries that are known as alert definitions based oneach user's requests. These queries are run on a schedule that is set up by
Every time the alerting jobs run, they generate one alert for each alert definition where actions aredetected, batching up all detected actions so that users receive a single alert or email. The date/timeof an alert is the date/time that the job is processed at the server.
IBM i2 iBase administration center 97

Note: Alerting requires that the server machine on which SQL Server is running has the same date andtime as the iBase client machines. A significant time difference between an iBase server and itsclients could prevent the server from detecting the events that trigger iBase alerts.
Users use the Alert Details dialog to determine the exact nature of the changes. Users who are deniedaccess to the Audit History receive alerts and can see the alert summaries but are unable to use theAlert Details dialog. The alert details are taken from the audit history and the same details aredisplayed regardless of the audit level of the database. A user who is denied access to the AuditHistory will not be able to use the Alert Details dialog.
Note: Contact Technical Support for information on setting up Alerting when using SQL ServerExpress. This edition of SQL Server has no facility for scheduling jobs and you must to use Windowsscheduling instead. You should also contact Technical Support if you are planning to use Alerting withiBase database replication.
Permissions required to configure alerting
The user who configures alerting must be an iBase system administrator. They must also have an SQLServer login for the msdb system database that is a member of both the public andSQLAgentUserRole database roles.
Initializing alerting and setting up alerting jobs
By default, a single alerting job runs every 10 minutes on the server. However, you may need tochange the number of alerting jobs and their frequency to suit the load on your SQL Server machine.You can configure alerting to use up to 10 alerting jobs to distribute alert processing more efficiently.Although the jobs run to the same schedule, the start times will be offset slightly.
• The time taken to run an alert is dependent on the hardware setup, the load on your system and thecomplexity of both your data and any queries that are added as part of an alert. To ensure thatalerting is working as expected, you need to take into account the performance implications runningyour alerts before setting your alerting schedule.
• For performance reasons, you may prefer not to schedule these jobs to run at the same time as theroutine backup or large imports (or the alerting jobs should be temporarily disabled whilst thesetasks are running).
• There will only be one job for processing email alerts.
To initialize alerting and set up the alerting jobs, in iBase Designer, select Tools > FeatureAvailability > Alerting Configuration.
Note: The number of actions detected by the alerting job, and whether all actions are detected, willdepend on the frequency with which the job runs. In particular, editing a record after the jobcompletes and then undoing that edit before the next job runs will not be detected. However, the twoedits will always be recorded in the audit log (depending on how you have chosen to configureauditing).
Backing up the security database
After initializing alerting you need to back up the security file if it is in SQL Server format. See BackingUp iBase Databases.
Setting up email alerts
No setup is required on the SQL Server machine beyond setting up the SQL Server instance for email:
• For SQL Server 2005 and later, alerting uses database mail with the default public profile
98 IBM i2 iBase: Administration

Refer to the SQL Server documentation for information on these.
Note: Users must have valid email addresses as iBase cannot verify these.
Opening the database in iBase Designer after alerting is configured
Before you can open a database in iBase Designer, you must have exclusive access to that database.This means that no users can be connected to that database in iBase, Analyst's Notebook, and noservices for that database should be running.
You will be asked whether you want to shut down the database services. After waiting a few minutesfor the services to be shut down, you can attempt to open the database. If you do not succeed, forexample because users are still connected to the database, you are asked whether you want to retryor cancel. If you choose to cancel, the alerting jobs will automatically resume and the database willnot be opened.
On exiting iBase Designer, the alerting jobs are automatically resumed.
Alerting securityAlerting complies with the security that you have set up for your iBase system and case-control (ifused). This means that users cannot be added as subscribers to alert definitions that would give themaccess to denied records. Specifically, when a user adds an alert definition, the only users eligible tosubscribe are users who can see the same (or a wider range of) records, entity types, link types, andfields as the user adding the alert definition.
Alert definitions are updated whenever group permissions are changed in the security file. Thisupdate occurs after exiting from iBase Designer and when any user next opens the database in iBaseor iBase Designer. For this reason, after making security changes and logging off, reopen the databaseas soon as possible to apply the changes.
Changes to user permissions can mean two things:
• If the user is a subscriber, then they are automatically unsubscribed from any alerts that monitorthe denied item. This also means that the user can no longer view the details of any alerts already intheir alerting Inbox.
• If the user is the owner of the alert definition, then the alert definition is automatically deleted. Thisalso means that subscribers can no longer view the details of any alerts already in their alertingInbox.
No sensitive information is included in an email alert. The information is restricted to the name of thealert and the emails are recorded in the audit log.
You can also deny users the right to add alert definitions or the right to add alert definitions that sendemails. In iBase Designer, select Security > System Commands Access Control command, and onthe Access Denied page, turn on:
• Alerting to deny permission to add alert definitions• Alert Email Notifications check box to deny the permission to send email alerts.
Note: Alerting applies only to records in the main database and not to any database subsets.However, when the database subset is synchronized with the main database, alerts will be raised inthe usual way on any records that are modified as a result of the synchronization.
Attention: Exporting data as XML will not raise alerts because of the large volume of data thatmay be exported (potentially all the records in the database).
Initializing alerting and setting up alerting jobs
IBM i2 iBase administration center 99

Setting up email alerts
Setting Up Text SearchThere are two ways to search for text in an iBase database, Search 360 (in SQL Server databasesonly) or Word Search. A text search index must exist before users can use either search method.
Text search indexes allow users to search multiple fields in multiple entity and link types. Databasedesigners can define the rules used to build and search an index. A text search index is unique to adatabase.
Using Search 360
Search 360 can be used to search any type of text field in SQL Server databases, including documentsand charts, using a range of techniques that allow for:
• Any number of words in a phrase• Typing mistakes (for example typing ROBETRSON instead of ROBERTSON, or Danielsmith instead of
Daniel Smith)• Variations in spellings and variations based on how words are pronounced (for example typing
PETERSON instead of PEDERSON because, in English, the two names sound the same)• Synonym matching (for example, in English, Mike and Michael are synonym matches)• Variations in word order (for example "Joyce Gallagher" and "Gallagher, Joyce" are exact matches)• Allowances are made for punctuation and accents (for example Francoise and Françoise are exact
matches)• Records directly related to the main search (that is, just one link away from a record found by the
main search)
Using Word Search
Word Search can be used to search a database of any format using:
• Exact words• Wildcards• Synonym matching• Soundex
When matched text is found, it is highlighted in context in the document. Word Search also allowsusers to browse the index and find text based on the number of times they occur or by their leadingcharacters.
What is not searched?
The text search methods do not search:
• The targets (records, files or URLs) of Hyperlink fields, only hyperlink text is searched.• In Search 360, document types for which there is no installed iFilter on the machine that performs
the indexing.• All Number type fields, including numbers, dates, time zones, system and calculated fields, and so
on.
100 IBM i2 iBase: Administration

Installing iFiltersIf you are an SQL Server administrator, you can install iFilters that allow documents of a set type to besearched using Search 360 and Full-Text search.
To install iFilters:
1. Remove the document type fields from the index.2. Install the correct 32-bit or 64-bit iFilter on the correct machine.
For Search 360, this should be the Search Indexer machine.
For Full Text Search, this should be the SQL Server.
Guidelines are provided below for different document types.
• For Microsoft Office documents, you need to install and register Microsoft Filter Pack iFilters on theSQL Server machine.
• An iFilter for html files is likely to be installed already, however The titles of pages, and othermetadata, are not indexed.
• iFilters must be installed for each indexed document type. If an iFilter is not installed, documents ofthat type are not included in the index. If an iFilter is installed after the index is built, the index willneed to be rebuilt for the document type fields before the document will be indexed correctly.
After you installed the correct iFilter, you must complete some additional steps for Search 360 andFull Text Search:
Search 360
For Search 360 you must to ensure that the Index Service includes any new document types:
1. From the Tools > Search > Search 360 Administration.2. In the Types area, for turn off all document type fields.3. Click OK.4. Display the Search 360 Administration dialog again and reselect all document type fields.5. Click OK and exit iBase Designer.6. Run the Index Service to include the new document types in your Search 360 index. For more
information about the Index Service, refer to Managing the Index Service.
Full-Text Search
For Full-Text Search you need to complete one or more extra steps depending on which iFilter youinstalled:
• If you have installed the 64-bit Adobe PDF iFilter download, set the PATH environment variable tothe bin directory of the iFilter installation. For example, in the PATH variable, add the pathC:\Program Files\Adobe\AdobePDF iFilter 9 64-bit\bin
If you installed Adobe Reader 9.4, this has been done for you.• If you have installed any PDF iFilter (or other iFilter that does not have a signed binary) run the
following command in SQL Server Management Studio for your instance:
exec sp_fulltext_service 'verify_signature', 0;
• If you have installed any new iFilter, run the following command in SQL Server Management Studiofor your instance:
IBM i2 iBase administration center 101

exec sp_fulltext_service 'load_os_resources', 1;
• Stop and restart the SQL Server service. If you have only added the Office 2010 iFilter, this mightnot be needed.
• Rebuild the Full Text Search index in iBase Designer to include the documents.
Checking which iFilters are installed
To determine which file extensions the iBase database currently has iFilters for, you can run thefollowing SQL Script:
select document_type, path from sys.fulltext_document_types;
Setting Up Search 360This section summarizes setting up Search 360:
Required permissionsYou require a Microsoft SQL Server installation on the machine on which you want to create the iBaseindex database. The tool can only connect to an instance on the local machine. The iBase databasesto be indexed can either be on the local machine or elsewhere on the network.
To use the Index Service configuration tool, you require a Microsoft SQL Server login with suitableadministrative rights to allow databases and jobs to be created:
Task Role
To configure the index service: dbcreator server role
To schedule an index service job on the databaseitself:
SELECT, INSERT, UPDATE on_Configuration_Text
SELECT, INSERT, UPDATE on _Configuration_Def
To schedule an index service job on the msdbdatabase:
Member of the SQLAgentUser role
SELECT on sysjobs
After the index service is configured, you require an account to run the index service. In SQL Server,this can be one of the following:
• a Windows account that is a member of the sysadmin server role• a proxy account that is a member of the "public database role" of the database to be indexed
Process OverviewThe following steps summarize the processes that are required to enable Search 360 on your system.
About this task
Note: Steps 3 - 5 must to be repeated for each iBase database.
Note: If you use iBase database replication, then you must to repeat steps 1 - 5 for each replicateddatabase because the search indexes are not replicated.
102 IBM i2 iBase: Administration

Installing the Index Service Configuration toolYou must install the Index Service Configuration tool on a machine that has a local instance of SQLServer. The iBase index database is created in the data folder for this instance.
Installing the Index Service Configuration tool, installs the following in the iBase installation folder:
• Command-line application, i2.iBase.SearchIndexerExe.exe• Configuration tool, i2.iBase.SearchIndexerConfig.exe
Note: The databases to index can be on the same machine or on a remote server.
Checking iFiltersSearch 360 will automatically index all documents with the suffix RTF, ANB, LNB, TCV, XML, CSV, andTXT. All other document types require that an appropriate iFilter is installed on the machine on whichindexing is performed.
iFilters are third-party plug-ins that enable index services, such as the Search 360 Index Service, toscan the different document types that can be embedded in entity and link records and extract indexterms. Suitable iFilters might already be installed depending on the version of the applications youare using. The easiest way to determine whether the correct iFilter is installed is to import adocument of the required type, update the index and then search for a term that you know is in thedocument.
Attention: Documents larger than 100 Mb might not be included in the index.
If your document does not appear in the search results, you must to install the related iFilter. SeeInstalling iFilters for further details.
Configuring a database for Search 360To allow Search 360 search capabilities such as spelled-like and sounds like, the data that is stored inyour database needs to be augmented to include extra details. Initializing a database for Search 360creates extra database tables that cannot be removed.
Procedure
To initialize the database for Search 360:1. Select Tools > Search > Search 360 Administration.2. In the Search 360 Administration window, turn on Enable Search 360.
Note: Turning off Enable Search 360 prevents the index service from running successfully.3. If you want indexing to occur when the index service next runs, click Rebuild Index. Your SQL
Server administrator needs to set up the index service.4. Optional: Select the Record Types and Field Types to include in the index.
If you include an entity or link type it initially includes all its fields, you can then turn off the fieldsthat you want to exclude.
5. Optional: If you would like to include any metadata from selected document Field Types, selectIndex document metadata.
6. Click OK and then close the iBase database. The index service cannot connect to the databasewhile you are in the database.
7. Ask your SQL Server administrator to set up the index service.
IBM i2 iBase administration center 103

What to do next
System administrators use the Index Service Configuration tool to set up the index service and itsschedule. If installed, and assuming you have permission to run the tool, you can start the tool byselecting the following option from the Windows start menu:
• Programs > IBM i2 iBase 8 > iBase Index Service Configuration.
Configuring the index serviceThe Index Service Configuration tool is an application that indexes one or more iBase databases forSearch 360.
About this taskFor each database, you can set up an index service and a job schedule. Each time the job runs, itstarts the index service, which obtains the location of the iBase database to index from the indexdatabase (IBaseIndexDB). No sensitive information is stored in this database as the index serviceconnects to the SQL Server database using Windows authentication.
Procedure
To set up index services for your iBase database:1. Make sure the database that you want to configure is closed, and that you are logged in using a
suitable Windows or SQL Server account.2. Select All Programs > IBM i2 iBase 8 > > iBase Index Service Configuration
Running the Index Service Configuration tool for the first time on the local machine creates adatabase, called IBaseIndexDB, and creates a file Searching Config.xml in the All Usersapplication data folder on the local machine, specifically: C:\Documents and Settings\AllUsers\Application Data\i2\i2 iBase 8\<language>\Searching. If necessary, thedatabase name is appended with a number to make this name unique.
Note: The index database and configuration file should be included in your backup schedule.Losing either of these files requires you to reconfigure your iBase databases for indexing.
3. Click Add to set up a configuration for this database.4. Advise the iBase database administrator of the date and time of the first scheduled job as this is
not visible in iBase Designer.
Checking the service configurationConfirmation that the index service is configured successfully for a specific database is available inseveral places.
Procedure
• In SQL Server Management Studio, SQL Server Agent lists an i2_Search_Indexing job for thedatabase, which reports success or failure in the SQL Server Agent job history
• In the Windows Event Viewer, started and completed events are listed for the database• In iBase Designer, the date and time of the last index update is displayed in the Search 360
Administration dialog• In iBase, the date and time of the last index update is displayed in the Search 360 dialog.
What to do next
To find out why the service is not running:
• Check that the SQL Server Agent is running
104 IBM i2 iBase: Administration

• Check the Windows Event Viewer — the service logs when the service starts and stops• Try running the Index Service from the command line (type just the command namei2.iBase.SearchIndexerExe.exe to display the arguments)
Note: Depending on the frequency with which the index service runs, you might want to change theproperties of the Windows Event Viewer log file; for example, change its size or control what happenswhen the maximum log size is reached.
Managing the Index ServiceThe index service runs at the scheduled frequency if Search 360 is enabled in iBase Designer. Unlikemost other SQL Server job properties, the enabled flag enables both the job and the schedule.
Attention: Jobs run if Search 360 is turned off in iBase Designer but exit without performingany indexing.
Use Index Service Configuration to manage the Search 360 index service:
• To modify the schedule for a Search 360 index service, click Configure. Do not use SQL Server tochange the schedule.
• To stop or suspend the index service, click Configure and turn off the Enabled check box. Thisallows iBase users to continue to use Search 360 but without any updates for new information.
• To remove the index service, for example before uninstalling the Index Service Configuration tool ormoving an iBase database, click Delete. This deletes the job and prevents the index tool fromrunning.
Include the IBaseIndexDB database and Searching Config.xml configuration file in your backupschedule. Losing either of these files require you to reconfigure your iBase databases for indexing. Donot schedule index service backups for the same time as iBase backups.
Note: If you accidentally delete the iBase index database, you do not delete the jobs but they are notvisible in the Index Service Configuration dialog. To resolve this, you need to either restore thedatabase from backup or reschedule the jobs (which deletes and then recreates the jobs).
As a part of the regular maintenance of your index service you should monitor the transaction log andclear this down when it becomes too large. This is especially important after you complete a full indexas many entries are added.
Setting up Word SearchSet up Word Search for a Microsoft Access or SQL Server database.
To provide a Microsoft Access or SQL Server database with Word Search, you must:
• Review the excluded words that are supplied with iBase and decide whether to import these or setup your own. You exclude words that do not provide useful information during a search, such as his,her, into, around.
• Define the scope of the index that is used for a word search by selecting the entity types, link types,and fields to index.
• Build the actual index (which is based on the existing records in the database).• Decide whether to increase the flexibility of word search by importing a file of synonyms or by
setting up your own. For example, a search for the word 'handgun' might also find records with thewords revolver and firearm if these words were defined as part of the same synonym group.
Users cannot search for a word if it does not exist in the Word Search index. For this reason, it isimportant to keep the index up-to-date. How frequently you rebuild the index depends on thefrequency and quantity of updates to the database.
For background information on Word Search, see “Setting Up Text Search” on page 100
IBM i2 iBase administration center 105

Setting up excluded words for Word SearchBy default when you build a Word Search index, any words that occur in the selected fields areincluded in the index. However, you might want to exclude words.
You may want to exclude words for the following reasons:
• The words occur in all, or nearly all, records and contribute little to the searchability of thedatabase, while adding greatly to the size of the search index.
• The words relate to administrative or other uses that you do not want to be visible to all users oftext search— users are warned that the word is excluded and that no search can be performed.
As a starting point, iBase is supplied with an example file of common words, WSexclude.txt. Thefile is formatted for importing into the Word Search system.
Inspect the file to see whether it is suitable for your database— you can open it in any text editor. Youcan copy this file to another location and edit it to add or remove words if required. When you aresatisfied with the excluded word list, you are ready to build the word search index. You can import thelist as part of this step.
Note: Alternatively, you can modify the excluded word list after you import the file. You use theExcluded Words page of the Word Search Index Build dialog.
Location of the default excluded word list
If the default location is accepted when installing iBase, then WSexclude.txt is in theConfiguration folder in the application data area of your installation. For full details, seeInstallation and Application Data Folders.
Format of excluded word lists
The excluded word list must be an unformatted text file that contains one word per line with no blanklines. The only characters that are not taken to be part of a word are the space character and thedouble quotation mark ( " ). You cannot exclude words that are longer than 20 characters.
Double quotation marks are optional, but if they appear they must do so in pairs, one each at the startand end of a line. Paired double quotation marks are ignored - only the words between them areimported.
The words can be in any order, use uppercase, lowercase or any mixture of case, and can beduplicated within the file. Duplicates are removed when you import; the lettercase remainsunchanged.
If you see the message ERRORS IN FILE after you import, the import completed but there weresome errors in the import data. The most likely causes for the errors are:
• A space character anywhere in the file, possibly before or after one of the words.• A completely blank line.• A mismatched or badly placed double quotation mark.
Setting up synonymsSynonyms are associated words such that whenever you specify a word to search for, all theassociated words are automatically searched for too. The associated words might compare all thewords that have the same meaning; for example, 'found, detected, discovered'.
Before you begin
106 IBM i2 iBase: Administration

About this task
For Word Search and Full-Text Search, you must add synonyms in groups, even if you create only onegroup. Each group should contain words that users consider as being the same for the purposes oftheir search. For example, a synonym group that is named Firearm might have the values: Firearm,Shotgun, Rifle, Handgun, Revolver, Pistol.
There are two ways of defining synonyms:
• In a text editor and by importing into iBase Designer• In iBase Designer using the Word Search Administration dialog (Synonyms page)
You can also export synonyms that are defined in one database for external editing or transfer toother databases.
Note: You can also set up synonyms in the Full-Text Search Administration dialog. There is only oneset of synonyms regardless of whether you use Word Search or Full-Text Search, and regardless ofwhich dialog you use to maintain them.
To import a synonym list, you require a text file (.txt) of the correct format. This example defines asynonym group named Firearm with the values: Firearm, Shotgun, Rifle, Handgun, Revolver, Pistol:
[Firearm]FirearmShotgunRifleHandgunRevolverPistol
Note: The name of the synonym group is enclosed in square brackets. This will not be treated as asynonym unless you also include it in the group. This is why Firearm appears twice in this example.
Procedure
To import synonyms from a text file:1. From the Tools Search menu in iBase Designer, select one of the following commands:
• Word Search Administration (the Synonyms page should be displayed)• Full-Text Search Administration
2. Click Import.3. In the File field, enter the path and file name of the list you want to import.4. Inspect the Preview area carefully to verify whether the list contains the expected words. If a
message is displayed reporting that the file is missing or contains an error, edit the file (in your texteditor) to remove the error. Click Refresh to preview the new contents if you change the file.
5. Decide whether you want to keep any synonyms already defined for this database.6. To keep existing synonyms, turn on the Merge with existing data check box. Use this option only
if you are certain that all existing synonyms are as you want them.7. To clear all synonyms and use only the synonyms defined in the file you are importing, turn off
Merge with existing data.8. Click Import.
IBM i2 iBase administration center 107

What to do next
You can add extra synonyms or edit and delete existing ones in the Word Search Administrationdialog (or the Full-Text Search Administration dialog). For further information on using these dialogs,click Help in the dialog.
Note: You do not need to rebuild the index after importing or editing the synonyms.
Building the Word Search indexThe Word Search index is a list of the words that can be searched when using Word Search in iBase. Itcontains the words extracted from specific (text type) fields for selected entity and link types andtheir fields.
Before you begin
About this task
Note: Words need not necessarily contain only letter characters; they can contain, or consist entirelyof, numbers for example.
Note: Punctuation characters are not included in indexed words. This is because these characters areused to determine where words start and end. For example, the space in 'first word' or theunderscore in ' first_word' means that the index would contain the words 'first' and 'word'.
Configuration consists of:
• Selecting the fields that can be indexed.• Excluding specific words from the index, such as words that appear in almost all records.• Set a limit on the length of the words that you can search for, to create a smaller index that returns
search results more quickly.• Deciding whether to index words that contain only numerical characters.
After you build the index, you can inspect it using the Index Browser page of the Word SearchAdministration dialog. Users can also see a read-only version of the index enabling them to see whichfields are indexed: from the Analysis menu in iBase, select Word Search.
Procedure
To select the fields for the Word Search index:1. Select Tools > Search Word Search Indexing.2. Click the Fields tab.3. Click Delete to delete any current index.
You must delete the current index because you are changing the configuration of the index.4. Select the entity type, link type, or field you want to index. If you include an entity or link type it
initially includes all its fields, you can then turn off the fields that you want to exclude.
Note: You can display a list of the fields included or excluded from the index by clicking Includedor Excluded.
5. Optional: You can import a list of words to exclude from Word Searches:a) Click the Excluded Words tab to display the Excluded Words page.b) Click Import to import the excluded word list. See Setting Up Excluded Words for Word Search
Index if you have not yet prepared your list of excluded words.If you do not want to set a limit on the length of the words that can be searched for, or excludewords that contain just numbers, you are ready to build the index.
108 IBM i2 iBase: Administration

6. Optional: Click the Advanced tab to display the Advanced page where you can set other optionsthat affect the size and usefulness of the index.Option Description
Number ofcharactersto index
This setting is the maximum length of entries in the index.
The default setting of 10 is usually satisfactory. Longer words are trimmed to thislength when placed in the index. For example, if the first 8 characters are indexedand the word shoplifting is indexed, this list shows only the first 8 characters,shoplift. A user can search for and find this word with either of the termsshoplifting or shoplifter.
If you set a limit of less than 10, a smaller index is created and search results arereturned more quickly. However, the search results may contain unexpectedresults. For example, it finds words that are different but, which have the samefirst few characters. You can check for false results by inspecting the foundrecords.
ExcludeNumerics
Turn on this option to exclude from the index any words that are entirely numeric.By default, entirely numeric entries are excluded. Turn off the option if you preferto include these entries.
For example, the text 320 in the BMW 320 is not indexed if numerics areexcluded. The text 320i in the entry BMW 320i is indexed because 320i is not acompletely numeric value.
A more complex example concerns the hyphen or minus character ( - ), where thecharacter’s position affects the interpretation. Numerals surrounding a hyphencharacter are considered non-numeric. For example, a banking reference for anaccount in the format 0012-3963 is treated as a single non-numeric word, nottwo numerics. Conversely, a number that is written with a leading minuscharacter, in the style -3, is treated as a numeric (as is the positive equivalent,+3).
7. When you are ready to build the index, click Full Build.
You can monitor the progress of the build through the progress bars that are displayed:
• The upper bar shows progress through each table, corresponding to each selected entity or linktype.
• The lower bar shows the total word count for the index.
Note: You can click Stop to abandon the build if it is proceeding slowly but this leaves anincomplete index. If you click Stop, delete the index to prevent anyone from using the incompleteindex.
What to do next
An iBase SQL Server installation is effective in both creating and using Word Search. When creatingthe word search index it is a good idea to create it entity type by entity type, or link type by link type,and only index useful fields such as notes and text. However, you should be careful of the largevolumes of data that are handled. Word search queries are expensive in CPU and memory resources.If they are to be used extensively, it is advisable to increase the amount of physical memory and CPUresources on the server.
Maintaining Word Search indexesBefore users can use Word Search, you must build a search index. The build process generates anindex of words in the entity type and link type fields of the database that is chosen for indexing and
IBM i2 iBase administration center 109

the records in which the words occur. The date and time of the last build is shown in the title bar ofthe Word Search Indexing dialog. To keep this index up-to-date, you can either do a full rebuild or anincremental build.
Updating existing indexes
A full build scans all records (for the selected entity and link types) and generates a new index. To doa full build:
• From the Tools > Search menu in iBase Designer, select Word Search Indexing and click FullBuild.
An incremental build scans only the records that have changed since the last full build wascompleted, and modifies an existing index. This needs to be done regularly to include or exclude datafrom new and updated records. To do an incremental build:
• From the Tools > Search menu in iBase Designer, select Word Search Indexing and clickIncremental.
Any change to the build conditions, for example the indexing of an additional field, means that youmust delete the index first, and then perform a full build. Adding, editing or deleting synonyms doesnot affect the index.
Backing up Word Search indexes
The location of the index varies for different types of databases:
• In SQL Server databases, the Word Search index is stored in the main database. Backing up thedatabase is sufficient to back up the index.
• In Access databases, the Word Search index is stored in a separate database, created in the samefolder as the database file. If the database is called dbname.idb, the index file is calleddbname.idx. Add the dbname.idx file to your backup lists.
Note: The .idx file is a password-protected database file, which you can open in Microsoft Access ifyou want. The password is the database password, which system administrators can see in theAdvanced page of the Options dialog.
Reviewing the index
The index browser displays words in the index, allowing you to choose words for display by theirfrequency in the index or by their initial characters. You can also exclude some of these displayedwords from the index. For example, you can exclude words that appear in almost all records.
To display the index browser:
• From the Tools > Search menu in iBase Designer, select Word Search Administration and thenclick the Index Browser tab.
Setting Up Full-Text SearchFull-Text Search requires an SQL Server database that must be provided by a server running MicrosoftSQL Server with the Microsoft Search service.
Note: Search 360 is the replacement for Full-Text Search if you are using SQL Server.
110 IBM i2 iBase: Administration

Features of Full-Text Search
Features Description
Index Administrators can specify automatic updates ofthe Full-Text Search index.
Exclude indexed
fields
Users can exclude specific indexed fields fromthe search and save this as a selection set for re-use in another session.
Exclude words Administrators can exclude words from theindex.
Field types Supports:
• Hyperlink• Multi-Line Text and Multi-Line Text (Append
Only)• Security Classification Code• Selected from Code List and Suggested from
Code List• Text• Content of files embedded in Document fields
(such as Word, Excel, PowerPoint, text files, orHTML)
Note: The content of PDF files can also besearched if the Adobe PDF iFilter is installed. SeePDFs, Office 2007, and Full-Text Search.
Note: However, you cannot search the content ofDocument fields that exceed size limits for theoriginal document or extracted text. You cansearch up to the maximum size of a searcheddocument, which is 16 MB. The extracted textmust be less than 256KB.
Phrases Users can search for phrases in addition to singlewords.
Wildcards Users can use only the wildcard * (or itsequivalent %), which finds any number ofcharacters including zero. Users can use thesewildcards only at the ends of words or phrases,and not with fuzzy search.
Synonyms Users can search by synonym, either synonymsspecified by the user or synonyms of names(where searching for "Robert" would also find,for example, "Bob", "Bobby", "Roberto", and"Robbie").
Inflections of words Users can search for variations in thegrammatical form of a single word (inflections),such as drive, driving, drove, driven.
IBM i2 iBase administration center 111

Features Description
Fuzzy search Users can perform a keyword search using fuzzysearch (inexact words).
Soundex Users can extend a search to include words thatsound the same as a specified word. Forexample, specify check and find cheque.
Spaces between words Treats spaces as word breaks. Punctuation andnon-alphabetic characters are not word breaks.
Setting up Full-Text Search
To provide Full-Text Searching within an SQL Server database, you must:
• Set up the SQL Server machine (you might need the assistance of an SQL Server databaseadministrator for this step).
• Review the excluded words supplied with iBase and decide whether these are suitable. You excludewords that do not provide useful information during a search, such as his, into, around. If this list isnot suitable, you might need the assistance of an SQL Server administrator because setting up yourown list of excluded words requires changes on the server that affects all applications that use theMicrosoft Search Service.
• Define the scope of the index that is used for a search by selecting the entity types, link types, andfields to index.
• Build the actual index (which is based on the existing records in the database).• Decide whether to increase the flexibility of searches by importing a file of synonyms or by setting
up your own. For example, a search for the word handgun might also find records with the wordsrevolver and firearm if these words were defined as part of the same synonym group. With theexception of the name synonyms (that are imported automatically when you build the first Full-TextSearch index) the synonyms are identical to the ones used in Word Search.
• Decide how to keep the index up-to-date with new data added to the database.• Optionally, install the Adobe PDF iFilter if your users need to search the text of PDF documents held
in Document fields. See Installing iFilters.
Note: On large databases, it might be necessary to stop the Microsoft Search Service while work isdone in iBase Designer that alters the database schema. See Changing the schema of an indexeddatabase for details.
Setting Up the server for Full-Text SearchFull-Text Search works in collaboration with the Microsoft Search service to provide the ability tosearch, catalog, and index the database. This service maintains catalogs and indexes outside SQLServer, on the server computer’s file system. The SQL Server database for iBase and search indexesmust be on the same server.
Note: Search 360 is the replacement for Full-Text Search.
There are some required actions for initial set up of a system using Full-Text Search:
• You must ensure that the server computer has sufficient resources to run SQL Server and theMicrosoft Search service. This is largely a case of providing enough disk space and memory (RAM).
• There is no need to configure the Microsoft Search Service. For background information on thisservice, see the Administration Center document Managing Access Control.
112 IBM i2 iBase: Administration

• If you want to index the content of Microsoft Office 2007/2011 or PDF documents, you must installthe appropriate iFilters. To install an iFilter for PDF documents, install Adobe Reader 9.4 (or later).This also installs the iFilter. See Installing additional iFilters for information on installing theMicrosoft filter pack and rebuilding the index.
• iBase queries the msdb database to determine any schedules for Full-Text builds or update jobs forthe database. For this reason the SQL Server login that is used by iBase to connect to the SQL Serverdatabase must have execute permission on the following stored procedures in the msdb systemdatabase:
sp_add_jobsp_add_jobschedulesp_add_jobserversp_add_jobstepsp_delete_jobsp_help_jobschedulesp_update_jobschedule
SQL Server administrators can grant this permission by editing the properties of the Public databaserole defined in the msdb database.
As part of the routine maintenance of a system using Full-Text Search, you need to:
• Set up a backup routine for the files holding the search catalogs and indexes.• If you move a full-text indexed database to another server, you must also have the Microsoft Search
service on that server if you want to continue using Full-Text Search and you must to recreate theindex on the new server. The database and search indexes must be on the same server.
Note: If the server provides functions other than database access, those functions (such as MicrosoftIIS Web server) can also provide full-text searching and use the same Microsoft Search service, butuse separate catalogs and indexes to the ones used by iBase.
Note: You might experience a 45-second delay when you run a Full-Text Query in an instance of SQLServer that is running on a server without Internet access.
Setting Up excluded words for Full-Text SearchIn Full-Text Search, the indexes are built and words excluded by the Microsoft Search Service.However, you can set up iBase to display the words excluded by the Microsoft Search Service.
Note: Search 360 is the replacement for Full-Text Search.
You might want to exclude words because:
• The words occur in all, or nearly all, records and contribute little to the searchability of thedatabase, while adding greatly to the size of the search index.
• The words relate to administrative or other uses that you do not want to be visible to all users oftext search.
You might also want to restore to the index some common words that SQL Server excludes by default,as being common words in the relevant language, but which have some special meaning in thedatabases.
Excluding words is a two-part process that requires essential administrative work outside iBaseDesigner.
IBM i2 iBase administration center 113

About excluded words in iBase and SQL Server
In Full-Text Search, excluded words are managed on the computer running SQL Server using textfiles, called noise word files. Client applications running on other computers cannot modify thesefiles, so managing excluded words requires set up by you in iBase Designer and by the administratorof the computer running SQL Server.
There are two ways to work:
• Take the noise word file defining the exclusions by the Microsoft Search service and SQL Server onthe server, and import the words into Full-Text Search in iBase Designer. This is always a good firststep, because it brings all systems into a consistent state, and the exclusions might be sufficient foryour application. It is also the simpler of the two ways.
• Define exclusions in iBase Designer, export the list to a text file, and pass the file to theadministrator of the computer running SQL Server. If possible, start with the same list as used onthe server because, after minor reformatting in a text editor, the administrator will be able tosubstitute your file in place of the one used previously on the server.
Location of the default excluded word list
iBase is supplied with an example file, FTSexclude.txt, which is the content of the default noiseword file for SQL Server but reformatted to match the import format used by iBase Designer. If thedefault location is accepted when installing iBase then FTSexclude.txt is in the Configurationfolder in the application data area of your installation; for full details, see Installation and ApplicationData Folders.
Inspect this file to check that it uses the correct language for your system. (In English, the US andBritish files are identical in current versions.) You can import this file into your database beforebuilding the Full-Text Search index. See Importing an excluded word list for details.
Format of excluded word lists
Any excluded word list must be an unformatted text file containing one word per line with no blanklines or spaces. A word must not exceed 20 characters.
Note: If necessary, the word list can contain double quotation marks ( " ) to separate words, however,if the quotation marks appear they must do so in pairs, one each at the start and end of a line. iBaseDesigner imports the word between the marks, ignoring the paired double quotation marks.
The words can be in any order or case (uppercase, lowercase or any mixture of the two), and may beduplicated within the file. iBase Designer sorts the list when importing, removes duplicates, andleaves the case unchanged.
If you see the message ERRORS IN FILE after importing, the import completed but there weresome errors in the data. The most likely causes of the errors are:
• a space character anywhere in the file, possibly before or after one of the words• a completely blank line• a mismatched or badly placed double quotation mark
You can edit the excluded words after importing them into your database. In the Full-Text IndexMaintenance dialog, click the Excluded Words tab to display the Excluded Words page, enter a wordin the upper field of the dialog and click Exclude Word. iBase Designer transfers that word to the listin the lower list field, where it appears in alphabetic order.
114 IBM i2 iBase: Administration

Identifying the correct noise word file on the server
If you must copy or replace a noise word file on the database server, it is important to identify thecorrect file.
There can be several noise word files, so identification is not always trivial. Each noise word file isspecific to a particular language and applies to all databases hosted on that server. For example, thefile for English is noise.eng or noise.enu (for the British or US variant).
Be especially careful if you have other functions using Microsoft Search. For example, you might findthat a Web server uses the same service but has its own set of configuration data, including similarnoise word files.
The location of noise word files is subject to choices made during the installation of SQL Server.
Building the Full-Text Search indexThe Full-Text Search Index is a list of the words that can be searched when using Full-Text Search iniBase. It contains the words extracted from specific (text type) fields for selected entity and link typesand their fields, and is available for SQL Server databases only.
Before you begin
Note: Search 360 is the replacement for Full-Text Search.
Before you can build an index for the first time, you need to set up the server. See Setting Up theServer for Full-Text Search for further details.
After you have built the index, any permitted user can then start iBase and use the index by selectingFull-Text Search from the Analysis menu. Users can see a read-only version of the index,enabling them to see which fields can be searched on.
Procedure
To create a new Full-Text Search index:1. In iBase Designer, select Tools > Search Full-Text Search Indexing.
The Fields page lists the entity and link type fields that you can index. The list of entity types andlink types might be shorter than you expect because the dialog lists only the types with fields thatFull-Text Search can index.
2. In the Fields page, select the items that you want to include in the index.
Do not turn on the check boxes of fields that add little to the value of the index, or add too much tothe size of the index. For example, you might want to exclude fields that hold geocoding data orfields that hold a unique identifier for the record that holds it, such as social security number,driving license number.
Note: If the check box for an entity type or link type is turned on, it does not necessarily mean thatall eligible fields of that type are selected for indexing. To be sure that all fields are selected, turnoff an entity type or link type check box and then turn it back on.
You can display a list of the fields included or excluded from the index by clicking Included orExcluded.
If you do not want to import an excluded word list, you are ready to build the index.3. Optional: To import a list of excluded words for reference purposes:
a) In the Full-Text Index Maintenance dialog, click the Excluded Words tab to display theExcluded Words page.
b) Click Import to import a text file of the words that you have chosen to exclude from theMicrosoft Search Service.
IBM i2 iBase administration center 115

c) In the Import dialog, enter a file name or browse for the excluded word file.d) Inspect the preview to check that the file contains the words you want to exclude. If the
message ERRORS IN FILE appears, there are some formatting errors.e) If you want to keep the existing list, turn on Merge with existing data.f) After you have identified a suitable file, click Import to read the list from this file.
4. Click Apply.
What to do next
This instructs the Microsoft Search Service to start building the index for your selection of fields, witha default option for updating the index as the database changes. These options are described inMaintaining Full-Text Search Indexes.
If this is the first time that you have built a Full-Text Search index in this database, the name variantsare imported into the database. This is done once only and is used by Full-Text Search only. SeeImporting Name Variants for details.
Note: You will not be able to build the Full-Text Search index if performance tuning was stoppedhalfway through. To complete the performance tuning, rerun the Performance Tuning wizard. SeePerformance Tuning in iBase Designer for details.
Maintaining Full-Text Search indexesIn routine use, the Microsoft Search service updates the index without you needing to requestupdates. However, you can use various settings to balance the need for an up-to-date index with theability of the server to respond to the amount of data entry and analysis being done.
Note: Search 360 is the replacement for Full-Text Search.
For example, you can choose to suspend index updates while performing a large bulk import, batchimport or batch edit.
You can control how iBase Designer updates the Full-Text Search index by using the options on theIndex Maintenance page of the Full-Text Maintenance dialog.
The schedule might depend on several factors:
• The size of the database• The amount of change in the database• The timing of the changes, particularly whether changes are typically made by near-continuous data
entry or made by less frequent but larger batch operations• The available memory, disk, and processor resource• The load on the server presented by users performing interactive or batch tasks such as data entry,
analysis, and data maintenance
Your aim should be to keep the search index as up-to-date as possible without noticeably slowingdown the server’s performance in other areas.
Given these factors, the best way to update an index might vary over time as the size and uses of thedatabase change.
For example:
• If data is added interactively every day of the week and by a batch import at 18:00, you mightchoose a schedule for regular incremental updates of the index of Every 1 week(s), at 00:00, onSun, Mon, Tue, Wed, Thu, Fri, Sat.
116 IBM i2 iBase: Administration

• If you use a database for read-only analysis of historical data that is added by batch import onlyonce a week, you might reasonably update the index on the day of updates soon after thecompletion of the import.
You must monitor the effects of your choice after the database is operational. Where possible, trymore than one approach, for example so that you know the time taken and the server loading, bothfor a typical incremental update and for a full rebuild.
Change tracking incrementally updates the existing index in response to changes in the data. Theupdates can be done continuously or according to a schedule.
Update method Description
Continuous updates Use change tracking and continuous incrementalupdates when there is enough processor andmemory resources on the server, when it isimportant that the index is kept up-to-date, andrecords are added or changed at slow ormoderate rates (slow enough for the indexing tokeep up with changes).
Scheduled updates Use change tracking with scheduled incrementalupdates when processor and memory are onlyavailable at scheduled times, when there isenough disk space for storing changes, andchanges made between the scheduled times aresmall enough for the incremental updates to takeless time than full rebuilds. This is typical of adatabase with large numbers of interactiveusers.
Checking the status of the index
Full-Text Search reports any activity performed on the index, for example, whether the service isperforming a full or incremental re-build, or the index is completely up-to-date.
To see the current state of the index:
1. In the Full-Text Index Maintenance dialog, click the Index Maintenance tab to display the IndexMaintenance page.
2. Click Index Status to display the current status.
The message does not update automatically.3. Click OK to close the message dialog, and click OK again if you want to see an up-to-date status.
Removing a Full-Text Search index
To remove the Full-Text Search index for a database:
1. In the Full-Text Index Maintenance dialog, click the Fields tab to display the Fields page.2. Clear any check boxes that are selected.3. Click Apply and then Yes to delete the index.
Changing the schema of an indexed database
On large databases, the time taken for the Microsoft Search Service to index the database can bequite substantial and this can affect the performance of operations in iBase Designer that alter the
IBM i2 iBase administration center 117

database schema. For example, it might not be possible to add a standard field to the schema untilthe Search Service has finished indexing the database.
For this reason, you might want to ask your SQL Server administrator to stop the Search Service untilwork on the database schema is completed.
Attention: You cannot change the length of a field that is indexed. Before you can change thelength, you will need to remove the field from the index, make your change and then add thefield to the index again.
Updating the Full-Text Search index continuously
Procedure
To update the index continuously:1. In the Full-Text Index Maintenance dialog, click the Index Maintenance tab to display the Index
Maintenance page.2. Turn on Track Database Changes.3. Turn on Incremental Updates.4. Select the Continuous automatic update of the index option.5. Click Apply.
Updating the index according to a schedule
About this task
Option Description
Track Database Changes Change tracking incrementally updates theexisting index in response to changes in the data.
Update Index Click to start an immediate update of the index.
Note: This can be disabled if you have madechanges to the setup of the index but not savedyour changes. To continue, click Apply—it cantake a noticeable time for iBase Designer to savethe changes.
Incremental Updates Enables automatic incremental updates, eithercontinuous or scheduled.
118 IBM i2 iBase: Administration

Option Description
Continuous automatic update of the index Select this option if you expect the database tochange, and if it is used frequently for analysis.This option keeps the index as up-to-date aspossible.
Note: There is some continuous processing loadon the server when you choose this option andyou might want to suspend automatic updateswhen carrying out large batch imports or similaroperations that change a lot of data. After theoperation, perform a manual update using one ofthese methods:
1. • For moderate amounts of change, clickUpdate Index; this method always worksbut may not be the fastest.
• For changes to a large percentage ofrecords, it is quicker to turn off the TrackDatabase Changes check box then clickRe-build in the Full Index Build area; afterthe re-build, turn on the Track DatabaseChanges check box to resume automaticupdates.
Scheduled automatic update of the index Select this option to make updates at regulartimes on particular days, based on changes tothe data since the last update. You must alsoclick Change to choose an appropriate schedule.
Procedure
To update the index according to a schedule:1. In the Full-Text Index Maintenance dialog, click the Index Maintenance tab to display the Index
Maintenance page.2. Turn on Track Database Changes.3. Turn on Incremental Updates.4. Select the Scheduled automatic update of the index option.5. Click Change to define the update schedule.
Rebuilding the Full-Text indexYou need to rebuild the whole index whenever a large percentage of records change or are added atparticular times, especially if the change is concentrated at one time each day or week. This is typicalof a database in which most records are added by import. If imports take place in small batches overlong periods of time, consider using change tracking with scheduled or continuous incrementalupdates.
Procedure
To fully rebuild the index1. In the Full-Text Index Maintenance dialog, click the Index Maintenance tab to display the Index
Maintenance page.
IBM i2 iBase administration center 119

2. To rebuild the whole index immediately:a) Turn on Track Database Changes.b) Click Rebuild.
3. To rebuild the whole index according to a schedule:a) Turn on Schedule Full Rebuilds of the index.b) Click Change to set up the schedule. This button can be unavailable if you have made changes
to the setup of the index but not saved your changes. To continue, click Apply—it may take anoticeable time for iBase Designer to save the changes.
Name variantsThe first time that you build a Full-Text Search index in a database, the name variants areautomatically imported into the database. The imported name variants do not change unless yourequest it, and do not add significantly to the size of the database.
Note: Search 360 is the replacement for Full-Text Search.
Name variants are used in Full-Text Search when users search for people in the database. Forexample, a person with a first name of Bob in a database. Searching for "Robert" would also find"Bob", "Bobby", "Roberto", and "Robbie" as all these names are defined as variants of each other.
The name variants are part of semantics and are installed with the IBM i2 Semantic Type Library.
Updating the name variants
Occasionally, a newer version of the Name Variant file becomes available. If the Full-Text IndexMaintenance service detects a newer version of the file, it will prompt you to re-import the namevariants.
To re-import the name variants, in iBase Designer, select Tools > Search > Update Person NameVariants.
Note: You might also need to re-import the name variants if you suspect that the name variants forthe database have become corrupted.
Setting up the Index ServiceThe Index Service Configuration tool is a command-line application that indexes one or more IBM®
i2®iBase databases. You use this tool to enable the iBase databases for Search 360.
For each database, you can set up an index service and a job schedule. Each time the job runs, itstarts the index service, which will obtain the location of the iBase database to index from the indexdatabase (IBaseIndexDB). No sensitive information is stored in this database as the index service willconnect to the SQL Server database using Windows authentication.
To use Index Service Configuration tool, you will require:
• An SQL Server installation on the machine on which you want to create the iBase index database.The tool can only connect to an instance on the local machine. The iBase databases to be indexedcan either be on the local machine or elsewhere on the network.
• An SQL Server login with suitable permissions to allow databases and jobs to be created• For each index service, a suitable Windows account or a proxy account
120 IBM i2 iBase: Administration

The Index Service configuration installationInstalling the Indexer, installs the following in the iBase installation folder: a command-lineapplication, i2.iBase.SearchIndexerExe.exe and a configuration tool,i2.iBase.SearchIndexerConfig.exe.
Running the Search Index Configuration tool for the first time on the local machine will create adatabase, called IBaseIndexDB, and creates a file Searching Config.xml in the All Users applicationdata folder on the local machine, specifically: C:\Documents and Settings\All Users\Application Data\i2\i2 iBase <n>\<language>\Searching
If necessary, the database name is appended with a number in order to make this name unique.
Note: The database and configuration file should be included in your backup schedule. Losing eitherof these files will require you to reconfigure your iBase databases for indexing.
SQL Server logins and Windows accountsThe SQL Server login, or Windows account, you use to run the Index Service Configuration toolrequires the following permissions:
When launching the index service configurationtool for the first time to create the IBaseIndexDBdatabase:
dbcreator server role
To create the IBaseIndexDB database table: db_owner database role on the IBaseIndexDBdatabase
To detect the IBaseIndexDB database table: db_datareader on the IBaseIndexDB database
To add new records into the table: db_datawriter on the IBaseIndexDB database
To schedule an index service job: db_datareader on the actual iBase database
SELECT, INSERT, UPDATE on_Configuration_Text on the actual iBasedatabase
SELECT, INSERT, UPDATE on _Configuration_Defon the actual iBase database
To create a job: db_datawriter on the IBaseIndexDB database
SELECT on sysjobs within the msdb database
EXECUTE on sp_add_job within the msdbdatabase
EXECUTE on sp_add_jobstep within the msdbdatabase
EXECUTE on sp_add_jobschedule within themsdb database
EXECUTE on sp_add_jobserver within the msdbdatabase
IBM i2 iBase administration center 121

To delete a schedule: EXECUTE on sp_help_job within the msdbdatabase
EXECUTE on sp_help_jobstep within the msdbdatabase
EXECUTE on sp_help_jobschedule within themsdb database
EXECUTE on sp_help_jobserver within the msdbdatabase
EXECUTE on sp_delete_job within the msdbdatabase
Logging onYou can only connect to an SQL Server instance on the local machine and the iBase index databasewill be created in the data folder for this instance.
Procedure
1. Select the SQL Server instance if you are not connecting to the default instance.2. Log in to the SQL Server instance in the usual way.
Configuring an iBase databaseTo set up the Search index service for an iBase database:
Procedure
1. Click Add to display the Configure Database dialog.2. Enter the name of the server that hosts the iBase database.3. Enter the SQL Server name of the iBase database.4. In Run as, enter the Windows account to be used to run the index service.
Note: Your SQL Server administrator will be able to tell you which account to use.5. Select the frequency at which the index jobs will run and then set up the schedule.6. To start the index service on the date and time specified for the first job, turn on the Enabled
check box.
Note: Unlike most other SQL Server job properties, the enabled flag enables both the job and theschedule.
7. Click OK to create the index service. If the Enabled check box is turned on, a job(i2_Search_Indexing_<server>_<InstanceName>_<DatabaseName>) will run at the nextscheduled time and start the index service.
8. Advise the iBase database administrator of the date and time of the first scheduled job as this isnot visible in iBase Designer.
Important: Jobs will run if Search 360 is turned off in iBase Designer but will exit withoutperforming any indexing.
122 IBM i2 iBase: Administration

Checking that the service is configured successfullyWhen you complete the steps for creating or modifying an index, you should ensure that the index hasbeen configured successfully before it can be used.
Information that the index service has been configured successfully for a specific database isavailable in several places:
• In SQL Server Management Studio, SQL Server Agent will list an i2_Search_Indexing job for thedatabase (the Job Activity Monitor will report whether the last run was successful or whether therewas an error)
• In the Windows Event Viewer, a started event will be listed for the database• In iBase Designer, the last date and time that the index was updated will be displayed in the Search
360 Administration dialog• In iBase, the last date and time that the index was updated will be displayed in the Search 360
dialog.
If the service is not running:
• Check the Windows Event Viewer - the service logs when the service starts and stops• Try running the Index Service from the command line (type just the command namei2.iBase.SearchIndexerExe.exe in the root of the iBase install directory to display thearguments) for example:
C:\Program Files (x86)\i2 iBase 8> i2.iBase.SearchIndexerExe.exe SearchIndexerExe /iBaseDBName User_guide
.
Managing the index serviceUse the Index Service Configuration dialog to manage the index service:
Procedure
• To modify the schedule for the index service, click Configure. Do not use SQL Server to change theschedule.
• To stop or suspend the index service, click Configure and turn off the Enabled check box. Thisallows iBase users to continue to use Analysis Ready Search but without any updates for newinformation.
• To remove the index service, for example before moving the database or uninstalling the IndexService Configuration tool, click Delete. This deletes the job and prevents the index tool fromrunning.
Note: The database (IBaseIndexDB) and configuration file (Searching Config.xml) should beincluded in your backup schedule. Losing either of these files will require you to reconfigure youriBase databases for indexing.
IBM i2 iBase administration center 123

TroubleshootingIf you accidentally delete the iBase index database, you will not delete the jobs but they will not bevisible in the Search Index Configuration dialog. To resolve this, you need to either restore thedatabase from backup or reschedule the jobs (which will delete and then recreate the jobs).
AuditingYou can set up iBase to log each time that a user modifies or accesses a record and to log virtually alluser actions with or without user-supplied reasons for performing the actions.
Note: For information on how auditing works in a replicated database, see the Administration Centerdocument Setting Up iBase database replication.
What is recorded?
iBase starts auditing at the lowest possible level of detail when you create a database. You cannotstop this level of auditing but you can choose to start at a higher level, and to modify all auditingoptions for existing databases. See Controlling What is Audited for further details.
Attention: The option to record user accesses to records, without change of data, createslarge volumes of log data so it is available only with iBase SQL Server databases. Use thisoption only when strictly required. Your SQL Server administrator can configure the disks toimprove performance in this area; for details, see Server machines.
Independently of the audit level of the database (SQL Server format only), you can audit changes todata. The iBase field types that you can audit depend on the SQL Server version. See Audit History.
Where is it recorded?
There are separate audit logs for security files and databases.
Security file logs track the opening of databases, failed logon attempts, and a range of administrativeactions such as creating templates, and managing users and groups. They do not record logons andlogoffs.
Database logs track the opening and closing of databases, historical data (if logged), and all therequested actions within databases. Actions are recorded regardless of origin: users can requestdatabase actions from iBase Designer, iBase, Analyst’s Notebook, or third-party mappingapplications.
The physical form and location of logs is different for security files, Access databases, and SQL Serverdatabases. The audit viewer handles these differences and can produce archive files in a standardform.
Viewing audit logs
To use the Audit Viewer, a user needs to be a system administrator, a database administrator or anaudit administrator.
The Audit Viewer, if installed, is available from the Windows start menu, under, for example, IBM i2iBase 8 Tools iBase Audit Viewer. It allows you to view and manage audit logs for databases andsecurity files. You can open multiple windows to inspect logs for several databases provided thatthose databases are managed through the same security file.
Audit Viewer does not display all the entries in the audit log:
• Some users generate restricted audit log entries and you need the Audit Administrator role to viewthese
124 IBM i2 iBase: Administration

• Some audit log entries are hidden if SC codes are used — you can only view the entries for recordsrelating to your security classification
The level of detail in the audit log is determined by the audit level set for the database.
Audit log databases
If you are using iBase and an Access database, the database log is held in the .idl file stored in thesame folder as the database file.
In an SQL Server installation of iBase, an audit log database is created alongside the main SQL Serverdatabase. The name of the database is the same as the main database name with the suffix _log. Forinstance, the database User_Guide has an audit log database User_Guide_log.
Your SQL Server administrator must ensure that iBase users can access this audit log database. If auser has no access to the audit log database, iBase attempts to create a new one and fail with amessage that says it could not do so successfully. For further information, see the AdministrationCenter document Managing Access Control.
Note: For information on backing up audit log databases, see Backing Up iBase Databases.
Controlling what is auditediBase starts auditing at the lowest possible level of detail when you create a database. You cannotstop this level of auditing but you can choose to start at a higher level, and to modify all auditingoptions for existing databases. The audit level applies to all users equally, and only to the database inwhich you specify it.
Each of the available auditing options and the circumstances when you might want to use them aredescribed in the following information.
Note: Independently of setting the audit level, you can configure the database to log commands thatare run by users, case control, and audit history. For more information, see System CommandsAccess Control Groups, Working with cases and Audit History.
Audit levels 1 - 5
Level 1 records the least detail and level 5 records the most detail. The level of auditing is cumulative,each level records the information for all lower numbered levels. For example, level 3 records queriesand all information specified by levels 1 and 2.
Level Description
1 Logs each time that a user logs in, a database isopened or closed, or when an email alert is sent.
Note: If the database is configured to audit theuse of commands, or to request a reason for useof a command, those commands and reasonsappear at this level. If your SQL Server databaseis set up for Audit History, extra logging occurs atall levels. Also, if an SQL Server database is case-controlled, the log always records when casesare added, modified, deleted, renamed, closed,or reopened.
2 Also logs when entity types, link types, and fieldsare added, changed, or deleted. In other words,this level logs a change of database design.
IBM i2 iBase administration center 125

3 Also logs each time a query is run on thedatabase. The query can be direct, for exampleby using Find, Browse, Query or Search 360; orindirect, for example by using a browse definitionbased on a query. Search criteria set when usingSearch 360 are audited at level 3 and upwards.
Note: The log does not include work on sets orhow the data was retrieved.
4 Also logs when entity and link records are added,changed, or deleted. In other words, this levellogs a change of database data content. The logincludes when records are soft-deleted, restoredor purged and when a conflict is detected orresolved.
Note: The log does not include individual recordsaffected by a Bulk Import, only the start and endof the import is recorded.
5 Also logs when entity and link records areaccessed or viewed, without change to the data.This logging produces large volumes of auditdata and for this reason, is available only for SQLServer databases.
Note: The log does not include individual recordsaffected by a Bulk Import, only the start and endof the import is recorded.
Attention: Because XML exports can be used to export large amounts of data (potentially allthe records in a database), XML exports are not audited.
More about audit level 5
Audit level 5 produces high volumes of audit data. For this reason, it is available only with iBase SQLServer databases. Use this option only when strictly required.
As a way of controlling the volume of audit data, you can set Number of records to be displayedbefore auto-pausing to a low number in the Advanced page of the Options window. When the auditlevel is 5, this option pauses the listing of records returned by a query or browse at the specifiednumber. This option allows the user to look at the records returned so far, and decide if it isworthwhile to continue with the remainder of the records, or if it is likely to return too many records.
The useful consequence for auditing is that the audit log records only the number of records that theuser actually views. For example, if the user cancels after a pause that shows 50 records, only thosefirst 50 records are shown in the audit log. If the user continues to list the other records, thoserecords are audited as normal.
Audit level 5 can be used with Reason for Action entries. See System Commands Access ControlGroups for details.
126 IBM i2 iBase: Administration

Audit history
In SQL Server databases only, changes to the data in iBase entity and link records, and code lists, canbe recorded if the Audit History check box is turned on in the Database Properties window. For auditlevels 1 - 4, changes to the data are recorded and additionally, at audit level 5 record accesses(views) are logged. A reason for an update can also be recorded as part of the audit log of a record.See Audit History for details.
Note: If you initialize a database for alerting, Audit History is automatically turned on and you cannotturn it off while alerting is in use. The audit history provides the details that enable users tounderstand the edits and views that raised the alerts. The same details are displayed regardless ofthe audit level of the database. A user who is denied access to the Audit History cannot use the AlertDetails window.
Audit log options
Depending on the type of database and your logging requirements, you can define how log data iswritten to the Audit Log database with the following options.
Action Description
Choose the initial level of auditing detail for anew database
In the iBase window, select Create NewDatabase and click OK. Use the Audit Leveloption on the Details page of the Create NewDatabase window.
Change the audit level for an existing database From the File menu in iBase Designer, selectDatabase Properties. Use the Audit Leveloption in the Database Properties window.
Audit the usage of selected commands From the Security menu in iBase Designer,select System Commands Access Control.
• Any action turned on in the Reason for Actionpage displays a window to the user asking for areason for running the command. After theuser supplies a reason, iBase adds the text tothe audit log (as Detail). iBase also stores thatreason for use in the session and supplies it asa default for all subsequent reasons within thesame session of work. At each prompt, theuser can edit the reason or accept it as stillvalid.
• Any action turned on in the Audit page recordsthe action without prompting for a reason orotherwise notifying the user.
Auditing that is configured in this window appliesto particular groups of users, at all audit levels,and to all databases accessed through the samesecurity file. For more information, see SystemCommands Access Control Groups.
IBM i2 iBase administration center 127
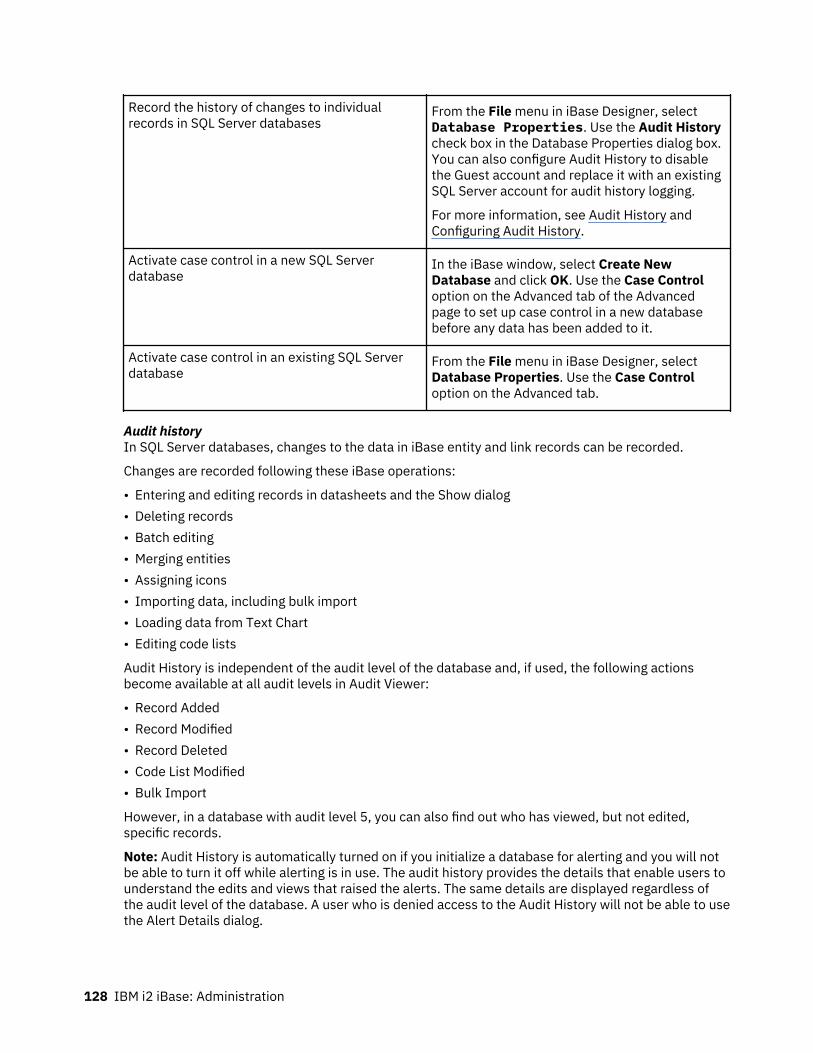
Record the history of changes to individualrecords in SQL Server databases
From the File menu in iBase Designer, selectDatabase Properties. Use the Audit Historycheck box in the Database Properties dialog box.You can also configure Audit History to disablethe Guest account and replace it with an existingSQL Server account for audit history logging.
For more information, see Audit History andConfiguring Audit History.
Activate case control in a new SQL Serverdatabase
In the iBase window, select Create NewDatabase and click OK. Use the Case Controloption on the Advanced tab of the Advancedpage to set up case control in a new databasebefore any data has been added to it.
Activate case control in an existing SQL Serverdatabase
From the File menu in iBase Designer, selectDatabase Properties. Use the Case Controloption on the Advanced tab.
Audit historyIn SQL Server databases, changes to the data in iBase entity and link records can be recorded.
Changes are recorded following these iBase operations:
• Entering and editing records in datasheets and the Show dialog• Deleting records• Batch editing• Merging entities• Assigning icons• Importing data, including bulk import• Loading data from Text Chart• Editing code lists
Audit History is independent of the audit level of the database and, if used, the following actionsbecome available at all audit levels in Audit Viewer:
• Record Added• Record Modified• Record Deleted• Code List Modified• Bulk Import
However, in a database with audit level 5, you can also find out who has viewed, but not edited,specific records.
Note: Audit History is automatically turned on if you initialize a database for alerting and you will notbe able to turn it off while alerting is in use. The audit history provides the details that enable users tounderstand the edits and views that raised the alerts. The same details are displayed regardless ofthe audit level of the database. A user who is denied access to the Audit History will not be able to usethe Alert Details dialog.
128 IBM i2 iBase: Administration

Restrictions on the field types that are audited
You can audit the following iBase field types:
• Changes to calculated field data are not audited (because values in calculated fields are not storedbut depend on values held in other fields).
• All other iBase field types are audited.• All data is converted to text apart from Document and Picture fields which are stored in their
original format.
You can view this historical data in Audit Viewer or in iBase itself when showing a record or link,unless permission to do so is denied (see the following information for details).
What is recorded
The following are recorded when a record is updated in iBase:
• Original value• iBase user who made a change• Date and time the change was made• Machine name of the editing user• OS user name (name of the Windows user)• Reason for the change• SCC – needed to ensure that the user only sees the data they should if SCC values are altered
during records history• Location of user – from iBase user location• Reason for the update (optional)• Whether the update was made using an IBM i2 product such as iBase or Text Chart• Data in the extra field (if this feature is used)
The following is recorded if an iBase record is updated directly in SQL Server:
• The name of the account used to connect to SQL Server
If a single record was changed, the audit log records a Record Modified action and the record ID isdisplayed in Audit Viewer. This is not possible for a bulk import when the audit log records a bulkImport action.
Note: Changes to code lists are also audited, that is old and new values, descriptions and parent picklists.
Setting up audit history
To enable and set up audit history, in the iBase Designer Database Properties, turn on Audit History.An Audit History action is added to the audit log to record when, and who, enabled this feature.
You can require users who modify records in iBase to enter the reason for the edit before they cansave their changes:
• In iBase Designer, select System Commands Access Control > Reason For Action and turn on oroff Data Auditing.
Note: You might need to run the Tools Update Command Groups command first.
By default all users will be able to view the audit history. To deny users access to this, edit theappropriate user group:
IBM i2 iBase administration center 129

• In iBase Designer in the System Commands Access Control dialog, display the Access Denied pageand turn on or off the View History check box.
You can also configure audit history to disable the Guest account and replace it with an existing SQLServer login for audit history logging. For further details, see Configuring Audit History.
Maintaining auditing stored procedures
When a user logs into a database with Audit History turned on, checks are made on the SQL Serverdatabase and, if any problem is detected with auditing, the user is denied access to the database. Tofix the problem, reopen the database in iBase Designer.
Configuring audit historyBy default Audit History enables the guest account in the iBase log database. However, you canconfigure Audit History to disable the guest account. You must then use an alternative SQL Serveruser for logging Audit History information to the log database.
Before you begin
Attention: These steps are not reversible. After the guest account is disabled, you cannotenable it again.
The SQL User that you use to replace the Guest account must be associated with a login that also hasa corresponding account in the iBase log database. It needs appropriate permissions in eachdatabase.
Note: To create an account to replace the guest account, create a login that is associated with a userin the iBase main database and the iBase log database.
The following database roles are needed:
• The iBase main database user must be a db_datareader.• The iBase log database user must a db_datawriter.
Procedure
To disable the guest account and use an alternative SQL Server user account:1. Display the Configure Audit History by clicking Database Properties > Configure.2. Connect to the SQL Server as a user with system administrative permissions. Select Use specific
SQL Server account.3. Select an Authentication type:
• Windows authentication. Your Windows user account must have the system administratorpermissions.
• SQL Server authentication. You must enter an SQL Server login, and password, that has systemadministrator permissions.
Note: You can use either method of connecting to the server, regardless of the security methodthat is used in the iBase connection file.
4. Click Connect.5. In Audit history logging account, select an SQL Server user to replace the guest account.6. In Authentication with iBase Log Database, enter a certificate password to be used by the SQL
Server to:
• Create the certificate.• Back up the certificate (the password is required to restore the certificate from the backup).
130 IBM i2 iBase: Administration

• Provide the security context for logging audit history.7. Click OK.
Restricted audit logs for sensitive dataYou can restrict access to the audit logs of users who work on sensitive data. This requires changes tothe user accounts of those who work on sensitive data and to the user accounts of those authorized toview restricted audit logs.
Before you begin
Users who do not have access to restricted audit logs can still view the audit history of any recordaccessible to them but they cannot see any of the changes made by users with restricted audit logs.Users who generate restricted audit logs cannot view the restricted audit logs of other users.
Note: You can also prevent users from viewing the history of entity and link records by denying accessto the History button. To do this, you turn on the View history check box in the System CommandsAccess Control dialog.
For each user who works on sensitive data:
1. In iBase Designer in the Security Manager, edit the account of the user whose audit log you wantto restrict.
2. On the Account page of the User dialog, turn on Restricted Audit Log.
This will prevent unauthorized users from filtering the records displayed in Audit Viewer or the iBaseAudit History dialog to view just the records touched by that user.
Note: By default, system administrators do not have permission to view restricted audit logs. Theymust be granted this permission like other types of user.
Procedure
To grant permission to view restricted audit logs, you need to create a new Database Managementgroup that includes the Audit Administrator role or edit an existing group. For example:1. In iBase Designer in the Security Manager, edit the group to which you want to add the Audit
Administrator role.2. On the Permissions page of the Group dialog, turn on Audit Administrator.3. On the Users page of the Group dialog, review the list of users in this group as the existing
members of the group will acquire the new permission.For more information, see Creating Groups and Adding Members.
What to do nextA user who has the Audit Administrator role can use the Audit Viewer or iBase Audit History, and theycan view the records touched by any iBase user.
Auditing records from external databasesIn a database with an audit level of 4 or 5, the audit log can record data from a named field wheneverit logs an audited action specific to an entity or link record. The value is displayed in the Extra Detailcolumn of the audit log.
Before you begin
A field needs to be specified provides the extra detail:
• In the Create New Database or Database Properties, enter the field name in Extra Detail forAudit Log.
IBM i2 iBase administration center 131

The Extra Detail for Audit Log has a specific application that requires some detailed work whendesigning and creating databases.
The specific application is to import data from an external database and maintain a way of associatingrecords in the external database with records in the iBase database. The imported records must havea unique reference from the external database.
Procedure
1. In iBase Designer, create a field or standard field to hold a unique reference from the externaldatabase. You need to add this to all entity and link types that might be linked to external records.This field must have the same name in all those entity and link types. Using a standard field is aconvenient way to ensure this consistency.
Note: The standard field is also present in entity and link types that are not imported, but you canset the default value so that in these non-imported types the field is blank or has a non-conflictingvalue.
2. In the Advanced page of the Database Properties dialog:a) Set the Extra Detail for Audit Log field to the name of the iBase field holding the unique
reference.b) Select either audit level 4 or 5 so that the audit log records actions on specific records. This
means potentially large audit logs.3. When you import data from an external source, import the unique identifier used in the external
database or system into the field that you have created to hold a unique reference.
ResultsAfter you have done all this, the audit log will record the value of the named field for all actionsaffecting imported records, in the Extra Detail column. The audit log will also record the iBase uniqueidentifier, in the Record ID column.
Archiving audit logsThere are different methods of archiving iBase audit logs.
Using Audit Viewer
For iBase databases in Microsoft Access format, you can archive audit logs using Audit Viewer andthen reopen the archive also in Audit Viewer.
For iBase databases in SQL Server format, you can archive audit logs to a new SQL Server databasethat Audit Viewer creates for you. The new database is on a linked SQL Server machine that your SQLServer administrator must set up for you. However, archived data cannot be accessed using AuditViewer; you need to use SQL Server itself.
Archiving logs using third-party tools
If you want to archive logs using tools external to iBase and Audit Viewer, you need to know wherethe logs are stored. There are different locations for different types of databases and logs.
For Access databases, the database log is held in the _AuditLog table of the .idl file stored in thesame folder.
For SQL Server databases, the database audit log is created as a separate SQL Server database with aname constructed from the database name with the added text _log, for example dbname_log. Thisdatabase can get very large so if you do not want to use Audit Viewer to extract sections as archives,you will need to archive the whole log using a Microsoft SQL Server backup tool and then delete the
132 IBM i2 iBase: Administration

contents of the _AuditLog table. A new audit log database is created the next time that a userperforms an auditable action.
Opening an archive using MS Access
For iBase databases in Microsoft Access format, the audit log is held as an archive file, .idla file.This is a password-protected database file, which you can open in Microsoft Access if you wish.
The password for Access databases is the database password, which you can see in the Optionsdialog, on the Advanced page. To view this, you must open the database in iBase Designer as a userwith system administrator rights.
The database password is the same for all databases accessed through one security file.
Auditing optionsThe different options available in iBase to control what is viewed and who can view it.
For example, to be able view restricted audit logs (history) in iBase, a user requires the followingpermissions:
• View History, set in the System Commands Access Control dialog• Audit Administrator role, set in the User dialog
Required permissions
Allow Option View History Audit Admin role Database Admin role
View history in iBase
Note: Details of thechanges to the recorddata are only availablein databases with theAudit History propertyturned on.
— —
View restricted historyin iBase
Note: Only restrictswhat is viewed in theAudit History and AuditViewer dialogs. Userswill not know whoworked on the recordand when but they maybe able to work outwhat some of thechanges were.
—
View Audit Viewer —
Either
Or
IBM i2 iBase administration center 133

Required permissions
Allow Option View History Audit Admin role Database Admin role
View history in AuditViewer
Note: Applies to theRecord Modified andCode List Modifiedactions, at all auditlevels.
—
View restricted entriesin Audit Viewer
—
View restricted entries& history in AuditViewer
Note: The facility to restrict audit logs is set for individual users as part of their user account in theUser dialog.
Welcome to iBase Audit ViewerThis help describes how to use Audit Viewer for IBM® i2® iBase for a database that has already beenconfigured for auditing.
Note: For background information on setting up Audit Viewer, on the different audit levels, on thepermissions required by users to view audit logs, on audit history, and on how to set up the databaseto audit records from external databases, see the Administration Center.
The physical form and location of logs is different for security files, Microsoft Access databases, andSQL Server databases.
Types of audit log
Use Audit Viewer to view the audit logs for security files and databases:
• Security file logs record the opening of databases, failed logon attempts, and a range ofadministrative actions such as creating templates, and managing users and groups.
• Database logs record all the requested actions within databases, and the closing of databases.Actions are recorded regardless of origin: users can request database actions from IBM i2 iBaseDesigner, IBM i2 iBase, IBM i2 Analyst’s Notebook, or third party mapping applications. You caninspect logs for several databases provided that those databases are managed through the samesecurity file.
Monitoring database usage
Audit Viewer helps you monitor usage of iBase databases and commands. For example, you can find:
• Failed logons.• Microsoft Access to databases by unexpected users or at unusual times.• Use of commands that send data outside of iBase: to a printer, to a file, or to an external application
such as Analyst’s Notebook or a mapping application.
134 IBM i2 iBase: Administration

• History of changes to single iBase entity or link records and who made them (if you log historicalinformation).
About actions
Audit logs are potentially very large files, which the viewer displays as a grid of rows and columns,where each row represents an action on a database or security file and each column provides adifferent piece of information about an action. Much of Audit Viewer is designed to provide ways toidentify and arrange actions (the rows) that are interesting or related in some way.
You can:
• Print the displayed actions• Export the actions to a file for further analysis using a spreadsheet, database, or other visualization
tool• Archive them to a standalone database file
Logging on to the audit viewerWhen you log on to iBase Audit Viewer, you open a security file that defines the permissions for theuser account to which you are logged on.
When you are logged on to a security file, you can:
• Open the audit log for the database controlled by the current security file• View the security log• Open an archive file
Logging onTo log on to the audit viewer:
Procedure
1. From the File menu, select Logon or Logon As.Select Logon As if you usually log on using your Windows user name and password but on thisoccasion want to log on using an iBase user name and password.
2. In the Security File dialog, browse for the security file to open— the file name will end with .ids.3. Click Open. The Logon dialog may be displayed if you have an iBase user name and password. If
you use your Windows user name and password, then the dialog is only displayed if you are able tolog on as one of several iBase users.
4. If the Logon dialog is displayed:
• either, enter your iBase user name and password• or, select the iBase user from the list
Tip: to avoid this step in the future, turn on the Remember my selection check box5. Click OK to open the security file.
Logging on as a different Windows userDepending how Windows security is set up at your site, you may be prompted to select the user to logon as. To avoid repeating this step each time you log on, you may have turned on the Remember myselection check box in the Logon dialog.
Procedure
To cancel this selection:
IBM i2 iBase administration center 135

1. Start iBase, not Audit Viewer.2. Log on in the usual way (you do not need to open the database).3. Select Tools > Options.4. On the General page, turn off the Remember user for Windows single sign-on check box.5. Log off.6. Log on to Audit Viewer and you will then be prompted to select the iBase user log on as.
Starting the audit viewerWhen you have started Audit Viewer, select Logon to log on to a security file without opening a log orarchive. Once you are logged on, select one of the following commands from the File menu:
Menu option Description
Open Database Log File Displays the database log for viewing.
View Security Log Displays the security log for viewing.
Open Archive File Displays an archive of an audit log.
The viewer opens each log or archive in a separate window with a title bar matching the title of the logor archive. You can maximize the window within the application window.
On opening each log or archive, the viewer displays all of the logged actions that have beenperformed today, meaning the day of viewing the log. This may mean that there are no actions or thatthere are very many.
Note: There are slight differences in the contents of the window to suit database logs, security filelogs, and archives. The description below is for database logs.
About the columns in the Audit Viewer window
The grid displays the audit log data, one logged action on each row. For database logs, the columns inthe grid are:
Date The date and time of the action.
User The iBase logon name of the user performing theaction.
Action The actions, such as Database Opened or RecordAdded. Double-click on the action to display thedetail in a dialog. Actions are shown or hidden onthe Actions page.
Record ID The iBase record identifier, if the action referredto an individual record, or blank if the actionrefers to multiple records as the result of a bulkimport. If Audit History is turned on, double-clicking on the record ID will display the historyof that record.
Extra Detail Optionally, the contents of a field chosen by thedatabase designer if the action referred to aspecific record.
136 IBM i2 iBase: Administration

Location The location of the user performing the action, asspecified in the user's account or in the UserInformation dialog.
Note: The location for the user is recorded at thetime the log entry is made. The location maysubsequently have been edited, but the logreflects the correct location at the time theaction was performed.
Filtering by location will not identify the recordswhich a user owns (if you are using ownerhyperlink fields), only those records that theycreate or update.
Network Login The machine and user identifier of the userperforming the action, as identified by MicrosoftWindows. This uniquely identifies users who logon using single sign-on rather than an iBase useraccount.
Note: The network login is displayed in both theUser and Network Login columns for changesmade outside of iBase as the machine namecannot be determined for this type of change.
Detail Information, typically the item affected or settingchanged by the action. For example, it holds thename of the database and security files foractions that affect databases, the old and newaudit levels for changes of audit level, and therecord's label for actions that affect a specificrecord.
Finding log entries
You can change the rules used to display the log entries on the Selection Criteria and Actions pages.To apply your changes, click Refresh.
On the Selection Criteria page, for example:
• You can extend the date range if there is no data shown for today.• You can view subsets of log data based on various criteria, for example actions made at a time of
day specified by start and end times, on particular days of the week, or by a specific user.
On the Actions page:
• You can specify which actions are displayed—for example, you may only want to know when adatabase is opened.
• You can change the type of actions that are available for display by selecting an audit level from theDisplay actions for audit level list.
Using wildcards to find log entries
You can use wildcards to include or exclude specific log entries. For example:
• Entering [!user1] in Detail (contains) excludes log entries containing user1 in their Details field
IBM i2 iBase administration center 137

• Entering [user1] includes these log entries
Example of using the audit viewerYou may wish to discover if any user opens a database outside of normal working hours, here taken tomean between midnight and 09:00.
Procedure
1. Click the Selection Criteria tab to display the Selection Criteria page.2. Set the date and weekday ranges, time of day, and User ID:
a) In the Between these dates: box, select an appropriate start date. For example, to set a datetwo months before today, click to highlight the month part of the date and press the downarrow key on your keyboard. In the to: box, leave the end date at today’s date
b) In the Between these times: box, enter the time that you want logging to start. For example,the earliest time you can enter is midnight, which you must enter using the 24-hour system as00:00:00.
c) From the On these days: list, select the appropriate days of the week. For example, to look atall days, leave the setting at its initial value of <All Days>.
d) In the to: time picker to the right, enter the time that you want logging to stop. For example,normal working hours may start at 9 am, which you must enter using the 24-hour system as09:00:00.
e) You want to see all users who have opened databases outside of normal working hours so youcan leave the value in the User box as <Any User>, which is the default. You could usewildcards in this and other text boxes. See “Starting the audit viewer” on page 136 for details.
This set of rules will find all the users who have performed a logged action in the date and timeranges you have set. The grid does not change automatically.
3. Click Refresh to find the log entries matching these rules.4. You can filter the log entries by selecting one or more actions. For example, you can only view the
actions when a database is opened:a) Click the Actions tab to display the Actions page. When you first open a log, this page lists all
possible actions for the current audit level.b) Click Clear All to turn off all actions.c) Turn on only the Database Opened check box.
This sets all the necessary rules. The grid does not change automatically.5. Click Refresh to display actions based on all the rules that you have specified. The matching
results are displayed in the grid.
Working with log entriesThe log entries can be sorted to make locating specific entries easier.
To navigate through the log entries displayed in the grid, you can:
• Use the scroll bars to scroll horizontally or vertically• Click any cell in the grid then use the Page Up and Page Down keys
You can also display additional information:
• Double-click anywhere on the row of the log entry to display the log entry in the Audit Entry Detaildialog.
• To display the history of the record, double-click on the row with the Record Modified or Code ListModified action.
138 IBM i2 iBase: Administration

Copying text
To copy text from any of the boxes in the dialog, select the required text, right-click anywhere in thatbox, and from the shortcut menu, select Copy. (You can also press Ctrl+C.)
Sorting the log entries
To sort the log entries displayed in the grid, select the appropriate sort column from the Sort Orderlist.
Exporting the log entries
You can select Action > Export to export the displayed log entries to a comma separated value textfile (.csv file). This can then be read into a spreadsheet or other visualization tool.
Note: The audit history is not exported.
Printing the log entries
You can select Action > Print to print the log entries displayed in the grid.
Note:
• The audit history is not printed.• Log entries are printed using Landscape layout.• You may find that the contents of the Detail column wrap around to the beginning of the next line.
Deleting and archiving the log entries
The only way to delete selected data from the audit log is to create an archive. If you no longerrequire the data you have placed in the archive, you can then delete the archive file.
Note: For SQL Server databases, you can back up the whole archive database and then delete it. Anempty archive database will then be created the next time a user performs an auditable action.
Inspecting logs for different audit levelsWhen you start Audit Viewer, it displays all possible actions for the current audit level.
About this task
To see fewer types of logged actions:
• Select any value shown in the Actions for audit level list and click Refresh.
Procedure
If the audit level is now lower than it was in the past, the viewer will not show the actions logged forhigher audit levels. To vary this behavior:1. Click the Actions tab to display the Actions page.2. Select the maximum value from the Display actions for Audit Level list.3. Click Refresh.
Note: If the viewer shows more actions, at least part of the log was recorded at a higher auditlevel.
IBM i2 iBase administration center 139

Viewing audit historiesIn SQL Server databases, you may be able to view the history of the changes made to records in thedatabase provided your database is set up to use Audit History. How far back the history goesdepends on how frequently your system administrator archives this data. iBase has a similar AuditHistory facility.
To display the audit history, double-click on the entry with a Record Modified action to display thedetails of the changes in the Audit History dialog.
You can now filter the records that are displayed by user, entity and link type, and by time, or you canextend the selection to include other records of interest.
Note: In a database set to audit level 5, the number of times the records have been viewed, but notedited, is displayed in the Views column.
Selecting records of interest
To select further records of interest, click Select in the top right of the Audit History dialog to displaythe Select dialog.
To display all records touched by a specific user:
• In the Records to display area, select All records used by and select the user name from the list.The selected user name will be displayed as a reminder in the top left of the Audit History dialog.
To filter by entity and link types:
• In the Types to display area, turn off or on the entity or link type check boxes of the entities and linktypes.
Note: Only types with records in your selection are listed, and the records for a selected type aredisplayed only when the appropriate check box is turned on.
To filter by time:
• In the Time period to display area, select a time period.
Changing what's shown in the edit history area
The entries in the edit history area can be displayed in a variety of ways:
1. Make sure that by all users is selected from the Show Edits drop-down list.2. Turn on or off the following options:
• Show Headers to hide or show the shaded line that displays either the date/time/user name orthe field name. You cannot expand and collapse when this option is turned off.
• to expand the complete history.
• to collapse the complete history and display just the headers.• Audit groups the entries by the name of the user who worked on the record and when they were
created, updated or deleted.• Field groups the entries by the data that has been added, updated or deleted. Click again to sort
in ascending or descending order by date edited.• Edits displays a history of the changes to the record (only available if the database is set to audit
level 5)
140 IBM i2 iBase: Administration

• Views displays a history of who viewed the record and when (only available if the database is setto audit level 5)
In the edit history area, you can filter the edits to those made by a specific user — filtering by usermakes the other display options unavailable:
• Select Show Edits > user_name The users on this list are selected by clicking Select in the top rightof the Audit History dialog.
Copying the edit history
Click Copy to copy all the information shown in the History of edits area to the Windows clipboard.
Note: You cannot copy image and document fields.
Description of the columns in the history of edits area
The history of edits area shows information on the changes made to the selected record:
Information shown... Description
Field Name The old and current values.
Edited by The logon name of the user who made the change.
Date Edited The date and time of the change.
Reason If required by the database, the reason given by the user for making thechange.
OS User The Windows name of the user made the change.
Machine Name The machine that the user was working on.
Location The location as entered in the User Information dialog.
iBase Change When this check box is turned off, the update was made outside iBase (andAudit Viewer may be unable to determine the machine name).
Extra Detail You may see an additional Extra Detail column that displays additionalinformation for the current record.
Note: For information on how an administrator can set up the audit log torecord extra detail, see the Administration Center.
Additional historical data
Additional data may be shown for each record. This may include:
• the name of the icon if an alternate icon is assigned to the record• the icon color (which will be blank if the standard icon color is used)• the record status (applicable only if Soft Delete is used). The record status may be Soft Deleted,
Normal (because the record has been soft deleted or restored), and Purged.• Security Classification, the old and new SC code (if this feature is used and if you have authority to
view this information)
Some information may be displayed that you do not usually see, such as the date the record wascreated and the record ID.
IBM i2 iBase administration center 141

Viewing code list historiesOn the Selection Criteria page, double-click on the Code List Modified action to view the changes to apick list, icon list or SCC list.
Details could include:
• old and new values• old and new descriptions• old and new parent pick lists, for filtered pick lists
All the changes made in the same session are grouped together by user name, date and time. Asthere may be several pages of changes, you can print the list or save it as a Microsoft Excelspreadsheet or PDF file. How far back the history goes depends on how frequently your systemadministrator archives this data.
Note: Changes to code lists are only logged if the database is an SQL Server database and audithistory is turned on. To find out whether the database logs audit history, check the setting of the AuditHistory check box in the Database Properties dialog.
Working with security logsThe security log lists the transactions of interest. To open a security log, select File > View SecurityLog.
There are two possibilities:
• The log is displayed immediately. (This is the log for the security file to which you are currentlylogged on.)
• A Security File browser is displayed where you can locate and open a security file. Audit Vieweropens a security log once you have successfully logged on to the security file.
Compared to working with a database log, there are some minor differences:
• The grid does not contain columns for record IDs or extra detail because these columns are relevantonly to specific records, for which the security log does not record actions.
• The Selection Criteria page has fewer controls. The unavailable controls are those relevant only tospecific records.
• The Actions page lists different actions and you cannot change the audit level. The extra actions arethose relevant to database and security operations: compacting, converting, and upsizingdatabases; creating databases and templates; managing users and groups; and failed logonattempts.
• You can only sort by date (in the Sort Order list).
Archiving audit logsYou can reduce the size of the audit logs and security logs for a database by archiving some of therecords in them. When you create an archive, iBase Audit Viewer writes the log entries to an .idlafile and then deletes the matching results, and audit history, from the audit log.
The format of the archive file depends on the database format:
• For iBase databases in SQL Server format, the audit log is held in a separate SQL Server database,which must be on a different server.
• For iBase databases in Microsoft Access format, the audit log is held as a password-protecteddatabase file, .idla file, which you can open in Microsoft Access.
Archiving SQL Server databasesYou can save the audit log for an iBase SQL Server database to a new SQL Server database on adifferent server machine (a linked server). The archived data will no longer be accessible from within
142 IBM i2 iBase: Administration

Audit Viewer so you will need the assistance of an SQL Server administrator to retrieve specific logentries or run reports.
Procedure
To save part of the audit log to a new SQL Server database (and then delete those records from theaudit log):1. Open the database audit log.2. Select Action > Archive.3. From the Linked Server Name list, select the machine on which you want to create the new
database.4. Enter the name of the new database.5. Enter the name and password for a user who has permission to create databases on this machine.6. Enter the cutoff date for the archive. All audit log entries before this date will be deleted from the
audit log.You cannot inspect archived audit logs in Audit Viewer. Use SQL Server to retrieve records fromthe archived audit log.
Archiving Microsoft Access databasesTo save data in an iBase Microsoft Access format database, or security file, to an archive file (and thendelete those records from the audit log).
Procedure
1. Open the database audit log or the security log.2. Select the data that you want to archive.
Important: All the records shown in the grid will be deleted from the database log after archiving.3. Select Action > Archive.4. Click Yes to save the displayed records to a new archive file and, when prompted, enter a
descriptive name for the database audit log or security log.To inspect archived audit logs in Audit Viewer in the same way that you can inspect the originaldatabase or security logs:5. Select File > Open Archive File and browse for the archive.
To find out when the archive was created and the name of database or security log used to create thearchive:6. Open the archive as described above.7. Click on the Properties tab to display the Properties page.
Bulk importBulk import is a faster method of importing large quantities of data, for example in the region ofhundreds of thousands of records. You can also import from XML.
Bulk import:
1. Uses the BULK INSERT statement to import into temporary tables.
Note: You do not need to change the database recovery model to BULK LOGGED because bulkimport uses bulk operations on temporary tables, and bulk operations on objects in tempdb arealready BULK LOGGED.
2. Creates temporary files in the Bulk Import data files folder that is defined as part of the serverconfiguration.
IBM i2 iBase administration center 143

3. Transfers the data into the iBase database and on successful completion of this phase, deletes thetemporary files that are created in the Bulk Import data files folder.
Bulk import can be used with:
• Import specifications run manually from iBase Designer (they can be set up and verified in iBase)• Import batch specifications run manually from iBase Designer (they can also be set up in iBase)• Import batch specifications are run on a scheduled basis by iBase Scheduler
For each entity or link type imported, bulk import runs through four phases:
1. It copies the import data to a temporary file in the specified Bulk Import data files folder.
Warning: Secure this folder to prevent unauthorized access to the temporary copy of theimport data. This temporary file cannot be deleted if iBase or Scheduler crash during a bulkimport.
The import fails if any errors are encountered while creating the temporary file. However, carryingout a preliminary verification in iBase would identify these errors in advance of the import. Thepossible errors include:
• Data that is too long for the iBase field• Mismatch between locales (for example dates that are in the wrong format for the locale)• Too many matches because the identifiers are not sufficiently selective
Before running a bulk import that uses a new import specification, you can verify it with somerepresentative sample data. To verify an import, click Verify on the last page of the Import wizard.
2. It imports the data into temporary tables.
The import fails if any errors are encountered at this stage. 3. For each entity and link type, it reports any records with any of the following errors:
• Value not defined in list for field (for 'selected from code list' fields)• Mandatory field value not supplied• Field value too long• Invalid direction• Invalid strength• Invalid date• Invalid time• Invalid numbers• Incorrect number of columns
Bulk import then maps data to records in the database to obtain statistics on the numbers ofrecords added, updated, and unchanged when the data is imported. All work takes place intemporary tables; no changes are made to the iBase database at this stage.
Any errors that occur at this stage prevent individual records for this entity or link type from beingcreated or updated.
Note: Users can decide on the threshold for the number of errors that will cause an import to stopcompletely in phases 3 or 4. If unspecified, this is set to a default threshold of 10,000 errors.Records imported into the database before the threshold is reached will remain in the database.
For example, suppose that you are importing links, and the 'entity 1' records are already imported.During the import of the 'entity 2' records, the error threshold is reached. This means that the
144 IBM i2 iBase: Administration

'entity 1' records will remain in the database, but no records for 'entity 2' or the links would beimported.
(Standard imports will continue to run even if 10,000 errors occur.)4. Finally, it transfers the data into the database and updates the corresponding import set. Because
the data transfer and the update of the import set occur in the same step, the import set willaccurately reflect the data that was imported (even after a catastrophic server failure, such as apower cut). It will also delete the temporary files created in the Bulk Import Data Files folder.
If you are using audit level 4 or 5, the start and end of the import is recorded in the audit log. SeeControlling What is Audited.
Permissions for running bulk import
When iBase is run with an SQL Server database, the security context for all database operations is setat the database level and defined through the iBase application role. However, bulk import uses theBULK INSERT statement and it is not possible to grant the server-level permissions required toexecute this statement to the iBase application role.
To obtain the necessary level of permissions, impersonation is used. Depending on the securityrequirements of your organization, there are several ways of configuring this. All methodsimpersonate a principal that has the ADMINISTER BULK OPERATIONS permission by using theEXECUTE AS clause in a stored procedure that executes the BULK INSERT statement. In order to useimpersonation, you must either:
• Set the TRUSTWORTHY database property to ON.• Use a certificate-signed stored procedure.
This documentation includes three examples of suitable stored procedures that will work for bothWindows and SQL Server Authentication (see Related topics below). The certificate-signed storedprocedure is the most secure of the three methods.
Configuring a server for bulk import
Bulk import can only be run on a suitably configured database and server. Configuration consists ofproviding the information required to generate a stored procedure that executes the BULK INSERTstatement. This must be repeated for each database.
There are two ways of doing this:
• If you are both the SQL Server administrator and the iBase administrator, and are satisfied with thesecurity context for the iBase database and its server, you can configure the server from withiniBase Designer. This avoids the need to write an SQL script. For further details, including details ofthe default security context, see Activating Bulk Import in iBase Designer.
• If you want to control the security context within which bulk import runs on the server (for example,if you do not want to grant server-level permissions to the iBase administrator), you will need to usean SQL script. Three example scripts are provided (see Related topics below).
Note: After you have set up the database and server for bulk import, iBase administrators should notrun the Activate Bulk Import command in iBase Designer, as this will overwrite your customizedsetup.
Backing up databases that use bulk import
You need to ensure that the iBase database is always backed up before bulk import is run, and thenagain after the import has completed.
IBM i2 iBase administration center 145

SQL Server database statistics and bulk import
A SQL Server administrator must update the SQL Server database statistics on the tables that arebeing loaded (including the _LinkEnd table when importing links) if the following error is displayed butyou consider the identifiers to be sufficiently selective: Bulk Import failed the safetycheck because there are too many matches; the identifiers are notsufficiently selective.
Example activation script 1This SQL script demonstrates a simple but insecure way to activate bulk import on an iBase database.
A BULK INSERT statement is run in the security context of the user who ran this script. This method ofactivating bulk import has the following security disadvantages:
• A BULK INSERT statement is in a security context with far more permissions than necessary.• It requires that the TRUSTWORTHY database property is set to ON.
You can copy and paste this script into SQL Server Management Studio. Some of the values that areused in this script must be modified for your iBase database.
146 IBM i2 iBase: Administration

Note: Comments are indicated by /* and */. The parts of this script that require modification aremarked with exclamation marks.
USE Your_DB; /*!!!!!!!!!!!!!!!!!!!!!!!!!!!!!!!!!!!!!!!!!!!!!!!!!!!!!!!!!!!!!!!!!!Replace all occurrences of the string 'Your_DB' with the SQL Server name of the iBase database for which Bulk Import will be activated.!!!!!!!!!!!!!!!!!!!!!!!!!!!!!!!!!!!!!!!!!!!!!!!!!!!!!!!!!!!!!!!!!!!!*//*Add or update an iBase configuration setting. The 'SQLServer:BulkImportDataFileLocation' configuration setting specifies a UNC path for a folder that Bulk Import can use for creating the temporary files.iBase users will need to have a Windows account that has read/write permissions on this shared network location.The account under which SQL Server runs requires read permission on this shared network location.*/IF EXISTS ( SELECT * FROM _Configuration WHERE Item = 'SQLServer:BulkImportDataFileLocation') UPDATE _Configuration SET Data = '\\computername\sharedfolder\' WHERE Item = 'SQLServer:BulkImportDataFileLocation' ;ELSE INSERT INTO _Configuration (Item, Data) VALUES ('SQLServer:BulkImportDataFileLocation', '\\computername\sharedfolder\');PRINT 'Bulk Import Data File configuration setting updated.';/*!!!!!!!!!!!!!!!!!!!!!!!!!!!!!!!!!!!!!!!!!!!!!!!!!!!!!!!!!!!!!!!!!!!!Replace the string '\\computername\sharedfolder\' with the name of your shared network location.!!!!!!!!!!!!!!!!!!!!!!!!!!!!!!!!!!!!!!!!!!!!!!!!!!!!!!!!!!!!!!!!!!!!*//*Add or update iBase configuration settings: 'SQLServer:BulkImportColumnDelimiter' and 'SQLServer:BulkImportRowDelimiter'.These configuration settings specify terminators to be used in the temporary data file that Bulk Import creates as part of the Bulk Import process. They must be specified using (escape) characters that are understood by the T-SQL BULK INSERT statement.Under normal circumstances you will not need to change these configuration settings.*/DECLARE @fieldTerminator VARCHAR(20);DECLARE @rowTerminator VARCHAR(20);SET @fieldTerminator = '\0F\0'-- !!! If you require a different field terminator, specify it here.!!SET @rowTerminator = '\0R\0' -- !!! If you require a different row terminator, specify it here.!!IF EXISTS ( SELECT * FROM _Configuration WHERE Item = 'SQLServer:BulkImportColumnDelimiter') UPDATE _Configuration SET Data = @fieldTerminator WHERE Item = 'SQLServer:BulkImportColumnDelimiter' ;ELSE INSERT INTO _Configuration (Item, Data) VALUES ('SQLServer:BulkImportColumnDelimiter', @fieldTerminator);IF EXISTS ( SELECT * FROM _Configuration WHERE Item = 'SQLServer:BulkImportRowDelimiter') UPDATE _Configuration SET Data = @rowTerminator WHERE Item = 'SQLServer:BulkImportRowDelimiter' ;ELSE INSERT INTO _Configuration (Item, Data) VALUES ('SQLServer:BulkImportRowDelimiter', @rowTerminator);PRINT 'Row and column delimiter configuration settings updated.';/*Add or update the iBase configuration setting: 'SQLServer:BulkImportIdentifierSelectivityThreshold'.This configuration setting specifies the threshold ratio of source to target records, after which Bulk Import fails because there are too many matches; i.e. the import identifiers are not sufficiently selective.Under normal circumstances you will not need to change this configuration setting.*/IF EXISTS ( SELECT * FROM _Configuration WHERE Item = 'SQLServer:BulkImportIdentifierSelectivityThreshold') UPDATE _Configuration SET Data = @rowTerminator WHERE Item = 'SQLServer:BulkImportIdentifierSelectivityThreshold' ;ELSE INSERT INTO _Configuration (Item, Data) VALUES ('SQLServer:BulkImportIdentifierSelectivityThreshold', '10');PRINT 'Identifier Selectivity Threshold configuration settings updated.';/*Delete _BulkInsert stored procedure.*/IF EXISTS(SELECT * FROM INFORMATION_SCHEMA.ROUTINES WHERE SPECIFIC_SCHEMA = 'dbo' AND SPECIFIC_NAME = '_BulkInsert' )BEGIN DROP PROCEDURE dbo._BulkInsert PRINT '_BulkInsert stored procedure deleted.'ENDELSEBEGIN PRINT '_BulkInsert stored procedure not found.'ENDUSE Your_DB;goIF EXISTS (SELECT * FROM sys.database_principals WHERE name = N'i2iBaseBulkInsertUser_Your_DB') BEGIN DROP USER i2iBaseBulkInsertUser_Your_DB; PRINT 'Bulk Insert user deleted.'ENDELSEBEGIN PRINT 'Bulk Insert user not found.'ENDgo/*Delete bulk insert login*/USE master; goIF EXISTS (SELECT * FROM sys.server_principals WHERE name = N'i2iBaseBulkInsertLogin_Your_DB')BEGIN DROP LOGIN i2iBaseBulkInsertLogin_Your_DB PRINT 'Bulk insert login deleted.' ENDELSEBEGIN PRINT 'Bulk Insert login not found.'ENDUSE master;CREATE LOGIN i2iBaseBulkInsertLogin_Your_DB WITH PASSWORD = '#BulkInsertL0ginPa$$word#' ;REVOKE CONNECT SQL FROM i2iBaseBulkInsertLogin_Your_DB; GRANT ADMINISTER BULK OPERATIONS TO i2iBaseBulkInsertLogin_Your_DB ;PRINT 'Bulk Insert Login created.';/*A user for the i2iBaseBulkInsertLogin_Your_DB login.Used as the security context for performing a BULK INSERT.*/USE Your_DB; CREATE USER i2iBaseBulkInsertUser_Your_DB FOR LOGIN i2iBaseBulkInsertLogin_Your_DB ;PRINT 'Bulk Insert User created.';USE Your_DB;go/*Stored procedure used by Bulk Import for executing a BULK INSERT command.Uses impersonation to execute as the system administrator.*/ALTER DATABASE Your_DB SET TRUSTWORTHY ON;goCREATE PROCEDURE dbo._BulkInsert @stagingTable VARCHAR(500), @dataFile VARCHAR(500), @formatFile VARCHAR(500), @kiloBytesPerBatch VARCHAR(500), @maxErrors INT WITH EXECUTE AS 'i2iBaseBulkInsertUser_Your_DB'AS BEGIN EXEC( ' BULK INSERT ' + @stagingTable + ' FROM ''' + @dataFile + '''' + ' WITH (FORMATFILE =''' + @formatFile + ''', MAXERRORS=' + @maxErrors + ', KILOBYTES_PER_BATCH=' + @kiloBytesPerBatch + ')' ) END PRINT '_BulkInsert stored procedure (re) created.';
IBM i2 iBase administration center 147

Example activation script 2This SQL script demonstrates a simple but insecure way to activate bulk import on an iBase database.
A BULK INSERT statement is run in the security context of the user who ran this script. This method ofactivating Bulk Import has the following security disadvantages:
• A BULK INSERT statement is in a security context with more permissions than necessary.• It requires that the TRUSTWORTHY database property is set to ON.
You can copy and paste this script into SQL Server Management Studio. Some of the values that areused in this script must be modified for your iBase database.
148 IBM i2 iBase: Administration

Note: Comments are indicated by /* and */. The parts of this script that require modification aremarked with exclamation marks.
USE Your_DB;/*!!!!!!!!!!!!!!!!!!!!!!!!!!!!!!!!!!!!!!!!!!!!!!!!!!!!!!!!!!!!!!!!!!Replace all occurrences of the string 'Your_DB' with the SQL Server name of the iBase database for which Bulk Import will be activated.!!!!!!!!!!!!!!!!!!!!!!!!!!!!!!!!!!!!!!!!!!!!!!!!!!!!!!!!!!!!!!!!!!!!*//*Add or update an iBase configuration setting. The 'SQLServer:BulkImportDataFileLocation' configuration setting specifies a UNC path for a folder that Bulk Import can use for creating the temporary files.iBase users will need to have a Windows account that has read/write permissions on this shared network location.The account under which SQL Server runs requires read permission on this shared network location.*/IF EXISTS ( SELECT * FROM _Configuration WHERE Item = 'SQLServer:BulkImportDataFileLocation') UPDATE _Configuration SET Data = '\\computername\sharedfolder\' WHERE Item = 'SQLServer:BulkImportDataFileLocation' ;ELSE INSERT INTO _Configuration (Item, Data) VALUES ('SQLServer:BulkImportDataFileLocation', '\\computername\sharedfolder\');PRINT 'Bulk Import Data File configuration setting updated.'; /*!!!!!!!!!!!!!!!!!!!!!!!!!!!!!!!!!!!!!!!!!!!!!!!!!!!!!!!!!!!!!!!!!!Replace the string '\\computername\sharedfolder\' with the name of your shared network location.!!!!!!!!!!!!!!!!!!!!!!!!!!!!!!!!!!!!!!!!!!!!!!!!!!!!!!!!!!!!!!!!!!!!*//*Add or update iBase configuration settings: 'SQLServer:BulkImportColumnDelimiter' and 'SQLServer:BulkImportRowDelimiter'.These configuration settings specify terminators to be used in the temporary data file that Bulk Import creates as part of the Bulk Import process. They must be specified using (escape) characters that are understood by the T-SQL BULK INSERT statement.Under normal circumstances you will not need to change these configuration settings.*/DECLARE @fieldTerminator VARCHAR(20);DECLARE @rowTerminator VARCHAR(20);SET @fieldTerminator = '\0F\0'-- !!! If you require a different field terminator, specify it here.!!SET @rowTerminator = '\0R\0'-- !!! If you require a different row terminator, specify it here.!!IF EXISTS ( SELECT * FROM _Configuration WHERE Item = 'SQLServer:BulkImportColumnDelimiter') UPDATE _Configuration SET Data = @fieldTerminator WHERE Item = 'SQLServer:BulkImportColumnDelimiter' ;ELSE INSERT INTO _Configuration (Item, Data) VALUES ('SQLServer:BulkImportColumnDelimiter', @fieldTerminator);IF EXISTS ( SELECT * FROM _Configuration WHERE Item = 'SQLServer:BulkImportRowDelimiter') UPDATE _Configuration SET Data = @rowTerminator WHERE Item = 'SQLServer:BulkImportRowDelimiter' ;ELSE INSERT INTO _Configuration (Item, Data) VALUES ('SQLServer:BulkImportRowDelimiter', @rowTerminator);PRINT 'Row and column delimiter configuration settings updated.'; /* Add or update the iBase configuration setting: 'SQLServer:BulkImportIdentifierSelectivityThreshold'.This configuration setting specifies the threshold ratio of source to target records, after which Bulk Import fails because there are too many matches; i.e. the import identifiers are not sufficiently selective.Under normal circumstances you will not need to change this configuration setting.*/IF EXISTS ( SELECT * FROM _Configuration WHERE Item = 'SQLServer:BulkImportIdentifierSelectivityThreshold') UPDATE _Configuration SET Data = @rowTerminator WHERE Item = 'SQLServer:BulkImportIdentifierSelectivityThreshold' ;ELSE INSERT INTO _Configuration (Item, Data) VALUES ('SQLServer:BulkImportIdentifierSelectivityThreshold', '10');PRINT 'Identifier Selectivity Threshold setting updated.';USE Your_DB;goALTER DATABASE Your_DB SET TRUSTWORTHY ON;/*Stored procedure used by Bulk Import for executing a BULK INSERT command.Uses impersonation to execute as the system administrator.*/ALTER DATABASE Your_DB SET TRUSTWORTHY ON;goIF EXISTS(SELECT * FROM INFORMATION_SCHEMA.ROUTINES WHERE SPECIFIC_SCHEMA = 'dbo' AND SPECIFIC_NAME = '_BulkInsert' ) DROP PROCEDURE dbo._BulkInsertgoCREATE PROCEDURE dbo._BulkInsert @stagingTable VARCHAR(500), @dataFile VARCHAR(500), @formatFile VARCHAR(500), @kiloBytesPerBatch VARCHAR(500), @maxErrors INT WITH EXECUTE AS SELFAS BEGIN EXEC( ' BULK INSERT ' + @stagingTable + ' FROM ''' + @dataFile + '''' + ' WITH (FORMATFILE =''' + @formatFile + ''', MAXERRORS=' + @maxErrors + ', KILOBYTES_PER_BATCH=' + @kiloBytesPerBatch + ')' ) END PRINT '_BulkInsert stored procedure (re) created.';
IBM i2 iBase administration center 149

Example activation script 3This SQL script demonstrates the most secure method for activating bulk import. A certificate-signedstored procedure is used for running the BULK INSERT statement.
A BULK INSERT statement is run in the security context of a special user that can run BULK INSERTand nothing else. The iBase database can have the TRUSTWORTHY database property set to OFF.
You can copy and paste this script into SQL Server Management Studio. Some of the values that areused in this script must be modified for your iBase database.
150 IBM i2 iBase: Administration

Note: Comments are indicated by /* and */. The parts of this script that require modification aremarked with exclamation marks.
USE Your_DB;/*!!!!!!!!!!!!!!!!!!!!!!!!!!!!!!!!!!!!!!!!!!!!!!!!!!!!!!!!!!!!!!!!!!!Replace all occurrences of the string 'Your_DB' with the SQL Server name of the iBase database for which Bulk Import will be activated.!!!!!!!!!!!!!!!!!!!!!!!!!!!!!!!!!!!!!!!!!!!!!!!!!!!!!!!!!!!!!!!!!!!!!*//*Add or update an iBase configuration setting. The 'SQLServer:BulkImportDataFileLocation' configuration setting specifies a UNC path for a folder that Bulk Import can use for creating the temporary files.iBase users will need to have a Windows account that has read/write permissions on this shared network location.The account under which SQL Server runs requires read permission on this shared network location.*/IF EXISTS ( SELECT * FROM _Configuration WHERE Item = 'SQLServer:BulkImportDataFileLocation') UPDATE _Configuration SET Data = '\\computername\sharedfolder\' WHERE Item = 'SQLServer:BulkImportDataFileLocation' ;ELSE INSERT INTO _Configuration (Item, Data) VALUES ('SQLServer:BulkImportDataFileLocation', '\\computername\sharedfolder\');PRINT 'Bulk Import Data File configuration setting updated.';/*!!!!!!!!!!!!!!!!!!!!!!!!!!!!!!!!!!!!!!!!!!!!!!!!!!!!!!!!!!!!!!!!!!!!!Replace the string '\\computername\sharedfolder\' with the name of your shared network location.!!!!!!!!!!!!!!!!!!!!!!!!!!!!!!!!!!!!!!!!!!!!!!!!!!!!!!!!!!!!!!!!!!!!!*//*Add or update iBase configuration settings: 'SQLServer:BulkImportColumnDelimiter' and 'SQLServer:BulkImportRowDelimiter'.These configuration settings specify terminators to be used in the temporary data file that Bulk Import creates as part of the Bulk Import process. They must be specified using (escape) characters that are understood by the T-SQL BULK INSERT statement.Under normal circumstances you will not need to change theseconfiguration settings.*/DECLARE @fieldTerminator VARCHAR(20);DECLARE @rowTerminator VARCHAR(20);SET @fieldTerminator = '\0F\0' -- !!! If you require a different field terminator, specify it here.!!SET @rowTerminator = '\0R\0' -- !!! If you require a different row terminator, specify it here.!!IF EXISTS ( SELECT * FROM _Configuration WHERE Item = 'SQLServer:BulkImportColumnDelimiter') UPDATE _Configuration SET Data = @fieldTerminator WHERE Item = 'SQLServer:BulkImportColumnDelimiter' ;ELSE INSERT INTO _Configuration (Item, Data) VALUES ('SQLServer:BulkImportColumnDelimiter', @fieldTerminator);IF EXISTS ( SELECT * FROM _Configuration WHERE Item = 'SQLServer:BulkImportRowDelimiter') UPDATE _Configuration SET Data = @rowTerminator WHERE Item = 'SQLServer:BulkImportRowDelimiter' ;ELSE INSERT INTO _Configuration (Item, Data) VALUES ('SQLServer:BulkImportRowDelimiter', @rowTerminator);PRINT 'Row and column delimiter configuration settings updated.';/*Add or update the iBase configuration setting: 'SQLServer:BulkImportIdentifierSelectivityThreshold'.This configuration setting specifies the threshold ratio of source totarget records, after which Bulk Import fails because there are too many matches; i.e. the import identifiers are not sufficiently selective.Under normal circumstances you will not need to change this configuration setting.*/IF EXISTS ( SELECT * FROM _Configuration WHERE Item = 'SQLServer:BulkImportIdentifierSelectivityThreshold') UPDATE _Configuration SET Data = @rowTerminator WHERE Item = 'SQLServer:BulkImportIdentifierSelectivityThreshold' ;ELSE INSERT INTO _Configuration (Item, Data) VALUES ('SQLServer:BulkImportIdentifierSelectivityThreshold', '10');PRINT 'Identifier selectivity threshold configuration setting updated.';USE master;/*Configure server for xp_cmdshell.*/EXEC sp_configure 'xp_cmdshell', 1; RECONFIGURE; USE Your_DB; /*!!!!!!!!!!!!!!!!!!!!!!!!!!!!!!!!!!!!!!!!!!!!!!!!!!!!!!!!!!!!!!!!!!!If you do not want xp_cmdshell to be permanentlyenabled you can disable it using the following SQL:EXEC sp_configure 'xp_cmdshell', 0; RECONFIGURE; !!!!!!!!!!!!!!!!!!!!!!!!!!!!!!!!!!!!!!!!!!!!!!!!!!!!!!!!!!!!!!!!!!!*//*Delete _BulkInsert stored procedure.*/IF EXISTS(SELECT * FROM INFORMATION_SCHEMA.ROUTINES WHERE SPECIFIC_SCHEMA = 'dbo' AND SPECIFIC_NAME = '_BulkInsert' )BEGIN DROP PROCEDURE dbo._BulkInsert PRINT '_BulkInsert stored procedure deleted.'ENDELSEBEGIN PRINT '_BulkInsert stored procedure not found.'END/*Delete server authenticator login*/USE master; IF EXISTS (SELECT * FROM sys.server_principals WHERE name = N'i2iBaseServerAuthenticator_Your_DB')BEGIN DROP LOGIN i2iBaseServerAuthenticator_Your_DB PRINT 'Server authenticator login deleted.' ENDELSEBEGIN PRINT 'Server authenticator login not found.'END/*Delete master certificate*/USE master; IF EXISTS (SELECT * FROM sys.certificates WHERE [name]=N'i2iBaseBulkInsertCertificate_Your_DB') BEGIN DROP CERTIFICATE i2iBaseBulkInsertCertificate_Your_DB; PRINT 'Bulk Insert certificate deleted from mater database.'END ELSEBEGIN PRINT 'Bulk Insert certificate not found in master database.'END;USE Your_DB; /*Delete database certificate*/IF EXISTS (SELECT * FROM sys.certificates WHERE [name]=N'i2iBaseBulkInsertCertificate_Your_DB') BEGIN DROP CERTIFICATE i2iBaseBulkInsertCertificate_Your_DB; PRINT 'Bulk Insert certificate deleted from iBase database.';END ELSEBEGIN PRINT 'Bulk Insert certificate not found in iBase database.'ENDgo/*Delete bulk insert user*/IF EXISTS (SELECT * FROM sys.database_principals WHERE name = N'i2iBaseBulkInsertUser_Your_DB') BEGIN DROP USER i2iBaseBulkInsertUser_Your_DB; PRINT 'Bulk Insert user deleted.'ENDELSEBEGIN PRINT 'Bulk Insert user not found.'ENDgo/*Delete bulk insert login*/USE master; IF EXISTS (SELECT * FROM sys.server_principals WHERE name = N'i2iBaseBulkInsertLogin_Your_DB')BEGIN DROP LOGIN i2iBaseBulkInsertLogin_Your_DB PRINT 'Bulk insert login deleted.' ENDELSEBEGIN PRINT 'Bulk Insert login not found.'ENDUSE master; /*!!!!!!!!!!!!!!!!!!!!!!!!!!!!!!!!!!!!!!!!!!!!!!!!!!!!!!!!!!!!!!!!!!!!!Replace all occurrences of the following strings with a strong password:'#BulkInsertL0ginPa$$word#''#Server C3rtificate Passw0rd#''#C3rtificate Backup Passw0rd#''#iBase Database C3rtificate Passw0rd#'!!!!!!!!!!!!!!!!!!!!!!!!!!!!!!!!!!!!!!!!!!!!!!!!!!!!!!!!!!!!!!!!!!!!*//*Create certificate in master database*/CREATE CERTIFICATE i2iBaseBulkInsertCertificate_Your_DB ENCRYPTION BY PASSWORD = '#Server C3rtificate Passw0rd#' WITH SUBJECT = 'For ADMINISTER BULK OPERATIONS permission', START_DATE = '20020101', EXPIRY_DATE = '20200101' PRINT 'Bulk Insert certificate created in master database.'BACKUP CERTIFICATE i2iBaseBulkInsertCertificate_Your_DB TO FILE = 'c:\Program Files\Microsoft SQL Server\ MSSQL.1\MSSQL\DATA\i2iBaseBulkInsertCertificate.cer' WITH PRIVATE KEY (FILE = 'c:\Program Files\Microsoft SQL Server\ MSSQL.1\MSSQL\DATA\i2iBaseBulkInsertCertificate.pvk' , ENCRYPTION BY PASSWORD = '#C3rtificate Backup Passw0rd#', DECRYPTION BY PASSWORD = '#Server C3rtificate Passw0rd#');PRINT 'Master Bulk insert certificate exported to file.'; /*!!!!!!!!!!!!!!!!!!!!!!!!!!!!!!!!!!!!!!!!!!!!!!!!!!!!!!!!!!!!!!!!!!!!!Replace all occurrences of the following string: c:\Program Files\Microsoft SQL Server\ MSSQL.1\MSSQL\DATA\i2iBaseBulkInsertCertificate.cerwith a complete path, including file name, of the file in which the certificate is to be saved.!!!!!!!!!!!!!!!!!!!!!!!!!!!!!!!!!!!!!!!!!!!!!!!!!!!!!!!!!!!!!!!!!!!!!*//*!!!!!!!!!!!!!!!!!!!!!!!!!!!!!!!!!!!!!!!!!!!!!!!!!!!!!!!!!!!!!!!!!!!!!Replace all occurrences of the following string: c:\Program Files\Microsoft SQL Server\ MSSQL.1\MSSQL\DATA\i2iBaseBulkInsertCertificate.pvkwith a complete path, including file name, of the file in which the certificate key file is to be saved.!!!!!!!!!!!!!!!!!!!!!!!!!!!!!!!!!!!!!!!!!!!!!!!!!!!!!!!!!!!!!!!!!!!!!*//*A Login with permission to perform BULK INSERT (ADMINISTER BULK OPERATIONS permission)*/USE master;CREATE LOGIN i2iBaseBulkInsertLogin_Your_DB WITH PASSWORD = '#BulkInsertL0ginPa$$word#' ;REVOKE CONNECT SQL FROM i2iBaseBulkInsertLogin_Your_DB; GRANT ADMINISTER BULK OPERATIONS TO i2iBaseBulkInsertLogin_Your_DB ;PRINT 'i2iBaseBulkInsertLogin created.';USE master; /*A login with AUTHENTICATE SERVER permission, able to authenticate the server-level permission to run BULK INSERT.*/CREATE LOGIN i2iBaseServerAuthenticator_Your_DB FROM CERTIFICATE i2iBaseBulkInsertCertificate_Your_DB; PRINT 'Server authenticator login created.'REVOKE CONNECT SQL FROM i2iBaseServerAuthenticator_Your_DB; GRANT AUTHENTICATE SERVER TO i2iBaseServerAuthenticator_Your_DB; PRINT 'Server authenticator granted AUTHENTICATE SERVER permission and revoked CONNECT SQL permission.'/*A user for the i2iBaseBulkInsertLogin_Your_DB login.Used as the security context for performing a BULK INSERT.*/USE Your_DB; CREATE USER i2iBaseBulkInsertUser_Your_DB FOR LOGIN i2iBaseBulkInsertLogin_Your_DB ;PRINT 'Bulk Insert User created.';/*Stored procedure used by Bulk Import for executing a BULK INSERT command.Uses impersonation to execute in the context of the i2iBaseBulkInsertUser.*/goCREATE PROCEDURE dbo._BulkInsert @stagingTable VARCHAR(500), @dataFile VARCHAR(500), @formatFile VARCHAR(500), @kiloBytesPerBatch VARCHAR(500), @maxErrors INT WITH EXECUTE AS 'i2iBaseBulkInsertUser_Your_DB' AS BEGIN EXEC( ' BULK INSERT ' + @stagingTable + ' FROM ''' + @dataFile + '''' + ' WITH (FORMATFILE =''' + @formatFile + ''', MAXERRORS=' + @maxErrors + ', KILOBYTES_PER_BATCH=' + @kiloBytesPerBatch + ')' ) END PRINT '_BulkInsert stored procedure (re) created.';goUSE Your_DB; /*Create a certificate in the iBase database that is a copy of the certificate in the master database.*/CREATE CERTIFICATE i2iBaseBulkInsertCertificate_Your_DB FROM FILE = 'c:\Program Files\Microsoft SQL Server\ MSSQL.1\MSSQL\DATA\i2iBaseBulkInsertCertificate.cer' WITH PRIVATE KEY (FILE = 'c:\Program Files\Microsoft SQL Server\ MSSQL.1\MSSQL\DATA\i2iBaseBulkInsertCertificate.pvk', DECRYPTION BY PASSWORD = '#C3rtificate Backup Passw0rd#', ENCRYPTION BY PASSWORD = '#iBase Database C3rtificate Passw0rd#' )PRINT 'Bulk Insert certificate created in iBase database.';/*The backup of the certificate and its key file are deleted. */EXEC master..xp_cmdshell'DEL "C:\Program Files\Microsoft SQL Server\ MSSQL.1\MSSQL\Data\i2iBaseBulkInsertCertificate.*"'PRINT 'Bulk Insert certificate backup files deleted.';/*Sign the stored procedure so that it has permission to perform a BULK INSERT command.*/USE Your_DB; ADD SIGNATURE TO dbo._BulkInsert BY CERTIFICATE i2iBaseBulkInsertCertificate_Your_DBWITH PASSWORD = '#iBase Database C3rtificate Passw0rd#';PRINT '_BulkInsert stored procedure signed with Bulk Insert certificate';/* Disable xp_cmdshell.*/USE master; EXEC sp_configure 'xp_cmdshell', 0; RECONFIGURE; /*!!!!!!!!!!!!!!!!!!!!!!!!!!!!!!!!!!!!!!!!!!!!!!!!!!!!!!!!!!!!!!!!!!!!!If you want xp_cmdshell to be permanently enabledthen comment out the three lines above!!!!!!!!!!!!!!!!!!!!!!!!!!!!!!!!!!!!!!!!!!!!!!!!!!!!!!!!!!!!!!!!!!!!!*/
IBM i2 iBase administration center 151

Activating bulk import in iBase DesignerBefore an iBase database administrator can run bulk import, the server that holds the database mustbe configured for bulk import.
About this task
An iBase database administrator can do this by running the Activate Bulk Import command onthe Tools > Feature Availability menu in iBase Designer. This method of configuring the databaseand server is suitable if:
• The security context for the server is appropriate for your organization.• The iBase database administrator can be granted the permissions listed below.
The iBase database administrator who runs the Activate Bulk Import command must be amember of the SQL Server sysadmin fixed server role.
The SQL Server service must have permission to create and delete files in the SQL Server data folder.
After the iBase database administrator has the right SQL Server permissions, bulk import can beactivated. You must reactivate Bulk Import if you move the database to a different server.
Procedure
1. In iBase Designer, select Tools > Feature Availability > Activate Bulk Import.The command is not available if the database is Microsoft Access format.
2. In Connect to Server, enter the details that are required to connect to the server, as a serveradministrator. You can use:
• Windows authentication, in which case you do not need to enter a user name or password -your Windows user account must have the SQL Server permissions listed above.
• SQL Server authentication, in which case you must enter an SQL Server login, and password,that has the permissions listed above.
Note: You can use either method of connecting to the server, regardless of the security methodused in the iBase connection file.
3. In Bulk Import Password, enter a password.This password is used by SQL server to:
• Create the certificate• Back up the certificate (the password is required to restore the certificate from the backup)• As the password for the special login that provides the security context for performing BULK
INSERT4. In Bulk Import Data Files Folder, enter the UNC path of the shared folder used by bulk import for
temporary files.
Attention: This folder should be secured to prevent unauthorized access to the temporarycopy of the data. This temporary file cannot be deleted if iBase, or Scheduler, crash duringa bulk import.
5. Click OK.
What to do next
The database is then activated for bulk import on the specified server.
152 IBM i2 iBase: Administration

Attention: This command temporarily enables xp_cmdshell to move certificates from themaster database to the iBase database. In the unlikely event, that it fails to disable it at theend of the procedure, this message is displayed:
Note: Cannot disable xp_cmdshell. Disable xp_cmdshell manually otherwise your server securitymight be compromised.
Note: If this occurs, you must take immediate steps to disable xp_cmdshell yourself.
You can change the location of the bulk import data files folder later, without having to reactivate thedatabase for Bulk Import. This changes the path for all users of Bulk Import:
1. From the File menu in iBase Designer, select Database Properties.2. On the Advanced page, in the Bulk Import Data Files Folder field, enter the UNC path of the
folder.
Note: This folder must be shared. iBase users must have a Windows account that has read/writepermissions for this folder. The account under which SQL Server runs requires read permission forthis folder.
Scheduling imports and exportsiBase Scheduler provides automatic scheduling for data imports (both standard and bulk imports) andexports for multiple iBase databases on either local or remote machines.
In iBase, you define the data that you want to import or export as one or more import or exportspecifications, which you group together, in the sequence in which you want them to run, in batchspecifications. You schedule the import or export by setting up tasks in Scheduler.
Using Scheduler, you can run scheduled tasks:
• Immediately• Once, at a specified time• At preset intervals (hourly, daily, weekly, monthly)• Whenever a specified file is updated• Until an optional cutoff date or time is reached
Before or after importing or exporting data, you can run a command-line program, a custom plug-in,or an operating system command. For example, to move data files for import to a different directoryor send a notification that the batch export has run.
Details of scheduled tasks are stored in the Scheduler database, which is monitored by a service,which automatically runs the scheduled tasks.
Note: iBase Scheduler can be installed on any machine on which iBase is already installed; you do nothave to run the service on this machine. For further information about installing Scheduler, see theAdministration Center document Setting Up iBase Scheduler.
Before you can schedule any batch imports or exports, you need to set up a connection to open therequired iBase database. The database can be on the local machine or on the network.
Note: Paths that are entered by using a mapped network drive are always converted to UNC (UniformNaming Convention) paths when you click OK.
Before you start, check that the database can be opened by using the UNC path (You can skip thisstep if the database is on the local machine). This allows other users to open it using this path:
1. Close Scheduler.2. Open iBase Designer.
IBM i2 iBase administration center 153

3. From the File menu, select Open Database. The Open Database dialog is displayed.4. In the File name field, type in the UNC path of the database (.idb) file, and then click Open.5. Close iBase Designer.
To set up a database connection:
1. Start Scheduler: from the Windows Start menu, select Programs > IBM i2 iBase 8 Tools > iBaseScheduler Configuration. The iBase Scheduler Configuration dialog is displayed.
2. Click the Schedules tab to display the Schedules page.3. In the Connections area, click New to define a new database connection.4. Enter the name that you want to use for the connection to the database.5. Enter the path to the database file (.idb), or click to browse for it.6. Enter the path to the security file (.ids) for this database, or click Browse to browse for it.7. Enter the iBase user name and password that you want the Scheduler service to use when opening
the database; these will be saved in the Scheduler database in encrypted form.
See below for details of the permissions required by this user account.8. Verify that the connection works by clicking Test Connection—a message is displayed if there is a
problem with the connection to the database. See the Scheduler online help for information ontroubleshooting database connections.
9. Click OK to save the database connection.
Setting up the user account for running Scheduler
You cannot run Scheduler using iBase user accounts that are mapped to a Windows user or group. Inaddition, the users must have the following minimum user permissions in iBase:
• Add Entity/Link Records• Update Entity/Link Records• Update/Delete Entity/Link Records created by other users• The iBase system role Database administrators is also required to run any import specification or
batch import specification set up for bulk import.
These permissions are the same as those required to run import specifications in iBase itself.
The user account for running iBase Scheduler is best if no security restrictions applied. However,iBase Scheduler does support these iBase security features:
• Database Management groups.
These determine whether users will be denied access to the database when they try to test aconnection or create a new task. The minimum user permissions are described in Minimum userpermissions below.
• Data Access Control groups.
These restrict access to specific entity and link type records or to specific fields, and will preventiBase Scheduler from running tasks that access those records and fields. In these circumstances,the completion status of the task will indicate that the task failed.
• Folder Object Control—specifically access to the folder containing the batch import or exportspecifications.
The following security features are not supported by iBase Scheduler, and any restrictions imposedby these features will be ignored:
154 IBM i2 iBase: Administration

– System Command Access Control– Reason for Action– Auditing - nothing is recorded in the audit log
Note: If you need to change the permissions granted to a user account that is used to run iBaseScheduler make sure you retest the connection to the database. If you are using Data AccessControl groups, then you need to run a trial import/export to verify that these are set correctly.
Configuring the Scheduler service
The Scheduler service is installed in the Windows services database, and is managed by the WindowsServices application. You configure it using the Service page of the iBase Scheduler Configurationdialog. You can only run the service on a machine where iBase is installed.
Scheduled imports and exports (tasks) are stored in the Scheduler database, which is a MicrosoftAccess database. This is monitored by the service, at a frequency that you specify when you configureit. The service automatically runs the scheduled tasks as they fall due.
You can start, stop, pause, resume, or disable the service by using the Services application. Serviceactivity may be recorded in a log file if required.
To configure the service:
1. In the i2 iBase Scheduler Configuration dialog, click the Service tab to display the Service page.2. Specify the frequency with which the service scans the Scheduler database, by entering the
number of minutes and seconds. The default interval is 10 seconds. How frequently you want theservice to run depends on the number of tasks that you are running, and available computingresources.
Note: The Scheduler service is installed to run under the local Windows system account, which is onlyapplicable if the service is running on the local machine. If you intend to run Scheduler using aScheduler database that is installed on a different machine, then the service needs to log on using adomain user name and password. For more information, see Setting Up iBase Scheduler.
Setting up iBase clientsAfter you create the iBase database, you might need to configure each iBase installation to suit thework to be done in that database.
Setting options on local machines
You can specify some general options for how users use iBase in the Options (on the Tools menu ineither iBase or iBase Designer). You do not need to log on to a security file or open a database, theoptions apply to the application not to any databases.
Page Detail
General Basic options for using iBase, for example, howusers use categories. Any user can change theseoptions without affecting any other user of themachine. These options take effect immediately.
IBM i2 iBase administration center 155

Charting Defaults that are used when charting in Analyst'sNotebook (unless specified otherwise in acharting scheme or the Charting Settings dialog).Any user can change these options withoutaffecting any other user of the machine. Theseoptions take effect the next time records arecharted.
The use of these charting options is covered inthe iBase online help.
Advanced User options that can be changed by any user ofthe machine; changes to the Local MachineSettings affect all users of the computer. You canprevent users from changing the local machinesettings by denying write access to theSettings.xml file.
Hiding plug-ins
You can deny access to certain iBase features for any user that is working on a specific machine. Thisis a local machine setting and can be copied between machines.
For more refined control set at the user group level, you might prefer to define System CommandsAccess Control groups.
Copying the local machine settings to other machines
The local machine settings in the Options dialog and Plug-In Manager are saved in the fileSettings.xml. You can copy this file to the other machines on which iBase is installed. For details ofwhere to copy the file, see Installation and Application Data Folders.
SQL Server connection files on local machines
Users should connect to iBase databases that are in SQL Server format by using connection filesstored in a shared folder on the network.
Copying connection files to client machines might compromise the security of your system and addsto the administrative workload. If it becomes necessary to copy a connection file, then the file nameand path must be identical on each machine to which you copy it.
Access to folder objectsUsers (depending on their permissions) might want to save items such as queries and reportdefinitions to use again or experienced users might want to create standard definitions for others touse. This type of item is referred to as a folder object.
Folder objects consist of:
• Browse definitions• Queries and scored matching definitions• Report definitions• Import specifications and import batch specifications• Export specifications and export batch specifications• Sets
156 IBM i2 iBase: Administration

• Charting schemes• Mapping configurations (if iBase GIS Interfaces is in use)
In a database with many users, large numbers of folder objects can accumulate. Users can organizefolder objects by saving them in categories. The following example shows report definitions saved incategories called General and Operation Crest (the latter subdivided into further categories):
Categories appear as folders, with similar behavior to Windows Explorer folders, and users navigatethe folders in a similar way. Users can move items between categories. However, categories cannotbe renamed and disappear when a user deletes the last item in them and then closes the dialog.
When a user creates a new folder object, you can set up iBase to prompt the user to specify acategory.
Users can control access to a folder object by making the access:
• Public• Private• Restricted to a folder object control group
Any user (with suitable permissions) can create public or private folder objects but only users whobelong to a specific folder object control group can save folder objects with restricted access.
Default categories and Options
When a user saves a folder object without specifying the category, the object is saved in a defaultcategory. This is:
• Either, the category defined for the user, as part of their user details. See Default Categories forUsers.
• Or, the category set in the Options dialog (on the Tools menu in iBase or the Tools > FeatureAvailability menu in iBase Designer).
Controlling the categories used for folder objects
Folder objects are always saved in a category. However, you can allow users to select their defaultcategory, select a different category and set the access type before saving the object:
• In Options, turn on Prompt for Category when Saving Folder Objects. This displays the Categorizedialog in which users can select the category and access type. When this check box is turned on,clicking Cancel in the Categorize dialog also cancels the save.
Note: Turn off the Prompt for Category when Saving Folder Objects check box to automatically savefolder objects in their default category with the default access type where possible. The Categorizedialog is always displayed if users belong to more than one folder object control group.
Controlling access to folder objects
Access control is set on individual folder objects, not on categories.
Option Description
Public Any user can access the folder objects.
IBM i2 iBase administration center 157

Private Only the person who flagged the folder object asprivate and the system administrator can see it.For example, unless you are logged on as asystem administrator, private report definitionsbelonging to others do not appear in the AllReport Definitions folder.
Note: Users who are members of a folder objectcontrol group might be unable to set the accesson folder objects to private. Access is alwaysrestricted to the folder object group. For detailedinformation, see below About folder objectcontrol groups.
Restricted to groups This is the most restrictive of the three types offolder access, and is described below.
Defaulting to Public or Private access
Access to a folder object in a category can be either public or private to the user who flagged it asprivate. Private folder objects cannot be listed or viewed by any other user (apart from the systemadministrator).
To set the default access type for any new folder objects that are created:
• In the Options dialog, turn on or off the Default to Public Access check box:
– Turn on the check box so that new folder objects are public by default (this overrides anymembership of folder object control groups to which the user might belong).
– Turn off the check box so that new folder objects are private by default (unless the user belongsto a folder object control group).
For detailed information on access types and folder object control groups, see the followinginformation about Folder object control groups.
Note: If you want users to be able to change the access before you save folder objects, set the optionPrompt for Category when you save folder objects in the Options dialog.
Folder object control groups
A folder object control group is the most restrictive of the three types of folder access describedpreviously. Folder object control groups are defined in iBase Designer using the Security Manager buttheir usage is defined by the users who belong to the group, and the following two settings made inthe Options dialog in each iBase installation:
• Prompt for Category When Saving Folder Objects• Default to 'Public' Access
Category prompt Default access type Result when users
Save a folder object
158 IBM i2 iBase: Administration

ON Private Users are prompted to selectthe access type for the folderobject when they click Save.The default access type is thefolder object control group towhich the user belongs. If theuser belongs to several groups,the access type defaults toprivate.
ON Public The user is prompted to selectthe access type for the folderobject when they click Save.The default access type ispublic.
OFF Private The folder object isautomatically saved with thefolder object control group towhich the user belongs. If theuser belongs to several groups,they are prompted to select oneor more groups, or to changethe access type.
OFF Public The folder object isautomatically saved with publicaccess — overriding themembership of the FolderObject Control group. If the userbelongs to several groups, theuser is prompted to select oneor more groups, or to changethe access type.
Options for opening the databaseThere are various options that affect how a user opens an iBase database.
List of most recently opened databases
The Most Recently Used list is the list of databases at the end of the File menu in iBase and iBaseDesigner. Each time a new database is opened, an entry for it is placed in the list. Selecting the entryis a quick way for the user to open a database that they use frequently.
To change the maximum number of databases in the list:
1. In iBase Designer, select Tools > Feature Availability > Options.2. On the General page, enter the maximum number in the Maximum number of most recently
opened databases to show in the file menu box.
After this number is reached, new entries at the top push the bottom entries off the list. This takeseffect the next time iBase and iBase Designer is started.
The full list of databases can be seen in the MRU List Manager
IBM i2 iBase administration center 159

Editing the list of recently opened database
You can view, and edit, the full list of databases opened on this machine:
• In iBase Designer, select Tools > Database Administration > MRU List Manager (in iBase, selectTools > MRU List Manager)
The MRU List Manager dialog lists the databases by the names of their database or connection files.
It is possible that some of the databases no longer exist, which can happen if somebody deletes thedatabase or moved the database or connection file. Also, some databases can be temporarilyunavailable while a server machine is out of service. Such databases still appear as entries in thisdialog but not in the File menu, where the availability of each database is checked before its name isdisplayed.
You can delete entries and change the ordering of the entries that you want to keep.
Note: You can remove this command from the iBase Tools menu using a System Commands AccessControl group. See System Commands Access Control Groups.
Opening the last used database on startup
You can set the last used database to open when a user starts iBase (but not iBase Designer). Usersare still prompted to enter their user name and password. Users do not have to open this database;they can cancel and select an alternative database.
To set up this feature:
1. In iBase Designer, select Tools > Feature Availability > Options (in iBase, Tools > Options).2. On the General page, turn on Open last used database on start-up.
Options for identifying matching recordsiBase has facilities for checking whether records that already exist in the database share commonvalues with a new record that a user is either entering or about to save.
By default:
• Two entities match if the values in their discriminator fields are identical.• Two links match if the link end entities, the link direction and the link strength are the same.
You can control how matching records are detected by setting options in the Options dialog. Userscan also change these options.
Check for matching records (datasheets only)
This option only applies when a user enters or edits a record in a datasheet. The option warns thatthey are creating a matching record if they enter a value in a discriminator field that matches thevalue in the same discriminator field of other records in the database. This allows users to check theirdata at an earlier stage than the Prompt to confirm creation of matching records option which onlywarns the user when they attempt to save the record.
To set this option:
1. From the Tools menu in iBase Designer, select Feature Availability > Options (in iBase, selectTools > Options).
2. On the General page, turn on the Check for matching records whenever a discriminator fieldvalue changes (datasheets only) check box.
This only applies to datasheets and displays a warning about potential duplicate records when youenter data in a discriminator field which results in a match with one or more existing records.
160 IBM i2 iBase: Administration

Prompt to confirm creation of matching records
This option applies to records created both in standard dialogs and datasheets.
Users are always warned when they attempt to save a record that is a duplicate of one already in thedatabase. However, you can display an additional prompt that is displayed when they click Yes tocreate the duplicate. The user must confirm that they want to create the matching record, or they canreview the list of records found or change their record.
To set this option:
1. From the Tools menu in iBase Designer, select Feature Availability > Options (in iBase, selectTools > Options).
2. On the General page, turn on the Prompt to confirm creation of matching records check box.
If you choose to turn off the check box, then there are other methods of identifying matching recordsin iBase, such as the Duplicate Records Checker. See the iBase help for details.
Location of templates, icons, and other filesInformation on where templates and other files are created on the local machine.
To display the Options dialog:
• From the Tools menu in iBase Designer, select Feature Availability > Options and click Advanced(in iBase, select Tools > Options instead).
On the Advanced page of the Options dialog, the User Settings area applies to the user who is loggedon. Any user can change these settings for themselves:
User setting Description
User Templates Folder Displays the path of the folder that is used whenany database templates are saved by this user.
Note: Users who need to create databasetemplates or use the Update Database Schemacommand require write access to this folder.
Temporary Files Folder Displays the path of the folder used fortemporary files. These files are created when, forexample, a user uses View to edit a documentspecified in a document type field.
On the Advanced page of the Options dialog, the Local Machine Settings area applies to the iBaseinstallation and affects all users of the machine:
Machine setting Description
Command Group File Path of the example Access database thatorganizes the iBase system command accesscontrol. The Update Command Groupscommand on the Tools Database Setup menuuses the database in this folder.
IBM i2 iBase administration center 161

Icon List File Path of the file that lists all the icons available inthis installation of iBase.
Note: This setting takes effect the next timeiBase or iBase Designer is started.
Workgroup Templates Folder Displays the path of the folder that contains thedatabase templates that you want all users tohave access to. iBase does not allow users tosave database templates in this folder.
Graphics Folder Path of the folder that contains the icons used in,for example, the Database Explorer and menuitems (but not the entity, or entity type icons).
The local machine settings are saved in the file Settings.xml. To prevent users from changing thelocal machine settings, change the permissions on the Settings.xml.
Hiding featuresUse the Plug-in Manager to deny access to certain iBase features. For example, you might want toprevent the use of the Excel Interface or Word Search on certain machines. All installed features areavailable unless you specify otherwise.
These local machine settings, are saved in the file Settings.xml. To prevent users from hiding orshowing plug-ins, you need to change permissions on the Settings.xml file.
To hide one or more plug-ins from users that are working on this machine only:
1. Open the database in either iBase or iBase Designer.2. From the Tools menu:
• In iBase Designer, select Feature Availability > Plug-in Manager• In iBase, select Plug-in Manager
3. In the Plug-in Manager:
• Turn on the check box for a plug-in module if you want it to be available to any user. (You candeny the related commands to some or all users by using System Commands Access Controlgroups.)
• Turn off the check box for a plug-in module if you want it to be unavailable to all users.
Note: You can remove the Plug-in Manager command from the iBase Tools menu using SystemCommands Access Control groups.
Installation and application data foldersWhen you install iBase, you can install it in the folder suggested by the installer or to a folder of yourchoice. Regardless of where you choose to install the product, any data that is used by the IBM i2application is automatically copied to the application data folder as defined by the version ofMicrosoft Windows that you are running. These are hidden Windows folders.
The application data folder is defined by the version of Microsoft Windows that you are running. Usersalso have a folder for storing files such as iBase templates. The folder can also contain shortcuts toother folders that contain per user application data.
162 IBM i2 iBase: Administration

Per machine data
Data that is specific to the machine on which iBase is installed is held in the per machine applicationdata area given previously. This is a copy of data in C:\Program Files. You should not use any dataheld in the Program Files area. If you choose to copy configuration files from one machine to another,then you should always overwrite the files in the application data area.
Folder Files or folders
i2\i2 iBase <n>\ en- us\Configuration
Iconlist.txt
Military Iconlist.txt
Combined Iconlist.txt
FTSexclude.txt
WSexclude.txt
i2\i2 iBase <n>\ en-us\CommandGroups CommandGroups.mdb
i2\i2 iBase <n>\ en-us\Settings Settings.xml (as set by options in the Optionsdialog)
Note: All users have read/write access to this fileunless you change the permissions on the file.
i2\i2 iBase <n>\ en-us\WorkgroupTemplates
*.idt files (the default workgroup templatessupplied by IBM and any templates that youwant to make available to all users)
i2\i2 iBase <n>\ en-us\Mapping Mapping configuration files. For information onthe mapping configuration files, see the releasenotes for iBase GIS Interfaces.
i2\i2 iBase <n>\ en-us\Scheduler Scheduler.mdb (you can specify an alternativelocation)
Per user data
Application data that is specific to a user of the machine is copied to, or created in, the per userapplication data folder given previously.
External Access ControlThis document provides a summary of how you can control network access to an iBase database,whether in Microsoft Access or SQL Server format. For detailed information on access control,especially for information of interest to Windows and SQL Server administrators, see theAdministration Center document Managing Access Control.
Controlling access to Microsoft Access databasesMaintaining the security of Microsoft Access databases created by iBase is largely a matter ofapplying controls by using the Security menu in iBase Designer. However, outside iBase, you need to
IBM i2 iBase administration center 163

consider file-level security settings for the database and security files, user accounts, and grouppolicies.
Application level security
iBase uses a security file (.ids) to secure the iBase database (.idb file) from unwanted access. Onlyusers who are known to the security file are allowed access to the database. For detailed informationon setting up iBase application security using iBase Designer, see Security Files, Users and Groups.
Making a database available and secure
A single security file can be used to control access to more than one database file. The security file isnormally placed in the same folder as the database files it secures. You should protect both thesecurity and database files at the file system level. Some suggested permissions are given in thefollowing table.
You must also ensure that all iBase users can access the database file from a folder to which theyhave both create and read/write permissions. iBase creates a temporary locking file in the folder. Thislocking file can be created and deleted by any iBase user.
The folder in which the database file is stored must be shared. This is required because iBase recordsthe location of the database file in UNC format so that it can be located from any client machine onthe network.
Suggested permissions for users
These are the suggested permissions for users on iBase files and their folders. In summary, thesesettings deny most users the ability to rename or substitute files crucial to security, but allow them tocreate and delete lock files and to add to files such as the database log.
Files and folders iBase System administrator iBase users (notadministrators)
Security file Full Control Read & Execute, Write
Database file Full Control Read & Execute, Write
Folders Full Control Modify, Read & Execute, andWrite
All Users folder in theapplication data area (forexample, the WorkgroupTemplates folder)
Read & Execute
Note: Only the Windowsadministrator for the localmachine has full control.
Read & Execute
Note: You might want to changethe permissions on the fileSettings.xml (by default, anyuser can change local machinesettings).
Note: Write permission mightbe required to any mappingapplication configuration files;for details, see the iBase GISInterfaces release notes.
User's personal folder in theapplication data (for example,the Templates folder)
Full Control (the default) Full Control (the default)
164 IBM i2 iBase: Administration

iBase database administrators, security administrators, and system administrators require differentpermissions; for details, see the Administrative Center document Managing Access Control.
Controlling access to SQL Server databasesMaintaining the security of SQL Server databases that are created by iBase is largely a matter ofapplying controls by using the Security menu in iBase Designer
Outside of iBase, you must consider security settings for:
• Database files, security files, and any connection files, at the file system level• The SQL Server instance• Users, such as user profiles and group policies in Windows, and or logins and users in SQL Server
You also need to make sure that applications such as Data Miner, or services such as the MicrosoftSearch Service, have access to the database.
Application level security
iBase uses a security file to secure the iBase database from unwanted access. Only users who areknown to the security file are allowed access to the database. For more information, see SecurityFiles, Users and Groups.
In addition to the application security provided by the security file, iBase uses two mechanisms tocontrol access to the SQL Server database. Either SQL Server authentication or Windowsauthentication (sometimes called integrated security). For more information, see AuthenticatingConnections to SQL Server.
Making a database available and secure
The difference between an SQL Server database and a Microsoft Access database is that the data isheld in an SQL Server database and the idb file is a connection file to the SQL Server database.Optionally, the security file can also be in SQL Server format, in which case the ids file is also aconnection file. A connection file contains the minimum amount of information that is required toallow the user to connect to the SQL Server database. For information about connection files, seeConfiguration Options for an iBase System.
A single security file (or security connection file) can be used to control access to more than onedatabase connection file. The security file or security connection file is normally placed in the samefolder as the database connection files it secures. The folder in which the connection files are storedmust be shared because an iBase SQL Server database records the location of the connection files inUNC format.
Protect both the security and database connection files at the file system level. Some suggestedWindows permissions for iBase files and folders are given below.
Note: Do not copy connection files to client machines, whether security connection files or databaseconnection files. This might compromise the security of your system and adds to the administrativeworkload. You should keep the security connection file, in the same folder as the databaseconnection file, in a central location. If it becomes necessary to copy it, then the file name and pathmust be identical on each machine to which you copy it.
Files and folders iBase system administrator iBase users (not administrators)
Security file Full Control Read & Execute
Database file Full Control Read & Execute
IBM i2 iBase administration center 165

Folders Full Control Modify, Read & Execute, andWrite
All Users folder in theapplication data area (forexample, the WorkgroupTemplates folder)
Read & Execute
Note: Only the Windowsadministrator for the localmachine has full control.
Read & Execute
Note: You might want to changethe permissions on the fileSettings.xml (by default, anyuser can change local machinesettings).
Note: Write permission mightbe required to any mappingapplication configuration files;for details, see the iBase GISInterfaces release notes.
User's personal folder in theapplication data (for example,the Templates folder)
Full Control (the default) Full Control (the default)
iBase database administrators, security administrators, and system administrator require differentpermissions. For details, see the Administrative Center document Managing Access Control.
Overview of SQL Server Logins
Users and administrators connect to the SQL Server instance using SQL Server logins set up by yourSQL Server administrator. There are different logins for iBase, iBase Designer, and, depending on thesetup of the system, for the Microsoft Search Service (required by Full-Text Search).
Typically, two SQL Server logins are required for use in iBase and iBase Designer:
• A login with permissions for creating databases and modifying the schema of databases for use bydatabase administrators in iBase Designer. This login could connect to the server using SQL Serverauthentication.
• A less-powerful login for use by iBase users. This login should connect to the server using Windowsauthentication and be set up for a Windows user group, so that any member of that Windows groupcan be allowed access to the iBase SQL Server database.
To switch between SQL Server logins, change the iBase database properties in the DatabaseProperties dialog or use the Database Configuration utility.
For detailed information on setting up the SQL Server logins, see the Administration Center documentManaging Access Control.
Authenticating connections to SQL ServerAll users connect to an iBase SQL Server database using the same SQL Server login identifier (ID) andpassword, which is saved as part of the database properties.
The SQL Server login is used:
• when any iBase user logs on to a security file and opens the database• when any iBase administrator upsizes a database from Access to SQL Server format, creates a new
database or uses the Database Configuration utility
The identity of the user attempting to connect is authenticated by using one of the followingmechanisms (as defined as part of the SQL Server login):
166 IBM i2 iBase: Administration

• SQL Server authentication• Windows authentication, sometimes called integrated security, where SQL Server accepts the fact
that a user has logged on to a Windows domain as sufficient permission to connect to the server.(This is a more secure method than SQL Server authentication because it uses the Kerberosauthentication protocol.)
You can also inspect the server and login names in the Database Properties dialog in iBase Designer.
Before you can create or upsize a database, the SQL Server login name and password must beconfigured in Microsoft SQL Server, for example by your SQL Server administrator. As a minimum, thelogin must have the dbcreator server role.
Creating databases
After creating an iBase SQL Server database, the SQL Server login and password are stored,encrypted, in the connection file (.idb file).
It is your choice whether all iBase administrators who create databases use the same SQL Serverlogin and password, or whether each iBase administrator has an individual login. Individual loginsmake it easier for the SQL Server administrator to trace the owner of a database on the server, so youmight prefer this option if several users are likely to create databases.
Changing the SQL Server login after database creation
Because the SQL Server login is used when any user logs on to a security file and opens the database,you might prefer to change the login after you create the database to an SQL Server login with a lowerlevel of permissions or to use Windows authentication instead.
You can do this using the Database Configuration utility. This is a much safer method than changingsettings while a database is open, using the Database Properties dialog.
If you choose to change the login that is used to a less powerful one suitable for use by iBase users,you must to ask your SQL Server administrator to grant iBase users permissions on the new database.
Note: You could add this login, which should be mapped to a Windows user group, to the modeldatabase. This ensures that members of this group are automatically given database access rights toany database created in iBase.
Managing Access ControlYou can install and operate IBM i2 iBase and ensure that access is securely controlled. Access to dataand functions is based on the user name and password that are specified by the user when they logon to iBase, but to fully ensure control of the data it is also necessary to manage the physical andlogical security of other aspects of the whole system.
Setting up iBase clientsAfter you create the iBase database, you might need to configure each iBase installation to suit thework to be done in that database.
Setting options on local machines
You can specify some general options for how users use iBase in the Options (on the Tools menu ineither iBase or iBase Designer). You do not need to log on to a security file or open a database, theoptions apply to the application not to any databases.
IBM i2 iBase administration center 167

Page Detail
General Basic options for using iBase, for example, howusers use categories. Any user can change theseoptions without affecting any other user of themachine. These options take effect immediately.
Charting Defaults that are used when charting in Analyst'sNotebook (unless specified otherwise in acharting scheme or the Charting Settings dialog).Any user can change these options withoutaffecting any other user of the machine. Theseoptions take effect the next time records arecharted.
The use of these charting options is covered inthe iBase online help.
Advanced User options that can be changed by any user ofthe machine; changes to the Local MachineSettings affect all users of the computer. You canprevent users from changing the local machinesettings by denying write access to theSettings.xml file.
Hiding plug-ins
You can deny access to certain iBase features for any user that is working on a specific machine. Thisis a local machine setting and can be copied between machines.
For more refined control set at the user group level, you might prefer to define System CommandsAccess Control groups.
Copying the local machine settings to other machines
The local machine settings in the Options dialog and Plug-In Manager are saved in the fileSettings.xml. You can copy this file to the other machines on which iBase is installed. For details ofwhere to copy the file, see Installation and Application Data Folders.
SQL Server connection files on local machines
Users should connect to iBase databases that are in SQL Server format by using connection filesstored in a shared folder on the network.
Copying connection files to client machines might compromise the security of your system and addsto the administrative workload. If it becomes necessary to copy a connection file, then the file nameand path must be identical on each machine to which you copy it.
Setting and maintaining user access rightsThis topic describes how you can manage access to iBase by using features within iBase and alsoother measures outside of the control of iBase.
iBase application security
iBase provides the tools that are needed to set and maintain the access rights for groups of users,controlling what they can do within the application. One security file can control access to any
168 IBM i2 iBase: Administration

number of databases. After a user has access to a database, they are subject to the following types ofsecurity:
• Database-wide permissions, to read or alter data• Command access or denial• Usage monitoring, with audit logs• Folder object control, to provide private storage of analysis methods
An iBase SQL Server installation also supports Extended Access Control (EAC) that provides anextended range of Data Access Control features so that you can manage the degree to which userscan manipulate data.
Security measures outside of iBase
There are measures must take outside of iBase to ensure that only authorized users access iBase andits data. The degree to which you want to exercise these external controls depends on your own dataand environment. Managing the overall security of your system is likely to result in moreadministrative work. For this reason, it is important to apply only the degree of control that you need.
It is good practice to implement the controls that are discussed in this document incrementally toisolate the effect of each change. It is a necessary implication of managing access that some peopleare denied rights. For this reason, it is important that changes are tested and documented so that ifanyone loses the ability to work with the database the cause can be easily established.
To fully control access to the data managed by iBase, you must to understand and implement:
• Access to the network on which iBase runs• physical access to the iBase design and security features• logical access to the iBase design and security Features
Some of these features require that particular users or groups of users have user identities thatprovide direct or indirect access to iBase data. The number of such users must be restricted, and theidentities and passwords are held securely.
Physical access to iBase DesignerFor maximum security, it is advisable to limit physical access to IBM i2 iBase Designer and itscapabilities. If a user cannot gain access to the tools that implement access control for theapplication, they cannot modify the settings and compromise security.
There are several precautions that can be taken to minimize the possibility of unauthorized access toiBase Designer.
When you install iBase, limit the number of machines on which iBase Designer is installed. Forexample, do not install the following unless necessary:
• Designer• Tools (including the Database Configuration utility and the Audit Viewer)
The smaller the group that has access to iBase and the machines on which it runs, the easier it is tomanage access control. Strategies that place the machines and database on a separate networkwithout contact with other parts of the organization are inherently easier to control than generalinstallations.
iBase is not designed to operate over a WAN. Implementation over a WAN impairs performance andalso increase the exposure of the database to a wider audience through the network infrastructure.
IBM i2 iBase administration center 169

Logical access to iBase (roles)iBase application security provides three system roles to control a user’s access to the databasedesign and administration functions in iBase Designer. To manage access, you need to ensure thatusers have the appropriate roles.
Role Description
Database Creator This role should only be granted to users whoneed to create databases.
Database Administrator This role allows a user to create and modify thedefinition of the database by adding, amending,and deleting the information that defines theentity and link types and the associatedinformation. It also allows users to completedatabase administration tasks. A member of agroup with this role can see the completedefinition of the database and can view records.This is essential to allow a user to define andmaintain the database.
Security Administrator This role allows a user to create and modifygroup definitions and their access settings. Italso allows a user to use Audit Viewer to manageaudit logs. Security administrators cannot listrecords in iBase Designer; but they can listrecords in iBase and show individual records.
A user who through group membership has all three roles along with the full set of databasemanagement permissions is known as a System Administrator and has rights to complete any task iniBase. For detailed information on setting up administrative users, see the Administration Centerdocument Security Files, Users and Groups.
To design and administer the database, a user must be able to see the structure of the data. Any userto whom you grant access to iBase Designer using an iBase user name with a Database Administratoror System Administrator role is able to examine the entity and link types. An iBase SystemAdministrator always has access to all of the data records to be able to check that changes they makeare working as they expect. In contrast, an iBase Database Administrator can be denied access to allor specified records in iBase by a Security Administrator, but this might complicate databaseadministration.
You should minimize the number of people who are given user accounts that include DatabaseAdministrator or Security Administrator roles.
iBase files on the network (permissions)The iBase security file and database are managed through the security (.ids) and database (.idb)files.
For Microsoft Access format security files and databases, the .ids and .idb files contain all the datain the iBase system (apart from the audit log data held in the . ldb file). However, when you use theSQL Server format security file and databases, these files contain only the information that is requiredto connect to the SQL Server instance and databases. All other data is stored within the SQL Serverdatabases.
170 IBM i2 iBase: Administration

For successful operation of iBase, all users need the ability to create and delete files in the folder thatcontains the security file and database. This is because iBase creates and deletes multi-user lock filesin this folder.
It is important for both access control and normal system management that users are prevented fromdeleting the security (.ids) and database (.idb) files. You should apply security settings to thesefolders and files to prevent this.
The access permissions that are required on the iBase security file and database depends on whetherMicrosoft Access or SQL Server is in use for storing the data:
• It is necessary for iBase to write to the Access format security file whenever a user logs in to thesecurity file because a Microsoft Access format security file contains the Security Audit log.
• When an SQL Server format security file is used, iBase only needs to write to the Microsoft Accessconnection file when the database properties or connection details are changed. This operation canbe performed through iBase Designer or the Database Configuration utility by an iBase user withboth the Security Administrator and Database Administrator roles only.
The following tables detail the permissions necessary on the folder, security file, and database filesfor the various configurations and roles in the iBase system.
Role Minimum Windowspermissions
Folder containing the iBasesecurity file and database
All roles Modify
Security file All roles Read, Write
Database file All roles Read, Write
Audit log file All roles Read, Write
Role Minimum Windowspermissions
Folder containing the iBasesecurity file and database
All roles Modify
Security file All roles Read, Write
Database connection file Users with SecurityAdministrator role
Read, Write
All other roles Read
Audit log file - -
Role Minimum Windowspermissions
Folder containing the iBasesecurity file and database
All roles Modify
Security connection file Users with SecurityAdministrator roles
Read, Write
All other roles Read
IBM i2 iBase administration center 171

Role Minimum Windowspermissions
Database connection file Users with both Security andDatabase Administrator roles
Read, Write
All other roles Read
Audit log file - -
SQL Server login and user accountsThe SQL Server installation must be set up and configured for iBase users.
The main activities in managing security for iBase in an SQL Server installation are to:
• Set up login accounts and user accounts for iBase users.• Deny access to the iBase databases from applications other than iBase.• Allow access to other applications that must access the database such as the backup tool or the
Microsoft Search service that creates the index for Full-Text Search.
Note: Access from iBase to an SQL Server database is managed through an application role.Application roles are an SQL Server mechanism that allows external applications to assume control ofa database in a secure manner. Database access in Analyst's Notebook through the iBase API.
In an SQL Server installation of iBase, each user must gain access to an instance of Microsoft SQLServer through a login that establishes the user's ability to connect (authentication). This login is thenmapped to an SQL Server user account, which is used to control activities performed in the database(permissions validation). Therefore, a single login is mapped to one user account that is created ineach database the login is accessing. If no user account exists in a database, the user cannot accessthe database even though the user may be able to connect to an instance of SQL Server.
Almost all users that work with iBase need only have permissions to access the SQL Server database.They do not need any other permissions. To configure this, the SQL Server administrator should usethe public database role. Every user of a database will be given the public database role.
In an SQL Server installation, the default permissions for this role allow a user to access systemtables and run predefined stored procedures. It does not allow any access to any of the user tablesthat hold the iBase data. All access to user tables is handled by iBase. If a user only has the publicdatabase role they cannot use other applications to access the data in the database. This will preventthem from using tools such as Microsoft Query, Enterprise Manager or Management Studio to seedata in the database.
In addition, the SQL Server login that is used to connect to the SQL Server database must haveexecute permission on the sp_help_jobschedule stored procedure in the msdb system database.SQL Server administrators can grant this permission by editing the properties of the Public databaserole defined in the msdb database.
SQL Server administrators can further reduce access to the database by removing access to all of thesystem tables within the database from the public role. This can be done by accessing the roles forthe database and changing the permissions to not allow access. This measure prevents an iBase userwith valid access from using the public role to open the database from another tool and reading thecontents of the system tables which would, for instance, allow them to determine the names of tablesand fields.
172 IBM i2 iBase: Administration

Database Description
iBase security >All users of an iBase database must haveaccess to the database (security file) whichsecures the main iBase database.
The name of the database is provided by theiBase security administrator at the time ofcreation. The security database on the SQLServer machine will have the SQL Serverequivalent name of the Microsoft Accesscomponent with the suffix _ sec. For example, asecurity file that has been given the nameVehicle Crimes will have a connection file namedVehicle Crimes.ids and an SQL Serverdatabase name of Vehicle_Crimes_sec.
iBase database iBase manages the way that users can accessthe data within the database. Users can accessonly the data for which they have accesspermissions, which are set using the optionaliBase Extended Access Control (EAC) module.
The name of the database file is provided by theiBase administrator at the time of creation. Thedatabase on the SQL Server machine will havethe SQL Server equivalent name of the MicrosoftAccess connection file. The SQL Server databasedoes not have a suffix. For example, a databasefile that has been given the name Vehicle Crimeswill have a connection file named VehicleCrimes.idb and an SQL Server database nameof Vehicle_Crimes.
Audit log database In an SQL Server installation, iBase creates anaudit log database alongside the main database.The name of the database is the same as themain database name with the suffix _log. Forinstance, the database Vehicle_Crimes has anaudit log database Vehicle_Crimes_log.
You must also ensure that iBase users canaccess this audit log database. If you do notprovide access to the audit log database iBaseattempts to create a new audit log database andfail with a message that says it could not do sosuccessfully.
Managing data access
The model database is used by SQL Server as a template for all new databases that are created.Setting the permissions of the public database role on the model database ensures that newlycreated security databases, iBase databases, or audit databases copy the permissions that are set onthe model database. This applies to all databases created on the server and not only those that arecreated through iBase.
IBM i2 iBase administration center 173

In a Microsoft Windows environment, a simple way to manage data access is to use a Windows groupfor iBase users. For instance, create a windows group with the name iBase_users and add to it allusers that need access to the database. In SQL Server, create a login for this group and grant it accessto the iBase database (or even to the model database). Do not give this login any server roles ordatabase roles other than public.
SQL Server login for creating databases in iBase Designer
When you create SQL Server databases using iBase Designer, users must have the iBase roleDatabase Creator. These users must also have a corresponding SQL Server login that is a member ofthe dbcreator fixed server role.
A simple way to manage the creation of databases is to have a dedicated SQL Server login that useseither SQL Server or Windows authentication and is a member of the dbcreator fixed server role.iBase administrators use this login whenever they create new SQL Server databases or convertMicrosoft Access databases to SQL Server. The databases are created with this login mapped to thedbo user.
The login used to create the database will continue to have dbo rights to the database and audit logdatabase. It is important that either the login and password are kept secure, or the ownership of thedatabases is changed by an SQL Server administrator.
Note: After creating an iBase database, an iBase administrator can change the connection file so thatusers will connect to the database via a less powerful SQL Server login. The SQL Server administratormust grant this login access to the database on the SQL Server instance. For details of the login, seeabove Data access for iBase users. Alternatively, they can change the connection to use Windowsauthentication. For details of this step, see the Administration Center document External AccessControl.
Working with BUILTIN\Administrators
Any Windows account that is an Administrator of the machine on which SQL Server is running isautomatically a member of the SQL Server BUILTIN\Administrators group. In some SQL Serverinstallations, it is a policy that this powerful group is removed so that SQL Server administration isseparate from administration of the server machine on which it runs. If this group is removed ormodified, it will be necessary to take additional measures to ensure that SQL Server and iBasecontinue to function.
Attention: If the BUILTIN\Administrators login is removed, ensure that there is at leastone other login that is a member of the System Administrators fixed server role. If thislogin is validated using SQL Server authentication, also ensure that the SQL Server isconfigured to allow both SQL Server and Windows authentication.
If, during the installation of the SQL Server instance, the option was chosen to run the SQL Serverservice and SQL Server Agent service under the context of the localsystem account, it will benecessary to set up specific
Service Windows user account
SQL Server This user account should only be a member ofthe Windows group Domain Users.
174 IBM i2 iBase: Administration

Service Windows user account
SQL Server Agent This user account usually only needsmembership of the Windows group DomainUsers, however to perform certain advancedtasks, for example, executing xp_cmdshell orusing the AutoRestart feature of the SQL ServerAgent service, it will also need to be a member ofthe Local Administrators group.
You may need to provide a login for backup operations. This login will need to have thedb_backupoperator database role.
Access for Full-Text Search
The Microsoft Search Service must have permission to read the database. By default this service runsas localsystem and has access to the databases on the server via the BUILTIN\Administratorslogin.
If you remove access for BUILTIN\Administrators login you must add a new login with the name:
NT AUTHORITY\System (notice the space between NT and AUTHORITY)
This login must be a member of the SQL Server System Administrators fixed server role.
Use iBase with other productsiBase provides a sophisticated security model that controls all aspects of access to the data andfunctions. iBase users must provide a username and password to enter the iBase system, anddetermine the level of permissions.
If iBase Extended Access Control is used, some users might be able to read any data, but not add ormodify anything; other users might not be able to see specific entity or link types, specific data fields,or individual records.
Consider carefully the folders in which data extracted from iBase in the form of charts, reports, orexport files are stored. Ensure that these folders are given appropriate access permissions. After datais outside of iBase, it is potentially exposed to unauthorized access and aspects of the iBase databaseschema and data can be revealed.
Attention: Data that is taken from an iBase database, in the form of a chart, a report, a map oras an export file for use in a third-party system, is no longer protected by iBase access control.
The security implications of exporting data from iBase for use in other third-party products mustalways be carefully considered.
Analyst’s Notebook and Chart Reader
Many customers use Analyst’s Notebook with iBase to extend their visualization and analyticalcapabilities. When using Analyst's Notebook with iBase, the user can only chart data and includethose field values to which they are permitted access in the iBase database. In particular,consideration must be given to data that is exposed in the Analyst's Notebook chart by using cards,attributes, and data records, which might reveal the presence of a particular database field to whichthe user that creates the chart has access, but which is hidden from other users.
Chart Reader enables chart data, extracted from an iBase database and charted using Analyst’sNotebook, to be shared as a snapshot of the database content with other non-iBase users. Someorganizations are happy to send charts as email attachments for browsing using Chart Reader within,
IBM i2 iBase administration center 175

or even outside, their organization. However, after is is e-mailed, information tends to disseminatefurther in unexpected ways. Ensure that iBase data that is exposed in this way complies with yourorganization’s data distribution and disclosure policies.
Text Chart
iBase provides facilities to enable its use in conjunction with IBM i2 Text Chart for the extraction andstructuring of data from unstructured text documents. Factors to consider when generating a TextChart template from the iBase schema are dealt with separately in the Administration Centerdocument Using iBase with Text Chart.
iBase GIS Interfaces
When using the optional IBM i2 iBase Geographic Information System Interfaces to plot iBase data ona map, the user can only plot data and transfer those field values into the mapping application towhich they are permitted access in the iBase database. Caution should be exercised if it is intended tosave the data in a map for sharing with others who may not have the same level of data accesspermission as the iBase user who originally plotted the data on the map.
Physical security
After extracted from the iBase database and printed as charts, reports or maps, your data is moreaccessible.
You should review your physical security if the printouts of extracted data are going to be used inparts of your premises that are not usually used by iBase users. Is it permissible for iBase data anddetails of your iBase database schema to leave your secure working areas? If so, you must plan andrestrict how much you do want to reveal.
iBase with TextChartThis document discusses the process of transferring TextChart data to iBase, and proposes somebest practices to optimize the process and avoid most of potential pitfalls. It does not describe all thesteps to perform the various processes as those are covered in user manuals and help.
This document is intended for iBase administrators and supervisory personnel who set up andmanage TextChart data capture operations with iBase. Specifically, iBase administrators anddatabase designers who are responsible for:
• Setting up iBase users• Setting up the iBase database schema• Controlling iBase system security
As well as staff supervisors who specify, or manage, data capture workflows that involve marking updocuments or loading visualizations.
The document covers the following areas:
Section Description
Ways of Working with iBase and TextChart Summary of the different ways of using iBasewith TextChart.
iBase TextChart Security Considerations Summary of the issues to consider to preservethe security of an iBase database that is updatedby using TextChart.
176 IBM i2 iBase: Administration

Planning Workflows for TextChart Overview of the steps involved in implementingTextChart as part of your iBase system.
Before Starting Data Capture in TextChart Discussion of the issues that you need toconsider before you start to capture any data inTextChart. For example, how you handle sourcedocuments, references, and grades.
Data Capture Considerations Discussion of the issues that you need toconsider after you are ready to capture data inTextChart. For example, how data capture andloader users handle mandatory fields, or howrecords loaded into iBase are connected to theirsource documents.
Optional Schema Extensions for TextChart There are a number of iBase features relating toits more advanced use with TextChart that areonly available if certain items are defined in theiBase database schema. This section describesthe optional changes that need to be made to thedatabase schema and charting scheme.
Troubleshooting iBase TextChart Additional information to help understanding andfixing any problems that might arise whengenerating TextChart templates or loading datafrom TextChart visualizations.
Ways of working with iBase and TextChartThere are various ways of working with iBase and TextChart and, depending on the requirements ofyour organization, you can combine these different approaches. When using any of these approaches,take care to use an appropriate template for TextChart, to avoid any potential problems when addingdata to the iBase database.
Using the live connection from TextChart to iBase
Users can mark up external documents, such as Microsoft Word documents, in TextChart and updatethe iBase database with this data as markup continues. This method requires a live connection to thedatabase. Work done during the session can be saved as a visualization (.tcv file) and any changesthat occur in the iBase database during the session can be used to refresh iBase data already existingin the visualization.
Using visualization files to update iBase
Instead of connecting to the iBase database in TextChart and updating the data directly, users canupdate the database by starting iBase and loading records from the visualization file into thedatabase. Data loading is done later after markup is complete and is probably done by a differentuser. This method does not require a live connection to the database.
Using the database as a document repository
You can use the iBase database as a document repository whereby data is sent to TextChart, markedup and then added to the original database or to a different one. The data can be added immediatelyby using the live connection or later by loading from visualizations. The source data can be fromsupporting documents embedded in the database or from the contents of multi-line text fields.
IBM i2 iBase administration center 177

iBase TextChart security considerationsiBase provides a sophisticated security model that controls all aspects of access to the data andfunctionality. This is in contrast to TextChart, which applies few limitations on the user.
iBase security
iBase controls all aspects of access to its data and functionality. iBase users must provide a username and password to enter the iBase system, and this determines which level of permissions isgranted to that user. Some users might be able to read any data but not add or modify anything or, ifiBase Extended Access Control (EAC) is used, some users may not be able to see specific entity or linktypes, or fields.
TextChart security
In contrast to the security model in iBase, TextChart applies no limitations on the user, other than therange of icons provided at startup that signify the entity types available. To make it possible forTextChart to successfully integrate with the more rigorously defined iBase security model, it isimportant to consider iBase security when setting up templates and planning workflows. This applieswhen working with both the live connection to iBase and when working independently of iBase.
TextChart sessions must be started from a template generated from the iBase database. If the aim isto transfer the captured data into iBase, then data capture users who create new workspaces that arenot based on data sourced from the iBase database must be trained to always start sessions with aNew from Template operation. If TextChart is used only to capture data for loading into iBase, thenthe template generated from the iBase database could be set as the standard template.
TextChart templates
Templates generated in iBase are required if TextChart is to be used to update iBase databases. Thetemplate represents the view of the iBase database that is available to the user who generated thetemplate. Thus a user with more permissions may generate a template that a less-privileged userwould be able to use to create a TextChart visualization but not be able to load back into iBase. Forthis reason, it is very important to consider these issues before beginning data capture.
Preserving iBase database security
Before generating a TextChart template from the iBase database, preservation of iBase databasesecurity must be considered within the context of the whole data capture workflow. Specifically:Will data be sent from the database for mark up in TextChart, and who will perform the markup?
If there are security issues concerning the database, the template used for this should be basedon the highest security risk users.
Who is to mark up the source documents using TextChart?Are these staff (who may not be iBase users) entitled to know details of all the entity and linkdefinitions, and their fields, held in the iBase database? If not, make sure that the templatecontains only entity and link types of which the staff have knowledge. In other words, if these staffmembers were iBase users, they would have at least READ access to those entities and links.
Who is to add or load into iBase the data captured with TextChart?Do these staff members have READ, INSERT, and UPDATE permissions to that data in the iBasedatabase? If not, either use different staff or make appropriate changes to their securitypermissions before they attempt to load data from TextChart.
178 IBM i2 iBase: Administration

Are there any physical security issues?You should review your physical security if TextChart is going to be used with a templatecontaining iBase schema information in parts of your premises not usually used by iBase users.Also, consider whether TextChart is being used on standalone machines such as laptops. Is itpermissible for details of your iBase schema to leave your secure working areas?
Planning workflows for TextChartCapturing and maintaining data is generally a team effort involving different personnel and physicalresources. The goal is to populate an iBase database with accurate, graded information of traceableprovenance. To achieve this, the workflow should be planned with certain constraints in mind.
The following steps are recommended when planning a workflow for use of TextChart within an iBaseenvironment:
IBM i2 iBase administration center 179

It is assumed that you, as the iBase administrator, create and maintain the iBase database schemaand the TextChart templates that are generated from it. These templates are used by TextChart usersto create TextChart visualizations.
The steps are described in greater detail in the following sections.
Step 1: Identify staffing and security requirementsYou, as the iBase administrator, must identify the staff members who are involved in the entireworkflow.
To simplify the information about workflow planning, this document distinguishes between four roles:
• iBase administrators• Data capture users• Data loader users• Data checker users
Not all organizations have exactly these roles or job titles, but the activities and responsibilities arerecognizable. In some cases, one person can fulfill multiple roles.
TextChart templates must be created by the iBase administrator to centralize control of changeslikely to affect any data capture that is still being processed. To maintain control, securityadministrators can deny a user access to each of the TextChart related commands in iBase, by usingSystem Commands Access Control groups.
Data capture users
In TextChart, users markup documents and extract data either by using a live connection to an iBasedatabase, or working independently of iBase.
Working method Notes
Live connection These users work with a live connection to aniBase database and are likely to be experiencediBase users as they are responsible forinteracting directly with iBase data fromTextChart. They must make decisions thatconcern record matching, updates, andduplicates as they work. Data capture users thatuse iBase Live need to be analysts orexperienced iBase data handlers.
Work independently These users do not need to be iBase users andtheir only knowledge of iBase might be by using aTextChart template generated from the iBaseschema.
Data loader users
If data is loaded into iBase from visualizations, rather than added by using the live connection, thendata loader users manage decisions about duplicates that are flagged. Therefore, the data loaderneeds to be an analyst or a very experienced iBase data handler.
Depending on the organization, you might prefer to use data entry clerks to load the data. In this case,it is best practice for these clerks always create duplicate records during loading. At the end of the
180 IBM i2 iBase: Administration

load process, the data entry clerk creates an iBase set from the new records, which an experiencedanalyst or data checker can evaluate later and resolve any duplicates.
Data checker users
If data is loaded from visualizations, rather than added by using the live connection, then the datachecker role can represent an “expert” who checks the data as it is loaded into iBase or just after it isloaded.
Security requirements
iBase provides a sophisticated security model, which controls all aspects of access to the data andfunctionality. In contrast to the security model in iBase, TextChart applies no limitations on the user,other than the range of icons that are provided at startup that signify the entity types available. Tomake it possible for TextChart to successfully integrate with the more rigorously defined iBasesecurity model, it is important to consider iBase security when setting up templates, and planningworkflows. This applies when working with both the live connection and when working independentlyof iBase.
Step 2: Determine data sources and target databasesThe intended interaction between iBase and TextChart determines your workflow.
The requirements for the templates vary depending on whether:
• There is a live connection from TextChart to the iBase database so that the TextChart user candirectly find, add, and modify records in the database.
• The iBase database is to be used as a document source for TextChart, in which case, embeddeddocuments, and data from multi-line text fields are sent to TextChart for mark up.
• There is no connection between TextChart and the iBase database so users load TextChart data intothe database from visualizations that are created in TextChart.
These approaches are not mutually exclusive. The following tables outline the different templaterequirements for the working methods discussed earlier.
Live connections to update iBase databases
In this way of working, TextChart users can open the iBase database to work directly in the database.
Data path Template requirements
New TextChart workspace live connection todatabase #1
The template must be valid for the connecteddatabase and must have the same name as thedatabase.
It must be stored with the database, in the samefolder as the .idb file.
If there are security requirements, then thistemplate should be based on the most restrictiveuser template.
The template for the connected database mustbe loaded before mark up commences.
Existing TextChart workspace live connection todatabase #1
The existing workspace must be created by usinga valid template for the connected database.
IBM i2 iBase administration center 181
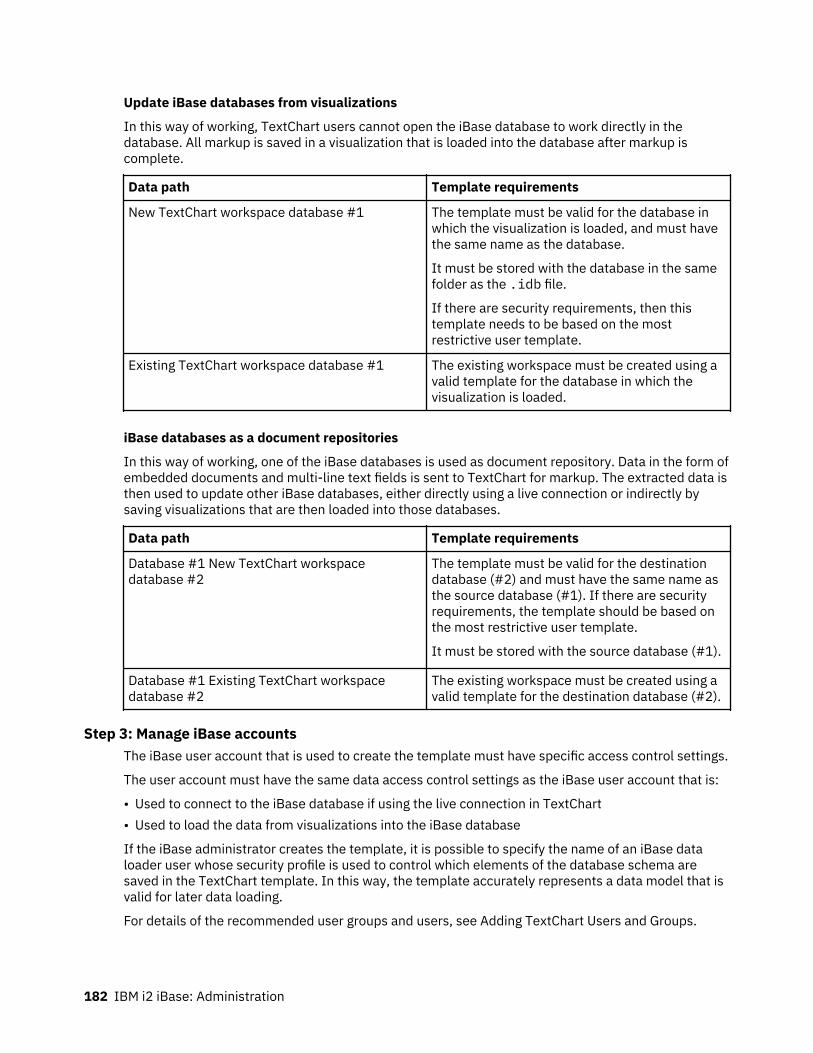
Update iBase databases from visualizations
In this way of working, TextChart users cannot open the iBase database to work directly in thedatabase. All markup is saved in a visualization that is loaded into the database after markup iscomplete.
Data path Template requirements
New TextChart workspace database #1 The template must be valid for the database inwhich the visualization is loaded, and must havethe same name as the database.
It must be stored with the database in the samefolder as the .idb file.
If there are security requirements, then thistemplate needs to be based on the mostrestrictive user template.
Existing TextChart workspace database #1 The existing workspace must be created using avalid template for the database in which thevisualization is loaded.
iBase databases as a document repositories
In this way of working, one of the iBase databases is used as document repository. Data in the form ofembedded documents and multi-line text fields is sent to TextChart for markup. The extracted data isthen used to update other iBase databases, either directly using a live connection or indirectly bysaving visualizations that are then loaded into those databases.
Data path Template requirements
Database #1 New TextChart workspacedatabase #2
The template must be valid for the destinationdatabase (#2) and must have the same name asthe source database (#1). If there are securityrequirements, the template should be based onthe most restrictive user template.
It must be stored with the source database (#1).
Database #1 Existing TextChart workspacedatabase #2
The existing workspace must be created using avalid template for the destination database (#2).
Step 3: Manage iBase accountsThe iBase user account that is used to create the template must have specific access control settings.
The user account must have the same data access control settings as the iBase user account that is:
• Used to connect to the iBase database if using the live connection in TextChart• Used to load the data from visualizations into the iBase database
If the iBase administrator creates the template, it is possible to specify the name of an iBase dataloader user whose security profile is used to control which elements of the database schema aresaved in the TextChart template. In this way, the template accurately represents a data model that isvalid for later data loading.
For details of the recommended user groups and users, see Adding TextChart Users and Groups.
182 IBM i2 iBase: Administration

Step 4: Create the TextChart templatesYou should only generate templates when the iBase database schema is believed to be stable.
You can use iBase Designer to edit the database properties and record the version of the databaseschema (for example, v2.0) in the database Description panel. The database description is displayedwhenever an iBase database is opened. This shows the user the current schema version and anynotes that the iBase administrator might have supplied to explain the changes. Note that this versionnumber refers to the database design as seen by the iBase administrator. Depending on their securitypermissions, users may not be able to see the actual schema changes.
Use iBase to generate a TextChart template from the schema:
• From the File menu in iBase, select Data > Generate i2 TextChart Template.
Naming convention for TextChart templates
If the template is to be used to mark up data sourced directly from the iBase database, then thetemplate must be given the same name as the destination database and be stored in the same folderas the source iBase database (or connection file). However, if the TextChart template is only used tocreate visualizations from external data then it might be stored in any common location. It isrecommended that the name of the TextChart template includes the corresponding version of theiBase database schema, for example: CrimInt-v01.tct.
In a similar way to the schema version being identified in the name of the template, it is wise toinclude a reference to the security level appropriate for the template, for example:
CrimInt-v01-Researcher.tct.
Updating TextChart templates
To make small, cosmetic, changes to the template, use TextChart Designer (for example, addingattribute symbology for some types). The changes should be sufficiently small that they do notconstitute a change to the data representations, and so do not need a different schema versionnumber; however, you might want to increment the template name in some way to signify thecosmetic differences, for example: CrimInt-v02.tct.
We do not recommend that you spend too much time reworking the template generated from aniBase database because:
• There is a risk of making the template inconsistent with the database• The modifications would need to be redone each time the database schema is modified
Step 5: Validate the TextChart templatesIf you are generating templates for other users, it is suggested that you validate the templateimmediately after its creation. This validation, makes sure that any problems with users' data accessrights are resolved before any data is captured.
If you make any changes in TextChart Designer, you must validate the template for the data loaderuser. Failure to do this validation, might lead to incompatibilities between the TextChart template andthe iBase schema, and prevent the loading the captured data from the visualization into iBase.
If the pre-load validation fails when loading a visualization, due to the user's permissions then you,can change the permissions for the data loader or else load the data yourself.
IBM i2 iBase administration center 183

Step 6: Distribute the TextChart templatesAfter a template is validated successfully, you can either install it in the folder that contains thedatabase, or distribute the TextChart template to the data capture users.
Data capture users need to use templates from a centralized shared folder. Use a naming conventionso that any additions to the set of templates are immediately obvious. It is good practice to withdrawany templates that do not exactly match the latest version of the iBase schema.
When you are creating visualizations that are not based on data that is sourced from an iBasedatabase, it is suggested that you create a “Workgroup Template Folder” to simplify theadministration and sharing of templates.
Note: When you plan your workflow, make sure that templates are not distributed immediately beforeyou make incompatible iBase schema changes.
Step 7: Access data in TextChartYou can access data in TextChart by adding external documents to the workspace or by sendingembedded documents or text in multi-line fields from the iBase database.
Adding documents to the workspace
For information on adding documents to a workspace, see the TextChart documentation.
Sending iBase data for mark up in TextChart
The contents of multi-line text fields and documents that are embedded in Document fields can besent to TextChart for markup. This data can optionally be consolidated to produce a single markupdocument for each entity or link record. The user then has several choices about how to use the datain TextChart. They can:
• Create a TextChart workspace• Add the data to an existing workspace• Add it to a currently open workspace• Add it to a workspace that is suitable for use (aligned) with a different iBase database
For each of these options, it is vital that the appropriate template is used, as no template validationtakes place at this step. The new workspace option uses the template that is saved in the databasefolder; the other options require that an appropriate template for the destination database is usedwhen the workspaces is created. Refer to the tables in step 2 to determine the templaterequirements.
The resulting documents are then loaded into TextChart, and are automatically named based on theiBase label of each item included. For example, if two entities each with several multi-line fields weresent for markup, and the data was consolidated, two markup documents would be produced, eachnamed after the label of the source entities.
Contained within the properties of each of the documents is a source reference (which cannot bechanged) that links the markup documents back to their source entity, to maintain traceability.
Step 8: Extract data in TextChartYou can begin data capture when connected to an iBase database, or independently of the iBasedatabase.
The user can be:
• Connected to an iBase database and able to work directly with the data in the database.
184 IBM i2 iBase: Administration

• Independent of the iBase database - a data loader user loads the completed visualization intoiBase.
The template that was generated in iBase contains information about data controls enforced byiBase. TextChart does not enforce these constraints but makes the user aware of mandatory fields,discriminator fields, and default values by the use of symbols in the properties for the item. Inaddition, multi-line text fields enable a TextChart feature to append multiple text markups to thesame attribute slot.
When you create a visualization using TextChart, it is possible to mark each entity and link withgrades. Grades are usually used to rate the quality of the data based on its reliability, provenance, anddissemination policy. See Handling Grade Information for details.
Data capture when connected to an iBase database
Users who use the live connection to an iBase database must be able to log on to a security file andopen the database. In this way, their access to the data is controlled by Base application-levelsecurity. Also, the TextChart palette is aligned with the iBase schema by loading the appropriatetemplate for the database.
Data capture when independent of the iBase database
There is no link to the iBase database if you are working independently of iBase. Data captureprogresses using the template created from the iBase schema and, if data is sent for markup fromiBase, using the documents generated from the iBase data.
Other considerations
You, as the iBase administrator, must make sure that you give due consideration to any TextChartdata capture that is still in progress before changes are made to the iBase schema. Replacing theTextChart template with an updated version does not introduce the change for data capture activitiesthat are underway. The work that is still in the system takes some time to make its way through.
To overcome this, facilities are available to update the template after it is embedded inside aTextChart visualization after data capture starts.
Step 9: Load visualizations into iBaseThis step of the workflow applies if you choose to load extracted data into iBase from TextChartvisualizations rather than use the live connection.
You do not have any problems when loading data in iBase provided that:
• You follow the recommendations on template validation.• You do not change the iBase schema after you create the template.• You do not change any user permissions after you create the template.
When designing the workflow, it is important to decide a strategy for dealing with duplicate recordsarising from the load process. Duplicates can either be:
• Resolved by the data loader user at the time the data is loaded.• Always created but the loaded data is put into a set to enable the duplicates to be analyzed later
(for example by using the Duplicate Records Checker dialog) or checked by the data checker user.
If you use iBase mandatory fields, you must to formulate guidelines to help the data loader userhandle any missing mandatory fields detected during loading.
IBM i2 iBase administration center 185

Step 10: Confirm data integrityDepending on who captures and loads the data, there might be a separate verification step. In somecases, the data loader user can resolve a significant number of duplicates, add source identification,and set appropriate defaults and mandatory values.
In some organizations, the data that is loaded would not be treated as reliable until it is validated byan expert analyst.
Before Starting Data Capture in TextChartThe various components of the setup part of the TextChart
Evaluate the database schemaiBase is designed with analysis in mind. It incorporates a flexible database system that can be used toadapt your database as the investigation progresses and requirements change. Changes to theschema are immediately available to all iBase users.
Unfortunately, such changes can have a detrimental effect on TextChart work in progress because theTextChart template cannot automatically update in step with changes to the iBase schema.
Extending the schema
For many customers, schema changes occur rarely and it is possible to use TextChart with iBasewithout modifying the iBase schema. However, there are a number of iBase features that can only beused if extensions are made to the schema.
For example, if source documents are to be stored, it is necessary to specify an entity type, such asSource Document, to which the document can be attached.
After users start to mark up source documents using TextChart, changes to the iBase schema shouldbe made only with care.
iBase records that a TextChart template has been generated for that database and iBase Designerdisplays a warning when you open that database. This acts as a reminder that changes to the schemashould now be considered in the light of work in progress based on the existing TextChart template.
Modifying the schema after data capture is started
In general, if you need to change the schema, you should try to make it additive rather thansubtractive. This means that if a field is added to the schema then existing visualizations, based on anearlier template, is still valid for the database though clearly with no data for the new field. However,if a field is removed from the schema, existing visualizations that use that field, based on an earliertemplate, becomes invalid.
To update the iBase schema while data capture is in progress:
1. Change the iBase schema using iBase Designer. Where possible, these changes should beadditive.
2. Use TextChart to apply the revised template to each visualization in which data capture is inprogress.
3. Use the Validate i2 TextChart Template command in iBase to validate the updatedtemplate embedded in the visualization. To do this, you must specify the visualization file (.tcv)explicitly.
4. Confirm that the template embedded in the visualization validates without any errors.5. Resume data capture into the visualization using TextChart.
186 IBM i2 iBase: Administration

If you use a live connection to iBase, then TextChart will validate the template saved in the workspacebefore the workspace is connected to a database. It checks that the template is compatible with thedatabase schema and if it is not compatible, it prompts for the correct template to be applied to theworkspace. Notice that a TextChart template may be compatible with the database but yet not reflectthe latest changes to its schema. For example, the validator will not detect changes to default fieldvalues, to the setting of the Indexed, Mandatory, Discriminator or Characteristic field properties, orthe addition of a new entity type. This does not affect any data capture in progress; see Impact ofSchema Changes on Data Capture.
Additional considerations
It is good practice to keep a record of the changes made to a schema and to adopt a namingconvention for templates, probably incorporating a version, date, or both to clearly identify eachvariant of the schema.
Use semantic types with TextChartUsers of TextChart with iBase benefit from the introduction of semantic types.
Why assign semantic types?
If semantic types are assigned to the iBase schema, semantic types are included in all TextCharttemplates that are generated for that database. The semantic types are used to align the content of avisualization with the iBase schema whenever data is loaded from visualizations based on one of thetemplates.
Additionally, certain semantic labels allow TextChart to “derive” values for semantic properties basedon the item label. For example, a Person entity can derive values for given name, surname, full name,gender, title, and suffix, making data capture more efficient in TextChart, and allow easy import intoiBase. This functionality is supported in TextChart for the following semantic types: Person, Vehicle,Credit Card, and Bank Account.
Another advantage of assigning semantic types in the iBase schema is that if certain types ofincompatible change are made either to the iBase database schema or to the TextChart template,data from the visualization can still be added or loaded into iBase (provided that the semantic typesalign between the visualization and the database).
This is useful if a database or template field, entity type, or link type was renamed since the templatewas originally generated.
When are semantic types used?
Semantic types are applied when validating a template against a database or loading data from avisualization as follows:
• If there are no semantic types assigned, or semantic types are assigned to only some of theschema, then the names of the entity types, link types, and fields in the visualization, which are notassigned semantic types must match those of the database.
• Where semantic types are assigned, the semantic types in the visualization must match those in thedatabase unless a match can be found in the database, by using the generalized form of thesemantic type as used in the visualization.
Handle source documentsThe TextChart workspace is derived from a template, and is stored as a TextChart visualization (.tcv)file.
TextChart has a workspace, which comprises:
IBM i2 iBase administration center 187

• One or more source documents (such as Word, PDF, HTML, WordPerfect)• Markups associated with one or more source documents• An i2 chart
The workspace is derived from a template, and is stored as a TextChart visualization (.tcv) file. Whena document is marked up in TextChart, the resulting workspace contains an embedded HTML versionof the marked up source document.
As part of the transfer of data into an iBase database, you can also store the marked-up sourcedocuments to help maintain a history of where the information came from. To do this, you mustconfigure the iBase database and the TextChart template before the TextChart workspace is created.See Optional Schema Extensions for TextChart for further details.
Handle source referencesEvery entity, link, and field in a visualization is marked with a source reference.
By default, this source reference is the name of the document that is being marked up. However, itmight identify additional information about the source document. The information might comprise:
• The reference number for the document• The location where the document is physically stored• Other identifying characteristics
How source references are used in iBase
In iBase the TextChart source reference can be stored in two places in:
• a field within the iBase entities and links• a field within the Source Document entity
It can be used as a common value to keep related records from TextChart together; this makes itespecially valuable when used with source documents. Where multiple documents are used in theTextChart workspace, the source reference can be used to annotate each entity with the individualsource document from which it was created.
Configuring iBase to allow source references
To store TextChart source references in iBase, you need to configure the iBase schema to have a fieldin which to store the reference. You must also set up the charting scheme. For details, see:
• Schema Extensions: Source References• Charting Schemes: Source References
Items created from multiple source documents
If a TextChart item is created from multiple source documents, the individual source references areconcatenated together into a single string of characters. The individual source references areenclosed in double quotation marks and separated by commas.
To store source references from multiple source documents in iBase, you need to configure the iBaseschema to have a field in which to store the reference; see Schema Extensions: Advanced Use ofSource References for details. You must also set up the charting scheme; see Charting Schemes:Advanced Use of Source References for details.
188 IBM i2 iBase: Administration

Note: If the overall source reference string exceeds the length of the iBase field used to store thesource reference, then an error occurs when validating the visualization before loading it. In thissituation, use TextChart to reduce the overall length of the source reference strings.
Handle grade informationWhen creating a visualization in TextChart, it is possible to mark each entity and link with grades.Grades are used to rate the quality of the data based on its reliability, provenance, and disseminationpolicy.
Grading information takes the form of three grade fields that can be assigned values from a pre-defined list. The actual values available depend on the grading system in force within yourorganization.
If grading information is recorded in the document, this can be captured as part of the markup usingthe grading scheme value defined in iBase. In iBase the grading information is stored with the entityand link records.
Configuring the grading scheme in iBase
The iBase grading scheme is defined by the iBase schema, which needs to be set up before theTextChart template is created. You must also set up the charting scheme.
Generating the TextChart template
After you set up the grade fields, the TextChart template can then be generated from the iBaseschema. When you create the template, turn on the Use this charting scheme check box, and selectthe appropriate charting scheme.
Add TextChart users and groupsIt is suggested that a new database management group is defined in iBase and given permissionsappropriate to the scope of its intended use with TextChart. For example, if the source documentcontains information about people, the group must be able to INSERT and UPDATE any Personrecords.
After the group is defined to the appropriate level of permissions, it is suggested that a representativeuser is created as a member of the group, for example:
• Researcher• Data Entry Clerk• Document Reader
You then use this representative user and its password to generate the TextChart template. Thisdictates the security permissions that govern how much of the iBase schema is transferred to theTextChart template.
Using a representative user makes sure that the iBase administrator has access to its password andhas a security profile that can be customized by the iBase administrator without consultation with anyactual individual. However, this representative user account should not be used for data loading,since audit accountability is lost.
It is inappropriate to give the representative user or group READ permission without INSERT andUPDATE permissions, since the purpose of the exercise is to create or modify data. The iBaseadministrator can use the representative user to perform test validations and loads, for examplewhen there are schema changes or template modifications using TextChart Designer, withoutinvolving any individual user.
IBM i2 iBase administration center 189

If you intend to have several staff members who use the live connection to iBase or act as dataloaders in TextChart, each should be a separate iBase user that shares a common security profile. Insome organizations, it might be sufficient to have a single iBase user whose profile is used to generatethe TextChart template from the iBase schema and who is responsible for all data loading.
Note: It is important not to create iBase users that are shared by several staff members for TextChartrelated activities. An “anonymous” user undermines the staff accountability inherent in the iBasedatabase audit trail.
Check data integrityAs part of your working practices, you might require that the data that is extracted from documents isnot considered reliable until it is checked by a second person. This might be an analyst, who uses thewider context of the iBase database content to verify the interpretation made by the data captureuser.
It is suggested that a standard field is added to all data that is likely to be added from TextChart (orindeed through any other data import mechanism) to record the status of the data. During the dataloading operation, the default value for this field is set to something like:
• Not Checked• Not Validated
After the data is checked, the value in that field can be cleared or set to some significant value, suchas:
• Checked• Validated
This workflow step is important if you do not use the live connection in TextChart. The only contextavailable to the data capture user is the source document - the data capture users do not have thebenefit of the wider context offered by the database.
Validate TextChart templates before works startsAlways validate TextChart templates before you release them for general use.
To validate TextChart templates:
• In iBase, select File > Data Validate > i2 TextChart Template.
If errors are reported:
1. Make sure that you understand why the errors are occurring.2. Take appropriate corrective action to fix them.3. Revalidate the template before you start data capture.
Validation never reports that additions to a database schema are missing from a template, forexample that a new entity type is missing.
Note: If the user who is validating a template does not have the right permissions in the iBasedatabase, the validation reports that the entity and link types do not exist. The same applies duringthe validation that is performed on TextChart visualizations. This preserves security because to a userwho is not allowed to access an entity type or link type, the system behaves as if the type does notexist. This is important on sites where staff use the same iBase database for different purposes.
How validation errors can arise
Validation errors are a result of:
190 IBM i2 iBase: Administration

• Data access permissions failure - this is user-specific, change the user’s data access permissions oruse a different user with permissions to validate the template or load the visualization.
• Unaligned template - this should not occur if the recommendations in this document are adopted. Ifit does, corrective action can take a lot of time, and unless multiple or large visualizations areaffected, it might be more cost effective to recapture the data using a template that is aligned withthe iBase database.
• Modification of the visualization file type - the file type of a TextChart visualization can be changed,for example by opening it with Analyst’s Notebook then saving it as a .anb or .ant file. However, ifthis is done, it is no longer suitable for loading into iBase.
Data Capture ConsiderationsThe various components of the data capture part of the TextChart.
Data capture in TextChartProvide users of TextChart with guidelines to ensure that the data in the visualization is structuredcorrectly for iBase.
Depending on your organizational requirements the guidelines vary, but consider:
• Always use an appropriate template for the TextChart session.• Give advice on template names and storage conventions. For more information, see Evaluating the
Database Schema.• Set the TextChart workspace properties, such as source reference. For more information, see
Handling Source References.• Apply the appropriate conventions for handling any mandatory fields. For more information, see
Handling Mandatory Fields in TextChart and iBase.
There are several extra factors when you are working in TextChart with a live connection to the iBasedatabase:
• When the connection is made to the iBase database, the currently loaded TextChart template,visualization, or both are compared against the template for the iBase database. If they are notaligned, the iBase template is applied to TextChart and the current visualization. As this template isa standard template, it must be designed to take data security into account so that users can onlysee the data types that they are cleared to view.
Note: A TextChart template might be compatible with the database but yet not reflect the latestchanges to its schema. For example, the validator does not detect changes to default field values, tothe setting of the Indexed, Mandatory, Discriminator or Characteristic field properties, or theaddition of a new entity type. This does not prevent users from completing any data capture inprogress. For more information, see Impact of Schema Changes on Data Capture.
• When finding data in the iBase database, TextChart by default uses the discriminator fields to find amatch though users can specify that more or fewer fields are used. Where the user has insufficientaccess rights to either an entity type or an individual record a match is not found.
• Where TextChart is used as a data creation tool for iBase, users should update the iBase recordwhenever data entry for that record is completed; this makes sure that the latest information isavailable for other analysts working with the iBase data.
• TextChart users can add the source document markup directly into the iBase database, as well ascreate connections between the visualization items and their source document. This should only becarried out when the current phase of data capture is complete to avoid unnecessary duplication ofsource document entities in the iBase database.
IBM i2 iBase administration center 191

Handle mandatory fields in TextChart and iBaseTextChart notifies users that a field is mandatory but does not enforce it (unless you are using the liveconnection). For this reason, there is the potential for problems if the target iBase database usesmandatory fields.
This can be addressed partly by working practice. For example, users in TextChart are made aware ofany mandatory fields and are requested to make every effort to populate those fields in everyvisualization produced for data loading.
TextChart can store inferred values in property values so it is not always necessary to populate thesefields with values obtained from marking up the document.
Note: The following information is only relevant if you intend to load data from visualizations in iBase.
Loading records when the mandatory data is missing
There are occasions when values for some mandatory fields are found to be missing when loading thedata in iBase. As a workaround, you should define an easily recognizable default value, such as*DEFAULTED* or in the case of date fields 01-Jan-1900, to allow the data loading to proceed.
The resulting records must be treated with some caution since the value was not strictly derived fromthe source documents.
In cases where the data loader user elects to perform a manual load of an entity or link, color codingis used to help prevent the data loader user accidentally choosing to overwrite an existing value in theiBase database with a value that has been defaulted in the TextChart visualization record.
Checking the records after loading
The default value might need to be replaced with a specific value by a qualified data checker user,such as an iBase analyst, as soon as possible after loading the visualization.
At the end of loading, use an iBase set to record the entities and links created so that the datachecker user can identify the loaded items.
Connect entities and links to source documents in iBaseAfter you add data from TextChart to iBase, you can automatically connect the loaded entities andlinks to the source document from which they were extracted. In addition, if data for markup wasoriginally sourced from the iBase database, a link is generated between the marked up document,and the original source item.
This enables the relationship between the entities and source documents to be displayed graphically.
Optionally, the TextChart occurrences count can be recorded, indicating the number of times an itemwas found by TextChart in each connected source document.
To connect the loaded entities and links to their source document, you need to configure the iBaseschema to have an appropriate link type to use for the connection, and fields in which to store thesource reference and occurrences information. See Automatically Connect Records to SourceDocuments for details of how to set up the iBase schema.
192 IBM i2 iBase: Administration

Load visualizations in iBaseThe following section is not intended to describe in detail the process of loading data fromvisualizations - that process is covered in much more detail in the iBase help. Rather the followingsection describes the issues which you should consider when you plan and perform data loading.
Using sets
It is suggested that after you load each visualization, a named set is created to group the associatedentities and links together. If a naming convention is applied, it should be possible to identify eachcollection of data corresponding to a data loading session. This might become critical if you need toretrace the steps performed to populate the database, or to audit the data integrity.
Handling errors during loading
Even if there are no validation errors from the pre-load comparison of the visualization and the iBaseschema, individual entities and links might have errors. Although such errors might not cause thewhole loading process to fail, only valid entities and links can be loaded. The table in Pre-loadValidation Errors in iBase gives causes and remedies for this type of error.
Stopping a load session before it is complete
For simplicity, it is advised that loading a visualization into iBase should be completed in a singlesession. Only experienced users should attempt to load a visualization into iBase over multiplesessions.
Users might be obliged to stop loading a visualization into the iBase database because of a lack oftime. In this situation, it is suggested that:
• Loading is stopped only after all the entity records of an entity type is done.• iBase sets are used to record items that are loaded.• Users make a note of the entity types loaded in each named set.
The same recommendations apply when you load links.
Users working in a multi-user iBase database should complete the loading as soon as possible,otherwise changes might be made by other users, which might undermine work in progress. Forexample, another user might delete entities that are required as link end entities.
Reloading a visualization after further data capture in TextChart
After a visualization is loaded into iBase, it can sometimes be necessary to reopen it in TextChart toextract further information from the original source documents, or to add further source documentsto the TextChart workspace to provide greater context than was available for the initial dataextraction.
In this case, a potential problem is the creation of duplicate entities and links in the iBase databasewhen the visualization is loaded a second time. The Load i2 Text Chart Visualization dialog providestools to help users overcome this.
Note: If you choose to load source documents into iBase, reloading the visualization might result inthe creation of a new instance of the source document in the iBase database if the source documenthas been modified by adding additional markup.
IBM i2 iBase administration center 193

Optional schema extensions for TextChartFor ease of reference, the following section contains a series of extensions to the database schemaand charting scheme that you might want to apply. Some extensions depend on having performed theinstructions in other schema extensions. These dependencies are clearly indicated.
Database schema extensions
It is possible to use TextChart with iBase without modifying the iBase schema. However, there are anumber of iBase features that relate to its more advanced use with TextChart that are only available ifcertain items are defined in the schema. To take advantage of these features, it might be necessary tomake some extensions to the database schema and charting scheme used with TextChart.
To apply these extensions, work through the various schema and charting scheme extensions,ignoring those that you do not require. Do not generate your TextChart template until you havecompleted all the extensions that you need.
Charting scheme extensions
A charting scheme defines how the iBase fields are copied into a template as chart item properties.Chart item properties include the built-in fields applicable to all TextChart entities and links, such asthe Date/Time, Date/Time Description and, optionally, Grade 1 - 3 and Time Zone.
There are three areas where extensions are required to the charting scheme specified whengenerating a TextChart template. These are source references, advanced source references, andgrades. All the changes must be made to the same charting scheme.
When you generate your TextChart template, remember to specify that charting scheme.
Generating the TextChart Template
When you have completed all the schema and charting scheme extensions that you need, you can useiBase to generate your TextChart template. If you have made changes to the charting scheme,remember to specify that charting scheme and any document entity that you have created, at thetime that you generate the template.
If you are making advanced use of source references, after generating the template do not forget toreturn to Charting Scheme: Advanced Use of Source References and follow the instructions on usingTextChart Designer to define the final mapping between the new Document Source Field and theSource Reference chart property.
Record statusIt is suggested that a standard field is added to all data that is likely to be added or loaded fromTextChart to record whether the data is checked by a second person.
Prerequisites
None - there are no related schema extensions that you must follow to benefit from this feature.
Details of the schema change
Add a standard field to the entity and link types. Depending on the number of settings for this field,you might use a Yes/No field type or a Selected from Code List field type.
194 IBM i2 iBase: Administration

Source referencesAll entities and links that are extracted from source documents in TextChart are assigned a sourcereference. This information can only be added or loaded into iBase if a suitable field exists.
If you want to record:
• Just the current source reference - make the schema change described in the following information• Both current and historical source references - make the schema changes described in Advanced
Use of Source References
Prerequisites
None - there are no related schema extensions that you must follow to benefit from this feature.
Details of the schema change
Define a field in the iBase database schema with both the following characteristics:
• As a standard field (so that the reference can be stored against all entities and links)• As a text type field of length 255 characters• As a discriminator field
Note: Do not define this field as a multi-line (append only) field unless you want to maintain ahistorical record of source references contributing to an entity, as explained in Advanced Use ofSource References.
Source documentsIf source documents are to be added or loaded into iBase, it is necessary to specify an existing entitytype or configure a new entity type such as Source Document to which the document can be attached.
Prerequisites
None - there are no related schema extensions that you must follow to benefit from this feature.
Details of the schema change
The Source Document entity type must have the following characteristics:
• It must have at least one writable document type field.• It must not be required in the TextChart data capture process (because it is not included in the
TextChart palette).• It must contain a standard field for the source reference value; this is automatically applied to all
entities and links, and the chosen Source Document entity. See Handling Source References.• The Source Reference field should be set as a discriminator field for the Source Document entity
when loading the visualization in iBase. Setting it to be mandatory ensures an audit trail.
Automatically connect records to source documentsIf you want to automatically connect entities and links that you add or load from TextChart to theirsource documents, and record the number of occurrences that are created when marking up thedocument in TextChart, you might need to make changes to your database schema.
Prerequisites
To benefit from this feature, you must have already applied “Source documents” on page 195.
IBM i2 iBase administration center 195

Details of the schema change
• To connect entities to source documents
Ensure that there is a suitable link type to use for the link between the loaded entities and thesource document. For example, the link end constraints need to include all the entity types thatmight be loaded from a visualization.
If you want to record the number of occurrences, the link type must contain a numerical field oftype Counting Number.
• To connect links to source documents
Ensure that any link types that might be loaded from a visualization have a suitable hyperlink fielddefined for them. The name of the hyperlink field must be common to all the link types.
If you want to record the number of occurrences, all the link types must contain a numerical field oftype Counting Number, with the same name.
GradesIf grades are to be added or loaded into iBase, it is necessary to configure the iBase database schemato have up to three new or existing fields in which to store the grade values.
Prerequisites
None - there are no related schema extensions that you must follow to benefit from this feature.
Details of the schema change
The fields for storing the grade values must have the following characteristics:
Characteristic Details
Standard fields They should be standard fields so that the gradescan be stored against all entities and links.
Field type The field type should be a Selected From CodeList type field.
Grade values You need to create code lists that define thepossible grade values, for example:
• 1, 2, 3, 4, 5, -• A, B, C, D, E, -• Confidential, Secret, Management, unknown
Default value If a default value for the grade is set in iBase,then TextChart uses that value as the defaultgrade (even if the user does not select a gradewhen creating the item in the visualization). If nodefault is set in iBase, TextChart uses the lastitem in the code list as the default grade.
196 IBM i2 iBase: Administration

Use semantic types when loading visualizationsSemantic types are included in all TextChart templates generated for a database if semantic types areassigned to the iBase schema. The semantic types are used to align the content of a visualization withthe iBase schema whenever data is loaded from visualizations that contain semantic types.
Prerequisites
None - there are no related schema extensions that you must follow to benefit from this feature.
Advanced use of source referencesIf an ordinary (non-append) text field is used to store the source reference information, its originalcontents are overwritten when additional information is added to an existing entity by loading a newvisualization. To overcome this, you can use an append only type field for the source reference. Thisallows for updates to the Source Reference field while retaining the original value, since the newvalue is appended to the existing value.
Prerequisites
None - there are no related schema extensions that you must follow to benefit from this feature.
Details of the schema changes
You need to set up a Source Reference field and a Document Source Reference field as follows -these must be different fields:
Field Characteristics
Source Reference field Set up the Source Reference field as follows:
• Standard field (the reference must be storedagainst all entities and links)
• Multi-Line Text (Append Only) field
Document Source Reference field Set up a separate source reference field for theSource Document entity - it must be differentfrom the Source Reference field used for theother entity and link types:
• Use a Text or Multi-Line Text field type but nota Multi-Line Text (Append) only field type
• Define the field as a discriminator field (thismakes sure that it is set as an identifier field forthe Source Document entity when loading thevisualization)
Additional requirements
Set up the charting scheme as described in Charting Schemes: Advanced Use of Source References.
Charting schemes: source referencesThis charting scheme extension is only required if you intend to use source references.
If you intend to make advanced use of source references, ignore the following information and usethe instructions that are given in Charting Schemes: Advanced Use of Source References.
IBM i2 iBase administration center 197

How to modify the charting scheme
After the Source Reference field is created, set up a charting scheme to map the TextChart chart itemto the iBase field.
Note: When the TextChart template is generated, any default value for the field mapped to the SourceReference, Source Type, and Time Zone properties are ignored.
When you generate the TextChart template, turn on the Use this charting scheme check box andselect the appropriate charting scheme.
When TextChart uses this template, it is necessary to enter a value for the “Reference” workspaceproperty of each document, so that the reference value can be added automatically to each markup.
Charting schemes: advanced use of source referencesThis charting scheme extension is only required if you intend to make advanced use of sourcereferences.
This involved setting up a separate Document Source Reference field for the Source Document entity.
How to modify the charting scheme
After the field is created, set up a charting scheme to map the iBase Document Source Reference fieldto the TextChart Source Reference item for the Source Document entity only.
Do not set up a charting item for the Source Reference field (in fact iBase prevents you from settingthe field as a charting item). If you use a charting scheme for other items, set Source Reference to“Blank” for the default item.
Note: When the TextChart template is generated, any default value for the field mapped to the SourceReference, Source Type, and Time Zone properties of the charting scheme are ignored.
After the template is generated use TextChart Designer to set up a subitem mapping between theMulti-Line Text (Append Only) field added by you and the Source Reference chart property. You needto do this for every entity and link type (except the Document entity that is the source referred to):
Note: If the template is recreated from iBase, the mapping between the Multi-Line Text (AppendOnly) field and the source reference chart property must be set up again.
Charting Schemes: gradesThis charting scheme extension is only required if you intend to add or load grades into the iBasedatabase. This Schema Extension requires three new or existing fields in which to store the gradevalues.
How to modify the charting scheme
After the fields are created in the iBase database schema, update your existing charting scheme orset up a new charting scheme to map the TextChart visualization items to the iBase fields as shown.
Note: Leave Grade 1, Grade 2, and Grade 3 blank if you do not want the grade to be set to the defaultvalue for every chart item. In this way, you are still able to grade items using the grading scheme (asnormal attributes) but the value remains blank until the user sets it.
Troubleshooting iBase TextChartThe following section contains extra information to help understanding and fixing any problems thatmight arise when you generate TextChart templates or adding from TextChart visualizations. Whether
198 IBM i2 iBase: Administration
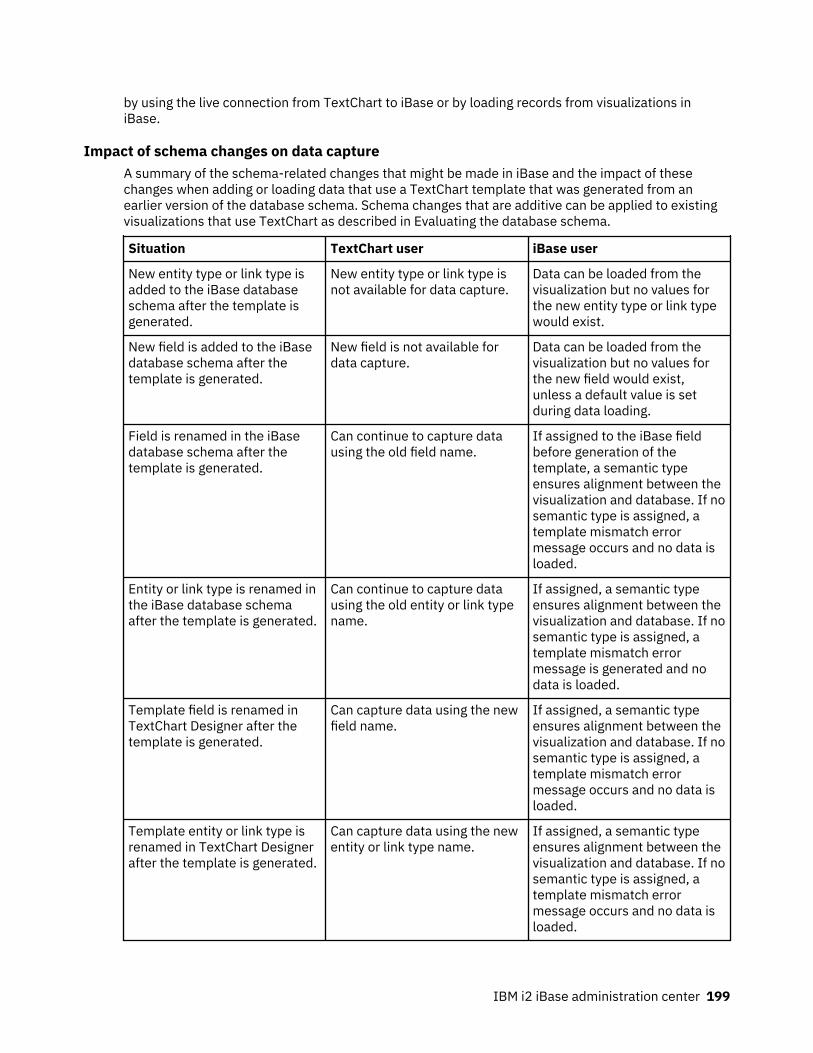
by using the live connection from TextChart to iBase or by loading records from visualizations iniBase.
Impact of schema changes on data captureA summary of the schema-related changes that might be made in iBase and the impact of thesechanges when adding or loading data that use a TextChart template that was generated from anearlier version of the database schema. Schema changes that are additive can be applied to existingvisualizations that use TextChart as described in Evaluating the database schema.
Situation TextChart user iBase user
New entity type or link type isadded to the iBase databaseschema after the template isgenerated.
New entity type or link type isnot available for data capture.
Data can be loaded from thevisualization but no values forthe new entity type or link typewould exist.
New field is added to the iBasedatabase schema after thetemplate is generated.
New field is not available fordata capture.
Data can be loaded from thevisualization but no values forthe new field would exist,unless a default value is setduring data loading.
Field is renamed in the iBasedatabase schema after thetemplate is generated.
Can continue to capture datausing the old field name.
If assigned to the iBase fieldbefore generation of thetemplate, a semantic typeensures alignment between thevisualization and database. If nosemantic type is assigned, atemplate mismatch errormessage occurs and no data isloaded.
Entity or link type is renamed inthe iBase database schemaafter the template is generated.
Can continue to capture datausing the old entity or link typename.
If assigned, a semantic typeensures alignment between thevisualization and database. If nosemantic type is assigned, atemplate mismatch errormessage is generated and nodata is loaded.
Template field is renamed inTextChart Designer after thetemplate is generated.
Can capture data using the newfield name.
If assigned, a semantic typeensures alignment between thevisualization and database. If nosemantic type is assigned, atemplate mismatch errormessage occurs and no data isloaded.
Template entity or link type isrenamed in TextChart Designerafter the template is generated.
Can capture data using the newentity or link type name.
If assigned, a semantic typeensures alignment between thevisualization and database. If nosemantic type is assigned, atemplate mismatch errormessage occurs and no data isloaded.
IBM i2 iBase administration center 199

Situation TextChart user iBase user
Entity type or link type isdeleted from the iBasedatabase after the template isgenerated.
Note: It is not possible to ignoredata captured using an entitytype or link type deleted fromthe iBase schema. You need toopen the visualization inTextChart and delete the itemscaptured for the deleted entityor link type. Reload the editedvisualization into the iBasedatabase.
Can continue to capture datausing the obsolete entity type orlink type.
Only a problem if items arecreated using the deleted entityor link type. If so, a templatemismatch error message occursand no data is loaded.
Field is deleted from the iBasedatabase after the template isgenerated.
Note: It is not possible to ignoredata captured for a field thathas been deleted from theiBase schema. Open thevisualization in TextChart anddelete values captured for thedeleted field. Reload the editedvisualization into the iBasedatabase.
Can continue to capture datausing the obsolete field.
Only a problem if items arecreated using the deleted field.If so, a template mismatch errormessage occurs and no data isloaded.
Field changed to mandatory.
Note:
The mandatory field attributeslot marker is not shown inTextChart. Mandatory fields arenot enforced in TextChart, somight be accidentally omittedfrom data capture.
Alternatively, data to populatethe mandatory field might notbe available.
Error reported at data loadstage.
Note: To avoid the error, adefault value can be setmanually in the Load i2TextChart Visualization dialog(by clicking Session Defaults orDefaults).
Discriminator fields added. The discriminator field attributeslot marker is not shown inTextChart. Appropriate valuesmight not be assigned to thesefields.
Duplicate records might becreated.
Note: Use the iBase DuplicateRecords Checker to locate andresolve duplicate records.
200 IBM i2 iBase: Administration

Source document issuesThe following situations might help you to understand the cause of any problems with sourcedocuments and TextChart template.
Situation Behavior
Template is created without turning on the UseiBase Entity check box to specify an entity typefor the source document.
TextChart stores the source document in HTMLformat.
The source document is not loaded into iBase.
No error message is generated during loading iniBase.
The Use iBase Entity check box is turned onwhen creating the template, and an entity type ischosen for the source document.
TextChart stores the source document in HTMLformat.
The chosen entity type is not available in theTextChart palette.
A new Source Document entity is created foreach marked up document contained in thevisualization when it is loaded in iBase.
The chosen Source Document entity type doesnot contain a document type field, or thedocument type fields are read-only.
TextChart stores the source document in HTMLformat.
The chosen entity is not available in theTextChart palette.
A Source Document entity is created for eachmarked-up document but it does not contain themarked-up document.
No error message is generated during loading iniBase.
The chosen Source Document entity type hasone or more document type fields.
A Source Document entity is created for eachmarked-up document.
Each Source Document entity created containsthe HTML code for the marked-up document,which is stored in the first writable documentfield for the entity.
IBM i2 iBase administration center 201

The Source Document entity record exists in theiBase database.
During loading, iBase identifies potentialduplicates using the identifier field that you setup for the source reference.
iBase compares the HTML content of the sourcedocument for the existing document entity withthe new document entity.
If the HTML content is different, the documententity is not identified as a duplicate even if thesource reference is the same. A new documententity is created. If the HTML code is the same,iBase shows the entity as a duplicate entity.
Note: When a duplicate document entity isfound, it is likely that the visualization is alreadyloaded. This is because the HTML coderepresenting the marked-up document isidentical. Cancel the loading of the visualizationunless you are sure you want to load it again. Ifyou choose to continue there are two options:
• Create a duplicate source document entitycontaining the HTML code for the marked-updocument.
• Use the existing Source Document entity,however it is not possible to overwrite theexisting embedded HTML document.
Pre-load validation errors in iBaseThe following section explains the error messages and causes for problems that might be reportedwhen you validate a TextChart template before you load a visualization in iBase.
The visualization is automatically validated when loading begins in iBase, and it is possible that someproblems are encountered immediately. The most likely cause of a problem is when the template isaltered using TextChart Designer, and is no longer aligned with the iBase database. iBase checks forvarious possible problems and warn the data loader user of likely causes.
If warning messages are generated, the data loader user is asked whether to proceed. If no data iscaptured using the problem area of the template, loading continues successfully. If data is capturedusing problem areas, the load stops and you, as the iBase administrator, should apply the remediessuggested in the table below. After you apply any of the suggested remedies, it is imperative that thetemplate is revalidated and any further errors fixed before proceeding.
Some of the remedies suggested require iBase administrator permissions so the data loader usersmight not be able to make all these changes.
202 IBM i2 iBase: Administration

Message Cause Remedy (if data is captured)
Not a valid link strength - '<linkstrength name>'
When a template is createdfrom iBase the three standardiBase link strengths are used:Confirmed, Unconfirmed, andTentative.
This error is caused bymodifying the template linkstrengths in TextChart Designer.
Use TextChart to remove allcaptured link strength valuesthat are not the iBase standardlink strengths. If the iBasestandard link strengths are stillavailable in the template, usethese to recapture link strengthvalues.
Text length for attribute –‘<attribute name>’ is greaterthan the permitted size
The iBase database has adefined length for each texttype field. This error is causedby modifying the field lengths inthe template using TextChartDesigner, or by modifying theschema in iBase.
Choose between:
• Use TextChart to remove allcaptured values for thespecified attribute class.
• Use TextChart to adjust thelength of the captured valuesfor the specified attributeclass.
• Change the iBase schema toincrease the field length.
This might have someimplications for other iBaseusers if the database is multi-user.
Incorrect data type for attributeclass - <attribute name>
The data type for the attributeclass has changed in the iBaseschema since the TextCharttemplate was generated.
Choose between:
• Use TextChart to remove allcaptured attributes of thespecified class.
• If possible change the iBaseschema to restore the field toits original field type. Forinformation on changingbetween field types, see thei2 iBase Designer Guide.
This might have seriousimplications for other iBaseusers if the database is multi-user.
IBM i2 iBase administration center 203

Message Cause Remedy (if data is captured)
<code list item name> is nolonger a valid item in the codelist - <code list name>
Choose between:
• TextChart Designer was usedto add the code list item tothe template originallygenerated from the iBaseschema.
• The code list item has beenremoved from the iBaseschema since the TextCharttemplate was generated.
This message is only a warning;it will not prevent data beingloaded.
Choose between:
• Use TextChart to remove allcaptured instances of thespecified code list item.
• Change the iBase schema torestore the code list to itsoriginal state.
This might have seriousimplications for other iBaseusers if the database is multi-user.
Not a valid entity type name -<entity type name>
Not a valid link type name -<link type name>
Choose between:
• TextChart Designer was usedto add a entity or link type tothe template originallygenerated from the iBaseschema.
• iBase Designer was used toremove the entity or link typefrom the schema.
• The user has insufficientpermissions to access thespecified entity or link type inthe iBase database. This erroronly occurs if using DataAccess Control to controlaccess to selected fields.
To preserve security, the failureis reported as an invalid entityor link type because it might beundesirable for that user toknow that the iBase databasecontains such an entity or linktype.
Choose between:
• Use TextChart to remove allcaptured instances of thespecified entity or link type.
• Consider why the user isdenied access to the specifiedentity or link type in the iBasedatabase before changing theuser’s access permissions.Alternatively use a differentuser with appropriatepermissions to load thevisualization.
204 IBM i2 iBase: Administration

Message Cause Remedy (if data is captured)
Not a valid field name - <fieldname>
Choose between:
• TextChart Designer was usedto add a field to the templateoriginally generated from theiBase schema.
• iBase Designer was used toremove the field from theschema.
• The user has insufficientpermission to access thespecified field. This error onlyoccurs if using Data AccessControl to control access toselected fields.
Choose between:
• Use TextChart to remove allcaptured data for thisattribute class.
• Consider why the user isdenied access to the specifiedfield in iBase before changingthe user’s accesspermissions. Alternatively usea different user withappropriate permissions toload the visualization.
Field is read-only - <fieldname>
Choose between:
• The user has insufficientpermission to write to thespecified field. This error onlyoccurs if using Data AccessControl to control access toselected fields.
• TextChart Designer was usedto map a template attributeslot onto an iBase systemfield, such as Last Update orRecord ID. iBase systemfields cannot be modified byusers.
Choose between:
• Consider why the user isdenied write access to thespecified field beforechanging the user’s accesspermissions.
• Use a different user withappropriate permissions toload the visualization.
• Use TextChart to remove allcaptured data for thisattribute class.
Not a valid link for <link typename>: End1Type - <entity typename>, End2Type - <entity typename>
Choose between:
• TextChart Designer was usedto alter the link endrestrictions in the template,making them incompatiblewith those defined in theiBase schema.
• The valid end type restrictionswere changed in the iBaseschema since the TextCharttemplate was generated.
Choose between:
• Use TextChart to remove allcaptured instances of the linktype that has incompatiblelink end entities.
• Change the iBase schema torestore the link endrestrictions to their originalstate.
This can have seriousimplications for other iBaseusers if the database is multi-user.
IBM i2 iBase administration center 205

Data loading errors in iBaseIf there is a problem with an individual entity or link in the TextChart visualization, an error message isdisplayed when data is loaded into iBase.
The possible error messages are:
Error message Cause Remedy
You cannot link an entity recordto itself.
From the identifiers applied,two link end entity records areresolved to a single entity.
None, within this loadingsession. You might try reloadingentities of the affected entitytype with different identifiersand then reload the links.
This link type is not validbetween these two entity types.
(1) TextChart Designer wasused to alter the link endrestrictions in the template sothat they are incompatible withthose defined in the iBasedatabase schema.
(2) The valid end typerestrictions have changed in theiBase database schema sincethe TextChart template wasgenerated.
(1) and (2) This error ispreceded by a warning messageat the validation stage ofloading. See Pre-load ValidationErrors in iBase for suggestedremedies.
This link is not valid becauseone (or both) of the end recordsare no longer accessible.
iBase is a multi-user databasesystem and in the intervalbetween loading the entities atthe end of the current link andloading the link itself, anotheruser has deleted one or both ofthe link end entities.
Consider introducing workingpractices that reduce thechances of two or more usersworking on the same entities atthe same time.
No value was specified for themandatory field - <field name>.
In the iBase database schema,the current entity or link typehas the specified field definedas a mandatory field but thevalue for the correspondingattribute in the visualization isblank.
Define a default value for thespecified field for the currententity (or link) type or for allentity (or link) types. SeeHandling Mandatory Fields inTextChart and iBase for furtherdetails. Load the current entity/link type again to force the loadof instances of the entity or linkthat had the mandatory fielderror.
iBase SchedulerIn IBM i2 iBase, you define the data that you want to import or export as one or more import or exportspecifications. You can group them together in the sequence you want them to run, in import batch orexport batch specifications. These batch specifications are run by iBase Scheduler by using aWindows service that you configure with the Scheduler Configuration utility.
Using Scheduler, you can run batch imports and exports:
206 IBM i2 iBase: Administration

• Immediately• Once, at a specified time• At preset intervals (hourly, daily, weekly, monthly)• Whenever a specific file is updated• Until an optional cut-off date or time is reached
Before or after you run the batch process, you can run a command prompt program, a custom plug-in,or an operating system command. For example, to move data files to a different folder or to send anotification that the batch ran.
Details of scheduled imports or exports are stored in the Scheduler database. This is monitored bythe Scheduler Service, which automatically runs the scheduled batch imports or exports. TheScheduler service runs as a Windows Service, and can be started, stopped, paused, resumed, ordisabled through the Services application.
The Scheduler Configuration utility can be installed on any machine on which iBase is alreadyinstalled; you do not have to run the Scheduler Service on this machine. The Scheduler service mustalso be installed on a machine that iBase is installed on. For more information about installing theScheduler, see the Release Notes®.
Why is it useful?Scheduler can be used to schedule data imports and exports to occur at times when systemresources are lightly loaded or when iBase would otherwise be unattended. For example, at night orduring lunch breaks. It is useful for controlling automatic imports of data that is generated by systemsexternal to iBase and that might be required to occur regularly.
How Scheduler worksiBase Scheduler provides features to control how, when, and with which database automatic dataimport or export occurs.
TriggersThe Scheduler Service uses triggers to activate a task within an iBase database. A trigger can beconfigured to either monitor a file for changes, or to wait for a specific date and time before the task isactivated.
For each trigger, an activation date and optionally a deactivation date can be specified.
File change triggersFile change triggers are a useful means of completing a task on an ad hoc basis, or for near real-timedatabase updates. For example, if an iBase database is to be kept up-to-date with data from anothersystem, but it is not known the precise time the export files from the other system are created, itmight be possible for the other system to create or touch a triggering file after the export iscompleted.
Scheduler can be configured by using file change triggers to monitor the triggering file for a change inthe modification date. After a change is detected in the modification date, Scheduler will start thetask to import the data contained in the import files, or export data from another database.
Interval triggers
Interval triggers are useful for completing a task regularly, for instance, once a day, on particular daysof the week, or on a specific day in the month. The trigger can instruct the task to run at a specifictime in the day, or at regular intervals within a time window, with a minimum interval of a minute.
IBM i2 iBase administration center 207

Note: The time window cannot span midnight. To do this, two triggers must be configured, onerunning from the start time up to midnight, the other running from midnight to the end time.
The service intervalThe Scheduler Service monitors triggers at a specified interval. This interval can be adjusted throughthe configuration utility to monitor triggers as frequently as once a second. The maximum value thatcan be specified for the service interval is 9999 minutes.
Configuring the service interval to 1 second does not ensure that the triggers are monitored everysecond because the service interval is applied after any tasks are run. For example, if the serviceinterval is set to 5 minutes, the trigger defines an execution frequency of 5 minutes. The task takes aminute to run, then the interval between executions of the task is a minimum of 6 minutes.
The service interval should be set to monitor triggers more frequently than the smallest of all theexecution frequencies of tasks defined by triggers. Setting the service interval to a value that isgreater than the smallest execution frequency of the tasks causes the Scheduler Service to miss oneor more expected schedules. For example, a trigger that is configured to run a task every fifteenminutes with a service interval of twenty-five minutes run only three in every five schedules. However,having a service interval that is less than the smallest execution frequency does not necessarily solvethis problem if the time taken to run the tasks extends the service interval to a value greater than thetask frequency.
Task actionsBefore a task is run and after the successful completion of a task, it is possible to complete one ormore actions. These actions can take the form of an operating system command, a batch file, or acustom plug in written in a high-level language that supports COM interfaces.
• Program actions
Program actions can be a single operating system command, a batch file, or an executable program.These might be used to complete a simple data clean on a source file to remove unwanted records,data formatting to ensure that dates are in the correct format ready for import, or sending anotification message to a user by using the NET SEND command.
• Plug-in actions
Plug-in actions are written for customers in a high-level language that supports the Microsoft COMinterface, for example C++ or Visual Basic. Plug-ins can be used to manipulate the contents of thedatabase or complete a custom action that is not easily completed through a program action, forinstance sending an email message.
A plug-in action must adhere to the following rules:
• It must provide a means of accepting a reference to an iBase database.• It must provide a means of accepting a reference to the Scheduler log.• The processing must be completed inside a single entry point.
To ensure that the developer of a plug-in provides the three preceding functions on its objectinterface, the Scheduler Framework includes an interface definition for use by plug-ins.
Installing and configuring SchedulerThe Scheduler Configuration utility can be installed as a stand-alone application, or with theScheduler Service component.
It is suggested that you install the Scheduler Service component on an application server thatcontinually runs the Windows operating system.
208 IBM i2 iBase: Administration

If the machine on which iBase Scheduler is installed is in a remote location, or a location that is noteasily accessible, the folder that the Scheduler database is installed into must be shared so that it canbe accessed from other machines on the network by the Scheduler Configuration Utility.
If the Scheduler service is to complete imports or exports solely with Microsoft Access iBasedatabases that are on the same machine as the service is running, a standard installation ofScheduler suffices. However, if iBase SQL Server databases are to be used with integrated security orthe iBase database, or one or more files are to be accessed across the network, any combination ofthe following might have to be altered:
• The Scheduler Service account startup context• SQL Server permissions• File and folder security permissions• Folder share permissions
For example, when import files, export files, or trigger files must be accessed over the network, one ormore of the following changes must be made:
• Change the configuration of the Scheduler service to start by using the security context of a domainaccount. Grant this account the relevant access rights to the files.
• If the account context under which the service is configured to start must remain as ‘Local System’,the permissions to all files and folders that are to be accessed must be changed. The local systemaccount has limited network access and is only able to access files that are authorization that isgranted to the ‘Everyone’ group.
• If the database is an SQL Server database and the SQL server is on another machine, the servicemust be configured to run under the context of a domain user with sufficient rights to access theSQL Server database on the SQL server.
IBM i2 iBase administration center 209

Set up a standard configurationThe default Scheduler installation installs all the components of the Scheduler on the local machine.This installation is useful for application, file, and database servers, or individual users who want toschedule imports into their personal databases.
Use the Local System accountInstalling Scheduler without changing any of the default installation options configures the Schedulerservice to use the Local System account. The Local System account has administrative rights on thelocal machine but limited access to the network. On a secure network, where the Everyone group hasno rights, the service is unable to access resources that are not on the local machine.
An installation that uses the Local System account is able to access the import files or export folderon the local machine if the local Administrators group has access to them.
If the iBase database is a Microsoft Access database, the service must be able to open the databasethrough iBase and import data into it or export data from it. However, if the iBase database is an SQLserver database, the service is able to open the database and import data into it, or export data fromit, provided the installation of Microsoft SQL Server has either the BUILTIN\Administrators groupor NT AUTHORITY\System login assigned to the sysadmin fixed server role.
Access to the Scheduler database through the configuration utility depends on the rights of the userthat is running the application.
210 IBM i2 iBase: Administration

Set up an advanced configurationWithin an enterprise environment, it is unlikely that all the components required for iBase andScheduler are on the same machine.
It is possible that:
• A dedicated SQL Server machine stores the iBase database.• A file server has the iBase database connection file, Scheduler database, import files, and triggerfiles and is the destination for export files.
• An application server runs the Scheduler Service and is accessed through terminals to run iBaseand the Scheduler Configuration utility.
• The configuration utility can also be installed on users' PCs.
Before you install SchedulerBefore you install Scheduler, the following preparatory actions must be carried out:
IBM i2 iBase administration center 211

• Create a domain account for the Scheduler service. Set the ‘Password never expires’ option for thisaccount.
• Create a folder on the file server for the Scheduler database. Share this folder and ensure that theEveryone group has Full Control of the share.
• Assign the required security permissions through NTFS security on the Scheduler database folder tothe following domain accounts:
– Scheduler Service account.– Any users that configure Scheduler. For example, create a Windows group for this purpose and
assign the permissions to the group rather than to individual users. When a new user is toconfigure Scheduler, they can be added to this group.
– Installation user. This is not required if the user that installs the Scheduler service is already amember of the Windows group for Scheduler users.
• Map a drive on the application server to the Scheduler database folder on the file server.
Installing Scheduler on the serverInstall the Scheduler on the application server, selecting both the Service and Configuration optionsin the installer. You can choose where to install the Scheduler database. Typically, the defaultlocation for the Scheduler database is:
C:\Documents and Settings\All Users\Application Data\i2\i2 iBase 8\en-us\Scheduler\Scheduler.mdb
You can move the database to a different shared folder if required. You are prompted for the locationof the Scheduler database when you first start the Scheduler Configuration utility.
To display the Scheduler Configuration dialog, select Start > Programs > IBM i2 iBase 8 > Tools >iBase Scheduler Configuration.
Setting the permissionsAfter the installation, the Scheduler service account will require permission to access the followinginformation:
• Connection and security files for any of the iBase databases in use by the Scheduler Configurationutility.
• Import and trigger files.• The destination folder for export files.
For SQL Server databases, the Scheduler service account requires access to the databases on the SQLserver that are referenced by the connection files.
When you configure Scheduler in a distributed environment, it is important to use UNC pathsthroughout the Scheduler Configuration utility and within the import and export specificationsthemselves.
Note: The use of more than one Scheduler service monitoring the same Scheduler database is notsupported in this release because of the risk that each instance of the Scheduler service might run thesame import specification. This might result in duplicate entities and links created in the iBasedatabase, depending on how the individual import specifications are set up to handle duplicated dataread from import files.
Setting up a domain account for the Scheduler serviceThe Scheduler service is installed to run under the local Windows system account, which is onlyapplicable if the service is running on the local machine. To run Scheduler that uses a Scheduler
212 IBM i2 iBase: Administration

database that is installed on a different machine, then the service needs to log on using a domain username and password. The user and password are set in the Windows Services application.
Directories and files Min. permission
The Scheduler directory that contains the fileScheduler.mdb
Modify
Scheduler.mdb Read, Write
Directory containing the DLLs and EXEs for iBaseScheduler
List Folder Contents
DLLs and EXEs for iBase Scheduler Execute
Directory containing the file on which a filetrigger is created— no permissions are requiredon the file itself.
List Folder Contents
Directory containing the batch scripts or plug-insthat are required to execute as task actions.Alternatively, you might assign List FolderContents permission to the directory and Readand Execute permission to the files.
Read & Execute
Data files for import or the directories thatcontain the data files. You require Writepermission if the file is to be altered by a batchscript or plug-in, and Modify permission if thefile is to be deleted by a task action.
Read
Directory containing the iBase security file. Modify
iBase security file Read, Write
iBase database directory (JET databases only) Modify
iBase database file (JET databases only) Read, Write
iBase database file (SQL Server databases only) Read
The Windows Services application automatically grants the domain account the permissions that arerequired to run services.
If you are using Windows integrated security (NTLM authentication), then the domain account needsto have permit access for the relevant SQL Server databases.
Scheduler configurationWhen iBase Scheduler is installed on a user’s machine solely to keep their personal database up-to-date, no configuration changes are required to the service or SQL Server databases. It is anticipatedthat, in this case, Scheduler can be configured by the administrator of the iBase database.
If Scheduler is installed on an application server, possibly accessing files on a file server or databaseson SQL Server, the service configuration must be changed by using the iBase Scheduler Configuration:
• Users must have write access to the Scheduler database, Scheduler.mdb.• Users must log on with an iBase user name and password (they cannot use single sign-on).
The configuration of the Scheduler connections, tasks and triggers, and the iBase import or exportspecifications becomes more involved because of the need to use UNC paths throughout. Therefore,
IBM i2 iBase administration center 213

it is beneficial for the user who configures Scheduler to understand Windows security and foldersharing in an enterprise environment.
After the Scheduler service is installed on the machine that is to run the tasks, the SchedulerConfiguration Utility can be installed on a remote machine for administering the Scheduler database.
Note: During the installation, the Scheduler database is installed in its default location. You can movethe database if required. See Installing Scheduler on the server for details.
Configuring Scheduler
Note: To display the iBase Scheduler Configuration dialog, users require write access to theScheduler database, Scheduler.mdb. They must log on with an iBase user name and password(they cannot use single sign-on).
This involves the following steps:
1. Set up a connection to the required iBase database.2. A database connection contains the information that is required by Scheduler to open the
database, that is, the location of the database and its security file, and the user name andpassword. Notice that Scheduler does not require exclusive access to the database whenscheduled tasks are run.
3. Add one or more tasks to specify the data to import or export.4. A task specifies the batch specification that defines the import or export specifications to run.
(Specifications and batch specifications are created in iBase itself.) You can also set up programsor custom plug-ins to perform specific actions (task actions) either before or after you import orexport data.
5. Set up one or more triggers for each task to determine the scheduling frequency.6. A trigger is the event that causes the task to run, for example either when a specified date and
time is reached or when the modification date on a file changes. A trigger can recur or be a once-only event.
7. For more information about configuring Scheduler, refer to the Scheduler online help.
Securing the Configuration utilityIt is possible to apply a password to the Scheduler database to prevent users from using Scheduler toattempt an import into, or export from, an iBase database that is prevented through their usual iBaseaccount. Assigning the password is accomplished through the Service page within the configurationutility. After a password is assigned, any user that starts the Scheduler Configuration utility mustenter this password before access is gained to the configuration dialogs.
Configuring iBase ScheduleriBase Scheduler provides automatic scheduling for data imports and exports for multiple iBasedatabases on either local or remote machines. Data is imported or exported using a Windows servicethat you configure with the iBase Scheduler Configuration dialog.
In IBM® i2® iBase, you define the data that you want to import or export as one or more import orexport specifications, which you group together, in the sequence in which you want them to run, inbatch specifications. You schedule the import or export by setting up tasks in iBase Scheduler.
Using iBase Scheduler, you can run scheduled tasks:
• Immediately• Once, at a specified time• At preset intervals (hourly, daily, weekly, monthly)
214 IBM i2 iBase: Administration

• Whenever a specified file is updated• Until an optional cutoff date or time is reached
Before or after importing or exporting data, you can run a command-line program, a custom plug-in,or an operating system command. For example, to move data files for import to a different directoryor send a notification that the batch export has run.
Details of scheduled tasks are stored in the Scheduler database, which is monitored by a service,which automatically runs the scheduled tasks. This service runs as part of the Windows Servicesapplication. You use this application to start, stop, pause, resume, or restart the service.
The iBase Scheduler Configuration dialog can be installed on any machine on which iBase is alreadyinstalled; you do not have to run the service on this machine. For further details of installing iBaseScheduler, see the Administration Center.
Scheduling imports and exportsBefore you use iBase Scheduler to schedule the import or export of data, you need to configure it inthe iBase Scheduler Configuration dialog.
This involves the following steps:
• Set up a connection to the required iBase database.
A database connection contains the information required by iBase Scheduler to open the database,that is the location of the database and its security file, and the user name and password. Noticethat iBase Scheduler does not require exclusive access to the database when running scheduledtasks.
• Add one or more tasks to specify the data to import or export.
A task specifies the batch specification that defines the import or export specifications to run.(Specifications and batch specifications are created in iBase itself.) You can also set up programs orcustom plug-ins to perform specific actions (task actions) either before and/or after importing orexporting data.
• Set up one or more triggers for each task to determine the scheduling frequency.
A trigger is the event that causes the task to run, for example either when a specified date and timeis reached or when the modification date on a file changes. A trigger can recur or be a once-onlyevent.
Scheduler and iBase security features
The user account for running iBase Scheduler does not need any security restrictions applied.However, iBase Scheduler does support these iBase security features:
• Database Management groups. These determine whether users will be denied access to thedatabase when they try to test a connection or create a new task. The minimum user permissionsare described in Minimum user permissions below.
• Data Access Control groups. These restrict access to specific entity and link type records or tospecific fields, and will prevent iBase Scheduler from running tasks that access those records andfields. In these circumstances, the completion status of the task will indicate that the task failed.
• Folder Object Control— specifically this restricts access to the folder containing the batch import orexport specifications.
The following iBase security features are not supported by iBase Scheduler, and any restrictionsimposed by these features will be ignored in iBase Scheduler:
• System Command Access Control
IBM i2 iBase administration center 215

• Reason for Action• Auditing— nothing is recorded in the audit log
Minimum user permissions
Scheduling can only be run by authorized users with the following minimum user permissions iniBase:
• Add Entity/Link Records• Update Entity/Link Records• Update/Delete Entity/Link Records created by other users
These are the same as those required to run import specifications in iBase itself.
Note: If you need to change the permissions granted to a user account which is used to run iBaseScheduler then make sure you re-test the connection to the database. If you are using Data AccessControl groups then you need to run a trial import/export to verify that these are set correctly.
Setting up database connectionsBefore you can schedule any batch imports or exports, you need to set up a connection to open therequired iBase database. The database can be on the local machine or on the network.
About this task
Note: Paths entered by using a mapped network drive are always converted to UNC (Uniform NamingConvention) paths when you click OK.
Procedure
1. You can skip this step if the database is on the local machine. If the database is on the network,check that it can be opened by using a UNC path:a) Close iBase Scheduler.b) Open iBase Designer.c) Select File > Open Database
The Open Database dialog is displayed.d) In the File name box, type in the UNC path of the database (.idb) file, and then click Open.e) Close iBase Designer.f) Re-open iBase Scheduler.
Note: A system administrator must first open the database using the UNC path in order to allowother users to open it using this path.
2. In the Connection dialog, enter the name that you want to use for the connection to the database.3. Enter the path to the database file (.idb).4. Enter the path to the security file (.ids) for this database.5. Enter the iBase user name and password that you want the Scheduler service to use when opening
the database; these will be saved in the Scheduler database in encrypted form.For details of the permissions required by this user account, see “Scheduling imports and exports”on page 215.
6. Verify that the connection works by clicking Test Connection - a message is displayed if there is aproblem with the connection to the database.See Troubleshooting database connections below for possible reasons for the failure.
216 IBM i2 iBase: Administration

7. Click OK to save the database connection.
ResultsThe database connection is configured. You can change any of the details of an existing connection,such as the connection name, database path, user name and password without affecting anyscheduled tasks. To edit a connection, click Edit in the Connections area.
Although the changes to the connection are made as soon as you click OK, the changes only affect theScheduler service when the next task is scheduled. To update the schedules, cancel the currentscheduled tasks by making the trigger inactive.
Note: It may not be appropriate to change the database path to another database because the tasksmay no longer be relevant to the batch specifications in the new database.
To remove a database connection and all the tasks, triggers, and scheduled tasks associated with it,click Delete in the Connections area.
If you use the logging option, When tasks are scheduled to run, any scheduled tasks for this databaseare marked as Trigger deleted in the log description.
The connection to a database may be unsuccessful for a variety of reasons. For example:
• The user name and/or password are no longer valid.• The user account has insufficient permissions to open the database. See “Scheduling imports and
exports” on page 215 for the required permissions.• It references a security file that is not associated with the database.• Someone is logged on to the security file in iBase Designer, and has made a change to it but has not
yet logged off.• The database has moved so the path is no longer correct. Use iBase Designer to open the database
in order to re-register the location of the security file that controls it.• The database has been deleted.
Immediately after opening iBase Scheduler, you may be unable to select any of the databaseconnections and this message appears:
Could not connect to the iBase database for this connection.
The database may have been moved or deleted, or your connection details are incorrect.
This occurs if the database for the first connection in the list is open in iBase Designer. To continue,close the database in iBase Designer. A similar problem also occurs later in the session if one of theother databases for which there are connections is open. To continue, find out which of the databasesis open in iBase Designer, and close it.
Setting up the logging optionsDetails of batch imports and exports for each database connection can be logged in the Schedulerdatabase. You control the level of detail by setting the logging options on the Schedules page of theScheduler Configuration dialog; these can be different for each database connection. Nothing isrecorded if no logging options are set.
Procedure
To set the logging options for a database connection:1. Click the Schedules tab to display the Schedules page.2. Select the required database connection.
By default, all the logging options are selected when the database connection is created.
IBM i2 iBase administration center 217

3. In the Logging Options area, turn on or off any of the following logging options. Your changes takeeffect immediately.Option Records
When tasks arescheduled to run
The date and time that the next batch import or export will run. Thisprovides a useful confirmation that the task and trigger are set upcorrectly as the Scheduler service will add a log entry for thescheduled import or export the next time that the service runs.
When tasks start andfinish
When the batch specification started and finished running.
When task actionsstart and finish
The startup and shutdown of programs and plug-ins that run before orafter the import or export.
When componentsstart and finish
The start and finish of individual specifications in the batchspecification. (For example, an import specification is a component ofa batch import specification.)
Statistics when acomponent finishes
The number of records that are added, updated, unchanged, or resultin errors for the main entity, or the link end entities, in the specification(component). For a link import, will also include the number of recordsadded, updated, unchanged or result in errors for the link itself.
For an export, will include the number of records exported.
The completion statuswhen a task finishes
Whether the batch specification ran successfully or whether there wasa problem and, if so, what the status of the scheduled task is.
Warnings, Errors Any warnings and errors generated by the batch import or export.
Setting up tasksBatch imports and exports are defined as tasks. A task consists of a single batch specification thatlists one or more import or export specifications in the order in which they are to run and, optionally,actions to perform before and after the batch import or export.
About this taskThe batch specifications and import/export specifications are created in iBase.
The only restriction is that the import specifications cannot contain any prompts for user input. Youwill not be able to select an import batch specification that contains such an import specification. Youshould not modify an import specification that is used by iBase Scheduler so that it requires input; ifyou do so, the Scheduler service will not run the associated task.
You must set up a connection to the database before you can add any tasks. Once you have added atask, you can set up the triggers to schedule when the task runs.
Note: You cannot add tasks to an iBase database that cannot currently be opened by iBaseScheduler. For example, if another user has opened the database in iBase Designer.
Procedure
1. Click the Schedules tab to display the Schedules page.2. Select the required database connection from the Connections list.3. Click New below the Tasks area to display the Task dialog.4. Enter a descriptive task name.
218 IBM i2 iBase: Administration
For example, you might include the name of the batch specification in your task name. Themaximum length of the task name is 255 characters.
5. In the Type list, select either Batch Import or Batch Export.6. Select the batch specification that you want to use.
Note: The list displays only suitable batch specifications - it does not display any that containimport or export specifications that require input from the user. However, when you browse for aspecification, all batch specifications are listed regardless of suitability.
7. If required, enter the programs or plug-ins that you want to run before or after the batch import orexport.For details, see “Setting up task actions” on page 221.
8. Click OK to save the task.
ResultsThe task is now set up.
How soon the task runs will depend on how frequently the service runs.
Scheduling a task to run immediatelyYou can schedule a task to run when the Scheduler service next runs, even if there is no trigger forit:
1. Select the task that you want to schedule.2. Click Run below the list of tasks.
Editing a taskYou can change any of the details of the task without affecting any scheduled tasks. Thespecification name shown may be different if the batch specification has been renamed in iBase.
To edit a task, select the connection, and click Edit below the list of tasks.
Note: Changing the name of the task will change the task name against all entries in the log,including log entries for completed scheduled tasks. If required, you can save the existing log file.
Although the changes to the task are made as soon as you click OK, the changes only affect theScheduler service when the next task is scheduled. To update the schedules, cancel the currentscheduled tasks by making the trigger inactive.
If the batch specification used by a task is deleted, then the list of tasks will display #Not Foundnext to the name of the task.
Canceling scheduled tasksTo prevent iBase Scheduler from running a scheduled task, and prevent further scheduling, youneed to make the trigger inactive. For details, see “Setting up triggers” on page 220.
Deleting a task and its triggersYou can remove a task, and any triggers defined for it, from a database connection by selectingthe connection to the database, then selecting the task and clicking Delete below the list of tasks.
If you use the logging option, When tasks are scheduled to run, any scheduled tasks are markedas Trigger deleted in the log description.
Deleting a database connection will also delete all the tasks and triggers set up for it.
IBM i2 iBase administration center 219

Setting up triggersA trigger defines the event that causes the task to run, for example either reaching a specified dateand time or when the modification date on a file changes. A trigger can recur at a regular interval orrun once only.
About this task
You must create a task before you can set up any triggers.
There are three types of trigger:
• File change runs a task to import or export data whenever a specified file is updated (or created ifthe file is copied to a directory prior to the import/export). The file does not have to be associatedwith any import specification.
The Scheduler service will check the modification or creation date on the file at the interval which isset for the service on the Service page of the iBase Scheduler Configuration dialog. It will run thescheduled task when the modification date for the file is later than the start date set in the trigger.The date and time on the file is set by the server the file resides on.
• Interval runs a task to import or export data after an interval of time.
The service will calculate the interval from the details in the trigger, and run the scheduled taskwhen the calculated date and time is reached.
• Run now runs the selected task the next time the service runs.For details, see “Setting up tasks” onpage 218.
With the exception of Run Now triggers, triggers last indefinitely unless you set an end date. Triggersthat have passed their end date remain on the system and can be reused.
The following date/time options are available:
Option The task is scheduled to run...
Option The task is scheduled to run...
Daily After the specified number of days.
For example, enter 10 to run a batch importevery 10 days.
Weekly After the specified number of weeks, on therequired days of the week.
Monthly After the specified number of months, on therequired day of the month.
Note: A task that is scheduled to run on day 30or 31 will always run on the last day of the monthif there are less than 30 or 31 days in the month.
Once Once only on the run date, at the selected time.
Every Every n minutes or hours, on the run date,between the specified times.
Each time the Scheduler service runs, it calculates the next scheduled task for any active triggers itfinds that do not have a schedule. The run date is shown in the log if the logging option When tasksare scheduled to run is selected. The time that a task runs is always approximate.
220 IBM i2 iBase: Administration

If for some reason there is a delay, such as pausing the service, then the service will attempt to run itlater when the service resumes. The next scheduled task will not be added to the queue, or shown inthe log file, until the current scheduled task has completed.
The first run date depends on the start date and time in the active trigger, but all dates are inclusive:
Start date Effect on scheduling
Today's date The task will run today. If it is set to run at a timein the past, then the task runs immediatelyunless the Ending at time is also passed.
Past date, future date This date is used to calculate the next run dateonly, at the time(s) specified in the trigger.
When you edit a trigger, the service recalculates the run date of the next task to be scheduled for theactive trigger, and marks the current scheduled task as updated (in the log description).
Procedure
a. Click New below the list of triggers to display the Trigger dialog.b. Enter a descriptive name for the trigger, such as Every Monday Night, Alternate Weeks (until Jun
2005). The maximum length of the name is 255 characters.c. If you do not want to schedule the task at this stage turn off the Active check box.d. In Start date, enter the date that iBase Scheduler will use as the starting point when calculating
the intervals between scheduled tasks. You can choose a past or future date if required. Selectinga past date and/or time will affect how the next task is scheduled; for details, see How tasks aretriggered above.
e. Triggers are active until further notice. To turn off this feature, click End date and enter the enddate.
For example, if you enter the 5th May then the last possible date on which the task can run is the 5th.Triggers that reach their end date can be re-used by editing them.
a. Choose the event that makes the task run. To trigger the task to run:b. When the modification date on a file changes, select Trigger when file changes, and then enter the
path to the file or browse for it. The file does not have to exist at this stage.c. When a date and time is reached, select Trigger by date/time and then enter the number of days,
weeks or months, and an optional time.
See Types of trigger above for details.
a. Click OK to save the trigger.
The first task scheduled for this trigger will appear in the log the next time the Scheduler service runs(provided that the logging option When tasks are scheduled to run is selected).
Setting up task actionsBefore and after the data is imported or exported, you can run a program, a custom plug-in or anoperating system command. The program or custom plug-in must have a command line so that it canbe run from the operating system, and neither should prompt for user input.
About this task
Examples include:
IBM i2 iBase administration center 221

• Before export, running a program to move, copy or rename data files from one directory to anotherdirectory.
• After import, using an operating system command to delete data files.• Using a custom plug-in to send an email notifying recipients that the batch import has run and its
status on completion.• Using the Windows Networking command to inform users that their import has completed.
Depending how the Scheduler service is configured, the steps that follow the program will becanceled if the program takes too long to run, and the task marked as canceled in the log — this doesnot undo any import that may have taken place. This does not apply to plug-ins. For details, see“Configuring the scheduler service” on page 227.
Procedure
To set up a task action when adding or editing a task:1. In the Task dialog, click to turn on one or both of these check boxes:
• Perform actions before the task runs - the program or plug-in will run before the batchspecification is run.
• Perform actions after the task runs - if the import or export completes successfully, theprogram or plug-in will run after the last specification in the batch specification is finished.
2. From the Action Type list, select Program or Plug-in.3. Enter the details of the task actions:
• For a program, the command-line parameters of an operating system file that you want toexecute. Browse for the location of the program file.
• For a plug-in, its project and class names in the format project.class.
Reading the scheduler logThe Scheduler log can record the details of scheduled and completed batch imports and exports - theactual events that are logged will depend on the logging options set on the Schedules page of theiBase Scheduler Configuration dialog. Activity for each database connection is logged to the same file.
To display the log viewer
1. Click the Schedules tab to display Schedules page.2. Click View Log to display the Log Viewer, and then click the required entry. This displays full
details at the bottom of the Log Viewer.3. To update the display in the Log Viewer, click Refresh.
Completion status
The different statuses for scheduled tasks are shown in the following table. To display the status inthe Log Viewer, click on the row you are interested in.
Completion status Description
Task execution successful The task ran successfully.
Trigger updated The trigger has been edited.
Trigger inactive The trigger has been made inactive and will notrun again until you make it active.
222 IBM i2 iBase: Administration

Completion status Description
Trigger expired This batch import or export did not run becausethe end date on the File Change type trigger hadpassed.
Trigger deleted The trigger has been deleted. Also, the task wasscheduled but was canceled by the servicebecause the trigger had expired. This mighthappen, for example, if a previous task tookmuch longer to run than expected.
Notice that scheduled tasks are not canceled ifthe end time is in the past.
Error The task was not completed successfully.
Scheduled batch imports and exports that fail
If the logging option When tasks are scheduled to run is selected, entries are added to the log fortasks that are scheduled to run in the future.
The file associated with a file trigger does not have to exist; the task will still be scheduled and anentry appear in the log. If the file does not exist or if the permissions on the folder containing the fileprevent viewing of the date and time of the file then these messages will be logged once every 24hours:
• The file X does not exist or there are insufficient permissions on the directory it is located in to readthe file.
• The File Change trigger file X does not exist or there are insufficient permissions on the directory it'slocated in to read it.
A batch import or export will fail if the batch specification contains a specification that requires inputfrom or is output to a text file, and this text file is missing. For example, you will see the message:Failed to create import set X. File not found.
Note: Tasks will fail to run if the service cannot get exclusive access to the database, for examplebecause it is open in iBase Designer.
Completed batch imports and exports
To prevent a type of message from appearing in the log, display the Schedules page, and click to turnoff the required Logging option, as described in the table below in the Log Description section.
Column Description
Date & Time Timestamp recorded when this phase of thebatch import or export was started or completed.Most recent events are listed first.
Connection Name Name of the connection to the iBase database.
Task Name, Task Type Name of the task that has been scheduled, andits type.
Trigger Name, Trigger Type Name of the trigger that scheduled the task, andits type: Interval or File Change.
IBM i2 iBase administration center 223

Column Description
Log Type The log type corresponds to the logging optionsset on the Schedules page:
Log Type Logging Option
Schedule When a task isscheduled to run
Execute Task When a task starts andfinishes
Execute Program When the program fora task action startsand finishes
Plugin When a plug-in for atask action starts andfinishes
Execute Component When componentsstart and finish
Statistics Statistics when a taskcompletes
Completion Status The completion statuswhen a task finishes.See Completion Statusabove for details.
Warnings Warnings produced bya batch specificationrunning.
Errors Errors produced by abatch specificationrunning.
Log Description The messages detail, in reverse order, theprogress of the task. For example:
224 IBM i2 iBase: Administration

Column Description
Message Records
Completed executionof batch X
When batch X finished.This marks the end ofthis task.
Exclude this messageby turning off Whentasks start and finish.
Completed executionof X
When the namedimport/exportspecification finishedrunning. The messagesgiven below relate tothis specification.
Exclude this messageby turning off Whencomponents start andfinish.
Entity, Links, EntityEnd 1/2
When importingentities and links, thisreports statisticsconcerning the entityor link records. If anyerrors are reported,then they are logged inthe text file specifiedin the specification.When exporting,reports the number ofrecords exported.
Exclude this messageby turning offStatistics when acomponent finishes.
Execution <status> Shows the status ofthe completed batchimport/export. SeeCompletion statusabove.
Exclude this messageby turning off Thecompletion statuswhen a task finishes.
Starting execution of X When the servicebegan to run thenamed specification.
Starting execution ofbatch X
When the servicebegan to run thenamed batchspecification.
IBM i2 iBase administration center 225

Managing the scheduler serviceThe Scheduler service is installed in the Windows services database, and is managed by the WindowsServices application. You configure it using the Service page of the iBase Scheduler Configurationdialog.
About this taskScheduled imports and exports (tasks) are stored in the Scheduler database, which is a MicrosoftAccess database. This is monitored by the service, at a frequency that you specify when you configureit. The service automatically runs the scheduled tasks as they fall due.
You can start, stop, pause, resume, or disable the service by using the Services application. Serviceactivity may be recorded in a log file if required.
You can only run the service on a machine where iBase is installed.
The Windows Services application provides these commands for managing the service.
Command Description
Start Starts the service after it has been stopped. Anyscheduled tasks are run if they have passed orreached their start date and time.
By default, the service starts automatically afterrestarting the computer.
Stop Stops the service, after completing any tasks thatare currently in progress.
Pause Suspends the service, after completing any tasksthat are currently in progress.
Resume Resumes the service at the beginning of the nextiteration of the service loop. Any scheduled tasksare run if they have passed or reached their startdate and time.
Restart Stops and then immediately restarts the service.
These actions may be recorded in the Service log depending how the service is configured.
Procedure
You can find out whether the service is running by using the Service log - you can only do this if theactivities of the service are recorded in the Service log:1. Open the Windows Services application.2. Click the Service tab to display the Service page.3. Click View Log.
The current status of the service is shown at the top of the Log Viewer.4. As required, click Refresh to update the Log Viewer.
226 IBM i2 iBase: Administration

Configuring the scheduler serviceBefore you can use the iBase Scheduler, you must configure the iBase Scheduler service.
About this task
To configure the iBase Scheduler service, you need to:
• Set the frequency with which the service scans the Scheduler database for scheduled tasks.• Choose which events are recorded in the Service log file - by default, all logging options are
selected.• Set the interval after which a scheduled task is canceled if the program that runs before or after the
batch import/export is taking too long to run.
Note: You can also configure the service using the Windows Services application. For example, youmight want to change the startup type from Automatic. There are no startup parameters for theservice. For further information, see the Help for the Services application.
Procedure
To configure the service:1. Click the Service tab to display the Service page.2. Specify the frequency with which the service scans the Scheduler database, by entering the
number of minutes and seconds. The default interval is 10 seconds.How frequently you want the service to run depends on the number of tasks that you are running,and available computing resources.
Specify which details are recorded in the service log by turning on or off these check boxes:
Option Records
Starts up When the service is started by using commands in the Windows Servicesapplication, or when the machine starts up (if the service is set to use Automaticstartup).
Shuts down When the service is shut down by using the Services application, or when themachine is shut down.
Pauses When the service is suspended by using the Services application.
Continues When the service is resumed by using the Services application.
Fails When a problem occurs that prevents the service from running. An exception iswhen the database cannot be opened.
3. If the programs associated with a task take too long to complete, enter the interval after which theservice should cancel this and any other programs associated with the task. This is 10 minutes bydefault. This feature does not apply to plug-ins.
4. Click Save.
What to do next
The service is installed to run under the local Windows system account, which is only applicable if theservice is running on the local machine. If you intend to run iBase Scheduler using a Schedulerdatabase that is installed on a different machine then the service needs to log on using a domain username and password. This is set in the Windows Services application.
The account under which the service runs must have the following minimum file permissions:
IBM i2 iBase administration center 227

Directories and files Min. permission
Scheduler directory containing the fileScheduler.mdb
Modify
Scheduler.mdb Read, Write
Directory containing the DLLs and EXEs for iBaseScheduler
List Folder Contents
DLLs and EXEs for iBase Scheduler Execute
Directory containing the file on which a filetrigger is created— no permissions are requiredon the file itself.
List Folder Contents
Directory containing the batch scripts or plug-insrequired to execute as task actions.Alternatively, you could assign List FolderContents permission to the directory and Read &Execute permission to the files.
Read & Execute
Data files for import and/or the directoriescontaining the data files. You will require Writepermission if the file is to be altered by a batchscript or plug-in, and Modify permission if the fileis to be deleted by a task action.
Read
Directory containing the iBase security file. Modify
iBase security file Read, Write
iBase database directory (JET databases only) Modify
iBase database file (JET databases only) Read, Write
iBase database file (SQL databases only) Read
Managing the scheduler databaseIf you have set up the scheduler database, there are a number of administrative tasks that you willneed to carry out to manage your installation. These tasks should be carried out within the iBaseScheduler dialog.
The Scheduler database is a Microsoft Access database, which stores the:
• Scheduler service configuration• Details of connections, tasks, and triggers• Details of batch imports/exports that are scheduled, completed, or inactive (canceled)
Do not open or edit the Scheduler database in Microsoft Access. You should configure the databaseusing the iBase Scheduler Configuration dialog, and view the log files using the View Log button. TheScheduler database is password protected to prevent accidental changes to the data that might beincompatible with iBase Scheduler.
You should back up the Scheduler database in the same way that you back up your other iBasedatabases.
228 IBM i2 iBase: Administration

Setting a password to control access to the configuration dialogYou may want to set up a password to prevent unauthorized use of iBase Scheduler. The passwordcontrols access to the Scheduler database via the iBase Scheduler Configuration dialog. Users will beprompted for this password before the iBase Scheduler Configuration dialog opens.
Procedure
To set the password:1. Click the Service tab to display the Service page.2. Enter the password in the Scheduler Configuration Password field, and then re-enter the
password when prompted.3. To apply the password immediately, click Close. When you close the dialog, iBase Scheduler
checks the password and prompts you to re-enter it if there is a mismatch between the passwordsyou typed.
Saving the log filesYou can save the Scheduler log file or the Service log file as a text file.
Procedure
1. Click the appropriate tab to display either the Schedules or Service page depending which log fileyou want to save.
2. Click View Log to display the Log Viewer.3. Click Save, and then enter the file name and the directory that you want to use. The current date
and time is automatically added to the file name.
Purging the log files and the scheduler databaseYou can delete all the entries from the Scheduler or Service log files, with the option of saving them toa text file first. Purging the Scheduler log file deletes all the log entries for scheduled tasks, howeverthis has no effect on scheduled tasks which will run at the correct time. It also has the effect ofpurging the Scheduler database of any deleted connections, tasks, and triggers.
Procedure
To purge the log file (and also purge the Scheduler database):1. Click the appropriate tab to display either the Schedules or Service page depending which log file
you want to purge.2. Click View Log to display the Log Viewer.3. Click Purge. You are asked whether you want to save the log entries to a file before they are
deleted.4. Click Yes to save the entries in a text file, and then enter the file name and the directory that you
want to use, or No to delete the entries immediately.
Moving the scheduler databaseAt any point you can move the scheduler database. When iBase Scheduler detects that the databasefile has moved, you will be prompted to identify the new location.
About this taskThe Scheduler database is located in a directory that you specify when you install iBase Scheduler,and its location is shown on the Service page of the iBase Scheduler Configuration dialog. You cannotedit the database path on this page.
IBM i2 iBase administration center 229

Procedure
1. Close the iBase Scheduler Configuration dialog and then stop the iBase Scheduler service.2. Move the file Scheduler.mdb to the new directory.3. Start iBase Scheduler and then, when prompted, select the new location of the database file.4. Restart the iBase Scheduler service.
The Scheduler LogScheduler cannot send progress or error information for an interactive user to act upon becauseimporting or exporting data by using Scheduler is a non-interactive automatic process. Any actionsthe Scheduler Service makes are recorded in the Scheduler log.
The Scheduler log is an important source of information about what happens. In particular, its recordof the sequence of events provides valuable diagnostic information about the import or export. Thelevel of detail that is recorded in the Scheduler log can be configured on a per connection basis andincludes:
• When a task is scheduled• When a task runs and its completion status• When task actions run and their completion status• When an individual component within a task runs, and its completion status• Statistics that are returned from a task component• Errors and warnings detected by the service
230 IBM i2 iBase: Administration

Interpreting the Scheduler LogThe Scheduler Log contains information about each task that is run.
The most recent event is at the top of the Log Viewer. An example of a successful execution of aBatch Import task log is shown in the following section:
Each line of the log displays a summary in the Log Type column of what occurred. More detailedinformation can be found in the Details pane in the lower portion of the screen.
Reading from the bottom of the log upwards and examining the dates and times, that the task wasscheduled for execution a number of days before it was run. The log activity for any successfulexecution of a task is as follows:
• Task execution commences• Pre-task actions are run• Task components are run• Post-task actions are run• Task execution completes• Completion status is logged• Task is rescheduled
In the previous log, which contains the results of the ‘Example of a Successful Import Batch’ task, thefirst import specification creates only a single statistics line. From this, it can be concluded that theimport specification is importing entity records. The details for the statistics show the number ofentities that were added, updated, unchanged, or were in error. The second import specificationcreates three separate statistics lines: it can be concluded from this that the import specification isimporting link records. The statistics show the number of entities or links that were added, updated,unchanged, or were in error for the links, end 1 entities, and end 2 entities.
IBM i2 iBase administration center 231

Note: A task does not run if a user changes an import or export specification within the batch thatrequires a response from the user. Changes of this type would be an import specification thatprompts for confirmation of the action to take when a matching entry is found in the database or anexport specification that relies on a parameterized query.
If a pre-task plug-in, post task plug-in, or component fails to complete successfully the taskexecution stops at that point and the completion status indicates that a problem was encountered.The log does not report on any pre-task or post-task programs that fail to complete.
Pre-task action errorsThe following log, containing the results from the ‘Example of a Pre-Task Error’ task, shows that aproblem was encountered when a pre-task action is run:
The second pre-task action that is run resulted in an error because the program timeout, set to 1minute in the services configuration screen, was exceeded during its execution. None of the importspecifications or post task actions that should follow were run.
The following log, containing the results from the ‘Example of a Post-Task Error’ task, shows that aproblem occurred with a post task action. In this case, the batch file that was to be run was not found.The name of the file can be found in the description of the ‘Execute Action’ log entry.
232 IBM i2 iBase: Administration

Log managementThe log viewer retrieves the 100 most recent entries from the log by default. However, the logcontains all the entries in the log since Scheduler was installed or the log was last purged.
The size of the log varies depending on the number of tasks configured, the frequency of execution ofthe tasks and the logging options selected on the connections. The log must be purged regularly toprevent the Scheduler database from filling up with log information. When you purge the log, you aregiven the option to save the current log information to a text file. The name of the text file is generatedautomatically with the date and time of the purge appended to it so as not to conflict with or overwriteany previously saved log file. The information that is written to the text file is that which is displayedin the log viewer screen.
Scheduler error messagesThe following errors are reported in the Scheduler log if problems with the configuration ofconnections or errors in tasks or triggers occur. Each error is explained together with possiblecorrective action.
Many of the errors are caused by inadequate permissions on files, folders or within SQL Server. Fordetails of the minimum permissions that are required for access to all the files and folders that arerequired by the Scheduler Service, see Setting up a Domain Account for the Scheduler Service.
Service errorsCould not start the iBase Scheduler Service on Local Computer.
Error 1053: The service did not respond to the start control request in a timely fashion.
This error message is displayed after a short interval when an attempt is made to manually start theScheduler service by using the Windows Services application.
IBM i2 iBase administration center 233

Refer to the next error message if this message is displayed immediately after an attempt is made tostart the service. However, when there is a delay of thirty seconds or more between attempting tostart the service and the error message appearing then the possible causes for the error are asfollows:
Configuration Possible Cause Solution
N/A The database file has the 'ReadOnly' attribute enabled.
Disable the 'Read Only' attributeon the database file.
The Scheduler database is oneither the local machine or aremote machine and isaccessed through a folder shareby using a UNC path. The filesystem in use is either NTFS orFAT.
The folder share permissionsare set to 'Read' for theScheduler Service account.
Alter the folder sharepermissions to grant theScheduler service account atleast 'Change' permissions onthe folders and files availablethrough the share.
The Scheduler database resideson the local machine or aremote machine. The filesystem in use is NTFS.
The folder or file securitypermissions prevent writeaccess to the database.
Alter the folder and file securitypermissions to grant theScheduler service account atleast the minimum permissionsrequired for the Schedulerdatabase.
The Scheduler service isconfigured to execute under thecontext of the local systemaccount. The database is on aremote machine.
The local system account usesthe 'Anonymous' login when isaccesses files on remotemachines.
Change the Scheduler serviceaccount context to a domainaccount with the requiredpermissions on the databasefolder and file.
Or
Grant the 'Everyone' group therequired permissions on thedatabase folder and file.
The Scheduler service isconfigured to run under thecontext of a local machineaccount. The database is on thelocal machine and is accessedwith a local path. The filesystem in use is NTFS.
The local machine account musthave permission to access thedatabase file.
Grant the local machine accountthe required permissions to thedatabase folder and file.
The Scheduler service isconfigured to run under thecontext of a local machineaccount and the database is ona remote machine. The filesystem in use is NTFS or FAT.
A local machine account isunable to access files acrossthe network.
Configure the Scheduler serviceaccount to run under thecontext of either the LocalSystem account, or a domainaccount.
234 IBM i2 iBase: Administration

The Scheduler service isconfigured to run under thecontext of the local systemaccount and the database is onthe local machine.
The local system account is amember of the Administratorslocal group. The Administratorslocal group does not havepermission to access thedatabase file.
Grant the Administrators localgroup the required permissionson the database folder and file.
Could not start the iBase Scheduler Service on Local Computer.
Error 1053: The service did not respond to the start control request in a timely fashion.
This error message is displayed immediately after an attempt is made to manually start the Schedulerservice by using the Windows Services application.
Refer to the previous error message if this error message is displayed thirty seconds or more after anattempt is made to start the service. However, when the error message is displayed immediately afteran attempt to start the service the possible causes for this error are as follows:
Configuration Possible Cause Solution
N/A The Scheduler database ismoved.
Open the SchedulerConfiguration dialog and choosethe new location of theScheduler database whenprompted. After the location ofthe database is verified and theScheduler Configuration utilitystarts, try starting the serviceagain from the Services controlpane.
The Scheduler service isconfigured to run under thecontext of a local machineaccount. The database is on thelocal machine and is accessedby a local path. The file systemin use is NTFS.
The local machine account musthave permission to access thedatabase file.
Grant the local machine accountthe required permissions to thedatabase directory and file.
The Scheduler service isconfigured to run under thecontext of a local machineaccount and the database is ona remote machine. The filesystem in use is NTFS or FAT.
A local machine account isunable to access files acrossthe network.
Configure the Scheduler serviceaccount to execute under thecontext of either the LocalSystem account, or a domainaccount.
The Scheduler service isconfigured to run under thecontext of the local systemaccount and the database is onthe local machine.
The local system account is amember of the Administratorslocal group. The Administratorslocal group does not havepermission to access thedatabase file.
Grant the Administrators localgroup the required permissionson the database directory andfile.
IBM i2 iBase administration center 235

Scheduler Configuration utility errorsThe Microsoft Jet database engine cannot open the file '< scheduler_database_file >.' It isalready opened exclusively by another user, or you need permission to view its data.
This error is displayed when the configuration application is started.
Configuration Possible Cause Solution
The Scheduler database is oneither the local machine or aremote machine. The filesystem in use is NTFS.
The user that is attempting toaccess the database does nothave sufficient permissions tothe Scheduler database folderor file.
Grant the user the requiredpermissions to the Schedulerdatabase folder and file.
Unable to write to the database – you may not have permission.
This error is displayed when an attempt is made to save or edit a connection, task, or trigger.
Configuration Possible Cause Solution
The Scheduler database is onthe local machine or a remotemachine and is accessedthrough a folder share by usinga UNC path. The file system inuse is either NTFS or FAT.
The user that is attempting toaccess the Scheduler databasehas sufficient rights to readfrom the database, but not tomodify its contents. The foldershare permissions for the userare set to ‘Read’ for the user.
Alter the folder sharepermissions to grant the user‘Change’ permissions on thefolders and files availablethrough the share.
The Scheduler database is onthe local machine or a remotemachine. The type of file systemin use is NTFS.
The user that is attempting toaccess the Scheduler databasehas sufficient rights to readfrom the database, but not tomodify its contents. The folderor file security permissionsprevent write access to thedatabase for the user.
Alter the folder and file securitypermissions to grant the user atleast the minimum permissionsrequired for the Schedulerdatabase.
Unable to delete the connection/task/trigger – you may not have permission.
This error is displayed when an attempt is made to delete a connection, task, or trigger. Refer to theprevious error for possible solutions.
Could not connect to the iBase database for the ‘< connection_name >’ connection.
The databaseis moved or deleted, or your connection details are incorrect.
This error message is displayed when either the Scheduler Configuration dialog is started, or an entryis selected from the list of connections.
Configuration Possible Cause Solution
236 IBM i2 iBase: Administration

The iBase connection andsecurity files is on the localmachine or a remote machineand are accessed through afolder share by using a UNCpath. The file system in use iseither NTFS or FAT.
The user that is attempting toaccess the iBase database doesnot have permission to accessthis share, or they do not havepermission to change the filesand folders available throughthe share.
Ensure the user that isaccessing the iBase databasehas at least ‘Change’ permissionon the folder share.
The iBase connection andsecurity files reside on a localmachine or remote machine.The file system in use is NTFS.
The folder or file securitypermissions are preventingwrite access to the iBasesecurity file for this user.
Alter the folder and file securitypermissions to grant the user atleast the minimum permissionsrequired for the iBase databaseand security file.
The iBase security file has the‘Read Only’ attribute enabled.
Disable the ‘Read Only’attribute on the iBase securityfile.
N/A The iBase security file has the‘Read Only’ attribute enabled.
Disable the ‘Read Only’attribute on the iBase securityfile.
The iBase security file is on aremote machine and isaccessed through a folder shareby using a UNC path. The filesystem in use is NTFS or FAT.
The folder share permissionsprevent write access to thesecurity file for the Schedulerservice account.
Alter the folder sharepermissions to grant theScheduler service account‘Change’ permissions on thefolders and files availablethrough the share.
The iBase security file is on thelocal machine or a remotemachine. The file system in useis NTFS.
The folder or file securitypermissions prevent writeaccess to the security file forthe Scheduler service account.
Alter the folder and file securitypermissions to grant theScheduler service account atleast the minimum permissionsrequired for the iBase securityfile.
Log errorsThe file < file_name> does not exist or there are insufficient permissions on directory to read thefile.
The user successfully created a file trigger through the Scheduler Configuration dialog, but the serviceimmediately logs the error in the Scheduler log.
Configuration Possible Cause Solution
The trigger file is on the samemachine as the SchedulerConfiguration utility and isaccessed through a local path.The file system in use is eitherNTFS or FAT.
The Scheduler service is on aremote machine.
The Scheduler service is lookingfor the file on the machine thatthe service is running on. Thisfile does not exist on thismachine.
Create a folder share on theScheduler Configuration utilitymachine and reference thetrigger file through this share.
IBM i2 iBase administration center 237

The trigger file is on either thelocal machine or a remotemachine and is accessedthrough a folder share by usinga UNC path. The file system inuse is either NTFS or FAT.
The Scheduler service is oneither the local machine or theremote machine.
The Scheduler service accountdoes not have permission toview the trigger file.
Ensure that the Schedulerservice account has at least theminimum folder and file securitypermissions required for thetrigger file.
The Scheduler service accountdoes not have access to thefolder share.
Add the Scheduler serviceaccount to the list of authorizedusers on the folder share. Theaccount must have a minimumof 'Read' permissions on thefiles and folders availablethrough the share.
Login failed for user '< windows_user_name>'
The Scheduler service creates an entry in the log when a batch import or export specification is run.
Configuration Possible Cause Solution
SQL Server is hosting an iBaseSQL Server database.
The Scheduler service isrunning under the context of adomain account.
The iBase database connectionfile is configured to access theSQL Server machine by usingWindows security.
The Scheduler service accountdoes not have a correspondinglogin, which uses the Windowsauthentication security model,on the SQL Server machine.
Create an SQL Server login thatuses the Windowsauthentication model and usesthe domain account in use bythe Scheduler service.
Grant the SQL Server loginrights to access the iBasedatabase on the SQL Servermachine.
Login failed for user ‘NT AUTHORITY\SYSTEM'
The Scheduler service creates an entry in the log when a batch import specification is run.
Configuration Possible Cause Solution
238 IBM i2 iBase: Administration

SQL Server is hosting an iBaseSQL Server database. TheBUILTIN\Administratorsgroup has been removed fromthe SQL Server securityconfiguration.
The Scheduler service is on thesame machine as the SQLServer instance that is hostingthe iBase database and isrunning under the context of thelocal system account.
The local system account doesnot have rights to access theiBase database.
The local system account is aspecial account withadministrative rights on thelocal machine and is a memberof the Administrators group atthe operating system level.
Removing the BUILTIN\Administrators accountfrom SQL Server has revokedrights to the database for thelocal system account.
Create a security login withinSQL Server with the name NTAUTHORITY\SYSTEM that usesthe Windows authenticationmodel.
Add this new login to theSystem Administratorsserver role.
Or
Configure the Scheduler serviceto run under the context of adomain account that has rightswithin SQL Server to access theiBase SQL Server database.
Login failed for user ‘< domain_name >\< computer_name >$’.
The Scheduler service creates an entry in the log when a batch import specification is run.
Configuration Possible Cause Solution
SQL Server is hosting an iBasedatabase that is on a differentmachine to the machine onwhich the Scheduler Service isrunning.
The Scheduler service isrunning under the context of thelocal system account.
The iBase database connectionfile is configured to access theSQL Server using Windowssecurity.
The local system account canonly access iBase databasesthat are hosted on the samemachine as that running theservice.
Change the Scheduler serviceconfiguration to run under thecontext of a domain account.
Create an SQL Server login thatuses the Windowsauthentication model and usesthe domain account in use bythe Scheduler service.
Grant the SQL Server loginrights to access the iBasedatabase on the SQL Servermachine.
Logon failed for user ‘(null)’. Reason: Not associated with a trusted SQL server connection.
The Scheduler service creates an entry in the log when a batch import specification is run.
Configuration Possible Cause Solution
IBM i2 iBase administration center 239

The Scheduler service isrunning under the context of alocal machine account.
SQL Server is hosting an iBaseSQL Server database on adifferent machine to thatrunning the Scheduler service.
The iBase database connectionfile is on the same machine asthe Scheduler service, and isconfigured to access the SQLServer by using Windowssecurity.
It is not possible to grant a localWindows account on onemachine access to an SQLserver instance on anothermachine.
Change the Scheduler serviceconfiguration to run under thecontext of a domain account.
Create an SQL Server login thatuses the Windowsauthentication model and usesthe domain account in use bythe Scheduler service.
Grant the SQL Server loginrights to access the iBasedatabase on the SQL Servermachine.
Cannot open database requested in login ‘< database_name >’. Login fails.
The Scheduler service creates an entry in the log when a batch import specification is run.
Configuration Possible Cause Solution
The Scheduler service isrunning under the context of adomain account.
SQL Server is hosting an iBaseSQL Server database.
The iBase connection isconfigured to access the SQLServer by using Windowssecurity.
The Scheduler service accountdoes not have sufficient rightswithin SQL Server to access theiBase database.
Grant the SQL Server login forthe Scheduler service domainaccount rights to access theiBase database on the SQLServer machine.
Invalid procedure call or argument.
The Scheduler service creates this entry in the log when a task action is run.
Configuration Possible Cause Solution
The task that is run has aProgram Action that is to be run.
The Program Action is definedto run an operating systembatch file.
The batch file has no content.
Remove the batch file from thelist of actions for the task.
Or
Ensure that the batch file is notzero bytes by entering acarriage return into the file.
Permission Denied file path: < path >.
The Scheduler service creates this entry in the log when a batch import specification is run and anattempt is made to read an import file.
Configuration Possible Cause Solution
The Scheduler service isrunning on the same machineas the import file location.
The Scheduler service hasinsufficient permissions to openthe import file.
Grant the Scheduler serviceaccount the requiredpermissions to the import files.
240 IBM i2 iBase: Administration

The Scheduler service isoperating under the context ofthe Local System account. Theimport files is on a remotemachine.
The Scheduler service hasinsufficient permissions to openthe import file.
Change the Scheduler serviceaccount to a domain accountwith the required permissionson the import files.
Or
Grant the 'Everyone' group therequired permissions on theimport files.
Path/File access error.
The Scheduler service creates this entry in the log when a batch export specification is run and anattempt is made to create or overwrite an export file.
Configuration Possible Cause Solution
The Scheduler service isrunning on the same machineas the export file location.
The Scheduler service hasinsufficient permissions tocreate an export file in thefolder specified.
Grant the Scheduler serviceaccount the requiredpermissions to the folder inwhich the export file is to becreated.
The Scheduler service isoperating under the context ofthe Local System account. Theexport file folder is on a remotemachine.
The Scheduler service hasinsufficient permissions tocreate an export file in thefolder specified.
Change the Scheduler serviceaccount to a domain accountwith the required permissionson the folder intended forexport files.
Miscellaneous problemsA task that is set up to execute on the change of a trigger file executes more than once, or doesnot execute when expected.
Configuration Possible Cause Solution
The Scheduler service and thetrigger files are on two separatemachines.
The machine on which theScheduler service is executinghas a different date, time, orboth to the machine on whichthe trigger file is.
Ensure that the Windows Timeservice is running on eachmachine. This automaticallysynchronizes the times on thetwo machines with the domaincontroller.
Or
Manually synchronize the timeson the two machines by usingthe NET TIME command.
The Scheduler database lock file ( Scheduler.ldb) persists in the directory after both the serviceand configuration applications have been shut down.
The .ldb file is a Microsoft Jet locking file that is removed if the applications are shut down cleanly.
Configuration Possible Cause Solution
IBM i2 iBase administration center 241

N/A The last application to use theScheduler database stoppedabnormally.
The file will be removed thenext time an application thatuses the Scheduler database isstopped cleanly and it is the lastapplication that is accessing thedatabase.
The database is accessedthrough a folder share. The filesystem in use is NTFS or FAT.
The folder share permissionsare preventing users fromdeleting files available throughthe share.
Alter the folder sharepermissions to allow users thataccess the Scheduler databasewith the SchedulerConfiguration utilitypermissions to delete the Jetlocking file.
The database is accessedthrough a folder share. The filesystem in use is NTFS.
The folder and file securitypermissions are preventingusers from deleting the Jetlocking file.
Alter the folder and file securitypermissions to grant the usersthat use the SchedulerConfiguration utility at least theminimum permissions requiredfor the Scheduler database.
iBase database replicationiBase database replication is the process of automatically distributing copies of iBase data anddatabase objects between SQL Server instances in different locations and keeping this datasynchronized. The data is copied by use of SQL Server merge replication, using the standard toolsprovided in SQL Server. iBase database replication provides more tools to manage the iBasedatabase. All servers that are involved in replication must use the same SQL Server version.
In iBase database replication, one of the iBase database servers is configured as the Publisher, andempty iBase databases are created at the other locations. To start replication, the SQL Serveradministrator either configures a subscription that downloads a snapshot of the data over thecommunications link or transfers the data on removable media using a backup file.
Owing to the complexity of SQL Server replication, the users who configure and maintain theunderlying SQL Server databases require appropriate SQL Server training. Analysts do not require anyadditional skills to operate iBase within a replicated environment. Senior analysts with responsibilityfor operations such as merging, batch editing and deleting, restoring, and purging, and reviewingconflicts require an understanding of the replication environment.
What does iBase database replication contain?
iBase database replication is installed as part of iBase. It contains the following functionality toenable iBase administrators to manage replication:
• Conflict Viewer dialog— for reviewing the data conflicts that might occur when two users change thesame record within the same replication cycle. Conflicts are reviewed on a record by record basis atthe publisher site.
• File Manager dialog for uploading files into one database for replication to the databases at othersites. Files might be a database template, audit archive files, IBM® i2® Text Chart templates, and soon.
• Update Database Schema dialog for applying changes to the database design.
242 IBM i2 iBase: Administration

• Status report to show whether replication is configured in SQL Server.
Project managementThe following section introduces the different steps that are involved in deploying iBase databasereplication. It brings together the preparation that is required for the iBase security file, the database,and the audit log with the configuration required in SQL Server.
Users can work in the database that becomes the publication database, even if it is not yet configuredfor replication. Users at the subscriber sites can only start work after replication is fully configured.
Version 5 security files and databases require upgrading to version 8, and after these files areupgraded, they cannot be used with iBase 5. You must also convert (upsize) the security file to SQLServer format (and the database if it is in Microsoft Access format). You can only replicate SQL Serverdatabases.
The following flow charts show the sequence in which the configuration tasks can be completed, whoperforms these tasks (whether the iBase or the SQL Server administrator) and what the dependenciesare.
For more background information on managing the deployment of iBase database replication, see:
• Overview of Supported SQL Server Replication Features• Overview of Preparing iBase for Database Replication• Overview of Setting Up iBase Database Replication in SQL Server• Overview for Large Databases
Documentation for iBase and SQL Server administrators
The Administration Center documentation is optionally installed when iBase is installed.
SQL Server administrators that require the documentation can access the files on the product CD orinstall just the Administration Center. (The Administration Center should always be run on themachine on which it is installed.)
New systems or systems with small amounts of data
The following flow chart shows the sequence of tasks and the dependencies when you are configuringa new system or a system in which the initial snapshot of data, for the iBase database containing theentity and link data, is small enough to transfer over a communications link.
The following flow chart shows, for example, that an SQL Server administrator might configure thepublications and subscriptions at the same time if the preparation of the iBase security file anddatabase is complete.
The work flow is identical for all supported versions of SQL Server.
IBM i2 iBase administration center 243

244 IBM i2 iBase: Administration

For further information See
Publisher site: iBase administrators • Creating New Security Files and a PublicationDatabase
• Preparing Existing Security Files• Preparing Existing Databases• Updating the Database Design• Managing Security• Updating User Data
Publisher site: SQL Server administrators • Setting the Time on the Servers• Configuring the Distributor• Publishing Security Data• Publishing Entity and Link Data• Publishing Audit Data
Subscriber site: iBase administrators • Converting the Security File to SQL Server• Protecting the Security Connection File• Creating Subscription Databases• Managing Security• “Updating user data” on page 286
Subscriber sites: SQL Server administrators • Setting the Time on the Servers• Subscribing to Security Publications• Subscribing to Entity and Link Publications• Subscribing to Audit Publications• Setting Up the Merge Agents
Systems with large amounts of data
The following flow chart shows the sequence of tasks and the dependencies when you are configuringa system in which the initial snapshot of data, for the database containing the entity and link data, istoo large to transfer over a communications link.
IBM i2 iBase administration center 245

246 IBM i2 iBase: Administration

For further information See
Publisher site: iBase administrators • Preparing Existing Security Files• Preparing Existing Databases• Updating the Database Design• Managing Security• Updating User Data
Publisher site: SQL Server administrators • Setting the Time on the Servers• Configuring the Distributor• Publishing Security Data• Publishing Entity and Link Data• Publishing Audit Data
Subscriber site: iBase administrators • Preparing Existing Security Files• Creating Subscription Databases• Managing Security• Updating User Data• Testing Replicated Databases
Subscriber sites: SQL Server administrators • Setting the Time on the Servers• Subscribing to Security Publications• Subscriptions for Restored Databases• Subscribing to Audit Publications• Setting Up the Merge Agents
For iBase administratorsHow to prepare iBase databases for replication, and then how to maintain them after replication isconfigured in SQL Server.
Note: Unless stated otherwise, the information in the following section applies to all supportedversions of SQL Server.
Introducing iBase database replicationThe following section introduces the principles of iBase database replication, and describes howworking in a replicated database is different from a non-replicated database. It is intended for iBaseadministrators and senior analysts with some administrative responsibilities rather than SQL Serveradministrators. It also provides background information on database replication.
For an overview more relevant to SQL Server administrators, see the topics in “For SQL Serveradministrators” on page 302.
What is database replication?Replication is the process of copying data from a central database to one or more databases.
The central database is called the publication database because it provides the data for users at othersites. The data in the publication database is copied (replicated) to subscription databases at otherlocations. All users whether connected to the publisher server (the Publisher) or to a server at one of
IBM i2 iBase administration center 247

the remote sites (a Subscriber) see the same data and work on the same records. A Subscriber can bea Subscriber such as a file server or a disconnected Subscriber such as a laptop.
A change that is made in one subscription database is copied to the Publisher (merged), and thePublisher then replicates that change to the other Subscribers. On fixed Subscribers, this is acontinuous process and you are not aware of it happening, synchronization usually occurs in a matterof seconds. The effect is that all users on fixed Subscribers have an almost identical view of the dataeven though they are working on different databases.
This figure shows the main database that is configured as the publication database with threesubscription databases on servers that have permanent (fixed) connection to the Publisher:
The situation is slightly different if you are using a disconnected Subscriber, such as a laptop, and theSubscriber is only periodically connected to the Publisher. Your changes can only be merged with thePublisher, and you only receive updates to the data, when the laptop is on the network and connectedto the Publisher. For this reason, your view of the data can become progressively outdated, and thereis also a risk that your changes might conflict with changes made by others.
248 IBM i2 iBase: Administration
Note: Many of the terms that are used in iBase database replication are derived from Microsoft SQLServer merge replication on which iBase database replication is based.
Editing and deleting records in a replicated database
When you edit or delete a record, you affect the data in use at other sites. You can, for example:
• Edit a record that is "owned" by a user at a different site.• Delete a link that is associated with an entity that is part of another user's area of investigation.• Delete an entity that a user at another site is about to edit.
None of this is new but it is important to be aware of who owns a particular record.
You can find out who last worked on a record by looking at the record properties (in iBase, right-clickon the record, for example in a record list, and from the menu, select Properties).
Field Description
Record identifier The record identifier is composed of<table><record number>\<databaseidentifier>. Therefore, SUB in this exampleidentifies the database in which the record wascreated.
Note: The record identifier for records enteredusing iBase 3 has the database identifier beforethe <table><record number>.
Created by The name of the user who entered the data. Theoptional number is part of the username and canbe used to show where the user is located. Youcan also assign users to locations as part of theircontact details as explained in the subsequentinformation.
Updated by The name of the user who last entered the data.
Note: Because updates are made independently by users at each Subscriber, the same data might beupdated at the Publisher or by users at more than one Subscriber. Therefore, conflicts can occurwhen data modifications are merged. However, this should be a rare event, and the iBaseadministrator can resolve any conflicts that occur.
For information on who created or last modified the record, or who owns the record, you might beable to display their contact details.
Restricted operations in a replicated database
In a replicated database, particular care needs to be taken with:
• Batch editing• Batch deleting• Merging entities• Imports
IBM i2 iBase administration center 249

With the first three types of operation, unexpected consequences can occur if you do not carefullyanalyze the records involved in the operation. For this reason, these operations are restricted tospecific users.
Soft delete is always used in a replicated database. This means that deleting a record, marks it asdeleted but leaves it in the database so it can be restored if necessary. Soft deleted records can onlybe restored and purged in the publication database. Soft deleted records are only visible to systemadministrators. They do not appear in search results, when listing and browsing records or whencharting but they do appear, for example, in the Links dialog.
Soft deleted records cannot be purged or restored if there are any conflicts.
Merging entities is a restricted and time-consuming operation in a replicated database (requiringcooperation from all the different sites). For this reason, steps need to be taken to reduce the numberof unnecessary duplicates in your data, including duplicates created when you import. See MergingEntities for details.
Note: Bulk Import is not supported with iBase database replication.
Setting up iBase database replication
When you and your SQL Server administrator set up replication, you replicate the iBase:
• Entity and link data (including the contents of code lists).• Security data, and the users and groups that it contains.• Audit log and its entries, so that changes to the audit trail can be analyzed for a single site or for the
organization as a whole.
Different types of data are held in different SQL Server databases and require separate publicationsand subscriptions.
For an iBase database, you do not replicate the database schema. The database at each site musthave the complete database schema before replication is configured. For more information on what isand is not replicated, see Updating the Database Design.
When to use iBase replication?Use iBase replication to copy and distribute data across sites and servers.
Replication is a solution if your organization needs to:
• Copy and distribute data to one or more sites.• Distribute data changes to other servers.• Allow multiple users and sites to change and then merge the data modifications together,
identifying and resolving conflicts if they occur.
Organizations that can benefit from replication include:
• Organizations with geographically distinct groups of users who need to share common data.• Organizations that operate separate iBase databases to overcome practical restrictions that are
imposed by iBase when large numbers of users simultaneously access the database.
Replication can also be used to store data redundantly so that part of the organization can continueoperating if one or more of the servers or communication links fail. To take advantage of this feature,users need to be able to log on to a remote server.
When to replicate the security data
Replicating the security data means that all sites have the same user groups and users, and adding auser at one site adds that user to the security files at all sites. This can be administered centrally by
250 IBM i2 iBase: Administration

one security administrator by remote logon, or locally. For more information, see How Security Worksin a Replicated Database.
When to replicate the audit log
If you currently use the audit log, you probably want to replicate it. Replicating the audit log allowsboth analysts and administrators to extend their analysis of the log entries to include changes that aremade at any site. For more information, see How the Audit Log Works in a Replicated Database.
If you do not replicate the audit log:
• Users are only able to analyze log entries made at the local site.• Users who need to analyze changes at other sites need to be able to log on to remote servers. This
increases the workload for the network administrator (who must grant the users permission toaccess servers in other domains).
• Users at the subscriber sites do not see any entries that show how conflicts between entity or linkrecords were resolved.
• Security administrators might not be able to see how a group or username conflict was resolved ifthe conflict was detected at a different site. The outcome is recorded in the audit log for the sitethat detected the conflict. See Handling duplicate group and user names for details of namingconflicts.
Note: Conflict resolution and detection are only logged if the database is set to audit level 4 or 5.
When to use read-only subscription databases
You might want to distribute data and data changes to other servers in your organization but preventusers of that data from changing it. Use iBase database replication to create subscription databases,which are read-only but still receive updates from the Publisher.
How iBase uses replicationReplication is not a feature of iBase itself. To replicate an iBase database, your SQL Serveradministrator uses functionality within Microsoft SQL Server. However, in iBase you can prepare thedatabases for replication, and manage the databases after replication is configured in SQL Server.
Note: iBase uses Microsoft SQL Server merge replication in its simplest form. For information onsupported configurations, see Overview of Supported SQL Replication Features.
Database configuration
iBase entity and link records, security records, and audit log are held in separate SQL Serverdatabases, and each database is replicated separately. Replicating the audit log is optional. Youcannot replicate Microsoft Access databases.
An iBase database that is set up for replication requires the following properties:
• A database identifier that is unique across all the replicated databases. The database and thesecurity file for a site can have the same database identifier (site identifier).
• Soft delete, which is required by the iBase Conflict Viewer. Using the Conflict Viewer, users canreview the way in which the conflicts between entities and links are resolved and can undo thechange in order to select a different outcome.
The databases at the subscriber sites can be read-only. They receive updates from the Publisher butusers are not able to make any changes.
Note: The maximum length of database and security file names is 119 characters. For moreinformation, see Before creating any iBase databases.
IBM i2 iBase administration center 251

Publishers and subscribers in an iBase system
One server must be selected as the Publisher, and the iBase database on this server is the publicationdatabase— the central database that provides the initial data for the other sites, and receives andsends updates from the databases at these sites.
The database that you select as the publication database:
• Is used to detect and resolve conflicts.• Is the only database in which records can be restored, purged, and merged.• Provides the security file that will be used at all the sites involved in replication.
The subscription databases are identical to the publication database in terms of the entity and linkdata. Filtering of data (for example, by SQL Server) is not supported. However, each database canhave its own report definitions, queries, import specifications, Text Chart templates.
Subscription databases can be administered centrally if you are able to log on remotely to the serverson which replication is running. Conflict resolution is always done centrally at the Publisher.
Note: Only one site should change the schema of a replicated database in iBase Designer, howeverthe site might be either a publisher or a subscriber site. Regardless of which site the changes aremade, there is a procedure that must be followed.
The security file in a replicated database
With a replicated security file, any iBase security administrator can add, delete, or update user groupsand users, and the new user data is merged with the security file at the Publisher and then replicatedto the security files at the Subscribers. Any duplicate user or group names are detected and a securityadministrator, working at any site, can correct any duplicates that might occur.
You should replicate the security file. You can only replicate a security file that you upsized to SQLServer.
Attention: If you use iBase with Extended Access Control, then it is essential to replicate thesecurity file and failure to do so undermines the additional security provided by ExtendedAccess Control.
For more information, see How Security Works in a Replicated Database.
Working on entity and link records
Any user given the correct permissions can log on to their local database, whether at the publisher ora subscriber site, and add, modify, or delete records. Changes that are made at fixed Subscribers arequickly merged with the data held in the publication database (if the user is working at one of thesubscriber sites) and the changes are quickly replicated to the other sites so that all sites see thesame data. In SQL Server, a separate merge process for each Subscriber uploads local changes to thePublisher and downloads all the changes made at or received by the Publisher. For a disconnectedSubscriber, such as a laptop, merging, and replication can only occur when the Subscriber is on thenetwork and connected to the Publisher.
For fixed Subscribers, merging and replication should be quick because the merge processes runcontinuously, and the frequency with which the processes run generally prevent any conflictingchanges from occurring. In the unlikely event that a conflict does occur, SQL Server automaticallyresolves the conflict in favor of the Publisher and then the Subscriber who merged first. There is aniBase Conflict Viewer available in the publication database to review these conflicts and, if required,change how they were resolved.
For fixed Subscribers, conflicts are most likely to occur after a problem with a communication linkbetween the publisher and one of the subscriber sites is rectified (there are no conflicts while the link
252 IBM i2 iBase: Administration

is down). For disconnected Subscribers, conflicts can occur after connecting with the Publisher andmerging their changes into the publication databases.
For more information, see Conflicts and How They Occur.
The audit log in a replicated database
You can choose to replicate the audit log to maintain an audit trail that covers all the replicateddatabases and security files. You can filter the audit log to view activity at just one site or for thewhole organization.
Note: The facility to control who can view the audit log generated by users that work on sensitive datarequires you to replicate the security file.
For more information, see How the Audit Log Works in a Replicated Database.
How security works in a replicated databaseReplicate the database, and then replicate the appropriate security file.
There are two file formats for iBase security files:
• Microsoft Access (which cannot be replicated)• Microsoft SQL Server (a more secure format that can be replicated)
When you select SQL Server format for the security file, you create an SQL Server database thatcontains the data, and a connection file that stores the connection information. Keep the securityconnection file in the iBase database folder alongside the connection files for the iBase databasesthat use it.
Replicating a security file
Replicating the security data enables your organization to implement a global security systemwhereby the following are identical:
• Security policy• User groups• User accounts• Access rights derived from membership of the user groups
The advantages of replicating the security data are:
• Reduced administration for the security administrator as replication synchronizes the security dataat the different sites.
• Any security administrator at any site can maintain the security data. You control access to the localcopies of the security file in the usual way.
• Usernames and contact details are always consistent and up-to-date, which assists analysts whouse the audit log, record properties, or owner details in iBase.
Non-replicated databases can continue to use a replicated security file, provided the databases areusing the same version of iBase.
Why you must replicate the security file
Using a replicated iBase database with an unreplicated security file reduces the security of yoursystem - if you are replicating the database, you must implement a unified and global securitysystem. This is important if users can log on remotely to any server in the iBase system. Local security
IBM i2 iBase administration center 253

systems can potentially give users access to different commands and data depending on the serverthey log on to.
The facility to control who can view the audit log generated by users that work on sensitive datarequires you to replicate the security file.
Attention: If you use iBase with Extended Access Control, then it is essential to replicate thesecurity file and failure to do so undermines the additional security provided by ExtendedAccess Control.
Importance of the security file at the publisher site
All sites must have a copy of the security file or database used at the publisher site because this is thesecurity file associated with the database that is replicated. You can only open this database, or thesubscription databases created from it, using the user accounts defined in its replicated security file.
It is not possible for the subscriber sites to create their own security file for use with a replicateddatabase. Each site must either start with a copy of the publisher security file and convert this fromMicrosoft Access format to SQL Server, or start with a duplicate of the publisher security databasecreated by restoring from an SQL Server backup provided by the publisher site.
Attention: You should keep a copy of the security file in Microsoft Access format in case youneed to add new subscriber sites in the future.
How the audit log works in a replicated databaseIf required you can choose to replicate the audit log to maintain an audit trail that covers all sites.Typically, the audit level is set to the same value in all the replicated databases. You must set theaudit level to 4 or 5 if you want to include actions that relate to the Conflict Viewer.
The main consideration for the audit log when you set up iBase database replication is the method ofidentifying the site at which a specific change was made. Depending on your organization, you mightobtain this information from:
• User names that contain a site identifier• Locations that are associated with the user• Network logins
The origin of a record that is entered after replication was configured in SQL Server (but not of anyupdates to it) can be determined from its record ID, which always contains a database identifier.
Using the audit log
When you view the records in the audit log, you see the actions taken in each replicated database. Torestrict the actions to a specific site, you need to filter the audit log.
There are actions specific to iBase database replication to cover resolving conflicts in the database,and in the security file. These actions are used when the audit level is set to 4 or above.
Archived audit log files are not replicated.
Note: The dates and times that are recorded in the audit log are for the server on which the user wasworking.
Note: If Audit History is turned on, then the audit history will also log changes made by the ConflictViewer if there is a data conflict.
Filtering the audit log
There are various ways of filtering the audit log to view activity for a specific site:
254 IBM i2 iBase: Administration

Filter by Description
User name In a replicated iBase system, each user musthave a unique user name (so there can be noconfusion about who worked on which record).This allows you to list the records worked on by asingle user regardless of the server they log onto.
Optionally, each user name might contain anelement to identify the site at which the userworks, and this can be a useful way of filteringthe audit log by site.
Network Login
The audit log records the server and networklogin name of the user who performed the action.This may be a useful way of determining thelocation of the user if users can only connect to adatabase on one server.
Location Locations are optional. A location is associatedwith a user name and records something extraabout the user, such as:
• The site they work at• The division or business unit they work in• Their area of responsibility
If you want the capability to filter by location,then all user accounts should have a location andthe location names must be consistent.
Choosing not to replicate the audit log
If you choose not to replicate the audit log, then actions are still logged as usual but the audit log onlyrecords actions local to the replicated database or security file. Other sites might not be able to viewthis information or easily compare it with actions recorded in other audit logs.
For more information, see When to replicate the audit log.
Differences between working in a replicated and non-replicated databaseAnalysts see little difference in how they work in a replicated database. The main differences are forsenior analysts who check for and review conflicts, and merge records, and for database designerswho use iBase Designer.
Analysts
When a user edits or deletes a record, the updated or deleted record is merged with the publicationdatabase, and the Publisher replicates that change to the other subscription databases. The user isnot aware of this process.
If another user is working on the same record when the change is replicated to their database, theyare prevented from saving their changes to the record. They must click Cancel to close the dialog andthen re-enter their changes. This is identical behavior to a non-replicated database, for example, ifanother user makes a change first.
IBM i2 iBase administration center 255

Users see little difference when they work in a replicated database. From their point of view, the maindifference is the need to consider who owns a record before they edit or delete it. To make thisprocess easier, individual users should add their own contact details. See Checking the Ownership ofRecords for further details.
Note: If an analyst makes a change that results in a conflict, their change is overwritten if the changemade by the other site merged with the Publisher first. The user going back to their records does notsee their change and might want to re-enter it. However, before they continue they should reviewboth the data and the record properties to find who changed it and when.
During data entry, users should always pay attention to warnings that concern duplicate values, andshould always investigate the circumstances that produced the warning.
Database designers
Attention: Unless you are a security administrator, do not open a replicated database in iBaseDesigner while replication is configured in SQL Server.
After a database is being replicated, you are restricted to what you can do in iBase Designer with thepublication and subscription databases. In particular, you cannot make any changes that affect thedatabase schema, for example change the entity or link types, add new code lists, or assign semantictypes. See What is a Schema Change? for further details.
However, you can do the following (although you might use iBase for most of these tasks):
• Import and export data.• Update search indexes (these are not replicated).• Create database templates (these are not replicated unless you specifically upload them using the
File Manager).• Define labeling schemes (these are not replicated and this can be done in iBase).• Add values to code lists (this can be done in iBase).
To make changes to the database schema, the SQL Server administrator must disable replication atall sites. This requires all fixed and disconnected Subscribers to be connected to the Publisher.Changing the schema of a replicated database is not a trivial task for either the iBase or SQL Serveradministrators. For more information, see Changing the Schema of a Replicated Database.
Note: Changes made to the database while replication is not configured are not replicated to theother sites when replication is reconfigured in SQL Server.
iBase database administrators
There are a number of differences between replicated and non-replicated databases that might affectday-to-day working, for example how you merge records, and restore and purge soft deleted records.However, the principal administrative task in a replicated database is to check regularly for conflictingchanges to the entity and link data.
When there is a conflict:
• All sites see the same data.• Users are not aware that an entity or link is in conflict, and work with the winning record until the
outcome of the conflict is changed in the Conflict Viewer.• Users can modify and delete the "winning" record in the usual way.• Users in the publication database cannot remove the conflict by restoring a record using the
Restore Deleted Records dialog (because this dialog cannot be displayed while any conflicts exist).
256 IBM i2 iBase: Administration

If a user at a subscriber site is working on a record while it is in conflict, for example editing it, and therecord is changed and replicated as a result of reviewing it in the Conflict Viewer, that user isprevented from saving their work. However, this is identical behavior to a non-replicated databasewhen another user saves their changes first.
There are a number of ways in which you might be able to improve how you use iBase to minimize therisk of conflicts occurring. This is important if you use the Merge Entities command as anyconflicts that arise from merges cannot be handled by the Conflict Viewer.
iBase security administrators
When the security data is replicated, security administrators must implement a procedure to preventthe creation of duplicate user accounts. They are also responsible for checking that no duplicategroups or user accounts exist. Allowing users to log on with a duplicated user account and passwordcan give one of those users access rights to which they are not entitled.
Replication and other IBM i2 applicationsEnsure that you understand the impact that replication has on other IBM i2 Applications.
Replication has no effect on how you use these IBM i2 products with iBase:
• IBM® i2® Text Chart• IBM® i2® Analyst's Notebook®
• IBM® i2® iBase Geographic Information System Interfaces• Extended Access Control
For Text Chart and Analyst's Notebook, you can use the File Manager on the iBase Replication menuto replicate files such as templates, Analyst's Notebook charts, and Text Chart visualizations.
iBase GIS Interfaces
Using iBase GIS Interfaces to provide an interface in iBase to a mapping application has no effect onhow you set up iBase database replication. Each site that uses a mapping application must installiBase GIS Interfaces and set up its own mapping configurations. Mapping configurations are notreplicated.
If you choose to hold geocoding data in the iBase records, then all sites see this data, even if they donot use any mapping applications.
iBase Scheduler
It is only necessary to install iBase Scheduler and configure the Scheduler service to run at one of thesites. This can be any one of the publisher or subscriber sites.
Note: The Scheduler service should only run while replication is configured because records importedafter replication is disabled by the SQL Server administrator are not replicated to other sites evenwhen replication is reconfigured. You might also want to consider disabling the service if there is aninterruption to the communications link. See Handling a Network Communications Failure for details.
Note: Disabling the Scheduler service, rather than stopping it, prevents the service from restarting ifthe server is rebooted.
Semantic types
The management of semantic types is simplified in a replicated database. You no longer need todistribute copies of the semantic type library from a central database using .mtc files. Semantictypes and how they are assigned are distributed as part of the database schema.
IBM i2 iBase administration center 257

For background information on semantic types in iBase, see the iBase Designer help.
Conflicts and how they occurA data conflict occurs when a user changes a record that has been changed by a user at a differentsite, within the same replication cycle.
Examples of data conflicts are:
• Data in any field in the same entity is modified by two users, even if in different fields.• One user modifies a link, for example gives it a direction, but a different user deletes it.• One user adds a link but a different user deletes a link end entity for that link.
In normal circumstances, it is unlikely that any data conflicts occur in systems with fixed Subscribersonly because changes from Subscribers are merged continuously with the Publisher and replicated tothe Subscribers almost immediately.
For a conflict to arise, the first update to a record and the second conflicting update must merge withthe Publisher before the Publisher can replicate the first update to the Subscribers. In this example,Sites A and B make conflicting changes to the same record:
In this example, a conflict occurs because Site B merges its change into the publication databasebefore the Publisher can replicate the change made by Site A. The conflict is automatically resolved infavor of the first change to merge at the Publisher (Site A), and it is this record which is replicated toSite B. The outcome would be the same if Site A was actually the Publisher.
Conflicts are most likely to occur when disconnected Subscribers connect to the Publisher or when afailed communications link comes back online.
All conflicts are resolved automatically by SQL Server which replicates the modification or deletion toall sites. You need to review all the conflicts in the iBase Conflict Viewer. If required, you can change
258 IBM i2 iBase: Administration

how the conflicts were resolved. Changing the outcome of a conflict updates the publication databaseand replicate the change to all the subscription databases.
Note: Conflicts must be reviewed before you can purge or restore soft deleted records, and beforethe SQL Server administrator disables replication. All conflict data is lost when replication is disabledby the SQL Server administrator.
Understanding the Conflict Viewer
Conflicts are reviewed using the iBase Conflict Viewer, in the publication database only.
The user who reviews the conflicts must decide whether to keep the "winning" record in the conflict(the record currently seen at all sites) or replace it with the "loser". When they confirm their decision,the record they choose to discard is purged from the database. Before they confirm their decision,they can edit the record they want to keep, for example, to include details from the record that ispurged.
If the outcome of the conflict is changed, the records are replicated to all the subscriber sites toupdate the databases and produce a consistent view of the data across all the sites. If the decision isto keep the original outcome, then nothing is replicated and the databases remain unchangedbecause they already have the data.
The following figure summarizes the iBase Conflict Viewer. The Subscriber to merge first with thePublisher is presented as the winner, and the Subscriber to merge second is presented as the loser:
IBM i2 iBase administration center 259

Note: The records that are displayed might contain several conflicting changes, for example to boththe link direction and to a field in the link.
Note: It is important to remember the deletions and modifications that are shown in the ConflictViewer have already taken place. The winning record is already seen at all fixed Subscribers, and atany disconnected Subscribers that are online and connected to the Publisher since the conflict wasresolved. You use the Conflict Viewer to either confirm that the deletion or modification was correct,or to change the outcome.
The different types of conflict are described in detail in the following information:
Unless otherwise stated, the examples given in the following sections apply both to a conflictautomatically resolved in SQL Server or to a conflict reviewed in the iBase Conflict Viewer.
260 IBM i2 iBase: Administration

Conflicting changes to an entity
In this example, the Subscriber at Site A deletes the entity but the Subscriber at Site B changes it insome way:
• If Site A wins the conflict, the entity is soft deleted at all Subscribers.• If Site B wins the conflict, the entity is updated at all Subscribers, and users at Site A see a restored
entity, in its updated form.
Conflicting changes to a link
In this example, the Site A Subscriber deletes the link while the Site B Subscriber adds a direction tothe link:
• If Site A wins, the link is soft deleted at all Subscribers.• If Site B wins, the link is updated at all Subscribers, and users at Site A see a restored link with the
update made by Site B.
Note: There is a similar outcome if the change at the Site B Subscriber is a change to a link field.
Non-conflicting changes to a link
Conflicts on links occur only:
• Between fields in the link record• Between the link direction, strength, or both• Between the link end entities
A conflict cannot occur when, for example:
• One site changes a link field and another site changes a link end entity• One site changes the link direction or strength and another site changes a field in the link record
Even though these changes are not conflicts, they are detected by the Conflict Viewer, which highlightjust the Modified Date and Modified By fields as the difference. However, if one site changes any ofthe fields in the link, then the conflict presents itself as a conflict between the link fields.
See Unsupported Conflicts for changes that involve both link end entities.
Conflicting changes to an entity with links
In this example, the Site A Subscriber deletes the entity, which automatically deletes the two links,and the Site B Subscriber changes fields in the entity but leaves the links untouched:
Initial record:
Site A change: Site B change:
IBM i2 iBase administration center 261

How this type of conflict is handled by SQL Server and the Conflict Viewer is different from a conflictthat involves just links or just entities.
If Site A wins, the conflict is resolved as you would expect by SQL Server, which replicates the deletedentity and links to the other databases. When you review the conflict in iBase (and click Apply belowthe Winner area to confirm that the change made at Site A is correct), nothing is replicated to theother databases because they already have the correct data. This is the usual behavior.
However, if Site B wins, the conflict is not resolved as you would expect in SQL Server because itcannot restore the soft deleted links which is a feature of iBase. Therefore, SQL Server replicates theupdated entity as changed at Site B and the soft deleted links as deleted at Site A. As a result all sitessee the data in this state until you review the conflict in the Conflict Viewer:
To correct this, use the Conflict Viewer. In this example, it reports that two links are affected by thisupdate. When you click Apply below the Winner area to confirm that the change made at Site B iscorrect, the links are restored and replicated to the other databases.
Broken links
In this example, which is not a conflict, the Site A Subscriber deletes the link end entity (and thereforethe connecting link) while the Site B Subscriber adds a link:
Initial record: Site A change: Site B change:
If Site B wins, the new link is replicated to all Subscribers, and users at Site A see a restored entitywith the new link added by Site B.
If Site A wins, the link end entity and its link are deleted at all Subscribers, however, at Site B, there isa broken link because the new link is left without one of its link end entities:
262 IBM i2 iBase: Administration

For this reason, after the conflict is resolved, you use an extra facility in the iBase Conflict Viewer toensure the integrity of all records. You can either delete the broken link or restore the missing link endentity. Therefore, the final outcome will be one of the following:
Deleted link: Restored link end:
Note: This type of conflict is specific to iBase, and is not visible in the SQL Server Conflict Resolver.
Conflicts between three or more sites
It is possible for three or more sites to make conflicting changes to the same data. The conflicts arelisted in the Conflict Viewer in the usual way (by the record label of the winning record). The secondconflict that is listed in this example occurs between a third site and the "winner" of the first conflict:
Conflicts when records are deleted
Conflicts occur when users at different sites delete the same entity, link, or entity with links. Althoughthe outcome of these conflicts is the same regardless of which site wins the conflict, you might wantto investigate why users at different sites are deleting the same records.
IBM i2 iBase administration center 263

Unsupported conflicts
Merge conflicts and a specific type of link end conflict are not supported in the Conflict Viewer.
Conflicts resulting from merging
Conflicts arising from merging entities are not supported, and cannot be viewed in the ConflictViewer. You need to set up a procedure to prevent these conflicts from arising. See Merging Entitiesfor working practices.
Conflicts resulting from changing different or both link ends
A link where different, the same, or both link end entities are changed is detected by the ConflictViewer as a change to the link, and not as a conflict. In the Conflict Viewer, there is no visibledifference between the two records apart from the Modified Date and Modified By fields.
For example:
Changes made Site A - Site B
This is the original link before the link endentities are changed:
Site A changes one of the link end entities and isthe first to merge with the Publisher.
Site B changes the other link end entity andmerges last. This overwrites the Site A change.You cannot change this outcome in the ConflictViewer.
Prepare iBase for database replicationBefore the SQL Server administrator can set up replication for the first time, you (as the iBaseadministrator) need to prepare the publication and subscription databases.
The publication database is the database containing the data that you want to make available toother sites. This database is on a server that is known as the Publisher.
The subscription databases are the databases that receive this data. These databases are on serversthat are known as Subscribers.
When you prepare an iBase system for replication, you must to:
• Upgrade both the iBase database and its security file if you are using iBase five files.• Convert both the database and security file to SQL Server (you can only replicate databases that are
in SQL Server format).• Set up the security connection file at each site (all sites start with a copy of the same security data).
264 IBM i2 iBase: Administration

• Set the database properties required by replicated databases.• Ensure that the database design and the folder objects for the database are up-to-date, and
suitable for use at all sites.• Create a database at each subscriber site. The database design must be the same at all sites.
Although you create the publication and all the subscription databases in iBase, the subscriptiondatabases are populated using SQL Server when replication is configured. This ensures that theSubscribers are synchronized with the Publisher.
How you prepare iBase for replication depends on the size of your database, the speed of thecommunication links between the publisher and subscriber sites, and the version of SQL Server.
All these steps are described in greater detail in separate topics. For an overview of the wholeconfiguration process covering both iBase and SQL Server, see Project Management Overview.
Before you create any iBase databases
Before you create new iBase databases on a server, you might want to give the SQL Serveradministrator an opportunity to predefine the security for these databases. See Overview of SettingUp iBase database replication in SQL Server for details.
The names that you choose for the security file and database are used to generate the names of theSQL Server databases so you should discuss the naming convention to use with your SQL Serveradministrator.
SQL Server database names are derived from the names of the .idb and .ids files created in iBase.
Preparing new iBase databases and security files
For organizations that are starting with a new iBase database, see:
1. Creating New Security Files and a Publication Database2. Creating Subscription Databases3. Testing Replicated Security Files4. Testing Replicated Databases
Note: You might also want to read Updating the Database Design. This explains which parts of thedatabase design are replicated and suggests features that you might want to incorporate into yourdatabase.
Users can start work in the publication database after preparation is complete; you do not have towait for replication to be configured. Users in the subscription databases must wait for replication tobe configured before they enter data in the security file or database.
Preparing existing security files
If you have an existing security file, follow the steps in Preparing Existing Security Files.
Preparation involves:
1. Adding the administrative user accounts required by the sites involved in replication, to theexisting security file.
2. Updating the System Commands Access Control groups with the new command groups for iBase.3. Distributing copies of the security file to all the sites involved in replication. You need to distribute
an SQL Server backup if security data is held in an SQL Server database.
IBM i2 iBase administration center 265

4. At each site, converting the security file to SQL Server format to create a security database on theserver machine at each subscriber site. If you are using an SQL Server database already, restorethe database from the backup.
After replication is configured by the SQL Server administrator, you must to test the replicatedsecurity file; see Testing Replicated Security Files.
Users can start work in the publication database after preparation is complete; you do not have towait for replication to be configured. Users at the subscriber sites must wait for replication to beconfigured in SQL Server before they change any of the security data.
Preparing existing iBase databases
For organizations that have an existing database that they want to replicate, where it is possible topopulate the subscription databases over a communications link or from an SQL Server backup, see:
1. Preparing Existing Databases2. Updating the Database Design3. Creating Subscription Databases4. Testing Replicated Databases
For a visual overview of how to set up your system, see Project Management Overview.
Users can start work in the publication database after preparation is complete; you do not have towait for replication to be configured. Users in the subscription databases must wait for replication tobe configured before they enter data in the security file or database.
Preparing the audit log
No preparation is required for existing or new audit log databases.
Creating security files and a publication databaseThe following section describes how to create a new security file and iBase database suitable forreplication. The database that you create is used as the publication database. All subscriber sitesmust have a copy of the security file created at the publisher site, and a database created from adatabase template, which was also created at the publisher site.
Before you begin
The names that you choose for the security file and database are used to generate the names of theSQL Server databases so you might want to agree a convention for file naming with your SQL Serveradministrator. See Before creating any iBase databases for details.
Procedure
1. Create a new security file:a) At the publisher site, create a new database folder to hold the security file and database that
you create. The folder must be shared and should be on the database or application servermachine.
b) Using iBase Designer, log on as a security or system administrator and create a new securityfile in Microsoft Access format. You convert this file to SQL Server (upsize it) later.
c) In the Security Manager, add user groups and users. As a minimum, add the system, database,and security administrators for the publisher and subscriber sites. At this stage, you can alsodefine Data Access Control groups but you cannot set permissions for them yet.
d) Back up the security file.
266 IBM i2 iBase: Administration

Attention: You will need the original Microsoft Access security file if you want to extendthe iBase system in the future by adding additional subscriber sites.
See Managing Security for further details.2. Distribute the security file to the subscriber sites:
The security files used at the publisher and at all subscriber sites must be converted fromMicrosoft Access format to SQL Server (upsized) from the same security file. For backgroundinformation on why this is necessary, see Importance of the security file at the publisher site.a) Distribute the security file, which is in Microsoft Access format, to the subscriber sites using
any appropriate method, such as copying to CD, sending by email, or copying over a local orwide area network.
b) At each subscriber site, create a shared folder and copy the supplied security file to it.
Attention: Do not make any changes to the security data at the subscriber site. You canrename the file if required but any other changes are lost when replication is configured.For information on file names, see Before creating any iBase databases.
3. Convert the security files to SQL Server, at the publisher site and at all subscriber sites:You must convert (upsize) the security file from Microsoft Access format to SQL Server before youcan replicate it. This process leaves a security connection file (.ids file) in the iBase databasefolder and create an SQL Server database with the name <file>_Sec on the designated server(where <file> is the name of the ids file).
After you upsize the security file, you need to assign a site identifier to the security database.
a) Using iBase Designer, log on as a security or system administrator using the Microsoft Accesssecurity file distributed by the publisher site.
b) Click Cancel at the prompt to create or open a database.c) Select Tools > Upsize Security File to SQL Server.d) Click OK when you are informed that a backup is made. This is a backup of the original
Microsoft Access security file and has the file extension .ids.bak (appended with a number,such as .ids.bak1, if there is already a file with this extension in the folder).
e) Enter the server name.
Note: Do not select the Local option from the Server list.f) Select the security mode. This is Windows Authentication unless your SQL Server administrator
directs otherwise.g) In Identifier, enter a site identifier, up to 5 characters long.
The identifiers used for the security connection file and the database at a site are generally thesame but should otherwise be unique within the replicated system. For example, you might usethe site identifier PUB for both the security file at the publisher site and the publicationdatabase.
h) Click OK to validate the settings and perform the upsize, then click OK when the upsize iscomplete.If you want to review the connection details and ID of the security connection file, select FileSecurity File Properties. The path of the security connection file will also be displayedin the status area with (SSE) after the file name to indicate that it is SQL Server format.
i) Repeat these steps for each site involved in replication.j) Back up the connection file at each site (.ids file).
If you lose the connection file, you are not able to log on.
IBM i2 iBase administration center 267

Attention: Do not make any changes to the upsized security file at the subscriber site.You can rename the file if required but any other changes are lost when replication isconfigured. For information on file names, see Before creating any iBase databases.
4. Protect the security connection file
In Windows, protect the SQL Server security connection file by making it read-only or by settingappropriate security permissions. This allows any user in iBase Designer to view the properties ofthe connection file but prevents anyone, including iBase security administrators, from changingthe SQL Server connection details.
You should also ensure that the security connection file is included in any backup schedules forthe database folder.
5. Create a new iBase database at the publisher site:a) Create a database. This database is configured by the SQL Server administrator as the
publication database. The database should have the following mandatory properties:
Field Description
Database type Select SQL Server. You cannot replicate MSAccess databases.
Server Enter the name of the server for the publishersite.
Note: Do not select the Local option from theServer list.
Use Windows Authentication Turn on the Use Windows Authenticationcheck box, unless your SQL Serveradministrator asks you to use SQL Serverauthentication.
Database identifier On the Advanced page, enter a unique siteidentifier, up to five characters in length. Thisis usually the same identifier as the securityconnection file used at the subscriber site. Forexample, the site identifier for a publicationdatabase and its security connection filemight be PUB.
Soft Delete On the Advanced page, turn on the SoftDelete check box.
Attention: You must use Soft Deletein a replicated database. Users arenot able to open the database if this isturned off.
For information on designing databases for replication, see Updating the Database Design.
Warning: It can be a time-consuming process to modify the database schema afterreplication is started so it is important to take the time now to review, test, and refineyour design. You are not able to change the schema after replication is configured in SQLServer without first disabling replication.
268 IBM i2 iBase: Administration

b) Initialize the database for replication, in iBase Designer, select Tools > Feature Availability >Initialize Database for Replicationand then click Yes.
Warning: Databases that are created from this template are not initialized forreplication.
c) Create a database template from the initialized database, and send this template to thesubscriber sites.
d) Back up the connection file (.idb file) to your publication database. If you lose the connectionfile, you are not able to open the publication database.
What to do next
Step Details
Security connection file Tell your SQL Server administrator whether youneed to replicate the security audit log.
After the security connection file exists:
• At the publisher site, request the SQL Serveradministrator to configure replication for thesecurity database. You can add user groups ofany type, add users, and assign them togroups, and define permissions for SCACgroups either before or after replication isconfigured (but you should not change thesecurity files at the subscriber sites).
• At each subscriber site, request the SQLServer administrator to configure replicationfor the security database. Do not change thesecurity data at the subscriber sites until youare notified that replication is enabled forthese.
After replication is fully configured, test thereplicated security file at each site.
Publication database Ask your SQL Server administrator to configurereplication for this database and, optionally, forthe audit log database.
Subscription databases Create an iBase database at each subscriber sitefrom the new database template. See CreatingSubscription Databases for details.
Secure the publication database Ask your Windows administrator to restrictaccess to the iBase database folder and to anyother folders used by iBase, for example foldersused when importing, exporting, and reporting. Itis particularly important to restrict access to thedatabase connection file.
IBM i2 iBase administration center 269

Preparing existing security filesThe publisher and all subscriber sites must start with the same security file or database.
Before you begin
Do not make any changes to the security data at the subscriber sites until replication is configured, forexample do not add any groups or users - any changes that you make are lost when replication isconfigured in SQL Server.
You need to log on as a security administrator or as a system administrator to perform the followingsteps.
About this task
Using the Security Manager, verify that the user details are correct before you distribute the MicrosoftAccess security file to the other sites. Although, the security file does not need to contain the namesof all the iBase users, it should as a minimum contain the system, database and securityadministrator accounts for the publisher and subscriber sites. See Managing Security for details.
Attention: Back up the security file if it is in Microsoft Access format. You will need the originalMicrosoft Access security file if you want to extend the iBase system in the future by addingadditional subscriber sites.
Procedure
1. Distribute your security database to the subscriber sitesOption Description
SQLServer
If your security file is already in SQL Server format, you need to send the following filesas used at the publisher site to the subscriber sites, along with a user name andpassword:
• A full SQL Server backup of the SQL Server security database• A copy of the iBase security connection file• The user name and password of a security administrator• The iBase database password (this is required if the security administrator at the
subscriber site works on a machine that cannot connect to the publicationdatabase). This is obtained from the Options dialog in iBase Designer.
At each subscriber site:
a. Ask your SQL Server administrator to restore the security database from thesupplied backup. This should be done on the server that acts as the Subscriber. Thename of the restored database is identical to that of the security database at thePublisher.
Warning: If the SQL Server database component is to have a differentname, create a new security file with the required name, upsize it and thenrestore the supplied SQL Server backup over the SQL Server component forthe new security database.
b. Redirect the connection file to the restored database on the Subscriber:c. Start the iBase Database Configuration utility from the Windows Start menu.d. In the Database Configuration utility, browse to the security connection file.
270 IBM i2 iBase: Administration

Option Description
e. Click Next and, if prompted, enter the database password.f. Change the connection properties to direct the security connection file to the
security database on the Subscriber.g. Test and save the connection settings.
Access The security files used at the subscriber sites must be upsized from a copy of thesecurity file used at the publisher site. They are in Microsoft Access format. Forbackground information, see Importance of the Security File at the Publisher Site.
a. Distribute the upgraded security file, in Microsoft Access format, to the subscribersites using any appropriate method, such as CD or email.
b. At each subscriber site, create a shared folder and copy the supplied security file toit. The folder must be on an application or database server.
Attention: Do not make any changes to the security files at the subscribersites. You can rename the files if required but any other changes are lost whenreplication is configured. For information on file names, see Before creatingany iBase databases.
You need to convert (upsize) the security file from Microsoft Access to SQL Serverformat before you can replicate it. Upsizing creates an SQL Server database on thedesignated server, leaving the .ids file in the database folder as a connection file forthe SQL Server database.
Before upsizing, review the name of the security file because the logical name of theSQL Server database is derived from it. For information on file names, see Beforecreating any iBase databases.
At the publisher and all subscriber sites:
a. In iBase Designer, log on as security administrator or as a system administrator,using the Microsoft Access security file.
b. Click Cancel when you are prompted to open or create a database.c. From the Tools menu, select Upsize Security File to SQL Server.d. You are informed that a backup is made of the Microsoft Access security file. This
has the file extension .ids.bak (appended with a number, such as .ids.bak1,if there is already a file with this extension in the folder). Click OK to continue. TheUpsize Security File dialog is displayed.
e. Enter the name of the server for the site.
Note: Do not select the Local option from the Server list.f. Select the security mode. This is Windows Authentication unless your SQL Server
administrator directs otherwise.g. In Identifier, enter a site identifier, up to 5 characters long. The identifiers for the
security connection file and the database at a site are generally the same butotherwise should be unique within the replicated system. For example, you mightuse the site identifier PUB for the security file at the publisher site and thepublication database.
h. Click OK to validate the settings and perform the upsize, and then click OK when itcompletes.
IBM i2 iBase administration center 271

Option Description
The path of the security connection file will be displayed in the status area with(SSE) after the file name to indicate that it is now in SQL Server format.
i. Repeat these steps for each site involved in replication.j. Back up the connection files (.ids files). If you lose a connection file, you are not
able to log on at that site.
Attention: Do not make any changes to the security data at the subscribersites. You can rename the files if required but any other changes are lost whenreplication is configured. For information on file names, see Before creatingany iBase databases.
2. Protect the security connection file.
In Windows, protect the SQL Server security connection file by making it read-only or by settingappropriate security permissions. This allows any user in iBase Designer to view the properties ofthe connection file but prevents anyone, including iBase security administrators, from changingthe SQL Server connection details.
You should also ensure that the security connection file is included in any backup schedules forthe database folder.
3. Assign an identifier to a security connection file:
If you upsized the security file without entering an identifier, you can enter one now.
a) Make sure that you have write access to the security connection file.b) In iBase Designer, select File > Security File Properties and enter the site identifier in the
Identifier field.
What to do next
Step Details
Security connection file Tell your SQL Server administrator whether youneed to replicate the security audit log.
After the security connection file exists:
• At the publisher site, request the SQL Serveradministrator to configure a publication for thesecurity file. You can add user groups of anytype, add users, and assign them to groups,and define permissions for SCAC groups eitherbefore or after replication is configured (butyou should not change the security data at thesubscriber sites).
• At each subscriber site, request the SQLServer administrator to configure thesubscriptions. Do not change the security dataat the subscriber sites until you are notifiedthat replication is configured for these.
After replication is fully configured, test thereplicated security file at each site.
272 IBM i2 iBase: Administration

Step Details
Database preparation To continue, review the design of the databaseas discussed in Updating the Database Design. Ifno updates are required, see Preparing ExistingDatabases.
Preparing existing databasesYou must convert (upsize) iBase databases in Microsoft Access format to SQL Server before you canreplicate them.
About this task
Upsizing creates an SQL Server database (leaving the .idb file in the database folder as a connectionfile for the SQL Server database). The connection file stores the details that are needed to connect tothe server that holds the database. Before upsizing, review the database name because the logicalname of the SQL Server database is derived from it. For information on file names, see Before creatingany iBase databases.
You must set the database properties that are required for replication and then initialize thedatabase. This database becomes the publication database. After you initialize a database, you madechanges to the database tables that cannot be undone, and soft delete must always be used.
To perform these steps, you must log on as a database or system administrator.
Procedure
1. Upsize the database to SQL Server:a) In iBase Designer, log on using the correct security connection file. You might need to upgrade
the security file first. Do not open the database.b) Select Tools > Upsize Database to SQL Serverc) Follow the instructions displayed by the Database Upsize Wizard and, when prompted, enter
the named server for the publisher site and the correct security mode. Your SQL Serveradministrator tells you which server and security mode to use.
Note: Do not select the Local option from the Server list.d) Click Finish to perform the upsize, and then Close once it is complete.
Note: Back up the connection file (.idb file) to the database. If you lose the connection file,you are not able to open the publication database.
2. Set the database properties required for replication, open the database in iBase Designer, thenselect File > Database Properties > Advanced.
• Database identifier
Each database in the replicated iBase system must have a unique site identifier, up to 5characters in length, which is used by the Conflict Viewer and the audit log. The identifier istypically the same as the associated SQL Server security connection file for the site. Forexample, the site identifier for both the main publication database and its security file might bePUB.
• Soft delete
Soft delete must be turned on as this is required by the Conflict Viewer. You must not turn offsoft delete after the database is initialized for replication as this prevents users from openingthe database (even if replication is not currently configured in SQL Server).
IBM i2 iBase administration center 273

• Audit level
Set the audit level to 4 or 5 if you want to log the results of conflict resolution. Although theaudit level property is not replicated, it should be set the same at all sites involved inreplication.
3. Initialize the database for replication:a) In iBase Designer, log on as a database or system administrator using the correct security
connection file and open the database.b) Select Tools > Feature Availability > Initialize Database for Replication, and then click Yes.
This operation can take a long time on large databases.
You do not need to do this step at the subscriber sites. They are initialized for replication whenthe SQL Server administrator creates a subscription to the publication.
4. Create a database template.
It is important to ensure that the design of the iBase database that you want to replicate is up-to-date and suitable for use by all sites before you continue. For details, see Updating the DatabaseDesign.
If the database design is already up to date, then create a database template for use at thesubscriber sites. The databases at all sites must use the same database design.
5.
What to do next
Step Details
Publication database Request that your SQL Server administratorconfigures a publication for this database and,optionally, for the audit log database. The usersof the publication database can continue to workin the database while replication is configured.
Subscription databases Send the new database template to thesubscriber sites. The subscription databases canthen be created from this template. See CreatingSubscription Databases.
Secure the databases Ask your Windows administrator to restrictaccess to the iBase database folders and to anyother folders used by iBase, for example to thefolders used when importing, exporting, andreporting. It is important to restrict access to thedatabase connection files.
Updating the database designIt is important to ensure that the design of the iBase database that you want to replicate is up-to-dateand suitable for use by all sites. When the database template is created, it is distributed to all sitesand the SQL Server administrator configures the publisher site for replication.
About this task
The database design comprises more than its entity and link types, it also includes items that affectits usability, such as datasheets, and supporting files. The items to consider fall into these categories:
• Database schema, such as link types and code lists
274 IBM i2 iBase: Administration
• Folder objects, such as queries and report definitions; and non-folder objects, such as datasheetsand labeling schemes
• Other files, which are database-specific but not part of the database, such as supporting files forreport definitions
Print a database design report to obtain a list of items to review in your database.
Note: the report does not include items such as folder objects, or datasheets and charting schemes.
After replication is configured, iBase provides tools to update the database design at all sites.Nevertheless, it can take time to make these changes, mainly because of the cooperation that isrequired between sites. You must also require the cooperation of the SQL Server administrators ateach site as they must delete and then re-create the publication and subscriptions.
Items that must exist before the publisher site is configured for replication
The database schema must be set up correctly before replication is configured for the publishersite. For database replication, the items in the database schema are:
• Entity types• Link types• Fields• Standard fields• Pick lists, icon lists, and SCC lists (but not their contents, which can be changed by any
authorized user at any time)• Chart attributes• Datasheets• Common folder objects (folder objects that are marked as common folder objects in iBase but
not dependent on any data)• Semantic types and the way they are assigned
You might want to make certain changes to the database schema to support database replication.Specifically, adding a Merge Request entity to help manage the merging of records, and addingowner fields to reduce the risk that conflicts might occur.
The following objects are not replicated, and need to be added to the database template beforeyou set up new databases at the subscriber sites:
• Labeling schemes
Public and private folder object control groups are not replicated but the objects they contain arecopied for all users. (Folder object control groups are defined in the security file.)
Note: You might want to delete unwanted objects at this stage otherwise they are copied to thedatabases at the subscriber sites.
Items that can be added at any time
The items in pick lists, icon lists, and SCC lists can be updated at any time as the contents of theselists are replicated.
The following non-database files can also be replicated (by loading them in the File Manager) andtherefore do not need to be considered when you prepare the database for replication. The exactlist of files depend on how you use iBase:
• Command groups (CommandGroups.mdb)• Word documents that are used for styles or as templates in reporting
IBM i2 iBase administration center 275

• Lists of excluded words for search indexes (WSexclude.txt)• Icon lists (Iconlist.txt) and, if customized, the associated graphic files (.ico)• IBM i2 Text Chart templates• IBM i2 Analyst's Notebook templates• Mapping configuration files
If there are many files, for example Word documents, then consider archiving them in a .zip filebefore you load them in the File Manager.
Note: After replication, you will need to copy these files to the correct place in the database folderor to the correct folder in the iBase installation.
Items that are site-specificThe Word Search and Full-Text Search indexes must be built individually at each subscriber site.
Possible schema changes for replication
When you review the current database schema, you might want to consider making the followingtwo changes to support iBase database replication.Adding a Merge Request entity type
The Merge Request entity type is intended to support the procedure for merging entities. Aprocedure is required because the iBase Conflict Viewer does not handle conflicts that arisefrom merging entities or occurring in the records that are affected by a merge operation.
When you design a suitable entity type for Merge Requests, you might want to add fields for:
• The name and location of the analyst• The reason for the merge• Details of the records for the proposed merge, for example by listing the record IDs.• A screen capture of the pre-merge data• Room for an analyst from each site to enter comments• Voting buttons, one for each site (you might use a checkbox or a list with Yes/No/Discuss
options)
For more information, see Merging Entities.
Adding owner hyperlink fields to entity and link types
To reduce the likelihood that conflicts occur, you can define a hyperlink field thatautomatically inserts the name of the current user whenever a new record is saved. Users cansee this information when you show or edit the record. For more information, see Checkingthe Ownership of Records.
To define this type of field, use iBase Designer to create new fields or a new standard fieldwith:
• The hyperlink field type• A name such as Owner• A default value of $ (the $ symbol automatically inserts the name of the current user when
the record is saved)
You must also update your datasheets to show the owner field.
276 IBM i2 iBase: Administration

Process for changing the design of a live database
To make changes to the design of a live database that is not yet configured for replication in SQLServer, work on an isolated copy of the iBase database.
After you finalize the design, you can apply the changes to the live database using the UpdateDatabase Schema dialog (you can use this dialog even though replication is not yet configured) oryou can make them by hand.
The steps are:
1. Create a template from your live database.2. Create a temporary database from the template, in either Microsoft Access or SQL Server
format.3. Make the required changes to the design of your temporary database, considering all the
issues described in this topic.4. Test the new design in iBase.5. Create a template to capture the new design. This template is needed by the subscriber sites.
You can then repeat these changes in the live database or use the Update Database Schemadialog to apply some of the changes for you. Changes to folder objects and datasheets mustalways be made manually.
Procedure
Apply the updated design to a live database:1. Create a template from the temporary database that contains the updated database design.2. Create another copy of the live database for test purposes. The database must be:
• SQL Server format, with the database properties listed in To create a subscription database.• Initialized for replication. For details, see Initializing the database for replication.
3. Apply the updated database schema to the test database:a) In iBase, log on as a database administrator and open the database.b) Load the database template into the database using the File Manager: select Tools >
Replication File Manager.See “Replicating non-database files” on page 293 for details.
c) To prevent users from opening the database (and to inform users that the database is closing),select Tools > Replication Take Offline, and then click OK.See Shutting Down the Databases for details.
d) Select Tools > Replication Update Database Schema.e) Click Update to apply the changes shown in the Update Database Schema dialog and then,
after this is finished, click OK to reopen the database.f) Select Tools > Replication Bring Online.
4. Check that the template was applied successfully.5. If the template was applied successfully, apply the changes to the live database.
IBM i2 iBase administration center 277

What to do nextCreating a database template
For details of how to create and test a database template, see Process for changing the design ofa live database. The databases at all sites must have the same database design. After you finalizethe design of the iBase database, and completed the preparation of the database:
Step Details
Publication database Request that your SQL Server administratorconfigures a publication for this database. Theusers of the publication database can continueto work in the database while replication isconfigured.
Subscription databases Send the new database template to thesubscriber sites. The subscription databasescan then be created from this template. SeeCreating Subscription Databases.
Users of subscription databases cannot work inthe database until replication is configured.
Creating subscription databasesAt each subscriber site, you need to create an iBase database from the correct database template assupplied by the publisher site.
About this task
The procedure described here is suitable for:
• Any database that is populated with data from the publication database by downloading the dataover a communications link
• Large databases that are populated with data from a backup
Note: If you are using Windows Terminal Services, you need to log on to the application servermachine for the site where iBase is installed and create the subscription database on the database orapplication server for the site.
To create a security connection file
All sites must start with a copy of the same security data as the publisher site. This is distributedeither as a Microsoft Access security file that is upsized to SQL Server or as an SQL Server backup.If you do not have this yet, see:
• Creating New Security Files and a Publication Database• Preparing Existing Security Files
Procedure
At the subscriber site:1. Ensure that the database template supplied by the publisher site is copied to the Templates
folder for your iBase installation.2. In iBase Designer, log on as a user with the database creator role, using the correct security
connection file for the site.3. Create a database with the properties described in the following steps.
278 IBM i2 iBase: Administration

4. Enter an appropriate database name for the subscriber site. This name becomes the logical nameof the SQL Server database so you might want to agree a convention for file naming with your SQLServer administrator. For more information, see Before creating any iBase databases.
5. Select the following for the new database:Option Description
Database type Select SQL Server. You cannot replicate Microsoft Access databases.
Server Enter the name of the server for the subscriber site. Do not select theLocal option from the Server list.
Use WindowsAuthentication
Turn on the Use Windows Authentication check box, unless your SQLServer administrator asks to use SQL Server authentication.
Audit Level On the Details page, select the same audit level as set for the publicationdatabase. For more inmSee How the Audit Log Works in a ReplicatedDatabase.
Template On the Template page, select the template that contains the databaseschema. This must be identical to the schema of the publicationdatabase. See Updating the Database Design.
Database identifier On the Advanced page, enter a unique site identifier, up to five charactersin length. This is usually the same identifier as the security connectionfile used at the subscriber site. For example, the site identifier for asubscription database and its security connection file might be SUB.
Soft Delete On the Advanced page, turn on the Soft Delete check box.
Attention: You must use Soft Delete in a replicated database.Users are not able to open the database if this is turned off.
Read Only On the Advanced page, turn on the Read Only check box if thesubscription database is to be read-only. The database still receiveupdates from the Publisher in the usual way.
6. Click OK to create the new database. The new database is opened if it is created successfully.7. Verify that the database contains the correct entity and link types, semantic types, code lists.
Note:
• If the database schema seems incorrect, contact the iBase administrator responsible for thepublication database. The corrections must be made in the publication database. The schemafor the publication and subscription databases must be identical.
• If changes are made to the schema, you must delete the connection file and the SQL Serverdatabase and start again.
8. Do not turn on Audit History at this stage. You do this later after the SQL Server administratorfinishes configuring replication.
9. Close the database.10. Repeat this procedure for each subscriber site.
What to do next
The preparation for the iBase database at the subscriber sites is now complete:
IBM i2 iBase administration center 279

• Notify the SQL Server administrator that the subscription databases are ready for replication to beconfigured. You must tell the administrator if any of these databases are read-only. Notify the SQLServer administrator that the audit log database can also be configured at this stage.
• After you are notified that replication is configured, test that replication is working correctly. SeeTesting Replicated Databases.
Testing replicated security filesTest the replicated security files to ensure that the properties are correct, and replication is workingcorrectly.
Before you begin
About this task
After the SQL Server administrator configures replication for the security data at all sites, you need tocheck that:
• The database properties are correct• Replication is working correctly• The audit log for the security data is working correctly (optional)
Procedure
1. Check that the security connection file has a site identifier:a) In iBase Designer, log on as a security or system administrator.b) Select File > Security File Properties, and enter a unique site identifier if required. To do this,
you need write access to the security connection file.
Note: You should protect the security connection file by making it a read-only file or by settingappropriate security permissions. See Protecting the security connection file for details.
2. Test that replication is working:This operation requires a security or system administrator at each site if you are unable to log onto the remote servers.
When you use the Security Manager for this test, you can refresh the groups and users displayed inthe Security Manager by closing and reopening it. You should also consider the frequency withwhich updates are replicated between sites. Depending on your organization, the frequency might,for example, be anything from every minute to once a day.
a) At the publisher site, add a user and then close the Security Manager.b) After a suitable interval, log on at the subscriber site and check that the new user is replicated
to this site.c) At the subscriber site, delete the user.d) At the publisher site, after a suitable interval, redisplay the Security Manager and then check
that the user is deleted.e) Repeat these steps for any other subscriber sites in your iBase system.
Contact your SQL Server administrator if there are any problems.3. Add groups and users:
After you are satisfied that replication is working correctly, you can add groups and users. Theaccess rights for the users who resolve conflicts, merge records, and perform batch edits anddeletions are described in Managing Security.
280 IBM i2 iBase: Administration

You will not be able to set up or check the permissions for Data Access Control groups until thepublication database exists.
Before you allow users to open any of the databases and start entering data:
• Check that there are no duplicate group or user names. See Handling Duplicate Group and UserNames.
• If you are intending to record contact details for each user, predefine the location names. SeeAssigning a Location to Each User.
When you allow users to start entering data, you might want to ask the users to add their contactdetails to the database. Each user selects a predefined location from the Location list.
4. Test the security audit log.The audit log for the security data is held in the security file and is configured in SQL Server as partof the security file. If you choose to replicate the audit log, check that the audit log is recordingsecurity related actions for other sites.
For example:
a. Open the security audit log for the publisher site. You do not need to open the publicationdatabase. You should see, for example, Database Opened actions for all the replicated securityfiles.
b. Repeat this for each site.
Contact your SQL Server administrator if security actions are not being recorded.
Testing replicated databasesTest replicated database to ensure that replication is working correctly and the database propertiesare correct. You must also test that the Conflict Viewer dialog is accessible.
About this task
After the SQL Server administrator configures all the publication and subscription databases forreplication, you need to check that:
• Replication is enabled• The database properties are correct (at this stage you can turn on Audit History)• Replication is working correctly• The Conflict Viewer dialog is accessible in the publication database• The audit log is working correctly (if used)
You must log on as a database or system administrator to perform these steps.
Procedure
1. To test that replication is enabled:a) At the publisher site, start iBase, log on as a database or system administrator, and open the
publication database.b) Select Tools > Replication Status Report.
Depending on the status of the publication database, you should see the following messages:
Publication is OK The publication database is configured for replication.
<server>\<instance>:<SQLServer database name>
Lists the names of the subscription databases, one foreach subscriber site.
IBM i2 iBase administration center 281

No subscriptions Indicates that the subscriber sites are not yet configuredfor replication.
Publication not found Replication is not running at the Publisher. Contact yourSQL Server administrator.
The publication is invalidbecause it permits anonymoussubscriptions
Replication is incorrectly configured in SQL Server. Contactyour SQL Server administrator.
Note: You are not able to review and resolve any conflictsuntil this problem is rectified.
2. Verify that the user who uses the Conflict Viewer has the correct access rights in SQL Server:a) At the publisher site, start iBase, log on as the user who administers conflicts, and open the
publication database.b) Select Tools > Replication Conflict Viewer.
The Conflict Viewer dialog appears if the user has sufficient access rights to the SQL Serverdatabase. For more information about the iBase permissions required by this user account, seeiBase system roles.
Note: If there is a problem with how replication is configured in SQL Server, you see a messagewarning that the publication is invalid. This problem prevents you from using the replicatediBase database. Contact your SQL Server administrator.
3. Test that replication is working:A user is required at each site to test replication; the users do not need to be administrators.Alternatively, you might be able to perform the whole test yourself if you are able to log on to theremote servers.a) In the publication database, add a record.b) After a short interval, check that the new record is replicated to the subscription data
Note: If you are using a read-only database, replication is working correctly if the new recordappears in the subscription database. Remove the test record by deleting it in the publicationdatabase.
c) If the subscription database is not read-only, delete the record.d) After a short interval, check that the record is deleted from the publication database. For
example, try searching for it.e) Repeat these steps for any other subscription databases in your iBase system.
Note: Contact your SQL Server administrator if there are any problems.4. Test the audit log:
Check that the audit log is recording the appropriate actions for all the sites that are involved inreplication, and that audit history is turned on (if required).a) Open the audit log for the publication database. You should see the Database Opened and
Database Closed actions for all the replicated databases.b) Repeat this for each site. The audit level should be the same for all sites.c) To test that the audit history is replicating, edit a record in the subscription database and
confirm that you can see the audit history for that record. After a short interval, check the audithistory for that record in the publication database.
282 IBM i2 iBase: Administration

Working with a replicated database in iBaseIn a replicated database, you should only add data (whether manually or by scheduled import), or editor delete data while replication is either configured or temporarily stopped. You must not add, edit, ordelete data while replication is disabled.
There are a number of other differences between replicated and non-replicated databases that mightaffect day-to-day working. For an overview of these, see Differences between Working in a Replicatedand Non-Replicated Database.
When replication is stopped
Replication might be temporarily stopped because it is suspended by the SQL Server administrator orinterrupted by a technical problem. When this occurs, changes cannot be replicated between sitesuntil replication is restarted.
Depending on the reason why replication is temporarily stopped, you can choose to:
• Ask users to log on using a different server and open a different replicated database. This requiresWindows Terminal Services or similar.
• Allow your users to continue working but consider discouraging operations such as importing(because there is an increased risk that conflicts occur). After replication is running again, reviewany conflicts that might occur.
• Take the database offline to allow users who are currently working to save their work before closingtheir sessions, and to prevent others from starting new sessions.
When replication is disabled
Whenever replication needs to be disabled. You should take the database offline before the SQLServer administrator disables replication. iBase administrators can still open an offline database.
When replication is disabled, it is no longer configured in SQL Server and any changes that are madeto the data cannot be replicated to other sites and are not replicated even when replication isreconfigured. In contrast, you can only change the database schema when replication is disabled.
Before replication is disabled, you need to review any existing conflicts. All Subscribers must beonline and connected to the Publisher at this stage.
Note: If it becomes necessary to change the data, you need to work in the publication database, andinform the SQL Server administrator so that they can configure replication appropriately.
Managing securityManaging security in a replicated database is similar to an unreplicated database. However, thesecurity file must be SQL Server format.
Replication ensures that your iBase security setup is identical at all sites. When you are using areplicated security file, any change that is made by a security administrator at one site is replicated toall the other sites, whether adding or modifying user groups, defining permissions for those groups, oradding or modifying users. Updates are replicated to all the sites at a frequency that is agreed withthe SQL Server administrator and might, for example, be anything from every minute to once a day.
If one site requires slightly different security arrangements, you must set up user groups and usersthat are site-specific.
Each analyst should have their own user account, and any naming convention for these should includea location identifier in the user name. See Updating User Data for details.
Note: To refresh the user groups and users displayed in the Security Manager, close and reopen theSecurity Manager— updates to user groups and users from other sites are not otherwise displayed.
IBM i2 iBase administration center 283

iBase system roles
iBase administrators that work with security files, database properties, and the Conflict Viewerrequire different iBase system roles:
Tasks Required permissions
Work with the security file and set up groups andusers
You need to be able to log on as a securityadministrator. Your user account must be amember of a group with the securityadministrator system role.
This enables you to:
• Upsize the security file to SQL Server• Change the properties of the security file
(anyone with access to iBase Designer canview the properties of the security file but onlya security administrator can change them)
• Display the Security Manager (and check forduplicate groups or users)
• Define the permissions for groups
Initialize a database for replication and use theoptions on the Replication menu
Note: Allows you to display but not reviewconflicts
You need to be able to log on as a databaseadministrator. Your user account must be amember of a group with the databaseadministrator system role.
This enables you to:
• Initialize a database for replication (in iBaseDesigner)
• In iBase, run all the commands on theReplication menu. You are able to displayconflicts in the Conflict Viewer but notreview them.
Note: You also need permission to access theSQL Server conflict tables in the database.Contact your SQL Server administrator if youcannot display the Conflict Viewer but appear tohave the correct iBase permissions.
Use the Conflict Viewer to review conflicts Your user account must be a member of a groupwith the database administrator system role, andalso have add, update, and delete permissionsfor entity and link records, including entity andlink records created by other users.
Note: You also need permission to access theSQL Server conflict tables in the database.Contact your SQL Server administrator if youcannot display the Conflict Viewer but appear tohave the correct iBase permissions.
284 IBM i2 iBase: Administration

Tasks Required permissions
Change database properties You need to be able to log on as a systemadministrator. Your user account must be amember of a group with both the securityadministrator and database administrator roles.
Maintaining System Commands Access Control (SCAC) groups
In a replicated database, you can deny access to iBase commands using System Command AccessControl groups. You create the groups for the whole organization using the Security Manager andassign permissions using the System Commands Access Control command at the followingtimes:
• In the Microsoft Access security file before you distribute the security files to the subscriber sites.• In the publication database, either before or after the security file is configured for replication.• In the subscription database, after replication is configured for the security file at the subscriber
sites.
Before you define permissions for System Command Access Control groups, you should review howthe following access controls are assigned:
Group Notes
Soft Delete Denies users access to the commands forpurging and restoring soft deleted records. Thesecommands are only available in the publicationdatabase, after all current conflicts are resolved.
Batch Modification Denies users access to Batch Edit and BatchDelete which, when used especially on entitieswith large numbers of links, can introduceconflicts into your data. This group also deniesaccess to Merge Entities. Conflicts arising frommerging cannot be handled in the iBase ConflictViewer and must therefore be avoided by goodworking practices. See Merging Entities fordetails.
IBM i2 iBase administration center 285

Group Notes
Show User Information Denies access to the User Information and SelectUser dialogs. This is available in the followingplaces:
• On the File menu• In the Conflict Viewer by clicking the user
name• In the Properties dialog by clicking the User
Information button • In the Show dialog and datasheets by clicking
the user name (if owner hyperlink fields areused in the entity and link types)
Note: If this group is not displayed in the SystemCommands Access Control dialog, update theSCAC groups by selecting Update CommandGroups from the Tools menu.
If a particular group of users at one site requires different permissions to similar users at another site,then you need to assign their user accounts to a separate SCAC group.
Maintaining Data Access Control groups
Extended Access Control (EAC) gives the ability to assign rights to Data Access Control groups (DACgroups). In a replicated database, you create the groups for the whole organization using the SecurityManager and deny access to specific tables and fields on the database using the Data AccessControl command at the following times:
• In the Microsoft Access security file before you distribute the security files to the subscriber sites, ifthe publication database exists. However, you are not able to deny access based on SecurityClassification Code lists as these are a feature of SQL Server databases.
• In the publication database, either before or after the security file is configured for replication, if thepublication database exists.
• In the subscription database, after replication is configured for the security file at the subscribersites, if the subscription database exists.
You need to open the database to define the permissions for Data Access Control groups. However,empty groups can be created and users assigned even if the database does not yet exist.
If a particular group of users at one site requires different permissions to similar users at another site,then you need to assign their user accounts to a separate Data Access Control group.
Updating user dataAdditional user details can be recorded to provide contact information for other iBase users who needto establish the history of a particular record or modification.
The information is available in the Conflict Viewer and Property dialog, and also in the Show dialogand datasheets if owner hyperlink fields are added to the entity and link types.
Contact information consists of a user's:
286 IBM i2 iBase: Administration

• Full name• Location (which is predefined by the security or system administrator)• Email address• Telephone number• Notes
It is simplest to ask your users to add their own details: in iBase, select Change UserInformation from the File menu. You can also enter these details when you create new accounts inthe User dialog (but these details are not copied if you copy a user account). This feature is availablein both replicated and unreplicated databases.
Note: Contact details are stored in the security file and are replicated.
Adding users
Add a user account for each analyst who uses iBase database replication. Each user must log in usinga unique user name otherwise the Conflict Viewer might not be able to report conflicts between twousers logged in with the same user name.
Devising a naming convention for users that includes a location identifier in the username allows youto continue to add new users if a communications link goes down without any risk of creatingduplicate users. Ensure that the default password that is given to new accounts is specific to eachsite.
Duplicate names are checked whenever you display the Security Manager, and are automaticallyrenamed.
Note: To refresh the user groups and users who are displayed in the Security Manager, close andreopen the Security Manager. This does not necessarily display the users and groups added by othersites as this depends on the frequency with which updates to the security file are replicated.Depending on your organization, the frequency might, for example, be anything from every minute toonce a day.
When to set up the user data
You can add user groups and users, and assign users to groups at any of these stages:
• In the Microsoft Access security file, before it is distributed to the subscriber sites.• At the publisher site, before or after the SQL Server administrator configures the security database
for replication.• At the subscriber sites, after the SQL Server administrator configures the security database for
replication. Changes made to security data at any site is replicated to the other sites.
Note: For information on when to define the permissions for Data Access Control groups, seeManaging Security.
Assigning a location to each user
In a replicated database where the audit log is also replicated, it is important to assign each user alocation as part of their contact details. You can derive the location from the user name, however, theadvantage of using the location field in the contact details is that the user can keep the same username even if they move location. Typically the location is the physical location of the user rather thanthe location of the database.
IBM i2 iBase administration center 287

You can structure the location name to facilitate wildcard searching in the Audit Viewer if you chooseto use the location field in the contact details rather than rely on the user name containing a locationidentifier.
You must predefine the locations by adding contact information to a sample user from each location:
1. In the Security Manager, select an existing user and click Edit.
2. Click the User Information button .3. Enter the location name, up to a maximum of 50 characters.4. Click OK twice. The location name is not saved until you click OK in the User dialog.
Note: As a security or system administrator, you can also add and modify location names in the UserInformation dialog in iBase.
Handling duplicate group and user names
You should periodically check for duplicate groups and users.
When you display the Security Manager at any publisher or subscriber site, iBase Designer checks forand corrects duplicate names (whether groups or users). For example, the duplicates are renamed_***1***, _***2***, . The group or user created first keeps the original name, and the second group oruser is renamed.
If there are any duplicates, the Security Manager displays a warning message. You should make anote of the groupss and users involved because this message is displayed once only. However, namechanges are recorded in the security audit log.
Note: Where there are duplicate user accounts with the same password, either user can log on usingthe usable account but the access rights might not be correct.
Checking the ownership of recordsEveryone with a specific responsibility for managing the data in an iBase database can enter their owncontact details. These details make it easier for other iBase users to contact them if there is a querythat concerns a record that they own. Contact the owner of the record before you modify, delete, ormerge records.
About this task
Note: It depends on your organization whether every record type has an owner, or a similarly named,field. Records that are entered in the database before the owner field was added to the entity or linktype have a blank owner field.
Depending on your organization, you might need to record additional information about yourself. Thisinformation can assist other users with queries about the data for which you are responsible, or whomight need to talk to you before they edit, merge, or delete records that you own.
The contact details are for the user name that you use when you log on.
Procedure
To add contact details in iBase:1. Select File > Change User Information.
288 IBM i2 iBase: Administration

2. Enter your full name, telephone number, and email address. You may also need to select alocation. Depending on your organization, this can be a geographical area, a division, or an area ofresponsibility.
Note: If nothing suitable is displayed in the Location list, contact your system administrator.3. Save your details by clicking OK.
Changing the owner of a recordThe owner of a record can be contacted for more information. Keeping the ownership of records up-to-date ensures that the right people are contacted.
Procedure
When you add a record or updating an existing one, you can:• Make yourself the owner by typing $.
If it is not already displayed, your user name is inserted when you save the record.• Select a different user as the owner:
a) Click Browse next to the "owner" field to display the list of possible owners. If you know thefirst few characters of the name, enter these first - this then scrolls down to that position in thelist.
b) Double-click a name to select that person as the owner.
Finding the owner of a recordThe record owner is the person that should be contacted for information about the record. The recordowner can be a different person to the user who created or updated the record.
About this task
When you use either Show or a datasheet, there are two ways of displaying the contact details for theowner of the record:
• Click the username that is shown in the owner, or a similarly named, field. The user name isdisplayed as a hyperlink.
• Click Edit and then double-click the user name.
Procedure
To find out who these users were:1. Right-click on the record in any record list and, from the menu, select Properties.
2. Click to display the contact details for the person who created or updated the record.
Handling conflictsDepending on the amount of data that is added and edited each day and the types of procedure thatyou have in place, the interval at which you should check for conflicts in the Conflict Viewer varies. Tobegin with, a suitable interval might be hourly, then after you know how frequently conflicts occur youcan adjust the interval, for example, to once a day.
It is important to review the conflicts regularly as SQL Server will automatically delete the conflictsafter a set time, for example after 14 days. You might want to discuss the length of this period withyour SQL Server administrator.
IBM i2 iBase administration center 289

Note: You must review all current conflicts before replication is disabled. The losing records in theconflicts are deleted when the SQL Server administrator disables replication. To make sure that yousee all the conflicts, all fixed and disconnected Subscribers must be connected to the Publisher.
Minimizing the risk that conflicts occur
It is important to understand that the risk that conflicts occur is low where only fixed Subscribers areused— the risk increases with disconnected Subscribers because users at these Subscribers areworking with data that is only periodically synchronized with the publication database.
Your existing working practices and procedures (that control how data is entered and updated) mightalready go a long way to minimize the risk that data conflicts occur. Especially if your proceduresrequire analysts to consider the ownership of records before any updates are made.
• Ask your SQL Server administrator to configure a message (an alert) to send an email, or a messageto a pager, if replication is temporarily stopped.
• Ensure that each record has an owner and that the owner's contact details are available. Forexample, you can enforce the ownership of records by adding an owner hyperlink field, as astandard field, to every entity and link type (see Adding owner fields to entity and link types fordetails). Contact details can also be added to the database in iBase by individual users using theChange User Information command on the File menu.
• Review who has permission to perform batch edits and batch deletes as this type of operation ismore likely to generate conflicts. In particular, batch deleting large numbers of entities.
Using the Conflict Viewer
You use the Conflict Viewer to review the conflicts that are automatically resolved in SQL Server. SQLServer resolves each conflict in favor of the Publisher and then in favor of the site that merges first.When you review a conflict, you either confirm that the conflict is resolved correctly or you change theoutcome of the conflict, for example in favor of the other site or by editing the winning record.
When you finish, the losing record is purged from the database— this cannot be undone. If you changethe outcome of the conflict, then the new outcome is replicated to all sites.
The record that is in conflict can be a modification or a deletion (held as a soft deleted record). Whenthe outcome of a resolved conflict is a deletion, the record remains soft deleted.
To use the Conflict Viewer, you need to log on as a database administrator with full rights to the entityand link records. For more information. see iBase system roles. Your SQL Server administrator mightalso need to grant you specific rights.
To display the Conflict Viewer, in iBase select Replication Conflict Viewer from the Tools menu.
Working with disconnected Subscribers
You must review the conflicts that might occur when a disconnected Subscriber synchronizes with thePublisher.
Note: You might want to discourage operations such as importing, including imports scheduled byiBase Scheduler.
Handling a network communications failure
If network communications fail, changes cannot be merged with the Publisher. However, thedatabase server can still be running so your users are able to continue working in the iBase databasebut with an increase in the risk that conflicts occur.
You can choose to:
290 IBM i2 iBase: Administration

• Ask users to log on using a different server and open a different subscription database. Thisrequires Windows Terminal Services or similar.
• Allow your users to continue working and review any conflicts that might occur. However, you mightwant to discourage operations such as importing, including imports scheduled by iBase Scheduler.
• Take the database offline to prevent anyone else from logging on. This allows users who arecurrently working to save their work before they close their session.
Merging entitiesThe Conflict Viewer, handles conflicting changes to entities and their links that arise from directediting or deleting of the records; it does not handle conflicts that arise from merging entities oroccurring in the records affected by a merge operation. A typical example of this type of conflict issomeone edits a link that is deleted as a result of a merge performed at a different site.
About this task
For this reason:
• Only authorized users can access the Merge Entities options.• You need to establish a procedure for reviewing and merging entities so that only one user at a time
merges entities, preferably using the publication database.• You need to review any existing procedures that might add to the number of duplicates in the
system.
It is important to restrict who has access to Merge Entities This ensures that only users whounderstand the impact of merging entities on a replicated database have authority to perform thisoperation.
Note: Merging is part of the same command group as batch editing and batch deleting.
The objective of this procedure is to ensure that only one user at a time merges entities to preventmerge conflicts from arising in the first place.
Each site needs to appoint a senior analyst with responsibility for carefully analyzing the recordsinvolved in a merge. Depending on the procedure, they might have permission to also perform theactual merge, or you might choose to restrict this to a single user account.
A senior analyst at each site must carefully analyze the records involved in the proposed merge.There are various ways of organizing this. For example, if you want to use iBase to manage this, apossibility is to define a Merge Request entity type in your database schema, which would contain theinformation that relates to the merge, and use this as a way of reviewing and getting agreement onthe decision to merge.
The procedure would be, for example:
Procedure
1. When records are identified as candidates for a merge, a senior analyst charts the records involvedto an Analyst's Notebook chart and saves the chart as a record of the pre-merge data.
Note: This is also a useful way of restoring the data to its original state if a problem is discoveredwith the merge later.
2. Using iBase, the analyst adds a Merge Request entity that contains details of the records involvedin the proposed merge. Depending on how you choose to design the Merge Request entity type,the analyst also includes a screen capture of the pre-merge data to help the review.
IBM i2 iBase administration center 291

3. When the Merge Request is saved, it is automatically replicated to all databases for review.Analysts responsible for reviewing merge requests have set up a browse definition that auto runswhen they log on, and that tells them when a new merge request is waiting to be reviewed.
4. Each analyst reviews the details of the proposed merge, and updates the Merge Request entity.There should be space for each analyst to add comments. After saving, their review comment isreplicated to the other databases so that other reviewers can follow the progress of the review.
Note: There is a risk that conflicts occur if two or more analysts edit the Merge Request recordwithin the same replication cycle. In this situation, review the record in the Conflict Viewer in theusual way, taking care to copy the comments from the losing record to the winning record beforeyou click Apply.
5. After all the analysts review the merge request, the nominated user merges the records.To do the merge, they:
• Should work in the publication database• Check that all Subscribers are online (a conflict can occur when a communication link, which was
down, comes back online)
They can either:
• Select one record to keep as the merge entity, and merge the other entity records into it• Create a new entity of a suitable type and merge the existing records into this.
6. After the merge is complete, you might want to update the owner of the merged record (if you useowner hyperlink fields).
What to do nextDesigning a Merge Request entity type
For information on what to consider to design a suitable entity type for Merge Requests, seeUpdating the Database Design.
Note: Adding a Merge Request entity type is a change to the database schema and must be donebefore the publication database is configured for replication in SQL Server or when replication isdisabled in SQL Server.
How are duplicate records created at the moment?
Consider whether there is any scope within your current working practices to reduce the numberof duplicate records that are added to the system. For example:
• Are users importing data that contains duplicates and then using merge to remove theduplicates? In this case, consider how you might clean your data before you import it into areplicated database.
• Check that you have discriminators set on all your entity and link types to prevent users fromaccidentally entering duplicates.
• Avoid performing batch edits, especially on discriminator fields.
What to do if a conflict occurs
A typical conflict that arises from a merge is, for example, someone edits a link or entity beforesomeone else performing a merge in which the entity or link is deleted. The iBase Conflict Viewercannot display the context in which this conflict arose, and it is not possible to use the ConflictViewer to restore it to its original state.
In this situation, the best course of action is to use the chart that contains the pre-merge data torecreate any missing data. It is also possible that your SQL Server administrator might be able touse an SQL Server Conflict Resolver to restore some of the data.
292 IBM i2 iBase: Administration

To avoid this situation from arising in the future:
• Always chart the data to Analyst's Notebook and then save a chart before a merge— this givesyou the opportunity to recreate the data if you discover a problem.
• Do not merge if any Subscribers are offline.
Restoring and purging soft deleted recordsYou can only restore and purge soft deleted records in the publication database after all outstandingconflicts are reviewed in the Conflict Viewer and when there are no broken links. You can neverrestore and purge soft deleted records when you work at the subscriber sites.
If the outcome of reviewing a conflict in the Conflict Viewer is to keep a soft deleted record, then thatrecord remains soft deleted and might be restored or purged.
After a conflict is reviewed in the Conflict Viewer, the losing record is automatically purged from thedatabase and you cannot restore it. See Conflicts and How They Occur for further details.
Note: Only purge records when all Subscribers are connected to the Publisher. Purging records whendisconnected Subscribers are offline might result in hanging links that is links without any entities.
Note: Hanging links can occur when an entity and its links are purged at the Publisher but adisconnected Subscriber modifies one of those links. When the Subscriber connects with thePublisher, the modified link is merged into the publication database but the connecting entity nolonger exists.
Replicating non-database filesWorking in the publication database or in any of the subscription databases, you can use the FileManager dialog to load any type of file into the database for replication to the other sites. You can onlyload one database template. To load additional database templates, you should archive them orrename them with a different file extension.
You can add a description to the file that is also replicated. After the file is replicated, save it to diskbut do not delete it from the File Manager dialog. Editing the description of a file or deleting a file alsoedits or deletes it at the other sites.
You should only delete files that you know to be out-of-date or that are no longer required.
Example file types
Examples of these file types are:
• A database template (.idt file)• Text Chart templates (.tct files)• Analyst's Notebook templates (.ant files)• Archive log files (.idla files)• Microsoft Word documents that are used as templates for iBase report definitions, if there are many
these, consider adding them to an archive file first (.zip file)
Note: After replication, copy these files to the correct place in the database folder or to the correctfolder in the iBase installation.
Displaying the File Manager
To display the File Manager in iBase, log on as a database administrator and, select Tools >Replication File Manager.
IBM i2 iBase administration center 293

Replicating the audit logIt is optional whether the audit logs for the database and security file are replicated. The audit logs forthe database and security data are replicated separately.
The audit logs are optionally replicated:
• If the audit data for the database and security file is replicated, authorized users at any site canreview all activities.
• If the audit data for the database and security file is not replicated, the audit logs records activity forthe local database and security file only. The main effect of this is incomplete information on howconflicts between entity and link records, and in the security data were resolved. For example, logentries for the Conflict Viewer are only recorded in the audit log for the publication database (if theaudit level is set to 4 or 5).
Note: The dates and times that are shown in the audit log are local to the server on which the userwas working.
Filtering the audit log for the database
In a replicated audit log, the best way of filtering the log entries for a specific site depends on howuser names and locations are defined in your organization:
Filter by Description
User name The user name might be a useful way of filteringthe audit log if each user name contains anelement to identify the site at which the userworks.
Network Login If users are restricted to logging on to thedatabase on the local server, then the networklogin can indicate the location of the user.
Location Locations can be a useful way of filtering theaudit log if all user accounts have a location andthat the location names are consistent.
Note: Filtering by location does not identify therecords, which a user owns (if you are usingowner hyperlink fields), only those records thatthey create or update.
Viewing log entries for conflict resolution
There are two actions for the Conflict Viewer: Conflict Detected and Conflict Resolved. These arerecorded if the audit level of the publication database is set to 4 or 5.
Two examples showing the audit trail for these actions are included in the following information.
Note: All dates and times for the Conflict Detected/Resolved records are the SQL Server date/time onthe Publisher as conflicts are always detected and resolved in the publication database.
Viewing the audit log for the security file
In addition to the standard entries for non-replicated databases, the audit log for the security filerecords changes to group and user names that results from resolving duplicate names in the SecurityManager.
294 IBM i2 iBase: Administration

The site to which a user belongs is identified by the name of the user that created it.
The site to which a group belongs is identified by the group ID which contains the database identifier.
The first site to create the user or group keeps that user or group with the permissions they defined.The user or group at the second site is treated as a duplicate and loses any defined permissions.
For example:
Date/time User Action Detail
09:35:09 Sub1Admin Create User User SmithT created
10:06:04 PubAdmin Create User User SmithT created
16:00:00 Sub2Admin Change User User SmithT renamedto ***1***
Note: The userSub2Admin displayedthe Security Managerwhich detected thisduplicate andautomatically renamedit.
17:05:06 PubAdmin Change User User ***1*** renamedto 03SmithT
Note: The SmithTcreated by Sub1Adminis kept withpermissions assignedby Sub1Admin. Theother SmithT is treatedas a duplicate (and itspermissions areignored).
Archiving audit log files
You can archive audit log files in the usual way. It is not necessary to stop or disable replication to dothis. However, notice that although the entries you delete are deleted from the audit log at all sites,the archive file is not replicated.
To make the archived entries available to all sites, you should load the archive file into the databaseby using the replication File Manager.
Example 1: Accepting the original outcome of the conflictThe audit log records two changes to the same record but made at different sites. To simplify theexamples, only relevant details are shown:
Date/time User Action Detail
10:50:19 01Smith Record Modified
10:50:25 03Malina Record Soft-Deleted
IBM i2 iBase administration center 295

At this stage, there is no indication that a conflict has occurred. The date and time shows when therecords were changed— it does not show which record merged first with the Publisher.
After the conflict is reviewed in the Conflict Viewer, the audit log shows which record won the initialconflict because it merged first with the Publisher (the change made at 10:50:25) and then which onewon when the conflict was reviewed in the Conflict Viewer. In this example the initial outcome isunchanged:
Date/time User Action Detail
10:50:19 01Smith Record Modified
10:50:25 ConfAdmin Conflict Detected Winner 10:50:25(03Malina) Loser10:50:19 (01Smith)
Note: The winner is therecord kept by SQLServer and replicatedto all sites. The dateand time is logged onlywhen the user runs theConflict Viewer. It isalways the later of thetwo update date/timesof the records inconflict (regardless ofwhich record won orlost the conflict).
10:50:25 03Malina Record Soft-Deleted
10:54:16 ConfAdmin Conflict Resolved Winner 10:50:25(03Malina) Loser10:50:19 (01Smith)
Note: The winner is therecord chosen by theuser as the one tokeep. The user chosethe same record as SQLServer so there is nochange to the databaseand no additional logentry.
Example 2: Change to the original outcome of the conflictThe audit log records two changes to the same record but made at different sites:
Date/time User Action Detail
11:20:03 03Malina Record Modified
11:20:07 01Smith Record Soft-Deleted
At this stage, there is no indication that a conflict has occurred.
296 IBM i2 iBase: Administration

After the conflict is reviewed in the Conflict Viewer, the audit log shows which record won the initialconflict (the change made at 11:20:07) and then which one won when the conflict was reviewed inthe Conflict Viewer. In this example the initial outcome is changed:
Date/time User Action Detail
11:20:03 03Malina Record Modified
11:20:07 ConfAdmin Conflict Detected Winner 11:20:07(01Smith) Loser11:20:03 (03Malina)
Note: This entry islogged when theConflict Viewer is runbut takes the date/timeof the later of the tworecords in conflict.
11:20:07 01Smith Record Soft-Deleted
18:00:55 ConfAdmin Record Modified Note: Because thisrecord was chosen bythe conflictadministrator as theone to keep, it isreplicated to all sitesand an extra entryappears in the auditlog.
18:00:55 ConfAdmin Conflict Resolved Winner 11:20:03(03Malina) Loser11:20:07 (01Smith)
Note: The conflictadministrator chose tokeep the original losingrecord.
Updates to code listsThe contents of code lists (that is pick lists, icon lists, and SCC lists) are not part of the databaseschema, and can be updated at any time by any authorized user. The modifications are replicated tothe other sites in the usual way, and will be available to any user who logs on after the changed list isreplicated.
Note: Adding or editing the description of a list, or assigning a pick list as a parent or child to create afiltered pick list, is a schema change and is not replicated.
Users who are logged on at the time the change is made continue to see the old pick list (seefollowing information), icon list, or SCC list until they do one of the following:
• Close and then reopen the database.• Display the pick list dialog and then click OK to close it (which updates the contents of all the lists).
This does not apply to filtered pick lists where changes to the contents are seen as soon as they arereplicated.
IBM i2 iBase administration center 297

Shutting down the databasesTo make it easier to gain exclusive access to the databases, for example before you apply changes tothe database schema, you can use the Take Offline command to broadcast a message to all activeiBase users that asks them to end their sessions. Existing users are not ejected from the system bythis message but new users (except for database administrators) cannot open the databases.
About this task
The message does not deny database access to services such as the Scheduler service, which shouldbe disabled manually. For more information, see iBase Scheduler.
You can broadcast just the standard message (which is *** WARNING *** This database isnow offline) or you can add a message to provide users with some instructions or information.
Note: Typically the Take Offline command is run from just one of the databases and the databasestatus is replicated to all the other sites. However, it might need to be run locally if a site is unable tocommunicate with the publisher site because of a network communications failure.
Procedure
To take the databases offline:1. Start iBase and log on as a database administrator.2. Open one of the databases and from the Tools menu, select Replication Take Offline.3. In the Take Offline dialog, enter a message (if required). Only users who are actively using iBase,
or trying to log on, see the message.4. Select the frequency with which the message is displayed and click OK.
This prevents new sessions from being started (unless the user is a database administrator) but itdoes not end any current sessions.
5. To change the frequency with which the message displays or to change the message:6. From the Tools menu, select Replication Bring Online.7. Click Yes to bring the databases online.8. From the Tools menu, select Replication Take Offline and re-enter the message, change the
interval, or both.
What to do next
When the databases are offline, in iBase, select Tools > Replication Bring Online to bring thedatabases back online to make them available to users who want to start new sessions.
You can bring the publication database online as soon as your SQL Server administrator tells you thatreplication is configured for the publisher site. The subscription databases automatically come backonline as the subscriber sites are configured for replication.
Note: Do not bring the publication database online while replication is disabled. You should only adddata (whether manually or by scheduled import), or edit or delete data while replication is configured.This is because any changes that are made to the data while replication is disabled cannot bereplicated to other sites even when replication is reconfigured.
Changing the schema of a replicated databaseSchema changes cannot be replicated. To change the schema of a replicated database, the SQLServer administrator must disable replication for all sites while you update the database template ateach site. After you apply the changes at each site, the SQL Server administrator must to reconfigurereplication. For this procedure, all Subscribers must be connected to the Publisher.
298 IBM i2 iBase: Administration

About this task
The different stages of the operation are:
1. Preparing a new database template with the wanted schema (you need to work on a testdatabase). When the new template is ready, you load the new template into your productiondatabase by using the File Manager - replication automatically distributes it to all sites.
2. Preparing the database so that replication can be disabled. This involves taking the databaseoffline (to prevent further conflicts from occurring) and then reviewing all existing conflicts. Afterthis is done the SQL Server administrator disables replication by deleting the publication and itssubscriptions.
3. Applying the new schema at all sites. Only changes to entity types, link types, fields, standardfields, code lists, semantic types, datasheets, and common folder objects are applied.
4. After the new schema is applied, the SQL Server administrator reconfigures replication.
Note: Although the changes to the database schema are not discarded, they cannot be replicated.Changing the schema in this way, can also prevent you from usingFile Manager and UpdateDatabase Schema to update the schema as described in the following information.
What is a schema change?
Any of the following changes to the database design constitutes a schema change (and are notreplicated):
• Adding, modifying, or deleting entity types, link types, fields or standard fields• Adding, renaming, or deleting pick lists, icon lists, or Security Classification Code lists
Note: Adding or editing the description of the list is a schema change. Changing the content ofthese lists is not a schema change, and any changes you make to the contents are replicated.
• Adding, modifying, or deleting common folder objects• Adding, modifying, or deleting datasheets• Adding semantic types (whether manually or by loading a custom semantic type library) and
assigning them
Do not delete anything from a database schema once the database is live.
Procedure
1. To change the database schema, you can work at any one of the sites involved in replication:a) Create a database template to capture the current schema.b) Using the template, create a temporary database in which to develop and test the modified
schema. The database can be either an Access or an SQL Server database, whichever is mostconvenient.
c) Use the temporary database to develop the new database schema, and then test it to checkthat it works as intended.
d) Create a database template to capture the updated schema. You should test the databasetemplate by applying it to a parallel database.
Note: At this stage, you might want to plan what changes (if any) are required to other iBase objectsuch as report definitions or labeling schemes.
2. Use the File Manager to replicate the new template to all the sites:a) Log on as a database administrator, open one of the replicated databases, and load the
database template into the database using the File Manager.See Replicating Non-Database Files for details.
IBM i2 iBase administration center 299

The database template is replicated to all sites.b) Check that all Subscribers received the new database template.
Note: Do not delete the database template from the File Manager dialog.c) Optional: At each site, save the new template to the WorkgroupTemplates folder of the local
iBase installation.3. After all sites receive the new database template, you need to prepare iBase so that replication
can be disabled by the SQL Server administrator. This needs to be done in the publicationdatabase:a) If you use iBase Scheduler, disable the Scheduler service to prevent any imports from running.
Disabling rather than stopping the service prevents the service from restarting if the server isrebooted.
b) Make sure that all Subscribers are connected to the Publisher.c) Log on as a database administrator and open the publication database.d) Take the database offline: in iBase, select Tools > Replication Take Offline.
See Shutting Down the Databases for details.
This is replicated after a short interval, and the message is displayed to all users activelyworking in iBase or trying to open one of the databases.
e) Check that everyone closed the databases. For example, if you can log on to the remoteservers, try to open each of the databases in iBase Designer. If necessary, ask the SQL Serveradministrator to log out the remaining users on all sites.
f) Review the current conflicts in the Conflict Viewer: in iBase, from the Tools menu, selectReplication Conflict Viewer. If you change any of the records involved in the conflicts make anote of the last record that you change and the nature of the change. (This helps you to checklater that the modified records reached the subscriber sites.)
Any changes that you make in the Conflict Viewer are replicated to all subscriber sites.g) Check that any records modified as a result of using the Conflict Viewer reached all subscriber
sites.h) Ask the SQL Server administrator to disable replication.
Warning: After replication is disabled, you must not make any changes to the data inany of the databases. The changes are not replicated to the other sites after replicationis reconfigured.
After the SQL Server administrator informs you that replication is disabled, you can apply the newschema to the databases. Before you start, ensure that you have a backup of the database andthat replication is disabled.
• If you are working in the publication database, run the Status report to check that replication isdisabled: in iBase, from the Tools menu, select Replication Status Report. It reportsPublication not found.
• If you are working in a subscription database, open the database in iBase Designer. If replicationis still running, you see the message:*** WARNING *** This is a replicated database. You must not change the database schema.
4. To apply the schema change at each site:a) In iBase, log on as a database administrator, and select Tools > Replication Update Database
Schema.
Note: You cannot display this dialog if you are a member of a Data Access Control group thatdenies access to any tables or fields in the database.
300 IBM i2 iBase: Administration

b) Click OK to close the database.If you are warned that there is no database template, you can still load it manually. However,do not load any other files into the database as all the files listed in the File Manager can beoverwritten after replication is reconfigured.
c) Optional: Save a list of schema changes in a format that is useful for the SQL Server
administrator: in the Update Database Schema dialog, click . You can print this file later.d) Click Update to apply the changes and then, once this is finished, click OK to reopen the
database.e) Check that the template is applied successfully.
After all subscriber sites apply the schema change, notify the SQL Server administrator thatreplication can be reconfigured.
5. When the SQL Server administrator informs you that replication is reconfigured:a) Verify that replication is running: for example, open the publication database in iBase, and from
the Tools menu, select Replication Status Report. The message Publication is OK isdisplayed.
You might also want to test that replication is running correctly. See Testing ReplicatedDatabases for details.
b) In iBase, log on as a database administrator, open the publication database and make thedatabase available again to other users: from the menu, select Tools > Replication BringOnline.
After a short interval, the status is replicated to the subscriber sites.c) Notify users that they can log on again.d) If you use iBase Scheduler, restart the Scheduler service.
Warning: After replication is configured, you should not open the database in iBaseDesigner unless necessary (unless you are a security administrator).
Check the integrity of iBase databasesThere are some restrictions on when you can check the integrity of replicated iBase databases.
Schema integrity
You cannot run a schema integrity check while replication is configured in SQL Server.
Link integrity
You can run a link integrity check on a replicated database, preferably on the publication database, ifthere are no conflicts and you have exclusive access to the database. To obtain exclusive access tothe database, use the Take Offline command.
Note: The Link Integrity Checker runs on physically deleted records and therefore, does not assistyou in resolving any problems with merged entities (which apply to soft deleted records only).
IBM i2 iBase administration center 301

For SQL Server administratorsWhen you set up iBase database replication in SQL Server Enterprise Manager or Management Studio,keep your replication setup as simple as possible and avoid using SQL Server replication features thatincrease the complexity of the setup.
iBase database replication uses SQL Server merge replication to distribute data from the Publisher toSubscribers, allowing the Publisher and Subscribers to make updates, and then to replicate theupdates between sites. However, iBase database replication is unlike SQL Server merge replication inthat Subscribers must always be connected to their Publisher - it is not suitable for disconnectedusers.
The setup is described in more detail in the following information.
iBase supports the following features of SQL Server replication:
• Merge replication.• Servers running SQL Server 2005 or SQL Server 2008 (the replicated iBase system must not contain
a combination of these).• Native SQL Server format for the initial snapshots.• Subscribers that synchronize with the Publisher— the Subscribers can be either fixed or
disconnected.• Subscribers that receive subscription data from the Publisher.
For more information, see Supported Publication Options and Supported Subscription Options.
Prerequisites
All servers that are to be configured for merge replication must be set to the same time.
Unsupported features
iBase does not support:
• Anonymous pull subscriptions - publications that allow anonymous pull subscriptions are invalid.• On demand synchronization - data from Subscribers must be synchronized at a regular interval, for
example a polling interval for the Merge Agent of 1 second for the publication that contains theentity and link records. You can select a different interval for the publications that contain thesecurity and audit data.
• Subscribers that receive subscription data from another Subscriber rather than from the centralPublisher (republishing).
• Subscribers that synchronize with another Subscriber rather than with the Publisher (an alternatesynchronization partner).
• Column level conflict resolution in iBase databases all updates are handled at row level. This isbecause a change to a single column changes the modification date and user, which results in aconflict occurring.
• Data filtering of either columns or rows when you add a table to an article, you must select all thecolumns and rows.
• Dynamic data filtering (you cannot filter the data that you provide for different Subscribers).• Publishing via the Internet.• Custom resolvers iBase has its own Conflict Viewer, which runs as part of iBase and requires that
the first change to merge with the Publisher wins the conflict. The Conflict Viewer allows iBaseusers to review the conflicts and change the outcome if required.
302 IBM i2 iBase: Administration

Supported publisher optionsYou must select specific SQL Server options to configure Publishers for iBase databases.
When you configure Publishers for iBase databases, whether containing entity and link data, securitydata or audit data, you must select the following SQL Server options only, and accept all otherdefaults:
• Merge replication• Either SQL Server 2005 or SQL Server 2008 as the only subscriber type (the replicated iBase system
must not contain a combination of these)• Articles that contain tables only - there is no need to replicate the iBase stored procedures, and
there are no views.
Although there are a wide range of Publisher properties, iBase supports the default settings only. Forthis reason, you should not alter any of the default article properties (except where indicated in thefollowing instructions).
Supported subscription optionsiBase has various supported subscription options.
When you configure subscriptions to a publication that contains iBase data:
• Configure either push subscriptions or named pull subscriptions• Accept all the default settings for the subscription options - the iBase Conflict Viewer is designed to
work with the default conflict settings.• Use continuous, rather than on demand or scheduled synchronization.
Never use the Pull Subscription wizard to create new subscription databases - databases are alwaysbe created by an iBase administrator using iBase Designer.
When you configure subscriptions for a system in which replication is already configured, you shouldnot initialize the schema and data. The databases always have their schema and data, and aresynchronized with each other (if the rules for schema changes are followed by the iBaseadministrators).
When you work with a large iBase database or a slow communications link, you can transfer iBasedata to the Subscriber using a full backup rather than download a snapshot. The backup is a standardfull backup - there are no specific options that must be set. When you restore the backup, you mustturn off the Preserve the replication settings checkbox on the Options page of the Restore Databasedialog.
Setting Up iBase database replication in SQL ServerSet up iBase database replication in SQL Server. Ensure that the environment is correctly prepared.
Before you begin
Publications and subscriptions for entity and link data, security data, and audit data can be created inany order:
Data type iBase file SQL Server database
Security data <database name>.ids <database_name>_Sec
Entity and link data <database name>.idb <database_name>
Audit data — <database_name>_Log
IBM i2 iBase administration center 303

Note: In database names that are derived from iBase file names, characters outside the range of A–Z, a– z, 0– 9, and space are converted to underscores. An underscore is also appended to thedatabase name if the iBase file name consists of a single word.
Typically security data is configured first and the audit data is configured last.
Before you can initialize a subscription, you must to transfer an initial snapshot of data to eachSubscriber, and it is possible that the entity and link data is too large to download.
If you intend to apply the initial snapshot for the entity and link database over a communications link,then follow the steps in Configuring Subscribers. However, if the entity and link database is too largefor this, follow the steps in Applying the snapshot manually using removable media.
Before the iBase administrators create any new iBase databases, you might want to predefine thesecurity for these databases by restricting permissions to the Public role for the Model database(which is the template for new user databases). For details, see the Administration Center documentManaging Access Control. The information in this document applies to all types of iBase database.
You should also agree a database naming convention with the iBase administrator. The databasename must not exceed 119 characters.
Note: All servers, which are to be configured for merge replication must be set to the same time.
Procedure
1. Enable the server that you are using as the Distributor and Publisher for replication. If you want tocreate push subscriptions or named pull subscriptions, also enable the servers that you are usingas Subscribers.
2. Configure the Distributor.3. At the Publisher, create publications for the security data, entity and link data, and optionally the
audit data.For more information, see
• “Publishing security data” on page 307• “Publishing entity and link data” on page 309 (there is an additional step if you need to apply the
snapshot manually)• “Publishing audit data” on page 314
4. Back up the replicated databases, scripts, and appropriate system databases. See Backing Up andRestoring Replicated Databases for details.
Note: The iBase administrator must to set up the databases at the Publisher before you canconfigure replication. Details are given in each section.
What to do next
Follow these steps if you intend to initialize the subscriptions by applying the initial snapshot overyour communications link:
1. Create a subscription to the publication that contain the:
• security data• entity and link data• audit data (optional)
The subscription can be a push subscription or a named pull subscription. The iBaseadministrator has already created the subscription databases.
304 IBM i2 iBase: Administration

2. Set up the Merge Agents to run at an appropriate interval, for example 1 second for the entity andlink data. If the Subscriber is to be read-only, configure the Merge Agents to prevent uploads tothe Publisher.
3. Back up the replicated databases, scripts, and appropriate system databases. See Backing Up andRestoring Replicated Databases for details.
Follow these steps if you cannot apply the initial snapshot of the entity and link data over acommunications link:
1. At the Publisher, perform a full backup of the replicated, publication database. Distribute thebackup file to the subscriber sites.
2. At each Subscriber, restore the publication database over the empty subscription database.3. Create a subscription and then synchronize it with the Publisher.4. Set up the Merge Agent for each subscription to run continuously at a 1 second interval. If a
Subscriber is to be read-only, configure the Merge Agents to prevent uploads to the Publisher.5. Back up the replicated databases, scripts, and appropriate system databases. See Backing Up and
Restoring Replicated Databases for details.
Considerations for large databasesTransfer the initial snapshot of the entity and link data from a large publication database to yoursubscriber sites by backing up the publication database (in SQL Server) and then restoring it over theempty subscription databases.
This process:
• Ensures that all the required iBase system and user tables are created correctly - most of the iBasesystem tables are not replicated.
• Avoids the need to transfer large amounts of data over your communication links.• Ensures that the Subscriber receives all the updates made to the publication database since the
publication was created and the Subscriber configured (if the time lapse between the two does notexceed the expiration setting on the publication).
• Allows you to synchronize the newly configured Subscribers and Publisher at a convenient time.
Replication securityThe following information describes the general security environment for iBase Database Replication.However, there are no differences between security for replicated iBase databases and security forother types of replicated database. For detailed information on general replication security, refer tothe Microsoft SQL Server documentation.
The following section also explains the SQL Server logins required by iBase administrators. Inparticular, the permissions required for the iBase Conflict Viewer.
SQL Server Agent
Replication, in common with other SQL Server functions that use scheduled services, requires anSQLServerAgent service to be running on each SQL Server instance (whether Publisher, Distributor, orSubscribers). Configure the SQL Server Agent service to start automatically when the server starts up.
This service needs a Windows logon and password. For Windows logons, you can use one of thefollowing:
• A domain account. If the account belongs to different domains, you might need to set up trustrelationships between the domains. However, for SQL Server Agents, the account does not need tobelong to the Windows Administrators group.
IBM i2 iBase administration center 305
• Local accounts. Each local account must be identical on all servers and must be a member of thelocal Administrators group.
The Merge and Snapshot Agents used by merge replication run within the security context of the SQLServer Agent. For more information, see the Microsoft SQL Server documentation.
The SQL Server Agent account needs appropriate permission to the snapshot folder on the server thatacts as the Distributor.
Snapshot files and folder
The folder in which the initial snapshot files of the iBase data are stored must be available to the SQLServer Agent account for the Publisher and Subscribers. Specifically:
• The Snapshot Agent that writes the initial snapshots from the Publisher requires Full Control.• The Merge Agent for each Subscriber requires Read access (because the Merge Agent must read
the snapshot at each Subscriber before replication can start).
To ensure secure access to the snapshot files, use an explicit share, rather than the administrativeshare because accounts must be a member of the Administrators group to access this share.
In addition to the default permissions on this folder, the SQL Server Agent account for the Publisherneeds read and write access to the contents of the folder so that they can read and write snapshotfiles.
Security mode
Connections to a server (Publisher, Distributor, or Subscribers) can use Windows Authentication orSQL Server security. Windows Authentication provides greater security and general ease of use.
SQL Server login and roles for SQL Server administrators
You must be an SQL Server system administrator to enable the servers, on which the iBase databasesare held, for replication.
After replication is enabled, you do not need to be an SQL Server system administrator to configurepublications and subscriptions, or to invoke or schedule the replication agents. You must be in thesysadmin or db_owner roles to create publications, create subscriptions, and attach subscriptiondatabases.
SQL Server login and roles for iBase administrators
If you follow the configuration method for iBase database replication that uses attachablesubscription databases, then you must grant the logins for the iBase administrators access to thesubscription databases as they lose their access rights as a result of this configuration method.
The user responsible for conflict resolution in iBase must have the necessary permissions to accessthe SQL Server conflict tables. You grant this access by adding their login name to the PublicationAccess List.
Setting Up Database Replication in SQL ServerCreate publications and subscriptions for iBase.
You can create publications and subscriptions for iBase based on:
• Entity and link data from the main iBase database• Security data (this can be shared by several iBase databases)• Audit data
306 IBM i2 iBase: Administration

And, optionally:
• Suitable procedures for creating publications and subscriptions are described in the followingsection. Unless stated otherwise, the procedures are the same for all supported versions of SQLServer.
For the main iBase database that contains the entity and link data, you publish all the user tablesand a specified set of iBase system tables. You do not publish any user-defined stored proceduresor views. The procedure is slightly more complicated when the initial snapshot for the maindatabase is too large to download over a communication link. For details of the deployment processused in this situation, see:
• Overview for Large Databases
For background information on the SQL Server options supported by iBase, see Overview ofSupported SQL Server Replication Features.
Note: Only qualified SQL Server administrators should implement replication for iBase databases.
Setting the time on the serversAll servers that are to be configured for merge replication must be set to the same time.
Configure the distributorAs with any type of SQL Server database replication, deployment starts when you configure aDistributor. Configuring the Distributor for iBase is no different than configuring one for other types ofSQL Server replication, and there are no special considerations for iBase.
Publishing security dataThe following section describes how to publish the security data associated with the main iBasedatabase. Before you can configure the Publisher for a security database, the iBase administratorshould have already set up the iBase security database on the server that is the Publisher.
Before you begin
If you intend to replicate the security audit log, include the _ AuditLog table when you create thepublication.
Note: In iBase, this database is typically referred to as the security file.
Procedure
To create a publication for security data:1. From the Object Explorer list, select Replication > Local Publications, right-click and select New
Publication.
• Server: select the server that is also the Publisher of the entity and link data for the iBasesystem. (Use the same server for all publications.)
2. On the Publication Database page, select the existing database that contains the security datayou want to publish.The database name is <database>_Sec where <database> is derived from the name of the idsfile created at the publisher site.
3. On the Publication Type page, select Merge publication.4. On the Subscriber Types page, ensure that only SQL Server 2008 or later is selected.5. On the Articles page, expand the Tables node. Select these iBase system tables:
• _ AccessDenied• _ AuditLog (omit this table if you do not want to replicate the security audit log)
IBM i2 iBase administration center 307

• _AutoLogon (optional but only relevant if Windows Single Sign-On is used and users are ableto log on to the different systems using the same Windows credentials)
• _CommandGroup• _Group• _PasswordHistory• _SecurityPolicy (optional)• _User• _ UserGroup• _UserSettings
Note:
You must not include these tables:
• _Configuration_Binary• _Configuration_Def• _Configuration_Text• _ NextId
6. Accept whatever article issues are reported - typically SQL Server warns that“Uniqueidentifier columns will be added to tables”.
7. Enter the publication name. For example, iBase_security_data.8. Generate the publication in the usual way. There are no additional properties to set for this type of
publication.
What to do next
After you create the publication:
1. Restrict access to the tables in the SQL Server database. See the Administration Center documentManaging Access Control, for details.
2. Back up the database(s). See:
• The Administration Center document Creating and Maintaining Databases, for information onbacking up iBase connection files
• Microsoft SQL Server documentation for information on backing up the replicated SQL Serverdatabases
3. Tell the iBase administrator that the security data at the Publisher is configured for replication.
Subscribing to security publicationsYou can create push or named pull subscriptions for iBase security data. Unless specified below,always accept the default options for the subscription (notice that there are no conflicts for SQLServer to resolve in this type of iBase database).
Before you begin
Before you can start, the iBase administrator should have already created iBase security databaseson the Subscribers. These can contain some data but the data is overwritten by the initial snapshot.
Procedure
1. Create a subscription and select the following options for the subscription:
308 IBM i2 iBase: Administration

• The Subscriber does not have the schema and data and should therefore be initialized.• Depending on the subscription type, set the Merge Agent to initialize the subscription
immediately (optional).• The Merge Agent should continuously check for updates.• The subscription is a client subscription type
2. Verify that the initial snapshot is applied. For example, check that a rowguid column is added toone of the tables included in the publication, such as the _User table.
3. Test that replication is working correctly for the new subscription. Use the _User table for thispurpose:a) At the Subscriber, in the _User table, add a user.b) After the change is merged, check the corresponding row in the _User table at the Publisher.c) At the Publisher, delete the user you added.d) After the change is replicated, check the corresponding row in the _User table at the
Subscriber.4. Set the polling interval for the Merge Agent to the required frequency. See Setting Up the Merge
Agents.5. Restrict access to the tables in the SQL Server database. See the Administration Center document
Managing Access Control, for details. The information in this document applies to all types of iBasedatabase.
Note: The iBase administrator who created this database might already have a suitable SQL Serverlogin as they are the database owner but you might need to add the logins for any otheradministrators to the database.
6. Back up the databases.For more information, see:
• “Create and maintain databases” on page 51• “Back up and restore replicated databases” on page 319• Microsoft SQL Server documentation for information on backing up the replicated SQL Server
databases7. Tell the iBase administrator that the security data at the Subscriber is configured for replication.
Publishing entity and link dataThe following section describes how to publish the entity and link data in the main iBase database.The procedure for publishing the security and audit data is slightly different. There are some optionalsteps at the end of the procedure that are required if you need to transfer the initial snapshot of datato the subscriber sites by using removable media rather than over a communications link.
Before you begin
Before you can configure the Publisher, the iBase administrator should have prepared the database,and advised whether Audit History is being used.
Use the same server for all publications of iBase data.
About this taskTo create a publication for entity and link data, whether for a new database or a database that isalready replicated, follow these steps. You should accept all the default options unless indicatedotherwise in the instructions.
IBM i2 iBase administration center 309

Procedure
1. From the Object Explorer list, select Replication > Local Publications, right-click and select NewPublication.
• Server: select the server that is also the Publisher of the entity and link data for the iBasesystem. (Use the same server for all publications.)
2. On the Publication Database page, select the existing database that contains the iBase entityand link data that you want to publish.
3. On the Publication Type page, select Merge publication.4. On the Subscriber Types page, ensure that only SQL Server 2008 or later is selected.5. On the Articles page, expand the Tables node. Select these iBase system tables:
Option Description
_ AccessDenied iBase system table that stores data for Data Access Control groups.
_Codes iBase system table that stores the contents of pick lists, icon lists, andSCC lists.
_DataTable_Audit Select this only if you are using Audit History.
_Field_Audit Select this only if you are using Audit History.
_ GlobalConfiguration iBase system table that stores the online/offline status of thedatabase.
_ LinkEnd iBase system table that stores the link connections made by usersbetween entity records, the link direction, link strength, and theSecurity Classification codes (SCC codes).
_ ReplicationFiles iBase system table that stores any files uploaded to the database. Ifthis table is missing, cancel the publication and ask the iBaseadministrator to initialize the database for replication.
iBase user tables You must replicate all the user tables in the iBase database. There isone table for each user-defined object in the database schema. Usertable names do not start with an underscore.
Note: Do not include the tables beginning _AL_, _FTS_, the SQL Server system tables or theremainder of the iBase system tables. These iBase system tables are not designed for replication— the names of these system tables begin with an underscore.
6. If you are using Audit History, in Article Properties, for all the selected tables, set Copy UserTriggers to False.
7. Accept any article issues that are reported.Typically SQL Server warns that “ Uniqueidentifier columns will be added totables”.
8. Enter the publication name. For example, iBase_entity_and_link_data.9. Generate the publication in the usual way.
10. Set the publication property Anonymous pull subscriptions to False as this option is notsupported.
Note: Do not change any other publication properties. Specifically, allowing anonymous pullsubscriptions invalidates the publication.
11. If you are replicating this database for the first time and you need to transfer the initial snapshotto each Subscriber using removable media, then perform a full backup of the database.
310 IBM i2 iBase: Administration

What to do next
After you create the publication:
1. Restrict access to the tables in the SQL Server database. For more information, see “ManagingAccess Control” on page 167.
2. Back up the databases. For more information, see:
• The Administration Center document Creating and Maintaining Databases, for information onbacking up iBase connection files
• Microsoft SQL Server documentation for information on backing up the replicated SQL Serverdatabases
3. Tell the iBase administrator that the security data at the Publisher is configured for replication.
Subscribing to entity and link publicationsCreate push or named pull subscriptions for an entity and link database.
About this task
Note: If you are creating a subscription for the first time to a database transferred to the subscribersite as a backup or attachable subscription database, follow the instructions in:
In this situation,
• Subscriptions for Restored Databases
If you are recreating a subscription that has been dropped, follow the instructions in RecreatingPublications and Subscriptions.
Before you can start, the iBase administrator should have:• Created a database for the entity and link data on the Subscriber• Told you if the database is to be read-only because this affects how you set up the Merge Agent
Unless specified below, you should always accept the default options when you create thesubscription.
Procedure
1. Start a new subscription of the required type. The subscription should be as follows:Option Description
Publication The database that contains the iBase entity and link data at thePublisher.
Subscription database The existing entity and link database at the Subscriber.
Select the following options for the subscription:
• The Subscriber does not have the schema and data and should therefore be initialized.• Depending on the subscription type, set the Merge Agent to initialize the subscription
immediately (optional).• The Merge Agent should continuously check for updates.• Use the Publisher as a proxy for the Subscriber when resolving conflicts (described as First to
Publisher Wins).• The subscription is a client subscription type
IBM i2 iBase administration center 311

2. Set the Merge Agent for the Subscriber to run at the required frequency, for example a pollinginterval of 1 second.For more information, see Merge agent for the entity and link database.
Note: If the iBase database at this Subscriber is read-only, configure the Merge Agent to preventany uploads to the Publisher. For more information, see Merge agent for a read-only database.
3. Verify that the snapshot has been applied by checking that a rowguid column exists in one of theuser tables selected for the article. If this column is missing, check that the snapshot has beenapplied.
4. Test that replication is working correctly for the new subscription. Use one of the user-definedtables:a) At the Publisher, in one of the user tables (table names do not start with an underscore),
change the data in one of the columns for a row. For a new database, carry out this test on the_GlobalConfiguration table and change the version number but take care to change itback to its original value.
b) After the change is replicated, check the corresponding table at the Subscriber.c) At the Subscriber, change the column back to its original value.d) After the change is replicated, check the table at the Publisher. If the Subscriber is supposed to
be read-only, and the change is merged at the Publisher, check the setting of the Merge Agent.e) If the Subscriber is read-only, change the data at the Publisher back to its initial value.
5. Restrict access to the tables in the SQL Server database. See the Administration Center documentManaging Access Control, for details. The information in this document applies to all types of iBasedatabase.
6. Back up the databases.For more information, see:
• “Create and maintain databases” on page 51• “Back up and restore replicated databases” on page 319• Microsoft SQL Server documentation for information on backing up the replicated SQL Server
databases7. Tell the iBase administrator that the security data at the Subscriber is configured for replication.
Subscriptions for restored databasesThis procedure only applies to systems where the initial snapshot is transferred manually using a fullbackup.
Before you begin
You need to restore the iBase entity and link data if you chose to transfer the initial snapshot of datato the subscriber site by using a full backup. Your iBase administrator should have already created anempty iBase database to receive the data.
Perform the restore in the usual way. When you restore:
• Turn on Overwrite the existing database• Leave Preserve the replication settings turned off
After you restore the database, you apply the initial snapshot of data and you are ready to configure asubscription. After you configure the subscription, you must to synchronize the Subscriber with thePublisher.
312 IBM i2 iBase: Administration

Procedure
1. Start a new subscription, either a push subscription or a named pull subscription:Option Description
Publication The database that contains the iBase entity and link data at thePublisher.
Subscription database The existing entity and link database at the Subscriber.
Select the following options for the subscription:
• The Subscriber does not have the schema and data and should therefore be initialized.• The Merge Agent should continuously check for updates.• Use the Publisher as a proxy for the Subscriber when resolving conflicts (described as First to
Publisher Wins).• The subscription is a client subscription type
2. Synchronize each Subscriber with the Publisher:a) If the Merge Agent is set to use On Demand synchronization, start the Merge Agent manually to
upload any changes from the Publisher.
Note: If there has been many changes at the Publisher, you might want to delay this step untilthere is a quiet period on your communications link.
b) Check whether you are synchronized with the Publisher by verifying that a recent change in oneof the user tables at the Publisher is replicated to the Subscriber.
3. Set the Merge Agent for the Subscriber to run at the required frequency, for example a pollinginterval of 1 second.For more information, see Merge agent for the entity and link database.
Note: If the iBase database at this Subscriber is read-only, configure the Merge Agent to preventany uploads to the Publisher. For more information, see Merge agent for a read-only database.
4. Verify that the snapshot has been applied by checking that a rowguid column exists in one of theuser tables selected for the article. If this column is missing, check that the snapshot has beenapplied.
5. Test that replication is working correctly for the new subscription. Use one of the user-definedtables:a) At the Publisher, in one of the user tables (table names do not start with an underscore),
change the data in one of the columns for a row. For a new database, carry out this test on the_GlobalConfiguration table and change the version number but take care to change itback to its original value.
b) After the change is replicated, check the corresponding table at the Subscriber.c) At the Subscriber, change the column back to its original value.d) After the change is replicated, check the table at the Publisher. If the Subscriber is supposed to
be read-only, and the change is merged at the Publisher, check the setting of the Merge Agent.e) If the Subscriber is read-only, change the data at the Publisher back to its initial value.
6. Restrict access to the tables in the SQL Server database. See the Administration Center documentManaging Access Control, for details. The information in this document applies to all types of iBasedatabase.
7. Back up the databases.For more information, see:
IBM i2 iBase administration center 313

• “Create and maintain databases” on page 51• “Back up and restore replicated databases” on page 319• Microsoft SQL Server documentation for information on backing up the replicated SQL Server
databases8. Tell the iBase administrator that the security data at the Subscriber is configured for replication.
Publishing audit dataThe audit log database records events that affect the entity and link data. iBase automatically createsthis database alongside the database that holds the entity and link data, giving it the same databasename but with the suffix _log. For instance, the database Crime_ has an audit log databaseCrime__log (note the double underscore).
About this task
Audit records for the security data are held in the _ AuditLog table in the security database. Thisinformation is already replicated if you included the _ AuditLog table when creating the securitypublication.
To create a publication for audit data, follow these steps. You should accept all the default optionsunless indicated otherwise in the following instructions.
Procedure
1. From the Object Explorer list, select Replication > Local Publications, right-click and select NewPublication.
• Server: select the server that is also the Publisher of the entity and link data for the iBasesystem. (Use the same server for all publications.)
2. On the Publication Database page, select the existing database that contains the audit data (itends with the suffix _log). For example, the publication database Crime_ has an audit logdatabase called Crime__log (note the double underscore).
3. On the Publication Type page, select Merge publication.4. On the Subscriber Types page, ensure that only SQL Server 2008 or later is selected.5. On the Articles page, expand the Tables node. Select these iBase system tables:
• Select the _AuditLog table if Audit History is not used.• If Audit History is used, select:
– _Audit– _AuditCodes– _AuditData– _AuditDataBinary– _AuditLog– _Field
6. If you are using Audit History, in Article Properties, for all the selected tables, set Copy UserTriggers to False and Copy Permissions to True.
7. Accept any article issues that are reported.Typically SQL Server warns that “ Uniqueidentifier columns will be added totables”.
8. Enter a publication name. For example, iBase_audit_data.9. Generate the publication in the usual way.
314 IBM i2 iBase: Administration

What to do next
After you create the publication:
1. Restrict access to the tables in the SQL Server database. For more information, see “ManagingAccess Control” on page 167.
2. Back up the databases. For more information, see:
• The Administration Center document Creating and Maintaining Databases, for information onbacking up iBase connection files
• Microsoft SQL Server documentation for information on backing up the replicated SQL Serverdatabases
3. Tell the iBase administrator that the security data at the Publisher is configured for replication.
Subscribing to audit publicationsYou can create either push or named pull subscriptions for an audit log database. When you createthe subscription, you should always accept the default options unless specified otherwise in thefollowing instructions (notice that there are no conflicts to resolve in this type of iBase database).
About this task
Note: The audit log database is created automatically when the database that contains the entity andlink data is first opened in iBase.
Procedure
1. Start a new subscription, either a push subscription or a named pull subscription:Option Description
Publication The database that contains the iBase entity and link data at thePublisher.
Subscription database The existing entity and link database at the Subscriber.
Select the following options for the subscription:
• The Subscriber does not have the schema and data and should therefore be initialized.• The Merge Agent should continuously check for updates.• Use the Publisher as a proxy for the Subscriber when resolving conflicts (described as First to
Publisher Wins).• The subscription is a client subscription type• Depending on the subscription type, set the Merge Agent to initialize the subscription
immediately.2. Verify that the snapshot is applied by checking that a rowguid column exists in the _ AuditLog
table. If this column is missing, check that the snapshot is applied.3. Set the Merge Agent for the Subscriber to run at the required frequency, for example a polling
interval of 1 second.For more information, see Merge agent for the entity and link database.
Note: If the iBase database at this Subscriber is read-only, configure the Merge Agent to preventany uploads to the Publisher. For more information, see Merge agent for a read-only database.
4. Test that replication is working correctly for the new subscription. Use one of the user-definedtables:
IBM i2 iBase administration center 315

a) At the Publisher, in the _ AuditLog table, change one of the user names.b) After the change is replicated, check the corresponding table at the Subscriber.c) At the Subscriber, change the column back to its original value.d) After the change is replicated, check the table at the Publisher. If the Subscriber is supposed to
be read-only, and the change is merged at the Publisher, check the setting of the Merge Agent.e) If the Subscriber is read-only, change the data at the Publisher back to its initial value.
5. Restrict access to the tables in the SQL Server database. See the Administration Center documentManaging Access Control, for details. The information in this document applies to all types of iBasedatabase.
6. Back up the databases.For more information, see:
• “Create and maintain databases” on page 51• “Back up and restore replicated databases” on page 319• Microsoft SQL Server documentation for information on backing up the replicated SQL Server
databases7. Tell the iBase administrator that the security data at the Subscriber is configured for replication.
Setting up the merge agentsThe synchronization process in merge replication ensures that data at the Publisher and Subscriberseventually converge and that all sites end up with the same data values. However, the sites are nevercompletely synchronized unless there is a period of complete inactivity in iBase.
The best way to ensure that the sites are as closely synchronized as possible is to set a low pollinginterval, particularly for the entity and link data, for example a 1 second polling interval. Differentconsiderations will apply for the iBase security data and audit log.
Note: After you change agent properties, stop and start the agent, or start the agent manually byusing Start Synchronizing.
The SQLServerAgent service should be set to auto-start whenever the operating system starts.
Configuring the Merge Agent to run continuously
The pull subscriptions that you use to deploy replication to the subscriber sites for large entity andlink databases are configured for On Demand synchronization. However, in day-to-day use, the MergeAgent must run continuously for iBase database replication to function correctly. To reconfigure theMerge Agent, change the properties of the Merge Agent by adding the following to the Run Agentcommand line:
-Continuous
This parameter specifies that the agent queries the Publisher or Subscriber for data changes at thespecified interval, even if there are no updates pending.
You also need to set the polling interval as described in the following information.
Start or restart the agent to use the new agent properties.
Note: Until the Merge Agent is set to run continuously, a pull subscription at the Subscriber has thestatus Never Started and at the Publisher, the status Deactivated.
316 IBM i2 iBase: Administration

Merge Agent for the entity and link database
By default, the Merge Agent runs every 60 seconds. Reconfigure the Merge Agent to run at a 1 secondpolling interval to reduce the risk that data conflicts occur. Add the following to the Run Agentcommand line:
-PollingInterval 1
Start or restart the agent to use the new agent properties.
Merge Agent for the security database
For the security data, you can set the polling interval for the Merge Agent for each Subscriber to anyrequired frequency, for example 1 second. To decide the polling interval for this database, consider:
• How often does the user data in the security database change?• How quickly must changes be replicated to other sites?
Note: Users can add records at the Subscriber before their user login is known at the Publisher.
Merge Agent for the audit log
If you replicate the audit log, you can set the polling interval for the Merge Agent for each Subscriberto any suitable frequency, for example hourly. However, the best frequency for your organizationdepends on:
• How often analysts consult the audit log• How long it takes for a problem to be identified and for analysts to decide to review the audit log• The audit level of the database
Where the audit level is set to 5, all database activity is logged including tasks that do not change thedata, such as browsing. In this case, you might want to configure an interval that coincides withquieter periods on your communication links.
Merge Agent for a read-only database
Configure the Merge Agent for a read-only iBase database to prevent any changes made at theSubscriber from being uploaded to the Publisher. For example, changes made through SQL ServerQuery Analyzer.
To reconfigure the Merge Agent, add this parameter to the Run Agent command line:
-ExchangeType 2
The argument specifies that the agent only downloads data changes from the Publisher to theSubscriber.
Replicated databases in SQL ServerHow to recreate publications and subscriptions after replication is already deployed but is dropped,for example to allow changes to be made in iBase to the schema of an iBase database in which data isalready replicated. It is important to establish a backup policy for the iBase connection files and thereplicated SQL Server databases.
Disabling replicationYou must inform the iBase administrator before you drop any publications and subscriptions for aniBase database, especially the databases that contain the entity and link data. In the case of this
IBM i2 iBase administration center 317

database, the iBase administrator must to review any current conflicts, check any changes that arisefrom this review are replicated to the Subscribers, and attempt to get all users out of the iBasesystem.
Before you begin
When you are ready to drop the publications and subscriptions:
Procedure
1. Check that all Subscribers are online and connected to the Publisher.2. Log out any users who are still accessing the databases.3. Check that no errors are reported for the Merge Agents which might prevent the iBase
administrator from completing the preparation of the iBase databases.4. You might want to check that there are no outstanding conflict records. Any records in the conflict
tables are deleted when you drop the publication.
Recreating publications and subscriptionsHow to recreate publications and subscriptions in a system where the iBase database was previouslyenabled for replication and the previous publications and subscriptions are dropped.
About this task
Creating publications for the database that contains the entity and link data is the same regardless ofwhether the database was previously enabled for replication or not. For detailed information, seePublishing Entity and Link Data.
When recreating subscriptions, you should not need to generate a snapshot that contains the dataand schema because the databases should already have all the data. The iBase administrator shouldhave denied database access to all users until replication is reconfigured. The databases have thecomplete database schema— if there were any schema changes, the iBase administrators applied thechanges by using the appropriate iBase utility.
Procedure
1. Start a new subscription of the required type. The subscription should be as follows:Option Description
Publication The database that contains the iBase entity and link data at thePublisher.
Subscription database The existing entity and link database at the Subscriber.
Select the following options for the subscription:
• The Subscriber has the schema and data.• The Merge Agent should continuously check for updates.• Use the Publisher as a proxy for the Subscriber when resolving conflicts (described as First to
Publisher Wins).• The subscription is a client subscription type
2. Test that replication is working correctly for the new subscription. Use one of the user-definedtables:a) At the Publisher, in one of the user tables (table names do not start with an underscore),
change the data in one of the columns for a row. For a new database, carry out this test on the
318 IBM i2 iBase: Administration

_GlobalConfiguration table and change the version number but take care to change itback to its original value.
b) After the change is replicated, check the corresponding table at the Subscriber.c) At the Subscriber, change the column back to its original value.d) After the change is replicated, check the table at the Publisher. If the Subscriber is supposed to
be read-only, and the change is merged at the Publisher, check the setting of the Merge Agent.e) If the Subscriber is read-only, change the data at the Publisher back to its initial value.
3. Set the Merge Agent for the Subscriber to run at the required frequency, for example a pollinginterval of 1 second.For more information, see Merge agent for the entity and link database.
4. Validate the subscriptions to check that there are no discrepancies between the data at thePublisher and Subscribers. For example, use the Validate All Subscriptions dialog,selecting the option to use both the checksum and rowcount validation methods. For moreinformation, see the Microsoft SQL Server documentation.
5. Back up the databases.For more information, see:
• “Create and maintain databases” on page 51• “Back up and restore replicated databases” on page 319• Microsoft SQL Server documentation for information on backing up the replicated SQL Server
databases6. Tell the iBase administrator that the security data at the Subscriber is configured for replication.
Back up and restore replicated databasesIt is important to establish a backup policy that covers all the elements of a replicated iBasedatabase.
The following artifacts must be completed at all sites:
• The iBase security connection file (ids file)• The iBase database connection file (idb file)• The iBase database and application folders - the locations of database templates, Analyst's
Notebook templates, icons
Then, depending on the type of site, the backup can also include the:
• Distribution database• Publication databases• Subscription databases• SQL Server system databases (the master, msdb, and model databases)• SQL Server replication scripts
For information about backing up SQL Server databases, see the Microsoft SQL Serverdocumentation.
Setting the retention period for conflictsiBase has its own Conflict Viewer in which iBase users, in the publication database holding the entityand link data, review the conflicts automatically resolved by the default SQL Server Conflict Resolver.iBase users check how each conflict was resolved and can choose to keep the losing record.
You might want to check how frequently the iBase administrator reviews the resolved conflicts todetermine the length of the conflict retention period set for the entity and link publication.
IBM i2 iBase administration center 319

This does not apply to the database holding the audit or security data.
Setting up replication alertsYou can enable predefined replication alerts to notify users, such as the iBase administrators at thedifferent sites, if a Merge Agent fails because of a problem with a communications link.
The iBase administrator might want to know whether a database is not receiving and sending updatesto restrict the type of work done in that database. For example, the might want to postpone specifictasks that increase the risk that conflicts occur.
Note: When you configure alerts, consider how communication links are used in your organization. Ifreplication uses a dedicated communications link, then you might be able to send messages throughemail otherwise it might be preferable to send messages to a pager.
Setting up the Index ServiceThe Index Service Configuration tool is a command-line application that indexes one or more IBM®
i2®iBase databases. You use this tool to enable the iBase databases for Search 360.
For each database, you can set up an index service and a job schedule. Each time the job runs, itstarts the index service, which will obtain the location of the iBase database to index from the indexdatabase (IBaseIndexDB). No sensitive information is stored in this database as the index service willconnect to the SQL Server database using Windows authentication.
To use Index Service Configuration tool, you will require:
• An SQL Server installation on the machine on which you want to create the iBase index database.The tool can only connect to an instance on the local machine. The iBase databases to be indexedcan either be on the local machine or elsewhere on the network.
• An SQL Server login with suitable permissions to allow databases and jobs to be created• For each index service, a suitable Windows account or a proxy account
The Index Service configuration installationInstalling the Indexer, installs the following in the iBase installation folder: a command-lineapplication, i2.iBase.SearchIndexerExe.exe and a configuration tool,i2.iBase.SearchIndexerConfig.exe.
Running the Search Index Configuration tool for the first time on the local machine will create adatabase, called IBaseIndexDB, and creates a file Searching Config.xml in the All Users applicationdata folder on the local machine, specifically: C:\Documents and Settings\All Users\Application Data\i2\i2 iBase <n>\<language>\Searching
If necessary, the database name is appended with a number in order to make this name unique.
Note: The database and configuration file should be included in your backup schedule. Losing eitherof these files will require you to reconfigure your iBase databases for indexing.
SQL Server logins and Windows accountsThe SQL Server login, or Windows account, you use to run the Index Service Configuration toolrequires the following permissions:
When launching the index service configurationtool for the first time to create the IBaseIndexDBdatabase:
dbcreator server role
320 IBM i2 iBase: Administration

To create the IBaseIndexDB database table: db_owner database role on the IBaseIndexDBdatabase
To detect the IBaseIndexDB database table: db_datareader on the IBaseIndexDB database
To add new records into the table: db_datawriter on the IBaseIndexDB database
To schedule an index service job: db_datareader on the actual iBase database
SELECT, INSERT, UPDATE on_Configuration_Text on the actual iBasedatabase
SELECT, INSERT, UPDATE on _Configuration_Defon the actual iBase database
To create a job: db_datawriter on the IBaseIndexDB database
SELECT on sysjobs within the msdb database
EXECUTE on sp_add_job within the msdbdatabase
EXECUTE on sp_add_jobstep within the msdbdatabase
EXECUTE on sp_add_jobschedule within themsdb database
EXECUTE on sp_add_jobserver within the msdbdatabase
To delete a schedule: EXECUTE on sp_help_job within the msdbdatabase
EXECUTE on sp_help_jobstep within the msdbdatabase
EXECUTE on sp_help_jobschedule within themsdb database
EXECUTE on sp_help_jobserver within the msdbdatabase
EXECUTE on sp_delete_job within the msdbdatabase
Logging onYou can only connect to an SQL Server instance on the local machine and the iBase index databasewill be created in the data folder for this instance.
Procedure
1. Select the SQL Server instance if you are not connecting to the default instance.2. Log in to the SQL Server instance in the usual way.
IBM i2 iBase administration center 321

Configuring an iBase databaseTo set up the Search index service for an iBase database:
Procedure
1. Click Add to display the Configure Database dialog.2. Enter the name of the server that hosts the iBase database.3. Enter the SQL Server name of the iBase database.4. In Run as, enter the Windows account to be used to run the index service.
Note: Your SQL Server administrator will be able to tell you which account to use.5. Select the frequency at which the index jobs will run and then set up the schedule.6. To start the index service on the date and time specified for the first job, turn on the Enabled
check box.
Note: Unlike most other SQL Server job properties, the enabled flag enables both the job and theschedule.
7. Click OK to create the index service. If the Enabled check box is turned on, a job(i2_Search_Indexing_<server>_<InstanceName>_<DatabaseName>) will run at the nextscheduled time and start the index service.
8. Advise the iBase database administrator of the date and time of the first scheduled job as this isnot visible in iBase Designer.
Important: Jobs will run if Search 360 is turned off in iBase Designer but will exit withoutperforming any indexing.
Checking that the service is configured successfullyWhen you complete the steps for creating or modifying an index, you should ensure that the index hasbeen configured successfully before it can be used.
Information that the index service has been configured successfully for a specific database isavailable in several places:
• In SQL Server Management Studio, SQL Server Agent will list an i2_Search_Indexing job for thedatabase (the Job Activity Monitor will report whether the last run was successful or whether therewas an error)
• In the Windows Event Viewer, a started event will be listed for the database• In iBase Designer, the last date and time that the index was updated will be displayed in the Search
360 Administration dialog• In iBase, the last date and time that the index was updated will be displayed in the Search 360
dialog.
If the service is not running:
• Check the Windows Event Viewer - the service logs when the service starts and stops• Try running the Index Service from the command line (type just the command namei2.iBase.SearchIndexerExe.exe in the root of the iBase install directory to display thearguments) for example:
C:\Program Files (x86)\i2 iBase 8> i2.iBase.SearchIndexerExe.exe SearchIndexerExe /iBaseDBName User_guide
.
322 IBM i2 iBase: Administration

Managing the index serviceUse the Index Service Configuration dialog to manage the index service:
Procedure
• To modify the schedule for the index service, click Configure. Do not use SQL Server to change theschedule.
• To stop or suspend the index service, click Configure and turn off the Enabled check box. Thisallows iBase users to continue to use Analysis Ready Search but without any updates for newinformation.
• To remove the index service, for example before moving the database or uninstalling the IndexService Configuration tool, click Delete. This deletes the job and prevents the index tool fromrunning.
Note: The database (IBaseIndexDB) and configuration file (Searching Config.xml) should beincluded in your backup schedule. Losing either of these files will require you to reconfigure youriBase databases for indexing.
TroubleshootingIf you accidentally delete the iBase index database, you will not delete the jobs but they will not bevisible in the Search Index Configuration dialog. To resolve this, you need to either restore thedatabase from backup or reschedule the jobs (which will delete and then recreate the jobs).
IBM i2 iBase administration center 323

324 IBM i2 iBase: Administration

Notices
This information was developed for products and services offered in the U.S.A.
IBM may not offer the products, services, or features discussed in this document in other countries.Consult your local IBM representative for information on the products and services currently availablein your area. Any reference to an IBM product, program, or service is not intended to state or implythat only that IBM product, program, or service may be used. Any functionally equivalent product,program, or service that does not infringe any IBM intellectual property right may be used instead.However, it is the user's responsibility to evaluate and verify the operation of any non-IBM product,program, or service.
IBM may have patents or pending patent applications covering subject matter described in thisdocument. The furnishing of this document does not grant you any license to these patents. You cansend license inquiries, in writing, to:
IBM Director of Licensing IBM Corporation North Castle Drive Armonk, NY 10504-1785 U.S.A.
The following paragraph does not apply to the United Kingdom or any other country where suchprovisions are inconsistent with local law: INTERNATIONAL BUSINESS MACHINES CORPORATIONPROVIDES THIS PUBLICATION "AS IS" WITHOUT WARRANTY OF ANY KIND, EITHER EXPRESS ORIMPLIED, INCLUDING, BUT NOT LIMITED TO, THE IMPLIED WARRANTIES OF NON-INFRINGEMENT,MERCHANTABILITY OR FITNESS FOR A PARTICULAR PURPOSE. Some states do not allow disclaimerof express or implied warranties in certain transactions, therefore, this statement may not apply toyou.
This information could include technical inaccuracies or typographical errors. Changes areperiodically made to the information herein; these changes will be incorporated in new editions of thepublication. IBM may make improvements and/or changes in the product(s) and/or the program(s)described in this publication at any time without notice.
Any references in this information to non-IBM Web sites are provided for convenience only and do notin any manner serve as an endorsement of those Web sites. The materials at those Web sites are notpart of the materials for this IBM product and use of those Web sites is at your own risk.
IBM may use or distribute any of the information you supply in any way it believes appropriatewithout incurring any obligation to you.
Licensees of this program who wish to have information about it for the purpose of enabling: (i) theexchange of information between independently created programs and other programs (including thisone) and (ii) the mutual use of the information which has been exchanged, should contact:
IBM United Kingdom Limited Hursley House Hursley Park Winchester, Hants, SO21 2JN UK
Such information may be available, subject to appropriate terms and conditions, including in somecases, payment of a fee.
The licensed program described in this document and all licensed material available for it areprovided by IBM under terms of the IBM Customer Agreement, IBM International Program LicenseAgreement or any equivalent agreement between us.
Any performance data contained herein was determined in a controlled environment. Therefore, theresults obtained in other operating environments may vary significantly. Some measurements mayhave been made on development-level systems and there is no guarantee that these measurementswill be the same on generally available systems. Furthermore, some measurements may have beenestimated through extrapolation. Actual results may vary. Users of this document should verify theapplicable data for their specific environment.
© Copyright IBM Corp. 1991, 2020 325

Information concerning non-IBM products was obtained from the suppliers of those products, theirpublished announcements or other publicly available sources. IBM has not tested those products andcannot confirm the accuracy of performance, compatibility or any other claims related to non-IBMproducts. Questions on the capabilities of non-IBM products should be addressed to the suppliers ofthose products.
All statements regarding IBM's future direction or intent are subject to change or withdrawal withoutnotice, and represent goals and objectives only.
This information contains examples of data and reports used in daily business operations. Toillustrate them as completely as possible, the examples include the names of individuals, companies,brands, and products. All of these names are fictitious and any similarity to the names and addressesused by an actual business enterprise is entirely coincidental.
COPYRIGHT LICENSE:
This information contains sample application programs in source language, which illustrateprogramming techniques on various operating platforms. You may copy, modify, and distribute thesesample programs in any form without payment to IBM, for the purposes of developing, using,marketing or distributing application programs conforming to the application programming interfacefor the operating platform for which the sample programs are written. These examples have not beenthoroughly tested under all conditions. IBM, therefore, cannot guarantee or imply reliability,serviceability, or function of these programs. The sample programs are provided "AS IS", withoutwarranty of any kind. IBM shall not be liable for any damages arising out of your use of the sampleprograms.
If you are viewing this information softcopy, the photographs and color illustrations may not appear.
TrademarksIBM, the IBM logo, and ibm.com are trademarks or registered trademarks of International BusinessMachines Corp., registered in many jurisdictions worldwide. Other product and service names mightbe trademarks of IBM or other companies. A current list of IBM trademarks is available on the Web at"Copyright and trademark information" at www.ibm.com/legal/copytrade.shtml.
Adobe, the Adobe logo, PostScript, and the PostScript logo are either registered trademarks ortrademarks of Adobe Systems Incorporated in the United States, and/or other countries.
Microsoft, Windows, Windows NT, and the Windows logo are trademarks of Microsoft Corporation inthe United States, other countries, or both.
Java™ and all Java-based trademarks and logos are trademarks or registered trademarks of Oracleand/or its affiliates.
ArcGIS, EDN, StreetMap, @esri.com, and www.esri.com are trademarks, registered trademarks, orservice marks of Esri in the United States, the European Community, or certain other jurisdictions.
Other names may be trademarks of their respective owners. Other company, product, and servicenames may be trademarks or service marks of others.
326 IBM i2 iBase: Administration


IBM®
Part Number: 99F9999Product Number: 5725-G23
SC27-5091-00
(1P) P
/N:
99F9
999