IAN 74612 - NET
94
SEWING MACHINE SNMD 33 A1 IAN 74612 Èíñòðóêöèè çà îáñëóæâàíå è áåçîïàñíîñò Instrucþiuni de utilizare ºi de siguranþã ØE ÌÀØÈÍÀ ÂÍÀ MA IN DE CUSUT ª Ã Bedienungs- und Sicherheitshinweise NÄHMASCHINE SEWING MACHINE Operation and Safety Notes
-
Upload
khangminh22 -
Category
Documents
-
view
1 -
download
0
Transcript of IAN 74612 - NET

SEWING MACHINE SNMD 33 A1
IAN 74612
Èíñòðóêöèè çà îáñëóæâàíå è áåçîïàñíîñò Instrucþiuni de utilizare ºi de siguranþãØE ÌÀØÈÍÀÂÍÀ MA IN DE CUSUTª Ã
Bedienungs- und SicherheitshinweiseNÄHMASCHINESEWING MACHINE
Operation and Safety Notes

GB / IE Operation and Safety Notes Page 49
DE / AT / CH Bedienungs- und Sicherheitshinweise Seite 71
Înainte de a citi instrucþiunile, priviþi imaginile ºi familiarizaþi-vã cu toate funcþiile aparatului.
Ïðåäè äà ïðî÷åòåòå îòâîðåòå ñòðàíèöàòà ñ ôèãóðèòå è ñëåä òîâà ñå çàïîçíàéòå ñâñè÷êè ôóíêöèè íà óðåäà.
BG 5Èíñòðóêöèè çà îáñëóæâàíå è áåçîïàñíîñò Còðàíèöà
RO 27Instrucþiuni de utilizare ºi de siguranþã Pagina
Before reading, unfold the page containing the illustrations and familiarise yourself with allfunctions of the device.
Klappen Sie vor dem Lesen die Seite mit den Abbildungen aus und machen Sie sichanschließend mit allen Funktionen des Gerätes vertraut.
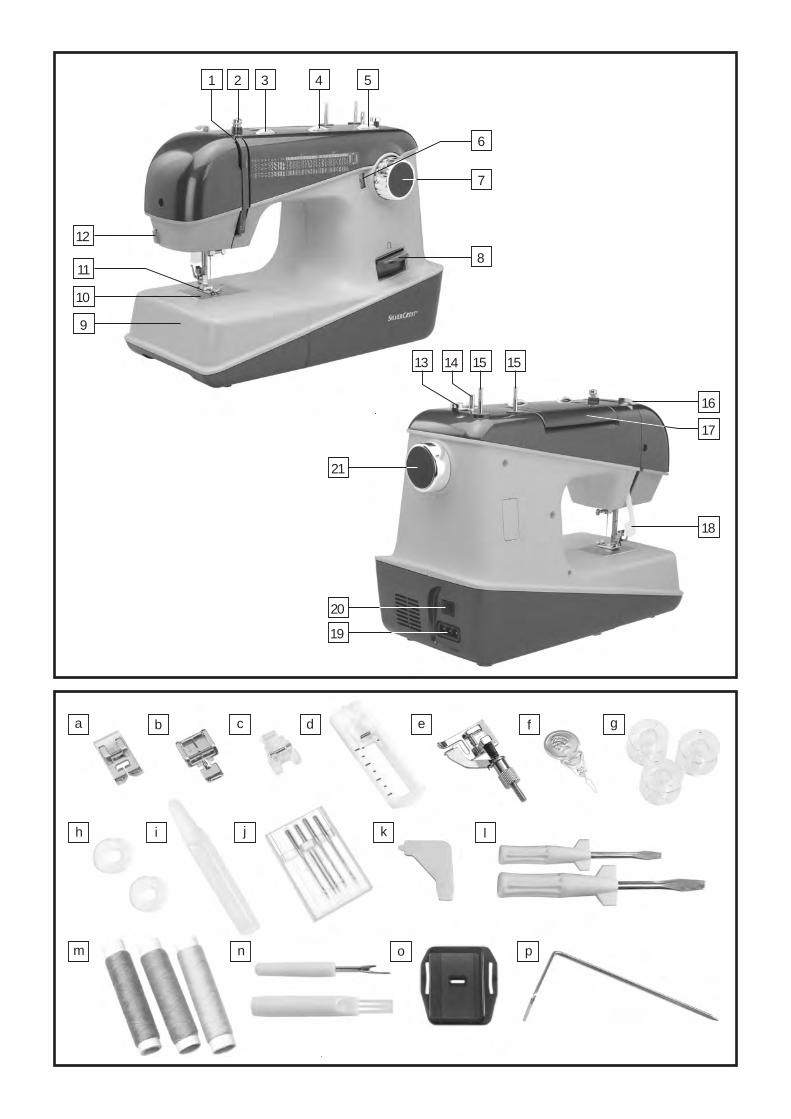
8
6
7
12
11
10
9
54321
13 14 15 15
18
16
17
19
21
20
n o p
j
m
k
c d g
i
e
h
fa b
l


Âúâåäåíèå
Ïîäãîòîâêà
Âúâåäåíèå ...............................................................................................................CòðàíèöàÓïîòðåáà ïî ïðåäíàçíà÷åíèå Còðàíèöà
CòðàíèöàCòðàíèöàCòðàíèöà
Còðàíèöà
CòðàíèöàCòðàíèöàCòðàíèöàCòðàíèöàCòðàíèöà
Íàñòðîéêà íà ùèôòîâåòå íà øïóëàòà CòðàíèöàCòðàíèöàCòðàíèöàCòðàíèöàCòðàíèöàCòðàíèöà
Øåâ / Ïîëåçíè ïðèëîæåíèÿ CòðàíèöàCòðàíèöàCòðàíèöàCòðàíèöàCòðàíèöàCòðàíèöàCòðàíèöàCòðàíèöàCòðàíèöàCòðàíèöàCòðàíèöà
Pàçòåãëåí áîä CòðàíèöàCòðàíèöàCòðàíèöàCòðàíèöàCòðàíèöàCòðàíèöà
CòðàíèöàCòðàíèöà
Còðàíèöà
Còðàíèöà
Còðàíèöà
Còðàíèöà
Îñíîâè íà øèåíåòî
Ñåðâèç
6................................................................................. 6
.................................................................................. 6..................................................................................................... 6
.................................................................................... 7
.................................... 8
.............................................. 9....................................................................................... 9
............................................................................................... 10....................................................................... 10
........................................................................ 11................................................................... 11
.............................................................................................. 12.................................................................... 12
....................................................................................... 13..................................................................................................... 14
.................................................................................. 14
.................................................................................... 151516
................................................................................ 1617
...................................................................................... 17................................................................................................... 18
.................................................................................. 18.......................................................................................................... 19
2020212122
.............................................................................................................. 22..................................................................................................................... 23
23
2425
........................... 26
.............................................................................................................. 26
.......................................................... 26
.................................................................................................. 26
Âàæíè óêàçàíèÿ çà Âàøàòà áåçîïàñíîñò
.............................................................................................................................
...............................................................................................................
.......................................................................................................................................................................................................
..............................................................................................................................................................................................................................
...............................................................................................
.............................................................................................................
...........................................................................................................................................................................
Îñíîâíè ÷àñòè íà ìàøèíàòàÏðèíàäëåæíîñòèÒåõíè÷åñêè õàðàêòåðèñòèêè
Âêëþ÷âàíå íà ìàøèíàòà â åëåêòðè÷åñêàòà ìðåæàÏîäâèæíà ÷àñò íà ìàñàòàÏîñòàâÿíå íà èãëàòàÄâóñòåïåííî ïîâäèãàíå íà êðà÷åòîÌîíòèðàíå íà äúðæà÷à íà êðà÷åòî
Íàâèâàíå íà êàëåðêàÏîñòàâÿíå íà êàëåðêàòà â ñîâàëêàòàÂäÿâàíå íà ãîðíèÿ êîíåöÎïúí íà êîíöèòåÈçâàæäàíå íà äîëíèÿ êîíåö
Çàâèñèìîñò ìåæäó äåáåëèíà íà êîíåöà, íà èãëàòà è íà ïëàòàÈçáîð íà âèäà áîäÏðàâ áîä è ïîçèöèÿ íà èãëàòàÇèã çàã áîäÊðà÷å çà çàøèâàíå íà öèïÊðà÷å çà ñëÿï áîäÊðà÷å çà çàøèâàíå íà êîï÷åÊðà÷å çà èëèêÎâåðëî÷íè áîäîâåÒðèòî÷êîâ çèã çàã
Ïà÷óúðêÁðîäèðàíå ñ ãåðãåô*ÀïëèêèðàíåÔåñòîíÄâîéíà èãëà
Ïîääðúæêà íà ìàøèíàòàÎòñòðàíÿâàíå íà ïðîáëåìè
Òåëåôîíåí íîìåð íà ãàðàíöèîííèÿ ñåðâèç
Ïîääðúæêà
Èçèñêâàíèÿ çà îïàçâàíå íà îêîëíàòà ñðåäà
Ãàðàíöèÿ
Ïðîèçâîäèòåë
BG 5
Ñúäúðæàíèå

a. Óíèâåðñàëíî êðà÷å
c. Êðà÷å çà êîï÷å
e. Êðà÷å çà ñëÿï áîä
g. Êàëåðêè (3 áð.)
i. Ìàñëî
k. L-îáðàçíà îòâåðòêà
m. Ìàêàðè (ñèíÿ, ðîçîâà, æúëòà)
o. Ïëî÷êà çà ïîêðèâàíå íà çúáèòå ïðè áðîäèðàíå
b. Êðà÷å çà öèï
d. Êðà÷å çà èëèê
f. Âäåâà÷êà
h. Ôèëöîâè ïîäëîæêè çà ìàêàðè (2 áð.)
j. Èãëè (3 ñòàíäàðòíè, 1 äâîéíà)
l. Îòâåðòêè (ìàëêà è ãîëÿìà) (L&S)
n. Íîæ÷å çà ðàçïàðÿíå è çà ïðîðàçâàíå íà èëèê
p. Ëèíåàë çà óñïîðåäíè øåâîâå
1. Ëîñò÷å çà ïîâäèãàíå íà êðà÷åòî
Ðåãóëàòîð çà îïúí íà êîíåöà
Ðåãóëàòîð çà äúëæèíà íà áîäà
Êîï÷å çà èçáîð íà âèäà áîä
Ïëîñêà ÷àñò íà ìàñàòà
Êðà÷åòà
13. Îãðàíè÷èòåë ïðè íàâèâàíå íà êàëåðêà
15. Ùèôò çà ìàêàðà
17. Äðúæêà çà íîñåíå íà ìàøèíàòà
19. Áóêñà çà âêëþ÷âàíå â åëåêòðè÷åñêàòà ìðåæà
21. Ìàõîâèê (êîëåëî çà ðú÷íî çàäâèæâàíå íàìàøèíàòà)
2. Âîäà÷ çà ãîðíèÿ êîíåö
4. Ðåãóëàòîð çà øèðèíà íà áîäà
6. Ïðîçîð÷å çà ïîêàçâàíå íà âèäà áîä
8. Êîï÷å çà øèåíå íàçàä
10. Èãëåíà ïëî÷êà
12. Íîæ÷å çà îòðÿçâàíå íà êîíåöà
14. Óñòðîéñòâî çà íàâèâàíå íà êàëåðêà
16. Âîäà÷ íà êîíåöà ïðè íàâèâàíå íà êàëåðêàòà
18. Äâóñòåïåííî ïîâäèãàíå íà êðà÷åòî
20. Êîï÷å çà âêëþ÷âàíå/èçêëþ÷âàíå íà ìàøèíàòà
3.
5.
7.
9.
11.
Ïîçäðàâëåíèÿ çà ïðèäîáèâàíåòî íà øåâíàòà ìàøèíà. Çàêóïèëè ñòå ñè êà÷åñòâåí ïðîäóêò, êîéòî åïðîèçâåäåí ñ ãîëÿìà îòãîâîðíîñò. Òàçè èíñòðóêöèÿ çà óïîòðåáà ñúäúðæà âñè÷êè âàæíè íåùà, êîèòîòðÿáâà äà çíàåòå, çà äà ñå âúçïîëçâàòå îò âúçìîæíîñòèòå íà øåâíàòà ìàøèíà. Àêî îáà÷å ñå ïîÿâÿòâúïðîñè îò Âàøà ñòðàíà, ìîëÿ îáúðíåòå ñå êúì òúðãîâñêèÿ îáåêò, îòêúäåòî ñòå êóïèëè ìàøèíàòà.Æåëàåì Âè äà ÿ ïîëçâàòå ñúñ çäðàâå.
Ïðåäè äà èçïîëçâàòå øåâíàòà ìàøèíàçà ïúðâè ïúò, âàæíî å äà ñå çàïîçíàåòå ïîäðîáíîñ ôóíêöèèòå íàèçäåëèåòîè äà ðàçáåðåòå êàê ïðàâèëíî äà ïîëçâàòå øåâíàòà ìàøèíà. Ïðî÷åòåòå ñëåäâàùèòå óêàçàíèÿçà íà÷èíà íà ðàáîòà, êàêòî è èíñòðóêöèèòå çà áåçîïàñíîñò. Çàïàçåòå òåçè èíñòðóêöèè. Êîãàòî ïðåäàâàòåèçäåëèåòî íà òðåòà ñòðàíà, çàåäíî ñ íåãî ïðåäàéòå è òåçè èíñòðóêöèè.
Âúâåäåíèå
Óïîòðåáà â äîìàêèíñòâîòî îçíà÷àâà ...- óïîòðåáà êàòî ïðåíîñèì óðåä,- çà çàøèâàíå íà óïîòðåáÿâàíèòå â äîìàêèíñòâîòî òåêñòèëè è ...- çà çàäîâîëÿâàíå íà ëè÷íè äîìàêèíñêè íóæäè.
Ìàøèíàòà íå å ïðåäâèäåíà çà ...- óïîòðåáà êàòî ñòàöèîíàðåí óðåä,- çà çàøèâàíå íà äðóãè ìàòåðèè (íàïðèìåð êîæà, ïàëàòêè, ïëàòíà è äð. ïîäîáíè)- çà ôèíè ìàòåðèè ïðè çàíàÿò÷èéñêî (àòåëèåòà) è èíäóñòðèàëíî ïðîèçâîäñòâî.
6 BG
1
3
5
7
9
11
13
15
17
19
21
a
c
e
g
i
k
m
o
b
f
h
p
n
l
j
d
Óïîòðåáà ïî ïðåäíàçíà÷åíèå
Âúâåäåíèå
Îñíîâíè ÷àñòè íà ìàøèíàòà
Ïðèíàäëåæíîñòè
2
20
18
16
10
14
12
4
6
8
Íîìèíàëíî íàïðåæåíèå
Íîìèíàëíà ìîùíîñò
Ãàáàðèòíè ðàçìåðè
Äúëæèíà íà êàáåëà
Òåãëî
Ìàãòåðèàë
Åëåìåíòè çà âúçäåéñòâèå
Åëåìåíòè/óêàçàíèÿ
Ãðàéôåðíà ñèñòåìà
Ñèñòåìà íà èãëàòà
Áåçîïàñíîñò
TUF èçïèòàíèÿ
Ãàðàíöèÿ
- Íà ìàøèíàòà
- Íà îñâåòëåíèåòî
- Îáùî
- Äðúæêàòà å ïðèáðàíà
- Íà êàáåëà êúì ìðåæàòà
- Íà êàáåëà êúì ìàøèíàòà
- Íà ìàøèíàòà
- Êîï÷å çà âêëþ÷âàíå/èçêëþ÷âàíå
- Ïåäàë
- Ïðîçîð÷å çà âèäà áîä
- Îñâåòëåíèå (ìàøèíàòà å ïîä íàïðåæåíèå)
- Ëþëååù
- Çà äîìàêèíñêè øåâíè ìàøèíè
230 V / 50 Hz
70 W
70 W
1,8 m
1,4 m
6,0 kg
Àëóìèíèé, ïëàñòìàñà
Íàëè÷íî
Íàëè÷åí
Íàëè÷íî
Íàëè÷íî
Âåðòèêàëåí
130/705Í
Íàëè÷íè
3 ãîäèíè
Êëàñ
mm
Ñïîðåä åâðîïåéñêèòåäèðåêòèâè
II
100 mW
397 x 277 x 194.5
BG 7
Òåõíè÷åñêè õàðàêòåðèñòèêè
Âúâåäåíèå

Êîãàòî èçïîëçâàòå åëåêòðè÷åñêè óðåä, âèíàãè òðÿáâà äà ñïàçâàòå èçèñêâàíèÿòà çà áåçîïàñíîñò.Ïðî÷åòåòå öÿëîòî óïúòâàíå, ïðåäè äà çàïî÷íåòå ðàáîòà ñ ìàøèíàòà.
1. Íèêîãà íå îñòàâÿéòå ìàøèíàòà âêëþ÷åíà áåç íàáëþäåíèå.2. Âèíàãè èçäúðïâàéòå ùåïñåëà íà òîçè óðåä îò ùåïñåëíàòà êóòèÿ íåçàáàâíî ñëåä óïîòðåáà, êàêòî
è ïðåäè ïî÷èñòâàíå è ïîääðúæêà.3. Øåâíàòà ìàøèíà å îáîðóäâàíà ñ LED-ëàìïà. Àêî LED-ëàìïàòà ñå ñ÷óïè, òÿ òðÿáâà äà áúäå
çàìåíåíà îò ïðîèçâîäèòåëÿ èëè îò íåãîâ ñåðâèçåí àãåíò, çà äà ñå èçáåãíàò ðèñêîâåòå.
1. Íå ïîçâîëÿâàéòå íà äåöà äà ñè èãðàÿò ñ ìàøèíàòà. Òÿ íå å èãðà÷êà. Àêî èçïîëçâàòå ìàøèíàòà âíåïîñðåäñòâåíà áëèçîñò äî äåöà, òðÿáâà äà ÿ äúðæèòå ïîä íåïðåêúñíàòî íàáëþäåíèå.
2. Èçïîëçâàéòå ìàøèíàòà ñàìî ïî íà÷èíèòå, êîèòî ñà îïèñàíè â ðúêîâîäñòâîòî.3. Íå èçïîëçâàéòå ìàøèíàòà, àêî êàáåëúò èëè ùåïñåëà ñà ïîâðåäåíè, àêî âîäà å ïîïàäíàëà âúâ
âúòðåøíîñòòà íà ìàøèíàòà èëè àêî ìàøèíàòà íå øèå ïðàâèëíî. Âúâ âñè÷êèòå òåçè ñëó÷àè åçàäúëæèòåëíî äà ñå îáúðíåòå êúì îòîðèçèðàí ñåðâèç.
4. Ïîðàäè âäèãàíåòî è ñïóñêàíåòî íà èãëàòà â ïðîöåñà íà øèåíå ñúùåñòâóâà âúçìîæíîñòòà äà ñåíàðàíèòå, íàïðèìåð äà ïðîáîäåòå ïðúñòà ñè. Íåîáõîäèìî å èçîñòðåíî âíèìàíèå.
5. Èçïîëçâàéòå âèíàãè îðèãèíàëíà èãëåíà ïëî÷êà, â ïðîòèâåí ñëó÷àé òîâà ìîæà äà äîâåäå äîñ÷óïâàíå íà èãëàòà.
6. Íå èçïîëçâàéòå êðèâè, ïîâðåäåíè, ïîäáèòè è íåêà÷åñòâåíè èãëè.7. Íèêîãà íå äúðïàéòå ïëàòà ïðè øèåíå. Òîâà ìîæå äà äîâåäå äî îãúâàíå è â ïîñëåäñòâèå ñ÷óïâàíå
íà èãëàòà.8. Âèíàãè èçêëþ÷âàéòå ìàøèíàòà îò åëåêòðè÷åñêàòà ìðåæà, êîãàòî Âè ñå íàëàãà äà ïðàâèòå
ìàíèïóëàöèè è íàñòðîéêè, êàòî íàïðèìåð âäÿâàíå, ñìÿíà íà èãëà, ñìÿíà íà êðà÷å è ò.í.9. Âèíàãè èçâàæäàéòå ùåïñåëà îò êîíòàêòà, êîãàòî âè ñå íàëàãà äà èçâúðøâàòå äåéíîñòèòå ïî
ïîäðúæêà íà ìàøèíàòà, îïèñàíè â òîâà ðúêîâîäñòâî.10.Íèêîãà íà ïúõàéòå ïðåäìåòè â îòâîðèòå íà ìàøèíàòà.11.Íå èçïîëçâàéòå ìàøèíàòà íà îòêðèòî.12.Çà äà èçêëþ÷èòå ìàøèíàòà îò åëåêòðè÷åñêàòà ìðåæà, âèíàãè ïîñòàâÿéòå ïðåâêëþ÷âàòåëÿ íà
ïîçèöèÿ ("O") è èçâàæäàéòå ùåïñåëà îò êîíòàêòà.13.Êîãàòî èçâàæäàòå ùåïñåëà îò êîíòàêòà, íèêîãà íå ãî äúðïàéòå çà êàáåëà, à õâàùàéòå ñàìèÿ ùåêåð.14.Øóìà ïðè íîðìàëíà óïîòðåáà íà ìàøèíàòà íå íàäâèøàâà 75dB(A).15.Àêî Âè ñå ñòîðè, ÷å ìàøèíàòà íå ôóíêöèîíèðà ïðàâèëíî, âåäíàãà ÿ èçêëþ÷åòå îò
åëåêòðè÷åñêàòà ìðåæà.16.Íå ïîñòàâÿéòå íèêîãà íèùî âúðõó ïåäàëà.17.Àêî êàáåëúò êúì ïåäàëà å ïîâðåäåí, íåçàáàâíî ñå îáúðíåòå êúì êâàëèôèöèðàí ïåðñîíàë, çà
îòñòðàíÿâàíå íà ïîâðåäàòà.18.Ìàøèíàòà íå å ïîäõîäÿùà çà óïîòðåáà îò õîðà ñ ôèçè÷åñêè èëè óìñòâåíè íåäúçè, êàêòî è îò
äåöà. Àêî òîâà ñå íàëàãà, âèíàãè òðÿáâà äà ñå îñúùåñòâÿâà ïðÿêî íàáëþäåíèå ïðåç öÿëîòîâðåìå îò îòãîâîðíèòå çà òÿõ ëèöà.
19.Ñúõðàíÿâàéòå ìàøèíàòà íà ñèãóðíî ìàñòî, òàêà ÷å äåöà äà íÿìàò äîñòúï äî íåÿ.20.Âíèìàâàéòå ïî íÿêàêúâ íà÷èí äà íå çàïóøèòå îòâîðèòå çà ïðîâåòðåíèå íà ìàøèíàòà.21.Ñúõðàíÿâàéòå èíñòðóêöèÿòà íà ïîäõîäÿùî ìÿñòî, òàêà ÷å äà íå ÿ çàãóáèòå, îñâåí òîâà âèíàãè,
êîãàòî øèåòå, äà Âè å ïîä ðúêà. Ñúùî òàêà, êîãàòî ïðåäàâàòå óðåäà íà äðóã ÷îâåê, íåçàáðàâÿéòå èíñòðóêöèÿòà.
22.
Òàçè ìàøèíà å ïðåäíàçíà÷åíà ñàìî çà óïîòðåáà çà äîìàêèíñêè íóæäè.
Êàê äà èçáåãíåì îïàñíîñòòà îò åëåêòðè÷åñêè óäàð?
Êàê äà èçáåãíåì îïàñíîñòòà îò ïîæàð èëè íàðàíÿâàíå?
Èíñòðóêöèÿòà çà óïîòðåáà å âàæíà, ïàçåòå ÿ!
Ñúõðàíÿâàéòå èíñòðóêöèèòå íà ïîäõîäÿùî ìÿñòî â áëèçîñò äî ìàøèíàòà è ãè ïðåäàéòå çàåäíîñ íåÿ, êîãàòî ïðåäàâàòå ìàøèíàòà íà òðåòà ñòðàíà.
8 BG
Âàæíè óêàçàíèÿ çà Âàøàòà áåçîïàñíîñò
Âàæíè óêàçàíèÿ çà Âàøàòà áåçîïàñíîñò
BG 9
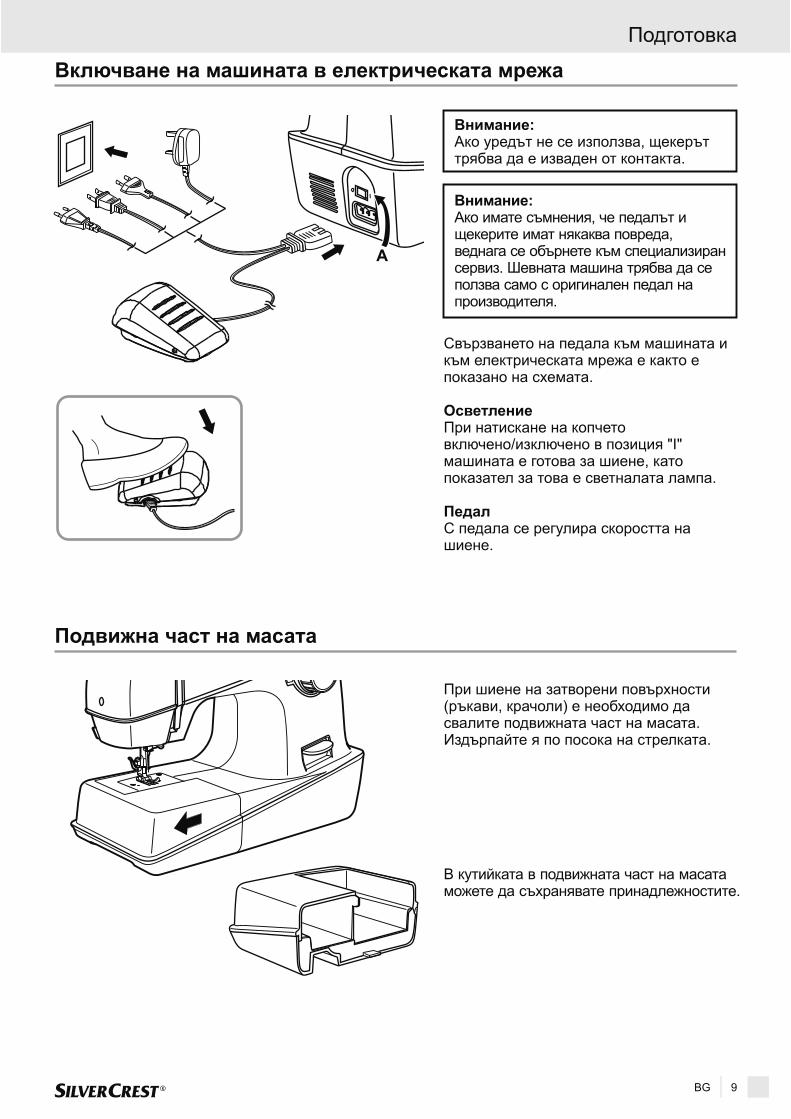
Âíèìàíèå:
Âíèìàíèå:
Îñâåòëåíèå
Ïåäàë
Àêî óðåäúò íå ñå èçïîëçâà, ùåêåðúòòðÿáâà äà å èçâàäåí îò êîíòàêòà.
Àêî èìàòå ñúìíåíèÿ, ÷å ïåäàëúò èùåêåðèòå èìàò íÿêàêâà ïîâðåäà,âåäíàãà ñå îáúðíåòå êúì ñïåöèàëèçèðàíñåðâèç. Øåâíàòà ìàøèíà òðÿáâà äà ñåïîëçâà ñàìî ñ îðèãèíàëåí ïåäàë íàïðîèçâîäèòåëÿ.
Ñâúðçâàíåòî íà ïåäàëà êúì ìàøèíàòà èêúì åëåêòðè÷åñêàòà ìðåæà å êàêòî åïîêàçàíî íà ñõåìàòà.
Ïðè íàòèñêàíå íà êîï÷åòîâêëþ÷åíî/èçêëþ÷åíî â ïîçèöèÿ "²"ìàøèíàòà å ãîòîâà çà øèåíå, êàòîïîêàçàòåë çà òîâà å ñâåòíàëàòà ëàìïà.
Ñ ïåäàëà ñå ðåãóëèðà ñêîðîñòòà íàøèåíå.
Âêëþ÷âàíå íà ìàøèíàòà â åëåêòðè÷åñêàòà ìðåæà
Ïîäâèæíà ÷àñò íà ìàñàòà
Ïðè øèåíå íà çàòâîðåíè ïîâúðõíîñòè(ðúêàâè, êðà÷îëè) å íåîáõîäèìî äàñâàëèòå ïîäâèæíàòà ÷àñò íà ìàñàòà.Èçäúðïàéòå ÿ ïî ïîñîêà íà ñòðåëêàòà.
 êóòèéêàòà â ïîäâèæíàòà ÷àñò íà ìàñàòàìîæåòå äà ñúõðàíÿâàòå ïðèíàäëåæíîñòèòå.
Ïîäãîòîâêà
AA

Âíèìàíèå:Èçêëþ÷åòå ìàøèíàòà, êàòî íàòèñíåòåêîï÷åòî â ïîçèöèÿ "Î".
Èãëèòå ñå èçíîñâàò ïðè øèåíå è åíåîáõîäèìî ðåãóëÿðíî äà ñå ñìåíÿò,äîðè è äà íå ñà èçêðèâåíè èëè ñ÷óïåíè.Ïîñòàâåòå èãëàòà êàêòî å ïîêàçàíî íàñõåìàòà.
À. Ðàçâèéòå âèíòà îòñòðàíè è ñëåäïîñòàâÿíå íà íîâàòà èãëà îòíîâî ãîçàâèéòå.
Â. Ïëîñêàòà ñòðàíà íà øèéêàòà íàèãëàòà òðÿáâà äà ñî÷è íàçàä.
C/D. Èçáóòàéòå èãëàòà íàãîðå äîäîñòèãàíå íà îãðàíè÷èòåëÿ.
Âíèìàâàéòå êàêâè èãëè èçïîëçâàòå.Ìîãàò äà ñå ïîÿâÿò ïðîáëåìè, àêî èãëèòåñà:- ïîäáèòè- èçêðèâåíè- çàòúïåíè
Ïîñòàâÿíå íà èãëàòà
�
10 BG
A
BC
D
Äâóñòåïåííî ïîâäèãàíå íà êðà÷åòî
Ïðè øèåíå íà èçêëþ÷èòåëíî äåáåëèïëàòîâå, ìîæåòå äà îñâîáîäèòå ïîâå÷åìÿñòî ïîä êðà÷åòî, êàòî ïîâäèãíåòåìàêñèìàëíî íàãîðå (À).
Ïîäãîòîâêà

A B
C
A
D
Âíèìàíèå:
Ïîñòàâÿíå íà êðà÷åòî:
Ñâàëÿíå íà êðà÷åòî:
Ïîñòàâÿíå íà ëèíåàëà çà óñïîðåäíèøåâîâå:
Ïðè èçâúðøâàíå íà âñÿêàêâèìàíèïóëàöèè ïî ìàøèíàòà âèíàãè ÿèçêëþ÷âàéòå îò åëåêòðè÷åñêàòà ìðåæà.Êîï÷åòî òðÿáâà äà å íà ïîçèöèÿ "Î".
1. Ïðè ïîâäèãíàòî êðà÷å (à) ìîíòèðàòåäúðæà÷à íà êðà÷åòî (b), êàêòî åïîêàçàíî.
2. Ùàíãàòà çàêðà÷åòî ñå ñïóñêà íàäîëó ñ ïîìîùòàíà ëîñò÷åòî çà ïîâäèãàíå/ñâàëÿíå íàêðà÷åòî, êðà÷åòî ñå ïîñòàâÿ îòäîëó,îñè÷êàòà (d) òðÿáâà äà å ïîäîñâîáîæäàâàíåòî íà äúðæà÷à (ñ). Çàçàêðåïâàíå íà êðà÷åòî ìîæå ëåêî äàïðèäúðïàòå íàïðåä ëîñò÷åòî âúðõóäúðæà÷à (å). Êðà÷åòî (f) ñå çàêðåïâà ñùðàêâàíå ïðè ñïóñêàíå íà ëîñò÷åòî çàïîâäèãàíå/ñâàëÿíå íà êðà÷åòî.
3. Ïðè âäèãíàòîêðà÷å íàòèñíåòå ëîñò÷åòî (å) âúðõóäúðæà÷à. Êðà÷åòî ñå îñâîáîæäàâà èïàäà ñàìî.
4.Êàêòî å ïîêàçàíî íà ñõåìàòà,
ëèíåàëúò ñå ïîäïúõâà ïîäïëàñòèí÷àòàòà ïðóæèíà è ñå èçáóòâàîòäÿñíî íàëÿâî.
Ìîíòèðàíå íà äúðæà÷à íà êðà÷åòî
BG 11
c
d
e
f
eg
b
a
1 2
3 4
Ùèôòîâåòå íà øïóëàòàñå èçïîëçâàò, çàäà õâàíàò øïóëàòà çà êîíöèòå êîãàòîêîíåöúò ñå ïîäàâà â ìàøèíàòà.Çà äà ïîëçâàòå, èçäúðïàéòå íàãîðåùèôòîâåòå íà øïóëàòà. Çà ñúõðàíåíèå,íàòèñíåòå íàäîëó.
A. Ãîðåí êîíåöB. ÎòâîðC. Çàïëåòåíî ïîëîæåíèåD. Ùèôò çà ìàêàðà
Êîãàòî ñå èçïîëçâà êîíåö,êîéòî èìàòåíäåíöèÿòà äà ñå çàïëèòà îêîëî ùèôòàíà øïóëàòà (D), ïðîêàðàéòå êîíåöà ïðåçîòâîðà (B) íà ùèôòà íà øïóëàòà, òàêàêàêòî å ïîêàçàíî. Îòâîðúò òðÿáâà äà åîáúðíàò êúìøïóëàòà çà êîíåöà.
Áåëåæêà:
Íàñòðîéêà íà ùèôòîâåòå íà øïóëàòà
Ïîäãîòîâêà

Íàâèâàíå íà êàëåðêà
Ïîñòàâÿíå íà êàëåðêàòà â ñîâàëêàòà
12 BG
1
2
3
4
5 6
a
a. Ôèëöîâà ïîäëîæêà
Âúðõó ùèôòà çà ìàêàðàòà ñå ïîñòàâÿïúðâî ôèëöîâàòà ïîäëîæêà è âúðõó íåÿìàêàðàòà. Êîíåöúò ñå íàâèâà íÿêîëêîïúòè îêîëî êàëåðêàòà ïî ïîñîêà íà÷àñîâíèêîâàòà ñòðåëêà. Êàëåðêàòà ñåïîñòàâÿ âúðõó îñè÷êàòà çà íàâèâàíå íàêàëåðêà è çàåäíî ñ ùèôòà ñå èçáóòâàíàäÿñíî (ïî ïîñîêà íà ñòðåëêàòà âúðõóñõåìàòà).
Íàòèñíåòå ïåäàëà è íàâèâàíåòî íàêàëåðêàòà çàïî÷âà. Íàâèâàíåòî íàêàëåðêàòà ñïèðà àâòîìàòè÷íî, êîãàòî òÿñå íàïúëíè. Òðÿáâà äà èçáóòàòå ùèôòúòçà êàëåðêàòà îáðàòíî íàëÿâî è äàèçâàäèòå êàëåðêàòà.
Ïðè ïðèäâèæâàíå íà êàëåðêàòà çàåäíîñ ùèôòà íàäÿñíî ñå ïðåóñòàíîâÿâàçàäâèæäàíåòî íà èãëàòà. Çà äà ìîæåòåîòíîâî äà øèåòå, òðÿáâà äàïðèäâèæèòå ùèôòà íàëÿâî (â ïîçèöèÿøèåíå).
Áåëåæêà:
Âíèìàíèå:Ìàøèíàòà òðÿáâà äà å èçêëþ÷åíà îòåëåêòðè÷åñêàòà ìðåæà. Êîï÷åòîâêëþ÷åíî/èçêëþ÷åíî òðÿáâà äà å íàïîçèöèÿ "O".
Ïðè ïîñòàâÿíå è ñâàëÿíå íà êàëåðêàòàèãëàòà âèíàãè òðÿáâà äà áúäå â ãîðíîïîëîæåíèå.
1. Îòâîðåòå êàïà÷åòî ïðè ãðàéôåðà.
2. Ïîñòàâåòå êàëåðêàòà â ñîâàëêàòà (2).3. òàêà, ÷å êîíåöúò äà ñå ðàçâèâà â ïîñîêà
íà ÷àñîâíèêîâàòà ñòðåëêà (3).
4. Ïðîìóøåòå êîíåöà ïðåç øëèöà è ñëåäòîâà ïîä ïëàñòèí÷àòàòà ïðóæèíà âúðõóñîâàëêàòà.
5. Õâàíåòå ñîâàëêàòà çà ïîäâèæíîòî6. êàïà÷å (5) è ÿ ïîñòàâåòå â ãðàéôåðíîòî
ëåãëî ñ ðîã÷åòî íàãîðå (6).
Ïîäãîòîâêà

Âäÿâàíå íà ãîðíèÿ êîíåö
BG 13
Âíèìàíèå:Ìàøèíàòà òðÿáâà äà å èçêëþ÷åíà îòåëåêòðè÷åñêàòà ìðåæà. Êðà÷åòî èèãëàòà ñà â ãîðíî ïîëîæåíèå.
a. Ôèëöîâà ïîäëîæêà
1. Ïîñòàâåòå ìàêàðà âúðõó ùèôòà çàìàêàðàòà.
2. Ïîäâåäåòå êîíåöà ïðåç âîäà÷à îòãîðåíà ìàøèíàòà îò äÿñíî íà ëÿâî, ñëåäòîâà íàäîëó ïðåç øàéáèòå,îñúùåñòâÿâàùè îïúíà íà ãîðíèÿ êîíåö.
3. "Çàêà÷åòå" êîíåöà êàêòî å ïîêàçàíî íàñõåìàòà, êàòî ïðåç òåñíèÿ âåðòèêàëåíîòâîð ìîæåòå äà âèäèòå, êàê ñå çàêà÷àçà ïðóæèíêàòà-êîíåöîîïúâà÷.
4. Ñëåä òîâà îòíîâî íàãîðå è îêîëîêóêàòà-êîíåöîïîâäèãà÷ îò äÿñíîíàëÿâî.
5. Îòíîâî íàäîëó ïðåç âîäà÷à íàèãëîíîñà÷à è ïðåç óõîòî íà èãëàòàîòïðåä íàçàä.
Ïîäãîòîâêà
a
1
2 3
4 5 Âäåâà÷êà
Ìîæåòå äà èçïîëçâàòå âäåâà÷êàòà çàóëåñíÿâàíå íà âäÿâàíåòî íà êîíåöà.
1. Ïúõíåòå âäåâà÷êàòà îòçàä íàïðåäïðåç óõîòî íà èãëàòà.
2. Ïðåêàðàéòå ãîðíèÿ êîíåö ïðåçòåëåíàòà ãàéêà íà âäåâà÷êàòà.
3. Èçäúðïàéòå îáðàòíî ïðåç óõîòî íàèãëàòà âäåâà÷êàòà ñ êîíåöà.
1 2 3

Áåëåæêà: îáùèÿ ñëó÷àé îïúíúò íà äîëíèÿ êîíåöíå å íåîáõîäèìî äà ñå ðåãóëèðà.
Îïúíúò íà äîëíèÿ êîíåö ñå êîíòðîëèðà ïîñëåäíèÿ íà÷èí. Ïîñòàâÿ ñå ïúëíà êàëåðêà âñîâàëêàòà. Ñëåä òîâà ñå õâàùà êðàÿ íàêîíåöà, êàòî ñîâàëêàòà îñòàâà äà âèñèñâîáîäíî. Ðàçêëàùàòå ñîâàëêàòà êàòîïðèäâèæâàòå ðúêàòà ñè ëåêî íàãîðå íàäîëó.Ïðè âñÿêî äâèæåíèå íàãîðå ñîâàëêàòàòðÿáâà äà ñå ñïóñêà ìåæäó 5 è 10 ñì íàäîëóïî êîíåöà, ñëåä êîåòî äà ñïèðà. Àêîñîâàëêàòà ñå ñïóñêà òâúðäå ëåñíî íàäîëó,îïúíúò íà äîëíèÿ êîíåö å ìàëúê. Àêî òðóäíîñå ïðèäâèæâà èëè èçîáùî íå ïîìðúäâà,îïúíúò íà êîíåöà å òâúðäå ñèëåí.
Ôàáðè÷íàòà íàñòðîéêà íà ãîðíèÿ êîíåö å íàïîçèöèÿ "AUTO". Çà äà óâåëè÷èòå îïúíà íàãîðíèÿ êîíåö, òðÿáâà äà çàâúðòèòåðåãóëàòîðà â ïîñîêà íà ãîëåìèòå ñòîéíîñòè.Çà äà íàìàëèòå îïúíà íà ãîðíèÿ êîíåö,òðÿáâà äà çàâúðòèòå ðåãóëàòîðà êúì ïî-íèñêèòå ñòîéíîñòè.
À. Ïðàâèëåí îïúí íà êîíöèòåÂ. Îïúíúò íà ãîðíèÿ êîíåö å òâúðäå ìàëúêÑ. Îïúíúò íà ãîðíèÿ êîíåö å òâúðäå ãîëÿì
Ðåãóëèðàíå íà îïúíà íà äîëíèÿ êîíåö
Ðåãóëèðàíå íà îïúíà íà ãîðíèÿ êîíåö
Îïúí íà êîíöèòå
Èçâàæäàíå íà äîëíèÿ êîíåö
14 BG
A
B
C
Õâàíåòå êðàÿ íà ãîðíèÿ êîíåö ñ ëÿâàòàñè ðúêà.Ñ äÿñíàòà ðúêà çàâúðòåòå êîëåëîòî çàðú÷íî çàäâèâæâàíå êúì ñåáå ñè, äîêàòîèãëàòà íàïðàâè åäèí ïúëåí îáîðîò.
Ëåêî èçäúðïàéòå ãîðíèÿ êîíåö, äîêàòîäîëíèÿ èçëåçå âúâ âèä íà ïðèìêà.Èçêàðàéòå êðàÿ íà äîëíèÿ êîíåö è äâàòàêîíåöà çàåäíî ïîäâåäåòå ïîä êðà÷åòî.
Ïîäãîòîâêà

BG 15
A
B
Øåâ / Ïîëåçíè ïðèëîæåíèÿ
Ïîäøèâàíå êðàÿ íà øåâà íàòèñíåòå êîï÷åòî çàøèåíå íàçàä, êàòî íå ïóñêàòå ïåäàëà.Óøèéòå íÿêîëêî áîäà â îáðàòíà ïîñîêà,ñëåä òîâà ïóñíåòå êîï÷åòî çà øèåíåíàçàä è óøèéòå íÿêîëêî áîäà íàïðåä.Òàêà ñå ïðàâÿò çàòÿæêè â íà÷àëîòî è âêðàÿ íà øåâà.
Çàâúðòåòå êîëåëîòî çà ðú÷íî çàäâèâàíåíà ìàøèíàòà (ìàõîâèêà) êúì ñåáå ñè,äîêàòî êóêàòà-êîíåöîïîâäèãà÷ äîñòèãíåãîðíî ïîëîæåíèå. Ïîâäèãíåòå êðà÷åòî èèçâàäåòå ïëàòà íàçàä.
Õâàíåòå ñ äâåòå ñè ðúöå ïëàòà. Îòðåæåòåêîíöèòå ñ ïîìîùòà íà íîæ÷åòî (Â) âúðõóñòðàíè÷íèÿ êàïàê íà ìàøèíàòà.
(A)
Îñâîáîæäàâàíå íà ïëàòà îò ìàøèíàòà
Îòðÿçâàíå íà êîíöèòå
Çàâèñèìîñò ìåæäó äåáåëèíà íà êîíåöà, íà èãëàòà è íà ïëàòà
Âàæíî:
Âíèìàíèå:
Íàé-÷åñòèòå ïðîáëåìè ïðè øèåíåòî ñå ïîëó÷àâàò, àêî íå ñå èçïîëçâà ïîäõîäÿùà èãëà â çàâèñèìîñò îòìàòåðèÿòà. Ïðåïîðú÷âàìå äà ñå èíôîðìèðàòå â ñïåöèàëèçèðàíè ìàãàçèíè è çà ïðèëîæåíèåòî íà èãëèçà äúíêè, çà ñòðå÷ ìàòåðèè, çà êîæà, çà ëàìå è äð.
1. Äâîéíàòà èãëà ñå èçïëîçâà çà óêðàñèòåëíè øåâîâå.2. Àêî ïîñòàâèòå äâîéíàòà èãëà, ðåãóëàòîðúò çà øèðèíà òðÿáâà äà å ïîä ìàðêèðîâêàòà 3.3. Åâðîïåéñêàòà íîìåðàöèÿ çà äåáåëèíèòå íà èãëèòå å 65, 70, 80 è ò.í., à àìåðèêàíñêàòà è ÿïîíñêàòà
ñúîòâåòíî 9, 11, 12 è ò.í.4. Èãëèòå ñå èçíîñâàò è å ïðåïîðú÷èòåëíà ÷åñòàòà èì ñìÿíà, äîðè è äà íå ñà ñå ñ÷óïèëè èëè îãúíàëè.
Àêî ìàøèíàòà çàïî÷íå äà êúñà êîíåö èëè äà ïðåñêà÷à áîäîâå, ïúðâî òðÿáâà äà ñìåíèòå èãëàòà. Àêîøèåòå òðèêîòàæåí ïëàò, íåïðåìåííî òðÿáâà äà ñëîæèòå èãëà çà òðèêî.
Ïðåïîðúêè ïðè èçáîðà íà èãëà è êîíåö â çàâèñèìîñò îò ìàòåðèÿòà
Äåáåëèíàíà èãëàòà
9-11 (65-75)
12 (80)
14 (90)
16 (100)
18 (110)
Ëåêè ìàòåðèè: òúíêè ïàìó÷íè ïëàòîâå,êîïðèíà, ìóñåëèí, îðãàíçà, êðåï, æàðñå,ïîëåñòåð, ðèçàðñêè ïàëòîâå, ïàìó÷íî òðèêî.
Ñðåäíî äåáåëè ïëàòîâå: ïàìó÷íè, ñàòåí,ëåêè êàìãàðíè ïëàòîâå, ïî-ïëúòíî òðèêî.
Ñðåäíî äåáåëè ïëàòîâå: õàâëèåíè, êàìãàðíè,äåáåëè òðèêà, äúíêîâè ïëàòîâå.
Äåáåëè ïëàòîâå: äîê, âàòèðàíè ïëàòîâå, çàãîðíî îáëåêëî, ïðîìàçàíè.
Ìíîãî äåáåëè ïëàòîâå: çà ïàëòà, ìåêè êîæèèëè âèíèëîâè òúêàíè.
Òúíêè ïàìó÷íè, íàéëîíîâè èëèïîëèåñòåðíè êîíöè.
Ñðåäíî äåáåëè ïëàòîâå: ïàìó÷íè, ñàòåí,ëåêè êàìãàðíè ïëàòîâå, ïî-ïëúòíî òðèêî.
Ñðåäíî äåáåëè ïëàòîâå: õàâëèåíè,êàìãàðíè, äåáåëè òðèêà, äúíêîâè ïëàòîâå.
Äåáåëè ïëàòîâå: äîê, âàòèðàíè ïëàòîâå,çà ãîðíî îáëåêëî, ïðîìàçàíè.
Ìíîãî äåáåëè ïëàòîâå: çà ïàëòà, ìåêèêîæè èëè âèíèëîâè òúêàíè.
Ïëàò Êîíåö
Îñíîâè íà øèåíåòî
A
16 BG
0
12
3
4
S1
S2
4 3 2 1 0.5
5 0
1234
5 2.5 0
S1
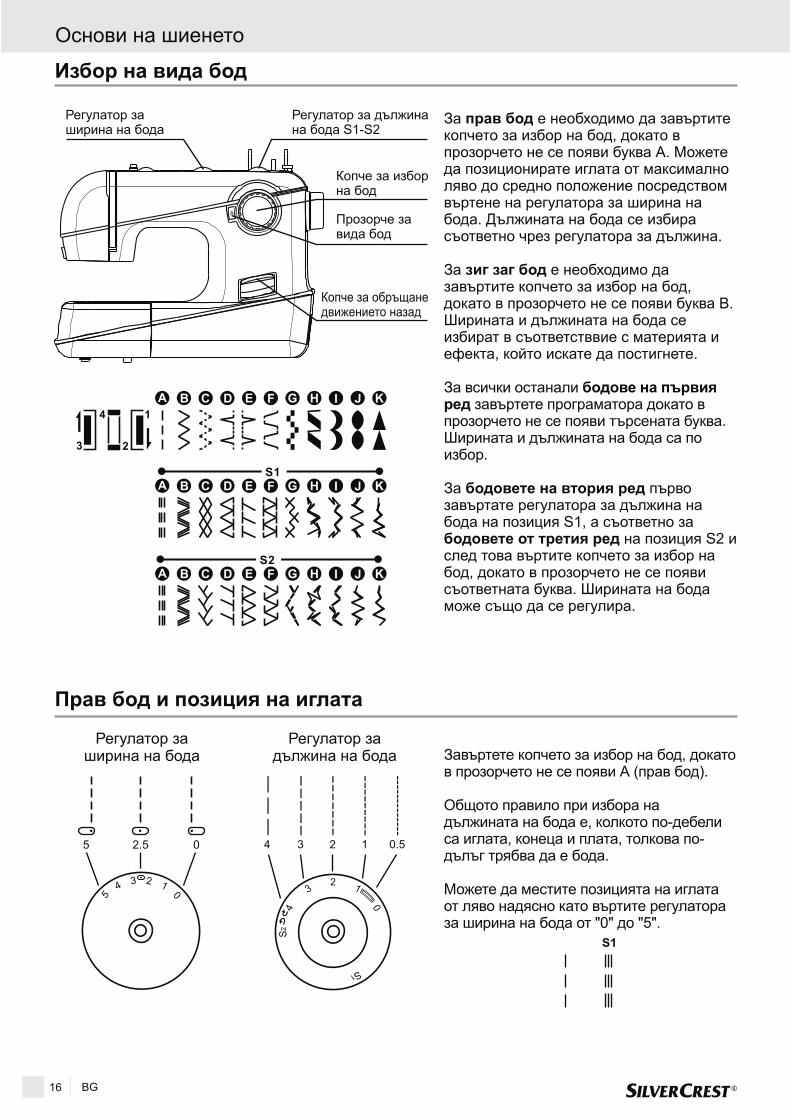
Èçáîð íà âèäà áîä
Çà å íåîáõîäèìî äà çàâúðòèòåêîï÷åòî çà èçáîð íà áîä, äîêàòî âïðîçîð÷åòî íå ñå ïîÿâè áóêâà À. Ìîæåòåäà ïîçèöèîíèðàòå èãëàòà îò ìàêñèìàëíîëÿâî äî ñðåäíî ïîëîæåíèå ïîñðåäñòâîìâúðòåíå íà ðåãóëàòîðà çà øèðèíà íàáîäà. Äúëæèíàòà íà áîäà ñå èçáèðàñúîòâåòíî ÷ðåç ðåãóëàòîðà çà äúëæèíà.
Çà å íåîáõîäèìî äàçàâúðòèòå êîï÷åòî çà èçáîð íà áîä,äîêàòî â ïðîçîð÷åòî íå ñå ïîÿâè áóêâà Â.Øèðèíàòà è äúëæèíàòà íà áîäà ñåèçáèðàò â ñúîòâåòñòââèå ñ ìàòåðèÿòà èåôåêòà, êîéòî èñêàòå äà ïîñòèãíåòå.
Çà âñè÷êè îñòàíàëèçàâúðòåòå ïðîãðàìàòîðà äîêàòî â
ïðîçîð÷åòî íå ñå ïîÿâè òúðñåíàòà áóêâà.Øèðèíàòà è äúëæèíàòà íà áîäà ñà ïîèçáîð.
Çà ïúðâîçàâúðòàòå ðåãóëàòîðà çà äúëæèíà íàáîäà íà ïîçèöèÿ S1, à ñúîòâåòíî çà
íà ïîçèöèÿ S2 èñëåä òîâà âúðòèòå êîï÷åòî çà èçáîð íàáîä, äîêàòî â ïðîçîð÷åòî íå ñå ïîÿâèñúîòâåòíàòà áóêâà. Øèðèíàòà íà áîäàìîæå ñúùî äà ñå ðåãóëèðà.
ïðàâ áîä
çèã çàã áîä
áîäîâå íà ïúðâèÿðåä
áîäîâåòå íà âòîðèÿ ðåä
áîäîâåòå îò òðåòèÿ ðåä
Ïðàâ áîä è ïîçèöèÿ íà èãëàòà
Ðåãóëàòîð çàäúëæèíà íà áîäà
Ðåãóëàòîð çàøèðèíà íà áîäà Çàâúðòåòå êîï÷åòî çà èçáîð íà áîä, äîêàòî
â ïðîçîð÷åòî íå ñå ïîÿâè À (ïðàâ áîä).
Îáùîòî ïðàâèëî ïðè èçáîðà íàäúëæèíàòà íà áîäà å, êîëêîòî ïî-äåáåëèñà èãëàòà, êîíåöà è ïëàòà, òîëêîâà ïî-äúëúã òðÿáâà äà å áîäà.
Ìîæåòå äà ìåñòèòå ïîçèöèÿòà íà èãëàòàîò ëÿâî íàäÿñíî êàòî âúðòèòå ðåãóëàòîðàçà øèðèíà íà áîäà îò "0" äî "5".
Ðåãóëàòîð çàøèðèíà íà áîäà
Ðåãóëàòîð çà äúëæèíàíà áîäà S1-S2
Ïðîçîð÷å çàâèäà áîä
Êîï÷å çà èçáîðíà áîä
Êîï÷å çà îáðúùàíåäâèæåíèåòî íàçàä
Îñíîâè íà øèåíåòî

BG 17
5 0
1234
5 4 3 2 1 0
1 2
Çèã çàã áîä
Çàâúðòåòå êîï÷åòî çà èçáîð íà áîä, äîêàòîâ ïðîçîð÷åòî íå ñå ïîÿâè  (çèã çàã áîä).
Ìàêñèìàëíàòà øèðèíà íà çèã çàã áîäà å"5". Øèðèíàòà ìîæå äà ñå íàìàëÿâà ïðèâñåêè áîä â èíòåðâàëà îò "0" äî "5".
Íàé-÷åñòî ñå èçïîëçâà çèã çàã ñ ãúñòîòà"2,5". Íî â çàâèñèìîñò îò ðåçóëòàòà,êîéòî èñêàòå äà ïîñòèãíåòå, ìîæåòå äàâàðèðàòå ìåæäó "0,5" è "4".
Àêî ðåãóëàòîðúò çà äúëæèíà (ãúñòîòà) íàáîäà å â èíòåðâàëà îò "0" äî "1" ñåïîëó÷àâà ìíîãî ãúñò çèã çàã, êîéòî ñåèçïîëçâà çà óêðàñèòåëåí è ñúùî òàêà ïðèèëèê.
Àêî øèåòå çèã çàã íà ìíîãî òúíêèìàòåðèè, çà äà íå ñå íàáðú÷êà øåâà, åíåîáõîäèìî äà ïîñòàâèòå òúíêà õàðòèÿïîä ìàòåðèÿòà è äà øèåòå âúðõó äâåòå.Ñëåä ïðèêëþ÷âàíå íà øèåíåòî, õàðòèÿòàñå îòñòðàíÿâà.
Ôóíêöèÿ íà ðåãóëàòîðà çà øèðèíà íàáîäà
Ôóíêöèÿ íà ðåãóëàòîðà çà äúëæèíà íàáîäà ïðè çèã çàã
Ïëúòåí çèã çàã
Ïðè ôèíè òúêàíè
Êðà÷å çà çàøèâàíå íà öèï
Êðà÷åòî çà çàøèâàíå íà öèï ìîæå äà ñåïîñòàâè îòëÿâî èëè îòäÿñíî, â çàâèñèìîñòêîÿ ñòðàíà íà öèïà ñå çàøèâà â ìîìåíòà (1).
Çà äà "ïðåñêî÷èòå" ìàøèíêàòà çàçàòâàðÿíå íà öèïà, çàáîäåòå èãëàòà â ïëàòà,ïîâäèãíåòå êðà÷åòî, ïðåìåñòåòå ìàøèíêàòà,îòíîâî ñïóñíåòå êðà÷åòî è ïðîäúëæåòå äàøèåòå.
Ñ òîâà êðà÷å ìîæåòå äà çàøèåòå è êîðäà (2).
 çàâèñèìîñò îò äåáåëèíàòà íà ïëàòàðåãóëàòîðúò çà äúëæèíà íà áîäà å âèíòåðâàëà îò "1" äî "4".
Ðåãóëàòîð çàäúëæèíà íà áîäà
Ðåãóëàòîð çàøèðèíà íà áîäà
Îñíîâè íà øèåíåòî

18 BG
Êðà÷å çà ñëÿï áîä
Èçïîëçâà ñå çà ïîäãúâàíå íà çàâåñè,ïàíòàëîíè, ïîëè è äð.
Ìîæå äà ñå èçïîëçâà ñúùî òàêà è çàåëàñòè÷íè ìàòåðèè.
Íåîáõîäèìî å äà ñãúíåòå ïëàòà òàêà, êàêòîå ïîêàçàíî íà ñõåìàòà (1).Òàêà ñãúíàòèÿò ïëàò ñå ïîñòàâÿ ïîä êðà÷åòî.Çàâúðòåòå êîëåëîòî çà ðú÷íî çàäâèæâàíåíà ìàøèíàòà êúì ñåáå ñè, äîêàòî èãëàòà íåñå ïðåìåñòè ìàêñèìàëíî â ëÿâî. Òóê òÿòðÿáâà äà ïðîáîäå ãúíêàòà, êàòî çàõâàíåñàìî åäíà íèøêà. Àêî òîâà íå å òàêà,òðÿáâà äà êîðèãèðàòå øèðèíàòà íà áîäà (2).Ïî îãðàíè÷èòåëÿò (3) òðÿáâà äà ñå âîäèãúíêàòà, êàòî ìîæåòå äà íàñòðîèòåïîëîæåíèåòî íà îãðàíè÷èòåëÿ ñ ïîìîùòà íàâèíòà (4).Ïðåïîðú÷âàìå äà øèåòå áàâíî. Òîçè áîäèçèñêâà èçâåñòíà ñðú÷íîñò, òàêà ÷å àêî íåñå ïîëó÷è îò ïúðâèÿ ïúò, íå ñå îò÷àéâàéòå,îïèòàéòå ïàê.
Êðà÷å çà çàøèâàíå íà êîï÷å
Ïîñòàâåòå ïëî÷êàòà çà ïîêðèâàíå íà çúáèòå.Ïîñòàâåòå êðà÷åòî çà êîï÷å.
Ïúõíåòå ïëàòà ïîä êðà÷åòî, ñëåä òîâàíàãëàñåòå êîï÷åòî ïîä êðà÷åòî, òàêà ÷åäóïêèòå äà ñà íà íèâîòî íà èãëàòà.Ïîñòàâåòå ðåãóëàòîðà çà øèðèíàòà íà áîäàâ ìàêñèìàëíî ëÿâî ïîëîæåíèå è óøèéòåíÿêîëêî áîäà íà ìÿñòî â ëÿâàòà äóïêà íàêîï÷åòî. Ñëåä òîâà óâåëè÷åòå øèðèíàòà íàáîäà ñïðÿìî ðàçñòîÿíèåòî ìåæäó äóïêèòåíà êîï÷åòî (íàé-÷åñòî ìåæäó 3 è 4).Çàâúðòàéêè êîëåëîòî çà ðú÷íî çàäâèæâàíåêúì ñåáå ñè ïðîâåðåòå äàëè èãëàòà áîäå îòäÿñíî ñúîòâåòíî â äÿñíàòà äóïêà íà êîï÷åòî.Àêî å íåîáõîäèìî ðåãóëèðàéòå øèðèíàòà íàáîäà. Íàïðàâåòå áàâíî íÿêîëêî êîíòðîëíèáîäà è ñëåä òîâà çàøèéòå êîï÷åòî.
Íàêðàÿ ïîñòàâåòå îòíîâî ðåãóëàòîðà çàøèðèíà íà áîäà íà ïîçèöèÿ "0" è îòíîâîíàïðàâåòå íÿêîëêî çàòÿãàùè áîäà.
Îñíîâè íà øèåíåòî
1 4
32

Ïðåäâàðèòåëíà ïîäãîòîâêà
Ïîäãîòîâêà íà ìàòåðèÿòà
Ñúâåòè:
Ñâàëåòå óíèâåðñàëíîòî êðà÷å è ïîñòàâåòåêðà÷åòî çà èëèê. Äúëæèíàòà (ãúñòîòàòà) íà áîäàå â èíòåðâàëà îò "0,5" äî "1", êàòî çàâèñè îòäåáåëèíàòà íà ìàòåðèÿòà. Íå å íåîáõîäèìîèëèêúò äà å ìíîãî ãúñò, çàùîòî â ïîñëåäñòâèåíàäèãà êîï÷åòî.Óêàçàíèå: Âèíàãè øèéòå ïðîáåí èëèê íà ñúùàòàìàòåðèÿ â ñúùàòà ïîñîêà ñïðÿìî íèøêèòå íàïëàòà.
Èçìåðåòå äèàìåòúðà íà êîï÷åòî è ïðèáàâåòå0,3ñì êúì íåÿ çà äâåòå çàòÿæêè. Ïðè ïî-äåáåëèêîï÷åòà, òðÿáâà äà ïðèáàâèòå ïî-ãîëÿìàñòîéíîñò. Ìàðêèðàéòå ìÿñòîòî è äúëæèíàòà íàèëèöèòå âúðõó ïëàòà.Ïîçèöèîíèðàéòå ïëàòà ïîä èëèêà òàêà, ÷å èãëàòàäà å íàä ïî-äàëå÷íàòà ìàðêèðîâêà. Èçáóòàéòåøåéíè÷êàòà âúðõó êðà÷åòî çà èëèêà ìàêñèìàëíîíàïðåä. Ñâàëåòå êðà÷åòî.
a. Ïðåìåñòåòå êîï÷åòî çà èçáîð íà ïðîãðàìà íàïîçèöèÿ " " (äÿñíà çàòÿæêà). Áàâíî øèéòåäîêàòî èãëàòà äîñòèãíå ïðåäíàòà ìàðêèðîâêà.
b. Ïîñòàâåòå êîï÷åòî çà èçáîð íà ïðîãðàìà íàïîçèöèÿ " " (çàòÿæêà) è óøèéòå 5-6 áîäà.
c. Ïðåìåñòåòå êîï÷åòî çà èçáîð íà ïðîãðàìà íàïîçèöèÿ " " (ëÿâà çàòÿæêà). Áàâíî øèéòåäîêàòî èãëàòà äîñòèãíå îòäàëå÷åíàòàìàðêèðîâêà.
d. Ïîñòàâåòå êîï÷åòî çà èçáîð íà ïðîãðàìà íàïîçèöèÿ " " (çàòÿæêà) è îòíîâî óøèéòåíÿêîëêî áîäà çà çàäíàòà çàòÿæêà.
Âäèãíåòå êðà÷åòî è èçâàäåòå ïëàòà íàïðåä.Îòðåæåòå êîíöèòå, èçäúðïàéòå ãîðíèÿ êîíåö îòîáðàòíàòà ñòðàíà è çàâúðæåòå äâàòà êîíåöà.Ïðîðåæåòå ìíîãî âíèìàòåëíî èëèêà ñ íîæ÷åòîçà ïðîðÿçâàíå íà èëèöè.
- Àêî ëåêî íàìàëèòå îïúíà íà ãîðíèÿ êîíåö,äîëíèÿò êîíåö ùå èçêàðâà ãîðíèÿ îò îáðàòíàòàñòðàíà è ùå ïîëó÷èòå ïî-êðàñèâ èëèê.
- Ïðè ôèíè è îñîáåíî ïðè ðàçòåãëèâè òúêàíè åçàäúëæèòåëíî èçïîëçâàíåòî íà ïîäëåïâàùìàòåðèàë.
- Çà ðàçòåãëèâè è òðèêîòàæíè ïëàòîâåïðåïîðú÷âàìå èçïîëçâàíå íà óÿê÷èòåëíàíèøêà. Çèã çàãúò íà äâåòå âåðèæêè òðÿáâà äàîáõâàùà íèøêàòà (å).
BG 19
Êðà÷å çà èëèê
Îñíîâè íà øèåíåòî
a b c d
e

20 BG
A B C
1 2
Îâåðëî÷íè áîäîâå
Áåëåæêà:Ñëîæåòå íîâà èãëà èëè èçïîëçâàéòåñòðå÷ èãëà.
Ïðàâèëíî å äà ñå èçïîëçâà äóìàòàîâåðëîêîïîäîáíè áîäîâå, íî "îâåðëî÷íè"å íàâëÿçëà â áúëãàðñêèÿ åçèê è ùå ÿèçïîëçâàìå è íèå.Ïðåäíàçíà÷åíèåòî èì å çà åäíîâðåìåííîçà÷èñòâàíå è çàøèâàíå íà êðàèùàòà íàïëàòà. Àêî å íåîáõîäèìî ñàìîçà÷èñòâàíå, ïðåïîðú÷âàìå èçïîëçâàíåòîíà îáèêíîâåí çèã çàã.
Çà ôèí òðèêîòàæ è ôèíè òúêàíè ïëàòîâå (À).
Ïðèëè÷à íàé-ìíîãî íà áîäà îò ìàøèíàòàîâåðëîã (Â).
Èçïîëçâà ñå çà ïîäãúâàíå è åäíîâðåìåííîçà÷èñòâàíå (Ñ).
Ïðè âñè÷êè òÿõ å íåîáõîäèìî èãëàòàîòäÿñíî äà ïðîáîæäà ïëàòà ñúâñåì â êðàÿ.
Îâåðëî÷åí áîä:
Ñòàíäàðòåí îâåðëî÷åí áîä:
Äâîåí îâåðëî÷åí áîä:
Ïðåäíàçíà÷åíèå: Çà çàøèâàíå íà ëàñòèêè äàíòåëà, çà çàêúðïâàíå, çà çà÷èñòâàíå.
Çà çàêúðïâàíå (1).
Àêî å íåîáõîäèìî çàêúðïâàíåòî íàïðîðåç, ïðåïîðú÷âàìå îò äîëíàòà ñòðàíàäà ñå ïîäëîæè ïàð÷åíöå ïëàò è äà ñåøèå âúðõó íåãî. Ïúðâî çàøèéòå âñðåäàòà è ïîñëå ïî åäèí øåâ è îò äâåòåñòðàíè (2).
Òðèòî÷êîâ çèã çàã
Îñíîâè íà øèåíåòî

BG 21
1 2
Ïà÷óúðê
Òîçè áîä å ïîäõîäÿù çà íàñðåùíîçàøèâàíå íà äâà ïëàòà, êàòî ìåæäó òÿõîñòàíå èçâåñòíî ðàçñòîÿíèå.
-
àëîòî è â êðàÿ íà øåâà.
Ïëàòîâåòå, êîèòî ùå ñå çàøèâàòíàñðåùíî ñå ñãúâàò (åâåíòóàëíîèçãëàæäàò ñ þòèÿòà) è ñå ìîíòèðàò (ñêàðôèöè èëè ñå òðàïîñâàò) âúðõó ïàð÷åõàðòèÿ, êàòî ìåæäó òÿõ ñå îñòàâÿèçâåñòíî ðàçñòîÿíèå.
- Øèå ñå âíèìàòåëíî ïî ëèíèÿòà ìåæäóäâàòà ïëàòà, êàòî â íà÷àëîòî, çà äàïîåìàò çúáèòå, å íåîáõîäèìî äà õâàíåòåêðàèùàòà íà êîíöèòå è ëåêî äà ãè äúðïàòåíàçàä.
- Ìîæåòå äà èçïîëçâàòå ìàëêî ïî-äåáåëêîíåö îò îáèêíîâåíîòî èëè íÿêàêúâäåêîðàòèâåí êîíåö (íàïðèìåð êîïðèíåí).
- Ñëåä êàòî ñâúðøèòå ñ øèåíåòî îòñòðàíåòåõàðòèÿòà è êàðôèöèòå (òðàïîñêàòà).Íàêðàÿ òðÿáâà äà çàâúðæåòå êîíöèòå âíà÷
Òðîåí ïðàâ áîä (1)Çà íàòîâàðåíè øåâîâå.Ìàøèíàòà øèå äâà áîäà íàïðàä è åäèííàçàä. Ïî òîçè íà÷èí íà âñÿêà ñòúïêà ñåïðàâàò ïî òðè áîäà. Ïîëó÷àâà ñå çäðàâøåâ, êîéòî îñâåí òîâà èìà è èçâåñòíàåëåñòè÷íîñò.
Òðîåí çèã çàã áîä (2)Èçïîëçâà ñå çà íàòîâàðåíè øåâîâå, çàïîäãúâè è çà îñîáåíî åôåêòåíóêðàñèòåëåí øåâ. Ïîäõîäÿù å çàèçïúëíåíèå âúðõó ïî-äåáåëè ïëàòîâå êàòîäúíêîâè.
Îñíîâè íà øèåíåòî
Pàçòåãëåí áîä

22 BG
Áðîäèðàíå ñ ãåðãåô*
Àïëèêèðàíå
* Â êîìïëåêòîâêàòà íà ìàøèíàòà íÿìà ãåðãåô.Çàêóïóâà ñå îòäåëíî îò ñïåöèàëèçèðàíèòå ìàãàçèíè.
Ïîñòàâÿíå íà ïëî÷êàòà çà ïîêðèâàíå íàçúáèòå
Ïîäãîòîâêà çà áðîäèðàíå íà íàäïèñ èëèäðóã ìîòèâ*
- Îòñòðàíÿâàò ñå êðà÷åòî è äúðæà÷à íàêðà÷åòî.
- Ïîñòàâÿ ñå ïëî÷êàòà çà ïîêðèâàíå íàçúáèòå.
- Ïðåäè äà çàïî÷íåòå äà øèåòå å íåîáõîäèìîäà ñâàëèòå ëîñò÷åòî çà êðà÷åòî.
- Øèðèíàòà íà çèã çàã áîäà ñå ðåãóëèðà âçàâèñèìîñò îò äåáåëèíàòà íà áóêâèòå èëèíà óêðàñèòåëíèÿ øåâ, êîèòî èñêàòå äàíàïðàâèòå.
- Íàäïèñúò èëè ìîòèâúò ñå ñêèöèðàò îòîáðàòíàòà ñòðàíà íà ïëàòà ñ ìîëèâ/êðåäà.
- Ïëàòúò ñå îïúâà âúçìîæíî íàé-ñòåãíàòîâúðõó ãåðãåôà.
- Ïîäâåæäà ñå ïîä èãëàòà è ñå ñâàëÿëîñò÷åòî çà êðà÷åòî.
- Çàâúðòåòå êîëåëîòî çà ðú÷íî çàäâèæâàíåíà ìàøèíàòà êúì ñåáå ñè, äîêàòî èçêàðàòåäîëíèÿ êîíåö è óøèéòå íÿêîëêî çàòÿãàùèáîäà íà ìÿñòî.
- Õâàíåòå ãåðãåôà çäðàâî ñ äâåòå ðúöå ñïàëöèòå îò ãîðíàòà ñòðàíà.
- Âíèìàòåëíî øèéòå, êàòî êîîðäèíèðàòåñêîðîñòòà íà ìàøèíàòà è äâèæåíèåòî íàòåðãåôà.
- Òðÿáâà äà èçðåæåòå ìîòèâà çààïëèêèðàíå ñ ãîëÿìà òî÷íîñò èïðåïîðú÷âàìå äà ãî ïîäëåïèòå.Ïîñòàâåòå ãî íà ìÿñòîòî íààïëèêàöèÿòà è ãî ïðèêðåïåòå ñ êàðôèöèèëè ãî òðàïîñàéòå.
- Âíèìàòåëíî øèéòå ïî î÷åðòàíèÿòà. Àêîîñòàíå ìàòåðèàë èçâúí øåâà, îùå ïî-âíèìàòåëíî ãî èçðåæåòå ñ îñòðà íîæè÷êà.
- Îòñòðàíåòå êàðôèöèòå èëè òðàïîñêàòà.
- Èçâàäåòå ãîðíèÿò êîíåö îò äîëíàòàñòðàíà è çàâúðæåòå äâàòà êðàÿ íàêîíöèòå.
Îñíîâè íà øèåíåòî

1 2
BG 23
Äâîéíà èãëà
Óêàçàíèå:Ïðåäè äà çàïî÷íåòå äà øèåòå,ïðîâåðåòå äàëè øèðèíàòà íà áîäàîòãîâàðÿ íà øèðèíàòà íà äâîéíàòà èãëà.Àêî ñòå èçáðàëè äâîéíà èãëà ñ ïî-ãîëÿìîðàçñòîÿíèå, âåðîÿòíî ùå ìîæåòå äàøèåòå ñàìî ïðàâ áîä. Ïðîâåðêàòà ñòàâàêàòî çàâúðòèòå áàâíî êîëåëîòî çà ðú÷íîçàäâèæâàíå íà ìàøèíàòà êúì ñåáå ñè,òàêà ÷å èãëàòà äà ïðîáîäå âåäíúæîòëÿâî è âåäíúæ îòäÿñíî. È â äâàòàñëó÷àÿ èãëàòà òðÿáâà äà ïðîáîæäà ïëàòàâ îòâîðà íà êðà÷åòî. Êîãàòî ïîëçâàòåäâîéíà èãëà ïðåïîðú÷âàìå âèíàãè äàøèåòå áàâíî, çà äà ñå ïîëó÷è ïî-êðàñèâøåâ.
- Ïðè øèåíå ñ äâîéíà èãëà å àáñîëþòíîçàäúëæèòåëíî äâàòà êîíåöà äà ñà ñåäíàêâà äåáåëèíà, íî ìîæå äà ñà ñðàçëè÷åí öâÿò.
- Ïîñòàâåòå äâîéíàòà èãëà.
- Äâàòà êîíåöà îò ãîðíàòà ñòðàíà òðÿáâàäà âäåíåòå êàêòî îáèêíîâåíî.
- Ñàìî íàêðàÿ åäíèÿò êîíåö âäÿâàòå âóõîòî íà ëÿâàòà èãëà, à ñúîòâåòíî äðóãèÿò- â óõîòî íà äÿñíàòà èãëà.
Ôåñòîí
Òàçè ìàøèíà äàâà âúçìîæíîñò äàóêðàñèòå êðàÿ íà ñàëôåòêè èëè íà áëóçêàñ êðàñèâ ôåñòîí.
1. Øèåòå áëèçî äî êðàÿ íà ïëàòà.
2. Ñ îñòðà íîæè÷êà èçðåæåòå ïëàòàèçâúí ôåñòîíà. Âíèìàâàéòå äà íåñðåæåòå êîíåöà, ñ êîéòî ñòå øèëè.
Îñíîâè íà øèåíåòî
24 BG
4
5
6
7
3
1
2
Ïîääðúæêà íà ìàøèíàòà
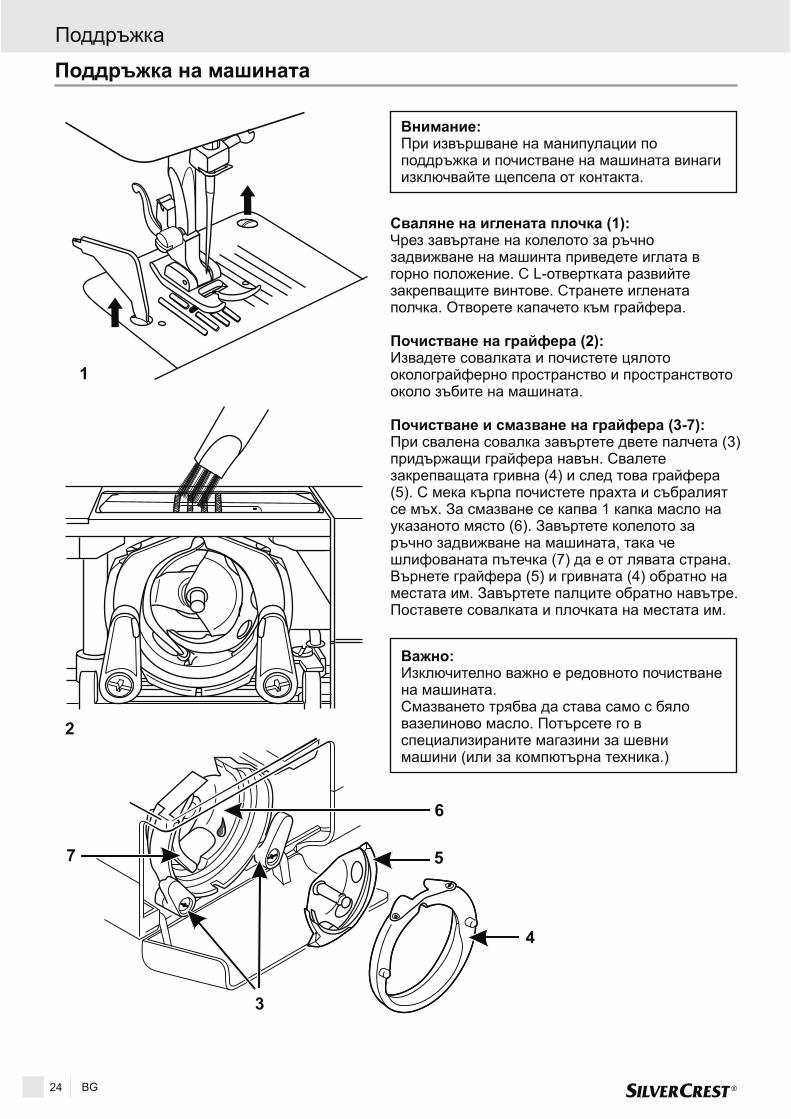
Âíèìàíèå:
Ñâàëÿíå íà èãëåíàòà ïëî÷êà (1):
Ïî÷èñòâàíå íà ãðàéôåðà (2):
Ïî÷èñòâàíå è ñìàçâàíå íà ãðàéôåðà (3-7):
Âàæíî:
Ïðè èçâúðøâàíå íà ìàíèïóëàöèè ïîïîääðúæêà è ïî÷èñòâàíå íà ìàøèíàòà âèíàãèèçêëþ÷âàéòå ùåïñåëà îò êîíòàêòà.
×ðåç çàâúðòàíå íà êîëåëîòî çà ðú÷íîçàäâèæâàíå íà ìàøèíòà ïðèâåäåòå èãëàòà âãîðíî ïîëîæåíèå. Ñ L-îòâåðòêàòà ðàçâèéòåçàêðåïâàùèòå âèíòîâå. Ñòðàíåòå èãëåíàòàïîë÷êà. Îòâîðåòå êàïà÷åòî êúì ãðàéôåðà.
Èçâàäåòå ñîâàëêàòà è ïî÷èñòåòå öÿëîòîîêîëîãðàéôåðíî ïðîñòðàíñòâî è ïðîñòðàíñòâîòîîêîëî çúáèòå íà ìàøèíàòà.
Ïðè ñâàëåíà ñîâàëêà çàâúðòåòå äâåòå ïàë÷åòà (3)ïðèäúðæàùè ãðàéôåðà íàâúí. Ñâàëåòåçàêðåïâàùàòà ãðèâíà (4) è ñëåä òîâà ãðàéôåðà(5). Ñ ìåêà êúðïà ïî÷èñòåòå ïðàõòà è ñúáðàëèÿòñå ìúõ. Çà ñìàçâàíå ñå êàïâà 1 êàïêà ìàñëî íàóêàçàíîòî ìÿñòî (6). Çàâúðòåòå êîëåëîòî çàðú÷íî çàäâèæâàíå íà ìàøèíàòà, òàêà ÷åøëèôîâàíàòà ïúòå÷êà (7) äà å îò ëÿâàòà ñòðàíà.Âúðíåòå ãðàéôåðà (5) è ãðèâíàòà (4) îáðàòíî íàìåñòàòà èì. Çàâúðòåòå ïàëöèòå îáðàòíî íàâúòðå.Ïîñòàâåòå ñîâàëêàòà è ïëî÷êàòà íà ìåñòàòà èì.
Èçêëþ÷èòåëíî âàæíî å ðåäîâíîòî ïî÷èñòâàíåíà ìàøèíàòà.Ñìàçâàíåòî òðÿáâà äà ñòàâà ñàìî ñ áÿëîâàçåëèíîâî ìàñëî. Ïîòúðñåòå ãî âñïåöèàëèçèðàíèòå ìàãàçèíè çà øåâíèìàøèíè (èëè çà êîìïþòúðíà òåõíèêà.)
Ïîääðúæêà

BG 25
Îòñòðàíÿâàíå íà ïðîáëåìè
Ïðîáëåì
Êúñà ñå ãîðíèÿêîíåö
Êúñà ñå äîëíèÿêîíåö
Ìàùèíàòàïðîïóñêàáîäîâå
Èãëàòà ñå ÷óïè
Ïîÿâÿâàò ñåáðèìêè
Øåâúò ñåíàáèðà èëèíàêúäðÿ
Íåðàâíîìåðíèáîäîâå
Ìàøèíà åøóìíà
Ìàøèíàòà åáëîêèðàëà
Ïðè÷èíà Êàêâî ìîæå äà ñå íàïðàâè
1. Íå å âäÿíàò ïðàâèëíî.2. Ìíîãî å ñèëåí îïúíà íà ãîðíèÿ
êîíåö.3. Êîíåöúò å òâúðäå äåáåë çà èãëàòà.4. Èãëàòà å ïîñòàâåíà íåïðàâèëíî.5. Îìîòàë ñå êîíåö îêîëî ãðàéôåðà.6. Èãëàòà å ïîâðåäåíà.
1. Êàëåðêàòà å ïîñòàâåíà íàïðàâèëíîâ ñîâàëêàòà.
2. Êîíåöúò å ïðîìóøåí ïîäïðóæèíàòà íåïðàâèëíî.
3. Ìíîãî å ñèëåí îïúíà íà äîëíèÿêîíåö.
1. Èãëàòà å ïîñòàâåíà íåïðàâèëíî.2. Èãëàòà å ïîâðåäåíà.3. Èãëàòà íå å çà äîìàøíà ìàøèíà.4. Äåáåëèíàòà íà èãëàòà íå å
ïîäõîäÿùà.5. Øèåòå ñòðå÷îâà ìàòåëèÿ, à íå ñòå
ïîñòàâèëè èãëà çà ñòðå÷.6. Ïîñòàâèëè ñòå íåïîäõîäÿùî êðà÷å.
1. Èãëàòà å ïîâðåäåíà.2. Íå ïîñòàâÿò ïðàâèëíî èãëàòà.3. Ïëàòúò å òâúðäå äåáåë çà òàçè èãëà.4. Êðà÷åòî íå å ïîäõîäÿùî.
1. Ìàøèíàòà å âäÿíàòà íåïðàâèíî.2. Íå ñòå èçïúëíèëè ïðåïîðúêèòå çà
èçáîð íà èãëà/êîíåö/ìàòåðèÿ.3. Íå ñúîòâåòñòâàò îïúíèòå íà
êîíèöòå.
1. Èãëàòà å òâúðäå äåáåëà çà ïëàòà.2. Îïúíúò íà êîíöèòå å òâúðäå ãîëÿì.
1. Êîíåöúò å òâúðäå òúíúê èëèíåêà÷åñòâåí.
2. Íåïðàâèëíî âäÿíàò äîëåí êîíåö.3. Äúðïàòå ïëàòà ïðè øèåíå.
1. Íóæäàå ñå îò ïî÷èñòâàíå èñìàçâàíå.
2. Èìà îñòàòúöè îò ïëàò èëè êîíöè âîêîëîãðàéôåðíîòî ïðîñòðàíñòâî.
3. Ïðè ïðåäèøíî ñìàçâàíå ñòåèçïîëçâàëè íåêà÷åñòâåíî ìàñëî.
4. Èãëàòà ñå íóæäàå îò ñìÿíà.
Îêîëî ãðàéôåðà èìà óâèòè êîíöè.
1. Âäåíåòå îòíîâî.2. Íàìàëåòå îïúíà íà ãîðíèÿ êîíåö.3. Ñëîæåòå ïî-äåáåëà èãëà.4. Ñ ïëîñêàòà ÷àñò íà øèéêàòà íàçàä.5. Ïðîâåðåòå è ïî÷èñòåòå.6. ×åñòî ñìåíÿéòå èãëèòå.
1. Ïîñòàâåòå ÿ îòíîâî. Êîíåöúò òðÿáâà äà ñåðàçâèâà îò ñîâàëêàòà ñ ëåêî ñúïðîòèâëåíèå.
2. Ïðîâåðåòå âñè÷êè ñòúïêè îòíîâî.3. Êîðèãèðàéòå, êàòî ïðî÷åòå óêàçàíèÿòà â
ðúêîâîäñòâîòî (âèæ íàïðåä âðúêîâîñòâîòî).
1. Ñ ïëîñêàòà ÷àñò íà øèéêàòà íàçàä.2. Ïîñòàâåòå íîâà èãëà.3. Òðÿáâà äà å îò ñèñòåìàòà 705H.4. Ïîãëåäíåòå òàáëèöàòà çà ñúîòâåòñòâèå
(âèæ íàïðåä).5. Ïîñòàâåòå êà÷åñòâåíà ñòðå÷ èãëà.6. Âèæ ïðåïîðúêèòå çà ñúîòâåòíèÿ áîä â
ðúêîâîäñòâîòî.
1. Ïîñòàâåòå íîâà èãëà.2. Ïðî÷åòå óêàçàíèÿòà îùå âåäíúæ.3. Âèæ òàáëèöàòà ñ ïðåïîðúêèòå íàïðåä â
ðúêîâîñòâîòî.4. Âèæ ïðåïîðúêèòå çà ñúîòâåòíèÿ áîä.
1. Ïðîâåðåòå ãîðíèÿ è äîëíèÿ êîíåö.2. Ïðî÷åòåò âíèìàòåëíî óêàçàíèÿòà.3. Ïðîâåðåòå âíèìàòåëíî.
1. Ïîñòàâåòå ïîäõîäÿùà èãëà.2. Ïðîâåðåòå è êîðèãèðàéòå îïúíà íà
êîíöèòå.
1. Øèéòå ñàìî ñ ìàøèíñêè êîíöè.2. Âäåíåòå îòíîâî.3. Îñòàâåòå ìàøèíàòà ñàìà äà âîäè ïëàòà,
âèå ñàìî íàïðàâëÿâàéòå.
1. Ïðåäè ñìàçâàíå çàäúëæëèòåëíîïî÷èñòâàéòå.
2. Ñâàëåòå âñè÷êî, ïî÷èñòåòå, ñìàæåòå èñãëîáåòå îòíîâî.
3. Îáúðíåòå ñå êúì óêàçàíèÿ ñåðâèç çàïðåïîðúêà çà ìàñëîòî.
4. Ñëîæåòå íîâà èãëà è èçõâúðëåòå ñòàðàòà.
Ðàçãëîáåòå, ïî÷èñòåòå è ñìàæåòå.
Ïîääðúæêà

Êîëêîòî è ïîäðîáíî äà å ðúêîâîäñòâîòî, òî íÿìà äà ìîæå äà îòãîâîðè íà âñè÷êèòå Âè âúïðîñè.Çà ïî-ïîäðîáíà èíôîðìàöèÿ òúðñåòå ãàðàíöèîííèÿ ñåðâèç.
Àêñèîìà Ì ÎÎÄ1504 ÑîôèÿÓë. Ñèëèñòðà ‡‚ 6, îôèñ/ìàãàçèí 202/946 10 08www.axioma.3clab.com
Ñúõðàíÿâàéòå ãðèæëèâî òàçè èíñòðóêöèÿòà çà ðàáîòà, çàùîòî òÿ ùå Âè å îò ïîëçà ïðåçöÿëîòî âðåìå íà óïîòðåáà íà ìàøèíàòà.
IAN 74612
Òåëåôîíåí íîìåð íà ãàðàíöèîííèÿ ñåðâèç
- Àêî â óðåäúò ñå ïîÿâè îïàñåí äåôåêò, âåäíàãà ïðåóñòàíîâåòå óïîòðåáàòà ìó è ãîèçõâúðëåòå èëè ñå îáúðíåòå êúì îòîðèçèðàí ñåðâèç.
- Òîçè óðåä íå ñå èçõâúðëÿ â êîôèòå çà áèòîâè îòïàäúöè.- Òîçè ïðîäóêò ñúîòâåòñòâà íà Åâðîïåéñêàòà äèðåêòèâà 2002/96/EC.- Â èíòåðíåò ñòðàíèöàòà íà ñåðâèçíàòà ôèðìà, ìîæåòå äà ñå çàïîçíàåòå ñ
âúçìîæíîñòèòå çà èçõâúðëÿíå íà óðåäà.- Èçïúëíÿâàéòå àêòóàëíèòå ïðåäïèñàíèÿ íà áúëãàðñêîòî çàêîíîäàòåëñòâîòî è àêî
èìàòå âúïðîñè, ñå îáúðùàéòå êúì ñåðâèçíàòà ôèðìà, óêàçàíà â òîâà ðúêîâîñòâî.- Îïàêîâú÷íèòå ìàòåðèàëè ñúùî òðÿáâà äà ñå èçõâúðëÿò íà óêàçàíèòå îò âàøàòà
îáùèíà ìåñòà.
Ïðåïîðú÷âàìå, îñîáåíî äî èçòè÷àíå íà ãàðàíöèîííèÿ ñðîê, äà íå èçõâúðëÿòåîïàêîâêàòà, çà äà ìîæåòå, àêî ñå íàëîæè, áåçïðîáëåìíî äà èçïðàòèòå ìàøèíàòà äîóêàçàíèÿ ñåðâèç.
Èçèñêâàíèÿ çà îïàçâàíå íà îêîëíàòà ñðåäà
Ãàðàíöèÿòà íà óðåäà å 3 ãîäèíè îò äàòàòà íà çàêóïóâàíå. Ïðåäè èçëèçàíå îò çàâîäà óðåäúò åâíèìàòåëíî èçïèòàí. Ìîëÿ, çàïàçåòå êàñîâàòà áåëåæêà, êàòî äîêàçàòåëñòâî çà äàòàòà íàçàêóïóâàíå. Àêî ñå ïîÿâè ïðîáëåì, îáúðíåòå ñå êúì ãàðàíöèîííèÿ ñåðâèç. Ñàìî ïî òîçè íà÷èíùå ïîëó÷èòå áåçïëàòíî îòñòðàíÿâàíå íà ïîâðåäàòà.
Ãàðàíöèÿòà âàæè ñàìî çà ôàáðè÷íè äåôåêòè. Ãàðàíöèÿòà íå ñå îòíàñÿ çà èçíîñåíè ÷àñòè è çàïîâðåäè ïðåäèçâèêàíè îò íåâíèìàòåëíà ðàáîòà èëè íåçíàíèå (íåïðî÷èòàíå íà íàñòîÿùîòîðúêîâîäñâî). Ìàøèíàòà å ïðåäíàçíà÷åíà èçêëþ÷èòåëíî çà äîìàêèíñêà óïîòðåáà è íå åïîäõîäÿùà çà çàíàÿò÷èéñêî ïðîèçâîäòâî.
Ãàðàíöèÿòà îòïàäà, àêî óðåäúò ñå óïîòðåáÿâà èçâúí ïðåäíàçíà÷åíèåòî ìó, àêî å ïðèëîæåíàñèëà è àêî å îòâàðÿí èçâúí îòîðèçèðàí ñåðâèç. Íåçàâèñèìî îò óñëîâèÿòà íà ãàðàíöèÿòà,ïðîäàâà÷úò îòãîâàðÿ çà ñúîòâåòñòâèåòî íà ñòîêàòà ñ äîãîâîðà çà ïðîäàæáà ñúãëàñíî ÇÇÏ.
26 BG
Crown Technics GmbHLerchenstrasse 2DE-74226 Nordheim
Èçèñêâàíèÿ çà îïàçâàíå íà îêîëíàòà ñðåäà Ãàðàíöèÿ Ïðîèçâîäèòåë/ / /Ñåðâèç
Ãàðàíöèÿ
Ïðîèçâîäèòåë
Ìîëÿ èìàéòå ïðåäâèä, ÷å ñëåäâàùèÿò àäðåñ íå å íà ñåðâèçà. Ñâúðæåòå ñå ïúðâî ñ ïîñî÷åíèÿïî-ãîðå ñåðâèç.

Introducere
Pregãtire
Introducere...................................................................................................................... 28Adecvatã utilizarea.......................................................................................................... 28Principalele componente ale maºinii............................................................................... 28Accesorii ......................................................................................................................... 28Date tehnice.................................................................................................................... 29
.................................................................. 30
Racordarea maºinii de cusut la o sursã de alimentare ................................................... 31Fixarea extensiei de masã retractabilã ........................................................................... 31Înfilarea acului................................................................................................................. 32Cele 2 poziþii ale pârghiei picioruºului presor.................................................................. 32Fixarea picioruºului presor în suportul de prindere......................................................... 33Setarea axelor mosoarelor ............................................................................................. 33Înfiletarea bobinei............................................................................................................ 34Instalarea bobinei............................................................................................................ 34Înstalarea firului superior................................................................................................. 35Tensionarea firului........................................................................................................... 36Ridicarea firului inferior ................................................................................................... 36
Cusutul / aplicaþii utile ..................................................................................................... 37Potrivirea acelor, a materialului ºi a firului ...................................................................... 37Cum sã alegeþi modelul .................................................................................................. 38Coaserea dreaptã ºi poziþia acului.................................................................................. 38Coaserea în zig-zag........................................................................................................ 39Coaserea fermoarelor ºi a ºireturilor............................................................................... 39Coaserea invizibilã a tivului............................................................................................. 40Coaserea nasturilor......................................................................................................... 40Coaserea butonierelor .................................................................................................... 41Cusãturile de surfilare ..................................................................................................... 42Coaserea în zig zag în 3 paºi ......................................................................................... 42
.............................................................................................................. 43Legarea........................................................................................................................... 43Monogramarea ºi brodarea cu ajutorul suportului de brodare*....................................... 44Coaserea aplicaþiilor ....................................................................................................... 44Festonare........................................................................................................................ 45Acul dublu ....................................................................................................................... 45
Întreþinerea...................................................................................................................... 46Depanarea ...................................................................................................................... 47
........................................................................................................................ 48
Numãrul de service ......................................................................................................... 48
................................................................................................................. 48
Mãsuri importante de siguranþã
Elementele fundamentale ale cusutului
Întreþinerea
Casare
Garanþie
Service
PaginaPaginaPaginaPaginaPagina
Pagina
PaginaPaginaPaginaPaginaPaginaPaginaPaginaPaginaPaginaPaginaPagina
PaginaPaginaPaginaPaginaPaginaPaginaPaginaPaginaPaginaPaginaPagina
Cusãturã întinsã PaginaPaginaPaginaPaginaPaginaPagina
PaginaPagina
...........................................................................................................................Pagina 48
Pagina
Pagina
PaginaProducãtor
RO 27
Cuprins

a. Picioruº multifuncþional
Picioruº pentru nasturi
Picioruº pentru tiv invizibil
Bobine (3)
i. Ungator
k. ªurubelniþã cu cot
m. Aþe (1x albastrã, 1 x roz, 1 x galben)
o. Placã
b. Picioruº pentru fermoare
d. Picioruº pentru butoniere
f.
h. Pâslã (2)
Cutie ace (3 x ac simplu, 1 x ac dublu)
ªurubelniþã (L&S)
Cuþit butoniere/ Perie de curãþare
Ghidaj
c.
e.
g.
j.
l.
n.
p.
Dispozitiv de bãgat firul în ac
1. Pârghie de ridicare a firului
3. Disc de tensionare a firului
5. Selector pentru lungimea pasului de coasere
Selector cusãturã
Extensie masã/Compartiment accesorii
Picioruº presor
13. Bobinator
15. Ax mosor
17. Mâner de transport
19. Conector alimentare
21. Volant
2. Conducãtorul firului de la bobinã
4. Buton selectare lãþime cusãturã
6. Fereastrã pentru afiºarea cusãturii
8. Clapã pentru coasere înapoi
10. Placã ac
12. Tãietor de fir
14. Opritor bobinã
16. Conducãtorul firului superior
18. Pârghia picioruºului presor
20. Întrerupãtor On/Off
7.
9.
11.
1
3
5
7
9
11
13
15
17
19
21
2
20
18
16
10
14
12
4
6
8
a
c
e
g
i
k
m
o
b
f
h
p
n
l
j
d
Felicitãri pentru achiziþionarea maºinii de cusut. Aþi achiziþionat un produs de calitate înaltã care a fostfabricat cu deosebitã atenþie.Aceste Instrucþiuni de Operare conþin tot ceea ce aveþi nevoie sã cunoaºteþi despre utilizarea maºiniidumneavoastrã de cusut.Sperãm sã vã bucuraþi de maºina dumneavoastrã de cusut ºi vã dorim succes.
Anterior utilizãrii maºinii de cusut prima datã, este esenþial sã vã familiarizaþi cu funcþiile aparatului ºisã descoperiþi modul de utilizare corectã a maºinii de cusut. Citiþi urmãtoarele instrucþiuni de utilizare,ca ºi instrucþiunile de siguranþã. Pãstraþi aceste instrucþiuni. Atunci când predaþi aparatul unei terþepãrþi., daþi-i ºi aceste instrucþiuni.
Maºina de cusut ...- pentru uz ca maºina portabilã- pentru coaserea materialelor textile tipice gospodãriri ºi...- doar uzului în gospodãrie privatã.
Maºina de cusut ...- instalãrii într-o locaþie fixã,- pentru prelucrarea altor materiale (ex. piele sau alte materiale grele, precum pânza de cort sau
pentru pânzele de navigaþie)- uzului comercial sau industrial.
este destinatã
nu este destinatã
28 RO
Introducere
Introducere
Principalele componente ale maºinii
Accesorii
Adecvatã utilizarea
Voltaj nominal
Capacitate nominalã
Dimensiuni
Lungimea cablului
Greutate
Material
Elemente de operare
Elemente de afiºare
Sistem maiezã
Sistem ac
Fãrã interferenþe
Aprobatã TUV
Garanþii produs
Clasa
- Maºina
- Bec coasere
- Total
- Când mânerul este în jos
- Cablu de alimentare
- Cablu pedalã picior
- Maºina
- Întrerupãtor reþea PORNIT/OPRIT
- Pedalã pentru controlarea vitezei
de coasere
- Afiºare cusãturã
- Bec coasere
230V/ 50 Hz
70 Waþi
100 mW
70 Waþi
Aprox. 397 x 277 x 194.5 mm (l x î x d)
Aprox. 1,8 m
Aprox. 1,4 m
Aprox. 6.0 kg
Aluminiu/plastic
Disponibil
Disponibil
Disponibil
Disponibil
Cârlig oscilant
130/705 H
În conf. Cu Directiva UE
Da
3 ani
II
RO 29
Date tehnice
Introducere

Când utilizaþi aparate electrice, respectaþi întotdeauna precauþiuni esenþiale, în special urmãtoarele.Citiþi în întregime acest manual de instrucþiuni înante de a utiliza aceastã maºinã de cusut.
1. Nu lãsaþi aparatele electrice nesupravegheate cât timp sunt racordate la o prizã electricã. Opriþi aparatulsau scoateþi-l din prizã atunci când îl lãsaþi nesupravegheat.
2. Vã rugãm sã scoateþi ºtecherul aparatului întotdeauna imediat dupã folosire din prizã precum ºi înaintede curãþare ºi de alte proceduri de mentenanþã.
3. Maºina de cusut este dotatã cu un bec LED. Dacã becul LED este spart, acesta trebuie înlocuit deproducãtor sau de firma de service în vedere evitãrii pericolelor.
1. Nu permiteþi ca acest aparat sã fie utilizat ca ºi jucãrie. Se recomandã atenþie sporitã când aparatul esteutilizat de sau în apropierea copiilor.
2. Utilizaþi acest aparat doar în scopul desemnat de acest manual. Utilizaþi doar accesoriile recomandate decãtre fabricant precum indicat în acest manual.
3. Nu utilizaþi acest aparat în cazul deteriorãrii cablului electric, funcþionãrii defectuoase a aparatului, dacã afost scãpat pe jos sau avariat ori introdus în apã. Trimiteþi aparatul la cel mai apropiat dealer autorizat sauservice pentru a fi examinat, reparat sau pentru a fi supus la modificãri electrice ori mecanice. În cazulavarierii cablului de alimentare, acesta trebuie înlocuit de cãtre fabricant, serviciul sãu post vânzãri saupersoane cu calificãri similare pentru a evita orice pericol.
4. Nu utilizaþi aparatul dacã oricare din fantele sale de aerisire sunt blocate. Pãstraþi aceste orificii precum ºicele din pedalã neobstrucþionate de acumulãrile de scame, praf ºi resturi de material.
5. Nu vã apropiaþi degetele de componentele mobile. Se recomandã grijã deosebitã în jurul acului maºinii decusut.
6. Întotdeauan utilizaþi placa de ac adecvatã. Utilizarea unei plãci nepotrivite poate duce la ruperea acului.7. Nu îndoiþi acele.8. Nu trageþi sau împingeþi de material în timpul coaserii datoritã riscului de a curba acul ºi de a-l rupe.9. Poziþionaþi întrerupãtorul maºinii de cusut pe off (poziþia "O") când efectuaþi anumite operaþiuni în
apropierea acului precum înfilarea acului, înlocuirea acestuia, înfilarea bobinei sau înlocuirea picioruºuluipresor.
10. Întotdeauna scoateþi maºina de cusut din prizã atunci când îndepãrtaþi capace de protecþie, ungeþianumite componente sau când efectuaþi alte operaþiuni de întreþinere menþionate în acest manual.
11. Nu scãpaþi ºi nu introduceþi nicun obiect în niciunul din orificiile maºinii de cusut.12. Nu utilizaþi maºina de cusut în exterior.13. Nu utilizaþi maºina de cusut în locuri unde sunt utilizaþi aerosoli (spray-uri) sau oxigen.14. Pentru a opri maºina de cusut, poziþionaþi toate butoanele de control pe "O", iar apoi scoateþi ºtecãrul din prizã.15. Nu scoateþi maºina din prizã trãgând de cablu ci apucând de ºtecãr.16. Nivelul sonor în condiþii normale de utilizare este sub 75dB(A).17. Vã rugãm opriþi maºina sau scoateþi-o din prizã când nu funcþioneazã adecvat.18. Nu amplasaþi nimic pe pedala maºinii de cusut.19. În cazul deteriorãrii cablului pedalei, acesta nu poate fi înlocuit decât de cãtre fabricant, agentul acestuia
sau de o persaonã cu calificãri similare pentru a evita orice risc.20. A nu se utiliza acest aparat de cãtre persoane (inclusiv copii) cu capacitãþi fizice, senzoriale sau mentale
reduse, sau lipsite de experienþã ºi cunoºtinþe, doar dacã sunt supravegheate sau instruite cu privire lautilizarea acestui aparat de cãtre persoane responsabile cu siguranþa lor.
21. Supravegheaþi copiii pentru a vã asigura cã nu se joacã cu maºina.22. Opriþi maºina sau scoateþi-o din prizã dacã rãmâne nesupravegheatã.23. Scoateþi maºina din prizã înainte de a efectua orice operaþiuni de întreþinere sau de înlocuire a becului.24. Pãstraþi instrucþiunile de utilizare într-un loc potrivit în apropierea aparatului. Remiteþi ºi instrucþiunile de
utilizare dacã daþi aparatul terþilor.
Aceastã maºina de cusut este destinatã exclusiv uzului casnic/familial.
PERICOL
AVERTISMENT
PÃSTRAÞI ACEST MANUAL PENTRU CONSULTÃRI ULTERIOARE
-
-
Pentru a reduce riscul electrocutãrii:
Pentru a reduce riscul arsurilor, incendiului, al electrocutãrii sau al vãtãmãriicorporale:
30 RO
Mãsuri importante de siguranþã
Mãsuri importante de siguranþã

RO 31
Þineþi extensia de masã în poziþie orizontalãºi împingeþi-o în direcþia indicatã de sãgeatã.
Compartimentul din interiorul mesei poate fiutilizat pentru stocarea accesoriilor.
Fixarea extensiei de masã retractabilã
Atenþie:
Atenþie:
Veioza
Pedala de control
Scoateþi maºina din prizã pe durataneutilizãrii.
Dacã aveþi dubii privind conectareamaºinii la o sursã de alimentare, adresaþi-vã unui electrician autorizat. Scoateþicablul de alimentare din prizã dacãmaºina nu este utilizatã.Aceastã maºinã trebuie utilizatãîmpreunã cu pedala de control FC-2902B(pentru alimentare de 220-240 V)fabricate de ZHEJIANG FOUNDERMOTOR CORPORATION Ltd. (China)
Conectaþi maºina la sursa de alimentareelectricã conform diagramei.
Apãsaþi întrerupãtorul On/Off (A) pentru aporni maºina ºi aprinde veioza (poziþia "I").
Pedala de control are drept rol controlareavitezei de coasere a maºinii.
Racordarea maºinii de cusut la o sursã de alimentare
Pregãtire
AA

Cele 2 poziþii ale pârghiei picioruºului presor
�
32 RO
A
BC
DAvertisment:Poziþionaþi întrerupãtorul On/Off pe Off("O").
Înlocuiþi periodic acul, mai ales cândprezintã semne de uzurã ºi cauzeazãprobleme.Instalaþi acul conform instrucþiunilordiagramei din partea opusã.
A. Slãbiþi ºurubul de prindere a acului,introduceþi un ac nou ºi strângeþi ºurubul.
B. Partea platã din partea cea mai groasã aacului trebuie poziþionatã cu spatele.
C/D. Introduceþi acul pânã la capãt.
Condiþia acelor trebuie sã fie perfectã.Urmãtoarele probleme cu acele pot apãrea:
Ac îndoitAc tocitAc deteriorat
-
-
-
Dacã doriþi sã coaseþi mai multe straturi dematerial sau un material mai gros, puteþiridica picioruºul la nivelul doi pentru a vã fimai uºor de poziþionat (A).
Înfilarea acului
Pregãtire

RO 33
c
d
e
f
eg
b
a
1 2
3 4
Axele mosoarelor sunt utilizate ca suportpentru aþã atunci când aceasta intrã înmaºinã.Pentru a le utiliza, trageþi în sus axelemosoarelor. Împingeþi în jos pentruperioadele de depozitare a maºinii.
A. Aþa superioarãB. OrificiuC. ÎncurcareD. Ax mosor
Atunci când utilizaþi aþã cu tendinþe deîncurcare în jurul unui ax al mosorului (D),treceþi aþa prin orificiul (B) axului mosoruluiaºa cum este indicat. Orificiul trebuie sãfie orientat cu faþa spre axul mosorului.
Notã:
Avertisment:
2. Ataºarea picioruºului presor
3. Îndepãrtarea picioruºului presor
4. Ataºarea ghidajului
Poziþionaþi întrerupãtorul On/Off pe Off("O") înainte de a efectua operaþiuneadescrisã mai sus.
Ridicaþi axul picioruºului presor (a).Prindeþi suportul picioruºului presor (b)conform ilustraþiei.
Coborâþi suportul picioruºului (b) pânãcând ºanþul (c) este poziþionat deasupraridicãturii (d).Împingeþi pârghia (e) în direcþia indicatãde sãgeatã.Coborâþi suportul picioruºului (b) astfelîncât acesta (f) sã fie fixat în poziþie.
Ridicaþi picioruºul.Împingeþi pârghia (e) în direcþia indicatãde sãgeatã.
Introduceþi ghidajul (g) în fantã precum înilustraþie. Ajustaþi-l în funcþie de ce doriþisã coaseþi: tivuri, pliseuri, etc.
1.
Fixarea picioruºului presor în suportul de prindere
Setarea axelor mosoarelor
Pregãtire
A B
C
A
D
34 RO
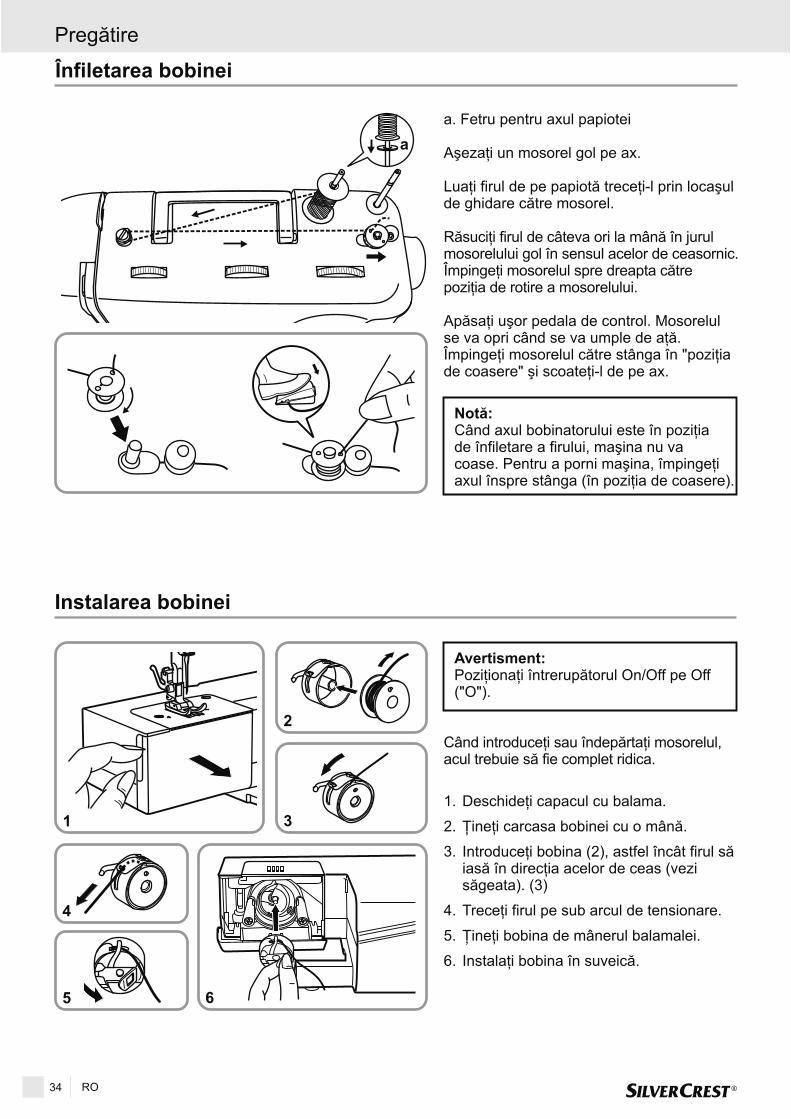
a
Înfiletarea bobinei
Instalarea bobinei
a. Fetru pentru axul papiotei
Aºezaþi un mosorel gol pe ax.
Luaþi firul de pe papiotã treceþi-l prin locaºulde ghidare cãtre mosorel.
Rãsuciþi firul de câteva ori la mânã în jurulmosorelului gol în sensul acelor de ceasornic.Împingeþi mosorelul spre dreapta cãtrepoziþia de rotire a mosorelului.
Apãsaþi uºor pedala de control. Mosorelulse va opri când se va umple de aþã.Împingeþi mosorelul cãtre stânga în "poziþiade coasere" ºi scoateþi-l de pe ax.
Când axul bobinatorului este în poziþiade înfiletare a firului, maºina nu vacoase. Pentru a porni maºina, împingeþiaxul înspre stânga (în poziþia de coasere).
Notã:
Avertisment:Poziþionaþi întrerupãtorul On/Off pe Off("O").
Deschideþi capacul cu balama.
Þineþi carcasa bobinei cu o mânã.
3. Introduceþi bobina , astfel încât firul sãiasã în direcþia acelor de ceas (vezisãgeata).
Treceþi firul pe sub arcul de tensionare.
Þineþi bobina de mânerul balamalei.
Instalaþi bobina în suveicã.
1.
2.
(2)
(3)
4.
5.
6.
Când introduceþi sau îndepãrtaþi mosorelul,acul trebuie sã fie complet ridica.
Pregãtire
1
2
3
4
5 6
RO 35
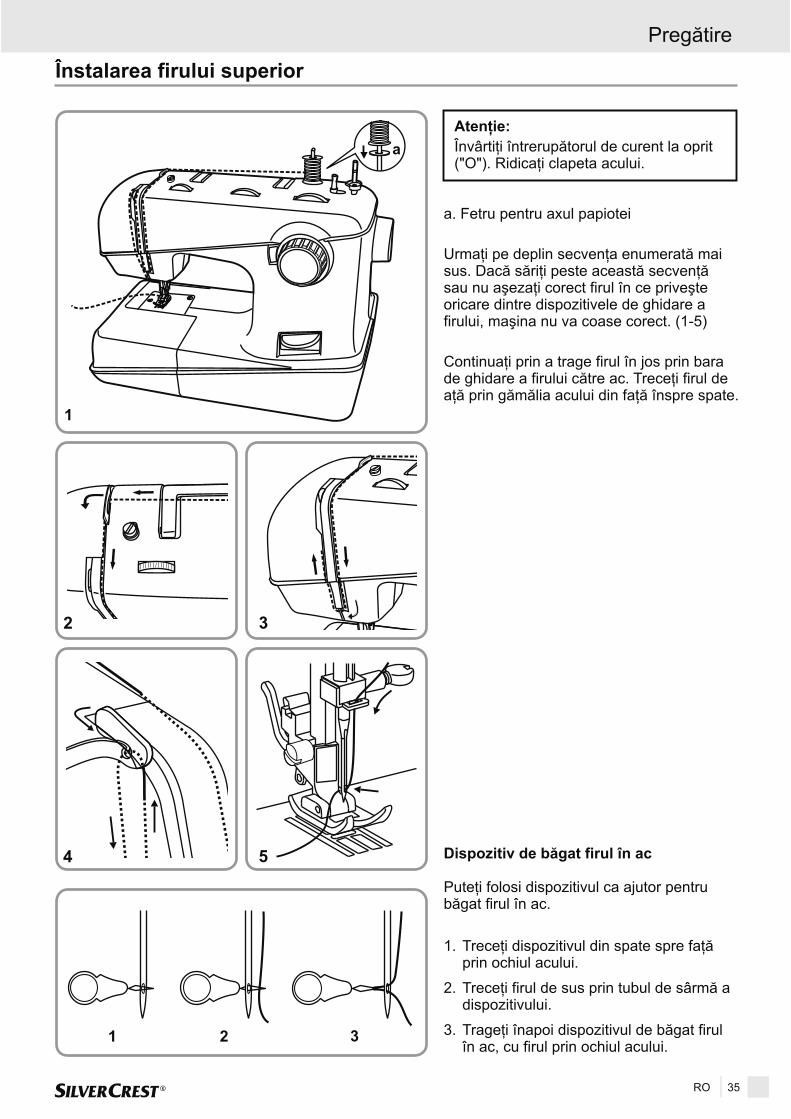
Înstalarea firului superior
Atenþie:Învârtiþi întrerupãtorul de curent la oprit("O"). Ridicaþi clapeta acului.
a. Fetru pentru axul papiotei
Urmaþi pe deplin secvenþa enumeratã maisus. Dacã sãriþi peste aceastã secvenþãsau nu aºezaþi corect firul în ce priveºteoricare dintre dispozitivele de ghidare afirului, maºina nu va coase corect. (1-5)
Continuaþi prin a trage firul în jos prin barade ghidare a firului cãtre ac. Treceþi firul deaþã prin gãmãlia acului din faþã înspre spate.
Pregãtire
a
1
2 3
4 5 Dispozitiv de bãgat firul în ac
Puteþi folosi dispozitivul ca ajutor pentrubãgat firul în ac.
1. Treceþi dispozitivul din spate spre faþãprin ochiul acului.
2. Treceþi firul de sus prin tubul de sârmã adispozitivului.
3. Trageþi înapoi dispozitivul de bãgat firulîn ac, cu firul prin ochiul acului.
1 2 3

36 RO
A
B
C
Notã:
Tensionarea firului inferior
Tensionarea firului superior
În mod nomal, nu este necesar sãajustaþi tensiunea firului bobinei.
Pentru a testa tensiunea firului bobinei,scoateþi carcasa bobinei ºi bobina ºi þineþi-oatârnatã de fir. Scuturaþi-o o datã sau dedouã ori. Dacã tensiunea firului estecorectã, 3-5cm de fir ar trebui sã iasã.Dacã firul este prea tensionat, acesta nu vaieºi deloc. Dacã tensiunea este insuficientã,carcasal va cãdea la o anumitã distanþã.Pentru ajustarea tensiunii, strângeþi ºurubulde pe peretele lateral al bobinatorului.
Nivelul normal de tensionare al firului este:"AUTO".Pentru mãrirea tensiunii, rotiþi discul spreurmãtorul numãr. Pentru a reducetensiunea, rotiþi-l în sens invers.A. Tensiunea normalã a firuluiB. Firul superior nu este suficient de
tensionatC. Firul superior este prea tensionat
Þineþi firul superior cu mâna stângã. Rotiþivolantul în faþã pânã când acul este ridicatcomplet.
Ridicaþi firul superior pentru ridicarea firuluiinferior prin fanta din placa acului.Aºezaþi ambele fire în spate, sub picioruºulpresor.
Tensionarea firului
Ridicarea firului inferior
Pregãtire

RO 37
A
B
Cusutul / aplicaþii utile
însãilareLa capãtul cusãturii, apãsaþi clapa pentrucoasere înapoi pentru efectuarea câtorvapaºi de cusãturã. Când eliberaþi clapa,maºina va relua coaserea înainte (A).
Rotiþi volantul înainte pentru a ridicapârghia firului de ac în poziþia cea maiînaltã, ridicaþi picioruºul presor ºi trageþimaterialul în spate.
Þineþi cu ambele mâini firele în spatelepicioruºului presor, amplasaþi-le în canelurã(B) ºi trageþi-le în jos.
Scoaterea materialului
Tãierea firului
NEEDLE SIZE
9-11(65-75)
12(80)
14(90)
16(100)
18(110)
Materiale subþiri: bumbac subþire, voal, serj, mãtase,muselinã, Qiana, tricot, tricotaje din bumbac, jerseu,crep, poliester þesut, materiale pentru cãmãºi ºi bluze.
Materiale medii: bumbac, satin, muselinã asprã, pânzãde vapor, tricotaje duble, materiale uºoare din lânã.
Materiale medii: pânzã de lânã, materiale de lânã,tricotaje groase, tricot pluºat, denim.
Materiale groase: bumbac, materiale din lânã,materiale pentru foaie de cort ºi matlasare, denim,materiale pentru tapiþerii (de la subþiri la medii).
Materiale groase din lânã, materiale pentru paltoane,materiale pentru tapiþerii, anumite materiale dinpiele ºi vinilin.
Fir din bumbac uºor, nailon saupolyester.
Majoritatea firelor comercializatesunt de grosime medie ºi potrivitepentru aceste materiale ºi ace.Pentru rezultate optime, utilizaþi firede poliester pentru coasereamaterialelor sintetice ºi fire debumbac pentru materialele din lânãnaturalã.Întotdeauna utilizaþi acelaºi tip deaþã pentru firul superior ºi cel inferior.
Aþã de mare rezistenþã, aþã pentrucoaserea covoarelor.(Creºteþi presiunea pe picioruºulpresor numere mari.)
MATERIAL FIR
Potrivirea acelor, a materialului ºi a firului
TABEL PENTRU SELECTAREA ACULUI, A MATERIALULUI ªI A FIRULUI
Reþineþi cu privire la acele duble:1. Acele duble, pot fi cumpãrate pentru lucrãri decorative sau pentru avantajul pe care îl prezintã.2. Când coaseþi cu ac dublu, lãþimea pasului de coasere trebuie setat la mai puþin de "3" iar poziþia acului sã
fie setatã la mijloc.3. Acele europene aratã dimensiunile 65,70,80 etc. Acele americane ºi cele japoneze aratã dimensiunile
9,11,12 etc.4. Înlocuiþi acul des (aproximativ la fiecare nou material cusut) ºi/sau la prima rupere a firului sau cusãturi omise.
IMPORTANT: Asiguraþi-vã cã dimensiunea acului se potriveºte cu firul ºi materialul.
Elementele fundamentale ale cusutului

38 RO
0
12
3
4
S1
S2
4 3 2 1 0.5
5 0
1234
5 2.5 0
S1
Cum sã alegeþi modelul
A
Buton selectarelãþime cusãturã
Selectorcusãturã
Clapã decoasere înapoi
Fereastrã afiºaj
Selectorul lungimiipasului S1-S2
Pentru , selectaþi modelul" " cu butonul de selectare a modelului.Ajustaþi lungimea cusãturii cu butonul deselectare a pasului de coasere. Puteþi alegeorice poziþie a acului, prin învârtireabutonului de selectare a lãþimii cusãturii.
Pentru , selectaþimodelul " " cu butonul de selectare amodelului. Ajustaþi lungimea cusãturii ºilãþimea cusãturii la nevoile materialuluiutilizat.
Pentru a obþine oricare altpe panoul de selecþie a
cusãturii, selectaþi litera de deasupracusãturii cu ajutorul butonului de selectarea cusãturii. Ajustaþi lungimea ºi lãþimeacusãturii cu butoanele de control conformrezultatului dorit.
Pentru a obþine oricare dintre, învârtiþi butonul de
selectare a lungimii cusãturii la "S1", pentrua obþine oricare alt
, învârtiþi butonul de selectare a lungimiicusãturii, selectaþi modelul dorit cu butonulde selectare a modelului ºi ajustaþi lãþimeacusãturii cu butonul de selectare a lãþimiicusãturii.
cusãturile drepte
coaserea în zigzag
model arãtat înrândul superior
modelele depe rândul al doilea
model de pe rândultrei
Coaserea dreaptã ºi poziþia acului
Selectorul lungimii pasuluiButon selectarelãþime cusãturã Rotiþi butonul de selectare a modelului
astfel încât indicatorul de cusãturã sã fie îndreptul "A" (coasere dreaptã).
În general, cu cât sunt mai grose materialul,firul ºi acul, cu atât mai lungã ar trebui sãfie cusãtura.
Alegeþi poziþia acului, din poziþia stânga înpoziþia dreapta prin rotirea butonului deselectare a lãþimii cusãturii de la "0" la "5".
Elementele fundamentale ale cusutului

RO 39
5 0
1234
5 4 3 2 1 0
1 2
Rotiþi butonul de selectare a modelului la "B".
Lãþimea maximã pentru cusãtura în zigzageste de "5"; totuºi, lãþimea poate fi redusãpentru orice model. Lãþimea creºte când rotiþibutonul de coasere în zigzag de la "0" la "5".
Densitatea cusãturilor în zigzag creºte pemãsurã ce setarea lungimii cusãturii ajungela "0". Cusãturile în zigzag frumoase se obþin,de obicei, la "2,5" sau la valori mai mici.
Când lungimea cusãturii este setatã între"0" ºi "1" cusãturile sunt foarte apropiateproducând "coasere în relief" care sefoloseºte pentru a realiza butoniere saucusãturi decorative.
Când coaseþi pe material foarte delicat,aºezaþi o foaie subþire de hârtie sub material.Hârtia se rupe apoi uºor dupã terminareacusãturii.
Funcþionarea butonului de selectare alãþimii cusãturii
Funcþionarea butonului de selectare alungimii în cazul modelului zigzag
Coaserea în relief
Materiale fine
Coaserea în zig-zag
Selectorul lungimii pasuluiButon selectarelãþime cusãturã
Latime pasCusatura Lungime pas
2.5A 1~4
Picioruºul pentru coaserea fermoarelorpoate fi instalat pe stânga sau pe dreapta înfuncþie de partea picioruºului pe care veþicoase fermoarul. (1)
Pentru a coase peste cheiþa fermoarului,coborâþi acul în material, ridicaþi picioruºulpresor ºi împingeþi cheiþa în spatelepicioruºului. Coborâþi picioruºul ºi continuaþicoaserea.
Este posibil sã coaseþi pe lungime, un ºnurprin dublura unui material.Setaþi lungimea cusãturii în funcþie degrosimea materialului. (2)
Coaserea fermoarelor ºi a ºireturilor
Elementele fundamentale ale cusutului

40 RO
Pentru tivurile perdelelo/draperiilor, apantalonilor, fustelor, etc..
Tiv invizibil pentru materiale tari.
Împãturiþi materialul precum în ilustraþie, cuverso-ul în sus. (1)Aºezaþi materialul sub picioruºul presor.Rotiþi volantul înainte, pânã când acul estepe stânga. Acesta ar trebui sã strãpungãcuta din material. (2)Ajustaþi ghidajul (3) rotind selectorul (4)astfel încât ghidajul sã calce cuta.Coaseþi uºor, apãsând cu grijã pedala decontrol ºi ghidând materialul cu margineaghidajului.
Instalaþi plãcuþa de stopare. Aceasta vaacoperi gheara de înaintare ºi lungimeacusãturii va fi dezactivatã.
Aºezaþi materialul sub tãlpiþã. Rotiþi butonulla poziþia marcatã, lãsaþi în jos tãlpiþa,ajustaþi lãþimea cusãturii "0" ºi coaseþicâteva cusãturi de încercare. Rotiþi roatamanualã pentru a verifica dacã acul intrãcorect în gaura din dreapta sau din stângaale nasturelui ºi coaseþi nasturele. Ajustaþilãþimea cusãturii la "0" ºi coaseþi cusãturilede fixare.
Dacã este nevoie sã lãsaþi un spaþiu întrecusãturã ºi nasture, aºezaþi un ac penasture ºi coaseþi. Pentru nasturi cu 4orificii, începeþi prin a coase prin cele 2orificii de sus, apoi împingeþi articolul înfaþã pentru a coase ºi cele 2 orificii rãmase.(3)
Coaserea nasturilor
Coaserea invizibilã a tivului
Latime pasCusatura Lungime pas
0~5B 0
Latime pasCusatura Lungime pas
1~2D 3~5
Elementele fundamentale ale cusutului
1 4
32
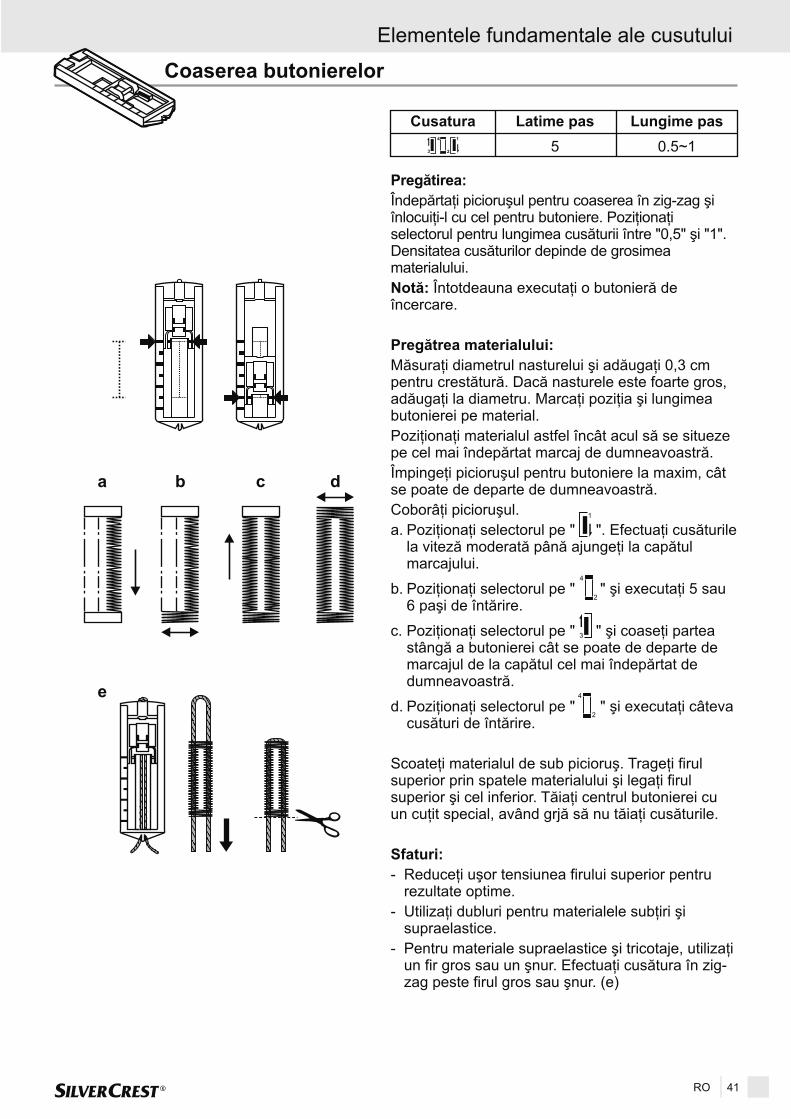
Pregãtirea:
Notã:
Pregãtrea materialului:
Sfaturi:
Îndepãrtaþi picioruºul pentru coaserea în zig-zag ºiînlocuiþi-l cu cel pentru butoniere. Poziþionaþiselectorul pentru lungimea cusãturii între "0,5" ºi "1".Densitatea cusãturilor depinde de grosimeamaterialului.
Întotdeauna executaþi o butonierã deîncercare.
Mãsuraþi diametrul nasturelui ºi adãugaþi 0,3 cmpentru crestãturã. Dacã nasturele este foarte gros,adãugaþi la diametru. Marcaþi poziþia ºi lungimeabutonierei pe material.Poziþionaþi materialul astfel încât acul sã se situezepe cel mai îndepãrtat marcaj de dumneavoastrã.Împingeþi picioruºul pentru butoniere la maxim, câtse poate de departe de dumneavoastrã.Coborâþi picioruºul.a. Poziþionaþi selectorul pe " ". Efectuaþi cusãturile
la vitezã moderatã pânã ajungeþi la capãtulmarcajului.
b. Poziþionaþi selectorul pe " " ºi executaþi 5 sau6 paºi de întãrire.
c. Poziþionaþi selectorul pe " " ºi coaseþi parteastângã a butonierei cât se poate de departe demarcajul de la capãtul cel mai îndepãrtat dedumneavoastrã.
d. Poziþionaþi selectorul pe " " ºi executaþi câtevacusãturi de întãrire.
Scoateþi materialul de sub picioruº. Trageþi firulsuperior prin spatele materialului ºi legaþi firulsuperior ºi cel inferior. Tãiaþi centrul butonierei cuun cuþit special, având grjã sã nu tãiaþi cusãturile.
- Reduceþi uºor tensiunea firului superior pentrurezultate optime.
- Utilizaþi dubluri pentru materialele subþiri ºisupraelastice.
- Pentru materiale supraelastice ºi tricotaje, utilizaþiun fir gros sau un ºnur. Efectuaþi cusãtura în zig-zag peste firul gros sau ºnur. (e)
RO 41
Cusatura Latime pas Lungime pas
5 0.5~1
Coaserea butonierelor
Elementele fundamentale ale cusutului
a b c d
e

42 RO
A B C
1 2
Notã:
Surfilare întinsã:
Cusãturã overlock:
Surfilare dublã:
Utilizaþi ace noi, cu cap rotund sau acepentru materiale supraelastice.
Cusãturi, finisaj îngrijit, tivuri vizibile.
Pentru tricotaje subþiri, jerseu, gulere ºimanºete. (A)
Pentru pânze fie, jerseu, marginile alegâtului, borduri. (B)
Pentru tricotaje subþiri, tricotaje de mânã,tighel. (C)
Toate cusãturile de surfilare sunt potrivitepentru coaserea ºi finisarea îngrijitã amarginilor ºi a tighelelor vizibile, într-osingurã operaþie.Pentru un aspect îngrijit, acul trebuie sãtreacã peste marginea materialului.
Pentru coaserea pe dantelã ºi elastic,cârpirea, peticirea ºi întãrirea marginilor.
Aºezaþi petecul în poziþie. Lungimeacusãturii poate fi scurtatã pentru cusãturifoarte apropiate (1).
Pentru cârpirea deºirãrilor, se recomandãutilizarea unei bucãþi de material pentruîntãrire. Densitatea cusãturilor poate variaîn funcþie de ajustarea lungimii cusãturilor.Mai întâi, coaseþi peste centru, trecândpeste ambele laturi. Coaseþi 3-5 rânduri decusãturi, în funcþie de tipul de material ºi derupturã (2).
Coaserea în zig zag în 3 paºi
Cusãturile de surfilare
Latime pasCusatura Lungime pas
3~5E, F S1, S2
Latime pasCusatura Lungime pas
3~5C 1~2
Elementele fundamentale ale cusutului

RO 43
1 2
Aceste cusãturi pot fi utilizate la legareaunor bucãþi de material, lãsând un micspaþiu între ele.
- Pliaþi marginile ambelor bucãþi de materialpentru a face un tiv ºi aºezaþi marginilepe o bucatã de hârtie subþire, lãsândfoarte puþin spaþiu între ele.
- Coaseþi de-a lungul marginii, trãgând uºorde ambele fire la începutul coaserii.
- Utilizaþi o aþã uºor mai groasã decât deobicei.
- Dupã terminare, îndepãrtaþi cusãturile deînsãilare ºi hârtia. Terminaþi prin a înnodape dos, la capãt ºi la sfârºit.
Cusãturã dreaptã triplã: (1)Pentru cusãturile supuse la frecare.Maºina va coase doi paºi înainte ºi unulînapoi. Acesta va oferi o triplã întãriturã.
Cusãtura de zig zag triplã: (2)Pentru cusãturile supuse la frecare, tivuri ºicusãturi decorative.Aceastã cusãturã este potrivitã pentrumaterialele groase precum denimul ºicatifeaua.
Legarea
Latime pasCusatura Lungime pas
2.5A S1, S2
Latime pasCusatura Lungime pas
3~5F S1
Latime pasCusatura Lungime pas
3~5B S1, S2
Elementele fundamentale ale cusutului
Cusãturã întinsã

44 RO
Acoperiþi trenul de alimentare
Pregãtirea înaintea monogramãrii ºi abrodãrii*
- Setaþi maºina precum în instrucþiunilealãturate.
- Îndepãrtaþi picoruºul presor ºi suportulacestuia.
- Potriviþi placa de ghidare.- Coborâþi pârghia pricioruºului rpesor
înainte de a începe coaserea.- Ajustaþi lãþimea pasului în funcþie de
mârimea literei sau a desenului.
- Desenaþi litera sau modelul dorit pespatele materialului.
- Întideþi materialul la maxim pe suportul debrodare.
- Aºezaþi materialul sub ac. Asiguraþi-vã cãpicoruºul presor se aflã în poziþia cea maijoasã.
- Rotiþi volantul înspre dumneavoastrãpentru ca firul inferior sã strãpungãmaterialul. Executaþi câþiva paºi desecurizare în punctul de pornire albroderiei.
- Þineþi suportul de brodare cu ambelemâini între inelar ºi degetul mare în timpce apãsaþi materialul cu al doilea ºi altreilea deget ºi sprijiniþi margineaaccesoriului cu degetele mici.
* Acest accesoriu nu este furnizat împreunã cumaºina de cusut.
- Decupaþi aplicaþia ºi însãilaþi-o pematerial.
- Coaseþi uºor în jurul ei.
- Tãiaþi excesul de material ce depãºeºtecusãturile. Atenþie sã nu tãiaþi cusãturile.
- Îndepãrtaþi însãilarea.
- Înnodaþi firul inferior ºi cel superior pentrua evita descoaserea acestora.
Monogramarea ºi brodarea cu ajutorul suportului de brodare*
Coaserea aplicaþiilor
Latime pasCusatura Lungime pas
1~5B 0
Latime pasCusatura Lungime pas
3~5B 0.5~1
Elementele fundamentale ale cusutului
1 2
RO 45
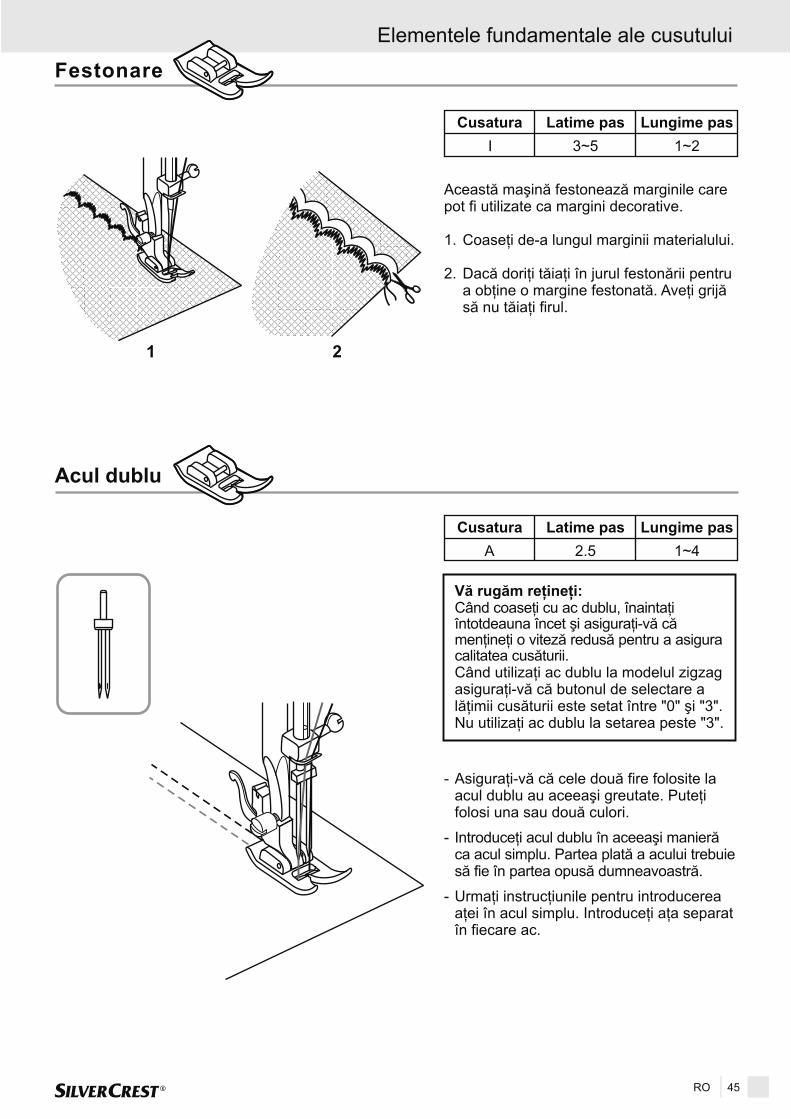
Acul dublu
Vã rugãm reþineþi:Când coaseþi cu ac dublu, înaintaþiîntotdeauna încet ºi asiguraþi-vã cãmenþineþi o vitezã redusã pentru a asiguracalitatea cusãturii.Când utilizaþi ac dublu la modelul zigzagasiguraþi-vã cã butonul de selectare alãþimii cusãturii este setat între "0" ºi "3".Nu utilizaþi ac dublu la setarea peste "3".
siguraþi-vã cã cele douã fire folosite laacul dublu au aceeaºi greutate. Puteþifolosi una sau douã culori.
Introduceþi acul dublu în aceeaºi manierãca acul simplu. Partea platã a acului trebuiesã fie în partea opusã dumneavoastrã.
Urmaþi instrucþiunile pentru introducereaaþei în acul simplu. Introduceþi aþa separatîn fiecare ac.
- A
-
-
Festonare
Aceastã maºinã festoneazã marginile carepot fi utilizate ca margini decorative.
1. Coaseþi de-a lungul marginii materialului.
2. Dacã doriþi tãiaþi în jurul festonãrii pentrua obþine o margine festonatã. Aveþi grijãsã nu tãiaþi firul.
Latime pasCusatura Lungime pas
3~5I 1~2
Latime pasCusatura Lungime pas
2.5A 1~4
Elementele fundamentale ale cusutului

46 RO
4
5
6
7
3
1
2
Atenþie:
Îndepãrtarea plãcii acului (1):
Curãþarea trenului de alimentare (2):
Curãþarea ºi ungerea cârligului (3-7):
Important:
Opriþi alimentarea electricã a maºinii, decuplândºtecãrul de priza electricã. Scoateþi întotdeaunamaºina din prizã înainte de a o curãþa.
Rotiþi volantul pânã când acul este complet ridicat.Deschideþi capacul cu balama ºi scoateþi ºurubulplãcii cu ajutorul unei ºurubelniþe.
Îndepãrtaþi carcasa bobinei ºi curãþaþi locaºul cuperia prevãzutã în acest sens.
Scoateþi carcasa bobinei. Depãrtaþi cele douãpicioruºe de prindere (3) împingându-le în exterior.Scoateþi opritorul din locaºul cârligului (4) ºi cârligul(5). Curãþaþi cu o cârpã moale. Ungeþi punctelerespective cu 1 sau 2 picãturi de ulei pentru maºinade cusut (6). Rotiþi volantul pânã când locaºulcârligului (7) este poziþionat în stânga. Reinstalaþicârligul (5) ºi închideþi cele douã picioruºe deprindere. Introduceþi carcasa bobinei ºi bobina ºireamplasaþi placa acului.
Scamele ºi resturile de aþã trebuie curãþateperiodic. Maºina de cusut trebuie verificatãperiodic de unul din centrele noastre de service.
Întreþinerea
Întreþinerea

RO 47
Depanarea
Probleme Cauze Soluþii
Firul superior serupe
Firul inferior serupe
Cusãturi lipsã
Acul se rupe
Cusãturi slãbite
Cusãturile seadunã
Cusãturiinegale,alimentareinegalã
Maºina estezgomotoasã
Maºina seblocheazã
1. Maºina nu este înfilatã corect.2. Tensiunea firului este prea mare.3. Firul este prea gros pentru ac.4. Acul nu este instalat corect.5. Firul se desface în jurul suportului
de bobinã.6. Acul este deteriorat.
1. Carcasa bobinei nu este instalatãcorect.
2. Carcasa bobinei nu este înfilatãcorect.
3. Firul inferior este prea tensionat.
1. Acul este incorect instalat.2. Acul este deteriorat.3. Mãrimea acului este greºitã.4. Picioruºul nu este instalat corect.
1. Acul este deteriorat.2. Acul este incorect instalat.3. Mãrimea acului este greºitã pentru
material.4. Aþi instalat picioruºul greºit.
1. Maºina nu este corect înfilatã.2. Carcasa bobinei nu este înfilatã
corect.3. Combinaþia ac/material/fir este
greºitã.4. Tensiunea firului este greºitã.
1. Acul este prea gros pentru material.2. Lungimea cusãturii este setatã
greºit.3. Firul este prea strâns.
1. Aþã de calitate slabã.2. Carcasa bobinei nu este înfilatã
corect.3. Materialul a fost tras.
1. Maºina trebuie unsã.2. Scame sau ulei s-au acumulat în
cârlig sau în placa acului.3. Uleiul utlizat este de slabã calitate.4. Acul este deteriorat.
Firul este prins în cârlig.
1. Reînfilaþi maºina.2. Micºoraþi tensiunea firului (scãdeþi numãrul).3. Alegeþi un ac mai mare.4. Îndepãrtaþi ºi reinstalaþi acul (partea platã
înspre spate).5. Scoateþi bobina.6. Schimbaþi acul.
1. Scoateþi ºi reinstalaþi carcasa bobinei ºitrageþi de fir. Ar trebui sã iasã uºor.
2. Verificaþi bobina ºi carcasa.3. Reduceþi tensiunea firului inferior precum
în instrucþiuni.
1. Îndepãrtaþi ºi reinstalaþi acul (partea platãînspre spate).
2. Instalaþi un ac nou.3. Alegeþi un ac potrivit cu firul ºi materialul
utilizat.4. Verificaþi ºi prindeþi-l corect.
1. Instalaþi un ac nou2. Instalaþi acul corect (partea platã înspre
spate).3. Alegeþi un ac potrivit cu firul ºi materialul
utilizat.4. Alegeþi un picioruº potrivit.
1. Verificaþi firul.2. Înfilaþi bobina conform instrucþiunilor.3. Alegeþi un ac potrivit cu firul ºi materialul
utilizat.4. Corectaþi tensiunea firului.
1. Utilizaþi un ac mai subþire.2. Reajustaþi lungimea cusãturii.3. Reduceþi tensiunea firului.
1. Alegeþi o aþã de mai bunã calitate.2. Scoateþi carcasa bobinei. Înfilaþi-o ºi
reintroduceþi-o corect.3. Nu trageþi de material în timpul coaserii.
Lãsaþi-l sã fie tras de maºinã.
1. Ungeþi conform recomandãrilor.2. Curãþaþi cârligul ºi trenul de alimentare.3. Utilizaþi doar ulei de bunã calitate.4. Înlocuiþi acul.
Îndepãrtaþi firul superior ºi carcasa bobinei,rotiþi volantul înapoi ºi înainte cu mâna ºiîndepãrtaþi resturile de aþã. Ungeþi conformrecomandãrilor.
Întreþinerea
Aceste Instrucþiuni de Operare nu pot acoperi toate aplicaþiile posibile.Pentru mai multe informaþii sau în cazul unor probleme neprezentate sau prezentate insuficient în acesteInstrucþiuni de Operare, vã rugãm sunaþi la numãrul de service +40 21 319 54 77/78
SERCOTEX INTERNATIONAL srlStr. Sdt.Gh. Matac, 29/29B,020341 Bucuresti, Sector 2Phone: +40 21 319 54 77/78Fax: +40 21 230 75 49RDS: 031 805 45 05/06Email: [email protected]
Vã rugãm pãstraþi aceste Instrucþiuni de Operare într-un loc sigur ºi daþi-le mai departeviitorilor utilizatori.
Adresa Centrului de service:
IAN 74612
Numãrul de service
Produsul este în garanþie timp de trei ani de la data cumpãrãrii.Aparatul a fost verificat cu atenþie ºi în mod temeinic înainte de livrare.Vã rugãm pãstraþi chitanþa ca dovadã a cumpãrãrii.În cazul unei reclamaþii privind garanþia, vã rugãm sunaþi la centrul de service.Doar aºa puteþi sã vã asiguraþi transportul gratuit al bunului dumneavoastrã cãtre noi.Garanþia acoperã doar defecþiunile materialelor sau defecþiuni de fabricaþie, nu acoperã piese uzate,deteriorate sau fragile ex. întrerupãtoarele.Produsul este menit doar pentru uz privat, nu comercial.În cazul utilizãrii incorecte sau a manevrãrii necorespunzãtoare, a utilizãrii forþei sau a oricãrui tip deintervenþie care nu a fost realizatã de biroul nostru de service, garanþia va fi anulatã.Aceastã garanþie nu vã limiteazã drepturile statutare.
48 RO
Crown Technics GmbHLerchenstrasse 2DE-74226 Nordheim
Casare / / Service /Garanþie Producãtor
Garanþie
- Casaþi dispozitivele cu elementele periculoase cu mare atenþie ºi asiguraþi-vã cã nu le maifoloseºte nimeni.
- Nu aruncaþi dispozitivul în gunoiul menajer.- Acest produs este fabricat conform directivei UE 2002/96/CE.- Casaþi dispozitivul la o firmã înregistratã de casare sau prin intermediul unei fabrici locale
de casare.- Respectaþi reglementãrile în vigoare. În cazul în care aveþi îndoieli, consultaþi centrul de
casare a deºeurilor.- Vã rugãm casaþi toate materialele de ambalare într-o manierã prietenoasã mediului.
Pãstraþi ambalajul în care a fost transportatã maºina de cusut. Poate fi util pentru pãstrareamaºinii, dar poate fi extrem de utilã dacã doriþi sã transportaþi maºina pentru reparaþii.Majoritatea cazurilor de deteriorãri au loc atunci când maºinile sunt transportate.
Casare
Producãtor
Fiþi atent cãci adresa urmãtoare nu este o adresã de service. Contactaþi mai întâi locul de servicesusmenþionat.

Introduction
Important safety instructions
Getting ready
Sewing basics
Disposal
Guarantee
Service
Manufacturer
Introduction............................................................................................................................Page 50Intended use..........................................................................................................................Page 50Details of the machine...........................................................................................................Page 50Accessories ...........................................................................................................................Page 50Technical data .......................................................................................................................Page 51
..............................................................................Page 52
Connecting machine to power source...................................................................................Page 53Fitting the snap-in sewing table.............................................................................................Page 53Inserting the needle...............................................................................................................Page 54Two-step presser foot lever ...................................................................................................Page 54Attaching the presser foot holder ..........................................................................................Page 55Setting spool pins ..................................................................................................................Page 55Winding the bobbin................................................................................................................Page 56Inserting the bobbin...............................................................................................................Page 56Threading the upper thread...................................................................................................Page 57Thread tension ......................................................................................................................Page 58Bringing up the lower thread .................................................................................................Page 58
Sewing / Useful applications .................................................................................................Page 59Page 59Page 60
Straight stitching and needle position....................................................................................Page 60Page 61
Zippers and piping.................................................................................................................Page 61Blind hem foot .......................................................................................................................Page 62Sewing on buttons.................................................................................................................Page 62How to sew buttonholes ........................................................................................................Page 63
Page 64Page 64Page 65Page 65Page 66
Applique ................................................................................................................................Page 66Scallop stitching ....................................................................................................................Page 67
Page 67
Page 68Page 69
..............................................................................................................................Page 70
..........................................................................................................................Page 70
Service number .....................................................................................................................Page 70
...................................................................................................................Page 70
Matching needle/ fabric/ thread.............................................................................................How to choose your pattern ..................................................................................................
Zigzag stitching .....................................................................................................................
Overlock stitches ...................................................................................................................3-step zig-zag........................................................................................................................
.........................................................................................................................Patch work.............................................................................................................................Monogramming and embroidering with embroidery hoop*....................................................
Twin needle ...........................................................................................................................
Maintenance..........................................................................................................................Trouble shooting guide..........................................................................................................
Maintenance
Stretch-stitch
Table of contents
GB / IE 49

Congratulations on the purchase of your sewing machine. You have bought a top quality productwhich has been manufactured with great care.These Operating Instructions contain all you need to know about using your sewing machine.We hope you enjoy your sewing machine and wish you success.
the sewing machineBefore you use for the first time, it is essential that you make yourself fully familiarwith the functions of the appliance and find out how to correctly use sewing machine. Read thefollowing directions for use as well as the safety instructions. Keep these instructions. When handingthe device on to a third party, hand these instructions on, too.
Introduction
Intended use
The sewing machine is ...- for use as a movable machine,- for sewing of typical household textiles and ...- only for private household use.
The sewing machine is ...- to be installed at a fixed location,- for processing of other materials (e.g. leather or other heavy materials such as tent or sail fabrics)- for commercial or industrial use.
intended
not intended
Introduction
50 GB / IE
Details of the machine
Accessories
a. All purpose foot
Button sewing foot
Blind hem foot
Bobbin (3x)
i. Oil bottle
k. L-screwdriver
m. Threads (1x blue, 1x pink, 1x yellow)
o. Darning plate
b. Zipper foot
d. Buttonhole foot
f. Needle threader
h. Spool pin felt (2x)
Screwdriver (L&S)
Seam ripper/ brush
Edge/ quilting guide
c.
e.
g.
j. Needle box (3x single needle, 1x twin needle)
l.
n.
p.
1.
3.
5.
7.
9.
11.
Thread take-up lever
Thread tension dial
Stitch length dial
Patten selector dial
Sewing table
Presser foot
13. Bobbin winder stopper
15. Spool pin
17. Handle
19. Main plug socket
21. Hand wheel
2. Bobbin thread guide
4. Stitch width dial
6. Stitch display
8. Reverse sewing lever
10. Needle plate
12. Thread cutting
14. Bobbin winder spindle
16. Upper thread guide
18. Presser foot lifter
20. Power switch
b
f
h
p
n
l
j
d
a
c
e
g
i
k
m
o
1
3
5
7
9
11
13
15
17
19
21
2
20
18
16
10
14
12
4
6
8

Technical data
Rated voltage
Power rating
Dimensions
Cable length
Weight
Material
Operating elements
Display elements
Looper system
Needle system
Interference-free
TÜV approved
Product guarantees
Class
- Machine
- Sewing light
- Total
230 V/ 50 Hz
70 Watt
100 mW
70 Watt
Approx. (W x H x D)
Approx. 1,8 m
Approx. 1,4 m
Approx. 6.0 kg
Aluminium / plastic
Available
Available
Available
Available
130/705H
In acc. with EU Directive
Yes
3 years
- When handle is folded down
- Power cable
- Foot control cable
- Machine
- Mains power switch ON/OFF
- Foot control for sewing speed
- Stitch display
- Sewing light
397 x 277 x 194.5 mm
Oscillating Hook
II
GB / IE 51
Introduction

Important safety instructions
When using an electrical appliance, basic safety should always be followed, including the following:Read all instructions before using this sewing machine.
1. An appliance should never be left unattended when plugged in.2. Always unplug this appliance from the electric outlet immediately after using, as well as before
cleaning and other maintenance.
1. Do not allow to be used as a toy. Close attention is necessary when this appliance is used by ornear children.
2. Use this appliance only for its intended use as described in this manual. Use only attachmentsrecommended by the manufacturer as contained in this manual.
3. Never operate this appliance if it has a damaged cord or plug, if it is not working properly, if it hasbeen dropped or damaged, or dropped into water. Return the appliance to the nearest authorizeddealer or service center for examination, repair, electrical or mechanical adjustment.
4. Never operate the appliance with any air openings blocked. Keep ventilation openings of thesewing machine and foot controller free from accumulation of lint, dust, and loose cloth.
5. Keep fingers away from all moving parts. Special care is required around the sewing machine needle.6. Always use the proper needle plate. The wrong plate can cause the needle to break.7. Do not use bent needles.8. Do not pull or push fabric while stitching. It may deflect the needle causing it to break.9. Switch the sewing machine off ("O") when making any adjustments in the needle area, such as
threading needle, changing needle, threading bobbin, or changing presser foot, and the like.10. Always unplug sewing machine from the electrical outlet when removing covers, lubricating, or
when making any other user servicing adjustments mentioned in the instruction manual.11. Never drop or insert any object into any opening.12. Do not use outdoors.13. Do not operate where aerosol spray products are being used or where oxygen is being administered.14. To disconnect, turn all controls to the off ("O") position, then remove plug from outlet.15. Do not unplug by pulling on cord. To unplug, grasp the plug, not the cord.
This sewing machine is intended for household use only.
DANGER
SAVE THESE INSTRUCTIONS
- To reduce the risk of electric shock:
3. The sewing machine is equipped with a LED lamp. If the LED lamp is broken, it must be replacedby the manufacturer or its service agent in order to avoid a hazard.
16. The sound pressure level under normal operating conditions is 75dB(A).17. Please turn off the machine or unplug when the machine is not operating properly.18. Never place anything on the foot controller.19. If the supply cord that is fixed with foot controller is damaged, it must be replaced by the
manufacturer or its service agent or a similar qualified person in order to avoid a hazard.20. This appliance is not intended for use by persons (including children) with reduced physical,
sensory or mental capabilities, or lack of experience and knowledge, unless they have been givensupervision or instruction concerning use of the appliance by a person responsible for their safety.
21. Children should be supervised to ensure that they do not play with the appliance.22. Keep the instruction at a suitable place that close to the machine, and hand it over if you give the
machine to a third party.
WARNING - To reduce the risk of burns, fire, electric shock, or injury to persons:
52 GB / IE
Important safety instructions

GB / IE 53
Connecting machine to power source
Attention:
Attention:
Sewing light
Foot control
Unplug power cord when machine is notin use.
Consult a qualified electrician if in doubtas to connect machine to power source.Unplug power cord when machine is notin use.The foot control must be used with theappliance by FC-2902B (220-240V area)manufactured by
Connect the machine to a power source asillustrated.
Press main switch (A) for power and lighton. (" l ")
Foot control regulates the sewing speed.
FDM (zhejiang foundermotor corporation ltd, China).
Installing the snap-in sewing table
Keep the snap-in sewing table horizontal,and push it in the direction of the arrow.
The inside of the snap-in sewing table canbe utilized as an accessory box.
Getting ready
AA

�
54 GB / IE
Attention:Turn power switch to off ("O").
Needles must be in perfect condition.Change the needle regularly, especially if itis showing signs of wear and causingproblems.
Insert the needle following the illustratedinstructions.
A. Loosen the needle clamp screw andtighten again after inserting the newneedle.
B. The flat side of the shaft should betowards the back.
C/D. Insert the needle as far up as it will go.
Only use fully-functional needles:
Problems can occur with:
- Bent needles
- Blunt needles
- Damage points
A
BC
D
Two-step presser foot lifter
When sewing several layers or thick fabrics,the presser foot can be raised a secondstage for easy positioning of the work. (A)
Inserting the needle
Getting ready

GB / IE 55
Attaching the presser foot holder
Attention:
2. Attaching the presser foot
3. Removing the presser foot
4. Attaching the edge/ quilting guide
Turn power switch to off ("O") whencarrying out any of the above operations!
1. Raise the presser bar (a) with thepresser foot lifter. Attach the presser footholder (b) as illustrated.
Lower the presser foot holder (b) usingthe presser foot lifter, until the cut-out (c)is directly above the pin (d)The presser foot (f) will engageautomatically.
Raise the presser foot using the presserfoot lifter.Raise the lever (e) and the footdisengages.
Attach the edge/ quilting guide (g) in theslot as illustrated.Adjust as needed for hems, pleats,quilting, etc.
c
d
e
f
eg
b
a
1 2
3 4
Setting spool pins
The spool pins are used for holding thespools of thread when feeding the thread tothe machine.To use, pull up the spool pins. Push downfor storage.
A. Upper threadB. HoleC. TangleD. Spool pin
When using thread which has tendencyto tangle around a spool pin (D), threadthrough the hole (B) of spool pin asshown. The hole should face the threadspool.
Note:
Getting ready
A B
C
A
D

56 GB / IE
a. Spool pin felt
Place an empty bobbin on spindle.
Take the thread from the spool through theguide to the bobbin.
Wind the thread a few times by hand aroundthe empty bobbin in a clockwise direction.Push the bobbin to the right towards thebobbin winding position.
Press the foot control gently. The bobbinwill stop winding when it is full. Push thebobbin to the left to "sewing position" andremove it.
When the bobbin winder spindle is in"bobbin winding" position, the machinewill not sew. To start sewing, push thebobbin winder spindle to the left (sewingposition).
Note:
Inserting the bobbin
Attention:Turn power switch to off ("O").
When inserting or removing the bobbin, theneedle must be fully raised.
1. Open the hinged cover.
2. Hold the bobbin case with one hand.
3. Insert the bobbin (2) so that the threadruns in a clockwise direction (arrow). (3)
4. Put the thread under the tension spring.
5. Hold the bobbin case by the hinged latch.
6. Insert it into the shuttle.
a
Getting ready
Winding the bobbin
1
2
3
4
5 6

GB / IE 57
Threading the upper thread
Attention:
Turn power switch to off . Raise theneedle bar.
Follow completely the numbered sequencein upper threading. Should you skip or failto properly engage the thread with any ofthe thread guides, you will not sew properly.(1-5)
Continue to draw the thread down and intothe needle bar thread guide. Pass thethread through the eye of the needle fromfront to back.
("O")
a. Spool pin felt
Getting ready
a
1
2 3
4 5 Needle threader
You can use the needle threader as aknitting aid.
1. Insert the needle threader through theeye of the needle from back to front.
2. Guide the upper thread through the wireloop of the needle threader.
3. Pull the needle threader together withthe thread back through the eye of theneedle.
1 2 3

58 GB / IE
Thread tension
Note:
Lower thread tension
Upper thread tension
The bobbin thread tension does notnormally have to be adjusted.
To test the bobbin thread tension, removethe bobbin case and bobbin and hold it bysuspending it by the thread. Jerk it once ortwice. If the tension is correct, the thread willunwind by about an inch or two. If thetension is too tight, it does not unwind at all.If the tension is too loose, it will drop toomuch. To adjust, turn the small screw on theside of the bobbin case.
Basic thread tension setting: "AUTO"
To increase the tension, turn the dial to thenext number up. To reduce the tension, turnthe dial to the next number down.
A. Normal thread tension
B. Upper thread tension too loose
C. Upper thread tension too tight
Bringing up the lower thread
Hold the upper thread with the left hand.
Turn the handwheel forwards until theneedle is raised.
Pull on the upper thread to bring the lowerthread up through the stitch plate hole. Layboth threads to the back under the presserfoot.
A
B
C
Getting ready

GB / IE 59
NEEDLE SIZE
9-11(65-75)
12(80)
14(90)
16(100)
18(110)
Lightweight fabrics-thin cottons, voile, serge, silk,muslin, Qiana, interlocks, cotton knits, tricot,jerseys, crepes, woven polyester, shirt & blousefabrics.
Medium weight fabrics-cotton, satin, kettleclote,sailcloth, double knits, lightweight woollens.
Medium weight fabrics-cotton duck, woolen,heavier knits, terrycloth, denims.
Heavyweight fabrics-canvas, woolens, outdoortent and quilted fabrics, denims, upholsterymaterial (light to medium).
Heavy woollens, overcoat fabrics, upholsteryfabrics, some leathers and vinyls.
Light-duty thread in cotton,nylon or polyester.
Most threads sold are mediumsize and suitable for thesefabrics and needle sizes. Usepolyester threads on syntheticmaterials and cotton on naturalwoven fabrics for best results.Always use the same thread ontop and bottom.
Heavy duty thread, carpetthread. (Use heavy footpressure-large numbers.)
FABRICS THREAD
Sewing / Useful applications
Stitching
Cutting the thread
At the end of seam, press down the reversesewing lever. Sew a few reverse stitches.Release the lever and the machine will sewforwards again. (A)
Removing the work
Turn the handwheel towards to bring thethread take up lever to its highest position,raise the presser foot and remove worktowards the back.
Hold the threads behind the presser footwith both hands, guide them to the slit (B)and press down.
A
Matching needle/ fabric/ thread
Note twin needle:1. Twin needles, can be purchased for utility and decorative work.2. When sewing with twin needles, the stitch width dial should be set at less than "3" and set the needle
position dial to middle position.3. European needles show sizes 65, 70, 80 etc. American and Japanese needles show size 9, 11, 12 etc.4. Replace needle often (approximately every other garment) and / or at first thread breakage or skipped
stitches.
NEEDLE, FABRIC, THREAD SELECTION GUIDE
IMPORTANT: Match needle size to thread size and weight of .fabric
B
Sewing basics
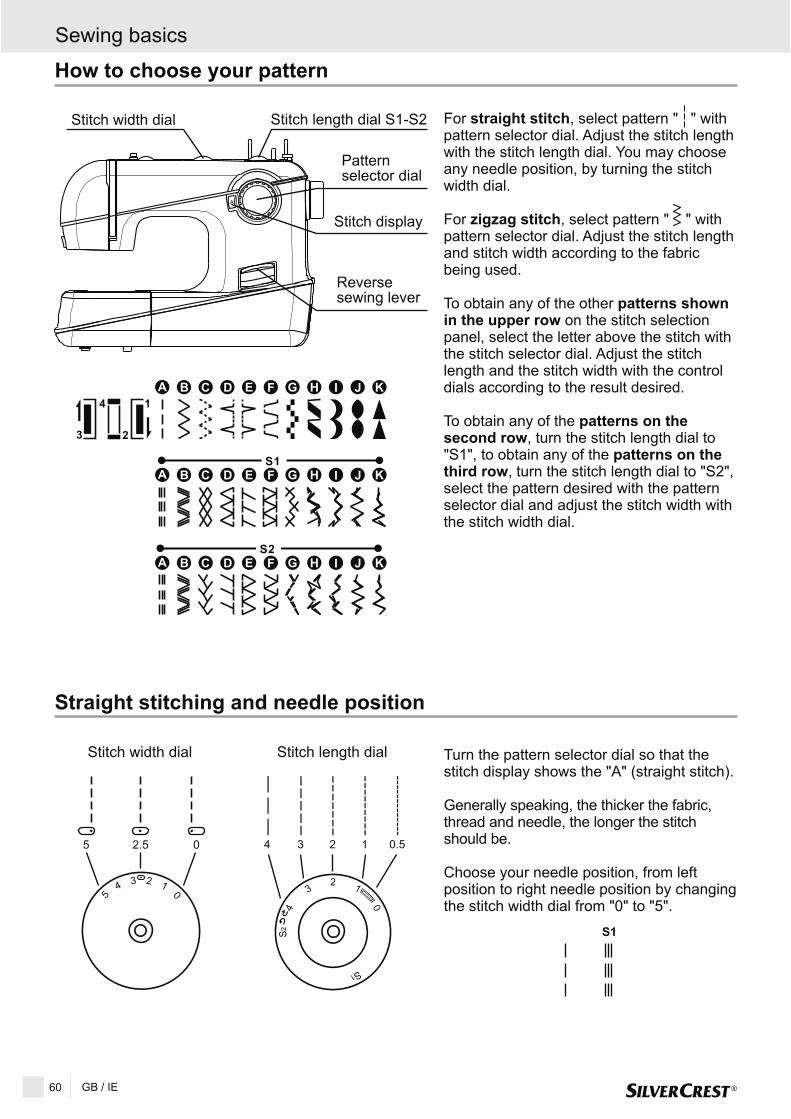
Stitch length dial S1-S2
A
60 GB / IE
How to choose your pattern
Stitch width dial
Patternselector dial
Reversesewing lever
Stitch display
For , select pattern " " withpattern selector dial. Adjust the stitch lengthwith the stitch length dial. You may chooseany needle position, by turning the stitchwidth dial.
For , select pattern " " withpattern selector dial. Adjust the stitch lengthand stitch width according to the fabricbeing used.
To obtain any of the otheron the stitch selection
panel, select the letter above the stitch withthe stitch selector dial. Adjust the stitchlength and the stitch width with the controldials according to the result desired.
To obtain any of the, turn the stitch length dial to
"S1", to obtain any of the, turn the stitch length dial to "S2",
select the pattern desired with the patternselector dial and adjust the stitch width withthe stitch width dial.
straight stitch
zigzag stitch
patterns shownin the upper row
patterns on thesecond row
patterns on thethird row
Straight stitching and needle position
Stitch length dial
0
12
3
4
S1
S2
4 3 2 1 0.5
Stitch width dial
5 0
1234
5 2.5 0
S1
Turn the pattern selector dial so that thestitch display shows the "A" (straight stitch).
Generally speaking, the thicker the fabric,thread and needle, the longer the stitchshould be.
Choose your needle position, from leftposition to right needle position by changingthe stitch width dial from "0" to "5".
Sewing basics

GB / IE 61
Zig zag stitching
Turn the pattern selector dial to "B".
The maximum zigzag stitch width for zigzagstitching is "5"; however, the width can bereduced on any pattern. The width increasesas you move zigzag dial from "0" - "5".
The density of zigzag stitches increase as thesetting of stitch length dial approaches "0".Neat zigzag stitches are usually achieved at"2.5" or below.
When the stitch length is set between "0" -"1", the stitches are very close togetherproducing the "satin stitch" which is usedfor making buttonholes and decorativestitches.
When sewing on very fine fabric, place apiece of thin paper under the fabric. It is easyto tear the paper and remove the paper afteryou have finish your seam.
Function of stitch width dial
Function of stitch length dial whilezigzaging
Satin stitch
Fine fabric
Stitch width dial
5 0
1234
5 4 3 2 1 0
Stitch length dial
Zipper foot
Stitch Stitch width Stitch length
A 2.5 1~4
The zip foot can be inserted right or left,depending on which side of the foot you aregoing to sew. (1)
To sew past the zip pull, lower the needleinto the fabric, raise the presser foot andpush the zip pull behind the presser foot.Lower the foot and continue to sew.
It is also possible to sew in a length of cord,into a bias strip to form a "welt".
According to thickness of fabric to set stitchlength control. (2)
1 2
Sewing basics

62 GB / IE
Blind hem foot
For hems, curtains, trousers, skirts, etc.
Blind hem/ lingerie for firm fabrics.
Fold the fabric as illustrated with the wrongside uppermost. (1)Place the fabric under the foot. Turn thehandwheel forwards by hand until the needleswings fully to the left. It should just piercethe fold of the fabric. If it does not, adjust thestitch width accordingly. (2)Adjust the guide (3) by turning the knob (4)so that the guide just rests against the fold.Sew slowly, by pressing the foot controllightly guiding the fabric along the edge ofthe guide.
Stitch Stitch width Stitch length
D 1~2 3~5
Button sewing foot
Install the darning plate. This will cover thefeed dog and the stitch length will bedisabled
Position the work under the foot. Place thebutton on the marked position, lower thefoot, adjust stitch width to "0" and sew a fewsecuring stitches. Adjust the stitch width
. Turn thehandwheel to check that the needle goescleanly into the left or right hole of thebutton, and sew on the button. Adjust thestitch width to "0" and sew a few securingstitches.
If a shank is required, place a darningneedle on top of the button and sew. Forbuttons with 4 holes, sew through the fronttwo holes first, push work forward and thensew through the back two holes asdescribed.
according to the button
.
Stitch Stitch width Stitch length
B 0~5 0
Sewing basics
1 4
32

GB / IE 63
Buttonhole foot
Preparation:
Note:
To prepare the fabric:
Tips:
Remove the zigzag foot and attach the buttonholefoot. Adjust the stitch length dial between "0.5" - "1".The density of the stitch depends on thickness ofthe fabric.
Always test sew a buttonhole.
Measure the diameter of the button and add 0.3cm(1/8") for the bartacks. If you have a very thickbutton, add more to the diameter measurement.Mark the position and length of the buttonhole onthe fabric.
Position the fabric so that the needle is on the markthat is furthest from you.
Pull the buttonhole foot towards you as far as it willgo.
Lower the foot.
a. Turn the pattern selector dial to " ". Sew atmoderate speed until you reach the end mark.
b. Turn the pattern selector dial to " " and sew 5-6bartack stitches.
c. Turn the pattern selector dial to " " and sew theleft side of the buttonhole to the mark at the endwhich is further from you.
d. Turn the pattern selector dial to " " and sew bartack stitches.
Remove the fabric from under the foot. Draw theupper thread through the backside of the fabric andknot upper and lower threads. Cut the center of thebuttonhole with the seam ripper, being careful not tocut the stitches on either side.
- Slightly reduce upper thread tension to producebetter results.
- Use backing material for fine and stretchy fabrics.
- It is advisable to use a gimp cord for stretch orknit fabrics. The zigzag should sew over the gimp.(e)
Stitch Stitch width Stitch length
5 0.5~1
Sewing basics
a b c d
e

64 GB / IE
Overlock stitches
Stitch Stitch width Stitch length
E, F 3~5 S1, S2
Note:Use new needles or ball point needles orstretch needle!
Seams, neatening, visible hems.
For fine knits, jerseys, neck edges, ribbing.(A)
For fine knits, jerseys, neck edges, ribbing.(B)
For fine knits, handknits, seams. (C)
All overlock stitches are suitable for sewingand neatening edges and visible seams inone operation.When neatening, the needle should just goover the edge of the fabric.
Stretch overlock
Standard overlock
Double overlock stitch
A B C
Sewing on lace and elastic, darning,mending, reinforcing edges.
Place patch in position. The stitch lengthcan be shortened to produce very closestitches. (1)
When mending tears, it is advisable to use apiece of backing fabric to reinforce. The stitchdensity can be varied by adjusting the stitchlength. First sew over the centre and thenoverlap on both sides. Depending on the typeof fabric and damage, sew between 3 and 5rows. (2)
Stitch Stitch width Stitch length
C 3~5 1~2
1 2
3-step zig-zag
Sewing basics

GB / IE 65
Stretch-stitch
Stitch Stitch width Stitch length
A 2.5 S1, S2
To join two pieces of fabric while leaving aspace between their edges.
- Fold over the edges of the two pieces offabric for the hem and baste the edges toa thin piece of paper leaving a smallspace between them.
- Stitch along the edge, pulling both threadsslightly when beginning to sew.
- Use thicker than normal threads forsewing.
- After sewing, remove the basting and thepaper. Finish by tying knots on thereverse side at the beginning and the endof the seams.
Patch work
Stitch Stitch width Stitch length
F 3~5 S1
Triple straight stitch: (1)
For hardwearing seams.
The machine sews two stitches forwardsand one stitch backwards. This gives triplereinforcement.
Stitch Stitch width Stitch length
B 3~5 S1, S2
Triple zig-zag: (2)
For hardwearing seams, hems anddecorative seams.
Triple zig-zag is suitable for firm fabrics likedenim, corduroy, etc.
1 2
Sewing basics

66 GB / IE
Monogramming and embroidering with embroidery hoop*
Attach the darning plate
Preparation for Monogramming andEmbroidering*
- Remove the presser foot and the presserfoot holder.
- Attach the darning plate.
- Lower presser foot lever before starting tosew.
- Adjust the stitch width according to thesize of lettering or design.
- Draw the desired lettering or design onthe right side of the fabric.
- Stretch the fabric between embroideryhoop as firmly as possible.
- Place the fabric under the needle. Makesure the presser foot bar is down in itslowest position.
- Turn the balance wheel towards you tobring up the lower thread through thefabric. Sew a few securing stitches at thestarting point.
- Hold the hoop with thumb and forefingersof both hands.
- Coordinate sewing speed and movementof hoop.
Stitch Stitch width Stitch length
B 1~5 0
Stitch Stitch width Stitch length
B 3~5 0.5~1
Applique
* Embroidery hoop not included with machine.
- Cut out the applique design and baste it tothe fabric.
- Sew slowly around the edge of the design.
- Trim excess material outside the stitching.Make sure not to cut any stitches.
- Remove the basting thread.
- Tie top and bottom thread under theapplique to avoid unraveling.
Sewing basics

1 2
Stitch Stitch width Stitch length
I 3~5 1~2
GB / IE 67
Twin needle
Please note:When sewing with twin needle, alwaysproceed slowly, and make sure to maintaina low speed to insure quality stitching.
- Make sure that the two threads used tothread the twin needle are of the sameweight. You can use one or two colors.
- Insert the twin needle in the same way assingle needle. Flat side of needle shouldface away from you.
- Follow instructions for single needlethreading. Thread each needle separately.
When using twin needle on zig-zag makesure the stitch width dial is set between "0"and "3". Do not use twin needle at settingabove "3".
Stitch Stitch width Stitch length
A 2.5 1~4
Scallop stitching
This machine automatically produces ascallop stitch which may be used asdecorative edging.
1. Sew the scallop stitch along the edge ofthe material.
2. If desired, trim around the scallop withscissors to create a scalloped edge. Becareful not to cut the thread.
Sewing basics

68 GB / IE
Attention:
Remove the stitch plate (1):
Cleaning the feed dog (2):
Cleaning and lubricating the hook (3-7):
Important:
Disconnect the machine from the electricity supplyby removing the plug from the mains socket. Whencleaning the machine, it must always bedisconnected from the electricity supply.
Turn the handwheel until the needle is fully raised.Open the hinged front cover and unscrew theneedle plate screw with the screw driver.
Remove the bobbin case and use the brushsupplied to clean the whole area.
Remove the bobbin case. Snap the two hookretaining arms (3) outwards. Remove the hook racecover (4) and the hook (5) and clean with a softcloth. Lubricate at the points (6) (1-2 drops) withsewing machine oil. Turn the handwheel until thehook race (7) is in the left position. Replace thehook (5). Replace the hook race cover and snapback the two hook retaining arms. Insert he bobbincase and bobbin and replace the stitch plate.
Fabric fluff and threads must be removedregularly. Your machine should be serviced atregular intervals at one of our service agencies.
4
5
6
7
3
1
2
Maintenance
Maintenance

GB / IE 69
Trouble shooting guide
Problem Cause Correction
Upper threadbreaks
Lower threadbreaks
Skippedstitches
Needle breaks
Loose stitches
Seams gatheror pucker
Uneven stitches,uneven feed
The machine isnoisy
The machinejams
1.The machine is not threaded correctly.2.The thread tension is too tight.3.The thread is too thick for the needle.4.The needle is not inserted correctly.5.The thread is round wound the spool
holder pin.6.The needle is damaged.
1.The bobbin case is not insertedcorrectly.
2.The bobbin case is threaded wrongly.3.The lower thread tension is too tight.
1.The needle is not inserted correctly.2.The needle is damaged.3.The wrong size needle has been
used.4.The foot is not attached correctly.
1.The needle is damaged.2.The needle is not correctly inserted.3.Wrong needle size for the fabric.4.The wrong foot is attached.
1.The machine is not correctly threaded.2.The bobbin case is not correctly
threaded.3.Needle/ fabric/ thread combination is
wrong.4.Thread tension wrong.
1.The needle is too thick for the fabric.2.The stitch length is wrongly adjusted.3.The thread tension is too tight.
1.Poor quality thread.2.The bobbin case is wrongly
threaded.3.Fabric has been pulled.
1.The machine must be lubricated.2.Fluff or oil have collected on the
hook or needle bar.3.Poor quality oil has been used.4.The needle is damaged.
Thread is caught in the hook.
1.Rethread the machine.2.Reduce the thread tension. (lower number)3.Select a larger needle.4.Remove and reinsert the needle. (flat side
towards the back)5.Remove the reel and wind thread onto reel.6.Replace the needle.
1.Remove and reinsert the bobbin case andpull on the thread. The thread should pulleasily.
2.Check both bobbin and bobbin case.3.Loosen lower thread tension as described.
1.Remove and reinsert needle. (flat sidetowards the back)
2.Insert a new needle.3.Choose a needle to suit the thread and
fabric.4.Check and attach correctly.
1.Insert a new needle.2.Insert the needle correctly. (flat side
towards the back)3.Choose a needle to suit the thread and
fabric.4.Select the correct foot.
1.Check the threading.2.Thread the bobbin case as illustrated.3.The needle size must suit the fabric and
thread.4.Correct the thread tension.
1.Select a finer needle.2.Readjust the stitch length.3.Loosen the thread tension.
1.Select a better quality thread.2.Remove bobbin case and retread and
insert correctly.3.Do not pull on the fabric while sewing, let
it be taken up by the machine.
1.Lubricate as described.2.Clean the hook and feed dog as described.3.Only use good quality sewing machine oil.4.Replace the needle.
Remove the upper thread and bobbin case,turn the handwheel backwards and forwardsby hand and remove the thread remands.Lubricate as described.
Maintenance

70 GB / IE
There is a three year guarantee on this device starting from the purchase date.
The device was inspected carefully and thoroughly before delivery.
Please keep your receipt as proof of purchase.
In case of a guarantee complaint, please call your service centre.
This is the only way to ensure free shipment of your goods to us.
The guarantee scope only covers material or manufacturing defects, it does not cover wear parts ordamage to fragile parts e.g. switches. The product is only intended for private and not commercial use.
In the event of misuse or improper handling, force or any kind of intervention, which has not beenperformed by our service office, the guarantee will lapse.
This guarantee does not limit your statutory rights.
Guarantee
- Dispose of devices with dangerous defects carefully and ensure that they are no longerused.
- Do not dispose of the device in normal domestic waste.
- This product is produced according to EU directive 2002/96/EC.
- Dispose of the device over a registered waste disposal firm or through your communalwaste disposal facility.
- Observe the currently valid regulations. In case of doubt, consult your waste disposal facility.
- Please dispose of all packaging materials in an environmentally friendly manner.
Keep the sewing machine's transport packaging. It may be useful for storing the machine,but is particularly useful if you want to ship the sewing machine for repair. Most instances ofdamage occur when the machines are being transported.
Disposal
Crown Technics GmbHLerchenstrasse 2DE-74226 Nordheim
Manufacturer
Disposal / Guarantee / Service / Manufacturer
Service number
These Operating Instructions cannot cover all possible applications.For more information or in case of problems not covered or inadequately covered in these OperatingInstructions, please contact the service number
Service-Address:
00800 555 00 666 ( )
Please keep these Operating Instructions in a safe place and pass on to any future users.
free
CROWN Service Centerteknihall Elektronik GmbHBreitefeld 15DE-64839 M nsterü
IAN 74612
Please be aware that the following address is not a service address. Please first contact the serviceoffice stated above.

Einleitung
Wichtige Sicherheitshinweise
Wartung
Entsorgung
Garantie
Service
Hersteller
Einleitung...............................................................................................................................Seite 72Bestimmungsgemäße Verwendung ......................................................................................Seite 72Nähmaschinenkomponenten.................................................................................................Seite 72Zubehör .................................................................................................................................Seite 72Technische Daten..................................................................................................................Seite 73
.............................................................................Seite 74
Anschluss des Geräts an der Stromversorgung....................................................................Seite 75Der Anschiebetisch................................................................................................................Seite 75Einsetzen der Nadel ..............................................................................................................Seite 76Zweistufen-Nähfußhebel .......................................................................................................Seite 76Montieren des Nähfußhalters ................................................................................................Seite 77Einrichten der Garnspulenstifte .............................................................................................Seite 77Unterfaden spulen .................................................................................................................Seite 78Spule einlegen.......................................................................................................................Seite 78Oberfaden einfädeln..............................................................................................................Seite 79Fadenspannung ....................................................................................................................Seite 80Unterfaden heraufholen.........................................................................................................Seite 80
Nähen / Nützliche Anwendungen ..........................................................................................Seite 81Gegenseitige Abstimmung von Nadel, Stoff und Faden........................................................Seite 81Stichwahl ...............................................................................................................................Seite 82Geradstich und Nadelposition ...............................................................................................Seite 82Zick-Zack-Stich......................................................................................................................Seite 83Reißverschlussfuß.................................................................................................................Seite 83Blindsaumfuß ........................................................................................................................Seite 84Knopfannähfuß......................................................................................................................Seite 84Knopflochfuß .........................................................................................................................Seite 85Overlock-Stiche .....................................................................................................................Seite 86Genähter Zickzack ................................................................................................................Seite 86Stretchstich............................................................................................................................Seite 87Patchwork..............................................................................................................................Seite 87Stickereien mit Stickrahmen* ................................................................................................Seite 88Aufnähen...............................................................................................................................Seite 88Festonabschluss ...................................................................................................................Seite 89Zwillingsnadel........................................................................................................................Seite 89
Wartung der Nähmaschine....................................................................................................Seite 90Beheben von Störungen........................................................................................................Seite 91
......................................................................................................................Seite 92
..............................................................................................................................Seite 92
Servicenummer .....................................................................................................................Seite 92
...........................................................................................................................Seite 92
Vorbereitung
Grundlagen des Nähens
DE / AT / CH 71
Inhaltsverzeichnis

Nähmaschinenkomponenten
1. Fadenhebel
3. Fadenspannung
5. Stichlängenknopf
7. Stichwahlknopf
9. Anschiebetisch
11. Nähfüße
13. Begrenzung für Spuleneinrichtung
15. Garnrollenstift
17. Tragegriff
19. Netzanschluss
21. Handrad
2. Fadenführung zum Spulen
4. Stichbreitenknopf
6. Stichwahlfenster
8. Hebel zum Rückwärtsnähen
10. Stichplatte
12. Fadenabschneider
14. Spuleinrichtung
16. Oberfadenführung
18. Zweistufen-Nähfusshebel
20. Hauptschalter
Herzlichen Glückwunsch zum Kauf lhrer Nähmaschine.Sie haben ein Qualitätsprodukt erworben, welches mit größter Sorgfalt hergestellt wurde.Diese Bedienungsanleitung vermittelt lhnen alles Wissenswerte über die Anwendungsmöglichkeitenlhrer Nähmaschine. Sollten dennoch Fragen offen bleiben, bitten wir Sie, sich an lhren Händler zuwenden.Wir wünschen lhnen viel Freude und große Näherfolge.
Bevor Sie die Nähmaschine zum ersten Mal benutzen, ist es sehr wichtig, dass Sie sich eingehend mitden Funktionen des Gerätes vertraut machen und herausfinden, wie man die Nähmaschine richtigbedient. Bitte lesen Sie nachstehende Bedienungsanleitung sowie die Sicherheitshinweise. Bittebewahren Sie diese Bedienungsanleitung gut auf. Wenn Sie das Gerät an Dritte übergeben,vergessen Sie nicht, diese Bedienungsanleitung ebenso auszuhändigen.
Die Nähmaschine ist ...- zur Verwendung als ortsveränderliches Gerät,- zum Nähen von haushaltsüblichen Textilien und ...- nur zu Verwendung im privaten Hausgebrauch.
Die Nähmaschine ist ...- zur ortsfesten Aufstellung,- zur Verarbeitung von anderen Materialien (z.B. Leder, Zelt-, Segel- und ähnliche schwere Stoffe)...- für eine Verwendung in gewerblichen oder industriellen Bereichen.
vorgesehen
nicht vorgesehen
Bestimmungsgemäße Verwendung
72 DE / AT / CH
Einleitung
Einleitung
Zubehör
a. Allzweck-Nähfuß
c. Knopfannähfuß
e. Blindsaumfuß
g. Spulen (3x)
i. Ölflasche
k. L-Schraubendreher
m. Garnrolle (1x blau, 1x pink, 1x gelb)
o. Stick-und Stopfplatte
b. Reißverschlussfuß
d. Knopflochfuß
f. Fadeneinfädler
h. Filzkissen (2x)
j. Nadelbox (3x einzelne Nadel, 1x Zwillingsnadel)
l. Schraubenzieher (gross und klein) (L&S)
n. Nahttrenner/ Pinsel
p. Kanten-/ Quiltführung
1
3
5
7
9
11
13
15
17
19
21
2
20
18
16
10
14
12
4
6
8
a
c
e
g
i
k
m
o
b
f
h
p
n
l
j
d

Nennspannung
Nennleistung
Abmessungen
Kabellänge
Gewicht
Material
Bedienungselemente
Anzeigeelemente
Greifersystem
Nadelsystem
Funkentstört
TÜV geprüft
Produkte-Garantie
Schutzklasse
- Nähmaschine
- Nählicht
- Total
- Griff eingeklappt
- Netzkabel
- Fußanlasserkabel
- Nähmaschine
- Hauptschalter
- Fußanlasser für Nähgeschwindigkeit
- Stichanzeigefenster
- Nählicht
230 Volt/ 50 Hz
70 Watt
100 mW
70 Watt
ca. 397 x 277 x 194.5 mm (B x H x T)
ca. 1.8 m
ca. 1.4 m
ca. 6.0 kg
Aluminium / Kunststoff
vorhanden
vorhanden
vorhanden
vorhanden
CB-Greifer
130/705H
nach EU-Richtlinie
Ja
3 Jahre
II
DE / AT / CH 73
Technische Daten
Einleitung

Wichtige Sicherheitshinweise
74 DE / AT / CH
Wichtige Sicherheitshinweise
Wenn Sie ein elektrisches Gerät benutzen, sollten Sie immer die grundlegenden Sicherheitshinweisebeachten.Lesen Sie alle Bedienungsanleitungen bevor Sie die Nähmaschine benutzen.
1. Die Nähmaschine sollte nie unbeaufsichtigt eingeschaltet sein.2. Bitte ziehen Sie den Netzstecker immer sofort nach der Benutzung aus der Steckdose. Dies gilt
auch vor dem Reinigen und anderen Wartungsvorgängen.3. Die Nähmaschine verfügt über eine LED-Lampe. Wenn die LED-Lampe beschädigt ist, muss sie
vom Hersteller oder einem seiner Kundendiensttechniker ausgetauscht werden, um Gefahren zuvermeiden.
1. Gestatten Sie nicht, dass die Nähmaschine als Spielzeug verwendet wird. Eine Überwachung istnotwendig, wenn die Nähmaschine in der Nähe von Kindern verwendet wird.
2. Verwenden Sie die Nähmaschine nur für jene Dinge, die in der Bedienungsanleitung beschrieben sind.3. Verwenden Sie die Nähmaschine nicht, wenn das Kabel oder der Netzstecker kaputt ist, wenn
Wasser in das Innere eingedrungen ist oder wenn die Nähmaschine nicht richtig näht. Bringen Siedie Nähmaschine in diesen Fällen in eine autorisierte Werkstätte, um sie dort überprüfen zu lassen.
4. Betreiben Sie die Nähmaschine niemals mit blockierten Belüftungsöffnungen. Halten Sie dieBelüftungsöffnungen der Nähmaschine sowie des Fußpedals frei von Fusseln, Staub undStoffabfällen.
5. Wegen der Auf- und Abwärtsbewegung der Nadel beim Nähen besteht eine Verletzungsgefahr!Arbeiten Sie stets mit Vorsicht und behalten Sie das Arbeitsfeld im Auge.
6. Verwenden Sie immer die entsprechende Stichplatte. Eine falsche Stichplatte kann zuNadelbrüchen führen.
7. Verwenden Sie keine verbogenen Nadeln.8. Ziehen Sie während des Nähens nie am Stoff! Dies kann die Nadel ablenken und zum
Nadelbrechen führen.9. Schalten Sie die Nähmaschine immer aus, wenn Sie Einstellungen in der Nadelgegend machen,
wie z.B. Einfädeln, Nadeln wechseln, Wechseln des Fußes etc.10. Ziehen Sie immer den Netzstecker, bevor Sie den Deckel entfernen, die Nähmaschine ölen oder
andere Wartungsarbeiten, wie in der Bedienungsanleitung beschrieben, durchführen.11. Werfen Sie keine Gegenstände in die Öffnungen der Nähmaschine.12. Verwenden Sie die Nähmaschine nicht im Freien.13. Nähmaschine nicht benutzen, wo Treibgasprodukte (Sprays) oder Sauerstoff verwendet werden.14. Um die Nähmaschine abzuschalten, stellen Sie den Hauptschalter auf "O" und ziehen den
Netzstecker aus der Steckdose.15. Ziehen Sie den Netzstecker aus der Steckdose, ziehen Sie nicht am Kabel selbst.16. Der Schalldruckpegel unter normalen Betriebsbedingungen beträgt 75dB(A).17. Bitte schalten Sie die Nähmaschine aus oder ziehen Sie den Netzstecker, wenn die Nähmaschine
nicht ordnungsgemäß funktioniert.18. Platzieren Sie keine Gegenstände auf dem Fußpedal.19. Wenn das am Fußpedal befestigte Kabel beschädigt ist, muss es vom Hersteller, dessen
Kundendienst oder anderem qualifizierten Personal ausgetauscht werden, um Gefahren zuvermeiden.
20. Dieses Gerät ist nicht dafür bestimmt, durch Personen (einschließlich Kinder) mit eingeschränktenphysischen, sensorischen oder geistigen Fähigkeiten oder mangels Erfahrung und/oder mangelsWissen benutzt zu werden, es sei denn, sie werden durch eine für ihre Sicherheit zuständige Personbeaufsichtigt oder erhielten von ihr Anweisungen, wie das Gerät zu benutzen ist.
21. Kinder sind zu beaufsichtigen, um sicherzustellen, dass sie nicht mit dem Gerät spielen.22. Bewahren Sie die Bedienungsanleitung an einem geeigneten Ort in der Nähe des Gerätes auf.
Händigen Sie die Bedienungsanleitung bei der Weitergabe des Gerätes an Dritte ebenfalls mit aus.
Diese Nähmaschine ist nur für den Haushalt gedacht.
Gefahr
Achtung
- wie das Risiko eines Stromschlages reduziert wird:
- wie das Risiko eines Brandes, eines Feuers oder einer Verletzung verringert wird:
Verwahren Sie diese Bedienungsanleitung

DE / AT / CH 75
Achtung:
Achtung:
Beleuchtung
Fußpedal
Ziehen Sie den Netzstecker aus derSteckdose, wenn Sie das Gerät nichtbenutzen.
Bitte treten Sie bei irgendwelchenZweifeln hinsichtlich des Anschlusses derNähmaschine an der Netzversorgung miteinem qualifizierten Elektrodienst inVerbindung.Wenn Sie die Nähmaschine nichtbenutzen, ziehen Sie den Netzsteckeraus der Steckdose.Die Nähmaschine muss mit dempassenden ELECTRONIC Fußpedal
(220-240-V-Netz) des HerstellersFDM (zhejiang founder motor corporationltd, China) verwendet werden.
Den Netzanschluss gemäßnebenstehender Zeichnung durchführen.
Durch Drücken des Hauptschalters (A) inPosition "I" wird die Nähmaschine in Betriebgenommen und die Beleuchtungeingeschaltet.
Mit dem Pedal wird dieBetriebsgeschwindigkeit der Nähmaschinegeregelt.
FC-2902B
Der Anschiebetisch
Wenn auf dem Freiarm genäht werden soll,in Pfeilrichtung abziehen.
Das lnnere des ist fürZubehör vorgesehen.
den Anschiebetisch
Anschiebetisches
Anschluss des Geräts an der Stromversorgung
Vorbereitung
AA
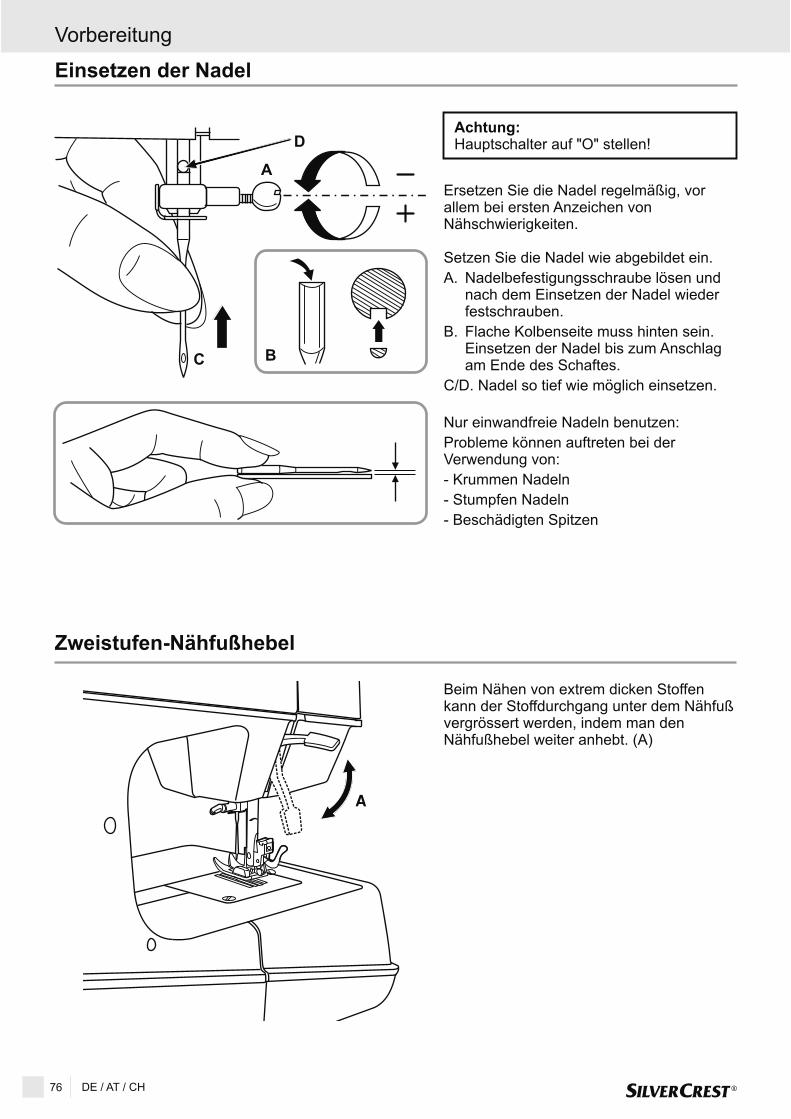
�
76 DE / AT / CH
Achtung:Hauptschalter auf "O" stellen!
Ersetzen Sie die Nadel , vorallem bei ersten Anzeichen vonNähschwierigkeiten.
Setzen Sie die Nadel wie abgebildet ein.A. Nadelbefestigungsschraube lösen und
nach dem Einsetzen der Nadel wiederfestschrauben.
B. Flache Kolbenseite muss hinten sein.Einsetzen der Nadel bis zum Anschlagam Ende des Schaftes.
C/D. Nadel so tief wie möglich einsetzen.
regelmäßig
Nur einwandfreie Nadeln benutzen:Probleme können auftreten bei derVerwendung von:- Krummen Nadeln- Stumpfen Nadeln- Beschädigten Spitzen
Zweistufen-Nähfußhebel
Beim Nähen von extrem dicken Stoffenkann der Stoffdurchgang unter dem Nähfußvergrössert werden, indem man denNähfußhebel weiter anhebt. (A)
Einsetzen der Nadel
Vorbereitung
A
BC
D

A B
C
A
D
DE / AT / CH 77
Montieren des Nähfußhalters
Achtung:
1.
2. Nähfuß einsetzen
3. Nähfuß abnehmen
4. Einsetzen der Kanten-/Quiltführung
Bei allen Anwendungen Hauptschalterauf ("O") stellen!
Nähfuß-Stange (a) hochstellen.Nähfußhalter (b) wie abgebildetmontieren.
Nähfuß-Stange (a) senken bis die Rille(c) direkt oberhalb des Stifts (d) ist.Hebel (e) leicht nach vorne drücken.Nähfuß-Stange (a) senken, Nähfuß (f)rastet ein.
Nähfuß hochstellen.Hebel (e) leicht nach vorne drücken undder Fuß ist frei.
Wie die Abbildung zeigt, Kanten-/Quiltführung (g) sorgfältig einschieben,z.B. für Säume, Falten usw.
Nähfußhalter montieren
Die Garnspulenstifte dienen zum Festhaltender Garnspulen während der Garnzufuhrzur Nähmaschine.Zur Verwendung ziehen Sie die Spulenstiftenach oben. Zum Aufbewahren nach untendrücken.
A. OberfadenB. ÖseC. GewirrD. Garnrollenstift
Wenn Sie Garn verwenden, dass dazuneigt, sich rund um den Spulenstift zuwickeln (D), führen Sie das Garn durchdie Öse (B) des Spulenstifts, siehe Abb.Die Öse sollte in Richtung Garnspulezeigen.
Hinweis:
Vorbereitung
Einrichten der Garnspulenstifte
c
d
e
f
eg
b
a
1 2
3 4

78 DE / AT / CH
Unterfaden spulen
Leere Spule auf Achse stecken.
a. Filzkissen
Garnrolle auf Garnrollenstift setzen. Fadenvon der Garnrolle durch die Führung ziehen.
Faden von Hand einige Male imUhrzeigersinn um die leere Spule wickeln.Spule nach rechts in die Spulpositiondrücken.
Fußpedal betätigen. Spulvorgang stelltautomatisch ab, sobald die Spule voll ist.Spule zurückdrücken und entfernen.
Wenn sich die Spuleinrichtung in derSpulposition befindet, wird derNähvorgang automatisch unterbrochen.Zum Nähen die Spuleinrichtung nachlinks drücken (Nähposition).
Hinweis:
Spule einlegen
Achtung:Hauptschalter auf "O" stellen!
Beim Einsetzen und Herausnehmen derSpule muss die Nadel immer inHöchststellung sein.
1. Klappdeckel öffnen.
2. Spulenkapsel mit einer Hand halten.
3. Spule so einlegen (2), dass der Fadenim Uhrzeigersinn aufgespult ist (Pfeil). (3)
4. Faden in den Schlitz und unter die Federziehen.
5. Spulenkapsel mit Zeigefinger undDaumen am Kläppchen halten.
6. Kapsel in die Greiferbahn einsetzen.
Vorbereitung
a
1
2
3
4
5 6

DE / AT / CH 79
Oberfaden einfädeln
Achtung:Hauptschalter auf ("O") stellen!Nähfuß-Stange hochstellen, Fadenhebel inhöchste Position bringen.
a. Filzkissen
1. Garnrolle auf den Garnrollenstift stecken.
2. Faden durch die Führungsöse vonrechts nach links, dann zwischen dieSpannungsscheiben.
3. durch dieFadenanzugsfeder.
4. Nach oben und von rechts nach linksdurch den Fadenhebel.
5. Nach unten durch die zwei Ösen führen.Nadel stets von vorne einfädeln.
Von oben nach unten
Vorbereitung
a
1
2 3
4 5Fadeneinfädler
Als Einfädelhilfe können Sie denFadeneinfädler verwenden.
1. Fadeneinfädler von hinten nach vornedurchs Nadelöhr stecken.
2. Den Oberfaden durch die Drahtschlaufedes Fadeneinfädlers führen.
3. Den Fadeneinfädler mit dem Fadendurch das Nadelöhr zurückziehen.
1 2 3

80 DE / AT / CH
Fadenspannung
Hinweis:
Unterfadenspannung
Oberfadenspannung
Normalerweise müssen Sie dieFadenspannung des Unterfadens nichtverändern.
Um die Fadenspannung des Unterfadens zukontrollieren, wird die volle Spule in dieSpulenkapsel gesteckt. Dann lässt man dieSpulenkapsel samt Greifer am Fadenendehängen. Die Fadenspannung ist dann richtig,wenn sich die volle Spulenkapsel beileichtem Schwingen ca. 5 bis 10cm nachunten abrollt, und dann ruhig hängen bleibt.Wenn sich die volle Kapsel zu leicht abrollt,ist die Fadenspannung zu leicht; rollt sie sichnur schwer oder gar nicht ab, ist dieFadenspannung zu stark.
Grundeinstellung der Fadenspannung:"AUTO".Für eine stärkere Oberfadenspannung Skalaauf die nächstgrößere Zahl drehen. Für eineleichtere Fadenspannung muss die nächstkleinere Zahl eingestellt werden.
A. Fadenspannung normalB. Oberfadenspannung zu schwachC. Oberfadenspannung zu stark
Unterfaden heraufholen
Ende des Oberfadens mit der Hand halten.Das Handrad gegen den Uhrzeigersinndrehen, bis die Nadel wieder oben steht.(Eine volle Umdrehung).
Am Oberfaden ziehen, damit derUnterfaden aus dem Stichloch gezogenwird. Beide Fäden unter dem Nähfuß nachhinten legen.
Vorbereitung
A
B
C

DE / AT / CH 81
Nähen / Nützliche Anwendungen
Vernähen
Nähguts
Nähgut
Am Ende der Naht angelangt auf denRückwärtslauf-Hebel drücken. Einige Sticherückwärts nähen. Den Hebel loslassen,worauf die Nähmaschine wieder nach vornzu nähen beginnt. (A)
Das Handrad nach vorn drehen, um denFadenspanner möglichst weit anzuheben.Den Nähfuß hochfahren und dasnach hinten ziehen, um es freizusetzen.
Die Fäden mit beiden Händen hinter demNähfuß ergreifen, in die Kerbe (B) einführenund die Hände nach unten bewegen.
Freisetzen des
Durchtrennen des Fadens
Gegenseitige Abstimmung von Nadel, Stoff und Faden
NADELGRÖ E STOFF FADENß
9-11(65-75)
12(80)
14(90)
16(100)
18(110)
Leichte Stoffe: dünne Baumwolle, Schleier, Serge,Seide, Musselin, Qiana, Interlockware, Baumwolltrikot,Jersey, Krepp, Polyestergewebe, Hemdstoffe.
Mittlere Stoffe: Baumwolle, Satin, grobes Musselin,Segeltuch, Doppelmaschentrikot, leichte Kammgarne.
Mittlere Stoffe: schweres Tuch, Kammgarne,schweres Trikot, Frotteestoff, Denim.
Schwere Stoffe: Drillich, Kammgarne, Zeltstoffe undwattierte Stoffe, Denim, leichte und mittlerePolsterstoffe.
Schweres Kammgarn, Mantelstoffe, Polsterstoffe,gewisse Leder oder Vinyl.
Leichte Baumwoll-, Nylon- oderPolyesterfäden.
Die meisten handelsüblichen Fädensind von mittlerer Dicke und sind fürdiese Stoffe und Nadelgrößen geeignet.Um optimale Ergebnisse zu erhaltensind Polyesterfäden für Kunstfaserstoffeund Baumwollfäden für natürlicheGewebe zu verwenden. Immer fürOber- und Unterfaden die gleicheFadensorte verwenden.
Sehr reißfeste Fäden, Teppichfäden(den Fuß auf starken Anpressdruckeinstellen - hohe Nummern).
TABELLE ZUR WAHL VON NADEL, STOFF und FADEN
Wichtig: Nadelgröße, Schwere des Stoffs und Dicke des Fadens müssen aufeinander abgestimmt werden.
Achtung:1. Die Zwillingsnadel wird für Ziernähte verwendet.2. Beim Einsatz der Zwillingsnadel soll der Stichbreitenknopf unter "3" gestellt werden.3. Die europäische Nadelstärke ist 65, 70, 80 usw. und die amerikanische und japanische Nadelstärke
ist 9, 11, 12 usw.4. Ersetzen Sie die Nadel regelmäßig, spätestens beim ersten Fadenriss oder bei ersten Fehlstichen.
Grundlagen des Nähens
A
B
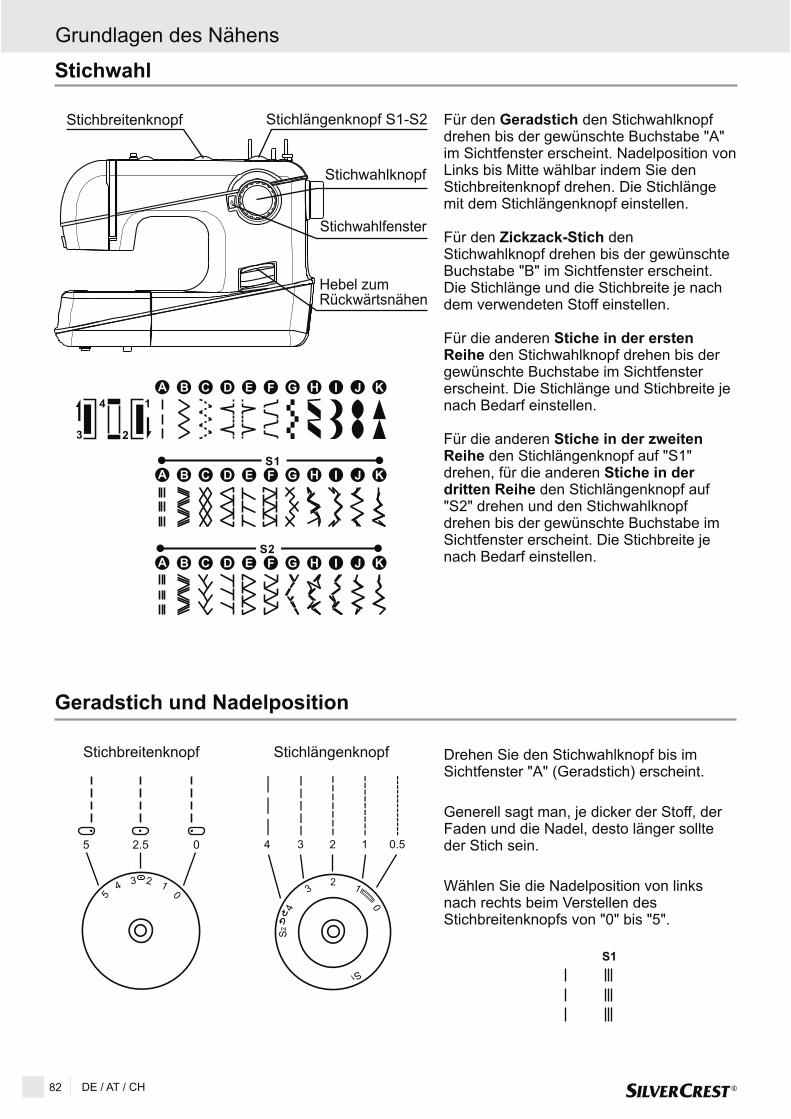
Stichbreitenknopf Stichlängenknopf
Geradstich und Nadelposition
Drehen Sie den Stichwahlknopf bis imSichtfenster "A" (Geradstich) erscheint.
Generell sagt man, je dicker der Stoff, derFaden und die Nadel, desto länger sollteder Stich sein.
Wählen Sie die Nadelposition von linksnach rechts beim Verstellen desStichbreitenknopfs von "0" bis "5".
Stichlängenknopf S1-S2
82 DE / AT / CH
Stichwahl
Für den den Stichwahlknopfdrehen bis der gewünschte Buchstabe "A"im Sichtfenster erscheint. Nadelposition vonLinks bis Mitte wählbar indem Sie denStichbreitenknopf drehen. Die Stichlängemit dem Stichlängenknopf einstellen.
Für den denStichwahlknopf drehen bis der gewünschteBuchstabe "B" im Sichtfenster erscheint.Die Stichlänge und die Stichbreite je nachdem verwendeten Stoff einstellen.
Für die anderenden Stichwahlknopf drehen bis der
gewünschte Buchstabe im Sichtfenstererscheint. Die Stichlänge und Stichbreite jenach Bedarf einstellen.
Für die anderenden Stichlängenknopf auf "S1"
drehen, für die anderenden Stichlängenknopf auf
"S2" drehen und den Stichwahlknopfdrehen bis der gewünschte Buchstabe imSichtfenster erscheint. Die Stichbreite jenach Bedarf einstellen.
Geradstich
Zickzack-Stich
Stiche in der erstenReihe
Stiche in der zweitenReihe
Stiche in derdritten Reihe
0
12
3
4
S1
S2
4 3 2 1 0.5
5 0
1234
5 2.5 0
S1
Stichbreitenknopf
Stichwahlfenster
Stichwahlknopf
Hebel zumRückwärtsnähen
Grundlagen des Nähens
A
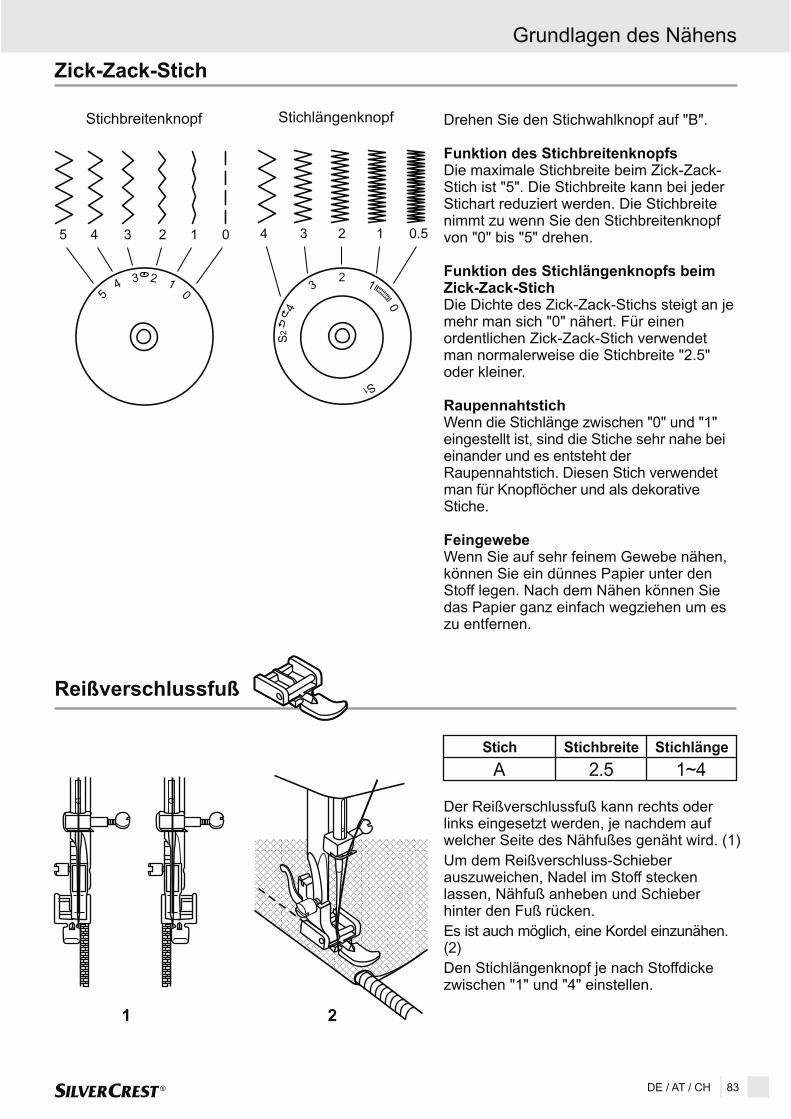
Der Reißverschlussfuß kann rechts oderlinks eingesetzt werden, je nachdem aufwelcher Seite des Nähfußes genäht wird. (1)Um dem Reißverschluss-Schieberauszuweichen, Nadel im Stoff steckenlassen, Nähfuß anheben und Schieberhinter den Fuß rücken.Es ist auch möglich, eine Kordel einzunähen.(2)Den Stichlängenknopf je nach Stoffdickezwischen "1" und "4" einstellen.
Drehen Sie den Stichwahlknopf auf "B".
Die maximale Stichbreite beim Zick-Zack-Stich ist "5". Die Stichbreite kann bei jederStichart reduziert werden. Die Stichbreitenimmt zu wenn Sie den Stichbreitenknopfvon "0" bis "5" drehen.
Die Dichte des Zick-Zack-Stichs steigt an jemehr man sich "0" nähert. Für einenordentlichen Zick-Zack-Stich verwendetman normalerweise die Stichbreite "2.5"oder kleiner.
Wenn die Stichlänge zwischen "0" und "1"eingestellt ist, sind die Stiche sehr nahe beieinander und es entsteht derRaupennahtstich. Diesen Stich verwendetman für Knopflöcher und als dekorativeStiche.
Wenn Sie auf sehr feinem Gewebe nähen,können Sie ein dünnes Papier unter denStoff legen. Nach dem Nähen können Siedas Papier ganz einfach wegziehen um eszu entfernen.
Funktion des Stichbreitenknopfs
Funktion des Stichlängenknopfs beimZick-Zack-Stich
Raupennahtstich
Feingewebe
DE / AT / CH 83
Zick-Zack-Stich
Rei verschlussfuß ß
Stich Stichbreite Stichlänge
A 2.5 1~4
Grundlagen des Nähens
Stichbreitenknopf
5 0
1234
5 4 3 2 1 0
Stichlängenknopf
1 2

Stopfplatte einsetzen.
Arbeitsstück unter den Fuß schieben. Knopfauf die bezeichnete Stelle legen, Fußsenken, Stichbreite auf "0" lassen und erstein paar Vernähstiche im linken Loch nähen,Stichbreite einstellen (meistens zwischen 3-4). Mit dem Handrad Kontrollstich machenbis die Nadel genau in das rechte Loch desKnopfes einsticht (Je nach KnopfStichbreite variieren). Knopf annähen.Stichbreite auf "0" stellen und einigeVernähstiche nähen.
Ist ein Hals erwünscht, wird eine Stopfnadelauf den Knopf gelegt und übernäht. Bei denKnöpfen mit 4 Löchern mit den beidenvorderen beginnen, dann Nähgut nachvorne schieben und gleich vorgehen wiebeschrieben.
Für Säume, Vorhänge, Hosen, Rock usw.
Blindsaumstich für elastisches Gewebe.
Den Stoff wie abgebildet umlegen, mit derlinken Seite nach oben. (1)Den umgelegten Stoff unter den Fuß legen.Das Handrad von Hand nach vorne drehenbis sich die Nadel ganz links befindet. Siesollte die Stofffalte nur wenig anstechen.Ansonsten muss die Stichbreite korrigiertwerden. (2)Das Führungslineal (3) an die Stofffaltebringen, indem Sie den Knopf (4) drehen.Langsam nähen und den Stoff sorgfältigführen, damit sich seine Lage amFührungslineal nicht verändert.
Blindsaumfuß
Knopfannähfuß
84 DE / AT / CH
Stich
D 1~2 3~5
Stichbreite Stichlänge
B 0~5 0
Stich Stichbreite Stichlänge
Grundlagen des Nähens
1 4
32

Vorbereitungen:
Vorbereitung des Stoffs:
Ratschläge:
Den Nähfuß entfernen und den Knopflochfußmontieren. Die Stichlängen-Einstellung zwischen"0,5" und "1" einstellen. Die Stichdichte hängt vonder Stoffdicke ab.Hinweis: Immer ein Test-Knopfloch anfertigen.
Den Knopfdurchmesser messen und demfestgestellten Maß 0,3 cm für die Versteifungenzufügen. Bei sehr dicken Knöpfen zumgemessenen Knopfdurchmesser mehrhinzuaddieren. Position und Länge des Knopflochsauf dem Stoff markieren.Den Stoff so positionieren, dass die Nadel auf dieentferntere Markierung zeigt.Den Knopflochfuß so weit wie möglich nach vorneschieben. Den Fuß senken.a. Die Stich-Wahlscheibe auf " " drehen. Mit
mäßiger Geschwindigkeit bis zur Endmarkierungnähen.
b. Die Stich-Wahlscheibe auf " " stellen und 5 bis6 Verstärkungsstiche nähen.
c. Die Stich-Wahlscheibe auf " " drehen und denlinken Teil des Knopflochs bis zum entferntenEnde nähen.
d. Die Stich-Wahlscheibe auf " " drehen undeinige Verstärkungsstiche nähen.
Den Stoff unter dem Fuß vorziehen. Den Oberfadenvon der Rückseite durch den Stoff ziehen undOberfaden und Unterfaden verknoten. DieKnopflochöffnung mit dem Nahttrenneraufschneiden. Dabei darauf achten, nicht auf einerSeite in die Stiche zu schneiden.
- Durch leichte Reduzierung derOberfadenspannung können bessere Ergebnisseerhalten werden.
- Für feine und dehnbare StoffeVerstärkungsmaterial verwenden.
- Für dehnbare und Trikotstoffe wird die Verwendungeines Einsatzes empfohlen. Der Zickzackstichmuss über den Einsatz laufen (e).
Knopflochfuß
DE / AT / CH 85
Stich Stichbreite Stichlänge
5 0.5~1
Grundlagen des Nähens
a b c d
e

3~5
86 DE / AT / CH
1 2
Overlock-Stiche
Hinweis:
Overlockstich:
Standard-Overlockstich:
Doppel-Overlockstich:
Neue Nadel oder Kugelspitznadelverwenden!
Nähte, Nähen und Versäubern von Kanten,Sichtsaum.
Für feinere Maschenware, Tricot,Halsausschnitte, (A).
Für feinere Maschenware, Tricotgewebe,Halsausschnitte, (B).
Für feinere Strickstoffe, handgestrickte Teile,Nähte (C).
Alle Overlockstiche eignen sich zum Nähenund Versäubern von Kanten undSichtsäumen in einem Arbeitsgang.Beim Versäubern sollte die Stoffkante vonder Nadel knapp übernäht werden.
Kanten
Kanten
Genähter Zickzack
C 3~5 1~2
Stich Stichbreite Stichlänge
Elastisches Nähen und Spitzen aufsetzen,Ausbessern, Risse flicken, Kantenverstärken.
Flicken aufsetzen. (1)
Beim Flicken von Rissen ist es ratsam, einStückchen Stoff zu unterlegen (Verstärkung).Erst über die Mitte nähen, dann beidseitigknapp überdecken, je nach Art desGewebes und der Beschädigung 3-5Reihen nähen. (2)
Stich Stichbreite Stichlänge
E, F S1, S2
Grundlagen des Nähens
A B C

DE / AT / CH 87
Diese Stiche werden verwendet, um zweiStoffstücke zu verbinden und dabei einenleichten Zwischenraum zwischen ihnen zulassen.
- Die Ränder der beiden Stoffstücke für denSaum zurückschlagen und auf einemdünnen Papierstück festheften, wobeizwischen ihnen ein kleiner Abstand zulassen ist.
- Längs des Rands einstechen und beimBeginn des Nähens leicht an den beidenFäden ziehen.
- Zum Nähen einen etwas dickeren Fadenals für normale Arbeiten wählen.
- Nach Beenden des Nähens die Heftungund das Papier entfernen. Zum Abschlussam Anfang und am Ende der Verbindungauf der Rückseite Knoten anbringen.
Patchwork
F 3~5 S1
Stich Stichbreite Stichlänge
Stretchstich
Dreifach Geradstich (1)Für Strapaziernähte.Die Nähmaschine näht zwei Stichevorwärts und einen Stich zurück. Diesergibt eine 3fache Verstärkung.
Dreifach-Zickzack (2)Für Strapaziernähte, Säume und .Der 3fach Zickzackstich eignet sich fürfeste Stoffe wie Jeans, Cord usw.
Ziernähte
A 2.5 S1, S2
Stich Stichbreite Stichlänge
B 3~5 S1, S2
Stich Stichbreite Stichlänge
Grundlagen des Nähens
1 2

* Der Stickrahmen wird nicht mit der Nähmaschine geliefert.
Aufnähen
B 3~5 0.5~1
Stich Stichbreite Stichlänge
- Das aufzunähende Muster ausschneidenund auf dem Stoff auflegen undfestheften.
- Langsam um das Muster nähen.- Das außerhalb der Stiche gelegene
überschüssige Material abschneiden.Darauf achten, nicht in die Stiche zuschneiden.
- Den Heftfaden entfernen.- Ober und Unterfaden unter dem
Aufnähstück verknoten, um jeglichesAustreten zu vermeiden.
Stickereien mit Stickrahmen*
B 1~5 0
Stich Stichbreite Stichlänge
Einsetzen der Stopfplatte
Zweistufen-Nähfußhebel
Zweistufen-Nähfußhebel senken.Das Handrad
Am AnfangSicherheitsstiche
- Den Nähfuß und seine Halterungabbauen.
- Stopfplatte einsetzen.- Vor Beginn des Nähens den
senken.- Die Stichbreite der Breite von Buchstaben
oder Muster entsprechend einstellen.
- Die gewünschten Buchstaben oderMuster auf der Rückseite des Stoffsaufzeichnen.
- Den Stoff auf dem Stickrahmen möglichststark spannen.
- Den Stoff unter die Nadel platzieren.
- zum Benutzer hin drehen,sodass der Unterfaden angehoben wird.
der Stickerei einigenähen.
- Halten Sie den Stickrahmen mit Daumenund Zeigefinger von beiden Händen fest.
- Koordinieren Sie Nähgeschwindigkeit undBewegung des Stickrahmens.
Vorbereitungen zur Erstellung einesZeichens oder einer Stickerei*
88 DE / AT / CH
Grundlagen des Nähens

1 2
Zwillingsnadel
DE / AT / CH 89
Festonabschluss
Einen dekorativen Rand erzielen Sie mitdem Festonabschluss.
1. Auf der Saumlinie nähen.2. Stoff dicht der Nählinie entlang
abschneiden. Darauf achten, dass derNähfaden nicht mitgefasst wird.
I 3~5 1~2
Stich Stichbreite Stichlänge
Hinweise:Vor Nähbeginn Stichbreite einstellen.Handrad von Hand vorsichtig drehen zurÜberprüfung, ob die Nadel ins Stichlochgeht, ohne an der Stichplatte oder demNähfuß zu streifen oder garaufzuschlagen.Beim Nähen mit einer Zwillingsnadelimmer langsam vorgehen und langsamnähen, um schöne Nähergebnisse zuerzielen.
- Beim Nähen mit einer Zwillingsnadelmüssen beide Fäden dieselbe Stärkeaufweisen. Es können eine oder zweiFarben verwendet werden.
- Zwillingsnadel einsetzen.
- Oberfaden und zweiter Faden wiegewohnt einfädeln.
- Am Schluss den einen Faden in die linkeNadel einfädeln und den anderen Fadenin die rechte Nadel einfädeln.
A 2.5 1~4
Stich Stichbreite Stichlänge
Grundlagen des Nähens

90 DE / AT / CH
Wartung
4
5
6
7
3
1
2
Wartung der Nähmaschine
Achtung:
Ausbau der Stichplatte (1) :
Reinigung der Greifer (2) :
Reinigung und Schmierung des Hakens (3-7) :
Wichtig:
Trennen Sie die Nähmaschine von derStromversorgung, wozu Sie den Netzstecker ausder Steckdose ziehen müssen.Bei allen Reinigungsarbeiten muss dieNähmaschine von der Stromversorgung getrenntsein.
Durch Drehen des Handrads die Nadel vollständiganheben. Die Frontklappe öffnen und die Schraubender Stichplatte mit dem L-Schraubendreher entfernen.
Die Spulenkapsel herausnehmen und den gesamtenBereich mit der gelieferten Bürste reinigen.
Die Spulenkapsel herausnehmen. Die beidenHakenhalter (3) nach außen drehen. Den Bügel derSchiffchenbahn (4) und den Haken (5) entfernenund mit einem weichen Lappen reinigen. ZumSchmieren ein oder zwei Tropfen Nähmaschinenölan der gezeigten Stelle (6) auftragen. Das Handradsoweit drehen bis sich die Schiffchenbahn (7) linksbefindet. Den Haken (5) wieder einsetzen und diebeiden Halter wieder nach innen drehen. DieSpulenkapsel und die Unterfadenspule montierenund die Stichplatte wieder einsetzen.
Entfernen Sie Flusen und Fadenreste regelmässig!

Beheben von Störungen
Störung Ursache Fehlerbehebung
Oberfaden reißt
Unterfaden reißt
Fehlstiche
Nadelbruch
Beim NähenentstehenSchlingen
Die Nähte ziehensich zusammenoder kräuseln sich
UnregelmässigeSticheunregelmässigerTransport
DieNähmaschine istlaut und ruppig
DieNähmaschine istblockiert
1. Die Nähmaschine ist falsch eingefädelt2. Die Fadenspannung ist zu stark3. Der Faden ist zu dick für die Nadel4. Die Nadel ist nicht richtig montiert5. Der Faden hat sich um die
Spuleinrichtung gewickelt6. Die Nadel ist beschädigt
1. Die Spulenkapsel ist nicht richtigeingesetzt
2. Die Spulenkapsel ist falscheingefädelt
3. Die Spannung des Unterfadens ist zustark
1. Die Nadel ist falsch montiert2. Die Nadel ist beschädigt3. Die falsche Nadel ist montiert4. Der falsche Fuß ist montiert
1. Die Nadel ist beschädigt2. Die Nadel ist nicht richtig montiert3. Stoff zu dick/falsche Nadelgröße4. Der falsche Fuß ist montiert
1. Die Nähmaschine ist nicht richtigeingefädelt
2. Die Spulenkapsel ist nicht richtigeingefädelt
3. Nadel/Stoff/Faden-Verhältnis stimmtnicht
4. Falsche Fadenspannung
1. Die Nadel ist zu dick für den Stoff2. Die Fadenspannung ist zu stark
1. Der Faden ist zu schwach2. Die Spulenkapsel ist falsch
eingefädelt3. Der Stoff wird beim Nähen gezogen
1. Die Nähmaschine muss geölt werden2. Fusseln und Ölreste kleben an
Greifer oder an der Nadelstange3. Minderwertiges Öl, das die
Nähmaschine verklebt, wurdeverwendet
4. Die Nadel ist beschädigt
Faden im Greifer eingeklemmt
1. Nähmaschine und Nadel neu einfädeln2. Die obere Fadenspannung reduzieren (kleinere
Zahl)3. Eine größere Nadel verwenden4. Nadel neu montieren (flache Seite nach hinten)5. Spule abnehmen und Faden abwickeln6. Nadel ersetzen
1. Spulenkapsel neu einsetzen und am Fadenziehen. Wenn er leicht abrollt, ist es richtig
2. Spule und Kapsel überprüfen3. Fadenspannung des Unterfadens laut
Anweisung korrigieren
1. Nadel neu montieren (flache Seite nach hinten)2. Nadel ersetzen3. Nadelgröße dem Stoff und Faden anpassen4. Kontrollieren, ob der richtige Fuß montiert ist
1. Nadel ersetzen2. Nadel richtig montieren (flache Seite nach hinten)3. Nadelgröße dem Stoff und Faden anpassen4. Richtigen Fuß benutzen
1. Nähmaschine korrekt einfädeln2. Kapsel wie aufgezeigt einfädeln3. Nadelgröße muss mit Faden und Stoff
übereinstimmen4. Fadenspannung korrigieren
1. Feinere Nadel verwenden2. Fadenspannung überprüfen
1. Bessere Fadenqualität verwenden2. Kapsel neu einfädeln und richtig einsetzen3. Stoff nicht ziehen. Er muss automatisch
transportiert werden
1. Nähmaschine nach Anweisung ölen2. Greifer und Transporteur gemäß Anweisung
reinigen3. Nähmaschine nur mit Nähmaschinenöl ölen4. Nadel ersetzen
Oberfaden und Spulenkapsel entfernen, von Handdas Handrad ruckartig vor-und rückwärts drehen,Fadenreste entfernen. Nach Anweisung ölen.
DE / AT / CH 91
Wartung
Diese Bedienungsanleitung kann nicht jeden denkbaren Einsatz berücksichtigen.Für weitere Informationen oder bei Problemen, die in dieser Bedienungsanleitung nicht oder nichtausführlich genug behandelt werden, wenden Sie sich bitte an die Servicenummer:
Service-Adresse:
ü
00800 555 00 666 ( )
Bewahren Sie die Bedienungsanleitung sorgfältig auf und geben Sie sie an Nachbenutzer weiter.
kostenfrei
CROWN Service Centerteknihall Elektronik GmbHBreitefeld 15DE-64839 M nster
92 DE / AT / CH
Sie erhalten auf dieses Gerät 3 Jahre Garantie ab Kaufdatum. Das Gerät wurde sorgfältig und vorAnlieferung gewissenhaft geprüft. Bitte behalten Sie den Kassenbon als Nachweis für den Kauf auf.Bitte setzen Sie sich im Garantiefall mit Ihrer Servicestelle telefonisch in Verbindung. Nur so kann einekostenlose Einsendung Ihrer Ware gewährleistet werden.
Die Garantieleistung gilt nur für Material- oder Fabrikationsfehler, nicht aber für Verschleißteile oderfür Beschädigungen an zerbrechlichen Teilen, z. B. Schalter. Das Produkt ist lediglich für den privatenund nicht für den gewerblichen Gebrauch bestimmt.Bei missbräuchlicher oder unsachgemäßer Behandlung, Gewalteingriffen und bei Eingriffen, die nichtbei unserer autorisierten Service-Niederlassung vorgenommen wurden, erlischt die Garantie. Ihregesetzlichen Rechte werden durch diese Garantie nicht berührt.
- Geräte mit gefährlichem Defekt sofort entsorgen und sicherstellen, dass sie nicht mehrverwendet werden können.
- Werfen Sie das Gerät keinesfalls in den normalen Hausmüll.- Dieses Produkt unterliegt der europäischen Richtlinie 2002/96/EC.- Entsorgen Sie das Gerät über einen zugelassenen Entsorgungsbetrieb oder über Ihre
kommunale Entsorgungseinrichtung.- Beachten Sie die aktuell geltenden Vorschriften. Setzen Sie sich im Zweifelsfall mit Ihrer
Entsorgungseinrichtung in Verbindung.- Führen Sie alle Verpackungsmaterialien einer umweltgerechten Entsorgung zu.
Bewahren Sie die Transportverpackung der Nähmaschine auf! Zum einen kann sie Ihnenfür die Aufbewahrung der Nähmaschine nützlich sein - vor allem aber, wenn Sie dieNähmaschine zur Reparatur versenden wollen. Die meisten Schäden entstehen nämlicherst auf dem Transportweg.
Entsorgung
Crown Technics GmbHLerchenstrasse 2DE-74226 Nordheim
Hersteller
Entsorgung Garantie/ / Service / Hersteller
Garantie
Servicenummer
IAN 74612
Bitte beachten Sie, dass die folgende Anschrift keine Serviceanschrift ist. Kontaktieren Sie zunächstdie oben benannte Servicestelle.


021VGJ3001(BG/RO/GB/DE) Jul/12Silver Crest_SNMD 33 A1(87J0)/A4
IAN 74612
www.sewingguide.de
Àêòóàëíîñò íà èíôîðìàöèÿòàLast Information Update Stand der Informationen:07/2012 Ident.-No.:072012
Versiunea informaþiilor
Òåëåôîíåí íîìåð íà ãàðàíöèîííèÿ ñåðâèç:02/946 10 08
Numãr de service pentru reclamaþii:+40 21 319 54 77/78
Service number for complaints:
Servicenummer bei Reklamationen:
00800 555 00 666 ( )
00800 555 00 666 ( )
free
kostenfrei
RO BG,