
IAM V4.1 User Manual - e-rong.co.th
529
SANGFOR Technologies Co., Ltd. International Service Centre: +60 12711 7129 (7511) Malaysia: 1700817071 Email: [email protected] RMA: [email protected] IAM V4.1 User Manual April, 2014
-
Upload
khangminh22 -
Category
Documents
-
view
0 -
download
0
Transcript of IAM V4.1 User Manual - e-rong.co.th
SANGFOR Technologies Co., Ltd.
International Service Centre: +60 12711 7129 (7511)
Malaysia: 1700817071
Email: [email protected]
RMA: [email protected]
IAM V4.1 User Manual
April, 2014

SANGFOR IAM v4.1 User Manual
2
Table of Contents
Table of Contents .............................................................................................................................. 2
Announcement .................................................................................................................................. 5
Preface .............................................................................................................................................. 6
About This Manual ................................................................................................................... 6
Document Conventions............................................................................................................. 6
Graphic Interface Conventions ......................................................................................... 6
Symbol Conventions ......................................................................................................... 7
Technical Support ..................................................................................................................... 7
Acknowledgements ................................................................................................................... 7
Chapter 1 IAM Installation ........................................................................................................ 8
1.1 Environment Requirement ........................................................................................ 8
1.2 Power ........................................................................................................................ 8
1.3 Product Appearance .................................................................................................. 8
1.4 Configuration and Management ............................................................................... 9
1.5 Wiring Method of Standalone ................................................................................... 9
1.6 Wiring Method of Redundant System..................................................................... 12
Chapter 2 IAM Console........................................................................................................... 13
2.1 WebUI Login .......................................................................................................... 13
2.2 Configuration .......................................................................................................... 16
Chapter 3 Functions................................................................................................................. 18
3.1 Status ....................................................................................................................... 18
3.1.1 Running Status ................................................................................................ 18
3.1.2 Security Status ................................................................................................ 25
3.1.3 Flow Status...................................................................................................... 26
3.1.4 Real-time Behaviors........................................................................................ 39
3.1.5 Online Users ................................................................................................... 40
3.1.6 Email Audit ..................................................................................................... 44
3.1.7 DHCP Status ................................................................................................... 47
3.2 Objects .................................................................................................................... 47
3.2.1 Application Ident Library................................................................................ 49
3.2.2 Intelligent Ident Library .................................................................................. 52
3.2.3 Application Customization ............................................................................. 56
3.2.4 URL Library .................................................................................................... 60
3.2.5 Ingress Rule Library ....................................................................................... 65
3.2.6 Service ............................................................................................................ 83
3.2.7 IP Group .......................................................................................................... 85
3.2.8 Schedule .......................................................................................................... 87
3.2.9 Black/White List Group .................................................................................. 88
3.2.10 Keyword Group .............................................................................................. 89
3.2.11 File Type Group .............................................................................................. 90
SANGFOR IAM v4.1 User Manual
3
3.2.12 Trusted CA ...................................................................................................... 92
3.3 User/Policy ............................................................................................................. 92
3.3.1 Access Management ....................................................................................... 93
3.3.2 User Management ......................................................................................... 183
3.3.3 User Authentication ...................................................................................... 233
3.4 Bandwidth Management ....................................................................................... 308
3.4.1 Overview ....................................................................................................... 308
3.4.2 Bandwidth Channel Matching/Priority ......................................................... 309
3.4.3 Bandwidth Channel ....................................................................................... 309
3.4.4 Line Bandwidth ............................................................................................. 328
3.4.5 Virtual Line ................................................................................................... 329
3.5 Proxy/Cache .......................................................................................................... 336
3.5.1 Overview ....................................................................................................... 336
3.5.2 Proxy Options ............................................................................................... 336
3.5.3 Cache Options ............................................................................................... 339
3.5.4 Cache Hit Logs ............................................................................................. 342
3.6 Security ................................................................................................................. 343
3.6.1 Anti-DoS ....................................................................................................... 343
3.6.2 ARP Protection ............................................................................................. 345
3.6.3 Antivirus ....................................................................................................... 347
3.7 Firewall ................................................................................................................. 349
3.7.1 Firewall Rules ............................................................................................... 349
3.7.2 SNAT ............................................................................................................ 353
3.7.3 DNAT ............................................................................................................ 360
3.8 Network ................................................................................................................ 368
3.8.1 Deployment ................................................................................................... 368
3.8.2 Interfaces ....................................................................................................... 414
3.8.3 Static Route ................................................................................................... 420
3.8.4 Policy Route .................................................................................................. 423
3.8.5 High Availability ........................................................................................... 429
3.8.6 DHCP ............................................................................................................ 437
3.8.7 VPN System .................................................................................................. 439
3.8.8 Protocol Extension ........................................................................................ 480
3.9 System................................................................................................................... 483
3.9.1 License .......................................................................................................... 483
3.9.2 Administrator ................................................................................................ 484
3.9.3 System Time ................................................................................................. 495
3.9.4 Auto Update .................................................................................................. 496
3.9.5 Alarm Options ............................................................................................... 498
3.9.6 Global Excluded Address .............................................................................. 501
3.9.7 Backup/Restore ............................................................................................. 503
3.9.8 Custom Prompt Page..................................................................................... 504
3.9.9 Data Center Options ...................................................................................... 506
3.9.10 Advanced ...................................................................................................... 508

SANGFOR IAM v4.1 User Manual
4
3.10 Diagnostics ........................................................................................................... 514
3.10.1 System Logs .................................................................................................. 514
3.10.2 Capture Packets ............................................................................................. 515
3.10.3 Command Console ........................................................................................ 517
3.10.4 Bypass/Packet Drop List ............................................................................... 518
3.10.5 Restart ........................................................................................................... 520
Appendix A: Gateway Update Client ........................................................................................... 522
Appendix B: Acronyms and Abbreviations .................................................................................. 528

SANGFOR IAM v4.1 User Manual
5
Announcement
Copyright © SANGFOR Technologies Co., Ltd. All rights reserved.
No part of the information contained in this document shall be extracted, reproduced or transmitted in any
form or by any means, without prior written permission of SANGFOR.
SANGFOR, SANGFOR Technologies and the SANGFOR logo are the trademarks or registered
trademarks of SANGFOR Technologies Co., Ltd. All other trademarks used or mentioned herein belong to
their respective owners.
This manual shall only be used as usage guide, and no statement, information, or suggestion in it shall be
considered as implied or express warranties of any kind, unless otherwise stated. This manual is subject to
change without notice. To obtain the latest version of this manual, please contact the Customer Service of
SANGFOR Technologies Co., Ltd.

SANGFOR IAM v4.1 User Manual
6
Preface
About This Manual
This user manual includes the following chapters:
Chapter Describe…
Chapter 1 IAM Installation Describes the product appearance, function features and performance
parameters of IAM device, and preparations and cautions before
installation.
Chapter 2 IAM Console Describes how to use the IAM console and perform general operations
on the console.
Chapter 3 Functions Describes how to configure the device-related configurations, including
status displays, objects, user/policy, bandwidth management,
proxy/cache, security, firewall, network, system and diagnostics.
Document Conventions
Graphic Interface Conventions
Convention Meaning Example
boldface Keywords or highlighted items
The user name and password are Admin by
default.
italics Directories, URLs
Enter the following address in the IE address bar:
http://10.254.254.254:1000
[ ] Page titles, names of
parameters, menus, and
submenus
Select [System] > [Web UI] to open the Web UI
page, and then configure the [Webpage Timeout].
< > Names of buttons or links on
the web interface or key-press Click <Update> to save your settings.
> Multilevel menus and
submenus
Go to [System] > [Network Interface] to configure
the network interfaces.
“ ” Prompts popped up
The browser may pop up the prompt "Install
ActiveX control"

SANGFOR IAM v4.1 User Manual
7
Symbol Conventions
This manual also adopts the following symbols to indicate the parts that need special attention to be paid
during the operation:
Convention Meaning Description
Caution
Indicates actions that could cause setting error, loss of data or
damage to the device.
Warning Indicates actions that could cause injury to human body.
Note Indicates helpful suggestion or supplementary information.
Technical Support
Email: [email protected]
International Service Centre: +60 12711 7129 (7511) Malaysia: 1700817071
Website: www.sangfor.com
Acknowledgements
Thanks for using our product and user manual. If you have any suggestion about our product or user
manual, please provide feedback to us through phone or email.

SANGFOR IAM v4.1 User Manual
8
Chapter 1 IAM Installation
This chapter mainly describes the appearance and installation of SANGFOR IAM hardware device. After
correct installation, you can configure and debug the system.
1.1 Environment Requirement
The SANGFOR IAM device requires the following working environment:
Input voltage: 110V-230V
Temperature: 0-45℃
Humidity: 5%-90%
To ensure long-term and stable running of the system, the power supply should be properly grounded,
dustproof measures taken, working environment well ventilated and indoor temperature kept stable. This
product conforms to the requirements on environment protection, and the placement, usage and discard of
the product should comply with relevant national law and regulation.
1.2 Power
The SANGFOR IAM device uses 110 ~ 230V alternating current (AC) as its power supply. Make sure it is
well-grounded before being provided with power supply.
1.3 Product Appearance
SANGFOR IAM Hardware Device
Above is the front panel of SANGFOR IAM hardware gateway device. The interfaces or indicators on the
front panel are described respectively in the following table.

SANGFOR IAM v4.1 User Manual
9
Table 1 Interface Description
No. Interface/Indicator Usage
1 CONSOLE Interface Used for high-availability function (redundant system)
2 WAN2 (eth3) Network interface to be defined as WAN2 interface
3 DMZ (eth1) Network interface to be defined as DMZ interface
4 WAN1 (eth2) Network interface to be defined as WAN1 interface
5 LAN (eth0) Network interface to be defined as LAN interface
6 POWER Indicator Power indicator of IAM gateway device
7 ALARM Indicator Alarm indicator of IAM gateway device
The CONSOLE interface is only for debugging by technical engineers. The end users connect to the
device via the network interfaces.
1.4 Configuration and Management
Before configuring the device, please prepare a computer and make sure the web browser (for example,
Internet Explorer browser) of the computer can be used normally. Then connect the computer with the
IAM device to a same local area network (LAN) and then configure the IAM device on the computer over
the established network.
The default IP address settings for the network interfaces are described below:
Interface IP Address
eth0 (LAN) 10.251.251.251/24
eth1 (DMZ) 10.252.252.252/24
eth2 (WAN1) 200.200.20.61/24
1.5 Wiring Method of Standalone
Connect the power cable to the Power interface on the rear panel of the IAM device and switch on the
power supply. The POWER indicator (in green) and ALARM indicator (in red) on the front panel will be
lighted. The ALARM indicator will go out one or two minutes later, indicating the device runs normally.
SANGFOR IAM v4.1 User Manual
10
Follow the instructions below to wire the interfaces:
Use standard RJ-45 Ethernet cable to connect the LAN interface to the local area network and
then configure the IAM device.
Use standard RJ-45 Ethernet cable to connect the WAN1 interface with the networking device,
such as router, optical fiber transceiver, ADSL Modem, etc.
Use standard RJ-45 Ethernet cable to connect DMZ interface to the DMZ zone network.
Generally, the Web server and Mail server providing services to wide area network (WAN) are
placed at the DMZ zone. The IAM device provides secure protection for these servers.
When wiring the interfaces, please use the correct cables for connection as instructed below:
Use straight-through cable to connect a WAN interface with the Modem, and crossover cable to
connect a WAN interface with the router.
Use straight-through cable to connect the LAN interface with the switch, and crossover cable to
connect the LAN interface on the device with the network interface on the computer.
If connections cannot be established while the corresponding indicator functions normally, please check
whether cables are correctly used for connections. The differences between straight-through cable and
crossover cable are the wire sequences at both ends, as shown below:

SANGFOR IAM v4.1 User Manual
11
Wire Sequences of Straight-through Cable and Crossover Cable
After correct connections, log in to the console of IAM device and configure the deployment mode
according to the network topology (see section 3.8.1 "Deployment").
1. Multi-line function of the IAM device allows multiple Internet lines to be connected in. In this
situation, connect the second networking device to WAN2 interface, the third networking device to
WAN3 interface, and so on.
2. When IAM gateway device is running, the POWER indicator (in green) keeps lighted, the WAN
LINK and LAN LINK indicators (in orange) keep lighted. The ACT indicator (in green) will flicker
if there is data flow. When the device is starting, the ALARM indicator is lighted (in red) due to
system loading and then goes out after one or two minutes, indicating successful startup of the
device. After startup, the ALARM indicator may flash, which means the device is writing logs.
However, if the ALARM indicator stays lighted for a long time and does not go out, please shut
down the device and restart the device after 5 minutes. If this situation remains after restart, please
contact us.
SANGFOR IAM v4.1 User Manual
12
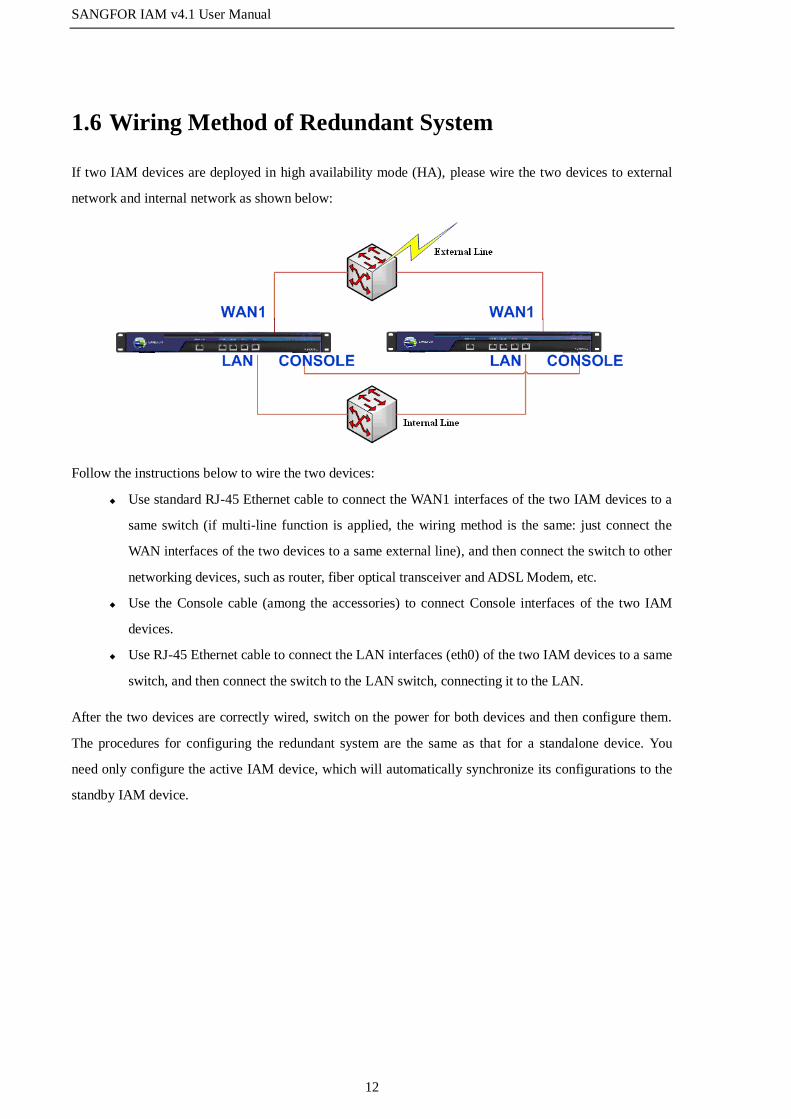
1.6 Wiring Method of Redundant System
If two IAM devices are deployed in high availability mode (HA), please wire the two devices to external
network and internal network as shown below:
Follow the instructions below to wire the two devices:
Use standard RJ-45 Ethernet cable to connect the WAN1 interfaces of the two IAM devices to a
same switch (if multi-line function is applied, the wiring method is the same: just connect the
WAN interfaces of the two devices to a same external line), and then connect the switch to other
networking devices, such as router, fiber optical transceiver and ADSL Modem, etc.
Use the Console cable (among the accessories) to connect Console interfaces of the two IAM
devices.
Use RJ-45 Ethernet cable to connect the LAN interfaces (eth0) of the two IAM devices to a same
switch, and then connect the switch to the LAN switch, connecting it to the LAN.
After the two devices are correctly wired, switch on the power for both devices and then configure them.
The procedures for configuring the redundant system are the same as that for a standalone device. You
need only configure the active IAM device, which will automatically synchronize its configurations to the
standby IAM device.

SANGFOR IAM v4.1 User Manual
13
Chapter 2 IAM Console
2.1 WebUI Login
The IAM device supports secure HTTPS login, using the standard port of HTTPS protocol. If you log into
the Web Console of the IAM device for the first time, type the default login address https://10.251.251.251
in the address bar of the browser.
Using HTTPS to login to the WEBUI and manage the IAM device can avoid the potential risks that
the configurations may be intercepted during transmission.
Log into the Web Console
After finishing all the wiring, you can then log into the Web User Interface (UI) to configure the
SANGFOR IAM device. Follow the procedures below to log into the console of the IAM device:
Step 1. Configure an IP address (for example, 10.251.251.100) on the 10.251.251.X subnet for the
computer, and then type the default login IP address and port in the IE address bar:
https://10.251.251.251. Click <Go> and the following alert dialog appears:
Step 2. Click <Yes> to open the login interface, as shown below:

SANGFOR IAM v4.1 User Manual
14
Step 3. Type the user name and password, and click <Login> to log into the IAM device console. The
username and password are Admin by default.
To view the version of the current IAM gateway device, click <Version>.
You can log into the console without installing any ActiveX. Non-IE browsers are also supported.
Remove the Certificate Alert Dialog
During the login to the console, the browser may pop up the certificate alert dialog. To remove it, do as
follows:
Step 1. Log into the console, open the [System] > [Advanced] > [Web UI Options] page. Specify the IP
address (to which the certificate will be issued) in the [Issue Console SSL Cert. To] field. Here,
the IP address refers to that of the network interface for login and it is the IP address of the LAN
interface by default. In this example, we suppose that you have logged into the console through
the default address of the LAN interface.

SANGFOR IAM v4.1 User Manual
15
Step 2. Click <Download Certificate> to download the certificate to the local computer and click <Save>
to save it.
Step 3. Locate the certificate in the local computer and double-click it to install.
After the certificate is installed, the alert dialog will not pop up when you login through the default address
of the LAN interface.
Only when you login through the IP address specified in [Issue Console SSL Cert. To] and the local
computer has installed the certificate will this alert dialog be removed. If you login through other
address or the computer has not installed the certificate, the alert dialog will still pop up.

SANGFOR IAM v4.1 User Manual
16
2.2 Configuration
After logging in to the Web UI, you will see the following major modules: [Status], [Objects],
[User/Policy], [Bandwidth Mgt], [Proxy/Cache], [Security], [Firewall], [Network], [System] and
[Diagnostics], as shown below:
The following instructions for the buttons and icons are applicable to all the configuration pages on the
IAM device and will not be described again in the subsequent sections:
If a <Commit> button is included on the configuration page, after you change the configurations,
you need click this button to apply your configuration changes. Generally, it may take 5 to 10
seconds for the configuration changes to take effect. To make them take effect immediately, click
the icon at the bottom-right of the page.
The icon at the bottom-right of the page is for broadcasting some system messages or
warning messages in real time.
Most of the configuration pages include the icon. When you put your mouse cursor over
this icon, a brief description for the current configuration item will pop up.
When you modify the settings on the [Network] > [Deployment] page or [System] > [System Time]
page or default encoding on the [System] > [Advanced] > [Web UI Options] page, the IAM device
will restart and you need to re-login.

SANGFOR IAM v4.1 User Manual
17
For most of the pages that display the configuration information and status in List View, you can select the
columns to be displayed to easily get your desired information and sort the information in ascending or
descending order according to your needs. For example:
1. On the [Member List] page, you can select the columns that you want to display and the page will only
display the information of the selected columns, as shown below:
2. On the [Online Users] page, you can select [Sort Ascending] or [Sort Descending] to sort the
information in ascending or descending order by the corresponding column.
SANGFOR IAM v4.1 User Manual
18
Chapter 3 Functions
3.1 Status
The [Status] module displays the basic status information of the IAM device, including [Running Status],
[Security Status], [Flow Status], [Real-time Behaviors], [Online Users], [Email Audit] and [DHCP Status].
3.1.1 Running Status
The [Running Status] displays the following information of the IAM device: resource information,
interface information, interface throughput, trend of application flow speed, flow ranking, real-time
behaviors and security status.
3.1.1.1 Select Displayed Modules
On the [Running Status] page, you can select the modules to be displayed on the [Running Status] page
according to your needs.
To select the modules that you want to display, do as follows:
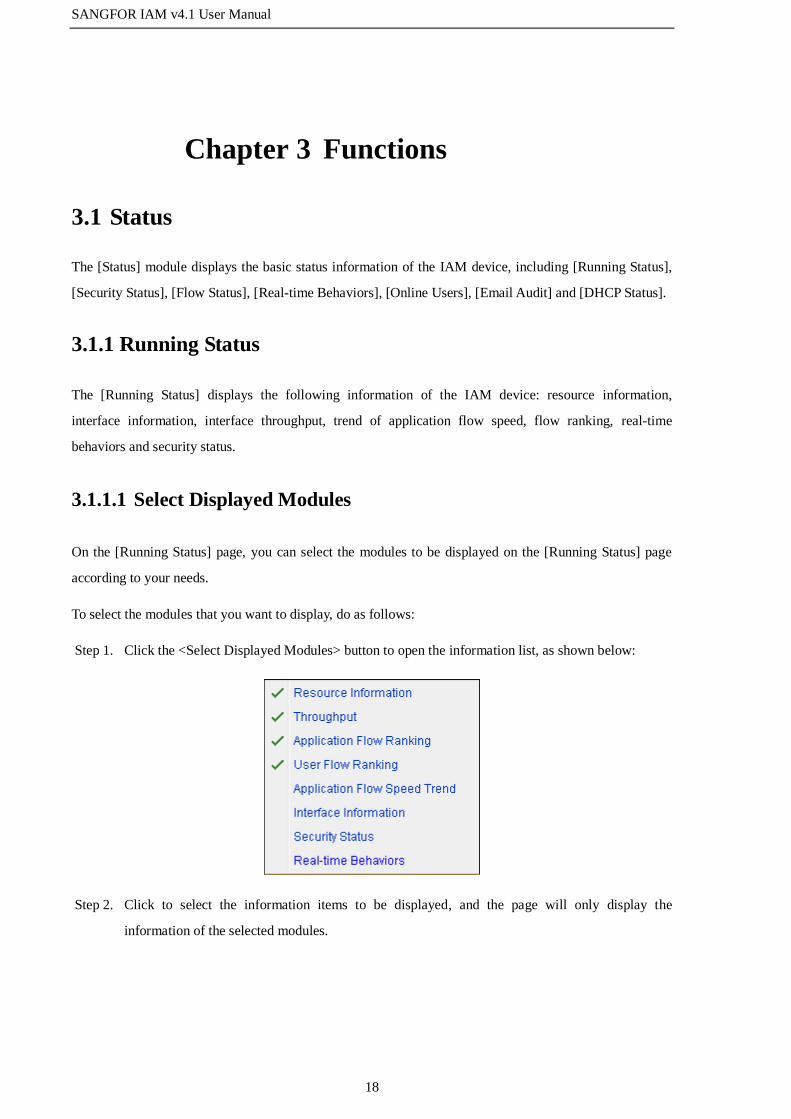
Step 1. Click the <Select Displayed Modules> button to open the information list, as shown below:
Step 2. Click to select the information items to be displayed, and the page will only display the
information of the selected modules.

SANGFOR IAM v4.1 User Manual
19
3.1.1.2 Restore Default Display
On the [Running Status] page, click the <Restore Default Display> button to display the default modules
only, namely, [Resource Information], [Throughput], [Application Flow Ranking] and [User Flow
Ranking].
3.1.1.3 View Status
3.1.1.3.1 Resource Information
The [Resource Information] section displays the brief information of the device resources, including CPU
usage, memory usage, disk usage, device sessions, online users, system time and log information of the day,
as shown below:
To enable the automatic refresh function, click the icon to open the [Options] page, and then check the
[Enable Auto Refresh] option and set the refresh interval, as shown below:
To enter the Internal Data Center, click the [Internal Data Center] link to enter the data center and search

SANGFOR IAM v4.1 User Manual
20
for logs or make statistics.
3.1.1.3.2 Throughput
The [Throughput] section uses a line graph to dynamically display the status of the WAN interface sending
or receiving packets in real time, as shown below:
To set the parameters related to the graph, do as follows:
Step 1. Click the icon to open the [Graph Settings] page, as shown below:

SANGFOR IAM v4.1 User Manual
21
Step 2. Specify the following information.
Table 2 Graph Settings (Throughput)
Field Description
Enable Auto Refresh Check the option to enable the automatic refresh function and then set the
refresh interval.
Select Time Period Select the time period, in which the throughput of the interface is to be
displayed.
Select Unit Select the flow unit.
Select Interface Select the interface whose throughput is to be displayed.
Step 3. Click <Commit> to save your settings.
3.1.1.3.3 Application Flow Ranking
The [Application Flow Ranking] section displays the flow ranking of top 10 applications. You can rank
them by uplink flow, downlink flow or total flow. As shown in the following figure, if you click the
[Uplink] column, the [Percent] column display the percentage of uplink flow; if you click the [Downlink]
column, the [Percent] column display the percentage of downlink flow. By default, the [Application Flow
Ranking] displays applications of ALL flow type, which include IPv4 and IPv6. User has options to select
either IPv4 or IPv6 flow for applications display.
To set the automatic refresh interval and flow type, click the icon.
SANGFOR IAM v4.1 User Manual
22
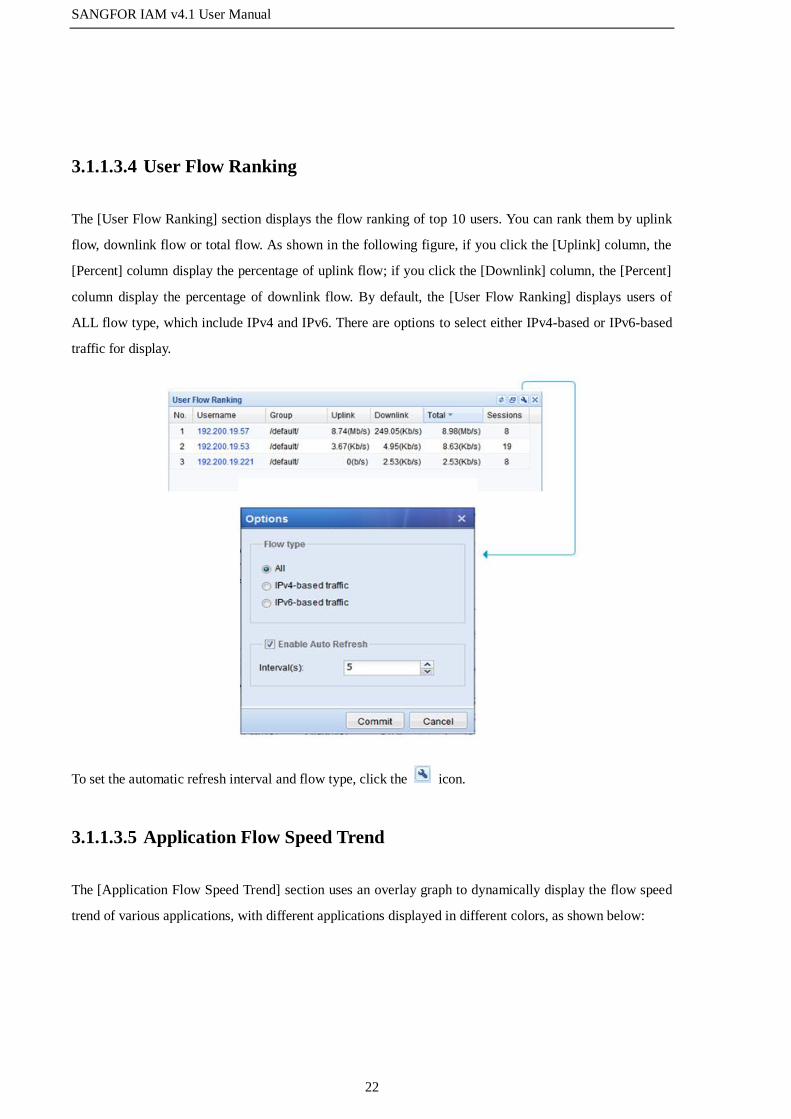
3.1.1.3.4 User Flow Ranking
The [User Flow Ranking] section displays the flow ranking of top 10 users. You can rank them by uplink
flow, downlink flow or total flow. As shown in the following figure, if you click the [Uplink] column, the
[Percent] column display the percentage of uplink flow; if you click the [Downlink] column, the [Percent]
column display the percentage of downlink flow. By default, the [User Flow Ranking] displays users of
ALL flow type, which include IPv4 and IPv6. There are options to select either IPv4-based or IPv6-based
traffic for display.
To set the automatic refresh interval and flow type, click the icon.
3.1.1.3.5 Application Flow Speed Trend
The [Application Flow Speed Trend] section uses an overlay graph to dynamically display the flow speed
trend of various applications, with different applications displayed in different colors, as shown below:
SANGFOR IAM v4.1 User Manual
23
To set the parameters related to the graph, do as follows:
Step 1. Click the icon to open the [Graph Settings] page, as shown below:
Step 2. Specify the following information.
Table 3 Graph Settings (Application Flow Speed Trend)
Field Description
Enable Auto Refresh Check the option to enable the automatic refresh function and then set the
refresh interval.
Select Unit Select the flow unit.
Select Line Select the line. Options are: [All], [Line1] and [Line2].
Type Select the flow speed type. Options are: [Total], [Uplink] and [Downlink].

SANGFOR IAM v4.1 User Manual
24
Step 3. Click <Commit> to save your settings.
3.1.1.3.6 Interface Information
The [Interface Information] section mainly displays the status of the network interfaces on the IAM device,
and the corresponding flow sent and received in real time, as shown below:
The icon indicates the interface is connected, and the icon indicates the interface is not
connected yet.
To set the automatic refresh interval, click the icon.
3.1.1.3.7 Security Status
The [Security Status] section mainly displays the insecure behaviors detected by the IAM device, as shown
below:
To set the automatic refresh interval, click the icon.

SANGFOR IAM v4.1 User Manual
25
3.1.1.3.8 Real-time Behaviors
The [Real-time Behaviors] section mainly displays the real-time network behaviors of the users, as shown
below:
To set the automatic refresh interval, click the icon.
3.1.2 Security Status
The [Security Status] page mainly displays the insecure behaviors detected by the IAM device, as shown
below:
There are 10 types of insecure behaviors: [Virus Event], [DoS/ARP Attack], [Port Scanning], [Outgoing
Email Anomaly (high sending freq)], [Flow Anomaly at Standard Port], [Protocol Anomaly], [Malicious
SANGFOR IAM v4.1 User Manual
26
Script], [Plugin Blocking], [Untrusted SSL Web Browsing] and [Access via Illegal Gateway]. If these
insecure behaviors are detected by the IAM device, this page will list the total number of insecure
behaviors, last occurred time, and last involved user/IP, and display the recent 10 logs and detailed event
information of the insecure behavior.
To view the detailed logs, click the number displayed in the [Total Counts] column to enter the data center.
3.1.3 Flow Status
The [Flow Status] page mainly displays the following information of the IAM device: flow information of
online users and various applications, bandwidth channel status, optimization status and connection
monitoring.
3.1.3.1 User Flow Ranking
The [User Flow Ranking] page mainly displays the bandwidth utilization of online users.
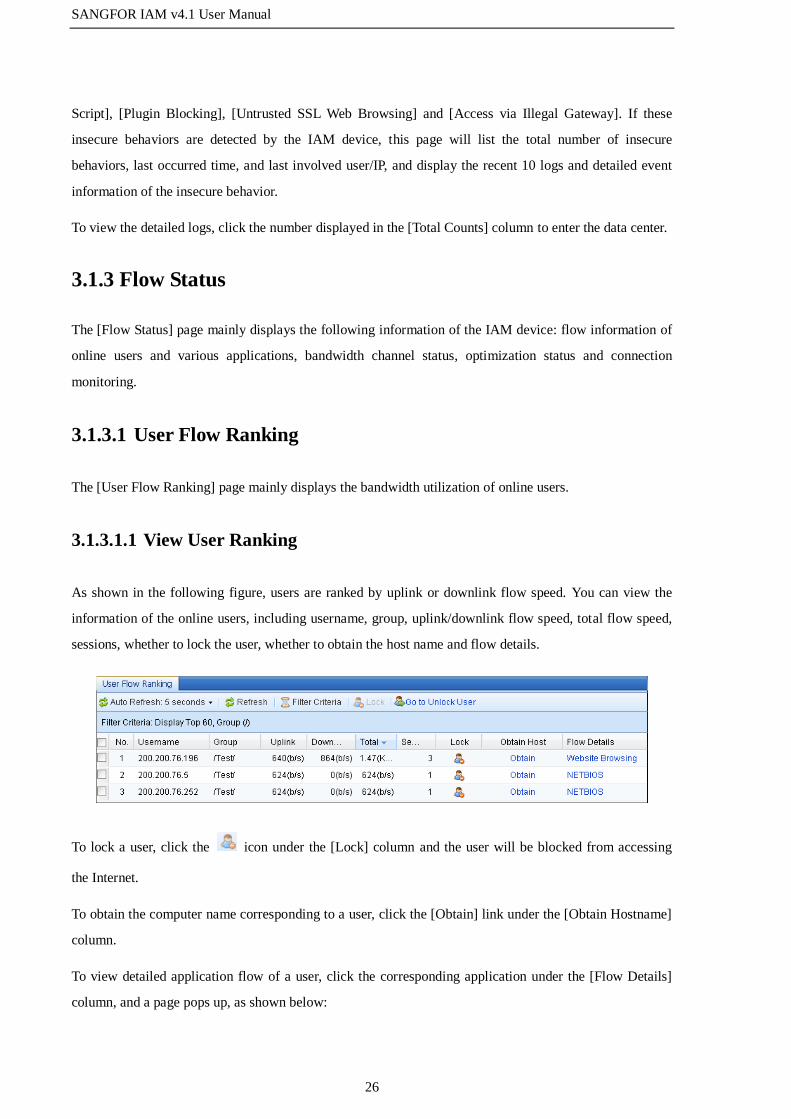
3.1.3.1.1 View User Ranking
As shown in the following figure, users are ranked by uplink or downlink flow speed. You can view the
information of the online users, including username, group, uplink/downlink flow speed, total flow speed,
sessions, whether to lock the user, whether to obtain the host name and flow details.
To lock a user, click the icon under the [Lock] column and the user will be blocked from accessing
the Internet.
To obtain the computer name corresponding to a user, click the [Obtain] link under the [Obtain Hostname]
column.
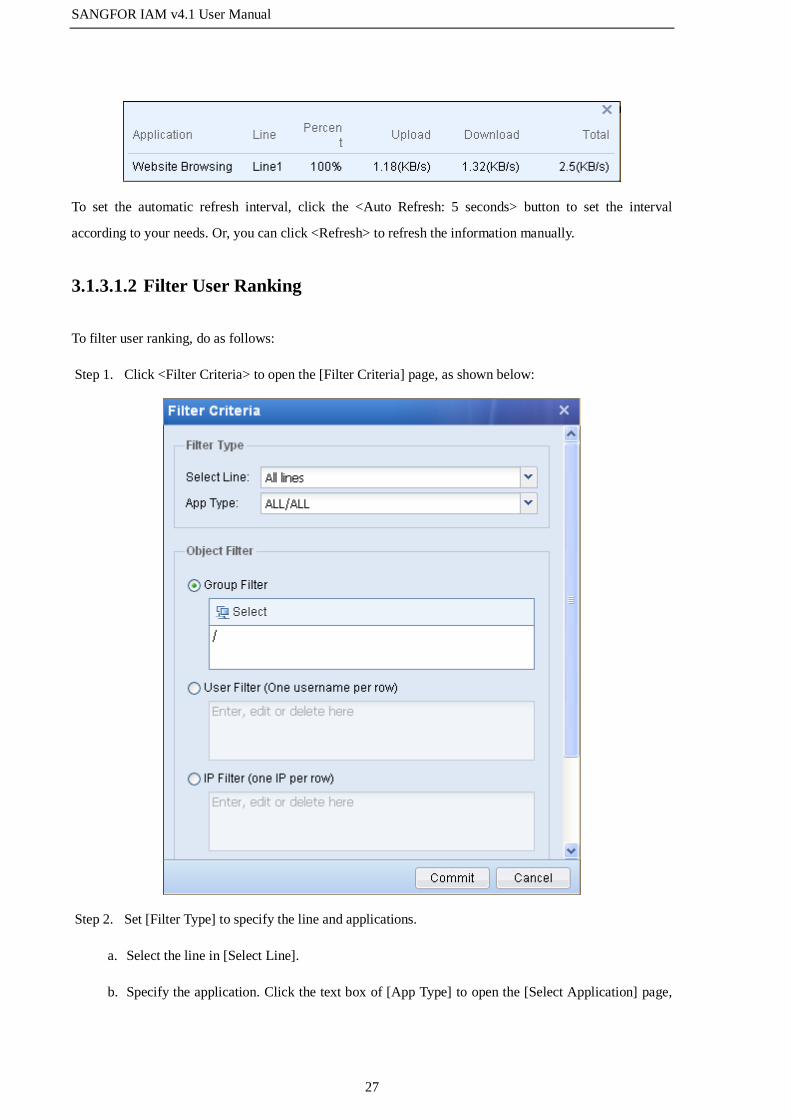
To view detailed application flow of a user, click the corresponding application under the [Flow Details]
column, and a page pops up, as shown below:
SANGFOR IAM v4.1 User Manual
27
To set the automatic refresh interval, click the <Auto Refresh: 5 seconds> button to set the interval
according to your needs. Or, you can click <Refresh> to refresh the information manually.
3.1.3.1.2 Filter User Ranking
To filter user ranking, do as follows:
Step 1. Click <Filter Criteria> to open the [Filter Criteria] page, as shown below:
Step 2. Set [Filter Type] to specify the line and applications.
a. Select the line in [Select Line].
b. Specify the application. Click the text box of [App Type] to open the [Select Application] page,

SANGFOR IAM v4.1 User Manual
28
as shown below:
c. To filter the applications, select [All], [Selected] or [Unselected] from the [Filter] drop-down list
to display all, selected or unselected applications. Check specific applications on the left pane,
and your selected applications will be displayed in the [Select List] on the right. Then, click
<OK> to save your settings.
Step 3. Set [Object Filter] to specify the specific user, group or IP address.
a. Select and set one of the three filters: [Group Filter], [User Filter] and [IP Filter].
In group filter, the slash “/” indicates all groups. To specify a specific group, click <Select> to
open the [Select Group] page, as shown below:

SANGFOR IAM v4.1 User Manual
29
b. Check the groups you want to view or enter the corresponding group name in the text box, and
then click <OK> to save your settings.

SANGFOR IAM v4.1 User Manual
30
Step 4. Set [Display Option] to specify the number of top users whose flow ranking you want to display.
Step 5. Set [Flow Type] to specify the traffic type of flow that includes IPv4-based traffic or IPv6-based
traffic or All, which means both traffics. Default setting is All.
Step 6. Click <OK> to save your settings.
3.1.3.1.3 Lock User
The <Lock> button or the icon under the [Lock] column is used to cut off the connection of a user so
that the user cannot access the Internet in a certain time period.
To lock a user, check the corresponding record and click the <Lock> button or the icon. Then set the
lockout period (in minutes) and click <Commit> to save your settings.
3.1.3.1.4 Unlock User
If you want to unlock the users who are still in lockout period so that they can access the Internet again,
click the [Go to Unlock User] link and you will enter the [Online Users] page, as shown below:
To unlock a user, locate the locked user, check the box at the beginning of the record and click <Unlock>.

SANGFOR IAM v4.1 User Manual
31
3.1.3.2 Application Flow Ranking
The [Application Flow Ranking] mainly displays the flow ranking of the applications in real time.
3.1.3.2.1 View Application Ranking
As shown in the following figure, the applications are ranked by the occupied bandwidth. You can view the
information of the applications, including application type, uplink/downlink flow speed, total flow speed,
line, percentage of occupied bandwidth and main users that use the corresponding application.
To view the information of the user that uses a corresponding application, click the user under the [Main
Users] column and a page pops up, displaying the username, group, IP address, upload/download speed
and total speed, as shown below:
To set the automatic refresh interval, click the <Auto Refresh: 5 seconds> button to set the interval
according to your needs. Or, you can click <Refresh> to refresh the information manually.
3.1.3.2.2 Filter Application Ranking
To filter application ranking, do as follows:
Step 1. Click <Filter Criteria> to open the [Filter Criteria] page, as shown below:

SANGFOR IAM v4.1 User Manual
32
Step 2. Set [Object Filter] to specify the line and user group.
Step 3. Set [Display Option] to specify the number of top applications whose flow ranking you want to
display.
Step 4. Set [Flow Type] to specify the traffic type of flow that includes IPv4 based traffic or IPv6 based
traffic or All, which means both traffics. Default setting is All.
Step 5. Click <Commit> to save your settings.
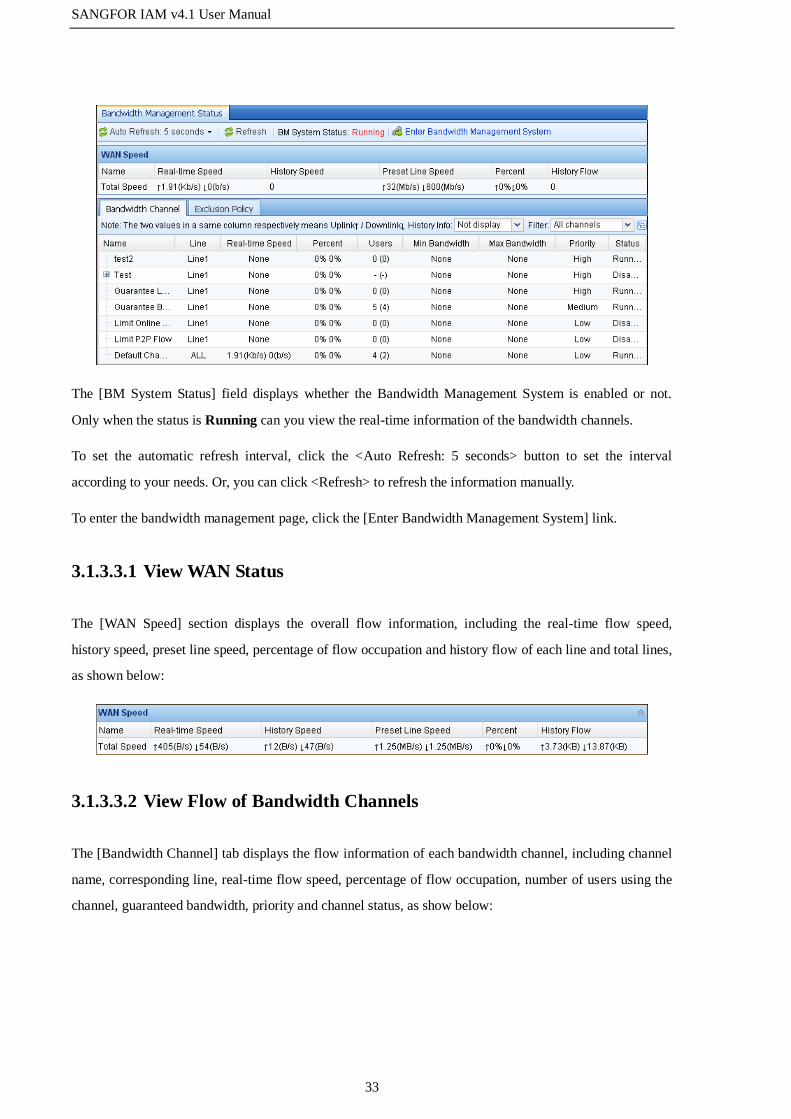
3.1.3.3 Bandwidth Management Status
The [Bandwidth Mgt Status] page mainly displays the flow information of the bandwidth channels
configured and already enabled on the [Bandwidth Mgt] > [Bandwidth Settings] > [Bandwidth Channel]
page.
SANGFOR IAM v4.1 User Manual
33
The [BM System Status] field displays whether the Bandwidth Management System is enabled or not.
Only when the status is Running can you view the real-time information of the bandwidth channels.
To set the automatic refresh interval, click the <Auto Refresh: 5 seconds> button to set the interval
according to your needs. Or, you can click <Refresh> to refresh the information manually.
To enter the bandwidth management page, click the [Enter Bandwidth Management System] link.
3.1.3.3.1 View WAN Status
The [WAN Speed] section displays the overall flow information, including the real-time flow speed,
history speed, preset line speed, percentage of flow occupation and history flow of each line and total lines,
as shown below:
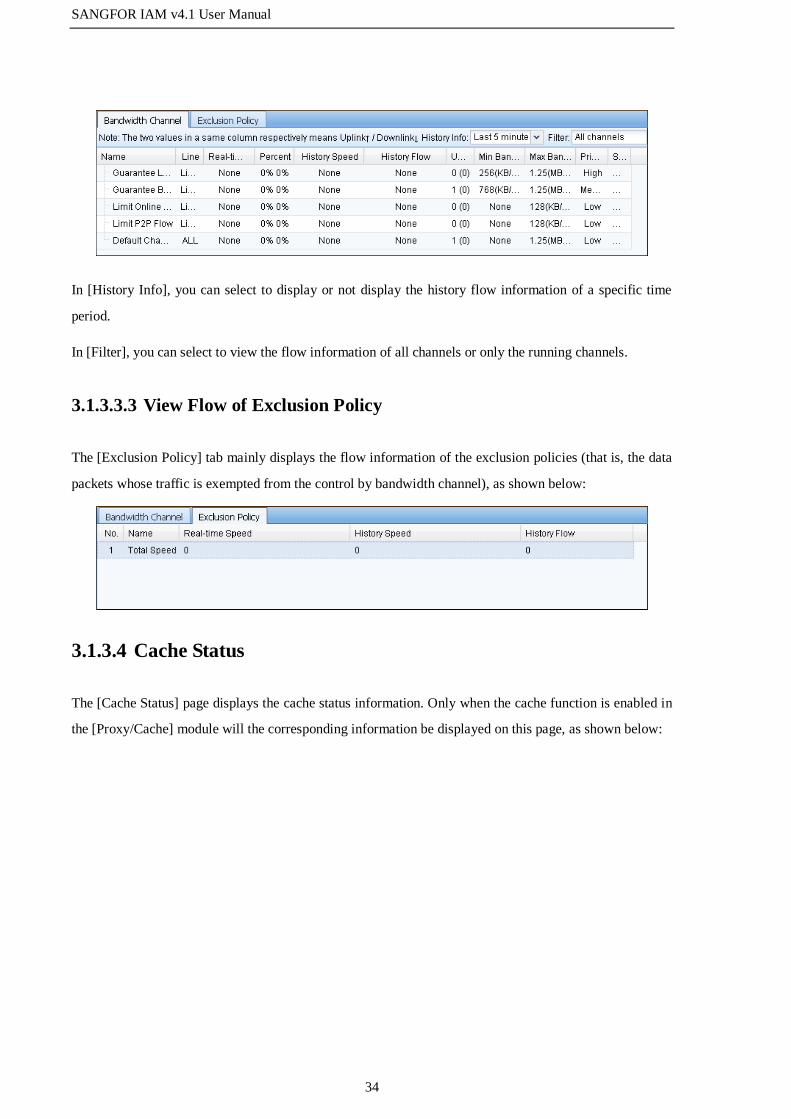
3.1.3.3.2 View Flow of Bandwidth Channels
The [Bandwidth Channel] tab displays the flow information of each bandwidth channel, including channel
name, corresponding line, real-time flow speed, percentage of flow occupation, number of users using the
channel, guaranteed bandwidth, priority and channel status, as show below:
SANGFOR IAM v4.1 User Manual
34
In [History Info], you can select to display or not display the history flow information of a specific time
period.
In [Filter], you can select to view the flow information of all channels or only the running channels.
3.1.3.3.3 View Flow of Exclusion Policy
The [Exclusion Policy] tab mainly displays the flow information of the exclusion policies (that is, the data
packets whose traffic is exempted from the control by bandwidth channel), as shown below:
3.1.3.4 Cache Status
The [Cache Status] page displays the cache status information. Only when the cache function is enabled in
the [Proxy/Cache] module will the corresponding information be displayed on this page, as shown below:

SANGFOR IAM v4.1 User Manual
35
On the above page, you can view the cache-related information, including disk utilization, memory
utilization, number of concurrent sessions, number of cached objects, optimization effect and cache hit of
the cache module.
3.1.3.4.1 Cache Hit
The [Cache Hit] tab enables you to view the cache hit rate, as shown below:

SANGFOR IAM v4.1 User Manual
36
3.1.3.4.2 Saved Bandwidth
The [Saved Bandwidth] tab enables you to view the flow optimization, as shown below:
WAN flow indicates the flow sent from the IAM device to the wide area network, while LAN flow
indicates the flow sent from the local area network to the IAM device.
Saved flow = LAN flow–WAN flow.
3.1.3.4.3 Comprehensive Hit Analysis
The [Comprehensive Hit Analysis] tab enables you to view the cache hit rate and flow optimization, as
shown below:
The cache hit graphs mainly display the statistics of the LAN users' requested data that are read from the
cache of the IAM device, as shown below:

SANGFOR IAM v4.1 User Manual
37
By default, the statistics are displayed in bar graphs. You can click the <Pie Graph> button to view the
information in pie graphs, as shown below:
The information displayed on the above figure is described in the following table.
Table 4 Cache Hit Information
Field Description
Object Hit Indicates the requested data that are served by reading the cache of the device.
Byte Hit Indicates the portions of the requested data that are served by reading the cache
of the device.
Memory Hit Indicates the requested data that are served by reading the memory cache.
Disk Hit Indicates the requested data that are served by reading the disk cache.
Instant Request Indicates the requests sent for the first time, or the requests that are denied by
the URL filter.
Non Cacheable Indicates the requested data that are marked with "not cacheable", that is, the
data that will not be cached by the IAM device.
Statistical Period Select the time period of which the statistics is to be made. You can select last
24 hours, last 7 days or last 30 days.

SANGFOR IAM v4.1 User Manual
38
The [Comprehensive Hit Analysis] tab displays the cache hit graphs by default. You can click the <Flow
Speed> button to view the flow speed optimization graph, as shown below:
WAN bandwidth indicates all the packets sent from the IAM device to the wide area network, while LAN
bandwidth indicates all the packets sent from the local area network to the IAM device.
You can select to view the flow speed optimization information over last 24 hours, last 7 days or last 30
days.
3.1.3.5 Connections
The [Connections] page is used to search for the active connection information of a specific user or IP
address. You can search by IP address or username, as shown below:
3.1.3.5.1 Search by IP
By default, the system displays [Search by IP]. To search for the connection information of a certain IP
address, type the IP address in the text box, for example, 192.168.1.105, and click the icon. The
search results will be listed and you can view the connection information of the IP address, including
source address, destination address, protocol, application type, direction, etc., as shown below:

SANGFOR IAM v4.1 User Manual
39
3.1.3.5.2 Search by Username
To search for the connection information by username, click [Search by IP] to select [Search by Username],
as shown below. Then type the username and click the icon.
3.1.4 Real-time Behaviors
3.1.4.1 View User Behaviors
The [Real-time Behaviors] page mainly displays the recent network behaviors of users, including such
information as occurred time, IP address, group, application type, application name and behavior details, as
shown below:
3.1.4.2 Filter User Behaviors
To filter the network behaviors, do as follows:
Step 1. Click <Filter Criteria> to open the [Filter Criteria] page, as shown below:

SANGFOR IAM v4.1 User Manual
40
Step 2. Set [Filter Type] to specify the user, group or IP address. Select and set one of the three filters:
[Group Filter], [User Filter] and [IP Filter].
Step 3. Set [Filter Object] to specify the behaviors you want to view. Options include [Search Keyword],
[Post], [Email], [Outgoing File], [IM Chat Logs], [Website Browsing] and [Others].
Step 4. Click <Commit> to save your settings.
3.1.5 Online Users
The [Online Users] page enables you to manage the online users that already pass the authentication on the
IAM device. The function is not available for IPv6 address users.
3.1.5.1 View Online Users
You can view all the authenticated online users, including such information as login name (display name),
group, IP address, authentication type, login time/lock time, online duration and operation that you can
perform.

SANGFOR IAM v4.1 User Manual
41
In the [Organization Structure] section, you can enter a keyword to search for a specific user group and
view the online users in the corresponding group.
In the [User List] section, you can search for a specific user through [Search by Login Name] or [Search by
IP] at the top right corner, as shown below:
3.1.5.2 Filter Online Users
To filter online users, do as follows:
Step 1. Click <Filter Criteria> to open the [Filter Criteria] page, as shown below:
SANGFOR IAM v4.1 User Manual
42
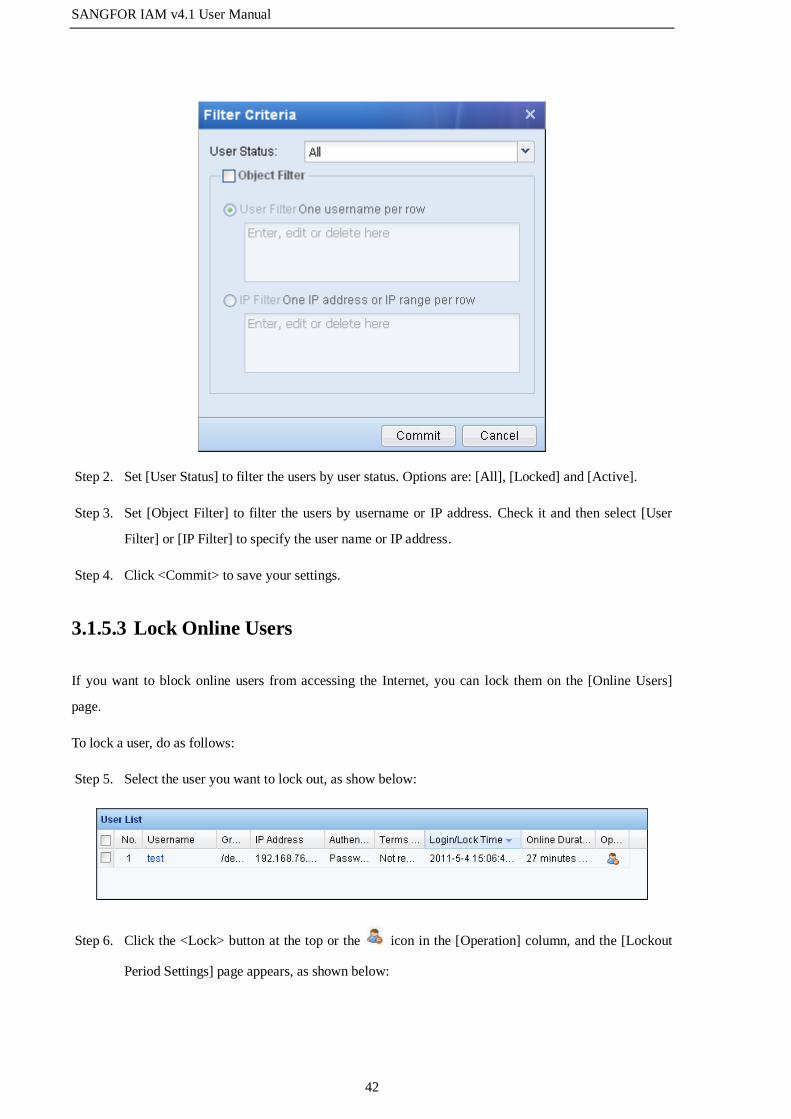
Step 2. Set [User Status] to filter the users by user status. Options are: [All], [Locked] and [Active].
Step 3. Set [Object Filter] to filter the users by username or IP address. Check it and then select [User
Filter] or [IP Filter] to specify the user name or IP address.
Step 4. Click <Commit> to save your settings.
3.1.5.3 Lock Online Users
If you want to block online users from accessing the Internet, you can lock them on the [Online Users]
page.
To lock a user, do as follows:
Step 5. Select the user you want to lock out, as show below:
Step 6. Click the <Lock> button at the top or the icon in the [Operation] column, and the [Lockout
Period Settings] page appears, as shown below:

SANGFOR IAM v4.1 User Manual
43
Step 7. Specify the lockout period and click <Commit>.
After being locked, the user cannot access the Internet during the lockout period. The status of the user is
as shown below:
3.1.5.4 Unlock Online Users
For the users still in lockout period, you can also unlock them so that they can access the Internet again.
To unlock a user, select the locked user you want to unlock and then click the <Unlock> button at the top
or the icon in the [Operation] column.
After being unlocked, the user can access the Internet again.
3.1.5.5 Logout Online Users
Administrators can logout online users through the [Online Users] page. However, the temporary users,
DKey users and the users that need not be authenticated cannot be logged out. If you select these users and
click <Force to Logout>, the following prompt will appear:
To logout users adopting SSO authentication or password authentication, do as follows:
Step 8. Select the user you want to logout, as shown below:

SANGFOR IAM v4.1 User Manual
44
Step 9. Click the <Force to Logout> button, and the following prompt appears:
Step 10. Click <Yes>, and the user is logged out.
3.1.6 Email Audit
The [Email Audit] page displays the emails delayed for audit. Only when the email delay/audit function is
enabled on the [User/Policy] > [Access Management] page will the corresponding information be
displayed on this page.
3.1.6.1 View Emails
The [Email Audit] page lists all the emails that need be audited, including such information as the name of
email sender, email subject, sender email address, receiver email address, email size, number of files
attached to the email, timestamp, email status and the operations that you can perform.
3.1.6.2 Filter Emails
To filter the emails, click <Filter Criteria> to open the [Search Emails] page, as shown below. Then select
and set one of the three filters: [Group Filter], [User Filter] and [IP Filter], and click <Commit> to save
your settings.

SANGFOR IAM v4.1 User Manual
45
To download the emails to local computer, click the icon in the [Operation] column.
3.1.6.3 Delete Emails
If you want to delete some of the delayed emails, do as follows:
Step 1. Select the email you want to delete, as shown below:
Step 2. Click the <Delete> button at the top or click the icon in the [Operation] column, and the
following prompt appears:
Step 3. Click <Yes>, and the email is deleted without being sent to the receiver.
3.1.6.4 Audit Emails
If you want to audit the delayed emails, do as follows:
Step 1. Select the email you want to audit, as shown below:

SANGFOR IAM v4.1 User Manual
46
Step 2. Click the <Audit&Approve> button at the top or the icon in the [Operation] column, and the
status of the email changes to "Waiting to be sent", as shown below:
After being audited and approved, the email will be successfully sent out as long as the device
communicates smoothly with the mail server.
You can also set the audit priority of emails, as shown below:
If there are several emails audited and approved, the email with high priority will be preferentially sent out,
while the emails with medium or low priority will queue up and wait to be sent after the high priority email
is successfully sent.
3.1.6.5 Set Email Audit Options
If you want to configure the email audit options, click the [Configure Audit Timeout/Action] link to go to
the [System] > [Advanced] > [Email Audit Options] page and set relevant parameters, as shown below:

SANGFOR IAM v4.1 User Manual
47
3.1.7 DHCP Status
The [DHCP Status] page displays the IP allocation by DHCP, including such information as total number
of allocated IP addresses, the computer name and MAC address of the user who is allocated with the IP
address, and lease date and lease term of the allocated IP address. Only when DHCP is enabled and
relevant options are configured will the corresponding information be displayed on this page, as shown
below:
3.2 Objects
The [Objects] module defines various objects which will be used by network behavior filter, network
behavior audit and bandwidth management. All the control and audit conducted by the IAM device are
based on the objects defined in this module.
It includes the following information:
[App Ident Library], [Intelligent Ident Lib]: Displays various common Internet applications
already defined. By analyzing the data feature and behavior feature of various applications
commonly used, SANGFOR engineers have defined corresponding identification rules. You can
reference the two types of objects in [Access Management] > [Access Control] > [App Control]
to conduct control over Internet applications. Based on the two types of application identification
rules, you can also implement [Web Filter], [SSL Management], [Internet Audit] and [Reminder],
and conduct different bandwidth control over different application types through bandwidth
management. [App Ident Library] can be updated periodically by visiting the SANGFOR server.
SANGFOR will periodically update the application identification library on the server so that it
can identify the latest application and version.
[App Customization]: To customize application rules by yourself. You can also configure the
packet feature. If you know how to capture packets and analyze packet feature, you can define
your own application identification rules here. However, generally, it is not recommended to
customize rules, for the conflict between customized rules and internal rules may incur
application identification chaos, which may then result in unavailability of partial control and

SANGFOR IAM v4.1 User Manual
48
audit functions.
[URL Library]: Displays the URLs commonly used, which are already categorized. It includes
the URL library built in the SANGFOR IAM device and the URL library customized by yourself.
You can reference these objects in [Access Management] > [Access Control] > [Web Filter] to
conduct URL control.
[Ingress Rule Library]: To define ingress rules. The ingress rule will check the operating system,
process, file, registry and other information at client end. Besides, ingress rules can be used to
realize audit on chat logs of encrypted IM tools. You can reference the ingress rules in [Access
Management] > [Ingress Policy] to implement the detection and control over user computers.
[Service]: To define network services based on port and protocol. You can reference the services
defined here in [Access Management] > [Access Control] > [Port Control] to conduct control
over packets by detecting the port and protocol of the packets. Besides, you can reference them
in [Firewall] > [Firewall Rules].
[IP Group]: To define IP groups, which will be used to conduct control based on IP address. You
can reference them in [Access Management] > [Access Control] > [Port Control], [Bandwidth
Mgt] > [Bandwidth Settings] and [Firewall] > [Firewall Rules].
[Schedule]: To define the schedules, which will be used to conduct control based on a specified
time period. Besides, they may be used for searching behaviors and making statistics in Data
Center.
[Black/White List Group]: To define black list group and white list group for URLs. You can
reference them in [Access Management] > [Access Control] > [Web Filter] > [File Type Filter],
[Access Management] > [Security Policy] > [Script Filter] and [ActiveX Filter].
[Keyword Group]: To define the keyword groups, which will be used by [Access
Management] > [Access Control] > [Web Filter] > [Keyword Filter].
[File Type Group]: To define the file type groups, which will be used by [Access Management] >
[Access Control] > [Web Filter] > [File Type Filter] and [Bandwidth Mgt] > [Bandwidth
Settings].
[Trusted CA]: To add trusted CA. When a LAN user accesses website using SSL protocol, the
IAM device will verify the certificate used. If SSL protocol uses a certificate specified in
[Trusted CA], the certificate will be regarded as legal by the device and the user can proceed.
You can delete or add trusted SSL certificate. You can check the [SSL Certificate Chain Control]
on the [Access Management] > [Access Control] > [SSL Management] > [SSL Security] page to
enable the SSL certificate verification.

SANGFOR IAM v4.1 User Manual
49
3.2.1 Application Ident Library
The [App Ident Library] page is used to determine and detect the application types of data packets.
According to the combined conditions that include feature code or protocol, port, direction, packet length
matching and packet contents matching, it can easily identify the application types that cannot be detected
simply based on port or protocol, such as QQ, P2P, etc.
Application identification library comprises internal rules and customized rules. The internal rules cannot
be modified and are periodically updated by the device. When updating internal rules, please make sure the
update license is available and the device can connect to the Internet. For customized rules, you can add,
delete or modify them (See section 3.2.3 "Application Customization" for detailed instructions).
You can reference the application identification rules in [Access Management] > [Access Control] > [App
Control] to implement control over applications. In addition, the control and audit functions implemented
by Web filter, SSL management, audit policy, reminder policy and bandwidth management are based on
the application identification results; therefore, application identification library is very important. They
cannot be edited nor deleted. Some of the rules can be disabled; however, the rules involving basic
protocol judging cannot be disabled.
3.2.1.1 View Application Ident Rules
On the [App Ident Library] page, you can view the application identification rules.
The information displayed on the above figure is described in the following table.
Table 5 App Ident Library Information
Field Description

SANGFOR IAM v4.1 User Manual
50
Total Applications, Total
Rules
Displays the total number of applications and rules in the current
application identification library of the IAM device.
Current Library Released
On
Displays the release date of the current identification library.
Update Service Expired
On
Displays the date when the update service of the current identification
library expires.
Application Category Displays the categories of the application identification rules, such as IM,
game, etc.
When you select an application from the category list on the left, the
specific applications included in this category will be displayed under
[Specific Applications] on the right. They are categorized further, for
example, QQ, MSN included in the IM category.
To filter the application rules, select [ALL], [Enabled] or [Disabled] from the [Filter] drop-down list at the
upper right of the page to display all, enabled or disabled application rules.
To search for a specific application rule, enter the keyword in the [Search] text box and then press the
<Enter> key on your keyboard. For example, to search for the application rules corresponding to QQ, type
QQ in the text box and then press the <Enter> key. The search results appear, as shown below:
Besides, you can manually import application identification rules into the device. To do this, click <Update
App Ident Library Manually>, select the application identification rule file and click <Open> to import it.
3.2.1.2 Enable/Disable Application Ident Rules
You can enable or disable application identification rules on the [App Ident Library] page.
SANGFOR IAM v4.1 User Manual
51
To enable or disable application identification rules, for example, to enable/disable the QQ-related rules, do
as follows:
Step 1. Open the [Objects] > [App Ident Library] page. Type QQ in the [Search] text box to search for
the QQ-related applications, as shown below:
Step 2. Check the application QQ, and then click the or icon in [Rule Status] column to enable
or disable all the rules related to QQ.
Step 3. If you want to disable/enable one application identification rule of the QQ application, click the
<Settings> button, and the [QQ Ident Rule] dialogue appears, listing all the rules related to QQ,
as shown below:

SANGFOR IAM v4.1 User Manual
52
Step 4. Check the rule and click <Enable>/<Disable> to enable/disable it.
The application identification rules of some basic protocols (for example, HTTP) cannot be disabled,
for it may affect other data identification based on HTTP protocol.
3.2.2 Intelligent Ident Library
The [Intelligent Ident Lib] page is also used to identify the application type of various Internet access data,
but its identification method is different from that of [App Ident Library]. The intelligent identification can
identify some encrypted data (such as P2P application, Skype, SSL, and SANGFOR VPN data in plaintext
or ciphertext), proxy tools (such as freegate, unbounded browsing), and VOIP and IM video/audio data.
3.2.2.1 Enable/Disable Intelligent Ident Rules
To enable or disable intelligent identification rules, for example, to enable/disable the rules related to
Video Voice, do as follows:

SANGFOR IAM v4.1 User Manual
53
Step 1. Open the [Objects] > [Intelligent Ident Lib] page, as shown below:
Step 2. Check the application Video Voice, and then click the or icon in [Rule Status] column
to enable or disable all the intelligent identification rules related to Video Voice.
Step 3. If you want to disable/enable one intelligent identification rule of the Video Voice application,
click the <Settings> button, and the [Video Voice Ident Rule] dialogue appears, listing all the
rules related to Video Voice, as shown below:
SANGFOR IAM v4.1 User Manual
54
Step 4. Check the rule and click <Enable>/<Disable> to enable/disable it.
3.2.2.2 Edit P2P Behavior Ident Rule
The P2P behavior identification rule is a supplement to the application identification library. It can
intelligently identify the P2P data, which cannot be identified by application identification library. The P2P
behavior rule is editable.
To modify P2P behavior rule, do as follows:
Step 1. Click P2P Behavior to open the following page:
SANGFOR IAM v4.1 User Manual
55
Step 2. Check the [Enable Rule] to enable the current rule. [Rule Name], [Category] and [Description]
respectively indicate the name, application category and description of the current intelligent
identification rule. These three fields cannot be modified.
Step 3. Specify the sensitivity level of the rule. The P2P intelligent identification may cause
misjudgement. The higher the sensitivity level is, the lower the misjudgement rate is. You can
adjust the sensitivity level according to specific data. For example,
If there is large amount of unidentified data that is connected to high-end ports randomly
and changeable destination address, these data probably is unidentified P2P data. In this
case, you can adjust the sensitivity to a higher level.
If some data, which is not P2P data, is misjudged as P2P data, the sensitivity is probably set
too high. In this situation, you can adjust it to a lower level.
Step 4. Specify the ports to be excluded. If the destination port of data is excluded here, the IAM device
will not implement the P2P intelligent identification on the data to avoid misjudgement.
Step 5. Click <Commit> to save your settings.

SANGFOR IAM v4.1 User Manual
56
3.2.3 Application Customization
The [App Customization] page allows you to customize application identification rules. You can define
some applications that are not included in the [App Ident Library] according to data direction, IP, protocol
and port.
3.2.3.1 Customize Application Rules
You can customize application rules on the [App Customization] page according to your needs.
Case Study: Suppose you need to guarantee certain amount of bandwidth to company emails, but there is
no Company Email application type in the application list for you to select when you are configuring the
bandwidth channel. In this case, you can define an application rule named Company Email.
To customize the application rule, do as follows:
Step 1. Click <Add> on the [App Customization] page to open the [Customize Application] page, as
shown below:

SANGFOR IAM v4.1 User Manual
57
Step 2. Specify the information as follows:
SANGFOR IAM v4.1 User Manual
58
Table 6 Application Customization Settings
Field Description
Enable Application Check this option to enable the current application rule.
Rule Name Type a name for the application rule.
Description Type a brief description for the rule.
App Type Specify the type of the application. You can select the application type from
the drop-down list or define it by yourself.
Application Specify the application corresponding to the current application rule.
Packet Direction Select the direction of data passing through the IAM device. Only when the
direction of data is matched will the identification go on.
Layer 3 Protocol Specify the protocol type adopted by data transfer. In this example, the email
sending adopts TCP protocol.
Destination Port Set the destination port of data. In this example, email sending uses the TCP
25 port.
IP Address Set the source IP, destination IP or the destination IP identified by the proxy.

SANGFOR IAM v4.1 User Manual
59
Match Domain Set the destination domain address of data. In this example, the domain of
the company email address is mail.sangfor.com.cn.
Step 3. Click <Commit>, and the application rule is added to the custom application list, as shown
below:
Step 4. Set the priority for the customized application rule. Since internal application identification
library already includes the email identification rule, if priority is given to internal rules, data
packets may be preferentially matches the internal rules instead of the customized Company
Email rule. To make the customized rule preferentially matched, check the [Give Priority to
Custom Rules] option on the [App Customization] page.
Step 5. Go to the [Bandwidth Mgt] > [Bandwidth Settings] > [Bandwidth Channel] page to configure a
guaranteed bandwidth channel to assure certain amount of bandwidth for emails sending (see
section 3.4.3 "Bandwidth Channel").
It is recommended to set such identification information as destination port, IP address and domain
name when you are customizing application rules. If the conditions for identifying are too broad, the
customized application rules may conflict with internal ones and cause identification chaos, resulting
in unavailability of some control and audit functions.
3.2.3.2 Enable/Disable/Delete Custom Application Rules
To enable, disable or delete the customized application rules, check the rules and then click the <Enable>,
<Disable> or <Delete> button.

SANGFOR IAM v4.1 User Manual
60
3.2.3.3 Import/Export Custom Application Rules
To import customized application rules, click <Import>, select the rule file and click <Open>.
To export customized application rules, select the application rules you want to export and then click
<Export>.
3.2.4 URL Library
The [URL Library] page displays the URL categories defined according to the contents of websites, which
help the IAM device identify various websites to realize the control over flow and over access to various
websites.
3.2.4.1 URL Library List
The [URL Library List] page lists the internal URL library and customized URL library. SANGFOR will
update the internal URL library regularly onto the server and the IAM device will then automatically
connect to the server for updating (on the condition that the corresponding license is obtained and the IAM
can connect to the Internet). For the customized URL library, you can add, delete or modify the URL
groups according to your needs.
You can view the release time and update service expiry time of the current internal URL library at the top
of the page.

SANGFOR IAM v4.1 User Manual
61
3.2.4.1.1 Search URL
You can query the URL category to which a specific URL belongs.
To find out the URL category of a specific URL, click <Search URL> to open the [Search URL] page.
Then type the domain name you want to search and click <Search>. The search result will display the URL
category to which the URL belongs, as shown below:
URL does not support fuzzy search.
3.2.4.1.2 Add URL Group
You can customize the URL groups according to your needs.

SANGFOR IAM v4.1 User Manual
62
To add a URL group, do as follows:
Step 1. Click <Add> on the [URL Library] page to open the [Add URL Group] page, as shown below:
Step 2. Specify the following information.
Table 7 URL Group Settings
Field Description
Name Type a name for the URL group.
Description Type descriptive information for the URL group.

SANGFOR IAM v4.1 User Manual
63
URL Type the URLs that you want to add into this URL group. One URL group may
include multiple URL entries.
The wildcard character (*) is supported in URL entries. For example, to set a
URL entry that matches the subpages of "Sina.com" (such as
"news.sina.com.cn", "sports.sina.com.cn", "ent.sina.com.cn", etc.), type
*.sina.com.cn in the text box.
The wildcard character can only be used to indicate the first-level domain
matching and can only be typed at the beginning of a URL entry (DO NOT
type it in the middle); otherwise, the URL entry will not take effect.
Domain Name
Keyword
Type the domain name keyword. If a visited domain name contains any of the
keywords specified here, it will be identified as this URL group. Domain
Name Keyword has lower priority to be matched than Internal URL Library
and Custom URL Library, that is, the system identifies a URL first according to
the internal URL library, then the customized URL library and finally the
domain name keyword.
Step 3. Click <OK> to save your settings.
The URL library supports up to 100 URL categories (including internal and customized ones), and
you can enable at most 10 customized URL categories (the excessive ones can be disabled).
3.2.4.1.3 Delete URL Group
You can delete the customized URL groups. The internal URL groups cannot be deleted.
To delete a customized URL group, check the URL group and then click <Delete>.
3.2.4.1.4 Modify URL Group
You can modify both the customized URL groups and internal URL groups, but there are some differences:
For the customized URL group, you can modify the description, URL entries and domain name
keywords;
For the internal URL group, you can only add URL entries and domain name keywords to
supplement the URL group, while other information, including the name, description, existing
URL entries and domain name keywords, cannot be modified.
To modify a URL group, click the name of the URL group to open the [Edit URL Group] page, as shown

SANGFOR IAM v4.1 User Manual
64
below, and then edit the URL group according to your needs (see section 3.2.4.1.2 "Add URL Group").
3.2.4.1.5 Update Internal URL Library
The <Update Internal Library Manually> button displayed at the top of the [URL Library List] page
enables you to update the internal URL library manually.
To update the internal library, click <Update Internal Library Manually>, select the internal library file and
then click <Open>.

SANGFOR IAM v4.1 User Manual
65
3.2.5 Ingress Rule Library
The ingress rules are used to check the operating system, process, file, registry or other information of the
computers in the local area network by means of the ingress program installed at client end. Besides,
ingress rules can be used to realize audit over chat logs of encrypted IM tools.
You can define these ingress rules on the [Ingress Rule Library] page, which will be referenced in [Access
Management] > [Ingress Policy] (see section 3.3.1.4.6 "Add Ingress Policy"). If ingress system is enabled
in the policy, the LAN users associated with the policy should satisfy the corresponding ingress rule before
they are allowed to access the Internet. When accessing the Internet for the first time, users need to install
the ingress control. The IAM device has already defined multiple built-in ingress rules, and you can also
define the ingress rules according to your needs.
3.2.5.1 Ingress Rule
The [Ingress Rule] page enables you to define the ingress rules. You can add, delete or manage them
according to your needs.

SANGFOR IAM v4.1 User Manual
66
3.2.5.1.1 Add Ingress Rule
To add an ingress rule, click <Add> on the [Ingress Rule] page and then select the rule type. Options are
[Operating System Rule], [Process Rule], [File Rule], [Registry Rule], [Scheduled Task Rule] and [Other
Rule], as shown below:
Add Operating System Rule
[Operating System Rule] is used to check the operating system of end users' computers.
Suppose the company requires that all the computers in the intranet should use Windows XP and upgrade
the patch to at least SP4 to avoid the risk of infecting with virus; otherwise, they will be restricted from
accessing the Internet.

SANGFOR IAM v4.1 User Manual
67
To meet the requirements, do as follows:
Step 1. On [Ingress Rule] page, click <Add> and select [Operating System Rule] to open the [Operating
System Rule] page, as shown below:
Step 2. Specify the information as follows:

SANGFOR IAM v4.1 User Manual
68
Table 8 Operating System Rule Settings
Field Description
Rule Name Type a name for the rule. The length of rule name cannot exceed 95 bytes.
Rule Type Specify the rule type. You can select a rule type from the drop-down list or
define it by yourself. The length of rule type cannot exceed 95 bytes.
Description Type a brief description for the rule.
User PC must use
the OS selected
below
Specify the operating system (OS) and related patch that should be installed on
user PCs.
In this example, check the [windowsXP] option and select [SP4 or above]
under the [Patch] column.
Action If Violated Select the action that will be taken by IAM device to the user whose computer
does not satisfy the requirements set here. Options are [Deny Internet access]
and [Submit report only] (the latter indicates only recording it in Data Center,
with no action taken).
In this example, select [Deny Internet access].
SANGFOR IAM v4.1 User Manual
69
Step 3. Click <Commit> to save your settings.
Add Process Rule
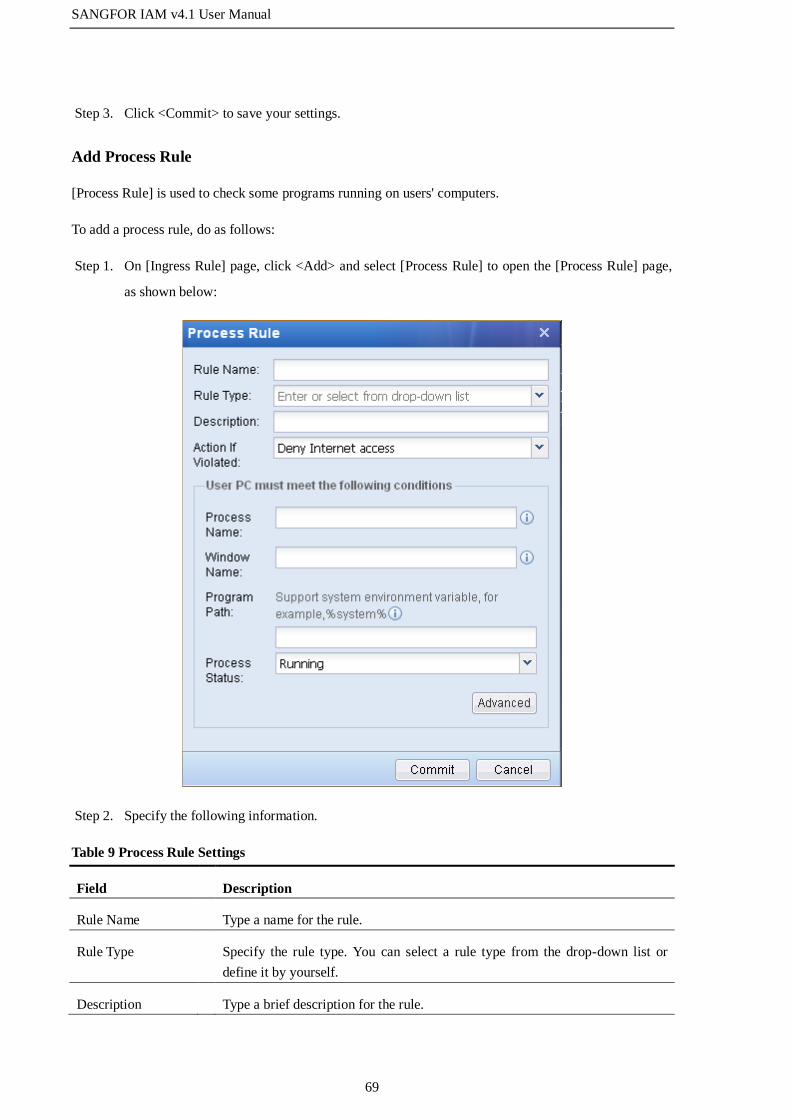
[Process Rule] is used to check some programs running on users' computers.
To add a process rule, do as follows:
Step 1. On [Ingress Rule] page, click <Add> and select [Process Rule] to open the [Process Rule] page,
as shown below:
Step 2. Specify the following information.
Table 9 Process Rule Settings
Field Description
Rule Name Type a name for the rule.
Rule Type Specify the rule type. You can select a rule type from the drop-down list or
define it by yourself.
Description Type a brief description for the rule.

SANGFOR IAM v4.1 User Manual
70
Action If Violated Select the action that will be taken by IAM device to the user whose computer
does not satisfy the requirements set here. The options available vary with the
setting of [Process Status] at the bottom. When [Process Status] is set to
Running, the options available are [Deny Internet access], [Stop process] and
[Submit report only]. When [Process Status] is set to Not running, the options
available are [Deny Internet access], [Start process] and [Submit report only].
Process Name Type a complete process name. The wildcard character is not supported.
Window Name Type a complete window name. The wildcard character is not supported.
Program Path Type the installation path of the program. The following environment variables
are supported:
Process Status Specify the status of the process. Options are [Running] and [Not running]. If
you select [Running], the [Advanced] button is available.
Step 3. If you set [Process Status] to [Running], you can click the [Advanced] button to set the advanced
conditions: [Match program MD5] and [Match program size], as shown below:
Step 4. Click <OK> and then <Commit> to save your settings.

SANGFOR IAM v4.1 User Manual
71
Add File Rule
[File Rule] is used to check some files on users' computers.
To add a file rule, do as follows:
Step 1. On [Ingress Rule] page, click <Add> and select [File Rule] to open the [File Rule] page, as
shown below:
Step 2. Specify the following information.
Table 10 File Rule Settings
Field Description
Rule Name Type a name for the rule.
Rule Type Specify the rule type. You can select a rule type from the drop-down list or
define it by yourself.
Description Type a brief description for the rule.
Action If Violated Select the action that will be taken by IAM device to the user whose computer
does not satisfy the requirements set here. The options available vary with the
setting of [File Status] at the bottom. When [File Status] is set to File exists,
the options available are [Deny Internet access], [Delete the file] and [Submit
report only]. When [File Status] is set to File does not exist, the options
available are [Deny Internet access] and [Submit report only].

SANGFOR IAM v4.1 User Manual
72
File Path Enter a complete file saving path. The following environment variables are
supported:
File Status Specify the status of the file. Options are [File exists] and [File does not exist].
If you select [Running], the [Advanced] button is available.
Step 3. If you set [File Status] to [Running], you can click the [Advanced] button to set the advanced
conditions: [Match file MD5], [Match file size] and [File's update cannot be delayed more than],
as shown below:
Step 4. Click <OK> and then <Commit> to save your settings.
Add Registry Rule
[Registry Rule] is used to check some registry items on users' computers.
To add a registry rule, do as follows:
Step 1. On [Ingress Rule] page, click <Add> and select [Registry Rule] to open the [Registry Rule] page,

SANGFOR IAM v4.1 User Manual
73
as shown below:
Step 2. Specify the following information.
Table 11 Registry Rule Settings
Field Description
Rule Name Type a name for the rule.
Rule Type Specify the rule type. You can select a rule type from the drop-down list or
define it by yourself.
Description Type a brief description for the rule.
Action If Violated Select the action that will be taken by IAM device to the user whose computer
does not satisfy the requirements set here. The options available vary with the
setting of [Item Status] at the bottom. When [Item Status] is set to Contained
in user registry, the options available are [Deny Internet access], [Delete the
item] and [Submit report only]. When [Item Status] is set to NOT contained in
user registry, the options available are [Deny Internet access], [Add the item]
and [Submit report only].
Registry Item Type the registry item. It refers to the file folder path to the registry item
displayed on the left pane of the [Registry Editor] window.
Item Name Type the name of the registry item.

SANGFOR IAM v4.1 User Manual
74
Item Data Type the data of the registry item.
Item Status Specify the status of the registry. Options are [Contained in user registry] and
[NOT contained in user registry].
Step 3. Click <Commit> to save your settings.
Add Scheduled Task Rule
[Scheduled Task Rule] is used to check the execution result of the scheduled task called by ingress client
on user PC. The scheduled task can be an executable program, Jscript or Vbscript. The IAM device will
take the corresponding action specified in the rule for different execution results.
To add a scheduled task rule, do as follows:
Step 1. On [Ingress Rule] page, click <Add> and select [Scheduled Task Rule] to open the [Scheduled
Task Rule] page, as shown below:

SANGFOR IAM v4.1 User Manual
75
Step 2. Set the following information.
Table 12 Scheduled Task Rule Settings
Field Description
Rule Name Type a name for the rule.
Rule Type Specify the rule type. You can select a rule type from the drop-down list
or define it by yourself.
Description Type a brief description for the rule.
Program Type Specify the type of the program. Options are [Executable program],
[Jscript] and [Vbscript].
Program Path Type the detailed saving path where the program or script is saved in
user's computer. The program path must be a network address accessible
to all the users associated with this rule.
Scheduled Task There are two types of scheduled task: [Run periodically] and [Run once
when ingress program is started on user PC].
Task Return Result Check Set whether to check the execution result of the scheduled task script.
Options are [Check return result] and [No check].
Return Result Timeout Set the timeout for returning result.
If task return result=1/2,
then
Specify the corresponding action for different return result of task.
Options are [Only record], [Prompt], [Deny Internet access] and
[Prompt&Deny Internet access].
Step 3. Click <Commit> to save your settings.

SANGFOR IAM v4.1 User Manual
76
Add Other Rule
To add other rule, do as follows:
Step 1. On [Ingress Rule] page, click <Add> and select [Other Rule] to open the [Other Rule] page, as
shown below:
Step 2. Set the following information.
Table 13 Other Rule Settings
Field Description
Rule Name Type a name for the rule.
Rule Type Specify the rule type. You can select a rule type from the
drop-down list or define it by yourself.
Description Type a brief description for the rule.
Block super admin (member of
Administrator group) of user PC to
access the Internet
Check it to block the user who logs in as administrator
from accessing the Internet.
Verify IP/MAC login conditions of user
PC on ingress program
Check it to realize the IP/MAC binding over layer 3
switch.
Step 3. Click <Commit> to save your settings.
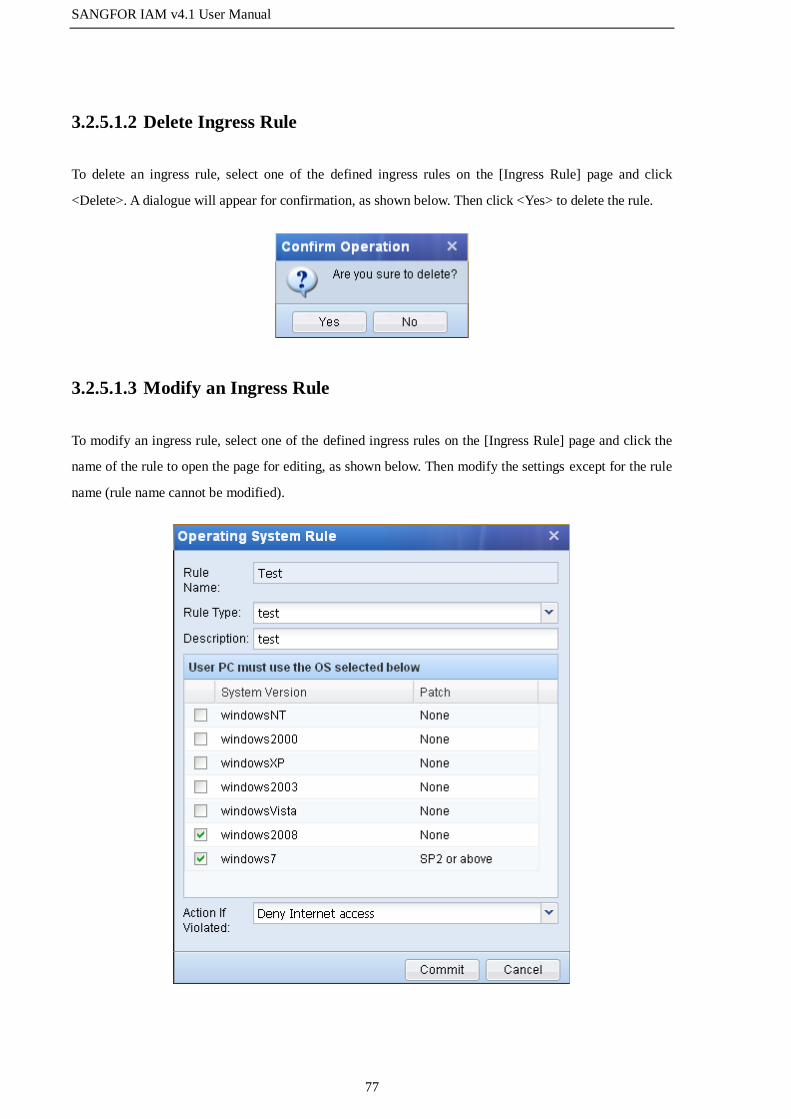
SANGFOR IAM v4.1 User Manual
77
3.2.5.1.2 Delete Ingress Rule
To delete an ingress rule, select one of the defined ingress rules on the [Ingress Rule] page and click
<Delete>. A dialogue will appear for confirmation, as shown below. Then click <Yes> to delete the rule.
3.2.5.1.3 Modify an Ingress Rule
To modify an ingress rule, select one of the defined ingress rules on the [Ingress Rule] page and click the
name of the rule to open the page for editing, as shown below. Then modify the settings except for the rule
name (rule name cannot be modified).

SANGFOR IAM v4.1 User Manual
78
3.2.5.1.4 Modify Multiple Ingress Rules
You can modify multiple ingress rules at a time; however, only the rule type can be modified in batch
editing.
To modify multiple ingress rules, select two or more of the defined ingress rules on the [Ingress Rule] page
and click the <Edit Multiple> button to open the page for editing, as shown below. Then modify the rule
type.
3.2.5.1.5 Import/Export Ingress Rules
To import ingress rules, click the <Import> button and select the ingress rule file to import.
To export ingress rules, select one or more ingress rules on [Ingress Rule] page and click the <Export>
button to export the selected ingress rules.
The internal ingress rules cannot be exported.
3.2.5.1.6 Update Internal Library Manually
The internal ingress rule library supports manual update. To update the internal library, obtain the internal
library file and then click <Update Internal Library Manually> on [Ingress Rule] page to import the
internal library into the device.
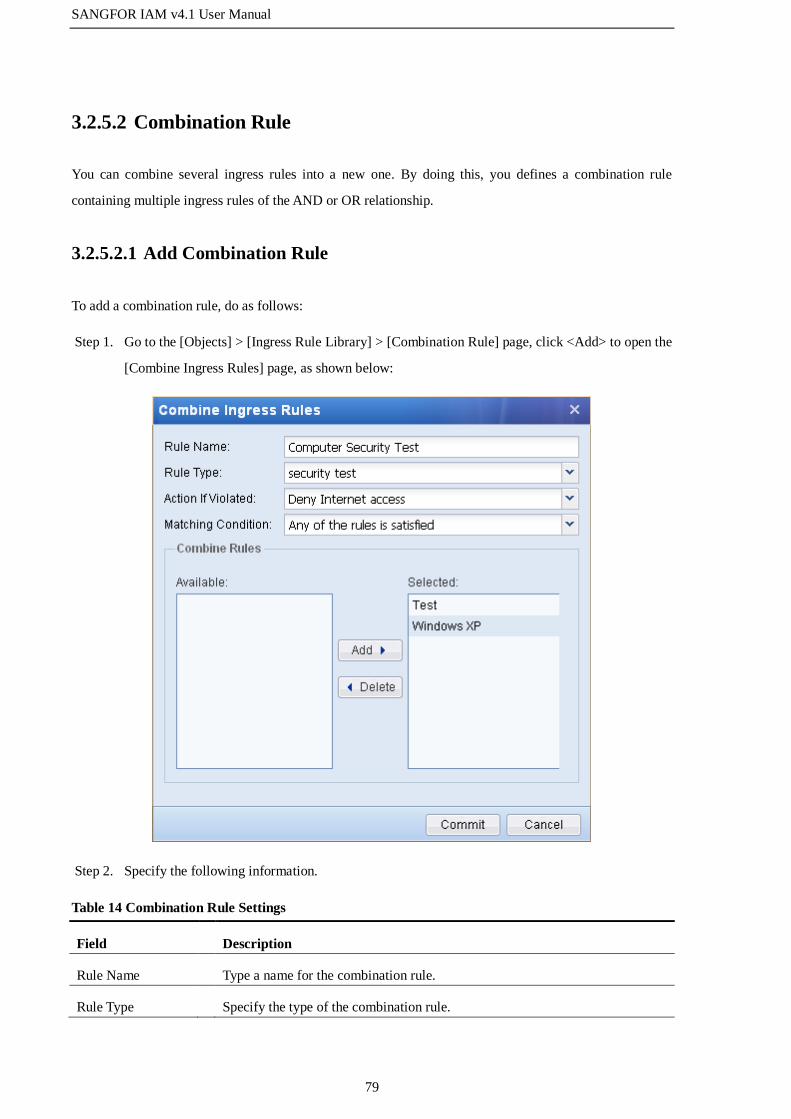
SANGFOR IAM v4.1 User Manual
79
3.2.5.2 Combination Rule
You can combine several ingress rules into a new one. By doing this, you defines a combination rule
containing multiple ingress rules of the AND or OR relationship.
3.2.5.2.1 Add Combination Rule
To add a combination rule, do as follows:
Step 1. Go to the [Objects] > [Ingress Rule Library] > [Combination Rule] page, click <Add> to open the
[Combine Ingress Rules] page, as shown below:
Step 2. Specify the following information.
Table 14 Combination Rule Settings
Field Description
Rule Name Type a name for the combination rule.
Rule Type Specify the type of the combination rule.

SANGFOR IAM v4.1 User Manual
80
Action If Violated Select the action that will be taken by IAM device to the user whose computer
does not satisfy the requirements set here. Options are [Deny Internet access]
and [Submit report only].
Condition Specify the relationship among the ingress rules included in the combination
rule. Options are [Any of the rules is satisfied] and [All of the rules are
satisfied]. When the [Condition] set here is satisfied, the action specified in
[Action If Violated] will be taken.
Combine Rules Select the customized ingress rules from the [Available] list and click <Add>
to add them to the [Selected] list.
Step 3. Click <Commit> to save your settings.
Case Study: Suppose your company requires that all the computers in the intranet should install either
Kaspersky or Rising anti-virus software. Only the computers running Kaspersky or Rising anti-virus
software are allowed to access the Internet. If computers have not run any of them, they will be blocked
from accessing the Internet.
To realize the anti-virus software detection and implement the control over Internet access, do as follows:
Step 1. Add two ingress rules for checking Kaspersky and Rising respectively to detect the process of the
anti-virus software applications on user PC, as shown below:

SANGFOR IAM v4.1 User Manual
81

SANGFOR IAM v4.1 User Manual
82
The process names of the anti-virus software should be typed according to the actual situation.
Step 2. Combine the above two ingress rules to define a combination ingress rule. Since the requirement
is to only allow the computers running either Kaspersky or Rising to access the Internet, you need
to set [Matching Condition] to All of the rules are satisfied and [Action If Violated] to Deny
Internet access, indicating that computers not running any of them will be blocked from
accessing the Internet.
Step 3. Go to [User/Policy] > [Access Management] page to add an ingress policy. Reference the
combination ingress rule and then associate the ingress policy with the corresponding user/group.

SANGFOR IAM v4.1 User Manual
83
3.2.5.2.2 Delete/Modify Combination Rule
To delete a combination rule, check the rule and click <Delete>.
To modify a combination rule, click the name of the combination rule to open the page for editing, as
shown below. Then modify the settings except the rule name (rule name cannot be modified).
3.2.6 Service
The [Service] page allows you to define various network services, including the ports and protocols used
by the services. The services defined here will be referenced in [Firewall] > [Firewall Rules] or in
[User/Policy] > [Access Management] > [Access Control] > [App Control] > [Port Control].
To add a service, do as follows:
Step 1. Open the [Objects] > [Service] page, as shown below:

SANGFOR IAM v4.1 User Manual
84
Step 2. Click <Add> to open the [Edit Service] page, as shown below:
Step 3. Type a name for the service, and then set the protocol type and port number used by the service
under [Service Settings]. Click [TCP], [UDP], [ICMP] and [Others] tabs to select the protocol
type and enter the corresponding port.
Step 4. Click <Commit> to save your settings.

SANGFOR IAM v4.1 User Manual
85
In [Others] tab, you can enter the protocol number. The protocol number 0 indicates all protocols.
3.2.7 IP Group
The [IP Group] page allows you to define IP groups that include certain IP addresses, which can be IP
ranges in an intranet or public network, or all IP addresses. The IP groups defined here will be referenced
in:
[Firewall] > [Firewall Rules] to set the source IP, destination IP for the firewall rules.
[User/Policy] > [User Management] > [Group/User] to set the IP address bound with the user
through [Obtain from IP Group] when you add or edit a user (under [User Attribute] > [Bind
IP/MAC] > [Bind IP]).
[User/Policy] > [Access Management] > [Access Control] > [App Control] > [Port Control] to
set destination IP.
[Bandwidth Mgt] > [Bandwidth Settings] to set the destination IP.
To add an IP group, do as follows:
Step 1. Open the [Objects] > [IP Group] page, as shown below:
Step 2. Click <Add> to open the [Edit IP Group] page, as shown below:
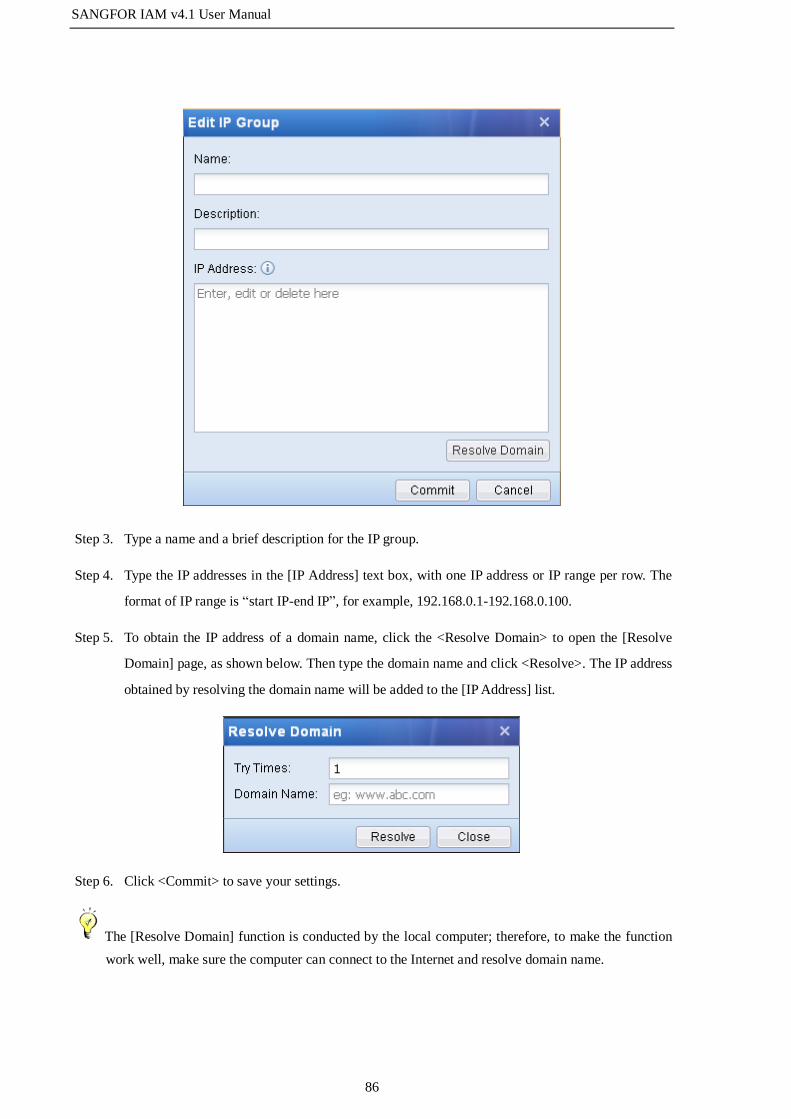
SANGFOR IAM v4.1 User Manual
86
Step 3. Type a name and a brief description for the IP group.
Step 4. Type the IP addresses in the [IP Address] text box, with one IP address or IP range per row. The
format of IP range is “start IP-end IP”, for example, 192.168.0.1-192.168.0.100.
Step 5. To obtain the IP address of a domain name, click the <Resolve Domain> to open the [Resolve
Domain] page, as shown below. Then type the domain name and click <Resolve>. The IP address
obtained by resolving the domain name will be added to the [IP Address] list.
Step 6. Click <Commit> to save your settings.
The [Resolve Domain] function is conducted by the local computer; therefore, to make the function
work well, make sure the computer can connect to the Internet and resolve domain name.

SANGFOR IAM v4.1 User Manual
87
3.2.8 Schedule
The [Schedule] page allows you to combine several commonly used time periods into one schedule. The
schedules defined here will be referenced in [Firewall] > [Firewall Rules], [User/Policy] > [Access
Management] and [Bandwidth Mgt] > [Bandwidth Settings] > [Bandwidth Channel] as the valid period or
invalid period for the rules.
To add a schedule, do as follows:
Step 1. Open the [Objects] > [Schedule] page, as shown below:
Step 2. Click <Add> to open the [Edit Schedule] page, as shown below:
Step 3. Type a name and a brief description for the schedule.
Step 4. Click <Add Time Segment> to set the specific days of the week and time segments, as shown
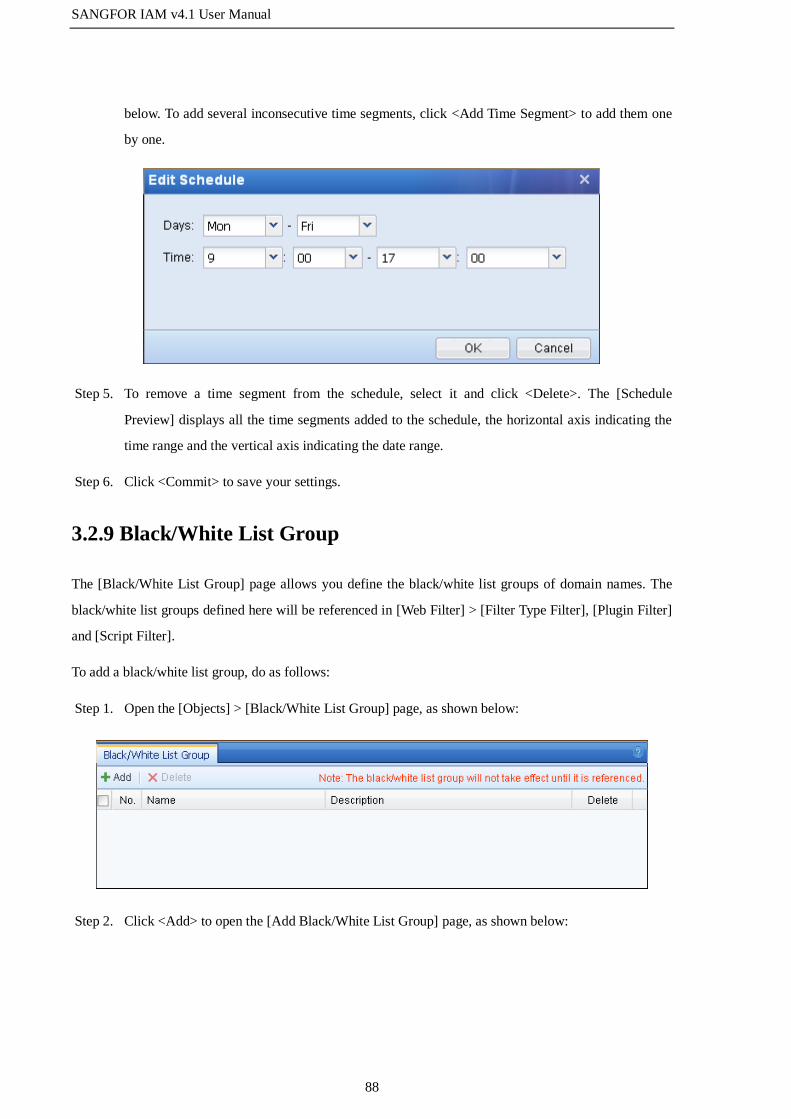
SANGFOR IAM v4.1 User Manual
88
below. To add several inconsecutive time segments, click <Add Time Segment> to add them one
by one.
Step 5. To remove a time segment from the schedule, select it and click <Delete>. The [Schedule
Preview] displays all the time segments added to the schedule, the horizontal axis indicating the
time range and the vertical axis indicating the date range.
Step 6. Click <Commit> to save your settings.
3.2.9 Black/White List Group
The [Black/White List Group] page allows you define the black/white list groups of domain names. The
black/white list groups defined here will be referenced in [Web Filter] > [Filter Type Filter], [Plugin Filter]
and [Script Filter].
To add a black/white list group, do as follows:
Step 1. Open the [Objects] > [Black/White List Group] page, as shown below:
Step 2. Click <Add> to open the [Add Black/White List Group] page, as shown below:

SANGFOR IAM v4.1 User Manual
89
Step 3. Type a name and a brief description for the black/white list group.
Step 4. Specify the URLs in the [URL] text box, one URL per row. You can enter up to 512 URL entries.
Step 5. To reference the internal URL categories in the black/white list group, click the text box of
[Include the following URL categories] to open the [URL Library] page and then select the URL
categories according to your needs.
Step 6. Click <Commit> to save your settings.
3.2.10 Keyword Group
The [Keyword Group] page allows you to define keyword groups that include specific keywords. The
keyword groups defined here will be referenced in [User/Policy] > [Access Management] > [Access
Control] > [Web Filter] > [Keyword Filter] to restrict the search and upload of specified keywords.
To add a keyword group, do as follows:
Step 1. Open [Objects] > [Keyword Group] page, as shown below:
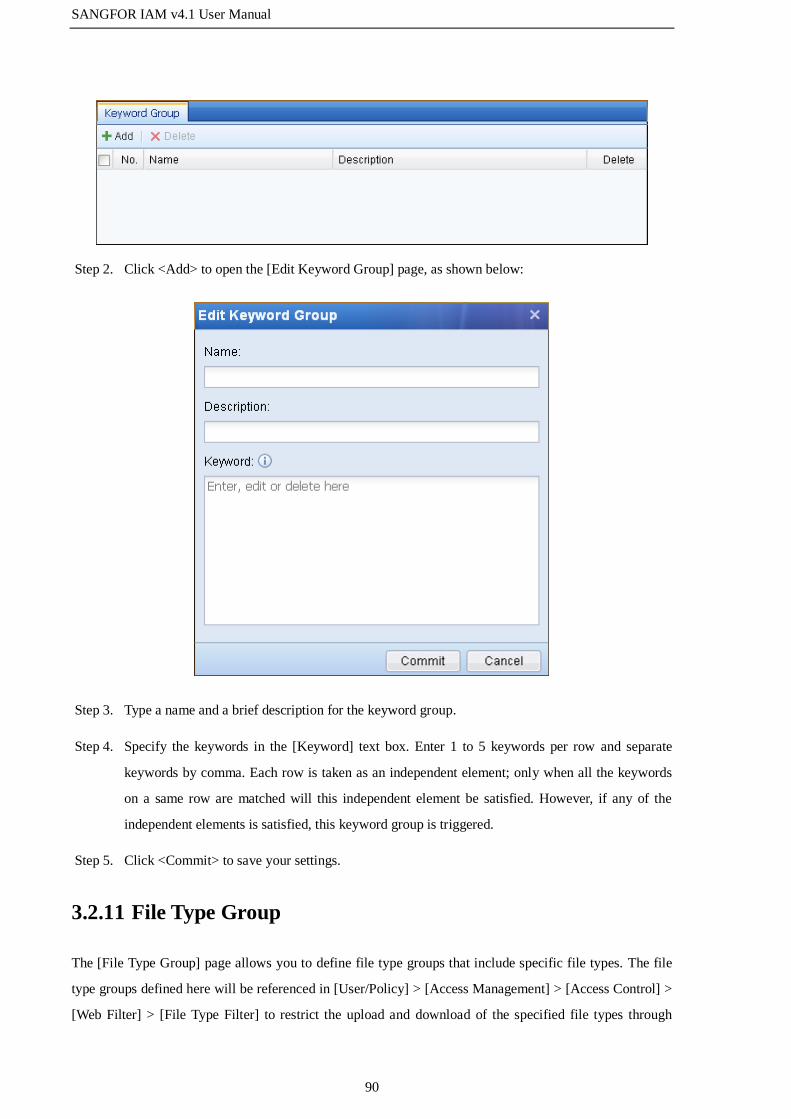
SANGFOR IAM v4.1 User Manual
90
Step 2. Click <Add> to open the [Edit Keyword Group] page, as shown below:
Step 3. Type a name and a brief description for the keyword group.
Step 4. Specify the keywords in the [Keyword] text box. Enter 1 to 5 keywords per row and separate
keywords by comma. Each row is taken as an independent element; only when all the keywords
on a same row are matched will this independent element be satisfied. However, if any of the
independent elements is satisfied, this keyword group is triggered.
Step 5. Click <Commit> to save your settings.
3.2.11 File Type Group
The [File Type Group] page allows you to define file type groups that include specific file types. The file
type groups defined here will be referenced in [User/Policy] > [Access Management] > [Access Control] >
[Web Filter] > [File Type Filter] to restrict the upload and download of the specified file types through
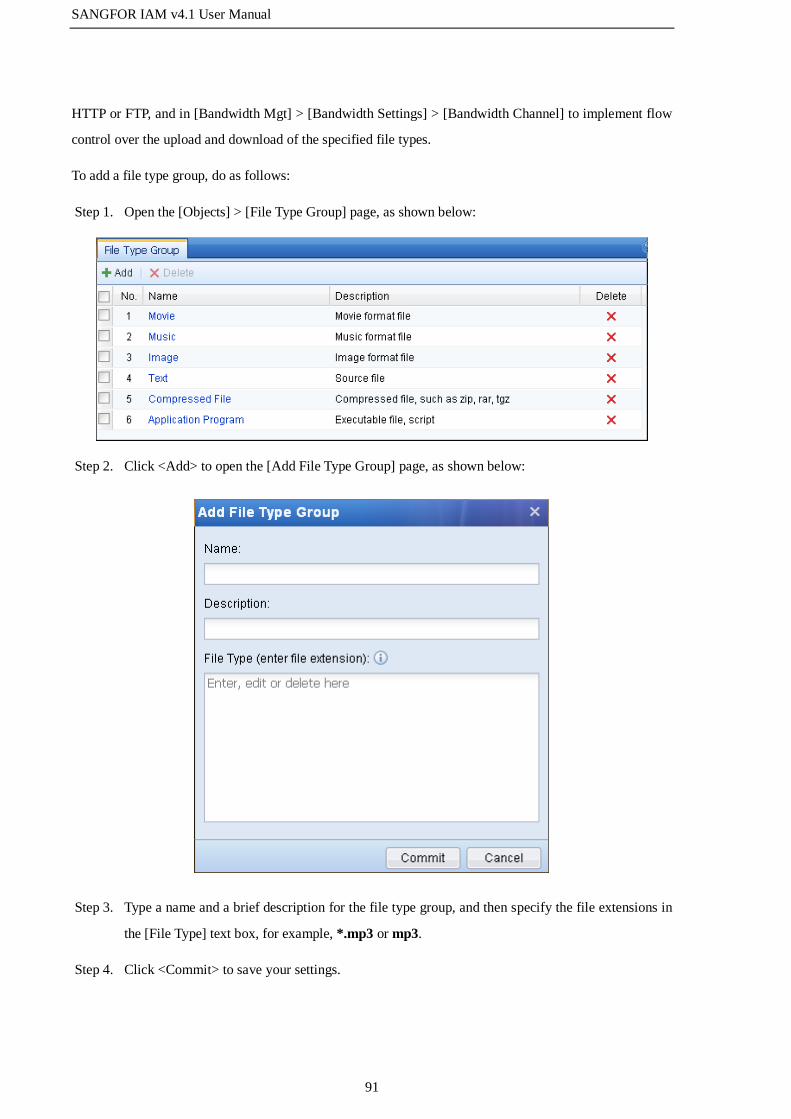
SANGFOR IAM v4.1 User Manual
91
HTTP or FTP, and in [Bandwidth Mgt] > [Bandwidth Settings] > [Bandwidth Channel] to implement flow
control over the upload and download of the specified file types.
To add a file type group, do as follows:
Step 1. Open the [Objects] > [File Type Group] page, as shown below:
Step 2. Click <Add> to open the [Add File Type Group] page, as shown below:
Step 3. Type a name and a brief description for the file type group, and then specify the file extensions in
the [File Type] text box, for example, *.mp3 or mp3.
Step 4. Click <Commit> to save your settings.

SANGFOR IAM v4.1 User Manual
92
3.2.12 Trusted CA
The [Trusted CA] page displays the trusted certificates, which will be referenced in [User/Policy] >
[Access Management] > [Access Control] > [SSL Management] > [SSL Security]. If [SSL Security] is
enabled, all the root certificates in SSL certificate library are trusted. You can also import a certificate into
the library or delete a certificate from the library.
To import a certificate, click <Add Trusted CA> on the [Trusted CA] page and then select the certificate to
import. The supported certificate formats are .crt and .cer.
You can only import the certificate from the local computer and the same certificate cannot be imported
again. When importing, the IAM device will check if the certificate already exists according to its MD5
value. If the MD5 is different, the certificate is unique.
Generally, the name of the certificate main body is the Common Name (CN) corresponding to the
certificate subject in the IE browser. If there is no CN in the certificate subject, the name of the last
field in the subject will be adopted (the sort order of subject fields may differ from that in IE).
3.3 User/Policy
The [User/Policy] module is used for managing users and access management policies. The users defined
on the IAM device are end-point users in the local area network, who are the basic units to be allocated
with network access privileges. The administrators can manage the users through [User Management] and
their network access privileges through [Access Management], and configure different access management
policies for different users according to their privilege features. Please note that the users and access

SANGFOR IAM v4.1 User Manual
93
management policies are independent elements on the IAM device. If you want to apply some access
management policies to specific users, you need associate the policies with the users through the
[User/Policy] page.
3.3.1 Access Management
The [Access Management] page is used for managing all the access management policies. The
administrators can set different access management policies for different users according to the privileges
allocated to them. There are six types of access management policies, namely, [Access Control], [Audit
Policy], [Security Policy], [Reminder Policy], [Flow/Duration Control], [Ingress Policy].
3.3.1.1 Introduction to Access Management Policies
3.3.1.1.1 Access Control Policy
The access control policy includes the application control, web filter, SSL management and email filter
functions.
Application Control
By setting [App Control], you can control the connections of LAN users to the applications over the
Internet and determine whether to allow or deny the connections of some applications. The IAM device
provides several ways of control over applications, including [App Control], [Port Control] and [Proxy
Control], which are described in the following.
[App Control] controls a certain application by analyzing the features of Internet data at
application layer. The IAM device has already defined the application rules for various common
network applications (see sections 3.2.1-3.2.3) and you can reference these rules in [App Control]
to realize the application control.
[Port Control] conducts control over Internet access data by detecting IP address, protocol
number and port number of data packets. You can first define the destination IP group you want
to control on the [Objects] > [IP Group] page, and define target protocols or ports on the
[Objects] > [Service] page (see sections 3.2.6 and 3.2.7), and then reference these objects in
[Port Control] to realize the control over Internet access data.
[Proxy Control] specifies whether to allow LAN users to use HTTP proxy or SOCKS proxy. The
[Deny other protocols at standard HTTP or SSL port] option is used to prevent some applications
from using standard HTTP port (TCP 80) and SSL port (TCP 443) to transmit its own data to
SANGFOR IAM v4.1 User Manual
94
evade the control and restrictions by the IAM device.
Web Filter
By setting [Web Filter], you can control the behaviors of accessing websites using HTTP or HTTPS
protocol. It enables you to filter the websites, keywords searched in search engine, keywords uploaded
through HTTP and file types uploaded or downloaded through HTTP, as described in the following:
[HTTP URL Filter] includes [Web Browsing Filter] and [Post Filter]. [Web Browsing Filter]
conducts control over the behaviors of visiting websites by detecting the URLs of websites. The
URLs set here are referenced from the URL groups defined on the [Objects] > [URL Library]
page, on which there are built-in URL groups, collected and categorized by specialized staff. You
can reference these built-in URL groups or define them according to your needs (for details, see
section 3.2.4 "URL Library"). [Post Filter] implements control over the HTTP POST behaviors
when users are accessing website by detecting the URLs of websites. If you want to allow some
users to access a forum website but block them from sending posts to the forum, you need to
configure a [Post Filter] policy.
[HTTPS URL Filter] filters secure websites connected using HTTPS protocol. Similar to the
[HTTP URL Filter], it references the URL groups defined on the [Objects] > [URL Library] page.
The difference between them is that [HTTPS URL Filter] uses a different method to detect URL.
Since data is encrypted when users are accessing secure websites using HTTPS protocol, the
IAM device cannot detect the URL directly. However, the URL of a secure website is generally
the same as that set in [Issued to] of the SSL certificate; therefore, the device can obtain the URL
of the secure website by detecting the [Issued to] field in SSL certificate. Given the feature of the
above detection method, if you are to define a URL of an HTTPS website, please set the URL
according to the [Issued to] field in the certificate corresponding to the website.
[Keyword Filter] includes two filters: [Search Keyword] filter and [HTTP Upload] filter. The
former filters the keywords searched in search engine or generates corresponding alarms, while
the latter filters the keywords uploaded through HTTP or generates corresponding alarms. The
keywords set here are referenced from the [Objects] > [Keyword Group] page (for details, see
section 3.2.10 "Keyword Group"). The two keyword filters are specific to HTTP websites and
are not applicable to the keywords of specified URL.
[File Type Filter] filters the types of files uploaded or downloaded through HTTP or FTP. The
file types set here are referenced from the [Objects] > [File Type Group] page (for details, see
section 3.2.11 "File Type Group").
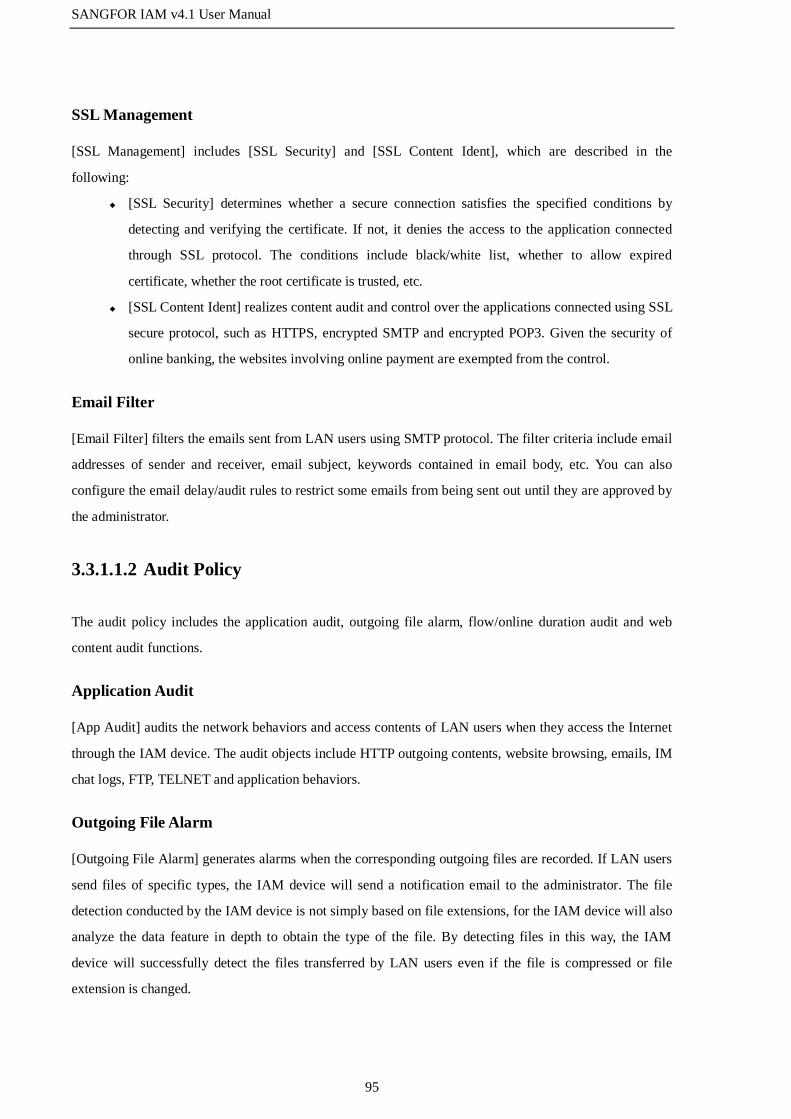
SANGFOR IAM v4.1 User Manual
95
SSL Management
[SSL Management] includes [SSL Security] and [SSL Content Ident], which are described in the
following:
[SSL Security] determines whether a secure connection satisfies the specified conditions by
detecting and verifying the certificate. If not, it denies the access to the application connected
through SSL protocol. The conditions include black/white list, whether to allow expired
certificate, whether the root certificate is trusted, etc.
[SSL Content Ident] realizes content audit and control over the applications connected using SSL
secure protocol, such as HTTPS, encrypted SMTP and encrypted POP3. Given the security of
online banking, the websites involving online payment are exempted from the control.
Email Filter
[Email Filter] filters the emails sent from LAN users using SMTP protocol. The filter criteria include email
addresses of sender and receiver, email subject, keywords contained in email body, etc. You can also
configure the email delay/audit rules to restrict some emails from being sent out until they are approved by
the administrator.
3.3.1.1.2 Audit Policy
The audit policy includes the application audit, outgoing file alarm, flow/online duration audit and web
content audit functions.
Application Audit
[App Audit] audits the network behaviors and access contents of LAN users when they access the Internet
through the IAM device. The audit objects include HTTP outgoing contents, website browsing, emails, IM
chat logs, FTP, TELNET and application behaviors.
Outgoing File Alarm
[Outgoing File Alarm] generates alarms when the corresponding outgoing files are recorded. If LAN users
send files of specific types, the IAM device will send a notification email to the administrator. The file
detection conducted by the IAM device is not simply based on file extensions, for the IAM device will also
analyze the data feature in depth to obtain the type of the file. By detecting files in this way, the IAM
device will successfully detect the files transferred by LAN users even if the file is compressed or file
extension is changed.

SANGFOR IAM v4.1 User Manual
96
Flow/Duration Audit
[Flow/Duration Audit] enables you to make flow or online duration statistics of various applications. If you
check the related options, you can go to the Data Center to search for the flow and online duration caused
by LAN users when they are accessing various applications over the Internet.
Web Content Audit
[Web Content Audit] audits the contents of the websites accessed by LAN users. You can set to audit
website title and body contents, only audit contents of websites containing specified keywords or filter the
websites containing specified keywords. Please note that when this module is enabled, it will consume
large amount of device performance.
3.3.1.1.3 Security Policy
The security policy includes the risk behavior identification, ActiveX filter and script filter functions.
Risk Identification
[Risk Ident] identifies and blocks risk network behaviors, including HTTP Trojan, SMTP Trojan, port
scanning, HTTP flow anomaly and email sending anomaly.
ActiveX Filter
[ActiveX Filter] identifies and filters the ActiveX plugins downloaded when users are accessing websites.
Some malicious ActiveX plugins on websites may cause the browser to malfunction, or even monitor
network behaviors and steal your personal information. Usually, the malicious plugins are automatically
installed on user PCs through the browser. However, by filtering the signature of ActiveX control, the
[ActiveX Filter] function prevents untrusted plugins from being installed on the computers across the LAN
and therefore ensures the security of the LAN.
Script Filter
As the network security problem becomes increasingly severe, user computers may be infected with
various viruses or Trojan when accessing some malicious websites by accident. Most of these problems are
caused by malicious scripts. Based on this situation, the [Script Filter] function, by identifying the features
of the scripts on the websites visited by LAN users, blocks scripts before they are downloaded and
executed on the browser and therefore protects the security of the LAN. It supports JavaScript filter and
VBScript filter.

SANGFOR IAM v4.1 User Manual
97
3.3.1.1.4 Reminder Policy
The reminder policy includes the online duration reminder, flow reminder and bulletin board functions.
Online Duration Reminder
[Duration Reminder] enables you to set online duration limit on LAN users according to different time
periods. When the online duration limit is reached, the IAM device will display a reminder page to
reminder LAN users.
Flow Reminder
[Flow Reminder] enables you to set the upper limit on average flow speed of users. When the upper limit is
reached, the IAM device will display a reminder page to reminder LAN users.
Bulletin Board
[Bulletin Board] is used to periodically pop up the pages specified by administrator for LAN users.
3.3.1.1.5 Flow/Duration Control Policy
The flow/duration control policy includes the flow quota, online duration control and sessions control
functions.
Flow Quota
[Flow Quota] limits the daily or monthly flow caused by a single user accessing the Internet through the
IAM device. When the flow of a user in a specified time period exceeds the flow quota set here, the user
will be blocked from accessing the Internet.
Online Duration Control
[Duration Control] limits the online duration of a single user in a specified time period. When the online
duration of a user in a specified time period exceeds the limit set here, the user will be blocked from
accessing the Internet.
Concurrent Sessions Control
[Sessions Control] limits the number of concurrent connections caused by a single user accessing the
Internet through the IAM device. When the limit set here is reached, the redundant connections will be

SANGFOR IAM v4.1 User Manual
98
discarded.
3.3.1.1.6 Ingress Policy
Ingress Policy
[Ingress Policy] checks the operating system, process, file, registry or other information of the computers
in the LAN by means of the ingress program installed at client end. Besides, it can be used to audit chat
logs of encrypted IM tools. When the ingress system is enabled, the user computers should satisfy
corresponding conditions before they are allowed to connect to the Internet.
Illegal Gateway Detection
[Illegal Gateway Detect] checks if the gateway address configured on the LAN computers is legal by
means of the ingress program installed at client end. If the users access the Internet through an illegal
gateway, the IAM device will record it in Data Center.
3.3.1.2 Associate Policy with User/Group
The users/groups and access management policies are independent elements on the device. Therefore, you
need to associate the access management policies with users/groups in both IPv4 and IPv6 environment to
make the policies work so that when the users/groups are accessing the Internet, the corresponding access
management policies will be matched. There are two ways to add access management policies for specific
user/group, as described in the following.
Associate Policy with User/Group When Creating Policy
When creating an access management policy, you can associate it with a specific user/group. The
procedures are as follows:
Step 1. Click <Add> on the [Access Management] page to add a policy.
Step 2. After setting the policy, click the [Applicable User/Group] tab, select your desired user group
under [Organization Structure] on the left and then select the users or subgroups on the right.
Check the [Newly-added subgroup/user] option to also apply this policy to the users and
subgroups subsequently added into the current user group; otherwise, the policy only applies to
the selected users/subgroups.
All your selected users/groups will be listed under [Selected List] at the bottom.
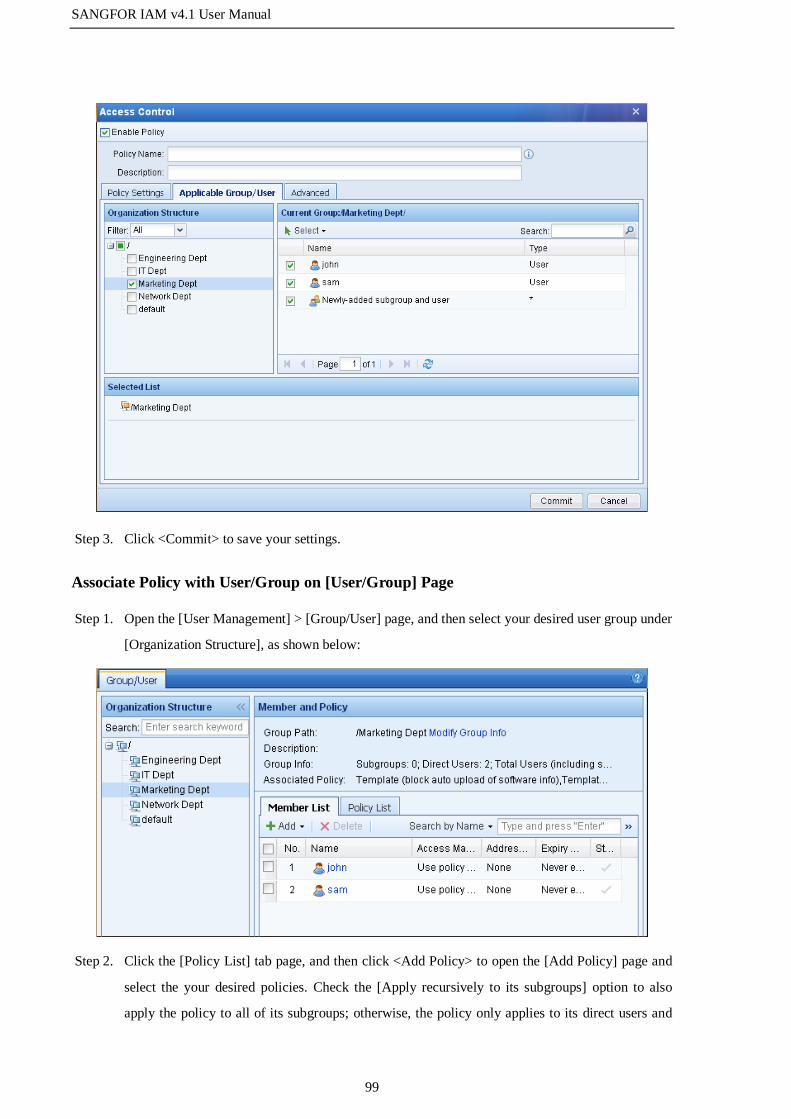
SANGFOR IAM v4.1 User Manual
99
Step 3. Click <Commit> to save your settings.
Associate Policy with User/Group on [User/Group] Page
Step 1. Open the [User Management] > [Group/User] page, and then select your desired user group under
[Organization Structure], as shown below:
Step 2. Click the [Policy List] tab page, and then click <Add Policy> to open the [Add Policy] page and
select the your desired policies. Check the [Apply recursively to its subgroups] option to also
apply the policy to all of its subgroups; otherwise, the policy only applies to its direct users and

SANGFOR IAM v4.1 User Manual
100
subsequently added subgroups.
Step 3. After setting the policy, click <OK> to save and the [Policy List] page returns, displaying all the
policies associated with the current user group. The [Apply to Its Users/Subgroups] column
indicates whether the corresponding policy applies to all or some of its subgroups and users.
3.3.1.3 Match Policies
When a user/group is associated with multiple access management policies, there are two policy-matching
rules: one is to match policies from the first one to the last one, supporting superposition of multiple
policies; the other is to match the first available policy only, that is, it will stop matching downwards once
there is an available policies matched.
The modules supporting superposition of multiple policies include: [App Control], [Port Control], [HTTP
URL Filter], [HTTPS URL Filter], [Keyword Filter], [File Type Filter], [Ingress Policy], [App Audit],
[Duration Reminder] and [Flow Reminder], among which most of the policies are matched from top to
bottom but some of them are matched according to the sequence, as shown below:

SANGFOR IAM v4.1 User Manual
101
The modules not supporting superposition of multiple policies include: [Proxy Control], [SSL Security],
[SSL Content Ident], [Email Filter], [Outgoing File Alarm], [Flow/Duration Audit], [Web Content Audit],
[Risk Ident], [ActiveX Filter], [Script Filter], [Bulletin Board], [Flow Quota], [Duration Control],
[Sessions Control]. For these modules, the first available policy will prevail.
When the display order of policies on the [Access Management] page is adjusted, the display order
of policies on the [User Management] > [User/Group] > [Policy List] page will be also adjusted
accordingly, ensuring the same display order.
3.3.1.4 Add Access Management Policy
3.3.1.4.1 Add Access Control Policy
To add an access control policy, do as follows:
Step 1. On the [Access Management] page, click <Add> and select [Access Control] to open the [Access
Control] page, as shown below:

SANGFOR IAM v4.1 User Manual
102
Step 2. Check the [Enable Policy] option to enable the access control policy.
If this option is not checked, the policy will not take effect.
Step 3. Type the policy name and description. [Policy Name] is the unique identifier of the policy, which
must be entered and unique. [Description] refers to descriptive information of the policy, which is
optional.
Step 4. Open the [Policy Settings] tab and set the access control policy according to your needs. First,
select the control type under [Access Control] on the left pane and then configure the policy on
the right pane. The access control policy covers the following four control modules: [App
Control], [Web Filter], [SSL Management] and [Email Filter] (for detailed settings of the modules,
see the subsequent sections).
Step 5. Click to open the [Group/User] tab. Select your desired user group under [Organization Structure]
on the left pane and then select the users or subgroups on the right pane. The user groups or users
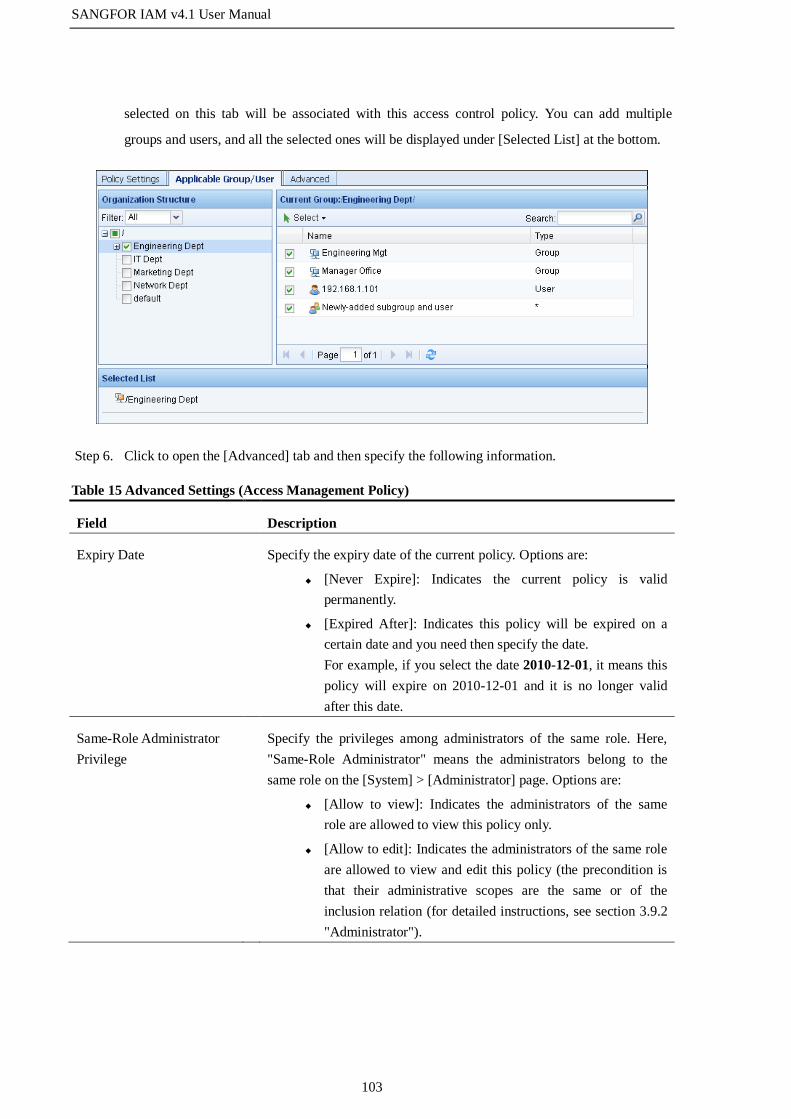
SANGFOR IAM v4.1 User Manual
103
selected on this tab will be associated with this access control policy. You can add multiple
groups and users, and all the selected ones will be displayed under [Selected List] at the bottom.
Step 6. Click to open the [Advanced] tab and then specify the following information.
Table 15 Advanced Settings (Access Management Policy)
Field Description
Expiry Date Specify the expiry date of the current policy. Options are:
[Never Expire]: Indicates the current policy is valid
permanently.
[Expired After]: Indicates this policy will be expired on a
certain date and you need then specify the date.
For example, if you select the date 2010-12-01, it means this
policy will expire on 2010-12-01 and it is no longer valid
after this date.
Same-Role Administrator
Privilege
Specify the privileges among administrators of the same role. Here,
"Same-Role Administrator" means the administrators belong to the
same role on the [System] > [Administrator] page. Options are:
[Allow to view]: Indicates the administrators of the same
role are allowed to view this policy only.
[Allow to edit]: Indicates the administrators of the same role
are allowed to view and edit this policy (the precondition is
that their administrative scopes are the same or of the
inclusion relation (for detailed instructions, see section 3.9.2
"Administrator").

SANGFOR IAM v4.1 User Manual
104
Allow administrator of
lower role to view
Specify whether to allow administrators of lower role to view this
policy. If you check it, the lower role administrators are allowed to
view this policy (view-only). Here, “administrator of lower role” refers
to the administrators on the [System] > [Administrator] page whose
role level is lower than that of the administrator creating this policy.
Step 7. Click <Commit> to save the access control policy.
Application Control
App Control
Application control is a way to control some applications by detecting the contents of packets. It enables
you to conduct control over various identified or unidentified application services, such as, P2P application,
QQ, email, etc.
Case Study: Suppose you need to create a policy that denies P2P-relevant applications.
To meet the requirements, do as follows:
Step 1. Check [App Control] on the left pane to open the [App Control] page on the right. The
application control references the settings defined on [App Ident Library], [Intelligent Ident Lib],
[App Customization] and [Schedule] pages (for details, see sections 3.2.1-3.2.3 and 3.2.8).
Step 2. Click <Add> and then click the icon to open the [Select Application] page, as shown below:
Step 3. Select the target applications. You can select [All], [Selected] or [Unselected] from the [Filter]
drop-down list to display all, selected or unselected applications. The left pane displays the

SANGFOR IAM v4.1 User Manual
105
applications available, with a check box in front of each item. Check the box to select the
corresponding application or type the keyword in the text box to quickly find your desired
applications. In this example, type P2P in the text box and press Enter on your keyboard or click
the icon. The search will start and corresponding applications will be displayed. Then check
all the relevant applications, and your selections will be displayed under [Selected List] on the
right. Finally, click <OK> to save your settings.
Step 4. Set [Action] to Deny and [Schedule] to All Day (for settings of schedule, see section 3.2.8
"Schedule"), and then click <OK> to save the application control rule.
Step 5. To manage the application control rule, check the rule entry and then click <Delete> to delete it,
click <Allow>/<Deny> to change the action to [Deny]/[Allow], or click <Up>/<Down> to move
this entry up/down to adjust the display order. Since the rules are matched from top to bottom, the
rule entry displayed at the top will be preferentially matched.
Step 6. If you only want to conduct application control in this policy, click <Commit> to complete the
policy settings; if you want to set other functions, continue to select the function and further set
the policy.
By default, the IAM device allows the access to the application types that are not configured in the
access control module.

SANGFOR IAM v4.1 User Manual
106
Port Control
Port control is a way to conduct control based on destination IP, port and time period, for instance, to block
LAN users from accessing the port 80 of a certain IP group.
Case Study: Suppose you need to create a policy that denies the access to the services on ports 1000-1001
of the destination IP group 200.200.200.1-200.200.200.254 during office hours.
To meet the requirements, do as follows:
Step 1. Check [Port Control] on the left pane to open the [Port Control] page on the right. The port
control references the settings defined on the [IP Group], [Service] and [Schedule] pages (for
details, see sections 3.2.6-3.2.8).
Step 2. Click <Add> and then select the destination IP group.
a. Click the drop-down arrow to select one of the IP groups available. If you want to add your own
IP group, click [Add IP Group] at the bottom of the drop-down list to open the [Add IP Group]
page.
b. Type the name and description for the IP group and type 200.200.200.1-200.200.200.254 in the
[IP Address] text box, as shown below. Then click <Commit> to save your settings.

SANGFOR IAM v4.1 User Manual
107
c. Select the newly added IP group from the drop-down list.
Step 3. Select the service.
a. Click the drop-down arrow to select one of the services available. If you want to add your own
service, click [Add Service] at the bottom of the drop-down list to open the [Add Service] page.

SANGFOR IAM v4.1 User Manual
108
b. Type the service name, port and protocol number, as shown below. Then click <Commit> to save
your settings.
c. Select the newly added service from the drop-down list.
Step 4. Set [Action] to Deny and [Schedule] to Office Hours, and then click <OK> to save the port
control rule.
Step 5. To manage the port control rule, check the rule entry and then click <Delete> to delete it, click
<Allow>/<Deny> to change the action to [Deny]/[Allow], or click <Up>/<Down> to move this
entry up/down to adjust the display order. Since the rules are matched from top to bottom, the
rule entry displayed at the top will be preferentially matched.
Step 6. If you only want to conduct port control in this policy, click <Commit> to complete the policy
settings; if you want to set other functions, continue to select the function and further set the
policy.

SANGFOR IAM v4.1 User Manual
109
By default, the IAM device allows access to the network services that are not configured in the port
control module.
Proxy Control
Proxy control enables you to set whether to disable HTTP proxy, Socks proxy and transparent proxy, and
deny the use of other protocols at standard ports of HTTP or SSL protocol for the LAN users. You can also
enable the Anti-Proxy Detection to detect if LAN users access Internet through other users.
The options displayed on the [Port Control] page are respectively described in the following table.

SANGFOR IAM v4.1 User Manual
110
Table 16 Proxy Control Settings
Field Description
Disable HTTP proxy Specify whether to allow users in local area network (LAN) to access the
Internet through HTTP proxy.
Disable Socks4 or
Socks5 proxy
Specify whether to allow users in LAN to access the Internet through Socks
proxy.
Deny other protocols at
HTTP or SSL standard
port
Specify whether to allow users to use other protocols at standards port of
HTTP or SSL protocols. Some software already known or unknown will
choose the common ports (such as TCP80, TCP443) for communicate to
pass the firewall at the front end, but the communication contents are of its
own protocol format, for example, QQ (IM tool) logs in through SSL. To
deny this kind of behavior, check this option.
Disable transparent
proxy
Specify whether to allow the users/groups associated with this policy to use
the transparent proxy.
Enable Anti-Proxy
Detection
Specify whether to enable the anti-proxy function to detect if LAN users
access Internet via other user. Click the [Configure Detection Interval] link
to configure the detection interval. If this option is checked, the system will
conduct the anti-proxy detection, and will remind the user and record the
log if proxy is detected. You can also check the [Lock user if proxy is
detected] option and specify the lockout period to lock the corresponding
user for a certain period.
The IAM device can deny the above proxy data only when the proxy server is placed at the WAN
interface end of the IAM device and the data requested by proxy client to proxy server goes through
the IAM device. If the proxy server is placed at the LAN interface end of the IAM device, the proxy
data cannot be denied by setting the options here.
Web Filter
HTTP URL Filter
The HTTP URL filter module covers [Web Browsing Filter] and [Post Filter]. By detecting the
URLs of websites, [Web Browsing Filter] implements control over website browsing. For instance,
you can set it to block some users from accessing certain websites in a specified time period. [Post
Filter] uses the same way to control HTTP POST behaviors of LAN users when they are visiting
websites. For example, you can allow some users to access a forum website, but disallow them to
post on to it.

SANGFOR IAM v4.1 User Manual
111
In IPv6 environment, IAM device supports only GET, POST and SSL types of URL filtering. IAM
device is able to recognize URL categories through in-cloud URL library. Self-define URL library is
not supported in IPv6 environment. The IAM device can filter the URL and prompt customized
webpage if URL access denied. The policies enforced through Group/User defined in both IPv4 and
IPv6 environment. Figures below show the access control policy for HTTP and HTTPs and the
applicable User/Group of the policy. The way to use access control policy in IPv6 environment is
exactly same as in IPv4 environment.
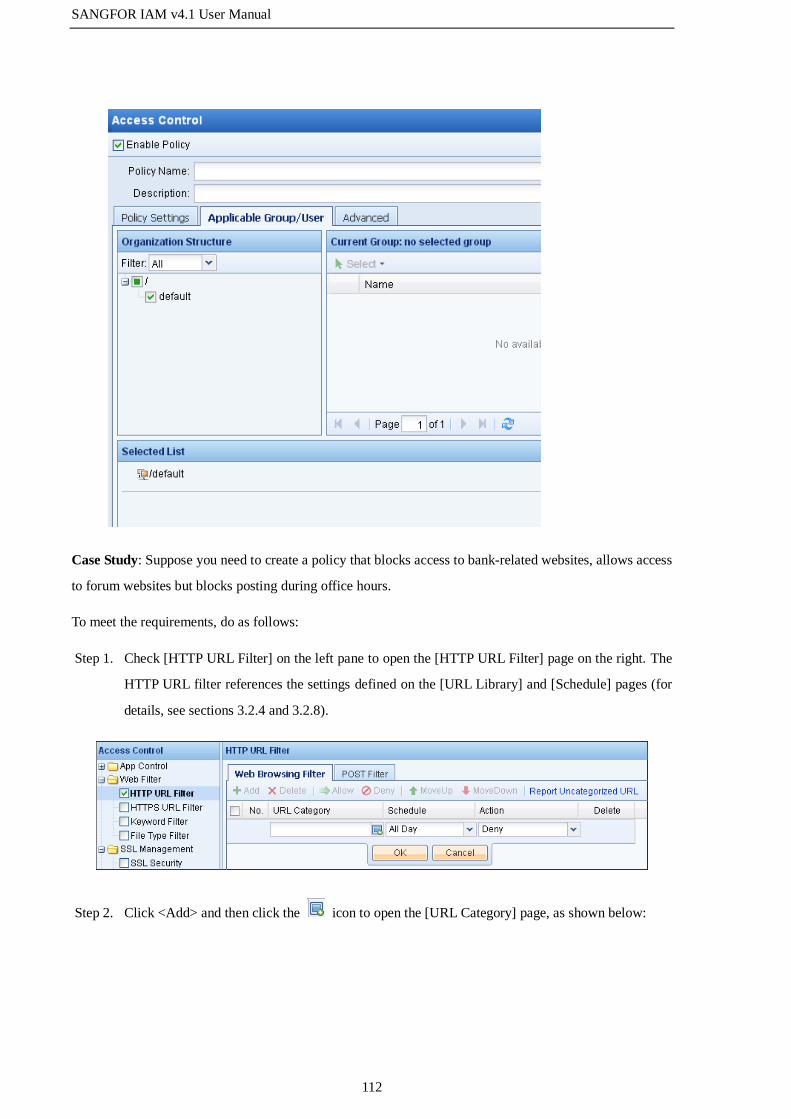
SANGFOR IAM v4.1 User Manual
112
Case Study: Suppose you need to create a policy that blocks access to bank-related websites, allows access
to forum websites but blocks posting during office hours.
To meet the requirements, do as follows:
Step 1. Check [HTTP URL Filter] on the left pane to open the [HTTP URL Filter] page on the right. The
HTTP URL filter references the settings defined on the [URL Library] and [Schedule] pages (for
details, see sections 3.2.4 and 3.2.8).
Step 2. Click <Add> and then click the icon to open the [URL Category] page, as shown below:
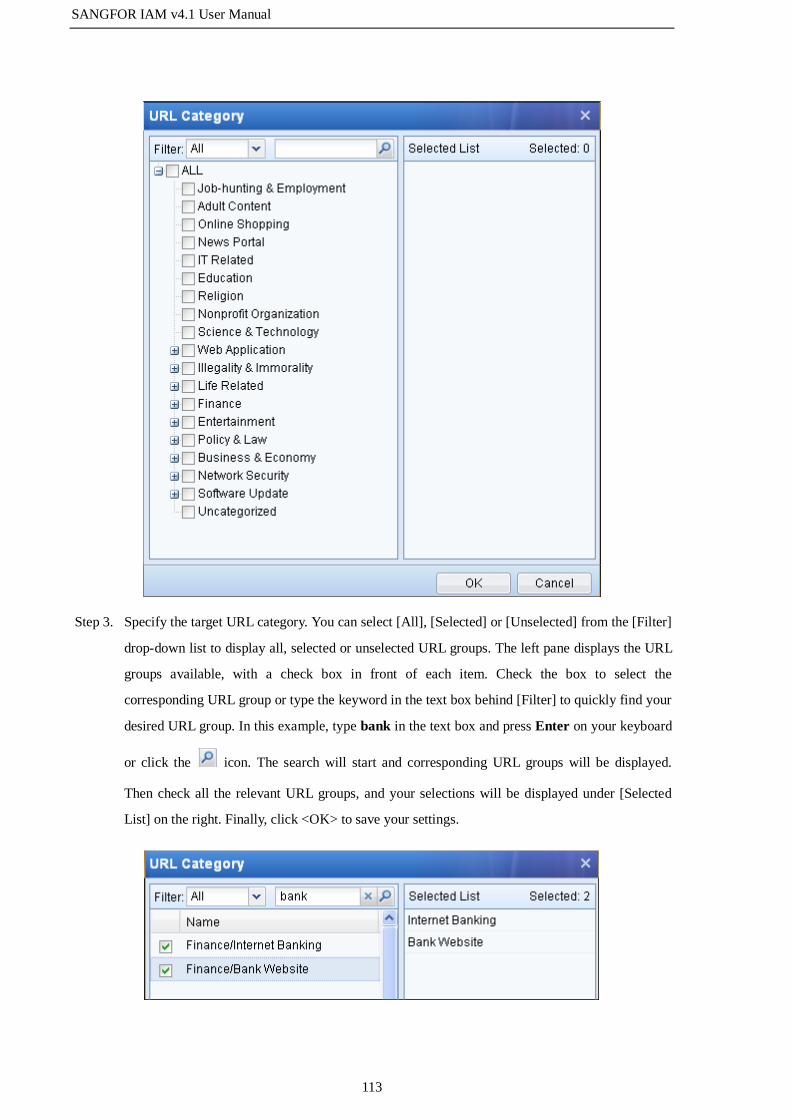
SANGFOR IAM v4.1 User Manual
113
Step 3. Specify the target URL category. You can select [All], [Selected] or [Unselected] from the [Filter]
drop-down list to display all, selected or unselected URL groups. The left pane displays the URL
groups available, with a check box in front of each item. Check the box to select the
corresponding URL group or type the keyword in the text box behind [Filter] to quickly find your
desired URL group. In this example, type bank in the text box and press Enter on your keyboard
or click the icon. The search will start and corresponding URL groups will be displayed.
Then check all the relevant URL groups, and your selections will be displayed under [Selected
List] on the right. Finally, click <OK> to save your settings.
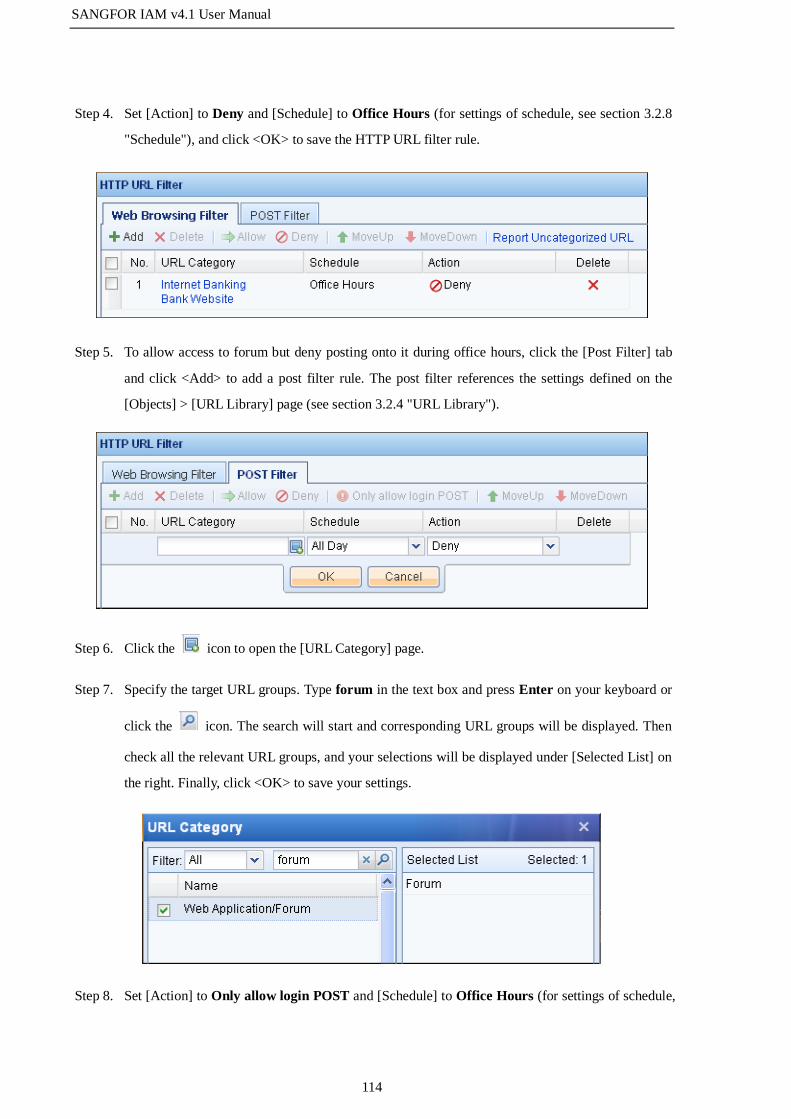
SANGFOR IAM v4.1 User Manual
114
Step 4. Set [Action] to Deny and [Schedule] to Office Hours (for settings of schedule, see section 3.2.8
"Schedule"), and click <OK> to save the HTTP URL filter rule.
Step 5. To allow access to forum but deny posting onto it during office hours, click the [Post Filter] tab
and click <Add> to add a post filter rule. The post filter references the settings defined on the
[Objects] > [URL Library] page (see section 3.2.4 "URL Library").
Step 6. Click the icon to open the [URL Category] page.
Step 7. Specify the target URL groups. Type forum in the text box and press Enter on your keyboard or
click the icon. The search will start and corresponding URL groups will be displayed. Then
check all the relevant URL groups, and your selections will be displayed under [Selected List] on
the right. Finally, click <OK> to save your settings.
Step 8. Set [Action] to Only allow login POST and [Schedule] to Office Hours (for settings of schedule,
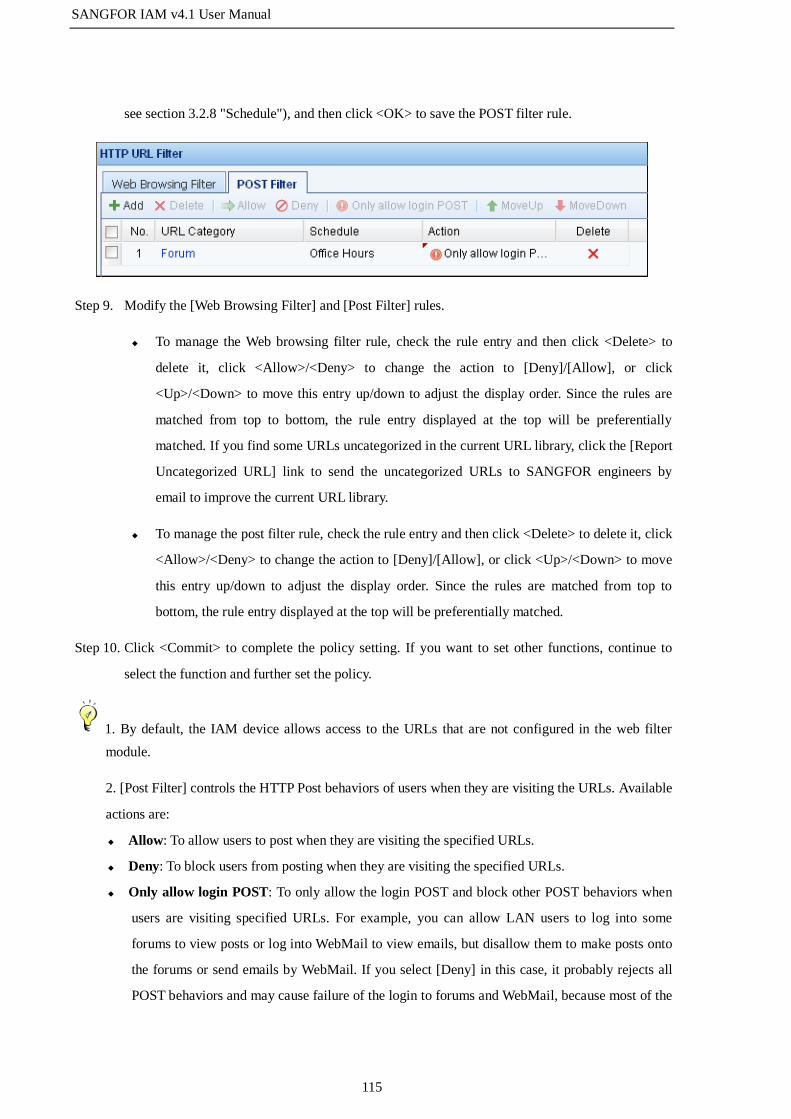
SANGFOR IAM v4.1 User Manual
115
see section 3.2.8 "Schedule"), and then click <OK> to save the POST filter rule.
Step 9. Modify the [Web Browsing Filter] and [Post Filter] rules.
To manage the Web browsing filter rule, check the rule entry and then click <Delete> to
delete it, click <Allow>/<Deny> to change the action to [Deny]/[Allow], or click
<Up>/<Down> to move this entry up/down to adjust the display order. Since the rules are
matched from top to bottom, the rule entry displayed at the top will be preferentially
matched. If you find some URLs uncategorized in the current URL library, click the [Report
Uncategorized URL] link to send the uncategorized URLs to SANGFOR engineers by
email to improve the current URL library.
To manage the post filter rule, check the rule entry and then click <Delete> to delete it, click
<Allow>/<Deny> to change the action to [Deny]/[Allow], or click <Up>/<Down> to move
this entry up/down to adjust the display order. Since the rules are matched from top to
bottom, the rule entry displayed at the top will be preferentially matched.
Step 10. Click <Commit> to complete the policy setting. If you want to set other functions, continue to
select the function and further set the policy.
1. By default, the IAM device allows access to the URLs that are not configured in the web filter
module.
2. [Post Filter] controls the HTTP Post behaviors of users when they are visiting the URLs. Available
actions are:
Allow: To allow users to post when they are visiting the specified URLs.
Deny: To block users from posting when they are visiting the specified URLs.
Only allow login POST: To only allow the login POST and block other POST behaviors when
users are visiting specified URLs. For example, you can allow LAN users to log into some
forums to view posts or log into WebMail to view emails, but disallow them to make posts onto
the forums or send emails by WebMail. If you select [Deny] in this case, it probably rejects all
POST behaviors and may cause failure of the login to forums and WebMail, because most of the

SANGFOR IAM v4.1 User Manual
116
login behaviors are by POST.
HTTPS URL Filter
HTTPS URL filter is specific to URL filter by HTTPS GET, controlling the process of users visiting
websites by encrypted method. For example, you can set an HTTPS filter rule to deny the GMail that
requires HTTPS access. The setting of [HTTPS URL Filter] is similar to that of [HTTP URL Filter]. The
[Clone Settings of HTTP Web Browsing Filter] option enables you to copy all the settings of HTTP URL
filter to HTTPS URL filter, without the need to make the configurations again when you want to
implement control over the same URLs.
Case Study: Suppose you need to create a policy that always blocks login to GMail.
To meet the requirements, do as follows:
Step 1. As there is no URL group corresponding to GMail in the internal URL library, you need to create
a URL group and add the URL of GMail into it.
a. Go to the [Objects] > [URL Library] page and click <Add> to open the [Add URL Group] page.
b. Type the URL group name, description and URL entry, as shown below, and then click
<Commit> to save your settings.
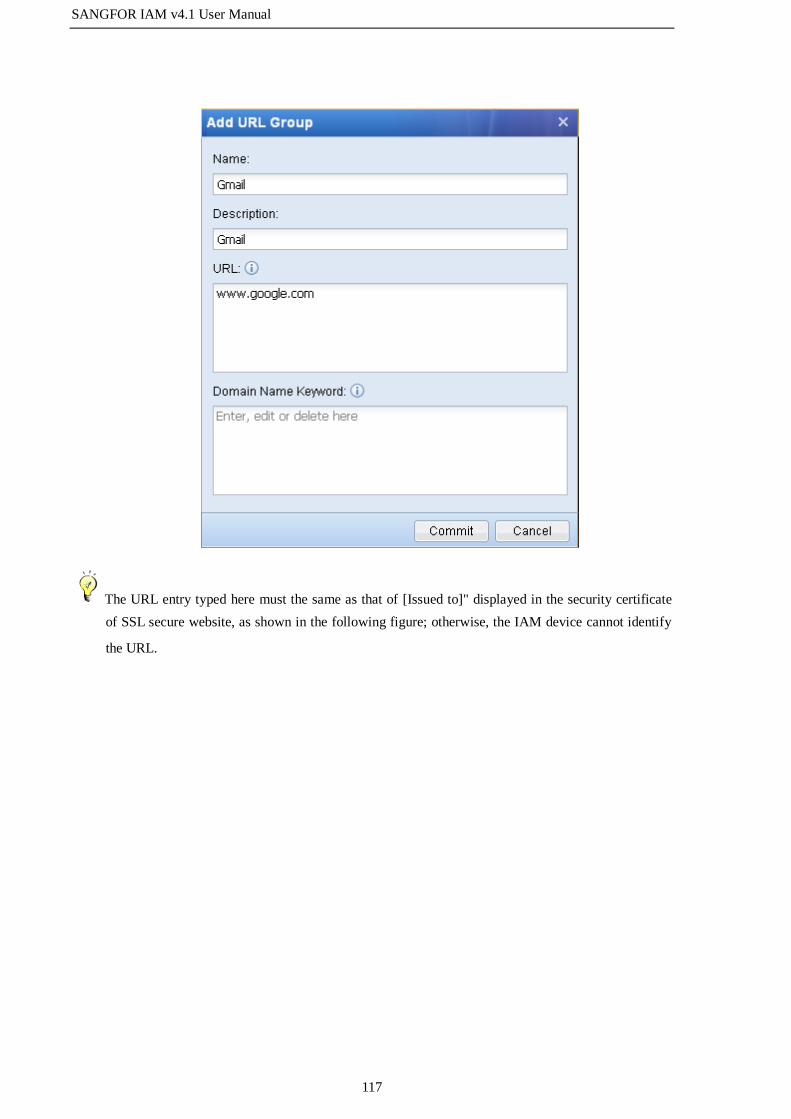
SANGFOR IAM v4.1 User Manual
117
The URL entry typed here must the same as that of [Issued to]" displayed in the security certificate
of SSL secure website, as shown in the following figure; otherwise, the IAM device cannot identify
the URL.

SANGFOR IAM v4.1 User Manual
118
Step 2. Check [HTTPS URL Filter] on the left pane to open the [HTTPS URL Filter] page on the right.
The HTTPS URL filter references the settings defined on the [URL Library] and [Schedule]
pages (for details, see sections 3.2.4 and 3.2.8).
Step 3. Click <Add> and the click the icon to open the [URL Category] page.
Step 4. Select your desired URL group. As in this example, you need to find out all URL groups related
to GMail, enter GMail in the text box and press Enter on your keyboard or click the icon.
The search will start and corresponding URL groups will be displayed. Then check all the
relevant URL groups, and your selections will be displayed under [Selected List] on the right.
Finally, click <OK> to save your settings.

SANGFOR IAM v4.1 User Manual
119
Step 5. Set [Action] to Deny and [Schedule] to All Day, and then click <OK> to save the HTTPS URL
filter rule.
Step 6. To manage the [HTTPS URL Filter] rule. check the rule entry and then click <Delete> to delete it,
click <Allow>/<Deny> to change the action to [Deny]/[Allow], or click <Up>/<Down> to move
this entry up/down to adjust the display order. Since the rules are matched from top to bottom, the
rule entry displayed at the top will be preferentially matched. If you find some URLs
uncategorized in the current URL library, click the [Report Uncategorized URL] link to send the
uncategorized URLs to SANGFOR engineers by email to improve the current URL library.
Step 7. If you only want to conduct HTTPS URL filter in this policy, click <Commit> to complete the
policy setting; if you want to set other functions, continue to select the function type and further
set the policy.
1. By default, the IAM device allows access to the URLs that are not configured in the web filter
module.
2. Since data is encrypted when users are accessing secure websites using HTTPS protocol, the IAM
device cannot detect the corresponding URL. However, the URL of a secure website is generally the
same as that set in [Issued to] of the SSL certificate; therefore, the device can obtain the URL of the
secure website by detecting the [Issued to] of SSL certificate. Given the feature of the above
detection method, if you are to define a URL of an HTTPS website, please set the URL according to
the [Issued to] field of the certificate corresponding to the website.

SANGFOR IAM v4.1 User Manual
120
Keyword Filter
Keyword filter covers [Search Keyword] and [HTTP Upload]. [Search Keyword] filters the keywords
searched in search engine or generates corresponding alarms. For instance, you can create a keyword filter
rule to filter the searching of some keywords in Baidu, Google or other search engines. [HTTP Upload]
filters the keywords uploaded through HTTP or generates corresponding alarms. For instance, you can
create an HTTP upload filter rule to filter the contents containing some keywords to be posted onto some
forums or Qzone. If you set the action to [Email Alarm], the IAM device will send an alarm email to the
specified email address when the uploaded content contains the keywords.
Case Study: Suppose you need to create a policy that fulfills the following requirements:
Always filter the searching of the keyword “Job”
Allow the searching of the keyword “Game”, but when the keyword is searched, send an alarm
email to the email address: [email protected]
Block the uploading of contents containing some politically sensitive keywords through HTTP
To meet the requirements, do as follows:
Step 1. Check [Keyword Filter] on the left pane to open the [Keyword Filter] page on the right pane. The
keyword filter references the settings defined on the [Keyword Group] and [Schedule] pages (for
details, see sections 3.2.8 and 3.2.10).
Step 2. Create the keyword filter rule to always block the searching of "Job".
a. Open the [Search Engine Keyword] tab and click <Add>.
b. Select the target keyword group. Click the drop-down arrow to select one of the keyword groups

SANGFOR IAM v4.1 User Manual
121
available. If you want to add your own keyword group, click [Add keyword Group] at the bottom
of the drop-down list to create a keyword group according to your needs.
c. Set [Action] to Deny and [Schedule] to All Day, as shown below. Then click <OK> to save your
settings.
Step 3. Create the keyword filter rule to give an email alarm when the keyword "Game" is searched.
a. Click <Add> and then select the corresponding keyword group (see the first two substeps of Step
2).
b. Set [Action] to Email Alarm and [Schedule] to All Day, as shown below. Then click <OK> to
save your settings.
Step 4. Create an HTTP upload filter rule to block the HTTP uploading of contents containing politically
sensitive keywords.
a. Open the [HTTP Upload] page and click <Add>.

SANGFOR IAM v4.1 User Manual
122
b. Select the keyword group. Click the drop-down arrow to select one of the keyword groups
available. If you want to add your own keyword group, click [Add keyword Group] at the bottom
of the drop-down list to create a keyword group according to your needs.
c. Set [Action] to Deny and [Schedule] to All Day, as shown below. Then click <OK> to save your
settings.
Step 5. Set the email address to which the alarm email will be sent. Check [Send Alarm Email To] and
type [email protected] in the text box, as shown below:
1. This option takes effect only when the [Outgoing Info Alarm] function is enabled on [System] >
[Alarm Options] > [Alarm-Triggering Events] page.
2. If this option is checked but the email address is not set, the alarm email will be sent to the address

SANGFOR IAM v4.1 User Manual
123
set on [System] > [Alarm Options] > [Alarm Email] page.
Step 6. To manage the keyword filter rule, check the rule entry and then click <Delete> to delete it, click
[Email Alarm], or <Allow>/<Deny> to change the action to [Email Alarm] or [Deny]/[Allow], or
click <Up> or <Down> to move this rule up or down to adjust the rule sequence. Since the rules
are matched from top to bottom, the rule entry displayed at the top will be preferentially matched.
Step 7. If you only want to conduct keyword filter in this policy, click <Commit> to complete the policy
setting; if you want to set other functions, continue to select the function and further set the
policy.
File Type Filter
File type filter includes [Upload] and [Download] two parts, which enable you to filter the upload or
download of files of certain type through HTTP or FTP protocol.
Case Study: Suppose you need to create a policy that blocks the uploading and downloading of the
"Movie" files of through website or FTP.
To meet the requirements, do as follows:
Step 1. Check [File Type Filter] on the left pane to open the [File Type Filter] page on the right. The file
type filter references the settings defined on the [File Type Group] and [Schedule] pages (for
details, see sections 3.2.8 and 3.2.11).
Step 2. Check the [Also apply the filter settings to FTP upload/download] option to apply the settings of
file type filter to FTP upload and download as well.
Step 3. Create a file type filter rule to always block the upload of movie files through website and FTP.
a. Open the [Upload] tab and click <Add>, as shown below:

SANGFOR IAM v4.1 User Manual
124
b. Select the file type group. Click the drop-down arrow to select one of the file type groups
available. If you want to add your own file type group, click [Add File Type Group] at the
bottom of the drop-down list to create a file type group according to your needs.
c. Set [Action] to Deny and [Schedule] to All Day, and click <OK> to save your settings.
Step 4. Create a file type filter rule to always block the download of movie files through website and
FTP.
a. Open the [Download] tab and click <Add>, as shown below:

SANGFOR IAM v4.1 User Manual
125
b. Select the file type group. Click the drop-down arrow to select one of the file type groups
available. If you want to add your own file type group, click [Add File Type Group] at the
bottom of the drop-down list to create a file type group according to your needs.
c. Set [Action] to Deny and [Schedule] to All Day, and click <OK> to save your settings.
Step 5. To manage the filter type filter rule, check the rule entry and then click <Delete> to delete it, click
[Email Alarm], or <Allow>/<Deny> to change the action to [Email Alarm] or [Deny]/[Allow], or
click <Up> or <Down> to move this rule up or down to adjust the rule sequence. Since the rules
are matched from top to bottom, the rule entry displayed at the top will be preferentially matched.
Step 6. If you only want to conduct file type filter in this policy, click <Commit> to complete the policy
setting; if you want to set other functions, continue to select the function and further set the
policy.
SSL Management
The SSL management module includes [SSL Security] and [SSL Content Ident] two functions.

SANGFOR IAM v4.1 User Manual
126
SSL Security
[SSL Security] determines whether a secure connection satisfies the specified conditions by detecting and
verifying the certificate. If not, it denies the access to the applications connected through SSL protocol.
The conditions include black/white list, whether to allow expired certificate and whether root certificate is
trusted, etc. The [SSL Security] controls the connections of applications using SSL-based protocols,
including HTTPS, SMTP, POP3, etc. You can specify the SSL black/white list, set whether to block
expired certificate and check certificate chain to conduct the control over the access to relevant websites,
further improving the security of SSL access.
Case Study: Suppose you need to create a policy that allows unexpired SSL certificate issued by Google.
To meet the requirements, do as follows:
Step 1. Check [SSL Security] on the left pane to open the [SSL Security] page on the right. Check
[Enable SSL Black/White List Control] to enable the SSL black/white list control. The two
options are respectively described as follows:
[Block certificate issued by the following organization]: Indicates the IAM device
determines whether the connection is allowed by identifying the [Issued to] field in the
security certificate. If the [Issued to] field matches the conditions set here, the
corresponding connection will be denied; otherwise, it is allowed.
[Only allow certificate issued by the following organization]: Indicates the IAM device
determines whether the connection is allowed by identifying the [Issued to] field in the
security certificate. If the [Issued to] field matches the conditions set here, the
corresponding connection will be allowed; otherwise, it is denied.

SANGFOR IAM v4.1 User Manual
127
Step 2. Select the [Only allow certificates issued by the following organizations] option and type Thawte
SGC CA in the text box, as shown in the following figure (for the security certificate of Google,
see section "HTTPS URL Filter" under Web Filter).
Step 3. Check the [Block expired certificate] option and click <Commit> to save the policy. If you want
to set other functions, continue to select the function and further set the policy.
SSL Content Ident
[SSL Content Ident] conducts content audit and control over the applications connected using SSL secure
protocol, such as HTTPS, encrypted SMTP, encrypted POP3. Given the security of online banking, the
bank-relevant websites will not be monitored.
Case Study: Suppose you need to create a policy that identifies and controls the contents of QQ WebMail.
To meet the requirements, do as follows:
Step 1. Check [SSL Content Ident] on the left pane to open the [SSL Content Ident] page on the right, as
shown below:

SANGFOR IAM v4.1 User Manual
128
Step 2. Type the domain you want to monitor and audit in the text box of [Only identify the following
websites]. In this example, as the encrypted QQ webmail is to be audited, type the domain
address of QQ webmail: mail.qq.com, as shown in the following figure:
Step 3. Check [Apply "Web Filter" to SSL-transferred contents of the above websites (on ports 443, 465,
995)] to enable the control over the contents of encrypted connection. After checking this option,
you need go to [Access Control] > [App Control] > [Web Filter] to set relevant options to make it
take effect (see section 3.3.1.4.1).
Step 4. Check [Apply "App Audit" to SSL-transferred contents of the above websites (on ports 443, 465,

SANGFOR IAM v4.1 User Manual
129
995)] to enable the audit on the SSL-encrypted contents. After checking this option, you need go
to [Audit Policy] > [App Audit] to set relevant options (see section 3.3.1.4.2).
Step 5. Click the [HTTP Website Example] link to download some website URLs suggested by the IAM
device that can be audited.
Step 6. Click the [Download SSL Ident Root Cert.] link to download and install the root certificate on
your computer to remove the security alert caused by enabling the SSL content identification
from the browser.
Step 7. Click <Commit> to save the policy. If you want to set other functions, continue to select the
function and further set the policy.
To prevent the sensitive financial information from being audited, the IAM device screens this kind
of information, and therefore the SSL content identification will not apply to the bank-related
contents.
Email Filter
Email Filter
[Email Filter] filters the emails sent from or received by LAN users through SMTP or POP3 protocol. The
filter criteria include email addresses of sender and receiver, email subject, keywords contained in email
body, etc. You can also set the email delay/audit options to restrict some emails from being sent out until
they are approved by the administrator. Email filter includes [Send/Receive Email] and [Email Audit Rules]
two pages.
Case Study: Suppose you need to create a policy that meets the following requirements:
Filter the emails sent to 163 email address or attached .exe file
Delay/Audit emails sent to sina email address
To meet the requirements, do as follows:
Step 1. Check [Email Filter] on the left pane to open the [Email Filter] page.

SANGFOR IAM v4.1 User Manual
130
Step 2. Click to open the [Send/Receive Email] page, and the options displayed on it are described in the
following table.
Table 17 Email Filter Settings (Send/Receive Email)
Field Description
Block email sent from the
following address/domain
Filter emails based on sender address. Check it and specify the email
address or domain name that is not allowed to send emails. The IAM
device will block the email whose sender address matches any of the
addresses or domain names set here.
Only allow email sent from
the following
address/domain
Filter emails based on sender address. Check it and specify the email
address or domain name that is only allowed to send emails. The IAM
device will only allow the emails whose sender address matches any
of the addresses or domain names set here.
Block email sent to the
following address/domain
Filter emails based on the receiver address. Check it and specify the
email address or domain name to which emails are not allowed to be
sent. The IAM device will block the email whose receiver address
matches any of the addresses or domain names set here.
Only allow email sent to the
following address/domain
Filter emails based on the receiver address. Check it and specify the
email address or domain name to which emails are allowed to be sent.
The IAM device will only allow the email whose sender address
matches any of the addresses or domain names set here.
Block email containing the
following keyword in title
or body
Filter emails by checking if the specified keyword is contained in the
email title or body. If the keyword is contained in an email, the IAM
device will block the email from being sent out.
For example, if you want to filter the emails containing the keyword
"Job", type Job in the text box.

SANGFOR IAM v4.1 User Manual
131
Block email attached file of
the following types
Filter emails by checking if the file of specified type is attached to the
email. If yes, the IAM device will block the email from being sent
out.
Block the email whose size
is greater than
Filter emails based on email size. Check it and specify the email size
threshold. The IAM device will block the email from being sent out
when its size exceeds the threshold set here.
Block the email whose
attached files exceed
Filter emails based on attachment count. Check it and specify the
maximum number of attachments allowed. The IAM device will
block the email from being sent out when the number of files attached
to the email exceeds the threshold set here.
The above options are of the "OR" relationship and are matched from top to bottom. The IAM device
will take the corresponding action once one of them is matched. If any conflict occurs, the option
first matched will prevail.
Step 3. Configure the email filter options on the [Send/Receive Email] page to filter the emails sent to
163.com or attached .exe file.
a. To filter the emails sent to 163 email address, type the domain name @163.com in the text box
of [Block email sent to the following address/domain] under [Destination Address Filter], as
shown below:
b. To filter the emails attached .exe file, type .exe in the text box of [Block email attached file of the
following types], as shown below:

SANGFOR IAM v4.1 User Manual
132
Step 4. Click to open the [Email Audit Rules] page, and the options displayed on it are described in the
following table.
Table 18 Email Filter Settings (Email Audit Rules)
Field Description
Enable Email Delay/Audit Check the option to enable the email delay/audit function.
Delay/Audit email sent to the
following address/domain
Detect the receiver address of an email. If the receiver address
matches the address set here, the email will be delayed/audited.
Delay/Audit emails containing
the following keywords in title
or body
Detect the email title and email body. If the keyword specified
here is contained in title or body of an email, the email will be
delayed/audited.
Delay/Audit the email whose
size is greater than
Detect the email size. If the size of an email exceeds the limit set
here, the email will be delayed/audited.
Delay/Audit the email when
whose attached files exceed
Detect the number of files attached to an email. If the number of
files attached to an email exceeds the limit set here, the email
will be delayed/audited.
Delay/Audit the email whose Cc
receivers exceed
Detect the number of Cc receivers of an email. If the number of
Cc receivers of an email exceeds the limit set here, the email will
be delayed/audited.
NOT delay/audit email sent to
the following address/domain
Set the receiver addresses of emails that will be not
delayed/audited. If the receiver address of an email matches any
of the addresses set here, the email will not be delayed/audited.

SANGFOR IAM v4.1 User Manual
133
Send a notification to the
following address once an email
is delayed
Set the email address to which the IAM device will send a
notification message to notify the administrator once an email is
delayed.
1. This option takes effect only when the [Email Audit
Alarm] function is enabled on [System] > [Alarm Options] >
[Alarm-Triggering Events] page.
2. If this option is checked but the email address is not set, the
notification email will be sent to the address set on [System] >
[Alarm Options] > [Alarm Email] page.
The [NOT delay/audit email sent to the following address/domain] option (audit-free address list)
may conflict with those under the [Delay/Audit email when any of the following conditions is
matched] section. There are three situations:
If the audit-free address list conflicts with the audit address list ([Delay/Audit email sent to the
following address/domain]), the audit address list takes precedence, that is, the corresponding
email will be delayed/audited.
If the audit-free address list conflicts with other options under [Delay/Audit email when any of
the following conditions is matched] section, the audit-free address list takes precedence, that is,
the corresponding email will NOT be delayed/audited.
If only the audit-free address list is set and none of the audit options above it is set, the emails
sent to the receivers specified in the audit-free list will NOT be delayed/audited, but other
emails will be delayed/audited.
Step 5. Configure the email audit rules on the [Email Audit Rules] page to delay/audit emails sent to
sina.com.
a. Check the [Enable Email Delay/Audit] option to enable the email delay/audit function. The email
that triggers the corresponding conditions will be delayed and cannot be sent out until it is
approved by the administrator.
b. To delay/audit emails sent to sina.com, type @sina.com.in the text box of [Delay/Audit email
sent to the following address/domain], as shown below:

SANGFOR IAM v4.1 User Manual
134
Step 6. Click <Commit> to save the policy. If you want to set other functions, continue to select the
function and further set the policy.
1. When setting email address in [Email Filter], you can type a complete email address, such as
"[email protected]", or just type an email domain name, such as "@abc.com" or "abc.com". Please note
that if you enter "abc.com", it will match "abc.com" and "abc.com.cn". The format is one email
address or domain name per row.
2. When setting keywords in [Email Filter], you can enter one or more keywords per row. The
regular expression is supported. For example, if you type "key.*d", it will match "keyd", "keyword",
etc. There are two formats:
Type one keyword per row. The keyword on different rows are of the OR relationship, which
means the email will be matched when it contains any of the keywords.
Type several keywords per row and separate keywords by comma. The keywords on the same row
are of the AND relationship, which means the email will be matched only when it contains all the
keywords on the same row.
3. [Email Filter] will not apply to WebMail. It only applies to emails sent using SMTP protocol on
the condition that the email data goes through the IAM device. The standard port of SMTP protocol
for sending email is TCP 25. If emails are sent using non-standard port, the email filter function does
not work.
4. The SMTP authentication password of an email must contain at least 3 characters; otherwise, the
email cannot be sent out even if it is approved by administrator.
5. When [Email Filter] is enabled, please make sure the IAM device can connect to the mail server;
otherwise, emails may not be sent out.

SANGFOR IAM v4.1 User Manual
135
3.3.1.4.2 Add Audit Policy
The audit policy audits the network behaviors of LAN users. It includes [App Audit], [Outgoing File
Alarm], [Flow/Duration Audit] and [Web Content Audit] modules.
To create an audit policy, do as follows:
Step 1. On the [Access Management] page, click <Add> and select [Audit Policy] to open the [Audit
Policy] page, as shown below:
Step 2. Check the [Enable Policy] option to enable the audit policy.
If this option is not checked, the policy will not take effect.
Step 3. Type the policy name and description. [Policy Name] is the unique identifier of the policy, which
must be entered and unique. [Description] refers to descriptive information of the policy, which is
optional.
Step 4. Open the [Policy Settings] tab and set the audit policy according to your needs. First, select the
audit type under [Audit Policy] on the left pane and then configure the policy on the right pane.
The audit policy covers the following four modules: [App Audit], [Outgoing File Alarm],
[Flow/Duration Audit] and [Web Content Audit] (for detailed settings of the modules, see the

SANGFOR IAM v4.1 User Manual
136
subsequent sections).
Step 5. Open the [Group/User] tab to select the applicable user/group. The user groups or users selected
on this tab will be associated with this audit policy.
Step 6. Go to the [Advanced] tab and set advanced options, including [Expiry Date], [Same-Role
Administrator Privilege] and [Allow administrator of lower role to view].
Application Audit
[App Audit] audits the network behaviors and contents accessed by LAN users when they access the
Internet through the IAM device. The audit objects include HTTP outgoing contents, website browsing,
emails, IM chat logs, FTP, TELNET, network application behavior, etc.
Case Study: Suppose you need to create a policy that meets the following requirements:
Audit WebBBS posts, WebMail and the contents of WebMail attachment
Audit the websites visited by LAN users and the name of the file downloaded from website
Audit the behaviors of various applications already known
To meet the requirements, do as follows:
Step 1. Check [App Audit] on the left pane to open the [App Audit] page on the right, as shown below:
Step 2. Click <Add> on the right pane and then click the icon to open the [Select Audit Object] page,
and the options displayed on it are described in the following table.
Table 19 Application Audit Settings (Select Audit Object)
Field Description
HTTP Outgoing Content
Web BBS post To audit the contents posted by LAN users to forums.

SANGFOR IAM v4.1 User Manual
137
Outgoing WebMail content To audit the body of the email sent by LAN users through web
(attachment is excluded).
Attachment uploaded through
web, including WebMail
attachment
To audit the attachments uploaded through web. If you want to
audit the attachment of WebMail, check this option.
Text uploaded through web To audit text contents uploaded through HTTP protocol. Enabling
this option may generate massive logs; therefore, it is
recommended to enable the above three options only.
URL/Filename
Visited URLs To audit URLs of websites visited by LAN users.
If you want to audit all URLs, select the [All URLs] option; if you
want to only audit the specified URLs, select [Specified URL] and
click the [Select URL] link to open the [Select URL Type], and
then select the URL groups you want to audit (for the settings of
URL group, see section 3.2.4 "URL Library").
For how detailed the URL is recorded, you can go to [System] >
[Advanced] > [Web Audit Options] page to set (see section
3.9.10.2 "Log Record Options").
Filename of downloaded file To audit the name of the file downloaded from web (HTTP
protocol). This option will not record the contents of the file.
Sent email (SMTP) To audit emails sent by LAN users, including the file attached to
the emails.
The protocol used for sending emails must be SMTP.
Received email (POP3) To audit emails received by LAN users, including the file attached
to the emails.
The protocol used for receiving emails must be POP3.
IM Chat Logs
MSN To audit the chat behaviors and logs of LAN users through MSN.
For the chat logs of encrypted IM tool, you can configure the
ingress policy to audit them (for details, see section 3.3.1.4.6 "Add
Ingress Policy").

SANGFOR IAM v4.1 User Manual
138
Yahoo To audit the chat behaviors and logs of LAN users through Yahoo
Messenger.
GTalk To audit the chat behaviors and logs of LAN users through GTalk.
Fetion To audit the chat behaviors and logs of LAN users through Fetion.
FTP
File uploaded through FTP (file
name and content)
To audit the name and contents of the file uploaded by LAN users
through FTP protocol.
File downloaded through FTP
(file name only)
To only audit the name of the file downloaded by LAN users
through FTP protocol.
TELNET
Commands executed through
TELNET
To audit the commands executed by LAN users through Telnet.
Here, the port of Telnet must be 23.
Application Behavior
All identified application
behaviors (exclusive of content)
To audit the application behaviors that can be identified by the
IAM device. This option only records the behaviors. To audit
contents, set the relevant options above.
Unidentified application
behaviors (including access to
an address or port; it will
generate massive logs)
To audit the application behaviors that cannot be identified by the
IAM device. Since the IAM device cannot identify the application,
it will record such information as destination IP address and port
of the behavior, which will generate massive logs. It is not
recommended to enable this option.
Step 3. Select the audit objects. It covers the following seven menus: [HTTP Outgoing Content],
[URL/Filename], [Email], [IM Chat Logs], [FTP], [TELNET] and [Application Behavior]. Click
one of them to quickly link to the corresponding section.
a. Go to [HTTP Outgoing Content] section. To audit WebBBS posts, WebMail and the contents of
its attachment, select the first three options, as shown in the following figure:

SANGFOR IAM v4.1 User Manual
139
b. Go to [URL/Filename] section. To audit the websites visited by LAN users and the name of the
file downloaded from website, check [Visited URLs] to select [All URLs], and then select
[Filename of downloaded file], as shown in the following figure:
c. Go to [Application Behavior] section. To audit the behaviors of various applications already
known, check the first option, as shown in the following figure:
Step 4. Click <OK> to save the selected audit objects, and then set [Schedule] to All Day and [Action] to
Audit, as shown below:

SANGFOR IAM v4.1 User Manual
140
Step 5. Click <OK> to save the application audit rule.
Outgoing File Alarm
[Outgoing File Alarm] generates alarms when the corresponding outgoing files are recorded. If LAN users
send files of specific file types, the IAM device will send an alarm notification to the administrator. You
can also set to record the contents and relevant information of files when they are transferred. The file
detection conducted by the IAM device is not simply based on file extensions. The IAM device will
analyze the data feature in depth to obtain the type of the file. By detecting files in this way, the IAM
device will successfully detect the files transferred by LAN users even if their file extensions are changed
or they are compressed.
Case Study: Suppose you need to create a policy that generates alarms when the Engineering &
Manufacturing files are sent and sends the alarm email to [email protected].
To meet the requirements, do as follows:
Step 1. Go to [App Audit] to check the related options to audit files uploaded through FTP, HTTP and
SMTP.
Step 2. Check [Outgoing File Alarm] on the left pane to open the [Outgoing File Alarm] on the right, and
then click <Add>, as shown below:
Step 3. Click the drop-down arrow of [Category-File Type-Feature ident] to open the [Select Alarm File
Type] page. Then select [Feature ident], locate the Engineering & Manufacturing file type and
click <OK>, as shown below:

SANGFOR IAM v4.1 User Manual
141
Step 4. You can also type the specific file extension in the text box right below [Feature ident] to search.
The identification methods for file types includes [Feature ident] and [Extension ident], which are
introduced below:
[Feature ident] identifies files according to their features. There are seven common file
categories: compressed packets, office software, reader, engineering & manufacturing,
video & image, program source file, text file and unknown type. The IAM device has built
in the features of these file categories, and therefore can identify them even if their
extensions are changed or they are compressed. However, the files compressed with
encryption are excepted.
[Extension ident] identifies files based on file extensions. You can enter the file extensions.
When typing multiple extensions, use comma to separate.
Step 5. Set [Attribute] to Regular&encrypted, [File size] to Any size and [Email Alarm] to Enable, as
shown below. These three items are respectively described below:
[Attribute]: It only has one available option, that is, [Regular&encrypted file].
[File Size]: It has two options available: [Any size] and [Greater than]. To generate an alarm
for any file that matches the specified condition regardless of the file size, select [Any size];
to generate alarms for the files of specified size, select [Greater than] and enter the size
threshold. In this case, the IAM will only generate alarms for the files that mach the

SANGFOR IAM v4.1 User Manual
142
specified condition and that are greater than the threshold set here.
[Email Alarm]: When it is enabled, it means when there is a file matches the criteria, the
IAM device will sent an alarm email to the specified email address; if it is disabled, the
alarm email will not be sent.
Step 6. Set the following two configuration items according to your needs. In this example, you can
ignore them.
[Enable email alarm on multi-layer nested compressions (more than 2 layers)]: To enable
the alarm for the file with multiple compressions. If a file is compressed repeatedly (more
than 2 layers of nested compressions), the IAM device will not detect the file, but will send
alarm email to the specified email address.
[Ignore outgoing files of the following extensions]: To set the file extensions that will
exempt from the file alarm. The IAM device will not generate an alarm for the file whose
file extension is listed here.
Step 7. Set the email address to which the alarm email will be sent. Check [Send alarm email to the
following address] and type [email protected] in the text box, as shown below:
1. This option takes effect only when the [Outgoing Info Alarm] function is enabled on [System] >
[Alarm Options] > [Alarm-Triggering Events] page.

SANGFOR IAM v4.1 User Manual
143
2. If this option is checked but the email address is not set, the alarm email will be sent to the address
set on [System] > [Alarm Options] > [Alarm Email] page.
Step 8. Click <Commit> to save the policy. If you want to set other functions, continue to select the
function and further set this policy.
[Outgoing File Alarm] only applies to the file uploaded through HTTP, SMTP or FTP protocol, and it
works only when the relevant audit options for FTP, HTTP or SMTP are checked in [App Audit] >
[Select Audit Object].
Flow/Duration Audit
[Flow/Duration Audit] enables you to make flow or online duration statistics of various applications. If you
check the related options, you can go to the Data Center to search for the flow and online duration caused
by LAN users when they are accessing various applications over the Internet.
To configure the flow/online duration audit, do as follows:
Step 1. Check [Flow/Duration Audit] on the left pane to open the [Flow/Duration Audit] page on the
right, as shown below:
Step 2. Check the [Make flow statistics of applications] option to have the IAM device make statistics of
the flow caused by LAN users when they are accessing various applications through the IAM
device; otherwise, the IAM device will not collect the flow statistics and total flow, which means
you cannot search the flow information and ranking in the Data Center.
Step 3. Check the [Make online duration statistics of applications] option to have the IAM device make
statistics of the online duration of LAN users when they are accessing various applications
through the IAM device; otherwise, the IAM device will not collect the online duration statistics
and total online duration, which means you cannot search the information and ranking of online
duration in the Data Center.
Web Content Audit
[Web Content Audit] audits the contents of the websites accessed by LAN users. You can set to audit
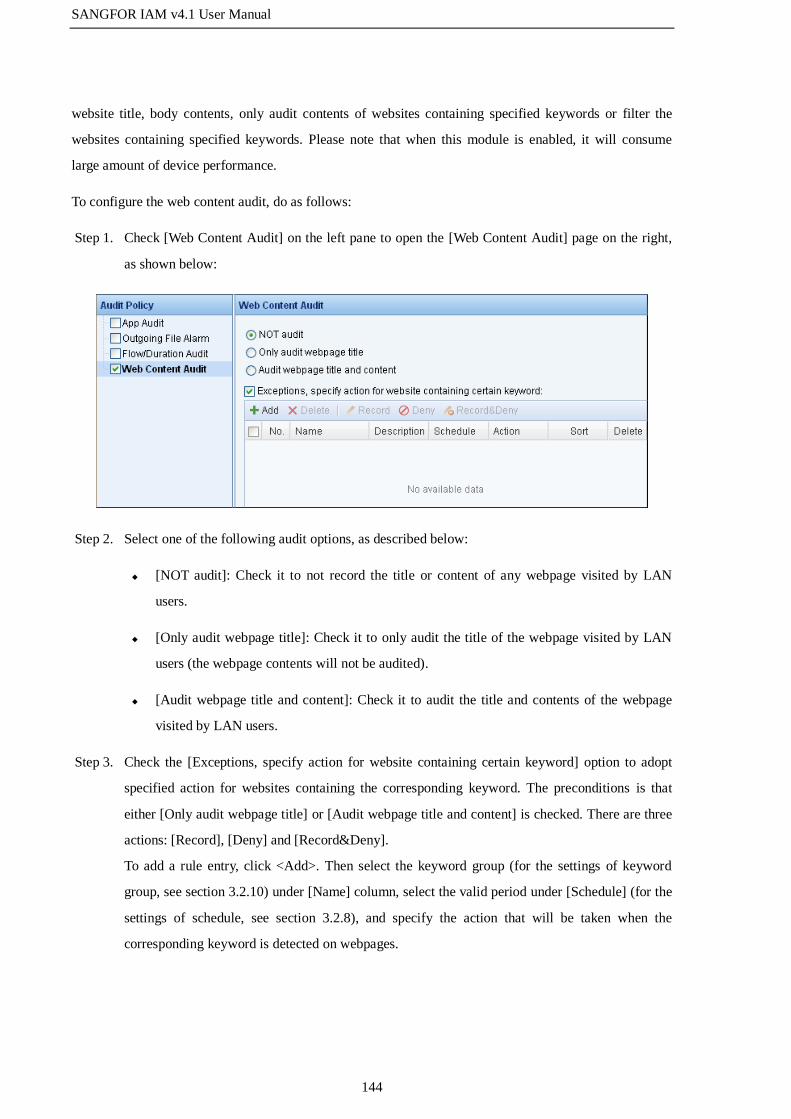
SANGFOR IAM v4.1 User Manual
144
website title, body contents, only audit contents of websites containing specified keywords or filter the
websites containing specified keywords. Please note that when this module is enabled, it will consume
large amount of device performance.
To configure the web content audit, do as follows:
Step 1. Check [Web Content Audit] on the left pane to open the [Web Content Audit] page on the right,
as shown below:
Step 2. Select one of the following audit options, as described below:
[NOT audit]: Check it to not record the title or content of any webpage visited by LAN
users.
[Only audit webpage title]: Check it to only audit the title of the webpage visited by LAN
users (the webpage contents will not be audited).
[Audit webpage title and content]: Check it to audit the title and contents of the webpage
visited by LAN users.
Step 3. Check the [Exceptions, specify action for website containing certain keyword] option to adopt
specified action for websites containing the corresponding keyword. The preconditions is that
either [Only audit webpage title] or [Audit webpage title and content] is checked. There are three
actions: [Record], [Deny] and [Record&Deny].
To add a rule entry, click <Add>. Then select the keyword group (for the settings of keyword
group, see section 3.2.10) under [Name] column, select the valid period under [Schedule] (for the
settings of schedule, see section 3.2.8), and specify the action that will be taken when the
corresponding keyword is detected on webpages.

SANGFOR IAM v4.1 User Manual
145
3.3.1.4.3 Add Security Policy
To create a security policy, do as follows:
Step 1. On the [Access Management] page, click <Add> and select [Security Policy] to open the
[Security Policy] page, as shown below:
Step 2. Check the [Enable Policy] option to enable the security policy.
If this option is not checked, the policy will not take effect.

SANGFOR IAM v4.1 User Manual
146
Step 3. Type the policy name and description. [Policy Name] is the unique identifier of the policy, which
must be entered and unique. [Description] refers to descriptive information of the policy, which is
optional.
Step 4. Open the [Policy Settings] tab and set the security policy according to your needs. First, select the
security type under [Security Policy] on the left pane and then configure the policy on the right
pane. The security policy covers the following three modules: [Risk Ident], [ActiveX Filter] and
[Script Filter] (for detailed settings of the modules, see the subsequent sections).
Step 5. Open the [Group/User] tab to select the applicable user/group. The user groups or users selected
on this tab will be associated with this security policy.
Step 6. Go to the [Advanced] tab and set advanced options, including [Expiry Date], [Same-Role
Administrator Privilege] and [Allow administrator of lower role to view].
Risk Ident
[Risk Ident] identifies and blocks risk network behaviors, including HTTP Trojan, SMTP Trojan, port scan,
HTTP flow anomaly and email sending anomaly. The configuration of [Risk Ident] covers three parts:
[Basic Settings], [Email Sending Anomaly Ident] and [Send alarm email to the following address].
Basic Settings
Under the [Basic Settings] section, you can set the identification sensitivity level, alarm level and block
level of risk behaviors, including the following parameters:
[Sensitivity]: It has three levels: high, medium and low.

SANGFOR IAM v4.1 User Manual
147
[Alarm Level]: It has four options: high, medium, low and not alarm. Please note that the alarm
level cannot be higher than the sensitivity level.
[Block Level]: It has four options: high, medium, low and not block. Please note that the block
level cannot be higher than the alarm level.
Different levels correspond to detection of different risk behaviors. The risk behaviors detected by each
level are described as follows:
Low: To detect suspected HTTP Trojan flow (detect HTTP Trojan to prevent information leakage
through HTTP channel).
Medium: To detect suspected HTTP and SMTP Trojan flow (detect HTTP or SMTP Trojan to
prevent information leakage by HTTP or SMTP).
High: To detect suspected HTTP, SMTP Trojan flow (detect HTTP or SMTP Trojan to prevent
information leakage by HTTP or SMTP), port scanning (to prevent attacks caused by scanning
hosts in extranet and avoid the risks that the LAN may be screened), HTTP flow anomalies
(commonly caused by non-browser network software) and non-standard protocol flow at
common ports (21, 25, 80, 110, 443).
Email Sending Anomaly Ident
The [Outgoing Email Anomaly Ident] monitors the anomalous email sending behaviors of LAN users. The
detection is implemented from the two aspects: [Limit sending frequency of same-sized email per IP] and
[Limit email sending frequency per IP]. You can set the two options according to your needs and then set
the [Lock IP when it reaches any of the above two limits] option to block email sending when email
sending anomaly is detected.

SANGFOR IAM v4.1 User Manual
148
The settings of the three options are respectively described in the following:
[Limit sending frequency of same-sized email per IP]: To limit the number of emails of the same
size that are allowed to be sent by each IP address in a specified time period. For example, if you
set [Email Count] to 10 and [Interval] to 1, it indicates that when a same IP address sends 10 or
more than 10 emails of the same size during one minute, the IAM device will regard this
behavior as an email sending anomaly.
[Limit email sending frequency per IP]: To limit the number of emails that are allowed to be sent
by each IP address in a specified time period. For example, if you set [Email Count] to 20 and
[Interval] to 1, it indicates that when a same IP address sends 20 or more than 20 emails during
one minute, the IAM device will regard this behavior as an email sending anomaly.
[Lock IP when it reaches any of the above two limits]: To block the IP address from sending
emails for a certain period when any of the above email sending anomalies is detected. For
example, if you set [Lockout Period] to 5, it means that when an IP address triggers any of the
above two conditions, the IAM device will block the IP address from sending emails for 5
minutes.
[Send alarm email to the following address] refers to the email address to which the alarm email will be
sent. If you check this option and type an email address, for example, [email protected], the IAM
device will send an alarm email to this address when any risk behavior is detected. You can enter only one

SANGFOR IAM v4.1 User Manual
149
email address here.
1. This option takes effect only when the [Risk Ident Alarm] function is enabled on [System] >
[Alarm Options] > [Alarm-Triggering Events] page.
2. If this option is checked but the email address is not set, the alarm email will be sent to the address
set on [System] > [Alarm Options] > [Alarm Email] page.
Active X Filter
[ActiveX Filter] identifies and filters the ActiveX plugins downloaded when users are accessing websites.
Some malicious ActiveX plugins on websites may cause the browser to malfunction, or even monitor
network behaviors and steal your personal information. Usually, the malicious plugins are automatically
installed on user PCs through the browser. However, by filtering the signature of ActiveX control, the
[ActiveX Filter] function prevents untrusted plugins from being installed on the computers across the LAN
and therefore ensures the security of the LAN. It covers the following two sections: [ActiveX Filter Option]
and [Excluded Website].
ActiveX Filter Options
The configuration of [ActiveX Filter Options] covers [Verify digital signature of ActiveX] and [Only allow
the following ActiveX], as described below:
1. [Verify digital signature of ActiveX]
This option verifies the digital signature of ActiveX. After checking this option, select relevant options
right below it to filter the ActiveX that fails the verification. It provides five configuration items, which are
introduced below:
[Block unsigned ActiveX]: To filter the ActiveX that uses an unsigned certificate.
[Block altered ActiveX]: To filter the ActiveX that has been altered.
[Block ActiveX that uses expired certificate]: To filter the ActiveX that uses an expired
certificate.
[Block ActiveX that fails the verification]: To filter the ActiveX whose certificate is not in the
trusted certificate library. When verifying the certificate of the ActiveX, the IAM device will
check if the certificate exists in the trusted certificate library displayed on the [Trusted CA] page

SANGFOR IAM v4.1 User Manual
150
(see section 3.2.12)). If not, the ActiveX will be filtered.
[Block ActiveX List]: To set the keywords used to filter ActiveX plugin. If an ActiveX plugin
contains any keyword set here, it will be blocked. Type one plugin or issuer name per row. For
example, if you want to filter the ActiveX plugin issued by Beijing Jiangmin New
Sci,&Tec.Co.Ltd, enter Beijing Jiangmin New Sci,&Tec.Co.Ltd here.
2. [Only allow the following ActiveX]
This option specifies the ActiveX controls that are only allowed by the IAM device and other ActiveX
controls not listed here will be filtered by default. The IAM device has built in some common plugin types,
such as Online Antivirus Plugin, Player Plugin and Entertainment Plugin. You can check the option to
allow the installation of the corresponding ActiveX plugins:
[safe plugins (e.g. Beijing Rising)]: When it is selected, the ActiveX plugins belonging to online
antivirus type are allowed to install.
[player plugins (e.g. flash player)]: When it is selected, the ActiveX plugins belonging to players
type are allowed to install.
[recreational plugins (e.g. NetEase)]: When it is selected, the ActiveX plugins belonging to

SANGFOR IAM v4.1 User Manual
151
entertainment type are allowed to install.
[Custom ActiveX List] specifies the ActiveX plugins that are only allowed by the IAM device.
Type one plugin or issuer name per row. If an ActiveX plugin contains any keyword set here, it
will be regarded as secure and allowed to be installed.
1. The ActiveX keyword (plugin or issuer name) does not support the wildcard character. Each
keyword should contain less than 64 bytes and the total number of keywords allowed is 32.
2. In bypass mode, the [ActiveX Filter] only detects and records the ActiveX plugins, and does not
support the filtering function.
Excluded Website
[Excluded Website] is used to specify the websites whose plugins will not be filtered. Select the objects
displayed under [Available White List] and click <Add> to add the relevant websites to the text box under
[Excluded Object]. The websites listed under [Excluded Object] will exempt from ActiveX filter. If you
want to delete some websites from this list, select it and click <Delete> to remove it (for the setting of
white list, see section 3.2.9 "Black/White List Group").
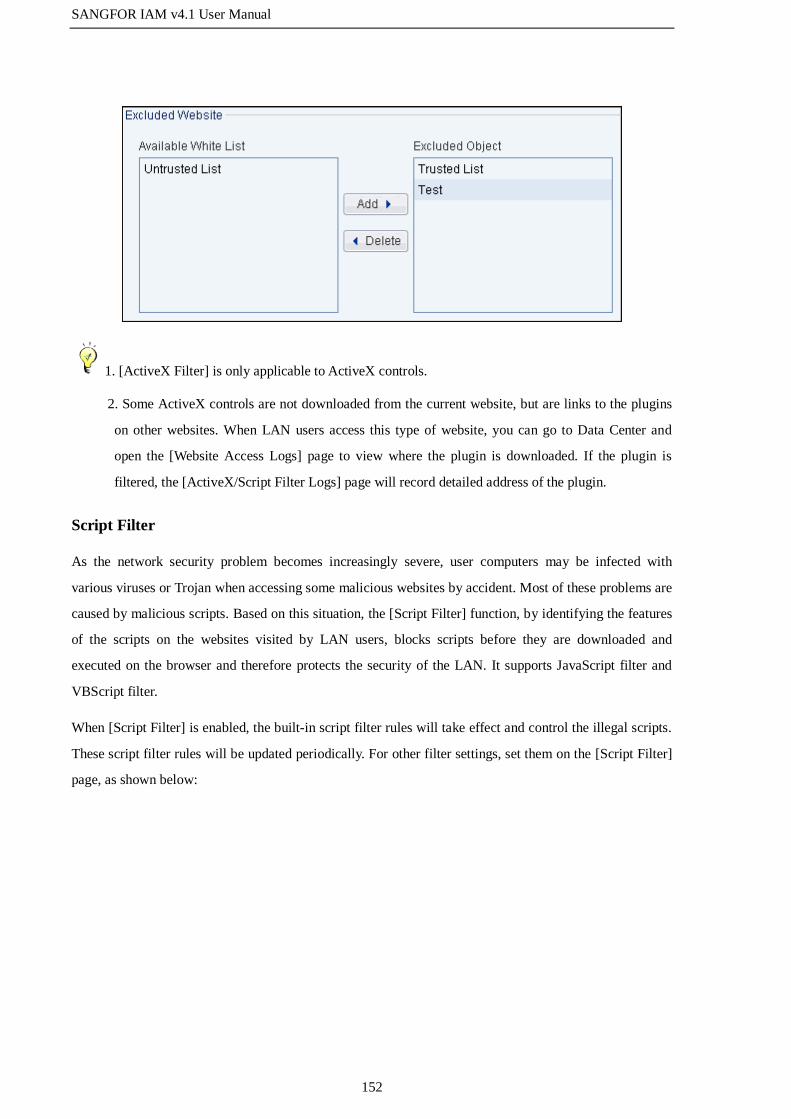
SANGFOR IAM v4.1 User Manual
152
1. [ActiveX Filter] is only applicable to ActiveX controls.
2. Some ActiveX controls are not downloaded from the current website, but are links to the plugins
on other websites. When LAN users access this type of website, you can go to Data Center and
open the [Website Access Logs] page to view where the plugin is downloaded. If the plugin is
filtered, the [ActiveX/Script Filter Logs] page will record detailed address of the plugin.
Script Filter
As the network security problem becomes increasingly severe, user computers may be infected with
various viruses or Trojan when accessing some malicious websites by accident. Most of these problems are
caused by malicious scripts. Based on this situation, the [Script Filter] function, by identifying the features
of the scripts on the websites visited by LAN users, blocks scripts before they are downloaded and
executed on the browser and therefore protects the security of the LAN. It supports JavaScript filter and
VBScript filter.
When [Script Filter] is enabled, the built-in script filter rules will take effect and control the illegal scripts.
These script filter rules will be updated periodically. For other filter settings, set them on the [Script Filter]
page, as shown below:
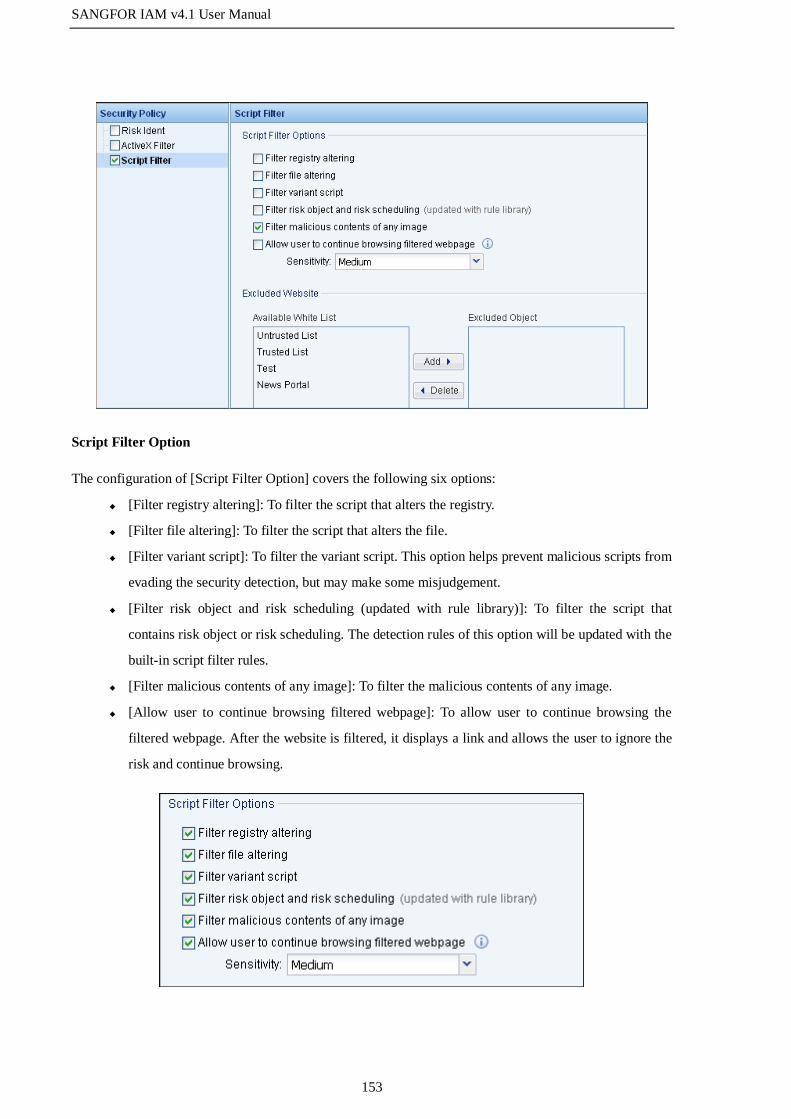
SANGFOR IAM v4.1 User Manual
153
Script Filter Option
The configuration of [Script Filter Option] covers the following six options:
[Filter registry altering]: To filter the script that alters the registry.
[Filter file altering]: To filter the script that alters the file.
[Filter variant script]: To filter the variant script. This option helps prevent malicious scripts from
evading the security detection, but may make some misjudgement.
[Filter risk object and risk scheduling (updated with rule library)]: To filter the script that
contains risk object or risk scheduling. The detection rules of this option will be updated with the
built-in script filter rules.
[Filter malicious contents of any image]: To filter the malicious contents of any image.
[Allow user to continue browsing filtered webpage]: To allow user to continue browsing the
filtered webpage. After the website is filtered, it displays a link and allows the user to ignore the
risk and continue browsing.
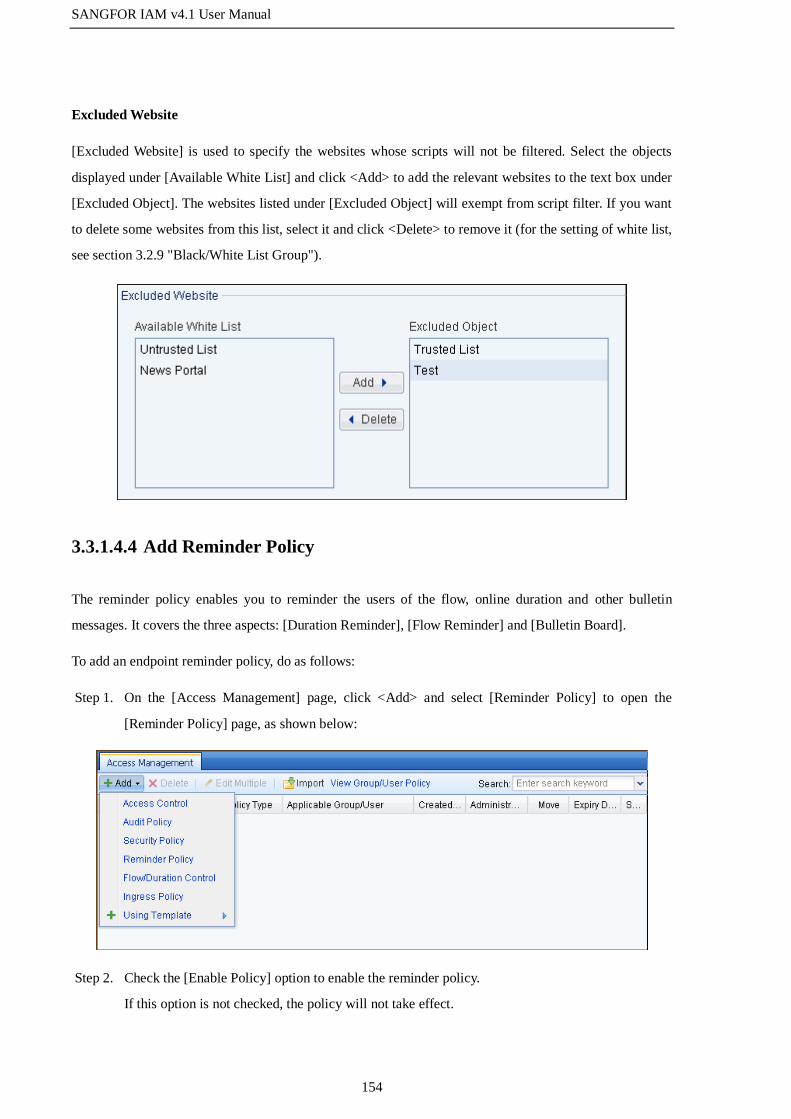
SANGFOR IAM v4.1 User Manual
154
Excluded Website
[Excluded Website] is used to specify the websites whose scripts will not be filtered. Select the objects
displayed under [Available White List] and click <Add> to add the relevant websites to the text box under
[Excluded Object]. The websites listed under [Excluded Object] will exempt from script filter. If you want
to delete some websites from this list, select it and click <Delete> to remove it (for the setting of white list,
see section 3.2.9 "Black/White List Group").
3.3.1.4.4 Add Reminder Policy
The reminder policy enables you to reminder the users of the flow, online duration and other bulletin
messages. It covers the three aspects: [Duration Reminder], [Flow Reminder] and [Bulletin Board].
To add an endpoint reminder policy, do as follows:
Step 1. On the [Access Management] page, click <Add> and select [Reminder Policy] to open the
[Reminder Policy] page, as shown below:
Step 2. Check the [Enable Policy] option to enable the reminder policy.
If this option is not checked, the policy will not take effect.

SANGFOR IAM v4.1 User Manual
155
Step 3. Type the policy name and description. [Policy Name] is the unique identifier of the policy, which
must be entered and unique. [Description] refers to descriptive information of the policy, which is
optional.
Step 4. Open the [Policy Settings] tab and set the reminder policy according to your needs. First, select
the reminder type under [Reminder Policy] on the left pane and then configure the policy on the
right pane. The reminder policy covers the following three modules: [Duration Reminder], [Flow
Reminder] and [Bulletin Board] (for detailed settings of the modules, see the subsequent
sections).
Step 5. Open the [Group/User] tab to select the applicable user/group. The user groups or users selected
on this tab will be associated with this reminder policy.
Step 6. Go to the [Advanced] tab and set advanced options, including [Expiry Date], [Same-Role
Administrator Privilege] and [Allow administrator of lower role to view].
Online Duration Reminder
[Duration Reminder] enables you to set the online duration reminder, including the following four
configuration items:
[Schedule]: To specify the valid period in which the online duration of selected applications will
be detected and calculated. If it is not in the time period set here, the online duration will not be
detected.
[Online Duration Threshold]: To specify the online duration threshold that triggers the reminder.
When the online duration of selected applications reaches the threshold set here, the system will
gives a reminder. The value range is 0 to 1440 minutes. When you enter 0 here, it means the

SANGFOR IAM v4.1 User Manual
156
system will remind the user immediately.
[Reminder Interval]: To set the interval for reminding. The value range is 0 to 1440 minutes.
After the reminder, the system will detect if the selected application is still online. If yes, the
system will remind the user again after the interval set here. When you enter 0 here, it means the
system will remind the user only once.
[Application]: To select the applications whose online duration will be detected and calculated.
Case Study: Suppose you need to create a policy that reminds user of the online duration when the
duration that the user plays games reaches 180 minutes during office hours and reminds user again every
30 minutes.
To meet the requirements, do as follows:
Step 1. Check [Duration Reminder] on the left pane to open the [Duration Reminder] page on the right,
as shown below:
Step 2. Set [Schedule] to Office Hours (the schedules listed here are predefined on the [Objects] >
[Schedule] page, see section 3.2.8 "Schedule").
Step 3. Enter 180 in the [Online Duration Threshold] text box and 30 in the [Reminder Interval] text box,
as shown below:

SANGFOR IAM v4.1 User Manual
157
Step 4. Click the [Please Select] link to select the [Game] item on the displayed [Select Application] page
and click <OK>. Here, when multiple applications are selected, the overlapped online duration of
applications will be counted only once.
Step 5. Click <Commit> to save this policy.
1. The reminder is realized by returning a webpage to the client; therefore, the reminder page appears
only when the users are accessing website.
2. You can modify the reminder page on the [System] > [Custom Prompt Page] page. For detailed
settings, see section 3.9.8 "Custom Prompt Page".

SANGFOR IAM v4.1 User Manual
158
Flow Reminder
[Flow Reminder] enables you to set the flow reminder, including the following configuration items:
[Schedule]: To specify the valid period in which the flow of selected applications will be
detected and calculated. If it is not in the time period set here, the flow will not be detected.
[Reminder Interval]: To set the interval for reminding. The value range is 0 to 60 minutes. After
the reminder interval, the system will calculate the average flow speed again. If it still exceeds
the threshold, the system will remind the user again. When you enter 0 here, it means the system
will remind the user only once.
[Flow Direction]: To select the type of flow to be calculated. There are three options: uplink flow,
downlink flow and total flow.
[Flow Statistics Period]: To set the time period in which the flow will be calculated. The value
range is 0 to 60 minutes.
[Average Flow Speed Threshold]: To specify the flow speed threshold that triggers the reminder.
The unit can be Kbps or Mbps, and the value range is 0-1048576Kbps. When you enter 0 here, it
means the system will remind the user immediately once the flow of selected applications is
detected.
[Application]: Indicates the application whose flow will be detected and calculated.
Case Study: Suppose you need to create a policy that reminds user of the flow speed when the flow speed
of downloading reaches 200kbps during the whole day and reminds the user again every 10 minutes.
To meet the requirements, do as follows:
Step 1. Check [Flow Reminder] on the left pane to open the [Flow Reminder] page on the right, as shown
below:

SANGFOR IAM v4.1 User Manual
159
Step 2. Set [Schedule] to All Day (the schedules listed here are predefined on the [Objects] > [Schedule]
page, see section 3.2.8 "Schedule"), and enter 10 in the [Reminder Interval] text box, as shown
below:
Step 3. Select [Downlink flow] from the [Flow Direction] drop-down list, enter 10 in the [Flow Statistics
Period] text box and 200 in the [Average Flow Speed Threshold] text box, as shown below:
Step 4. Click the [Please Select] link to select the [Download Tools] item on the displayed [Select
Application] page and click <OK>.

SANGFOR IAM v4.1 User Manual
160
Step 5. Click <Commit> to save this policy.
1. The reminder is realized by returning a webpage to the client; therefore, the reminder page appears
only when the users are accessing website.
2. You can modify the reminder page on the [System] > [Custom Prompt Page] page. For detailed
settings, see section 3.9.8 "Custom Prompt Page".
Bulletin Board
[Bulletin Board] is used to pop up pages when users are accessing the Internet. The configuration covers
the following three items:
[Redirection Interval]: To set the time interval after which the bulletin board will pop up. The
value range is 1 to 1440 minutes. When the users associated with this policy are accessing the
Internet, the system will display the bulletin board periodically after the internal.
[Use internal bulletin board]: To use the built-in bulletin. For detailed settings, see section 3.9.8
"Custom Prompt Page".
[Use external bulletin board]: To define the URL of bulletin board by yourself. The system will

SANGFOR IAM v4.1 User Manual
161
link to the bulletin page corresponding to the URL.
3.3.1.4.5 Add Flow Quota/Duration Control Policy
To add a flow quota/online duration control policy, do as follows:
Step 1. On the [Access Management] page, click <Add> and select [Flow Quota/Duration Control Policy]
to open the [Flow Quota/Duration Control Policy] page, as shown below:
Step 2. Check the [Enable Policy] option to enable the flow quota/duration control policy.
If this option is not checked, the policy will not take effect.

SANGFOR IAM v4.1 User Manual
162
Step 3. Type the policy name and description. [Policy Name] is the unique identifier of the policy, which
must be entered and unique. [Description] refers to descriptive information of the policy, which is
optional.
Step 4. Open the [Policy Settings] tab and set the flow quota/duration control policy according to your
needs. First, select the function type under [Flow Quota/Duration Control Policy] on the left pane
and then configure the policy on the right pane. The flow quota/duration control policy covers the
following three modules: [Flow Quota], [Duration Control] and [Sessions Control] (for detailed
settings of the modules, see the subsequent sections).
Step 5. Open the [Group/User] tab to select the applicable user/group. The user groups or users selected
on this tab will be associated with this flow quota/duration control policy.
Step 6. Go to the [Advanced] tab and set advanced options, including [Expiry Date], [Same-Role
Administrator Privilege] and [Allow administrator of lower role to view].
Flow Quota
[Flow Quota] enables you to limit the daily or monthly flow of a single user when the user is accessing the
Internet through the IAM device. When the flow of a user in a specified time period exceeds the flow quota
set here, the user will be blocked from accessing the Internet. It covers the following configuration items:
[Start Date of Month]: To specify the start day of a month from which the flow will be calculated.
For instance, if you enter 3 here, it means the period counts from the 3rd day of current month to
the 3rd day of next month and the flow quota will be cleared and allocated again on the 3rd day of
every month. This option is a global setting, which means once the start day of a month is set in
one policy, it will be adopted by other [Flow Quota] policies.

SANGFOR IAM v4.1 User Manual
163
[Monthly Flow Quota Per User]: To limit the total flow allocated to each user every month. The
flow quota here refers to the total of uplink flow and downlink flow.
[Daily Flow Quota Per User]: To limit the total flow allocated to each user every day. The flow
quota here refers to the total of uplink flow and downlink flow.
Online Duration Control
[Duration Control] enables you to limit the online duration of a single user in a specified time period.
When the online duration of a user in a specified time period exceeds the limit set here, the user will be
blocked from accessing the Internet.
To enable online duration control, first, you need to check the [Enable Online Duration Control] option. It
is the master switch of the online duration control function. Then set the following configuration items:
[Schedule]: To specify the valid period in which the online duration will be calculated. Only in
this period will the online duration be calculated.
[Max Online Duration]: To specify the maximum online duration allowed. The maximum value
is 1440 minutes.
[Excluded Port]: To set the ports that will be exempt from online duration control, that is, the
online duration of the ports typed here will be not controlled. Type one port per row. You can
type up to 20 ports.

SANGFOR IAM v4.1 User Manual
164
Concurrent Sessions Control
[Sessions Control] enables you to limit the number of concurrent sessions of a single user when the user is
accessing the Internet through the IAM device. When the limit set here is reached, the redundant
connections will be discarded. This function restricts users from using scanning tools or the tools that may
establish a large number of connections simultaneously, such as P2P and therefore decreases the chances
that the viruses may spread widely by scanning computers to build massive connections.
To enable concurrent sessions control, first, you need to check the [Limit Concurrent Sessions Per User]
option and then type the maximum number of concurrent sessions allowed in the text box of [Max
Concurrent Sessions]. The maximum value is 65535 sessions.
3.3.1.4.6 Add Ingress Policy
[Ingress Policy] checks the operating system, process, file, registry or other information of the computers
in the local area network by means of the ingress program installed at client end. Besides, it can be used to
audit chat logs of encrypted IM tools. When the ingress system is enabled, the user computers should
satisfy corresponding conditions before they are allowed to connect to the Internet.
To add an ingress policy, do as follows:
Step 1. On the [Access Management] page, click <Add> and select [Ingress Policy] to open the [Ingress

SANGFOR IAM v4.1 User Manual
165
Policy] page, as shown below:
Step 2. Check the [Enable Policy] option to enable the ingress policy.
If this option is not checked, the policy will not take effect.
Step 3. Type the policy name and description. [Policy Name] is the unique identifier of the policy, which
must be entered and unique. [Description] refers to descriptive information of the policy, which is
optional.
Step 4. Open the [Policy Settings] tab and set the ingress policy according to your needs. First, select the
function type under [Ingress Policy] on the left pane and then configure the policy on the right
pane. The ingress policy covers the following two modules: [Ingress Policy] and [Illegal Gateway
Detect] (for detailed settings of the modules, see the subsequent sections).
Step 5. Open the [Group/User] tab to select the applicable user/group. The user groups or users selected
on this tab will be associated with this ingress policy.
Step 6. Go to the [Advanced] tab and set advanced options, including [Expiry Date], [Same-Role
Administrator Privilege] and [Allow administrator of lower role to view].

SANGFOR IAM v4.1 User Manual
166
Ingress Policy
Case Study: Suppose you need to create a policy that monitors the chat logs of users by QQ (instant
messaging tool).
To meet the requirements, do as follows:
Step 1. Check the [Ingress Policy] option on the left and click <Add> on the right, as shown below:
Step 2. Click [Type] to IM Monitor and [Schedule] to All Day.
Step 3. Click <OK> to save the ingress policy.
1. For the setting of [Type], see section 3.2.5 "Ingress Rule Library".
2. The users associated with the ingress policy need to install the ingress program on their computers
and cannot connect to the Internet before the ingress program is successfully installed. When they
access the Internet for the first time, the IAM device will automatically redirect their browsers to the
installation of ingress client.
Illegal Gateway Detection
[Illegal Gateway Detect] checks if the gateway address configured on the LAN computers is legal by
means of the ingress program installed at client end. If the users access the Internet through an illegal
gateway, that is, the gateway not allowed by the IAM device, the IAM device will record it in Data Center.
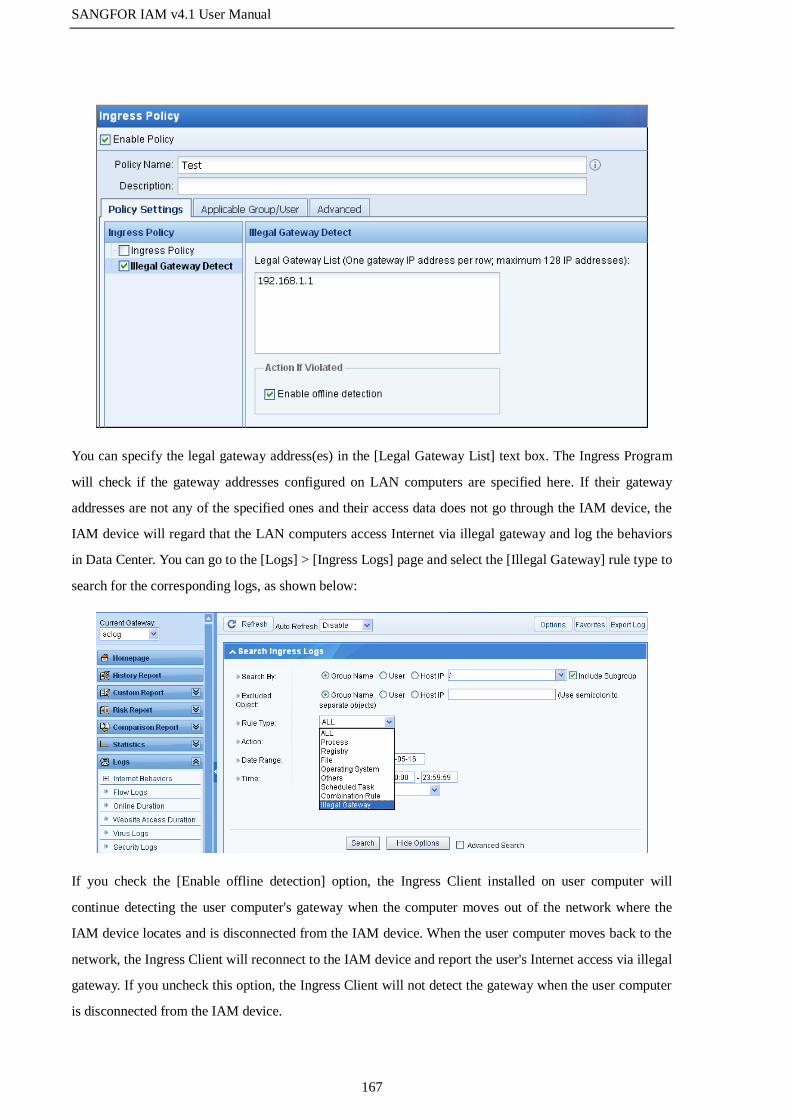
SANGFOR IAM v4.1 User Manual
167
You can specify the legal gateway address(es) in the [Legal Gateway List] text box. The Ingress Program
will check if the gateway addresses configured on LAN computers are specified here. If their gateway
addresses are not any of the specified ones and their access data does not go through the IAM device, the
IAM device will regard that the LAN computers access Internet via illegal gateway and log the behaviors
in Data Center. You can go to the [Logs] > [Ingress Logs] page and select the [Illegal Gateway] rule type to
search for the corresponding logs, as shown below:
If you check the [Enable offline detection] option, the Ingress Client installed on user computer will
continue detecting the user computer's gateway when the computer moves out of the network where the
IAM device locates and is disconnected from the IAM device. When the user computer moves back to the
network, the Ingress Client will reconnect to the IAM device and report the user's Internet access via illegal
gateway. If you uncheck this option, the Ingress Client will not detect the gateway when the user computer
is disconnected from the IAM device.

SANGFOR IAM v4.1 User Manual
168
3.3.1.5 Add Policy Using Template
You can use a policy already defined or a built-in policy as template to add policy. The settings of a policy
added in this way are the same as those of the template it uses. This is a convenient way to add similar
access management policies. The built-in templates are as shown in the following figure:
For example, if you use the [_Audit Behaviors & Contents] policy as template to add a policy, all the
policies settings of the template will be copied to this policy. You can modify the following configuration
items: [Policy Name], [Description], [Policy Settings], [Group/User] and [Advanced].

SANGFOR IAM v4.1 User Manual
169
If the [Allow administrator of lower role to view] option on the [Advanced] tab is not checked, the
administrator of lower role cannot use this policy as template to add policy.
3.3.1.6 Delete Policy
You can delete the access management policies already configured on the [Access Management] page.
After the deletion, the policies will be permanently deleted and the users/groups referencing these policies
will automatically cancel the association with them.
To delete one or several access management policies, do as follows:
Step 1. Select the policies you want to delete, as shown below:
Step 2. Click the <Delete> button and then click <Yes> to confirm the deletion.
After the policies are deleted, the Web Console will pop up a message to prompt the operation
result, as shown below:

SANGFOR IAM v4.1 User Manual
170
An administrator of higher role can delete the policies created by administrators of lower role when
its administrative scope covers that of the latter. An administrator can delete the policies created by
another same-role administrator on the condition that its administrative scope cover that of latter and
the [Allow to edit] option is selected (on [Advanced] tab) in the policies.
3.3.1.7 Edit Multiple Policies
You can edit multiple access management policies at a time. When editing multiple policies simultaneously,
you can only edit the [Group/User] option. This is very convenient if you need to edit all the policies
associated with a specific user/group.
To edit multiple policies simultaneously, do as follows:
Step 1. Select the access management policies you want to edit simultaneously, as shown below:
Step 2. Click the <Edit Multiple> button to open the page for batch editing, as shown below:
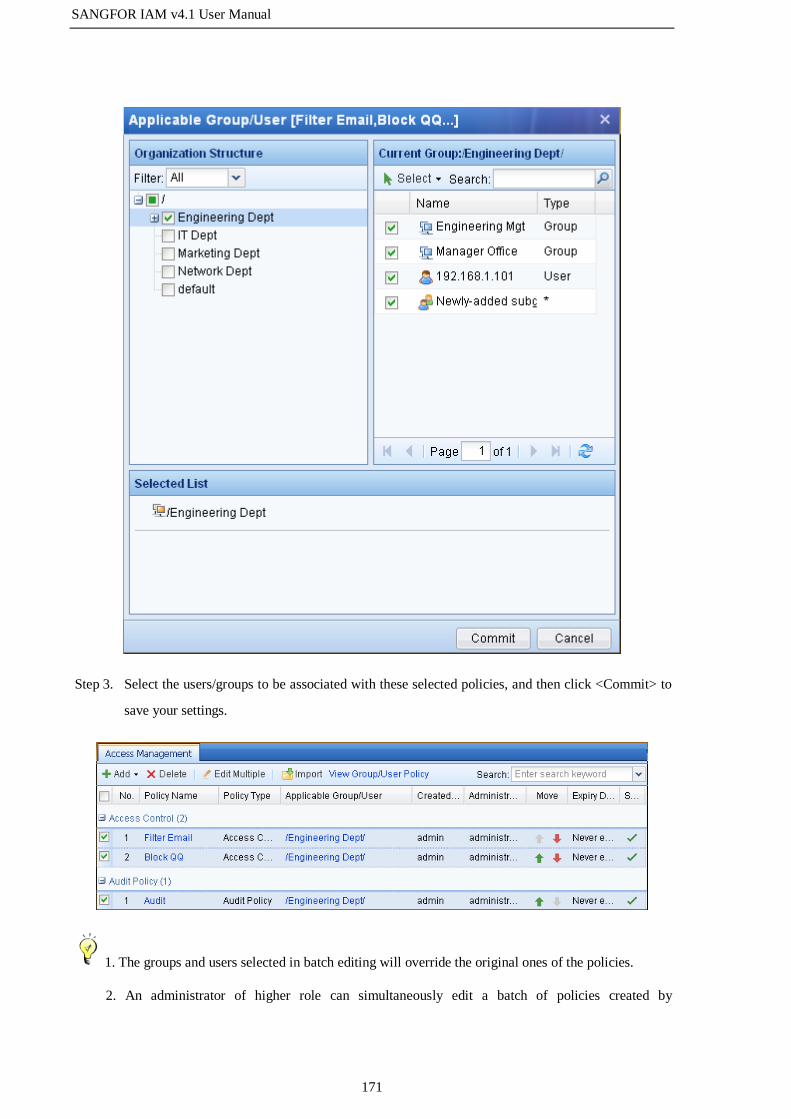
SANGFOR IAM v4.1 User Manual
171
Step 3. Select the users/groups to be associated with these selected policies, and then click <Commit> to
save your settings.
1. The groups and users selected in batch editing will override the original ones of the policies.
2. An administrator of higher role can simultaneously edit a batch of policies created by
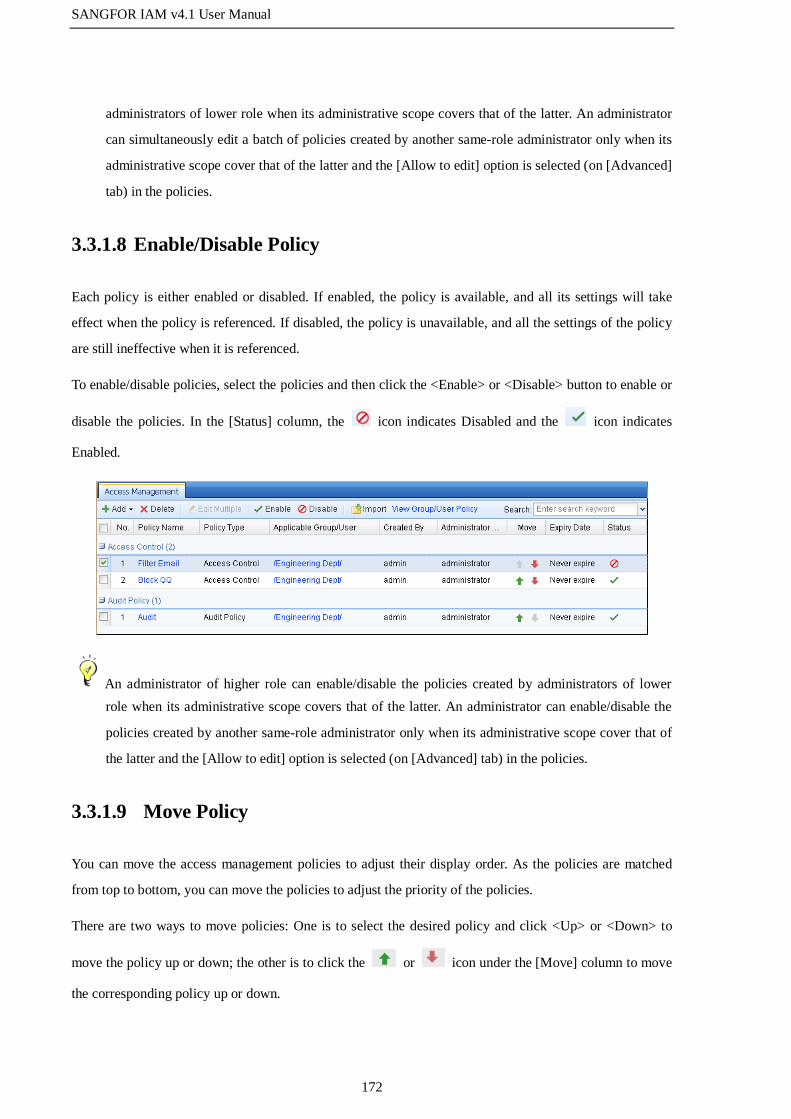
SANGFOR IAM v4.1 User Manual
172
administrators of lower role when its administrative scope covers that of the latter. An administrator
can simultaneously edit a batch of policies created by another same-role administrator only when its
administrative scope cover that of the latter and the [Allow to edit] option is selected (on [Advanced]
tab) in the policies.
3.3.1.8 Enable/Disable Policy
Each policy is either enabled or disabled. If enabled, the policy is available, and all its settings will take
effect when the policy is referenced. If disabled, the policy is unavailable, and all the settings of the policy
are still ineffective when it is referenced.
To enable/disable policies, select the policies and then click the <Enable> or <Disable> button to enable or
disable the policies. In the [Status] column, the icon indicates Disabled and the icon indicates
Enabled.
An administrator of higher role can enable/disable the policies created by administrators of lower
role when its administrative scope covers that of the latter. An administrator can enable/disable the
policies created by another same-role administrator only when its administrative scope cover that of
the latter and the [Allow to edit] option is selected (on [Advanced] tab) in the policies.
3.3.1.9 Move Policy
You can move the access management policies to adjust their display order. As the policies are matched
from top to bottom, you can move the policies to adjust the priority of the policies.
There are two ways to move policies: One is to select the desired policy and click <Up> or <Down> to
move the policy up or down; the other is to click the or icon under the [Move] column to move
the corresponding policy up or down.

SANGFOR IAM v4.1 User Manual
173
1. When the policies here are moved, the policies on the [User Management] > [Group/User] >
[Policy List] page will be moved accordingly.
2. The moving operation among policies created by administrators of different roles cannot be
performed randomly. The priority of the policies should conform to the priority of administrators
creating them. The moving operation among policies created by administrators of the same role can
be performed.
3. An administrator of higher role can move the policies created by administrators of lower role
when its administrative scope covers that of the latter. An administrator can move the policies
created by another same-role administrator only when its administrative scope cover that of the latter
and the [Allow to edit] option is selected (on [Advanced] tab) in the policies.
3.3.1.10 Import/Export Policy
The [Import/Export] function enables you to back up the policies already configured on the IAM device
and import them when they are needed. If there are several IAM devices of the same version that require
the same policy configurations, you just need to configure the policies on one of the IAM devices and then
import the policy configurations into other devices, without the need to configure them repeatedly.
To export access management policies, select one or several access management policies, click the
<Export> button to export them, as shown below, and then save the exported policies to your desired
location.
To import access management policies, click the <Import> button and select the policies you want to
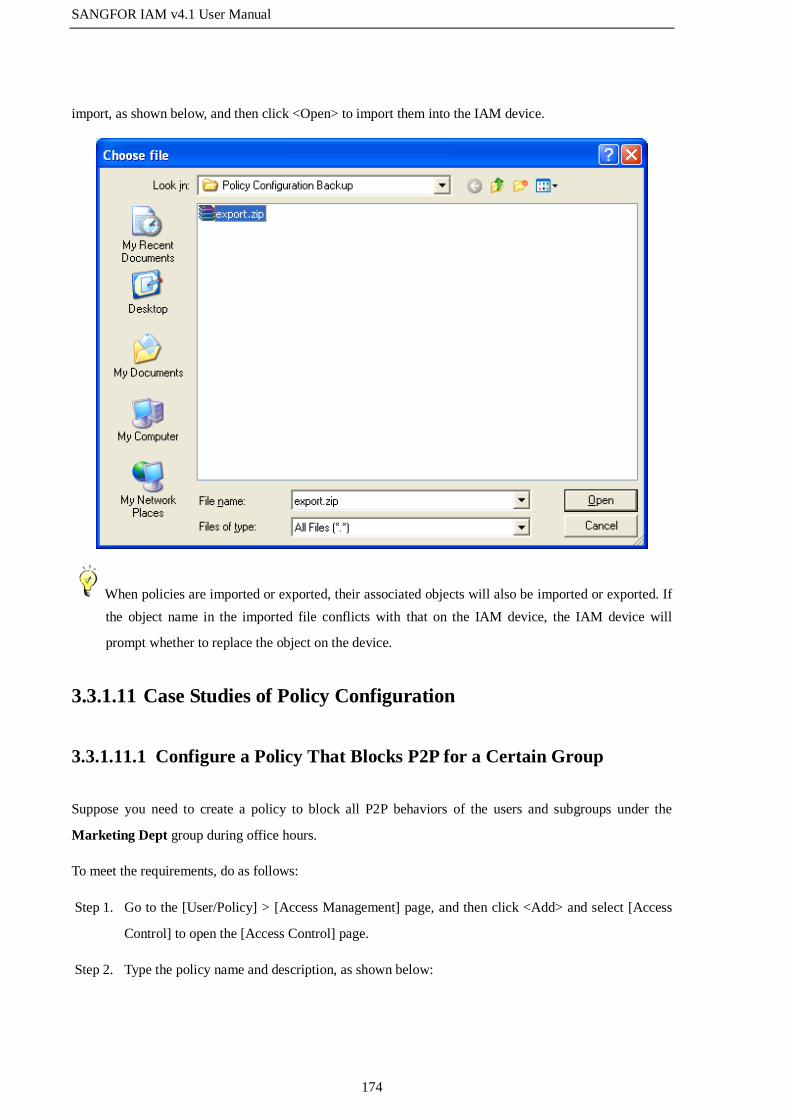
SANGFOR IAM v4.1 User Manual
174
import, as shown below, and then click <Open> to import them into the IAM device.
When policies are imported or exported, their associated objects will also be imported or exported. If
the object name in the imported file conflicts with that on the IAM device, the IAM device will
prompt whether to replace the object on the device.
3.3.1.11 Case Studies of Policy Configuration
3.3.1.11.1 Configure a Policy That Blocks P2P for a Certain Group
Suppose you need to create a policy to block all P2P behaviors of the users and subgroups under the
Marketing Dept group during office hours.
To meet the requirements, do as follows:
Step 1. Go to the [User/Policy] > [Access Management] page, and then click <Add> and select [Access
Control] to open the [Access Control] page.
Step 2. Type the policy name and description, as shown below:

SANGFOR IAM v4.1 User Manual
175
Step 3. Go to the [Policy Settings] page, click [App Control] on the left pane to open the [App Control]
page on the right and then click <Add>, as shown below:
Step 4. Click the icon to open the [Select Application] page, as shown below:
Step 5. Type P2P in the text box and press Enter on your keyboard or click the icon to search for
all the applications related to P2P. Then check the applications displayed, as shown below:
Step 6. Click <OK> to return to the [App Control] page, set [Schedule] to Office Hours and [Action] to
Deny, and then click <OK> to save your settings.

SANGFOR IAM v4.1 User Manual
176
Step 7. Go to the [Group/User] page, select the Marketing Dept group and check all the users and
subgroups under it, as shown below:
Step 8. Click <Commit> to save the policy.
3.3.1.11.2 Configure a Policy That Monitors IM for a Certain Group
Suppose you need to create a policy to apply to the Marketing Dept and Engineering Dept groups with
the following purposes:
Monitor the chat logs of all IM tools, including encrypted QQ chat logs
Record all the chat logs in Data Center
To meet the requirements, do as follows:
Step 1. Open the [User/Policy] > [Access Management] page.
Step 2. Create an audit policy to record all the chat logs.
a. Click <Add> and select [Audit Policy] to open the [Audit Policy] page, and then type the policy
name and description, as shown below:

SANGFOR IAM v4.1 User Manual
177
b. Go to the [Policy Settings] page, click [App Audit] on the left pane to open the [App Audit] page
and then click <Add>, as shown below:
c. Click the icon to open the [Select Audit Object] page and select all the options under [IM
Chat Logs] section, as shown below:
d. Click <OK> to save your settings.
e. Go to the [Group/User] page, and select the Marketing Dept and Engineering Dept groups, as

SANGFOR IAM v4.1 User Manual
178
shown below:
Step 3. Click <Commit> to save the audit policy.
Step 4. Create an ingress policy to monitor the chat logs of all IM tools, including encrypted QQ chat
logs.
a. On the [Access Management] page, click <Add> and select [Ingress Policy] to open the [Ingress
Policy] page, and then type the policy name and description, as shown below:
b. Set [Type] to IM Monitor and [Schedule] to All Day
c. Go to the [Group/User] page, and select the Marketing Dept and Engineering Dept user groups,

SANGFOR IAM v4.1 User Manual
179
as shown below:
d. Click <Commit> to save the ingress policy.
Step 5. After the above two policies are configured, the users in the Marketing Dept or Engineering
Dept groups will be required to install the Ingress Client before connecting to Internet. When
they are connecting to the Internet, the following prompt page will pop up, as shown below:
To install the Ingress Client, the users must log in as administrators of their computers. The users
cannot connect to the Internet until the Ingress Client is installed on their computers.
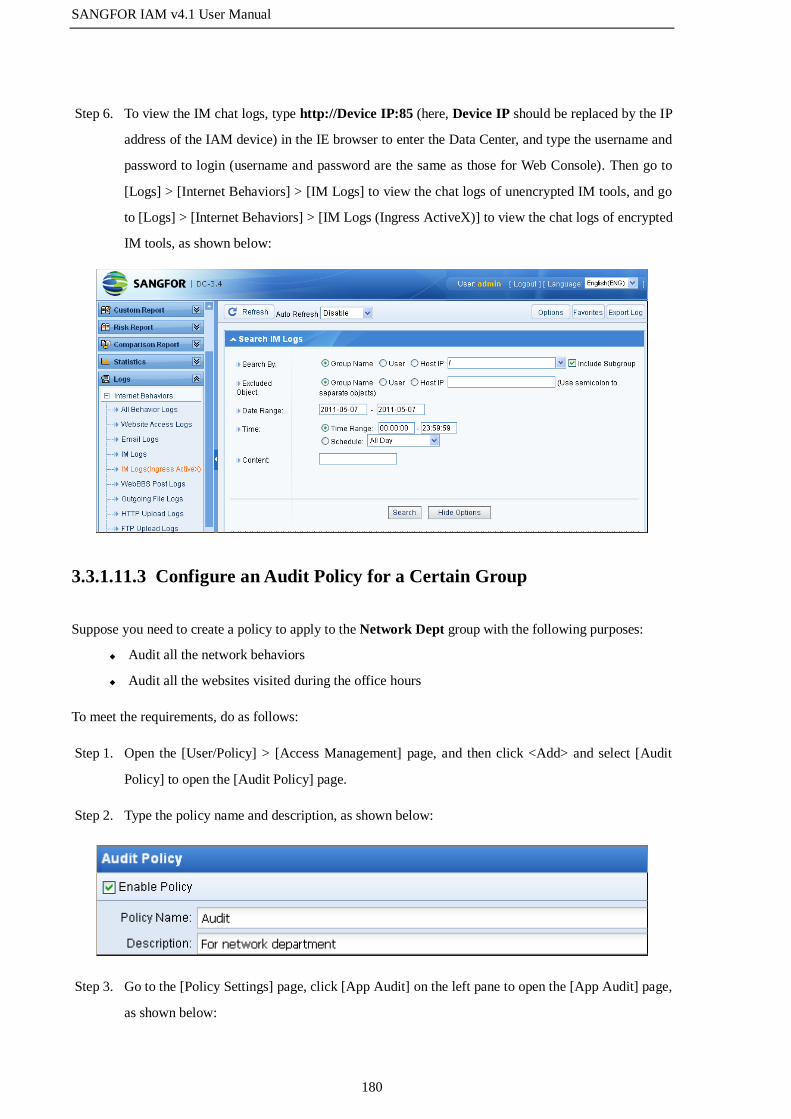
SANGFOR IAM v4.1 User Manual
180
Step 6. To view the IM chat logs, type http://Device IP:85 (here, Device IP should be replaced by the IP
address of the IAM device) in the IE browser to enter the Data Center, and type the username and
password to login (username and password are the same as those for Web Console). Then go to
[Logs] > [Internet Behaviors] > [IM Logs] to view the chat logs of unencrypted IM tools, and go
to [Logs] > [Internet Behaviors] > [IM Logs (Ingress ActiveX)] to view the chat logs of encrypted
IM tools, as shown below:
3.3.1.11.3 Configure an Audit Policy for a Certain Group
Suppose you need to create a policy to apply to the Network Dept group with the following purposes:
Audit all the network behaviors
Audit all the websites visited during the office hours
To meet the requirements, do as follows:
Step 1. Open the [User/Policy] > [Access Management] page, and then click <Add> and select [Audit
Policy] to open the [Audit Policy] page.
Step 2. Type the policy name and description, as shown below:
Step 3. Go to the [Policy Settings] page, click [App Audit] on the left pane to open the [App Audit] page,
as shown below:

SANGFOR IAM v4.1 User Manual
181
Step 4. Add an application audit rule to audit all the visited websites in office hours.
a. Click <Add> and then click the icon to open the [Select Audit Object] page.
b. Click the [URL/Filename] section, and then check the [Visited URL] and [All URLs] options, as
shown below:
c. Click <OK> to return to the [App Audit] page. Then set [Schedule] to Office Hours and click
<OK> to save to the application audit rule.
Step 5. Add another application audit rule to audit all network application behaviors.
a. Click <Add> and then click the icon to open the [Select Audit Object] page.
b. Click the [Application Behavior] section, and then check the [All identified application behaviors]
option, as shown below:

SANGFOR IAM v4.1 User Manual
182
c. Click <OK> to return to the [App Audit] page. Then set [Schedule] to All Day and click <OK>
to save to the application audit rule.
Step 6. Go to the [Group/User] page, and select the Network Dept group, as shown below:

SANGFOR IAM v4.1 User Manual
183
Step 7. Click <Commit> to save the policy.
3.3.2 User Management
3.3.2.1 Overview
The users managed by the IAM device are end users who access the Internet through the IAM device;
therefore, the users are the basic units to be allocated with network access privileges. The administrators
can manage users and their privileges through the [Group/ User] page.
3.3.2.2 Principle
3.3.2.2.1 User Authentication Methods
The traditional network devices implement management based on IP addresses, while the IAM device
conducts management based on users, which is more intuitive and accurate than that based on IP addresses.
To realize the user-based management, the IAM device need know who the user of a certain IP address is
at a certain moment and therefore authenticate the user when it accesses the Internet.
The IAM device provides four types of authentication, as described in the following sections:

SANGFOR IAM v4.1 User Manual
184
Username/Password Authentication
The username/password authentication will redirect the browser to the authentication page and require user
to enter correct username and password before they can connect to the Internet. There are two types of
password authentication: password authenticated on local computer and that on external server.
After the user enters username and password, the device will first check if the username and password are
correct according to the local user list. If it cannot find the user in the local user list and external
authentication server has been configured, the device will try to check the username and password on the
external server.
Only the accounts that have checked the [Local password] option will adopt local password
authentication. If the accounts have not checked the option, their username and password will be sent
to external server for authentication.
SSO Authentication
SSO indicates that if the network already deploys the authentication system, the IAM device will combine
the authentication system to identify the user corresponding to a certain IP address, so that when the user
connects to the Internet, it will not be required to type the username/password again.
At present, the following types of SSO are supported (see section 3.3.3.2.1 "SSO Options"):
Active Directory Domain SSO
Proxy SSO
POP3 SSO
Web SSO
Authentication Based on IP, MAC/Hostname
This authentication identifies users according to the source IP address, MAC address or computer name.
The advantage of this authentication is that the authentication dialogue will not appear to require users to
type username and password, so that the users will not perceive the existence of the IAM device. The
disadvantage is that this authentication cannot identify the specific name of the user and thus cannot locate
the specific user of network behaviors, especially in an environment where addresses are dynamically
allocated. In this situation, policies will fail to implement accurate control on the user.
DKey Authentication
The users adopting DKey authentication need submit the user information saved in DKey to IAM device,
which will then identify the user according to the DKey authentication information. Among the four

SANGFOR IAM v4.1 User Manual
185
authentications, the DKey authentication has the highest priority. If you insert the DKey into a computer
that is already authenticated using other method, the identity of the computer will be changed into DKey
user with the corresponding privileges.
There are two types of DKey: One is authentication DKey; the other is audit-free DKey. The audit-free
DKey has not only the authentication function, but also the privilege to be exempt from being audited by
the IAM device, which means the IAM device will not monitor nor record the behaviors of the audit-free
DKey user.
3.3.2.2.2 User Type
According to the source of user, users can be divided into the following types:
Users found and automatically created by the IAM device
Users created by administrator
Users imported from CSV file
Users imported from external LDAP server
Users imported by scanning LAN computers
According to the authentication methods, users can be divided into the following types:
Users adopting no authentication (bound with IP/MAC)
Users adopting local password authentication
Users adopting external password authentication
Users adopting DKey authentication
Users adopting SSO (combined with external authentication system)
3.3.2.3 Group/User
3.3.2.3.1 View Group/User
To view the information of users and groups that already exist on the IAM device, select the user group
you want to view under [Organization Structure] and the information of the selected group will be
displayed on the [Member and Policy] page on the right. Displayed information includes the group to
which it belongs, description, group information, associated access management policy, etc.
The [Member List] page enables you to view detailed information of the subgroups and users included in a
certain group, such as group to which they belong, access management policy, binding information (IP or
MAC address bound with the user), expiry date (of user), description, status (enabled or disabled), etc. You

SANGFOR IAM v4.1 User Manual
186
can also click the column to filter the information you want to view.
[Select] Function: The [Select] button displayed above the member list is used to quickly select the users or
groups on the current page or all the pages. Click this button and the following page appears:
Search Function: The search function is used to quickly find out the users or groups. Click the button to
select one of the search methods: [Search by Name], [Search by IP] or [Search by MAC], then enter the
corresponding contents in the text box and press Enter on your keyboard.
Advanced Search: The advanced search function is only applicable to users. When you want to set several
conditions to search for a specific user, use the advanced search function. The search conditions include
[Basic Conditions] and [Others]. All the conditions set are of the "AND" relationship, which means all the
conditions must be satisfied at the same time.
[Basic Conditions] includes [Username], [IP] and [MAC]. You can select one of them to specify the
condition, as shown below:
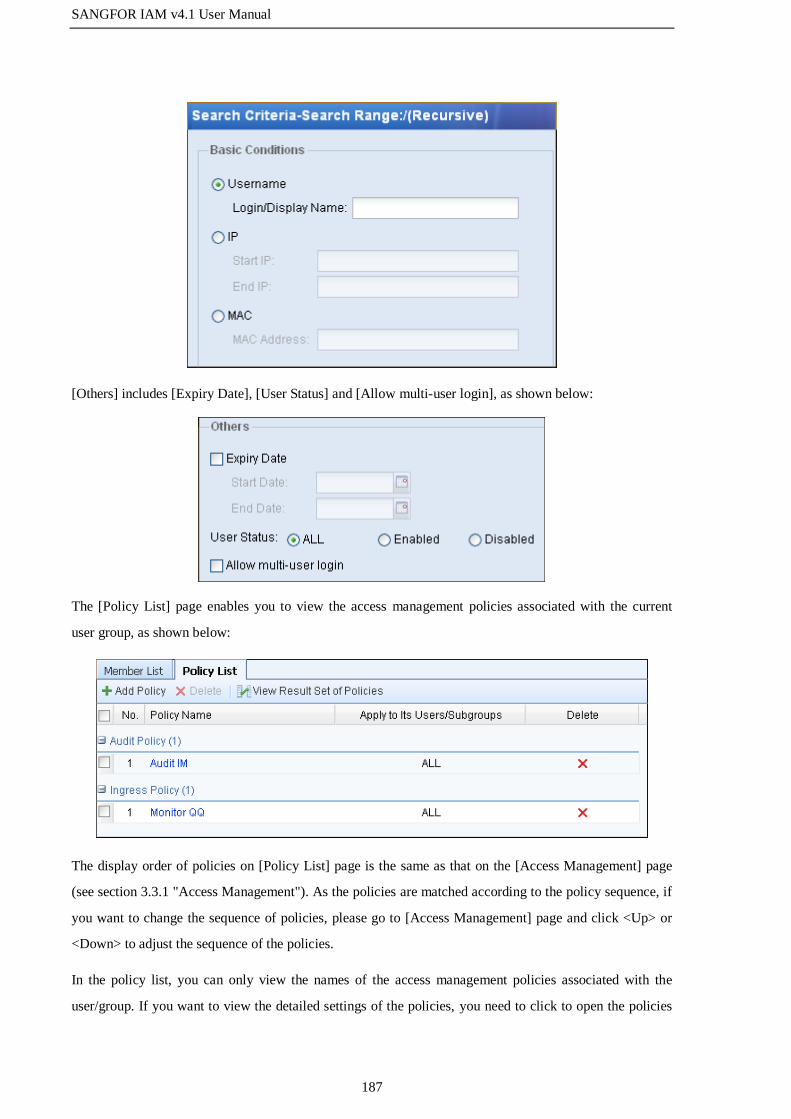
SANGFOR IAM v4.1 User Manual
187
[Others] includes [Expiry Date], [User Status] and [Allow multi-user login], as shown below:
The [Policy List] page enables you to view the access management policies associated with the current
user group, as shown below:
The display order of policies on [Policy List] page is the same as that on the [Access Management] page
(see section 3.3.1 "Access Management"). As the policies are matched according to the policy sequence, if
you want to change the sequence of policies, please go to [Access Management] page and click <Up> or
<Down> to adjust the sequence of the policies.
In the policy list, you can only view the names of the access management policies associated with the
user/group. If you want to view the detailed settings of the policies, you need to click to open the policies

SANGFOR IAM v4.1 User Manual
188
one by one, which is very troublesome. However, the <View Result Set of Policies> button provides a very
convenient way for you to view details of all the policies associated with the user/group. Click the button
to view the policy result set of the group, and all the policies associated with the group will be integrated
and detailed settings will be listed.
Case Study: Suppose you need to generate the policy result set of the Engineering Dept group.
To generate the policy result set, do as follows:
Step 1. Select the Engineering Dept group in the organization structure.
Step 2. Open the [Policy List] tab page to display the policies associated with this group, as shown
below:
Step 3. Click the <View Result Set of Policies> button, and the result set of policies associated with the
Engineering Dept group will be generated, as shown below:

SANGFOR IAM v4.1 User Manual
189
3.3.2.3.2 Add User/Group
Add Subgroup
The default group built in the IAM device is root (root group). The root group cannot be deleted and its
name cannot be modified. All the groups created by administrators are subgroups under the root group. In
order to conform to the organization structure of a company for convenient management, the user groups
are graded in the IAM device: the root group is the first level group, the direct subgroup of the root group
is second level group, and so on.
Case Study: Suppose you need to add a subgroup named Engineers under the root group and associate the
subgroup with the access management policy named Policy For Engineers.
To add the subgroup, do as follows:
Step 1. Select the root group "/" to which you want to add the subgroup under [Organization Structure],
as shown below:
Step 2. Click <Add> and select [Group] on the [Member List] page to open the [Add Group] page. Then
set related information, as shown below:

SANGFOR IAM v4.1 User Manual
190
Step 3. Click <Commit> to save the subgroup, which is then added to the member list, as shown below:
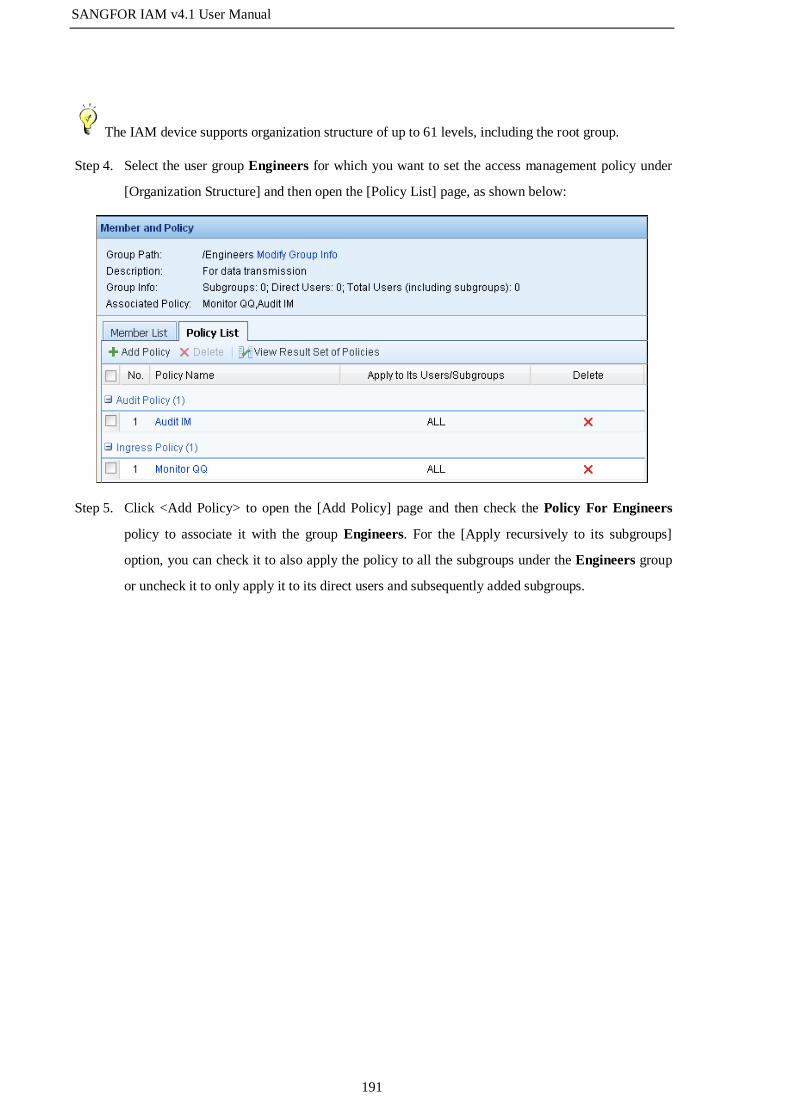
SANGFOR IAM v4.1 User Manual
191
The IAM device supports organization structure of up to 61 levels, including the root group.
Step 4. Select the user group Engineers for which you want to set the access management policy under
[Organization Structure] and then open the [Policy List] page, as shown below:
Step 5. Click <Add Policy> to open the [Add Policy] page and then check the Policy For Engineers
policy to associate it with the group Engineers. For the [Apply recursively to its subgroups]
option, you can check it to also apply the policy to all the subgroups under the Engineers group
or uncheck it to only apply it to its direct users and subsequently added subgroups.

SANGFOR IAM v4.1 User Manual
192
Step 6. Click <Commit> to save the policy, which is then added to the policy list, as shown below:
Add a Single User
You can add a single user or multiple users at a time.
When adding a single user, you can set the user attributes such as username, group to which it belongs,
access management policy, password, binding IP/MAC address, etc. However, you cannot set the
authentication for the user here. The authentication methods of LAN users are configured on [User

SANGFOR IAM v4.1 User Manual
193
Authentication] > [Authentication Policy] page. The IAM device will determine the authentication of user
according to the IP or MAC address configured.
Case Study 1: Suppose the customer has the following requirements:
All the computers on the 192.168.1.0/255.255.255.0 subnet should adopt username/password
authentication.
Add a user named Public Account into the Engineers group and the user should adopt
username/password authentication, unidirectionally bind with the IP range
192.168.1.2-192.168.1.100 (that is, the user can only login from this IP range), and allow
multiple users to login simultaneously.
To meet the requirements, do as follows:
Step 1. To have all the computers on the subnet 192.168.1.0/255.255.255.0 adopt the username/password
authentication, configure an authentication policy for the users.
a. Go to the [User Authentication] > [Authentication Policy] page, click <Add> to open the
[Authentication Policy] page.
b. Type a name for the policy, type 192.168.1.0/255.255.255.0 in the [IP/MAC Range] text box and
check the [Local/external password authentication/SSO] option, as shown below:

SANGFOR IAM v4.1 User Manual
194
c. Click <Commit> to save the authentication policy.
Step 2. Add the user Public Account into the Engineers group.
a. Go to the [User Management] > [Group/User] page, and then select the user group Engineers
under [Organization Structure], as shown below:
b. Click <Add> and select [User] on the [Member List] to open the [Add User] page. Then specify
[Login Name], [Description] and [Display Name], as shown below:

SANGFOR IAM v4.1 User Manual
195
c. On the [User Attribute] tab, check the [Local password] option and enter the password for
authentication, as shown below:
d. To have the user unidirectionally bind the IP range 192.168.1.2-192.168.1.100, check the [Bind
IP/MAC] option, and click the [Binding Mode] link to select [Unidirectional binding of
user/address]. Then check the [Bind IP] option and enter 192.168.1.2-192.168.1.100 in the text
box, as shown below:
e. To have the user account allow multiple users to log in, check the [Allow multi-user login] option,
as shown below:
f. Check the [Display Logout page after successful password authentication] option to display the
Logout page for the user after it logs in. This option is specific to user with the
username/password authentication.

SANGFOR IAM v4.1 User Manual
196
g. Set the expiry date for the user account in [Expiry Date].
Step 3. Add the access management policy for the user. Open the [Policy List] page and click <Add
Policy> to open the [Add Policy] page and then select the policies to be associated with the user.
Step 4. Click <Commit> to save the user.
After the configurations are completed, when any of the users on the subnet 192.168.1.0/255.255.255.0
opens the browser to connect to the Internet, the browser will be redirected to the authentication page of
the IAM device, as shown below:

SANGFOR IAM v4.1 User Manual
197
The users need to enter username and password and then click <Login>. If the username and password are
correct and the IP address satisfies the conditions set, the user will pass the authentication and be allowed
to connect to the Internet. If the username and password are correct, but the login IP address does not fall
within the IP range bound with the user, the user will fail the authentication and the following prompt will
appear:
There are two modes of IP/MAC binding: unidirectional binding and bidirectional binding.
Unidirectional binding indicates that the user can only use the specified address(es) to login, while
the address(es) can also be used by other users. Bidirectional binding indicates that the user can only
use the specified address(es) to login, and the address(es) can only be used by the specified user.
Case Study 2: Suppose the customer has the following requirements:
All of the computers on the 192.168.1.0/255.255.255.0 subnet should adopt username/password
authentication
Add a new user named Engineer Li into the Engineers group and the user should adopt
username/password authentication, and bidirectionally bind with IP/MAC
192.168.1.117/00-1C-25-AC-4C-44 (that is, the user account must use the IP /MAC for

SANGFOR IAM v4.1 User Manual
198
authentication, and other users cannot use it).
To meet the requirements, do as follows:
Step 1. To have all the computers on the subnet 192.168.1.0/255.255.255.0 adopt the username/password
authentication, configure an authentication policy for the users.
a. Go to the [User Authentication] > [Authentication Policy] page, click <Add> to open the
[Authentication Policy] page.
b. Type a name for the policy, type 192.168.1.0/255.255.255.0 in the [IP/MAC Range] text box and
check the [Local/external password authentication/SSO] option, as shown below:
c. Click <Commit> to save the authentication policy.
Step 2. Add the user Engineer Li into the Engineers group.
a. Go to the [User Management] > [Group/User] page, and then select the user group Engineers
under [Organization Structure], as shown below:

SANGFOR IAM v4.1 User Manual
199
b. Click <Add> and select [User] on the [Member List] to open the [Add User] page. Then specify
[Login Name], [Description] and [Display Name], as shown below:
c. On the [User Attribute] tab, check the [Local password] option and enter the password for
authentication, as shown below:
Step 3. To have the user bidirectionally bind the IP/MAC 192.168.1.117/00-1C-25-AC-4C-44, check the
[Bind IP/MAC] option, and click the [Binding Mode] link to select [Bidirectional binding of
user/address]. Then check the [Bind IP/MAC] option and enter
192.168.1.117(00-1C-25-AC-4C-44) in the text box, as shown below:

SANGFOR IAM v4.1 User Manual
200
Step 4. Since the user is bound with only one IP/MAC address, the user account is a private account by
default.
Step 5. Check the [Display Logout page after successful password authentication] option to display the
Logout page for the user after it logs in. This option is specific to user with the
username/password authentication.
Step 6. Set the expiry date for the user account in [Expiry Date].
Step 7. Add the access management policy for the user. Open the [Policy List] page and click <Add
Policy> to open the [Add Policy] page and then select the policies to be associated with the user.
Step 8. Click <Commit> to save the user.

SANGFOR IAM v4.1 User Manual
201
After the configurations are completed, when any of the users on the subnet 192.168.1.0/255.255.255.0
opens the browser to connect to the Internet, the browser will be redirected to the authentication page of
the IAM device.
The user needs to enter username and password and then click <Login>. If the username and password are
correct and the login IP/MAC address is same as that bound with the user, the user will pass the
authentication and be allowed to access the Internet. If the username and password are correct, but the
login IP/MAC address does not match the IP/MAC address bound with the user, the user will fail the
authentication and the following prompt will appear:
If other user uses this IP/MAC address for authentication, the user will also fail the authentication and the
following prompt will appear:

SANGFOR IAM v4.1 User Manual
202
If you have checked the [None/SSO] option for a user on the [User Authentication] > [Authentication
Policy] page, the user can connect to the Internet without typing the username and password. In this
situation, the IAM device identifies the user according to the IP address, MAC address or computer
name. To create a user with no authentication required, the typical configurations are:
1. Select bidirectional binding of user and IP/MAC address when creating the user. Since in
bidirectional binding, user and IP/MAC are biunique, the IAM device can identify the user
according to the IP/MAC address.
2. Go to the [User Authentication] > [Authentication Policy] page, check the [None/SSO] option and
select to take IP, MAC or host name as username. When the user is being authenticated, the IAM
device will match the username according to the IP address, MAC address or host name.
Case Study 3: Suppose you need to add a user named Director into the Engineers group with the
following requirements:
The Director user does not need to be authenticated.
Bidirectionally bind the user with the IP/MAC address 192.168.1.117/00-1C-25-AC-4C-44 of its
computer (that is, the Director user account can be used only on the director's computer).
To meet the requirements, do as follows:
Step 1. Configure an authentication policy for the user.
a. Go to the [User Authentication] > [Authentication Policy] page, click <Add> to open the
[Authentication Policy] page.
b. Type a name for the policy, type 192.168.1.117 in the [IP/MAC Range] text box and check the
[None/SSO] option, as shown below:

SANGFOR IAM v4.1 User Manual
203
c. Click <Commit> to save the authentication policy.
Step 2. Add the user Director into the Engineers group.
a. Go to the [User Management] > [Group/User] page, and then select the user group Engineers
under [Organization Structure], as shown below:
b. Click <Add> and select [User] on the [Member List] to open the [Add User] page. Then specify
[Login Name], [Description] and [Display Name], as shown below:

SANGFOR IAM v4.1 User Manual
204
c. To have the user bidirectionally bind with the IP range IP/MAC
192.168.1.117/00-1C-25-AC-4C-44, check the [Bind IP/MAC] option, and click the [Binding
Mode] link to select [Bidirectional binding of user/address]. Then check the [Bind IP/MAC]
option and enter 192.168.1.117(00-1C-25-AC-4C-44) in the text box, as shown below:
d. Set the expiry date for the user account in [Expiry Date].
Step 3. Add the access management policy for the user. Open the [Policy List] page and click <Add
Policy> to open the [Add Policy] page and then select the policies to be associated with the user.
Step 4. Click <Commit> to save the user.

SANGFOR IAM v4.1 User Manual
205
After the configurations are completed, when the Director user connects to the Internet through the IAM
device, the IAM device will verify if the IP/MAC address of the user matches that bound with the user. If
yes, the Director user will pass the authentication directly and connect to the Internet successfully with no
authentication page displayed. If not, the Director user will fail the authentication. In this case, the user
can connect to the Internet with no prompt page displayed to notify the user.
The SANGFOR DKey saves the user information for authentication and the user can use the DKey
to pass the authentication. DKey authentication has the highest priority, which means once a user
logs into the computer using DKey, the computer will access the Internet using the privileges of the
DKey user even if it is authenticated using any other authentication method. When configuring other
authentication methods for user, you need to go to the [User Authentication] > [Authentication
Policy] to add a corresponding authentication policy; however, to configure DKey authentication for
user, you can configure it when creating the user on the [Group/User] page.
Case Study 4: Suppose you need to create a user who adopts DKey authentication and show the login
process of the DKey user.
To meet the requirements: do as follows:
Step 1. Select the user group to which you want to add the user under [Organization Structure], and the
[Member List] on the right displays the member information of the group.
Step 2. Click <Add> and select [User] on the [Member List] to open the [Add User] page. Then specify
[Login Name], [Description] and [Display Name], as shown below:
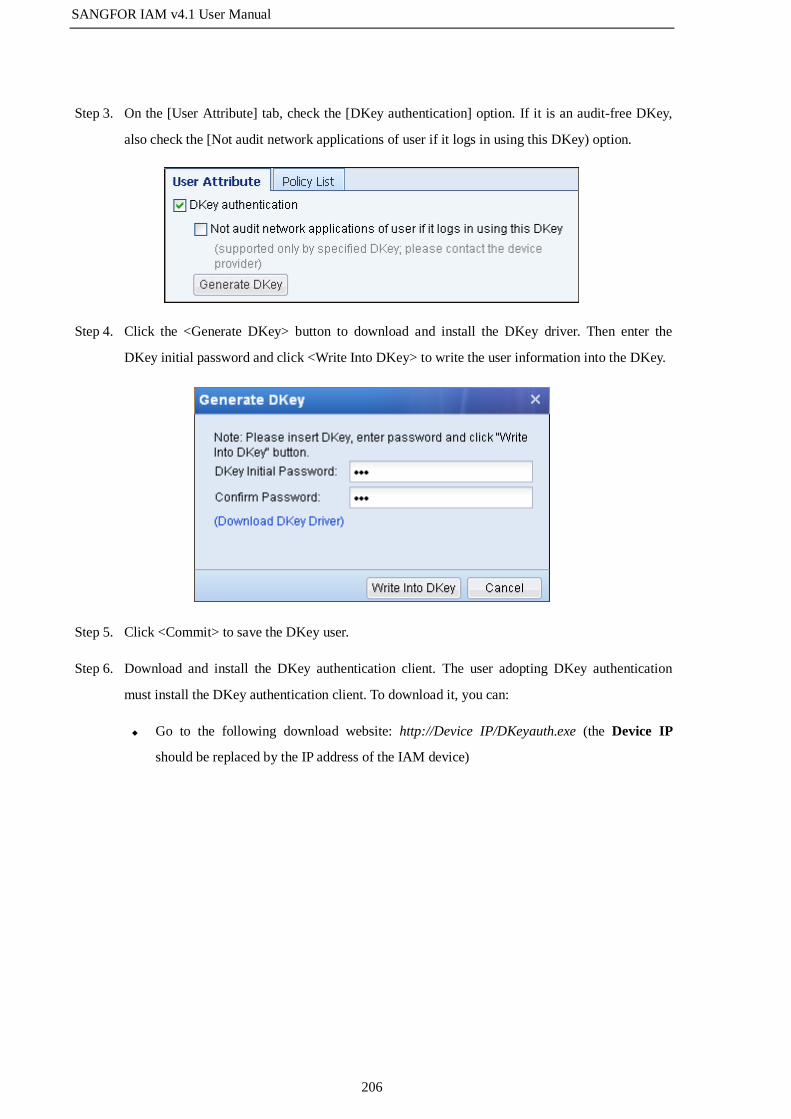
SANGFOR IAM v4.1 User Manual
206
Step 3. On the [User Attribute] tab, check the [DKey authentication] option. If it is an audit-free DKey,
also check the [Not audit network applications of user if it logs in using this DKey) option.
Step 4. Click the <Generate DKey> button to download and install the DKey driver. Then enter the
DKey initial password and click <Write Into DKey> to write the user information into the DKey.
Step 5. Click <Commit> to save the DKey user.
Step 6. Download and install the DKey authentication client. The user adopting DKey authentication
must install the DKey authentication client. To download it, you can:
Go to the following download website: http://Device IP/DKeyauth.exe (the Device IP
should be replaced by the IP address of the IAM device)
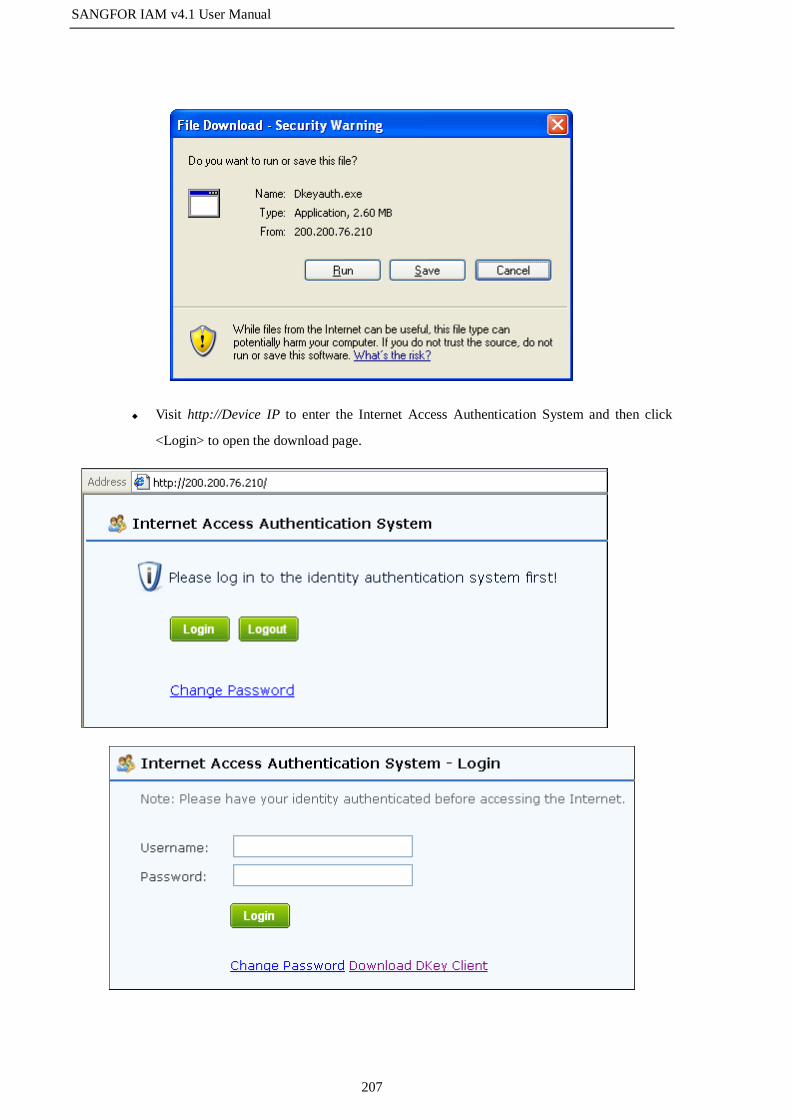
SANGFOR IAM v4.1 User Manual
207
Visit http://Device IP to enter the Internet Access Authentication System and then click
<Login> to open the download page.

SANGFOR IAM v4.1 User Manual
208
Step 7. After the DKey authentication client is installed, when the DKey user starts the computer, a
dialogue will appear for the user to enter DKey password, as shown in the following figure. If the
[Save Password] option is checked, the user will automatically login after inserting the DKey into
the computer without the need to enter the password again.
Step 8. Click <Login> to get authenticated. If the password is correct, the DKey user will pass the
authentication and a prompt indicating the authentication success will pop up at the lower corner
of the computer.
Step 9. After the DKey user logs in, the login status of the DKey user is as shown below:
Add Multiple Users
The [Add Multiple Users] is used to add several users simultaneously. Different from [Add User], the user
attributes [DKey authentication] and [Bidirectional binding of user/address] are unavailable when you add
multiple users, because the two options are unique and cannot be set when you add multiple users.
When you add multiple users at a time, the attributes and policies of the users are exactly the same except
the user names. You can type several usernames in the [Username List] text box and separate them from
each other by comma, as shown in the following figure. Other configurations for adding multiple users are
the same as those for adding a single user. Please refer to the previous section.
SANGFOR IAM v4.1 User Manual
209
3.3.2.3.3 Delete Group/User
The [Delete] button enables you to delete unnecessary users or groups on the [User/Group] page.
To delete user/group, do as follows:
Step 1. Select the user or group that you want to delete.
Step 2. Click the <Delete> button, and a dialogue appears, as shown below:
Step 3. Click <Yes> to confirm the deletion. After the user or group is deleted, a prompt will pop up to
inform you of the successful deletion.
If a user group is referenced by any authentication policy on the [Authentication Policy] page, it
cannot be deleted directly. When you delete it, a prompt will pop up to inform you of the deletion
failure, as shown in the following figure. To delete the group, you need first delete the authentication

SANGFOR IAM v4.1 User Manual
210
policy that references it on the [Authentication Policy] page and then delete the user group (for
settings of [Authentication Policy], see section 3.3.3.1 "Authentication Policy").
3.3.2.3.4 Edit Multiple Groups/Users
When editing multiple users or groups simultaneously, you cannot edit the two user attributes [DKey
authentication] and [Bidirectional binding of user/address], because the two options are unique.
Case Study: Suppose you need to edit the following information of the six users User1, User2, User3,
User4, User5 and User6 at a time:
Change their description into Engineer.
Change their authentication passwords into a same one.
Unidirectionally bind the six users with the IP range 192.168.1.1-192.168.1.255.
Change their account expiry date to 2012-1-1.
To meet the requirements, do as follows:
Step 1. Check the six users, and then click the <Edit Multiple> button, as shown below:
Step 2. On the displayed [Edit Multiple Users], check the [Description] option and enter Engineer in the
text box. Then check [Password Settings], select [Local password] and type the password, as
shown below:
SANGFOR IAM v4.1 User Manual
211
Step 3. Check [Bind IP/MAC], select the [Enable IP/MAC Binding] option and select [Unidirectional
binding of user/address]. Then check [Modify IP/MAC address], select [Bind IP] and type
192.168.1.1-192.168.1.255 in the text box, as shown below:
Step 4. Check [Expiry Date], select [Expired On] and set it to 2012-01-01 00:00, as shown below:
SANGFOR IAM v4.1 User Manual
212
Step 5. Click <Commit> to save your settings.
3.3.2.3.5 Export and Import Group/User
The [Export/Import] button enables you to export or import users/groups in a batch.
To import users, click the <Export/Import> button to select [Import] and the page will link to the [User
Import] page, on which you can import the users. For detailed procedures, see section 3.3.2.4 "User
Import".
Case Study: Suppose you need to export the Engineering Dept group and its users.
To meet the requirement, do as follow:
Step 1. Select the Engineering Dept group on the [Member List] page, and then click the
<Export/Import> button to select [Export], as shown below:
Step 2. The console will gives a prompt and displays a dialogue, as shown below:
Step 3. Click the link to download and save the exported file into the local computer.

SANGFOR IAM v4.1 User Manual
213
When a group contains no user, it cannot be exported.
3.3.2.3.6 Move Group/User
The <Move> button enables you to move use/subgroup from a group to another group. If moving is
successful, the user/subgroup will be removed from the original group and added into the target one. After
being moved, the user/group will not use the access management policies of its own but those associated
with the target group.
To move a user or subgroup, do as follows:
Step 1. Select the user or subgroup you want to move, as shown below:
Step 2. Click the <Move> button, and the [Select Group] dialog appears, as shown below:
Step 3. Select your target group, and the user/subgroup will be moved to the target group.
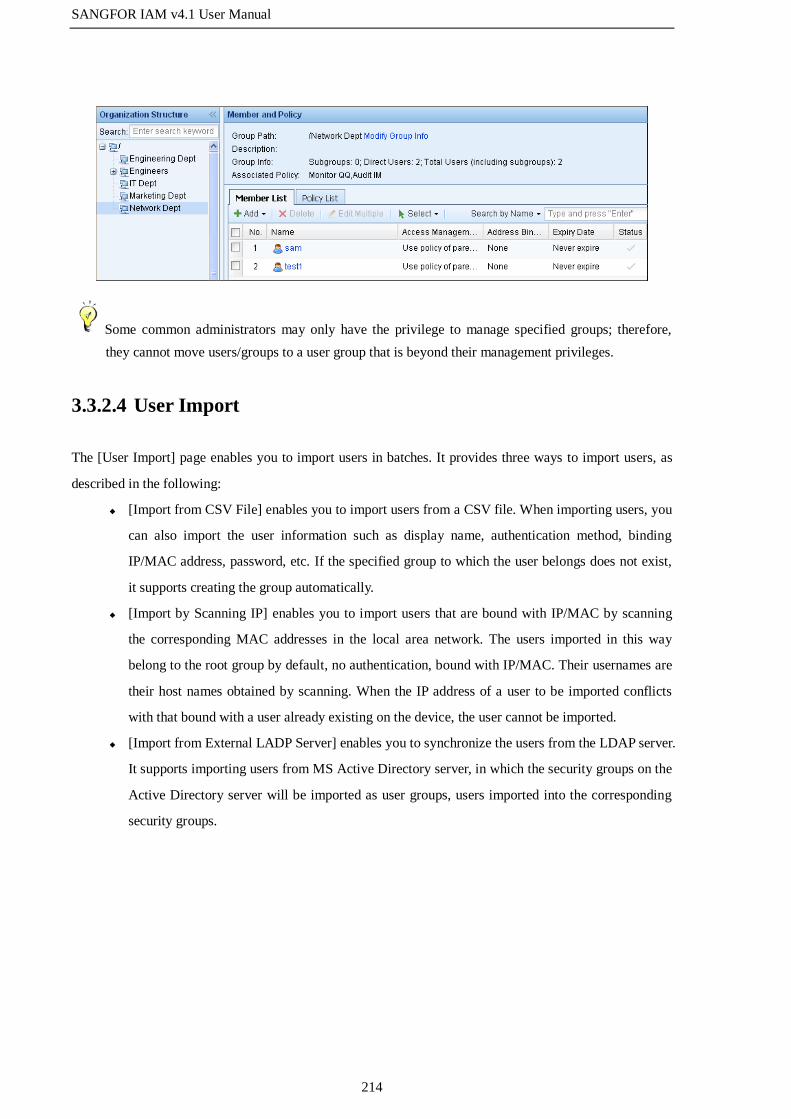
SANGFOR IAM v4.1 User Manual
214
Some common administrators may only have the privilege to manage specified groups; therefore,
they cannot move users/groups to a user group that is beyond their management privileges.
3.3.2.4 User Import
The [User Import] page enables you to import users in batches. It provides three ways to import users, as
described in the following:
[Import from CSV File] enables you to import users from a CSV file. When importing users, you
can also import the user information such as display name, authentication method, binding
IP/MAC address, password, etc. If the specified group to which the user belongs does not exist,
it supports creating the group automatically.
[Import by Scanning IP] enables you to import users that are bound with IP/MAC by scanning
the corresponding MAC addresses in the local area network. The users imported in this way
belong to the root group by default, no authentication, bound with IP/MAC. Their usernames are
their host names obtained by scanning. When the IP address of a user to be imported conflicts
with that bound with a user already existing on the device, the user cannot be imported.
[Import from External LADP Server] enables you to synchronize the users from the LDAP server.
It supports importing users from MS Active Directory server, in which the security groups on the
Active Directory server will be imported as user groups, users imported into the corresponding
security groups.

SANGFOR IAM v4.1 User Manual
215
3.3.2.4.1 Import from CSV File
When importing users from a CSV file, you can import user information, such as display name,
authentication method, binding IP/MAC address, password, etc. If the specified group to which the user
belongs does not exist, it supports creating the user group automatically.
What is CSV file? CSV is a simple data format, which can be edited and saved by almost all spreadsheet
software. For example, Microsoft EXCEL can edit the CSV file and conveniently convert an xls file a CSV
file. The CSV file is very simple and does not support editing the attributes such as column width, front
and color. To conveniently edit and manage users, you can first edit the user information in xls file and
then convert it to CSV when importing it.
To import users from CSV file, do as follows:

SANGFOR IAM v4.1 User Manual
216
Step 1. Set the user information in the specified format. For the format, click the [Example File] link to
download an example file and set the user information to be imported according to the format in
the example file.
Step 2. Import the CSV file.
a. Click the <Import> button to open the [Import CSV File] dialog and click <Browse> to select the
CSV file to be imported.
b. If you check the [If user group does not exist, auto create it] option, the system will automatically
create the group if the user group corresponding to a user does not exist; otherwise, the user
group will not be created and the corresponding user will be imported to the root group by
default.
c. The [If a user already exists in local list, then] item has two options. When a user already exists
in the local user list, you can select [Continue to import and override existing one] to continue
importing the user and update the attributes of the existing one, or select [Skip and not import
this user] to skip the user, not updating the user attributes.
Step 3. Click <Commit> to import the users from the CSV file.

SANGFOR IAM v4.1 User Manual
217
3.3.2.4.2 Import by Scanning IP
This function enables you to scan the MAC addresses according to the IP addresses in the local area
network and then import them as users into the IAM device, with computer names as their user names.
These users will be imported into the root group by default, with IP address and MAC address bound and
no authentication required.
Case Study: Suppose you need to scan the computers in the IP range 200.200.76.1-200.200.76.100 and
import then into the user list on the IAM device.
To meet the requirements, do as follows:
Step 1. Click <Import> under the [Import by Scanning IP] section, and then type the IP range you want
to scan, as shown below:
Step 2. Click <Scan> to scan all the computers in the IP range, and the corresponding active computers
are scanned out, with host names as their user names, as shown in the following figure:

SANGFOR IAM v4.1 User Manual
218
Step 3. Import the scanning results into the IAM device.
a. Click <Import>, and the following page appears:
b. If you check the [If user group does not exist, auto create it] option, the system will automatically
create the group when the user group corresponding to a user does not exist; otherwise, the user
group will not be created and the corresponding user will be imported to the root group by
default.

SANGFOR IAM v4.1 User Manual
219
c. The [If user already exists in local list, then] item has two options. When a user already exists in
the local user list, you can select [Continue to import and override existing one] to continue
importing the user and update the attributes of the existing user, or select [Skip and not import
this user] to skip the user, not updating the user attributes.
d. Click <Commit>, and the users are imported into the root group, as shown in the following
figure:
Step 4. Or, click <Download to Edit> in step 3 to save the scanning results as a CSV file into the local
computer, then edit the scanning results and user attributes in the file, and finally click <Import>
under the [Import from CSV file] section to import them into the IAM device (see section
3.3.2.4.1 "Import from CSV File").
1. The IAM device obtains the MAC addresses corresponding to the IP addresses by sending ARP
requests; therefore, to scan the MAC addresses of a certain IP range, you need to make sure the IAM
device locates in the IP range.
2. The unknown username displayed in the scanning results indicates that the host name is not
obtained. The hostname is obtained by the computer that has logged into the Web Console, using the
NetBIOS protocol. If the hostname is not obtained, please check the following:
Whether the target computer has enabled the NetBIOS protocol;
Whether the target computer has configured multiple IP addresses;
Whether a firewall on the target computer has filtered the NetBIOS protocol;
Whether a device deployed in the network path has filtered the NetBIOS protocol.
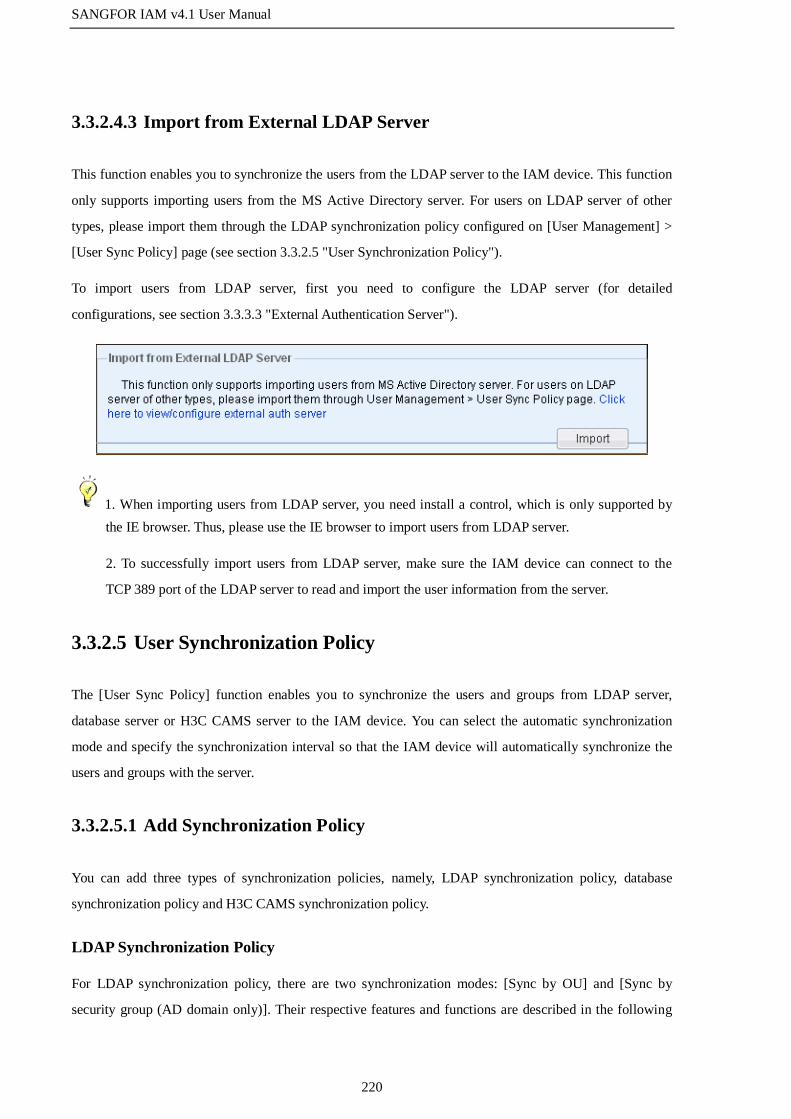
SANGFOR IAM v4.1 User Manual
220
3.3.2.4.3 Import from External LDAP Server
This function enables you to synchronize the users from the LDAP server to the IAM device. This function
only supports importing users from the MS Active Directory server. For users on LDAP server of other
types, please import them through the LDAP synchronization policy configured on [User Management] >
[User Sync Policy] page (see section 3.3.2.5 "User Synchronization Policy").
To import users from LDAP server, first you need to configure the LDAP server (for detailed
configurations, see section 3.3.3.3 "External Authentication Server").
1. When importing users from LDAP server, you need install a control, which is only supported by
the IE browser. Thus, please use the IE browser to import users from LDAP server.
2. To successfully import users from LDAP server, make sure the IAM device can connect to the
TCP 389 port of the LDAP server to read and import the user information from the server.
3.3.2.5 User Synchronization Policy
The [User Sync Policy] function enables you to synchronize the users and groups from LDAP server,
database server or H3C CAMS server to the IAM device. You can select the automatic synchronization
mode and specify the synchronization interval so that the IAM device will automatically synchronize the
users and groups with the server.
3.3.2.5.1 Add Synchronization Policy
You can add three types of synchronization policies, namely, LDAP synchronization policy, database
synchronization policy and H3C CAMS synchronization policy.
LDAP Synchronization Policy
For LDAP synchronization policy, there are two synchronization modes: [Sync by OU] and [Sync by
security group (AD domain only)]. Their respective features and functions are described in the following

SANGFOR IAM v4.1 User Manual
221
sections.
To synchronize the users, organizational units (OUs) or security groups from LDAP server to the IAM
device, first, you need to configure the synchronization policy so that they will be synchronized according
to the settings of the policy.
Synchronize by OU
The [Sync by OU] mode is applicable to all types of LDAP server. By this mode, the OUs on the LDAP
server will be synchronized in the form of user groups to the IAM device and the organization structure of
OUs synchronized in the same way, ensuring the users still belongs to their respective groups after the
synchronization.
Case Study: Suppose you need to create a synchronization policy that automatically synchronizes the three
OUs: OU=Engineering Dept, OU=Marketing Dept and OU=IT Dept, together with their sub OUs and users
from the LDAP server to the IAM device. The organization structure on the LDAP server is as shown in
the following figure:
To meet the requirements, do as follows:
Step 1. Set the LDAP server from which you want to synchronize the OUs. Type the IP address, port,
login username and password, and other information (for detailed configurations, see section
3.3.3.3 "External Authentication Server").
Step 2. Go to the [User/Policy] > [User Management] > [User Sync Policy] page, click <Add> and select
[LDAP Sync Policy] to open the [LDAP Sync Policy] page.

SANGFOR IAM v4.1 User Manual
222
Step 3. Type the policy name and description, set [Sync Mode] to Sync by OU, check the [Enable Auto
Sync] option and specify the synchronization interval, as shown below:
Step 4. Configure the fields under [Sync Source], which are relevant information of the OUs to be
synchronized from the LDAP server.
a. Specify the LDAP server from which you want to synchronize the OUs. Here, select the LDAP
server configured in Step 1.
b. Specify the OUs to be synchronized. Click <Select> under [Synchronized Remote Target] to
open the [Select Group] page and select the three OUs: Engineering Dept, Marketing Dept and
IT Dept, and then click <OK> to confirm.
c. Specify the starting point of synchronization. In this example, select the second option, that is,
[Create local OU from selected remote target]. The meanings of the three options are respectively
introduced in the following:

SANGFOR IAM v4.1 User Manual
223
[Create local OU from root directory of remote target]: Indicates the root domain on the
LDAP server will be also synchronized as group together with the target OUs, with their
hierarchical structure unchanged.
[Create local OU from selected remote target]: Indicates the synchronization will start from
the selected OU.
[Create local OU from subdirectory of selected remote target]: Indicates the synchronization
will start from the sub OU of the selected OU, while the selected OU and its direct users
will not be synchronized to the IAM device.
d. Specify the OU synchronization depth in [OU Import Depth]. If you set it to 10 and the
synchronization starts from the selected OU, it means the sub OUs of up to 9 levels under the
selected OU will be synchronized as user groups to the IAM device, while other sub OUs deeper
than 9 levels will not be synchronized as user groups, but their users will be synchronized to the
user group corresponding to sub OU of level 9 after the synchronization.
e. Set the filter parameter in the [Filter] text box.
Step 5. Configure the fields under [Sync Destination], including import method, location to which the
OUs and users will be synchronized, and attributes of synchronized users.
a. Select the synchronization method. In this example, select the first option, that is, [Synchronize
LDAP OU and user to local]. The meanings of the three options are respectively introduced in
the following:
[Synchronize LDAP OU and user to local]: Indicates the OUs will be synchronized as user
groups to the IAM device, with their respective users synchronized to the corresponding
user groups.
[Synchronize LDAP user to local, OU ignored]: Indicates only the users in the OUs will be
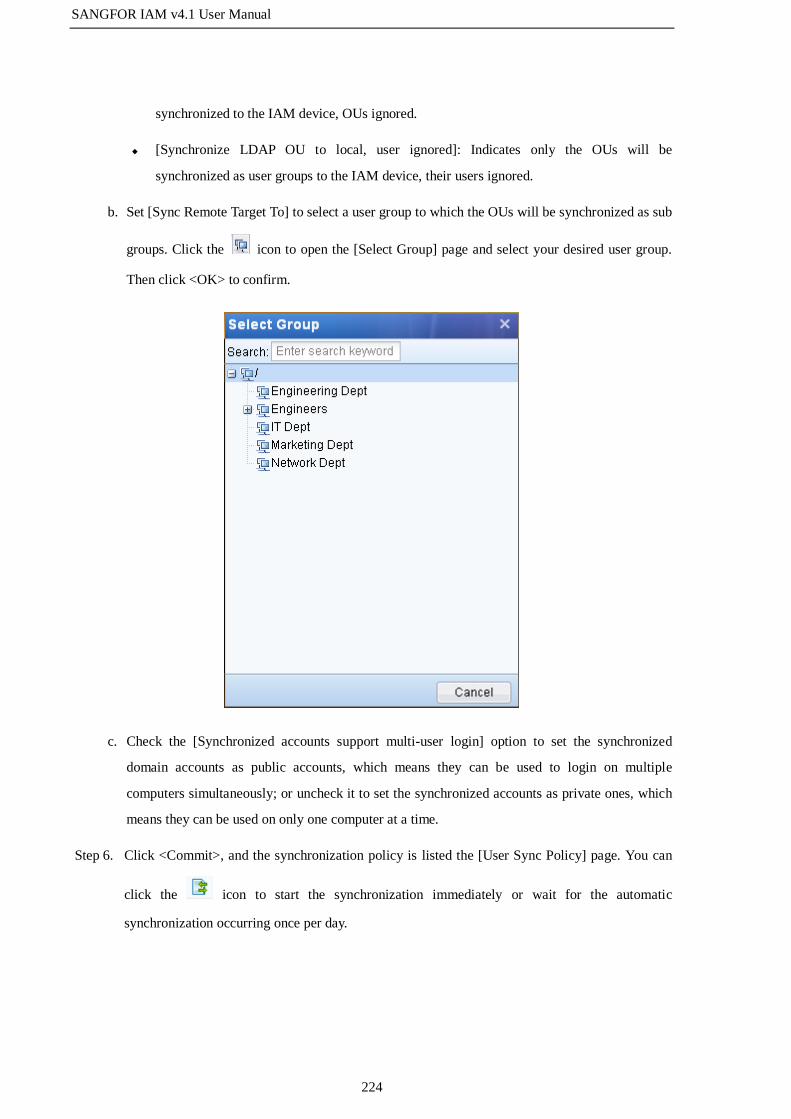
SANGFOR IAM v4.1 User Manual
224
synchronized to the IAM device, OUs ignored.
[Synchronize LDAP OU to local, user ignored]: Indicates only the OUs will be
synchronized as user groups to the IAM device, their users ignored.
b. Set [Sync Remote Target To] to select a user group to which the OUs will be synchronized as sub
groups. Click the icon to open the [Select Group] page and select your desired user group.
Then click <OK> to confirm.
c. Check the [Synchronized accounts support multi-user login] option to set the synchronized
domain accounts as public accounts, which means they can be used to login on multiple
computers simultaneously; or uncheck it to set the synchronized accounts as private ones, which
means they can be used on only one computer at a time.
Step 6. Click <Commit>, and the synchronization policy is listed the [User Sync Policy] page. You can
click the icon to start the synchronization immediately or wait for the automatic
synchronization occurring once per day.
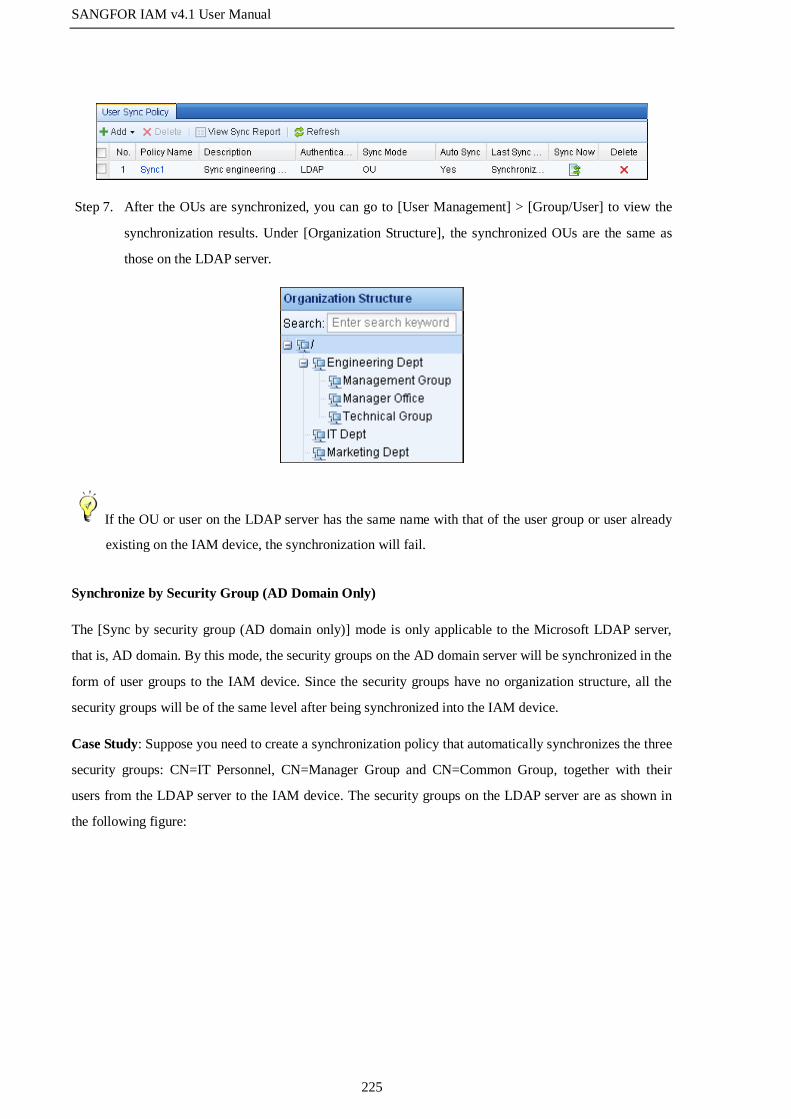
SANGFOR IAM v4.1 User Manual
225
Step 7. After the OUs are synchronized, you can go to [User Management] > [Group/User] to view the
synchronization results. Under [Organization Structure], the synchronized OUs are the same as
those on the LDAP server.
If the OU or user on the LDAP server has the same name with that of the user group or user already
existing on the IAM device, the synchronization will fail.
Synchronize by Security Group (AD Domain Only)
The [Sync by security group (AD domain only)] mode is only applicable to the Microsoft LDAP server,
that is, AD domain. By this mode, the security groups on the AD domain server will be synchronized in the
form of user groups to the IAM device. Since the security groups have no organization structure, all the
security groups will be of the same level after being synchronized into the IAM device.
Case Study: Suppose you need to create a synchronization policy that automatically synchronizes the three
security groups: CN=IT Personnel, CN=Manager Group and CN=Common Group, together with their
users from the LDAP server to the IAM device. The security groups on the LDAP server are as shown in
the following figure:

SANGFOR IAM v4.1 User Manual
226
To meet the requirements, do as follows:
Step 1. Set the LDAP server from which you want to synchronize the OUs. Type the IP address, port,
login username and password, and other information (for detailed configurations, see section
3.3.3.3 "External Authentication Server").
Step 2. Go to the [User/Policy] > [User Management] > [User Sync Policy] page, click <Add> and select
[LDAP Sync Policy] to open the [LDAP Sync Policy] page.
Step 3. Type the policy name and description, set [Sync Mode] to Sync by security group (AD domain
only), check the [Enable Auto Sync] option and specify the synchronization interval, as shown
below:
Step 4. Configure the fields under [Sync Source], which are relevant information of the security groups
to be synchronized from the LDAP server.

SANGFOR IAM v4.1 User Manual
227
a. Specify the LDAP server from which you want to synchronize the security groups. Here, select
the LDAP server configured in Step 1.
b. Specify the security groups to be synchronized. Click <Select> under [Synchronized Remote
Target] to open the [Select Group] page and select the three security groups: CN=IT Personnel,
CN=Manager Group and CN=Common Group, and then click <OK> to confirm.
c. Specify the starting point of synchronization. In this example, select the second option, that is,
[Create local OU from selected remote target]. The meanings of the three options are respectively
introduced in the following:
[Create local OU from root directory of remote target]: Indicates the root domain on the
LDAP server will be also synchronized as group together with the target security groups,
with their hierarchical structure unchanged.
[Create local OU from selected remote target]: Indicates the synchronization will start from
the selected security groups.
[Create local OU from subdirectory of selected remote target]: Indicates the synchronization
will start from the sub directory of the selected security group, while the selected security
groups and its direct users will not be synchronized to the IAM device.
d. Ignore the [OU Import Depth] option, because it is useless when synchronizing security groups.

SANGFOR IAM v4.1 User Manual
228
e. Set the filter parameter in the [Filter] text box.
Step 5. Configure the fields under [Sync Destination], including the location to which the security groups
and users will be synchronized, and attributes of synchronized users.
a. The options of [Sync Method] are unavailable under the [Sync by security group] mode. By
default, the system will synchronize both the security groups and their users to the IAM device.
b. Set [Sync Remote Target To] to select a user group to which the security groups will be
synchronized as sub groups. Click the icon to open the [Select Group] page and select your
desired user group. Then click <OK> to confirm.
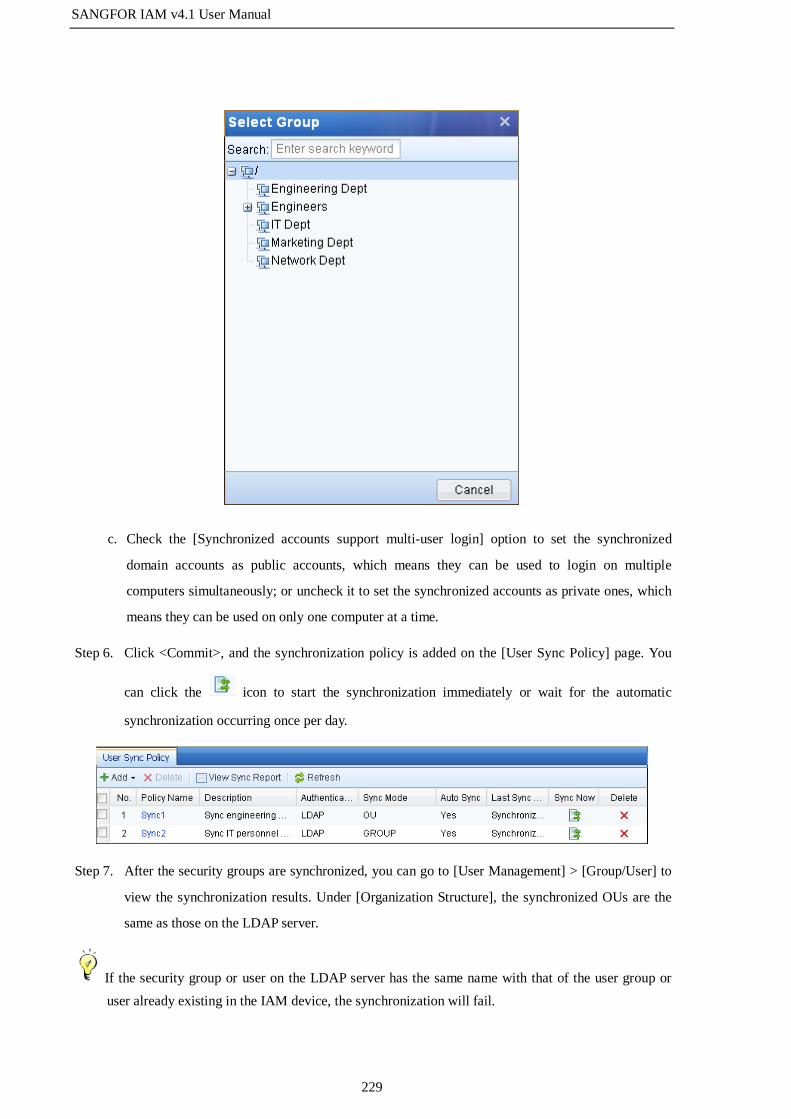
SANGFOR IAM v4.1 User Manual
229
c. Check the [Synchronized accounts support multi-user login] option to set the synchronized
domain accounts as public accounts, which means they can be used to login on multiple
computers simultaneously; or uncheck it to set the synchronized accounts as private ones, which
means they can be used on only one computer at a time.
Step 6. Click <Commit>, and the synchronization policy is added on the [User Sync Policy] page. You
can click the icon to start the synchronization immediately or wait for the automatic
synchronization occurring once per day.
Step 7. After the security groups are synchronized, you can go to [User Management] > [Group/User] to
view the synchronization results. Under [Organization Structure], the synchronized OUs are the
same as those on the LDAP server.
If the security group or user on the LDAP server has the same name with that of the user group or
user already existing in the IAM device, the synchronization will fail.

SANGFOR IAM v4.1 User Manual
230
Database Synchronization Policy
To synchronize users and groups from database server to the IAM device, first, you need to configure the
synchronization policy so that they will be synchronized according to the settings of the policy.
To add a database synchronization policy, do as follows:
Step 1. Configure the database server from which you want to synchronize the users and groups. Type the
IP address, port, login username and password, and other information (for detailed configurations,
see section 3.3.3.3 "External Authentication Server").
Step 2. Go to the [User/Policy] > [User Management] > [User Sync Policy] page, click <Add> and select
[Database Sync Policy] to open the [Database Sync Policy] page.
Step 3. Type the policy name and description, check the [Enable Auto Sync] option and specify the
synchronization interval, as shown below:
Step 4. Configure [Sync Source]. Select the database server configured in Step 1, type the SQL statement
for obtaining users and specify the group path separator. The [Group Path Separator] specifies the
separator to be used to separate groups and subgroups when the user groups are stored in the
format of "Group"+"Separator"+"Subgroup" in the database table. If you type "-", as shown
in the following figure, it means the groups and subgroups will be separated by hyphen (-). If the
field only contains groups of one level, that is, no subgroup is contained, leave [Group Path
Separator] blank.

SANGFOR IAM v4.1 User Manual
231
Step 5. Configure [Sync Destination]. Select a local user group (to which the users will be synchronized)
in the [Sync Remote Target To] text box. Check the [Synchronized accounts support multi-user
login] option to set the synchronized domain accounts as public accounts, which means they can
be used to login on multiple computers simultaneously; or uncheck it to set the synchronized
accounts as private ones, which means they can be used on only one computer at a time.
Step 6. Click [Test Validity], and it will list the users obtained, the corresponding group path and the time
taken by executing SQL.
Step 7. Click <Commit>, and the synchronization policy is added on the [User Sync Policy] page. You
can click the icon to start the synchronization immediately or wait for the automatic
synchronization occurring once per day.
H3C CAMS Synchronization Policy
To synchronize users and groups from H3C CAMS server to the IAM device, first, you need to configure
the synchronization policy so that they will be synchronized according to the settings of the policy.
To add an H3C CAMS synchronization policy, do as follows:
Step 1. Configure the H3C CAMS server from which you want to synchronize the users and groups.
Type the IP address, port, login username and password, and other information (for detailed

SANGFOR IAM v4.1 User Manual
232
configurations, see section 3.3.3.3 "External Authentication Server").
Step 2. Go to the [User/Policy] > [User Management] > [User Sync Policy] page, click <Add> and select
[H3C CAMS Sync Policy] to open the [H3C CAMS Sync Policy] page.
Step 3. Type the policy name and description, check the [Enable Auto Sync] option and specify the
synchronization interval, as shown below:
Step 4. Configure [Sync Source]. Select the H3C CAMS server configured in Step 1.
Step 5. Configure [Sync Destination]. Select a local user group (to which the users will be synchronized)
in the [Sync Remote Target To] text box. Check the [Synchronized accounts support multi-user
login] option to set the synchronized domain accounts as public accounts, which means they can
be used to login on multiple computers simultaneously; or uncheck it to set the synchronized
accounts as private ones, which means they can be used on only one computer at a time.

SANGFOR IAM v4.1 User Manual
233
Step 6. Click <Commit>, and the synchronization policy is added on the [User Sync Policy] page. You
can click the icon to start the synchronization immediately or wait for the automatic
synchronization occurring once per day.
3.3.2.5.2 Delete Synchronization Policy
If some synchronization policies are useless, you can delete them.
To delete a certain synchronization policy, select the policy on the [User Sync Policy] page and then click
the <Delete> button. The deletion of synchronization policy will cause no effect on the groups and users
already synchronized to the IAM device.
3.3.2.5.3 View Synchronization Report
Every time when the IAM device synchronizes users from LDAP server, Database server or H3C CAMS
server, the system will generate a synchronization report for you to check the synchronization details.
To view synchronization report, click the <View Sync Report> on the [User Sync Policy] page, and then
select and download the report you want to view.
3.3.3 User Authentication
The [User Authentication] module enables you to configure the parameters related to user authentication,
including the three configuration pages: [Authentication Policy], [Authentication Options] and [External
Auth Server].
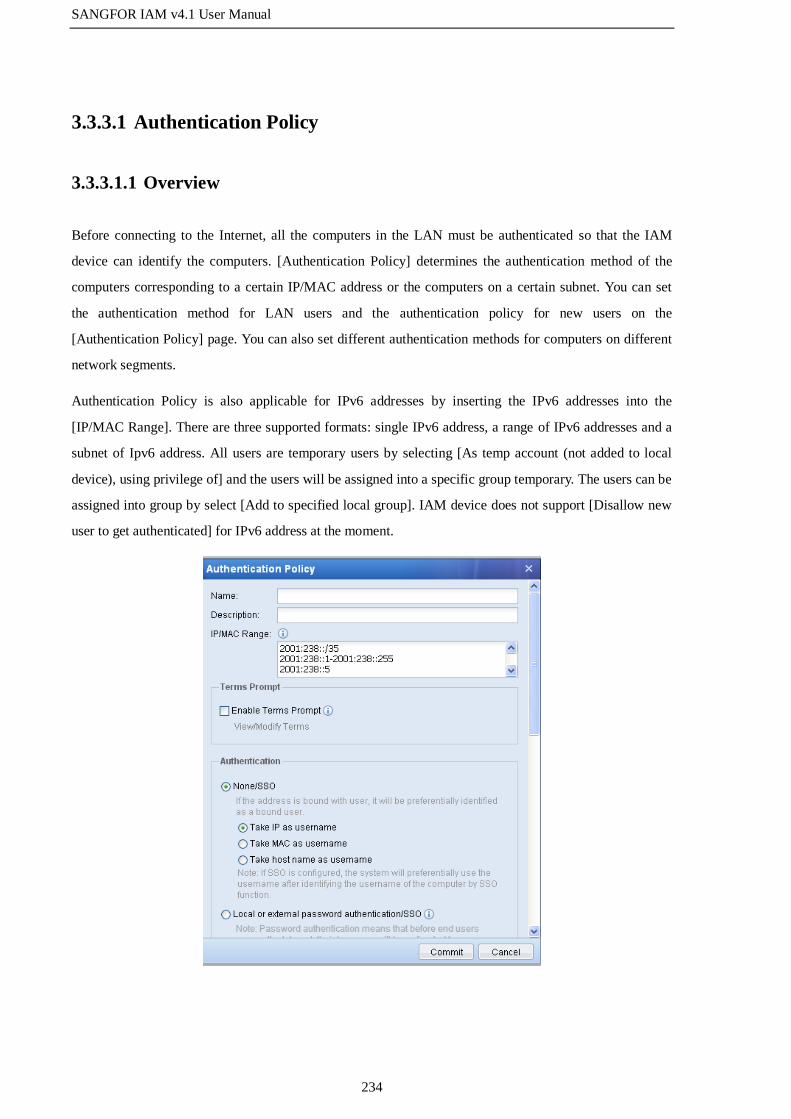
SANGFOR IAM v4.1 User Manual
234
3.3.3.1 Authentication Policy
3.3.3.1.1 Overview
Before connecting to the Internet, all the computers in the LAN must be authenticated so that the IAM
device can identify the computers. [Authentication Policy] determines the authentication method of the
computers corresponding to a certain IP/MAC address or the computers on a certain subnet. You can set
the authentication method for LAN users and the authentication policy for new users on the
[Authentication Policy] page. You can also set different authentication methods for computers on different
network segments.
Authentication Policy is also applicable for IPv6 addresses by inserting the IPv6 addresses into the
[IP/MAC Range]. There are three supported formats: single IPv6 address, a range of IPv6 addresses and a
subnet of Ipv6 address. All users are temporary users by selecting [As temp account (not added to local
device), using privilege of] and the users will be assigned into a specific group temporary. The users can be
assigned into group by select [Add to specified local group]. IAM device does not support [Disallow new
user to get authenticated] for IPv6 address at the moment.
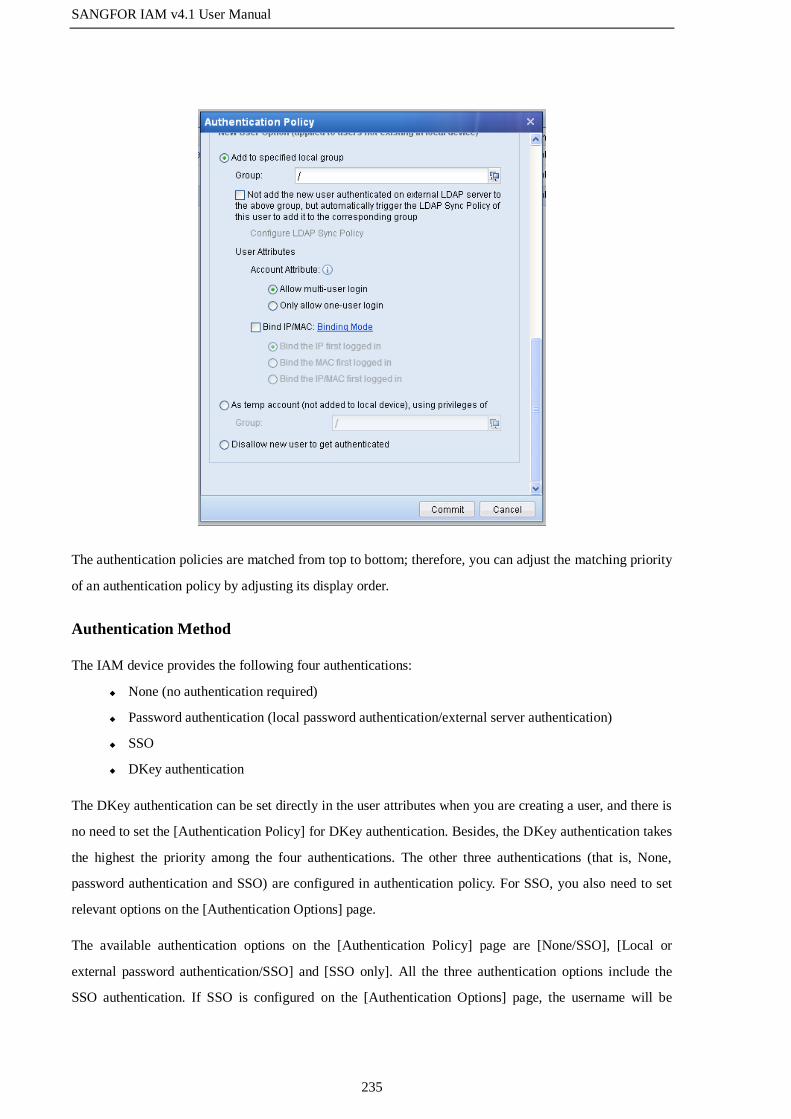
SANGFOR IAM v4.1 User Manual
235
The authentication policies are matched from top to bottom; therefore, you can adjust the matching priority
of an authentication policy by adjusting its display order.
Authentication Method
The IAM device provides the following four authentications:
None (no authentication required)
Password authentication (local password authentication/external server authentication)
SSO
DKey authentication
The DKey authentication can be set directly in the user attributes when you are creating a user, and there is
no need to set the [Authentication Policy] for DKey authentication. Besides, the DKey authentication takes
the highest the priority among the four authentications. The other three authentications (that is, None,
password authentication and SSO) are configured in authentication policy. For SSO, you also need to set
relevant options on the [Authentication Options] page.
The available authentication options on the [Authentication Policy] page are [None/SSO], [Local or
external password authentication/SSO] and [SSO only]. All the three authentication options include the
SSO authentication. If SSO is configured on the [Authentication Options] page, the username will be

SANGFOR IAM v4.1 User Manual
236
preferentially used to access Internet after it is identified through SSO.
The supported authentication option in IPv6 environment is [None/SSO] only. [Local or external password
authentication/SSO] and [SSO only] are not supported.
1. [None/SSO]
When this authentication option is selected and the SSO is configured on the [Authentication Options]
page, the username will be preferentially used to access Internet after it is identified through SSO.
If the SSO is not configured, the IAM device will identify the user according to the source IP address,
source MAC address and computer name contained in the packets. The advantage of this authentication
(no authentication required) is that the authentication dialogue will not pop up to require users to enter
username and password, so that the user will not perceive the existence of the IAM device.
To create a user with no authentication required, do any of the following:
Select bidirectional binding of user and IP/MAC address when creating the user, and then select
the [None/SSO] option when creating the authentication policy for the user. As the IP/MAC
address and user are biunique in bidirectional binding, the IAM device can identify the user
according to the IP/MAC address (please note that the IP/MAC address bound with the user
must be included in the IP/MAC range specified in the corresponding authentication policy.
Select the [None/SSO] option and take IP address, MAC address or host name as username when
creating the authentication policy. When the LAN user is being authentication, the IAM device
will match the corresponding username according to the IP/MAC address or host name.
2. [Local or external password authentication/SSO]
If the SSO is not configured or SSO failed, the authentication process of the users adopting this
authentication option is as follows:
Step 1. When a user is connecting to the Internet, the browser will be redirected to an authentication
dialogue and the user is required to enter username and password. The user cannot connect to the
Internet until it enters the correct username and password. Suppose the user types test and
password respectively in the text boxes.
Step 2. The system then tries to find the test user in the local user list. If it exists in the local user list and
the user has set a local password (that is, has set the [Local password] option in user attribute),
the system will check whether the local password is password. If yes, the user will pass the
authentication; otherwise, the user will fail the authentication.
Step 3. If there is no test user in the local user list, or it exists but the user has not set local password, the

SANGFOR IAM v4.1 User Manual
237
system will go to external authentication server to verify the username and password. If both are
correct, the user will pass the authentication; otherwise, the user will fail the authentications.
In brief, users adopting this authentication option will be first authenticated on the local IAM device. If the
local authentication fails, they will be then authenticated on external authentication server.
3. [SSO only]
When this authentication option is selected, the users in the specified address range must use SSO to pass
the authentication.
The configuration procedures are as follows:
Step 1. Select the [SSO only] option when creating the authentication policy for a specified subnet or
address range.
Step 2. Enable SSO on the [Authentication Options] page. If it is domain SSO, you need also configure
the domain server (see section 3.3.3.2.1 "SSO Options").
Step 3. If SSO is not required for some users, you can specify the users in the [User Exception] text box.
These users need to enter username and password manually to pass the authentication.
New User Handling
The new users refer to the users who do not exist in the IAM device. For these users, the IAM device will
match the authentication policy according to their IP or MAC addresses and determine whether to add the
new users to the IAM device according to the settings under [New User Option] of the authentication
policy.
Users who have passed the authentication will be automatically added to the IAM device. These users
include users adopting none authentication (with IP/MAC or hostname as their usernames), users using
SSO and users using external password authentication.
According to you needs, you can select one of the three handling ways for new user: [Add to specified
local group], [As temp account] and [Disallow new user to get authenticated].
3.3.3.1.2 Add Authentication Policy
Case Study 1: Suppose your company has the following requirements for authentication:
The users in the Engineering Dept (subnet: 192.168.1.0/255.255.255.0) adopt password
authentication on third-party LDAP server, and new users should be added to the “/ Engineers”
group with username bidirectionally bound with IP address.

SANGFOR IAM v4.1 User Manual
238
Users on other subnets adopt none authentication and take IP address as username, and new
users should be added to the "/Default Group".
This configuration takes LDAP as an example to show how to configure external server authentication. For
other types of external server, the configuration procedures are similar.
To meet the requirements, do as follows:
Step 1. Go to the [External Auth Server] page to configure the LDAP authentication server (see section
3.3.3.3 "External Authentication Server").
Step 2. Go to the [User Authentication] > [Authentication Policy] page, and click <Add> to configure the
authentication policy. Type the policy name and description information. [Name] is required and
[Description] is optional.
Step 3. Specify the IP/MAC address range to which this authentication policy applies. You can enter IP
address, IP range or MAC address in the [IP/MAC Range] text box. When users access the
Internet through the IAM device before they pass the authentication, the IAM device will match
the corresponding authentication policy according to the IP or MAC address contained in the
packets of the users. In this example, type 192.168.1.0/255.255.255.0, as shown below:
Step 4. Specify the authentication method under [Authentication]. There are three options: [None/SSO],
[Local or external password authentication/SSO] and [SSO only] (for the introduction to the three
authentication methods, see section 3.3.3.1.1 "Overview"). In this example, as the requirement is
to adopt password authentication on third party server, select the second option, as shown, below:

SANGFOR IAM v4.1 User Manual
239
Step 5. Specify the method for handling new users under [New User Option].
a. The [Add to specified local group] option indicates whether to automatically add new users to
the local user list. In this example, check this option and select the "/Engineers" user group in
[Group], which means the new users authenticated on third party server will be added to this user
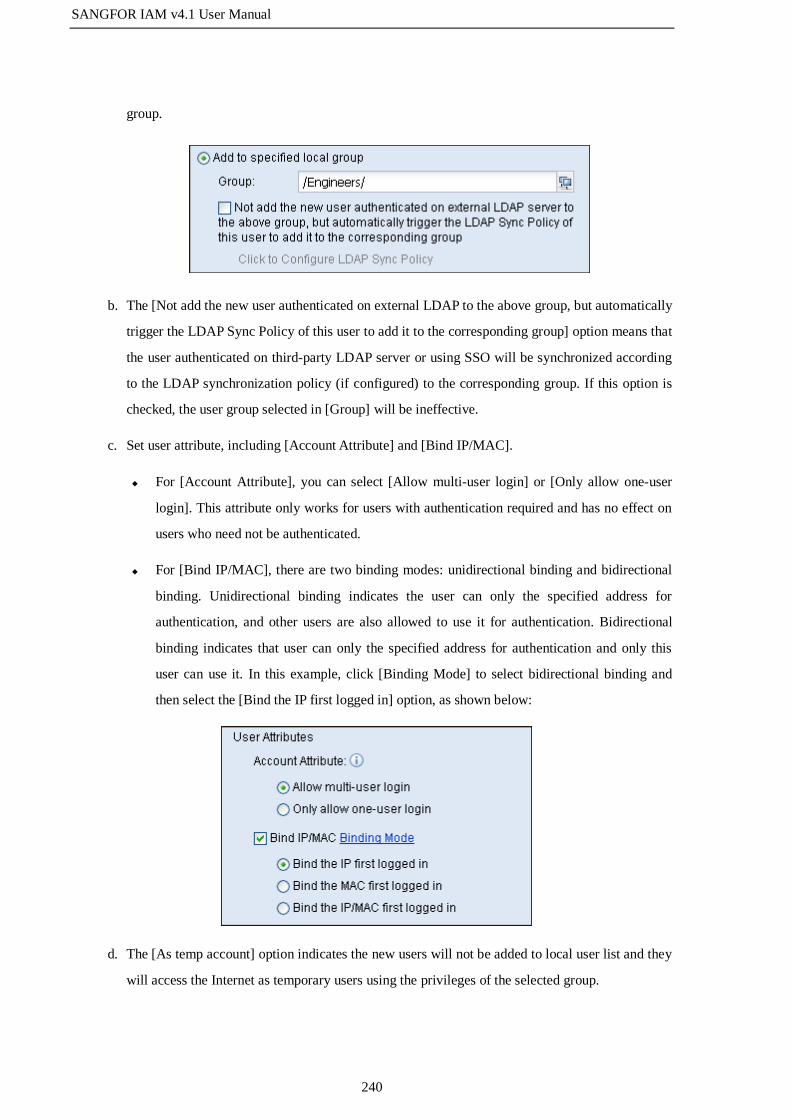
SANGFOR IAM v4.1 User Manual
240
group.
b. The [Not add the new user authenticated on external LDAP to the above group, but automatically
trigger the LDAP Sync Policy of this user to add it to the corresponding group] option means that
the user authenticated on third-party LDAP server or using SSO will be synchronized according
to the LDAP synchronization policy (if configured) to the corresponding group. If this option is
checked, the user group selected in [Group] will be ineffective.
c. Set user attribute, including [Account Attribute] and [Bind IP/MAC].
For [Account Attribute], you can select [Allow multi-user login] or [Only allow one-user
login]. This attribute only works for users with authentication required and has no effect on
users who need not be authenticated.
For [Bind IP/MAC], there are two binding modes: unidirectional binding and bidirectional
binding. Unidirectional binding indicates the user can only the specified address for
authentication, and other users are also allowed to use it for authentication. Bidirectional
binding indicates that user can only the specified address for authentication and only this
user can use it. In this example, click [Binding Mode] to select bidirectional binding and
then select the [Bind the IP first logged in] option, as shown below:
d. The [As temp account] option indicates the new users will not be added to local user list and they
will access the Internet as temporary users using the privileges of the selected group.
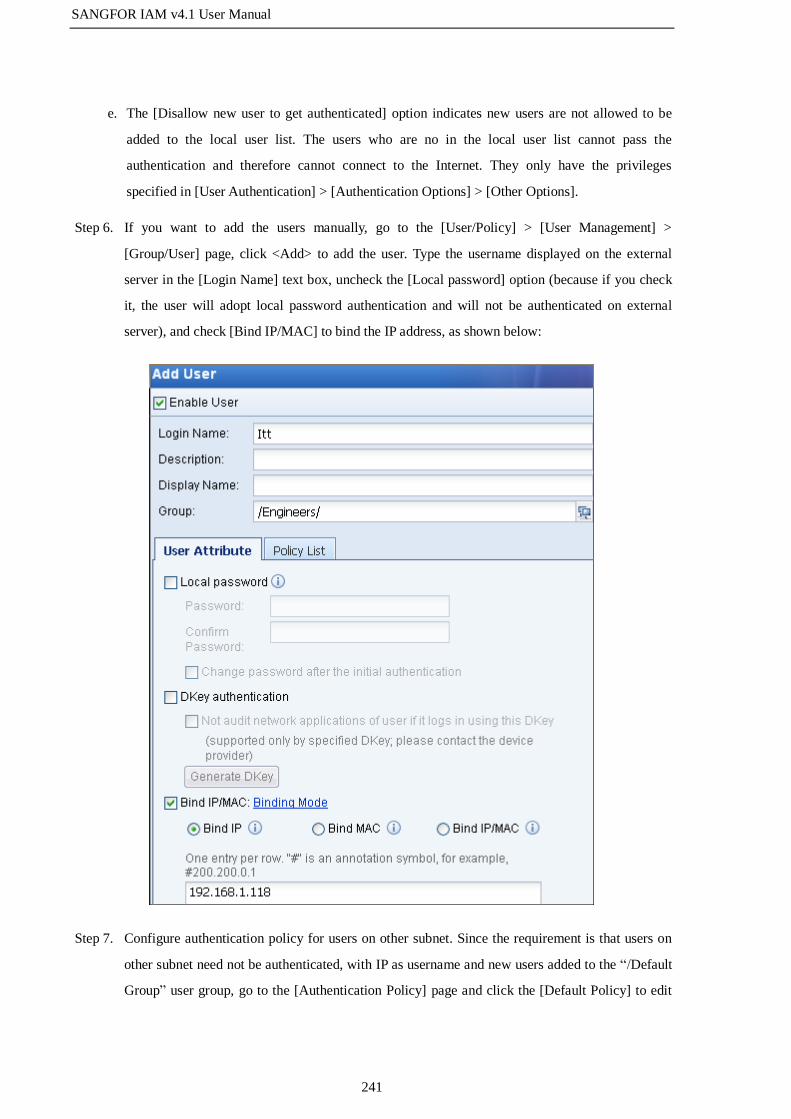
SANGFOR IAM v4.1 User Manual
241
e. The [Disallow new user to get authenticated] option indicates new users are not allowed to be
added to the local user list. The users who are no in the local user list cannot pass the
authentication and therefore cannot connect to the Internet. They only have the privileges
specified in [User Authentication] > [Authentication Options] > [Other Options].
Step 6. If you want to add the users manually, go to the [User/Policy] > [User Management] >
[Group/User] page, click <Add> to add the user. Type the username displayed on the external
server in the [Login Name] text box, uncheck the [Local password] option (because if you check
it, the user will adopt local password authentication and will not be authenticated on external
server), and check [Bind IP/MAC] to bind the IP address, as shown below:
Step 7. Configure authentication policy for users on other subnet. Since the requirement is that users on
other subnet need not be authenticated, with IP as username and new users added to the “/Default
Group” user group, go to the [Authentication Policy] page and click the [Default Policy] to edit

SANGFOR IAM v4.1 User Manual
242
the default policy.
a. Under [Authentication] section, check the [None/SSO] option and click [Take IP as username],
as shown below:
b. Under the [New User Option] section, check [Add to specified local group] and select “/Default
Group/”, as shown below:
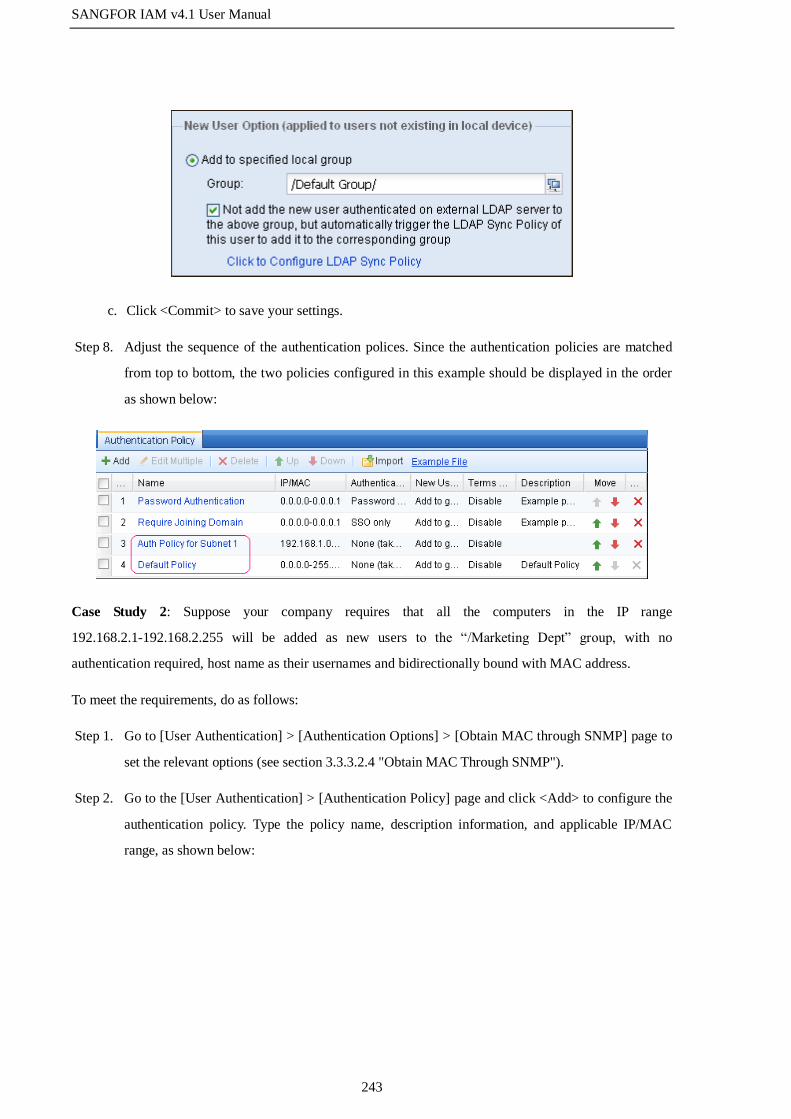
SANGFOR IAM v4.1 User Manual
243
c. Click <Commit> to save your settings.
Step 8. Adjust the sequence of the authentication polices. Since the authentication policies are matched
from top to bottom, the two policies configured in this example should be displayed in the order
as shown below:
Case Study 2: Suppose your company requires that all the computers in the IP range
192.168.2.1-192.168.2.255 will be added as new users to the “/Marketing Dept” group, with no
authentication required, host name as their usernames and bidirectionally bound with MAC address.
To meet the requirements, do as follows:
Step 1. Go to [User Authentication] > [Authentication Options] > [Obtain MAC through SNMP] page to
set the relevant options (see section 3.3.3.2.4 "Obtain MAC Through SNMP").
Step 2. Go to the [User Authentication] > [Authentication Policy] page and click <Add> to configure the
authentication policy. Type the policy name, description information, and applicable IP/MAC
range, as shown below:

SANGFOR IAM v4.1 User Manual
244
Step 3. Under the [Authentication] section, check the [None/SSO] option and select [Take host name as
username], as shown below:
Step 4. Configure the [New User Option]. Check the [Add to specified local group] and select the
“/Marketing Dept/” group. Then check the [Bind IP/MAC] option and select [Bind the MAC
first logged in]. In this example, since the intranet crosses over the layer 3 switch, the MAC
address must be obtained through the SNMP protocol from the switch (configure the related
options on the [User Authentication] > [Authentication Options] > [Obtain MAC through SNMP]
page).

SANGFOR IAM v4.1 User Manual
245
Step 5. Click <Commit> to save the authentication policy.
1. The IAM device obtains the host name of the computers through the NetBIOS protocol. When the
IAM device fails to obtain the host name, it will take the computer as temporary user with the
username being Unknown Computer and will not add it into the local group. You can only view
this user on [Online Users] page. In case the hostname is not obtained, please check the following:
Whether the target computer has enabled the NetBIOS protocol;
Whether the target computer has configured multiple IP addresses;
Whether a firewall on the target computer has filtered the NetBIOS protocol;
Whether a device deployed in the network path has filtered the NetBIOS protocol.
2. If the data requested by user computers go through the IAM device by way of one or more layer 3
switches, the source MAC addresses will change and IAM device cannot obtain the correct source
MAC addresses. In this case, you can use the following two methods to identify the correct source
MAC address:
Use the SNMP protocol to obtain the ARP table of the layer 3 switch that is nearest to the
local computer (that is, the gateway device that the computer directs to) and therefore to
obtain the real source MAC address.
Enable the Ingress System and install the Ingress Client on local computers to obtain real

SANGFOR IAM v4.1 User Manual
246
source MAC address (this method is NOT recommended, because the real MAC address
obtained by Ingress Program is not applicable for automatically adding user with MAC
address as username or adding user with MAC address bound).
Case Study 3: Suppose your company requires that:
The computers on the 192.168.3.0/255.255.255.0 subnet use AD domain SSO for authentication
(that is, once the users pass the AD domain authentication, they also pass the authentication on
the IAM device).
The AD domain users should be synchronized to the IAM device.
If the users on the subnet fails the SSO login or have not logged into the domain, they should be
automatically added to the “/Default Group”, with IP address as username and no authentication
required.
To meet the requirements, do as follows:
Step 1. Configure external authentication server and LDAP synchronization policy (see sections 3.3.3.3
"External Authentication Server" and 3.3.2.5"User Synchronization Policy").
Step 2. Go to the [Authentication Policy] page and click <Add> to configure the authentication policy.
Type the policy name, description information, and applicable IP/MAC range, as shown below:
Step 3. Under the [Authentication] section, check the [None/SSO] option and select [Take IP as
username], as shown below:

SANGFOR IAM v4.1 User Manual
247
Step 4. Configure the [New User Option].
a. Check the [Add to specified local group] and select the “/Default Group/” group, indicating the
users having not configured SSO will be automatically added to the Default Group, adopting the
access management policy of Default Group.
b. Check the [Not add the new user authenticated on external LDAP to the above group, but
automatically trigger the LDAP Sync Policy of this user to add it to the corresponding group]
option, indicating the users using domain SSO will be added to the corresponding groups
according to the synchronization policy.
c. In this example, you cannot select bidirectional binding, because after the user who has not
configured SSO is added and bound with IP/MAC bidirectionally, the IP/MAC address can be
used only by this user and cannot conduct SSO authentication any longer. However, you can
select unidirectional binding.
Step 5. Click <Commit> to save the authentication policy.
3.3.3.1.3 Delete Authentication Policy
You can delete useless authentication policies.
To delete authentication policy, select one or several authentication policies you want to delete, click
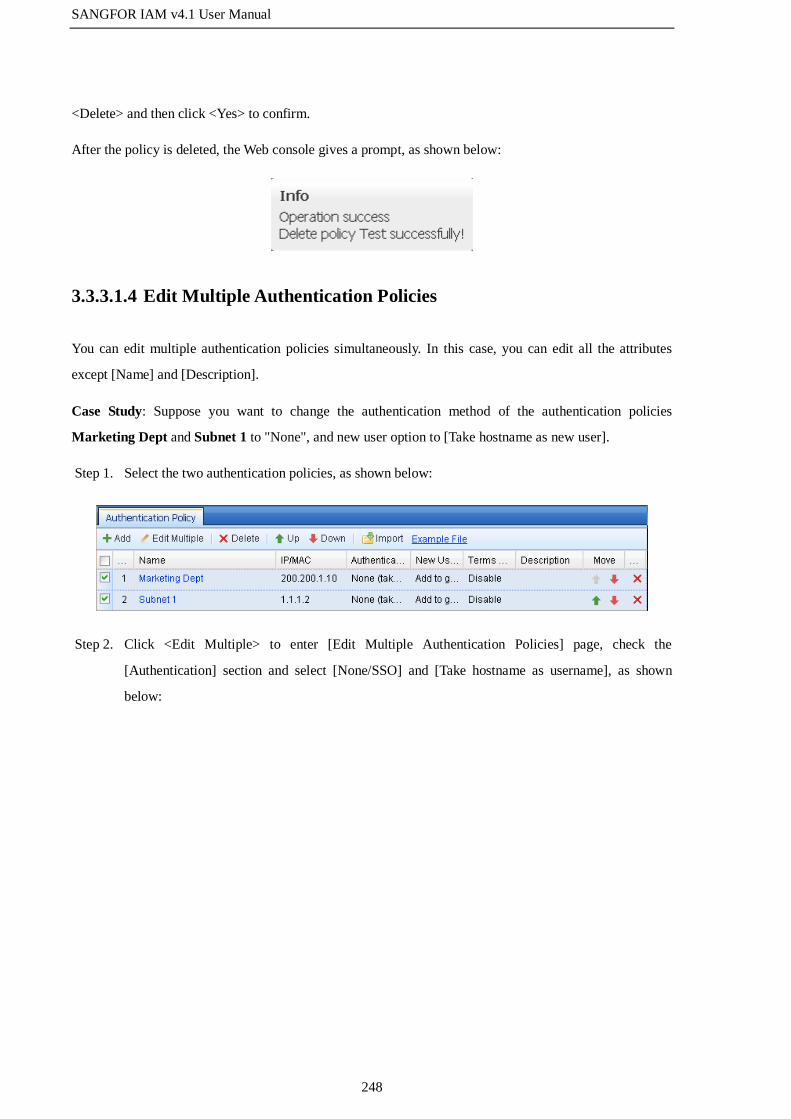
SANGFOR IAM v4.1 User Manual
248
<Delete> and then click <Yes> to confirm.
After the policy is deleted, the Web console gives a prompt, as shown below:
3.3.3.1.4 Edit Multiple Authentication Policies
You can edit multiple authentication policies simultaneously. In this case, you can edit all the attributes
except [Name] and [Description].
Case Study: Suppose you want to change the authentication method of the authentication policies
Marketing Dept and Subnet 1 to "None", and new user option to [Take hostname as new user].
Step 1. Select the two authentication policies, as shown below:
Step 2. Click <Edit Multiple> to enter [Edit Multiple Authentication Policies] page, check the
[Authentication] section and select [None/SSO] and [Take hostname as username], as shown
below:
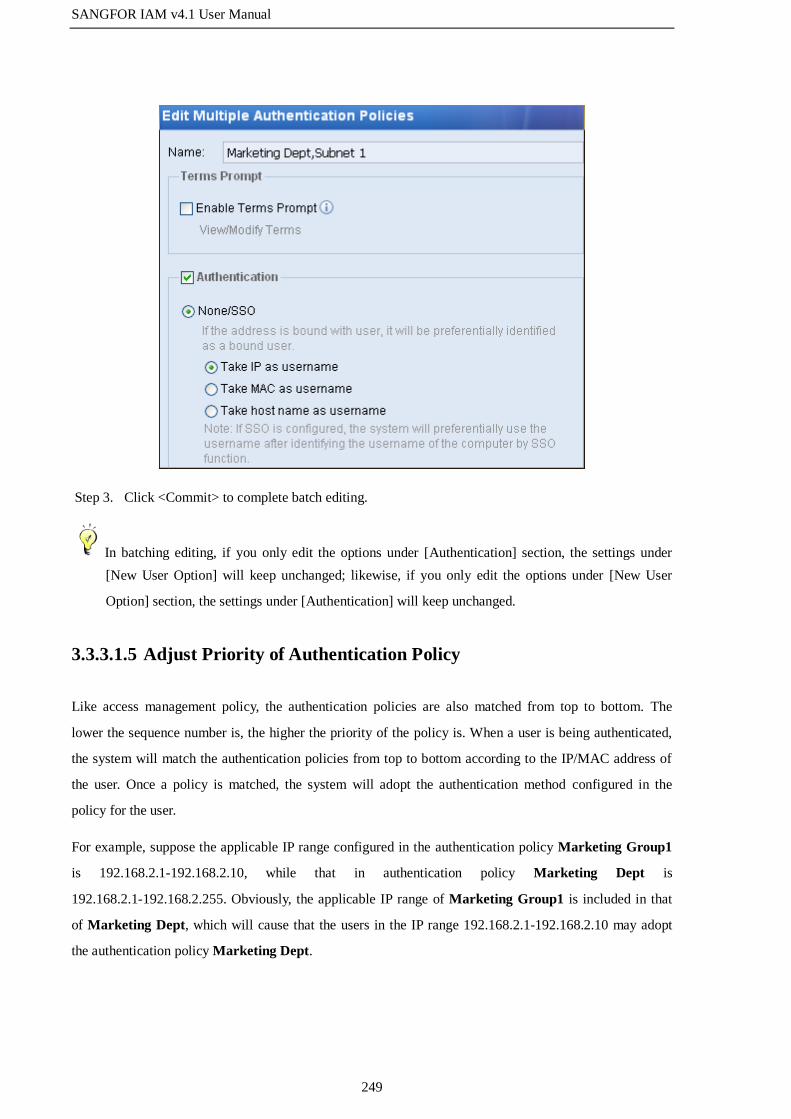
SANGFOR IAM v4.1 User Manual
249
Step 3. Click <Commit> to complete batch editing.
In batching editing, if you only edit the options under [Authentication] section, the settings under
[New User Option] will keep unchanged; likewise, if you only edit the options under [New User
Option] section, the settings under [Authentication] will keep unchanged.
3.3.3.1.5 Adjust Priority of Authentication Policy
Like access management policy, the authentication policies are also matched from top to bottom. The
lower the sequence number is, the higher the priority of the policy is. When a user is being authenticated,
the system will match the authentication policies from top to bottom according to the IP/MAC address of
the user. Once a policy is matched, the system will adopt the authentication method configured in the
policy for the user.
For example, suppose the applicable IP range configured in the authentication policy Marketing Group1
is 192.168.2.1-192.168.2.10, while that in authentication policy Marketing Dept is
192.168.2.1-192.168.2.255. Obviously, the applicable IP range of Marketing Group1 is included in that
of Marketing Dept, which will cause that the users in the IP range 192.168.2.1-192.168.2.10 may adopt
the authentication policy Marketing Dept.

SANGFOR IAM v4.1 User Manual
250
To change the situation, check the Marketing Group1 authentication policy, click <Up> to move it above
the Marketing Dept policy, ensuring that Marketing Group1 policy takes higher priority than Marketing
Dept policy and the users in the IP range 192.168.2.1-192.168.2.10 will first adopt the Marketing Dept
authentication policy.
3.3.3.1.6 Import Authentication Policy
When there are a number of authentication policies, you can import them through a CSV file.
For the format of the CVS file, please click the [Example File] link to download the example file and view
the format, and then edit the authentication policies according to the specified format. The example file is
as shown below:
SANGFOR IAM v4.1 User Manual
251
After editing and saving the policy file according to the example file, click <Import> to import the file.
3.3.3.2 Authentication Options
The [Authentication Option] is used to set relevant information of user authentication on the IAM device,
including the settings of [SSO Options], [Auth Page Redirection], [Authentication Conflict], [Obtain MAC
Through SNMP] and [Other Options].
3.3.3.2.1 SSO Options
When LAN users are authenticated on a third-party server, they can use SSO to pass the authentication on
the IAM device as long as they pass the authentication on third-party server and obtain relevant privileges
to access the Internet. The username and password for authentications on the IAM device are the same as
those on the third-party server. Currently, the IAM device supports the following types of SSO: AD domain
SSO, Proxy SSO, POP3 SSO and Web SSO. The settings configured on this page only fulfill the basic
method to realize the SSO. To complete the configurations of SSO, you need also configure users,
authentication methods of users, and authentication servers respectively on the [Group/User],
[Authentication Policy] and [External Auth Server] pages (see sections 3.3.2.3 "Group/User", 3.3.3.1
"Authentication Policy" and 3.3.3.3 "External Authentication Server").
Domain SSO
If there is a Microsoft Active Directory (AD) domain server for managing users in the network and LAN
users uses domain accounts to log into the computers, the domain Single Sign-On (SSO) can be used to
enable the LAN users to pass the authentication on the IAM device after they log into the domain. In other
words, by using the domain SSO, the LAN users can access Internet once they log into the domain, no
need to be authenticated by the IAM device.
There are two ways to realize domain SSO: one is by executing domain script and the other is by
monitoring the packets of users logging into the domain. The domain SSO is only applicable to the
Microsoft Active Directory domain.
By Executing Domain Script
To realize domain SSO by executing domain script, you need to configure the logon (logon.exe) and logoff
(logoff.exe) scripts on the domain server. After that, when users log in to or log out of the domain, the
domain policy will be sent to execute the logon or logoff script and complete the login to or logout of the
IAM device at the same time.

SANGFOR IAM v4.1 User Manual
252
Topology:
In this mode, the data processing flow is as follows:
1. PC requests for logging into the domain.
2. Domain returns the "successful login" to the PC.
3. PC runs the logon.exe and reports the "successful login to domain" to the IAM device.
To achieve the AD domain SSO by executing domain script, do as follows:
Step 1. Configure the AD domain server. Go to the [User Authentication] > [Authentication Options] >
[External Auth Server] page to configure (see section 3.3.3.3 "External Authentication Server").
Step 2. Configure the domain SSO function on the IAM device.
a. Go to [User Authentication] > [Authentication Options] > [SSO Options] > [Domain] page, and
check the [Enable Domain SSO] option.
b. Check the [Obtain login profile by executing logon script through domain] option (indicating
achieving SSO by executing domain script) and type the shared key (used for encrypted
communication between AD domain server and IAM device) in [Shared Key] text box. The
shared key set in the logon script must be the same as this one.
c. Click the [click here to download] link to download the logon and logoff scripts which will be
used in Step 3 and Step 4.

SANGFOR IAM v4.1 User Manual
253
Step 3. Configure the logon script on the AD domain server.
a. Log into the domain server and select [Manage Your Server] menu, as shown below:
b. Select [Manage users and computers in Active Directory], as shown below:

SANGFOR IAM v4.1 User Manual
254
c. Right-click the to-be-monitored domain in the pop-up window, and select [Properties], as shown
below:
d. Open the [Group Policy] tab and then double-click [Default Domain Policy], as shown below:
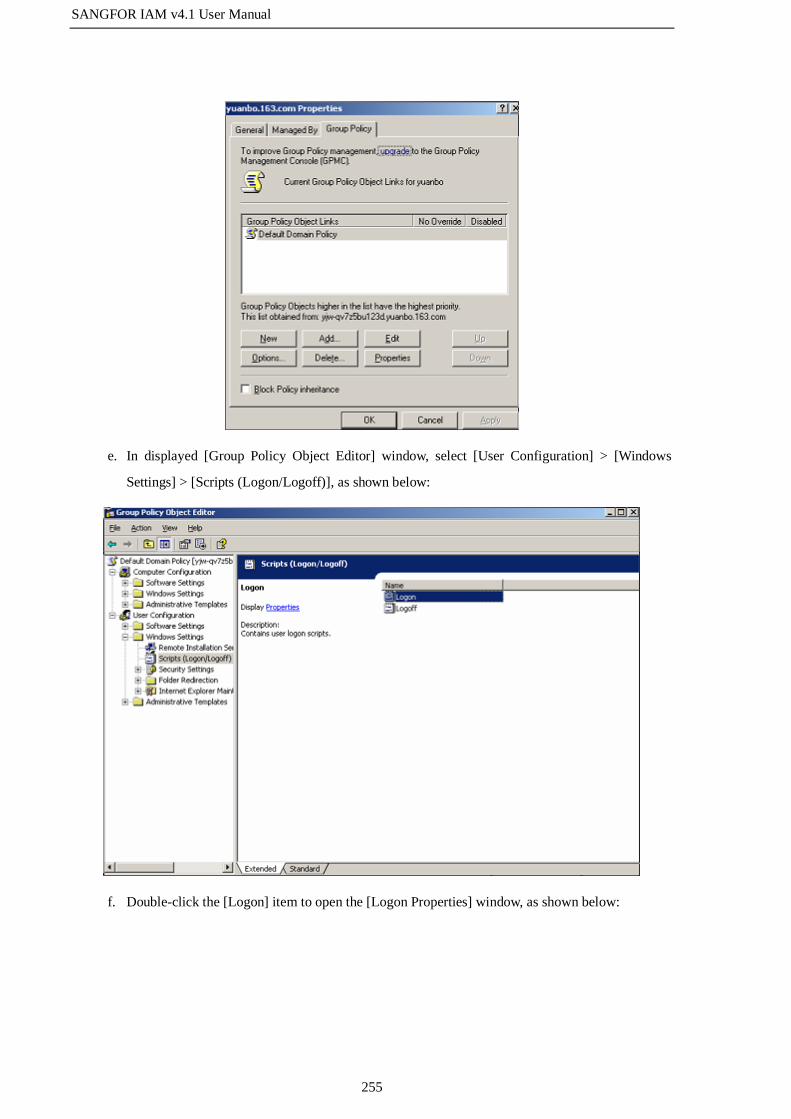
SANGFOR IAM v4.1 User Manual
255
e. In displayed [Group Policy Object Editor] window, select [User Configuration] > [Windows
Settings] > [Scripts (Logon/Logoff)], as shown below:
f. Double-click the [Logon] item to open the [Logon Properties] window, as shown below:
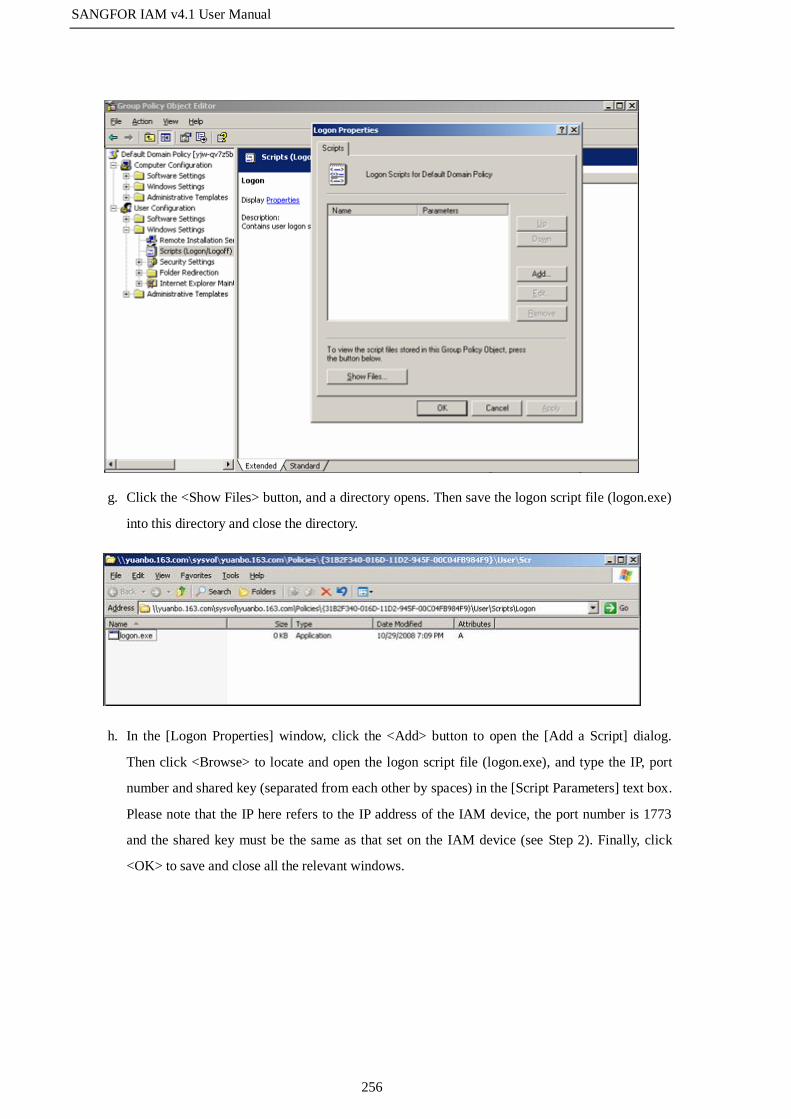
SANGFOR IAM v4.1 User Manual
256
g. Click the <Show Files> button, and a directory opens. Then save the logon script file (logon.exe)
into this directory and close the directory.
h. In the [Logon Properties] window, click the <Add> button to open the [Add a Script] dialog.
Then click <Browse> to locate and open the logon script file (logon.exe), and type the IP, port
number and shared key (separated from each other by spaces) in the [Script Parameters] text box.
Please note that the IP here refers to the IP address of the IAM device, the port number is 1773
and the shared key must be the same as that set on the IAM device (see Step 2). Finally, click
<OK> to save and close all the relevant windows.
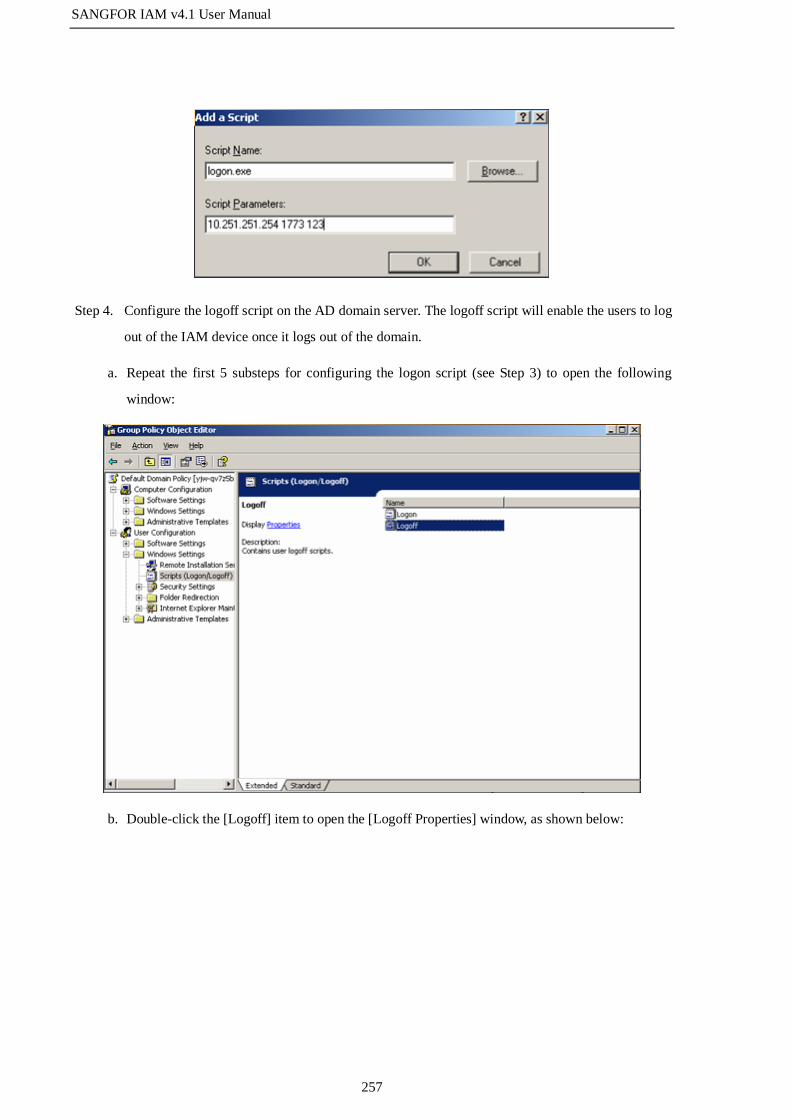
SANGFOR IAM v4.1 User Manual
257
Step 4. Configure the logoff script on the AD domain server. The logoff script will enable the users to log
out of the IAM device once it logs out of the domain.
a. Repeat the first 5 substeps for configuring the logon script (see Step 3) to open the following
window:
b. Double-click the [Logoff] item to open the [Logoff Properties] window, as shown below:

SANGFOR IAM v4.1 User Manual
258
c. Click the <Show Files> button, and a directory opens. Then save the logoff script file
(logoff_release.exe) into this directory and close the directory.
d. In the [Logon Properties] window, click the <Add> button to open the [Add a Script] dialog.
Then click <Browse> to locate and open the logoff script file (logff_release.exe), and type the IP
address (10.251.251.251) in the [Script Parameters] text box. Please note that the IP here refers to
the IP address of the IAM device, same as that set in logon script. Finally, click <OK> to save
and close all the relevant windows.

SANGFOR IAM v4.1 User Manual
259
e. Select [Start] > [Run] on the desktop of your computer, type gpupdate and click <OK> to apply
the group policy.
Step 5. Configure the authentication policy according to the IP address or MAC address of the users who
need use SSO. Go to the [User Authentication] > [Authentication Policy] page to add the
authentication policy (for detailed settings, see section 3.3.3.1.2 "Add Authentication Policy").
After the above configurations are completed, the users can access the Internet once they log into the
domain.
1. The primary DNS on the user computers must be set to the IP address of the domain server;
otherwise, the domain IP address cannot be resolved and therefore may cause that the users cannot
log into the domain server.
2. If a user modifies the DNS address or IP address after logging into the domain successfully, the
SSO will not work. Although it seems that the user can log into the domain and enter Windows using
the correct password. However, the user actually has not logged into the domain, and the
authentication dialog will still pop up to require the user to type the username and password when
the user accesses the Internet. This is because Windows can remember the password typed last time
and the user can enter Windows even if it does not log into the domain.
3. The IP addresses of the domain server, IAM device and user computers should be able to
communicate with one another.
By Monitoring
The monitoring mode means that the IAM device obtains the login profiles of the users by monitoring the
data of computers logging into the domain server and therefore realize SSO. Using this mode, you need not
install any component on the domain server, but it must be ensured that the data of LAN computers
logging into the domain must go through the IAM device or be mirrored to the IAM device through the
mirror interface. By monitoring the login information on UDP 88 port, the IAM device will not
authenticate the users again if they have logged into the domain, that is, the users can access the Internet
once they logs into the domain successfully. This monitoring mode is applicable no matter whether the

SANGFOR IAM v4.1 User Manual
260
domain server is located in the local area network (LAN) or wide area network (WAN).
The subsequent sections will respectively illustrate how to configure the domain SSO when the domain
server is located in LAN and in WAN.
1. Domain Server Locates in LAN
The data processing flow is as follows:
1. The IAM monitors the whole process of PC logging into the domain.
2. The user automatically passes the authentication on the IAM device once it logs into the domain
successfully.
In this case, follow the steps below to configure the AD domain SSO:
Step 1. Configure the AD domain server. Go to the [User Authentication] > [Authentication Options] >
[External Auth Server] page to configure (see section 3.3.3.3 "External Authentication Server").
Step 2. Configure the domain SSO function on the IAM device.
a. Go to [User Authentication] > [Authentication Options] > [SSO Options] > [Domain] page, and
check the [Enable Domain SSO] option.
b. Check the [Obtain login profile by monitoring the data of computer logging into domain] option
(indicating achieving SSO by monitoring data), and type the IP address and port number of the
domain server (in the format of "IP:Port") in [Domain Controller List], as shown below. If there
are several domain servers, type one entry per row.

SANGFOR IAM v4.1 User Manual
261
Step 3. If the login data does not go through the IAM device, you need to set the mirror interface on the
device and then connect it to the mirror interface of the switch that will forward the login data.
Click the [Others] tab and select an idle interface as the mirror interface of the IAM device. Do
NOT select an interface that is being used.
Step 4. Configure the authentication policy according to the IP address or MAC address of the users who
need use domain SSO. Go to the [User Authentication] > [Authentication Policy] page to add the
authentication policy (for detailed settings, see section 3.3.3.1.2 "Add Authentication Policy").
After the above configurations are completed, the users can access the Internet once they log into the
domain.
2. Domain Server Locates in WAN

SANGFOR IAM v4.1 User Manual
262
The data processing flow is as follows:
1. PC logs into the domain, the login data going through the IAM device.
2. The LAN interface of the IAM device works as the monitoring interface, no need to set other monitoring
interface.
In this case, follow the steps below to configure the AD domain SSO:
Step 1. Configure the AD domain server. Go to the [User Authentication] > [External Auth Server] page
to configure (see section 3.3.3.3 "External Authentication Server").
Step 2. Configure the domain SSO function on the IAM device.
a. Go to [User Authentication] > [Authentication Options] > [SSO Options] > [Domain] page, and
check the [Enable Domain SSO] option.
b. Check the [Obtain login profile by monitoring the data of logging into domain] option (indicating
achieving SSO by monitoring data), and type the IP address and port number of the domain
server (in the format of "IP:Port") in [Domain Controller List], as shown below. If there are
several domain servers, type one entry per row.
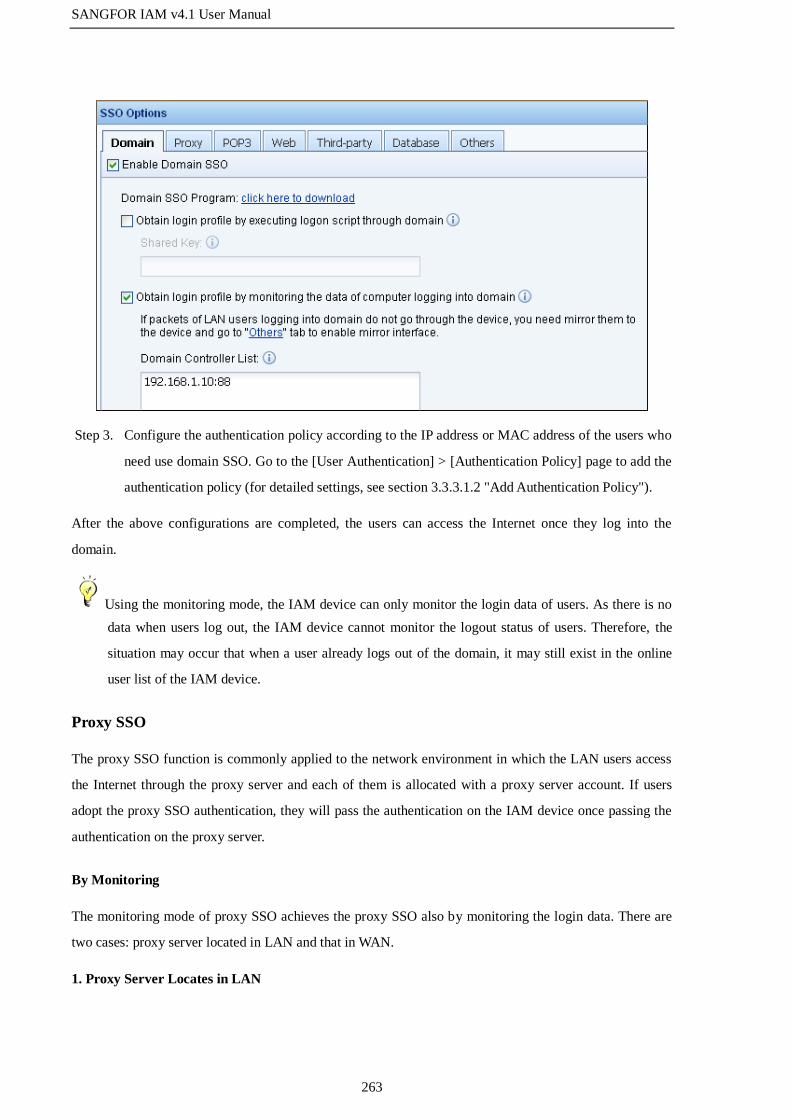
SANGFOR IAM v4.1 User Manual
263
Step 3. Configure the authentication policy according to the IP address or MAC address of the users who
need use domain SSO. Go to the [User Authentication] > [Authentication Policy] page to add the
authentication policy (for detailed settings, see section 3.3.3.1.2 "Add Authentication Policy").
After the above configurations are completed, the users can access the Internet once they log into the
domain.
Using the monitoring mode, the IAM device can only monitor the login data of users. As there is no
data when users log out, the IAM device cannot monitor the logout status of users. Therefore, the
situation may occur that when a user already logs out of the domain, it may still exist in the online
user list of the IAM device.
Proxy SSO
The proxy SSO function is commonly applied to the network environment in which the LAN users access
the Internet through the proxy server and each of them is allocated with a proxy server account. If users
adopt the proxy SSO authentication, they will pass the authentication on the IAM device once passing the
authentication on the proxy server.
By Monitoring
The monitoring mode of proxy SSO achieves the proxy SSO also by monitoring the login data. There are
two cases: proxy server located in LAN and that in WAN.
1. Proxy Server Locates in LAN

SANGFOR IAM v4.1 User Manual
264
The data processing flow is as follows:
1. PC accesses the Internet through the proxy server, the IAM device monitoring the communication
between PC and proxy server.
2. When PC passes the authentication on the proxy server, it will automatically pass the authentication on
the IAM device.
In this case, follow the steps below to configure the proxy SSO:
Step 1. Configure the Proxy SSO function on the IAM device.
a. Go to [User Authentication] > [Authentication Options] > [SSO Options] > [Proxy] page, and
check the [Enable Proxy SSO] option.
b. Check the [Obtain login profile by monitoring the data of computer logging into proxy server]
option (indicating achieving SSO by monitoring data), and type the IP address and port number
of the domain server (in the format of "IP:Port") in [Proxy Server List], as shown below. If there
are several domain servers, type one entry per row.

SANGFOR IAM v4.1 User Manual
265
Step 2. If the login data does not go through the IAM device, you need to set the mirror interface on the
device and then connect it to the mirror interface of the switch that will forward the login data.
Click the [Others] tab and select an idle interface as the mirror interface of the IAM device. Do
NOT select an interface that is being used.
Step 3. Configure the authentication policy according to the IP address or MAC address of the users who
need use proxy SSO. Go to the [User Authentication] > [Authentication Policy] page to add the
authentication policy (for detailed settings, see section 3.3.3.1.2 "Add Authentication Policy").
After the above configurations are completed, the users can access the Internet once they log into the
proxy server.
When the proxy server locates in the LAN, the login data of user does not go through the IAM
device and the IAM device adopts the mirroring mode. In this case, the [Compatible with Kerberos
authentication] function is not supported.
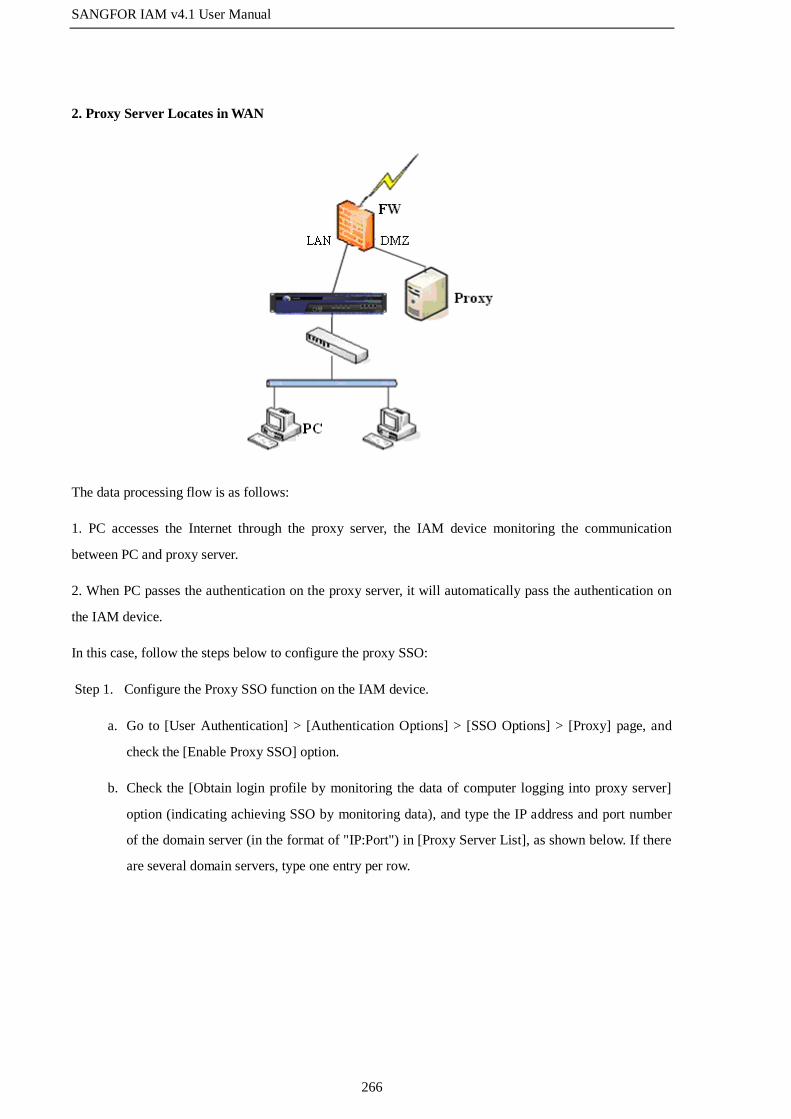
SANGFOR IAM v4.1 User Manual
266
2. Proxy Server Locates in WAN
The data processing flow is as follows:
1. PC accesses the Internet through the proxy server, the IAM device monitoring the communication
between PC and proxy server.
2. When PC passes the authentication on the proxy server, it will automatically pass the authentication on
the IAM device.
In this case, follow the steps below to configure the proxy SSO:
Step 1. Configure the Proxy SSO function on the IAM device.
a. Go to [User Authentication] > [Authentication Options] > [SSO Options] > [Proxy] page, and
check the [Enable Proxy SSO] option.
b. Check the [Obtain login profile by monitoring the data of computer logging into proxy server]
option (indicating achieving SSO by monitoring data), and type the IP address and port number
of the domain server (in the format of "IP:Port") in [Proxy Server List], as shown below. If there
are several domain servers, type one entry per row.

SANGFOR IAM v4.1 User Manual
267
Step 2. Configure the authentication policy according to the IP address or MAC address of the users who
need use proxy SSO. Go to the [User Authentication] > [Authentication Policy] page to add the
authentication policy (for detailed settings, see section 3.3.3.1.2 "Add Authentication Policy").
After the above configurations are completed, the users can access the Internet once they log into the proxy
server.
If the Proxy server is an ISA server and adopts "Integrated Windows Authentication", you need
check the [Compatible with Kerberos authentication] option to achieve the proxy SSO. This function
is only applicable to the situation when the login data goes through the IAM device. It does not apply
to the mirroring mode and is not supported in Bypass mode.
By Using ISA Control
The ISA control mode applies to the situation when the ISA server locates in the LAN and the data for
logging into the ISA server does not go through the IAM device. This mode registers the extended plugin
on ISA server, and the extended plugin will then report the message that the PC logs into the ISA server
successfully to the IAM device, completing the login to the IAM device.

SANGFOR IAM v4.1 User Manual
268
The data processing flow is as follows:
1. PC passes the proxy authentication of the ISA through the HTTP proxy.
2. ISA reports the successful login of the PC to the IAM device.
3. The IAM device automatically lets the PC pass the authentication and allows its access data.
In this case, follow the steps below to configure the proxy SSO:
Step 1. Configure the authentication policy according to the IP address or MAC address of the users who
need use proxy SSO. Go to the [User Authentication] > [Authentication Policy] page to add the
authentication policy (for detailed settings, see section 3.3.3.1.2 "Add Authentication Policy").
Step 2. Configure the Proxy SSO function on the IAM device.
a. Go to [User Authentication] > [Authentication Options] > [SSO Options] > [Proxy] page, and
check the [Enable Proxy SSO] option.
b. Check the [Obtain login profile by executing logon control through proxy] option (indicating
achieving SSO by using ISA control) and type the shared key in [Shared Key] text box, as shown
below:
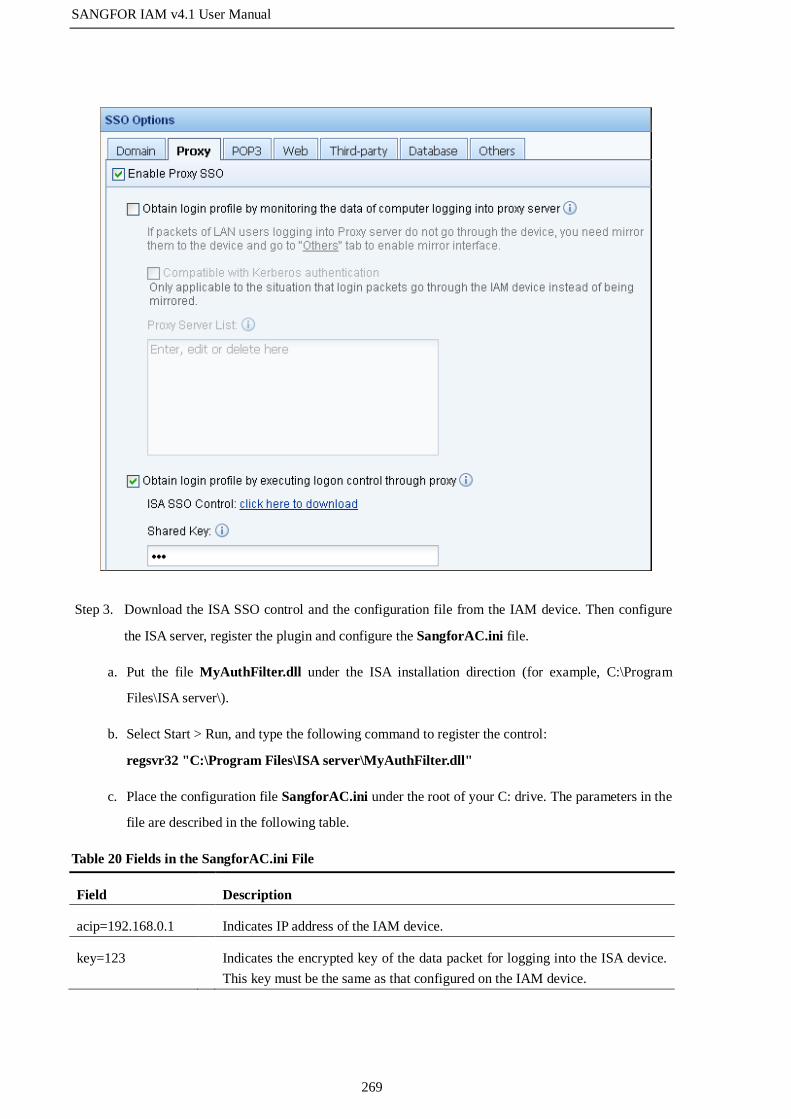
SANGFOR IAM v4.1 User Manual
269
Step 3. Download the ISA SSO control and the configuration file from the IAM device. Then configure
the ISA server, register the plugin and configure the SangforAC.ini file.
a. Put the file MyAuthFilter.dll under the ISA installation direction (for example, C:\Program
Files\ISA server\).
b. Select Start > Run, and type the following command to register the control:
regsvr32 "C:\Program Files\ISA server\MyAuthFilter.dll"
c. Place the configuration file SangforAC.ini under the root of your C: drive. The parameters in the
file are described in the following table.
Table 20 Fields in the SangforAC.ini File
Field Description
acip=192.168.0.1 Indicates IP address of the IAM device.
key=123 Indicates the encrypted key of the data packet for logging into the ISA device.
This key must be the same as that configured on the IAM device.

SANGFOR IAM v4.1 User Manual
270
cycle=30 Indicates the minimum interval (in seconds) that the login data packet is sent
from an IP address. It prevents an IP address from sending login packets at a
too high frequency, for the IP address may send login packet every time it
initiates a new session or visits a new website.
logpath= Indicates the path to the debug log file. If it is null, it means the log function is
disabled, that is, the debug information will not be logged; if it is filled with a
path, it means the debug information will be logged. By default, the log
function is disabled. Please enable it if necessary. In addition, make sure that
the NETWORK SERVICE users have the right to read and write the directory
where this file locates.
maxlogsize=1 Indicates the maximum capacity (MB) of the file storing the debug logs. Once
it reaches the threshold, the logs will be cleared automatically.
charset=UTF-8 Indicates the charset. The supported encodings are UTF-8, UTF-16, GB2312,
GB18030 and BIG5.
d. Make sure the "Sangfor ISA Auth Filter" plugin is enabled on the ISA plugin panel.
After the above configurations are completed, the users can access the Internet once they log into the
proxy server.
1. You need to register the plugin again every time when you modify the SangforAC.ini file.
2. The ISA control will not help the domain user log out of the IAM device when the user logs off or
turns off the computer. However, you can configure the timeout interval on the IAM device to have
the user automatically logged out of the IAM device after a certain time period. Go to the
[Authentication Options] > [Other Options] page, check the first option and specify the timeout, as
shown below:
3. The shared key configured on the IAM device must be the same as that configured in the ISA
configuration file and it cannot be the same as the shared key for any other SSO.
4. The ISA server should be configured to allow the data to be sent between the server itself and the
UDP 1773 port of the IAM device.
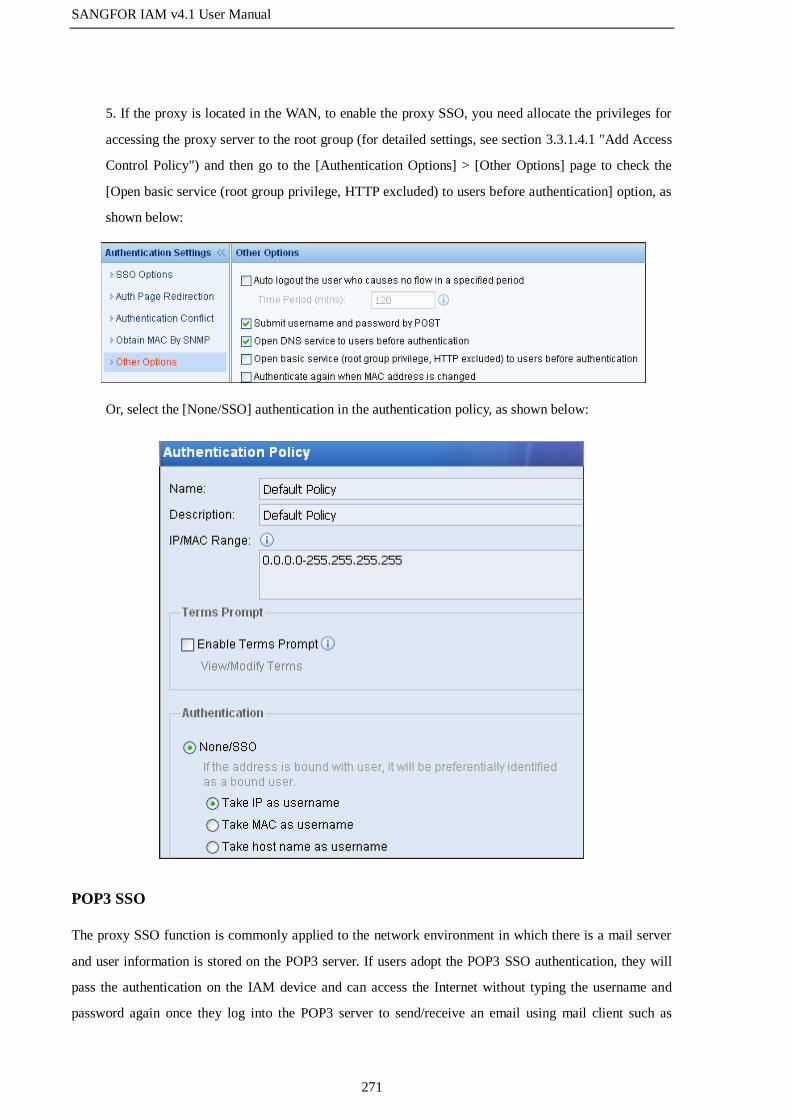
SANGFOR IAM v4.1 User Manual
271
5. If the proxy is located in the WAN, to enable the proxy SSO, you need allocate the privileges for
accessing the proxy server to the root group (for detailed settings, see section 3.3.1.4.1 "Add Access
Control Policy") and then go to the [Authentication Options] > [Other Options] page to check the
[Open basic service (root group privilege, HTTP excluded) to users before authentication] option, as
shown below:
Or, select the [None/SSO] authentication in the authentication policy, as shown below:
POP3 SSO
The proxy SSO function is commonly applied to the network environment in which there is a mail server
and user information is stored on the POP3 server. If users adopt the POP3 SSO authentication, they will
pass the authentication on the IAM device and can access the Internet without typing the username and
password again once they log into the POP3 server to send/receive an email using mail client such as

SANGFOR IAM v4.1 User Manual
272
Outlook and Foxmail, for the IAM device will obtain the login profiles of the users by monitoring and
automatically identify and authenticate the users.
The POP3 SSO is applicable no matter whether the POP3 server is located in the local area network (LAN)
or wide area network (WAN). The subsequent sections will respectively illustrate how to configure the
POP3 SSO when the POP3 server is located in LAN and in WAN.
1. POP3 Server Locates in LAN
The data processing flow is as follows:
1. PC communicates with the POP3 server through the mail client, the IAM device monitoring the whole
communication process.
2. When the mail client successfully logs into the POP3 server, the IAM device automatically authenticates
the user, who then can access the Internet without typing the password again.
3. As the data interacts in the LAN and the data of users logging into the POP3 server does not go through
the IAM device, you need set a monitoring interface on the IAM device.
In this case, follow the steps below to configure the POP3 SSO:
Step 1. Configure the authentication POP3 server. Go to the [User Authentication] > [External Auth
Server] page to configure (see section 3.3.3.3 "External Authentication Server").
Step 2. Configure the POP3 SSO function on the IAM device.
a. Go to [User Authentication] > [Authentication Options] > [SSO Options] > [POP3] page, and
check the [Enable POP3 SSO] option.

SANGFOR IAM v4.1 User Manual
273
b. Type the IP address and monitoring port of the POP3 server (in the format of "IP:Port") in [Mail
Server List], as shown below. Here, the port refers to the POP3 authentication port, which is TCP
110 port generally. If there are several POP3 servers, type one entry per row.
Step 3. If the login data does not go through the IAM device, you need to set the mirror interface on the
device and then connect it to the mirror interface of the switch that will forward the login data.
Click the [Others] tab and select an idle interface as the mirror interface of the IAM device. Do
NOT select the interface that is being used.
Step 4. Configure the authentication policy according to the IP address or MAC address of the users who
need use POP3 SSO. Go to the [User Authentication] > [Authentication Policy] page to add the
authentication policy (for detailed settings, see section 3.3.3.1.2 "Add Authentication Policy").
After the above configurations are completed, the users can access the Internet once they logs into the
POP3 server successfully by sending/receiving an email through mail client.
2. POP3 Server Locates in WAN

SANGFOR IAM v4.1 User Manual
274
The data processing flow is as follows:
1. PC logs into the POP3 server, the login data going through the IAM device.
2. The LAN interface of the IAM device works as the monitoring interface, no need to set other monitoring
interface.
In this case, follow the steps below to configure the POP3 SSO:
Step 1. Configure the authentication POP3 server. Go to the [User Authentication] > [External Auth
Server] page to configure (see section 3.3.3.3 "External Authentication Server").
Step 2. Configure the POP3 SSO function on the IAM device.
a. Go to [User Authentication] > [Authentication Options] > [SSO Options] > [POP3] page, and
check the [Enable POP3 SSO] option.
b. Type the IP address and monitoring port of the POP3 server (in the format of "IP:Port") in [Mail
Server List], as shown below. Here, the port refers to the POP3 authentication port, which is TCP
110 port generally. If there are several POP3 servers, type one entry per row.
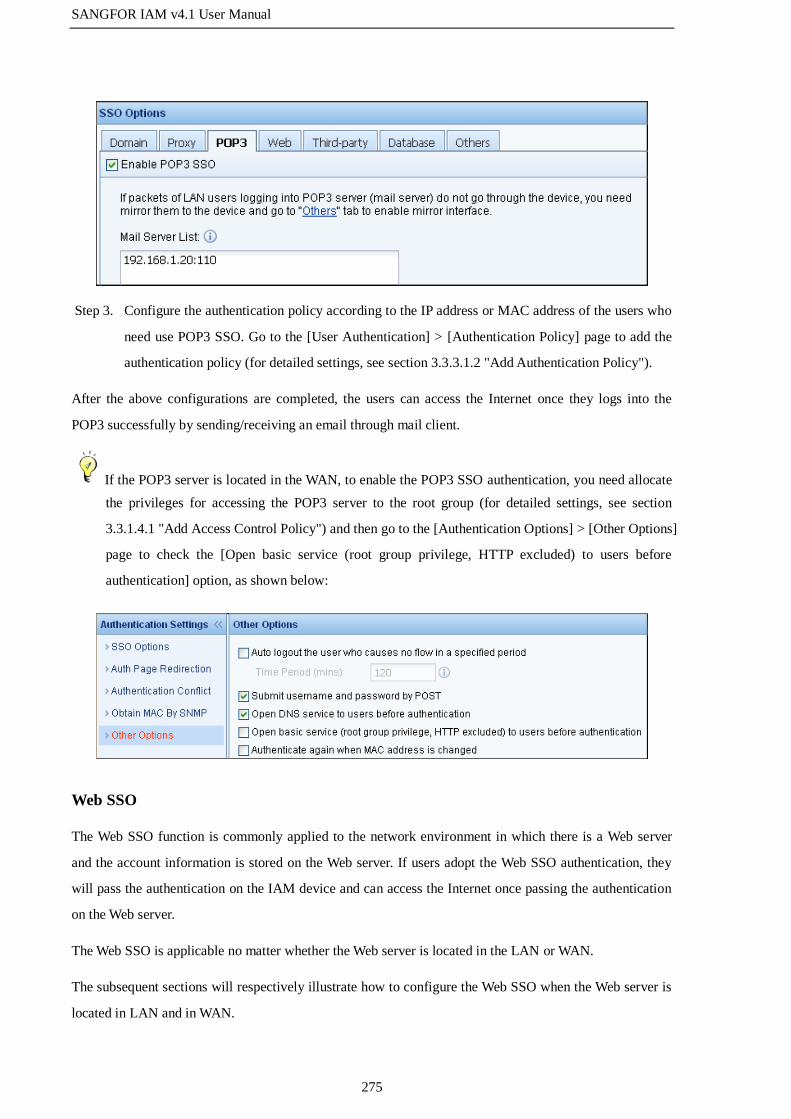
SANGFOR IAM v4.1 User Manual
275
Step 3. Configure the authentication policy according to the IP address or MAC address of the users who
need use POP3 SSO. Go to the [User Authentication] > [Authentication Policy] page to add the
authentication policy (for detailed settings, see section 3.3.3.1.2 "Add Authentication Policy").
After the above configurations are completed, the users can access the Internet once they logs into the
POP3 successfully by sending/receiving an email through mail client.
If the POP3 server is located in the WAN, to enable the POP3 SSO authentication, you need allocate
the privileges for accessing the POP3 server to the root group (for detailed settings, see section
3.3.1.4.1 "Add Access Control Policy") and then go to the [Authentication Options] > [Other Options]
page to check the [Open basic service (root group privilege, HTTP excluded) to users before
authentication] option, as shown below:
Web SSO
The Web SSO function is commonly applied to the network environment in which there is a Web server
and the account information is stored on the Web server. If users adopt the Web SSO authentication, they
will pass the authentication on the IAM device and can access the Internet once passing the authentication
on the Web server.
The Web SSO is applicable no matter whether the Web server is located in the LAN or WAN.
The subsequent sections will respectively illustrate how to configure the Web SSO when the Web server is
located in LAN and in WAN.

SANGFOR IAM v4.1 User Manual
276
1. Web Server Locates in LAN
The data processing flow is as follows:
1. PC logs into the Web server, the IAM device monitoring the whole communication process.
2. The IAM device judges the success or failure of the authentication according to the keyword returned by
the server and consequently determines the success or failure of the Web SSO.
In this case, follow the steps below to configure the Web SSO:
Step 1. Go to [User Authentication] > [Authentication Options] > [SSO Options] > [Web] page, and
check the [Enable Web SSO] option.
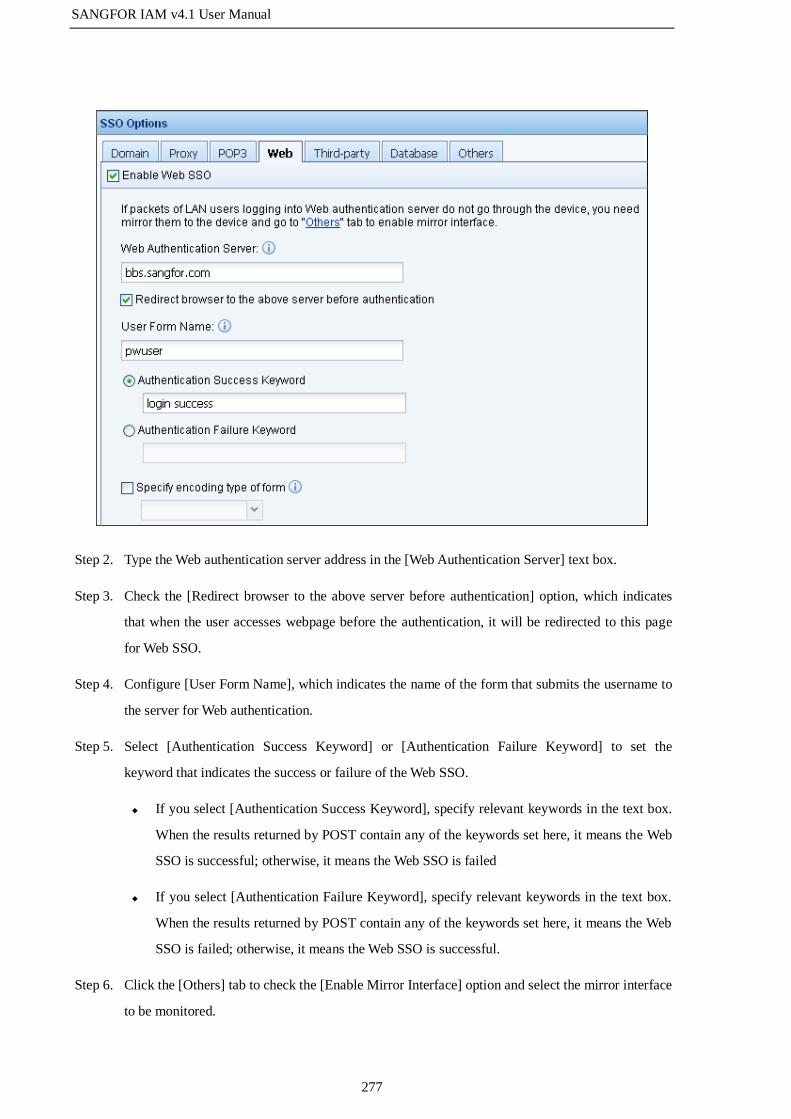
SANGFOR IAM v4.1 User Manual
277
Step 2. Type the Web authentication server address in the [Web Authentication Server] text box.
Step 3. Check the [Redirect browser to the above server before authentication] option, which indicates
that when the user accesses webpage before the authentication, it will be redirected to this page
for Web SSO.
Step 4. Configure [User Form Name], which indicates the name of the form that submits the username to
the server for Web authentication.
Step 5. Select [Authentication Success Keyword] or [Authentication Failure Keyword] to set the
keyword that indicates the success or failure of the Web SSO.
If you select [Authentication Success Keyword], specify relevant keywords in the text box.
When the results returned by POST contain any of the keywords set here, it means the Web
SSO is successful; otherwise, it means the Web SSO is failed
If you select [Authentication Failure Keyword], specify relevant keywords in the text box.
When the results returned by POST contain any of the keywords set here, it means the Web
SSO is failed; otherwise, it means the Web SSO is successful.
Step 6. Click the [Others] tab to check the [Enable Mirror Interface] option and select the mirror interface
to be monitored.

SANGFOR IAM v4.1 User Manual
278
After the above configurations are completed, when the PC accesses the Internet, the browser will be
redirected to the BBS (bbs.sangfor.com) first and once the PC logs into the BBS successfully, it can access
the Internet.
2. Web Server Locates in WAN
The data processing flow is as follows:
1. PC logs into the Web server, the login data going through the IAM device.
2. The LAN interface of the IAM device works as the monitoring interface, no need to set other monitoring
interface. After the user logs in to the Web server successfully, the Web SSO is successful.
In this case, follow the steps below to configure the Web SSO:
Step 1. Go to [User Authentication] > [Authentication Options] > [SSO Options] > [POP3] page, and

SANGFOR IAM v4.1 User Manual
279
check the [Enable Web SSO] option.
Step 2. Type the Web authentication server address in the [Web Authentication Server] text box.
Step 3. Check the [Redirect browser to the above server before authentication] option, which indicates
that when the user accesses webpage before the authentication, it will be redirected to this page
for Web SSO.
Step 4. Configure [User Form Name], which indicates the name of the form that submits the username to
the server for Web authentication.
Step 5. Select [Authentication Success Keyword] or [Authentication Failure Keyword] to set the
keyword that indicates the success or failure of the Web SSO.
If you select [Authentication Success Keyword], specify relevant keywords in the text box.
When the results returned by POST contain any of the keywords set here, it means the Web
SSO is successful; otherwise, it means the Web SSO is failed
If you select [Authentication Failure Keyword], specify relevant keywords in the text box.
When the results returned by POST contain any of the keywords set here, it means the Web
SSO is failed; otherwise, it means the Web SSO is successful.

SANGFOR IAM v4.1 User Manual
280
After the above configurations are completed, when the PC accesses the Internet, the browser will be
redirected to the BBS (bbs.sangfor.com) first and once the PC logs into the BBS successfully, it can access
the Internet.
PPPoE SSO
PPPoE SSO is commonly applied to the network environment in which users on the IAM device are
consistent with the PPPoE dial-up accounts, the PPPoE authentication has been adopted and users are
expected to automatically pass the authentication on the IAM device once they pass the PPPoE
authentication. It is applicable to the network in which the PPPoE server is located in the WAN, as shown
below:
PPPoP Server Locates in WAN
The data processing flow is as follows:
1. The PPPoE client sends request for authentication or logout of the PPPoE server.
2. The IAM device monitors the PPPoE communication packets, obtaining the username for authentication
or logout.
In this case, follow the steps below to configure the PPPoE SSO:
Step 1. Go to [User Authentication] > [Authentication Options] > [SSO Options] > [PPPoE] page, and
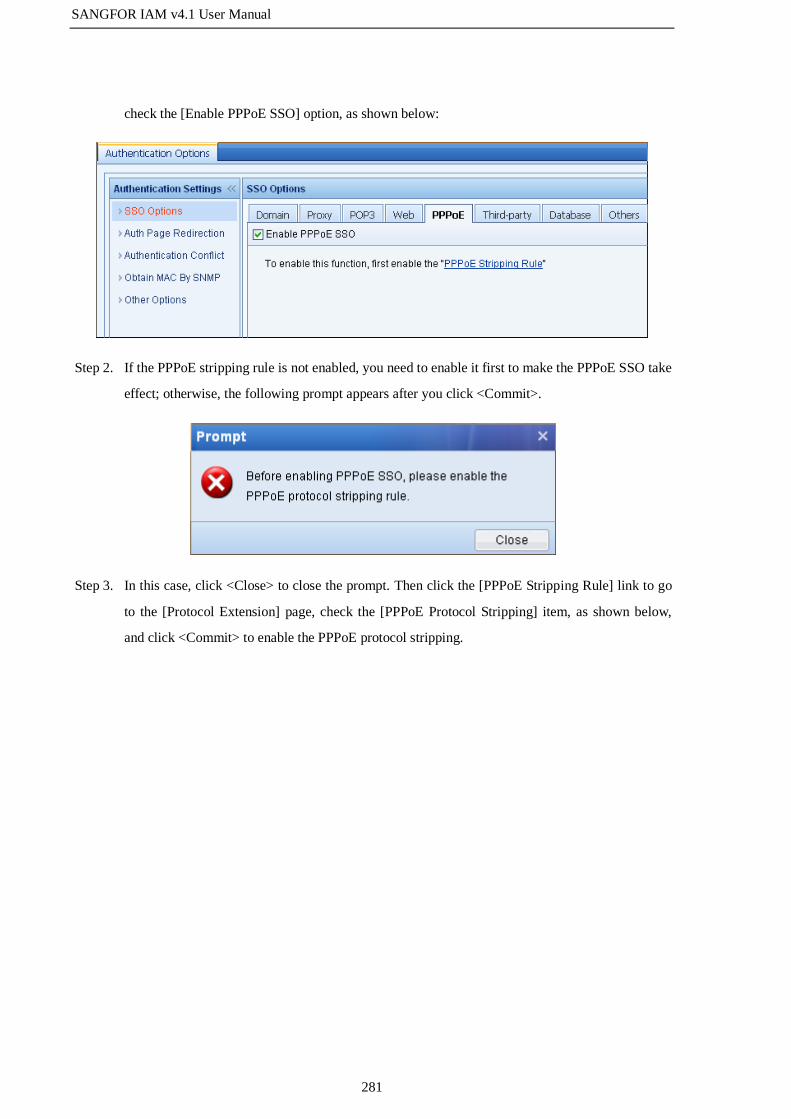
SANGFOR IAM v4.1 User Manual
281
check the [Enable PPPoE SSO] option, as shown below:
Step 2. If the PPPoE stripping rule is not enabled, you need to enable it first to make the PPPoE SSO take
effect; otherwise, the following prompt appears after you click <Commit>.
Step 3. In this case, click <Close> to close the prompt. Then click the [PPPoE Stripping Rule] link to go
to the [Protocol Extension] page, check the [PPPoE Protocol Stripping] item, as shown below,
and click <Commit> to enable the PPPoE protocol stripping.
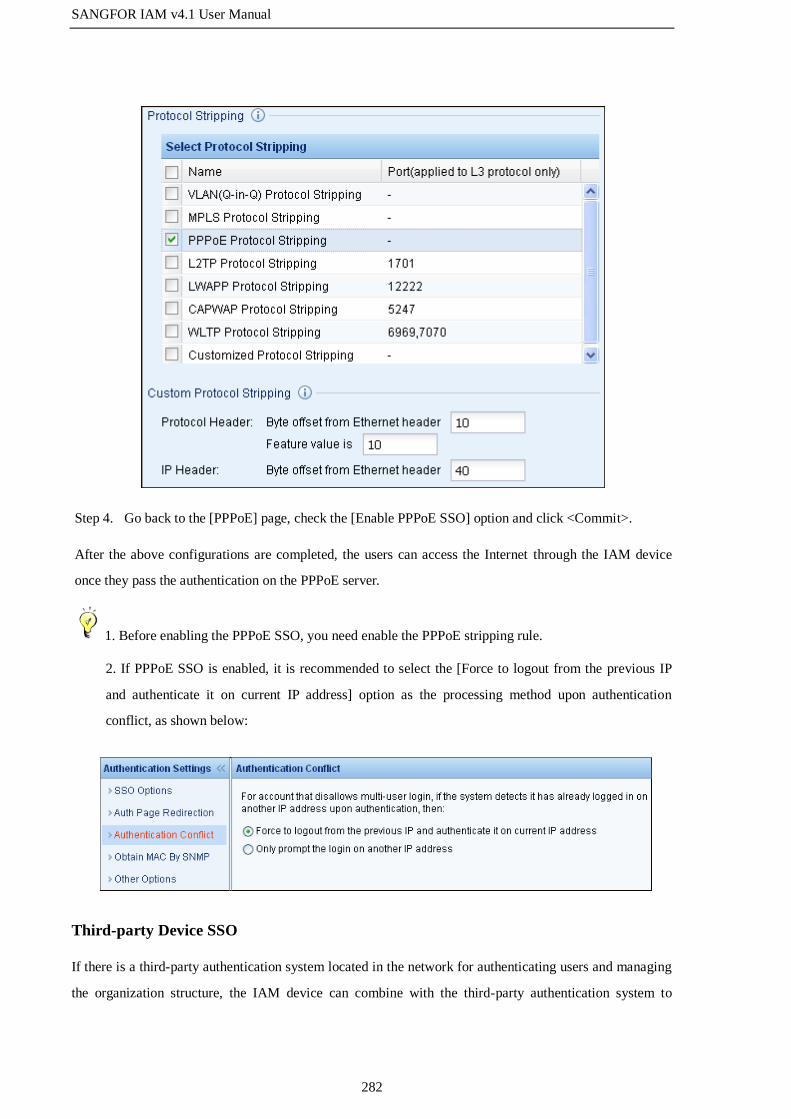
SANGFOR IAM v4.1 User Manual
282
Step 4. Go back to the [PPPoE] page, check the [Enable PPPoE SSO] option and click <Commit>.
After the above configurations are completed, the users can access the Internet through the IAM device
once they pass the authentication on the PPPoE server.
1. Before enabling the PPPoE SSO, you need enable the PPPoE stripping rule.
2. If PPPoE SSO is enabled, it is recommended to select the [Force to logout from the previous IP
and authenticate it on current IP address] option as the processing method upon authentication
conflict, as shown below:
Third-party Device SSO
If there is a third-party authentication system located in the network for authenticating users and managing
the organization structure, the IAM device can combine with the third-party authentication system to

SANGFOR IAM v4.1 User Manual
283
achieve SSO. At present, the IAM device supports the following third-party authentication systems: Ruijie
SAM system, HTTP SSO interface (applicable to City Hotspot Billing System) and H3C CAMS system.
Ruijie SAM
The Ruijie SAM system is a bandwidth management system with authentication and billing functions,
commonly used by universities and secondary ISPs. Before accessing the Internet, the users must pass the
authentication on Ruijie SAM system, and when the users pass the authentication on or log out of the SAM
system or, they will automatically pass the authentication on or log out of the IAM device.
The data processing flow is as follows:
1. PC passes the authentication on or logs out of the Ruijie SAM system.
2. The database server of the Ruijie SAM system instructs the IAM device to authenticate or log out the
corresponding user, achieving SSO and logout.
In this case, follow the steps below to configure the Ruijie SAM SSO:
Step 1. Go to [User Authentication] > [Authentication Options] > [SSO Options] > [Third-party] page,
check the [Ruijie SAM System] and type the shared key, as shown below:

SANGFOR IAM v4.1 User Manual
284
Step 2. Download the Ruijie SAM SSO program and configure the database server of the SAM system to
have the database server send the user authentication information to the IAM device when the PC
logs into the SAM system. Here, we take the SQL Server 2005 of Ruijie SAM system as an
example to show how to configure the database server.
a. Click the [click here to download] link below the [Ruijie SAM System] option to download the
rjsam.zip package (which includes the logon.exe and trigger SQL script) to the database server
and then decompress it to get the following files:
b. Copy the application program logon.exe (to be called by the trigger) to the directory of the SAM
server.
c. The file folder 2005 stores the SQL statements (triggers) customized for SQL Server 2005,
including: logon_trigger.sql, logout_trigger.sql and update_trigger.sql. You need to modify the
three triggers. Take logon_trigger.sql as an example, open the file and copy all the contents to
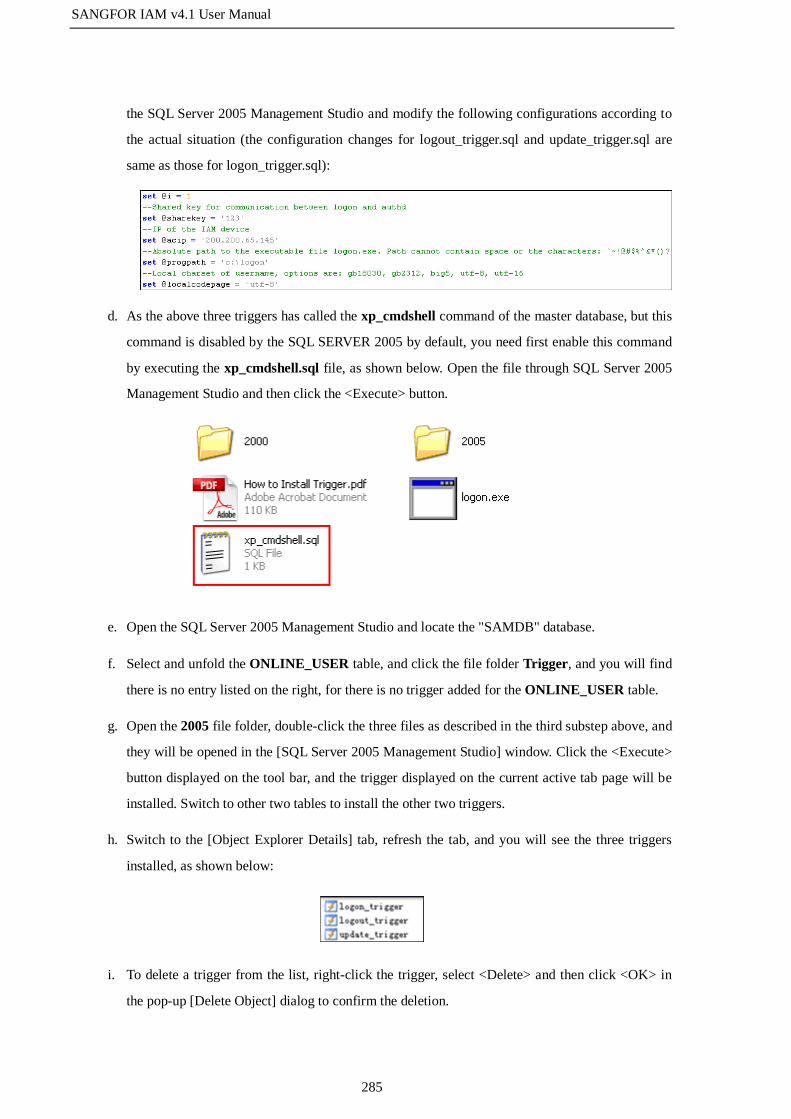
SANGFOR IAM v4.1 User Manual
285
the SQL Server 2005 Management Studio and modify the following configurations according to
the actual situation (the configuration changes for logout_trigger.sql and update_trigger.sql are
same as those for logon_trigger.sql):
d. As the above three triggers has called the xp_cmdshell command of the master database, but this
command is disabled by the SQL SERVER 2005 by default, you need first enable this command
by executing the xp_cmdshell.sql file, as shown below. Open the file through SQL Server 2005
Management Studio and then click the <Execute> button.
e. Open the SQL Server 2005 Management Studio and locate the "SAMDB" database.
f. Select and unfold the ONLINE_USER table, and click the file folder Trigger, and you will find
there is no entry listed on the right, for there is no trigger added for the ONLINE_USER table.
g. Open the 2005 file folder, double-click the three files as described in the third substep above, and
they will be opened in the [SQL Server 2005 Management Studio] window. Click the <Execute>
button displayed on the tool bar, and the trigger displayed on the current active tab page will be
installed. Switch to other two tables to install the other two triggers.
h. Switch to the [Object Explorer Details] tab, refresh the tab, and you will see the three triggers
installed, as shown below:
i. To delete a trigger from the list, right-click the trigger, select <Delete> and then click <OK> in
the pop-up [Delete Object] dialog to confirm the deletion.

SANGFOR IAM v4.1 User Manual
286
After the above configurations are completed, the users can access the Internet through the IAM
device once they pass the Ruijie SAM authentication.
1. The procedures for installing the triggers on Ruijie SQL Server 2000 are similar to those on SQL
Server 2005, with the two differences that the triggers to be installed are in the 2000 folder and the
file xp_cmdshell.sql need not be executed if the stored procedure xp_cmdshell has been enabled.
2. If the database name of Ruijie SAM system is not SAMDB, change SAMDB on the first row "use
SAMDB" of the SQL statement into the actual database name. If the table name and field name are
also different from those in the above example, change them according to the actual situation.
3. Please pay attention to the following field in the trigger script, as shown below. If multiple users
are allowed to log in or log out simultaneously, you need to modify the value after "@i >" according
to the actual number of users. Generally, it is recommended to set it to a value no greater than 2000
(high-end device supports at most 3000 users). If you keep the default value, but there are two users
in the network logging in simultaneously, the IAM device will authenticate only one of them,
causing that the other user cannot access the Internet.
If you modify this value to 9, as shown below, it indicates the IAM device supports simultaneous
login or logout of up to 10 users.
4. Please pay attention to the following field in the trigger script, as shown below. When the program
logon.exe sends the authentication information to the IAM device, the log is disabled by default to
protect the server performance. If you want to enable the log, you need to replace the first row with
the third row (that is, the row ending with "-1", which means enabling the log).
After you enable the log, the corresponding logs will be generated and stored under the main
directory of users on the database server, as shown below:

SANGFOR IAM v4.1 User Manual
287
5. The shared key configured on the IAM device must be the same as that configured in the trigger
script and cannot be the same as the shared key for any other SSO.
6. To achieve Ruijie SAM system SSO, it must be ensured that the IAM device can
intercommunicate with the Ruijie SAM server, and the Ruijie SAM server can send authentication
information by connecting to the UDP 1773 port of the IAM device. It is not required that the data of
user logging into the SAM system go through the IAM device.
7. Apart from the Ruijie SAM system, this function is applicable to all the other database systems
whose background database is MS SQL SERVER 2000/2005. However, you need to modify the SQL
scripts accordingly to make sure the scripts accord with the actual database name, table name and
field name.
HTTP SSO Interface
The HTTP SSO interface available on the IAM device can provide any third-party authentication device
(such as City Hotspot Billing System) with the HTTP(S)-based SSO/logout functions by GET method.

SANGFOR IAM v4.1 User Manual
288
The data processing flow is as follows:
1. PC accesses the Web authentication server through HTTP or HTTPS, and passes the authentication on or
logs out from the Web server.
2. The authentication/logout page on the Web server is processed so that the Web server will inform the
IAM device to authenticate/logout the user accordingly, achieving SSO.
3. PC can access the Internet through the IAM device after it passes the authentication on the Web server.
In this case, follow the steps below to configure the HTTP SSO interface to achieve third-party device
SSO:
Step 1. Enable the HTTP SSO interface on the IAM device. Go to [User Authentication] >
[Authentication Options] > [SSO Options] > [Third-party] page, and check the [Enable HTTP
SSO Interface] option, as shown below:

SANGFOR IAM v4.1 User Manual
289
Step 2. Click the [Download Example Illustration] link to download the example, which includes the
files Logon.js and Logon.html. Modify the file Logon.html and configure the Web authentication
server.

SANGFOR IAM v4.1 User Manual
290
After the above configurations are completed, the users will automatically pass the authentication on or
log out of the IAM device once they pass the authentication on or log out of the HTTP/HTTPS server.
1. The HTTP SSO interface can be used to combine the IAM device with the City Hotspot Billing
System or other Web authentication systems (whose Web authentication page may need to be
modified) to achieve SSO.
2. When the HTTP SSO function is not needed, please do NOT check the [Enable the interface
supporting HTTP SSO] option.
H3C CAMS System
Similar to the Ruijie SAM system, the H3C CAMS system is also a bandwidth management system with
authentication and billing functions, commonly used by universities and secondary ISPs. The IAM device
combines with the H3C CAMS server through the interface provided by the H3C CAMS server to obtain
the user information from the CAMS system regularly and update its own online user list/user list,
achieving SSO.
The data processing flow is as follows:
1. PC passes the authentication on the H3C CAMS system.
2. The IAM device regularly synchronizes the organization structure and online users from the H3C CAMS

SANGFOR IAM v4.1 User Manual
291
system.
3. PC accesses the Internet as one of the online users obtained by the IAM device.
In this case, follow the steps below to configure the H3C CAMS system SSO:
Step 1. Configure the H3C CAMS server. Go to the [User Authentication] > [External Auth Server] page
to configure (see section 3.3.3.3 "External Authentication Server").
Step 2. Go to [User Authentication] > [Authentication Options] > [SSO Options] > [Third-party] page,
check the [H3C CAMS System] option, select the H3C CAMS configured in Step 1 and specify
the [Interval for Obtaining Authenticated User], as shown below:
After the above configurations are completed, the users can access the Internet through the IAM device
once they pass the authentication on the H3C CAMS system.
1. The H3C CAMS server supports the automatic synchronization of users. For details, see section
3.3.2.5 "User Synchronization Policy".
2. In some cases, it may take some time (determined by the [Interval for Obtaining Authenticated
User] field) for the user to automatically pass the authentication on the IAM device after passing the
authentication on the H3C CAMS system. It is recommended to set the authentication method to
[None/SSO] in the corresponding authentication policy.
Database SSO
When there is already a database system that stores and manages user authentication information and

SANGFOR IAM v4.1 User Manual
292
organization structure in the network, the SANGFOR IAM device can combine the database system to
achieve SSO. As the IAM device supports SQL statement, it will use the SQL statement to query the user
list and authenticated users in the database system, and synchronizes them into its own organization
structure and online user list, enabling the users to pass the authentication on or log out of the IAM device
automatically after they pass the authentication on or log out of the database server. Currently, the
supported databases are Oracle, MS SQL server, DB2 and MySQL.
The data processing flow is as follows:
1. PC passes the authentication on the authentication server, the database server updating the PC's
authentication information.
2. The IAM device regularly queries the online users in the database server and updates its own.
3. PC accesses the Internet as one of the online users obtained by the IAM device.
In this case, follow the steps below to configure the database SSO:
Step 1. Configure the database server. Go to the [User Authentication] > [External Auth Server] page to
configure (see section 3.3.3.3 "External Authentication Server").
Step 2. Go to [User Authentication] > [Authentication Options] > [SSO Options] > [Database] page,
check the [Enable Database SSO] option, select the database server configured in Step 1 and
specify the SQL statement, as shown below:

SANGFOR IAM v4.1 User Manual
293
[SQL Statement for Obtaining Authenticated User] specifies the Select statement that can be
used to query the online users. The IAM device uses this Select statement to query the user
information table in the database and obtain the online users. Please note that the result set
returned by SQL statement cannot exceed 2 columns (the first column is Username and the
second one is IP address), and the number of records searched cannot exceed 200000.
[Interval for Obtaining Authenticated User] specifies the maximum interval between the
authentication on the authentication server and that on the IAM device. By default, it is 30
seconds.
Step 3. Click <Test Validity> to list the user information that can be obtained.
1. The online user list only supports synchronizing the "Username" and "IP" columns, and other user
attributes, such as user status (whether the user is disabled) and expiry date (whether the user is
expired) will not be synchronized. By default, the synchronized users are enabled and will never be
expired.
2. The database server supports the automatic synchronization of users. For details, see section
3.3.2.5 "User Synchronization Policy".
3. In some cases, it may take some time (determined by the [Interval for Obtaining Authenticated
User] field) for the user to automatically pass the authentication on the IAM device after passing the
authentication on the database server. It is recommended to set the authentication method to
[None/SSO] in the corresponding authentication policy.

SANGFOR IAM v4.1 User Manual
294
Others
The [Others] page enables you to configure the mirror interface to monitor the data of user logging into the
server when the data does not go through the IAM device. You need to configure the monitored mirror
interface for domain SSO (monitoring mode), POP3 SSO and Web SSO. This monitored interface can also
be used to monitoring the mirrored packets when the IAM device is deployed in Bypass mode.
To configure the mirror interface to be monitored, check the [Enable Mirror Interface] option and select an
idle interface.
3.3.3.2.2 Authentication Page Redirection
The [Auth Page Redirection] page allows you to set the page that will be displayed after users pass the
Web authentication.

SANGFOR IAM v4.1 User Manual
295
The options displayed on the [Auth Page Redirection] page are respectively described in the following
table.
Table 21 Auth Page Redirection Settings
Field Description
Recently requested page If this option is checked, after the LAN user passes the authentication,
the Web page will be redirected to the page requested by the user before
the authentication.
Logout page If this option is checked, after the LAN user passes the authentication,
the Web page will be redirected to the user logout page.
Customized page URL If this option is checked, you need to specify the page URL in the text
box. After the LAN user passes the authentication, the Web page will be
redirected to the page specified here.
User information ranking
page
If this option is checked, after the LAN user passes the authentication,
the Web page will be redirected to the user information ranking page.
3.3.3.2.3 Authentication Conflict
The [Authentication Conflict] page allows you to select the processing method when the system finds an
account that disallows multi-user login has already logged in upon authentication. There are two options:
[Force to logout from the previous IP and authenticate it on current IP address] and [Only prompt the login
on another IP address], as shown in the following figure:
3.3.3.2.4 Obtain MAC Through SNMP
In the network environment in which LAN users adopt the authentication of MAC binding or restriction
and layer 3 switch is crossed, you need to enable the [Obtain MAC Through SNMP] function to obtain the

SANGFOR IAM v4.1 User Manual
296
MAC addresses of the LAN users. However, the precondition is that the LAN switch supports the SNMP
function.
Working Principle: The IAM device periodically sends snmp request to the layer 3 switch to request for
the MAC table on the switch and saves it in the memory of the device. When the computers on other
network segments of the layer 3 switch access the Internet by way of the IAM device, for example, if the
computer 192.168.1.2 (which is not on the same network segment as the LAN interface of the device)
accesses the Internet through the IAM device, the IAM device will verify the MAC address of the data
packets of the computer. If the IAM device finds that the MAC address is that of the layer 3 switch, it will
not handle the MAC but search for the actual MAC address from the memory according to the IP address
192.168.1.2 and then authenticate the actual MAC address of the user.
To configure the [Obtain MAC Through SNMP] function, do as follows:
Step 1. Enable the SNMP function on the layer 3 switch.
Step 2. Go to the [User Authentication] > [Authentication Options] > [Obtain MAC Through SNMP]
page, and check the [Enable SNMP Settings] option to enable the SNMP function on the device,
as shown below:
Step 3. Specify the [SNMP Server Access Timeout] and [SNMP Server Access Interval]. Generally, keep
the default settings.
Step 4. Configure [SNMP Server List]. Click <Add> to open the [Add SNMP Server] page, type the
SNMP IP address and click <Search> to search the server. After the search result is displayed,
check the server and click <Add> to add the server, as shown below:

SANGFOR IAM v4.1 User Manual
297
Step 5. Configure the authentication policy according to the IP address or MAC address of the users who
adopt MAC authentication. Go to the [User Authentication] > [Authentication Policy] page to add
the authentication policy (see section 3.3.3.1.2 "Add Authentication Policy").
After the above configurations are finished, the LAN computers located under the layer 3 switch can
access the Internet after they are authenticated by the IAM device using new user authentication.
3.3.3.2.5 Other Options
The [Other Options] page allows you to set the options related to authentication, as shown below:

SANGFOR IAM v4.1 User Manual
298
The options displayed on the [Other Options] page are respectively described in the following table.
Table 22 Basic Settings
Field Description
Auto logout the user who causes no
flow in a specified period
Indicates whether to specify the timeout in which if a user
does not cause any flow, the system will automatically logout
the user.
Submit username and password by
POST
Indicates whether to display the authentication dialog in form
of webpage for the users who adopt the username/password
authentication.
Open DNS service to users before
authentication
Indicates whether to allow users to access DNS service before
the authentication.
Open basic service (root group
privilege, HTTP excluded) to users
before authentication
Indicates whether to allow users to use the root group
privileges (HTTP service excluded) before the authentication.

SANGFOR IAM v4.1 User Manual
299
Authenticate again when MAC
address is changed
Indicates whether to re-authenticate the user when the MAC
address of the authenticated user is changed.
For example, suppose the user whose IP address is
192.168.1.1 adopts the username/password authentication.
After the user gets offline, it will not be logged out
immediately. At this time, another user changes its IP address
into 192.168.1.1 and wants to access the Internet using this
IP. In this situation, as the MAC address is changed, the IAM
device will authenticate the user again.
Password Policy Indicates whether to enable password policy to enhance the
security of the user password. After enabling it, you can then
check relevant options to impose requirements on the
password, such as:
Password cannot be the same as username.
New password cannot be the same as the old one.
Password length cannot be shorter than certain
characters.
Password must contain letters, numeric digits and
special characters.
Lock out the user when
authentication attempts reach the
maximum
Indicates whether to lock out a user when its authentication
attempts reach a certain value.
To enable it, check this option and specify the maximum
authentication attempts and lockout time period.
The values 3 (Max Failed Attempts) and 1 (Lockout Period)
set in the above figure indicates that when a user fails the
authentication for three times, it will be locked out for 1
minute.
1. The users who adopt username/password authentication can change the password by themselves
(no need to be changed by the administrator). If changing password failed, the user will be locked
out for a certain period, which is determined by the [Lockout Period] set under the [Lock out the user
when authentication attempts reach the maximum] option.
2. To change the password, type http://device IP (device IP should be replace by the IP address of the
IAM device) in the address bar of the browser to open the page as shown below:

SANGFOR IAM v4.1 User Manual
300
Click <Change Password> to open the following page. Then type the username, old password, new
password and new password again, and click <OK>.
3. To enable DKey authentication, click <Login> on the [Internet Access Authentication System]
page to open the login page, as shown below. Then click the [Download DKey Client] to download
the DKey authentication client.

SANGFOR IAM v4.1 User Manual
301
3.3.3.3 External Authentication Server
[External Auth Server] enables you to configure the information of third-party authentication servers. The
IAM device supports five types of external authentication servers, namely, LDAP server, RADIUS server,
POP3 server, Database server and H3C CAMS server.
3.3.3.3.1 Add External Authentication Server
LDAP Server
To add a LDAP server, do as follows:
Step 1. Go to the [User/Policy] > [User Authentication] > [External Auth Server] page, click <Add> and
select [LDAP Server] to open the [Add LDAP Server] page.
Step 2. Type the server name and set the parameters under [Basic Settings], including IP address,
authentication port, timeout and BaseDN (the specific path to the server that the user locates), as
shown below:

SANGFOR IAM v4.1 User Manual
302
Step 3. Specify the information under [Sync Settings], including the username and password of the
domain user, type of domain and other information. The IAM device supports the following
seven types of LDAP: [MS Active Directory], [OPEN LDAP], [SUN LDAP], [IBM LDAP],
[Lotus LDAP], [Novell LDAP] and [OTHER LDAP].
Step 4. Specify the options under [Search Settings], as described below:

SANGFOR IAM v4.1 User Manual
303
Table 23 Search Settings
Field Description
Use extension
function
If the LDAP server supports the paged search, check this option; otherwise, the
common ldap_search function will be used. If it is not supported by the LDAP
server, it possibly because it is disabled by the server or not supported by the
LDAP software (for example, the openldap of lower version).
Page Size Specify the size returned by each page when using the extension function. Please
contact the LDAP server administrator (It is commonly set to 800/400/200. Try a
smaller value until the synchronization works).
Size Limit Specify size limit of synchronization. DO NOT set the option unless the server
has specific configuration.
Step 5. Click <Test Validity> to test if the IP address, port number and username are available. Then click
<Commit> to save your settings.
Generally, keep the default settings for the fields under [Search Settings].
RADIUS Server
To add a RADIUS server, do as follows:
Step 1. Go to the [User/Policy] > [User Authentication] > [External Auth Server] page, click <Add> and
select [RADIUS Server] to open the [Add RADIUS Server] page, as shown below:
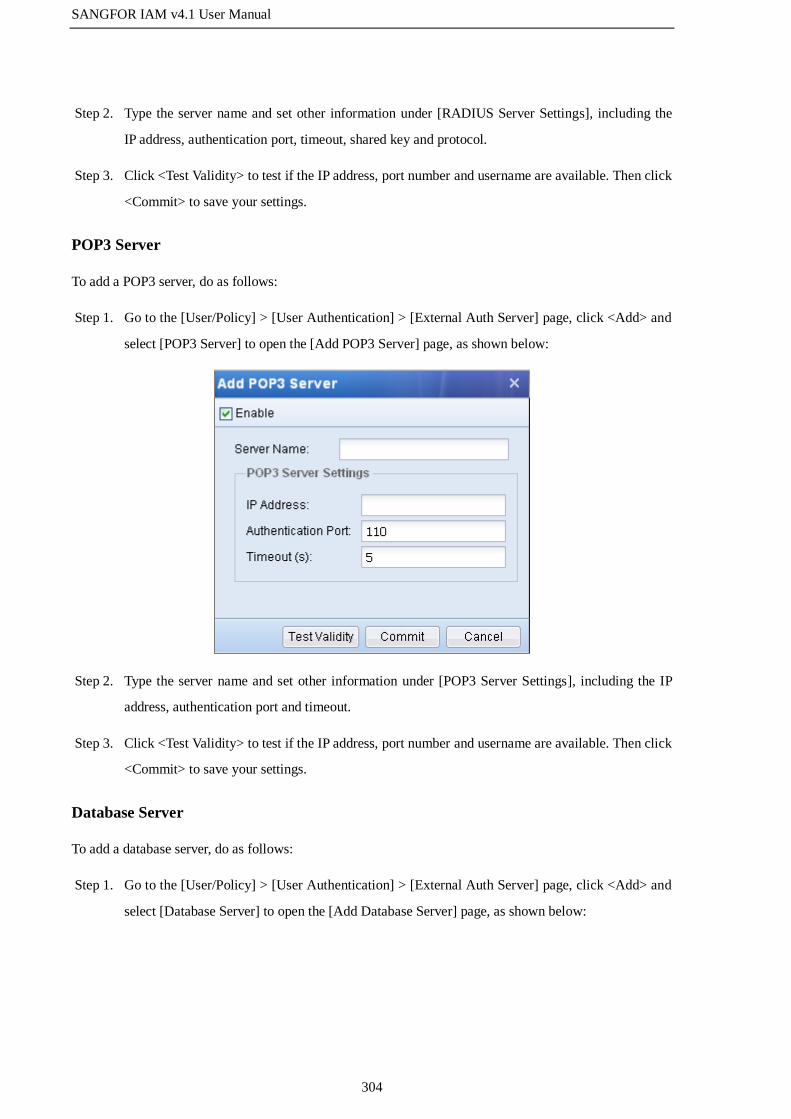
SANGFOR IAM v4.1 User Manual
304
Step 2. Type the server name and set other information under [RADIUS Server Settings], including the
IP address, authentication port, timeout, shared key and protocol.
Step 3. Click <Test Validity> to test if the IP address, port number and username are available. Then click
<Commit> to save your settings.
POP3 Server
To add a POP3 server, do as follows:
Step 1. Go to the [User/Policy] > [User Authentication] > [External Auth Server] page, click <Add> and
select [POP3 Server] to open the [Add POP3 Server] page, as shown below:
Step 2. Type the server name and set other information under [POP3 Server Settings], including the IP
address, authentication port and timeout.
Step 3. Click <Test Validity> to test if the IP address, port number and username are available. Then click
<Commit> to save your settings.
Database Server
To add a database server, do as follows:
Step 1. Go to the [User/Policy] > [User Authentication] > [External Auth Server] page, click <Add> and
select [Database Server] to open the [Add Database Server] page, as shown below:

SANGFOR IAM v4.1 User Manual
305
Step 2. Specify the following information.
Table 24 Database Server Settings
Field Description
Server Name Type a name for the database server.
Database Type Specify the database type. It supports the following types: DB2, ORACLE,
MS SQL and MYSQL.
Server Address, Port Type the address and listening port of the database server.
Database Encoding Select the database encoding type. Options are: UTF-8, GBK and BIG5.
Username, Password Type the username that has the privilege to use SQL statement to query and
the corresponding password.
Database Name Type the name of the target database.
Timeout Specify timeout interval (in seconds) for the IAM device to connect to the
database server to obtain data. The default value is 60 seconds. You can
adjust the value according to the load of the server and number of users.
Step 3. Click <Test Validity> to test the connectivity between the IAM device and the database server
and check if the above configurations are valid. Then click <Commit> to save your settings.
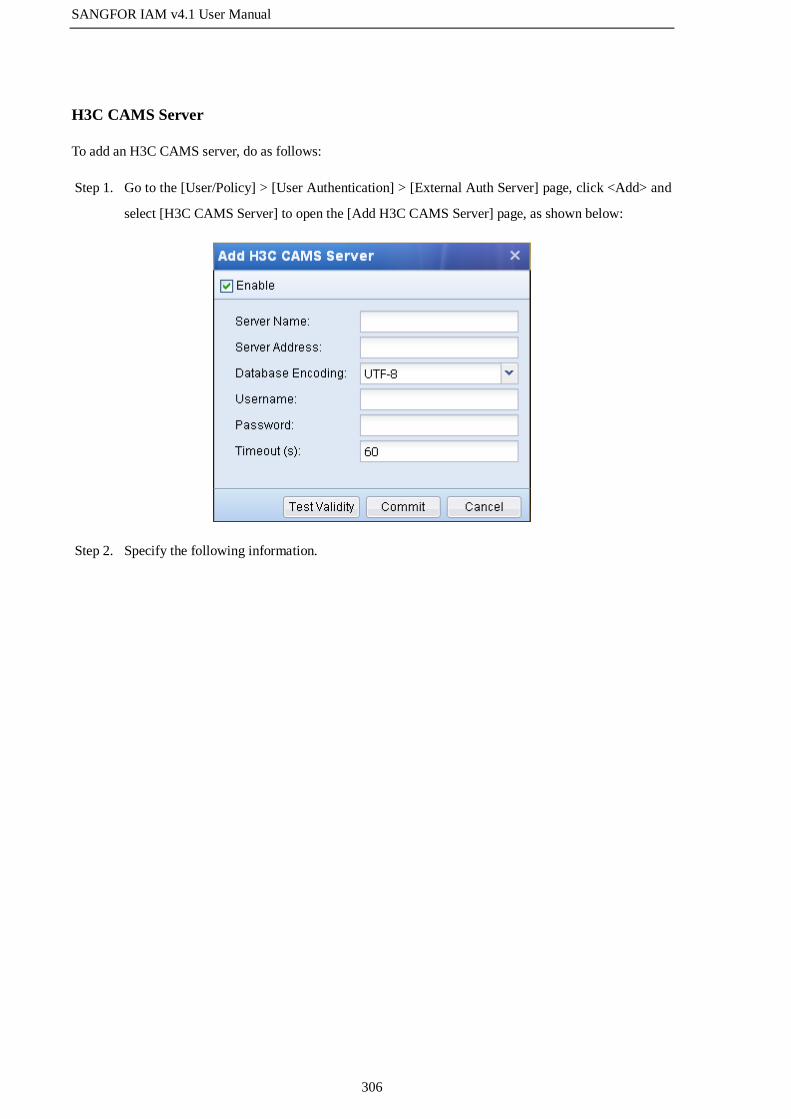
SANGFOR IAM v4.1 User Manual
306
H3C CAMS Server
To add an H3C CAMS server, do as follows:
Step 1. Go to the [User/Policy] > [User Authentication] > [External Auth Server] page, click <Add> and
select [H3C CAMS Server] to open the [Add H3C CAMS Server] page, as shown below:
Step 2. Specify the following information.
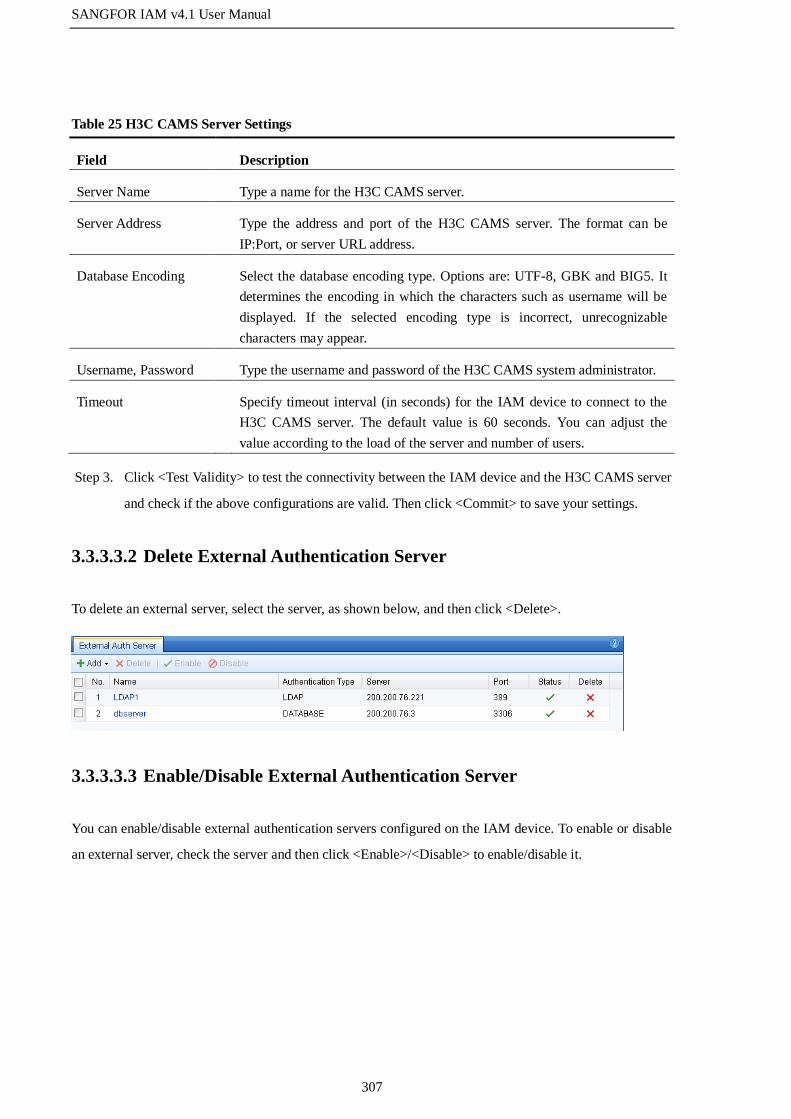
SANGFOR IAM v4.1 User Manual
307
Table 25 H3C CAMS Server Settings
Field Description
Server Name Type a name for the H3C CAMS server.
Server Address Type the address and port of the H3C CAMS server. The format can be
IP:Port, or server URL address.
Database Encoding Select the database encoding type. Options are: UTF-8, GBK and BIG5. It
determines the encoding in which the characters such as username will be
displayed. If the selected encoding type is incorrect, unrecognizable
characters may appear.
Username, Password Type the username and password of the H3C CAMS system administrator.
Timeout Specify timeout interval (in seconds) for the IAM device to connect to the
H3C CAMS server. The default value is 60 seconds. You can adjust the
value according to the load of the server and number of users.
Step 3. Click <Test Validity> to test the connectivity between the IAM device and the H3C CAMS server
and check if the above configurations are valid. Then click <Commit> to save your settings.
3.3.3.3.2 Delete External Authentication Server
To delete an external server, select the server, as shown below, and then click <Delete>.
3.3.3.3.3 Enable/Disable External Authentication Server
You can enable/disable external authentication servers configured on the IAM device. To enable or disable
an external server, check the server and then click <Enable>/<Disable> to enable/disable it.
SANGFOR IAM v4.1 User Manual
308
3.4 Bandwidth Management
3.4.1 Overview
The bandwidth management function enables you to control the amount of bandwidth used by various
applications according to the bandwidth channels. There are two types of bandwidth channels: guaranteed
channel and limited channel. The guaranteed channel works by guaranteeing a predefined amount of
bandwidth to some important applications, while the limited channel limits the amount of uplink, downlink
and total bandwidth based on group/user and applications. The Bandwidth Management System also
allows you to configure a channel hierarchy, creating a parent channel and then a child channel for this
channel to further conduct detailed bandwidth allocation.
Basic Concepts:
Bandwidth Channel: By configuring bandwidth channels, you can separate the total bandwidth into
several pieces according to the service type and user/group, each piece being a bandwidth channel.
According to the purpose, the bandwidth channels can be classified into guaranteed channel and limited
channel, as described below:
Guaranteed Channel: It works by limiting the maximum bandwidth and guaranteeing the
minimum bandwidth. When the network is busy, this channel will ensure at least the predefined
minimum bandwidth to applicable applications.
Limited Channel: It works by limiting the maximum bandwidth. When the network is busy, this
channel will limit the bandwidth of applicable applications to an amount no greater than the
maximum bandwidth predefined.
Parent Channel/Child Channel: The bandwidth channel supports the hierarchical management. You can
create child channels under another channel to allocate bandwidth detailedly and manage the bandwidth
more efficiently.
Line Bandwidth: It configures the actual uplink and downlink bandwidth of the public line. When the
IAM device is deployed in Bridge mode, you can configure the actual bandwidth of the public line of the
front-end gateway. Since the bandwidth rate allocated to limited channel and guaranteed channel are
configured based on the total bandwidth of the line, you need to the set the actual bandwidth of the line in
[Line Bandwidth].
Virtual Line: The virtual line is available only when the IAM device is deployed in Bridge mode. It
enables you to define one line into multiple virtual lines and configure bandwidth channels for them.

SANGFOR IAM v4.1 User Manual
309
3.4.2 Bandwidth Channel Matching/Priority
When the bandwidth management system is enabled, the IAM device will match the data coming into or
out of the device with the corresponding bandwidth channel. The matching criteria include group/user,
source IP address, application, valid period and destination IP group. Only when a packet satisfies all the
criteria specified in a bandwidth channel will this packet match this bandwidth channel.
The same packets will match a same bandwidth channel. The bandwidth channels are matched from top to
bottom, and therefore you need to place the channel with more detailed matching conditions at the top. The
child channels are also matched from top to bottom. When a packet matches a parent channel, the IAM
device will not execute it immediately, but keep matching all of its child channels downwards in depth to
find out the optimum child channel.
3.4.3 Bandwidth Channel
3.4.3.1 Guaranteed Channel
The guaranteed channel enables you to guarantee a certain amount of bandwidth to specified applications
so that the applications will share an amount of bandwidth no less than the predefined amount, ensuring the
smooth running of the important applications even if the line is busy.
Cast Study: Suppose there are 1000 users in your company intranet and your company has leased a
Telecom line of 10Mb/s. The requirement is that when the employees in the Financial Department when
they are visiting online banking websites and sending/receiving emails, at least 2Mb/s and at most 5Mb/s
of the bandwidth should be guaranteed.
To meet the requirements, do as follows:
Step 1. Go to [Bandwidth Mgt] > [Line Bandwidth] page and click [Line1] under the [Line] column to
open the [Edit Line Bandwidth: Line1] page. In this example, as the company has leased a
Telecom line of 10Mb/s, type 1.25MB/s (1Mb/s=1/8MB/s; 10Mb/s=1.25MB/s) in the [Uplink]
and [Downlink] text boxes, as shown below:

SANGFOR IAM v4.1 User Manual
310
Step 2. Go to the [Bandwidth Mgt] > [Bandwidth Settings] page, and check the [Enable Bandwidth
Management System] to enable the bandwidth management system. The [Line Bandwidth] below
displays the total bandwidth of the public line. You can click it to edit it.
Step 3. Open the [Bandwidth Channel] tab, click <Add> and select <Add Parent Channel> to open the
[Add Parent Channel] page, as shown below:
Step 4. Check [Enable Channel] to enable this channel. If you do not check it, the channel will be
disabled and does not take effect. Then type the channel name in [Name] text box. The [Channel]
displays the channel level. “/” indicates the current channel is the first-level channel.
Step 5. Configure [Channel Settings]. Click [Channel Settings] under [Channel Menu] to open the

SANGFOR IAM v4.1 User Manual
311
[Channel Settings] page on the right, and then set the following information.
Table 26 Guaranteed Channel Settings
Field Description
Valid Line Select the line applicable to this channel. Only when the packet goes through
this line will it matches this bandwidth channel.
In this example, there is only one line, that is, Line1; therefore, select Line1 in
[Valid Line].
Channel Type Select the type of bandwidth channel and define the bandwidth value.
In this example, as the requirement is to guarantee at least 2Mb/s and at most
5Mb/s of bandwidth when the staff in Financial Department are accessing
online banking websites and send/receive emails, check the [Guaranteed
channel], type 20 and 50 in [Min] and [Max] text boxes respectively for
[Uplink Bandwidth] and [Downlink Bandwidth]. As the total bandwidth is
10Mb/s, the minimum bandwidth is 2Mb/s and the maximum is 5Mb/s.
[Priority] has three options: high, medium and low. The high priority channel
has the first opportunity to use the idle bandwidth.

SANGFOR IAM v4.1 User Manual
312
Max Bandwidth Per
User
Limit the bandwidth of each IP address that matches this channel to a certain
value.
In this example, there is no requirement to limit bandwidth of each IP address;
therefore, do not check it.
Bandwidth
Allocation Among
Users
Set how to allocate the bandwidth to users who matches this channel. There are
two options: [Average allocation] and [Free competition]. The default selection
is [Average allocation], which indicates averagely allocating bandwidth among
users. Please note that the users here refer to those whose flow matches this
channel. The users who are specified in [Applicable Object] but have no flow
of the corresponding application are not applicable. The [Free competition]
option is unavailable at present.
Advanced Check the option to take every WAN IP as a user in the channel so that it can
equally share the bandwidth with LAN users and be limited by Max Bandwidth
Per User (typically selected for server providing services to WAN, please select
with caution).
Step 6. Configure [Applicable Objects] to set the matching conditions for this channel, including
application type, applicable objects, valid period and destination IP group. Data packet must
satisfy all the criteria to match this channel.
a. Click [Applicable Objects] under [Channel Menu] to open the [Applicable Objects] page on the
right, as shown below:
b. Select applicable application. If you check [All applications], it means this channel will apply to
all types of applications; if you check [Custom], you need to select the specific applications.
Click the [Select Application] link to open the [Select Application] page, and then select the

SANGFOR IAM v4.1 User Manual
313
application type and website type.
In this example, as the target applications are online banking websites and emails, select
[Mail/ALL] under [Application Type] and [Online Payment] and [Internet Banking] under
[Website Type]. By the way, [File Type] is used to conduct control over the download of files
through HTTP or FTP. Your selection will be displayed under [Select List] on the right. After
selecting the applications, click <OK> to save your settings.
c. Select applicable group/user or IP address. If you check [All users], it means this channel will
apply to all users in the LAN; if you check [Custom], you need to select the specific users/groups.
Click the [Select Object] link to open the [Custom Object] page, and then select the users/groups.
In this example, the target user group is the Financial Department, select the Financial Dept
group under [Organization Structure] and then select your desired users and subgroups on the
right. Your selection will be displayed under [Selected Group/User] at the bottom. [Custom IP] at
the lower right corner is used to define a single IP or IP range. When the source IP address of a
packet matches the IP address set here, the packet will match this channel. After selecting the
applicable user/group, click <OK> to save your settings.

SANGFOR IAM v4.1 User Manual
314
d. Specify the valid period destination IP group of this channel. In this example, set [Schedule] to
All Day and [Dst IP Group] to ALL, as shown below:

SANGFOR IAM v4.1 User Manual
315
Step 7. Click <OK> to save the guaranteed channel.
1. When the total bandwidth of guaranteed channels exceeds 100%, the minimum bandwidth of each
guaranteed channel will be reduced in proportion. For example, suppose you configured two
guaranteed channels: the first channel guaranteed 30% and the second channel guaranteed 90%. As
the total bandwidth exceeds 100%, the first channel is actually assigned with 30/(90+30)%, that is,
25% and the second is assigned with 90/(90+30)%, that is, 75%.
2. If there is idle bandwidth, the high priority bandwidth channel has the first opportunity to use
them.
3.4.3.2 Limited Channel
The limited channel enables you to limit the maximum amount of bandwidth allowed for the packets that
match the channel.
Case Study: Suppose there are 1000 users in your company intranet and your company has leased a
Telecom line of 10Mb/s. As the employees in the Marketing Department often use Thunder or P2P
download tools, which occupies a large amount of bandwidth and influences the running of other important
services, the company requires that the bandwidth allocated to P2P or Thunder download should be limited
to 2Mb/s and that occupied by each user should be limited to 30KB/s.
To meet the requirements, do as follows:
Step 1. Go to [Bandwidth Mgt] > [Line Bandwidth] page and click [Line1] under the [Line] column to
open the [Edit Line Bandwidth: Line1] page. In this example, as the company has leased a
Telecom line of 10Mb/s, type 1.25MB/s (1Mb/s=1/8MB/s; 10Mb/s=1.25MB/s) in the [Uplink]
and [Downlink] text boxes, as shown below:
Step 2. Go to the [Bandwidth Mgt] > [Bandwidth Settings] page, and check the [Enable Bandwidth
Management System] to enable the bandwidth management system. The [Line Bandwidth] below

SANGFOR IAM v4.1 User Manual
316
displays the total bandwidth of the public line. You can click it to edit it.
Step 3. Open the [Bandwidth Channel] tab, click <Add> and select <Add Parent Channel> to open the
[Add Parent Channel] page, as shown below:
Step 4. Check [Enable Channel] to enable this channel. If you do not check it, the channel will be
disabled and not take effect. Then type the channel name in [Name] text box. The [Channel]
displays the channel level. “/” indicates the current channel is the first-level channel.
Step 5. Configure [Channel Settings]. Click [Channel Settings] under [Channel Menu] to open the
[Channel Settings] page on the right, and then set the following information.
SANGFOR IAM v4.1 User Manual
317
Table 27 Limited Channel Settings
Field Description
Valid Line Select the line applicable to this channel. Only when the packet goes through
this line will it matches this bandwidth channel.
In this example, there is only one line, that is, Line1; therefore, select Line1 for
[Valid Line].
Channel Type Select the type of bandwidth channel and define the bandwidth value.
In this example, as the requirement is to limit the bandwidth of P2P download
data to 2Mb/s, type 20 in the [Max] text box respectively for [Uplink
Bandwidth] and [Downlink Bandwidth]. As the total bandwidth is 10Mb/s, the
minimum bandwidth is 2Mb/s.
[Priority] has three options: high, medium and low. The high priority channel
has the first opportunity to use the idle bandwidth.
Max Bandwidth Per
User
Limit the bandwidth of each IP address that matches this channel to a certain
value.
In this example, as the requirement is to limit the bandwidth occupied by each
user to 30KB/s, check this option and type 30 in the [Uplink] and [Downlink]
text boxes respectively.
Bandwidth
Allocation Among
Users
Set how to allocate the bandwidth to users who matches this channel. There are
two options: [Average allocation] and [Free competition]. The default selection
is [Average allocation], which indicates averagely allocating bandwidth among
users. Please note that the users here refer to those whose flow matches this
channel. The users who are specified in [Applicable Object] but have no flow
of the corresponding application are not applicable. The [Free competition]
option is unavailable at present.
Advanced Check the option to take every WAN IP as a user in the channel so that it can
equally share the bandwidth with LAN users and be limited by Max Bandwidth
Per User (typically selected for server providing services to WAN, please select
with caution).
Step 6. Configure [Applicable Objects] to set the matching conditions for this channel, including
application type, applicable objects, valid period and destination IP group. Data packet must
satisfy all the criteria to match this channel.
a. Click [Applicable Objects] under [Channel Menu] to open the [Applicable Objects] page on the
right, as shown below:

SANGFOR IAM v4.1 User Manual
318
b. Select applicable application. If you check [All applications], it means this channel will apply to
all types of applications; if you check [Custom], you need to select the specific applications.
Click the [Select Application] link to open the [Select Application] page, and then select the
application type and website type.
In this example, as the target applications are P2P-relevant applications and data download,
select [Download Tools/ALL], [P2P/ALL] and [P2P Stream medium/ALL] under [Application
Type]. You can also select the corresponding applications under [Website Type] and [File Type].
[Website Type] is used to conduct control over packets of or access to websites. [File Type] is
used to conduct control over file download through HTTP or FTP. Your selection will be
displayed under [Select List] on the right. After selecting the applications, click <OK> to save
your settings.

SANGFOR IAM v4.1 User Manual
319
c. Select applicable group/user or IP address. If you check [All users], it means this channel will
apply to all users in the LAN; if you check [Custom], you need to select the specific users/groups.
Click the [Select Object] link to open the [Custom Object] page, and then select the users/groups.
In this example, the target user group is the Marketing Department, select the Marketing Dept
group under [Organization Structure] and then select your desired users and subgroups on the
right. Your selection will be displayed under [Selected Group/User] at the bottom. [Custom IP] at
the lower right corner is used to define a single IP or IP range. When the source IP address of a
packet matches the IP address set here, the packet will match this channel. After selecting the
applicable user/group, click <OK> to save your settings.

SANGFOR IAM v4.1 User Manual
320
d. Specify the valid period and destination IP group of this channel. In this example, set [Schedule]
to All Day and [Dst IP Group] to ALL, as shown below:

SANGFOR IAM v4.1 User Manual
321
Step 7. Click <OK> to save the limited channel.
3.4.3.3 Child Channel
Child channel is used to further allocate the bandwidth of its parent channel (guaranteed channel or limited
channel).
Case Study: Suppose there are 1000 users in your company intranet and your company has leased a
Telecom line of 10Mb/s. The requirements are:
Guarantee at least 3MB/s and at most 5MB/s of bandwidth to HTTP applications even when the
network is busy.
Since there are a large number of employees in the Marketing Dept, for which the HTTP
application is very important, ensure a bandwidth of no less than 1MB/s and no more than
2MB/s for the HTTP applications used by employees in the Marketing Dept at any time.
Limit the bandwidth occupied by HTTP applications per employee in the Marketing Dept to no
more than 20KB/s.
To meet the requirements, do as follows:
Step 1. Go to [Bandwidth Mgt] > [Line Bandwidth] page and click [Line1] under the [Line] column to
open the [Edit Line Bandwidth: Line1] page. In this example, as the company has leased a
Telecom line of 10Mb/s, type 1.25MB/s (1Mb/s=1/8MB/s; 10Mb/s=1.25MB/s) in the [Uplink]
and [Downlink] text boxes, as shown below:
Step 2. Go to the [Bandwidth Mgt] > [Bandwidth Settings] page, and check the [Enable Bandwidth
Management System] to enable the bandwidth management system. The [Line Bandwidth] below
displays the total bandwidth of the public line. You can click it to edit it.
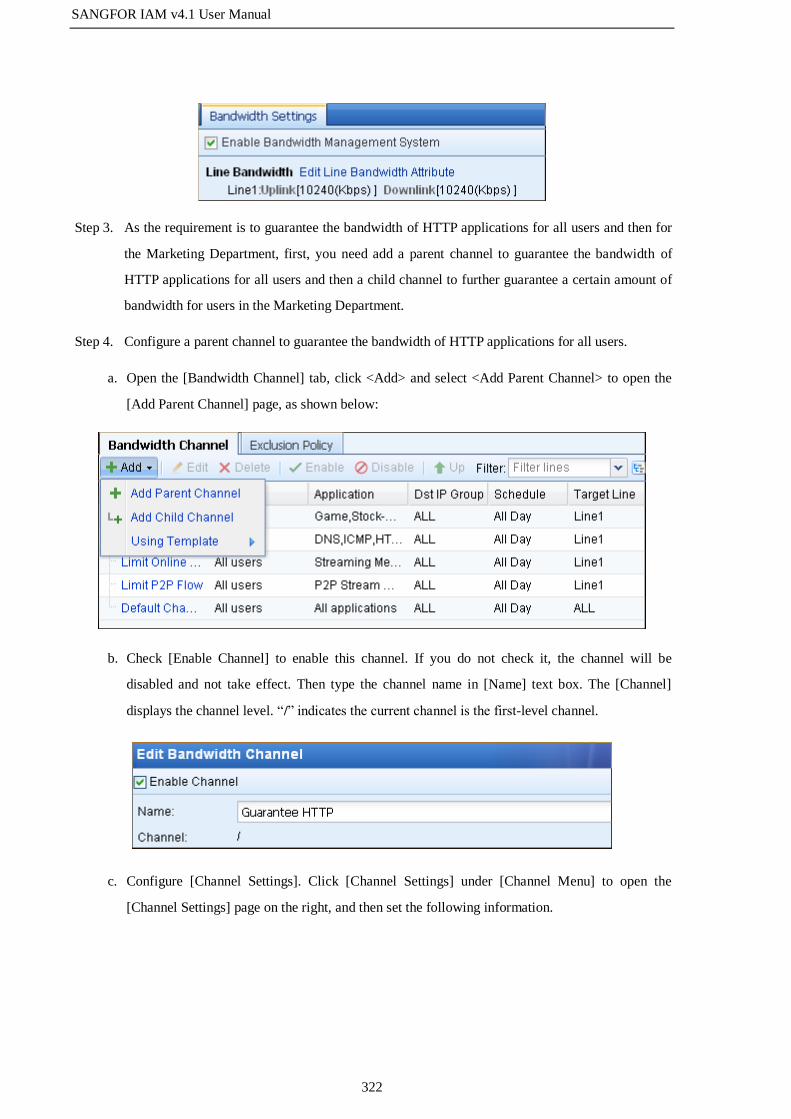
SANGFOR IAM v4.1 User Manual
322
Step 3. As the requirement is to guarantee the bandwidth of HTTP applications for all users and then for
the Marketing Department, first, you need add a parent channel to guarantee the bandwidth of
HTTP applications for all users and then a child channel to further guarantee a certain amount of
bandwidth for users in the Marketing Department.
Step 4. Configure a parent channel to guarantee the bandwidth of HTTP applications for all users.
a. Open the [Bandwidth Channel] tab, click <Add> and select <Add Parent Channel> to open the
[Add Parent Channel] page, as shown below:
b. Check [Enable Channel] to enable this channel. If you do not check it, the channel will be
disabled and not take effect. Then type the channel name in [Name] text box. The [Channel]
displays the channel level. “/” indicates the current channel is the first-level channel.
c. Configure [Channel Settings]. Click [Channel Settings] under [Channel Menu] to open the
[Channel Settings] page on the right, and then set the following information.
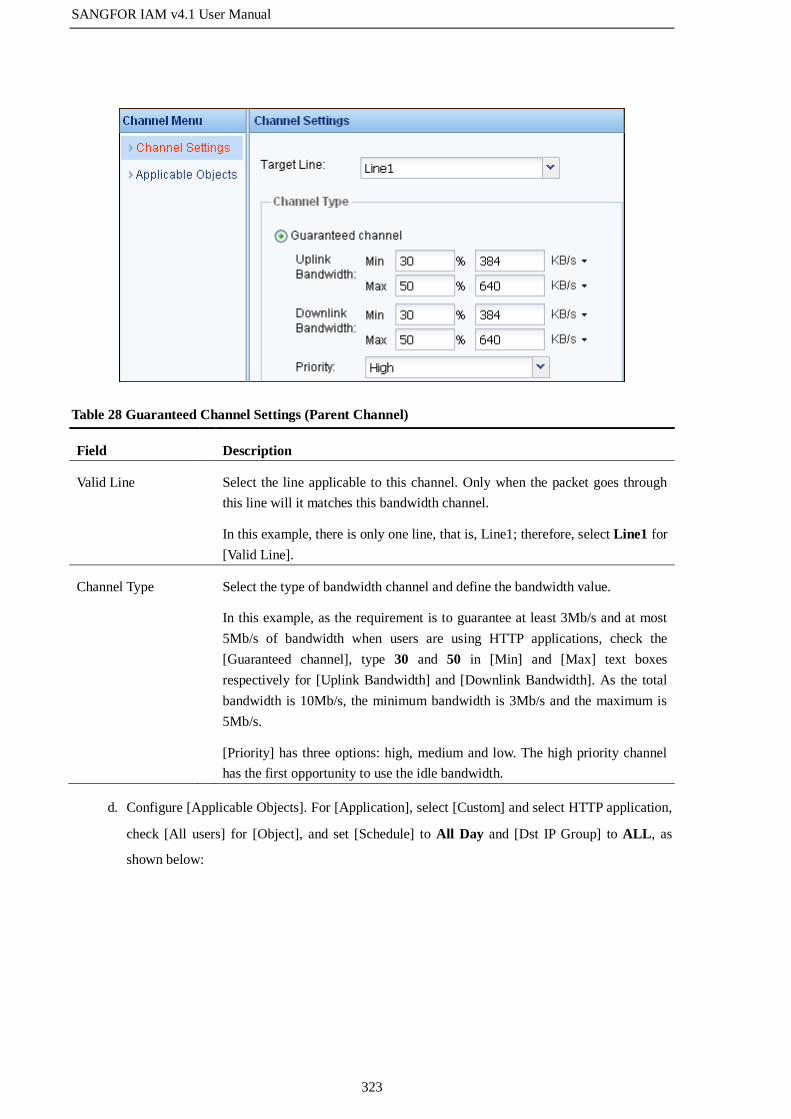
SANGFOR IAM v4.1 User Manual
323
Table 28 Guaranteed Channel Settings (Parent Channel)
Field Description
Valid Line Select the line applicable to this channel. Only when the packet goes through
this line will it matches this bandwidth channel.
In this example, there is only one line, that is, Line1; therefore, select Line1 for
[Valid Line].
Channel Type Select the type of bandwidth channel and define the bandwidth value.
In this example, as the requirement is to guarantee at least 3Mb/s and at most
5Mb/s of bandwidth when users are using HTTP applications, check the
[Guaranteed channel], type 30 and 50 in [Min] and [Max] text boxes
respectively for [Uplink Bandwidth] and [Downlink Bandwidth]. As the total
bandwidth is 10Mb/s, the minimum bandwidth is 3Mb/s and the maximum is
5Mb/s.
[Priority] has three options: high, medium and low. The high priority channel
has the first opportunity to use the idle bandwidth.
d. Configure [Applicable Objects]. For [Application], select [Custom] and select HTTP application,
check [All users] for [Object], and set [Schedule] to All Day and [Dst IP Group] to ALL, as
shown below:

SANGFOR IAM v4.1 User Manual
324
e. Click <OK> to save the parent channel.
Step 5. Configure a child channel based on the Guarantee HTTP channel (configured above) to
guarantee the bandwidth of HTTP applications for Marketing Department.
a. Check the Guarantee HTTP channel, and then click <Add> and select [Add Child Channel] to
add a child channel under the parent channel Guarantee HTTP.
b. Check [Enable Channel] to enable this channel. If you do not check it, the channel will be
disabled and not take effect. Then type the channel name in [Name] text box. The [Channel]
displays the channel level. “/Guarantee HTTP” indicates the current channel is a child channel
of the Guarantee HTTP channel.
c. Configure [Channel Settings]. Click [Channel Settings] under [Channel Menu] to open the
[Channel Settings] page on the right, and then set the following information.

SANGFOR IAM v4.1 User Manual
325
Table 29 Guaranteed Channel Settings (Child Channel)
Field Description
Valid Line
It is same as that selected in parent channel. It cannot be changed.
Channel Type
Select the type of bandwidth channel and define the bandwidth value.
In this example, as the requirement is to guarantee at least 1MB/S and at most
2MB/S of bandwidth when users in the Marketing Department are using HTTP
applications, check the [Guaranteed channel], type 33 and 40 in [Min] and
[Max] text boxes respectively for [Uplink Bandwidth] and [Downlink
Bandwidth]. The bandwidth available for this channel refers to the guaranteed
bandwidth of the parent channel, that is, 30% of the total 10 Mb/s.
[Priority] has three options: high, medium and low. The high priority channel
has the first opportunity to use the idle bandwidth.
Max Bandwidth Per
User
Limit the bandwidth of each IP address that matches this channel to a certain
value.
In this example, as the requirement is to limit the bandwidth occupied by each
user in Marketing Department to 20KB/s, check this option and type 20 in the
[Uplink] and [Downlink] text boxes respectively.
d. Configure [Applicable Objects]. For [Application], select [Custom] and select HTTP application;
for [Object], check [Custom] and then select Marketing Dept group. Then set [Schedule] to All
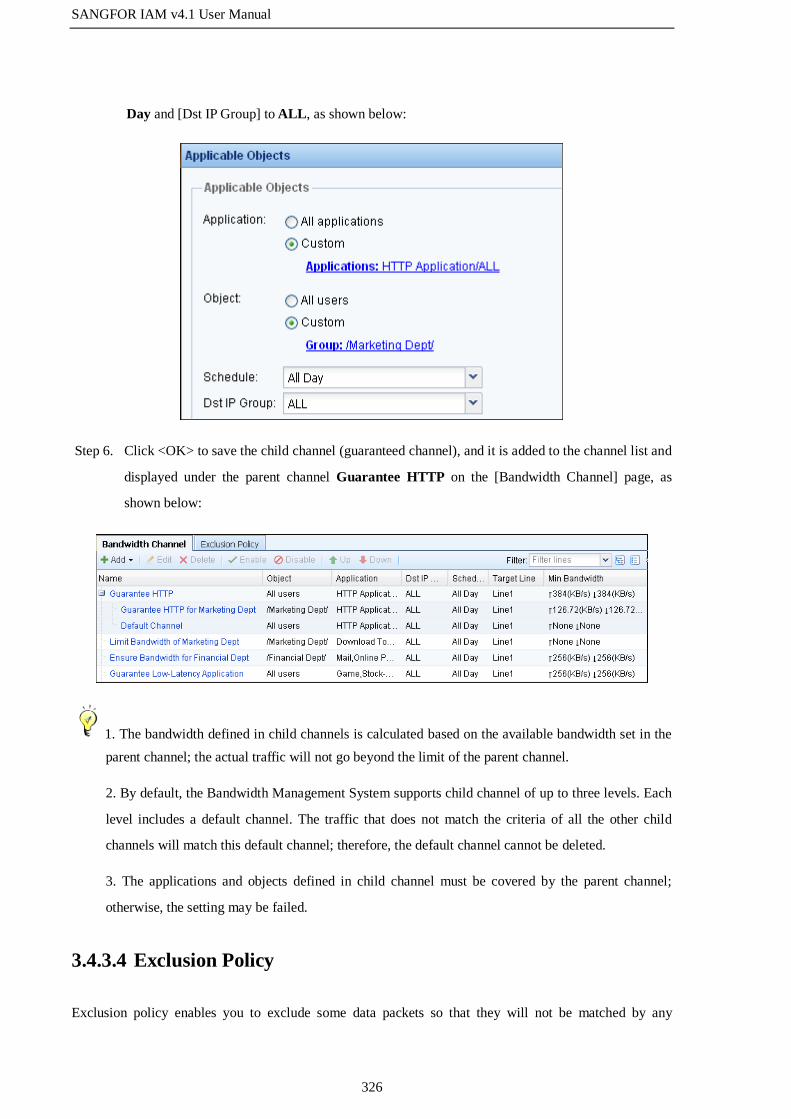
SANGFOR IAM v4.1 User Manual
326
Day and [Dst IP Group] to ALL, as shown below:
Step 6. Click <OK> to save the child channel (guaranteed channel), and it is added to the channel list and
displayed under the parent channel Guarantee HTTP on the [Bandwidth Channel] page, as
shown below:
1. The bandwidth defined in child channels is calculated based on the available bandwidth set in the
parent channel; the actual traffic will not go beyond the limit of the parent channel.
2. By default, the Bandwidth Management System supports child channel of up to three levels. Each
level includes a default channel. The traffic that does not match the criteria of all the other child
channels will match this default channel; therefore, the default channel cannot be deleted.
3. The applications and objects defined in child channel must be covered by the parent channel;
otherwise, the setting may be failed.
3.4.3.4 Exclusion Policy
Exclusion policy enables you to exclude some data packets so that they will not be matched by any

SANGFOR IAM v4.1 User Manual
327
bandwidth channel and therefore their traffic will not be controlled. For example, when the IAM device is
deployed in bridge mode and the DMZ zone of the front-end firewall is connected with some servers, there
is no need to control the traffic when LAN users access these servers, for the data is not destined for the
public network. In this situation, you can add an exclusion policy for the applications or IP addresses
corresponding to these servers to have them exempted from the traffic control.
Case Study: Suppose the IAM device is deployed in bridge mode and the DMZ zone of the front-end
firewall is connected with some servers. Now you need to have the data requested for these servers
exempted from the traffic control.
To meet the requirements, do as follows:
Step 1. Go to [Objects] > [IP Group] to define an IP group, and add the IP addresses you want to
excluded from the bandwidth control into this IP group, as shown below:
Step 2. Go to the [Bandwidth Mgt] > [Bandwidth Settings] > [Exclusion Policy] page, as shown below:

SANGFOR IAM v4.1 User Manual
328
Step 3. Click <Add> to open the [Exclusion Policy] page. Then type the policy name and select the
application type. If you are not sure about the application type, select [ALL]. Specify the
destination IP group. In this example, select the Servers group defined in Step 1, as shown
below:
Step 4. Click <Commit> to save the exclusion policy.
3.4.4 Line Bandwidth
The [Line Bandwidth] page is used to configure the total bandwidth of the public line. The IAM device
allocates the bandwidth according the actual bandwidth set here. Please make sure the bandwidth
configured here conforms to the actual bandwidth of the public line; otherwise, the Bandwidth
Management System may not yield the effects as it is supposed.
To edit the line bandwidth, do as follows:
Step 1. Open the [Bandwidth Mgt] > [Line Bandwidth] page, as shown below:
Step 2. Click the line to be edited. Line1 corresponds to the line connected to the WAN1 interface, line 2
corresponds to the line connected to the WAN2 interface, and so on. When the IAM device is
deployed in Route mode, there are several lines (on the condition that the Multi-Line function is
enabled).

SANGFOR IAM v4.1 User Manual
329
Step 3. Click <Commit> to save your settings.
3.4.5 Virtual Line
Under bridge mode, no matter whether the front-end device is connected with several lines or the IAM
device has configured multi-bridge and connected with several egresses, the IAM device regards that all
the data going through the device are transferred over one line, and the bandwidth management function of
the device conducts traffic control based on the total traffic of the line by default. If you want to implement
separate control on multiple lines in Bridge mode, configure the virtual line.
In virtual line configuration, there is only one line (line 1) by default. If you do not set other lines, the
bandwidth of line 1 should be the total of the bandwidth of multiple lines (on the condition that the
front-end device is connected with multiple public lines or the IAM device has configured multi-bridge
and connected with several egresses). However, in this situation, the IAM device cannot conduct separate
traffic control on multiple extranet lines.
Case Study: Suppose the IAM device is deployed into the following network and works in Bridge mode.
There are two egress interfaces on firewall: one is Telecom line of 10Mb/s; the other is Unicom line of
4Mb/s. The requirement is to implement separate traffic control on P2P data transferred over two lines and
limit the bandwidth occupied by P2P data to 20% over each line.

SANGFOR IAM v4.1 User Manual
330
Step 1. Configure virtual lines. You need to configure two virtual lines on the device, which are
corresponding to the two public network lines on the firewall. Configure their bandwidth
according to the actual bandwidth of the two public network lines.
a. Go to the [Bandwidth Mgt] > [Virtual Line] > [Virtual Line List] page, and click the [Line1] link
to set the bandwidth of line 1. Suppose line 1 is corresponding to the Telecom line, set the
bandwidth as follows:
b. On the [Virtual Line List] page, click <Add> to set the bandwidth of line 2. Suppose line 2 is
corresponding to the Unicom line, set the bandwidth as follows:

SANGFOR IAM v4.1 User Manual
331
Step 2. Configure virtual line rules. You need to configure the virtual line rules to have different data
allocated to different virtual line according to the actual line rules, realizing consistency between
virtual lines and actual lines. As the front-end device (firewall) usually has configured the line
rules, you need only configure the virtual line rules according to the routing settings on the
firewall.
a. Go to the [Bandwidth Mgt] > [Virtual Line] > [Virtual Line Rule] page, and click <Add> to open
the [Add Virtual Line Rule] page. According to the lines rule on firewall, define the virtual line
Line1 for the data transferred through Telecom line with the destination address 202.96.0.0/24.

SANGFOR IAM v4.1 User Manual
332
b. Specify the following information.
Table 30 Virtual Line Rule Settings
Field Description
Protocol Settings Specify the protocol type of the data packets.
LAN Address Specify the source IP and source port of the data packets.
WAN Address Specify the destination IP and destination port of the data packets.
Line Settings [Bridge List] specifies the bridge from which the data packets applicable to this
virtual line rule are forwarded under Multi-Bridge mode.
[Target Line] specifies the target virtual line through which the data packets
satisfy the above conditions will be transmitted.
Step 3. Continue to add other virtual line rule until the virtual line rules configured on the device are
consistent with the line rules on firewall.
Step 4. Configure bandwidth channels to control the traffic of P2P application data transferred over two
virtual lines.
a. Go to the [Bandwidth Mgt] > [Bandwidth Setting] > [Bandwidth Channel] page, click <Add>
and select [Add Parent Channel] to open the [Add Parent Channel] page.

SANGFOR IAM v4.1 User Manual
333
b. As you need to limit the traffic over the line 1 (Telecom Line), select Line1 as the target line and
Limited channel as the channel type. Then set both the [Uplink Bandwidth] and [Downlink
Bandwidth] to 20% of the total bandwidth. Since the total bandwidth is 10Mb/s, the uplink
bandwidth and downlink bandwidth are limited to 2Mb/s (1Mb/s=1/8MB/S; 2 Mb/s =0.25
MB/S).
c. Select an allocation method under [Bandwidth Allocation Among Users] to allocate the
bandwidth for users applicable to this channel. By default, [Average allocation] is selected, that is,
bandwidth is evenly allocated to users.

SANGFOR IAM v4.1 User Manual
334
d. Click [Applicable Objects] to configure the applications and users applicable to this channel. To
select the application, check the [Custom] option and click the [Select Application] link to open
the [Select Application] page. As the requirement is to control the traffic of P2P applications,
select P2P/ALL, P2P Stream Media/ALL, as shown below, and then click <OK> to save your
settings.

SANGFOR IAM v4.1 User Manual
335
e. For applicable users, check [All users] or [Custom]. [All users] means the current channel will
apply to all the users in the LAN.
Step 5. Continue to configure a bandwidth channel for Line2 to limit the traffic of P2P applications. The
procedures are similar to those for Line1 (see Step 4).
Step 6. After two bandwidth channels are configured, they will be added into the bandwidth channel list.
1. Virtual line rules are matched from top to bottom.
2. On the [Virtual Line Rule] page, you can click <Add Multiple> to configure multiple virtual line
rules simultaneously; however, virtual line rules edited in batch only support selecting line according
to destination address and bridge.
3. Virtual line rules can be imported or exported.

SANGFOR IAM v4.1 User Manual
336
3.5 Proxy/Cache
3.5.1 Overview
In modern enterprise networks, the bandwidth resources are generally limited. Besides, there may be many
wastes of bandwidth resources. For example, an extranet line may transfer many repetitive data. When
thousands of LAN users visit a well-known website, the same data will be transmitted thousands of times,
which consumes and wastes massive bandwidth resources.
However, the proxy/cache function provided by the IAM device helps solve this problem. The IAM device
will cache the data requested by any LAN user for the first time. If a second LAN user sends requests for
the same data, the IAM device will directly fetch it from the cache instead of its original location.
The whole process is transparent to LAN users, which means you need only configure the IAM device,
without requiring LAN users to make any changes to their computer settings.
3.5.2 Proxy Options
The [Proxy Options] displays the information and options related to the proxy function.
3.5.2.1 HTTP Transparent Proxy
To enable the HTTP transparent proxy, go to the [Proxy/Cache] > [Proxy Options] page and check the
[Enable HTTP Transparent Proxy] option, as shown below:
When the [Enable HTTP Transparent Proxy] option is checked, the HTTP transparent proxy function
applies to all users by default. To disable the function for some users or user groups, please go to the
[Access Management] > [Access Control] > [App Control] > [Proxy Control] page, check the [Disable
transparent proxy] option, as shown below, and then associate the policy with your desired users or user
groups.
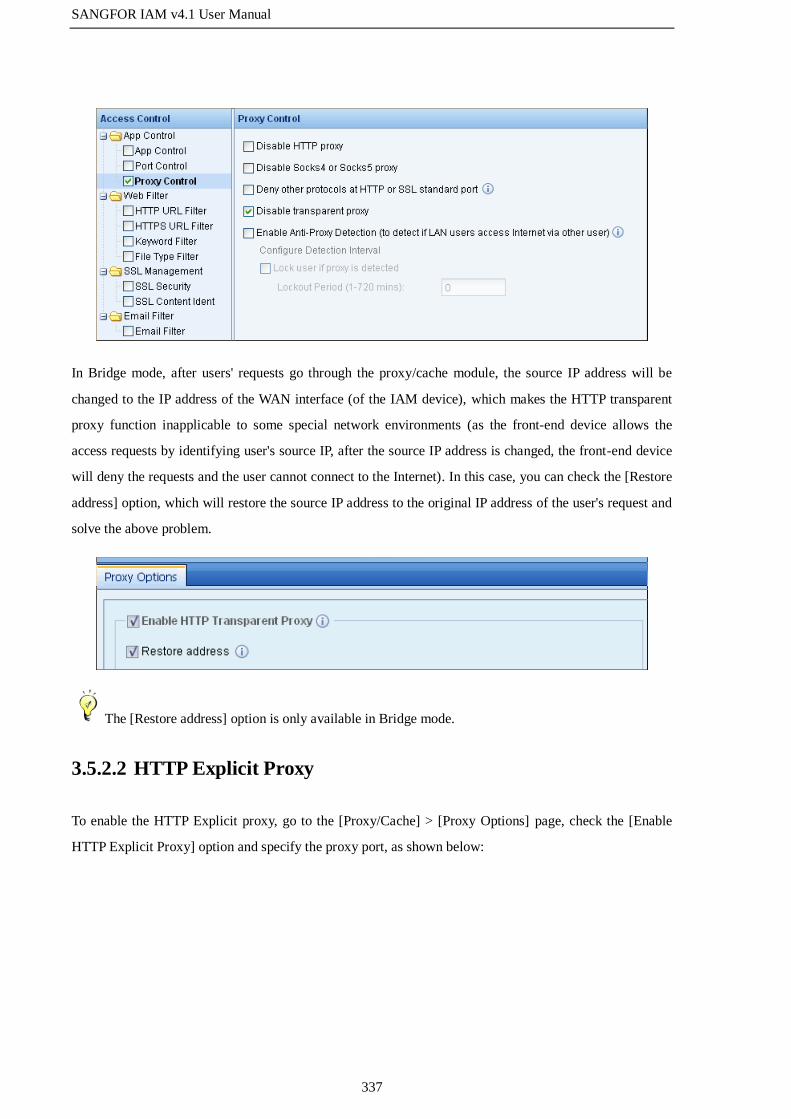
SANGFOR IAM v4.1 User Manual
337
In Bridge mode, after users' requests go through the proxy/cache module, the source IP address will be
changed to the IP address of the WAN interface (of the IAM device), which makes the HTTP transparent
proxy function inapplicable to some special network environments (as the front-end device allows the
access requests by identifying user's source IP, after the source IP address is changed, the front-end device
will deny the requests and the user cannot connect to the Internet). In this case, you can check the [Restore
address] option, which will restore the source IP address to the original IP address of the user's request and
solve the above problem.
The [Restore address] option is only available in Bridge mode.
3.5.2.2 HTTP Explicit Proxy
To enable the HTTP Explicit proxy, go to the [Proxy/Cache] > [Proxy Options] page, check the [Enable
HTTP Explicit Proxy] option and specify the proxy port, as shown below:

SANGFOR IAM v4.1 User Manual
338
You can enter up to 5 ports and separate them with commas.
The [Enable cache] option specifies whether to enable the cache function after the HTTP Explicit proxy is
enabled.
The [Device uses proxy server to access the Internet] option specifies whether to have the HTTP proxy
requests proxied through the front-end proxy server. If it is checked, you need to enter the IP address
(domain name not supported) and proxy port (one port only) of the front-end proxy server in the [Server IP]
and [Port] textboxes respectively.
The <Check Validity> button enables you to check the connectivity between the IAM device and the proxy
port of the proxy server. If you want to have the proxy server require authentication, check the [Server
requires authentication] option, and set the username and password respectively. The basic authentication
is supported only.

SANGFOR IAM v4.1 User Manual
339
3.5.2.3 Socks5 Proxy
To enable the Socks5 proxy, go to the [Proxy/Cache] > [Proxy Options] page, check the [Enable Socks5
Proxy] option and specify the proxy port, as shown below:
You can enter up to 5 ports and separate them with commas.
3.5.3 Cache Options
The [Cache Options] displays cache-related information and options.
3.5.3.1 Clear Cache
To clear cached data, go to the [Proxy/Cache] > [Cache Options] page and click the <Clear Cache> button,
as shown below:
3.5.3.2 Cache Settings
You can set the cache-related options here, including [YouTube Caching], [Windows Updates Caching],
[HTTP Caching], [Black/White List] and [Advanced Settings]. In [Black/White List], there are [Preferred
Website List] and [Non-Cache Website List], as shown below:

SANGFOR IAM v4.1 User Manual
340
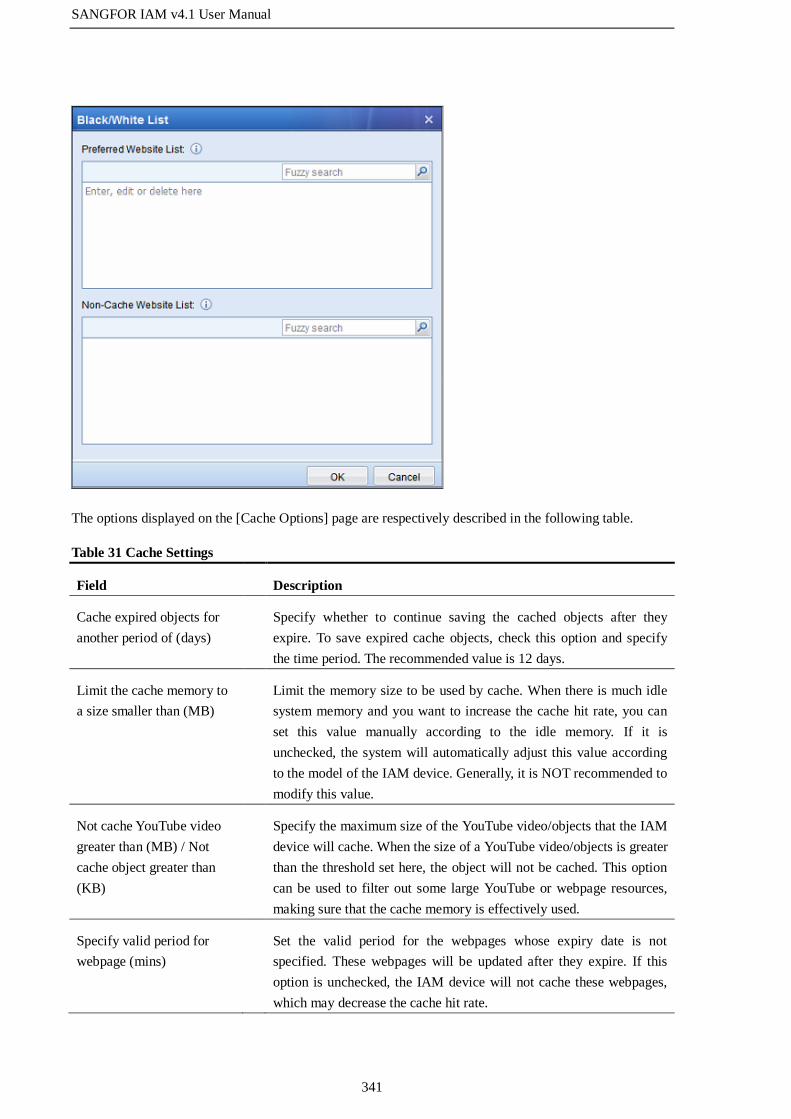
SANGFOR IAM v4.1 User Manual
341
The options displayed on the [Cache Options] page are respectively described in the following table.
Table 31 Cache Settings
Field Description
Cache expired objects for
another period of (days)
Specify whether to continue saving the cached objects after they
expire. To save expired cache objects, check this option and specify
the time period. The recommended value is 12 days.
Limit the cache memory to
a size smaller than (MB)
Limit the memory size to be used by cache. When there is much idle
system memory and you want to increase the cache hit rate, you can
set this value manually according to the idle memory. If it is
unchecked, the system will automatically adjust this value according
to the model of the IAM device. Generally, it is NOT recommended to
modify this value.
Not cache YouTube video
greater than (MB) / Not
cache object greater than
(KB)
Specify the maximum size of the YouTube video/objects that the IAM
device will cache. When the size of a YouTube video/objects is greater
than the threshold set here, the object will not be cached. This option
can be used to filter out some large YouTube or webpage resources,
making sure that the cache memory is effectively used.
Specify valid period for
webpage (mins)
Set the valid period for the webpages whose expiry date is not
specified. These webpages will be updated after they expire. If this
option is unchecked, the IAM device will not cache these webpages,
which may decrease the cache hit rate.

SANGFOR IAM v4.1 User Manual
342
Specify shortest update
interval (mins)
Set the shortest interval that the cached objects will be updated by the
IAM device. If the valid period of a cached object is shorter than this
interval, the IAM device will not update it even if it expires, which
may cause that the cached object is not up to date, but increases the hit
rate. If the valid period of a cached object is longer than this value, the
IAM device will update it after this update interval.
Check for updates upon
every request
Specify whether to check for updates on the server every time the
cached objects are requested. This option is generally used when the
expiry date of objects is incorrectly set on the server. Enabling this
option will greatly influence the performance of the cache module,
and thus it is recommended to leave it unchecked, and the IAM device
will decide whether to check for updates according to the expiry date
of cached objects.
Preferred Website List Specify the websites that will be preferentially cached. For example,
if you want to speed up the access to company website server, add the
server address into this preferred website list. Please note that when
this preferred website list is used, the overall optimization effect will
lower down.
Non-Cache Website List Specify some IP addresses or domain names that need not be cached
by the IAM device. If a Web server in the LAN is accessed by LAN
users through the IAM device, it is recommended to add the address
of this server into this non-cache website list, for the access speed
within the intranet is already fast, and caching this type of data will
not yield obvious optimization effect but consume the memory and
disk resources of the device. In addition, if you want to have some
webpage resources updated more frequently and make sure the
resources are up to date every time they are visited, add these websites
into this list, for they may not be the latest if they are cached, although
reading cache accelerates the access.
The [YouTube caching] option is only available to cache YouTube video. Unable to cache other
streaming media and Live-YouTube video.
Cache Hit Logs
The [Cache Hit Logs] tab enables you to view the cache hit status in real-time. You can also query the
cache hit status of a specific URL object. This function is mainly used to check whether the cache function
of the IAM device works normally. When the cache hit log function is enabled, you can view the cache hit
logs for a specific source IP address or all source IP addresses. If the logs are not refreshed in 5 minutes,

SANGFOR IAM v4.1 User Manual
343
the cache hit log function will be closed automatically.
To check whether a URL is cached or not, click <Search Cached Object>, enter the URL and then click
<Search>. The search result will display the cache status of the URL, as shown below:
To close the cache hit log function, click <Close>.
After the proxy/cache function is enabled, HTTP data is accessed through the IAM device; therefore,
it must be ensured that the IAM device can connect to the Internet and access the HTTP service over
the Internet.
3.6 Security
3.6.1 Anti-DoS
Denial of Service (DoS) attacks, usually with the purpose of consuming server end resources and forcing
the server to stop responding, are implemented by forging massive requests that go beyond the server's
handling capability and causing response congestion so that the server cannot respond to legitimate

SANGFOR IAM v4.1 User Manual
344
requests. The anti-DoS function provided by SANGFOR IAM device, however, can prevent against DoS
attacks initiated from outside the local area network (LAN), as well as the DoS attacks initiated from
computers that are infected with virus or computers by using attacking tools inside the LAN.
The [Anti-DoS] configuration page is as shown below:
The fields on the [Anti-DoS] page are respectively described in the following table.
Table 32 Anti-DoS Settings
Field Description
Enable Anti-DoS
Indicates the switch of the anti-DoS function. Check it to enable the
function.
LAN Subnet List
Indicates the LAN subnets that access the Internet through the IAM
device. When you check it and set this list, the IAM device will
discard the packets sent by any IP address that is not included in this
list (the users not listed here cannot access the Internet through the
IAM device and cannot log into the device by LAN interface).
If you do not check this option, the anti-DoS function only detects the
attacks from outside.
Typically, it is recommended to check and configure this list to enable
the anti-DoS function against attacks from inside.

SANGFOR IAM v4.1 User Manual
345
LAN PCs connect to the
device via one or several
layer 2 switches, no layer 3
switch crossed
DO NOT check this option when the intranet is a layer 3 environment.
When the IAM device and the intranet is in a layer 2 environment and
no layer 3 networking device or router locates there, you can check
this option, but it is not necessary. By default, the IAM device detects
the attacks according to the source IP. If you check this option, the
IAM device will detect the attack based on the MAC address.
The reason why you cannot check this option when the intranet is a
layer 3 environment is that the source MAC address of a packet will
be changed to the MAC address of the layer 3 device after the packet
is transferred through layer 3 device or router. Since the source MAC
address is changed, if the IAM device detects attacks based on MAC
address, it may make wrong judgement and block the MAC address of
the layer 3 device, resulting in the discarding of the packets from
intranet.
NOT defend against attacks
initiated by IP addresses
listed below
The attacks initiated by the IP addresses listed here will not be
defended again.
For instance, if a server in the LAN provides services for public
network and builds many connections, in this case, you can enter the
server address in this list so that it will be excluded from the anti-DoS
function.
Max TCP Connections
Limit the maximum of TCP connections that each IP address is
allowed to send to the same port of an IP address in one minute.
If the threshold here is reached, the IP address will be locked for a
specified period.
Max Attack Packets
Limit the maximum of attack packets that each host is allowed to send
in one second (the attack packets include SYN, ICMP and TCP/UDP
small packets).
If the threshold here is reached, the IP or MAC address will be locked
for a specified period.
Lockout Period
Specify the period that the attacking host will be locked after the
attack is detected. The unit is minute.
Configure Alarm Email
Click this link and it links to the [Alarm Options] page.
For detailed setting of Alarm Email, see section 3.9.5 "Alarm
Options".
3.6.2 ARP Protection
ARP spoofing is a common intranet virus. The computers infected with virus will send ARP spoofing
broadcast packets across the intranet from time to time, which obstructs the normal communication of the
computers and may even cause the breakdown of the network.

SANGFOR IAM v4.1 User Manual
346
However, the ARP protection function provided by the IAM device can defend against the ARP spoofing
by combining the Ingress Client installed on user computers. The device first protects its own ARP cache
by not accepting the ARP requests or replies that feature attacking. Besides, if users are bound with
IP/MAC address, the IAM device will take the IP/MAC binding information as the standard. The ARP
protection for the computers in the intranet is realized by Ingress Client installed, which communicates
with the IAM device to obtain the correct IP/MAC mapping table from the IAM device and perform static
binding.
The [ARP Protection] configuration page is as shown below:
The fields on the [ARP Protection] page are respectively described in the following table.
Table 33 ARP Protection Settings
Field Description
Enable ARP
Protection
Indicate the switch of the ARP protection function. Check it to enable the
function.

SANGFOR IAM v4.1 User Manual
347
Enable Static ARP
Check and configure this static ARP list if the gateway address of the
computers in the intranet is not the interface address of the IAM device. For
instance, if the IAM device works in bridge mode, the gateway address of the
computers in the intranet should be the interface address of the router (or
firewall) in the front. In this case, you can enter the IP/MAC address of the
interface on the router in this list.
If computers in the intranet have installed Ingress Client, the client can obtain
the correct IP/MAC address and bind them with the computer, ensuring the
correctness of the IP/MAC address of the computers' gateway and smooth
communication between computers and IAM device.
Broadcast Interval
of Gateway MAC
Specify the interval of broadcasting MAC address of the gateway device (that
is, the LAN interface of the device). Typically, it is set to 10 seconds.
You can click <Broadcast Gateway MAC> to broadcast the MAC address of the LAN interface on the
IAM device immediately. When the ARP spoofing is cleared, you can also click this button to restore the
ARP table of computers in the intranet.
3.6.3 Antivirus
The gateway antivirus function is used to scan the packets going through the IAM device for viruses,
ensuring the security of the computers in the intranet. It is applicable to the common four protocols, HTTP,
FTP, POP3 and SMTP. The IAM device has built in the antivirus engine developed by the famous antivirus
manufacturer F-PROT in Iceland. This antivirus engine features high identification for virus and high
efficiency for virus scanning and handling. The virus library of the IAM device is synchronously updated
with that of the F-PROT. Generally, the update cycle is 1 or 2 days. The [Antivirus] covers the [Antivirus
Settings] page and [Virus Library Update] page.
1. [Antivirus Settings] page

SANGFOR IAM v4.1 User Manual
348
The fields displayed on the [Antivirus Settings] page are respectively described in the following table.
Table 34 Antivirus Settings
Field Description
Enable HTTP Download
Antivirus
Indicate the switch of the HTTP download antivirus function. Check it
to enable the function.
Enable FTP Download
Antivirus
Indicate the switch of the FTP download antivirus function. Check it to
enable the function.
Enable POP3 Antivirus
Indicate the switch of the POP3 antivirus function. Check it to enable
the function.
Enable SMTP Antivirus
Indicate the switch of the SMTP antivirus function. Check it to enable
the function.
Enable Excluded Website
(Domain)
Indicate the websites or domain names which will not be scanned for
virus. Type one domain name per row in the text box. The wildcard
character is supported.
Enable File Type
Antivirus
Specify the type of files to be scanned for virus. Type file extension in
the text box.
Configure Alarm Email
Click this link and it links to the [Alarm Options] page.
For detailed setting of Alarm Email, see section 3.9.5 "Alarm Options".
2. [Virus Library Update] page

SANGFOR IAM v4.1 User Manual
349
The fields displayed on the [Virus Library Update] page are respectively described in the following table.
Table 35 Virus Library Update Settings
Field Description
Update Service Expired
On
Indicate the expiry date of the automatic update service for the virus
library. Before the expiry date, the IAM device will automatically
connects to the SANGFOR server to update the virus library.
Current Virus Library
Date
Indicate the version date of the current virus library, that is, the date when
the virus library is released.
Update Virus Library
Click the <Select File> button to locate the virus library file and import it
into the IAM device to update the virus library.
3.7 Firewall
The [Firewall] module includes [Firewall Rules], [SNAT], [DNAT]. The [Firewall Rules] page enables you
to configure such filtering conditions as destination protocol and port, source IP address, destination IP
address and time schedule to filter the data forwarding among the network interfaces on the IAM device.
The [SNAT] page enables you to configure the source network address translation (SNAT) rules to proxy
the LAN users to access the Internet. You can also set SNAT rules for other source addresses. The [DNAT]
page enables you to configure the destination network address translation (DNAT) rules to deliver LAN
services to the public network. The [SNAT] and [DNAT] pages are available only when the IAM device is
deployed in Route mode.
3.7.1 Firewall Rules
Firewall rules are used to conduct filtering on data forwarding among the network interfaces on the IAM
device. The filtering criteria include destination protocol and port, source IP address, destination IP address
and time schedule. You can configure the firewall filtering rules of the following directions: LAN<->DMZ,
DMZ<->WAN, WAN<->LAN, LAN<->LAN, DMZ<->DMZ, VPN<->WAN and VPN<->LAN.

SANGFOR IAM v4.1 User Manual
350
To add a firewall rule, do as follows:
Step 1. On the [Firewall Rules] page, select the data forwarding direction on the left pane and then click
<Add> to open the corresponding page, as shown below:
Step 2. Specify the following information.
SANGFOR IAM v4.1 User Manual
351
Table 36 Firewall Rule Settings
Field Description
Enable Rule Check it to enable the firewall rule.
Rule Name Type a name for the firewall rule.
Sequence No. Type the sequence number of the rule, which determines the priority of the
rule. The smaller the sequence number is, the higher the priority of the rule is.
Description Type descriptive information for the firewall rule.
Action Specify the action to be taken when the packets match the criteria of this
firewall rule.
Service Select the service to which this firewall rule applies.
The services available here are predefined on [Objects] > [Service] page (see
sections 3.2.6 "Service").
Src IP Group Select the source IP group of the packets to which this firewall rule applies.
The IP groups available here are predefined on [Objects] > [IP Group] page
(see section 3.2.7 "IP Group").
Dst IP Group Select the destination IP group of the packets to which this firewall rule
applies.
The IP groups available here are predefined on [Objects] > [IP Group] page
(see section 3.2.7 "IP Group").
Schedule Select a time segment in which this firewall rule is in effect. The schedules
available here are predefined on [Objects] > [Schedule] page (see section 3.2.8
"Schedule").
Direction Select the data forwarding direction to which this firewall rule applies.
Log Enable or disable the corresponding firewall log. If enabled, it records the data
allowed or denied by this rule on the [System Logs] page. If you need to do
troubleshooting, enable this field. Generally, it is recommended to disable this
field to avoid massive logs.
Step 3. Click <Commit> to save your settings.
For the firewall rules already defined, you can also manage or edit them.
To edit a firewall rule, click the name of the rule to open the editing page and then edit the firewall rule
according to your needs.
To manage a firewall rule, check the firewall rule and then do one of the following:
Click <Delete> to delete the rule.
Click <Enable Rule>/<Disable Rule> to enable/disable the rule.
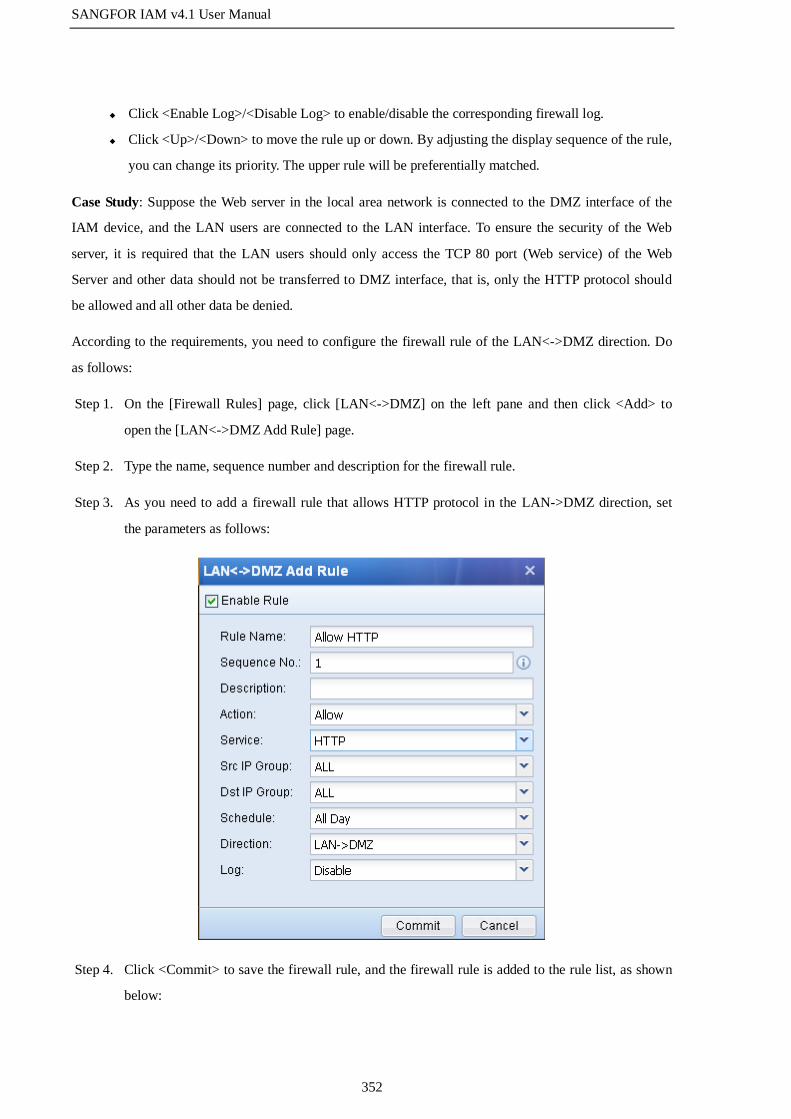
SANGFOR IAM v4.1 User Manual
352
Click <Enable Log>/<Disable Log> to enable/disable the corresponding firewall log.
Click <Up>/<Down> to move the rule up or down. By adjusting the display sequence of the rule,
you can change its priority. The upper rule will be preferentially matched.
Case Study: Suppose the Web server in the local area network is connected to the DMZ interface of the
IAM device, and the LAN users are connected to the LAN interface. To ensure the security of the Web
server, it is required that the LAN users should only access the TCP 80 port (Web service) of the Web
Server and other data should not be transferred to DMZ interface, that is, only the HTTP protocol should
be allowed and all other data be denied.
According to the requirements, you need to configure the firewall rule of the LAN<->DMZ direction. Do
as follows:
Step 1. On the [Firewall Rules] page, click [LAN<->DMZ] on the left pane and then click <Add> to
open the [LAN<->DMZ Add Rule] page.
Step 2. Type the name, sequence number and description for the firewall rule.
Step 3. As you need to add a firewall rule that allows HTTP protocol in the LAN->DMZ direction, set
the parameters as follows:
Step 4. Click <Commit> to save the firewall rule, and the firewall rule is added to the rule list, as shown
below:
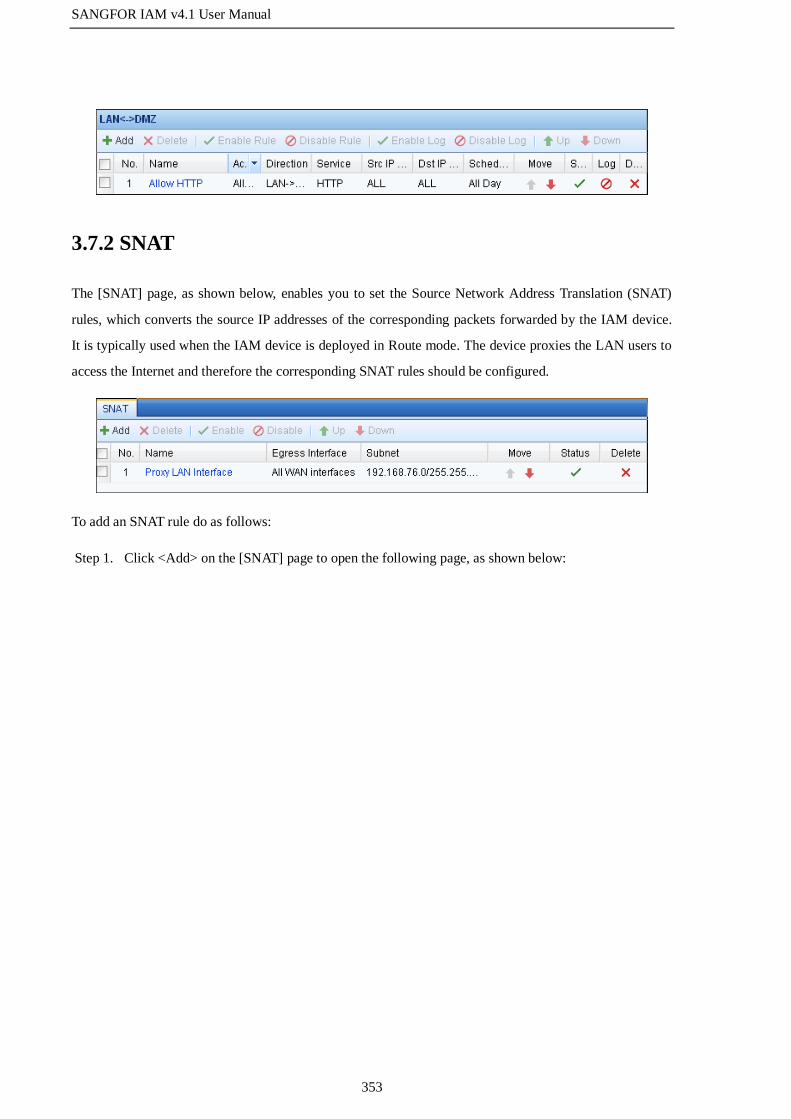
SANGFOR IAM v4.1 User Manual
353
3.7.2 SNAT
The [SNAT] page, as shown below, enables you to set the Source Network Address Translation (SNAT)
rules, which converts the source IP addresses of the corresponding packets forwarded by the IAM device.
It is typically used when the IAM device is deployed in Route mode. The device proxies the LAN users to
access the Internet and therefore the corresponding SNAT rules should be configured.
To add an SNAT rule do as follows:
Step 1. Click <Add> on the [SNAT] page to open the following page, as shown below:
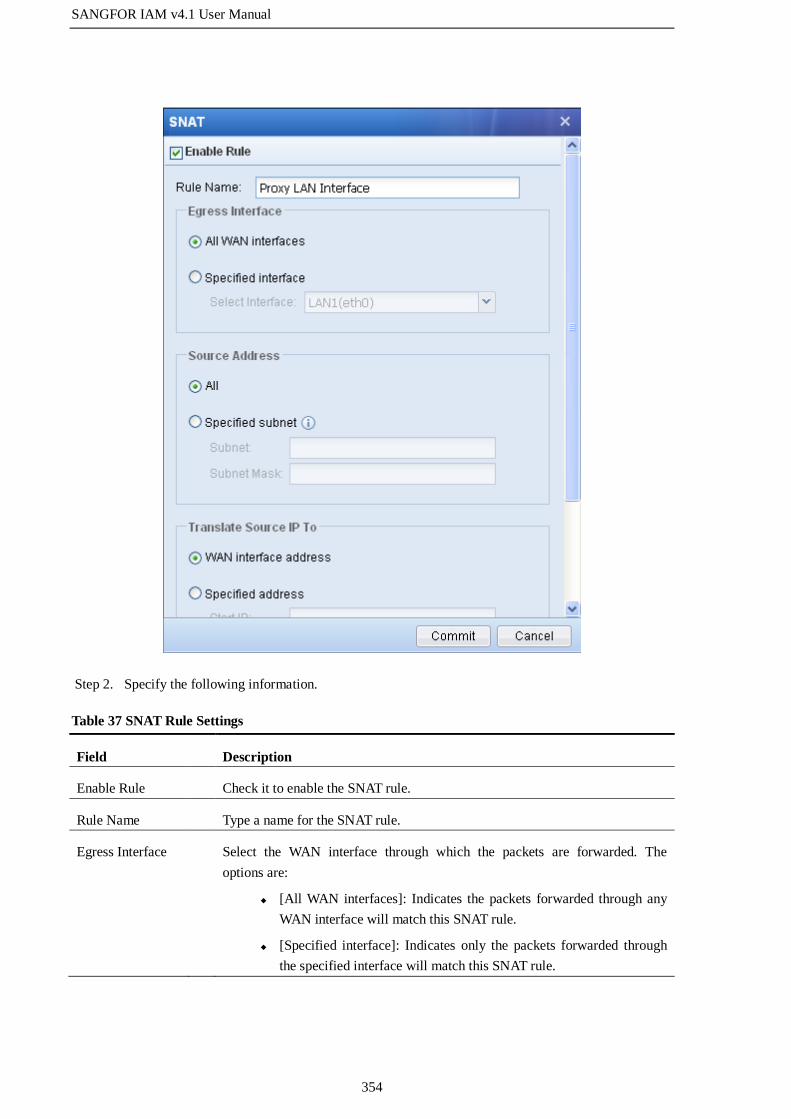
SANGFOR IAM v4.1 User Manual
354
Step 2. Specify the following information.
Table 37 SNAT Rule Settings
Field Description
Enable Rule Check it to enable the SNAT rule.
Rule Name Type a name for the SNAT rule.
Egress Interface Select the WAN interface through which the packets are forwarded. The
options are:
[All WAN interfaces]: Indicates the packets forwarded through any
WAN interface will match this SNAT rule.
[Specified interface]: Indicates only the packets forwarded through
the specified interface will match this SNAT rule.

SANGFOR IAM v4.1 User Manual
355
Source Address Specify the source IP addresses to be proxied by the IAM device. The options
are:
[All]: Indicates all the addresses in the LAN will be proxied by the
IAM device.
[Specified subnet]: Indicates only the specified address will be
proxied by the IAM device.
Translate Source
IP To
Specify the addresses to which the source address of the packets matching the
criteria of this rule will be translated. The options are:
[Egress interface address]: Indicates translating the source address to
the IP address of the selected egress interface.
[Specified address]: Indicates translating the source address to the
specified IP address or IP range.
Step 3. To set advanced parameters, click <Advanced> to open the [Advanced] page, as shown below:
Step 4. Specify the [Destination Address] and [Protocol]. [Destination Address] indicates the destination
address of the packets that match this SNAT rule and [Protocol] indicates the protocol that this
SNAT rule will apply.

SANGFOR IAM v4.1 User Manual
356
Step 5. Click <Commit> to save the SNAT rule.
For the SNAT rules already defined, you can also manage or edit them.
To edit an SNAT rule, click the name of the rule to open the editing page, and then edit the SNAT rule
according to your needs.
To manage a SNAT rule, check the SNAT rule and then do one of the following:
Click <Delete> to delete the rule.
Click <Enable>/<Disable> to enable/disable the rule.
Click <Up>/<Down> to move the rule up or down. By adjusting the display sequence of the rule,
you can change its priority. The upper rule will be preferentially matched.
Case Study 1: Suppose there is a subnet 192.168.1.0/255.255.255.0 in the local area network, in which the
IAM device is deployed in Route mode and connected with two public network lines. The requirement is
that the LAN users can access the Internet through the IAM device.
To meet the requirements, do as follows:
Step 1. Click <Add> on the [SNAT] page to open the following page. Check the [Enable Rule] option to
enable this rule and then type the rule name, as shown below:
Step 2. Configure [Egress Interface]. As the IAM device will proxy the packets going through the two
WAN interfaces, select [All WAN interfaces].
Step 3. Configure [Source Address]. As the requirement is to proxy the users on the
192.168.1.0/255.255.255.0 subnet to access the Internet, check the [Specified subnet] option and
type 192.168.1.0 and 255.255.255.0 respectively, as shown below:

SANGFOR IAM v4.1 User Manual
357
Step 4. Configure [Translate Source IP To]. Check [Egress interface address] to translate the source
addresses to the IP address of the egress interface selected in Step 2 or check [Specified address]
to translate them to a specified IP address or IP range.
Step 5. Click <Commit> to save the SNAT rule.
Step 6. Go to the [Firewall Rules] page and add a firewall rule to allow all packets from LAN to WAN
(for detailed settings, see section 3.7.1 "Firewall Rules").
Case Study 2: Suppose the IAM device is deployed in Route mode and connected with two extranet lines:
one is Telecom line and the other is Edunet line. The requirement is that when the users on the
192.168.1.0/255.255.255.0 subnet are accessing the port 80 of the services on the 202.3.3.0/255.255.255.0
subnet of Edunet, the source address should be translated to the IP address 202.96.1.1 of the WAN1
interface (Edunet line).
To meet the requirements, do as follows:
Step 1. Go to the [Network] > [Policy Route] page and add a policy route to automatically forward the
packets destined for the 202.3.3.0/255.255.255.0 subnet via WAN1 (that is, the Edunet line) (for
detailed settings, see section 3.8.4 "Policy Route").

SANGFOR IAM v4.1 User Manual
358
Step 2. Go to the [SNAT] page, click <Add> to open the following page. Check the [Enable Rule] option
to enable this rule and then type the rule name, as shown below:
Step 3. Configure [Egress Interface]. As the IAM device only proxy the packets forwarded through
Edunet line WAN1, check the [Specified interface] option and select [WAN1(eth2)], as shown
below:
Step 4. Configure [Source Address]. As the requirement is to proxy the users on the

SANGFOR IAM v4.1 User Manual
359
192.168.1.0/255.255.255.0 subnet to access the Internet, check the [Specified subnet] option and
type 192.168.1.0 and 255.255.255.0 respectively, as shown below:
Step 5. Configure [Translate Source IP To]. As the requirement is to translate the source IP to the IP
address 202.96.1.1 of the WAN1 interface, check [Specified address] option and enter 202.96.1.1
in both the [Start IP] and [End IP] text boxes, as shown below:
Step 6. Click <Advanced> to open the [Advanced] page. As the requirement is to translate the source IP
when users are accessing the port 80 of the services on 202.3.3.0/255.255.255.0 subnet, set the
destination address and protocol as shown below:

SANGFOR IAM v4.1 User Manual
360
Step 7. Go to the [Firewall Rules] page and add a firewall rule to allow all packets from LAN to WAN
(for detailed settings, see section 3.7.1 "Firewall Rules").
The [SNAT] function is available only in Route mode.
3.7.3 DNAT
The [DNAT] page, as shown below, enables you to set the Destination Network Address Translation
(DNAT) rules, which converts the destination IP addresses of the packets going through the IAM device.
The typical usage includes releasing server, map the services provided by LAN servers to the public
network or providing access to Internet users.
There are two types of DNAT rules: one is [Basic Rule] and the other is [Advanced Rule]. The basic rule

SANGFOR IAM v4.1 User Manual
361
only includes some necessary criteria while the advanced rule includes more detailed settings, commonly
used to meet detailed requirements.
1. Basic DNAT Rule
To add a basic DNAT rule, do as follows:
Step 1. On the [DNAT] page, click <Add> and then select [Basic Rule] to open the following page:
Step 2. Specify the following information.
Table 38 DNAT Rule Settings (Basic Rule)
Field Description
Enable Rule Check it to enable the SNAT rule.
Rule Name Type a name for the SNAT rule.
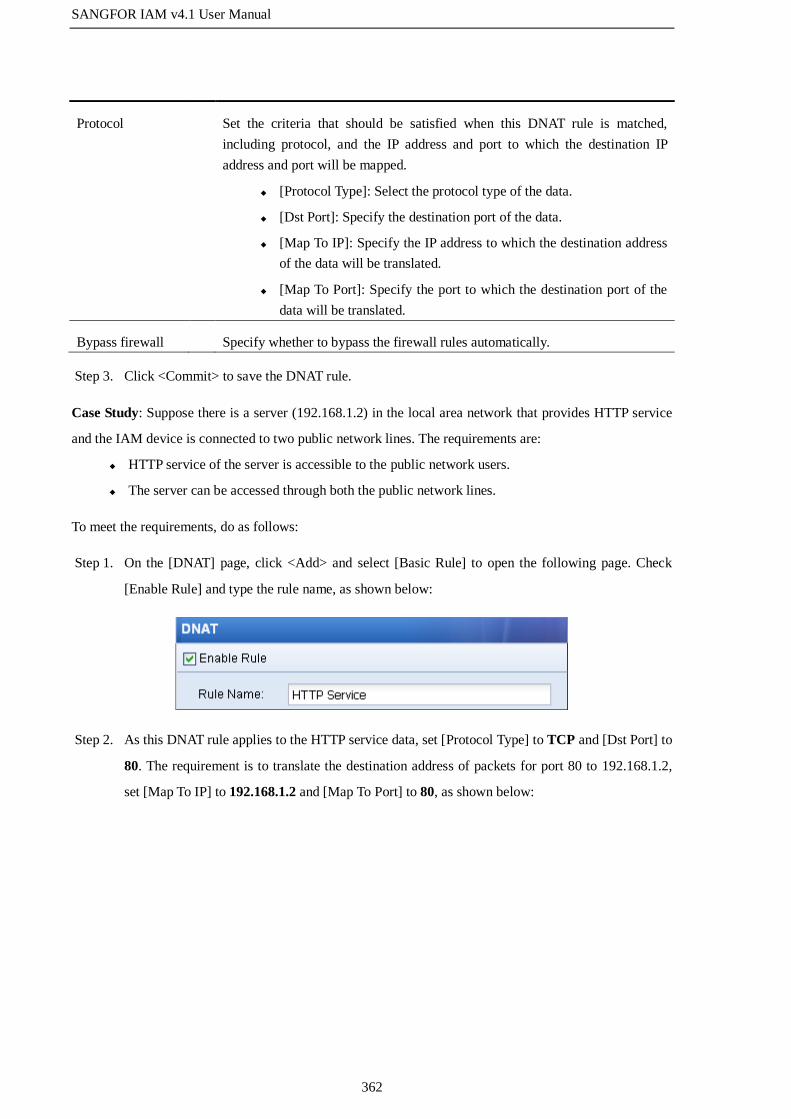
SANGFOR IAM v4.1 User Manual
362
Protocol Set the criteria that should be satisfied when this DNAT rule is matched,
including protocol, and the IP address and port to which the destination IP
address and port will be mapped.
[Protocol Type]: Select the protocol type of the data.
[Dst Port]: Specify the destination port of the data.
[Map To IP]: Specify the IP address to which the destination address
of the data will be translated.
[Map To Port]: Specify the port to which the destination port of the
data will be translated.
Bypass firewall Specify whether to bypass the firewall rules automatically.
Step 3. Click <Commit> to save the DNAT rule.
Case Study: Suppose there is a server (192.168.1.2) in the local area network that provides HTTP service
and the IAM device is connected to two public network lines. The requirements are:
HTTP service of the server is accessible to the public network users.
The server can be accessed through both the public network lines.
To meet the requirements, do as follows:
Step 1. On the [DNAT] page, click <Add> and select [Basic Rule] to open the following page. Check
[Enable Rule] and type the rule name, as shown below:
Step 2. As this DNAT rule applies to the HTTP service data, set [Protocol Type] to TCP and [Dst Port] to
80. The requirement is to translate the destination address of packets for port 80 to 192.168.1.2,
set [Map To IP] to 192.168.1.2 and [Map To Port] to 80, as shown below:
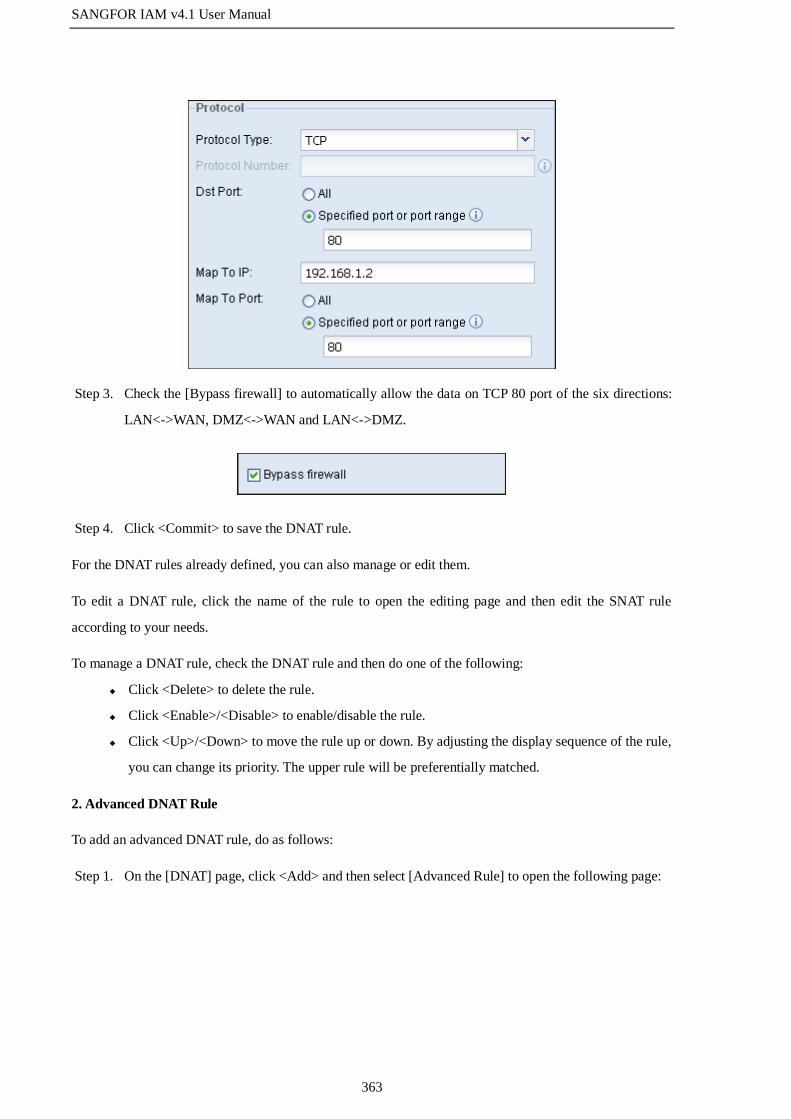
SANGFOR IAM v4.1 User Manual
363
Step 3. Check the [Bypass firewall] to automatically allow the data on TCP 80 port of the six directions:
LAN<->WAN, DMZ<->WAN and LAN<->DMZ.
Step 4. Click <Commit> to save the DNAT rule.
For the DNAT rules already defined, you can also manage or edit them.
To edit a DNAT rule, click the name of the rule to open the editing page and then edit the SNAT rule
according to your needs.
To manage a DNAT rule, check the DNAT rule and then do one of the following:
Click <Delete> to delete the rule.
Click <Enable>/<Disable> to enable/disable the rule.
Click <Up>/<Down> to move the rule up or down. By adjusting the display sequence of the rule,
you can change its priority. The upper rule will be preferentially matched.
2. Advanced DNAT Rule
To add an advanced DNAT rule, do as follows:
Step 1. On the [DNAT] page, click <Add> and then select [Advanced Rule] to open the following page:

SANGFOR IAM v4.1 User Manual
364

SANGFOR IAM v4.1 User Manual
365
Step 2. Specify the following information.
Table 39 DNAT Rule Settings (Advanced Rule)
Field Description
Enable Rule Check it to enable the DNAT rule.
Rule Name Type a name for the DNAT rule.
Ingress Interface Select the interface through which the packets coming in to the device will
match this DNAT rule. The options are:
[All WAN interfaces]: Indicates the packets coming in through any
WAN interface will match this DNAT rule.
[Specified interface]: Indicates only the packets coming in through
the specified interface will match this DNAT rule.
Source Address Specify the source address criteria that the data packet should satisfy to match
this DNAT rule. The options are:
[All]: Indicates there is no limit to the source address.
[Specified subnet]: Indicates this DNAT rule will be applied only
when the source address belongs to the subnet specified here.
Destination
Address
Specify the destination address criteria that the data packet should satisfy to
match this DNAT rule. The options are:
[All]: Indicates there is no limit to the destination address.
[Specified subnet]: Indicates this DNAT rule will be applied only
when the destination address belongs to the subnet specified here.
[Specified interface address]: Indicates the DNAT rule will be
applied only when the destination address is the IP address of the
specified interface.
Protocol Specify the protocol criteria that the data packet should satisfy to match this
DNAT rule.
Map To IP Specify the address to which the destination address will be translated when
the data packet satisfies the above criteria.
Map To Port Specify the port to which the destination port will be translated when the data
packet satisfies the above criteria.
Bypass firewall Specify whether to bypass the firewall rules automatically.
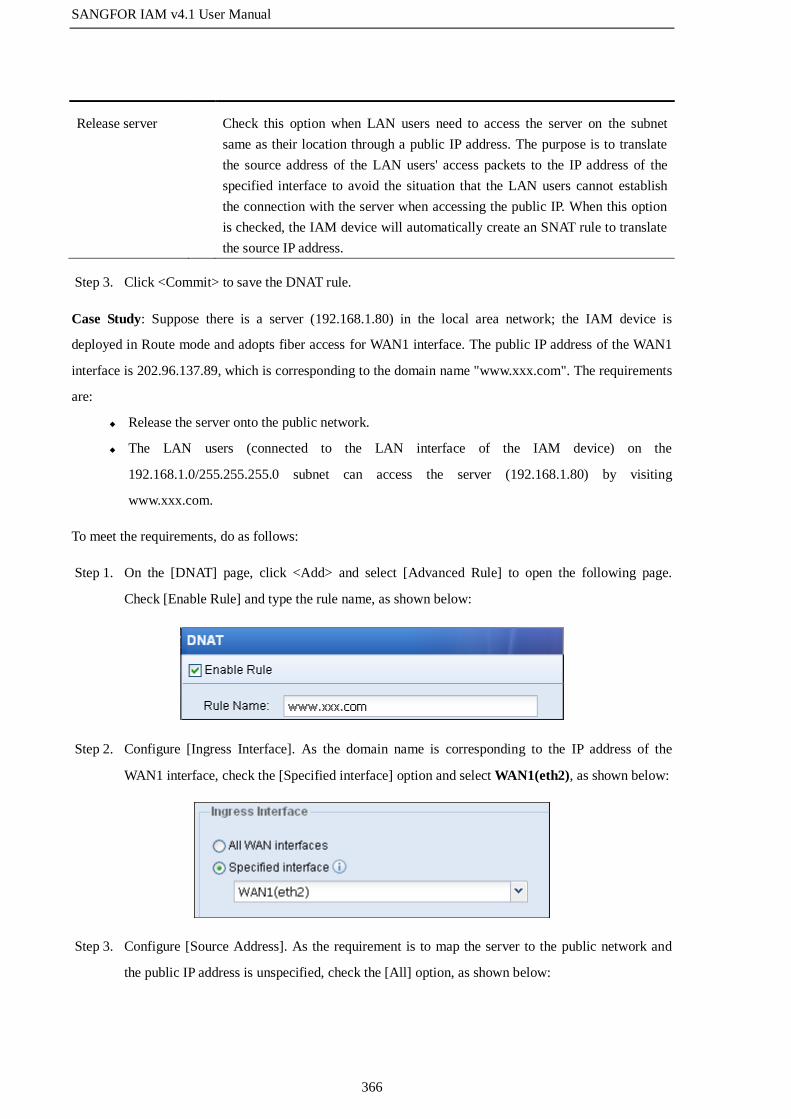
SANGFOR IAM v4.1 User Manual
366
Release server Check this option when LAN users need to access the server on the subnet
same as their location through a public IP address. The purpose is to translate
the source address of the LAN users' access packets to the IP address of the
specified interface to avoid the situation that the LAN users cannot establish
the connection with the server when accessing the public IP. When this option
is checked, the IAM device will automatically create an SNAT rule to translate
the source IP address.
Step 3. Click <Commit> to save the DNAT rule.
Case Study: Suppose there is a server (192.168.1.80) in the local area network; the IAM device is
deployed in Route mode and adopts fiber access for WAN1 interface. The public IP address of the WAN1
interface is 202.96.137.89, which is corresponding to the domain name "www.xxx.com". The requirements
are:
Release the server onto the public network.
The LAN users (connected to the LAN interface of the IAM device) on the
192.168.1.0/255.255.255.0 subnet can access the server (192.168.1.80) by visiting
www.xxx.com.
To meet the requirements, do as follows:
Step 1. On the [DNAT] page, click <Add> and select [Advanced Rule] to open the following page.
Check [Enable Rule] and type the rule name, as shown below:
Step 2. Configure [Ingress Interface]. As the domain name is corresponding to the IP address of the
WAN1 interface, check the [Specified interface] option and select WAN1(eth2), as shown below:
Step 3. Configure [Source Address]. As the requirement is to map the server to the public network and
the public IP address is unspecified, check the [All] option, as shown below:

SANGFOR IAM v4.1 User Manual
367
Step 4. Configure [Destination Address]. As the requirement is to translate the packets destined for the IP
address of WAN1 interface, check the [Specified interface address] option and select
WAN1(eth2), as shown below:
Step 5. Configure [Protocol]. As the destination port is 80, set [Protocol Type] to TCP, [Src Port] to All
and [Dst Port] to 80, as shown below:
Step 6. Configure [Map To IP]. As the target server is 192.168.1.80, check the [Specified IP] option and
enter 192.168.1.80 in the text box, as shown below:

SANGFOR IAM v4.1 User Manual
368
Step 7. Configure [Map To Port]. As the destination port is port 80 of the server 192.168.1.80, check the
[Specified port or port range] option and enter 80 in the text box, as shown below:
Step 8. Check the [Bypass firewall] option to automatically allow data on TCP 80 port of the six
directions: LAN<->WAN, DMZ<->WAN and LAN<->DMZ.
Step 9. As the LAN users need to access the server in the LAN through the public IP address, check the
[Release server] option and select 192.168.1.12(LAN1), as shown below:
Step 10. Click <Commit> to save the DNAT rule.
The [DNAT] page is available only in Route mode.
3.8 Network
3.8.1 Deployment
The [Deployment] page enables you to set the work mode of the IAM device. You can deploy it in Route
mode, Bridge mode, Bypass mode or Single Arm mode. Selecting an appropriate deployment mode helps
deploy the IAM device to the network successfully and maximize the functions of the device.
SANGFOR IAM v4.1 User Manual
369
The IAM device must be deployed in Multi-bridge mode in order to support IPv6 traffic environment.
The differences among the four deployment modes are respectively described in the following table.
Table 40 Differences Among Four Deployment Modes
Deployment Mode Description
Route Mode When deployed in Route mode, the IAM device works as a routing device.
This deployment requires the biggest change to the original network, but
fulfills all the functions of the IAM device.
Bridge Mode When deployed in Bridge mode, the IAM device works as a network cable
with the filtering function. This deployment requires no changes to the
original network and fulfills most of the functions of the device, and thus it is
recommended when it is inconvenient to change the original network
topology.
Bypass Mode When deployed in Bypass mode, the IAM device is connected to the mirror
port of the switch or HUB in the local area network, monitoring the Internet
access data of LAN users. This deployment mode requires no changes to the
original network topology and exerts no influence on the network, which
means the LAN users can still access the Internet even if the IAM device
breaks down. However, this mode fulfills the least of the control functions
and some other functions are unavailable.
Single Arm Mode When deployed in Single Arm mode, the IAM gateway device works as a
proxy server, through which the LAN users access the Internet. It fulfills the
single-armed proxy, controlling and monitoring functions. This deployment
requires no changes to the original network topology and exerts no influence
on the network, which means if the IAM device is down, the users can still
connect to the Internet only after disabling the proxy service on their
computers.
To configure the deployment mode, select [Network] > [Deployment] to open the [Deployment] page and
then click <Configure>. The page displays the deployment modes available: [Route Mode], [Bridge Mode],
[Bypass Mode] and [Single Arm Mode]. You can select the deployment mode according to your needs.

SANGFOR IAM v4.1 User Manual
370
Before you deploy the IAM device to the network, please configure the information such as deployment
mode, interface, route, user, etc. The default IP address settings of the IAM device are shown in the
following table.
Table 41 Default IP Addresses of the Interfaces
Interface IP Address
ETH0 (LAN) 10.251.251.251/24
ETH1 (DMZ) 10.252.252.252/24
ETH2 (WAN1) 200.200.20.61/24
3.8.1.1 Route Mode
When deployed in Route mode, the IAM device works as a routing device and is typically placed at the
exit gateway of local area network or behind the router to proxy the LAN to access the Internet. The
typical deployment topologies are shown in the following figure:

SANGFOR IAM v4.1 User Manual
371
Case Study: Suppose the network is a cross-layer (layer 3) switching environment, as shown in the
following figure and the requirement is to deploy the IAM device as a gateway to proxy the LAN users to
access the Internet. The public network line is optical fiber with static IP address.
To meet the requirements, do as follows:
Step 1. Log into the device through the default IP address. Suppose you log into the device through the
LAN interface, whose default IP address is 10.251.251.251/24. Configure an IP address on the
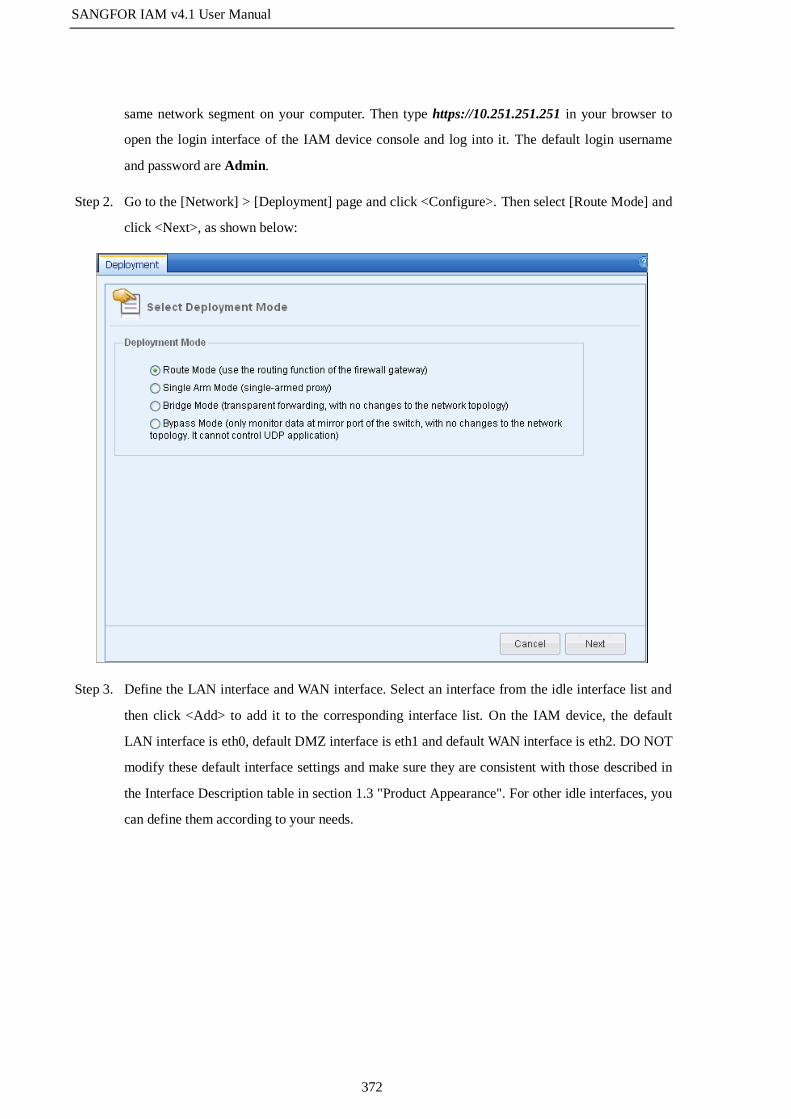
SANGFOR IAM v4.1 User Manual
372
same network segment on your computer. Then type https://10.251.251.251 in your browser to
open the login interface of the IAM device console and log into it. The default login username
and password are Admin.
Step 2. Go to the [Network] > [Deployment] page and click <Configure>. Then select [Route Mode] and
click <Next>, as shown below:
Step 3. Define the LAN interface and WAN interface. Select an interface from the idle interface list and
then click <Add> to add it to the corresponding interface list. On the IAM device, the default
LAN interface is eth0, default DMZ interface is eth1 and default WAN interface is eth2. DO NOT
modify these default interface settings and make sure they are consistent with those described in
the Interface Description table in section 1.3 "Product Appearance". For other idle interfaces, you
can define them according to your needs.

SANGFOR IAM v4.1 User Manual
373
Table 42 Route Mode-Interface List Settings
Field Description
Idle Interface List Displays all the idle interfaces.
LAN Interface List Define the interface in the LAN zone. The LAN zone interface will be
connected to the intranet.
WAN Interface List Define the interface in the WAN zone. The WAN zone interface will be
connected to the extranet. When multiple WAN interfaces are needed, you
need to apply for multi-line license.
DMZ Interface List Define the interface in the DMZ zone. The DMZ interface also belongs to the
LAN zone. You can place some important servers at the DMZ zone and then
configure the firewall to control the access privilege from LAN zone to DMZ
zone to ensure the security of the servers (for firewall settings, see section 3.7
"Firewall").
Step 4. After defining the interfaces, click <Next> to configure the IP address of LAN interface. In this
example, the LAN interface is eth0. Set the IP address of eth0 to 192.168.1.12/255.255.255.0, as
shown below. As the LAN interface is connected to the layer 3 switch, it is not necessary to
enable VLAN.
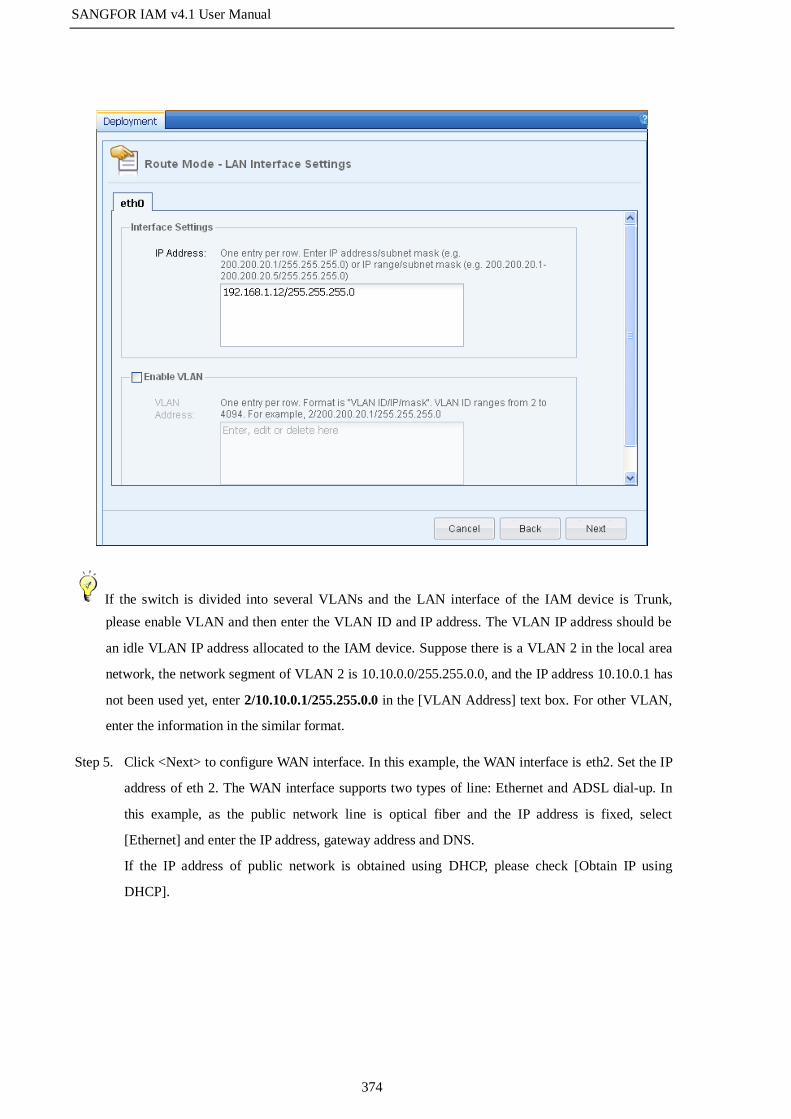
SANGFOR IAM v4.1 User Manual
374
If the switch is divided into several VLANs and the LAN interface of the IAM device is Trunk,
please enable VLAN and then enter the VLAN ID and IP address. The VLAN IP address should be
an idle VLAN IP address allocated to the IAM device. Suppose there is a VLAN 2 in the local area
network, the network segment of VLAN 2 is 10.10.0.0/255.255.0.0, and the IP address 10.10.0.1 has
not been used yet, enter 2/10.10.0.1/255.255.0.0 in the [VLAN Address] text box. For other VLAN,
enter the information in the similar format.
Step 5. Click <Next> to configure WAN interface. In this example, the WAN interface is eth2. Set the IP
address of eth 2. The WAN interface supports two types of line: Ethernet and ADSL dial-up. In
this example, as the public network line is optical fiber and the IP address is fixed, select
[Ethernet] and enter the IP address, gateway address and DNS.
If the IP address of public network is obtained using DHCP, please check [Obtain IP using
DHCP].

SANGFOR IAM v4.1 User Manual
375
If the line is ADSL dial-up, the WAN interface must be connected with the Modem. Check the
[ADSL Dial-up] option, and enter the username and password of the ADSL account. If the [Auto
dial-up] option is checked, the line will automatically dial up once the line is aborted or the IAM
device is restarted.
Step 6. Configure the DMZ interface. In this example, the DMZ interface is eth1. Enter the IP address
and subnet mask, as shown below:

SANGFOR IAM v4.1 User Manual
376
Step 7. Configure the NAT to set the SNAT rules. When the IAM device works as a gateway and is
directly connected to the public network, you need to configure the SNAT rule so that the IAM
device will proxy the LAN users to access the Internet. Specify the [Source Address] and [WAN
Interface]. The [WAN Interface] can be one or all of the WAN interfaces.
After you finish the above settings, an SNAT rule named Proxy LAN Interface will be added on
the [SNAT] page. You cannot modify the [Rule Name] and [Translate Source IP To] here. To
modify them, go to the [SNAT] page. If there are users on other network subnets of the local area
network that need to access the Internet through the IAM device, you need also go to the [SNAT]
page to add the corresponding SNAT rule (for detailed settings, see section 3.7.2 "SNAT").

SANGFOR IAM v4.1 User Manual
377
Step 8. After finishing the settings, check if the settings are correct and then click <Commit>.
Step 9. To make the settings take effect, the IAM device will restart. Click <Yes> on the displayed dialog,
as shown below:

SANGFOR IAM v4.1 User Manual
378
Step 10. In this example, as the LAN interface of the IAM device is not located on the same network
segment as the LAN users, you need to add a system route directing the IAM device to the LAN.
Go to [Network] > [Static Routing], click <Add> to add the corresponding route (for detailed
settings, see section 3.8.3 "Static Route"). When the LAN consists of several network segments,
you need to add several system routes.
Step 11. Configure [Firewall] > [Firewall Rules] to allow all data from LAN to WAN (see section 3.7.1
"Firewall Rules").
Step 12. Go to the [Group/User] page to add users/groups or go to the [Authentication Policy] page to add
authentication policy for new users to avoid the situation that the LAN users cannot access the
Internet through the IAM device due to no valid identity authentication (see section 3.3.2.3
"Group/User" and section 3.3.3.1 "Authentication Policy").
Step 13. Place the IAM device into the network, with the WAN interface connected to WAN line and LAN
interface to LAN switch whose gateway directs to the LAN interface of the IAM device.
1. When the IAM device works in Route mode, the gateway of the LAN computers are directing to
the LAN interface of the IAM device or the layer 3 switch, whose gateway is directing to the IAM
device. All the Internet access data are forwarded through the NAT or routing function of the IAM
device.
2. The IP addresses of WAN interface, LAN interface and DMZ interface should be on different
network segments.
3. If the LAN interface is configured with 802.1Q-VLAN address, the LAN interface can be
connected with the TRUNK interface of the layer 2 switch that supports VLAN and the IAM device

SANGFOR IAM v4.1 User Manual
379
can forward data among different VLANs (single-armed routing). You can also configure the firewall
rule of the LAN<->LAN direction to control the access among different VLAN IDs.
4. Under Route mode, if there is a front-end device in the network, please configure for the WAN
interface of the IAM device an IP address that is on the same network segment as that of the LAN
interface of the front-end device in Step 5. If the front-end device has enabled DHCP, please also
check the [Obtain IP using DHCP] option for the WAN interface and make sure the WAN interface
communicates with the DHCP server smoothly.
3.8.1.2 Bridge Mode
When deployed in Bridge, the IAM device works as a network cable with the filtering function. This
deployment is generally used when it is inconvenient to change the original network topology. When
selecting Route mode, deploy the IAM device between the original gateway and LAN users. You need only
configure the IAM device, with no changes to the original gateway and LAN users. To the users, they do
not know the existence of the IAM device; in other words, the IAM device is totally transparent to the
original gateway and LAN users, which is the main feature of Bridge deployment mode. The Bridge mode
falls into two modes: Multi-Interface and Multi-Bridge. Only Multi-bridge mode is supporting IPv6
environment currently.
3.8.1.2.1 Multi-Interface
Multi-Interface means the IAM device sets up only one bridge, and the LAN interface and WAN interface
are not of a one-to-one correspondence. The LAN interface or the WAN interface may be connected to
multiple interfaces. In Multi-Interface mode, the IAM device only maintains one ARP table and data
forwarding is allowed among different interfaces.
The Multi-Interface mode is generally used in the following two running environments:
Environment 1: The switch is connected to the two external lines FW1 and FW2. In this network
environment, the IAM device can be deployed between the switch and firewalls, adopting
Single-In-Double-Out multi-interface mode, as shown in the following figure:

SANGFOR IAM v4.1 User Manual
380
Environment 2: To enhance the stability of the network and reduce single point of failure, both the core
switch and route in the LAN adopt high availability scheme. In this network environment, two IAM
devices can be deployed into the network, adopting Double-In-Single-Out multi-bridge mode, as shown in
the following figure:
Case Study: Suppose the following network topology is what it is required: the IAM device adopts
multi-interface mode, the local area network is connected with the layer 3 switch, and the LAN consists of
two network segments 192.168.2.0/255.255.255.0 and 192.168.3.0/255.255.255.0.
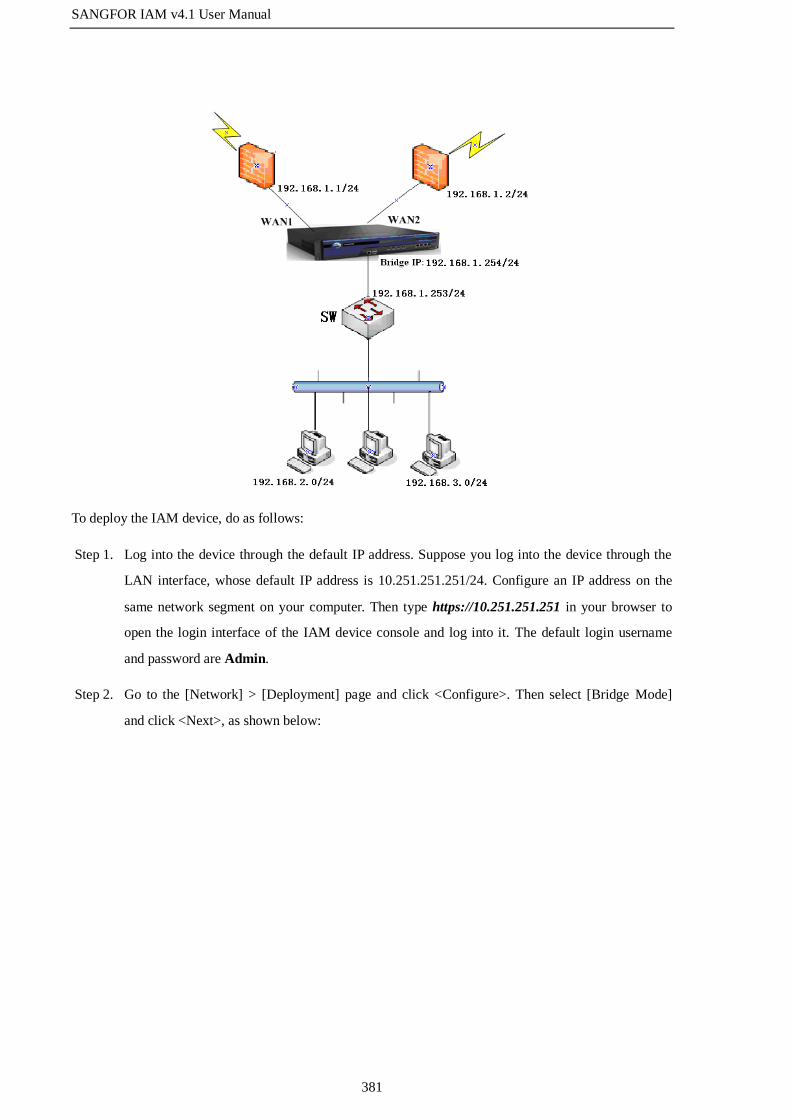
SANGFOR IAM v4.1 User Manual
381
To deploy the IAM device, do as follows:
Step 1. Log into the device through the default IP address. Suppose you log into the device through the
LAN interface, whose default IP address is 10.251.251.251/24. Configure an IP address on the
same network segment on your computer. Then type https://10.251.251.251 in your browser to
open the login interface of the IAM device console and log into it. The default login username
and password are Admin.
Step 2. Go to the [Network] > [Deployment] page and click <Configure>. Then select [Bridge Mode]
and click <Next>, as shown below:

SANGFOR IAM v4.1 User Manual
382
Step 3. Select [Multi-Interface] mode and then click <Next>, as shown below:
Step 4. Define the bridge interfaces, denied flow direction and allowed flow direction. To set the LAN

SANGFOR IAM v4.1 User Manual
383
interface and WAN interface, select an interface from the idle interface list and then click <Add>
to add it to the corresponding interface list. On the IAM device, the default LAN interface is eth0
and default WAN interface is eth2. DO NOT modify these default interface settings and make
sure they are consistent with those described in the Interface Description table in section 1.3
"Product Appearance".
Table 43 Multi-Interface Settings (Bridge Mode)
Field Description
Idle Interface List Displays all the idle interfaces.
LAN Interface List Define the LAN zone interface. The LAN zone interface will be
connected to the intranet.
WAN Interface List Define the WAN zone interface. The WAN zone interface will be
connected to the extranet. In this example, multiple WAN interfaces are
needed. There is no need to apply for multi-line license when multiple
WAN interfaces are used in Bridge mode, which is different from that
in Route mode.
Allowed Flow Direction Define the flow directions eth0<->eth2 and eth0<->eth3 here, which
means data forwarding is allowed between the LAN interface and two
WAN interfaces.
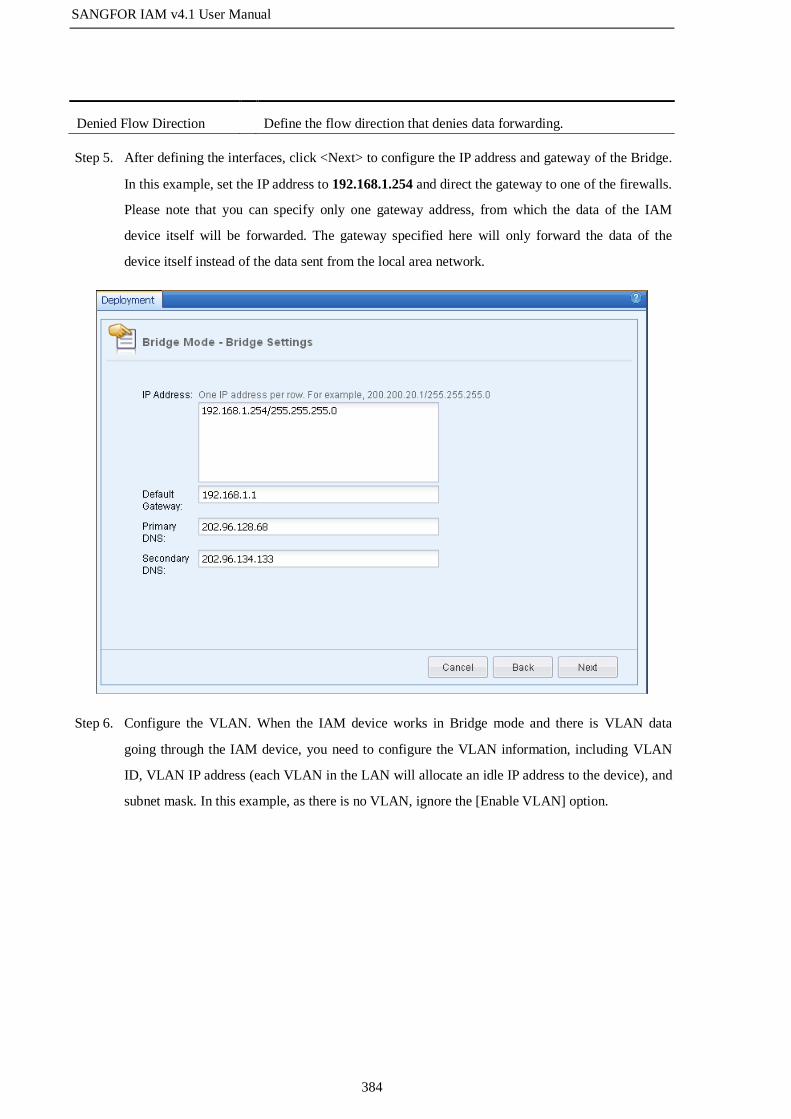
SANGFOR IAM v4.1 User Manual
384
Denied Flow Direction Define the flow direction that denies data forwarding.
Step 5. After defining the interfaces, click <Next> to configure the IP address and gateway of the Bridge.
In this example, set the IP address to 192.168.1.254 and direct the gateway to one of the firewalls.
Please note that you can specify only one gateway address, from which the data of the IAM
device itself will be forwarded. The gateway specified here will only forward the data of the
device itself instead of the data sent from the local area network.
Step 6. Configure the VLAN. When the IAM device works in Bridge mode and there is VLAN data
going through the IAM device, you need to configure the VLAN information, including VLAN
ID, VLAN IP address (each VLAN in the LAN will allocate an idle IP address to the device), and
subnet mask. In this example, as there is no VLAN, ignore the [Enable VLAN] option.

SANGFOR IAM v4.1 User Manual
385
Step 7. Configure the DMZ interface and firewall rule. Select an idle interface as the management
interface from the drop-down list of [Select MANAGE Interface]. The users will connect to the
IAM device through this management interface. By default, the management interface is eth1.
Then configure the [IP Address] and [Subnet Mask]. Please note that the management interface
and the bridge IP address cannot be on the same network segment. For the [Auto bypass firewall]
option, check it to allow all data from WAN to LAN and LAN to WAN.
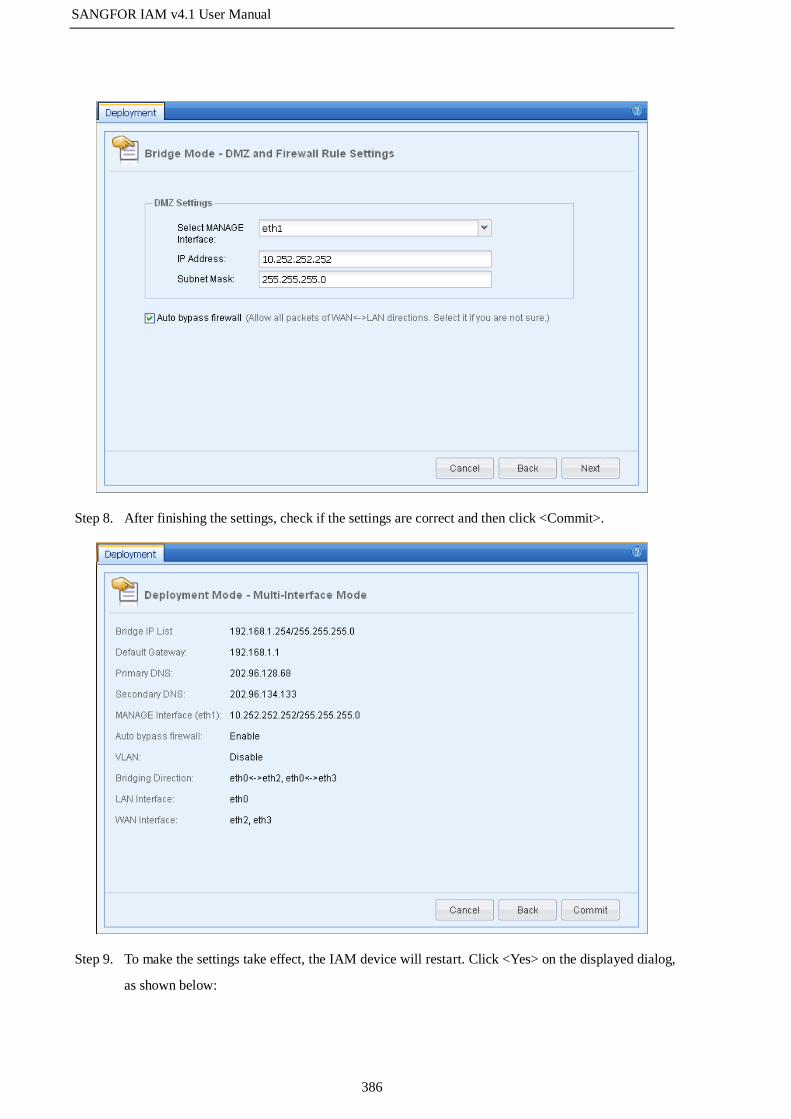
SANGFOR IAM v4.1 User Manual
386
Step 8. After finishing the settings, check if the settings are correct and then click <Commit>.
Step 9. To make the settings take effect, the IAM device will restart. Click <Yes> on the displayed dialog,
as shown below:
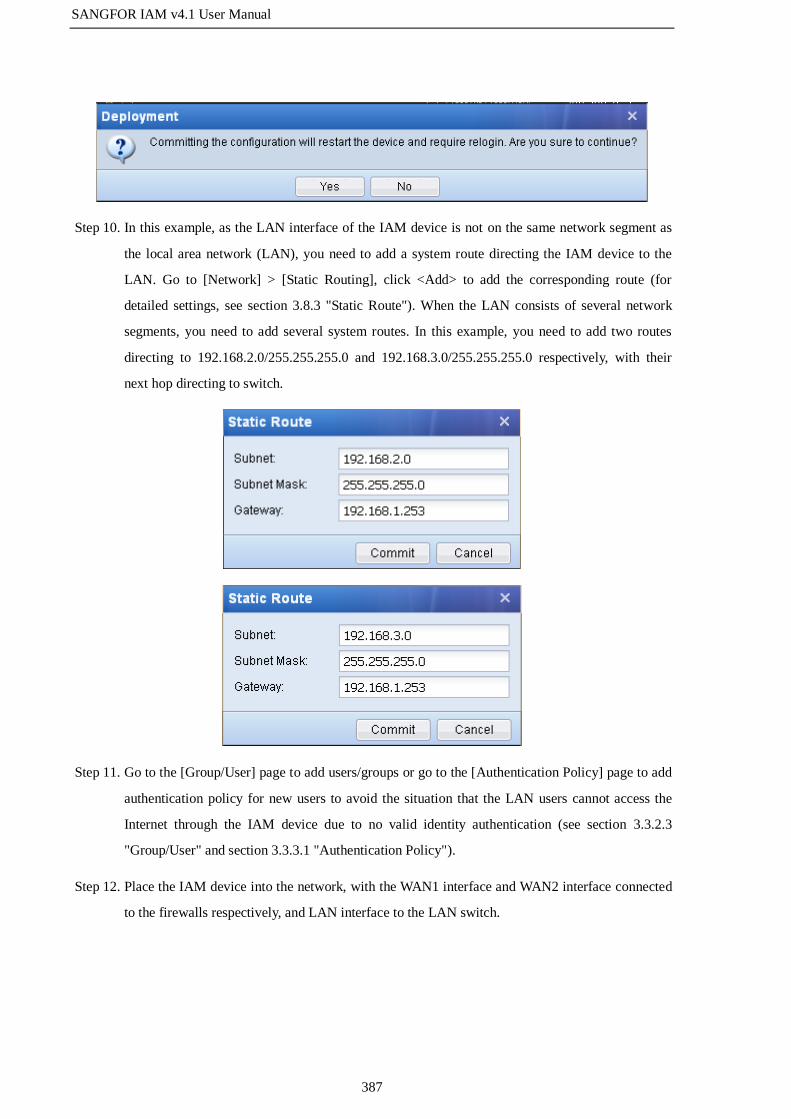
SANGFOR IAM v4.1 User Manual
387
Step 10. In this example, as the LAN interface of the IAM device is not on the same network segment as
the local area network (LAN), you need to add a system route directing the IAM device to the
LAN. Go to [Network] > [Static Routing], click <Add> to add the corresponding route (for
detailed settings, see section 3.8.3 "Static Route"). When the LAN consists of several network
segments, you need to add several system routes. In this example, you need to add two routes
directing to 192.168.2.0/255.255.255.0 and 192.168.3.0/255.255.255.0 respectively, with their
next hop directing to switch.
Step 11. Go to the [Group/User] page to add users/groups or go to the [Authentication Policy] page to add
authentication policy for new users to avoid the situation that the LAN users cannot access the
Internet through the IAM device due to no valid identity authentication (see section 3.3.2.3
"Group/User" and section 3.3.3.1 "Authentication Policy").
Step 12. Place the IAM device into the network, with the WAN1 interface and WAN2 interface connected
to the firewalls respectively, and LAN interface to the LAN switch.
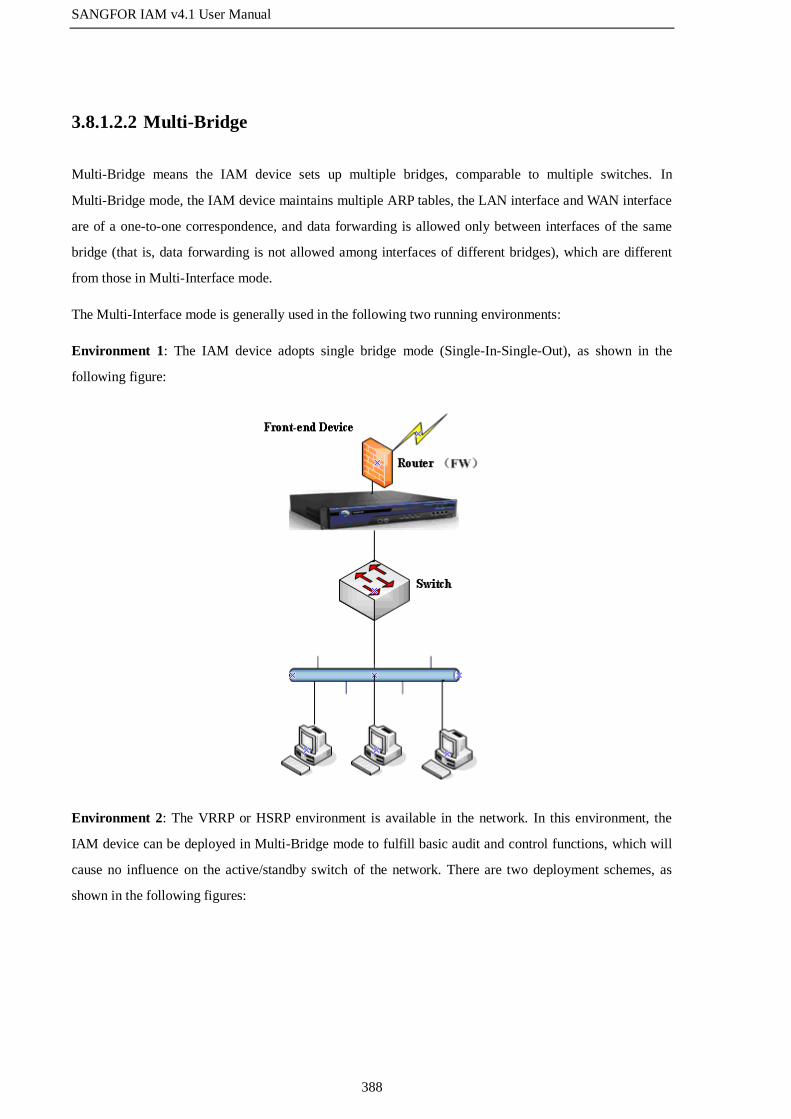
SANGFOR IAM v4.1 User Manual
388
3.8.1.2.2 Multi-Bridge
Multi-Bridge means the IAM device sets up multiple bridges, comparable to multiple switches. In
Multi-Bridge mode, the IAM device maintains multiple ARP tables, the LAN interface and WAN interface
are of a one-to-one correspondence, and data forwarding is allowed only between interfaces of the same
bridge (that is, data forwarding is not allowed among interfaces of different bridges), which are different
from those in Multi-Interface mode.
The Multi-Interface mode is generally used in the following two running environments:
Environment 1: The IAM device adopts single bridge mode (Single-In-Single-Out), as shown in the
following figure:
Environment 2: The VRRP or HSRP environment is available in the network. In this environment, the
IAM device can be deployed in Multi-Bridge mode to fulfill basic audit and control functions, which will
cause no influence on the active/standby switch of the network. There are two deployment schemes, as
shown in the following figures:
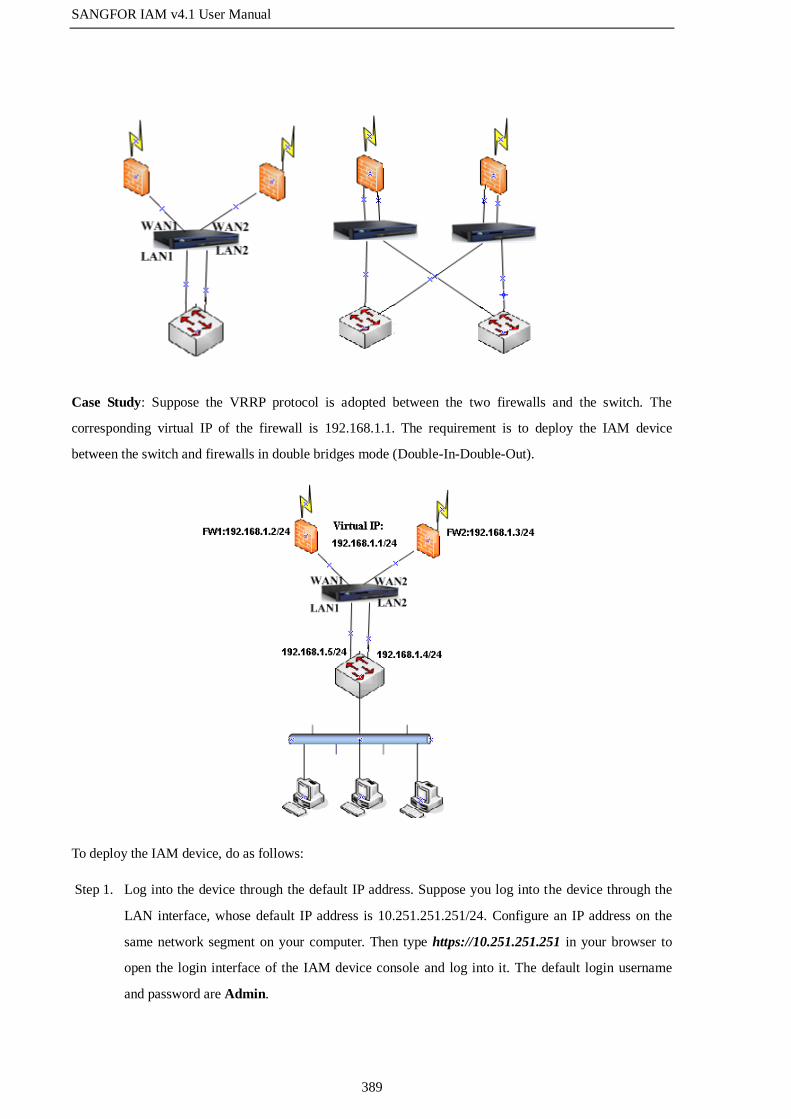
SANGFOR IAM v4.1 User Manual
389
Case Study: Suppose the VRRP protocol is adopted between the two firewalls and the switch. The
corresponding virtual IP of the firewall is 192.168.1.1. The requirement is to deploy the IAM device
between the switch and firewalls in double bridges mode (Double-In-Double-Out).
To deploy the IAM device, do as follows:
Step 1. Log into the device through the default IP address. Suppose you log into the device through the
LAN interface, whose default IP address is 10.251.251.251/24. Configure an IP address on the
same network segment on your computer. Then type https://10.251.251.251 in your browser to
open the login interface of the IAM device console and log into it. The default login username
and password are Admin.
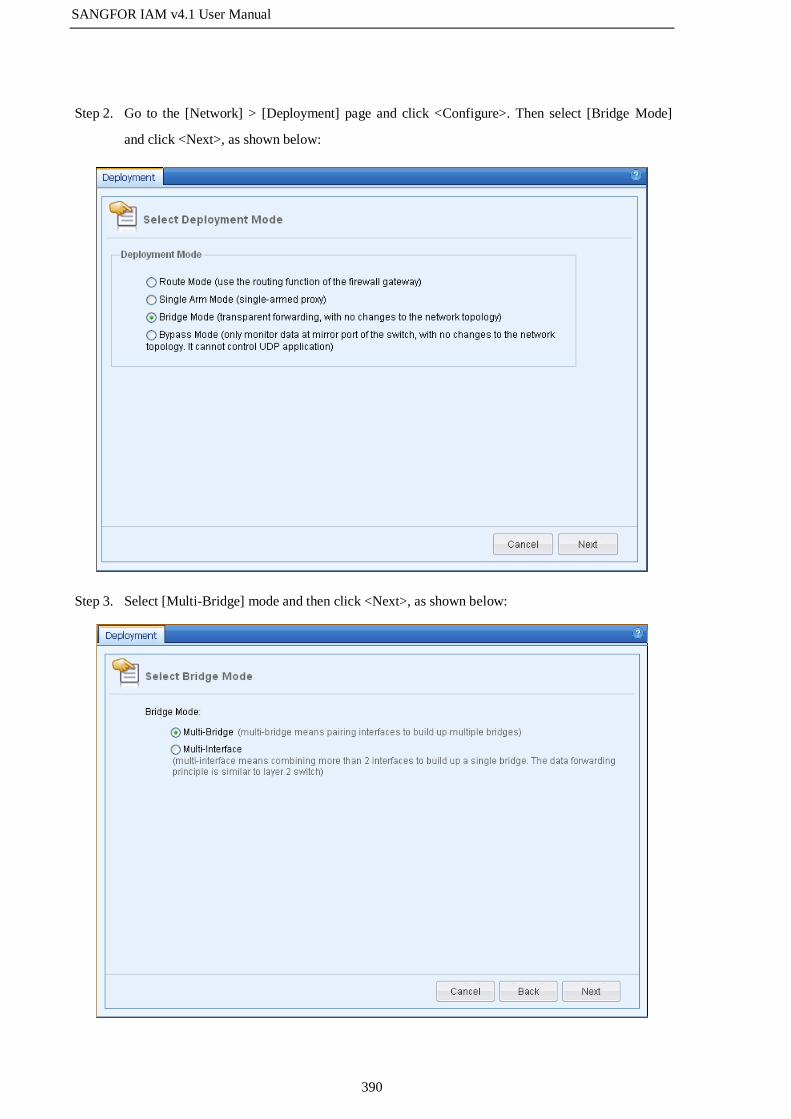
SANGFOR IAM v4.1 User Manual
390
Step 2. Go to the [Network] > [Deployment] page and click <Configure>. Then select [Bridge Mode]
and click <Next>, as shown below:
Step 3. Select [Multi-Bridge] mode and then click <Next>, as shown below:

SANGFOR IAM v4.1 User Manual
391
Step 4. Select two LAN interfaces and two WAN interfaces respectively from [LAN Interface List] and
[WAN Interface List] to make two bridges, as shown below:
Table 44 Multi-Bridge Settings (Bridge Mode)
Field Description
LAN Interface List Select LAN interface. You need to select a LAN interface from this list and
a WAN interface from the [WAN Interface List] to make a bridge.
WAN Interface List Select WAN interface. You need to select a LAN interface from the [LAN
Interface List] and a WAN interface from this list to make a bridge.
Bridge List Define the bridge. The data forwarding is only allowed between the two
interfaces of the same bridge. In other words, the data is not allowed to be
forwarded among interfaces of different bridges.
Enable multi-bridge
link sync
Indicates when one interface of a bridge switches its status between
Connected and Disconnected, the other interface automatically switches its
status accordingly to achieve status synchronizing of the two interfaces of
the bridge. This function is commonly used in a redundant network
environment to notify the peer device that the link has failed or recovered
from a fault. It is recommended to enable this option.
Step 5. Configure the IP address, default gateway, primary DNS, secondary DNS and set whether to
enable VLAN for the two bridges respectively.

SANGFOR IAM v4.1 User Manual
392
In this example, as the two bridges are on the same network segment, the IP addresses of the two
bridges can be on the same network segment, but they cannot be the same. Allocate two idle IP
addresses to the two bridges, direct the default gateway to the virtual IP address of the front-end
firewall, and set the DNS to the public network DNS address allocated by the ISP.
When the IAM device works in Bridge mode and there is VLAN data going through the IAM
device, you need to configure the VLAN information, including VLAN ID, VLAN IP address
(each VLAN in the LAN will allocate an idle IP address to the device), and subnet mask. In this
example, as there is no VLAN, ignore the [Enable VLAN] option.

SANGFOR IAM v4.1 User Manual
393
If there is no available idle IP address to be allocated to the bridge, the LAN users can still access the
Internet; however, the IAM device has no valid IP address to communicate with the local area
network and the Internet, and therefore some functions are restricted, such as internal library update,
Web authentication, ingress function, etc. In this case, you can connect the IAM device to the LAN
switch through the management interface to realize the communication between the IAM device and
the LAN area or the Internet. For detailed settings, see the subsequent Special Case.
Step 6. Configure the management interface and firewall rule. Select an idle interface (non-bridge
interface) as the management interface from the drop-down list of [Select MANAGE Interface],
and check the [Auto bypass firewall] option to allow all data from WAN to LAN and LAN to
WAN.

SANGFOR IAM v4.1 User Manual
394
Step 7. After finishing the settings, check if the settings are correct and then click <Commit>.
Step 8. To make the settings take effect, the IAM device will restart. Click <Yes> on the displayed dialog,
as shown below:

SANGFOR IAM v4.1 User Manual
395
Step 9. Go to the [Group/User] page to add users/groups or go to the [Authentication Policy] page to add
authentication policy for new users to avoid the situation that the LAN users cannot access the
Internet through the IAM device due to no valid identity authentication (see section 3.3.2.3
"Group/User" and section 3.3.3.1 "Authentication Policy").
Step 10. Place the IAM device into the network, with the WAN1 interface connected to the firewall 1
(FW1), WAN2 interface to firewall 2 (FW2), and LAN1 interface and LAN2 interface to the
LAN switch.
Special Case: Suppose there is a front-end router in the network, which proxies the local area network to
access the Internet. Below the router lays a layer 3 switch. As the network IP addresses have strict rules,
the IP prefix between the router and the layer 3 switch is IP/30 (which means the first 30 bits are used to
represent the network and the remaining 2 bits are used to identify hosts). The requirements are:
The IAM device works in Bridge mode, monitoring the Internet access data of all subnets in the
LAN.
The IAM device can update the internal rule library automatically.
The LAN users use the Web authentication and can log into the Console of the device to manage
the device from local area network.
Given the requirements and the special network topology, the following deployment scheme is adopted:
When the IAM device is deployed in Bridge mode and there is no available IP address allocated between
the firewall (FW) and the switch, the device cannot access the Internet through the Bridge IP address. As
the IAM device needs to connect to the Internet and communicate with the LAN smoothly, the solution is
to connect the management interface (DMZ interface) to the LAN switch and allocate an idle IP address to
it. The IAM device will communicate with the Internet and the LAN through this address.

SANGFOR IAM v4.1 User Manual
396
To deploy the device, do as follows:
Step 1. Log into the device through the default IP address. Suppose you log into the device through the
LAN interface, whose default IP address is 10.251.251.251/24. Configure an IP address on the
same network segment on your computer. Then type https://10.251.251.251 in your browser to
open the login interface of the IAM device console and log into it. The default login username
and password are Admin.
Step 2. Go to the [Network] > [Deployment] page and click <Configure>. Then select [Bridge Mode]
and click <Next>, as shown below:

SANGFOR IAM v4.1 User Manual
397
Step 3. Select [Multi-Bridge] mode and then click <Next>, as shown below:
Step 4. Select a LAN interfaces and a WAN interfaces respectively from [LAN Interface List] and [WAN
Interface List] to make a bridge. In this example, select eth0 and eth2 as the LAN interface and
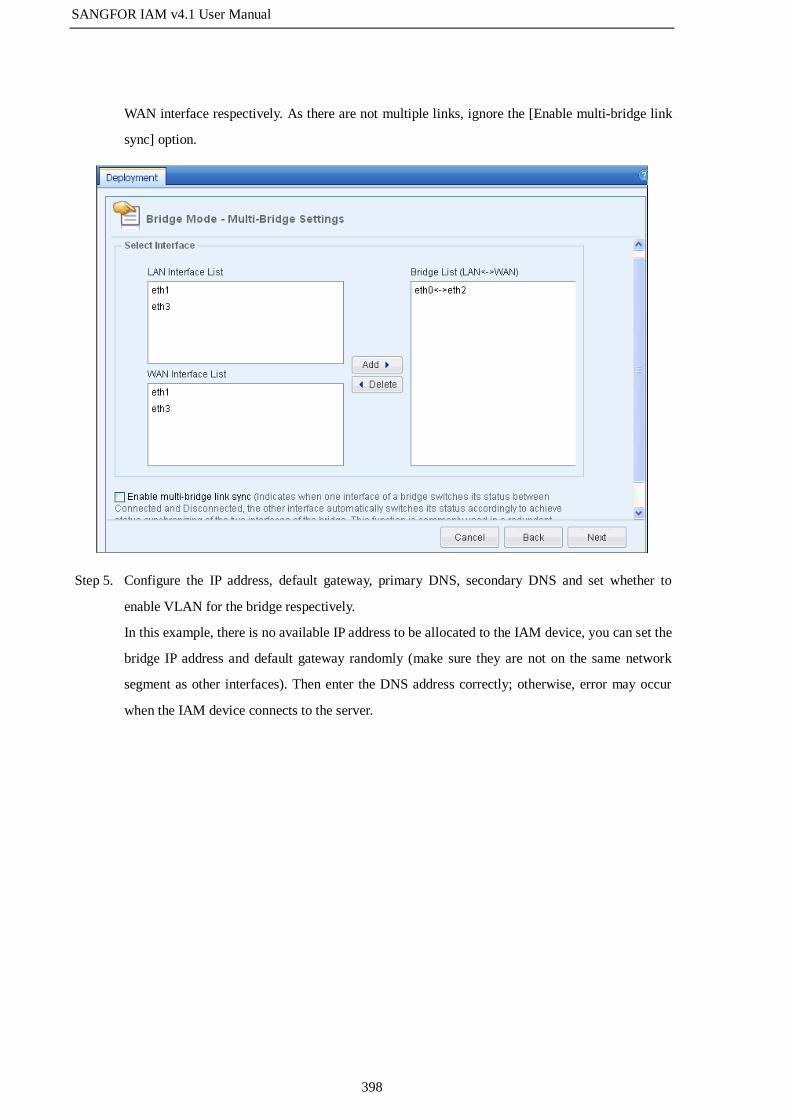
SANGFOR IAM v4.1 User Manual
398
WAN interface respectively. As there are not multiple links, ignore the [Enable multi-bridge link
sync] option.
Step 5. Configure the IP address, default gateway, primary DNS, secondary DNS and set whether to
enable VLAN for the bridge respectively.
In this example, there is no available IP address to be allocated to the IAM device, you can set the
bridge IP address and default gateway randomly (make sure they are not on the same network
segment as other interfaces). Then enter the DNS address correctly; otherwise, error may occur
when the IAM device connects to the server.
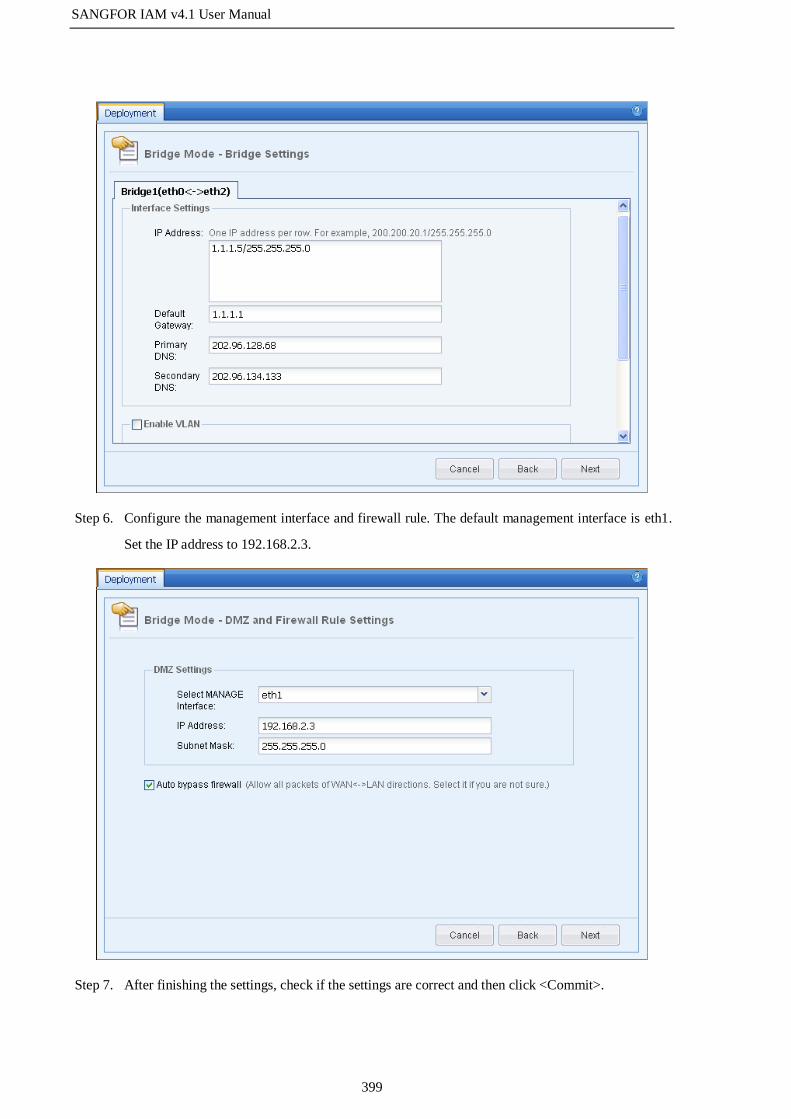
SANGFOR IAM v4.1 User Manual
399
Step 6. Configure the management interface and firewall rule. The default management interface is eth1.
Set the IP address to 192.168.2.3.
Step 7. After finishing the settings, check if the settings are correct and then click <Commit>.

SANGFOR IAM v4.1 User Manual
400
Step 8. To make the settings take effect, the IAM device will restart. Click <Yes> on the displayed dialog,
as shown below:
Step 9. Configure the static route. Set the default route of the device, that is, the gateway directs to the
interface 192.168.2.1/255.255.255.0 of the switch (see section 3.8.3 "Static Route").
Step 10. Go to the [Group/User] page to add users/groups or go to the [Authentication Policy] page to add
authentication policy for new users to avoid the situation that the LAN users cannot access the
Internet through the IAM device due to no valid identity authentication (see section 3.3.2.3
"Group/User" and section 3.3.3.1 "Authentication Policy").

SANGFOR IAM v4.1 User Manual
401
Step 11. Place the IAM device into the network, with the WAN interface connected to the firewall (FW),
LAN interface to the LAN switch, DMZ interface to another interface of the LAN switch. The
LAN switch is a layer 3 switch, the IP addresses of whose interfaces locate on different network
segments.
IPv6 Environment: As mentioned, Sangfor IAM device only support IPv6 traffic monitoring and filtering
in Multi-bridge deployment mode. To deploy the device in IPv6 environment, do as below:
Step 1. Log into the device through the default IP address. Suppose you log into the device through the
LAN interface, whose default IP address is 10.251.251.251/24. Configure an IP address on the
same network segment on your computer. Then type https://10.251.251.251 in your browser to
open the login interface of the IAM device console and log into it. The default login username
and password are Admin.
Step 2. Go to the [Network] > [Deployment] page and click <Configure>. Then select [Bridge Mode]
and click <Next>, as shown below:
Step 3. Select [Multi-Bridge] mode and then click <Next>, as shown below:

SANGFOR IAM v4.1 User Manual
402
Step 4. Select a LAN interfaces and a WAN interfaces respectively from [LAN Interface List] and [WAN
Interface List] to make a bridge. In this example, select eth0 and eth2 as the LAN interface and
WAN interface respectively. As there are not multiple links, ignore the [Enable multi-bridge link
sync] option.
Step 5. Configure the IP address, default gateway, primary DNS and secondary DNS respectively in IPv4
page. Enter the DNS address correctly; otherwise, error may occur when the IAM device
connects to the server.

SANGFOR IAM v4.1 User Manual
403
Step 6. Configure the management interface and firewall rule. The default management interface is eth1.
Step 7. After finishing the settings, check if the settings are correct and then click <Commit>.

SANGFOR IAM v4.1 User Manual
404
Step 8. To make the settings take effect, the IAM device will restart. Click <Yes> on the displayed dialog,
as shown below:
1. When the IAM device works in Bridge mode, there is no need to change the gateway of the LAN
computers (that is, keep the gateway directed to the LAN interface IP address of the front-end
device).
2. When the IAM works in Bridge mode, to conduct monitoring and control over the data sent from
LAN to WAN, you need to make sure the WAN interface is connected to the front-end routing device
and the LAN interface to the LAN switch.
3. The Bridge mode realizes transparency at the Data Link Layer (Layer 2 of the seven-layer OSI
model) by bridging several interfaces of the IAM device. All the data at the Data Link Layer or
above layers can go through the IAM device. When the original gateway need enable the IP/MAC
binding and DHCP functions, it must be ensured that the data at layer 2 can traverse the IAM device.
4. In Bridge mode, the IAM device has no NAT function.
SANGFOR IAM v4.1 User Manual
405
5. In Bridge mode, the VPN function of the IAM device is unavailable.
6. To enable the antivirus or email filtering functions or have the IAM device automatically update
the URL library, application identification rule library, virus library, etc., you need to configure the
bridge IP address, default gateway and DNS address and ensure that the IAM device can connect to
the Internet (you can test the connectivity using PING through the update console).
7. To enable the Web authentication, ingress rule or other functions that will redirect users' browsers
when the LAN consists of multiple subnets, you need to add a route that is destined for the indirectly
connected network segment in the LAN and directs to the LAN router.
8. When the layer 2 switch has multiple network segments (not VLAN) and the gateway device is
also configured with IP addresses of multiple network segments, if you want to enable antivirus,
email filtering, ingress rule, Web authentication, and other functions that will redirect users' browsers,
you need to configure the IP addresses of these network segments in the [IP Address] text box under
[Bridge Mode] > [Multi-Bridge Settings] > [Bridge Settings].
9. In Bridge mode, the IAM device supports VLAN TRUNK traversal and the bridge IP address
supports the address of 802.1Q-VLAN, that is, the IAM device can be transparently connected to the
main channel of the VLAN TRUNK.
10. The differences between Multi-Interface and Multi-Bridge modes are: in Multi-Interface mode, a
bridge has multiple interfaces and the IAM device maintains only one MAC address table; while in
Multi-Bridge mode, the IAM device is virtualized into two independent bridges, each maintaining its
own MAC address table and data forwarding not allowed between the two bridges.
11. In IPv6 environment multi-bridge mode, VLAN does not support IPv6 address. DNS server ip
address can only configured with IPv4 type ip address.
3.8.1.3 Bypass Mode
When deployed in Bypass mode, the IAM device is connected to the mirror port of the switch or HUB in
the local area network. To realize the monitoring and control functions of the IAM device, it must be
ensured that the Internet access data of LAN users will go through the switch or HUB and the mirror port
will mirror both the uplink and downlink data. This deployment mode requires no changes to the original
network environment and exerts no influence on the network, which means the LAN users can still access
the Internet even if the IAM device breaks down. The typical running environments are as shown in the
following figures:
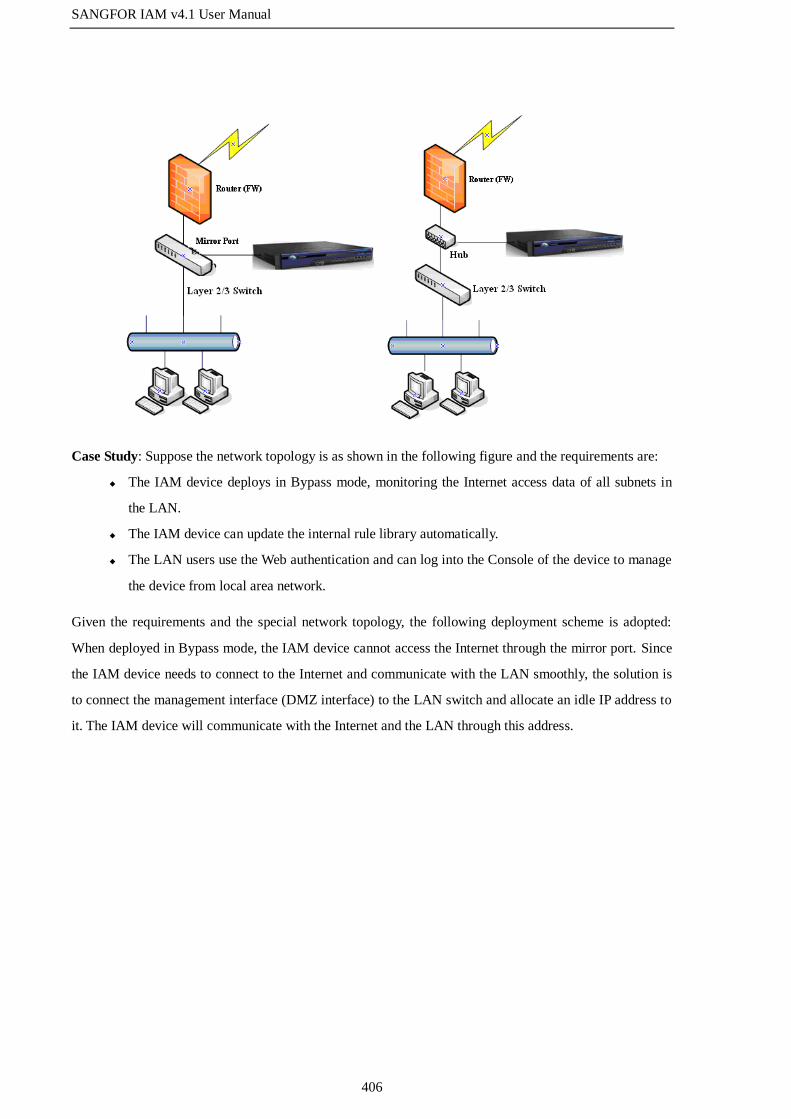
SANGFOR IAM v4.1 User Manual
406
Case Study: Suppose the network topology is as shown in the following figure and the requirements are:
The IAM device deploys in Bypass mode, monitoring the Internet access data of all subnets in
the LAN.
The IAM device can update the internal rule library automatically.
The LAN users use the Web authentication and can log into the Console of the device to manage
the device from local area network.
Given the requirements and the special network topology, the following deployment scheme is adopted:
When deployed in Bypass mode, the IAM device cannot access the Internet through the mirror port. Since
the IAM device needs to connect to the Internet and communicate with the LAN smoothly, the solution is
to connect the management interface (DMZ interface) to the LAN switch and allocate an idle IP address to
it. The IAM device will communicate with the Internet and the LAN through this address.
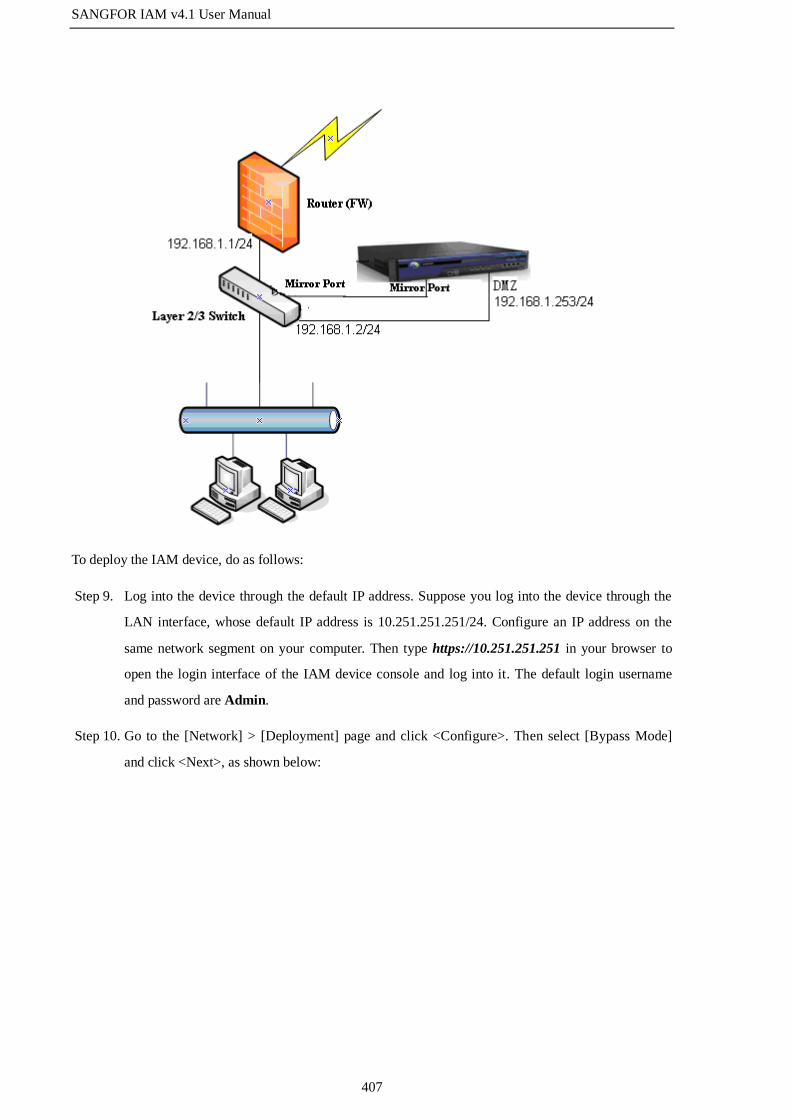
SANGFOR IAM v4.1 User Manual
407
To deploy the IAM device, do as follows:
Step 9. Log into the device through the default IP address. Suppose you log into the device through the
LAN interface, whose default IP address is 10.251.251.251/24. Configure an IP address on the
same network segment on your computer. Then type https://10.251.251.251 in your browser to
open the login interface of the IAM device console and log into it. The default login username
and password are Admin.
Step 10. Go to the [Network] > [Deployment] page and click <Configure>. Then select [Bypass Mode]
and click <Next>, as shown below:

SANGFOR IAM v4.1 User Manual
408
Step 11. Configure the management interface. In Bypass mode, the management interface is eth1 by
default, which cannot be modified. [IP Address] indicates the IP address allocated to the
management interface (DMZ interface). In this example, as the DMZ interface is connected to the
LAN switch, enter an IP address that can communicate with the switch and the LAN. [Default
Gateway] indicates the gateway of the IAM device. For this case, enter the address of the
interface (of the switch) connected with the DMZ interface. Specify the DNS addresses available
in the public network in the text boxes of [Primary DNS] and [Secondary DNS].

SANGFOR IAM v4.1 User Manual
409
Step 12. Configure the monitored subnet and monitored server list. In bypass mode, the IAM device can
fulfill partial TCP control functions. As control is based on monitoring, that is, only the monitored
data will be controlled, you need to set the addresses to be monitored on this page.
a. Enter the to-be-monitored subnets 192.168.1.0/255.255.255.0 in the [Monitored Subnet/Excluded
IP] textbox, which means the data of this subnet accessing other subnets will be monitored, while
the access data within this subnet will not be monitored. If you want to have an IP range (such as
192.168.1.1-192.168.1.10) exempted from the monitoring, type -192.168.1.1-192.168.1.10 in the
text box, which means the data of the IP addresses in the range 192.168.1.1-192.168.1.10 for
accessing other subnets or extranet will not be monitored.
b. Enter the to-be-monitored servers in the [Monitored Server List] text box. When the monitored
IP address accesses the address specified here, the data will also be monitored. For example,
suppose there is a Web server in the LAN, as the data for accessing addresses in a same subnet
will not be monitored, to record the data of LAN users accessing this Web server, you need enter
the IP address of the Web server in the [Monitored Server List].

SANGFOR IAM v4.1 User Manual
410
Step 13. After finishing the settings, check if the settings are correct and then click <Commit>.
Step 14. To make the settings take effect, the IAM device will restart. Click <Yes> on the displayed dialog,
as shown below:

SANGFOR IAM v4.1 User Manual
411
1. To deploy the IAM device in Bypass mode, you must use HUB or a switch with a mirror port. If
the switch has no mirror port, please connect a HUB in the front of the switch.
2. In Bypass mode, there is no data displayed on the [App Flow Ranking], [User Flow Ranking] and
[Connections] page under [Flow Status] module.
3. In Bypass mode, the TCP control is realized by sending reset packets through the DMZ interface,
and therefore you need to make sure the reset packets will be received by the PC and the public
network server.
4. Many functions are unavailable in Bypass mode, such as VPN, DHCP and ingress rules.
5. In Bypass mode, the IAM device mainly plays a monitoring role, and fulfills partial control
functions, which are not as complete as those in Route mode or Bridge mode. It can only restrict the
TCP connections, such as URL filter, keyword filter, email filter, etc. For UDP connections, such as
P2P software, QQ login, it does not work.
6. In Bypass mode, only when the WAN interface is connected with the mirror port will the
[Status] > [Running Status] page displays the relevant flow graphs (application flow speed trend
graph and interface throughput graph) and the interface throughput graph only shows the received
flow (no sent flow).
3.8.1.4 Single Arm Mode
When deployed in Single Arm mode, the IAM device is connected to the switch, working as a proxy server
and achieving the single-armed proxy, monitoring and controlling functions. This deployment requires no
changes to the original network topology, and plays no influence on the network environment. If the IAM
device is down, the users only need to disable the proxy service on their computers and then they can
connect to the Internet again.
Typical topology of the Single Arm mode is as shown below:

SANGFOR IAM v4.1 User Manual
412
To deploy the IAM device in Single Arm mode, do as follows:
Step 1. Log into the device through the default IP address, go to the [Network] > [Deployment] page and
click <Configure> to open the following page:
Step 2. Select [Single Arm Mode], click <Next> to open the next page, and then specify the IP address
(IP address of the LAN interface), subnet mask, default gateway (gateway of the LAN, same as
that configured on user computers) and DNS server address, as shown below:
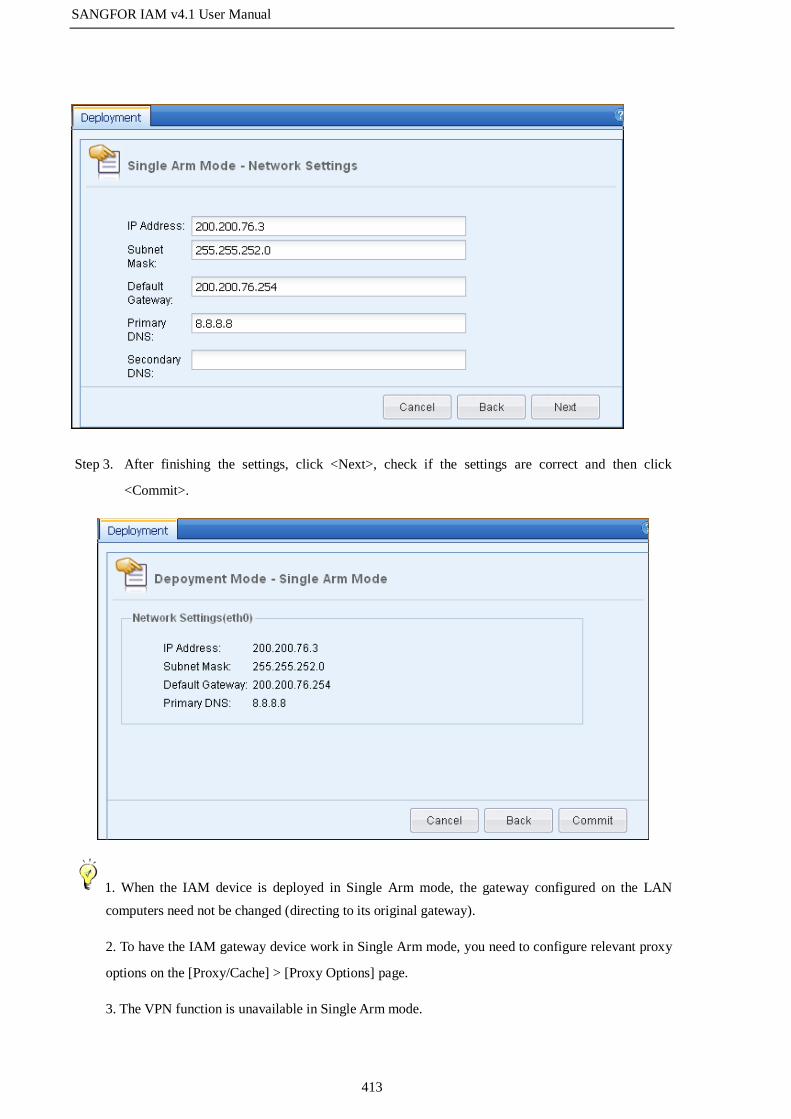
SANGFOR IAM v4.1 User Manual
413
Step 3. After finishing the settings, click <Next>, check if the settings are correct and then click
<Commit>.
1. When the IAM device is deployed in Single Arm mode, the gateway configured on the LAN
computers need not be changed (directing to its original gateway).
2. To have the IAM gateway device work in Single Arm mode, you need to configure relevant proxy
options on the [Proxy/Cache] > [Proxy Options] page.
3. The VPN function is unavailable in Single Arm mode.
SANGFOR IAM v4.1 User Manual
414
4. Deployed in Single Arm mode, the IAM device mainly fulfills the proxy function. If LAN users
want to access the Internet, they need only configure the proxy server on their computers. For
example, if they want to access websites, they need only set the proxy server on their browsers,
server IP address being the LAN interface IP and the port being the proxy port of the HTTP Explicit
Proxy (configured on [Proxy/Cache] > [Proxy Options] page).
3.8.2 Interfaces
On the [Interfaces] page, you can configure the information of the interfaces when the IAM device is
deployed in Route mode or configure the bridge information when the device is deployed in Multi-Bridge
mode.
3.8.2.1 Configure Interfaces in Route Mode
When the IAM device is deployed in Route mode, the [Interfaces] page is as shown below:
The fields displayed on the above page are respectively described in the following table.
Table 45 Interfaces (Route Mode)
Field Description
Connection Status Indicates the connection status and MTU of the interface.
The icon in green means the interface is connected; otherwise, it means the
interface is not connected.
Physical Interface Indicates the physical interface corresponding to the interface on the IAM
device.
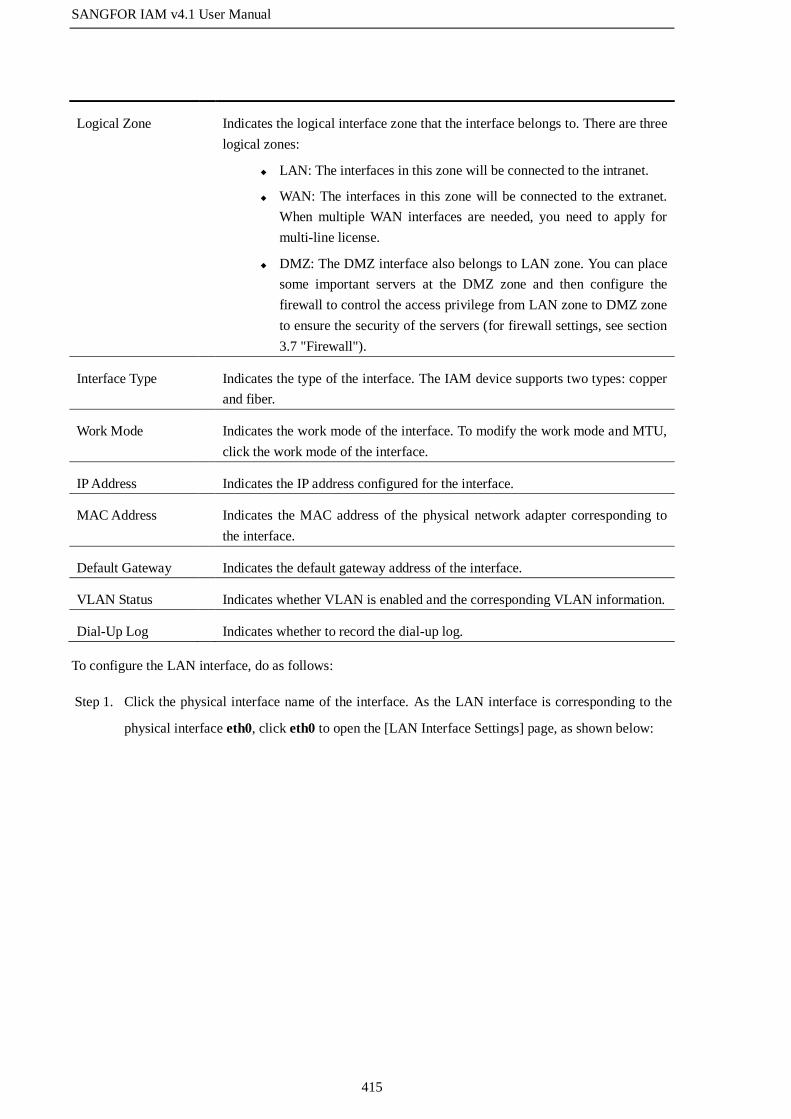
SANGFOR IAM v4.1 User Manual
415
Logical Zone Indicates the logical interface zone that the interface belongs to. There are three
logical zones:
LAN: The interfaces in this zone will be connected to the intranet.
WAN: The interfaces in this zone will be connected to the extranet.
When multiple WAN interfaces are needed, you need to apply for
multi-line license.
DMZ: The DMZ interface also belongs to LAN zone. You can place
some important servers at the DMZ zone and then configure the
firewall to control the access privilege from LAN zone to DMZ zone
to ensure the security of the servers (for firewall settings, see section
3.7 "Firewall").
Interface Type Indicates the type of the interface. The IAM device supports two types: copper
and fiber.
Work Mode Indicates the work mode of the interface. To modify the work mode and MTU,
click the work mode of the interface.
IP Address Indicates the IP address configured for the interface.
MAC Address Indicates the MAC address of the physical network adapter corresponding to
the interface.
Default Gateway Indicates the default gateway address of the interface.
VLAN Status Indicates whether VLAN is enabled and the corresponding VLAN information.
Dial-Up Log Indicates whether to record the dial-up log.
To configure the LAN interface, do as follows:
Step 1. Click the physical interface name of the interface. As the LAN interface is corresponding to the
physical interface eth0, click eth0 to open the [LAN Interface Settings] page, as shown below:
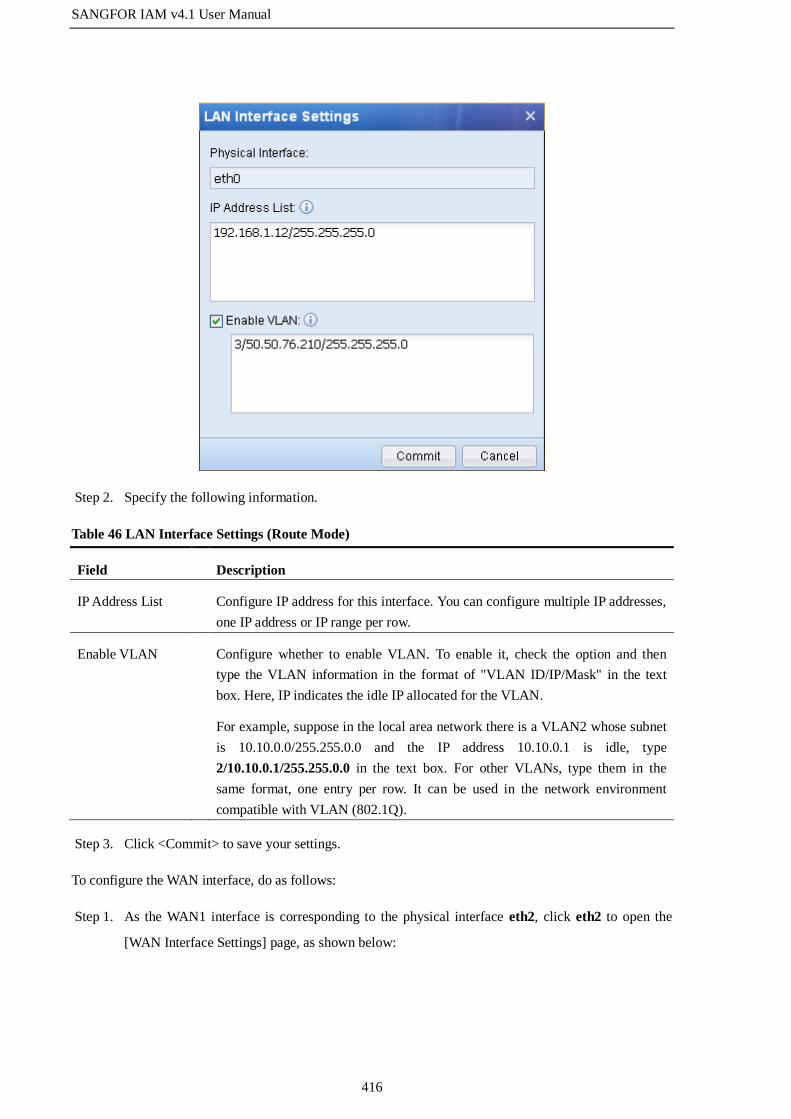
SANGFOR IAM v4.1 User Manual
416
Step 2. Specify the following information.
Table 46 LAN Interface Settings (Route Mode)
Field Description
IP Address List Configure IP address for this interface. You can configure multiple IP addresses,
one IP address or IP range per row.
Enable VLAN Configure whether to enable VLAN. To enable it, check the option and then
type the VLAN information in the format of "VLAN ID/IP/Mask" in the text
box. Here, IP indicates the idle IP allocated for the VLAN.
For example, suppose in the local area network there is a VLAN2 whose subnet
is 10.10.0.0/255.255.0.0 and the IP address 10.10.0.1 is idle, type
2/10.10.0.1/255.255.0.0 in the text box. For other VLANs, type them in the
same format, one entry per row. It can be used in the network environment
compatible with VLAN (802.1Q).
Step 3. Click <Commit> to save your settings.
To configure the WAN interface, do as follows:
Step 1. As the WAN1 interface is corresponding to the physical interface eth2, click eth2 to open the
[WAN Interface Settings] page, as shown below:

SANGFOR IAM v4.1 User Manual
417
Step 2. Specify the following information. [Ethernet] and [ADSL Dial-up] are two Internet access modes,
and they are alternative.

SANGFOR IAM v4.1 User Manual
418
Table 47 WAN Interface Settings (Route Mode)
Field Description
Ethernet If [Ethernet] is checked, type the static IP addresses allocated by the Internet
service provider (ISP) or check the [Obtain IP using DHCP] option to obtain the
IP automatically. For details, contact the local ISP.
ADSL Dial-up Select the Internet access mode of the interface. If [ADSL Dial-up] is checked,
type the username and password provided by the ISP (such as Telecom,
Unicom).
Line Attribute Configure the uplink bandwidth and downlink bandwidth of the link.
Step 3. If you select [ADSL Dial-up], you can then configure the attributes of the ADSL dial-up line.
Click <Advanced> to open the [Advanced] page and then set the handshake time, timeout and
maximum timeout counts. The recommended values for the three fields are 20, 80 and 3
respectively, as shown below:
Step 4. Click <OK> and then <Commit> to save your settings.
3.8.2.2 Configure the Interfaces in Multi-Bridge Mode
When the IAM device is deployed in Multi-Bridge mode, the [Interfaces] page is as shown below:
The fields displayed on the above page are respectively described in the following table.

SANGFOR IAM v4.1 User Manual
419
Table 48 Interfaces (Multi-Bridge Mode)
Field Description
Bridge Indicates the name of the bridge.
Flow Direction Indicates the LAN interface and WAN interface of the bridge and the data
forwarding direction.
IP Address Indicates the IP address of the bridge and whether the VLAN is enabled.
Gateway/DNS Info Indicates the default gateway and DNS address of the bridge.
To configure the information of a bridge, do as follows:
Step 1. Click the name of the bridge to open the [Bridge Settings] page, as shown below:
Step 2. Specify the following information.
Table 49 Bridge Settings (Multi-Bridge Mode)
Field Description
IP Address Configure the IP address for the bridge.
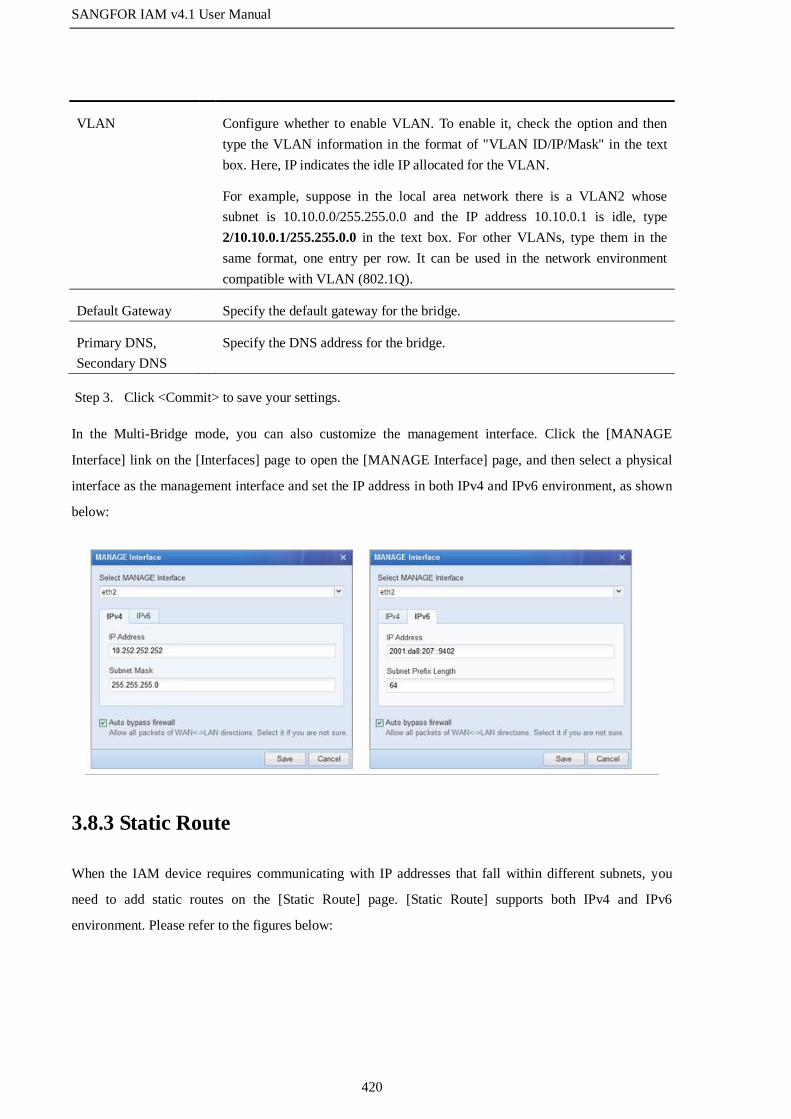
SANGFOR IAM v4.1 User Manual
420
VLAN Configure whether to enable VLAN. To enable it, check the option and then
type the VLAN information in the format of "VLAN ID/IP/Mask" in the text
box. Here, IP indicates the idle IP allocated for the VLAN.
For example, suppose in the local area network there is a VLAN2 whose
subnet is 10.10.0.0/255.255.0.0 and the IP address 10.10.0.1 is idle, type
2/10.10.0.1/255.255.0.0 in the text box. For other VLANs, type them in the
same format, one entry per row. It can be used in the network environment
compatible with VLAN (802.1Q).
Default Gateway Specify the default gateway for the bridge.
Primary DNS,
Secondary DNS
Specify the DNS address for the bridge.
Step 3. Click <Commit> to save your settings.
In the Multi-Bridge mode, you can also customize the management interface. Click the [MANAGE
Interface] link on the [Interfaces] page to open the [MANAGE Interface] page, and then select a physical
interface as the management interface and set the IP address in both IPv4 and IPv6 environment, as shown
below:
3.8.3 Static Route
When the IAM device requires communicating with IP addresses that fall within different subnets, you
need to add static routes on the [Static Route] page. [Static Route] supports both IPv4 and IPv6
environment. Please refer to the figures below:

SANGFOR IAM v4.1 User Manual
421
The following example illustrates when the static route will be needed.
User Scenarios: The IAM device is deployed in Route mode and acts as the gateway. The computers in the
local area network are connected to the IAM device by way of a layer 3 switch. However, the LAN
interface of the IAM device and the LAN computers are located on different network segments: LAN
interface on 192.168.1.2/255.255.255.0 while computers on 192.168.2.0/255.255.255.0. The network
topology is as shown in the following figure:
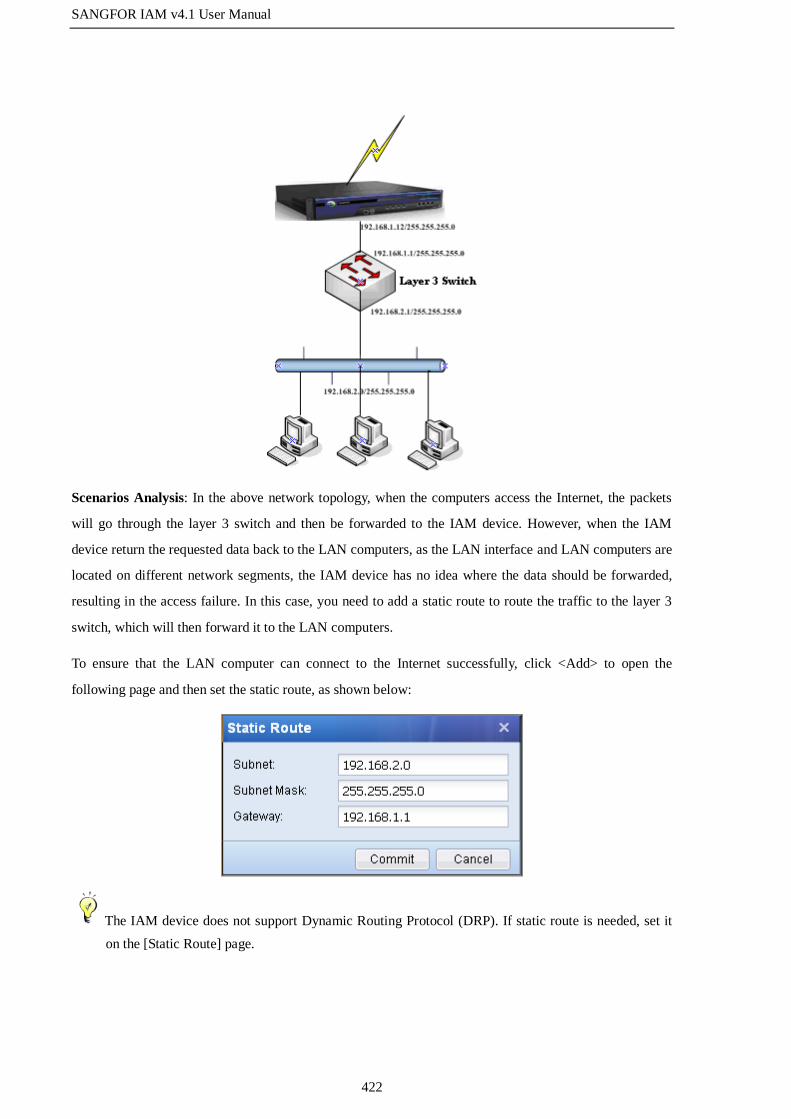
SANGFOR IAM v4.1 User Manual
422
Scenarios Analysis: In the above network topology, when the computers access the Internet, the packets
will go through the layer 3 switch and then be forwarded to the IAM device. However, when the IAM
device return the requested data back to the LAN computers, as the LAN interface and LAN computers are
located on different network segments, the IAM device has no idea where the data should be forwarded,
resulting in the access failure. In this case, you need to add a static route to route the traffic to the layer 3
switch, which will then forward it to the LAN computers.
To ensure that the LAN computer can connect to the Internet successfully, click <Add> to open the
following page and then set the static route, as shown below:
The IAM device does not support Dynamic Routing Protocol (DRP). If static route is needed, set it
on the [Static Route] page.
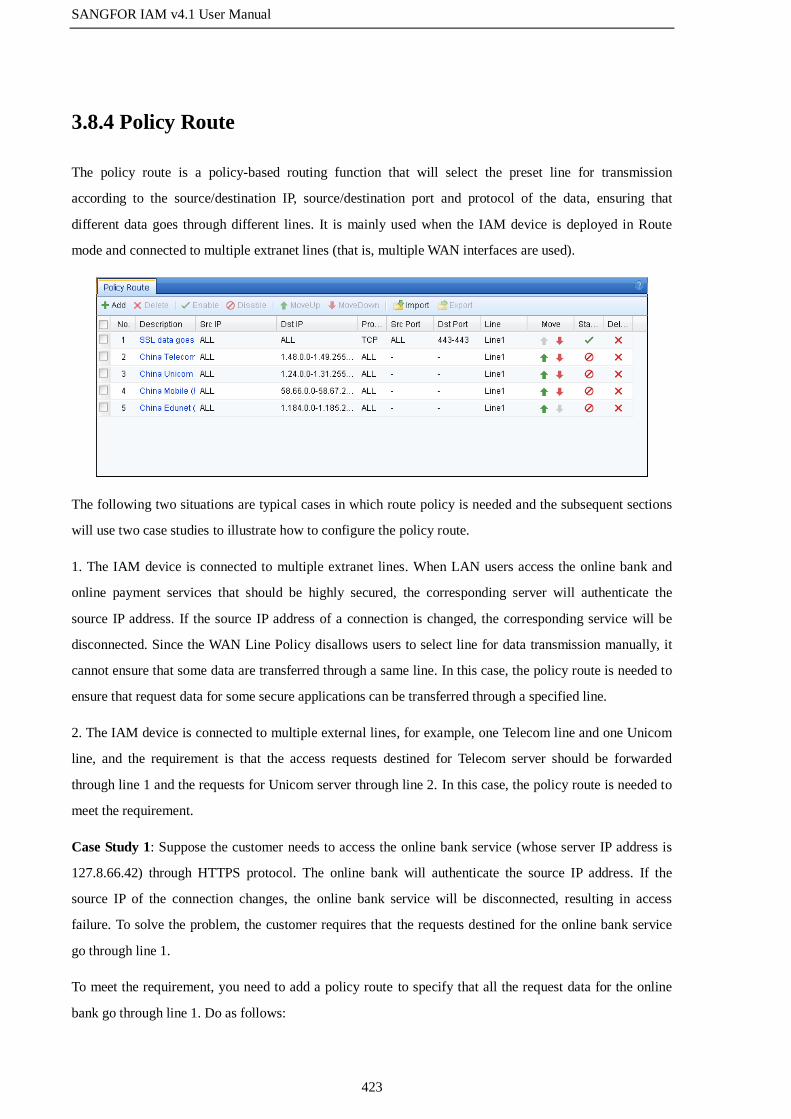
SANGFOR IAM v4.1 User Manual
423
3.8.4 Policy Route
The policy route is a policy-based routing function that will select the preset line for transmission
according to the source/destination IP, source/destination port and protocol of the data, ensuring that
different data goes through different lines. It is mainly used when the IAM device is deployed in Route
mode and connected to multiple extranet lines (that is, multiple WAN interfaces are used).
The following two situations are typical cases in which route policy is needed and the subsequent sections
will use two case studies to illustrate how to configure the policy route.
1. The IAM device is connected to multiple extranet lines. When LAN users access the online bank and
online payment services that should be highly secured, the corresponding server will authenticate the
source IP address. If the source IP address of a connection is changed, the corresponding service will be
disconnected. Since the WAN Line Policy disallows users to select line for data transmission manually, it
cannot ensure that some data are transferred through a same line. In this case, the policy route is needed to
ensure that request data for some secure applications can be transferred through a specified line.
2. The IAM device is connected to multiple external lines, for example, one Telecom line and one Unicom
line, and the requirement is that the access requests destined for Telecom server should be forwarded
through line 1 and the requests for Unicom server through line 2. In this case, the policy route is needed to
meet the requirement.
Case Study 1: Suppose the customer needs to access the online bank service (whose server IP address is
127.8.66.42) through HTTPS protocol. The online bank will authenticate the source IP address. If the
source IP of the connection changes, the online bank service will be disconnected, resulting in access
failure. To solve the problem, the customer requires that the requests destined for the online bank service
go through line 1.
To meet the requirement, you need to add a policy route to specify that all the request data for the online
bank go through line 1. Do as follows:
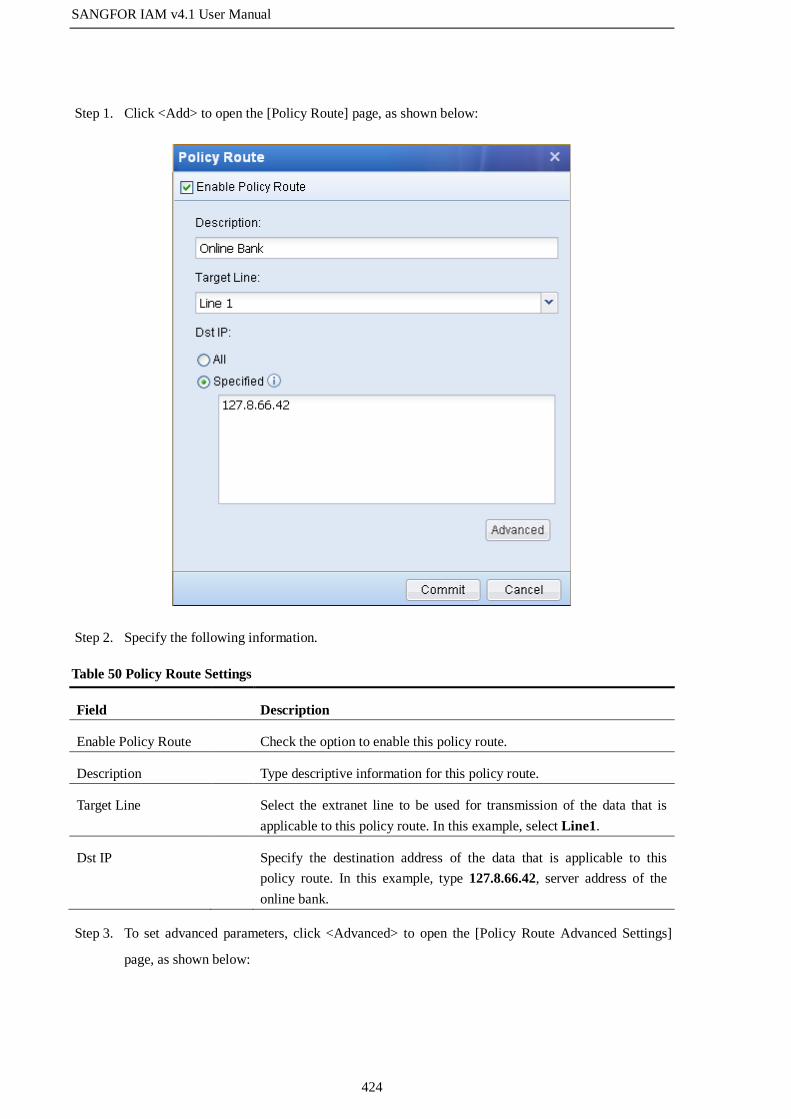
SANGFOR IAM v4.1 User Manual
424
Step 1. Click <Add> to open the [Policy Route] page, as shown below:
Step 2. Specify the following information.
Table 50 Policy Route Settings
Field Description
Enable Policy Route Check the option to enable this policy route.
Description Type descriptive information for this policy route.
Target Line Select the extranet line to be used for transmission of the data that is
applicable to this policy route. In this example, select Line1.
Dst IP Specify the destination address of the data that is applicable to this
policy route. In this example, type 127.8.66.42, server address of the
online bank.
Step 3. To set advanced parameters, click <Advanced> to open the [Policy Route Advanced Settings]
page, as shown below:

SANGFOR IAM v4.1 User Manual
425
Step 4. Specify the advanced information.

SANGFOR IAM v4.1 User Manual
426
Table 51 Policy Route Advanced Settings
Field Description
Src IP Specify the source IP of the data that is applicable to this policy route.
You can enter a single IP, IP range or subnet.
In this example, as the requirement is to ensure that all LAN users can access the
online bank service, check the [All] option, indicating no limit is set to the source
IP.
Protocol Specify the protocol of the data that is applicable to this policy route.
You can enter protocol number or port number.
In this example, as the requirement is to ensure smooth running of the online
bank service through HTTPS, and HTTPS is corresponding to the TCP protocol
and destination port 443, set the [Protocol Type] to TCP and [Dst Port] to 443.
Step 5. Click <OK> and then <Commit> to save the policy route.
Case Study 2: Suppose the IAM device is connected to two external lines, one Telecom line (line 1) and
one Unicom line (line 2). The requirement is that the access requests destined for Telecom server should be
forwarded through line 1 and the requests for Unicom server through line 2.
To meet the requirements, do as follows:
Step 1. Configure [WAN Line Policy] to set that data will preferentially go through the first available
line.
a. Click the <WAN Line Policy> button at the upper right corner of the [Policy Route] page to open
the following page:
b. Check the [Select the first available line] option. In this example, you need first set that data
preferentially go through a line and then set that specific data go through another line. The four
option displayed on the [WAN Line Policy] page are respectively described in the following

SANGFOR IAM v4.1 User Manual
427
table.
Table 52 WAN Line Selection Policy
Field Description
Select line of largest downlink
bandwidth left
The system automatically selects the line with the largest
remaining downlink bandwidth, making full use of the bandwidth.
Select line of largest uplink
bandwidth left
The system automatically selects the line with the largest
remaining uplink bandwidth, making full use of the bandwidth.
Evenly distribute connections to
all lines
The system evenly distributes all connections to the lines despite
of the remaining bandwidth.
Select the first available line The system selects the first available line. If the line is
disconnected or unavailable, the system will switch the date to
next available line. This option is preferable for the VPN
deployment. The "first available line" generally refers to line 1.
Step 2. Configure [Policy Route] to specify the Unicom line (line 2) for transmission of the request data
destined for the Unicom addresses.
a. Click <Add> on the [Policy Route] page to open the following page:

SANGFOR IAM v4.1 User Manual
428
b. Check the [Enable Policy Route], type the description and then set [Target Line] to Line 2 and
[Dst IP] to 201.86.14.0/255.255.255.0 (Unicom addresses).
Step 3. Click <Commit> to save the policy route.
Step 4. Repeat step 2 and step 3 to continue adding policy routes for other Unicom addresses so that all
the request data destined for Unicom addresses will be forwarded through line 2.
Step 5. Or, you can import the policy route. To obtain policy route file of a specific ISP, please call 800
or obtain it from the technical forum of SANGFOR. To import the policy route file, click
<Import> on the [Policy Route] page, select the policy route file that selects line 2 for Unicom
address and click <Open> to import.
Step 6. Click <Commit> to save the policy route.
The defined policy routes can be exported. You can export the policy routes onto other devices that are of
the same software version.
To export policy route, check the policy routes to be exported and click <Export> to export them.
1. If the specified target line is unavailable, the IAM device will automatically switch the data to next
available line.
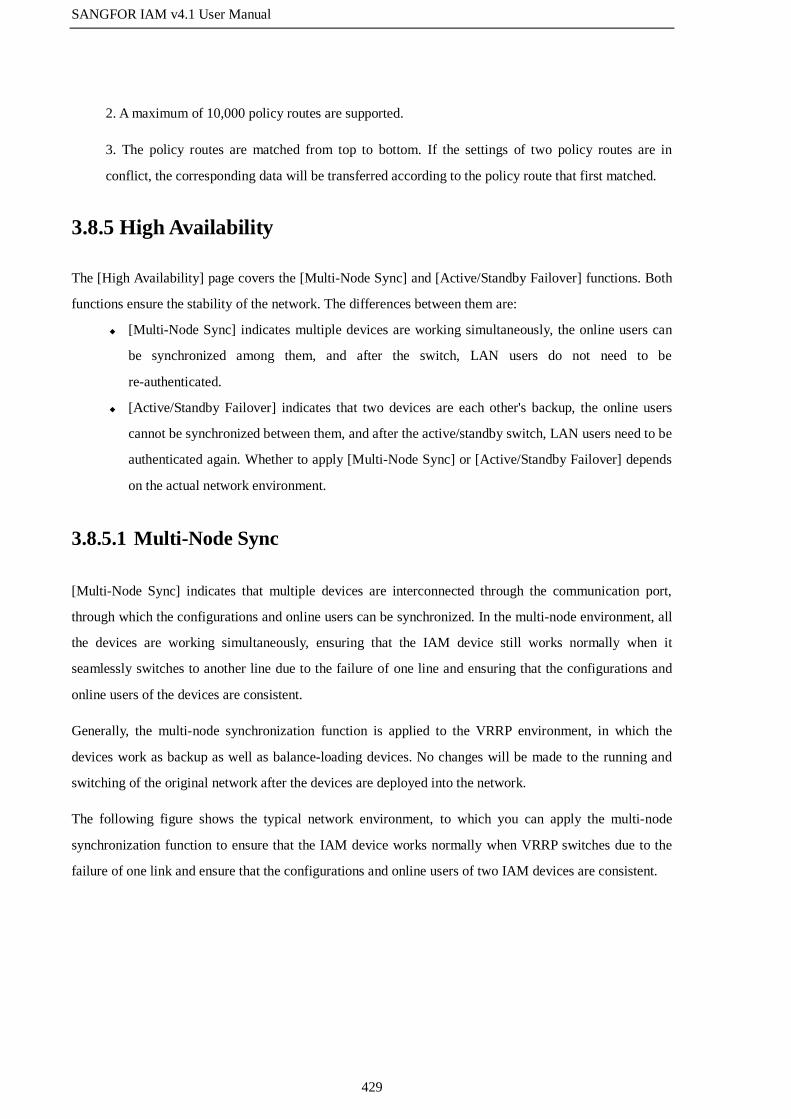
SANGFOR IAM v4.1 User Manual
429
2. A maximum of 10,000 policy routes are supported.
3. The policy routes are matched from top to bottom. If the settings of two policy routes are in
conflict, the corresponding data will be transferred according to the policy route that first matched.
3.8.5 High Availability
The [High Availability] page covers the [Multi-Node Sync] and [Active/Standby Failover] functions. Both
functions ensure the stability of the network. The differences between them are:
[Multi-Node Sync] indicates multiple devices are working simultaneously, the online users can
be synchronized among them, and after the switch, LAN users do not need to be
re-authenticated.
[Active/Standby Failover] indicates that two devices are each other's backup, the online users
cannot be synchronized between them, and after the active/standby switch, LAN users need to be
authenticated again. Whether to apply [Multi-Node Sync] or [Active/Standby Failover] depends
on the actual network environment.
3.8.5.1 Multi-Node Sync
[Multi-Node Sync] indicates that multiple devices are interconnected through the communication port,
through which the configurations and online users can be synchronized. In the multi-node environment, all
the devices are working simultaneously, ensuring that the IAM device still works normally when it
seamlessly switches to another line due to the failure of one line and ensuring that the configurations and
online users of the devices are consistent.
Generally, the multi-node synchronization function is applied to the VRRP environment, in which the
devices work as backup as well as balance-loading devices. No changes will be made to the running and
switching of the original network after the devices are deployed into the network.
The following figure shows the typical network environment, to which you can apply the multi-node
synchronization function to ensure that the IAM device works normally when VRRP switches due to the
failure of one link and ensure that the configurations and online users of two IAM devices are consistent.

SANGFOR IAM v4.1 User Manual
430
To apply the multi-node synchronization function to the above topology, first you need to specify a
communication interface for the communication between the two devices. For the communication interface,
you can select an interface that is being used or an idle interface. If you select an interface being used,
make sure the communication interfaces configured on both devices belong to the same broadcast domain,
that is, the same layer 2 environment. If you select an idle interface, use cross-over cable to connect the
two communication interfaces directly. However, the communication interface cannot be a dial-up
interface or an interface that obtains IP using DHCP.
As the switches used in the above topology are layer 3 switches, select the idle interface DMZ as the
communication interface and adopt the following wiring method:
To configure the multi-node synchronization function, do as follows:
Step 1. Configure one of the two IAM devices.

SANGFOR IAM v4.1 User Manual
431
a. Go to the [Multi-Node Sync] page, and check the [Enable Multi-Node Sync] option to enable the
function.
b. Specify the following information.
Table 53 Multi-Node Sync Settings
Field Description
Communication
Interface
Specify the interface to be used for synchronizing the configuration of the
device.
In this example, select the idle interface DMZ interface.
Communication IP Define an IP address for the communication interface. The IP addresses of the
communication interfaces configured on both devices must be on the same
network segment and cannot be on the network segment that the IP address of
any existing interface locates.
Multicast IP Configure the multicast IP address for synchronizing configuration between the
two devices. You can specify any address as long as it is in the multicast
address range. As the multi-node synchronization is realized through multicast,
the communication interfaces configured on the devices must belong to the
same broadcast domain and the multicast addresses configured on the devices
must be the same.
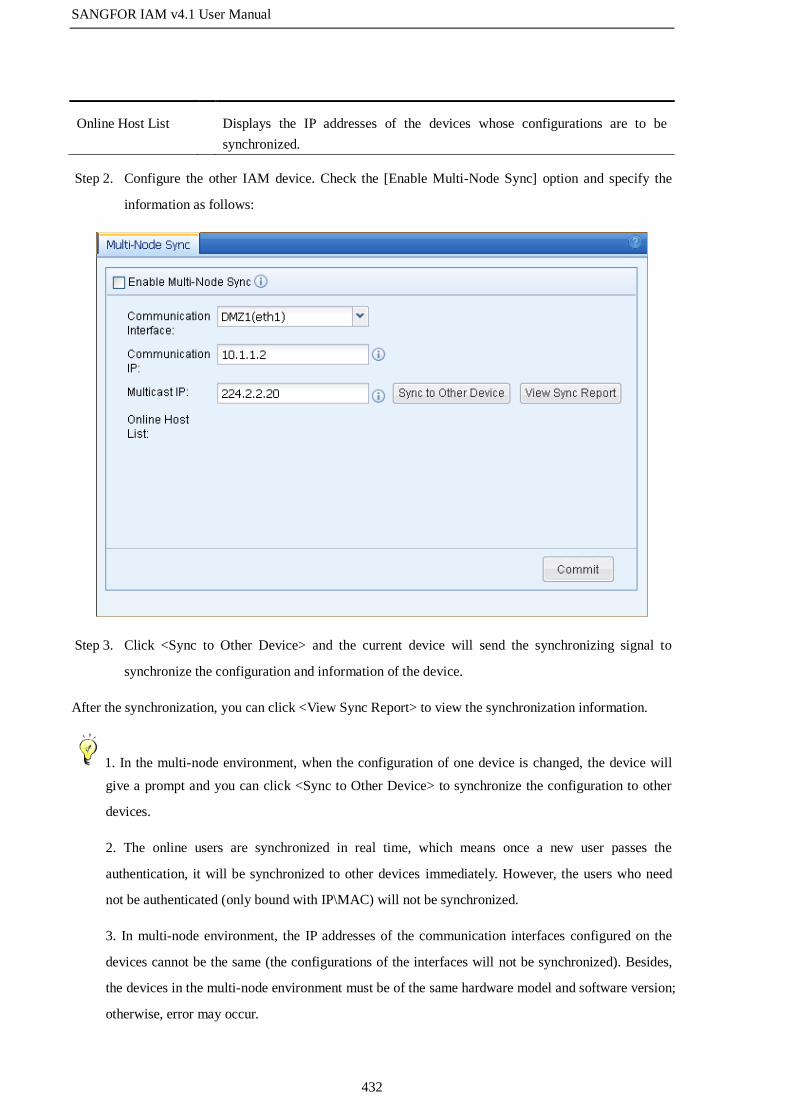
SANGFOR IAM v4.1 User Manual
432
Online Host List Displays the IP addresses of the devices whose configurations are to be
synchronized.
Step 2. Configure the other IAM device. Check the [Enable Multi-Node Sync] option and specify the
information as follows:
Step 3. Click <Sync to Other Device> and the current device will send the synchronizing signal to
synchronize the configuration and information of the device.
After the synchronization, you can click <View Sync Report> to view the synchronization information.
1. In the multi-node environment, when the configuration of one device is changed, the device will
give a prompt and you can click <Sync to Other Device> to synchronize the configuration to other
devices.
2. The online users are synchronized in real time, which means once a new user passes the
authentication, it will be synchronized to other devices immediately. However, the users who need
not be authenticated (only bound with IP\MAC) will not be synchronized.
3. In multi-node environment, the IP addresses of the communication interfaces configured on the
devices cannot be the same (the configurations of the interfaces will not be synchronized). Besides,
the devices in the multi-node environment must be of the same hardware model and software version;
otherwise, error may occur.
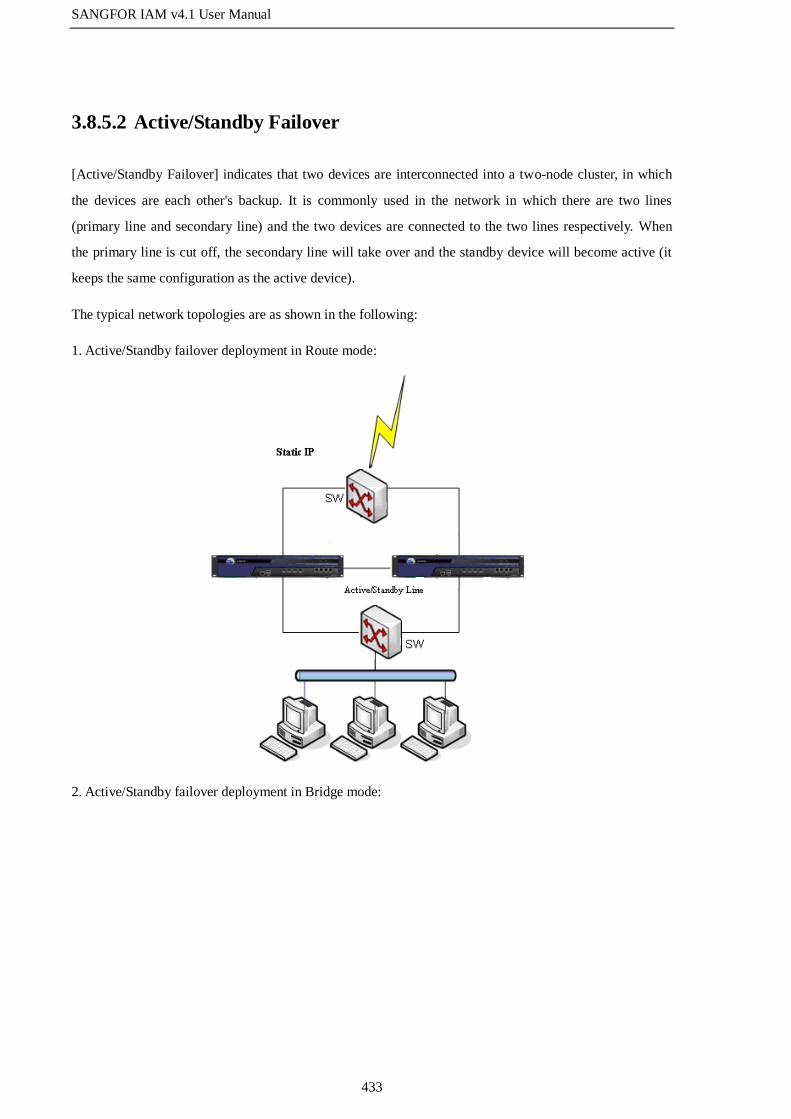
SANGFOR IAM v4.1 User Manual
433
3.8.5.2 Active/Standby Failover
[Active/Standby Failover] indicates that two devices are interconnected into a two-node cluster, in which
the devices are each other's backup. It is commonly used in the network in which there are two lines
(primary line and secondary line) and the two devices are connected to the two lines respectively. When
the primary line is cut off, the secondary line will take over and the standby device will become active (it
keeps the same configuration as the active device).
The typical network topologies are as shown in the following:
1. Active/Standby failover deployment in Route mode:
2. Active/Standby failover deployment in Bridge mode:
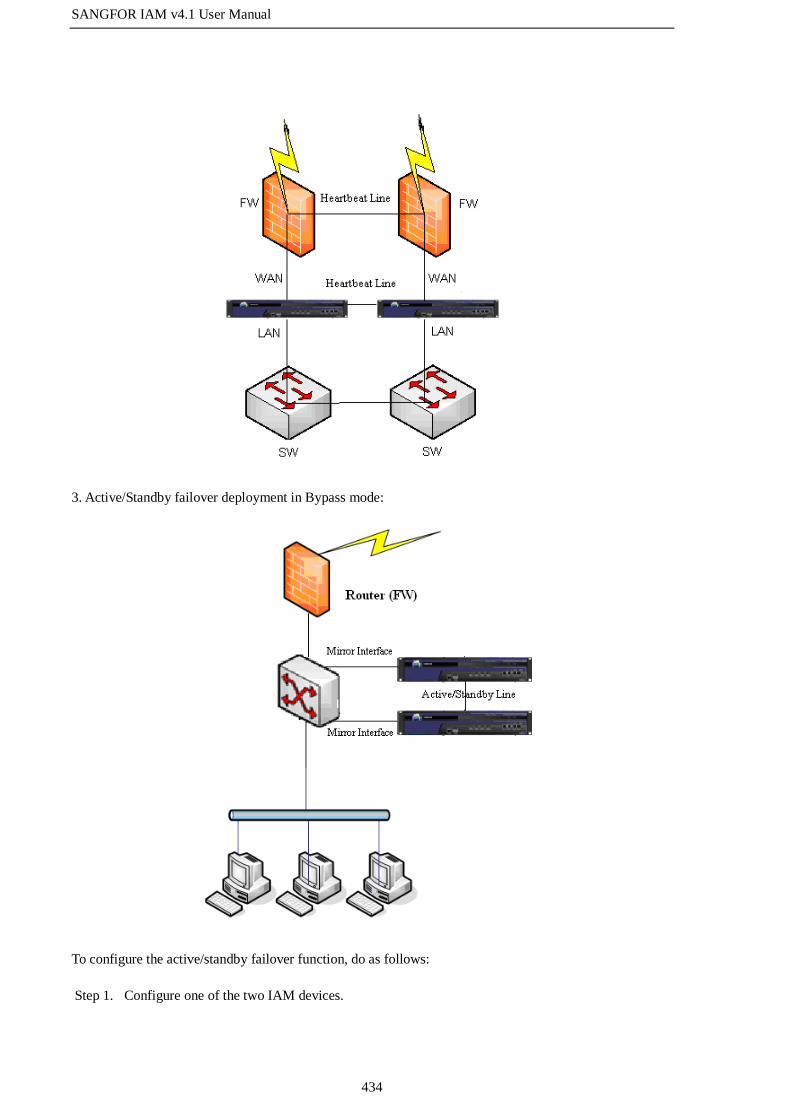
SANGFOR IAM v4.1 User Manual
434
3. Active/Standby failover deployment in Bypass mode:
To configure the active/standby failover function, do as follows:
Step 1. Configure one of the two IAM devices.
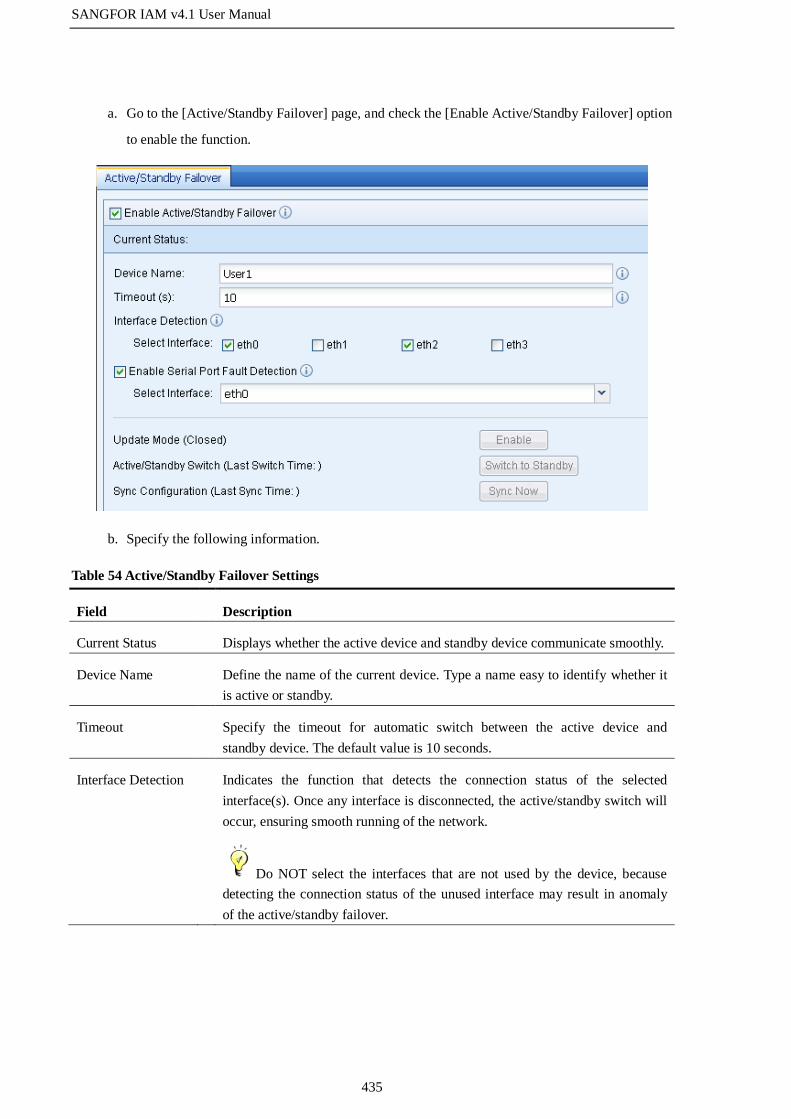
SANGFOR IAM v4.1 User Manual
435
a. Go to the [Active/Standby Failover] page, and check the [Enable Active/Standby Failover] option
to enable the function.
b. Specify the following information.
Table 54 Active/Standby Failover Settings
Field Description
Current Status Displays whether the active device and standby device communicate smoothly.
Device Name Define the name of the current device. Type a name easy to identify whether it
is active or standby.
Timeout Specify the timeout for automatic switch between the active device and
standby device. The default value is 10 seconds.
Interface Detection Indicates the function that detects the connection status of the selected
interface(s). Once any interface is disconnected, the active/standby switch will
occur, ensuring smooth running of the network.
Do NOT select the interfaces that are not used by the device, because
detecting the connection status of the unused interface may result in anomaly
of the active/standby failover.

SANGFOR IAM v4.1 User Manual
436
Enable Serial Port
Fault Detection
Specify whether to enable serial port fault detection. When the serial port fails
(for example, serial cable falls out), it probably causes that both devices
become active simultaneously. To avoid the IP conflict, this function (if
enabled) will detect the status of the peer device according to the network
packets transferred through the selected interface and automatically switch a
device to standby one and the other to active.
The interfaces selected on both devices should be connected to a same switch;
otherwise, this function will not work.
Update Mode Indicates the function that is used to update the devices. When the update mode
is enabled, the active/standby switch function will be disabled to avoid the
update failure that may be caused by the active/standby switch occurring
during updating. Thus, it is recommended to enable the update mode only
when you are to update and maintain the two devices. After updating is
completed, please DO close the update mode.
Active/Standby
Switch
Indicates switching between the active device and standby device manually.
Click <Switch to Standby> to switch between the devices. The last switch time
will be displayed.
Sync Configuration Indicates synchronizing configuration manually. Click <Sync Now> to
synchronize the configuration immediately. The last synchronization time will
be displayed.
Step 2. Configure the other IAM device. Check the [Enable Active/Standby Failover] option and specify
the information as follows:
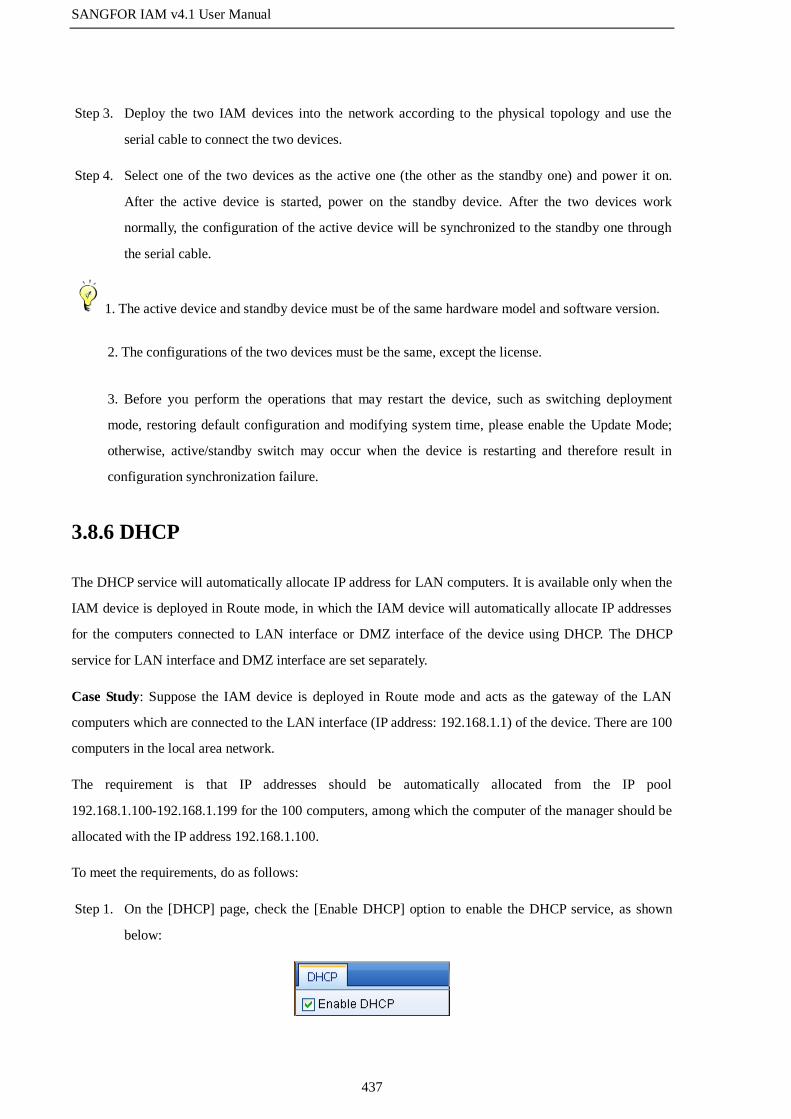
SANGFOR IAM v4.1 User Manual
437
Step 3. Deploy the two IAM devices into the network according to the physical topology and use the
serial cable to connect the two devices.
Step 4. Select one of the two devices as the active one (the other as the standby one) and power it on.
After the active device is started, power on the standby device. After the two devices work
normally, the configuration of the active device will be synchronized to the standby one through
the serial cable.
1. The active device and standby device must be of the same hardware model and software version.
2. The configurations of the two devices must be the same, except the license.
3. Before you perform the operations that may restart the device, such as switching deployment
mode, restoring default configuration and modifying system time, please enable the Update Mode;
otherwise, active/standby switch may occur when the device is restarting and therefore result in
configuration synchronization failure.
3.8.6 DHCP
The DHCP service will automatically allocate IP address for LAN computers. It is available only when the
IAM device is deployed in Route mode, in which the IAM device will automatically allocate IP addresses
for the computers connected to LAN interface or DMZ interface of the device using DHCP. The DHCP
service for LAN interface and DMZ interface are set separately.
Case Study: Suppose the IAM device is deployed in Route mode and acts as the gateway of the LAN
computers which are connected to the LAN interface (IP address: 192.168.1.1) of the device. There are 100
computers in the local area network.
The requirement is that IP addresses should be automatically allocated from the IP pool
192.168.1.100-192.168.1.199 for the 100 computers, among which the computer of the manager should be
allocated with the IP address 192.168.1.100.
To meet the requirements, do as follows:
Step 1. On the [DHCP] page, check the [Enable DHCP] option to enable the DHCP service, as shown
below:

SANGFOR IAM v4.1 User Manual
438
Step 2. Under [DHCP Service Interface] on the left, select the interface for which the DHCP is to be set.
For this example, select LAN1 to configure the DHCP service:
Step 3. Specify the following information.
Table 55 DHCP Settings
Field Description
Lease Term Specify the lease term of the allocated IP address.
DHCP Parameters Type the gateway, DNS and WINS addresses of the DHCP
service.
DHCP IP Pool Configure the IP addresses available for allocation.
Step 4. Configure the reserved IP to allocate the IP address 192.168.1.100 for the computer of the
manager.
a. Click the <Reserved IP Settings> button, as shown below:
b. On the displayed [Reserved IP Settings] page, click <Add> and type the name, IP address, MAC

SANGFOR IAM v4.1 User Manual
439
address and host name, as shown below:
Step 5. Click <OK> and then <Commit> to save the DHCP settings.
To view the DHCP running status and the allocated IP addresses, go to [Status] > [DHCP Status]
page.
3.8.7 VPN System
The [VPN System] page provides an entrance for you to enter the VPN system. You can click the <VPN
Setup> button to view the VPN connection status and then configure the VPN system.
1. To enter the VPN system, you need to use the IE browser.

SANGFOR IAM v4.1 User Manual
440
2. The VPN function is available only when the IAM device is deployed in Route mode and the VPN
function is activated by the multi-function license (see section 3.9.1 "License").
3.8.7.1 VPN Status
The [VPN Status] page displays the current VPN connections and network flow information, as shown
below:
To view the connection information of a specific user, click the <Search> button to open the [Search User]
dialog, as shown below. Then enter the username and click <OK> to quickly search for the connection
information of the user.
To stop the VPN service, click the <Stop Service> button.

SANGFOR IAM v4.1 User Manual
441
3.8.7.2 Basic Settings
On the [Basic Settings] page, you can set the information required by VPN connection, such as WebAgent
information, MTU value of VPN data, minimum compression value, VPN listening port, VPN connection
mode, broadcast packet and performance settings, as shown below:
The fields on the [Basic Settings] page are respectively described in the following table.
Table 56 Basic Settings
Field Description
Primary WebAgent,
Secondary WebAgent
WebAgent refers to the address on the Web server where the dynamic IP
addressing file is located, including primary WebAgent and secondary
WebAgent.
When the HQ VPN uses dynamic IP (dynamic addressing), please enter a
WebAgent website address (typically ending with .php). When the HQ
VPN uses static IP, please enter the WebAgent address in the format of
IP:Port. For example, 202.96.134.133:4009.
After setting the WebAgent address, you can click <Change PWD> to set
the WebAgent password so as to prevent unauthorized user from using the
WebAgent to update masqueraded IP address. By clicking <Shared Key>,
you can set a shared key to prevent the access by illegal device.
If the IAM device adopts multiple lines whose IP addresses are
static, you can enter the WebAgent address in the format of IP1#IP2:Port.

SANGFOR IAM v4.1 User Manual
442
MTU Value Indicates the Maximum Transmission Unit (MTU) of VPN data. It is 1500
by default.
Min Compression
Value
Indicates the minimum size of the VPN data packet that is to be
compressed. It is 100 by default.
VPN Listing Port Indicates the listening port of VPN service. It is 4009 by default. You can
change it according to your needs.
Change MSS Indicates the Maximum Segment Size (MSS) of VPN data under UDP
transfer mode.
Directly connect,
Indirectly connect
Refers to the connection mode between the gateway device and Internet. If
the Internet IP can be obtained directly or the Internet user can access the
VPN port of the gateway device by DNAT (destination translation)
function, select the [Directly connect] option; otherwise, select the
[Indirectly connect] option.
1. After the WebAgent password is set, please keep it carefully, for once it is lost, there is no way to
get it back. The only solution is to contact the Customer Service of SANGFOR to generate a file that
does not contain the WebAgent password and then use this file to replace the original one.
2. If the shared key is configured, all the VPN nodes must set the same shared key to interconnect
and communicate with one another.
3. The [MTU Value], [Min Compression Value] and [Change MSS] options are already configured
with default values. Typically, it is recommended to keep the default settings. If you need to change
them, please DO follow the instructions given by SANGFOR technical engineer.
After finishing the above settings, you can click <Test> to test whether the primary WebAgent and
Secondary WebAgent can be connected.
The <Performance and Broadcast> button enables you to set the maximum number of VPN connections
and set whether to transmit broadcast packets in VPN tunnel. Click the <Performance and Broadcast>
button to open the [Performance and Broadcast] page, as shown below:
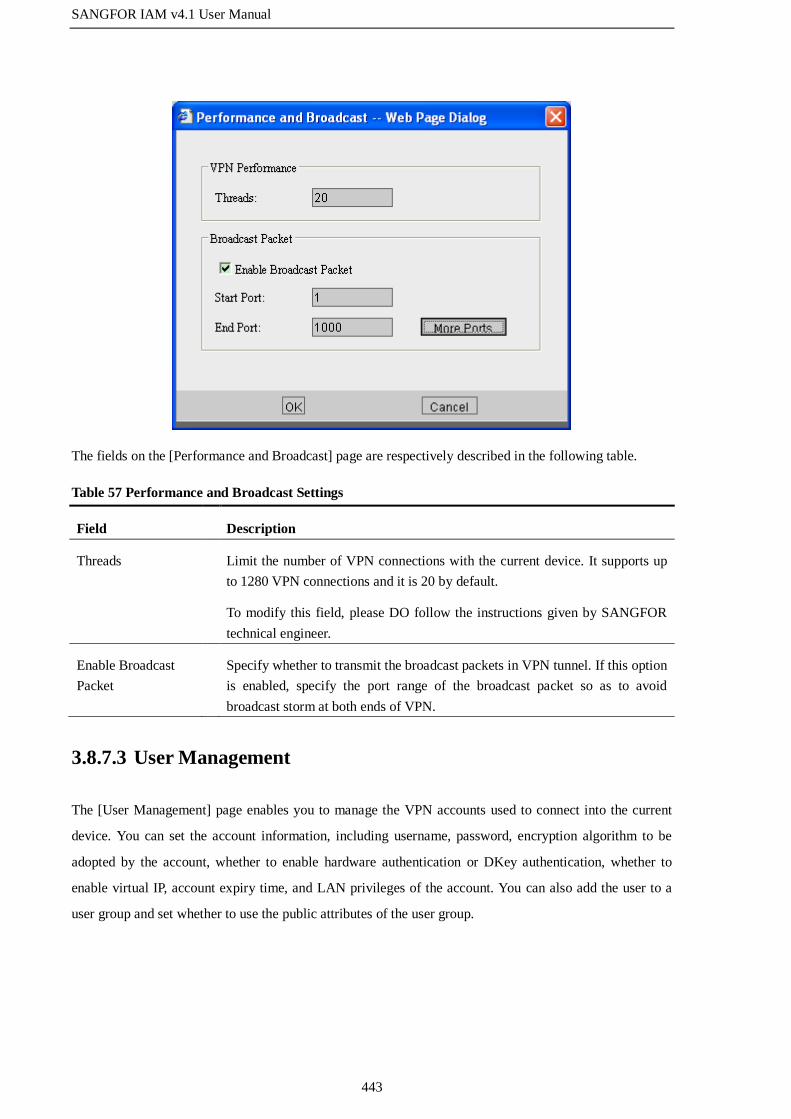
SANGFOR IAM v4.1 User Manual
443
The fields on the [Performance and Broadcast] page are respectively described in the following table.
Table 57 Performance and Broadcast Settings
Field Description
Threads Limit the number of VPN connections with the current device. It supports up
to 1280 VPN connections and it is 20 by default.
To modify this field, please DO follow the instructions given by SANGFOR
technical engineer.
Enable Broadcast
Packet
Specify whether to transmit the broadcast packets in VPN tunnel. If this option
is enabled, specify the port range of the broadcast packet so as to avoid
broadcast storm at both ends of VPN.
3.8.7.3 User Management
The [User Management] page enables you to manage the VPN accounts used to connect into the current
device. You can set the account information, including username, password, encryption algorithm to be
adopted by the account, whether to enable hardware authentication or DKey authentication, whether to
enable virtual IP, account expiry time, and LAN privileges of the account. You can also add the user to a
user group and set whether to use the public attributes of the user group.
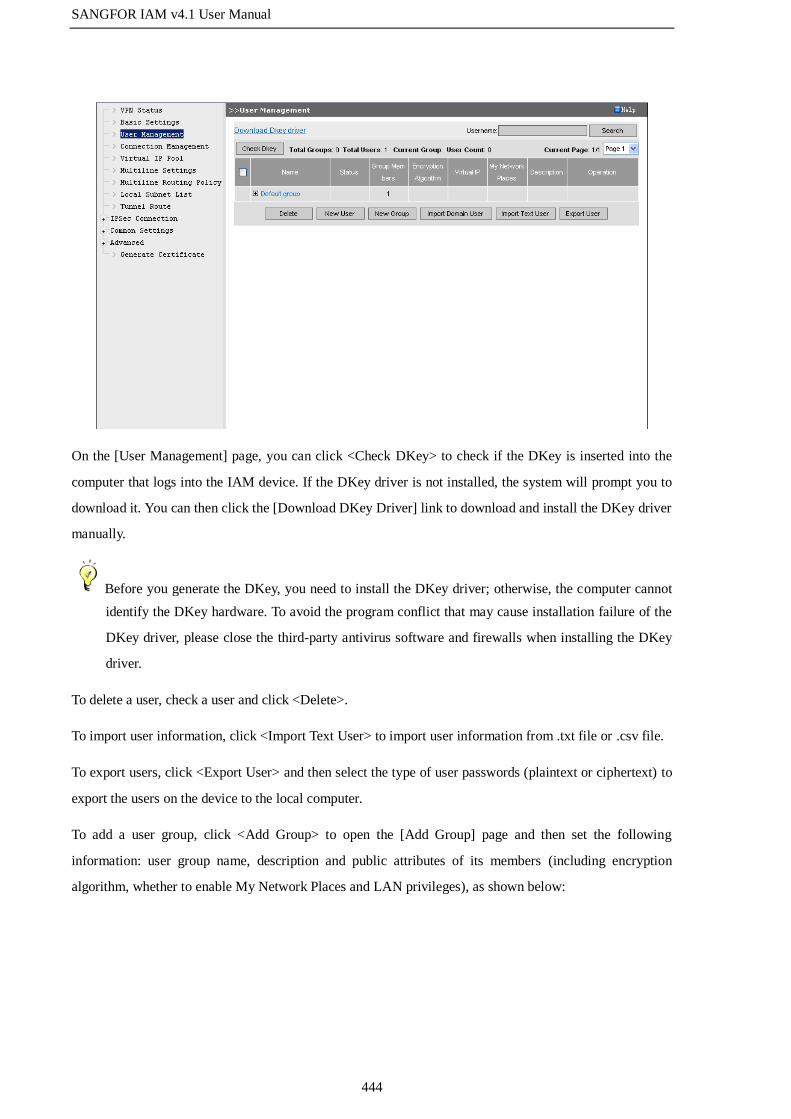
SANGFOR IAM v4.1 User Manual
444
On the [User Management] page, you can click <Check DKey> to check if the DKey is inserted into the
computer that logs into the IAM device. If the DKey driver is not installed, the system will prompt you to
download it. You can then click the [Download DKey Driver] link to download and install the DKey driver
manually.
Before you generate the DKey, you need to install the DKey driver; otherwise, the computer cannot
identify the DKey hardware. To avoid the program conflict that may cause installation failure of the
DKey driver, please close the third-party antivirus software and firewalls when installing the DKey
driver.
To delete a user, check a user and click <Delete>.
To import user information, click <Import Text User> to import user information from .txt file or .csv file.
To export users, click <Export User> and then select the type of user passwords (plaintext or ciphertext) to
export the users on the device to the local computer.
To add a user group, click <Add Group> to open the [Add Group] page and then set the following
information: user group name, description and public attributes of its members (including encryption
algorithm, whether to enable My Network Places and LAN privileges), as shown below:
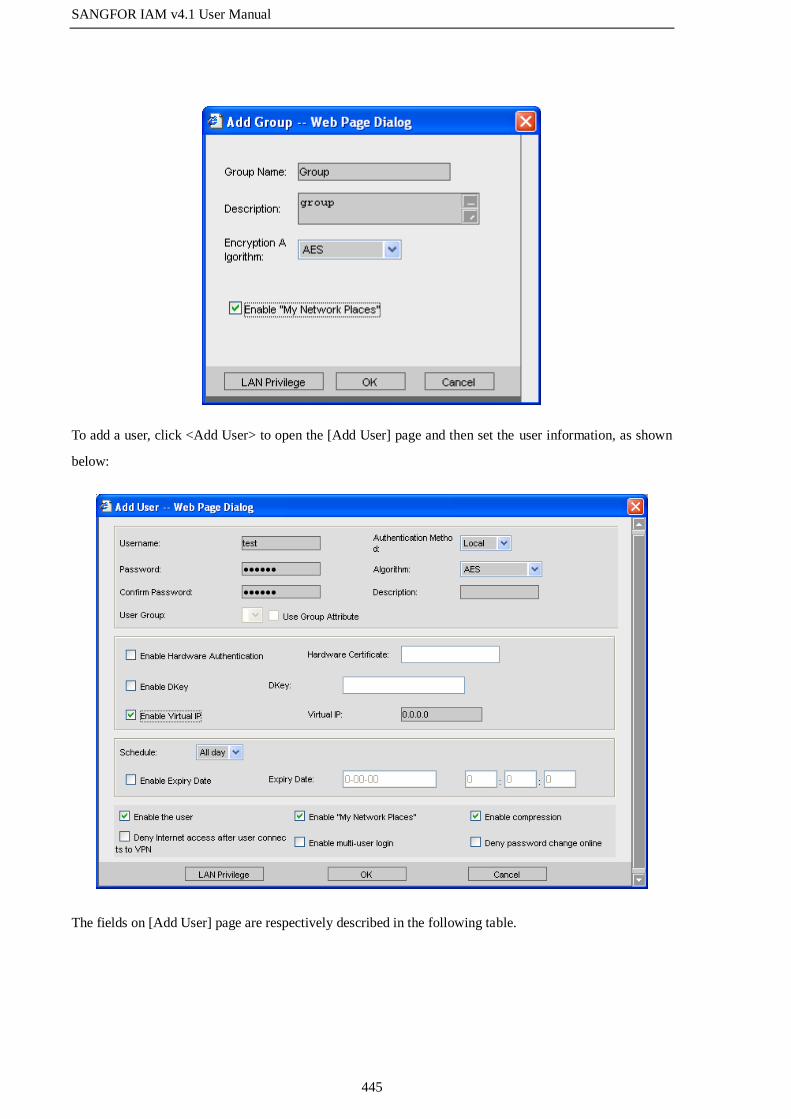
SANGFOR IAM v4.1 User Manual
445
To add a user, click <Add User> to open the [Add User] page and then set the user information, as shown
below:
The fields on [Add User] page are respectively described in the following table.
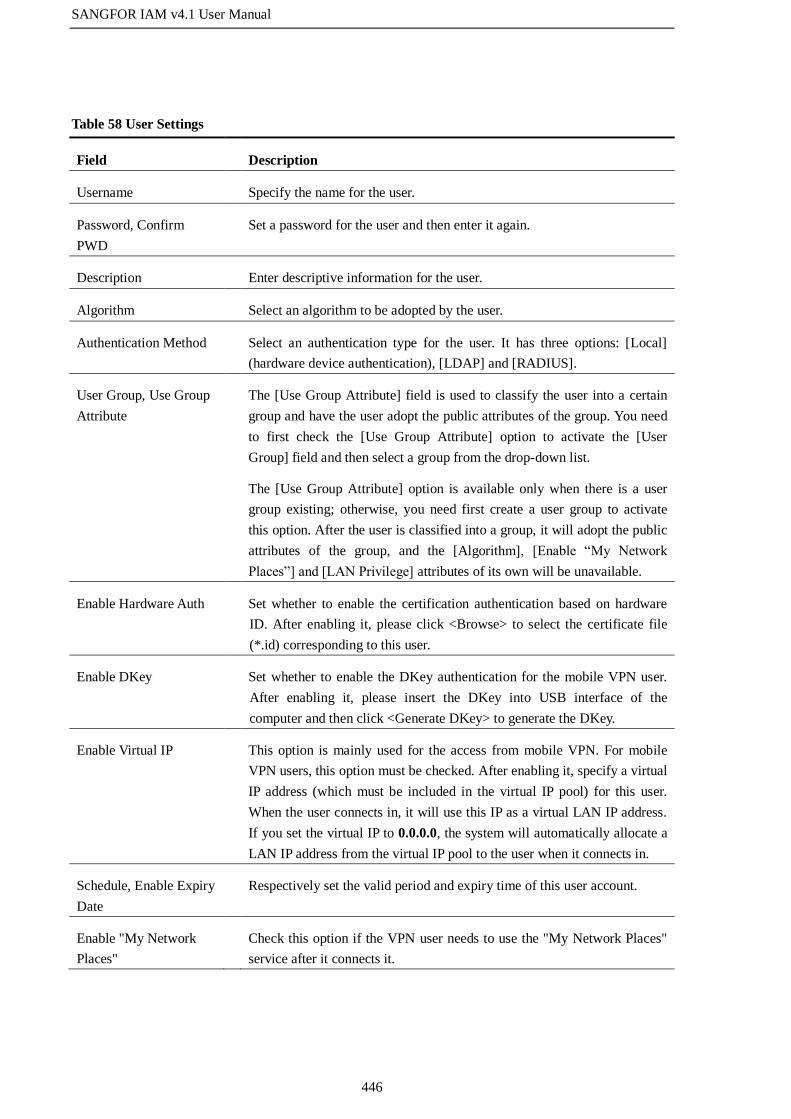
SANGFOR IAM v4.1 User Manual
446
Table 58 User Settings
Field Description
Username Specify the name for the user.
Password, Confirm
PWD
Set a password for the user and then enter it again.
Description Enter descriptive information for the user.
Algorithm Select an algorithm to be adopted by the user.
Authentication Method Select an authentication type for the user. It has three options: [Local]
(hardware device authentication), [LDAP] and [RADIUS].
User Group, Use Group
Attribute
The [Use Group Attribute] field is used to classify the user into a certain
group and have the user adopt the public attributes of the group. You need
to first check the [Use Group Attribute] option to activate the [User
Group] field and then select a group from the drop-down list.
The [Use Group Attribute] option is available only when there is a user
group existing; otherwise, you need first create a user group to activate
this option. After the user is classified into a group, it will adopt the public
attributes of the group, and the [Algorithm], [Enable “My Network
Places”] and [LAN Privilege] attributes of its own will be unavailable.
Enable Hardware Auth Set whether to enable the certification authentication based on hardware
ID. After enabling it, please click <Browse> to select the certificate file
(*.id) corresponding to this user.
Enable DKey Set whether to enable the DKey authentication for the mobile VPN user.
After enabling it, please insert the DKey into USB interface of the
computer and then click <Generate DKey> to generate the DKey.
Enable Virtual IP This option is mainly used for the access from mobile VPN. For mobile
VPN users, this option must be checked. After enabling it, specify a virtual
IP address (which must be included in the virtual IP pool) for this user.
When the user connects in, it will use this IP as a virtual LAN IP address.
If you set the virtual IP to 0.0.0.0, the system will automatically allocate a
LAN IP address from the virtual IP pool to the user when it connects in.
Schedule, Enable Expiry
Date
Respectively set the valid period and expiry time of this user account.
Enable "My Network
Places"
Check this option if the VPN user needs to use the "My Network Places"
service after it connects it.

SANGFOR IAM v4.1 User Manual
447
Enable compression Set whether to use algorithm to compress the data transferred between the
gateway device and the user.
This option is an exclusive technology of SANGFOR VPN, which
will efficiently utilize the bandwidth in low-bandwidth environment to
speed up data transmission. However, this option may not be applicable to
all network environments. Please check it according to the actual situation.
Deny Internet access
after user connects to
VPN
Set whether to block mobile VPN users from accessing the Internet after it
connects into the VPN. This option is only applicable to mobile VPN
users.
Allow multi-user login Set whether to allow multiple users to log into the VPN using this account
simultaneously.
Deny PWD change
online
Set whether to allow mobile VPN user to change its login password after it
connects to the VPN. If it is unchecked, it means the user cannot change
its login password.
LAN Privilege Set the access privileges of the user after it connects to the VPN, that is,
limit the access privileges of the user to certain services. By default, there
is not limit.
Before you set [LAN Privilege], please go to [Advanced] > [LAN
Service] page to add your desired services.
3.8.7.4 Connection Management
To achieve interconnecting among multiple network nodes, the IAM device provides the [Connection
Management] page for you to manage and configure the interconnecting of network nodes.
The [Connection Management] need be configured only when the current IAM device connects to
other VPN device (HQ VPN) as a branch VPN. If it works as the HQ VPN, ignore the [Connection
Management] page.

SANGFOR IAM v4.1 User Manual
448
To add a connection destined for HQ VPN (Headquarters VPN), do as follows:
Step 1. On the [Connection Management] page, click <New> to open the [Edit Connection] page, as
shown below:

SANGFOR IAM v4.1 User Manual
449
Step 2. Set the following information.
Table 59 Connection Management Settings
Field Description
Connection Name,
Description
Enter a name and corresponding description to identify the connection.
Primary Webagent,
Secondary Webagent
Enter the Webagent corresponding to the HQ VPN to be connected. After
entering it, click <Test> to test if the WebAgent is available. If yes, the
testing result is as follows:
The testing request is initiated by the local computer instead of the
IAM device. If the WebAgent is typed in format of domain name,
successful testing result indicates the webpage exists; otherwise, it
indicates the webpage does not exist. If the WebAgent is entered in format
of static IP, successful testing result only means the format (IP:Port) of
the input is correct, that is, successful testing result does not ensure
successful connection with the VPN.
Transfer Type Select the transfer type of VPN data. Options are: [TCP] and [UDP]. It is
UDP by default.
Data Encryption Key,
Username, Password
Set the three fields according to the information of the access account
provided by HQ VPN.
Cross-ISP This function is applicable to the situation where the HQ VPN device and
branch VPN devices are interconnected using lines of different Internet
service providers (ISPs) and packet loss occurs frequently. Options are
[Low packet loss], [High packet loss] and [Set manually].
You need to apply for the license to activate the Cross-ISP function.
Once activated on HQ VPN device, this function is available on all the
branch VPN devices and mobile VPN devices that are connected to this
HQ VPN device.
Step 3. Click <LAN Privilege> to set the access privilege of the peer VPN device, that is, limit the access
by peer VPN device to certain services provided by the local VPN device.

SANGFOR IAM v4.1 User Manual
450
Step 4. After setting the above information, check the [Enable] option to activate the current connection
and then click <OK> to save your settings.
3.8.7.5 Virtual IP Pool
The IP addresses included in the virtual IP pool are the idle IP addresses or IP ranges allocated by the
SANGFOR IAM device from the local area network (LAN). They will be used as virtual IP addresses by
mobile VPN users to connect to the IAM device. When a mobile VPN user connects in, the IAM device
will allocate a virtual IP to the user. All the operations performed by the user on the IAM device are based
on this virtual IP, just as if the operations are performed in the LAN where the IAM device locates. After
the user connects in, it can access any computer in the LAN, even if the computer does not direct its
gateway to the IAM device. You can specify the network attributes such as DNS for the connected mobile
VPN user.
Procedures for configuring the virtual IP pool are as follows:
1. Create virtual IP pool. The IP addresses in the pool are the idle IP addresses in the local area network
that the IAM device locates.
2. Specify a virtual IP for the mobile VPN user. If the virtual IP of a mobile VPN user is set to 0.0.0.0, it
means the IAM device will automatically allocate a virtual IP from the virtual IP pool to the user when it
is connecting it.
To create a virtual IP pool, do as follows:

SANGFOR IAM v4.1 User Manual
451
Step 1. Click <New> on the [Virtual IP Pool] page to open the [Virtual IP Settings] page, and then type
the start IP and end IP, as shown below:
Step 2. Click <OK> and the range of IP addresses are added into the pool.
Step 3. Click <Advanced> to configure the information that will be allocated to the virtual network
adapter of the mobile VPN user, including mask of the virtual IP, DNS and WINS server, as
shown below:

SANGFOR IAM v4.1 User Manual
452
Step 4. Click <OK> to save your settings.
After the information on the above [Advanced Settings] page is configured, the virtual network
adapter "Sinfor VPN virtual network adapter" on the mobile VPN user's computer must be set to
[Obtain an IP address automatically] and [Obtain DNS server address automatically]; otherwise, the
information configured on [Advanced Settings] page will not be allocated to the virtual network
adapter of the mobile VPN user.
3.8.7.6 Multiline Settings
If the IAM device has multiple WAN interfaces and is connected to multiple extranet lines, you have to set
[Multiline Settings]. You can add, delete or modify the lines on [Multiline Settings] page, as shown below:
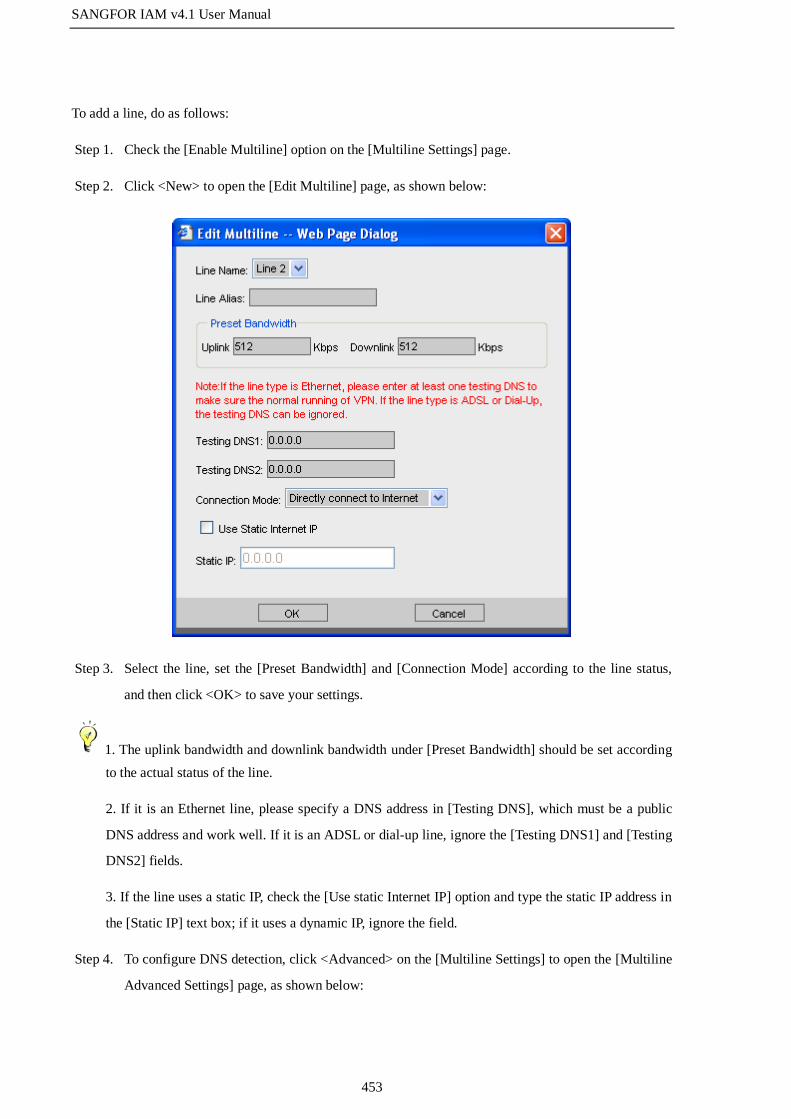
SANGFOR IAM v4.1 User Manual
453
To add a line, do as follows:
Step 1. Check the [Enable Multiline] option on the [Multiline Settings] page.
Step 2. Click <New> to open the [Edit Multiline] page, as shown below:
Step 3. Select the line, set the [Preset Bandwidth] and [Connection Mode] according to the line status,
and then click <OK> to save your settings.
1. The uplink bandwidth and downlink bandwidth under [Preset Bandwidth] should be set according
to the actual status of the line.
2. If it is an Ethernet line, please specify a DNS address in [Testing DNS], which must be a public
DNS address and work well. If it is an ADSL or dial-up line, ignore the [Testing DNS1] and [Testing
DNS2] fields.
3. If the line uses a static IP, check the [Use static Internet IP] option and type the static IP address in
the [Static IP] text box; if it uses a dynamic IP, ignore the field.
Step 4. To configure DNS detection, click <Advanced> on the [Multiline Settings] to open the [Multiline
Advanced Settings] page, as shown below:

SANGFOR IAM v4.1 User Manual
454
Step 5. Check the [Enable DNS Detection] option to enable the DNS detection function to detect the
status of multiple lines, and then type the detection interval in the [DNS Detection Time] text
box.
3.8.7.7 Multiline Routing Policy
The SANGFOR IAM device provides the powerful routing policy among multiple VPN lines. You can set
the multiline routing policy according to the protocol type, source IP, destination IP, source port and
destination port of the data transferred in VPN tunnel.
Case Study: Suppose the branch VPN (172.16.1.0/24) has established the connection with the HQ VPN
and can access the FTP server (IP: 192.168.1.20) that locates in the local area network of the HQ VPN. The

SANGFOR IAM v4.1 User Manual
455
requirement is that when the branch VPN accesses the FTP server, the Line1 of the HQ VPN should be
used to transfer the data packets.
To meet the requirements, do as follows:
Step 1. On the [Multiline Routing Policy] page, click <New> to open the [Edit Multiline Routing Policy]
page and then type the policy name, as shown below:
Step 2. Click <Add> to open the [IP Range Settings] page, as shown below:

SANGFOR IAM v4.1 User Manual
456
Step 3. Specify the following information.

SANGFOR IAM v4.1 User Manual
457
Table 60 Multiline Routing Policy Settings
Field Description
Protocol Indicates the protocol type of the data. In this example, set it to TCP.
Source IP Indicates the LAN IP address in the local end. In this example, it is
192.168.1.20.
Source Port Indicates the service port of the local end. In this example, it is 20-21.
Destination IP Indicates the IP address of the peer VPN. In this example, it is the LAN subnet
of branch VPN: 172.16.1.1-172.16.1.254.
Destination Port Indicates the port used by the peer VPN to access the service at local end. In
this example, it is 1-65535.
Step 4. After setting the above fields, click <OK> to save your settings. Then check the [Bandwidth
stacking] option and the [Advanced] button behind it is available.
Step 5. Click <Advanced> to open the [Advanced Settings] page and then select the line to be used for
transferring the data sent from branch VPN to FTP server. In this example, check the entry [Line1
(Local)----Line1 (Peer)] and then click <OK> to finish setting.

SANGFOR IAM v4.1 User Manual
458
1. In the above Case Study, we assumed that the branch VPN (peer VPN) only has one line. If it has
multiple lines, you can select the corresponding line number (from the drop-down list of [Number of
Peer Lines]) and check the corresponding options (under the [Available Line List]) on the [Advanced
Settings] page.
2. The <Advanced> button is available only for the [Bandwidth stacking], [Active/Standby] and
[Average distribution] routing policy modes, and you can then click it to specify the line for data
transmission. If the line specified in the multiline routing policy fails, the system will automatically
switch the connection to next available line, ensuring smooth transmission of the data. If you select
the [Dynamic detection] mode, the system will automatically select the optimal line for the fastest
connection.
3.8.7.8 Local Subnet List
The [Local Subnet List] is used when there are multiple subnets in the local area network (LAN) where the
HQ VPN device locates, and mobile or branch VPN users need to access all the subnets after connecting
into the HQ VPN.
Case Study: Suppose there are two subnets (192.200.100.x, 192.200.200.x) in the LAN where the HQ
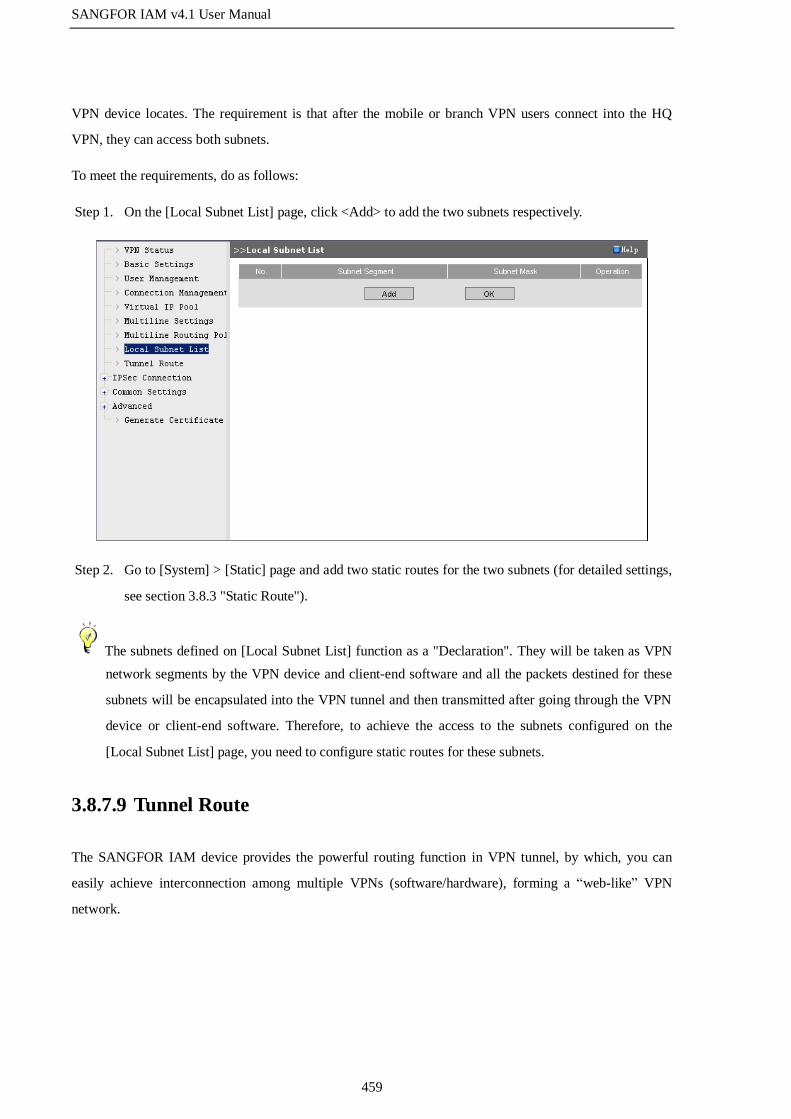
SANGFOR IAM v4.1 User Manual
459
VPN device locates. The requirement is that after the mobile or branch VPN users connect into the HQ
VPN, they can access both subnets.
To meet the requirements, do as follows:
Step 1. On the [Local Subnet List] page, click <Add> to add the two subnets respectively.
Step 2. Go to [System] > [Static] page and add two static routes for the two subnets (for detailed settings,
see section 3.8.3 "Static Route").
The subnets defined on [Local Subnet List] function as a "Declaration". They will be taken as VPN
network segments by the VPN device and client-end software and all the packets destined for these
subnets will be encapsulated into the VPN tunnel and then transmitted after going through the VPN
device or client-end software. Therefore, to achieve the access to the subnets configured on the
[Local Subnet List] page, you need to configure static routes for these subnets.
3.8.7.9 Tunnel Route
The SANGFOR IAM device provides the powerful routing function in VPN tunnel, by which, you can
easily achieve interconnection among multiple VPNs (software/hardware), forming a “web-like” VPN
network.

SANGFOR IAM v4.1 User Manual
460
Case Study: Suppose the branch offices Shanghai (172.16.1.x/24) and Guangzhou (10.1.1.x/24) have
established VPN connections with the Headquarters Shenzhen (192.168.1.x/24) respectively (Shanghai and
Guangzhou have configured [Connection Management] and used the user accounts Guest and Test
respectively to establish the VPN connections with the Headquarters Shenzhen). However, there is no VPN
connection established between Shanghai and Guangzhou. The requirement is that the branch offices
Shanghai and Guangzhou can access each other.
To meet the requirements, do as follow:
Step 1. Configure the IAM device located in the Shanghai branch.
a. Go to the [Tunnel Route] page, check the [Enable Tunnel Route] option and then click <Add> to
open the [Edit Tunnel Route] page, as shown below:

SANGFOR IAM v4.1 User Manual
461
b. Specify the information as follows:
Table 61 Tunnel Route Settings
Field Description
Source Subnet Indicates the source subnet of the tunnel route.
Source Mask Indicates the mask of the source subnet.
Destination Subnet Indicates the destination subnet of the tunnel route.
Destination Mask Indicates the mask of the destination subnet.

SANGFOR IAM v4.1 User Manual
462
Destination Route User This field determines to which VPN device the packets applicable to
this tunnel route will be forwarded, that is, the next hop of this tunnel
route.
In this example, as the packets are to be first forwarded to the
Headquarters Shenzhen and then to the destination Guangzhou, select
the username Guest, which has been used by Shanghai branch to
establish VPN connection with the HQ Shenzhen.
Enable Check this option to enable this tunnel route.
Access Internet via
destination route user
Indicates whether to access the Internet via the destination route user.
[Source Subnet] and [Destination Subnet] defines the source IP address and destination IP address of
the data packets that are applicable to this tunnel route. When the packets transmitted in the VPN
tunnel match the two conditions, they will be forwarded to the corresponding VPN device.
c. Click <OK> to save your settings.
Step 2. Configure the IAM device located in the Guangzhou branch.
a. Go to the [Tunnel Route] page, check the [Enable Tunnel Route] option and then click <Add> to
open the [Edit Tunnel Route] page.
b. Specify the information as follows:
c. Click <OK> to save your settings.

SANGFOR IAM v4.1 User Manual
463
You can also set to have a branch access Internet through the VPN device located at the Headquarters, all
the packets of the branch forwarded by the HQ VPN.
For example, to have the branch Shanghai access Internet through the gateway of the VPN device located
at Shenzhen, click <New> to add a tunnel route and specify the information as follows:
If the IAM device located at the Headquarters is deployed in Route mode, you need to add
corresponding SNAT rules for the VPN subnets on the [Firewall] > [SNAT] page. For detailed
settings, see section 3.7.2 "SNAT".
3.8.7.10 IPSec Connection
SANGFOR IAM device offers the function of interconnecting with third-party VPN device, which enables
you to establish standard IPSec VPN connection with third-party VPN device.
3.8.7.10.1 Device List
The [Device List] allows you to set the relevant information of the peer VPN device that requires
establishing standard IPSec connection with SANGFOR IAM device. This is the first phase of the standard
IPSec negotiation.
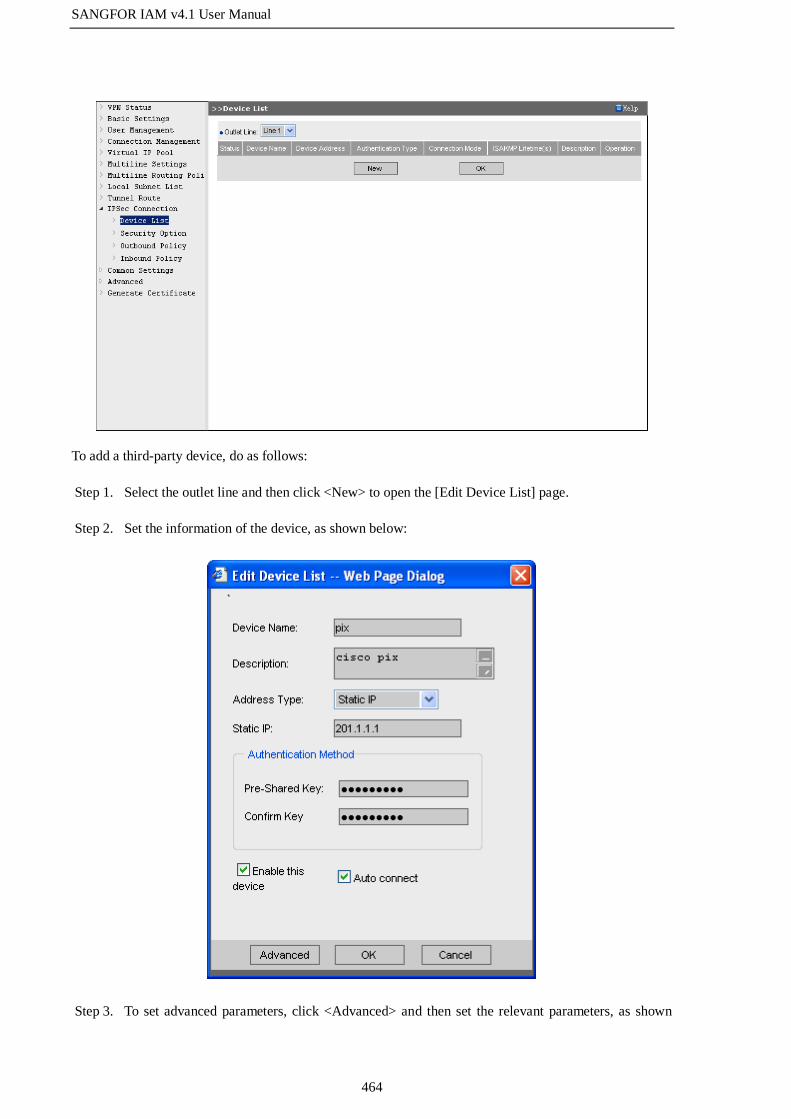
SANGFOR IAM v4.1 User Manual
464
To add a third-party device, do as follows:
Step 1. Select the outlet line and then click <New> to open the [Edit Device List] page.
Step 2. Set the information of the device, as shown below:
Step 3. To set advanced parameters, click <Advanced> and then set the relevant parameters, as shown
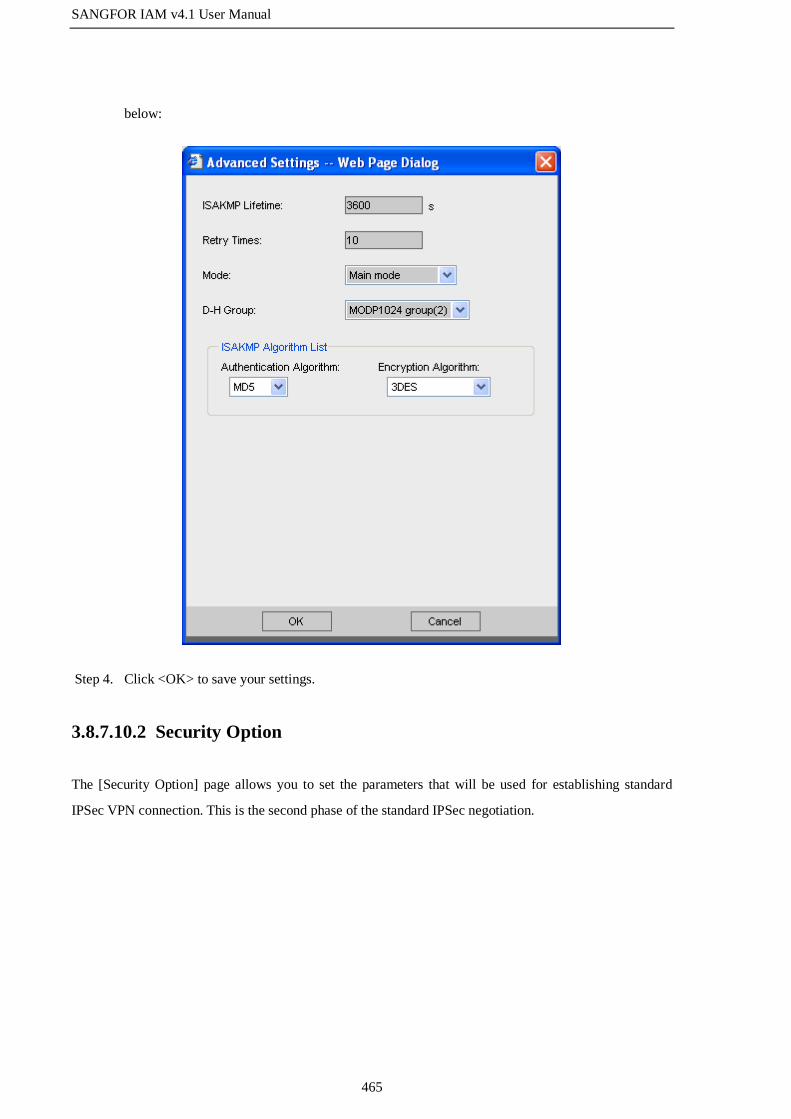
SANGFOR IAM v4.1 User Manual
465
below:
Step 4. Click <OK> to save your settings.
3.8.7.10.2 Security Option
The [Security Option] page allows you to set the parameters that will be used for establishing standard
IPSec VPN connection. This is the second phase of the standard IPSec negotiation.

SANGFOR IAM v4.1 User Manual
466
Before establishing IPSec connection with the third-party device, please figure out the connection policy to
be used by the peer device, including such information as the protocol (AH or ESP), authentication
algorithm (MD5 or SHA-1) and encryption algorithm (DES, 3DES or AES). Then click <New> to set the
security options according to the above information, as shown below.
The SANGFOR IAM device will use the connection policy set above to negotiate with the peer device and
then establish the IPSec connection.
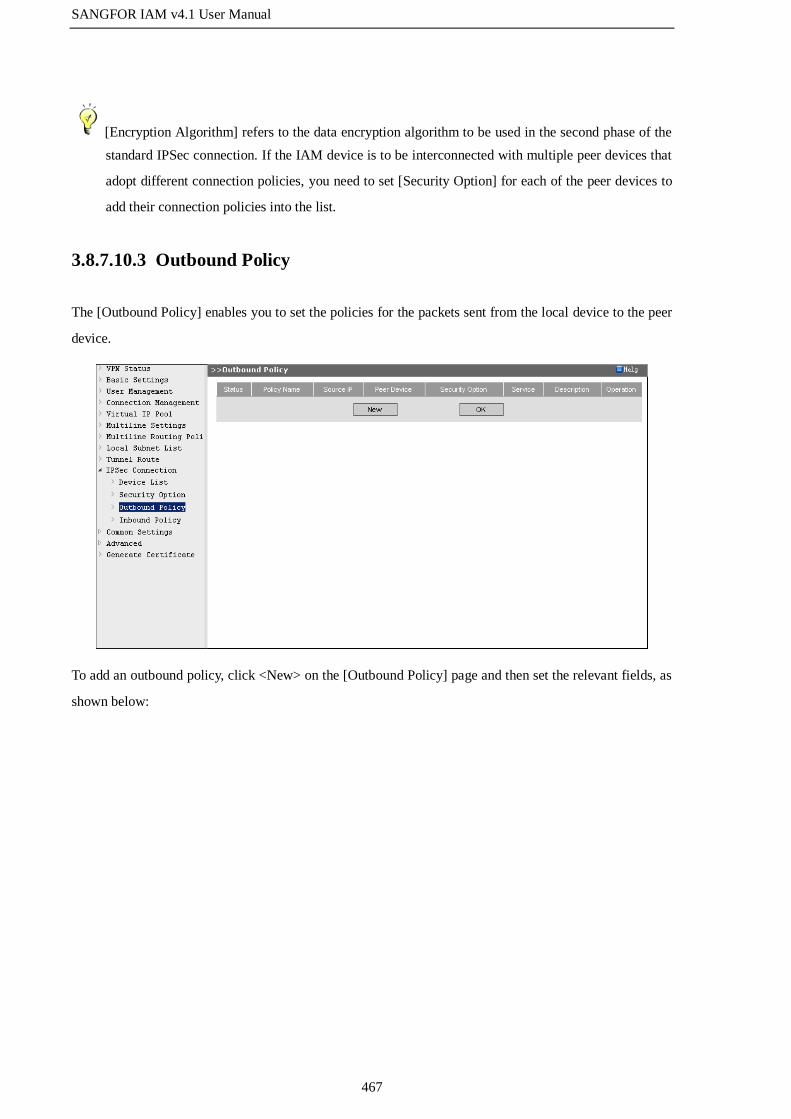
SANGFOR IAM v4.1 User Manual
467
[Encryption Algorithm] refers to the data encryption algorithm to be used in the second phase of the
standard IPSec connection. If the IAM device is to be interconnected with multiple peer devices that
adopt different connection policies, you need to set [Security Option] for each of the peer devices to
add their connection policies into the list.
3.8.7.10.3 Outbound Policy
The [Outbound Policy] enables you to set the policies for the packets sent from the local device to the peer
device.
To add an outbound policy, click <New> on the [Outbound Policy] page and then set the relevant fields, as
shown below:

SANGFOR IAM v4.1 User Manual
468
3.8.7.10.4 Inbound Policy
The [Inbound Policy] enables you to set the policies for the packets sent from the peer device to the local
device.

SANGFOR IAM v4.1 User Manual
469
To add an inbound policy, click <New> on the [Inbound Policy] page and then set the relevant fields, as
shown below:

SANGFOR IAM v4.1 User Manual
470
1. The [Service] and [Schedule] configured in the inbound/outbound policy are extension rules
provided by the SANGFOR IAM device. They only take effect on the local device and will not be
negotiated when the local device is establishing VPN connection with third-party device.
2. The source IP addresses applicable to the inbound/outbound policy (that is, source IP allowed to
connect in to or out of the local VPN device) are those that are included in both the [Source IP
Address] configured in the inbound/outbound policy and [Source IP Range] set in the selected LAN
service.
3.8.7.11 Common Settings
The [Common Settings] module covers the [Schedule] and [Algorithm List] pages.
3.8.7.11.1 Schedule
The [Schedule] page allows you to combine commonly used time segments into a schedule, mainly used as
a time period in which relevant settings are in effect. The schedules defined here will be referenced by
[User Management], [Inbound Policy] and [Outbound Policy]. The time defined in schedules is subject to
the system time of the current IAM device.
To add a schedule, do as follows:
Step 1. On the [Schedule] page, click <New> to add a schedule.
Step 2. Type the name and description, and then drag over the grids and click <Enable>/<Disable> to add
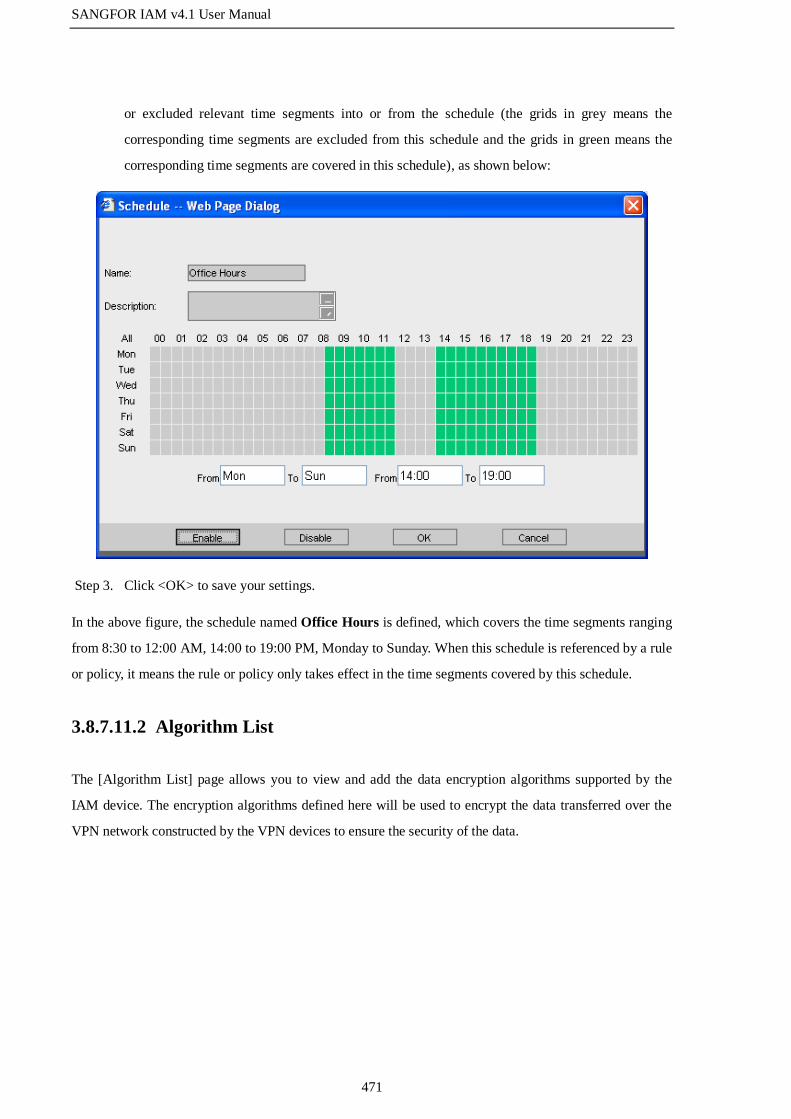
SANGFOR IAM v4.1 User Manual
471
or excluded relevant time segments into or from the schedule (the grids in grey means the
corresponding time segments are excluded from this schedule and the grids in green means the
corresponding time segments are covered in this schedule), as shown below:
Step 3. Click <OK> to save your settings.
In the above figure, the schedule named Office Hours is defined, which covers the time segments ranging
from 8:30 to 12:00 AM, 14:00 to 19:00 PM, Monday to Sunday. When this schedule is referenced by a rule
or policy, it means the rule or policy only takes effect in the time segments covered by this schedule.
3.8.7.11.2 Algorithm List
The [Algorithm List] page allows you to view and add the data encryption algorithms supported by the
IAM device. The encryption algorithms defined here will be used to encrypt the data transferred over the
VPN network constructed by the VPN devices to ensure the security of the data.

SANGFOR IAM v4.1 User Manual
472
The IAM device has already built in multiple encryption algorithms and authentication algorithms,
including DES, 3DES, MD5, AES, SHA-1 and SANGFOR_DES. If you want to add other encryption
algorithms and authentication algorithms, please contact the technical engineer of SANGFOR.
3.8.7.12 Advanced
The [Advanced] module covers the [LAN Service], [VPN Interface], [LDAP Server] and [RADIUS Server]
pages.
3.8.7.12.1 LAN Service
The [LAN Service] page enables you to specify the access privileges for the VPN user connected in
(for example, to limit a branch/mobile VPN user's access to a specified service provided by a
specified computer) and define the LAN services to be referenced by outbound policy and inbound
policy (for detailed settings, see section 3.8.7.10.3 "Outbound Policy" and section 3.8.7.10.4 "Inbound
Policy").

SANGFOR IAM v4.1 User Manual
473
By configuring the LAN services and allocate corresponding LAN privileges for VPN users connected in,
you can achieve secure management in the VPN tunnel.
To allocate the LAN privileges, there are two steps:
1. Create LAN service.
2. Allocate the corresponding LAN service (LAN privilege) for a specific user. By default, the system
does not set any limit to the access privileges of VPN users.
Case Study: Suppose the branch office Branch1 has established VPN connection with the Headquarters
and there is a FTP server (192.168.1.20) located at Headquarters. The requirement is that only the user
branch1 (IP: 172.16.1.200) in the branch office be allowed to access the FTP server and requests initiated
from other IP addresses in the branch office be denied.
To meet the requirements, do as follows:
Step 1. On the [LAN Service] page, click <New> to open the [Edit LAN Service] page.
Step 2. Type a service name (easy to identify) and check the protocol type.
In this example, as the FTP service uses the TCP protocol, check the [TCP] option, as shown
below:

SANGFOR IAM v4.1 User Manual
474
Step 3. Click <New> to open the [IP Range Settings] page and then set the IP range applicable to this
LAN service.
Step 4. Specify the information as follows:
[Source IP]: 172.16.1.200 (IP address of the user branch1)
[Source Port]: 1-65535
[Destination IP]: 192.168.1.20 (IP address of the FTP server)
[Destination Port]: 20-21 (FTP service port)

SANGFOR IAM v4.1 User Manual
475
Step 5. Click <OK> to save the LAN service.
So far, you just "defined" the LAN service. To have the privileges configured in the LAN service
take effect, you need then allocate the privileges for the user account through [User Management]
page.
Step 6. Go to the [User Management] page, select the user branch1 and click <Edit> to open the [Edit
User: branch1] page, as shown below:

SANGFOR IAM v4.1 User Manual
476
Step 7. Click <LAN Privilege> to open the [Privilege Settings] page. Then click <Right> to move the
Branch1 service to the service list on the right, check the box under the [Allow] column (that is,
set the action to Allow), and select the [Deny] option under [Default Action], as shown below:
Step 8. Click <OK> to save and apply your settings.
After the above settings are saved and applied, only the IP address 172.16.1.200 is allowed to access
the FTP server and any other requests initiated by this IP address or other IP addresses in the branch

SANGFOR IAM v4.1 User Manual
477
office will be denied. Meanwhile, the computers other than the FTP server at Headquarters cannot
access the branch office either, because the [LAN Service] will deny any packet whose destination IP
is not 192.168.1.20 (FTP server IP) when the branch responds to the requests initiated by the
computers at Headquarters.
3.8.7.12.2 VPN Interface
The [VPN Interface] page allows you to set the virtual adapter IP address of the VPN service.
1. Under the [VPN Interface Settings] section, [Obtain IP address automatically] is checked by
default. If IP conflict occurs, you can then check the [Customize VPN interface IP] option and set the
IP address manually.
2. The VPN interface is a virtual interface of the IAM device, and no corresponding physical
interface actually exists on the IAM device.
3.8.7.12.3 LDAP Server
The VPN service provided by the SANGFOR IAM device supports using the third-party LDAP
authentication.
If third-party LDAP authentication is required, you need to configure [LDAP Server].
Do as follows:
Step 1. Set the information of the third-party LDAP server, including IP address, port, administrator

SANGFOR IAM v4.1 User Manual
478
name and password of the LDAP server, as shown below:
Step 2. Check the [Enable LDAP Authentication] option to enable the third-party LDAP authentication.
Step 3. If necessary, click <Advanced> to open the [Advanced Settings] page and set the advanced
parameters according to your needs, as shown below:
Step 4. Click <OK> to save your settings.
3.8.7.12.4 RADIUS Server
The VPN service provided by the SANGFOR IAM device supports using the third-party RADIUS
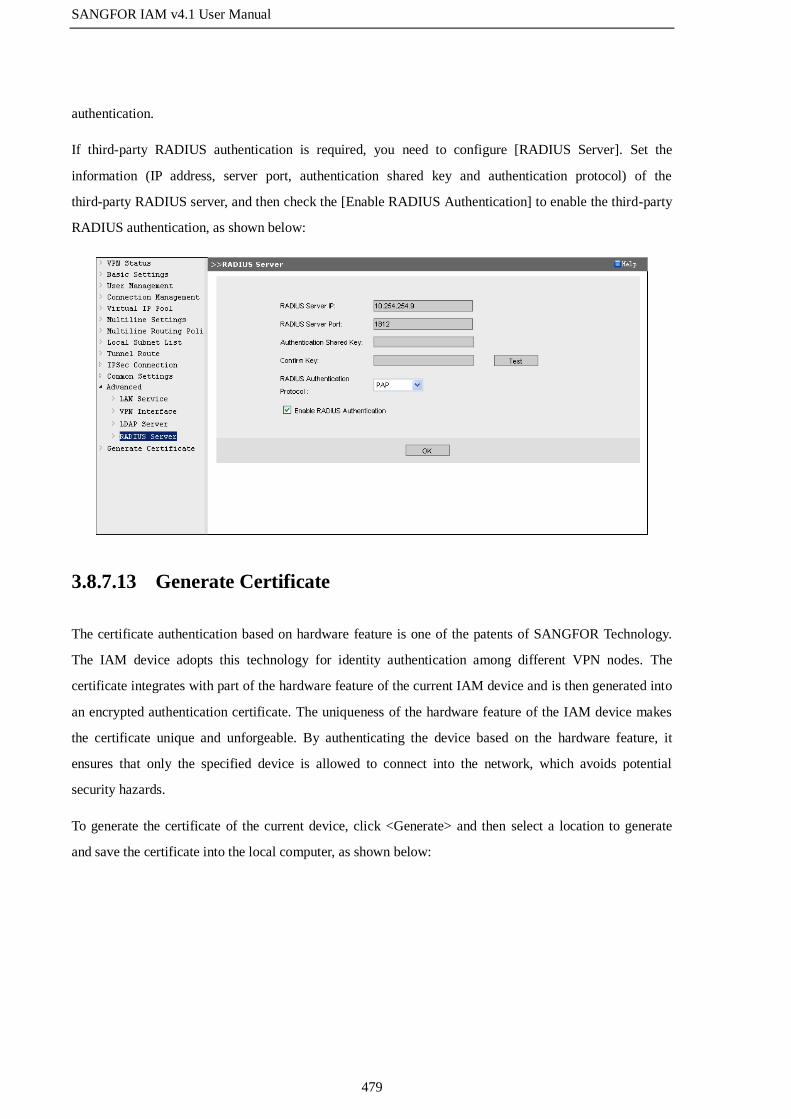
SANGFOR IAM v4.1 User Manual
479
authentication.
If third-party RADIUS authentication is required, you need to configure [RADIUS Server]. Set the
information (IP address, server port, authentication shared key and authentication protocol) of the
third-party RADIUS server, and then check the [Enable RADIUS Authentication] to enable the third-party
RADIUS authentication, as shown below:
3.8.7.13 Generate Certificate
The certificate authentication based on hardware feature is one of the patents of SANGFOR Technology.
The IAM device adopts this technology for identity authentication among different VPN nodes. The
certificate integrates with part of the hardware feature of the current IAM device and is then generated into
an encrypted authentication certificate. The uniqueness of the hardware feature of the IAM device makes
the certificate unique and unforgeable. By authenticating the device based on the hardware feature, it
ensures that only the specified device is allowed to connect into the network, which avoids potential
security hazards.
To generate the certificate of the current device, click <Generate> and then select a location to generate
and save the certificate into the local computer, as shown below:

SANGFOR IAM v4.1 User Manual
480
Then, send the generated certificate to the administrator of the VPN device to which you want to connect.
The administrator of that VPN device will then select the hardware authentication and bind this certificate
with the user when creating the VPN user account for this device.
3.8.8 Protocol Extension
In some network environment, the communication packets are encapsulated by some special protocols
(such as PPPoE and MPLS). These protocol data packets adds the header identifier of their own into the
common IP packets and make the IP packets unable to be analyzed even by the device that has the protocol
analyzing function.
However, the SANGFOR IAM device, by using the protocol striping function, can analyze the features of
these special protocol packets and match them with the built-in protocol rules to strip the protocol header
off the special protocol within the device so that it still can conduct authentication, audit and control over
the original data encapsulated by special protocols.
At present, the SANGFOR IAM device supports protocol stripping of the following types: [VLAN
Protocol Stripping], [MPLS Protocol Stripping], [PPPOE Protocol Stripping], [L2TP Protocol Stripping],
[LWAPP Protocol Stripping], [CAPWAP Protocol Stripping] and [WLTP Protocol Stripping]. It also
supports customized protocol stripping.
Case Study: Suppose in the network, as shown below, PCs are required to dial up to the PPPoE server and
pass the authentication on the PPPoE server before accessing the Internet. The IAM device, deployed
between the PCs and the PPPoE server in Bridge mode, is required to audit and control the PC's network
behaviors.

SANGFOR IAM v4.1 User Manual
481
To meet the requirements, do as follows:
Step 1. Go to the [Network] > [Protocol Extension] page, check the [PPPoE Protocol Stripping] item and
click <Commit> to enable the PPPoE protocol stripping.

SANGFOR IAM v4.1 User Manual
482
Step 2. Go to the [User/Policy] > [Access Management] page, and configure the corresponding access
control policy and access audit policy according to your needs.
After the above configurations are completed, the IAM device will audit and control the network behaviors
of the PCs that access the Internet by PPPoE dial-up.
If the special protocol is included in the built-in protocol stripping list, but adopts a non-default port for
communication (for example, the L2TP protocol does not adopt the default port 1701 for communication),
you can double-click the corresponding stripping rule to edit the port. If there are multiple ports, separate
them from each other by commas.
If multiple protocols or combinations of protocols that are included in the protocol stripping list exist in the
network, enable the corresponding protocol stripping rules.
If other special protocol of uncommon IP packet exists in the network, but the protocol is not included in
the built-in protocol stripping list, you can set a customized protocol stripping and the corresponding
stripping rule under the [Custom Protocol Stripping] section:
[Protocol Header] specifies the start point of the special protocol's header in the whole data
packet (including the Ethernet header) and the feature value of the protocol header.
[IP Header] specifies the start point of the IP header after the packet is encapsulated by the
special protocol.
1. Protocol Stripping is not available in Route mode.
2. In Bridge mode, the IAM device supports the Protocol Stripping and can implement automatic
authentication, application audit and control on the data with protocol stripped off. However, in some
special environment, some functions may be unavailable, including functions that will redirect users'
browsers (such as Web authentication, Ingress authentication, Access Denied page, Reminder page),
SSL content identification, control on MSN file transfer, Kerberos authentication SSO, and functions
that require the proxy of the IAM device (such as email delay/audit, and gateway antivirus).
3. In Bypass mode, the IAM device supports the Protocol Stripping, but it can only conduct
automatic authentication and application audit.
4. In protocol stripping environment, the IAM device does not support taking host name or MAC
address as username, or binding user with MAC address.
5. Some data packets, after being encapsulated by a special protocol (for example, L2TP), may have
two IP headers. When the protocol is stripped off, the outmost IP header is stripped off; therefore, the
authentication, audit and control are conducted based on the innermost IP, and meanwhile, the
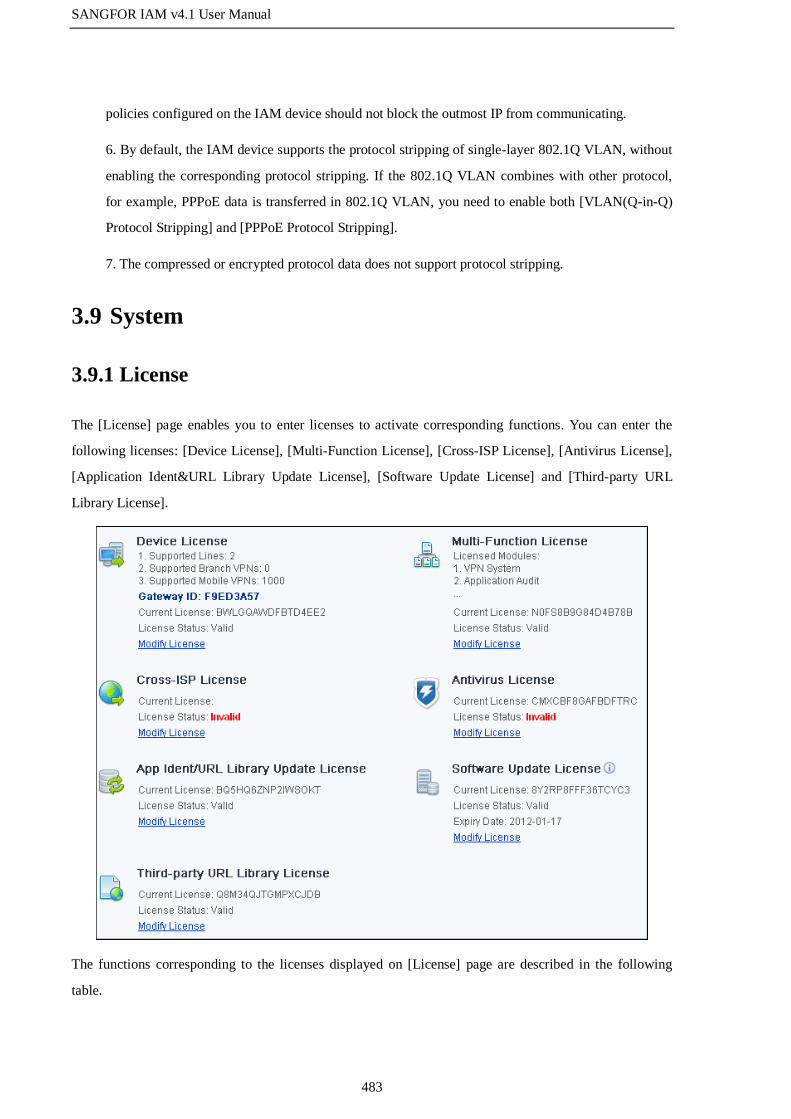
SANGFOR IAM v4.1 User Manual
483
policies configured on the IAM device should not block the outmost IP from communicating.
6. By default, the IAM device supports the protocol stripping of single-layer 802.1Q VLAN, without
enabling the corresponding protocol stripping. If the 802.1Q VLAN combines with other protocol,
for example, PPPoE data is transferred in 802.1Q VLAN, you need to enable both [VLAN(Q-in-Q)
Protocol Stripping] and [PPPoE Protocol Stripping].
7. The compressed or encrypted protocol data does not support protocol stripping.
3.9 System
3.9.1 License
The [License] page enables you to enter licenses to activate corresponding functions. You can enter the
following licenses: [Device License], [Multi-Function License], [Cross-ISP License], [Antivirus License],
[Application Ident&URL Library Update License], [Software Update License] and [Third-party URL
Library License].
The functions corresponding to the licenses displayed on [License] page are described in the following
table.

SANGFOR IAM v4.1 User Manual
484
Table 62 License Settings
Field Description
Device License To activate the device. This license determines the number of lines,
branch VPNs and mobile VPNs.
Multi-Function License To activate the multi-function. Here, multi-function includes the
following functions: VPN, Application Audit, SSL Content Ident,
Proxy/Cache, Outgoing File Alarm, Risk Ident, Email Audit, IM Audit,
HTTP Outgoing Content, Application Control and DKey Management
Data Center.
Cross-ISP License To activate the optimization function of the VPN network established
using lines of different Internet service providers (ISPs).
Antivirus License To activate the update service for virus library.
App Ident&URL Library
Update License
To activate the update service for URL library and application
identification library.
Software Update License To activate the service that updates the software version of the device.
Third-party URL Library
License
To activate the update service for third-party URL library.
To enter or modify any of the above licenses, click the corresponding <Modify License> button and enter
the license. The corresponding function will be activated.
3.9.2 Administrator
The [Administrator] page enables you to set the system administrators who manage the IAM device
through the console.
You can click the corresponding button displayed above the administrator list to add, delete, enable or
disable administrator account. The <Role Management> button enables you to define the privilege level of
administrators, commonly used in the situation when multiple administrators are needed to conduct

SANGFOR IAM v4.1 User Manual
485
hierarchical management. In administrator role list, the upper role has higher privileges. Given the same
administrative scope, the administrator of higher role level can modify the policies created by
administrators of lower role level, and its policies take higher priority than those created by the latter. The
"administrator" role is an internal role, which has full privileges to administer the current device and can
add or delete any other administrator accounts.
To add an administrator, do as follows:
Step 1. Create administrator role. On the role list, the upper role has higher priority level. The
administrator of lower role level cannot modify the objects created or modified by administrator
of higher role level. You can add a role according to your needs. Click the <Role Management>
button to open the [Role Management] page, as shown below. Then, click <Add>, enter the role
name and description, and click <Commit>.
Step 2. Create administrator account.
a. Click the <Add> button, type the administrator name and description, and select the
administrator role, as shown below:
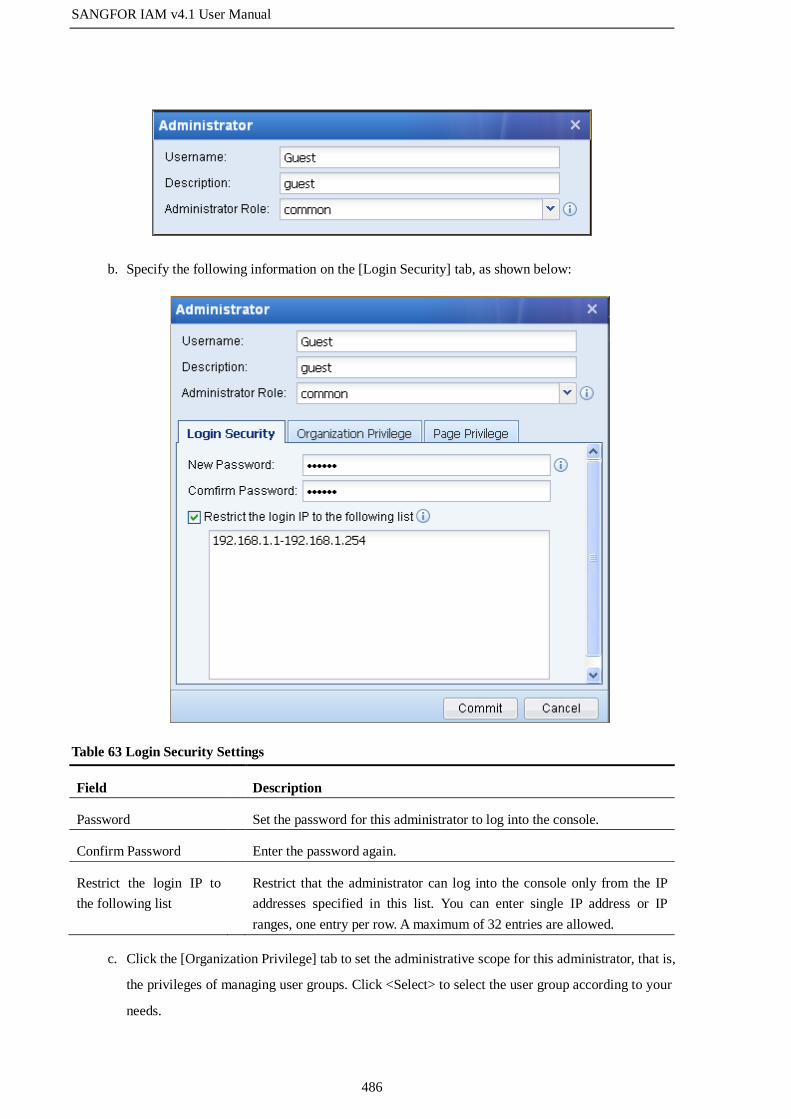
SANGFOR IAM v4.1 User Manual
486
b. Specify the following information on the [Login Security] tab, as shown below:
Table 63 Login Security Settings
Field Description
Password Set the password for this administrator to log into the console.
Confirm Password Enter the password again.
Restrict the login IP to
the following list
Restrict that the administrator can log into the console only from the IP
addresses specified in this list. You can enter single IP address or IP
ranges, one entry per row. A maximum of 32 entries are allowed.
c. Click the [Organization Privilege] tab to set the administrative scope for this administrator, that is,
the privileges of managing user groups. Click <Select> to select the user group according to your
needs.

SANGFOR IAM v4.1 User Manual
487
d. Click the [Page Privilege] tab to set the page privileges for this administrator, that is, whether this
administrator has the privilege to view or edit the pages of the console.
Step 3. Click <Commit> to save the administrator account.
Case Study 1: Suppose you need to create an administrator account with the following requirements:
The role of the administrator is test.
The username of the administrator account is John, with password of 123, administrative scope
of Network Dept group and privileges of editing and viewing the [User Authentication], [User
Import/Sync] pages and all the pages under [Objects] module.

SANGFOR IAM v4.1 User Manual
488
To meet the requirements: do as follows:
Step 1. Create administrator role. On the [Administrator] page, click the <Role Management> button to
open the [Role Management] page, as shown below. Then click <Add>, enter the role name test
and corresponding description, and click <Commit>.
Step 2. Create administrator account.
a. On the [Administrator] page, click the <Add> button to add an administrator. Enter the
administrator name John and corresponding description, and click the drop-down arrow to select
the role test, as shown below.
b. Click to open the [Login Security] tab, enter the password 123 and confirm the password.
c. Click to open the [Organization Privilege] tab, click <Select> to open the [Select Group] page,
check the Network Dept group and click <OK> to save your settings.
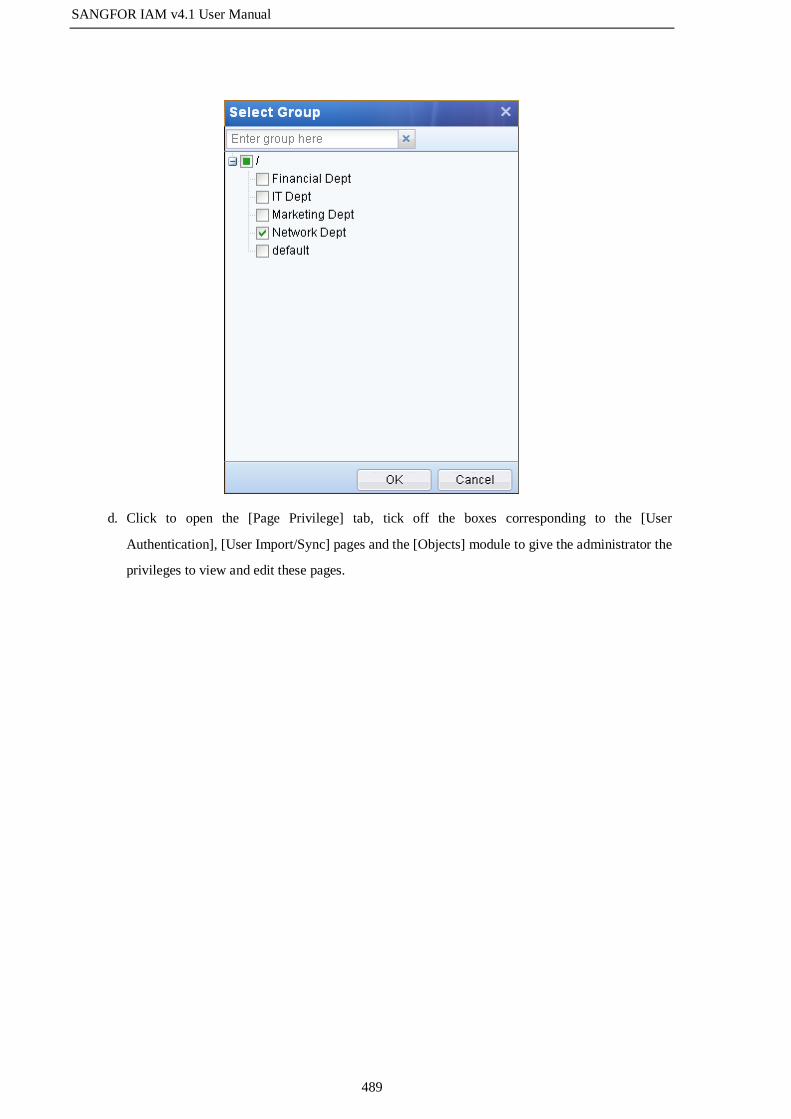
SANGFOR IAM v4.1 User Manual
489
d. Click to open the [Page Privilege] tab, tick off the boxes corresponding to the [User
Authentication], [User Import/Sync] pages and the [Objects] module to give the administrator the
privileges to view and edit these pages.

SANGFOR IAM v4.1 User Manual
490
e. Click <Commit> to save the administrator account.
Step 3. After the above configurations are completed, use the administrator account John to log into the
console, and you will find this administrator can only manage the users/subgroups in the
Network Dept group and the corresponding access management policies, define objects under
[Objects] and configure [User Authentication].
Case Study 2: Suppose you need to create the following two administrator accounts:
One administrator account is test1 and belongs to the school level role. This account has the
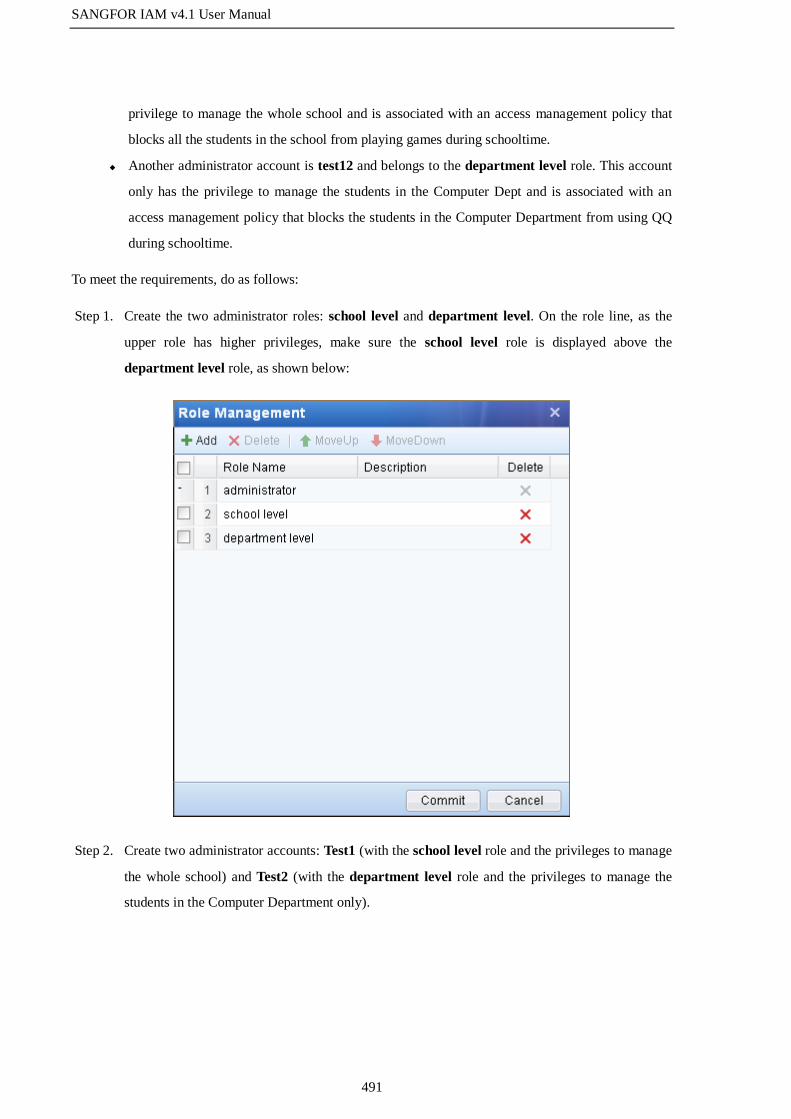
SANGFOR IAM v4.1 User Manual
491
privilege to manage the whole school and is associated with an access management policy that
blocks all the students in the school from playing games during schooltime.
Another administrator account is test12 and belongs to the department level role. This account
only has the privilege to manage the students in the Computer Dept and is associated with an
access management policy that blocks the students in the Computer Department from using QQ
during schooltime.
To meet the requirements, do as follows:
Step 1. Create the two administrator roles: school level and department level. On the role line, as the
upper role has higher privileges, make sure the school level role is displayed above the
department level role, as shown below:
Step 2. Create two administrator accounts: Test1 (with the school level role and the privileges to manage
the whole school) and Test2 (with the department level role and the privileges to manage the
students in the Computer Department only).

SANGFOR IAM v4.1 User Manual
492

SANGFOR IAM v4.1 User Manual
493
Step 3. Log into the console using the administrator account Test1, and add an access management
policy named "Deny Game in Schooltime” to block all the users in the school from playing
games during schooltime (for detailed settings, see section 3.3.1 "Access Management"). After
the policy is successfully added, it will be listed on the [Access Management] page, as shown
below:
Step 4. Log in to the console using the administrator account Test2, add an access management policy
named "Deny QQ in Schooltime” to block the users in the Computer Department from using QQ
during schooltime (for detailed settings, see section 3.3.1 "Access Management"). After the
policy is successfully added, it will be listed on the [Access Management] page, as shown below:

SANGFOR IAM v4.1 User Manual
494
Step 5. As displayed in the above two figures, the priority of the policies are corresponding to the role
level of its creator. As the school level role is higher than department level role, the policy Deny
Game in Schooltime created by the administrator Test1 has higher priority than the policy Deny
QQ in Schooltime created by Test2.
In this case, the administrator test2 can only view the access management policy created by the
administrator test1, as the <Commit> button is disabled, as shown in the following figure:
Besides, for the administrators of the same role level, if their administrative scopes are different, they
cannot edit each other's access management policies. For example, suppose both the test2 and test3
administrators belong to the department level role, and the administrative scope of test2 is Computer
Department, while that of test3 is Management Department. In this case, these two administrators cannot
SANGFOR IAM v4.1 User Manual
495
modify each other's policies; they can only view the policies.
1. The privilege levels of administrators depend on their administrator roles. The upper the role ranks
on [Role Management], the higher privilege it has.
2. The administrator of higher role level can set whether to allow administrators of lower role level
to view its policies and whether to allow the administrator of the same role to view or edit its
policies.
3. By default, the administrator of lower role level cannot modify the access management policies
created by administrators of higher role level.
4. Even if the administrator A checks the [Allow to edit] option on the [Advanced] tab when creating
access management policy, the administrator B who belong to the same role level cannot edit the
policy unless its administrative scope is the same as or covers that of administrator A.
5. Even if the administrator A checks the [Allow to edit] option on the [Advanced] tab when creating
access management policy, the administrator C who belong to a higher role level cannot edit the
policy unless its administrative scope is the same as or covers that of administrator A.
6. The priority of an access management policy has much to do with the role level of its creator. The
higher the role of the administrator is, the higher priority its policy takes. For the access management
policies created by administrators of the same role, you can adjust their display sequence. For the
matching process among policies, see section 3.3.1.3 "Match Policies".
7. After an administrator is deleted, the user groups and users created by this administrator remain
unchanged and the corresponding access management policies will keep the same policy level, the
corresponding creator will change to admin.
8. The “Administrator” role is a default role that has full privileges. It cannot be deleted. Only the
administrators who belong to the “Administrator” role can create roles and administrator accounts.
9. Before you delete an administrator role, you need to delete the administrators who belong to this
role and the access management policies corresponding to this role.
3.9.3 System Time
The [System Time] page is used to set the system time of the SANGFOR IAM device. You can modify the
time on this page by yourself or have the time synchronized with the time server.

SANGFOR IAM v4.1 User Manual
496
The [Date/Time Settings] section displays the current system time and time. You can modify the system
time manually, or you can also click <Get Local Time> to keep the system time of the device same as that
of the computer logging into the console or click <Get System Time> to refresh the time in real time.
In addition, you can have the system time of the device synchronized with the time server. Under the [Time
Zone Settings] section, select the time zone that the device locates, check the [Auto Sync with Internet
Time Server] option and set the Internet time server. The IAM device will then automatically synchronize
the system time with this time server.
3.9.4 Auto Update
The [Auto Update] is used to manage the automatic update service of gateway patches, internal libraries
(virus library, URL library, intelligent identification URL library, application identification library and
ingress rule library).
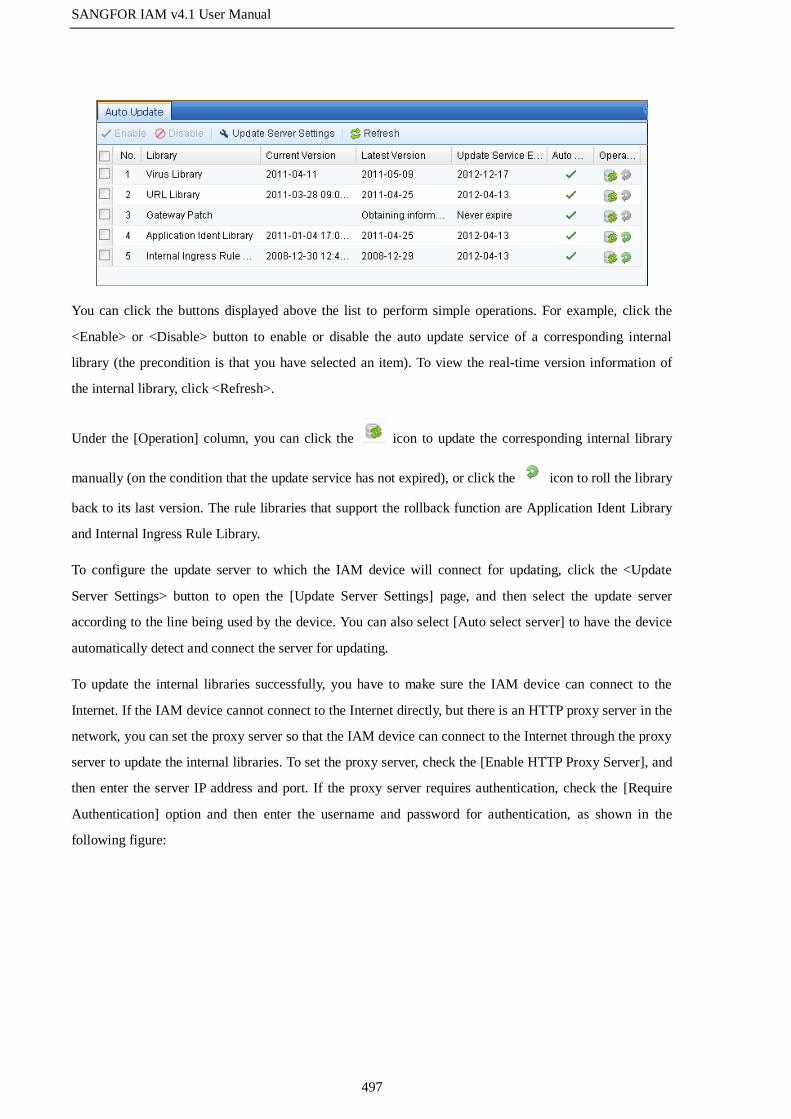
SANGFOR IAM v4.1 User Manual
497
You can click the buttons displayed above the list to perform simple operations. For example, click the
<Enable> or <Disable> button to enable or disable the auto update service of a corresponding internal
library (the precondition is that you have selected an item). To view the real-time version information of
the internal library, click <Refresh>.
Under the [Operation] column, you can click the icon to update the corresponding internal library
manually (on the condition that the update service has not expired), or click the icon to roll the library
back to its last version. The rule libraries that support the rollback function are Application Ident Library
and Internal Ingress Rule Library.
To configure the update server to which the IAM device will connect for updating, click the <Update
Server Settings> button to open the [Update Server Settings] page, and then select the update server
according to the line being used by the device. You can also select [Auto select server] to have the device
automatically detect and connect the server for updating.
To update the internal libraries successfully, you have to make sure the IAM device can connect to the
Internet. If the IAM device cannot connect to the Internet directly, but there is an HTTP proxy server in the
network, you can set the proxy server so that the IAM device can connect to the Internet through the proxy
server to update the internal libraries. To set the proxy server, check the [Enable HTTP Proxy Server], and
then enter the server IP address and port. If the proxy server requires authentication, check the [Require
Authentication] option and then enter the username and password for authentication, as shown in the
following figure:

SANGFOR IAM v4.1 User Manual
498
3.9.5 Alarm Options
The [Alarm Options] page is used to set the email alarm to notify the administrator when the IAM device
detects attacks, viruses, file disclosure, email delayed for audit, risk behavior, insufficient remaining disk
space or the flow exceeding threshold.

SANGFOR IAM v4.1 User Manual
499
The [Enable Event Alarm] option is a master switch of alarm function. You can check it to enable the event
alarm function.
The [Alarm-Triggering Events] page displays the events that will trigger the alarm functions. These alarm
events include [Attack Alarm], [Antivirus Alarm], [Outgoing Info Alarm], [Email Audit Alarm], [Risk
Ident Alarm], [Disk Space Alarm] and [Flow Alarm]. You can select one or more of them according to your
needs.
For the [Flow Alarm], you need to set the flow thresholds after enabling this function. When one of these
thresholds is exceeded, the flow alarm is triggered. The settings include the time duration and flow
threshold of uplink flow, downlink flow and total flow. If you set the duration and flow threshold to 5 and
100 respectively, it means flow alarm will be triggered when the corresponding flow exceeds 100 Kbps in
5 consecutive minutes. If the options are not checked, or either duration or flow threshold is set to 0, it
means no flow alarm will be triggered. When finishing setting, click <OK> to save, as shown below:

SANGFOR IAM v4.1 User Manual
500
The [Alarm Email] page is used to set the mail server that will send alarm email when any of the alarm
events is triggered, and corresponding sender and receiver addresses.
The fields displayed on the above page are respectively described in the following table.

SANGFOR IAM v4.1 User Manual
501
Table 64 Alarm Email Settings
Field Description
Email Title Define the subject of the alarm email. You can enter any information easy to
recognize, but do NOT set any special character.
Sending Interval Specify the interval at which the alarm email will be sent.
Sender Address Set the email address from which the alarm email will be sent.
Receiver Address Set the email address to which the alarm email will be sent when any of the
alarm events is triggered.
SMTP Mail Server Specify the address of the SMTP server that will be used for sending the
alarm email. You can enter an IP address or a domain name.
If the SMTP server requires authentication, check the [Require
Authentication] option, and then enter the username and password.
After setting the above fields, you can click <Send Testing Email> to test if the email could be sent
successfully. If yes, click <Commit> to save and apply the settings.
3.9.6 Global Excluded Address
When the IP address of a LAN user or a destination server is specified in the excluded address list on the
[Global Excluded Address] page, the access request initiated from the LAN user or destined for the
destination server will be not monitored nor controlled, that is, the user can successfully connect to the
Internet and the destination server can be accessed. You can set the addresses to be excluded on this page.
It supports IP address and domain name.
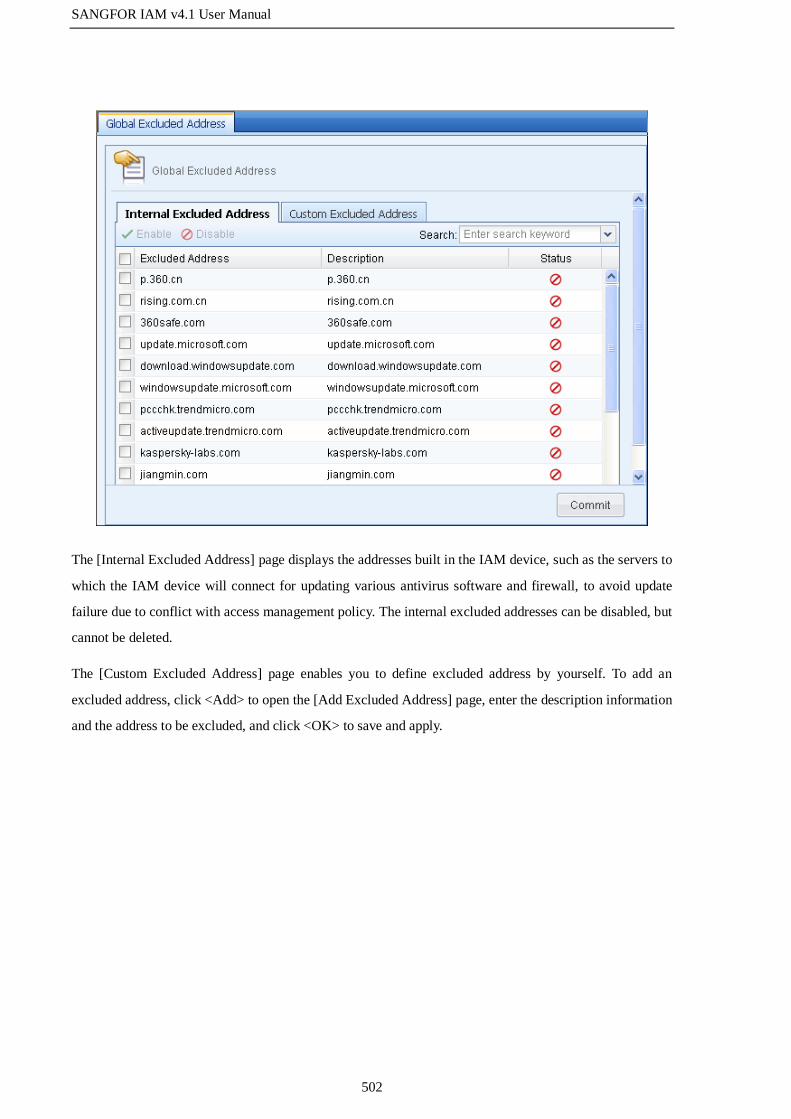
SANGFOR IAM v4.1 User Manual
502
The [Internal Excluded Address] page displays the addresses built in the IAM device, such as the servers to
which the IAM device will connect for updating various antivirus software and firewall, to avoid update
failure due to conflict with access management policy. The internal excluded addresses can be disabled, but
cannot be deleted.
The [Custom Excluded Address] page enables you to define excluded address by yourself. To add an
excluded address, click <Add> to open the [Add Excluded Address] page, enter the description information
and the address to be excluded, and click <OK> to save and apply.

SANGFOR IAM v4.1 User Manual
503
3.9.7 Backup/Restore
The [Backup/Restore] page enables you to download and save the current configuration of the IAM device
or restore the configuration from a backup file.

SANGFOR IAM v4.1 User Manual
504
Under the [Backup Configuration] section, you can backup the current configuration of the IAM device.
Click the <Backup Configuration> button to download and save the configuration.
Under the [Restore Configuration] section, you can restore the configuration for a backup file. There are
two ways to restore configuration:
One is to restore the configuration from the file automatically backed up. The IAM device will
automatically backup the configuration every morning. By default, it saves the backup
configuration files of the last 7 days. To restore the configuration, select one of the automatic
backup file and click <Restore>.
The other is to restore configuration from a local file. To restore the configuration, click <Select
File> to open the backup file and then click <Restore> to restore the configuration.
3.9.8 Custom Prompt Page
The [Custom Prompt Page] enables you to customize the prompt pages to which the IAM device will be
redirected. The prompt pages that you can customize include: [Authentication Result], [Access Denied],
[Virus Detected], [Duration Timeout], [Ingress Client], [Change Password], [Bulletin Board], [Web
Authentication], [Duration Reminder], [Flow Reminder], [Daily Flow Quota], [Monthly Flow Quota],
[User Lockout], [SSO Failure], [User Terms], [Anti-Proxy Reminder] and [Anti-Proxy Control].

SANGFOR IAM v4.1 User Manual
505
The fields displayed on the above page are respectively described in the following table.
Table 65 Custom Prompt Page Settings
Field Description
Enable Prompt Page It is recommended to enable this option. If a prompt page is disabled, it
will not be displayed. Please note that some prompt pages cannot be
disabled.
Edit Page To edit the prompt page. You can change the source code of the page to
change the display of the page. It is recommended to change the text and
image only. Other changes may result in the loss of some links on the
page.
Upload
Image/Javascript File
To upload the image to be displayed on the prompt page. It only supports
the .jpg and .gif formats. To upload an object, click <Add File> to locate
the file and then change the image file name and Javascript name in the
editing box.
After you edit a prompt page in the editing box, you can click <Preview> to preview the current prompt
page. Then you can click <Save> to save the page, click <Restore Defaults> to restore the prompt page to
the default settings or click <Restore Previous> to restore the prompt page to the latest customized one.

SANGFOR IAM v4.1 User Manual
506
3.9.9 Data Center Options
The [Data Center Options] page enables you to set the IP address, synchronization account,
synchronization password and web service port of External Data Center, as well as whether to enable the
[Auto Delete] function to delete the audit logs. The [Data Center Options] page is as shown below:
On the [External Data Center Option] page, you can click the icon under the [Operation] column to
test the connectivity between the IAM device and data center server. If you click the icon, the IAM
device will send a SYNCHRONIZE command immediately to the data center server to synchronize the
logs.
To enter the External Data Center, click the [Enter External Data Center] link under the [Operation]
column to open the Web login page of External Data Center as shown below. Then enter the username and
password and click <Login>. By default, the username and password are admin.
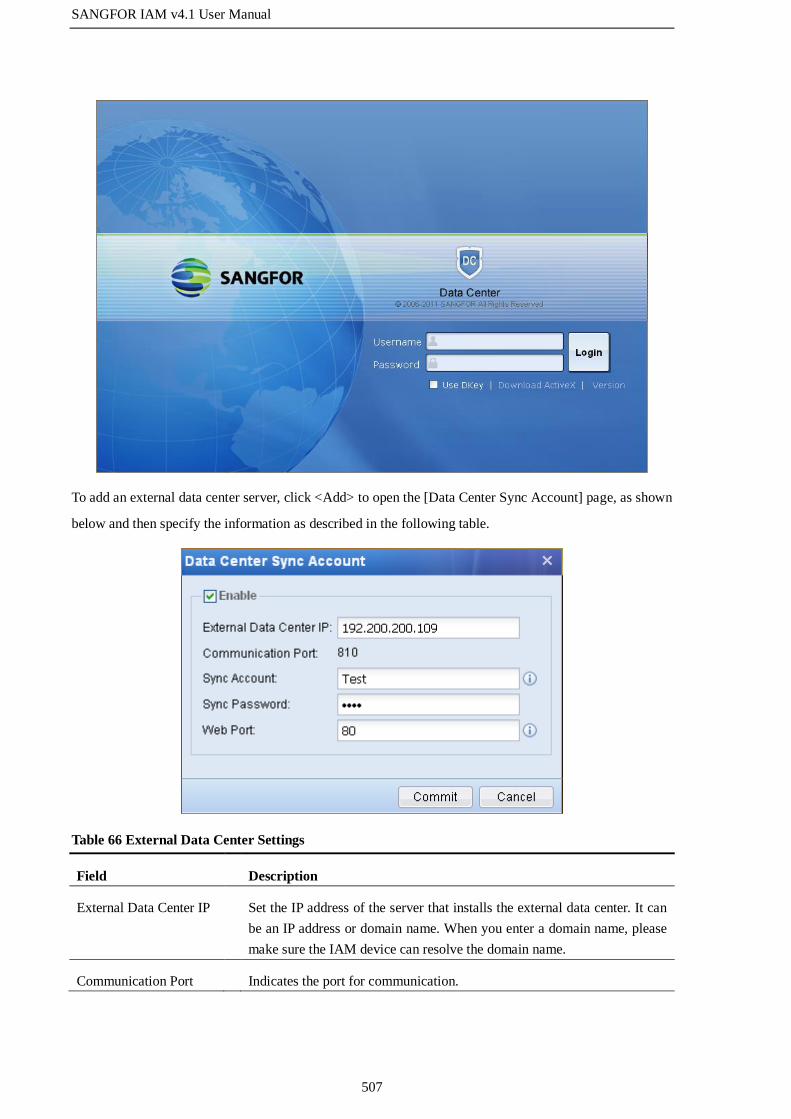
SANGFOR IAM v4.1 User Manual
507
To add an external data center server, click <Add> to open the [Data Center Sync Account] page, as shown
below and then specify the information as described in the following table.
Table 66 External Data Center Settings
Field Description
External Data Center IP Set the IP address of the server that installs the external data center. It can
be an IP address or domain name. When you enter a domain name, please
make sure the IAM device can resolve the domain name.
Communication Port Indicates the port for communication.

SANGFOR IAM v4.1 User Manual
508
Sync Account Set the account name of external data center for synchronizing.
Sync Password Set the account password of external data center for synchronizing.
Web Port Specify the port at which the external data center provides web service.
On the [Internal Data Center Option] page, you can check the [Auto Delete] option to enable the automatic
deletion function of audit logs (it is recommended to enable this option). Then you can set one of the
following two options:
[Limit the number of days that audit logs will be saved]: It indicates the number of days that the
audit logs will be saved. You need to specify the maximum saving period. After this period, the
corresponding audit logs will be deleted automatically.
[Limit the disk space occupied by audit logs]: It indicates the disk space allowed to be occupied
by audit logs. You need to specify the maximum disk usage. When this value is reached, the logs
of the first day will be deleted automatically.
The [Optimize Audit Performance] option enables IAM device to record every log when there are a larger
number of logs. This option improves the audit performance; however, you cannot enter the internal data
center when this option is checked. Therefore, it is recommended to install the External Data Center.
After finishing setting, click <OK> to save your settings.
3.9.10 Advanced
The [Advanced] page enables you to set some other system configurations, including [Web UI Options],
[Log Record Options], [Proxy Server Settings], [Remote Maintenance] and [Email Audit Options].

SANGFOR IAM v4.1 User Manual
509
3.9.10.1 Web UI Options
The [Web UI Options] page, as shown below, enables you to set options related to Web UI.
The fields displayed on the [Web UI Options] page are respectively described in the following table.
Table 67 Web UI Options
Field Description
Default Encoding To specify the encoding type that will be adopted by default when the
encoding of data is unrecognized. It has two options: GBK and BIG5.
Global Flow Speed
Unit
To select the unit of flow monitored by the IAM device. Click the drop-down
list to select the unit.
HTTPS Login Port To set the login port of console. The default port is TCP 443.
Idle Timeout To specify the period of time (minutes) required for the web console to time
out due to inactivity. If you do not perform any operation during this period,
the system will automatically disconnect and you need to login again.
Issue Console SSL
Cert. To
To specify the IP address or domain name to which the SSL certificate of the
web console will be issued.
You can click the [Download Certificate] link to download the SSL
certificate of the web console and then install it on your computer. By doing
this, you can remove the SSL certificate alert dialog which may appear
during logging into the Web console.

SANGFOR IAM v4.1 User Manual
510
3.9.10.2 Log Record Options
The [Log Record Options] page enables you to set the options related to Web audit.
The options displayed on the [Log Record Options] page are respectively described in the following table.
Table 68 Log Record Options
Field Description
Optimize access logs It only records the access to text webpages and record only once if a
same domain is visited again in a short period.
Only record the access to text
types (text/html)
It only records the access to text webpages. If this option is
unchecked, the access to any website will be recorded.
Only record the access to
root URLs of websites
It only records the access to root URLs of webpages. If detailed logs
are needed, please uncheck this option.
Record the access to any
webpage
It records every element of the requested webpage. This option will
cause massive logs, and thus typically, it is NOT recommended to
check this option.
The [NOT record the access to files of the following types] option
below is used to excluded some types of files so that the access to
these files will not be recorded. Enter the file extensions in the text
box and use comma to separate them.

SANGFOR IAM v4.1 User Manual
511
Not record the access to
URLs with the following
prefix
When this option is checked and set, the access to the URLs with any
of the prefixes specified in the text box will NOT be logged. It
supports fuzzy matching, but does not support the wildcard character.
Not record the access to
URLs with the following
suffix
When this option is checked and set, the access to the URLs with any
of the suffixes specified in the text box will NOT be logged. It
supports fuzzy matching, but does not support the wildcard character.
Block website access via IP
address unless the IP is
included in URL library
When this option is checked, the access to websites in the form of IP
address will be denied unless the IP address is included in the URL
library.
3.9.10.3 Proxy Server Settings
When users are connecting to the Internet through a proxy server, all the requests from users are forwarded
to the proxy server. However, as the firewall module determines whether to deny a connection by detecting
the destination address and port, many functions of the firewall module will be disabled. To make sure the
firewall module works as usual, the actual destination address and port of the requests forwarded to proxy
server must be identified by the IAM device so that the address and port can be used by the firewall
module.
For example, suppose the network environment is as shown below:
You have to make sure the data packets go through the IAM device before they are forwarded to the proxy
server, that is, the proxy server must be placed at the WAN interface of the IAM device.
By default, the IAM device will detect and monitor all proxy data. If you want it to delete the data of a
certain proxy server, set the IP address or IP range of the proxy server in the text box on the [Proxy Server
Settings] page, as shown below:

SANGFOR IAM v4.1 User Manual
512
When the proxy server is specified here, the IAM device will only detect whether the packets to be
forwarded to this proxy server are proxied and conduct Internet access control over these packets. If the list
is null, the IAM device will identify all the data packets, which will greatly influence the identification
efficiency. Therefore, it is recommended to specify the IP address of proxy server in the text box.
3.9.10.4 Remote Maintenance
The [Remote Maintenance] page enables you to set whether to allow remote login to the IAM device
through WAN interface, and whether to enable automatic report functions of unidentified URL,
unidentified application and system error.
Table 69 Remote Maintenance Settings

SANGFOR IAM v4.1 User Manual
513
Field Description
Enable Remote
Maintenance
Indicates whether to allow remote login to the IAM device through
WAN interface. When this option is checked, the WAN interface of the
IAM device will automatically allow the ping function.
Enable auto report of
unidentified URL
When this options is checked, the URLs that are unidentified by
internal URL library will be automatically reported, which helps
enrich the internal URL library and improve the service further. This
function will not disclose the information of your company.
Enable auto report of
system error
When this options is checked, the system error messages will be
automatically reported, which helps improve the service further. The
function will not disclose the information of your company.
Enable auto report of
unidentified application
When this options is checked, the applications unidentified will be
automatically reported, which helps improve the service further. The
function will not disclose the information of your company.
3.9.10.5 Email Audit Options
The [Email Audit Options] page enables you to set options related to email audit.
Table 70 Email Audit Options
Field Description
Timeout (minutes) Set the timeout for auditing delayed emails. The default value is 1 minute.

SANGFOR IAM v4.1 User Manual
514
After the timeout period,
email still not audited
will be
Specify the processing mode when the delayed emails are still not audited
after the timeout period set above. It has two options: [Sent] and [Deleted
from the disk without being sent].
Max Sending Attempts Set the number of attempts for sending the delayed emails after they are
audited. When the threshold set here is reached, the emails still not sent
out will be deleted.
3.10 Diagnostics
3.10.1 System Logs
On the [System Logs] page, you can view the running status logs of each modules of the IAM device,
through which you will understand whether the corresponding module is running smoothly. The page is as
shown below:
To select the log types to be displayed on the [System Logs] page, click the <Log Options> to open the
[Log Options] page, as shown below:

SANGFOR IAM v4.1 User Manual
515
After finishing the settings, click <Commit> to save and apply them. Then you will find only the selected
types of logs are displayed on the [System Logs] page.
At the upper right corner of the page, you can select a specific date to view the system logs of the
corresponding date.
3.10.2 Capture Packets
The [Capture Packets] page is used to capture the packets that go through the IAM device to quickly locate
the problems. It functions as a troubleshooting assistant tool. To configure the packet capture options, click
<Capture Options> to open the [Capture Options] page, as shown below:

SANGFOR IAM v4.1 User Manual
516
Table 71 Capture Options
Field Description
Captured Packets Specify the number of packets to be captured.
Simple (capture
unknown flow)
When selecting this option, you can set the conditions such as LAN address and
port, WAN address and port and packet type and then capture the unknown
application packets that match your conditions.
Note: This option only captures the unknown application packets that cannot be
identified by the IAM device. If you want to capture all the packets of specified
conditions, please select the [Advanced (TCPDUMP)] option below.
Advanced
(TCPDUMP)
When selecting this option, you can specify the network interface and then
capture the packets that go through it. In the text box of [Filter Expression], you
can set the conditions for capturing packets (it adopts the standard TCPDUMP
format under Linux operating system).
The [Simple (capture unknown flow)] and [Advanced (TCPDUMP)] options are
alternative.
After finishing the above settings, click <Start Capture> to start capturing packets. On the [Capture Packets]
page, the capture status displays "Capture program is running", as shown below:
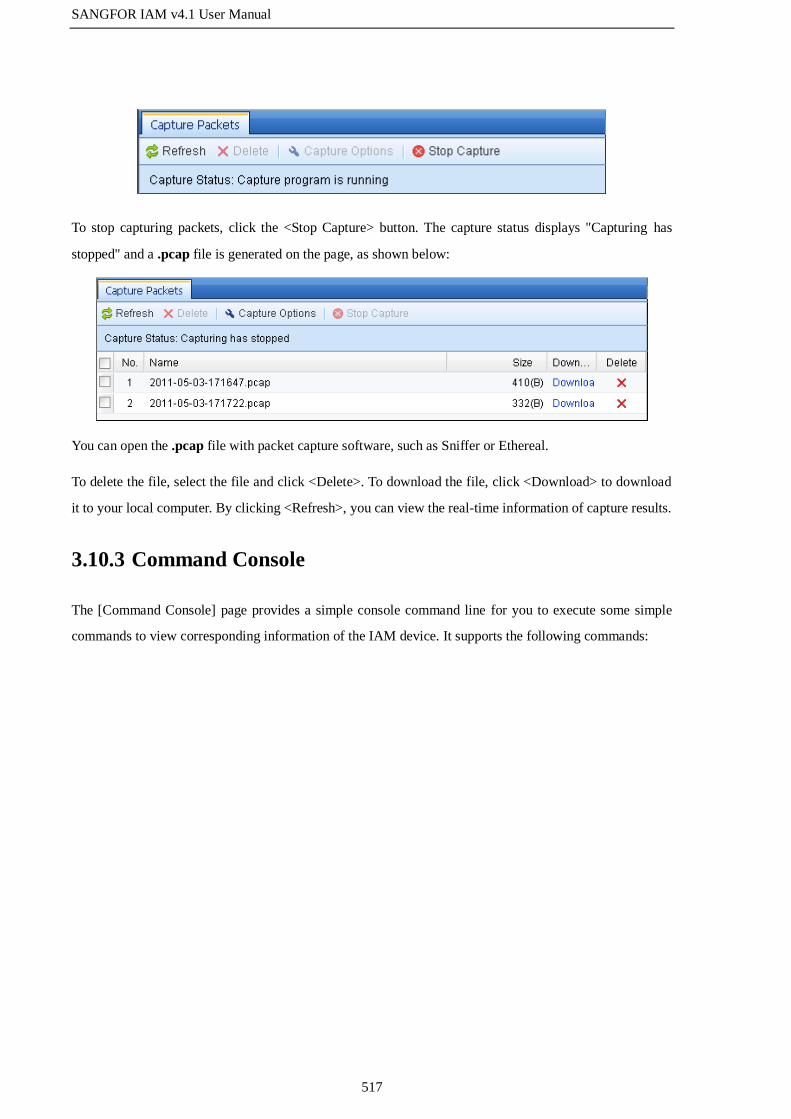
SANGFOR IAM v4.1 User Manual
517
To stop capturing packets, click the <Stop Capture> button. The capture status displays "Capturing has
stopped" and a .pcap file is generated on the page, as shown below:
You can open the .pcap file with packet capture software, such as Sniffer or Ethereal.
To delete the file, select the file and click <Delete>. To download the file, click <Download> to download
it to your local computer. By clicking <Refresh>, you can view the real-time information of capture results.
3.10.3 Command Console
The [Command Console] page provides a simple console command line for you to execute some simple
commands to view corresponding information of the IAM device. It supports the following commands:

SANGFOR IAM v4.1 User Manual
518
Table 72 Command Description
Command Function
arp View ARP table.
mii-tool List connection status of network interface.
ifconfig View information of network interface.
ping Test connectivity of host.
telnet Test connectivity of port.
ethtool View information of network adapter.
route Display routing table.
traceroute Track packet forwarding path.
To execute a command, type the command on the command line and then press the Enter key on your
keyboard, as shown below:
3.10.4 Bypass/Packet Drop List
The [Bypass/ Packet Drop List] page enables you to find out why a packet has been denied and which

SANGFOR IAM v4.1 User Manual
519
module has denied it when it goes through the IAM device. This helps quickly locate the error position and
test whether some rules take effect. To set the conditions, click <Filter Criteria> to open the [Filter Criteria]
page. You can then set the conditions, including IP address, protocol type and port, as shown below:
The fields and buttons on the [Filter Criteria] page are respectively described in the following table.
Table 73 Bypass/Packet Drop List Settings
Field Description
Specified IP Specify the IP address whose packet drop list is to be displayed. By default,
it includes all subnets.
Protocol Type Select the protocol type. Only the denied packets that match the specified
protocol type and port will be listed. It has five options: [ALL], [TCP],
[UDP], [ICMP] and [Others].
Protocol Number Enter the protocol number. This option is available only when the [Protocol
Type] above is set to [Others]. Enter an integer between 0 and 255.
Port Specify the port. This option is available only when the [Protocol Type]
above is not set to [Others]. You can select [ALL] or specify a port number.
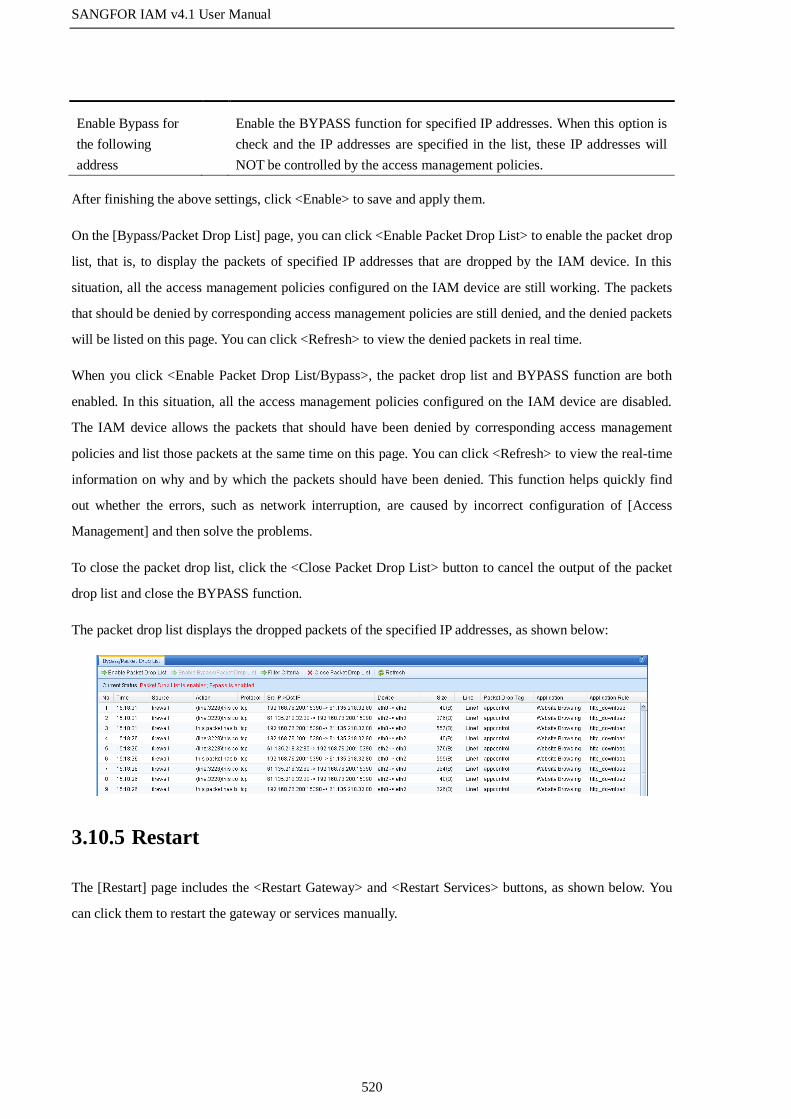
SANGFOR IAM v4.1 User Manual
520
Enable Bypass for
the following
address
Enable the BYPASS function for specified IP addresses. When this option is
check and the IP addresses are specified in the list, these IP addresses will
NOT be controlled by the access management policies.
After finishing the above settings, click <Enable> to save and apply them.
On the [Bypass/Packet Drop List] page, you can click <Enable Packet Drop List> to enable the packet drop
list, that is, to display the packets of specified IP addresses that are dropped by the IAM device. In this
situation, all the access management policies configured on the IAM device are still working. The packets
that should be denied by corresponding access management policies are still denied, and the denied packets
will be listed on this page. You can click <Refresh> to view the denied packets in real time.
When you click <Enable Packet Drop List/Bypass>, the packet drop list and BYPASS function are both
enabled. In this situation, all the access management policies configured on the IAM device are disabled.
The IAM device allows the packets that should have been denied by corresponding access management
policies and list those packets at the same time on this page. You can click <Refresh> to view the real-time
information on why and by which the packets should have been denied. This function helps quickly find
out whether the errors, such as network interruption, are caused by incorrect configuration of [Access
Management] and then solve the problems.
To close the packet drop list, click the <Close Packet Drop List> button to cancel the output of the packet
drop list and close the BYPASS function.
The packet drop list displays the dropped packets of the specified IP addresses, as shown below:
3.10.5 Restart
The [Restart] page includes the <Restart Gateway> and <Restart Services> buttons, as shown below. You
can click them to restart the gateway or services manually.
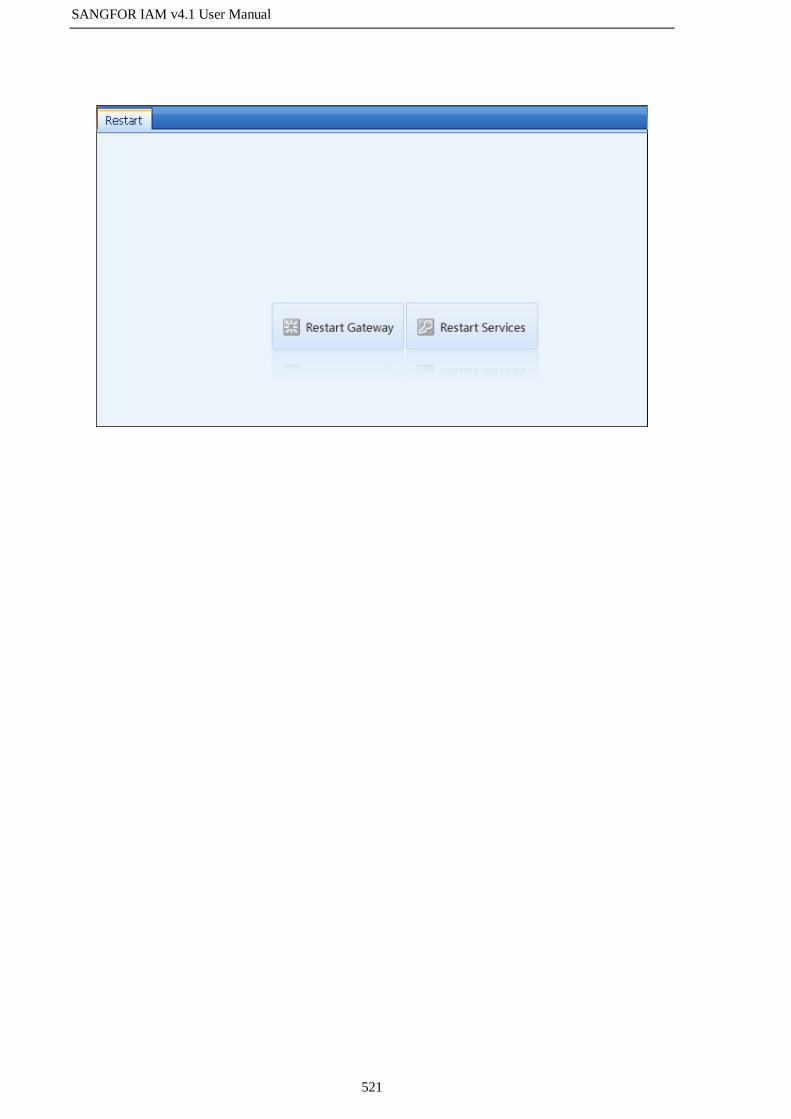
SANGFOR IAM v4.1 User Manual
521

SANGFOR IAM v4.1 User Manual
522
Appendix A: Gateway Update Client
The gateway update and restoration system can be used to update the kernel version of SANGFOR IAM
gateway device and backup configuration. When vital errors occur in the system, the IAM gateway device
can be restored to the factory default configuration via the gateway restoration system. In addition, the
gateway restoration system can be used to inspect the running state of the network interface and
configuration of the routing, as well as to modify the work mode of the network interface, etc.
On the gateway update client, as shown above, there are the following menus: [System], [Update],
[Backup], [ManagePackage], [Tools], [Updatehistory] and [Help]. Their functions will be described
respectively in the following parts.
[System]: It includes the five functions: [Connect], [Search], [Change Password], [Disconnect] and [Quit].

SANGFOR IAM v4.1 User Manual
523
[Connect]: To connect to the gateway device. Just type the IP address of the IAM device to be connected,
and then the password to log in.
The default password is dlanrecover. The login page is as shown below:
After you login successfully, the corresponding login success message will be displayed on the interface of
Gateway Update Client, as shown below:
[Search]: To automatically search the local area network for the IAM gateway devices (as long as they are
reachable by layer 2 broadcast and not by way of routing device), even if they are located in different
subnets (on the condition that no router or layer 3 switch is in the way). The search results are as shown
below:
[Change Password]: To change to the login password of Gateway Update Client.
[Disconnect]: To cut off the connection with the SANGFOR IAM gateway device. If there is no operation
performed in a certain time period, the Gateway Update Client will also automatically disconnect from it.

SANGFOR IAM v4.1 User Manual
524
[Update]: It includes the three functions: [Update Firmware], [Restore Default Configuration] and
[Restore Default Network], as shown below:
[Update Firmware] and [Restore Default Configuration]: Both are available only after you connect to the
IAM hardware gateway. [Update Firmware] is used for updating the kernel Firmware of IAM device and
[Restore Default Configuration] for restoring the IAM device to the default configuration. These
operations will update the key document of the device, or will change serial number. Please DO NOT
perform this operation by yourself. If update is needed, please contact our technical engineer and follow
the instructions given.
[Restore Default Network]: This function is available only when the Gateway Update Client is
disconnected from the SANGFOR IAM gateway device. It is used for restoring the network configuration
of the device to defaults. This operation is implemented by sending commands through broadcast package,
and will apply to all the SANGFOR gateway devices deployed in the local area network (LAN). This
operation may result in hazardous outcome, please DO NOT perform it by yourself.
1. The IAM device should be upgraded from lower version to higher one; it does not allow
version-skipping upgrade.
2. Upgrade may bring about risk. Inappropriate upgrade operation may damage the device. Please
DO NOT upgrade by yourself. If upgrade is needed, please contact our technical engineer for
instructions.
[Backup]: It includes the two functions: [Backup Configuration] and [Restore Backup], as shown below:
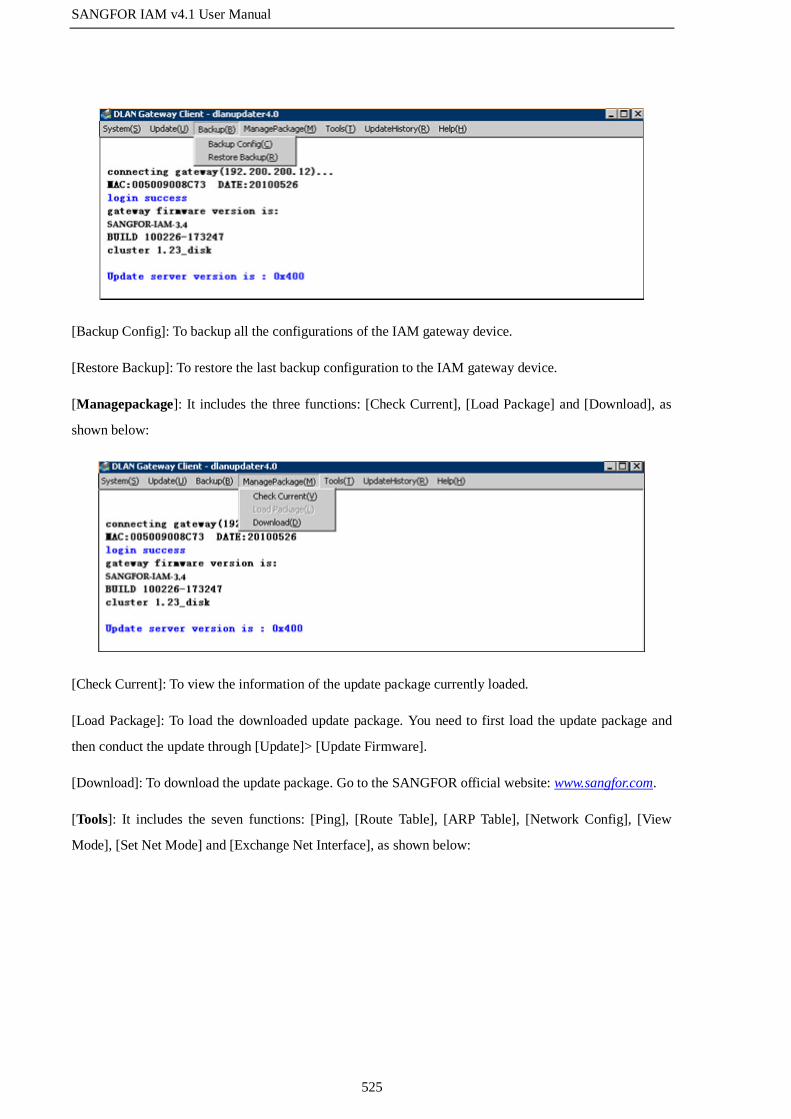
SANGFOR IAM v4.1 User Manual
525
[Backup Config]: To backup all the configurations of the IAM gateway device.
[Restore Backup]: To restore the last backup configuration to the IAM gateway device.
[Managepackage]: It includes the three functions: [Check Current], [Load Package] and [Download], as
shown below:
[Check Current]: To view the information of the update package currently loaded.
[Load Package]: To load the downloaded update package. You need to first load the update package and
then conduct the update through [Update]> [Update Firmware].
[Download]: To download the update package. Go to the SANGFOR official website: www.sangfor.com.
[Tools]: It includes the seven functions: [Ping], [Route Table], [ARP Table], [Network Config], [View
Mode], [Set Net Mode] and [Exchange Net Interface], as shown below:

SANGFOR IAM v4.1 User Manual
526
[Ping]: To ping the device to check if the device is connected to Internet. To perform the operation, you
need first log into the device via [System] > [Connect].
[Route table]: To view the route table of the IAM gateway device.
[Arp table]: To view the ARP table of the IAM gateway device.
[Network config]: To view the network configuration of the IAM gateway device, including the
configuration of interface IP addresses.
[View mode]: To view the mode the current network interface card (NIC) is working in.
[Set net mode]: To configure manually the working mode of NIC for the IAM gateway device, if the
setting is not coherent to the actual NIC mode.
[Update History]: It includes the three functions: [View Gateway History], [View Local Records] and
[Delete Local Records].
[View Gateway History]: To view the update logs of the IAM gateway device.
[View Local Records]: To view the update logs of the local Gateway Update Client.
[Delete Local Records]: To clear the update logs of the local Gateway Update Client.

SANGFOR IAM v4.1 User Manual
527
Procedures for Updating
Step 1. Download the update package to the local computer.
Step 2. Start the Gateway Update Client and then click [ManagePackage] > [Load Package] to load the
update package.
Step 3. Log in to the device through [System] > [Connect].
Step 4. Click [Update] > [Update Firmware].
If update is successful, the corresponding message will be displayed on the interface of the
Gateway Update Client and the IAM gateway device will reboot.
Step 5. If you want to restore the default configuration, log into the device and click [Update] > [Restore
Default Config].
If you want to update the Firmware of the IAM hardware device, please contact our technical
engineer and follow the instructions given.

SANGFOR IAM v4.1 User Manual
528
Appendix B: Acronyms and Abbreviations
AC Alternating Current
AD Active Directory
ARP Address Resolution Protocol
BM Bandwidth Management
CA Certificate Authority
CAPWAP Control And Provisioning Of Wireless Access Points
CPU Central Processing Unit
CN Common Name
DHCP Dynamic Host Configuration Protocol
DNAT Destination Network Address Translation
DNS Domain Name Server
DoS Denial of Service Attack
DRP Dynamic Routing Protocol
HA High Availability
HTTP Hyper Test Transfer Protocol
HTTPS Secure Hyper Text Transfer Protocol
HSRP Hot Standby Router Protocol
IAM Internet Access Management
ICMP Internet Control Message Protocol
IM Instant Message
IP Internet Protocol
IPS Intrusion Prevention System
ISP Internet Service Provider
LAN Local Area Network
LDAP Lightweight Directory Access Protocol
LWAPP Lightweight Access Point Protocol
SANGFOR IAM v4.1 User Manual
529
L2TP Layer 2 Tunneling Protocol
MTU Maximum Transmission Unit
MPLS Multiprotocol Label Switching
NIC Network Interface Card
OS Operating System
OSI Open System Interconnect Reference Model
OU Organization Unit
POP3 Post Office Protocol 3
PPPoE Point-to-Point Protocol over Ethernet
SC Secure Center
SMTP Simple Message Transfer Protocol
SNAT Source Network Address Translation
SNMP Simple Network Management Protocol
SSL Secure Sockets Layer
SSO Single Sign-On
TCP Transmission Control Protocol
UDP User Datagram Protocol
UI User Interface
URL Uniform Resource Locator
VID VLAN ID
VLAN Virtual Local Area Network
VPN Virtual Private Network
VRRP Virtual Router Redundancy Protocol
WAN Wide Area Network
WLTP Wire-Label Transport Protocol