Hybrid Animation - National Academic Digital Library of Ethiopia
298
-
Upload
khangminh22 -
Category
Documents
-
view
1 -
download
0
Transcript of Hybrid Animation - National Academic Digital Library of Ethiopia

HybridAnimation

TinaO’Hailey brings her realwork experience fromDisney andElectronicArts tomake this a solid reference for theanimatororproducerdoinghybridanimationforthefirst timeoraprodouble-checkingthattheyhaveaccountedforeverything in the pipeline. The book combines the best how-to specifics with the creative theory behind the bestanimationtoday.Youcanenvisionthecreativeandaestheticsacrificesthatareinevitablewithouttheknowledgefromthedetailedindustryexamplesinthisbook.Excellentbreakdownofthechallengesofintegrating2Dand3Danimationsoitallworkstogetherintheend.
—CraigCaldwell,Ph.D.USTARSeniorResearchProfessor,DigitalMediaClusterArtsDirector,EngineeringArtsandEntertainmentFilm&MediaArtsDept.&SchoolofComputing,UniversityofUtah
Tina’sexperienceandconfident,professionalhandiswellrepresentedinthisbook.It’shardtofindatextthatreadslikefriendlyandinformedadviceratherthanamaptoaprogrammer’slabyrinth.Thisisagreatmixofpractical,artfulandanecdotalevents thatadduptoa trulyvaluablebook.Even ifyou’reonlyvaguely interested increatingorproducinghybridanimation,thisbookissuretostiryourenthusiasm.
—RobBekuhrs,AnimationDirector,SuperGeniusStudio
Openingwiththequestionofwhyonewouldusehybridanimationtechniques,thisbookaffordsthereaderrareinsightinto the creative and technical processes of merging traditional drawn and CG animation. With Tina’s hands-onexperience working and teaching in animation, these concepts are now presented as a series of practical exercises,supported by examples from world class animation studios where such techniques have been used. The film studioexamplesaloneareavisualtreatundocumentedelsewhere.Tina’sbookwillsurelybecomeaclassicanimationreferenceformanyyearstocome.
—EricGuaglione,SupervisingDirectorofRovioEntertainment
Thefirsteditionkeptitseyeontheball,emphasizingthenotionthatnomatterthecombinationoftoolsortechniquesanimationisalwaysabouttheperformance!Thisneweditionexpandsonthattraditionbybringingupdatedandrefinedexamplesanddiscussiontobear.Amust-readforanyoneinvolvedwithhybridanimation.
—MartyAltman,Professor,SavannahCollegeofArtandDesign(SCAD)

HybridAnimationIntegrating2Dand3DAssets
SecondEdition
TINAO’HAILEY

Firstpublished2015
byFocalPress
70BlanchardRoad,Suite402,Burlington,MA01803
andbyFocalPress
2ParkSquare,MiltonPark,Abingdon,OxonOX144RN
FocalPressisanimprintoftheTaylor&FrancisGroup,aninformabusiness
©2015Taylor&Francis
TherightofTinaO’Haileytobeidentifiedasauthorofthisworkhasbeenassertedbyherinaccordancewithsections77
and78oftheCopyright,DesignsandPatentsAct1988.
Allrightsreserved.Nopartofthisbookmaybereprintedorreproducedorutilisedinanyformorbyanyelectronic,
mechanical,orothermeans,nowknownorhereafterinvented,includingphotocopyingandrecording,orinanyinformation
storageorretrievalsystem,withoutpermissioninwritingfromthepublishers.
Notices
Knowledgeandbestpracticeinthisfieldareconstantlychanging.Asnewresearchandexperiencebroadenour
understanding,changesinresearchmethods,professionalpractices,ormedicaltreatmentmaybecomenecessary.
Practitionersandresearchersmustalwaysrelyontheirownexperienceandknowledgeinevaluatingandusingany
information,methods,compounds,orexperimentsdescribedherein.Inusingsuchinformationormethodstheyshouldbe
mindfuloftheirownsafetyandthesafetyofothers,includingpartiesforwhomtheyhaveaprofessionalresponsibility.
Productorcorporatenamesmaybetrademarksorregisteredtrademarks,andareusedonlyforidentificationand
explanationwithoutintenttoinfringe.
LibraryofCongressCataloging-in-PublicationData
O’Hailey,Tina.
Hybridanimation:integrating2Dand3Dassets/TinaO’Hailey.
pagescm
Includesbibliographicalreferencesandindex.
1.Computeranimation.I.Title.
TR897.7.O422015
006.6′96—dc23
2014025648
ISBN:978-1-138-85703-2(hbk)
ISBN:978-0-415-71870-7(pbk)

ISBN:978-1-315-86788-5(ebk)
TypesetinUtopiaandUnivers
ByApexCoVantage,LLC

Professorandnon-professorfriends,amazingstudents,patientfamily;Ithankyou.…tina
ContributingStudentsandAlumni:
YossayaAisiriJenniferChandlerCandiceCieslaChrisEllisLoraineHowardIIIJessicaHuangAlstonJonesJohn-MichaelKirkconnellErikMinkinBrentMorrisDanMurdockAmandaPowellPaulTillaryJessicaToedtShaniVargoJohnT.Vu
ContributingFriendsandPeers:
MartyAltmanAlexDukaiJeffDuttonJosephGillandTroyGustafsonDeraldHutMoniraKamalMatthewMaloneyToddRednerJasonSchleifer
Extraspecialthanksto:
BrentMorrisfortechnicaleditingofeverysingletutorial.“Aweshum!^_^”ChelseyL.Cline foramazing, thoroughcheckingof the text from front tobackand

everysinglebuttonclickandmissedcommainbetween.DanielTieslingforwonderfulmodelsandrigs:ontimeandexceedingexpectations.Jason Walling and Clint Donaldson for their overwhelming dedication to JaguarMcGuireandallofitschallenges.ClaireAlmonforheramazingwork.DiannaBedellforwork,ontimeandwithasmile.
Coverimage:PaulTillary’sM.F.A.thesisfilmThunderCluckYoucanseethefilmhere:http://www.thundercluck.com/
DearReader,
Welcome to the second edition ofHybridAnimation. There are a lot of changes, somyapologiesifyouwereusingthisforatextbook;you’llhavetoupdateyourreadingassignmentpage numbers. The first edition of this book was based on a class I taught at SCAD, theSavannahCollegeofArtandDesign.I’mhappytosaythatclassisnolongerinthecatalog.Whydoesthatmakemehappy?Becausehybridanimationasaconcepthasbeenwovenintoourcompletecurriculum;theconceptsaretaughtfromdayoneandnotpigeonholedintooneelective.You’llnoteasimilarconceptthroughouttheindustry,Ihope.It’sallanimation.Itjustdoesn’tmatteranymorewhatyouareanimatingwith.However,thereisatricktocombiningmediumsandthatisultimatelywhatourjourneytogetheristodiscover.
Then the questions to ask are: what are the different ways those mediums are usuallycombined?Whattechniquesdoyouuse?Whatproblemsdoyouneedtoovercome?Whatdoyouneedtowatchoutfor?Whydoitatall?
Inthesepageswewillanswerthesequestionsandmore.Ibreakthingsdowninpatterns,repeatablepatterns.We’ll exploredifferent software solutions foreachpattern.Thenwithalittlepractice,youcanmixandmatchthetechniquesforyourownfilms.Don’tseeaspecificsoftwareinthesepages?That’sOK.I’llbetyoucanfindapatternortechniquethatmatchesyourworkflowandthen,coupledwithafewtutorialsonhowtouseyourspecificsoftware,youcancomeupwiththeanswer.Certainly,problemsolvingisourbiggestquest.
Ican’twaittogettothefun.
Warmly,…tina
Companiondatacanbefound:www.hybridanimation.comSoftwareversionsusedinthisbook:TutorialsarecreatedwithMaya2014(PC/MAC)(inmostcasestheMayafilesaresavedin
2011)

AdobeBridgeCS6AfterEffectsCS6AdobeFlashCS6AdobeMediaEncoderCS6AutodeskSmoke2013CorelPainter12Nuke7.0PencilCheckProV7.4.0PhotoshopCS6ToonBoomAnimate3ToonBoomAnimate3ProToonBoomHarmony

Contents
AbouttheAuthor
1:HybridAnimation:WhatandWhy?
2:3DCharacterLeads2DCharacter
3:2DCharacterswith3DParts(2DLeads)
4:3DCharacterswith2DParts(3DLeads)
5:EFX
6:Camera:Flat,Limited,andDeepSpace
7:CompletedWorks
8:WhatNext?
Index

AbouttheAuthor
Theauthorisamild-manneredmotheroftwowhoseeksrespiteinthemountainswithherfamily,onabluffoverlookingawoodedvalley.Hereducation includesaBFA inComputerAnimationfromRinglingSchoolofArtandDesign.(ItwascalledComputerGraphicsatthetimeandtheschoolisnowcalledRinglingCollegeofArtandDesign,butthesentimentisstillthe same.) She also holds a MSCIT degree in Object Oriented Programming from RegisUniversity.Whennotwearingflannel,jeans,andafloppyhat,shecanbefoundwanderingthehalls or teaching in the classrooms of SCAD’s campuses, both Savannah and Atlanta, andsometimesHongKong.
SheiscurrentlytheDeanofDigitalMediaattheSavannahandAtlantacampusesofSCAD.O’Haileystillconsidersherselfaprofessorwhohappens towant toscheduleclassesandseethatthe“pipeline”oflearningforthestudentsisstreamlinedandworthy.Sheenjoysbeingintheclassroomandlearningnewthingsandmakingthestudentslaughwhiletheylearn.Herhobbiesincludecaving,motorcycles,andbaking.Youcankeepupdatedwithherlatestworkat:http://coffeediem.wordpress.com/
TinaO’Hailey.PhotographbyMarkOstrander

1
HybridAnimation
WhatandWhy?
FIGURE1.12Dcharacterinteractingwitha3Dcharacter,TheIronGiant
TheIronGiant©WarnerBros.,adivisionofTimeWarnerEntertainmentCompany,L.P.AllRightsReserved
WhatisHybridAnimation?
Hybrid animation is the combination of 2D and 3D animation mediums. 2D and 3Danimationmediumscanbeused,andareused, independentlyofoneanother.Pixar’sB.O.O.:BureauofOtherworldlyOperationsorInsideOutarecompletely3Danimatedfilms.Disney’sLittleMermaid andMiyazaki’s (StudioGhibli)TheWindRises are completely 2Danimatedfilms.
Yet,eversincethefirstappearanceofa3Dglowingbaubleina2Danimatedfilm,Disney’sThe Black Cauldron, artists have been finding inventive ways to combine the animation

mediums.Theuseof2D/3DatDisneypredatesTheBlackCauldronandcanbeseeninashorttest done by JohnLassiter titledWhere theWild ThingsAre (1983). In Japanese animation,2D/3DcanbeseenasearlyasPrincessMononoke(1997)andGhostintheShell(1995)andasrecentlyasBerserkGoldenAgeArc3Descent(2013).
FIGURE1.2ThebaublefromDisney’sTheBlackCauldron(1985)wasoneofthefirst3Delementstobecombinedwith2D
animation
©1985Disney
Whatcombinationsof2Dand3Darethere?Renderingcharactersindifferentmediumsisthe first type of combination. Someof the earliest examples can be found in theAcademyAward– nominated short Technological Threat (1998) and also in a wonderful short filmproducedatDisney’sFloridaStudiocalledOffHisRockers (1992). In featureanimated films,probablyoneofthemostmemorablecombinationsofmediumsisfoundinWarnerBros.’TheIronGiant(1999),inwhichayoungboybefriendsanalienrobot;therobotbeing3Dina2Danimatedfilm.However,charactersthemselvesdonotneedtobecompletelyrenderedinonemediumoranother,aswasthecasewiththecharacterJohnSilverinDisney’sTreasurePlanet(2002),orthebicyclists inTheTripletsofBelleville (2003). In those films2Dcharactersweredrawnwith 3D appendages rendered tomatch the 2D portions.Most recently, the overallcharacters themselves canbe a combination entirely of 3Dand 2Daswas seen inDisney’sOscar-winningshortPaperman (2012),where theanimationwascreated in3Dandthen2Danimationwasdoneovertopofthe3D.Lastly,themostcommonuseofcombiningmediumsisfornon-characteranimationelements.Thiscombinationof3Delementsinto2Danimationisseeninalmostanymodern2Danimation:Mulan,TheSimpsons,FamilyGuy,andFuturama,tonameafew.

FIGURE1.32Dcharacterwith3Dpartsridinga3DbikefoundinTheTripletsofBelleville
Now,let’sclarifyexactlywhat2Dand3Danimationassetsareandhowtheyarecreated,just to make sure we are all clear. You might be proficient with a few of these creationmethods.Duringthecourseofthisbook,hopefully,youwillfindyourselfexperimentingwithothermethods.Alarge,loominggoalofthisbookistoshowyouthepathtofearlessnessandflexibilitywithsoftware,becauseattheendoftheday,itisanimation—that’sall.
2Danimationassetsare images thatexistonly in twodimensionsduringcreation;averyacademicdefinition.Howthe2Dimagesarecreatedistheinterestingpartthatmustbedealtwith inyourpipeline.These imagescanbecreated in thebirth traditionofanimationusingpencil and paper and then scanned into a computer for compositing. Traditional animationartists have had great success in drawing their images digitally using software such asPhotoshop,Flash,orToonBoom,tonameafew.Otherwaysofcreating2Danimationimagesinclude painting on glass, drawing in sand, scratching on film, or other flat methods ofcreation.Allofthesemethodsfallunderthe2Danimationcategory.

FIGURE1.42Dtraditionalcharacter“M.E.,”animation(red)byTinaO’Hailey,cleanup(graphite)byJohnO’Hailey
FIGURE1.5Imagefrom“HowtoThrowaJellyfishParty”drawnandanimatedinFlashbyDanMurdock,2008,DigitalCel
ICourse,SCAD
3Danimationassetsexistinthreedimensionsduringthecreationprocess.Moreacademic-speak,butlookatthekeyphrase:“duringthecreationprocess.”Live-actionfilmwouldcomeunderthiscategoryifwewerenotlimitingourselvestoanimationassets.3Danimationassetsincludedigital and stop-motionanimation.Digital animation canbe created in 3D softwarepackages such as XSI,Maya,Max, or amultitude of other lower-budget software such asBlender,Wings,andthelike.Stop-motionistheprocessofanimatingtangibleitemsinfrontof

acamera,usuallyposeablepuppetsmadeofclay, silicon,orothermaterials.There isa sub-categoryofstop-motioncalledpixilation,whichusesliveobjects,recordedframebyframe,tocreateananimation.
FIGURE1.63DcharactermodeledbyErikMinkin,2014,SCAD

FIGURE1.7Characterfromstop-motionanimation“KingRuss”byM.T.Maloney
Sincewearefocusingonanimationandnotliveaction,combiningfilmorvideowith2Dor3Danimationisbeyondthescopeofthisbook.However,thesameproblem-solvingconceptsandcompositingtechniquescoveredinthisbookcanbeappliedtowardcombiningliveactionandanimation.
WhyUseOneMediumOvertheOther?
Artists’ imaginations continue to grow and stretch the boundaries of animation to tellstories.Itcanbecomedifficulttodecidewhichmediumisbesttotellthestory.Sometimes,faddecisionsaremadebasedonthenewnessofamedium.
To take an objective look at the decision, these following five reasons show why onemediummightbepreferredoveranother:
VisualtargetnotsubjectmatterLinemileageComplexityTeamskillsversusproductionschedulePhysicalassetsandbudget
VisualTargetNot SubjectMatter. The visual target or visual style of a film is a largefactorindecidingwhichtypeofmediumwillbechosen.Itisnolongerthesubjectmatterthatisthedecidingfactor.Thedivisionbetweenwhatmediumisbestforwhatsubjectmatterhasbecome so blurred as to be nonexistent. 3D software techniques have advanced so thathumans, furry animals, and otherwarm-looking creatures are no longer out of their grasp.Whichmediumlendsitselfbesttotheartists’ finalvisionisthequestiontoask.Thiswillbeansweredwithstrongartdirectionandexperimentingduringpre-production.

FIGURE1.8Visualstyleandframeoffinal2D/3DanimationbyClaireAlmon,2007,SCAD
LineMileage. “Linemileage” is a termmeaninghowmuch lineyouhave tophysicallydraw.Ifyouweretotakeatraditionaldrawingandstretchoutthelinesendtoendyouwouldseewhatyour “linemileage” is.Everymillimetermoreofpencil ordigital line takesmoretime to draw. Intricate character designsmay look good as still images, but the reality ofanimating such a character is time consuming.A characterwith long, curlyhair,wearing awrinklyovercoat,multipleammostrapsoverhisshoulders,andastripedshirthasextralinemileage. It isdifficulttokeepsomanylinesmovingwellwithoutseemingtocrawl,pop,ordistractfromtheanimation.
FIGURE1.9Linemileageishowmuchlinemustbedrawn,shownherebystretchingoutthedrawingendtoend
Ifatraditionalmediumischosenandtheanimationisfullyanimated,linemileageislookedat very closely and characters are simplified in order to minimize the line mileage. Anexample:onafullyanimatedfilm,suchasDisney’sLilo&Stitch,thecharacterNani’st-shirthadonitsfrontacoffeecupdesign.Thedesignwassimplifiedtoaheartinordertolowerthelinemileage.Thismaynotseemlikealargesimplification.GiventhatNaniwasinsomuchofthemovie,theseeminglysmallsimplificationalongwithmanyothersaddeduptolesstimespentdrawing.Animecharacterscanbedesignedwithmoredetailsincetheanimationstyledictatesminimalinbetweeningofthecharacters.
A common multiplier of line mileage is crowds. If a traditional animated film calls forcrowdsofpeople,thatisatonoflinemileage.Inordertosimplifythelinemileage,many3Dcrowd techniques have been used. 3D crowdswere rendered tomatch the 2D line style inDisney’sHunchbackofNotreDameandwiththeHunchargeinMulan.Anothermethodusedistoprocedurallypopulatea3Dworldwith2Danimatedsprites;thismethodwasalsousedinMulan.TheSimpsonsMovieusedasimilartechniqueofmovinga3Dcameramovethrougha2Dcrowd.
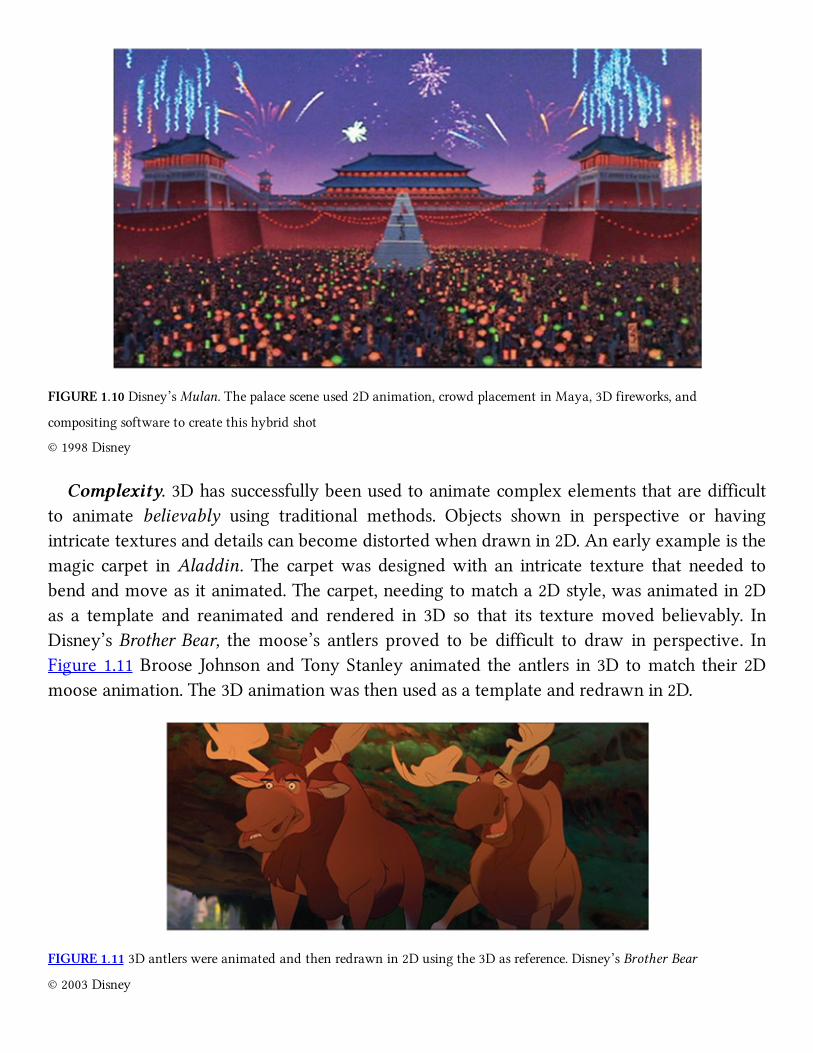
FIGURE1.10Disney’sMulan.Thepalacesceneused2Danimation,crowdplacementinMaya,3Dfireworks,and
compositingsoftwaretocreatethishybridshot
©1998Disney
Complexity.3Dhassuccessfullybeenusedtoanimatecomplexelementsthataredifficultto animate believably using traditional methods. Objects shown in perspective or havingintricatetexturesanddetailscanbecomedistortedwhendrawnin2D.Anearlyexampleisthemagic carpet inAladdin. The carpetwas designedwith an intricate texture that needed tobendandmoveasitanimated.Thecarpet,needingtomatcha2Dstyle,wasanimatedin2Das a template and reanimated and rendered in 3D so that its texturemoved believably. InDisney’sBrotherBear, themoose’s antlers proved to be difficult to draw in perspective. InFigure1.11Broose JohnsonandTonyStanleyanimated theantlers in3D tomatch their2Dmooseanimation.The3Danimationwasthenusedasatemplateandredrawnin2D.
FIGURE1.113Dantlerswereanimatedandthenredrawnin2Dusingthe3Dasreference.Disney’sBrotherBear
©2003Disney

Team Skills versus Production Schedule. A reality is that you might have a team ofartists who are not comfortable with the medium you want to use. If you do not have aproduction schedule that allows for training and retooling for different mediums, it willultimately sway the medium choice. Students can relate to this as well. Often they findthemselvesupagainstaprojectdeadlineandoptforthemediumtheyaremostcomfortablewithinsteadofexperimentingwithnewmediums.Asasidenote,thisisacyclicalissue:themediumanartistputsonhisreelismorethanlikelythemediumhewillgetajobin.Unlessthe artist finds himself on a project that has the budget and time to allow training in adifferentmedium,hemayfindjobsscarceshouldafadshowanimationstudiosfavoringonemediumoveranother.
PhysicalAssetsandBudget.Havingornothaving thebudget topurchase thephysicalassetsyouneedforagivenmediumwillcertainlyswaywhatyourproductiondecisionsare.Whatisthecostofagivenmedium?Isonelesscostlythananother?
Physical asset costs for the differentmediums,when compared, are varying. The cost ofcomputeranimationsoftwarehassteadilymadethesoftwaremoreaccessibletothegeneralpublic; however, 3D studios are costly to set up and even more costly to maintain. Stop-motionormodelanimationcostsareclosetothatoftraditional2Danimation,andtraditionalanimation’s costs can be kept lowwith homemade light tables and self-punched paper. Aswithanybusiness,physicalassetcostscanbeaslittleorasmuchasonewantstospend.
Ultimately, the largest cost is thatof time spenton theproject and thenumberof artistsneededtocomplete theproject.Digitalprocesseshavetriedtoanswerthis“time ismoney”issue.3Dstudios,theoretically,canrecouppartoftheircostbyhavingsmallercrews.Paperlessor digital 2D animation is slightly cheaper than 2D animation using paper since the digitalprocesssavestimebyallowingeasysharingofartassetsandbypassesthescanningprocess.
Once a studio is set up and running in a givenmedium, adding anothermedium incursadditional costs. For example, the small studio that creates The Simpsons television series(writing,story,andkeys)inLAhassmallbudgetsandextremelyquickturnarounds.However,they also created the larger-budget The Simpsons Movie. In that movie there was a largeamountof2D/3D.Naturally,afterthatexposureto3Dthecrewbegantoincorporate3Dmoreinto the television show. A traditional pipeline that has a low budget may be extremelyhesitanttotakeonanydifferentandpossiblyexpensivetechnique.Suchrequestscancertainlyconcerntheaccountingdepartmentduetotheextraexpense.
WhatistheMainProblemofCombiningtheMediums?
Onceadecisionhasbeenmadetousemultiplemediums,theproblemsofhowtoproduce

theshotsloomlarge.Itisveryimportanttoworkoutthefollowingpipelineissuessothattheproductioncanbesuccessful:
StylematchingRegistrationFramerateandimageformatTimingImagesizesAlphachannel
FIGURE1.12Pipelinetestof2Dcharacterwalkcyclewith3DheadbyClaireAlmon,2007,2D/3Dcourse,SCAD
StyleMatching. During the pre-visualization stage of production, experimentation willneed to takeplace.Multiple software,drawingmethods, combinationsof themediums,andpostprocessing effectsneed tobe compared toone another to seewhichpipelinewillmosteasilyachievethevisualstyleset forthbytheartdirector.Doyouneedtousevector lines?Canyougetawaywithraster?Canyoudothisprocedurally?
Itisimportantthatallexperimentsbewelldocumented.Whatwastheworkflowtogettheartwork from the concept to the final render? Did it achieve the visual style? At times adifferentvisual stylewillbeachieved,onenot correct for thepresentprojectbutuseful forsomething in the future. Other times amethodwill not work—the technologywill not beadvancedenoughyet.Sometimesitonlytakesahalfayearforthetechnologytocatchupandforthenextprojectyouwillhaveahalf-developedtechniquethatcanbereappliedandtested.
Having a small team of enthusiastic risk takers who are unafraid to experiment withtechnology and artistic techniques with an eye toward creating stunning visual results isnecessary.Thetechniquesfoundinthisbookwillhelpyoubecomeoneofthoseenthusiasticrisktakers.

FIGURE1.13ConceptartforPoisonTree,2D/3Dgroupproject,2008,SCAD
FIGURE1.14FinalimagefromPoisonTree,2D/3Dgroupproject,2008,SCAD
Registration. Registration refers to when one object touches another in the scene. Forexample,whenthe2DcharacterHogarthclimbsintothe3Drobot’shandinTheIronGiant;wheretheymakecontactistheregistrationline.Inthepast,havinga3Dobjectcontacta2Dobjectwasalargeregistrationissuethatwasnearlyimpossibletoovercome.3Dobjectshadtobeprintedoutandpeggedontoanimationpaper.Thisprocessiserrorpronethemomenttheprinter spitsout the firstpage.Theprinter itselfdoesnotprintawell-registered image; thepeggingprocesscannotbeperfectenough.The2Danimatormustregisterhis2Dart tothiswobblyreferenceimage.ThismethodiswhatwasusedonMulan,Lilo&Stitch,andcountlessotheranimatedfilms.Withdedicationtodetailitispossibletoproducewell-registeredimagesthisway,thoughthismethodisverydifficult.TechnologyhasadvancedandnowthatWacomtablets, Cintiq tablets, and paperless animation have arrived, the printing pipeline forregistrationisnolongernecessary(unlessyouhavebudgetaryissues).
However,evenwiththeintroductionoftheCintiqandWacomtablets,registrationisstillan

issuethatcanbelittlethe2D/3Dcompositingefforts.Iftheartistsarecarelessinregardtotheregistrationlines,inotherwordsiftheartistshavesloppydraftsman-ship,allthetechnologyintheworldcannotsavetheshot.
Eachcombinationofelementsrequiresadifferentpipeline toobtain thebest registration.Dependingonwhichelement“leadsthemovement”ineachshot,the3Delementwillhavetobedrawnfirstorthe2Delementwillhavetobedrawnfirst. Inthecomingchapters,aswecoverthecommoncombinationsofthemediums,wewillalsohighlightthepipelineneededforproperregistration.
FIGURE1.15Exampleof2Dcharacterregisteringwith3DcharacterbyCandiceCiesla,2007,2D/3Dcourse,SCAD
FrameRateandImageFormat.Itseemslikeasmallissue,anditisoftenoverlookedinasmall studio or on student films. When combining different mediums, especially acrossmultiplesoftwarepackages,itisextremelyimportanttoagreeontheframeratethatwillbeused and in what format the images will go through the pipeline. For example: if a 2Dcharacter is drawn and pencil tests are done at 24 frames per second, the animation isapproved,andareference.avifileismade,thenthatanimationisbroughtintoa3Dsoftwarepackageforthe3Danimatortocreatetheoctopusarmsthataretoattachtothe2Dcharacter,then the3Danimatorshould,obviously,use thesameframerateas the2Danimator. Is the.avifilethatheisreferencingactually24framespersecond?Didthe3Danimatorremembertosethisplaybacksettingsto24fpsorisheon30fps?Pipelinetestsneedtocheckthatimageformatsmaintainconstantframerateandimagesizethroughouttheproduction.Allofthesetopics thatwe coverwill save unnecessary redos of scenes due to animation notmatchingproperly.

Timing.Anyonewhohas ever animateda characterholdinga coffee cup (or somethingsimilar),eveninasinglemedium,knowsthat it isdifficult tomakesurethatthecoffeecupmovesinsyncwiththehand.Intraditionalanimationthecupisonaseparatepieceofpaperandtheanimatorhasaccess tothetimingchartorx-sheetandknowswherethekeyframesareandwhattypeoftimingwasused.Shecanmatchsimilarkeyframesandtimingtothecuplevel.AnexampleofthistechniqueisdepictedinFigure1.16. If thesametypeofanimationweretobedonein3D,thenconstraintscouldbeusedtohelpsimplifytheissue.
FIGURE1.16Exampleofmultiple2Delementsregistering
Anystudentwhohastriedtoanimateahand-heldobject in3Dwithoutusingconstraintsshouldinstantlycringeathowdifficult it istomatchthetiming.Thisiswhathappenswhenmultiplemediumsarecombined—thetimingmustbematchedframebyframe.
Inordertodothis,itiseasiesttoknowwherethekeyframes(extremes)areandwhattypeoftimingisbeingused.Inthecaseofatraditionalcharacterleadingadigitalcharacter,arethe2D character’s inbetweens onhalves?Thirds?Held?This is not an issue if the animation iscompletely done on ones (every frame is drawn); however, this is not commonly done.Maintaininganx-sheetandsomestyleoftimingchartisthesolutiontothisproblem.
X-sheetsordopesheetscanbefoundincountless“howtoanimate”books.Theyarerarelyusedin3D,whichmakestheinclusionofthemina2D/3Danimationprocessalientothe3Danimators.
Timing charts, the chart drawn on a traditional keyframe that communicates to the

inbetweenerhowtospacetheinbetweenshemustdraw,isanothertraditionaltechniquethatis not used by 3D animators. This might be the hardest of all concepts to apply to yourpipeline.
It ispossibletocombine2Dand3Dwithouttimingchartsandx-sheets.Theuseofthem,however,willmakeitlesspainstaking.Aswithallofthepreviousconcepts,wewilltakecaretoanswerthisissueanditsdifferentvariationsintheupcomingchapters.ImageSizes.Thenexttolastconceptthatmustberesolvedfora2D/3Dpipelineisthatof
image sizes. Because scanned images, rendered images, digitally drawn images, andmaybeeven still photography are to be combined, in order for them to register properly youwillneedtomakesurethatyouareusingthesamepixelratioandhaveagreedonresolutionandimagesizesforyourpipeline.Again,thisissuemightseemobvioustoasoloartist.However,on a group project nothing is too trivial to outline.Often there are different file sizes usedthroughout the production to speed up workflow. For example, in the rough stages ofanimation, reference images need not be at full res size— that will only slow down thesoftware package being used and transfer of images between artists. Finding ways to usesmaller res sizes (all at the correct ratio so that registration stays consistent) will increaseproductivity.Inproductiontheremightbethreefilesizesused;dependingonthestudiotheremaybemore.FinalRes:Thefinalrenderofanimationassetsthatarethencompositedtogether.(Example:
1280X720,imageratio1:77,pixelratio:1)MidRes:Used for double-checking registration and getting animation approved. (Example:
960X540,imageratio1:77,pixelratio:1)LowRes:Usedforinitialscansandroughanimation.Thisallowsformemorysavingsandease
ofusein3Danimationpackagesasreference.(Example:512X288,imageratio1:77,pixelratio:1)
Alpha Channel: While considering how to send images back and forth to the differentsoftware packages, a complete production-stoppingmistake is to fail to consider alphachannels. Because you will be compositing elements from one software package overelements in other software packages, at every step youwillwant auto-generated alphachannels that are of good quality. An alpha channel is a grayscale image that tells thecomputerwhichpartsofthepicturearetransparentoropaque.
To recap,once thepipeline for reachingavisual style isachieved, then it isdecidedhowassetswillgo through thepipeline toaccomplish thebest registrationbasedonwhichassetneeds to be created first. Then a test is needed to make sure that the image sizes, alphachannels,aswellasframerateandimageformatallflowthroughthepipelineandendupintoafinalimagethatissuccessful.
JudgingtheSuccessof2D/3DIntegration
Therearealotofthingstoconsiderwhencombining2Dand3Danimation.Afterworkingthroughthechaptersinthisbook,youshouldbewellonyourwaytohavingmasteredsomeofthepreviousconsiderations.Howdoyouknowifyou’vedoneitsuccessfully?
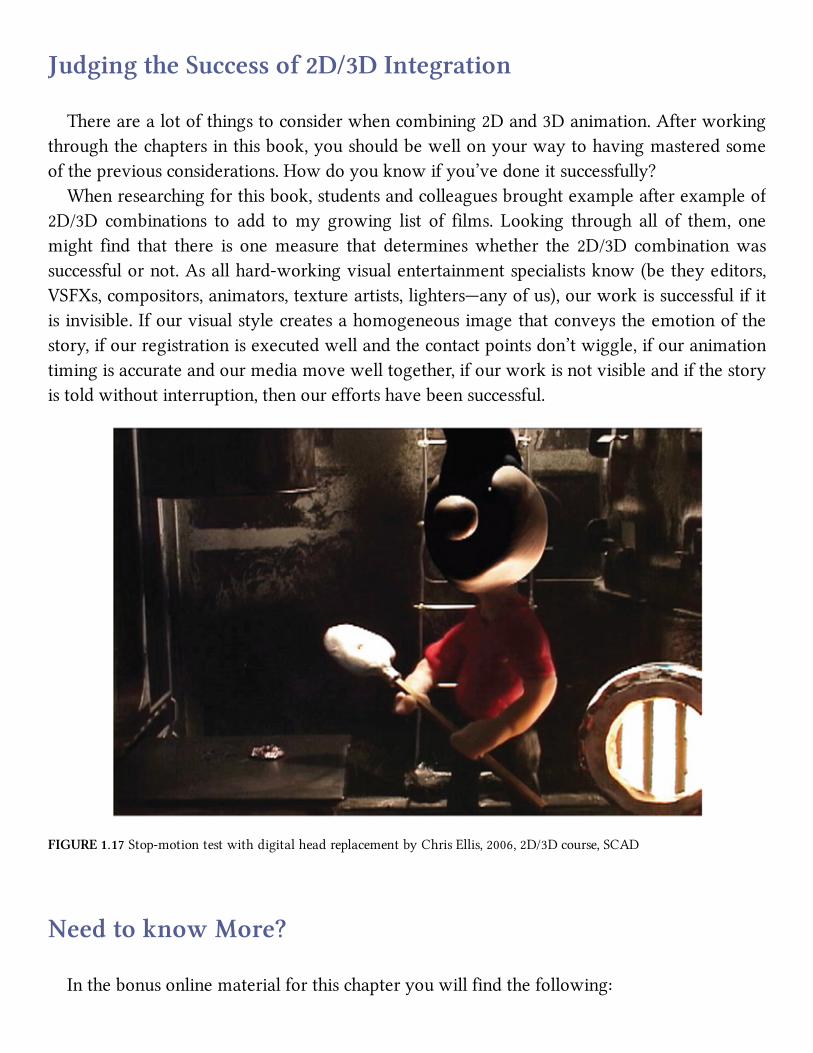
Whenresearchingforthisbook,studentsandcolleaguesbroughtexampleafterexampleof2D/3D combinations to add tomy growing list of films. Looking through all of them, onemight find that there is onemeasure that determineswhether the 2D/3D combinationwassuccessfulornot.Asallhard-workingvisualentertainmentspecialistsknow(betheyeditors,VSFXs,compositors,animators,textureartists,lighters—anyofus),ourworkissuccessfulifitisinvisible.Ifourvisualstylecreatesahomogeneousimagethatconveystheemotionofthestory,ifourregistrationisexecutedwellandthecontactpointsdon’twiggle,ifouranimationtimingisaccurateandourmediamovewelltogether,ifourworkisnotvisibleandifthestoryistoldwithoutinterruption,thenoureffortshavebeensuccessful.
FIGURE1.17Stop-motiontestwithdigitalheadreplacementbyChrisEllis,2006,2D/3Dcourse,SCAD
NeedtoknowMore?
Inthebonusonlinematerialforthischapteryouwillfindthefollowing:

1. Storybeatsandbull’s-eyes,whichincludes:TopicReviewofmanytopicsthatareoftenreferredtointhistext
HittingtheemotionaltargetStorybeatsVisualstorytelling.
Hands-OnExercise thatcreatesastorybasedonthebull’s-eyemethodcovered inthetopicoverviewandthenbeginstoassignthebestmediumsneededtosupportthestory.
2. Chapter One Project, which contains a research project for students. (Insert evilprofessorlaughhere.)
3. Pipelines andMoments—an extra chapter dedicated to research and developmentmethodsthatsupportcreatingaworthwhilestorywithastrongvisualaesthetic.(ThisisfoundwithChapter2’scompaniondata.)
Hybridanimationexamples(tonameafew):
GhostintheShell1995PrincessMononoke1997PrinceofEgypt1998Mulan1998TheIronGiant1999Tarzan1999CowboyBebop1999TitanA.E.2000ElDorado2000Spirit:StallionoftheCimarron2002Lilo&Stitch2002TreasurePlanet2002BrotherBear2003TheTripletsofBelleville2003Steamboy2004Mushishi(episode1)2005TheSimpsonsMovie2007FamilyGuy:BlueHarvest2007Futurama1999–2009WaltzwithBashir2009BerserkGoldenAgeArc2013

FurtherReading
Block,Bruce.TheVisualStory:CreatingtheVisualStructureofFilm,TVandDigitalMedia.Boston:FocalPress,2008.
Glebas,Francis.DirectingtheStory.Boston:FocalPress,2008.Hooks,Ed.ActingforAnimators.Portsmouth,NH:Heinemann,2003.Stanislavsky,Constantin.AnActorPrepares.NewYork:TheatreArtsBooks,1948,1965
StudentContributors
Contributingstudentsforthischapter,inorderofcontribution:
DanMurdockErikMinkinClaireAlmonCandiceCieslaAmandaPowellChrisEllis

2
3DCharacterLeads2DCharacter
FIGURE2.12D/3DcompositingexamplebyCandiceCiesla,2008,SCAD
LectureNotes
This chapter explores having a 2D character and a 3D character interacting with oneanother.Weexaminethemostimportantmethodofelicitinganemotionalresponsefromtheaudience,whichisbyincludingtouchinourcharacters.Thecharactersmusttouchbotheachother and themselves. The issues that need to be resolved are registration, timing, and linelook.Howdowemakecharactersdrawnindifferentmedialookliketheyaretouchingandmakethelinequalityofthecharacterslookliketheymatch?
IndustryExamples
Let’stakealookatsomememorablescenesthathaveshowntheinteractionbetweentwocharacterswhohappenedtobeofdifferentmedia.
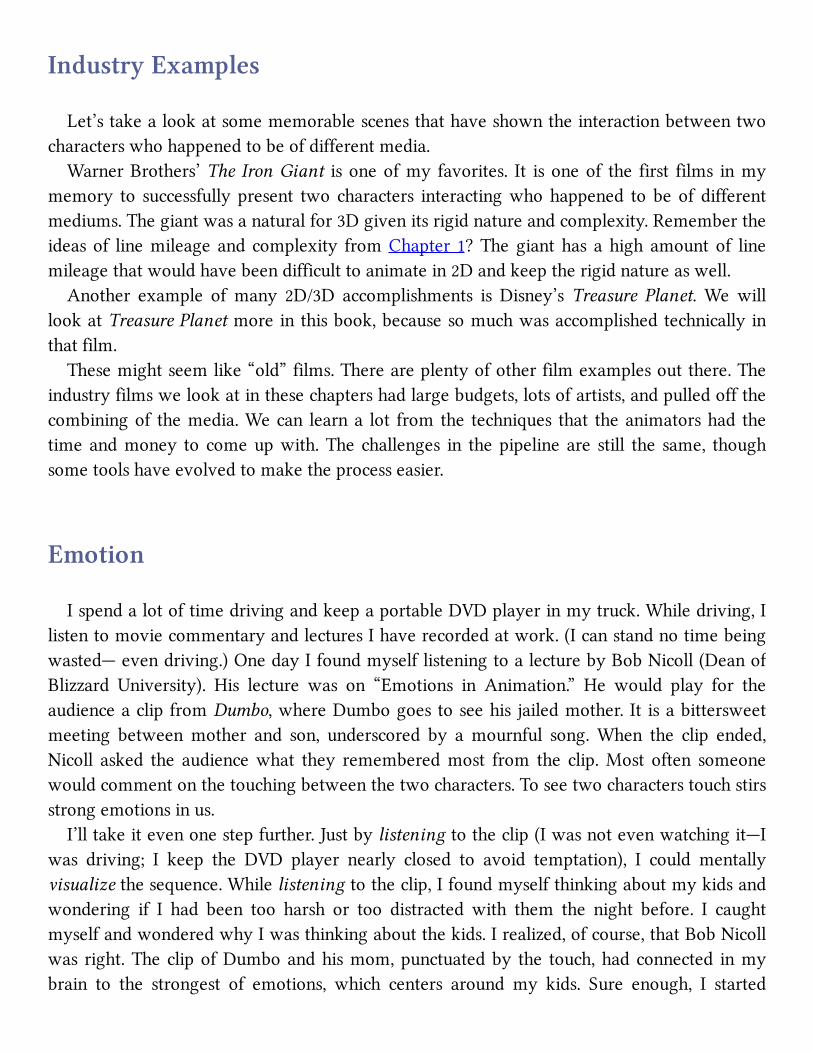
WarnerBrothers’The IronGiant isoneofmy favorites. It isoneof the first films inmymemory to successfullypresent two characters interactingwhohappened tobeof differentmediums.Thegiantwasanaturalfor3Dgivenitsrigidnatureandcomplexity.Remembertheideasof linemileageandcomplexity fromChapter1?The gianthas ahigh amount of linemileagethatwouldhavebeendifficulttoanimatein2Dandkeeptherigidnatureaswell.
Another example ofmany 2D/3D accomplishments is Disney’sTreasure Planet.We willlookatTreasurePlanetmoreinthisbook,becausesomuchwasaccomplishedtechnicallyinthatfilm.
Thesemightseemlike“old”films.Thereareplentyofotherfilmexamplesoutthere.Theindustryfilmswelookatinthesechaptershadlargebudgets,lotsofartists,andpulledoffthecombiningof themedia.Wecan learna lot fromthe techniques that theanimatorshad thetimeandmoney to comeupwith.The challenges in thepipelineare still the same, thoughsometoolshaveevolvedtomaketheprocesseasier.
Emotion
IspendalotoftimedrivingandkeepaportableDVDplayerinmytruck.Whiledriving,IlistentomoviecommentaryandlecturesIhaverecordedatwork.(Icanstandnotimebeingwasted—evendriving.)OnedayIfoundmyselflisteningtoalecturebyBobNicoll(DeanofBlizzard University). His lecture was on “Emotions in Animation.” He would play for theaudienceaclipfromDumbo,whereDumbogoestoseehis jailedmother. It isabittersweetmeeting betweenmother and son, underscored by amournful song.When the clip ended,Nicoll asked the audiencewhat they rememberedmost from the clip.Most often someonewouldcommentonthetouchingbetweenthetwocharacters.Toseetwocharacterstouchstirsstrongemotionsinus.
I’lltakeitevenonestepfurther.Justbylisteningtotheclip(Iwasnotevenwatchingit—Iwas driving; I keep the DVD player nearly closed to avoid temptation), I could mentallyvisualizethesequence.Whilelisteningtotheclip,Ifoundmyselfthinkingaboutmykidsandwondering if I had been too harsh or too distracted with them the night before. I caughtmyselfandwonderedwhyIwasthinkingaboutthekids.Irealized,ofcourse,thatBobNicollwas right.TheclipofDumboandhismom,punctuatedby the touch,hadconnected inmybrain to the strongest of emotions, which centers around my kids. Sure enough, I started

thinkingofthem,whichinturnstirredmoreemotions.Bingo.Thatisthewaywegetaudiencestofeelemotions—wemustconnecttoamemory
they have in their heads. (My students are cringing. They think I’m going to talk aboutneuroscience. I promise, I’ll holdmyself back.)Youmighthaveheard that a largememorytriggerissmell.Well,thatoneisoutfornow.WithSmell-O-Visionaside,we’llhavetolooktoanotherlargesensethatweuse—touch.Wetouchourfaces,wringourhands,hugourbodies;wedoallsortsofself-touchtoconveytoothershowwefeel.Wealso,basedonculture,touchotherstoconveyfriendship,intimidation,love,andahostofotheremotions.
This is our first task to undertake when combining 2D and 3D animation. We have tomasterhowtohaveourcharacterstouch.
DigDeeper
Youcanindeeddigdeeperintowhyandhowemotionsconnectinourbrains.MyfavoritebookonthissubjectisJosephLeDoux’sSynapticSelf.This is theonly time I’llmention it; Iswear.
FIGURE2.2Touchbetweencharacters,byClaireAlmon,2007,2D/3Dcompositingcourse,SCAD

Hands-OnExamples
The following section will finally let us get into putting together a scene. While goingthroughthishands-onportion,wewillcoversomeofthepipelineissues:registration,timing,and line look.We will also look at various ways to combine 2D animation on top of 3Dimages.Fromthesemethodsyoucanfindwhatfitsyourpipelinebestorcomeupwithoneofyourown.
WhoLeads?
Inthefirstscenewewilldo,asmallcharacterclimbsintothehandofalargercharacterandislifted.YoucanuseTheIronGiantasyourreference.Thefirstquestiontoask,then,is,“Wholeads?” In other words, whose movement is moving the other? In this case, the largercharacterwillbeliftingthesmallercharacter;therefore,thelargercharacterleads.Whichoneiswhichmedium?Theboycharacterwillbe2Dandtherobotcharacterwillbe3D.Sointhiscase,3Dwilllead2D.

FIGURE2.33Dleadsdigital2Dpipeline
This pipeline has 2D animation being done digitally. Thismeans using Photoshop, Flash,ToonBoom,andsoon:software.YoucandrawwithaWacomtabletoruseaCintiqtablet.Itisn’t advisable to think about 2D animating with a mouse. I’m sure it can be done, but Iwouldn’twanttodoit.
WhatifyoudonothaveafancyWacomtabletandneedtodrawthe2Donpaper?Thenyouwould need to print the 3D animation, peg it up, and use it as reference for your 2Danimation.Itisacheappipeline,butitinstantlycausesregistrationissuesattheprintingstage.The3Dcharacterisprintedontopaper.Thatpaperishand-pegged,meaningsomeonesitsatalighttable,linesupcrosshairsthatwereprintedontheanimation,andtapesapegstripatthebottomof thepage.Onebyone eachpage is peggedup.Apencil test is shot to see if thepeggingprocesswasacceptable.Thentheanimatorcanbegintoanimateusingthe3Dimagesas reference.Once completed, the 2D animation needs to be scanned back in to compositewiththe3Danimation.

FIGURE2.43Dleadstraditionalpaper2Dpipeline
TakeNote
Beware.Theprintingandscanningprocessaddsmoretimetoyourpipelineandmostlikelyintroducesbadregistrationbetweenyour2Dand3Dcharactersunlessabsolutecareisgiventothepeggingprocess.
Youmightask,“Whatiftheorderwerereversed?Whatiftheboycharacterwas3Dandtherobot characterwas 2D?” Thenwewould need to use a pipelinewhere 2D leads 3D. I’veaddedtheoptionofthe2Dbeingtraditionalpaperordigital.Whentraditionalpaper2Dleads,itisn’tasproblematicunlessthelaststageoftweaking2Dto3Disneeded.Inthatcase,therewouldbeaprintingandpeggingofthe3Dassetsandpossibleregistrationissues.

FIGURE2.52Dleads3Dpipeline
In sceneswhereonecharacter isdefinitively leading theotherone, it isaneasypipeline.However,whatifthisscenewasadanceorafightbetweencharacters?Whatiftheyhadtotango?Thatwouldtakemorecoordinationbetweenanimators.Morethanlikelyoneanimatorwould lead and rough inwhere he or she expected the other character to be. The secondanimatorwouldthentakeoverandmatchwherethefirstanimatorindicatedthecharactertobe. If therewere any discrepancies, therewould have to be a back-and-forth between theanimators.
Anytimetheanimationgoesfromoneanimatorbacktotheotherfortweaking,itcanbeconsideredaredo.Itcostsextratimeandusuallyworriestheartproductionmanager.Itisthefirstpartof thepipelinetobeavoided.Thatdoesmeanthatusuallyeachanimatorhasonlyone shot to get the acting, registration, and timing correct and hope it matches to thecharacter’s animation.However, if it is an “A” scene (a scene that is very important, like amoment scene with high emotion and story importance) or a scene where no discerniblecharacterleadstheother,thentheredos/tweakingshouldbeallowed(withinreason)tomake
suretheanimationisacceptable.
TakeNote
Remember,anytweakingbetweenmediameansmuchmoretimewillbeneededtofinishthescene.Factorthatinwhenyouarebudgetingtimeforyourpersonalfilms.
We’lltakealookatsomedifferentsoftwareusage.Whatifyoudon’thavethesoftwareweuseinthisbook?Herearethestepsingeneraltermssothatyoucanapplythemtowhateversoftwareyoudohaveinyourtoolbox.
1. Animateyour3Dcharacter;ontwosisbest.2. Createa3Dstand-inthatwillserveasareferenceforthe2Danimator.3. Renderthe3Dcharacterwithanalphachannelasanimageseries.4. Renderthe3Dstand-incharacterwithanalphachannelasanimageseries.5. Import the 3D character and the stand-in layers into a drawing package of your
choiceorprintandpeg.6. Animate the 2D character using the stand-in character as a guide. Note the
registrationpointsbetweenthe2Dcharacterandthe3Dcharacter.7. Render, export, or scan your 2D animation as an image series or raw .mov to
maintainalphachannel.8. Compositethecharacters togetherandcreatethefinalmoviefile inthepackageof
yourchoice.9. Enjoyyoursuccess.
3DLeads2D:Animatinga3DCharacterwitha3DStand-inUsingMaya
Thishands-ontutorialwillwalkyouthroughthetechnicalstepsofanimatingourrobotrig,creatinga stand-in3Dobject forour2Dcharacter, andconstraining it to follow the robot’shand. Then you will bring the levels into a 2D raster paint program to animate the 2Dcharacter.
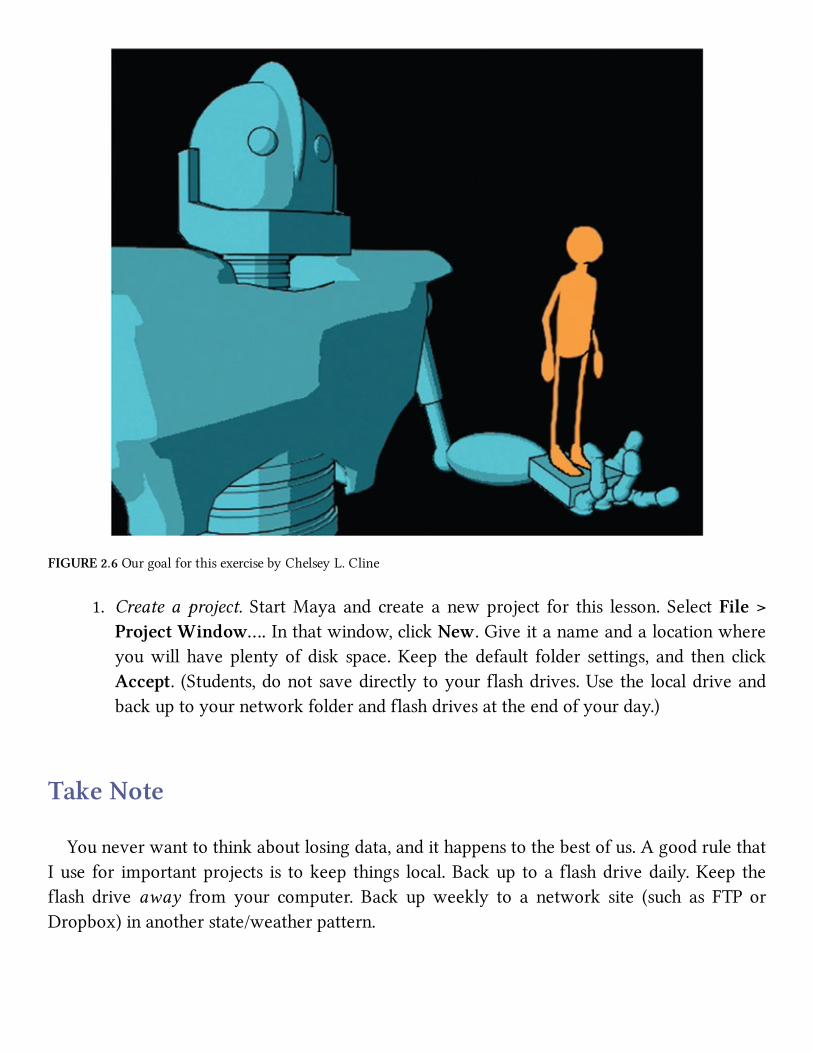
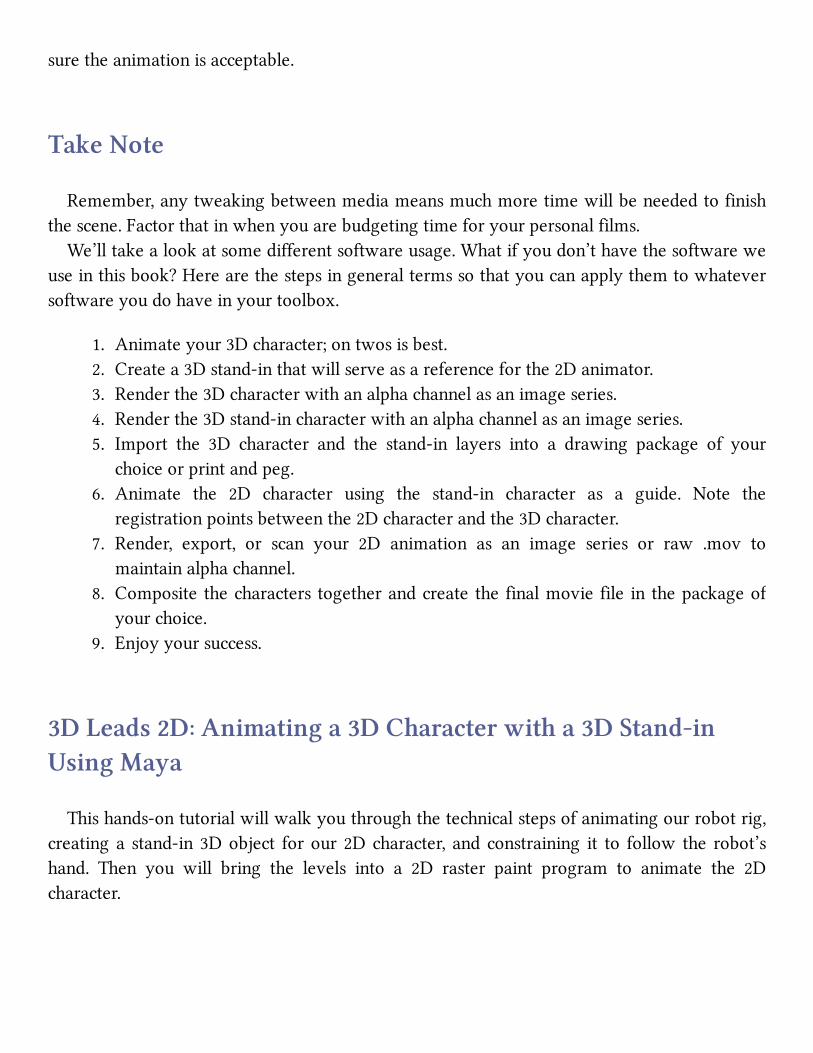
FIGURE2.6OurgoalforthisexercisebyChelseyL.Cline
1. Create a project. StartMaya and create anewproject for this lesson. SelectFile >ProjectWindow….Inthatwindow,clickNew.Giveitanameandalocationwhereyouwill haveplenty of disk space.Keep thedefault folder settings, and then clickAccept. (Students,donotsavedirectlytoyourflashdrives.Usethelocaldriveandbackuptoyournetworkfolderandflashdrivesattheendofyourday.)
TakeNote
Youneverwanttothinkaboutlosingdata,andithappenstothebestofus.AgoodrulethatIuse for importantprojects is tokeep things local.Backup toa flashdrivedaily.Keep theflash drive away from your computer. Back upweekly to a network site (such as FTP orDropbox)inanotherstate/weatherpattern.

TakeNote
Mayawillhappilysaveyourfileevenifyourcomputerorhomedirectoryhasrunoutofdiskspace. Itwillnotevencomplain.Youwon’tknowyouhaverunoutofdiskspace (andhavecorruptedfiles)untilthenexttimeyouopenyourscene.Noamountofbackupswillsaveyoufromthat!
2.Open the file. Open our robot rig. File > Open Scene … locate the rigRobby_3DLeads2D_1.ma,andclickOpen.
3.Selectthecharactersetmode. Inthebottomright-handcorner,selectthecharactersetforthisrig:Robby.Thisallowsyoutosetkeyframesandnotworryabouthavingthecontrolsselected.Ifyouarefamiliarwithanimatingwithoutcharactersets,feelfreetodoso.Wewillusecharactersetsinthisbook.Whentheredarrowison,youareusingcharactersetstoanimate.
4.Animatingtothecamera.Becausewehaveacamerasetforthisscene,wewilluseittocheck our silhouettes. In the perspective window, click Panels > Perspective >Render_Cam.Donotmovethiscamera.Itisimportanttokeeptherenderingcamerastillduringtheanimationprocess.Instead,wewillsetitasidesothatwecananimatetothecamera.Animatingtothecamerameansanimatingintheperspective,top,front,andsidewindowwiththeabilitytoorbitaroundandlookingattheRender_Camtomake sure the poses readwell. ChoosePanels >TearOffCopy. Now you have afree-floatingpanelofyourrendercamera.Resizeitandplaceitsothatitisoutofthewaybut still visible. (For those fortunate animators, place thepanel onyour secondmonitor.)IntheRender_Campanel,choosethefollowingitemssothatyoucangetacleansilhouetteview:
a. Under Show, hide everything but the geometry. Make sure to check offManipulators.
b. Pressthe7keyonthekeyboard.Thatputsyouinlightingmode.Becausewehavenolights,yourscenecharactershouldbeincompletesilhouette.

FIGURE2.7Atorn-offRender_Campanel,whichwewillusetocheckoursilhouettesasweanimateinthe
Perspectiveview
5.Animate.Nowyouarereadytoanimatethehandsothatitstartsatthebottomoftheframe and lifts up tomid-chest level. Our animation lasts 18 frames. You can openRobby_3DLeads2D_2.mbforanalreadyanimatedversionofRobby.
6.Setframerate.Whatframeratewillyouanimatein?Youneedtomakesurethetimeiscorrect and stays constant throughout the production. In other words, right here iswhere you can mess things up! Take a moment and set the frame rate in theAnimationPreferenceswindow,underSettings >Time Slider > Playback Speed.OursissettoReal-Time[24fps].Ateachstepofthepipeline,wewillneedtomakesurethisisourframespersecond.(UsetheHelpfunctionifyoucan’tfindtheiconfortheanimationpreferenceswindow.Yes,thiswasatest.)

FIGURE2.8KeyframesofanimatedRobbyhand
7.Import2D’s3Dstand-in.Now, import in the2Dcharacter’s3Dstand-in.ClickFile >Import…andfindthefileRoy_3DLeads2D_Standin.ma.ClickImport.Royappearsattheorigin,beneaththerobot.InthePerspectiveview,orbitaroundtoseehim.
8.Constrainstand-intofollowthehand.Thestand-incharacterisasmallrigitself,abletobeanimated ina limited fashionasreference for the2Danimator.You’llnoticeRoyhasafewcontrolstomovehisarms,legs,head,hips,andchest.ThereisalsoasmallcircleathisbottomtitledPLACE_ME.
a. Go to frameone. Select Roy’s “Place_Me” controller. Translate and rotateRoyintoplaceinRobRobot’sopenhand.
b. To make Roy follow Rob Robot’s animated hand, select Rob Robot’s“Attach_Here”control(ontheanimatedhand),holdshift,thenselectRoy’s“Place_Me”control.Bothcontrollersshouldbeselected.“Attach_Here”willbewhite, and “Place_Me” should be green. This indicates that “Place_Me”wasselectedlast.
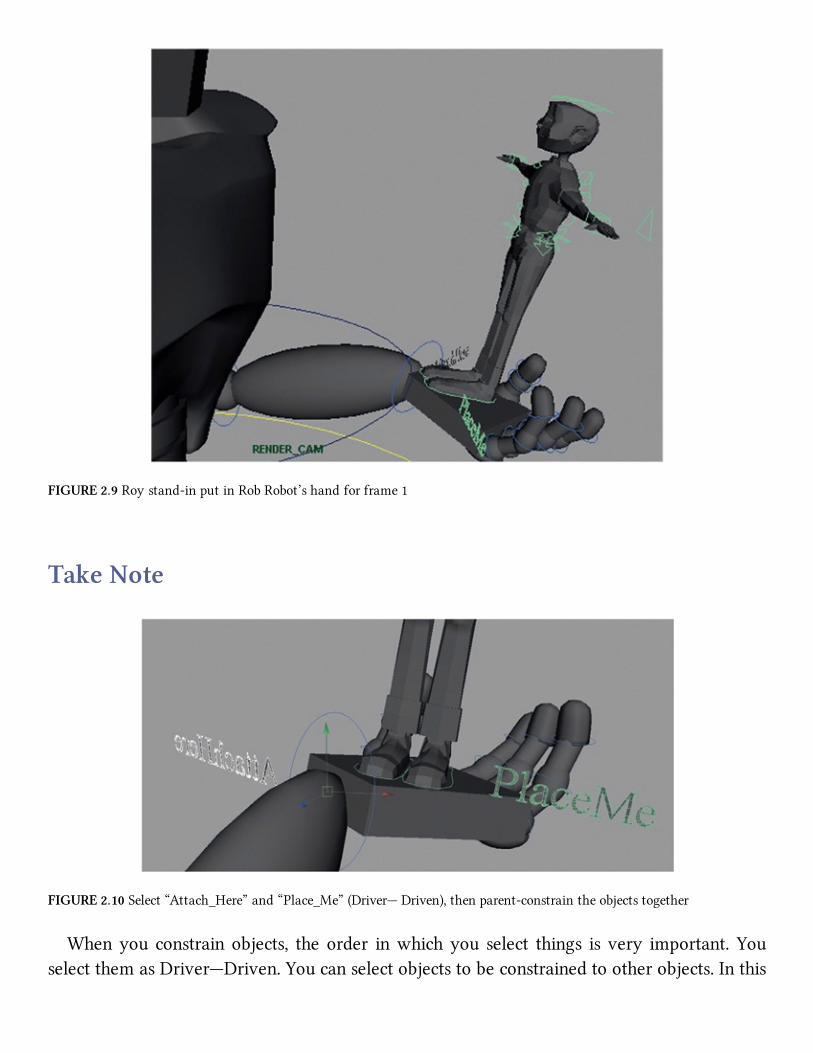
FIGURE2.9Roystand-inputinRobRobot’shandforframe1
TakeNote
FIGURE2.10Select“Attach_Here”and“Place_Me”(Driver—Driven),thenparent-constraintheobjectstogether
Whenyou constrain objects, the order inwhich you select things is very important. YouselectthemasDriver—Driven.Youcanselectobjectstobeconstrainedtootherobjects.Inthis

case,wehadrigswithattachingcontrolsthatweused.Ifyoulikerigging,checkoutmyotherbookRigItRight!
c.IntheAnimationmenu,selectConstrain>Parent(optionbox).d.The default settings are just fine (you can click edit > rest settings to get default
settings).ItisimportantthatMaintainOffsetison.e.ClickAdd.
9.SeeRoymove inRobRobot‘shand. Scrub through or play the animation to see thatRoy’s3Dstand-indoesindeedsitinRobRobot’shandthroughouttheanimation.
10.Toaidthe2Danimator,addafewkeyframesforRoy.Remembertonotoverlaptherobotover-topofRoyinthisanimation.Thatwouldcomplicateourcomposite.We’llgettothattechniquelater.
11.Save your file. If you wish to see our completed file from this tutorial, viewRobby_3DLeads2D_3.mb.
FIGURE2.11RoynowmovesinRobRobot’shand
OnesorTwos?
3D animators might not think of this at first. 2D animators will ask this questionimmediately. 2D is normally drawn on twos. Thismeans that every frame is held for twoframes.Why?Thereislesstodraw.Drawingsomethingonones,oradrawingforeverysingleframeof film,makes forverysubtlemovementand it isdifficult tokeep the2Danimatingsmoothly. It canbedone.Certainly there are thosewhohaveused a style of animatingonones—Richard Williams, for example. There are also times when you need to put theanimationonones,suchaswhenthemovementisveryfast.Asa2D/3Danimator,youwillwanttheabilitytoatleastbeabletoputeverythingontwosandatmostbeabletocontrolwhenthingsareontwosandwhenthingsareonones.
There aremanymethods to convert your animation in 3D to be on twos. You can do itmanuallyinthegrapheditorafterallofyouranimationisdone;youwilldothisbyinserting

keysoneveryotherframeandusingsteppedinbetweensbetweenthekeys.Althoughthatisfine,itcanmakeitdifficulttogobackandadjustyouranimation.
GreggAzzopardi,oneof the technical editorsof thisbook, suggested thismethod tome.ThereisascriptthatcanbefoundonCreativeCrashcalledtwos.mel.ItwaswrittenbyJasonSchleifer.Schleifer issuchagreatbrainintheriggingforanimationfield.Enclosedwiththecompaniondataforthisbook,youwillfindamodifiedversionofthescriptthatworkswiththeusageinthischapter.
InstalltheScript
To use this script, you will want to copy the twos.mel script into your scripts folder.Generallythisisinyourhomedirectory,maya/XXXX/scripts.SubstitutetheversionofMayayouareusingforXXXX.
Restart Maya, or if Maya is already open you can type rehash in the command line.(RemembertohitEnteronthekeyboard.)
Macusers,yourscriptsfolderisintheLibraryfolder,whichishiddeninnewerversionsofMacOS. Inthefinder,OptionClickontheGomenutoopenthe library folder.Thescriptsfolderyouare lookingfor ishere: /Users/YOU/Library/Preferences/Autodesk/maya/201X-XX/scripts.
UsetheScriptonCharacterSets
Ifyouareusingcharactersets toanimate, likeweused intheexamplefiles, followthesesteps:
1. Selectthecharactersetintheoutliner.2. Inthecommandline,typetwosandhitenteronthekeyboard.
It will take a moment as the script goes through all of the animated attributes in yourcharacter,checksthem,andthenaddsanodethatcontrolstheanimationcurvesandsetsthemtorunonlyontwos.Thescriptwillthenpromptyoutoaddthefollowinglineonyourshelf:select-rtimeOnTwos.Ifyoumiddle-clickonthosewordsanddragthemtoashelf,Mayawillcreateabutton.Whenyouclickonthatbutton, itselects thenodethatSchleifer’sscripthascreatedforyou.

FIGURE2.12JasonSchleifer’stwos.melscriptinaction
Bydefault, the “by”attribute is set to2.Youcan simplykey-frame that todifferent stepratestoenjoyyouranimationontwosandonones(orotherincrements)asneeded.
WhenyouplaybackyouranimationinMayaandlookatthetimelineorgrapheditor,youwillnoticethateverythingstilllooksthesame.Thisscriptdoesnotinterruptyouranimationprocess or the sweetening process at all. (Those wearing geek hats can check out theHypergraphConnectionseditortoseethenodeandmathexpressionthatSchleiferhascreatedtomakethisasseamlessaspossible.)
IfyouwantedtogobackandanimateRoytouseasreference,maybejustafewkeyposesofhowhewouldreacttobeinghoistedupintospace,youwillwanttoalsoputhisanimationontwos.Currently,heisfollowingalongwiththerobot,soyoudonotneedtodoanythingspecialtohistiming.Ifyoudidanimatehim,youwouldwanttogothroughthesamestepsasoutlinedearlier:selectinghischaractersetandtypingtwos intothechannelbox.HewillbehookedtothesametimeOnTwosnodeandByattribute.Thisisgreat.Thatmeansthatyourreferenceobjectwillstaywiththesametimingastherobot.Thatisoneofthehardestthingsto have to worry about—making sure that the 2D animation has the same keyframes andtimingas the 3D.Why? If the 2Danimateson frameswhen the 3D isholding still (orviceversa),thingsstarttowiggleandyougiveawaytheillusionofregistration.
Also,ifyouarenotusingcharactersets,youcanselectalloftheanimatedcontrolsandusethescript.Theresultwillbethesame.
3DAnimationisdone—NowWhat?
When do we put toon lines on our animated characters?When do we do the final 3D

render?Whendowestartanimatingour2Dcharacter?Goodquestions.Inaproductionsetting,youwanttohaveyouranimationcompleted(and
approved) first before you beginworking on the final look. Iterations to a quick approval,adjustment,oraquickremovalarekeytonotwastingtimeonproduction.
Becauseour3Danimationiscompleteandistobehandedofftothe2Ddepartment,let’salsohanditofftotherenderingdepartment.
Note:youwillfindanoverviewtoMaya’sToonLineusageinthecompaniondataofthisbook:ChapterTwo_MayasToonLine.pdf.
3DLeads2D:ToonFillShading
Herewewillapplytoonshadingtoour3Dcharacter,Robby.Wearetryingtogetflatcolorwith a little shading for the paint fill and a thick and thin line to match a 2D character’scleaned-upline.Ourtutorial2Dcharacterisprettybasictogetusstarted.
FIGURE2.132Dcharacter

FIGURE2.143Dcharacterwithtoonline
Open the file: open the animation file that you saved or our fileRobby_3DLeads2D_3_onTwos.mb.
FillShader
First,toworkwithourgeometryandputshadingonit,wewillhavetobeabletoselectit.Mostmodernrigshavethegeometrylockeddownsothattheanimatorscannottouchitandharmitinanyway.(Iftherigisn’tlockeddownandthecreatorisinmyclass,thatis10pointsoff.)
1. In the Layer panel, locate the GEO layer for the robot and make it editable byclicking on theR (R stands for reference; the object cannot be selected).Once youclicktheR, itwillbecomeaT(T stands for template; theobjectcannotbeselectedand it is displayed as a pink wire frame). Click again on theT and the box willbecomeempty.Nowthecontentsofthatlayerareeditable.
2. In the perspectivewindow, select the robot’s geometry andpress theup arrowonyour keyboard to select all of the geometry. (You can also locate theGEO groupnodeintheoutlinerfortherobot.)
3. IntheRenderingarea,selectToon>AssignFillShader>ShadedBrightnessThreeTone.

4. ClickontheRendericontoseewhatthefillshaderlookslike.
FIGURE2.15RendericonisclickedtoseeToonFillShaderonRobby
TakeNote
Ifyouapplytoonfilltoanobjectanditturnsoutverychunky,thereisaneasywaytofixit.Toonfillshaderswillshowfacetingof low-polyobjectsunlesstheyhavesoftnormals.Withthemeshselected,gotothePolygonsareaandselectNormals>SoftenEdge.Re-rendertheframetoseethebetterresults.
TweakFillShader
ThenicethingaboutfillshadersisthatyoucanadjustthemusingIPR:
1. ClickontheIPRbutton,either in therenderwindowthatyouhaveopenorat the

topstatusline.2. Whentherenderhascompleted,followthedirectionsfoundatthebottom:“Selecta
regiontobegintuning.”
FIGURE2.16IPRallowsyoutoselectaregiontointeractivelyrenderwhileyouadjustparameters
3. Select any of the robot geometry; open the Attribute Editor (CTRL + A); scrollthroughthetabsuntilyoufindthethree-ToneBrightnessShadertab.
4. The three-tone brightness shader is a ramp shader. You can click and drag on thesmallcirclestoadjustthethresholdthatthecolorsshowupin.Therightmostcoloristhecolorthatshowsupwherethelightisthestrongest.Theleftmostcolorshowsupwherethelightistheweakest.
FIGURE2.17UsetheIPRrenderviewtoquicklytweakyourfillshaderusingthethreeToneBrightnessShadertab
5. Createadarkgrayfortheleftcolorandalightgrayfortherightcolor.Deletethemiddle color by clicking on theX. Let’s find a midrange color using a differentmethodyoumightnotbeawareof.
FIGURE2.18Deletethemiddlecolor
6. DoubleClickontheSelectedColorchipandanexpandedColorChooserwindow

willopen.Inthatwindow,opentheBlendtab.7. In theBlend tab, click on any of the four rectangles, then click on the light color;
repeatforthedarkcoloruntilyouhavecreatedanicegradient.SeeFigure2.19asanexample.
8. Clickontherampbetweenthetwocolorsandthatwilladdathirdcolorcircle.9. In theBlendTab, select a color from the blend area. Itwill load into the selected
rampcolor.Forme,thissavesalotoftimebyallowingmetousetheblendfeaturetogetsomethingcloserthatIcanworkwith.
10. ClickAccept orDone (depending on your version of Maya) to close the ColorChooserwindow.
FIGURE2.19AddcolorsintotheBlendtab.(OlderversionsofMayaautoloadtheselectedcolorchip.Newerversionsgive
youaneyedroppercursortopickthecolor.)
FIGURE2.20Thirdcolorchosenwiththeeyedroppertool
This looks like a good place to save. Our completed file is saved atRobby_3DLeads2D_4.mb.
ToonLine

Thenextstepistoputonatoonlinethatmatchesthe2Dcharacter’scleaned-upline.ForthisnextsectionusetheanimationfilethatyousavedorourfileRobby_3DLeads2D_4.mb.
ToonLineShader
Thegeometryshouldstillbeselectablefromearlierinthelessonwhenweappliedthetoonfill:
1. Selecttherobot’sGEOnodeintheoutliner,orclickonthegeometryandclicktheuparrowkeyonthekeyboard.(Therobotshouldbehighlightedgreen.)
2. IntheRenderingarea,selectToon>AssignOutline>AddNewToonOutline. Intheattributeeditor,changeLineWidth=0.058orsomethingsmaller.(Don’tgotoosmall;we’reabouttoadjustthislinesomemore.)
3. Scroll down and open the section forCurvature BasedWidth Scaling; this willallowustoadjustthethicknessofcurvedlinesversusstraightlines.
4. TurnonthecheckboxforCurvatureModulation.(Where’sthelittlegreenMarvinMartian?Giveme theQ-36ExplosiveSpaceModulator.)Youmighthave toadjustyourgloballinewidthtomakeyourlinesvisibleagain.
5. I find it hard to see the toon lines in the perspective window when they arehighlighted in green. So in the camera view you can select Show > SelectionHighlightingtohidethehighlighting.
Let’slookatthatcurvaturewidthramp.Whathappenswhenyoumovethecurve?Itmighttakealittlebitofthoughttofigureitout.Itlookslikethedocumentationhastheexplanationbackward(Imightbereadingitwrong).HereishowIseeitworking:
1. [Left]Moving thecurve to the left sideof the rampaffects the toon lines thatarecurved.
2. [Right]Movingthecurvetotherightsideoftherampaffectsthetoonlinesthatarestraight.
3. [Top]Movingthecurvetothetopoftherampmakesthetoonlinesthicker.4. [Bottom]Movingthecurvetothebottomoftherampmakesthetoonlinesthinner.
FIGURE2.21Curvaturewidthramp

Ittakessometweaking.IfyougetyourcurvetolookliketheoneshowninFigure2.22,youcangetalittlethickandthindependingonhowcurvedtheobjectis,andthestraightlinesarenotasthickasthethinones:
1. In the profile tab, bring theProfileWidthModulation to .3 to overall adjust thetaper.
2. AdjusttheProfileWidthasnecessarytogetalinethicknessthatyoulike.3. TestRender.
FIGURE2.22Snapshotoftherobot’sneckandthecurvaturewidthramp
Creases
Thecreaseinthefrontoftherobot’schestmaynothaveatoonline.Orperhapsthereareotherareaswhereyouwanttoaddatoonline.Let’sseehowtofixthatproblem:
1. Yourfirstinstinctmightbetogotothecreaselinestab,turnoffHardcreases,andadjusttheCreaseAngleMintoseeifyoucandialinthatspecificcreaseintherobot.

However, you end up getting a lot more creases that way, more than you want.(Keepbringingthatsliderdownandyoucandoanicewireframerender.)
2. Instead,keeptheoptionforHardCreaseson.Gotoedgeselectionmodeandselectalineofedgesacrossthecreaseinthebottomoftheribcage(Figure2.23).
3. InthePolygonarea,selectNormals>SetNormalAngle…4. Inthepopupwindow,bringthevalueto0andclickApplyandClose.5. AdjusttheCreaseWidthandCreaseAngleMaxasnecessary.
Figure 2.23 shows the visible crease at the bottom of the chest. Using hard edges onlyallowsyoualittlemorecontrolofexactlywhatcreasesareshown.
FIGURE2.23TheHardCreaseLinesoptionisturnedonandedgesinthechestaregivenhardnormals,resultinginacrease
line

FIGURE2.23ARobotwithtoonfillandhardcreases
3DLeads2D:MayaRenderLayersandPhotoshop
Wearereadytoexportourlevelsofanimation.OnelevelwillbetheRobotRobbyandthesecondlevelwillbeourstand-incharacter.TorenderoutseparatelevelsinMaya,youcanuseRenderLayers.SettingthemupismuchlikesettingupDisplayLayers.Infact,becarefultonotewhenyouareintheDisplayLayermodeversustheRenderLayermode.ThefollowingishowtouseRenderLayersinMaya2008orolderversions.We’lllookatMaya2009aswell.
1. Createrenderlayers:
a. AtthebottomoftheChannelsboxinthelayersarea,clicktheRendertab.b. Intheoutliner,selectRobbyRobot,thenclickLayers>CreateLayerfrom
Selected.

c. Double-clickonthenewlayer(layer1)andnameitRobby_Anim.ClickonSave.Note:onlytheRobbyisvisible.
FIGURE2.24TheRobby_Animrenderlayerhasonlytherobotinit.Everythingelsehides(willnot
render)
d. ClickbackontheMasterlayer,andyouwillseeeverythingagain.e. ThetoonlinesmorethanlikelywerenotaddedtoyourRobbyLayer.Select
RobRobot’s toon lines, thenright-clickon theRobby_Anim render layerandchooseAddSelectedObjects.
RepeatbthroughcforRoy,thestand-in.
f.Youshouldhavethefollowingrenderlayers:i. Masterlayer—showseverythingwhenclicked.ii. Robby_Anim—showsonlytherobotwhenclicked.iii. Roy_Ref—showsonlythestand-incharacterwhenclicked.
2.Renderingtheimages:Thenextthingtodoistorenderouttheseimages.Youcansetthebackgroundcolortobesomethingotherthanblack.TherendersshowninFigure

2.26 have a white background color. Background colors can be set in the cameraattributes.Thisdoesnotaffectthealphachannel.
a. IntheRenderLayerwindow,chooseOptions>OptionBoxforRenderAllLayers.
b. IntheoptionsboxchooseKeepLayers.ClickApplyandClose.c. Double-checkthattheRenderAllLayersisactuallycheckedon.d. Open your Render Settings window. (Window > Rendering Editors >
RenderSettings)
FIGURE2.25Roy_Reflayerwithstand-incharacter
FIGURE2.26Renderalllayers
Wewillusethefollowingsettings:
1. Setthename.2. Namingconventionisname.#.ext.3. Numberpaddingto4.4. By Frame is set to 1 or 2. (One, if you want to render every frame. Two, if the
animationisontwosandyouwanttorendereveryotherframeandsavesometime.Nosenseinrenderingaframetwiceifithasn’tchanged.)
5. We’lluse.tifs.

6. Choosetheappropriateframelength;oursis1–18.7. ChoosetheRENDER_CAMastheRenderableCamera.8. Watchout!Makesurealphachannelsisturnedon!9. Resolutionshouldbeyourfinalresolution.
a. NowyoucanclickRender>BatchRender.Therendersforeachlayerwillbeplacedinnamedfolders.LookattheScriptEditortoseetheprogress.
FIGURE2.27Rendersettingsandexpectedresults
Whydidwegothroughthetroubleofsettinguprenderlayers?Nowwehaveasequenceof images forboth characters.Eachhas its ownalpha channel so that it canbe compositedovertopofabackgroundorotherlevelsasneeded.Nowwecantakeourrobot’s3Drenderand use Roy’s 3D reference render to draw the 2D animation and make sure that theregistrationiscorrect.
DigDeeper!
Aquicknoteonfiletypes.Notallfiletypessupportalphachannels.Tiffdoes.JPG(whichisalsocompressed)doesnot.Pleaseseekhelpwithanintroto3Dbookifyouareunsureoffiletypes.
What could go wrong? I hit two possible bugs in this section both on PC and Mac(versions2011–2014).
1. Thetwosscriptmaynotworkwithbatchrendering!Youmayhavetoditchthetwosnode inorder to render.Select that timingnode thescriptcreatedby typing in the

command line select-r timeOnTwos. This selects the node. Now, delete it. Batchrenderasbefore.
2. During playback in Maya, it wouldn’t evaluate the timeline! I knew there wasanimationthere,butitwouldnotshow.IwasabletoturnitonagainbyclickingonModify > EvaluateNodes > EvaluateAll. I think this wasmore user error—theaccidentalhittingofahotkey.
3DLeads2D:Animating2DonTopof3D
Whatsoftwaredoyouusetodrawyour2Danimationontopofthe3Danimation?Inclasswe have been using many different software packages and find that each one lends itselftowarddifferentfinallooks.You’llwanttoexperimentwithanysoftwareprogramsyouthinkmightworktoseehowwellyoucananimateinthem.Wewillcoverthetechnicalaspectsofafewofthemhereinthischapter.
MayaandPhotoshop
AnewfeaturethatwasputintoPhotoshop,asofversionCS3,istheabilitytoeditandworkonsequencesofimages.
OpenOurRenders
ToopentherenderedfilesequenceintoPhotoshop,clickFile>Open, thenselectthefirstimageoftheRobotlevel.OursisinthefolderRobby_Animandisnamedrb.00001.tif.ClickontheImageSequenceoption.
Oh,look—awindowopensforyoutosettheproperframerate(rememberwhatwesaidinChapter1—therearemany,manyplacestomessupframerate);select24fps.

FIGURE2.28Remembertosetthecorrectframerate
Noticethevideolayerinthelayerpalette.Thisisnolongeranormalimagelayer.InnewerversionsofPhotoshopatime-linewindowautomaticallyopensup.(Inearlierversions,openthetimelinebyclickingonWindow>TimelineorWindow>Animation.)
FIGURE2.29Robbyimportedasvideolayer
IfyourepeatedthestepspresentedearlierfortheRoyimages,youwouldhaveaseparatePhotoshopfile.InnewerversionsofPhotoshopthevideoofRobbyisinaVideoGroup.IfyoudothenextstepwithRobby’sLayer1selected,PhotoshopwillloadthevideoclipofRoyafterRobby.
Instead, click on the main canvas so that the Robby Layer 1 layer is deselected. Now,continuetothenextstep.SelectLayer>VideoLayers>NewVideoLayerfromFile, thenselectthefirstimageofRoy.
Youcan’tseebothlayersnow,canyou?Thereisadifficultyhere.Photoshopdoesn’tknowwhatalphachanneltouse,soitdoesnotuseany.Wecangetaroundthis.SelectRoy’slayer,thenchangethelayerblendtomultiply.Nowyoucanseebothlayers.

Later inanotherchapter,wewill learnhowtoworkaroundPhotoshop’svideolayersnotseeing individual imagealphas.Fornow,weareonlyusing the layersas reference, so theiralphachannelisnotabsolutelyneededrightnow.
FIGURE2.30Multiplyblendnodeallowsyoutoseebothlayers
ToAnimate

FIGURE2.31Blankvideolayertodrawon.TimelineshowsRobbyandRoyreferencelayersandtheemptyvideolayeryou
willdrawon
TodrawframebyframeinPhotoshop,youwillneedablankvideolayeronwhichtodraw:
1. Click on the canvas tomake sure no video layer is selected.ClickLayer > VideoLayers > New Blank Video Layer. Note the new blank video layer in the layerpalette.
2. Toseedifferentframes,scrubthroughthetimelineframesbyclickinganddraggingonthebluearrow.
3. Youcando straight-aheadanimationeasilyordopose-to-poseanimation.Youwillwant to turnonion-skinningonso thatyoucanseekeyframesbeforeandafter thebreakdown. Click on the arrow at the top right of the timeline window. Turn onEnableOnionSkins.ThenchooseOnionSkinSettings.Set theFrameBeforeandFrameAfter,andFrameSpacingoptionsto8.Youshouldseeghostingappearinyouranimation.
4. Nowyouarereadytodraw.Setbrushsizeandstyletoyourliking.

FIGURE2.32Onion-skinning
DigDeeper
IfyouwanttoknowalotmoreabouthowtocontrolthelinelookinPhotoshop,checkoutCreativePhotoshop:DigitalIllustrationandArtTechniquesCoveringPhotoshopCS3byDerekLea.
5.Makesuretheblankvideolayerisselected.Animatebydrawingoneachframe.Movethebluearrowtothenextframe.Continuetodraw.Ifyouhavekeyframeswiththe3D reference character posed, it helps the 2D animator tie down the contact pointsmoreclearly.
Anoteonanimating inPhotoshop: this chapter isusing time-linekeyframes. The othermethodofusingPhotoshoptoanimateisframeanimation.Frameanimationis theoriginalimplementation of animation; timeline was developed later. If you wish to use the olderversionofanimation,takealookatthePhotoshopdocumentation.
IfyouareusingCS4orlater,youcanusehotkeystoadvancetothenextframeorgobacktothepreviousframe(superhandywhenanimating).Thehotkeysarethearrowkeys,andyouwillneedtoturnontimelinehotkeysbyclickingontheoptionarrowintheupperrightcorneroftheanimationwindowandturningonEnableTimelineShort-CutKeys.

Rendering
Whenyouaredoneanimating, youwillwant to saveoutyour file as individual images.These images can then be composited together with the other levels in the compositingpackage of your choice. The most important thing here is to get an alpha channel. Thesedirectionswillhelpyougetthat.It’strickyinPhotoshop.
1. First,HIDEBOTH reference layers. (Otherwise theywill renderwith your drawnimages.OOPS!)
2. SavethePSDfiletoretainthevideolayersforfuturechanges.3. SelectFile>Export>RenderVideo…
Usethefollowingsettings:
1. Setnameandfolder.2. You can render out toquick timeor individual frames.Theonlyway to get alpha
channelsistouseQuickTimeMovie.3. To keep from losing render quality: Format = QuickTime Settings. Preset =
Uncompressed (Iwouldprefer touse .tifs, but at themomentAdobepackagesdonotseemtosupport.tifrgba.)
4. SettheAlphaChanneltobePremultipliedwithWhite.5. Warning!Watchoutfortheframerateoptionatthebottomofthemenu!6. ClickRender.
Thiswill saveamovie file ofyour animationwithalpha channels.Note thatyoudonothaveanimageforeachframe.Instead,youhaveamoviefileandthatfilecangetquitelarge.Itisuncompressed,whichissometimesreferredtoas“Animation”formatinQuickTime.Itisthesamedifference—100 individual framesoronebigfile. It is lossless,meaningthere isnocompressionthatcancausevisualartifacts.

FIGURE2.33Renderingoptions
MayaandCorelPainter
Iwanttomakeapointhere.Don’tgetallsnobbishaboutsoftware.(Thisisaremindertomyselfaswell.)Whatothersoftwareisoutthere?Whatcanitdo?Whatdoweneedittodoforour2D/3Dneeds?Mostimportantly,our2Dpackageneedstobringinaseriesofimagesoramoviefilesowecananimate;needstosaveoutalphachannels;andneedstobeabletohandle the resolution of images and color depth youwant.What if youwant to useCorelPainter to animate in? It takes a fewmore button clicks, but you get the added bonus ofanimating in Painter. The paintbrushes and paper textures can add a great look to youranimatedfilm.
There are some issueswithCorelPainter.UnlikePhotoshop,you cannothavemore thanone reference video reference. (If you find away to do so, contactme via the publisher’swebsite.) Second, older versions of Painter crash when reading in .tifs. There are someconcernswithbitdepthinthenewerversions.Toavoidallofthat,youmaywanttocreatea

renderfromMayathatisaJPGandisnotusingrenderlayers.
Re-Render
YoucanusePhotoshoptocompositetheRobbyandRoyreferenceimagestogetherorre-renderinMaya.Itisuptoyou.Inthischapter,we’lluseMayaveryquicklytore-render.
1. Open the Maya file of your completed animation or our fileRobby_3DLeads2D_5.mb.
2. FreakoutbecauseyouonlyseeRoyandnot theRobot. (Idid. I thought Ihad lostsomething.Oneshouldn’tworksolateatnight.Itmakesonejumpy.)
3. GototheRenderLayerareaandclickmasterLayersothateverythingshows.4. TurnoffOptions>RenderAllLayers.5. In the render layers,makesure thatanR isonlyon themaster-Layer oryouwill
wonderwhyyoudon’thavethemasterLayerrendered.6. ChangetherendersettingssothatyououtputaJPGimage.7. BatchRender.
AnimatinginCorelPainter
Corel Painter 12 has changed how you sketch over a movie source. Note: the onlinedocumentation for it is not accurate (at least when I was reading it). Here’s how it reallyworks:
1. Createamoviefileforyour2DcharacterbyclickingonMovie>NewMovie.Nameit“my2D.frm”.Myfilesizeisverysmall:320×240.Yourswillbethefinalsizethatyouareworkingat.Watchout—youcouldrunoutofmemoryhere.Setthenumberofimages=18,OnionSkin=2. (Onion-skinningrefers tohowmanyframesare infrontandbehindofthemovieyougettosee.)
2. OpentheclonesourcewindowbyclickingWindow>CloneSource.3. Atthebottomleftoftheclonesourcewindow,clicktheiconforOpenSourceImage
>OpenSource…4. Locate theRobby_Roy_together images. Because this is a sequence of images you
willneedto:
a. Selectthefirstnumberedfile,thenclickopen.

b. Selectthelastnumberedfile,thenclickopen.c. NamethefilethatPainterwillsave:myRef.FMP.d. Select the proper level of onion-skinning and bit depth (we’ll use the
defaults),andclickOK.
5. Selectthemy2Dwindowsothatitistheactivewindow.6. IntheCloneSourcewindowclickonOpenSourceImageandchoosethereference
image. It will only have the name of the first image listed—for example,rr_together.0001.tif.
7. Toseethereferencemovie,clickonCanvas>TracingPaper.Tracingpaperletsyouseetheclonesourcelayerunderyourdrawinglayers.
8. TheFrameStackwindowshouldalreadybeopen.Youcandrawoneachframeandadvanceforwardtocontinuetoanimate.
FIGURE2.34SettingstocreatenewmoviedocumentinCorelPainter
Whataboutonion-skinning?Thatwasset in thedialogboxwhenyou firstcreated thedocument.Youcanclosethedocumentandreopenittosetanewnumberofimagestoshowforonionskinning.Why?Idon’tknow.Let’sassumeithastodowithhowtheprogramallocatesmemory.Thepointertothereferencefiledoesnotgetsavedwithyouranimationfile.
Oops—bug alert: The frame stack window in my version is not advancing the clonesourceframes.Itshould.Well,that’sabummer.Toworkaroundit,youcangotothereferencemovie,frameadvance,andintheclonewindowaddthesamefileagain.Itwillcontinuetostackmultipleimages.Clickonthecorrectimageasreference.Wow—

that can go wrong very quickly. You have to be super careful to make sure thereferenceimageisthesameframeastheoneyouaredrawingon.
FIGURE2.35AnimatingusingMovieCloneSourceastracingpaper
RenderinginCorelPainter
Whenyouhavecompletedyouranimation,itistimetorenderouttheimages:
1. SelectFile>SaveAs…2. ChooseSaveMovieasMovieFile.3. Use the same settings that we used in Photoshop: Animation Compression and
MillionsofColors.Watchoutforframerate!

FIGURE2.36RenderinganimationinCorelPainter
Bug:olderversionsofCorelPaintercrashedwhentryingtoexportmoviefiles.Inversion12it isworking.Whenyouaresavingyour imagesasaQuickTimefileandyouexperiencecrashes, itmight be the version ofQuickTime you are using that is causing issues and notnecessarily thepieceof software.TryadifferentQuickTimeversion,possiblyevenanolderone.Ifyouareonaschool’scomputerwhereyouareunabletoinstallfiles,youmayhavetofindanalternativemethodforsavingyourimages.
Let’sconsiderwhatwejustwentthrough.There’salotofbuttonclickingandsomethingsthat just aren’t functional. In your personal pipeline, youmaywant to evaluate your timeversusmoney. Ifyouareusingcheaper softwarebecause that is allyourbudgetwill allow,consider how much time and effort each extra button click, bug, issue, crash, or baddocumentationcostyou.Tocounterbalance the time,youmay find thatyoucanonlygetacertain look out of a given piece of software. Corel does have extremely nice paintingfunctionality.It’syourdecision.
MayaandOtherSoftware

Ofcourse,thereareothersoftwarepackagesthatyoucanusetoanimatein2D.Flashmightbeyour firstchoice,as itwasdesignedasananimationpackage.The thing towatch is thatyourlinelookslikeahand-drawn2DlineandnotlikeaFlashredrawnline.Todothisyouwillhave to hand-massage every line that you draw by turning the lines into brushstrokes (ordrawingwiththebrushtobeginwith)andadjustingthevectorpointstosmoothouttheline.Figure2.37showsadrawinginFlashwiththepointsselectedforadjustment.ToseeanonlineexampleofFlashanimation,takealookatHomeStarRunneratwww.homestarrunner.com.All animations are created inFlash, and eachdrawn line ismassaged (or cleanedup) tobeexactlywhattheartistsintended.
FIGURE2.37DrawinginFlashcreatesvectorlines
Agreatpackage,andonethat isa2Ddigitalanimationindustrystandard, isToonBoom.We’lltakealookatdrawinginToonBoomlateroninthisbook.
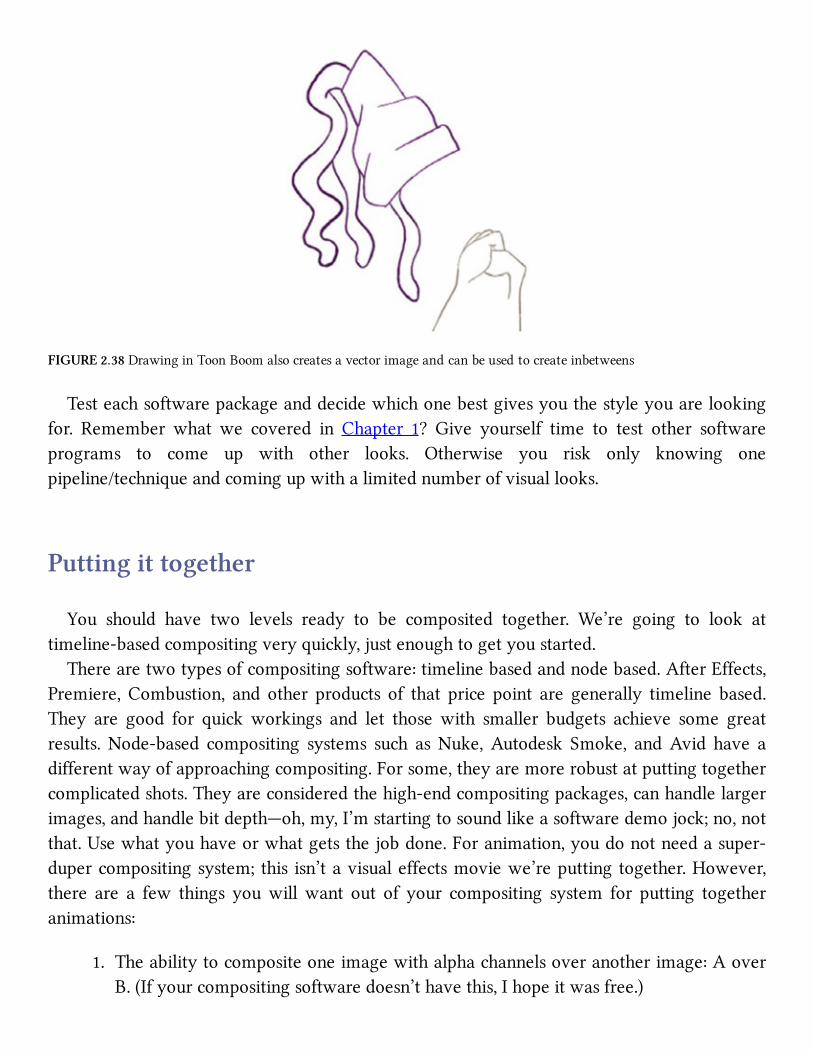
FIGURE2.38DrawinginToonBoomalsocreatesavectorimageandcanbeusedtocreateinbetweens
Testeachsoftwarepackageanddecidewhichonebestgivesyouthestyleyouarelookingfor. Remember what we covered in Chapter 1? Give yourself time to test other softwareprograms to come up with other looks. Otherwise you risk only knowing onepipeline/techniqueandcomingupwithalimitednumberofvisuallooks.
Puttingittogether
You should have two levels ready to be composited together. We’re going to look attimeline-basedcompositingveryquickly,justenoughtogetyoustarted.
Therearetwotypesofcompositingsoftware:timelinebasedandnodebased.AfterEffects,Premiere, Combustion, and other products of that price point are generally timeline based.They are good for quickworkings and let those with smaller budgets achieve some greatresults. Node-based compositing systems such asNuke,Autodesk Smoke, andAvid have adifferentwayofapproachingcompositing.Forsome,theyaremorerobustatputtingtogethercomplicatedshots.Theyareconsideredthehigh-endcompositingpackages,canhandlelargerimages,andhandlebitdepth—oh,my,I’mstartingtosoundlikeasoftwaredemojock;no,notthat.Usewhatyouhaveorwhatgetsthejobdone.Foranimation,youdonotneedasuper-dupercompositingsystem;this isn’tavisualeffectsmoviewe’reputtingtogether.However,there are a few things youwillwant out of your compositing system for putting togetheranimations:
1. Theabilitytocompositeoneimagewithalphachannelsoveranotherimage:AoverB.(Ifyourcompositingsoftwaredoesn’thavethis,Ihopeitwasfree.)
2. Theabilitytocreatetravelingmaskstohelpregistertwoimagestogether.3. Theabilitytousemaskstocolorcorrect.4. Theabilitytoreuseartworkeasily.5. Theabilitytoquicklyrenderoutthefinalproductatdifferentresolutions,forquick
testingofthefinalresults.
Forthischapter,wewilluseAfterEffects.Youwillwanttobringinyourtwolevels,RobbyandRoy,andcompositethemtogethertocreatethefinaloutputmovie.
TakeNote
Watchoutforframerate(again).We’reworkingat24framespersecond.AfterEffects(andmostcompositingsoftwareprograms)defaultto30framespersecond.
SettheFrameRate
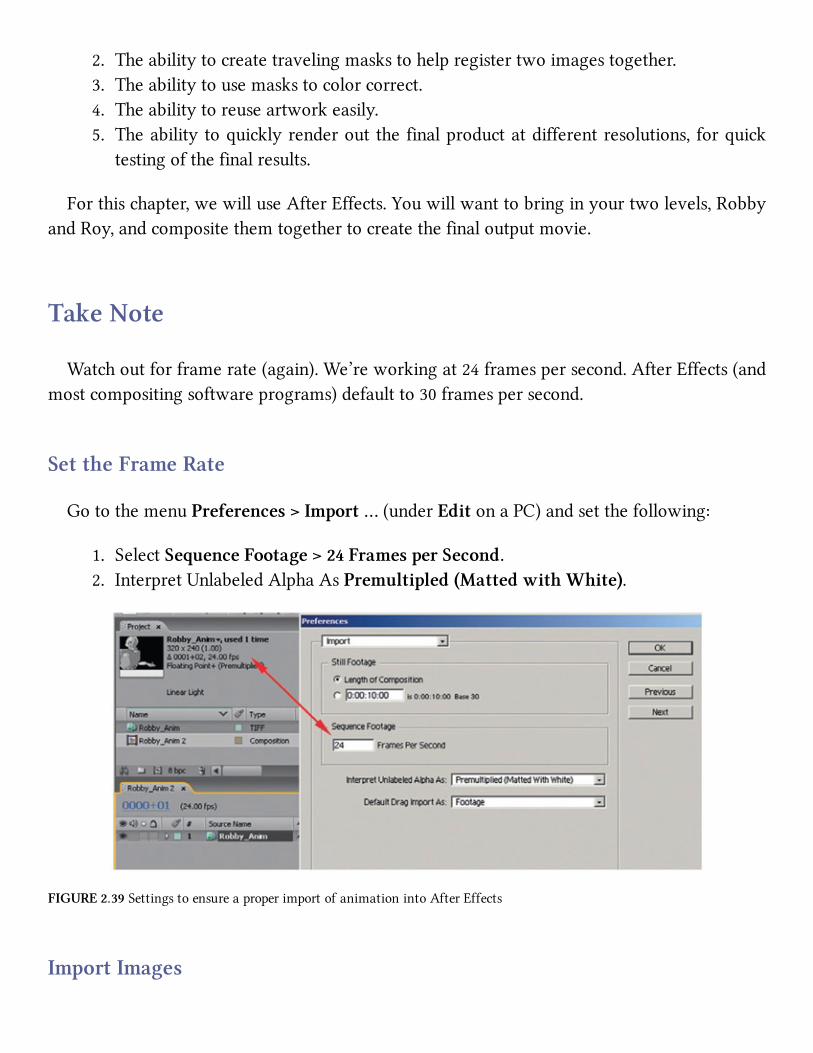
GotothemenuPreferences>Import…(underEditonaPC)andsetthefollowing:
1. SelectSequenceFootage>24FramesperSecond.2. InterpretUnlabeledAlphaAsPremultipled(MattedwithWhite).
FIGURE2.39SettingstoensureaproperimportofanimationintoAfterEffects
ImportImages
1. SelectFile > Import File, and choose the robot’s images.Make sure to select .tifSequenceandForceAlphabeticalOrder.
TakeNote
What cangowronghere? If youdonothave zeropadding inyournumbers—image-.tif,image-2.tif, image-10.tif—your images will come in out of sequence. Eeek! Don’t do that,Batman!Instead,usezeropaddinginyourimagenames:image-00001.tif,image-00002.tif,andsoon.
2.Repeatstep1foryour2DRoyimages. If thefilesareaQuick-Timemovie,youonlyhavetoselectthefile.AfterEffectswillbringitinasyouexpectitto.
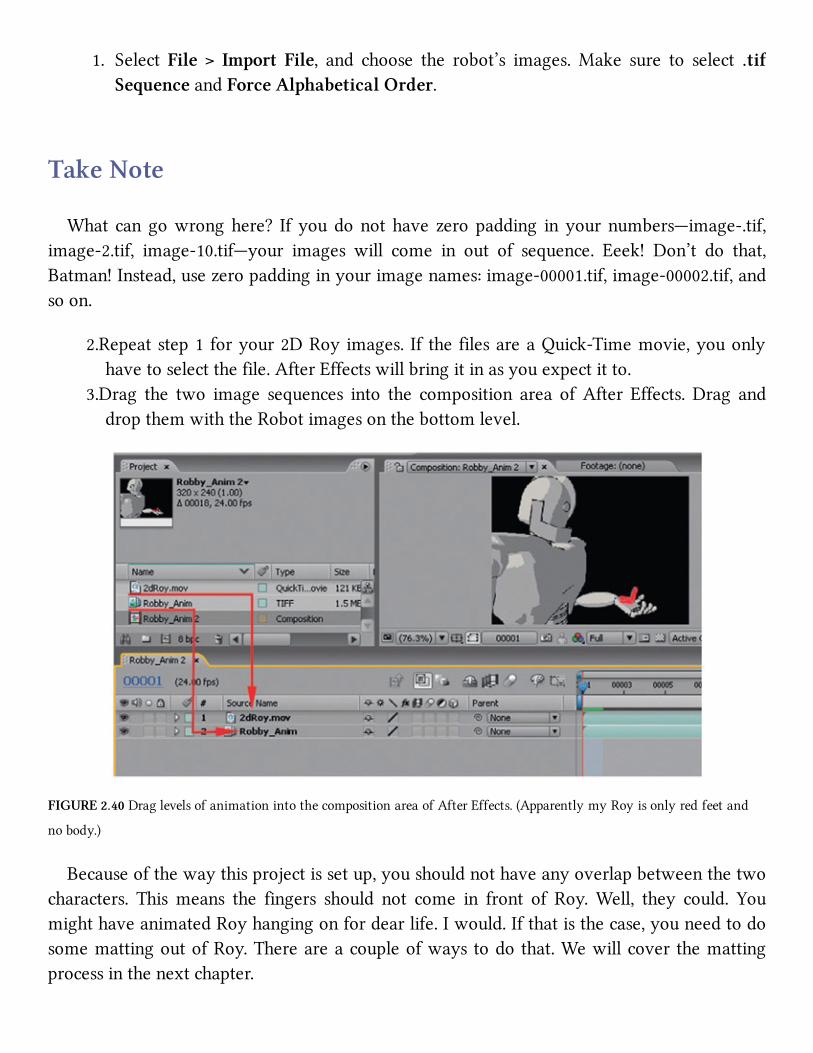
3.Drag the two image sequences into the composition area ofAfter Effects.Drag anddropthemwiththeRobotimagesonthebottomlevel.
FIGURE2.40DraglevelsofanimationintothecompositionareaofAfterEffects.(ApparentlymyRoyisonlyredfeetand
nobody.)
Becauseofthewaythisprojectissetup,youshouldnothaveanyoverlapbetweenthetwocharacters. Thismeans the fingers should not come in front of Roy.Well, they could. YoumighthaveanimatedRoyhangingonfordearlife.Iwould.Ifthatisthecase,youneedtodosomemattingoutofRoy.Thereareacoupleofwaystodothat.Wewillcoverthemattingprocessinthenextchapter.

RenderYourFinalMovie!
Render a low-resolution pass first for a quick check, then do a high-res composite. Youprobablyguessedwheretogotoexportoutyourfinal2D/3Dmovie.IntheProjecttab,selectthecomposition.ThenselectFile>Export>AddtoRenderQueue.ClickonthesmallarrownexttoOutputModule.Thisgivesa listofquickrenderingselections.Whatdoyourenderyourmovie in?That isuptoyou.Foranimationclasseswe like torender inQuickTime,sothatwecanscrubthroughthemovieframebyframeinQuick-Time.Also,acodecthathasagoodcompressionratethatdoesn’tdegradetheimagetoomuchisuseful.Thereareplentyoftexts or websites dedicated to exhaustive comparison of codecs. I like Sorenson 3; still, itrendersquicklyandletsmedouble-checkalliswellbeforecompletingalosslessrender.YoumaylikeH.264;itexpectsacertainimagesize.
Onceyouaresatisfiedthatalliswell,repeatthestepsagaintogetthefinalrenderwithalossless compression. If you chose the quick setting of “losslesswithAlpha,” a peek at thecustomsettingswillshowthatyouareusingananimationcodecthatsavesrawimagesinaQuickTimefilewithapremultipliedalphamatte.Theseimagesyoucanusetoputintoyourfinaledit,addsoundeffects,andsoon.
Oneothernote:theframeratewillnowbechangedto29.97framespersecond,sinceonlyfilmactuallyplaysat24fps.You’llnoteawarningnoticeinthecustomrenderingsettings.
FIGURE2.41Compressionsettingsforfinalcomposite

FIGURE2.42Keyframesfromfinalcomposite
FurtherReading
Lea,Derek.CreativePhotoshop:Digital IllustrationandArtTechniquesCoveringPhotoshopCS3.Amsterdam;Boston:FocalPress,2007.
LeDoux,Joseph.SynapticSelf:HowOurBrainsBecomeWhoWeAre.London:Penguin,2003.OHailey,Tina.RigitRight!.London;Boston:FocalPress,2013.
StudentContributors
Contributingstudentsforthischapter,inorderofcontribution:
CandiceCieslaClaireAlmonDanielTieslingChelseyL.ClineJessicaHuangJohn-MichaelKirkconnell

3
2DCharacterswith3DParts(2DLeads)
FIGURE3.1John-MichaelKirkconnell,2009,2D/3Dcourse,SCAD
LectureNotes
Thischapterexploresatruehybridcharacterthatis2Dand3D.InChapter2,welookedattwo characters of different media interacting. The contact point could have been skillfullyhiddentoavoidtheissueoftouch.Wechosetoshowthetouch/contactpointbecausewewerediscussinghowimportanttouchbetweencharacterscanbe.However,inthischapter,wewilllook at one character in which we want the media to be seamless. We do not want the

differences in the character’s media to divert the viewer’s attention from the character’sacting.
Aswitheverythingwehaveencountered,therearequestionsthatmustbeanswered.Howdowemakethetwomedialooklikeeachother?Whatshouldwelookoutfor?Whatpipelineisbesttoensureregistration?Whatmethodwillallowforthebestanimation?Whatmethodwillgetinthewayoftheanimatortheleast?
HowdoWeMaketheTwoMediaLookLikeEachOther?
Agoodanswermightbethatwedraweverythingin2D:animatetheleadingportionin2Dandthenanimatethe3Dsection.Thenwewouldtakethe3Drenderanddrawovertopofitin3D.Thisdoesn’thelpourlinemileageany,butcancertainlymakeforauniformlook.
Figure3.2 shows an example of an animation thatwas done inMaya and then redrawnframebyframeinPhotoshop.Inthiscase,theanimationwasofacameramovingaroundthethreecharacters.Doingtheanimationin3Dhelpedtheanimatortoworkouttheperspectivechangesanddrawingovertopin2Dgaveitaniceorganicfeel.
FIGURE3.23Danimationredrawnin2Dtocreateanorganicfeel.
Imagefrom3MagiciansbyClaireAlmon

Therearemanyexamplesof this typeof line look.ThePearceSistersbyLuisCook isanexample of a hybrid animation created in 3D but drawn over in 2D(www.pearcesisters.co.uk/production.html). The resulting look is very stylized and wasdefinitelyinfluentialto3Magicians.
Now that toon line rendering has come so far (though it cannot completely emulate thebeauty of anice cleanup line),we canput 3Dand 2D together to createhybrid characters.Laterinthischapter,wewilllookatsomeindustryexamplesof2D/3Dcharacters.Figure3.3showsa2D/3Dcharacterfromagroupprojectclass.ThecastitselfwasmodeledandtoonlinerenderedinMaya.Theorganicpartsofthecharacterweredrawnin2DusingFlash.
FIGURE3.33Dbodycastwith2DcharacterfromJaguarMcGuirebyClintDonaldson,2009,SCADgroupproject
Toformacohesivehybridcharacter,youwillneed tokeep inmind thecamera, lighting,shading,andmovement.

Camera
Theartistwillwanttoflattenoutthe3Dasmuchaspossiblebyusingatelephotolens(iffeasible) tominimize theperspective shiftofobjects.This step isoftenoverlookedasmanynewanimatorsarenotcomfortableenoughworkingwiththecamerainthe3Dsoftware;theytendtoleaveitatthedefaultlensandfocaldistance.
LightingandShading
Whenputtingthe2Dand3Dportionsofthecharactertogether,wewillwanttominimizehowroundedthe3Dcharacter looksbyusing flat toonshading;or, ifwechoosearoundedlook,the2Dcharacterportionwillhavetohavetonesonittomakeitseemroundedaswell.
Movement
We’vegottenawaywithtimingthingsoutin3Dandbasicallyrotoscopingthe2Dontopofreferencecontactpoints.Withacharacterledby2D,the3Danimatorwillneedtohaveaccesstothetimingchartandx-sheetfortheanimationinordertoseewherethe3Dkeysshouldbeplacedandwhattypeofspacingshouldbeused.Itispossibletoproceedwithoutx-sheetsandtimingcharts,butdoingsocancauseadisjointedfeelintheanimation.Alsokeepinmindthatthe2Dwillmorethanlikelybeontwos.
WhatshouldWeLookOutfor?
Whenanimatinga2Dcharacterthatwillhavea3Dlimborsometypeof3Dappendage,make sure to draw in the placement for the limb. Itwill be erased at compositing time.Abeginner’smistakeistoforgettosketchinwherethemissinglimbisandthusforgettoputweighton itand the like.Themore informationyouput intoyour2Danimation, themoreyouhavetofollowwhenplacingthe3Dportion.
WhatPipelineisBesttoEnsureRegistration?

When2Dleads,itdoesn’taffectregistrationifyouuse2Dpaperordigital2D.Therewillbesome time spent on scanning in the 2D paper animation, but this should not add anyregistrationissues.Remember,wehaveregistrationissuesthesecondweprint,notwhenwescan.Inshort,2Dleadingiseasieronthepipelinethananythingelse.Iftherehavetobeany2D animation fixes after 3D appendage animation is done, I would suggest doing themdigitally. Ifyoudon’t, thenyouwillhave togo throughaprintingandpeggingprocess foryour 3D appendage and then you will have to rescan. Art production managers will belookingattheirschedulesandgrimacing.
WhatMethodwillgetintheWayoftheAnimatortheLeast?
When it comes todigital 2Danimation, I havekeptmyeyeout fordifferent techniques.Recently,onagroupproject,wehadahandfulofanimatorsworkinginPhotoshop,Flash,andToonBoom.We comparednotes anddebated onwhichmethodwe liked best.We’ll coverdifferentsoftwareandanimationtechniquesinthisbook.Youcanchoosewhichonefitsyourpreferredmethodofanimation.
WhatMethodwillAllowfortheBestAnimation?
Buttonpushingaside,thereareotherfactorsthatareimportanttoconsiderwhenchoosingyourpipelinefordigital2Danimation:
1. Timing.Youwanttheeasiestmethodthatallowsyoutoworkoutyouranimation’stiming.
2. Playback.Youneedtobeabletoplaybackyouranimationeasily,often,andattheproperframerate.
3. Useofreference.Youwant tobeable toeasilyuse reference images to see contactpoints.Thesecanbefromyour3Dassets,sketches,andsoon.
4. Onion-skinning. It is important that the methods you use allow for pose-to-poseanimationsothatyoucanseeyourpreviousandnextkeywhileworkingontheposeinbetween.Themethodmustnotbe cumbersome (uh-oh, I’mslipping intowhite-paper,software-architecturelanguage—“mustnot,”“shallhave”).
5. Linequality.Canyoudrawinit?Doesitslowyourdrawingprocessdown?Thehopeis that it does not. This is the one main deciding factor in many of our groupproject/student project discussions. If the package you animate in doesn’t give you

thefinallinequalityyouwant,thatisokay.Youmayhavetoaddanothersoftwarepackagetodothecleaned-uplineovertoptheanimation.
In fact, given the specifications listed earlier of what an animator wants out of theproduction pipeline, it is not uncommon to havemultiple software packages. For example,youmightuseFlashforthetimingportionbecauseoftheeaseofthetimeline,Photoshopforthesecondpassattheanimationandinbetweens,ToonBoomforthefinalcleaned-upline,andAfterEffectsforthefinalcomposite.Now,thesoftwareIjustmentionedisjustanexample;itis more from a student’s vantage point of the software he or she might have available.StudentsmighthavetostayinPhotoshopforthecleaned-uplineiftheydonothaveaccesstonon-Adobe products. Other software programs that could be used include US Animation’sOpus,PlasticAnimationPaper,andCTPPro,tonameafew.
IsitHardtoAnimateaHybridCharacter?
Creating a hybrid character does add some technical challenge. Youwillwant to have agoodreasontodoit.Whatreasons?ThosethatwespokeaboutinChapter1:visualtarget,linemileage, and complexity. If it supports the story by supporting your visual target andminimizeseitheryourlinemileage(howmuchtheanimatorhastodraw)orthecomplexity(perspective,lotsofparts,andsoforth),thenyouhaveacandidatefora2D/3Dcharacter.
Thesecondyoudecidetodoonecharacterasmultiplemediayoumightfindthatyourcrewofanimatorscannothandleorprefersnottodoboth2Dand3D.Somedo,andthosethatdowill be able to handle their shots alone. Some prefer only onemedium, therefore youwillhavetoassigntwoanimatorsforonecharacter.Didyouhearanaccountantjustopenabottle?Thatdoesmakeforanexpensivecharacter.Whileoneanimatorisworkingonthe2Dportion,theotheranimatormighthavenoworkathisorherdesk.Notanoptimalsituationfortightbudgets.
IndustryExamples
Using 2D for the character (be it traditional paper or digital) allows an artist to drawkeyframesusingthosetraditionalskillsthatgivesomuchpersonalitytothecharacter.Ontopofthatpersonality,theartistisabletouse3Dtoolstopushthecharacterfurtherbyallowingmorecomplexpartstobeanimated.
ThemostamazingmainstreamindustryexamplescanbefoundinGlenKean’sanimationof

JohnSilverintheanimatedfilmTreasurePlanet,andanothermoresubtleexampleisshowninTheTripletsofBelleville,wherethe2D/3Dintegrationisinvisible.
IencourageyoutotakealookatthebonusfeaturesontheTreasurePlanetDVD.Thereissomuchinformationontherethatyouwillhavetowatchitmanytimes.Infact,itisoneofthebestexamplesofavisualcommentaryonaDVD.Youcansetitupsothatyouwatchthefilm and, like a built-in lecture, the filmwill pause at the appropriate places, play a bonusvideocliponhowthingsweremade,andsoon,andthenresumeplaybackofthemovie.ItisaclassroomonaDVD.
FIGURE3.4Pipelinetestof3DarmwithCaptainHookanimation
©2002Disney
IfyoulookatthebonusfeaturesontheDVD,youwillfindapenciltestofCaptainHookthat has his arm replacedwith a 3D arm.According toGlennKeane in his interview, theychose that scene because it had such strong acting and vibrancy. If you watch, it shouldbecomeevidentthatthe2Dcharacterleads.Theideaof2DleadingisthesamewiththeJohnSilver character.Thismakes sensebecausehe is the charactermovingaroundand the arm,eyepiece,andpegleg(whichare3D)followthe2D’smovement.Thecharacterdesignallowsfor an easy fit of the pieces together. I don’tmean to say it is easy, just that the characterdesigndoesnotgetintheway.Thearmseam,whereitfitsthebody,isalogicalseaminthedrawing.Ifandwhenthe2Dsleevecomesoverthe3Darm,specialcaremustbetakenwhencompositingthesetogether,becausethe3Dwouldbebothinfrontofthe2Dchestandbehindthe2Dsleeve.Thiswouldrequireamattetoholdout(ornotshow)someofthe3Darm.

FIGURE3.5CloseupofJohnSilver’sarmshowsacleanjoininglinebetweenthetwoelements
2002Disney
However,youmighthavenotnoticedthemostinvisibleexamplesofhybridanimation.InTheTriplets ofBelleville, youmighthavemissed the 2D/3Dportions.Youprobablynoticedsomedistinct3Delementslikethebicyclewheel,butdidyouseethe2D/3Dcharacter?Anytimeacharacterisridingabicycle,thecharacter’scontactlimbsareactually3D.Therestofthebodyissometimesanimatedin3Daswelltouseasreference.YoucantakealookatthebonusfeaturesontheDVDtoseeexamples.The3Dlinewasdirtieduptomakeitlessperfectinordertomatchthe2Dline.

FIGURE3.6TheTripletsofBellevilleshowsa2D/3Dcharacterwitha3Dbicycle
InDreamworks’Spirit,StallionoftheCimarron,youmaynothavenoticedthatthemainhorseissometimes2D,sometimes3D.Thesamegoesformanyforegroundandbackgroundcharactersinthefilm.Itcouldbecategorizedasa2Dwitha3Dpartora3Dwitha2Dpartbecause it is so interchanged. Buy that film and look at the extras on the DVD. From thebeginning,Dreamworkshadcomputersat thedesksof the2Dartists. Itwasalways treatedjustlikeanyothertool.Thisshowedintheirfilmswheretheycombined2Dand3Dseeminglyeffortlessly.Dreamworkseventuallydidtransitioncompletelyto3Dformostofitsfilms.
Studentsinmyclass,yourhomeworkistogowatchthesethreemoviesonceforthestoryandoncemoreframe-by-frametoseethe2Dand3Danimation.
One lastexample thatyouprobablyarenotawareof (therewasnomentionof itontheDVD)isthemoosefromBrotherBear.Itmighthavebeenmentionedinthecommentary.Themoosewereanimated in 2D, and then theanimatorsbrought their 2Ddrawings intoMayaandanimatedtheantlersin3Dtomatchthe2Ddrawings.Thedrawingswereprintedoutandpeggedup,andthecleanupdrawingsweredonetraditionallyonpaper.IwishIhadapictureof the antler rig thatwasmade for the animators, Tony Stanley andBroose Johnson.Theycame to the training room one day and showed me the “make funny” button, which putGrouchoMarx’sglasses andmustacheon the3Dversionof themoose’shead.Youhave tokeepasenseofhumor.
Hands-OnExamples

Nowlet’sgothroughtheprocessofmakingananimationofa2Dcharacterwhohasa3Darm.Ourmain concernswill be registrationand line look.Asdiscussedpreviously, the linelook of the two elements will need to match. To do this, you must master the renderingprocessandrenderthe3Dlinelookorusethe3Dpartasatemplateanddrawoveritinthesoftwarepackageofyour choosing.Unfortunately, the latter choicedoesnotdecreaseone’slinemileage.
Wewilltakesequence1,scene10,fromthestoryboardatthebeginningofthissection.Thisis a sequence from SCAD student Dianna Bedell’s senior project. The character was notdesignedtobe2D/3D.WewillretrofittheHoodoopriestesswitha3Darm.
FIGURE3.7Finished2DcharacterdesignbyDiannaBedell,cleanupbyAmandaPowell,2009,SCAD
FIGURE3.83DarmbyDannyTiesling,2009,SCAD
FIGURE3.93Darmaddedtoa2Dcharacter
Allimagesforthishands-onsectioncanbefoundinthecompaniondataforthisbook.
Timing
Whenworkingoutyouranimationtiming,therearemanysoftwareandanalogoptionsfor

you. I encouragemy students towork inwhatevermethod is fast and cheap. I don’tmeancheapasinhowmuchitcosts.Instead,Imeancheapasinhowdearitistoyou.Ifyouhavetoworkveryhardtocreatejustoneimage,youwillbelessinclinedtopartwithitifitneedstobechangedordiscarded.However,ifyouutilizeamethodthateasilyallowsyoutochangeanimagethatisnotasdeartoyou,youaremorelikelytotweak.Youwillalsowantsomethingthatallowsyou toadjustyour timingeasilyandgoback topreviousversions justaseasily.Thiswill allow you to be bold and experimentwith new timing.Who knowswhat happyaccidentsmightturnup?
Hopefully, you have already begun working in 2D and in this you have already begunworkingonthe2Danimationpipelinethatbestsuitsyou.Inthischapterwe’regoingtopushfordigitalanimationmethods.Feelfreetomodifytofitthepipelinethatbestsupportsyourcreativeprocess.
Thischapterwillnothelpyouonyouranimationandacting.You’llhavetobringthattothetable yourself. To further push your animations, you can always refer to Action! ActingLessonsforCGAnimatorsbyJohnKundert-Gibbs.
To beginwork onyour sketches, stay loose andwork in your sketchbook and then scanthosein.Oryoucanuseyourfavoritesoftwaretodrawin.FilmRoman,thestudiothatbringsusTheSimpsons,hasrecentlygonethroughatransitionfrompapertodigitaldrawing.FilmRoman’s animators use both methods depending on the scene and need. They use ToonBoom’sSketchbookProtocreatetheirkeysketches.
Once your main ideas are worked out, you will want to work on the timing of yourkeyframes.Thiscanbereferredtoasapenciltest.IhaveafewstudentswhousePhotoshoptodotheirtiming.IfinditgetsinmywaybecauseIthinkinx-sheetsandtimelines.Tousex-sheetswecoulduseFlashorToonBoom.
TiminginFlash
Forthisexample,wehavescannedinourimagesusingaflatbedscanner.Figure3.10showsananimationthathasbeenscannedinwithkeyframesplacedintoFlash’stimeline.Additionalposescanbedrawneasily inFlash.Keyframescanbemoved.Heldframescanbeaddedorremovedtoadjustthetiming.Playbackisdoneeasilyaswell.

FIGURE3.10KeyframesplacedinFlashandtimingadjusted
TakeNote
Remembertocheckyourframeratesettings!Weareworkingat24fpsforthisexample.
TiminginToonBoom’sPencilCheckPro
Another software program that you can use is Toon Boom’s Pencil Check Pro. Here I’llshow an example of using Pencil Check Pro and amultifeed scanner. (Youwill be spoiledrottenifyouuseoneofthesescanners.)
InPencilCheckPro,clickFile>Capturetoscaninthepegged-upimages.You’llnotethatthere are advanced settings for adjusting peg position and field size for scanning in thissoftware.Youcanalsoimportdrawingsthathavealreadybeenscanned.Whateversoftwareyouuse, theobject is toadjust the timingof thekey-frames. In thex-sheetwindow,PencilCheckProhassomefeaturesyoumightfindhandy.

FIGURE3.11KeyframesscannedintoPencilCheckProwithadjustedtiming
1. Holdingkeyframes.Onceyouhavebroughtyourdrawingsintothex-sheet,selectthefirstkeyframeandclickontheEX+icon.Thisextendstheexposure.InFigure3.11youseethatthefirstkeyframewasheldforthreemoreframes.
2. Onion-skinning. This one is very easy to find. There is an icon for “ShowOnionSkin.” Figure 3.12 has onion skin showing. Settings can be found under View >Drawing>OnionSkin.
3. Addingdrawings.ToaddakeyframeorbreakdowninPencilCheckPro,simplyclickonanemptycellinthex-sheet.Draw.Doesn’tgetmucheasierthanthat.You’llnotethatPencilCheckProdrawsinvectorlines,whichisresolutionindependent.
4. Playbackandadjusting.Presstheplayarrowatthetopofthecanvas,andyouwillseeyouranimation.Addanddecreaseexposureinthex-sheetasneededforpropertiming.
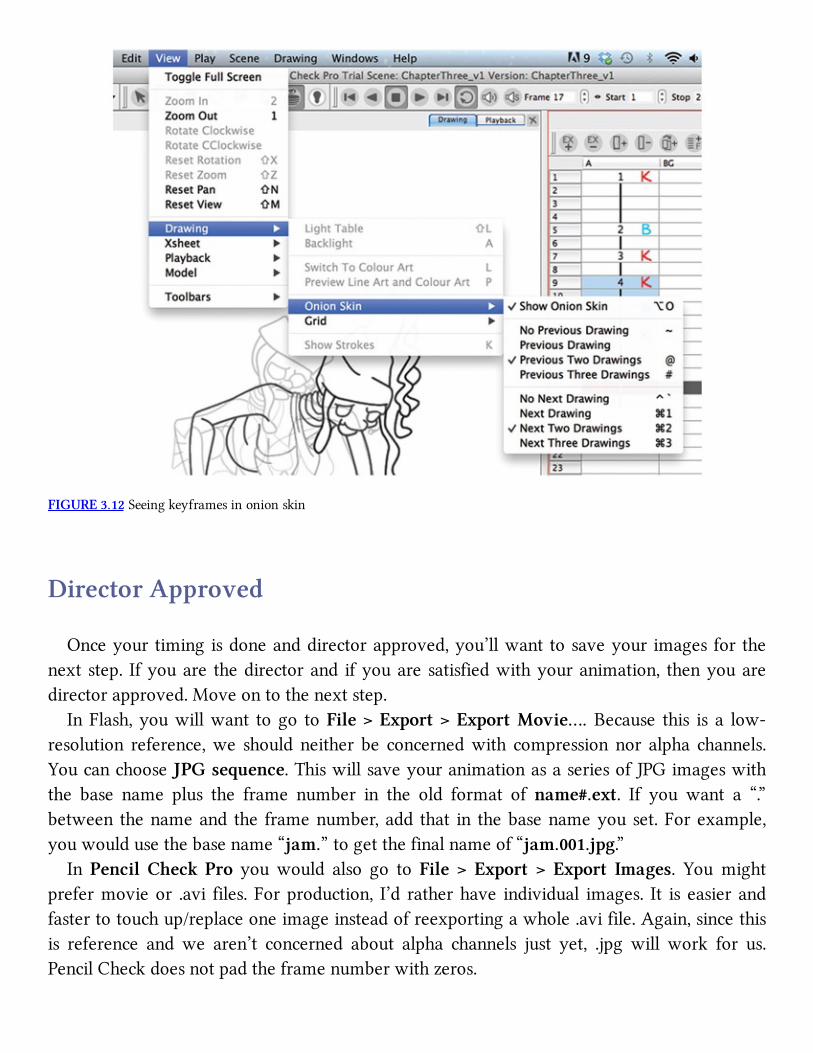
FIGURE3.12Seeingkeyframesinonionskin
DirectorApproved
Onceyourtimingisdoneanddirectorapproved,you’llwanttosaveyourimagesforthenextstep. Ifyouare thedirectorand ifyouaresatisfiedwithyouranimation, thenyouaredirectorapproved.Moveontothenextstep.
InFlash,youwillwant togo toFile>Export>ExportMovie….Because this is a low-resolution reference,we should neither be concernedwith compression nor alpha channels.YoucanchooseJPGsequence.ThiswillsaveyouranimationasaseriesofJPGimageswiththe base name plus the frame number in the old format of name#.ext. If you want a “.”between thenameand the framenumber,add that in thebasenameyouset.Forexample,youwouldusethebasename“jam.”togetthefinalnameof“jam.001.jpg.”
InPencil Check Pro youwould also go toFile > Export > Export Images. You mightprefermovieor .avi files. Forproduction, I’d ratherhave individual images. It is easierandfastertotouchup/replaceoneimageinsteadofreexportingawhole.avifile.Again,sincethisis reference and we aren’t concerned about alpha channels just yet, .jpg will work for us.PencilCheckdoesnotpadtheframenumberwithzeros.

FIGURE3.13PosetestfromPencilCheckPro.ImagesbyDiannaBedell,2009,SeniorProjectII,SCAD
3DArminMaya
Beforecleaningupthe2Danimation,you’llwanttogetthecharactercompletelyanimatedand have that approved.We’ll add the arm appendage. Depending on which 3D softwareprogramyouareusing,thebuttonsusedwillbedifferent,buttheprocesswillbemostlythesame.Yourgoalistobringthe2Dimagesin,setuparendercameratomatchthe2Dimage,workwiththe lensof thecamerasothat it flattensoutperspectiveasmuchasyouneedtomatchyour2D,animateyour3Darmtothatcamerasothattheimageyoucreatelookslikeitregisterstothe2Dimage,andthenrender.Simple,right?Really,itis.Let’sgothroughit,shallwe?

Import2D
Inside Maya, there are many ways to bring in an image plane. To make sure we areanimatingtothesamecameraasthe2Dimage,weabsolutelyneedtoattachtheimageplaneto the camera. Other techniques of bringing in the image and texture-mapping it onto apolygonwillnotensurethatour3Dcameraisaccurate.
1. Createanewcamera:Create>Cameras>Camera.Becausethisisalocked-offshot(thecameraisnotmoving),we’lluseaplaincamerawithnoaimorup.RenamethecameraRender_Cam,andgiveitaFocalLengthof150.
2. Makesurethiscameraisthecurrentcamera(Panels>Perspective>Render_Cam).In the top of the camera window, clickView > Image Plane > Import Image….Selectthefirstimageofyour2Dsequence.
3. Butyouhavemorethanoneimage,don’tyou?You’llhavetotellMayathat.Perhapsinafutureversiontheywillhavea“UseImageSequence”buttonrightthereintheopendialogbox.Instead,atthetopofthecamerawindowclickView>ImagePlane>ImagePlaneAttributes> imagePlane1. In theattributeeditor, clickon theUseImageSequenceoption.
Now inyourcameraview,you should seeyouranimation. Ifyouusemovie filesor .avifiles, those will read in as well (if you have the QuickTime driver installed). If you scrubthroughtheMayatimeline,youshouldseeyouranimationintheRender_Camwindow.

FIGURE3.142DimagesimportedintoMaya
What could gowrong here? If your naming convention is notName.number.extension,Mayawillnotbeabletofigureoutthatyouhaveanimagesequence.Ifyouhaveanumberinthename,Mayagetsconfused.Forexample,kitty10001.tif,kitty10002.tifmighthaveissues.Itshouldworkifyouinsteadnameitkitty1.0001.tif,kitty1.0002.tif.
TakeNote
MakesurethatyourMayaRendersettingsaretheoutputresolutionthatyouwant!Thisisalocked-offshot,sothecamera(canvassize)shouldmatchthe2Dimagesthatwecreated.Awaytosee immediately ifyourresolution issetcorrectly is togoto theRender_CamviewandclickView>CameraSettings>ResolutionGate.Theresolutiongate(orrectangle) ishardtoseebecauseitexactlymatchesthe2Dimagethatwasbroughtinasanimageplane.IntheupperrightcornerofFigure3.14,theresolutiongateisbeingshown.Asyoucansee,theresolutionsizeisbarelyvisibleovertheimageplane.Youdonotseetherectangleresolutiongate,because it iswhiteand the imageplane iswhite. If therendersettingswere incorrect,youwouldseetheresolutiongateasadifferentsizefromtheimageplane.
Here’s a goodquestion:Do theyneed tomatch?No.Actually, your 2D images canbe a

separatesizeandyoucanadjustduringcompositing time.Youwouldonlyneed togloballyresizeyour3Dimagetomatch.Butwhygothroughthat?Rememberthatbadhabitwetalkedabout—the“we’llfixitinpost”terror,whichisshorthandfor“Idon’twanttothinkaboutitrightnow.Letsomeoneelsefixtheproblem.”
Holdonamoment.Ineedtostopandlookatthis.Allthesebuttonclicks;allthesethingsthat could potentially gowrong. And in a group project we’ll havemultiple people doingthesethings?Golly.Animationthatgoesbeyondasingleactordoingavaudevilleactinfrontoftheaudienceisnoteasy.Butweloveit,so,okay.Thatwasourrealitycheck.Backtowork.
Ourfilewassavedas2D_Leads_3D_v1.mbinsidethe3D_Armfolder.
Animate
The odd thing to get overwhen animating 3D on top of 2D is that you canmove yourcameraallaroundtogettheobjectlookinglikeitisinthecorrectspot.Thethingthatmattersishowthefinalimageisgoingtorenderout.Soyoucandosomeunconventionalmovementinthecameraplacementtocheatperspectiveoruseittoyouradvantage.Beware:overuseofthispowercanmakeforsomeodd-lookinganimation.
FIGURE3.15KeyframessetinMaya
Becausewehavetheknowledgeofwhatframesarekeyframesviathex-sheetandwehaveanunderstandingofwhat timingwasusedvia the timingcharts,wehaveaneasier timeof

matchingthe3Danimationtothe2Danimation:
1. Importinthe3Darmrig.ClickFile>ImportandlocatetheArmRig_v1.mbfile.Thiswillbringinthearmattheorigin.
2. UsethePerspectiveandorthogonalviewstopositionthearmsothatitlookslikeitisinthecorrectspotintheRender_Camview.
3. Findthekeyframesonthex-sheetandposeyourarmforthosemainkeyframes.Ourx-sheet for thisexample isona simpleExcel spreadsheet:x-sheet.xls.Youcan seethespreadsheetontheleftsideofFigure3.15.
Tohelpposethe3Darmbetter,theRender_Camhasbeentornoff(muchaswedidinChapter2).Also,Shading>Xrayhasbeenchosensothattheanimatorcanseethroughthe3Dobjecttothe2Darm.Ifyouhavethe2Droughed-inarm, that will help you pose your limb. Of course, the perspective hand-drawnwill notmatch. Look tomatch the contact points, the shoulder andwrist,morethantheelbow.
To set keyframes easily, this 3D arm has a character set: Arm1. Select thecharactersetforthearmandhitsforeachkey-frame.AsFigure3.15shows,keyframesset inthetimelinecorrespondtothex-sheet.You’llnotethat theperspectivecameraisusedtoposethearmin3DspacesothatitlookscorrectintheRender_Camview.
4. Next, lookforbreakdownsandthespacingtheyshouldhave,andcreatekeyframesforyourarm.Again,ifyouhaveatimingchartfromthe2Danimation,youshouldbeabletomatchthesamespacingandachievebetterregistrationwiththe2Dcharacter.Ifyoudonothaveatimingchart,you’llhavetoguesswherethebreakdownisandknowthatthenextstepisgoingtotakemuchlonger.InFigure3.16thebreakdown28ishalfwaybetweenthekeyframefor16and35.(Forthosetrulyfollowingalongwiththeencloseddata,frame16isheldfromframe14,andintheenclosedexample,frame28wasmovedto29.)
5. Remembertorollthroughyourdrawingsoftentomakesurethatthearmregistersinits socket. Look for jiggling at the contact point and adjust your keyframes toeliminatethejiggling.
6. Now, add your inbetweens.Use the graph editor to adjust the final spacing of thedrawingstomatchthe2D.

FIGURE3.16BreakdownssetinMaya
TakeNote
Anoteon following the timingchart.With the timingchart showingwherebreakdownsareonhalves,orhalfwaybetweenthekeyframes,youcanspeedupyourworkflowanduseMayatoyourbenefit.Forinstance,thetimingchartbetweenframes16and28callsforframe22tobehalfwaybetweenthekeyframes.Setthetangentsonframe16tobelinear.Frame22willthenbemathematicallyhalfwaybetweenthetwokeyframes.Gotoframe22,takealookatthedrawing,andadjustasnecessarytoputthingsonarcsoraddoverlappingactionandsoforth,thenhitstosetakeyframe.

FIGURE3.17UsingMaya’sinbetweensbutmovingthemtothecorrecttimetomatchthetimingchart
Thenexthalfonthetimingchartisforframe22.Thatdrawingissupposedtobehalfwaybetweenframes16and22.LetMayadotheworkforyou.LocatetheinbetweenthatMayahasmade that isvisuallyhalfwaybetween frame16and frame22. Inourexample, it isonframe19.Gotoframe19andhitsonthekeyboardtomakethatakeyframeinMaya.Thensimplyuse thedope sheet tomove thekeyframe to frame20as the timingchart indicates.Nowyou canmore easily go into the graph editor and adjust your spacingbymoving thetangents. Your timing, where the keyframes and breakdowns are, is already in place. Thismethod speeds up your work-flow tremendously. Use Maya to do the work for you, butcontrolitsothatyoudon’tendupwithMayainbetweens.(Thehorror!)

FIGURE3.18CompletedanimationinMaya
7.We’lluseyourtwos.melscripttoputthisanimationontwos:
a. Intheoutliner,selectthecharacterset.b. Typetwosinthecommandline.c. Youwill receive the feedback. Put this commandon a shelf to animate the
timing:select—rtimeOnTwos.d. Highlightthecommandselect—rtimeOnTwosandmiddle-mouse-dragitto
acustomshelfsothatyoucanuseitlateron.e. Scrubthroughyouranimationtoseethatyourworkisnowontwos.
What? Oh. Your animation isn’t always on twos? That is the casesometimes, isn’t it? Let’s look again at our animation. If you havetimingthatisononesatsomepointsandontwos(orfours,whateverit may be) at others, you can animate what the script has set yourtiming tobe. It isn’t toohard, either. I like thismethodmuchbetterthan setting every key on stepped and manually making everykeyframeontwos.
f. If you haven’t clicked anything since running the script, the timeOnTwosnodeisstillselectedandyoucanseeitinthechannelbox.Ifnot,you’llneedto click on the button you made or type into the script editor: select— rtimeOnTwos.
g. Youcananimatethisattributeasneededtoadjustyourtiming.Withthetimeset to frame1, right-clickon theattributeandkeyframeselected.Thiswillsetakeyframefortimingontwos.

h. AdvancetoaframewhereyouneedthetimingtochangetoonesandchangetheByattributeto1.Setthekeyframeonthatattribute.
i. Thisway you can adjust your ones and twos but still use the graph editorwithoutcreatingalargemess.
FIGURE3.19Usingtwosscripttoput3Danimationontwos
8.Rendertheanimation.Thereisalreadyatoonshaderandinklineonthearmforyou.Youneedonly to render thearm level.Thismeans thatyoudonotwant the imageplanetorender.Howdoyougetridofthat?Youcaneitherdeletetheimageplaneatthispointoradjustthealphagainfortheimageplanetobe0.Thenrenderasfollows:
a. Settherendersettings.SeeFigure3.20.
i. Namethelevelii. Name.#extensioniii. .tif(orsomethingthatkeepsalphachannels)iv. Startandendframesv. Framepaddingvi. Selectthecorrectcameravii. Makesuretoincludealphachannelsviii. Makesureyoursizeiscorrect.
b. ClickRender>BatchRender.

FIGURE3.20Rendersettingsandexampleoffinalrenders
Ourarmlevelfilenamesarearm.#.tif.Howdidyoudo?Thingsshouldstarttoseemaloteasiernow.Ifyoudidnothaveagood
grasp on the graph editor to beginwith, thismight be a little tricky for you. Please, avoidkeyitis.Thisisahorriblediseaseinwhichtheanimatorwhodoesnotfeelcomfortableinthegrapheditorbeginstocompensatebysettingkey-framesoneveryframe.Yes,youcandothis,but you start to get into stop-motion animation at that point, where everything is beingmovedmanually and nomatter how hard you try, therewill be pops and jumps betweenimages.Ofcourse,ifyouaregoingforastop-motionfeel,don’tdoitthatwayeither.Thereareproceduralwaystoadjustyourtimingtogetthesametypeoffeel.Ican’tstopyou.Ifyouhavetogothroughyourkeyitisphase,goahead,getitoutofyoursystem.Ifyoustarttomissyourquotas,comebackandconqueryourfearofthegrapheditor.KudostomystudentswhoIhaveseenworkhardongettingovertheirgrapheditorfear.
TakeNote
Remember,ifyourenderout.tifimages,theydonotreadintoPhotoshopwiththeiralphachannel.Foreverycompositorthatexists,.tifsarefine—justnotPhotoshop.
RimLight

Something toconsiderwhenyouhavea2Dobjectanda3Dobject together in thesamesceneiswhetheryouwantthemtolookveryflatorwhetheryouwantthemtohavesomedimension.Usually this boils down to the question ofwhether you have time,money, andhumanresourcestomakerimlights,tones,andshadowsforallofyourcharacters.ThesetypesofelementsareusuallyproducedbytheSpecialEffectsEFXdepartment.I’lltalkmoreaboutthisoddbrandofartistslateronintheEFXchapter.(Imeanoddinagreatway.)Foroursoloproject,wewillincluderimlights(orhighlights)onour3Darm,asitismadeofmetal.
Wewillmake the rim light as a separate pass from the rendered arm.Thiswaywe canadjust it at composite time tomatch everything else. Our goal is to create a rimmatte: ablack-and-whiteimagerepresentingtheareathatwillbeahighlight.
Thisisadifferentwaytothink.Asyoucreatethisimage,youarenotthinkingofanythingbut a black-and-white image that representswhere the highlightwill be. So do notworryabout the main color of the arm. I’m starting with my last saved Maya file:2D_Leads_3D_v5.mb.
1. Tostart,Ihavetohidemyimageplane.Thebrightwhitegetsinmyway.I’lltoggleoffcamerasbyclickingintheRender_Camwindow:Show>Cameras.Inmysamplefile,Ihavedeletedtheimageplane.
2. Now,let’sassignaspecialtoonshadertothearm:
a. UnlocktheGEO_LayerbyclickingtheR.b. SelectanypartofthearmandhittheuparrowkeyorselecttheGEOgroup
nodeintheoutliner.c. Assign a Dark Profile Toon shader to the arm underAnimation:Toon >
AssignFillShader>DarkProfile.d. Createthecolorrampsothatitsfirstchipiswhiteandthesecondisblackas
showninFigure3.21.Thiswillcreateawhiteareawherewewanttohaveahighlightandallelseisblack.Perfect.
e. Intheoutliner,deletetheToonLineShader.Wedonotneeditforthispass.
3. Rendertherimlightpass.
a. GotoyourRenderSettingsandprepareyourrender.SeeSettingsinFigure3.22andthenBatchRender.

FIGURE3.21Darkprofileaddedtotherobotarm.Thiswillbeusedasarim/highlightmatte
FIGURE3.22RenderSettingsandanexampleoffinalrenders
TakeNote
EventhoughwehavesetuptherimlightasanRGBimagethatwillbeusedasamask,westillneedthealphachannelforthearm.Makesuretouse.tiforsomeformatthatkeepsalpha

channels.OurRimLightfilenamesarearm_RL.#.tif.
CleanupinPhotoshop
Todopropercleanup inPhotoshop,youwillwant touseabrush thatgives thebest linequality.Well,howdoyouaccomplish that?ThoseofuswhogrewupwithPhotoshophaveseenitchangefromatoolthatyouwouldneverdreamofdrawingwithtoatoolthathaslotsofpotential.Infact,ithastoomuchpotential—itcanbeathickforesttotraversethroughtogetabrushthatyoulikeandfitswhatyouneed.(Thosearetwoseparaterequirements.Youcanlikeabrushbutitisn’twhatyouneed.)
Thechoicesseemtoboildowntothese:
1. Useabuilt-inbrushinPhotoshop.2. Createacustombrush.3. Downloadone.
Youmightjumptothethirdoptionautomatically.Itsoundsliketheeasychoice.Notanyofthe choices are easy, actually. You are forced to pick out one piece of candy in a nearlyinfinitely sizedcandystore.Howcanyoudo that?Therecouldbeabetter-lookingpieceofcandyinthenextparameterthatyoutweakorinthenextbrushthatyoudownload!
Ihavewatchedvariousstudentsgothroughthisprocessastheyworkontheseniorprojectsoronagroupproject.Ihavealsogonethroughthissameprocessmyself.JustwhenIthinkIgetabrush that I like, I try todrawvery tightlyand find that thebrushdoesn’tworkwellenoughformypurposesordoesnotdrawsmoothlyenoughforme.OnceIgetabrushthatIlike,however,Icandrawmyheartout.ItistheprocessofgettingthatbrushthatIimagineisenough;whenanartistfindsabrush,sheorhemightnottryanyothers.
What limitations are we taking onwith Photoshop? This is drawing in rasters, which isresolutiondependent.Youareprobablyalreadyfamiliarwiththelimitationsofrasterimages.If you zoom in too far, the imagewill pixelate. This is avoidable if you keepdrawing at ahigherresolution.Whatdoyougain?Adifferentlookthanvectordrawing(suchaswefoundinToonBoomandFlash).
Built-inPhotoshopBrush

Let’sstartwithbuilt-inPhotoshopbrushes.Canyoudocleanupwiththosebasicbrushes?Yes.Forthosewholoveathick-thincleanupline,youmightnotbesatisfiedwiththeresultsifyoudonotdigdeeper.
I intervieweda studentwhohad spentweeksdoingcleanupona seniorprojectpiece.Anotetotheconceptofcleanup:wedon’thaveanactualclassoncleanupinthecurriculum.Wetendtofocusonanimation,acting,storyboarding,andthelike.Sostudentswhotakeonthetaskof cleaningup, inkingandpainting, orotherwise completinga 2D filmare learningastheygo.
FIGURE3.23CleanupusingPhotoshop’sstandardbrush
Youmighthave takena lookat thebasic brushes inPhotoshopand scrolled through thepresets.Butdidyoueverloadtheotherpresets?I’lladmitIhadn’tforquiteawhile,untilonedayIwentpokingaroundtoseewhatelsewasthere.Ifyouopentheoptionsforthebrushespalette,youwillseeatthebottomvariousbrushsetsthatyoucanloadin.Figure3.24showsafewbrushesthatcomewithPhotoshop.

FIGURE3.24PresetbrushesinPhotoshop
Whenyourcleanupandpaintingaredone,youwillexportanuncompressedmoviefiletokeepyouralphachannels.Thatcatchessomestudents—andprofessors.

FIGURE3.25ExportingthefinallevelofJam,savingasrawQuickTimeinordertohavealphachannels
ThecleanupfilenameinthecompaniondataisJam_Lvl_12fps.mov.
CustomBrushes
Youcanpushfurtherthanthestockbrushesandcreateyourown.Thereisalotyoucandowhenyoumodifytheattributesofthestockbrushes,andyoucancomeupwithanamazingassortmentoflooksthataremuchmorepainterlyoratleastnon-round.Ittakesalotoftimetoexperiment,somakesuretosetsomeoneonthistaskearlyoninyourgroupproject.Ifyouaredoingasoloproject,thatsomeoneisyou.
When you create custom brushes, the brush shape is based on a grayscale image.Completelyblackareaswillfullydeliverpainttothecanvas,grayareaswilldeliveravaryingdegreeofpaint, andwhiteareaswillnotpaint.Thebrushattributescanbeapplied toyourcustombrushtip.
Howdoyoumakethatblack-and-whiteimage?Youcanpaintit inPhotoshop,scaninanimage,orcreateitinIllustratororasimilarprogram.
Here’sanexampleofcreatingacustombrush:
1. CreatethedesiredbrushtipshapeinIllustratorandsave.2. OpenthatfileinPhotoshop.

3. ClickEdit>DefineBrushPreset….Thiscreatesabrushfromthatimage.4. Tweaktheparametersuntilyougetthedesiredresults.
FIGURE3.26UsinganIllustratorfiletocreateacustomPhotoshopbrush
DigDeeper
LearnhowtoharnessPhotoshop’sbrusheswithCreativePhotoshopDigitalIllustrationandArt Techniques by Derek Lea. Just reading the first chapter sent me off painting withPhotoshoplikeneverbefore.
DownloadingBrushes
Ofcourse,whyreinventthewheel?Thereareanamazingnumberofbrusheswaitingforyoutodownload.Injustdoingaquicksearchforthegroupproject,IfoundmorebrushesthanI could ever test in one session. For example, I ran across a brush web-site:myphotoshopbrushes.com.ThoughthereweremanysetsofbrushesthatIcouldhavelooked
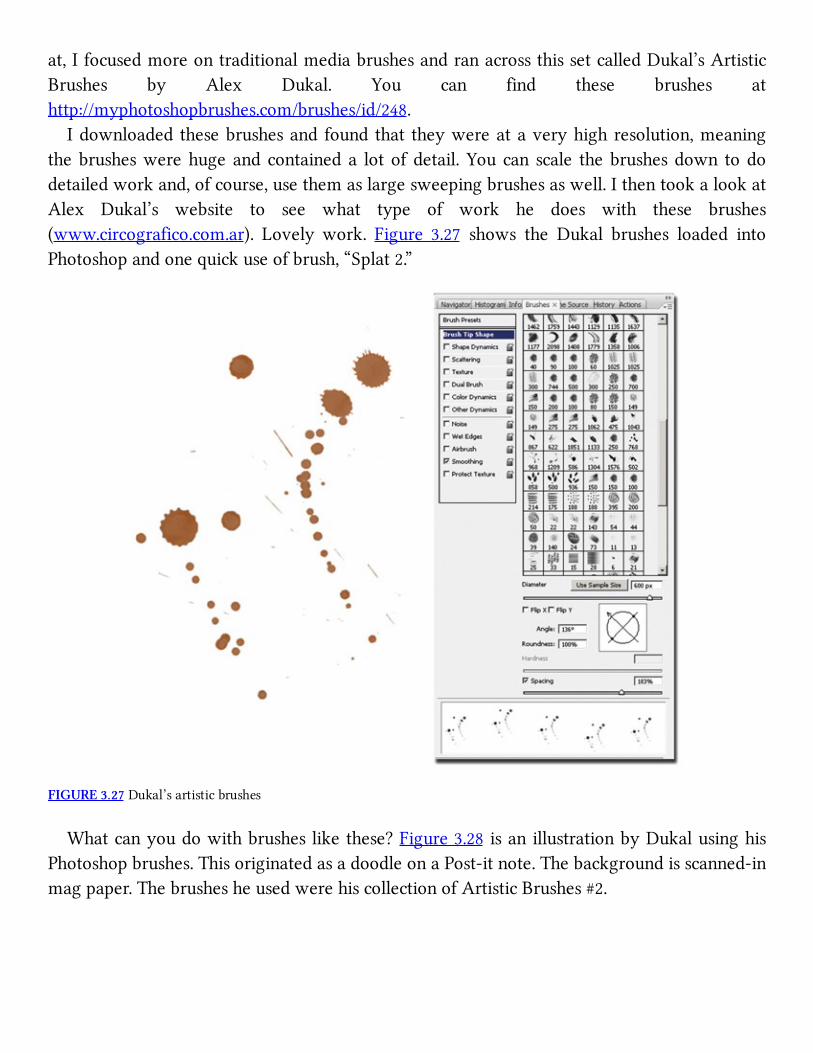
at,IfocusedmoreontraditionalmediabrushesandranacrossthissetcalledDukal’sArtisticBrushes by Alex Dukal. You can find these brushes athttp://myphotoshopbrushes.com/brushes/id/248.
Idownloadedthesebrushesandfoundthat theywereataveryhighresolution,meaningthebrusheswerehugeandcontaineda lotofdetail.Youcan scale thebrushesdown tododetailedworkand,ofcourse,usethemaslargesweepingbrushesaswell.IthentookalookatAlex Dukal’s website to see what type of work he does with these brushes(www.circografico.com.ar). Lovely work. Figure 3.27 shows the Dukal brushes loaded intoPhotoshopandonequickuseofbrush,“Splat2.”
FIGURE3.27Dukal’sartisticbrushes
Whatcanyoudowithbrusheslikethese?Figure3.28isanillustrationbyDukalusinghisPhotoshopbrushes.ThisoriginatedasadoodleonaPost-itnote.Thebackgroundisscanned-inmagpaper.ThebrushesheusedwerehiscollectionofArtisticBrushes#2.

FIGURE3.28AlexDukal’sChickoftheYear
Ididn’tsearchforit,butIwouldbetthereisadownloadablebrushsetofcoffeestainsorstainsingeneral.I’llhavetoputthatontomyto-dolistforlookinguporcreating.Canyouimagineit?IcouldputcoffeestainsonallofmylecturenotesorPowerPointslides.
OrCleanUpinToonBoom
AnotherpackagethatyoumightusetodocleanupinisToonBoom.Thiscompanyoffersdifferentproductsolutions.Eachonehasadifferenttoolset.Forframebyframeanimation,we’lluseToonBoomAnimate3.(NottheProversion—whichismoreforthecut-outstyleofanimationaccordingtothedocumentation.)
InFigure3.29youseethetimelineatthebottomofthescreen.Thex-sheetcanbefoundunderthex-sheettab.ThekeyframesthatweredrawninPhotoshophavebeenbroughtintoonelevelbyimportingthedrawingsandadrawinglevelhasbeenplacedabovethekeys.

FIGURE3.29AnimationbroughtintoToonBoomforinbetweensandcleanup
TogetataperedlineinToonBoom,youwillneedtoadjustthesettingsforthebrushtool.See Figure 3.30 for an example. A range between a minimum of 0 and maximum ofsomethingofyourchoicewillvarythethicknessoftheline.Theattributesmoothingwill trytoautoadjustyourline.Thehigherthenumber,themoreitbelievesyoucannotdrawandwilltrytodrawforyou.Forsomethis isabonus,forothers it isamajorannoyance.Bringthatsettingdownaslowasyouneedtoforsanity.Anotherthingyoumightnoticedirectlyoffthebatisthatthelineseemsjaggedwhenyoudraw.Thisisavectorlineandyouareonlyseeinga quick screen representation. You will have to select Play > Render and Play. In olderversionsthehotkeyCTRL+ENTERwillopentheplaybackwindow.IntheplaybackwindowyoucanseethereallineasshowninFigure3.30.Notethatthefineartofcreatingwonderfulcleanuplinesliesinyou—notthesoftware.Takecaretodrawyourlineswithappropriatethickandthinweights,whichsoftwaredoesnotautomaticallytakeintoaccountasitrenders.

FIGURE3.30Cleanuplineinthejaggedpreviewandinthefinalrenderview
FinalRender
In this book we’ll use many different compositing softwares. For this chapter, we’ll useAfterEffectstocompositethedifferentlevelstogether.Lateroninthisbook,we’lluseanode-basedcompositortoseethedifferenceinhowyouapproachascene.
Let’s review the levels thatwehave starting from theback to the front.Refer to Figure3.31.Thebottomlevelisabackground,whichwaspaintedinPhotoshop.Thenextlevelupisthecharacterlevel,whichiscomposedofboththeinkandthepaintlevel.Theselevelscouldbeseparatedintotwolevels.Withthemseparate,therearemorecompositingtricksthatyoucandowith the ink lines.Next, there is the3Darm level,whichalsohasboth the inkandpaint together. Above those is the RGB version of theRim Light level. It is important torememberthatweareseeinganRGBimageofamatteandnotlookingatanalphachannel.(One is inverted from the other.) Lastly, we have a table level, which is titledunderlay/overlay. Ithasthis titlebecause it liesovermosteverythingbutalso“lies”underJam’selbows.

FIGURE3.31Levelsthatneedtobecompositedtogetherandafinalcompositedimage
SettingUptheComposition
BringtheartassetsintoAfterEffects.Remembertocheckyourimportpreferencessothattheymatchtheframeratethatyourprojectisin.SeeFigure3.32foranexample.
FIGURE3.32Importpreferencesshouldmatchtheframerateoftheproject
On newer versions of After Effects on a Macintosh, the images come in automaticallypackagedintoaniceimagesequence.Lovely.SeeFigure3.33asanexample.

FIGURE3.33CS6ofAfterEffectsonaMacpackagesimagesequencesneatlyforyou.Noprecompnecessary
In older versions, you’ll want to follow the next steps to keep things neat and orderly:createafolderforthelevelsthatareindividual.tifimages.Forexample,thearmandthearmrimlightlevelswouldhavetheirownfolder.Thenyou’llwanttomakea“precomp”ofeachofthoselevels.First,makeacompositionofthearmlevelbyselectingarm.0001.tif througharm.0050.tifanddraggingthemontotheCreateaNewCompositionbutton.Thiswillopenadialogbox.Togettheimagestoshowuponeaftertheother,youneedtoselectSequenceLayers andmake sure that theStillDuration isone frame:0:00:00:01. See Figure3.34 andFigure3.35forexamples.
FIGURE3.34Creatingaprecompofthearmlevel

FIGURE3.35Armcomposition
Createanewcompositionanddrag in the levels in the followingorderstartingfromthebottomleveltothetop:background,olul,Jam.Donotdraginthearmandarmrimlightjustyet.SeeFigure3.36foranexampleofhowthecompositionshouldlookatthispoint.You’llnote that Jam isovertopof the table.That isgreat forherhands,butherbodyneeds tobebehindthetable.We’llhavetomattethatout.We’lltacklematteslateroninthischapter.

FIGURE3.36LevelsinAfterEffects
3DArmwithRimLight
The3Darmisgoingtotakejustalittlebitofworkingwithtogettherimlightonit.Thegreatthingaboutusingmattestoadjustlightingisthatinthiscompingstage,youcanseethearmlevelinrelationshipwithalloftheotherlevels.
1. CreateanewcompositionbyclickingtheCreateNewCompositionicon.2. Give the composition the name 3DArm. Make sure that the composition is the
correctsize,andwatchoutforframerate!3. DragtheArmcompositionthatwemadeearlierintothisnewcomposition.4. Right-clickinthetimelineandaddaNew>AdjustmentLayerabovethe3Darm.5. DragintheArmRimLightcompositionandplaceitabovetheAdjustmentLayer.

FIGURE3.37ArmandArmRimLightputintotheirowncomposition
6. Select theAdjustment Layer and from the topmenu clickLayer >TrackMatte >LumaMatte.Youwillbeabletoseethearmlevelagain.You’llnoticeamatteiconnexttotheAdjustmentLayerandtheArmRimLightlevel.
7. Right-clickontheAdjustmentLayerandaddEFFECT>ColorCorrection>ColorBalance(HLS).
8. BringLightnessuptothedesiredlevel.
Anothergreatthingabouthavingthisrimlightmatteisthatyoucanadjustthecolorofthe painted object. Some tutorials might have you make a black-and-white matte,adjusttheopacity,andjustlayitovertopofthearmlevel.Thatisavalidmethodbutdoesnotgivethemostcolorcorrectioncapability.
Let’sworkwiththatmattejustalittlebitmore.

FIGURE3.38RimLightmattelevelusedtoadjustthecolorofthearm
1. Select the Arm Rim Light Layer and clickEffect >Blur & Sharpen >GaussianBlur.
2. Blur themattebychangingblurriness toadesirednumber.Ours is set to3. (Makesurethevisibilityofthelayerisoff.)
Backinthemaincomposition,draginthe3DArmcompositionthatwejustcompleted.Youshouldnowhavea3Darmwithrimlightontopofyour2Dcharacter.
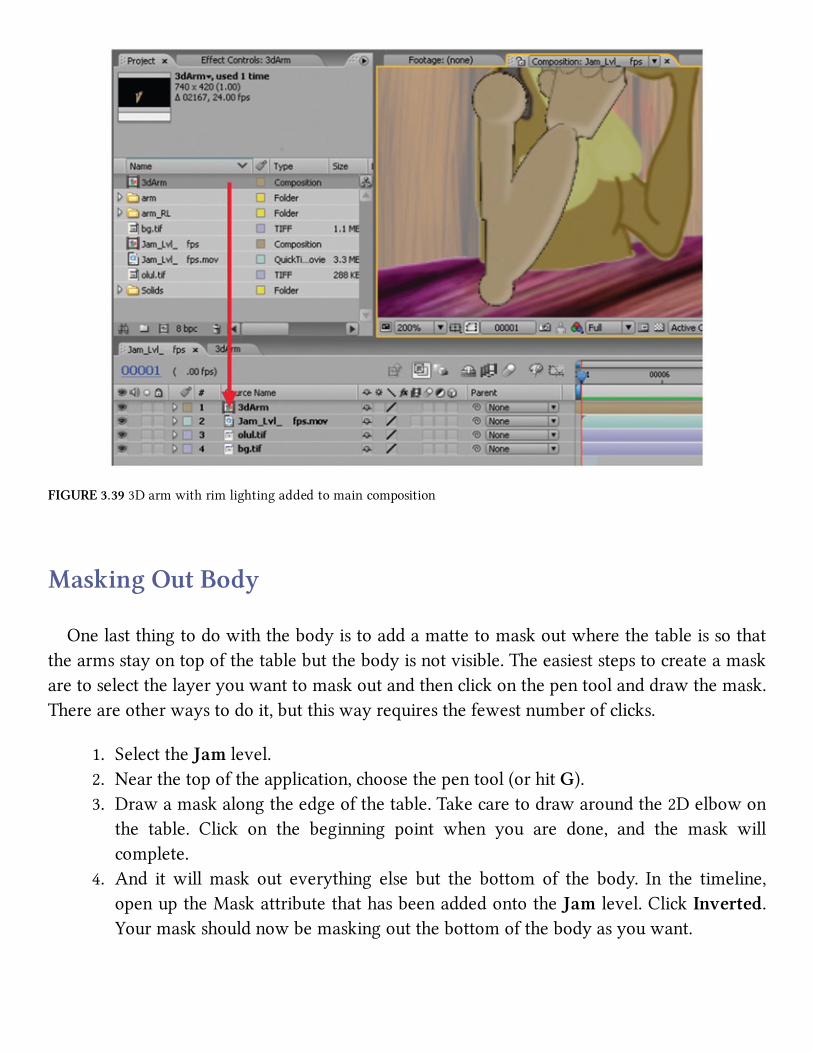
FIGURE3.393Darmwithrimlightingaddedtomaincomposition
MaskingOutBody
Onelastthingtodowiththebodyistoaddamattetomaskoutwherethetableissothatthearmsstayontopofthetablebutthebodyisnotvisible.Theeasieststepstocreateamaskaretoselectthelayeryouwanttomaskoutandthenclickonthepentoolanddrawthemask.Thereareotherwaystodoit,butthiswayrequiresthefewestnumberofclicks.
1. SelecttheJamlevel.2. Nearthetopoftheapplication,choosethepentool(orhitG).3. Drawamaskalongtheedgeofthetable.Takecaretodrawaroundthe2Delbowon
the table. Click on the beginning point when you are done, and the mask willcomplete.
4. And itwillmask out everything else but the bottom of the body. In the timeline,openuptheMaskattributethathasbeenaddedontotheJamlevel.ClickInverted.Yourmaskshouldnowbemaskingoutthebottomofthebodyasyouwant.

RandomNote
Thewordsarebuggingmehere, incaseyoucouldn’t tell. Inmyvocabulary,amatte isanoun;it iswhatyoudraw.Theverbis“mask.”Usingtheseterms,amattemasksoutthings.However,AfterEffectscallsthemattesmasks.Oh,bother.
FIGURE3.40Bodymaskedoutsothatitisnotvisibleovertopofthetable
Youmight have noticed that the 3D arm is overtop of the hair at the beginning of theanimation.Repeatthesamestepsaboveforthe3Darmleveltomakeitlooklikethehairison topof thearm.Somethingdifferentyouwillhave todo ismake ita travelingmatte; inotherwords,animateitmovingalongwiththehair.SimplyusetheSelectionTool (orpressv)tomovethepointsaround.AfterEffectswillauto-keyframeforyou.

FIGURE3.41Travelingmattecreatedtoholdoutthearmwherethehairshouldappearontop
Ateverystagethatwehavegonethrough,thereisroomforbeingmeticulous.Tonotbesoistocreateerrorsthatwillshowupinthefinalstage.Youcanimagineinalargeproduction,oreveninyoursmallgroupproject,manyofthesestepsarecarriedoutbydifferentpeoplewithno ideawhat theotherpeoplearegoing todowith their imageswhen theyaredonewiththemandnoideaofhowthewholepipelinefitstogether.Ateverystage,youwanttolookforareaswhereyoucan“plustheimage”andunderstandhowthosebeforeandafteryouaregoingtoworkwiththeassetyoucreatesothatyoucanhelpandnothinderthemwithyourwork. You’ll have tomakemistakes to figure that out.My suggestion is to do groupprojectsoften.Thiswillhelpyouseethosecostlymistakesbeforeyourpaycheckisridingonit.
FIGURE3.42Finalcomp
Interview
Name:ToddRedner

Title:AnimationDirectoratFloydCountyProductionshttp://www.imdb.com/name/nm2400789/
Let’sfaceit,wehavelimitsintherealworldandtheyarecalled“budgets.”Theonlywaywewereabletomakea3Dpilotandkeepitunderbudgetwastouse2Danimationon3Dmodels.Thecharactersweresculptedasgenericpeople.Wesimplyunwrappedthemodelsanddrewallthefacialfeatures,colors,clothing,andsooninFlash.The3Danimatorsonlyhadtoworryaboutbodymovements,whilethe2Danimatorsdidalloftheeyemovementsand lipsync inFlash. Itworkedreallywellandhadaveryuniquelook.Itsavedustimeandmoneyinmultipleareas:wedidn’thavetopurchasemultipleworkstations,rendertimesdidnotkillus,andbyseparatingthefacialmovementsfromthebodyanimationwewereabletoanimatefaster.
Thebiggesthelpinusing3Dand2Dtogetherforushasbeenwithbackgroundsandobjects.Youcanspendsomecrazyhoursonbuildingrealisticbackgroundsforyour3Dshow.Oneofourprojectswastakingwaytoolongtodrawandpaintthebackgrounds,sooursolutionwastotakeroughsketchesandbuildasimple3Dbackground.Thatwaywecouldhavethemodeldoneforallanglesinoneshot,gettheshadingdonefaster,andtheperspectivewasalreadydonebeforethenextshotwaslaidout!Afterwepickthe

shot,wejustrenderandaddanytextureoreffects.Anothershowwedidcalledforthereverse.Thecharacterswereentirelycreatedin3D,butwepaintedthebackgroundsin2D.Therewerejustsomanyshotsthatrequiredcrazyamountsofobjectsandsetsthatwouldjustnotworkforourbudgettodoin3D.Sowecreativelyblended2Dand3Dintothebackgrounds.Nomatterwhatthemedia is—2D,3D,or4D(fingerscrossed!)—whateverittakestogettherightlookandalsokeeptheprojectunderbudgetiswhatwehavetodo.Otherwise,weareeitherlosingmoney,losingwork,orboth.
FurtherReading
Kundert-Gibbs,J.Action!ActingLessonsforCGAnimators.Indianapolis:Sybex,2002.Lea,Derek.CreativePhotoshopDigitalIllustrationandArtTechniques.Amsterdam;Boston:
FocalPress,2007.Schroeppel, Tom. The Bare Bones Camera Course for Film and Video. Coral Gables, FL:
Schroeppel,1980.
StudentContributors
Contributingstudentsforthischapter,inorderofcontribution:
John-MichaelKirkconnellClaireAlmonClintDonaldsonDiannaBedellAmandaPowellDanielTiesling

4
3DCharacterswith2DParts(3DLeads)
FIGURE4.1Bouncing2D/3Dballs,byJessicaToedt,2009,2D/3Dcompositingcourse,SCAD
LectureNotes
Howareyoudoingsofar?Ihopethatyouaregettingusedtotheprocessandthinkingup

waystocombinethemediaandreasonswhyyoushould.Onceyouhaveeverythingbrokendownintothebasicpatternsofproblems—2Dleads,3Dleads,usingcamerasandtexturestoflatten3Dorusingtonesandshadowstoround2D(we’llcoverthatsoon),renderinginlayers,compositing,andusingmasks—thenit’sjustamatteroffindingthebestwaystoachieveyourlookwithwhatevertechniquesyouneed.
Bynowyouhaveprobablylostalittlefearanddonotbelievethatyouneedtostayinonepackageforyourscenes;heavens,no.Bynowyoushouldbethinkinginlayersofimages.Youshouldbe thinking that theoutputofanygivensoftwarepackage is justan imageand thatyourcharacterismadeupofmultiplepassesofimages.Good,youhavecomefar.
Often in class (or even the industry) I see those who becomemesmerized with the 3Dpackage.Theygetstuckinthat3DCartesianworldandthinkthateverythinghastobedonethere. Students get stuck thinking that theyneed to render thewhole frame inonego andoverlook the concept of breaking things into levels. Breaking things into levels allowsanimatorstousemattesinacompositingpackagetoadjustcolorsandtoisolateelementsintolevelssothatifsomethingneedstobetweakedoradjusted,theydonothavetore-renderthewholeframe,justtheonelevel.Ah,thetimesavingsthatprocessgives;itmakesmehappy.
Thesamethinggoesforourcharacters,aswehavefound.Theydonothavetobestuckinonemediumorsoftwarepackage.Formanyreasons,wehavediscoveredyoumightwanttouse3Dtohelpalongyour2Danimation,whether itbe toreduce linemileageorhelpwithperspectiveandcomplexityofthecharacter.Wehavefocusedonwhyonewoulduse3D.Butwhywouldoneuse2D?Can’teverythingbedone in3Dnowadays?If Iwerestanding inaclassroominfrontofyou,Iwouldhaveaperplexedlookonmyfaceandwouldbetryinghardnottoletmysarcasmshow.Yes,manythingscanbedonein3D.Butshouldtheybe?
Inmyclassrooms,thestudentshavetoproduceaseniorfilm(withapassinggrade)ortheydonotgraduate.I’msurethisisthecaseonmanycampuses:thefilmstendtobemonomedia.Itisamonochromaticseaof3D-ishness,anditalllooksthesame.Ofcourse,ifitwereall2Dfilms it might look the same too because of similar animation style emulation in thecurriculum.However,morethanlikely,itwillnotallbesimilarsimplybecauseofthedifferentartists’hands.Iamgeneralizing,ofcourse.The3Dworkdoesn’talllookexactlythesame,butthereisatrapthatyoungartistscanfallinto.Whentheycreatesomethingusingthe3Dtools,thesame3Dtoolsthatthenext500artistsareusing,theybecomesatisfiedwithwhattheyseeonscreenandthinkthatitisthevisiontheywereafter,wheninactuality,itistheeasiestthingthatthetoolhasofferedthemandtheother500to1,000artists.Onlythefew,whoknowwhattheirartisticvisionisandpushtomakethesoftwaredotheirbidding,produceimagesthatarenotinthatmonochromatic3Dsea.Becausethetoolsproducesomethingthatcanbelabeledasthe 3D package programmers’ artistic vision, those without their own clear artistic visionsettlefortheprogrammers’vision.Evenifyoudonotuse2D/3Dinyourindependentfilms,atleastpushbeyondtheprogrammers’artisticvision.Iwillnowputawaymysoapbox.

Onourcampus,onlyinthepastfewyearsafter introducingthis2D/3Dclass, Ihaveseenthe nonmono films created. It is nice to see this transition. We must break free from themonochromaticsea.(HowdidIgetbackuponthissoapbox?)
Wehavedonea2Dcharacterwith3Dparts,where the2Dcharacter leads.Nowwewillturnourattentiontoa3Dcharacterwith2Dparts,wherethe3Dcharacterleads.Thequestiontoask,then,is,whyuse2Dparts?
Why indeed shouldweuse 2D?With enough time for researchanddevelopment,nearlyanythingcanbedonein3Dthatcanbedonein2D.BackinChapter1,wediscussedhowitisno longer the subjectmatter thatdecides.Humancharactersdonothave to bedone in 2D,becausetheycanbeaccomplishedin3D.Fuzzycharactersdonothavetobedonein2D.3Dhascomealongway.Soitisn’texactlythesubjectmatterthatdecidesthemedium.Whatwasthat? The student in the back row, you had an answer? Yes. You are correct. The look,supportingtheartisticvision,isagreatreasontochoose2Dover3D.Youhavebeenlistening.Verygood.This ismypoint:once thestudentoryoungfilmmakergetsbeyondthe thoughtprocessthattheprogrammers’artisticvisionisagoodone,simplybecauseitiseasiertopushabutton,thenthatfilmmakercangrowintoseeingwhichmethodwillbestsupporthisorherownpersonalartisticvision.
Thenyoucanstarttoseethatsometimes2Dcanbetheanswer.We’lllookatsomeindustryandstudentexamplesfurtheroninthischapter.First,let’scategorizesomereasonsyoumightdecidetouse2Dover3D.
LineLook
What ifyou trulyneeded tohaveacertain styleof line thatcurrentlycan’tbe replicatedwith3Dtoonlines?Perhapsyouneedalovelycleanupthickandthinline.Perhapsyouwantascratchyhand-paintedline?Possiblyyoucouldcreateitwith3D,butthatbringsustothenextreason.Readon.
Time
Sometimes it takes less time to draw it than it does to do all of the research anddevelopmenttofigureouthowtodoagiventhingin3D.We’llexaminetheelementoftimeintheindustryexamplessection.

AnimationStyle
Another reason that might tip the scales toward 2D instead of 3D is to match a givenanimationstyle.Itmightbeeasiertoanimatein2D.
Whateverthereason,itsometimesisthehardestdecisiontomake,toaddin2D.Weloveour3Dshinybuttonsandwidgets. It ishard to stopandwonder if itwouldbeeasier, lookbetter, or possibly take less time than it would take for the research and developmentdepartmenttodrawtheassets.DidIjustsay2Dcouldcostlessthan3D?Ifyouconsiderhowmuchtimeitcantaketotest,develop,andrender3Dassetstolooklikewhatyouwant,thenyes,2Dcancostless.I’mreferringtomorerisky3Dassets,whichpossiblyyouhavenotdonebeforeorthatarehighlytechnicallikewater,goo,dynamics,andsoon.
IndustryExamples
ThehydrafromDisney’sHercules(1997)isagoodexampleofwhen2Dwasusedtogetitright.When thehydra’sheadsgrow from the stumpwhere thepreviousheadwas severed,thereisaneruptionofgoo.Thehydrawasa3Delementina2Dfilm.Theanimatorsusedflatshading on it, with tones and highlights. There were rendered toon lines done withRenderman.(Inthatday,youhadtoworkhardtohavetoonlines.)Forthegoothatwastoeruptfromthestump,theyinvestigated3Dparticlesystems.Theyspentalongtimetryingtogettheparticlestolookright.Itwasn’tworking.Finallythelookdevelopmentsupervisorhadawonderfulidea.Sheasked,“Canwedoitin2Dinstead?”Itlookedgreat.Theanimatorsdidasimple2DEFXelementofgooandcompositeditintotheshot.
Nowthatyouaregettingusedtotheideaof2D/3Danimation,itmaynotseemthatoddtoyoutoconsiderdrawinga2Delementontopofa3Delement.Threechaptersagoyoumightnothavesoeasilycometotheideaofputting2Dgooontopof3D.There’snoturningbacknow.Itisjustanimage.Anythinggoestogetthatanimationonthescreen.
RecentlyIwanderedthrougharoomwhereDreamworks’Spirit,StallionoftheCimarronwasbeingplayed.IthadbeenawhilesinceIhadlookedatthatfilm.Itisagreatexampleof2D/3Dmixtures.Thesequenceplayingwasoneinwhichtheleadhorsefallsintoariver.(Whyanimalmovies,bothanimatedandliveaction,alwayshavetodouseanimalsinragingrivers,Idonotknow.)Asthehorsestruggledinthe3Dwater,hissplasheswere2D.Itworkedprettywelltohavethe2Dsplashesatthecontactpointofthe2Dhorseandthe3Dwater.Tohave3Dperfectwateraroundaflat2Dhorsewouldhavedrawnattentiontothecontactpointanddrawnattentionawayfromtheactionofthescene.
I have anotherDisney example that I lived through. For Fantasia 2000’s Pines of Rome

sequence, theanimatorsworkedhard todevelop3Dwhales.Theywere lovelywhales;youcancheckout theDVDtosee them. It’sacute taleaboutababywhaleandhisadventureswhiletryingtoflywithhisparents.Therewereafewelementsinthatsequencethatcouldnotbeexecutedverywellin3Datthetime.Duringproduction,in1995,3Dwasnotthebestatafewthings.Thefirstelementthatwasnotconvincingin3Dwastheeyesforthewhales,andthesecondelementwasthewatersplashes.Bothelementsweredonein2D.The3Dwhaleswereprinted,peggeduponpaper,andusedbythe2Dartistasreference.I’llassumethattherewassomehand-adjustingofthe2Deyesinthecompositingsoftwareattheendoftheprocessiftherewereanyregistrationissues.Theeyesweredrawnin2D,andthewatersplasheswerenotonlydrawnin2D,theyweredrawninanolderstyleofEFXanimationwiththesideofthepencil instead of drawing outlines. A similar style was used in the Sorcerer’s ApprenticesequenceintheoriginalFantasia(1940).
FormonthsIwatchedthesesequencesastheywentthroughanimation.Ididn’tevenworkat Disney at the time. I worked at Dreamworks. After getting off work I would drive toFlowerStreet to takedinner tomyspouse,whoworkedasacleanupartist in thecharacterdepartmentbydayanddidovertime inEFXatnight.Hewas incrunch time thenandwasworkingovertimedrawingthosewhaleeyesandwatersplashes. Itwasahugeundertakingandturnedoutverywell.Imarveledattherotoprintsofthe3Dwhales.Forsomeshotstheywere printed out on 24 field paper, and the artists had to draw eyes on that large 24 fieldpaper. Iwish I knew for sure, but I’m confident that animatingon 24 field paper (which isincrediblyhuge)hadtohavecausedsomeslightregistrationissues.Imaginethesehugepiecesofpaperthatweretwicethesizeofnormalanimationpaperandtheonlythingsonthemwereacoupleofsmallwhaleeyes.I’mnotsurewhytheywereusing24fieldpaper.Usuallywhenyouaredrawingasmall imageona largebackground,youcandrawonsmallerpaperandcompositethedrawingintothecorrectplace.I’msuretherewasareason.
Hands-OnExamples
I run a group project class at least once a year. In 2008, the group project was verysuccessfulforsuchasmallteam.I’mproudtosayweplacedintheDaytonaFilmFestival,theSavannahFilmFestival, and theAtlantaFilmFestival.Thegroupproject for 2009wasof aslightly larger scope, and our team size doubled. At the start of the project I knew that Iwantedittolineuptoproduceartworkforthisbook.SoIputontothegrouponerestriction:thecharacterhadtobea2D/3Dcharacter.AtfirstIworriedthatforcingarestrictionlikethatwouldhamperthecreativeprocessoritwouldbeforcedontothestorywithnoreason.Theruletheteamcameupwithfortheuseof2Dand3Dwasthis:organic=2D,nonorganic=3D.

I thought thiswas an interesting concept.We’ll take a look at a sequence that exemplifiesthoserulesandthe2D/3Dprocess.
JaguarMcGuire:CapeonFireSequence
Theshortgroupprojectfilmthatwecameupwithfor2009istitledJaguarMcGuire.Itisastoryaboutaconflictbetweenacatandhisowner.ThecatownerisnoneotherthanJaguarMcGuire,who, the audience finds out in the opening shot, is a daredevil. They also realizequicklythathemusthavehadbadfortuneinhiscareerasheisinabodycast.ThesecondshotshowsJaguarlookinglonginglyathiscapeandseeminglyreminiscingoverhiscareer,which,asanewspaperheadlineremindshim,isdefinitelyover.JustaswearefeelingsorryforpoorJaguarMcGuire,werealize thathis troublesare far fromoveraswehear the firstofmanyhundreds ofmeows that come fromhis cat. This troubled cat owner’s cat still requires thethingsthatcatsneed.HowwillJaguarquellthemeowing?Whatensuesisaphysicalcomedythatissuretohaveyoulaughing.
Duringthestruggles,thereisasequencewherethecatclimbsontopofJaguar’sbodycast.Jaguarhasonefreelegandtriestokickthecatoff.Unfortunately,thecatjumpsoffjustbeforethe leg connects and insteadof kicking the cat, Jaguar kickshis own injured leg out of thesling.Themomentumpropelshislegoffthesideofthebedandknocksoverhistable,whichlaunchesavaseofwater(inslowmotion)throughtheair.Thevasecrashesandshort-circuitsan electrical outlet. The sparks, sadly, catch the hemof the cape on fire. Jaguarwatches inhelpless horror as the flames burst up the length of the cape. Being a daredevil, Jaguarbelieveshecanstopthefireanduseshisonlyfreefoottotrytostomptheflames.
We’lltakealookathowthecharacterscametobeinthe2D/3Dprocessforthissequence.Manyindividualswereinvolvedinthecreationofthisshortanimatedfilm.Westartedwithateamof14thatmetweeklyintheclassroomfor10weeksandthenworkedwithmanymoreartistsoutsideoftheclassroomaswecontinuedthroughproductionandpost-production.
Jaguar
Manydesignsbystudentswereturnedinforthemaincharacter,JaguarMcGuire.Ourartdirector, JasonWalling, compiled different ideas and ultimately came up with the page ofdesignideasyouseeinFigure4.2.Thecharacterdesignallowedfora2Dleg,2Dhead,and2Dwigglingtoesandthumbs;allelseonJaguar,beinginacast,is3D.You’llnotethatthefaceandlegarecompletelyencasedinbandages.Ittooksomeconvincing,butwefinallycametothe

agreementthatatleastthelegwouldnotbecoveredinbandages.Thereasonforminimizingthebandages is that2Dbandagesare incrediblyhardtokeepupwithwhenanimating,andthecleanuponthemwouldmakeitdifficulttomanagequalitycontrol.Anyonewhohasgonethrough2Danimationclasseshasprobablyheardtheevilsofstripes,longflowinghair,printsonclothing,complicatedribbonwork,andthelike.Alloftheseitemscancontributetoamorecomplex cleanup line, which if not managed well can cause strobing, jiggle, or otherwisedistractfromtheanimation.Thebandagesonthefacestayed,becausethosewereimportanttokeepupthehighleveloffrustrationneededthroughoutthefilm.
FIGURE4.2JaguarMcGuirecharacterdesignbyJasonWalling
Ourdirector,ClintDonaldson,tooktheconceptandbeganworkingonideasofhowthe2Dand3Dwouldworktogether.InFigure4.3,youseeavisualtargetcreatedbyClintthatisourfirstdepictionofa2DJaguarbodyinsideofa3Dcast.Fromtheverybeginning,theideaofa3Dcastthatwassimplyimmovablebackedourstoryofthistrappedstuntman.Itfitthestoryand I was pleased that the restriction I originally gave did not end up feeling like it wasretrofittedintothestory.

FIGURE4.3JaguarMcGuire’s2D/3DvisualtargetbyClintDonaldson
For the first 10weeksofproductionwehada classof 14 individuals.Manywere taskedwithmodelingandtexturing.The3Dcastrigwascreatedalongwitha3Dversionoftheheadand leg tobeusedasreference for the2Danimation.Figure4.4 isa shotof the roomwithJaguar’ssupinebodyonthebed.Becausethiswasaproductionpipelinewithmanyindividualsinvolved,weutilizedthereferenceconceptforeverything.ThemodelandtherigfilewereallreferencedintothemainblockedMayascenes.Thiswaythescenescouldbepushedthroughthepipelinebeforethemodelsorrigswerecompleted.Asthemodelersfinishedthehigher-resolutionversionsofthemodels,theyupdatedthereferencefiles.Thenastheriggersfinishedrigging the files, thosewere updated. From the animator’s point of view, they animated ablockversionofthecharacterinablockroomoneday,andastheproductionwentalongtheroomtheyreferencedinbecamemorehighresolutionandfilledoutuntilitwasacompletedroomreadytorender.

FIGURE4.4JaguarMcGuire3Dmodel.Headandlegare2Dreferencestand-ins
Theanimationwascompleted inMaya.Theanimatorschose toanimate the3Dstand-inscompletelytobettervisualizetheanimation.Figure4.5showskeyframesofthe3Danimationincludingthestand-inleg.Thestand-infortheheadisalow-resversion.Thiswastherigthatwaspushedthroughearlierinproduction.Laterintheproduction,ahigher-res3Dheadwasdevelopedtoallowmoreperspectivehelpforthe2Danimators(Figure4.6).Thishigher-reshead was necessary for other shots where we did a crazy zolly shot (a rite of passage,according to the artists). A zolly shot on a 2D/3D character, though, is very challenging.Anotherthingthat thehigher-resheadgaveuswastheabilitytocastshadowsontheheadandpullthoseshadowstocompositeovertopofour2Dcharacter.We’lllookatthattechniqueinthechapteronEFX.

FIGURE4.5JaguarMcGuire’s3Dlow-resheadreferencedintotheanimator’sscene
FIGURE4.6JaguarMcGuire’s3Dhigh-resheadreferencedintotheanimator’sscene
TheanimationwasdonenormallyinMaya,creatingacharactersetandsettingkeyframes

asyouareusedto.Also,thetwos.melscriptwasusedtomakesurethattheanimationwasontwos. You can see a playblast of the animation of the 3D character in the file3DLeads2D_3Danim.avi.ThisplayblastfromMayashowsthecontrolsfromtherigaswell.Itwasasimplerig,asnodeformationswereonthecastitself.Wedebatedwhetherornottoaddthem.Intheendwedecidedthatforcomiceffectwewouldtryitwithoutanydeformations.
Uponcompletionofthe3Danimation,ClintbroughttheanimationintoFlashtoroughoutthe2Danimation.ClintandJason,thetwodirectorsofthegroupproject,preferredcreatingtheirrough2DanimationinFlashbecauseitiseasiertosetupkey-framesinthetimelineandadjusttiming.TheywerenotfamiliarwithanimatinginPhotoshop.Theyalsolikedworkingwiththetimelinesandbeingabletoadjustthetimingoftheir2Deasilybymovingkeyframesin Flash. You can open the Flash file to see the layering used and the rough 2D animationdrawnovertopofthe3DinthefileShot41–43_2DRough.fla,foundinthecompaniondata.
FIGURE4.72DroughanimationdrawninFlash
Notallanimatorsinthegroupprojectwereabletodoboththe2Dandthe3Danimation.ClintandJasonbothwereableto,andtheyhandledthetotalanimationofeachoftheirshots.Thecleanup,originally,wastobehandedofftoourteamofvolunteercleanupartists.Usingthe standard round brush inside Photoshop, theywere to complete the cleanup pass of thecharacter. However, we found that the animators had fairly clean lines in their animation.MostofthecleanupwascompletedinFlashwithaverysmallbrush.
Jaguar’sNeckBrace

Therewasmuch discussion early on about whether or not wewould break our rule of“organicis2D”withtheneckbrace.ClintandIpushedfora2Dneckbrace,thinkingitwouldbeeasiertoanimatethatway.Ialsobelievedthatitmightmakeforaneasiercontactpointbetweenthe2Dandthe3D.Toourartdirector’scredit,Jasondidnotthinkwewerecorrectanddidatesttoshowusthata3Dneckbracewouldworkjustfine.Heanimatedshot9witha3Dneckbrace.Theneckbracehadasimplelatticedeformeronit,anditworkedjustfine.Infact,sincewerarelyseetheneckofthecharacter,the2Dheadcanmostlybecompositedontopofthecharacterwithfewregistrationissues.WeallhadtoagreethatJasonwascorrect.Thetestprovedit.
Figure 4.8 shows how the 3D neck brace moves along with the high-res 3D head. Aplayblastofscene9’s3Disinthecompaniondata:3DLeads2D_3Danim_shot9.avi.
FIGURE4.8Shot9ofJaguarMcGuireandhis3DneckbraceanimatedbyJasonWalling,ourartdirector
The3Danimationwas thenbrought intoFlashwhere the rough2Danimationheadwasplaced.Thehigh-resversionoftheheadinMayahelpedtheanimatorwithperspectiveontheface and ears.When combining 2Dwith a 3D shot, it is extremely important that the 2Dfollow perspective as much as possible. Otherwise there would be a visual mismatch thatwoulddetractfromtheanimation.

FIGURE4.9Shot9ofJaguarMcGuire’s2Dhead,animatedinFlashbyJasonWalling,ourartdirector
The Flash file for this rough animation scene is in the companion data for you to view:3DLeads2D_2DAnim_shot9.fla.
ThescenewascleanedupinFlashusingaverysmallbrush.Thenthescenewasreadyforfinalcomposite.
FIGURE4.10CleanupdrawinFlash,byJasonWalling,2009,SCADgroupproject
YourShot4

Nowitisyourturntotakeashotfromtheproject.Youhavebeenissuedshot4.ThisisareactionshotofJaguar.Hehasbeenlookingathiscapeandcardsandthenewspaperheadlinethatpronounceshiscareerover.Justashesighs,adeepsadgroan,hisnostalgiclamentingisinterruptedbyhiscat’smeow.
3DAnimationLeads
Start by opening theMaya fileShot4_Blocked.mb. If your project is not set,Mayawillautomaticallycallinthereferencedrigfilejaguar_bodyCast_v2.mb. IfMayacannotfindit,youwillbepromptedtobrowseforthefile.OncethefileisloadedintoMaya,youcanswitchviewstodisplaytheanimatedcameraforthisscene,camera1.Todothis,inthepanelwindowclickPanels>Perspective>Camera1.
FIGURE4.11BlockedinMaya,thisfilewasopenedandviewedthroughananimatedcamera
Theanimationfortheheadhasbeenblockedinalreadyforyou.Thesceneis100frameslong.Theframerateis24framespersecond(fps).OurcamerarenderingsettingsareHD720.Youwillnotethattheblocked-inanimationwasnotplacedontherigcontrolsbutontheheaditself.Selecttheheadsothatitturnsgreen,andyouwillbeabletoseethekeyframesinthetimeline.Thisisnormallynaughtyrigging.Inriggingclasses,Iteachthestudentstolockdownallgeometryso that thecontrolsare theonly thing thatcanbeanimated.Rigging thiswaykeepsnoviceanimatorsfrombreakingtherigeasily.However, inasmallgroupproject likethisone,wheremostofuswerefamiliarwiththeoutliner,webrokeconventionandanimated

thegeometry.Inlargergroupprojectsorwhentheteamissuesscenestoanimatorswhoarenot familiarwith the rig (like you), this convention could cause confusion. Inmany scenesthroughoutthefilm,wehadtobreaktherigtogettheposingweneeded.Thisisentirelytobeexpected in settingsoutsidea sterile classroom.Dowhatyouneed todo toensure that theshotiscompletedontime,butdonotcausemoreissuesforothersdownpipelinefromyou.Becauseyouarebeingissuedthisscene,pleasenotethatthereisnocharactersetonJaguar,andtheheadgeometryhasbeenanimated.
FIGURE4.12Animationisonthegeometry—naughtyrigging.(ReadRigItRight!formoreinformationontherulesof
rigging.)
Thecamerahasbeenanimated,whichwilllikelybethecaseinaproductionenvironment.Youaretoanimatethe3Dcharacter.Thosewhohaveworkedinproductionknowthistobethecase;forstudents,thismightbeanewconcept.
Theneckbrace isnot rigged.Youcanselecton itdirectlyandrotate itasyousee fit foryouranimation.Thosewhotakemyriggingcoursesknowthatthisbothersmetothecoreofmybeing.Makeanote: thesestudentsdidnottakemyriggingclassandwe’ll livewiththeuncleanimplications.Inaperfectworld,wewouldhaveacompletelylocked-downrigwithcontrolsinplace.Breakingtherigonashot-by-shotbasisisonething,buthavingapartoftherigthatshouldhavecontrolstobeanimatedineveryshotisanother.Itissimpleanimationforthebrace,sowecananimatethegeometry.

FIGURE4.13Theneckbracecanbeanimateddirectlybymovinggeometry
When you have completed your animation, do not forget to run the twos.mel script bytypingtwos inthecommandline.Thiswillputyouranimationontwosforyou,andinthisscene there shouldn’tbe aneed to change it toonesunlessyou feelyouneed towhen thecharacterquicklyturnstofindthesourceofthemeow.
Render3DReferenceImages
Saveyourprojectandrenderoutasequenceofimagestobringitintothe2Dpackageofyourchoice.Thereisnoneedtorenderoutrenderpassesinthisscenebecausetheheadonlyneedstobecompositedrightontopofthebody.Thisisaneasyregistrationscene.However,ifitwillmakeyourregistrationalittlebiteasier,wecanrenderouttheheadonaseparatelevelso thatwhenyouaredrawing inyour2Dpackageyoucanhide theheadandseeonly thebodylevel.Thiswillallowyoutoseeifyoutrulyhaveproperregistration.
CreaterenderlayersaswedidinChapter3fortheheadandthebody:
1. Clickonthebody;itshouldturngreen.2. IntheRenderLayerwindow,selectLayers>CreateLayersfromSelected.3. LabelthelayerRLBody.4. Repeatforthehead.

FIGURE4.14Renderlayersforthebodyandhead
Rememberthesettingsthatyouneedtohaveinordertorenderlayers:
1. YouhavetotellMayatorenderallofthelayersintheRenderLayerareabyclickingOptions>RenderAllLayers.
2. Makesurethatyourrendersettingshavethefollowing:
a. Correctnamingandfileextensionb. Correctframerangeandpaddingc. Camera1selectedandalphachanneld. HD720resolution
3. ThenclickRender>BatchRender.4. Your imageswill be placed inside folderswith namesmatching your render layer
names.
TakeNote
Watchout.Whatifyourcompositingsoftwareofchoicedoesn’treadinalphachannelswith.tif image sequences?Youhave twooptions: createa rawQuickTimemovie filewithalphachannelsoranFLVfile.
CreatingarawQuickTimemoviefilewithalpha:
1. Inthepackageofyourchoice,convertthose.tifortgaimagestoaQuickTimemoviefile.IwilluseAfterEffects.Aswehavedonebefore,importyourimagesintoAfterEffectsandcreateacompositionwiththeproperframerate.Tocheckifyouralphachannel is there (please check, thiswill save you the headache of having to comebackandredothis),clickontheShowChannel iconandselectAlpha.Youshouldseeablack-and-white imagethatmatchestheshapeoftheobject inyourimage. If

youonlyseewhite,youhavenoalphachannel.Gobacktostep2andmakesureyouarenotusingJPGsorsomeotherimageformatthatdoesnotsupportalphachannels.I’llwaitforyourighthereuntilyougetback.
2. Onceyouaresurethatyouhavealphachannels,exporttheimagesasaQuickTimemoviewiththecompressionsetatAnimation.Thiswillbasicallybeamovieoffull-resimagesthatcontainalpha.
3. Repeatfortheheadlayer.
CreatingFLVorSWFfiles:Here, we’ll use a new piece of software found in the creative suite. In Adobe Media
Encoderchoose:
1. File>AddSource…andselectyour.tifsequence.MakesuretoselectTIFF imagefilesequence.
2. SettheoutputtoFLV.3. Click on FLV to open the options. Make sure the video tab has Encode Alpha
Channelcheckedon.Allelseshouldautomaticallymatchthesizeofyour.tifimages.4. Clickonthegreenplayarrowintheupperrightof theprogramtostart thequeue
andrendertheFLVfile.
WhenthisFLVfileisbroughtintoFlash,thealphachannelswillberespected.
FIGURE4.15UsingMediaEncodertoconvert.tifsequence(withalpha)toFLVfile(withalpha).TeachFlashtorespectyour

alphachannels
2DAnimationFollows
Nextwewilldoour2DroughanimationinFlash.Createanewdocument(ActionScript3.0document)with the following dimensions: 1280 × 720, 24 fps.Wewill bring the referenceimagesintothetimeline.
1. GotoFile>Import>ImportVideo…andselectthebodylevelmoviefile.2. TurnonEmbedvideoinSWFandplayintimeline.3. Click onnext andmake sure the symbol type isembeddedvideo. Click onnext,
thenfinish.4. Repeatfortheheadreferencelayer.
ANoteonFlashandImportingVideo
Flashwasnever reallyoptimized tousevideo. Itwasbasicallymakingavector for eachpixel—supermemorybog.CS6andnewerversionsofFlashexpectFLVorSWFfiles.Olderversionsof Flashwill bring in a rawQuickTime file.Whatwould happen ifwe used a .tifimagesequence?Gladyouasked,becauseIdiduse.tifimagesandwhenIbroughtthemintoFlashtheyreadinasanastronomicallyhugefilethatIcouldnotsee.Ifyoutrytouseatga,itwillopencorrectlybutwithout thealphachannel.Adobeproductswill readalphachannelswithFLVfiles.AfterEffectswillalsoreadtheQuickTimefileanditsalpha.Ofcourse,bythetime this prints it could change—so always check your alpha channels and image types foryourpipeline.
DrawinginFlash
Insertanewlayeraboveyourvideolayersandchoosethepencilorbrushtooltodrawin.The shotswith rough animation shown in Figure 4.16were drawn using the brush tool inFlash.Youcanseethatusingthebrushtoolstillcreatesavectorline;theoutlineofthebrushisvector.Thebrushtoolworkswithtabletpressuresensitivityaswell.

FIGURE4.16RoughanimationusingbrushtoolinFlash
ForthosenewtodrawinginFlashandtheconceptsofkey-frames,hereareafewtips:lockalllayersthatyouarenotcurrentlydrawingon.Ifyoudon’t,youmightaccidentallydrawonlayers thatyoudonotwishto.Also,youcandraganddropkeyframesonthetimeline;butbeware,youcanaccidentallyduplicatekey-framesandcauseamessytimeline.RefertoFigure4.17forthefollowingexplanations:
1. Thecurrenttimeisindicatedbyaredbar.2. A blank keyframe,where nothing is drawn, is indicated by awhite blockwith an
emptycircle.Youcanright-clickonthetimelinetoinsertablankkeyframeorusethehot keyF7. Once you have a blank keyframe, or a blank piece of paper, you canbegintodrawyourkey;thecirclewillfillinandthekeyframewillturngray.
3. Tocreateakeyframethatalsohasacopyofthepreviousdrawingonit,usethehotkeyF6.
4. Toextendakeyframebyholdingitlonger,usethehotkeyF5.Theendofaholdisindicatedbyagrayrectangleonthetimeline.

FIGURE4.17UsingthetimelineinFlash
Whenyouhavecompletedyourroughanimation,youwillwanttoexportthoseimagessothattheycanbebroughtintothecleanuppackageofyourchoice.ForourproductionJaguarMcGuire,wedebatedusingToonBoomorPhotoshop.Intheend,becauseofitsfamiliarityandtoenablestudentstoworkonprojectsathome,wechoseFlashformostscenes.Bynowyoushouldalreadybe thinkingof thenext step. Ifweneed thealphachannel, canweoutputaseriesof.tifsortgas?Yes,orwe’llexportaQuick-Timefile:
1. Delete all but the rough head animation levels. Even if you hide layers, theywillexport.
2. ChooseFile>Export>ExportMovie.3. Giveitaname,chooseQuickTimeMovie,andclickSave.4. Intheexportsettings,makesurethattheimagesizeiscorrect.5. If youwant an alpha channel,make sure that Ignore stage color (generate alpha
channel)isclickedon.6. ClickQuickTimeSettings…7. Makesurethatthecompressionsettingsareforanimation,andthattheframerateis
correct.8. ThenclickExport.

FIGURE4.18ExportingroughanimationfromFlash
Itisalwaysgoodtobeparanoidwhenexportingimagesandalwaysdouble-checkthattheyexportedwhatyouwantedthemto.Alltoooftenyougetfivestepsdownthepipelineonlytorealizeyouhaveexportedcompletelyblankimagesor imagesfromthewrongcamera. It isalsogoodtocheckwhetheralphachannelsarepresentandiftheimagesarethecorrectsize.Whiletestingthischapter,IwashappilyfollowingalonguntilIrealizedthatmyimageswerenotexportingoutatthecorrectsizefromFlash.Thisisverysad.ThenIrememberedthatthesamethinghappenedduringa24-hourartchallengewhereIdida2D/3Dshot,andatfiveinthemorningmybraincouldnotprocesswhymy2Dimage(whichwasdrawninFlash)wasnotliningupwiththe3Dimage.NowIseewhy.WhenyouexportasimplelinedrawingfromFlash, even though your export settings are the correct size, it will crop to the smallestrectanglethatwillencompassyourimage.Thatcanbequiteashock.Awayaroundthisistoplaceaboundingrectanglearoundyourcanvasthatisjustatthecutoffsize.Ifyoumakeitaguidelayer,itwillnotrender.Thiswillensureaproperexport.Warning:Iftheboxisbiggerthan the output file size should be, you may have registration issues in your compositingsoftware.

FIGURE4.19PlacinganoutlineinFlashtoensureanexportofthepropercanvassize
CleanupinPhotoshop
TheeasiestwaytoopenaQuickTimeorFLVmovieintoavideolayerandmakesurethatthefilesizeisthecorrectdimensionistosimplygotoFile>OpenandopenthemoviefileyouexportedoutofFlash.Thiswillopenthefileintoavideolayerandgiveyouadocumentthat is the correct size and bit depth. Watch out for your document’s playback settings,however.Duringtesting,ourframeratehadtobechangedmanually.Youcansee inFigure4.20wheretheframerateisincorrect.

FIGURE4.20UsingroughanimationinPhotoshopforcleanup
Addanextravideolayerandusethebrushthatyouwishtodrawinyourcleanupline,aswe have in previous chapters. When you are done, export your video layer for finalcompositing.

FIGURE4.21Cleaned-upanimationinPhotoshop
MoreonToonLines
Wehaven’tlookedattoonlinesinawhile,andyouwerepromisedmore.Let’stakealookatsomemorefeaturesoftoonlines.Whatifyouwantedascratchy,non-pencil-likeline?Let’suseourshot4sceneandtestoutsomepainteffectstoonlines.
OpentheShot4_Blocked.mb fileor the fileyouhave justanimated.Select thebodycastandneckbraceandapplyanewtoonshaderbyclickingonToon>AssignOutline>AddNewToonOutline.Nowa toon line isapplied toyourcharacterandyoucan see it in themainviewport.Nextwewanttoworkwiththepainteffectsbrushesandapplythemtothetoonoutline.Someofthesebecomeheavytorenderintheviewport;youmighthavetoturnoffDisplayinViewportintheattributeeditor.Otherpainteffectsbrushesdonotdisplaywellandareonlyappreciatedwhenrendered.Tobeginwith,openthevisorwindowbyclickingPaintEffects>GetBrush:
1. SelectthepfxToon1toonlinenodeintheoutliner.2. Select abrush in thevisorwindow>Paint effects tab. In Figure4.22 theToon >
ThickOilLinebrushhasbeenselected.3. Toapplythebrushtothetoonline,clickToon>AssignPaintEffectsBrushtoToon
Lines.
YoucanseeintheviewportshowninFigure4.22thatthepainteffectstoonlineisvisible.Figure4.23isarenderofthetoonlinecompositedwiththeroughanimation.
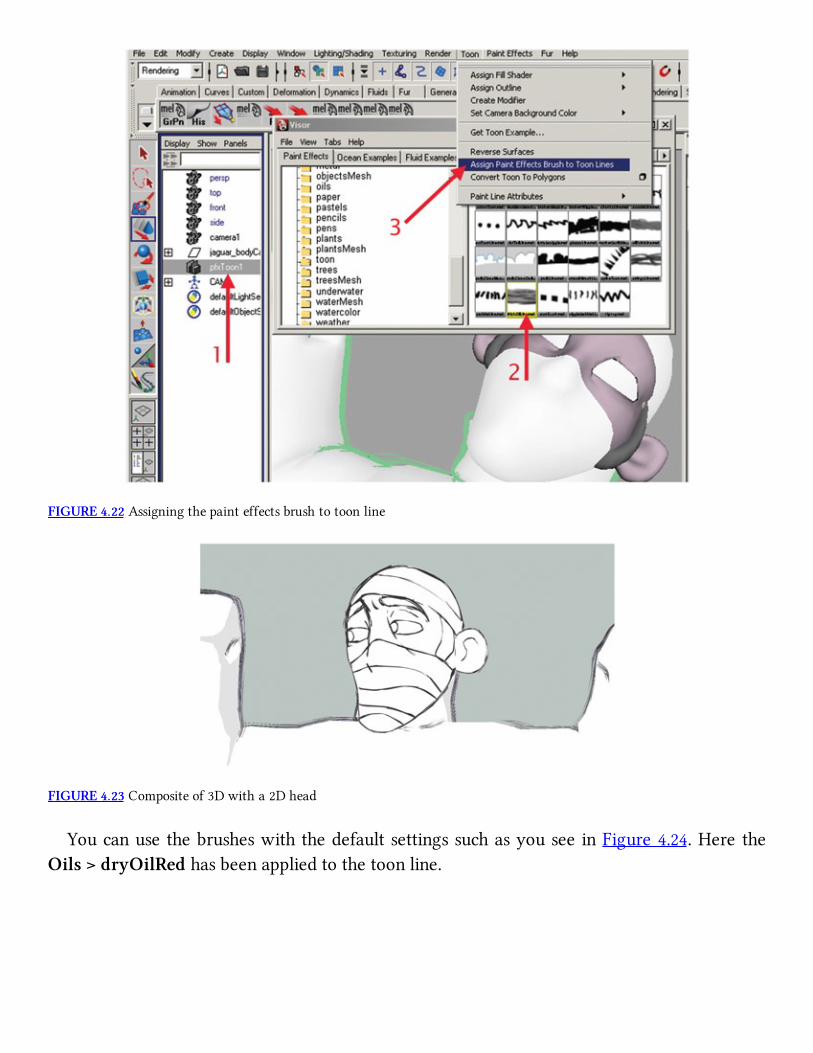
FIGURE4.22Assigningthepainteffectsbrushtotoonline
FIGURE4.23Compositeof3Dwitha2Dhead
YoucanusethebrusheswiththedefaultsettingssuchasyouseeinFigure4.24.Here theOils>dryOilRedhasbeenappliedtothetoonline.

FIGURE4.24DryOilRedPaintEffectsbrush
OryoucanselectthebrushintheAttributeEditorandadjustthesettingsformorecontrol.InFigure4.25thepainteffectsbrushOils>thickOilRedwasappliedtothetoonline.Asyoucan see in the image, the brush typewas set to Thin Line,MultiStreakswas set to 2, andStreakSpreadswasadjusted.Giveyourselftimetoworkwiththeseattributes,asittakestimetobecomefamiliarwiththem.Whenyoufirstbegintoworkwithpainteffectsandtoonlines,takescreengrabsofthesettingsyouhaveadjustedandtherendersyoucomeupwith.Thesecanhelpyounavigatethroughgoodandbadadjustments.
FIGURE4.25ThickOilRedPaintEffectsbrush

Don’toverlooknontraditional-soundingpainteffectsbrushes.Youwillbesurprisedbywhatyoucanuse.InFigure4.26Itookachanceandusedanintestinalflowpainteffectsbrush.
FIGURE4.26Intestinalf lowpainteffectsbrush
Puttingitalltogether
Nowyouhavesomeimagesreadytobeplacedtogether.Whatassetsdoyouhave?
1. 3Danimatedbodyandneckbrace2. 2Danimatedhead
Thisshouldbeasimplecompositeinyourfavoritecompositor:AfterEffects,Smoke,Nuke,or Final Cut. Simply place the asset clips overtop of one another in separate layers andcompleteafinalcomposite.Whatcouldgowrong?Alphachannels,imagesize,framerate.Ifyoudonothave alpha channels in anyof the layers, thenyouwill need to goback to theoriginating software package and re-render with alpha channels that your compositingsoftwarewillread.Ifyourenderedalayeratthewrongsize—thenyouwillneedtore-render.Lastly,watchinyourcompositingsoftwarethatallimagesequencesforthelayerscomeinatthesameframeratethattheyweredrawnin.Therewasnobackgroundsuppliedtoyouforthisshot.Youcancreateanartcard(colorcard)foryourfinalcomposite.
Let’stryitinAutodeskSmoke.AfteropeningSmokeandsettingaprojectandusername,clickontheMediaHubtabatthebottomoftheinterface.Navigatetothefolderswithyourimagesequences.Thefirstthingyouwanttolookforisyourimageswithalphachannels.Youcanseestraightawayifthealphachannelsarebeingrespectedornot.InFigure4.27youcansee two versions of the body layer. One is a movie file with no alpha and the other is a

sequenceof.tifimageswithalpha.Thealphaisindicatedbytheword“MULTI,”whichisatthebottomrighthandoftheimage’sicon.DoubleclickonMULTIandtheRGBandAlphachannelwilldisplay.Youcanevenscrubthroughtheclipsbyclickinganddraggingonthem.ControlclickontheclipwiththealphaandchooseImport.Repeatfortheheadlayeraswell.TheseclipswillloadintotheMediaLibraryattheleftsideoftheinterface.
FIGURE4.27ImportingimageswithalphachannelsintoAutodeskSmoke
TheremanywaystodealwithalphachannelsinSmokeandtheyhaveadedicatedYouTubechannel tohelpyoufigureout theways.Lookup“DealingwithAlphaVideoSeries” intheSmokeLearningChannelonYouTube.
GototheTimelinetabinSmokeandcreateanewsequencebyclickingonFile>New>Sequence.Doubleclickonthesequence in theMediaLibrary.Thismakes itactive in theviewingarea.Draganddropthebodylayerintotheemptyvideochannel.CreateanewvideotrackbyclickingonSequence>New>VideoTrack.Draganddroptheheadlayerintothenewemptyvideochannel.(Youcouldhavesetthesequencetohavetwovideochannelsintheoptionboxwhenyoucreatedit.Didyou?Goodjob.Yousavedaclick.)
Butthecompositedimageisn’tshowing?Well,Smokeismorethanatimelineeditor.Itusesthetimelinetosequencethevideoclips,butyoucandomoreunderthehoodwiththem.IfyoucomparethisthoughtprocesstoMaya,inaway,itissimilar.Smokeisn’tasimplenode-basedcompositoreither.(We’lllearnaboutthoselater.)
Select the head layer, then locate the small FX button at the left of the screen in the

timelinepane.Clickthat,thenclickonAxis.Thiswilltellthetwolayerstocomposite.
FIGURE4.28UsingAxisFXtocompositethetwoclipsoveroneanother
Inawaythatissimilartomostpackages,makesurethatyouhavethesequenceselectedinthemedialibraryandselectFile>Export.Givethefileanameandthedesiredformat,thenclickonExport.
You’llnotethatintheexampleabove,Iusedthe3Dheadreferencetoshowthepipeline.You’lluseyour2DanimationcompletedinFlash,ToonBoom,Photoshop,Gimp,orwhateveryouchosetoanimatein.
Bynow,youshouldreallybegettinga feel formovingaround in thedifferentpackages.You don’t have to use a compositing software if your animation/cleanup software doescompositing as well. For example, Toon Boom Animate Pro would allow you to do thecleanupanimationandcompositeall inonepackage.SeeFigure4.29 foranexample. (Note:this is what drawingwith amouse looks like!) The default import settings brought in thecorrectalphachannelinformation.

FIGURE4.29BodyandheadlayerbroughtintoToonBoomAnimatePro.Cleanupandcompositingcantakeplaceinthat
samepackagewithouthavingtouseAfterEffectsorSmoke
Congratulations!We’removingalongatasteadypacenow.Areyouusingthesepipelineswith multiple software packages? Do you know where your alpha channels are now?Excellent.Iwonderwhatisnext.
Interview
MartyAltman
FormerCGITechnicalDirector,WaltDisneyFeatureAnimation
Theconvergenceofallthings“digitalmedia,”theever-growingdemandforcontent,and inparticular shrinkingbudgets and time frames,means themixingof approachesandtechniquesisbecomingmoreprevalent.Progressivelymoreexamplesappearalmostevery day now, but this trend started years ago. Some specific examples of hybridapproachesfromthenot-too-distantpasthelptellthisstory.
ThepalacecrowdelementinDisney’sanimatedfeaturefilmMulanwasaninterestingmixof2Dand3Dapproaches.Weutilizedaslightlymodifiedversionoftheproprietary

crowdsimulation,whichwasusedforthewildebeeststampedeinLionKing,thecrowdsinHunchbackofNotreDame,thewhalesinPinesofRomeinFantasia2000,aswellastheHunchargeinMulan.WealsousedamodifiedversionoftheeditorwrittenfortheHuncharge.Thesimulationplacedthecharactersin3D,andbehaviorsweresimulatedasbefore.Theeditorwasa3Dapplicationwithcertain2Dcapabilities.
The2Dapproachreallycameinwiththepalacecrowdcharactersthemselves.Allthecrowd behaviors, both cycles and transitions, were traditionally animated charactersconverted to an interesting system of animated textures andmapped onto individualpolygons.Colorsforsomeportionsofthetextures,inthiscaseskintoneandhaircolor,were locked. Other portions of the textures, such as clothing, used a false-colortechniqueandart-directedcolorpalettestoincreaseperceivedvariety.
Thishybridapproachnotonlymatchedthetraditionalstyleofthefilmbutprovidedawiderangeofusefulnessforthecharacters—theycouldappearfullscreenascouldanyotheranimatedcharacterinthefilm,andthesamesystemcouldplace30,000charactersin a single scene. While still a good bit of work to traditionally animate the crowdcharacters, a pure 3Dapproachwouldhave taken significantlymore calendar time tomeet those same requirements. Ifpure3Dhadbeen theonlyoption,we likelywouldhavelostthepalacecrowdelementduetobudgetandtimeconstraints.
The Pooh’s Hunny Hut attraction at Tokyo Disneyland provides examples ofintegrationissuesgoingbeyondjust2Dand3D,becauseofthepracticalaspectsneededfor a theme park attraction. One involves traditional painted backgrounds, a 2Dcharacter (Tigger) bouncing across three large screens, and a swarm of 3D characters(bees). It also has a big multiplane camera move incorporating both the projectedartwork and several levels of practical elements placed between the viewers and thescreens.Forthemultiplaneshottosucceed,alltheselevelshavetoworktogether.
AnotherHunnyHutexamplemakesuseofprojectionontoahalf-silveredmirror,soviewers see themselves with a 3D character. Several issues made this challenging. Aspecialprojectorwasshippedstraight fromthefactorytoTokyo,soweneverhadthechancetotestourimagerydirectlyandinsteadhadtomakeadjustmentsbasedonphoneconversationswith the Imagineers inTokyo looking at the screen.Theheffalump is asemitransparent 3D character that fills up with semitransparent honey, and since theprojectorwasfedwithanNTSCsource,wehadtoanticipatecolorissues.Ofcourse,theheffalump’sprimarycolorwasred(arguablyNTSC’sleastfavoritecolor).
The short time frame and increased logistical issues required a different thoughtprocess. The heffalump elementwas broken down into severalmore rendered levelsthanwouldordinarilybeusedtoprovidemaximumflexibilityforcontrollingthefinallook in the composite. We also borrowed a bracketing technique from traditionalphotographytofurthercutdowntheneedtogobackandforthbetweenOrlandoand

Tokyotoresolvethefinalversion.Acommentlike“athirdofthewaybetweennumber2 and number 3”meant one tweak of the parameters in the composite andweweredone.
The convergence of animation, film, visual effects, broadcast, games, web andinteractive, andother related industries is leadingus to aplacewhere the truepowerusernotonlypreferstohavemanytoolsinhistoolboxbutalsohasaninsatiableneedtolearnmore.Therationaleisstraightforward.Themoretoolsandtechniquesyouhaveatyourdisposal,thebetteryourchancesofseeingconnectionsthatleadtohigheraestheticquality,greaterefficiencies,orboth.Betterqualitygetsyounoticedandisalwaysgood.Efficiency,as ingettingthe jobdoneontimeandwithinbudget,helpsensureyougetthenextcall.
FurtherReadings
OHailey,Tina.RigitRight!.London;Boston:FocalPress,2013.
StudentContributors
Contributingstudentsforthischapter,inorderofcontribution:
ClintDonaldsonJohn-MichaelKirkconnellJessicaHuangJessicaToedtShaniVargoJasonWalling

5
EFX
FIGURE5.1MeltingMan,byTroyGustafson
LectureNotes
Inthepreviouschapter,wediscussed3Dcharacterswith2Dparts.Oneoftheexampleswetalkedaboutwasgooonathree-headedhydra.Forthischapter,let’stakealookattheartofspecial effects (EFX). It is a worthy topic that is more than often left out of animationdiscussions.

Whentrainingthedifferentdepartmentsinfeatureanimationstudios,IfoundthattheEFXteamwas composed of odd, quirky individuals, more so than the other departments. In abuilding of more than 150 artists, who are normally slightly odd and fun loving, theseindividuals looked at things completely differently than the character animators. Wherecharacter animators look at the bodymechanics and acting as awhole large unit, the EFXanimators look at the subcomponents of the character. EFX animators look at the self-castshadowsonthebody, thehighlights fromakey light,waterdrippingdownthehair,goo(ifany),incidentalprops,andthelike.Inotherwords,theyseetheworldcompletelydifferentlythan do character animators, and in my opinion they are underappreciated and lackappropriaterepresentationinanimationtomes.Ofcourse,thatisunderstandable,asfewEFXanimatorshavewrittenanything,althoughafewbookshavebeenpublishedonthesubject.Wewillnotbeabletodothetopicjusticehere.Wewillonlybeabletogainanoverviewandapplyittowardour2D/3Dadventure.
DigDeeper
If you want to dig deeper into the topic of traditional EFX, read Joe Gilland’s bookElementalMagic:TheArtofSpecialEffectsAnimation.

FIGURE5.2EFXexamplebyJoeGillandinhisbookElementalMagic,TheArtofSpecialEffectsAnimation
Let’s try to categorize the types of EFX elements to give you a better understanding ofwhattolookforinyourscenes.TheconstantrulethroughoutallEFXelementsisthatusuallythesearenonacting,ornoncharacter,elementsinthestory.However,thereareexceptionstothatrule,whichwewilldiscusslateroninthischapter.Whendiscussingthistopicwithmanyindividuals,wehavecomeupwiththefollowingcategoriesforEFXanimationandexampleelements:
1. Solidshapes
a. Propswithcontactpoints:leadingthecharacterorledbythecharacterb. Movingmanmadeobjectswithoutcontactpointstoacharacterc. Movingorganics:trees,flowers,rocks
2. Abstractshapes
a. Liquid:flowing,contained,drops,orstreamsb. Fire:small,large,linear,billowing

c. Smoke/vapors:linear,billowing,wispyd. Wind/weather:rain,snow(whileintheair)e. Earthparticulates:dustf. Magic/sparkles
3. Light
a. Highlightsb. Shadowsc. Tones
Nomatterhowyoudissect thesubpartsofEFXelements, thereareat least twoseparategroupings:asolidshapegroupandanabstractshapegroup.Solidshapesare,ifyourememberyourscienceclass,solids.Theyhavedefiniteformandshapeandcanusuallybebrokendownintosmallershapes.Theabstractcategoryincludesliquids,gases,andplasmas.Wedefinethemasabstractbecausetheshapestheyform,whendrawn,includeacertainlevelofdesignthatisinspiredbynaturebutdoesnotmimicitexactly.Therearethosewhoprefertoanimatethesolid shapes and those who prefer to animate the abstract shapes. For either category, 3Dtools,particlesystems,fluidsimulators,andproceduralshadershavebeendesignedtoaidinthecreationoftheseEFX.Thethirdcategory,light,couldarguablybeplacedundereitherthesolidorabstractcategorybasedonthepropertyoflightbeingobserved.Thethingtonoteisthat in EFX,we are thinking of the shape of visible light or the absence of it.We are notlookingatlightasin3Dlightingandrendering.We’lllookateachofthesecategoriesmoreindepth.
SolidShapes

FIGURE5.33DBMXbicyclemodeledbyJeffDuttonandMichaelSpokas
Inourlistingofsolidshapes,ourfirstitemispropswithcontactpoints.Thesearethingsthatthecharactermoves(coffeecups,cigars,pipes,forks,newspapers,etc.)orthingsthatmovethecharacter(bicycles,cars,spaceships,etc.).Thesecondlistingisobjectsthatmovebuthavenocontactpointtothecharacter.Thiscanincludejustaboutanythingyouseeinanenvironmentthatismanmade:trash,roadsigns,gardengnomes,andwindwheels,forinstance.Thenextcategoryismovingorganicobjectssuchastrees,flowers,andgrass.Dependingonanimationstyle,theamountofmovementtotheseitemsmaybekeptataminimumbecauseitcanbeextremely time consuming to create this movement, even when done in 3D. Rocks andbouldersareinthiscategorybecausetheyaresolidshapesthatcanfallandreacttogravity.Ifwemustcontinuetocategorize,youwouldwanttoincludeiceandglaciersintothiscategoryaswell,becausetheyaresolidinshape.
AbstractShapes
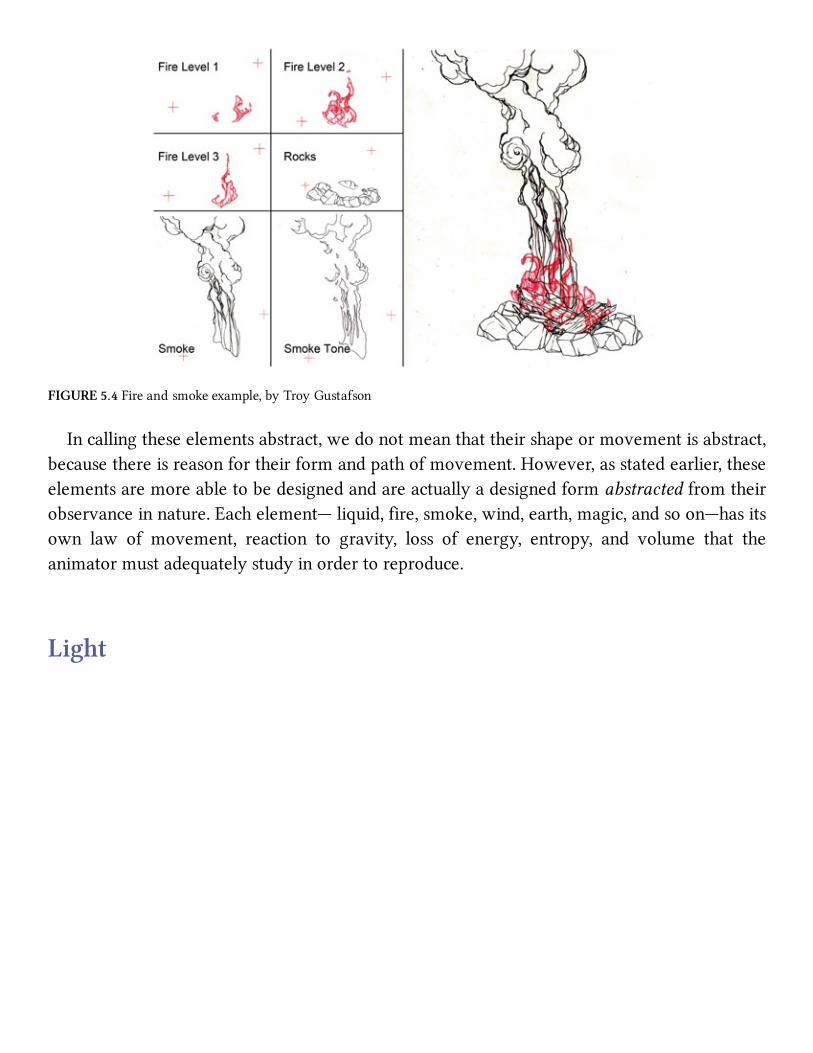
FIGURE5.4Fireandsmokeexample,byTroyGustafson
Incallingtheseelementsabstract,wedonotmeanthattheirshapeormovementisabstract,becausethereisreasonfortheirformandpathofmovement.However,asstatedearlier,theseelementsaremoreabletobedesignedandareactuallyadesignedformabstractedfromtheirobservanceinnature.Eachelement—liquid,fire,smoke,wind,earth,magic,andsoon—hasitsown law of movement, reaction to gravity, loss of energy, entropy, and volume that theanimatormustadequatelystudyinordertoreproduce.
Light

FIGURE5.5Tonesandshadowsonacharacter,byTroyGustafson
In2DEFX, lightmustbedrawn. It isusuallydrawnasanimatedmattes thatareusedatcompositingtimetoaffect thecoloringof thecharacterandenvironment.Anartistcanalsopullanimatedmattesfroma3Drenderandusethemwhencompositingtoachievedifferentlighting and shading effects. There are three visible elements to lightswhen drawn in thismanner.Highlights are thebrightareasonacharacter.Theyareusuallycausedbyakickerlight,orrimlight.Tonesarethedarkerareasonacharacterwherethelightisnotilluminatingthecharacter.Tonesaddgreatdepthtoacharacter,especiallywhencombininga2Dcharacterwitha3Dcharacter.However,beware:drawingtonesoneverycharacterineveryshottakesalotoftime.Duringatimecrunch,thisisusuallythefirstelementtoberemoved.Shadowsare,obviously, the shadows that a character or object casts upon the environment. All threeelementsareusuallyblurredandminimizedinmovementsothattheydonotdistractfromthemainactionofthestory.
Exceptions

FIGURE5.6Meltingcharacterwithroughcharacterlevel,roughEFXlevel,andfinalcleanupEFXlevel,byTroyGustafson
TherecanbeablurrylinebetweencharacteranimationandEFXanimationincertaincases.Whatiftheshadowistellingthestory?Inthatcase,itisacharacterandmaybetakenoverbythe character animators. What if the character is made of wind or fire? (Think about theelementcharactersinDisney’sfeatureanimationHercules.)Whatdoyoudowithacharacterwho is basically composed of an EFX element? Something like that might be roughlyanimatedbythecharacteranimator,andthentheEFXanimatoraddshisorherexpertiseoffire/wind/ice to the animator’s expertise of charactermovement.What if the prop that thecharacterisholdingisintricatetotheacting?Dependingonthecharacteranimator,heorshemay rough in the placement of the prop or even animate the complete prop. The EFXanimatorswoulddowhatwasneededtofinishtheprop’sanimation.
TrenchNote
All of these examples are based on studio culture and the artists found therein. ThisinformationisbasedonthegeneralpatternthatIwitnessedinthetwostudioswhereIhaveworked. Both studioswere large. In smaller studioswhere individuals have towearmany

hats,ofcourse,theseideascanbeverydifferentbasedonthetalentfoundthere.
ContactPointsandPipeline
Thequestions, as always, are these:Which element leads?Where are the contact points?Whatmediawillbeused?
Usuallythepropanimationisthefirstonetobeconsidered.Propseitherleadthecharacteror are led by the character. As in our earlier discussions, props themselves can becomecomplicatedinlinemileageandperspective.Sousing3Dpropshasbecomepopular.
Afterconsideringprops,thenextfactorstoconsideraretheenvironmentandtheelements.Most elemental items react to the character; therefore, they follow after the characteranimation.Evenwhentheenvironmentandelementstodonotreacttothecharacter,theyarestill usuallydoneafter the character animation so that theydonot accidentallyobscure theimportantstorypointswearetryingtoconveyinthescene.
The last element that is usually drawn is light. This is the light that is cast upon thecharacters,props,water,goo,andsoon.
TrenchNote
Youcanimaginethatafter thecharacteranimatorsaredoneandhavingtheircelebratory“animation isdone”parties,EFXartists are still bentover theirdesksworkingon the light,props,andabstractshapesthatare intheverysceneswhose“doneness” isbeingcelebrated.The same can be said for the other departments that follow EFX. These departments arereferred to as the “back end” of production.At theDisney studio, these departmentswerecalledsceneplanning,scanning,colormodels,inkandpaint,compositing,andfinalcheck.Thedepartmentsandthebreakdownoftasksvaryfromstudiotostudio.Thetakeawayhereisthatthewaterfallof“doneness”isnevercompleteuntilthewrapparty.
IndustryExamples
You do not have to look very hard to find plenty of examples of props leading 2Danimation : Futurama, Family Guy, The Simpsons, Lilo & Stitch, The Triplets of Belleville,Mulan,Atlantis,TreasurePlanet,Sinbad,TheRoadtoElDorado,Pokemonmovies,Macross

Zero,andthelistgoesonandon.Youmighthavenoticedtheheavyuseof3DspaceshipsandenvironmentsinFuturama.I’ve
hadstudentscommentthattheydidnotnoticeituntiltakingmyclass,wheretheyweretoldtogo look.The flat shadingand toon shadingdidnot cause the3D to standout toomuch,which we know from Chapter 1 is a sign of success. Other examples that students havecommentedonincludetheobvioususeof3DintheFamilyGuymovie,CloneWars.
Otherfilmshaveused3Dandyoumightnothaveevennoticed.Mulan,forinstance,usedalargeamountof3DforbothcharacterandEFX.OnecomplicatedshotcomestomindwhereMushuislookingforMulanwhileridingashielddowna2Davalanche.Thebackgroundwasatraditionalpainting.Thesnowavalanchewasdonein2D.Inthiscase,the2DEFXavalanchewas leading, so an animated gridwas created to helpwith the perspective of the sloshingsnow.A3Dshieldholdinga3DreferenceMushuwasalsocreated.The3Dshieldwastheonly3D element thatwas to be used in the final composite; all elsewas reference. TheMushucharacterwas so small for someof the shot that theykept the3Dstand-in for that section,much to the happiness of the 3D animator. The 2D avalanchewas added alongwith snowchunks, snowparticulates, tones, shadows, andaHunhead.This scene itselfwas extremelychallengingbecauseitcontainedatravelingpanacrosssomuch2Dsnow,andthiswasdonebefore we had Cintiq tablets. Lacking a way to do digital 2D animation meant that aprinting/peggingprocesshad tooccur so that the2Danimators coulduse the3Dreference.Because thiswas a large camera pan, the paper thatwas used for printingwas extremelylarge:24fields,theprinting/peggingdays.Cometothinkofit,wouldn’tthatbeagreatshottorecreate as a homework assignment?Note to self:maybe for the advanced version of thisclass.

FIGURE5.7Drawingon24fieldpaper
Using 3D for props and environments, if not having contact with the 2D character, isrelativelyeasy,andthereforetheuseof3Dpropsiswidespread.Aswehavefound,oncethedifferent elements begin interacting, things take on a bitmore complexity. The trickwhencombining the 3D prop with the 2D character is making sure that their dimensionalitymatches.Eitherthe3Dpropneedstobeflattenedvisuallytomatchthe2D,orthe2Dneedstobemademoreroundedbyusingtonesandhighlightstomatchthe3D.Ifthe2Dappearstobevery flat and the 3D appears very highly rendered and round, the styles may clashconsiderably.Inthelastchapter’sassignmentyoumayhavealreadyfoundsomeofyourownexamplesofgoodandbad2D/3Dthatmightshowthisstylemishmash.
Using2DanimatedEFXontopof3Dusuallywouldnotseemcohesiveifthestylewereahighlyrendered3Dlook.However,ifthevisualstyleisflatortoonish,then2DEFXelementscanbeused.Weexaminedthegoousedonthehydra’sheadinthepreviouschapter.Wealsotook a look at shots from the groupproject JaguarMcGuire.Nextwewill examine a fewshotsthathave3Dprops,2DEFXelements,andsomeinteractionbetweenboth.

Hands-OnExamples
WewillnowexaminefiveEFXissuesthatmightneedtoberesolvedina2D/3Dfilm:
1. 3Dpropsleading2D2. 2Dleading3D3. Tones4. Shadows5. Compositingtrickswithinklines
3DPropsLeading2D
In previous shots, Jaguar McGuire has tried to kick the cat as it sat on his broken leg.Insteadofconnectingwiththecat,Jaguarinsteadkickshisownbrokenleg,whichpropelsitoutofitsslingandcausesittohitanearbytable,sendingavasefilledwithflowersthroughthe air (in slowmotion). Please see the companion data for the storyboard displaying thefollowingsequence.Ourshot,39,showsthevaseofflowershittingthefloor.Uponhittingthefloor, the flowersandwater splashout.Thewater,unfortunately, splashes intoanelectricaloutlet.Theoutletshort-circuitsandshootsafierysparktolandonJaguarMcGuire’scape.Thecapemust beold anddry, or soaked inkerosene, for it instantlybursts into flames. Jaguar,beingasuperdaredevilandstillbelievinghimselfinhuman,triestostampoutthefirewithhisfreefoot.
Theelements inshots38and39are listedhere,alongwiththesoftwarethatwasusedtocreatethem:

FIGURE5.8Elementsfromshot38:temporary3Dbackground,3Dvasereference,2Dwater,and2Dflowers
The pipeline for 3D prop leading 2D is the same as a 3D character with 2D parts. Thisshouldbegettingfamiliarnow.
Beginbysettingupyourcamerainthe3Dpackageofyourchoiceandanimatingthe3Dprop.IntheexampleshowninFigure5.9,youseethecameraplacedinthe3Droomandthekey-framesofa3Dvase.Thisistheshotwewerediscussingearlierintheindustrysectionofthelecturenotes.ClintDonaldson,thedirectorofJaguarMcGuire,did theanimationof the3Dvase.
Inthisexample, therendersize isHD720,whichhasapixelsizeof1280×720 inMaya’srendersettings.Becauseweareonlyrenderingoutareferenceimageforthe2Danimator,wecan simplify things by rendering out the vase layer only. Also, the alpha channel is notnecessarilyneededhere.Wecanaddagraybackgroundtothecamera’senvironmentsettingsothatwedonotgetablackbackground.
Tosetthebackgroundtobegrayforthisreferencerender,followthesesteps:
1. Intherenderingcamera’sviewport,clickView>CameraAttributeEditor….This

openstheAttributeEditorforthecamera.2. OpentheEnvironmenttabandchangetheBackgroundColortothedesiredcolor.3. Renderaseriesofimagesasusual.Remembertoselecttherenderingcamera.Ifyou
needthealphachannel,thenremembertoselectit,andaswehavelearned,tokeepthatalphachannelyouwillneedtocreateaQuickTimeanimationcompressionfile.Forthisexample,wedonotneedthealphachannel,sowewillstaywithaseriesof.tiffiles.
AquickcheckinAdobeBridgeshowsusthattheimagesarerenderedcorrectly:fromtheright camera, named with frame padding (leading zeros), correct background color, andcorrectversionofanimation.We’vealreadytalkedaboutitbefore,butIcannotstressenoughthatitisagreattimesavertocheckyourrendersbeforeproceeding.Itisanevenbetterworkhabittodoaspotcheckononeframebeforekickingoffarenderthatmighttakealongtime.Onceyouloseacoupleofhours’worthoftimetoasillyoversightandalmostmissadirectordrivebyapprovaltime,you’llstartdeveloping“rulesyoushouldliveby”too.
Therendermentionedpreviouslyhasbeenincludedinthechaptercompanionforthisbook.LookinsidethefolderChapterFive>3Dleads2D>vase.
2DAnimationinPhotoshop
Open your .tif series of images in Photoshop by clicking File >Open…. Select the firstimageofthesequenceandclickonimagesequence.Don’tforgettosetthecorrectframerate.
This will automatically create a canvas with the correct image size and load the imagesequence into a video layer.Note: in newer versions of Photoshop, the video layerwill beinsideavideogroupasseeninFigure5.9.

FIGURE5.9AreferenceloadedinasavideolayerinPhotoshop
Aswehavedonebefore,youwillwanttocreateavideolayertodrawyourEFXlayersin.In newer versions of Photoshop, if you have a video group, click in the layerswindow todeselectthatgroupbeforecreatinganewvideolayer.WehavemanyEFXelementstodrawinthisshot:water,flowers,sparks,andflyingcopperbits.We’llstartwiththeflowers.Ifyourememberbacktoourlectureatthebeginningofthechapter,flowerswouldcomeunderoursolidshapescategory.
InFigure5.10thevasereferencelayerisinthebottomlayerposition.Afloweranimationlayerisalsovisible.Asanotetomystudents,noticethattheflowersareextremelyroughedin.Thisisagreatwaytoanimatethroughyourshotquicklysothatyoucantestoutvariousversionsor,aswas thecasewith thisexample,get theanimationsupervisor’s feedbackandapproval.Agreatguidelineistoworkroughandfast;showearly;showoften.
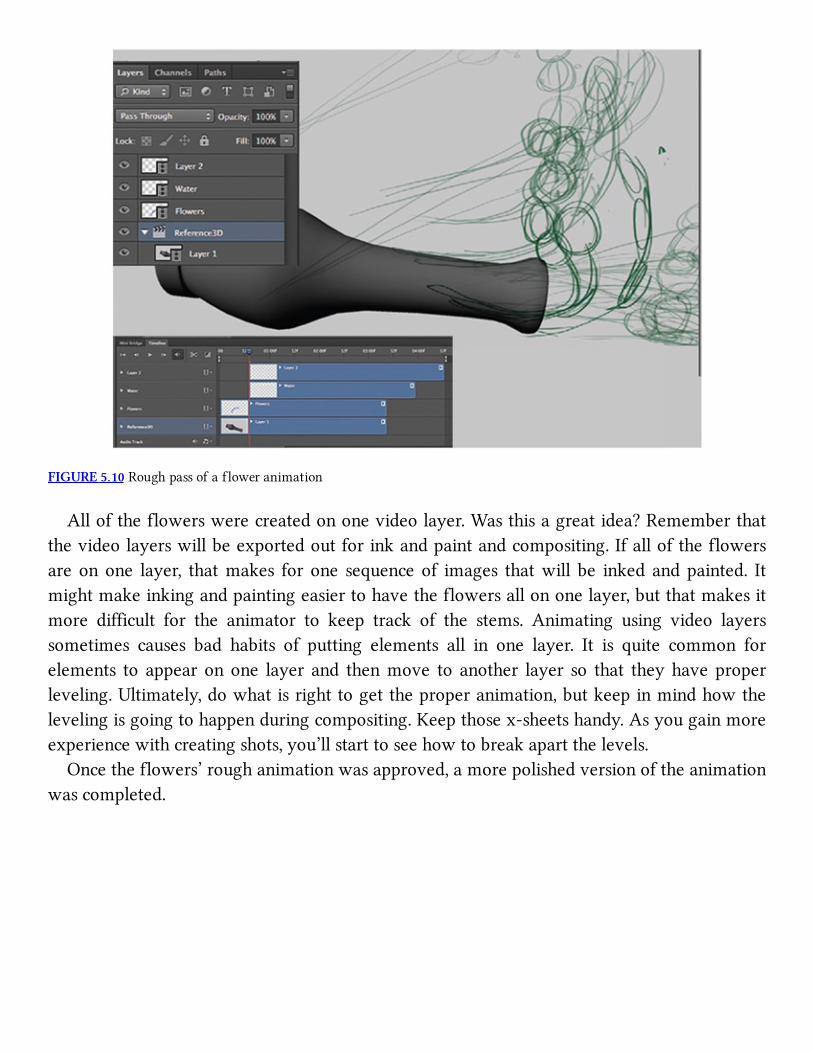
FIGURE5.10Roughpassofaf loweranimation
Alloftheflowerswerecreatedononevideolayer.Wasthisagreatidea?Rememberthatthevideolayerswillbeexportedoutforinkandpaintandcompositing.Ifalloftheflowersare onone layer, thatmakes for one sequenceof images thatwill be inked andpainted. Itmightmakeinkingandpaintingeasiertohavetheflowersallononelayer,butthatmakesitmore difficult for the animator to keep track of the stems. Animating using video layerssometimes causes bad habits of putting elements all in one layer. It is quite common forelements to appear onone layer and thenmove to another layer so that theyhaveproperleveling.Ultimately,dowhatisrighttogettheproperanimation,butkeepinmindhowthelevelingisgoingtohappenduringcompositing.Keepthosex-sheetshandy.Asyougainmoreexperiencewithcreatingshots,you’llstarttoseehowtobreakapartthelevels.
Oncetheflowers’roughanimationwasapproved,amorepolishedversionoftheanimationwascompleted.

FIGURE5.11Finalanimationoff lowers
AspecialnoteonanimatinginPhotoshop:inshot39,thetimingofthevasemovementwasworked out in Maya, and that dictated the main movement of the 2D flower and waterelements.ThewaterelementwaseasyenoughtoanimateinPhotoshopbecauseitwasmostlyanimatedstraightahead.Animatingpose topose inPhotoshop isdifficultwhenusingvideolayers. It canbedone,or theanimator canchoose touse theoldermethodofanimating inPhotoshop:using the framemethodversususingvideo layers.Why is itdifficult toanimateusingvideo layers?When there is akeyframeon frames1and7andyouwant to createabreakdownon frame 5, all of the other blank frames on the video layer get in thewayofrollingthroughyouranimation(seeFigure5.12).Foranimatorswholiketoflipbackandforthbetweenthedrawingsinsteadofusingtheonion-skinning,theblankframescancausetheeyetolosewherethepreviousdrawingwas.Itisstillpossible,withsomeduplicatingoflayers,touseafamiliarflippingorrollingmethod.
The followingmethod can be employedwhen doing cleanup in Photoshop or animatingposetopose:
1. Draw the first and second keyframes in a video layer, as we learned in previouschapters.
2. Duplicatethelayer.3. In the timeline,open the layerandnotice theblueboxeson thealteredvideo line.
Youcannotmovethesekeyframes(drawings),butyoucanmovetheduplicatelayeritselfsothatthekeyframeslineupwhereyouwantthemvisible.

4. Repeatasneededsothatyoucanseeyourkeysinthecorrectordertorollorfliptheimagesasdesiredwhileyoudrawtheneededbreakdowndrawing.
5. Whenyouaredone,deletetheduplicatelayer(s).
InFigure5.12threeflowerkeyframeshavebeendrawn.Thelayerhasbeenduplicatedandmovedsothatthetwokeyframesshowupatthesametime.Inordertorollthedrawings,theduplicatewouldbemovedbackoneframeintime.
FIGURE5.12Usingduplicatelayerstorollthroughkeyframeswithoutblankinbetweens
Tofliporroll imageshasadifferentdefinitionbasedonwhatstudio/countryoneis in. InsomeU.S.studios,toflipimagesmeanstheanimatorsstacktheirpapersinsuchawayastolookatthefirstkey,lookatthebreakdownthattheyarecurrentlydrawingon,andthenflipback a page to the second key. It is called “flip” because you endup flipping forward andbackwardtoseethemotion.Toroll,intheUnitedStates,istostackthepapersinorderandtorollthroughtheframeswiththefirstkeyonthebottom,thebreakdownontopofthat,andthesecondkeyontop.Dependingonone’sdexterity,onecanrolluptofivedrawingsatonce.Thesetermshavetodowithpaperandwhatonehastodoinordertokeepthedrawingoneiscurrentlyadjustingontopfordrawing.Inourdigitalanimationpipeline,youwillmostlyberolling or you might hear the term “scrub” (which comes from the digital editing field).Howeveryoumanageitorwhateveryoucallit,itisimperativeforthepose-to-poseanimatorand the cleanup artist to have the ability to roll through their drawingswithout seeing theblankinbetweens.
AnothertypeofEFXelementthatwediscussedwasabstractelements.Watercanfallinto

thiscategorybecauseitispurelydrawninasanabstractionofitsnaturalform.Liquid,water,and smoke are all abstract elements. Our shot 39 depicts a vase filled with water flyingthroughtheair.Thevasehitsthegroundandthewatersplashesoutontoanelectricaloutletinthewall.Thesamemethodofroughingintheanimationwithvideolayerswasused.YoucanseeanexampleoftheroughandfinalanimationinFigures5.13and5.14.You’llnotethattherough animation is extremely rough, with nothing more than bouncing balls to indicatedirectionandvolume.
FIGURE5.13Roughanimationofthewaterinthevase
FIGURE5.14FinalanimationofthewaterEFXelement

InkLines
Oncetheanimationandcleanuparecompleted,youwillwanttoaddcolortoyourartwork.Therearemanywaystodoitandmanydifferentsoftwaresolutions.Let’slookatthethingsyou might want to do with your ink lines before we deal with the button clicking anddifferentsoftwareprograms.
Thefirstthingwewilldoismakesurethattheinklinestaysseparatefromthepaint.Whywouldwewanttohavetheinklineseparatefromthepaint?Wecanreusetheinklineinourcompositingsoftwaretocreatevariousvisualcompositingtechniques.
With the ink line separate, you can easily change the color of the ink line if your paintpackage lets you fill in color and keep alpha channels. In Photoshop this can be done byselectingEdit>FillandmakingsurethatthePreserveTransparencyoptionisturnedon.
FIGURE5.15UsingFilltocolorinklineseasily
AsimpleexampleofhowinklinescanbefinessedisshowninFigure5.16.Theinklinehasbeenduplicatedandblurred.Thisblurred ink linewasclipped (ormaskedout)by thepaintlayer.Thiswaytheblurringdidnotextendontheoutsideofthewater,givingthewateranunwantedhalo.Theharshedgesoftheblurredinklinearenevervisiblebecausetheoriginalinklineislayeredontopofit,asyouseeinthetopportionofFigure5.16.Thepaintlayerisalsotransparent,thoughthatisnotvisibleinthisimage.

FIGURE5.16Inklinesample
Figure5.17 issimilartothepreviousexample,exceptthatthere isnottheadditionoftheoriginalinklineontop.Theblurredinklineisalsocoloredtobesimilartothatofthepaint.This isauseful techniquewhencombining2Delementswith3Delements thatdonothavestrongtoonlines.Justbecausethereisadrawnlineforthe2Delementdoesnotmeanthatithastostayvisibleinthefinalcomposite.
FIGURE5.17Inklinesample
If you use Photoshop or any painting package inwhich you use something like a paint

buckettool,agoodtechniquetouseforpaintingisthefollowing:
1. Placetheinklineononelayer.2. Createthepaintfillonasecondlayer.3. Paintusingthepaintbucketandbrushtools.Don’tworryaboutcoloringoutsideof
thelinestoomuch.4. Usingamagicwandtool,selectthepaintthatisoutsidethelines.InPhotoshop,make
suretohaveSampleAllLayersturnedon.5. Deletetheextrapaint.Touchupanymissedareas.
FIGURE5.18CreatingpaintfillsonaseparatelayerinPhotoshop
Node-BasedCompositors
Nuke
Myfavoritecompositingmethodisnodecompositing.IfirstlearnednodecompositingonEddie,anoldsystem,andFlame/Flint.(IusedFlameforbarelymorethanaweek,sodon’tbetoo impressed.) I usedShakequite abit and then itwas replacedwithNuke.Aswe statedearlier, there are twomain types of compositing systems: node and layer (timeline) based.Smoke,aswehaveseen,issomethinginbetween:atimelineeditorwithanodecompositorunder the hood. Once you know a node-based system, it is fairly easy to pick up anothernode-basedcompositor. I’lladmit, Iprefernodesystems.TheyseemmoreorganicandfluidforhowIwork/think.Iwouldencourageyoutobecomefamiliarwithbothtypesofsystems.Wereyoutofindyourselfinavisualeffects(VSFX)houseasacompositor,youwouldhavetolearn proprietary compositing systems; knowing both types will give you a head start onlearninghowtheprosdoit.
If youhave everworked inMaya’sHypershadeorHypergraphConnectionsEditor, thenyouhaveworkedwithnodenetworks.
We’lldo thiswatercomposite inNuke. Iwon’tgo through theNuke interface toomuch;you can read the documentation for that. Aswithmost software, the install comeswith a
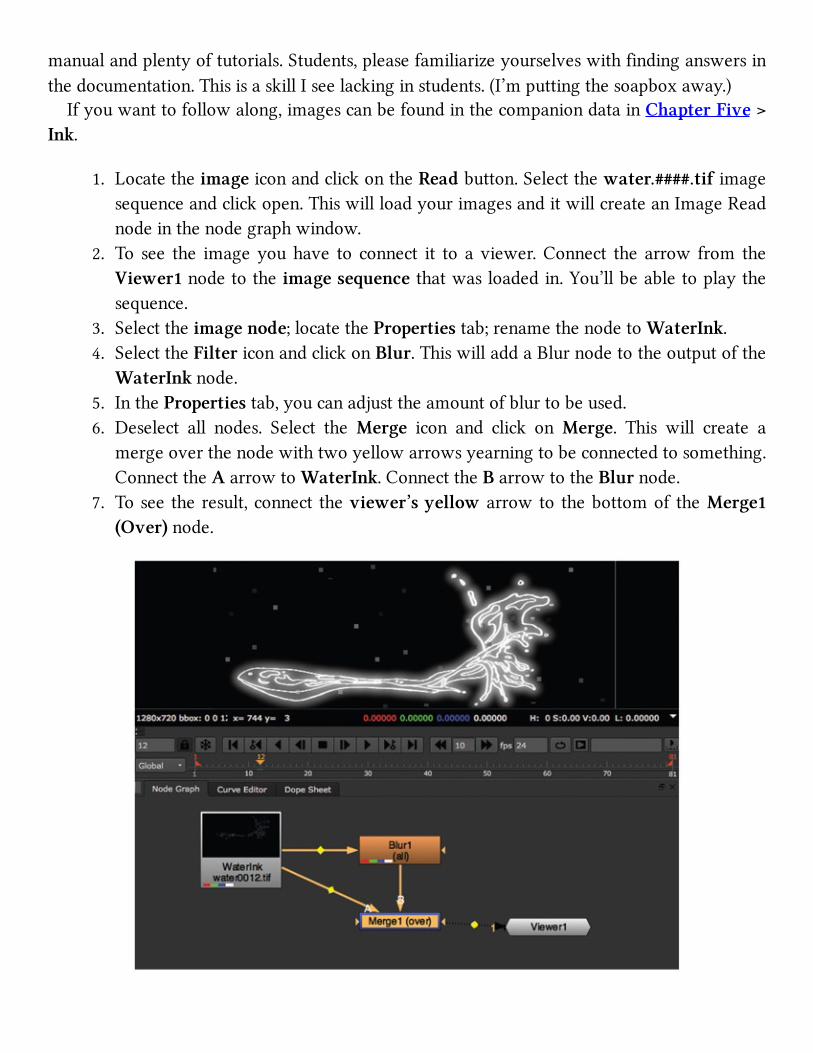
manualandplentyoftutorials.Students,pleasefamiliarizeyourselveswithfindinganswersinthedocumentation.ThisisaskillIseelackinginstudents.(I’mputtingthesoapboxaway.)
Ifyouwanttofollowalong,imagescanbefoundinthecompaniondatainChapterFive>Ink.
1. LocatetheimageiconandclickontheReadbutton.Selectthewater.####.tifimagesequenceandclickopen.ThiswillloadyourimagesanditwillcreateanImageReadnodeinthenodegraphwindow.
2. To see the imageyouhave to connect it to a viewer.Connect the arrow from theViewer1nodetotheimagesequencethatwasloadedin.You’llbeabletoplaythesequence.
3. Selecttheimagenode;locatethePropertiestab;renamethenodetoWaterInk.4. SelecttheFiltericonandclickonBlur.ThiswilladdaBlurnodetotheoutputofthe
WaterInknode.5. InthePropertiestab,youcanadjusttheamountofblurtobeused.6. Deselect all nodes. Select theMerge icon and click onMerge. This will create a
mergeoverthenodewithtwoyellowarrowsyearningtobeconnectedtosomething.ConnecttheAarrowtoWaterInk.ConnecttheBarrowtotheBlurnode.
7. Toseetheresult,connecttheviewer’syellowarrowto thebottomof theMerge1(Over)node.

FIGURE5.19InklineoverblurredinklineinNuke
Thepreviewimagenowshowsablurredinklineunderneathanonblurredinkline.Therearetwothings left todo: (1)addthepaint,and(2)cutoff theblurred linesothat itdoesn’textendoutsideoftheedgesoftheinkline.
1. FromtheImagetab,clickontheReadbuttonandloadaseriesofthepaintlevel.(Forthisexample,theinkandpaintlinesweredoneasseparatelayersinPhotoshopandexportedoutasseparatefilesequences.)
2. SelecttheMerge1(Over)nodeandtheWater_Paintnode.Thefirstnodeyouselectwillbelayeredontopinthenextstep.Wewantthepainttobeonthebottom,“B.”(We didn’t do this earlier with the blur node, because it would not have actedcorrectly.ItwouldhavedisconnectedtheBlurnode,oratleastinmyversionofNukeitdid.)
3. CreateaMergenodebyclickingonMerge>Merge.ItwillbecalledMerge2(over)andtheviewershouldupdatetoshowaninklayerontopofablurredinklayerontopofapaintlayer.
4. Thisistheextrafancystep.ClickanddragfromtherightsideoftheBlurnode tothepaint layer. Thiswill read the paint layer as amask andwill only show theblurredinklinewhereverthereispaint.Thiswaytheinklinedoesnotbluroutsideofthelines!
FIGURE5.20Addingthepaintandcontainingtheblurredline.Imageshownwithalphachanneltobetterillustratetheblur.
(FuzzyblocksareartifactsfromlearningeditionofNuke.)
Nowyou have gone through a crash course in node compositing. The great thing aboutusingnodesystemsisthatyoucanreuseseriesofimageseasilyandhookeverythingtogether,ifyouarepronetothinkingthisway.Infact,ifyoucomparethispagetothepagefromthe

previous edition of this book youwill note that it is almost the same steps with only thenames of the nodes changed. Thosewho have not adopted the usage of node compositingshouldchallengethemselvesandstepuptoahigher-endcompositingmethod,evenifusingalearningeditionofsoftware.You’llbegladyoudid.
ToonBoom
ToonBoomhasawonderfulassortmentof softwares.The typeofpipelineyouareusingdetermineswhichsoftwareyouuse.Luckily,mostoftheToonBoomproductshavealearningeditionsoyoucantestoutyourpipelinebeforepurchasing.Thenewestversion,ToonBoomHarmony,allowsfor3Dmodelstobebroughtintothescenedirectly,muchlikeyoucanwithPhotoshop.There isno learner’seditionof thatversionof thesoftware, though.There isaneducationaldiscount forHarmony.Oneother thing tonote is that scenesanimated inToonBoomAnimateorAnimateProarenotabletobebroughtintoHarmony.Harmonyisutilizedbylargercompanies,moreforitsdatabasestructureforassetmanagement.
Lately, the industry has been switching from Flash to Toon Boom Animate Pro andHarmony.Weaddedittoourclassroomssothatthestudentscouldgainexposuretoit.Wedonotusetheautolipsyncfunctionalityofthesoftware.However,thatfeatureisprobablyusefulforthoseinashortturnaround,small-budgetsituation.You’llfindampletrainingmaterialoutthereifyouwanttolearnmoreaboutthesoftware.
Herearetwowebsitesthatcanhelpyougetstartedwiththepackage:www.toonboomtutorials.comhttp://toonboomcartooning.wetpaint.com

FIGURE5.212DcharactersdrawninToonBoomAnimateovera3DtrainanimatedandrenderedinMaya.ByJessica
Huang,2009,2D/3Dcompositingcourse,SCAD
Thebottomofitallisgettingcomfortablemovingbetweenthedifferentpackages.Render3DinMaya,animate2DinPhotoshop,compositeinToonBoom.Or,basedonartists’talents,render3Dinwhatever3Dpackageyouuse,roughanimate2DinPhotoshop,cleanupanimateinToonBoom,compositeitallinNukeorAfterEffects.
Let’s cover the basics of bringing some images intoToonBoom. For thiswe’ll useToonBoomAnimate Pro. First, we’ll export out of Photoshop; things should be getting familiarnow.However,eachsoftwarepackageyouusebringsadifferentsetofbuttonclicks,andwitheachversionthosebuttonclickswillchange.Allisbasedonhowthesoftwarereadsthealphachannelsandwhat file formats thesoftwareworkswith.Themoreback-and-forthbetweenmultiple software packages that you gain exposure to, the easier time you will have atproblemsolvingthesepipelineissues.
Here’showtoexportfromPhotoshoptoToonBoom:
1. Hide all but the layer that youwant exported out of Photoshop and selectFile >RenderVideo.
2. NewerversionsofPhotoshopcanexportsequencesof images, including .tif images,withtransparency.Elseyoucanexportanuncompressedmoviefile.
Use these settings for a series of .tif images: Photoshop Render Sequence.

Format:TIFF.Make sure to setSettings > Save transparency (else itwillnot!).AlphaChannel:Straightunmatted.
Usethesesettingsforamoviefile:QuickTime/Raw(tokeepthealphachannel),alphachannel:StraightUnmated.Make sure your frame ratematches andthatyouhavenumberpaddingon.ClickRender.
FIGURE5.22ExportinganimationfromPhotoshop
Note:itisimportanttodouble-checkhowyouralphachannelsarebeingreadbetweenthedifferent file formats. You’llwant to test that out before proceeding. You’ll find thatmanysoftwares,dependingonversion,maynot read .tifor .mov filesand theiralphachannelsasexpected.
NowyouarereadytoimportyourimagesequenceintoToonBoom.
1. Openanewproject inToonBoomAnimatePro;make sure that the canvas size iscorrect.
2. SelectFile>Import>Images…(ormovie,basedonwhatyouhaveexportedfromPhotoshop).
3. Inthefilebrowserwindow,select thetiff imagesequenceorthemovie file.MakesurethealphachannelmatcheswhatyouusedtorenderinPhotoshop.
4. Chosetheoptionsforvectorizetheimagesincolor.Infact,unlikeinpastversionsofToonBoom,younowhavetovectorizeifyouwishtoinkandpainttheanimation.(Ifyoureadthefirsteditionofthisbook,vectorizingisnowverygoodinToonBoom,

especiallyincolor.)
The images are added to the exposure sheet and visible in the preview area.Do not bescaredby thepixilated line.This is a preview.As anote, graphics cardsmay react oddly, Ihave found.OnaMacBookPro,onlyselected layerswill showtheblack ink line.Else theyshowinwhite.ThisisanOpenGLissue.Creatingatestofthescenewillshowtheactuallinequality.Also,youcantogglebetweenOpenGLviewandRenderviewwiththebuttonsatthebottomofthecanvas.Theylooklikeflowers.
FIGURE5.23Waterdrawingsintheexposuresheet
Tocreate thesame typeofcompositingeffect inToonBoomaswedid inNuke,wewillexploretheToonBoommethodofnodecompositing.
ToonBoomAnimatePro
1. Locate theTimeline tab.Right-click on the ink levelandduplicate.Name the top
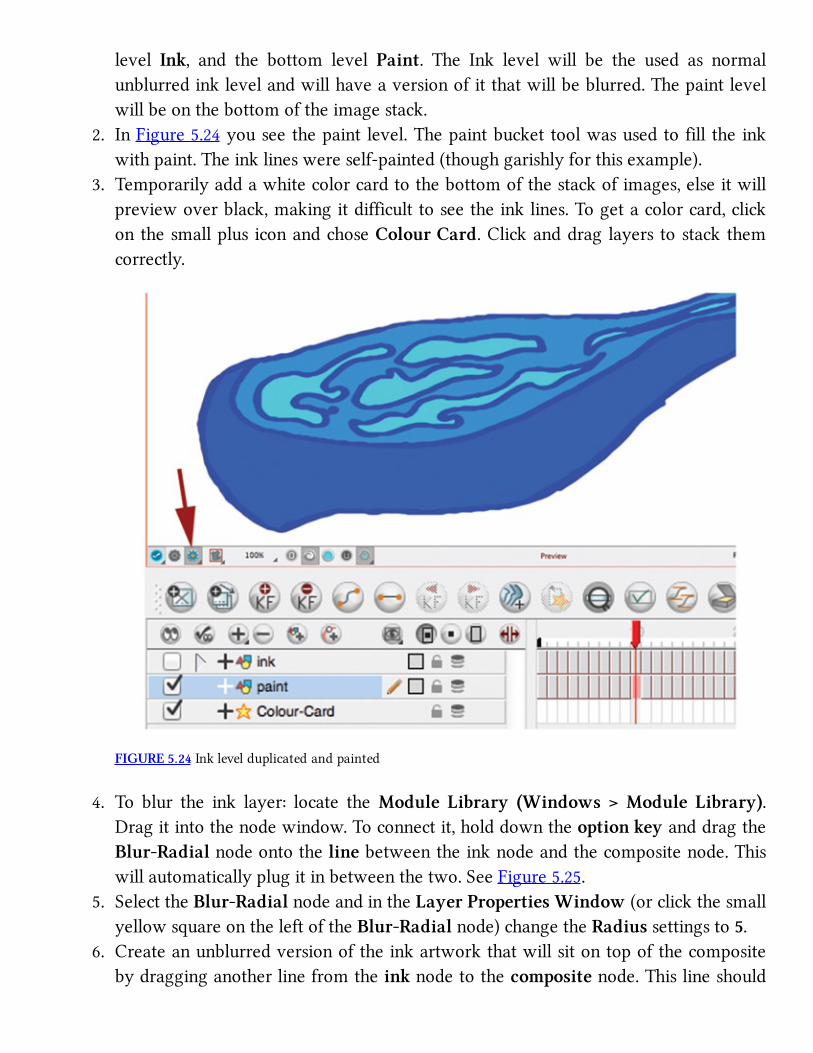
level Ink, and the bottom level Paint. The Ink level will be the used as normalunblurredinklevelandwillhaveaversionofitthatwillbeblurred.Thepaintlevelwillbeonthebottomoftheimagestack.
2. InFigure5.24youseethepaintlevel.Thepaintbuckettoolwasusedtofilltheinkwithpaint.Theinklineswereself-painted(thoughgarishlyforthisexample).
3. Temporarilyaddawhitecolorcardtothebottomofthestackofimages,elseitwillpreviewoverblack,makingitdifficulttoseetheinklines.Togetacolorcard,clickonthesmallplusiconandchoseColourCard.Clickanddrag layers tostackthemcorrectly.
FIGURE5.24Inklevelduplicatedandpainted
4. To blur the ink layer: locate theModule Library (Windows >Module Library).Dragitintothenodewindow.Toconnectit,holddowntheoptionkeyanddragtheBlur-Radialnodeontothelinebetweentheinknodeandthecompositenode.Thiswillautomaticallyplugitinbetweenthetwo.SeeFigure5.25.
5. SelecttheBlur-RadialnodeandintheLayerPropertiesWindow(orclickthesmallyellowsquareontheleftoftheBlur-Radialnode)changetheRadiussettingsto5.
6. Createanunblurredversionoftheinkartworkthatwillsitontopofthecompositebydragginganotherlinefromtheinknodetothecompositenode.Thislineshould

be to the left of the blurred ink line. To see the results, locate theRender Viewbutton(itlookslikealittlefloweratthebottomofthecamerawindow)andclickiton.Thiswillshowallofthelevelstogether.SeeFigure5.25.
7. Togetridofthebluroutsideofthecleaninkline,addaCutternodetotheNetworkWindow.Next,option drag theCutter node onto the line between theBlur nodeandtheCompositenode.Thiswillautomaticallyplugitin.Tocreatethemask,dragalinefromtheoutputofthepaintnodeandhookituptothetopleftoftheCutternode.
8. Lastly,clickontheyellowsquaretoopenuptheCutternode’sproperties,andselectinverted. The blurred inlines will only be visible on the inside of the water. SeeFigure5.26.
FIGURE5.25Bluraddedtotheinklayer.(Painthiddenforclarity.)

FIGURE5.26Blurredinklevelcuttoonlyshowontheinsideofthepaintareas
2DLeadingPropinPhotoshop
Another area for the effects artist is that of puttingprops into 2D characters’ hands.Thepropitselfcanbein2Dor3D.Manytimesitisin3D.Thehandplacingof3Dpropsina2Dcharacter’shandscanbetediousandispronetohavingjigglebecausethe2Danimatordoesnotanimateherorhis2Dcharacterholdingaspatiallyperfectprop.Theeasiestmethodistobringthe2Danimationintoa3Dsoftwarepackageasanimageplaneandplacethe3Dpropvisuallysothatitseemstomatchthecharacter’scontactpoint.Anothermethodthatisnowbecoming available is the limited ability to bring 3D objects into Photoshop, After Effects,Flash,ToonBoom,andother2Dpackages.
Withthisability,theanimatordoesnothavetoleavethe2Dpackagetoanimatethe3Dtofollowthe2D.Ifthe3Distohaveanylargeranimationabilitybeyondtranslate,rotate,andscale, then the artistwill need touse a 3Dpackage to do that advanced animation. Simplepropfollowinganimationcouldbelimitedtotranslate,rotate,andscale.However,thislimitedanimation for the 3D may make it stand out as 3D if the 2D character is squashing andstretching inacartoonyway. If that is thecase,or if thereare largeperspectivecheats thatmusthappentomatchthe3Dtothe2D,thena3Dpackagewillneedtobeused.
Duringproduction,proprequirements fora filmcanbe large.Hundredsofpropsmaybeneeded. If a team or student doesmore than one film, sometimes props can be reused orrevampedtouseinmultipleshows.Havingagoodsystemtostoreandreusepropscanhelpspeedupyourprocess.
We’llbrieflycoverusing3DobjectsinPhotoshop.Photoshopcanreadinmanytypesof3Dobjectsfiles.Someofthesefiletypesaresimpletowriteoutandhavebeenaroundforages;

othersarerelativelynew.Filetypesthatreadinareasfollows:
ExportYour3DObject
For this exercise we will work with a simple, blocky hat that has been created out ofpolygonsinMaya.IthasbeenUVedandevenhasacheckerboardtextureonitjusttoshowtheUVs.Thefileisfoundinthefoldernamed2D_Leads_3DPropandiscalledHat.mb,ifyouwant to open it and look for yourself. The checkerboard texturewill actuallynot be savedwiththeOBJtexturebecausethatisprocedural.Youcanconvertaproceduraltexturetoafile,andthenitwouldbeexported.
ToexportanobjectoutofMayaasanOBJobject,youwillfirsthavetoturnontheplug-inobjExport.mll:
1. OpenthefileHat.mbinMaya.2. ClickWindow>Settings/Preferences>Plug-inManager.3. In the window that opens, turn on the Loaded andAuto-Load checkbox for the
objExport.mllorobjExport.bundle(.mllor .bundledependingonwhichversionofMayayouareusing).
4. Selectthehatobject.Itwillhighlightingreen.5. ClickontheOptionBoxnexttoFile>ExportSelection.6. UnderGeneralOptions,selectFileType:OBJexport.7. ClickExport.
This has given us the exported fileshat.obj andhat.mtl. You can find these files in thefoldernamedexportFromMaya.

ImportOBJFileintoPhotoshop
InPhotoshopCS4orlater,openupthesamplefilethatwewillusebyclickingFile>Open,and locate the file DanMurdock_Big-Gulp_Section.mov inside the 2D_Leads_3DPropfolder.
FIGURE5.27DanMurdock_BigGulp_Section.movinPhotoshop,byDanMurdock,2009,digitalcelIcourse,SCAD
Wavefrontisoneoftheoriginal3DpackagesthatwasultimatelyboughtandincorporatedintoMaya, thusyouhavethe .OBJexporterbuilt in.OBJisauniversalobjectdescription. Ifyouwanted,youcouldopentheobjfileinatexteditorandlookitover.Itisgeekreadable.
Import3DOBJObject
InPhotoshop,locatethe3Dmenu.ThisportionofPhotoshopwillnotworkwitholderMacsorgraphicscards.TobringintheobjobjectfromMayaintoPhotoshop,dothefollowing:
1. Makesurethatthemovielayerisnotselected.Clickontheblankareainthelayer

editor todeselect thevideo layer. Ifyoudon’tdo this, thehatwillnot showup insomeversionsofPhotoshop!
2. Nowyoucanbringinthehat:3D>New3DLayerfromfile…3. Locatethehat.objfile.SelectthefileandclickOpen.4. ClickontheMovetool(“v”)toswitchtomove3Dmode.Usethesetoolstoposition
thehatsothatitlookstobeontopofthecharacter’shead.5. Ifyouclickdirectlyontheobjectyoucanadjustitslocalscale,position,andtranslate
properties.6. Createapositionkeyframeinthetimelineeditorsothatthehatstaysinposition.
You’llnotethatnew3Dtoolsshowupatthetopofthescreen.Thesearesimilartocameraattributes.
Rotatethe3DobjectinXYZspaceRolltheobjectinfrontofthecamera(usingallaxes)Dragthe3Dobject(inXandY,upanddown)Slidethe3Dobject(inZandupanddown)Scalethe3Dobject(whichisreallyscalingthewholeuniversethatitexistsin)
All right, 3Dpeople, thecameracontrolsarea littledifferent thanyouareused to.Notethat in the propertywindowyou can change to 3D coordinate system to type numbers in.Also,Apple-clickinafieldtogetavirtualslider.
InFigure5.28youseearrowsindicatingthe3Dhat,the3Dlayer,andinthetimelineeditorakeyframethathasbeenaddedtothe3Dpositioningoftheobject.
FIGURE5.28OBJloadedintoa3Dlayer
Youwillwant to turn off the shadow that is happening on the universe’s ground plane.

ClickonInfiniteLighticon(innewerversionsofPhotoshop)andturnofftheShadowoptionfoundinthePropertywindow.
Youcanevenpaintthe3DobjectinPhotoshop.Figure5.29showsthehatinvariousstagesof being painted. The normal paintbrushwas used. Remember that paint job;we’ll see thetexturethatwascreatedinjustamoment.
FIGURE5.29Paintingatextureforthe3Dobject
Tosetkeyframes,turnonthestopwatchforthe3DObjectPosition,andusethemovetool(v) to position and rotate the hat for the keyframes needed. You can see an example of afinishedanimatedobjinthePhotoshopfileDanMurdock_BigGulp_Section.psd.Figure5.30showsakeyframessetforthehatobj.

FIGURE5.30KeyframesinPhotoshop
Thelastportionwewillcoverasweexplorethe3DcapabilitiesinPhotoshopisexportingtheobjectfileandthetexturethatwepainted.Feelfreetoexplorethe3DpaintcapabilitiesinPhotoshop.
Toexport 3DobjectsoutofPhotoshop, simply select3D>Export 3DLayer…. Thiswillsavetheobjfile,amaterialfile(mtl),andatexture(psd).
Ifyouareusingtheobj file inMaya,youcan load in thepsd texture thatwascreated inPhotoshop.Selectthehatobject,createamaterialshader,lambert,forexample.ThencreateaPSDfilenode in thecolorchannel.Figure5.31showsthe texture loaded intoMaya.This isgreat news for Photoshop texture painters, because this shows a different workflow forpaintingthetexturesandusingthefamiliartoolsofPhotoshoppainting.

FIGURE5.31ApsdtextureloadedintotheMayascene
TheexportedfilesareinthecompaniondatainafoldertitledexportFromPhotoshop.Thisisjustthebeginningofworkingwith3DinPhotoshopandthebeginningofPhotoshop’s3Dcapabilities.AsnewversionsofPhotoshoparecreated,thefeaturesetwillcontinuetogrow.
ImportOBJFileintoToonBoomHarmony
Ifyouhaveaccess toToonBoomHarmony,youwill findthatyoucanbring3Dobj filesinto there as well. There is also aMaya plugin for Harmony that can be used. To importobjects in Harmony, go to File > Import > 3D Models…. The model comes in with thetransformation handle corresponding to where the origin was inMaya. Themodel can bemoved, rotated, and scaled inHarmony. It can even be animated in this fashion, just as inPhotoshop.RemembertoturntheAnimatebuttononforkeyframestoregister.

FIGURE5.31AImporting3DmodelsintoToonBoomHarmony
TonesandShadows
Thesetwotermscomefrom2Danimation.Becausewearedealingwiththecompositingofelementstomakeafinal imageandnotrenderingeverythingin3Dforonefinalframe,wewillcontinuetousethese2Dtermsforour2D/3Dpipeline.
Theterm“tones”referstotheareaonacharacterthatthelightdoesnotfullyilluminate,the area in shadow. This dark area can be caused by self-shadowing or cast shadows fromothercharacters,props,and the like.Although it is technicallya shadow,when this shadowareaisontopofacharacter,inanimationitisreferredtoasatone.Theterm“shadows”referstotheshadowcastfromthecharacterontothebackgroundelements.
In3Danimation,theartistmustonlythinkaboutsettingthelightupforgoodilluminationandtherenderingenginetakescareofthetoneandshadowportionoftheimagebasedonthematerialsappliedtotheobjects.Thepersoninchargeoflightinglookstomakesurethatthetonesarenotcoveringthecharacterinadistractingway.

FIGURE5.32Exampleof3Dtoneandshadow.ModelandrigbyJohnVu,2009,3Dcharacterandsetupanimationcourse,
SCAD
In 2D animation, the artist must draw the areas where the light is not visible. This 2Drepresentationofdarkareas—tonesandshadows—isusedinthecompositingstagetodarkenthecharacter’spaintedcolors.

FIGURE5.33Exampleof2Dtone,shadow,andhighlight.ByDiannaBedell,2009,SeniorProjectII,SCAD
The difference in the representation of light can cause issues when putting 2D and 3Dimages together. If the 3D element is rendered with 3D lighting and shadowing, the 2Dimagerycannotmatchbecauseitwillbeflatandatmosthaveaslightshadowingfromhand-drawn tonesandshadows.Wehaveexaminedmany films,both in thisbookandaspartofchapterprojects.Inyourresearch,youhaveseenexamplesofextremelyrendered3Dimagerycombinedwithveryflat2Dimagery.Thiscombinationcanbesomewhatjarring.
Whatdoyoudowithlightandshadowifthemedialookatthemdifferently?Howdowemakethemmatch?Theansweristochoosealighting/shadingmodeltouseforbothmedia.Youcanchoosetolightandshadeusing3Dmethodsforanyelementsthatareincontactwithoneanotherorlightandshadeusing2Dmethodsfortouchingelements.
There’sakeyconceptinthisapproach.Itisonlywhencharactersofdifferentmediaareincontactwith one another orwhen a character itself ismadeup of differentmedia that thelightingmodelsmustmatch.Acharacterand thecharacter’sbackgroundcanhavedifferentlightingmodels.
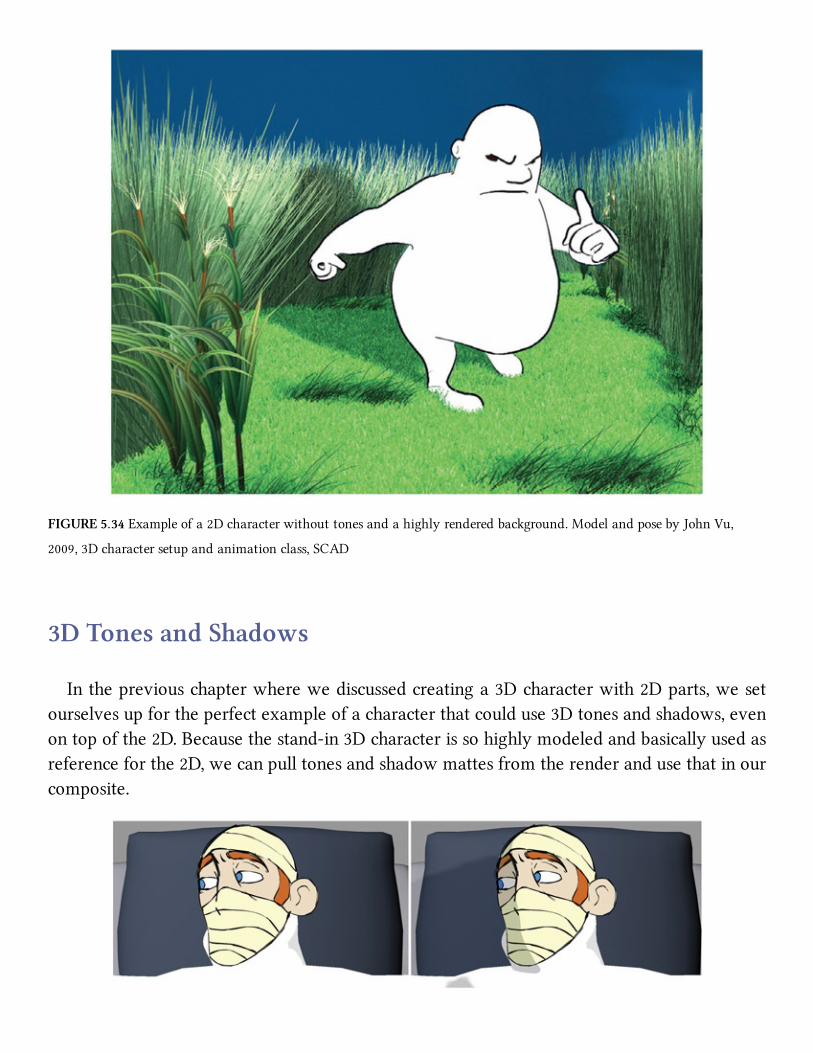
FIGURE5.34Exampleofa2Dcharacterwithouttonesandahighlyrenderedbackground.ModelandposebyJohnVu,
2009,3Dcharactersetupandanimationclass,SCAD
3DTonesandShadows
Inthepreviouschapterwherewediscussedcreatinga3Dcharacterwith2Dparts,wesetourselvesupfortheperfectexampleofacharacterthatcoulduse3Dtonesandshadows,evenontopofthe2D.Becausethestand-in3Dcharacterissohighlymodeledandbasicallyusedasreferenceforthe2D,wecanpulltonesandshadowmattesfromtherenderandusethatinourcomposite.
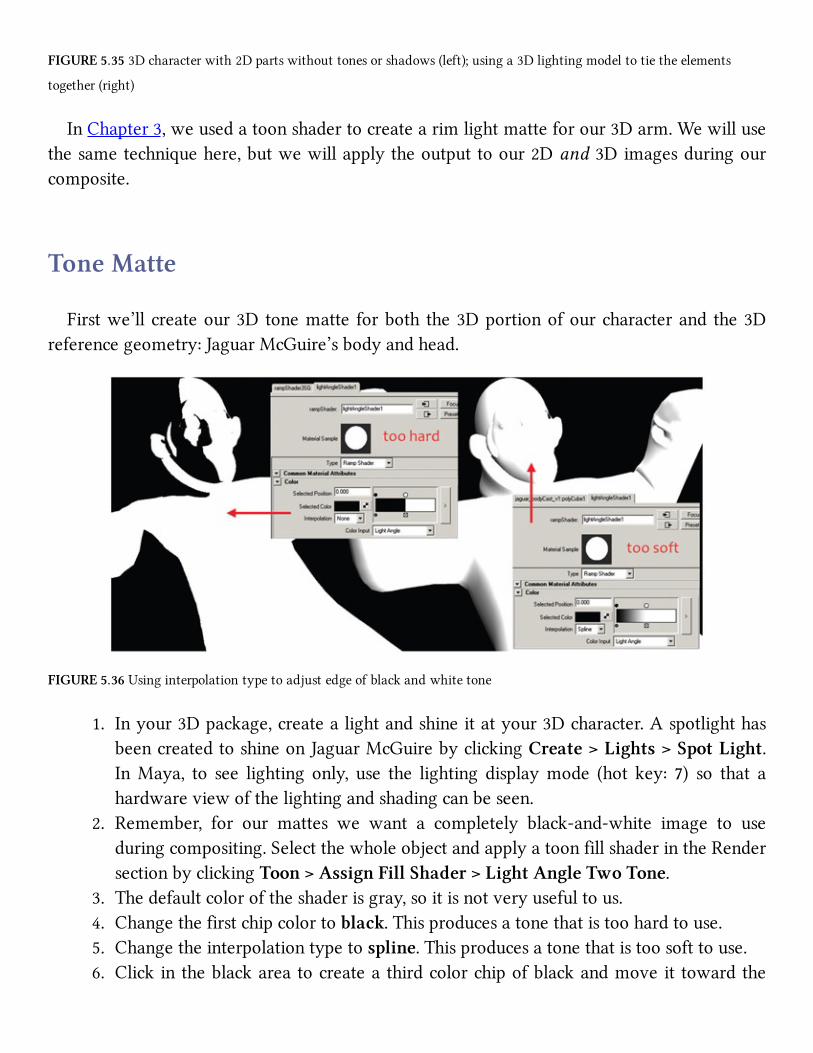
FIGURE5.353Dcharacterwith2Dpartswithouttonesorshadows(left);usinga3Dlightingmodeltotietheelements
together(right)
InChapter3,weusedatoonshadertocreatearimlightmatteforour3Darm.Wewillusethesametechniquehere,butwewillapplytheoutputtoour2Dand3Dimagesduringourcomposite.
ToneMatte
Firstwe’llcreateour3Dtonematte forboth the3Dportionofourcharacterand the3Dreferencegeometry:JaguarMcGuire’sbodyandhead.
FIGURE5.36Usinginterpolationtypetoadjustedgeofblackandwhitetone
1. Inyour3Dpackage,createalightandshineitatyour3Dcharacter.AspotlighthasbeencreatedtoshineonJaguarMcGuirebyclickingCreate>Lights>SpotLight.InMaya, to see lighting only, use the lighting displaymode (hot key: 7) so that ahardwareviewofthelightingandshadingcanbeseen.
2. Remember, for our mattes we want a completely black-and-white image to useduringcompositing.SelectthewholeobjectandapplyatoonfillshaderintheRendersectionbyclickingToon>AssignFillShader>LightAngleTwoTone.
3. Thedefaultcoloroftheshaderisgray,soitisnotveryusefultous.4. Changethefirstchipcolortoblack.Thisproducesatonethatistoohardtouse.5. Changetheinterpolationtypetospline.Thisproducesatonethatistoosofttouse.6. Clickintheblackareatocreateathirdcolorchipofblackandmoveittowardthe

whiteareaoftherampshader.Thisshouldproduceasmallerthresholdbetweentheblack-and-whitecolorchange.
7. Toadjusttheparametersandinteractivelyseefeedback,youcanusetheInteractivePhotorealistic Rendering (IPR) window. Click on the IPR button in the renderwindowandfollowthedirections todrawaboxaroundtherenderregion.Asyouadjustthesliderstothetoonshader,itwillinteractivelyupdateinyourwindowuntilyougettheshaderjustright.
FIGURE5.37UsingtheIPRwindowtointeractivelyseetoonshaderadjustments
Once you have the settings you think are correct, take amoment and go through youranimationtocheckforanyunwantedtoneeffects.AquickwaytodothisistousetheKeepImagefeatureoftheRenderViewwindow.
Renderthefirstimageinyouranimationtolookatthetones.IntheRenderViewwindowyoucansaveimagesbyclickingtheKeepImagebuttonatthetopofthewindow.Thenrenderanotherframelaterinyouranimationatakeypointofthemovement.YoucanusetheslideratthebottomoftheRenderViewwindowtoscrubbackandforthbetweentheimagesandcheck for unwanted popping in the tones or shapes that obscure important features of thecharacter. If such thingswere to showup, youwould need to readjust the lighting in yourscene.

FIGURE5.38UsingtheKeepImagefeatureoftheRenderViewwindowtocheckthetonematte.ShowninMaya2014(left)
andMaya2011(right).Eventhoughtheversionchanges,thebuttonsstayprettymuchinthesameplace
Once you are satisfied that your toneswill render correctly, you can render your tones.Steps like these can help you catch errors before you kick off a render,walk away to getcoffee,andcomeback toa surprise.Ofcourse, this isnot to say thatafteryou return fromgettingyourcoffeeyoustillwon’tbesurprised.Thatisthenatureofthemedium.Thosewhohavebeenaroundthedigitalblockatimeortwo,feelfreetoignorethesemusings.Students,takeheed.
When rendering the tone matte, we can use .tifs because this is now going to finalcompositing.Remembertousealphachannelsandframepadding(Figure5.39).
FIGURE5.39Renderingtonematte

For the Jaguar McGuire shot, we rendered out the background element as one image,because the elements are not being animated and the camera is locked (no cameramovement).Mayawillhappilyletyourender110framesofsomethingthatisn’tmoving.Takean extra moment before you hit the render button to contemplate: do you need all 110images?Normallyyouwillnotneedanalphachannelonabackground.
FIGURE5.40Renderingheldbackgroundelement
Nextwe’llrenderthecastlayermuchaswehavedonepreviously.Thereferenceheadhasbeenhidden.Itisagoodideatodoaquicktestrenderofoneframeandmakesurethatthealphachannelisthere.Youmightfindthatyouhaven’thiddeneverything.Thiswasthecaseduring themakingof the following image.Thebackgroundwallwas the samegrayas theperspectivewindow,sowethoughtitwashiddenwhenitwasnot.Onlyaftertherenderwascompleteddidwenoticethatthealphachannelwasapureblankrectangleofwhite.Aquickrendertestwouldhaveshownthatwasthecaseandcausedtheanimatortoinvestigatemoreanddiscoverthatthewallhadnotbeenhidden.Didn’twejustsaythatstudentsweretoheedtheimportanceoftestrenderings?Itissoeasytoclickthatrenderbuttonwithoutthinkingtocheck.Remember!

FIGURE5.41Renderingananimatedcastelementwithoutahead
AswesawinChapter4,theheadhasalreadybeendrawninFlash.Wehavealreadyinkedandpaintedthecharacter inFlash.See theadditionalonlinechapters formoreabout inkingandpaintingimages.
Tohavea rendered frame forevery frame (whichcanbeeasierwhencompositing if therender time is not an issue), we will select all of the keyframes and right-click to selectConverttoKeyframes.
FIGURE5.42Prepping2Danimationtoexportforfinalcomposite
Oncethisisdone,thereisakeyframeforeveryframeofanimation.Thereisnotanoptiontoexportaseriesof.tifimagesinFlash.Dependingonthesoftware
thatyouareusing,youmightbeabletousetheswffileitself.Ifthatformatdoesnotworkforyourcompositingsoftware,thenyouwillhavetouseaQuickTimeformat.Remembertouse

animation(nocompression)exportsettings.Toexportaswffile,therearenotmanyfilesettingsthatyouneedtochange.Weturnedoff
anycompressionsettings. Inaproductionsetting, Iwould testbetweenQuickTimeandswffilestoseeiftherewasanylossofimagequalitybeforeproceeding.Wetestedonlyslightlyduringonequarter’sclassandfoundthatexportingQuick-TimeoutofFlashcreatedaslipinframerate!Insteadofexportingoutat24framespersecond,itwasexportingat24.9,withnoobviouswayofcorrectingtheerror.TheslippageshowedupatthecompositingstagewhenwewererunningaframeshortinanythingthatcameoutofFlash.Mystudentsreportedthattheywereusingtheanimationcompression,whichshouldnothavecreatedanyslippage,yetitwasthere.Wechosetouseswfinstead.Test.Test.Test!
Youcanuseanycompositingsoftware toput these images together.We’llusebothAfterEffects and Nuke so you can see the differences between the two types of compositingsystems:time-lineandnodebased.
First we will use After Effects. Bring your elements (bg, cast [1–110].tif, head.swf,J_tones[1–110].tif)intoAfterEffectsbydragginganddroppingthemorimportingthem.Youcanfindtheelements inthecompaniondataTonesNShadows>Shot. InnewerversionsofAfterEffects,youcandraganddrop the folderof .tif imagesand itwillbring in thewholesequence. See Figure 5.43 for an example of elements brought into After Effects. In thisexampleweusedaswffileforthehead.
FIGURE5.43AnimationelementsbroughtintoAfterEffects

Ifyouhaveagroupofindividualimages,thenyouwillneedtocreateacompositeforeachelement layer. Inourexample, that is thecastelementandalso the tonematte.Tocreateacomposite:
1. Selectthecastimages1–110.2. Dragthemtothecompositionicon.3. Makesurethesettingsareforadurationofoneandthatthesequencelayersoption
isturnedon.4. Repeatsteps1–3forthetoneelement.
FIGURE5.44Creatingaprecompofthecastelement.Each.tifistreatedindividuallyasinolderversionsofAE
YouwillonlyneedtodothosethreestepsifyouareinanolderversionofAfterEffectsorthe images are being treated individually due to importing issues. If your images werebroughtinasasequence(ifyoudrag-and-droppedthefolder)theyshouldalreadybein24fpsandshowupononetimeline.You’llseeinFigure5.45thatthecompositionisindeedmadeat24framespersecond.

FIGURE5.45Tifimagesequenceofthecastandtonearetreatedlikeavideoclipifyoudrag-and-droppedthefolderof
imagesintoAE
Nowwe will affect the body with the 3D tone that we created.We will use the samemethodfromChapter3.Wewilluse the tonematte toadjust thecolorof theheadandthecastlevels:
1. Createanothercomposition,anddragintheheadandcast.Labelthishead_cast.2. Right-click in the timeline and add aNew >Adjustment Layer above the head
level.3. Draginthetonecompositionandplaceitabovetheadjustmentlayer.4. Select theAdjustmentLayerand from the topmenuclickLayer>TrackMatte>
LumaInvertedMatte.5. Right-click the Adjustment Layer and addEFFECT > Color Correction > Color
Balance(HLS).6. Bringlightnessdowntothedesiredlevel.
You’llnote the redarrowspointout the errors that can result from thismethod.The2Danimation did not exactly follow the 3Dhead thatwas used to generate the shadows. Thetonescanstillbeused.Aseparatecleanuppasswillneedtohappentoextendthemattestobettermatchthe2Danimation.Ifyourteamhasmanyjunioreffectsartists,orinourcasenewsophomorestudentshelpingoutonagroupproject,using3Dtonescanhelptheartistshavesomethingtogobyandhelpwithqualitycontrol.Ifyour2Danimationmatchesverywellto

your3Danimation,thenyourtoneswillmatchcorrectly.Thisprocesscanevengotheotherway. You could animate in 2D, then roto match a 3D stand-in just to cast tones on. Dowhateverhelpsyoutoattaintheshot.
FIGURE5.46AddingthetoneelementinAfterEffects(steps1–6listedlater)
JustonewayoffixingthetonemattesistobringthemintoPhotoshoporanypaintpackageand to simplify them there.Remember,donothand-blur theedges. Ifyouhand-bluredgesacrossmultipleframes,theywillnotanimateverywellandtheywillcauseboilinginthefinalcomposite.Itisbettertohaveahard-edgedmatteandbluritinthecompositingpackagethantotrytohand-blureachimage.InFigure5.47themattehasbeensimplified.Alloftheareasaroundtheeyefacingthelighthavebeenremoved,aswellassomeshadowingonthejawline.Note:youareseeingtheRGBlayerofthematte.

FIGURE5.47Simplifyingthetonematteinapaintpackage
Shadows
We’llusethesametechniqueofcreatinga3DshadowinMayaandcompositingitinAfterEffects.
Tocreateashadowmatteinyour3Dpackage,you’llneedtobeabletorenderashadowpass. In Maya 2008 or earlier versions, you can use render passes. In Maya 2009 +, thecompanychangedhowyoucreaterenderpasses.We’llshowbothmethods.Theconceptsarethesame;onlythebuttonsaredifferent.
We’llcontinueusingourJaguarMcGuireshot.Thefirststepistosetupalightthatwillbeused to cast the shadow.Thisdoesnotnecessarilyhave tobe exactly the sameas the lightusedinthemainrender.Remember,yourgoalistocreateashadowthattiesthe2Dand3Delementstogether.Inthisshotwehavea3Dheadthatwillcasttheshadowforthe2Dheadlayer.
FIGURE5.48Spotlightaddedtotheroomtocastashadow
Beforekickingoffafullrender,itwouldbeprudenttodoafewtestrendersjusttomakesuretheshadowsaregoingtobetoyourliking.Forinstance,inourshotthecharacter’srightearwasnotusedinthe2Danimation,soitneedstobehidden.Ofcourse,youwon’tseethatin the following imagebecause the author didnot followher ownadvice andkickedoff arenderwithoutchecking,resultingintheneedtore-rendertheimages.Ibreakthingsforyou.

Youarewelcome.
FIGURE5.49Viewofcharacterthoughthecamera
Tocreateashadowlayer,youshouldisolateonlytheobjectsthatarecastingorreceivingthe shadowaswell as the light that is casting the shadows. Figures5.50 and 5.51 show theroombeforearenderlayeriscreated.CreatealayerbyselectingRender(layer)>Layers>CreateLayerfromSelected.Rememberthatwhenarenderlayerisselected,asyouseeinFigure5.51,onlythoseobjectsarevisible.
FIGURE5.50Creatingarenderlayer

FIGURE5.51Renderlayershowsonlywhatisinthelayer
Before you go on, is your light set to cast shadows?Make sure the light that you haveincludedinyourrenderlayerisindeedcastingshadows.(Notthattheauthorhasevermadethatmistakebefore.Whatgaveyouthatidea?)
FIGURE5.52Spotlightissettocastdepthmapshadows
CreatingaShadowPassinMayabeforeVersion2009
To create a shadow render pass, right-click on the render layer and select Preset >Shadow.Youwillseethattherenderlayer’ssecondbuttonturnsred(Figure5.53).ThisrenderlayerdoesnotincludepartsofJaguarMcGuire,inordertosimplifythecastshadow.

FIGURE5.53RenderlayershadowpasscreatedinolderversionsofMaya
Renderasnormal.Forashadowpass therender isnotcreatinganRGBimage; it isonlycreatinganalphachannel.ThisisdifferentthanwhatwehavedonebeforewhereweactuallyusedtheRGBcreatedbythetoonshaderasamatte.This timeweareusingatrueshadowmatte.ItcanbeslightlydisconcertingthefirsttimeanartistopenstheshadowmatteandseesnothingintheRGBchannels.Donotpanic.Lookinthealphachannel.

FIGURE5.54Alphachannelofashadowpass
CreatingaShadowPassinMaya2009orNewer
AfewfeatureswereaddedinMaya2009toaddmorefunctionalitytorenderpasses.Atfirsttesting,Icouldn’tfigureitoutwithoutfinallygivinginandreadingthedocumentation.Iusedwhatwastheretofigureouthowitreallyworked.Here’saquickieoverviewofusingrenderpassesinMaya2009+.
ThepreviousstepswillworkifyouhaveMentalRayselectedasyourrenderer.YoumustselectMentalRayasyourrendererinorderforthelistofpassestoshowup.Iwasunabletoincludeascreengrabofthepasses:thereareplentyofthemtochoosefrom.
1. SelectyourobjectandintheRenderPasswindowchooseRender(layer)>Layers>CreateLayerfromSelected,aswedidpreviously.
2. ChooseMentalRayasyourrendererintheRenderSettingswindow.3. Right-click on the render layer and clickAddNew Render Pass. Select Shadow
renderpassfromthelargelistpresented.4. If you look at the Passes tab in theRender Settings window, you will see your
renderlayerlistedthere.5. Renderasnormalandwonderwhereyourrenderlayeris.6. In therenderwindow,selectFile>LoadRenderPass.Thiswill openyour render

layer.Remember, this isanalphachannel, sodisplay thealphachannel to seeyoursuccess.
Read thedocumentation formore information, includingmovies onhow touse thenewimplementationofrenderpasses.
FIGURE5.55RenderlayersinMayaversions2009ornewer
Compositing
We’llbringtheshadowsintoourAfterEffectscomposite.Hereisadifferentwaytobringinimages.Fortheseshadows,we’llbringalloftheminasonepieceoffootage.(Therenderedshadowandotherassetscanbefoundinthecompaniondata.)
1. ClickFile>Import>File.2. Selectthefirstimageintheshadowsequence.3. Make sure that Tiff Sequence is checked and Interpret as Footage is selected. (In
newerversionsofAfterEffects,youcan’tadjustthefootagesetting.)ClickOK.4. Thiswillbringalloftheimagesinasafootageclip.Youcanseethemlistedasone
pieceoffootageintheprojecttab.
Once the footage has been brought into After Effects, you can drag the shadow layer

betweentheheadandthebg(background)layers.SeeFigure5.56foranexample.Itdoesn’tmatteriftheshadowisbiggerthanyouneedbecausethecharacterwillcoverit.However,ifthere are any gapswhere the shadow does not quitemeet the character, youwill need toextend the shadow in Photoshop or a painting package. In the image on the companionwebsite, the shadow area (the white area of the alpha channel) has been extended andsimplified.
FIGURE5.56Ashadowimageplacedbetweenthecharacterandthebackground
Dependingonyourartdirection,youcouldsimplyadjusttheopacityoftheshadowlayerandcallthisshotfinished.However,justaddingablackshadowdoesnotgiveyouarichcolorpalette.Instead,wewillusethesamemethodthatweusedpreviouslyforthetonetousetheshadowasamattetoadjustthecolorofthebackgroundimage(s):
1. Right-click in the timeline and add a New > Adjustment Layer above thebackgroundlevel.
2. DragtheshadowlayerabovetheAdjustmentLayer.3. Becausethisistrulyanalphachannelthatweareusing,selecttheAdjustmentLayer
andfromthetopmenuclickLayer>TrackMatte>AlphaMatte.4. Right-clickontheAdjustmentLayerandaddEFFECT>ColorCorrection>Color
Balance(HLS),BrightnessandContrastorwhatevercolorcorrectionmethodyoudesire.
5. Adjustthecolorcorrectionsettingsuntilyoureceivethecorrectshadowlevel.

FIGURE5.57FinalcompositeinAfterEffects
3DTonesinNuke
Tocarryonourtraditionofusingmultipletypesofsoftwaretoachievethesamelook,let’stakealookathowtoachievethiscompositeinanode-basedcompositor.We’lluseNuke.Aswehavepointedout,node-basedcompositorsaresomewhatsimilar.You’llbeabletoapplythesameideastothesoftwareofyourchoice.
1.LocatetheReadbutton in the Image taband load in theassets. (HotkeyR.) In thisexample,thefollowingimagesequenceswereloaded:
a.bg.tif MayaRenderb.shadow[1–81].tif MayaShadowPassc.J_tone[1–81].tif MayaTwoToneShader(RGB)d.cast[1–81].tif MayaRendere.head.mov Flashswfconvertedtomov(Animationsettings)
You’llnotethatthehead.swffileweusedinAfterEffectsdoesnotreadintoNuke.Therefore,the rawmovie fileoran image sequenceneeds tobeused. InFigure5.58 the imageswereloadedandshowupinthenodeviewtab.

FIGURE5.58ShotassetsloadedusingmultipleFileInnodes
2.Firstwe’llcompositetheheadovertopofthecast.Selectthehead,thenthecast,andselecttheMerge>Mergeicon(HotkeyM.)ItshouldautomaticallyplugtheheadasAandthecastasB.(AoverB).
FIGURE5.59Compositingtheheadoverthecast
3.SelecttheMerge1(over)nodeandaddaColor>Gradenode.(HotkeyG.)Thiswillautomaticallyhooktheoutputofthehead/castmergeintothecolortool.Thiswillgiveanoverallcolorcorrectiontothehead/castmerge.Adjustthewhite-pointnumberto
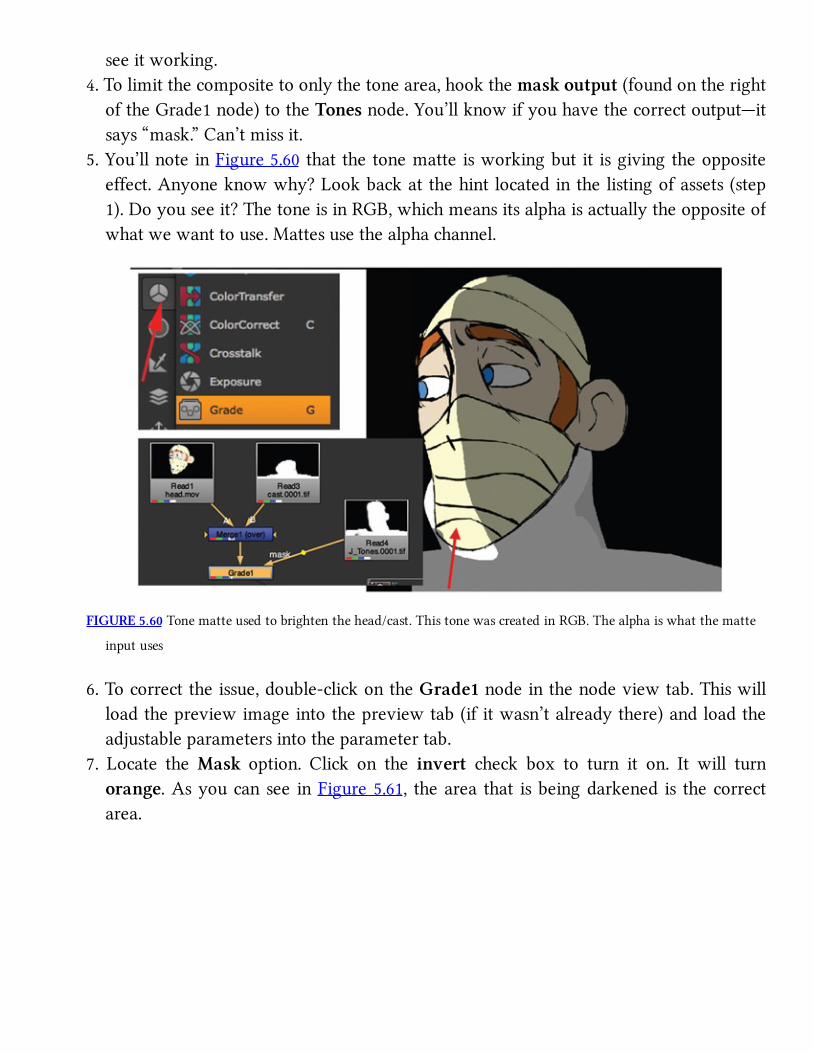
seeitworking.4.Tolimitthecompositetoonlythetonearea,hookthemaskoutput(foundontheright
oftheGrade1node)totheTonesnode.You’llknowifyouhavethecorrectoutput—itsays“mask.”Can’tmissit.
5.You’llnoteinFigure5.60thatthetonematteisworkingbutit isgivingtheoppositeeffect.Anyoneknowwhy?Lookbackatthehintlocatedinthelistingofassets(step1).Doyouseeit?ThetoneisinRGB,whichmeansitsalphaisactuallytheoppositeofwhatwewanttouse.Mattesusethealphachannel.
FIGURE5.60Tonematteusedtobrightenthehead/cast.ThistonewascreatedinRGB.Thealphaiswhatthematte
inputuses
6.Tocorrecttheissue,double-clickontheGrade1nodeinthenodeviewtab.Thiswillloadthepreviewimageintothepreviewtab(ifitwasn’talreadythere)andloadtheadjustableparametersintotheparametertab.
7. Locate theMask option. Click on the invert check box to turn it on. It will turnorange.Asyoucansee inFigure5.61, thearea that isbeingdarkened is thecorrectarea.

FIGURE5.61Invertingthetonemask
8.Ifyouwanttoaddablur(oranythingelse)toadjustthematte,youcanaddthattothenodenetworkbetweenthetoneandtheGrade1node.InFigure5.62youcanseetheadditionofaBlurnode.
FIGURE5.62BlurnodeaddedtothemattebeforetheGrade1node
9.Continuingtothebackgroundareaofthiscomposite,selectthebackgroundnodeandaddanotherGradenode.(FoundintheColortab,hotkeyG.).HooktherightsideoftheGrade2node to thebottomof theShadownode.Thiswilluse the shadowasa
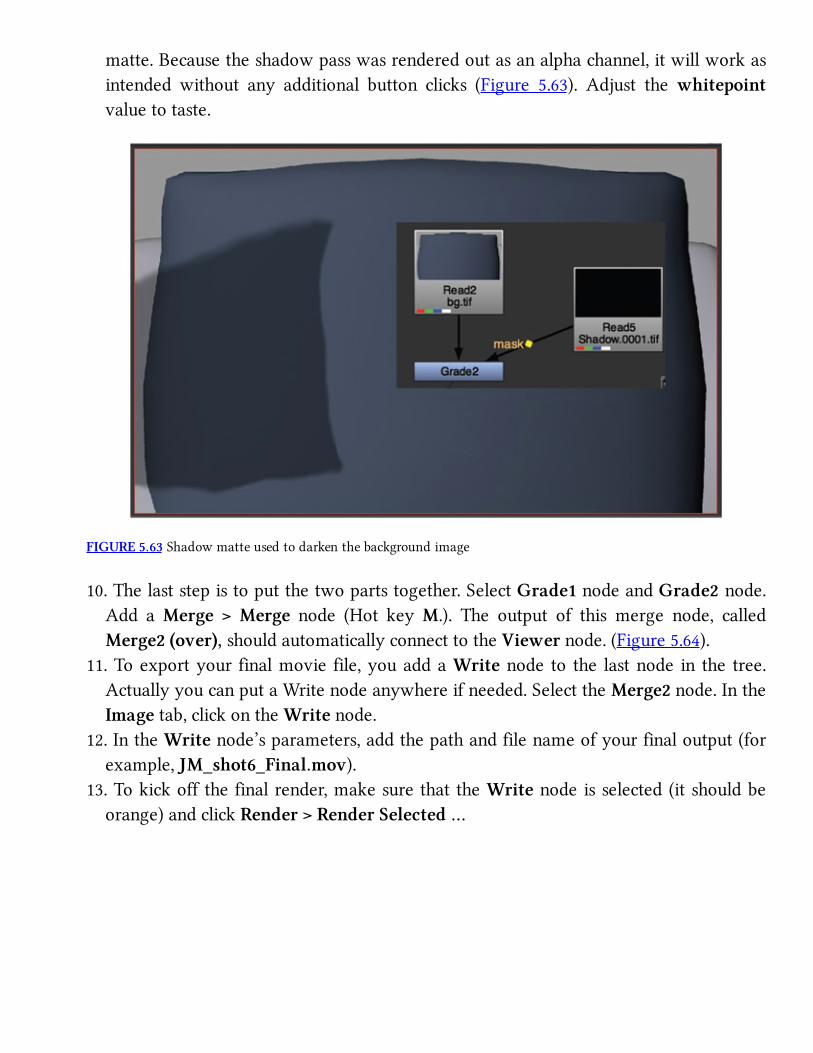
matte.Becausetheshadowpasswasrenderedoutasanalphachannel,itwillworkasintended without any additional button clicks (Figure 5.63). Adjust thewhitepointvaluetotaste.
FIGURE5.63Shadowmatteusedtodarkenthebackgroundimage
10.Thelaststepistoputthetwopartstogether.SelectGrade1nodeandGrade2node.Add aMerge >Merge node (Hot keyM.). The output of this merge node, calledMerge2(over),shouldautomaticallyconnecttotheViewernode.(Figure5.64).
11.Toexportyour finalmovie file,youaddaWritenode to the lastnode in the tree.ActuallyyoucanputaWritenodeanywhereifneeded.SelecttheMerge2node.IntheImagetab,clickontheWritenode.
12.IntheWritenode’sparameters,addthepathandfilenameofyourfinaloutput(forexample,JM_shot6_Final.mov).
13.Tokickoffthefinalrender,makesurethattheWritenodeisselected(itshouldbeorange)andclickRender>RenderSelected…

FIGURE5.64FinalCompositeTreeinNuke
2DTonesandShadows
Whendrawingtonesin2D,theartisthastocalculatewherethelightishittingthecharacterorobjectanddrawthis2Dmatte.It isessentialthatthesemattesflowalongthecharacter’ssurfaceandreacttothevolumesofthecharacterasitmovesinthelight.Whendrawingtheshadows, the artist draws a stylized representation of where the shadow falls on thebackground. The mattes should not pop or wobble and draw attention to themselves;however,themattesareusuallyblurred,sosomewobbleswillbeminimized.
Shadowsandtonesdonothavetobeexactrepresentationsofwhattheyshouldphysicallybe.Iftheywere,theywouldbecometoodistracting,whichcanbethecasewith3Dtonesandshadows.Themattesshouldbesimplifiedideasoftheshadowedareas.
Figure5.65showsacoffeecupstandinginthelight.Thelightdirectionhasbeendrawnin.You can seewhere the light rayshavebeen extended through the coffee cup andonto thegroundplane.Thisistheshadowarea.Wherethelighthitsthecupcreatingself-shadowareas,thisiswhatiscalledtones.Thetonesfollowthevolumeofthecup.Ofcourse,thisisasimpleobject.Ifyourcharacterhaslotsofdanglinghair,eyeglasses,andsoon,thetonesandshadowscould be extravagant. When creating 2D tones and shadows, you have the option ofsimplifyingtheseelementssothattheydonotdetractfromthemainanimation.

FIGURE5.653Dcoffeecupshowingtonesandshadows
Todraw2D tonesand shadows,youcanuseanymethodwehavecovered so far in thisbook:paper,Photoshop,ToonBoom,Corel,andthelike.Paperwouldbethemostdifficulttokeepregisteredbecauseyouwouldhavetogothroughaprintingprocess.Figure5.66showsfour levels of images broken apart so you can see what each looks like. The cup andbackgroundlevelare3Drenders.ThetoneandshadowaredrawninPhotoshop.

FIGURE5.663Dcupandbackgroundrenderand2Dtoneandshadowdrawing
Youcanfollowthesameprocessesweusedbeforetocompositethe2Dtoneandshadowsintoyourscene.Atiptokeepinmindwhencreatingtonesandshadows,especiallywith2D,isthatgenerallytonesandshadowsareblurred.2Dtonesandshadowstendtobeblurredmoretohelpmake them feel softer,much likeyouwouldgetwith a 3D toneor shadow. If youover-blur themattes, theywill pull away from the character (or coffee cup), as you see inFigure5.67.Whendrawing2Dmattes, it isbest tooverdrawthemso that theyoverlap theedges.Inotherwords,drawoutsidethelines.Becauseweareusingthemasmattesontopofthe character and tracking them as luma or alpha mattes, they will not be seen. Sooverdrawingthematteswillnotcauseanyharm.
FIGURE5.67Overdrawmattestokeepthemfrompullingawayfromtheedgeswhenblurredduringcompositing
FurtherReading
Gilland, Joseph.ElementalMagic:TheArtofSpecialEffectsAnimation.Boston: FocalPress,2009.
StudentContributors
Contributingstudentsforthischapter,inorderofcontribution:

JessicaHuangDanMurdockJohnVuDiannaBedellClintDonaldsonJasonWallingAlstonJonesDanielTiesling

6
Camera
Flat,Limited,andDeepSpace
FIGURE6.1Exampleoff lattodeepspacebyJohn-MichaelKirkconnell,2009,2D/3Dcompositingclass,SCAD
LectureNotes

You, dear reader/student, now have examined working with 2D and 3D art. Whencombininganimationmedia,theartistmustcreateaworldthathousesthesemedia.Thenexttopictoexploreishowtolookattheworldwheretheseimagescometogether.
Themostcommonmethod(notthatwearesayingitisthebest)istoputeverythingintoa3Dworld.Surely thishasbeenthecaseas3Dobjectsandenvironmentshavecrept into2Danimatedfilms.Infact,thehistoryofanimationhasseenasteadyprogressionfromtheuseofflat,totheuseoflimited,totheuseofdeepspaceenvironments.Mostly,in2Danimationwewereaccustomedtoflat-spacecameraworkuntilthemultiplanecamerawasinventedandwebegan to see limitedandeven thebeginningsofdeepspaceusage.Thenamismatchof thespaceusagesbegan.Wewouldfindourselveswatchingaflat-spacefilmwithsomeusageoflimitedspace;a2Dcharacterwouldbehappily tellinghisstorywhilemoving leftandrightacrossthescreenandsometimescomingtowardthecameraforaddeddepth;andthen,wham,wewouldcomeacrossascenewherethecamerawassuddenlyliberatedandmovingthrougha3Denvironmentthatpossiblyhadafew2Dcharactersinit.Thosewhorespondtotitillationwouldexclaim,“Wow!”Thosewhorespondtothestory,wouldretort,“Oh,Boy!Thatwasafailure.”Why?Wemadetheaudiencesay,“Wow,lookattheshinything,” insteadoffeelingthestorypointmore.
AnexampleofsuchanincidentcameaboutwhenIwasstillincollegeatRinglingSchoolofArt and Design (now Ringling College of Art and Design). At the time, the head of thetrainingdepartmentatWaltDisneyFeatureAnimation’sFloridastudiowouldvisitthecollegeeveryyearlookingforthenextroundofinternshipcandidatesforDisneyfeatureanimation.During the visits, Frank, the Disney representative, would treat us by giving a sneakprescreeningofthatyear’sanimatedfilm.Atthattime,itwasagreattreatinthelostendofFlorida to seemoviesbefore theywere released. Studentsnowadays canbarelyunderstandhowspecialthiswas,giventheircurrentreadyaccesstobootlegvideos.(Oh,andifyouthinkyoucanenjoyamovieonyouriPhone,pleaseskipthischapter.Itisnotforyou.)Frank,whoisa lovely,energeticman,screenedanumberof filmsduringmystayatRingling.OnewasBeautyandtheBeast.Iwasstudyingcomputeranimationatthetime,soIwasverytunedintoanyuseof3D,asweallwere.Inthecenterofthefilm,ofcourse,thereisthegreatballroomdance scenewhere the characterswalk into a ballroom and the camera follows them. Thecamerathenswoopsupandaroundtheceilingoftheballroom,revealingalltobeinglorious3Dandtextured,andthenitcomesbackdowntoswooparoundthedancing2Dcharacters.
Manyofuswerestunned.Whatalovelyexampleof3Dusage.Wasn’tthatbeautiful?Didyouseethat?Theywerereallypushingtheenvelope.Weallmarveledtogether.
Itwasn’tuntilyearslater,whenIworkedatDisneyandwasmoreeducatedontheprocessand art of animation, that I realized some considered the scene amiserable failure. In oneswoop,ittooktheaudienceoutofthemomentandshowedoffthetechnology.
The point to take away from this is that we shouldn’t show off our technology, our

pipelines.Thereshouldbereasons foreverythingwedo, includingtheworldwecreateandhowwemoveourcameraabout.Itshouldn’ttaketheaudienceawayfromthestory—whichiswhywestartedthisbookwiththequestion,“Howdoyouknowifitissuccessful?”
FIGURE6.2Bull’s-eyetokeepusfocusedonwhywesetupshots
We have come full circle, then. (I’m sure there is a pun there.) In Chapter 1’s onlinecompaniondataofthisbook,wediscussedBruceBlockandtheouterringofthebull’s-eye:visualstorytellingcomponents.Ifyouhaven’treadthatextrachapterorarenotfamiliarwithBruceBlock,pleasegoreferencethatonlinechapternow:“StorybeatsandBull’s-eyes.”Block,inhisteachings,remindsustotietheintensityofourvisualstightlywithourstory.Weknowthis; it is usually somethingwe do instinctively. However, youmight have noticed in yourresearchthatthereisafinelinebetweenaddingvisualintensitytoafilmwhenthestoryneedsit andaddingvisual intensity toa filmat every chance.Theproblemwith the latter is thatungoverned intensitywill become numbing and ultimately lower all intensity. If you haveeverseenavisualeffectsfilmwhereoneunitshotalloftheexpositionandtalkingheadsandanotherunitexecutedallofthewhiz-bangfightsequences,youmighthavefeltthisproblem

profusely. Itmight have felt like this: talking heads = flat, flat, flat; fighting =wow,wow,wow.Butpossiblythefightingwasover-wowedwitheachshotsothatbytheendyouwerethinkingtoyourself,“Isitoveryet?”Sotohelpusgovernourusageofvisualintensity,Blockgaveusthetoolofchartingthestorybeatstothevisualintensity.
FIGURE6.3Block’sintensitychart
Block’sbookcoversallof theactors thatcanbeused todisplayvisual intensity.Youwillwant to read and understand his text.We cannot cover all theways to apply the differentactors in this book.We have room only to discuss the actor called space.Wewill only belookingat theplacementandmovementof the charactersandcameras in this chapter.Youwill have to pursue the other subcomponents of space in your supplemental readings ofBlock’sbook.
It has been rumored throughout the student body that any studentwho takes a class ofmine shouldnotmove the camera. Studentsgive eachother theadvice to alwayshave thecameralockeddown.Theyexplain,“ProfessorOhatescameramoves.”Onthecontrary,Ilovethem.Yettheymustbewelldoneandhaveareason.
Whentryingtounderstandwherecamerasshouldgoandwhy,Ifoundmyselfonajourneyof exploration into many ideas, methods, glossary terms, and ideologies. Manycinematographybooksexplainedhowcertaincamerapositionswouldmaketheaudiencefeel.

However,Ifoundthatsomeofthebooksweretalkingaboutsingleshotsandnotlookingatthe whole film and how the shots related to one another. If you want to gain a holisticunderstanding of using the camera, I would suggest a reading list that includes the bestcinematographybookyoucanfind,alongwithBruceBlock’sbook,plusaconcisebookaboutcameramechanics, and something on the placement andmovement of camera blocking. Isuggestthefollowing:
1. Cinematography:ImageMakingforCinematographers,Directors,andVideographersbyBlainBrown,forbetterappreciatingwhyshotsaresetupthewaytheyare.
2. TheVisualStorybyBruceBlock,forlearningmoreabouthowtofocusonthewholestructureofthefilmasitrelatestothestory.
3. The Bare Bones Camera Course for Film and Video by Tom Schroeppel, forunderstandingwhatacameraactuallyis.
4. HollywoodCameraWork,whichisanamazingresourceoftutorialsandincludesanexhaustivesetoftutorialsonwheretoputthecameraandhowtoactuallymoveit.Seethecompaniondataandthewebsite(www.hollywoodcamerawork.us) formoreinformation.
Ofcourse,readingbookssuchasthesehelpstofloatglossaryterms,rules,thingstoavoid,thingstoremember,andthelikeinyourheadduringthecreationprocess.However,youthenneedtohavehands-ontimeinordertoputtheseideasintopracticeanddevelopthemintoarealityandnotjustanabstractidea.Sobeforewecontinueontotechniquesandmethodsthatarebeingtaughtawayfromthelargercontextofafullstory,pleaseremembertoutilizetheIntensityChartfromFigure6.3andheedBlock’steachingswhenyouapplythesemethodstoyourstory.Donotsimplyapplytutorialknowledgetoyourfilmswithoutunderstandingthewholeofit.Imeanit,orI’llhavetostartlecturingtoyouontheneuroscienceofitall.Don’tmakemedoit.
DigDeeper
Ifyouwishtounderstandhowtheaudience’sbrainisworkingasviewerswatchyourfilmandhowtousethatinformationtoyouradvantagewhentryingtoelicitemotionalresponsesout of the audience, read Synaptic Self: How Our Brains Become Who We Are by JosephLeDouxandviewthenumerousvideosouttherethatfocusonthistopic,eventhoseshownonYouTube.

SpaceandCameraMoves
Fourtypesofspacescanbecreatedinyourfilm’sworld.
1. Flatspace2. Limitedspace3. Deepspace4. Ambiguousspace
Wecreate theseworldsandcontrol thembyourplacementandmovementof charactersandcamerasinrelationshiptooneanother.Thefollowingisabriefoverviewofafewofthesubcomponentsofspace.Ofcourse,refertoBruceBlock’sbookforacompleteunderstanding.
Any of these spaces can be created in anymedium. However, somemedia traditionallyhavelentthemselvestocertainspecialrelationships.
FlatSpace
Characterplacement.Onthesameverticalplane,similarsize,moveparalleltothecamera.Cameramovement.Paralleltothecharacters,pan,tilt,zoom.Parallaxbetweenlevels.None.
The visible symptoms or subcomponents of a flat-space shot can be seen in how thecharacters are placed andmove, how the cameramoves, and how little parallax is shownbetween the elements. Basically, all depth cues are removed from a flat-space scene.Characterscanbeplacedonthesameverticalplaneandbeshownatsimilarsizes.Iftherearebigandsmallcharacters,theirsizedifferencecanbeminimizedbyseatingthemorshowingclose-ups of the characters and not showing them standing next to one another. If thecharactersmoveatall, theyshouldmove in frontof thecameraandnever toward it. If thecameramoves, it shouldmove parallel with the characters so that they stay a similar sizethroughouttheshot.
ThinkaboutCharlieBrown foramoment,ashewalksdown the sidewalk into the frontdoorofhishouse,outthebackdoorofhishouse,andapproachesthedoghouseuponwhichSnoopysleeps.Ifyouhaveseenthecomicsorthetelevisioncartoonshows,youhaveseenanexampleofabsoluteflatspace.Thecharacters,inaddition,arealljustaboutthesamesizejusttoaddtotheflatness.ItisthestyleofPeanuts.ThisstyleisallowedtobebrokenmostlywhenSnoopyfightstheRedBaron.Okay,that’sanoldreference.Let’slookatsomethingthatisin

thesamerealmbutmoremodern:CalvinandHobbes.Yes,thatseriesprobablyneverwillbeanimated,yetasimilarideacanbefoundinthosecomicstrips.
In fact, 2D animation is easiest when created in a flat space. It is the perspective andparallax ofmovements thatmake itmore difficult to draw.On the other hand, it ismorechallenging,yet rewarding, tomake3Dworlds into flat space.This canbedonebypayingcarefulattentiontotheplacementofcharactersandthemovementofthecameraaswellasapplyingamindfulusageoftonalseparationandtexturaldiffusion.(Youknowwheretogotoreadmoreaboutthat.)
Cameramovements fora flat space shotarepans, tilts, andzooms.Basically, thecameradoesnotmove.Thiskeepstheparallaxofelementsdowntoaminimum.Thisisaneasyspacetoachievebylockingthecameraandcharactersinonepositionor,iftheymove,movingthemtogether.Ifitissoeasy,whyisitnotdonein3Dveryoften?Becauseitisalsojustaseasytofly that camera around for no reason whatsoever. Remember, youmust have a reason tomovethecameraandavisualruletodescribewhyyouarechoosingtopaninsteadoftrack,orzoominsteadofdolly.
Pan
Topanacameraistostandinoneplaceandbasicallypivotthecameraonitsstandfromonesidetotheother,usuallytofollowacharacter.AsFigure6.4illustrates,whenyoupantheforegroundelementsandbackgroundelements,moveacrossthescreenatthesamerate.Howfar apart are the foreground and background levels?You do not know, because the specialclueshavebeen removed.Note inFigure6.4 that the distance between the branch and theboy’sheadneverchanges.
FIGURE6.4Camerapan
Tilt
Tilt is similar topan in that thecamera isheldstillandpivotson its stand.Fora tilt, the

cameratiltsupordowntofollowanobject.Usuallysomethingmotivatesthecameratomove.Thattopicisbeyondthecontextofthisbook;pity.Tilting,likepanning,movesforegroundandbackgroundelementsupanddownthescreenatthesamerate.NoteinFigure6.5,aswasthecaseinFigure6.4,thatthedistancebetweenthebranchandtheboy’sheadneverchanges.
FIGURE6.5Cameratilt
Zoom
Theactofzoomingisdonebyapushofabuttonoratwistofa lenstochangethefocaldistance. (InMaya, this is the focal length.)Thisaction scalesall characters, foregroundandbackground,atthesamerate.
FIGURE6.6Camerazoom
Ifyouaren’tquitesureaboutwhata3Dworldwouldbelikeinflatspace,thinkaboutyourgrandfather holding the video camera. Not all grandfathers, butmany, do notmovemuchwhentheyholdthevideocamera.Theystandinoneplacewatchingthesoccergame.Theypanthecamerafromlefttorightacrossthefield,tiltthecamerauptowatchtheballasitfliesintotheair,andusethezoomtogainacloserlookattheirprizegrandsonplayingdefense.Aslongasthesoccerplayersrunacrossthefieldanddonotruntowardthegrandfather,youhaveanexampleofflatspace.
Before continuing, please note that flat space does notmean that youmust use the 2Dmedium.The samespacecanbecreated in3Dor liveaction.Studentswhoarenew to theconceptofdefiningspacesometimesconfusemediumwithspatialrelationships.
In the hands-on section,wewill take a 3Dworld and compress it to create a flat-spacescene thathasbeen inspiredby theCoenbrothersbeing inspiredbyBusbyBerkeley inTheBigLebowski.
LimitedSpace
Thefollowingisalistofcommonattributesfoundinlimitedspace:
Characterplacement.Ondistinctiveforeground,midground,backgroundplanesCameramovement.Track,multiplaneParallaxbetweenlevels.Parallelparallax
Thevisible symptomsor subcomponents of limited space are seen inhow the charactersandelementsareplacedinrelationshiptooneanotherinfrontofthecamera.Theirplacementis typically in distinct levels that will show off the distance between them as seen by thecamera. You can think of these levels as a foreground,midground, and background. Theremaybemore levels than this inactuality,but theyare stillusuallygroupedpsychologicallyinto a foreground, midground, and background area. Character movements usually staywithintheirgivenlevelwithlimitedinteractionbackandfortharoundotherelementsintheirlevel.Inthepurestversionoflimitedspace,thereisnoZ-depthmovementofthecharactersorelements. The camera does not move toward the characters and elements, nor should thecharactersandelementscometowardthecamera.Theyarelockedintotheirhorizontallevel.Perspectiveisgenerallystillsquashedasmuchaspossibleandvanishingpointsarehiddeninthislinear-spaceworld.
Cameramovementinalimited-spaceworldistrackingthecamerafromsidetosidetogivethe depth cue of parallax between the levels. An example that you can look up onwatchthetitles.com is Teeth of the Night. These titles use limited space and multiplanesthroughoutthesequence.
Track
Totrackistopickthecameraupandmoveithorizontallyinfrontofthelevelsor,inversely,topickupthelevelsofartworkandmovethemunderneaththecamera,dependingonhowyouarecompositingyourshot.Theobjectistoshowofftheparallaxofmovementbetweenthecharacters.Todothatyoumustunderstandthenextconcept:multiplane.InFigure6.7thecamera is moved left in front of the characters. The characters that are farther from the

cameramoveacrossthescreenatadifferentratethanthecharacterclosertothecamera.
FIGURE6.7Trackshot
Multiplane
Multiplaneisnotreallyacameramove—it is thenameofacameradesignedintheearly1930sandperfectedbytheWaltDisneyStudio.Nowthetermisusedasaverb,meaningtosetartwork up in such a way as to show the parallax between levels. This was originallyaccomplishedbyusing themultiplanecamera,whichallowedartists tostackupglassplatesandmovethematvaryingspeedstosimulateparallaxofmovementfromlefttorightunderthe camera. Themain idea is that the artwork is set up at different depths away from thecameraandallof theelementsmoveatvaryingratios in relation tooneanother todisplayparallax.
FIGURE6.8Multiplanesina3Dspace
Youareprobablymostschooledinlimited-spacesetups.Thisisthetraditionalsetupfor2Danimation. Foreground elements, background elements, and characters are set up into theirindividualplanes.Tobreakawayfromtheflatspacethatcomeswithbasicanimationsetups,tools such asmultiplane cameraswere created to helpmove the planes in relation to oneanother, causing parallax between levels. This was the case with many of the 2D featureanimationfilms.Rememberthatjustbecausesomethingisin3Ddoesnotmeanthatithastobeindeepspace.Youcansetupalimited-spaceshotin3Dandliveactionaswell.Thinkofatheaterstageandthedifferentflyareasinthatstage. (Ifyou’veever lookedatthedifferentlevelsofcurtainsonalargerstageandseenthattheyhide,youhaveseentheflyareas.)Earlymusicalsandearlyfilmswerevaudevilleplaysthathadacamerasetdownintheaudience’sseat.Thosefilmsweremostcommonlyin limitedspace.Thiscanstillbeseeninthetheatertoday.Whyuseitin3D?AsBlockhassuggested,itisagoodwaytoemphasizetheemotionalcenterofyourfilm.Ifyoukeepyourcharactersjailedinlimitedspaceandthenfinallyreleasethem into deep space at a strategic point, the emotional impactwill be all the greater. Toemphasize this point, I like to showmy students Chapter 16 fromLittleMiss Sunshine, inwhichthebrothercharacter,whohasbeenheldinlimitedspaceforaverylongtime,learnsheiscolor-blindandfinallyescapesintodeepspace.Checkitout—itisverypowerful.
Inthehands-onsection,wewillcreateatraditionalmultiplanesceneusingsomewonderfulimageryfromaSCADstudent’spuppettheater.Becauseyouarenotinmyclassroom,Iwon’tbeabletoplayasongfrommyfavoritemusicaltoinspireyou.It’sashame.“Littleshop,littleshopofhorrors.”
DeepSpace
Thefollowingisalistofcommonattributesfoundindeepspace:
Characterplacement.Exaggeratesizedifference,movetowardthecameraCamera movement. Truck, dolly, boom, and other free movements of the camera
(Steadicam,wiretrack,helicopter,etc.)Parallaxbetweenlevels.Showingperspective,hasvanishingpoint
Deep space is the most modern of world spaces. Most advances in camera usage havepushed this specific type of space. Even in animation, itwasn’t long before the jump frommultiplanelimited-spacescenesetupsbecamedeepspace,justbymovingthecameratowardtheartworkandaddingZ-depth.Compositingsoftwarepackageswerecreatedthatallowed

for thesemultiplane-type shots to have unlimited numbers of layers and tomove beyondparallelparallax,andtheyaddedtheabilityforthecameratomoveinZ-depththroughtheflatlevelseasily.Z-depthcameramovesarethedefinitionofdeepspace,obviously.
Charactersinadeep-spaceshotareplacedtoexaggeratethesizedifference,anddynamiccompositionscanbecreated.Theyarefreetomovetowardthecameraandthecameraisfreetomovetowardthem.Whenusing3D,itiseasiertocreatedeepspacethananyothertypeofspace.
Anexamplethatyoucanlookuponwatchthetitles.comisGruesomeSchoolTrip.Thoughthetitlesare2Dflatplanes,deepspaceisappliedtothem.
Track
Fordeepspace,thecameracantrack,ormovefromlefttoright.Thedifferencebetweenatrackinlimitedspaceandoneindeepspaceistheexploitationofperspective.Limited-spaceshotsdonothavevanishingpointsorusethree-pointperspective,whereasdeepspaceshotsdo.
Dolly/Truck
To dolly is to pick the camera up and move it toward the characters. As a result, thecharactersvisiblyscaleatdifferentrates.Theoppositeofthisisazoom(seethesectiononflatspace),inwhichthecharactersscaleatthesamerate.InFigure6.9theboycharacterscalesupataslightlydifferentratethanthebackgroundelements.
FIGURE6.9Dollycameramove
Boom
A boom is an interesting camera move. The camera is physically moved up or down.Sometimesitiscombinedwithapanorpivot,wherethecamerapivotsonitsmovingstandto

continually face the character. This changes the perspective planes of the character, and allcharactersinviewmoveatdifferentrates(parallax).InFigure6.10theboymovesoutoftheframemorequicklythanthebackgroundelementsdo.
FIGURE6.10Boomcameramove
MultiplanewithPerspective
If you take the concept ofmultiplane and add forced perspective onto the actual planesthemselves,youcreateaworldwithdeeperspace.Thisisamethodthathasbeenexploredin2D/3D animation. It is achieved by taking what would normally be limited space, withdifferent levels placed in Z-depth, then adding dimension to the planes to augment theparallaxintheimagesthemselvesasthecameramovesthroughtheplanes.Somemightthinkthis is a conceptnovel toanimation;however, similar conceptshavebeenused foryears intheaterstagedesign,live-actionsetdesign,andstop-motionstagedesign.
This type of deep-spacemultiplanewithperspectivewasused throughoutMulan, Lilo&Stitch,PrinceofEgypt,andmanyotherfilms.Many“making-of”specialsfoundonDVDswillshowyouhowtheseshotswereputtogether.Youwillhavetouseyourwell-developedeyetosortoutmoremodernexamplesof2D/3Dmultiplanewithperspectiveusages,becausemostof theseare found in short films.Some filmmakers,however,arekindenough topost theirmaking-ofvideosontheirwebsites.Forexample,takealookatthefabulous2D/3DfilmtitledLeBuildinganditsmaking-ofvideoatwww.le-building.com.

FIGURE6.11Multiplanewithaddedperspective,byJenniferChandler,2008,2D/3Dcompositingcourse,SCAD
Fly-ThroughandHelicopter
We’llbrieflydiscussothertypesofcameramovesthatexploittheworldinallaxes.Therearemanywaystomovethecamerafreelyaboutthegravity-lessworldofacompositoror3DCartesianset.Afly-throughisonewayofexploringthesetandisgenerallywhat itsoundslike.Thecamerafliesthroughtheset,revealingpartsoftheenvironment.Agreatexampleofa2D/3Dfly-throughisinthevineskateboardingsequencesofTarzan.Here,thefleet-footedTarzan leads the camera as he barefoot-skates through the vines of the jungle. The cameramovesallthroughouttheenvironmentasthis2Dcharactermovesthroughthe3Dvines.
A helicopter shot is one where the camera revolves around the character in a circle,sometimesforthewhole360degrees.Thefocalpointofthecamera’smovementremainsthecharacterformostorallofthescene.Youhaveseenthisshotinhundredsoffilms.InBrotherBear,forinstance,thereisasequencewhereKodaandKenaiaresittingonarockbluff.KenaiisabouttobreakthenewstoKodaaboutthetruereasonforhismother’sdemise.Thecamerastarts behind the bears andwheels around them.They are drawn in 2D and placed onto abackground,whichinmymemoryisa3Drock.Youcanalsoseeagreathelicopter/360-degreeshotofthehorseinDreamworks’Spirit,StallionoftheCimarron,andevenagoodshowingof

the3D/2Dinthemaking-offeatureontheDVD.Thatexampleisabsolutelyseamless.
FIGURE6.12A360-degreeshotorhelicoptercameramove
Movingacameraaroundina3Dworldiseasyandeasilyabused.Inthischapterwewilllearnhow to push a deep-space shot usingmultiplemedia and adding perspective towhatwouldtraditionallybeaflatplane.
AmbiguousSpace
Thefollowingisalistofcommonattributesfoundinambiguousspace:
Character placement. Anything to make the subject unidentifiable or to unsettle theaudience
Camera movement. Anything to unsteady the audience: upside-down shots, reverserelationshiptocharactermovement
Parallaxbetweenlevels.Anythingtocreateaspacethatisoffkilterorindefinable
Ambiguous space is often used or abused in horror films. It is hard to give it any otheremotional center than that of confusing the audience, as it ismainly defined as a space inwhichtheviewersdonotknowwhattheyarelookingatorwheretheyare.Maintainascenelike this for too long,and theaudiencewill lose interest.Use it sparingly,andyou instantlyincreasethevisualintensity.

There are varying degrees of ambiguous space, however.We’ll put the zolly shot in thecategory of ambiguous space, because it ismeant to be off-putting to the audience. It is acameramovethathasareverserelationshiptothecharacter’smovement.Azollyisazoomandadollycombined.Youhaveseenitused,surely.Popquizwithextracreditforthosewhocannamethepersonwhofirstcreatedthezollycameramoveandwhatfamousshotwasitusedfor.Topushtheshot,youcanalsomovethecharacterawayfromthecameraatthesametimethecameramovesinandzoomsin.You’llnoteinFigure6.13thattheboyscalestowardthecamerawhilethebackgroundelementsstayrelativelythesamesize.
FIGURE6.13Zollyexample
All of the normal things towatch out for exist here: stylematching, frame rate, timing,imagesizes,andregistration.RememberwhatwelearnedinChapter2?Showcontactpointsjudiciously, focuson those that furtheryouremotional focus, andhideeverythingelse.Feetcontactpointsareusuallynothighlyemotional, justgravityatwork, so theycanbehiddenmostofthetimetoavoidgivingawayanybadcompositing.Ifyourcharactersaresittingandthecameramoveisahelicoptershot,hidethepointwheretheyareseatedontheground.Putabushinfrontofthem,anotherrock,something.Thattypeofcontactpointbetween2Dand3D is one of the hardest to keep from giving itself away. Again, where buttock contactsgroundisnothighlyemotional, justweight.Savethestressofgettingcontactpointsperfectfor the moments that support the emotional center of your shot. Now, if the buttockcontactingthegroundisamazinglyintricatetothestorybeingtold,becausethecharacter’slifewasjustsavedbyawedgedrockandthecameramovesaroundinasweepingarctoshowthegravityofthesituation,thenyes,showthatcontactpoint.
Hands-OnExamples
Four examples will be used: example art will be used to walk you through usingcompositingpackagestocreateaflatspace,limited-spaceshot,deep-spaceshot,andaforced-perspectiveshot.

Flatspace.Inthehands-onsection,wewilltakea3Dworldandcompressittocreateaflat-spacescenethathasbeeninspiredbytheCoenbrothersbeinginspiredbyBusbyBerkeleyinTheBigLebowski.
Limitedspace.Inthehands-onsection,wewillcreateatraditionalmultiplanesceneusingsomewonderfulimageryfromaSCADstudent’spuppettheater.
Deepspace.Wewilltakealookinthischapterathowtopushadeep-spaceshotusingmultiplemediaandaddingperspectivetowhatwouldtraditionallybeaflatplane.
Occasionally, students inmy class confuse the idea ofmediumwith camera space. Theythinkthatflatspacemustbedonein2Danddeepspacemustmean3D.Justtoprovethepointthatitiscameraspacewearedealingwithandthatdeepspacecanbecreatedwith2Dandflatspacecanbecreatedwith3D,wewilldojustthatinourhands-onexamples.
FlatSpace
The files for this hands-on project can be found in the companion data. The files are asfollows:
Maya_Files/FlatSpace_HatPinLadies.mbMayafilewithanimatedobjectsMaya_Files/2psdtexturesImage_Sequence/pinGirls.[1–80].tga
IfyouopentheFlatSpace_HatPinLadies.mb file inMaya,youwillseethattwocamerasaresetupforthescene.Theperspcameraissetupfortheflat-spaceshot.Thepersp1cameraissetupforadeeper-spaceshot.Let’slookatwhatmakesthissceneflatspace.

FIGURE6.14Af lat-spaceshot
The points to remember when creating a flat-space shot can be broken down into thefollowingelements:
1. Camera:placement,lens,andmovement2. Lighting3. Texture
Inthisproject,youwillnotethatthecamerahasbeenplacedlookingdowndirectlyatthecharacters. There are no perspective lines, and horizon lines are hidden orminimized. Thecamera lens is an important aspect when planning a flat-space shot. In Maya, the focaldistanceiswhatyouwouldadjusttogetanarroworwiderlens.Atelephotolensissimulatedby having a large focal distance. A wide-angle lens is simulated by having a small focaldistance.Youhaveprobablylearnedsomethingaboutcamerasandknowthatawider-anglelensexaggeratesyourperspectiveandbasicallycreatesadeeperspaceinyourshot,whereasatelephotolenscompressesspaceandminimizestheperspectiveshiftinyourshot.
In Figure 6.15 the original persp camera is looking down at the characters. The focaldistance is a very large 197. In Figure 6.16 the second camera in the scene, persp1, is in asimilar position, looking down at the characters, but this camera has a focal distance of anincredibly small 9. You can see the difference in the exaggerated perspective lines of the

characters.
FIGURE6.15Camerawithfocallengthof197
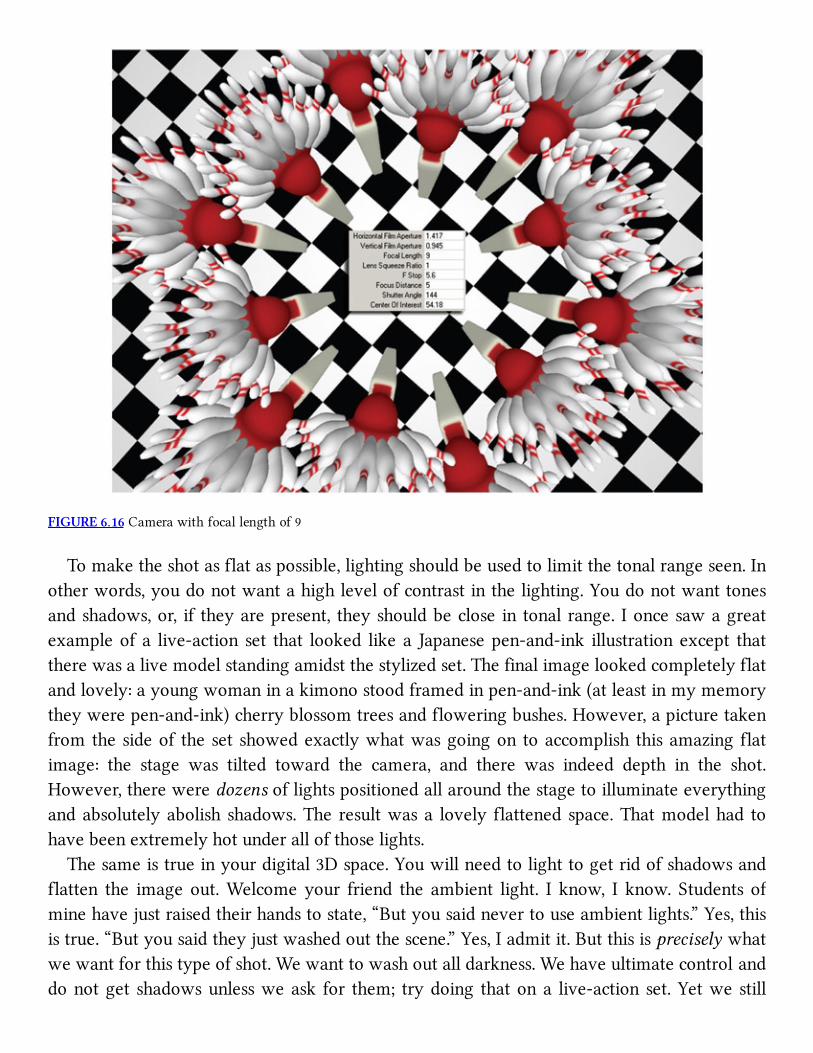
FIGURE6.16Camerawithfocallengthof9
Tomaketheshotasflataspossible,lightingshouldbeusedtolimitthetonalrangeseen.Inotherwords,youdonotwantahighlevelofcontrastinthelighting.Youdonotwanttonesandshadows,or, if theyarepresent, theyshouldbeclose intonalrange. Ioncesawagreatexampleofa live-action set that looked likea Japanesepen-and-ink illustrationexcept thattherewasalivemodelstandingamidstthestylizedset.Thefinalimagelookedcompletelyflatandlovely:ayoungwomaninakimonostoodframedinpen-and-ink(atleastinmymemorytheywerepen-and-ink)cherryblossomtreesandfloweringbushes.However,apicturetakenfromthesideof theset showedexactlywhatwasgoingon toaccomplish thisamazing flatimage: the stage was tilted toward the camera, and there was indeed depth in the shot.However,thereweredozensoflightspositionedallaroundthestagetoilluminateeverythingandabsolutelyabolish shadows.The resultwasa lovely flattenedspace.Thatmodelhad tohavebeenextremelyhotunderallofthoselights.
Thesameistrueinyourdigital3Dspace.Youwillneedtolighttogetridofshadowsandflatten the image out.Welcomeyour friend the ambient light. I know, I know. Students ofminehavejustraisedtheirhandstostate,“Butyousaidnevertouseambientlights.”Yes,thisistrue.“Butyousaidtheyjustwashedoutthescene.”Yes,Iadmitit.Butthisispreciselywhatwewantforthistypeofshot.Wewanttowashoutalldarkness.Wehaveultimatecontrolanddonotget shadowsunlessweask for them; trydoing thatona live-action set.Yetwestill

needtomakesurethatthedarkerareasonanobject’smaterialsareminimized.Ambientlightwillhelpwiththis.
FIGURE6.17Ambientlightaddedtothescenetof lattenoutthelighting
Forthematerialandtextureaspectofflatteningyourscene,thefirstideaisthatthelevelsoftexturedetailshouldbethesamethroughouttheimage.Iftextureslosedetailastheyfadeinthedistance,thisisadepthcueandstartstodeepenthespace.Youmightbecomeannoyedwithanydarknessinthematerialcolor.Ifyouarenotusingtoonshading(whichwerealizedoesnotreacttolightandflattensthe3Dcharacter),youcanadjusttheambientcolorinthematerial.Let’sdothistogether:
1. OpentheMayafilefromthecompaniondata:FlatSpace_HatPinLadies.mb.2. Open theHypershade window either by clicking the button on the toolbar or by
goingtoWindow>RenderingEditors>Hypershade.3. Locate the PinMaterial. Middle-mouse-drag it into the Work Area tab of the
Hypershade. With that node selected, click the Input and Output Connectionsbutton. Thiswill display the textures that are connected to thematerial node. Youwill see that aPhotoshop file is being read into for the specular channel and colorchannel.

FIGURE6.18Seeingtheinputconnectionstothematerialnode
4. In the fold-down tab menus on the left of the Hypershade window, locate theUtilities fold-down tab.Click theBlendColorsnode.Thiswill addablendcolorsnodetoyourhypershadeworkarea.

FIGURE6.19Addingablendcolorsnode
Wewanttoaddthecolortexturetotheambientchannel.However,ifweadditstraightin,itwillcompletelywashoutany3Dshading.Thatmightnotbewhatyouwant.Let’slookatthatpossibilityfirstbeforewecontinuewithhowwe’lldoitinthistutorial.
Aneasywaytohookupthetexturedirectlytotheambientchannelistodouble-clickonthePinMaterialnode.ThisshouldopentheAttributeEditorforthePinMaterial.
Then middle-mouse-drag the color texture on top of the Ambient color chip in theAttribute Editor. You will see the connection is automatically made in the Hypershadewindow’sworkarea.Figure6.20presentsanexampleof thisconnection.The imagesat thetop of the figure show what the material looked like before the addition of the ambienttextureandafterward.Youcanseethattheshadingiscompletelyflat,maybetooflatforourneeds.

FIGURE6.20Addingthecolortexturedirectlytotheambientcolor
Insteadwewillcarryonwithourmethod.Whatwewanttodoisusethesamecolorasthetexturebutknockitbackabit.Instep4wecreatedablendcolorsnode.We’lluseitnow.
5.ClicktheBlendColorsnodesothatitopensintheAttributeEditor.Middle-mouse-dragtheColortexturetotheBlendColorsnode’sColor1colorchip.
6.AddagraycolortotheBlendColorsnode’sColor2colorchip.
FIGURE6.21AddingcolortexturetotheBlendColorsnode
7.Clickon thePinMaterial so that it appears in theAttributeEditor.Middle-mouse-drag theBlendColorsnode to theAmbient color chip in theAttributeEditor.TheconnectionwillupdateintheHypershade’sWorkAreatab.TheimagepreviewoftheAttributeEditorshowsasmallamountofshadingbutnotalot.

FIGURE6.22ConnectingtheBlendShapenodetotheambientcolor
8. Click on theBlendColors node and adjust theBlender attribute in the AttributeEditor.Avalue of 0will give an ambient color of gray (orwhateverColor 2 is).Avalueof1willgivethetextureastheambientcolor.Anythinginbetweenisamixtureofthetwo.
Figure 6.23 presents four material previews. The one in the top left is the originalanisotropicmaterial thatwe startedwith.Theone in the top right iswith thecolor textureuseddirectlyas theambientcolor; itgaveacompletely flat look.Thebottomchipsuse theBlendColors node to blend between the color texture and a gray color. This allows someshadingbutstillkeepstherenderlookingflat.

FIGURE6.23Materialswithandwithoutambientcolor
ThefinalprojectforthistutorialissavedinafilenamedFlatSpace_HatPinLadies_v2.mb.Inthisfile,asimilarBlendColorsnodetechniquehasbeenappliedtotheladiesaswell.

FIGURE6.24Flatspacescenewithf latlighting
LimitedSpace
Limitedspaceiswhatyouexperienceintheaterandin2Danimation.Mostequatethistypeof spacewithmultiplane setups,where the backgroundmoves at a different rate from themiddle ground, which moves at a different rate than the foreground. The levels can haveparallaxofmovement,buttomaintainlimitedspaceandnotbecomedeepspace,thereshouldbenomovementtowardthecamera.
Thepointstorememberwhencreatingalimited-spaceshotcanbebrokendownintothefollowingelements:
ArtworkplacementinrelationtothecameraMovementoftheartworkparalleltothecameraMovementofthecameraparalleltotheartwork

Thefilesforthesehands-onprojectscanbefoundinthecompaniondata.Thefilesareasfollows:
FIGURE6.25Themainunder-the-sealevels
FIGURE6.26CharacteronebyYossayaAisiri,2008,SCAD
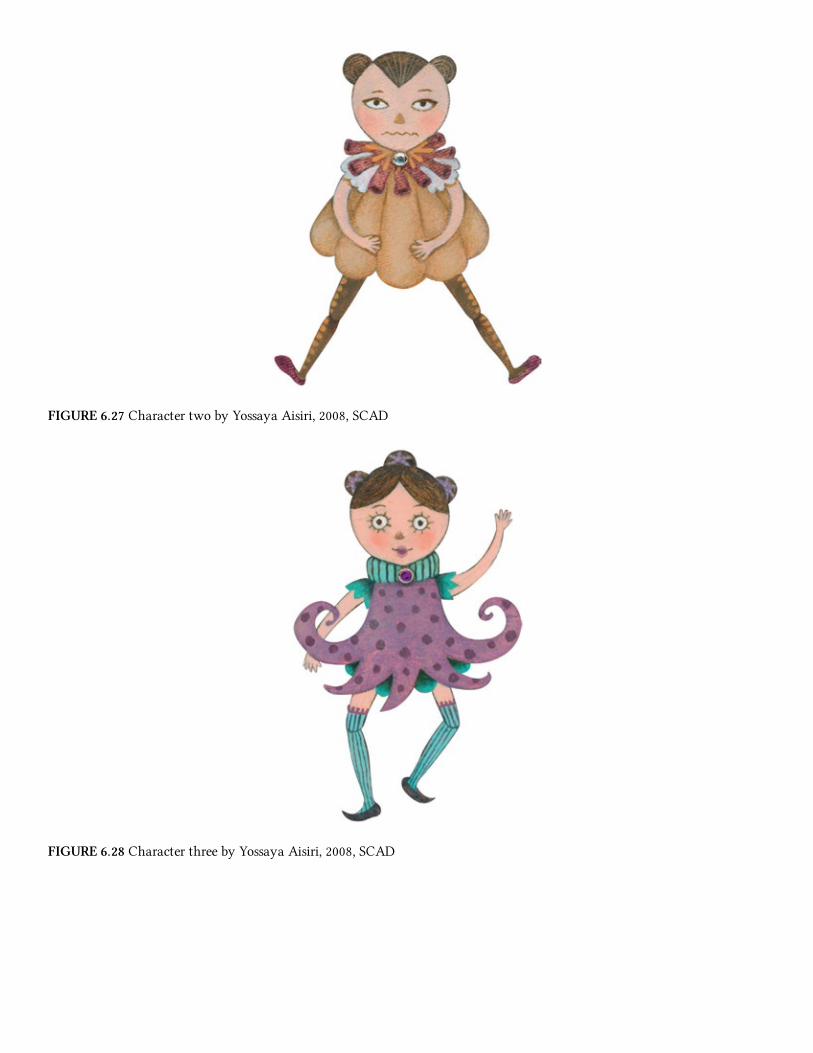
FIGURE6.27CharactertwobyYossayaAisiri,2008,SCAD
FIGURE6.28CharacterthreebyYossayaAisiri,2008,SCAD

FIGURE6.29CharacterfourbyYossayaAisiri,2008,SCAD
FIGURE6.30CharacterfivebyYossayaAisiri,2008,SCAD
Wewillusethe3DcamerainAfterEffectstosetuptheartworkintovaryingdepths,thenwewillmove the camera to show parallax between the levels: a basicmultiplane cameramove.Youcanaccomplishthismoveinsoftwarethatdoesnothavemultiplaningcapabilitiesbymovingtheartworkatdifferentrates.WewillalsorecreatethisshotinFlashtoshowthattechnique.Onceyouseethetwomostcommonmethodsforaccomplishingthistypeofshot,you shouldbe able to re-create it in any software.Oh,we’ll go ahead and tryourhandatToonBoomtoo,whilewe’reintheneighborhood.

UsingaCompositingSystem’s3DCamera
Nuke,AfterEffects, ToonBoom, Smoke, andmanyproprietary software packages that Ihaveworkedonhaveimplementedsometypeof3Dcamerathatfiguresoutthedepthoftheartworkinrelationshiptothecamerawheneitherismoved.MostofthesystemsIhaveseenhavebeen extremely similar.Theonlydifference in the proprietary software packages thatdoes not show up in off-the-shelf software is the capability to set the artwork scalerelationshipsothatwhenapieceofartworkismovedbackindepth,itautomaticallyscalestovisibly stay in the same scale relationship to theotherdrawings. I’ll betwe could comeupwithanAfterEffectsexpressiontodothat.Extracredit,anyone?
Ourfirstexampleusesanormal3DcameraformultiplanesetupsinAfterEffects.InversionCS3ofAfterEffectsorlater,youareabletobringinPhotoshopfilesandmaintainthelayers.Thisisanextremelyusefulfeature.Ofcourse,ifyourproductionpipelineneeds.tiffilesortga,youcanstillusethoseindividually.UsingapsdfileallowsustocreatethelevelsinPhotoshop,see therelationshipof the layers in theircomposition,andsave themall inone file forsafetransportation.Itisuptoyouwhatyourpipelineneeds.Forthisexample,ourPhotoshopfileisastaticimage.Thereisnoanimationinthesefiles.
Asanaside,thisisonlyonemethodforworkingonprojectsthatusebothAfterEffectsandPhotoshop, and as youhave noticed, this text is not the end-all/be-all text on how to clickevery single button in these software packages. After Effects, Smoke, Nuke, Photoshop,Illustrator,Flash,CorelDraw,ToonBoom,andanyotherpackageswemighthavetouchedonare huge software packages.With hope, this text has been a great “getting your toeswet”opportunity,andyouwillbefearlessinpickingupsomegreattextsthatexplorethepackagesindepth.Thereareevensomegreatconceptsinthehelpdocumentation,andifyoureadthedocumentationyouwillnote thatAdobehassomewonderfulonlinevideotutorialsaswell.How’sthatforinformationwhenyouneedit?Forexample,hereisagreatvideotowatchformore information on using Photoshop and After Effects together:www.adobe.com/go/vid0252. This link can be found in the help documentation alongwithmanyothers.
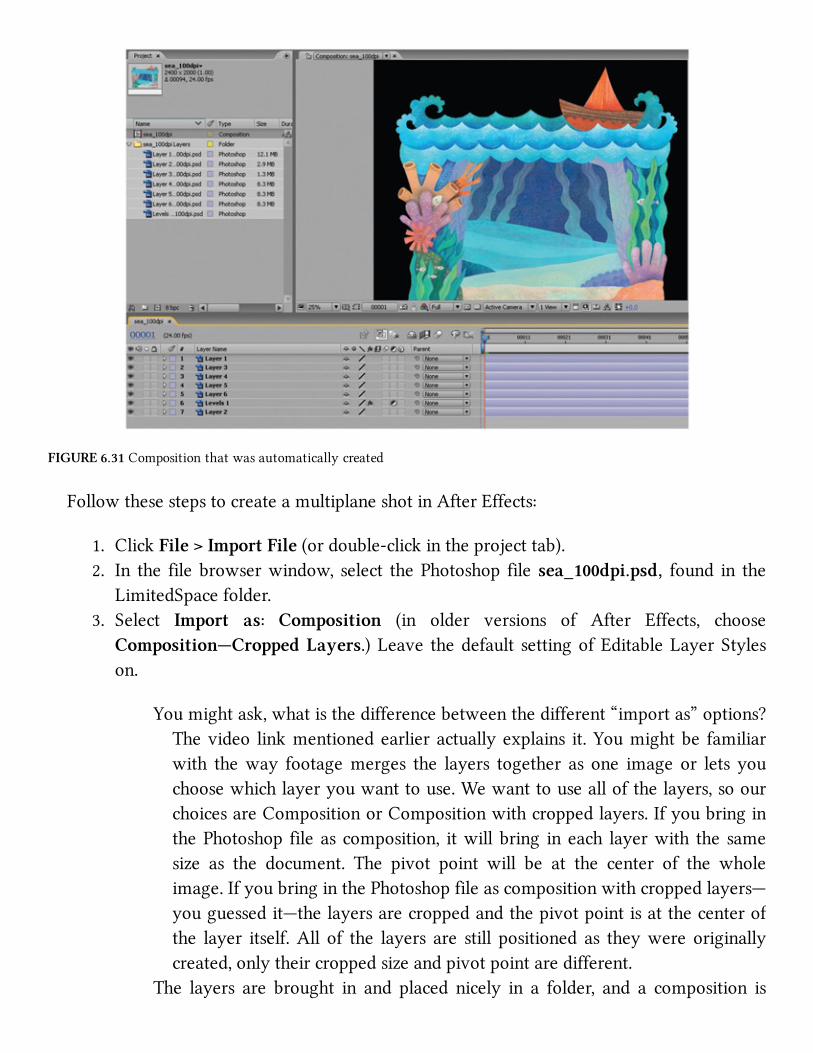
FIGURE6.31Compositionthatwasautomaticallycreated
FollowthesestepstocreateamultiplaneshotinAfterEffects:
1. ClickFile>ImportFile(ordouble-clickintheprojecttab).2. In the filebrowserwindow, select thePhotoshop filesea_100dpi.psd, found in the
LimitedSpacefolder.3. Select Import as: Composition (in older versions of After Effects, choose
Composition—CroppedLayers.)Leave thedefault settingofEditableLayerStyleson.
Youmightask,whatisthedifferencebetweenthedifferent“importas”options?Thevideo linkmentionedearlieractuallyexplains it.Youmightbe familiarwith theway footagemerges the layers together as one image or lets youchoosewhichlayeryouwanttouse.Wewanttouseallofthelayers,soourchoicesareCompositionorCompositionwithcroppedlayers.IfyoubringinthePhotoshop fileas composition, itwillbring ineach layerwith the samesize as the document. The pivot point will be at the center of the wholeimage.IfyoubringinthePhotoshopfileascompositionwithcroppedlayers—youguessedit—thelayersarecroppedandthepivotpointisatthecenterofthe layer itself.All of the layers are still positioned as theywere originallycreated,onlytheircroppedsizeandpivotpointaredifferent.
The layers are brought in and placed nicely in a folder, and a composition is

automaticallycreated.Thatsavedmanybuttonclicks,didn’tit?Anythingthatsavesaclickortwoisgreat!Thoseclicksanddragsadduptoprecioustimesaved.
4. Double-clickonthecompositiontitledsea_100dpitoseethelayerstogether.5. Tohelp rememberwhat layer iswhat, takeamoment to rename the layers in the
composition.Clickonthelayersothatithighlights,andhitEnteronthekeyboardtorenamethelayers.
6. Toplacetheselayersindepth,wewillneedtoturnonthe3Dicon.Itislocatedonthelayeritselfandlookslikeacube.Clickeachlayeron.
7. Right-click in the Composition tab and selectNew >Camera. For this hands-onproject,wewillusethedefaultcamera.Feelfreetoexperimentonyourownforthechapterassignment.ClickOK inthecameraoptionswindow.Youwillnoticethatacamera has been added to your composition. It doesn’t matter where it is in thetimeline.Iprefertohavethecameraatthetopofthetimelineforeasyaccess.
8. Tomakeiteasiertoseewhatyourcameraisseeingandwheretheartworkisinfrontofthecamera,changeyourviewporttohavetwoviews.Havetheleftviewshowatoporthographicviewbyclickingonceintheleftportandmakingittheactiveport(youwill seeyellowtrianglesateachcorner).Thenchangetheviewdrop-downtotop.Havetherightviewshowwhatthecameraisseeingbyclickingonceintherightport,making it theactiveport.Thenchange theviewdrop-downtobeCamera 1.SeeFigure6.32foranexample.

FIGURE6.32Settingupatwo-viewpanelwithtopandCamera1views
Youcan reposition the image in theviewportsbyusing thespacebar and click (pan) orzoominginandoutwiththemouse’smiddlerollerball(shouldyouhaveone)orusingthehotkeyz(zoomin)alt+z(zoomout).
Next,youwillwanttopositiontheartworkinfrontofthecamera.We have turned each layer into a 3D layer. This has added another dimension to the
transformattributes.WecannowsimplymovethembackinZ-depth:
1. Selecteachlayer,andlocatethePositionattributes.(Youcanshowjustthepositionattributeswiththehotkeyp.)StartbymovingthebglayerbackinZawayfromthecamera.YoucandragontheZattributewithyourmousebutton,orinthepreviewwindow,clickanddragontheZtranslatemanipulator.
Youwill notice that thebackground layer looks smallernow that it ismovedbackinspace.Perhapsonthewebsitewe’llhaveaspecialtrickonhowtoputin an expression tohookup scale to theZposition so that it automaticallyscales.Fornow,followthisstep.
2. ScalethebglayersothatitmatchesvisuallythesizeoftheotherlayerswhenviewedthroughCamera1.Youcanshowjustthescalingattributeswiththehotkeys.Inourexample, the bg image was moved back to about 4000 in Z, and the scale wasadjustedto200.
3. Repeatforthenextlayer.Thereedslayer,forexample,hasbeenmovedinZto3500andscaledto190. Inthecompaniondata,youcanseeanimageinwhichthereedslayerisalittlebitinfrontofthebackgroundlayerbutstillvisiblythesamesizewhenseen through the camera. You’ll note that the position and scale attributes are theonlyattributesvisible.Youcanachieve this effectbyusing thehotkeyp and thenholdingdownshiftandthenthehotkeys toshowthepositionattribute; thenaddthescaleattribute.
4. Repeatforallofthelayers.SeeFigure6.33foranexample.You’llnotethatthewaythingsareplaced inthetimelinehasnocorrelationas towhat is infrontorbehindanotherobjectinZposition.Infact,theboatandTopWaveareatthebottomofthetimelineyetclosesttothecamerainZ.

FIGURE6.33AlllevelsmovedinZ.TheboatandTopWavearetheclosesttothecamera
5. Make sure that you are on the first frame of the timeline and adjust the camera’szoomtogettheopeningviewoftheunderwaterstage.
Afterallofthat,youarereadytosettwokeyframestoseetheparallaxmagic.We’llmovethecamerauptorevealtheboat.Whenyouviewtheplayback,youshouldbeabletoseetheparallaxbetweenthelayers.Thecloserthelayersaretothecamera,thefastertheywillmoveacross the screen. The farther away the backgrounds, themore parallax (different rates ofmovement)youwillhave.
1. On frame1, create akeyframe for thepositionand thepoint of interest for thecamerabyclickingonthestopwatchicon.Ifyouonlysetakeyframefortheposition,the camerawillmove up but pivot down to continue to look at the center of theimages.
2. Onthelastframe,movethecamerapositionandpointofinterestup inY so thattheboatisvisible.Akeyframewillautomaticallyset.

FIGURE6.34Camerawithkeyframespositionandpointofinterest
Press play to play back a preview and notice the different rates of movement. Sometouchupscanstillbedone.You’llnoticethatthebackgroundlayerisvisiblewhenyoudon’twant it to be. Do not be afraid to move the artwork to exaggerate the parallax and usetravelinggarbagemattestohideunwantedlevels.
For the background and reed layers, wewill add amask to hide these levels when thecameramovesabovethesealevel.Forbothlevels,thesamestepswillgoasfollows:
1. Right-clickonthereedorbglevelandselectMask>NewMask.2. UndertheimageinthetimelinethereisnowaMaskparametersarea.Openthisarea,
changethesettingtosubtract,andclickonthestopwatchiconforMaskPath.Thiswillallowustoanimatethematte.
3. Make sureyouhave the selection tool active (oruse thev hot key).Go to framesmidwaythroughthecameramoveandattheend.Itmightbebesttostartattheendandwork backward.Adjust thematte as needed to hide the reeds or background.Keyframes will automatically be set. In Figure 6.35 three key-frames were set toadjustthematteduringthecamerapan.
4. To further tweak the animation, you canmove/slide the image layers to getmoreparallaxorabettercomposition.InFigure6.36afewkeyframeswereaddedtothepositionoftheFront-WaveandTopWaveimages.

FIGURE6.35Movingthemasktohidethereedsandbackgroundlevelsduringthecameramovement
FIGURE6.36Keyframescanbeaddedtotheartworklevelsthemselvestoincreaseparallaxorobtainabettercomposition
TakeNote
You will note that the image size is very large. When exporting out movie files, it isimportanttowatchyourfilesizesothatyoumaintainagoodplaybackspeed.Inthisbookwehavelearnedthatthecompressionsettinganimationisnotactuallyacompressionatall.Itis

alloftheframesintheirfullresstatepackedintoonemoviefile.Youwillnotreceiveagoodplaybackratewiththis.Asanexample,Ihaveexportedamoviefilefromthisexercise.Youwill note thatwith aSorenson3 compression, this2400 ×2000 pixelmovie is only 3MB.There are other compression types. Sorenson is pretty old but serves me well for quickcompressions.H.264ismorepopularnow.
MultiplaneinFlash
Whatifyouareusingapieceofsoftwarethatdoesnothavea3Dcamera?Well,thenyouaregoingtohavetosimulatetheexperiencetheold-fashionedway:bymovingtheartworkitselfatdifferentratios.Thecameraitselfwillnotmove,becausethereisnocameratomove.Insteadwewillmovetheartwork.Bymovingtheartworkatdifferentrates,wecanestablishwhatthecameraisfocusingon,whatisintheforegroundandmovesfasterandwhatisinthebackground andmoves slower. First, we’ll choose themain 100% level that stayswith thecamera.Everythingelseeithermovesfasterthanthatlevelorslower.Forexample,ifitisinfrontof the 100% level, it canmove150% faster, or if it is inbackof themain level, it canmove80%ofthespeedofthemainlevel.
Wewillusethecharactersandsomeoftheimageswehavealreadyusedinourhands-onexercise.
OpenFlashandimportthecharacterassets:
1. ClickFile>ImporttoLibrary.Selectsea01.psd;clickonopen.2. AwindowwillopenshowingeachlayerinthePhotoshopfile.Thecharacterlayeris
selected. That is correct. ClickOK. We do not need the composited layer of thecharacteroverawhitebackground.
3. Thiswillcreateafolderinthelibraryandplacethecharacterinsideofit.4. Dothesamefortheothercharacters(sea02.psd—sea05.psd).Youcanshiftselectall
of the character psd files and they will load in. Because they are unnamed inPhotoshop,weneedtotakeamomentandnamethemappropriatelyhere.Namethecharactersandorganizeyourlibrary.
5. Once again, click File > Import to Library and select the sea_100dpi.psd image.We’llonlyuselayers2,4,5,6,and7.Youcanbringthemallintoexperimentwith.
6. Oncethelayersareimportedtothestage,organizethemasnecessary.

FIGURE6.37Organizedlibrarywithallassetsloaded
Toanimatetheseassets,wewillhavetoturneachitemintoasymbol.Whilewearedoingthis,wewillgoaheadandloadthemintolayersandscalethem—theyarehugeimages:
1. RenamethefirstlevelintheFlashtimelinetobg.2. Dragthebluesquarebackgroundintoframe1ofthatlayer.Itwillfillthescreen.3. Withthebgselected,clickModify>ConverttoSymbolorusethehotkeyF8.4. Namethissymbol,andmakesureitisagraphic.5. UsingtheFreeTransformTool(hotkeyQ),scalethebackgroundtobemuchlonger
thantheFlashcanvasis.Inouranimationwecouldmoveitslightlyandneedroomtopanitunderthecamera.Pleaseviewthecompaniondatatoseeanexample.Inourexample, thebackground is shownat the topof the image,andat thebottom it isshowninwireframesothatyoucanseeitssizeinrelationshiptothecanvas.
6. Repeatthesestepstoaddareedlevel,acharacter,andawave.SeeFigure6.38foranexample.

FIGURE6.38Symbolsaddedtotheirownlayerandscaledintoplace
Youmight find it useful to lock layerswhenyou arenotworking on them—anything tohelpavoidputtingthesymbolsonthewronglayers.Itisveryimportantthateachsymbolbeonitsownlayer.Wearegoingtoaddmotiontweenstothese.IfyouhaveworkedwithFlashbefore,youmayknowthatyoucanonlyhaveonepivotpointpermotiontween;eachsymbolorgroupofsymbolshasonepivotpoint.Ifyouhaveanymorethanthat,themotiontweenwillnotwork.
Insteadofpullingoutthemathematicalformula,wearegoingtomovetheseitemsusingthosepivotpointstohelpus.Firstwe’llstartwiththe100%layer,becausethislayerwillbethebasisbywhichalloftheotherlayerswillmove.Althoughitistemptingtodothisviaactionscript(I’llleavethatexplanationtothosewhoarebentthatwaytofigureout),we’lldoitbyhand:
1. Selectthecharacterandonframe1placethecharacterontheright-handsideofthescreen.
2. In the timeline, right-clickon thekeyframeandselectCreateMotionTween.Thisholds the exposure of the keyframe for a second on the timeline and moves thecurrenttimetotheendofthatexposure.

3. Movethecharactertotheleft-handsideofthescreen.You’llseealineextendfromthefirstpositiontothesecondpositionofthecharacter.Inthetimeline,youcanclickanddragthelastframetoendatalaterframe,ifdesired.
FIGURE6.39Characters’animationkeyframesset
Flash(CS6andnewer)showsalineindicatingthepath.OlderversionsofFlashneedtouseonion-skinning(andadifferentmethodofaddingmotiontweens).Thewavethatisinfrontofthegirlshouldmovefasterthanshedoes—150%faster.Ifweclickandmovethewavefromwherethegirlwasinframe1andmoveittowherethegirlmovedtointhelastframe,thenkeep moving it farther (about half the amount we have already traveled), we have 150%movement.Itiseasiertoseethisinanimage.SeeFigure6.40foranexample.Theblackarrowindicates the amount of the character’smovement. The red arrow indicates the amount ofmovementforthefrontwave.IntheaccompanyingFlashfile,thisislabeledasanOL.Anyonerememberwhy?Itisanoverlay,meaningthefrontwaveislyingovertopofthecharacter.
FIGURE6.40Movethefrontlayer150%fasterthanthecharacter
1. Selectthefirstframeofthewaveelement.Createamotiontweenasyoudidwiththecharacter.At theendof thatmotiontweenexposuremovethewavefarther tothe left than the character moved. Refer to Figure 6.40 for amount of movementneeded.

2. Nextanimatethereedslevel.ThosekeepingnotesmayrememberthatthisisaUL,meaningitisanunderlay.Thislevelliesunderthemaincharacter.Ithasa“1”nexttoitincaseweweretoaddanotherunderlaythatwouldhavea“2”behindit.Thesamecanbedoneforoverlays.Theinterestingthingaboutthisnamingconventionisthatitindicatestheorderoflevelsandsimplifiestheconstantquestioningof“Whatwasinfront?Wasitthewavesorthereeds?”Imagineifthiswere100levelsdeep!Createamotiontweenonthefirstframeofthereedslevel.
3. Attheendofthemotiontweenexposureselectthereedselement.Thiselementwillmoveonly50%ofthecharacter,halfasmuch.Movethereeds levelhalfwaytotheleft; see Figure 6.41 for an example. The black arrow indicates the amount of thecharacter’smovement.Theredarrowindicatestheamountofmovementfortheul_1reeds.
Thebgdoesnothavetomove;wecanaddalittlemovementof5%toseeifitlooksokay.Remember, if it looksright, it isright;hangthemath.(Don’t letmyhighschoolgeometry/programmingteacher,Mr.Erdly,readthis.)
4. Animatethebgusingmotiontweensasyouhaveabove.Onceagain,measurehowmuchmovement shouldbeallotted to thebg.SeeFigure6.42 foranexample.Theblack arrow indicates the amount of the character’s movement. The red arrowindicatestheamountofmovementforthebg,whichis5%.
FIGURE6.41Theul_1movementof50%ofthecharacter’smovement

FIGURE6.42Thebgmovement:5%ofthecharacter’smovement
Usingthisidea,youcancontinueassigningamountsofmovementforlevelsthatarefartherbehindthecharacterorclosertothecamera.Thisisthesameconceptasifyouweretravelingdownaroadinacar.Imaginethatthecowsinthepasturearethe100%level.(Igrewuppasta dairy farm thatwas also past the sausage factory. So you can also hold your nosewhilethinkingofthispicture.Icouldhavemyeyesclosedasakidandknownwhenwewerefivemilesfromhomebythesmell.)Thecowsarethe100%level.Thebarbed-wirefenceinfrontofthemismoving150%fasterthanthecowsacrossyourfieldofvision.Thetelephonepolesinfrontofthefencearemovingmaybe170%faster.Thebicyclistontheroadistheclosesttothecamera (your eye) andmight bemoving 200% faster. The barn in the back of the field ismoving50%slower than thecowsand themountaineven fartherback isbarelymovingat10% the rate of the cows. The sun never seems tomove. Thank heavens the stink is gonebeforewegettomyhouse.
Gobacktothelastframeandadjusttheamountsofmovementuntiltheparallaxfeelsright.The levels should all seem tomovewithout anyone level seeming to stick slower or slidefasterthantheothers.Remembertoshowyourfriendsandgettheirfeedback.Sometimesyouworkonyourshotsolongandhavesomuchemotionalinvestmentintoitthatyoucannotseetheerrors.Yourfriendshavenosuchemotionalinvestmentanditwillnotcostthemanytimetofixanything.Sotheyaremorelikelytoseetheerrorsthatyourbrainsimplywillnotseebecauseitwantstheshottobedone.
Anexampleofthisexerciseispresentedinthecompaniondata:Multiplane.fla.
MultiplaneinToonBoom

Bynowyoushouldhaveahandleonimportingimagesandlayeringthings.ToonBoomhas3Dcapability,muchlikeyouhaveseeninAfterEffects.Youcanbringinyourimages,placethemintothetimelineandthenin3Dspace,movethemapartinZdepth.Thensetkeyframesas you are used to doing. But, there’s one very cool feature that is very much made foranimation:MaintainSize.InToonBoomyouuseaPerspectivewindowtomovethelayersinZ-depth.(Oranydirection,X,YorZ,forthatmatter.)IfyouselecttheMaintainSizetool,thentheimagewillscaleupordownasyoudragitclosertoorawayfromthecamera.Thatmeansthatinthecompositingcamera,theimagewilllooklikeitisalwaysthesamesize.Yet,youaremovingitinZ.ThisissothatanimatorscandrawtheirlayoutcompositionsandyoucanadjusttheZ-depthwithoutbotheringthatoriginalcomposition.
FIGURE6.42AToonBoomAnimatePro—imagesinthemaincompositewindowandtimeline.Compositionremainsthe
same

FIGURE6.42BToonBoomAnimatePro—usingtheMaintainSizetooltomoveimagesinZwithoutadjustingthesize
DeepSpace
Itshouldcomeasnosurprisetoyouthatdeepspaceallowsforthecameratomovetowardtheshotelementsandcharacters,ortheymovetowardthecamera.Perspectivecuesareusedto help deepen the space. These cues can include a one-, two-, or three-point perspective,vanishingpoints,anddiffusionoftexturesastheydiminishintothefarthestreachesoftheeye.(Of course, there are other symptoms of a deep-space shot. You’ll have to readThe VisualStorytolearnmore.)
Deep-spaceshotsare“easy”in3D.Pickthecameraupandmoveit.Itweighsnothing.Youdonothavetobuildatrackforit.Youdonothavetostrapittoyouorothers.Youmovethecameraaroundtheworldandshootwhatcomesinfrontofit.Right?
Mystudentsknowbetter,and theyknowa trickquestionwhen theyhearone.Althoughyouhaveavirtual3Dcamera,youshouldmaintain the idea that thecamera isexpected tobehavelikeaphysicalcamera.Itcandofly-throughsandmoveplacesthataphysicalcameracannot.However, the camera should alwaysmovewith slow ins and slowouts as if it hadweightandneededtotakeefforttomoveandefforttostop.Youhavelikelydugdeeperbyreadingrecommendedcinematographybookstounderstandwhyacamerawouldbeplacedatthefloorversusattheceilingorclosertoanactor’sfieldofview.YouhavereadTheVisualStorytounderstandhowthecamerasetupinoneshotrelatestothestoryasawhole.Ifyouhavenot, fearnot.Wecancontinuewith theseexercises to learnwhatbuttons topushandwhatpipelinestouse.However,makesuretogainmoreexposuretoreasonsformovingthecamera.I’mputtingthesoapboxaway(apparently,Ihaveaclosetfullofthem).
2DCharactersina3DCameraMove
Sofarinthischapter,wehavejustbeentalkingabout3Dcharactersina3Dworldand2Dcharacters in a 2D world; for a few pages, we did not talk about 2D/3D. Of course, anymediumormixtureofmediacouldhavebeenusedinthepreviousexercises.Nowwereturntoouroriginallyscheduledprogramof2Dand3Dmedia.
Inallofthepreviouschapters,wepurposefullyheldthecamerastill.Whathappensifyouwant to use 2D characters in a 3D cameramove?When you have a 2D character in a 3Dworldandhavea3Dcameramove,theconceptofregistrationbecomesextremelytricky.Youcanusethepipelinesthatwehaveexplored,createthe3Dfirst,thenanimatethe2Dtomatch.
Maintaininggoodcontactpointswillbedifficult,yetitcanbedone.Drawingthe2Dtomatchthe 3D either digitally or using print and peg pipelines will require studious attention tomatching those contact points. To that idea, we have also explored the concept of alwayshidingthecontactpointsunlesstheyareabsolutelytiedintothekeyemotionandstorybeatoftheshot.Keepthatinmindaswegothroughthisnextexercise.
Thisexerciseisbasicallyamultiplanesetup,exceptthatitisin3D.Also,insteadofhavingflatplanes, theywillbe ina sphere. Inclass Ihave lovinglycalled thisamultisphere setup.Thistypeofacameramovestartstoedgeusintoadeep-spaceworld.
You have possibly seen something similar to this before. In Tarzan, when Jane, theProfessor,andClaytonfollowTarzantothegorillasforthefirsttime,thereisarealizationshotwherethecharactersrecognizethattheyaresurroundedbygorillas. Janestandsup,andthecamerashowsthegorillasinthetreesaroundher.
IfyouwatchtheextracontentontheDVD,youwilllearnaboutDeepCanvas,asoftwareprogram that allowed the background painters to paint their canvases in 3D. Most mightconfusethiswithtypicaltexturepaintingor3DpaintsystemslikeZBrushorMudbox(greattoolstolearn,bytheway).YoumightknowhowtotexturepaintoruseZBrushalready.DeepCanvasdifferedfrom3Dpaintpackages.Itheldeachpaintstrokeinspace,layeredthepaintstrokes on top of each other (much like painting on glass, except in 3D), and then allowedthosepaintstrokestorespondtothescene’slighting.Itwasawonderfulpieceofengineeringthatwastrulyremarkableanddifferent. I’veneverseenanything like itsince.ThesoftwarewasoriginallycreatedforTarzan, thenitwasusedforTreasurePlanetandevenonBrotherBear.
BesidestheuseofDeepCanvas,thebiggestthingtonoteisthatthegorillarealizationshot(amongothers)isagreatexampleofadeep-spaceshotwith2Dcharactersin3Dworlds.Youwillnotethatthegorillasinthetreesareall2D.Ofcourse,Janeandcompanyare2Daswell.Theenvironment itself is3DpaintedwithDeepCanvas.The2Dgorillasareperched in thetreewiththeircontactpointshiddenasthecameramovesin3Dspacetorevealthem.
Whenfacedwithaproblemsuchasthis,itisprobablybesttobringthe2Dartworkintothe3D system and composite it there.Wewill use themermaid characters from before as anexampleandsetupamultisphereshot.Thisisaquickexercise;feelfreetoexpandonitfortheprojectportionofthischapter.
OurAssets
For this shotwewill take theoutputofourPhotoshopcharacters thathavebeenquicklyanimatedinFlash(asanexampleofusinganimation,notasanexampleofanimation),create

imagesequences,mapthosesequencesastexturesinsideofMaya,anddoourcameramovethere.
We’ve already covered theprocess of bringing the characters fromPhotoshop intoFlash.Justasareview,we’llmakea.tifsequencewithalphachannels.
InFlash
1. ExportaswffilebyselectingFile>ExportMovie.
FIGURE6.43Exportingaswfofthecharacters
In the companion data you will find a swf for each of the characters. The animation isminimal. These would be great candidates for taking into Flash and adding IK (inversekinematis)to.Extracreditgoestothestudentswhodothisintheirproject.
You could export out a gif sequence directly from Flash; it would maintain the alphachannelthatyouneed.However,compressionisnotyourfriend,sowewilluseAfterEffectstocreate the imagesequence.Thereareotherwaystodothis.Youcanhavescripts thatdothis automatically for you. Obviously, this is a step that is done often. Maintain a losslesscompressionandkeepyouralphachannels.Asubjectwehavenotevendiscussedinthisbookisthatoflookuptablesandcolorspace.Thattopicisbeyondthescopeofthisbook.
InOlderVersionsofAfterEffects
1. Loadthecharacter.swffileintoAfterEffects2. SelectFile>Export>ImageSequence…3. Choosethe.tiffileformatanduncheck“insertspacebeforenumber.”

4. Whenyou type in thebasenameof the image sequence,add in threezeros: “000.”Thiswilladdzeropadding.SeeFigure6.44foranexample.
FIGURE6.44ExportinganimagesequencewithanalphachannelfromAfterEffects
InAfterEffectsCS6
1. SelectFile>Export>AddtoRenderQueue.2. IntheRenderQueuetab,clickonOutputModuleLossless.3. Choosethe.tiffileformat.4. Whenyou type in thebasenameof the image sequence,add in threezeros: “000.”
Thiswilladdzeropadding.5. ClickonRender.
NowwearegoingtowanttobringthisimagesequenceintoMayaasatexture.However,MayawillnotreadanythingunlessithasaName.#.extension.Weneedaperiodbetweenthenameandthenumber.Usingwhatevermeansyouhave,youwillwanttochangethenameofthesequence.
WehaveusedAdobeBridgepreviouslyinthisbook.We’lluseitagain.YoucoulduseShakeor even script shake to do this. (Seewww.fundza.com for information on that process, andthankProfessorKessonforhisselflesscontributionstobetterthelivesofwould-betechnicaldirectorseverywhere.)
InAdobeBridge
1. Select all of the images (from 1 to 19) by clicking on image 1, holding shift, and

clickingonimage19.2. Right-clickonanyoftheimagesandselectBatchRename.3. Enterinthetexttogetabasenamea“.”andstartthenumberingat1.
I know—that was a lot, right? Imagine having to do that with thousands of layers andimages!GohugyourTD(technicaldirector)whowillmakescriptsandstreamlinethisprocessfor you in production. If you are doing this on your own, this process of moving imagesaround,keeping thealpha,keeping it lossless, andmaking sure thenamewill read into thenextsoftwarepackageistedious.I’msureyoucancomeupwithyourownmethodstogetitstreamlined.
Nowwearereadytobeginputtingour2DanimationintoMaya.Anotetomentionhereistorememberresolution.WhenyoubringimagesintoMayaandaregoingtorenderthem,youwillwant tokeep inmindhowbigthosecharactersaregoingtobeonscreenandhowbigyour final render isgoing tobe. Ifyouare renderingahigh-definition720 imageand thesecharactersaregoingtofillthescreen,youwillwanttomakesuretheyareatahighenoughresolution(haveenoughpixels)tobeviewedwell.
InMaya
TheobjectistopositionyourlevelsinsideMaya,movethecamerainMaya(aswellastheartwork),thenrenderoutthefinalimage.Youcanalsorenderoutmultiplepassesofprecompsandcompositethemtogetherinyourcompositingpackageofchoice.Itdoesn’thavetobeonefinalrender—whatevermakestheshot.
Let us remember alpha channels for a moment. In order to have anything seem see-through,youmusthaveanalphachannel.Bythischapter,thisstepshouldberoutine,butyouwouldbesurprisedhowitcanstilltripyouupifyou’renotreminded.Figure6.45showsthatthewavelevelfromsea_100dpi.psdhasbeensavedoutasastand-alone.tifimage.Theactualimage itselfhas transparencyaround it inPhotoshop.Youareable tosee thecheckerboardsaroundthewave.However,Mayawillnotknowthisissupposedtobeanalphachannelunlessanalphachannelisspecificallycreated.Inmanycasesyouwillneedtoselecttheimagewiththemagicwandtool(orselecttheemptyspacethengotoselect>invertselection). In thechannelstab,youcanseethatanalphachannelexists.Ifyoudonothaveone,youcancreateonefromtheselectionbyclickingontheSaveSelectionasChannelbuttonatthebottomofthetab.

FIGURE6.45AlphachannelinPhotoshopfortheWaveelement
Atfirstitwashardformetorememberwhichwasthealphachannelandwhichwaswherethepixelswouldshowup.Maybethiswillhelp:thecolorblackhasavalueof0.Ifyouthinkofazerovalueasnothing,thenthatmeansnothingshows:alpha.Thecolorwhitehasavalueof1(on);everythingshows.Thatisonlywhenyouarelookingatthealphaitself.Justwhenyouthinkyouhaveit,rememberthatinsomecasesinthisbookwehavecreatedmattesintheRGBchannels.WhenusingRGBmattes, it is just theopposite—createanoppositealphachannel.If indoubt:test.TheimageinFigure6.46showsaplainwhitecanvas inPhotoshopwithanalphachannel.IfthiswerebroughtintoMayaandplacedasatexture,itwouldshowupasacircle,shownintheinsert.Asanote,thefileisbroughtintothecolorattributeandthetransparencyattributeofthematerial.Thisisusuallydoneautomatically.However,sometimesyouhavetodoitmanually.
TakeNote
MakesurethatyourPhotoshoptextureissavedasanRGBandnotCMYK.IfitissavedasCMYK,thefourthchannelwillbereadasthealphachannel,whichmorethanlikelywilllead

toundesiredresults.(Notthattheauthordidthatbyaccident.)
FIGURE6.46AlphachannelinPhotoshopwithRGBshownasplainwhite
Thewavetexturehasbeencroppedtoasquaresize.Whyasquare?Thisisnowgoingtobeusedasatexture.Texturespaceisdefinedinasquarethatisnumberedfrom0to1acrossthetopanddownthelengthoftheimage.Thisishowtexturesareusedinalmostallpackages.WhileonthesubjectofUVs,becausethisisnowusingour2Dimagesinsideofa3Dspace,youwillneedtobecomefamiliarwithUVunwrapping.We’lllookatexamplestogether.
You can follow along in Maya with the file MultiSphere_setup.mb. Inside this file, asamplescenehasbeencreatedthathasafewtexturesalreadyloadedandproperlyusesalphachannels.(Ifthetexturesdonotshow,Mayadoesn’tknowwheretheyare.ReloadthetexturesintheHypershadewindow.)Wewillcreategeometrytoholdouranimatedcharactertexturesandmakesurethatthosetextureplanesfacethecameraforthefinalrender.
First, let’s examine the spheres with textures already applied. The outer sphere, labeled“OuterSphere,” is the background level and it has a background texture applied. The nextsphereinislabeled“MiddleSphere”andhasthereedstextureappliedtoit.Youcanseethatthealphachannelofthereedstextureisbeingreadin,andyoucanseethroughthatspheretothebackgroundsphere—hemispheres,actually; tobettershowwhat isgoingonthesphereshavebeen reduced tohemispheres.Yourproject canhave spheresorany typeofgeometrythatwrapsaroundthecamera.

FIGURE6.47MultiSphere_setup.mb
Thenextsphere in isaCharacterSphereand ithasbeenhiddenfor themoment.Wewillcomebacktoit.
The smallest sphere has been adjusted to hold the wave textures. It has been labeled“WaveSphere.” You will note that theWaveSphere has been broken up to hold the wavetextureintwodifferentways.OneisthenormaluseofUVinginthehemispheretoapplythewavetexture(Figure6.48).

FIGURE6.48WavetextureappliedtoapolygonhemispherenamedWave2
The second way that the texture has been applied can be seen in Wave1. Wave1 is aseparatepieceofgeometry.Asectionofthespherewasextruded.Thatextrudedsectionwasextractedandthenseparatedintoitsownobject. (History,ofcourse,wasdeleted.)Thiswaythe object itself can hold the texture but stillmaintains the curvature of the sphere. ItwasimportantintheUVingprocesstomakesurethatthetopsandsideswereUVedtobeintherightquadrantoftheUVeditorsothattheyreceivedthealphachannelinformationtobecometransparent. If theUV gets to the edge or outside of the texture, graywill showup in therendered image.Youmight see a small bit of that in the example file.To fix this problem,opentheUVtextureeditorandmovetheUVstobeinsidethequadrant.IfwehadUandVwrapturnedoninthetextureplacementnode,itwouldnotbeanissue.However,usuallyincaseslikethiswedonotwanttexturewrapon.
WehavekepteverythinginasphereshapesothatitwrapsaroundthecameramuchlikeanIMAXscreenwrapsaroundtheaudience.Itdoesn’thavetobeinasphere,butinthiscasewewillkeepthesphereshapeinordertopushthefisheyelensappearanceofthelevels.

FIGURE6.49Wavetextureappliedtoanextruded/separatedportionofthepolygonhemispherenamedWave1
TakeNote
Asyouorbitthecameraaroundtolookatthespheres,youmightnoticethatthewavelevelappearstogobehindthereedlevel.Thisisonlyahardwareshading(viewportpreview)issueand will not show up in the renders. However, to make the transparency sorting workcorrectly,intheviewportselectShading>PolygonTransparencySortingsothatitison.
Tocreategeometryplanesforthecharacters,wewillselectanareaoftheCharacterSphereandcreateitintoitsownpieceofgeometry:
1. Intheoutliner,selectCharacterSphereandturnitsvisibilityONinthechannelbox.2. Useyourfavoritemethodofselectiontoselectarectangleoffacesbehindoneofthe
waves.3. In the Polygons area, selectOption Box next toMesh > Extract. Make sure that
SeparateExtractedFacesisturnedoff.(Ifitislefton,everyfaceyouselectedwillbe divided from the others.) This has put the group of selected faces into its own“list,” but it isnot separated from theobjectyet.Youwillnote that in theoutlinerthereisstillonlyoneobjectnamedCharacterSphere.
4. Next,selectMesh>Separate.Thisshouldseparatetheextractedpolygonsintotheirownnamedobjectintheoutliner.However,thereisstillhistoryattachingthemtothemainCharacterSphere.
Note:dependingonyourversionofMaya,youmayreceiveanerror:Separateworksonselectedobjectsoronfacesfromonesingleobject.Thismessagemay

appearevenifyoudohavefacesselected,justnotexactlywhatMayawants.To get to the faces thatMayawants selected, right-click in the view-portwindow and hold down theCTRL key. This will open a hot boxwindow.Select from the bottom hot box: To Face Path. This will select the facescorrectlyandyoucancontinuewithstep5.
5. Makesure todelete thehistorybyclickingEdit>DeletebyType>History. YouwillknowyouweresuccessfulwhenthatpeskyTransformnodeisgonefromyouroutliner.
Nowthattheplaneforthecharacterisready,applyamaterialandthetexturebydoingthefollowing:
1. Selectthenewlyextractedplane.InthefigureoursisrenamedtoCrabKid.Applyalambertmaterialtotheplane.Onewayistoright-clickontheplaneandselectfromthehotboxmenuAssignNewMaterial>Lambert.
2. In theAttributeEditor, select thecheckerboard buttonnext to thecolor chip andaddafilenode.
3. Forthatfilenode, intheAttributeEditorclickthebrowsebuttonandfindthefirstframeofthecrabkidimagesequence,crabKid.0001.tif,andclickopen.
4. IntheAttributeEditor,makesuretoclickontheuseimagesequencebutton.Thiswillautomaticallyreadinanimagetomatchtheframethatthetimelineison.(Why,backinmydaywehadtowriteanexpressionforthat.)
Ifyoulookbackatthematerialnode,youwillnotethatthetransparencyhasautomaticallybeen loaded from the alpha channel for you. If not, you’ll have to do thatmanually in thehypershade.
Somethingscangowrongwhenyoudothisonyourown:
IfyouuseaCMYKimageinsteadofanRGBimage,alphareadsitincorrectly.If you use a naming convention that Maya cannot understand, like crab0001.tif orcrab_0001.tif,youwillgetapurplemessageaboutanodenotexisting.Youwillhaveproblemsifyouforgottohaveanalphachannel.Youwillhaveproblemsifyousavedtheimageasa.jpgorinaformatthatdoesnotholdalphachannels.
Now, as you look at your CharacterSphere you will think something has gone terriblywrongandyoumightstartthinkingoftheitemsintheprecedinglistaspossiblecandidates.Thereisnothingwrong,onlysomethingthathasnotbeendone:UVmapping.Ifyouopenthe

UVEditorbyselectingWindow>UVTextureEditor,theproblemshouldbecomeapparent.TheUVsarenowhereneartheimageofthecrabkid’ssmilingface.
FIGURE6.50UVsarenotcorrectlymappedtoshowcharactertexture
IfyouareunusedtoUVing,itissmalltaskslikethesethatwillhelpyougainconfidenceinthefineart.Inanexampleonthecompanionwebsite,theUVshavebeenmovedaround(byselecting them and using the move and scale tool) until they fit within the upper rightquadrantanddisplaythecharacter.Also,theUwrappingandVwrappinghavebeenturnedoff inside the file2Dtextureplacementnode.Youcan locate thesenodes in thehypershadewindow.
Repeat these steps to create textureplanes for theother animated textures.My students,remember tonameasyougo. InFigure6.51 themerman image sequencehasbeen loadedontoasmallpolygonareabehindtheotherwaveelement.

FIGURE6.51Twocharactersloadedastextures
TakeNote
Takenote:youwanttomakesurethatyouhaveenough2DimagestomatchthetimeinyourMaya timeline. If you advance past frame 15 in our example file, the crabkid texturedoesnothaveanymoreimages.Iteitherwillgoblankor,oddlyenough,loadinadifferenttexture!Oops.Thatisgoingtobeagotchaatrendertimeifyoudon’tplanforitnow!
ThelaststepistoplaceacamerainthescenebyclickingCreate>Cameras>Cameraorwhatever type of camera you prefer. Then animate the camera as desired. Please see thecompaniondataforanexampleinwhichacamerahasbeenplacedatthebaseofthesphereslookingupatthesegod-likemerfolk.
Very important: you will notice that the lighting in this scene is ambient to makeeverythingappearflatandthematerialsarelambertsothatthereisnospecularhighlight.Ofcourse,youcouldaddin3Dobjectsthathavetheirowntypeoflighting.You’llwanttouselightlinkingtomakesurethatthe3Dlightingdoesnotaffectthe2Dimageryandviceversa.Extra effort points to the studentswho include that step in their final project.You can findmoreinformationonlightlinkingintheMayahelpdocumentation.
ForcedPerspective
Whatifyouwanttoaddalittlemoredimensiontoyourscene?Therearetwothingsyou

cando.Oneistohavethecharacter’splanefollowthecamera.Doingthiswillenableyoutomove the camera without giving away the secret: that the character is only a pixel deep.Anotherthingyoucandoismuchliketheideaweexploredbycreatingspheres.Youcanadddimensiontoyourtextureplanes,pushperspective,andforcemoreparallaxtohappen.
First,havingyourcharacterplanesfacethecameraisausefultechniquetoknow.Becausewe created these characters as spheres, itmaynot benecessary.But if the camerawere tomoveorifthecharacterwere,say,adriverinaUFOthatmovedpastthecamera,youwouldwantthecharactertoalwaysfacethecamera.Toaccomplishthis,dothefollowing:
1. SelecttheCameraandthenthecharacter’splane.Thisisadriver/drivenrelationship,soitisimportantthatthecameraisselectedfirst.
2. UnderAnimation,selecttheoptionboxforConstraint>Aim.3. Youwanttheaimvectortomatchtheaxisyouwanttopointtowardthecamera.In
ourexampleonthecompanionwebsite,theXaxisispointingawayfromthecamera.Therefore,theaimvectorissetto−1inthexbox.(YoumighthaveassumedthatthethreeunmarkedboxesstandforX,Y,andZ.)ThenclickAdd.
4. If you want to adjust the offsets in any way, select the object, locate the aimconstraint in the inputs area of the channel box, and adjust the offsets to get thepositioning you desire. In Figure 6.52 the clouds are being adjusted to be framedbetterinthecameraview.
FIGURE6.52AdjustingtheAimconstraintoffsetasneeded
ThingstowatchoutforwhenusingAimconstraints:

Makesurethattheconstraintisaddedcorrectly.Thecamerashouldnotwhizaway.Ifitdoes,youhaveconstrainedthecameratothecharacter.Oops.Makesurethatyourplanesaregettingenoughambientlighting.Theymayturnfromthe light and become dark in your render. You may want to parent constrain anambientlighttofollowalongwithyourcameratoalwaysilluminatethecharacters.Remember,ifitlooksgoodinthefinalrendercamera,thatisallyoucareabout.Movethings, scale things; it is okay. If you are working for an art director, though, thatpersonmight changehis orhermindabout the cameramove. If thathappens, thenyouhavesomeextraworktodo.
Topushtheideaofadjustingtheselevelsevenmore,lookforopportunitiestocreatemoreparallaxbyaddingdimensiontothetextureplanesthemselves.Manypackagesnowallowforpushingofsimpletexturedpolygonplanes.ToonBoomisonewewilllookatnext.
Using our current example,we added a slight extrusion to theMiddleSphere so that thebottomportionof the texturewouldhaveparallaxwith itselfduring thecameramove.Forthisprocess,youwoulddothefollowing:
1. SelectEditMesh > Split PolygonTool or, in newerMaya versions,EditMesh >Interactive Split Tool in the Polygon area and click on the edges of theMiddleSpheretocutalinerunningalongthebottomblueareaofthetexture.
2. Useyourfavoriteselectionmethodtoselectthebottomareaofthetextureplanethatcorrespondswiththeblueoceanfloor.
3. SelectEditMesh>Extrude, and extrude the features so that the element juts outfromtherestofthetexture.
4. Place your camera andmove it. You should see parallax of the texture planewithitselfandotherelements.
FIGURE6.53Addingdimensiontothetextureplanebyextrudingareas
This techniquewasactuallyused inMulanandAtlantis, amongothers.You can see it inMulan’sopeningshotoftheGreatWallofChina,afterthewonderfulpaintingwithanimatedmattesandcompositing tricks fades into theactualanimatedshotof theGreatWall.As the

camerapullsbacktoshowthewall,youmightnoticeparallaxgoingonbetweenthesegmentsofthewallitself.Atechniqueofforcedperspectiveandalotofcreativecompositingwasusedto create that shot. I believe thatwaswhenMayawas available as a beta. Thismethod ofcreatingdeepspacewith2Dartworkwasusedthroughoutthefilmwithvaryingdegreesofdeepspace.Amorenotableshotwouldbefromsequence19shot24,whereMulanrunsintothecrowdandthecameraboomsuptoshowfireworksburstinginthesky.Thatisa3Dshotfullof2Dimagerywithforcedperspectiveonmanyofthepalaceelements,anddon’tforgetcrowdsandparticlefireworks.
FurtherReading
Ashman,Howard,etal.DVD.LittleShopofHorrors.Burbank,CA:WarnerHomeVideo,2000.Block,Bruce.TheVisualStory.Boston:FocalPress,2007.Brinkmann,Ron.TheArtandScienceofDigitalCompositing.Amsterdam:MorganKaufmann
Publishers/Elsevier,2008.Brown, Blain. Cinematography: Image Making for Cinematographers, Directors, and
Videographers.DirectorsandVideographers.Oxford:Focal,2002.HollywoodCameraWork.www.hollywoodcamerawork.us.LeDoux,Joseph.SynapticSelf:HowOurBrainsBecomeWhoWeAre.London:PenguinBooks,
2003.Schroeppel, Tom. The Bare Bones Camera Course for Film and Video. Coral Gables, FL:
Schroeppel,1980.
StudentContributors
Contributingstudentsforthischapter,inorderofcontribution:
John-MichaelKirkconnellJenniferChandlerBrentMorrisYosssayaAisiriDanielTiesling

7
CompletedWorks
We’ve covered how to get the shots done, which types of pipelines and softwarecombinationsmightbeused,andhowtheuseofcameramightbeaddressedineachshot.Weneed to take a step back and spend this chapter going over some completed works andlookingattheoverallmethodsused.
Disney’sPaperman
Thisisalovelystorywitharefreshinganimationstylethatcombinesmanyofthemethodsyou have learned in this book. There are SIGGRAPH papers presented about how theyachieved the filmand the toolscreated (http://siggraphencore.myshopify.com/products/2012-tk141). You can also read an article written by the director, John Kahrs:http://www.cgmeetup.net/home/the-making-of-paperman/.

FIGURE7.1MakingofPapermanfromhttp://www.disneyanimation.com/projects/paperman
Whatwas the process? First everythingwas animated in 3D.Then they created 2D linesovertopof the3D imagery.The3Dwasshadedvery flatly.Theaestheticwasverystylized.Thismethod isusedquite frequently,mostly.Youcanalmostre-create itwith the toolsyouhavereadaboutinthisbook.Thedifferencecomesinhowthe2Dlinewascreated.Thereissome magic here that you won’t be able to re-create completely. It is worth studying.“Computer-AssistedAnimationofLineandPaint”isthenameDisneygavetotheprocessintheirSIGGRAPH2013presentation.HerearethebasicstepstheydidtocreatePaperman:
The3DAnimation
1.Createdthenormal3Dcharacterandanimatedit.
Sofar,sogood—youknowhowtodothat.Thenextpartmaybenewandyou’llneedtodosomeresearch.
Createa2DTexturethatwillMovein3D
2.RanaprocessovertheZ-depthinformationoftheimageandcreatedamotionvector.3.Usedthatmotionvectortocreateapapertextureforthelineandpaintthatrespects
the3Dspaceandmovementofthecharacter.
YoucancreatemotionvectorswithMentalRay.Motionvectorsareimagesthatlookatthepreviousimageandthecurrentimage,thencreateanimageinbetweenthatonlyrepresentsthemovementvectorofeachcomponentof the image.Youcangetacrashcourse in themhere: http://www.youtube.com/watch?v=F9rW17naKUQ. The tips in that video for creatingmotionvectorsaretomakesuretochangetheshutterangleto360foreasieroffsetabilityandadd a render layer override that renders frame 1.5 instead of 1, and so on. Then whencompositingyoucanoffsetthemotionvector.
Create2DLinesthatMovein3D
4.Didamotionvectorpassforalltheverticesofthecharacter,renderitasanimage,andextenditforcompositingneedslateron.
Youcandoallofthiswiththetoonlineandpainteffectsengine.Itdoesstepsnumber4and5foryou.Butnowthingsarestartingtogettricky.YoumayhavewatchedtheMotionVector101videolistedabove.Step6issomethingthatyouneedtodowithvectorstoextendbeyondthecharacteroryou’llgethardedges.This is totexturethe lineseventually incompositing.Butbeware,youcannotcreatemotionvectorsoftoonlinesorpainteffectsinMayaunlessyouconvertthemtopolygonsfirst,ordoapost-compositingtrick.
5.Createdthe2Dkeyframes.
Ah,hereweareattherealdifference.Wecanachieveanimated2Dlineresults,butnotaselegantly as the proprietary tool that Disney created and not as beautifully, given thatwecannotdosomeoftheprocessingonthetoonline.ThankheavensDisneysharestheprocessesatSIGGRAPHsothatcreativeprogrammersouttherecanhelpmaketoolsavailabletootherartists.Sowhatcanwedo?
Wecanattachpainteffectsbrushestocurves,andwecananimatecurves.Well,itisn’teasytoanimatecvs.Youwanttodrawthelineslikeananimator—that’swheretheproprietarytoolexcelled.Wecan:

1. Create > CV Curve orPencil tool and draw the ink lines.Watch out if you aredrawingintheperspectivecamera;whoknowswherethelinewillgo.Thisisreasonnumberonewhythismethodwillbeapaintocontrol.
2. Selectthesurfaceandthecurve;clickonSurfaces>EditNURBS>ProjectCurveonSurface.Thispositionsthecurveonthesurfacebasedonthecameraview.Note:thesurfaceneedstobeaNURBSsurfaceforthistowork.
3. Selectanappropriatepaintbrush;makesurethecurveisstillselected:PaintEffects>CurveUtilities>AttachBrushtoCurves.
4. Gobacktothecurveitself,selectcvsandanimatethem.
FIGURE7.2Animatingcurveswithpainteffectsappliedtothem.(WehadtoseeRobbyonemoretimebeforetheendofthis
book.)
Well,thatwasn’telegant,wasit?Nowweknowwhytheproprietarysystemwasneeded.Ofcourse,thereareotherwaystomanuallydrawin2Doverthecharacter,andthatiswhatwecando.
“PackageWhispers”byMoniraKamal

FIGURE7.3MoniraKamalworkingonasceneof“PackageWhispers,”2012
Production:KonradWolfUniversityofFilmandTelevisionincollaborationwithUPS,“WeLoveLogistics”
Let’s takea lookat theanimatedshort “PackageWhispers,” createdbyMoniraKamalofGermany.ThisfilmwascreatedfortheUPSchallenge“WeLoveLogistics.”Theartdirectionwas clearly indicated by style frames inspired by artist StinaPersson.You can seehow thestyle frame pushed the animation to have a clear aesthetic in Figure 7.4. (Read further inChapter 2’s online material about “Iteration for Developing a Pipeline and Nailing theMoment.”)

FIGURE7.4Styleframeof“PackageWhispers”
FIGURE7.5Digital2Danimationin“PackageWhispers”usingaCintiqmonitor
Theanimatorsworkedin3Dtoanimatethecharactersintheirscenes.Thecharactersonlyhadthreedifferentbodytypes,butlooktobegoodmodelsandrigstoworkwith.TheseshotsarenotmixingdifferentcharactersofdifferentmediumslikewedidinChapter3.Insteadtheyare startingwith 3D (see Figure 7.6) characters and then flattening out the characters andadding toon shading.You’llnote in the style frames that the characters aredesigned tonothaveskintone,sotheflatshadingaddstothestoryofthispiece.(SeeFigure7.7.)

FIGURE7.63Danimationin“PackageWhispers”
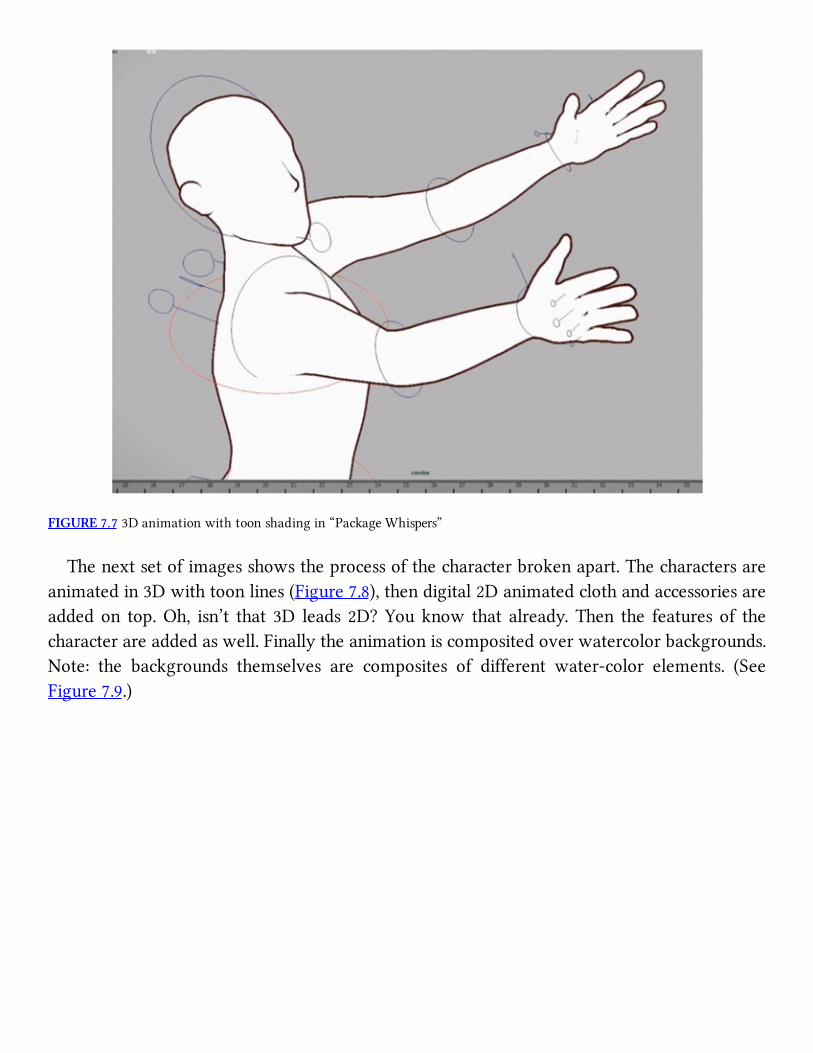
FIGURE7.73Danimationwithtoonshadingin“PackageWhispers”
Thenextsetofimagesshowstheprocessofthecharacterbrokenapart.Thecharactersareanimatedin3Dwithtoonlines(Figure7.8),thendigital2Danimatedclothandaccessoriesareaddedon top.Oh, isn’t that 3D leads 2D?Youknow that already.Then the features of thecharacterareaddedaswell.Finallytheanimationiscompositedoverwatercolorbackgrounds.Note: the backgrounds themselves are composites of different water-color elements. (SeeFigure7.9.)

FIGURE7.83Dmodelwithtoonlines,Digital2Danimatedcloth,andanimatedfeaturesin“PackageWhispers”
FIGURE7.9Charactercompositedoverwatercolorbackgroundin“PackageWhispers”
Pleasegoheretoviewthecompletedshortfilm:
http://www.hff-potsdam.de/de/filmeprojekte/hff-filme/detail/package-whispers.html.The making-of video can be found here: https://www.youtube.com/watch?
v=kHDdxQcdc0Q.
Thesegradstudentsdidagreatjobpullingoffagreatshortanimatedfilm.Congratulations!

8
WhatNext?
Well,everyone,wehavereachedtheendofourprintedjourney.Surely,asyouhavereadthisbookyouhavethoughtofdifferentwaystoapproachtheproblemswehavefaced.Maybetherearedifferentmethodsyouhaveusedorwant to testout.Therewillbenewsoftware,newversions,scripts,andmethodstobeexplored.Ontopofitall,therewillbeexamplesofanimationthatweallwanttolookattolearnfromorbeinspiredby.
Whatotherthingscanyouworkwith?IKbonesinToonBoomorFlash?Whathappensifyou bring live elements into your animation? I wonder where Photoshop and its 3Dcapabilitiesisgoingtogo?Howcanthisapplytospriteanimationandgameengines?(Ohmy—that’sawhole’notherworld.)
Whatalovelyjourneythishasbeen.Myonlywishisthatyouwillnotgetboggeddowninonemethod,onemedium,oneaesthetic.Instead,whilemakingbeautifulart,Ihopeyoukeepfearlesslyasking,“Whatdoesthisbuttondo?”and“Willithelptellmystory?”
Warmly,…tina

Index
Pagenumbersinitalicindicatefiguresandtables.
abstractshapes121,123
Action!ActingLessonsforCGAnimators(Kundet-Gibbs)63
AdobeBridge130,215
AfterEffects:bringingartassetsin83;compositionareaof51;finalcompositein167;imagesequencesin214–15;levelsin85;
multiplaneshotin200–1;puttingimagesin157–9,165–6;3Dcameraand199;24framespersecond50
Aimconstraintoffset222,223
alphachannels:compositingsoftwareand114;filetypes39–40;imagesizesand12;importingimageswith114;inPhotoshop
43,215–17;QuickTimemoviewith105–6
alphamatte52,173
ambientcolor192,194,195
ambientlight191,192,222
ambiguousspace179,187–8
animatedmattes124,224
animation: in After Effects 51; to camera 24; compositing system for 50; conversion to 3D 27–8; in Corel Painter 45–7;
emotionin17–18;hybridapproach117–18;keyframesof99;lightfor151;inperspective24;inPhotoshop40–4;pose-to-
pose132–3; renderingof72–3; savingmovie fileof44; softwarepackages for 4; stylematching9; timing for 29, 62–3;
tonesand159–60;of2Dcharacter61–2;3Dontopof2D68–70
animationassets3,4,12
animationelements2,158
animationstyle6,92,94,122
animators:coordinationbetween21;tweakingissues22
artassets8,83
artwork:addingcolorto135;movingatdifferentratios205;placementinrelationtocamera196,201
AttributeEditor113,194–5,220
AutodeskSmoke114–16
background:shadowimagebetweencharacterand166;using3Dand2Dtogether90;white205
backgroundcolors38,130
backgroundelements150,155,156
backgroundimages166,170

backgroundlayer202,203
backups,dailyandweekly23
BareBonesCameraCourseforFilmandVideo,The(Schroeppel)178
bglayer201,202
BlackCauldron,The1,2
blendcolorsnode193,194
Block,Bruce176–8
Blurnode137,138,170
blurredinkline135–6,138–9,142–4
body,maskingout87–9
boomcameramove185
breakdownsinMaya70,71
BrotherBear7,61,186
brushes:built-intoPhotoshop76–8;custom78;downloading79–81
brushtool81,107,136
budget:forphysicalassets7–8;forrealworldlimits90
bull’s-eyemethod14,176
camera:animating to24; artworkplacementand196,201; characterplaneand222; f lat-space shot and190;with a focal
lengthof 9191;with a focal length of 197 190; forming hybrid character and 56; keyframes and 203–4; pan 180; tilt
180–1;trackingwith182,184;viewofcharacterthrough162;zoom181
cameraattributes38–9
cameramovements:2Dcharactersin212–13;fordeepspace184–7,211–12;forf latspace180–1;forlimitedspace182–4
CaptainHook59,60
castelement156,159
characterassets:animating206–7;importing205–6
characterplacement179,181,184,187
characters: f lat spaceand179; interacting indifferentmediums16–17;minimizing linemileage6; shadow image between
backgroundand166;tonesandshadowson123;touchbetween18,54;viewof162;withouttones152
charactersets:scripton28–9;selectingmodeof24
CharacterSphere218–20
Cinematography:ImageMakingforCinematographers,Directors,andVideographers(Brown)178
Cintiqtablets10,19
cleanup:inPhotoshop76,110–11,132–3;inToonBoom81–2;usingstandardbrushfor77
clonesource46–7
composites,creatingforelementlayers158–9
compositingsystem/software:alphachannelsand114;typesof50;using3Dcamera199–205

composition:AfterEffectsand51;withcroppedlayers200;Photoshopfileas200;settingup83–5
compressionsettings52,109,157
contactpoints:hiding212;pipelineand125;propswith122;showingjudiciously188
CorelPainter:animatingin45–7;renderingin47–8
creases,toonlinein35–6
CreativePhotoshopDigitalIllustrationandArtTechniques(Lea)79
CreativePhotoshop:DigitalIllustrationandArtTechniquesCoveringPhotoshopCS3(Lea)43
croppedlayers200
crowds:asamultiplieroflinemileage6,2Dapproachwith117
DeepCanvassoftware212–13
deep space: attributesof 184; cameramovements in 185; f ly-throughand186–7;hands-onexamples189;multiplanewith
perspectiveand185–6;trackingwithcameraand182,184
deep-spaceshot211–12
digitalanimation4,49,63,133
Disney’sPaperman225–8
dollycameramove185
dopesheets.Seex-sheets
drawing:inFlash49,107–10;framebyframe42–3
Dukal’sartisticbrushes79–80
duplicatelayers133
EFXanimation121,124
EFXelements120–1,125,127,128,134
EFXteam119–20
ElementalMagic:TheArtofSpecialEffectsAnimation(Gilland)120
emotion:inanimation17–18;momentscenewith22
environment:lightand124;using3Dfor127
exporting: image sequences 214; levels of animation 37–9; movie files 205; from Photoshop 140–1, 149; rough animation
108–9;swffiles157,213;3Dobjects145–6
Fantasia200095,117
filetypes39–40,145
fillshader30–3,74,153
Flash:animationin100–2,106;drawingin49,107–10;imagesequencesin213–14;importingvideoand106–7;keyframesin
63,107;multiplanein205–10;savingimagesin65–6;timingin63
flatspace:attributesof179;cameramovementsfor180;hands-onexamples188–96;introductionto175–6
flat-spaceshot179,189,190

f lipimages133–4
floweranimation131,132
f ly-through186,211
frameanimation43,81
framepadding130,155
framerate:forcombiningmediums10–11;setting25,40,50–1
framestackwindow46,47
grapheditor27,29,70–3
heffalumpelement118
helicoptershot186–8
Hercules94,125
highlights74,94,124
HunchbackofNotreDame6,117
hybridanimation:defined1;examplesof14;mediumsand5–13
hybridcharacter:challengesrelatedto58–9;formingcohesive56–7;2D/3Dintegrationand13
imageformat10–11,105
imageplane:attachingtocamerainMaya67;hiding74;resolutiongateand68
images: bringing intoAfter Effects 157–9, 165–6; creating digitally 3; exporting 109–10; f lipping 133–4; importing of 51,
113–16,141–2;renderingof38–9;saving65–6
imagesequences67–8,83,214–15
imagesizes12,52,108,188
importing:characterassets205–6;ofimages51,113–16,141–2,210;inMaya67–8;OBJfile146,149–50;2D’s3Dstand-in25;
ofvideo106–7
inklevel142,143,144
inklines135–6,138
intensitychart177,178
InteractivePhotorealisticRendering(IPR)window31,32,154
IronGiant,The1,2,17
JaguarMcGuire:bodycast56;capeonfiresequence96;characterdesign96–100;neckbrace100–4;tonematte153–60
keyframes: adding to aid animator 27; of animation 99; camera and 203–4; from final composite 53; in Flash 63, 107; in
Maya69;onion-skinningand42,64–5;inPhotoshop148;timingof11,64
keyitis,avoiding73

layers:cropped200;duplicating132–3;editable30,31;puttingsymbolson206–7;reed202,203;renaming200
levels:inAfterEffects85;assigningamountsofmovementfor210;breakingthingsin92;compositing82–3
light/lighting:foranimation151;drawingin2DEFX124;f lat-spaceshotand191;forminghybridcharacterand56;media
issues152;tonesand150
LiloandStitch6,10,186
limitedspace:attributesof181–2;cameramovementsin182;hands-onexamples189,196–9;multiplanesand182–4;tracking
withcameraand182
limited-spaceshot183,184,196
linelook18,55,61,62
linemileage5–6,17,58,92
linequality76,142
losslesscompression52,214
maskingoutbody87–9
matte:adjustingcoloroftheobjectand86;maskingoutbodyand87–9;over-blurring173;usingtoadjustlighting85–6
Maya: animation in 6, 22–8, 102, 103; breakdowns set in 70, 71; Corel Painter and 45–8; image sequences in 215–16;
inbetweens71; installingscript28;keyframes in69; other softwareand48–9; Photoshop and 40–3; psd texture loaded
into149;renderingin37–40;re-renderingin45;shadowpassin163–5;3Darmin66
mediums:costissues7–8;determiningpreferred5–8;lightingissues152;makingtolooklikeeachother55–6;problemswith
combining8–13;tweakingbetween22
MiddleSphere217,223
motiontweens207–9
movement:forminghybridcharacterand57;organicobjects122
moviefiles44–5,47–8,141,205
Mulan:crowdelementin117;Hunchargein6;largeamountof3Din126
multiplanecamera117,198
multiplanes: in3Dspace183; inAfterEffects 200–1; inFlash205–10; limited spaceand182–4;with perspective 185–6; in
ToonBoom210–11
node-basedcompositors82,115,137–9
Nukesystem137–9,167–71
objects:constraining26;movingorganic122;using3Dand2Dtogether90
OBJfile,importing146,149–50
onion-skinning42–3,46,58,64–5
openingshot96,224
organicobjects,moving122

“PackageWhispers”228–30
painteffectsbrush112,113
paintfills,creating137
paintlevel82,143
palacecrowdelement117
panningacamera180
Paperman225–8
parallaxbetweenlevels179,181–4,187
PearceSisters,The(Cook)55
peggingprocess10,20,57,126
PencilCheckPro64–6
perspective:animationin24;forced222–4;multiplanewith185–6
Photoshop:alphachannelsin43,215–17;animationin40–4,130–4,144–5;cleanupin76,110–11,132–3;drawingframeby
framein42–3;exportingfrom140–1;imagesequencesin40–4; importingOBJfile into146;keyframes in148; painting
technique136;renderingin40,43–4;videolayersin130–2
Photoshopbrushes:built-in76–8;custom78;downloading79–81;preset77
physicalassets,budgetfor7–8
pipeline:foranimation57–8;contactpointsand125;forproperregistration10,13
pipelinetest:forimageformats11;of2Dcharacter8;of3Darm59
pivotpoints200,207
Pooh’sHunnyHutattraction117–18
Posetest66
pose-to-poseanimation42,58,132
props:withcontactpoints122;leading2Danimation126,128–30;using3Dfor127
QuickTimefile48,52,107–8,110–11
QuickTimemovie44,105–6
referenceimages:foranimation58;renderingof104–5
registration:animationand57;descriptionof9–10;pipelineforensuring10,13
rendering:ofanimation72–3;castlayer156; inCorelPainter47–8;finalmovie52; inMaya37–40; inPhotoshop43–4; of
referenceimages104–5;tonemattes155–7
renderlayers:creating37–9,162,163;inMaya165;settingup37
resolutiongate68
RGBimage75,82,164,220
rigging26,98,103
rimlight74–5,82,84–7
rimlightmatte86,153

rollimages133–4
roughanimation100,106–11,134
scene:addingdimensionsto222–3;f latspace196;materialandtextureaspectoff lattening192–4
script:oncharactersets28–9;installing28
sequencelayers84,158
shadowlayer162,166
shadowmatte152,161,170
shadowpass163–5
shadows:descriptionof124,150;higher-resheadand99;tonesand123,150–3,171–3;Seealsolight/lighting
SimpsonsMovie,The6,8
softwarepackages:foranimation4;usingmultiple40,58
solidshapes121–2
space:ambiguous187–8;deep184–7;f lat179–81;limited181–4;mismatchofusages175;typesof179
spotlight,addingtocastshadow161,163
stand-incharacter22,37,38,99
stop-motionanimation4,7,13,73
stylematching9,188
subjectmatter5,93
swffiles157,158,213
symbolsaddedtolayers206–7
SynapticSelf:HowOurBrainsBecomeWhoWeAre(Ledoux)178
3Danimation:assetsof4;complexelements7;convertingtobeontwos27–8;Disney’sPaperman226;inFlash101–2;inf lat
space181;handlingoffto2D29;“PackageWhispers”229–30;redrawnin2D55;2Danimationontopof40–5;twosscript
and72
3Dantlers7,61
3Dappendage2,57
3Darm:inMaya66;pipelinetestof59;withrimlight85–7;settingkeyframes69–70
3Dcamera199–205
3D character: animating 22–8; applying toon shading to 29–30; creating tonematte for 153–4; industry examples 16–17;
printingonpaper19–20;2Dcharacterand10,21–2
3Dcharacterswith2Dparts:animationand94,102–4,106;Flashand106–10;hands-onexamples95–6; importing images
and113–16;industryexamples94–5;introductionto92–3;JaguarMcGuireand96–102;linelookand93;Photoshopand
110–11;referenceimagesand104–5;toonlinesand111–13
3Delements2,10,94,151
3Dlayer147,201

3Dobjects10,145–9,175
3Dpackage:creatinglightin153;settingupcamerain129;shadowmattein161
3Dprops:leading2D128–30;placingvisually145;aspopular125,127;puttingin2Dcharacter’shand144–5
3Dtones:inNukesystem167–71;shadowsand152–3
tifimages51,105–7,141,157–9
tiltingcamera180
timelineeditor115,137,147
timelinekeyframes43,107
timelinewindow40,42
timing:foranimation29,62–3;forcombiningmediums11–12;inFlash63;inToonBoom’sPencilCheckPro64–5
timingcharts11,12,69,70,71
tonemattes:adjustingcoloroftheheadand159;creating3D153–4;fixingandsimplifying160;givingoppositeeffect169;
JaguarMcGuire153–60;rendering155–7
tones:animationand159–60;characterwithout152;descriptionof124,150;shadowsand123,150–3,171–3
ToonBoom:assortmentofsoftware139–40;cleanupin81–2;drawingin49;exportingfromPhotoshopto140–1;importing
imagesequenceinto141–2;multiplanein210–11
ToonBoomAnimatePro116,139–44
ToonBoomHarmony149–50
ToonBoomPencilCheckPro64–6
toonfillshading29–30
toonlines:featuresof111–13;matching2Dcharacter’scleaned-uplines33–5
toonlineshader34–5
TopWaveimages202,204
touchbetweencharacters18,54
trackingwithcamera182,184
TreasurePlanet17,59,213
TripletsofBelleville,The:bicyclistsin2,61;2D/3Dintegrationand59;2D/3Dportionsin60
24framespersecond11,50,159
2Danimation: assetsof 4; complex elements 7; in Flash 100,106; in f lat space 180; introduction to 2; lighting issues 151;
“PackageWhispers”229;inPhotoshop130–4;pipelinefor57–8;tonesand159–60;ontopof3Danimation40–5
2Dcharacter:animationof61–2;pipelinetestof8;putting3Dpropsin144–5;withouttones152;3Dbodycastwith56;in3D
cameramove212–13;3Dcharacterand1,10,19–22;with3Dparts2
2Dcharacterswith3Dparts:animationof61–2;compositionsetupand83–5;hybridcharacterand56–9;industryexamples
59–61; introduction to 54–5;inMaya 66–8;media and 55–6; registration issues 57; rim light and 74–5, 85–7; saving
imagesand65–6;timingissues62–5;Seealsoanimation;Photoshop
2DEFX94,124,126,127,128
2Delements10,11,94,136
2Dhead97,101,112,161

2Dimages3,66–8,217
2Dlines226–7
2Dtexture221,226
2Dtones171–3
2D/3Dcombinations2,13,90
2D/3Dfilms128,186
2D/3Dintegration13,59
twos.melscript28,72,100,104
UVeditor218,220
UVingprocess218,221
videolayers:blank42–3;inlayerpalette40;openingQuickTimefileinto110–11;inPhotoshop130–2
VisualStory,The(Block)178,211–12
visualstyle5,9,13,127
visualtarget58,97,98
Wacomtablets10,19
wavetextures217,218,219
x-sheets:combining2Dand3D57;maintaining12;inToonBoom81
Z-depth182,184,201,210,226
zeropadding51,214
zollyshot99,188
zoomingcamera181