HP Network Node Manager i - Business Service Management ...
58
HP Network Node Manager i Software For the Windows ® , HP-UX, Linux, and Solaris operating systems Software Version: NNMi 9.23 HP Network Node Manager i Software—HP Business Service Management Integration Guide Document Release Date: February 2015 Software Release Date: May 2013
-
Upload
khangminh22 -
Category
Documents
-
view
1 -
download
0
Transcript of HP Network Node Manager i - Business Service Management ...
HP Network Node Manager i Software
For the Windows®, HP-UX, Linux, and Solaris operating systems
Software Version: NNMi 9.23
HP Network Node Manager i Software—HP Business Service Management Integration Guide
Document Release Date: February 2015Software Release Date: May 2013

NNMi 9.23
Legal Notices
Warranty
The only warranties for HP products and services are set forth in the express warranty statements accompanying such products and services. Nothing herein should be construed as constituting an additional warranty. HP shall not be liable for technical or editorial errors or omissions contained herein.
The information contained herein is subject to change without notice.
Restricted Rights Legend
Confidential computer software. Valid license from HP required for possession, use or copying. Consistent with FAR 12.211 and 12.212, Commercial Computer Software, Computer Software Documentation, and Technical Data for Commercial Items are licensed to the U.S. Government under vendor's standard commercial license.
Copyright Notice
© Copyright 2008–2015 Hewlett-Packard Development Company, L.P.
Trademark Notices
Adobe® is a trademark of Adobe Systems Incorporated.
HP-UX Release 10.20 and later and HP-UX Release 11.00 and later (in both 32 and 64-bit configurations) on all HP 9000 computers are Open Group UNIX 95 branded products.
Microsoft® and Windows® are U.S. registered trademarks of Microsoft Corporation.
Oracle and Java are registered trademarks of Oracle and/or its affiliates.
UNIX® is a registered trademark of The Open Group.
Oracle Technology — Notice of Restricted Rights
Programs delivered subject to the DOD FAR Supplement are 'commercial computer software' and use, duplication, and disclosure of the programs, including documentation, shall be subject to the licensing restrictions set forth in the applicable Oracle license agreement. Otherwise, programs delivered subject to the Federal Acquisition Regulations are 'restricted computer software' and use, duplication, and disclosure of the programs, including documentation, shall be subject to the restrictions in FAR 52.227-19, Commercial Computer Software-Restricted Rights (June 1987). Oracle America, Inc., 500 Oracle Parkway, Redwood City, CA 94065.
For the full Oracle license text, see the license-agreements directory on the NNMi product DVD.
Acknowledgements
This product includes software developed by the Apache Software Foundation. (http://www.apache.org)
This product includes software developed by the Indiana University Extreme! Lab. (http://www.extreme.indiana.edu)
2

February 2015
Available Product Documentation
In addition to this guide, the following documentation is available for NNMi:
• HP Network Node Manager i Software Documentation List—Available on the HP manuals web site. Use this file to track additions to and revisions within the NNMi documentation set for this version of NNMi. Click a link to access a document on the HP manuals web site.
• NNMi Installation Guide—This is an interactive document, and is available on the NNMI 9.20 product media. See the nnmi_interactive_installation_en_README.txt file, located on the product media, for more information.
• HP Network Node Manager i Software Upgrade Reference—Available on the HP manuals web site.
• HP Network Node Manager i Software Release Notes—Available on the product media and the NNMi management server.
• HP Network Node Manager i Software System and Device Support Matrix—Available on the product media and the NNMi management server.
• HP Network Node Manager iSPI Network Engineering Toolset Planning and Installation Guide—Available on the NNM iSPI NET diagnostics server product media.
To check for recent updates or to verify that you are using the most recent edition of a document, go to:
http://h20230.www2.hp.com/selfsolve/manuals
This site requires that you register for an HP Passport and sign in. To register for an HP Passport ID, go to:
http://h20229.www2.hp.com/passport-registration.html
Or click the New users - please register link on the HP Passport sign-in page.
You will also receive updated or new editions if you subscribe to the appropriate product support service. Contact your HP sales representative for details.
3
NNMi 9.23
Support
Visit the HP Software Support Online web site at:
www.hp.com/go/hpsoftwaresupport
This web site provides contact information and details about the products, services, and support that HP Software offers.
HP Software online support provides customer self-solve capabilities. It provides a fast and efficient way to access interactive technical support tools needed to manage your business. As a valued support customer, you can benefit by using the support web site to:
• Search for knowledge documents of interest
• Submit and track support cases and enhancement requests
• Download software patches and associated patch documentation
• Manage support contracts
• Look up HP support contacts
• Review information about available services
• Enter into discussions with other software customers
• Research and register for software training
Most of the support areas require that you register as an HP Passport user and sign in. Many also require a support contract. To register for an HP Passport user ID, go to:
http://h20229.www2.hp.com/passport-registration.html
To find more information about access levels, go to:
http://h20230.www2.hp.com/new_access_levels.jsp
4
February 2015
Contents
HP NNMi–HP BSM RTSM Topology Integration . . . . . . . . . . . . . . . . . . . . . . . . . . . . . . . . . . . . . . . . . . . . . 8HP NNMi—HP Universal UCMDB Integration . . . . . . . . . . . . . . . . . . . . . . . . . . . . . . . . . . . . . . . . . . . . . . 8Comparison of HP BSM Topology and HP UCMDB Integrations. . . . . . . . . . . . . . . . . . . . . . . . . . . . . . . . . 8Comparison of Approaches to Integrating HP NNMi with HP BSM Operations Management . . . . . . . . 10HP NNMi–HP BSM Operations Management Integration. . . . . . . . . . . . . . . . . . . . . . . . . . . . . . . . . . . . . 11HP NNMi Integrated with HPOM Integrated with HP BSM Operations Management. . . . . . . . . . . . . . 11NNMi Visualizations in BSM . . . . . . . . . . . . . . . . . . . . . . . . . . . . . . . . . . . . . . . . . . . . . . . . . . . . . . . . . . . . 12HP NNMi–HP BSM Topology Integration . . . . . . . . . . . . . . . . . . . . . . . . . . . . . . . . . . . . . . . . . . . . . . . . . . 14
Value . . . . . . . . . . . . . . . . . . . . . . . . . . . . . . . . . . . . . . . . . . . . . . . . . . . . . . . . . . . . . . . . . . . . . . . . . . . . . 14Integrated Products . . . . . . . . . . . . . . . . . . . . . . . . . . . . . . . . . . . . . . . . . . . . . . . . . . . . . . . . . . . . . . . . . 14Documentation . . . . . . . . . . . . . . . . . . . . . . . . . . . . . . . . . . . . . . . . . . . . . . . . . . . . . . . . . . . . . . . . . . . . . 14
Enabling the HP NNMi–HP BSM Topology Integration . . . . . . . . . . . . . . . . . . . . . . . . . . . . . . . . . . . . . . . 15Using the HP NNMi–HP BSM Topology Integration . . . . . . . . . . . . . . . . . . . . . . . . . . . . . . . . . . . . . . . . . 16Changing the HP NNMi–HP BSM Topology Integration Configuration . . . . . . . . . . . . . . . . . . . . . . . . . . 18Disabling the HP NNMi–HP BSM Topology Integration . . . . . . . . . . . . . . . . . . . . . . . . . . . . . . . . . . . . . . 18Troubleshooting the HP NNMi–HP BSM Topology Integration . . . . . . . . . . . . . . . . . . . . . . . . . . . . . . . . . 18
Interface Labels Appear as MAC Addresses in the BSM User Interface . . . . . . . . . . . . . . . . . . . . . . . 18Duplicate CIs for Managed Nodes in the RTSM. . . . . . . . . . . . . . . . . . . . . . . . . . . . . . . . . . . . . . . . . . . 19
Application Failover and the HP NNMi–HP BSM Topology Integration . . . . . . . . . . . . . . . . . . . . . . . . . . 19HP NNMi–HP BSM Topology Integration Configuration Form Reference . . . . . . . . . . . . . . . . . . . . . . . . 19
NNMi management server Connection . . . . . . . . . . . . . . . . . . . . . . . . . . . . . . . . . . . . . . . . . . . . . . . . . . 19BSM Gateway Server Connection . . . . . . . . . . . . . . . . . . . . . . . . . . . . . . . . . . . . . . . . . . . . . . . . . . . . . . 20BSM Topology Filter . . . . . . . . . . . . . . . . . . . . . . . . . . . . . . . . . . . . . . . . . . . . . . . . . . . . . . . . . . . . . . . . . 21
HP NNMi–HP UCMDB Integration . . . . . . . . . . . . . . . . . . . . . . . . . . . . . . . . . . . . . . . . . . . . . . . . . . . . . . . 25Value . . . . . . . . . . . . . . . . . . . . . . . . . . . . . . . . . . . . . . . . . . . . . . . . . . . . . . . . . . . . . . . . . . . . . . . . . . . . . 26Integrated Products . . . . . . . . . . . . . . . . . . . . . . . . . . . . . . . . . . . . . . . . . . . . . . . . . . . . . . . . . . . . . . . . . 26Documentation . . . . . . . . . . . . . . . . . . . . . . . . . . . . . . . . . . . . . . . . . . . . . . . . . . . . . . . . . . . . . . . . . . . . . 26
Using the HP NNMi–HP UCMDB Integration . . . . . . . . . . . . . . . . . . . . . . . . . . . . . . . . . . . . . . . . . . . . . . 27Configuring Single Sign-On Between HP NNMi and HP UCMDB . . . . . . . . . . . . . . . . . . . . . . . . . . . . . . 27HP NNMi—HP BSM Operations Management Integration . . . . . . . . . . . . . . . . . . . . . . . . . . . . . . . . . . . . 29
Value . . . . . . . . . . . . . . . . . . . . . . . . . . . . . . . . . . . . . . . . . . . . . . . . . . . . . . . . . . . . . . . . . . . . . . . . . . . . . 30Integrated Products . . . . . . . . . . . . . . . . . . . . . . . . . . . . . . . . . . . . . . . . . . . . . . . . . . . . . . . . . . . . . . . . . 30Documentation . . . . . . . . . . . . . . . . . . . . . . . . . . . . . . . . . . . . . . . . . . . . . . . . . . . . . . . . . . . . . . . . . . . . . 31
Enabling the HP NNMi—HP BSM Operations Management Integration. . . . . . . . . . . . . . . . . . . . . . . . . 31Configuring HP NNMi to Close Incidents After the Corresponding HP BSM Events are Closed . . . . . . 34Using the HP NNMi—HP BSM Operations Management Integration . . . . . . . . . . . . . . . . . . . . . . . . . . . 35
Configuration Item Identifiers . . . . . . . . . . . . . . . . . . . . . . . . . . . . . . . . . . . . . . . . . . . . . . . . . . . . . . . . . 35Health Indicators . . . . . . . . . . . . . . . . . . . . . . . . . . . . . . . . . . . . . . . . . . . . . . . . . . . . . . . . . . . . . . . . . . . 36Default Policy Conditions . . . . . . . . . . . . . . . . . . . . . . . . . . . . . . . . . . . . . . . . . . . . . . . . . . . . . . . . . . . . . 36Customizing Policy Conditions. . . . . . . . . . . . . . . . . . . . . . . . . . . . . . . . . . . . . . . . . . . . . . . . . . . . . . . . . 37
Contents 5

NNMi 9.23
More Information . . . . . . . . . . . . . . . . . . . . . . . . . . . . . . . . . . . . . . . . . . . . . . . . . . . . . . . . . . . . . . . . . . . 37Changing the HP NNMi—HP BSM Operations Management Integration . . . . . . . . . . . . . . . . . . . . . . . . 38
Update the SNMP Trap Policy Conditions for New NNMi Traps . . . . . . . . . . . . . . . . . . . . . . . . . . . . . 38Change the Configuration Parameters . . . . . . . . . . . . . . . . . . . . . . . . . . . . . . . . . . . . . . . . . . . . . . . . . . 38
Disabling the HP NNMi—HP BSM Operations Management Integration . . . . . . . . . . . . . . . . . . . . . . . . 39Troubleshooting the HP NNMi—HP BSM Operations Management Integration. . . . . . . . . . . . . . . . . . . 39
BSM Operations Management Event Browser Contains No Forwarded Incidents . . . . . . . . . . . . . . . 39BSM Operations Management Event Browser Contains Only Some Forwarded Incidents. . . . . . . . . 42
HP NNMi–HPOM Agent Destination Form Reference (BSM Operations Management Integration) . . . 42BSM Connector Connection . . . . . . . . . . . . . . . . . . . . . . . . . . . . . . . . . . . . . . . . . . . . . . . . . . . . . . . . . . . 43BSM Operations Management Integration Content . . . . . . . . . . . . . . . . . . . . . . . . . . . . . . . . . . . . . . . 44BSM Connector Destination Status Information . . . . . . . . . . . . . . . . . . . . . . . . . . . . . . . . . . . . . . . . . . 46
MyBSM Portal . . . . . . . . . . . . . . . . . . . . . . . . . . . . . . . . . . . . . . . . . . . . . . . . . . . . . . . . . . . . . . . . . . . . . . . . 47NNMi Components Available in MyBSM . . . . . . . . . . . . . . . . . . . . . . . . . . . . . . . . . . . . . . . . . . . . . . . . 48Viewing the NNMi Components in MyBSM . . . . . . . . . . . . . . . . . . . . . . . . . . . . . . . . . . . . . . . . . . . . . . 48
Configuring Single Sign-On Between HP NNMi and HP BSM . . . . . . . . . . . . . . . . . . . . . . . . . . . . . . . . . 49Configuring an SSL Connection to HP BSM . . . . . . . . . . . . . . . . . . . . . . . . . . . . . . . . . . . . . . . . . . . . . . . . 50NNMi Data Available from BSM End User Management Reports. . . . . . . . . . . . . . . . . . . . . . . . . . . . . . . 54
End User Management Reports with Drilldown to HP NNMi. . . . . . . . . . . . . . . . . . . . . . . . . . . . . . . . 54Configuring Drilldown to NNMi Data . . . . . . . . . . . . . . . . . . . . . . . . . . . . . . . . . . . . . . . . . . . . . . . . . . . 55
Enabling NNMi Visualizations from HP BSM. . . . . . . . . . . . . . . . . . . . . . . . . . . . . . . . . . . . . . . . . . . . . . . 56
6 NNMi-BSM Integration Guide

HP Busi
February 2015
HP Business Service
Management Overview
ness Service Management Overview
The HP Business Service Management (HP BSM) platform provides tools for managing the availability of applications in production, monitoring system performance, monitoring infrastructure performance, and proactively resolving problems when they arise.
For information about purchasing HP BSM, contact your HP sales representative.
This chapter introduces the available integrations between HP NNMi and HP BSM. It contains the following topics:
• HP NNMi–HP BSM RTSM Topology Integration on page 8
• HP NNMi—HP Universal UCMDB Integration on page 8
• Comparison of HP BSM Topology and HP UCMDB Integrations on page 8
• Comparison of Approaches to Integrating HP NNMi with HP BSM Operations Management on page 10
• HP NNMi–HP BSM Operations Management Integration on page 11
• HP NNMi Integrated with HPOM Integrated with HP BSM Operations Management on page 11
• NNMi Visualizations in BSM on page 12
7

NNMi 9.23
HP NNMi–HP BSM RTSM Topology Integration
The HP NNMi–HP BSM RTSM Topology integration is different from the HP NNMi–HP UCMDB integration. HP recommends using the HP NNMi–HP BSM RTSM Topology integration for HP NNMi 9.0 or newer.
The HP NNMi–HP BSM Topology integration populates the HP BSM Run-time Service Model (RTSM) with the NNMi topology. HP BSM stores each device, interface, IP address, and a few other artifacts in the network topology as Configuration Items (CI) and includes them in the relevant views. HP BSM users and integrated applications can see the relationships between network devices. For more information, see HP Business Service Management Topology on page 13.
HP recommends the HP NNMi–HP UCMDB integration, summarized in HP NNMi—HP Universal UCMDB Integration, for backward compatibility with HP NNMi product versions older than HP NNMi 9.00.
HP NNMi—HP Universal UCMDB Integration
The HP NNMi–HP UCMDB integration method is different from the HP NNMi–HP BSM RTSM Topology integration. HP recommends the HP NNMi–HP UCMDB integration for backward compatibility with HP NNMi product versions older than HP NNMi 9.00.
HP Universal CMDB (HP UCMDB) automatically maintains accurate, up-to-date information on infrastructure and application relationships through native integration to HP Discovery and Dependency mapping (DDM). For more information, see HP Universal CMDB on page 25.
HP recommends the HP NNMi–HP BSM RTSM Topology integration, summarized in HP NNMi–HP BSM RTSM Topology Integration, for HP NNMi 9.00 or newer.
Comparison of HP BSM Topology and HP UCMDB Integrations
The HP NNMi–HP UCMDB and HP NNMi–HP BSM Topology integrations support different customer needs:
• HP recommends using the HP NNMi–HP BSM Topology integration for HP NNMi 9.00 or newer. The HP NNMi–HP BSM Topology integration is a real-time monitoring based synchronization tool using health indicators and key performance indicator (KPI) calculations.
• The HP NNMi–HP UCMDB integration uses a more static snapshot of NNMi inventory, is more useful for configuration or asset management, and is used for backward compatibility with HP NNMi product versions older than HP NNMi 9.00.
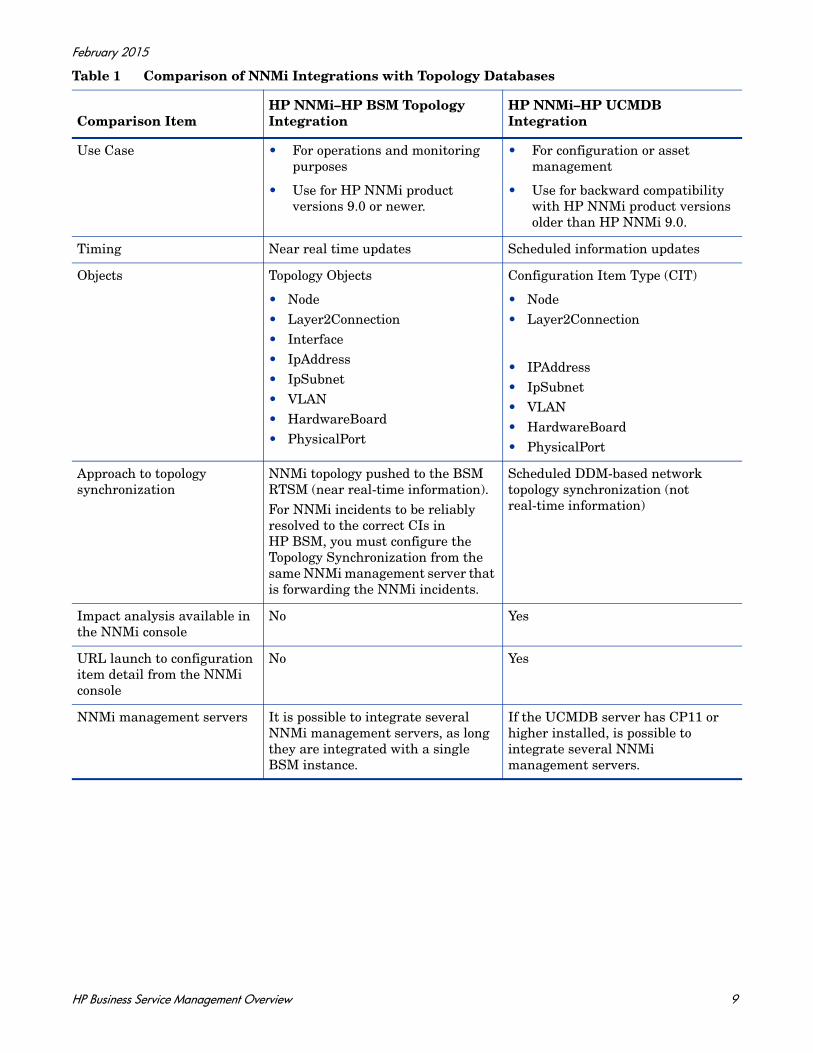
Table 1 on page 9 describes the primary differences between the HP NNMi–HP BSM Topology integration and the HP NNMi–HP UCMDB integration.
.
8 NNMi-BSM Integration Guide
February 2015
Table 1 Comparison of NNMi Integrations with Topology Databases
Comparison ItemHP NNMi–HP BSM Topology Integration
HP NNMi–HP UCMDB Integration
Use Case • For operations and monitoring purposes
• Use for HP NNMi product versions 9.0 or newer.
• For configuration or asset management
• Use for backward compatibility with HP NNMi product versions older than HP NNMi 9.0.
Timing Near real time updates Scheduled information updates
Objects Topology Objects
• Node• Layer2Connection• Interface• IpAddress• IpSubnet• VLAN• HardwareBoard• PhysicalPort
Configuration Item Type (CIT)
• Node• Layer2Connection
• IPAddress• IpSubnet• VLAN• HardwareBoard• PhysicalPort
Approach to topology synchronization
NNMi topology pushed to the BSM RTSM (near real-time information).For NNMi incidents to be reliably resolved to the correct CIs in HP BSM, you must configure the Topology Synchronization from the same NNMi management server that is forwarding the NNMi incidents.
Scheduled DDM-based network topology synchronization (not real-time information)
Impact analysis available in the NNMi console
No Yes
URL launch to configuration item detail from the NNMi console
No Yes
NNMi management servers It is possible to integrate several NNMi management servers, as long they are integrated with a single BSM instance.
If the UCMDB server has CP11 or higher installed, is possible to integrate several NNMi management servers.
HP Business Service Management Overview 9

NNMi 9.23
Comparison of Approaches to Integrating HP NNMi with HP BSM Operations Management
Table 2 compares the HP NNMi—HP BSM Operations Management with the HP NNMi—HPOM integration.
See HP NNMi–HP BSM Operations Management Integration on page 11 for information about integrating HP NNMi with HP BSM Operations Management.
See the HP Network Node Manager i Software—HP Operations Manager Integration Guide for information about integrating HP NNMi with HPOM.
.
Table 2 Comparison of NNMi Integrations with HP BSM Operations Management and HPOM
Comparison ItemDirect Integration with the BSM Connector Indirect Integration Through HPOM
Instruction text Events cannot contain instruction text. You could create a tool to launch user-defined instructions as a URL. (You would need to create external documentation for this tool).
Events can contain instruction text.
Actions Events cannot contain operator-initiated actions or automatic actions. You could create tools for these purposes.
Events can contain operator-initiated, automatic actions, or both.
NNMi management server monitoring
The BSM Connector serves as an event forwarder only. It does not monitor the NNMi management server.
The NNMi management server can be fully monitored by an HP Operations agent and policies.
Policy management If your environment contains multiple NNMi management servers, you must manually exchange policies among the BSM Connectors associated with the NNMi management servers.
For the agent implementation of the HP NNMi—HPOM integration: If your environment contains multiple NNMi management servers, HPOM can centrally manage the policies for the events forwarded from HP NNMi.
Licensing costs The BSM Connector is not licensed, so there is no licensing cost.
The HP Operations Agent license adds customer cost per NNMi management server.
Communication If an event’s lifecycle state changes to the closed state in BSM, it can be synchronized back to the event source through the BSM Connector.
• The agent implementation of the HP NNMi—HPOM integration is unidirectional.
• The web services implementations of the HP NNMi—HPOM integration provides bidirectional event handling.
10 NNMi-BSM Integration Guide
February 2015
HP NNMi–HP BSM Operations Management Integration
The HP NNMi—HP BSM Operations Management integration forwards NNMi management event incidents as SNMPv2c traps to the BSM Connector. The BSM Connector filters the NNMi traps and forwards them to the HP BSM Operations Management event browser. If you have an Event Management Foundation license, NNMi events are displayed in the Event Browser in Operations Management. You can also access the NNMi console from the Operations Management Event Browser.
The HP NNMi—HP BSM Operations Management integration can also forward the SNMP traps that HP NNMi receives to the BSM Connector.
The BSM Connector can be on the NNMi management server or on a separate server.
If the NNMi events have corresponding health indicators defined, these health indicators affect the status of the relevant CIs in BSM applications, such as Service Health and Service Level Management.
If you enable northbound forwarding as recommended (using the -omi_hi option to nnmopcexport.ovpl), the events visible in the HP BSM Operations Management event browser can include health indicators. If you enable the NNMi- BSM topology sync, the events are matched to CI's in the BSM RTSM inventory. For more information, see Health Indicators on page 36.
For more information, see HP NNMi—HP BSM Operations Management Integration on page 29.
HP NNMi Integrated with HPOM Integrated with HP BSM Operations Management
If you want NNMi incidents to appear in the HPOM active messages browser as well as the BSM Operations Management event browser, do both of the following in any order:
• Configure the agent implementation of the HP NNMi—HPOM integration, as described in the HP NNMi—HPOM Integration (Agent Implementation) section of the HP Network Node Manager i Software - HP Operations Manager Integration Guide
• Configure the HPOM integration with the BSM Operations Management event browser as described in the HP BSM - Operations Manager Integration Guide.
HP Business Service Management Overview 11

NNMi 9.23
NNMi Visualizations in BSM
When both HP NNMi and HP BSM are running in your environment, proper integration between the two products provides access to the following visualizations of NNMi data within HP BSM:
• NNMi components in the MyBSM portal. For more information, see MyBSM Portal on page 47.
• NNMi console views launched from events in the BSM Operations Management event browser. For more information, see Using the HP NNMi—HP BSM Operations Management Integration on page 35.
12 NNMi-BSM Integration Guide
HP Busi
February 2015
HP Business Service
Management Topology
ness Service Management Topology
HP recommends using the HP NNMi–HP BSM Topology integration method (explained in this chapter) for HP NNMi 9.0 or newer. This recommended integration is different from the HP NNMi–HP UCMDB integration explained in HP NNMi–HP UCMDB Integration on page 25.
HP Business Service Management (HP BSM) software provides tools for managing the availability of applications in production, monitoring system performance, monitoring infrastructure performance, and proactively resolving problems when they arise.
For information about purchasing HP BSM, contact your HP sales representative.
This chapter contains the following topics:
• HP NNMi–HP BSM Topology Integration
• Enabling the HP NNMi–HP BSM Topology Integration
• Using the HP NNMi–HP BSM Topology Integration
• Changing the HP NNMi–HP BSM Topology Integration Configuration
• Disabling the HP NNMi–HP BSM Topology Integration
• Troubleshooting the HP NNMi–HP BSM Topology Integration
• Application Failover and the HP NNMi–HP BSM Topology Integration
• HP NNMi–HP BSM Topology Integration Configuration Form Reference
13

NNMi 9.23
HP NNMi–HP BSM Topology Integration
The HP NNMi–HP BSM Topology integration populates the BSM Run-time Service Model (RTSM) with the NNMi topology. HP BSM stores each device in the NNMi topology as a configuration item (CI). BSM RTSM Users and integrated applications can see the relationships between network devices.
Additionally, the integration stores the identifier of populated CIs in the NNMi database. Uses for the CIs of the NNMi-managed devices include the following:
• NNMi components in the MyBSM portal.
• Path health views available from the BSM Real User Monitor (RUM).
• Using the agent implementation of the HP NNMi—HPOM integration, and pointing to a BSM Connector, results in an HP NNMi–HP BSM Operations Management integration that associates incidents regarding NNMi-managed devices with BSM CIs. For more information, see Configuration Item Identifiers on page 35.
• Using the agent implementation of the HP NNMi—HPOM integration, and pointing to an HPOM agent on the NNMi management server, can associate incidents regarding NNMi-managed devices with BSM CIs. For more information, see the Configuration Item Identifiers section of the HP Network Node Manager i Software - HP Operations Manager Integration Guide
Value
The HP NNMi–HP BSM Topology integration sets up HP NNMi as the authoritative source for network device status and relationship information. The integration is an enabler for other integrations with HP BSM. It does not provide access to the HP BSM user interface from the NNMi console.
Integrated Products
The information in this chapter applies to the following products:
• HP BSM
• HP NNMi 9.20
HP NNMi and HP BSM must be installed on separate computers. The NNMi management server and the BSM gateway server computer can be of the same or different operating systems.
For the most recent information about supported hardware platforms and operating systems, see the support matrices for both products.
Documentation
This chapter describes how to configure HP NNMi to communicate with HP BSM.
For the list of supported versions, see the NNMi System and Device Support Matrix.
14 NNMi-BSM Integration Guide
February 2015
The BSM documentation suite describes the BSM features and capabilities in detail. The documentation suite is included on the BSM product media.
Enabling the HP NNMi–HP BSM Topology Integration
On the NNMi management server, configure the connection between HP NNMi and HP BSM by following these steps:
1 Prerequisite: Make sure you have the HP BSM and HP NNMi licenses installed. For details, see License Management Overview in the BSM Platform Administration Guide.
2 Optional. Update the RTSM for interfaces to set the interface display label to prefer interface name over MAC address:
a In the BSM user interface, open the CI Type Manager page (Admin > RTSM Administration > Modeling > CI Type Manager).
b In the CI Types pane, select Interface (Configuration Item > Infrastructure Element > Node Element > Interface).
c On the Default Label tab in the editing pane, under CI Type Attributes, select InterfaceName.
d Under CI Type Label Definition Format, set the format to:
interface_name | mac_address
3 In the NNMi console, open the HP NNMi–HP BSM Topology Integration Configuration form (Integration Module Configuration > HP BSM Topology).
4 Select the Enable Integration check box to make the remaining fields on the form available.
5 Enter the information for connecting to the NNMi management server. For information about these fields, see NNMi management server Connection on page 19.
6 Enter the information for connecting to the BSM gateway server. For information about these fields, see BSM Gateway Server Connection on page 20.
7 Optional: Select Only synchronize managed objects if you want to exclude unmanaged CIs and unconnected interfaces from the integration.
HP NNMi cannot simultaneously integrate with HP BSM topology and HP Universal CMDB (HP UCMDB). If the HP NNMi–HP UCMDB integration is configured on this NNMi management server, disable that configuration before enabling the HP NNMi–HP BSM Topology integration. If you want NNMi information in both databases, do both of the following in any order:
• Configure the HP NNMi–HP BSM Topology integration, as described in this chapter.
• Configure the BSM integration with UCMDB, as described in the UCMDB Data Flow Management Guide, which is included on the UCMDB product media. This manual is also available for the UCMDB product at:http://h20230.www2.hp.com/selfsolve/manuals
HP Business Service Management Topology 15

NNMi 9.23
8 Optional: Enter the information that describes which NNMi nodes should be maintained in HP BSM. For information about these fields, see BSM Topology Filter on page 21.
9 Click Submit at the bottom of the form.
A new window displays a status message. If the message indicates a problem with connecting to the NNMi management server, click Return, and then adjust the values as suggested by the text of the error message.
10 Make sure that single sign-is configured in both HP BSM and HP NNMi with the same initialization string values. For details on how to configure the initialization string values in HP BSM, see Authentication Wizard in the BSM Platform Administration Guide. For details on how to configure the initialization string values in NNMi, see Configuring Single Sign-On Between HP NNMi and HP BSM on page 49.
11 Connect HP NNMi to another HP BSM instance: As HP NNMi stores the RTSM IDs after the first run of the topology integration, the reconciliation works only partially on the RTSM, and the NNMi log files still include several reconciliation errors, which are caused by the non-existing RTSM IDs. To fix this problem, complete the following steps:
a Change the integration to the new BSM system.
b Log on to the NNMi JMX console at http://<NNMi_fqdn_and_port>/jmx-console using the system account and password.
c Go to mbean NnmBsmModule.
d Run java.lang.String resetNnmBsmIds().You should see a list of devices from which the RTSM ID has been removed.
e Disable and enable the topology Integration to get the CIs into RTSM.
12 To display NNMi data in HP BSM and to access the NNMi components in MyBSM, complete the steps shows in Enabling NNMi Visualizations from HP BSM on page 56.
13 You can view NNMi data in MyBSM and EUM, as described in NNMi Components Available in MyBSM on page 48 and End User Management Reports with Drilldown to HP NNMi on page 54.
Using the HP NNMi–HP BSM Topology Integration
The HP NNMi–HP BSM Topology integration populates the following CI types in the BSM RTSM:
• InfrastructureElement > Node
The nodes in the NNMi topology. You can limit the set of nodes as described in BSM Topology Filter on page 21.
If you cannot connect to the NNMi management server, and suspect a problem with certificates, see Working with Certificates for NNMi in the NNMi 9.23 Deployment Reference.
16 NNMi-BSM Integration Guide
February 2015
• InfrastructureElement > NodeElement> Interface
The interfaces associated with the Node CIs that the integration populates in 3.
• InfrastructureElement > NetworkEntity > IpAddress
The IP addresses of the interfaces associated with the Node CIs that the integration populates in HP BSM.
• InfrastructureElement > NodeElement> HardwareBoard
The cards associated with the Node CIs that the integration populates in BSM.
• InfrastructureElement > NodeElement> PhysicalPort
The ports associated with the Node CIs that the integration populates in HP BSM.
• InfrastructureElement > NetworkEntity > IpSubnet
All subnets in the NNMi topology.
• InfrastructureElement > NetworkEntity > Layer2Connection
The NNMi Layer 2 connections with at least two connection ends that the integration populates as Node CIs in HP BSM.
For each CI created in the BSM RTSM, the integration stores the RTSM identifier in the NNMi database.
The HP NNMi–HP BSM Topology integration forwards NNMi information and updates to the BSM RTSM as a one-way communication. Because HP NNMi does not know or control how the BSM CI information is used, the integration relies on the BSM CI aging settings to delete CIs that have not been updated for a set period of time.
The HP NNMi–HP BSM Topology integration enables other products to use the NNMi topology information when they integrate with HP BSM. There is no direct user interaction with this integration.
By default, HP NNMi does not discover end nodes. Update the NNMi discovery and monitoring configuration to include the end nodes that you want to see in HP BSM.
For information about the CI Lifecycle, including instructions about enabling and running the aging mechanism, see CI Lifecycle and the Aging Mechanism and the related links in the BSM Help. To navigate to the CI Lifecycle and the Aging Mechanism section in the BSM Help, use the following menu located in the BSM console: RTSM Administration > Administration > CI Lifecycle and the Aging Mechanism.
To enable aging and configure aging attributes from the CI Type Manager, see the CI Lifecycle chapter in the RTSM Administration Guide.
If the NNMi topology is not synchronized with the BSM RTSM topology, the Monitored by property of the BSM CIs corresponding to the NNMi CIs is empty, and these CIs are not displayed in the System Monitors only Perspective, System Hardware Monitoring, and System Software Monitoring views.
HP Business Service Management Topology 17

NNMi 9.23
Changing the HP NNMi–HP BSM Topology Integration Configuration
1 In the NNMi console, open the HP NNMi–HP BSM Topology Integration Configuration form (Integration Module Configuration > HP BSM Topology).
2 Modify the values as appropriate. For information about the fields on this form, see HP NNMi–HP BSM Topology Integration Configuration Form Reference on page 19.
3 Verify that the Enable Integration check box at the top of the form is selected, and then click Submit at the bottom of the form.
Disabling the HP NNMi–HP BSM Topology Integration
1 In the NNMi console, open the HP NNMi–HP BSM Topology Integration Configuration form (Integration Module Configuration > HP BSM Topology).
2 Clear the Enable Integration check box at the top of the form, and then click Submit at the bottom of the form. The integration URL actions are no longer available.
Troubleshooting the HP NNMi–HP BSM Topology Integration
This section contains the following topics:
• Interface Labels Appear as MAC Addresses in the BSM User Interface on page 18
• Duplicate CIs for Managed Nodes in the RTSM on page 19
For information about troubleshooting the connection to the RTSM, see the BSM documentation suite.
Interface Labels Appear as MAC Addresses in the BSM User Interface
By default, the RTSM prefers MAC addresses over interface names for an interface label. To display interface names in the BSM user interface, edit the interface model as described in step 1 on page 15.
The changes take effect immediately. You do not need to restart ovjboss.
The changes take effect immediately. You do not need to restart ovjboss.
18 NNMi-BSM Integration Guide

February 2015
Duplicate CIs for Managed Nodes in the RTSM
If HP Operations Manager also synchronizes with the RTSM, you might see duplicate CIs for managed nodes in the RTSM. Nodes discovered by HPOM are of CI type Computer, while nodes discovered by NNM iSPI NET are of CI type Node. This duplication does not affect product performance.
Application Failover and the HP NNMi–HP BSM Topology Integration
If the NNMi management server participates in NNMi application failover, the HP NNMi–HP BSM Topology continues with the new NNMi management server hostname after failover occurs. Failover should be transparent to users of the integration.
The integration does not support automatic failover of the BSM server.
HP NNMi–HP BSM Topology Integration Configuration Form Reference
The HP NNMi–HP BSM Topology Integration Configuration form contains the parameters for configuring communications between HP NNMi and HP BSM. This form is available from the Integration Module Configuration workspace.
The HP NNMi–HP BSM Topology Integration Configuration form collects information for the following areas:
• NNMi management server Connection on page 19
• BSM Gateway Server Connection on page 20
• BSM Topology Filter on page 21
To apply changes to the integration configuration, update the values on the HP NNMi–HP BSM Topology Integration Configuration form, and then click Submit.
NNMi management server Connection
Table 3 on page 20 lists the parameters for connecting to the NNMi management server. This is the same information that you use to open the NNMi console. You can determine many of these values by examining the URL that invokes an NNMi console session. Coordinate with the NNMi administrator to determine the appropriate values for this section of the configuration form.
Only NNMi users with the Administrator role can access the HP NNMi–HP BSM Topology Integration Configuration form.
HP Business Service Management Topology 19
NNMi 9.23
.
BSM Gateway Server Connection
Table 4 lists the parameters for connecting to the BSM gateway server to communicate with the BSM RTSM. Coordinate with the BSM administrator to determine the appropriate values for this section of the configuration.
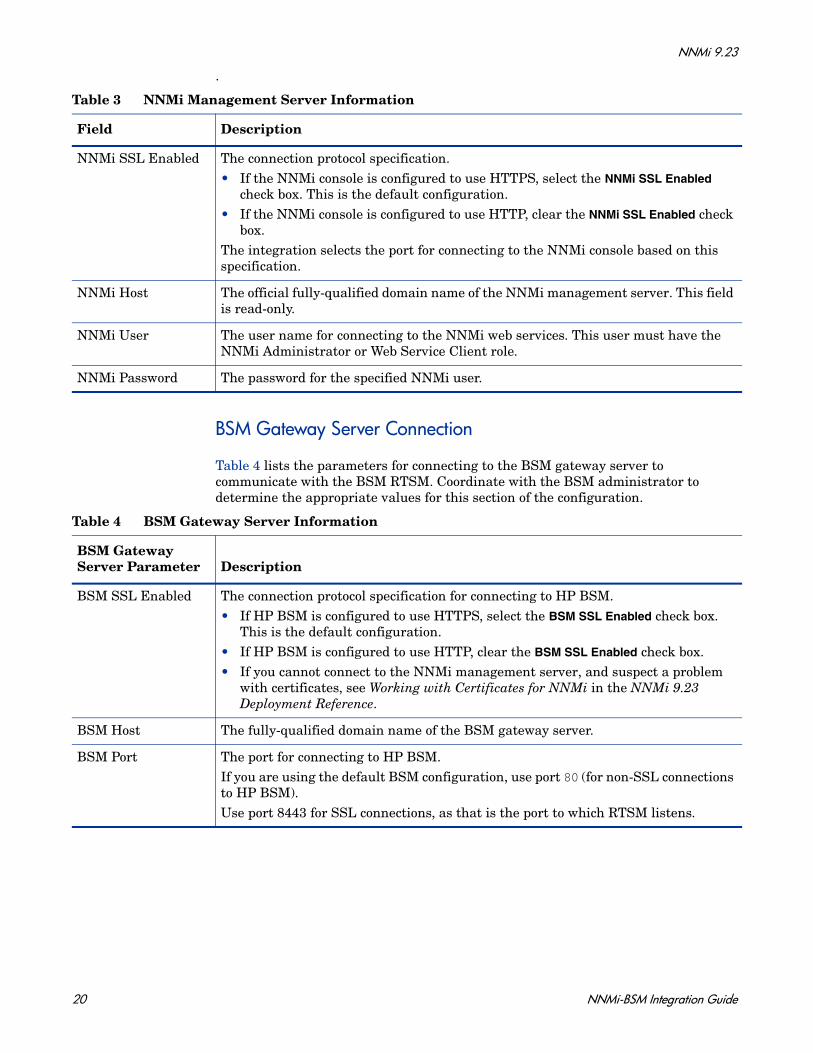
Table 3 NNMi Management Server Information
Field Description
NNMi SSL Enabled The connection protocol specification.• If the NNMi console is configured to use HTTPS, select the NNMi SSL Enabled
check box. This is the default configuration.• If the NNMi console is configured to use HTTP, clear the NNMi SSL Enabled check
box.The integration selects the port for connecting to the NNMi console based on this specification.
NNMi Host The official fully-qualified domain name of the NNMi management server. This field is read-only.
NNMi User The user name for connecting to the NNMi web services. This user must have the NNMi Administrator or Web Service Client role.
NNMi Password The password for the specified NNMi user.
Table 4 BSM Gateway Server Information
BSM Gateway Server Parameter Description
BSM SSL Enabled The connection protocol specification for connecting to HP BSM.• If HP BSM is configured to use HTTPS, select the BSM SSL Enabled check box.
This is the default configuration.• If HP BSM is configured to use HTTP, clear the BSM SSL Enabled check box.• If you cannot connect to the NNMi management server, and suspect a problem
with certificates, see Working with Certificates for NNMi in the NNMi 9.23 Deployment Reference.
BSM Host The fully-qualified domain name of the BSM gateway server.
BSM Port The port for connecting to HP BSM.If you are using the default BSM configuration, use port 80 (for non-SSL connections to HP BSM). Use port 8443 for SSL connections, as that is the port to which RTSM listens.
20 NNMi-BSM Integration Guide
February 2015
BSM Topology Filter
By default, the HP NNMi–HP BSM Topology integration conveys information about all nodes and interfaces in the NNMi topology to HP BSM. If you want the integration to maintain only a subset of the NNMi topology information in HP BSM, specify one or both of the optional node groups as described in this section.
The scenarios for the filtering NNMi topology information are as follows:
• Definitive—In HP NNMi, create one node group that explicitly defines every NNMi node to be included in the BSM topology. This approach requires an intimate knowledge of your network topology.
For example, you might create a node group called BSM_Topology containing the following types of devices:
— The application servers in the managed environment
— The routers and switches that connect the application servers
In this case, specify the node group (for example, BSM_Topology) as the topology filter node group. Do not specify an additional connections node group.
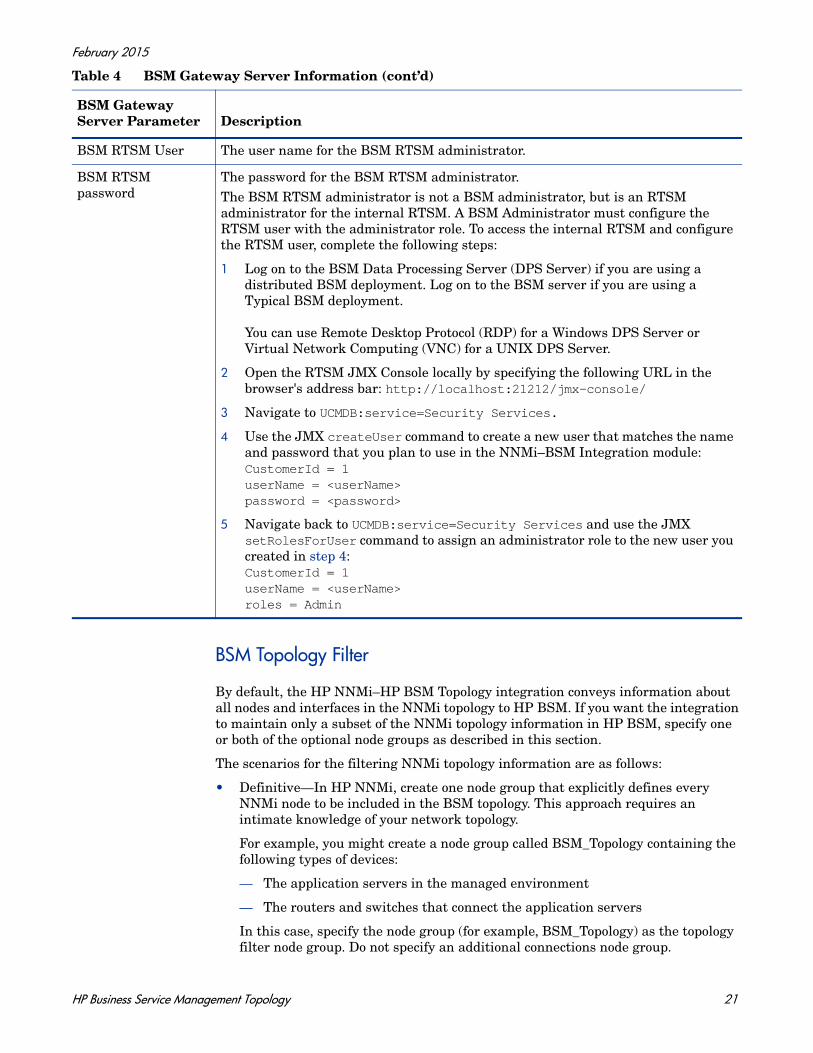
BSM RTSM User The user name for the BSM RTSM administrator.
BSM RTSM password
The password for the BSM RTSM administrator.The BSM RTSM administrator is not a BSM administrator, but is an RTSM administrator for the internal RTSM. A BSM Administrator must configure the RTSM user with the administrator role. To access the internal RTSM and configure the RTSM user, complete the following steps:
1 Log on to the BSM Data Processing Server (DPS Server) if you are using a distributed BSM deployment. Log on to the BSM server if you are using a Typical BSM deployment.
You can use Remote Desktop Protocol (RDP) for a Windows DPS Server or Virtual Network Computing (VNC) for a UNIX DPS Server.
2 Open the RTSM JMX Console locally by specifying the following URL in the browser's address bar: http://localhost:21212/jmx-console/
3 Navigate to UCMDB:service=Security Services.
4 Use the JMX createUser command to create a new user that matches the name and password that you plan to use in the NNMi–BSM Integration module: CustomerId = 1userName = <userName>password = <password>
5 Navigate back to UCMDB:service=Security Services and use the JMX setRolesForUser command to assign an administrator role to the new user you created in step 4:CustomerId = 1userName = <userName>roles = Admin
Table 4 BSM Gateway Server Information (cont’d)
BSM Gateway Server Parameter Description
HP Business Service Management Topology 21
NNMi 9.23
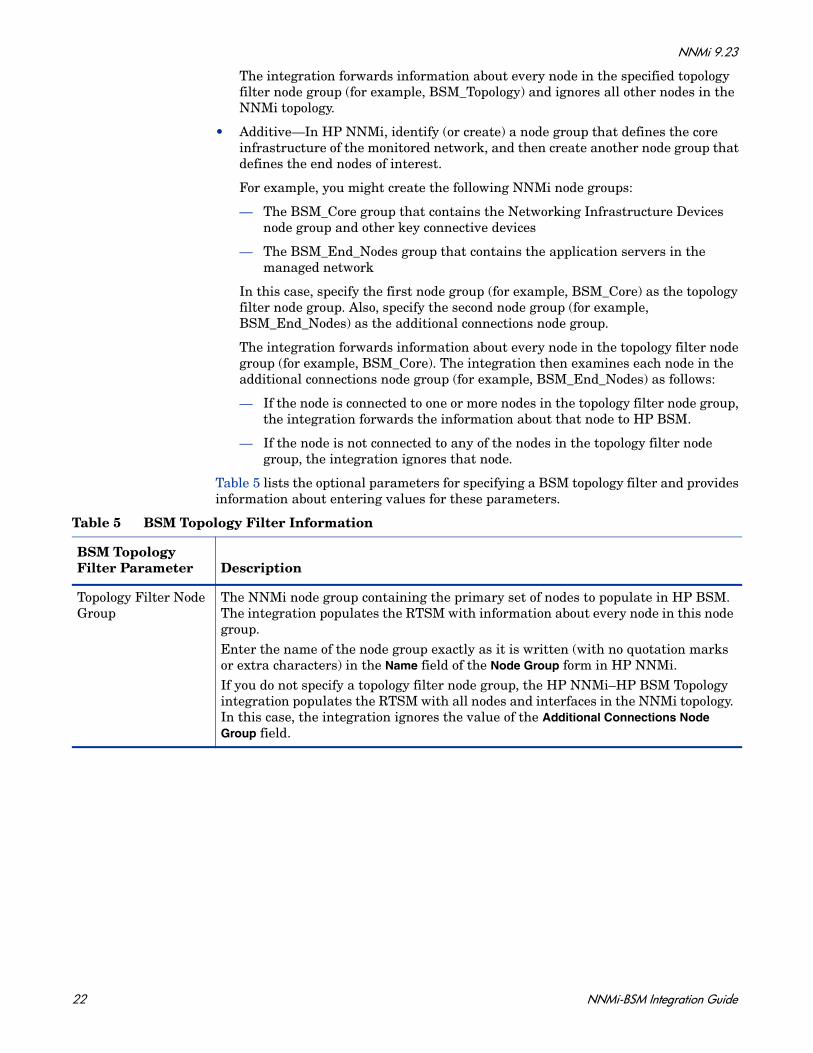
The integration forwards information about every node in the specified topology filter node group (for example, BSM_Topology) and ignores all other nodes in the NNMi topology.
• Additive—In HP NNMi, identify (or create) a node group that defines the core infrastructure of the monitored network, and then create another node group that defines the end nodes of interest.
For example, you might create the following NNMi node groups:
— The BSM_Core group that contains the Networking Infrastructure Devices node group and other key connective devices
— The BSM_End_Nodes group that contains the application servers in the managed network
In this case, specify the first node group (for example, BSM_Core) as the topology filter node group. Also, specify the second node group (for example, BSM_End_Nodes) as the additional connections node group.
The integration forwards information about every node in the topology filter node group (for example, BSM_Core). The integration then examines each node in the additional connections node group (for example, BSM_End_Nodes) as follows:
— If the node is connected to one or more nodes in the topology filter node group, the integration forwards the information about that node to HP BSM.
— If the node is not connected to any of the nodes in the topology filter node group, the integration ignores that node.
Table 5 lists the optional parameters for specifying a BSM topology filter and provides information about entering values for these parameters.
Table 5 BSM Topology Filter Information
BSM Topology Filter Parameter Description
Topology Filter Node Group
The NNMi node group containing the primary set of nodes to populate in HP BSM. The integration populates the RTSM with information about every node in this node group.Enter the name of the node group exactly as it is written (with no quotation marks or extra characters) in the Name field of the Node Group form in HP NNMi.If you do not specify a topology filter node group, the HP NNMi–HP BSM Topology integration populates the RTSM with all nodes and interfaces in the NNMi topology. In this case, the integration ignores the value of the Additional Connections Node Group field.
22 NNMi-BSM Integration Guide

February 2015
Additional Connections Node Group
The NNMi node group containing hints of additional nodes to populate in HP BSM. The integration populates the RTSM with information about only those nodes in this node group that are connected (in the NNMi topology) to one or more nodes in the topology filter node group.Enter the name of the node group exactly as it is written (with no quotation marks or extra characters) in the Name field of the Node Group form in HP NNMi.If you specify a topology filter node group and specify an additional connections node group, the HP NNMi–HP BSM Topology integration forwards information about the nodes and interfaces in the topology filter node group and the connected nodes in the additional connections node group.If you specify a topology filter node group but do not specify an additional connections node group, the HP NNMi–HP BSM Topology integration forwards information about the nodes and interfaces in the topology filter node group only.If you do not specify a topology filter node group, the HP NNMi–HP BSM Topology integration populates the RTSM with all nodes and interfaces in the NNMi topology. In this case, the integration ignores the value of the Additional Connections Node Group field.
Table 5 BSM Topology Filter Information (cont’d)
BSM Topology Filter Parameter Description
HP Business Service Management Topology 23

NNMi 9.23
24 NNMi-BSM Integration Guide
HP Univ
February 2015
HP Universal CMDB
ersal CMDB
HP recommends the HP NNMi–HP UCMDB integration for backward compatibility with HP NNMi product versions older than HP NNMi 9.00. This recommended integration is different from the HP NNMi–HP BSM Topology integration explained in HP NNMi–HP BSM Topology Integration on page 14. The HP NNMi–HP UCMDB integration uses a more static snapshot of NNMi inventory and is more useful for configuration or asset management.
HP Universal CMDB (HP UCMDB) periodically maintains information on infrastructure and application relationships through native integration to HP Discovery and Dependency mapping (DDM).
HP UCMDB is beneficial for the following tasks:
• Using impact modeling to show the rippling effect of infrastructure and application changes before they occur.
• Tracking actual planned and unplanned changes through discovered change history.
• Gaining a shared, authoritative view of the environment through awareness of existing data repositories.
For information about purchasing HP UCMDB, contact your HP sales representative.
This chapter contains the following topics:
• HP NNMi–HP UCMDB Integration
• Using the HP NNMi–HP UCMDB Integration
• Configuring Single Sign-On Between HP NNMi and HP UCMDB
HP NNMi–HP UCMDB Integration
The HP NNMi–HP UCMDB integration shares NNMi topology information with HP UCMDB. HP UCMDB stores each device in the NNMi topology as a configuration item (CI). HP UCMDB applies Discovery and Dependency Mapping (DDM) patterns
25

NNMi 9.23
to the CIs for the NNMi topology to predict the impact of a device failure. This impact analysis is available from the HP UCMDB user interface and also from the NNMi console.
Additionally, the integration stores the identifier of populated CIs in the NNMi database. Uses for the CIs of the NNMi-managed devices include the following:
• The HP NNMi–HP BSM Operations Management integration can associate incidents regarding NNMi-managed devices with UCMDB CIs. For more information, see Configuration Item Identifiers on page 35.
• The agent implementation of the HP NNMi—HPOM integration can associate incidents regarding NNMi-managed devices with UCMDB CIs. For more information, see Configuration Item Identifiers on page 35.
Value
The HP NNMi–HP UCMDB integration sets up HP NNMi as the authoritative source for network device relationships. The integration provides access to UCMDB impact analysis and CI details from the NNMi console.
Integrated Products
The information in this chapter applies to the following products:
• HP UCMDB.
• NNMi 9.20
HP NNMi and HP UCMDB 9.0x cannot be installed on the same computer. The two products must be installed on different computers in either of the following configurations:
• Different operating systems. For example, the NNMi management server is a Linux system, and the UCMDB 9.0x server is a Windows system.
• The same operating system. For example, the NNMi management server is a Windows system, and the UCMDB 9.0x server is a second Windows system.
For the most recent information about supported hardware platforms and operating systems, see the support matrices for both products.
Documentation
The HP NNMi–HP UCMDB Integration is fully described in the HP Network Node Manager (NNMi) Integration section of the HP UCMDB Online Help (version 10.0 or newer).
The HP NNMi–HP UCMDB integration information included in this chapter refers to the integration between NNMi and HP Universal CMDB version 9.0x.
For the list of supported versions, see the NNMi System and Device Support Matrix.
26 NNMi-BSM Integration Guide
February 2015
Using the HP NNMi–HP UCMDB Integration
For information about enabling, u sing, disabling, and troubleshooting the HP NNMi–HP UCMDB integration, see the HP Universal CMDB–HP Network Node Manager (NNMi) Integration Guide.
Configuring Single Sign-On Between HP NNMi and HP UCMDB
Single sign-on is available for all HP enterprise applications that use identical initialization string values and also share a common network domain name.
If the HP NNMi and HP Universal CMDB (HP UCMDB) user names are exactly the same for a particular individual, that person can log on to the NNMi console and launch HP UCMDB views without also logging on to HP UCMDB. This single sign-on feature maps user names, but not passwords, between the two products. The passwords for logging on to HP NNMi and HP UCMDB can be different. Single sign-on does not map user roles, so the user can have different privileges in each application. For example, a user might have normal privileges in HP NNMi and administrator privileges in HP UCMDB.
To configure single sign-on access from NNMi UCMDB, make sure that both applications use the same initialization string. You can copy the string from either application to the other. Consider all applications that interact when choosing which initialization string value to use. If necessary, also update the initialization string configuration for other applications.
UCMDB initializationstring
Locate the UCMDB initialization string as follows:
1 Access the JMX console for UCMDB at:
http://<UCMDB_hostname>:<UCMDB_JMX_port>/jmx-console/
2 Select service=LW-SSO Configuration (under Topaz).
The initialization string is the value of the InitString parameter.
3 If you change the value of the InitString parameter, click Apply Changes.
NNMi initializationstring
Locate the NNMi initialization string as follows:
1 Open the following file in a text editor:
• Windows: %NNM_PROPS%\nms-ui.properties
HP NNMi cannot simultaneously integrate with HP Business Service Management (HP BSM) topology and HP UCMDB. If the HP NNMi–HP BSM Topology integration is configured on this NNMi management server, disable that configuration before enabling the HP NNMi–HP UCMDB integration. If you want NNMi information in both databases, do both of the following in any order:
• Configure the HP NNMi–HP BSM Topology integration, as described in HP Business Service Management Topology on page 13.
• Configure the BSM integration with HP UCMDB, as described in the UCMDB Data Flow Management Guide, which is included on the UCMDB product media. This manual is also available for the HP UCMDB product at:http://h20230.www2.hp.com/selfsolve/manuals
HP Universal CMDB 27

NNMi 9.23
• UNIX: $NNM_PROPS/nms-ui.properties
2 Search for the string initString.
The initialization string is the value of the initString parameter without the quotation marks.
For example, if the nms-ui.properties file contains the following text:
initString=E091F3BA8AE47032B3B35F1D40F704B4
the initialization string is:
E091F3BA8AE47032B3B35F1D40F704B4
3 If you change the value of the initString parameter, run the following command to commit the changes:
nnmsso.ovpl -reload
28 NNMi-BSM Integration Guide
HP BSM
February 2015
HP BSM Operations
Management
Operations Management
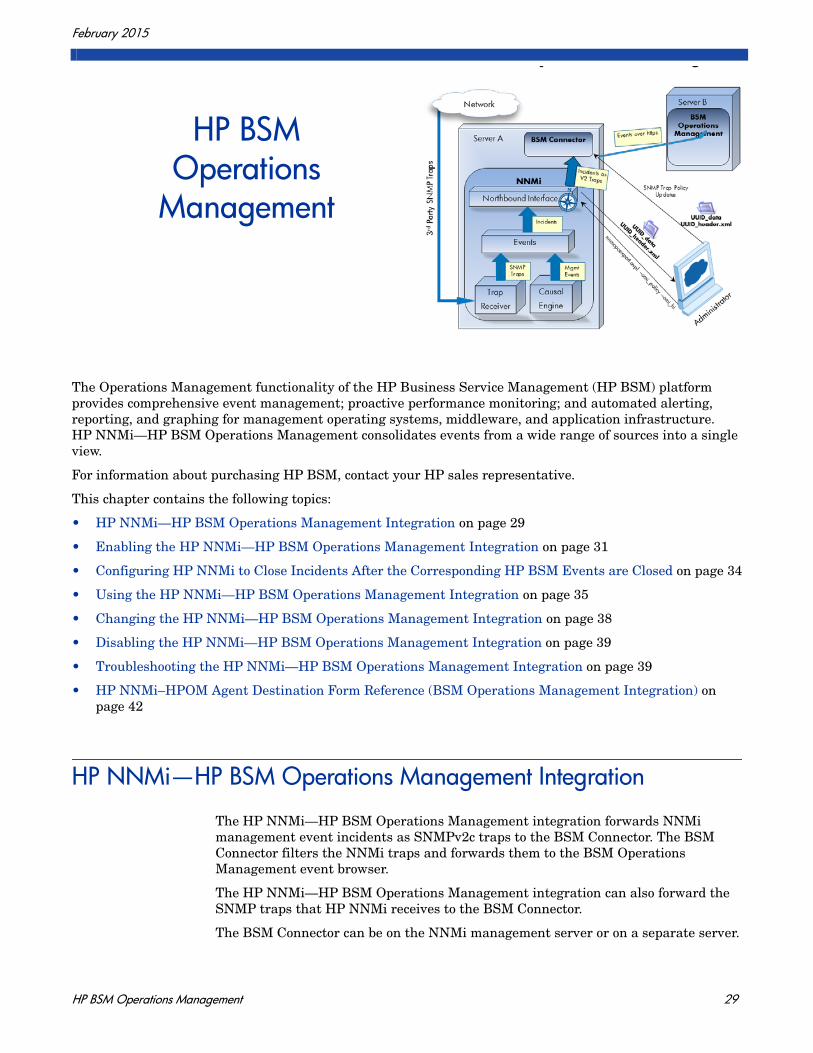
The Operations Management functionality of the HP Business Service Management (HP BSM) platform provides comprehensive event management; proactive performance monitoring; and automated alerting, reporting, and graphing for management operating systems, middleware, and application infrastructure. HP NNMi—HP BSM Operations Management consolidates events from a wide range of sources into a single view.
For information about purchasing HP BSM, contact your HP sales representative.
This chapter contains the following topics:
• HP NNMi—HP BSM Operations Management Integration on page 29
• Enabling the HP NNMi—HP BSM Operations Management Integration on page 31
• Configuring HP NNMi to Close Incidents After the Corresponding HP BSM Events are Closed on page 34
• Using the HP NNMi—HP BSM Operations Management Integration on page 35
• Changing the HP NNMi—HP BSM Operations Management Integration on page 38
• Disabling the HP NNMi—HP BSM Operations Management Integration on page 39
• Troubleshooting the HP NNMi—HP BSM Operations Management Integration on page 39
• HP NNMi–HPOM Agent Destination Form Reference (BSM Operations Management Integration) on page 42
HP NNMi—HP BSM Operations Management Integration
The HP NNMi—HP BSM Operations Management integration forwards NNMi management event incidents as SNMPv2c traps to the BSM Connector. The BSM Connector filters the NNMi traps and forwards them to the BSM Operations Management event browser.
The HP NNMi—HP BSM Operations Management integration can also forward the SNMP traps that HP NNMi receives to the BSM Connector.
The BSM Connector can be on the NNMi management server or on a separate server.
29

NNMi 9.23
The HP NNMi—HP BSM Operations Management integration also provides for accessing the NNMi console from within the BSM Operations Management event browser.
The HP NNMi—HP BSM Operations Management integration is a specific implementation of the NNMi northbound interface, which is described in the NNMi Northbound Interface chapter of the NNMi Deployment Reference.
The HP NNMi—HP BSM Operations Management integration consists of the following components:
• nnmi-hpom agent integration module
• nnmopcexport.ovpl tool
Value
The HP NNMi—HP BSM Operations Management integration provides event consolidation in the BSM Operations Management event browser for the network management, system management, and application management domains, so that users of the BSM Operations Management event browser can detect and investigate potential network problems.
The primary features of the integration are as follows:
• Automatic incident forwarding from HP NNMi to the BSM Connector. Forwarded incidents appear in the BSM Operations Management event browser.
• Access to the NNMi console from the BSM Operations Management event browser.
— Open the NNMi Incident form in the context of a selected event.
— Open an NNMi view (for example, the Layer 2 Neighbor view) in the context of a selected event and node.
— Launch an NNMi tool (for example, status poll) in the context of a selected event and node.
Integrated Products
The information in this chapter applies to the following products:
• HP BSM with the HP Operations Manager i license
• NNMi 9.20 on the Windows or Linux operating system only
HP NNMi and HP BSM must be installed on separate computers. The NNMi management server and the BSM server computer can be of the same or different operating systems.
This chapter describes the direct integration between HP NNMi and the BSM Operations Management event browser.
For the list of supported versions, see the NNMi System and Device Support Matrix.
30 NNMi-BSM Integration Guide

February 2015
The BSM Connector must be installed after NNMi installation. The BSM Connector can be on the NNMi management server computer or on a separate computer. It is recommended to install the BSM Connector on the NNMi management server computer to avoid network problems such as high latency between NNMi and the BSM Connector.
For the most recent information about supported hardware platforms and operating systems, see the support matrices for all products.
Documentation
This chapter describes how to configure HP NNMi to communicate with the BSM Operations Management event browser.
The BSM documentation describes how to install and use the BSM Connector and the applications that access the NNMi console from the BSM Operations Management event browser.
• BSM Application Administration Guide
• BSM Connector Installation and Upgrade Guide
• BSM Connector User Guide
• BSM Connector Help
• BSM Operations Management Extensibility Guide
Enabling the HP NNMi—HP BSM Operations Management Integration
It is recommended that an experienced BSM Connector user complete the procedure for enabling the HP NNMi—HP BSM Operations Management integration.
To enable the HP NNMi—HP BSM Operations Management integration, follow these steps:
1 On the NNMi management server, generate an SNMP trap policy file for the traps that HP NNMi forwards:
a Verify that the NNMi services are running:
ovstatus -c
All NNMi services should show the state RUNNING.
b Generate the SNMP trap policy file by entering the following command:
nnmopcexport.ovpl -u <username> -p <password> \-template "NNMi Management Events" -application "NNMi" \-omi_policy -omi_hi
When HP NNMi integrates with the HP Business Service Management (HP BSM) topology database, the HP NNMi—HP BSM Operations Management integration can associate incidents regarding NNMi-managed devices with BSM configuration items (CIs). This information is not available with the standard NNMi northbound interface. For more information, see Configuration Item Identifiers on page 35.
HP BSM Operations Management 31
NNMi 9.23
The values for <username> and <password> correspond to an NNMi console user with the Administrator role.
This command creates two files in the current directory:
— The <UUID>_data file is the SNMP trap policy file, where <UUID> is a universally unique identifier.
— The <UUID>_header.xml file identifies the <UUID>_data file to the BSM Connector.
The SNMP trap policy file includes a policy condition for each management event and SNMP trap configuration in the current NNMi incident configuration. For information about customizing the output of this command, see the nnmopcexport.ovpl reference page, or the UNIX manpage.
For information about the default policy conditions and customizing conditions, see Using the HP NNMi—HP BSM Operations Management Integration on page 35.
2 Install and configure the BSM Connector:
a On the NNMi management server or a separate server, install the BSM Connector as described in the BSM Connector Installation and Upgrade Guide.
b In BSM, configure the BSM Connector integration with BSM as described in the BSM Application Administration Guide.
c Use the BSM Connector user interface to import the header and policy files created in step 1 of this procedure.
For more information, see Working with BSM Connector> Policy Management> How to Import Policies in the BSM Connector Help.
d Use the BSM Connector user interface to activate the new policies.
For more information, see Working with BSM Connector > Policy Management > How to Activate and Deactivate Policies in the BSM Connector Help.
3 Identify an available port for SNMP communications between HP NNMi and the BSM Connector.
The BSM Connector will listen on this port for the SNMP traps that HP NNMi forwards to this port. While enabling the integration, this port number is used in both step 4 (for the BSM Connector) and step 5 (for HP NNMi) of this procedure.
If the BSM Connector is installed on the NNMi management server, this port number must be different from the port on which HP NNMi receives SNMP traps. Identify an available port as follows:
Do not edit or rename these output files, as doing so renders them unusable by the BSM Connector.
The HP Operations agent from HPOM and the BSM Connector can run simultaneously on one system. See the BSM Connector User Guide for more information.
The SNMP communications port is different from the HTTP and HTTPS ports for the Apache Tomcat server you specified when using the BSM Connector Configuration Wizard during the post-installation phase.
32 NNMi-BSM Integration Guide
February 2015
a From the NNMi management server, run the nnmtrapconfig.ovpl -showProp command. Look for the current trapPort value in the command output. This value is typically 162, which is the standard UDP port for receiving SNMP traps. Do not use this trapPort value when configuring SNMP communications between HP NNMi and the BSM Connector.
b Select a port for configuring SNMP communications between HP NNMi and the BSM Connector. A good practice is to use a port number similar to the value of trapPort. For example, if port 162 is not available, try port 5162.
c From the NNMi management server, run the netstat -a command and search the output for the port you selected in step b. If that port number does not appear in the output, it is probably available for the BSM Connector to use.
4 On the server where the BSM Connector is installed, configure the agent inside the BSM Connector with a custom port for receiving SNMP traps from HP NNMi by entering the following commands:
• Windows NNMi management server:
a Configure the agent:
ovconfchg -ns eaagt -set SNMP_TRAP_PORT <custom_port> \-set SNMP_SESSION_MODE NNM_LIBS
b Restart the agent:
ovc -restart opctrapi
• Linux NNMi management server:
a Configure the agent:
ovconfchg -ns eaagt -set SNMP_TRAP_PORT <custom_port> \-set SNMP_SESSION_MODE NO_TRAPD
b Restart the agent:
ovc -restart opctrapi
For <custom_port>, use the port that you identified in step 3 of this procedure.
5 On the NNMi management server, configure NNMi incident forwarding to the BSM Connector:
a In the NNMi console, open the HP NNMi–HPOM Integration Selection form (Integration Module Configuration > HPOM).
b Click HPOM agent implementation, and then click New.
(If you have selected an available destination, click Reset to make the New button available.)
c On the HP NNMi–HPOM Agent Destination form, select the Enabled check box to make the remaining fields on the form available.
d Enter the information for connecting to the BSM Connector. The trap destination port is the port that you identified in step 3 of this procedure.
For information about these fields, see BSM Connector Connection on page 43.
e Specify the sending options. Select the HTTP option for the NNMi Console Access field.
For information about these fields, see BSM Operations Management Integration Content on page 44.
HP BSM Operations Management 33

NNMi 9.23
f Click Submit at the bottom of the form.
A new window displays a status message. If the message indicates a problem with the settings, click Return, and then adjust the values as suggested by the text of the error message.
6 Optional. On the BSM server, install and configure the HPOprInf infrastructure content pack.
For information, see the BSM Operations Management Extensibility Guide.
Configuring HP NNMi to Close Incidents After the Corresponding HP BSM Events are Closed
You can configure HP NNMi to permit NNMi incidents to close automatically after the corresponding event is closed in HP BSM Operations Management.
After installing NNMi 9.21 patch 1, do the following to modify existing policies for the BSM Connector using the nnmopcexport.ovpl script:
1 Copy the OMBackSync.pl script to the correct location:
Windows: Copy %ovdatadir%\conf\nnm\backsync\OMBackSync.pl to %ovdatadir%\conf\backsync\OMBackSync.pl
Linux: Copy /var/opt/OV/conf/nnm/backsync/OMBackSync.pl to /var/opt/OV/conf/backsync/OMBackSync.pl
2 Modify the OMBackSync.pl script. Use the following example as a guide to modify the script parameters:
my $nnmi_server = 'localhost';my $nnmi_port = <http port used to access NNMi>;my $nnmi_user = '<administrator user name>';my $nnmi_pass = '<administrator password>';my $logfilepath = OV_DATA_DIR.'/log/OMBacksync-NNMi.log';my $verbosity = 2
3 Edit the OMBackSync.pl script and search for the following line:__END__Remove all of the text from __END__ to the end of the script in the OMBackSync.pl script. Make sure to save your work.
4 Windows Only: Run the following command from the %ovinstalldir% directory: newconfig\HPNmsCommon\scripts\nnm-configure-perl.ovpl -source newconfig\HPNmsCommon\perl\a -target nonOV\perl\a
5 Run the following command to restart the ombacksync process: ovc -restart ombacksync.
6 On the NNMi management server, use the nnmopcexport.ovpl script to regenerate each policy file for the new traps.
After modifying these existing policies, the BSM Connector finds and runs new scripts that initiates automatic incident synchronization with HP BSM Operations Management as it detects alerts being acknowledged.
If you reinstall HP NNMi 9.20, you must reinstall the BSM Connector and repeat step 1 on page 34 through step 6 on page 34.
34 NNMi-BSM Integration Guide

February 2015
Using the HP NNMi—HP BSM Operations Management Integration
As discussed in the previous section, can configure HP NNMi to permit NNMi incidents to close automatically after the corresponding event is closed in HP BSM Operations Management. The HP NNMi—HP BSM Operations Management integration provides a two-way flow of NNMi management events and SNMP traps to and from HP BSM and the BSM Operations Management event browser. The NNMi SNMP trap policy determines how the BSM Operations Management event browser treats and displays the incoming traps. For example, you can change a policy condition to include the value of a trap custom attribute in the event title.
View the forwarded NNMi incidents in the BSM Operations Management event browser. Menu commands in the BSM Operations Management event browser provide access to NNMi views in the context of the selected event. Information embedded in each event supports this cross-navigation:
• The nnmi.server.name and nnmi.server.port custom attributes in the event identify the NNMi management server.
• The nnmi.incident.uuid custom attribute identifies the incident in the NNMi database.
In the BSM Operations Management event browser, the original source object appears in the Object field on the Additional Info tab and in the nnm.source.name custom attribute.
Configuration Item Identifiers
In HP Business Service Management (HP BSM) and HP Universal CMDB Software (HP UCMDB), a configuration item (CI) is a database representation of a component in the IT environment. A CI can be a line of business, business process, application, server hardware, or a service.
When HP NNMi integrates with the BSM topology database or HP UCMDB, HP NNMi shares CI information with HP BSM or HP UCMDB for the devices that HP NNMi manages. In this case, the HP NNMi—HP BSM Operations Management integration can associate incidents regarding NNMi-managed devices with HP BSM or HP UCMDB CIs. The SNMP trap policy conditions enable this association.
For information about the integrations with HP BSM and HP UCMDB, see:
• HP Business Service Management Topology on page 13
• HP Universal CMDB on page 25
If you reinstall the BSM Connector, you must repeat step 1 on page 34 through step 6 on page 34. Reinstalling the BSM Connector overwrites the OMBackSync.pl script that you copied and modified in step 1 on page 34 through step 3 on page 34, and you will lose all of your changes. To avoid this problem, create a backup copy of the OMBackSync.pl script before you reinstall the BSM Connector.
HP NNMi sends only one copy of each management event or SNMP trap to the BSM Connector. This behavior is different from that of the NNM 6.x/7.x integration with HPOM.
HP BSM Operations Management 35
NNMi 9.23
Health Indicators
Because the NNMi SNMP trap policy file was created with the -omi_hi option to nnmopcexport.ovpl, the policy file associates a health indicator with each standard NNMi management event in the SNMP trap policy file, as appropriate. (Not all management event types have health indicators.) The health indicator is available in the EtiHint custom attribute.
For the specific health indicators, see the SNMP trap policy file.
Default Policy Conditions
The default integration behavior varies with the integration content, as described here:
• NNMi management event incidents
— The NNMi SNMP trap policy file includes conditions for all NNMi management event configurations defined in the NNMi incident configuration when the file was generated.
— The events created from NNMi management events appear in the BSM Operations Management event browser.
— These traps include the CI information described in Configuration Item Identifiers on page 35.
— The events created from these traps include health indicators described in Health Indicators on page 36.
• Third-party SNMP traps
— The NNMi SNMP trap policy file includes conditions for all SNMP trap configurations defined in the NNMi incident configuration when the file was generated.
— The events created from third-party traps appear in the BSM Operations Management event browser.
— These traps include the CI information described in Configuration Item Identifiers on page 35.
— The events created from these traps do not include health indicators.
— If you configure the integration to forward all received SNMP traps and the BSM Operations Management event browser receives SNMP traps directly from devices that HP NNMi manages, the BSM Operations Management event browser receives duplicate device traps. You can set the policies to correlate SNMP traps from HP NNMi with those that the BSM Operations Management event browser receives directly from managed devices.
• Syslog
— HP NNMi forwards both NNMi-generated management events and SNMP traps that HP NNMi receives from managed devices to the BSM Connector.
• EventLifecycleStateClosed traps
— The BSM Connector logs the events created from these traps. Generally, they do not appear in the BSM Operations Management event browser.
36 NNMi-BSM Integration Guide
February 2015
— The NNMi SNMP trap policy file causes the BSM Connector to acknowledge the event that corresponds to the closed NNMi incident in the BSM Operations Management event browser.
• LifecycleStateChangeEvent traps
— The NNMi SNMP trap policy file does not include conditions for processing these traps. The BSM Connector does not forward these traps to the BSM Operations Management event browser.
• EventDeleted traps
— The NNMi SNMP trap policy file does not include conditions for processing these traps. The BSM Connector does not forward these traps to the BSM Operations Management event browser.
• Correlation notification traps
— The BSM Connector logs the events created from these traps. They do not appear in the BSM Operations Management event browser.
— The BSM Connector processes the NNMi correlation traps to replicate NNMi incident correlation in the BSM Operations Management event browser.
Customizing Policy Conditions
Use the BSM Connector user interface to customize the default policy conditions. For more information, see Integrating Data With BSM Connector > SNMP Trap Policies > SNMP Policy User Interface > Configuring Rules in SNMP Policies in the BSM Connector help.
More Information
For more information about the HP NNMi—HP BSM Operations Management integration, see the following references:
• For descriptions of the trap types that the integration sends to the BSM Connector, see the Using the NNMi Northbound Interface section contained in the NNMi Northbound Interface chapter of the NNMi Deployment Reference.
• For information about the format of the traps that HP NNMi sends to the BSM Connector, see the hp-nnmi-nbi.mib file.
• For detailed information about using the HP NNMi—HP BSM Operations Management integration, see the BSM Operations Management Extensibility Guide.
HP BSM Operations Management 37
NNMi 9.23
Changing the HP NNMi—HP BSM Operations Management Integration
This section contains the following topics:
• Update the SNMP Trap Policy Conditions for New NNMi Traps on page 38
• Change the Configuration Parameters on page 38
Update the SNMP Trap Policy Conditions for New NNMi Traps
If new SNMP trap incident configurations have been added to HP NNMi since the integration was configured, follow these steps:
1 On the NNMi management server, use the nnmopcexport.ovpl command to create an SNMP trap policy file for the new traps.
For the -template option, specify a name that is different from the names of the existing SNMP trap policy files.
Use the -omi_policy and -omi_hi options.
You can limit the file contents to a specific author or OID prefix value. For more information, see the nnmopcexport.ovpl reference page, or the UNIX manpage.
2 Use the BSM Connector user interface to import and activate the new header and policy files.
Alternatively, you can re-create the SNMP trap policy file for all NNMi management events and SNMP traps. If you take this approach, delete the old policies from the BSM Connector user interface.
Change the Configuration Parameters
To change the integration configuration parameters, follow these steps:
1 In the NNMi console, open the HP NNMi–HPOM Integration Selection form (Integration Module Configuration > HPOM).
2 Click HPOM agent implementation.
3 Select a destination, and then click Edit.
4 Modify the values as appropriate.
For information about the fields on this form, see HP NNMi–HPOM Agent Destination Form Reference (BSM Operations Management Integration) on page 42.
5 Verify that the Enable Integration check box at the top of the form is selected, and then click Submit at the bottom of the form.
The changes take effect immediately.
If the BSM Connector configuration includes multiple policy conditions for one NNMi incident, duplicate messages appear in the BSM Operations Management event browser.
38 NNMi-BSM Integration Guide

February 2015
Disabling the HP NNMi—HP BSM Operations Management Integration
No SNMP trap queuing occurs while a destination is disabled.
To discontinue the forwarding of NNMi incidents to the BSM Connector, follow these steps:
1 In the NNMi console, open the HP NNMi–HPOM Integration Selection form (Integration Module Configuration > HPOM).
2 Click HPOM agent implementation.
3 Select a destination, and then click Edit.
Alternatively, click Delete to entirely remove the configuration for the selected destination.
4 Clear the Enable Integration check box at the top of the form, and then click Submit at the bottom of the form.
The changes take effect immediately.
Optionally deactivate or delete the SNMP trap policy as described in the BSM Connector help.
Troubleshooting the HP NNMi—HP BSM Operations Management Integration
This section contains the following topics:
• BSM Operations Management Event Browser Contains No Forwarded Incidents on page 39
• BSM Operations Management Event Browser Contains Only Some Forwarded Incidents on page 42
BSM Operations Management Event Browser Contains No Forwarded Incidents
In the following procedure, the OVBIN environment variable refers to the bin directory containing the commands for configuring the agent inside the BSM Connector. The OVBIN environment variable defaults to the following value:
• Windows: <drive>\Program Files (x86)\HP\HP BTO Software\bin
• Linux: /opt/OV/bin
HP BSM Operations Management 39
NNMi 9.23
If the BSM Operations Management event browser does not contain any incidents from NNMi, follow these steps:
1 On the server where the BSM Connector is installed, verify the agent configuration:
• Windows:
%OVBIN%\ovconfget eaagt
• Linux:
$OVBIN/ovconfget eaagt
The command output should include the following information:
• Windows:
SNMP_SESSION_MODE=NNM_LIBSSNMP_TRAP_PORT=<custom_port>
• Linux:
SNMP_SESSION_MODE=NO_TRAPDSNMP_TRAP_PORT=<custom_port>
The value of <custom_port> should not be 162 and should match the value of the Port field on the HP NNMi–HPOM Agent Destination form.
2 Evaluate the agent configuration by considering the results from step 1:
• If the agent configuration is as expected, continue with step 3 of this procedure.
• If the SNMP_SESSION_MODE parameter is not set correctly, repeat step 4 on page 33 until the ovconfget command returns the expected results.
• If the value of <custom_port> is 162 or does not match the value of the Port field on the HP NNMi–HPOM Agent Destination form, repeat step 3 on page 32 through step 5 on page 33, as appropriate, until the ovconfget command returns the expected results.
3 On the server where the BSM Connector is installed, verify that the agent is running:
• Windows:
%OVBIN%\opcagt –status
• Linux:
$OVBIN/opcagt –status
The command output should include an opctrapi entry similar to the following example:
opctrapi OVO SNMP Trap Interceptor AGENT,EA (4971) Running
If the output is not as expected, restart the agent:
ovc -restart opctrapi
40 NNMi-BSM Integration Guide

February 2015
4 On the server where the BSM Connector is installed, verify that the agent is listening on the expected SNMP trap port:
a Run the following command:
— Windows: netstat -an | findstr <custom_port>
— Linux: netstat -an | grep <custom_port>
Where <custom_port> is the value of SNMP_TRAP_PORT from step 1 of this procedure.
b Verify that the output includes the state LISTENING or LISTEN.
If the output is not as expected, restart the agent:
ovc -restart opctrapi
5 On the server where the BSM Connector is installed, verify that the SNMP trap policy file for HP NNMi has been deployed to the BSM Connector on the NNMi management server:
• Windows:
%OVBIN%\ovpolicy -list
• Linux:
$OVBIN/ovpolicy -list
The command output should include an entry similar to the following example:
Type Name Status Version----------------------------------------------------------------trapi "NNMi Management Events" enabled 0001.0000
The value of the Name field is the name of the SNMP trap policy file from the -template option to nnmopcexport.ovpl in step 1 on page 31.
6 On the server where the BSM Connector is installed, check the agent log file for any errors. The log file can be found in the following location:
— Windows:%ovdatadir%\log\System.txt
— UNIX: /var/opt/OV/log/System.txt
7 Verify that the BSM Connector is receiving traps:
a Verify that the BSM Connector can send events to the BSM Operations Management event browser. To do this, create a simple open message interface policy using the BSMC policy management UI. You must have forward unmatched events to active browser enabled on the options tab of the policy. Save and activate this new open message interface policy. After activating this open message interface policy, you can send events to the BSM Operations Management event browser using the opcmsg command.
b Enable tracing of the BSM Connector to determine whether the traps arrive at the BSM Connector. To do this, in the options tab of the appropriate SNMP policy, there is the possibility to configure the policy to log incoming trap events. These events are logged on the local node in the following log file:
— Windows: %ovdatadir%\log\OpC\opcmsglg
— UNIX: /var/opt/OV/log/OpC/opcmsglg
8 Verify that NNMi is forwarding management events to the BSM Connector.
HP BSM Operations Management 41
NNMi 9.23
For more information, see the Troubleshooting the NNMi Northbound Interface section contained in the NNMi Northbound Interface chapter of the NNMi Deployment Reference.
BSM Operations Management Event Browser Contains Only Some Forwarded Incidents
If one or more NNMi incidents do not appear in the BSM Operations Management event browser, follow these steps:
1 On the NNMi management server, verify that the SNMP trap policy does not suppress the trap.
2 On the BSM server, verify that BSM Operations Management is running.
If the BSM server shuts down, the BSM Connector queues received traps. The BSM Connector forwards the queued traps when the BSM Operations Management event browser becomes available.
If the BSM Connector shuts down, the forwarded traps are lost. HP NNMi does not resend traps.
3 On the NNMi management server, verify that the NNMi processes are running:
ovstatus -c
Any traps sent to HP NNMi while it is shut down are lost.
HP NNMi–HPOM Agent Destination Form Reference (BSM Operations Management Integration)
The HP NNMi–HPOM Agent Destination form contains the parameters for configuring communications between HP NNMi and the BSM Connector. This form is available from the Integration Module Configuration workspace. (On the HP NNMi–HPOM Integration Selection form, click HPOM agent implementation. Click New, or select a destination, and then click Edit.)
The HP NNMi–HPOM Agent Destination form collects information for the following areas:
• BSM Connector Connection on page 43
• BSM Operations Management Integration Content on page 44
• BSM Connector Destination Status Information on page 46
To apply changes to the integration configuration, update the values on the HP NNMi–HPOM Agent Destination form, and then click Submit.
On a windows BSM server, there is a web page showing the status of the BSM server. Use the Start > All Programs > HP Business Service Management > Administration -> HP Business Service Management Status menu to view the status.
Only NNMi users with the Administrator role can access the HP NNMi–HPOM Agent Destination form.
42 NNMi-BSM Integration Guide

February 2015
BSM Connector Connection
Figure 6 on page 43 lists the parameters for configuring the connection to the BSM Connector.
Table 6 BSM Connector Connection Information
Field Description
Host The fully-qualified domain name (preferred) or the IP address of the NNMi management server, which is the system on which the BSM Connector receives SNMP traps from HP NNMi.The integration supports the following methods for identifying the BSM Connector host:• NNMi FQDN
HP NNMi manages the connection to the BSM Connector on the NNMi management server and the Host field becomes read-only.This is the default and recommended configuration.
• Use LoopbackDo not use this option.
• OtherDo not use this option.
NOTE: If the NNMi management server participates in NNMi application failover, see Application Failover and the NNMi Northbound Interface in the NNMi Northbound Interface chapter of the NNMi Deployment Reference.
Port The UDP port where the BSM Connector receives SNMP traps. Enter the port number specific to the BSM Connector. This value is the port that you identified in step 3 on page 32.To determine the port, run the ovconfget eaagt command on the NNMi management server. The trap port is the value of the SNMP_TRAP_PORT variable.NOTE: This port number must be different from the port on which HP NNMi receives SNMP traps, as set in the SNMP Port field on the Communication Configuration form in the NNMi console.
Community String A read-only community string for the BSM Connector to receive traps.For the HP NNMi—HP BSM Operations Management integration, use the default value, which is public.
HP BSM Operations Management 43
NNMi 9.23
BSM Operations Management Integration Content
Table 7 on page 44 lists the parameters for configuring which content HP NNMi sends to the BSM Connector
.
Table 7 BSM Operations Management Integration Content Configuration Information
Field Description
Incidents The incident forwarding sending options.• Management
HP NNMi forwards only NNMi-generated management events to the BSM Connector.
• SNMP 3rd Party TrapHP NNMi forwards only SNMP traps that HP NNMi receives from managed devices to the BSM Connector.
• SyslogHP NNMi forwards both NNMi-generated management events and SNMP traps that HP NNMi receives from managed devices to the BSM Connector.This is the default configuration.
For more information, see the NNMi Northbound Interface chapter of the NNMi Deployment Reference.
Lifecycle State Changes
The incident change notification sending options.• Enhanced Closed
HP NNMi sends an incident closed trap to the BSM Connector for each incident that changes to the CLOSED lifecycle state.This is the default configuration.
• State ChangedHP NNMi sends an incident lifecycle state changed trap to the BSM Connector for each incident that changes to the IN PROGRESS, COMPLETED, or CLOSED lifecycle state.
• BothHP NNMi sends an incident closed trap to the BSM Connector for each incident that changes to the CLOSED lifecycle state. Additionally, the integration sends an incident lifecycle state changed trap to the BSM Connector for each incident that changes to the IN PROGESS, COMPLETED, or CLOSED lifecycle state.NOTE: In this case, each time an incident changes to the CLOSED lifecycle state, the integration sends two notification traps: an incident closed trap and an incident lifecycle state changed trap.
44 NNMi-BSM Integration Guide
February 2015
Correlations The incident correlation sending options.• None
HP NNMi does not notify the BSM Connector of incident correlations resulting from NNMi causal analysis.This is the default configuration.
• SingleHP NNMi sends a trap for each parent-child incident correlation relationship resulting from NNMi causal analysis.
• GroupHP NNMi sends one trap per correlation that lists all child incidents correlated to a parent incident. NOTE: HP recommends you select this value if you also want events correlated in BSM.
Deletions The incident deletion sending options.• Don’t Send
HP NNMi does not notify the BSM Connector when incidents are deleted in HP NNMi.This is the default configuration.
• SendHP NNMi sends a deletion trap to the BSM Connector for each incident that is deleted in HP NNMi.
NNMi Console Access
The connection protocol specification in the URL for browsing to the NNMi console from the BSM Operations Management event browser. The traps that HP NNMi sends to the BSM Connector include the NNMi URL in the NmsUrl varbind (1.3.6.1.4.1.11.2.17.19.2.2.2).The integration requires an HTTP connection to the NNMi console. Select the HTTP option.
Incident Filters A list of object identifiers (OIDs) on which the integration filters the events sent to the BSM Connector. Each filter entry can be a valid numeric OID (for example, .1.3.6.1.6.3.1.1.5.4.1.3.6.1.4.1.9) or OID prefix (for example, .1.3.6.1.6.3.1.1.5.*).Select one of the following options:• None
HP NNMi sends all events to the BSM Connector.This is the default configuration.
• IncludeHP NNMi sends only the specific events that match the OIDs identified in the filter.
• ExcludeHP NNMi sends all events except for the specific events that match the OIDs identified in the filter.
Specify the incident filter:• To add a filter entry, enter the text in the lower text box, and then click Add.• To delete a filter entry, select that entry from the list in the upper box, and then
click Remove.
Table 7 BSM Operations Management Integration Content Configuration Information (cont’d)
Field Description
HP BSM Operations Management 45

NNMi 9.23
BSM Connector Destination Status Information
Table 8 lists the read-only status information for the BSM Connector. This information is useful for verifying that the integration is working correctly.
Table 8 BSM Connector Destination Status Information
Field Description
Trap Destination IP Address
The IP address to which the BSM Connector destination host name resolves.This value is unique to this destination.
Uptime (seconds) The time (in seconds) since the northbound component was last started. The traps that NNMi sends to the BSM Connector include this value in the sysUptime field (1.3.6.1.2.1.1.3.0).This value is the same for all integrations that use the NNMi northbound interface. To see the latest value, either refresh or close and re-open the form.
NNMi URL The URL for connecting to the NNMi console. The traps that HP NNMi sends to the BSM Connector include this value in the NmsUrl varbind (1.3.6.1.4.1.11.2.17.19.2.2.2).This value is unique to this northbound destination.
46 NNMi-BSM Integration Guide
NNMi V
February 2015
NNMi Visualizations
Within HP Business Service
Management
isualizations Within HP Business Service Management
The HP Business Service Management (HP BSM) platform provides tools for managing the availability of applications in production, monitoring system performance, monitoring infrastructure performance, and proactively resolving problems when they arise.
For information about purchasing HP BSM, contact your HP sales representative.
This chapter contains the following topics:
• MyBSM Portal on page 47
• Configuring Single Sign-On Between HP NNMi and HP BSM on page 49
• Configuring an SSL Connection to HP BSM on page 50
• NNMi Data Available from BSM End User Management Reports on page 54
• Enabling NNMi Visualizations from HP BSM on page 56
For information about NNMi console views launched from events in the BSM Operations Management event browser, see Using the HP NNMi—HP BSM Operations Management Integration on page 35.
MyBSM Portal
MyBSM is a portal-based dashboard environment for viewing data across the HP Software portfolio. The MyBSM portal provides a collection of portal pages and portlets that display information relevant to a users specific business task
The MyBSM administrator sets up pages that include components that are of interest to specific users or groups of users. The MyBSM workspace provides smooth interactions between different BSM applications and reports.
There is a single limitation integrating multiple NNMi instances with one HP BSM: While the event and topology integrations function as expected, you should consider the functionality of other NNMi components in the MyBSM portal. These NNMi components are shown in NNMi Components Available in MyBSM on page 48. For the MyBSM integration only, you are limited to communicating with a single (pre-configured in HP BSM) NNMi instance.
47

NNMi 9.23
To access the NNMi components, you must have the appropriate licenses installed. NNMi components are only displayed if you have configured a connection to an NNMi management server (Admin >Platform > Setup and Maintenance > Infrastructure Settings > Foundations > Integrations with other applications > HP NNM).
NNMi Components Available in MyBSM
The BSM component gallery includes the following NNMi components:
• Open Key Incidents
Shows the incidents that are most important to network operators, and that often require more immediate action.
• Layer 2 Neighbor View
Shows a map view of a selected device and its connector devices within a specified number of hops from the selected device. This view is useful for understanding the switch connectivity between devices.
• Layer 3 Neighbor View
Shows a map view of a selected device and it connector devices within a specified number of hops from the selected device. This view is useful for understanding the router connectivity between devices.
• MPLS VPN Inventory
This is an enterprise customer view of how their sites are connected using service provided MPLS networks.
• Overall Network Health (Node Group Overview)
Shows a map containing all (top-level) node groups that do not have parent node groups.
• Overall Network Health - Routers
Shows a node group map of the router connectivity in your network.
• Overall Network Health - Switches
Shows a node group map of the switches connectivity in your network.
• Router Redundancy Groups Inventory
Shows the available router redundancy groups created by the NNMi administrator. Each router redundancy group is a set of two or more routers that use one or more virtual IP addresses to help ensure that information packets reach their intended destination.
Viewing the NNMi Components in MyBSM
To view the NNMi components in MyBSM, follow these steps:
1 If you have not already done so, configure a connection from HP BSM to HP NNMi as described in Enabling NNMi Visualizations from HP BSM on page 56.
2 If you have not already done so, enable single sign-on between HP BSM and HP NNMi as described in Configuring Single Sign-On Between HP NNMi and HP BSM on page 49.
48 NNMi-BSM Integration Guide

February 2015
3 If you have not already done so, configure HP NNMi to push topology information to the RTSM as described in Enabling the HP NNMi–HP BSM Topology Integration on page 15.
4 Add the NNMi components to the MyBSM portal:
a Within a user-defined MyBSM page, open the Component Gallery.
b Select one of the NNMi components and add it to your page.
For details, see How to Create Your MyBSM Workspace in the HP BSM Using MyBSM Guide.
Configuring Single Sign-On Between HP NNMi and HP BSM
Single sign-on is available for all HP enterprise applications that use identical initialization string values and also share a common network domain name.
If the HP NNMi and HP Business Service Management (HP BSM), user names are exactly the same for a particular individual, that person can log on to the MyBSM portal and view NNMi portlets without also logging on to HP NNMi. This single sign-on feature maps user names, but not passwords, between the two products. The passwords for logging on to MyBSM and HP NNMi can be different. Single sign-on does not map user roles, so the user can have different privileges in each application. For example, a user might have normal privileges in HP BSM and administrator privileges in HP NNMi.
To configure single sign-on access from HP BSM to HP NNMi, make sure that both applications use the same initialization string. You can copy the string from either application to the other. Consider all applications that interact when choosing which initialization string value to use. If necessary, also update the initialization string configuration for other applications.
BSM initializationstring
Locate the BSM initialization string as follows:
1 Access the JMX console for BSM at:
http://<BSM_hostname>:<BSM_JMX_port>/jmx-console/
2 Select service=LW-SSO Configuration (under Topaz).
The initialization string is the value of the InitString parameter.
3 If you change the value of the InitString parameter, click Apply Changes.
NNMi initializationstring
Locate the NNMi initialization string as follows:
1 Open the following file in a text editor:
• Windows: %NNM_PROPS%\nms-ui.properties
• UNIX: $NNM_PROPS/nms-ui.properties
2 Search for the string initString.
The initialization string is the value of the initString parameter without the quotation marks.
For example, if the nms-ui.properties file contains the following text:
initString=E091F3BA8AE47032B3B35F1D40F704B4
the initialization string is:
NNMi Visualizations Within HP Business Service Management 49
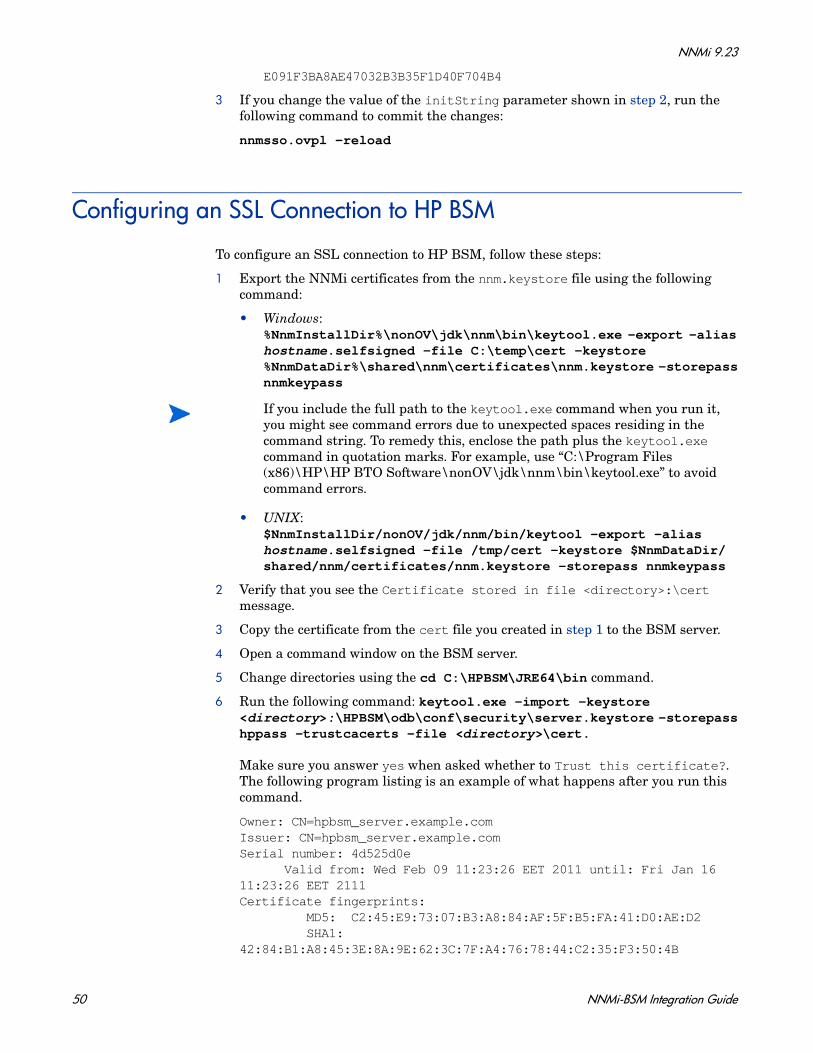
NNMi 9.23
E091F3BA8AE47032B3B35F1D40F704B4
3 If you change the value of the initString parameter shown in step 2, run the following command to commit the changes:
nnmsso.ovpl -reload
Configuring an SSL Connection to HP BSM
To configure an SSL connection to HP BSM, follow these steps:
1 Export the NNMi certificates from the nnm.keystore file using the following command:
• Windows: %NnmInstallDir%\nonOV\jdk\nnm\bin\keytool.exe -export -alias hostname.selfsigned -file C:\temp\cert -keystore %NnmDataDir%\shared\nnm\certificates\nnm.keystore -storepass nnmkeypass
• UNIX: $NnmInstallDir/nonOV/jdk/nnm/bin/keytool -export -alias hostname.selfsigned -file /tmp/cert -keystore $NnmDataDir/shared/nnm/certificates/nnm.keystore -storepass nnmkeypass
2 Verify that you see the Certificate stored in file <directory>:\cert message.
3 Copy the certificate from the cert file you created in step 1 to the BSM server.
4 Open a command window on the BSM server.
5 Change directories using the cd C:\HPBSM\JRE64\bin command.
6 Run the following command: keytool.exe -import -keystore <directory>:\HPBSM\odb\conf\security\server.keystore -storepass hppass -trustcacerts -file <directory>\cert.
Make sure you answer yes when asked whether to Trust this certificate?. The following program listing is an example of what happens after you run this command.
Owner: CN=hpbsm_server.example.comIssuer: CN=hpbsm_server.example.comSerial number: 4d525d0e Valid from: Wed Feb 09 11:23:26 EET 2011 until: Fri Jan 16 11:23:26 EET 2111Certificate fingerprints: MD5: C2:45:E9:73:07:B3:A8:84:AF:5F:B5:FA:41:D0:AE:D2 SHA1: 42:84:B1:A8:45:3E:8A:9E:62:3C:7F:A4:76:78:44:C2:35:F3:50:4B
If you include the full path to the keytool.exe command when you run it, you might see command errors due to unexpected spaces residing in the command string. To remedy this, enclose the path plus the keytool.exe command in quotation marks. For example, use “C:\Program Files (x86)\HP\HP BTO Software\nonOV\jdk\nnm\bin\keytool.exe” to avoid command errors.
50 NNMi-BSM Integration Guide
February 2015
Signature algorithm name: SHA1withRSA Version: 1Trust this certificate? [no]: yesCertificate was added to keystore
7 Run the command shown in step 6, substituting server.truststore for server.keystore: keytool.exe -import -keystore <directory>:\HPBSM\odb\conf\security\server.truststore -storepass hppass -trustcacerts -file <directory>:\cert.
Make sure you answer yes when asked whether to Trust this certificate?.The following program listing is an example of what happens after you run this command.
Owner: CN=hpbsm_server.example.comIssuer: CN=hpbsm_server.example.comSerial number: 4d525d0eValid from: Wed Feb 09 11:23:26 EET 2011 until: Fri Jan 16 11:23:26 EET 2111Certificate fingerprints: MD5: C2:45:E9:73:07:B3:A8:84:AF:5F:B5:FA:41:D0:AE:D2 SHA1: 42:84:B1:A8:45:3E:8A:9E:62:3C:7F:A4:76:78:44:C2:35:F3:50:4B Signature algorithm name: SHA1withRSA Version: 1Trust this certificate? [no]: yesCertificate was added to keystore
8 To add the NNMi certificate to JRE, run the following command: keytool.exe -import -file <directory>:\cert -keystore <directory>:\HPBSM\JRE\lib\security\cacerts -trustcacerts -storepass changeit.
Make sure you answer yes when asked whether to Trust this certificate?. The following program listing is an example of what happens after you run this command.
Owner: CN=hpbsm_server.example.comIssuer: CN=hpbsm_server.example.comSerial number: 4d525d0eValid from: Wed Feb 09 11:23:26 EET 2011 until: Fri Jan 16 11:23:26 EET 2111Certificate fingerprints: MD5: C2:45:E9:73:07:B3:A8:84:AF:5F:B5:FA:41:D0:AE:D2 SHA1: 42:84:B1:A8:45:3E:8A:9E:62:3C:7F:A4:76:78:44:C2:35:F3:50:4B Signature algorithm name: SHA1withRSA Version: 1Trust this certificate? [no]: yesCertificate was added to keystore
9 To add the NNMi certificate to JRE64, run the following command: keytool.exe -import -file <directory>:\cert -keystore <directory>:\HPBSM\JRE64\lib\security\cacerts -trustcacerts -storepass changeit.
NNMi Visualizations Within HP Business Service Management 51

NNMi 9.23
Make sure you answer yes when asked whether to Trust this certificate? The following program listing is an example of what happens after you run this command.
Owner: CN=hpbsm_server.example.comIssuer: CN=hpbsm_server.example.comSerial number: 4d525d0eValid from: Wed Feb 09 11:23:26 EET 2011 until: Fri Jan 16 11:23:26 EET 2111Certificate fingerprints: MD5: C2:45:E9:73:07:B3:A8:84:AF:5F:B5:FA:41:D0:AE:D2 SHA1: 42:84:B1:A8:45:3E:8A:9E:62:3C:7F:A4:76:78:44:C2:35:F3:50:4B Signature algorithm name: SHA1withRSA Version: 1Trust this certificate? [no]: yesCertificate was added to keystore
10 To import the BSM certificates into the NNMi management server, complete the following steps:
a Run the following command on the BSM server: keytool.exe -export -alias clientcert -file <directory>:\truststore -keystore <directory>:\HPBSM\odb\conf\security\server.truststore -storepass hppass
After the command finishes, the BSM truststore certificate is stored in the <directory>:\truststore file.
b Run the following command on the BSM server: keytool.exe -export -alias hpcert -file <directory>:\keystore -keystore <directory>:\HPBSM\odb\conf\security\server.keystore -storepass hppass
After the command finishes, the BSM keystore certificate is stored in the <directory>:\keystore file.
c Copy the truststore and keystore files to a temporary directory on the NNMi management server. These files are shown as residing on the NNMi management server in the <directory>:\temp\keystore, <directory>:\temp\truststore, /tmp/keystore and /tmp/truststore locations in the remaining commands.
d To merge the keystore certificate, run the following command on the NNMi management server:
— Windows:keytool -import -alias hpcert -keystore %NnmDataDir%\shared\nnm\certificates\nnm.keystore -storepass nnmkeypass -file <directory>:\temp\keystore
— UNIX:keytool -import -alias hpcert -keystore $NnmDataDir/shared/nnm/certificates/nnm.keystore -storepass nnmkeypass -file /tmp/keystore
52 NNMi-BSM Integration Guide

February 2015
e To merge the truststore certificate, run the following command on the NNMi management server:
— Windows:keytool -import -alias clientcert -keystore %NnmDataDir%\shared\nnm\certificates\nnm.truststore -storepass ovpass -file <directory>:\temp\truststore
— UNIX:keytool -import -alias clientcert -keystore $NnmDataDir/shared/nnm/certificates/nnm.truststore -storepass ovpass -file /tmp/truststore
f Complete this step only if you are using self-signed certificates (you are not using Certificate Authority (CA) signed certificates). To merge the BSM keystore certificate into the NNMi truststore, run the following command on the NNMi management server:
— Windows:keytool -import -alias bsmcert -keystore %NnmDataDir%\shared\nnm\certificates\nnm.truststore -storepass ovpass -file <directory>:/temp/keystore
— UNIX:keytool -import -alias bsmcert -keystore $NnmDataDir/shared/nnm/certificates/nnm.truststore -storepass ovpass -file <directory>:\temp\keystore
11 Optional: Run the following command sequence on the NNMi management server:
a ovstop
b ovstart
12 Optional: Run the following commands on both the NNMi management server and the BSM server. Compare the outputs to make sure the keystore certificates reside on both servers:
• NNMi management server:
— Windows: keytool.exe -list -keystore %NnmDataDir%\shared\nnm\certificates\nnm.keystore -storepass nnmkeypass
— UNIX: keytool -list -keystore $NnmDataDir/shared/nnm/certificates/nnm.keystore -storepass nnmkeypass
• BSM server: keytool.exe -list -keystore <directory>:\HPBSM\odb\conf\security\server.keystore -storepass hppass
13 Optional: Run the following commands on both the NNMi management server and the BSM server. Compare the outputs to make sure the truststore certificates reside on both servers:
• NNMi management server:
– Windows: keytool.exe -list -keystore %NnmDataDir%\shared\nnm\certificates\nnm.truststore -storepass ovpass
NNMi Visualizations Within HP Business Service Management 53

NNMi 9.23
– UNIX: keytool -list -keystore $NnmDataDir/shared/nnm/certificates/nnm.truststore -storepass ovpass
• BSM server: keytool.exe -list -keystore <directory>:\HPBSM\odb\conf\security\server.truststore -storepass hppass
NNMi Data Available from BSM End User Management Reports
If you have configured a link in to an NNMi management server, BSM users can drill down from some of the End User Management reports to NNMi data. In HP NNMi, you can see Path View (trace route) information between a source (client) machine and destination (server) machine, which can help you identify the root cause of network problems and pinpoint common network problems.
BSM users can also use URL tools to launch the NNMi console for further analyzing incoming events in HP NNMi.
End User Management Reports with Drilldown to HP NNMi
Table 9 lists the End User Management reports that provide drilldown to NNMi data. Table 9 also describes the relevant source and destination machines for which trace route data is displayed. For more information about any report type, see Analysis Reports in the BSM User Guide.
Table 9 End User Management Reports with Drilldown to NNMi
End User Management Report Source and Destination Machines
Action Over Time Report The source and destination IP addresses with the worst network time for the selected action. If more than one action is included in the filter, the first action is used.
Action Raw Data Report The source and destination IP addresses with the worst network time for the selected action.
RUM Action Summary Report The source and destination IP addresses with the worst network time for the selected action.
RUM End User Group Over Time Report
The source and destination IP addresses for the request-response with the worst network time in the selected application. If more than one end-user group is included in the filter, the first end-user group is used.NOTE: You can drill down to NNMi from this report only when it is generated for TCP applications, or Web applications with TCP data.
54 NNMi-BSM Integration Guide

February 2015
Configuring Drilldown to NNMi Data
To enable drilldown from End User Management reports to NNMi data, follow these steps:
1 If you have not already done so, configure a connection from HP BSM to HP NNMi as described in Enabling NNMi Visualizations from HP BSM on page 56.
2 If you have not already done so, enable single sign-on between HP BSM and HP NNMi as described in Configuring Single Sign-On Between HP NNMi and HP BSM on page 49.
3 If you have not already done so, configure HP NNMi to push topology information to the RTSM as described in Enabling the HP NNMi–HP BSM Topology Integration on page 15.
4 Optional. On the BSM server, install and configure the HPOprInf infrastructure content pack.
For information, see the BSM Operations Management Extensibility Guide.
RUM End User Group Summary Report
The source and destination IP addresses for the request-response with the worst network time from the selected application. NOTE: To drill down from this report to HP NNMi, the report must be generated for TCP applications or web applications with TCP data.
RUM Tier Summary Report The source and destination IP addresses for the request-response with the worst network time in the selected application.
RUM Transaction Summary Report
The source and destination IP addresses with the worst network time for the selected transaction.
Session Details Report The action server and session client IP addresses.
Tiers Over Time Report The source and destination IP addresses for the request-response with the worst network time in the selected application.
Transaction Over Time Report The source and destination IP addresses with the worst network time for the selected transaction. If more than one transaction is included in the filter, the first transaction is used.
Table 9 End User Management Reports with Drilldown to NNMi (cont’d)
End User Management Report Source and Destination Machines
NNMi Visualizations Within HP Business Service Management 55

NNMi 9.23
Enabling NNMi Visualizations from HP BSM
Configure a connection from HP BSM to HP NNMi to view the following data:
• NNMi components in MyBSM
• Drilldown to HP NNMi from End User Management reports
To configure the connection from HP BSM to HP NNMi, follow these steps:
1 In the BSM user interface, open the Infrastructure Settings page (Admin > Platform > Setup and Maintenance > Infrastructure Settings).
2 Select Foundations, and then select Integrations with other applications.
3 In the HP NNM table, locate and modify the following parameters:
• HP NNM Integration URL: the URL for accessing the NNMi console. Use the correct URL in the following form: <protocol>://<fully_qualified_domain_name>:<port_number>
<protocol> represents either http or https.
<fully_qualified_domain_name> represents the official fully-qualified domain name (FQDN) of the NNMi management server.
<port_number> is the port for connecting to the NNMi console, as specified in the following file:
— Windows: %NnmDataDir%\conf\nnm\props\nms-local.properties
— UNIX: $NnmDataDir/conf/nnm/props/nms-local.properties
For non-SSL connections, use the value of jboss.http.port, which is 80 or 8004 by default (depending on the presence of another web server when NNMi was installed).
For SSL connections, use the value of jboss.https.port, which is 443 by default.
• HP NNMi User name: the user name for connecting to the NNMi web services. This user must have the NNMi Administrator or Web Service Client role.
• HP NNMi User password: the password for the specified NNMi user name.
56 NNMi-BSM Integration Guide

We appreciate your feedback!
If an email client is configured on this system, by default an email window opens when you click here.
If no email client is available, copy the information below to a new message in a web mail client, and then send this message to [email protected].
Product name and version: NNMi 9.23
Document title: HP Network Node Manager i Software—HP Business Service Management Integration Guide
Feedback: