Getting Started - Version 2022.4.0 - Black Duck - Synopsys
59
Getting Started Version 2022.4.0
-
Upload
khangminh22 -
Category
Documents
-
view
5 -
download
0
Transcript of Getting Started - Version 2022.4.0 - Black Duck - Synopsys

Getting StartedVersion 2022.4.0

This edition of the Getting Started refers to version 2022.4.0 of Black Duck.
This document was created or updated on Thursday, March 31, 2022.
Please send your comments and suggestions to:
Synopsys800 District Avenue, Suite 201Burlington, MA 01803-5061 USA
Copyright © 2022 by Synopsys.
All rights reserved. All use of this documentation is subject to the license agreement between Black DuckSoftware, Inc. and the licensee. No part of the contents of this document may be reproduced or transmittedin any form or by any means without the prior written permission of Black Duck Software, Inc.
Black Duck, Know Your Code, and the Black Duck logo are registered trademarks of Black Duck Software,Inc. in the United States and other jurisdictions. Black Duck Code Center, Black Duck Code Sight, BlackDuck Hub, Black Duck Protex, and Black Duck Suite are trademarks of Black Duck Software, Inc. All othertrademarks or registered trademarks are the sole property of their respective owners.
Contents
Chapter 1: About Black Duck 5Chapter 2: Logging in to Black Duck 7Chapter 3: Scanning your code 9
Using Synopsys Detect (Desktop) 9Downloading and installing Synopsys Detect (Desktop) 10Configuring Synopsys Detect (Desktop) 11Certificates 18Scanning options 18Creating a scan file 19Managing scans 20Uploading scan files to Black Duck 22Viewing uploaded scans 23
Creating a project 25Mapping a scan to a project 26
Chapter 4: Viewing risk in Black Duck 29Dashboards 29Project version pages 33
Viewing your dashboards 34Viewing dashboards 35About the Watching and My Projects dashboards 36About saved searches dashboards 39
Viewing the health of your projects 49About security risk 52
Suggested work flow 53Chapter 5: Viewing your BOM 55
Adjusting the component and/or component version in a BOM 55
P a g e | 1 Black Duck 2022.4.0

P a g e | 2 Black Duck 2022.4.0
Black Duck documentationThe documentation for Black Duck consists of online help and these documents:
Title File Description
Release Notes release_notes.pdf Contains information about the new and improved features, resolved issues, and known issues in the current and previous releases.
Installing Black Duck using Docker Swarm
install_swarm.pdf Contains information about installing and upgrading Black Duck using Docker Swarm.
Getting Started getting_started.pdf Provides first-time users with information on using Black Duck.
Scanning Best Practices scanning_best_practices.pdf Provides best practices for scanning.
Getting Started with the SDK getting_started_sdk.pdf Contains overview information and a sample use case.
Report Database report_db.pdf Contains information on using the report database.
User Guide user_guide.pdf Contains information on using Black Duck's UI.
The installation methods for installing Black Duck software in a Kubernetes or OpenShift environment are Synopsysctl and Helm. Click the following links to view the documentation.
n Helm is a package manager for Kubernetes that you can use to install Black Duck.
n Synopsysctl is a cloud-native administration command-line tool for deploying Black Duck software in Kubernetes and Red Hat OpenShift.
Black Duck integration documentation is available on Confluence.
Preface
Customer supportIf you have any problems with the software or the documentation, please contact Synopsys Customer Support.
You can contact Synopsys Support in several ways:
n Online: https://www.synopsys.com/software-integrity/support.html
n Phone: See the Contact Us section at the bottom of our support page to find your local phone number.
To open a support case, please log in to the Synopsys Software Integrity Community site at https://community.synopsys.com/s/contactsupport.
Another convenient resource available at all times is the online customer portal.
Synopsys Software Integrity CommunityThe Synopsys Software Integrity Community is our primary online resource for customer support, solutions, and information. The Community allows users to quickly and easily open support cases and monitor progress, learn important product information, search a knowledgebase, and gain insights from other Software Integrity Group (SIG) customers. The many features included in the Community center around the following collaborative actions:
n Connect – Open support cases and monitor their progress, as well as, monitor issues that require Engineering or Product Management assistance
n Learn – Insights and best practices from other SIG product users to allow you to learn valuable lessons from a diverse group of industry leading companies. In addition, the Customer Hub puts all the latest product news and updates from Synopsys at your fingertips, helping you to better utilize our products and services to maximize the value of open source within your organization.
n Solve – Quickly and easily get the answers you’re seeking with the access to rich content and product knowledge from SIG experts and our Knowledgebase.
n Share – Collaborate and connect with Software Integrity Group staff and other customers to crowdsource solutions and share your thoughts on product direction.
Access the Customer Success Community. If you do not have an account or have trouble accessing the system, click here to get started, or send an email to [email protected].
TrainingSynopsys Software Integrity, Customer Education (SIG Edu) is a one-stop resource for all your Black Duck education needs. It provides you with 24x7 access to online training courses and how-to videos.
New videos and courses are added monthly.
At Synopsys Software Integrity, Customer Education (SIG Edu), you can:
n Learn at your own pace.
n Review courses as often as you wish.
Getting Started Preface
P a g e | 3 Black Duck 2022.4.0

n Take assessments to test your skills.
n Print certificates of completion to showcase your accomplishments.
Learn more at https://community.synopsys.com/s/education or for help with Black Duck, select Black Duck
Tutorials from the Help menu ( ) in the Black Duck UI.
Synopsys Statement on Inclusivity and DiversitySynopsys is committed to creating an inclusive environment where every employee, customer, and partner feels welcomed. We are reviewing and removing exclusionary language from our products and supporting customer-facing collateral. Our effort also includes internal initiatives to remove biased language from our engineering and working environment, including terms that are embedded in our software and IPs. At the same time, we are working to ensure that our web content and software applications are usable to people of varying abilities. You may still find examples of non-inclusive language in our software or documentation as our IPs implement industry-standard specifications that are currently under review to remove exclusionary language.
Getting Started Preface
P a g e | 4 Black Duck 2022.4.0

P a g e | 5 Black Duck 2022.4.0
Chapter 1: About Black Duck
The Synopsys Software Integrity Group (SIG) offers a comprehensive suite of services and tools that support customers on their security journey. From customers just starting with security, to customers strengthening an established program, SIG has the expertise, skills, and products necessary for success.
Black Duck, a Software Composition Analysis (SCA) tool, helps with managing the supply chain of software, understanding the third-party components in use and minimizing risks from known vulnerabilities and licensing. Black Duck is a comprehensive solution for supply chain management, based primarily on source analysis.
Using Black Duck, you can:

n Scan your code and identify open source software that exists in your code base.
n View the generated Bill of Materials (BOM) for your software projects.
n View vulnerabilities that have been identified in open source components.
n Assess your security, license, and operational risk.
Getting Started Chapter 1: About Black Duck
P a g e | 6 Black Duck 2022.4.0
P a g e | 7 Black Duck 2022.4.0
Chapter 2: Logging in to Black Duck
Logging in to Black Duck lets you search projects that may be restricted to team members or company employees.
Note: You must have a username and password to access Black Duck. Contact your system administrator if you do not have a username. If Black Duck is configured to use LDAP, you may be able to log in to Black Duck using those credentials.
To log in to Black Duck:
1. Using a browser, navigate to the Black Duck URL supplied by your system administrator. Typically the URL is in the format https://<server hostname>.
2. Enter the username and password provided by your Black Duck administrator. Your password is case sensitive.
Note: If your administrator has enabled password requirements and your password does not meet the requirements, a dialog box appears notifying you that you must change your password. When updating your password, make sure that it meets the requirements, as listed in the dialog box. You will not be able to log in to Black Duck unless the password meets all requirements.
3. Click Login.
When you first log in after installing Black Duck, an empty Dashboard page appears. For information to appear in Black Duck, you need to scan your code and map your code to a project, as described in the next chapter.

By default the Dashboard page only shows the Watching and My Projects dashboards. You can also create custom dashboards so that you can quickly view the project versions or component versions that are important to you: search for projects and/or components and then save the searches. Your saved searches appear on the Dashboard page.
Getting Started Chapter 2: Logging in to Black Duck
P a g e | 8 Black Duck 2022.4.0

P a g e | 9 Black Duck 2022.4.0
Chapter 3: Scanning your code
Black Duck component scanning is scanning functionality that provides an automated way to determine the set of open source software (OSS) components that make up a software project. Component scanning helps organizations manage their use of open source binaries by identifying and cataloging OSS components in order to provide additional metadata such as license, vulnerability, and OSS project health for those components.
Black Duck provides these scanning tools:
n Synopsys Detect. Synopsys Detect is the recommended scanning tool for Black Duck.
n Black Duck's Rapid Scanning provides a way for developers to quickly determine if the versions of open source components included in a project violate corporate policies surrounding the use of open source. Using Synopsys Detect, Rapid Scanning quickly returns results as it only employs package manager scanning and does not interact with the Black Duck server database. Refer to the Black Duck online help or User Guide for more information about Rapid Scanning.
n Synopsys Detect (Desktop), as described below.
n Command line (CLI) version of the Signature Scanner. Refer to the Black Duck online help or User Guide for more information.
Using Synopsys Detect (Desktop)Synopsys Detect (Desktop) provides a new interface to make it easier to scan code.
With Synopsys Detect (Desktop), you can:
n Scan source directories, binaries and executables, and docker images and distributions.
n Create a scan file to be uploaded at a later time.
n Manage scan files.
n Upload scan files directly to Black Duck.
n View uploaded scans.
To use Synopsys Detect (Desktop):
1. Download and install Synopsys Detect (Desktop).
2. Configure Synopsys Detect (Desktop) with your Black Duck server settings and complete the installation process.
3. Use Synopsys Detect (Desktop) to scan and/or upload your files.
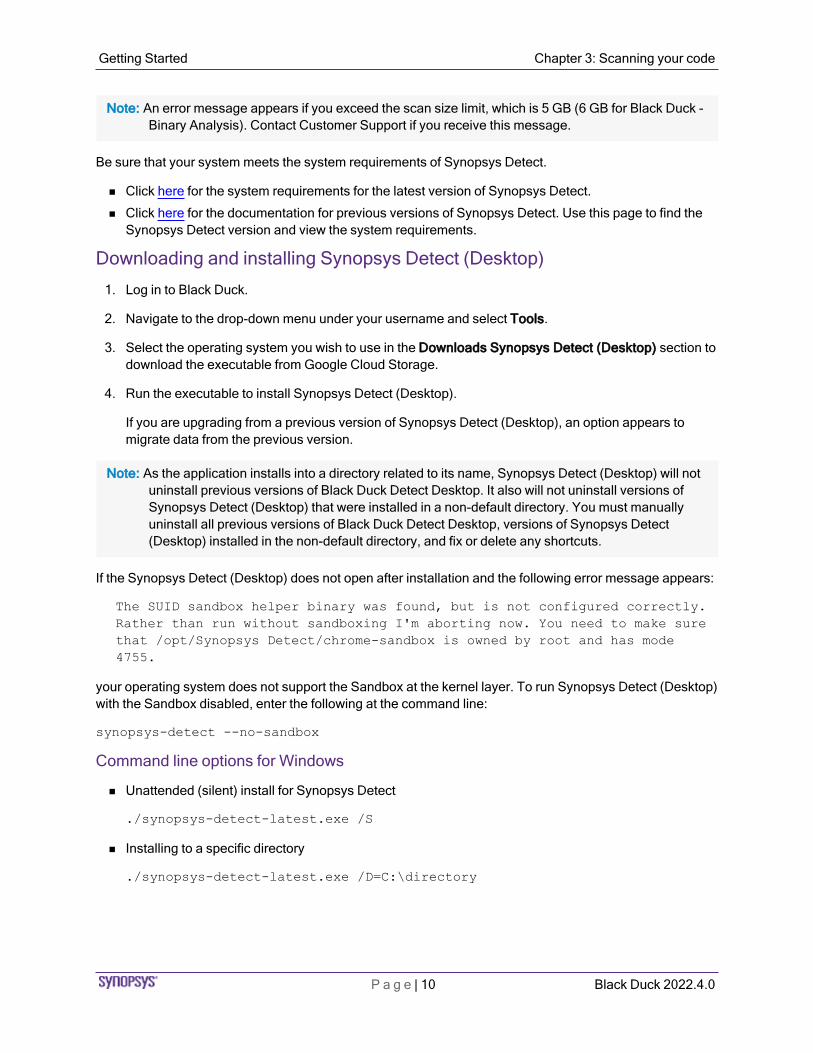
Note: An error message appears if you exceed the scan size limit, which is 5 GB (6 GB for Black Duck - Binary Analysis). Contact Customer Support if you receive this message.
Be sure that your system meets the system requirements of Synopsys Detect.
n Click here for the system requirements for the latest version of Synopsys Detect.
n Click here for the documentation for previous versions of Synopsys Detect. Use this page to find the Synopsys Detect version and view the system requirements.
Downloading and installing Synopsys Detect (Desktop)
1. Log in to Black Duck.
2. Navigate to the drop-down menu under your username and select Tools.
3. Select the operating system you wish to use in the Downloads Synopsys Detect (Desktop) section to download the executable from Google Cloud Storage.
4. Run the executable to install Synopsys Detect (Desktop).
If you are upgrading from a previous version of Synopsys Detect (Desktop), an option appears to migrate data from the previous version.
Note: As the application installs into a directory related to its name, Synopsys Detect (Desktop) will not uninstall previous versions of Black Duck Detect Desktop. It also will not uninstall versions of Synopsys Detect (Desktop) that were installed in a non-default directory. You must manually uninstall all previous versions of Black Duck Detect Desktop, versions of Synopsys Detect (Desktop) installed in the non-default directory, and fix or delete any shortcuts.
If the Synopsys Detect (Desktop) does not open after installation and the following error message appears:
The SUID sandbox helper binary was found, but is not configured correctly. Rather than run without sandboxing I'm aborting now. You need to make sure that /opt/Synopsys Detect/chrome-sandbox is owned by root and has mode 4755.
your operating system does not support the Sandbox at the kernel layer. To run Synopsys Detect (Desktop) with the Sandbox disabled, enter the following at the command line:
synopsys-detect --no-sandbox
Command line options for Windows
n Unattended (silent) install for Synopsys Detect
./synopsys-detect-latest.exe /S
n Installing to a specific directory
./synopsys-detect-latest.exe /D=C:\directory
Getting Started Chapter 3: Scanning your code
P a g e | 10 Black Duck 2022.4.0

Installing the Linux version of Synopsys Detect (Desktop)
1. Download the executable from your Black Duck server, as described in the previous section.
2. Install Synopsys Detect (Desktop):
cd Downloads
To install on CentOS/RedHat:
sudo yum localinstall synopsys-detect-latest.rpm
To install on Ubuntu/Debian:
sudo apt install ./synopsys-detect-latest.deb
3. Change the permission of chrome-sandbox:
cd "/opt/Synopsys Detect"sudo chmod 4755 chrome-sandbox
4. Run Synopsys Detect (Desktop):
./synopsys-detect --no-sandbox
Configuring Synopsys Detect (Desktop)
After installing Synopsys Detect (Desktop), continue the installation process by configuring your Black Duck settings.
Getting Started Chapter 3: Scanning your code
P a g e | 11 Black Duck 2022.4.0

1. After installing or upgrading to Synopsys Detect (Desktop), the Welcome page appears.
2. Click , located in the upper right corner display the Settings page.
Getting Started Chapter 3: Scanning your code
P a g e | 12 Black Duck 2022.4.0

3. As described below, select one of the following tabs and complete the installation and configuration process:
l Server Configuration
l Proxy Settings
l Synopsys Detect
l Updates
Black Duck server configuration
To add a server:
1. Select the Server Configuration tab and click Add Server.
The Add Server dialog box appears.
Getting Started Chapter 3: Scanning your code
P a g e | 13 Black Duck 2022.4.0
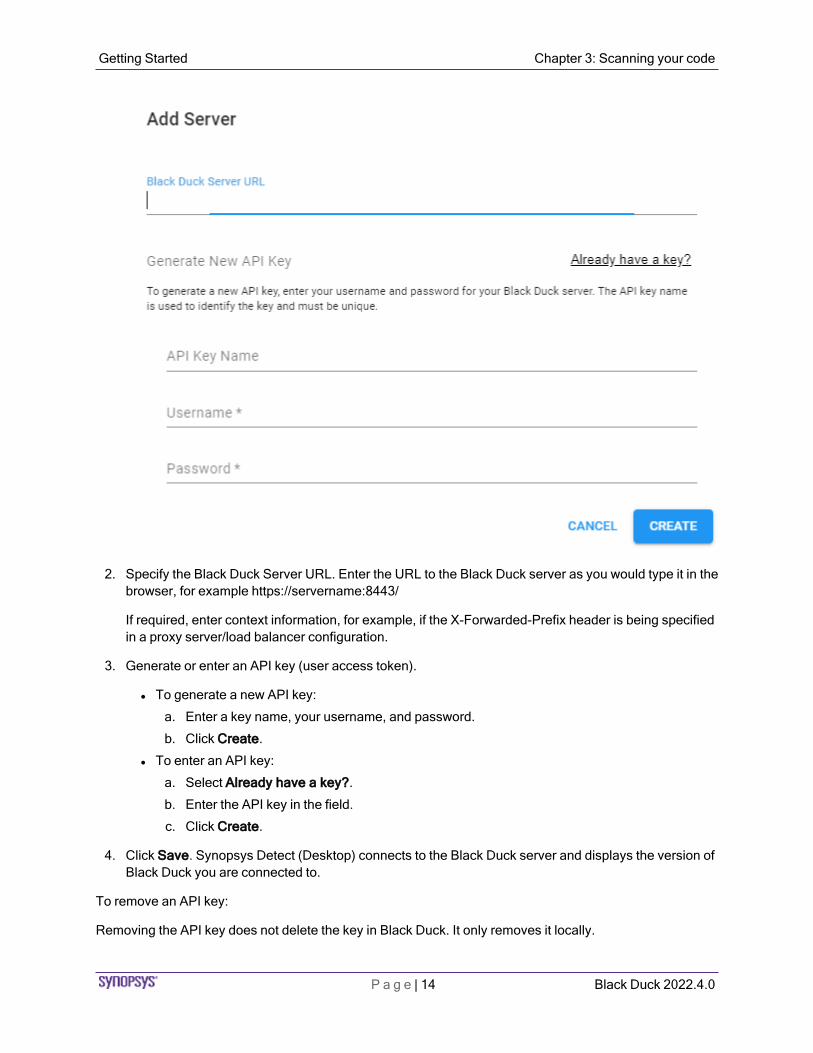
2. Specify the Black Duck Server URL. Enter the URL to the Black Duck server as you would type it in the browser, for example https://servername:8443/
If required, enter context information, for example, if the X-Forwarded-Prefix header is being specified in a proxy server/load balancer configuration.
3. Generate or enter an API key (user access token).
l To generate a new API key:
a. Enter a key name, your username, and password.
b. Click Create.
l To enter an API key:
a. Select Already have a key?.
b. Enter the API key in the field.
c. Click Create.
4. Click Save. Synopsys Detect (Desktop) connects to the Black Duck server and displays the version of Black Duck you are connected to.
To remove an API key:
Removing the API key does not delete the key in Black Duck. It only removes it locally.
Getting Started Chapter 3: Scanning your code
P a g e | 14 Black Duck 2022.4.0

1. Select the Server Configuration tab.
2. Click in the row of the server and select Remove API Key.
The Remove API Key dialog box appears.
3. Click OK to confirm.
To delete a configuration
1. Click in the row of the server and select Delete Configuration.
The Delete Server Configuration dialog box appears.
2. Click OK to confirm.
Proxy settings
Accessing Synopsys Detect (Desktop) through a proxy is supported. Synopsys Detect (Desktop) automatically uses your local system proxy setup.
If you are required to manually enter your proxy settings or you do not require a proxy, you can modify these default settings.
To modify the default proxy settings:
Getting Started Chapter 3: Scanning your code
P a g e | 15 Black Duck 2022.4.0
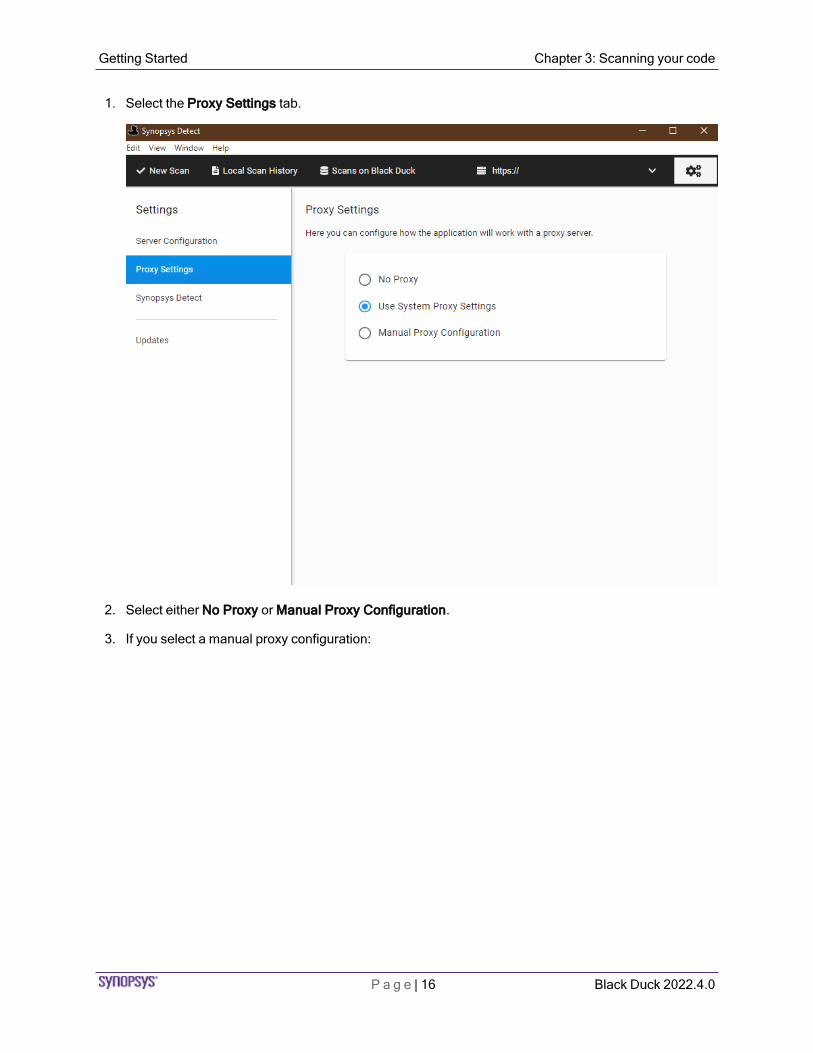
1. Select the Proxy Settings tab.
2. Select either No Proxy or Manual Proxy Configuration.
3. If you select a manual proxy configuration:
Getting Started Chapter 3: Scanning your code
P a g e | 16 Black Duck 2022.4.0

a. Enter the following information:
l Your proxy host name.
l Port number.
l Whether authentication is required.
l Your username and password.
If a proxy is enabled and authentication is required, you may have to re-enter your username and password.
b. Click Save.
4. Restart the application.
Configuring Synopsys Detect settings
Optionally, select Synposys Detect and if necessary, define any Synopsys Detect settings, clear any build tools you do not want to use, or manually configure the path to the build tools.
Checking for updates
You can check to see if there are updates to the Synopsys Detect (Desktop) by selecting the Updates tab. The page lists the last time you checked for updates. Click Check for updates to view if there are newer
Getting Started Chapter 3: Scanning your code
P a g e | 17 Black Duck 2022.4.0

versions available. This option is only available for Windows and MacOS systems.
Certificates
When connecting to Black Duck, you can ignore invalid or insecure SSL certificates.
1. Click , located in the upper right corner display the Settings page.
2. Select the Server Configuration tab and select Ignore invalid or insecure SSL Certificates.
3. Restart the application.
Caution: This is a potentially unsafe operation. It should only be used if you must connect to a system with an insecure or self-signed certificate.
Scanning options
The Synopsys Detect (Desktop) makes it easier to scan:
n Source directories
n Binaries or executables
n Docker images or distributions
By default, all scans are uploaded to the Black Duck server and mapped to a project version. However, you can create a scan file as described here, to output the scan to a file which you can later upload to Black Duck.
To specify project and/or version names:
1. Click ADD located next to Project Settings.
2. Select Project Name and/or Version Name. The fields appear in the UI.
3. Specify the values for the field(s).
Scanning Source Directory
To scan a source directory:
1. Click New Scan.
2. From the What type of scan? list, select Source Directory,
3. Click to select the directory you would like to scan.
4. Optionally, modify or configure any project or scan settings by clicking ADD and selecting the setting.
If you have purchased a snippet scanning license and want to enable snippet scanning, select Snippet Matching from the Scan Settings options and enable it.
5. Click Scan.
Getting Started Chapter 3: Scanning your code
P a g e | 18 Black Duck 2022.4.0
The status of the scan appears along with an option to cancel the scan.
6. When the scan is complete, select the Local Scan History tab to view information on the completed scan. From this tab, you can manage your scan. You can also view the uploaded scan using the Scans tab.
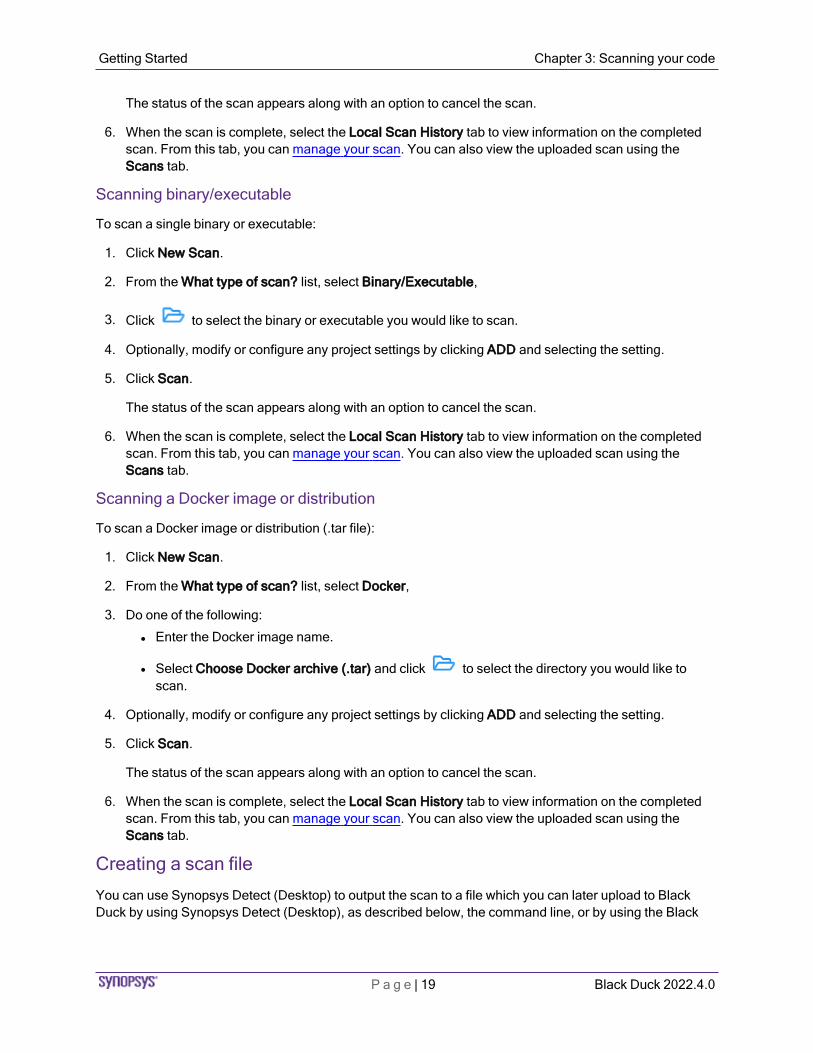
Scanning binary/executable
To scan a single binary or executable:
1. Click New Scan.
2. From the What type of scan? list, select Binary/Executable,
3. Click to select the binary or executable you would like to scan.
4. Optionally, modify or configure any project settings by clicking ADD and selecting the setting.
5. Click Scan.
The status of the scan appears along with an option to cancel the scan.
6. When the scan is complete, select the Local Scan History tab to view information on the completed scan. From this tab, you can manage your scan. You can also view the uploaded scan using the Scans tab.
Scanning a Docker image or distribution
To scan a Docker image or distribution (.tar file):
1. Click New Scan.
2. From the What type of scan? list, select Docker,
3. Do one of the following:
l Enter the Docker image name.
l Select Choose Docker archive (.tar) and click to select the directory you would like to scan.
4. Optionally, modify or configure any project settings by clicking ADD and selecting the setting.
5. Click Scan.
The status of the scan appears along with an option to cancel the scan.
6. When the scan is complete, select the Local Scan History tab to view information on the completed scan. From this tab, you can manage your scan. You can also view the uploaded scan using the Scans tab.
Creating a scan file
You can use Synopsys Detect (Desktop) to output the scan to a file which you can later upload to Black Duck by using Synopsys Detect (Desktop), as described below, the command line, or by using the Black
Getting Started Chapter 3: Scanning your code
P a g e | 19 Black Duck 2022.4.0

Duck UI.
Note: Snippet scanning cannot be completed offline as it requires communication with the Black Duck server.
To create a scan file:
1. Click New Scan.
2. Select the type of scan (Source Directory, Binary/Executable, or Docker).
3. Optionally, modify or configure any project or, for source directory scanning, scan settings by clicking ADD and selecting the setting.
4. Select Offline Mode.
5. Click Scan.
The status of the scan appears along with an option to cancel the scan.
6. When the scan is complete, select the Local Scan History tab to view information on the completed scan.
Managing scans
Use the Local Scan History tab to manage your scans.
1. Click Local Scan History.
A list of scans on your local system appears in the left column of the tab.
Getting Started Chapter 3: Scanning your code
P a g e | 20 Black Duck 2022.4.0
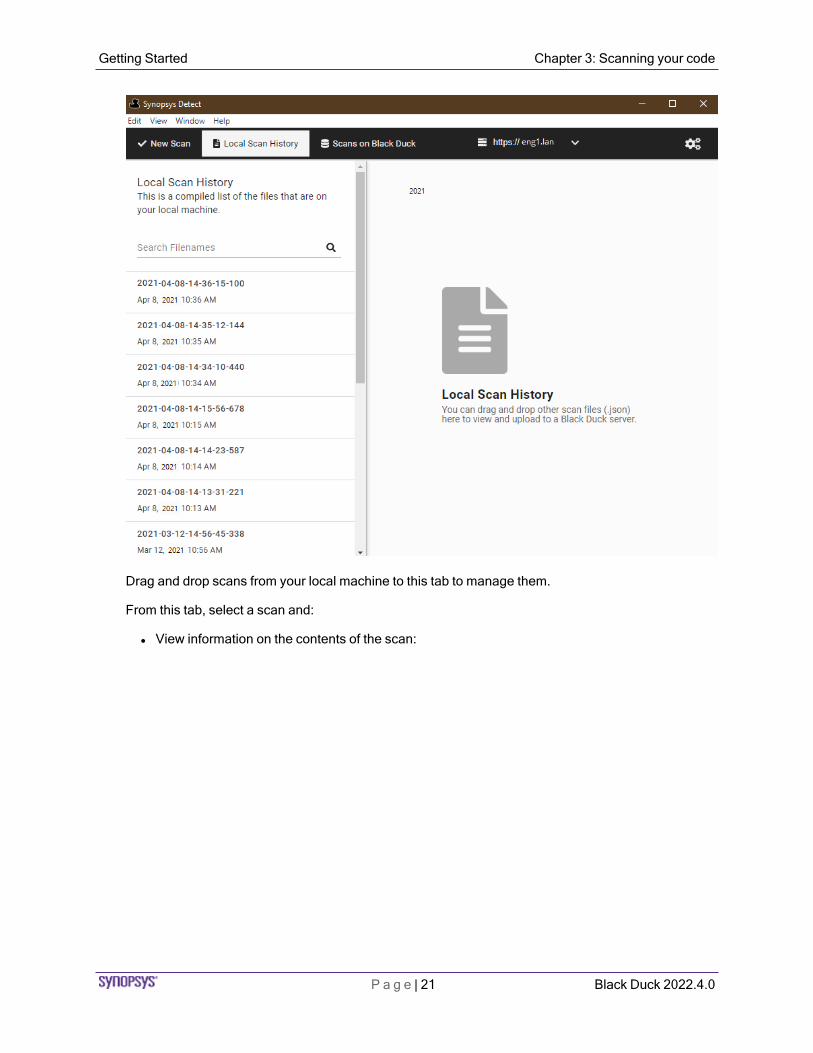
Drag and drop scans from your local machine to this tab to manage them.
From this tab, select a scan and:
l View information on the contents of the scan:
Getting Started Chapter 3: Scanning your code
P a g e | 21 Black Duck 2022.4.0

l View the location of the file on your system by clicking and selecting Show File.
l Upload the file, as described in the next section.
l Delete the scan by hovering over the scan name in the left column and clicking Delete. Click Yes to confirm.
Uploading scan files to Black Duck
You can use Synopsys Detect (Desktop) to upload scan files to Black Duck.
Getting Started Chapter 3: Scanning your code
P a g e | 22 Black Duck 2022.4.0
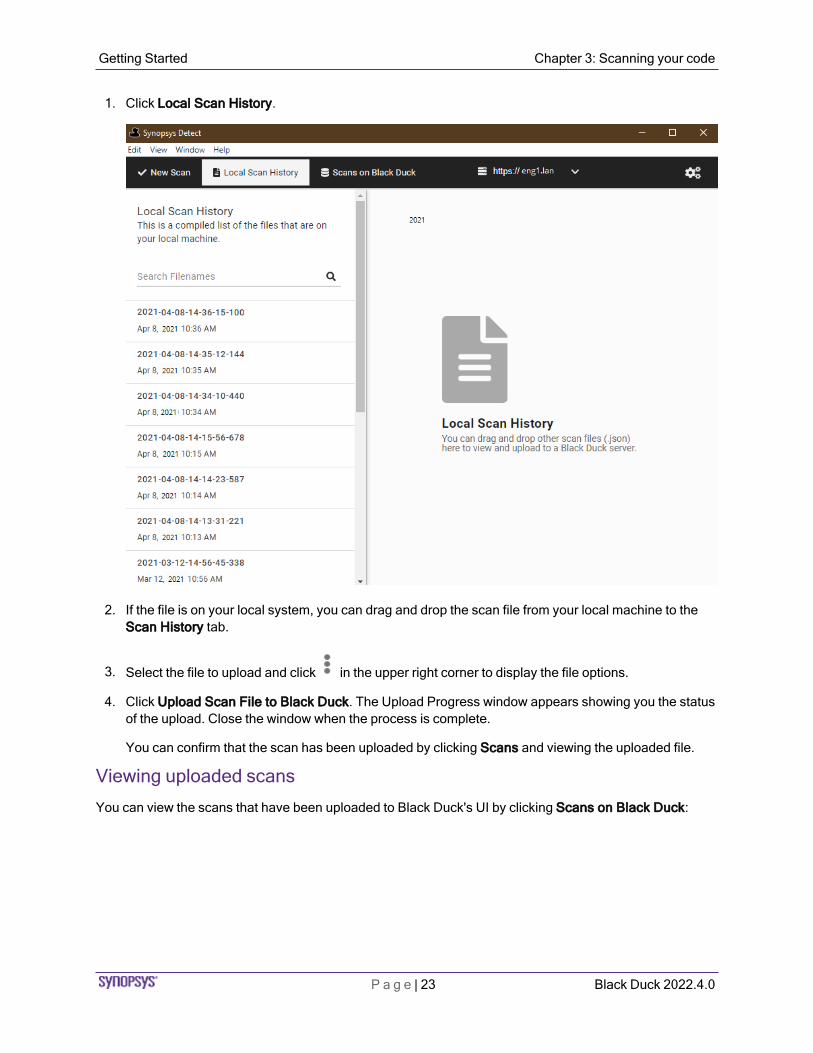
1. Click Local Scan History.
2. If the file is on your local system, you can drag and drop the scan file from your local machine to the Scan History tab.
3. Select the file to upload and click in the upper right corner to display the file options.
4. Click Upload Scan File to Black Duck. The Upload Progress window appears showing you the status of the upload. Close the window when the process is complete.
You can confirm that the scan has been uploaded by clicking Scans and viewing the uploaded file.
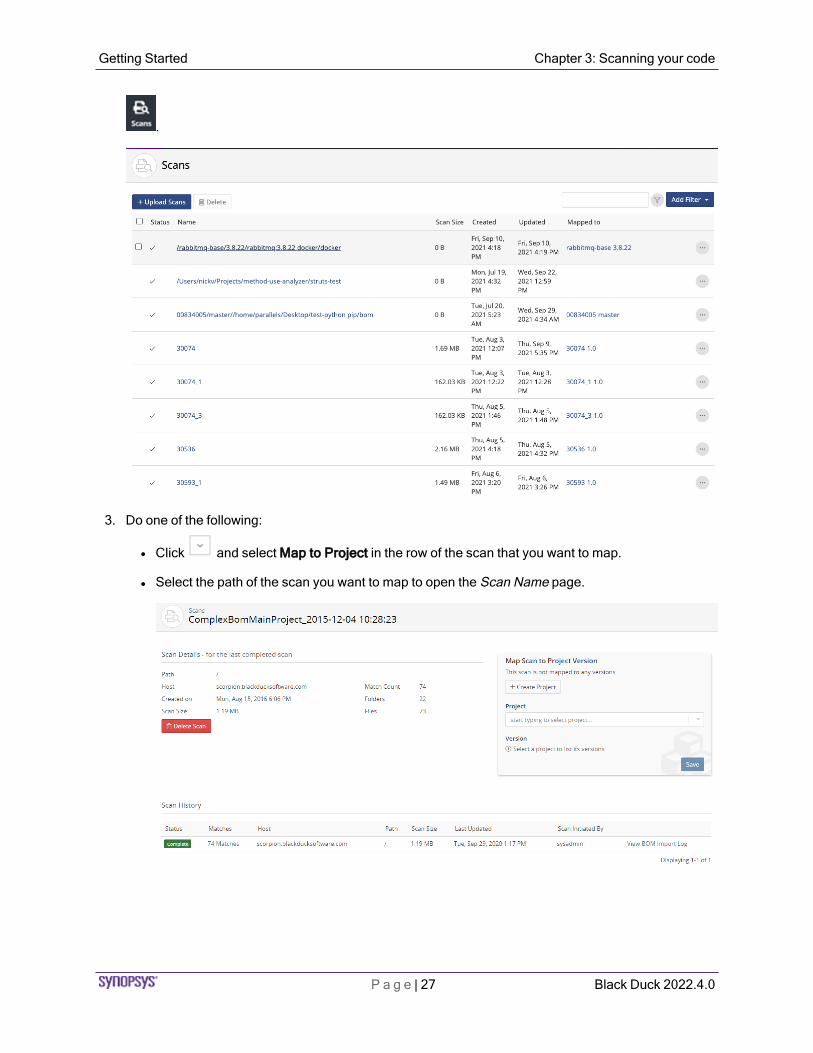
Viewing uploaded scans
You can view the scans that have been uploaded to Black Duck's UI by clicking Scans on Black Duck:
Getting Started Chapter 3: Scanning your code
P a g e | 23 Black Duck 2022.4.0

This tab displays the following information:
n The left side of the tab shows uploaded scans by status (in progress, completed, or error).
Use the search field to find a scan or limit the scans shown.
n The right side of the page lists the scans and shows the following information for each scan:
l Name
l Project and project version scan is mapped to or indicates that the scan is not mapped to a project.
l Date the scan was uploaded to Black Duck.
Select a scan to open the Scan Name page in Black Duck for the selected scan.
Note: The number of scanned bytes displayed in Synopsys Detect (Desktop) may differ from the number of scanned bytes shown in Black Duck. This is because of how Black Duck calculates and counts the number of bytes used. This is normal and is expected to occur in some scans.
Getting Started Chapter 3: Scanning your code
P a g e | 24 Black Duck 2022.4.0

Creating a projectA project is the base unit in Black Duck. A project can be both a stand-alone development project and part of another project. For example, Apache Tomcat is a project in its own right but it may also be part of other, larger projects. You must create the projects that you want to make available for search by other developers in your organization.
Note that a project or application is limited to 10GB of Managed Code base.
To create a project:
1. Log in to Black Duck.
2. Click + Create Project at the top of any page.
3. In the Create a New Project dialog box, enter a project name. This name must be unique among projects in Black Duck, although it can have the same name as a project in the Black Duck KB.
Tip: As a best practice, you should think about how other users will search for your projects when creating project names. For example, if your project is related to 3D graphics, naming it "3DGraphics" means that the user must type the entire project name in order to find your project. If you use a space or an underscore in the name, for example, "3D Graphics" or "3D_Graphics", the additional separator characters will allow users to locate the project using the search term "3D".
4. Optionally, select Add project details to enter additional information such as:
l Description.
Tip: As a best practice, you should think about how other users will search for your projects when creating project descriptions. The description should be specific about what the project does and how it is unique, so that it is easily distinguishable from other similar projects.
l Name of the project owner in the Owner field.
Note: If the user you add is not already a project member, Black Duck adds the user to the project team.
By default, the user creating the project is the project owner. The owner has the ability to assign
Getting Started Chapter 3: Scanning your code
P a g e | 25 Black Duck 2022.4.0

their projects to users and groups.
l Select a tier. 1
l Select the attributes you wish to clone for new versions of this project.
l Select whether to enable custom scan signatures.
Note: To assign an application ID to a project, create the project, as described here, and then modify the project settings.
5. Type the version for this project in the Version field.
6. Optionally, select Add version details to enter additional information such as the planned release date, the project phase, and the method in which the project is being delivered.
7. By default, edits to a version of this project apply to all versions of this project, excluding archived versions and manually added components. Clear this option if you want edits to apply to specific versions only.
8. Click Create.
Black Duck displays the Project Name page.
Mapping a scan to a projectMapping a scan adds the scan data to the BOM of a project version.
Note: You can scan a Docker image or file directory location or archive more than once, but you only have to map it to a project version once. The host and path may be changed, but as long as code location name is the same, Black Duck automatically updates the BOM of the project with any new information discovered during subsequent scans.
To map a scan to a project:
1. Log in to Black Duck.
2. Click
1A tier lets you categorize projects in terms of importance to your company. Tier 0 projects are defined as those that are most critical to the company, where Tier 5 projects are defined as least critical.
Getting Started Chapter 3: Scanning your code
P a g e | 26 Black Duck 2022.4.0
.
3. Do one of the following:
l Click and select Map to Project in the row of the scan that you want to map.
l Select the path of the scan you want to map to open the Scan Name page.
Getting Started Chapter 3: Scanning your code
P a g e | 27 Black Duck 2022.4.0

4. Start typing the name of a project to progressively display matches in the Project field.
If necessary, select Create Project to create a new project and version.
5. Select the project version to which you want to map the component scan.
If necessary, select Create Version to create a new version for a project.
6. Click Save.
Black Duck displays the name and version of the project to which you mapped the component scan. Select the link to open the BOM page.
Note: Black Duck displays an aggregate project version BOM. If a component version appears more than once in an archive, it is only displayed in the BOM once.
Getting Started Chapter 3: Scanning your code
P a g e | 28 Black Duck 2022.4.0
P a g e | 29 Black Duck 2022.4.0
Chapter 4: Viewing risk in Black Duck
Black Duck helps you understand the type and severity of risks, at several levels of detail, across your projects. The data used to calculate risk is provided by the Black Duck KB.
Use the following pages to identify and manage risk in projects:
n Dashboard pages
n Project version page/Components tab
n Project version page/Security tab
Note that the security risk values shown use CVSS v2 or CVSS v3.x scores, depending on which security risk calculation you selected; by default, CVSS v2 scores are shown. Note that the security risk graph displays a Critical risk category with a value of 0, if you selected CVSS v2.
Dashboards
Dashboards provide a high-level overview of risk from different perspectives.
Note: Dashboards will not contain any project or component information until you create projects and then map scans to these projects or manually add components to BOMs. The risk information for the components in your project versions' BOMs will then appear on the Dashboard pages.
n You can view the projects that interest you by using the Watching or My Projects dashboard or create a custom dashboard by saving your project search results.

Create a saved component search to view the components that interest you that are used in one or more projects.
Getting Started Chapter 4: Viewing risk in Black Duck
P a g e | 30 Black Duck 2022.4.0

n Create a saved vulnerability search to view the components that interest you.
Getting Started Chapter 4: Viewing risk in Black Duck
P a g e | 31 Black Duck 2022.4.0

n Use the Summary Dashboard to view the overall health of the projects you have permission to view and identify areas of concern.
Getting Started Chapter 4: Viewing risk in Black Duck
P a g e | 32 Black Duck 2022.4.0
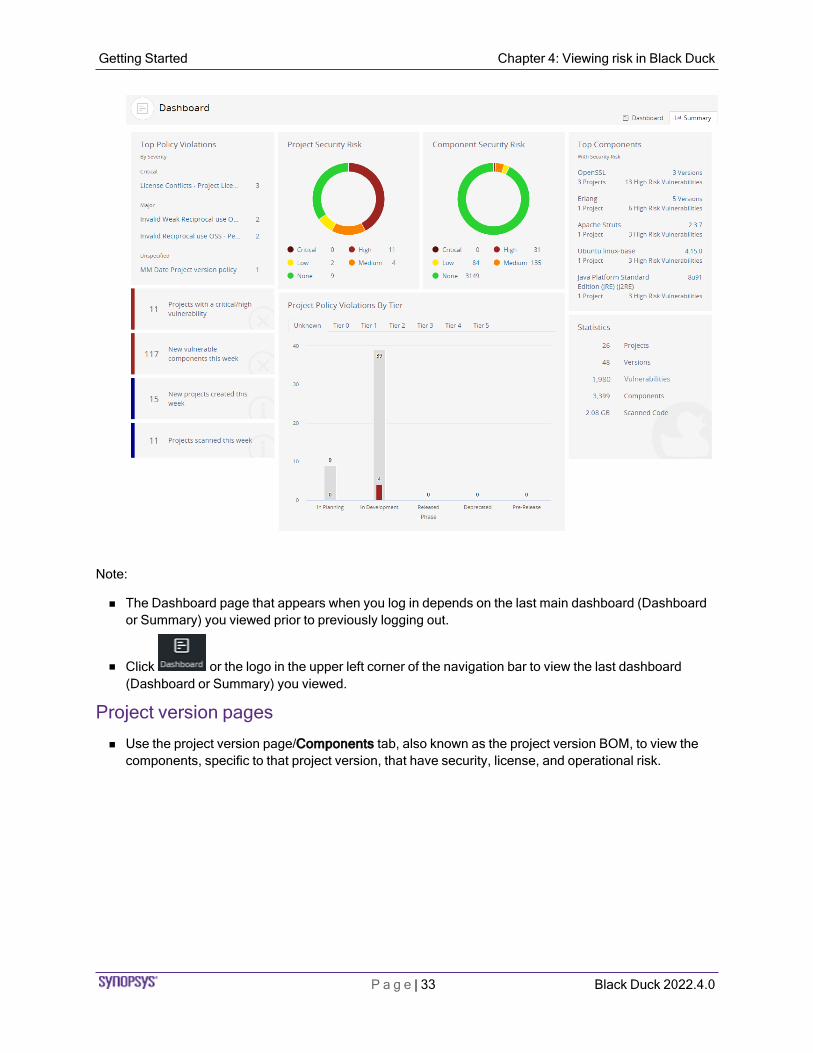
Note:
n The Dashboard page that appears when you log in depends on the last main dashboard (Dashboard or Summary) you viewed prior to previously logging out.
n Click or the logo in the upper left corner of the navigation bar to view the last dashboard (Dashboard or Summary) you viewed.
Project version pages
n Use the project version page/Components tab, also known as the project version BOM, to view the components, specific to that project version, that have security, license, and operational risk.
Getting Started Chapter 4: Viewing risk in Black Duck
P a g e | 33 Black Duck 2022.4.0
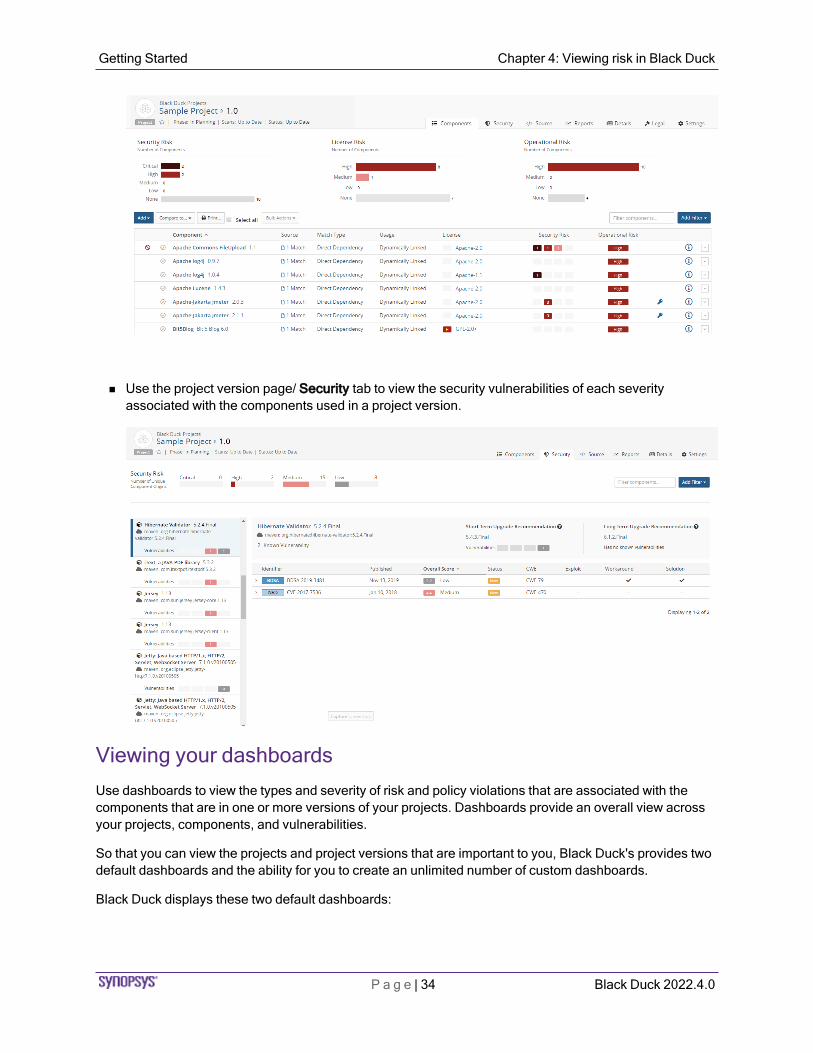
n Use the project version page/ Security tab to view the security vulnerabilities of each severity associated with the components used in a project version.
Viewing your dashboardsUse dashboards to view the types and severity of risk and policy violations that are associated with the components that are in one or more versions of your projects. Dashboards provide an overall view across your projects, components, and vulnerabilities.
So that you can view the projects and project versions that are important to you, Black Duck's provides two default dashboards and the ability for you to create an unlimited number of custom dashboards.
Black Duck displays these two default dashboards:
Getting Started Chapter 4: Viewing risk in Black Duck
P a g e | 34 Black Duck 2022.4.0

n Watching. Your watched projects.
n My Projects. All of your projects, including projects that you are not watching.
These dashboards display information on the Dashboard page at the project level.
In addition, you can create custom dashboards so that you can quickly view the project versions, component versions, and vulnerabilities that are important to you: search for projects, components, and/or vulnerabilities and then save the searches; use the Dashboard page to view the information from those saved searches.
Viewing dashboards
To view the dashboards:
1. Click to display the dashboards.
The dashboard page that appears depends on the last dashboard (a specific Dashboard page or Summary Dashboard) you viewed previously. If not displayed, select Dashboard to display your dashboards.
Getting Started Chapter 4: Viewing risk in Black Duck
P a g e | 35 Black Duck 2022.4.0
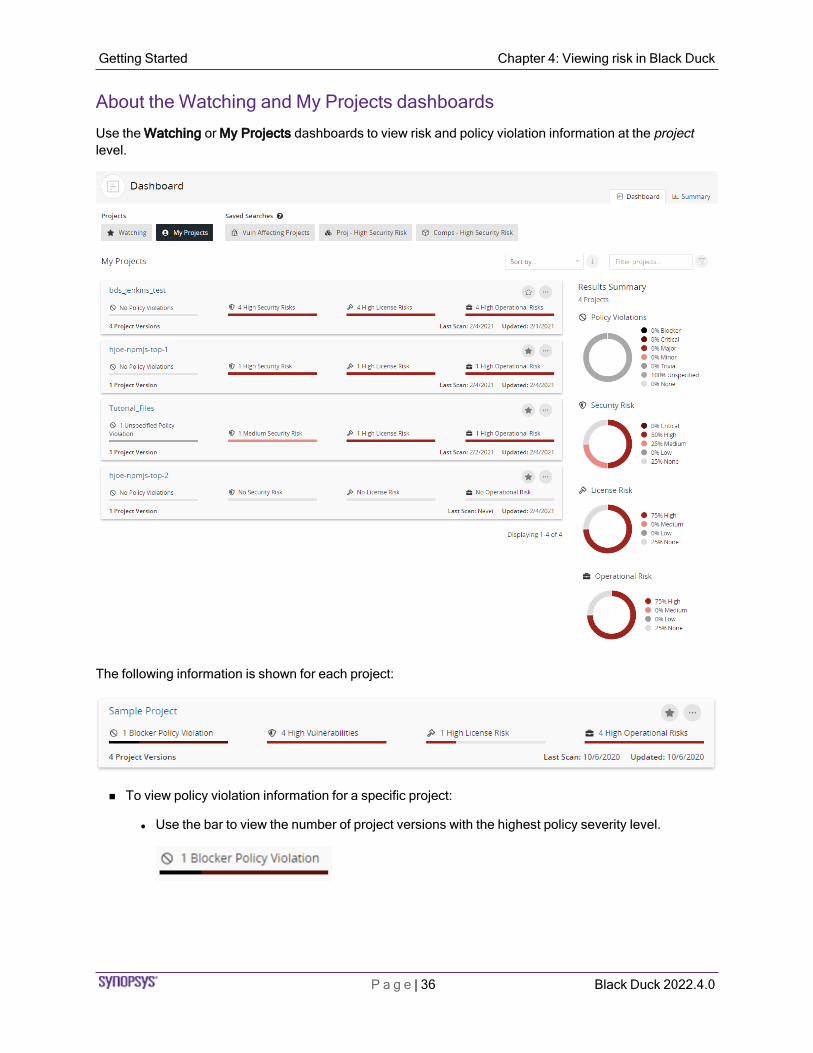
About the Watching and My Projects dashboards
Use the Watching or My Projects dashboards to view risk and policy violation information at the project level.
The following information is shown for each project:
n To view policy violation information for a specific project:
l Use the bar to view the number of project versions with the highest policy severity level.
Getting Started Chapter 4: Viewing risk in Black Duck
P a g e | 36 Black Duck 2022.4.0
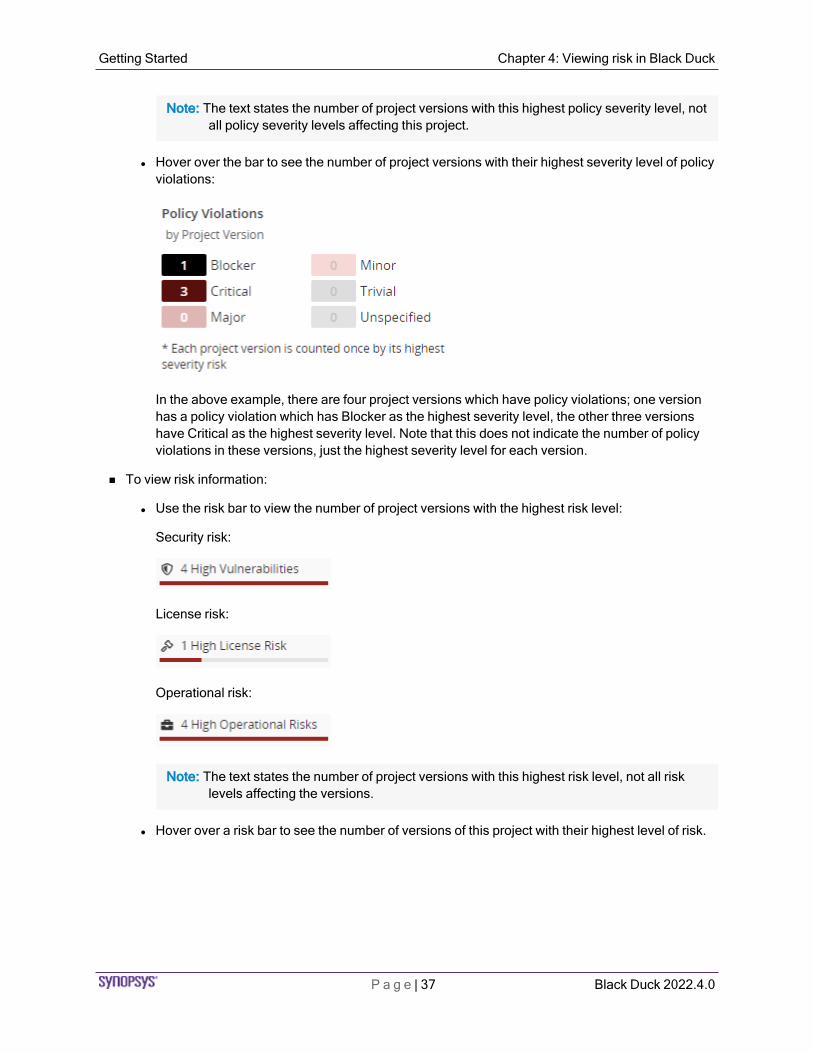
Note: The text states the number of project versions with this highest policy severity level, not all policy severity levels affecting this project.
l Hover over the bar to see the number of project versions with their highest severity level of policy violations:
In the above example, there are four project versions which have policy violations; one version has a policy violation which has Blocker as the highest severity level, the other three versions have Critical as the highest severity level. Note that this does not indicate the number of policy violations in these versions, just the highest severity level for each version.
n To view risk information:
l Use the risk bar to view the number of project versions with the highest risk level:
Security risk:
License risk:
Operational risk:
Note: The text states the number of project versions with this highest risk level, not all risk levels affecting the versions.
l Hover over a risk bar to see the number of versions of this project with their highest level of risk.
Getting Started Chapter 4: Viewing risk in Black Duck
P a g e | 37 Black Duck 2022.4.0
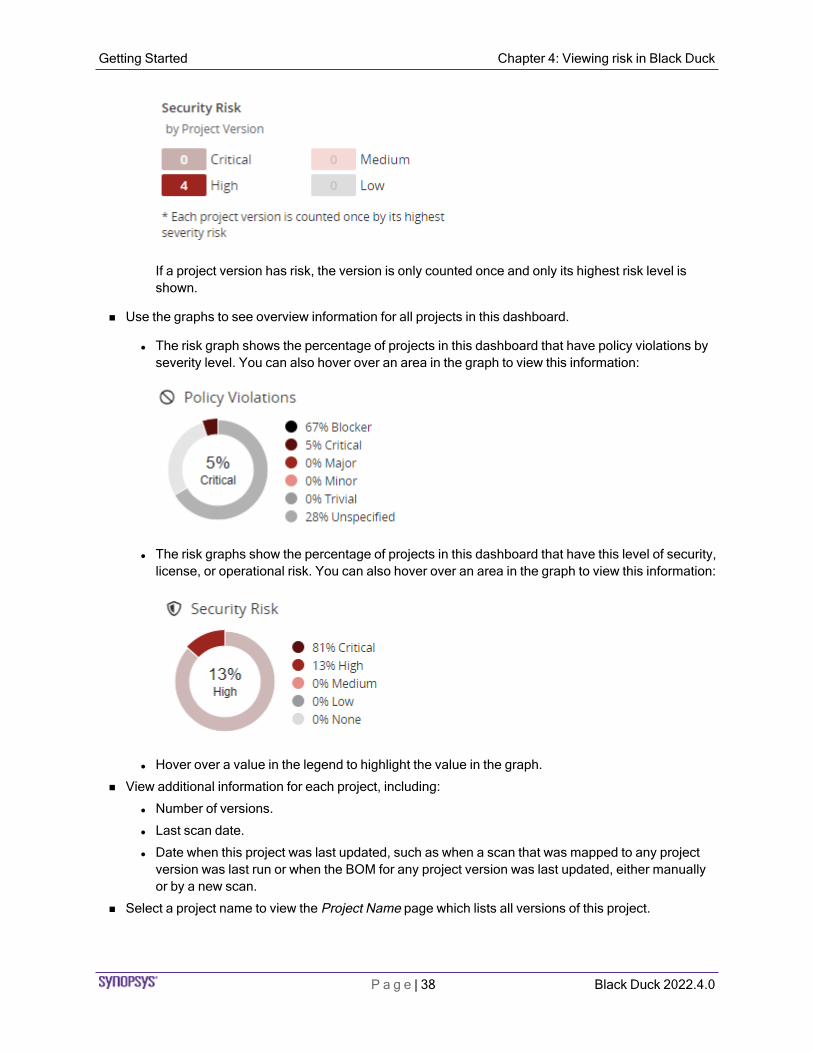
If a project version has risk, the version is only counted once and only its highest risk level is shown.
n Use the graphs to see overview information for all projects in this dashboard.
l The risk graph shows the percentage of projects in this dashboard that have policy violations by severity level. You can also hover over an area in the graph to view this information:
l The risk graphs show the percentage of projects in this dashboard that have this level of security, license, or operational risk. You can also hover over an area in the graph to view this information:
l Hover over a value in the legend to highlight the value in the graph.
n View additional information for each project, including:
l Number of versions.
l Last scan date.
l Date when this project was last updated, such as when a scan that was mapped to any project version was last run or when the BOM for any project version was last updated, either manually or by a new scan.
n Select a project name to view the Project Name page which lists all versions of this project.
Getting Started Chapter 4: Viewing risk in Black Duck
P a g e | 38 Black Duck 2022.4.0

n Manage how the projects are shown in these dashboards:
l Use the Sort by field to select an attribute to sort by and click an arrow to select the sort order
(ascending) or (descending).
l Use the Filter projects field to filter the projects shown in either dashboard.
n Use the icons to manage your watched projects or delete a project.
About saved searches dashboards
Use a saved search to view the project versions, component versions, and vulnerabilities that are important to you.
For each saved search, Black Duck lists the date and time this search was last updated.
Select Saved Search Settings to view the filters for this saved search.
Select Edit Saved Search to open the Find page displaying your saved search. Use the page to edit and save this revised saved search.
Getting Started Chapter 4: Viewing risk in Black Duck
P a g e | 39 Black Duck 2022.4.0

Project version saved searches
The following information is shown for each project version:
n located in front of the saved search name indicates that this is a project saved search.
n To view policy violation information for a specific project version:
l Use the bar to see the number of components with the highest policy severity level for this project version.
For example, the following shows that while there are components with lower severity levels, the highest policy severity level for this project version is Blocker and there are five components that have Blocker as their highest policy severity level.
Getting Started Chapter 4: Viewing risk in Black Duck
P a g e | 40 Black Duck 2022.4.0

Note: The text states the number of components with the highest policy severity level for this project version, not all policy severity levels affecting this project version.
l Hover over the bar to see the number of components with policy violations by the highest policy severity level:
If a component has a policy violation, the component is only counted once and only its highest policy severity level is shown.
n To view risk information:
l Use the risk bars to quickly view the number of components with the highest level of security, license, or operational risk.
Security risk:
License risk:
Operational risk:
For example, the following shows that while there are components with lower risk, the highest security risk for this project version is High and that one component in this project version has a high level of security risk as their highest risk level:
Getting Started Chapter 4: Viewing risk in Black Duck
P a g e | 41 Black Duck 2022.4.0

l Hover over the bar to see the number of components for each risk category.
In this example, there is one component that has a high risk level as its highest risk, 10 components that have medium risk as their highest risk level, and six components that have low risk as their highest risk level.
Note: Each component is only counted once and is shown with its highest risk level.
n Use the graphs to view overview information for all project versions in this dashboard categorized by policy severity and risk levels. The graphs lists the percentages for each level. You can also:
l Hover over the graph to view the percentage of project versions with policy violations for each policy severity level.
l Hover over the graph to view the percentage of project versions in this dashboard for each risk level.
l Hover over a value in the legend to highlight the value in the graph.
n For each project version, the dashboard also shows:
Getting Started Chapter 4: Viewing risk in Black Duck
P a g e | 42 Black Duck 2022.4.0
l Number of components in this project version.
l Last scan date.
l Date when this project version was last updated, such as when a scan that was mapped to this project version was last run or when the BOM for this project version was last updated, either manually or by a new scan.
l License of this project version.
l Phase for this project version.
l Distribution of this project version.
n Select the project or version name to view the BOM.
n Manage how the projects are shown in these dashboards:
l Use the Sort by field to select an attribute to sort by and click an arrow to select the sort order
(ascending) or (descending).
l Use the Filter projects field to filter the projects shown in the dashboard.
Getting Started Chapter 4: Viewing risk in Black Duck
P a g e | 43 Black Duck 2022.4.0

Component saved searches
The following information is shown for each component.
Getting Started Chapter 4: Viewing risk in Black Duck
P a g e | 44 Black Duck 2022.4.0
n located in front of the saved search name indicates that this is a component saved search.
n Select the component name/version to display the Component Name Version page.
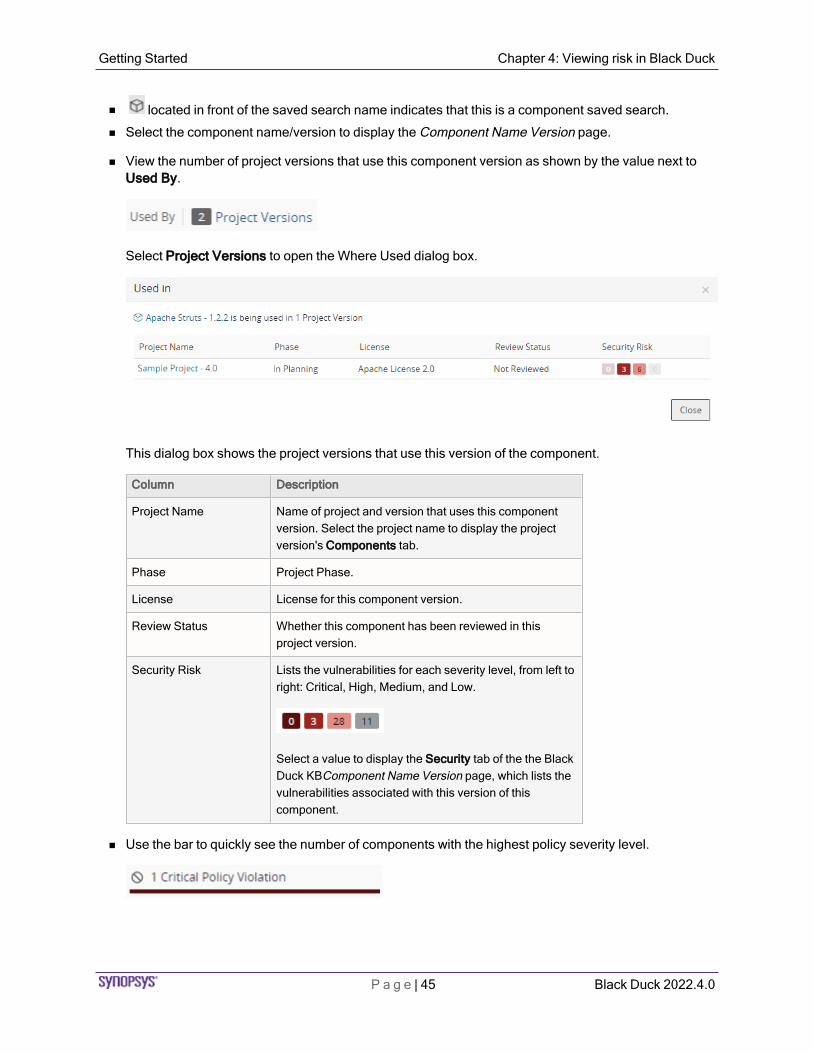
n View the number of project versions that use this component version as shown by the value next to Used By.
Select Project Versions to open the Where Used dialog box.
This dialog box shows the project versions that use this version of the component.
Column Description
Project Name Name of project and version that uses this component version. Select the project name to display the project version's Components tab.
Phase Project Phase.
License License for this component version.
Review Status Whether this component has been reviewed in this project version.
Security Risk
Lists the vulnerabilities for each severity level, from left to right: Critical, High, Medium, and Low.
Select a value to display the Security tab of the the Black Duck KBComponent Name Version page, which lists the vulnerabilities associated with this version of this component.
n Use the bar to quickly see the number of components with the highest policy severity level.
Getting Started Chapter 4: Viewing risk in Black Duck
P a g e | 45 Black Duck 2022.4.0
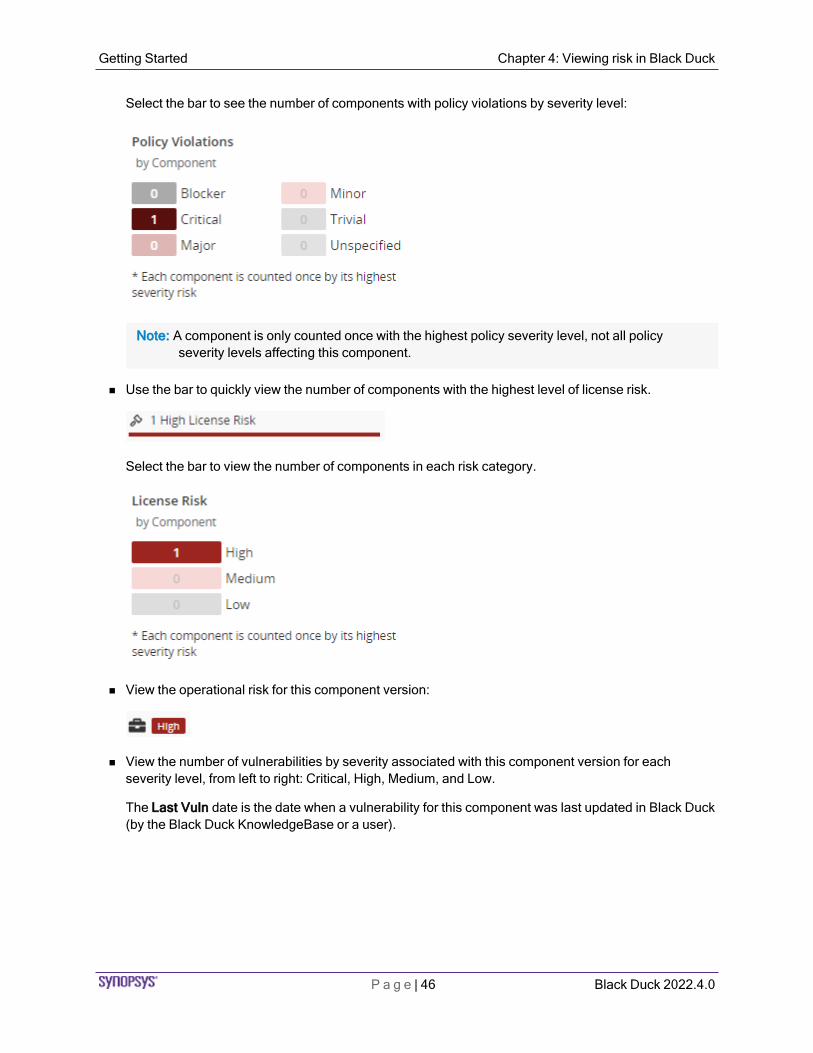
Select the bar to see the number of components with policy violations by severity level:
Note: A component is only counted once with the highest policy severity level, not all policy severity levels affecting this component.
n Use the bar to quickly view the number of components with the highest level of license risk.
Select the bar to view the number of components in each risk category.
n View the operational risk for this component version:
n View the number of vulnerabilities by severity associated with this component version for each severity level, from left to right: Critical, High, Medium, and Low.
The Last Vuln date is the date when a vulnerability for this component was last updated in Black Duck (by the Black Duck KnowledgeBase or a user).
Getting Started Chapter 4: Viewing risk in Black Duck
P a g e | 46 Black Duck 2022.4.0

Select a value to display the Security tab of the the Black Duck KBComponent Name Version page, which lists the vulnerabilities associated with this version of this component.
n For each component version, the search results also show:
l Approval status. Status indicates whether this component version has been reviewed.
l First detected date.
l Date this component version was released.
l Number of newer versions.
l Date when a vulnerability for the component was last updated in Black Duck (by updates from the Black Duck KnowledgeBase or a user manually changing the associated vulnerability and so on).
n Manage how the components are shown in these dashboards:
l Use the Sort by field to select an attribute to sort by and click an arrow to select the sort order
(ascending) or (descending).
l Use the filter field to filter the components shown in the dashboard.
Getting Started Chapter 4: Viewing risk in Black Duck
P a g e | 47 Black Duck 2022.4.0
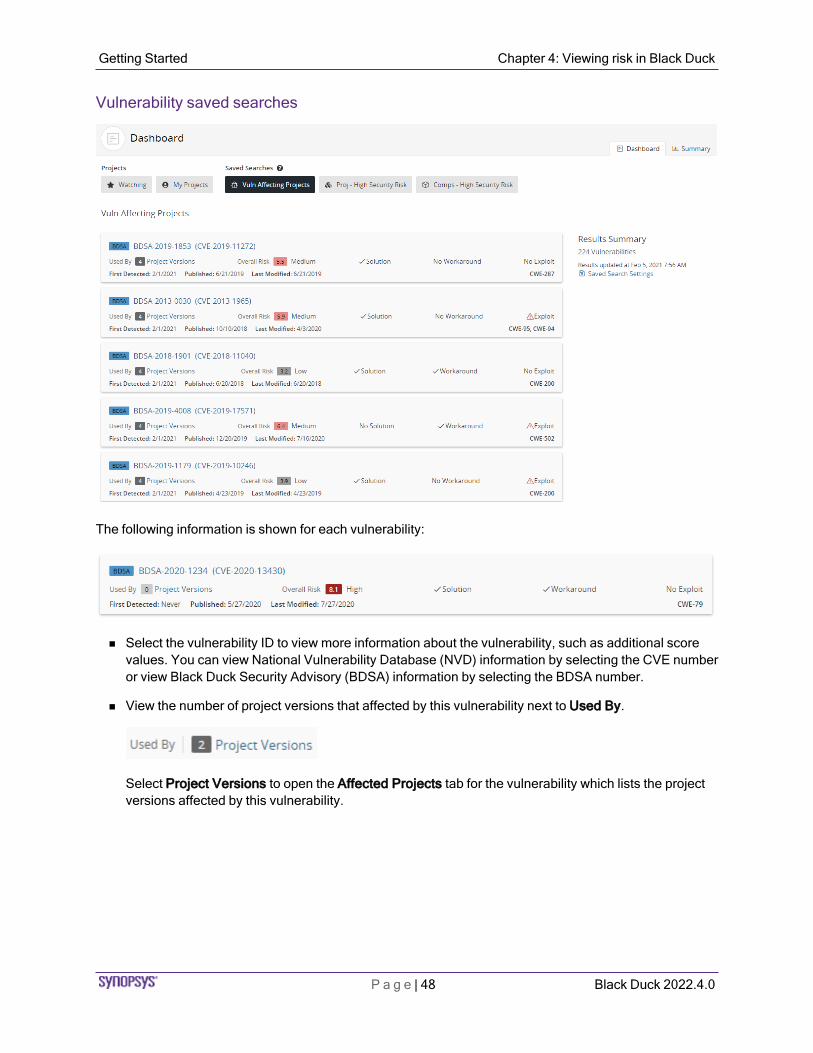
Vulnerability saved searches
The following information is shown for each vulnerability:
n Select the vulnerability ID to view more information about the vulnerability, such as additional score values. You can view National Vulnerability Database (NVD) information by selecting the CVE number or view Black Duck Security Advisory (BDSA) information by selecting the BDSA number.
n View the number of project versions that affected by this vulnerability next to Used By.
Select Project Versions to open the Affected Projects tab for the vulnerability which lists the project versions affected by this vulnerability.
Getting Started Chapter 4: Viewing risk in Black Duck
P a g e | 48 Black Duck 2022.4.0

n View the overall risk score. The search results show the Temporal Score for BDSA vulnerabilities, or the Base Score for NVD vulnerabilities and the associated risk level. Note that the score shown and risk level depends on the selected security rankings.
Select the score to view individual scores: temporal, base, exploitability, and impact for BDSA; base, exploitability, and impact for NVD.
n View whether a solution, workaround, or exploit is available:
l indicates that there is a solution or workaround available for this vulnerability.
l indicates there is an exploit for this vulnerability.
n For each vulnerability, the search results also show:
l First Detected.
l Published date.
l Last modified date.
l Common Weakness Enumeration (CWE) number for this security vulnerability.
Viewing the health of your projectsUse the Summary tab to view the overall health of your projects and identify areas of concern. The page consists of widgets that provide business critical information which you can use to quickly assess areas where you need to focus your attention.
Getting Started Chapter 4: Viewing risk in Black Duck
P a g e | 49 Black Duck 2022.4.0
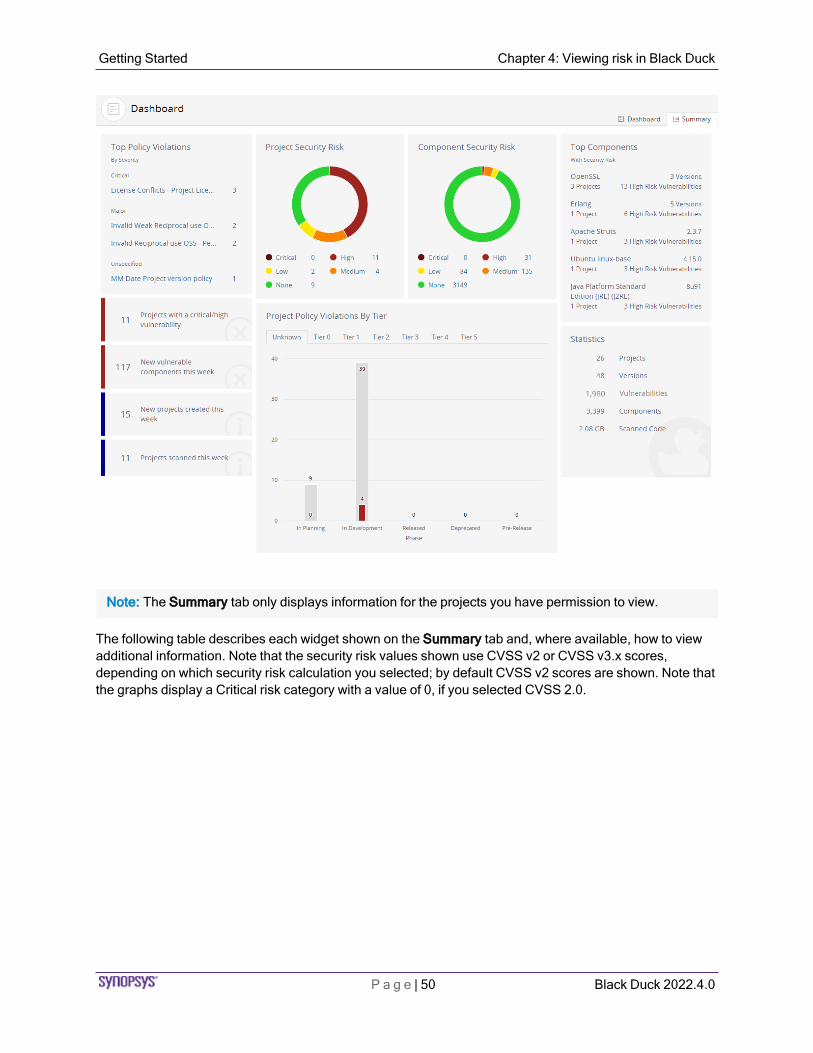
Note: The Summary tab only displays information for the projects you have permission to view.
The following table describes each widget shown on the Summary tab and, where available, how to view additional information. Note that the security risk values shown use CVSS v2 or CVSS v3.x scores, depending on which security risk calculation you selected; by default CVSS v2 scores are shown. Note that the graphs display a Critical risk category with a value of 0, if you selected CVSS 2.0.
Getting Started Chapter 4: Viewing risk in Black Duck
P a g e | 50 Black Duck 2022.4.0
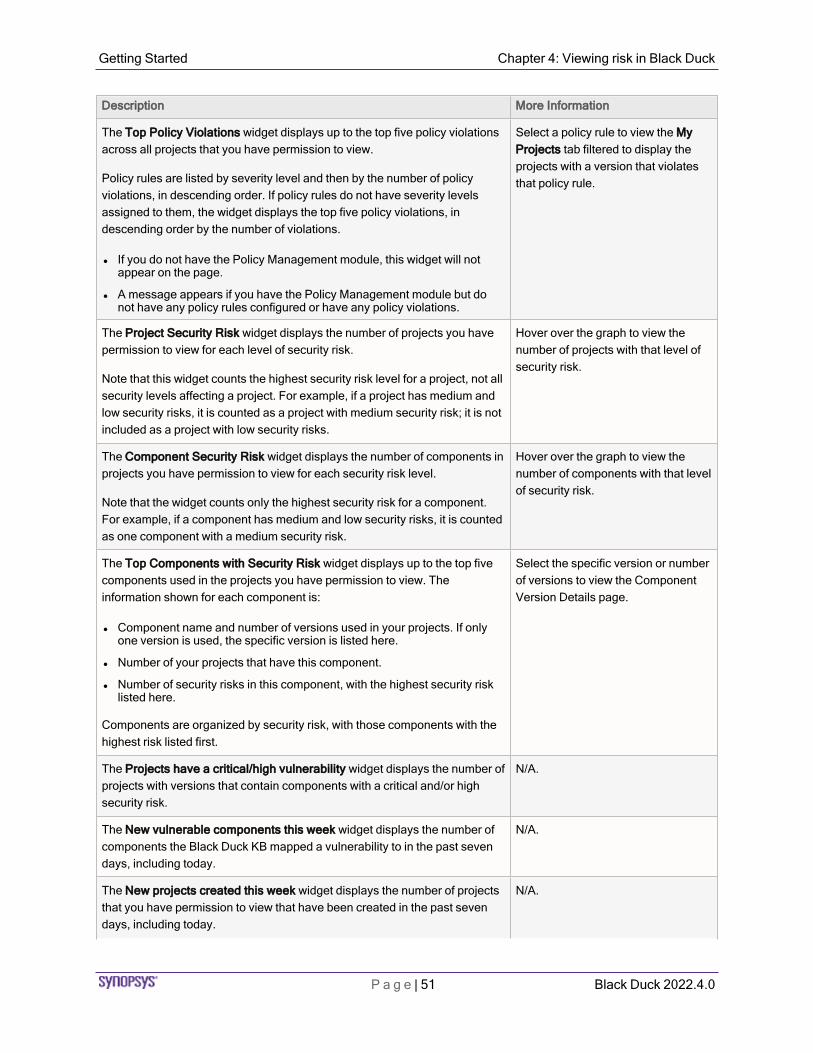
Description More Information
The Top Policy Violations widget displays up to the top five policy violations across all projects that you have permission to view.
Policy rules are listed by severity level and then by the number of policy violations, in descending order. If policy rules do not have severity levels assigned to them, the widget displays the top five policy violations, in descending order by the number of violations.
l If you do not have the Policy Management module, this widget will not appear on the page.
l A message appears if you have the Policy Management module but do not have any policy rules configured or have any policy violations.
Select a policy rule to view the My Projects tab filtered to display the projects with a version that violates that policy rule.
The Project Security Risk widget displays the number of projects you have permission to view for each level of security risk.
Note that this widget counts the highest security risk level for a project, not all security levels affecting a project. For example, if a project has medium and low security risks, it is counted as a project with medium security risk; it is not included as a project with low security risks.
Hover over the graph to view the number of projects with that level of security risk.
The Component Security Risk widget displays the number of components in projects you have permission to view for each security risk level.
Note that the widget counts only the highest security risk for a component. For example, if a component has medium and low security risks, it is counted as one component with a medium security risk.
Hover over the graph to view the number of components with that level of security risk.
The Top Components with Security Risk widget displays up to the top five components used in the projects you have permission to view. The information shown for each component is:
l Component name and number of versions used in your projects. If only one version is used, the specific version is listed here.
l Number of your projects that have this component.
l Number of security risks in this component, with the highest security risk listed here.
Components are organized by security risk, with those components with the highest risk listed first.
Select the specific version or number of versions to view the Component Version Details page.
The Projects have a critical/high vulnerability widget displays the number of projects with versions that contain components with a critical and/or high security risk.
N/A.
The New vulnerable components this week widget displays the number of components the Black Duck KB mapped a vulnerability to in the past seven days, including today.
N/A.
The New projects created this week widget displays the number of projects that you have permission to view that have been created in the past seven days, including today.
N/A.
Getting Started Chapter 4: Viewing risk in Black Duck
P a g e | 51 Black Duck 2022.4.0
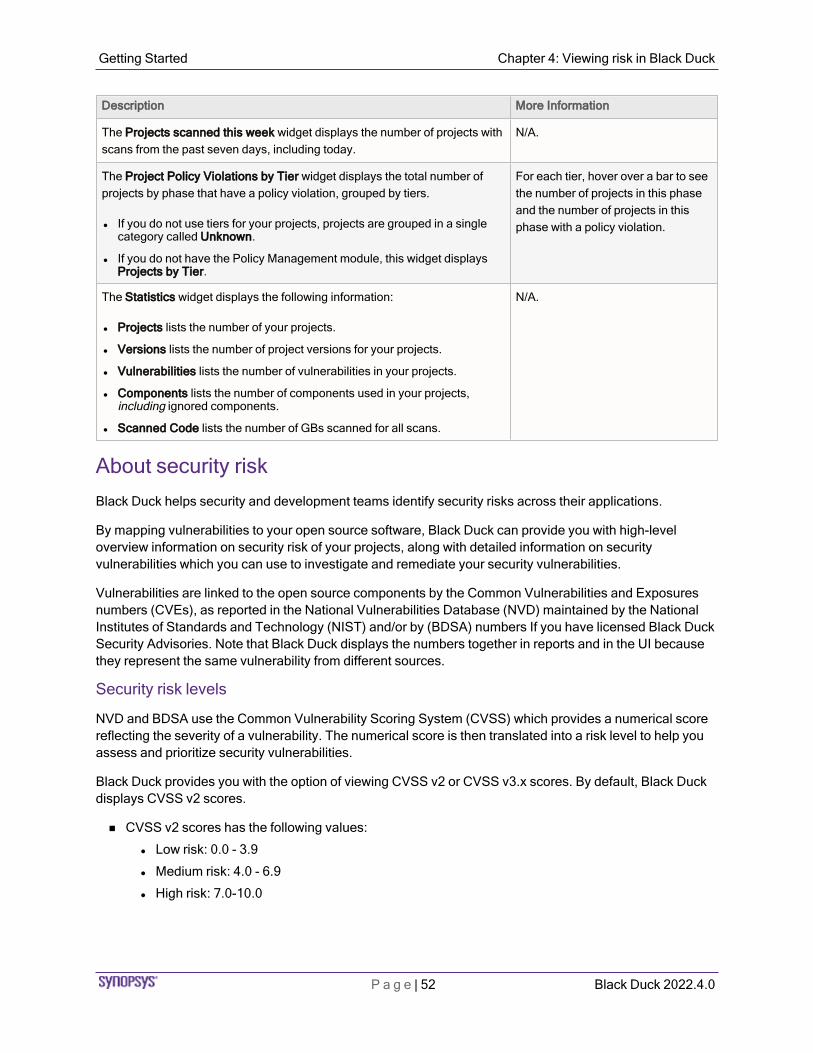
Description More Information
The Projects scanned this week widget displays the number of projects with scans from the past seven days, including today.
N/A.
The Project Policy Violations by Tier widget displays the total number of projects by phase that have a policy violation, grouped by tiers.
l If you do not use tiers for your projects, projects are grouped in a single category called Unknown.
l If you do not have the Policy Management module, this widget displays Projects by Tier.
For each tier, hover over a bar to see the number of projects in this phase and the number of projects in this phase with a policy violation.
The Statistics widget displays the following information:
l Projects lists the number of your projects.
l Versions lists the number of project versions for your projects.
l Vulnerabilities lists the number of vulnerabilities in your projects.
l Components lists the number of components used in your projects, including ignored components.
l Scanned Code lists the number of GBs scanned for all scans.
N/A.
About security riskBlack Duck helps security and development teams identify security risks across their applications.
By mapping vulnerabilities to your open source software, Black Duck can provide you with high-level overview information on security risk of your projects, along with detailed information on security vulnerabilities which you can use to investigate and remediate your security vulnerabilities.
Vulnerabilities are linked to the open source components by the Common Vulnerabilities and Exposures numbers (CVEs), as reported in the National Vulnerabilities Database (NVD) maintained by the National Institutes of Standards and Technology (NIST) and/or by (BDSA) numbers If you have licensed Black Duck Security Advisories. Note that Black Duck displays the numbers together in reports and in the UI because they represent the same vulnerability from different sources.
Security risk levels
NVD and BDSA use the Common Vulnerability Scoring System (CVSS) which provides a numerical score reflecting the severity of a vulnerability. The numerical score is then translated into a risk level to help you assess and prioritize security vulnerabilities.
Black Duck provides you with the option of viewing CVSS v2 or CVSS v3.x scores. By default, Black Duck displays CVSS v2 scores.
n CVSS v2 scores has the following values:
l Low risk: 0.0 - 3.9
l Medium risk: 4.0 - 6.9
l High risk: 7.0-10.0
Getting Started Chapter 4: Viewing risk in Black Duck
P a g e | 52 Black Duck 2022.4.0

Note that Black Duck shows vulnerabilities with a 0.0 score as no risk.
Although CVSS v2 does not have a Critical risk category, the security graphs In the Black Duck UI display a Critical risk category. This category will display a value of 0 for CVSS v2.
n CVSS v3.x scores has the following values:
l None: 0.0
l Low risk: 0.1 - 3.9
l Medium risk: 4.0 - 6.9
l High risk: 7.0 - 8.9
l Critical risk: 9.0 - 10.0
Note that the scores shown for CVSS v3.x can be v3.0 or v3.1 scores.
This estimated risk statistic is formulated by looking at all the versions of a component sorted by security vulnerability severity category and calculating the maximum vulnerability count for each severity category for each component version. The maximum vulnerability count for each severity category is shown in the “Estimated Security Risk by Severity Category" on the Bill of Material for Security risk. The highest severity category counts may reference different component versions. For example:
n Version 1.1 has 2 Critical, 3 High, 15 Medium, 4 Low
n Version 1.2 has 2 Critical, 4 High, 12 Medium, 1 Low
n Estimated Security Risk by severity category for components with unknown versions would return as 2 Critical, 4 High, 15 Medium, 4 Low on the BoM.
Users should choose the exact version used in the application to view the accurate risk instead of the estimated risk. This estimated risk information is provided to help prioritize what components to review first. Users are encouraged to use estimated risk information in conjunction with BD Policy Management to further prioritize what components to triage first based on their company’s security policies.
Note: The information presented is only a statistical data estimation. As a result, the estimated security risks will not have CVE data.
Suggested work flow
To manage security risk using Black Duck:
1. With the assistance of your security team, determine your security risk policies.
2. If necessary, users with the system administrator role can define the default security ranking.
Note that the security ranking also defines how vulnerabilities appear in reports. Depending on the data available, the vulnerability will be presented as either: BDSA (NVD) or NVD (BDSA). For example, if the security ranking is NVD2, BDSA2, BDSA3, NVD3 then:
l Vulnerabilty A has data just for NVD3. The vulnerability is listed as NVD-1234-5678 in the report.
l Vulnerabilty B has data for NVD3 and BDSA3. The report lists it as BDSA (NVD).
Getting Started Chapter 4: Viewing risk in Black Duck
P a g e | 53 Black Duck 2022.4.0

l Vulnerabilty C has data for everything. The report lists it as NVD (BDSA).
3. Create policies that trigger violations when components do not comply with your security policies.
4. Depending on your interests:
l Use the Summary Dashboard to view the overall health of your projects and identify areas of concern. Use this page to quickly assess areas where you need to focus your attention.
l Use these pages for a high-level overview information of security risk:
o Use the Watched or My Projects Dashboard to view the security risk across all your projects.
o Create saved searches to customize the information shown on the Dashboard page to view the projects, components, and vulnerabilities that interests you.
l Use these pages for project version-level information:
o project version page/Components tab, also known as the project version BOM, to view the components specific to that project version, that have security risk.
o project version page/ Security tab to view the security vulnerabilities of each severity associated with the components used in a project version.
5. Investigate vulnerabilities and policy violations. For detailed information on security vulnerabilities, view the:
l CVE page
l BDSA page if you have licensed Black Duck Security Advisories (BDSA)
6. After reviewing the severity of the vulnerability, users with the appropriate role can change the remediation status of the security vulnerability.
7. Monitor notifications for any new security vulnerabilities.
You will receive notification alerts if security vulnerabilities are published or updated against components that are included in one or more of your projects.
Getting Started Chapter 4: Viewing risk in Black Duck
P a g e | 54 Black Duck 2022.4.0

P a g e | 55 Black Duck 2022.4.0
Chapter 5: Viewing your BOM
Once you have mapped a component scan to a project version, the results automatically create the project version's BOM.
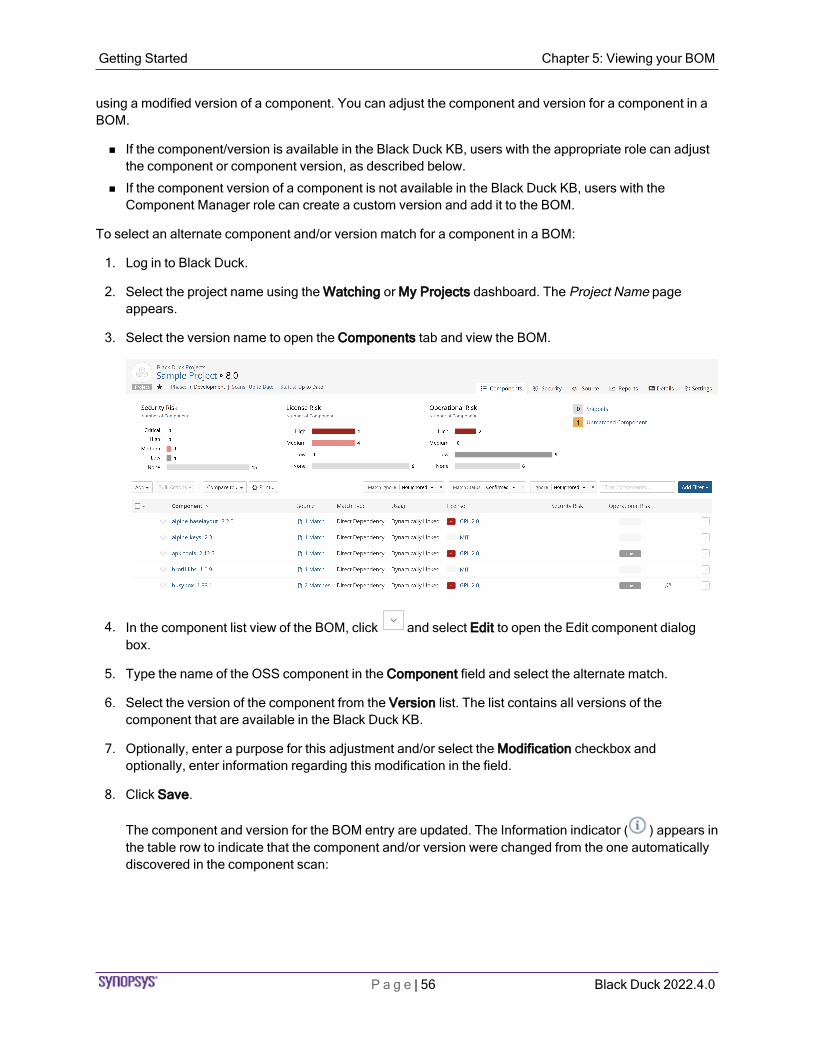
To view a project version's BOM:
1. Log in to Black Duck.
2. Select the project name using the Watching or My Projects dashboard. The Project Name page appears.
3. Select the version name of the project that you want to view.
The Components tab shows you the BOM.
By default, the BOM displays a "flat" view of components where all components found are listed at the same level. If the hierarchical BOM has been enabled, options to view the list view (as shown here) or the hierarchical BOM appear. Select Tree to view a hierarchical view which is based on file system relationships.
Adjusting the component and/or component version in a BOMOnce you have mapped a component scan to a project version, the scan results automatically create the project version's BOM. Although component scanning automatically discovers the open source component and component version from most archive files by comparing them to components in the Black Duck KB, you may be using a version of the component that is not available in the Black Duck KB, or you may be
using a modified version of a component. You can adjust the component and version for a component in a BOM.
n If the component/version is available in the Black Duck KB, users with the appropriate role can adjust the component or component version, as described below.
n If the component version of a component is not available in the Black Duck KB, users with the Component Manager role can create a custom version and add it to the BOM.
To select an alternate component and/or version match for a component in a BOM:
1. Log in to Black Duck.
2. Select the project name using the Watching or My Projects dashboard. The Project Name page appears.
3. Select the version name to open the Components tab and view the BOM.
4. In the component list view of the BOM, click and select Edit to open the Edit component dialog box.
5. Type the name of the OSS component in the Component field and select the alternate match.
6. Select the version of the component from the Version list. The list contains all versions of the component that are available in the Black Duck KB.
7. Optionally, enter a purpose for this adjustment and/or select the Modification checkbox and optionally, enter information regarding this modification in the field.
8. Click Save.
The component and version for the BOM entry are updated. The Information indicator ( ) appears in the table row to indicate that the component and/or version were changed from the one automatically discovered in the component scan:
Getting Started Chapter 5: Viewing your BOM
P a g e | 56 Black Duck 2022.4.0

Getting Started Chapter 5: Viewing your BOM
P a g e | 57 Black Duck 2022.4.0