
General Ledger - Solomon Cloud Solutions
211
General Ledger Release 2015
-
Upload
khangminh22 -
Category
Documents
-
view
1 -
download
0
Transcript of General Ledger - Solomon Cloud Solutions
General Ledger Release 2015
Disclaimer
This document is provided “as-is”. Information and views expressed in this document, including URL
and other Internet Web site references, may change without notice. You bear the risk of using it.
Some examples are for illustration only and are fictitious. No real association is intended or inferred.
This document does not provide you with any legal rights to any intellectual property in any Microsoft
product. You may copy and use this document for your internal, reference purposes only.
Sample Code Warranty disclaimer
Microsoft Corporation disclaims any warranty regarding the sample code contained in this
documentation, including the warranties of merchantability and fitness for a particular purpose.
License agreement Use of this software is covered by a license agreement provided with it. If you have any questions,
please call the Customer Assistance Department at 800-456-0025 (in the United States or Canada) or
+1-701-281-6500.
Copyright
© 2014 Microsoft Corporation. All rights reserved.
Publication Date
September 2014
Contents iii
Contents
Introduction 1
General Ledger Overview ................................................................................................................ 1 General Ledger Interaction .............................................................................................. 2
User Guide Overview ....................................................................................................................... 3 What is Covered in the User Guide? ................................................................................ 3 Who Should Use the User Guide? .................................................................................... 3 How to Use the User Guide .............................................................................................. 3
Quick Reference Task List .............................................................................................................. 4 How Do I Change...? .......................................................................................................... 4 How Do I Check...? ............................................................................................................ 4 How Do I Close...? ............................................................................................................. 4 How Do I Create...? ........................................................................................................... 4 How Do I Define...? ........................................................................................................... 4 How Do I Delete...? ........................................................................................................... 4 How Do I Distribute...? ...................................................................................................... 4 How Do I Generate...? ....................................................................................................... 4 How Do I Enter...? ............................................................................................................. 4 How Do I Print...? .............................................................................................................. 4 How Do I Read...?.............................................................................................................. 5 How Do I Release...? ......................................................................................................... 5 How Do I Review...? .......................................................................................................... 5 How Do I Set Up...? ........................................................................................................... 5
Setting Up the General Ledger 7
Overview .......................................................................................................................................... 7 Structuring the Chart of Accounts .................................................................................... 7 Structuring Account Numbers .......................................................................................... 7 Using Subaccounts ........................................................................................................... 8 Using Consolidation Accounts .......................................................................................... 8
Setting Up a Chart of Accounts ...................................................................................................... 9 Setting Up Subaccounts ............................................................................................................... 10 Setting Up Account/Subaccount Combinations .......................................................................... 11 Setting Up Allocation Groups ........................................................................................................ 14 Creating Multiple Ledgers ............................................................................................................. 17 Setting Up General Ledger Defaults ............................................................................................ 18 Setting Up Company Information ................................................................................................. 20 Defining Fiscal Periods ................................................................................................................. 22 Defining the Base Currency .......................................................................................................... 24 Changing the Chart of Account Order .......................................................................................... 25 Selecting Posting Options ............................................................................................................. 26 Entering General Ledger Beginning Balances ............................................................................. 29
Processing General Ledger Transactions 31
Overview ........................................................................................................................................ 31 Processing General Ledger Transactions ...................................................................... 31 General Ledger Transaction Flow .................................................................................. 32
Entering General Ledger Transactions ........................................................................................ 33 Entering Reversing and Correcting General Ledger Transactions ............................................. 36 Generating Recurring Transactions ............................................................................................. 38 Releasing General Ledger Batches .............................................................................................. 39 Posting Transactions to the General Ledger ............................................................................... 40 Generating Allocation Transactions ............................................................................................. 42
iv General Ledger
Generating Consolidation Files ..................................................................................................... 43 Reading Consolidation Files ......................................................................................................... 45
Consolidation Errors ........................................................................................................ 45 Printing or Reprinting General Ledger Batch Control Reports .................................................... 47 Closing the General Ledger .......................................................................................................... 49
Budgeting 51
Overview ......................................................................................................................................... 51 Budgeting in Microsoft Dynamics SL ............................................................................. 51
Setting Budget Defaults ................................................................................................................ 52 Setting Up Basic Operating Budgets ............................................................................................ 53 Setting Budget Group Access ....................................................................................................... 54 Setting up Extended Budgeting .................................................................................................... 55
Defining Budget Segments ............................................................................................. 55 Defining Fill Characters for Unused Segments ............................................................. 56 Defining the Relationship Between the Resulting Budget Ledger and the Basis
(Source) Ledgers for Budgets and Actuals .................................................................... 57 Creating Budget Annual Totals ....................................................................................... 58 Distributing Yearly Amounts to Period Amounts ............................................................ 61 Setting Up Access Groups .............................................................................................. 62 Setting Up an Extended Budget ..................................................................................... 63
Defining Custom Budget Distribution Types ................................................................................ 64 Distributing Budgets ...................................................................................................................... 65 Creating New Budget Versions ..................................................................................................... 67
Reviewing General Ledger Information 69
Overview ......................................................................................................................................... 69 Reviewing Account History ............................................................................................................ 70 Reviewing Account History Detail ................................................................................................. 71 Reviewing Currency Account Detail .............................................................................................. 72 Reviewing Account Balances ........................................................................................................ 73 Reviewing Account/Subaccount Balances .................................................................................. 74 Reviewing Account/Subaccount Details ...................................................................................... 75 Printing Reports ............................................................................................................................. 76
Maintaining General Ledger Data 77
Overview ......................................................................................................................................... 77 Deleting Accounts and Subaccounts ........................................................................................... 77 Deleting Batches ........................................................................................................................... 78 Deleting General Ledger Data ...................................................................................................... 79 Checking General Ledger Data Integrity ...................................................................................... 80
Transaction Screens 81
Journal Transactions (01.010.00) ............................................................................................... 81 Correct Journal Transactions (01.012.00) .................................................................................. 89
Maintenance and Inquiry Screens 91
Budget Maintenance (01.250.00) ............................................................................................... 91 Budget Distribution (01.250.01) .................................................................................................. 93 Chart of Accounts Maintenance (01.260.00).............................................................................. 94 Subaccount Maintenance (01.270.00) ....................................................................................... 97 Allocation Group Maintenance (01.290.00) ................................................................................ 98 Account History (01.300.00) ......................................................................................................103 Account History Detail (01.300.01) ...........................................................................................105 Currency Account Detail (01.300.02) ........................................................................................108 Account Summary Inquiry (01.301.00) .....................................................................................110

Contents v
Account/Subaccount Summary Inquiry (01.302.00) ............................................................... 112 Account/Subaccount Detail Inquiry (01.303.00) ...................................................................... 114 Ledger Maintenance (01.310.00) ............................................................................................. 116 Account/Subaccount Maintenance (01.320.00) ...................................................................... 118 Account/Subaccount Maintenance Worksheet (01.320.01) ................................................... 120 Generate Acct/Sub Combinations (01.320.02) ........................................................................ 121
Copy Companies Tab .................................................................................................... 121 Copy Accounts Tab ........................................................................................................ 122 Copy Subaccounts Tab ................................................................................................. 123 Build Combinations Tab ............................................................................................... 124
Extended Budget Maintenance (01.330.00) ............................................................................ 125 Create Budget Set (01.330.02) ................................................................................... 128 Set Proposed Budget (01.330.04) .............................................................................. 129
Budget Distribution (01.340.00) ............................................................................................... 131 Budget Group Access (01.350.00) ............................................................................................ 133 Budget Distribution Types (01.360.00) ..................................................................................... 134 Budget Version Maintenance (01.370.00) ............................................................................... 135 Account Class Maintenance (01.380.00) ................................................................................. 137
Process Screens 139
Release GL Batches (01.400.00) .............................................................................................. 139 Generate Consolidation (01.500.00) ........................................................................................ 141 Read Consolidation (01.510.00) ............................................................................................... 143 Post Transactions (01.520.00) .................................................................................................. 145 Generate Recurring (01.530.00) ............................................................................................... 147 Closing (01.560.00) .................................................................................................................... 149 Delete GL Detail (01.570.00) ..................................................................................................... 151 Generate Allocations (01.580.00) ............................................................................................. 152
Setup and Integrity Screens 155
GL Setup (01.950.00) ................................................................................................................ 155 Options Tab ................................................................................................................... 155 Master Company Info Tab ............................................................................................ 160 Fiscal Info Tab ............................................................................................................... 162 Currency Info Tab .......................................................................................................... 164 Chart of Acct Order Tab ................................................................................................ 165 Budget Info Tab ............................................................................................................. 167 Posting Options Tab ...................................................................................................... 168
Extended Budgeting Setup (01.960.00) ................................................................................... 170 GL Integrity Check (01.990.00) ................................................................................................. 172
Reports 175
Reprint GL Batch Control Reports (01.410.00) ........................................................................ 175 Trial Balance (01.610.00) .......................................................................................................... 177
Report Tab ..................................................................................................................... 178 Options Tab ................................................................................................................... 179
Trial Balance (SSRS) (01.611.00).............................................................................................. 180 Report Tab ..................................................................................................................... 181 Options Tab ................................................................................................................... 182
Detail General Ledger (01.620.00) ........................................................................................... 183 Report Tab ..................................................................................................................... 185 Options Tab ................................................................................................................... 186
Chart of Accounts (01.650.00) .................................................................................................. 187 Report Tab ..................................................................................................................... 187
Subaccounts (01.660.00) .......................................................................................................... 188 Account Classes (01.670.00)..................................................................................................... 189 GL Transactions (01.680.00) ..................................................................................................... 190
vi General Ledger
Report Tab .....................................................................................................................190 Allocation Groups (01.710.00) ...................................................................................................191 Ledgers (01.720.00) ...................................................................................................................192 Budget Distribution (01.740.00) ................................................................................................193 Out of Balance Exception (01.750.00) ......................................................................................194 Budget Segment Detail (01.770.00) .........................................................................................195 Budget Version Detail (01.780.00) ............................................................................................196 GL Batch Register (01.800.00) ..................................................................................................197
Report ............................................................................................................................197 GL Edit (01.810.00) ....................................................................................................................199
Report Tab .....................................................................................................................199
Glossary of Terms 201
Index 203
Introduction 1
Introduction
General Ledger Overview The General Ledger module in Microsoft Dynamics® SL is the central accounting module, where all
bookkeeping and accounting transactions are summarized, posted, and reported. The General Ledger
module provides a solid foundation for all accounting operations by accurately tracking business
activity, generating reports that aid in management decision-making, and maintaining a complete
audit trail of business transactions.
General Ledger can be operated as a stand-alone program. However, to make full use of its integrated
design, use it with other Microsoft Dynamics SL accounting modules, including:
Accounts Payable
Purchasing
Order Processing
Project Controller
Accounts Receivable
Inventory
Bill of Material
Cash Manager
Currency Manager
Payroll
Bank Reconciliation
After information has been entered into the General Ledger module, you can print financial
statements using Management Reporter.

2 General Ledger
General Ledger Interaction
Figure 1: General Ledger Interaction
Introduction 3
User Guide Overview This user guide provides information regarding the setup and use of the Microsoft Dynamics SL for
Windows General Ledger module. Reviewing the user guide can help you make informed decisions
regarding the implementation of the General Ledger module in your business.
What is Covered in the User Guide?
The user guide consists primarily of procedures and checklists that describe how to perform the
various tasks featured in the General Ledger module. The user guide also contains topics that help
you become better acquainted with the capabilities of the module. Topics are arranged in a logical
order that builds on information previously presented in other user guides.
Who Should Use the User Guide?
The user guide is designed for readers who are new to Microsoft Dynamics SL. The guide provides the
information necessary for making decisions regarding how to use the General Ledger module in order
to get the most from your system.
How to Use the User Guide
Read the appropriate section of the user guide before proceeding with any system customizations. The
user guide presents the procedures and steps required for completing the various customization
processes. To assist you in locating information, the user guide contains:
A Table of Contents of logically organized activities and tasks.
An alphabetized Quick Reference Task List of commonly performed tasks.
An alphabetized Index of the information provided in the user guide.
4 General Ledger
Quick Reference Task List This list contains tasks that are commonly performed with the General Ledger module. Each task is
cross-referenced to a specific page in the user guide.
How Do I Change...?
The chart of accounts order: see page 25
How Do I Check...?
General Ledger data integrity: see page 80
How Do I Close...?
The General Ledger: see page 49
How Do I Create...?
Multiple ledgers: see page 17
New budget versions: see page 67
How Do I Define...?
Fiscal Periods: see page 22
The Base Currency: see page 24
Custom budget distribution types: see page 64
How Do I Delete...?
Accounts and Subaccounts: see page 77
Batches: see page 78
General Ledger data: see page 79
How Do I Distribute...?
Budgets: see page 65
How Do I Generate...?
Recurring transactions: see page 38
Allocation transactions: see page 42
Consolidation files: see page 43
How Do I Enter...?
General Ledger beginning balances: see page 26
General Ledger transactions: see page 33
How Do I Print...?
General Ledger batch control reports: see page 47
Reports: see page 76
Introduction 5
How Do I Read...?
Consolidation files: see page 45
How Do I Release...?
General Ledger batches: see page 39
How Do I Review...?
Account history: see page 70
Account history detail: see page 71
Currency account detail: see page 72
Account balances: see page 73
Account/subaccount balances: see page 74
Account/subaccount details: see page 75
How Do I Set Up...?
A chart of accounts: see page 9
Subaccounts: see page 10
Account/subaccount combinations: see page 11
General Ledger defaults: see page 18
Company Information: see page 20
Budget defaults: see page 52
Basic operating budgets: see page 53
Budget group access: see page 54
Extended budgets: see page 55

6 General Ledger
Setting Up the General Ledger 7
Setting Up the General Ledger
Overview The Setting Up the General Ledger section provides information and procedures for setting up the
General Ledger module to fit your business needs and practices. These basic tasks include:
Setting Up a Chart of Accounts
Setting Up Subaccounts
Setting Up Account/Subaccount Combinations
Setting Up Allocation Groups
Creating Multiple Ledgers
Setting Up General Ledger Defaults
Setting Up Company Information
Defining Fiscal Periods
Defining the Base Currency
Changing the Chart of Account Order
Selecting Posting Options
Entering General Ledger Beginning Balances
Structuring the Chart of Accounts
Because the chart of accounts affects not only general ledger transactions but also those of all other
modules, a well-designed chart of accounts is one of the most important elements of your system.
Invest the time up front to design a chart of accounts that meets your company’s accounting needs
today as well as tomorrow.
Consider the following when designing a chart of accounts:
Base your chart of accounts on the financial and management reporting needs of your company.
Analyze these needs carefully and determine their impact on the chart of accounts before
committing to a final chart of accounts design.
The software can support account numbers up to 10 characters long. Use sufficient characters
to accomplish your chart of accounts design objectives, but do not feel obligated to use all
available characters. The fewer characters you use for account numbers, the less time it takes to
enter transactions during data entry operations.
Although you may feel your present chart of accounts is adequate, the General Ledger setup
period is a perfect time to review your existing chart to determine if some updates should be
made. Remember, time spent designing a chart of accounts leading to better financial and
management reporting is a worthwhile investment.
Always involve your accountant and/or consultant in designing your chart of accounts.
Structuring Account Numbers
Account numbers should have an orderly, logical structure to them; one based on a specific account
number coding scheme. A coding scheme is a system of combining and arranging numbers and/or
letters into meaningful record identifiers. The purpose of a coding scheme is to make each record
distinguishable from all other records in the database and to make the records associated with a
given identifier easy to reference and report. A typical structured account numbering approach divides
the chart of accounts into the following groups:
Main account groups (asset, liability, income, expense)
8 General Ledger
Subgroups within the main groups (cash, accounts receivable, etc.)
Detail accounts within the subgroups (petty cash, payroll, checking, etc.)
For example, using a four-character account number, you might structure account numbers like this:
Main Group + Subgroup + Detail Acct = Acct Number
1 (Assets) + 0 (Cash) + 10 (Petty Cash) = 1010
Using Subaccounts
One of the key decisions to make when setting up a chart of accounts is to decide if and how to use
subaccounts. Subaccounts identify specific segments of your business, such as departments,
divisions, or profit centers, which is extremely useful for maintaining responsibility accounting
information. If you decide to use subaccounts to identify your cost centers, define their format and
information on Flexkey Definition (21.320.00) in the Shared Information module and Subaccount
Maintenance (01.270.00).
Subaccount numbering is extremely flexible, allowing you to define a subaccount numbering structure
to fit to the specific needs of your business. To make subaccount usage more efficient, divide the
overall subaccount number into two or more segments set apart from each other by a separator
character, such as a hyphen. You then can define a range of acceptable values for each segment on
Flexkey Table Maintenance (21.330.00) in the Shared Information module and use these values when
entering subaccount numbers during regular operations. For each subaccount number entered, the
software checks the entries against the acceptable values for each segment to determine if the
subaccount number is valid if Validate is selected on Flexkey Definition (21.320.00) in the Shared
Information module.
Using Consolidation Accounts
A consolidation account permits companies with subsidiaries to perform corporate-level database
management functions. Consolidation accounts are useful when subsidiaries need a more specific
account breakdown than the main office or when you want to eliminate inter-company transactions
from the corporate financial statements.
Example: The corporate office has one supplies account: 1250 Supplies. A subsidiary has the three
supplies accounts: 1251 Janitorial, 1252 Office, and 1253 Shop. The subsidiary assigns each of these
accounts the consolidation account number 1250 Supplies. When the main office consolidates the
subsidiary’s activity into the corporate general ledger, the activity from all three subsidiary accounts is
placed automatically in the corporate account.
Example: You want to eliminate inter-company transactions from being reported on consolidated
financial reports. Use 0000, which is the inter-company elimination account, as the consolidation
account for each subsidiary account that you do not want to consolidate into the corporate general
ledger. Since all inter-company transactions should net to zero, the balance of the inter-company
elimination account should be zero when subsidiary accounts are consolidated into the corporate
chart of accounts.
Setting Up the General Ledger 9
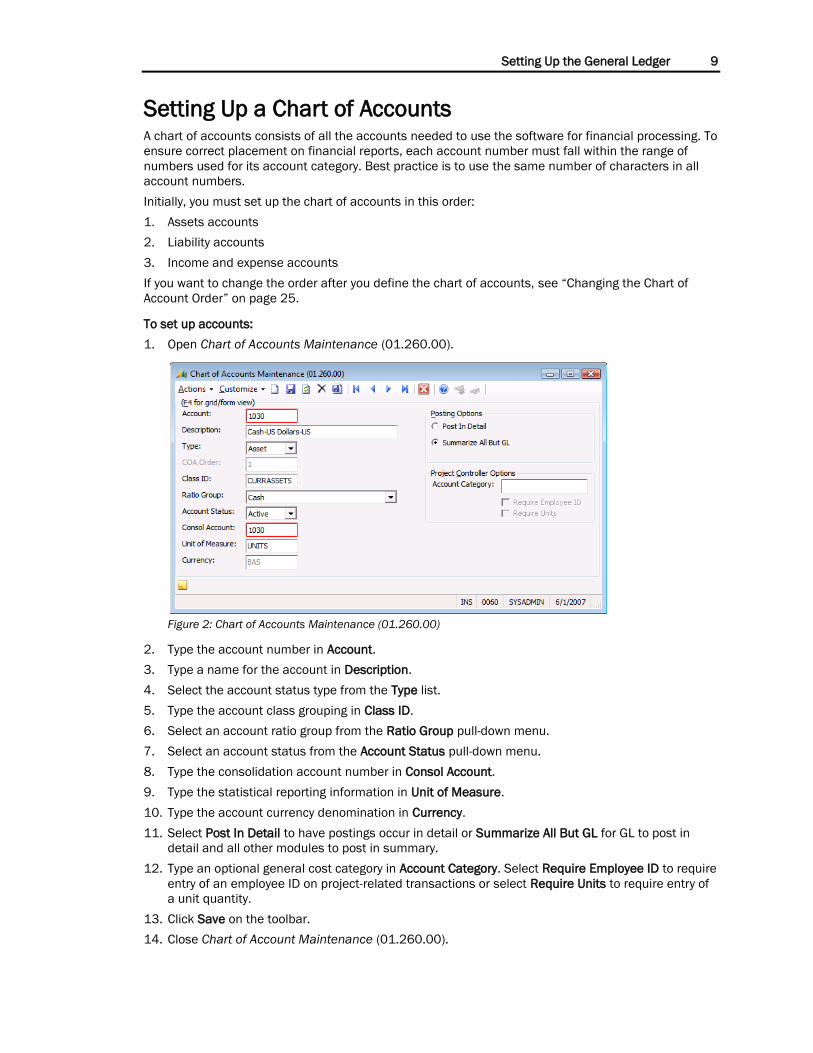
Setting Up a Chart of Accounts A chart of accounts consists of all the accounts needed to use the software for financial processing. To
ensure correct placement on financial reports, each account number must fall within the range of
numbers used for its account category. Best practice is to use the same number of characters in all
account numbers.
Initially, you must set up the chart of accounts in this order:
1. Assets accounts
2. Liability accounts
3. Income and expense accounts
If you want to change the order after you define the chart of accounts, see “Changing the Chart of
Account Order” on page 25.
To set up accounts:
1. Open Chart of Accounts Maintenance (01.260.00).
Figure 2: Chart of Accounts Maintenance (01.260.00)
2. Type the account number in Account.
3. Type a name for the account in Description.
4. Select the account status type from the Type list.
5. Type the account class grouping in Class ID.
6. Select an account ratio group from the Ratio Group pull-down menu.
7. Select an account status from the Account Status pull-down menu.
8. Type the consolidation account number in Consol Account.
9. Type the statistical reporting information in Unit of Measure.
10. Type the account currency denomination in Currency.
11. Select Post In Detail to have postings occur in detail or Summarize All But GL for GL to post in
detail and all other modules to post in summary.
12. Type an optional general cost category in Account Category. Select Require Employee ID to require
entry of an employee ID on project-related transactions or select Require Units to require entry of
a unit quantity.
13. Click Save on the toolbar.
14. Close Chart of Account Maintenance (01.260.00).
10 General Ledger
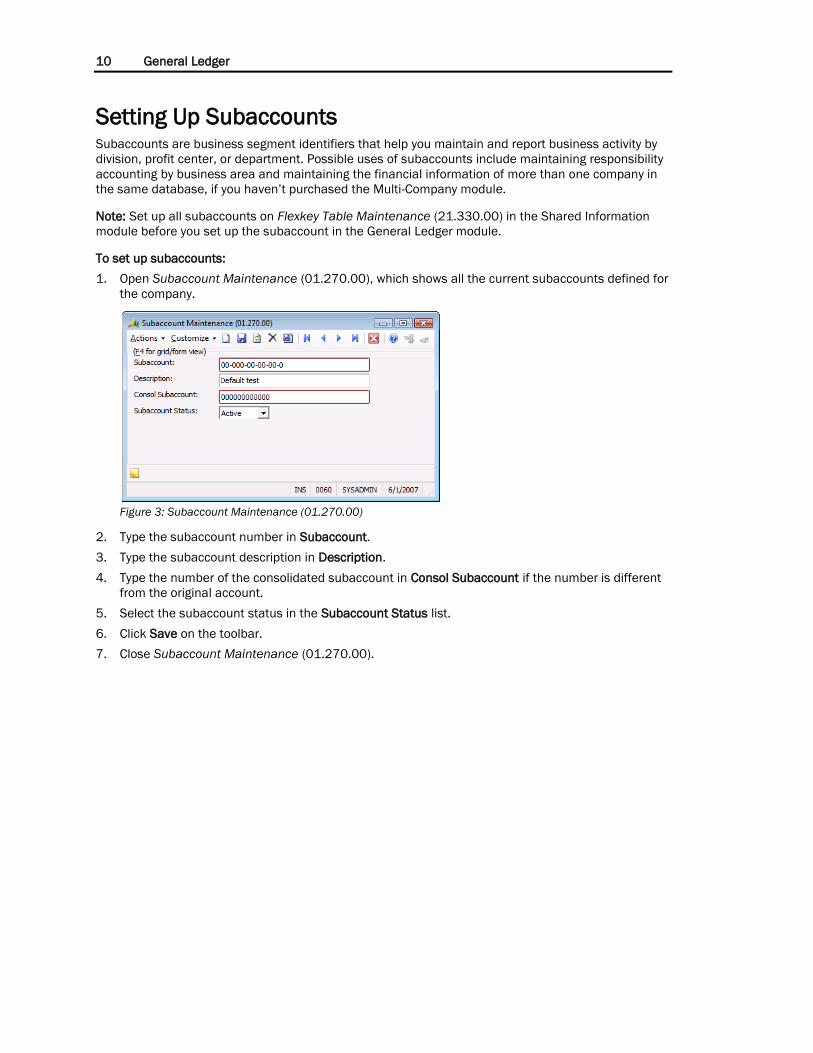
Setting Up Subaccounts Subaccounts are business segment identifiers that help you maintain and report business activity by
division, profit center, or department. Possible uses of subaccounts include maintaining responsibility
accounting by business area and maintaining the financial information of more than one company in
the same database, if you haven’t purchased the Multi-Company module.
Note: Set up all subaccounts on Flexkey Table Maintenance (21.330.00) in the Shared Information
module before you set up the subaccount in the General Ledger module.
To set up subaccounts:
1. Open Subaccount Maintenance (01.270.00), which shows all the current subaccounts defined for
the company.
Figure 3: Subaccount Maintenance (01.270.00)
2. Type the subaccount number in Subaccount.
3. Type the subaccount description in Description.
4. Type the number of the consolidated subaccount in Consol Subaccount if the number is different
from the original account.
5. Select the subaccount status in the Subaccount Status list.
6. Click Save on the toolbar.
7. Close Subaccount Maintenance (01.270.00).
Setting Up the General Ledger 11
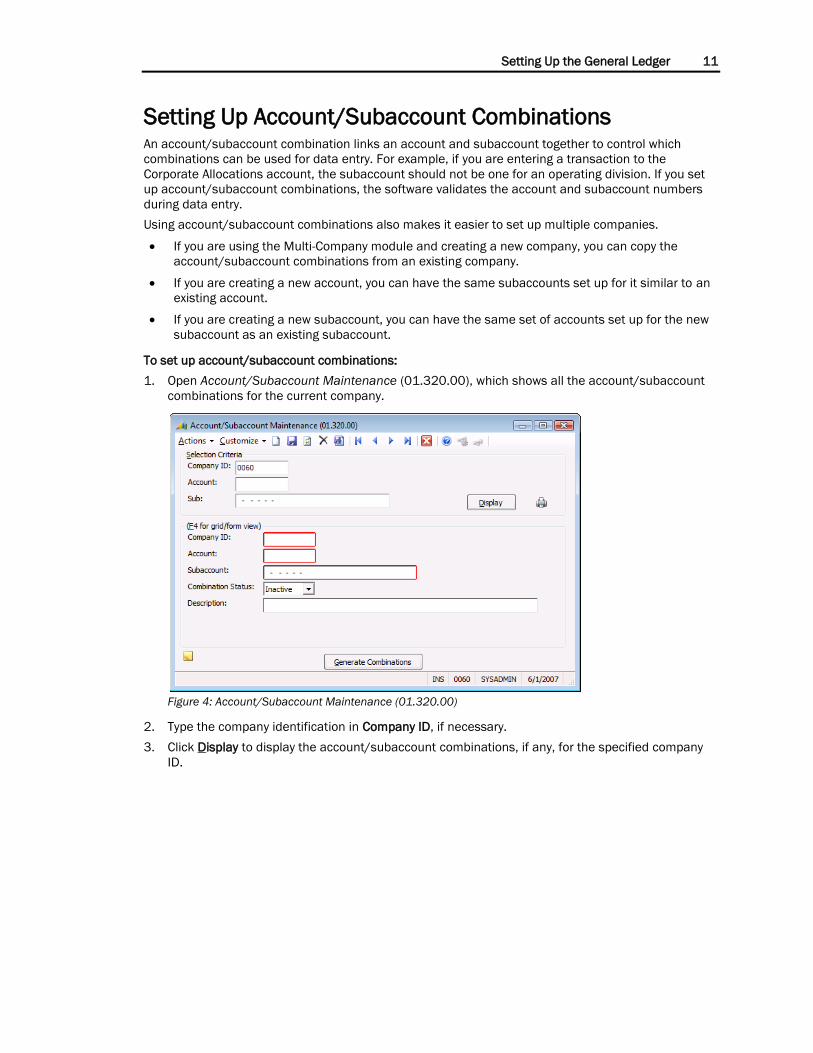
Setting Up Account/Subaccount Combinations An account/subaccount combination links an account and subaccount together to control which
combinations can be used for data entry. For example, if you are entering a transaction to the
Corporate Allocations account, the subaccount should not be one for an operating division. If you set
up account/subaccount combinations, the software validates the account and subaccount numbers
during data entry.
Using account/subaccount combinations also makes it easier to set up multiple companies.
If you are using the Multi-Company module and creating a new company, you can copy the
account/subaccount combinations from an existing company.
If you are creating a new account, you can have the same subaccounts set up for it similar to an
existing account.
If you are creating a new subaccount, you can have the same set of accounts set up for the new
subaccount as an existing subaccount.
To set up account/subaccount combinations:
1. Open Account/Subaccount Maintenance (01.320.00), which shows all the account/subaccount
combinations for the current company.
Figure 4: Account/Subaccount Maintenance (01.320.00)
2. Type the company identification in Company ID, if necessary.
3. Click Display to display the account/subaccount combinations, if any, for the specified company
ID.
12 General Ledger
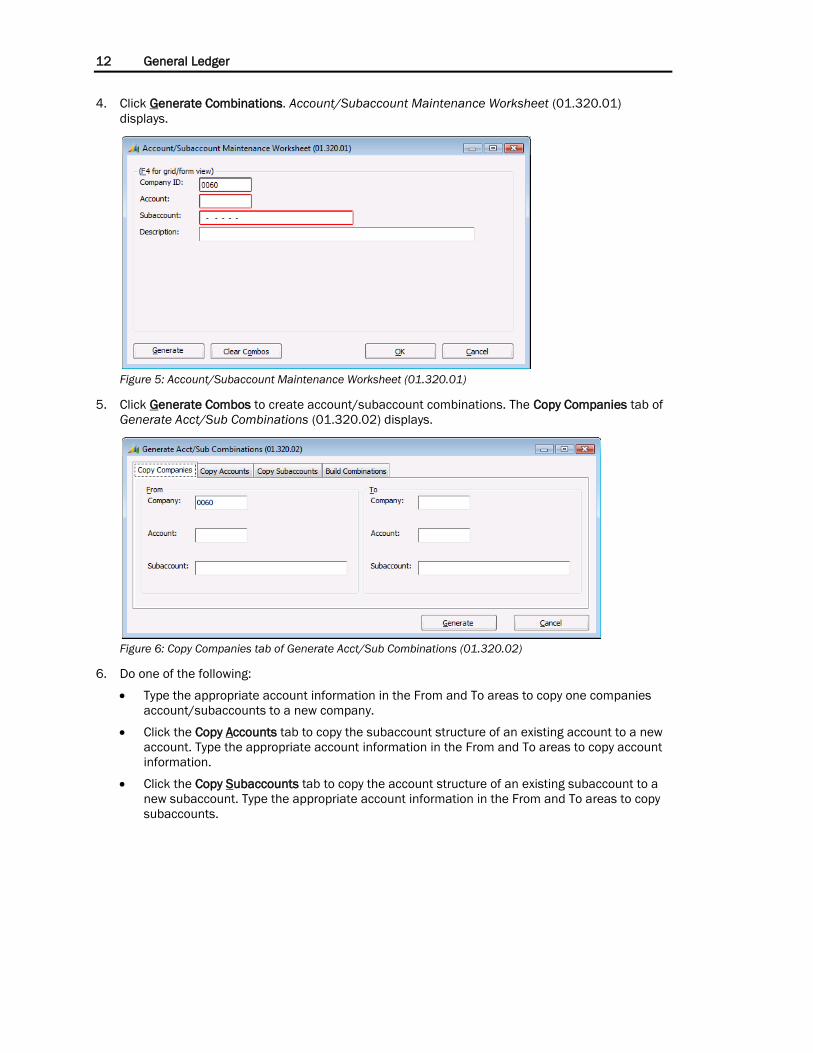
4. Click Generate Combinations. Account/Subaccount Maintenance Worksheet (01.320.01)
displays.
Figure 5: Account/Subaccount Maintenance Worksheet (01.320.01)
5. Click Generate Combos to create account/subaccount combinations. The Copy Companies tab of
Generate Acct/Sub Combinations (01.320.02) displays.
Figure 6: Copy Companies tab of Generate Acct/Sub Combinations (01.320.02)
6. Do one of the following:
Type the appropriate account information in the From and To areas to copy one companies
account/subaccounts to a new company.
Click the Copy Accounts tab to copy the subaccount structure of an existing account to a new
account. Type the appropriate account information in the From and To areas to copy account
information.
Click the Copy Subaccounts tab to copy the account structure of an existing subaccount to a
new subaccount. Type the appropriate account information in the From and To areas to copy
subaccounts.
Setting Up the General Ledger 13
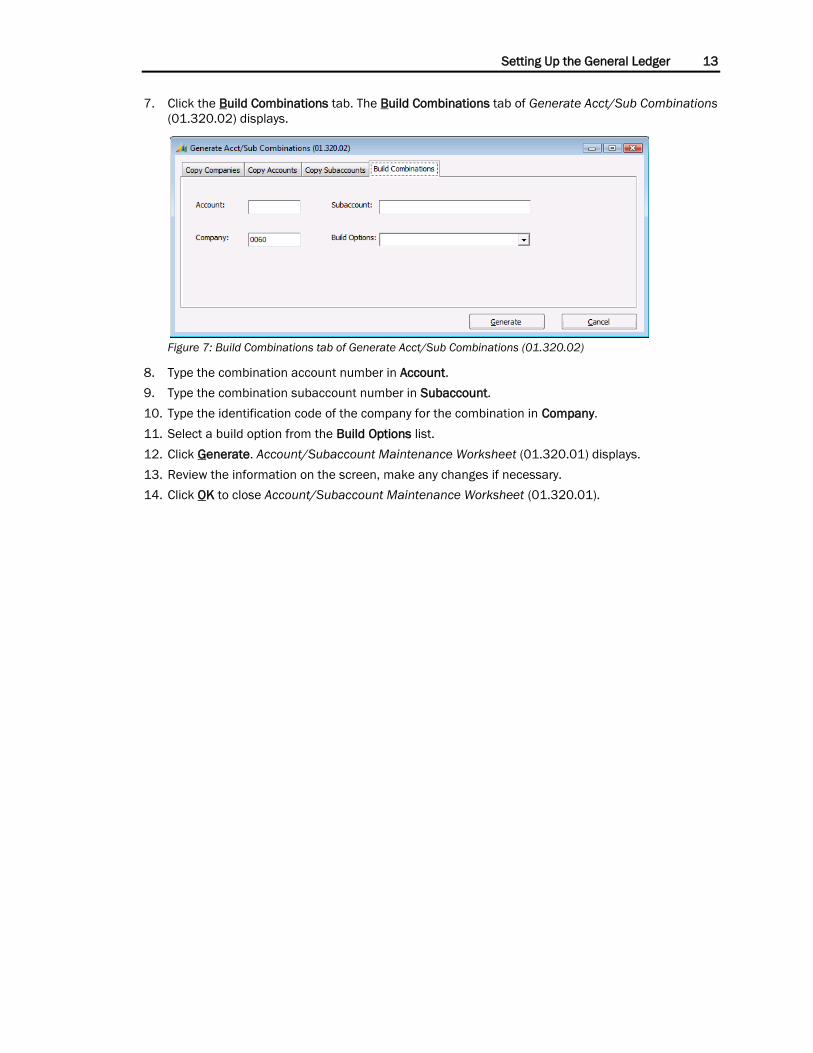
7. Click the Build Combinations tab. The Build Combinations tab of Generate Acct/Sub Combinations
(01.320.02) displays.
Figure 7: Build Combinations tab of Generate Acct/Sub Combinations (01.320.02)
8. Type the combination account number in Account.
9. Type the combination subaccount number in Subaccount.
10. Type the identification code of the company for the combination in Company.
11. Select a build option from the Build Options list.
12. Click Generate. Account/Subaccount Maintenance Worksheet (01.320.01) displays.
13. Review the information on the screen, make any changes if necessary.
14. Click OK to close Account/Subaccount Maintenance Worksheet (01.320.01).
14 General Ledger
Setting Up Allocation Groups An allocation group consists of one or more source accounts and one or more destination accounts
together with the factors and/or limits used to distribute all or a portion of the year-to-date balance
from each source account to a destination account. Once set up, you can use the allocation groups to
create a balanced batch of allocation transactions.
Consider the following when structuring allocation groups:
The first source or destination account determines the account types that
the software allows for subsequent accounts. For example, an asset or expense account allows
other asset or expense accounts.
The software permits you to enter multiple source-to-destination account and subaccount
combinations.
Account allocation saves time and increases productivity by automating routine allocations of
expenses or income to various cost or profit centers. Using allocations eliminates the need to look up
original account balances or compute distributed amounts by hand.
There are six ways to set up allocated funds for distribution among destination accounts. The
Allocation Methods are:
Percent — Amount allocated is distributed to each destination account according to the percent
for each account; total percents for all destination accounts in a group must equal 100%.
Unit Ratio — Amount allocated is distributed to each destination account according to the ratio
between the units for each account and the total units of all destination accounts; unit used is
user defined.
Actual Period-to-Date — Amount allocated is distributed to each of the destination accounts
according to the ratio of each account’s period-to-date balance to the total period-to-date
balance of all destination accounts.
Actual Year-to-Date — Amount allocated is distributed to each of the destination accounts
according to the ratio of each account’s year-to-date balance to the total year-to-date balance of
all destination accounts.
Ledger Period-to-Date — Amount allocated is distributed to each of the destination accounts
according to the ratio of each account’s ledger amount for a particular period to the total ledger
amount for that period for all destination accounts.
Ledger Year-to-Date — Amount allocated is distributed to each of the destination accounts
according to the ratio of each account’s annual ledger amount to the total annual ledger amount
of all destination accounts.
Setting Up the General Ledger 15
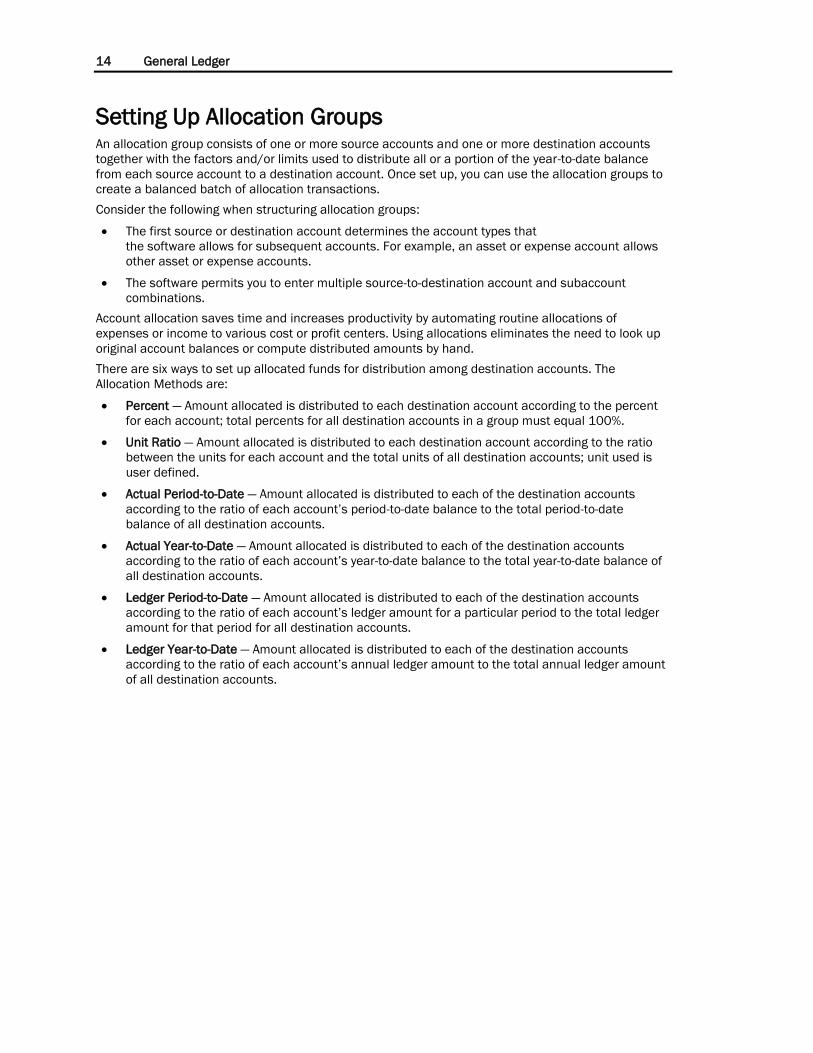
To set up an allocation group:
1. Open Allocation Group Maintenance (01.290.00).
Figure 8: Allocation Group Maintenance (01.290.00)
2. Type an identification code for the allocation group in Group ID.
3. Type a description of the allocation group in Description.
4. Last Revision Date will default today’s date, if you want to use another date enter it here.
5. Type the starting fiscal period to generate allocations in Start Period.
Note: The period entered here is when the allocation group will become available to process. It will
not automatically process for prior periods. If you are generating allocations in Generate
Allocations (01.580.00) only those with a Start Period prior to or equal to the period being
allocated will be available, as long as the End Period is not a prior period.
6. Type the ending period for to generate allocations in End Period.
7. Choose a method for making allocations to destination accounts from the Allocation Method drop-
down list. See the explanation of each in the previous section.
8. If your Allocation Method is either Ledger Period-to-Date or Ledger Year-to Date, enter the Basis
Ledger. If you are using any other allocation method, this field will be skipped.
9. Type the identification code of the destination ledger in Destination Ledger.
10. The Status will default to Active, if you do not want to activate the allocation method, select
Inactive.
11. If there is a specific sequence that you need the allocations to take place in make sure you enter
the appropriate sequence in the Pool Sequence field.
12. Use Basis Accounts check box should be checked if you wish to base the allocation calculation on
amounts in other accounts. When this is selected fields are available in the destination accounts
section for the Basis Company ID, Basis Account and Basis Subaccount. The check box can be
selected for all methods except Percent or unit ratio type.
13. Type the associated general ledger source account of the allocation group in Account. This is the
account that will be allocated from this account to other accounts.
16 General Ledger
14. Type the associated source subaccount of the allocation group in Subaccount.
15. Type the maximum percent amount of the account and subaccount balance to allocate in Limit
Percent. This gives you the ability to select only a portion of the amount in the account to be
allocated to other accounts. You may limit the allocation by either a percentage of the account
balance or fixed amount. Use this field to limit by percentage.
16. Select the calculation method to use for determining the limit percent amount from the Percent
Limit Type list. If you select:
By Allocation — Limits are applied based on the remaining balance in the account. If the limit
percent is 50% and the allocation is generated multiple times (or other allocation groups are
run which contain this account), each subsequent allocation will limit itself to 50% of the net
balance after the previous allocations. Each time you run the allocation, you will be notified if
there are prior allocations for the period, and given the option to stop the process.
By Period — Limits are applied based on the activity for the month. If the limit percent is 50%
and the allocation is generated multiple times, the first allocation will include 50% of the
activity for the month, and subsequent allocations will be zero.
17. Type the maximum dollar amount of the account and subaccount to allocate in Limit Amount. You
may limit the allocation by either a percentage of the account balance or fixed amount. Use this
field to limit by fixed amount.
18. Type a contra account to use to credit/debit an allocation rather than a source account in Contra
Account.
19. Type a contra subaccount to use to credit/debit an allocation rather than a source subaccount in
Contra Subaccount.
20. Type the identification code of the company with the destination account in Company ID.
21. Type the associated general ledger destination account of the allocation group in Account.
22. Type the associated destination subaccount of the allocation group in Subaccount.
23. Type the destination account and subaccount unit ratio or percentage for the allocation group in
Factor. Each destination amount will be calculated by using the factor value divided by the total
factors. For example, if destination row 1 has a factor of 1 and destination row 2 has a factor of 2;
destination account/subaccount 1 will receive one third of the total and destination
account/subaccount 2 will receive two thirds of the total.
24. If you have selected the Use Basis Accounts check box in the Allocation Group section, enter the
Basis Company ID, Basis Account and Basis Subaccount.
Setting Up the General Ledger 17
Creating Multiple Ledgers Creating multiple ledgers allows you to maintain the information of multiple sets of books in a single
database. A ledger can be a company’s financial or tax books, a budget, statistics, or a translated set
of financials. Ledgers provide the flexibility you need to maintain unlimited sets of books. The four
types of ledgers are:
Actuals — To set up a tax ledger that is separate from your financial ledger.
Budgets — To set up a ledger for an original budget with additional ledgers for budget revisions or
what-if scenarios.
Statistical — To do sales comparisons on multiple types of statistics, such as setting a ledger for
gallons sold, number of employees, or square feet.
Reporting Currency — To translate financials from a subsidiary’s to a parent’s base currency in a
multinational organization. This translation is performed using the Financial Statement
Translation module. Each translated set of books is a ledger. This allows you to have your local
books in one ledger, re-measure your books to a functional currency ledger, and then have a
third set of books for the translated financials for the parent company.
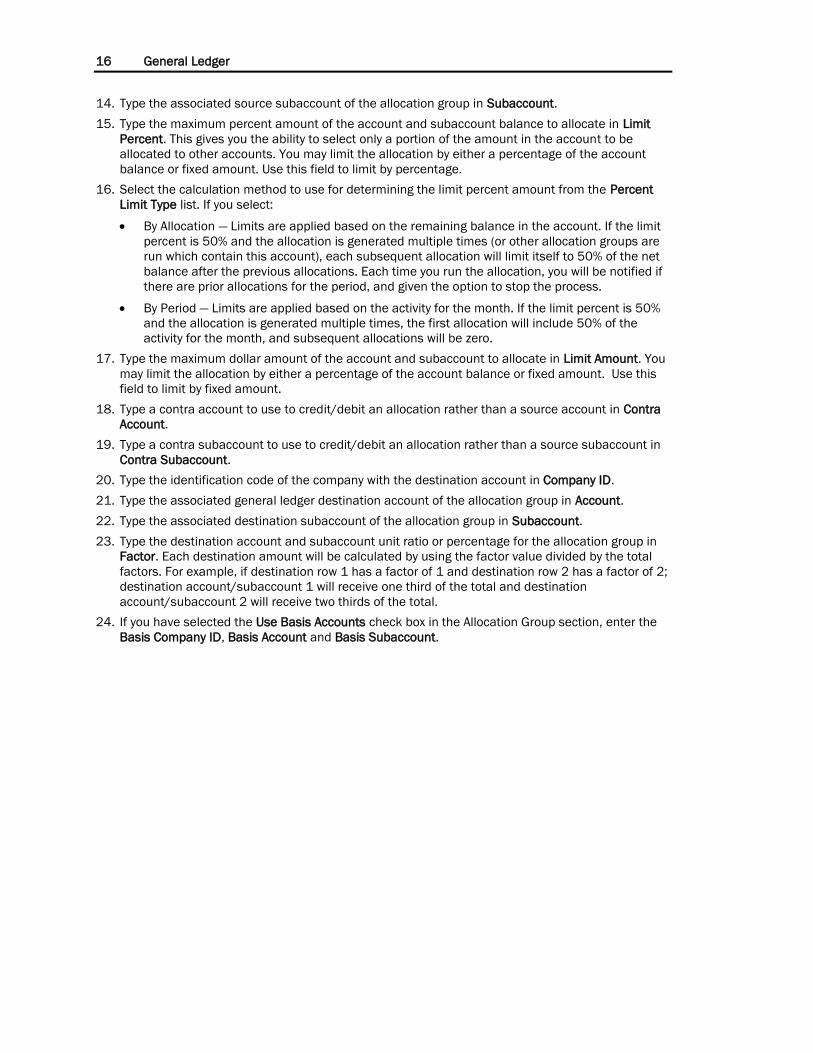
To create multiple ledgers:
1. Open Ledger Maintenance (01.310.00).
Figure 9: Ledger Maintenance (01.310.00)
2. Type the ledger identification code in uppercase characters in Ledger ID.
3. Type a description of the ledger in Description.
4. Type the balance type category in Balance Type.
5. Type the base currency identification in Base Currency.
6. Select Balancing Required if the ledger must be balanced before it can be released and posted.
7. Click Save on the toolbar.
18 General Ledger
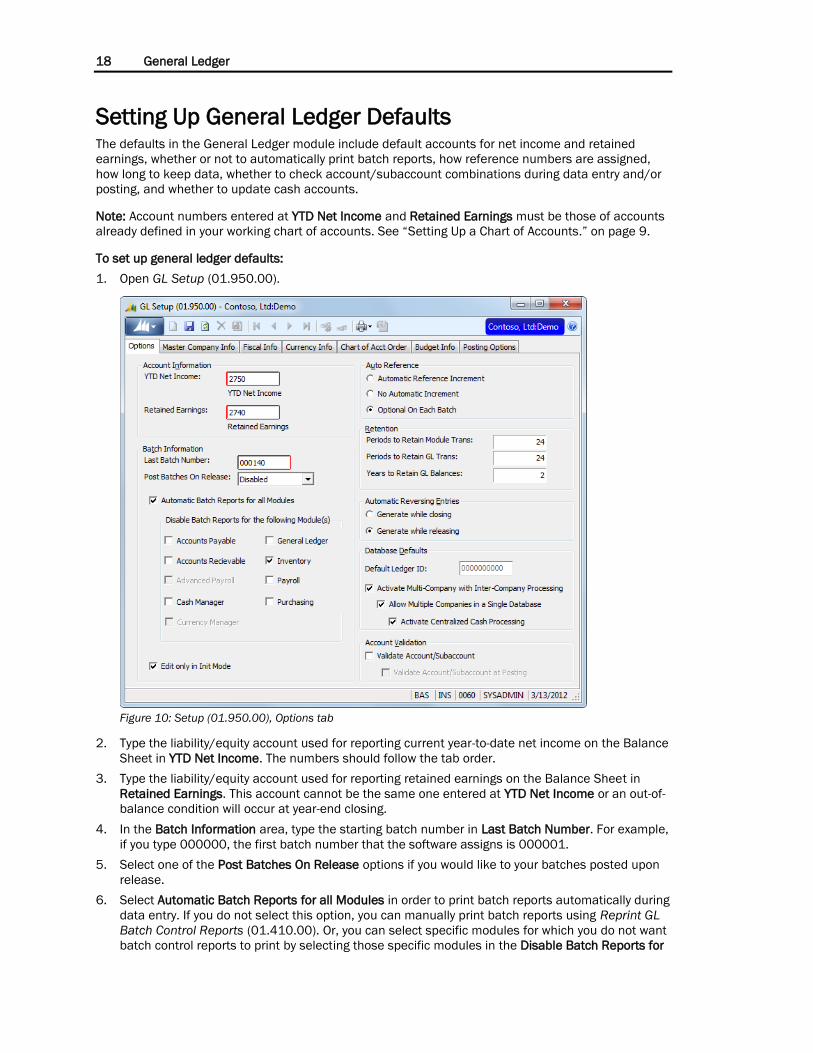
Setting Up General Ledger Defaults The defaults in the General Ledger module include default accounts for net income and retained
earnings, whether or not to automatically print batch reports, how reference numbers are assigned,
how long to keep data, whether to check account/subaccount combinations during data entry and/or
posting, and whether to update cash accounts.
Note: Account numbers entered at YTD Net Income and Retained Earnings must be those of accounts
already defined in your working chart of accounts. See “Setting Up a Chart of Accounts.” on page 9.
To set up general ledger defaults:
1. Open GL Setup (01.950.00).
Figure 10: Setup (01.950.00), Options tab
2. Type the liability/equity account used for reporting current year-to-date net income on the Balance
Sheet in YTD Net Income. The numbers should follow the tab order.
3. Type the liability/equity account used for reporting retained earnings on the Balance Sheet in
Retained Earnings. This account cannot be the same one entered at YTD Net Income or an out-of-
balance condition will occur at year-end closing.
4. In the Batch Information area, type the starting batch number in Last Batch Number. For example,
if you type 000000, the first batch number that the software assigns is 000001.
5. Select one of the Post Batches On Release options if you would like to your batches posted upon
release.
6. Select Automatic Batch Reports for all Modules in order to print batch reports automatically during
data entry. If you do not select this option, you can manually print batch reports using Reprint GL
Batch Control Reports (01.410.00). Or, you can select specific modules for which you do not want
batch control reports to print by selecting those specific modules in the Disable Batch Reports for
Setting Up the General Ledger 19
the following Module(s) area. These check boxes are enabled only when the Automatic Batch
reports for all Modules check box is selected.
7. Select Edit only in Init Mode to allow batch editing only when in Initialize mode. See the System
Manager online help or user guide for more information on the Initialize mode.
8. In the Auto Reference area, specify how you want to assign reference numbers.
9. Type the number of periods after the current period to retain data in the Retention area. For
example, 02 indicates that transactions should be retained for two periods after the current
period. Once a record meets this criterion, you can delete it from the database on Delete GL Detail
(01.570.00).
10. Select to generate automatic reversing entries either during closing or releasing in the Automatic
Reversing Entries area.
11. Select Activate Multi-Company with Inter-Company Processing, if necessary, to enable the Multi-
Company module.
12. Select Allow Multiple Companies in a Single Database if working with multiple companies in a
single database.
13. Select Allow Centralized Cash Processing to enable centralized cash control if the company
receives and applies cash for other companies, pays invoices for other companies, or makes
regular sweeps of other companies’ cash accounts.
14. Select Validate Account/Subaccount to perform account/subaccount validation. Select Validate
Account/Subaccount at Posting to perform account/subaccount validation during posting.
15. Type the default ledger identification code, if any, in Default Ledger ID.
16. (optional) Select the Fiscal Info tab to define your fiscal year setup. For more information, see
“Defining Fiscal Periods” on page 22.
17. (optional) Select the Currency Info tab to define your base currency setup. For more information,
see “Defining the Base Currency” on page 24.
18. Click Save on the toolbar if you are changing the defaults.
19. Close GL Setup (01.950.00) or click the next desired tab.
20 General Ledger
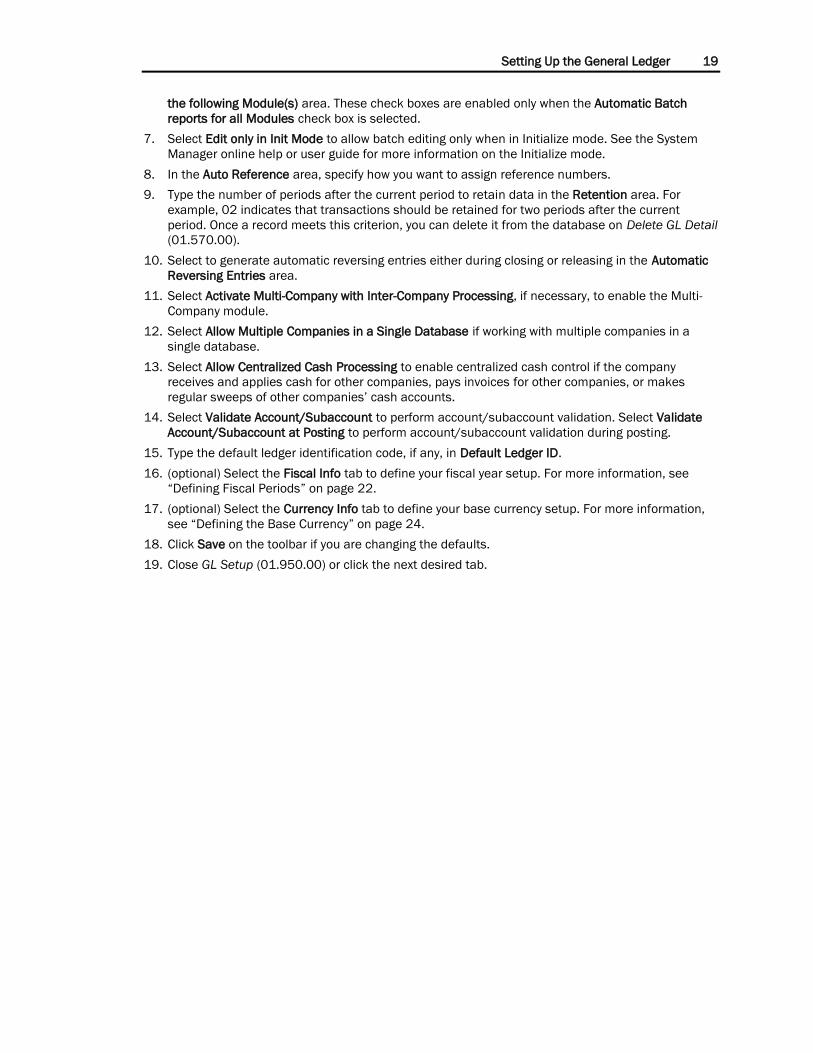
Setting Up Company Information The master company information displayed on the Master Company Info tab of GL Setup (01.950.00)
defaults from information defined in Company Maintenance (98.280.00).
Figure 11: GL Setup(01.950.00)p, Master Company Info tab
You can view, but cannot change, company information on the Master Company Info tab in GL Setup
(01.950.00). All company information is defined and maintained in the utility window Company
Maintenance (98.280.00).
Note: If Multi-Company is installed, you define master company information in Multi-Company
Company Setup (13.290.00). If changes to company information are necessary, make these changes
in Company Maintenance (98.280.00).
Setting Up the General Ledger 21
To set up master company information:
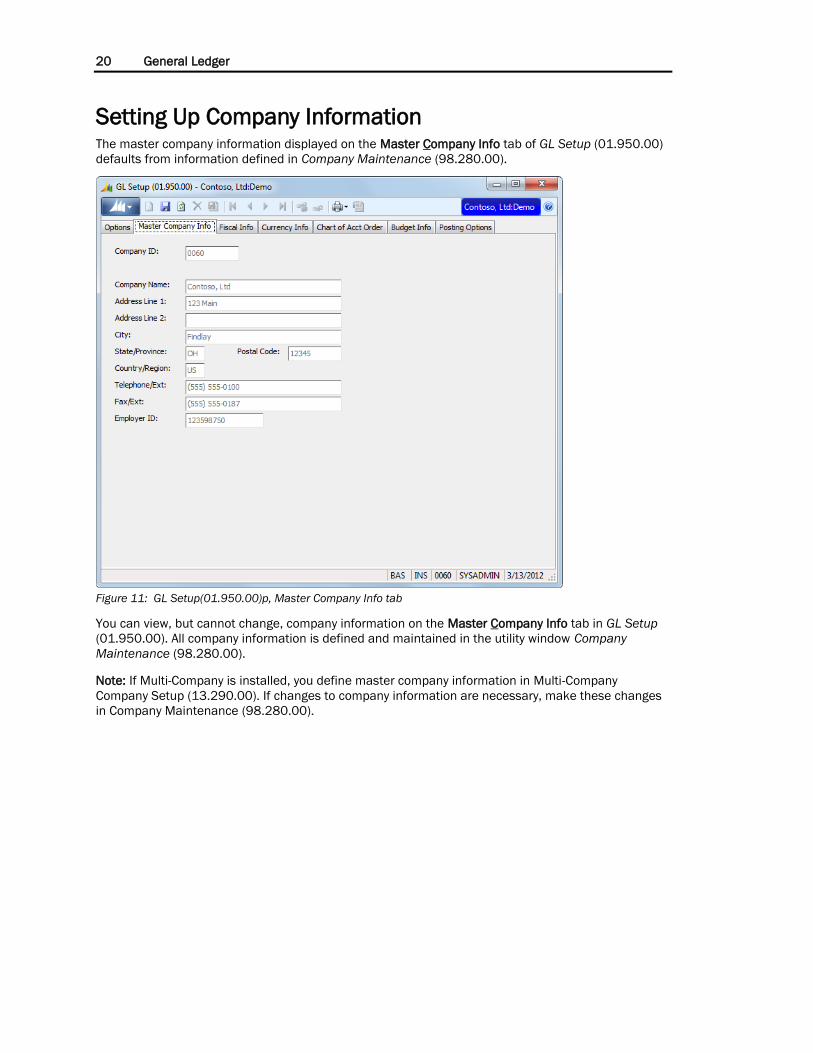
1. Select Utility | Company Maintenance. Company Maintenance (98.280.00) appears.
Figure 12: Company Maintenance (98.280.00)
2. If Multi-Company is installed, select Menu | Function. Multi-Company Company Setup
(13.290.00) appears.
3. Click New on the toolbar.
At Company ID, specify an appropriate company ID.
At Company Name, specify an appropriate company name.
At Database Name, specify the appropriate Application database name.
At Address: through Employer Tax ID, specify the company’s address and other related
information.
4. Click Save on the toolbar, and close the window.
5. Select File | Exit.
6. Start Microsoft Dynamics SL and open GL Setup (01.950.00).
7. Click the Master Company Info tab on GL Setup (01.950.00). The Master Company Info tab of GL
Setup (01.950.00) displays.
8. Verify that all master company information appears on the Master Company Info tab correctly.
9. Change master company information as necessary in Company Maintenance (98.280.00).
22 General Ledger
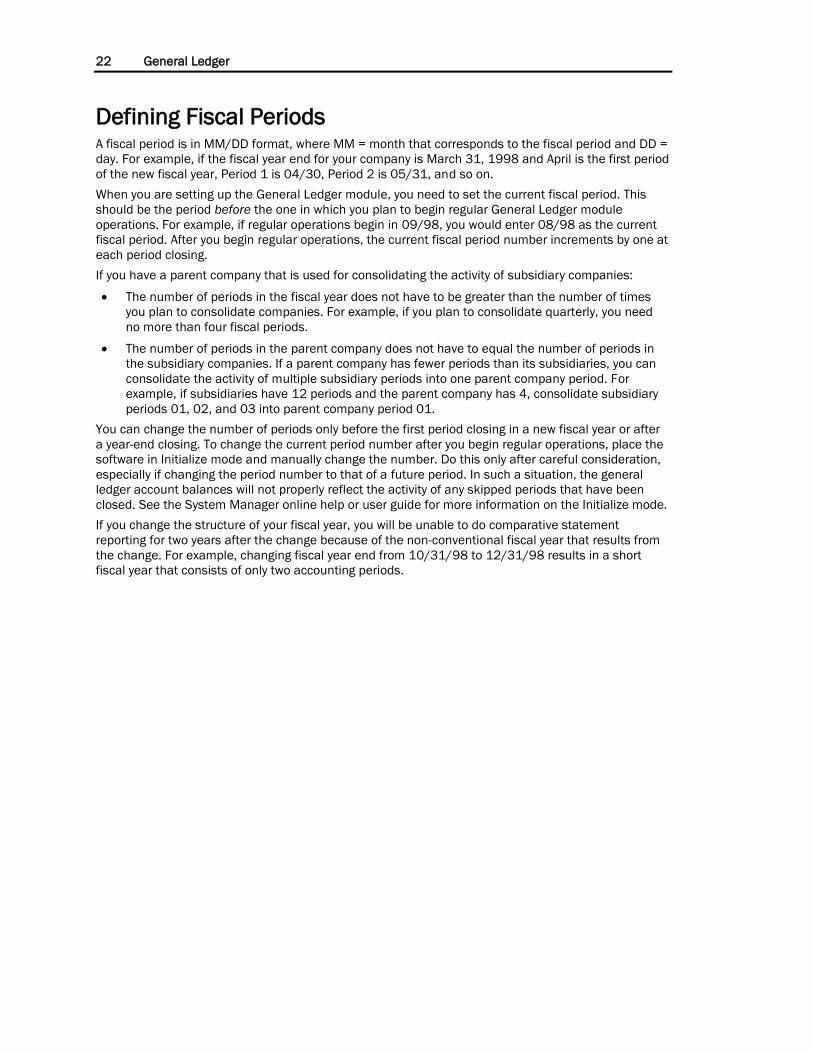
Defining Fiscal Periods A fiscal period is in MM/DD format, where MM = month that corresponds to the fiscal period and DD =
day. For example, if the fiscal year end for your company is March 31, 1998 and April is the first period
of the new fiscal year, Period 1 is 04/30, Period 2 is 05/31, and so on.
When you are setting up the General Ledger module, you need to set the current fiscal period. This
should be the period before the one in which you plan to begin regular General Ledger module
operations. For example, if regular operations begin in 09/98, you would enter 08/98 as the current
fiscal period. After you begin regular operations, the current fiscal period number increments by one at
each period closing.
If you have a parent company that is used for consolidating the activity of subsidiary companies:
The number of periods in the fiscal year does not have to be greater than the number of times
you plan to consolidate companies. For example, if you plan to consolidate quarterly, you need
no more than four fiscal periods.
The number of periods in the parent company does not have to equal the number of periods in
the subsidiary companies. If a parent company has fewer periods than its subsidiaries, you can
consolidate the activity of multiple subsidiary periods into one parent company period. For
example, if subsidiaries have 12 periods and the parent company has 4, consolidate subsidiary
periods 01, 02, and 03 into parent company period 01.
You can change the number of periods only before the first period closing in a new fiscal year or after
a year-end closing. To change the current period number after you begin regular operations, place the
software in Initialize mode and manually change the number. Do this only after careful consideration,
especially if changing the period number to that of a future period. In such a situation, the general
ledger account balances will not properly reflect the activity of any skipped periods that have been
closed. See the System Manager online help or user guide for more information on the Initialize mode.
If you change the structure of your fiscal year, you will be unable to do comparative statement
reporting for two years after the change because of the non-conventional fiscal year that results from
the change. For example, changing fiscal year end from 10/31/98 to 12/31/98 results in a short
fiscal year that consists of only two accounting periods.

Setting Up the General Ledger 23
To define fiscal periods:
1. Click the Fiscal Info tab on GL Setup. The Fiscal Info tab of GL Setup (01.950.00) displays.
Figure 13: GL Setup(01.950.00), Fiscal Info tab
2. Type the number of accounting periods in the company’s fiscal year in Periods in Fiscal Year.
3. Type the current fiscal period in Current Fiscal Period. This should be the period before the one in
which you plan to begin regular General Ledger module operations. For example, if regular
operations begin in 09, enter 08 as the current fiscal period.
4. Type the fiscal year in Fiscal Year.
5. Select one of the following:
Beg. Calendar Year to specify the fiscal year begins in the year indicated.
End. Calendar Year to specify the fiscal year ends in the year indicated.
6. Type the respective ending dates for each period in the Fiscal Period Ending Dates frame.
7. Click Save.
Note: A message displays when your fiscal year crosses two calendar years so that you can
approve your fiscal year setup.
8. Close GL Setup (01.950.00) or click the next desired tab.
24 General Ledger
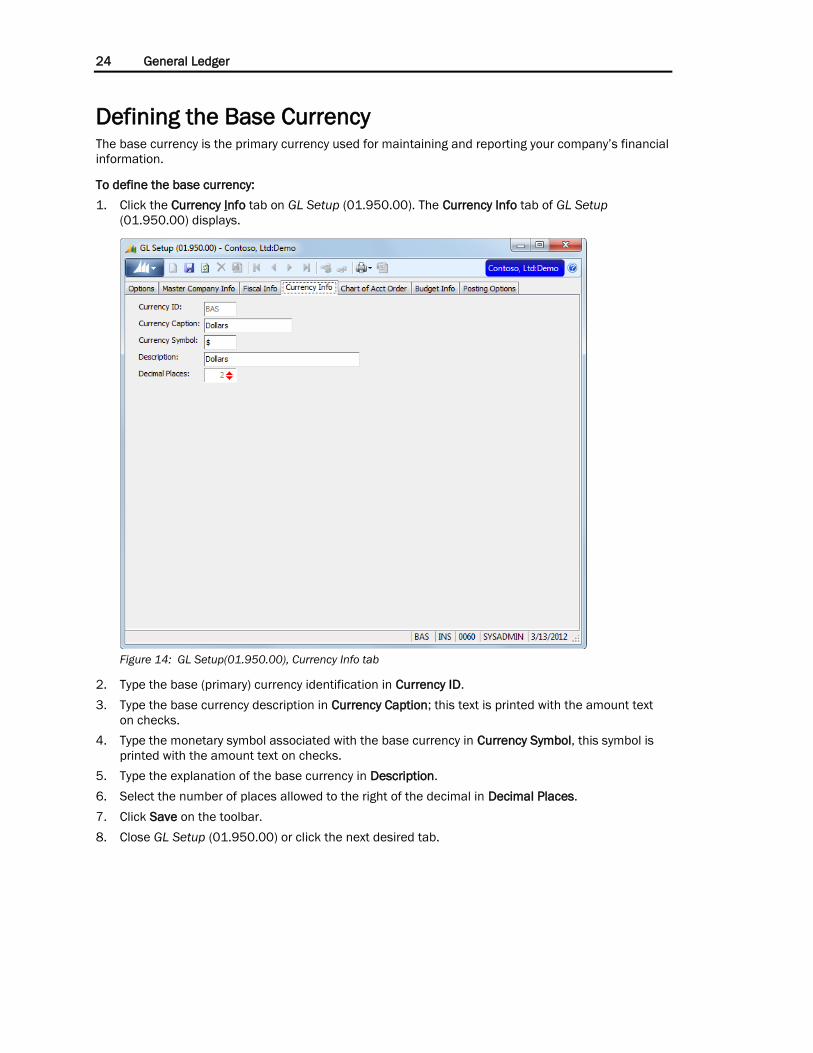
Defining the Base Currency The base currency is the primary currency used for maintaining and reporting your company’s financial
information.
To define the base currency:
1. Click the Currency Info tab on GL Setup (01.950.00). The Currency Info tab of GL Setup
(01.950.00) displays.
Figure 14: GL Setup(01.950.00), Currency Info tab
2. Type the base (primary) currency identification in Currency ID.
3. Type the base currency description in Currency Caption; this text is printed with the amount text
on checks.
4. Type the monetary symbol associated with the base currency in Currency Symbol, this symbol is
printed with the amount text on checks.
5. Type the explanation of the base currency in Description.
6. Select the number of places allowed to the right of the decimal in Decimal Places.
7. Click Save on the toolbar.
8. Close GL Setup (01.950.00) or click the next desired tab.
Setting Up the General Ledger 25
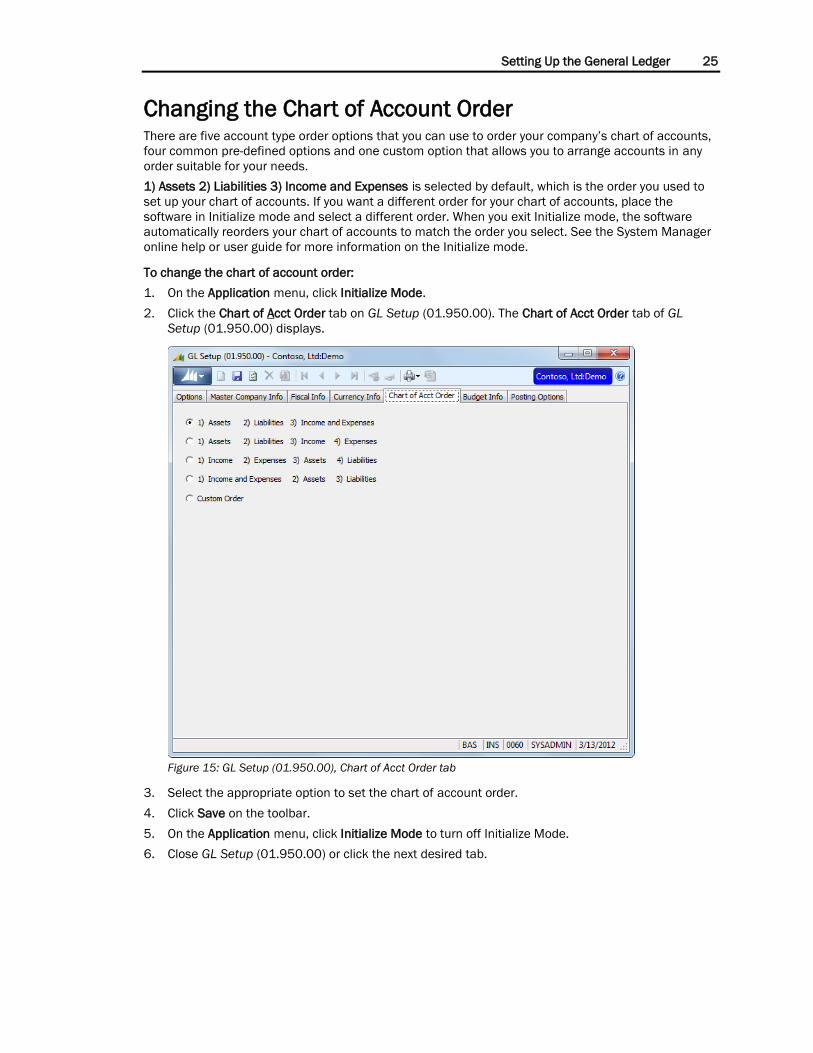
Changing the Chart of Account Order There are five account type order options that you can use to order your company’s chart of accounts,
four common pre-defined options and one custom option that allows you to arrange accounts in any
order suitable for your needs.
1) Assets 2) Liabilities 3) Income and Expenses is selected by default, which is the order you used to
set up your chart of accounts. If you want a different order for your chart of accounts, place the
software in Initialize mode and select a different order. When you exit Initialize mode, the software
automatically reorders your chart of accounts to match the order you select. See the System Manager
online help or user guide for more information on the Initialize mode.
To change the chart of account order:
1. On the Application menu, click Initialize Mode.
2. Click the Chart of Acct Order tab on GL Setup (01.950.00). The Chart of Acct Order tab of GL
Setup (01.950.00) displays.
Figure 15: GL Setup (01.950.00), Chart of Acct Order tab
3. Select the appropriate option to set the chart of account order.
4. Click Save on the toolbar.
5. On the Application menu, click Initialize Mode to turn off Initialize Mode.
6. Close GL Setup (01.950.00) or click the next desired tab.

26 General Ledger
Selecting Posting Options In the Posting Options tab, select whether to allow postings to closed periods or closed fiscal years. By
default, the Allow posting to closed fiscal periods for all Modules check box is selected and the
Prevent posting to prior fiscal years check box is cleared. If you want to enable the posting to prior
periods on a per module basis, you can decide to enable posting for individual modules.
To enable posting to closed fiscal periods for all modules:
1. Click to select the Allow posting to closed fiscal periods for all Modules check box if it is cleared.
This lets you post to the prior fiscal periods.
Figure 16: GL Setup (01.950.00), Posting Options tab – Allow Posting to closed fiscal periods for all modules
2. If you want to enable posting only to a prior period in the current year, click to select the Prevent
posting to prior fiscal years check box.
3. Click Save, and then close GL Setup (01.950.00).
4. Open Access Rights Maintenance (95.270.00) from the System Manager menu.
5. Grant rights to each user who you want to be able to post to prior periods. Type 01.HC0.00 in the
Screen/Report Nbr box for each user who you are granting the ability to post to prior periods.
Note:
By default, no user (except SYSADMIN and members of Administrators group) will be able to
specify a prior period unless they are given access rights at the View level or higher, to the
Hard Close Feature (01.HC0.00) screen. The Hard Close Feature (01.HC0.00) screen is not a
physical screen, but is an entry in the Access Rights Maintenance (95.270.00) screen so that
you can give users and groups rights to this feature.
To revoke permissions to specify a prior period, you must remove the Hard Close Feature
(01.HC0.00) row from Access Rights Maintenance (95.270.00) for the user or group.
Setting Up the General Ledger 27
The ability to post to closed periods in Order Management is not affected. By default, Order
Management screens allow for posting to previous periods if Initialization rights are given to
the user.
The ability to post to closed periods in Project Management and Accounting is not affected. By
default, Project Management and Accounting screens do not allow for posting to prior periods.
To enable posting to prior Project Management and Accounting periods, select the Allow
Posting of a Financial Batch to a Prior Period check box in Project Controller Setup
(PA.SET.00).
You must post all prior period batches with a Status of “Balanced,” including those that
contain recurring transactions, before you restrict posting to prior periods.
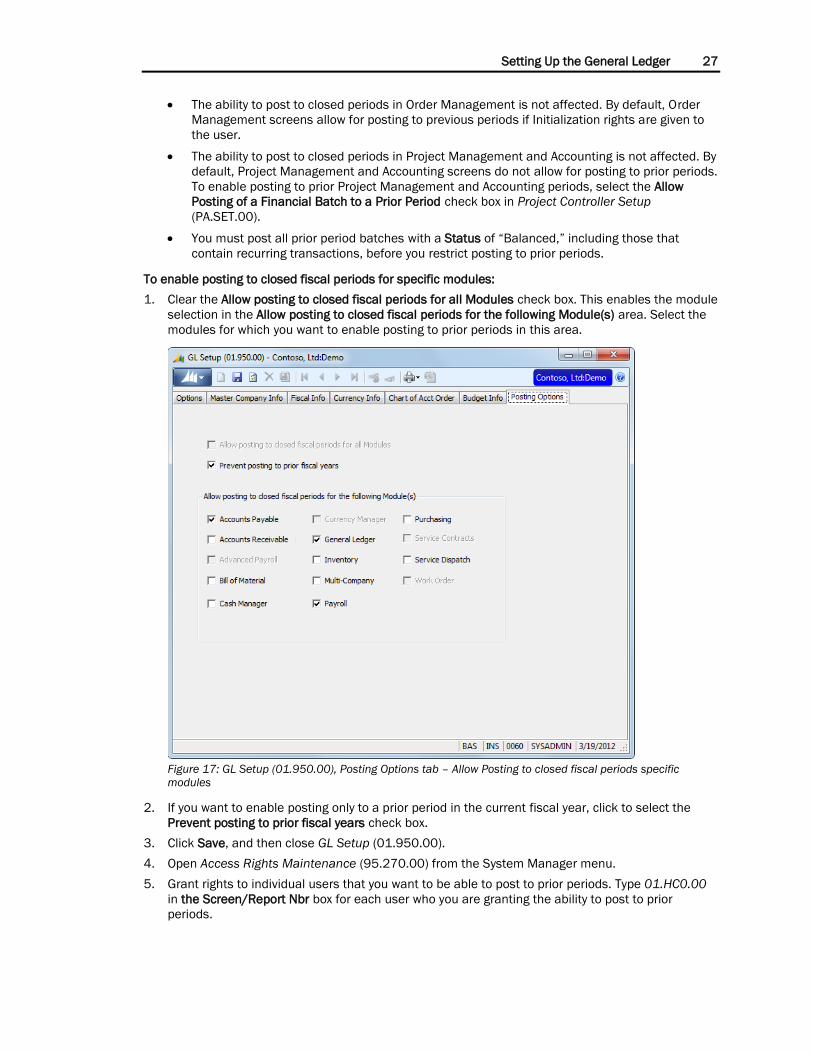
To enable posting to closed fiscal periods for specific modules:
1. Clear the Allow posting to closed fiscal periods for all Modules check box. This enables the module
selection in the Allow posting to closed fiscal periods for the following Module(s) area. Select the
modules for which you want to enable posting to prior periods in this area.
Figure 17: GL Setup (01.950.00), Posting Options tab – Allow Posting to closed fiscal periods specific
modules
2. If you want to enable posting only to a prior period in the current fiscal year, click to select the
Prevent posting to prior fiscal years check box.
3. Click Save, and then close GL Setup (01.950.00).
4. Open Access Rights Maintenance (95.270.00) from the System Manager menu.
5. Grant rights to individual users that you want to be able to post to prior periods. Type 01.HC0.00
in the Screen/Report Nbr box for each user who you are granting the ability to post to prior
periods.
28 General Ledger
Note:
By default, no user (except SYSADMIN and members of Administrators group) will be able to
specify a prior period unless they are given access rights, at the View lever or higher, to the
Hard Close Feature (01.HC0.00) screen. The Hard Close Feature (01.HC0.00) screen is not a
physical screen, but is an entry in the Access Rights Maintenance (95.270.00) screen so that
you can give users and groups rights to this feature.
To revoke permissions to specify a prior period, you must remove the Hard Close Feature
(01.HC0.00) row from Access Rights Maintenance (95.270.00) for the user or group.
The ability to post to closed periods in Order Management is not affected. By default, Order
Management screens allow for posting to previous periods if Initialization rights are given to
the user.
The ability to post to closed periods in Project Management and Accounting is not affected. By
default, Project Management and Accounting screens do not allow for posting to prior periods.
To enable posting to prior Project Management and Accounting periods, select the Allow
Posting of a Financial Batch to a Prior Period check box in Project Controller Setup
(PA.SET.00).
You must post all prior period batches with a Status of “Balanced,” including those that
contain recurring transactions, before you restrict posting to prior periods.
Setting Up the General Ledger 29
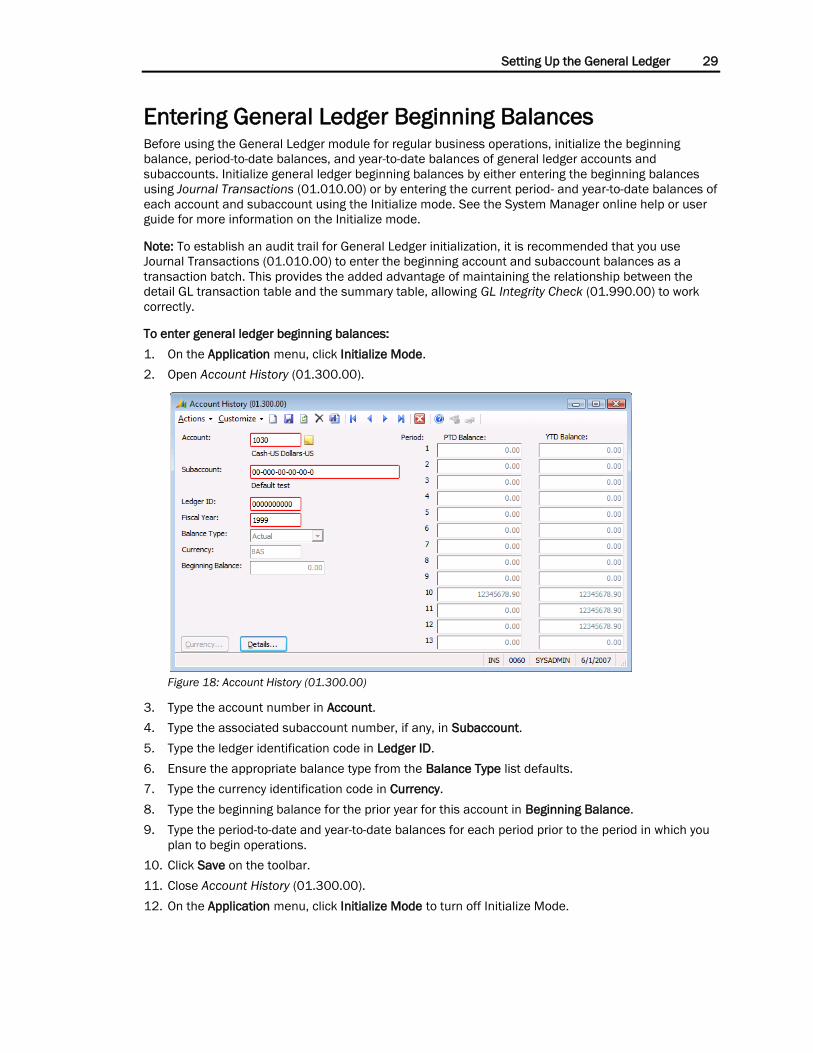
Entering General Ledger Beginning Balances Before using the General Ledger module for regular business operations, initialize the beginning
balance, period-to-date balances, and year-to-date balances of general ledger accounts and
subaccounts. Initialize general ledger beginning balances by either entering the beginning balances
using Journal Transactions (01.010.00) or by entering the current period- and year-to-date balances of
each account and subaccount using the Initialize mode. See the System Manager online help or user
guide for more information on the Initialize mode.
Note: To establish an audit trail for General Ledger initialization, it is recommended that you use
Journal Transactions (01.010.00) to enter the beginning account and subaccount balances as a
transaction batch. This provides the added advantage of maintaining the relationship between the
detail GL transaction table and the summary table, allowing GL Integrity Check (01.990.00) to work
correctly.
To enter general ledger beginning balances:
1. On the Application menu, click Initialize Mode.
2. Open Account History (01.300.00).
Figure 18: Account History (01.300.00)
3. Type the account number in Account.
4. Type the associated subaccount number, if any, in Subaccount.
5. Type the ledger identification code in Ledger ID.
6. Ensure the appropriate balance type from the Balance Type list defaults.
7. Type the currency identification code in Currency.
8. Type the beginning balance for the prior year for this account in Beginning Balance.
9. Type the period-to-date and year-to-date balances for each period prior to the period in which you
plan to begin operations.
10. Click Save on the toolbar.
11. Close Account History (01.300.00).
12. On the Application menu, click Initialize Mode to turn off Initialize Mode.

30 General Ledger
Processing General Ledger Transactions 31
Processing General Ledger
Transactions
Overview The Processing General Ledger Transactions section provides information and procedures for entering
transactions, consolidating files, posting transactions, and closing the General Ledger. These basic
tasks include:
Entering General Ledger Transactions
Generating Recurring Transactions
Releasing General Ledger Batches
Posting Transactions to the General Ledger
Generating Allocation Transactions
Generating Consolidation Files
Reading Consolidation Files
Printing or Reprinting General Ledger Batch Control Reports
Closing the General Ledger
Processing General Ledger Transactions
1. Review open general ledger files to make sure that all documents have been entered for the
period. Use the GL Transactions (01.680.00) report or the GL Edit (01.810.00) report to check for
open general ledger batches.
2. Complete any open batches identified in step 1.
3. Make sure the closing process for all modules except General Ledger has been completed.
4. Use Journal Transactions (01.010.00) to enter any necessary general adjustments, reversing
transactions, prior period adjustments, or other outstanding entries.
5. Process consolidation files, if applicable, using Generate Consolidation (01.500.00) and Read
Consolidation (01.510.00).
6. Process recurring transactions, if applicable, using Generate Recurring (01.530.00).
7. Post all unposted current- or prior-period transactions using Post Transactions (01.520.00).
8. Process allocation transactions, if applicable, using Generate Allocations (01.580.00).
9. Complete the following Currency Manager operations if you are using Currency Manager:
Generate Unrealized Gains/Losses (24.630.00).
Revalue any appropriate asset or liability accounts, using General Ledger Revaluation
(24.500.00).
10. Generate and review the Trial Balance (01.610.00) or Trial Balance (SSRS) (01.611.00) report.
11. Generate and review financial statements using Management Reporter.
12. File all period financial statements, the Trial Balance (01.610.00) or Trial Balance (SSRS)
(01.611.00) report, the posted transactions batch control report, and the consolidation event log.
13. Sign off and back up the database.
14. Sign on to Microsoft Dynamics SL and close the General Ledger module, using Closing
(01.560.00).
32 General Ledger
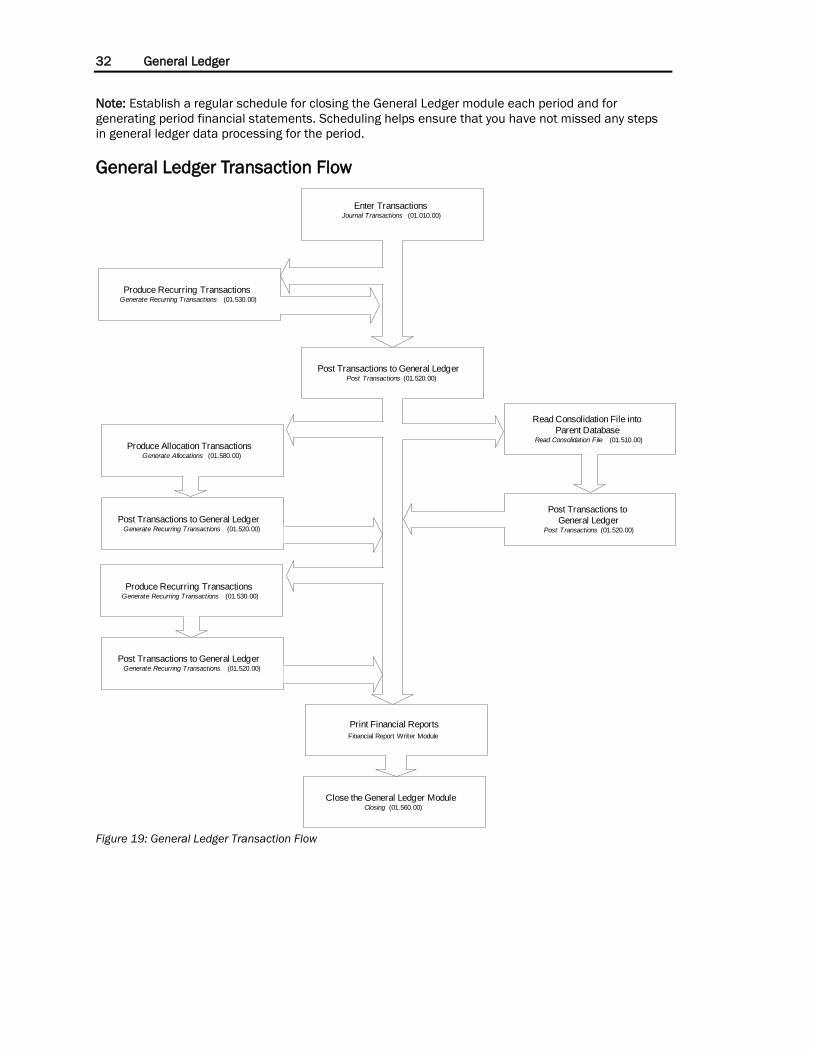
Note: Establish a regular schedule for closing the General Ledger module each period and for
generating period financial statements. Scheduling helps ensure that you have not missed any steps
in general ledger data processing for the period.
General Ledger Transaction Flow
Figure 19: General Ledger Transaction Flow
Enter TransactionsJournal Transactions (01.010.00)
Produce Recurring TransactionsGenerate Recurring Transactions (01.530.00)
Post Transactions to General LedgerPost Transactions (01.520.00)
Close the General Ledger ModuleClosing (01.560.00)
Read Consolidation File into
Parent DatabaseRead Consolidation File (01.510.00)
Print Financial Reports
Financial Report Writer Module
Produce Recurring TransactionsGenerate Recurring Transactions (01.530.00)
Produce Allocation TransactionsGenerate Allocations (01.580.00)
Post Transactions to
General LedgerPost Transactions (01.520.00)
Post Transactions to General LedgerGenerate Recurring Transactions (01.520.00)
Post Transactions to General LedgerGenerate Recurring Transactions (01.520.00)
Processing General Ledger Transactions 33
Entering General Ledger Transactions Before entering transactions to the general ledger:
Group all transactions with the same batch type. Six batch types are available:
– Nonrecurring — One-time transactions or transactions that do not occur regularly. This is the
most common transaction, typically used to enter cash receipts, cash disbursements,
purchases, payments, and corrections.
– Recurring — A transaction that occurs regularly for a fixed amount each time, typically used for
amortization entries. Once created, a recurring transaction is processed automatically
whenever you use Generate Recurring (01.530.00). The values at Cycle and Nbr of Cycles
control the frequency of posting and the number of times the software generates a recurring
transaction batch.
– Manual — Transactions that occur regularly for a different amount each time; typically used by
a CPA to set up a standard set of journals for clients. A manual transaction generates a batch
that will post to the general ledger when you change Handling to Release Now. The software
does not delete the template of the manual transaction after posting but retains the template
in the database where it can be used to prepare similar manual transactions in the future.
– Adjustment — Transactions used to make one-sided adjustments to account balances. The
entry of adjustment batches requires the software to be in Initialize mode.
– Reversing – Transaction that is created from a pre-existing batch and is identical to the
original batch except the transaction type (debit/credit) flag has been flipped.
– Correcting – Transaction that occurs by reversing a pre-existing batch and creating a new,
similar batch from the original batch that may be edited before the batch is released.
Group all transactions with the same journal type. The software uses many standard journal
types, such as GJ (general journal) and AP (accounts payable). You can also define new journal
types, such as SJ (sales journal) or CR (cash receipts journal).
Group the transactions by their general ledger fiscal posting period: current, prior, or future. The
entire batch is posted to only one period. For example, if you enter transactions, change the
period, and then enter more transactions, all the transactions are posted to the last period
entered.
Note: If you are using the Currency Manager module, you can enter transactions for an unlimited
number of currencies. All monetary amounts are entered or viewed as the foreign currency and are
translated automatically to the designated base or domestic currency. Transaction amounts and
account balances are stored in both the currency used for entry and the base or domestic currency
equivalent. See the Currency Manager online help or user guide for more information.
34 General Ledger
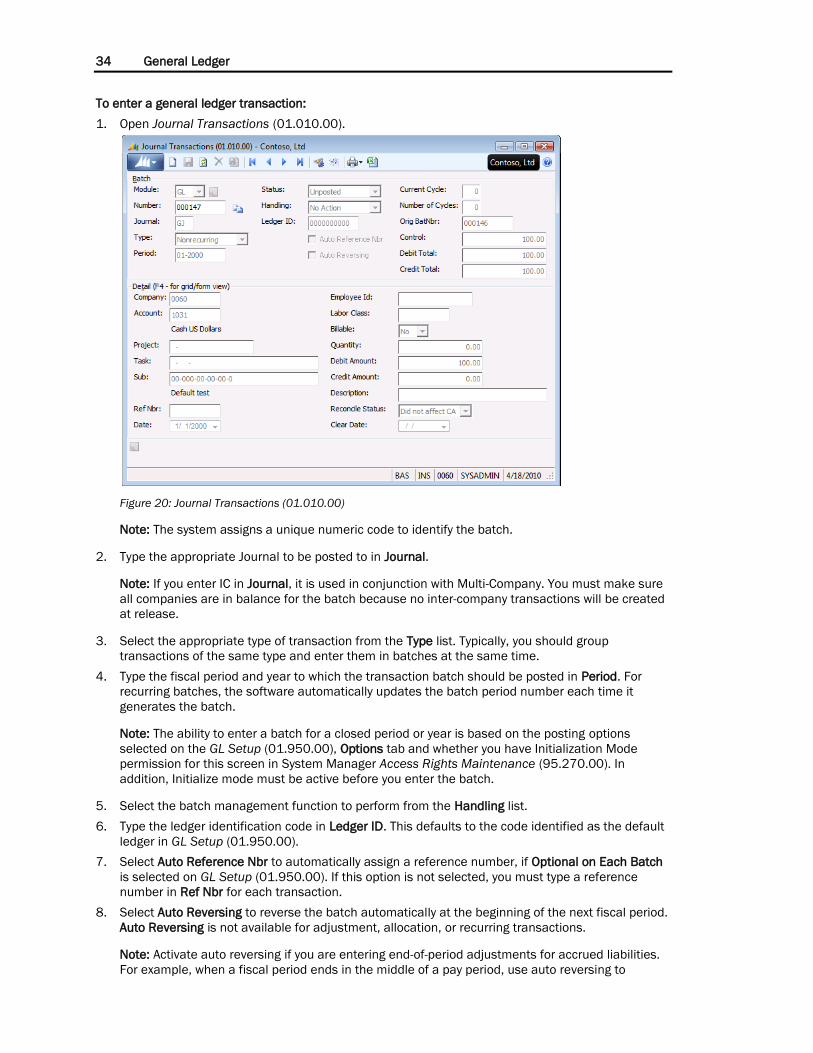
To enter a general ledger transaction:
1. Open Journal Transactions (01.010.00).
Figure 20: Journal Transactions (01.010.00)
Note: The system assigns a unique numeric code to identify the batch.
2. Type the appropriate Journal to be posted to in Journal.
Note: If you enter IC in Journal, it is used in conjunction with Multi-Company. You must make sure
all companies are in balance for the batch because no inter-company transactions will be created
at release.
3. Select the appropriate type of transaction from the Type list. Typically, you should group
transactions of the same type and enter them in batches at the same time.
4. Type the fiscal period and year to which the transaction batch should be posted in Period. For
recurring batches, the software automatically updates the batch period number each time it
generates the batch.
Note: The ability to enter a batch for a closed period or year is based on the posting options
selected on the GL Setup (01.950.00), Options tab and whether you have Initialization Mode
permission for this screen in System Manager Access Rights Maintenance (95.270.00). In
addition, Initialize mode must be active before you enter the batch.
5. Select the batch management function to perform from the Handling list.
6. Type the ledger identification code in Ledger ID. This defaults to the code identified as the default
ledger in GL Setup (01.950.00).
7. Select Auto Reference Nbr to automatically assign a reference number, if Optional on Each Batch
is selected on GL Setup (01.950.00). If this option is not selected, you must type a reference
number in Ref Nbr for each transaction.
8. Select Auto Reversing to reverse the batch automatically at the beginning of the next fiscal period.
Auto Reversing is not available for adjustment, allocation, or recurring transactions.
Note: Activate auto reversing if you are entering end-of-period adjustments for accrued liabilities.
For example, when a fiscal period ends in the middle of a pay period, use auto reversing to
Processing General Ledger Transactions 35
recognize the liability (wages payable) and the expense (salaries expense) for the portion of the
pay period falling in the fiscal period you are closing.
9. Type the number of fiscal periods between generation of a recurring batch in Current Cycle. Type
the number of time to generate a recurring batch in Number of Cycles.
10. Type the batch control total amount in Control.
11. Type the name of the company to post the transaction to in Company. This defaults to the
company that was signed into.
12. Type the account number to post the transaction to in Account.
13. Type the identification code in Project of the project associated with the transaction. The project
must be set up on Project Maintenance (PA.PRJ.00) in the Project Controller module. Project is
available only if the Project Controller module is installed and the account number is associated
with an account category on Chart of Accounts Maintenance (01.260.00) in the General Ledger
module.
14. Type the identification code in Task of the task associated with the project specified in Project.
15. Type the subaccount number in Sub.
16. Type a reference number in Ref Nbr, if Auto Reference Nbr is not selected.
17. Type the date of the transaction occurrence in Date.
18. If Project Controller is installed, type your employee identification code in Employee Id.
19. If Project Controller is installed, type your labor code in Labor Class.
20. If Flexible Billing is installed, determine if this transaction should be billed to a project. In the
Billable field, select Yes if this is billable.
21. Type the number of items in the transaction in Quantity.
22. Type the amount to debit the account in Debit Amount.
23. Type the amount to credit the account in Credit Amount.
24. Type an explanation of the transaction in Description.
25. Verify that the values in Control, Debit Total, and Credit Total are equal. If they are not equal,
adjust the incorrect amounts, change Handling to Hold or No Action status and save it for future
editing, or delete batches by going to Batch Number and clicking Delete on the toolbar.
Note: For an adjustment batch, the values in Control, Debit Total, and Credit Total do not need to be
equal. Because it allows one-sided adjustments, it does not have to be in balance to be posted.
Note: After saving the current transaction batch, you can click the Quick Print button, to print the GL
Edit (01.810.00) report for the batch. The batch must be saved and assigned a batch number before
you can use the quick print feature.
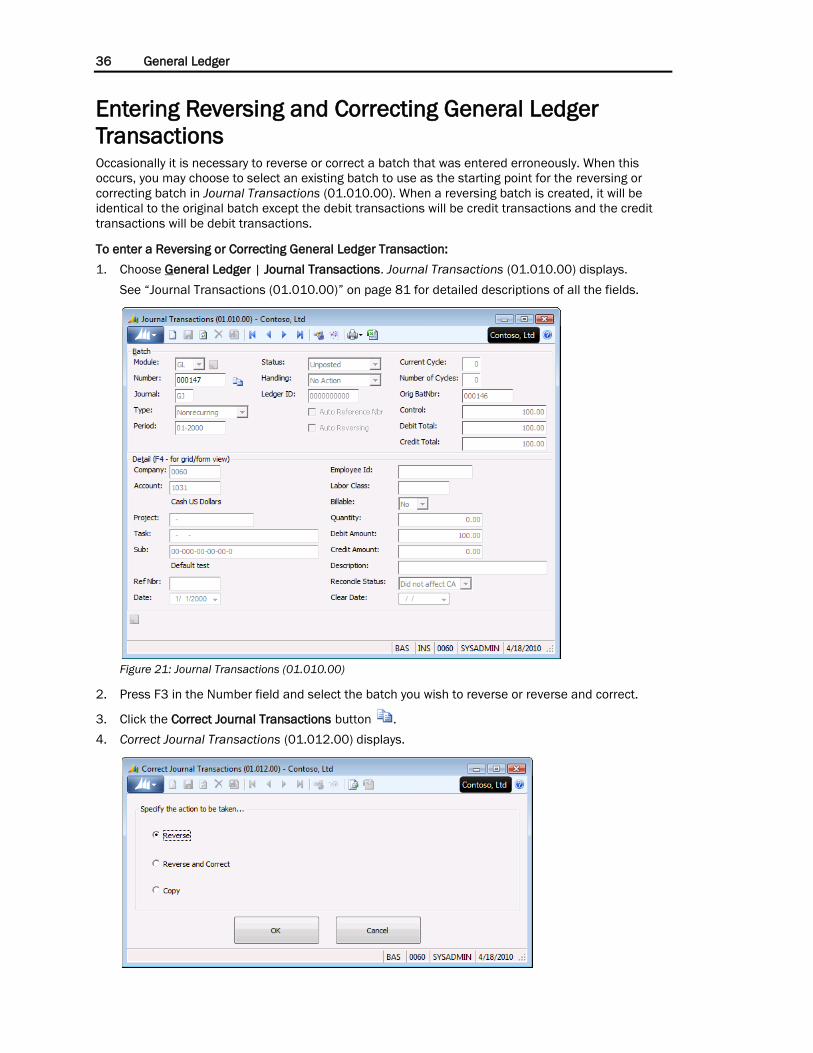
36 General Ledger
Entering Reversing and Correcting General Ledger
Transactions Occasionally it is necessary to reverse or correct a batch that was entered erroneously. When this
occurs, you may choose to select an existing batch to use as the starting point for the reversing or
correcting batch in Journal Transactions (01.010.00). When a reversing batch is created, it will be
identical to the original batch except the debit transactions will be credit transactions and the credit
transactions will be debit transactions.
To enter a Reversing or Correcting General Ledger Transaction:
1. Choose General Ledger | Journal Transactions. Journal Transactions (01.010.00) displays.
See “Journal Transactions (01.010.00)” on page 81 for detailed descriptions of all the fields.
Figure 21: Journal Transactions (01.010.00)
2. Press F3 in the Number field and select the batch you wish to reverse or reverse and correct.
3. Click the Correct Journal Transactions button .
4. Correct Journal Transactions (01.012.00) displays.
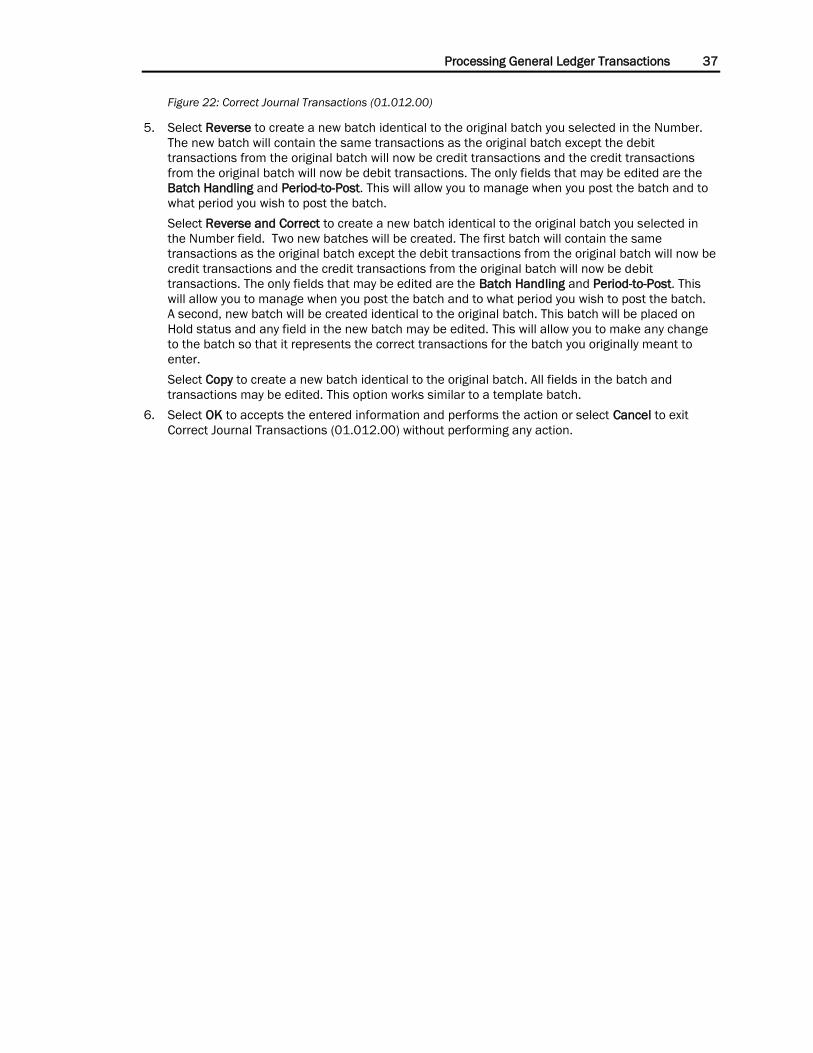
Processing General Ledger Transactions 37
Figure 22: Correct Journal Transactions (01.012.00)
5. Select Reverse to create a new batch identical to the original batch you selected in the Number.
The new batch will contain the same transactions as the original batch except the debit
transactions from the original batch will now be credit transactions and the credit transactions
from the original batch will now be debit transactions. The only fields that may be edited are the
Batch Handling and Period-to-Post. This will allow you to manage when you post the batch and to
what period you wish to post the batch.
Select Reverse and Correct to create a new batch identical to the original batch you selected in
the Number field. Two new batches will be created. The first batch will contain the same
transactions as the original batch except the debit transactions from the original batch will now be
credit transactions and the credit transactions from the original batch will now be debit
transactions. The only fields that may be edited are the Batch Handling and Period-to-Post. This
will allow you to manage when you post the batch and to what period you wish to post the batch.
A second, new batch will be created identical to the original batch. This batch will be placed on
Hold status and any field in the new batch may be edited. This will allow you to make any change
to the batch so that it represents the correct transactions for the batch you originally meant to
enter.
Select Copy to create a new batch identical to the original batch. All fields in the batch and
transactions may be edited. This option works similar to a template batch.
6. Select OK to accepts the entered information and performs the action or select Cancel to exit
Correct Journal Transactions (01.012.00) without performing any action.
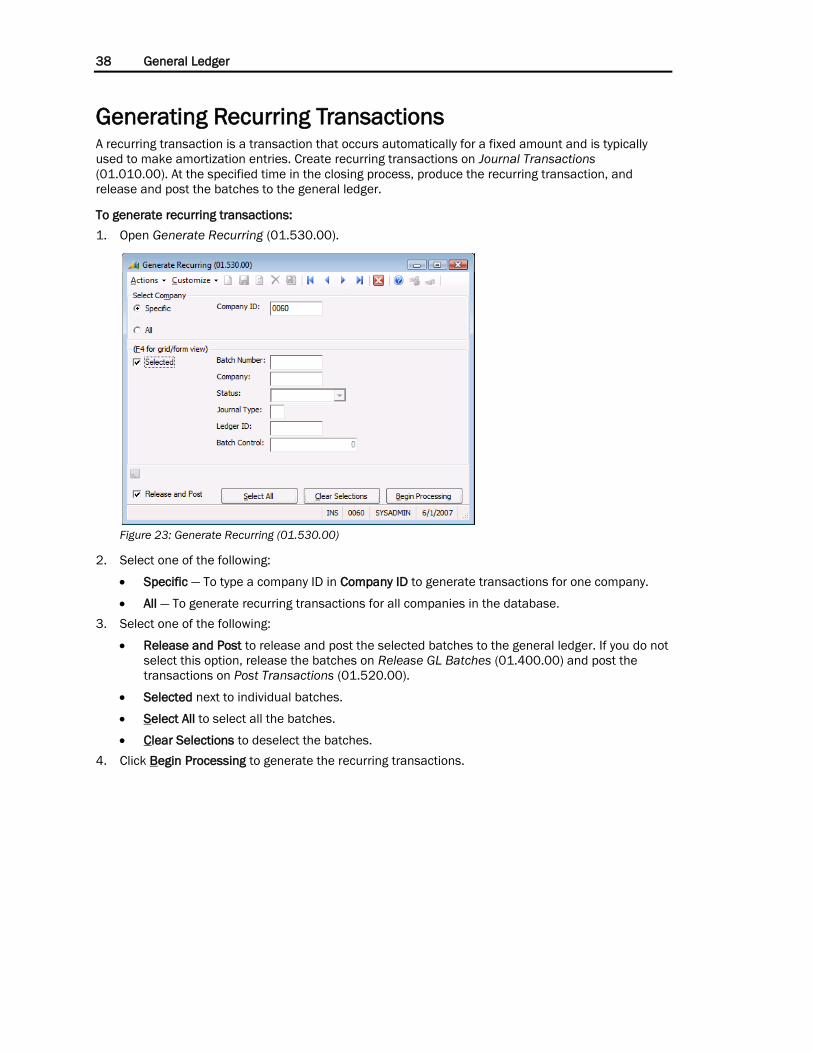
38 General Ledger
Generating Recurring Transactions A recurring transaction is a transaction that occurs automatically for a fixed amount and is typically
used to make amortization entries. Create recurring transactions on Journal Transactions
(01.010.00). At the specified time in the closing process, produce the recurring transaction, and
release and post the batches to the general ledger.
To generate recurring transactions:
1. Open Generate Recurring (01.530.00).
Figure 23: Generate Recurring (01.530.00)
2. Select one of the following:
Specific — To type a company ID in Company ID to generate transactions for one company.
All — To generate recurring transactions for all companies in the database.
3. Select one of the following:
Release and Post to release and post the selected batches to the general ledger. If you do not
select this option, release the batches on Release GL Batches (01.400.00) and post the
transactions on Post Transactions (01.520.00).
Selected next to individual batches.
Select All to select all the batches.
Clear Selections to deselect the batches.
4. Click Begin Processing to generate the recurring transactions.
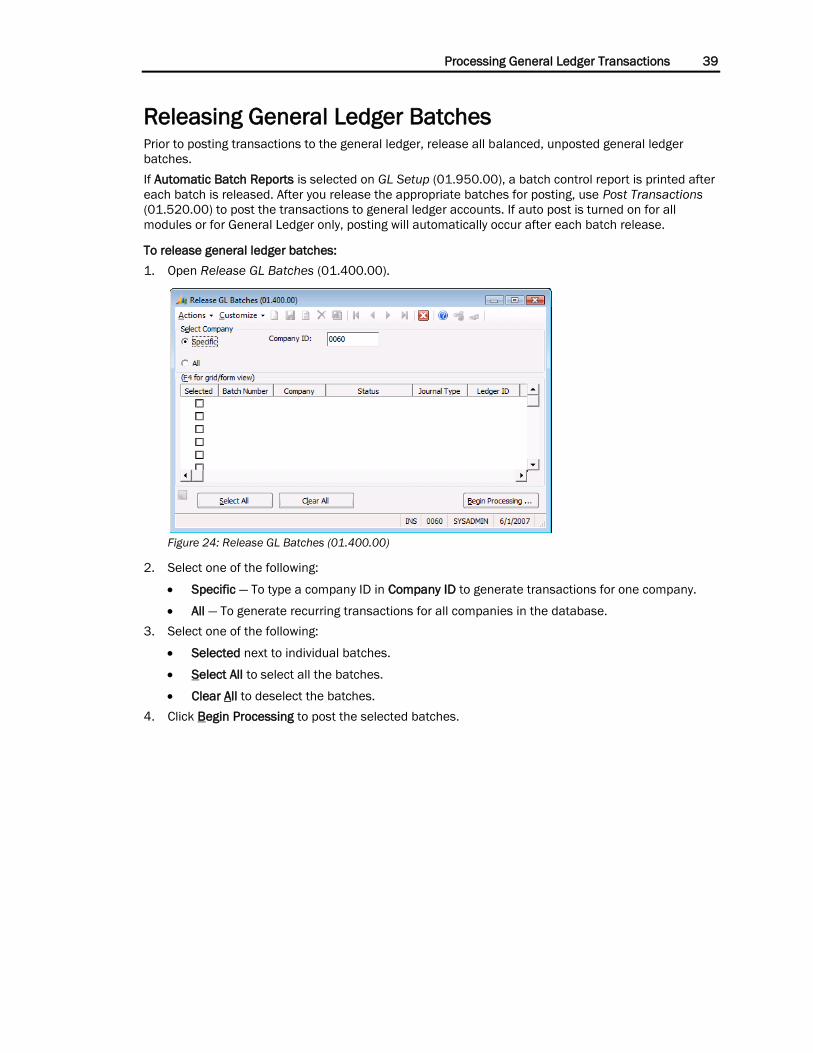
Processing General Ledger Transactions 39
Releasing General Ledger Batches Prior to posting transactions to the general ledger, release all balanced, unposted general ledger
batches.
If Automatic Batch Reports is selected on GL Setup (01.950.00), a batch control report is printed after
each batch is released. After you release the appropriate batches for posting, use Post Transactions
(01.520.00) to post the transactions to general ledger accounts. If auto post is turned on for all
modules or for General Ledger only, posting will automatically occur after each batch release.
To release general ledger batches:
1. Open Release GL Batches (01.400.00).
Figure 24: Release GL Batches (01.400.00)
2. Select one of the following:
Specific — To type a company ID in Company ID to generate transactions for one company.
All — To generate recurring transactions for all companies in the database.
3. Select one of the following:
Selected next to individual batches.
Select All to select all the batches.
Clear All to deselect the batches.
4. Click Begin Processing to post the selected batches.
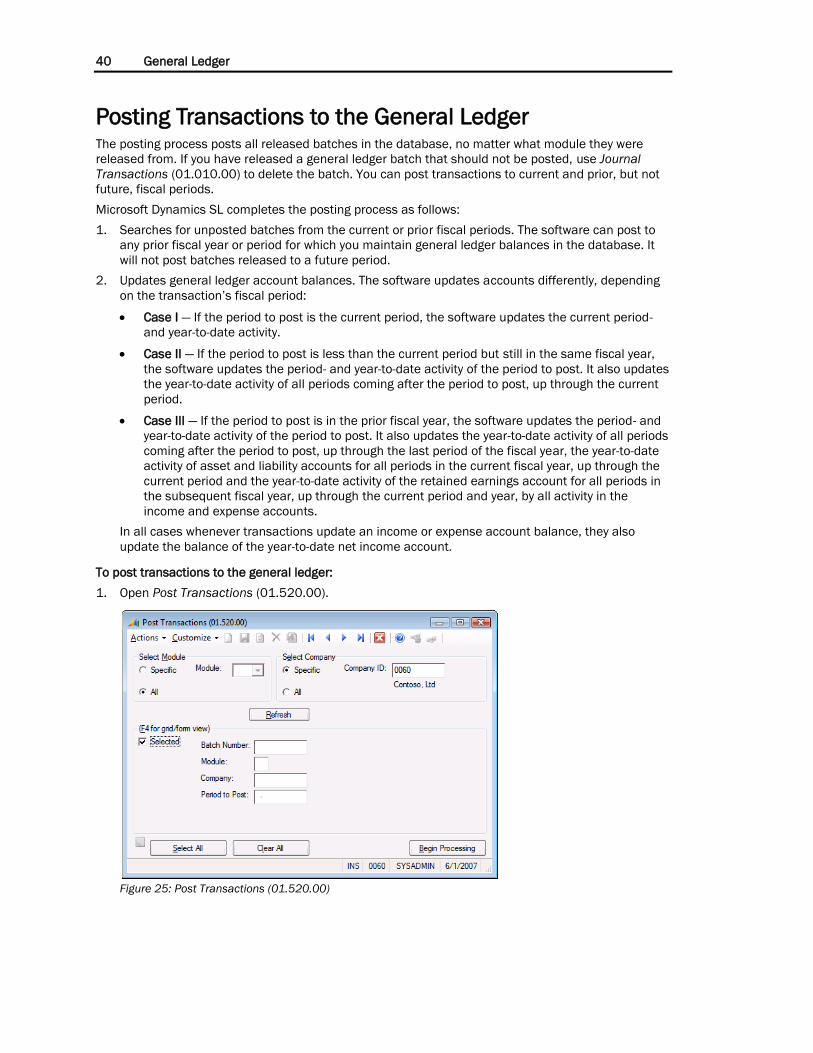
40 General Ledger
Posting Transactions to the General Ledger The posting process posts all released batches in the database, no matter what module they were
released from. If you have released a general ledger batch that should not be posted, use Journal
Transactions (01.010.00) to delete the batch. You can post transactions to current and prior, but not
future, fiscal periods.
Microsoft Dynamics SL completes the posting process as follows:
1. Searches for unposted batches from the current or prior fiscal periods. The software can post to
any prior fiscal year or period for which you maintain general ledger balances in the database. It
will not post batches released to a future period.
2. Updates general ledger account balances. The software updates accounts differently, depending
on the transaction’s fiscal period:
Case I — If the period to post is the current period, the software updates the current period-
and year-to-date activity.
Case II — If the period to post is less than the current period but still in the same fiscal year,
the software updates the period- and year-to-date activity of the period to post. It also updates
the year-to-date activity of all periods coming after the period to post, up through the current
period.
Case III — If the period to post is in the prior fiscal year, the software updates the period- and
year-to-date activity of the period to post. It also updates the year-to-date activity of all periods
coming after the period to post, up through the last period of the fiscal year, the year-to-date
activity of asset and liability accounts for all periods in the current fiscal year, up through the
current period and the year-to-date activity of the retained earnings account for all periods in
the subsequent fiscal year, up through the current period and year, by all activity in the
income and expense accounts.
In all cases whenever transactions update an income or expense account balance, they also
update the balance of the year-to-date net income account.
To post transactions to the general ledger:
1. Open Post Transactions (01.520.00).
Figure 25: Post Transactions (01.520.00)
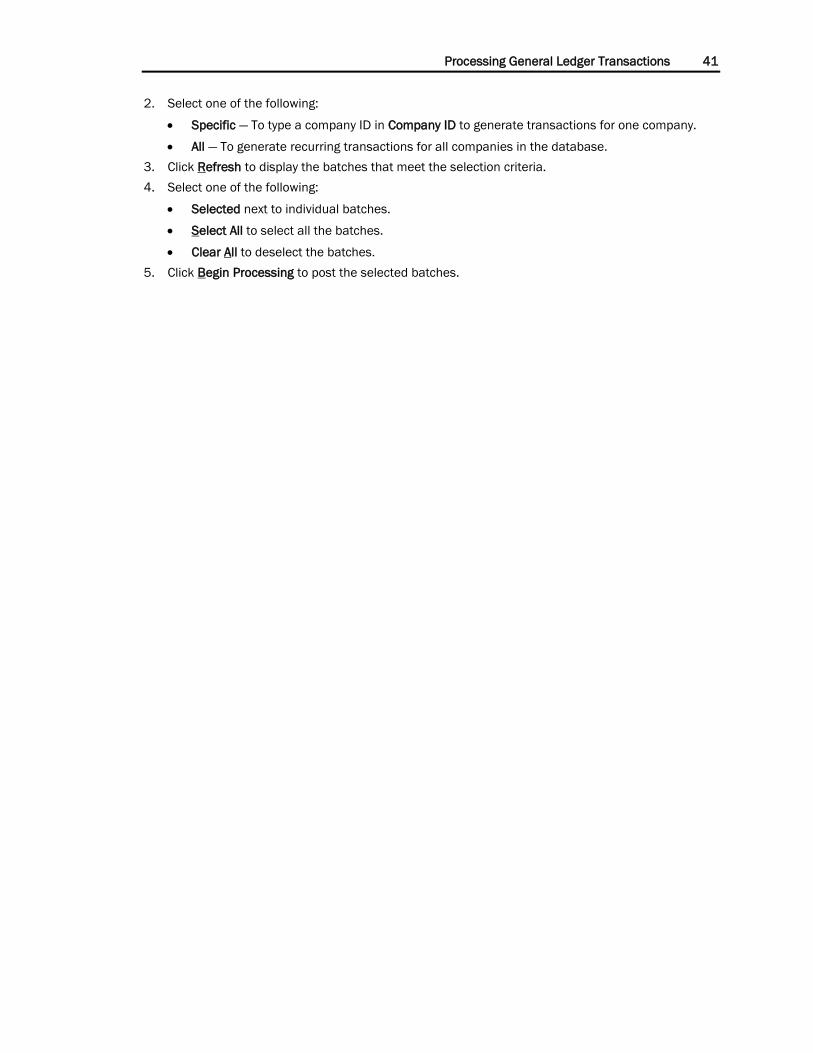
Processing General Ledger Transactions 41
2. Select one of the following:
Specific — To type a company ID in Company ID to generate transactions for one company.
All — To generate recurring transactions for all companies in the database.
3. Click Refresh to display the batches that meet the selection criteria.
4. Select one of the following:
Selected next to individual batches.
Select All to select all the batches.
Clear All to deselect the batches.
5. Click Begin Processing to post the selected batches.
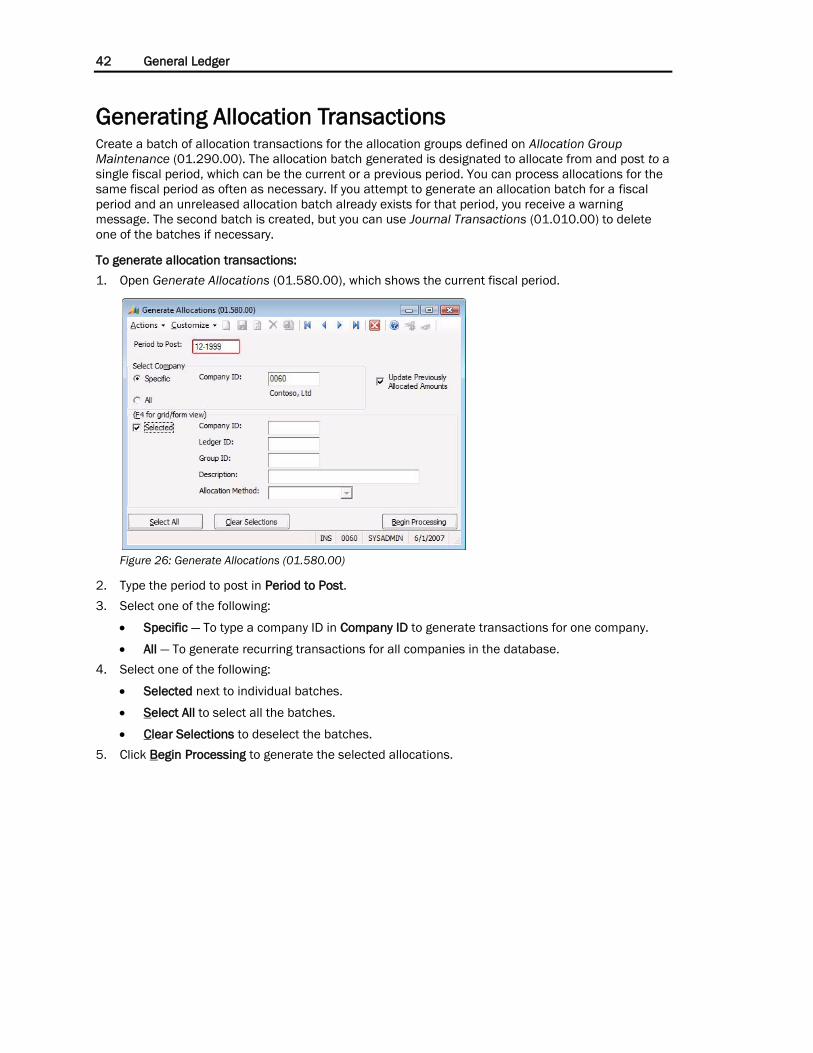
42 General Ledger
Generating Allocation Transactions Create a batch of allocation transactions for the allocation groups defined on Allocation Group
Maintenance (01.290.00). The allocation batch generated is designated to allocate from and post to a
single fiscal period, which can be the current or a previous period. You can process allocations for the
same fiscal period as often as necessary. If you attempt to generate an allocation batch for a fiscal
period and an unreleased allocation batch already exists for that period, you receive a warning
message. The second batch is created, but you can use Journal Transactions (01.010.00) to delete
one of the batches if necessary.
To generate allocation transactions:
1. Open Generate Allocations (01.580.00), which shows the current fiscal period.
Figure 26: Generate Allocations (01.580.00)
2. Type the period to post in Period to Post.
3. Select one of the following:
Specific — To type a company ID in Company ID to generate transactions for one company.
All — To generate recurring transactions for all companies in the database.
4. Select one of the following:
Selected next to individual batches.
Select All to select all the batches.
Clear Selections to deselect the batches.
5. Click Begin Processing to generate the selected allocations.
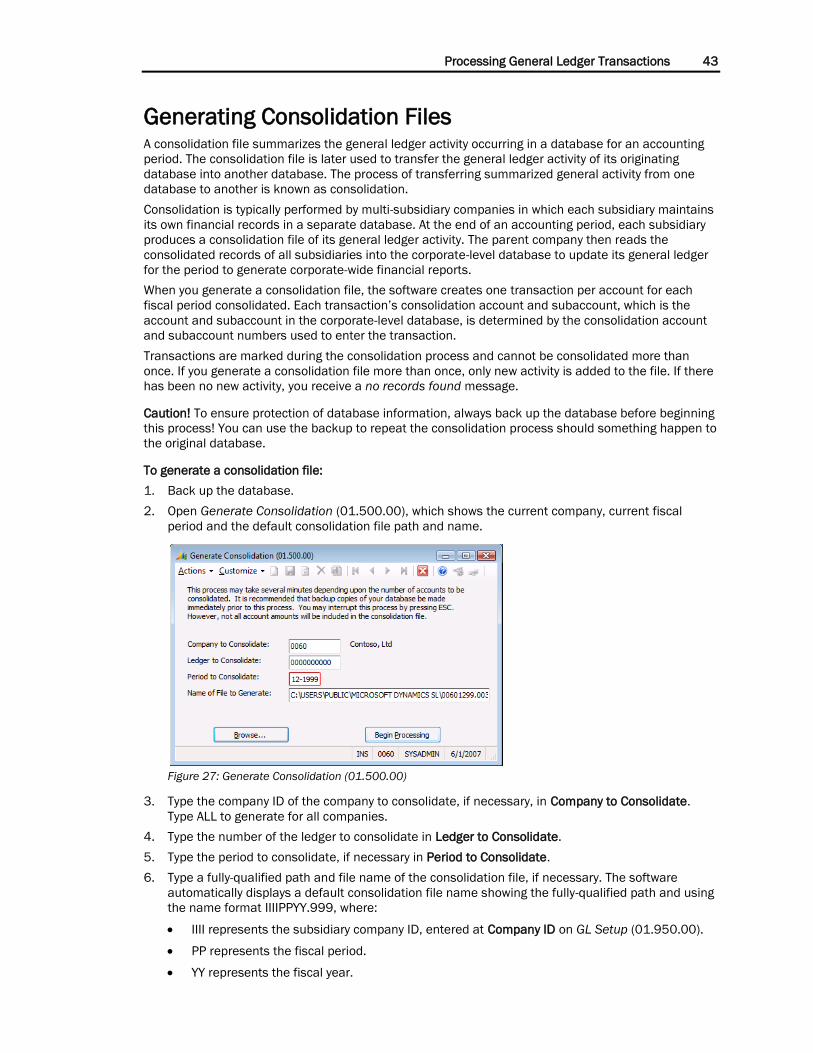
Processing General Ledger Transactions 43
Generating Consolidation Files A consolidation file summarizes the general ledger activity occurring in a database for an accounting
period. The consolidation file is later used to transfer the general ledger activity of its originating
database into another database. The process of transferring summarized general activity from one
database to another is known as consolidation.
Consolidation is typically performed by multi-subsidiary companies in which each subsidiary maintains
its own financial records in a separate database. At the end of an accounting period, each subsidiary
produces a consolidation file of its general ledger activity. The parent company then reads the
consolidated records of all subsidiaries into the corporate-level database to update its general ledger
for the period to generate corporate-wide financial reports.
When you generate a consolidation file, the software creates one transaction per account for each
fiscal period consolidated. Each transaction’s consolidation account and subaccount, which is the
account and subaccount in the corporate-level database, is determined by the consolidation account
and subaccount numbers used to enter the transaction.
Transactions are marked during the consolidation process and cannot be consolidated more than
once. If you generate a consolidation file more than once, only new activity is added to the file. If there
has been no new activity, you receive a no records found message.
Caution! To ensure protection of database information, always back up the database before beginning
this process! You can use the backup to repeat the consolidation process should something happen to
the original database.
To generate a consolidation file:
1. Back up the database.
2. Open Generate Consolidation (01.500.00), which shows the current company, current fiscal
period and the default consolidation file path and name.
Figure 27: Generate Consolidation (01.500.00)
3. Type the company ID of the company to consolidate, if necessary, in Company to Consolidate.
Type ALL to generate for all companies.
4. Type the number of the ledger to consolidate in Ledger to Consolidate.
5. Type the period to consolidate, if necessary in Period to Consolidate.
6. Type a fully-qualified path and file name of the consolidation file, if necessary. The software
automatically displays a default consolidation file name showing the fully-qualified path and using
the name format IIIIPPYY.999, where:
IIII represents the subsidiary company ID, entered at Company ID on GL Setup (01.950.00).
PP represents the fiscal period.
YY represents the fiscal year.

44 General Ledger
999 represents the last three digits of the database access number in use during file
creation.
7. Click Begin Processing to generate the consolidation file. The time it takes to generate a
consolidation file varies, depending on the number of accounts in the database. After the software
has generated the consolidation file, read it into the consolidation database using Read
Consolidation (01.510.00).
Processing General Ledger Transactions 45
Reading Consolidation Files After you transmit or copy a subsidiary’s consolidation file to the hard drive where the target database
is located, you can read the consolidation file into the target database.
The journal transactions created after you read the consolidation file appear on Journal Transactions
(01.010.00) of the target database. The batch type is Consolidation and the batch status is On Hold.
To read a consolidation file:
1. Open Read Consolidation (01.510.00), which shows the current company and fiscal period.
Figure 28: Read Consolidation (01.510.00)
2. Type the company ID of the company to transfer the consolidation file to, if necessary, in
Consolidate to Company.
3. Type the number of the ledger to transfer the consolidation file to in Consolidate to Ledger.
4. Type a fully-qualified path and file name of the consolidation file to read in Name of File to be
Read or click Browse to select a file.
5. Type the period to post the consolidation file data, if necessary in Period to Post.
6. Click Begin Processing to generate the consolidation file. The time it takes to generate a
consolidation file varies, depending on the number of accounts in the database.
7. Review the Consolidation Transaction File List for any errors.
8. Revise the consolidation file, if necessary, and release it for posting on Journal Transactions
(01.010.00).
9. Post the consolidation file on Post Transactions (01.520.00).
10. Print the consolidated financial statements.
Note: To read XML files created from the Microsoft Retail Management System (RMS), create the
required XML file using the exporting feature on the Post Closed Batches screen in RMS and edit the
account/subaccount information to map to the account/subaccount structure. This needs to be done
in the Journal/Assign GL Accounts screen. Failure to do this step will result in no files being exported.
Read in the file using the Read Consolidation File process. The journal transactions created after you
read the consolidation file will appear in Journal Transactions (01.010.00). The batch type is
Consolidation, and the batch status is On Hold. The RMS memo field will be placed in the transaction
description, and the RMS transaction entry field will appear in the RefNbr. These batches will need to
be released.
Consolidation Errors
Consolidation errors occur most often when you are using a consolidation file created outside of the
software. The error occurs because the transactions in the file are incorrectly formatted, so the
software will not read such transactions into a database. The log that is generated at the end of this
46 General Ledger
process lists the batch number and details of any incorrect consolidation transactions. Before you can
release an incorrect consolidation batch for posting, you must complete the batch by correctly entering
the incorrect consolidation transactions on Journal Transactions (01.010.00).
If consolidation errors occur during file reading, the software lists the transactions in error and the
appropriate error message on the process log. Possible error messages are:
Invalid Input — Input for a field or fields does not follow the correct data entry format: alphabetic,
numeric, alphanumeric.
Invalid Account — A transaction’s consolidation account number in the parent-company database
is not the same as the one used for the transaction in the subsidiary database.
Invalid Subaccount — A transaction’s consolidation subaccount in the parent-company database
is not the same as the one used for the transaction in the subsidiary database.

Processing General Ledger Transactions 47
Printing or Reprinting General Ledger Batch Control
Reports When a batch is released in any module, a batch control report can be produced as a record of the
entry. The Automatic Batch Reports for all Modules check box on the Options tab in GL Setup
(01.950.00) controls whether batch control reports are produced in all modules. If this option is
selected, batch control reports can then be turned off by specific modules in the Disable Batch
Reports for the following Modules(s) area of the same screen. See the “Setting Up General Ledger
Defaults” section to review the options for setup.
In the General Ledger, a batch control report can be produced after releasing a batch on Journal
Transaction (01.010.00), Release GL Batches (01.400.00), Post Transaction (01.250.00), Generate
Recurring (01.530.00), and Generate Allocations (01.580.00).
Reprint GL Batch Control Reports (01.410.00) allows you to recreate a batch control report for any
unposted or posted general ledger batch for any fiscal period for which the transaction details are
retained. A batch control report can be recreated for any batch whether the batch control report was
initially produced or not.
Note:
Print GL Edit (01.810.00) to view the details of a general ledger batch that is on hold or
balanced.
If you want to print more than one batch to a file, select Concatenate on Print to File to merge
the reports to the file. The reports are appended in the file based on the order they are
selected here. If you do not select Concatenate, the software generates a batch control report
in the file for only the last batch you select. See the System Manager user guide or online help
for more information.
To print or reprint General Ledger batch control reports:
1. Open Reprint GL Batch Control Reports (01.410.00), which shows all the batches that are
available to print.
Figure 29: Reprint GL Batch Control Reports (01.410.00)
2. Select one of the following:
Batch Range and type a range of batch numbers in From Batch and Thru Batch to display an
individual batch or range of batches.
All to display all batches.
48 General Ledger
3. Select one of the following:
Specific next to individual ledgers and type the company ID in Company ID.
All to select all the ledgers.
4. Select one of the following:
Selected next to individual batches.
Select All to select all the batches.
Clear Selections to deselect the batches.
5. Click Begin Processing to print the control reports for the selected batches.
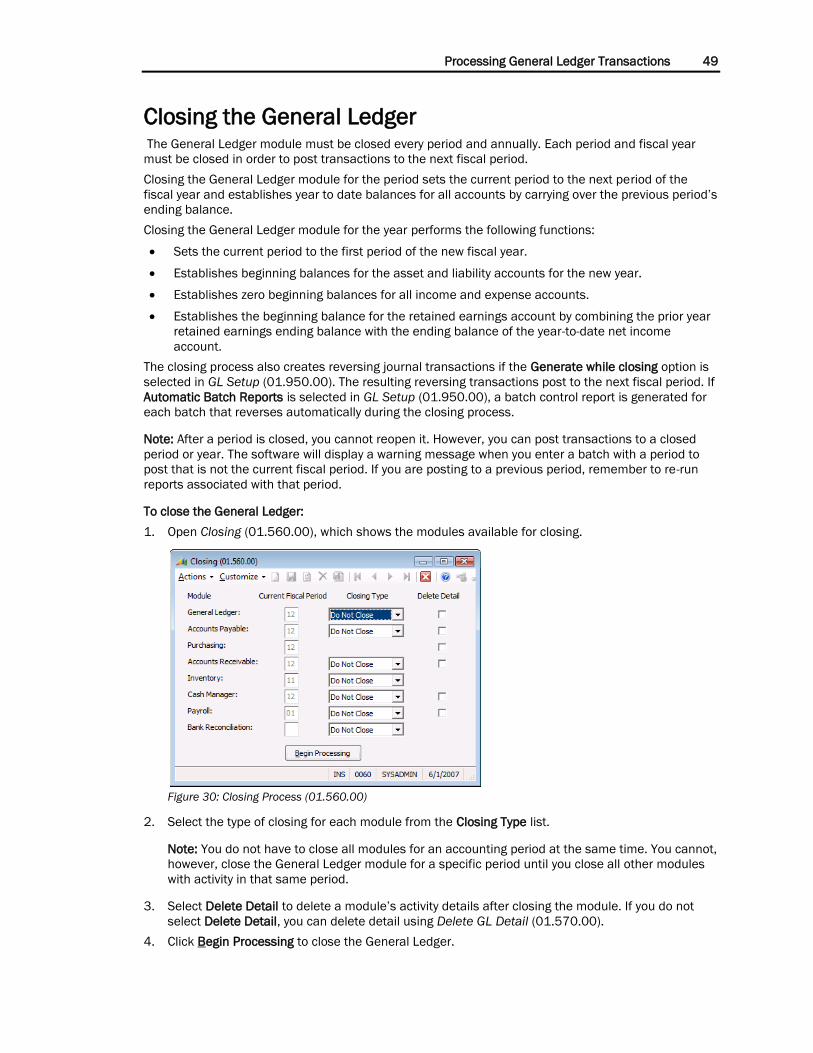
Processing General Ledger Transactions 49
Closing the General Ledger The General Ledger module must be closed every period and annually. Each period and fiscal year
must be closed in order to post transactions to the next fiscal period.
Closing the General Ledger module for the period sets the current period to the next period of the
fiscal year and establishes year to date balances for all accounts by carrying over the previous period’s
ending balance.
Closing the General Ledger module for the year performs the following functions:
Sets the current period to the first period of the new fiscal year.
Establishes beginning balances for the asset and liability accounts for the new year.
Establishes zero beginning balances for all income and expense accounts.
Establishes the beginning balance for the retained earnings account by combining the prior year
retained earnings ending balance with the ending balance of the year-to-date net income
account.
The closing process also creates reversing journal transactions if the Generate while closing option is
selected in GL Setup (01.950.00). The resulting reversing transactions post to the next fiscal period. If
Automatic Batch Reports is selected in GL Setup (01.950.00), a batch control report is generated for
each batch that reverses automatically during the closing process.
Note: After a period is closed, you cannot reopen it. However, you can post transactions to a closed
period or year. The software will display a warning message when you enter a batch with a period to
post that is not the current fiscal period. If you are posting to a previous period, remember to re-run
reports associated with that period.
To close the General Ledger:
1. Open Closing (01.560.00), which shows the modules available for closing.
Figure 30: Closing Process (01.560.00)
2. Select the type of closing for each module from the Closing Type list.
Note: You do not have to close all modules for an accounting period at the same time. You cannot,
however, close the General Ledger module for a specific period until you close all other modules
with activity in that same period.
3. Select Delete Detail to delete a module’s activity details after closing the module. If you do not
select Delete Detail, you can delete detail using Delete GL Detail (01.570.00).
4. Click Begin Processing to close the General Ledger.

50 General Ledger
Budgeting 51
Budgeting
Overview The Budgeting section provides information and procedures for setting up and using budgets with
data. These basic tasks include:
Setting Budget Defaults
Setting Up Basic Operating Budgets
Setting Budget Group Access
Setting Up an Extended Budget
Defining Custom Budget Distribution Types
Distributing Budgets
Creating New Budget Versions
Budgeting in Microsoft Dynamics SL
Setting up budgets in Microsoft Dynamics SL is an optional but sound accounting and managerial
practice. If you decide to implement budgets, first identify the appropriate account and subaccount to
budget. Then enter the annual budget amount. Finally, distribute the annual budget amount as
appropriate among all fiscal periods.
The software can automatically distribute the annual budget amount equally among all fiscal periods,
or you can manually distribute the annual budget among any or all periods. If you later change a
budget, you can distribute the change manually, equally, or by a percentage increase.
Some types of data import tools can make the process of entering budget information more efficient.
For more information about importing data, see “Importing Transaction Data” in the System Manager
help or user guide.
You can change budget information at any time. Once entered, budget information appears on several
standard financial reports. You can modify the standard financial reports to present budget and memo
information in various ways: for the period, on a quarterly basis, year-to-date, or on an annual basis.
In addition, the software does not automatically delete this information when you close the General
Ledger module for the year. This enables you to maintain budgets for more than one fiscal year for
comparison reporting.
There are two types of budgets you can create:
Basic Operating Budget — Used to budget by period and to accommodate those with limited
budgeting needs.
Extended Budget — Allows you to create any type of budget for those who use budgets
extensively.
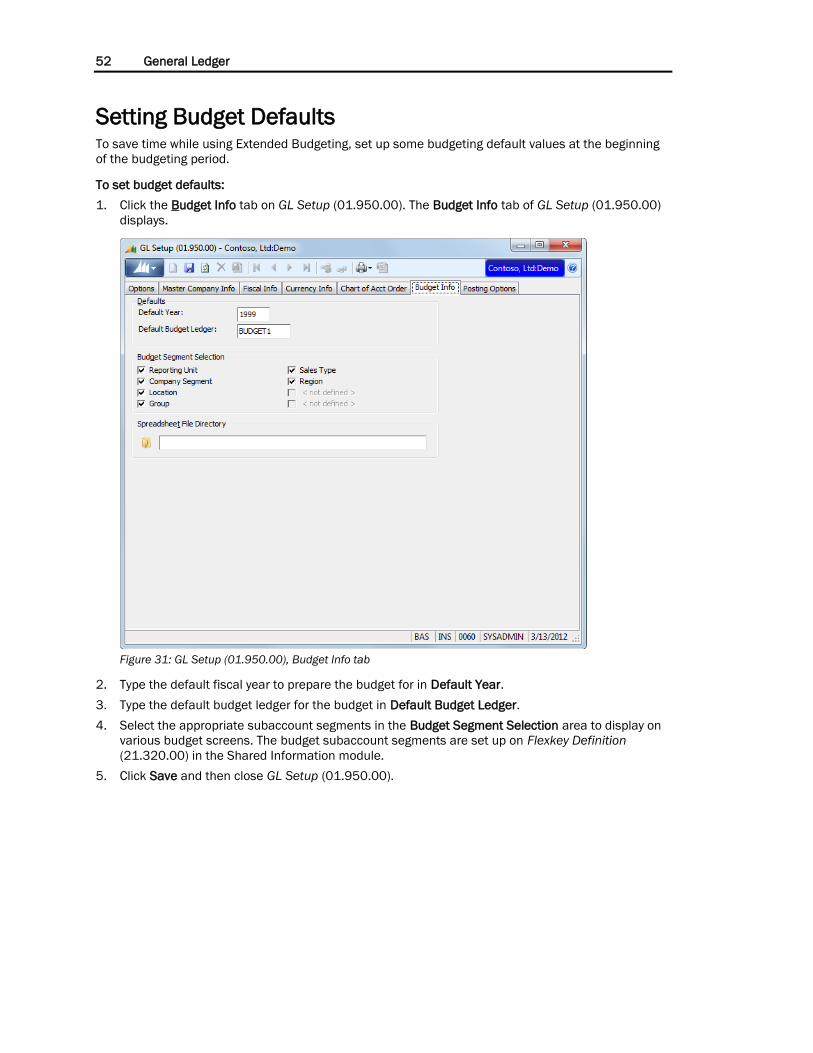
52 General Ledger
Setting Budget Defaults To save time while using Extended Budgeting, set up some budgeting default values at the beginning
of the budgeting period.
To set budget defaults:
1. Click the Budget Info tab on GL Setup (01.950.00). The Budget Info tab of GL Setup (01.950.00)
displays.
Figure 31: GL Setup (01.950.00), Budget Info tab
2. Type the default fiscal year to prepare the budget for in Default Year.
3. Type the default budget ledger for the budget in Default Budget Ledger.
4. Select the appropriate subaccount segments in the Budget Segment Selection area to display on
various budget screens. The budget subaccount segments are set up on Flexkey Definition
(21.320.00) in the Shared Information module.
5. Click Save and then close GL Setup (01.950.00).
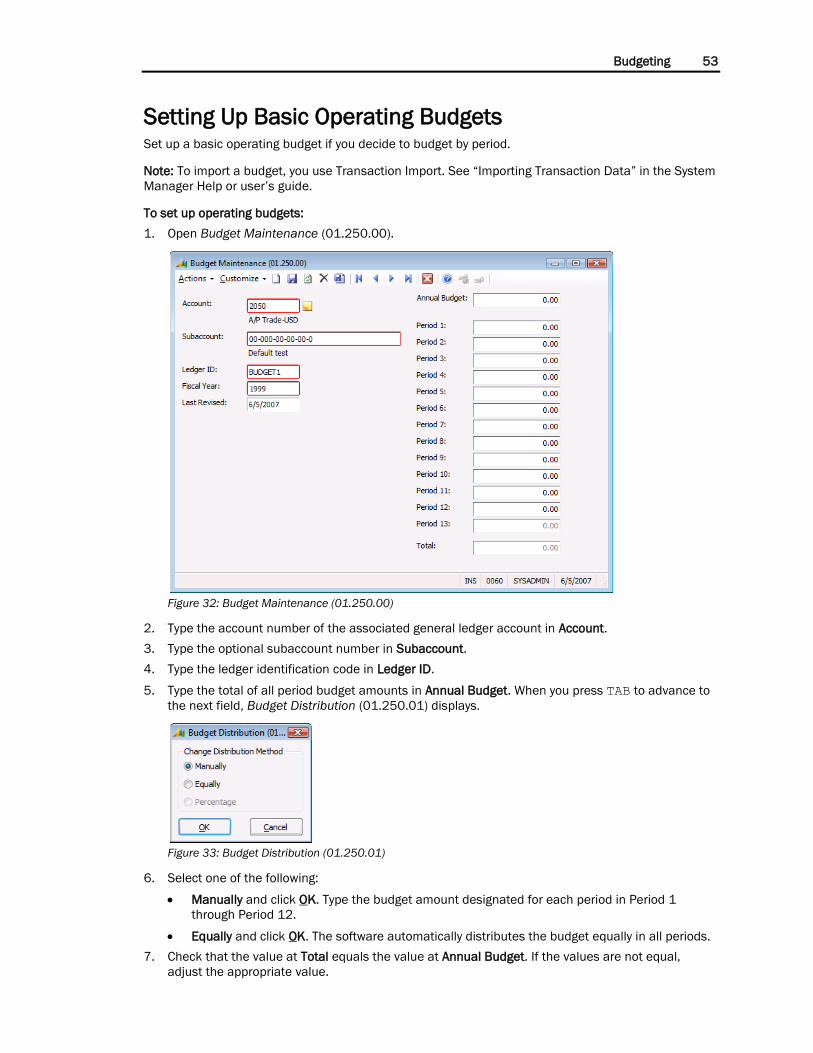
Budgeting 53
Setting Up Basic Operating Budgets Set up a basic operating budget if you decide to budget by period.
Note: To import a budget, you use Transaction Import. See “Importing Transaction Data” in the System
Manager Help or user’s guide.
To set up operating budgets:
1. Open Budget Maintenance (01.250.00).
Figure 32: Budget Maintenance (01.250.00)
2. Type the account number of the associated general ledger account in Account.
3. Type the optional subaccount number in Subaccount.
4. Type the ledger identification code in Ledger ID.
5. Type the total of all period budget amounts in Annual Budget. When you press TAB to advance to
the next field, Budget Distribution (01.250.01) displays.
Figure 33: Budget Distribution (01.250.01)
6. Select one of the following:
Manually and click OK. Type the budget amount designated for each period in Period 1
through Period 12.
Equally and click OK. The software automatically distributes the budget equally in all periods.
7. Check that the value at Total equals the value at Annual Budget. If the values are not equal,
adjust the appropriate value.
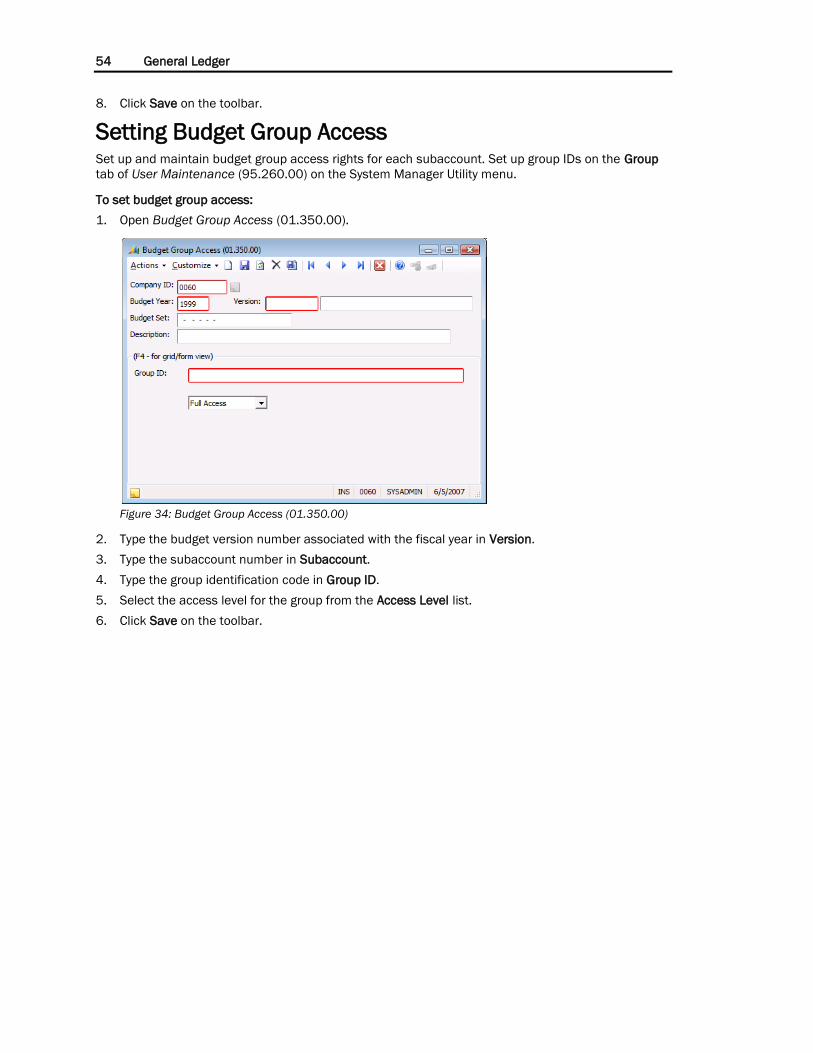
54 General Ledger
8. Click Save on the toolbar.
Setting Budget Group Access Set up and maintain budget group access rights for each subaccount. Set up group IDs on the Group
tab of User Maintenance (95.260.00) on the System Manager Utility menu.
To set budget group access:
1. Open Budget Group Access (01.350.00).
Figure 34: Budget Group Access (01.350.00)
2. Type the budget version number associated with the fiscal year in Version.
3. Type the subaccount number in Subaccount.
4. Type the group identification code in Group ID.
5. Select the access level for the group from the Access Level list.
6. Click Save on the toolbar.
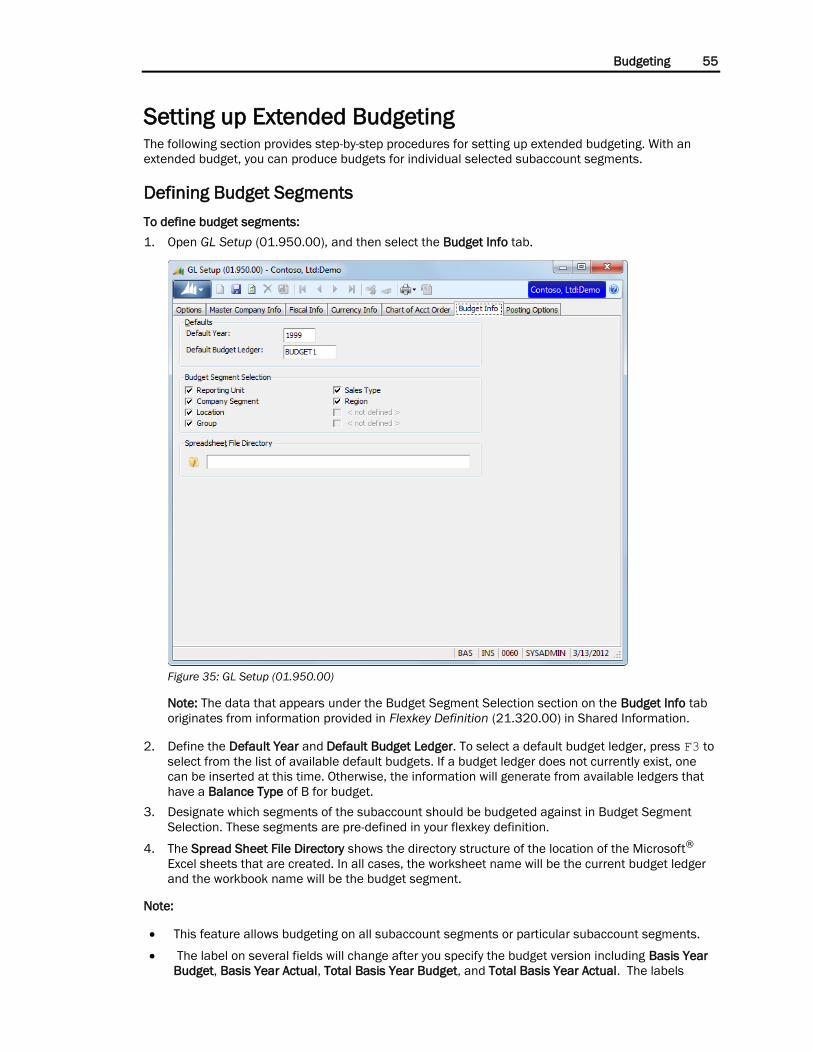
Budgeting 55
Setting up Extended Budgeting The following section provides step-by-step procedures for setting up extended budgeting. With an
extended budget, you can produce budgets for individual selected subaccount segments.
Defining Budget Segments
To define budget segments:
1. Open GL Setup (01.950.00), and then select the Budget Info tab.
Figure 35: GL Setup (01.950.00)
Note: The data that appears under the Budget Segment Selection section on the Budget Info tab
originates from information provided in Flexkey Definition (21.320.00) in Shared Information.
2. Define the Default Year and Default Budget Ledger. To select a default budget ledger, press F3 to
select from the list of available default budgets. If a budget ledger does not currently exist, one
can be inserted at this time. Otherwise, the information will generate from available ledgers that
have a Balance Type of B for budget.
3. Designate which segments of the subaccount should be budgeted against in Budget Segment
Selection. These segments are pre-defined in your flexkey definition.
4. The Spread Sheet File Directory shows the directory structure of the location of the Microsoft®
Excel sheets that are created. In all cases, the worksheet name will be the current budget ledger
and the workbook name will be the budget segment.
Note:
This feature allows budgeting on all subaccount segments or particular subaccount segments.
The label on several fields will change after you specify the budget version including Basis Year
Budget, Basis Year Actual, Total Basis Year Budget, and Total Basis Year Actual. The labels
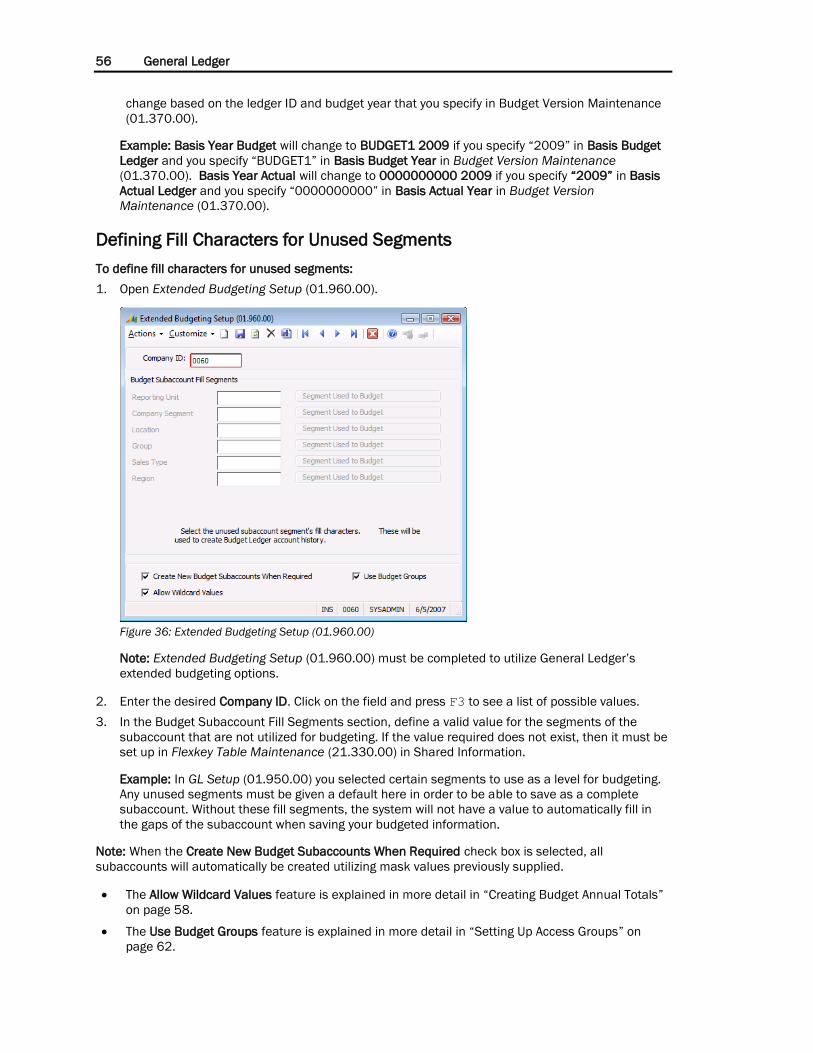
56 General Ledger
change based on the ledger ID and budget year that you specify in Budget Version Maintenance
(01.370.00).
Example: Basis Year Budget will change to BUDGET1 2009 if you specify “2009” in Basis Budget
Ledger and you specify “BUDGET1” in Basis Budget Year in Budget Version Maintenance
(01.370.00). Basis Year Actual will change to 0000000000 2009 if you specify “2009” in Basis
Actual Ledger and you specify “0000000000” in Basis Actual Year in Budget Version
Maintenance (01.370.00).
Defining Fill Characters for Unused Segments
To define fill characters for unused segments:
1. Open Extended Budgeting Setup (01.960.00).
Figure 36: Extended Budgeting Setup (01.960.00)
Note: Extended Budgeting Setup (01.960.00) must be completed to utilize General Ledger’s
extended budgeting options.
2. Enter the desired Company ID. Click on the field and press F3 to see a list of possible values.
3. In the Budget Subaccount Fill Segments section, define a valid value for the segments of the
subaccount that are not utilized for budgeting. If the value required does not exist, then it must be
set up in Flexkey Table Maintenance (21.330.00) in Shared Information.
Example: In GL Setup (01.950.00) you selected certain segments to use as a level for budgeting.
Any unused segments must be given a default here in order to be able to save as a complete
subaccount. Without these fill segments, the system will not have a value to automatically fill in
the gaps of the subaccount when saving your budgeted information.
Note: When the Create New Budget Subaccounts When Required check box is selected, all
subaccounts will automatically be created utilizing mask values previously supplied.
The Allow Wildcard Values feature is explained in more detail in “Creating Budget Annual Totals”
on page 58.
The Use Budget Groups feature is explained in more detail in “Setting Up Access Groups” on
page 62.

Budgeting 57
Defining the Relationship Between the Resulting Budget Ledger and the
Basis (Source) Ledgers for Budgets and Actuals
To define the relationship between the resulting budget ledger and the basis ledgers:
1. Open Budget Version Maintenance (01.370.00) to set up the new budget ledger.
Figure 37: Budget Version Maintenance (01.370.00) – Multi-Company Database View
2. Select an existing ledger ID or define a new one in Ledger.
3. Select the appropriate Company ID for this budget.
4. Enter a Description for the new ledger.
Note: Basis Actual Company ID, Basis Actual Year, and Basis Actual Ledger are the Company ID, Year,
and Actual Ledger ID that will be used to model the new budgeting information.
Budget Version Maintenance (01.370.00) is the only extended budgeting screen where there is a
difference in view between a multi-company and single company database. The single company
database view is shown below.
Figure 38: Budget Version Maintenance (01.370.00) – Single Company Database View
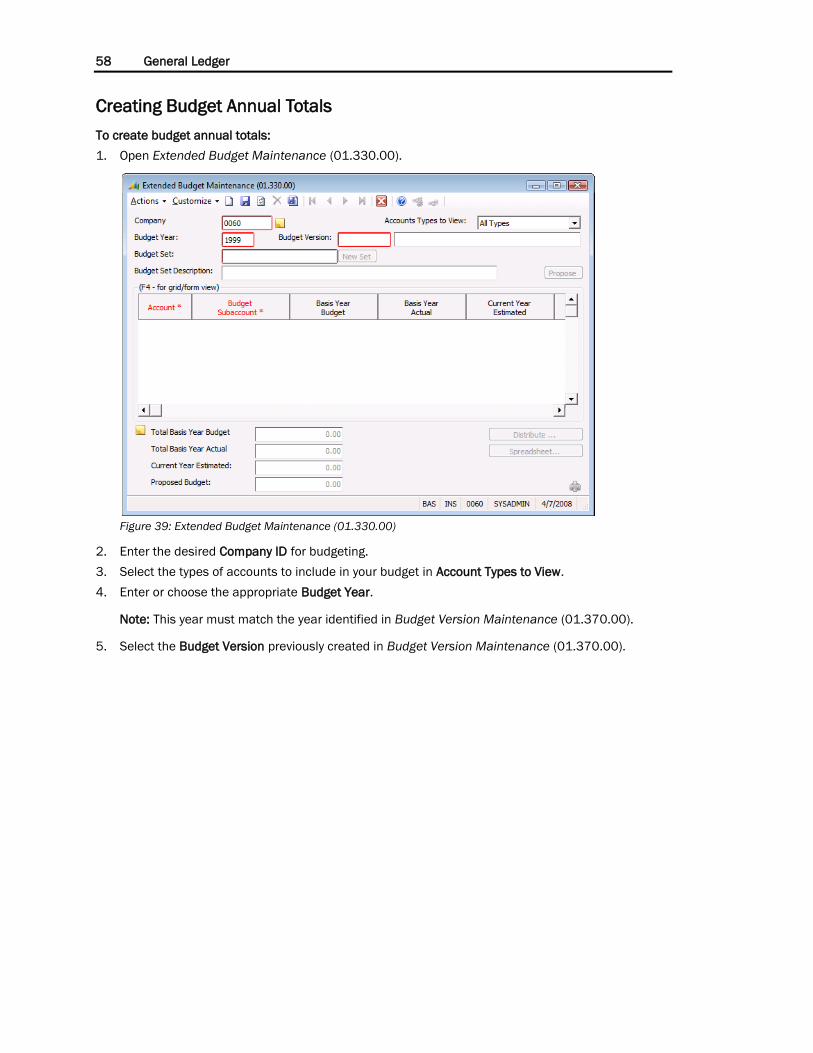
58 General Ledger
Creating Budget Annual Totals
To create budget annual totals:
1. Open Extended Budget Maintenance (01.330.00).
Figure 39: Extended Budget Maintenance (01.330.00)
2. Enter the desired Company ID for budgeting.
3. Select the types of accounts to include in your budget in Account Types to View.
4. Enter or choose the appropriate Budget Year.
Note: This year must match the year identified in Budget Version Maintenance (01.370.00).
5. Select the Budget Version previously created in Budget Version Maintenance (01.370.00).
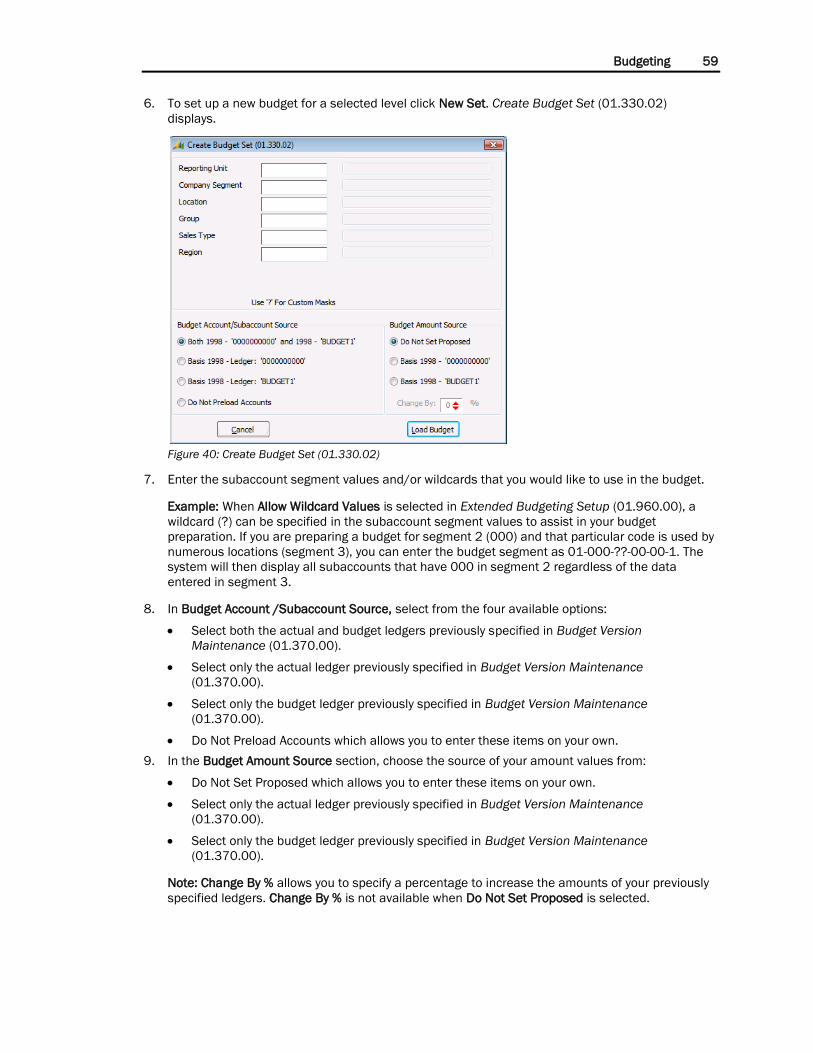
Budgeting 59
6. To set up a new budget for a selected level click New Set. Create Budget Set (01.330.02)
displays.
Figure 40: Create Budget Set (01.330.02)
7. Enter the subaccount segment values and/or wildcards that you would like to use in the budget.
Example: When Allow Wildcard Values is selected in Extended Budgeting Setup (01.960.00), a
wildcard (?) can be specified in the subaccount segment values to assist in your budget
preparation. If you are preparing a budget for segment 2 (000) and that particular code is used by
numerous locations (segment 3), you can enter the budget segment as 01-000-??-00-00-1. The
system will then display all subaccounts that have 000 in segment 2 regardless of the data
entered in segment 3.
8. In Budget Account /Subaccount Source, select from the four available options:
Select both the actual and budget ledgers previously specified in Budget Version
Maintenance (01.370.00).
Select only the actual ledger previously specified in Budget Version Maintenance
(01.370.00).
Select only the budget ledger previously specified in Budget Version Maintenance
(01.370.00).
Do Not Preload Accounts which allows you to enter these items on your own.
9. In the Budget Amount Source section, choose the source of your amount values from:
Do Not Set Proposed which allows you to enter these items on your own.
Select only the actual ledger previously specified in Budget Version Maintenance
(01.370.00).
Select only the budget ledger previously specified in Budget Version Maintenance
(01.370.00).
Note: Change By % allows you to specify a percentage to increase the amounts of your previously
specified ledgers. Change By % is not available when Do Not Set Proposed is selected.
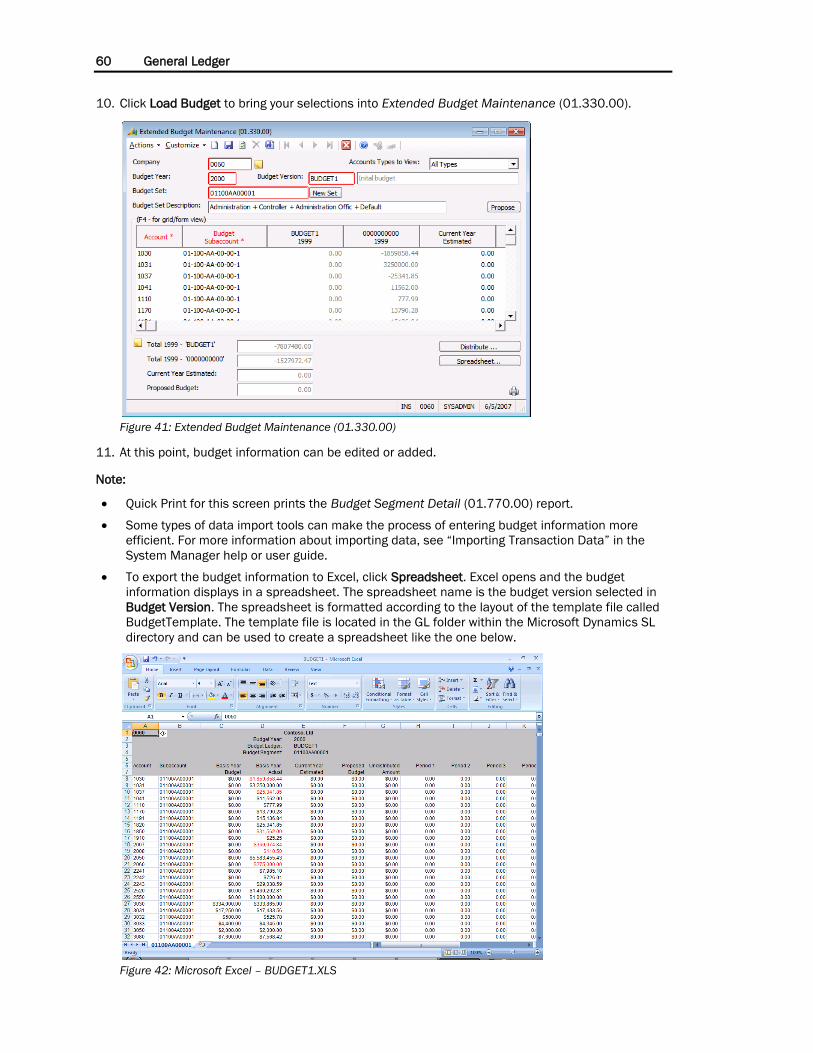
60 General Ledger
10. Click Load Budget to bring your selections into Extended Budget Maintenance (01.330.00).
Figure 41: Extended Budget Maintenance (01.330.00)
11. At this point, budget information can be edited or added.
Note:
Quick Print for this screen prints the Budget Segment Detail (01.770.00) report.
Some types of data import tools can make the process of entering budget information more
efficient. For more information about importing data, see “Importing Transaction Data” in the
System Manager help or user guide.
To export the budget information to Excel, click Spreadsheet. Excel opens and the budget
information displays in a spreadsheet. The spreadsheet name is the budget version selected in
Budget Version. The spreadsheet is formatted according to the layout of the template file called
BudgetTemplate. The template file is located in the GL folder within the Microsoft Dynamics SL
directory and can be used to create a spreadsheet like the one below.
Figure 42: Microsoft Excel – BUDGET1.XLS
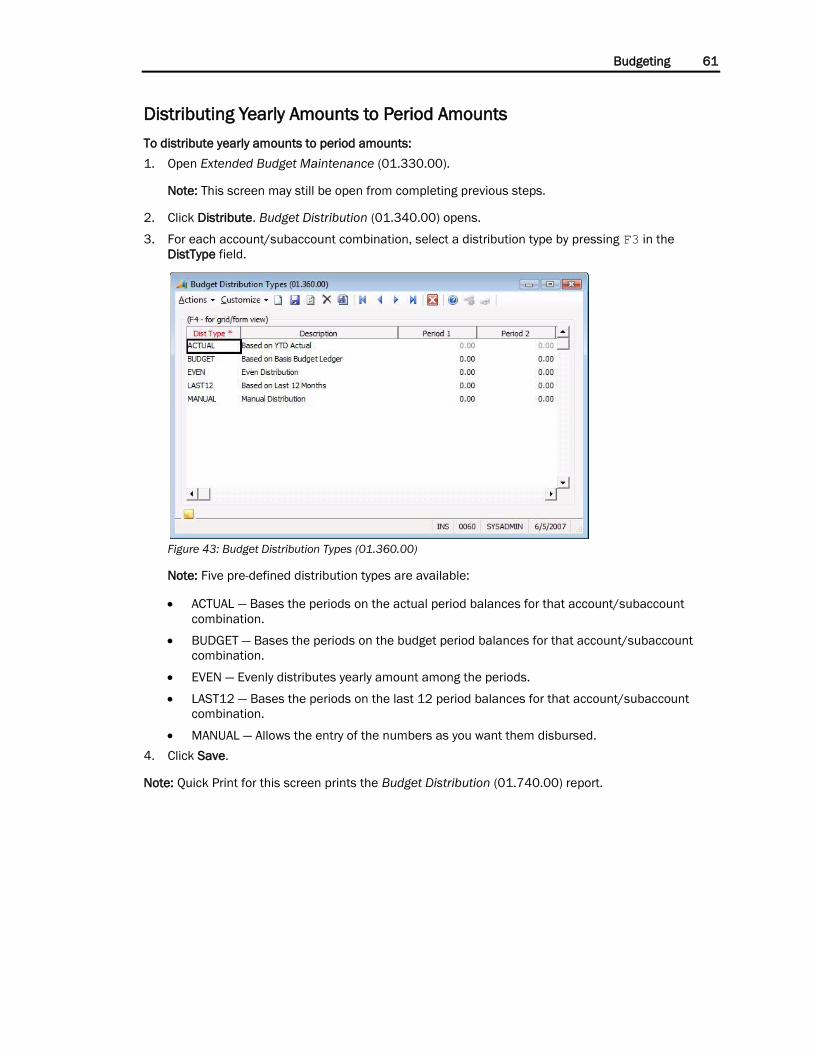
Budgeting 61
Distributing Yearly Amounts to Period Amounts
To distribute yearly amounts to period amounts:
1. Open Extended Budget Maintenance (01.330.00).
Note: This screen may still be open from completing previous steps.
2. Click Distribute. Budget Distribution (01.340.00) opens.
3. For each account/subaccount combination, select a distribution type by pressing F3 in the
DistType field.
Figure 43: Budget Distribution Types (01.360.00)
Note: Five pre-defined distribution types are available:
ACTUAL — Bases the periods on the actual period balances for that account/subaccount
combination.
BUDGET — Bases the periods on the budget period balances for that account/subaccount
combination.
EVEN — Evenly distributes yearly amount among the periods.
LAST12 — Bases the periods on the last 12 period balances for that account/subaccount
combination.
MANUAL — Allows the entry of the numbers as you want them disbursed.
4. Click Save.
Note: Quick Print for this screen prints the Budget Distribution (01.740.00) report.

62 General Ledger
Setting Up Access Groups
Note: These steps only need be completed if the Use Budget Groups check box was selected in
Extended Budgeting Setup (01.960.00).
To set up access groups:
1. Open Budget Group Access (01.350.00).
Figure 44: Budget Group Access (01.350.00)
2. Select the Company ID of your new budget.
3. Select the Version of your new budget.
4. Select the Budget Set that you created previously.
5. Select the desired Group ID for access rights. If your group is not available, this can be designated
in Access Rights Maintenance (95.270.00).
6. Select the appropriate access level for the Group ID.
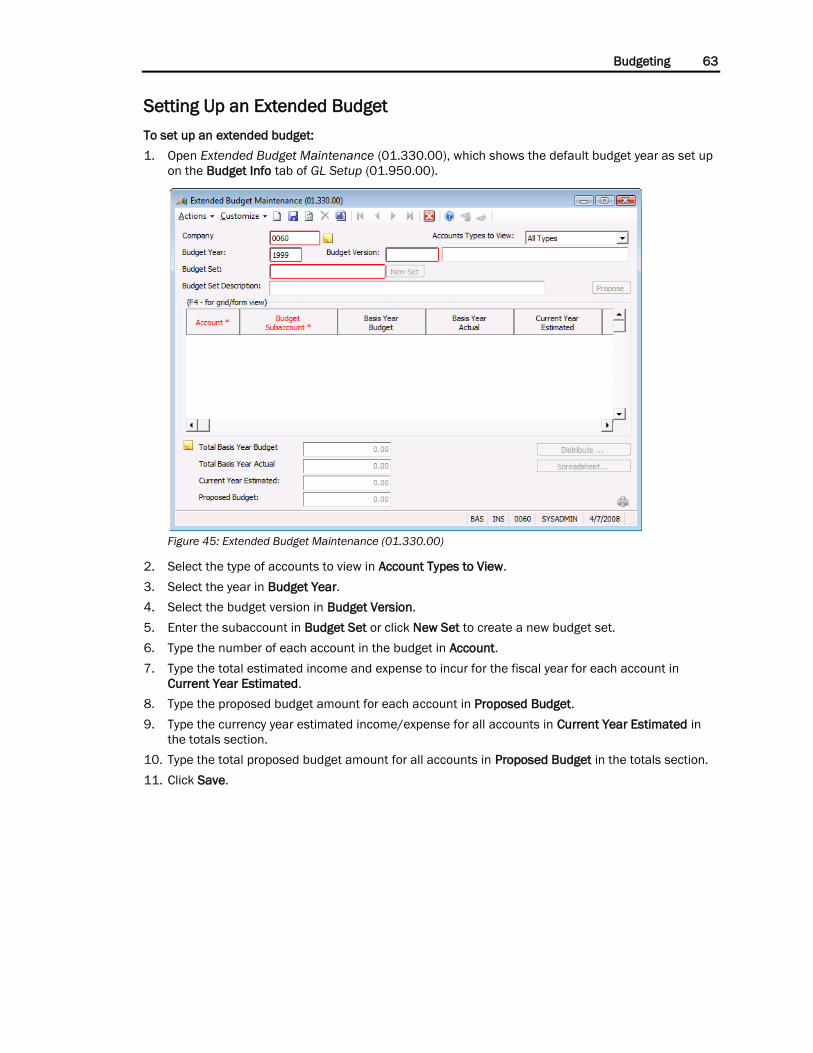
Budgeting 63
Setting Up an Extended Budget
To set up an extended budget:
1. Open Extended Budget Maintenance (01.330.00), which shows the default budget year as set up
on the Budget Info tab of GL Setup (01.950.00).
Figure 45: Extended Budget Maintenance (01.330.00)
2. Select the type of accounts to view in Account Types to View.
3. Select the year in Budget Year.
4. Select the budget version in Budget Version.
5. Enter the subaccount in Budget Set or click New Set to create a new budget set.
6. Type the number of each account in the budget in Account.
7. Type the total estimated income and expense to incur for the fiscal year for each account in
Current Year Estimated.
8. Type the proposed budget amount for each account in Proposed Budget.
9. Type the currency year estimated income/expense for all accounts in Current Year Estimated in
the totals section.
10. Type the total proposed budget amount for all accounts in Proposed Budget in the totals section.
11. Click Save.
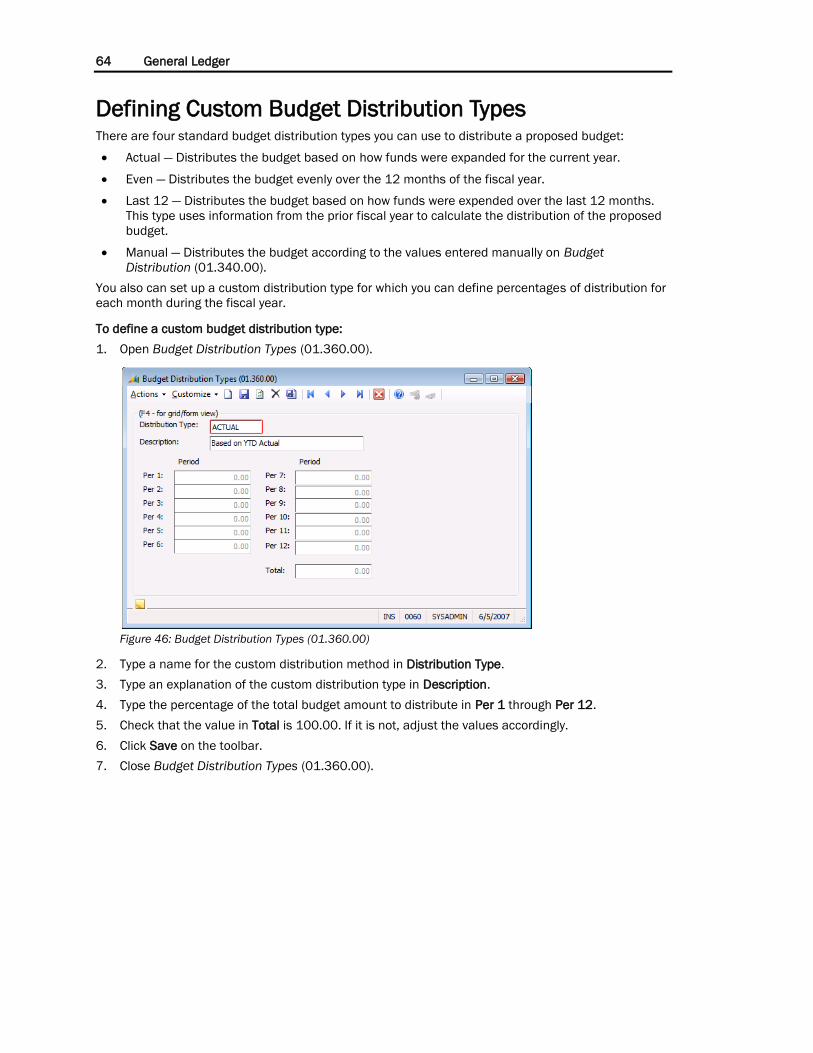
64 General Ledger
Defining Custom Budget Distribution Types There are four standard budget distribution types you can use to distribute a proposed budget:
Actual — Distributes the budget based on how funds were expanded for the current year.
Even — Distributes the budget evenly over the 12 months of the fiscal year.
Last 12 — Distributes the budget based on how funds were expended over the last 12 months.
This type uses information from the prior fiscal year to calculate the distribution of the proposed
budget.
Manual — Distributes the budget according to the values entered manually on Budget
Distribution (01.340.00).
You also can set up a custom distribution type for which you can define percentages of distribution for
each month during the fiscal year.
To define a custom budget distribution type:
1. Open Budget Distribution Types (01.360.00).
Figure 46: Budget Distribution Types (01.360.00)
2. Type a name for the custom distribution method in Distribution Type.
3. Type an explanation of the custom distribution type in Description.
4. Type the percentage of the total budget amount to distribute in Per 1 through Per 12.
5. Check that the value in Total is 100.00. If it is not, adjust the values accordingly.
6. Click Save on the toolbar.
7. Close Budget Distribution Types (01.360.00).
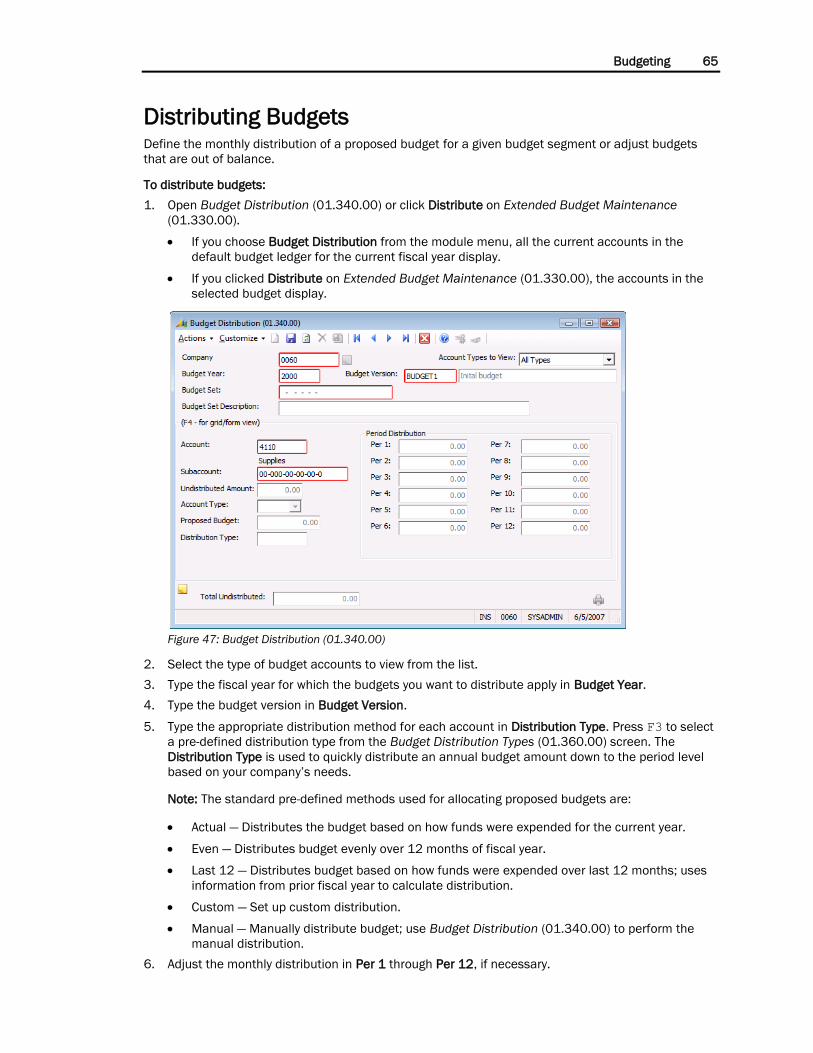
Budgeting 65
Distributing Budgets Define the monthly distribution of a proposed budget for a given budget segment or adjust budgets
that are out of balance.
To distribute budgets:
1. Open Budget Distribution (01.340.00) or click Distribute on Extended Budget Maintenance
(01.330.00).
If you choose Budget Distribution from the module menu, all the current accounts in the
default budget ledger for the current fiscal year display.
If you clicked Distribute on Extended Budget Maintenance (01.330.00), the accounts in the
selected budget display.
Figure 47: Budget Distribution (01.340.00)
2. Select the type of budget accounts to view from the list.
3. Type the fiscal year for which the budgets you want to distribute apply in Budget Year.
4. Type the budget version in Budget Version.
5. Type the appropriate distribution method for each account in Distribution Type. Press F3 to select
a pre-defined distribution type from the Budget Distribution Types (01.360.00) screen. The
Distribution Type is used to quickly distribute an annual budget amount down to the period level
based on your company’s needs.
Note: The standard pre-defined methods used for allocating proposed budgets are:
Actual — Distributes the budget based on how funds were expended for the current year.
Even — Distributes budget evenly over 12 months of fiscal year.
Last 12 — Distributes budget based on how funds were expended over last 12 months; uses
information from prior fiscal year to calculate distribution.
Custom — Set up custom distribution.
Manual — Manually distribute budget; use Budget Distribution (01.340.00) to perform the
manual distribution.
6. Adjust the monthly distribution in Per 1 through Per 12, if necessary.

66 General Ledger
7. Click Save on the toolbar.
8. Close Budget Distribution (01.340.00).
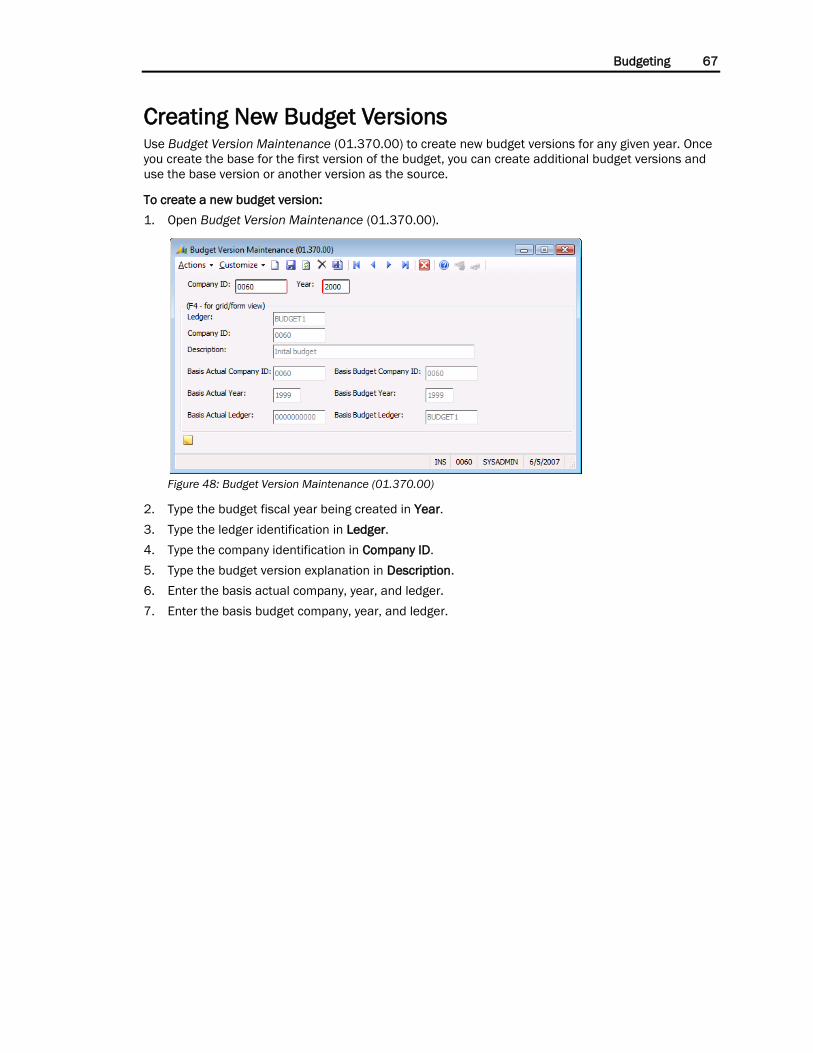
Budgeting 67
Creating New Budget Versions Use Budget Version Maintenance (01.370.00) to create new budget versions for any given year. Once
you create the base for the first version of the budget, you can create additional budget versions and
use the base version or another version as the source.
To create a new budget version:
1. Open Budget Version Maintenance (01.370.00).
Figure 48: Budget Version Maintenance (01.370.00)
2. Type the budget fiscal year being created in Year.
3. Type the ledger identification in Ledger.
4. Type the company identification in Company ID.
5. Type the budget version explanation in Description.
6. Enter the basis actual company, year, and ledger.
7. Enter the basis budget company, year, and ledger.

68 General Ledger

Reviewing General Ledger Information 69
Reviewing General Ledger Information
Overview The Reviewing General Ledger Information section provides information and procedures for looking up
information online and printing reports. These basic tasks include:
Reviewing Account History
Reviewing Account History Detail
Reviewing Currency Account Detail
Reviewing Account Balances
Reviewing Account/Subaccount Balances
Reviewing Account/Subaccount Details
Printing Reports
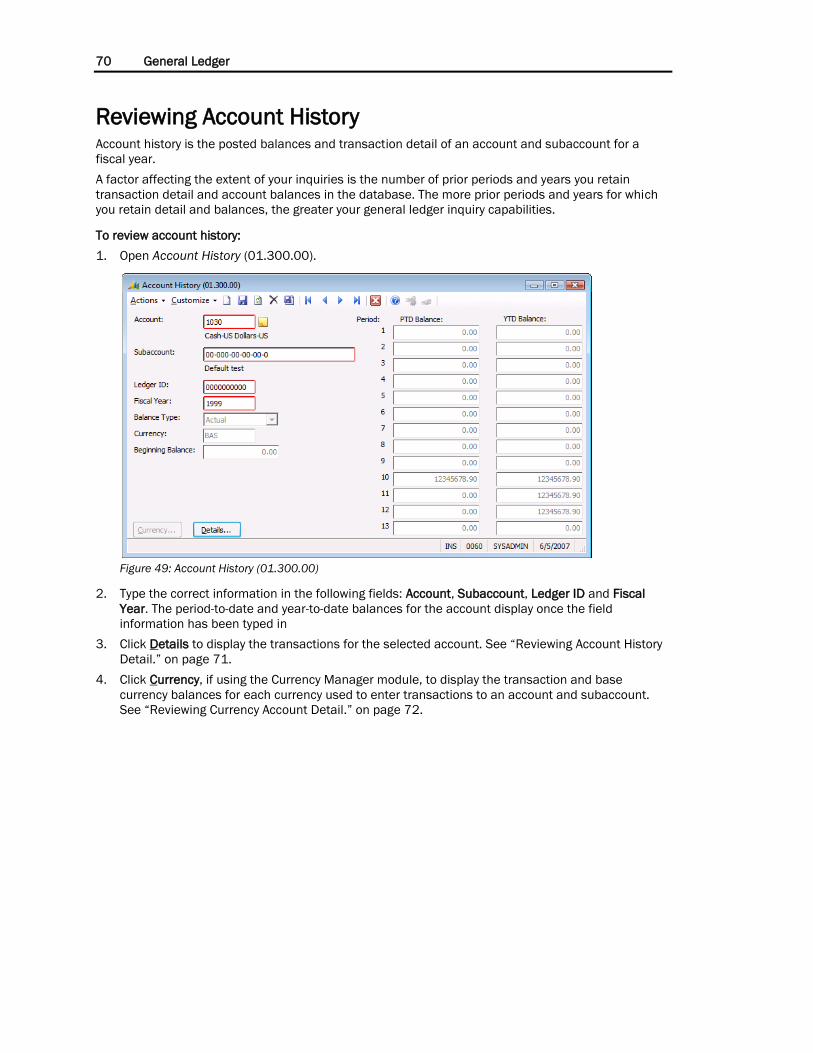
70 General Ledger
Reviewing Account History Account history is the posted balances and transaction detail of an account and subaccount for a
fiscal year.
A factor affecting the extent of your inquiries is the number of prior periods and years you retain
transaction detail and account balances in the database. The more prior periods and years for which
you retain detail and balances, the greater your general ledger inquiry capabilities.
To review account history:
1. Open Account History (01.300.00).
Figure 49: Account History (01.300.00)
2. Type the correct information in the following fields: Account, Subaccount, Ledger ID and Fiscal
Year. The period-to-date and year-to-date balances for the account display once the field
information has been typed in
3. Click Details to display the transactions for the selected account. See “Reviewing Account History
Detail.” on page 71.
4. Click Currency, if using the Currency Manager module, to display the transaction and base
currency balances for each currency used to enter transactions to an account and subaccount.
See “Reviewing Currency Account Detail.” on page 72.
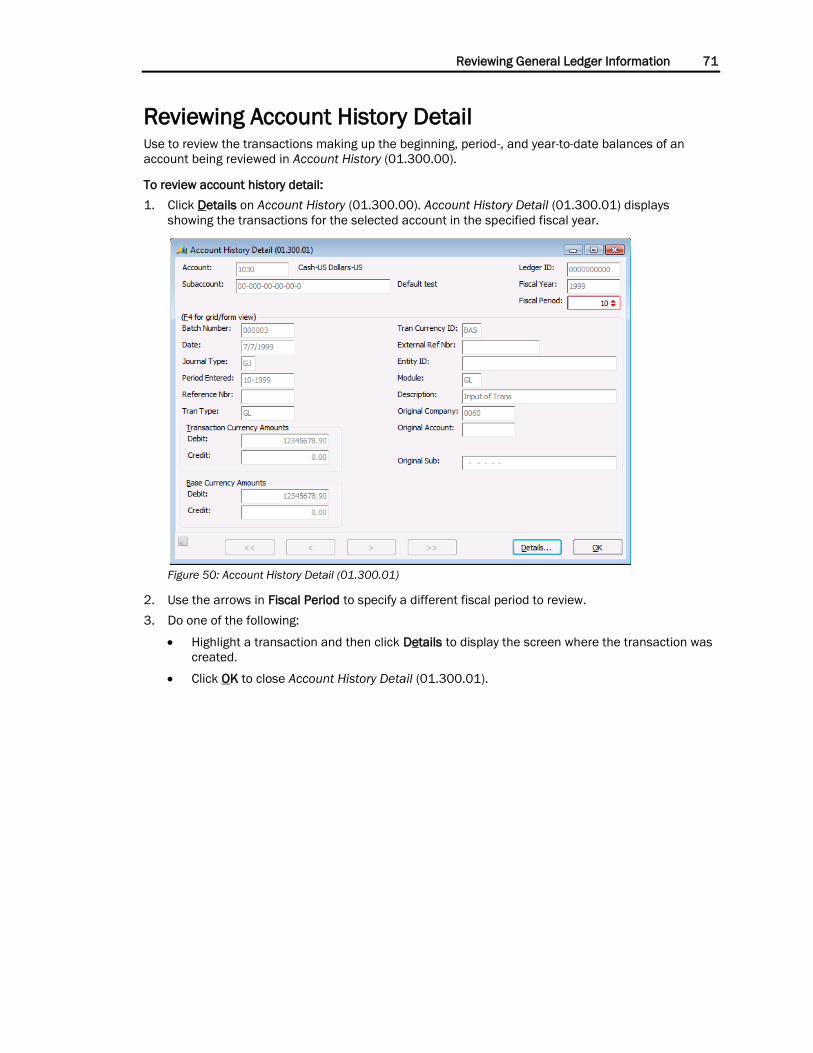
Reviewing General Ledger Information 71
Reviewing Account History Detail Use to review the transactions making up the beginning, period-, and year-to-date balances of an
account being reviewed in Account History (01.300.00).
To review account history detail:
1. Click Details on Account History (01.300.00). Account History Detail (01.300.01) displays
showing the transactions for the selected account in the specified fiscal year.
Figure 50: Account History Detail (01.300.01)
2. Use the arrows in Fiscal Period to specify a different fiscal period to review.
3. Do one of the following:
Highlight a transaction and then click Details to display the screen where the transaction was
created.
Click OK to close Account History Detail (01.300.01).

72 General Ledger
Reviewing Currency Account Detail If you are using the Currency Manager module, you can review the period-to-date and year-to-date
balances for the currencies used to enter transactions in an account.
To review currency account detail:
1. Click Currency on Account History (01.300.00). Currency Account Detail (01.300.02) displays
showing the period-to-date and year-to-date balances for the currencies used to enter
transactions in the selected account in the specified fiscal year.
Figure 51: Currency Account Detail (01.300.02)
2. Use the arrows in Fiscal Period to specify a different fiscal period to review.
3. Click OK to close Currency Account Detail (01.300.02).
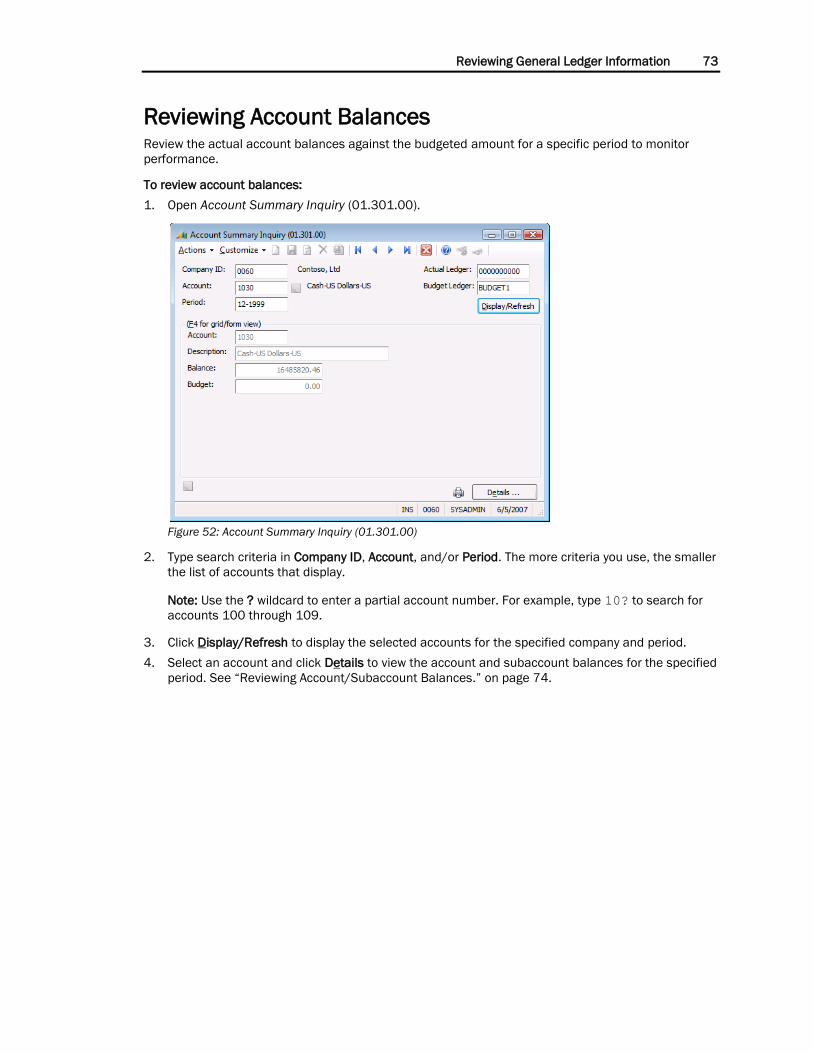
Reviewing General Ledger Information 73
Reviewing Account Balances Review the actual account balances against the budgeted amount for a specific period to monitor
performance.
To review account balances:
1. Open Account Summary Inquiry (01.301.00).
Figure 52: Account Summary Inquiry (01.301.00)
2. Type search criteria in Company ID, Account, and/or Period. The more criteria you use, the smaller
the list of accounts that display.
Note: Use the ? wildcard to enter a partial account number. For example, type 10? to search for
accounts 100 through 109.
3. Click Display/Refresh to display the selected accounts for the specified company and period.
4. Select an account and click Details to view the account and subaccount balances for the specified
period. See “Reviewing Account/Subaccount Balances.” on page 74.

74 General Ledger
Reviewing Account/Subaccount Balances Review the actual account/subaccount balances against the budgeted amount for a specific period to
monitor performance.
To review account/subaccount balances:
1. Open Account/Subaccount Summary Inquiry (01.302.00) or highlight an account and click Details
on Account Summary Inquiry (01.301.00).If you are drilling down from Account Summary Inquiry
(01.310.00), the selected account/subaccount information displays.
Figure 53: Account/Subaccount Summary Inquiry (01.302.00)
2. Type search criteria in Company ID, Account, Subaccount, and/or Period. The more criteria you
use, the smaller the list of accounts that display.
Note: Use the ? wildcard to enter a partial account or subaccount number. For example, type 10?
to search for accounts 100 through 109.
3. Click Display/Refresh to display the selected accounts for the specified company and period.
4. Select an account and click Details to view the transactions in the account for the specified
period. See “Reviewing Account/Subaccount Details.” on page 75.
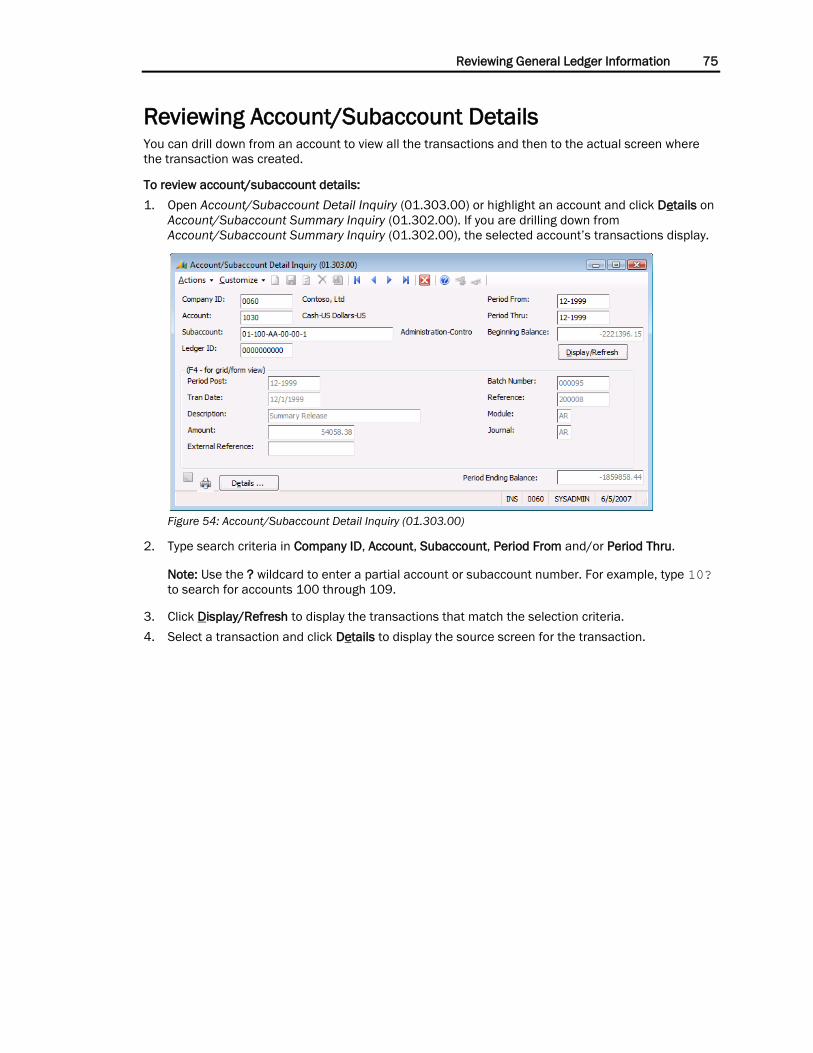
Reviewing General Ledger Information 75
Reviewing Account/Subaccount Details You can drill down from an account to view all the transactions and then to the actual screen where
the transaction was created.
To review account/subaccount details:
1. Open Account/Subaccount Detail Inquiry (01.303.00) or highlight an account and click Details on
Account/Subaccount Summary Inquiry (01.302.00). If you are drilling down from
Account/Subaccount Summary Inquiry (01.302.00), the selected account’s transactions display.
Figure 54: Account/Subaccount Detail Inquiry (01.303.00)
2. Type search criteria in Company ID, Account, Subaccount, Period From and/or Period Thru.
Note: Use the ? wildcard to enter a partial account or subaccount number. For example, type 10?
to search for accounts 100 through 109.
3. Click Display/Refresh to display the transactions that match the selection criteria.
4. Select a transaction and click Details to display the source screen for the transaction.
76 General Ledger
Printing Reports For more information on the individual report, see the Reference section. For information on printing
reports, see “Printing Reports” in the System Manager Help or user ‘s guide.
To view or print a listing of: Use:
Displays the beginning, current, and ending
balances for each account and subaccount
Trial Balance (01.610.00) or Trial
Balance (SSRS) (01.611.00)
Transactions posted to general ledger accounts
and subaccounts plus their beginning and
ending balances.
Detail General Ledger (01.620.00)
General ledger accounts Chart of Accounts (01.650.00)
Subaccounts Subaccounts (01.660.00)
Transactions posted to general ledger accounts
and subaccounts, as well as, all unposted
transactions.
GL Transactions (01.680.00)
Account allocation groups Allocation Groups (01.710.00)
Provides a listing of all ledgers in the database Ledgers (01.720.00)
Displays all budget distributions Budget Distribution (01.740.00)
Displays all budget distributions with out-of-
balance amounts
Out of Balance Exception (01.750.00)
Pulls all budget ledger data for the company,
fiscal year, ledger, and segment combination
Budget Segment Detail (01.770.00)
Details account history for all distinct
account/subaccount combinations from the
three ledgers associated with a budget version:
the Budget Ledger, the Basis Actual Ledger, and
the Basis Budget Ledger
Budget Version Detail (01.780.00)
Displays information for all batches created in
the General Ledger module
GL Batch Register (01.800.00)
General ledger transaction batches:
nonrecurring batches, recurring batches, and
manual batches.
GL Edit (01.810.00)
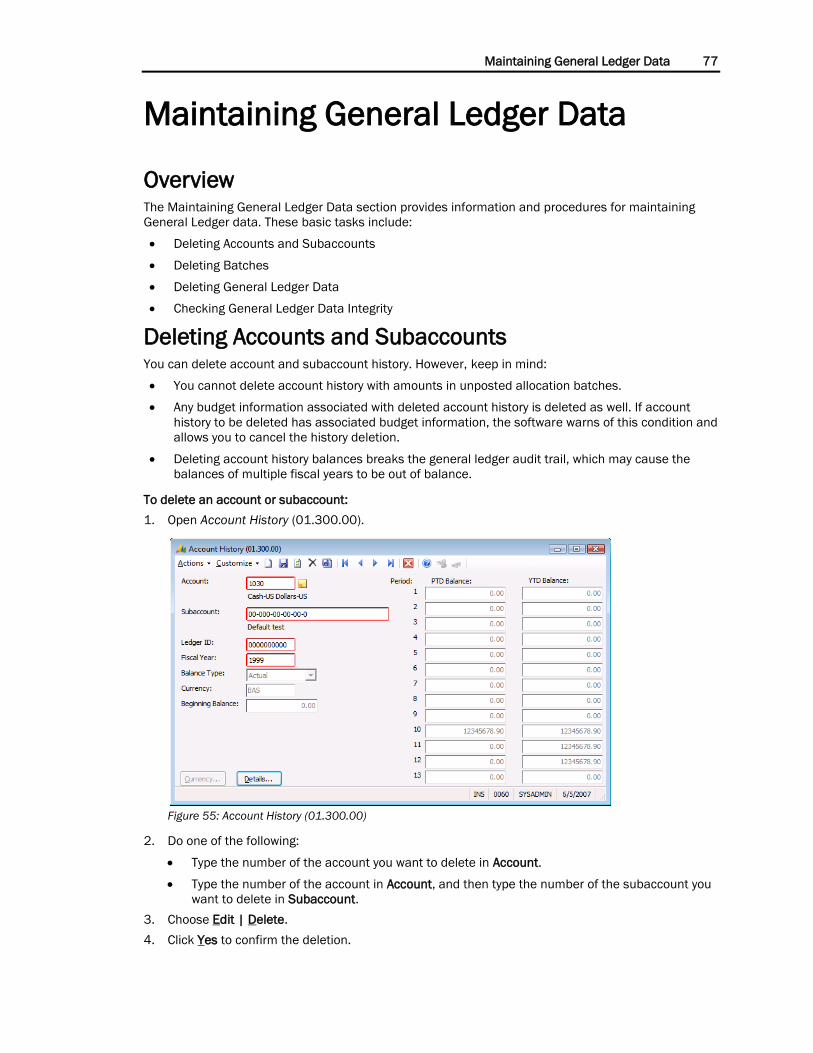
Maintaining General Ledger Data 77
Maintaining General Ledger Data
Overview The Maintaining General Ledger Data section provides information and procedures for maintaining
General Ledger data. These basic tasks include:
Deleting Accounts and Subaccounts
Deleting Batches
Deleting General Ledger Data
Checking General Ledger Data Integrity
Deleting Accounts and Subaccounts You can delete account and subaccount history. However, keep in mind:
You cannot delete account history with amounts in unposted allocation batches.
Any budget information associated with deleted account history is deleted as well. If account
history to be deleted has associated budget information, the software warns of this condition and
allows you to cancel the history deletion.
Deleting account history balances breaks the general ledger audit trail, which may cause the
balances of multiple fiscal years to be out of balance.
To delete an account or subaccount:
1. Open Account History (01.300.00).
Figure 55: Account History (01.300.00)
2. Do one of the following:
Type the number of the account you want to delete in Account.
Type the number of the account in Account, and then type the number of the subaccount you
want to delete in Subaccount.
3. Choose Edit | Delete.
4. Click Yes to confirm the deletion.
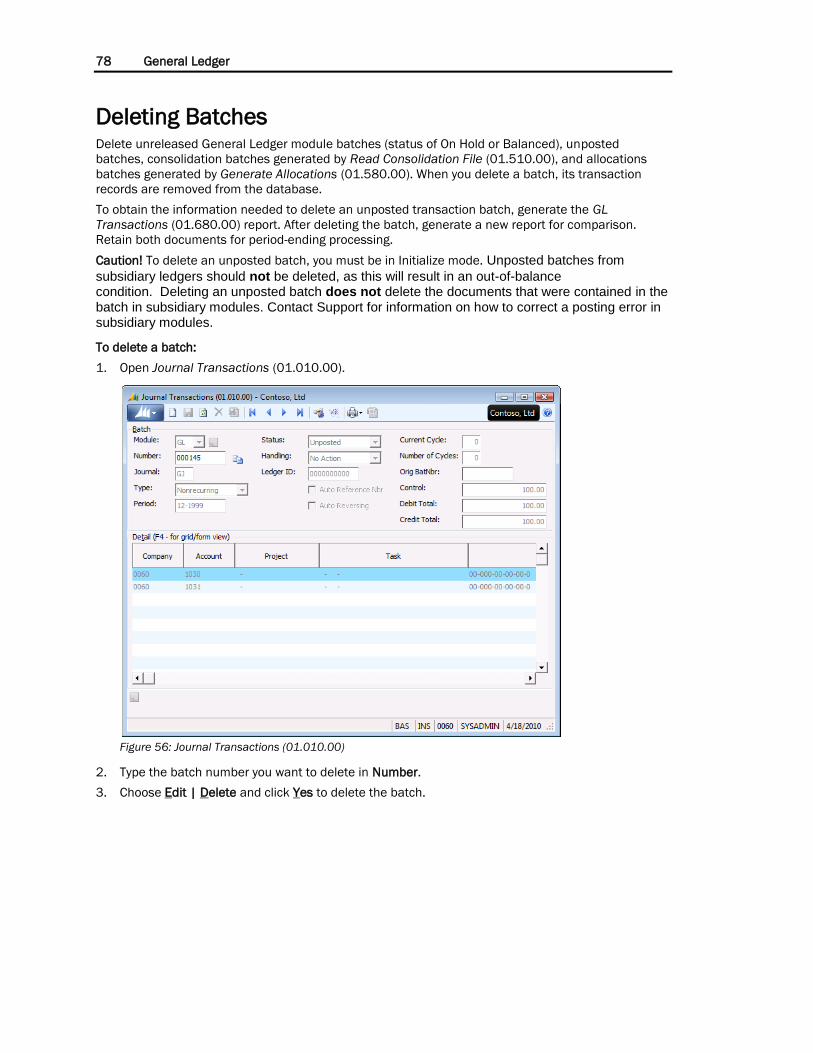
78 General Ledger
Deleting Batches Delete unreleased General Ledger module batches (status of On Hold or Balanced), unposted
batches, consolidation batches generated by Read Consolidation File (01.510.00), and allocations
batches generated by Generate Allocations (01.580.00). When you delete a batch, its transaction
records are removed from the database.
To obtain the information needed to delete an unposted transaction batch, generate the GL
Transactions (01.680.00) report. After deleting the batch, generate a new report for comparison.
Retain both documents for period-ending processing.
Caution! To delete an unposted batch, you must be in Initialize mode. Unposted batches from
subsidiary ledgers should not be deleted, as this will result in an out-of-balance condition. Deleting an unposted batch does not delete the documents that were contained in the batch in subsidiary modules. Contact Support for information on how to correct a posting error in subsidiary modules.
To delete a batch:
1. Open Journal Transactions (01.010.00).
Figure 56: Journal Transactions (01.010.00)
2. Type the batch number you want to delete in Number.
3. Choose Edit | Delete and click Yes to delete the batch.

Maintaining General Ledger Data 79
Deleting General Ledger Data When you close the General Ledger on Closing (01.560.00), the software performs several
housekeeping tasks on the database. One significant task you can ask it to perform is to delete
unwanted data according to the Years to Retain GL Balances and Periods to Retain GL Tran settings
on the Options tab of GL Setup (01.950.00).
If you do not want to delete unwanted data during the closing process, you can run the operation
separately. You can also choose to set a new date other than the default set up on the Options tab of
GL Setup (01.950.00).
Before you delete any General Ledger data, run the Trial Balance (01.610.00) or Trial Balance (SSRS)
(01.611.00) report to check for any documents that require action.
To delete General Ledger data:
1. Open Delete GL Detail (01.570.00), which shows the default retention settings from the Options
tab of GL Setup (01.950.00).
Figure 57: Delete GL Detail (01.570.00)
2. Click Begin Processing.
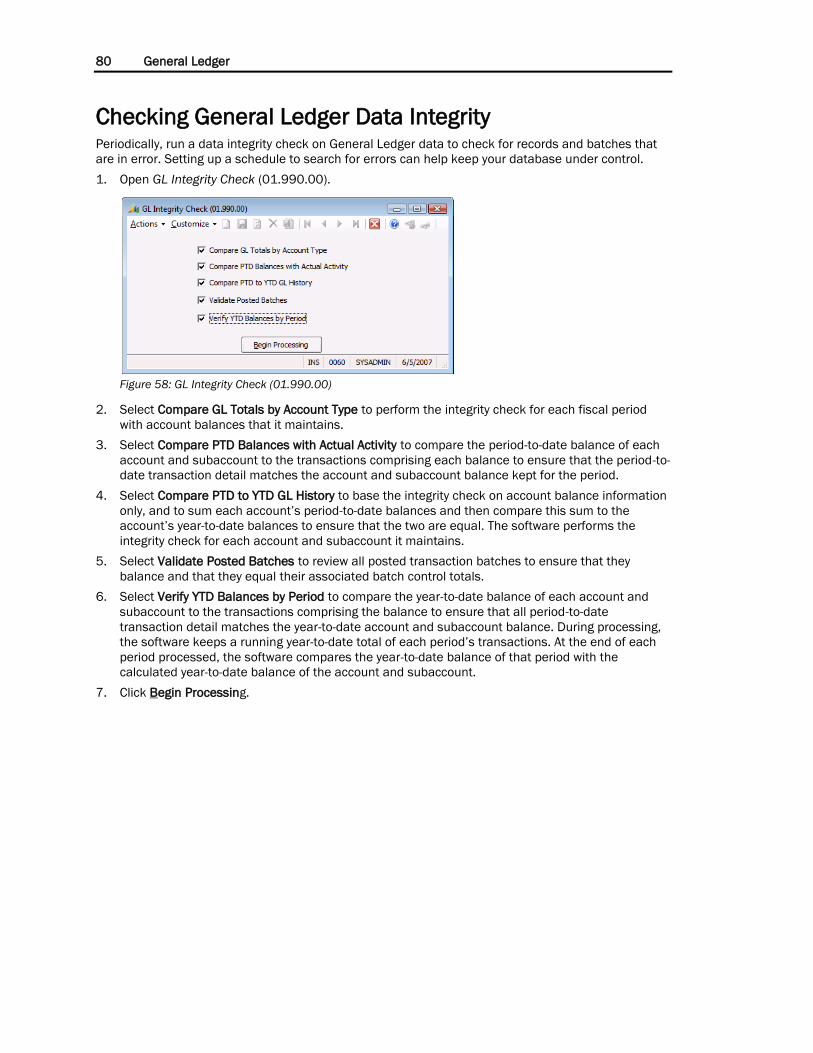
80 General Ledger
Checking General Ledger Data Integrity Periodically, run a data integrity check on General Ledger data to check for records and batches that
are in error. Setting up a schedule to search for errors can help keep your database under control.
1. Open GL Integrity Check (01.990.00).
Figure 58: GL Integrity Check (01.990.00)
2. Select Compare GL Totals by Account Type to perform the integrity check for each fiscal period
with account balances that it maintains.
3. Select Compare PTD Balances with Actual Activity to compare the period-to-date balance of each
account and subaccount to the transactions comprising each balance to ensure that the period-to-
date transaction detail matches the account and subaccount balance kept for the period.
4. Select Compare PTD to YTD GL History to base the integrity check on account balance information
only, and to sum each account’s period-to-date balances and then compare this sum to the
account’s year-to-date balances to ensure that the two are equal. The software performs the
integrity check for each account and subaccount it maintains.
5. Select Validate Posted Batches to review all posted transaction batches to ensure that they
balance and that they equal their associated batch control totals.
6. Select Verify YTD Balances by Period to compare the year-to-date balance of each account and
subaccount to the transactions comprising the balance to ensure that all period-to-date
transaction detail matches the year-to-date account and subaccount balance. During processing,
the software keeps a running year-to-date total of each period’s transactions. At the end of each
period processed, the software compares the year-to-date balance of that period with the
calculated year-to-date balance of the account and subaccount.
7. Click Begin Processing.

Transaction Screens 81
Transaction Screens
Journal Transactions (01.010.00) Use Journal Transactions (01.010.00) to enter general ledger journal transactions (debit and credit
entries); and to revise, edit, or delete module batches.
Figure 59: Journal Transactions (01.010.00)
Journal Transactions (01.010.00) includes total batch information as well as individual transaction
information. Transaction batches are comprised of individual transactions to be entered into this
window. These individual transactions make up a batch of transactions. The batch information is used
to ensure all transactions are entered for the correct amounts, to the correct period and released for
posting when the batch is complete.
Before entering this window, group the transactions together in a batch and compute the total of all
the debits and credits. These totals must equal each other and will be your Batch Control total. Then
use this screen to enter each transaction to the appropriate account and subaccount. If you are
entering transactions to multiple periods, use a separate batch for each period.
The following information is helpful when using this window:
Group transactions of the same period and ledger together for entry.
The entire batch will be posted to one period and to one ledger.
Data can be entered to prior, current, or future periods.
Prior period data can be entered as far back as you are keeping history.
Group transactions of the same journal type together for entry.
Group transactions of the same batch type together for entry:
Nonrecurring — One time transactions.
Recurring — Transactions that recur regularly for fixed amounts.
Manual — Transactions that recur regularly for different amounts each time.
82 General Ledger
Adjustment — Special batch type that does not have to be in balance to post and requires
Initialize mode.
Reversing batch — Transactions reversed from a pre-existing batch. This batch is identical to the
original batch except the debits and credits have been reversed to back out the original
transaction amounts from the account balance once the batch is posted.
Reversing and Correcting batch — Transactions are reversed from a pre-existing batch and a new,
editable batch is created. The reversing batch is identical to the original batch except the debits
and credits have been reversed to back out the original transaction amounts from the account
balance once the batch is posted. A second, new batch will be created identical to the original
batch and any field in the new batch may be edited.
Copied batch — Transactions from a pre-existing batch may be copied to a new batch (similar to a
template batch) and all fields in the batch and transactions may be edited.
All transactions entered in this screen will have a transaction type of GL.
If using the multi-company feature, you can specify other companies when entering transaction detail.
When batches are released, inter-company transactions are automatically generated between
companies ensuring all companies remain in balance.
Caution! If you are using the Cash Manager module, do not enter journal entries that affect a cash
account through Journal Transactions (01.010.00) unless Cash Manager is set to accept General
Ledger entries. If Cash Manager is not set to accept GL entries, entries made in the General Ledger
might cause the Cash Manager to be out of balance with the General Ledger.
Module
The module for which you are entering a new transaction batch, or reviewing or editing a batch already
released or posted; available only when the software is in Initialize mode. Options are:
AP — Accounts Payable
AR — Accounts Receivable
BI — Flexible Billings
CA — Cash Manager
CM — Currency Manager
GL — General Ledger
IN — Inventory
IT — Project Inventory Transaction Transfer
OP — Order Processing
PA — Project Allocator
PC — Project Controller
PO — Purchasing
PR — Payroll
TE — Travel and Expense
TM — Time and Expense for Projects
During normal data entry (that is, non-Initialize mode), Module defaults to GL (General Ledger) and
cannot be changed.
Number
Numeric code assigned to a transaction batch that uniquely identifies the batch (that is, the batch
number). If editing an existing batch, enter the batch number or use the F3 inquiry key to view a list of
existing batches. When adding a new batch, the system automatically assigns a batch number when
the batch is saved.

Transaction Screens 83
Correct Journal Transactions (button)
Correct Journal Transactions allows you to reverse, reverse and correct or copy a batch by copying the
details from another batch.
Enabled when an existing batch has been selected.
Journal
Code that associates a batch with a standard accounting book of original entry; standard journal types
are:
AP — Accounts Payable journal
AR — Accounts Receivable journal
BI — Flexible Billings journal
CA — Cash Manager journal
CM — Currency Manager journal
GJ — General journal
IN — Inventory journal
IT — Project Inventory Transaction Transfer
PA — Project Allocator journal
PC — Project Controller journal
PO — Purchasing journal
PR — Payroll journal
TE — Travel and Expense
TM — Time and Expense for Projects
IC — Inter-company; entering IC as a journal type will force the user to keep all companies in
balance and no Inter-company transactions will be created.
The software automatically displays the default journal type GJ. Enter the journal type according to
company policies.
Journal will display other values if you are in Initialize mode and viewing transactions from other
modules such as AP. When entering General Ledger entries, there are no restrictions or validation for
entries to Journal. It is simply a tool for identifying batches. For example, you may want to use a
journal type of TX for all tax entries and a journal type of AU for all audit entries. Journal can then be
used as a selection criterion when printing reports.
Type
Type of general ledger transaction (Nonrecurring is the default); options are:
Adjustment — Special batch type that does not require transactions to be in balance in order to
release and post; used to make a one-sided adjustment to an account balance. Creating and
editing adjustment batches requires the software to be in Initialize mode; see the System
Manager online help or user guide for more information on Initialize mode.
Allocation — Transactions that occur regularly, but for different amounts, depending upon the
balance of selected accounts. Reserved for batches created on Generate Allocations
(01.580.00) (that is, allocation batches cannot be created in Journal Transactions [01.010.00]).
Consolidation — Transactions which were read into the database from a consolidation file.
Reserved for batches created on Read Consolidation (01.510.00) (that is, consolidation batches
cannot be created in Journal Transactions [01.010.00]).
Manual — Transaction that occurs regularly, containing the same account information, but for a
different amount each time (for example, accrued wages at the end of the period). When you
84 General Ledger
release a Manual batch, the software makes a copy of the batch with a status of Hold. This
allows you to retrieve the batch, update the amounts and release it again.
Nonrecurring — Transaction that occurs one time.
Recurring — Transaction that occurs on a regular interval of time, in accounting periods, for the
same amount and same account information each time. For example, a one-year rent contract
specifying 12 equal monthly payments.
Reversing – Transaction that is created from a pre-existing batch and is identical to the original
batch except the transaction type (debit/credit) flag has been flipped.
Correcting – Transaction that occurs by reversing a pre-existing batch and creating a new, similar
batch from the original batch that may be edited before the batch is released.
Note: An alternative to the Manual entry option for long or complex entries is to use the template
function. With Manual entries, you might have to search through a long list of batches to find the
original manual batch to be retrieved.
Another alternative to the manual entry option for long or complex entries is to use copy and paste to
transfer information to and from a spreadsheet file. You can copy the detail section of the entry
directly to a spreadsheet, make any necessary changes, and then copy and paste the detail rows back
into a new batch.
Nonrecurring — One-time transaction or a transaction that does not occur regularly.
Recurring — Transaction that occurs regularly for a fixed amount each time (for example,
amortization); the values in Current Cycle and Nbr of Cycles control the frequency of posting and
the number of times the software generates a recurring transaction batch. Generate this type of
transaction batch using Generate Recurring (01.530.00).
Note: While recurring entries are normally used for entries like depreciation expense, they can also be
quite useful for correcting entries. For example, assume that the year-end audit determines that an
accrual was understated for the entire prior year and it is decided to spread the expense over the
entire year so the history will not be distorted. To accomplish this, a recurring entry can be entered and
set to post in Period 1 of the prior year, with a Cycle of 1 and Number of Cycles of 12. When the entry
is saved and Generate Recurring (01.530.00) is run, the entry will be posted immediately to all 12
periods of the prior year.
Period
Fiscal period and year to which the transaction batch should be posted; options are:
A range of prior fiscal periods that extend as far back as the General Ledger history retention
setting
The current fiscal period
Any future fiscal period
Period defaults to the current period. The period to post applies to the entire batch of transactions. If
the period to post is not the current fiscal period, a warning message reminds you that you are posting
to a period that is not the current fiscal period. This is simply a warning, and will not prevent release or
posting.
A message will also appear if you select a closed period or fiscal year. The action you are able to take
depends upon posting options that were selected on the GL Setup (01.950.00), Options tab and
whether you have Initialization Mode permission for this screen in System Manager Access Rights
Maintenance (95.270.00). In addition, Initialize Mode must be activated before the batch is entered.
Note: You may be reluctant to close the modules before all entries have been made for the period,
especially at year end. Closing a module does not prevent later entries to the closed period, from any
of the modules. Entries can be made to prior fiscal years simply by entering the appropriate period to
post when entering the batch. For entries to prior years, the Retained Earnings and Year-To-Date Net
Income accounts adjust themselves automatically, with no additional steps required.
Transaction Screens 85
Status
Current condition of the batch in the system; options are:
On Hold — The batch is not to be released.
Balanced — The batch is ready for release.
Void — The batch has been voided.
Unposted — The batch is released to GL but has not been posted to the GL module yet.
Posted — The batch has been released and posted to the GL.
Handling
Batch management function performed upon batch entry completion (how the batch is handled when
you finish working on the batch in this window); options are:
Hold — Save the batch for future editing or additions and change Status to On Hold.
Release Later — Balance the batch; change Status to Balanced if the batch is in balance. A
Balanced batch can be released for posting on Release General Ledger Batches (01.400.00).
You can also return to Journal Transactions (01.010.00), retrieve the batch, and change the
handling to Release Now.
Release Now — release the batch for posting on completing the batch (after selecting Finish,
New, or Close). When the batch is released, a batch control report will be printed if you have
selected the Automatic Batch Control Reports option in GL Setup (01.950.00).
No Action — Leave the current batch status unchanged.
The difference between Hold and No Action is noticed with batches that have a Status of Balanced.
When a batch on Balanced Status is retrieved, if the user changes the Handling to Hold, the Status will
be changed from Balanced to On Hold. If the Handling is left at No Action, the batch will remain with a
Status of Balanced.
Ledger ID
Unique identification code of the selected ledger for financial transactions.
Auto Reference Nbr
Specifies whether you want the software to increment the transaction reference numbers
automatically, or if you want to enter them manually during entry of journal transactions.
Select to automatically assign transaction reference numbers during transaction entry. If Auto
Reference Nbr is selected, transaction reference numbers will automatically increment by 1 from the
previous detail line. Numbers will be six characters and will pad with zeros if the first reference
number entered is less than six characters (for example, if you enter 1001 in the first line, the next
line will default to 001002).
Auto Reversing
Indicates that you want this entry to automatically reverse when the batch is released. If the batch is
recurring, the software automatically skips Auto Reversing. Reversing transactions for the next period
are created automatically either when the batch is released or as part of the closing process
depending on the option chosen in GL Setup (01.950.00). Reversing transactions are then posted to
the General Ledger and reflected in the appropriate journal transaction listings.
Select to reverse the batch automatically at the beginning of the next fiscal period; not available for
adjustment, allocation, or recurring transactions. If Auto Reversing is not selected, normal transaction
processing occurs and no other entry will be created other than the one currently being entered.
Current Cycle
Number of fiscal periods between generations of a recurring batch. Current Cycle is used only for
recurring entries. If that is the case, enter the number of periods between generations of the
86 General Ledger
transaction (for example, a value of 1 would cause an entry to be created every month; a value of 2,
an entry would be generated every other month).
Number of Cycles
Number of times to generate a recurring batch. Number of Cycles is also used only for recurring
entries. Enter the number of times that the software should generate the batch of transactions. After
the last posting cycle, it deletes the recurring batch.
Note: For entries such as depreciation that would normally expire during the last period of the year,
you may want to enter one more period than needed. This would allow you to edit the transaction after
year-end without having to reenter all the detail accounts and subaccounts.
Note: To ensure the length of the recurring batch is correct, you can multiply the Current Cycle times
the Number of Cycles to get the length of the recurring batch (for example, if you are using a quarterly
recurring batch for twelve months, the Current Cycle of 3 is entered and the Number of Cycles is set to
four: 3 x 4 = 12).
Note: Use Initialize mode to make changes to Current Cycle or Number of Cycles for the original
recurring batch.
Orig BatNbr
Connects the current batch with the batch from which it originated; blank if the current batch did not
originate from another batch. An original batch number is found on batches created from manual and
recurring transaction batch types. Auto reversing batches generate a reversed copy of the original
batch. The reverse copy displays the originating batch number here.
Control
Total transaction amount of the batch. This amount is used to ensure the entered transactions equal
the expected total of transactions.
Debit Total
Running total of all debit amounts entered for the batch. The debit total increments as additional
transactions are added to the batch. The debit total must equal the batch Control amount after all
transactions are entered. If the batch is out of balance, you can save it for later editing, but the batch
cannot be released until it is in balance.
Credit Total
Running total of all credit amounts entered for the batch. The credit total increments as additional
transactions are added to the batch. The credit total must equal the batch Control amount after all
transactions are entered. If the batch is out of balance, you can save it for later editing, but the batch
cannot be released until it is in balance.
Company
Company ID for this transaction line (company the transaction is being posted to). If you are using the
multi-company feature, when batches are released, inter-company transactions are automatically
generated between companies ensuring all companies remain in balance.
Account
General ledger account to which the transaction should be posted.
Project
Associates the transaction with a specific budget segment set up in the Project Controller module;
available only if the transaction’s account number is associated with an account category.
Transaction Screens 87
Task
Associates the transaction with a specific task set up in the Project Controller module; available only if
the transaction’s account number is associated with an account category; if the Project Controller
module is not installed, and Task is not enabled.
Sub
Optional subaccount to which the transaction should be posted.
Ref Nbr
Identifying code assigned to the transaction that distinguishes it from all other transactions in the
database; the reference number for the transaction if any. This field is used to link a transaction to a
source document. For example, when entering a deposit in Journal Transactions (01.010.00), use the
deposit number.
If this batch is an allocation batch, Ref Nbr indicates LS for the ledger source account in the allocation
group, and will indicate LD for the ledger destination account from the allocation group.
Date
Date of transaction’s occurrence as listed on the source document; default is current date.
Employee Id
Unique identification code for employee entering transaction. This field is used only when the Project
Controller module is used. If you are using the Project Controller module, enter the appropriate
employee ID.
Labor Class
Type of service performed. This field is used only when the Project Controller module is used. If you are
using the Project Controller module, enter the appropriate labor class.
Billable
Indicates that the transaction will be posted to a project and will appear on invoices printed in the
Flexible Billing module.
Quantity
Total number of items involved in the transaction. This field is used only when the Project Controller
module is used. If you are using the Project Controller module, enter the appropriate quantity.
Debit Amount
Amount to debit the transaction’s associated account and subaccount. You cannot enter a debit and a
credit amount on a single line. If you need to enter both a debit and a credit to the same
account/subaccount, you must use two transaction lines.
Credit Amount
Amount to credit the transaction’s associated account and subaccount. You cannot enter a debit and
a credit amount on a single line. If you need to enter both a debit and a credit to the same
account/subaccount, you must use two transaction lines.
Description
Explanation of the transaction; maximum number of characters is 30. This description will be shown in
the reports which show batch detail.

88 General Ledger
Quick Print (printer icon)
Click the printer icon to print the GL Edit (01.810.00) report for the current transaction batch after the
batch has been saved. The batch must be saved and assigned a batch number before you can use the
quick print feature.
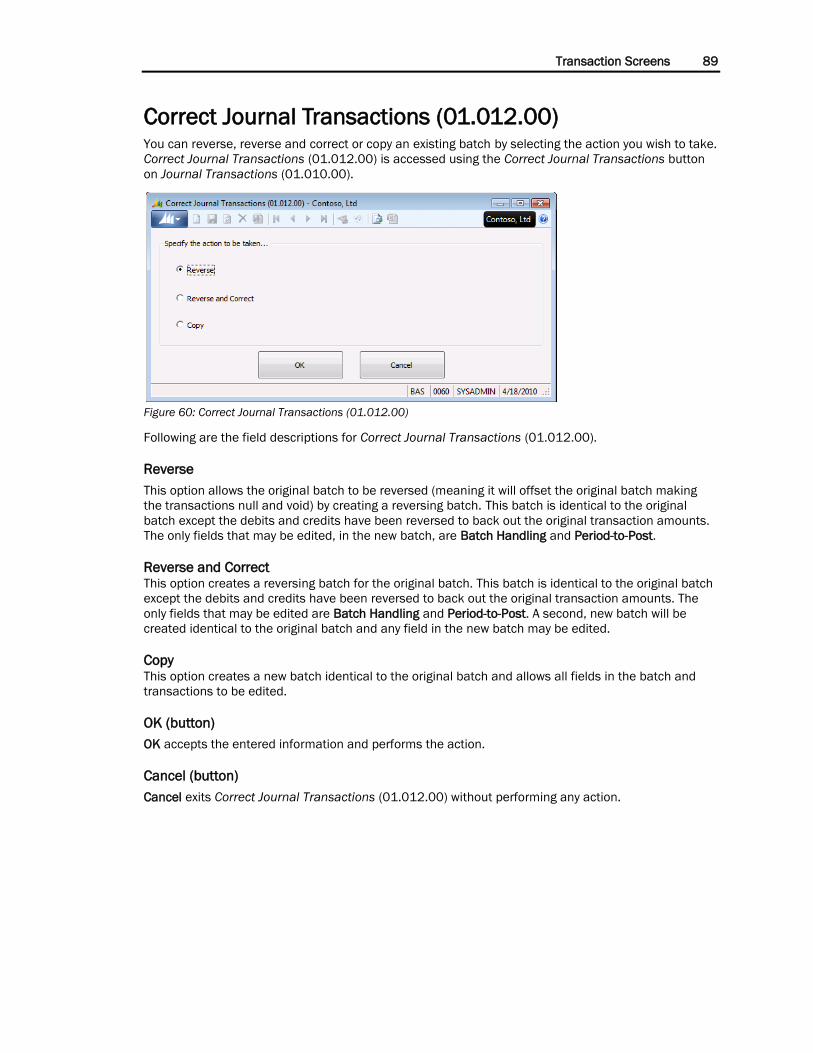
Transaction Screens 89
Correct Journal Transactions (01.012.00) You can reverse, reverse and correct or copy an existing batch by selecting the action you wish to take.
Correct Journal Transactions (01.012.00) is accessed using the Correct Journal Transactions button
on Journal Transactions (01.010.00).
Figure 60: Correct Journal Transactions (01.012.00)
Following are the field descriptions for Correct Journal Transactions (01.012.00).
Reverse
This option allows the original batch to be reversed (meaning it will offset the original batch making
the transactions null and void) by creating a reversing batch. This batch is identical to the original
batch except the debits and credits have been reversed to back out the original transaction amounts.
The only fields that may be edited, in the new batch, are Batch Handling and Period-to-Post.
Reverse and Correct This option creates a reversing batch for the original batch. This batch is identical to the original batch
except the debits and credits have been reversed to back out the original transaction amounts. The
only fields that may be edited are Batch Handling and Period-to-Post. A second, new batch will be
created identical to the original batch and any field in the new batch may be edited.
Copy This option creates a new batch identical to the original batch and allows all fields in the batch and
transactions to be edited.
OK (button)
OK accepts the entered information and performs the action.
Cancel (button)
Cancel exits Correct Journal Transactions (01.012.00) without performing any action.

90 General Ledger
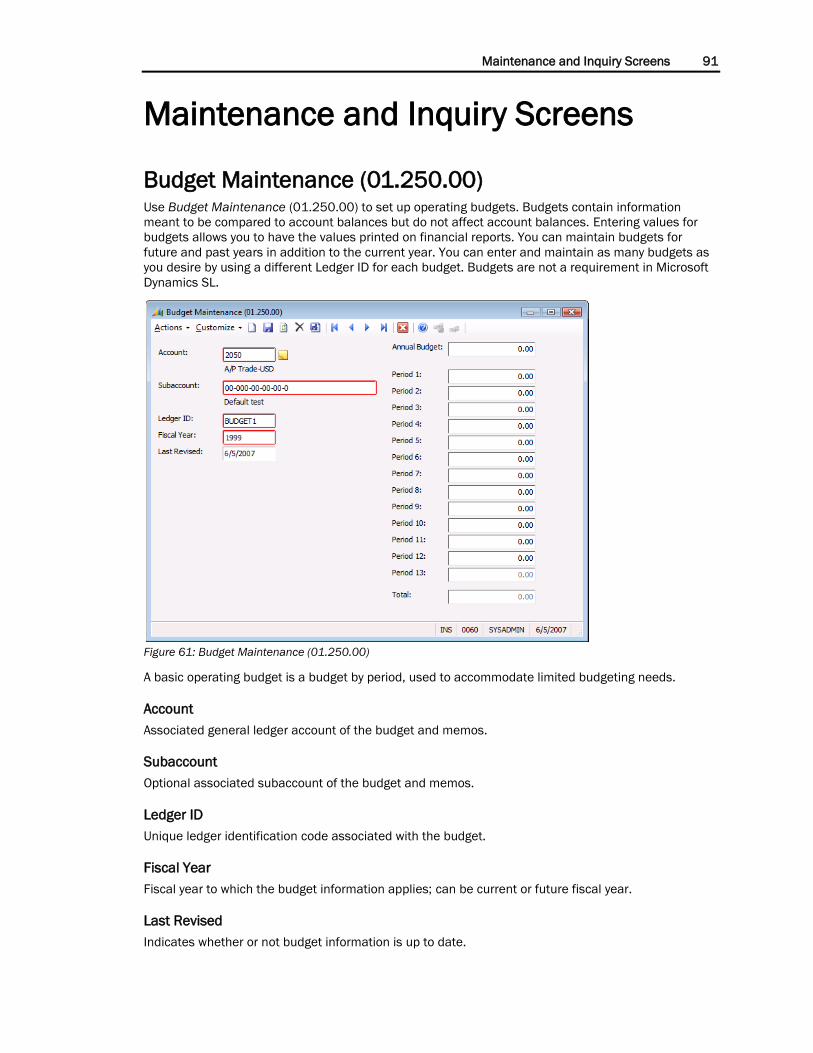
Maintenance and Inquiry Screens 91
Maintenance and Inquiry Screens
Budget Maintenance (01.250.00) Use Budget Maintenance (01.250.00) to set up operating budgets. Budgets contain information
meant to be compared to account balances but do not affect account balances. Entering values for
budgets allows you to have the values printed on financial reports. You can maintain budgets for
future and past years in addition to the current year. You can enter and maintain as many budgets as
you desire by using a different Ledger ID for each budget. Budgets are not a requirement in Microsoft
Dynamics SL.
Figure 61: Budget Maintenance (01.250.00)
A basic operating budget is a budget by period, used to accommodate limited budgeting needs.
Account
Associated general ledger account of the budget and memos.
Subaccount
Optional associated subaccount of the budget and memos.
Ledger ID
Unique ledger identification code associated with the budget.
Fiscal Year
Fiscal year to which the budget information applies; can be current or future fiscal year.
Last Revised
Indicates whether or not budget information is up to date.
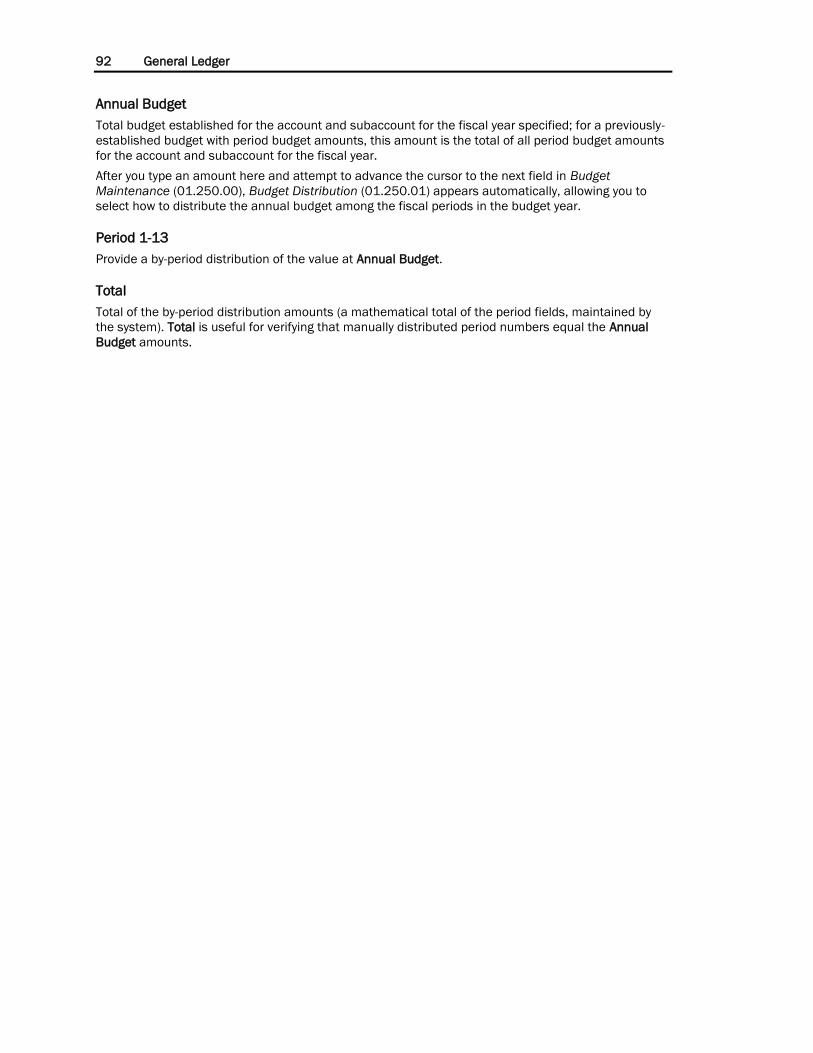
92 General Ledger
Annual Budget
Total budget established for the account and subaccount for the fiscal year specified; for a previously-
established budget with period budget amounts, this amount is the total of all period budget amounts
for the account and subaccount for the fiscal year.
After you type an amount here and attempt to advance the cursor to the next field in Budget
Maintenance (01.250.00), Budget Distribution (01.250.01) appears automatically, allowing you to
select how to distribute the annual budget among the fiscal periods in the budget year.
Period 1-13
Provide a by-period distribution of the value at Annual Budget.
Total
Total of the by-period distribution amounts (a mathematical total of the period fields, maintained by
the system). Total is useful for verifying that manually distributed period numbers equal the Annual
Budget amounts.
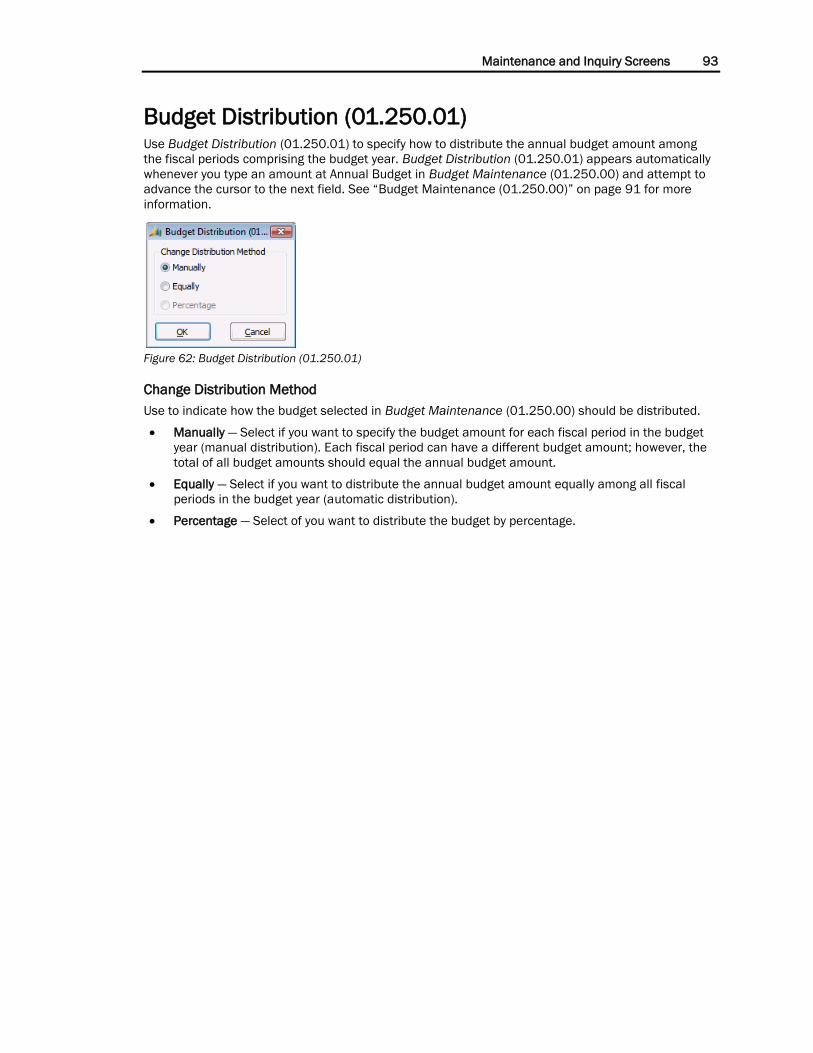
Maintenance and Inquiry Screens 93
Budget Distribution (01.250.01) Use Budget Distribution (01.250.01) to specify how to distribute the annual budget amount among
the fiscal periods comprising the budget year. Budget Distribution (01.250.01) appears automatically
whenever you type an amount at Annual Budget in Budget Maintenance (01.250.00) and attempt to
advance the cursor to the next field. See “Budget Maintenance (01.250.00)” on page 91 for more
information.
Figure 62: Budget Distribution (01.250.01)
Change Distribution Method
Use to indicate how the budget selected in Budget Maintenance (01.250.00) should be distributed.
Manually — Select if you want to specify the budget amount for each fiscal period in the budget
year (manual distribution). Each fiscal period can have a different budget amount; however, the
total of all budget amounts should equal the annual budget amount.
Equally — Select if you want to distribute the annual budget amount equally among all fiscal
periods in the budget year (automatic distribution).
Percentage — Select of you want to distribute the budget by percentage.
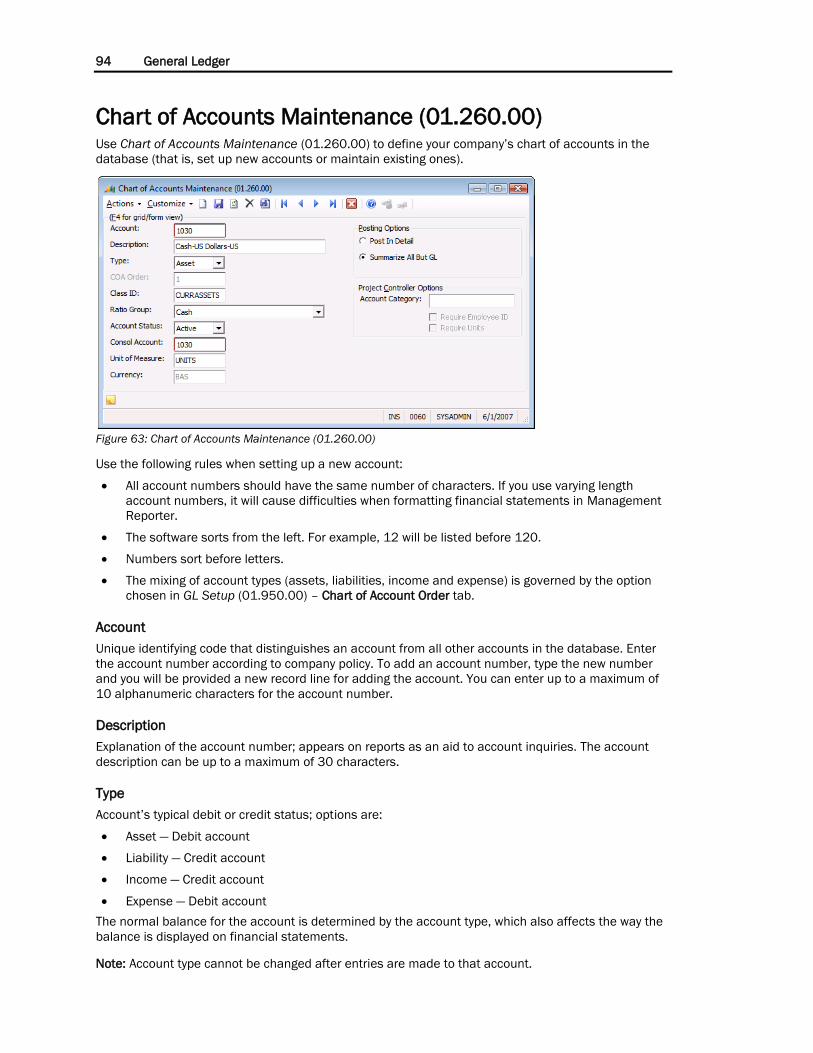
94 General Ledger
Chart of Accounts Maintenance (01.260.00) Use Chart of Accounts Maintenance (01.260.00) to define your company’s chart of accounts in the
database (that is, set up new accounts or maintain existing ones).
Figure 63: Chart of Accounts Maintenance (01.260.00)
Use the following rules when setting up a new account:
All account numbers should have the same number of characters. If you use varying length
account numbers, it will cause difficulties when formatting financial statements in Management
Reporter.
The software sorts from the left. For example, 12 will be listed before 120.
Numbers sort before letters.
The mixing of account types (assets, liabilities, income and expense) is governed by the option
chosen in GL Setup (01.950.00) – Chart of Account Order tab.
Account
Unique identifying code that distinguishes an account from all other accounts in the database. Enter
the account number according to company policy. To add an account number, type the new number
and you will be provided a new record line for adding the account. You can enter up to a maximum of
10 alphanumeric characters for the account number.
Description
Explanation of the account number; appears on reports as an aid to account inquiries. The account
description can be up to a maximum of 30 characters.
Type
Account’s typical debit or credit status; options are:
Asset — Debit account
Liability — Credit account
Income — Credit account
Expense — Debit account
The normal balance for the account is determined by the account type, which also affects the way the
balance is displayed on financial statements.
Note: Account type cannot be changed after entries are made to that account.
Maintenance and Inquiry Screens 95
COA Order
Order of accounts in the chart of accounts (COA); available only if Custom Order is selected in the
Chart of Acct Order tab of GL Setup (01.950.00). Enter the order for this account if the company uses
a custom order for the COA.
Class ID
Account class identification code.
Ratio Group
Controls how the software groups accounts during the computation of ratio analysis; options are:
Cash — Include in current assets and total assets
A/R Trade Less Doubtful Accts — Include in current assets and total assets
All Other A/R — Include in current assets and total assets
Inventory — Include in current assets and total assets
Inventory-Supplies — Include in current assets and total assets
Prepaid Expenses — Include in total assets
Fixed – Deferred-Other Assets — Include in total assets
A/P Trade & Customer Refunds — Include in current liabilities and total liabilities
All Other Payables — Include in current liabilities and total liabilities
Long Term Debt — Include in total liabilities
Shareholder Loans — Include in total liabilities
Shareholder Equity — Include in stockholder equity
YTD Net Income — Include in stockholder equity
Sales Income — Include in income accounts
Cost of Goods Sold — Include in COGS
Interest Expense-General — Include in interest expense
Interest Expense-Long Term — Include in interest expense
Taxes — Include in Tax accounts
None — Do not include this account in ratio analysis
Account Status
Controls whether or not account is activated (available for additional account activity) or disabled
(unavailable for additional account activity) in the chart of accounts; options are:
Active — Account is active and available for data entry (available for posting from all modules
including the General Ledger).
Inactive — Account is inactive and not available for data entry (cannot have entries made to it
from any module including General Ledger). Inactive accounts can carry a balance forward.
A change in account status does not affect transactions already entered.
Consol Account
Controls which account number the transactions should be posted to when performing the
consolidation process into another database. Function permits companies made up of subsidiaries to
perform corporate-level database management functions; options are:
Link accounts in each subsidiary’s database to accounts in the corporate database

96 General Ledger
Eliminate transactions between a company’s subsidiaries when corporate-wide consolidated
financial statements are being prepared
This field defaults to the account number. Accept the default or enter a different consolidation
account.
Unit of Measure
Unit of measure that is being used for this account. This is primarily used for statistical ledgers (that is,
to specify unit quantity standards) since financial transactions will use currency units. If an account
will accumulate multiple units of measure, use separate ledgers to maintain each unit of measure and
leave this field blank.
Currency
Determines account’s currency denomination. This field should be left blank, unless the account will
not use the base currency.
Posting Options
Use to specify how transaction postings to the accounts should occur; options are:
Post In Detail — Posting should occur in detail for all modules (that is, all transactions will be
posted in detail to this account as they were produced from each module).
Summarize All But GL — Postings from other modules should occur in summary (that is,
transactions from other modules will post to this account in summary); from the General Ledger
module should occur in detail. This setting overrides the GL Posting Option of Detail setting in
each individual module setup screen.
Most accounts will be set for Post in Detail.
Note: You can turn this option off and on as needed. For example, you may want to track detail during
a new setup but then have summary information once the system is set up.
If detail is desired when using drilldown in Management Reporter, you must retain the detail for the GL
Balances.
If the GL Posting Option in a module setup screen is flagged for summary, the software totals the
amounts by account and subaccount, and posts one amount to each account/subaccount, regardless
of the posting option setting in the Chart of Accounts.
If the GL Posting Option in a module is flagged for detail, the software looks at the Posting Option field
in this screen. If the Posting Option is set to Summarize All But GL, the software overrides the post in
detail and summarizes the information for the account to post one total amount.
Project Controller Options
Use to specify optional Project Controller requirements. If you are using the Project Controller module,
select the Account Category for the account. Indicate whether this Account Category requires
Employee ID or Units by checking the appropriate boxes.
Account Category
General cost category associated with the account.
Require Employee ID
Select to require entry of an employee ID on budget segment-related transactions associated with the
account.
Require Units
Select to require entry of a unit quantity on budget segment-related transactions associated with the
account.

Maintenance and Inquiry Screens 97
Subaccount Maintenance (01.270.00) Use Subaccount Maintenance (01.270.00) to define the subaccounts, which are business segment
identifiers that help maintain and report business activity by division, profit center, department, etc.,
for use with modules. If you need to add a new segment value, you must first use Flexkey Table
Maintenance (21.330.00) in the Shared Information module to enter valid values for each subaccount
segment.
Note: You must be logged on to the master company to add or change subaccounts. The master
company can be found on the Master Company Info tab in GL Setup (01.950.00).
Figure 64: Subaccount Maintenance (01.270.00)
Subaccount
Unique identifying code that distinguishes a subaccount from all other subaccounts in the database;
subaccount must correspond to existing flexkey definitions and optionally must be composed of valid
segment.
Description
Explanation of the subaccount number. The subaccount description can be up to a maximum of 30
characters.
Consol Subaccount
Use in companies with subsidiaries to link the subaccounts in individual subsidiary databases or
subaccounts in the corporate database. Accept the default or enter a different Consolidation
Subaccount to which the subaccount transactions should be posted when performing the
consolidation process. The default is the subaccount number.
Note: The Consol Subaccount does not show segments because the parent database may have
different segmenting than a subsidiary.
Subaccount Status
Use to designate whether or not the subaccount is available for additional account activity; options
are:
Active — Subaccount is active and available for data entry (available for posting from all modules
including the General Ledger).
Inactive — Subaccount is inactive and not available for data entry (cannot have entries made to it
from any module including General Ledger). Inactive subaccounts can carry a balance forward.
A change in subaccount status does not affect transactions already entered.
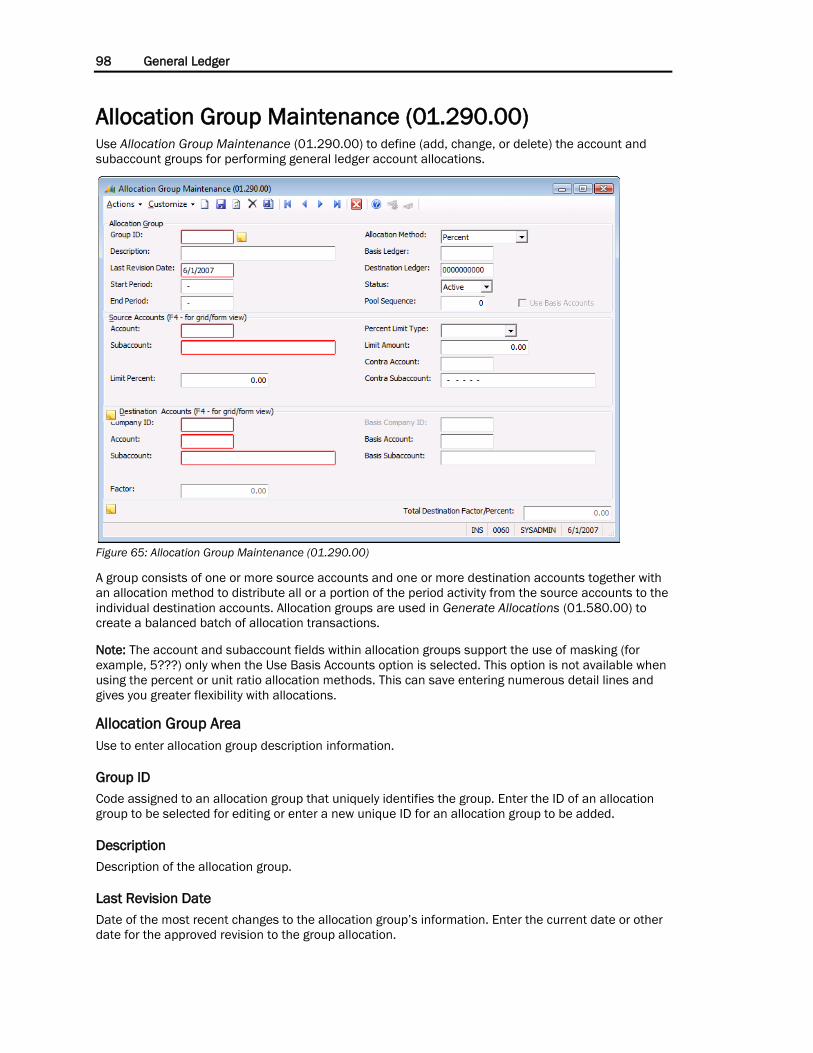
98 General Ledger
Allocation Group Maintenance (01.290.00) Use Allocation Group Maintenance (01.290.00) to define (add, change, or delete) the account and
subaccount groups for performing general ledger account allocations.
Figure 65: Allocation Group Maintenance (01.290.00)
A group consists of one or more source accounts and one or more destination accounts together with
an allocation method to distribute all or a portion of the period activity from the source accounts to the
individual destination accounts. Allocation groups are used in Generate Allocations (01.580.00) to
create a balanced batch of allocation transactions.
Note: The account and subaccount fields within allocation groups support the use of masking (for
example, 5???) only when the Use Basis Accounts option is selected. This option is not available when
using the percent or unit ratio allocation methods. This can save entering numerous detail lines and
gives you greater flexibility with allocations.
Allocation Group Area
Use to enter allocation group description information.
Group ID
Code assigned to an allocation group that uniquely identifies the group. Enter the ID of an allocation
group to be selected for editing or enter a new unique ID for an allocation group to be added.
Description
Description of the allocation group.
Last Revision Date
Date of the most recent changes to the allocation group’s information. Enter the current date or other
date for the approved revision to the group allocation.
Maintenance and Inquiry Screens 99
Start Period
Starting period for when group will be available in Generate Allocations (01.580.00); if none entered,
group is always available. When generating allocations, the software looks at the current fiscal period
and only displays groups where the current fiscal period falls between the values at Start Period and
End Period. If you leave these fields blank, the allocation group will always be available for generation.
End Period
Ending period for when group will be available in Generate Allocations (01.580.00); if none entered,
group is always available. When generating allocations, the software looks at the current fiscal period
and only displays groups where the current fiscal period falls between the values at Start Period and
End Period. If you leave these fields blank, the allocation group will always be available for generation.
Allocation Method
Method making allocations to destination accounts; options are:
Percent — Amount allocated is distributed to each destination account according to the percent
for each account (entered at Factor); total percents for all destination accounts in a group must
equal 100%.
Unit Ratio — Amount allocated is distributed to each destination account according to the ratio
between the units for each account (entered at Factor) and the total units of all destination
accounts in this group; unit used is user defined. Examples of units are number of employees or
office area in square feet. The Unit Ratio method works the same as the Percent method. The
difference is that the Unit Ratio entries do not have to equal 100.
Actual Period-to-Date — Amount allocated is distributed to each of the destination accounts
according to the ratio of each account’s period-to-date balance to the total period-to-date
balance of all destination accounts.
Actual Year-to-Date — Amount allocated is distributed to each of the destination accounts
according to the ratio of each account’s year-to-date balance to the total year-to-date balance of
all destination accounts.
Ledger Period-to-Date — Amount allocated is distributed to each of the destination accounts
according to the ratio of each account’s ledger amount for a particular period to the total ledger
amount for that period for all destination accounts.
Ledger Year-to-Date — Amount allocated is distributed to each of the destination accounts
according to the ratio of each account’s annual ledger amount to the total annual ledger amount
of all destination accounts.
Basis Ledger
Source ledger identification. Basis Ledger is available only when either Ledger Period-to-Date or
Ledger Year-To-Date has been selected as the Allocation Method (if the allocation is to be based on
balances in a ledger, the system must be told which ledger to use in the calculation). You can use the
inquiry function to look up the appropriate Ledger ID. You cannot leave this field blank if the allocation
method is Ledger Period-to-Date or Ledger Year-To-Date.
Destination Ledger
Use to enter destination ledger identification code for this allocation group. The allocation entry will be
set to post to the Destination Ledger. However, regardless of this selection, the entry will be calculated
using account balances from the Default Ledger, as specified in GL Setup (01.950.00).
100 General Ledger
Status
Current condition of the allocation group; options are:
Active — Allocation group is active
Inactive — Allocation is not active
An inactive allocation group cannot be generated.
Pool Sequence
This field is used to identify and sequence an allocation group that is used by the Project Indirect Rate
Calculator. The default value is zero. If the value is left as zero (the default), then this allocation group
will not be used by the Project Indirect Rate Calculator. Enter a positive integer (not validated) to
indicate the order in which the allocation group will be processed. This field has no effect on the GL
Generate Allocations process.
Use Basis Accounts
Click to enable Basis Company ID, Basis Account, and Basis Subaccount in the Destination Accounts
section. Use Basis Accounts is not available when the allocation is to be based on percent or unit ratio.
Source Accounts Area
Use to enter specific source account information: which accounts and subaccounts the information
will be allocated from. You can enter one or more account/subaccount combinations.
Account
Associated general ledger source account(s) of the allocation group.
Subaccount
Associated source subaccount(s) of the allocation group.
Limit Percent
Maximum percent amount of the account and subaccount balance to be allocated; 100.00 indicates
no limit.
Percent Limit Type
Calculates the limit percent amount either per allocation run or per period. If there is an amount
entered at Limit Percent, use this field to indicate the Percent Limit Type. The options are:
By Allocation — Limits are applied based on the remaining balance in the account. If the limit
percent is 50% and the allocation is generated multiple times (or other allocation groups are run
which contain this account), each subsequent allocation will limit itself to 50% of the net balance
after the previous allocations. Each time you run the allocation, you will be notified if there are
prior allocations for the period, and given the option to stop the process.
By Period — Limits are applied based on the activity for the month. If the limit percent is 50% and
the allocation is generated multiple times, the first allocation will include 50% of the activity for
the month, and subsequent allocations will be zero.
Limit Amount
Maximum dollar amount of the account and subaccount to be allocated. When an amount is entered
in this field, the software will not allocate more than the amount entered here.
Contra Account
Contra account to use to credit/debit an allocation rather than a source account. This provides a
method to allocate expenses to other accounts, while leaving the source account at its original
Maintenance and Inquiry Screens 101
balance. This is sometimes referred to as a soft allocation versus a hard allocation, which actually
expenses the amount out of an account.
Contra Subaccount
Contra subaccount to use to credit/debit an allocation rather than a source subaccount. This provides
a method to allocate expenses to other accounts, while leaving the source account at its original
balance. This is sometimes referred to as a soft allocation versus a hard allocation, which actually
expenses the amount out of an account.
Destination Accounts Area
Use to enter destination account information: which accounts and subaccounts the information will be
allocated into. You can enter one or more account/subaccount combinations.
Company ID
Company identification code and company name for the allocated amount. Company ID defaults to the
current company ID. If you enter an ID for a different company, an inter-company transaction will be
created.
The lines of the entry for the Due To/Due From accounts are created at the time the batch is released
for posting. If you print edit reports for the batch while it is still in Balanced status, you will not see
those portions of the entry.
Account
Associated general ledger destination account(s) of the allocation group.
Subaccount
Associated destination subaccount(s) of the allocation group.
Factor
Destination account and subaccount unit ratio or percentage for the allocation group. Used only when
allocations are based on Percent or Unit Ratio. Factor is used to specify the portion of the allocated
amounts to be posted to each of the destination accounts. If the allocation is using the Percent
method, the total of the Factors entered must be 100%. If the Unit Ratio method is used, the amounts
do not need to total to 100%.
Basis Company ID
Company identification code to use as a basis for performing allocations. Available only when Use
Basis Accounts is selected and can only be used with allocation methods other than Percent and Unit
Ratio.
With the other allocation methods, the distribution of the allocated amounts is determined by the
balances in certain accounts. Normally the program will base the calculation on the balances in the
Destination Accounts. Basis Company ID is provided to allow you to base the calculation on other
accounts.
Basis Account
Account that is used as a basis for performing the allocations. Available only when Use Basis Accounts
is selected and can only be used with allocation methods other than Percent and Unit Ratio.
With the other allocation methods, the distribution of the allocated amounts is determined by the
balances in certain accounts. Normally the program will base the calculation on the balances in the
Destination Accounts. Basis Account is provided to allow you to base the calculation on other
accounts.
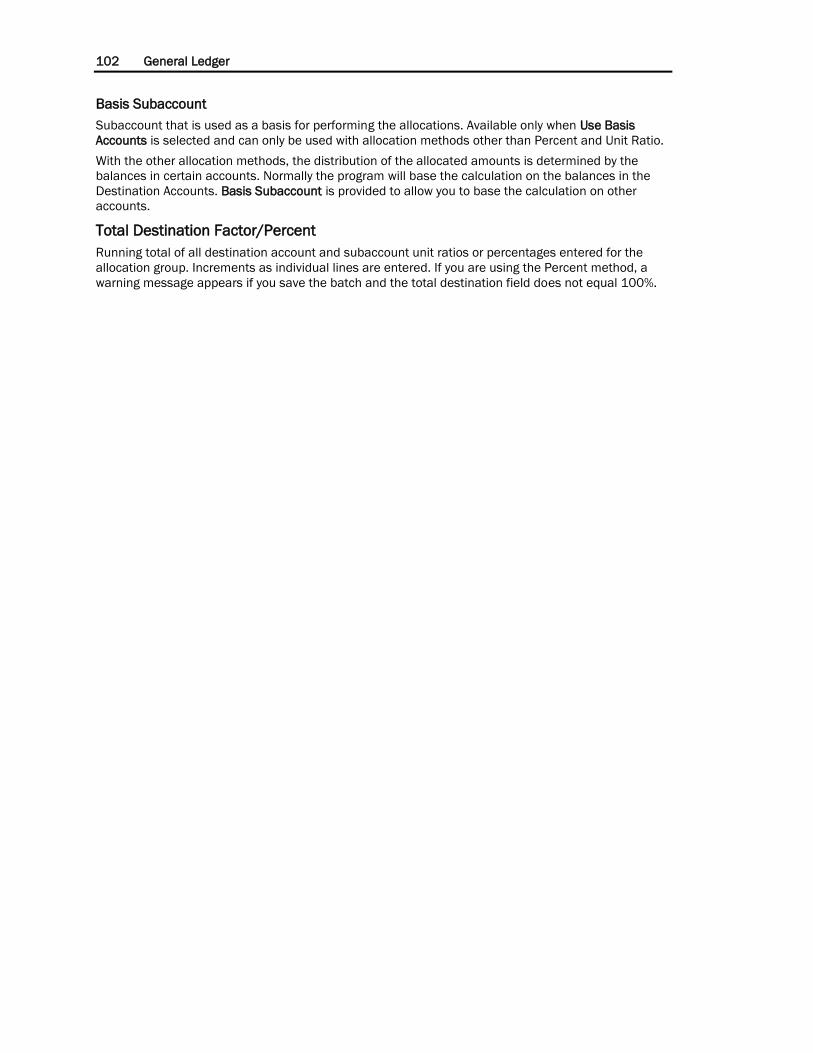
102 General Ledger
Basis Subaccount
Subaccount that is used as a basis for performing the allocations. Available only when Use Basis
Accounts is selected and can only be used with allocation methods other than Percent and Unit Ratio.
With the other allocation methods, the distribution of the allocated amounts is determined by the
balances in certain accounts. Normally the program will base the calculation on the balances in the
Destination Accounts. Basis Subaccount is provided to allow you to base the calculation on other
accounts.
Total Destination Factor/Percent
Running total of all destination account and subaccount unit ratios or percentages entered for the
allocation group. Increments as individual lines are entered. If you are using the Percent method, a
warning message appears if you save the batch and the total destination field does not equal 100%.
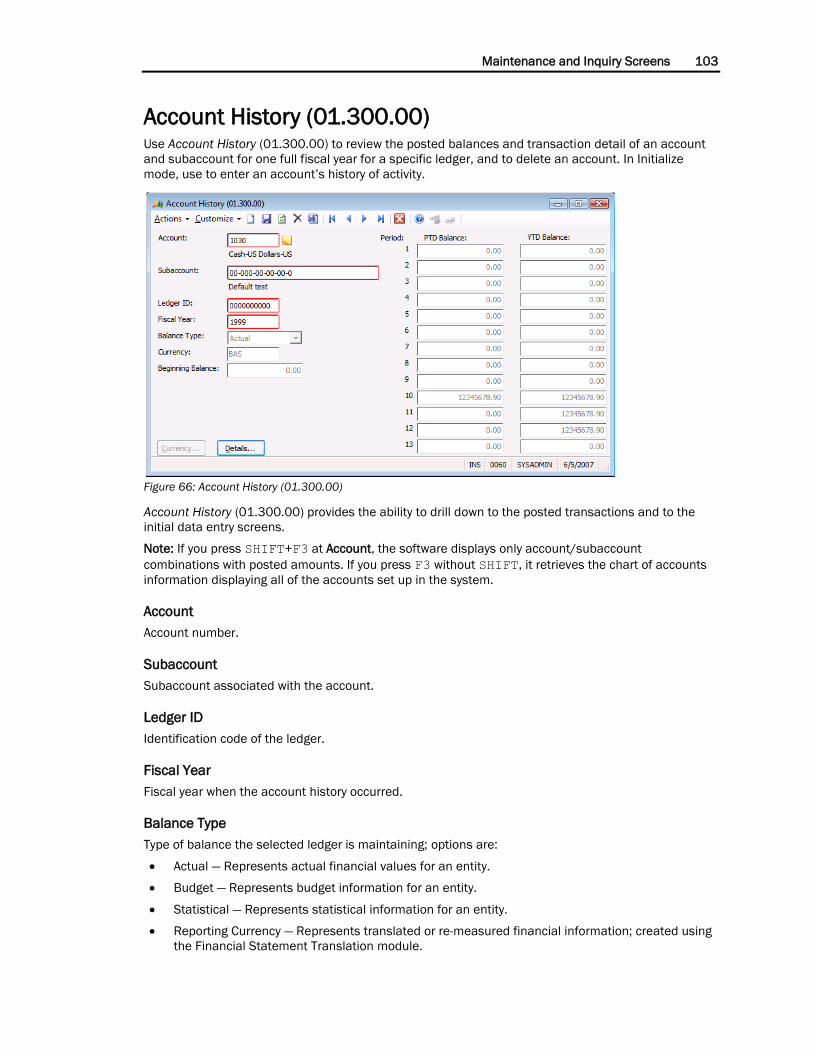
Maintenance and Inquiry Screens 103
Account History (01.300.00) Use Account History (01.300.00) to review the posted balances and transaction detail of an account
and subaccount for one full fiscal year for a specific ledger, and to delete an account. In Initialize
mode, use to enter an account’s history of activity.
Figure 66: Account History (01.300.00)
Account History (01.300.00) provides the ability to drill down to the posted transactions and to the
initial data entry screens.
Note: If you press SHIFT+F3 at Account, the software displays only account/subaccount
combinations with posted amounts. If you press F3 without SHIFT, it retrieves the chart of accounts
information displaying all of the accounts set up in the system.
Account
Account number.
Subaccount
Subaccount associated with the account.
Ledger ID
Identification code of the ledger.
Fiscal Year
Fiscal year when the account history occurred.
Balance Type
Type of balance the selected ledger is maintaining; options are:
Actual — Represents actual financial values for an entity.
Budget — Represents budget information for an entity.
Statistical — Represents statistical information for an entity.
Reporting Currency — Represents translated or re-measured financial information; created using
the Financial Statement Translation module.
104 General Ledger
Currency
ID of the currency in which the account balances are denominated.
Beginning Balance
Balance of the account and subaccount at the start of the fiscal year.
Period
Indicates the number of fiscal periods in your fiscal year.
PTD Balance
Sum of the accounts and subaccounts posted activity for each period of the fiscal year.
YTD Balance
Sum of all period-to-date balances for the account and subaccount to that point in the fiscal year.
Currency (button)
Click to access Currency Account Detail (01.300.02) to review the foreign currencies and base
currency account and subaccount beginning period- and year-to-date balances.
Details (button)
Click to access Account History Detail (01.300.01) to review the individual postings to the account
and subaccount you are viewing.
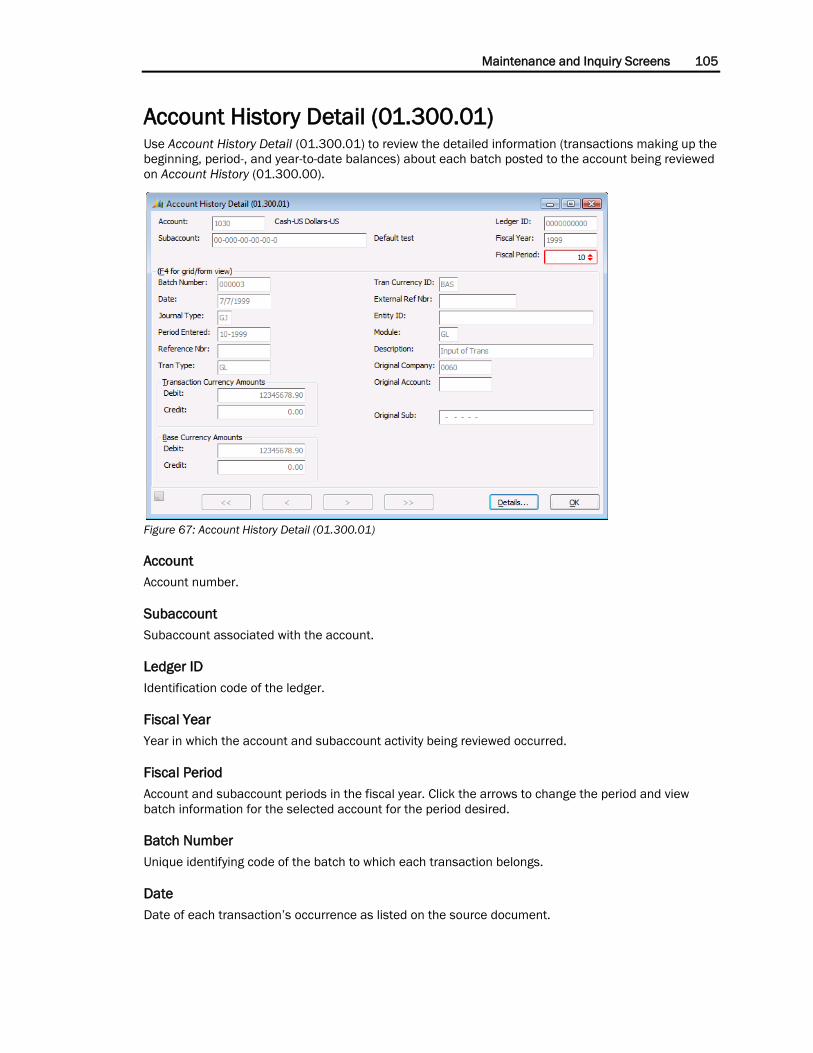
Maintenance and Inquiry Screens 105
Account History Detail (01.300.01) Use Account History Detail (01.300.01) to review the detailed information (transactions making up the
beginning, period-, and year-to-date balances) about each batch posted to the account being reviewed
on Account History (01.300.00).
Figure 67: Account History Detail (01.300.01)
Account
Account number.
Subaccount
Subaccount associated with the account.
Ledger ID
Identification code of the ledger.
Fiscal Year
Year in which the account and subaccount activity being reviewed occurred.
Fiscal Period
Account and subaccount periods in the fiscal year. Click the arrows to change the period and view
batch information for the selected account for the period desired.
Batch Number
Unique identifying code of the batch to which each transaction belongs.
Date
Date of each transaction’s occurrence as listed on the source document.
106 General Ledger
Journal Type
Identifying code of each transaction’s book of original entry; standard journal types are:
AP — Accounts Payable journal
AR — Accounts Receivable journal
BI — Flexible Billings journal
CA — Cash Manager journal
CO — Consolidation journal
GL — General Ledger journal
IC — Inter company
IN — Inventory journal
IT — Project Inventory Transaction Transfer
OP — Order Processing journal
PA — Project Allocator journal
PC — Project Controller journal
PO — Purchasing journal
PR — Payroll
TE — Travel and Expense
TM — Time and Expense for Projects
Period Entered
Fiscal period and year of each transaction’s entry.
Reference Nbr
Identifying code assigned to a transaction that distinguishes it from all other transactions in the
database.
Tran Type
Transaction document type; options are:
VO — Voucher
IN — Invoice
BO — Back order
Tran Currency ID
Identification code of the currency used to enter each transaction.
External Ref Nbr
Identification code of any external document, such as vendor invoice, customer purchase order,
associated with a transaction; external reference numbers appear only if transactions are posted to
general ledger in detail.
Entity ID
Important identification code, such as a vendor ID or inventory item ID, associated with the
transaction; IDs related to transactions appear only if transactions are posted to general ledger in
detail.
Maintenance and Inquiry Screens 107
Module
Module originally used to enter each transaction, options are:
AP — Accounts Payable
AR — Accounts Receivable
BI — Flexible Billings
CA — Cash Manager
CM — Currency Manager
GL — General Journal
IN — Inventory
IT — Project Inventory Transaction Transfer
PA — Project Allocator
PC — Project Controller
PO — Purchasing
PR — Payroll
TE — Travel and Expense
TM — Time and Expense for Projects
Description
Description of each transaction.
Original Company
Displays the name of any company to which a transaction originates from.
Original Account
Displays the number of any account to which the software originally attempted to post a transaction
but for some reason could not, such as wrong account number.
Original Sub
Displays the number of any subaccount to which the software originally attempted to post a
transaction but for some reason could not, such as wrong subaccount number.
Transaction Currency Amounts
Indicates the amount of transaction, and whether it is a debit or credit.
Base Currency Amounts
Indicates the amount of the transaction in base currency, and whether it is a debit or credit.
Details (button)
Click Details to access related source module screen for currently highlighted account history line.
Before clicking Details, position the cursor on the row for the transaction for which you need to see the
detail. For example, if you are on a line that originated in the Accounts Payable module in Voucher and
Adjustment Entry (03.010.00), clicking on the button would load Voucher and Adjustment Entry
(03.010.00) with the correct batch and document displaying on screen.
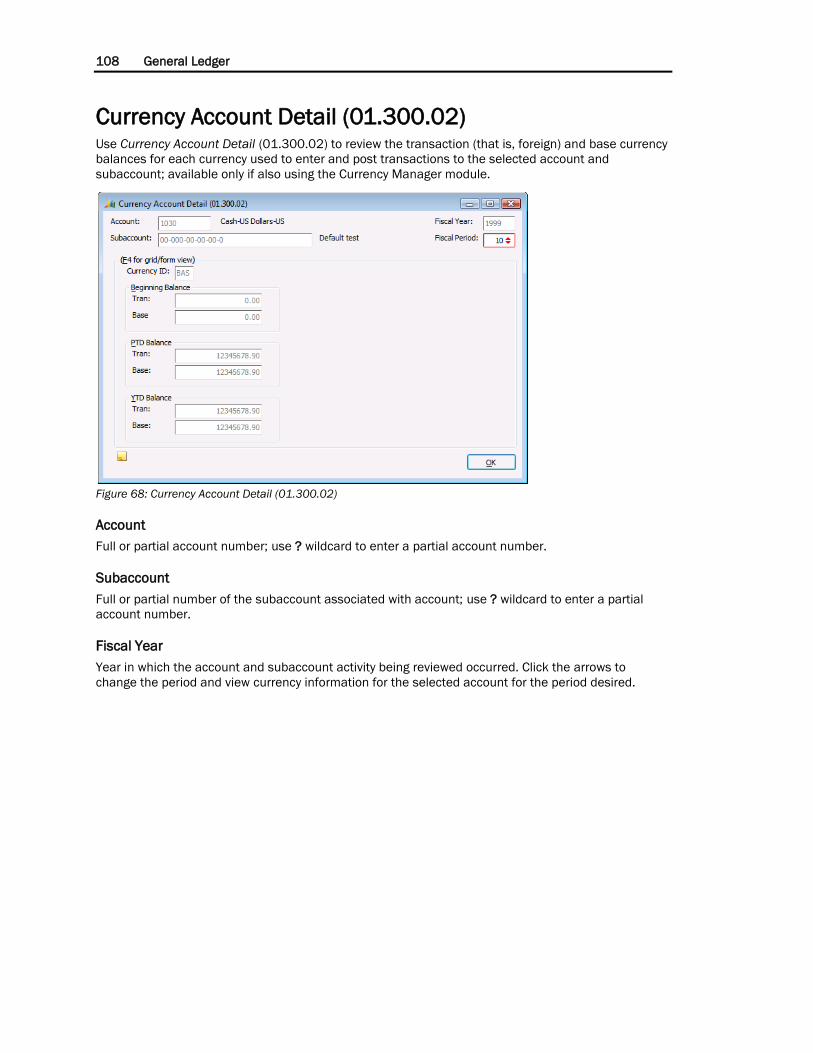
108 General Ledger
Currency Account Detail (01.300.02) Use Currency Account Detail (01.300.02) to review the transaction (that is, foreign) and base currency
balances for each currency used to enter and post transactions to the selected account and
subaccount; available only if also using the Currency Manager module.
Figure 68: Currency Account Detail (01.300.02)
Account
Full or partial account number; use ? wildcard to enter a partial account number.
Subaccount
Full or partial number of the subaccount associated with account; use ? wildcard to enter a partial
account number.
Fiscal Year
Year in which the account and subaccount activity being reviewed occurred. Click the arrows to
change the period and view currency information for the selected account for the period desired.
Maintenance and Inquiry Screens 109
Fiscal Period
Account and subaccount periods in the fiscal year.
Currency ID
Currency in which the account and subaccount’s activity is entered and posted.
Beginning Balance
The total for the beginning balance postings of each currency used to enter transactions to the
account and subaccount. The total is shown in both the Transaction and Base currencies.
Period-to-Date
The total for the period-to-date postings of each currency used to enter transactions to the account
and subaccount. The total is shown in both the Transaction and Base currencies.
Year-to-Date
The total for year-to-date postings of each currency used to enter transactions to the account and
subaccount. The total is shown in both the Transaction and Base currencies.
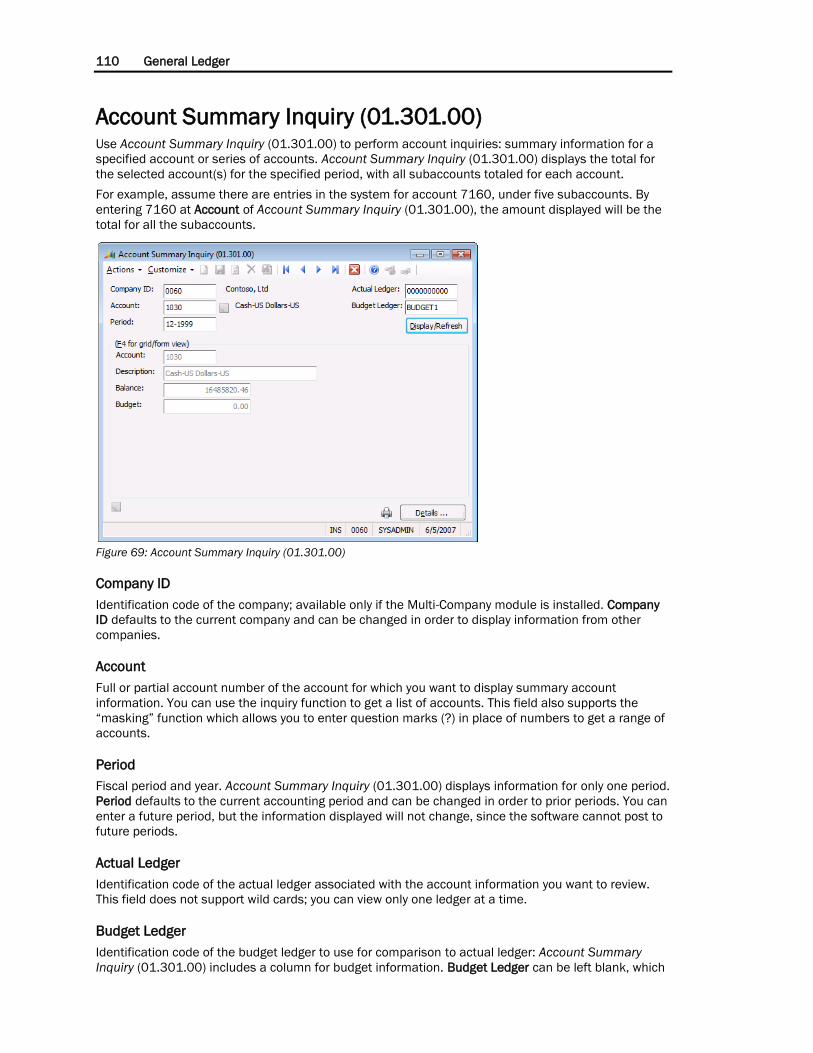
110 General Ledger
Account Summary Inquiry (01.301.00) Use Account Summary Inquiry (01.301.00) to perform account inquiries: summary information for a
specified account or series of accounts. Account Summary Inquiry (01.301.00) displays the total for
the selected account(s) for the specified period, with all subaccounts totaled for each account.
For example, assume there are entries in the system for account 7160, under five subaccounts. By
entering 7160 at Account of Account Summary Inquiry (01.301.00), the amount displayed will be the
total for all the subaccounts.
Figure 69: Account Summary Inquiry (01.301.00)
Company ID
Identification code of the company; available only if the Multi-Company module is installed. Company
ID defaults to the current company and can be changed in order to display information from other
companies.
Account
Full or partial account number of the account for which you want to display summary account
information. You can use the inquiry function to get a list of accounts. This field also supports the
“masking” function which allows you to enter question marks (?) in place of numbers to get a range of
accounts.
Period
Fiscal period and year. Account Summary Inquiry (01.301.00) displays information for only one period.
Period defaults to the current accounting period and can be changed in order to prior periods. You can
enter a future period, but the information displayed will not change, since the software cannot post to
future periods.
Actual Ledger
Identification code of the actual ledger associated with the account information you want to review.
This field does not support wild cards; you can view only one ledger at a time.
Budget Ledger
Identification code of the budget ledger to use for comparison to actual ledger: Account Summary
Inquiry (01.301.00) includes a column for budget information. Budget Ledger can be left blank, which
Maintenance and Inquiry Screens 111
causes the budget column to be zero. To view account information for a specific budget, enter the
Budget Ledger ID.
Display/Refresh
Once you have entered or changed information in Account Summary Inquiry (01.301.00), click to
display account information matching the selection criteria. The software displays the details for the
information entered.
Account (detail)
Number of the account that matches the selection criteria.
Description
Explanation of the account.
Balance
Current year-to-date balance for the account.
Budget
Year-to-date budget balance for the account.
Quick Print (printer icon)
Click the printer icon to print the information displayed.
Details (button)
Click to display Account/Subaccount Summary Inquiry (01.302.00) for the selected account to view
the account’s transactions.
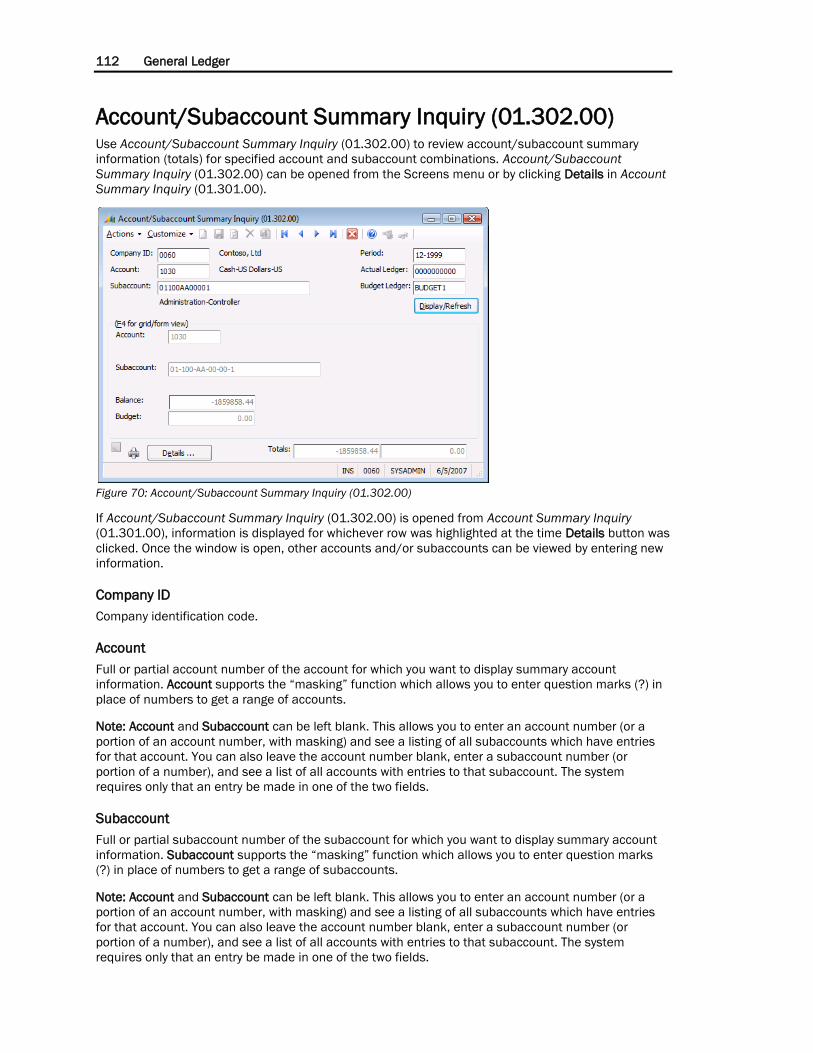
112 General Ledger
Account/Subaccount Summary Inquiry (01.302.00) Use Account/Subaccount Summary Inquiry (01.302.00) to review account/subaccount summary
information (totals) for specified account and subaccount combinations. Account/Subaccount
Summary Inquiry (01.302.00) can be opened from the Screens menu or by clicking Details in Account
Summary Inquiry (01.301.00).
Figure 70: Account/Subaccount Summary Inquiry (01.302.00)
If Account/Subaccount Summary Inquiry (01.302.00) is opened from Account Summary Inquiry
(01.301.00), information is displayed for whichever row was highlighted at the time Details button was
clicked. Once the window is open, other accounts and/or subaccounts can be viewed by entering new
information.
Company ID
Company identification code.
Account
Full or partial account number of the account for which you want to display summary account
information. Account supports the “masking” function which allows you to enter question marks (?) in
place of numbers to get a range of accounts.
Note: Account and Subaccount can be left blank. This allows you to enter an account number (or a
portion of an account number, with masking) and see a listing of all subaccounts which have entries
for that account. You can also leave the account number blank, enter a subaccount number (or
portion of a number), and see a list of all accounts with entries to that subaccount. The system
requires only that an entry be made in one of the two fields.
Subaccount
Full or partial subaccount number of the subaccount for which you want to display summary account
information. Subaccount supports the “masking” function which allows you to enter question marks
(?) in place of numbers to get a range of subaccounts.
Note: Account and Subaccount can be left blank. This allows you to enter an account number (or a
portion of an account number, with masking) and see a listing of all subaccounts which have entries
for that account. You can also leave the account number blank, enter a subaccount number (or
portion of a number), and see a list of all accounts with entries to that subaccount. The system
requires only that an entry be made in one of the two fields.
Maintenance and Inquiry Screens 113
Period
Fiscal period and year.
Actual Ledger
Identification code of the actual ledger associated with the account.
Budget Ledger
Identification code of the budget ledger to use for comparison to actual ledger.
Display/Refresh
Click to display account information matching the selection criteria.
Account (detail)
Number of the account that matches the selection criteria.
Subaccount (detail)
Number of the subaccount that matches the selection criteria.
Balance
Current year-to-date balance for the account.
Budget
Year-to-date budget balance for the account.
Quick Print (printer icon)
Click the printer icon to print the information displayed.
Details (button)
Click to display Account/Subaccount Detail Inquiry (01.303.00) to review details about the selected
transaction.
Totals
Total balance and budget for the accounts displayed in the selection.
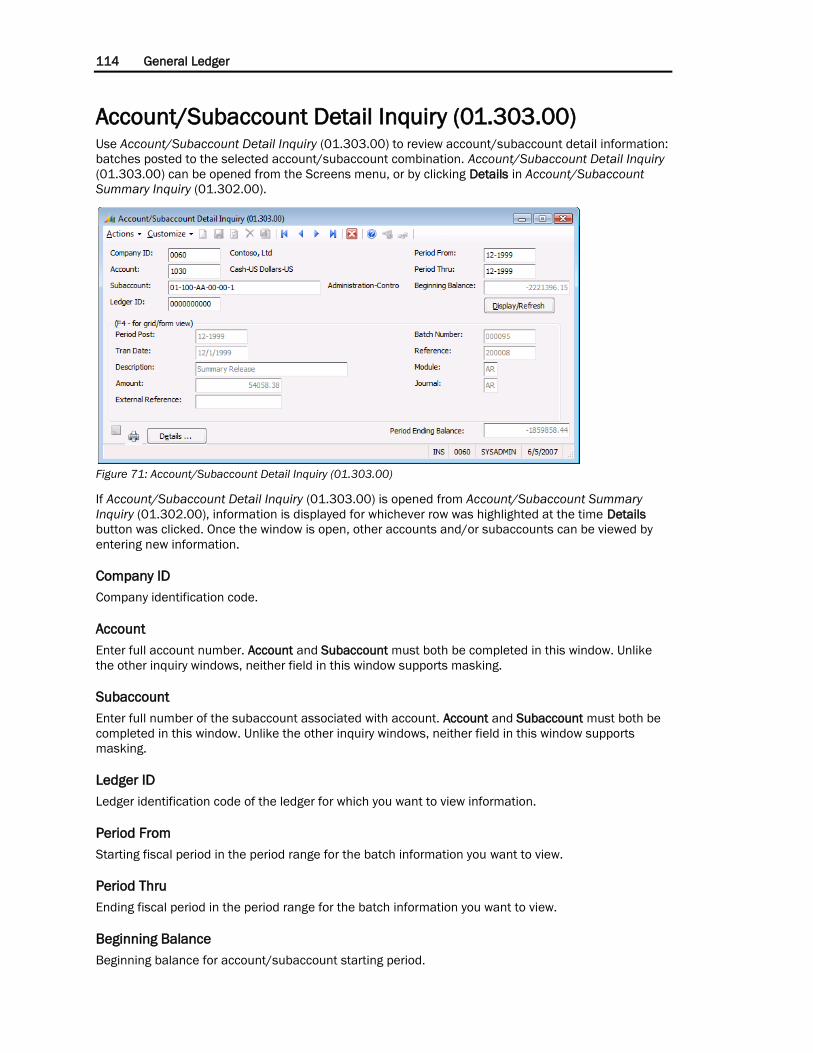
114 General Ledger
Account/Subaccount Detail Inquiry (01.303.00) Use Account/Subaccount Detail Inquiry (01.303.00) to review account/subaccount detail information:
batches posted to the selected account/subaccount combination. Account/Subaccount Detail Inquiry
(01.303.00) can be opened from the Screens menu, or by clicking Details in Account/Subaccount
Summary Inquiry (01.302.00).
Figure 71: Account/Subaccount Detail Inquiry (01.303.00)
If Account/Subaccount Detail Inquiry (01.303.00) is opened from Account/Subaccount Summary
Inquiry (01.302.00), information is displayed for whichever row was highlighted at the time Details
button was clicked. Once the window is open, other accounts and/or subaccounts can be viewed by
entering new information.
Company ID
Company identification code.
Account
Enter full account number. Account and Subaccount must both be completed in this window. Unlike
the other inquiry windows, neither field in this window supports masking.
Subaccount
Enter full number of the subaccount associated with account. Account and Subaccount must both be
completed in this window. Unlike the other inquiry windows, neither field in this window supports
masking.
Ledger ID
Ledger identification code of the ledger for which you want to view information.
Period From
Starting fiscal period in the period range for the batch information you want to view.
Period Thru
Ending fiscal period in the period range for the batch information you want to view.
Beginning Balance
Beginning balance for account/subaccount starting period.
Maintenance and Inquiry Screens 115
Display/Refresh
Click to display transactions that match the selection criteria.
Period Post
Period transaction was posted.
Tran Date
Date of the transaction.
Description
Description of the transaction.
Amount
Amount of the transaction.
External Reference
Outside company’s reference number, such as customer purchase order number.
Batch Number
Number of the batch in which transaction was created.
Reference
Unique number assigned to further identify the transaction.
Module
Source module that created the transaction.
Journal
Source journal in which transaction was entered.
Quick Print (printer icon)
Click the printer icon to print information displayed.
Details (button)
Click to view source window of the selected transaction. To view the original data entry window for a
batch, position the cursor on the row for that batch and click Details. For example, if you are on a line
that originated in the Accounts Payable module in Voucher and Adjustment Entry (03.010.00), clicking
on the button will load Voucher and Adjustment Entry (03.010.00) with the correct batch and
document displaying on screen.
Period Ending Balance
Ending balance for account/subaccount ending period.
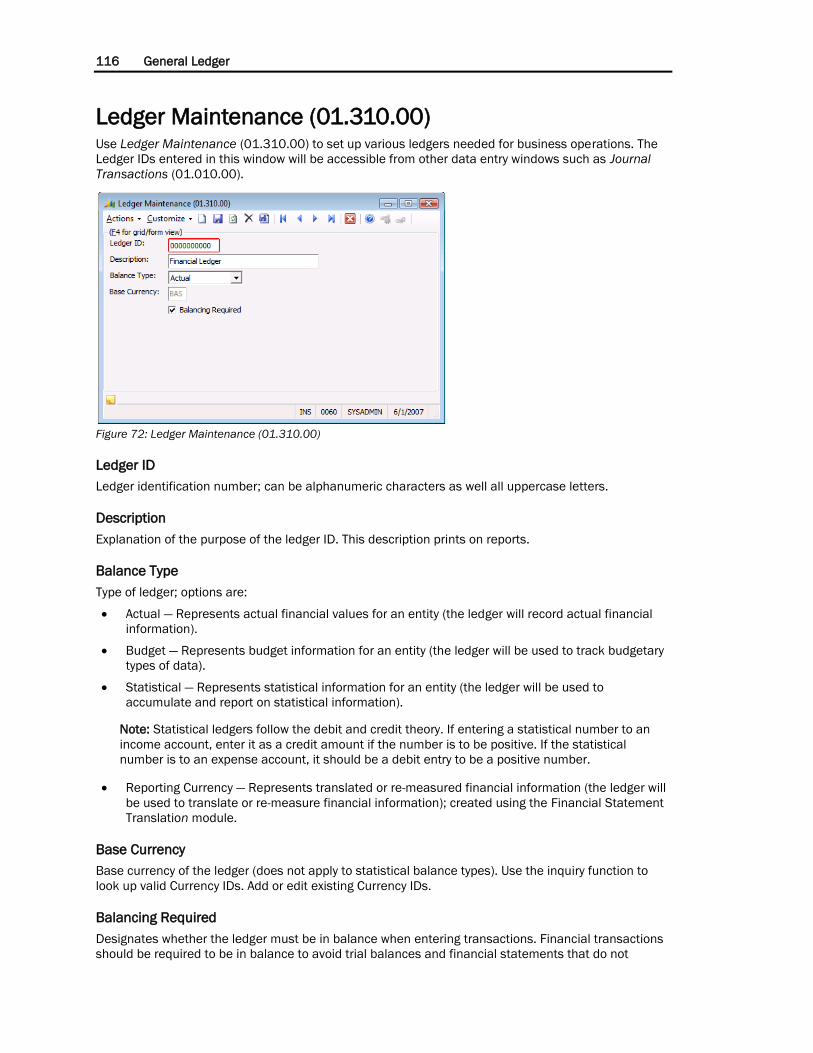
116 General Ledger
Ledger Maintenance (01.310.00) Use Ledger Maintenance (01.310.00) to set up various ledgers needed for business operations. The
Ledger IDs entered in this window will be accessible from other data entry windows such as Journal
Transactions (01.010.00).
Figure 72: Ledger Maintenance (01.310.00)
Ledger ID
Ledger identification number; can be alphanumeric characters as well all uppercase letters.
Description
Explanation of the purpose of the ledger ID. This description prints on reports.
Balance Type
Type of ledger; options are:
Actual — Represents actual financial values for an entity (the ledger will record actual financial
information).
Budget — Represents budget information for an entity (the ledger will be used to track budgetary
types of data).
Statistical — Represents statistical information for an entity (the ledger will be used to
accumulate and report on statistical information).
Note: Statistical ledgers follow the debit and credit theory. If entering a statistical number to an
income account, enter it as a credit amount if the number is to be positive. If the statistical
number is to an expense account, it should be a debit entry to be a positive number.
Reporting Currency — Represents translated or re-measured financial information (the ledger will
be used to translate or re-measure financial information); created using the Financial Statement
Translation module.
Base Currency
Base currency of the ledger (does not apply to statistical balance types). Use the inquiry function to
look up valid Currency IDs. Add or edit existing Currency IDs.
Balancing Required
Designates whether the ledger must be in balance when entering transactions. Financial transactions
should be required to be in balance to avoid trial balances and financial statements that do not

Maintenance and Inquiry Screens 117
balance. Statistical ledgers would not necessarily need to be kept in balance. Select to require that a
ledger must balance before it can be released and posted.
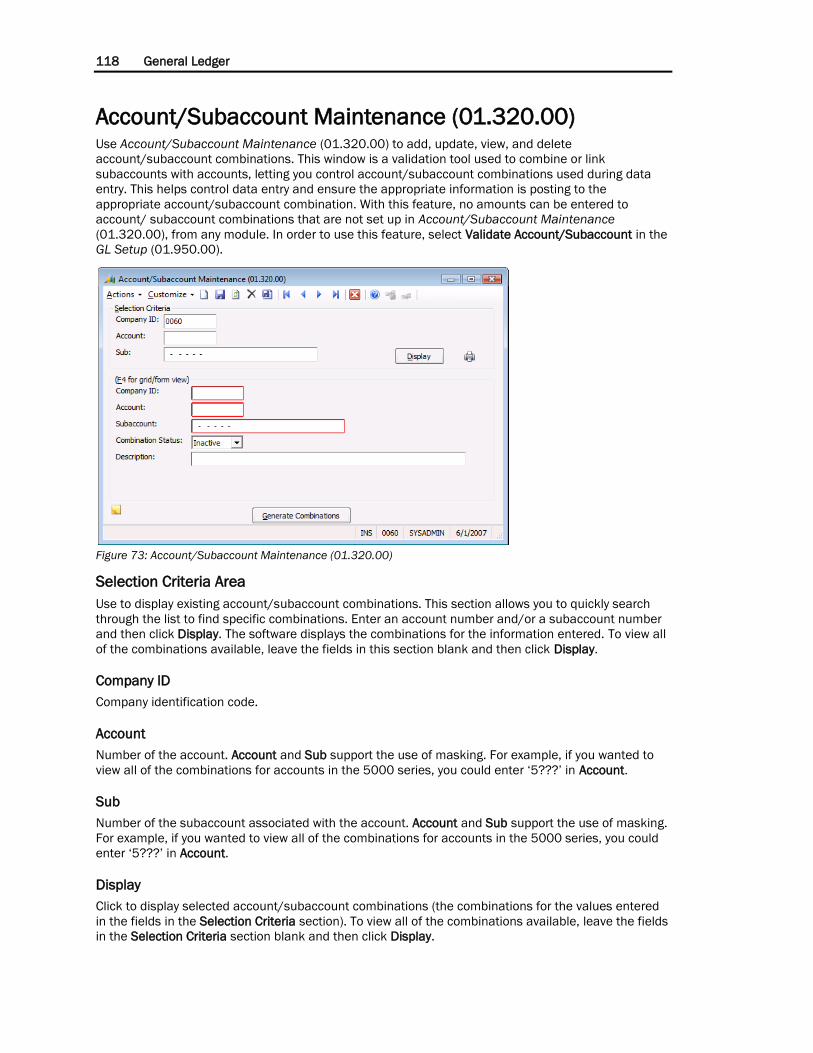
118 General Ledger
Account/Subaccount Maintenance (01.320.00) Use Account/Subaccount Maintenance (01.320.00) to add, update, view, and delete
account/subaccount combinations. This window is a validation tool used to combine or link
subaccounts with accounts, letting you control account/subaccount combinations used during data
entry. This helps control data entry and ensure the appropriate information is posting to the
appropriate account/subaccount combination. With this feature, no amounts can be entered to
account/ subaccount combinations that are not set up in Account/Subaccount Maintenance
(01.320.00), from any module. In order to use this feature, select Validate Account/Subaccount in the
GL Setup (01.950.00).
Figure 73: Account/Subaccount Maintenance (01.320.00)
Selection Criteria Area
Use to display existing account/subaccount combinations. This section allows you to quickly search
through the list to find specific combinations. Enter an account number and/or a subaccount number
and then click Display. The software displays the combinations for the information entered. To view all
of the combinations available, leave the fields in this section blank and then click Display.
Company ID
Company identification code.
Account
Number of the account. Account and Sub support the use of masking. For example, if you wanted to
view all of the combinations for accounts in the 5000 series, you could enter ‘5???’ in Account.
Sub
Number of the subaccount associated with the account. Account and Sub support the use of masking.
For example, if you wanted to view all of the combinations for accounts in the 5000 series, you could
enter ‘5???’ in Account.
Display
Click to display selected account/subaccount combinations (the combinations for the values entered
in the fields in the Selection Criteria section). To view all of the combinations available, leave the fields
in the Selection Criteria section blank and then click Display.
Maintenance and Inquiry Screens 119
Quick Print (printer icon)
Click the printer icon to print the Acct/Sub Maintenance – Valid Account Combinations report for the
data entered in the Selection Criteria section. To print a report of all combinations, leave the fields in
the Selection Criteria section blank. To print a report for a group of accounts or subaccounts, enter the
information in the Selection Criteria section accordingly. Use question marks (?) to get a range of
account or subaccount numbers.
You do not need to click Display prior to printing.
Company ID
Company identification code. The company ID defaults from the Company ID in the Selection Criteria
section of this window. You cannot change the company ID displayed here.
Account
Number of the account in the combination. This is the account number to be included in a validation.
Use the inquiry function for a list of valid accounts.
Subaccount
Number of the subaccount associated with the account in the combination. This is the subaccount
number to be included in a validation. Use the inquiry function for a list of valid subaccounts.
Depending on the validation options selected, the inquiry function may list only values for the
individual segments.
Combination Status
Status of the combination; options are:
Active
Inactive
You cannot enter a combination that is inactive during data entry. However inactive combinations will
still be reflected in financial statements.
Description
Explanation of the account/subaccount combination. The software defaults Description to the
description for the account number entered in this combination. Change the description as necessary.
Generate Combinations (button)
Click Generate Combinations to display Account/Subaccount Maintenance Worksheet (01.320.01) to
add existing account/subaccount combinations. From within Account/Subaccount Maintenance
Worksheet (01.320.01), you can access several subscreens allowing you to quickly generate
account/subaccount combinations when a new account or subaccount has been added to the chart of
accounts. Once you generate combos, the new account/subaccount combinations are displayed in
this worksheet.
When setting up combinations for the first time, the combinations must be entered manually for the
master company, as there are no existing combinations from which to generate.
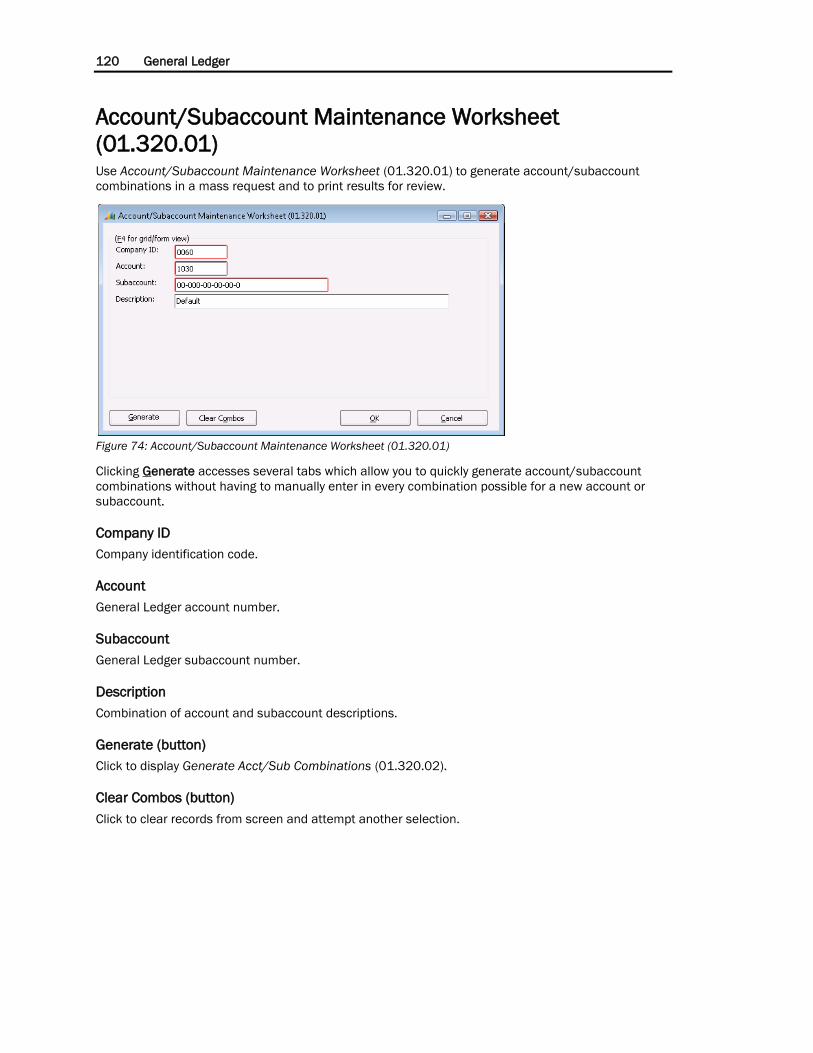
120 General Ledger
Account/Subaccount Maintenance Worksheet
(01.320.01) Use Account/Subaccount Maintenance Worksheet (01.320.01) to generate account/subaccount
combinations in a mass request and to print results for review.
Figure 74: Account/Subaccount Maintenance Worksheet (01.320.01)
Clicking Generate accesses several tabs which allow you to quickly generate account/subaccount
combinations without having to manually enter in every combination possible for a new account or
subaccount.
Company ID
Company identification code.
Account
General Ledger account number.
Subaccount
General Ledger subaccount number.
Description
Combination of account and subaccount descriptions.
Generate (button)
Click to display Generate Acct/Sub Combinations (01.320.02).
Clear Combos (button)
Click to clear records from screen and attempt another selection.
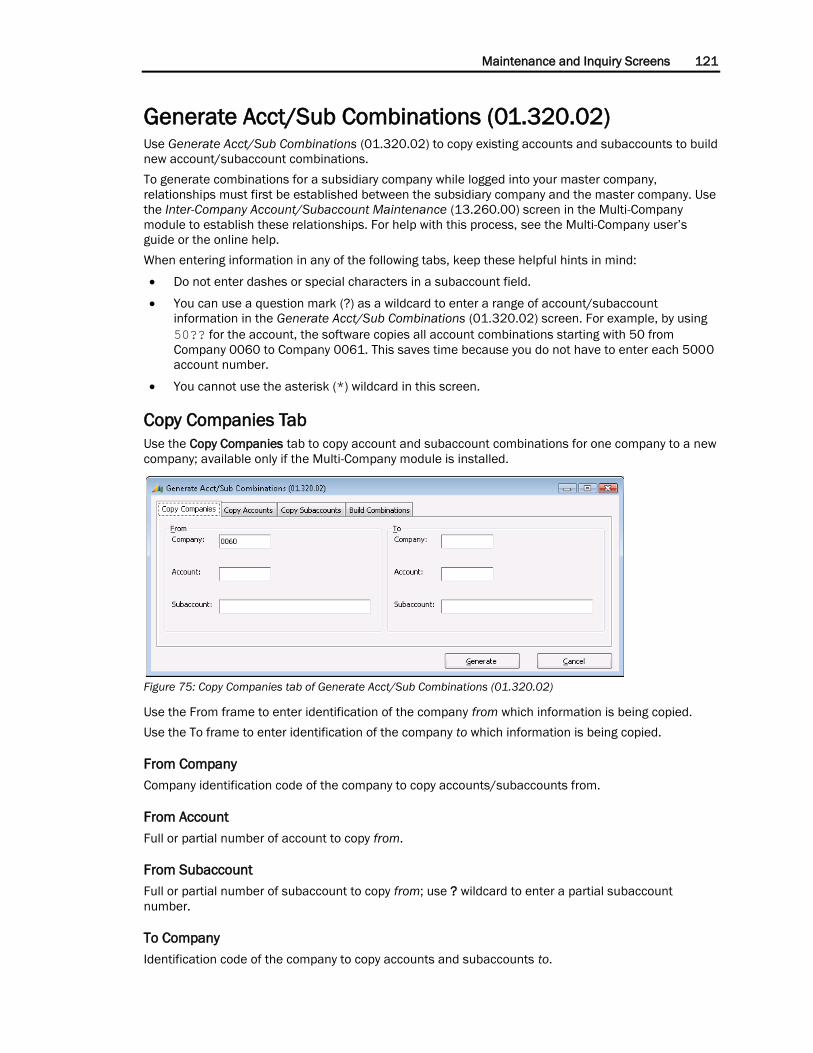
Maintenance and Inquiry Screens 121
Generate Acct/Sub Combinations (01.320.02) Use Generate Acct/Sub Combinations (01.320.02) to copy existing accounts and subaccounts to build
new account/subaccount combinations.
To generate combinations for a subsidiary company while logged into your master company,
relationships must first be established between the subsidiary company and the master company. Use
the Inter-Company Account/Subaccount Maintenance (13.260.00) screen in the Multi-Company
module to establish these relationships. For help with this process, see the Multi-Company user’s
guide or the online help.
When entering information in any of the following tabs, keep these helpful hints in mind:
Do not enter dashes or special characters in a subaccount field.
You can use a question mark (?) as a wildcard to enter a range of account/subaccount
information in the Generate Acct/Sub Combinations (01.320.02) screen. For example, by using
50?? for the account, the software copies all account combinations starting with 50 from
Company 0060 to Company 0061. This saves time because you do not have to enter each 5000
account number.
You cannot use the asterisk (*) wildcard in this screen.
Copy Companies Tab
Use the Copy Companies tab to copy account and subaccount combinations for one company to a new
company; available only if the Multi-Company module is installed.
Figure 75: Copy Companies tab of Generate Acct/Sub Combinations (01.320.02)
Use the From frame to enter identification of the company from which information is being copied.
Use the To frame to enter identification of the company to which information is being copied.
From Company
Company identification code of the company to copy accounts/subaccounts from.
From Account
Full or partial number of account to copy from.
From Subaccount
Full or partial number of subaccount to copy from; use ? wildcard to enter a partial subaccount
number.
To Company
Identification code of the company to copy accounts and subaccounts to.

122 General Ledger
To Account
Full or partial number of the account to copy to.
To Subaccount
Full or partial number of the subaccount to copy to.
Note: The Account and Subaccount fields default from the FROM side and cannot be entered.
Copy Accounts Tab
Use the Copy Accounts tab to copy the account structure of an existing account to a new account or
from one account to another account.
Figure 76: Copy Accounts tab of Generate Acct/Sub Combinations (01.320.02)
Use the From frame to enter identification of the account from which information is being copied.
Use the To frame to enter identification of the account to which information is being copied.
From Account
Number of account to copy from.
From Company
Identification code of company to copy accounts from.
From Subaccount
Full or partial number of subaccount to copy from.
To Account
Number of account to copy to.
To Company
Identification code of company to copy accounts to.
To Subaccount
Number of subaccount to copy to.
Note: The Account and Subaccount fields default from the FROM side and cannot be entered.
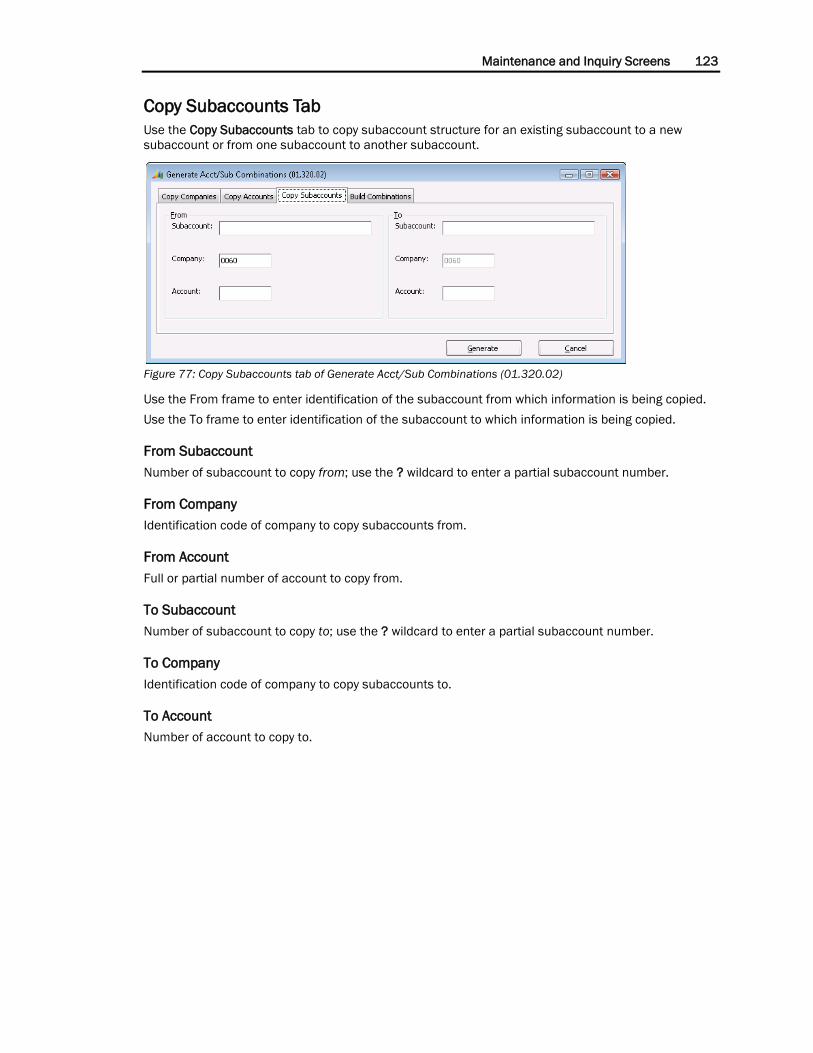
Maintenance and Inquiry Screens 123
Copy Subaccounts Tab
Use the Copy Subaccounts tab to copy subaccount structure for an existing subaccount to a new
subaccount or from one subaccount to another subaccount.
Figure 77: Copy Subaccounts tab of Generate Acct/Sub Combinations (01.320.02)
Use the From frame to enter identification of the subaccount from which information is being copied.
Use the To frame to enter identification of the subaccount to which information is being copied.
From Subaccount
Number of subaccount to copy from; use the ? wildcard to enter a partial subaccount number.
From Company
Identification code of company to copy subaccounts from.
From Account
Full or partial number of account to copy from.
To Subaccount
Number of subaccount to copy to; use the ? wildcard to enter a partial subaccount number.
To Company
Identification code of company to copy subaccounts to.
To Account
Number of account to copy to.
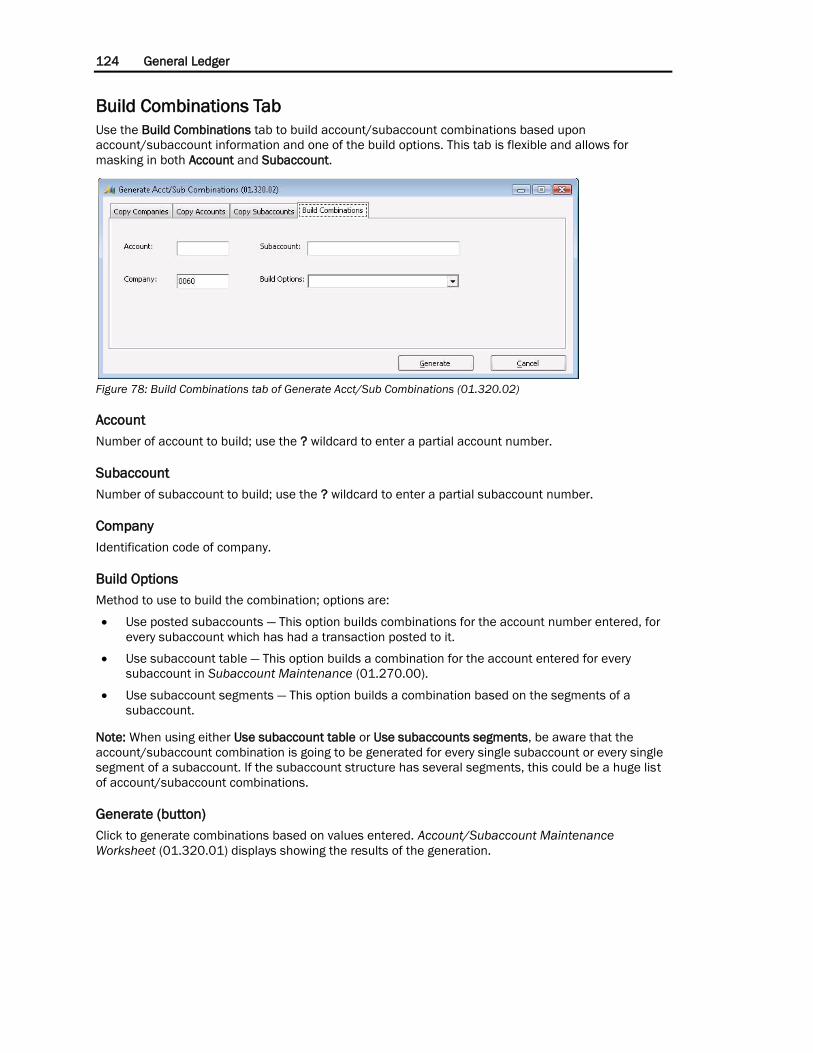
124 General Ledger
Build Combinations Tab
Use the Build Combinations tab to build account/subaccount combinations based upon
account/subaccount information and one of the build options. This tab is flexible and allows for
masking in both Account and Subaccount.
Figure 78: Build Combinations tab of Generate Acct/Sub Combinations (01.320.02)
Account
Number of account to build; use the ? wildcard to enter a partial account number.
Subaccount
Number of subaccount to build; use the ? wildcard to enter a partial subaccount number.
Company
Identification code of company.
Build Options
Method to use to build the combination; options are:
Use posted subaccounts — This option builds combinations for the account number entered, for
every subaccount which has had a transaction posted to it.
Use subaccount table — This option builds a combination for the account entered for every
subaccount in Subaccount Maintenance (01.270.00).
Use subaccount segments — This option builds a combination based on the segments of a
subaccount.
Note: When using either Use subaccount table or Use subaccounts segments, be aware that the
account/subaccount combination is going to be generated for every single subaccount or every single
segment of a subaccount. If the subaccount structure has several segments, this could be a huge list
of account/subaccount combinations.
Generate (button)
Click to generate combinations based on values entered. Account/Subaccount Maintenance
Worksheet (01.320.01) displays showing the results of the generation.
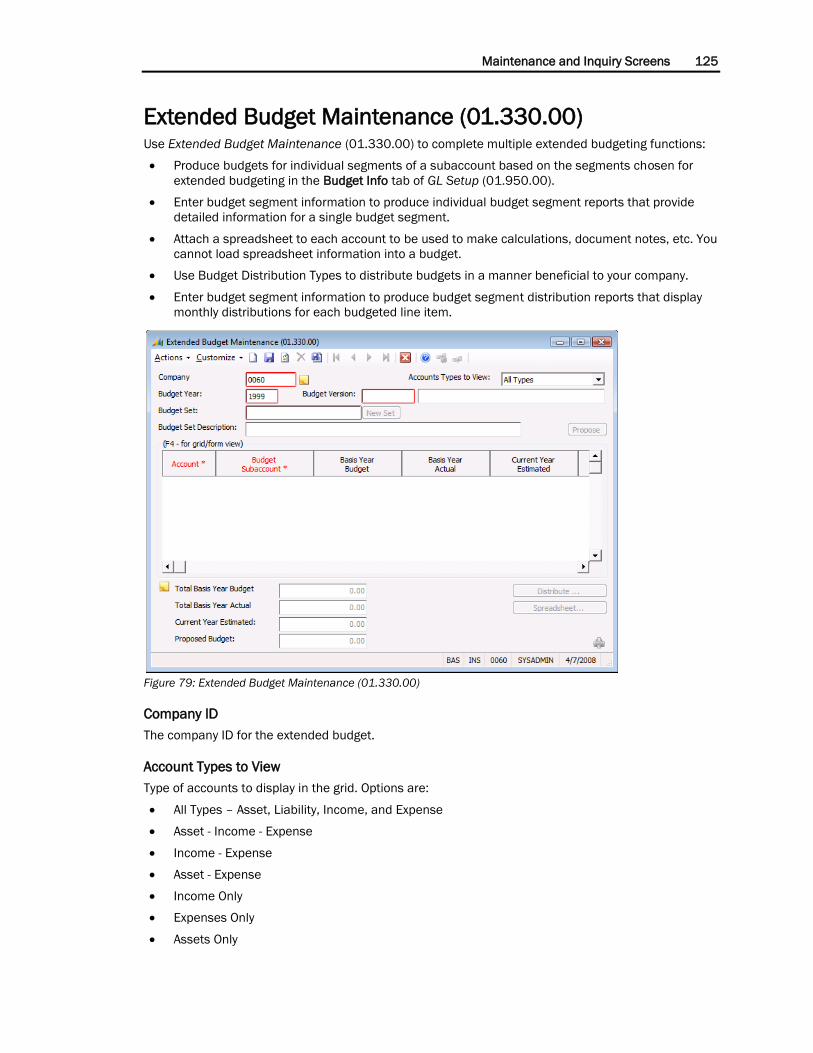
Maintenance and Inquiry Screens 125
Extended Budget Maintenance (01.330.00) Use Extended Budget Maintenance (01.330.00) to complete multiple extended budgeting functions:
Produce budgets for individual segments of a subaccount based on the segments chosen for
extended budgeting in the Budget Info tab of GL Setup (01.950.00).
Enter budget segment information to produce individual budget segment reports that provide
detailed information for a single budget segment.
Attach a spreadsheet to each account to be used to make calculations, document notes, etc. You
cannot load spreadsheet information into a budget.
Use Budget Distribution Types to distribute budgets in a manner beneficial to your company.
Enter budget segment information to produce budget segment distribution reports that display
monthly distributions for each budgeted line item.
Figure 79: Extended Budget Maintenance (01.330.00)
Company ID
The company ID for the extended budget.
Account Types to View
Type of accounts to display in the grid. Options are:
All Types – Asset, Liability, Income, and Expense
Asset - Income - Expense
Income - Expense
Asset - Expense
Income Only
Expenses Only
Assets Only

126 General Ledger
Budget Year
Fiscal year for the budget being prepared. Budget Year defaults from Default Year on the Budget Info
tab of GL Setup (01.950.00) . You can enter any valid budget year.
Budget Version
Budget ledger for the budget being prepared. Budget Version is defined in Budget Version
Maintenance (01.370.00).
Budget Version Description
The description of the Budget Version defined in Budget Version Maintenance (01.370.00).
Budget Set
The subaccount for which you wish to enter extended budget information. Available subaccount
segments are defined on Flexkey Definition (21.320.00) in the Shared Information module.
The number of segments of the subaccount displayed is based on the segments selected for extended
budgeting in the Budget Info tab of GL Setup (01.950.00).
Note: After Budget Set is populated, all accounts that had activity in the prior year that match the
segment entered display in the grid. If an account did not have activity, it is not displayed. However,
you can enter accounts which have had no activity if necessary.
Note: Instead of entering a specific subaccount, leave Budget Set blank and click New Set which
provides greater flexibility in the subaccount selected.
New Set (button)
Click New Set to open Create Budget Set (01.330.02) and define a new budget set.
Budget Set Description
The description of the subaccount selected in Budget Set.
Proposed (button)
Click Propose to open Set Proposed Budget (01.330.04) and update the proposed budget total.
Account (grid)
Number of the account that matches the criteria specified in Account Types to View.
Budget Subaccount (grid)
Number of the subaccount that matches the criteria specified in Budget Set.
Basis Year Budget (grid)
Amount of the current year budget for the account entered.
Basis Year Actual (grid)
The year-to-date general ledger balance for the account as of the last closed accounting period.
Current Year Estimated (grid)
Total estimated income and expense to be incurred during current fiscal year for the account.
Proposed Budget (grid)
Total proposed annual budget amount proposed for the account. This amount is distributed to each
period based on the distribution type.
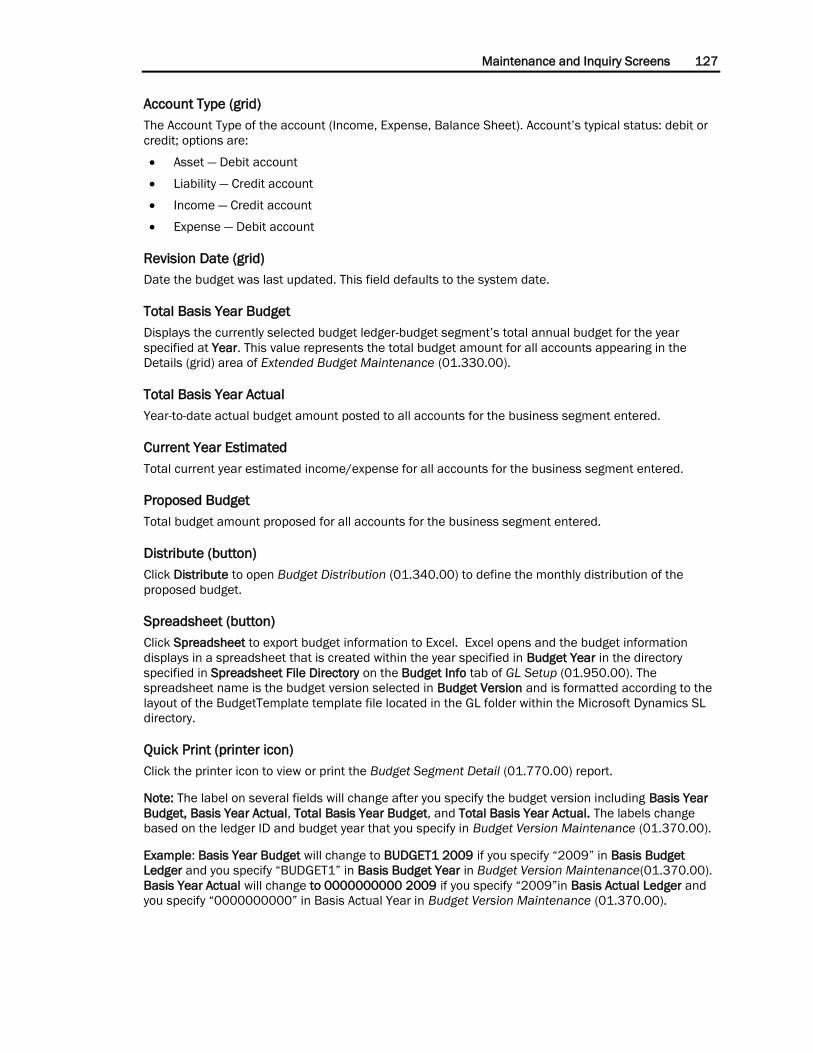
Maintenance and Inquiry Screens 127
Account Type (grid)
The Account Type of the account (Income, Expense, Balance Sheet). Account’s typical status: debit or
credit; options are:
Asset — Debit account
Liability — Credit account
Income — Credit account
Expense — Debit account
Revision Date (grid)
Date the budget was last updated. This field defaults to the system date.
Total Basis Year Budget
Displays the currently selected budget ledger-budget segment’s total annual budget for the year
specified at Year. This value represents the total budget amount for all accounts appearing in the
Details (grid) area of Extended Budget Maintenance (01.330.00).
Total Basis Year Actual
Year-to-date actual budget amount posted to all accounts for the business segment entered.
Current Year Estimated
Total current year estimated income/expense for all accounts for the business segment entered.
Proposed Budget
Total budget amount proposed for all accounts for the business segment entered.
Distribute (button)
Click Distribute to open Budget Distribution (01.340.00) to define the monthly distribution of the
proposed budget.
Spreadsheet (button)
Click Spreadsheet to export budget information to Excel. Excel opens and the budget information
displays in a spreadsheet that is created within the year specified in Budget Year in the directory
specified in Spreadsheet File Directory on the Budget Info tab of GL Setup (01.950.00). The
spreadsheet name is the budget version selected in Budget Version and is formatted according to the
layout of the BudgetTemplate template file located in the GL folder within the Microsoft Dynamics SL
directory.
Quick Print (printer icon)
Click the printer icon to view or print the Budget Segment Detail (01.770.00) report.
Note: The label on several fields will change after you specify the budget version including Basis Year
Budget, Basis Year Actual, Total Basis Year Budget, and Total Basis Year Actual. The labels change
based on the ledger ID and budget year that you specify in Budget Version Maintenance (01.370.00).
Example: Basis Year Budget will change to BUDGET1 2009 if you specify “2009” in Basis Budget
Ledger and you specify “BUDGET1” in Basis Budget Year in Budget Version Maintenance(01.370.00).
Basis Year Actual will change to 0000000000 2009 if you specify “2009”in Basis Actual Ledger and
you specify “0000000000” in Basis Actual Year in Budget Version Maintenance (01.370.00).
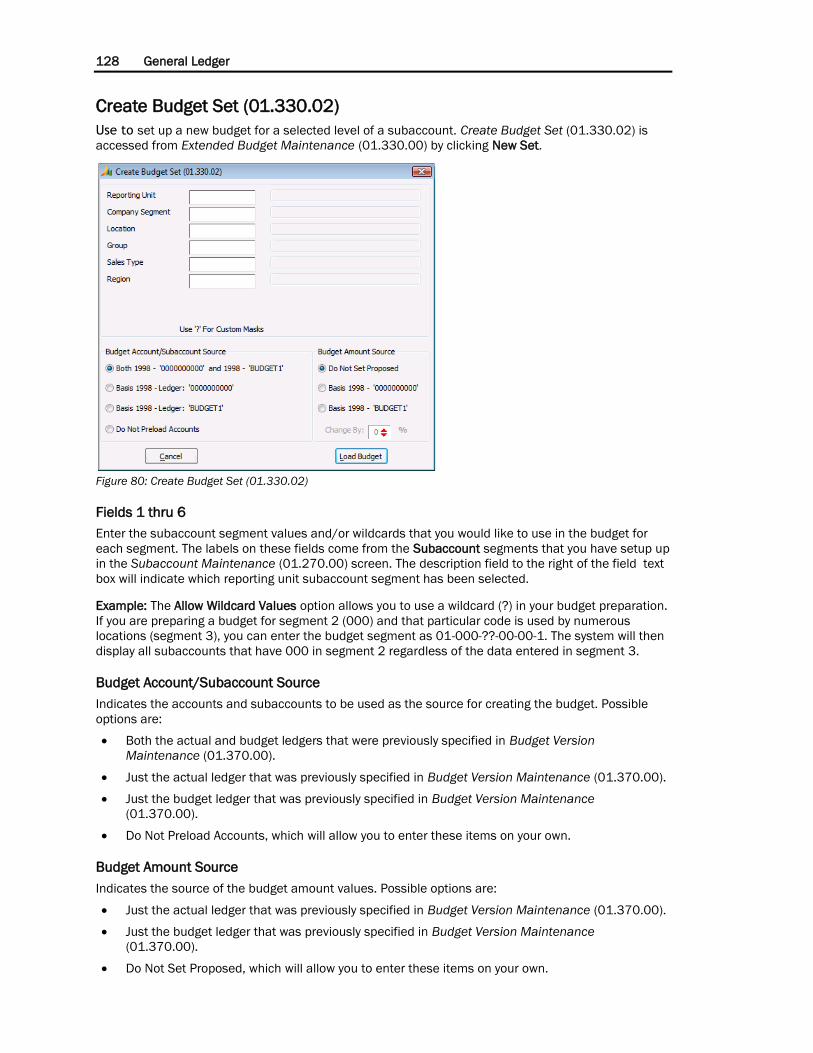
128 General Ledger
Create Budget Set (01.330.02)
Use to set up a new budget for a selected level of a subaccount. Create Budget Set (01.330.02) is
accessed from Extended Budget Maintenance (01.330.00) by clicking New Set.
Figure 80: Create Budget Set (01.330.02)
Fields 1 thru 6
Enter the subaccount segment values and/or wildcards that you would like to use in the budget for
each segment. The labels on these fields come from the Subaccount segments that you have setup up
in the Subaccount Maintenance (01.270.00) screen. The description field to the right of the field text
box will indicate which reporting unit subaccount segment has been selected.
Example: The Allow Wildcard Values option allows you to use a wildcard (?) in your budget preparation.
If you are preparing a budget for segment 2 (000) and that particular code is used by numerous
locations (segment 3), you can enter the budget segment as 01-000-??-00-00-1. The system will then
display all subaccounts that have 000 in segment 2 regardless of the data entered in segment 3.
Budget Account/Subaccount Source
Indicates the accounts and subaccounts to be used as the source for creating the budget. Possible
options are:
Both the actual and budget ledgers that were previously specified in Budget Version
Maintenance (01.370.00).
Just the actual ledger that was previously specified in Budget Version Maintenance (01.370.00).
Just the budget ledger that was previously specified in Budget Version Maintenance
(01.370.00).
Do Not Preload Accounts, which will allow you to enter these items on your own.
Budget Amount Source
Indicates the source of the budget amount values. Possible options are:
Just the actual ledger that was previously specified in Budget Version Maintenance (01.370.00).
Just the budget ledger that was previously specified in Budget Version Maintenance
(01.370.00).
Do Not Set Proposed, which will allow you to enter these items on your own.

Maintenance and Inquiry Screens 129
Note: If you choose to base the amounts on your previously specified ledgers, you do have the option
of changing these amounts by a specified percentage.
Load Budget (button)
Click Load Budget to bring the information that matches your selections into Extended Budget
Maintenance (01.330.00).
Set Proposed Budget (01.330.04)
Set Proposed Budget (01.330.04)allows you to create a proposed budget based on either the Actual
Ledger or the Budget Ledger. You can adjust the amount up or down by percent.
Figure 81: Set Proposed Budget (01.330.04)
Set Proposed Budget Column Based on Area
The Set Proposed Budget Column Based on area of the screen allows you to choose whether you want
to base your proposed budget on the Basis Actual Ledger or the Basis Budget Ledger information.
This information will then populate the Proposed Budget column in the Extended Budget Maintenance
(01.330.00) screen.
Option1:
Selecting this option allows you to select the Basis Actual Ledger information which is stored in the
Budget Version Maintenance (01.370.00) screen for a particular Company ID and year combination.
The description of this option is populated based on the Basis Actual Year and Basis Actual Ledger
fields in the Budget Version Maintenance (01.370.00) screen and will change based on the Company
Id and year combination selected.
Option2:
Selecting this option allows you to select the Basis Budget Ledger information which is stored in the
Budget Version Maintenance (01.370.00) screen for a particular Company ID and year combination.
The description of this option is populated based on the Basis Budget Year and Basis Budget Ledger
fields in the Budget Version Maintenance (01.370.00) screen and will change based on the Company
Id and year combination selected.
Change By %:
The Change by % field allows you to increase or decrease an proposed budget by a particular
percentage.
Cancel (Button)
Clicking the Cancel button returns you to the Extended Budget Maintenance (01.330.00) screen and
does not save your changes

130 General Ledger
Load Proposed (Button)
Clicking the Load Proposed button saves your changes made in the Set Proposed Budget (01.330.04)
screen and populates the Proposed Budget column of the Extended Budget Maintenance (01.330.00)
screen.
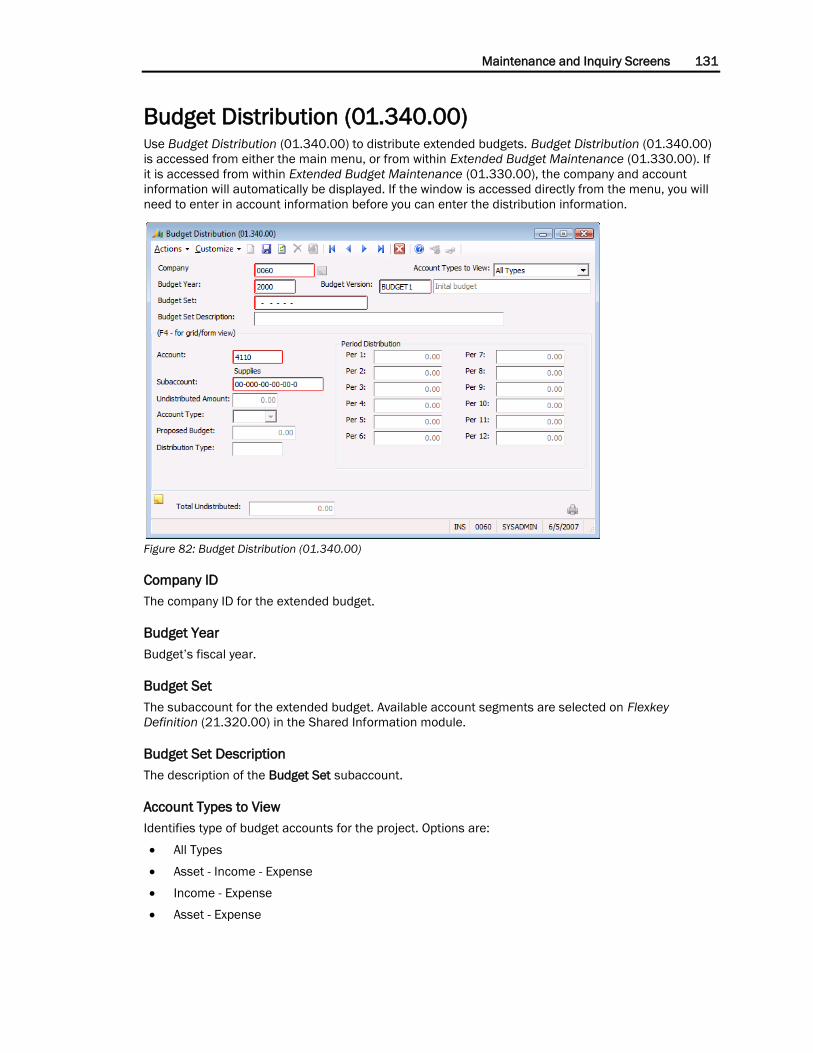
Maintenance and Inquiry Screens 131
Budget Distribution (01.340.00) Use Budget Distribution (01.340.00) to distribute extended budgets. Budget Distribution (01.340.00)
is accessed from either the main menu, or from within Extended Budget Maintenance (01.330.00). If
it is accessed from within Extended Budget Maintenance (01.330.00), the company and account
information will automatically be displayed. If the window is accessed directly from the menu, you will
need to enter in account information before you can enter the distribution information.
Figure 82: Budget Distribution (01.340.00)
Company ID
The company ID for the extended budget.
Budget Year
Budget’s fiscal year.
Budget Set
The subaccount for the extended budget. Available account segments are selected on Flexkey
Definition (21.320.00) in the Shared Information module.
Budget Set Description
The description of the Budget Set subaccount.
Account Types to View
Identifies type of budget accounts for the project. Options are:
All Types
Asset - Income - Expense
Income - Expense
Asset - Expense
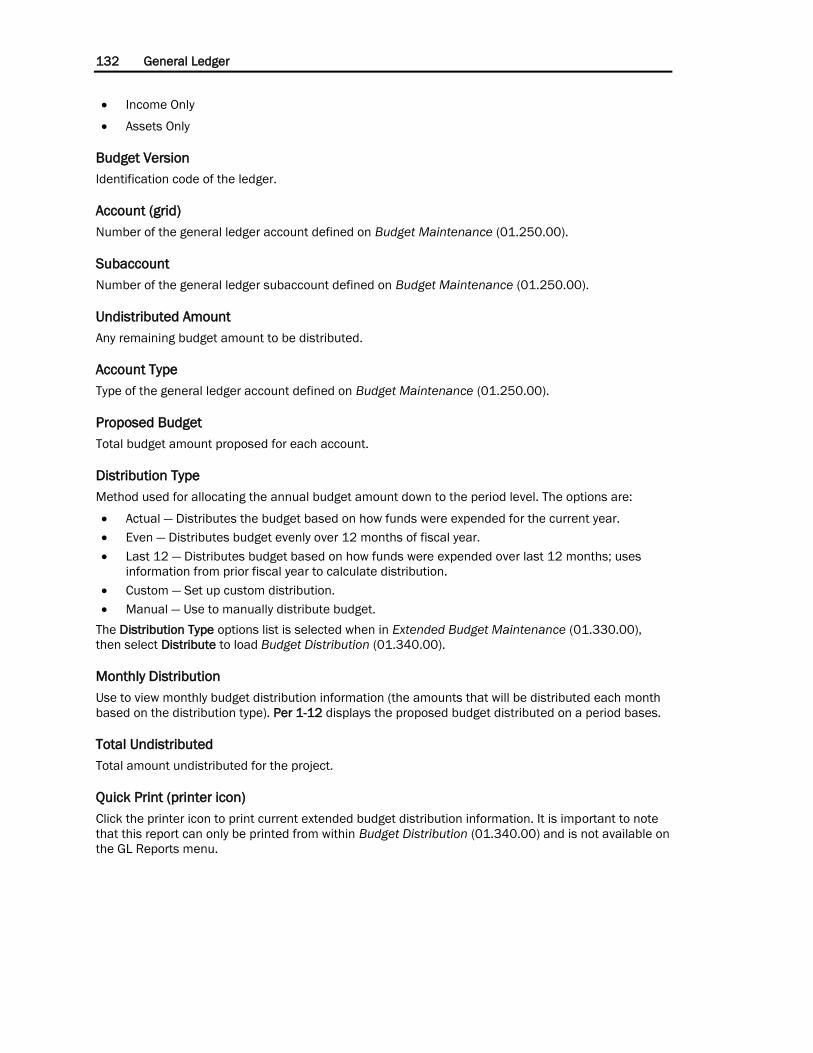
132 General Ledger
Income Only
Assets Only
Budget Version
Identification code of the ledger.
Account (grid)
Number of the general ledger account defined on Budget Maintenance (01.250.00).
Subaccount
Number of the general ledger subaccount defined on Budget Maintenance (01.250.00).
Undistributed Amount
Any remaining budget amount to be distributed.
Account Type
Type of the general ledger account defined on Budget Maintenance (01.250.00).
Proposed Budget
Total budget amount proposed for each account.
Distribution Type
Method used for allocating the annual budget amount down to the period level. The options are:
Actual — Distributes the budget based on how funds were expended for the current year.
Even — Distributes budget evenly over 12 months of fiscal year.
Last 12 — Distributes budget based on how funds were expended over last 12 months; uses
information from prior fiscal year to calculate distribution.
Custom — Set up custom distribution.
Manual — Use to manually distribute budget.
The Distribution Type options list is selected when in Extended Budget Maintenance (01.330.00),
then select Distribute to load Budget Distribution (01.340.00).
Monthly Distribution
Use to view monthly budget distribution information (the amounts that will be distributed each month
based on the distribution type). Per 1-12 displays the proposed budget distributed on a period bases.
Total Undistributed
Total amount undistributed for the project.
Quick Print (printer icon)
Click the printer icon to print current extended budget distribution information. It is important to note
that this report can only be printed from within Budget Distribution (01.340.00) and is not available on
the GL Reports menu.
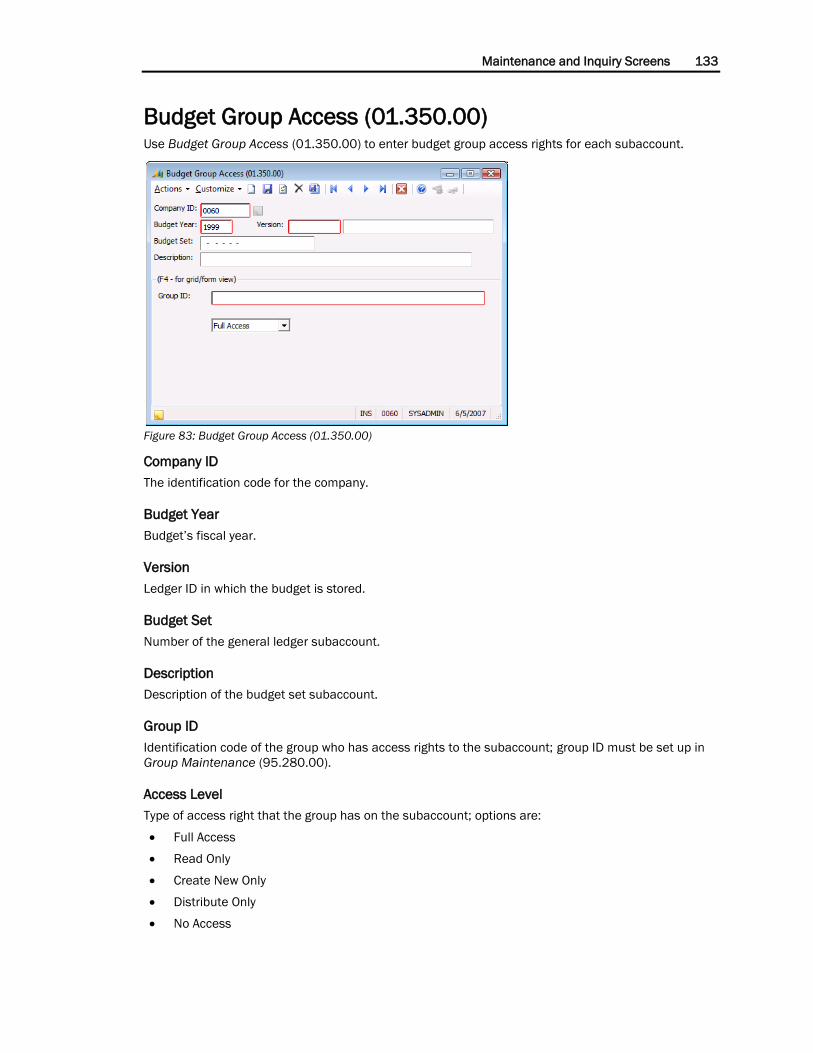
Maintenance and Inquiry Screens 133
Budget Group Access (01.350.00) Use Budget Group Access (01.350.00) to enter budget group access rights for each subaccount.
Figure 83: Budget Group Access (01.350.00)
Company ID
The identification code for the company.
Budget Year
Budget’s fiscal year.
Version
Ledger ID in which the budget is stored.
Budget Set
Number of the general ledger subaccount.
Description
Description of the budget set subaccount.
Group ID
Identification code of the group who has access rights to the subaccount; group ID must be set up in
Group Maintenance (95.280.00).
Access Level
Type of access right that the group has on the subaccount; options are:
Full Access
Read Only
Create New Only
Distribute Only
No Access
134 General Ledger
Budget Distribution Types (01.360.00) Use Budget Distribution Types (01.360.00) to view information about standard budget distribution
types and to enter information about a custom budget distribution type: custom distribution methods
for distributing an annual budget amount down to the period level in extended budgeting. By setting
up custom distribution types, you can quickly distribute an annual budget amount down to the period
level based on your company’s needs.
Figure 84: Budget Distribution Types (01.360.00)
Distribution Type
Method used for allocating proposed budget; standard predefined budget distribution types are:
Actual — Distributes the budget based on how funds were expended for the current year.
Even — Distributes budget evenly over 12 months of fiscal year.
Last 12 — Distributes budget based on how funds were expended over last 12 months; uses
information from prior fiscal year to calculate distribution.
Custom — Set up custom distribution.
Manual — Manually distribute budget; use Budget Distribution (01.340.00) to perform the
manual distribution.
Description
Explanation of the budget distribution type.
Period
Percentage of the amount to distribute in each budget period (January through December).
Total
Total percentage for all periods.
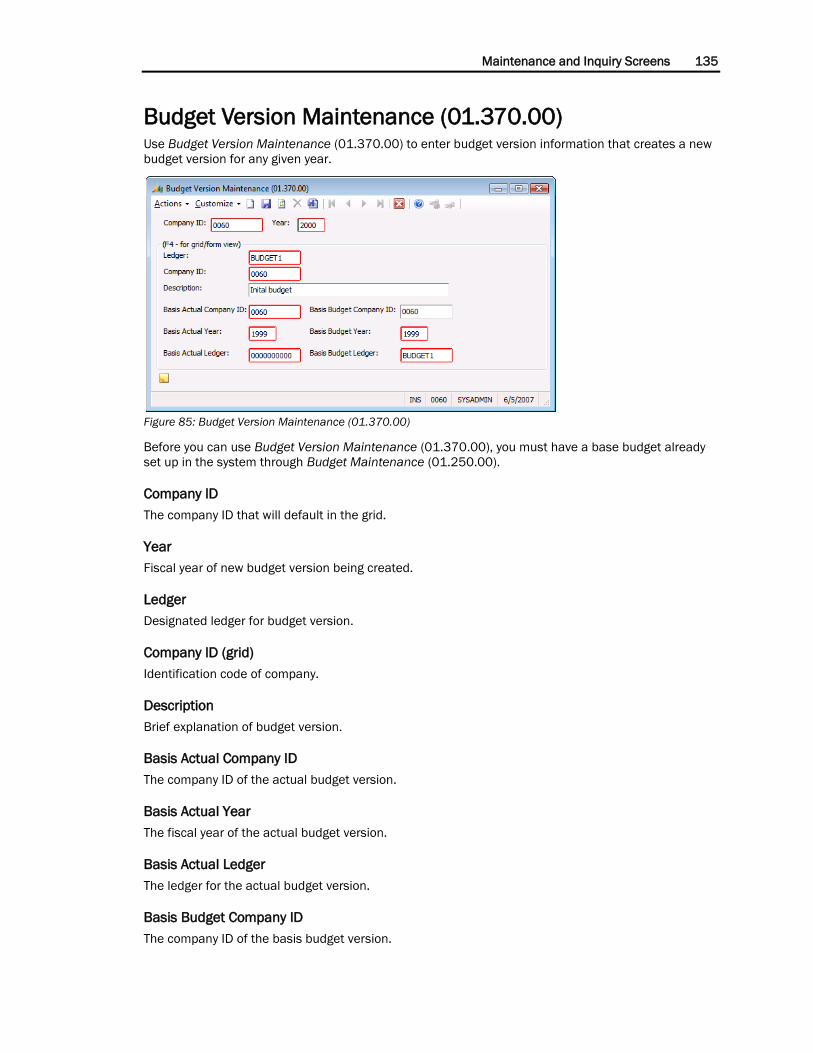
Maintenance and Inquiry Screens 135
Budget Version Maintenance (01.370.00) Use Budget Version Maintenance (01.370.00) to enter budget version information that creates a new
budget version for any given year.
Figure 85: Budget Version Maintenance (01.370.00)
Before you can use Budget Version Maintenance (01.370.00), you must have a base budget already
set up in the system through Budget Maintenance (01.250.00).
Company ID
The company ID that will default in the grid.
Year
Fiscal year of new budget version being created.
Ledger
Designated ledger for budget version.
Company ID (grid)
Identification code of company.
Description
Brief explanation of budget version.
Basis Actual Company ID
The company ID of the actual budget version.
Basis Actual Year
The fiscal year of the actual budget version.
Basis Actual Ledger
The ledger for the actual budget version.
Basis Budget Company ID
The company ID of the basis budget version.

136 General Ledger
Basis Budget Year
The fiscal year of the basis budget version.
Basis Budget Ledger
The ledger ID for the basis budget version. For example, if this budget is based on an increase of
percentage on another budget, enter the other budget’s ID here.
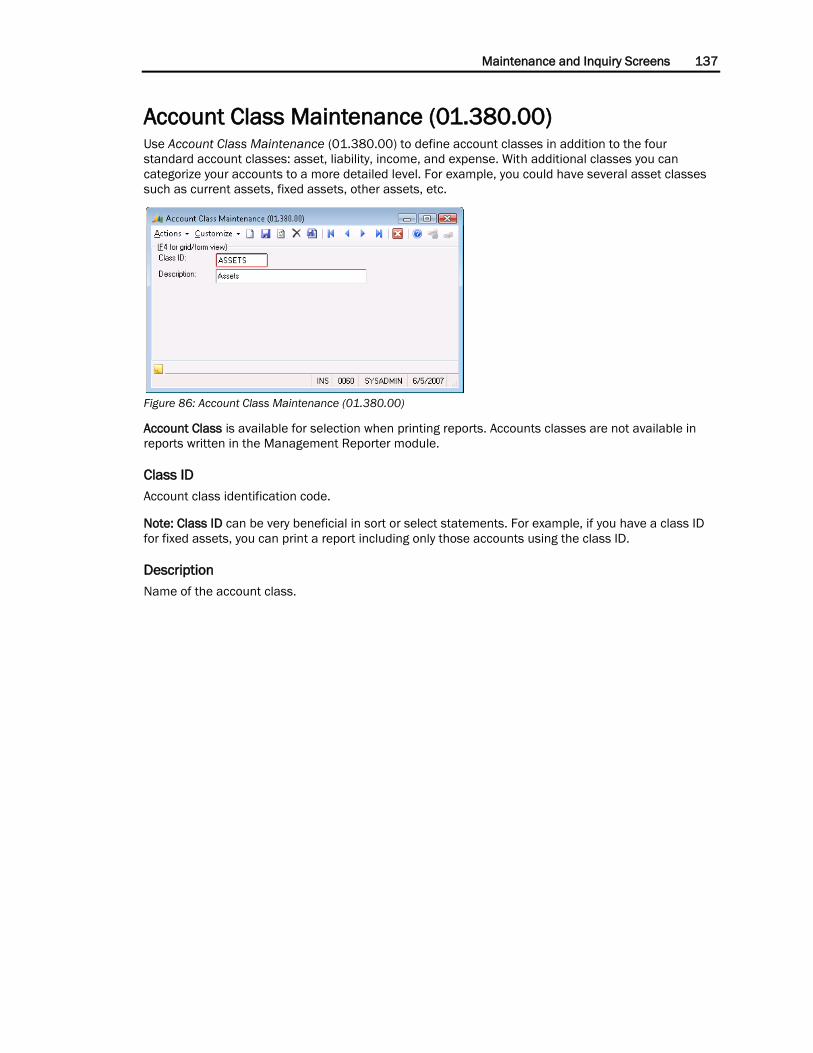
Maintenance and Inquiry Screens 137
Account Class Maintenance (01.380.00) Use Account Class Maintenance (01.380.00) to define account classes in addition to the four
standard account classes: asset, liability, income, and expense. With additional classes you can
categorize your accounts to a more detailed level. For example, you could have several asset classes
such as current assets, fixed assets, other assets, etc.
Figure 86: Account Class Maintenance (01.380.00)
Account Class is available for selection when printing reports. Accounts classes are not available in
reports written in the Management Reporter module.
Class ID
Account class identification code.
Note: Class ID can be very beneficial in sort or select statements. For example, if you have a class ID
for fixed assets, you can print a report including only those accounts using the class ID.
Description
Name of the account class.

138 General Ledger
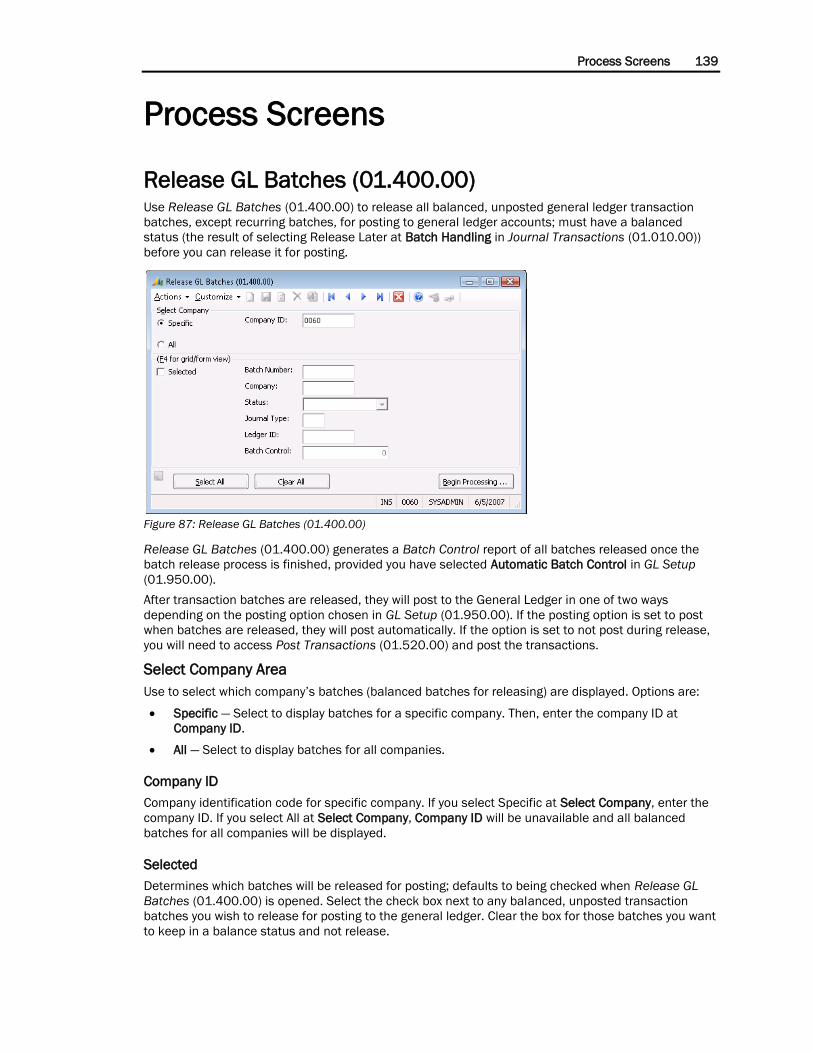
Process Screens 139
Process Screens
Release GL Batches (01.400.00) Use Release GL Batches (01.400.00) to release all balanced, unposted general ledger transaction
batches, except recurring batches, for posting to general ledger accounts; must have a balanced
status (the result of selecting Release Later at Batch Handling in Journal Transactions (01.010.00))
before you can release it for posting.
Figure 87: Release GL Batches (01.400.00)
Release GL Batches (01.400.00) generates a Batch Control report of all batches released once the
batch release process is finished, provided you have selected Automatic Batch Control in GL Setup
(01.950.00).
After transaction batches are released, they will post to the General Ledger in one of two ways
depending on the posting option chosen in GL Setup (01.950.00). If the posting option is set to post
when batches are released, they will post automatically. If the option is set to not post during release,
you will need to access Post Transactions (01.520.00) and post the transactions.
Select Company Area
Use to select which company’s batches (balanced batches for releasing) are displayed. Options are:
Specific — Select to display batches for a specific company. Then, enter the company ID at
Company ID.
All — Select to display batches for all companies.
Company ID
Company identification code for specific company. If you select Specific at Select Company, enter the
company ID. If you select All at Select Company, Company ID will be unavailable and all balanced
batches for all companies will be displayed.
Selected
Determines which batches will be released for posting; defaults to being checked when Release GL
Batches (01.400.00) is opened. Select the check box next to any balanced, unposted transaction
batches you wish to release for posting to the general ledger. Clear the box for those batches you want
to keep in a balance status and not release.
140 General Ledger
Batch Number
Unique identifying code of each batch that can potentially be released for posting.
Company
Company identification code.
Status
Current condition of the batch in the system; options are:
Hold — Not to be released.
Balanced — Ready for release.
Unposted — Released for posting but not yet posted.
Posted — Released and posted.
Journal Type
Identifying code of each batch’s book of original entry. For example, GL specifies the general journal.
Ledger ID
Identification code of ledger to release for posting.
Batch Control
Total amount of all transactions in each batch.
Select All (button)
Click to select all displayed batches for release for posting (this selects all check boxes under
Selected).
Clear All (button)
Click to deselect all displayed batches (this clears all check boxes under Selected). You can select
which batches you want to release.
Begin Processing (button)
Click to start the release for posting process once the appropriate batches are chosen. The software
will release all of the batches where Selected is selected.
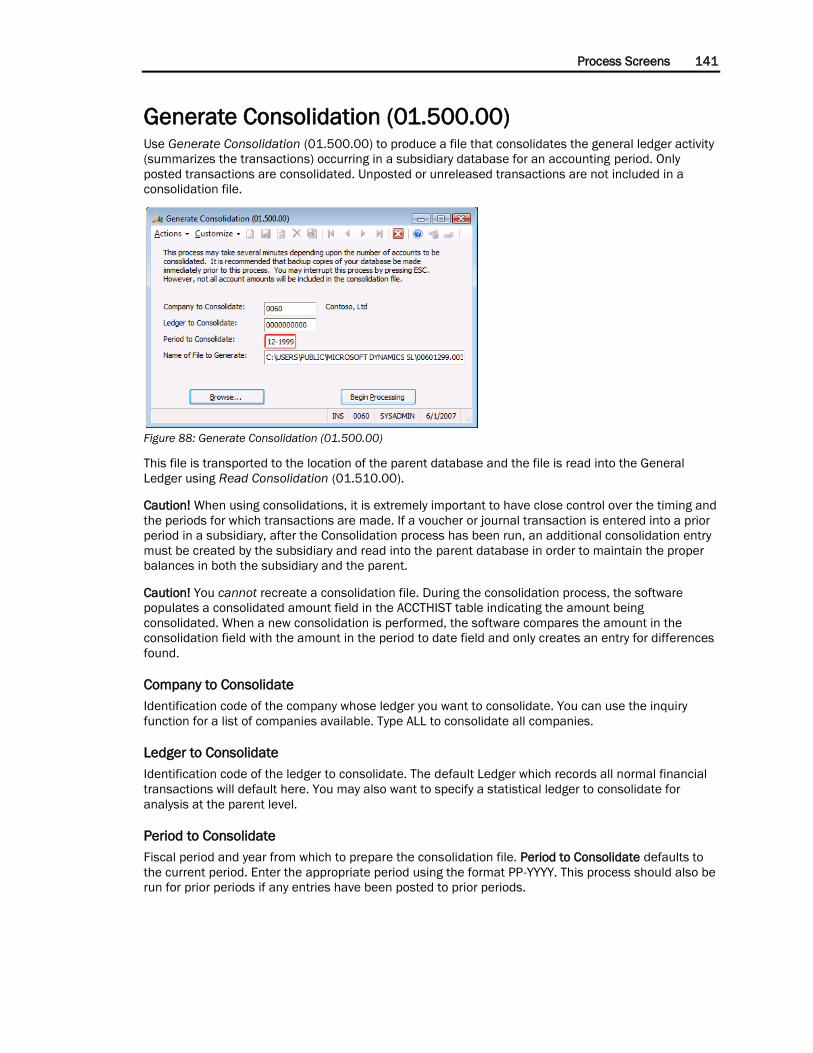
Process Screens 141
Generate Consolidation (01.500.00) Use Generate Consolidation (01.500.00) to produce a file that consolidates the general ledger activity
(summarizes the transactions) occurring in a subsidiary database for an accounting period. Only
posted transactions are consolidated. Unposted or unreleased transactions are not included in a
consolidation file.
Figure 88: Generate Consolidation (01.500.00)
This file is transported to the location of the parent database and the file is read into the General
Ledger using Read Consolidation (01.510.00).
Caution! When using consolidations, it is extremely important to have close control over the timing and
the periods for which transactions are made. If a voucher or journal transaction is entered into a prior
period in a subsidiary, after the Consolidation process has been run, an additional consolidation entry
must be created by the subsidiary and read into the parent database in order to maintain the proper
balances in both the subsidiary and the parent.
Caution! You cannot recreate a consolidation file. During the consolidation process, the software
populates a consolidated amount field in the ACCTHIST table indicating the amount being
consolidated. When a new consolidation is performed, the software compares the amount in the
consolidation field with the amount in the period to date field and only creates an entry for differences
found.
Company to Consolidate
Identification code of the company whose ledger you want to consolidate. You can use the inquiry
function for a list of companies available. Type ALL to consolidate all companies.
Ledger to Consolidate
Identification code of the ledger to consolidate. The default Ledger which records all normal financial
transactions will default here. You may also want to specify a statistical ledger to consolidate for
analysis at the parent level.
Period to Consolidate
Fiscal period and year from which to prepare the consolidation file. Period to Consolidate defaults to
the current period. Enter the appropriate period using the format PP-YYYY. This process should also be
run for prior periods if any entries have been posted to prior periods.
142 General Ledger
Name of File to Generate
Name of the consolidation file; format is IIIIPPYY.999, where:
IIII = subsidiary company ID, entered at Company ID in GL Setup (01.950.00)
PP = fiscal period
YY = fiscal year
999 = last three digits of the database access number in use during file creation
The path defaults to the Microsoft Dynamics SL program directory. It is preferred to create a directory
devoted to holding consolidation files until they have been transferred successfully to the parent.
The default file name uses the Company ID from the Master Company Info tab of GL Setup
(01.950.00) as the first four characters of the file. The next four characters represent the fiscal period
and year. The extension is numeric and is incremented with each new file that is created.
Browse (button)
Click to find the location to store the consolidation file.
Begin Processing (button)
Click to start the consolidation process (create the consolidation file).
Note: Transactions are included in consolidation files only one time! Transactions are marked during
the consolidation process and cannot be consolidated again. If you run this process again for the
same fiscal period, the resulting file includes only the net activity posted to accounts since the last
time the consolidation process was run.
Process Screens 143
Read Consolidation (01.510.00) Use Read Consolidation (01.510.00) to import the contents of a consolidation file into a database.
Figure 89: Read Consolidation (01.510.00)
Caution! It is possible to read a consolidation file into the same database more than once, or into
multiple databases. Be sure to control the consolidation files carefully to avoid posting an entry more
than once.
Note: To read XML files created from the Microsoft Retail Management System, see “Reading
Consolidation Files” on page 45.
Consolidate to Company
Identification code of the company to receive the contents of the consolidation file (the target
company ID). This is the company ID that will be used in the journal transaction created from the
consolidation.
Consolidate to Ledger
Identification code of the ledger to receive the contents of the consolidation file. This ledger ID does
not have to be the same as the ledger ID of the subsidiary.
Period to Post
Fiscal period and year to which the batch of transactions in the consolidation file should be posted;
default is the current fiscal period-year. Enter the period to post using the format PP-YYYY.
Note:
This does not have to be the same as the period in the source database. This allows you to
maintain consolidated balances with companies of differing year ends.
The ability to enter a batch for a closed period or year is based on the posting options selected
on the GL Setup (01.950.00), Options tab and whether you have Initialization Mode permission
for this screen in System Manager Access Rights Maintenance (95.270.00). In addition, Initialize
mode must be activated before you enter the batch.
Name of File to be Read
The fully-qualified path to and file name of the consolidation file to read into the database.
Browse (button)
Click to locate the consolidation file.

144 General Ledger
Begin Processing (button)
Click to start the read consolidation file process. After the process is complete, a journal transaction
with a Consolidation type and a balanced status can be found in Journal Transactions (01.010.00).
Process Screens 145
Post Transactions (01.520.00) Use Post Transactions (01.520.00) to post batches of transactions that have been released for
posting to the appropriate general ledger accounts. You can post batches to the current period or a
prior period. You can choose to post all batches from all modules and companies or from specific
modules and companies. In addition, specific batches can be selected for posting.
Example: You can choose to post only your Accounts Payable entry at this time.
Figure 90: Post Transactions (01.520.00)
You cannot post transactions to future periods until those periods become current. Batches for future
periods will be held until their period is current.
Transactions will not show up on General Ledger reports until the Post Transactions (01.520.00)
process is complete, unless the report includes a format allowing you to choose unposted information.
Also, if entries are made to future periods, they will not be reflected until the General Ledger is closed
to that future period (that is an entry to next January will not post until next January).
Caution! Once a batch has been posted, you cannot make changes to the batch. You will need to enter
a new journal transaction with the correcting entries.
Select Module Area
Use to specify the batches that display. Options are:
Specific — Select to display transactions for a specific module.
All — Select to display all transactions batches for all modules.
Module
Module identification code.
Select Company Area
Use to specify the batches that display. Options are:
All — Select to display transactions for all companies.
Specific — Select to display transaction batches for a specific company.
Company ID (select)
Company identification code.
146 General Ledger
Refresh (button)
Click to update the display based on the selected search criteria.
Selected (Grid/Form)
Select to post the batch.
Batch Number (Grid/Form)
Number assigned to a particular batch.
Module (Grid/Form)
Identification code of the module in which the batch was created.
Company (Grid/Form)
Identification code of the company in which the batch was created.
Select All (button)
Click to select all displayed batches for posting.
Clear All (button)
Click to deselect all displayed batches.
Begin Processing (button)
Click to start the post transactions process for the selected batches.
Process Screens 147
Generate Recurring (01.530.00) Use Generate Recurring (01.530.00) to produce any batches of recurring transactions required to
complete an accounting period. Recurring transactions are ones that repeat periodically for the same
amounts. Examples of recurring transactions include depreciation, amortization, and automatic bank
withdrawals for insurance premiums.
Figure 91: Generate Recurring (01.530.00)
Recurring transactions are initially set up in Journal Transactions (01.010.00) like any other journal
transaction, except that Current Cycle and Number of Cycles are used. These fields determine how
often and how many times a recurring entry will be used to create a journal transaction.
Once a recurring transaction has been entered, it must be generated using Generate Recurring
(01.530.00) before it can update the General Ledger. Generate Recurring (01.530.00) creates a
journal transaction from the recurring transaction (that is, creates a copy of the original entry for
posting to the General Ledger) and decrements Number of Cycles by 1 for the recurring transaction.
For example, assume a recurring journal transaction has a Current Cycle of 1 and Number of Cycles of
12. The next time it goes through the generation process, Number of Cycles is reduced to 11.
Generate Recurring (01.530.00) provides options for viewing all recurring entries, or only those for a
specified company. Also, the entries can be individually selected for generation. The window includes
a Release and Post option. If this option is selected, the selected entries will be generated and
immediately posted to the General Ledger. If the option is not selected, the generated entries are
created with a Balanced status, requiring release from Journal Transactions (01.010.00) or Release
GL Batches (01.400.00).
Only entries set to post to the current or prior periods are displayed in this window. If an entry has
been generated for the current period, it will not be displayed the next time the screen is opened.
Because of this, there is no risk of inadvertently generating the same entry twice in one period.
Caution! If a recurring entry is not processed for several months, when you run Generate Recurring
(01.530.00), the software will generate a batch for each month to bring the recurring batch current.
Select Company Area
Use to generate recurring transactions for all or specific companies. Options are:
Specific — Select to generate recurring transaction batches for a specific company in the
database.
All — Select to generate recurring transaction batches for all companies in the database.
148 General Ledger
Company ID - Select Company
Company identification code.
Selected (Grid/Form View)
Select to generate recurring transactions for the accounting period.
Batch Number (Grid/Form View)
Unique identifying code of each recurring transaction batch that can potentially be generated.
Company (Grid/Form View)
Company identification code.
Status (Grid/Form View)
Current condition of each recurring batch in the system; options are:
Hold — Not to be released.
Balanced — Ready for release.
Unposted — Released for posting but not yet posted.
Posted — Released and posted.
Journal Type (Grid/Form View)
Identifying code of each batch’s book of original entry; for example GJ specifies the general journal.
Ledger ID (Grid/Form View)
Ledger identification code.
Batch Control (Grid/Form View)
Total amount of all transactions in each recurring transaction batch.
Release and Post
Select to automatically release and post recurring transactions after they are generated.
Select All (button)
Click to select all displayed recurring batches for transaction generation.
Clear Selections (button)
Click to deselect all displayed recurring batches.
Begin Processing (button)
Click to start the recurring transaction generation process for the selected batches.
Process Screens 149
Closing (01.560.00) Use Closing (01.560.00) to close one or all accounting modules for a fiscal period. Closing is normally
performed at the end of each accounting period.
Figure 92: Closing (01.560.00)
The closing process performs several “housekeeping” functions:
Detail deletion can be done at any time using Closing (01.560.00) or Delete GL Detail
(01.570.00). You do not have to delete detail at the same time the module is being closed.
Closing a module without deleting detail will generally cause the closing to not take as long.
Unwanted data will be deleted according to the data retention settings specified in the setup
screen of each module. The Field Service modules currently have no data retention settings and
no processes for deleting historical data.
If you are closing a period, Closing (01.560.00) will set the current period to the next period. This
make the entry screens in the module default to the new period.
If you are closing a year, Closing (01.560.00) will set the current year and period to the first
period of the new year. It will also establish the new year beginning balances for the asset and
liability accounts with the old year’s net income closing to the retained earnings account. The
period to date and year to date history for the old year will be retained.
You do not have to close the accounting period for all modules at the same time. You can close some
modules while leaving others open for remaining activity. For example, you can close the Payroll
module and begin a new period while holding the Accounts Payable module open for the old period.
The exception to this is the General Ledger, which cannot be closed ahead of the other modules.
Note: if you need to change the year for a reason other than closing the year, see the Knowledgebase
article “How to change from a fiscal year to a calendar year in General Ledger in Microsoft Dynamics
SL” at https://mbs2.microsoft.com/Knowledgebase/KBDisplay.aspx?scid=kb;en-us;873596.
Module
Names of all accounting modules.
Current Fiscal Period
Period to close for each module. This value is display only and can only be changed by closing.
Closing Type
Type of closing; options are:
Do Not Close — Do not close the module.
150 General Ledger
Period — Close the module for a fiscal period.
Year — Close the module for a fiscal year.
Note: Purchasing does not have a closing type option.
Delete Detail
Select to delete a module’s obsolete activity details, such as transactions or history, after closing the
module. Only the detail that falls outside of the retention setting in GL Setup (01.950.00) will be
deleted. You can also use Delete GL Detail (01.570.00) to delete obsolete detail.
Note: You may be reluctant to delete detail. Remember that the process only deletes closed items that
are older than the retention periods set up in GL Setup (01.950.00) for each module. If the retention
levels are set appropriately, detail can be deleted without concern.
In larger databases, deleting detail during the closing process might slow down the process
significantly. You may prefer to delete the detail using Delete GL Detail (01.570.00).
Note: You might want to use Delete GL Detail (01.570.00) rather than Closing (01.560.00) because
the period being deleted is actually displayed in the window.
The problems with not deleting detail regularly are increased data file size and reduced system
performance. Also, when the detail is finally deleted, the deletion process can take a significant
amount of time, due to the buildup of old data.
Begin Processing (button)
Click to start the closing process for selected modules.
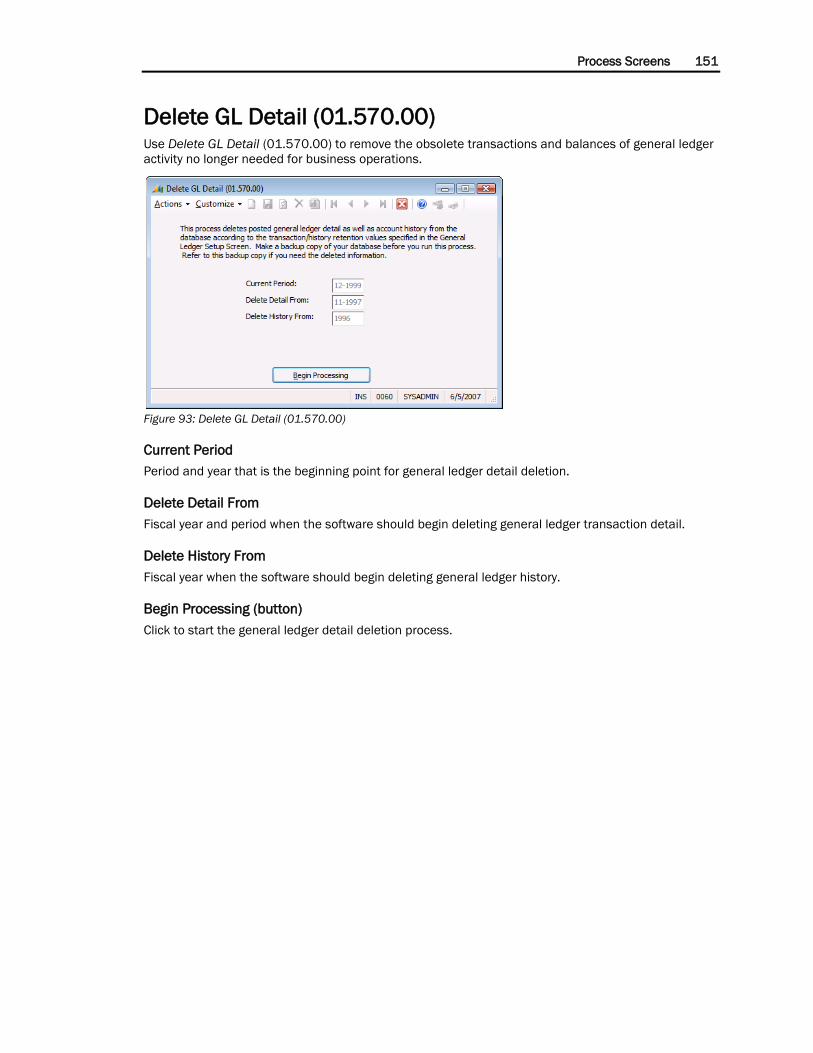
Process Screens 151
Delete GL Detail (01.570.00) Use Delete GL Detail (01.570.00) to remove the obsolete transactions and balances of general ledger
activity no longer needed for business operations.
Figure 93: Delete GL Detail (01.570.00)
Current Period
Period and year that is the beginning point for general ledger detail deletion.
Delete Detail From
Fiscal year and period when the software should begin deleting general ledger transaction detail.
Delete History From
Fiscal year when the software should begin deleting general ledger history.
Begin Processing (button)
Click to start the general ledger detail deletion process.
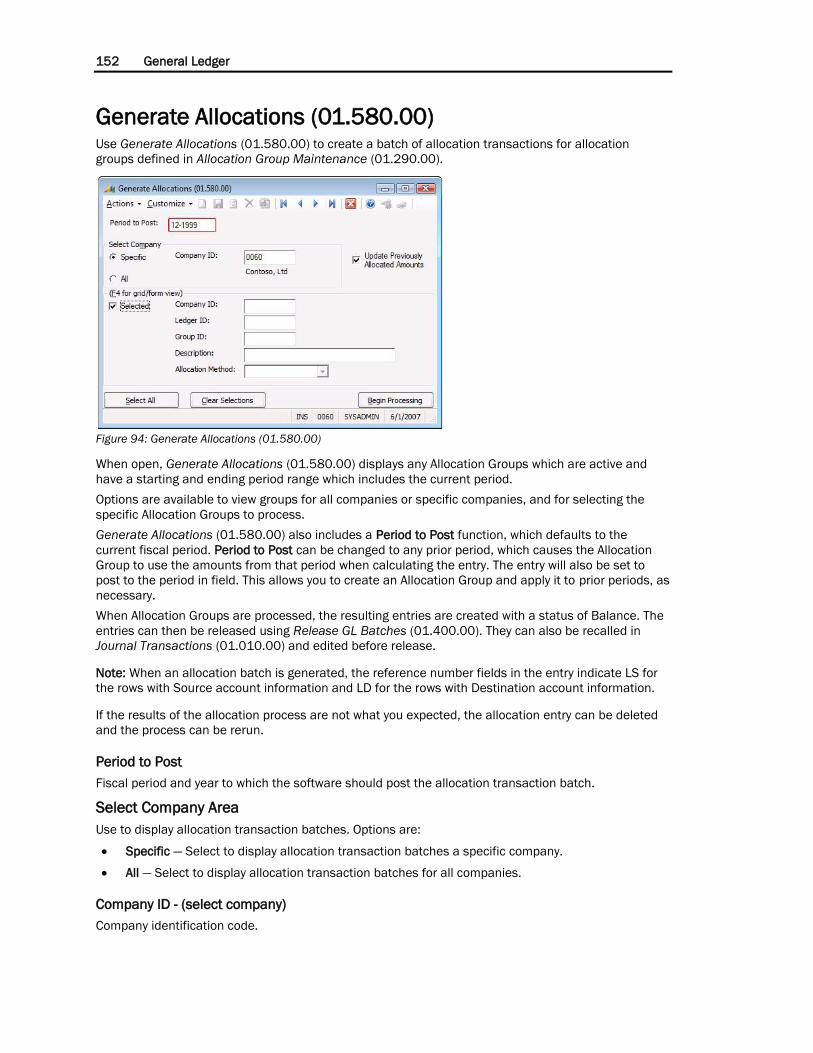
152 General Ledger
Generate Allocations (01.580.00) Use Generate Allocations (01.580.00) to create a batch of allocation transactions for allocation
groups defined in Allocation Group Maintenance (01.290.00).
Figure 94: Generate Allocations (01.580.00)
When open, Generate Allocations (01.580.00) displays any Allocation Groups which are active and
have a starting and ending period range which includes the current period.
Options are available to view groups for all companies or specific companies, and for selecting the
specific Allocation Groups to process.
Generate Allocations (01.580.00) also includes a Period to Post function, which defaults to the
current fiscal period. Period to Post can be changed to any prior period, which causes the Allocation
Group to use the amounts from that period when calculating the entry. The entry will also be set to
post to the period in field. This allows you to create an Allocation Group and apply it to prior periods, as
necessary.
When Allocation Groups are processed, the resulting entries are created with a status of Balance. The
entries can then be released using Release GL Batches (01.400.00). They can also be recalled in
Journal Transactions (01.010.00) and edited before release.
Note: When an allocation batch is generated, the reference number fields in the entry indicate LS for
the rows with Source account information and LD for the rows with Destination account information.
If the results of the allocation process are not what you expected, the allocation entry can be deleted
and the process can be rerun.
Period to Post
Fiscal period and year to which the software should post the allocation transaction batch.
Select Company Area
Use to display allocation transaction batches. Options are:
Specific — Select to display allocation transaction batches a specific company.
All — Select to display allocation transaction batches for all companies.
Company ID - (select company)
Company identification code.
Process Screens 153
Update Previously Allocated Amounts
Selecting Update Previously Allocated Amounts allows the user to run allocation(s) multiple times in
the same period without reallocating previously allocated amounts. This check box has effect on the
outcome only if you are using contra accounts. The Percent Limit Type does however. If the limit
percent is by period, the second allocation will not happen. If the limit percent is by allocation, the
second allocation will happen but it will be for half of the balance in the account. This assumes you
post the first allocation before running the second allocation.
Example: If the period-to-date balance equals $1,000, and you have already run an allocation for 80%
without selecting the Update Previously Allocated Amounts check box, the balance in the account is
$200. When you run the same allocation again in the same period, it will allocate the 80% based on
the account balance of $200.
Selected
Select to generate allocation transactions for a group.
Ledger ID
Ledger identification code.
Group ID
Identification code of each allocation group.
Company ID (detail)
Company identification code.
Description
Explanation of the allocation group ID.
Allocation Method
Method making allocations to destination accounts; options are:
Percent — amount allocated is distributed to each destination account according to the percent
for each account; total percents for all destination accounts in a group must equal 100%.
Unit Ratio — amount allocated is distributed to each destination account according to the ratio
between the units for each account and the total units of all destination accounts; unit used is
user defined.
Actual Period-to-Date — amount allocated is distributed to each of the destination accounts
according to the ratio of each account’s period-to-date balance to the total period-to-date
balance of all destination accounts.
Actual Year-to-Date — amount allocated is distributed to each of the destination accounts
according to the ratio of each account’s year-to-date balance to the total year-to-date balance of
all destination accounts.
Ledger Period-to-Date — amount allocated is distributed to each of the destination accounts
according to the ratio of each account’s ledger amount for a particular period to the total ledger
amount for that period for all destination accounts.
Ledger Year-to-Date — amount allocated is distributed to each of the destination accounts
according to the ratio of each account’s annual ledger amount to the total annual ledger amount
of all destination accounts.
Select All (button)
Click to select all displayed allocation groups for transaction generation.

154 General Ledger
Clear Selections (button)
Click to deselect all displayed allocation groups.
Begin Processing (button)
Click to start the transaction generation process.
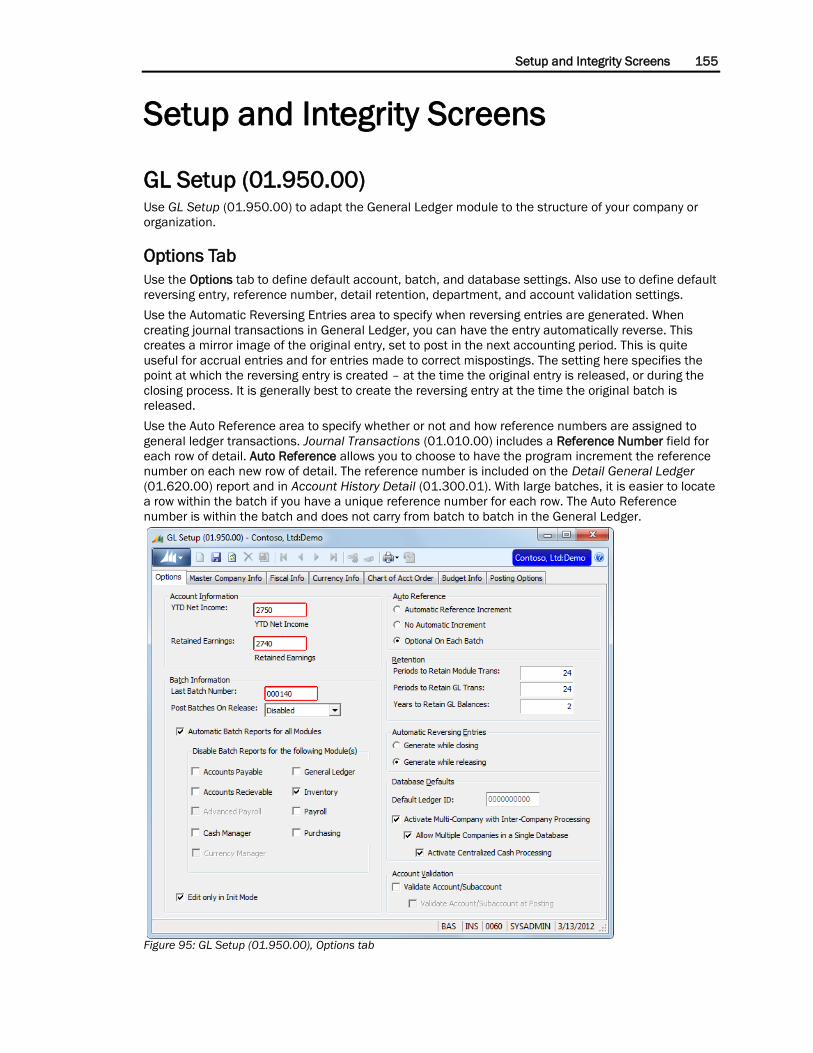
Setup and Integrity Screens 155
Setup and Integrity Screens
GL Setup (01.950.00) Use GL Setup (01.950.00) to adapt the General Ledger module to the structure of your company or
organization.
Options Tab
Use the Options tab to define default account, batch, and database settings. Also use to define default
reversing entry, reference number, detail retention, department, and account validation settings.
Use the Automatic Reversing Entries area to specify when reversing entries are generated. When
creating journal transactions in General Ledger, you can have the entry automatically reverse. This
creates a mirror image of the original entry, set to post in the next accounting period. This is quite
useful for accrual entries and for entries made to correct mispostings. The setting here specifies the
point at which the reversing entry is created – at the time the original entry is released, or during the
closing process. It is generally best to create the reversing entry at the time the original batch is
released.
Use the Auto Reference area to specify whether or not and how reference numbers are assigned to
general ledger transactions. Journal Transactions (01.010.00) includes a Reference Number field for
each row of detail. Auto Reference allows you to choose to have the program increment the reference
number on each new row of detail. The reference number is included on the Detail General Ledger
(01.620.00) report and in Account History Detail (01.300.01). With large batches, it is easier to locate
a row within the batch if you have a unique reference number for each row. The Auto Reference
number is within the batch and does not carry from batch to batch in the General Ledger.
Figure 95: GL Setup (01.950.00), Options tab

156 General Ledger
Account Information area
YTD Net Income
Liability/equity account used for reporting current year-to-date net income on the Balance Sheet. The
YTD Net Income account is updated whenever an amount is posted to an income or expense account,
so that it has a balance equal to the net income. A separate YTD Net Income balance is maintained for
each subaccount.
Caution! Because the YTD Net Income account is updated automatically. No entries should be made
to this account.
Retained Earnings
Liability/equity account used for reporting retained earnings on the Balance Sheet. The Retained
Earnings account is updated only when the General Ledger module is closed for the year. It is updated
by the amount in the YTD Net Income account, which in turn is adjusted to zero during the closing
process. A separate Retained Earnings balance is maintained for each subaccount.
Caution! The Retained Earnings account should not have entries posted to it, except at the end of a
year when owner equity entries may be necessary.
Batch Information area
Last Batch Number
Unique numeric code assigned to a transaction batch that distinguishes the batch from all other
batches in the database. The value at Last Batch Number is maintained by the system, displaying the
last number used in the General Ledger module. To start the numbering for the batches at a different
number, enter a higher number in this field.
Note: Consider setting the batch number in each module to start with a different number (for example,
100000 for GL, 200000 for AR, 300000 for AP, etc.). This prevents duplicate batch numbers in the
system. While the software can handle duplicate batch numbers from different modules, it can
sometimes be confusing to users. Also, having unique numbers for every batch makes it easier to filter
reports by batch number.
Post Batches on Release
Determines which batches will automatically post to the General Ledger and when they will be posted;
options are:
Disabled — Do not post Accounts Receivable, Accounts Payable, or General Ledger batches to
General Ledger on batch release. Another step is required before posting is completed. All
batches must be selected for posting through the Post Transactions (01.520.00) screen.
In GL Only — Post only General Ledger batches on batch release. Batches from Accounts
Receivable and Accounts Payable modules will require an additional step of selection in the Post
Transactions (01.520.00) screen.
In GL, AR & AP — Post General Ledger, Accounts Receivable, and Accounts Payable batches on
release within their modules.
Automatic Batch Reports for all Modules
Select to specify that a batch control report is automatically generated for all modules at the
completion of batch-level operations, such as entering receipts, applying payments, or releasing
batches for posting. If you do not select Automatic Batch Reports for all Modules, no batch reports will
be produced for any of the modules. Batch reports are more useful for some users than others. You
might find that a lot of paper is consumed by reports that are not being reviewed. If so, clear
Automatic Batch Reports for all Modules. Reports with the same information can be produced as
needed, from each of the modules.
Setup and Integrity Screens 157
Another option is to have some modules print batch reports. To do this, select the Automatic Batch
Reports for all Modules check box; then select each the check box in the Disable Batch Reports for the
following Module(s) area for each module for which you do not want to automatically print batch
reports.
Disable Batch Reports for the following Module(s)
The module check boxes are enabled if the Automatic Batch Reports for all Modules check box is
selected. Select those modules for which you do not want to print batch reports. If none of the check
boxes are selected, batch reports will print for all of the listed modules.
Edit Only in Init Mode
Select to specify that you can edit transaction batches only when the software is in the Initialize mode.
When General Ledger journal transaction batches are released for posting, it is still possible to retrieve
them prior to posting and make revisions. By selecting this option, you must be in Initialize mode in
order to retrieve released batches. (Initialize mode must be used in order to modify unposted batches
from other modules, regardless of this setting.)
See the System Manager online help or user guide for more information on Initialize mode.
Auto Reference Area
Automatic Reference Increment
Select to increment transaction reference numbers automatically.
No Automatic Increment
Select to manually control the numbering format of each transaction reference number entered.
Optional On Each Batch
Select to specify for each new transaction batch entered on Journal Transactions (01.010.00),
whether or not reference numbers should be assigned to transactions.
Retention area
Periods to Retain Module Trans
Maximum number of periods prior to the current one to retain general ledger transactions created by
other modules (Accounts Receivable, Accounts Payable, Payroll, etc.) in the database. The setting
affects retention only for batches coming to the General Ledger from the other modules.
The Periods to Retain Module Trans detail can be viewed in Account History Detail (01.300.01) and
appears on the Detail General Ledger (01.620.00) report.
Periods to Retain GL Trans
Maximum number of periods prior to the current one to retain transactions created by the General
Ledger module. The setting affects retention only for batches originating in the General Ledger.
The Periods to Retain GL Trans detail can be viewed in Account History Detail (01.300.01) and
appears on the Detail General Ledger (01.620.00) report.
Years to Retain GL Balances
Maximum number of fiscal years prior to the current one to retain general ledger balances. If you need
to print financial statements with 5 years of comparison, Years to Retain GL Balances will need to be
set for at least 5 years. GL balances can be viewed in Account History (01.300.00) and are used when
producing financial statements. If detail is desired when using drilldown in Management Reporter, you
must retain the detail for the GL balances.
Caution! There are trade-offs to consider when setting retention levels. In the beginning, the settings
will not have a lot of impact, as there will not be much history to retain. But as data begins to
158 General Ledger
accumulate in the files, performance will begin to decline, backups will take longer, and reports will
not print as quickly. Although you may want to set the retention levels quite high, be realistic in
considering the number of periods for which detail is needed. The retention settings can be changed
at any time.
Note: Transaction detail should be retained in the General Ledger for a minimum of 18 to 24 months.
This allows you to produce a Detail General Ledger (01.620.00) report for an entire year, six to 12
months after closing, allowing time for all audit and tax adjusting entries to be posted.
Automatic Reversing Entries area
Generate while closing
Select to automatically generate reversing entries when closing.
Generate while releasing
Select to automatically generate reversing entries when releasing.
Database Defaults area
Default Ledger ID
Used to identify the ledger ID for all General Ledger module screens and processes. The default ID is
the ledger that contains the actual financial book numbers. All entries in the system must have a
ledger specification. The Default Ledger ID is used to fill the Ledger field during data entry. A different
ledger ID can be entered at that time, if necessary.
Caution! The entry in Default Ledger ID should be the ledger containing the actual operating
information. This field cannot be changed once entries have been made.
Note: All of the Management Reporter reports use the “Actual” ledger, which is the default ledger that
the software uses. To be consistent and save time, you may want to use the “Actual” ledger as the
default.
Activate Multi-Company with Inter-Company Processing
Activates multi-company processing (that is, activates the Multi-Company module) for the application
database.
Allow Multiple Companies in a Single Database
Allows users to have more than one company in the database. You cannot select this check box
without first selecting Activate Multi-Company with Inter-Company Processing.
Activate Centralized Cash Processing
Used to activate the centralized cash control function. You cannot select this check box without first
selecting Activate Multi-Company with Inter-Company Processing and Allow Multiple Companies in a
Single Database.
When this option is selected, the software creates all of the necessary entries in Accounts Payable,
Accounts Receivable, General Ledger, and Cash Manager to facilitate the control to the central
company.
Centralized Cash Control allows organizations to manage their cash from a central company.
Concentrating funds into a central company helps to make cash management easier, assists in
investment decisions, helps to control payments, and reduces the complexity of inter-company
relationship. In many organizations, each operating entity may have their own checks. They also have
business transactions with other entities in the organization. Controlling the cash from a central
company is accomplished in four main steps:
All Accounts Payable vouchers are paid by the central company.
Setup and Integrity Screens 159
All Accounts Receivable payments are received by the central company. The central company
applies the cash to the individual company invoices.
Each company maintains a bank account and these accounts are “swept” frequently and
deposited into the central company.
Inter-company transactions are maintained between the central company and the individual
companies so that the central company can report at any time what is due or from each
company. An additional reason for the inter-company relationships with the central company is
so the central company can exact finance charges on any outstanding balance a subsidiary has
with it.
Account Validation area
Validate Account/Subaccount
Select to restrict data entry to specific account/subaccount combinations. For example, if all balance
sheet entries should be made to subaccount 0100, using validation would prevent an entry to a cash
account and subaccount 0210. If account/subaccount validation is used, the valid combinations must
be set up in Account/Subaccount Maintenance (01.320.00).
Validate Account/Subaccount at Posting
Select to validate account and subaccount combinations at the time entries are posted. If you do not
select Validate Account/Subaccount at Posting, validation of the combinations takes place during data
entry.
Caution! If you plan to use Account/Subaccount Validation, you should activate it and enter the values
in Account/Subaccount Maintenance (01.320.00) before setting up or using any of the other
modules. Otherwise, it will be possible to create entries in the other modules which will not be allowed
once the validation is activated.
Caution! The Account/Subaccount Validation process is an “all or nothing” process. You cannot have
some accounts and subaccounts validated, and have other combinations not validated.
Quick Print (printer icon)
Click the printer icon to print the GL Setup report.
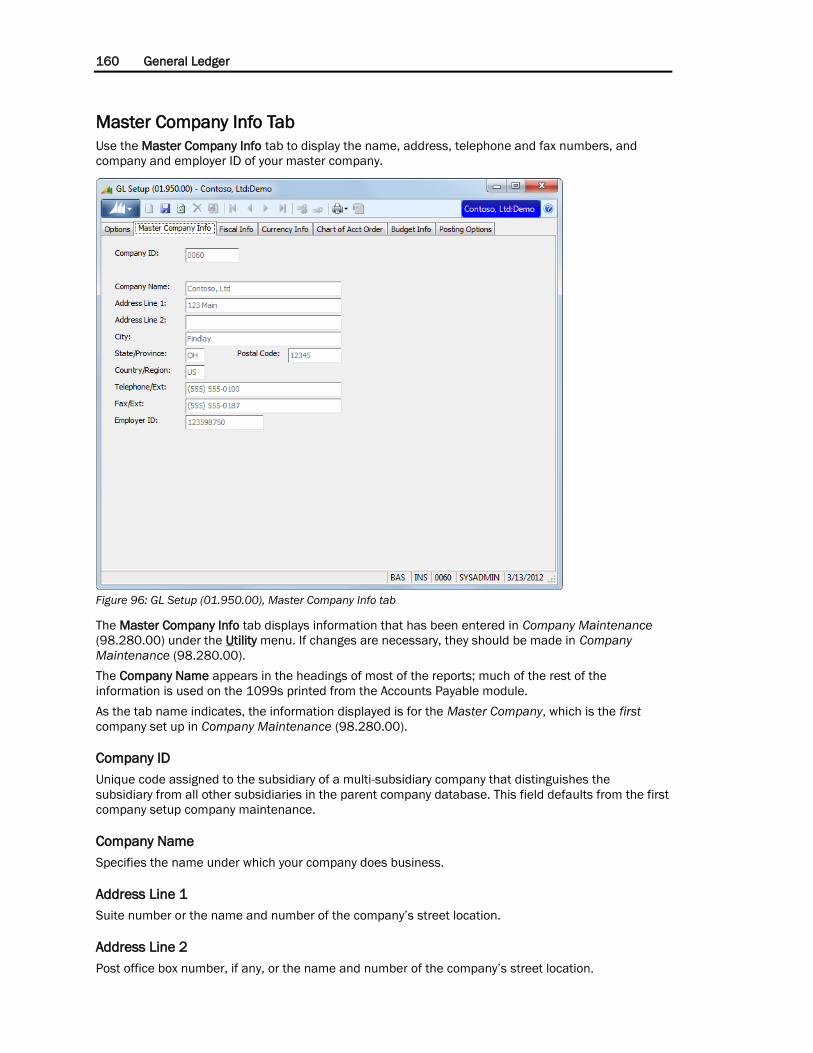
160 General Ledger
Master Company Info Tab
Use the Master Company Info tab to display the name, address, telephone and fax numbers, and
company and employer ID of your master company.
Figure 96: GL Setup (01.950.00), Master Company Info tab
The Master Company Info tab displays information that has been entered in Company Maintenance
(98.280.00) under the Utility menu. If changes are necessary, they should be made in Company
Maintenance (98.280.00).
The Company Name appears in the headings of most of the reports; much of the rest of the
information is used on the 1099s printed from the Accounts Payable module.
As the tab name indicates, the information displayed is for the Master Company, which is the first
company set up in Company Maintenance (98.280.00).
Company ID
Unique code assigned to the subsidiary of a multi-subsidiary company that distinguishes the
subsidiary from all other subsidiaries in the parent company database. This field defaults from the first
company setup company maintenance.
Company Name
Specifies the name under which your company does business.
Address Line 1
Suite number or the name and number of the company’s street location.
Address Line 2
Post office box number, if any, or the name and number of the company’s street location.
Setup and Integrity Screens 161
City
Municipality where your facility is located; can be either a subsidiary or parent company location.
State/Province
Standard two-letter state or province abbreviation.
Postal Code
Five-digit zip code or the newer ZIP+4.
Country/Region
Standard three-letter country or region abbreviation.
Telephone/Ext
Telephone number, including area code, and appropriate telephone extension number.
Fax/Ext
Facsimile number, including area code, and any appropriate extension number.
Employer ID
Company’s federal employer identification number.
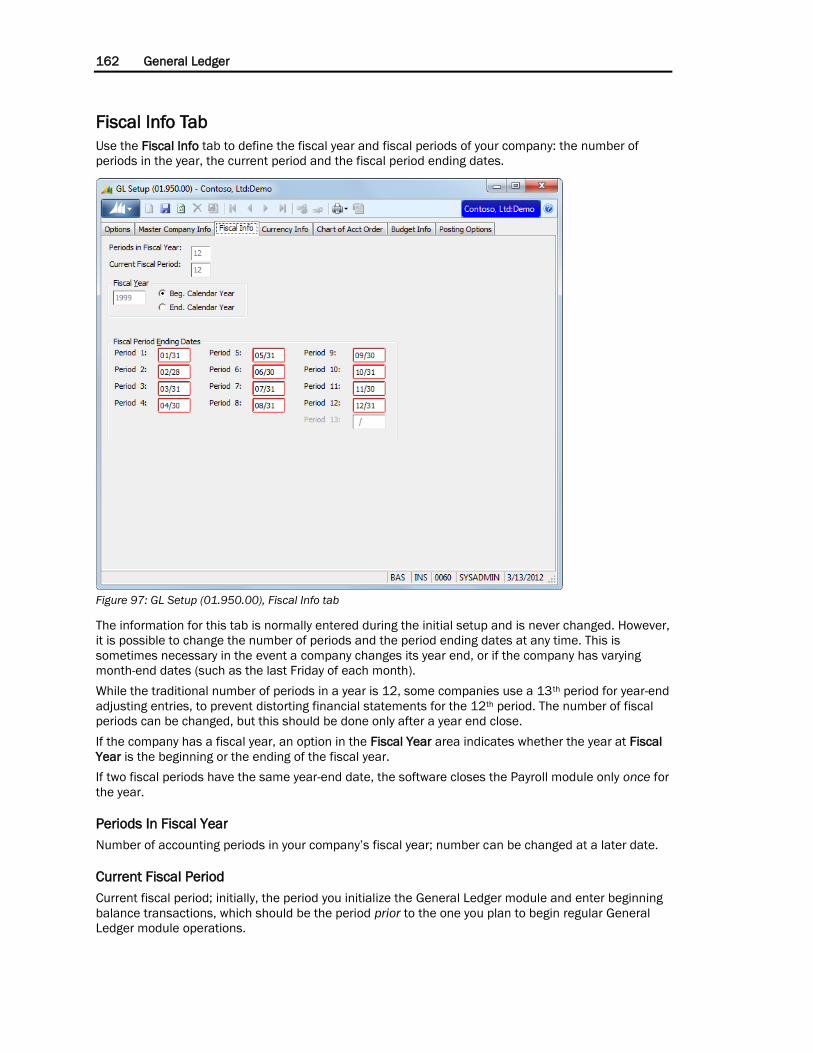
162 General Ledger
Fiscal Info Tab
Use the Fiscal Info tab to define the fiscal year and fiscal periods of your company: the number of
periods in the year, the current period and the fiscal period ending dates.
Figure 97: GL Setup (01.950.00), Fiscal Info tab
The information for this tab is normally entered during the initial setup and is never changed. However,
it is possible to change the number of periods and the period ending dates at any time. This is
sometimes necessary in the event a company changes its year end, or if the company has varying
month-end dates (such as the last Friday of each month).
While the traditional number of periods in a year is 12, some companies use a 13th period for year-end
adjusting entries, to prevent distorting financial statements for the 12th period. The number of fiscal
periods can be changed, but this should be done only after a year end close.
If the company has a fiscal year, an option in the Fiscal Year area indicates whether the year at Fiscal
Year is the beginning or the ending of the fiscal year.
If two fiscal periods have the same year-end date, the software closes the Payroll module only once for
the year.
Periods In Fiscal Year
Number of accounting periods in your company’s fiscal year; number can be changed at a later date.
Current Fiscal Period
Current fiscal period; initially, the period you initialize the General Ledger module and enter beginning
balance transactions, which should be the period prior to the one you plan to begin regular General
Ledger module operations.
Setup and Integrity Screens 163
Fiscal Year
Use to specify how you define the fiscal year, which is either the calendar year in which it begins or the
calendar year in which it ends.
Beg. Calendar Year
Select to identify the year as the start of the fiscal year.
End. Calendar Year
Select to identify the year as the end of the fiscal year.
Fiscal Period Ending Dates
Use to specify the ending dates for each period in the fiscal year. The format is MM/DD, where DD is
the last day of the month. Period 1 through Period 13 specifies the ending date for the period in the
fiscal year.
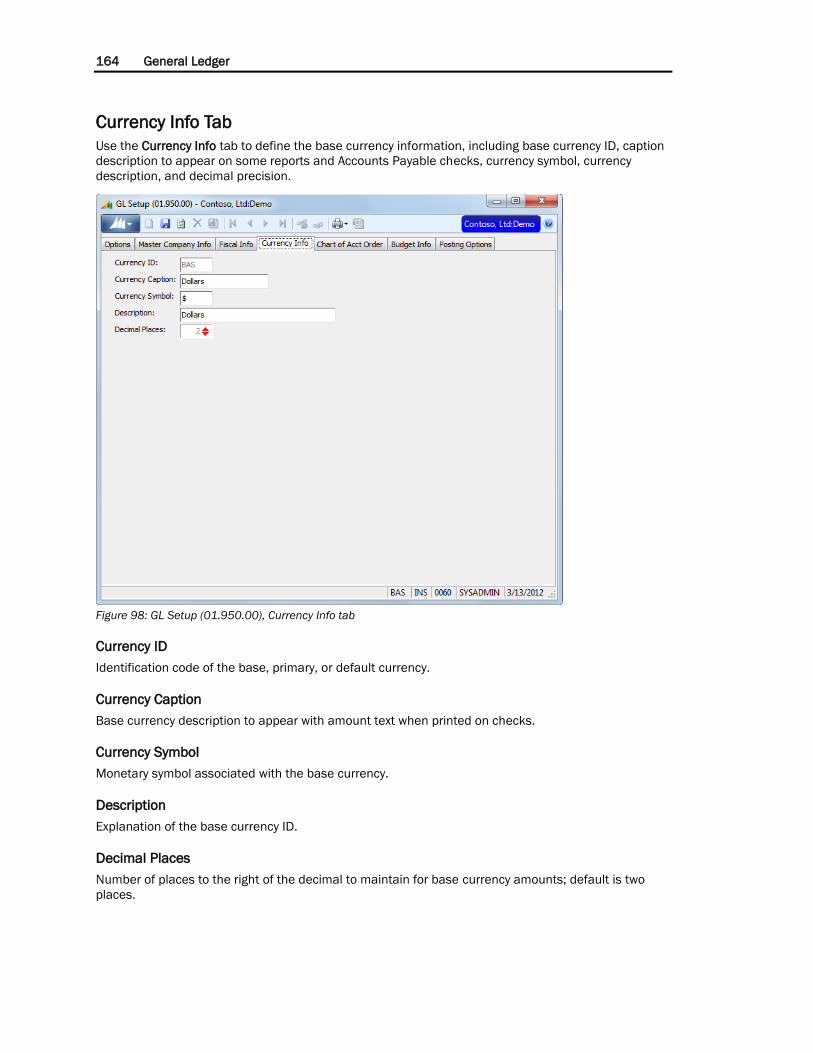
164 General Ledger
Currency Info Tab
Use the Currency Info tab to define the base currency information, including base currency ID, caption
description to appear on some reports and Accounts Payable checks, currency symbol, currency
description, and decimal precision.
Figure 98: GL Setup (01.950.00), Currency Info tab
Currency ID
Identification code of the base, primary, or default currency.
Currency Caption
Base currency description to appear with amount text when printed on checks.
Currency Symbol
Monetary symbol associated with the base currency.
Description
Explanation of the base currency ID.
Decimal Places
Number of places to the right of the decimal to maintain for base currency amounts; default is two
places.
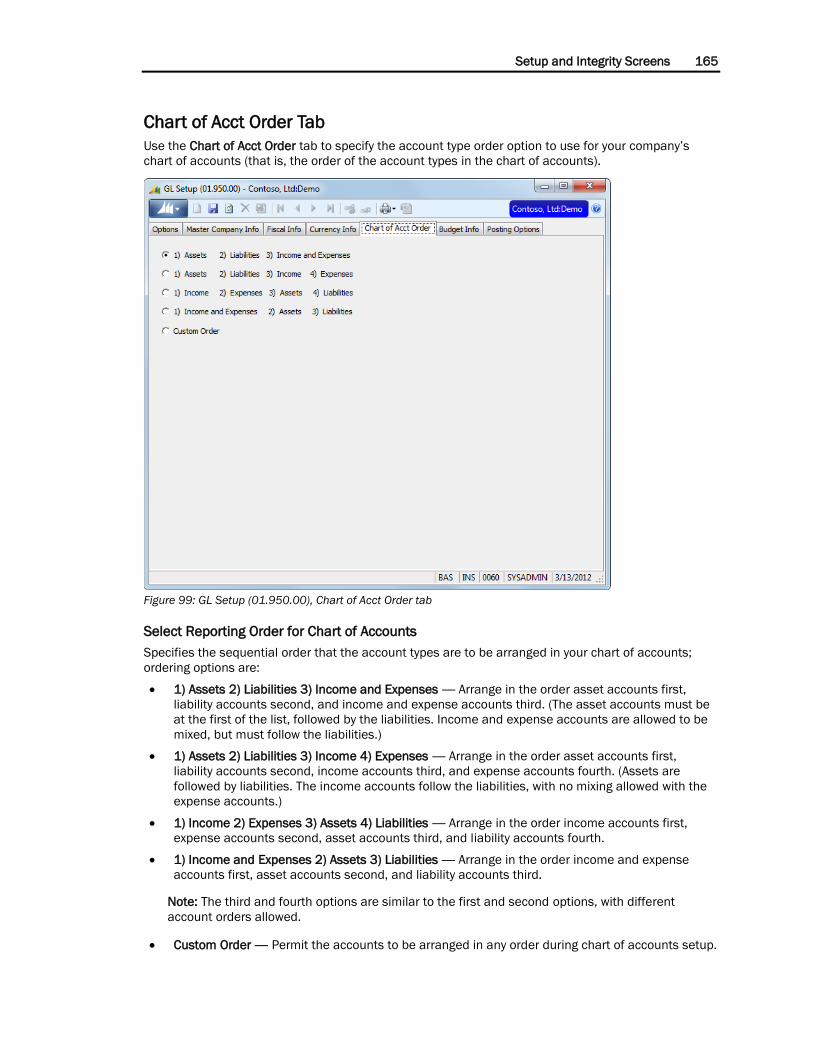
Setup and Integrity Screens 165
Chart of Acct Order Tab
Use the Chart of Acct Order tab to specify the account type order option to use for your company’s
chart of accounts (that is, the order of the account types in the chart of accounts).
Figure 99: GL Setup (01.950.00), Chart of Acct Order tab
Select Reporting Order for Chart of Accounts
Specifies the sequential order that the account types are to be arranged in your chart of accounts;
ordering options are:
1) Assets 2) Liabilities 3) Income and Expenses — Arrange in the order asset accounts first,
liability accounts second, and income and expense accounts third. (The asset accounts must be
at the first of the list, followed by the liabilities. Income and expense accounts are allowed to be
mixed, but must follow the liabilities.)
1) Assets 2) Liabilities 3) Income 4) Expenses — Arrange in the order asset accounts first,
liability accounts second, income accounts third, and expense accounts fourth. (Assets are
followed by liabilities. The income accounts follow the liabilities, with no mixing allowed with the
expense accounts.)
1) Income 2) Expenses 3) Assets 4) Liabilities — Arrange in the order income accounts first,
expense accounts second, asset accounts third, and liability accounts fourth.
1) Income and Expenses 2) Assets 3) Liabilities — Arrange in the order income and expense
accounts first, asset accounts second, and liability accounts third.
Note: The third and fourth options are similar to the first and second options, with different
account orders allowed.
Custom Order — Permit the accounts to be arranged in any order during chart of accounts setup.

166 General Ledger
To change the order from the default, you must be in Initialize mode. Once the order is set and the
chart of accounts is set up, this window should not be changed.
Setup and Integrity Screens 167
Budget Info Tab
Use the Budget Info tab to specify budget defaults and segment selections. Use the Defaults section
to enter default information for the Extended Budget module.
Figure 100: GL Setup (01.950.00), Budget Info tab
Default Year
Fiscal year for the budget being prepared (the year for which you will be entering budgets); does not
prevent activity to other budget years. The year can be overridden during data entry, if necessary.
Default Budget Ledger
Default budget ledger for the budget. When entering budgets, the ledger ID entered in here is entered
automatically in Budget Version. A different ID can be entered at that time, if necessary.
Budget Segment Selection
Specifies the subaccount segments used for budgeting in Extended Budget Maintenance (01.330.00).
The budget subaccount segment options appearing here are defined on Flexkey Definition
(21.320.00) in the Shared Information module. Up to eight budget subaccount segments can be
defined. See the Shared Information online help or user guide for more information. You can select
one, any combination, or all segments listed here.
Spread Sheet File Directory
Specifies the location where the budget Excel spreadsheet will be stored.
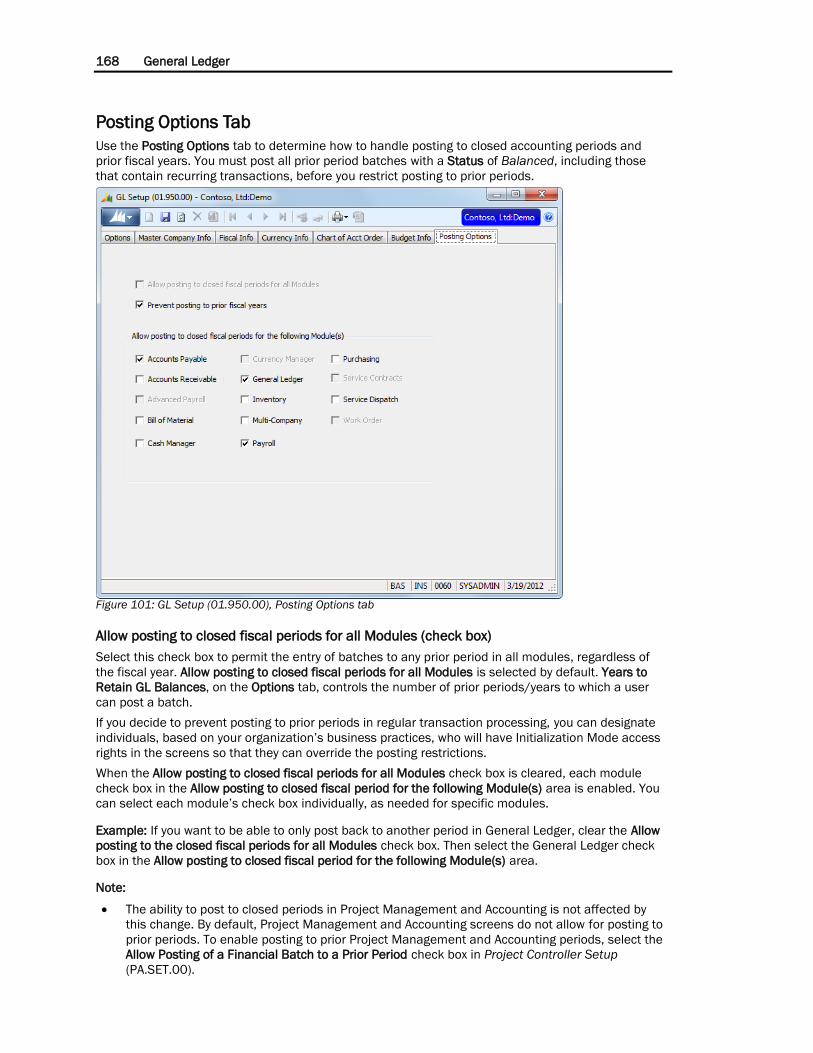
168 General Ledger
Posting Options Tab
Use the Posting Options tab to determine how to handle posting to closed accounting periods and
prior fiscal years. You must post all prior period batches with a Status of Balanced, including those
that contain recurring transactions, before you restrict posting to prior periods.
Figure 101: GL Setup (01.950.00), Posting Options tab
Allow posting to closed fiscal periods for all Modules (check box)
Select this check box to permit the entry of batches to any prior period in all modules, regardless of
the fiscal year. Allow posting to closed fiscal periods for all Modules is selected by default. Years to
Retain GL Balances, on the Options tab, controls the number of prior periods/years to which a user
can post a batch.
If you decide to prevent posting to prior periods in regular transaction processing, you can designate
individuals, based on your organization’s business practices, who will have Initialization Mode access
rights in the screens so that they can override the posting restrictions.
When the Allow posting to closed fiscal periods for all Modules check box is cleared, each module
check box in the Allow posting to closed fiscal period for the following Module(s) area is enabled. You
can select each module’s check box individually, as needed for specific modules.
Example: If you want to be able to only post back to another period in General Ledger, clear the Allow
posting to the closed fiscal periods for all Modules check box. Then select the General Ledger check
box in the Allow posting to closed fiscal period for the following Module(s) area.
Note:
The ability to post to closed periods in Project Management and Accounting is not affected by
this change. By default, Project Management and Accounting screens do not allow for posting to
prior periods. To enable posting to prior Project Management and Accounting periods, select the
Allow Posting of a Financial Batch to a Prior Period check box in Project Controller Setup
(PA.SET.00).
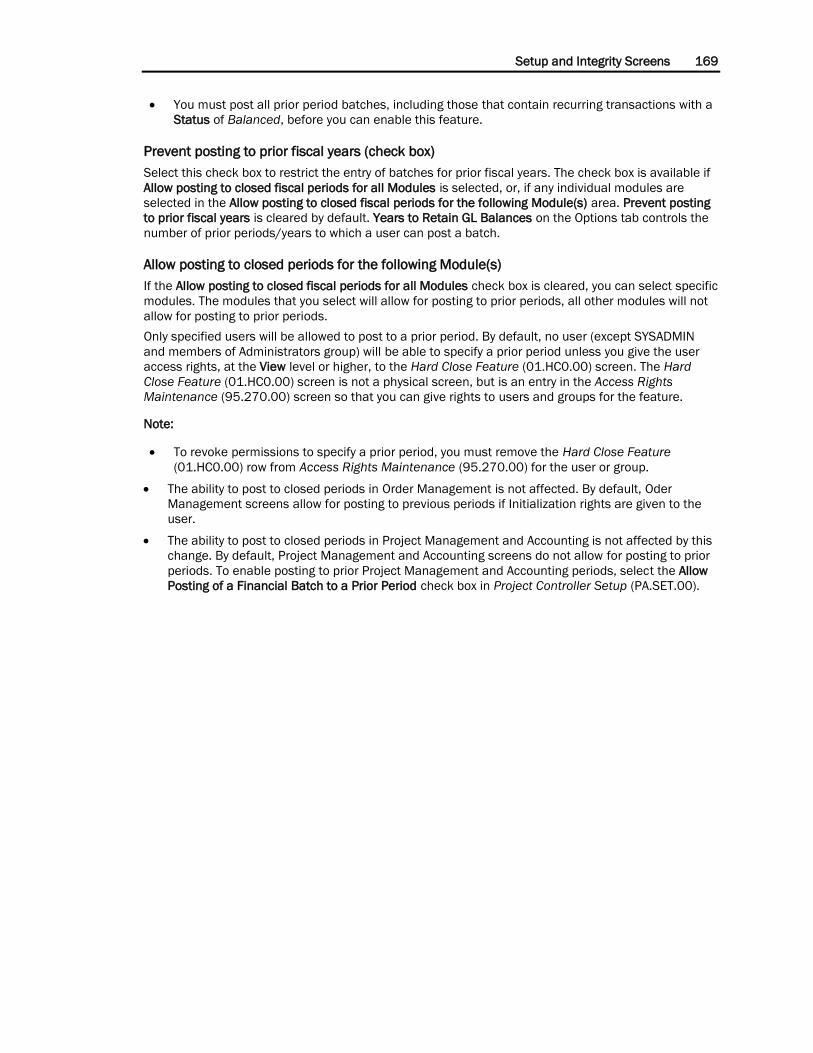
Setup and Integrity Screens 169
You must post all prior period batches, including those that contain recurring transactions with a
Status of Balanced, before you can enable this feature.
Prevent posting to prior fiscal years (check box)
Select this check box to restrict the entry of batches for prior fiscal years. The check box is available if
Allow posting to closed fiscal periods for all Modules is selected, or, if any individual modules are
selected in the Allow posting to closed fiscal periods for the following Module(s) area. Prevent posting
to prior fiscal years is cleared by default. Years to Retain GL Balances on the Options tab controls the
number of prior periods/years to which a user can post a batch.
Allow posting to closed periods for the following Module(s)
If the Allow posting to closed fiscal periods for all Modules check box is cleared, you can select specific
modules. The modules that you select will allow for posting to prior periods, all other modules will not
allow for posting to prior periods.
Only specified users will be allowed to post to a prior period. By default, no user (except SYSADMIN
and members of Administrators group) will be able to specify a prior period unless you give the user
access rights, at the View level or higher, to the Hard Close Feature (01.HC0.00) screen. The Hard
Close Feature (01.HC0.00) screen is not a physical screen, but is an entry in the Access Rights
Maintenance (95.270.00) screen so that you can give rights to users and groups for the feature.
Note:
To revoke permissions to specify a prior period, you must remove the Hard Close Feature
(01.HC0.00) row from Access Rights Maintenance (95.270.00) for the user or group.
The ability to post to closed periods in Order Management is not affected. By default, Oder
Management screens allow for posting to previous periods if Initialization rights are given to the
user.
The ability to post to closed periods in Project Management and Accounting is not affected by this
change. By default, Project Management and Accounting screens do not allow for posting to prior
periods. To enable posting to prior Project Management and Accounting periods, select the Allow
Posting of a Financial Batch to a Prior Period check box in Project Controller Setup (PA.SET.00).
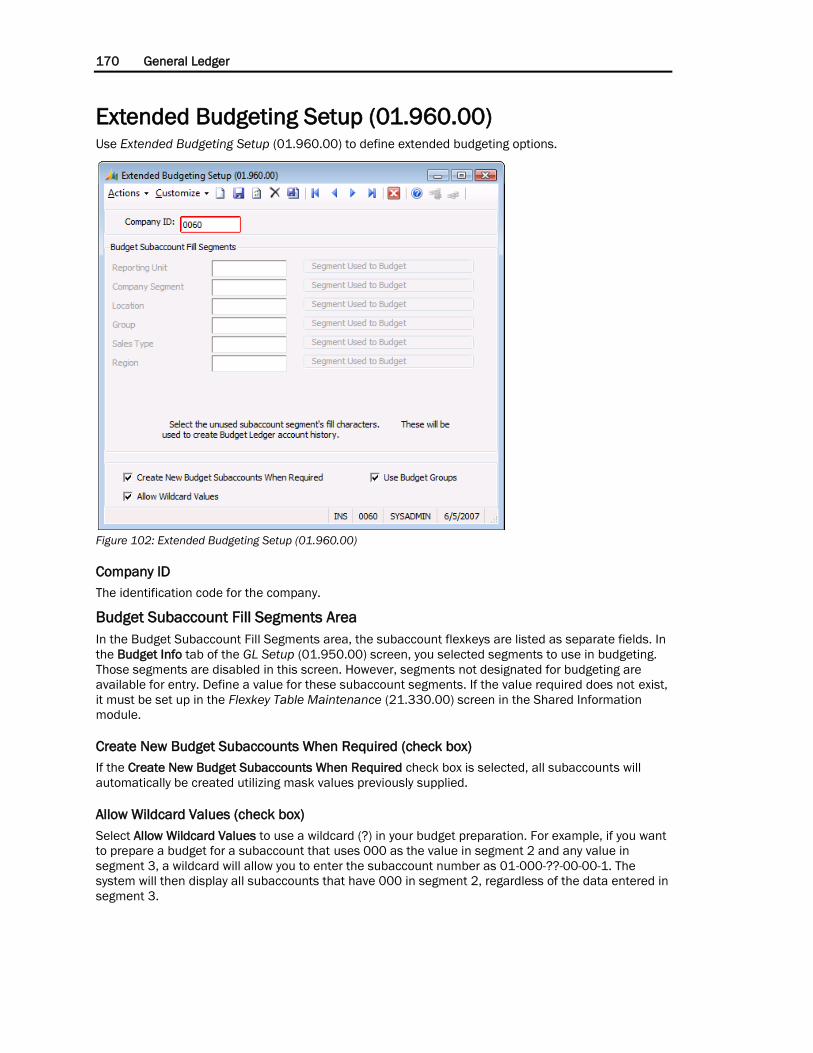
170 General Ledger
Extended Budgeting Setup (01.960.00) Use Extended Budgeting Setup (01.960.00) to define extended budgeting options.
Figure 102: Extended Budgeting Setup (01.960.00)
Company ID
The identification code for the company.
Budget Subaccount Fill Segments Area
In the Budget Subaccount Fill Segments area, the subaccount flexkeys are listed as separate fields. In
the Budget Info tab of the GL Setup (01.950.00) screen, you selected segments to use in budgeting.
Those segments are disabled in this screen. However, segments not designated for budgeting are
available for entry. Define a value for these subaccount segments. If the value required does not exist,
it must be set up in the Flexkey Table Maintenance (21.330.00) screen in the Shared Information
module.
Create New Budget Subaccounts When Required (check box)
If the Create New Budget Subaccounts When Required check box is selected, all subaccounts will
automatically be created utilizing mask values previously supplied.
Allow Wildcard Values (check box)
Select Allow Wildcard Values to use a wildcard (?) in your budget preparation. For example, if you want
to prepare a budget for a subaccount that uses 000 as the value in segment 2 and any value in
segment 3, a wildcard will allow you to enter the subaccount number as 01-000-??-00-00-1. The
system will then display all subaccounts that have 000 in segment 2, regardless of the data entered in
segment 3.

Setup and Integrity Screens 171
Use Budget Groups (check box)
A group of users can have access to the budgets as long as the group is set up in System Manager
Group Maintenance (98.280.00). Select from the list the appropriate level of access to the budgets. If
a group is not available, it can be designated in Access Rights Maintenance (95.270.00).
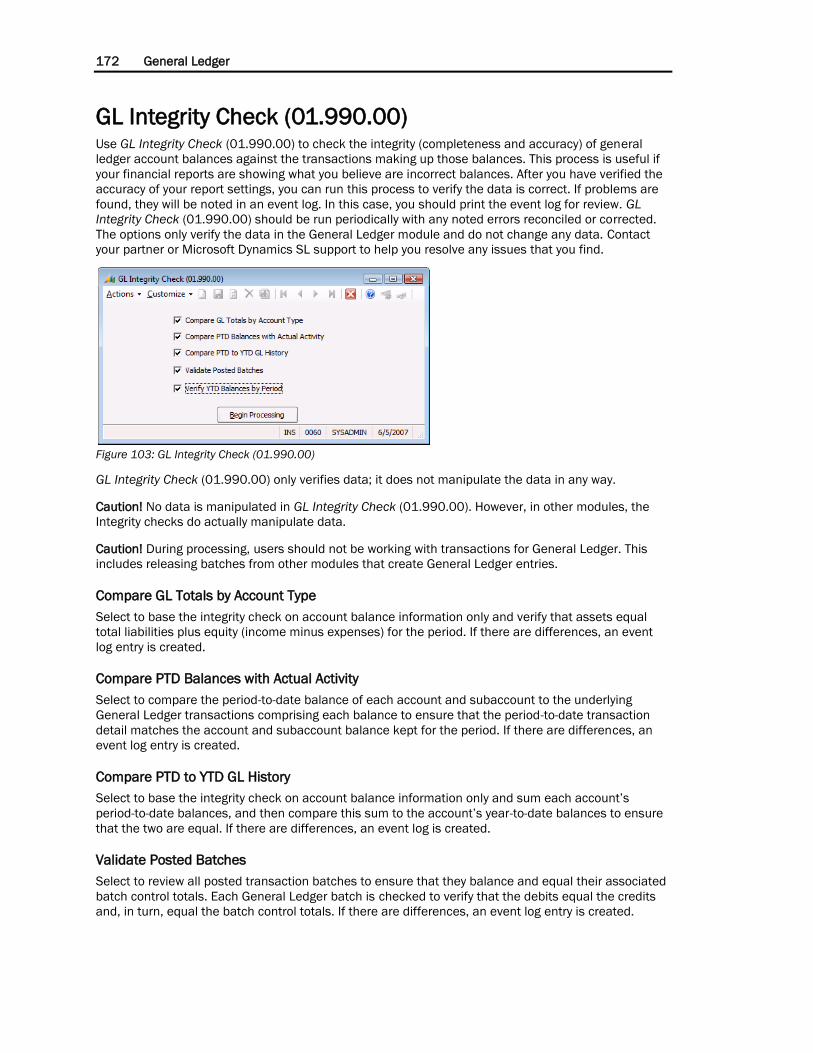
172 General Ledger
GL Integrity Check (01.990.00) Use GL Integrity Check (01.990.00) to check the integrity (completeness and accuracy) of general
ledger account balances against the transactions making up those balances. This process is useful if
your financial reports are showing what you believe are incorrect balances. After you have verified the
accuracy of your report settings, you can run this process to verify the data is correct. If problems are
found, they will be noted in an event log. In this case, you should print the event log for review. GL
Integrity Check (01.990.00) should be run periodically with any noted errors reconciled or corrected.
The options only verify the data in the General Ledger module and do not change any data. Contact
your partner or Microsoft Dynamics SL support to help you resolve any issues that you find.
Figure 103: GL Integrity Check (01.990.00)
GL Integrity Check (01.990.00) only verifies data; it does not manipulate the data in any way.
Caution! No data is manipulated in GL Integrity Check (01.990.00). However, in other modules, the
Integrity checks do actually manipulate data.
Caution! During processing, users should not be working with transactions for General Ledger. This
includes releasing batches from other modules that create General Ledger entries.
Compare GL Totals by Account Type
Select to base the integrity check on account balance information only and verify that assets equal
total liabilities plus equity (income minus expenses) for the period. If there are differences, an event
log entry is created.
Compare PTD Balances with Actual Activity
Select to compare the period-to-date balance of each account and subaccount to the underlying
General Ledger transactions comprising each balance to ensure that the period-to-date transaction
detail matches the account and subaccount balance kept for the period. If there are differences, an
event log entry is created.
Compare PTD to YTD GL History
Select to base the integrity check on account balance information only and sum each account’s
period-to-date balances, and then compare this sum to the account’s year-to-date balances to ensure
that the two are equal. If there are differences, an event log is created.
Validate Posted Batches
Select to review all posted transaction batches to ensure that they balance and equal their associated
batch control totals. Each General Ledger batch is checked to verify that the debits equal the credits
and, in turn, equal the batch control totals. If there are differences, an event log entry is created.

Setup and Integrity Screens 173
Verify YTD Balances by Period
Select to compare the year-to-date balance of each account and subaccount to the underlying General
Ledger transactions comprising the balance to ensure that all period-to-date transaction detail
matches the year-to-date account and subaccount balance. If there are differences, an event log entry
is created.
Begin Processing (button)
Click to start the integrity verification process for the options selected.

174 General Ledger
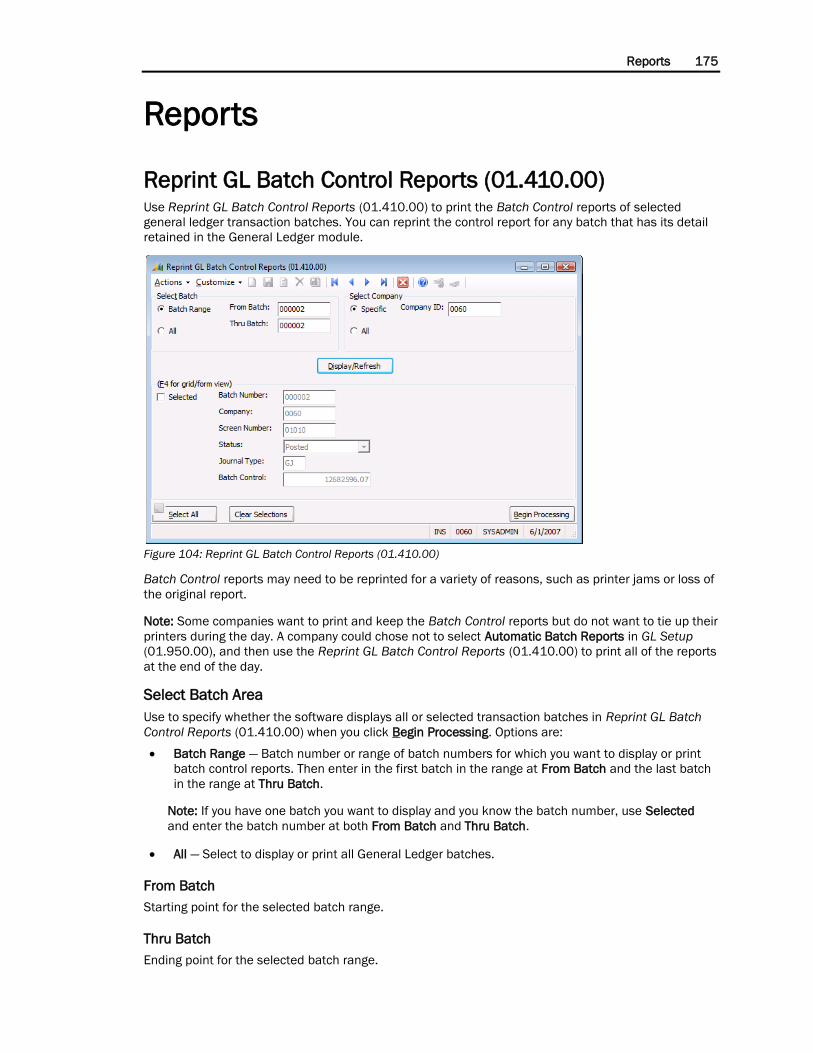
Reports 175
Reports
Reprint GL Batch Control Reports (01.410.00) Use Reprint GL Batch Control Reports (01.410.00) to print the Batch Control reports of selected
general ledger transaction batches. You can reprint the control report for any batch that has its detail
retained in the General Ledger module.
Figure 104: Reprint GL Batch Control Reports (01.410.00)
Batch Control reports may need to be reprinted for a variety of reasons, such as printer jams or loss of
the original report.
Note: Some companies want to print and keep the Batch Control reports but do not want to tie up their
printers during the day. A company could chose not to select Automatic Batch Reports in GL Setup
(01.950.00), and then use the Reprint GL Batch Control Reports (01.410.00) to print all of the reports
at the end of the day.
Select Batch Area
Use to specify whether the software displays all or selected transaction batches in Reprint GL Batch
Control Reports (01.410.00) when you click Begin Processing. Options are:
Batch Range — Batch number or range of batch numbers for which you want to display or print
batch control reports. Then enter in the first batch in the range at From Batch and the last batch
in the range at Thru Batch.
Note: If you have one batch you want to display and you know the batch number, use Selected
and enter the batch number at both From Batch and Thru Batch.
All — Select to display or print all General Ledger batches.
From Batch
Starting point for the selected batch range.
Thru Batch
Ending point for the selected batch range.
176 General Ledger
Select Company Area
Select to display or print batch control reports for a specific company. Options are:
Specific — Select to display batches for a specific company. Then enter the company ID at Company
ID.
All — Select to display batches for all companies.
Company ID (select company)
Identification code of the company for which you want to display or print batch control reports. If you
select Specific at Select Company, enter the Company ID. If you select All at Select Company,
Company ID will be unavailable and all batches for all companies will be displayed.
Display/Refresh (button)
Click once you have completed the top part of Reprint GL Batch Control Reports (01.410.00) to
update the display based on the selected search criteria (the software fills in the grid with the batches
meeting the criteria specified).
Selected (Detail)
Select to display or reprint the batch control report for the batch.
Batch Number (Detail)
Unique identifying code of each batch for which you can display or print a batch control report.
Company (Detail)
Company identification code.
Screen Number (Detail)
Screen used to enter each batch into the database; for example, 01010 specifies the General Ledger
Journal Transactions (01.010.00) screen.
Status (Detail)
Current condition of each general ledger batch in the system; options are:
Posted
Unposted
Completed
Journal Type (Detail)
Book of original entry for each batch; for example, GJ specifies the general journal.
Batch Control (Detail)
Total amount of all transactions in each batch.
Select All (button)
Click to select all displayed batches for batch control report printing.
Clear Selections (button)
Click to deselect all displayed batches.
Begin Processing (button)
Click to start display or print batch control reports for the selected batches.
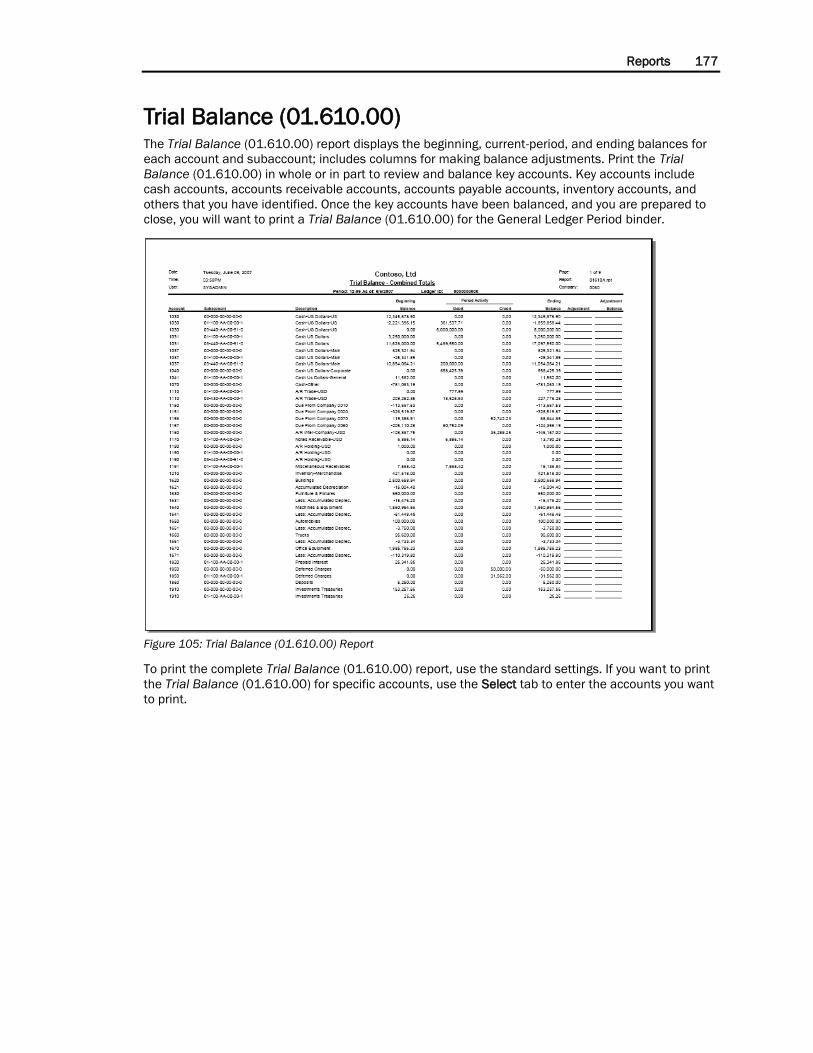
Reports 177
Trial Balance (01.610.00) The Trial Balance (01.610.00) report displays the beginning, current-period, and ending balances for
each account and subaccount; includes columns for making balance adjustments. Print the Trial
Balance (01.610.00) in whole or in part to review and balance key accounts. Key accounts include
cash accounts, accounts receivable accounts, accounts payable accounts, inventory accounts, and
others that you have identified. Once the key accounts have been balanced, and you are prepared to
close, you will want to print a Trial Balance (01.610.00) for the General Ledger Period binder.
Figure 105: Trial Balance (01.610.00) Report
To print the complete Trial Balance (01.610.00) report, use the standard settings. If you want to print
the Trial Balance (01.610.00) for specific accounts, use the Select tab to enter the accounts you want
to print.
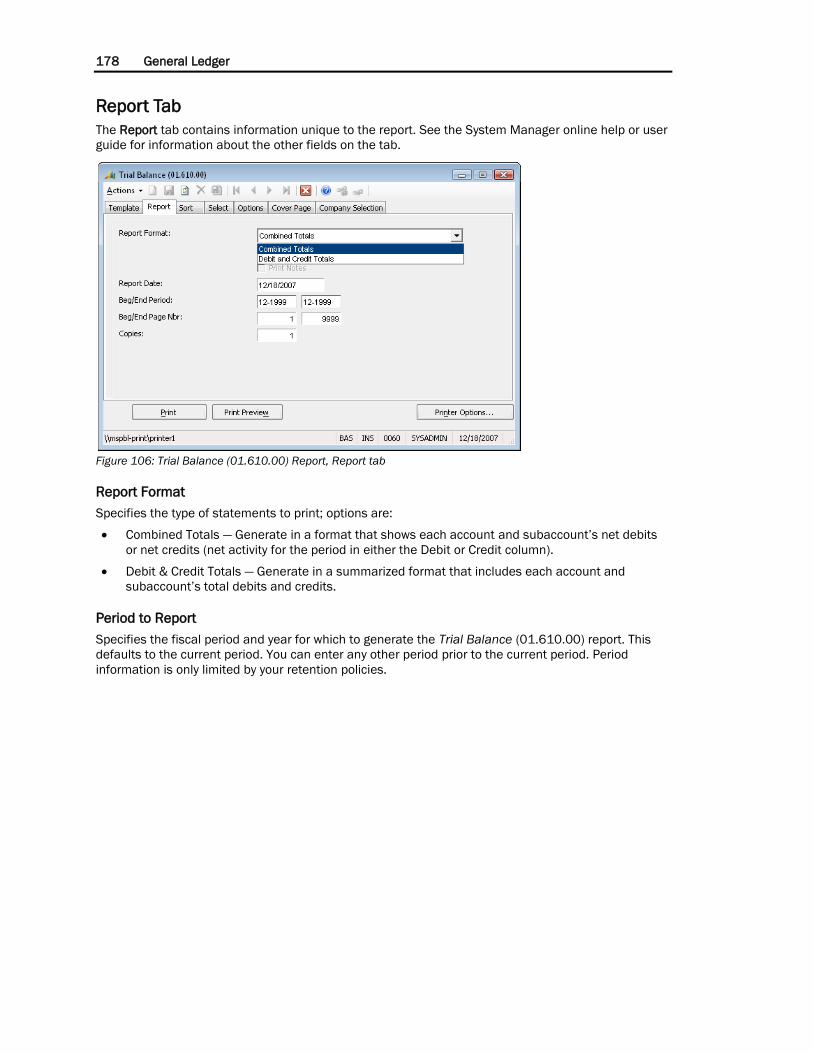
178 General Ledger
Report Tab
The Report tab contains information unique to the report. See the System Manager online help or user
guide for information about the other fields on the tab.
Figure 106: Trial Balance (01.610.00) Report, Report tab
Report Format
Specifies the type of statements to print; options are:
Combined Totals — Generate in a format that shows each account and subaccount’s net debits
or net credits (net activity for the period in either the Debit or Credit column).
Debit & Credit Totals — Generate in a summarized format that includes each account and
subaccount’s total debits and credits.
Period to Report
Specifies the fiscal period and year for which to generate the Trial Balance (01.610.00) report. This
defaults to the current period. You can enter any other period prior to the current period. Period
information is only limited by your retention policies.
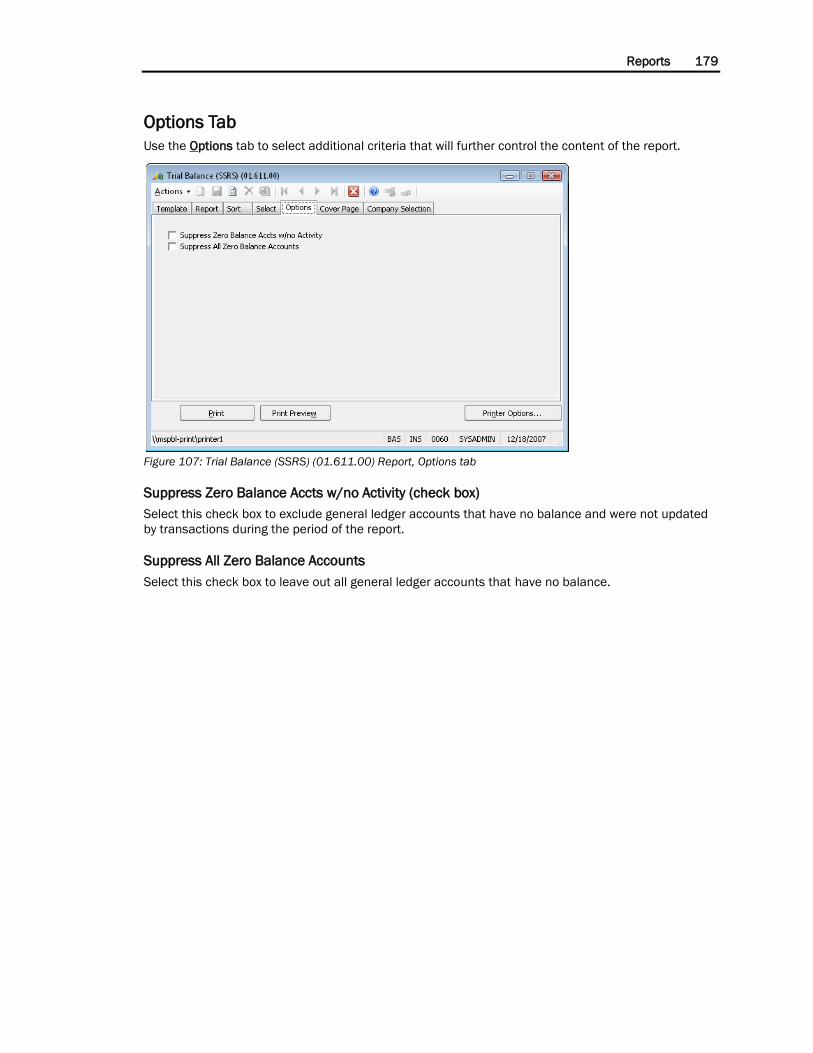
Reports 179
Options Tab
Use the Options tab to select additional criteria that will further control the content of the report.
Figure 107: Trial Balance (SSRS) (01.611.00) Report, Options tab
Suppress Zero Balance Accts w/no Activity (check box)
Select this check box to exclude general ledger accounts that have no balance and were not updated
by transactions during the period of the report.
Suppress All Zero Balance Accounts
Select this check box to leave out all general ledger accounts that have no balance.
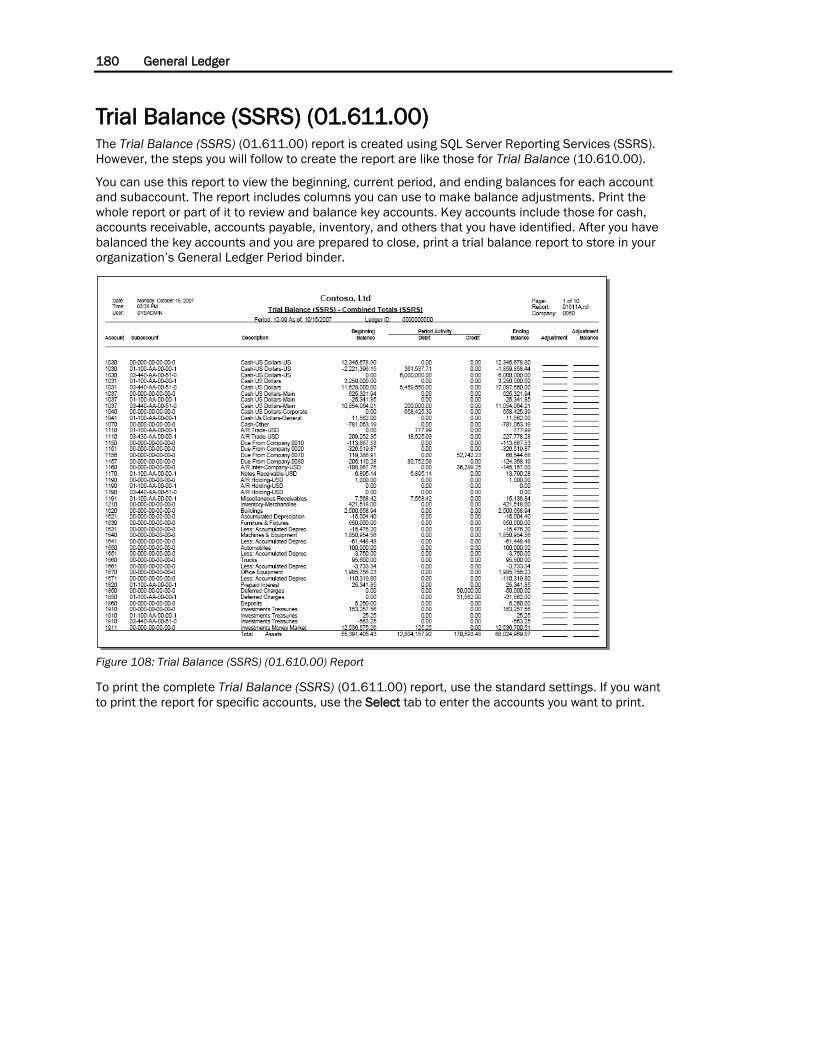
180 General Ledger
Trial Balance (SSRS) (01.611.00) The Trial Balance (SSRS) (01.611.00) report is created using SQL Server Reporting Services (SSRS).
However, the steps you will follow to create the report are like those for Trial Balance (10.610.00).
You can use this report to view the beginning, current period, and ending balances for each account
and subaccount. The report includes columns you can use to make balance adjustments. Print the
whole report or part of it to review and balance key accounts. Key accounts include those for cash,
accounts receivable, accounts payable, inventory, and others that you have identified. After you have
balanced the key accounts and you are prepared to close, print a trial balance report to store in your
organization’s General Ledger Period binder.
Figure 108: Trial Balance (SSRS) (01.610.00) Report
To print the complete Trial Balance (SSRS) (01.611.00) report, use the standard settings. If you want
to print the report for specific accounts, use the Select tab to enter the accounts you want to print.
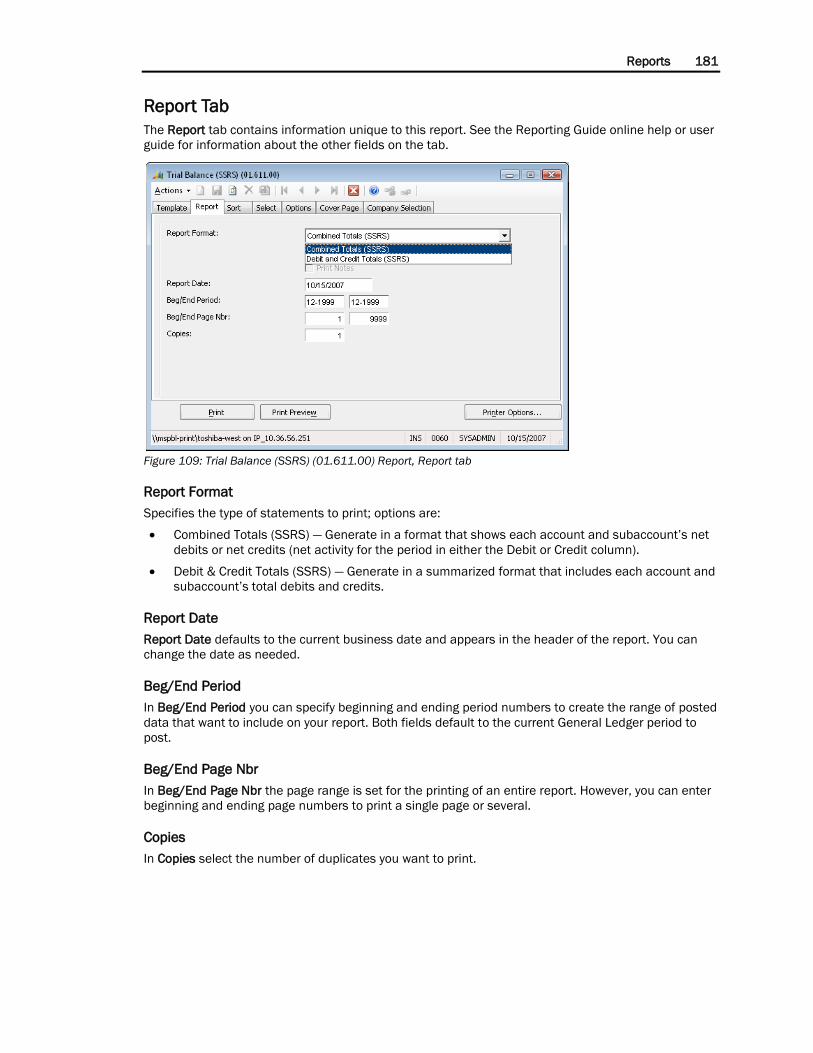
Reports 181
Report Tab
The Report tab contains information unique to this report. See the Reporting Guide online help or user
guide for information about the other fields on the tab.
Figure 109: Trial Balance (SSRS) (01.611.00) Report, Report tab
Report Format
Specifies the type of statements to print; options are:
Combined Totals (SSRS) — Generate in a format that shows each account and subaccount’s net
debits or net credits (net activity for the period in either the Debit or Credit column).
Debit & Credit Totals (SSRS) — Generate in a summarized format that includes each account and
subaccount’s total debits and credits.
Report Date
Report Date defaults to the current business date and appears in the header of the report. You can
change the date as needed.
Beg/End Period
In Beg/End Period you can specify beginning and ending period numbers to create the range of posted
data that want to include on your report. Both fields default to the current General Ledger period to
post.
Beg/End Page Nbr
In Beg/End Page Nbr the page range is set for the printing of an entire report. However, you can enter
beginning and ending page numbers to print a single page or several.
Copies
In Copies select the number of duplicates you want to print.
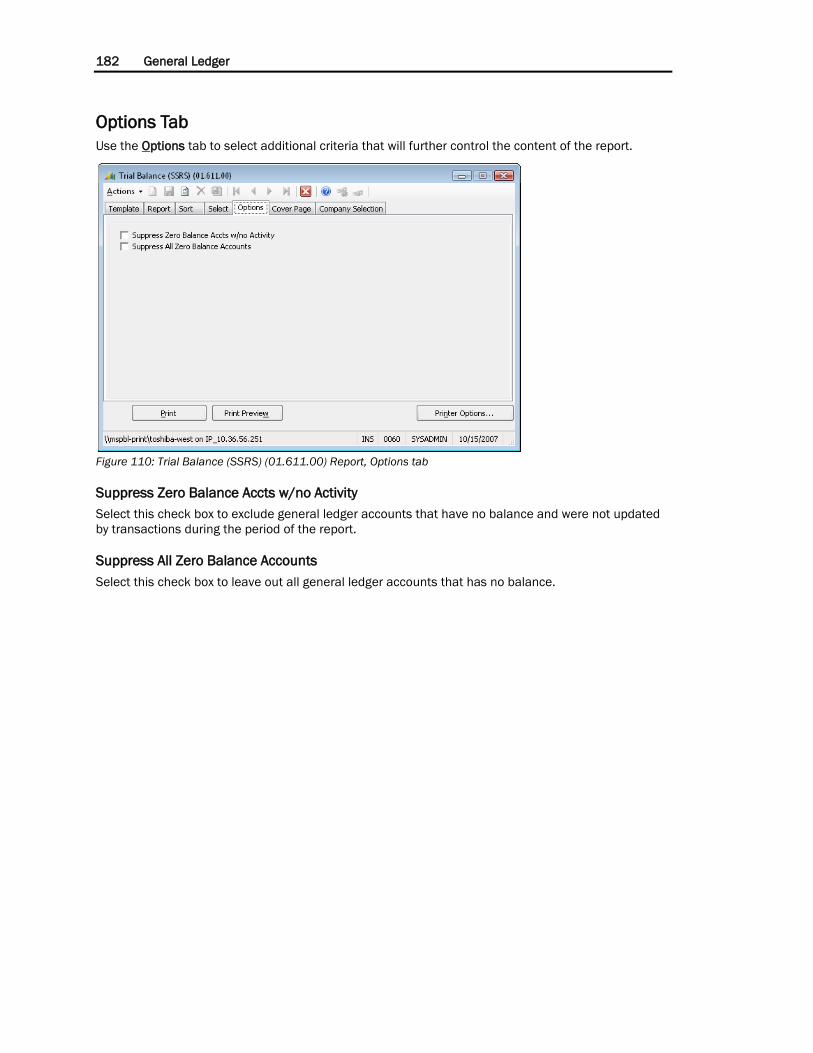
182 General Ledger
Options Tab
Use the Options tab to select additional criteria that will further control the content of the report.
Figure 110: Trial Balance (SSRS) (01.611.00) Report, Options tab
Suppress Zero Balance Accts w/no Activity
Select this check box to exclude general ledger accounts that have no balance and were not updated
by transactions during the period of the report.
Suppress All Zero Balance Accounts
Select this check box to leave out all general ledger accounts that has no balance.
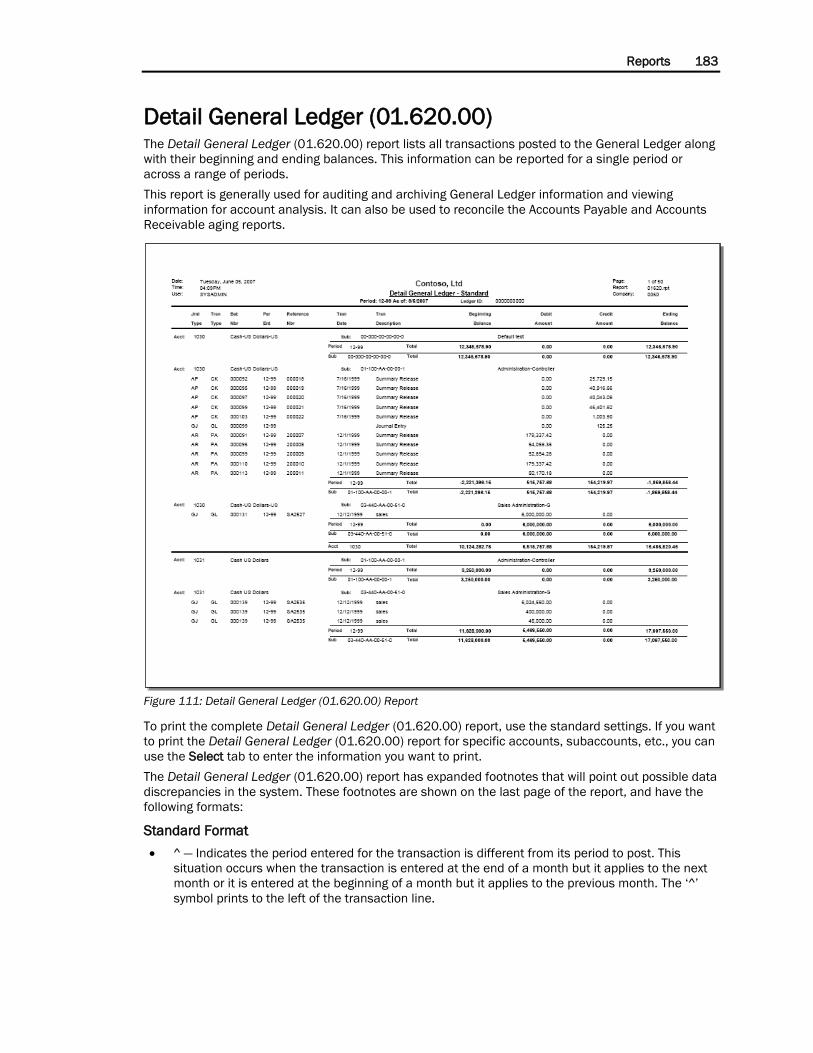
Reports 183
Detail General Ledger (01.620.00) The Detail General Ledger (01.620.00) report lists all transactions posted to the General Ledger along
with their beginning and ending balances. This information can be reported for a single period or
across a range of periods.
This report is generally used for auditing and archiving General Ledger information and viewing
information for account analysis. It can also be used to reconcile the Accounts Payable and Accounts
Receivable aging reports.
Figure 111: Detail General Ledger (01.620.00) Report
To print the complete Detail General Ledger (01.620.00) report, use the standard settings. If you want
to print the Detail General Ledger (01.620.00) report for specific accounts, subaccounts, etc., you can
use the Select tab to enter the information you want to print.
The Detail General Ledger (01.620.00) report has expanded footnotes that will point out possible data
discrepancies in the system. These footnotes are shown on the last page of the report, and have the
following formats:
Standard Format
^ — Indicates the period entered for the transaction is different from its period to post. This
situation occurs when the transaction is entered at the end of a month but it applies to the next
month or it is entered at the beginning of a month but it applies to the previous month. The ‘^’
symbol prints to the left of the transaction line.
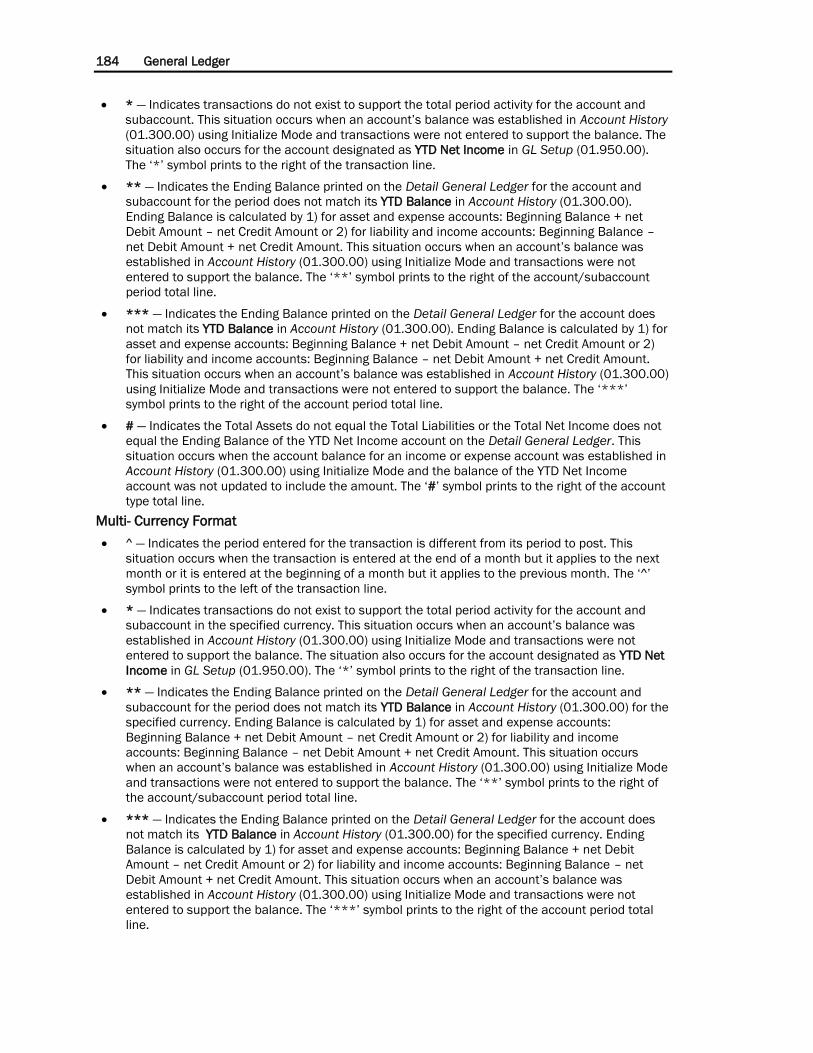
184 General Ledger
* — Indicates transactions do not exist to support the total period activity for the account and
subaccount. This situation occurs when an account’s balance was established in Account History
(01.300.00) using Initialize Mode and transactions were not entered to support the balance. The
situation also occurs for the account designated as YTD Net Income in GL Setup (01.950.00).
The ‘*’ symbol prints to the right of the transaction line.
** — Indicates the Ending Balance printed on the Detail General Ledger for the account and
subaccount for the period does not match its YTD Balance in Account History (01.300.00).
Ending Balance is calculated by 1) for asset and expense accounts: Beginning Balance + net
Debit Amount – net Credit Amount or 2) for liability and income accounts: Beginning Balance –
net Debit Amount + net Credit Amount. This situation occurs when an account’s balance was
established in Account History (01.300.00) using Initialize Mode and transactions were not
entered to support the balance. The ‘**’ symbol prints to the right of the account/subaccount
period total line.
*** — Indicates the Ending Balance printed on the Detail General Ledger for the account does
not match its YTD Balance in Account History (01.300.00). Ending Balance is calculated by 1) for
asset and expense accounts: Beginning Balance + net Debit Amount – net Credit Amount or 2)
for liability and income accounts: Beginning Balance – net Debit Amount + net Credit Amount.
This situation occurs when an account’s balance was established in Account History (01.300.00)
using Initialize Mode and transactions were not entered to support the balance. The ‘***’
symbol prints to the right of the account period total line.
# — Indicates the Total Assets do not equal the Total Liabilities or the Total Net Income does not
equal the Ending Balance of the YTD Net Income account on the Detail General Ledger. This
situation occurs when the account balance for an income or expense account was established in
Account History (01.300.00) using Initialize Mode and the balance of the YTD Net Income
account was not updated to include the amount. The ‘#’ symbol prints to the right of the account
type total line.
Multi- Currency Format
^ — Indicates the period entered for the transaction is different from its period to post. This
situation occurs when the transaction is entered at the end of a month but it applies to the next
month or it is entered at the beginning of a month but it applies to the previous month. The ‘^’
symbol prints to the left of the transaction line.
* — Indicates transactions do not exist to support the total period activity for the account and
subaccount in the specified currency. This situation occurs when an account’s balance was
established in Account History (01.300.00) using Initialize Mode and transactions were not
entered to support the balance. The situation also occurs for the account designated as YTD Net
Income in GL Setup (01.950.00). The ‘*’ symbol prints to the right of the transaction line.
** — Indicates the Ending Balance printed on the Detail General Ledger for the account and
subaccount for the period does not match its YTD Balance in Account History (01.300.00) for the
specified currency. Ending Balance is calculated by 1) for asset and expense accounts:
Beginning Balance + net Debit Amount – net Credit Amount or 2) for liability and income
accounts: Beginning Balance – net Debit Amount + net Credit Amount. This situation occurs
when an account’s balance was established in Account History (01.300.00) using Initialize Mode
and transactions were not entered to support the balance. The ‘**’ symbol prints to the right of
the account/subaccount period total line.
*** — Indicates the Ending Balance printed on the Detail General Ledger for the account does
not match its YTD Balance in Account History (01.300.00) for the specified currency. Ending
Balance is calculated by 1) for asset and expense accounts: Beginning Balance + net Debit
Amount – net Credit Amount or 2) for liability and income accounts: Beginning Balance – net
Debit Amount + net Credit Amount. This situation occurs when an account’s balance was
established in Account History (01.300.00) using Initialize Mode and transactions were not
entered to support the balance. The ‘***’ symbol prints to the right of the account period total
line.
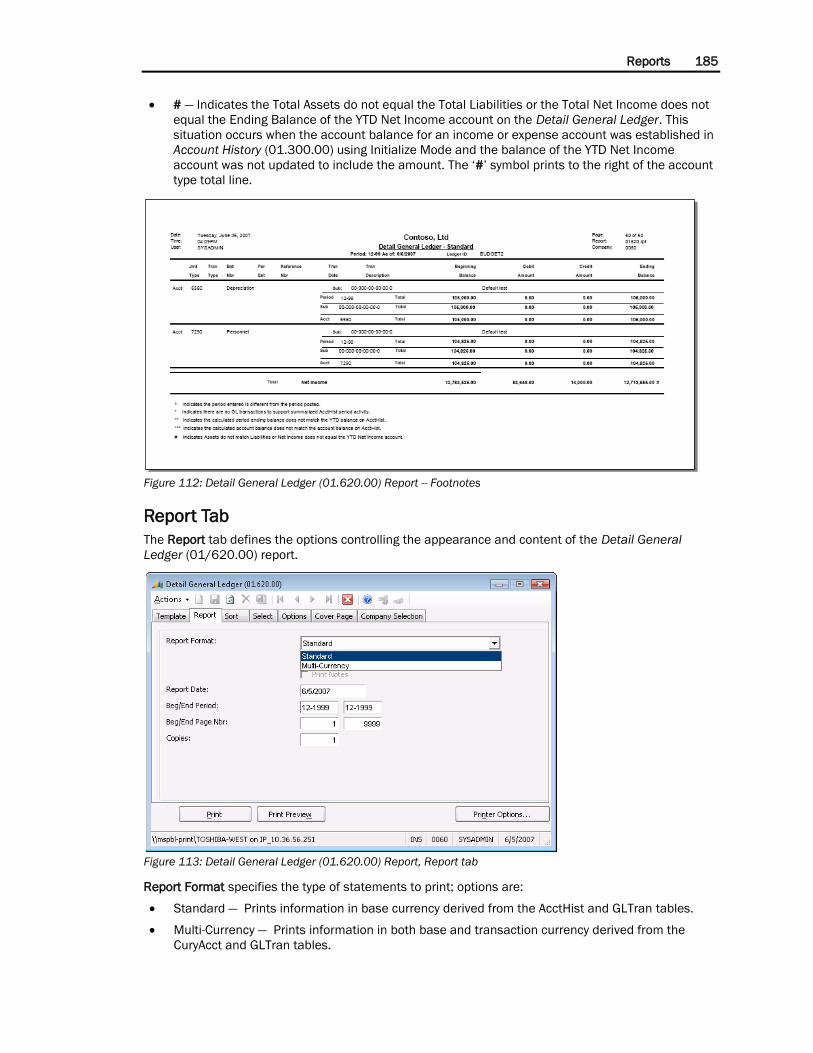
Reports 185
# — Indicates the Total Assets do not equal the Total Liabilities or the Total Net Income does not
equal the Ending Balance of the YTD Net Income account on the Detail General Ledger. This
situation occurs when the account balance for an income or expense account was established in
Account History (01.300.00) using Initialize Mode and the balance of the YTD Net Income
account was not updated to include the amount. The ‘#’ symbol prints to the right of the account
type total line.
Figure 112: Detail General Ledger (01.620.00) Report -- Footnotes
Report Tab
The Report tab defines the options controlling the appearance and content of the Detail General
Ledger (01/620.00) report.
Figure 113: Detail General Ledger (01.620.00) Report, Report tab
Report Format specifies the type of statements to print; options are:
Standard — Prints information in base currency derived from the AcctHist and GLTran tables.
Multi-Currency — Prints information in both base and transaction currency derived from the
CuryAcct and GLTran tables.
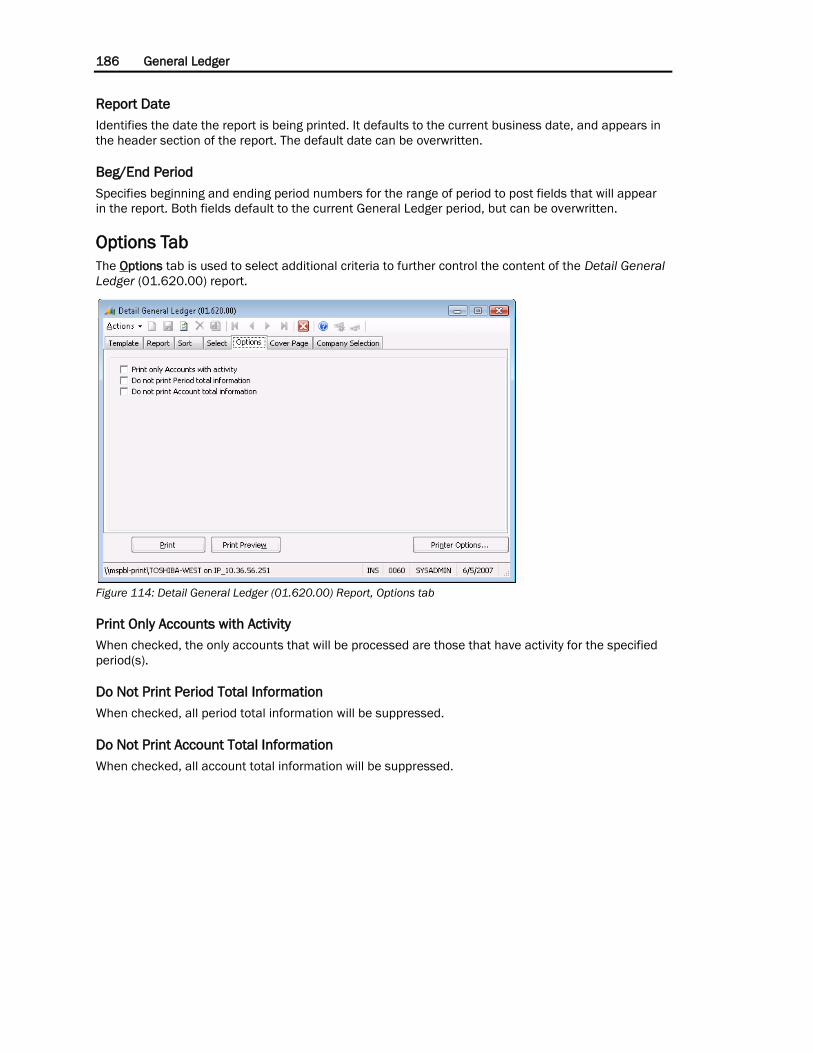
186 General Ledger
Report Date
Identifies the date the report is being printed. It defaults to the current business date, and appears in
the header section of the report. The default date can be overwritten.
Beg/End Period
Specifies beginning and ending period numbers for the range of period to post fields that will appear
in the report. Both fields default to the current General Ledger period, but can be overwritten.
Options Tab
The Options tab is used to select additional criteria to further control the content of the Detail General
Ledger (01.620.00) report.
Figure 114: Detail General Ledger (01.620.00) Report, Options tab
Print Only Accounts with Activity
When checked, the only accounts that will be processed are those that have activity for the specified
period(s).
Do Not Print Period Total Information
When checked, all period total information will be suppressed.
Do Not Print Account Total Information
When checked, all account total information will be suppressed.
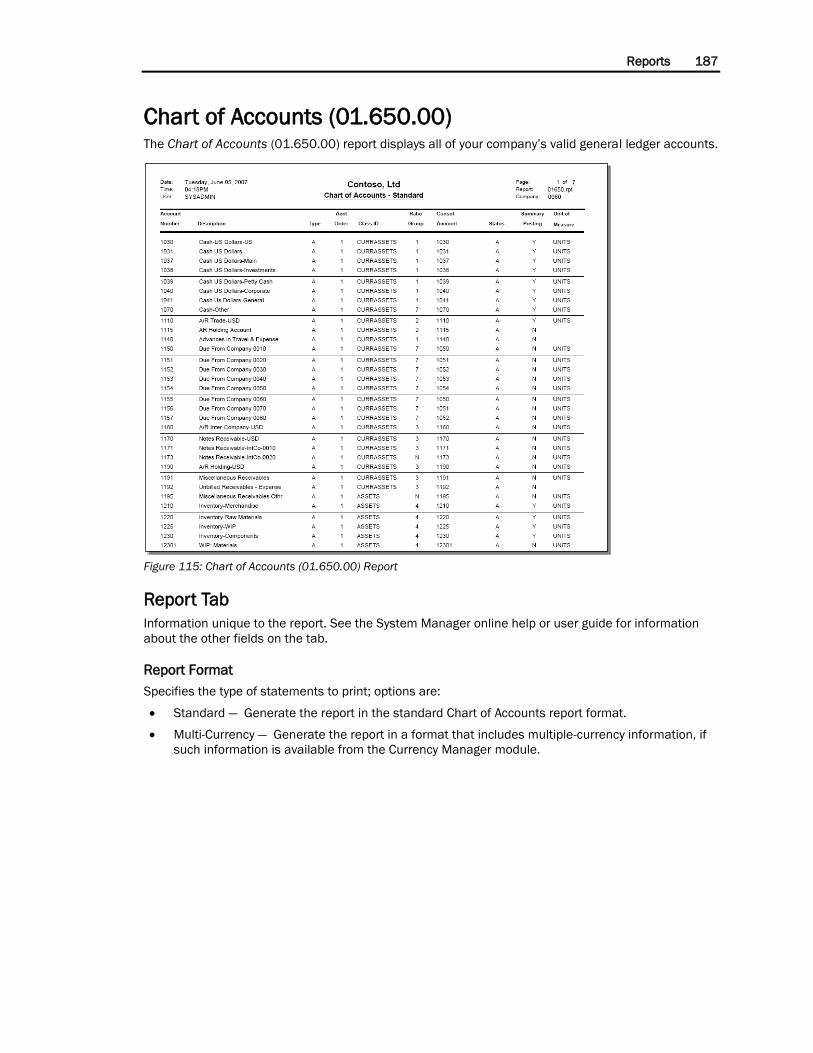
Reports 187
Chart of Accounts (01.650.00) The Chart of Accounts (01.650.00) report displays all of your company’s valid general ledger accounts.
Figure 115: Chart of Accounts (01.650.00) Report
Report Tab
Information unique to the report. See the System Manager online help or user guide for information
about the other fields on the tab.
Report Format
Specifies the type of statements to print; options are:
Standard — Generate the report in the standard Chart of Accounts report format.
Multi-Currency — Generate the report in a format that includes multiple-currency information, if
such information is available from the Currency Manager module.

188 General Ledger
Subaccounts (01.660.00) The Subaccounts (01.660.00) report lists the information of your company’s subaccounts.
Subaccounts are defined on Subaccount Maintenance (01.270.00) and Flexkey Table Maintenance
(21.330.00) in the Shared Information module.
Figure 116: Subaccounts (01.660.00) Report
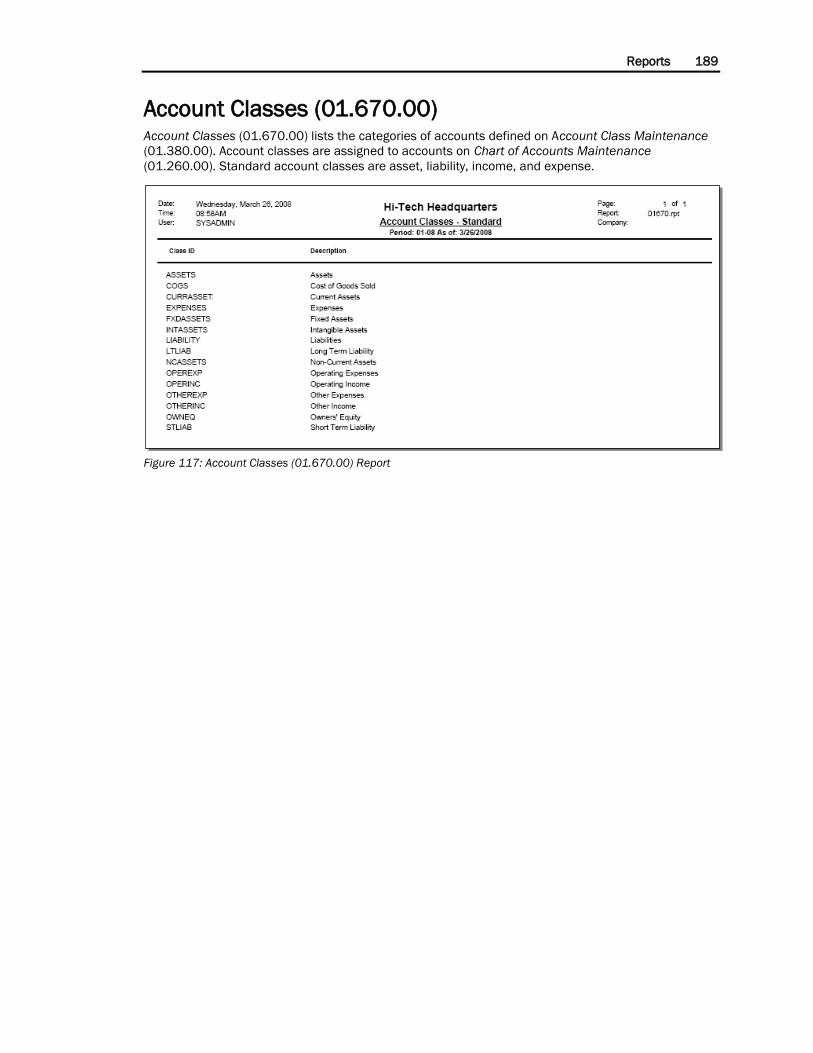
Reports 189
Account Classes (01.670.00) Account Classes (01.670.00) lists the categories of accounts defined on Account Class Maintenance
(01.380.00). Account classes are assigned to accounts on Chart of Accounts Maintenance
(01.260.00). Standard account classes are asset, liability, income, and expense.
Figure 117: Account Classes (01.670.00) Report
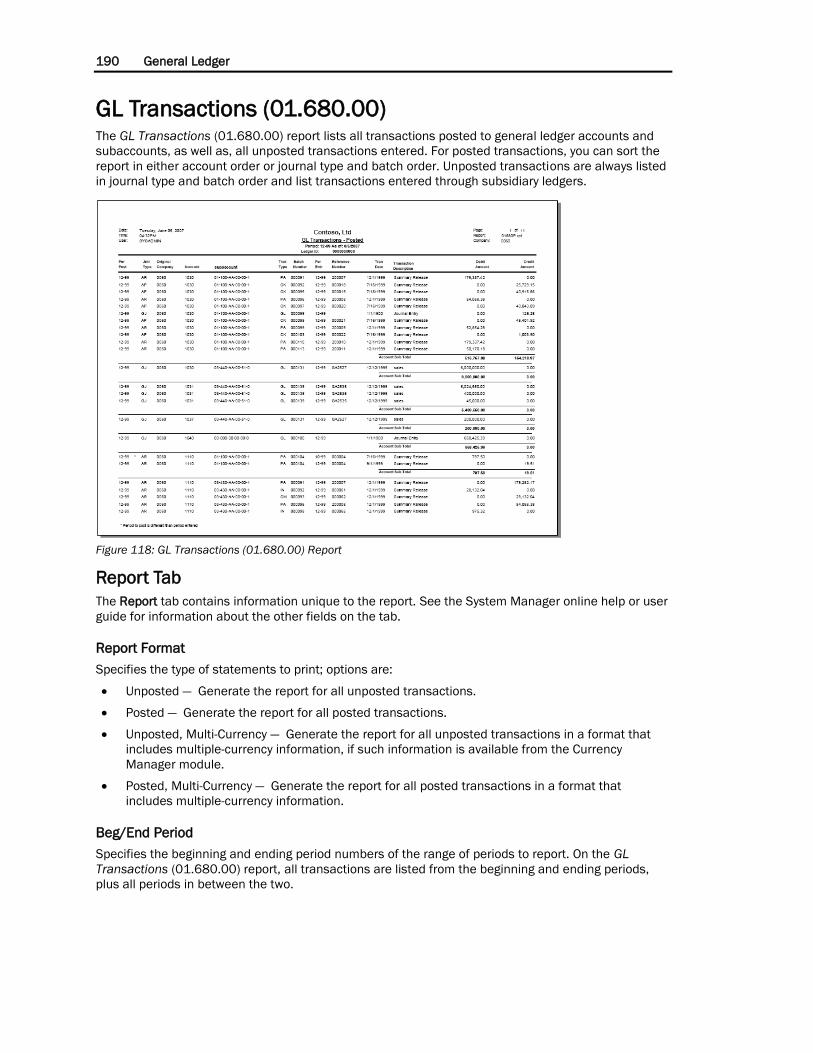
190 General Ledger
GL Transactions (01.680.00) The GL Transactions (01.680.00) report lists all transactions posted to general ledger accounts and
subaccounts, as well as, all unposted transactions entered. For posted transactions, you can sort the
report in either account order or journal type and batch order. Unposted transactions are always listed
in journal type and batch order and list transactions entered through subsidiary ledgers.
Figure 118: GL Transactions (01.680.00) Report
Report Tab
The Report tab contains information unique to the report. See the System Manager online help or user
guide for information about the other fields on the tab.
Report Format
Specifies the type of statements to print; options are:
Unposted — Generate the report for all unposted transactions.
Posted — Generate the report for all posted transactions.
Unposted, Multi-Currency — Generate the report for all unposted transactions in a format that
includes multiple-currency information, if such information is available from the Currency
Manager module.
Posted, Multi-Currency — Generate the report for all posted transactions in a format that
includes multiple-currency information.
Beg/End Period
Specifies the beginning and ending period numbers of the range of periods to report. On the GL
Transactions (01.680.00) report, all transactions are listed from the beginning and ending periods,
plus all periods in between the two.

Reports 191
Allocation Groups (01.710.00) The Allocation Groups (01.710.00) report lists information of any account allocation groups you have
set up for your company. Allocation group information includes the group source account(s), the
destination account(s), plus any factors or limitations used to distribute the year-to-date balance from
the source to the destination account(s). Allocation group information is entered on Allocation Group
Maintenance (01.290.00).
Figure 119: Allocation Groups (01.710.00) Report
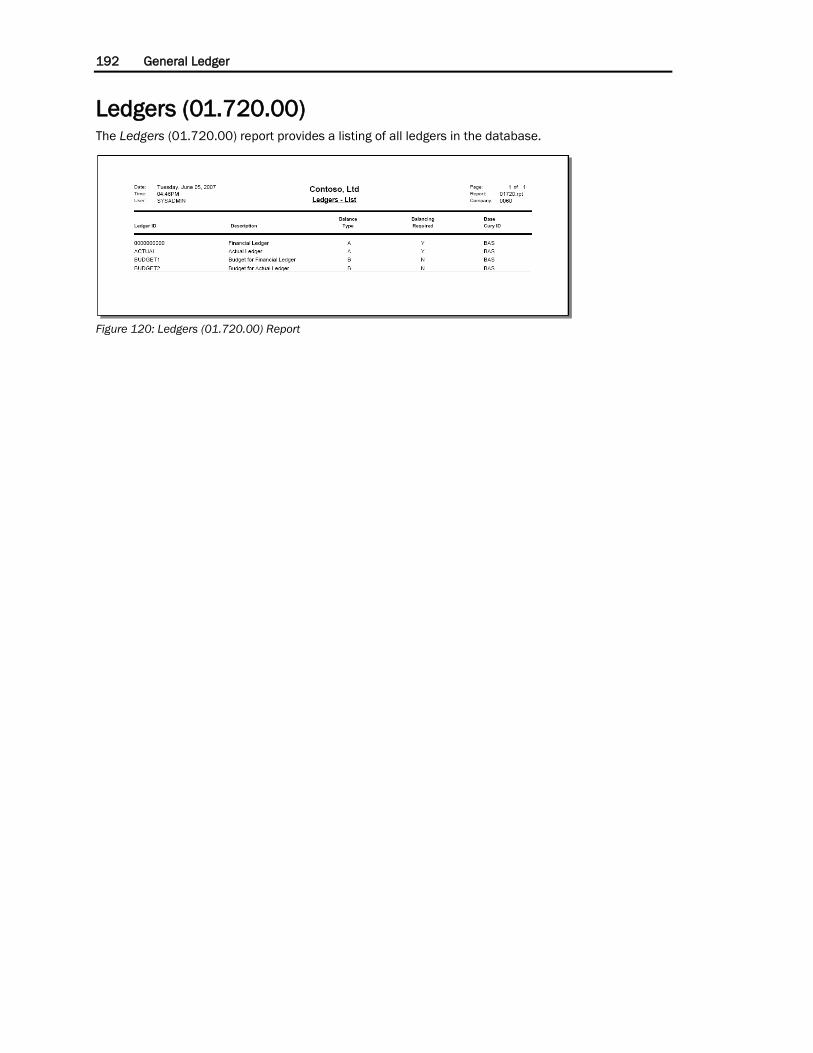
192 General Ledger
Ledgers (01.720.00) The Ledgers (01.720.00) report provides a listing of all ledgers in the database.
Figure 120: Ledgers (01.720.00) Report
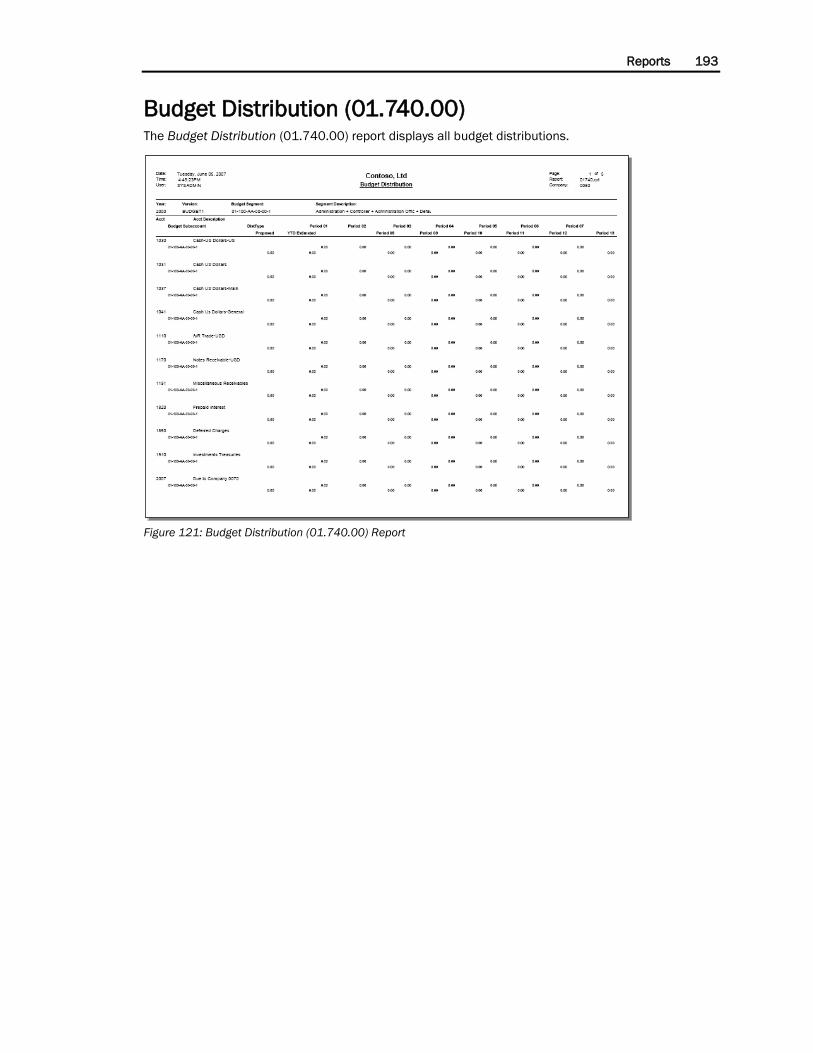
Reports 193
Budget Distribution (01.740.00) The Budget Distribution (01.740.00) report displays all budget distributions.
Figure 121: Budget Distribution (01.740.00) Report
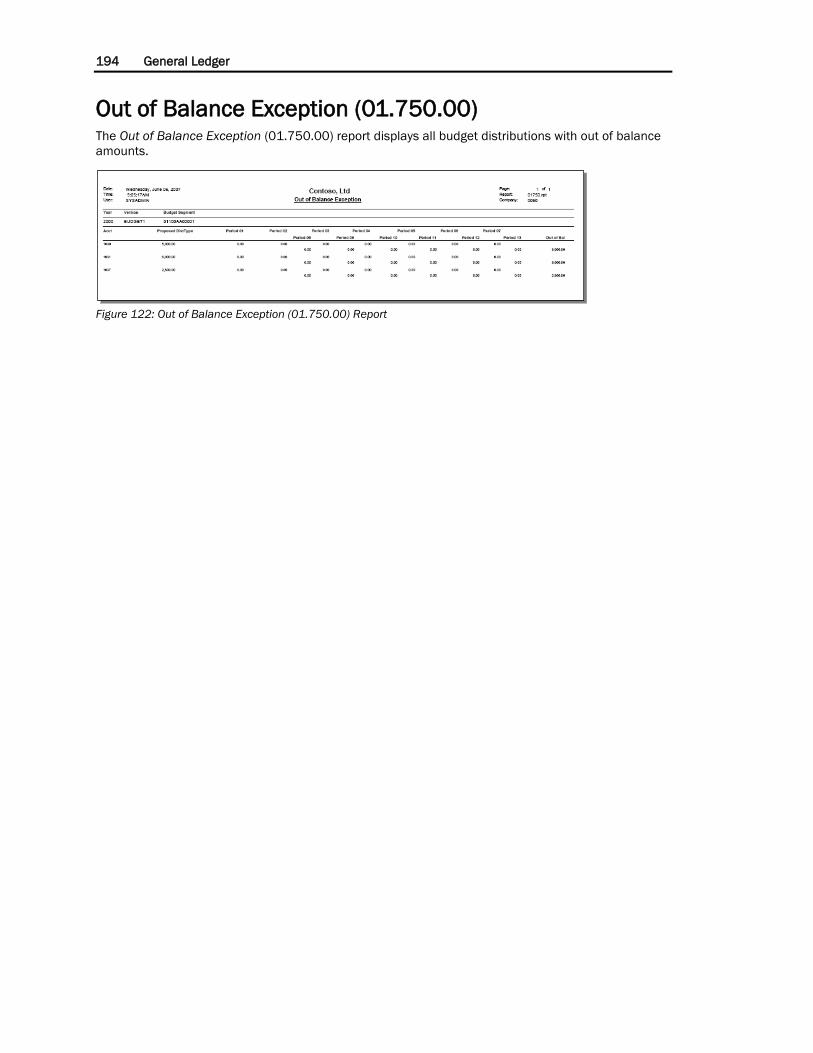
194 General Ledger
Out of Balance Exception (01.750.00) The Out of Balance Exception (01.750.00) report displays all budget distributions with out of balance
amounts.
Figure 122: Out of Balance Exception (01.750.00) Report
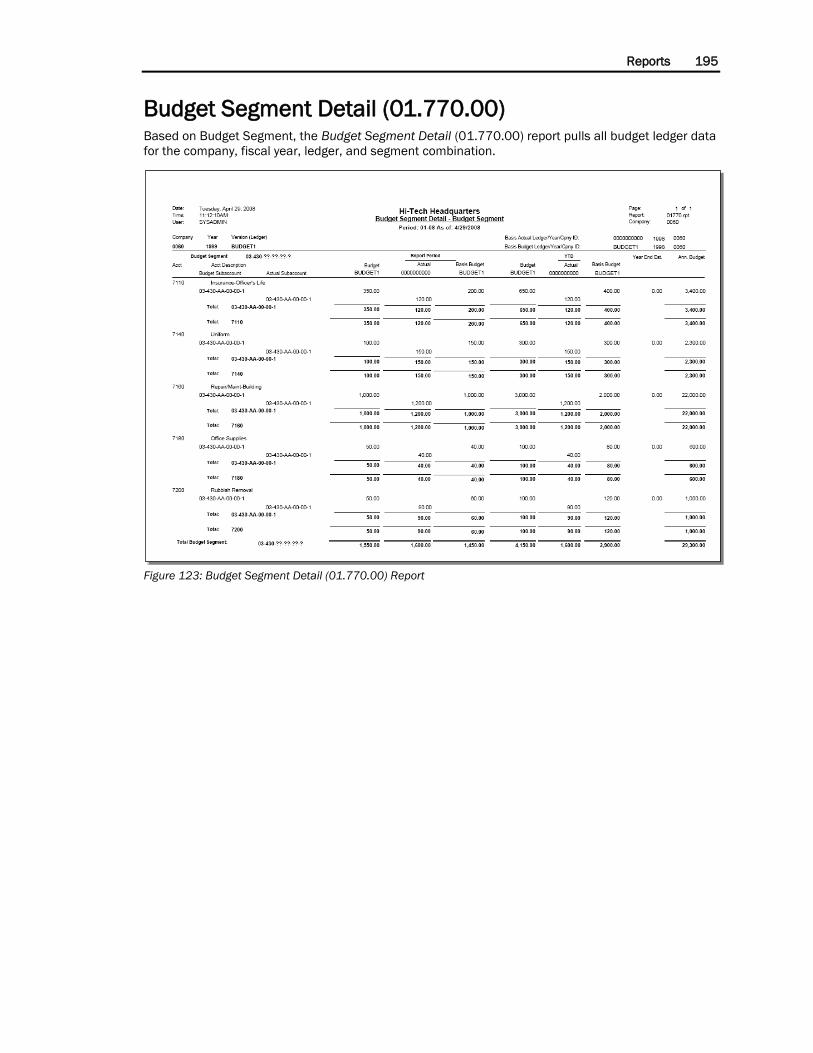
Reports 195
Budget Segment Detail (01.770.00) Based on Budget Segment, the Budget Segment Detail (01.770.00) report pulls all budget ledger data
for the company, fiscal year, ledger, and segment combination.
Figure 123: Budget Segment Detail (01.770.00) Report
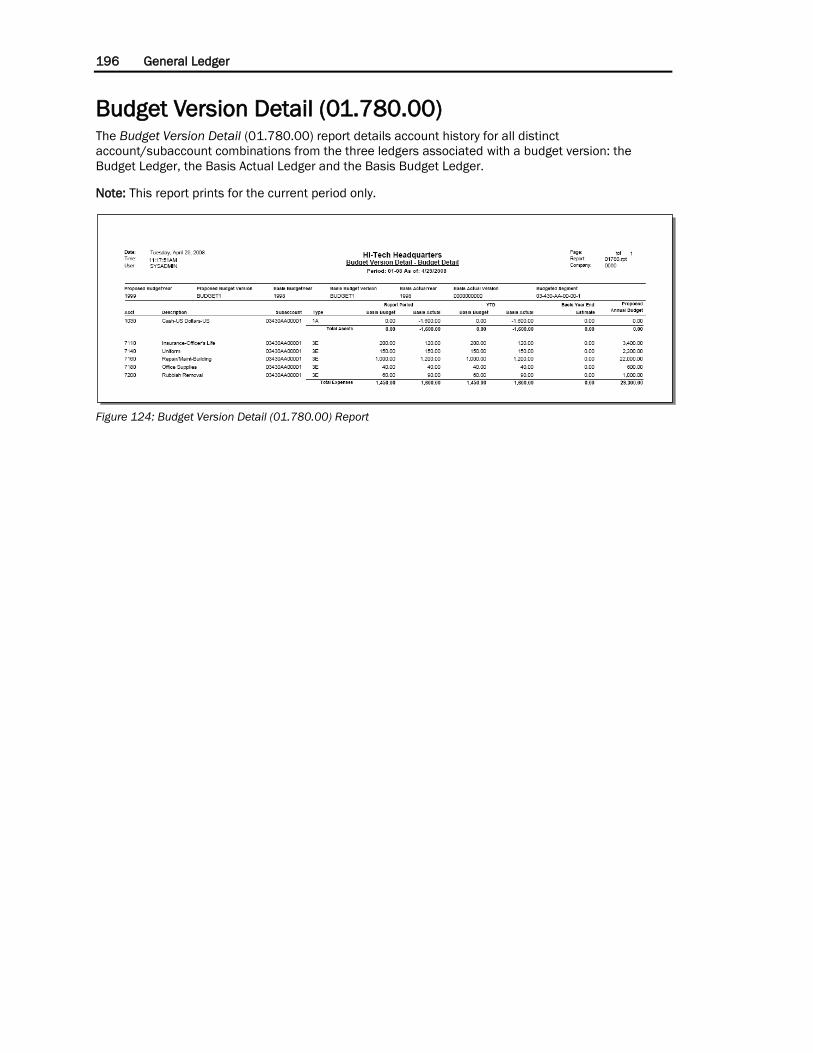
196 General Ledger
Budget Version Detail (01.780.00) The Budget Version Detail (01.780.00) report details account history for all distinct
account/subaccount combinations from the three ledgers associated with a budget version: the
Budget Ledger, the Basis Actual Ledger and the Basis Budget Ledger.
Note: This report prints for the current period only.
Figure 124: Budget Version Detail (01.780.00) Report
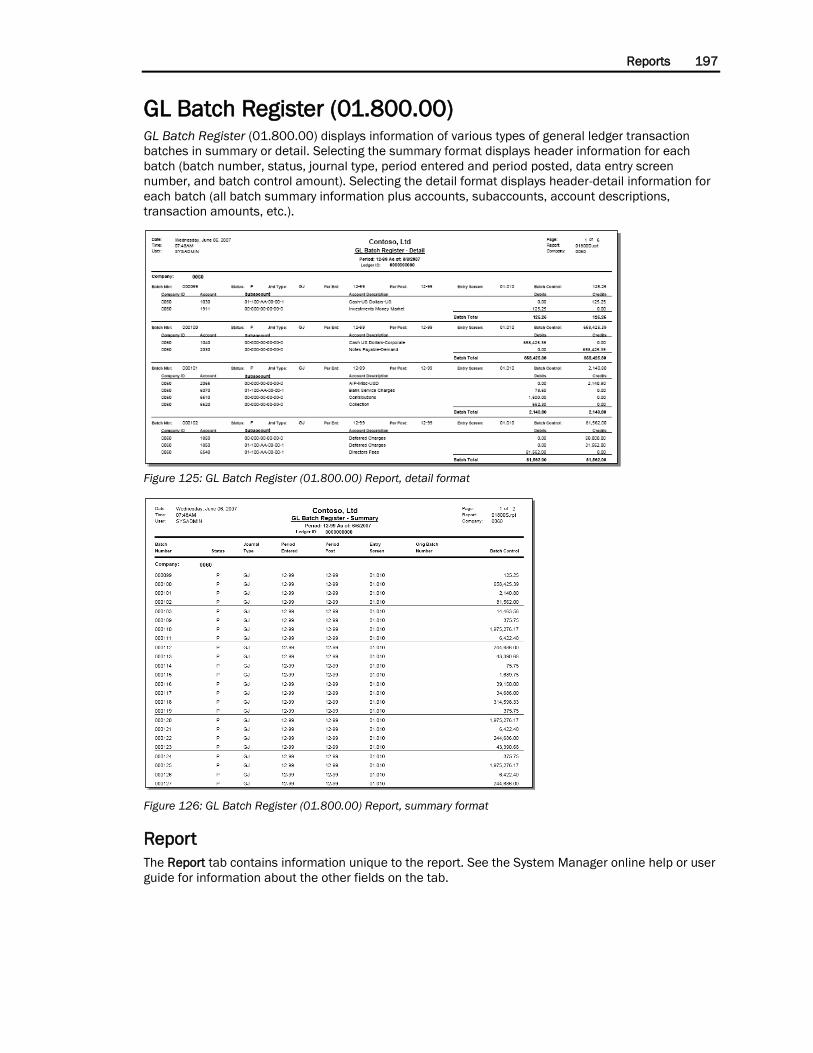
Reports 197
GL Batch Register (01.800.00) GL Batch Register (01.800.00) displays information of various types of general ledger transaction
batches in summary or detail. Selecting the summary format displays header information for each
batch (batch number, status, journal type, period entered and period posted, data entry screen
number, and batch control amount). Selecting the detail format displays header-detail information for
each batch (all batch summary information plus accounts, subaccounts, account descriptions,
transaction amounts, etc.).
Figure 125: GL Batch Register (01.800.00) Report, detail format
Figure 126: GL Batch Register (01.800.00) Report, summary format
Report
The Report tab contains information unique to the report. See the System Manager online help or user
guide for information about the other fields on the tab.
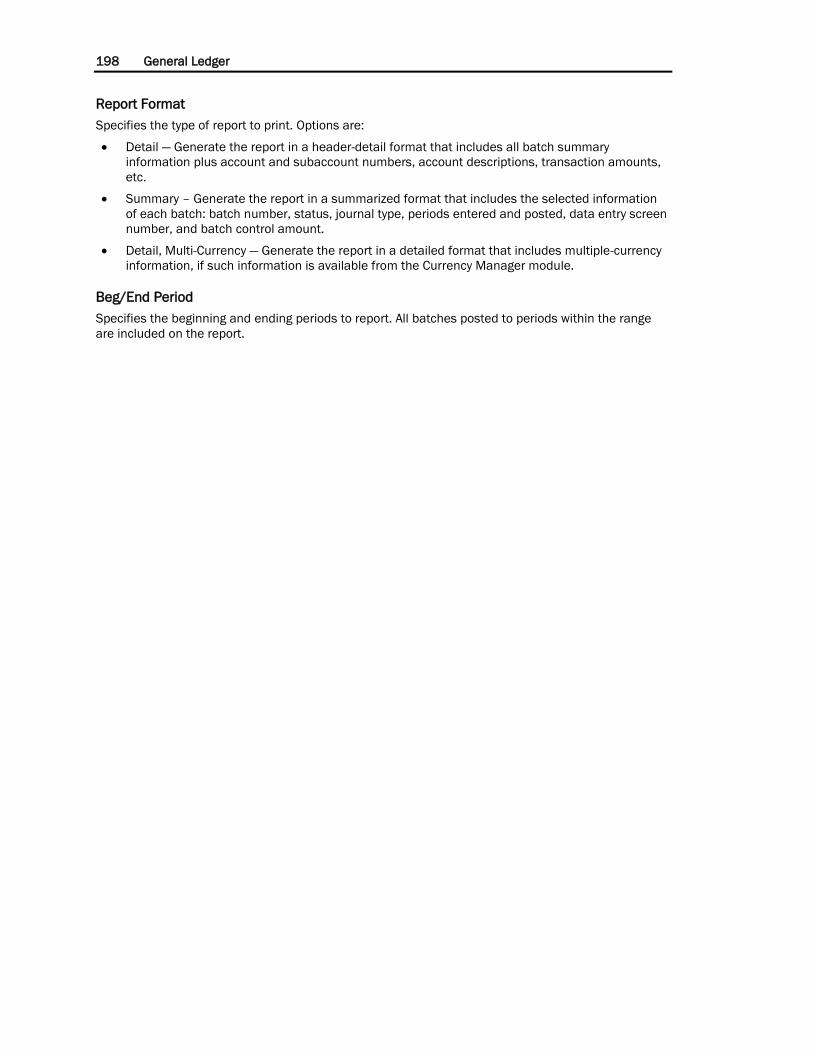
198 General Ledger
Report Format
Specifies the type of report to print. Options are:
Detail — Generate the report in a header-detail format that includes all batch summary
information plus account and subaccount numbers, account descriptions, transaction amounts,
etc.
Summary – Generate the report in a summarized format that includes the selected information
of each batch: batch number, status, journal type, periods entered and posted, data entry screen
number, and batch control amount.
Detail, Multi-Currency — Generate the report in a detailed format that includes multiple-currency
information, if such information is available from the Currency Manager module.
Beg/End Period
Specifies the beginning and ending periods to report. All batches posted to periods within the range
are included on the report.
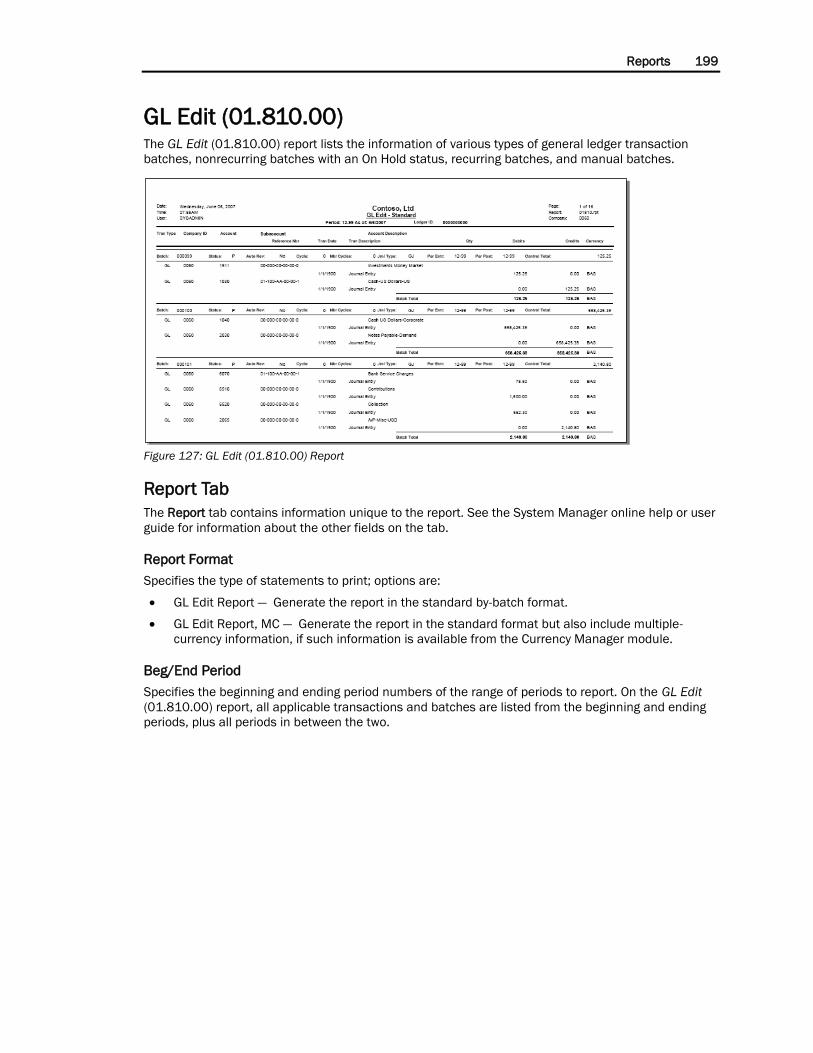
Reports 199
GL Edit (01.810.00) The GL Edit (01.810.00) report lists the information of various types of general ledger transaction
batches, nonrecurring batches with an On Hold status, recurring batches, and manual batches.
Figure 127: GL Edit (01.810.00) Report
Report Tab
The Report tab contains information unique to the report. See the System Manager online help or user
guide for information about the other fields on the tab.
Report Format
Specifies the type of statements to print; options are:
GL Edit Report — Generate the report in the standard by-batch format.
GL Edit Report, MC — Generate the report in the standard format but also include multiple-
currency information, if such information is available from the Currency Manager module.
Beg/End Period
Specifies the beginning and ending period numbers of the range of periods to report. On the GL Edit
(01.810.00) report, all applicable transactions and batches are listed from the beginning and ending
periods, plus all periods in between the two.

200 General Ledger
Glossary of Terms 201
Glossary of Terms
Account/Subaccount Combination
Links an account and subaccount together to control which combinations can be used for data entry.
Adjustment Transaction
A transaction used to make a one-sided adjustment to an account balance; creating and editing
adjustment batches requires the software to be in Initialize mode.
Allocation Group
One or more source accounts and one or more destination accounts, together with the factors and/or
limits used to distribute all or a portion of the year-to-date balance from each source account to a
destination account.
Allocation Transaction
A batch type used for batches created on Generate Allocation Transactions (01.580.00).
Base Currency
Primary currency used for maintaining and reporting your company’s financial information.
Chart of Accounts
All the accounts needed to use Microsoft Dynamics SL for financial processing.
Consolidation Account
The general ledger account into which subsidiary consolidation accounts are posted during the
consolidation process.
Consolidation File
Summarizes the general ledger activity occurring in a database for an accounting period.
Consolidation Transaction
A batch type reserved for batches created on Read Consolidation File (01.510.00).
Fiscal Period
Month and year in MM/YY format.
202 General Ledger
Journal Type
Identifying code that associates a batch with a standard accounting book of original
entry.
Ledger
A company’s financial or tax books, a budget, statistics, or a translated set of financials.
Manual Transaction
A transaction that occurs regularly but for a different amount each time. Typically used by a CPA to set
up a standard set of journals for clients.
Non-recurring Transaction
A one-time transaction or a transaction that does not occur regularly. This is the most common
transaction, typically used to enter cash receipts, cash disbursements, purchases, payments, and
corrections.
Recurring Transaction
A transaction that occurs regularly for a fixed amount each time, typically used for amortization
entries. Once created, a recurring transaction is saved in the database and processed automatically
whenever you use Generate Recurring Transactions (01.530.00).
Subaccounts
Business segment identifiers that help you maintain and report business activity by division, profit
center, or department.
Index 203
Index
A Account balances
reviewing 73
Account classes
defining 137
Account history
reviewing 70
Account history detail
reviewing 71, 105
Account inquiries
performing 110
Account integrity
checking 172
Account numbers
structure 7
Account/subaccount balances
reviewing 74
Account/subaccount combinations
copying 121
generating 120
maintaining 118
Account/subaccount details
reviewing 75, 114
Account/subaccount summaries
reviewing 112
Accounts
deleting 77
displaying 187
Allocation group information
displaying 191
Allocation groups
defining 98
Allocation transactions
generating 152
Auto reversing 34, 85
B Balances
deleting 151
Base currency balances
reviewing 108
Basic operating budgets
creating 51
setting up 53
Batch control reports
printing 47, 175
reprinting 47
Batch information
displaying 199
Batch types
defining 33
Batches
deleting 78
posting 145
releasing 139
Budget defaults
setting up 52
Budget distribution
entering 131
Budget distribution types
defining 64
Budget group access
entering 133
setting up 54
Budget segment information
entering 125
Budget versions
creating 67
entering 135
Budgets
distributing 65
importing 53, 60
setting up 51
C Chart of accounts
setting up 9
structuring 7
Checking
account integrity 172
data integrity 80
Closing
General Ledger 49, 149
year 150
Consolidation accounts
using 8
Consolidation errors
correcting 45
Consolidation file 144
Consolidation files
generating 141
reading 143
Copy From screen 89
Copying
account/subaccount
combinations 121
Correcting
consolidation errors 45
Creating
basic operating budgets 51
budget versions 67
extended budgets 51
Currency account detail
reviewing 72
D Data
checking integrity 80
deleting 79
Database
back up 31
Database access number 142
Defining
account classes 137
allocation groups 98
batch types 33
budget distribution types 64
204 General Ledger
chart of accounts 94
subaccounts 97
Deleting
accounts 77
balances 151
batches 78
data 79
subaccounts 77
transactions 151
Displaying
accounts 187
allocation group information 191
batch information 199
posted transactions 190
subaccount information 188, 189
Distributing
budgets 65
E Entering
budget distribution 131
budget group access 133
budget segment information 125
budget versions 135
journal transactions 82
Extended budgets
creating 51
G General Ledger
closing 49, 149
setting up 155
Generating
account/subaccount
combinations 120
allocation transactions 152
consolidation files 141
recurring transactions 147
I Importing
budgets 53, 60
J Journal transactions
entering 82
L Ledgers setting up 116
M Maintaining
account/subaccount
combinations 118
Multi-Company 20
O Operating budgets
setting up 91
P Performing
account inquiries 110
Posted balances
reviewing 103
Posted transactions
displaying 190
Posting 148
batches 145
Printing
batch control reports 47, 175
reports 76
R Reading
consolidation files 143
Recurring transactions 33
generating 147
Releasing
batches 139
Reports
printing 76
Reprinting
batch control reports 47
Reviewing
account balances 73
account history 70
account history detail 71, 105
account/subaccount balances 74
account/subaccount details 75, 114
account/subaccount summaries 112
base currency balances 108
currency account detail 72
posted balances 103
standard budget distribution 134
transaction detail 103
transactions 105
S Screens
Copy From 89
Setting up
basic operating budgets 53
budget defaults 52
budget group access 54
budgets 51
chart of accounts 9
General Ledger 155
ledgers 116
operating budgets 91
subaccounts 10
Source account 15
205
Standard budget distribution reviewing 134
Structuring
account numbers 7
chart of accounts 7
Subaccount information, displaying 188,
189
Subaccounts
defining 97
deleting 77
setting up 10
using 8
T Transaction detail
reviewing 103
transactions
copy 89
correcting 89
reversing 89
Transactions
deleting 151
recurring 33
reviewing 105
U Using
consolidation accounts 8
subaccounts 8
Y Year
change 149
close 149