Nominal Ledger and Cash Book - Datafile Software
404
Nominal Ledger and Cash Book Datafile Software Limited 5 Priory Mews Monks Ferry Birkenhead Wirral CH41 5AZ
-
Upload
khangminh22 -
Category
Documents
-
view
0 -
download
0
Transcript of Nominal Ledger and Cash Book - Datafile Software

Nominal Ledger and
Cash Book Datafile Software Limited 5 Priory Mews Monks Ferry Birkenhead Wirral CH41 5AZ


IMPORTANT NOTICE
This document is the copyright of Datafile Software Limited and may not be reproduced, stored in a retrieval system, or transmitted in any form or by any means, electronic, mechanical, photocopying, recording or otherwise without the prior written consent of Datafile Software Limited. Whilst all possible care is taken in the preparation of this document, Datafile Software Limited cannot be held responsible for any inaccuracies that may be found nor for any consequences resulting from such inaccuracies. Datafile Software Limited reserves the right to make changes without notice both to the material contained in this document and to the software packages it describes. The description contained in this document does not form part of a contract. The software described in this document is supplied under licence to the purchaser as described in the licence agreement supplied with the software. It is against the law to copy software for use at any other site in contravention of the terms of the agreement, and it is the responsibility of the purchaser to read and to abide by the terms of that agreement. Datafile Software Limited will be happy to supply further copies of the agreement at any time.
© Datafile Software Limited 2007

This document was prepared using Microsoft Word 2002 under Windows XP. Datafile Software Limited gratefully acknowledges all trademarks which appear in this documentation. Datafile Diamond, Diamond and Diamond Data are registered trademarks of Datafile Software Limited. Datafile Compact, Datafile Professional, Datafile Premier and Datafile DeskTop are trademarks of Datafile Software Limited.

Datafile Software Nominal Ledger and Cash Book Manual 06/07/07
Contents
Chapter 1 Introduction............................................................................. 1
Principle Features.....................................................................................................................3 Overview .............................................................................................................5
Charts of Account and Coding Structures................................................................................5 Transaction Types ....................................................................................................................7 Reporting Facilities ..................................................................................................................9 Multi-Period Processing.........................................................................................................10 Other Factors..........................................................................................................................12 Integration with Other Systems..............................................................................................13 Trying Out the Nominal Ledger & Cash Book ......................................................................15 Nominal Ledger Tour.............................................................................................................16 Cash Book Tour .....................................................................................................................21 Transferring from an Existing Nominal Ledger.....................................................................27 Transferring from an Existing Cash Book .............................................................................28 Daily, Weekly and Monthly Routines....................................................................................29
Chapter 2 Nominal Ledger Instructions ................................................ 33
Maintain Accounts ............................................................................................36 NAMES – New/Amend Account Names...............................................................................37 FULL – Maintain Accounts in Full........................................................................................39 MASTER – Maintain Header Accounts.................................................................................41 CASH – Maintain Bank Accounts .........................................................................................41 VIEW – View an Account .....................................................................................................42 DELETE - Delete an Account................................................................................................43 BUDGETS – Budgets Proposed ............................................................................................44 CALC – Recalculate Current Year Budgets ..........................................................................45 ENTER – Enter Current Budget Year Totals.........................................................................47 PERIOD – Budget Input for Periods......................................................................................48 FACTOR – Factor Period Budgets ........................................................................................49 PREV-YR-TOT – Previous Year Budget Totals ...................................................................50 PREV-YR-PER – Previous Year Period Budgets..................................................................50 COMPARATIVES – Enter Comparative Figures..................................................................50 YEAR-TOTALS – Enter Comparative Year Totals ..............................................................51 PERIODS – Comparative Input for Periods ..........................................................................52 PREV-YR-TOT – Previous Year-1 Comparative Totals .......................................................52 PREV-YR-PER – Previous Year-1 Period Comparatives......................................................52
Journals..............................................................................................................53 Journal Entry..........................................................................................................................56

ii Nominal Ledger and Cash Book
Datafile Software Nominal Ledger and Cashbook Manual 06/07/07
Provisional Journals .............................................................................................................. 60 Reports and Analysis .........................................................................................60
Trial Balance ......................................................................................................................... 69 Account Audit Trail .............................................................................................................. 71 Account Audit Trail (Currency) ............................................................................................ 71 List of Accounts .................................................................................................................... 74 Report Account Status........................................................................................................... 75 Budget Report ....................................................................................................................... 76 Comparatives Report............................................................................................................. 77 Journal Listing....................................................................................................................... 77 Drill Down Enquiry............................................................................................................... 79
Financial Summaries .........................................................................................83 Defining Financial Summaries ..........................................................................92
Full Mode Financial Summary Definition............................................................................. 95 Easy Mode Financial Summary Definition ......................................................................... 127
Account Enquiry..............................................................................................134 Update from Other Ledgers .............................................................................135 Set Current Period ...........................................................................................141 Other Journal Options......................................................................................141
Reverse Provisionals ........................................................................................................... 141 Reverse Dated Provisionals................................................................................................. 143 Reverse Journals.................................................................................................................. 144 User Defined Journals ......................................................................................................... 145 Defining User Journals........................................................................................................ 148 Revalue a Nominal Account................................................................................................ 155 Revalue All Nominal Accounts........................................................................................... 157
Year End Procedures .......................................................................................158 Close Previous Year ............................................................................................................ 159 Journal Cleardown............................................................................................................... 160 End of Year Procedure ........................................................................................................ 161
System Status...................................................................................................164
Chapter 3 Cash Book Instructions .......................................................165
Cash Book Overview.......................................................................................165 Getting Started with the Cash Book ................................................................171 Maintain Accounts...........................................................................................174
Names.................................................................................................................................. 176 Cash Account ...................................................................................................................... 178 View an Account ................................................................................................................. 181 Delete an Account ............................................................................................................... 182 Receipt Column Headings................................................................................................... 182 Payment Column Headings ................................................................................................. 184
Receipt and Payment Posting ..........................................................................185
Contents iii
Datafile Software Nominal Ledger and Cash Book Manual 06/07/07
Payments with Remittance Advice..................................................................199 Transfers ..........................................................................................................201 Automatic Postings..........................................................................................204 Journals............................................................................................................207 Set Current Period ...........................................................................................208 Reports and Analysis.......................................................................................208
Receipt Listing .....................................................................................................................216 Payment Listing ...................................................................................................................216 Receipt Totals Analysis .......................................................................................................218 Payment Totals Analysis......................................................................................................218 Transfer Listing....................................................................................................................220 Bank/Cash Statement ...........................................................................................................220 VAT Form 100.....................................................................................................................221 Trial Balance........................................................................................................................227 Account Audit Trail .............................................................................................................227 Account Audit Trail (Currency)...........................................................................................227 List of Accounts ...................................................................................................................228 Account Status Report .........................................................................................................228 Receipt Headings .................................................................................................................228 Payment Headings................................................................................................................228 Transaction Listing ..............................................................................................................229
Bank Reconciliation ........................................................................................229 Reconcile Bank Account......................................................................................................230 Bank Statement Report / Bank Statement Report (FC)........................................................235 Post Bank Charges ...............................................................................................................236 Unpresented Listing .............................................................................................................236 Commented Items Listing ....................................................................................................237 Cash Flow Forecast ..............................................................................................................237
Utilities ............................................................................................................243 Maintain Auto Postings........................................................................................................244 Maintain Receipt Templates ................................................................................................248 Maintain Payment Templates...............................................................................................248 Sales Allocations..................................................................................................................250 Purchase Allocations............................................................................................................250
Year End Facilities ..........................................................................................251 Close Previous Year.............................................................................................................252 Journal Cleardown ...............................................................................................................253 End of Year Procedure.........................................................................................................254
Account Enquiry..............................................................................................256 System Status ..................................................................................................257
Chapter 4 Nominal Ledger Configuration........................................... 259
Set Application Code Formats ........................................................................260 System Profiles................................................................................................261

iv Nominal Ledger and Cash Book
Datafile Software Nominal Ledger and Cashbook Manual 06/07/07
System Profiles Screen 1..................................................................................................... 262 System Profiles Screen 2..................................................................................................... 266 System Profiles Screen 3..................................................................................................... 268 Nominal Update Configuration ........................................................................................... 268
Application Manager .......................................................................................269 Ledger Enquiry Manager.................................................................................269
Enquiries Configuration ...................................................................................................... 270 Nominal Accounts File – Full Screen Design (Premier only)............................................. 270 Nominal Accounts File – Item Screen Design .................................................................... 272 Transaction / Detail Enquiries ............................................................................................. 272 Extra File Scans................................................................................................................... 275
Memo Facility Configuration ..........................................................................275 Controls and Audit Manager ...........................................................................276
Audit Pointers...................................................................................................................... 276 Transaction Control Numbers ............................................................................................. 276 Edit System Status Display ................................................................................................. 277 Set Non-Posting Status Flag................................................................................................ 277 Database Audit .................................................................................................................... 278 Compact & Audit Database................................................................................................. 278 Set Auto Expand Data Files ................................................................................................ 278 Expand Data Files ............................................................................................................... 279
Security and User Manager .............................................................................279 Application User Facilities ..............................................................................281
Maintain Chart of Accounts ................................................................................................ 281 Nominal Transactions.......................................................................................................... 286 Report Listings & Analyses ................................................................................................ 290 Financial Summaries ........................................................................................................... 298 Update from Other Systems ................................................................................................ 298 Standard Update – Sales and Purchase Ledgers .................................................................. 298 Standard Update – Payroll................................................................................................... 301 Multiple Updating ............................................................................................................... 303 Multiple Updating – General Details / Which Systems Allowed........................................ 306 Multiple Updating – Update from Sales and Purchase Ledger ........................................... 307 Multiple Updating – Payroll Update ................................................................................... 313 Multiple Updating - Update From Another Nominal .......................................................... 313 Multiple Updating - Update From Any Datafile Database File........................................... 314 Multiple Updating – Input from CSV File .......................................................................... 317 Period/Year End Facilities................................................................................................... 318 Account Enquiry ................................................................................................................. 318 System Status ...................................................................................................................... 321
Application Screen Layouts.............................................................................321 Select Key Definition ......................................................................................321 Recall Standard Text .......................................................................................322 Database Profiles .............................................................................................323
Account Mandatory............................................................................................................. 323 Optional Account Items....................................................................................................... 324

Contents v
Datafile Software Nominal Ledger and Cash Book Manual 06/07/07
Current Budgets ...................................................................................................................324 Previous Budgets .................................................................................................................324 Current Actuals ....................................................................................................................325 Previous Actuals ..................................................................................................................325 Prev –1 Actuals ....................................................................................................................325 Account Cash Book .............................................................................................................325 Account Currency - 1 ...........................................................................................................326 Account Currency - 2 ...........................................................................................................326 Account Currency - 3 ...........................................................................................................326 Mandatory Transaction Items ..............................................................................................327 Transactional Optional 1 ......................................................................................................327 Transaction Optional 2.........................................................................................................328 Transaction Currency...........................................................................................................329
Chapter 5 Cash Book Configuration ................................................... 331
Set Application Code Formats ........................................................................332 System Profiles................................................................................................333
System Profiles Screen 1......................................................................................................334 System Profiles Screen 2......................................................................................................336 System Profiles Screen 3......................................................................................................337
Application Manager .......................................................................................339 Ledger Enquiry Manager.................................................................................339
Enquiries Configuration .......................................................................................................340 Nom/CB Accounts File – Full Screen Design (Premier only).............................................340 Nom/CB Accounts File – Item Screen Design.....................................................................341 Transaction / Detail Enquiries..............................................................................................342 Extra File Scans ...................................................................................................................344
Memo Facility Configuration ..........................................................................345 Controls and Audit Manager ...........................................................................345
Audit Pointers ......................................................................................................................346 Transaction Control Numbers ..............................................................................................346 Edit System Status Display ..................................................................................................347 Database Audit.....................................................................................................................347 Compact & Audit Database .................................................................................................347 Set Auto Expand Data Files .................................................................................................348 Expand Data Files ................................................................................................................348
Security and User Manager .............................................................................349 Application User Facilities ..............................................................................350
Maintain Cash Book Accounts.............................................................................................351 Cash Book Transactions.......................................................................................................354 Cash Book Listings ..............................................................................................................358 Bank Reconciliation.............................................................................................................366 Reports & Analyses .............................................................................................................368 Period/Year-End Facilities ...................................................................................................372 Account Enquiry ..................................................................................................................372

vi Nominal Ledger and Cash Book
Datafile Software Nominal Ledger and Cashbook Manual 06/07/07
System Status ...................................................................................................................... 373 Application Screen Layouts.............................................................................373 Select Key Definition ......................................................................................373 Recall Standard Text .......................................................................................374 Database Profiles .............................................................................................375
Chapter 6 An Introduction to Accounting ...........................................377
The Mechanics of Accounting.........................................................................377 Starting and Growing a Business ........................................................................................ 377 Why Keep Records?............................................................................................................ 378 Accounting Records ............................................................................................................ 378 The Ledgers......................................................................................................................... 379 Computer-Based Accounting Systems ................................................................................ 381
Framework of Accounting...............................................................................382 Double Entry Bookkeeping ................................................................................................. 382 Debits and Credits ............................................................................................................... 383 Assets, Liabilities & Owners’ Equity .................................................................................. 384
Reporting and Control .....................................................................................384 Trial Balance ....................................................................................................................... 385 Management Reporting ....................................................................................................... 386 Profit And Loss Statement .................................................................................................. 386 The Balance Sheet ............................................................................................................... 388
Additional Topics ............................................................................................390 Accruals............................................................................................................................... 390 Prepayments ........................................................................................................................ 390 Depreciation ........................................................................................................................ 391 Suspense Accounts .............................................................................................................. 391 Control Accounts................................................................................................................. 391
Summary..........................................................................................................392

1
Datafile Software Nominal Ledger and Cash Book Manual 06/07/07
Chapter 1 Introduction
Whether installing both the Datafile Software nominal and cash book systems or just one, you have taken a further step forward towards greater financial control over your business. The nominal ledger produces management reports at the touch of a button, and allows you to implement budgeting systems with the minimum of effort. The cash book gives you an instant picture of your bank position, simplifies the task of bank statement reconciliation and — with its direct links to the other ledgers — lets you group all the procedures which handle cash into one place. You can use the nominal ledger at one of two levels too: either at a management level to record income and expenditure for monthly reporting, perhaps against budget; or at a full financial level to account for accruals, prepayments, depreciation, and all the other financial movements which let you produce full monthly profit and loss statements, balance sheets and other financial statements of affairs. With this level of control over your financial affairs, you could also expect to save on auditors fees. The Datafile Software nominal ledger and cash book applications are very closely related and you can use either one of them on its own, or the two together. Because of their close ties, we describe them both in this manual so you can see clearly how the boundaries relate between one application and the other. The nominal and cash book applications form the apex of the full suite of Datafile Software applications as is illustrated below.

2 Nominal Ledger and Cash Book
Datafile Software Nominal Ledger and Cashbook Manual 06/07/07
The bulk of financial transactions in a company are likely to centre on the sales and purchase ledgers. These flow into the nominal ledger to allow you — once you’ve entered any other journals needed — to produce income and expenditure reports, trial balances, profit and loss statements, balance sheets and any other financial reports needed by management. Add the cashbook too, and you have an up-to-the-minute picture of your bank and cash accounts. Operational applications — such as stock control, the invoicing and order processing applications, and job costing — all have implications on the nominal ledger, and indeed may need to refer to it in order to validate nominal codes. On the whole, however, these applications work at one step removed from the nominal ledger. On the surface, the accounting requirements at the nominal ledger level are unlikely to differ greatly between companies at a broad level. However, it is the potential of a system to match management reporting and operational needs which provides the full benefits to the user. For that reason the Datafile Software nominal ledger and cash book have as much flexibility in them as other Datafile applications. One of the key benefits of Datafile Software systems is the ease with which features can be activated when needed, or switched off if you no longer want to use them. An important strength of the Datafile Software nominal ledger is the ability to create reports and financial summaries — such as profit and loss statements and balance sheets — to match your own needs. These can be designed by the experienced user at any time; even a special report need take only a few minutes. Time spent in understanding the features and facilities available from the nominal and cash book programs will be amply repaid in speed and accuracy of use. In many cases your dealer may configure the systems to suit your particular needs using the Installation facilities. Dealers are fully trained in the use of Datafile applications, and their expertise allied to your knowledge of your own requirements will ensure the systems are correctly tailored to your needs.

Introduction 3
Datafile Software Nominal Ledger and Cash Book Manual 06/07/07
Principle Features General Multi-company ledgers Account codes up to ten characters in length (sixteen in Premier), partitioned up to five
levels for drill-down enquiry Account codes can be numeric, alphabetic or alphanumeric System calendar up to 13 periods in any one year Journals can be posted to any period of current year Previous year open kept open until ready to close for audit Journals can be posted to any period of previous year until closed Foreign currency option (needs Foreign Currency module) Nominal Ledger Features Fully integrated with other Datafile Software applications (sales and purchase ledgers,
payrolls, other files) Budgeting support, including up to five user-definable seasonal budget tables Up to 40 user-definable financial summaries (P & L statement, balance sheet etc) Summaries can be printed for any period of current and previous years Summaries can print period and year-to-date values, comparing with budgets or previous
year results to produce variances Easy-mode financial summaries report generator for quick reports, or full mode definition
for presentation purposes Branch, divisional, regional and company wide summaries produced from same full mode
summary definition Double-entry journals, or multi-entry journals each with up to 200 entry lines Reverse journal entry option Auditors adjustments can be posted to opening year balances Provisional (accrual and prepayment) journals supported Automatic reversal of provisional journals under user control Up to 40 user-definable proforma multi-entry journals can be predefined Proforma journals either easy mode for quick definition or full mode for easier run-time
use Full suite of reports including trial balance, full audit trail report, account and status
reports, plus budget and previous year comparative reports Reports can be printed for any period of current and previous years User-definable trial balance sub-breaks Powerful selection facilities for reports Parameters for updates from other ledgers and databases are user-definable Sales and purchase ledger updates in detail or in summary Full update for specified accounts even though summary update

4 Nominal Ledger and Cash Book
Datafile Software Nominal Ledger and Cashbook Manual 06/07/07
Cash Book Features Receipt, payment, cash account and standard journal transactions Up to 14 “columns” definable for both receipts and payment transactions Calculate and post VAT from gross values Integrated with Datafile Software sales and purchase ledgers plus job costing applications Full sales and purchase ledger transaction allocation options Up to 128 automatic cash book postings (standing orders etc) Up to 20 user-definable proforma cash payment and receipt transactions Cash book reports Bank statement reports Easy-to-use bank reconciliation facilities General reports include trial balance, full audit trail, account and status reports User-definable trial balance sub-breaks Powerful selection facilities for reports

Introduction 5
Datafile Software Nominal Ledger and Cash Book Manual 06/07/07
Overview In this section we describe the environment in which the nominal ledger and cash book operate, and also the facilities available when deciding how to use them in your particular company. Where appropriate, we also discuss the impact of such features on other Datafile Software applications. The nominal ledger and the cash book are fully integrated, and indeed use the same files. An accounts file holds information about your income, expenditure, bank, cash and other balance sheet accounts. A transactions file holds data on all the movements you have applied to the ledger and cash book. If you are only using the cash book, then the accounts file needs to contain only bank, cash, income and expense accounts, plus some control accounts. If you are using the nominal ledger too, then the accounts file effectively represents the complete chart of accounts. The nominal ledger and cash book are open for all periods of the year at all times — which means you can easily interrogate what your trading profits were in any period of the year at any time. When you start a new year, the previous year remains open for any journal entries until you are ready for your audit. Once you’ve closed a year, previous year reports can still be printed, but you can no longer post journals. All files are designed around the DataFiler database, which is at the heart of all Datafile Software systems. Whilst the files are fully managed by the application programs, you can tailor them individually to suit your specific needs (in Datafile Diamond and Premier only) and you may prepare additional reports using either Report Generator or the ProFiler application generator. For Datafile Diamond and Premier systems you can change the parameters to activate or modify the nominal ledger and cash book facilities using the Installation options described later in this manual.
Charts of Account and Coding Structures Before you start your nominal ledger and/or cash book applications, you need to design a chart of accounts. This is just as important for the cash book, even if you do not ever intend to implement the nominal ledger. Nominal Ledger Account Structure There are possibly as many coding structures as there are users of Datafile Software! However we can offer a number of guidelines, as shown below. The coding structure is defined using the Code Formats within the Installation section. Keep the structure reasonably simple. A three-digit code, allowing codes between 001 and 999 is widely used by many accountants, and indeed our demonstration data uses just such a structure.

6 Nominal Ledger and Cash Book
Datafile Software Nominal Ledger and Cashbook Manual 06/07/07
If, however, you want to include cost centres, branches, departments or other analysis levels within the code, then you may need to expand the structure. You might, for example, define a code structure such as “999-99-99” to represent code, location and cost centre.
Notes
Try to stick with numeric coding. Although codes can include letters as well as numbers, most clerical staff are faster with numbers.
You can define separators in the code. For example, code structures of 9–99–99 or 9/99.99 are easier to understand than 99999. Keep associated nominal codes within consecutive ranges. You should plan to keep income, expense, bank account and other balance sheet codes in defined ranges. This not only makes logical sense, buts help you when you define financial summaries later. Examples of such groupings include fixed assets, current assets, current liabilities, long term liabilities, occupancy (rent, rates, utilities), staff (payroll, taxes, recruitment), marketing (exhibitions, advertising, PR), overheads (equipment, stationery, printing), financial (depreciation, loan and bank interest). Make use of the transaction analysis field for more detailed information. There is nothing against designing complex code structures as such — it is merely a trade-off between the level of detail needed to produce (for example) financial summaries where a code structure would be required, and the accuracy of coding the information in the first place. For example, you may use the analysis code: If you run cost centres just for analysing expenses for non-financial summary reporting,
use the analysis code for the cost centre rather than incorporate it as part of the nominal accounts code.
UK companies must return to the Inspector of Taxes a form P11D for most employees and
director, itemising expenses reimbursed. Information for this comes from expense forms, and maybe from petty cash and the purchase ledger. Use the analysis code to hold the employee payroll number. Sort and report nominal transactions for employees at year end (using the Report Generator or ProFiler).
You want to control costs of marketing projects such as exhibitions, where the costs are
spread over a multitude of codes, and can come from a variety of sources. Again, use the analysis code on transactions for each event. The audit report can analyse these expense codes each period and for the year to-date.

Introduction 7
Datafile Software Nominal Ledger and Cash Book Manual 06/07/07
Cash Book Considerations A typical manual cash book records receipts on the left-hand pages and payments on the right-hand pages. In general an analysis book with lots of columns is used, so that receipts and payments in particular, can be recorded in appropriate columns to give a period-end analysis. Values are entered in the total column, and also under the relevant analysis columns. This has the advantage that the columns should cross-check against the total. A period-end procedure balances the cash book and agrees to the bank. A disadvantage is that only limited analysis can be achieved, dependent on the number of columns, itself limited by the physical width of the cashbook. The Datafile Software cash book preserves the concept of columns, but gives you greater levels of analysis by allowing you to use an income or expense code against each entry too. You can define thousands of these codes if you wish. There is no real limit to the analysis you can now do, even though the “columns” you can define for each side of your cash book are limited to 14. In practice, these expense codes are identical to nominal ledger accounts, should you decide to use the nominal ledger too. It is in fact a small step from the cash book to the nominal ledger. For the cash book you need to define three types of account: Cash accounts. You bank accounts, savings accounts, loan accounts, petty cash and any
other cash deposits such as till floats should each be given an account Income and expense analysis accounts. Define an account for each heading against which
you wish to analyse cash receipts and payments. It can help if you group together the accounts for any cash book column you define
Control accounts. You need accounts against which to post the other side of amounts such
as customer receipts, supplier payments, VAT and Inland Revenue payments, and your wages and salary cheques amongst others. These show only half the story in the cash book, because other aspects of your business give rise to the other side — your sales and purchase ledgers, and payroll in particular
If you are going to use the nominal ledger, even if in the future rather than straight away, then you should design your account structure with the nominal in mind. You should read any sections on the nominal ledger too, therefore.
Transaction Types There are a number of transaction facilities in both the nominal ledger and cash book which help to make the systems easy to use. Nominal Ledger Standard journals can have up to 200 entries

8 Nominal Ledger and Cash Book
Datafile Software Nominal Ledger and Cashbook Manual 06/07/07
Provisional journals (see also below) which can be automatically reversed Up to 40 user-defined journals. These let you pre-define journals to simplify regular
processes such as a template for posting payroll details, or the regular monthly depreciation values. You can even use these to reflect your checklist of monthly and quarterly journals, making preparation of accounts almost an automatic process
A Reverse Journal facility allows you to pick a specific journal and reverse it
automatically. This not only simplifies the reversal of the occasional incorrect journal, but you can use it with normal journals as an alternative to provisional journals where you want more direct control over when to reverse them
Cash Book Cash receipts. Not only can you post these direct to the customer account from the cash
book, but you can allocate receipts against the other transactions for that customer in the sales ledger. You can batch receipts onto a paying-in slip. Each individual receipt shows on the sales account and in cash book reports, but only one deposit amount shows on your bank statement for reconciliation
Cash Payments. In like vein you can post payments to supplier accounts and allocate them
too By including both creditor and debtor columns on (say) the payment side of the cash book,
you can contra amounts between customer and supplier accounts at the same time — helps net off invoices when customers are also suppliers
You can define up to 128 standing order and direct debit transactions which you can then
post automatically whenever you like. These take account of the termination date if any, and can analyse a transaction across up to seven expense headings
You can transfer moneys between cash and bank accounts as special journals You can enter journals between any accounts in the cash book, just like nominal ledger
journals (see above). This gives you a way to move amounts from one expense code to another— either to correct an error, or because you have defined new codes (for a new project, say) and want the expenses to reflect accurately
You can define up to 20 receipt and 20 payment journal templates to help when entering
(e.g.) petty cash or employee expense analyses A bank reconciliation procedure allows you to mark cleared transactions and speed up the
process of checking your bank statement

Introduction 9
Datafile Software Nominal Ledger and Cash Book Manual 06/07/07
Prepayments, Accruals and Provisional Journals The benefits of a computer nominal ledger include the ability to produce income and expenditure and other management reports on a regular basis. However, if you want to present a complete financially-orientated picture, then you should take account of distortions caused by (e.g.) quarterly or annual rent, quarterly expenses such as telephones, electricity and gas, and events such as (say) exhibitions, which concentrate expenses in a particular period. These can lead to wild fluctuations in the apparent profits and losses reported. The accountant handles these with accruals and prepayments, “book” journals whose sole purpose is to spread such transactions over a period of time to give a more realistic trading picture. The Datafile Software nominal ledger has two facilities here: User-defined journals: an excellent way to formalise many of the accrual and prepayment
transactions which need to be posted on a regular basis Provisional journals: no different to standard journals other than that they are flagged as
provisional. After a period-end you may reverse provisional transactions without the need to remember exactly which transactions you wanted to reverse. This is an excellent facility for (say) sales commissions, often paid in a later period, but really an expense of an earlier one
Reporting Facilities Trial Balance An important control in a manual system, the trial balance is also used to prepare management reports. With the Datafile Software trial balance you can define break points where you wish to print sub-totals. If you have designed your coding structure in a suitable way, these break points can be at the end of income and expenditure accounts, to give an immediate trading summary. At the major break points within the balance sheet you can get an immediate snapshot of (say) the excess of current assets over current liabilities, the book value of your fixed assets, and the extent of your longer-term liabilities such as HP commitments and loans. Audit Trail This report serves not only to show how each account has achieved its present balance, but can also summarise the transactions by each of the analysis codes (if you are using this feature) to give you the cost breakdown against each account. If you keep all the nominal ledger transactions on file for the year — which we recommend — then a complete year-end audit trail report can give your auditors all the information they need in one place to conduct their audit quickly. The savings on audit fees could be considerable.

10 Nominal Ledger and Cash Book
Datafile Software Nominal Ledger and Cashbook Manual 06/07/07
Financial Summaries This facility is an extremely powerful report generator for presenting monthly accounting and management information. Profit and loss statements and balance sheets are the standard reports produced, but you can also define other reports such as funds flow and cash flow statements. Some companies use this to produce complete sets of accounts, including the standard notes to the accounts usually seen only in year-end shareholder reports. You can define up to 40 financial summaries. Unlike a standard report generator, the financial summaries definition allows you to print accounts in any sequence you like, to suit the presentation you wish to make. You can define sub-totals in the usual way, and also perform arithmetic on report lines. For example, a profit and loss report — examples of which you can find under the Financial Summaries section of the Nominal Instructions later — often shows the sales total early in the report, and the expenses total later. You can print the net profit — sales less expenses — and even express both the expenses and the net profit as a percentage of the total sales. A special facility allows you to use the same financial summary to print (say) profit and loss statements for individual branches, for regions consisting of groups of branches, and for the company as a whole.
Multi-Period Processing The Datafile Software nominal ledger and cashbook keep all periods of the current year open at all times. You can post journals to any period of the year, and print financial summaries and reports for any period too. For each account an opening balance for the current year is kept, plus a value for each period which in fact represents the movement during that period. The balance on an account at the end of any period is the sum of the opening balance for the year, plus the period movements up to, and including, the period in question. This is illustrated on the right. A “current balance” figure is also kept for each account, to include all movements for the current year, even those which you may have posted in anticipation. As well as keeping movements for the current year’s periods, both the nominal ledger and cash book systems keep figures for last year’s periods, and those of the year before too. An exactly similar set of balances is maintained for these years as for the current year, with an opening
Opening Year Balance 15800 Movement Period 1 416 2 -812 3 -43 4 77 5 1432 6 -2500 7 -14 8 535 9 120 10 -648 11 31 12 -113 Closing Year Balance 14281
Balance Period 7 14356

Introduction 11
Datafile Software Nominal Ledger and Cash Book Manual 06/07/07
year balance, a movement value for each period, and a closing balance for the year. A complete set of empty period values is created when you start a new year. The oldest year’s set of movement’s drops out, last year’s becomes the oldest set, and what was the current year’s set now becomes the previous years. The new year’s set becomes the current year, ready to accept transactions. This is illustrated overleaf.
Starting a new year in fact has no effect on current operations other than to create a place for figures in the new year. What you knew as the “current” year has become “previous” year, and the new year has now become the “current” year. If you were in the process of posting transactions to the original “current” year periods, you must continue to post them to what are now “previous” year’s periods. Users of other systems — in particular, the sales and purchase ledgers — are not aware that anything has occurred in the nominal, because the sales and purchase ledgers are kept in step automatically during this process. Although they were still posting to (say) periods 11 and 12 in the sales or purchase ledgers — the last periods of what was the current year — the ledgers automatically switch to post to periods 11 and 12 of last year’s nominal or cash book when updating; the operation is transparent to users. Only nominal ledger users, who should know what is going on anyway, can tell that the new year has started.
Notes
You cannot start a new year if previous year is still open for posting. This is to safeguard the possibility that you may still have some journals to post to last year’s accounts. Once you have finalised last year’s accounts and sent them for audit, you must “close” last year — a simple process available in the year-end menu. You can then no longer post transactions to last year, though you can still print reports and financial summaries for any period in last year.

12 Nominal Ledger and Cash Book
Datafile Software Nominal Ledger and Cashbook Manual 06/07/07
The Processing Calendar The calendar which controls the multiple period processing is defined under Set Accounting Periods in the Installation section. You set the calendar as you initially create the company, although you can change the calendar at later points this does affect comparative reporting (comparing values this year against the same point last year) so you should ensure you define the accounting calendar correctly. Year End and Auditor’s Journals Once you’ve started a new year, you will still want to enter journal transactions into the year which has just ended, until you are satisfied that they are complete. At that point — whether it be a few weeks after the year end or several months — you will send your accounts off for audit. At this point you should close last year’s accounts. Most audits result in a number of journals to adjust the opening year balances. You can enter these at any time in the current year by posting them to period zero. This tells the system that these journals are to update the opening year balance. The opening balances then reflect exactly those which your auditor expects to find when you come to send the next year’s figures off for audit.
Notes
A system option, F9-Memo, lets you attach and subsequently look up a free-form memo to that account. You can enter any information at all, such as what the account is used for, alternative accounts, the depreciation rules for asset accounts, or prepayment and accrual rules. You could also, for example, record explanatory notes to the auditor, giving some background on the transactions for that account. At the end of the year you can browse through the memos attached to your nominal accounts, and print off a hard copy of those you wish to give to the auditor.
Other Factors Budgets and Comparatives Management reports tell a better story when compared either to budgets set for the current year, or to the equivalent periods last year. The Datafile Software nominal ledger has powerful features for you here. Comparisons with last year are immediately available because last year’s figures are already present in the file.

Introduction 13
Datafile Software Nominal Ledger and Cash Book Manual 06/07/07
You can enter budgets in a number of different ways, and can mix and match these too. First, you can base this year’s budgets either on last year’s budgets, or on last year’s actual results. You can adjust these up (or down) by a straight percentage if you wish. Another way is to enter the budget you want for the year for individual accounts, and then spread this figure either evenly across the periods, or based on a model for the year which allows for seasonal variations. You can define up to five budget tables (as the models are called) so that you can use different ones for (say) sales, wages, marketing, utilities and general accounts. Finally, for individual accounts you can enter specific budgets for each period. You can print comparative and budget figures on financial summaries, and also print the variances against actual, both for the chosen period and for the year-to-date. Integration with Spreadsheets Many companies use spreadsheets to develop company budgets and cash flow projections. All nominal ledger and cashbook reports can be output to Excel spreadsheets to facilitate this process. In addition, you could import period-by-period budget figures from your spreadsheet using the Report Generator CSV (or ASCII) import procedures and in a similar way you can output details from your nominal ledger to CSV for import into a spreadsheet. Managing Assets Datafile Software can supply a Fixed Assets Register module, which is in fact an application based on the ProFiler application generator. This calculates depreciation on a period-by-period basis, which you can update directly into your nominal ledger. Your Datafile Software reseller will be happy to talk to you about this module. It is recommended that separate balance sheet asset accounts are set up for each major asset heading, and for the accumulated depreciation for each asset heading. Even without a separate fixed asset register it is a simple task to determine the monthly depreciation which should be charged, and you can define these amounts in a user-defined transaction for ease of posting.
Integration with Other Systems Since the nominal ledger is the apex of the accounting system, data from all other applications flows towards it. The cash book updates the nominal ledger direct anyway. The standard facilities allow you to update from the sales and purchase ledgers, and also from the payroll. There are also more comprehensive facilities which allow you to update the nominal ledger with information from any Datafile database file (see Updates from Other Applications under Nominal Instructions). The following paragraphs outline certain aspects which you may need to think through when planning updates from other applications.

14 Nominal Ledger and Cash Book
Datafile Software Nominal Ledger and Cashbook Manual 06/07/07
Sales and Purchase Ledgers The main consideration here is the level of detail you want to transfer when you update from these ledgers. You have the choice either to transfer every sales and purchase ledger analysis and payment transaction, or to summarise them by nominal code first. The advantage of updating in detail is that every nominal transaction can be traced back to its source directly. The disadvantage is the sheer volume of nominal transactions which can result. Typically you would update the sales ledger in summary, but update the purchase ledger in detail. Even though you update in summary, however, you can mark a nominal account to update in detail, which means every sales and purchase transaction for that account is indeed written into the nominal ledger. It is common to mark balance sheet accounts, other than control accounts, to be updated in detail, but to leave income and expense accounts to be updated in summary. Payroll You can update monthly and weekly payrolls into the nominal ledger, once you have run the payroll and before you start a new payroll period. The transfer is in fact made from the payroll department file, so that you can update nominal codes at a departmental level if you wish. Invoicer and Order Processing These applications check nominal coding direct with the nominal ledger, but write transactions to the sales and purchase ledgers. Their interface is indirect, therefore. Stock Control Potentially there is heavy duplication between stock control transactions, and sales and purchase ledger transactions. It is unlikely that you will want to update stock transactions direct into the nominal ledger without some initial processing although you can do this. Where there is just a single stock location, and a single balance sheet code for stock, then many companies rely on monthly stock-takes to provide them with a stock movement journal for the period. This takes away any need to define a nominal procedure to update from stock. Job Costing and Bill of Materials Job costing is usually the recipient of information from the payroll, purchase and sales ledgers, and these transactions are already updated direct into the nominal ledger. Bill of Materials generates stock movements and so the stock/nominal procedures you use will reflect these. However, if you have substantial work in progress at any one time, you can update job costing/bill of materials data into the nominal ledger in order to value this work in progress.

Introduction 15
Datafile Software Nominal Ledger and Cash Book Manual 06/07/07
Consolidating Other Nominal Ledgers The nominal ledger Multiple Update procedure allows you to update a nominal ledger from the transactions of another nominal ledger. You can use this in particular to update from operating company nominal ledgers into a group company ledger to produce group company results.
Trying Out the Nominal Ledger & Cash Book You can start to use these applications immediately on the DEM company data supplied with your system. On this tour we will try the following operations — on either or both applications, depending on what you have purchased: Nominal Ledger Make some changes to the chart of accounts Print some profit and loss statements Post some nominal journals Reprint profit and loss statements, and print balance sheets Print a trial balance, audit report and journal listing Cash Book Post cash book entries receipt and payments Reconcile a bank statement Print some cash book reports Print some general reports Starting Up Start Datafile by double-clicking the icon on your desktop and sign-on as either the DEM user (no password is required) or with user-name / password your system supervisor has given you. Ensure you are in the DEM company by selecting ‘Open New Company’ from the Datafile pull-down option on the toolbar and selecting the DEM company.
16 Nominal Ledger and Cash Book
Datafile Software Nominal Ledger and Cashbook Manual 06/07/07
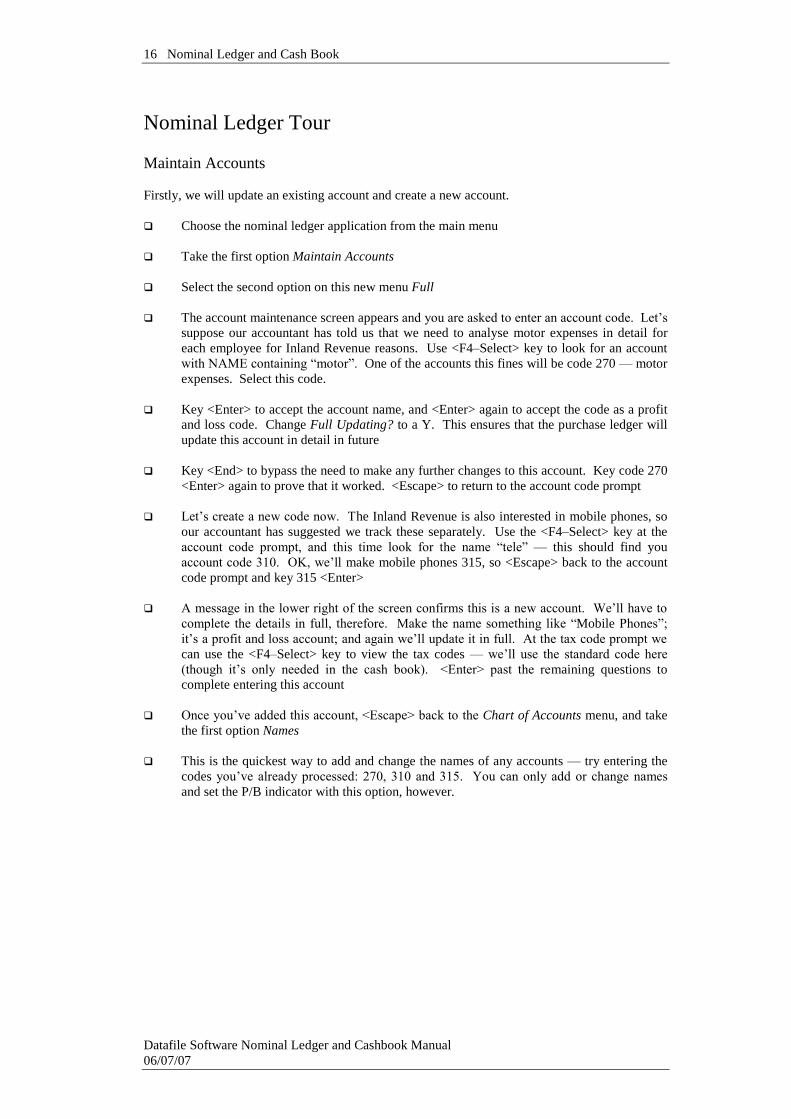
Nominal Ledger Tour Maintain Accounts Firstly, we will update an existing account and create a new account. Choose the nominal ledger application from the main menu Take the first option Maintain Accounts Select the second option on this new menu Full The account maintenance screen appears and you are asked to enter an account code. Let’s
suppose our accountant has told us that we need to analyse motor expenses in detail for each employee for Inland Revenue reasons. Use <F4–Select> key to look for an account with NAME containing “motor”. One of the accounts this fines will be code 270 — motor expenses. Select this code.
Key <Enter> to accept the account name, and <Enter> again to accept the code as a profit
and loss code. Change Full Updating? to a Y. This ensures that the purchase ledger will update this account in detail in future
Key <End> to bypass the need to make any further changes to this account. Key code 270
<Enter> again to prove that it worked. <Escape> to return to the account code prompt Let’s create a new code now. The Inland Revenue is also interested in mobile phones, so
our accountant has suggested we track these separately. Use the <F4–Select> key at the account code prompt, and this time look for the name “tele” — this should find you account code 310. OK, we’ll make mobile phones 315, so <Escape> back to the account code prompt and key 315 <Enter>
A message in the lower right of the screen confirms this is a new account. We’ll have to
complete the details in full, therefore. Make the name something like “Mobile Phones”; it’s a profit and loss account; and again we’ll update it in full. At the tax code prompt we can use the <F4–Select> key to view the tax codes — we’ll use the standard code here (though it’s only needed in the cash book). <Enter> past the remaining questions to complete entering this account
Once you’ve added this account, <Escape> back to the Chart of Accounts menu, and take
the first option Names This is the quickest way to add and change the names of any accounts — try entering the
codes you’ve already processed: 270, 310 and 315. You can only add or change names and set the P/B indicator with this option, however.

Introduction 17
Datafile Software Nominal Ledger and Cash Book Manual 06/07/07
Print a Profit & Loss Statement Before we enter any journals, we’ll print a profit and loss statement to see the state of our DEM company at present. Return to the main nominal ledger menu (use the <Escape> key if you’re not sure where
you are at present, back to the top level menu if need be) and choose the Financial Summaries option
You’re offered two types of profit and loss and two types of balance sheet. This time we’ll
just take the first option, the “easy mode” Profit and Loss It asks if you want to change the definition details, but reply No Now print the report “as at” period 1; accept today’s date; and give the period from and
period to dates as 01/01/XX to 31/01/XX (the start and end dates for period 1). Reply Y to print account codes in the report
When asked for the printer, select disk spooling The report now prints. If you spooled to disk, select the INSPECT button to view the
report. If you can print this out as hard copy, do so for comparison with later reports in this quick tour
Now have a go at printing this report for period 2, with period dates of 01/02/XX to
28/02/XX. In fact we don’t appear to have entered very much for period 2 yet, but we’re making the point that you can report on any period of the year
Now have yet another go at this report, this time giving the period as “P10”. This means
the tenth period of the last financial year for this company. The period start and end dates (these are cosmetic, incidentally — it’s the period number which drives the report) should be 01/10/XX to 31/10/XX. In fact you can print off such reports for any period of last year too.
Enter Journals Now we’ll enter some journals. Return to the main nominal ledger menu and choose the Journals option. Let’s suppose
we have found that an invoice for £300 in period 1 which we thought was for printing and stationery was, in fact, for a marketing department mailer. We’d like to attribute it correctly, and so want to transfer the expense
Confirm the journal number, set the period to 1, and instead of today’s date which is
prompted in the date field, change the date to (say) 31/01/XX — the last day of period 1 In the description field, write something suitable, like “Marketing Mailer”

18 Nominal Ledger and Cash Book
Datafile Software Nominal Ledger and Cashbook Manual 06/07/07
Now you are in the first entry line under the account code prompt. Key <F4–Select> here and choose the “NAME contains” option. Key “station” <Enter>. This finds us code 320–Printing & Stationery, select this code.
We need to know about debits and credits at this point. Expenses are debits, and so the
original £300 would have been posted to code 320 as a debit. To clear it out we need to enter a credit, so press <Enter> in the blank debit column, and you move across to the credit column. Type in 300.
For nominal transactions we can attach an analysis code and a reference if we wish (see
Overview earlier). We’ll ignore these for this journal by keying 0 <Enter> for the analysis code and <Enter> against a blank reference
Now we are at the second journal line. For this we need a marketing code, so again <F4–
Select> and look for the account with “mail” in it. You should find code 360 — brochures & mailers. <Enter> that code and key in 300 as the debit value, and ignore the analysis and reference values as before.
That’s it for this journal so, on the third line, press <Enter> on a blank nominal code and
choose the UPDATE option. Reply 'Yes' to another journal, and we’ll try a multi-line journal. We’re going to enter the
following employee expense details into the ledger:

Introduction 19
Datafile Software Nominal Ledger and Cash Book Manual 06/07/07
As before, accept the journal given, and choose period 1. Give a date which is the end of
the period according to the calendar, and describe this as “Expenses - J Francis”. The expense form has been well designed, with the nominal codes pre-printed on it, and we only need to be concerned with the totals
When we get to that point, we’ll use the analysis code for the employee number (let’s
assume this is 123) and the reference as the department — we’ll enter “Eng” here. The table below shows what you should enter for each of the four lines which make up this expense form:
Account Debit Credit Analysis Reference 290 51.03 123 Eng 300 3.62 <Enter> <Enter> 850 7.10 <Enter> <Enter> 990 61.75 <Enter> <Enter>
Now key <Enter> in a blank account code and you are given a set of actions. Hopefully you are offered the UPDATE option by default, because the credits and debits should total
Name
Dept .
Month
J Francis
Engineering
January
Date Details Travel Sundry VAT Total
4 Parking 4.26 0.74 5.00 12 Parking 6.81 1.19 8.00 15 Phone Calls 3.62 0.63 4.25 Mileage 39.96 4.54 44.50
51.03 3.62 7.10 61.75
290 300 850 990
Emp No Journal No
Expenses Claim Form
Totals N/L Expense Codes

20 Nominal Ledger and Cash Book
Datafile Software Nominal Ledger and Cashbook Manual 06/07/07
the same amount. Select TOTALS to prove that they do (or don’t — in which case you need to change the entries until they do!). You can use EDIT to return and edit any line, or ADD if you got to the actions before you’ve entered all the detail lines
Key <Enter> to the U action once it is offered to you. That was a simple journal, but note
that a journal could extend to 200 entries if needed Print Financial Summaries Now, we’ll return to the Financial Summaries to see the effect of our transactions. From the main nominal ledger journal again choose the Financial Summaries option. Print
out a profit and loss report (the first menu choice) for period 1, in just the same way as you did earlier. You can compare the result against the original print, particularly for codes 320 and 360 — where we transferred £300, and for codes 290 and 300, where we entered the expense form
Now print the other style of financial summary by taking option 3, the “full mode” profit
and loss. Print this for period 1, in the same way as you did for the “easy mode” profit and loss. This is the same report as before, but presented in a different way, and contained in a single page
Finally take options 2 and 4 to print out balance sheets for period 1 in the two styles.
Essentially the “easy mode” is quick to set up, but tends to list all the codes and print the full values, whereas the “full mode” style of report allows us to create better-looking reports to contain the essential points we want to make
Print Reports Now we’ll print off some standard reports from the system. From the nominal ledger main menu take the Reports and Analysis option. The first report
is the trial balance, so take that one and print for period 1. Note that you can print all reports for any period in the current and previous years. Select the PRINT option to give you a full trial balance (send to Disk Spooler as before). You’ll see that it lists all the accounts in the nominal ledger, and that the sum of all the debit accounts is the same as the sum of all the credit accounts, the totals being given at the end of the report
With that done, we’ll try the next report on the list, the Audit Report — again for period 1.
This could be quite lengthy, since it prints every transaction for every account. To avoid this, we’ll leave the “From Account ... To ..” prompts blank but set the prompt ‘Or List Accounts to be Reported’. We’ll print out an audit trail for codes 760–bank account, 850–VAT control account, and 990–general suspense. When you’ve entered these three codes, key <Enter> at a blank code to continue. All the rest of the report pre-amble is OK, so select the PRINT button to produce the report. This report shows how the account balance at the end of the period has arisen — you can see every transaction. The VAT control shows the entry from the expense form, and the general suspense shows the full value of

Introduction 21
Datafile Software Nominal Ledger and Cash Book Manual 06/07/07
the expense form (when J Francis is paid the expenses, the cash book entry will post a reverse entry to this account, returning it to zero)
Finally try the Journal Listing for period 1. This lists all the journals posted in period 1,
separating each journal by a blank line for presentation purposes That concludes our short tour of the nominal ledger. There is much more which you can follow through, however, much of it described in the Overview section above. If you’ve installed the cash book too, then you are recommended to take the tour of that application as well.
Cash Book Tour The receipts and payments posting we will make assume you also have the Datafile Software sales and purchase ledgers installed. If you don’t have the sales ledger, then ignore the receipts posting. If you don’t have the purchase ledger, then you’ll have to ignore the first payment posting made to the purchase ledger below, but will be able to make the second one. Receipt Posting (assumes presence of sales ledger) Choose the cash book application and select the option Receipts The cash receipts entry screen is given to you. We’re going to pay in three cheques we
received: £247.91 from Baltimore Corporation; £1410 from Marton Machines; and £206.78 from Walton Street Motor Company. We have made out a paying-slip for £1864.69 for the bank, and now want to enter the details here. Accept the journal number, and assume we’re on period 2
Instead of today’s date which is prompted here, change the date to (say) 18/02/xx, an
acceptable date for period 2 Under description enter something like “Bankings”. <Enter> to accept the account code of
760 for the bank, and also accept the paying-in slip number by keying <Enter>. If your paying slips are numbered, this should be the next one in sequence, and in real life you would check to see one hadn’t been left out
Now enter the total paying-in slip value of £1864.69 <Enter> (don’t enter the pound sign
though) You enter receipts as though you were entering them into a cash book, and must choose a
column. In this case, all the entries are for column 1, the sales ledger, so key 1 <Enter> now
At the bottom of the screen you are asked for the account code in the sales ledger. You
may not know these, so use the <F4–Select> key and <Enter> to view all the accounts (in practice you would search by name, but there’s few enough in the demonstration data not to worry). Use the <Down> arrow to Baltimore Corporation <Enter>. <Enter> to accept the details of this account

22 Nominal Ledger and Cash Book
Datafile Software Nominal Ledger and Cashbook Manual 06/07/07
<Enter> to accept the cash book account code (it’s predefined as the sales ledger control,
and you don’t need to change it). Key the cheque amount from Baltimore Corporation, which is 247.91 <Enter>. This amount is shown in the header under Analysed and the Balance in the header reduces to 1616.78
Follow the same procedure for Marton Machines and Walton Street Motors. If you’ve
typed the amounts correctly, the Analysed field in the header should equal the amount paid in to the bank, and the Balance should show as zero
Key <Enter> at a blank column on the fourth line and you are given some actions at the
bottom of the screen. The UPDATE action will be offered if the balance is zero, otherwise you may need to use the ADD or EDIT actions to correct the values until this is so
Select UPDATE when this option is allowed and the cash book and sales ledgers are
updated. Now you are asked if you wish to attempt allocations in the sales ledger. Well, let’s have a go and reply Yes
If you’ve used the sales ledger, you will be on familiar ground here. The first account
Baltimore Corporation is already shown, and you are asked for an allocation action. <Enter> to accept the DEBIT action offered, and <Enter> again to show only outstanding transactions. There are two transactions on the account, one of which is for the same value as the payment you’ve just received, so key A (for all) to allocate it in full, press the <End> key to complete this allocation and you can now update the allocation by selecting UPDATE. If you get into difficulties, you can always choose the EXIT action to abandon the allocation
The next account, Marton Machines is now offered to you. When prompted for the
allocation action, again accept DEBITS and list the outstanding transactions. You’ll see that there is an invoice which has been partially paid, leaving only £1410.00 outstanding. Allocate the remaining amount by keying A as you did last time, and update when done
The final account is now offered. We’ll risk letting you resolve this one by yourself! At
the end you are asked if you want to enter another cash receipt. Reply No to this. Payments Posting Select the option Payments on the cash book menu We’re going to make a payment to a supplier, and also post the week’s petty cash details
here. If you haven’t got the purchase ledger, then bypass the supplier payment, but try the petty cash analysis
As before, accept the journal number offered, keep it in period 2, and make sure the date is
within the period. For a description, key “Pay Conway Haulage”, and accept 760 <Enter> as the bank account. The next field is the cheque number – this can increment by one automatically each time, or may be left blank if you intend to use the purchase ledger routines to print the cheque – leave this as is for now. After the cheque number you are

Introduction 23
Datafile Software Nominal Ledger and Cash Book Manual 06/07/07
asked for the value of the cheque, which is for £612.26 — don’t key the pound sign, of course.
You enter payments as though you were entering them into a cash book, and must choose a
column. In this case, the entry is for column 1, the purchase ledger, so key 1. At the bottom of the screen you are asked for the account code in the purchase ledger.
You may not know these, so use the <F4–Select> key and <Enter> to view all the accounts (in practice you would search by name, but there’s few enough in the demonstration data not to worry). Use the <Down Arrow> to point to Conway Haulage and press <Enter> or use the mouse to select it. <Enter> to accept the details of this account
<Enter> to accept the cash book code 800 (it’s predefined as the purchase ledger control,
and you don’t need to change it). Key the value of 612.26 <Enter> for the cheque. Now key <Enter> on a blank column number to go to the set of actions to complete this
payment. The UPDATE action should be showing here, and you can select this to update the cash book and the purchase ledger (if the UPDATE action isn’t available then you’ve entered one or other of the values incorrectly; use the EDIT action to edit the detail line or the HEADER action to change the header)
You are asked if you want to attempt to allocate the purchase ledger. Reply YES to do this If you’ve used the purchase ledger, you will be on familiar ground here. The Conway
Haulage account is already shown, and you are asked for an allocation action. Select the CREDITS action offered, and select to show only outstanding transactions. There’s only one transaction on the account, for the same value as the payment you’ve just made. Key A (for All) to allocate it in full. Now you can update the allocation by selecting the UPDATE button. If you get into difficulties, you can always choose the EXIT button to abandon the allocation
We’ll enter another payment now, this time for the petty cash analysis. Again accept the
journal number and period number and a date within the period. For the description type “Petty Cash Analysis” <Enter>. The analysis which we are going to enter is shown below

24 Nominal Ledger and Cash Book
Datafile Software Nominal Ledger and Cashbook Manual 06/07/07
This time accept the journal number and period, giving the date as the 12th of the current
period. The description is to be “Petty Cash w/e 12th”. The cash account we want to use this time is the petty cash account, so use the <F4–Select> key to find it (it is in fact account 770). Leave the cheque number blank because this is merely recording payments made from petty cash. The amount is 70.35 — the total shown in the illustration above
Now we are going to enter the six lines of analysis as above. Although we could have had
a petty cash column, there isn’t one, so we’ll use column 5 Other Payments. Again, conveniently, an analysed cash book has been used, and the cash book (i.e. nominal) codes written against each column. Enter the values as shown below
DATE DESCRIPTIO N TO TAL VAT POST FUEL PRINT CLEAN O THER 770 850 370 270 320 245 6th Windows 18.00 18.00 6th Petrol 10.00 1.49 8.51 8th Courier 7.60 7.60 11th LJ—IOU 10.00 10.00 12th Pads & Pens 14.75 2.20 12.55 12th Petrol 10.00 1.49 8.51 Total for Week 70.35
Petty Cash Analysis

Introduction 25
Datafile Software Nominal Ledger and Cash Book Manual 06/07/07
Col. Account Net † Tax Tax Amount 5 245 18.00 5 270 8.51 S 1.49 5 370 7.60 5 990 10.00 5 320 12.55 S 2.20 5 270 8.51 S 1.49
† In the system you enter the net amount and not the gross. For lines with a tax code, you can key the gross amount plus the tax code — e.g. 10.00S for the second line. The net is broken out in this column, and the tax code and tax amounts automatically entered for you to confirm.
When the tax column is blank above, just key <Enter> (blank out any default), and you go
immediately on to the next line. Note that the IOU line is coded to the general suspense code. We’ll expect the employee called LJ to repay that amount very soon
Once you’ve completed the above details, key <Enter> on a blank column, and you are put
straight down to the actions. The UPDATE button should be available, but if it isn’t, then the analysis lines do not add up to the original total, by the amount in the Balance value in the heading. Use the EDIT, ADD and HEADER buttons to get the transaction to balance and then update the files. If you can’t get it to balance easily, then just EXIT to abandon for now
Reconcile Bank Statement From the cash book menu choose Bank Reconciliation. We are going to reconcile the bank
statement for period 1 (they are for January — if your period 1 is not January, pretend it is for now)
Choose the first option Reconcile Bank Statement. Accept the bank account 760 <Enter>.
Enter 46 <Enter> for the statement number (see copy below) and enter period 1 <Enter> for the date range of 1st to the 31st of January
Now give the opening bank balance as 18445.53, as it appears on the statement. Ignore the
unreconciled date — <Enter> at the blank date. Set to exclude previously reconciled items (if you hadn’t completed the last reconciliation then you would not exclude these items).
The account details are given to you now. Using the up and down arrow keys, enter Y
against each entry which you can reconcile against the bank statement overleaf. You can browse around this for as long as you want. When you reach the last entry, or
you <Escape> you are asked if reconciliation is complete. If the running balance in the reconciliation header equals the closing bank balance, then it
is. You can <Escape> from this question if you get into difficulties and need to abandon

26 Nominal Ledger and Cash Book
Datafile Software Nominal Ledger and Cashbook Manual 06/07/07
the reconciliation temporarily — you may need to refer to the detailed instructions in the Cash Book Instructions chapter later
Cash Book Reports From the cash book menu choose Reports. We’ll print off the first four reports to see what
they look like For each report choose period 2, and then select the PRINT button to print the report. If
you have a printer handy, then output to the printer when you are asked to do so, otherwise print to disk and INSPECT the report on your screen when prompted.
The first two reports show the details of what was entered for each receipt and payment
transaction respectively. The second two reports look more like a traditional cash book, with values for each entry showing against the appropriate columns. You should notice the transactions you entered yourself in this tour earlier
Now we’ll print off some standard reports, if you have a Nominal Ledger then these
reports were discussed earlier. The first report to run is the trial balance, so take that one and print for period 1. Note that you can print all reports for any period in the current and
National Bank 15 Pall Mall Branch Branchester Midshire
Sort Code 12-34-56 Account Number 12345678 Statement Date 31st January Statement No 46
Date Details Withdrawals Deposits Balance Balance B/F 18445.53 26th Jan Cheque No 002468 8457.62 9987.91 Cheque No 002469 22822.54 -12834.63 Deposit 100160 13646.75 812.12 Balance C/F 812.12

Introduction 27
Datafile Software Nominal Ledger and Cash Book Manual 06/07/07
previous years. Ignore the “From Account ... To ...” prompts to give you a full trial balance. You’ll see that it lists all the account in the cash book — which is also the nominal ledger in this case — and that the sum of all the debit accounts is the same as the sum of all the credit accounts, the totals being given at the end of the report
With that done, try and print the Audit Report — again for period 1. This could be quite
lengthy, since it prints every transaction for every account. To avoid this, we’ll leave the “From Account ... To ...” prompts blank but reply Y <Enter> when asked to list accounts to be reported. We’ll print out an audit trail for codes 760–bank account, 850–VAT control account, and 990–general suspense. When you’ve entered these three codes, key <Enter> at a blank code to continue. This report shows how the account balance at the end of the period has arisen — you can see every transaction.
Finally try the Journal Listing for period 1. This lists all the journals posted in period 1,
separating each journal by a blank line for presentation purposes That concludes our short tour of the cash book ledger. There is much more which you need to follow through, however, much of this is described in the Overview above.
Transferring from an Existing Nominal Ledger The key to the transfer is to agree the Datafile ledger with your previous system at the start and end of a chosen period, duplicating the transactions on both systems (not as time-consuming as it may sound). This procedure is called “parallel running”. The usual steps are: Balance the existing ledger. Take a “trial balance” of your current nominal ledger to prove
that the sum of all accounts in debit and credit do indeed balance as at a fixed date — usually a period end. If you are setting up a nominal ledger for the first time, it is a good idea to involve your accountants from the start. The best time for them may be at a year-end or quarter-end, when they can provide you with the opening figures
Add existing accounts into Datafile. Using the account maintenance features, put all
nominal account details, other than balances, into the ledger. Your previous system may be able to output the nominal account details as a CSV file, if so these details can be imported using the Report Generator tools.
Set your company accounting periods in the Installation section, and then take the nominal
ledger Period / Year-End Procedure option to set the period number in the current year to be the period number just ended
Enter current balances. The usual way is to enter journals with the current balance for
each account. You can’t enter more than 200 balances at a time so you might need a suspense account to hold the balancing value for each journal. At the end, the value of this suspense account should have returned to zero

28 Nominal Ledger and Cash Book
Datafile Software Nominal Ledger and Cashbook Manual 06/07/07
Check Datafile balances. Print a trial balance report and check that all account balances agree with the previous system. You can enter further journals to correct any errors found, until you get complete financial agreement. It is vital that the Datafile Software nominal ledger figures agree with the previous system
Set the nominal ledger period for the next period — an option on the nominal menu. Post transactions. During the parallel period, post all transactions both to your earlier
system and to the Datafile ledger. You can use the reporting features of the ledger to check that your postings match every day
End of parallel period. At the end of the new period, print trial balance, journal and
control reports to check against your earlier system. It is essential that all inconsistencies between the two are isolated and corrected. If any are found, they are as likely to be on the earlier system as on the Datafile system. This process may highlight some areas for operational improvements
Financial statements and other reports. If Datafile agrees to your earlier system, you may
use the Datafile to produce balance sheet and profit and loss reports rather than the other system. Print out all audit reports so that you can prove to the auditor the correctness of the transfer to Datafile
Once you are satisfied that Datafile is processing your ledger correctly, you may safely discontinue your earlier system.
Transferring from an Existing Cash Book If you are already running the Datafile Software nominal ledger, then there is no transfer to be done, since the cash accounts you are going to manage with the cash book should already exist as accounts in the nominal ledger. You may need to check the details for the cash accounts, however, to see that they are marked as cash accounts, and also marked for reconciliation if you wish to use those routines. If you do not have the Datafile Software nominal ledger, however, then you must undertake a very similar procedure to the nominal ledger take-on described above. However, you do not need to enter a complete chart of accounts; just those which you are going to use on a day-by-day basis through the cash book. These usually include the income and expenditure accounts, plus a few of the standard balance sheet control accounts, such as the cash accounts themselves, the VAT & Inland Revenue control accounts, together with sales and purchase ledger payment control accounts. You need to be able to enter balances for the balance sheet accounts you have entered into the accounts file, particularly for the cash accounts themselves. You may not have balances for the income and expense accounts (their presence would indicate you are running a full nominal ledger anyway) so you should define a “Cash Book Take-On” account as the balancing item.

Introduction 29
Datafile Software Nominal Ledger and Cash Book Manual 06/07/07
Then follow the procedures for take-on as described above for the nominal ledger. Opening balances may be as simple as this (they all count as balance sheet accounts): Account Debit Credit Current Bank Account 18,846.91 Building Society 20,000.00 Petty Cash 200.00 Till Floats 300.00 Sales Ledger Control 0.00 Purchase Ledger Control 0.00 Payroll Control 0.00 VAT Control 18,345.50 Inland Revenue Control 4,564.75 Cash Book Take-On Control 21,257.16 Totals 41,757.16 41,757.16
Daily, Weekly and Monthly Routines For many companies the nominal ledger is really a monthly system, not updated further until the following period. If you are using the cash book, however, your nominal ledger is being updated daily with receipts banked and any payments made. You should develop your own procedures for control and operation of your nominal ledger and cash book applications. The following notes are offered as a basis for such checklists. Daily and Weekly Routines Nominal Ledger - If you have weekly-paid employees, and plan to use the nominal ledger’s automatic update facility, you need to update the payroll into the nominal ledger each week after you have run the payroll and before you start the next weekly payroll period. For many companies, however, the nominal ledger is run on a monthly cycle, and there are no other daily or weekly processing routines other than the payroll. Cash Book – If not using the automatic nominal update options you may want to post a summary of your payroll(s) so that you can collect the period-by-period expenditure under the payroll headings for reporting purposes, and also maintain payroll controls in the cash book. As well as daily receipt and payment entries, you should post any standing orders and direct debits which are due to hit your bank accounts. When you receive your bank statements, check for transactions not yet entered into the computer — bank charges such as interest and service charges are typical of these — and enter them now. You can then use the bank reconciliation procedures to reconcile the bank statements.

30 Nominal Ledger and Cash Book
Datafile Software Nominal Ledger and Cashbook Manual 06/07/07
Monthly Routines – Nominal Ledger Give some thought to your cycle of nominal ledger processing before finalising your own period end procedures. The typical monthly cycle might be: Check that you’ve completed the processing for last period, including printing trial
balances, transaction listings and audit reports Check you’ve got a backup of the nominal ledger as it stands at present If you are using the Datafile Software cash book, make sure that all receipt and payment
entries have been posted through the cash book Update the nominal ledger from the sales and purchase ledgers, checking that the controls
and balances match between the ledgers (if not, why not?) If you do not use the cash book application, then you need to prepare nominal journals to
post all your manual cash book entries other than debtor receipts and creditor payments, and then post them. A sample journal form is shown overleaf.
Post monthly payroll summaries (and weekly, if not done already). If you are using a
payroll control, check that it is zero. If not then find out why not Post monthly transactions such as depreciation, hire purchase payments and interest
charges, prepayments and accruals. User-defined transactions are helpful here — pre-define them as steps in your check-list of monthly postings
If you are not using the cash book application, then post petty cash and expense analyses,
plus standing orders and other cash or bank transactions not yet entered from manual cash books
Post stock movements or gross margin adjustments as appropriate If you do not use the cash book application, reconcile your bank account(s) against the
bank’s own statements. If you are using the cash book application, then you should use the system provided procedures there to help you
Move the default nominal period forward by a period Reverse any of last period’s provisions which should be reversed Examine your purchase ledger for late invoices which you should provide for in the period
in question Determine and post any further provisions required Print trial balance, and check controls Print financial statements, and check for inconsistencies

Introduction 31
Datafile Software Nominal Ledger and Cash Book Manual 06/07/07
Print audit trail of reports and control reports Take a security copy of the nominal ledger
Journal A/C Code Debit Credit Ref. Narrative
Notes For Period No _____ Provisional Dated __________
ABC Company Limited

32 Nominal Ledger and Cash Book
Datafile Software Nominal Ledger and Cashbook Manual 06/07/07
Example Journal Form
You could use a form like this to prepare the details of your nominal journals before you enter them.
Monthly Procedures – Cash Book If not using the nominal ledger, then the period-end procedures concern checking that the bank and control accounts are correct. You may also need to give your accountants and managers the sales and expenditure figures for the period — the trial balance report is a useful summary of this. You should check that: Bank and other such accounts reconcile against your closing period balance Cash accounts (petty cash, till floats etc.) agree to the cash counted Sales receipt and purchase payment control account movements for the period agree to the
sales and purchase control summary receipts and payment figures The payroll control account(s) stand at zero for the period Any other control accounts you may have set up agree to their projected balance (usually
such accounts should return to zero at the period end)

33
Datafile Software Nominal Ledger and Cash Book Manual 06/07/07
Chapter 2 Nominal Ledger
Instructions This chapter describes how to use the Datafile Software Nominal Ledger application. We assume you have learned how to sign on to your Datafile Software system, and to use the main menu system together with all the Datafile DeskTop facilities (these topics are covered in full in the User Guide). Your nominal ledger is accessed from the main menu. If you have difficulty locating this, then ask your system supervisor. Once you have selected the ledger you are immediately given the main menu from which to choose the option you want.
Some of the options give you a sub-menu, from which you can choose the next level of option you want, until you have located the specific processing operation you need. This section of the

34 Nominal Ledger and Cash Book
Datafile Software Nominal Ledger and Cashbook Manual 06/07/07
manual is laid out as a reference to the ledger applications in the same order as the standard menu structure sent to you. Application Menu Parameters – Datafile Diamond and Premier Each menu option has a four-digit parameter number which is needed for Datafile users who wish to restructure their applications, and even to define completely new menus. For example the Trial Balance report has a parameter of “3001”, and the second financial summary definition can be called directly via the parameter of “4102”. These parameters are needed only under the CONFIG user to change or define application menu structures. Choosing the Right Company You can use your Datafile system for more than one company’s data. Where you have more than one company, then if the computer does not know which company’s data to process it asks you to select one from a list. This can occur if the operator has not previously processed any company in this session (and he/she has no default set), or the last company it processed does not have the relevant ledger defined for it.
Example Company List
You can always view the current company by noting the company id on the status line at the foot of the screen or by using the ‘About this Company’ option on the Datafile pull-down on the main

Nominal Ledger Instructions 35
Datafile Software Nominal Ledger and Cash Book Manual 06/07/07
toolbar. You can change the company, providing you are within the menu system rather than a specific action, by using the ‘Open New Company’ option on the Datafile pull-down on the main toolbar or by using the <Alt + O> shortcut key combination. General Notes Throughout Datafile Software there is syntax to using the keyboard keys, and conventions to the way screens and messages are displayed. These are fully described in the System Users Guide supplied with your system. However, the main things you need to know are: In the text below, chevrons <> around words or letters tells you to press that key on the
keyboard. For example, <End> means the key which has the word “End” on it; and <F1> refers to the first of the ten (at least) keys along the top of, or to the left of, the keyboard with the inscriptions “F1” through “F10” on them.
<Enter> means the (carriage) return key or “Enter” key on the keyboard, used to signify
that all the data for a field (the highlighted area on the screen in which key strokes appear as you type) is now ready to be processed by the computer.
<Escape> is the key marked “Escape” or “Esc”, and is used to exit from whatever you
were doing — often you are first asked if you have finished, to prevent accidents. The Select function is assigned to the <F4> key. This gives a powerful way to find an
account, either through a part of the code, or part of the account name, or even part of some other field such as a contact or telephone number.

36 Nominal Ledger and Cash Book
Datafile Software Nominal Ledger and Cashbook Manual 06/07/07
Maintain Accounts You use this part of the program to add, amend, view and delete nominal ledger accounts. You also use it to enter the values for budget and comparative items for periods and year, if these options are configured for this company’s nominal ledger.
A chart of accounts is simply a list of the nominal ledger accounts, with a carefully-designed structure so that the various types of account fall into specified ranges. For example, it is helpful to define codes so that consecutive series of nominal accounts define a range of income accounts, a range of expense accounts, a range of current asset accounts, and a range of current liability accounts and so on. See the discussion about code structures in the Introduction chapter above. You are recommended to review your chart of accounts and its structure with your accountant before you start to add any accounts. This will ensure that management reports provide the information required for audit purposes.

Nominal Ledger Instructions 37
Datafile Software Nominal Ledger and Cash Book Manual 06/07/07
Notes The first and second options of this menu have similar purposes — to add or amend accounts. When you first set up the ledger, you may find the first option NAMES much quicker for getting all the account names into the system. You can then use the second option on those accounts which need to have more information, such as those which are cash (bank) accounts or ones where you wish to apply factored budgets.
NAMES – New/Amend Account Names This is a fast way to enter account codes. Other than the account code and name the only parameter, on a non-currency system, you can change is the P/B indicator. However, most other parameters are exceptions anyway, so you can use the next option above to change those afterwards.
You need to enter an account code, the account name, and whether it is a profit and loss account (P) or balance sheet account (B) in the final column. If the account exists already, then the account name is displayed for you to alter. If the account is new, then you must enter an account name.

38 Nominal Ledger and Cash Book
Datafile Software Nominal Ledger and Cashbook Manual 06/07/07
Cost Centre Structure – If using a cost centre structure then you must create the header accounts first, i.e. if you wish to create an account 001-01 where 001 is the nominal code and 01 is the cost centre then the ‘header’ account 001 must be created first. Currency Code – The essence of the nominal ledger is that all transactions are converted to base currency values, but details are also held in the foreign currency for foreign currency nominal accounts. Each account on the nominal ledger should have a currency allocated to it. In the absence of a currency code then the base currency is assumed.
Notes
The account is immediately written to the file index at the time you complete each line. If you add an incorrect account number, then you must use the delete option below to remove it. You can enter or amend up to 15 accounts on each screen. Once a screen is full you are presented with a new blank screen on which to continue. <Enter> at a blank account code returns you to the Maintain Chart of Accounts menu. If you key <Escape> whilst typing an account name or the PB indicator, the cursor returns to the account code column without entering or changing that account. A second <Escape>, with the cursor in the account code column, returns you to the Maintain Chart of Accounts menu.

Nominal Ledger Instructions 39
Datafile Software Nominal Ledger and Cash Book Manual 06/07/07
FULL – Maintain Accounts in Full Use this option to add or amend nominal ledger accounts, together with their individual characteristics.
First, an account code is prompted for at the bottom of the screen. You may use the <F4-Select> key to look for an existing account to amend, or to check if the account has already been set up with another code. If the account already exists, its details are displayed for you to amend. If there is no such account you must enter all the details for the new account. For an existing account you may use the <End> key to update the account details without having to step through the remaining fields — a useful short cut. For a new account, however, you have to confirm the data for every field. You can abandon an account without making any changes by keying <Escape>. The items which you usually need to enter are as follows:

40 Nominal Ledger and Cash Book
Datafile Software Nominal Ledger and Cashbook Manual 06/07/07
Account name The size of the account name depends on the size of the item set up for it in the nominal accounts file. The standard size is 25 characters. Currency Enter the currency of this account (if left blank then base currency is assumed). PB indicator This indicator determines whether the account is a “Profit & Loss” or a “Balance Sheet” account. It can only take the value P for profit and loss, or B for balance sheet item. This distinction is needed because profit and loss account balances are reset at the end of a year, and also because journals posted into the prior year for profit and loss accounts are treated differently (see Journal Entries later). When you create a new account the system automatically sets the PB flag based on whether the account code is in the income/expenditure range or not – you can override this if required. Full updating You can choose whether sales and purchase ledgers are to update the nominal ledger in summary (one journal for the total of each code) or in detail (one nominal transaction for each sales or purchase ledger transaction) — see Nominal Configuration later. If you have elected to update the nominal ledger in summary, then you can still ensure that this particular account is always updated in detail by replying ‘Y’ here. This can be helpful for (say) asset accounts, or certain expense categories such as repairs, where you and your auditor need to see this detail within the nominal ledger. Budget factor You can define up to five sets of budgeting factors for your nominal ledger, whose purpose is to show the seasonal movement anticipated during the year. The budgeting routines use these to spread the total budget for the year automatically over the periods. Enter a value between 1 and 5 to say which budget factor table you are using for this account. Leave at zero if you don’t wish to use the budget factor facility for this account. See also Budgets and Comparatives later. Cash account The cash book application only posts payments and receipts to accounts marked as cash accounts. Enter ‘Y’ to flag this account as a cash account. Your bank accounts should always be marked as cash accounts. Other accounts you might also want to mark include petty cash, charge card accounts (e.g. American Express and Diners Club)
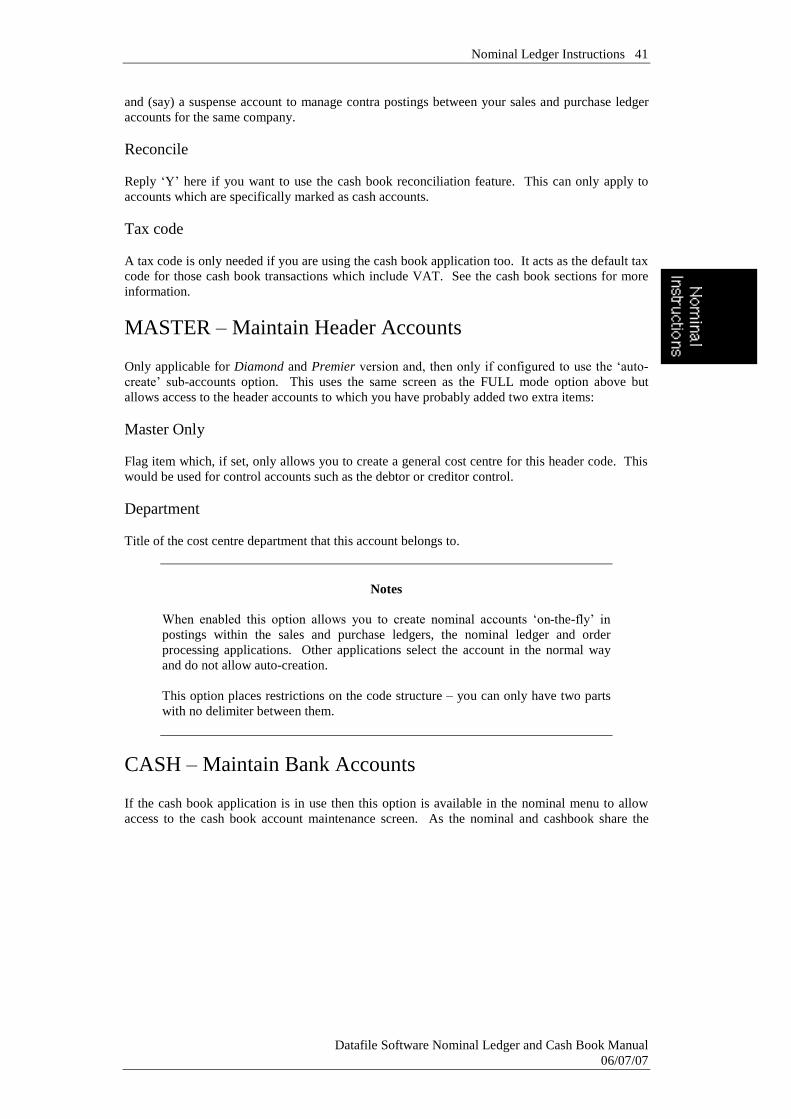
Nominal Ledger Instructions 41
Datafile Software Nominal Ledger and Cash Book Manual 06/07/07
and (say) a suspense account to manage contra postings between your sales and purchase ledger accounts for the same company. Reconcile Reply ‘Y’ here if you want to use the cash book reconciliation feature. This can only apply to accounts which are specifically marked as cash accounts. Tax code A tax code is only needed if you are using the cash book application too. It acts as the default tax code for those cash book transactions which include VAT. See the cash book sections for more information.
MASTER – Maintain Header Accounts Only applicable for Diamond and Premier version and, then only if configured to use the ‘auto-create’ sub-accounts option. This uses the same screen as the FULL mode option above but allows access to the header accounts to which you have probably added two extra items: Master Only Flag item which, if set, only allows you to create a general cost centre for this header code. This would be used for control accounts such as the debtor or creditor control. Department Title of the cost centre department that this account belongs to.
Notes
When enabled this option allows you to create nominal accounts ‘on-the-fly’ in postings within the sales and purchase ledgers, the nominal ledger and order processing applications. Other applications select the account in the normal way and do not allow auto-creation. This option places restrictions on the code structure – you can only have two parts with no delimiter between them.
CASH – Maintain Bank Accounts If the cash book application is in use then this option is available in the nominal menu to allow access to the cash book account maintenance screen. As the nominal and cashbook share the

42 Nominal Ledger and Cash Book
Datafile Software Nominal Ledger and Cashbook Manual 06/07/07
same databases the items on this screen are usually the same as the ‘FULL’ option above. This option is discussed fully in the Cash Book Instructions section later.
VIEW – View an Account This displays account details to the screen for you to look at. Up to 28 items in two columns of 14 items can be displayed.
Notes
In the Datafile Diamond and Premier systems you can configure which data items to view on this screen
View Which Account Once you’ve keyed a valid account code, the account details are displayed. You can use the <F4-Select> key to find an account if you are not sure of its code. The cursor immediately returns to the above prompt to allow you to enter another account code. <Escape> returns you to the Maintain Accounts menu. Note that you cannot amend account details with this option.

Nominal Ledger Instructions 43
Datafile Software Nominal Ledger and Cash Book Manual 06/07/07
DELETE - Delete an Account You cannot delete an account unless it has a non-zero balance, nor can you delete an account which still has transactions on file. You may have to wait until after all transactions for the account have been ‘cleared down’ before you can delete an account.
Delete Account Key a valid code here and some details from the nominal account code are displayed. You may use the <F4-Select> if you are not sure of the code. Once a code is accepted you are prompted whether you wish to delete an account – ‘No’ abandons the attempt to delete and prompts you for another account, if you reply ‘Yes’ then the system checks that the current balance is 0 and that there are no transactions present before deleting it. You may not delete an active account and the system will warn accordingly if this is the case.

44 Nominal Ledger and Cash Book
Datafile Software Nominal Ledger and Cashbook Manual 06/07/07
BUDGETS – Budgets Proposed You can set up budget figures for each period of the year for some or all accounts. These are maintained using the options on this sub-menu. There are a number of ways to create and update the budget figures on accounts: Base this year’s figures on last year’s actual results, or on last year’s budgets Enter the total budget value you want for the year, and ask the computer to divide these
across the periods, either equally or based on a pre-defined model Enter all the periods for the year one by one for each account Import them from an external source such as a spreadsheet
Note
Many people use a spreadsheet to develop their budgets, and then output the details to an ASCII file for input into their nominal ledger. The following options would then be used to revise the budgets input so far, rather than create them from scratch. See also the Introduction chapter for more information.
When you select the BUDGETS option a further menu of options is given.
Budget Factor Tables In most companies both income and expenditure follows a seasonal trend of some nature during the year. You can define up to five budget factor tables in the nominal ledger System Profiles to provide period by period trend figures. You might define one for sales accounts, another for gross margin accounts, perhaps a third for wages and salary costs, and a fourth for marketing expenditure. A budget factor table defines the percentages to apply to the annual budget figure for 12 or 13 periods (depending on the number of periods in your financial year). The percentages must sum to 100%. If you enter a budget figure for the year, and ask to allocate it according to a budget factor table, then the individual period budgets are calculated from the total budget times the budget factor for that period. In the example below, a budget of £800,000 has been allocated across the 12 periods according to the budget factor table overleaf

Nominal Ledger Instructions 45
Datafile Software Nominal Ledger and Cash Book Manual 06/07/07
Example of Budget Factor Table In Use Annual Budget £800,00 Budget
Factor Calculated Budget
Jan 6.75 54000 Feb 7.75 62000 Mar 8.50 68000 Apr 10.00 80000 May 9.50 76000 Jun 8.00 64000 Jul 7.50 60000 Aug 5.50 44000 Sep 6.50 52000 Oct 10.00 80000 Nov 10.50 84000 Dec 9.50 76000
CALC – Recalculate Current Year Budgets You would use this option at the start of a new year to calculate automatically the new year’s budgets based on either the actual results from the previous year or the previous year’s budgeted values. It is a batch operation — that is to say, it processes a range of accounts in the one run. You can ask to increase the previous year’s values by a fixed percentage in the process.

46 Nominal Ledger and Cash Book
Datafile Software Nominal Ledger and Cashbook Manual 06/07/07
Recalculate Using Which Value? If you want to recalculate the current year budgets using the actual month-by-month results from last year, then reply 1 <Enter>. If you want to base the current year’s budgets on the previous year’s budgets, then reply 2 <Enter>. Account range from: to: You can choose a consecutive range of nominal account codes here, which includes the ‘From’ and ‘To’ accounts entered. If you leave the ‘From’ account blank, then the range starts from the beginning of the file. If you leave the ‘To’ account blank, then the range finishes at the end of the file. Adjust Budgets by Percentage Value % You can increase last year’s values by entering a percentage here. If you enter ‘10.00’ here (you don’t have to enter the decimal places if zero) then last year’s values are increased by 10%. If you leave it zero, then last year’s values are copied without change. If you enter a negative value here, then last year’s values are reduced by this percentage. Automatically Set Period Budgets? Whilst this menu option is used to set the annual budget figure, in many cases you will want to reset the period budget figures at the same time. If you reply 'No' here then no period budget figures are touched by this option. If you reply ‘Y’ here then: If an account has a budget factor table number defined for it, that table is used to calculate
the period budgets based on the new annual figure, as described above If no budget table factor is defined for an account, then the period budgets are calculated
by dividing the annual budget by the number of periods in the year
Note
Rounding may leave a few pence ‘unallocated’ when determining the period budgets. The few odd pence not yet allocated to a period are added to the final period for equal budgets, or to the largest period value for factored budgets.

Nominal Ledger Instructions 47
Datafile Software Nominal Ledger and Cash Book Manual 06/07/07
ENTER – Enter Current Budget Year Totals This option lets you specify the annual budget total for individual accounts. First you are asked:
As with the previous option, you can ask that the period budgets are reset at the same time as you enter the annual budget for an account. Reply ‘Yes’ if you want the period budgets to be calculated automatically. The same rules for calculating period budgets apply to this option as described above. As you enter each account code in the screen shown below (use <F4–Select> to find the account you want) the present setting of the annual budget and the actual annual total for last year are shown. Change the current year budget figure if you need to. You can review the annual budget for up to thirteen accounts at one time, and then the screen is cleared to let you enter another thirteen. <Escape> to return to the menu.

48 Nominal Ledger and Cash Book
Datafile Software Nominal Ledger and Cashbook Manual 06/07/07
PERIOD – Budget Input for Periods Use this option to change the individual period budgets. Although you must give the annual budget figure for an account at the start, it is only when the period budgets add up to the annual budget that the account is updated. The sum of the period budgets so far is displayed at the bottom of the screen together with the difference from the annual budget. The previous year’s actual values are displayed on the right hand side of the screen for your information. You must first give an account code, following which the present budget value for the year and any existing period budgets are displayed, as illustrated below. If you <Escape> from the account code you are returned to the menu.
Either accept the annual budget by keying <Enter> or change its value to the annual budget figure you now want. After that you can confirm or change each period’s budget figure. The total of period budgets shows at the bottom. If you <Escape> from the period budgets, but they don’t add up to the annual total, then you are returned to the YEAR-TOTAL prompt. If you <Escape> from the period budgets and their values total to the annual budget you are asked:

Nominal Ledger Instructions 49
Datafile Software Nominal Ledger and Cash Book Manual 06/07/07
Reply 'Yes' to update the account with the new period budgets, or 'No' to return to the YEAR-TOTAL prompt above. Selecting Cancel abandons the change. Once the account has been updated, or if you cancel the update, you are asked whether you wish to amend the budgets for another account – respond accordingly.
FACTOR – Factor Period Budgets This option is similar to the previous option except that it allows you the option to specify a budget factor table number (1 to 5) to use to create the period budgets for any account. After you have selected an account and entered the annual budget figure, you are asked:
Set Period Values by Factor Table Reply ‘N’ to enter the period totals yourself — any existing values are displayed for you to modify. If you reply ‘Y’ you are now asked to choose the budget factor table to use. If a factor is already set for the account, that number is prompted, but you can decide to use a different table number. A new set of period budgets is then calculated and displayed on the screen for you to accept or change.

50 Nominal Ledger and Cash Book
Datafile Software Nominal Ledger and Cashbook Manual 06/07/07
In all other respects this option works as per the previous option.
Note
If you choose a different table number to that which is given in the account record, the budget factor number in the account record is not changed to reflect the table number chosen. You must change this separately, if you want to do so, by using the Maintain Accounts in Full option.
PREV-YR-TOT – Previous Year Budget Totals It would be rare for you to want to change last year’s budgets, but this allows you to do so. The option is similar to Enter Current Year Budget Totals described above except that it is used to update the previous year’s budget totals. The final column shows the actual total for the year before last year.
Note
It is perfectly possible to start a new year in the nominal ledger well in advance of the current year-end. For example, if you start your annual budgeting cycle six months (say) before the end of the current year, you might want to start the new year now, even though there are six months of the current year to go. In such a case you could well want to revise last year’s budgets, because last year hasn’t ended yet.
PREV-YR-PER – Previous Year Period Budgets This option is similar to Budget Input for Periods described above except that it is used to change the previous year’s total and period budgets. The right-hand side of the screen shows the actual period figures for the year before last.
COMPARATIVES – Enter Comparative Figures As well as printing financial summaries which compare the current year against the budgets that you have set, you can also compare the current year against last year — which we call the comparative figures. The ledger keeps not only the current year’s figures by period, but also those for the last two years on a period-by-period basis too. There are several circumstances, however, when you may want to change last year’s actual figures, including:

Nominal Ledger Instructions 51
Datafile Software Nominal Ledger and Cash Book Manual 06/07/07
When the auditor’s adjustments have made significant changes to last year’s figures and
you have closed the previous year. Although you may post a journal to change the current year’s opening balances this does not affect last year’s figures
When you have made a significant change to the basis of the current year’s figures, and
want to change last year’s to the same basis so that you can compare them properly Where a company is not interested in comparing against last year’s figures, but perhaps
wants to compare the current year against (say) the original budget for the current year as well as the new revised budget
In all these situations you may want to change the comparative figures from last year (and even the year before) which are held in your ledger.
Warning
You should not think about changing last year’s figures until you have closed last year in your ledger, since you could still post transactions. Once you have closed last year’s figures, however, it is then safe to do so.
You may update the comparative figures for the period and/or for the year, and there are several ways in which to enter these values. The following menu shows the options available:
YEAR-TOTALS – Enter Comparative Year Totals This option lets you change the comparative year total for individual accounts. If the nominal ledger is still open for the previous year then you are warned:
Reply No. If the previous year is still open for postings then you should not even consider changing the comparative figures, which are the actual values for last year. Only if you are supremely sure that it is safe to do so should you pass this step. This option works just like the Enter Current Budget Year Totals described above.

52 Nominal Ledger and Cash Book
Datafile Software Nominal Ledger and Cashbook Manual 06/07/07
PERIODS – Comparative Input for Periods This option lets you change both the comparative year total and the period values for individual accounts. Period totals must add up to the full year total before the account is updated. If the nominal ledger is still open for the previous year then you are warned. Reply No - If the previous year is still open for postings then you should not even consider changing the comparative figures, which are the actual values for last year. Only if you are supremely sure that it is safe to do so should you pass this step. Normally, if the previous year is still open for postings then there should be no reason to change comparatives for the previous year other than by normal journals. This option works in just the same way as the Budget Input for Periods option described above, except that last year’s actuals are given to you to amend, and there are no comparatives shown for the year before.
PREV-YR-TOT – Previous Year-1 Comparative Totals PREV-YR-PER – Previous Year-1 Period Comparatives These two options are used to change the annual total and period figures for the year before last year. The only reason you may need to do so is if you want to print financial summaries for last year which compare to the previous year’s actual results. These options work exactly the same as Comparative Year Totals, and Comparative Periods options described above.

Nominal Ledger Instructions 53
Datafile Software Nominal Ledger and Cash Book Manual 06/07/07
Journals Although you almost certainly update your nominal ledger automatically from your sales and purchase ledgers and maybe from other systems such as payroll and fixed assets too, there are many other transactions that you must enter directly into the nominal ledger. These are usually called “journal entries”. There are several ways in which you can post journal entries. These include multiple entry journals which allow you to enter a list of debit and credit transactions provided that the total of the debit entries agrees with the total of the credit entries; and provisional entries which may be reversed in a following period. In addition, a powerful facility exists to pre-define up to 40 user-defined journal formats, such as payroll entries, expense forms, depreciation values, accruals and prepayments. Once defined, you can post these to the ledger whenever they are due. A final option provides you with a simple way to reverse any journal. If an incorrect journal is posted then this facility lets you cancel it and enter a correct journal. The entry of standard and provisional journals is discussed here. User Defined Journals, the reversal of provisional and standard journals, and the revaluation of currency journals are discussed in the Other Journal Options section later. Provisional Journals Datafile Software provisional journals are a special form of journal transaction. They are designed for you to reverse at a later time, typically after the end of the period. You use them in cases such as: You are expecting an invoice from a supplier which hasn’t yet been received, but its value
affects the current month’s trading results You pay commission monthly in arrears, but you want to take account of the future
commission in the current month, to which it applies You are expecting some interest on a deposit account, but it won’t show up until next
month even though it applies to this month In such cases you need to have an entry in this period’s figures which takes account of these events, but then must make sure the true transaction isn’t double counted. In the first case, the invoice will arrive, and so will get posted into the purchase ledger, and from there to the nominal. In the second, the commission value will be part of next month’s payroll. In the third, the interest presumably will show on a future statement, and so be posted via the cash book or direct through the nominal. You can enter a transaction in advance of the true transaction so that your figures are OK, but you must reverse this transaction before the true transaction hits the ledger. In effect the reversed
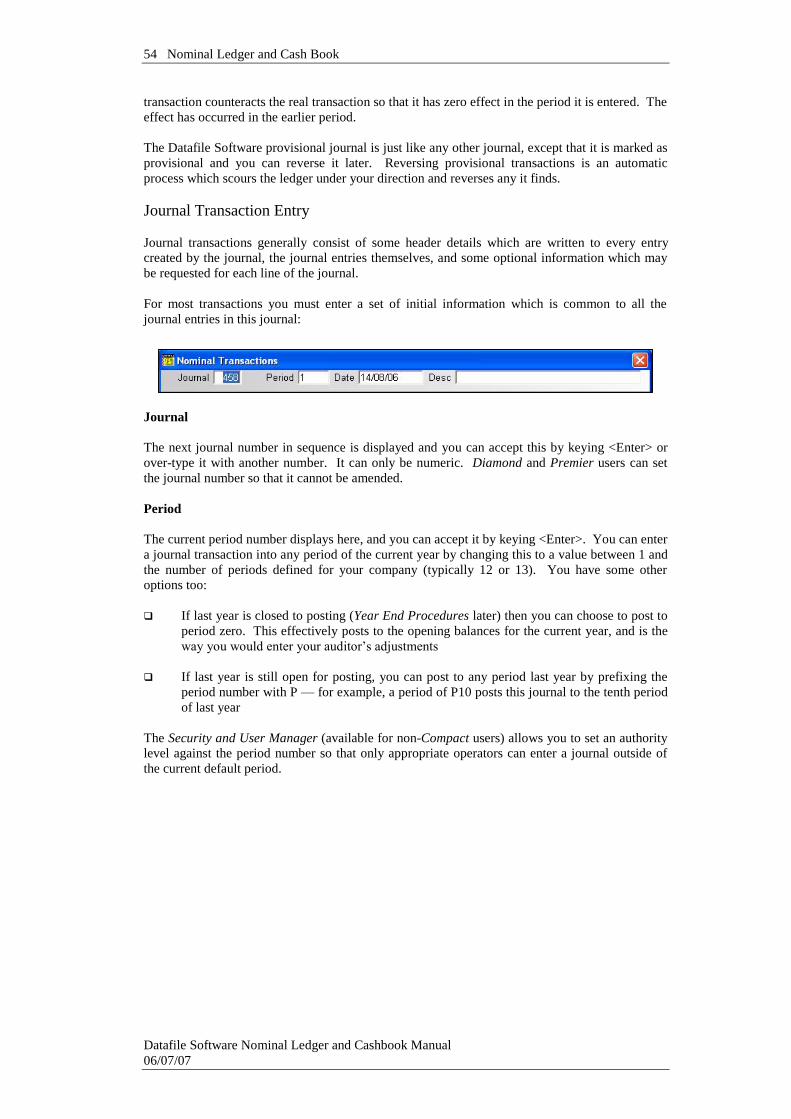
54 Nominal Ledger and Cash Book
Datafile Software Nominal Ledger and Cashbook Manual 06/07/07
transaction counteracts the real transaction so that it has zero effect in the period it is entered. The effect has occurred in the earlier period. The Datafile Software provisional journal is just like any other journal, except that it is marked as provisional and you can reverse it later. Reversing provisional transactions is an automatic process which scours the ledger under your direction and reverses any it finds. Journal Transaction Entry Journal transactions generally consist of some header details which are written to every entry created by the journal, the journal entries themselves, and some optional information which may be requested for each line of the journal. For most transactions you must enter a set of initial information which is common to all the journal entries in this journal:
Journal The next journal number in sequence is displayed and you can accept this by keying <Enter> or over-type it with another number. It can only be numeric. Diamond and Premier users can set the journal number so that it cannot be amended. Period The current period number displays here, and you can accept it by keying <Enter>. You can enter a journal transaction into any period of the current year by changing this to a value between 1 and the number of periods defined for your company (typically 12 or 13). You have some other options too: If last year is closed to posting (Year End Procedures later) then you can choose to post to
period zero. This effectively posts to the opening balances for the current year, and is the way you would enter your auditor’s adjustments
If last year is still open for posting, you can post to any period last year by prefixing the
period number with P — for example, a period of P10 posts this journal to the tenth period of last year
The Security and User Manager (available for non-Compact users) allows you to set an authority level against the period number so that only appropriate operators can enter a journal outside of the current default period.

Nominal Ledger Instructions 55
Datafile Software Nominal Ledger and Cash Book Manual 06/07/07
Date The date must lie within the company calendar date range for the period given above. If the date you enter is outside this range, you are warned:
The date range shown is that for the period number you entered above. Return to correct either the period number or the transaction date.
Note
Under Datafile Diamond and Premier you have an option to enter a date on each line of a transaction — see Nominal Configuration later. These dates must also be within the same stated period. If you need to enter a journal that apparently spans more than one period, then separate the entries for each period. Post one journal for each period with any balance to a suspense account. The suspense entries will cancel each other out. This could be necessary if you reimburse expenses (say) in a later period than that to which the expenses apply.
Provisional Reversal Date If entering a provisional journal then, after entering the transaction date, you are asked for the reversal date. The entry of a date controls whether the reversal is generated via one of two ‘reverse provisional’ options – reverse provisionals or reverse dated provisionals. Both would reverse the effect of the provisional journal but if you enter a date to reverse you can start a procedure at the beginning of the month to automatically reverse any journals due this period. Description You may type in a narrative description for this transaction. The number of characters you can enter here depends on the way your system is configured.

56 Nominal Ledger and Cash Book
Datafile Software Nominal Ledger and Cashbook Manual 06/07/07
Note — Datafile Diamond and Premier only You have an option to enter a different description on every line of a multiple journal — see Nominal Configuration later. The description you enter here is then offered as the description for the first line of the journal.
Currency Journal entries are entered in the currency of the account selected with an exchange rate prompted to the base currency when appropriate. Entering a currency within the journal ‘header’ restricts the accounts selected to those for a matching currency. Journal Memo This, Diamond and Premier only, option allows entry of three lines of memo text against each journal
Journal Memo
This option is prompted automatically when the memo text items are referenced within the nominal database profiles.
Journals in Previous Year If you post a journal to a previous year, the treatment differs according to whether each nominal account is a profit and loss, or balance sheet account. Balance sheet account. The journal entry value is posted to the previous year period
balance, the closing balance of the year and also to the opening year balance for the account
Profit and loss account. The journal entry value is posted to the previous year period
balance and closing year balance for the account, but also to the opening year balance of the profit and loss control account (see nominal System Profiles) not to the account itself
Journal Entry There are many requirements when you may need to post a journal to the nominal ledger: Posting payroll entries (if you do not already link the Datafile Software payroll to the
nominal ledger)

Nominal Ledger Instructions 57
Datafile Software Nominal Ledger and Cash Book Manual 06/07/07
Posting cash book entries (if you are not already using the Datafile Software cash book
application) Posting employee expense claim forms to the various expense headings Posting the month’s petty cash analysis Posting the period depreciation figures (if not using the Datafile Software fixed assets
application) Posting the period stock movement or stock take summaries Posting prepayment and accrual transactions Journal entry allows you to post up to 200 lines to the nominal ledger as a single journal, in groups of ten entries. The total of all the debit entries must be equal to the total of all the credit entries before you can complete the journal and update the files.
The transaction header is completed as described at the start of this section. For each journal entry you must then enter:

58 Nominal Ledger and Cash Book
Datafile Software Nominal Ledger and Cashbook Manual 06/07/07
Account Key in the account code for the entry line — or use the <F4-Select> key to find the nominal code you want. Provided it is a valid nominal account code, the account name displays in the NARRATIVE column and the cursor moves to the debit column. Debit/Credit If the value for this journal entry is a debit, then enter it here and key <Enter>. If the value to be entered is a credit, key <Enter> in the blank debit column and the cursor will move into the credit column for you to type in the credit value. If you <Escape> in any position of the journal line you are returned to the account code column, and <Escape> in the account column takes you to the journal entry completion routines described below.
Time Saving Tip
It is easy to key the first entry as a debit when you had meant to key a credit. If you’ve already pressed <Enter>, then <Escape> to the account code and <Enter> for the debit column, which shows the value you meant for the credit column. Use the <F3–Clear> key and follow with <Enter>. The value you keyed is now displayed in the credit column instead.
Additional Line Items Once you’ve entered the debit or credit value, you may be asked for up to four further values for this line: Analysis This can take a value in the range 0–9999. You might use it for (say) a cost centre or job code in situations where you only want to analyse transactions (cost centres would more normally be accommodated as part of the account code structure). Another use is to enter an employee code here, so that you can pull out employee expenses for Inland Revenue returns at the fiscal year end. Reference You can enter an alpha-numeric reference here — a docket reference perhaps, or the initials of the originator. Second Reference This option, Diamond and Premier only, allows input of a second reference. The title prompted is the field name of the data item referenced as ‘2nd Reference’ in the Database Profiles.

Nominal Ledger Instructions 59
Datafile Software Nominal Ledger and Cash Book Manual 06/07/07
Note — Datafile Diamond and Premier only
Both the analysis code and reference are optional items, which you can remove by taking out the reference to them in Database Profiles.
Description Provided the system is set up to allow it, you can enter a description for each line of a multiple entry journal. The description displayed here is either that of the previous entry or, in the case of the first entry, that given in the transaction header. Either <Enter> to accept the current description, or type a new description for this line. Date Again, provided the system is set up to allow it, you can enter a date on each journal entry line. Today’s date prompts here, and you can change this for another date. The date you give here must still be within the period of this transaction as defined in the header, however.
Note — Datafile Diamond and Premier only
The description and date are optional items, which you can add and remove using the Advanced Features Manager part of the Application Manager — see also Nominal Configuration later.
After completing any additional details you are then prompted for the account code of the next entry line. After every ten lines, you are given a fresh screen to continue further input. <Enter> on a blank account code takes you to the ‘completion’ stage. Journal Entry Completion Once the journal detail has been entered then you are given a series of options to amend and update the journal.
ADD This returns you to the account code prompt for the next vacant line so that you can
continue to enter lines on the journal. DELETE You can delete an entry line entire by selecting this option and giving the line number
you wish to delete. You are given the chance to confirm that you want to delete the chosen line, and then all the journal lines are shuffled up to fill the space left by the deleted transaction.

60 Nominal Ledger and Cash Book
Datafile Software Nominal Ledger and Cashbook Manual 06/07/07
EDIT This option puts you back at a specific line so that you can edit the details of that
entry. One of the most common mistakes is to put the value in the wrong column, and the <F3-Clear> tip above is a quick way to rectify this error.
LIST This lists the entries in this journal, starting from whichever line number you give and
listing ten at a time. If there are more entries to come, the option assumes you want to continue. Either <Escape> to the actions or continue to the end of the list when you will be automatically returned to the actions list.
TOTALS This option can help you to find the balancing value by choosing this option, which
gives the total of all debits and the total of all credits. You are warned if the totals do not balance and then you are returned to the actions list.
UPDATE This option updates the transactions to the ledger. If you try to update when the debit
and credit totals do not balance you are warned accordingly and returned to the actions list.
EXIT This option abandons the entered journal and returns you to the menu. If update the journal to the nominal then, afterwards, you are prompted whether you wish to enter another journal – respond as required.
Provisional Journals This option is used to enter provisional journals and operates in exactly the same manner as described above. The only difference is that the system automatically sets the provisional flag (and reversal date if entered) in the journals so that they can be reversed later. Your accountant can help you determine how best to use provisional entry transactions.
Reports and Analysis You can print reports whenever you need them for any period in the current, and if still open, the previous year. Selecting the Reports menu gives you a list of available reports.

Nominal Ledger Instructions 61
Datafile Software Nominal Ledger and Cash Book Manual 06/07/07
Prompts Used Throughout Reporting Procedures The nominal ledger reports ask a common set of questions whenever you choose to print a report.

62 Nominal Ledger and Cash Book
Datafile Software Nominal Ledger and Cashbook Manual 06/07/07
Date of Report <Enter> to accept today’s date here, or else overtype it with a different date. Report “as at” period number The nominal ledger keeps all the current year’s periods open, and all the previous year’s periods can also be viewed. Give here the period number whose period-end values you want printed on this report. Enter either a current year period, or — if you want to print a report of one of the previous year’s periods — prefix the period number with P. So “P10” would print a report based on the values at the end of the tenth period of last year. Report “As At” Date After entering the period number above, the period-end date for that period is offered. You can overwrite this date, though there should be little need to do so. From/To Account Code For most reports you can request a range of accounts to print. Key in the codes of the first and last nominal accounts you wish to include. If you leave the 'From' code blank, then the report

Nominal Ledger Instructions 63
Datafile Software Nominal Ledger and Cash Book Manual 06/07/07
starts from the beginning of the chart of accounts. If you leave the 'To' code blank, then the report prints to the end of the chart of accounts. When using cost centres the range of accounts are entered in their component parts. For example, if you have a format 999/99 where the first part is the nominal account and the second part is the cost centre department then you are asked firstly for the nominal code range and then the department range. In this way you could produce (say) a Trial Balance for department 01 by leaving the account range blank and defining the department range as 01 to 01.
Specify any Selection Criteria In addition to the account range above you can further restrict the accounts which are to print on a report. Setting this option allows you to enter selection criteria. The OPTIONS Button The Options button allows configuration facilities for the printing of the report – selecting margins and fonts. When you select the OPTIONS button a pop-up form is displayed.

64 Nominal Ledger and Cash Book
Datafile Software Nominal Ledger and Cashbook Manual 06/07/07
Before discussing the parameters you should note the buttons available at the footer of this parameter screen.
This option updates the individual parameters from your user default when they are set, overwriting presets where applicable. If no user defaults are set then this option is ‘greyed’ out and cannot be selected.
This option accepts your entered parameters for this print only, reverting to defaults next time the report is run.
Depending on whether the user is configured as an ‘Install’ user then the next option will be SAVE. This saves your set parameters so they are offered as default next time this report is run (Note: this is system wide not per user). Setting the user as an ‘Install’ user is achieved through the user configuration available under the MASTER sign-on.
This option abandons any changes made and returns you to the report screen. The report parameters available are: Paper Size - select the paper size the report is to be printed to (i.e. A4). You can elect to
leave this blank in which case the report is printed as per the last/default page size of the

Nominal Ledger Instructions 65
Datafile Software Nominal Ledger and Cash Book Manual 06/07/07
printer, however, if you do this you can only choose fixed pitch fonts (and the screen is a slightly different layout) – selecting a page size is mandatory to use proportional fonts.
Default Printer Font – a font dialog is display allowing you to select as required, the
default font to be used for this report. If you’ve sent the page size then all fonts are available, if you haven’t set this then only fixed pitch fonts can be assigned. You can also set bold/italic attributes and font size – note that if you haven’t set a page size then the font size option is not applicable (font is sized as per previous rules).
Selecting the Font Size
Generally you can’t go far wrong with 10point. However, if you have a lot of data items on your report, and are printing in portrait, 10point may be too big to fit all the required information without overlapping fields. The positioning of fields across the page is determined by the item size – if you view the Account Status report this shows, be default, the account code (7 characters), P/B flag (2 characters), the account name (25), and six value items (14 characters each), together with spaces between the items this gives a total of 126 characters, or columns required, across the page (think graph paper – you have 126 ‘cells’ across the page). Those 126 columns are split equally across the available page (page size and margins taken into account) as starting positions for data items – so the account code starts at column 1, the P/B flag at column 9 (account code plus 1 space is 8), etc. If you select a font size too big then the account code may not finish printing before the P/B flag starts causing the name to overlap the end of the account code. If this occurs then you can either reduce the font size or consider swapping the report to landscape orientation if the font size would go too small.

66 Nominal Ledger and Cash Book
Datafile Software Nominal Ledger and Cashbook Manual 06/07/07
Default to Landscape – set to default the printed report to landscape, leave blank for usual
portrait orientation. You may want to set reports such as the Nominal Ledger Audit Trail Report or the Cashbook Receipts Analysis Listing to landscape to increase the size of print as these reports require a large amount of detail to be printed.
Show Time in Report Headings – set to include the printed time in the report headings in
addition to the printed date. Include Selection Criteria – set to print any selection criteria that were applied to the
report. Email as Text – if send this report via email this option allows you to send as a text file
attachment as opposed to, if left blank, PDF. Omit Full Page Headings – When printing a multi-page report the system repeats the
headings for each page. Setting this option reduces the heading details for the second and subsequent pages allowing more record detail to be printed per page.
Default Output to Spooler – Usually, when printing a report, the default printer is the last
print device used. Select this option to set the default printer as the spooler for this report. This acts only as a default and doesn’t prevent you electing to print the report instead.
Allow Change of Printer Alias – when these options are configured then it is assumed
you are printing as ‘direct windows print’ and this is the alias set by default. Setting this option allows you to change the default alias at run-time to one of the list of Datafile configured printers. If you change the alias to a ‘DOS’ style alias then the page size (length/width) is again picked up from the Print Style Profile and fonts depend on ASCII codes configured, although other settings such as ‘include time’ etc. remain from the OPTIONS display.
Print Negatives in Red – on selected reports, assuming you have a colour printer; it may
be useful to print negative values in red. This option is not applicable if the page size is left blank.
The next set of parameters allows you to specify formatting and margin settings for both portrait and landscape when the page size has been set. The appropriate setting being used based on the orientation of the output selected at run-time. Characters Per Line – the system displays the width of the report items on the right. If
you leave this value at 0 (recommended) then the report width used in determining the start column positions of data items (as discussed above with regards to font size) is the larger of either the report print items or 80 columns. You can manually set a report width – from 64 to 255 columns. You may want to increase the number of columns on (say) a landscape report with few print items to bring the fields closer together to aid in reading.

Nominal Ledger Instructions 67
Datafile Software Nominal Ledger and Cash Book Manual 06/07/07
Lines Per Page – if left at 0 (recommended) then the number of lines per page is determined by the font and page size. Alternatively you can set a number of lines per page, perhaps to give a greater gap between rows of data items.
Left Margin (mm) – set the size of the left hand margin (relative to page orientation in
millimetres. Right Margin (mm) – set the size of the right hand margin. Top Margin (mm) – set the size of the top margin. Bottom Margin (mm) – set the size of the bottom margin. This set of parameters allows you to specify formatting and margin settings for both portrait and landscape when the page size has not been set. Two columns are definable, one to use if printing in portrait, the other if printing in landscape - the appropriate setting being used based on the orientation of the output selected at run-time. Minimum Characters Per Line – the system displays the width of the report items to the
right. If you leave this value as 0 then the report width is the larger of either the report print items or 80 characters. You can manually set a report width – from 64 to 255 characters wide – but if you set a width less than the items actually printed then this is overridden by the report width at run-time.
Maximum Lines Per Page – if left at 0 then when printing a report the system will
determine the number of lines per page based on the report width and the printable area of the page up to a maximum of 72 lines per page in portrait mode or 50 lines per page in landscape mode. Alternatively you can set the number of lines per page, from 16 to 255, and this is then taken into account when deciding font size to ensure that number of lines is printed. If left at 0 then when sending to the spooler the lines per page is assumed to be 72 in portrait mode and 50 in landscape. If you require an identical print from the printer and the spooler then a maximum number of lines should be set.
Left Margin – set the number of characters to be used as a margin from 1 to 64. If you
require a margin then when entering the value you need to take into account the report print width – a margin of 4 characters on an 80-character report will be bigger than a margin of 4 characters on a 132-character report. If left at 0 no left margin is applied.
Right Margin – if you require a margin to be applied on the right of the report set the
number of characters accordingly (again 1-64), if leave as 0 then no right margin is applied.
Top Margin – set the number of lines to leave as a margin at the top of the page (1-32
lines). If left at 0 then no top margin is applied. Bottom Margin – set the number of lines to leave as a margin at the bottom of the page
(1-32 lines). If left at 0 then no bottom margin is applied.

68 Nominal Ledger and Cash Book
Datafile Software Nominal Ledger and Cashbook Manual 06/07/07
Finally, you can set default options that are used when you send the report to print or e-mail. Print Device – if using a stand-alone Datafile system then you can set a default printer to
output to. This option only applies when sending to a print device; if last printer was spooler or fax then this remains the default. If using a networked Datafile system then you can still set this where you are printing to a networked printer – provided all terminals have a consistent device path. If the print device isn’t valid then the normal printer is offered instead.
E-mail Address – if the report is sent to email then here you can enter an email address
that is to be used by default for this report – though it can be amended at run-time. Once you’ve set the desired parameters select the ACCEPT option to apply the settings for this print or, if available, the SAVE option to apply for this and future prints. Printing Procedure Once you have accepted the printing parameters allows you to select the desired output.
Depending on the report and system configuration the report can be output in a number of different methods. To ‘print’ you select the desired output device and then click the OK button. Available options are:

Nominal Ledger Instructions 69
Datafile Software Nominal Ledger and Cash Book Manual 06/07/07
Screen – selecting this option displays the report on the screen. If you are happy with the output selecting <F7-Option> on the report allows you to print the report or save it for subsequent print/enquiry.
Print Device – selecting this option allows you to print the report to any printer configured
on your pc. The printer is selected from the NAME drop down list. Disk Spooler – selecting this option saves the report for subsequent enquiry / print. Microsoft Word – if Microsoft Word is installed then the report can be output as a
document to Word. Microsoft Excel – if Microsoft Excel is installed then this option allows the creation of an
Excel spreadsheet based on the report. Fax-File Server – this option is enabled if you have fax software such as Tobit David or
Zetafax that uses a ‘file scan’ folder to pickup faxes. If you use fax software such as WinFax then the fax output can be selected from the ‘print device’ list.
E-Mail – selecting this option creates an email message (Tobit David, Outlook and
Outlook Express only) with the report as a PDF or text file attachment. PDF – creates a PDF file of the report and displays it for review.
Trial Balance A trial balance reports all the nominal ledger accounts, with their current balances listed in the debit or credit column as appropriate, and so gives a complete picture of the current position of the nominal ledger. You should print the trial balance at the end of each month, after the updates from the purchase and sales ledgers, to check that the control totals in the nominal ledger agree to the ledgers themselves. Also you should check that bank balances in the nominal can be reconciled to your bank statements — if you are using the Datafile Software cash book application, and then use the specific bank reconciliation procedure there. You can arrange that your trial balance prints sub-totals on certain account code changes — after, for example, income and expenditure account ranges, fixed assets, current assets, current liabilities, long term liabilities and owners’ equity. These are specified in the nominal ledger System Profiles. There may be exceptional circumstances where you wish to report on only part of the ledger. In this case you may select on a range of accounts, but the total of the debit balances may not then agree with the total of the credit balances for the range of accounts selected.
Note

70 Nominal Ledger and Cash Book
Datafile Software Nominal Ledger and Cashbook Manual 06/07/07
If the debit and credit totals for the full ledger do not balance you are warned. It should never happen, of course, but if it does then something very serious has occurred. You must investigate the cause of this imbalance and remedy it before you do any more processing to your ledger. If you can’t locate the cause, take the advice of your dealer.

Nominal Ledger Instructions 71
Datafile Software Nominal Ledger and Cash Book Manual 06/07/07
Account Audit Trail Account Audit Trail (Currency) The audit trail reports all the transactions which apply to each account printed on the report — it is equivalent to an account statement. It is usual to print a complete audit trail for every account at year-end for audit purposes. The audit trail for each account may consist of up to three parts: a header showing up to 10 items from the accounts file a partial or complete list of the transactions for the account an optional analysis table giving debit and credit totals of transactions against each
analysis code used

72 Nominal Ledger and Cash Book
Datafile Software Nominal Ledger and Cashbook Manual 06/07/07
The currency audit trail operates on the same principal but excludes base currency accounts and shows the values in their original currency. In addition to the standard report options described at the start of this section, there are some further questions: OR List Accounts to be Reported If you leave the account range blank (this is part of the standard preamble) then you can elect to choose up to 200 specific account codes which you want to print by setting the option to “List Accounts”. You must first key the list of account codes you want to print, and only when the list is complete is the report printed or displayed. You can use the <F4–Select> key to help you find the codes you want. Transaction Records in Range From / To If you know the record range of the transactions you are looking for, you can enter them here. However, it is more usual to use date ranges for selection (see below). To help you restrict the transaction range to those for a particular period, you can note the last transaction number for each period by viewing the system status display at the period-end. However, since you can post to any period at any time, this may not be a complete guide to all the transactions for a specific period. If your system has been set up to write brought-forward transactions when the transaction file is cleared, you are also prompted at the bottom of the screen with the record number of the last brought-forward transaction. Transactions in Date Range From / To The date range of the “as at” period already chosen is prompted here, but you may overwrite these with different dates. If you clear the dates (<F3–Clear> is a quick way to do this) then all transactions on file for the chosen accounts are printed. Include Transaction Analysis If you are using analysis codes in nominal transactions, you may print a table at the end of the transaction list for each account which analyses the total of the debit transactions and the total of the credit transactions for each analysis code in use. Key 'N' if you do not want to print the analysis table, or 'Y' to print the analysis table. New Page for Each Account You have the option either to print each account starting on a new page, or to run the details of one account immediately after the previous one. It conserves paper to run accounts immediately after each other, but your auditors will probably prefer each account to start on a new page. Reply

Nominal Ledger Instructions 73
Datafile Software Nominal Ledger and Cash Book Manual 06/07/07
Y <Enter> to start each account on a new page, or N <Enter> to run each account immediately after its predecessor. Exclude Accounts with no Transactions It is not uncommon for nominal accounts to have had no journals within a period. Reply Y <Enter> to exclude from the report accounts which have no transactions, or N <Enter> to print all selected accounts whether or not they have any transactions. Include Any Journal Memo Text Only prompted if using this transaction option, when set any entered text is printed underneath the transaction.
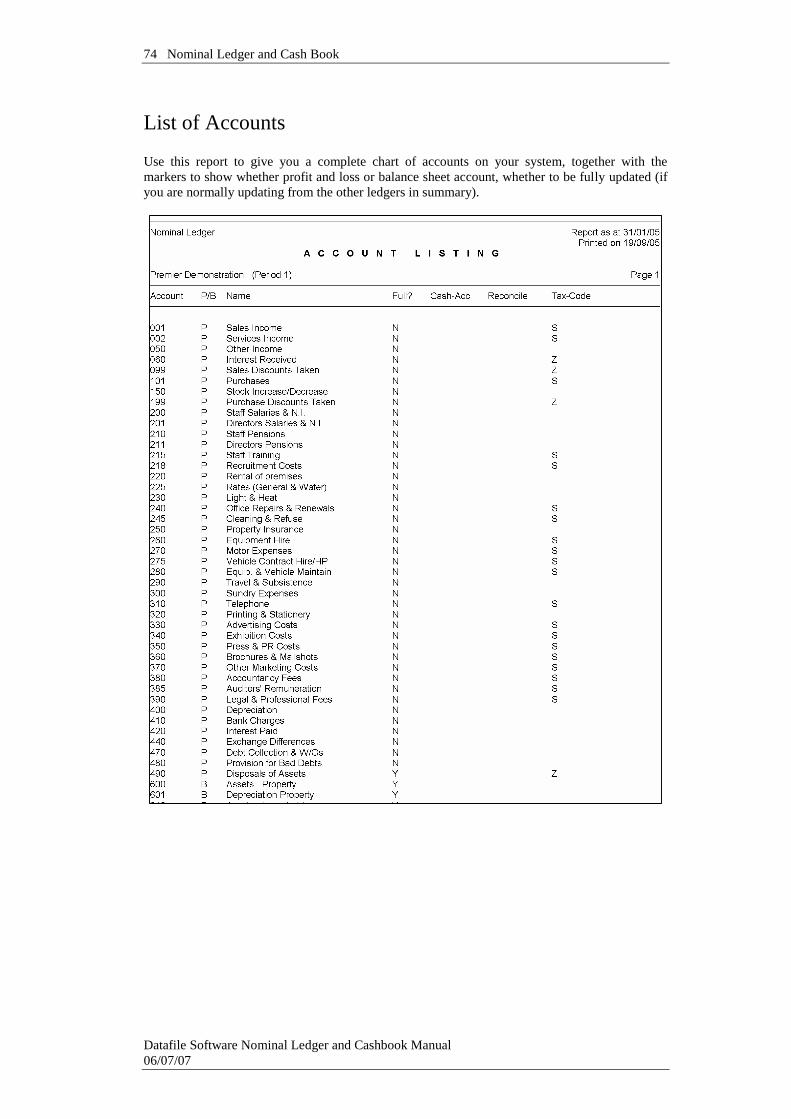
74 Nominal Ledger and Cash Book
Datafile Software Nominal Ledger and Cashbook Manual 06/07/07
List of Accounts Use this report to give you a complete chart of accounts on your system, together with the markers to show whether profit and loss or balance sheet account, whether to be fully updated (if you are normally updating from the other ledgers in summary).

Nominal Ledger Instructions 75
Datafile Software Nominal Ledger and Cash Book Manual 06/07/07
Report Account Status The account status report is usually used to provide an overview of the current period and year-to-date balances on nominal ledger accounts.

76 Nominal Ledger and Cash Book
Datafile Software Nominal Ledger and Cashbook Manual 06/07/07
Budget Report The budget report compares your current period and year-to-date account balances against budget.

Nominal Ledger Instructions 77
Datafile Software Nominal Ledger and Cash Book Manual 06/07/07
Comparatives Report The comparatives report compares your current period and year-to-date account balances against the comparative balances from last year.
Journal Listing This reports the journal transaction entry details from your nominal transaction file. In addition to the standard prompts described above for the reporting options, you may also select a range of transactions against the following criteria: Transaction Records in Range From / To If you know the record range of the transactions you are looking for, you can enter them here. However, it is more usual to use date ranges for selection (see below). To help you restrict the transaction range to those for a particular period, you can note the last transaction number for each period by viewing the system status display at the period-end. However, since you can post to any period at any time, this may not be a complete guide to all the transactions for a specific period.

78 Nominal Ledger and Cash Book
Datafile Software Nominal Ledger and Cashbook Manual 06/07/07
If your system has been set up to write brought-forward transactions when the transaction file is cleared, you are also prompted at the bottom with the record number of the last brought-forward transaction. Transactions in Date Range From / To The date range of the “as at” period already chosen is prompted here, but you may overwrite these with different dates. If you clear the dates (<F3–Clear> is a quick way to do this) then all transactions on file are printed. Include Any Journal Memo Text Only prompted if using this transaction option, when set any entered text is printed underneath the transaction.

Nominal Ledger Instructions 79
Datafile Software Nominal Ledger and Cash Book Manual 06/07/07
Drill Down Enquiry Particularly useful when using a cost-centre structured nominal code this option gives you a view of the ledger at the highest level and you can then drill-down to the lower levels of the hierarchy all the way to the transactions.
Enquire Accounts ‘As At’ Period Journal Date Range From / To Firstly, you are asked for the period number and date range (for transaction display) to use for this enquiry. Enter as required. Balance Items to be Reported Next you can select up to three balance items to be reported. The balance items, displayed on the right of the screen, allow you to display values such as the movement for the period, budget for period and the variance. Available balance items are: 1 Current Balance – The balance of the account as it would appear on the trial balance 2 Start of Year Balance – The opening balance at the start of the year 3 Start of Period Balance – The opening balance at the start of the current period

80 Nominal Ledger and Cash Book
Datafile Software Nominal Ledger and Cashbook Manual 06/07/07
4 Comparative Year Balance – The balance of the account as at the end of last year 5 Comparative Period Balance – The movement on the account for the same period last year 6 Budget for Year Balance – The total budget set for the year 7 Budget for Period Balance – The budget set for this period 8 Movement for Year – This is the difference between the start of year balance on the
account (item 2) and the current balance (item 1) 9 Movement for Period – This is the difference between the start of period balance (item 3)
and the current balance (item 1) 10 Comparative Year Variance – This is the difference between the balance at the end of
last year (item 4) and the movement for the year (item 8) 11 Comparative Period Variance – This is the difference between the movement on the
account for this period last year (item 5) and this year (item 9) 12 Budget Year Variance – This is the difference between the budget total for the year (item
6) and the movement for the year so far (item 8) 13 Budget Period Variance – This is the difference between the budget for the period (item
7) and the movement for the period (item 9) 14 Budget for Year Accum – This is the budget year-to-date (i.e. up to the period you run
the enquiry for) as opposed to item 6 for the full-year’s budget. 15 Budget for Year Accum Variance – This is the difference between the year-to-date
budget (item 14) and the movement for the year (item 8) 16 Comparative Year Accum – This is the year-to-date balance for this period last year as
opposed to the full year balance that is item 4. 17 Comparative Year Accum Variance – This is the difference between the balance at this
point last year (item 16) with this year (item 8) After setting the balance items (you don’t need to set all three) the system accumulates the balances up the hierarchy of the accounts (if transactions have been generated since last run) and displays the enquiry for level 1.

Nominal Ledger Instructions 81
Datafile Software Nominal Ledger and Cash Book Manual 06/07/07
You can scroll up/down the list using the arrow keys, the <page-up> and <page-down> keys, or use the mouse on the right-hand scroll bar. <F7-Option> will display a screen detailing more information on the account. To move to the next level press <Enter> or double-click with the mouse.

82 Nominal Ledger and Cash Book
Datafile Software Nominal Ledger and Cashbook Manual 06/07/07
You can move up/down the hierarchy all the way to the transactions. To move back up a level use the <ESC> key. If there are further levels then selecting an entry takes you to the next level, if no further code levels then selecting an entry takes you to its transactions.

Nominal Ledger Instructions 83
Datafile Software Nominal Ledger and Cash Book Manual 06/07/07
At the transaction level <F6-Journal> can be used to display the full detail of the journal and <F7-Option> can be used to view more detail on this transaction record.
Financial Summaries Financial summaries are the special management reports that show, amongst other things, the profitability or otherwise of the company. You use this part of the nominal ledger to produce such reports as the profit and loss statement, balance sheet, and funds flow statements, plus any other analyses or reports you want to define. You can print these reports whenever you like — and indeed for any period you like from both the current year or from the previous year. Financial summaries can either be “easy mode” reports which you can define very quickly, or “full mode” reports which give you greater control over the report format and complexity but need a bit more time to plan and implement. These reports are user-defined, and you may create up to 40 such summaries for any one company, using the facilities described later in this section.
Compact Systems
The Compact system only allows two ‘easy mode’ financial summaries. One for the profit and loss statement and one for the balance sheet.

84 Nominal Ledger and Cash Book
Datafile Software Nominal Ledger and Cashbook Manual 06/07/07
Taking this option shows you the menu of summaries you have defined so far. The following is an example.
Note If for any reason no definition file yet exists, or it is empty, then you are warned when you first take the Financial Summaries option. You are asked if you want to maintain the definition file right away —see below.
You have three choices here: You can select one of the reports to print You can key <F4-Select> to pick several reports to print together You can use the <F7–Options> key to go to the report definition procedure The reporting procedures are the same for the first two options (once you’ve selected which reports to run together for the second). These are described together below. Running Several Reports Together If you press <F4-Select> to run several reports together, then you can scroll up/down the list of reports using the <INSERT> key to select a summary to print and <DELETE> to de-select a summary from printing. Use the <ESC> key once you are happy with your selection. Reporting Procedure After selecting the financial summary to print then firstly, if the selected summary is an ‘easy mode’ definition, you are asked if you wish to change any details.
If you don’t want to change the design, then reply ‘No’. If you reply ‘Yes’ you go into the easy mode report definition process, which is described at the end of this section. Once you’ve changed the design you return to this point.

Nominal Ledger Instructions 85
Datafile Software Nominal Ledger and Cash Book Manual 06/07/07
A series of print parameters are displayed.
Report “as at” Period Number The nominal ledger keeps all the current year’s periods open, and all the previous year’s periods can still be viewed. Here you give the period number for which you want this report to print. It then takes the values “as at” the end of that period. Enter either a current year period, or — if you want to print a report on one of the previous year’s periods — prefix the period number with P. So “P10” would print a report based on the values at the end of the tenth period of last year. Confirm Dates – Report Date / Period From / Period To These dates do not affect the operation of the report; they are there only to print in the report heading for information. Today’s date is offered in the first prompt, and the period start and end dates are those which were used the last time a financial summary was printed. Typically the Period From date is used to give the start of the financial year or period, and the Period To date the end of the current period. How these dates are used on the report is defined by the financial summary specification. In fact these are all text fields up to 30 characters in length, so you could use them for any purpose. You could type dates in the format “31st July 20xx” for example; this can improve the look of the final printed summary.

86 Nominal Ledger and Cash Book
Datafile Software Nominal Ledger and Cashbook Manual 06/07/07
Print Account Codes in Report This prompt only occurs for easy mode financial summaries. If you reply Y then account codes are printed against report lines as well as account names. If you reply N then only the names print. See the sample reports at the end of this section for examples of each one. Comment to be Printed You can design full mode financial summaries to print a comment on the report to highlight some special aspect — for example “Prior to stock-take”, “Excludes service department” and so on. If you use this option, then the comment you want to print on this report is entered here. This comment can be up to 40 characters in length. After confirming these details you are asked for the print device to output to, select as required. Run-Time Selection (Full Mode Only) For a ‘full mode’ financial summary you may be asked to select an additional selection before the report is printed.
A very powerful feature, it allows you to run full mode financial summaries against some selection options. In effect you can run the same summary against the whole nominal ledger, or for just certain cost centres or departments (say). For example, suppose you have fifteen branches in your company, each with their own similar chart of accounts in the nominal ledger and with the branch code included as part of the nominal code. This option allows you to define a single financial summary and print it in any of the following ways: Print as Specified — This is the standard option, which prints a single financial summary
as specified by the definition Page per Selection Entered — this lets you enter the codes for one or more branches (in
fact you can enter a maximum of 100 codes in this option). A financial summary is printed for each branch code entered, which includes only the details for that branch. If your financial summary definition is for a profit and loss statement (say) then this option gives you a profit and loss statement for each branch whose code is entered here
In fact you are offered the nominal account code with the branch code (in this case) set to asterisks. You overtype the asterisks with the branch code you want to include. For

Nominal Ledger Instructions 87
Datafile Software Nominal Ledger and Cash Book Manual 06/07/07
example, if your code structure were 99.999, where the first two digits were the branch code, then you are offered “**.999” as the code, and you overtype the asterisks with 01 for branch 01, and so on
To complete the list of codes, use the <F3–Clear> key to make the code blank and <Enter>. The number of codes entered so far is shown during this process
Single Page of Listed Selection — you would use this to produce a financial summary
which consolidated a number of branches into one report — this would give you a report on a sales region, say. Again you can enter up to 100 nominal codes here in the same way as described above. All the codes for these branches are consolidated into a single report
Single Page with Exception Selection — this produces a financial summary which
consolidates all branches except those whose codes you enter here. You might use this to exclude head office costs and so give a trading profitability report for the operations side of the business

88 Nominal Ledger and Cash Book
Datafile Software Nominal Ledger and Cashbook Manual 06/07/07
Sample ‘Easy Mode’ Profit & Loss Statement
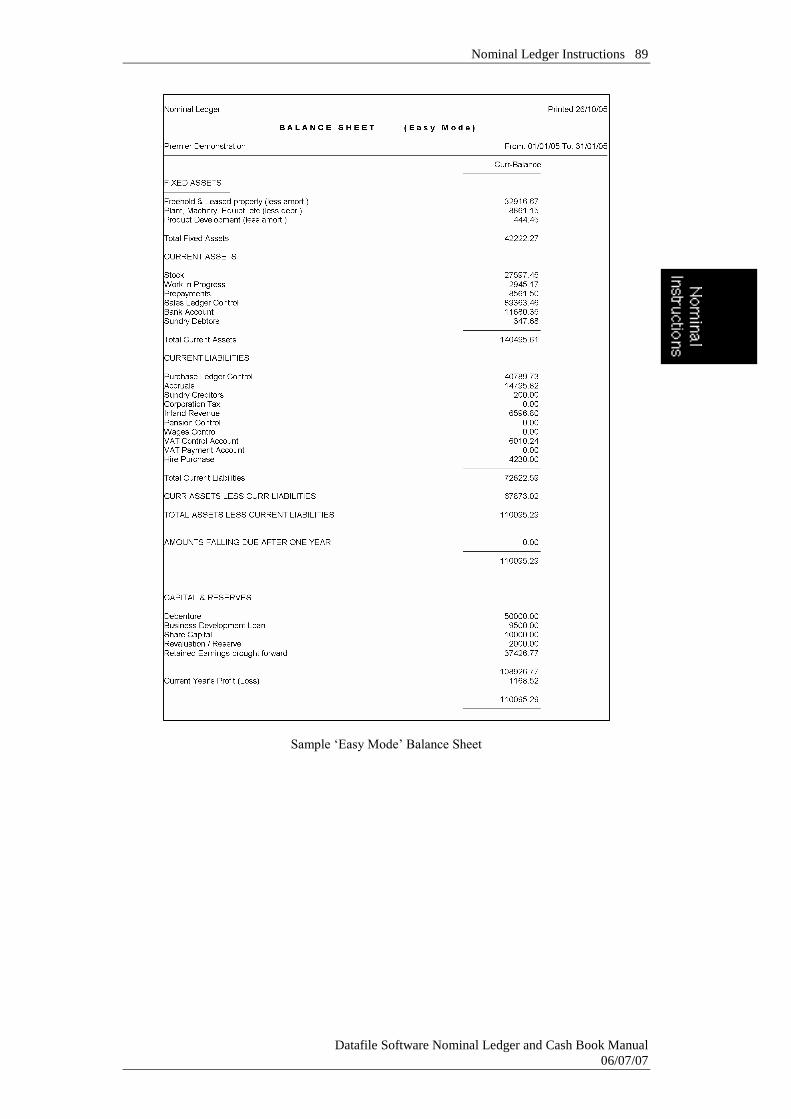
Nominal Ledger Instructions 89
Datafile Software Nominal Ledger and Cash Book Manual 06/07/07
Sample ‘Easy Mode’ Balance Sheet

90 Nominal Ledger and Cash Book
Datafile Software Nominal Ledger and Cashbook Manual 06/07/07
Sample ‘Full Mode’ Profit & Loss Statement

Nominal Ledger Instructions 91
Datafile Software Nominal Ledger and Cash Book Manual 06/07/07
Sample ‘Full Mode’ Balance Sheet

92 Nominal Ledger and Cash Book
Datafile Software Nominal Ledger and Cashbook Manual 06/07/07
Defining Financial Summaries On the Professional, Diamond and Premier product ranges you can design up to 40 financial summaries such as profit and loss statements, balance sheets, funds flow and other management reports. These are designed almost entirely to your own specification. Compact users are restricted to 2 financial summaries predefined as a profit and loss statement and a balance sheet – you can amend these layouts though. There are two styles of summary: the “easy mode” report which you can design and change at run time, and “full mode” reports which give greater control over what is printed and has more powerful features. Easy Mode Financial Summaries These let you design reports which list, sub-total and total groups of nominal codes. The difference between this and a conventional report is that you can select and print groups in the order which suits the report, not just in strict account code sequence. In addition you can include report lines which are in fact calculations and ratios based on previous sub-totals in the report. This lets you design financial summaries which would be beyond the scope of conventional report writers such as DataFiler. You create or change the design of these summaries at the time you run the report. This allows you to prepare quick ad hoc summaries to meet specific reporting needs. You can define up to six columns of values to print on the financial summary in Compact and Professional, 12 columns in Diamond and up to 20 columns in Premier. In addition to printing current balances, therefore, you can print start-of-period or start-of-year balances, movement figures, budget figures or comparative figures on the same report. Full Mode Financial Summaries (excluding Compact) Each full mode financial summary can hold up to 330 lines of printed information and up to 255 columns can be printed across the page. As with easy mode summaries, you can define up to twenty columns of values, subject to product level, to print on each report depending on the product level. Powerful calculation facilities exist so that you can group together many account codes into one figure for printing. In addition you can include report lines which are in fact calculations and ratios based on the values in previous lines of the report. A “wildcard” facility allows you to define a financial summary which can be used either for the company as a whole, or to consolidate divisions, or group together cost centres, or print individual branch results, depending only on a question at run time. Before you start to design the financial summaries you should plan the layout of the documents and the information that each one is to show. You can amend the specification later, but good preparation simplifies the subsequent definition.

Nominal Ledger Instructions 93
Datafile Software Nominal Ledger and Cash Book Manual 06/07/07
Managing the Definition File For easy mode financial summaries you are asked whether you want to change the definition details at the time you select the report from the menu. If you want to design or amend full mode financial summaries, or change between full and easy mode, or make the definition file larger, then you must access the financial summary definition procedures. You do this from the financial summaries menu by pressing the <F7-Option> key. This opens the definition file which holds the details of all the financial summaries, giving you the messages below.

94 Nominal Ledger and Cash Book
Datafile Software Nominal Ledger and Cashbook Manual 06/07/07
Note If the definition file is empty then you are warned when you first select the Financial Summaries option. You are then asked if you want to maintain the definition file. If you reply ‘Yes’ then the definition file is opened and you are taken straight into the financial summary definition process. If no file exists, then you are warned again and asked if you want to create a definition file. The pathname for this file is given in the nominal System Profiles. Reply ‘Yes’ to create a new file. You are asked how many summaries you wish to store in this file (a maximum of 40). You can create a smaller file, because it is very easy to make it larger later on if you need to.
Now press <Enter> to display the financial summaries menu so that you can choose which definition you wish to amend from the list given to you. Any financial summary which has already been designed is given with its menu name, as shown below. Any summary in the definition file which has yet to be defined shows with a name of “spare” or is blank.
All 40 financial summaries are shown, even though your definition file may be smaller. The additional ones are shown as “not allocated”.

Nominal Ledger Instructions 95
Datafile Software Nominal Ledger and Cash Book Manual 06/07/07
You have a number of choices here: Choose the number of an existing or spare/unallocated financial definition so that you can
go and modify or create a new summary definition. Press <Escape> to return to the Financial Summaries menu Type ‘COPY’ so that you can copy one financial summary definition to another in the file.
This is helpful where you have similar summaries to define. The system then asks for the number of the one you want to copy, the number of the one to copy to (which must be within the current definition file size) and then checks that you are sure before performing the copy
Choosing one of the menu options then puts you into the financial summary menu title field (see the example menu screen above) so that you can change the title if you wish. Note that if you blank out the title, then effectively you clear that financial summary from the menu. When you confirm the title you are prompted:
If you want to change the specification of the summary, then reply ‘Yes’, otherwise reply ‘No’ to return to the “Update Which Summary” prompt. From this point on the procedures are different for full mode and easy mode financial summaries. You should now refer to the appropriate section below.
Creating A New Definition
If you select a spare/unallocated entry you will be prompted to ‘Create this Financial Summary Definition’. Select Yes to create, No to return to the menu. You will then be prompted if it is to be an ‘Easy Mode Definition’. If ‘Yes’ you are taken into the parameters to set the definition for easy mode. If ‘No’ you are taken into the page setup details for the full mode designer.
Full Mode Financial Summary Definition A full mode financial summary prints up to 330 lines over several pages. The page can be up to 255 characters wide. You can print up to twenty columns of figures (depending on product level), each column consisting of one particular type of value — such as the current balance, the year-to-date movements, the current period budget, a variance, and so on.

96 Nominal Ledger and Cash Book
Datafile Software Nominal Ledger and Cashbook Manual 06/07/07
Within these parameters, however, you can print any values you like from the nominal ledger accounts file. You can print individual account values on a single line, or an accumulation of many account values. These accounts do not need to be in consecutive sequences in the file to be accumulated, and this factor gives enormous power to the reporting capability of full mode financial summaries. You can add and subtract between lines on the summary, and calculate percentage values to print on other lines. You can print values in thousands, or in units with or without decimal places. The same summary can be used for the company as a whole, for individual departments, cost centres and branches, and for groups of departments or branches at a divisional level. The financial summary definition process falls into three stages: Define or amend some overall options Design or amend a “mask” of the standard text which is always to print. This mask would
include the name of the financial summary, column headings, and the names of the items which are printed, such as “Sales”, “Expenditure”, and “Salaries” and so on.
Define or amend the details of the values and calculations which are to print
Converting a Summary
Prior to Release 5.8 the full mode summaries were designed in a different manner. Whenever you open an existing summary, that was designed using the old designer, you will be asked to convert to the new layout. To convert to the new style select ‘Use New Designer’, if you want to continue with the old layouts then select ‘Use Old Designer’. To abandon select the ‘Close’ button.
Definition Filenames The financial summaries are held in a file “ccc-FIN.DEF” with individual ‘full mode’ definitions held in a file “ccc-FIN.Onn” (where CCC is the company id and 0nn is the summary entry number). The new layout adds a file – a “ccc-FIN.Inn’ which contains the font settings, text labels, line and box drawing and image file(s) detail of the new design When you use the new designer for the first time a backup copy of the old layout is taken as ‘ccc-FIN.Xnn’ which you can copy back as “ccc-FIN.0nn” if needed (deleting the Inn file).

Nominal Ledger Instructions 97
Datafile Software Nominal Ledger and Cash Book Manual 06/07/07
Page Set-up When a summary is first created (or converted) you are asked to enter/confirm selected page set-up details.
Paper Size – offers a drop-down list of paper sizes available on your PC. Select the paper size appropriate. Print in Landscape – set whether the summary is to be printed in landscape. Leave blank to print in portrait. No of Columns Across / No of Lines Down / Number of Pages – These values can be amended up to 255 columns across and 132 lines down for any one page. The number of pages is limited to a total of 330 lines so at 66 lines per page this gives a maximum number of pages of 5, if reduce the lines down to 45 (landscape print) then this would allow 7 pages. The columns and line values form a ‘design grid’ on the summary layout with the no of columns set controlling the number of grid start points across the page, the lines down controlling the grid points down the page (think graph paper). Text, Image and Lines do not have to start at a grid point but data items do – increasing the number of columns / grid points across the page gives you more flexibility with regards to data item positioning. Take care on increasing this value on existing layouts as items starting at a particular column/grid point may overlap if you increase the number of columns. With regards to the number of lines down, again take care increasing this value on existing layouts as line items may overlap.

98 Nominal Ledger and Cash Book
Datafile Software Nominal Ledger and Cashbook Manual 06/07/07
Margins – next you can set, in millimetres, the left, right, top and bottom margins. When you print a summary each printer has its own internal set margin and the grid (discussed above) is fitted within this. If printing a summary on multiple printers, especially when using pre-printed stationery, you should set the margins on the summary equal to or greater than the largest margin of the printer(s), to ensure identical print on all printers. The Install menu on the toolbar allows the option ‘View Printers’ which enables you to perform a test print which shows the print margins (as a border on the page).
Notes
The Install menu on the toolbar (desktop) is only available for the SYSTEM user-id and for Premier users set to use the ‘Installer’ desktop.
Once you have set/confirmed the margins the summary mask is displayed.

Nominal Ledger Instructions 99
Datafile Software Nominal Ledger and Cash Book Manual 06/07/07
Converted Documents Initially the data items and text are assigned a default font as it would have printed previously – Courier New. This can be changed through the course of the summary design. Previously text was created on the summary by positioning the cursor and typing the required text. In converting this into the text labels of this new designer the assumption is made that text separated by a single space is part of the same label, more than one space and two (or more) separate labels are created. In this way the text heading on the summary shown above ‘T R A D I N G P R O F I T A N D L O S S’ is converted as four labels one for each word as the four words were separated by three spaces in the old designer.
The Summary Design Toolbar Before discussing the specifics of designing a summary, you should review the summary design toolbar. The toolbar has the options – File, Edit, Tools, Parameters and Format. Each of these (other than Parameters) offers a list of actions available.
The File menu has options to save the summary layout, amend/view the page set-up, preview the design to the screen, perform a test print of the summary, and exit out of the summary design (you will be prompted to save if you haven’t already done so).
The Edit menu has options that are only available when an item on the summary is selected. You can cut an object out of the design, copy an item (except data items), or delete an item. You can also insert a line above the selected item or delete a line with the selected item on.
The Tools menu has options to restructure a database, refresh the display, and controls for whether you show the data items (you may want to switch this off to position text behind it), whether you show the grid, and whether new text/line/image items are to be positioned at the start of the grid.

100 Nominal Ledger and Cash Book
Datafile Software Nominal Ledger and Cashbook Manual 06/07/07
The Format option allows you to apply font defaults and to set printer, email and fax settings.
The Parameters option loads the first of the parameter screens available for this summary definition Setting and Applying Font Defaults You can amend the fonts for each item individually (except balance items) but initially you are likely to want to assign a default font for all items. To set and apply default fonts select the Format option from the toolbar, choose Font Defaults – a dialog box will be displayed enabling you to select the font, style and size.
You can scroll up/down the list of fonts, use the mouse to select the required option (once selected the chosen value will be updated at the top of the list). After selecting the font, select the style and then the size. You can also amend the colour of the text if required. Once you have selected the required details press OK.
After selecting the font you can control whether it applies to the text items or the data items in the summary (or both or indeed neither – you might set a default because the next x items you are going to insert all use a specific font). Tick the options required and click the APPLY button.

Nominal Ledger Instructions 101
Datafile Software Nominal Ledger and Cash Book Manual 06/07/07
Once you have set and applied the default fonts you can then adjust the font and size of individual items as required. If you have need to reset all items to the set default fonts then choosing the Apply Fonts option available from the Format pull-down allows this. Inserting New Items To insert a new item position the mouse where you wish to insert the item and press the right-button on the mouse (hereafter described as right-click). A menu appears for you to select the type of item you wish to add.
You can select to insert a text prompt, a data item, lines, boxes, or insert a bmp image. You can also elect to insert a line on the summary at the current position or to delete a line. The ‘Paste Object’ option (greyed out in the picture on the right) is active if you have used the ‘Cut’ or ‘Copy’ option from the edit menu previously.
If you select to insert a Text Prompt a pop-up form allows you enter the text label to be displayed.
You type the text you require (up to 128 characters). If you click the APPLY button the text is updated onto the summary design in the default font/size. If you wish to change the font select the FONT button and the font dialog is shown as discussed earlier (you are setting the font for this item alone).

102 Nominal Ledger and Cash Book
Datafile Software Nominal Ledger and Cashbook Manual 06/07/07
To change the colour of the background to the text select the COLOUR button and a dialog will be displayed allowing you to select from a pre-defined colour set or allow you to create up to 16 custom colours of your choosing. To define a custom colour click with the mouse on the colour panel display and then move the scroll panel on the right to control the luminescence. Once your happy with the colour select the ‘Add to Custom Colours’
button and the colour will be added to the custom colours on the left for selection. The ‘SNAP’ button is used to position the text item at the centre of a row and at the start of a column – snapping the text to the grid. The ‘DELETE’ button removes the text and returns you to the summary mask. Once you are happy with the changes select the CLOSE option to update the text label and return to the summary mask. If you wish to abandon click the X button in the corner of the Text Properties window. This isn’t all the options available though – if you select the ACTION pull-down menu, in addition to the button prompts (with a bit more description) are further options to reset the font and colour to default settings, save the font and colour to and set from the palette – this is useful if making the same changes to several items. You also have the option to add a border around the text label, and to right align the text within the label. Finally you can choose to abandon changes or accept and update the changes.

Nominal Ledger Instructions 103
Datafile Software Nominal Ledger and Cash Book Manual 06/07/07
If you select to insert a new Data Item then a pop-up form allows you to select the data item to be displayed.
To select an item you need to select the category of item and then the print item itself. Drop down lists are available for each – use the mouse to activate first the category list.
Once the category is selected choosing the print item drop-down list shows the items available for selection in this category.
Items with a after them are already used within the summary so you cannot select these again (see Balance Items below though). Some categories allow you to choose direct from the database the items to print. For these items the ‘–‘ character as the print item represents a free item available for you to define. If you select this then the appropriate database is displayed for you to select a data item from.

104 Nominal Ledger and Cash Book
Datafile Software Nominal Ledger and Cashbook Manual 06/07/07
If you select the Balance Items category some additional parameters are displayed. Here the print items relate to the twenty balance ‘columns’ that can be defined.
When adding a data item to print on a line you select the ‘Balance Items’ category and either one of the defined ‘columns’ that have been configured, or select a ‘-‘ entry if a new ‘column’ is required.
After selecting a balance item a pop-up then allows you to define the line parameters for that entry – i.e. what is to print on that line using the selected balance item.

Nominal Ledger Instructions 105
Datafile Software Nominal Ledger and Cash Book Manual 06/07/07
Balance Item – if you selected an undefined entry (‘-‘) then you will be prompted for the balance item. This is the basis on which the data item is to be calculated. Available balance items are: 1 Current Balance – The balance of the account as it would appear on the trial balance 2 Start of Year Balance – The opening balance at the start of the year 3 Start of Period Balance – The opening balance at the start of the current period 4 Comparative Year Balance – The balance of the account as at the end of last year 5 Comparative Period Balance – The movement on the a/c for the same period last year 6 Budget for Year Balance – The total budget set for the year 7 Budget for Period Balance – The budget set for this period 8 Movement for Year – This is the difference between the start of year balance on the
account (item 2) and the current balance (item 1) 9 Movement for Period – This is the difference between the start of period balance (item 3)
and the current balance (item 1) 10 Comparative Year Variance – This is the difference between the balance at the end of
last year (item 4) and the movement for the year (item 8) 11 Comparative Period Variance – This is the difference between the movement on the
account for this period last year (item 5) and this year (item 9) 12 Budget Year Variance – This is the difference between the budget total for the year (item
6) and the movement for the year so far (item 8) 13 Budget Period Variance – This is the difference between the budget for the period (item
7) and the movement for the period (item 9) 14 Budget for Year Accum – This is the budget year-to-date (i.e. up to the period you run
the enquiry for) as opposed to item 6 for the full-year’s budget. 15 Budget for Year Accum Variance – This is the difference between the year-to-date
budget (item 14) and the movement for the year (item 8) 16 Comparative Year Accum – This is the year-to-date balance for this period last year as
opposed to the full year balance that is item 4. 17 Comparative Year Accum Variance – This is the difference between the balance at this
point last year (item 16) with this year (item 8) 99 Accounts Data Item - This allows you to choose a specific data item from the file. Its
data item number is then requested. For example, you could define a calculated field in the accounts file to accumulate one quarter’s results.
100 Percentage Value - This allows you to show the percentage of a total which the line represents. When set you are asked for which column you want a percentage of – this refers to the entries defined on the report – and whether you wish to round the resulting value. NB: When you set to print a line item for this column you are prompted for the line entry in where the total value (i.e. the 100%) is contained.
Offset – many of the balance items printed refer to the movement for a particular period – that being the period you run the summary for. This option allows you to print a balance item for a previous period (from up to 13 periods ago). When printing the value for the balance column the system, instead of using the current period uses the nth previous period. Note that the offset, as with the balance item itself, applies for the ‘column’ as a whole. Line Type – the Line Type determines how the values are to be calculated. Selection options include:

106 Nominal Ledger and Cash Book
Datafile Software Nominal Ledger and Cashbook Manual 06/07/07
L–LIST. This allows you to specify up to 10 account codes to add together. You define the account codes in a subsidiary window at the bottom of the screen. You can use “Wildcards” here (see below) which can greatly expand the number of codes which are accumulated in this one line.
R–RANGE. This allows you to specify an inclusive range of accounts. Key in the account
codes of the first and last accounts to be included pressing <Enter> after each. You can use the wildcard facility here too. Note that an R range is fully inclusive. For example, if you are using a 99.999 account code format and you specify the range 01.100 to 05.200, then accounts like 02.500 and 04.010 are included within this range. See also S–Selective Range below
S–SELECTIVE RANGE. This is a very powerful facility and makes use of the account
code structure to break the code into separate parts. The program considers each part of the account code range separately, and all conditions must be fulfilled for the account to be included. For instance, with an account code structure of 99.999, the selective range of 01.100 to 05.200 only includes accounts if the first part of the code is in the range 01 to 05, and if the second part of their code is in the range 100 to 200. Unlike the R–Range option, it would not include codes 02.500 or 04.010
*–CALCULATION. The asterisk indicates a calculation based on line values, and can
only use values accumulated on previous lines. You may include up to ten lines in the calculation, which can be added, subtracted, multiplied or divided against each other. The line numbers are prompted at the bottom of the screen, and each must be prefixed with a calculation sign.
%–PERCENTAGE. This indicates a ratio and allows the value of one line to be expressed
as the percentage of another, both of which must precede this line. The result is always given with two decimal places. Key the line numbers at the bottom of the screen
I–ITEM VALUE. This allows you to pick a specific value from a specific nominal
account — you just fill in the account code and the item number on the record which you want. For example, you could pull out vehicle registration numbers for a report which analyses individual vehicle costs. You can use wildcards in the code where you plan to use the selective code feature at run time
Tip — “Wildcards” A powerful feature of the Datafile financial summary definition is the ability to add together a number of accounts which have a common partition code. For example, suppose a nominal account code is specified in the format 999.99 where the last two numbers at the end of the code identify the branch. If the numeric account for motor expenses is 410, then the branch accounts for motor expenses would be: 410.01 Motor expenses — branch 01 410.02 Motor expenses — branch 02 410.03 Motor expenses — branch 03

Nominal Ledger Instructions 107
Datafile Software Nominal Ledger and Cash Book Manual 06/07/07
410.04 Motor expenses — branch 04 etc. For a consolidated financial summary you would require a single value for all motor expenses. Whilst this could be defined by specifying each of the account codes in a sum, the “wildcard” facility allows you to specify (in “R” or “L” type lines only, as described above): 410.** Use of the asterisk causes the program to sum all the accounts numbered 410, regardless of their suffix. If employee expenses were all in the range 410 to 419, then you could widen the use of the wildcard to group all employee expenses for all branches with the single entry — 41*.**
Tip — Include All Accounts! Most people design charts of accounts with codes in ranges and with gaps to allow for future codes should they be needed. However, if you add an account code in the future, you may also need to add this account to your financial summaries — nothing is more aggravating than a balance sheet which apparently does not balance! We strongly recommend that you plan your financial summaries to include every code which might possibly be defined. This is simple if you use combinations of the wildcard facility and account ranges in the design. It can save you much time later.
CR Balance - Credit values in the nominal ledger are stored as negative values. If the values on a line are expected to be a credit, but you do not wish to print the minus sign (or with brackets), select this option, otherwise leave blank. The effect of this is to reverse the sign, so that if the value in the file turned out to be a debit, then it would print as a negative (with a minus sign or brackets). For example, sales are credits and held as negative values in the file. These would print as negative values unless you specify CR here to switch their signs to positive.
Note
A value is printed and stored in the accumulator with whatever sign results from your entry here. If you use this line later in a calculation, then it is this stored value which is used. For example, sales are credits, but you would specify CR on that line to make them positive. A net margin line later which takes the costs (a positive

108 Nominal Ledger and Cash Book
Datafile Software Nominal Ledger and Cashbook Manual 06/07/07
value) from the sales (stored as a positive value) would be expressed as “plus sales line, minus costs line”.
Columns to Print - Each column here relates to the balance item columns you have already defined. If you want to print the accumulated value for a particular column, you must answer set that column. If you don’t want the value for a column to print then leave it blank on this line in that column position. The current balance item / column is pre-selected for you, other columns can be set for print as needed. Once the columns are set click OK to return to main Data Item properties and then Apply and then Close to update the data item. Once you have selected the item then the options are available, as with text, to change the font, background colour or delete. ‘Snap to Grid’ is not available on data items as data items are automatically ‘snapped to the grid’.
Balance Item Font Settings
Font settings for balance items are applied on a whole column basis, so that every value for a balance column uses the same font settings – i.e. Arial 10 Regular etc. You can however set an individual line/row on a report to override the font setting – i.e. make a totals line bold – but every balance item on that line overrides it’s column font setting with the line setting. When you amend the font for a balance item a pop-up will ask whether you wish to amend the font for the line or the column. Select as required and the other items on the line / column will be updated automatically. Once ‘line formatting’ is set for a row you can clear line formatting by selecting the option on the properties of the data item.
If you select to insert a new horizontal or vertical Line then a short line is drawn on screen and then moving the cursor to the end of the line (so the cursor changes to an arrow) will allow you to change the height or width of the line by holding down the left mouse button and dragging the mouse in the direction you want to go. You can also amend the depth of the line, and the width/length, by right-clicking and selecting the properties option.

Nominal Ledger Instructions 109
Datafile Software Nominal Ledger and Cash Book Manual 06/07/07
You are asked to set the width of the line and the height of the line in pixels and you can increase them by clicking the up arrow key next to the value, the down arrow decreases the width according to the set unit of increment. You can also overtype the size if required. Once you have drawn the line then the options are available are to set the colour, delete the line or ‘Snap to Grid’ – if snap to grid then the line is centred within the row/column. If you select to insert a new Box Drawing then a small box is drawn on screen and then moving the cursor to a corner (so the cursor changes to an arrow) will allow you to change the height or width of the box by holding down the left mouse button and dragging the mouse in the direction you wish to go. You can also amend the box by right-clicking and selecting the properties option.
You are asked to set the width of the box and the height of the box in pixels, you can increase the width by clicking the up arrow key next to the value, the down arrow decreases the width according to the set unit of increment (or you can also overtype the size if required). To increase the height of the box again you can click the up-arrow next to the height, down-arrow decreases the height, or you can overtype the value. Once you have drawn the box then the options are available to select the fill colour of the box (selected as per text colour above), to set rounded corners on the box, to snap the box to the grid and to delete the box. If you set a fill colour then any data items or text items within the box should be set to have the same background colour. If select to snap the box to the grid then the box border is centred within the row/column. NB: If you want to draw lines within a box then draw the box first and add the lines later. If you select to insert a new Image then a pop-up form allows you to select the image to be displayed.

110 Nominal Ledger and Cash Book
Datafile Software Nominal Ledger and Cashbook Manual 06/07/07
You are asked to enter the image filename (BMP/JPG files only). You can browse for the file by clicking the ‘?’ icon or pressing <F4-Select>. Images are held in folder ‘DocImage’ created automatically off the DFCOMP location (usually \DFWIN\DATA).
Although you can browse to other folders from here you can only select to apply images from the ‘DocImage’ folder – if necessary you can copy from another location and paste here via the file selection browser. Once you select the image file its filename is returned to the summary to be applied. Note that the image is sized as per the file and cannot be resized within Datafile – you must use an external package if you need to do this. Moving, Deleting and Amending Items You can move an items position by selecting it with the mouse and dragging it to where it’s required. If the ‘Tools’ option ‘Snap to Grid’ is enabled then all items start in a specified grid point, if switch this off then all bar data items can be set anywhere within the grid cell. Note that if move a balance item that the entire column moves. You can delete an item by selecting it with the mouse and pressing the <DELETE> key. If you delete a balance item then you will be prompted if you also wish to delete all balance items on

Nominal Ledger Instructions 111
Datafile Software Nominal Ledger and Cash Book Manual 06/07/07
this line or column – select as required (if delete just that item in effect you are changing the print column flag to ‘N’ for that line). If you right-click with the mouse on any item then a menu is available allowing you to change the properties.
Right-clicking against a Text item allows you to access the properties in full and allows individual options to amend the font, set the background colour, add (or remove) a border, right-align the text, or snap to the grid. You can also reset the font/colour to default values or save the font and colour to the palette for application to another item using the Set option. You can also delete the text item from here.
Right-clicking against a Data item allows you to access the properties box in full and allow individual options to amend the font, amend the background colour, add (or remove) a border, or to right-align the data item. Remember that font settings for balance data items apply on a column / whole line basis (see above). If line formatting is set then an option is available to clear this, reverting the fonts for the balance items on this line to their standard column font. As with text you can reset the font/colour to default values, save/set the font and colour from the palette or delete the
item. Balance Options allows direct access to the item properties for the balance data items. Right-clicking against a Line item allows you to access the properties in full, snap the line to the grid and to delete the line. In addition however once you have selected the line with the mouse moving the cursor to the end of the line (so the cursor changes to an
arrow) will allow you to change the height or width of the line by holding down the left mouse button and dragging the mouse in the direction you want to go.
Right-clicking against a Box item allows you to access the properties in full, amend the background (fill) colour of the box, set/clear round corners, snap the box to the grid and to delete the box. As with line drawing once you have selected the box with the mouse moving the cursor to the corners of the box (so
the cursor change to an arrow) will allow you to change the height or width of the box by holding down the left mouse button and dragging the mouse in the direction you want to go.

112 Nominal Ledger and Cash Book
Datafile Software Nominal Ledger and Cashbook Manual 06/07/07
You can position items within a box by right-clicking and choose the new option required – if you click on/near the box border you are assumed to be amending the box though, so if want an item up against the border insert it elsewhere and move it to the position you want. If you wish to include lines within a box, perhaps for a column border, then draw the box first and add the lines afterwards.
Right-clicking against an Image item allows you to access the properties of the image or to delete it.
Parameters The general parameters are completed over two screens.
Easy mode set up summary? This is where you set whether this summary is to be an easy mode or full mode summary. It should be left blank for full mode summaries. If you want to change this definition to an easy mode summary, then set this prompt and you are prompted:

Nominal Ledger Instructions 113
Datafile Software Nominal Ledger and Cash Book Manual 06/07/07
Reply ‘No’ to cancel this change to easy mode. You are then returned to the financial summary menu without any changes being made. If you reply ‘Yes’ the existing definition is completely cleared. You are also told:
This definition is now set as an easy mode financial summary. Return to the menu. Lines down to be printed (max 132)? This represents the physical length of the page on which this financial summary is to print. It can take a value up to 132 lines. Number of Pages This represents the number of pages the summary is to print over. The maximum definition length is 330 lines. If, say, there are 66 lines per page this allows a maximum number of pages of 5. Maximum width of line (max 255)? Set the width of the page, i.e. the number of characters to be printed across the page. This should match (or be smaller) than the width of the print style the report is linked to. Allow Previous Periods for Printing The report can be run for any period in the current year and, if still open, the previous year – this parameter does not impact on this. Instead this allows you to run the report to cover several periods, for example, when running the report for period 3 you may want to include the two previous periods so that you are printing the summary report for the quarter. Columns and Items Now you can specify and amend which value items from the nominal accounts file are to print in which columns of the summary (the actual account codes to print on each line are defined later). These items can be set from the summary mask but also amended here. For each entry line you are asked for the: Column Item Offset

114 Nominal Ledger and Cash Book
Datafile Software Nominal Ledger and Cashbook Manual 06/07/07
Each entry defines one column of figures on the financial summary, and you can choose to print as many columns as you need between 1 and 20 (subject to the product level). Column number — this represents the left-hand printing position across the page where this column of values is to print. It can take a value between 1 and the maximum line width specified above. If you do not want to use this entry, leave the column number zero. Value items generally take 14 characters to print (format 9999999999.99±). Each column should allow 15 characters if printed in full to include a space between the columns. You can reduce this to 12 characters if you omit decimal places (see later) or nine characters if you print thousands only. Item — this is the value item which is to print in this column. It can take a value between 1 and 17, which represents one of the values in the balance items list in the right-hand part of your screen. These items are described fully below Available balance items are: 1 Current Balance – The balance of the account as it would appear on the trial balance 2 Start of Year Balance – The opening balance at the start of the year 3 Start of Period Balance – The opening balance at the start of the current period 4 Comparative Year Balance – The balance of the account as at the end of last year 5 Comparative Period Balance – The movement on the a/c for the same period last year 6 Budget for Year Balance – The total budget set for the year 7 Budget for Period Balance – The budget set for this period 8 Movement for Year – This is the difference between the start of year balance on the
account (item 2) and the current balance (item 1) 9 Movement for Period – This is the difference between the start of period balance (item 3)
and the current balance (item 1) 10 Comparative Year Variance – This is the difference between the balance at the end of
last year (item 4) and the movement for the year (item 8) 11 Comparative Period Variance – This is the difference between the movement on the
account for this period last year (item 5) and this year (item 9) 12 Budget Year Variance – This is the difference between the budget total for the year (item
6) and the movement for the year so far (item 8) 13 Budget Period Variance – This is the difference between the budget for the period (item
7) and the movement for the period (item 9) 14 Budget for Year Accum – This is the budget year-to-date (i.e. up to the period you run
the enquiry for) as opposed to item 6 for the full-year’s budget. 15 Budget for Year Accum Variance – This is the difference between the year-to-date
budget (item 14) and the movement for the year (item 8) 16 Comparative Year Accum – This is the year-to-date balance for this period last year as
opposed to the full year balance that is item 4. 17 Comparative Year Accum Variance – This is the difference between the balance at this
point last year (item 16) with this year (item 8) 99 Accounts Data Item - This allows you to choose a specific data item from the file. Its
data item number is then requested. For example, you could define a calculated field in the accounts file to accumulate one quarter’s results.
100 Percentage Value - This allows you to show the percentage of a total which the line represents. When set you are asked for which column you want a percentage of – this

Nominal Ledger Instructions 115
Datafile Software Nominal Ledger and Cash Book Manual 06/07/07
refers to the entries defined on the report – and whether you wish to round the resulting value. NB: When you set to print a line item for this column you are prompted for the line entry in where the total value (i.e. the 100%) is contained.
Note Although you have selected values to print in each column, whether or not a value is actually printed on a specific line is defined under Line Specification or using the Balance Options from the summary mask. There are occasions when you might select one value to print in more than column — for example, a balance sheet where you want a detail column plus a subtotal and total column — or even different values to print in the same column (you have to decide later which to print on any one line).
Offset (Ofs) – Many of the balance items printed refer to the movement for a particular period – that being the period you run the summary for. This option allows you to print a balance item for a previous period (1-13 depending on the number of periods in the financial year). For example, you could print balance item ‘9-Movement for the Period’ three times and for the second and third print set the offset to 1 and 2 respectively showing the value for the quarter. General Parameters – Screen 2

116 Nominal Ledger and Cash Book
Datafile Software Nominal Ledger and Cashbook Manual 06/07/07
Print pence figures in values? If no, ensure rounding? If you don’t want to print decimal currency leave blank the first of these questions. If you omit pence, you should set the second question to ensure that the unit currency values are rounded before printing. Print values in thousands only? If yes, ensure rounding? If you don’t want to print values in thousands leave blank the first of these questions. If you do print in thousands, you should set the second question to ensure that the values are rounded to the nearest thousand. Print percentage with no of decimal If a balance item set to print percentages then set here the number of decimal places to print the percentage value to. Default is 0 for no decimals; you can set to 1 or 2. Print negative values with brackets? Print negative values in red? You have the choice of printing negative values either with a minus sign, e.g. “435.25-”, or in brackets, e.g. “(435.25)”. Set to print negative values with brackets, whereas leaving blank prints them with a minus sign. As an alternative you can also set negative values to be printed in red (assuming printed to colour printer!) Balance Sheet Budgets not Cumulative Values held in the nominal are in fact the differences between one month and the next. To get the actual balance in (say) month 6, the opening balance plus all the movements in the first six months are added together. When budgets for balance sheets accounts are created outside of Datafile and imported it is often the cumulative value that is recorded in the period in which case, if the program re-accumulates them it would give incorrect results. Setting this option means that instead of accumulating the budget values the system will read the budget for the period only. If budgets have been set in Datafile then this option should not be set. Include Start-Year in Budget (Item 14) When set this option includes the actual opening balance for the year as the base value to accumulate the budget(s) for the period to when printing balance sheet accounts against the balance item ’14-Budget for the Year Accum’ Specify Account Code Structure Selections Print Structure Selection on Line/Column If using a cost centre structured nominal code, i.e. 999.99 where the first part is the nominal code and the second part is the cost centre / department, then setting this option at run-time allows you

Nominal Ledger Instructions 117
Datafile Software Nominal Ledger and Cash Book Manual 06/07/07
to enter a range of codes to process for each cost centre. When set, a pop-up form allows entry of the structure level up to which you want to allow input at run-time. The second prompt allows you to set a print item on the document of the codes selected. Allow specific wild-card selection at run-time? Print Wild Card Selection on Line/Column Specify wild-card selection format This feature allows you to use the same financial summary for the whole company’s results; for each of (say) your departments, cost centres or branches; and for (say) a region of branches or a division of departments. Set the first question to activate this feature at run time. The second prompt allows you to print the selection made on the summary. The third option defines in which positions of the account code you can enter wildcard selections at run time. You should enter here the nominal ledger account code format as it is defined in the Company Manager for the company, with asterisks in the wildcard positions. For example, suppose your account code structure is formatted (say) 999.99, where the first three digits represent the expense code and the last two the department/cost centre code. If you want to define a financial summary — a trading report, say— which allows you to select each branch in turn, then you would enter “999.**” here. At run time you could elect to print for the company as a whole, or enter any number of branch codes (up to 100) to print individually. Print Description – Item / Code / Line / Column These prompts allow you to pull out a data item from a specific account and print it at a specific position on the summary. This is intended particularly for use with the wildcard selection facility defined above, since you can include wildcard asterisks in the account code. You could include (say) the branch name as one account per branch (for instance, with an expense code of, say, 000) so that this can print on each summary to identify to which branch it refers. Date printed on line / column Period ‘From’ date on line / column Period ‘To’ date on line / column The date prompts are for convenience only and do not affect the way the report prints. It is good practice to print the date the report was printed (the first prompt). It is helpful to print legends such as “For period from <date> to <date>“on profit and loss reports and “As at <date>“on balance sheets. These dates satisfy this practice. Enter here the printing positions on the financial summary where these dates are to be printed. If you do not want to print one of the dates, leave the parameters at zero. As usual, the printing position refers to the line and column number where the left-most characters of the dates are to print.

118 Nominal Ledger and Cash Book
Datafile Software Nominal Ledger and Cashbook Manual 06/07/07
Run Time Comment on line / column This allows you to enter a comment at run time, and specifies where it is to print on the financial summary. The comment can be up to 40 characters in length, and these parameters fix the line and column number of the first (left-most) character. Output Value Lines to File As an alternative to printing the financial summary to Microsoft Excel you can enter the pathname for a CSV file to be created at the same time as printing the report. Line Specification This type of financial summary has a maximum of 330 lines, here you can say which account codes are to be accumulated and summarised to print on each line. As with the balance columns you can set these items when adding Balance data items to the mask but the calculations are also included via a ‘Line Specification’ for convenience. The reporting program keeps 6600 accumulators — 330 lines times 20 columns — into which it saves the values according to the specifications you have provided. Whether or not the value in any particular accumulator actually prints in its appointed line and column position is decided by a simple yes/no answer. The specification process is shown eleven lines at a time, using a screen similar to that shown below:

Nominal Ledger Instructions 119
Datafile Software Nominal Ledger and Cash Book Manual 06/07/07
For each line of the financial summary you must answer four questions: How to derive the values to print on this line (Type) The account code or codes from which the values for this line are derived Whether or not to switch sign (sales, for example, are stored as negative values, but you
would probably want them to print as positive) Which column values you want to print on this line, and which not to print Type of Line and Account Codes These two go together because the type of line defines how you specify the codes. You have a number of choices for each line. These are: To leave this line out of the equation To print values from a single account code To print the sum of a number of account codes (up to ten) or the sum of a consecutive
range of accounts To print a calculation based on the values in previous report lines To print a percentage value calculated from the values in two previous lines

120 Nominal Ledger and Cash Book
Datafile Software Nominal Ledger and Cashbook Manual 06/07/07
You can use up and down arrow keys in the Type column to move between document lines. For each line the Type code can be: – The hyphen indicates that no values are accumulated on this line L–LIST This allows you to specify up to 10 account codes to add together.
You define the account codes in a subsidiary window at the bottom of the screen. You can use “Wildcards” here (see below) which can greatly expand the number of codes which are accumulated in this one line. If you cannot include all the accounts you want in this list, then you should read the tip about Hidden Calculations below
R–RANGE This allows you to specify an inclusive range of accounts. Key in
the account codes of the first and last accounts to be included pressing <Enter> after each. You can use the wildcard facility here too
Note that an R range is fully inclusive. For example, if you are
using a 99.999 account code format and you specify the range 01.100 to 05.200, then accounts like 02.500 and 04.010 are included within this range. See also S–Selective Range below
S–SELECTIVE RANGE This is a very powerful facility and makes use of the account code
structure to break the code into separate parts. The program considers each part of the account code range separately, and all conditions must be fulfilled for the account to be included
For instance, with an account code structure of 99.999, the selective
range of 01.100 to 05.200 only includes accounts if the first part of the code is in the range 01 to 05, and if the second part of their code is in the range 100 to 200. Unlike the R–Range option, it would not include codes 02.500 or 04.010
*–CALCULATION The asterisk indicates a calculation based on line values, and can
only use values accumulated on previous lines. You may include up to ten lines in the calculation, which can only be added and/or subtracted from each other. The line numbers are prompted at the bottom of the screen, and each must be prefixed with a plus or minus sign. If you need to include more than ten lines in the calculation, then you should read the tip on Hidden Calculations below
%–PERCENTAGE This indicates a ratio and allows the value of one line to be
expressed as the percentage of another, both of which must precede this line. The result is always given with two decimal places. Key the line numbers at the bottom of the screen
I–ITEM VALUE This allows you to pick a specific value from a specific nominal
account — you just fill in the account code and the item number on

Nominal Ledger Instructions 121
Datafile Software Nominal Ledger and Cash Book Manual 06/07/07
the record which you want. For example, you could pull out vehicle registration numbers for a report which analyses individual vehicle costs. You can use wildcards in the code where you plan to use the selective code feature at run time
Tip — “Wildcards” A powerful feature of the Datafile financial summary definition is the ability to add together a number of accounts which have a common partition code. For example, suppose a nominal account code is specified in the format 999.99 where the last two numbers at the end of the code identify the branch. If the numeric account for motor expenses is 410, then the branch accounts for motor expenses would be: 410.01 Motor expenses — branch 01 410.02 Motor expenses — branch 02 410.03 Motor expenses — branch 03 410.04 Motor expenses — branch 04 etc. For a consolidated financial summary you would require a single value for all motor expenses. Whilst this could be defined by specifying each of the account codes in a sum, the “wildcard” facility allows you to specify (in “R” or “L” type lines only, as described above): 410.** Use of the asterisk causes the program to sum all the accounts numbered 410, regardless of their suffix. If employee expenses were all in the range 410 to 419, then you could widen the use of the wildcard to group all employee expenses for all branches with the single entry — 41*.**
Tip — Include All Accounts! Most people design charts of accounts with codes in ranges and with gaps to allow for future codes should they be needed. However, if you add an account code in the future, you may also need to add this account to your financial summaries — nothing is more aggravating than a balance sheet which apparently does not balance! We strongly recommend that you plan your financial summaries to include every code which might possibly be defined. This is simple if you use combinations of the wildcard facility and account ranges in the design. It can save you much agony later.

122 Nominal Ledger and Cash Book
Datafile Software Nominal Ledger and Cashbook Manual 06/07/07
Reverse Signs Credit values in the nominal ledger are stored as negative values. If the values on a line are expected to be a credit, but you do not wish to print the minus sign (or with brackets), key the letters CR in this column. Otherwise leave blank. The effect of this is to reverse the sign, so that if the value in the file turned out to be a debit, then it would print as a negative (with a minus sign or brackets). For example, sales are credits and held as negative values in the file. These would print as negative values unless you specify CR here to switch their signs to positive.
Note
A value is printed and stored in the accumulator with whatever sign results from your entry here. If you use this line later in a calculation, then it is this stored value which is used. For example, sales are credits, but you would specify CR on that line to make them positive. A net margin line later which takes the costs (a positive value) from the sales (stored as a positive value) would be expressed as “plus sales line, minus costs line”.
Columns to Print Each column here relates to the value columns which you specified under General Parameters above. If you want to print the accumulated value for a particular column, you must answer set that column. If you don’t want the value for a column to print then leave it blank on this line in that column position. A common example of the use of this feature is on balance sheets where two columns are used for display purposes. Individual values are shown in the left-hand column, but the total for “Current Assets” is printed in the right-hand column — as illustrated here. This is achieved by specifying the current balance to print in both columns, and then manipulating which one actually prints, through the print switches here. In practice the computer has accumulated two identical values for each line, but only one has printed. The value of every line and column co-ordinate is calculated and stored in the accumulators. These parameters only determine whether or not they are to print.
Column 1 Column 2 Stock 39005.90 Debtors Ledger 154931.41 Bank Account 3203.72 Deposit Account 0.00 Cash in Hand 145.32 Prepayments 8438.38 Sundry Debtors 1000.00 ---------------- Current Assets 206724.73

Nominal Ledger Instructions 123
Datafile Software Nominal Ledger and Cash Book Manual 06/07/07
Tip — Hidden Calculations When using the L or * type of line, you are limited to a maximum of 10 accounts per line. However, many lines on the financial summary are used purely for text — such as headings and blank lines used for spacing. These lines become spare “accumulators”, allowing you to specify one of the item types above with parameters to add up a number of values, but then not to print these values in any of the columns. You can add up more than ten account values by using two or more of these “hidden” lines, and adding up the line values later in the report. This facility can also be used for * and % type lines.
When you’ve reached the end of a line specification screen, or if you use the <Escape> key anywhere within the screen, the “Are the above details OK?” question is displayed. ‘No’ allows you to return to amend the input, ‘Yes’ returns you to the line number prompt. The number of the next line in sequence displays automatically. Accept this by keying <Enter> or overtype with the line number at which you want to continue and key <Enter>. (This number does not have to be a multiple of 11, incidentally, even though only 11 lines are shown on the screen at one time.) To finish specifying any further lines at all, key <Escape> at this prompt. Printer Settings This option allows you to set a default printer and tray for the summary report.
Clicking the drop-down list shows the printers available from the pc for you to select, after selecting the printer the list of trays can also be selected from a drop-down list. Note that this option assumes that the same printer is available, on the same device path, from all terminals that will process the particular document. If the printer is not available the usual default will apply.

124 Nominal Ledger and Cash Book
Datafile Software Nominal Ledger and Cashbook Manual 06/07/07
E-Mail Settings The E-Mail Settings option allows you to configure default message details if the summary is printed to E-Mail.
Data item containing e-mail address – not applicable for financial summaries. Send Automatically – controls whether the message is to be displayed for confirmation/amendment before sending. See notes on Microsoft Outlook / Outlook Express below. Filename to Save As – the document is saved as an attachment to the email with a filename of the document title. You may want to save with a more relevant name. You only enter the filename not the path or suffix Address – this option asks for a ‘hard-coded’ email address to which to send the email. Subject – enter the subject of the email. You can use !nnn to pick up special items such as: 161 – Document Date 162 – User Name Message – enter the message detail as required. Again you can use !nnn to pick up items from the extra 161+ items above. Wordwrap – when you send a message the text is output as entered above but the use of !nnn items may cause one line entered in the message to overflow into two lines on the email. Setting

Nominal Ledger Instructions 125
Datafile Software Nominal Ledger and Cash Book Manual 06/07/07
the option to word wrap outputs the message text as paragraphs, a new paragraph starting after a blank line. You can also force a new paragraph by entering ‘%%’ at the start of the line.
Automatic Emails and Outlook Express / Microsoft Outlook
Security developments in later versions of Outlook Express and Microsoft Outlook mean that, by default, you cannot send emails automatically – a message is displayed warning that a program (i.e. Datafile) is trying to send an email message and asks whether you wish to proceed with the send (and you can’t respond Yes for a number of seconds). This feature was introduced to prevent viruses spreading themselves to everyone in your address book. This feature cannot be disabled by Datafile. Outlook Express can be set to disable this warning via the Tools / Options menu and the Security tab. Disabling ‘Warn me when other applications try to send mail as me’ will prevent the warning message. If you do this you must ensure that your virus checker and firewalls are currently up-to-date and are kept up-to-date. Microsoft Outlook does not have an equivalent option to this. Microsoft Support does notify that if using Outlook on top of Exchange Server then you can set via ‘Administer Outlook Security’ tools trusted programs that are allowed to send emails automatically. Finally, Outlook Express can be set to send mail immediately on creation. When this is set the email message is sent after each, for example, statement is produced in Datafile and Datafile cannot continue to the next statement until Outlook Express has sent the message. As you might imagine even on a broadband connection this can take some time. Within Outlook Express selecting Tools / Options and the ‘Send’ tab allows you to disable the option to send mail immediately.
Automatic Email and Anti-Virus Software As with the security checking introduced by Microsoft, anti-virus checkers can also look for several e-mail messages being sent in a short period of time. Anti-virus checkers generally warn when more than one message is sent with the same subject (which could be avoided by using the !nnn function to pick up a value from the main data item record), and also warn if a number of messages are sent within a number of seconds (these details depend on the virus software). Generally the Anti-virus software will pause the sending of the email message(s) and ask you to confirm it is OK to send.

126 Nominal Ledger and Cash Book
Datafile Software Nominal Ledger and Cashbook Manual 06/07/07
Fax Printing Selected fax software, such as Tobit David and Zetafax, allow programs to pass information to them with regards to fax and contact details. This option allows you to enter those commands and pick up fax and contact details from the customer / supplier account record.
You have the ability to enter up to ten lines of control text that will be passed to the fax printer (note if you print this to a standard printer directly – i.e. not print to the fax printer – these commands will appear on the printout) which will allow you to pass detail such as fax numbers and contacts. Include commands when sending to the spooler – If left blank then the commands will not be included if you send the document to the print spooler, nor will they be saved to the Ledger Enquiry reprint options. Note that if sending statement runs to the spooler containing multiple commands for different contact then Tobit for one cannot interpret the print job correctly. Print Preview and Test Print You can preview the summary to the screen or the printer from the File pull-down menu. Selecting the Print Preview option shows the summary on screen.

Nominal Ledger Instructions 127
Datafile Software Nominal Ledger and Cash Book Manual 06/07/07
You can use the scroll bars to move up/down/across the summary. <ESC> or clicking the X-close button returns you to the summary design. The preview also includes a report definition showing the detail of the line (balance item) specification. Selecting the Test Print option loads the printer dialog allowing you to send the summary to the printer, spooler or a PDF file. Save and Exit The File pull-down allows you to save the summary and exit the summary design. If you exit without saving you will be prompted to save the changes – if you respond ‘Yes’ then you save the summary before exiting, if you respond ‘No’ then any changes you have made since the last save are abandoned.
Easy Mode Financial Summary Definition When you select an ‘easy mode’ financial summary at run-time you are prompted:
If you reply ‘No’ then you continue to print the summary report. If you reply ‘Yes’ then you are taken in to the summary set-up process. Easy mode financial summaries are based on a fixed format, an example of which is illustrated below:

128 Nominal Ledger and Cash Book
Datafile Software Nominal Ledger and Cashbook Manual 06/07/07
The elements of a report are: Report Header — a report header consists of 7 lines, with the report date, the date range
which applies, and the report name from that given in the menu. It is printed on the first page and, optionally, on each subsequent page
Text Headings — Text headings within the body of the report, such as the word “SALES”
in the example above, can be printed on any line Ranges — A range of nominal accounts can be printed in the report Totals — Sub-totals and totals can be printed where needed, preceded and followed by
underlines (lines of minus or equal signs) to separate them from other report lines
PROFIT A ND LOSS REPORT
SALES Sales—Consumer 1553.57 Sales—Trade 19716.21 Sales—Export 4997.25 __________ TOTAL SA LES 26267.03 ========= Purchases 15215.65 Stock Movement 1217.61 __________ Cost of Sales 16433.26 GROSS MA RGIN 9833.77 as %age of Sales 37.44%
Report Header
Text Heading
Range
Underline
Total
Underline
Blank Line
Calculation
Ratio
Text Columns

Nominal Ledger Instructions 129
Datafile Software Nominal Ledger and Cash Book Manual 06/07/07
Calculations — Sub-totals can be added and subtracted to give further results Ratios — You can express one line as a percentage of another — e.g. gross margin,
operating costs and net profit as percentages of sales on separate lines An easy-mode definition consists of a set of general parameters, plus a set of up to 66 statements which define how the report is to print. The report itself may spread over many pages, however, since ranges of accounts are printed one per line.
Note
A summary can only be specified as an easy mode financial summary under the full mode definition process. Once you’ve specified it as an easy mode menu option, then it stays that way unless you change it through the <F7–Options> key again. See Full Mode above.
General Parameters

130 Nominal Ledger and Cash Book
Datafile Software Nominal Ledger and Cashbook Manual 06/07/07
New Report Title This is the name of the financial summary as it is to appear in the list of summaries and in the report heading. Printer control set (1-8)? You are shown the printer styles so far defined (via the CONFIG user — see System User Guide) and can choose one to use with this financial summary. Lines down to be printed (max 99)? This is the number of lines printed on one page before a new page is started and the seven-line report headings are reprinted at the top of the next page. Note this value should match that defined for the print style above.
Note
The maximum number of statements allowed for the definition itself is 66. Any one definition line, however, could result in many report lines being printed. An easy mode report, therefore, can print many pages, although the definition which describes it must be achieved within 66 statements.
Maximum width of line (max 128)? Easy mode financial summaries can print to a maximum width of 128 characters. Note that this value should match that defined for the print style (printer control set) defined above. First line available for printing? Normally you choose to print on line 1. You may choose to start printing at a line lower down the page, to leave an adequate margin at the top of the page. Last line available for printing? This defines the lowest line which is to be printed on a page. Should the report extend beyond that line, then a new page is started, the report headings being printed again at the line number specified as the first line available above. Full Headings on each page? The report header is always printed at the top of the first page. Set if you wish to see the report header printed at the start of every subsequent page, or leave blank to omit it from subsequent pages.
Nominal Ledger Instructions 131
Datafile Software Nominal Ledger and Cash Book Manual 06/07/07
Omit printing of accounts if zero? Easy mode summaries often list ranges of accounts. In some cases it can be unsightly to print those accounts which have zero values, and you can suppress these by setting this question. If you have designed your format to include page breaks at specific points, however, you may want all accounts to print anyway, to make it look right. In such cases leave this question blank. Allow Previous Periods for Printing The report can be run for any period in the current year and, if still open, the previous year – this parameter does not impact on this. Instead this allows you to run the report to cover several periods, for example, when running the report for period 3 you may want to include the two previous periods so that you are printing the summary report for the quarter. Columns and Items Now you must specify which value items from the nominal accounts file are to print in which columns of the summary (the actual account codes to print on each line are defined later). For each entry line you are asked for the: Column Item Each entry defines one column of figures on the financial summary, and you can choose to print as many columns as you need between 1 and 6. Column number — this represents the left-hand printing position across the page where this column of values is to print. It can take a value between 1 and the maximum line width specified above. If you do not want to use this entry, leave the column number zero. Value items generally take 14 characters to print (format 9999999999.99±). Each column should allow 15 characters if printed in full to include a space between the columns. Item — this is the value item which is to print in this column. It can take a value between 1 and 17, which represents one of the values in the balance items list in the right-hand part of your screen. These items are described fully below Available balance items are: 1 Current Balance – The balance of the account as it would appear on the trial balance 2 Start of Year Balance – The opening balance at the start of the year 3 Start of Period Balance – The opening balance at the start of the current period 4 Comparative Year Balance – The balance of the account as at the end of last year 5 Comparative Period Balance – The movement on the a/c for the same period last year 6 Budget for Year Balance – The total budget set for the year 7 Budget for Period Balance – The budget set for this period 8 Movement for Year – This is the difference between the start of year balance on the
account (item 2) and the current balance (item 1) 9 Movement for Period – This is the difference between the start of period balance (item 3)
and the current balance (item 1)

132 Nominal Ledger and Cash Book
Datafile Software Nominal Ledger and Cashbook Manual 06/07/07
10 Comparative Year Variance – This is the difference between the balance at the end of last year (item 4) and the movement for the year (item 8)
11 Comparative Period Variance – This is the difference between the movement on the account for this period last year (item 5) and this year (item 9)
12 Budget Year Variance – This is the difference between the budget total for the year (item 6) and the movement for the year so far (item 8)
13 Budget Period Variance – This is the difference between the budget for the period (item 7) and the movement for the period (item 9)
14 Budget for Year Accum – This is the budget year-to-date (i.e. up to the period you run the enquiry for) as opposed to item 6 for the full-year’s budget.
15 Budget for Year Accum Variance – This is the difference between the year-to-date budget (item 14) and the movement for the year (item 8)
16 Comparative Year Accum – This is the year-to-date balance for this period last year as opposed to the full year balance that is item 4.
17 Comparative Year Accum Variance – This is the difference between the balance at this point last year (item 16) with this year (item 8)
Summary Definition The definition is then created by entering statements of what to print. Using the above illustration as an example, the first part of the statement definition would be described by the screen shown below.
Each line of the specification describes what to print using the following codes:

Nominal Ledger Instructions 133
Datafile Software Nominal Ledger and Cash Book Manual 06/07/07
H - Heading. Prints one line with up to 40 characters of text. In the above example the
single word “SALES” is printed R - Range. You may specify a range of account codes to print. Every account in that
range prints, one per line, unless you requested that zero value accounts were not to print (see General Parameters above). The account name is used as the text for each line
This is the only specification code which prints more than one line on the
final report, and you may need to experiment with your format if the final report prints over more than one page
You can reverse the sign of all values before they print. Typically the profit
and loss income accounts, and the liability balance sheet accounts have negative values in your files, but you would want them to print as positive values
U – Underline. Prints an “underline” character, you can choose any character to print
continuously across the page (typically you would choose “–” or “=”) and can ask to underline the text part of your summary, the columns, or both text and columns
T – Total. This accumulates a value from a complete range of accounts, printing the
total on a single line. You may reverse the sign before you print, and you can also specify the text to print on this line. In the example above “TOTAL SALES”, “Purchases”, “Stock Movements” and “Cost of Sales” are all total lines
* - Calculation. This lets you add and subtract up to five values to print on a single line. The
values must be the results of any previous total line, and you give the specification line numbers for those totals. For example, the entry “GROSS MARGIN” in the example above was defined to be “+4 –10” — the sales total (fourth line of specification) less the cost of sales (line 10)
% - Percentage This lets you divide the result of one line (a total or a calculation) by the
result of another, giving the answer as a percentage. You might use this to express various totals as a percentage of (e.g.) sales. You can specify the text you wish to print in the text area on this line
– Blank Line Use a minus sign to indicate a blank line in your report. Judicious use of
these to format the report can improve the legibility of the end result P – Page Break Use this to force the start of a new page. Where you are printing ranges of
accounts, your report may well spread over more than one page, which prints without any page headings on the second or subsequent pages. To improve the appearance of subsequent pages you may want to force page breaks, and

134 Nominal Ledger and Cash Book
Datafile Software Nominal Ledger and Cashbook Manual 06/07/07
use underlines (across both text and columns) and headings to give page headings
Once you have completed the specification you are asked if you want to continue and print the summary. If you reply 'Yes' you go into the normal report print pre-amble described above. Reply No to return to the financial summaries sub-menu.
Account Enquiry This provides an easy way to view a nominal account and its transactions. You are first asked for the account code. You can use the <F4–Select> facility to search for an account here in the usual way. Once a valid account code has been entered, then account details as shown below are displayed.
You scroll up/down the list using the mouse or the arrow and page-up/down keys. Pressing <F6> or the journal button against a transaction shows the full journal of which that entry is a part. Before inputting the account code the <F7-Options> key can be used to configure details of the transaction display.

Nominal Ledger Instructions 135
Datafile Software Nominal Ledger and Cash Book Manual 06/07/07
Transaction Date Range: From Transaction Date Range: To You can specify here a date range between which transactions are to be displayed. If you leave either date blank it is assumed that you want to display from the start and/or end of the file respectively. Enquire Period Number (Curr Year) This defaults to the current period. If the account display items include the budget or movement for period 1 then this setting changes the values displayed to reflect the period. For example, if in period 7 it will display the movement values for period 1. If not displaying ‘period 1’ values in the enquiry header then this setting has no effect.
Update from Other Ledgers Your nominal ledger system is often linked to other Datafile Software systems such as the sales and purchase ledgers, and payroll. This option enables you to extract details of all the transactions from these linked systems. The program writes nominal ledger transactions and updates the appropriate nominal ledger accounts. You can also update your nominal from any Datafile Software database format file or CSV file. You can use this feature to update details from other applications such as stock control or job costing, or from your own ProFiler applications. The Datafile Software fixed asset register application is built using the ProFiler application generator and you can update the monthly depreciation from there into the nominal. As a final option, you can even update from other Datafile Software nominal ledger transaction files. You might use this, for example, where you want to consolidate several company nominal ledgers into a group holding company nominal ledger. Checks are built into this part of the program to ensure that transactions within the originating system which have already been updated to the nominal ledger are not transferred again. A report gives details of all the postings made by the program.

136 Nominal Ledger and Cash Book
Datafile Software Nominal Ledger and Cashbook Manual 06/07/07
In view of the major computer processing which occurs whenever you use this process, it is strongly recommended that you make a backup of all files before running any of these menu choices. Select Nominal Update Definition The option exists, for non-Compact users, to define more than one set of update processes (see Nominal Configuration later). For example, a number of divisions may run their own sales, purchase and nominal ledgers, but you want to consolidate these into one nominal ledger. You need a set of update procedures for each of these divisions. Another common example occurs when you have both weekly and monthly payrolls, so need an update procedure for each. If configured, then on selection of the option to update from other ledgers you are prompted to select the definition to update with. Select as required.
Note If you specify a file for multiple updating in the nominal System Profiles but fail to use the Advanced Features Manager to create and define at least one set of updates, you get the warning UPDATING DEFINITION NOT FOUND. Either remove the System Profiles filename, or create some definitions.
Update from Which System If not using the multiple updating definitions then you are presented with a list of the applications you have defined for update (sales, purchase and payroll).

Nominal Ledger Instructions 137
Datafile Software Nominal Ledger and Cash Book Manual 06/07/07
If using the multiple updating options then you are presented with a list of systems that you have defined in this update (sales, purchase, payroll, other nominal transaction database, and an external DFD or CSV file). If only one system is defined for update within the definition then this is automatically selected for you.
Update Procedure Once you’ve selected the application from which you wish to update, some initial processes occur to check that the update can proceed.
First you must confirm the input database pathname. Press <Enter> to accept the pathname offered or overtype with the pathname required. The program won’t continue until a valid database pathname is entered and the file successfully opened.

138 Nominal Ledger and Cash Book
Datafile Software Nominal Ledger and Cashbook Manual 06/07/07
The range of input records to be updated is shown and may be overtyped. When updating from sales and purchase ledgers the system knows from which record to start processing. With other files it offers 1 as the starting number (you should check this carefully). For example, the payroll should always process all department records but when updating from another nominal transaction file, and not clearing the input file afterwards, you only want to process transactions added since the last update. You can overtype with a different record range if so required.
Warning
When updating from another nominal transaction file, you need to take particular care, if you overwrite the transaction numbers offered, that you are starting from the first transaction of a journal, and ending on the last transaction of the same or another journal. No checks are made with this one type of update that the sum of debit and credit values balance out.
For the External Datafile Database option you will not be prompted to confirm the input record range but you may be asked to complete the standard selection criteria screen instead which does allow confirmation of the record range in addition to other criteria.
Note
This information also gives you an idea of the maximum number of nominal ledger transactions which may be created. You should check that there is room in the nominal transactions file to hold all these transactions.
Missing Mandatory Accounts After confirming the input records range the program checks the update definition. For the sales and purchase updates the system must know the ‘control’ accounts such as the sales tax control to post the tax element of the transactions. If a control account is not defined, or a set control account does not exist, then you are warned accordingly and you cannot proceed.
If this warning is displayed you need to check the nominal System Profiles and, if using the multiple update definition, the definition itself within the Application User Facilities to ensure that all control accounts are set correctly.
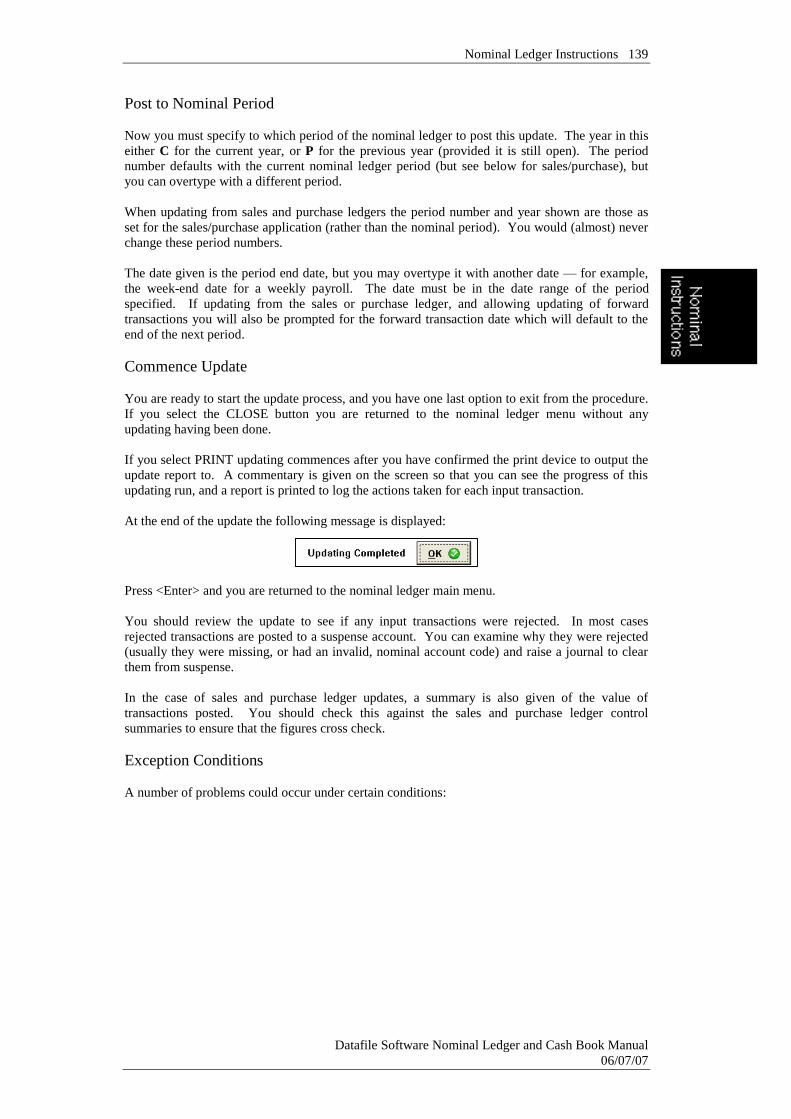
Nominal Ledger Instructions 139
Datafile Software Nominal Ledger and Cash Book Manual 06/07/07
Post to Nominal Period Now you must specify to which period of the nominal ledger to post this update. The year in this either C for the current year, or P for the previous year (provided it is still open). The period number defaults with the current nominal ledger period (but see below for sales/purchase), but you can overtype with a different period. When updating from sales and purchase ledgers the period number and year shown are those as set for the sales/purchase application (rather than the nominal period). You would (almost) never change these period numbers. The date given is the period end date, but you may overtype it with another date — for example, the week-end date for a weekly payroll. The date must be in the date range of the period specified. If updating from the sales or purchase ledger, and allowing updating of forward transactions you will also be prompted for the forward transaction date which will default to the end of the next period. Commence Update You are ready to start the update process, and you have one last option to exit from the procedure. If you select the CLOSE button you are returned to the nominal ledger menu without any updating having been done. If you select PRINT updating commences after you have confirmed the print device to output the update report to. A commentary is given on the screen so that you can see the progress of this updating run, and a report is printed to log the actions taken for each input transaction. At the end of the update the following message is displayed:
Press <Enter> and you are returned to the nominal ledger main menu. You should review the update to see if any input transactions were rejected. In most cases rejected transactions are posted to a suspense account. You can examine why they were rejected (usually they were missing, or had an invalid, nominal account code) and raise a journal to clear them from suspense. In the case of sales and purchase ledger updates, a summary is also given of the value of transactions posted. You should check this against the sales and purchase ledger control summaries to ensure that the figures cross check. Exception Conditions A number of problems could occur under certain conditions:

140 Nominal Ledger and Cash Book
Datafile Software Nominal Ledger and Cashbook Manual 06/07/07
If no transactions are found for updating (for instance, if the update has just been run and is being repeated by mistake) the message ‘No Input Details found for Updating’ is given. This is not serious, but you should check why there were no details. You may have used the wrong file, or it has been updated to the wrong nominal ledger If you have already updated the sales and purchase ledgers into the nominal and no transactions have been posted to them since that time you are told ‘No Additional Transactions for Updating’. Again this is not serious. There’s no point in continuing, however, so you might as well take the advice and <Escape> back to the nominal ledger menu If the nominal transaction file becomes full then you are told ‘Nominal Transaction File Full - Not All Data Updated. You Must Go Back to Backup’. This is very serious. You definitely need to restore a backup, expand the nominal ledger transaction file, and have another go at updating. Updates from Sales and Purchase Ledgers The sales and purchase ledger period end menus, and possibly the payroll period end as well, allow the ability to update the nominal ledger. These procedures actually run the options as outlined above. In the case of the sales and purchase ledger after you chosen the update definition, if using the multiple update definition, then the remaining options such as the posting dates are automatically set for you and you only choose to commence the update. Calling Individual Update Options Premier users can amend their menus to call individual update options in the same way as Datafile have pre-set a call to the sales and purchase updates to the nominal within the ledgers period end menu. For more detail on menu configuration refer to the Configuration Guide. The nominal ledger uses the parameter 5000 to call the update procedure but you can call the individual update options with the menu parameters listed below. If using the multiple updating definition file then you are given a list of the update definitions and the system will automatically select the appropriate update within that definition. You can append the definition number to the end of the parameter number below to automatically select the update definition as well – for example if want to call the sales ledger update from the fourth update definition the menu parameter would be 500104. 5001 Update from the Sales Ledger Transaction file. 5002 Update from the Purchase Ledger transaction file. 5003 Update from Payroll Department file. 5004 Update from Nominal Transactions file 5005 Update from another Datafile Database. 5006 Update from a CSV file.

Nominal Ledger Instructions 141
Datafile Software Nominal Ledger and Cash Book Manual 06/07/07
Set Current Period The period number (and year) entered here is used as the default for reports and journals. All periods of the year are open to you, and you can always override the default. However, you should update the default period each month to help ensure that no transactions are accidentally posted to the wrong period. Key in the period number as required, prefix with P to default into the previous year.
Other Journal Options This option gives a sub-menu of further journal procedures including options to reverse journals and to revalue currency accounts.
Reverse Provisionals In most cases those provisional journals which you have entered into one period need to be reversed out of the following period. This option provides an automatic way to reverse the journals that were not entered with a specific reversal date, and clears the flag which marked them

142 Nominal Ledger and Cash Book
Datafile Software Nominal Ledger and Cashbook Manual 06/07/07
as provisional. In effect, for every provisional journal encountered, a new journal is written to the same nominal account or accounts but with a credit value instead of debit, and vice versa. Although you may choose to reverse journals selectively according to date, journal number or transaction record number, it is generally better to reverse all the provisional journals in one go. If the event for which you raised the provisional journal has still not occurred, then you can always re-apply the provisional journal. First you must answer some initial questions:
Transaction Record Numbers From / To Transaction Date Range From / To Journal Number Range From / To These options allow you select the provisional journals you want to reverse. Initially the whole transaction record range is offered, although you may choose a different range. If you always reverse all transactions, then you should only need to reverse transactions from the highest record number you reversed last time. In addition you may choose a date and/or journal number range within which to search. Enter the options, if any, that you require. If you leave a ‘From’ date or journal number blank, then it assumes there is no lower limit, and if you leave the ‘To’ date or journal blank it assumes there is no upper limit to the search. Both the ‘From’ and ‘To’ values are inclusive.

Nominal Ledger Instructions 143
Datafile Software Nominal Ledger and Cash Book Manual 06/07/07
Post Reversed Journals in Period / Date Enter the period number into which the reversed provisional entries are to be posted, and the date to give to the reversed transaction. The date must be within the range for the period number given, otherwise you cannot proceed. Once you’ve answered all the above questions you are then asked ‘Ok to Commence Reversing of Journals?’ A reply of ‘No’ takes you back the menu. If you reply ‘Yes’ and the journal transactions you’ve selected are scanned. Any provisional journals are reversed with normal journals, and the provisional flags are removed.
Reverse Dated Provisionals This procedure is similar to the above except that it reverses provisional journals for which you did enter a reversal date for the current period.
As with the previous option you are asked to confirm the transaction record/date/journal range for which to scan for provisional journals. Unlike the previous option reversed journals are automatically posted into the current period and only those journals with an entered reversal date within the period date range are processed.

144 Nominal Ledger and Cash Book
Datafile Software Nominal Ledger and Cashbook Manual 06/07/07
Reverse Journals You may want to reverse a journal (other than a provisional journal) at any time. Perhaps a journal you entered is found to be incorrect, or an accrual you entered was over-cautious and you need to clear it from your ledger. This option allows you to call up any existing journal and to write a complementary journal with all debit values changed to credits and all credit values changed to debits. You must first specify which journal number is be reversed.
Enter the journal number you wish to reverse. You may use the <F4-Select> key to help identify the journal required. The system then searches for the journal and, if found, displays the details of the original journal except that debit values are shown as credits, and vice versa.
If this is not the journal you wanted, reply ‘No’ and you are returned to the menu. If this is the journal, however, reply ‘Yes’ and the journal is written to the file with a commentary appearing on the screen. When complete, press <Enter> to return to the menu.

Nominal Ledger Instructions 145
Datafile Software Nominal Ledger and Cash Book Manual 06/07/07
Note that when the reversed journal is displayed the journal number shown is that for the reversal journal the system is going to create.
User Defined Journals Many of the transactions which you need to enter into the nominal ledger are the same from one period to the next, with only perhaps some changes in values. To help you speed up journal entries you can define up to 40 pro-forma journals which you can call up and modify whenever you need them. Examples include: Standard accruals and prepayments — you should accrue for electricity, gas and telephone
on a monthly basis, and make any adjustments at the end of the quarter when the real bills come in. Similarly, you may rent quarterly, and need to spread the cost over each month
Depreciation and amortisation of equipment, buildings, patents and so on HP interest and repayments When posting user-defined journals the entry process looks very much like Journals as described above, although the specific details you are asked to enter can vary according to how you have defined each transaction. There are in fact two types of user-defined transactions: standard ones which you can only change through a special option, and “easy mode” ones which you can change at run time and save for later use.
Note
The easy mode transaction in particular can be used to develop a journal over a period of time until it is ready to enter. The journal definition is held and you can modify it many times until you are ready to post it fully.
Taking this option shows you the menu of journals you have defined so far. The following is a typical example.
Normally you select the journal option you wish to use by scrolling up/down the list using the mouse or arrow key and pressing <Enter> or clicking the required entry with the mouse. In addition, however, you can change the definition of any journal at this point by using the <F7–Options> key. The definition process is covered at the end of this section under Defining User Journals.

146 Nominal Ledger and Cash Book
Datafile Software Nominal Ledger and Cashbook Manual 06/07/07
Standard User-Defined Journals A standard user-defined journal follows the same pattern as the journal entry process, with three main exceptions: You may not be asked to confirm the nominal code, amount, and other details. The
definition process allows you to fix many aspects of the journal to prevent changes at run time. This is handy for regular journals where no alterations are needed, just the journal to post
You must step through all journal entries first. If you <Escape> from within the journal,
then you are asked to abandon the transaction. Reply ‘No’ to return to the journal details. If you reply ‘Yes’ the journal is abandoned and you are returned to the menu.
You do not have the option to delete or add entries when it comes to closing the journal. If
you want to change the journal in this way, then you must go back and change the definition before you use it
Once you have updated the nominal ledger you are asked if you wish to post another journal entry. If you reply ‘Yes’ then the original standard journal entries are refreshed so that you can enter another journal. If you want to pick another user-defined journal, however, reply ‘No’ and you are returned to the menu.

Nominal Ledger Instructions 147
Datafile Software Nominal Ledger and Cash Book Manual 06/07/07
After the journal has been posted the date of the journal is updated onto the menu of user-defined journals so you can review that all appropriate journals have been posted. Easy Mode User-Defined Journals If you choose an “easy mode” journal, you are first asked:
It is only this question (unless you mark it as such in the menu title) which tells you it is an easy mode journal. Easy mode journals allow you to develop a repertoire of standard transactions which you can define and keep for later use as you enter them. If you reply ‘No’ the journal is displayed for you on the screen and you must complete the header in the usual way. It follows the same procedure now as the standard user-defined transaction, itself modelled on the standard journal entry procedure. If you reply ‘Yes’ you first go into the easy-mode definition described below. Easy Mode Journal Definition
New Title First, the existing menu title is displayed so that you can change it if you want to. Provisional? If this is to be a provisional transaction, then reply Y <Enter>, otherwise reply N <Enter>. You are advised to note in the menu title that it is a provisional journal. If the transaction already has details defined for it you are now asked:
If you reply ‘No’ to initialise all values, then the original definition is ignored and you are given a blank transaction entry screen just like the usual journal entry procedure. (Whether the original definition is cleared depends on whether you update the new definition back at the end of this process). If you reply ‘Yes’ the existing transaction definition is displayed.

148 Nominal Ledger and Cash Book
Datafile Software Nominal Ledger and Cashbook Manual 06/07/07
From this point you proceed just as though this were a normal journal. You must complete the header information, and then step through the detail lines. Should you <Escape> from the Account prompt on any line, and then you go to the same Action options as for a normal journal. Once you are happy with the transaction, you can enter it into the nominal in the usual way, or you can decide not to post it. Either way, you are now asked whether you wish to save the entered journal back to the definition.
Reply ‘Yes’ to save the details in the definition file so that you can use it again at a later date. <F7–Options> Key to Update Definition Instead of picking one of the user-defined journals you can use the <F7–Options> key to put you into the full journal definition process. This is described below.
More User Defined Journals
If you’ve used all 40 slots within the definition file then Diamond and Premier users can create a new definition file. The usual definition file, ???-TXS.DEF (where ??? is the company id) is supplemented by ???-TXS.0nn (when nn is a number from 01 to 99). You need to enable this option in the Application User Facilities and configure the menu to call this new definition – the parameter number is 2005nn where nn is the definition number from 01 to 99.
Defining User Journals If you press the <F7–Options> key from the User-Defined Journals menu as described above, then you are put straight into the definition process. This section describes how you define these journals. The steps you take are: Open the definition file Select the journal you want to define or modify Complete certain preliminary details, including the choice of journal style — easy-mode or
full definition Define the journal details Open the Definition File All the definitions for user-defined journals are kept in a single definition file. The program first attempts to open this. When opened, you proceed to the next stage.

Nominal Ledger Instructions 149
Datafile Software Nominal Ledger and Cash Book Manual 06/07/07
Note If no definition file exists when you select the option you are asked to create it and taken straight into the definition process if you proceed.
Update Which Transaction You can now choose the transaction you want to update from the list given to you. Any transaction which has already been designed is given with its menu name, as shown below. If a transaction in the definition file is yet to be defined it shows with a name of “spare” or is blank. All forty transactions are shown, even though your definition file may be smaller. The additional ones are shown as “not allocated”.

150 Nominal Ledger and Cash Book
Datafile Software Nominal Ledger and Cashbook Manual 06/07/07
You have a number of options here: Choose the number of an existing or spare transaction so that you can go and modify or
create a user-defined transaction Key <Escape> to return to the menu Key COPY so that you can copy one transaction definition to another in the file. This is
helpful where you have similar transactions to define. The system asks for the number of the one you want to copy, the number of the one to copy to (which must be within the current definition file size) and then checks that you are sure before performing the copy
Key the number of one of the “not allocated” transactions. You are then asked if you wish
to expand the file. This is a simple way to create additional space in the definition file for more user-defined journals
Choosing one of the menu options then puts you into the journal menu title field (see the example screen above) so that you can change the title if you wish. If you are defining a provisional transaction, by the way, we recommend that you include the word “Provisional” in its title. Note that if you blank out the title, then effectively you clear that transaction from the menu.

Nominal Ledger Instructions 151
Datafile Software Nominal Ledger and Cash Book Manual 06/07/07
If you want to change the specification of the journal, then reply ‘Yes’ here, otherwise reply ‘No’ to return to the “Update Which Transaction” prompt. Definition Preliminaries
Allow “User” Easy Set-up of Journal Easy mode journals are ones which you can change quickly at run time, and save the changes for use in the future if you wish. It is worth having a few of these on your user-defined menu, because they are very easy to change. On the other hand, all details must be keyed through at run time, so there is scope for incorrect amendment which can be avoided using the standard user-defined journal. Set if this is to be an easy mode journal, otherwise leave blank to ensure this is a standard user-defined journal.
Note
Although you can proceed with the rest of the definition process for easy mode journals, their purpose is to be changed at run time. You may want to <Escape> now and <Escape> again to the “Save any changes made” prompt below, and move on to the next user-defined transaction.
Default Transaction Description Give here the default description which is to be offered when you choose this journal. You may want to change this at run time to give the period in words to which this applies, so a description such as “(month) Depr. Office Equip.” allow you to type in the month without having to type all the rest of the description.

152 Nominal Ledger and Cash Book
Datafile Software Nominal Ledger and Cashbook Manual 06/07/07
Is This a Provisional Transaction? Only set if this is to be used as a provisional transaction, otherwise leave blank. You are recommended to say in the transaction title that it is a provisional journal, to remind you when you come to use it. Allow User Overtyping Of Journal No Input Date per Entry Allow User Overtyping Of Description Input Description per Entry These questions determine whether or not you can enter or overtype the values given at run time. Set as appropriate. You now choose each entry in turn that you wish to add, amend or delete.
Enter the number of the entry you want to edit, D to delete an entry, or <Escape>. If you want to delete an entry, key ‘D’ at the line entry prompt, then the entry line number. The line for the entry is then deleted. Define Journal Entries User-defined transactions can have up to a hundred entries. To add or edit an entry, key the entry number as described above. For each entry you may now specify the following details:

Nominal Ledger Instructions 153
Datafile Software Nominal Ledger and Cash Book Manual 06/07/07
Debit or Credit entry (D or C)? Set as D if this is a debit entry line, otherwise set as C. Account Range From / To If you wish to ensure that the account code falls within a range of accounts, key the code of the first and last account of the range, otherwise leave blank. If you give the same account code for both the start and end of the range, then when the journal is used the account code cannot be changed by the user. Replace the narrative with the account name? Shortly you will key in some narrative for this entry, perhaps to remind the user of the purpose of this line. You can choose here whether this narrative should remain, or be replaced by the account code name when the journal is used. Set to overwrite, otherwise leave blank to remain (the more usual choice). Default reference Allow overtyping of reference You may type in a default reference here, otherwise leave it blank. You can also choose whether to allow it to be overtyped at run time. Set to allow users to overtype the reference at run time, otherwise leave blank.

154 Nominal Ledger and Cash Book
Datafile Software Nominal Ledger and Cashbook Manual 06/07/07
Default analysis code Allow overtyping of analysis code You may enter a default analysis code here, otherwise leave as zero. You can also choose whether to allow the analysis code to be overtyped at run time. Set to allow users to overtype the analysis code at run time, otherwise leave blank.
Note — Datafile Diamond and Premier only
You have the option to remove the reference code and/or analysis from journal entries at a global level, by removing them from the Datafile Profiles for the nominal ledger transaction file.
Amount equal to previous entry On any journal entry line except the first (where it is marked N/A as not applicable) you can choose to copy the value for this entry from the previous entry line. This is helpful where you have a number of balancing journal entries, and saves you at run time from having to key the value for every one. Set to copy the amount from the previous entry, otherwise leave blank. Allow overtyping of the amount This only applies if you have not already marked this line to copy its value from the previous entry (in which case it is marked N/A). You are about to enter a default value for this entry, and here you specify whether or not this value can be changed at run time. Set as appropriate. Default Values After replying to the above prompts you are put into the narrative and value fields for this entry so that you can enter default values to display when the journal is used subsequently. What you can enter depends on the replies you gave above. For instance, if an entry is set to copy its value from the previous entry, then the system inserts that amount in the debit or credit column as appropriate and you cannot enter another value.
Note
The above prompts allow considerable freedom to decide which values can be entered when the journal is used, and which are fixed and unchangeable. In fact you can define a transaction where nothing — account code, description, value or anything else — can be changed for any entry. This can ensure that predefined journals do not get changed accidentally.

Nominal Ledger Instructions 155
Datafile Software Nominal Ledger and Cash Book Manual 06/07/07
These user-defined journals have considerable versatility, and you can use them to define virtually the whole of your period-end journals. Completing the Transaction Definition You can continue to add to or amend the transaction by keying each line entry number and repeating the process above. To finish a definition key <Escape> at the line entry prompt. If you have defined a transaction where there is to be no overtyping on any of the entry values, then the total of the debit amounts must balance with the total of the credit amounts. If they do not balance at the point when you key <Escape>, you are warned accordingly. When you key <Escape> to end input you are asked to save any changes made. Reply ‘Yes’ to save any new input or changes, and you may then define or amend another transaction. ‘No’ throws away any input or changes made to the chosen transaction and returns you to the list of user transaction names above.
Revalue a Nominal Account The need to revalue nominal accounts normally comes about only due to a change in the holding rate. Even in this event it may only be certain balance sheet accounts which need to be revalued. Note that the debtor and creditor control accounts would be automatically revalued as a result of revaluing the sales and purchase ledgers and thus would not need a separate revaluation. This procedure allows accounts to be selected one-by-one for revaluation, ether at the current holding rate or spot rate. Any exchange difference is posted to the exchange difference account for that currency and this difference could be posted as a provisional journal if required.

156 Nominal Ledger and Cash Book
Datafile Software Nominal Ledger and Cashbook Manual 06/07/07
Period No / Date Enter the period number and date as of which you wish to revalue. Account Code Select the account code you wish to revalue, <F4-Select> is available. Of course, you can only revalue non-base currency accounts. Balance in Currency Balance in Home New Holding Rate New Spot Rate The system then displays the balance of the account in both the currency of the account and the base value together with the holding and spot rates it will revalue this account at. Revalue at Current / Spot Rate Effect of Exchange Difference Value This asks whether you want to revalue at the current holding rate (enter ‘C’) or the spot rate (enter ‘S’). At this point the system determines whether any exchange difference is calculated – if not then you are warned accordingly and asked if you wish to revalue another account. If a difference is calculated then the system displays the result.

Nominal Ledger Instructions 157
Datafile Software Nominal Ledger and Cash Book Manual 06/07/07
Write Off Exchange Difference to Account This asks for the account to post the exchange difference to, it defaults to the exchange difference account set for the currency but you can amend as required. <F4-Select> is available. Post as Provisional Journal Set accordingly. After confirming these details you will be prompted to update the nominal files, respond as required and then confirm whether you wish to revalue another nominal account.
Revalue All Nominal Accounts This option operates as above but allows the ability to revalue all, or selective, nominal accounts for a particular currency in one process rather than revaluing the accounts individually.
On selection of this option you are asked to confirm the period you wish to revalue at and the date to post any revaluation transactions ‘as at’ (note: the date is restricted to the period you are revaluing). You then select the currency to revalue and you have the option to enter additional selection criteria. The system displays the holding and spot rates to revalue at and asks you to confirm

158 Nominal Ledger and Cash Book
Datafile Software Nominal Ledger and Cashbook Manual 06/07/07
which rate you wish to revalue at. Next, you confirm the exchange differences account to post any revaluations to and whether the revaluation transactions are posted as ‘provisional’ journals or not. After confirming these details a prompt asks you whether you wish to process accounts automatically. If you respond ‘No’ the system processes each applicable account in turn, shows you the suggested exchange difference and asks you to confirm whether to process. If you respond ‘Yes’ the system revalues the applicable accounts automatically.
Year End Procedures The nominal ledger keeps all periods of the year open, so there are no particular actions which need to be taken at the end of each period. For your convenience you can set the default period number to the current period so that you do not need to keep changing the period number when posting journals. The year-end procedures themselves take place in two distinct phases. Firstly, you need to start a new year in the nominal at some convenient point. Secondly — but not usually until well into your new year — you need to close down the old year and do some housekeeping on the nominal such as to clear down historic transactions. You may need to start a new year in your nominal ledger as soon as, or even before, the new year has actually started. This is because the sales and purchase ledgers can only post forward transactions if there is a forward period defined in the calendar. When they reach the final period of the year, there is no forward period. The solution is to start a new year, which makes the current year become the old year. The sales and purchase ledgers are then positioned in the last period of the old year, and now have a forward period (the first period of the new year) into which to post forward transactions. You cannot only have two financial years open at one time so you cannot start a new year until the old year is closed — but there is unlikely to be any reason for the old year still to be open a year after it has ended. After you’ve started a new year, the current year becomes the old year but it is still open for further journals or updates from other systems. This can then remain open as long as you like (until the end of the next year if required). In most circumstances you will close this year when you send your annual accounts for audit. At that time you may want to clear down old transactions too. As with any procedure altering files on a global basis, it is recommended that you take security copies of your files before you undertake any year-end procedures.

Nominal Ledger Instructions 159
Datafile Software Nominal Ledger and Cash Book Manual 06/07/07
Close Previous Year As discussed previously the nominal ledger (and cashbook) covers two financial years – a current year and a previous year. You close the previous year once all postings and reports have been completed for that year, typically as you send the accounts of to your auditor or after they have sent you the adjustments to make. To give an example – if your current financial year is 01/01/2006 to the 31/12/2006 then when you close the previous year you are closing the year up to 31/12/2005.

160 Nominal Ledger and Cash Book
Datafile Software Nominal Ledger and Cashbook Manual 06/07/07
Reply ‘Yes’ to close the previous year when you select this option, ‘No’ to leave the year open.
Journal Cleardown You can clear transactions from the transactions file whenever you like and you do not have to remove transactions at all (subject to product level file size limits). You are advised to keep all transactions on file until at least the close of the previous year as this would allow you to print an audit report for the previous year’s accounts in full for your auditors, which can considerably speed the audit and possibly reduce the charge. Take this option when you are ready to remove historical transactions.
You are asked for the date up to which you clear transactions. You can enter any date prior to the start of the previous year, if you enter a date within the accounting calendar – current and previous year date range – then you can only enter a year start date or a period end date.
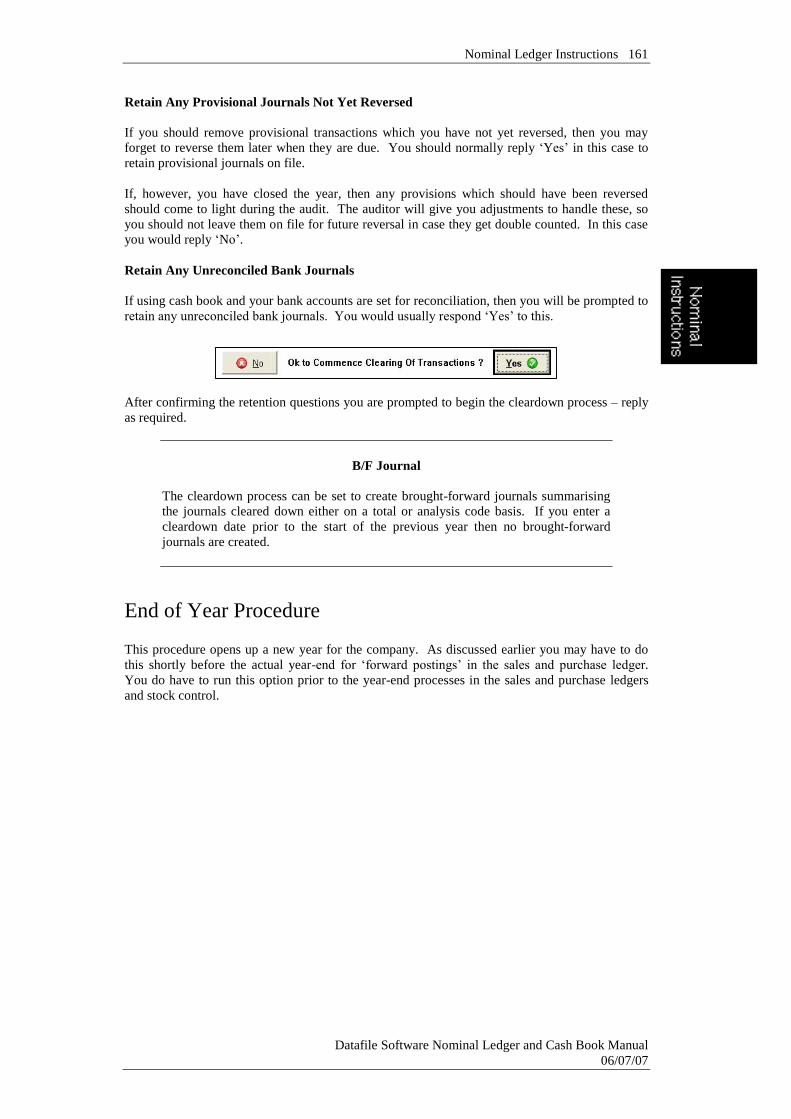
Nominal Ledger Instructions 161
Datafile Software Nominal Ledger and Cash Book Manual 06/07/07
Retain Any Provisional Journals Not Yet Reversed If you should remove provisional transactions which you have not yet reversed, then you may forget to reverse them later when they are due. You should normally reply ‘Yes’ in this case to retain provisional journals on file. If, however, you have closed the year, then any provisions which should have been reversed should come to light during the audit. The auditor will give you adjustments to handle these, so you should not leave them on file for future reversal in case they get double counted. In this case you would reply ‘No’. Retain Any Unreconciled Bank Journals If using cash book and your bank accounts are set for reconciliation, then you will be prompted to retain any unreconciled bank journals. You would usually respond ‘Yes’ to this.
After confirming the retention questions you are prompted to begin the cleardown process – reply as required.
B/F Journal
The cleardown process can be set to create brought-forward journals summarising the journals cleared down either on a total or analysis code basis. If you enter a cleardown date prior to the start of the previous year then no brought-forward journals are created.
End of Year Procedure This procedure opens up a new year for the company. As discussed earlier you may have to do this shortly before the actual year-end for ‘forward postings’ in the sales and purchase ledger. You do have to run this option prior to the year-end processes in the sales and purchase ledgers and stock control.

162 Nominal Ledger and Cash Book
Datafile Software Nominal Ledger and Cashbook Manual 06/07/07
I Haven’t Finished My Postings Yet A common query when asked to run the ‘End of Year Procedure’ occurs if the user hasn’t finished all their postings yet. Do not worry – your sales ledger, purchase ledger and stock system all remain in the period they were and you can continue posting. Any updates to the nominal ledger from these ledgers will update the correct period and update the opening balances for the new year this process creates. The nominal and cash book can also continue to post and report on this year as well – although you will have to prefix the period number with ‘P’.
The diagram below shows the effect of the year-end procedure on the accounting calendar.
The actions the ‘End of Year Procedure’ undertakes are: To move all actual and budget figures for the current year back by one year To move the old year’s actual figures back one year further still in the file To clear all the current year’s actual and budget figures To post the closing balances of all balance sheet accounts in the old year (which was the
current year) as the opening balances for the new current year To accumulate the net value of the closing balances of all profit & loss accounts in the old
year. This it posts into the opening balance for the balance sheet profit and loss control account (defined in the nominal system profiles)
To move the accounting calendar forward one year To ‘set’ the sales, purchase and stock ledger periods into their same period, but now in the
previous year On selection of this option the system displays the accounting year date ranges for the current and previous years plus the date range of the new year to be created. It also displays the account it will use to post the accumulated profit (loss) from the P&L accounts.

Nominal Ledger Instructions 163
Datafile Software Nominal Ledger and Cash Book Manual 06/07/07
You are first prompted to ensure you have a backup. You should always take a security backup prior to running this procedure. After confirming you have indeed taken a backup you are prompted to begin the year-end process. After you give the go ahead the system proceeds with the nominal year end and, when complete, gives you a status of the accumulated profit (loss) posted. <Enter> then returns you to the menu the year end having been completed.
Non-Monthly Periods
If you are operating a 13 period financial year – each period covering four weeks – then after the year-end is completed you will be asked to confirm the period date ranges for the new financial year. Similarly if any period date range in the current year ends on a date that doesn’t represent the end of a month you will be asked to confirm the new year period date ranges.

164 Nominal Ledger and Cash Book
Datafile Software Nominal Ledger and Cashbook Manual 06/07/07
System Status This displays a summary of the current status of the nominal ledger. It acts as a useful check on the ledger.
COMPANY — displays the identifying code and the name of the company in use FILES — displays the number of accounts and transactions reserved in the data files in total, and the number used so far. It should be clear if the files are becoming full and you can use the Controls & Audit Manager options to expand the files (if auto-expand not enabled). DATES — displays the system date, the current period number, the total number of periods in the year and whether the previous year is still open for postings CONTROLS — displays the following details: the last journal number used the highest transaction record number for brought forward balances the highest transaction number printed so far on any transaction listing

165
Datafile Software Nominal Ledger and Cash Book Manual 06/07/07
Chapter 3 Cash Book Instructions
Cash Book Overview Preparing the Cash Book Most companies use the cash book not only to record receipts and payments, but also to undertake a certain amount of analysis on these transactions. They use a multi-column cash book, recording receipts on the left-hand side and payments on the right. Usually more analysis columns are allocated to payments than to receipts. Receipts are largely from sales, whereas payments cover purchases for sale, wages, rents and rates, HP contracts, expenses, motor vehicles, and so on. One column on each side is often a “miscellaneous” column to act as a catch-all for any items which cannot be allocated conveniently to a specific analysis column. Space is left so that some notes can be written to help later posting to a nominal or general ledger. Cash Receipts The example overleaf shows a typical cash book receipts page. It shows that on 2nd August three cheques were banked for a total of £3985.45, and on 5th August there were two more for £2239.08. These total amounts will show up on the next bank statement when it comes in. The individual cheques need to be posted in the sales ledger. The Folio column can be used to record the paying-in slip number, or for a cross-reference number when the receipt is posted to the sales ledger. Some people merely tick the debtor value to show that they have posted it to the sales ledger. This example includes some extra entries, all of which are entered in the Miscellaneous column — if a particular type of entry were common enough, then you might want to use extra columns in a manual cash book to record them — although there is a limit to the width of page you can work with!
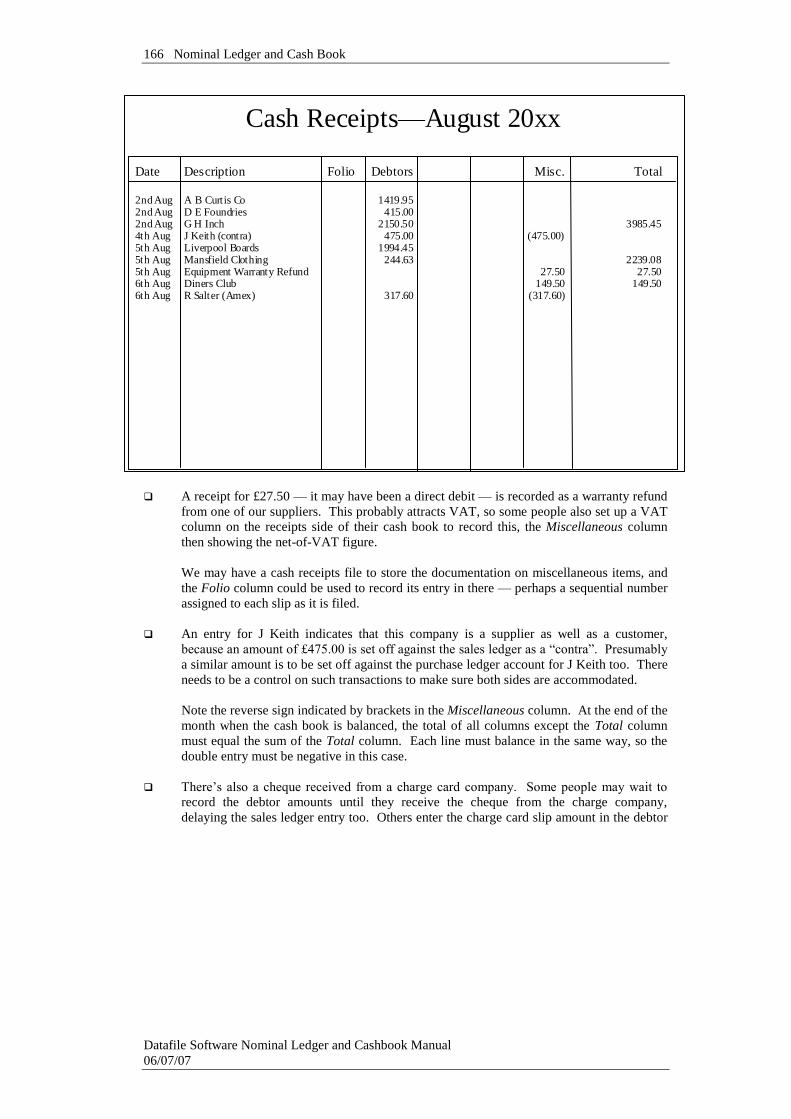
166 Nominal Ledger and Cash Book
Datafile Software Nominal Ledger and Cashbook Manual 06/07/07
A receipt for £27.50 — it may have been a direct debit — is recorded as a warranty refund
from one of our suppliers. This probably attracts VAT, so some people also set up a VAT column on the receipts side of their cash book to record this, the Miscellaneous column then showing the net-of-VAT figure.
We may have a cash receipts file to store the documentation on miscellaneous items, and the Folio column could be used to record its entry in there — perhaps a sequential number assigned to each slip as it is filed.
An entry for J Keith indicates that this company is a supplier as well as a customer,
because an amount of £475.00 is set off against the sales ledger as a “contra”. Presumably a similar amount is to be set off against the purchase ledger account for J Keith too. There needs to be a control on such transactions to make sure both sides are accommodated.
Note the reverse sign indicated by brackets in the Miscellaneous column. At the end of the month when the cash book is balanced, the total of all columns except the Total column must equal the sum of the Total column. Each line must balance in the same way, so the double entry must be negative in this case.
There’s also a cheque received from a charge card company. Some people may wait to
record the debtor amounts until they receive the cheque from the charge company, delaying the sales ledger entry too. Others enter the charge card slip amount in the debtor
Cash Receipts—August 20xx
Date Description Folio Debtors Misc. Total 2nd Aug A B Curtis Co 1419.95 2nd Aug D E Foundries 415.00 2nd Aug G H Inch 2150.50 3985.45 4th Aug J Keith (contra) 475.00 (475.00) 5th Aug Liverpool Boards 1994.45 5th Aug Mansfield Clothing 244.63 2239.08 5th Aug Equipment Warranty Refund 27.50 27.50 6th Aug Diners Club 149.50 149.50 6th Aug R Salter (Amex) 317.60 (317.60)

Cash Book Instructions 167
Datafile Software Nominal Ledger and Cash Book Manual 06/07/07
column at the time it is made out — presumably July in the case here. In fact, another charge card entry shows here, for R Salter paid by American Express.
The Datafile Cash Book works in a similar way. We can define up to fourteen “columns”, so we might well in this example have columns for the debtors ledger, one for charge cards (we might even consider having one column for each type) and one for warranty refunds, if that is a common occurrence. We still need to have the catch-all column for Miscellaneous. We do not need a VAT column, however, as the VAT element of cash book entries is covered by the transaction entry routines. Entries in the debtors’ column become the receipt postings to the sales ledger. The Folio column is effectively the transaction reference for these entries. Cash Payments An example cash payments page is shown below (most companies would have many more columns than this, but space was at a premium here!). This time we have a VAT column, which is helpful for the standing order coffee machine payment. The contra entry for J Keith is shown here too, so we can relax about that. The payment to Gamma Inc was transmitted by the bank, for which a charge was made — this is shown here by an entry under both the Creditors and the Miscellaneous columns. There is a column for the cheque number next to the total column, and a Journal column on the far right would allow us to record a journal or folio number for the miscellaneous entries. In practice we would also have left some space to write in details about miscellaneous entries to help us when we post to the nominal ledger.

168 Nominal Ledger and Cash Book
Datafile Software Nominal Ledger and Cashbook Manual 06/07/07
As with receipts, we can define up to fourteen computer columns to help speed entry of payments. Again, VAT does not need to be one of them, since this is handled by the transaction entry routines. What is the Bank Position? Pressures on cash flow being what they are, common questions are: what is the bank position, and can we pay certain suppliers? With a manual cash book the technique is often to keep a pencilled rolling balance of both the total receipt and total payment columns for the month. These, applied to the agreed opening bank balance, show the present position if all payments and receipts had cleared. After that we can use our knowledge of our bank and how quickly our suppliers clear their cheques to see if we can squeeze out another payment or two without breaching bank overdraft limits. A major benefit of the Datafile cash book is that the bank position on every account is immediately available to us — provided we have entered all the movements which we know about. The movements which can catch us out are the standing orders and direct debits. The Datafile Software cash book allows you to define these as automatic postings, which you can apply at any time to bring your bank account up to match what has, presumably, happened in your real account.
Cash Payments—August 20xx
Date Description Chq Total VAT Creditors Wages HP Misc. Jnl 2nd Aug J C Bee Co 283 1406.50 1406.50 2nd Aug Eagle Planet 284 230.00 230.00 2nd Aug Branchester Ind. Estate s/o 950.00 950.00 2nd Aug Lompoet Leasing s/o 375.00 375.00 3rd Aug CoffeeChum s/o 58.75 8.75 50.00 3rd Aug Copywright P rinting 285 146.75 146.75 3rd Aug J Keith - 475.00 (475.00) 4th Aug Goods Unlimited 286 1750.00 1750.00 4th Aug Gamma Inc (CHAPS) - 2855.39 2535.39 20.00

Cash Book Instructions 169
Datafile Software Nominal Ledger and Cash Book Manual 06/07/07
Balancing the Cash Book At the end of each month comes the hard work in a manual cash book. All the columns should be totalled up, and then control checks applied: For each side of the cash book, the sum of all the columns other than the Total column
should balance to the Total column. This can cause great diversions when it doesn’t Some of the columns must be balanced to other controls in your accounts. The debtors and
creditors columns should equal the net payments entered into your sales and purchase ledgers. The wages for the month should equal the net pay calculated from the payroll(s). Contra entries between sales and purchase accounts, should you use this technique, should be equal
The cash book needs to be checked to your bank statements — see below The Datafile Cash Book doesn’t need balancing in this way. You can print reports to show the month’s movements, and the Datafile Cash Book even lets you present these in a columnar manner to match what the cash book used to look like. Assuming you are using the Datafile Software sales and purchase ledgers, then the reports also confirm that receipts and payments match between the systems. The bank reconciliation must be done, however, and there are separate procedures for this. Reconciling Against Bank Statements When you receive bank statements, you check these against your cash book. You attempt to match each entry on the bank statement to an entry in the cash book, marking both with a tick. You enter into your cash book any entries which show on your bank statement but not in the cash book — bank interest and charges being typical examples. You would not initially reconcile entries beyond the current period-end date, so that you can compare your closing period cash balance to the bank statement at that date. Every bank statement entry should match to a cash book entry. However, there may be entries in your cash book which do not appear in the bank statements to the end of the month: Payments which have yet to be presented to your bank Receipts which you have entered but have yet to clear through the bank

170 Nominal Ledger and Cash Book
Datafile Software Nominal Ledger and Cashbook Manual 06/07/07
You can now do a simple calculation, as shown in the illustration on the right. This reconciles between the bank balance at the end of the period, and your own cash book balance. As with balancing the cash book itself, this operation can also create work at the period end in trying to reconcile the two balances. In the Datafile cash book you must also spend time to mark off the statement entries against the computer entries — with the computer equivalent of a tick. You can then spot immediately any difference between the bank balance and the computer cash book balance, and print a report which reconciles between the two. Transfer to Nominal Ledger Your previous cash book is likely to work in conjunction with your sales ledger, purchase ledger and payroll systems, so that at month end you need only check that the respective cash book columns match to the receipt and payment totals for the month in these systems. If you are running a nominal or general ledger, then you would also need to transfer the cash book entries not so far transcribed to this system — though some people do this operation at the same time as they enter the values into the cash book. A control check of some sort must be done here — possibly through analysis columns in the nominal or general ledger to break out those entries sourced from the cash book as opposed to those sourced from other places. The Datafile Cash Book can already provide monthly detail and total figures to simplify the task of posting to another nominal ledger. If you are using the Datafile Software nominal ledger, then the task disappears — the cash book is integral with the nominal ledger anyway. Columns vs. Detailed Codes The key to the cash book is in defining both the column structure and the detailed cash book account structure. If you are already using the nominal ledger, then you already have a complete account code structure. The nominal codes are all available to the cash book. All you need to do is to decide how to define your columns. If you are coming to the cash book for the first time, then — as already explained in the Overview in the Introduction chapter — there are three types of cash book account you need to define: the cash accounts themselves, the income and expenditure accounts against which you are going to analyses cash book transactions, and some control accounts used essentially for handling links to other systems such as the sales and purchase ledgers, and payroll. The income and expenditure accounts should be at the level of detail you need to post to your external nominal ledger. You should not then need any further analysis of entries.
Closing Balance Reconciliation Bank Balance 19631.20 PLUS Receipts Not Cleared 1691.30 LESS Cheques Not Presented 17131.21 -------------- Cash Book Balance 4191.29 =======

Cash Book Instructions 171
Datafile Software Nominal Ledger and Cash Book Manual 06/07/07
So far as defining your columns is concerned, you can define up to fourteen on each side of the cash book. Almost certainly you need a link to the sales ledger on the receipts side, and a link to the purchase ledger on the payments side. After that it is up to you to define what suits you best. Each column can accommodate a specified range of income and expenditure accounts (i.e. nominal codes) and could refer to a specific account such as “equipment lease” for example. The benefits of defining columns is that not only it is easy to place broadly where a payment should go, but if it is necessary to look up the exact expense code, then only the range of codes defined for the column need to be searched. You certainly need an open-ended column for miscellaneous items outside the ranges of accounts defined for the other columns. If you want to accommodate the facility whereby you can contra the same value to the sales and purchase accounts for a particular company, then it is usual to define a sales ledger column on the payments side which you call (say) the “Contra” column. It is worth taking some time to analyse your cash book to see what additional columns would have helped you in the past. Although you can change the column definitions once you have started the Datafile cash book, this should be done with care, and only at the period end — your reports are based on the current definition of your columns.
Getting Started with the Cash Book The rest of this chapter describes how to use the Datafile Software Cash Book application. We assume you have learned how to sign on to your Datafile Software system, and to use the main menu system together with all the Datafile DeskTop facilities (these topics are covered in full in the User Guide). Your cash book is accessed from the main menu. If you have difficulty locating this, then ask your system supervisor. Once you have selected the ledger you are immediately given the main menu from which to choose the option you want.
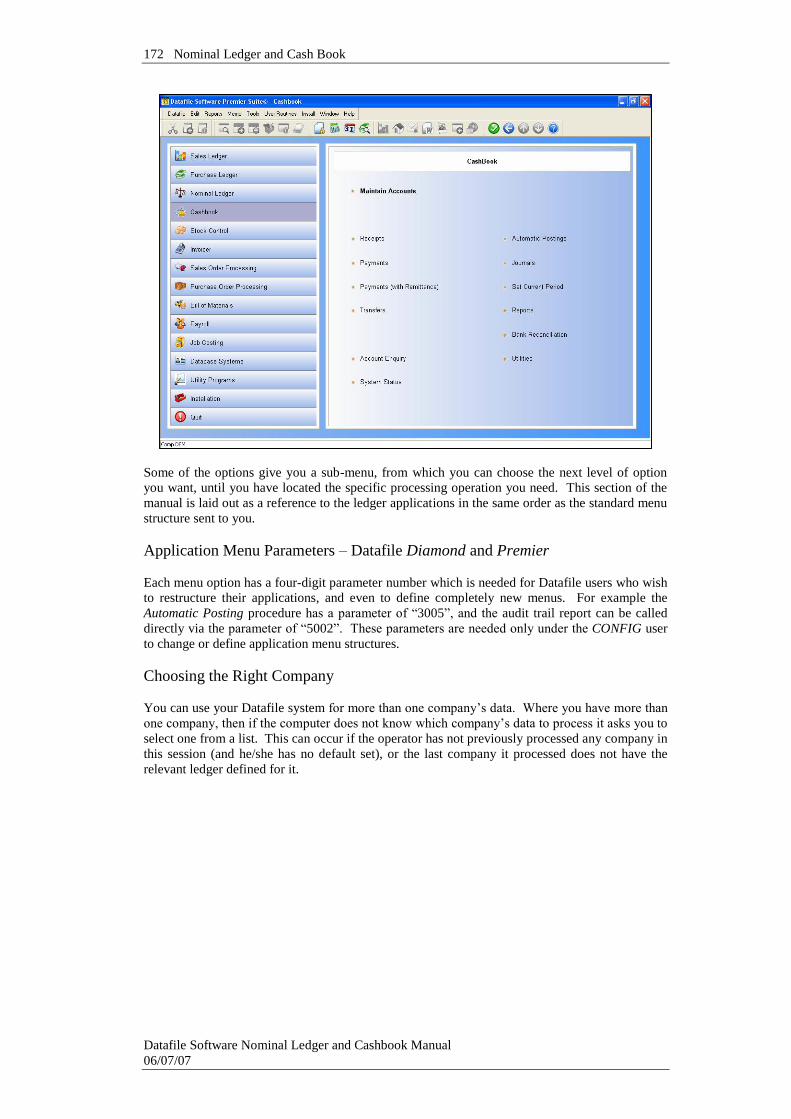
172 Nominal Ledger and Cash Book
Datafile Software Nominal Ledger and Cashbook Manual 06/07/07
Some of the options give you a sub-menu, from which you can choose the next level of option you want, until you have located the specific processing operation you need. This section of the manual is laid out as a reference to the ledger applications in the same order as the standard menu structure sent to you. Application Menu Parameters – Datafile Diamond and Premier Each menu option has a four-digit parameter number which is needed for Datafile users who wish to restructure their applications, and even to define completely new menus. For example the Automatic Posting procedure has a parameter of “3005”, and the audit trail report can be called directly via the parameter of “5002”. These parameters are needed only under the CONFIG user to change or define application menu structures. Choosing the Right Company You can use your Datafile system for more than one company’s data. Where you have more than one company, then if the computer does not know which company’s data to process it asks you to select one from a list. This can occur if the operator has not previously processed any company in this session (and he/she has no default set), or the last company it processed does not have the relevant ledger defined for it.

Cash Book Instructions 173
Datafile Software Nominal Ledger and Cash Book Manual 06/07/07
Example Company List
You can always view the current company by noting the company id on the status line at the foot of the screen or by using the ‘About this Company’ option on the Datafile pull-down on the main toolbar. You can change the company, providing you are within the menu system rather than a specific action, by using the ‘Open New Company’ option on the Datafile pull-down on the main toolbar or by using the <Alt + O> shortcut key combination. General Notes Throughout Datafile Software there is syntax to using the keyboard keys, and conventions to the way screens and messages are displayed. These are fully described in the System Users Guide supplied with your system. However, the main things you need to know are: In the text below, chevrons <> around words or letters tells you to press that key on the
keyboard. For example, <End> means the key which has the word “End” on it; and <F1> refers to the first of the ten (at least) keys along the top of, or to the left of, the keyboard with the inscriptions “F1” through “F10” on them.
<Enter> means the (carriage) return key or “Enter” key on the keyboard, used to signify
that all the data for a field (the highlighted area on the screen in which key strokes appear as you type) is now ready to be processed by the computer.

174 Nominal Ledger and Cash Book
Datafile Software Nominal Ledger and Cashbook Manual 06/07/07
<Escape> is the key marked “Escape” or “Esc”, and is used to exit from whatever you were doing — often you are first asked if you have finished, to prevent accidents.
The Select function is assigned to the <F4> key. This gives a powerful way to find an
account, either through a part of the code, or part of the account name, or even part of some other field such as a contact or telephone number.
Maintain Accounts This option allows you to add, amend, view and delete cash book accounts. If you are already using the nominal ledger, then these options largely duplicate the Maintain Chart of Accounts options in the nominal ledger. However, in addition here you can define the column headings to use when entering receipts and payments.
Note Whether or not you are able to use all these options may depend on the way your system has been configured. It is common to restrict the ability to maintain the nominal chart of accounts to a few specific users who have the right authority, and to prohibit the first two cash book account maintenance options completely.

Cash Book Instructions 175
Datafile Software Nominal Ledger and Cash Book Manual 06/07/07
Cash book accounts fall into three categories: Cash accounts, which are the bank accounts, petty cash, till float, and charge card accounts
that are to be managed by the cash book program Income and expense accounts, which analyse the receipts and payments that pass through
the cash book accounts. If you are running a sales ledger in conjunction with the cash book, then your income analysis comes from the sales ledger, and you would post receipts to a sales ledger receipts control account (see below). In a similar vein, most of the payment analysis might in fact come through the purchase ledger if that is linked
Control accounts, used to accumulate values against other systems Examples of control accounts include: Sales receipts control. If you have a nominal ledger, this is the same as the debtors’ ledger
control. If you are not using the nominal ledger, then the movements on this account every month should be checked to see that they agree to the payments figure in the sales ledger control
Purchase payments control. Similar to the sales receipts control, this time the nominal
ledger equivalent is the creditors ledger control Payroll control. Payments made to employees should accumulate in this control account,
and should equal the net pay from your payroll(s). If you have a nominal ledger, then the net pay figure from the payroll should refer to this account too, and so it should hold a balance of zero at the end of a period
If you are using the nominal ledger, then you already have a chart of accounts for the nominal, and these account codes are used by the cash book too. See the discussion about code structures in the Overview section to the Introduction chapter above. You are recommended to review your chart of accounts and its structure with your accountant before you start to add any accounts, particularly if you plan to implement the nominal ledger in the future.
Note
The first and second options of this menu have similar purposes — to add or amend accounts. When you set up the cash book initially, the first option Names is much quicker for getting all the accounts into the system. You can then use the second option to add the cash account, reconciliation, and other flags to the cash accounts themselves.

176 Nominal Ledger and Cash Book
Datafile Software Nominal Ledger and Cashbook Manual 06/07/07
Names This is a fast way to enter account codes with the information needed for income and expenditure accounts. You can enter the cash and control accounts using this option too, but you should take the Cash Account option later to mark the cash accounts with the extra parameters needed.
First enter an account code. If the account exists already, then the account name is displayed for you to alter. If the account is new, then you must enter an account name. You can enter three (or four if foreign currency) more factors for this account too, as described below. You can enter or amend up to 15 accounts on each screen. Once a screen is full, you are presented with a new blank screen on which to continue. <Enter> at a blank account code returns you to the menu. If you key <Escape> whilst typing an account name, tax code or column number, the cursor returns to the account code column without entering or changing that account code. A second <Escape> (with the cursor in the account code column) returns you to the menu.

Cash Book Instructions 177
Datafile Software Nominal Ledger and Cash Book Manual 06/07/07
Note An account is immediately written or changed in the accounts file at the time you complete each line on this entry screen. If you add an incorrect account number, then you must use the delete option below to remove it. You can reference the same account more than once when using this screen. A later entry overwrites an earlier one.
Tax code It is entirely optional to enter a tax code against cash book accounts, and the purpose is solely for use as a default when entering receipts or payment transactions which contain a VAT element. You could need to analyse tax on (for example) petty cash and employee expenses, and it can be helpful to have the default tax shown on the account codes used for these. If you enter a tax code here, this tax code is offered for cash receipt or payment transaction entry against this account code. You don’t have to give a tax code here, and can leave it blank — you can still enter a tax code at transaction entry time. The types of account for which you might want to enter a tax code include not only petty cash and employee expense headings, but also cash sales and expense items such as equipment rental contracts which are paid by standing order. You can use the <F4–Select> key to view the tax codes.
Note
The majority of tax transactions take place in the sales and purchase ledgers, and these do not look to the cash book for the default tax code. Only a few cash book accounts benefit from a default tax code.
Receipt column Payment column You can define a default column number for this account for both receipt and payment transactions. The effect of this is that the account can only be referenced when entering a receipt or payment in the column specified. This also means that this account could not be referenced through the Miscellaneous column if you‘ve defined one that can otherwise accept any income or expense code. If you leave the column number at zero, then no such check is carried out for this account. You could also use this feature to ensure that the debtor and creditor control accounts are not referenced by any other column by accident, by keying the debtor and creditor column numbers respectively for these accounts.

178 Nominal Ledger and Cash Book
Datafile Software Nominal Ledger and Cashbook Manual 06/07/07
Note You are advised to use this feature sparingly. You can already specify that a column be restricted to a range of accounts (see later). If you change your column setup at a future date, then you may also need to check the accounts, to see what column numbers you entered on them.
Currency Code Prompted when the foreign currency application is in use, the essence of the nominal ledger and cash book is that all transactions are converted to base currency values, but details are also held in a foreign currency for specific accounts. Each account on the nominal ledger should have a currency allocated to it. In the absence of a currency code then the base currency is assumed.
Cash Account You use this option to add or amend cash accounts, together with their individual characteristics. You can use it for non-cash accounts too.

Cash Book Instructions 179
Datafile Software Nominal Ledger and Cash Book Manual 06/07/07
You are prompted at the bottom of the screen to enter an account code. You may use the <F4-Select> key to look for an existing account to amend. If the account entered already exists, its details are displayed and you may amend them here. If there is no existing account you must enter all the details for the new account. If you type an account code which is outside the cash account range (as specified for the nominal ledger System Profiles), then you are reminded:
Reply ‘No’ to return to the account code prompt, or ‘Yes’ to continue. For an existing account you may use the <End> key to update the account details without having to step through the remaining fields — a useful short cut. For a new account, however, you have to confirm the data for every field. You can abandon an account without making any changes by keying <Escape> or selecting the ABANDON button.
Note — Datafile Diamond and Premier only
This is a user-definable screen, so its design may differ to that shown above. The ability to design this screen can be used to personalise it for your business, and to prompt for any additional data items added to the file.
The items for which you are usually requested include: Account name The size of the account name depends on the size of the item set up for it in the cash book accounts file. The standard size is 25 characters. Currency Code Prompted when the foreign currency application is in use, the essence of the nominal ledger and cash book is that all transactions are converted to base currency values, but details are also held in a foreign currency for specific accounts. Each account on the nominal ledger should have a currency allocated to it. In the absence of a currency code then the base currency is assumed. Cash account This indicator is needed to determine whether the account is a cash account or not. Only accounts marked with this flag can be referenced as the cash account code in the header of receipt and payment transactions. Reply Y to make this a cash account, or N if it is not a cash account.

180 Nominal Ledger and Cash Book
Datafile Software Nominal Ledger and Cashbook Manual 06/07/07
Reconcile against bank statement Reply Y here if you want to use the cash book reconciliation features described later in this chapter. This can only apply to accounts which are marked specifically as cash accounts. Default tax code It is entirely optional to enter a tax code against cash book accounts, and the purpose is solely for use as a default when entering receipts or payment transactions which contain a VAT element. You could need to analyse tax on (for example) petty cash and employee expenses, and it can be helpful to have the default tax shown on the account codes used for these. If you enter a tax code here, this tax code is offered for cash receipt or payment transaction entry against this account code. You don’t have to give a tax code here, and can leave it blank — you can still enter a tax code at transaction entry time. The types of account for which you might want to enter a tax code include not only petty cash and employee expense headings, but also cash sales and expense items such as equipment rental contracts which are paid by standing order. You can use the <F4–Select> key to view the tax codes.
Note
The majority of tax transactions take place in the sales and purchase ledgers, and these do not look to the cash book for the default tax code. Only a few cash book accounts benefit from a default tax code.
Profit & loss a/c or Balance sheet a/c This indicator is needed only by the nominal ledger to determine whether the account is a “Profit & Loss” or a “Balance Sheet” account. It can only take the value P for profit and loss, or B for balance sheet item. This distinction is needed because profit and loss account balances are reset at the end of a year, and also because the nominal ledger treats journals posted into the prior year differently for profit and loss accounts. You do not need to use this indicator if you do not have the nominal ledger, but you must define each account with this indicator if you are using the nominal ledger. Update from sales/purchase ledgers in detail Again needed only by the nominal ledger, you can choose whether sales and purchase ledgers are to update the nominal in summary (one journal for the total of each code) or in detail (one nominal transaction for each sales or purchase ledger transaction) — see Nominal Configuration below. If you have elected to update the nominal in summary, then you can still ensure that this particular account is always updated in detail by replying Y <Enter> here.

Cash Book Instructions 181
Datafile Software Nominal Ledger and Cash Book Manual 06/07/07
View an Account Selecting the VIEW option displays account details to the screen for you to review. Up to 28 items in two columns of 14 items can be displayed.
Note — Datafile Diamond and Premier only In Datafile Diamond and Premier systems you can configure which data items to view through the Application User Facilities.
Once you’ve keyed a valid account code, the account details are displayed. You can use the <F4-Select> key to find an account if you are not sure of its code. The cursor immediately returns to the above prompt to allow you to enter another account code. <Escape> returns you to the menu. Note that you cannot amend account details with this option.

182 Nominal Ledger and Cash Book
Datafile Software Nominal Ledger and Cashbook Manual 06/07/07
Delete an Account Selecting the DELETE option allows you to delete an account. You cannot delete an account unless it has a non-zero balance, nor can you delete an account which still has transactions on file. Indeed you may have to wait until after you have cleared down the journals before you can delete an account.
Key a valid code here and some details from the nominal account record are displayed. You may use the <F4-Select> key if you are not sure of the account code. You are then prompted ‘Ok to Delete This Account?’. ‘No’ abandons this attempt to delete the account and prompts for the code of the next account you want to try. If you reply ‘Yes’ the system checks that the current balance is zero and that there are no transactions present for the account before deleting it. You may not delete an active account, and should you try you are warned ‘Account Is Active - Cannot Be Deleted’. Key <Enter> to return to the account code prompt. <Escape> at this point returns you to the menu.
Receipt Column Headings You use this option to define the columns you want for entering cash receipts, and the characteristics of each column. The definition screen is shown below, and the list already shows

Cash Book Instructions 183
Datafile Software Nominal Ledger and Cash Book Manual 06/07/07
the maximum number of columns you defined under the cash book System Profiles — here only four columns, though the maximum is 14. The order in which you specify these columns is also the order in which they are printed in Cash Book Reports below.
You can key <Escape> or <End> at any time to exit this screen. For each column you must then define up to six parameters. Note that you can use the up and down arrow keys to take you between the column definition lines. Full Heading This is the full name for this column and is used in the cash receipt input prompts. This name can be up to 18 characters in length. If you leave it blank, then this column is not offered. Column Heading This is an abbreviated name which is above the appropriate columns when you print cash book reports later. This can be up to nine characters in length. Column Type For most columns leave this at zero to indicate that you intend to enter income (or expenditure) cash book account codes for this column. There are some other values this can take, however: 1 Link to Sales Ledger. You must have the Datafile Software sales ledger application for
this company if you choose this option. This column is then linked directly to the sales ledger, and any transaction values you enter in this column are also written to the sales ledger.
2 Link to Purchase Ledger. It is most unlikely that you would have a purchase ledger
column on the receipts side.
You must have the Datafile Software purchase ledger application for this company if you choose this option. This column is then linked directly to the purchase ledger, and any transaction values you enter in this column are also written to the purchase ledger.

184 Nominal Ledger and Cash Book
Datafile Software Nominal Ledger and Cashbook Manual 06/07/07
3 Tax. This has the special purpose of reserving this column for tax values when you come to print cash book reports. You cannot use it to enter a tax value, but that is handled by the cash receipt transaction anyway if you need it.
Account From / To These two prompts give the account range between which any income account codes entered for a receipt transaction in this column must lie. Either one can be left blank, in which case the range starts from the lowest account code (if the first is left blank) to the highest account code (if the second is left blank). Account Default This is the account code which is to be offered as the default code for this column. You can leave it blank if you do not want a default value.
Payment Column Headings Payment columns are defined in exactly the same way as for receipt columns, as shown in the screen below.

Cash Book Instructions 185
Datafile Software Nominal Ledger and Cash Book Manual 06/07/07
Notes This example shows a “contra” column defined to allow matching of invoices on the purchase ledger against those in the sales ledger for the same company. This is about the only time you would specify both sales and purchase ledgers on the same side. It is worth defining a VAT column, at least on the payments heading side. Although you do not enter VAT using this column number (see below) it means that VAT prints as one of the columns in the Cash Book Reports where the columns are requested just like in a manual cash book. On the payment side a fourth column type is allowed which can be used to post expenses to Job Costing.
Receipt and Payment Posting The most frequent use of receipt transactions is for recording the cheques received in any one day. You may be banking a number of cheques, some charge card receipts like American Express or Diners Club, and perhaps some cash as well. You would use one receipt transaction for each paying-in slip you make out, no matter how many cheques etc. are being paid in on that slip. Payment transactions cover all supplier payments, and any other payments which are not covered by automatic transactions for standing orders and direct debits. Templates If you have defined any transaction templates for receipts or payments you can select this prior to entry, the list of possible choices are offered on the right-hand side of the screen.
You might define a template for (say) entering a weekly petty cash summary, or the details from an employee expense form. Choose a template number, or leave at zero to start with a fresh transaction.

186 Nominal Ledger and Cash Book
Datafile Software Nominal Ledger and Cashbook Manual 06/07/07
Transaction Header
Journal no The next journal number in sequence is displayed and you can accept this by keying <Enter> or overwrite it with another number. This item can only be numeric, and usually shares its sequence with the nominal ledger if installed. Diamond and Premier users can set this to be view-only. Period The current period number is displayed here. You can accept it by keying <Enter>. In fact you can enter a transaction into any period of the current year by changing this to a value between 1 and the maximum number of periods defined for your company (typically 12 or 13). If last year is still open for posting, you can post to any period last year by prefixing the period number with P. For example, a period of P12 posts this transaction to the twelfth period of last year. This is only likely at the start of a new year, and the treatment of these is described at the end of this Receipts/Payments section.
Note
Should you choose a period which lies outside the periods currently active for the sales and purchase ledgers, then you will not be able to make any entries to those ledgers. View the Cash Book (or Sales/Purchase) system status option if you want to see the currently active ledger period numbers.
Date The date you enter must be within the date range specified for the period above in the company calendar. If the date you give is incorrect, you are warned the date is out of range for the period you gave above. Return to correct either the period number or the transaction date. Description You may type in a narrative description for this transaction. If you chose a template, then the default template description is offered. The number of characters you can enter here depends on the way your system is configured. If you are entering the same descriptions repeatedly then you

Cash Book Instructions 187
Datafile Software Nominal Ledger and Cash Book Manual 06/07/07
can use the <F11-Save> option, the entered description with then be available on a drop-down list.
Note — Datafile Diamond and Premier only
You may predefine a default description such as “Bankings”. You can still overwrite this description, however.
Cash account For receipt and payment transactions you must now enter a cash account code. You can use the <F4–Select> key to show a list of the cash accounts defined, and to make a choice of one of these. If the foreign currency application is in use and you select a cash account that isn’t set for the base currency then only matching currency entries can be processed at the detail level. Pay In Ref / Cheque no The paying-in reference number for receipts or cheque number for payments is offered here. Normally the number increments by one automatically each time you use it. However, you can type a non-numeric reference such as DD for direct debit, or SO for standing order, or even clear it to blank. Unless this field is strictly numeric, the same reference number is offered again next time to preserve the sequence. Total amount This is the total value of this cash receipt or payment transaction. If using the foreign currency application then this value is in the currency of the cash account selected. You can exceptionally leave the total at zero if you want to match invoices between sales and purchase ledger accounts. If you want to make contra entries between cash book accounts, then you should use Cash Transfer option described later. Analysed Balance These two header items are used whilst you are entering the transaction details. The first shows the total analysed so far, and the second the balance still left to enter. Only when the balance stands at zero can you post the transactions. Transaction Detail Now you can enter the details which make up this receipt or payment entry. You can include up to 490 entries in a transaction, and their values must sum to the total you gave at the start. You can enter up to seven entries at one time, after which the screen is cleared for you to enter the next seven.

188 Nominal Ledger and Cash Book
Datafile Software Nominal Ledger and Cashbook Manual 06/07/07
You can use the up and down arrows within the screen to edit any line still showing. You can use the <Page Up> and <Page Down> keys to move between sets of entries. If you use the down arrow key in the last entry of a screen you are taken to the first entry of the next screen if there is one, otherwise you go to the transaction completion routines. Column You must decide which cash book column applies for each entry. Normally the column names are displayed at the bottom of the screen, but if they aren’t, the <F4–Select> key displays them for you now. Key the column number you want.
Note
If you <Escape> from any other field on a line, you are returned to the column number field. If you <Escape> from the column number field of the first line when only one line is entered so far, then the transaction is abandoned. Otherwise <Escape> in the column number takes you to the transaction completion routines described below.

Cash Book Instructions 189
Datafile Software Nominal Ledger and Cash Book Manual 06/07/07
Three types of entry procedure can now occur depending on how the cash book column you chose was defined under Receipt Columns or Payment Columns above. Standard entry (column type was given as zero) Sales/purchase ledger entry (column type was given as 1 or 2) Job Costing expense posting (column type was given as 4) Standard Entry There are no extra items, prior to input of the nominal account. Sales/Purchase Ledger Entries When you choose a ledger-style entry line, then first a check is made that the transaction is within the allowable period range for this ledger. If the period you gave in the header is outside the current period for this ledger (including the forward period if using forward transactions) then you are warned that the ‘Required Period Not Active in the Sales/Purchase Ledger’. You are returned to the column prompt when you press <Enter>. Either <Escape> to enter the correct period number, or change the column number to one that is not linked to the sales or purchase ledgers. You must now choose the sales or purchase ledger account to which this receipt or payment entry refers.
Enter here the account code for the ledger account. You can use the <F4–Select> key to find the account you want in the usual way. The account details, and the current account balance is shown and you are asked to confirm that this is the account you want. If not clear the tick box (space bar or enter ‘N’) to return to choose another account. If this is the account you want press <Enter>. As an alternative, Diamond and Premier users can select the sales/purchase account to use by entering an invoice number that is to be paid. An option, available within the Application User Facilities, enables you to search for an account by the invoice reference. You enter the reference and the system defaults the account for confirmation as above.

190 Nominal Ledger and Cash Book
Datafile Software Nominal Ledger and Cashbook Manual 06/07/07
Job Costing Entries For job costing expenses you must select both the job number and the cost code.
Enter here the job code and cost code to use for posting to job costing. You can use <F4-Select> to find the codes required. After selecting each code the title of the job/cost code is displayed and, after selecting the cost code, you are asked to confirm the job details are ok – reply Y or N accordingly. Account You must now enter/confirm the cash book account code. Depending how the column was defined, a default account code may already be displayed here. You can <Enter> to accept this code, change it to another one, or use the <F4–Select> key to find one. If an account range was given for the column, then the account must fall within this range; but the <F4–Select> key only shows you this range anyway. For sales or purchase posting the debtors ledger or creditors ledger cash book control account code shows — this is one of the standard account codes which must be present and are defined under the nominal ledger System Profiles. Key <Enter> to accept this code.
Note
If you are told INCORRECT COLUMN HEADING ON ACCOUNT RECORD, this means that the cash book account has a receipt or payment column defined for it. You can only use that account code when you give that column number, and you cannot use it for the column number you’ve chosen. Either the column is wrong, or the code is wrong.
Narrative The selected nominal account name is displayed here. Net Amount Enter the value of the entry and press <Enter>. Note that you can enter a negative value here if (for example) you were refunding a payment, or if this is (say) a contra amount against the other ledger in a contra transaction. You are entering the net amount, if you have the gross value you

Cash Book Instructions 191
Datafile Software Nominal Ledger and Cash Book Manual 06/07/07
can enter this followed by the VAT code, i.e. ‘117.50S’, to have the system calculate the net amount and update the tax value. If line entry is for a sales/purchase account then you may be taken into the allocation processes here, rather than after update of the files. See details below for the allocation options. If the foreign currency application is in use and the sales/purchase or nominal code selected is not the base currency then a pop-up form asks for the amount in currency, the exchange rate to the base currency and the base value. If enter for a non-base account then the following tax inputs are skipped – even for nominal accounts. Tax Skipped if posting a sales/purchase entry, when a tax code is defined for the cash book account it is prompted here. It is generally uncommon to break out VAT here, and most times you will leave it blank. If you key <Enter> to a blank VAT code, then the following prompt is skipped. Note that you can use the <F4–Select> key to view the tax codes. Tax-amt If you have entered a tax code in the previous prompt, then the tax amount is entered here. It is not usually calculated for you and you have to enter the value, Diamond and Premier versions allow you to enable an option for automatic calculation.
Notes
The total value of net plus tax is added to the Analysed amount in the transaction header, and the Balance reduces by the same amount.
After entering the amount details Diamond and Premier users have the ability to enter four extra analysis items depending on configuration.
Analysis Code This can take a value in the range 0–9999. You might use it for (say) a receipt or payment type (cash, cheque, credit card, charge card, and so on).

192 Nominal Ledger and Cash Book
Datafile Software Nominal Ledger and Cashbook Manual 06/07/07
Reference Second Reference You can enter references here — the remittance advice reference perhaps, or the initials of the originator. The Second Reference item prompts with the name of the defined data item – in the screenshot above this is defined as ‘Posted-by’. Description The entry description is entered here.
Note
The Analysis Code, Reference and Description can be set to remember values from the previous line entry via the Application User Facilities.
Transaction Entry Completion <Enter> on a blank column number completes entry of the receipt/payment and takes you to the update parameters.
These options allow you to check that the transaction balances before you post it, edit the entries if not, or abandon it altogether if you cannot get it to balance. The possible actions are: Add - This returns you to the column prompt for the next vacant line so that you can
continue to enter lines for this transaction Delete - You can delete an entry entirely by taking this option and giving the line number
you want to delete. You are given the chance to confirm that you want to delete the chosen line, and then all the entries are shuffled up to fill the space left by the deleted line
Edit - This puts you back at a specific line so that you can edit the details of that entry Header - This returns you to the header part of the transaction so that you can change the
details there — in particular the total of this receipt or payment, if that is now seen to be incorrect. You should not change the period number if you have specified some sales or purchase ledger entries for this transaction
List - This lists the entries in this transaction, starting from whichever line number you
give and listing seven at a time. If there are more entries to come, the option assumes you

Cash Book Instructions 193
Datafile Software Nominal Ledger and Cash Book Manual 06/07/07
want to continue. Either <Escape> to the actions above, or continue until the end of the list, when you are returned to the above actions
Totals - This option gives you the total of the receipt and the analysis total so far. You are
warned if the totals do not balance and then returned to the actions above Update - Update this transaction to the ledger. If the Balance in the header is now zero,
then this option automatically prompts for you anyway. You cannot use this option if the balance is not zero
Exit - Finally, if you really can’t find the balancing error, or you realise that you do not
wish to complete this transaction yet, take this option to abandon the transaction and return to the menu
After you have successfully taken the UPDATE option, the nominal ledger/cash book plus depending on entries the sales, purchase or job costing systems, are updated with the values for this transaction.
Transactions in Previous Year
If you post a cash receipt or payment transaction to a previous year, the treatment differs according to whether each cash book account is a profit and loss, or balance sheet account. (Note that, unless there is an indication to the contrary, cash book accounts are assumed to be profit and loss accounts in nominal ledger terms). For balance sheet accounts the transaction entry value is posted to the previous year period balance, and also to the current opening year balance for the account For profit and loss accounts the transaction entry value is posted to the previous year period balance for the account, but also to the current opening year balance of the profit and loss control account, not to the account itself
Ledger Allocations If sales/purchase payments are posted for open-item accounts then you are allowed to allocate the transaction you have just entered against invoices for that account. The allocation procedure is an important technique and is therefore described here in detail. Allocating transactions follows three main stages: Choose the transactions to allocate Mark the amounts to allocate against the chosen transactions Update transactions with the amounts allocated

194 Nominal Ledger and Cash Book
Datafile Software Nominal Ledger and Cashbook Manual 06/07/07
The allocation screen (see example below) shows the progress of your allocation in the top window, the transactions themselves in the second window (you can scroll backwards and forwards through these) and the possible allocation actions in the bottom window.
Allocations Screen The top of the screen shows the account which you are allocating on the left and three values on the right: DB: This shows the total of all debit values allocated so far CR: This shows the total of all credit values allocated so far DIFF: This shows the difference between debits and credits. Only when this
difference is zero can the allocation be completed. As described later, you can part-allocate transactions so that the difference is made zero.
The account transactions are displayed in the middle window, and you can scroll up and down them using the up and down arrows, <Page-Up> and <Page-Down> keys. At the start no transactions show until you have made your first choice of action. Two shortcut prompts are offered, based on the circumstances, when entering a payment. If the payment value matches the account balance the system will offer to allocate automatically.

Cash Book Instructions 195
Datafile Software Nominal Ledger and Cash Book Manual 06/07/07
If the payment amount entered does not match the account balance but instead matches the first n outstanding invoices the system will offer to allocate these automatically also.
If you select YES for either of these prompts then the appropriate transactions are marked as allocated and you can choose to UPDATE the allocation. If you select NO then you can continue with a manual allocation. For a manual allocation you must choose one of the allocation actions shown. Every time you reach the end of the transactions for an account, or key <Escape>, you are returned to the allocation action prompt. The allocations you have made so far are noted, so that you can use a number of the techniques to achieve the result. Only if you abandon is your work on the allocation discarded. Select ALL to display all transactions, both debits and credits. You would choose this
option where you have a mixture of transactions which you need to allocate. Select DEBITS to display only debit transactions. This is the default for the sales ledger,
because sales invoices are debits. Select CREDITS to display only credit transactions. This is the default for the purchase
ledger, because purchase invoices are credits. Select UPDATE to update the allocation details at the end of the process (option only
available once allocation is complete and the DIFF figure in the top right-hand corner is nil)
Select EXIT to abandon the allocation and return to the transaction entry process. The first time you choose one of the actions which displays transactions (All, Debits, or Credits) you are asked whether to show only outstanding transactions or not.
Reply Yes or No as required. If you do a lot of allocations on an account during the period, then to display only those which are not allocated can save time. If you want to change, or ‘un-allocate’, some allocations you did earlier in the period, then you might choose to display all transactions, even those which you allocated earlier.

196 Nominal Ledger and Cash Book
Datafile Software Nominal Ledger and Cashbook Manual 06/07/07
Transactions Displayed Only ‘current’ transactions are displayed within the allocation procedures – these are transactions entered in this period or those transactions that were outstanding at the start of the period. Transactions that are fully allocated at the end of a period are assumed to be historic and are no longer accessible by the allocation routines after the period end process.
Each time you return to the allocation action choice the value of DIFF is checked to see if it is now zero. If not zero, then the help text “TOTALS DO NOT BALANCE” displays at the bottom right of the screen. Allocation Dates If you enter the allocation procedure as part of the payment entry processes then the allocation date is taken to be the same as the transaction entered. If you enter the allocation procedures through the separate option(s) in the Utilities menu then you are asked for a date of allocation. This date is posted to the ‘date allocated’ item in every transaction for which a transaction is fully allocated. However, there is a further dating consideration when allocating transactions. It is perfectly acceptable to allocate current period debits to forward period credits, and vice versa. However, you must not choose amongst either the credits or debits to mix some transactions dated in the forward period and those dated in the current or earlier period. For example, if you have an invoice for £117.50 within the current period paid in full by a payment in the forward period then you can allocate this. If you had an invoice for £117.50 and a credit for £10 in the current period and then a forward period payment for the balance then you cannot allocate this. If you try to do so, you are warned ‘Cannot Allocate Forward Dated Payment with Current Payment / Credit’. Press <Enter> and change the allocation details to rectify this by allocating the transactions in two stages. In the above example allocate the payment against the invoice and then update, and re-process the account to allocate the remaining balance of the invoice against the credit. Alternatively, you could abandon the allocation until after the period end. “All”, “Debit” and “Credit” Allocation Choices When the allocation action is selected the appropriate transactions are displayed and a ‘cursor bar’ highlights the first transaction. Each line displays the details of one transaction and includes the original total and the present amount outstanding, together with the description and transaction type. You can change the transaction highlighted by using the <Up> and <Down> arrow keys and the <Page-Up> and <Page Down> keys.

Cash Book Instructions 197
Datafile Software Nominal Ledger and Cash Book Manual 06/07/07
To allocate a transaction you can either: Enter the amount to allocate. The value you enter cannot be more that the outstanding
amount on the transaction in question. If you enter an incorrect amount, you may return and re-enter the correct amount. Leaving the amount zero or blank means that nothing is allocated to this transaction. If the transaction has been allocated previously you can enter a negative value. This allows you to ‘unallocate’ an amount against this transaction for allocation elsewhere. This helps in undoing an earlier incorrect allocation so that the correct transactions are left outstanding. You cannot enter a negative value that would leave the outstanding balance greater than the original full value of the transaction.
If you leave a small balance outstanding then the system may prompt for you to write off the balance of the transaction as a discount, respond as required.
The size of balance remaining before the system will prompt to write-off the remainder is set within the ledger system profiles. Within the profiles you set a percentage of the original value of the transaction under which any remaining balance is offered for write-

198 Nominal Ledger and Cash Book
Datafile Software Nominal Ledger and Cashbook Manual 06/07/07
off. You can set separate percentages for invoices/credits and payments. If any discount is given then a transaction is written to the ledger on update to reflect this.
Enter the letter A to allocate the full amount outstanding on the transaction. If the payment received clears the balance of the account then you can enter AUTO
against the first transaction in the list to allocate all the transactions on the account. If the payment does not clear the balance of the account then the use of AUTO will leave a difference between the allocated debits and credits and you will need to amend the allocation details to resolve this.
If an invoice (credit) has settlement discount details recorded against it then the allocation
window at the bottom of the screen displays these details.
The allocation window shows the settlement discount available, the nett allocation value if settlement is taken and the due date up to which the discount was/is available. If you choose to apply the settlement discount entering N for Nett updates the nett amount as the allocation value and prompts to write off the balance as discount. There is no restriction on entering N-Nett once the due date has past as the allocation may be done some time after the payment was received.
As the transactions are allocated a ‘*’ is updated against the transaction, the DB and CR values updated at the top of the screen and the DIFF value recalculated. Once the required allocations have been entered pressing <END> (or <Enter> against the last transaction in the list) will return you to the allocation actions. If the transaction has been flagged, the ‘!’ column, with a status code (disputed, bad debt, contra, etc.) then you may be prevented from entering an allocation amount against this transaction. Diamond and Premier users can control this via the Application User Facilities. “Update” Allocation Choice You select this option to update to the files the allocations you have made. Provided the allocated debit and credit values are the same you can take this option and proceed to the next. However, if the values do not match then one of two scenarios can occur: DIFF Value is negative. If the sum of allocated payments and credit notes is greater than
the sum of invoices, then the DIFF value shows as negative and you cannot exit the allocation routine. You must amend the allocation details so the value matches or abandon the allocation until advice can be sought.
DIFF Value is positive. If the sum of allocated invoices exceeds the sum of payments and
credit notes then you may be asked to write off the difference as a discount. Non-Compact

Cash Book Instructions 199
Datafile Software Nominal Ledger and Cash Book Manual 06/07/07
users can control whether this is allowed via the ledger system profiles. If you do not allow write-offs then you cannot exit the allocation routine until the DIFF value is 0 and you need to amend the allocation details so the value matches or abandon the allocation until later.
“Exit” Allocation Choice This option allows you to abandon the allocation process and you are returned to whatever is the next stage in the transaction process.
Payments with Remittance Advice This option allows you enter your payments within the Cashbook and produce a remittance advice (and cheque) as opposed to entering them in the Purchase Ledger. It is only applicable if the Purchase Ledger is in use and then only for Diamond and Premier users. The payment entry process is similar to the payment process discussed above – you confirm the journal number, period and date, you select the bank account and enter a cheque number (if not using the system to print the cheque). However you do not pre-enter a payment total, instead you then enter the payment detail. Note this option is intended to be similar to the ‘Manually Generate Payment’ option within the Purchase Ledger so only one entry is input per payment.

200 Nominal Ledger and Cash Book
Datafile Software Nominal Ledger and Cashbook Manual 06/07/07
After entry of the cashbook column, you select the purchase ledger account / nominal account as normal. If you select a non-P/L column then after entry of the nominal account you are asked for the ‘payee’ name – this is used on the remittance/cheque and recorded as the entry description/narrative. You then enter the amount/tax/tax-amount as normal and then given the option to update the payment.
If you select a P/L column, then after entering the supplier account you are taken into the allocation actions to select the invoices you wish to pay, plus credits you wish to take into account, and/or settlement discounts you wish to take using the ‘ALL/DEBITS/CREDITS’ option discussed in allocations earlier.
After selecting the transactions to pay, selecting the ‘Generate Payment’ button returns you to the payment entry screen to update the payment.

Cash Book Instructions 201
Datafile Software Nominal Ledger and Cash Book Manual 06/07/07
At this point you can re-edit the header or entry details before updating the payment, or exit to abandon the payment entry. When you elect to update the payment, the Nominal and Purchase (if appropriate) files are updated. You are then asked to confirm the printer to send the remittance to and, if remittance linked to a cheque, the cheque number to be used.
Transfers These are used specifically to transfer money from one account to another. The transaction process is very similar to receipt and payment transactions, with a header, some details, and a procedure to close the transaction.

202 Nominal Ledger and Cash Book
Datafile Software Nominal Ledger and Cashbook Manual 06/07/07
Transaction Header The concept of this is very much the same as for receipts and payments. Only the transaction number, period, date and description are required however. The cash accounts themselves are specified in the body of the transaction, and the debits and credits (cash in and cash out respectively) are shown, together with the difference between them. You cannot complete this transaction until the difference between the debits and credits is zero. Transaction Detail The entries on each line are very straightforward. The account code can only be a cash account in the range defined in the nominal ledger System Profiles — you can use the <F4–Select> key to view the accounts defined so far in this range. You must then give the money deposited (IN or debit) or withdrawn (OUT or credit). You can only enter a value in the debit or credit column of each line. If you leave the debit blank when you key <Enter> you are offered the credit column instead.

Cash Book Instructions 203
Datafile Software Nominal Ledger and Cash Book Manual 06/07/07
Time Saving Tip It is easy to key the first entry as a debit by accident when you meant to key a credit. If you’ve already pressed <Enter>, then <Escape> to the account code and <Enter> for the debit column. Use the <F3–Clear> key and follow with <Enter>. The value you keyed is now displayed in the credit column.
<Escape> in any other field of a line returns you to the account code column in the line. <Escape> in this column takes you to the Action prompts, which are exactly as defined for receipts and payments above. After entering the amount details Diamond and Premier users have the ability to enter four extra analysis items depending on configuration.
Analysis Code This can take a value in the range 0–9999. Reference You can enter references here. Description The entry description is entered here. Date Finally you may be given the chance to enter a specific date to this transaction entry. The transaction date is offered (see below) as a default, if you change the date the amended date must still be in the period date range for this transaction.

204 Nominal Ledger and Cash Book
Datafile Software Nominal Ledger and Cashbook Manual 06/07/07
Note The Analysis Code, Reference, Description and Date inputs can be set individually for input and to remember values from the previous line entry via the Application User Facilities.
Transaction Entry Completion <Enter> on a blank account code takes you to the update actions. These procedures operate in the same manner as the actions on receipt/payment entry discussed earlier.
Automatic Postings This is one of the very useful facilities of the cash book. You can define (via a Utilities menu option) up to 128 standard transactions, such as standing orders and direct debits, which occur regularly in your bank accounts. One simple operation can then make sure that all the regular transactions which you would expect to have occurred are posted up to today’s date.

Cash Book Instructions 205
Datafile Software Nominal Ledger and Cash Book Manual 06/07/07
Firstly, you must give the date up to, and including, which you want to post any automatic transactions which are now due. The current period date range is shown, and today’s date, which must be within this period, is given for you to accept or override. <Enter> to accept this date, or change as required.
Note
If the date range is not for the period you want, then use the Set Current Period option to set it to the period you want.
Each posting which is found to be due is now offered to you one by one to confirm whether or not you want it to be posted.

206 Nominal Ledger and Cash Book
Datafile Software Nominal Ledger and Cashbook Manual 06/07/07
If you answer ‘N’ the transaction is not processed, so it will be offered again the next time you try automatic postings for this period. If you answer ‘Y’ the transaction is immediately posted. As an alternative you can reply ‘X’ which ignores the transaction for the current period, but marks it in the postings file as processed for this period. This means that, should you run automatic postings again this period, this particular one is not offered. For example, you might have a regular payment to a supplier, but this month it is in dispute, so you want to hold it back. Once you have decided on all the transactions to post today, then a summary of the processing is displayed:

Cash Book Instructions 207
Datafile Software Nominal Ledger and Cash Book Manual 06/07/07
Notes You should make sure you run the Automatic Postings dated the last day of the month before you change the default period number for the next period. If the last day is (say) the 30th, then automatic postings marked as due on the 31st are also included — this is true for the 28/29 February too. Banks take account of weekends, and have a habit of bringing forward standing orders to the previous Friday if the due date is at the weekend. This occasionally causes a standing order for one month to occur at the end of the previous month. We do not follow this practice, which can lead to occasional differences when you reconcile bank statements.
Journals Standard journal entries work in exactly the same way as the Transfers option described above, except that you can reference any nominal/cash book accounts in this transaction.
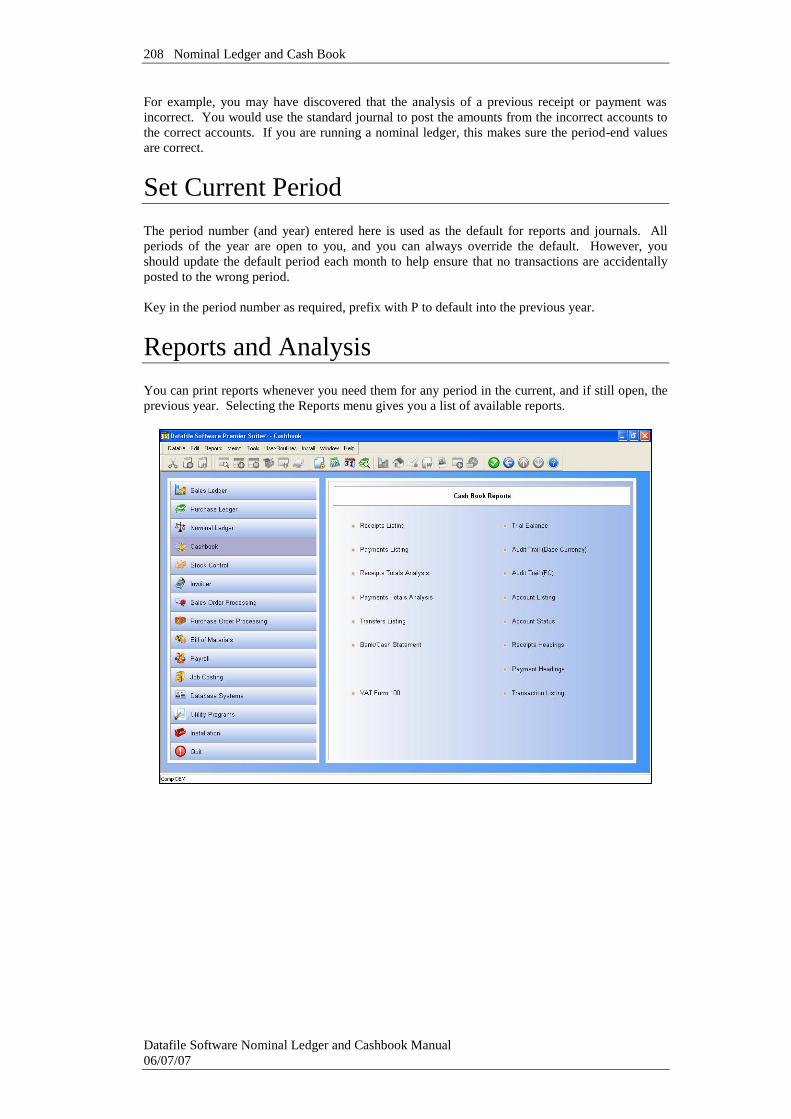
208 Nominal Ledger and Cash Book
Datafile Software Nominal Ledger and Cashbook Manual 06/07/07
For example, you may have discovered that the analysis of a previous receipt or payment was incorrect. You would use the standard journal to post the amounts from the incorrect accounts to the correct accounts. If you are running a nominal ledger, this makes sure the period-end values are correct.
Set Current Period The period number (and year) entered here is used as the default for reports and journals. All periods of the year are open to you, and you can always override the default. However, you should update the default period each month to help ensure that no transactions are accidentally posted to the wrong period. Key in the period number as required, prefix with P to default into the previous year.
Reports and Analysis You can print reports whenever you need them for any period in the current, and if still open, the previous year. Selecting the Reports menu gives you a list of available reports.

Cash Book Instructions 209
Datafile Software Nominal Ledger and Cash Book Manual 06/07/07
Prompts Used Throughout Reporting Procedures The cash book reports ask a common set of questions whenever you choose to print a report.
Date of Report <Enter> to accept today’s date here, or else overtype it with a different date. Report “as at” period number The nominal ledger keeps all the current year’s periods open, and all the previous year’s periods can also be viewed. Give here the period number whose period-end values you want printed on this report. Enter either a current year period, or — if you want to print a report of one of the previous year’s periods — prefix the period number with P. So “P10” would print a report based on the values at the end of the tenth period of last year. Report “As At” Date After entering the period number above, the period-end date for that period is offered. You can overwrite this date, though there should be little need to do so.

210 Nominal Ledger and Cash Book
Datafile Software Nominal Ledger and Cashbook Manual 06/07/07
From/To Account Code For most reports you can request a range of accounts to print. Key in the codes of the first and last nominal accounts you wish to include – for cash reports the range of bank accounts is already shown. If you leave the 'From' code blank, then the report starts from the beginning of the chart of accounts. If you leave the 'To' code blank, then the report prints to the end of the chart of accounts. Or List Accounts to be Reported As an alternative to reporting a range of accounts you can nominate individual accounts (up to 200) to be reported by clearing the account range list and then setting this option. Use <F4-Select> to find the accounts you require and press <Enter> on a blank code to complete the list. Transaction Records in Range From / To If you know the record range of the transactions you are looking for, you can enter them here. However, it is more usual to use date ranges for selection (see below). To help you restrict the transaction range to those for a particular period, you can note the last transaction number for each period by viewing the system status display at the period-end. However, since you can post to any period at any time, this may not be a complete guide to all the transactions for a specific period. If your system has been set up to write brought-forward transactions when the transaction file is cleared, you are also prompted at the bottom of the screen with the record number of the last brought-forward transaction. Transactions in Date Range From / To The date range of the “as at” period already chosen is prompted here, but you may overwrite these with different dates. If you clear the dates (<F3–Clear> is a quick way to do this) then all transactions on file for the chosen accounts are printed. Exclude Accounts with no Transactions It is not uncommon for nominal accounts to have had no journals within a period. Reply Y <Enter> to exclude from the report accounts which have no transactions, or N <Enter> to print all selected accounts whether or not they have any transactions. Specify any Selection Criteria In addition to the account (or transaction depending on report) range above you can further restrict the records which are to print on a report. Setting this option allows you to enter selection criteria.

Cash Book Instructions 211
Datafile Software Nominal Ledger and Cash Book Manual 06/07/07
The OPTIONS Button The Options button allows configuration facilities for the printing of the report – selecting margins and fonts. When you select the OPTIONS button a pop-up form is displayed.
Before discussing the parameters you should note the buttons available at the footer of this parameter screen.
This option updates the individual parameters from your user default when they are set, overwriting presets where applicable. If no user defaults are set then this option is ‘greyed’ out and cannot be selected.
This option accepts your entered parameters for this print only, reverting to defaults next time the report is run.
Depending on whether the user is configured as an ‘Install’ user then the next option will be SAVE. This saves your set parameters so they are offered as default next time this report is run (Note: this is system wide not per user). Setting the user as an ‘Install’ user is achieved through the user configuration available under the MASTER sign-on.
This option abandons any changes made and returns you to the report screen.

212 Nominal Ledger and Cash Book
Datafile Software Nominal Ledger and Cashbook Manual 06/07/07
The report parameters available are: Paper Size - select the paper size the report is to be printed to (i.e. A4). You can elect to
leave this blank in which case the report is printed as per the last/default page size of the printer, however, if you do this you can only choose fixed pitch fonts (and the screen is a slightly different layout) – selecting a page size is mandatory to use proportional fonts.
Default Printer Font – a font dialog is display allowing you to select as required, the
default font to be used for this report. If you’ve sent the page size then all fonts are available, if you haven’t set this then only fixed pitch fonts can be assigned. You can also set bold/italic attributes and font size – note that if you haven’t set a page size then the font size option is not applicable (font is sized as per previous rules).
Selecting the Font Size
Generally you can’t go far wrong with 10point. However, if you have a lot of data items on your report, and are printing in portrait, 10point may be too big to fit all the required information without overlapping fields. The positioning of fields across the page is determined by the item size – if you view the Account Status report this shows, by default, the account code (7 characters), P/B flag (2 characters), the account name (25), and six value items (14 characters each), together with spaces between the items this gives a total of 126 characters, or columns required, across the page (think graph paper – you have 126 ‘cells’ across the page). Those 126 columns are split equally across the available page (page size and margins taken into account) as starting positions for data items – so the account code starts at column 1, the P/B flag at column 9 (account code plus 1 space is 8), etc. If you select a font size too big then the account code may not finish printing
Cash Book Instructions 213
Datafile Software Nominal Ledger and Cash Book Manual 06/07/07
before the P/B flag starts causing the name to overlap the end of the account code. If this occurs then you can either reduce the font size or consider swapping the report to landscape orientation if the font size would go too small.
Default to Landscape – set to default the printed report to landscape, leave blank for usual
portrait orientation. You may want to set reports such as the Nominal Ledger Audit Trail Report or the Cashbook Receipts Analysis Listing to landscape to increase the size of print as these reports require a large amount of detail to be printed.
Show Time in Report Headings – set to include the printed time in the report headings in
addition to the printed date. Include Selection Criteria – set to print any selection criteria that were applied to the
report. Email as Text – if send this report via email this option allows you to send as a text file
attachment as opposed to, if left blank, PDF. Omit Full Page Headings – When printing a multi-page report the system repeats the
headings for each page. Setting this option reduces the heading details for the second and subsequent pages allowing more record detail to be printed per page.
Default Output to Spooler – Usually, when printing a report, the default printer is the last
print device used. Select this option to set the default printer as the spooler for this report. This acts only as a default and doesn’t prevent you electing to print the report instead.
Allow Change of Printer Alias – when these options are configured then it is assumed
you are printing as ‘direct windows print’ and this is the alias set by default. Setting this option allows you to change the default alias at run-time to one of the list of Datafile configured printers. If you change the alias to a ‘DOS’ style alias then the page size (length/width) is again picked up from the Print Style Profile and fonts depend on ASCII codes configured, although other settings such as ‘include time’ etc. remain from the OPTIONS display.
Print Negatives in Red – on selected reports, assuming you have a colour printer; it may
be useful to print negative values in red. This option is not applicable if the page size is left blank.
The next set of parameters allows you to specify formatting and margin settings for both portrait and landscape when the page size has been set. The appropriate setting being used based on the orientation of the output selected at run-time. Characters Per Line – the system displays the width of the report items on the right. If
you leave this value at 0 (recommended) then the report width used in determining the start column positions of data items (as discussed above with regards to font size) is the larger of either the report print items or 80 columns. You can manually set a report width – from

214 Nominal Ledger and Cash Book
Datafile Software Nominal Ledger and Cashbook Manual 06/07/07
64 to 255 columns. You may want to increase the number of columns on (say) a landscape report with few print items to bring the fields closer together to aid in reading.
Lines Per Page – if left at 0 (recommended) then the number of lines per page is
determined by the font and page size. Alternatively you can set a number of lines per page, perhaps to give a greater gap between rows of data items.
Left Margin (mm) – set the size of the left hand margin (relative to page orientation in
millimetres. Right Margin (mm) – set the size of the right hand margin. Top Margin (mm) – set the size of the top margin. Bottom Margin (mm) – set the size of the bottom margin. This set of parameters allows you to specify formatting and margin settings for both portrait and landscape when the page size has not been set. Two columns are definable, one to use if printing in portrait, the other if printing in landscape - the appropriate setting being used based on the orientation of the output selected at run-time. Minimum Characters Per Line – the system displays the width of the report items to the
right. If you leave this value as 0 then the report width is the larger of either the report print items or 80 characters. You can manually set a report width – from 64 to 255 characters wide – but if you set a width less than the items actually printed then this is overridden by the report width at run-time.
Maximum Lines Per Page – if left at 0 then when printing a report the system will
determine the number of lines per page based on the report width and the printable area of the page up to a maximum of 72 lines per page in portrait mode or 50 lines per page in landscape mode. Alternatively you can set the number of lines per page, from 16 to 255, and this is then taken into account when deciding font size to ensure that number of lines is printed. If left at 0 then when sending to the spooler the lines per page is assumed to be 72 in portrait mode and 50 in landscape. If you require an identical print from the printer and the spooler then a maximum number of lines should be set.
Left Margin – set the number of characters to be used as a margin from 1 to 64. If you
require a margin then when entering the value you need to take into account the report print width – a margin of 4 characters on an 80-character report will be bigger than a margin of 4 characters on a 132-character report. If left at 0 no left margin is applied.
Right Margin – if you require a margin to be applied on the right of the report set the
number of characters accordingly (again 1-64), if leave as 0 then no right margin is applied.
Top Margin – set the number of lines to leave as a margin at the top of the page (1-32
lines). If left at 0 then no top margin is applied.

Cash Book Instructions 215
Datafile Software Nominal Ledger and Cash Book Manual 06/07/07
Bottom Margin – set the number of lines to leave as a margin at the bottom of the page (1-32 lines). If left at 0 then no bottom margin is applied.
Finally, you can set default options that are used when you send the report to print or e-mail. Print Device – if using a stand-alone Datafile system then you can set a default printer to
output to. This option only applies when sending to a print device; if last printer was spooler or fax then this remains the default. If using a networked Datafile system then you can still set this where you are printing to a networked printer – provided all terminals have a consistent device path. If the print device isn’t valid then the normal printer is offered instead.
E-mail Address – if the report is sent to email then here you can enter an email address
that is to be used by default for this report – though it can be amended at run-time. Once you’ve set the desired parameters select the ACCEPT option to apply the settings for this print or, if available, the SAVE option to apply for this and future prints. Printing Procedure Once you have accepted the printing parameters allows you to select the desired output.

216 Nominal Ledger and Cash Book
Datafile Software Nominal Ledger and Cashbook Manual 06/07/07
Depending on the report and system configuration the report can be output in a number of different methods. To ‘print’ you select the desired output device and then click the OK button. Available options are: Screen – selecting this option displays the report on the screen. If you are happy with the
output selecting <F7-Option> on the report allows you to print the report or save it for subsequent print/enquiry.
Print Device – selecting this option allows you to print the report to any printer configured
on your pc. The printer is selected from the NAME drop down list. Disk Spooler – selecting this option saves the report for subsequent enquiry / print. Microsoft Word – if Microsoft Word installed then the report can be output to Word. Microsoft Excel – if Microsoft Excel is installed then this option allows the creation of an
Excel spreadsheet based on the report. Fax-File Server – this option is enabled if you have fax software such as Tobit David or
Zetafax that uses a ‘file scan’ folder to pickup faxes. If you use fax software such as WinFax then the fax output can be selected from the ‘print device’ list.
E-Mail – selecting this option creates an email message (Tobit David, Outlook and
Outlook Express only) with the report as a PDF or text file attachment. PDF – selecting this option creates the report as a PDF file.
Receipt Listing Payment Listing These reports are used to print the complete details of receipt and payment transactions. Usually they list the receipt or payment details on the left-hand side of the report, with the individual entries which went to make them up on the right.

Cash Book Instructions 217
Datafile Software Nominal Ledger and Cash Book Manual 06/07/07
Sample Receipts Listing

218 Nominal Ledger and Cash Book
Datafile Software Nominal Ledger and Cashbook Manual 06/07/07
Sample Payment Listing
Receipt Totals Analysis Payment Totals Analysis These reports serve a similar purpose to the preceding reports, except that they summarise the receipts and payments details into one line each. It is usual to show the individual cash book columns on this report, in the way that your manual cash book would have looked.

Cash Book Instructions 219
Datafile Software Nominal Ledger and Cash Book Manual 06/07/07
Sample Receipt Totals Analysis
Sample Payment Totals Analysis

220 Nominal Ledger and Cash Book
Datafile Software Nominal Ledger and Cashbook Manual 06/07/07
Transfer Listing This reports the cash transfer transactions as a simple audit list.
Bank/Cash Statement This report prints out the transaction details for your cash accounts in the same format as you would receive your bank statements.

Cash Book Instructions 221
Datafile Software Nominal Ledger and Cash Book Manual 06/07/07
Sample Bank/Cash Statement
VAT Form 100 This option allows the facility to print the details required for the quarterly (monthly) VAT Form 100 that all VAT traders in the UK must send to their VAT offices. The facility can also print an audit trail to show where the VAT figures come from. You can print the report as many times in the period as you like, when you are happy with the VAT figures, you can print the report one more time and set it to ‘update’ the system which marks the transactions with the VAT period number. By quoting an earlier VAT period number you can reprint the form from a previous period – it only uses those transactions marked with that period number. Source of VAT figures The values for the VAT Form 100 are accumulated from all VAT-able transactions that are entered into the system for the period in question. In essence VAT-able transactions come only from:
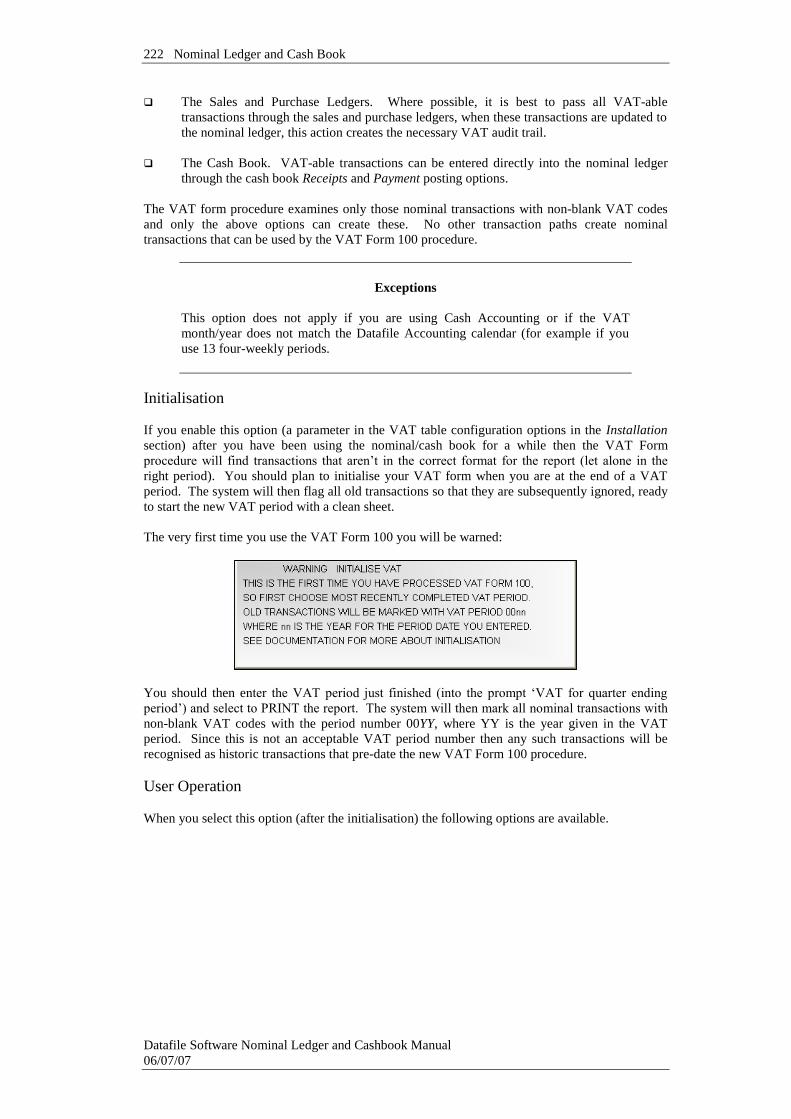
222 Nominal Ledger and Cash Book
Datafile Software Nominal Ledger and Cashbook Manual 06/07/07
The Sales and Purchase Ledgers. Where possible, it is best to pass all VAT-able transactions through the sales and purchase ledgers, when these transactions are updated to the nominal ledger, this action creates the necessary VAT audit trail.
The Cash Book. VAT-able transactions can be entered directly into the nominal ledger
through the cash book Receipts and Payment posting options. The VAT form procedure examines only those nominal transactions with non-blank VAT codes and only the above options can create these. No other transaction paths create nominal transactions that can be used by the VAT Form 100 procedure.
Exceptions
This option does not apply if you are using Cash Accounting or if the VAT month/year does not match the Datafile Accounting calendar (for example if you use 13 four-weekly periods.
Initialisation If you enable this option (a parameter in the VAT table configuration options in the Installation section) after you have been using the nominal/cash book for a while then the VAT Form procedure will find transactions that aren’t in the correct format for the report (let alone in the right period). You should plan to initialise your VAT form when you are at the end of a VAT period. The system will then flag all old transactions so that they are subsequently ignored, ready to start the new VAT period with a clean sheet. The very first time you use the VAT Form 100 you will be warned:
You should then enter the VAT period just finished (into the prompt ‘VAT for quarter ending period’) and select to PRINT the report. The system will then mark all nominal transactions with non-blank VAT codes with the period number 00YY, where YY is the year given in the VAT period. Since this is not an acceptable VAT period number then any such transactions will be recognised as historic transactions that pre-date the new VAT Form 100 procedure. User Operation When you select this option (after the initialisation) the following options are available.

Cash Book Instructions 223
Datafile Software Nominal Ledger and Cash Book Manual 06/07/07
VAT for quarter ending period VAT last updated in period The accounting period that is three periods (if quarterly, one if monthly) on from the period the VAT Form 100 was last updated is displayed here but may be overwritten. If you enter a period equal or prior to the last updated period then this identifies that you want to reprint the report for a historical period. Print VAT Audit Trail Too Set to print an audit trail and a summary of transactions after the VAT Form 100 itself. Update Files after Printing Set this when all transactions for the VAT period you are reporting have been entered and you are happy with the reported figures. After printing the report all transactions are marked with the associated VAT period and that period is ‘closed’. When you select to print the report the system process the transactions and accumulates the VAT Form 100 values for display.

224 Nominal Ledger and Cash Book
Datafile Software Nominal Ledger and Cashbook Manual 06/07/07
Once displayed you are given the option to proceed with printing of the VAT Form report and the supporting audit trail.

Cash Book Instructions 225
Datafile Software Nominal Ledger and Cash Book Manual 06/07/07
Sample VAT Form Summary

226 Nominal Ledger and Cash Book
Datafile Software Nominal Ledger and Cashbook Manual 06/07/07
Sample VAT Form Audit Trail

Cash Book Instructions 227
Datafile Software Nominal Ledger and Cash Book Manual 06/07/07
Trial Balance A trial balance reports all the cash book accounts, with their current balances listed in the debit or credit column as appropriate, and so gives a complete picture of the current position of the cash book accounts. You should print the trial balance at the end of each month, to check that the payment control totals in the cash book agree to other systems such as the sales and purchase ledgers, and also that the bank balances reconcile to bank statements. You can arrange that your trial balance prints sub-totals on certain account code changes — after, for example, income and expenditure account ranges. These are specified in the cash book System Profiles. There may be exceptional circumstances where you wish to report on only part of the ledger. In this case you may select on a range of accounts, but the total of the debit balances may not then agree with the total of the credit balances for the range of accounts selected. For an example report view the equivalent reporting option in the Nominal Ledger.
Account Audit Trail Account Audit Trail (Currency) The audit trail reports all the transactions which apply to each account printed on the report — it is equivalent to an account statement. It is usual to print a complete audit trail for every account at year-end for audit purposes. The audit trail for each account may consist of up to three parts: a header showing up to 10 items from the accounts file often including the closing balance
for the period of an account a partial or complete list of the transactions for the account with a running balance
showing the effect of the transaction an optional analysis table giving debit and credit totals of transactions against each
analysis code used The Account Audit Trail reports values in the base currency and processes all accounts, the currency report process non-base currency accounts and reports values in the currency of the account. For an example report view the equivalent reporting option in the Nominal Ledger.

228 Nominal Ledger and Cash Book
Datafile Software Nominal Ledger and Cashbook Manual 06/07/07
List of Accounts Use this report to give you a list of all cash book accounts on your system, together with the markers to show whether profit and loss or balance sheet account, whether to be fully updated (if you are normally updating from the other ledgers in summary), and the date the account was set up. You can choose a selective range of account codes for this report. For an example report view the equivalent reporting option in the Nominal Ledger.
Account Status Report The account status report is usually used to provide an overview of the current period and year-to-date balances on cash book accounts. You can choose a selective range of account codes for this report. For an example report view the equivalent reporting option in the Nominal Ledger.
Receipt Headings Payment Headings This report lists those accounts which have a non-zero receipt/payment column code against them. These accounts can only be used in receipt/payment transactions which call their specific column numbers. Should you decide to change the column headings, then this report can help you identify if you need to change any cash account column references too. You can choose a selective range of account codes for this report.
Sample Receipt Headings Listing

Cash Book Instructions 229
Datafile Software Nominal Ledger and Cash Book Manual 06/07/07
Transaction Listing This reports the transaction entry details from your cash book transaction file. It is exactly the same as the nominal ledger Journal Listing, for an example view this option in the Nominal Ledger earlier.
Bank Reconciliation These procedures are all designed to help you reconcile your bank accounts against the bank or other account statements. The steps you would take to reconcile a statement are: Make sure you have posted all receipt and payment transactions — check your paying-in
and cheque books Run the automatic postings up to the date of the bank statement to make sure that any
which are due appear in your cash book accounts Check the bank statement for obvious extra transactions — for example, bank charges
which you have not been told about. There is a transaction entry option on the cash book Bank Reconciliation procedures which you can use for this
Take the Reconcile Bank Account option to mark the transactions in your cash book
account as you find the match If any transactions on your account are not quite the same — perhaps they have added a
charge which you dispute — then you can attach a comment to that entry. You can print entries which have comments against them later

230 Nominal Ledger and Cash Book
Datafile Software Nominal Ledger and Cashbook Manual 06/07/07
If there still some transactions on the bank statement which do not appear in your account, then you need to add these, and return to mark them as reconciled
By now you should have accounted for any differences between the bank’s statement and your account. You should print the Unpresented and Commented Items reports to document any differences found
The bank reconciliation procedures are all run from the following menu:
Reconcile Bank Account This option allows you to perform the reconciliation procedure.

Cash Book Instructions 231
Datafile Software Nominal Ledger and Cash Book Manual 06/07/07
Cash Account Give the cash book account code for this account. The account name is then displayed. You can <Escape> from the cash account prompt back to the menu. Statement No This is the statement or page number given on the bank’s statement, and it will be marked on every transaction which is reconciled by this routine. If there is no suitable number, you could add your own number here and write it on the statement too. You can leave it at zero if you wish. This may default to the last statement number plus 1 if configured. Period Number The current period number is offered here and can be changed. Its purpose here is only to offer you a date range for the next prompts. You can leave it unchanged. Statement Date Range Enter here the first and last transaction dates on the statement you want to reconcile. The purpose of this is to restrict the transactions offered just to those within this date range. You may want to reconcile the statement a page at a time, so this avoids you being slowed down by too wide a

232 Nominal Ledger and Cash Book
Datafile Software Nominal Ledger and Cashbook Manual 06/07/07
range of transactions. All transactions within this range are shown, whether reconciled already or not (subject to parameters below). Opening Balance Enter the opening balance from the statement. This may default to the closing balance from the last reconciliation process if configured. Closing Balance Enter the closing balance of the statement (if prompted). The bank reconciliation must match this value before you can update the reconciliation. Include Unreconciled Items Since: Normally you can leave this blank, particularly if you give a start date for the range a few days earlier than the bank statement start date — there shouldn’t be unreconciled items in your account earlier than that! However, some people may not present your cheques for several weeks, so this allows you to bring these in too. Enter a date earlier than the start date already given to include any unreconciled items in that time. Exclude Previously Reconciled Items? Reply ‘Y’ if you only want to show unreconciled items in the date range chosen or ‘N’ if you want to include all items in the date range.

Cash Book Instructions 233
Datafile Software Nominal Ledger and Cash Book Manual 06/07/07
Now you are shown the transactions from which you can reconcile. In the top window you are shown the account details, the opening balance with the number of transactions which have been found for reconciliation, and the balance so far after applying the transactions marked to reconcile. The lower window shows up to ten of the transactions found. You can scroll this window up and down the transactions with the up and down arrow keys, <Page Up> and <Page Down>, and <Home> to return to the start of the transaction list. Note that the <End> and <Escape> keys are used to exit the reconciliation process. You can mark a transaction as reconciled by entering ‘Y’ in the ‘Rec?’ column against the transaction, or clear the flag by <Space><Enter>. As you mark and un-mark transactions the Running Balance in the top window changes its value. If any transaction has a comment attached (see below) then the comment shows at the bottom of the screen as you reach that transaction. Once you have found all the transactions in your account which match to the bank statement, then the running balance should now equal to the closing balance on the bank statement. If it does not, then you have to start some enquiries. Search <F4–Select> During the reconciliation process you can use the SEARCH button or the <F4–Select> key to find a specific transaction on its reference number or its value. On selection you are asked:

234 Nominal Ledger and Cash Book
Datafile Software Nominal Ledger and Cashbook Manual 06/07/07
Reply W (the default) to look in the withdrawal column — in other words, to look for a cheque you’ve drawn or a standing order — or D for deposit. Then enter a reference number and an amount. The reference ignores leading zeroes, so a cheque number of 2154 would find the transaction with a reference of 002154. If a transaction is found which matches these details, then the computer beeps, and you are told REFERENCE/AMOUNT FOUND OK. The transaction is marked, and the running balance adjusted for this transaction. Use <Enter> if you want to look for another reference, or <Escape> to return to the reconciliation process. If no matching transaction is found — or if a transaction is found which matches, but is already reconciled — then you are told so, and must press <Enter> to continue. Comment Using <F7–Options> You can use the COMMENT button or the <F7–Options> key at any time to bring up a box into which you can post a small comment such as “£159.95, but cleared as £159.59”. Normally you would apply this to a transaction with which there was some dispute, and you would clear the comment once the difficulty had been resolved later.
New Transaction using <F5> During the reconciliation you may find a transaction you have failed to post. The INSERT-TRANS button or the <F5-New Tx> key allows you to enter this missing transaction.
Once the transaction type has been selected you proceed to enter the transaction as you normally would. After update of the files you are returned to the reconciliation process where you left off, the newly entered transaction is marked as reconciled (provided it wasn’t of a later period than the reconciliation).

Cash Book Instructions 235
Datafile Software Nominal Ledger and Cash Book Manual 06/07/07
Ending Reconciliation If you have pre-entered a closing balance then once you have agreed the closing balance or if you have gone as far as you can go at this stage, then either press the UPDATE button or the <End> / <Escape> keys
Available only if the running balance on the reconciliation doesn’t match the pre-entered closing balance the EDIT-BALANCE option allows you to amend the closing balance (the assumption being you entered incorrectly initially). The EDIT ITEMS button returns you to the reconciliation to continue. The SAVE option, only available based on configuration, allows you to save an unfinished reconciliation and continue next time. The ABANDON button exits the reconciliation process – losing all changes this time. If not configured for pre-entry of a closing balance then UPDATE (or <End> / <Esc> key) will prompt:
Select ‘No’ to return to the reconciliation list, ‘Yes’ to update the reconciliation or <ESC> to abandon all changes.
Bank Statement Report / Bank Statement Report (FC) This allows you to print a report very much like the Cash/Bank Statement report under Cash Book Reports above. You would probably include the reconciliation flag and any comment on this report. Foreign Currency systems have an additional report which processes non-base currency accounts reporting the values in the currency of the account. The procedure to print this report is exactly as described for Cash Book Reports.

236 Nominal Ledger and Cash Book
Datafile Software Nominal Ledger and Cashbook Manual 06/07/07
The report gives a summary at then end of each account showing the Balance B/F (i.e. the balance at the start of the period), totals for the transactions reported – debit, credit and net totals – plus the closing balance. It also shows the total of the transactions reported that are unreconciled. It also shows a statement balance that it the closing balance of this report less any unreconciled transactions – this may not match you last statement if there are unreconciled transactions from earlier periods still.
Post Bank Charges This option gives you a journal entry screen exactly as described already for Journal Entries above. Follow the instructions there.
Unpresented Listing This report gives a bank statement-style report, except that it shows only the transactions which have yet to be allocated. It thus should show the difference between your account balance and the bank statement balance. The procedure to print this report is exactly as described for Cash Book Reports.

Cash Book Instructions 237
Datafile Software Nominal Ledger and Cash Book Manual 06/07/07
Sample Unpresented Listing
Commented Items Listing This report gives a bank statement-style report of the transactions which have a comment against them. It gives you a check-list of the outstanding queries between you and the bank. The procedure to print this report is exactly as described for Cash Book Reports.
Cash Flow Forecast Cash flow planning has two distinct flavours:

238 Nominal Ledger and Cash Book
Datafile Software Nominal Ledger and Cashbook Manual 06/07/07
Short-term cash flow, needed by you to make sure you are in funds. This looks forward only a few weeks, you may well revise it daily (at the minimum, once a week). You may well use a spreadsheet for this at the moment.
Long-term cash flow, as requested by the bank manager to check your overdraft or
financing needs. This usually looks forward for a whole year, you revise it perhaps once a year, and you probably use a spreadsheet program to prepare it.
The cash book Cash Flow Forecast is designed for the first of these categories. Its purpose is to allow you to predict how cash flow could fluctuate, its predictions based on your view of when you expect to receive cash and need to pay your liabilities. It helps you to manage your cash, and highlight any potential short-term crisis. To start a cash flow model you can automatically, if you wish, import transaction data from the nominal ledger, cash book, sales and purchase ledgers. From this you can view how your bank balance is likely to fluctuate based on your present creditor and debtor files. Once you have created a cash flow model from such data, you can them modify the transactions in the cash flow, particularly the dates on which you expect to receive cash or write cheques. You can add extra items you know will affect cash flow, like payroll, PAYE and NI, VAT payments, and cash banked (retail). Daily you can amend the cash flow with what has actually happened, and add or change any items which will affect the future cash flow. Then you can study the picture it gives you, and decide if you have to make any contingency plans. You might try to delay or split a large payment, showing this in the cash flow to see what it does. You might have to put extra pressure on overdue customers, or even offer an incentive for prompt payment. Using the Cash Flow Planning Function First you are offered a menu of cash flow definitions. Up to 32 cash flow forecasts may be maintained on the system, to cater for different bank accounts and for different plans. If you choose one which exists, then it is opened for you. If you want to delete a cash flow then, providing you are set as being the top authority level (0), then you can use the <F6> key to delete an entry. If you want to amend the title or bank account of a forecast use the <F7> key.

Cash Book Instructions 239
Datafile Software Nominal Ledger and Cash Book Manual 06/07/07
Starting a New Cash Flow If you want to start a new cash flow definition, then choose a blank entry from the list and either click with the mouse or press the <Enter> key. When you do so you are asked:
The title you enter here becomes the menu name for this new cash flow. Enter a specific bank account (<F4-select> is available) or leave the code blank if you wish to use the cash flow planning function on an account unrelated to the cash book. You can load up the cash flow definition with data from the bank account, from cash book automatic postings, and from transaction data in the sales and purchase ledgers. You can only load such data into an empty definition, however, and not into one already containing data.

240 Nominal Ledger and Cash Book
Datafile Software Nominal Ledger and Cashbook Manual 06/07/07
Cash Flow Options The options available to you are: Update – allows you to update existing entries and add new entries to the cash flow. Print – prints the cash flow definition Load New Data – imports details from the nominal, cashbook, sales and purchase ledgers
but only if the cash flow is empty Save – saves the working cash flow Clear Sel. – clears selective entries from the forecast Clear All – clears all entries from the forecast Exit – returns to the menu. Load New Data Although not the first option in the list, when you create a new cash flow you are likely to run this option first as it allows you to import details from the nominal, cashbook, sales and purchase ledgers. If your forecast is not empty then you are warned that proceeding will clear any existing data – proceed as required.

Cash Book Instructions 241
Datafile Software Nominal Ledger and Cash Book Manual 06/07/07
Choose the period number from which to start. Usually this would be the current period, but if you are starting to plan for next month’s cash flow, you might give that period number instead. The period starting date is shown, and you can decide how far forward you wish to plan by giving an ending date. The normal period-end date is shown, but you could use and earlier data, or a later date if you want the cash flow to look further ahead.
Now you can decide which data to import into the cash flow worksheet. The bank account data (if forecast is linked to an account) is taken from the nominal ledger and will include an opening balance, plus any transactions which have already been entered through the nominal ledger or cash book. Auto postings are those from the cash book – you might want to enter these because they are (presumably) going to hit your bank during the period. Whether or not you copy data from the sales and purchase ledgers depends on your particular business and how you run it. If you set these options for import then an entry is made in the cash flow for every invoice due to be paid in the date range covered by the forecast. If you raise volumes of sales invoices, then to carry over each and every invoice could make the forecast tedious to manage. You might prefer to enter manually a daily or weekly estimate of your bankings. Similarly, you may not want to enter every outstanding purchase invoice into your forecast either.

242 Nominal Ledger and Cash Book
Datafile Software Nominal Ledger and Cashbook Manual 06/07/07
Update Cash Flow Selecting the UPDATE option takes you into the cash flow forecast – you can scroll up/down using the arrow keys and the <Page-Up> and <Page-Down> keys. To amend an entry – perhaps to change a date – press <Enter> to select the transaction and then amend the details, if you change the date then on return to the list the entries are re-sorted so you can see the new cash flow. To delete an entry press the <Del> key, to add a new entry press the <Insert> key. Entries that come from the nominal ledger and have already been posted are marked with an asterisk in the ‘flag’ field. You can use the flag field for any other purpose to differentiate entries in the work sheet. Finally, you can use the <F5> key to copy a current entry and change it’s details. For example, you may have agreed to phased payments from a particular customer over a number of weeks. Once you’ve entered the first you can copy the details for the next three just changing the due dates expected. <ESC> takes you out of the transaction list and back to the cash flow options.

Cash Book Instructions 243
Datafile Software Nominal Ledger and Cash Book Manual 06/07/07
Print At any time you can print all, or a selected part, of the forecast to the printer for reference. Selecting this option prompts you for a date range to output – leave blank for all – before asking for the print device to output the report to. Save When you are happy with a particular cash flow model, you can save it away by choosing this option. Clear Selection The cash flow worksheet is a dynamic model, and every now and then you will want to clear old entries for clarity. This option allows you to choose a date up to and including which all entries are to be deleted. There are replaced by a single entry showing the balance at that date to carry forward in the cash flow. Clear All This clears all the data from the cash flow worksheet. Exit Returns you to the menu, if you haven’t saved your latest changes you are warned and you choose to save or abandon as required.
Utilities This menu provides options to define and maintain the auto-posting procedures, the payment and receipt templates, and allows you to perform sales and purchase allocations.

244 Nominal Ledger and Cash Book
Datafile Software Nominal Ledger and Cashbook Manual 06/07/07
Maintain Auto Postings You can define up to 128 automatic posting transactions. You would use these for bank transactions which you can predict, such as standing orders and direct debits. They can be as frequent as once a month, or as infrequent as once a year. You create or change an entry by the following steps: Choose an entry number Complete the broad entry parameters (start and end dates, frequency and value) Complete the full transaction details

Cash Book Instructions 245
Datafile Software Nominal Ledger and Cash Book Manual 06/07/07
If the definition file required by this option is not found, you are asked to create a new one – if you reply no you are returned to the menu, reply yes and an empty definition is created. Choose the Entry Number The first sixteen entries are displayed. You can use the <Page Down>, <Page Up>, <Home> and <End> keys to display the entries in groups of sixteen, and can choose any particular entry by keying its entry number <Enter>. (You can only choose the entry number of those which are displayed on the screen.) The maximum number of automatic postings you can define is 128. Complete the Posting Parameters Type This can take the value P (or PAYM) for a payment transaction, or R (or RECT) for a receipt transaction. To remove an entry, then clear this field to blank and press <Enter>. You are asked “ERASE THIS ENTRY?”, to which you reply ‘Yes’ to confirm that you want it deleted, or ‘No’ to return to the Type input.

246 Nominal Ledger and Cash Book
Datafile Software Nominal Ledger and Cashbook Manual 06/07/07
Heading Type in the heading which you want to appear in the list of automatic postings. This heading is also used as the default description when you first create this posting. The heading can be up to 21 characters in length. Start Date Enter here the date of the first payment or receipt for this posting. When you first set up this option, it doesn’t matter that it has already been running for a while, because a later parameter records the date of the last time this transaction was posted. The system assumes that the posting is to occur on this day of the date entered here, so it helps to get the day right.
Note
You are allowed to give start dates of 29th, 30th or 31st of the month. If the posting month — particularly February! — has fewer days than the apparent posting date for an automatic posting, then the posting date is brought forward. So a transaction with a start date of 31st January posts on 28th February (29th in a leap year) 31st March, 30th April, and so on.
Frequency Enter here the frequency in months. You would enter “1” for monthly, “3” for quarterly, “12” for annual. This can take any value between 1 and 12. Times Many standing orders and direct debits define the number of payments (or receipts) which are to occur under them, and you enter the number of times here. The maximum is 99; the minimum is one. For example, enter 36 for a monthly standing order which is to last for three years. For a quarterly standing order over four years, you would enter 16 here. End Date This is calculated for you from the start date, the frequency, and the number of times entered above. If this is wrong for any reason, then <Escape> to the beginning of the line and adjust the start date, frequency and times.

Cash Book Instructions 247
Datafile Software Nominal Ledger and Cash Book Manual 06/07/07
Note Some standing orders have all their payments for the same value, except for the last (or first) one. The solution is to define two standing orders; one for one time less than the number of times required, and the other for just a single payment dated to be the last (or first) payment made.
Amount Enter here the gross value of the transaction. Date This Posting Was Last Actioned: When you first set up your cash book you will have standing orders and direct debits which have been running for some while. Enter here the date of the most recent posting which has gone through your account, and which you do not want to action through the automatic posting routine. For example, if you are entering data for (say) May and want to use the automatic routines for May’s transactions, then for a monthly transaction you would give the April date here as the last date actioned. After confirming/entering these details you are asked to confirm they are OK before proceeding to the next stage - reply ‘No’ to return to the Type prompt for this transaction, ‘Yes’ to go to the next stage or <Escape> to take you back to the Update Which Entry Number prompt without recording any of the changes you may have made.
Note
You must proceed with the next step to define the transaction details. Should you try to <Escape> at this point, you lose the details entered so far.
Full Transaction Details You must now complete the details of the automatic posting definition. This is a procedure exactly like entering a Payment or Receipt transaction as described above, with the exception that no journal number, period or date applies to the transaction definition. These are applied when the automatic posting is actually run. Only when you complete this part of the definition process is the definition updated. See the example transaction definition screen below.

248 Nominal Ledger and Cash Book
Datafile Software Nominal Ledger and Cashbook Manual 06/07/07
Note You can link automatic postings to the sales and purchase ledgers too. For example, monthly lease/rental agreements often give you a composite VAT invoice which you may decide to enter through the purchase ledger to record VAT. The automatic posting can reference the purchase ledger account to post the payment, though it cannot do the allocation automatically!
Maintain Receipt Templates Maintain Payment Templates You can define up to twenty transaction templates for both receipt transactions and for payment transactions using these options. Taking either of these options opens up the definition screen below. If the definition file is not found you are warned and asked to create a new definition – ‘No’ returns you to the menu, ‘Yes’ creates a definition file.

Cash Book Instructions 249
Datafile Software Nominal Ledger and Cash Book Manual 06/07/07
Key in the number of one of the template entries you wish to amend or create and press <Enter>.
You now are asked to complete the outline details for this template. These are:

250 Nominal Ledger and Cash Book
Datafile Software Nominal Ledger and Cashbook Manual 06/07/07
Title — as is to appear in the definition menu above Default cash account for the transaction Default description for the transaction Up to twenty sets of column numbers and default account codes to use within the
transaction. For example, you could enter the twenty most common account codes used for (say) the weekly petty cash analysis here. A cash book System Profiles option allows the system to ignore zero value lines, so that only the expenses which occurred during the week would create transactions in the file
You can use the <F4–Select> key to view the columns and the account codes whilst you are completing this aspect of the transaction
You can press the <End> key during entry and update the transaction as it now is. Only non-zero column and account combinations are offered when this template is used.
Sales Allocations Purchase Allocations You can use either of these options to allocate invoice, payment and credit note transactions together in the sales ledger and in the purchase ledger respectively. When you take these options you are asked to confirm an allocation date:
The date you give here must be either in the current period for the ledger, or it can be in the next period provided this ledger is supporting forward dates. If the date is outside these periods you are warned:
The dates in the message are the current period dates for the ledger concerned, which may be different to the current period, defined for the cash book. You must press <Enter> to return to the date prompt. You can <Escape> from the date prompt to return to the menu.
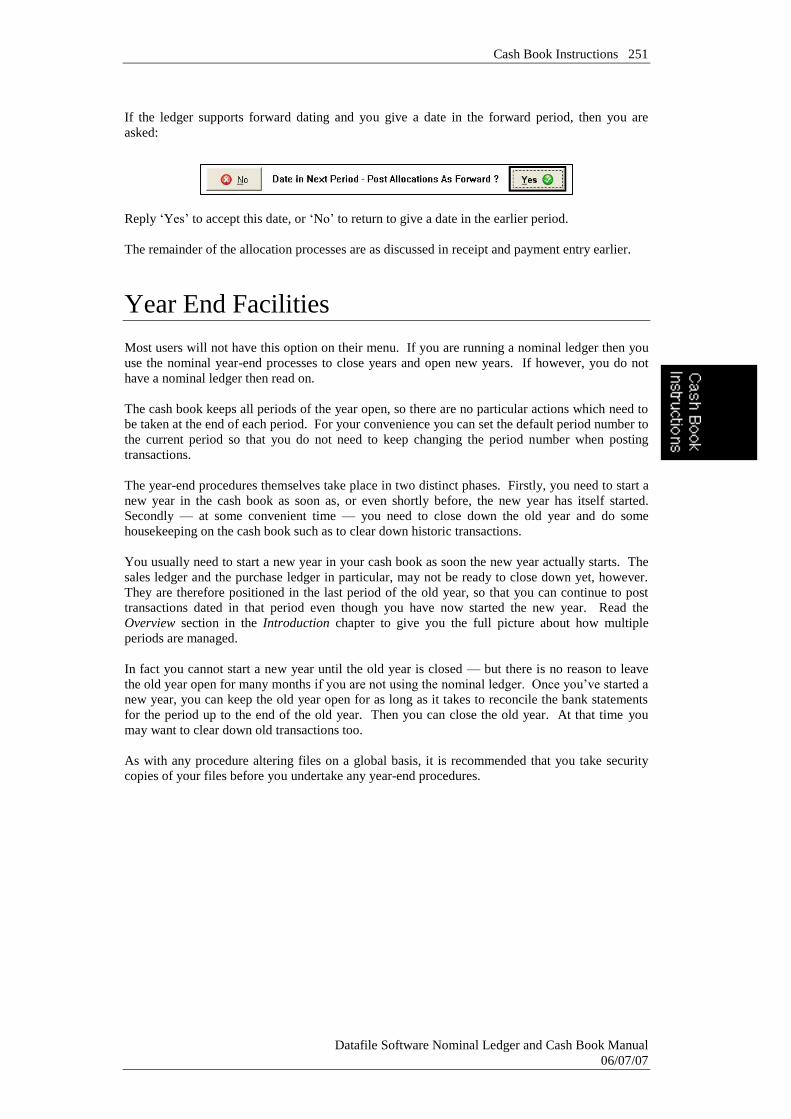
Cash Book Instructions 251
Datafile Software Nominal Ledger and Cash Book Manual 06/07/07
If the ledger supports forward dating and you give a date in the forward period, then you are asked:
Reply ‘Yes’ to accept this date, or ‘No’ to return to give a date in the earlier period. The remainder of the allocation processes are as discussed in receipt and payment entry earlier.
Year End Facilities Most users will not have this option on their menu. If you are running a nominal ledger then you use the nominal year-end processes to close years and open new years. If however, you do not have a nominal ledger then read on. The cash book keeps all periods of the year open, so there are no particular actions which need to be taken at the end of each period. For your convenience you can set the default period number to the current period so that you do not need to keep changing the period number when posting transactions. The year-end procedures themselves take place in two distinct phases. Firstly, you need to start a new year in the cash book as soon as, or even shortly before, the new year has itself started. Secondly — at some convenient time — you need to close down the old year and do some housekeeping on the cash book such as to clear down historic transactions. You usually need to start a new year in your cash book as soon the new year actually starts. The sales ledger and the purchase ledger in particular, may not be ready to close down yet, however. They are therefore positioned in the last period of the old year, so that you can continue to post transactions dated in that period even though you have now started the new year. Read the Overview section in the Introduction chapter to give you the full picture about how multiple periods are managed. In fact you cannot start a new year until the old year is closed — but there is no reason to leave the old year open for many months if you are not using the nominal ledger. Once you’ve started a new year, you can keep the old year open for as long as it takes to reconcile the bank statements for the period up to the end of the old year. Then you can close the old year. At that time you may want to clear down old transactions too. As with any procedure altering files on a global basis, it is recommended that you take security copies of your files before you undertake any year-end procedures.

252 Nominal Ledger and Cash Book
Datafile Software Nominal Ledger and Cashbook Manual 06/07/07
Close Previous Year As discussed previously the cash book covers two financial years – a current year and a previous year. You close the previous year once all postings and reports have been completed for that year, typically as you send the accounts of to your auditor or after they have sent you the adjustments to make. To give an example – if your current financial year is 01/01/2006 to the 31/12/2006 then when you close the previous year you are closing the year up to 31/12/2005.

Cash Book Instructions 253
Datafile Software Nominal Ledger and Cash Book Manual 06/07/07
Reply ‘Yes’ to close the previous year when you select this option, ‘No’ to leave the year open.
Journal Cleardown You can clear transactions from the transactions file whenever you like and you do not have to remove transactions at all (subject to product level file size limits). You are advised to keep all transactions on file until at least you close the previous year as this would allow you to print an audit report for the previous year’s accounts in full for your auditors, which can considerably speed the audit and possibly reduce the charge. Take this option when you are ready to remove historical transactions.
You are asked for the date up to which you clear transactions. You can enter any date prior to the start of the previous year, if you enter a date within the accounting calendar – current and previous year date range – then you can only enter a year start date or a period end date.

254 Nominal Ledger and Cash Book
Datafile Software Nominal Ledger and Cashbook Manual 06/07/07
After confirming the date you are prompted to begin the cleardown process – reply as required.
End of Year Procedure This procedure opens up a new year for the company. As discussed earlier you may have to do this shortly before the actual year-end for ‘forward postings’ in the sales and purchase ledger. You do have to run this option prior to the year-end processes in the sales and purchase ledgers and stock control.
I Haven’t Finished My Postings Yet
A common query when asked to run the ‘End of Year Procedure’ occurs if the user hasn’t finished all their postings yet. Do not worry – your sales ledger, purchase ledger and stock system all remain in the period they were and you can continue posting. Any updates to the nominal ledger from these ledgers will update the correct period and update the opening balances for the new year this process creates. The nominal and cash book can also continue to post and report on this year as well – although you will have to prefix the period number with ‘P’.
The diagram below shows the effect of the year-end procedure on the accounting calendar.
The actions the ‘End of Year Procedure’ undertakes are: To move all actual figures for the current year back by one year To move the old year’s actual figures back one year further still in the file To clear all the current year’s actual figures To post the closing balances of all bank accounts (flagged cash=Y) in the old year (which
was the current year) as the opening balances for the new current year

Cash Book Instructions 255
Datafile Software Nominal Ledger and Cash Book Manual 06/07/07
To accumulate the net value of the closing balances of all other accounts in the old year. This it posts into the year-end control account (defined in the cash book system profiles)
To move the accounting calendar forward one year To ‘set’ the sales, purchase and stock ledger periods into their same period, now in the
previous year On selection of this option the system displays the current accounting year date ranges for the current and previous years plus the date range of the new year to be created.
You are first prompted to ensure you have a backup. You should always take a security backup prior to running this procedure. After confirming you have indeed taken a backup you are prompted to begin the year-end process. After you give the go ahead the system proceeds with the cash book year end. When complete a message is displayed and <Enter> returns you to the menu.

256 Nominal Ledger and Cash Book
Datafile Software Nominal Ledger and Cashbook Manual 06/07/07
Non-Monthly Periods If you are operating a 13 period financial year – each period covering four weeks – then after the year-end is completed you will be asked to confirm the period date ranges for the new financial year. Similarly if any period date range in the current year ends on a date that doesn’t represent the end of a month you will be asked to confirm the new year period date ranges.
Account Enquiry This provides an easy way to view an account and its transactions. You are first asked for the account code. You can use the <F4–Select> facility to search for an account here in the usual way. Once a valid account code has been entered, then account details as shown below are displayed.
You scroll up/down the list using the mouse or the arrow and page-up/down keys. Pressing <F6> or the journal button against a transaction shows the full journal of which that entry is a part.

Cash Book Instructions 257
Datafile Software Nominal Ledger and Cash Book Manual 06/07/07
Before inputting the account code the <F7-Options> key can be used to configure details of the transaction display.
Transaction Date Range: From Transaction Date Range: To You can specify here a date range between which transactions are to be displayed. If you leave either date blank it is assumed that you want to display from the start and/or end of the file respectively. Enquire Period Number (Curr Year) This defaults to the current period. If the account display items include the budget or movement for period 1 then this setting changes the values displayed to reflect the period. For example, if in period 7 it will display the movement values for period 1. If not displaying ‘period 1’ values in the enquiry header then this setting has no effect.
System Status This displays a summary of the current status of the nominal ledger. It acts as a useful check on the ledger. COMPANY — displays the identifying code and the name of the company in use FILES — displays the number of accounts and transactions reserved in the data files in total, and the number used so far. It should be clear if the files are becoming full and you can use the Controls & Audit Manager options to expand the files (if auto-expand not enabled). DATES — displays the system date, the current period number, the total number of periods in the year and whether the previous year is still open for postings PREVIOUS YEAR STILL OPEN / CLOSED- One or other of these messages displays depending on the status of last year’s accounts. SALES LEDGER PERIOD / PURCHASE LEDGER PERIOD – The current period number active for the sales and purchase ledger is displayed here, together with whether each is the current or previous year.

258 Nominal Ledger and Cash Book
Datafile Software Nominal Ledger and Cashbook Manual 06/07/07
CONTROLS — displays the following details: the last journal number used the highest transaction record number for brought forward balances the highest transaction number printed so far on any transaction listing

259
Datafile Software Nominal Ledger and Cash Book Manual 06/07/07
Chapter 4 Nominal Ledger Configuration
Your Datafile Software ledger systems have a wide range of possible facilities, and you can undertake a great amount of structuring so that it suits your particular operation. This section describes how to use the Installation program to set up your ledger system and to define your document layouts. You can use the program for the requirements of many companies, and each may have a different configuration and its own set of data files. For each company specified a parameter file is written to disk which holds details of the configuration. Each company is identified by a three-letter code such as “DEM”.

260 Nominal Ledger and Cash Book
Datafile Software Nominal Ledger and Cashbook Manual 06/07/07
When you select the Installation option a menu will be displayed that contains the installation and configuration options – only operators with the highest authority level (0) are allowed to process any of the options within this menu. On Datafile Compact and Professional systems this menu differs slightly as options that aren’t applicable for the product level are removed – these include ‘Application Manager’ and ‘Ledger Enquiry Manager’ for both Compact and Professional plus the ‘Security and User Manager’ for Compact. The ‘Application Manager’ and ‘Ledger Enquiry Manager’ provide further configuration options. The Installation options are covered generally within the Configuration Guide manual; however where specific ledger configuration options are available these are covered here.
Lock Out All Systems
When making changes to the nominal ledger then that application has to be locked out. To lockout the ledger you select the option ‘Lock Out All Systems’. Firstly, you are prompted to lock out all systems – it can sometimes be easier to lock all systems as you may have to change settings in other applications at the same time – if you respond ‘Yes’ then all applications are locked, if you respond ‘N’ then you can select to lock just the applications required.
Set Application Code Formats This option allows you to set the prime index format for each of the application databases including the nominal account files.

Nominal Ledger Configuration 261
Datafile Software Nominal Ledger and Cash Book Manual 06/07/07
The default format for nominal is 999 – this forces account codes to have three numbers. A typical other format would be 999-AA which would allow three numbers, a delimiter, and two letters for (say) a department code. With the nominal ledger it is best to avoid the U or X formats. The ‘Company Name’ displayed here is used as the name in all reports including the Nominal and Cash Book reports.
System Profiles You specify here a number of parameters that are required if you are using the nominal ledger and/or cash book. Some of these parameters are used by other applications, such as the sales and purchase ledgers, invoicing and order processing.

262 Nominal Ledger and Cash Book
Datafile Software Nominal Ledger and Cashbook Manual 06/07/07
System Profiles Screen 1
Omit Year End for this Nominal You may have configured your system to share the same nominal ledger databases across companies. If you do this then you should only run the year-end in one company as the year end moves the ‘actual’ values back a year (losing the oldest set of values) as well as updating the accounting period dates. If you ran the year end on the same databases in another company then the values would move back another year. Setting this option doesn’t prevent you running the year end in this company – you still have to update the accounting calendar – but it does stop the process of moving back the values and the posting of the profit and loss total to the retained earnings account. Income: Accounts From and To Expend: Accounts From and To These prompts specify the range of accounts within which income (sales) or expenditure (purchase) nominal codes usually fall.

Nominal Ledger Configuration 263
Datafile Software Nominal Ledger and Cash Book Manual 06/07/07
It is recommended that you specify these ranges correctly, as this determines whether a P or a B is offered to denote the account as a Profit and Loss or Balance Sheet account when you create new nominal ledger accounts – you can overwrite the offered value, but mistakes would create later difficulties. Only Profit and Loss accounts are zeroed as part of the end of year procedure, based on the setting of the P/B item. If you have a formatted nominal code then you may use an asterisk wild-card when defining the range. For example, if your nominal code format were “999.99” with the first set representing the expense code and the second a cost centre, then you might specify the income range to be “001.**” to “099.**” to show that only the first part need to be checked for the range. Income: Default Expend: Default Enter here the default income or expenditure code to be offered for invoice or credit note analysis records. The default code may be overridden by codes specific to the customer or supplier, or copied from a stock or product record. In the absence of any other code to use, however, these are the codes offered. Income: Suspense Expend: Suspense When you come to update the nominal ledger from the sales and/or purchase ledgers, should the transaction nominal code be blank or not exist then the value of that transaction is written to the relevant suspense account specified here. In use this means you must investigate the reason, and raise some nominal journals to correct any postings. Income: P/L Disc Expend: S/L Disc Where payment discounts are entered for sales and purchase ledger payments these discounts are posted into the accounts specified here. Note that the payment discount appears under income codes, and the sales discount under expense codes – a sales discount is often shown as an expense item in a profit and loss statement. If the foreign currency application is in use then you can specify discount accounts per (non-base) currency used in the ledger within the currency maintenance options. Force Income Account Range Force Expend Account Range If you set these options then the nominal account code specified in sales and/or purchase transactions must be contained within the appropriate range specified earlier. If you leave blank then you are merely warned that the code you are using is outside the range, but you are not prevented from using it.

264 Nominal Ledger and Cash Book
Datafile Software Nominal Ledger and Cashbook Manual 06/07/07
It would be normal to leave the expenditure account range option blank and not force the input; you may well purchase items, such as assets, which are not considered as expense items. For the sales ledger, however, it is more usual to set this option as it is exceptional to want to enter non-income accounts as sales invoices. Assets: From Assets: To When entering purchase invoices and credits you will sometimes require the option to analyse against an asset account rather than the usual expenditure accounts and typically the asset range is not within the expenditure range. Here you can define an asset accounts range which, if defined, will allow use of a code within this range without warning in P/L, Supplier Invoices, and Purchase Order Processing (note the <F4-Select> will continue to display only the expenditure range). Bank Accounts: From Bank Accounts: To You may create as many bank accounts as you want. However you are advised to restrict them to the range of accounts that you specify here. Bank Accounts: Default Enter here the default bank account that is to be offered when a bank code is needed (for ledger payments and the cash book). This would normally be a current bank account, since most of the activity can be expected on that one. The default code may be overridden by codes specific to the customer or supplier, to the (non-base) currency, or the payment type (sales ledger only). Profit & Loss Control Enter here the code of the balance sheet account that holds the profits accumulated from previous years (often called Retained Earnings). This code is used by the end of year procedure in the nominal ledger as the account to which the current year’s profit or loss is to be posted to before starting the new year. Debtors Control Creditors Control These are the nominal ledger debtor and creditor control accounts used by the ledgers and the cash book when updating the nominal ledger. Sales Tax Purchase Tax

Nominal Ledger Configuration 265
Datafile Software Nominal Ledger and Cash Book Manual 06/07/07
These are the accounts used to accumulate sales and purchase taxes from the sales and purchase ledgers respectively. In the EC this is the value added tax (VAT). You may specify the same account for both; however, you may want to keep them separate for reporting purposes. EC Acquisition Tax This is the account code used to post the EC acquisition tax calculated within the purchase ledger when updated into the nominal ledger. It too could be the same code as that specified for the sales and/or purchase tax. Tax Control Account VAT is normally paid quarterly, and if using separate sales, purchase and acquisition accounts you would post a journal here once a quarter to show the VAT liability. Whether separate accounts specified or not you would then post a journal from this account to the VAT payment account when paid. Code Format Partition Start The code format shows what you have specified earlier in the Code Formats section and this option allows you to divide that code into a maximum of 5 partitions – each of which has a specific title. If, for example, you had a format of 999/99 this would be split into two elements – the first three digits representing the account code and the latter two digits as a cost centre or division code. The partitions would start on characters 1 and 5. Once you’ve entered the position where each part of the code starts, then a pop-up box opens you that you can give the narrative names to the partitions.

266 Nominal Ledger and Cash Book
Datafile Software Nominal Ledger and Cashbook Manual 06/07/07
System Profiles Screen 2
Financial Summaries Pathname Enter here the pathname for the file that holds the definitions for your financial summaries, such as the Profit & Loss and Balance Sheet statements. The usually pathname is DATA\???-FIN.DEF (where you replace ??? with the company id). The financial summaries are defined via the Nominal Ledger application itself. User Defined Transaction Pathname Enter here the pathname for the file that holds the definitions for your user-defined transactions. The usual pathname is DATA\???-TXS.DEF (where you replace ??? with the company id). The user-defined transactions are defined via the Nominal Ledger application itself. Multiple Updating Definition Pathname (excluding Compact) For the Datafile Professional, Diamond and Premier versions you may update the nominal ledger from more than just the sales/purchase ledger and payroll. The definition of such updates is held

Nominal Ledger Configuration 267
Datafile Software Nominal Ledger and Cash Book Manual 06/07/07
in the file you specify here (usually DATA\???-UPD.DEF where you replace ??? with your company id). You may want to use the multiple updating file to update across companies – where you have a weekly and monthly payroll system, or to update depreciation from the ProFiler Fixed Asset Register. The update definition is configured via the Application User Facilities for Diamond and Premier users and at the end of these system profile screens for Professional users. Journal Entry Codes Transactions in the nominal ledger originate from several sources. It can be helpful when auditing the ledger to know what the original source was. Datafile pre-define default three-character ids for each of the options specified but you may want to amend these to match your previous system. Trial Balance Sub-Breaks The Trial Balance is one of the most important reports in the nominal ledger. It can be helpful to print sub-totals at various code-breaks – these can give you an immediate feel for the current profit and loss on the company. Here you may specify up to 20 codes at which to sub-total. Codes up to and including the codes entered here are sub-totalled; so if income accounts were defined in the range 001-099, then you might enter a sub-break at 099. Codes entered here are sorted into sequence after entry, so there is no obligation to do so as you are entering them. As an alternative Diamond and Premier users can specify a nominal account file item to drive sub-totals instead. Either you could create a new data item to hold a special sub-total field or use the sub-item type field to break out a value from the nominal code itself to sub-total on. This item is defined via the Database Profiles.

268 Nominal Ledger and Cash Book
Datafile Software Nominal Ledger and Cashbook Manual 06/07/07
System Profiles Screen 3
Budget Factors The nominal ledger has powerful facilities for entering and maintaining budget figures to compare against actual values. One of these is the ability to enter an annual budget figure for an account, which is then divided over the periods according to a table of pre-defined percentages. This option allows you to define up to five tables of values to use for this process. In each table you enter the percentage of the annual amount against each period, so that the total of each table is 100. If the total does not equal 100 you are returned to the top of the table to adjust the percentages – the current total is displayed at the bottom as you change each period.
Nominal Update Configuration Compact and Professional users will be prompted at the end of the system profiles to “Change the Update to Nominal Definition”. Respond Yes or No as required. For further details on this option refer to the notes on the “Update from Other Systems” section of the Application User Facilities later in this manual. Diamond and Premier users configure the update through the application user facilities.

Nominal Ledger Configuration 269
Datafile Software Nominal Ledger and Cash Book Manual 06/07/07
Application Manager Select the Application Manager (Diamond and Premier only) menu option gives a further sub-set of actions.
The options available on this menu are discussed in their own sections later on where appropriate for the ledger.
Ledger Enquiry Manager The Ledger Enquiry Manager (Diamond and Premier only) allows you configure the display screens for the Nominal Ledger Enquiry. Enquiries Allowed for this Company Although there are no specific options relating to the nominal enquiry within here, this option controls whether the Ledger Enquiry as a whole is available for this application company.

270 Nominal Ledger and Cash Book
Datafile Software Nominal Ledger and Cashbook Manual 06/07/07
Applications Allowed This option allows you select whether you can enquire on the nominal ledger within the enquiry and the authority level needed before you can enquire.
Enquiries Configuration This option allows you to configure the Ledger Enquiry for each of the applications. After selecting the application a list of available options are displayed.
Nominal Accounts File – Full Screen Design (Premier only) In Premier systems you have the option to create two user-defined screens in which to display details from the nominal accounts file. On selection of this option you are asked if you wish to use a full-screen layout and, if selected, you are taken into the screen design.

Nominal Ledger Configuration 271
Datafile Software Nominal Ledger and Cash Book Manual 06/07/07
You design the screen as per the standard design parameters. To add text to the screen you use the mouse or arrow keys to position the cursor at the start of where you wish to enter your text and type in the required label(s). To clear any text you can use the space bar. To add a data item to the screen you use the mouse or arrow keys to position the cursor at the start of where you wish the item to display and then either ‘right-click’ with the mouse or press <F4-Select>. The list of available data items are displayed for you to select. To delete a data item from the screen use the mouse to click the item and then hit the <DELETE> key. To draw borders around the screen choose the option ‘Border’ on the Tools pull-down at the top of the screen. To draw a line on the screen select the option ‘Line Mode’ on the Tools pull-down and then use the mouse to click the start position of the line and then drag the line (horizontally or vertically) to the end position of the line. To delete a line use the mouse to select the line (it will turn blue when selected) and then hit the <DELETE> key. Once the line(s) has been drawn you can switch back to text mode use the option on the Tools pull-down. Once complete choose the File pull-down option ‘Save & Exit’. After save of the first screen you will be asked if you wish to use a second screen – respond as required.

272 Nominal Ledger and Cash Book
Datafile Software Nominal Ledger and Cashbook Manual 06/07/07
Nominal Accounts File – Item Screen Design If Diamond (or Premier and you don’t wish to use the full screen design) then this option allows you to quickly configure the display of up to 32 items from the accounts file in two columns of 16.
Here you list the items you want to display on, firstly, the left of the screen and then the right. The number displayed in brackets after an item indicate the field number that is being displayed on this line on the other half of the screen. If using Premier after configuring the left and right columns of the first screen you are able to define the second screen in the same manner.
Transaction / Detail Enquiries This option gives you the ability to configure the display of the transaction enquiries available for each nominal record. On selection of this option you are able to set the authority levels for access to the transaction enquiry.

Nominal Ledger Configuration 273
Datafile Software Nominal Ledger and Cash Book Manual 06/07/07
Blanking the authority level disables the transaction enquiry option otherwise set as appropriate (remember values are from 0-9 where 0 is the highest and 9 is the lowest authority level). After setting the appropriate levels you can then configure the display items for this option.

274 Nominal Ledger and Cash Book
Datafile Software Nominal Ledger and Cashbook Manual 06/07/07
LIFO Set to display transactions in LIFO – last in first out – order. If set then you should note that the enquiry process will be slower. DATE Transactions are usually displayed based on the order they were entered, setting this option sorts the details into date order – either FIFO or LIFO based on setting of the prompt above. List Items Here you can select up to eight items to be displayed when selecting the transaction options from the Nominal Enquiry. Premier users have an additional configuration option for transaction display after confirming the last of the list items. Full Screen Layout for ‘Transactions’ Enquiry Premier systems are given the option to design a full-screen enquiry display for the transaction record. If you elect to use the full-screen enquiry then you are taken into the screen design. You design the screen as per the standard design parameters.

Nominal Ledger Configuration 275
Datafile Software Nominal Ledger and Cash Book Manual 06/07/07
Extra File Scans The file scan option allows you to scan documents against the nominal account – you could, for example, scan your bank statements against the bank account.
This option allows you to set the authority level to perform a file scan. Note though that the scanned files can be viewed regardless of authority level (provided you can access the options). Authority levels are from 0-9 where 0 is the highest authority and 9 the lowest. Leave blank to disable the file scan option for this enquiry.
Memo Facility Configuration The Memo facility allows you to record notes against nominal records. Within the Ledger Enquiry Manager you have the option to define, for all applications, where the memo files are stored, whether users are warned or not and the authority level to update memos.

276 Nominal Ledger and Cash Book
Datafile Software Nominal Ledger and Cashbook Manual 06/07/07
Controls and Audit Manager The Controls and Audit Manager contains all the utility routines used to check the integrity of the database files and to undertake various housekeeping actions. The tools supplied allow: Audit Application Database Pointers Check integrity of the databases (audit) and rebuild their index’s Define the auto-expand parameters for databases Check and reset application values Recover Unused Space. After selecting the ‘Controls & Audit Manager’ menu option you are prompted to select the application and then you are presented with the Controls & Audit options for that application.
Audit Pointers This option checks and resets the relationship between the accounts and transactions file. On selection you are asked whether you want to perform the check for all master records or for individual codes – in practice you would choose do to this for all codes as there would normally be little difference in the time taken (the majority of the time being taken with reading the transactions).
Transaction Control Numbers This option lets you manually reset certain transaction pointer numbers in the control files.

Nominal Ledger Configuration 277
Datafile Software Nominal Ledger and Cash Book Manual 06/07/07
1) Highest B/F Transaction after Clear Down This pointer holds the highest b/f transaction created after running the nominal journal cleardown. This is used as a display suggestion in the audit trail for those who wish to exclude these transactions from the print. 2) Highest Transaction Record Printed This pointer holds the highest transaction record printed on a journal listing. It is displayed in the application System Status screen and could be checked for use as the starting record number in the journal listing report to report journals entered since last print. 3) Highest Transaction Since Structured If using a structured nominal code with partitions then the drill down zoom enquiry is of particular use. The drill-down enquiry accumulates values from the lower level codes to the higher. This value is used and updated as part of the enquiry and, next time the enquiry is run, if this value matches that of the highest transaction input the system doesn’t re-accumulate the values.
Edit System Status Display Each application has a ‘System Status’ option that summarises the key facts about it, such as files, their sizes, how full they are, the current period number and period dates plus various other control information such as last issue reference etc. You can reset the last journal numbers within this option.
Set Non-Posting Status Flag If using a partitioned code structure then the ‘header’ accounts should be flagged for ‘non-posting’ – i.e. no journals are entered for these accounts. When you create header accounts within the system then this flag is set automatically for you but if you import the accounts then you can run this option to flag header accounts automatically.

278 Nominal Ledger and Cash Book
Datafile Software Nominal Ledger and Cashbook Manual 06/07/07
Database Audit Use this option to check the internal integrity of any of the nominal files. If you’re sure that a particular record is in the file but you cannot select it via the indexes then you might want to use this option on that file. Really the only events liable to disturb the integrity of a database are power/hardware failures or an attempt to process a database in an outside program. The database audit checks every record in the file to make sure it is genuinely active and rebuilds its indexes from scratch. When you choose this option all the application databases are listed for you to select from – it is recommended that if you have the need to do one of the databases within the application you should probably do them all and follow it up with the ‘Audit Pointers’ option.
Compact & Audit Database The internal processing of databases does not necessarily re-use the space occupied by records that have been deleted (particularly in master files such as the nominal account file). New records are always added to the end of the file. Therefore, over a period of time, it is possible a file may appear full but there could be gaps in the middle where records were deleted. Using this option consolidates the active data and frees up space. This option effectively re-arranges all the active records so you must run the ‘Audit Pointers’ function after using this option. In addition you should not, in the normal course of events, use this option on the transaction file – the journal clear down process will do this for you and running here could affect the transaction control numbers (see above).
Set Auto Expand Data Files Datafile reserves a fixed space for database files and you need to expand that space should the file become full. This option allows you to set internal system parameters so that it automatically attempts to enlarge a file that is becoming full. The file is expanded when a user opens the file provided no-one else is already using that file, typically it would occur at the start of the day when the first user accesses an application.

Nominal Ledger Configuration 279
Datafile Software Nominal Ledger and Cash Book Manual 06/07/07
Expand By Enter the number of records by which you wish the system to expand the file when triggered. Strike a balance between too small a number, meaning that it would happen to frequently, and too large a number which would mean it would take a long time to expand the file and take up unnecessary disk space. When Less This represents the quantity of free records which when the database is below will trigger the automatic expansion when a user has exclusive access to the file. Minimum Spare This is an important parameter for files where batches of records are added – it represents the minimum quantity that must be free at all times. It would normally be less than the ‘When Less’ setting and if this setting reached it implies that no user has had exclusive access to the file since the ‘When Less’ quantity was reached. You should set the minimum to be the largest number that can be added through an automatic update.
Expand Data Files If not setting the auto-expand options then this option allows you to manually expand the data files as necessary.
Security and User Manager The Security and User Manager, available on Professional upwards, allows you to set authority levels and passwords on specific application options and to define any user authority overrides. After selecting the application two screens of options are allowed for security checks.

280 Nominal Ledger and Cash Book
Datafile Software Nominal Ledger and Cashbook Manual 06/07/07
In the first screen you may attach a password and/or an authority level for each of the main ledger options. If Premier and logging options have been enabled then you can log operators who attempt to enter password/authority protected areas and fail. You can also nominate operators, who are nominally blocked from this application by their authority level, to be allowed in.
On the second screen you are allowed to specify passwords/authority-levels for more specific transactions and record maintenance options.

Nominal Ledger Configuration 281
Datafile Software Nominal Ledger and Cash Book Manual 06/07/07
Application User Facilities The Application User Facilities allow configuration of the individual Nominal Ledger options – this facility is only available for Diamond and Premier users.
Maintain Chart of Accounts Only five of the seven choices on the sub-menu on the right allow you to specify any details. The details are effectively the data items to display when you enter or amend an account in full, view an account, delete an account or enter budgets.
The run time choices which have no user-defined options are shown for completeness in the menu below, but enclosed with brackets.

282 Nominal Ledger and Cash Book
Datafile Software Nominal Ledger and Cashbook Manual 06/07/07
Maintain Screen This option allows you to design the data entry screen used to maintain nominal ledger accounts in full.
You design the screen as per the standard design parameters. To add text to the screen you use the mouse or arrow keys to position the cursor at the start of where you wish to enter your text and type in the required label(s). To clear any text you can use the space bar. To add a data item to the screen you use the mouse or arrow keys to position the cursor at the start of where you wish the item to display and then either ‘right-click’ with the mouse or press <F4-Select>. The list of available data items are displayed for you to select. To delete a data item from the screen use the mouse to click the item and then hit the <DELETE> key. To draw borders around the screen choose the option ‘Border’ on the Tools pull-down at the top of the screen. To draw a line on the screen select the option ‘Line Mode’ on the Tools pull-down and then use the mouse to click the start position of the line and then drag the line (horizontally or vertically) to the end position of the line. To delete a line use the mouse to select the line (it will turn blue when selected) and then hit the <DELETE> key. Once the line(s) has been drawn you can switch back to text mode use the option on the Tools pull-down.

Nominal Ledger Configuration 283
Datafile Software Nominal Ledger and Cash Book Manual 06/07/07
Once complete choose the File pull-down option ‘Save & Exit’. View an Account Here you can define up to 28 data items from the nominal accounts file which are to display on the screen when a user chooses this option at run time.
You specify first the items you want to display in the left-hand column of the View Account screen, and then the items to display in the right-hand column. You can define up to 14 items for each side of this display, which you do from the parameter screen above. You can use the <F4–Select> key to select data items or enter the item number if known. After defining the left-hand column the screen resets for you to enter the right-hand column. Delete Account Here you can define up to 14 items from the nominal ledger accounts file which are to show when you ask to delete an account. You specify these data items in exactly the same way as already described above for View an Account. Enter Budgets You need to define here the data items which are to show for the various budget options.

284 Nominal Ledger and Cash Book
Datafile Software Nominal Ledger and Cashbook Manual 06/07/07
Enter Current Budget Year Totals – Show Which Item? At run time this is the second of the budgeting options which allows you to change the annual budget for the current year. It normally shows the actual value for last year (in other words, the closing year balance) for comparison. This prompts asks for the data item name for last year’s balance, but you could, if you prefer, give another value — last year’s annual budget instead, maybe. Previous Year Budget Totals – Show Which Item? At run time this is the fifth of the budgeting options which allows you to change the annual budget for the previous year. For comparison it normally shows the actual amount for the year before (in other words, the closing year balance) but you could show a different value. This prompt asks for the data item name for the previous year’s balance, but you could, if you prefer, give another value — the previous year’s annual budget perhaps. Budget Input for Periods – Show Which Values? At run time this is the third of the budgeting options which allows you to change the period budgets for the current year. It normally shows the actual period values for last year (in other words, the period movements) for comparison.

Nominal Ledger Configuration 285
Datafile Software Nominal Ledger and Cash Book Manual 06/07/07
You are given the choice of showing either the actual movements each period last year for comparison (in which case answer 1) or the budgets entered for each period last year (in which case answer 2). Previous Year Period Budgets – Show Which Values? At run time this is the sixth of the budgeting options which allows you to change the period budgets for the previous year. It normally shows the actual period values for last year (in other words, the period movements) for comparison. You are given the choice of showing either the actual movements each period last year for comparison (in which case answer 1) or the actual movements each period in the year before that year (in which case answer 2). Sub Accounts If using a two-level partition structure with no delimiter then this option allows you to configure the ability to auto-create a code when used.
Allow Auto-Create Set to allow auto-creation of nominal codes for a department/cost centre when posting within the sales and purchase ledgers, nominal ledger and the order processing applications. Note: other

286 Nominal Ledger and Cash Book
Datafile Software Nominal Ledger and Cashbook Manual 06/07/07
applications allow selection of any existing code but don’t give you the option to create codes that don’t exist. NLA Item for (1t Split) Code Allowed Only Enter the data item number, <F4-Select> is available, for the flag data item that controls whether or not only the general department/cost centre is allowed for this item. This would be set, for example, on control accounts so that only the general cost centre can be used/created. Department Code used for Master Only Enter the code value to be used for the general cost centre. NLA Item for Dept Enter the data item number, <F4-Select> is available if required, to update the department title to when a new nominal account is created.
Notes
This option relies on the code structure being to two levels only with no delimiter between them When enabled you are allowed to create accounts ‘on-the-fly’ in the nominal ledger, the sales/purchase ledgers and order processing. Other applications allow you to select an account but not to create one that doesn’t exist. This option relies on a second database holding the available cost centre / department codes. The database, ???-NLA2.DFD (replace ??? with your three-letter company id), would be maintained via the DeskTop or ProFiler and has two data items – item 1 being the department code (prime-index), and item 2 being the department title (secondary index).
Nominal Transactions The various types of journal include a single entry journal with matching debit and credit amounts; multiple debit and credit journals (up to a maximum of 200 in one journal) provided that total debit amounts equal total credit amounts; provisional transactions (accruals and pre-payments) and an automatic procedure to reverse provisional transactions; a simple procedure to reverse any journal; and up to 40 user-defined transactions to simplify standard and repetitive journal entry.

Nominal Ledger Configuration 287
Datafile Software Nominal Ledger and Cash Book Manual 06/07/07
Single Debit/Credit Entries Not used much today as it has been replaced by the multiple entries option, in fact this option isn’t on the default menu, you use this type of journal to post simple debit/credit transactions. The nominal ledger can write this as just a single transaction — with an entry for both the debit and the credit account — or as two transactions, one with the debit account and value, and the other with the credit account and the same value. The reasons you might wish to write just a single transaction are so that you can print both account codes on audit trails (which tells you where the other side of the journal was posted) or should you need to save space. On the other hand, if you want to use the DataFiler database or ProFiler application generator to produce reports from the nominal transactions file, you may find this easier if this type of transaction writes two journal records, so that each one has only one account code in it. Write Only A Single Transaction Record? Set as appropriate here.
Note
The journal transaction file design contains two fields for account codes, one for the debit entry and one for the credit entry. If you write individual records, then the credit account is blank for the debit transaction, and the debit is blank for the credit transaction. Both fields are used for the single version.

288 Nominal Ledger and Cash Book
Datafile Software Nominal Ledger and Cashbook Manual 06/07/07
Multiple Debit/Credit Entries This is the more common journal option and it is the option available as default on the menu. You use this type of journal where there are many entries, for which the sum of all debit values must equal the sum of all credit values. A journal transaction is created for each line of the journal, each one of which holds a credit or debit account code and the associated amount. This option allows the input of additional information for each entry.
Remember Reference during Entries Remember Analysis during Entries If you are using reference and analysis fields, and generally want them to hold the same value for each entry in the journal, then it saves time to remember them from one entry to the next. This does not preclude you at run time from changing their values on each line — if you do, then the new entry is offered for the subsequent line. The values are not remembered from one journal to the next, however. Set as appropriate for each of these questions.
Note
You have the option to decide anyway whether or not to offer analysis and reference prompts for journals. You specify this through the Datafile Profiles for the nominal ledger transactions file, either by defining data item numbers for these fields or by making the item numbers zero to leave them out.
Enter Description for All Entries Enter Date for All Entries You can decide whether or not to enter a description and/or a date for each line of the journal. Set each question above if you want them on each entry line, or leave blank to use the journal header description and/or date in every journal line. If you choose to enter these on every line, then at run time the journal header values are offered as defaults for the first journal entry, and the previous line entry is offered as the default for each new journal entry thereafter. Individual dates must lie in the date range of the period given for the journal.

Nominal Ledger Configuration 289
Datafile Software Nominal Ledger and Cash Book Manual 06/07/07
Provisional Single Debit/Credit Entries Provisional Multiple Debit/Credit Entries The answers you have already given for single and multiple journal entries apply to provisional single and multiple journals too. These menu options are given here only for the sake of consistency with the nominal ledger program, and you do not need to make changes here, therefore.
Note
If you do make changes, these apply to the single and multiple journals too — they are the same parameters.
User-Defined Transactions The transactions themselves are defined in the nominal ledger program itself — see under Nominal Instructions above. The definition file allows up to 40 user-transactions to be defined. If this becomes full and you need more options then you can set to allow multiple transaction definitions here. Allow multiple transaction definitions (suffix 0nn) Set, when you have used all 40 transaction definitions in the main definition file, to allow multiple definitions.
More User Defined Journals
If you’ve used all 40 slots within the definition file then Diamond and Premier users can create a new definition file. The usual definition file, ???-TXS.DEF (where ??? is the company id) is supplemented by ???-TXS.0nn (when nn is a number from 01 to 99). You need to configure the menu to call the new definition(s) – the parameter number is 2005nn where nn is the definition number from 01 to 99.
Reverse Provisional Entries These questions apply to the automatic reverse provisional journals process, which creates new journals which are the reverse of the original journal entries, but without the provisional flag (the provisional flag is also cleared from the original entry when they are reversed at run time).

290 Nominal Ledger and Cash Book
Datafile Software Nominal Ledger and Cashbook Manual 06/07/07
Write Transactions With Original Date? You can choose whether to use the original transaction date when new journals are written to reverse provisional journals, or whether to use the date of the run. You might choose to use the original date if using the next journal number (see below), or to use the run date if sticking to the original journal number Use Next Journal Number On Reverse? Each provisional journal which is reversed creates a new journal in the file. Either you can use the original journal number for the new journal or the next journal number in sequence. Set as appropriate. There are pros and cons to either choice. Using the original journal numbers means that the strict journal sequence is disturbed, but makes is easier for you to find the original journals. Using the next journal number each time maintains the strict journal sequence, but may make it harder to locate the original provisional journals which they reversed — a good reason to write it with the original date. Force Provision to have reversal date The provisional entry can ask for a date to reverse it as – set to force input of a reversal date. Entering a reversal date makes the actual reverse process easier as you automatically only reverse transactions due in the period, whereas if left blank you have restrict the provisionals processed by record number, input date or original journal number. Omit Overtype of Journal Number This option applies to all the above options and allows you to prevent the overtype of the number when you create journals in the nominal ledger allowing you to maintain a strict numeric sequence. Set as appropriate.
Report Listings & Analyses Here you define what items are to print on the nominal ledger reports. For each report you must define the print style to use and the data items which are to print. See the Nominal Instructions for examples of these reports. Print Control You can define up to eight printing styles for your system through the CONFIG user — see the System User Guide. These control not only the print style such as the number of characters per inch, but also the length and width of the report. The styles so far defined are shown at the bottom of the screen when you are prompted.

Nominal Ledger Configuration 291
Datafile Software Nominal Ledger and Cash Book Manual 06/07/07
Data Items You are asked to enter up to 10 data items (depending on the specific report) to print on each report. The file structure for the file concerned (nominal accounts or transactions) shows in the right-hand window when you take the option for any particular report. However, you can use the <F4–Select> key in the usual way to select a specific data item to print. It is the data item numbers which you enter, although the item names are shown alongside too. In addition to the data items in the file itself, you can select from a further set of items, which are derived from the data in each file up to the period number chosen for the report at run time. Use the <F7–Options> key to view these items, which are also described below. They are numbered from item number 161 upwards. It is preferable to use, for example, item 165 — the accumulated actual balance — than to use item 47, the current balance. The current balance always shows the full year regardless of which period you ask to print, whereas item 165 accumulates only up to the period number you choose when you print.
Additional Nominal Accounts File Items
161 Accumulated Budget. The sum of each period’s budget from the start of
the year to the report period number — i.e. the year-to-date budget 162 Accum Budget Variance. The difference between the budget to-date
item 161 and the actual movement to-date, which is item 165 163 Period Budget. The budget figure for the report period requested 164 Period Budget Variance. The difference between the period budget item
163 and the actual result for the period, which is item 167 165 Accumulated Actual. The sum of each period’s actual results from the
start of the year to the report period — i.e. the actual year-to-date result 166 Accumulated Actual Variance (Previous year actual). This is the
variance between the year-to-date result in item 165, and the comparative value for the same period range last year, item 169
167 Period Actual. The movement for the period — the current period’s results 168 Period Actual variance (Previous year actual). This is the variance
between the current period’s result in item 167 and the comparative value for the same period last year, item 170
169 Previous Year Actual Accumulated. This is the sum of the actual results from the start of last year to the same period last year as the report period
170 Previous Year Actual Period. The results for the same period last year
The OPTIONS Button The Options button allows you to set defaults for how this report is printed. The items available here can also be amended at run-time if required and were discussed as part of the user section of this manual, although they are included here again for reference.
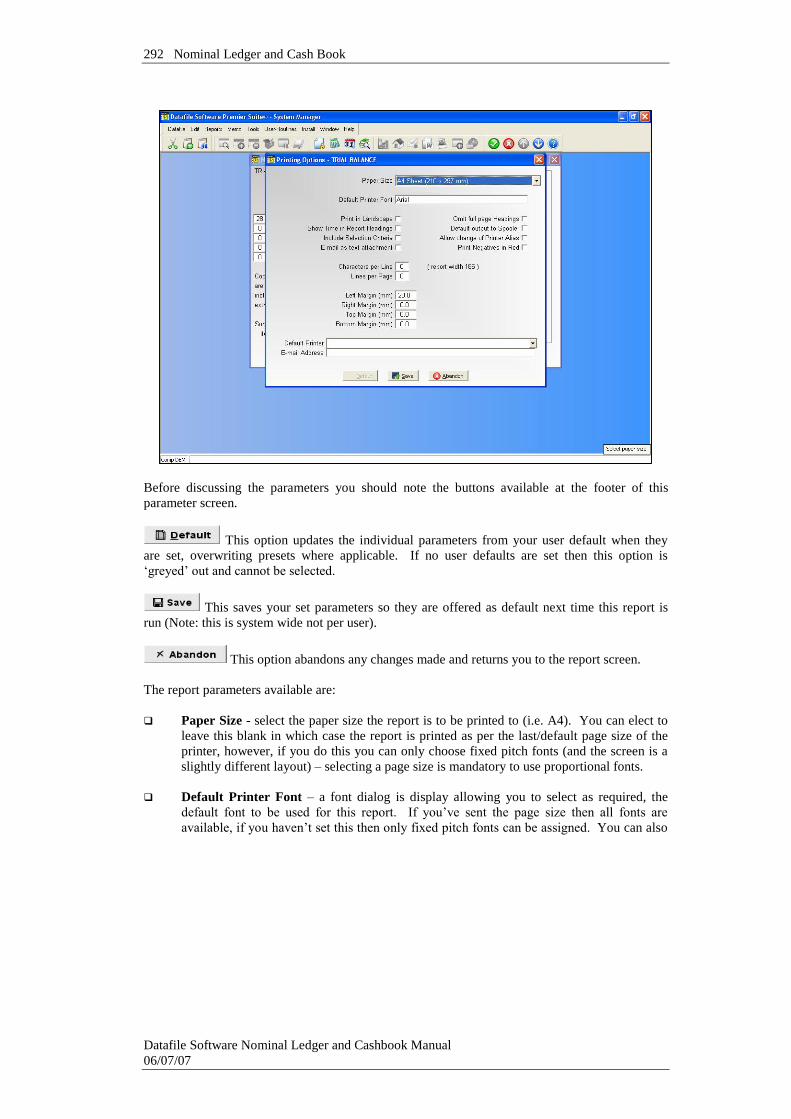
292 Nominal Ledger and Cash Book
Datafile Software Nominal Ledger and Cashbook Manual 06/07/07
Before discussing the parameters you should note the buttons available at the footer of this parameter screen.
This option updates the individual parameters from your user default when they are set, overwriting presets where applicable. If no user defaults are set then this option is ‘greyed’ out and cannot be selected.
This saves your set parameters so they are offered as default next time this report is run (Note: this is system wide not per user).
This option abandons any changes made and returns you to the report screen. The report parameters available are: Paper Size - select the paper size the report is to be printed to (i.e. A4). You can elect to
leave this blank in which case the report is printed as per the last/default page size of the printer, however, if you do this you can only choose fixed pitch fonts (and the screen is a slightly different layout) – selecting a page size is mandatory to use proportional fonts.
Default Printer Font – a font dialog is display allowing you to select as required, the
default font to be used for this report. If you’ve sent the page size then all fonts are available, if you haven’t set this then only fixed pitch fonts can be assigned. You can also

Nominal Ledger Configuration 293
Datafile Software Nominal Ledger and Cash Book Manual 06/07/07
set bold/italic attributes and font size – note that if you haven’t set a page size then the font size option is not applicable (font is sized as per previous rules).
Selecting the Font Size
Generally you can’t go far wrong with 10point. However, if you have a lot of data items on your report, and are printing in portrait, 10point may be too big to fit all the required information without overlapping fields. The positioning of fields across the page is determined by the item size – if you view the Account Status report this shows, be default, the account code (7 characters), P/B flag (2 characters), the account name (25), and six value items (14 characters each), together with spaces between the items this gives a total of 126 characters, or columns required, across the page (think graph paper – you have 126 ‘cells’ across the page). Those 126 columns are split equally across the available page (page size and margins taken into account) as starting positions for data items – so the account code starts at column 1, the P/B flag at column 9 (account code plus 1 space is 8), etc. If you select a font size too big then the account code may not finish printing before the P/B flag starts causing the name to overlap the end of the account code. If this occurs then you can either reduce the font size or consider swapping the report to landscape orientation if the font size would go too small.
Default to Landscape – set to default the printed report to landscape, leave blank for usual
portrait orientation. You may want to set reports such as the Sales Ledger Aged Debtors

294 Nominal Ledger and Cash Book
Datafile Software Nominal Ledger and Cashbook Manual 06/07/07
Report or the Cashbook Receipts Analysis Listing to landscape to increase the size of print as these reports require a large amount of detail to be printed.
Show Time in Report Headings – set to include the printed time in the report headings in
addition to the printed date. Include Selection Criteria – set to print any selection criteria that were applied to the
report. Email as Text – if send this report via email this option allows you to send as a text file
attachment as opposed to, if left blank, PDF. Omit Full Page Headings – When printing a multi-page report the system repeats the
headings for each page. Setting this option reduces the heading details for the second and subsequent pages allowing more record detail to be printed per page.
Default Output to Spooler – Usually, when printing a report, the default printer is the last
print device used. Select this option to set the default printer as the spooler for this report. This acts only as a default and doesn’t prevent you electing to print the report instead.
Allow Change of Printer Alias – when these options are configured then it is assumed
you are printing as ‘direct windows print’ and this is the alias set by default. Setting this option allows you to change the default alias at run-time to one of the list of Datafile configured printers. If you change the alias to a ‘DOS’ style alias then the page size (length/width) is again picked up from the Print Style Profile and fonts depend on ASCII codes configured, although other settings such as ‘include time’ etc. remain from the OPTIONS display.
Print Negatives in Red – on selected reports, assuming you have a colour printer; it may
be useful to print negative values in red. This option is not applicable if the page size is left blank.
The next set of parameters allows you to specify formatting and margin settings for both portrait and landscape when the page size has been set. The appropriate setting being used based on the orientation of the output selected at run-time. Characters Per Line – the system displays the width of the report items on the right. If
you leave this value at 0 (recommended) then the report width used in determining the start column positions of data items (as discussed above with regards to font size) is the larger of either the report print items or 80 columns. You can manually set a report width – from 64 to 255 columns. You may want to increase the number of columns on (say) a landscape report with few print items to bring the fields closer together to aid in reading.
Lines Per Page – if left at 0 (recommended) then the number of lines per page is
determined by the font and page size. Alternatively you can set a number of lines per page, perhaps to give a greater gap between rows of data items.

Nominal Ledger Configuration 295
Datafile Software Nominal Ledger and Cash Book Manual 06/07/07
Left Margin (mm) – set the size of the left hand margin (relative to page orientation in millimetres.
Right Margin (mm) – set the size of the right hand margin. Top Margin (mm) – set the size of the top margin. Bottom Margin (mm) – set the size of the bottom margin. This set of parameters allows you to specify formatting and margin settings for both portrait and landscape when the page size has not been set. Two columns are definable, one to use if printing in portrait, the other if printing in landscape - the appropriate setting being used based on the orientation of the output selected at run-time. Minimum Characters Per Line – the system displays the width of the report items to the
right. If you leave this value as 0 then the report width is the larger of either the report print items or 80 characters. You can manually set a report width – from 64 to 255 characters wide – but if you set a width less than the items actually printed then this is overridden by the report width at run-time.
Maximum Lines Per Page – if left at 0 then when printing a report the system will
determine the number of lines per page based on the report width and the printable area of the page up to a maximum of 72 lines per page in portrait mode or 50 lines per page in landscape mode. Alternatively you can set the number of lines per page, from 16 to 255, and this is then taken into account when deciding font size to ensure that number of lines is printed. If left at 0 then when sending to the spooler the lines per page is assumed to be 72 in portrait mode and 50 in landscape. If you require an identical print from the printer and the spooler then a maximum number of lines should be set.
Left Margin – set the number of characters to be used as a margin from 1 to 64. If you
require a margin then when entering the value you need to take into account the report print width – a margin of 4 characters on an 80-character report will be bigger than a margin of 4 characters on a 132-character report. If left at 0 no left margin is applied.
Right Margin – if you require a margin to be applied on the right of the report set the
number of characters accordingly (again 1-64), if leave as 0 then no right margin is applied.
Top Margin – set the number of lines to leave as a margin at the top of the page (1-32
lines). If left at 0 then no top margin is applied. Bottom Margin – set the number of lines to leave as a margin at the bottom of the page
(1-32 lines). If left at 0 then no bottom margin is applied. Finally, you can set default options that are used when you send the report to print or e-mail. Print Device – if using a stand-alone Datafile system then you can set a default printer to
output to. This option only applies when sending to a print device; if last printer was

296 Nominal Ledger and Cash Book
Datafile Software Nominal Ledger and Cashbook Manual 06/07/07
spooler or fax then this remains the default. If using a networked Datafile system then you can still set this where you are printing to a networked printer – provided all terminals have a consistent device path. If the print device isn’t valid then the normal printer is offered instead.
E-mail Address – if the report is sent to email then here you can enter an email address
that is to be used by default for this report – though it can be amended at run-time. Once you’ve set the desired parameters select the SAVE option to apply for future prints. Trial Balance The trial balance shows all the nominal accounts with their current debit or credit balance, and sums the debits and credits to prove that the ledger balances. You can specify that the trial balance is to print sub-totals at certain break points, by default these are defined in the nominal System Profiles, but you can nominate an item on the accounts file here – the system then prints sub-totals on change of value in this item. The trial balance is designed to print the account-code, the account name and the balance at the end of the chosen report period in either the debit or credit column as appropriate for each account. In addition you can print a further five items for each account on each line. You would usually print the “PB” indicator as well. Audit Trail The audit trail is designed to print three aspects of each nominal account: A header line of information from the account record Transaction details which apply to this account (you can choose which transactions to print
at run time) An analysis table derived from the transactions, if you ask for this at run time You can define up to ten items from the nominal accounts file to print in the header, and up to ten items to print from each transaction record. You have no control over the layout of the analysis table, other than whether to print it or not (via run-time parameter). Transactions As well as the data file items from the transactions file you can choose to print from five other items derived from the transaction data, as shown in the table below.

Nominal Ledger Configuration 297
Datafile Software Nominal Ledger and Cash Book Manual 06/07/07
Additional Nominal Transaction File Items
161 DB/CR-AMOUNT — this prints the transaction value in one of two columns headed debit and credit. Were you to print the amount itself, it would print in a single column regardless of whether debit or credit
162 RUNNING-BAL — this gives a running balance from the start of the year. A balance is calculated for each transaction regardless of whether it is printed or not, so that the balance which prints against a line represents the true account balance after applying that and all previous transactions
163 ALT-ACCOUNT — if you write single journal transactions (see above) then this prints the other account code for this transaction as a cross-reference. Nothing prints for transactions with just a single account code
164 DB-ACC-NAME - This prints the account name if the transaction has a debit account recorded against it.
165 CR-ACC-NAME - As above but prints if the transaction has a credit account recorded against it
You also have the option to sort the transactions for each account by date before you print them. With the ability to enter data for any period at any time, this option is advised, since it helps to show you where the period movement figures come from. Account Listing Account Status Budget Report Comparative List All these are general reports specified in the same way. You can print the additional nominal account date items 161–170 (as described above) on these reports as well — use the <F7–Options> key to give you a list of them. Transaction Listing This is a straight report of the journal entries in your system. A blank line separates the entries for one journal from those of the next. If (as would be usual) you are printing the amount then select the special item 161 instead of the data item (5) as this prints the values in separate debit and credit columns and allows you to sub-total the journals. As well as the normal transactions file items, you can also choose to print the debit and credit account names in separate columns by choosing data items 164 and 165, as shown at the bottom of the screen.

298 Nominal Ledger and Cash Book
Datafile Software Nominal Ledger and Cashbook Manual 06/07/07
Financial Summaries These are specified from within the nominal ledger itself, and there are no extra user-definable facilities here. If you choose this option you are warned this.
Update from Other Systems The Datafile Software nominal ledger possesses very powerful features for incorporating data from other systems. Most users will want to update from the sales and purchase ledgers and perhaps from the payroll as well. In addition, however, you can update either direct from another nominal ledger, or indeed from any suitable Datafile database files such as the stock transactions file or the fixed assets system. This User Facilities option defines how these updates are to work. In fact you have a major decision to take first. If you only want to update from the sales, purchase and payroll systems of this company, then you can take the standard update route. If you want to update from other files, or from more than one company’s data, i.e. if you run more than one payroll, then you need to take the multiple update route. Standard Update or Multiple Update? This decision is taken in the nominal ledger System Profiles. The second screen has options to define the pathnames of files used to store various sets of definitions — for financial summaries, user-defined transactions, and for multiple updates. If you want to use the standard update facilities, leave the pathname for multiple updating completely blank — the <F3–Clear> key is useful for this. If you want to use the multiple updating facilities, then give a pathname for the definition file (the file name must be in the standard 8.3 format, and must not exist as a file defined for some other purpose already). The Update from Other Systems option of the User Facilities menu checks to see if there is a definition pathname in System Profiles. If there isn’t, then it goes into the standard update set of questions described below. If there is a pathname, however, it knows it must take the multiple update route, and you should follow the Multiple Update instructions below.
Standard Update – Sales and Purchase Ledgers In this part of the program you define the parameters needed to update from the sales and purchase ledgers, and following this the update from the payroll for this company.

Nominal Ledger Configuration 299
Datafile Software Nominal Ledger and Cash Book Manual 06/07/07
The first four parameters relate to the sales ledger and they are then repeated for the purchase ledger. Post summarised totals from Sales (Purchase) Ledger? You can choose to update details from the sales and purchase ledger transaction files into the nominal ledger in one of two ways — either on a one-to-one basis or on a summarised basis. If you choose a one-to-one basis (by the above question blank) then a nominal transaction is written for every analysis line updated from the sales and purchase transaction files, and for each payment and payment adjustment transaction too. If you choose the summarised basis (by setting the above question) then when you update the nominal ledger, it accumulates values for each nominal code from the values of the sales or purchase transactions to be posted, and then writes one nominal transaction per account code with the total amount accumulated for it.

300 Nominal Ledger and Cash Book
Datafile Software Nominal Ledger and Cashbook Manual 06/07/07
Note You can mark individual nominal ledger accounts to be “fully updated”. These accounts are always updated in detail regardless of the option chosen above. It is common to update income and expenditure in summary, but balance sheet accounts — other than ledger and tax control accounts — in detail.
If yes, post to bank accounts in detail? If you have chosen to update the nominal ledger in summary, then you can override this specifically for bank accounts to ensure they are updated in detail. Set to do this — the answers are immaterial if you are already updating in detail. Allow Run-Time Confirmation of Period Number This option should not be set for normal use. If you introduce the nominal ledger into a Datafile software system that has been running for some time you may want to update some earlier transactions back to the start of the current financial year. As the update process takes every transaction not previously updated to the nominal (with the exception of forward transactions) if you ran the update all these transactions would be updated into the nominal as at the current (sales/purchase) period. Setting this option allows you to filter the transactions by period number, allowing you to run an update for each period. Once the nominal is fully up-to-date you would then switch this option off. Allow Payments Only If not using the cash book then payments and payment adjustments are entered via the ledger and must wait for a nominal update to be run before they hit the bank account. You can run the update as many times as you like during the period but some users prefer that invoices etc. only hit the nominal at period end. Setting this option enables a run-time parameter when you run the update to only process payments Which printer control for update commentary (1-8)? Whenever you update from the sales and purchase ledgers into the nominal ledger a report is printed to record the transactions created, and also to give you a control summary to compare against the sales/purchase ledger control summary. You need to specify the print style to use for this report. You can define up to eight printing styles for your system through the CONFIG user — see the System User Guide. These control not only the print style such as the number of characters per inch, but also the length and width of the report. The styles so far defined are shown at the bottom of the screen for you to choose one.

Nominal Ledger Configuration 301
Datafile Software Nominal Ledger and Cash Book Manual 06/07/07
Spool Setting this option defaults the printed report to output to the disk spooler. Report Extra Items Select up to six extra items from the nominal transaction file to be included on the report. Control Accounts The lower half of this screen shows the various nominal control account codes which you have already defined in the nominal ledger System Profiles for this company. If any of these are missing for either of the ledgers, then the update procedure for that ledger will prevent you even from starting. You should check they are all present for the ledgers from which you plan to update. If not, then you should use the System Profiles option to complete the list. Copy Items The next screen allows you to specify up to ten items which can be copied from the sales and purchase ledger transactions into the nominal ledger transactions as they are written. This only occurs, of course, for transactions which are updated in detail and for which there is a one-to-one correspondence. Any items you specify here are copied just prior to the transaction being written. You may want, for example, to carry across the actual transaction date to a field recording the original transaction date (not the nominal tx-date!), the transaction description, the sales or purchase account code, the reference number, and maybe other items too. You can use the <F4–Select> key to look up data item numbers from each file.
Standard Update – Payroll After entering/confirming the sales and purchase update details the next four screens define how the payroll is to be updated into the nominal. First you are asked if you want to change the payroll update definition – respond accordingly. Planning the Update Definition The items which you almost certainly wish to update into the nominal ledger are the gross pay, additions to gross and net, deductions from gross and net, tax and the NI categories, SSP, SMP, pension values, and any payroll “switch” values. There may be some other items too. It is important to note that the nominal ledger takes its input from the payroll department file, not from the employee file.

302 Nominal Ledger and Cash Book
Datafile Software Nominal Ledger and Cashbook Manual 06/07/07
When updating at a department level, you need to give the nominal codes for each item you want to update for each department. This can result in a lot of nominal codes to define, so you should plan the update definition carefully. You can define up to 60 nominal codes (debit and credit combinations, see later) which are to be updated from the department file.
Note
Normally you would enter the pay cheques, any cash drawn and any bank giros separately into your cash book or nominal ledger as journal entries. It is usual, therefore to define a payroll control account to act as the reverse side for both the payroll and cash book payment entries.
Defining the Update An example of one of the payroll update definition screens is shown below — there are four of them, and each allows you to enter up to 15 items.

Nominal Ledger Configuration 303
Datafile Software Nominal Ledger and Cash Book Manual 06/07/07
Flag Department Firstly, a pop-up asks for the department database data item to flag as updated when the update is run. <F4-Select> is available as required. This flag is cleared by the payroll period end, ready for the next run. Department Either enter the department code you want this item to refer to, or leave it at zero if all departments for this item are to update into the same nominal codes. You can use the <F4–Select> key to view the department file. Item Enter the item number — such as gross pay, NI deduction, tax or whatever. You can use the <F4–Select> key this time to view the department file structure so you can select the item you want. Debit Account and Credit Account You must enter a valid nominal code in both the debit and credit columns. Usually you debit expenditure codes and credit the payroll control account, or alternatively debit the payroll control account and credit a balance sheet item such as tax or NI accrual, or an accrual for one of the payroll “switches”.
Note
You must have a valid nominal account code for both sides of each entry. The definition is checked prior to the update being run, and you are warned then of any codes are missing or invalid.
Once you have entered all the prompts on screen, or if you <Escape> from any of the prompts in this screen, you are asked to confirm the above details OK. Reply 'No' to return to the start of the screen, or 'Yes' to continue to the next screen. After the last of the four you are returned to the User Facilities menu.
Multiple Updating The multiple updating facilities allows you to create up to 40 different updating definitions, from each of which you can update sales and purchase ledgers, payroll, a nominal ledger and one other Datafile database file or CSV file. You need this facility if you want to update several companies into one nominal ledger, or if you have more than one payroll to update.

304 Nominal Ledger and Cash Book
Datafile Software Nominal Ledger and Cashbook Manual 06/07/07
As explained earlier, the definition file pathname is defined in the nominal System Profiles, and it is the presence of this file name which tells the system you want to use the multiple updating facility. The Update from Other Systems option then tries to open the definition file. If it fails to find it you are asked:
If you don’t want to create the definition file, reply No and you are returned to the User Facilities menu. If you reply ‘Yes’ you are now asked:
It suggests 8 definitions, but you can overwrite this with any other number. In general you would define one definition for each company and for each payroll from which you wish to update. All 40 multiple update definitions are given, even though your definition file may be smaller. The additional ones are shown as “not allocated” in the drawing below. You have a number of choices here: Key the number of an existing or spare multiple update so that you can modify or create a
new update definition Key <Escape> to return to the User Facilities menu Key COPY so that you can copy one multiple update definition to another in the file. This
is helpful where you have similar updates to define. The computer asks for the number of the one you want to copy, the number of the one to copy to (which must be within the current definition file size) and then checks that you are sure before performing the copy
Key the number of one of the “not allocated” update definitions. You are then asked if you
wish to expand the file. This is a simple way to create additional space in the definition file for more multiple updates

Nominal Ledger Configuration 305
Datafile Software Nominal Ledger and Cash Book Manual 06/07/07
Choosing one of the menu options then puts you into the multiple update definition menu title field so that you can change the title if you wish. Note that if you blank out the title, then effectively you clear that multiple update from the menu.
Reply No to return to the “Update Which Update” prompt. If you want to change the specification of the multiple update, then reply ‘Yes’ here, and you are now given a sub-menu of options. You need to take the first option General Details anyway, and then the other options if you want to include those types of update in this definition.

306 Nominal Ledger and Cash Book
Datafile Software Nominal Ledger and Cashbook Manual 06/07/07
Multiple Updating – General Details / Which Systems Allowed A number of general questions are prompted here:
Which printer control for update commentary? Whenever you update from any file into the nominal ledger a report is printed to record the transactions created. You need to specify here the print style to use for this report. You can define up to eight printing styles for your system through the CONFIG user — see the System User Guide. These control not only the print style such as the number of characters per inch, but also the length and width of the report. The styles so far defined are shown at the bottom of the screen so that you can choose one. Spool? Set to default the report output to the disk spooler. Report Extra Items Select up to six extra items from the nominal transaction file to be included on the report.
Nominal Ledger Configuration 307
Datafile Software Nominal Ledger and Cash Book Manual 06/07/07
Update from Which Systems In the second part of the screen, set each type of system from which you want to update, and enter the pathname of the file from which the updating information is to come. In the case of sales or purchase ledgers, this should be the transaction file, and in the case of payroll it should be the department file. Note you cannot define a CSV import and an external DFD import in the same update definition. You can use the <F4–Select> key to look for the files you want to name here. These file names are offered to you at run time, and you can overwrite them at that stage if you want to. For example, it might be more convenient, when updating from several company files where only the company prefix changes, to change the prefix at run time rather than to define an update definition for each company.
Note
The systems to which you reply Y are then presented on a sub-menu at run-time. If only one system is defined, then the system goes straight into that update. You may prefer to define just one update from each multiple update definition option, rather than use these sub-menus.
Multiple Updating – Update from Sales and Purchase Ledger The definition process is similar to that discussed earlier with regards to the standard updates but a few more options are allowed.
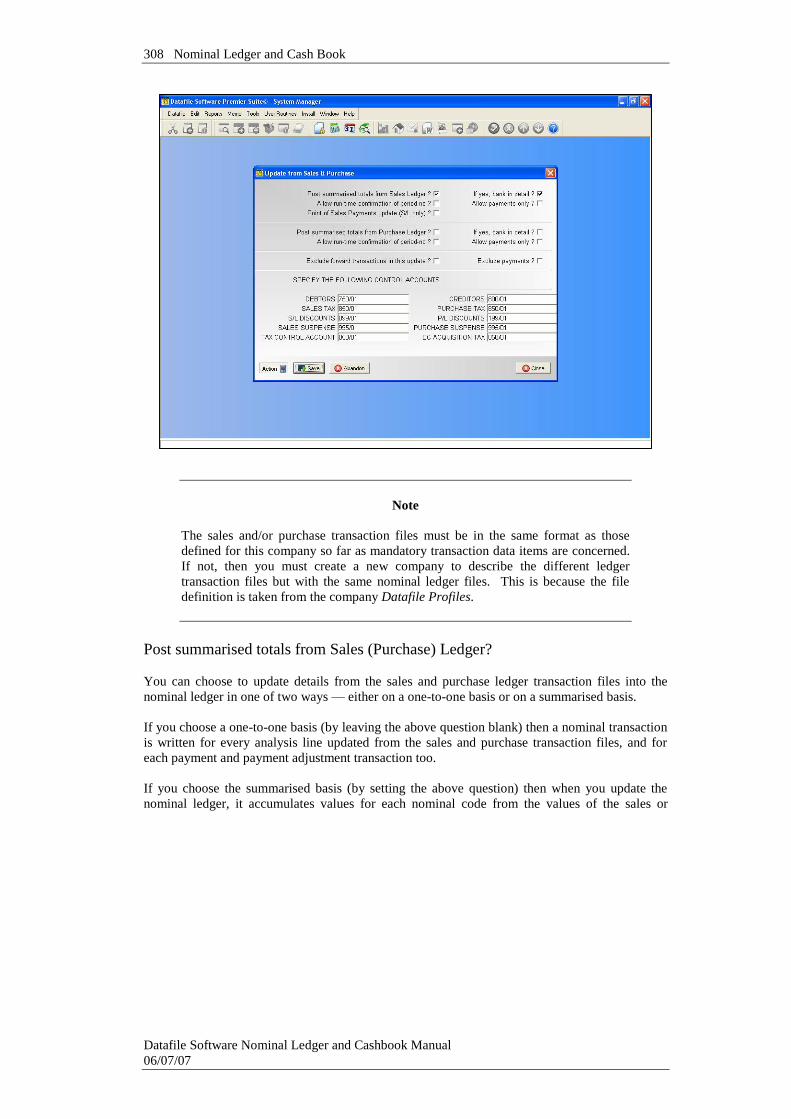
308 Nominal Ledger and Cash Book
Datafile Software Nominal Ledger and Cashbook Manual 06/07/07
Note
The sales and/or purchase transaction files must be in the same format as those defined for this company so far as mandatory transaction data items are concerned. If not, then you must create a new company to describe the different ledger transaction files but with the same nominal ledger files. This is because the file definition is taken from the company Datafile Profiles.
Post summarised totals from Sales (Purchase) Ledger? You can choose to update details from the sales and purchase ledger transaction files into the nominal ledger in one of two ways — either on a one-to-one basis or on a summarised basis. If you choose a one-to-one basis (by leaving the above question blank) then a nominal transaction is written for every analysis line updated from the sales and purchase transaction files, and for each payment and payment adjustment transaction too. If you choose the summarised basis (by setting the above question) then when you update the nominal ledger, it accumulates values for each nominal code from the values of the sales or

Nominal Ledger Configuration 309
Datafile Software Nominal Ledger and Cash Book Manual 06/07/07
purchase transactions to be posted, and then writes one nominal transaction per account code with the total amount accumulated for it.
Note
You can mark individual nominal ledger accounts to be “fully updated”. These accounts are always updated in detail regardless of the option chosen above. It is common to update income and expenditure in summary, but balance sheet accounts — other than ledger and tax control accounts — in detail.
If yes, post to bank accounts in detail? If you have chosen to update the nominal ledger in summary, then you can override this specifically for bank accounts to ensure they are updated in detail. Set to do this — the answers are immaterial if you are already updating in detail. Allow Run-Time Confirmation of Period Number This option should not be set for normal use. If you introduce the nominal ledger into a Datafile software system that has been running for some time you may want to update some earlier transactions back to the start of the current financial year. As the update process takes every transaction not previously updated to the nominal (with the exception of forward transactions) if you ran the update all these transactions would be updated into the nominal as at the current (sales/purchase) period. Setting this option allows you to filter the transactions by period number, allowing you to run an update for each period. Once the nominal is fully up-to-date you would then switch this option off. Allow Payments Only If not using the cash book then payments and payment adjustments are entered via the ledger and must wait for a nominal update to be run before they hit the bank account. You can run the update as many times as you like during the period but some users prefer that invoices etc. only hit the nominal at period end. Setting this option enables a run-time parameter when you run the update to only process payments Point of Sales Payment Update (Sales Ledger only) When updating payment transactions to the nominal ledger they are either updated in summaries for all transactions for a given account updated as one lump sum, or in detail where every transaction is posted individually. This option allows you update a total per payment type and gives options to group payment types and provide daily totals. In this way you can have the payment update details closer to your bank statement for reconciliation.

310 Nominal Ledger and Cash Book
Datafile Software Nominal Ledger and Cashbook Manual 06/07/07
Note This option ties in to the payment analysis type that is used by the Point-of-Sales application and can be applied to payment entry in the sales ledger.
When you set this option a pop-up allows entry of additional parameters.
Update for Which Bank Account Code Specify the bank account, usually the current account that the point-of-sale payments have been entered against. Payments made against other bank accounts are updated in the usual manner. You can then analyse the 14 payment types over 9 update entries. Update Description Enter the description that is to be used against the generated nominal transaction – you can include the update/payment date by including the text DDMMYY in the entered description.
Nominal Ledger Configuration 311
Datafile Software Nominal Ledger and Cash Book Manual 06/07/07
Update Which Payment Types Up to 14 payment types can be defined (in the Sales Ledger System Profiles). Set the types that are to be updated as part of this entry You can select more than one if required, for example cash and cheques may be analysed separately but posted to the bank together. The defined payment types are listed at the bottom of the screen. Daily Totals If set then one nominal transaction is generated for all the payments entered for this update entry per day, if not set then one transaction is generated for this update entry per run. Typically you might set cash and cheque updates for daily totals if you bank daily. Once all required details have been entered you are returned to the main sales/purchase update screen. Exclude Forward Transactions in this Update If running nominal updates for receipts/payments only then you may enable (in the ledger system profiles) to update forward transactions. If you only want forward payments to update but leave forward invoices until the appropriate period then set this option in your non-payments update (see next question). Exclude Payments An option above allows you the option to process payments only on an update. This is the reverse of that option and allows you to exclude payments from an update. This is typically used in conjunction with the point-of-sales update above – one update definition for payments only and a second for the other transactions. Control Accounts The lower half of this screen shows the various nominal control account codes. When you first create a definition these are picked up from the nominal ledger System Profiles for this company but you may amend these if you wish. If any of these are missing for either of the ledgers, then the update procedure for that ledger will prevent you even from starting. You should check that the codes specified here are all present for the ledgers from which you plan to update. Copy Items The next screen allows you to specify up to ten items which can be copied from the sales and purchase ledger transactions into the nominal ledger transactions as they are written. This only occurs, of course, for transactions which are updated in detail and for which there is a one-to-one correspondence.

312 Nominal Ledger and Cash Book
Datafile Software Nominal Ledger and Cashbook Manual 06/07/07
Any items you specify here are copied just prior to the transaction being written. You may want, for example, to carry across the actual transaction date to a field recording the original transaction date (not the nominal tx-date!), the transaction description, the sales or purchase account code, the reference number, and maybe other items too. You can use the <F4–Select> key to look up data item numbers from each file. Split Amount Updating There are occasions when certain income or expense values need to be split proportionally across more than one nominal account. For example, a company using profit centres as a management technique may like to split overheads such as rent, rates and power across the profit centres by previously agreed percentages. You could do this via journal entries in the nominal but this option does this automatically on update from sales or purchase transactions.
Notes
This option is only applicable for type 9 transactions (invoice or credit analysis lines) and not payments or currency difference transactions. Also, this option is only applicable if updating the nominal accounts in full.
You define the split on the nominal ledger account record and you can analyse the split over 15 separate nominal codes, one of these splits being the account that you are updating to initially. If no split details entered against an account then any values posted from the sales/purchase ledger to that account are updated in full.
Notes
You will need to add extra data items to the nominal accounts file if you use this feature. The first set of items would hold the nominal codes across which the split is to occur; these would be created as X (16) data items. The second set holds the percentage splits to be applied for each defined nominal code. There can be up to 15 data items in each set. We suggest you also add a calculated field summing up these percentages for display on screen – to ensure that any entered values sum 100%. Once the fields have been added you then need to amend the nominal accounts maintenance screen to allow entry of these values.

Nominal Ledger Configuration 313
Datafile Software Nominal Ledger and Cash Book Manual 06/07/07
The update definition asks here for the data items on the accounts file that hold the split nominal codes and the percentage splits to apply for these codes.
Multiple Updating – Payroll Update This process is exactly the same in every respect as was defined for the payroll in the standard update definition described above.
Multiple Updating - Update From Another Nominal This option assumes that the external nominal transaction file is in exactly the same format as this company’s nominal transactions file, and it also assumes you are only updating data for one period. In operation, the transactions from the other nominal ledger file are simply copied through in full, and the balances updated in this company’s nominal accounts file, with the option to remove records from the import file on completion.
Warning
In use this operation makes no checks that the debit and credit values sum to the same total. It would be possible for you to update from only part-way through a journal, which could result in an unbalanced ledger.

314 Nominal Ledger and Cash Book
Datafile Software Nominal Ledger and Cashbook Manual 06/07/07
There is only one user-definable option:
In case the incoming nominal transaction file has any account codes which do not exist in the present company’s chart of accounts, enter here the nominal account code to post these transactions. You will need to check the printed update report for any postings to this suspense account, and to resolve these with journal transactions.
Note
If you want to update into this company’ a nominal transaction file which differs in format to this company’s nominal transaction file, or you want to allow greater control of the transactions to update then you must use the following option instead — Update From Any Datafile Database File.
Multiple Updating - Update From Any Datafile Database File This option allows you to define how to update from any Datafile database file. You can create some very powerful system links outside the standard ledger and payroll links with this feature. In use the update procedure creates a double entry nominal ledger transaction for each incoming transaction — it is written with both debit and credit nominal codes. The definition is very straightforward to complete in the screen shown below, and is in two parts consisting of: The input accounting items for debit and credit amounts, value, and other items The data items to be copied between transactions for reference and analysis

Nominal Ledger Configuration 315
Datafile Software Nominal Ledger and Cash Book Manual 06/07/07
Input Accounting Items DB account or code: CR account or code: Enter here the data items on the input file for both the debit and credit accounts. In case the input file data item for either of these is blank, you must also give the nominal ledger code to which the value is to be posted instead. If you leave either the debit or credit account input items blank then the or code would usually be a control account, if you specify both the debit and credit account input items then the or code would usually be the suspense account. Journal Source Code Enter here the identify code of the journal – i.e. JNL if importing journals. You can view the codes you have defined in the nominal system profiles. If your input file contains a source code item, as you are importing from another nominal transaction file, then leave this blank and define an input copy item for it instead.

316 Nominal Ledger and Cash Book
Datafile Software Nominal Ledger and Cashbook Manual 06/07/07
Amount This is the data item which holds the value for this transaction. It can be an L-, K- or *-type data item in the input file. The transaction amount is expected to be positive. If there is a negative amount, then it is written into the nominal transaction file as a positive amount with the debit and credit codes reversed. Flag as being updated It is good practice to include in the input file a flag which the update procedure can set to Y as it updates each transaction. This prevents the possibility that this record can be accidentally updated again at some future time. Give here the data item number for this flag (which must be a ?-type item). Description This is the data item in the incoming file which holds the description to copy into the nominal ledger transaction description field. It is an optional item. Date (else run date) You would normally give the data item number of the input transaction date here. If you do not give the data item number of a date field in the input file, then the run date is used as the date of the nominal transaction. Note that you cannot import transactions across periods – the period number you run the import at is the period updated regardless of the date on the transactions. Post as Provisional? You have the option to post all the transactions which are input by this routine as provisional transactions – set as required.
Tip
The only thing which distinguishes a provisional from a regular transaction is that the flag is set to Y. If you have your own application whose data you wish to update into the nominal, and some of which could be marked as provisional, then put a Y in an appropriate field in your file and use the copy item feature below to transfer this flag to the provisional flag in the nominal transaction.
Use DB selection criteria? In many cases you may want to update only certain records from the input file. Set this option, and not only can you specify some selection criteria at run time but you can set up a proforma selection criteria screen following the input copy items procedure which comes next (see below).

Nominal Ledger Configuration 317
Datafile Software Nominal Ledger and Cash Book Manual 06/07/07
Input Copy Items You may specify up to 10 items which you want copied from the input file into the nominal transaction file. Do not include those already mentioned on the left of the screen, since the program knows where to put them. Enter the item number in the left-hand column for each item in your external file which you want copied, and the item number in the right-hand column for the nominal transaction file data item where you want it to go. At any time during the completion of this screen you can <Escape> to be asked ‘Are the above details OK?’ - reply ‘No’ to return to the start of the screen, or ‘Yes’ if the details are correct. If you had requested selection criteria, then you can complete a proforma selection criteria screen (see the System User Guide for more information on selection criteria) otherwise you are returned to the User Facilities menu.
Multiple Updating – Input from CSV File The definition for the update from CSV is largely the same as that from an external database except that the data items you specify are the entries in the CSV file – i.e. ‘ITEM-1, ITEM-2, ITEM-3, etc.’ Instead of the selection criteria and flag options, however, are options to delete the input file and to import new accounts as well. Opt. CSV to check accounts (Code, Name) Here you can enter a separate CSV file to use for importing account records, the CSV file containing two items - the account code followed by the account name. If the file is present the codes are first checked against the current nominal ledger and any new codes added before the journal is imported. Delete Files after Posting Set this option to delete the input file after posting – you cannot flag a CSV record as updated so deleting the file prevents duplicate posting.
Note
You cannot use the same multiple update definition to bring in transactions from both a CSV file and an ‘external’ DFD database – you must create separate definitions for them.

318 Nominal Ledger and Cash Book
Datafile Software Nominal Ledger and Cashbook Manual 06/07/07
Period/Year End Facilities The two user-defined options here determine what occurs when you clear the nominal transactions file. When Clear Transaction File, Write B/F Balances? You can choose here whether or not to write a transaction for each account to hold the opening year balance on that account. Accounts which have a zero opening balance do not give rise to such transactions. The reason you might want to do this is so that an audit trail running balance, which only accumulates its values from the transactions, should truly reflect the account balance. If you are keeping transactions for the whole year, then you would normally set this option. However, if you decide to keep only a few months’ transactions on file, then you would normally leave this option blank as there is little benefit in keeping brought forward balance transactions in this case. If Yes, Write For Each Existing Trans Analysis? If you have elected to write brought-forward transactions for accounts, and you also make use of the analysis code feature, then you may want to split each balance down into the amounts against each analysis code. If so, set this option, and a brought forward transaction is written for each analysis code for an account, their total being the brought forward balance for that account. For example, if you are using the analysis code for purposes of project costing, then it may be important to bring forward into the new year the costs expended so far against each project, so that the accumulation of these costs are not lost at the year end. (Note that profit and loss accounts are reset to zero as part of the end-of-year routines, so such project costs would need to be accumulated under balance sheet codes if they are to be retained over a year-end.)
Account Enquiry This feature allows you quickly to view a nominal account on the screen, including a list of transactions for the account. You can configure up to ten items to display in the header for the account, five items in two columns. For each account item that you want to display in the account enquiry screen, key the data item number <Enter>. The data item name is then displayed alongside the number. You can use the <F4–Select> key to look for a data item in the file structure in the usual way. Leave as zero any items not required.

Nominal Ledger Configuration 319
Datafile Software Nominal Ledger and Cash Book Manual 06/07/07
If you want to display the movement (actual) for the current period then set CURR-ACT-01 for display – the system will replace this will the current period value. This facility also applies to the budget and comparative values. If you actually want to display the period-1 values regardless of the period number you would have to create a calculated field in the accounts file and display this item instead. You have no control over the transaction data items displayed, which are the journal number, date, description, debit or credit amount, and the source of the transaction (as defined under the nominal System Profiles). After setting the enquiry screen two user defined screens are displayed – one for accounts and one for transactions. These are used by the drill-down zoom procedure for full-screen enquiry (via <F7>) for the account or transactions.

320 Nominal Ledger and Cash Book
Datafile Software Nominal Ledger and Cashbook Manual 06/07/07
You design the screen as per the standard design parameters. To add text to the screen you use the mouse or arrow keys to position the cursor at the start of where you wish to enter your text and type in the required label(s). To clear any text you can use the space bar. To add a data item to the screen you use the mouse or arrow keys to position the cursor at the start of where you wish the item to display and then either ‘right-click’ with the mouse or press <F4-Select>. The list of available data items are displayed for you to select. To delete a data item from the screen use the mouse to click the item and then hit the <DELETE> key. To draw borders around the screen choose the option ‘Border’ on the Tools pull-down at the top of the screen. To draw a line on the screen select the option ‘Line Mode’ on the Tools pull-down and then use the mouse to click the start position of the line and then drag the line (horizontally or vertically) to the end position of the line. To delete a line use the mouse to select the line (it will turn blue when selected) and then hit the <DELETE> key. Once the line(s) has been drawn you can switch back to text mode use the option on the Tools pull-down. Once complete choose the File pull-down option ‘Save & Exit’. On save of the accounts enquiry screen you are taken to the transactions screen for design / amendment. On save of the transactions screen you will be returned to the user facilities menu.

Nominal Ledger Configuration 321
Datafile Software Nominal Ledger and Cash Book Manual 06/07/07
System Status This screen lists the items which are displayed when you choose this option from the nominal ledger and also asks the following: Maintain Separate Journal Numbers for Auto Postings The journal number sequence is usually applied globally to all transactions generated in the nominal ledger (and cash book). Setting this option allows automatic postings such as updates from the sales ledger to maintain their own sequence. If set the last journal number for auto-postings can be maintained via the Controls & Audit Manager.
Application Screen Layouts This option allows access to the ‘Maintain Accounts’ section of the Application User Facilities. Refer to this section above for further details.
Select Key Definition Whenever you press <F4-Select> against an application database within the nominal the details displayed can be configured to show what you require.

322 Nominal Ledger and Cash Book
Datafile Software Nominal Ledger and Cashbook Manual 06/07/07
As you select this option the system displays the nominal accounts database asking you to select the items, up to ten, that you wish to display. You are also asked: LIFO Sequence The sequence in which the records are listed when using <F4-Select> depend on the item searched upon. If search on the prime-index (which for the nominal accounts file would be the account code) then items are listed in account code order, if enter a search on a secondary index (for the nominal accounts file this could be the account name) then items are listed in the order they were created. Setting this option reverses this sequence so that details are listed in either reverse prime-index or reverse entry order. Auto-Sort Column Auto-Sort Descending As an alternative to the above you could set the records to be listed in a set sequence. The item you sort on must be one of the list items you have set to be displayed and, here you select the column number of the data item you wish to sort upon and whether the records are to be sorted in descending order (leave blank for ascending order).
Notes
These items only affect the items displayed in the list when selected within the ledger; they do not affect the items you can filter on (i.e. the header selection inputs). These are the prime and secondary indexes of the databases concerned.
Recall Standard Text Recall Standard Text allows you to attach a word or phrase to a specific key combination (such as <Shift> + <F1>). For example you might have a series of standard texts to use for the transaction descriptions.

Nominal Ledger Configuration 323
Datafile Software Nominal Ledger and Cash Book Manual 06/07/07
Up to fifteen phrases can be entered and these are available for update into a text field throughout the application.
Database Profiles Database Profiles are the interface between the program and the databases, they allow the program to read/update the data and interpret the values contained within. The data item profiles for the nominal ledgers are detailed below.
Account Mandatory Data Item Type Alternative Notes Account code X (10) Can be X (16) on Premier systems. Account name X (25) Up to 28 characters are displayed in all
circumstances. Longer than 28 characters may be truncated in some transaction entry screens.
First transaction Y (6) N, Y (5–8) These two fields hold the record numbers of the first
Last transaction Y (6) N, Y (5–8) and last transactions for each account in the transaction file, regardless of whether the transaction holds a debit or credit value.

324 Nominal Ledger and Cash Book
Datafile Software Nominal Ledger and Cashbook Manual 06/07/07
Optional Account Items Data Item Type Alternative Notes Date set up D E System date written here when new account
added Full updating ?-type Overrides consolidated update for this account if
set to Y Memo Reference Y (6) Holds reference number of any memo attached
to an account. Add two-digit application code (NL) plus company suffix for filename
P&L / BS (PB) X (1) Holds P for profit and loss accounts, B for balance sheet accounts
Budget Factor No N Holds the budget factor sequence (see System Profiles)
Authority Level Y (1) Only users with authority levels equal or greater than this can access this account via the enquiry facilities.
Non-Posting A/c ?-type If Y, then is a structure account for drill-down/zoom. Used by this feature to accumulate consolidated values
Mand PL Job Link ?-type If Y, then any purchase ledger transaction with this nominal code must also have job code and cost codes entered if purchase ledger linked to the job costing system
Sub-Cont. Labour ?-type Flag to identify the nominal code as related to labour. This is used by the purchase sub-contracting accessory and defaults the tax rate for flagged codes.
Current Budgets Previous Budgets For each of these headings a set of value fields must be defined: Data Item Type Alternative Notes Budget 1-13 K L Up to 13 fields (depending on the number of
periods defined for this company) to hold the monthly budget movements. For balance sheet accounts, you have the option that these can hold the month-end budget balance figure instead.
Budget Total K L The total annual budget (or the year-end balance for a balance sheet account). It should equal the sum of the period budget fields, except for

Nominal Ledger Configuration 325
Datafile Software Nominal Ledger and Cash Book Manual 06/07/07
balance sheet accounts holding the period balances
Current Actuals Previous Actuals Prev –1 Actuals For each of these headings the following values are required: Data Item Type Alternative Notes Start Year Balance L K The actual start-of-year balance figure Actual 1-13 L K Up to 13 fields (depending on the number of
periods defined for this company) to hold the monthly movements in each account
Year Balance L K The end-of-year balance. This should be the sum of the start-of-year balance and all the actual balances for the year
Account Cash Book These items apply only to cash accounts, and are needed only by the Cash Book application. Data Item Type Alternative Notes Cash account? ?-type If Y ensures this account is treated by the cash
book and nominal ledgers as a cash account, allowing statements and reconciliations to be made.
Reconcile? ?-type Set to Y if you want to use the reconciliation procedures on this account. You would normally do so for bank accounts, but not for (say) petty cash.
Receipt Column N C, T The default analysis code for receipts posted to this account, offered as the analysis code to a cash book receipt transaction.
Payment Column N C, T The default analysis code for payments posted to this account, offered as the analysis code to a cash book payment transaction.
Tax Code X (1) Y (1) The default tax code for receipts or payments posted through this account, offered on receipt and payment transactions.
Last Cheque No X (6) The number of the last cheque used on this account. It is incremented and offered as the reference for a payment transaction.

326 Nominal Ledger and Cash Book
Datafile Software Nominal Ledger and Cashbook Manual 06/07/07
Last Slip No X (6) The number of the last paying-in slip used for this account. It is incremented and offered as the reference for a receipt transaction when used as a banking transaction.
Last Statement No N If the bank numbers your statements; this is the number of the last one you have reconciled
Last Statement Balance L K This was the closing balance on the last bank statement reconciled
Temp Bank Rec K L Holds the pre-entered closing reconciliation balance for the current reconciliation.
Account Currency - 1 You should define all the fields in the following three currency screens. Data Item Type Alternative Notes Currency Code X (3) Three-character currency code Current Year Start L K Start-of-year balance in currency, mirrors base
value above Current Actual 1-13 L K Up to 13 period movements in currency, which
mirror base values Current Year Balance L K End-of-year balance in currency, mirrors base
value above
Account Currency - 2 Data Item Type Alternative Notes Date Last Revalued D E Prev. Year Start L K Currency value, mirrors base value above Prev. Actual 1-13 L K Currency values, mirror base values above Prev. Year Balance L K Currency value, mirrors base value above
Account Currency - 3 Data Item Type Alternative Notes
Prev. Year - 1 Start L K Currency value, mirrors base value above Prev. Year - 1 Actuals L K Currency values, mirror base values above Prev. Year - 1 Balance L K Currency value, mirrors base value above

Nominal Ledger Configuration 327
Datafile Software Nominal Ledger and Cash Book Manual 06/07/07
Mandatory Transaction Items Data Item Type Alternative Notes Journal Number N Y (6) The journal number appears on every
transaction of a multiple transaction entry, thus allowing journals to be audited
Transaction date D E The posting date, which must be in the correct period when posted. If transaction created by update from other systems, then this is the effective date of update, not the original transaction date (see below)
Debit account X (10) Y Transactions normally have either a debit account or a
Credit account X (10) Y credit account on them. A single entry journal can carry both debit and credit accounts. Sales and purchase ledger updates can create such double entry transactions
Amount L K The amount is almost always a positive value regardless of whether it is a debit or credit entry. The account codes determine how it is applied. The amount could be negative (e.g. settlement discounts)
Description X (25) Provisional ?-type Marked Y if provisional, but changed to Y when
reversed Next DB transaction Y (6) N, Y (5–8) Next CR transaction Y (6) N, Y (5–8) Internal pointers used by the system Debit record no Y (6) N, Y (5–8) Credit record no Y (6) N, Y (5–8)
Transactional Optional 1 Data Item Type Alternative Notes Reference X (6) Often used to hold sales/purchase reference on
update, or internal docket number for nominal journals
Analysis N T, C Can be used for further analysis by (e.g.) cost code, if not part of nominal coding structure; or employee number to help complete year-end P11Ds
Orig-Tx- Date D E The actual date from transactions updated from other systems

328 Nominal Ledger and Cash Book
Datafile Software Nominal Ledger and Cashbook Manual 06/07/07
Cash Book Column N T, C For transactions which originate from the cash book, the “column” number used is stored here
Cash net amount L K The net and tax amounts for transactions entered through the cashbook
Cash tax amount L K Cash memo account X (10) Y For cashbook transactions posted to sales and
purchase ledgers, this is the associated ledger account. For other cashbook accounts it is the expense account used, to display in cashbook reports
Cash account narrative X (25) Either the sales/purchase account code or the expense account description is copied into this field as the transaction is written
Tax Code X (1) Y (1) The tax code (if appropriate) used for this transaction
Journal Source X (3) Holds a three-character description of the source of this transaction (e.g. S/L, P/L, JNL). See nominal ledger System Profile
Reconciled (Y/N) ?-type Set to Y when reconciled on bank statement Reconciliation comment X (30) Holds optional reconciliation comment Statement Page No N Bank statement page on which transaction
occurred Statement Date D E Date of statement when reconciled Temp Bank Rec ? Holds Y for items flagged in the current
reconciliation
Transaction Optional 2 Data Item Type Alternative Notes Was provisional ?-type This is set to Y if this was a provisional
transaction now reversed Text-1 X (30) These three fields are used to store a longer
journal memo Text-2 X (30) The fields may be up to 64 characters in length Text-3 X (30) Prov Rev Date D E Date a provisional transaction was reversed 2nd Reference X (10) Allows you to add an extra reference field to
nominal transactions VAT Period Y (4) Holds the period that the transaction was
reported on the VAT Form 100 (Only transactions with a non-zero cash-amount/cash-tax are updated).
Payee Name X (30) Holds the payee name entered on cashbook payments when a remittance advice is produced for a non-purchase ledger payment.

Nominal Ledger Configuration 329
Datafile Software Nominal Ledger and Cash Book Manual 06/07/07
Cash Memo Bank X (16) Holds the bank account against the analysis lines entered in a cash book receipt or payment.
Transaction Currency Data Item Type Alternative Notes Currency Code X (3) Three-digit currency code Currency Rate M The exchange rate used for the transaction Currency Amt L K Currency C/Net L K These currency values mirror the base values
entered above Currency C/Tax L K


331
Datafile Software Nominal Ledger and Cash Book Manual 06/07/07
Chapter 6 Cash Book Configuration
Your Datafile Software ledger systems have a wide range of possible facilities, and you can undertake a great amount of structuring so that it suits your particular operation. This section describes how to use the Installation program to set up your ledger system. You can use the program for the requirements of many companies, and each may have a different configuration and its own set of data files. For each company specified a parameter file is written to disk which holds details of the configuration. Each company is identified by a three-letter code such as “DEM”. When you select the Installation option a menu will be displayed that contains the installation and configuration options – only operators with the highest authority level (0) are allowed to process any of the options within this menu.

332 Nominal Ledger and Cash Book
Datafile Software Nominal Ledger and Cashbook Manual 06/07/07
On Datafile Compact and Professional systems this menu differs slightly as options that aren’t applicable for the product level are removed – these include ‘Application Manager’ and ‘Ledger Enquiry Manager’ for both Compact and Professional plus the ‘Security and User Manager’ for Compact. The ‘Application Manager’ and ‘Ledger Enquiry Manager’ provide further configuration options. The Installation options are covered generally within the Configuration Guide manual; however where specific ledger configuration options are available these are covered here.
Lock Out All Systems
When making changes to the cash book then that application, and the nominal ledger, has to be locked out. To lockout the ledger you select the option ‘Lock Out All Systems’. Firstly, you are prompted to lock out all systems – it can sometimes be easier to lock all systems as you may have to change settings in other applications at the same time – if you respond ‘Yes’ then all applications are locked, if you respond ‘N’ then you can select to lock just the applications required.
Set Application Code Formats This option allows you to set the prime index format for each of the application databases including the nominal account files which are used for both the nominal ledger and the cash book.

Cash Book Configuration 333
Datafile Software Nominal Ledger and Cash Book Manual 06/07/07
The default format for nominal is 999 – this forces nominal account codes to have three numbers. A typical other format would be 999-AA which would allow three numbers, a delimiter, and two letters for (say) a department code. With the nominal ledger it is best to avoid the U or X formats. The ‘Company Name’ displayed here is used as the name in all reports including the Nominal and Cash Book reports.
System Profiles You specify here a number of parameters that are required if you are using the cash book.

334 Nominal Ledger and Cash Book
Datafile Software Nominal Ledger and Cashbook Manual 06/07/07
System Profiles Screen 1
Cash Book installed? If you have purchased the cash book module, then set this option if the cash book is to be used for this present company. Omit Nominal Ledger for this company? It is possible to run with the cash book and to omit the nominal ledger. If so, then set this option. If you have also purchased the nominal ledger, then it would be normal to use it as well, and so you would leave this blank. Y/E Control Account If omitting the nominal ledger then you need to specify a control account which, during the year-end, is updated with the closing balances of all accounts, other than the bank accounts, before they are reset.

Cash Book Configuration 335
Datafile Software Nominal Ledger and Cash Book Manual 06/07/07
Use own journal sequence (diff from N/L) Every journal entered into the cash book and nominal ledger is given a unique journal number, which normally an increment by one for each journal, regardless of which application enters it. Some people prefer that the nominal ledger journal number be in a separate sequence to the cashbook journal number, in which case set this option. Maximum Column Headings for Receipts? Maximum Column Headings for Payments? The cashbook module mimics a manual cash book by entering data under a number of column headings on each side of the ledger. Specify here the number of columns (up to a maximum of 14) which you wish to use for this company. (Note that analysis codes are used within column headings for more detailed analysis.) Mandatory Column link for Receipts? Mandatory Column link for Payments? You can define expense/nominal codes to be linked specifically to cashbook columns, in which case you could set this option to insist that only those codes which relate to a specific column can be used in that column, to impose a discipline on cashbook entry. There are other techniques to validate codes used within a column, and it is more usual to leave these parameters blank. Cash Book linked to Sales/Purchase ledger? If you have sales and/or purchase ledgers, then specify whether or not the cash book is to link direct to them for this company. You would normally choose to do so if you are using them for this company. Omit Cash Postings in the Sales/Purchase ledgers? If you are posting cash receipts to the sales ledger and cash payments to the purchase ledger through the cash book, then you may wish to prevent cash receipts and payments from being entered in the sales and/or purchase ledgers. Set the relevant question to prevent payments being entered direct. It is common to set this option for the sales ledger, to ensure that sales receipts are only entered via the cash book, and so that bank entries truly reflect the gross entered on each slip, regardless of the number of receipts banked at one time. It is more usual to leave this option blank for the purchase ledger, so that automatic payment procedures can be used to the full. See the cash book manual for more information.

336 Nominal Ledger and Cash Book
Datafile Software Nominal Ledger and Cashbook Manual 06/07/07
Cash Book linked to Job Costing Where you have job costing installed, you may want to link the cashbook to it too, so that you can allocate (e.g.) petty cash payments direct to jobs as well. Set this option to link the cashbook to job costing.
System Profiles Screen 2
For each of the sales and purchase ledgers you are asked the following questions: Use Receipt/Payment ref as "Reference"? You enter a journal number against each cash book transaction. If you want this to be used as the reference number for the receipt or payment transaction when written to the sales or purchase ledger, then set this question. Or specify a default "Reference"? If you leave the above parameter blank, then you can specify here a default reference (such as “CB PAY”) to be offered as the reference for sales and/or purchase ledger receipt and/or payment transactions.

Cash Book Configuration 337
Datafile Software Nominal Ledger and Cash Book Manual 06/07/07
Use Journal heading as "Description"? Or specify a default "Description"? These two questions serve the same purpose for the description field of sales and purchase ledger payment transactions as described above for the “Reference” field. Allow Allocations after Cash Book posting? Once you have entered cash receipts and/or payments, then you may allocate such transactions directly in the sales and/or purchase ledgers if you set these questions. If you leave these questions blank, then you must allocate receipts and payments as separate operations. Allow Pre-Alloc This option allows you to allocate the receipt/payment to the sales/purchase ledger during the transaction entry (after entering the amount).
System Profiles Screen 3

338 Nominal Ledger and Cash Book
Datafile Software Nominal Ledger and Cashbook Manual 06/07/07
Template for Cash Postings File You can predefine up to 40 cashbook posting journals, to simplify entry of common transactions. Define here the pathname of the definition file which is to hold these templates. You create the definitions themselves from within the cashbook. Automatic Postings Definition File The cash book also allows you to create pre-defined standing orders (automatic postings) whether receipts or payments. Specify here the pathnames of the file which holds these definitions. You create the definitions themselves from within the cashbook. P/L Remittance for Generate Payment The cash book allows for the production of a remittance advice during payment entry (via the option Payments with Remittance). The remittance advice document pathname you enter here is the same as your purchase ledger remittance document and is configured via the Document Design Manager for the purchase ledger – refer to the purchase ledger manual for more details. Journal Entry Codes This mirrors the same profile definition in the nominal ledger. You can specify a three-character code which is to be written into cash book (nominal ledger) transactions as they are written, to identify the source of such transactions. T.B. Sub-Breaks This mirrors the same profile definition in the nominal ledger. The cash book is a sub-set of the nominal ledger, and there is a trial balance listing similar to the nominal ledger trial balance report. You specify here the cash book (nominal ledger) codes after each of which a sub-total is to be printed.
Nominal Ledger System Profiles
To define the range of bank accounts, the default bank account and the control accounts used for the debtors (sales), creditors (purchase) and tax you need to set the nominal system profiles. Refer to this section earlier in the manual. If you have not purchased the nominal ledger then you still need to access this option – mark it as ‘in use’ in the ‘Lock Out All Systems’ option to access.

Cash Book Configuration 339
Datafile Software Nominal Ledger and Cash Book Manual 06/07/07
Application Manager Selecting the Application Manager (Diamond and Premier only) menu option gives a further sub-set of actions.
The options available on this menu are discussed in their own sections later on where appropriate for the ledger.
Ledger Enquiry Manager Although sharing the same databases as the Nominal Ledger the enquiry options are independent. The Ledger Enquiry Manager (Diamond and Premier only) allows you configure the display screens for the Cash Book Enquiry. Enquiries Allowed for this Company Although there are no specific options relating to the cash book enquiry within here, this option controls whether the Ledger Enquiry as a whole is available for this application company.

340 Nominal Ledger and Cash Book
Datafile Software Nominal Ledger and Cashbook Manual 06/07/07
Applications Allowed This option allows you select whether you can enquire on the cash book within the enquiry and the authority level needed before you can enquire.
Enquiries Configuration This option allows you to configure the Ledger Enquiry for each of the applications. After selecting the application a list of available options are displayed.
Nom/CB Accounts File – Full Screen Design (Premier only) In Premier systems you have the option to create two user-defined screens in which to display details from the nominal accounts file. On selection of this option you are asked if you wish to use a full-screen layout and, if selected, you are taken into the screen design.

Cash Book Configuration 341
Datafile Software Nominal Ledger and Cash Book Manual 06/07/07
You design the screen as per the standard design parameters. To add text to the screen you use the mouse or arrow keys to position the cursor at the start of where you wish to enter your text and type in the required label(s). To clear any text you can use the space bar. To add a data item to the screen you use the mouse or arrow keys to position the cursor at the start of where you wish the item to display and then either ‘right-click’ with the mouse or press <F4-Select>. The list of available data items are displayed for you to select. To delete a data item from the screen use the mouse to click the item and then hit the <DELETE> key. To draw borders around the screen choose the option ‘Border’ on the Tools pull-down at the top of the screen. To draw a line on the screen select the option ‘Line Mode’ on the Tools pull-down and then use the mouse to click the start position of the line and then drag the line (horizontally or vertically) to the end position of the line. To delete a line use the mouse to select the line (it will turn blue when selected) and then hit the <DELETE> key. Once the line(s) has been drawn you can switch back to text mode by use of the option on the Tools pull-down. Once complete choose the File pull-down option ‘Save & Exit’. On save of the screen you will be asked if you wish to use a second screen – respond as required.
Nom/CB Accounts File – Item Screen Design If Diamond (or Premier and you don’t wish to use the full screen design) then this option allows you to quickly configure the display of up to 32 items from the accounts file in two columns of 16.

342 Nominal Ledger and Cash Book
Datafile Software Nominal Ledger and Cashbook Manual 06/07/07
Here you list the items you want to display on, firstly, the left of the screen and then the right. The number displayed in brackets after an item indicate the field number that is being displayed on this line on the other half of the screen. If using Premier after configuring the left and right columns of the first screen you are able to define the second screen in the same manner.
Transaction / Detail Enquiries This option gives you the ability to configure the display of the transaction enquiries available for each nominal record. On selection of this option you are able to set the authority levels for access to the transaction enquiry.

Cash Book Configuration 343
Datafile Software Nominal Ledger and Cash Book Manual 06/07/07
Blanking the authority level disables the transaction enquiry option otherwise set as appropriate (remember values are from 0-9 where 0 is the highest and 9 is the lowest authority level). After setting the appropriate levels you can then configure the display items for these options.

344 Nominal Ledger and Cash Book
Datafile Software Nominal Ledger and Cashbook Manual 06/07/07
LIFO Set to display transactions in LIFO – last in first out – order. If set then you should note that the enquiry process will be slower. DATE Transactions are usually displayed based on the order they were entered, setting this option sorts the details into date order – either FIFO or LIFO based on setting of the prompt above. List Items Here you can select up to eight items to be displayed when selecting the transaction options from the Nominal Enquiry. Premier users have an additional configuration option for transaction display after confirming the last of the list items. Full Screen Layout for ‘Transactions’ Enquiry If Premier, you are given the option to design a full-screen enquiry display for the transaction record. If you elect to use the full-screen enquiry then you are taken into the screen design. You design the screen as per the standard design parameters.
Extra File Scans The file scan option allows you to scan documents against the cashbook account – you could, for example, scan your bank statements against the bank account.
This option allows you to set the authority level to perform a file scan. Note though that the scanned files can be viewed regardless of authority level (provided you can access the options). Authority levels are from 0-9 where 0 is the highest authority and 9 the lowest. Leave blank to disable the file scan option for this enquiry.
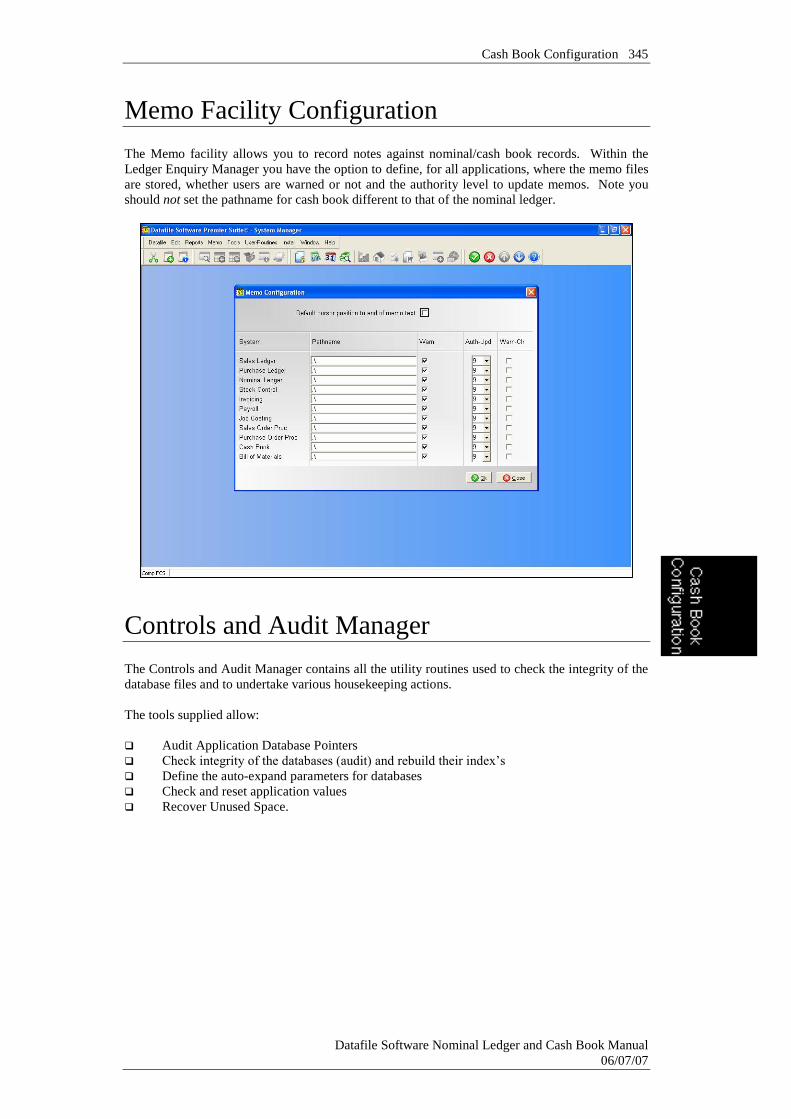
Cash Book Configuration 345
Datafile Software Nominal Ledger and Cash Book Manual 06/07/07
Memo Facility Configuration The Memo facility allows you to record notes against nominal/cash book records. Within the Ledger Enquiry Manager you have the option to define, for all applications, where the memo files are stored, whether users are warned or not and the authority level to update memos. Note you should not set the pathname for cash book different to that of the nominal ledger.
Controls and Audit Manager The Controls and Audit Manager contains all the utility routines used to check the integrity of the database files and to undertake various housekeeping actions. The tools supplied allow: Audit Application Database Pointers Check integrity of the databases (audit) and rebuild their index’s Define the auto-expand parameters for databases Check and reset application values Recover Unused Space.

346 Nominal Ledger and Cash Book
Datafile Software Nominal Ledger and Cashbook Manual 06/07/07
After selecting the ‘Controls & Audit Manager’ menu option you are prompted to select the application and then you are presented with the Controls & Audit options for that application.
Audit Pointers This option checks and resets the relationship between the accounts and transactions file. On selection you are asked whether you want to perform the check for all master records or for individual codes – in practice you would choose do to this for all codes as there would normally be little difference in the time taken (the majority of the time being taken with reading the transactions).
Transaction Control Numbers This option lets you manually reset certain transaction pointer numbers in the control files.
1) Highest B/F Transaction after Clear Down This pointer holds the highest b/f transaction created after running the nominal journal cleardown. This is used as a display suggestion in the audit trail for those who wish to exclude these transactions from the print.

Cash Book Configuration 347
Datafile Software Nominal Ledger and Cash Book Manual 06/07/07
2) Highest Transaction Record Printed This pointer holds the highest transaction record printed on a journal listing. It is displayed in the application System Status screen and could be checked for use as the starting record number in the journal listing report to report journals entered since last print. 3) Highest Transaction Since Structured If using a structured nominal code with partitions then the drill down zoom enquiry is of particular use. The drill-down enquiry accumulates values from the lower level codes to the higher. This value is used and updated as part of the enquiry and, next time the enquiry is run, if this value matches that of the highest transaction input the system doesn’t re-accumulate the values.
Edit System Status Display Each application has a ‘System Status’ option that summarises the key facts about it, such as files, their sizes, how full they are, the current period number and period dates plus various other control information such as last issue reference etc. You can reset the last journal numbers and the last VAT period within this option.
Database Audit Use this option to check the internal integrity of any of the nominal/cash book files. If you’re sure that a particular record is in the file but you cannot select it via the indexes then you might want to use this option on that file. Really the only events liable to disturb the integrity of a database are power/hardware failures or an attempt to process a database in an outside program. The database audit checks every record in the file to make sure it is genuinely active and rebuilds its indexes from scratch. When you choose this option all the application databases are listed for you to select from – it is recommended that if you have the need to do one of the databases within the application you should probably do them all and follow it up with the ‘Audit Pointers’ option.
Compact & Audit Database The internal processing of databases does not necessarily re-use the space occupied by records that have been deleted (particularly in master files such as the nominal account file). New records are always added to the end of the file. Therefore, over a period of time, it is possible a file may appear full but there could be gaps in the middle where records were deleted. Using this option consolidates the active data and frees up space. This option effectively re-arranges all the active records so you must run the ‘Audit Pointers’ function after using this option. In addition you should not, in the normal course of events, use

348 Nominal Ledger and Cash Book
Datafile Software Nominal Ledger and Cashbook Manual 06/07/07
this option on the transaction file – the journal clear down process will do this for you and running here could affect the transaction control numbers (see above).
Set Auto Expand Data Files Datafile reserves a fixed space for database files and you need to expand that space should the file become full. This option allows you to set internal system parameters so that it automatically attempts to enlarge a file that is becoming full. The file is expanded when a user opens the file provided no-one else is already using that file, typically it would occur at the start of the day when the first user accesses an application. These settings are shared between the nominal ledger and the cash book.
Expand By Enter the number of records by which you wish the system to expand the file when triggered. Strike a balance between too small a number, meaning that it would happen to frequently, and too large a number which would mean it would take a long time to expand the file and take up unnecessary disk space. When Less This represents the quantity of free records which when the database is below will trigger the automatic expansion when a user has exclusive access to the file. Minimum Spare This is an important parameter for files where batches of records are added – it represents the minimum quantity that must be free at all times. It would normally be less than the ‘When Less’ setting and if this setting reached it implies that no user has had exclusive access to the file since the ‘When Less’ quantity was reached. You should set the minimum to be the largest number that can be added through an automatic update.
Expand Data Files If not setting the auto-expand options then this option allows you to manually expand the data files as necessary.

Cash Book Configuration 349
Datafile Software Nominal Ledger and Cash Book Manual 06/07/07
Security and User Manager The Security and User Manager, available on Professional upwards, allows you to set authority levels and passwords on specific application options and to define any user authority overrides. After selecting the application two screens of options are allowed for security checks.
In the first screen you may attach a password and/or an authority level for each of the main ledger options. If Premier and logging options have been enabled then you can log operators who attempt to enter password/authority protected areas and fail. You can also nominate operators, who are nominally blocked from this application by their authority level, to be allowed in.
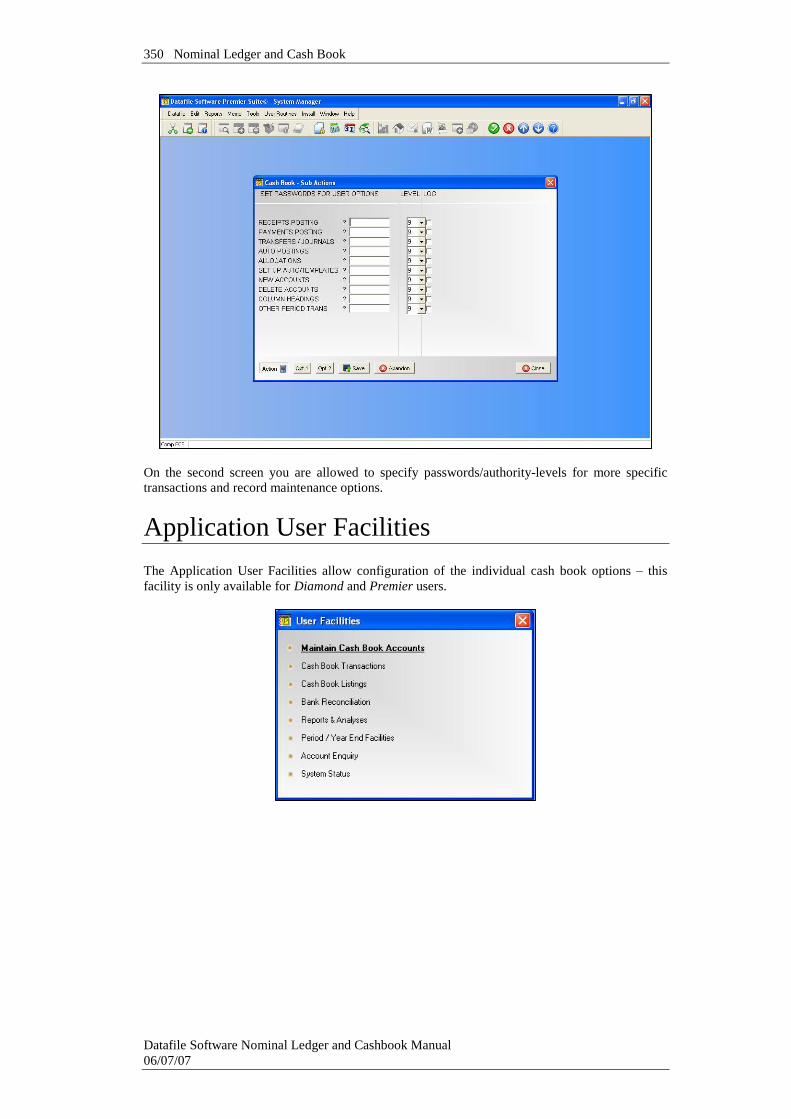
350 Nominal Ledger and Cash Book
Datafile Software Nominal Ledger and Cashbook Manual 06/07/07
On the second screen you are allowed to specify passwords/authority-levels for more specific transactions and record maintenance options.
Application User Facilities The Application User Facilities allow configuration of the individual cash book options – this facility is only available for Diamond and Premier users.

Cash Book Configuration 351
Datafile Software Nominal Ledger and Cash Book Manual 06/07/07
Maintain Cash Book Accounts Only three of the six choices in the sub-menu below allow you to specify any details. These details are effectively the data items to display when you enter or amend an account in full, view an account, or delete an account. The run time choices which have no user-defined options are shown for completeness in the menu on the right-hand side here, but in brackets.
Cash Accounts This option allows you to design the data entry screen used to maintain cash book accounts in full. This facility allows you to personalise the screen design for your own company, and even to ask for additional data items, such as the initials of the manager responsible for the account.

352 Nominal Ledger and Cash Book
Datafile Software Nominal Ledger and Cashbook Manual 06/07/07
You design the screen as per the standard design parameters. To add text to the screen you use the mouse or arrow keys to position the cursor at the start of where you wish to enter your text and type in the required label(s). To clear any text you can use the space bar. To add a data item to the screen you use the mouse or arrow keys to position the cursor at the start of where you wish the item to display and then either ‘right-click’ with the mouse or press <F4-Select>. The list of available data items are displayed for you to select. To delete a data item from the screen use the mouse to click the item and then hit the <DELETE> key. To draw borders around the screen choose the option ‘Border’ on the Tools pull-down at the top of the screen. To draw a line on the screen select the option ‘Line Mode’ on the Tools pull-down and then use the mouse to click the start position of the line and then drag the line (horizontally or vertically) to the end position of the line. To delete a line use the mouse to select the line (it will turn blue when selected) and then hit the <DELETE> key. Once the line(s) has been drawn you can switch back to text mode by use of the option on the Tools pull-down. Once complete choose the File pull-down option ‘Save & Exit’.

Cash Book Configuration 353
Datafile Software Nominal Ledger and Cash Book Manual 06/07/07
View an Account Here you can define up to 28 data items from the cash book accounts file which are to display on the screen when a user chooses this option at run time.
You specify first the items you want to display in the left-hand column of the View Account screen, and then the items to display in the right-hand column. You can define up to 14 items for each side of this display, which you do from the parameter screen above. Type in the number of each data item required or use <F4-Select>. The data item name is then displayed alongside the number. If you wish to leave blank lines on the screen to ease viewing, specify their data item numbers as zero. A similar screen follows for the right-hand 14 items. At any point you can key <Escape> to display the “Are the above details OK?” message. ‘No’ allows you to re-specify the data items, whereas ‘Yes’ exits to the user facilities menu. Delete Account Here you can define up to 14 items from the cash book accounts file which are to shown when you ask to delete an account. You specify these data items in exactly the same way as already described above for View an Account.

354 Nominal Ledger and Cash Book
Datafile Software Nominal Ledger and Cashbook Manual 06/07/07
Cash Book Transactions The various types of journal include cash receipts and cash payments, transfers between cash accounts, journal entries, and automatic postings. The cashbook program itself allows you to maintain the automatic posting transactions and to define some proforma receipt and payment transactions.
Only the first four and the last of these options on the above menu have parameter values which can be changed. The other options are all maintained from the cash book itself. If you try to take any of the last four options you are warned that the option is maintained in the cash book. Cash Receipts Cash Payments These two options offer similar parameters – the first for the receipt posting, the second for payment posting. You use the receipts option at run time to enter moneys received — for example, when you bank a set of cheques from customers. A cash book transaction is written not only for the total value of the receipt, but for each entry of the transaction too. If you are linked to the sales ledger, that is updated too, of course. You use the payments option to enter moneys paid. The user-definable options are just the same for cash payments as for cash receipts above, except that the payments refer to cheques rather than to paying-in slips.

Cash Book Configuration 355
Datafile Software Nominal Ledger and Cash Book Manual 06/07/07
Display Receipt / Payment Column Headings? You decide here whether or not to show the column headings at the bottom of the transaction screen as you enter cash transactions. If you decide not to show them (they can distract the eye when entering information) you still have the run time option <F4–Select> to display them. Increment Receipt Paying-In / Cheque Payment Number? If you are using paying-in books from the bank, then these often have a sequential number for each paying-in slip. It can be a useful check, and speed receipt entry, to let the computer automatically increment the paying-in number. Note that this doesn’t prevent you overtyping the number at run time. Similarly on the payment side this could be used as the cheque number (though not if going to print cheques via the Purchase Ledger option or the Cheque Printing application afterwards). Calculate Tax Amounts From Net? When you enter cash receipts or payments then at some stage you need to calculate the VAT element. If you set this option the system calculates the VAT based on the entered net amount and vat code. If you leave this blank then if you want to break out the VAT element at the time you enter the transactions, you have to work it out yourself.

356 Nominal Ledger and Cash Book
Datafile Software Nominal Ledger and Cashbook Manual 06/07/07
Omit Updating Of Zero Value Entry? When you use a template to act as a proforma for a transaction, then you may not need to complete all entries in the template. You would leave the values at zero on those template lines. If you set this option then zero value lines in the template (or in any cash receipt transaction) are not updated. If you leave this blank then all entries update the file, regardless of their value being zero. Default Transaction Description? You can pre-define here a default description. For example, the majority of your cash receipts may be to record bankings made each day. In this case it can speed transaction entry to give a default description such as “Receipts Banked”. You can overtype this description at run time, of course. Allow Search on Invoice Reference Via Option Key As an alternative to entering the customer/supplier account when posting a receipt or payment you can enter an invoice number from the remittance advice you have been given. To use the reference field on the sales/purchase transaction file must be a secondary index. If set ‘via option key’ the default selection method remains the account but you can press <F7> to search via the invoice reference. Analysis: Per Entry? Remember? Reference: Per Entry? Remember? Description: Per Entry? Remember? These questions determine whether or not you need to enter any further details for each entry of a transaction. For each set the first part to fix whether you want to enter them on each line. If you do this then you can decide whether or not the value from the previous entry is to be offered as the value for the next entry by setting the “Remember” question accordingly. There are no defaults for the first entry of a cash receipt, and you can overwrite any remembered values in subsequent entries. Transfers between Cash Accounts You use this option when you want to transfer money between cash accounts.

Cash Book Configuration 357
Datafile Software Nominal Ledger and Cash Book Manual 06/07/07
Default From Account Default To Account You can elect to give default 'From' and 'To' accounts here. Even though you may give defaults, you can still overwrite the bank accounts at run time. Default Transaction Description? You can pre-define a default description here — for example, “Bank Transfer”. Analysis Per Entry? Remember? Reference Per Entry? Remember? Description Per Entry? Remember? Date Per Entry? Remember? These questions determine whether or not you need to enter any further details for each entry of a cash transfer. For each reply option set the first party to control whether you want to enter them on each line. If you set the first part you can decide whether or not the value from the previous entry is to be offered as the value for the next entry by setting the “Remember” question. There are no defaults for the first entry of a cash transfer, and you can overwrite any remembered values in subsequent entries. Standard Journal Entries As for the cash transfer, you can decide whether or not to enter any other details per journal entry, and if so, whether or not to remember them between entry lines.

358 Nominal Ledger and Cash Book
Datafile Software Nominal Ledger and Cashbook Manual 06/07/07
Omit Overtype of Journal No This option asks one question that applies to all the transaction generation options in the cash book, namely do you want to omit (i.e. prevent) overtype of the journal number. Respond as required.
Cash Book Listings Here you define what items are to print on the specific cash book reports. Each of these reports uses the transactions file, except for the cash statement report which uses the accounts file as well. For each report you must define the print style to use and the data items which are to print. Print Control You can define up to eight printing styles for your system through the CONFIG user — see the System User Guide. These control not only the print style such as the number of characters per inch, but also the length and width of the report. The styles so far defined are shown at the bottom of the screen when you are prompted. Data Items You are asked to enter up to 10 data items (depending on the specific report) to print on each report. The file structure for the file concerned (cash book accounts or transactions) shows in the right-hand window when you take the option for any particular report. However, you can use the <F4–Select> key in the usual way to select a specific data item to print. It is the data item number which you enter, although the names are shown alongside too. Column Display — Data Item 166 When choosing items from the transaction file in these reports, you can also specify the special data item of 166. This item displays the analysis values in the columns you defined for receipts or payments. In effect it gives you a print which looks just like the columns you would have used in your manual cash book. If you choose data item 166 you are asked:

Cash Book Configuration 359
Datafile Software Nominal Ledger and Cash Book Manual 06/07/07
Maximum Size Of Values Printed (5-10)? Enter here the number of significant figures (i.e. the digits before the decimal point) which are to print in each column. Setting 5 would allow the value 12,345.99, and 7 would allow 1,234,567.99. If you had defined and want to print (say) 6 columns of figures, then it takes 60 print positions to do so if you answer “5” here. This is because each column needs a separating space, 5 digits, a decimal point, two decimal places and a sign — 10 characters in all. With 7 digits specified, then 72 print positions are needed. This should always be the last item you specify for a report, due to the amount of printing space it can take up. Any columns which cannot be printed in the space available are omitted from the report — including any items which you might have given to print after item 166 on the report line. Report Specification An example of the entry screen used for report definition is shown below. You select the data items that appear on the report by entering the data item number concerned or using <F4-Select>

360 Nominal Ledger and Cash Book
Datafile Software Nominal Ledger and Cashbook Manual 06/07/07
The OPTIONS Button The Options button allows you to set defaults for how this report is printed. The items available here can also be amended at run-time if required and were discussed as part of the user section of this manual, although they are included here again for reference.
Before discussing the parameters you should note the buttons available at the footer of this screen.
This option updates the individual parameters from your user default when they are set, overwriting presets where applicable. If no user defaults are set then this option is ‘greyed’ out and cannot be selected.
This saves your set parameters so they are offered as default next time this report is run
This option abandons any changes made and returns you to the report screen. The report parameters available are: Paper Size - select the paper size the report is to be printed to (i.e. A4). You can elect to
leave this blank in which case the report is printed as per the last/default page size of the

Cash Book Configuration 361
Datafile Software Nominal Ledger and Cash Book Manual 06/07/07
printer, however, if you do this you can only choose fixed pitch fonts (and the screen is a slightly different layout) – selecting a page size is mandatory to use proportional fonts.
Default Printer Font – a font dialog is display allowing you to select as required, the
default font to be used for this report. If you’ve sent the page size then all fonts are available, if you haven’t set this then only fixed pitch fonts can be assigned. You can also set bold/italic attributes and font size – note that if you haven’t set a page size then the font size option is not applicable (font is sized as per previous rules).
Selecting the Font Size
Generally you can’t go far wrong with 10point. However, if you have a lot of data items on your report, and are printing in portrait, 10point may be too big to fit all the required information without overlapping fields. The positioning of fields across the page is determined by the item size – if you view the Account Status report this shows, be default, the account code (7 characters), P/B flag (2 characters), the account name (25), and six value items (14 characters each), together with spaces between the items this gives a total of 126 characters, or columns required, across the page (think graph paper – you have 126 ‘cells’ across the page). Those 126 columns are split equally across the available page (page size and margins taken into account) as starting positions for data items – so the account code starts at column 1, the P/B flag at column 9 (account code plus 1 space is 8), etc. If you select a font size too big then the account code may not finish printing before the P/B flag starts causing the name to overlap the end of the account code. If this occurs then you can either reduce the font size or consider swapping the report to landscape orientation if the font size would go too small.

362 Nominal Ledger and Cash Book
Datafile Software Nominal Ledger and Cashbook Manual 06/07/07
Default to Landscape – set to default the printed report to landscape, leave blank for usual portrait orientation. You may want to set reports such as the Sales Ledger Aged Debtors Report or the Cashbook Receipts Analysis Listing to landscape to increase the size of print as these reports require a large amount of detail to be printed.
Show Time in Report Headings – set to include the printed time in the report headings in
addition to the printed date. Include Selection Criteria – set to print any selection criteria that were applied to the
report. Email as Text – if send this report via email this option allows you to send as a text file
attachment as opposed to, if left blank, PDF. Omit Full Page Headings – When printing a multi-page report the system repeats the
headings for each page. Setting this option reduces the heading details for the second and subsequent pages allowing more record detail to be printed per page.
Default Output to Spooler – Usually, when printing a report, the default printer is the last
print device used. Select this option to set the default printer as the spooler for this report. This acts only as a default and doesn’t prevent you electing to print the report instead.
Allow Change of Printer Alias – when these options are configured then it is assumed
you are printing as ‘direct windows print’ and this is the alias set by default. Setting this option allows you to change the default alias at run-time to one of the list of Datafile configured printers. If you change the alias to a ‘DOS’ style alias then the page size (length/width) is again picked up from the Print Style Profile and fonts depend on ASCII codes configured, although other settings such as ‘include time’ etc. remain from the OPTIONS display.
Print Negatives in Red – on selected reports, assuming you have a colour printer; it may
be useful to print negative values in red. This option is not applicable if the page size is left blank.
The next set of parameters allows you to specify formatting and margin settings for both portrait and landscape when the page size has been set. The appropriate setting being used based on the orientation of the output selected at run-time. Characters Per Line – the system displays the width of the report items on the right. If
you leave this value at 0 (recommended) then the report width used in determining the start column positions of data items (as discussed above with regards to font size) is the larger of either the report print items or 80 columns. You can manually set a report width – from 64 to 255 columns. You may want to increase the number of columns on (say) a landscape report with few print items to bring the fields closer together to aid in reading.
Lines Per Page – if left at 0 (recommended) then the number of lines per page is
determined by the font and page size. Alternatively you can set a number of lines per page, perhaps to give a greater gap between rows of data items.

Cash Book Configuration 363
Datafile Software Nominal Ledger and Cash Book Manual 06/07/07
Left Margin (mm) – set the size of the left hand margin (relative to page orientation in millimetres.
Right Margin (mm) – set the size of the right hand margin. Top Margin (mm) – set the size of the top margin. Bottom Margin (mm) – set the size of the bottom margin. This set of parameters allows you to specify formatting and margin settings for both portrait and landscape when the page size has not been set. Two columns are definable, one to use if printing in portrait, the other if printing in landscape - the appropriate setting being used based on the orientation of the output selected at run-time. Minimum Characters Per Line – the system displays the width of the report items to the
right. If you leave this value as 0 then the report width is the larger of either the report print items or 80 characters. You can manually set a report width – from 64 to 255 characters wide – but if you set a width less than the items actually printed then this is overridden by the report width at run-time.
Maximum Lines Per Page – if left at 0 then when printing a report the system will
determine the number of lines per page based on the report width and the printable area of the page up to a maximum of 72 lines per page in portrait mode or 50 lines per page in landscape mode. Alternatively you can set the number of lines per page, from 16 to 255, and this is then taken into account when deciding font size to ensure that number of lines is printed. If left at 0 then when sending to the spooler the lines per page is assumed to be 72 in portrait mode and 50 in landscape. If you require an identical print from the printer and the spooler then a maximum number of lines should be set.
Left Margin – set the number of characters to be used as a margin from 1 to 64. If you
require a margin then when entering the value you need to take into account the report print width – a margin of 4 characters on an 80-character report will be bigger than a margin of 4 characters on a 132-character report. If left at 0 no left margin is applied.
Right Margin – if you require a margin to be applied on the right of the report set the
number of characters accordingly (again 1-64), if leave as 0 then no right margin is applied.
Top Margin – set the number of lines to leave as a margin at the top of the page (1-32
lines). If left at 0 then no top margin is applied. Bottom Margin – set the number of lines to leave as a margin at the bottom of the page
(1-32 lines). If left at 0 then no bottom margin is applied. Finally, you can set default options that are used when you send the report to print or e-mail. Print Device – if using a stand-alone Datafile system then you can set a default printer to
output to. This option only applies when sending to a print device; if last printer was

364 Nominal Ledger and Cash Book
Datafile Software Nominal Ledger and Cashbook Manual 06/07/07
spooler or fax then this remains the default. If using a networked Datafile system then you can still set this where you are printing to a networked printer – provided all terminals have a consistent device path. If the print device isn’t valid then the normal printer is offered instead.
E-mail Address – if the report is sent to email then here you can enter an email address
that is to be used by default for this report – though it can be amended at run-time. Once you’ve set the desired parameters select the SAVE option to apply for future prints. Receipt Listing Payment Listing These user options print separate reports, one for receipts and one for payments. They are sorted into cash account order, and analyse the receipts and payments across the income and expense headings. They provide a detailed analysis of the receipt and payment transactions made during the chosen period, one line per detail. The first five items on the report print information from the transaction posted to the cash account — typically journal number, date, amount, reference and description. These details print only once per journal, no matter how many analysis entries. The last five items define what is to print for each analysis line. Typically you would show the memo account — either the sales or purchase ledger account code, or the income or expense code — the amount, the net of tax amount and the tax. You can use special item 166 to include a print by column as one of these last five items (see above) although the next two reports would be better suited for this. These options have two extra parameters: Include All Trans? By default the report only includes transactions posted as Cash Book transactions – receipts for the receipt listing, payments for the payment listings. If set then the receipt listing also includes and receipts entered via the sales ledger, the payment listing includes payments entered via the purchase ledger. Column No for Unknown If including non-CBR/CBP transactions then no column number would be analysed on these transactions. If including item 166 on the report then set the column number that these unanalysed transactions are to be recorded under.

Cash Book Configuration 365
Datafile Software Nominal Ledger and Cash Book Manual 06/07/07
Receipts Totals Analysis Payments Totals Analysis These user options also print separate reports, one for receipts and one for payments. They are sorted into cash account order, and would normally be used to create reports which would look exactly like a manual cashbook. Only one line prints per journal, and the analysis details are summarised for printing. Normally you would show the date, reference and amount, and then use the special data item 166 to create the column analysis for each transaction. Totals are printed for the columns as well as for any other value items printed. These reports also include the extra parameters discussed above. Transfers Listing This report specifically lists the transfer transactions that have made between cash accounts. Full journal reports are printed under General Reports and Analyses. Bank/Cash Statement These print reports for each cash account to look just like a bank statement. You can print up to ten lines from the account record in the header, and up to ten items from the journal transaction records in the detail lines. As well as the data items from the transactions file you can choose to print from five other items derived from the transaction data, as shown in the table below.
Additional Cash book Transaction File Items
Item Description
161 DB/CR-AMOUNT — this prints the transaction value in one of two
columns headed debit and credit. Were you to print the amount itself, it would print in a single column regardless of whether debit or credit
162 RUNNING-BAL — this gives a running balance from the start of the year. A balance is calculated for each transaction regardless of whether it is printed or not, so that the balance which prints against a line represents the true account balance after applying that and all previous transactions
163 ALT-ACCOUNT — this prints the other account code as a cross-reference for double entry journals (found only in the nominal ledger)
164 DB-ACC-NAME - This prints the debit account name if the transaction contains a debit account
165 CR-ACC-NAME - This print the credit account name if the transaction contains a credit account

366 Nominal Ledger and Cash Book
Datafile Software Nominal Ledger and Cashbook Manual 06/07/07
VAT Form 100 This option produces a pre-defined report layout – you only select the print control and any ‘Options’ parameters.
Bank Reconciliation Of the bank reconciliation choices shown here, only the items without brackets have options you can define. Most choices are reports, and you have the same facilities for defining their layouts as supplied above for cash book listings. All three reports print transactions details for each selected cash account, using the transaction items you select here. The account details printed for each report are the same, and are specified just once for the first report Bank Statements. You can use the same special transaction data items 161-165 for these reports as described above.
Bank Reconcile This screen gives two parameters to configure use of the bank reconciliation procedure. Default to Exclude Previously Reconciled Items? Set to default to exclude previously reconciled items at run-time.

Cash Book Configuration 367
Datafile Software Nominal Ledger and Cash Book Manual 06/07/07
Force Input of Closing Balance? Set to allow (mandatory) entry of the closing balance during the reconciliation pre-amble. You will not be allowed to update the reconciliation unless the running balance during the reconciliation matches this pre-entered total.
Bank Statement This is similar to the cash statement report under cash book listings above. It gives your view of the state of your bank account, as compared to the bank’s view. Note that this reports sorts the transactions by date before printing. Unpresented Listing This report shows the debit and credit items for each cash account that has not yet been marked off against the bank statement. You use it to reconcile the difference between your bank account total, and the bank’s statement of account. Commented Items Listing This report only shows those items for each cash account against which you have made some comment during reconciliation.

368 Nominal Ledger and Cash Book
Datafile Software Nominal Ledger and Cashbook Manual 06/07/07
Reports & Analyses These reports are almost exactly the same as the Report Listings & Analyses in the nominal ledger. Even though you may not be using the nominal ledger, you still have the same requirement for general account and transaction reports. Print Control You can define up to eight printing styles for your system through the CONFIG user — see the System User Guide. These control not only the print style such as the number of characters per inch, but also the length and width of the report. The styles so far defined are shown at the bottom of the screen when you are prompted. Data Items You are asked to enter up to 10 data items (depending on the specific report) to print on each report. The file structure for the file concerned (cash book accounts or transactions) shows in the right-hand window when you take the option for any particular report. However, you can use the <F4–Select> key in the usual way to select a specific data item to print. It is the data item numbers which you enter, although the names are shown alongside too. An example of the entry screen used for report definition is shown below.

Cash Book Configuration 369
Datafile Software Nominal Ledger and Cash Book Manual 06/07/07
In addition to the data items in the file itself, you can select from a further set of items, which are derived from the data in each file up to the period number chosen for the report at run time. Use the <F7–Options> key to view these items, which are also described below. They are numbered from item number 161 upwards. It is preferable to use, for example, item 165 — the accumulated actual balance — than to use item 47, the current balance. The current balance always shows the full year regardless of which period you ask to print, whereas item 165 accumulates only up to the period number you choose when you print.
Additional Cash Book Accounts File Items
Item Description 161 Accumulated Budget. The sum of each period’s budget from the start of
the year to the report period number — i.e. the year-to-date budget 162 Accum Budget Variance. The difference between the budget to-date
item 161 and the actual movement to-date, which is item 165 163 Period Budget. The budget figure for the report period requested 164 Period Budget Variance. The difference between the period budget item
163 and the actual result for the period, which is item 167 165 Accumulated Actual. The sum of each period’s actual results from the
start of the year to the report period — i.e. the actual year-to-date result 166 Accumulated Actual Variance (Previous year actual). This is the
variance between the year-to-date result in item 165, and the comparative value for the same period range last year, item 169
167 Period Actual. The movement for the period — the current period’s results
168 Period Actual variance (Previous year actual). This is the variance between the current period’s result in item 167 and the comparative value for the same period last year, item 170
169 Previous Year Actual Accumulated. This is the sum of the actual results from the start of last year to the same period last year as the report period
170 Previous Year Actual Period. The results for the same period last year
Note The references to budgets retain compatibility with the nominal ledger. The cash book itself does not support budgets.

370 Nominal Ledger and Cash Book
Datafile Software Nominal Ledger and Cashbook Manual 06/07/07
The OPTIONS Button The Options button allows configuration facilities for the printing of the report – selecting margins and fonts and was discussed above. Trial Balance The trial balance shows all the cash book accounts with their current debit or credit balance, and sums the debits and credits to prove that the ledger itself balances. The trial balance can print sub-totals at certain break points, and you define these in the cash book System Profiles — see the System User Guide. For example, you might want to print sub-totals after the income accounts, expenditure accounts, the bank and cash accounts, and the control accounts. Although the trial balance is designed in a manual system to check that a nominal ledger balances, it is also used to give the figures from which profit and loss statements and balance sheet reports are prepared. A cash book system on its own should balance too. You may want to print items 165 and 167 as well, to give you the year-to-date and current period movement figures. Audit Trail The audit trail is designed to print three aspects of each cash book account: A header line of information from the account record Transaction details which apply to this account (you can choose which transactions to print
at run time) An analysis table derived from the transactions, if you ask for this at run time You can define up to ten items from the cash book accounts file to print in the header, and up to ten items to print from each transaction record. You have no control over the layout of the analysis table, other than whether to print it or not. Transactions As well as the data file items from the transactions file you can choose to print from five other items derived from the transaction data, as shown in the table below. You also have the option to sort the transactions for each account by date before you print them. With the ability to enter data for any period at any time, this option is advised, since it helps to show you where the period movement figures come from.

Cash Book Configuration 371
Datafile Software Nominal Ledger and Cash Book Manual 06/07/07
Additional Cash book Transaction File Items Item Description
161 DB/CR-AMOUNT — this prints the transaction value in one of two
columns headed debit and credit. Were you to print the amount itself, it would print in a single column regardless of whether debit or credit
162 RUNNING-BAL — this gives a running balance from the start of the year. A balance is calculated for each transaction regardless of whether it is printed or not, so that the balance which prints against a line represents the true account balance after applying that and all previous transactions
163 ALT-ACCOUNT — this prints the other account code as a cross-reference for double entry journals (found only in the nominal ledger)
164 DB-ACC-NAME - This prints the debit account name if the transaction contains a debit account
165 CR-ACC-NAME - This print the credit account name if the transaction contains a credit account
Account Listing Account Status These two reports are general reports specified in the same way. You can print the additional cash book account data items 161–170 (as described above) on these reports as well — use the <F7–Options> key to give you a list of these. Receipt Headings Payment Headings These reports list just those income and expenditure accounts which are specifically marked for entry against receipt or payments columns. Transaction Listing This is a report of the journal entries in your system. A blank line separates the entries for one journal from those of the next. As well as the normal transactions file items, you can also choose to print the debit and credit account names in separate columns by choosing data items 164 and 165, as shown at the bottom of the screen. Special Item 161 allows printing of the transaction amount but split into debit and credit columns. If subtotalling the journals then you need to print this item instead of the amount data item (usually item 5).

372 Nominal Ledger and Cash Book
Datafile Software Nominal Ledger and Cashbook Manual 06/07/07
Period/Year-End Facilities There are no user-defined items for these options.
Account Enquiry This feature allows you quickly to view a cash book account on the screen, including a list of transactions for the account. You can configure up to ten items to display in the header for the account, five items in two columns
For each account item that you want to display in the account enquiry screen, key the data item number or use <F4-Select>. The data item name is then displayed alongside the number. Leave as zero any items not required. If you want to display the movement (actual) for the current period then set CURR-ACT-01 for display – the system will replace this will the current period value. This facility also applies to the budget and comparative values. If you actually want to display the period-1 values regardless of the period number you would have to create a calculated field in the accounts file and display this item instead.

Cash Book Configuration 373
Datafile Software Nominal Ledger and Cash Book Manual 06/07/07
You have no control over the transaction items, which are the journal number, date, description, debit or credit amount, and the source of the transaction.
System Status There are no user-defined options here, and it is included only for the sake of completeness. It lists the items which are displayed when you choose this option from the cash book.
Application Screen Layouts This option allows access to the ‘Maintain Accounts’ section of the Application User Facilities. Refer to this section above for further details.
Select Key Definition Whenever you press <F4-Select> against an application database within the cash book the details displayed can be configured to show what you require. This is done via the ‘Select Key Definition’.

374 Nominal Ledger and Cash Book
Datafile Software Nominal Ledger and Cashbook Manual 06/07/07
As you select this option the system displays each application database used in turn, asking you to select the items, up to ten, that you wish to display. You are also asked: LIFO Sequence The sequence in which the records are listed when using <F4-Select> depend on the item searched upon. If search on the prime-index (which for the nominal accounts file would be the account code) then items are listed in account code order, if enter a search on a secondary index (for the nominal accounts file this could be the account name) then items are listed in the order they were created. Setting this option reverses this sequence so that details are listed in either reverse prime-index or reverse entry order. Auto-Sort Column Auto-Sort Descending As an alternative to the above you could set the records to be listed in a set sequence. The item you sort on must be one of the list items you have set to be displayed and, here you select the column number of the data item you wish to sort upon and whether the records are to be sorted in descending order (leave blank for ascending order).
Notes
These items only affect the items displayed in the list when selected within the ledger; they do not affect the items you can filter on (i.e. the header selection inputs). These are the prime and secondary indexes of the databases concerned.
Recall Standard Text Recall Standard Text allows you to attach a word or phrase to a specific key combination (such as <Shift> + <F1>). For example you might have a series of standard texts to use for the transaction descriptions.

Cash Book Configuration 375
Datafile Software Nominal Ledger and Cash Book Manual 06/07/07
Up to fifteen phrases can be entered and these are available for update into a text field throughout the application. These phrases are shared between the nominal ledger and cash book.
Database Profiles Database Profiles are the interface between the program and the databases, allow the program to read/update the data and interpret the values contained within. The data item profiles for the nominal ledgers / cash book were detailed in the Nominal Ledger configuration earlier.


377
Datafile Software Nominal Ledger and Cash Book Manual 06/07/07
Chapter 6 An Introduction to
Accounting The purpose of this section is to introduce the principles of accounting as these affect a nominal ledger. It is not intended as a comprehensive tutorial in accountancy. Many businesses leave the finer points of accounting, including the preparation of profit and loss accounts and balance sheets, to their professional accountants. A company’s own involvement in the financial side is on the crucial aspects of cash flow, sales revenue, and in keeping suppliers happy. However, as the business grows a company will benefit from a tighter in-house control over the financial side, and perhaps reduce the annual charges from the accountants. If a budgeting system is planned or already in use, then the financial reporting should match the budget periods — quarterly or even monthly. For those who have had no accounting training, financial matters can seem hard to understand. Yet some grasp of accounting practices is desirable for any business person, and essential to the use of a computer nominal ledger. It is hoped that the following sections will serve as a primer to the major principles of accounting, and will help a business to successfully introduce a computer-based nominal ledger.
The Mechanics of Accounting Starting and Growing a Business Most businesses start because someone (or maybe a group of people) wishes to exploit an idea or skill. They want to work for themselves, earning money through the success of their venture rather than just taking a salary from someone else’s company. With luck and good sense, the money paid or promised from the customers of the business exceeds the money paid or owed for the goods and services required to satisfy the customers’ needs. Thus a profit is earned.

378 Nominal Ledger and Cash Book
Datafile Software Nominal Ledger and Cashbook Manual 06/07/07
Whatever the size or type of business, its prime purpose is to succeed, and the key to success is to make profits. (Even so-called “non-profit-making organisations” expect to make surpluses which they then distribute as charitable donations under the terms of their charter.)
Why Keep Records? As a separate entity, a business must account for its financial transactions. Indeed, depending on the type and structure of the business, there are statutory obligations of a greater or lesser extent to keep records. In general there are much stricter requirements for limited companies than for sole traders and partnerships — you should always check with your accountants and auditors that you are keeping adequate records. The main purposes of records are: To show if you are making a profit. Money in the bank is not in itself sufficient evidence
that you are trading profitably. An apparently profitable company can go broke and be unable to pay its suppliers — perhaps because it cannot make its own customers pay up quickly enough. Similarly you can be trading at a loss and yet have a healthy bank account — you only need to stop paying your bills for a few weeks!
To show Customs and Excise, and the Inland Revenue, that all the taxes and other
payments legally due to them are properly accounted and reported To comply with the statutory obligations of the various Companies Acts To report to banks, and perhaps to outside investors, that your business is doing well and
that their money is in sound hands To show potential investors, if you wish to give them the opportunity, that the business
could be a highly profitable investment for them
Accounting Records Ignoring for the moment that certain minimum records are required by law, it is certainly helpful to record details of all money received and spent by the business. Most of us have been involved at some time with accounting records, at the very least when we check our bank, credit card, or other similar statements. We may be organised enough to keep a notebook showing our income and how we spend it. Some of us get involved with local societies, or the office petty cash, where we have to keep more formal records of what is kept in a cash box. We probably have an account book for this, in which we record money received and how it is spent — in two columns like a bank statement if not on left and right-hand pages respectively.

An Introduction to Accounting 379
Datafile Software Nominal Ledger and Cash Book Manual 06/07/07
Every now and then we’d balance it all up — occasionally to find that what the book said we had in the cash box didn’t add up to what we counted in there. In a business environment, however, we must make sure all money is accounted for. What we were keeping, in the simplest sense, was a cash book. To make the cash book work for us, we may have used a book with several columns on each page labelled so that we could analyse where income came from, and where expenses went to. In a business environment, these headings would include such headings as “Sales”, “Other Income”, “VAT”, “Wages”, “Purchases for Resale”, “Rent and Rates”, and so on. Our ability to analyse the cash book is limited (without actually poring over the entries one by one) to the number of columns in the book. As soon as we start making sales on credit we need some way to record the fact that we’ve invoiced the customer, but haven’t yet been paid. A simple way to handle this is the sales day book, a book into which we can record all invoices as we raise them — marking off those which are cleared as we receive payment. If we have analysis columns in the sales day book, we can go into some more detailed analyses of the sales themselves — perhaps analysing the type of goods or services sold. The sum of sales entered into the day book represents the sales for the period. When the customer actually pays us, the transaction is entered into the cash book in the normal way. The difference between our sales and what our customers have so far paid represents an asset — something owed to the business.
The Ledgers Once we have any significant number of customers it is difficult to study the sales day book and the cash book to see how much any one customer owes. It is now worth having a separate system, the sales ledger, where we can keep a page or card per customer to give us his individual position at a glance. In a manual system, each customer’s account in the sales ledger is posted from (or possibly posted at the same time as) the sales day book. Payments are similarly posted to the ledger account and the cash book. Now it is a simple matter to look at the account for each customer to see the present balance owed. The debtors control account introduced earlier should be equal to the sum of the balances of all the sales ledger accounts. It is usually known, therefore, as the sales ledger control account. Once we start buying goods and services on credit, we have the reverse situation. We should note these invoices into a purchases day book, may start a purchase ledger, and will have a purchase ledger control account. As the business becomes more complex — we purchase machinery, buildings, furniture and cars; employ staff; offer and take up maintenance contracts etc. — increasingly we need to see an overall financial picture of the business. We may feel it is going well, but how do we really know whether it is trading profitably?

380 Nominal Ledger and Cash Book
Datafile Software Nominal Ledger and Cashbook Manual 06/07/07
It is the nominal ledger which serves this purpose and is in fact the hub around which all transactions eventually revolve. Indeed, your accountant keeps a nominal ledger for your business even if you don’t. Nominal ledger accounts include the cash book itself, sales and
Relationship of Ledgers and Books
Sales Ledger Cards
Receipts
Customers
Customer Invoices
Sales Day Book
Sales Ledger
Purchase Ledger Cards
Payments
Suppliers
Supplier Invoices
Purchases Day Book
Purchase Ledger
Standing Orders
Petty Cash
Payroll
Journals
Cash Book
Nominal Ledger
Income & Expenditure
Accounts
Balance Sheet
Accounts
Trial Balance
Profit &Loss Statement
Balance Sheet

An Introduction to Accounting 381
Datafile Software Nominal Ledger and Cash Book Manual 06/07/07
purchase ledger control accounts, accounts for each asset and liability, the profit and loss account, and so on. It is from the nominal ledger that we can draw the income and expenditure reports which tell us if we are in profit or not. There are many transactions which must be recorded, but which do not involve cash or day books. These include depreciation, profit or loss on sale of assets, provisions and accruals, and correction of errors. These are all entered into a journal which serves the same purpose for the nominal ledger as the day books for the sales and purchase ledgers. The picture is now virtually complete, as is shown in the diagram on the next page. The books of prime entry are the cash book, sales and purchases day books, and the journal. At regular intervals (weekly or monthly) these are summarised and posted to the nominal ledger. There may well be other books and ledgers, introduced to ease the task of finding out the financial position of our company. For example, in most businesses the cash book is actually a record of transactions into and out of the bank account — which should therefore mirror the bank’s own statements back to you. Since there is always need for real cash, if only to pay the milkman, there may be a petty cash box, and a petty cash book to record cash into and out of this box. There is then a petty cash account in the nominal ledger, and once a month a summary of petty cash transactions is recorded as a journal entry. If you purchase considerable amounts of equipment to use within the business, you may set up an asset register to record when equipment was bought, how much was paid for it, and by how much it has been depreciated so far. If you sell goods, then you ought to have a stock book to record goods in and out. There may be several stock accounts in the nominal ledger: goods for resale, stock in the process of being manufactured, raw material stocks, and stocks of consumables (paper, packing material, food and so on).
Computer-Based Accounting Systems Keeping proper records of the transactions within the business is an essential, not to say statutory, obligation. In a manual system, however, it can become a time-consuming burden. Transactions need to be entered at least twice into the appropriate books and ledgers in order to achieve double-entry controls. Regular summing and cross-checking of control figures must be done to prove accuracy. Since the accounting function does not of itself earn the business any money, there is pressure not to devote too much resource to it. For management to request analyses outside those for which the manual system was set up to provide, can be a laborious process of sifting through records. Far from being a benefit, the accounting system can become a millstone to the manager. Well-designed computer systems, however, excel at just those things which give such trouble in manual systems. For a start, a transaction need only be entered once for it to be correctly posted to all parts of the system. Controls should always balance, since arithmetic errors just do not occur (discipline is needed in the use and control of a computer system, but that’s another story).
382 Nominal Ledger and Cash Book
Datafile Software Nominal Ledger and Cashbook Manual 06/07/07
Statements, trial balances, profit and loss accounts can be printed automatically at the touch of a button. And the computer is at its best when asked for ad hoc analyses for management use. You need only ask a few simple questions and then get on with other work whilst the computer uncomplainingly selects, sorts, totals and finally prints the answers needed. The computer system puts you in financial control. Computer accounting systems normally comprise sales, purchase and nominal ledgers, with additional modules such as cash book, stock control, invoicing and payroll available if required. With such systems, sales and purchases daybooks and journals are automatic by-products of the preparation and posting of invoices, entering of payments and other transactions. Bank account statements can be reconciled through the cash book.
Framework of Accounting We are all familiar with our bank account or our credit card accounts. We receive regular — often monthly — statements which show the various transactions which have taken place; cheques written, goods purchased, payments made. An account is merely the record of the transactions which have taken place under one particular heading, our bank account or credit card, with a total showing the present balance. For a business the same is true. An account can be kept for any heading we care to think of. “Petty Cash” is a good heading, as are the business bank account “National Barcloyd Bank”, our relationship with supplier “Bloggs and Co”, the sales and payments from our customer “Jones”. Most business people are already familiar with sales and purchase ledgers, where they keep an account record for each customer and supplier. The nominal (or general, or private, or impersonal) ledger is merely the collection of all other “accounts” against which you wish to record transactions. In fact the sales and purchase ledgers are expansions of two specific accounts in the nominal ledger, for debtors and creditors. It is just more convenient to take them out into separate books than to have all customers and suppliers as accounts in the nominal ledger too. Nominal ledger accounts fall into two main groups: profit and loss (or trading) accounts, and balance sheet accounts. These are described in more detail below, but essentially the profit and loss accounts show how the business has been trading during a certain period of time, whereas the balance sheet accounts give a snapshot picture of the state of a company at one specific moment in time.
Double Entry Bookkeeping Accountants have been guilty for years of making complicated something which is entirely simple. “Double entry bookkeeping” is the name given to the obvious fact that, if a movement of money takes place at any time — we pay a bill, for example — then two actions have occurred. In this case, the supplier is paid, but the bank account is depleted.

An Introduction to Accounting 383
Datafile Software Nominal Ledger and Cash Book Manual 06/07/07
This elementary concept is the foundation of accountancy. By making sure that there are two sides to every transaction, a secure framework is created to check that records are correctly entered. Example of double entries include: Cash sale: Our sales total increases; our cash in hand also increases Credit sale: Our sales total increases; the customer account increases Customer pays: The bank account increases; the customer account reduces Buy stock for sale: Stock increases; our account with the supplier increases Purchase a car: Assets are increased; our hire purchase liability increases Move cash to a deposit account: One account is decreased, the other increased In accountant’s terms, every transaction has both a debit element and a credit element for the same value, so we need to understand what debits and credits are.
Debits and Credits These are the accountants’ way of saying “positive” and “negative”. A debit account has a positive value to the business, whereas a credit account has a negative value to the business. Because this sounds rather contradictory, most people inevitably get them wrong to start with! However, it is worth getting to understand debits and credits correctly. The clearing banks are partly responsible for most people’s perceptions, since they send us bank statements which show that we are in “credit”, and we interpret that to mean we are in funds. However, the bank statement is their perception of the situation — which is that they owe us the money should we care to ask for it! (This also means, from our point of view, that we actually have a debit balance at the bank — which seems to conflict with the common view that one shouldn’t get into debt.) A debit increases in some way what is owed to or is owned by the business A credit increases what is owed by the business, or else reduces the amount owned by the
business Most people know that it is creditors who can wind up a company and that is a sobering way to remind you of which way debits and credits work — creditors are owed money by the business. Every transaction has both a debit and a credit aspect to it. You would expect most nominal ledger accounts normally to take only a credit or a debit value, and another way to get debits and credits right is to remember that: Debits include assets, purchases and expenses Credits include liabilities, sales and profits If in doubt about a transaction, try to think it through against the above list. If that doesn’t help, try to analyse whether one side increases the amount owned or owed to the business, in which case it is a debit; or it increases the amount the business owes (or decreases the value of the

384 Nominal Ledger and Cash Book
Datafile Software Nominal Ledger and Cashbook Manual 06/07/07
business) in which case it is a credit.1 In manual ledgers, the convention is that debits are shown to the left, and credits to the right.
Assets, Liabilities & Owners’ Equity An asset can simply be defined as a valuable resource owned by the business which was acquired at a measurable financial cost. It has a value if it is cash, or can be converted into cash, or if it will benefit the future operation of the business. It must be owned — so leased equipment cannot be counted as an asset. And it must have been paid for, or is to be paid for, at some agreed price. Land, for example might be paid partly in cash and partly through a mortgage. The full price of the land is shown in the balance sheet, whereas the mortgage is a liability of the business. Assets are usually thought of under two main headings. “Current assets” include the sales ledger control, bank account and stock for resale, because these can quickly be turned into real cash to pay off debts. “Fixed assets” are the relatively long-lived assets such as buildings, land, and machinery acquired to use for the business. There may be a heading of “other assets” to cover those assets not specifically acquired for the use of the business (such as investments in other businesses) or non-physical things such as patents and copyrights. These latter are difficult to value, and may occur on a balance sheet only because money was paid out to acquire them. Liabilities, on the other hand, represent the claims of outsiders (other than the owners) against the business. Liabilities are usually divided into current liabilities (obligations falling due usually within the year, such as trade creditors, Inland Revenue and VAT) and long-term liabilities which do not necessarily have such immediate pressure for repayment (such as a bank loan, for example). Owners’ equity shows the claims of the shareholders, partners or sole trader in the business. It represents the original and any subsequent amounts of capital (money) invested in the business, plus the amounts of profit earned to date and not distributed to the owners (retained earnings). It is a liability of the business too, since if the business were to be wound up, any surplus value left after meeting the obligations of the other liabilities would revert to the owners.
Reporting and Control In Mechanics of Accounting we covered the various books and ledgers in which we would record transactions which had taken place in our company. There are two considerations now:
1 Whilst it is easy to use the rule of increasing or decreasing value to the business to
work out whether assets and liabilities are debits or credits, it seems less logical for income and expenditure accounts. Each of these is the opposite side of another transaction, however. A sale results in money (eventually) and this is an increase in what is owned by the business, so is a debit; the sale, therefore, is a credit. An expense has to be paid for, so reduces what is owned; that results in a credit, so the expense is therefore a debit.

An Introduction to Accounting 385
Datafile Software Nominal Ledger and Cash Book Manual 06/07/07
Have we recorded everything accurately? Can we get some useful management information out of the systems? Both of these questions revolve around the nominal ledger itself. In the first case, it is customary to rule off each nominal ledger account and each of the other ledgers in our system and to undertake some control checks at the end of a period. The immediate checks we can make include: The nominal ledger sales and purchase ledger control account balances should equal to the
total value of the sales and purchase ledgers themselves We should be able to reconcile between our nominal ledger bank balance and the bank’s
own statement, any differences being purely receipts which have not yet reached our account and cheques which have not been presented to our bank
The money in cash accounts such as petty cash and till floats should equal the balances we
show in the nominal ledger
Trial Balance One of the most important checks is to produce the trial balance. Since every transaction has an equal debit and credit value associated with it (double entry) the theory says that the sum of all accounts in the nominal ledger with a debit balance must equal the sum of all accounts with a credit balance. A trial balance is merely a list of all nominal ledger account balances (an example of a trial balance is given at the end of this appendix). The purpose is to prove the arithmetic accuracy of the bookkeeping. In a manual system, despite the best of endeavours, this may not always be so. Time must be spent to resolve the imbalance. However, a trial balance does not show up compensating errors such as: Misunderstandings in other parts of your systems. For example entering cash received
from a customer to increase his sales ledger account and reduce the bank balance, instead of the other way round, incorrectly updates the associated nominal ledger accounts. Hopefully the customer himself will complain when he gets his statement. Better still, you should spot an error yourself when you check your bank statement
Transactions not posted. If you don’t account for a transaction at all, no debit or credit
entry is recorded anywhere, so the trial balance still balances, though there is an omission in the books. Your internal control systems should check the movement of money between systems at a total value level. If the system is effective, then this should throw up by some control total errors
Posting an amount to the right side, but the wrong account, such as a machine (which
should have been counted as a fixed asset) being taken as stock for resale (which is a

386 Nominal Ledger and Cash Book
Datafile Software Nominal Ledger and Cashbook Manual 06/07/07
current asset). Again, the trial balance won’t show this up, and you will need to rely on spotting this type of error through a review of individual account balances
Management Reporting The trial balance supplies the figures needed to produce management reports. The income and expenditure accounts can be listed to produce an income and expenditure report. Even without applying mechanisms such as accruals and prepayments, this can give a picture of current trading. When allied to budgets too, results can be measured against plan and management decisions taken.
Profit And Loss Statement When financial adjustments such as accruals, prepayments and depreciation are included, a more financially accurate report known as the profit and loss statement can be printed. This shows how the business is doing over a certain period of time. It is always necessary to show such a statement for a full trading year, and most businesses would like to see how the firm has done on a quarterly, or even monthly, basis. It is essentially a statement of the sales and other income, less the costs and expenses during the same period, to show how much (if any) profit has been earned. An example of a profit and loss statement is shown overleaf, but the source of such a statement is the nominal ledger. All the sales and cost headings are either individual nominal accounts, or the sums of groups of nominal accounts, and the values are the sums of money which have been posted to those accounts during the period in question (in other words, the movements in the accounts). Thus the “Sales” account, which had nothing in it at the start of the year, had been posted with £419,595 by the end of the half year, and had a further £247,125 added during the third quarter. Its current value thus stands at £666,720 in the nominal ledger. All the nominal ledger accounts used in the preparation of such a profit and loss statement are set to a nil balance at the start of the trading year, the difference between them (in accordance with the double entry rule), less any distribution of profit, being posted to a balance sheet account often called “retained earnings”.

An Introduction to Accounting 387
Datafile Software Nominal Ledger and Cash Book Manual 06/07/07
ABC Limited Profit and Loss Statement Period 1 January 1990 to 30 September 1990 Year This to date Quarter SALES 666,720 247,125 ======= ======= COST OF SALES Opening Stock 184,350 236,265 Purchases 454,920 113,730 Carriage & Insurance 30,120 10,235 LESS Closing Stock 193,710 193,710 ------- ------- Cost of Sales 475,770 166,520 GROSS PROFIT 190,950 80,605 ------- ------- OPERATING COSTS Salaries and wages 88,170 29,450 NI 4,623 1,545 Rent and rates 24,390 8,130 Light, heat and power 8,840 2,150 Telephone 5,130 1,825 Repairs 2,110 1,750 Depreciation 4,140 1,380 Other expenses 16,677 4,790 ------- ------- 154,080 51,020 OPERATING PROFIT 36,870 29,585 ------- ------- Other Income 5,810 2,040 NET PROFIT BEFORE TAX 42,680 31,625 ------- ------- Provision for company tax 15,120 11,010 NET PROFIT AFTER TAX 27,560 20,615 ====== ======
Example of a Profit and Loss Statement

388 Nominal Ledger and Cash Book
Datafile Software Nominal Ledger and Cashbook Manual 06/07/07
The Balance Sheet The balance sheet is a statement of the company’s financial position, both of what it owns (assets) and of what it owes (liabilities). By the nature of double-entry bookkeeping, these must exactly match each other. An example of a balance sheet is shown overleaf. It gives a picture at one instance in time of the resources of the company and how those resources are being used. Whilst the profit and loss statement shows how the company has fared during a certain time period — useful information in knowing whether it is trading in a profitable manner — the balance sheet gives a view of the present financial health of the company. For example, the balance sheet tells you whether the company has the resources to pay the people it owes money to — whether the current assets are greater than the current liabilities. It is in a particularly good position if its “liquid” assets — meaning the debtors ledger and cash — can cover its current liabilities. It tells you whether the company is strong enough to withstand a lean period — accumulated profits invested perhaps in accessible assets such as government bonds and building society accounts. It can indicate how well it might be able to raise money for a new venture — few borrowings compared to the shareholders’ equity. It can indicate how well the company is trading — look for the number of times per annum the value of stock is turned over — and whether it is making a good return — the profit as a ratio of the money invested in it. Financial analysts apply numerous ratios to a company’s figures to try to understand its strengths and weaknesses. Again, the source of all the information in the balance sheet is the nominal ledger trial balance. Certain conventions apply to the way it is presented. Your auditor can help you to determine what information should be presented on accounts filed officially, and it makes sense to use the same format as this.

An Introduction to Accounting 389
Datafile Software Nominal Ledger and Cash Book Manual 06/07/07
ABC Limited Balance Sheet as at 30th September 1990 FIXED ASSETS Property, equipment and 298,004 fixtures at cost LESS depreciation 150,126 ------- 147,878 ------- CURRENT ASSETS Sales ledger control 123,530 Cash 545 Stock in hand 193,710 Prepayments 7,455 -------- 325,240 CURRENT LIABILITIES Purchase ledger control 105,671 Accruals 34,874 Bank overdraft 42,875 ------- 183,420 NET CURRENT ASSETS 141,820 ------- TOTAL NET ASSETS 289,698 ======= LONG-TERM LIABILITIES Business development loan 87,350 SHAREHOLDERS' EQUITY Issued share capital 112,664 Retained earnings 89,684 ------- 202,348 ------- 289,698 =======
Example of a Balance Sheet

390 Nominal Ledger and Cash Book
Datafile Software Nominal Ledger and Cashbook Manual 06/07/07
Additional Topics Many companies, who introduce a computer system, do so to increase the efficiency of the accounting function. In many cases they decide to use some of the time so released to take on responsibility for the nominal ledger, reducing their dependency on their accountants for quarterly, or even monthly, management figures. This section covers some of the additional aspects concerned with running a nominal ledger to produce full financial accounts.
Accruals An ever-ready danger when trying to produce profit and loss figures from the transactions recorded in the accounting system is the presence of liabilities which have yet to be recorded. Typical examples of these include telephone, gas, electricity, rent and rates which have yet to be invoiced, but which you have in effect consumed. You need to make some provision for them so that they do not give you a nasty shock when they do eventually arrive. A bigger danger is stock received and counted in the balance sheet, but for which invoices have not for some reason been posted to the purchase ledger. This could arise due to a buyer being slow in passing an invoice for payment, or a supplier being lax in invoicing it. Such an omission can grossly inflate your apparent profit. If the profit and loss statement is to present a reasonably true picture for the period, then some way must be found to include provisional sums for such transactions, making sure that when invoices do in time appear that they are not now double-counted. This is achieved by accruing for such transactions. It is common practice to have a number of accrual accounts in the nominal ledger. A transaction is posted to the relevant expense heading, so that it can be counted in the profit and loss statement, the double-entry being posted to the accrual account which shows as a liability in the balance sheet. Such a transaction is known as a provision, and once you have produced the accounts for the period, the provision is reversed — posted again with reverse values, to negate the original provision. Presumably the true invoice will shortly arrive, so double-counting has been avoided. Its effect has been carried into the accounts, however. If transactions have still not appeared by the time the next set of accounts is prepared, then provisional transactions will again need to be posted.
Prepayments Whilst accruals were liabilities which were provided for until the transactions relating to the items arrived for posting, prepayments are the reverse situation: invoices taken into the system but only part of whose value is attributable to the period in question.

An Introduction to Accounting 391
Datafile Software Nominal Ledger and Cash Book Manual 06/07/07
Examples of prepayments include annual rent and rate payments, where only that part attributable to the current and previous periods should be charged against profit and loss, the rest being an asset for future periods; equipment maintenance agreements, insurance premiums, and even advertising, where the same considerations apply. The mechanics of prepayments are similar to accruals in that provisional transactions are posted to the relevant profit and loss accounts to reduce their value, the contra entry being posted to a balance sheet prepayments account — an asset.
Depreciation The life of all fixed assets (except perhaps land and some buildings) is not unlimited. Depreciation spreads the original cost of the asset over its working life. There are many ways that such depreciation is calculated — percentage of its current value, equal amounts each year — and a journal entry is posted for each item being depreciated. This is a “book” transaction — no money moves anywhere. Depreciation is an “expense” item, so reduces the gross profit. It is normal to post the contra entry to a separate depreciation account (which thus reduces the value of the asset in the balance sheet).
Suspense Accounts Sometimes a transaction occurs which needs to be posted into the books, but for which only one aspect of it is known. For example, an unrecognised item or service is invoiced to the company, but quite where it should be charged has yet to be found. Another example is a cheque received by the company, but which sales ledger account it pays is not yet known. A suspense account is a nominal ledger account into which such transactions can be posted. In the first example, the invoice would be posted to the purchase ledger account for the supplier in question, and the contra entry posted to the suspense account. In the second, the bank account is debited, and the suspense account credited. When the expense heading for the invoice and the source of the cheque is determined, each transaction can be reversed by further journal entries. The end result is that the suspense account has returned to a zero balance. If you use suspense accounts, it is good practice to try to clear up at the end of each period any items which remain unresolved. In particular they should be “cleared” as part of your year-end routines before you send your accounts off for audit.
Control Accounts Control accounts were covered earlier with respect to the sales and purchases ledgers. They can, however, be used for any other separate system such as stock ledgers and asset registers. They

392 Nominal Ledger and Cash Book
Datafile Software Nominal Ledger and Cashbook Manual 06/07/07
are nominal ledger accounts in their own right, and summarise the net value of the system they are controlling. The purpose of control accounts in a manual system is twofold: To provide a check on the accuracy of entries made into the other systems. Procedures
will have been laid down so that control figures are produced and can be checked independently from add-lists of invoices and payments etc.
To give an immediate value for debtors, creditors, and other ledgers when preparing trial
balances, instead of having to sum all the accounts within each Control accounts are just as important and useful to the computer system — particularly where the various ledgers are run on independent files in the computer. Control accounts help to prove that the postings between the various systems (often done on a “batch” basis at weekly or monthly intervals) are fully in step with one another. For example, the nominal ledger control accounts for the sales and purchase ledgers should be checked at the end of each period to see that they equal the period end ledger balance of the sales and purchase ledgers themselves. If they do not, you need to investigate why not. For another example, let’s look at the payroll. If you update your payroll system into the nominal ledger automatically, then you would define a payroll control account to take the balancing item from the update, which is the net pay due on the payroll. Subsequently the employees are paid. The cash book transactions which record their payments from the bank or cash or whatever, have as their opposite sides the payroll control account. If all has gone well, the payroll control should now be zero. If it is not zero, then either you have overpaid someone, or not all entries were recorded through the payroll. Again you need to investigate the difference.
Summary In this section we have tried to introduce you to some of the accounting terms and principles which you are likely to meet in an accounting system. It is our belief that the basics are easy to understand, and necessary to know if you are to get the most out of a Datafile system. One of the advantages of installing a Datafile, however, is that you can let the system handle most of the mechanics, whilst you can concentrate on looking at the figures themselves, to see what they can tell you about your business. Whilst it helps to know enough about accounting principles to be able to make judgements (even if merely, is this a debit or a credit?) the benefits come from the ability of the system to give you different views of your business, at a speed and detail which you would never have had the time to contemplate from a manual system.

An Introduction to Accounting 393
Datafile Software Nominal Ledger and Cash Book Manual 06/07/07
Example Trial Balance Income Accounts 001 Sales Income - 60485.00 002 Services Income - 10654.00 050 Other Income - - 060 Interest Received - - 090 Delivery Charges - - 099 Sales Discounts Taken 52.74 - Expenditure Accounts 101 Purchases 32548.00 - 150 Stock Increase/Decrease 2516.00 - 199 Purchase Discounts Taken - - 200 Staff Salaries & N.I. 15132.53 - 201 Directors Salaries & N.I. 4416.00 - 210 Staff Pensions 450.00 - 211 Directors Pensions 600.00 - 215 Staff Training - - 218 Recruitment Costs - - 220 Rental of premises 5000.00 - 225 Rates (General & Water) 674.50 - 230 Light & Heat 550.00 - 240 Office Repairs & Renewals 300.00 - 245 Cleaning & Refuse 330.00 - 250 Property Insurance 412.00 - 260 Equipment Hire 412.00 - 270 Motor Expenses 870.00 - 275 Vehicle Contract Hire/HP 800.00 - 280 Equip. & Vehicle Maintain 450.00 - 290 Travel & Subsistence 210.00 - 300 Sundry Expenses 125.00 - 310 Telephone 540.00 - 320 Printing & Stationery 300.00 - 330 Advertising Costs 350.00 - 340 Exhibition Costs - - 350 Press & PR Costs - - 360 Brochures & Mailshots 300.00 - 370 Other Marketing Costs 225.00 - 380 Accountancy Fees - - 385 Auditors' Remuneration 400.00 - 390 Legal & Professional Fees 200.00 - 400 Depreciation 1022.21 - 410 Bank Charges 65.00 - 420 Interest Paid 625.00 - 470 Debt Collection & W/Os 94.50 - 480 Provision for Bad Debts - - 490 Disposals of Assets - -

394 Nominal Ledger and Cash Book
Datafile Software Nominal Ledger and Cashbook Manual 06/07/07
Fixed Assets 600 Assets – Property 30000.00 - 601 Depreciation Property - - 610 Assets – Leasehold 10000.00 - 611 Amortisation Leasehold - 7083.33 620 Assets - Plant/Machinery 8000.00 - 621 Depreciation Plant/Mach - 5333.33 630 Assets - Fixture/Fittings 5000.00 - 631 Depreciation Fix/Fittings - 3083.33 640 Assets - Motor Vehicles 14000.00 - 641 Depreciation Motor Veh - 9944.43 650 Assets – Equipment 4000.00 - 651 Depreciation Equipment - 3777.76 660 Product Development 8000.00 - 661 Depreciation Product Dev. - 7555.55 Current Assets 700 Stock 27597.45 - 720 Work in Progress 2945.17 - 740 Prepayments 8561.50 - 750 Sales Ledger Control 89363.46 - 760 Bank Account 11357.35 - 770 Petty Cash 347.68 - 780 Amex/Diners Control - - 790 Sundry Debtors - - 795 Staff Loans 500.00 - Current Liabilities 800 Purchase Ledger Control - 40966.73 810 Accruals - 14795.82 820 Sundry Creditors - 200.00 830 Corporation Tax - - 840 Inland Revenue - 6596.80 850 VAT Control Account - 6010.24 855 VAT Payment Account - - 860 Hire Purchase - 4230.00 890 Directors Loan Accounts - - Long-Term Liabilities 900 Debenture - 50000.00 910 Business Development Loan - 9500.00 Owner’s Equity 950 Share Capital - 10000.00 960 Revaluation / Reserve - 2000.00 970 Retained Earnings - 37426.77 TOTAL: 289643.09 289643.09