
GENERAL INFORMATION Section 1 IGNITION Section 2 ...
328
-
Upload
khangminh22 -
Category
Documents
-
view
4 -
download
0
Transcript of GENERAL INFORMATION Section 1 IGNITION Section 2 ...

TABLE OF CONTENTS
GENERAL INFORMATION Section 1
IGNITION Section 2
CARBURETION Section 3
GOVERNOR CONTROLS, CARBURETOR LINKAGE
& FLYWHEEL BRAKES Section 4
GOVERNORS Section 5
COMPRESSION Section 6
STARTERS & CHARGING SYSTEMS Section 7
LUBRICATION Section 8
PISTONS, RINGS, RODS Section 9
CRANKSHAFTS, CAM GEARS, GEAR REDUCTIONS &
AUXILIARY DRIVES Section 10
CYLINDERS & BEARINGS Section 11
SYNCHRO-BALANCE® & OSCILLATING COUNTER BALANCE ... Section 12

CHECKCOMMON SPECIFICATIONS FOR
A
L
U
M
1
N
U
M
C
A
S
T
1
R
0
N
BASIC
MODEL
SERIES
60000
80000
90000
10A900,10B900,
10C900
100200,100900
100700
110000
120000
130000
170000
190000
220000
250000
280000 except
286700
286700
230000
240000
300000
320000
OIL CAPACITY
Fl. Ozs.B
H21
H21
H21
V18
V18
H21
V28
V18
H21
V18T
V28
H21
V28
H44
V36
H48
V48
H48
V48
H48
V48
V48
V48
H64
H64
H64
H64
ARMATURE
AIR GAP
INCHES
.006
.010
.006
.010
,006.
.010
.006
.010
SiQQ
.010
.006
.010
sm.010
.006
.010
.010
.014
.010
.014
.010
.014
.010
.014
JMO.014
.010
.014
.010
.014
.010
.014
.010
.014
.010
.014
SttQ.014
TORQUE SPECIFICATIONS
FLYWHEEL
NUT
FT. LBS.
55
55
55
55
60
55
55
55
60
65
65
65
65
100
100
145
145
145
145
CYLINDER
HEAD
IN. LBS.
140
140
140
140
140
140
140
140
140
165
165
165
165
165
165
190
190
190
190
CONN. ROD
IN. LBS.
100
100
100-
100
100
100
100
100
100
165
185
185
1fl5
See Section
9, Page 8,
Table No. 4
See Section9,Psge8,
Table No. 4
190
190
190
190
CRANKCASE
COVER OR
SUMP
IN. LBS.
85
85
85
85
120'
85
85
85
120
140
140
140
140
140A
200A
140A
200A
90 mag.
190 PTO
90 mag.
190 PTO
90 mag.
190 PTO
SOrrtag,
190 PTO
VALVE CLEARANCE
INTAKE
INCHES
iOQ5,007
.005
.007
.007
J2Q5..007
.005
.007
£05.007
jm,007
.005
.007
iOO7
.005
.007
iQQS
;007
£05.007
" iQQ5..007
.005
.007
M£.006
.007
.009
.007
.009
.007
.009
J3Q2.009
EXHAUST
INCHES
m$$
.007
.009
sm.009
.007
.009
.009;
.007
.009
MZ;O09
.007
.009
*QQ8.011
.009
.011
sm.011
.009
.011
.011
.009
.011
jm
^11
sni.019
.017
.019
sm
.019
.017
,019
■ H for Horizontal Crankshaft & V for Vertical Crankshaft, ♦ Governed Idle, See Section 5 for adjustment procedures, V Right Angle Drive 21 Fl. Ozs.
A See Section 11, page 11, TABLE NO. 5.

CHARTALL SINGLE CYLINDER "L" HEAD ENGINE MODELS
STANDARD
CYLINDER
BORE
INCHES
2J3Z4Q2.3750
2.3740
2.3750
2*5015
2.5625
2.56152.5625
2,40202.5000
2*56152.5625
2JSQ22.7812 :
2£8Z52.6885
2*5S15
2.5625
2,9990.
3.0000
zsasm3.0000
3.4365
3.4375
343653.4375
3.4365
3.4375
34265
3.4375
2L999Q3.0000
3£fiU53.0625
3.4365
3.4375
3L561S3.5625
CRANKSHAFT
STROKE
INCHES
1.500
1.750
1.750
1.876
2.125
1.940
1.940
2.020
.2.438
2.375
2.750
2.375
2.625
3.062
3.062
3.250
3.250
3.250
3.250
STANDARD
CRANKPIN
JOURNAL
INCHES
Not Required
.9983
.9988
,9233
.9988
.8731
.8739
J98J3
.9988
.9983
.9988
,9983.9988
►.9983A9988
^1.0983/1.0991
,9983.9988
1.0920
1.0924
1.1239
1.1243
1.2489
1.2493
1.2489
1.2493
1.2489
1.2493
1.2489
1.2493
1.1840
1.1868
1.3114
1.3118
1.3114
1.3118
1.3114
1.3118
JOURNAL REJECT SIZES
INCHES
MAGNETO
.873
.873
.873
.873
.873
.873
.873
.873
.873
.997
1.179»
.997
1.179*
1.376
1.376
1.376
1.376
1.3769
Ball
Ball
Ball
CRANKPIN
.870
.996
.996
.872
.996
.996
.996
.996
.996
1.090
1.122
1.247
1.247
1.247
1.247
1.1844
1.3094
1.3094
1.3094
PTO
.873
.873
.873
.873
.998
1.060
.873
1.060
.998
1.179
1.179
1.376
1.376
1.376
1.376
1.3769
Ball
Ball
Ball
END PLAY
HORIZONTAL
INCHES
£02.008
.002
.008
£02.010
.002
.030
mz.008
£02
.030
£02.008
.002
.030
£02.008
£02
.008
£02.030
£02.030
£02.030
£02.023
£02.023
£02.008
JJQ2.008
,0112.008
Jffl2.008
VERTICAL
INCHES
-
-
JIQ2.030
.030
«QQ2
.008
JJQ2.030
.002
.008
JJQ2.030
J2G2.008
J2Q2.008
sm
.030
£02.030
J2Q2
.030
£02.023
J3Q2
.023
£02.008
£02.008
£02.008
£02.008
• Synchro-Balance®, <4 after Date Code 97011200, ► before Date Code 97011300

English to Metric Conversion Table
Fraction
1/64
1/32
3/64
1/16
5/64
3/32
7/64
1/8
9/64
5/32
11/64
3/16
13/64
7/32
15/64
1/4
17/64
9/32
19/64
5/16
21/64
11/32
23/64
3/8
25/64
13/32
27/64
7/16
29/64
15/32
31/64
1/2
Decimal
0.0156
0.0312
0.0469
0.0625
0.0781
0.0938
0.1094
0.1250
0.1406
0.1562
0.1719
0.1875
0.2031
0.2188
0.2344
0.2500
0.2656
0.2812
0.2969
0.3125
0.3281
0.3438
0.3594
0.3750
0.3906
0.4062
0.4219
0.4375
0.4531
0.4688
0.4844
0.5000
mm
0.3969
0.7938
1.1906
1.5875
1.9844
2.3812
2.7781
3.1750
3.5719
3.9688
4.3656
4.7625
5.1594
5.5562
5.9531
6.3500
6.7469
7.1438
7.5406
7.9375
8.3344
8.7312
9.1281
9.5250
9.9219
10.3188
10.7156
11.1125
11.5094
11.9062
12.3031
12.7000
Fraction
33/64
17/32
35/64
9/16
37/64
19/32
39/64
5/8
41/64
21/32
43/64
11/16
45/64
23/32
47/64
3/4
49/64
25/32
51/64
13/16
53/64
27/32
55/64
7/8
57/64
29/32
59/64
15/16
61/64
31/32
63/64
1
Decimal
0.5156
0.5312
05469
0.5625
0.5781
0.5938
0.6094
0.6250
0.6406
0.6562
0.6719
0.6875
0.7031
0.7188
0.7344
0.7500
0.7656
0.7812
0.7969
0.8125
0.8281
0.8438
0.8594
0.8750
0.8906
0.9062
0.9219
0.9375
0.9531
0.9688
0.9844
1.0000
mm
13.0969
13.4938
13.8906
14.2875
14.6844
15.0812
15.4781
15.8750
16.2719
16.6688
17.0656
17.4625
17.8594
18.2562
18.6531
19.0500
19.4469
19.8438
20.2406
20.6375
21.0344
21.4312
21.8281
22.2250
22.6219
23.0188
23.4156
23.8125
24.2094
24.6062
25.0031
25.4000
IV
60 .040
59 .041
58 .042
57 .043
56 .0465
55 .052
54 .055
53 .0595
1/16 —.0625
52 .0635
51 .067
50 .070
49 .073
48 .076
5/64 —.0781
47 .0785
46 .081
45 .082
44 .086
43 .089
42 .0935
3/32—.0938
41 .096
40 .098
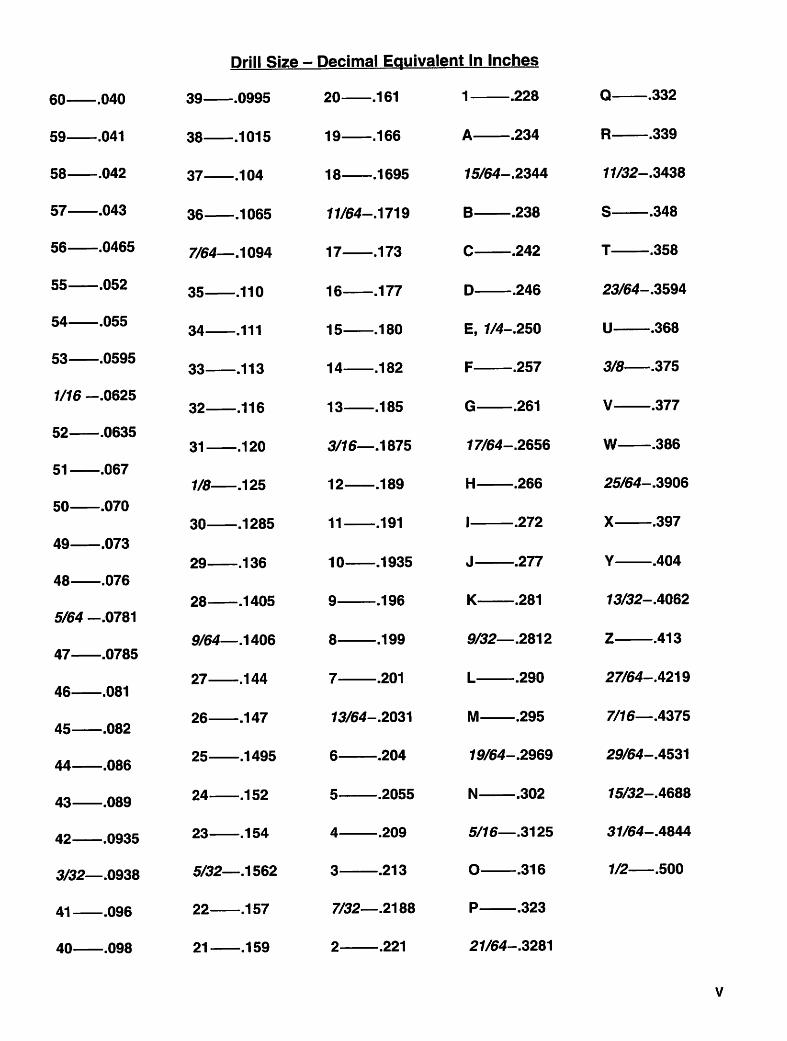
Drill Size - Decimal Equivalent In Inches
39 .0995 20 .161 1 .228
38 .1015
37 .104
36 .1065
7/64__.1O94
35 .110
34 .111
33 .113
32 .116
31 .120
1/8 .125
30 .1285
29 .136
28 .1405
9/64—.1406
27 .144
26 .147
25 .1495
24 .152
23 .154
5/32—.1562
22 .157
21 .159
19 .166
18 .1695
11/64-MW
17 .173
16 .177
15 .180
14 .182
13 .185
3/76—.1875
12 .189
11 .191
10 .1935
9 .196
8 .199
7 .201
73/64-.2031
6 .204
5 .2055
4 .209
3 .213
7/32—.2188
2 .221
A .234
J5/64-.2344
B .238
C .242
D .246
E, 7/4-.250
F .257
G .261
J7/64-.2656
H .266
I .272
J-
K-
-.277
-.281
9/32—.2812
L .290
M- -.295
19/64-.2969
N .302
5/76—.3125
O .316
P .323
27/04-.3281
Q .332
R .339
77/32-.3438
S .348
T .358
23/S4-.3594
U .368
3/8 .375
V .377
W .386
25/64-.3906
X .397
Y .404
73/32-.4062
Z .413
27/64-.4219
7/16—.4375
29/64-.4531
I5/32-.4688
37/G4-.4844
1/2 .500

SECTION 1
General Information
Section Contents
Page
SAFETY 2
AIR CLEANER IDENTIFICATION 8"10
Cartridge Type 8
Dual Element 9
Oil-Foam® 9
CHECK-UP 13"14
Compression 13
Carburetion 14
Ignition 13
ENGINE OPERATION
Equipment Affecting 14
Hard Starting 14Kick-Back 14
Noise 14Power Loss 14Will Not Start 14
Vibration 14
FUEL RECOMMENDATIONS 5
MAINTENANCE
Air Cleaners
Clean
Cartridge Type 11Dual Element See Cartridge and Oil-Foam® Types
Oil-Foam® 11Remove and Install
Cartridge Type 8
Dual Element 9
Oil-Foam® 11
Oil, Lubrication
Change Oil 6Oil Capacities 6
OIL RECOMMENDATIONS 5
Cooling System
Clean 7
ENGINE IDENTIFICATION 15
TUNE-UP PROCEDURE 12

IN THE INTEREST OF SAFETY
The safety alert symbol (** ) is used to identify safety information about hazards that can result in personal injury.
A signal word (DANGER, WARNING, or CAUTION) is used with the alert symbol to indicate the likelihood and thepotential severity of injury. In addition, a hazard symbol may be used to represent the type of hazard.
DANGER indicates a hazard which, if notavoided, will result in death or serious
injury.
WARNING indicates a hazard which, if notavoided, could result in death or serious
injury.
CAUTION indicates a hazard which, if notavoided, might result in minor or moderate
injury.
CAUTION, when used without the alertsymbol, indicates a situation that could result
in damage to the engine.
HAZARD SYMBOLS AND MEANINGS
Fire Moving Parts
Toxic Fumes Hot Surface Kickback
Hot Liquid or Steam Shock
• Prior to work, read and understand the section(s) ofthis manual that pertain to the job. Follow all safetywarnings.
• WEAR suitable eye protection (safety glasses,goggles or face shield when performing repair procedures).
• PREVENT ACCIDENTAL STARTING by removingspark plug wire from spark plug when servicing engine or equipment. Disconnect negative wire frombattery terminal if equipped with electric startingsystem.
• PERIODICALLY clean engine. Keep governorparts free of dirt, grass and other debris which canaffect engine speed.
• USE fresh gasoline. Stale fuel can gum carburetorand cause leakage.
• CHECK fuel lines and fittings frequently for cracks orleaks. Replace if necessary.
A WARNING: AThe engine exhaust from this productcontains chemicals known to the State
of California to cause cancer, birthdefects, or other reproductive harm.

^WARNING
Gasoline and its vapors are extremely flam
mable and explosive.
Fire or explosion can cause severe burns or
death.
WHEN ADDING FUEL
• Turn engine OFF and let engine cool at least
2 minutes before removing gas cap.
• Fill fuel tank outdoors or in well-ventilated
area.
• Do not overfill fuel tank. Fill tank to
approximately 1-1/2 inches below top ofneck to allow for fuel expansion.
• Keep gasoline away from sparks, open
flames, pilot lights, heat, and other ignition
sources.
• Check fuel lines, tank, cap, and fittings
frequently for cracks or leaks. Replace if
necessary.
WHEN STARTING ENGINE
• Make sure spark plug, muffler, fuel cap and
air cleaner are in place.
• Do not crank engine with spark plug
removed.
• If fuel spills, wait until it evaporates before
starting engine.
• If engine floods, set choke to OPEN/RUNposition, place throttle in FAST and crank
until engine starts.
WHEN OPERATING EQUIPMENT
• Do not tip engine or equipment at angle
which causes gasoline to spill.
• Do not choke carburetor to stop engine.
WHEN TRANSPORTING EQUIPMENT
• Transport with fuel tank EMPTY or with fuel
shut-off valve OFF.
WHEN STORING GASOLINE OR EQUIP
MENT WITH FUEL IN TANK
• Store away from furnaces, stoves, water
heaters or other appliances that have a pilot
light or other ignition source because they
can ignite gasoline vapors.
Unintentional sparking can result in fire or
electric shock.
Unintentional start-up can result in entangle
ment, traumatic amputation, or laceration.
BEFORE PERFORMING ADJUSTMENTS
OR REPAIRS
• Disconnect spark plug wire and keep it away
from spark plug.
• Disconnect battery at negative terminal (only
engines with electric start).
WHEN TESTING FOR SPARK
• Use approved spark plug tester.
• Do not check for spark with spark plug
removed.
WARNING
Starting engine creates sparking.
Sparking can ignite nearby flammable gases.
Explosion and fire could result.
If there is natural or LP gas leakage in area,
do not start engine.
Do not use pressurized starting fluids
because vapors are flammable.

Engines give off carbon monoxide, an odor
less, colorless, poison gas.
Breathing carbon monoxide can cause nau
sea, fainting or death.
• Start and run engine outdoors.
• Do not start or run engine in enclosed area,
even if doors or windows are open.
Running engines produce heat. Engine pails,
especially muffler become extremely hot.
Severe thermal burns can occur on contact.
Combustible debris, such as leaves, grass,
brush, etc. can catch fire.
• Allow muffler, engine cylinder, fins, and
radiator to cool before touching.
• Remove accumulated combustibles frommuffler area and cylinder area.
• Install and maintain in working order a spark
arrester before using equipment on forest-
covered, grass-covered, brush-covered
unimproved land. The state of California
requires this (Section 4442 of the California
Public Resources Code). Other states may
have similar laws. Federal laws apply onfederal land.
WARNING
Rotating parts can contact or entangle hands,
feet, hair, clothing, or accessories.
Traumatic amputation or severe lacerationcan result.
• Operate equipment with guards in place.
• Keep hands and feet away from rotatingparts.
• Tie up long hair and remove jewelry.
• Do not wear loose-fitting clothing, danglingdrawstrings or items that could becomecaught.
^WARNING
Broken bones, fractures, bruises or sprains
could result.
• Remove all external equipment/engineloads before starting engine.
• Direct coupled equipment components
such as, but not limited to, blades,
impellors, pulleys, sprockets, etc., mustbe securely attached.

Gasoline Engines
FUEL RECOMMENDATIONS
These engines are certified to operate on unleaded
gasoline. Use clean, fresh, regular unleaded gasoline
with a minimum of 77 octane. Do not mix oil with
gasoline. Fresh fuel prevents gum from forming in fuel
system or on essential carburetor parts. Purchase fuel
in quantity that can be used within 30 days to assure
fuel freshness. We recommend the use of Briggs &
Stratton Gasoline Additive. (See your Authorized
Briggs & Stratton Service Dealer for Part No. 5041 or
the single-use pouch.)
In countries other than U.S.A., leaded gasoline may be
used if it is commercially available and unleaded is
unavailable.
NOTE: Some fuels, called oxygenated or reformu
lated gasolines, are gasoline blended with
alcohols or ethers. Excessive amounts of
these blends can damage the fuel system or
cause performance problems. Do not use
gasoline which contains Methanol. If any
undesirable operating symptoms occur, use
gasoline with a lower percentage of alcohol
or ether.
Kerosene Engines
i FUEL RECOMMENDATIONS
These engines are certified to operate on kerosene
and start on gasoline (petrol). Fresh fuel prevents gum
from forming in fuel system or on essential carburetor
parts. Purchase fuel in quantity that can be used within
30 days to assure fuel freshness. We do not recom
mend the use of fuel additives in kerosene engines.
Do not mix kerosene with gasoline.
Do not use fuel additives.
Do not mix oil with kerosene or gasoline.
LUBRICATION
Use a high quality detergent oil classified "For Service
SF, SG, SH, SJ" or higher. Briggs & Stratton stronglyrecommends the use of synthetic oil. If synthetic oil is
not available, Briggs & Stratton non-synthetic 30
weight oil P/N 1000005 (20 oz.) or P/N 1000028 (48
oz.) is an acceptable substitute.
No special additives should be used with recom
mended oils.
Do not mix oil with gasoline.
Engine Oil
SAE VISCOSITY GRADES
STARTING TEMPERATURE RANGE ANTICIPATED BEFORE NEXT OILCHANGE
Air cooled engines run hotter than automotiveengines. Use of non-synthetic multi-viscosity oils(10W-30, etc.) in ambient temperaturesabove40° F (4° C) will result in high oil consumption. Ifmulti-viscosity oil is used, check oil level morefrequently to prevent engine damage due to lackof lubrication.
SAE 30 oil, if used below 40° F (4° C), will resultin hard starting and possible engine damage due
to inadequate lubrication.
Note: Synthetic oil meeting ILSAC
GF-2, API certification mark and API
service symbol (shown at left) with "SJ/
CF ENERGY CONSERVING" or higher
is an acceptable oil at all temperatures.
Use of synthetic oil does not
alter required oil change intervals.

CHANGE OIL after first 5 hours of operation. Thereaf
ter, change oil monthly or every 50 hours of operation.
Change oil more often if engine is operated under
heavy load or in high ambient air temperatures.
During normal operation, partially burned gasoline,small particles of metal from the cylinder walls, pistons,
bearings, combustion deposits, and dust particlesfrom the air will gradually contaminate the oil. If oil isnot changed regularly, these foreign particles can
cause increased friction and a grinding action which
shortens the life of the engine. Fresh oil also assists incooling. Old oil gradually becomes thick and loses its
cooling ability as well as its lubricating qualities.
OIL CAPACITY CHART
Basic Model
Series
Vertical Crankshaft
Aluminum Cylinders
60000, 80000, 90000,100700,
110000, 120000
100900,130000
170000, 190000
220000, 250000, 280000
Horizontal Crankshaft
Aluminum Cylinders
60000, 80000, 90000, 9K400,
100200,130000
100900,130000,135400,
13K400
19K400
220000, 250000
Horizontal Crankshaft
Cast Iron Cylinders
230000, 240000, 300000,
320000, 32K400
Capacity
Ounces
(Liters)
20
(.6)
28
(-8)
36
(1.1)
48
(1.4)
20
(-6)
28
(.8)
44
(1.3)
40
(1.2)
64
(1.9)
BE SURE OIL LEVEL IS PROPERLY MAINTAINED.Always fill to dipstick "FULL" mark (1), Fig. 1.
Plug and dipstick combinations, automotive style
dipsticks, or a screw type cap and dipstick combination
(1), Fig. 3 and Fig. 4, ail should be inserted completely
and then retracted to measure the oil level of theengine.
Checking the oil level: If the engine is equipped with an
oil fill plug (2) (Fig. 2), the oil level should be up to theplug opening (3).
Fig. 3 - Model Series 90000
Fig. 1
Fig. 2
Change Crankcase Oil
Remove oil drain plug (1), shown in Fig. 2. "A" shows
horizontal shaft engines, "B" shows vertical shaft
application - bottom view of mower deck showing
cutting blade (4). Drain oil while engine is warm.
Replace drain plug. Remove dipstick or oil fill plug (2),
Fig. 2. Refill with new oil of proper weight and
classification. Fill engines with oil fill plug to the top of
plug opening (3). Replace dipstick or oil fill plug.
Fig. 3

Fig. 4: Model Series 11OOOO, 120000, 130000
CLEAN COOLING SYSTEM
Grass particles, chaff or dirt can clog the air cooling
system. Continued operation with a clogged cooling-
system can cause severe overheating and possible
engine damage. Figures 5, (vertical crankshaft mod
el), and 6, (horizontal crankshaft model) show the
blower housing removed and areas to be cleaned (1).
This should be a regular maintenance operation,
performed yearly or every 100 hours, whichever
comes first. Clean more often if necessary.
AIR CLEANERS
A properly serviced air cleaner protects internal parts
of the engine from dust particles in the air. If air cleaner
maintenance instructions are not carefully followed,
dirt and dust which should be collected in the air
cleaner cartridge or foam element, will be drawn into
the engine.
The air cleaner should be examined during engine
service. If air cleaner, element or foam pre-cleaner (1)
shows signs of damage or restriction, clean or replace
parts as necessary.
NOTE: Also replace air cleaner gaskets and
mounting gaskets that are worn or dam
aged to prevent dirt and dust from entering
engine.
Fig. 6

AIR CLEANER IDENTIFICATION
Refer to Figs. 7 through 16 to determine air cleanertype and service procedures.
CARTRIDGE TYPE (Fig. 7)
(with or without Oil-Foam®
pre-cleaner or non-oiled pre-cleaner)
Remove and Install
1. Remove wing nut or loosen screw (6) .Removecover (5).
2. Carefully remove cartridge (3) to prevent dirt entryinto carburetor.
3. Replace grommet if torn or damaged.
4. Clean or replace cartridge (3) as described onpage 11.
5. If equipped with pre-cleaner (1), Fig. 7A, slide off
cartridge and clean as described on page 11. Note
position of pre-cleaner edge (7), Fig. 7.
6. Assemble so pre-cleaner edge (2) touches base
(4) in direction shown in Fig. 7.
Reverse Flow Cartridge Air Cleaner, Vertical
Crankshaft (Fig. 8)
Remove and Install
1. Remove air cleaner stud (1), cover screw (10),
cover (2), and gasket (9). Replace gasket if
damaged.
2. Remove plate screw (3), washer (8) and plate (7).
3. Remove cartridge (4) and clean air cleaner body
(5) carefully to prevent dirt from entering carbure
tor. Brush dirt from body through holes into duct.
NOTE: On reverse flow air cleaners, dirt accumu
lates on the inside surface of element.
4. Re-assemble air cleaner as shown in Fig. 8.
Fig. 7
///////////////y
////////////////////f/1//i////////////////////// Iff'///////////////////11 Iff
////////////t!!!!!!!!!
///Hi
///////////////////////////////////////////////III I////////////////////f/
////////////////?f/f/ffffJ
Fig. 7A
Fig. 8

DUAL ELEMENT AIR CLEANERS
Flat Cartridge (Figs. 9,10)
Remove and Install (Typical)1. Loosen screw(s) (7) and remove cover (6). Tilt to
remove covers with tabs (3) and slots (4), Fig. 9.
2. Carefully remove cartridge (2) and foam pre-cleaner (1) if equipped.
3. Clean pre-cleaner (1) as described on page 11.
4. Install cartridge and foam pre-cleaner. If pre-cleaner has lip, note orientation during disassembly and re-assemble accordingly.
5. Close cover (6) and fasten screw(s) (7) securely.Tabs in cover (3) (if present) must be in slots (4) ofback plate (5), Fig. 10.
Elliptical Cartridge (Fig. 11)
Remove and Install1. Remove one or two knobs (1) or wing nuts
(according to style) and air cleaner cover (2).
2. To service pre-cleaner (5) only, slide pre-cleaneroff cartridge and clean as described on page 11. Ifservicing both pre-cleaner and cartridge (4),remove wing nuts, then pre-cleaner with cartridgetogether. Slide pre-cleaner from cartridge andclean both as described on page 11.
3. Slide pre-cleaner (5) on cartridge (4) and installassembly over shaft (6) on air cleaner base (7).
4. Install one or two knobs or wing nuts (according tostyle) and tighten securely.
5. Install air cleaner cover (2) and two knobssecurely.
OIL-FOAM® AIR CLEANER
Remove and Install (Typical, Fig. 12)
1. Remove screw or wing nut (1).
2. Remove cover (2) and air cleaner (3) carefully toprevent dirt from entering carburetor aroundsealing lip (4), base (5), and gasket (6).
3. Disassemble air cleaner.
4. Clean Oil-Foam® element (7), as described on
page 11.
5. Reassemble air cleaner.
Fig. 10
Fig. 12

Remove and Install Air Cleaner, VerticalCrankshaft (Typical, Fig. 13)
1. Lift latch (1) on narrow end of air cleaner cover (2)and remove cover.
Remove Oil-Foam® (3) from air cleaner body.
Clean as described on page 11.
Place Oil-Foam® element (3) in air cleaner body(5) making sure lip (4) of element extends over alledges of air cleaner body to form a seal.
Insert slot (7) on cover into tabs (6) on air cleanerbody and press down to snap cover shut.
5.
Remove and Install Oil-Foam® Air Cleaner(Typical, Figs. 14,15,16)
1. Remove screw(s) (1) and lift off complete aircleaner.
2. Disassemble air cleaner.
3.
4.
5.
6.
7.
8.
Clean spacer(s), element support, screen, cup (3),body (4), and cover (5), (when used).
Clean Oil-Foam® element (6) as described onpage 11.
Insert element support, when used, (15), into body(4), making sure that carburetor air intake alignswith cutout in blower housing. Place Oil-Foam®element and diverter shield into body. Assembleone of the low points (2) toward narrow edge ofelement. Make sure that lip (7) of Oil-Foam®element extends over edge of body all the wayaround to assure a protective seal.
Install spacer(s) (12) with tangs up (if present) Fig.15. Install screen (14), diverter shield (13), and cup(3) (when used).
Place cover on air cleaner assembly with screw(s).
Seat air cleaner gasket (8) between body (4) andcarburetor and re-install air cleaner assembly oncarburetor.
Fig. 16
10

CLEANING AIR CLEANER CARTRIDGE OIL-FOAM® ELEMENTS
When to Clean
CARTRIDGE only, Clean every 25 hours or once a season, whichever comes first. More often in dusty conditions.
CARTRIDGE with dry or oiled foam pre-cleaner, pre-cleaner every 25 hours and cartridge every 100 hours. More
often in dusty conditions.
OIL-FOAM® ELEMENT
Clean and re-oil Oil-Foam® element every 25 hours or at three month intervals under normal conditions. Capacity of"Oil-Foam®" air cleaner is adequate for a full season's use, without cleaning, in average homeowner's lawn mower
service. (Clean every few hours under extremely dusty conditions.)
Clean Cartridge
1. Clean cartridge by tapping gently on flat surface.
2. Do not use cleaning fluids or soapy water to attempt to clean the paper cartridge. Replace dirty cartridge with
genuine Briggs & Stratton part.
3. Reassemble.
CAUTION:
Petroleum solvents, such as kerosene, are not to be used to clean cartridge. They will cause deterioration ofcartridge. Do not oil cartridge. DO NOT USE PRESSURIZED AIR TO CLEAN OR DRY CARTRIDGE.
Clean Oil-Foam® Element or Foam Pre-
cleaner (Fig. 17)
1. WASH foam element in liquid detergent and water
to remove dirt.
2. Wrap foam in cloth and squeeze dry.
3. Saturate foam with engine oil. Squeeze to remove
excess oil.
DO NOT OIL PRE-CLEANERS THAT ARE
IMPRINTED "DO NOT OIL."
4. Reassemble.
Fig. 17
11
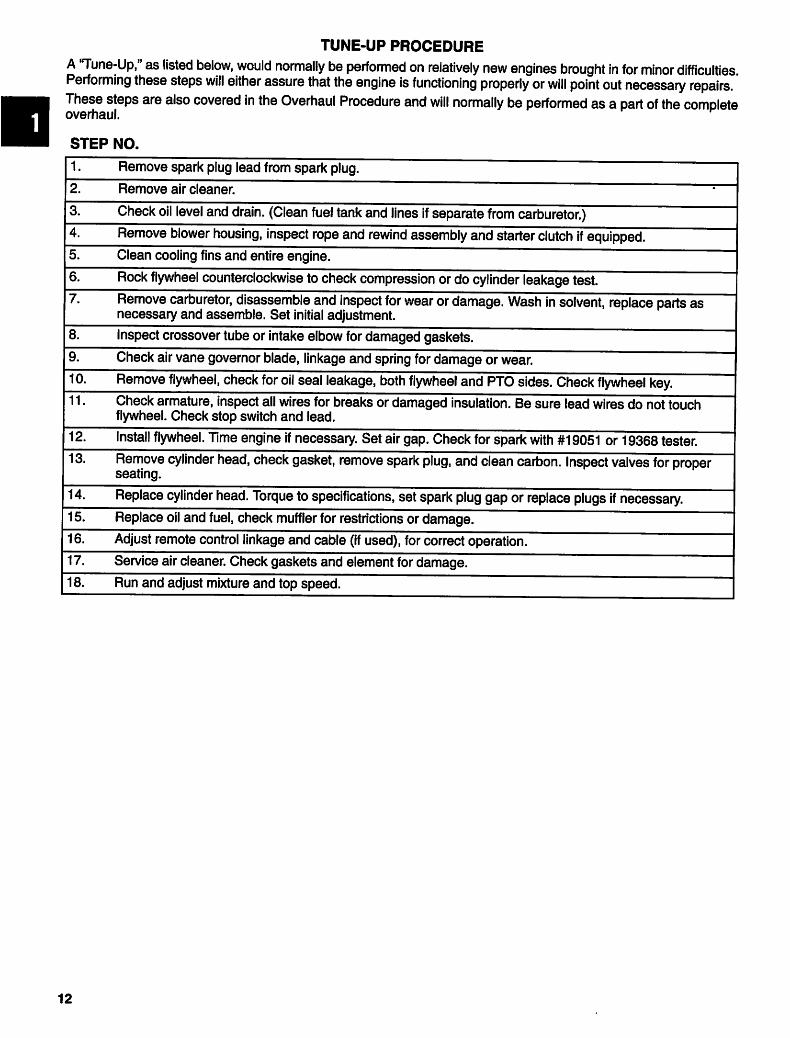
TUNE-UP PROCEDURE
A 'Tune-Up," as listed below, would normally be performed on relatively new engines brought in for minor difficulties.Performing these steps will either assure that the engine is functioning properly or will point out necessary repairs.
These steps are also covered in the Overhaul Procedure and will normally be performed as a part of the completeoverhaul.
STEP NO.
Remove spark plug lead from spark plug.
2. Remove air cleaner.
3. Check oil level and drain. (Clean fuel tank and lines if separate from carburetor.)
4. Remove blower housing, inspect rope and rewind assembly and starter clutch if equipped.
5. Clean cooling fins and entire engine.
6. Rock flywheel counterclockwise to check compression or do cylinder leakage test.
7. Remove carburetor, disassemble and inspect for wear or damage. Wash in solvent, replace parts asnecessary and assemble. Set initial adjustment.
8. Inspect crossover tube or intake elbow for damaged gaskets.
9. Check air vane governor blade, linkage and spring for damage or wear.
10. Remove flywheel, check for oil seal leakage, both flywheel and PTO sides. Check flywheel key.
11. Check armature, inspect all wires for breaks or damaged insulation. Be sure lead wires do not touchflywheel. Check stop switch and lead.
12. Install flywheel. Time engine if necessary. Set air gap. Check for spark with #19051 or 19368 tester.
13. Remove cylinder head, check gasket, remove spark plug, and clean carbon. Inspect valves for properseating.
14. Replace cylinder head. Torque to specifications, set spark plug gap or replace plugs if necessary.
15. Replace oil and fuel, check muffler for restrictions or damage.
16. Adjust remote control linkage and cable (if used), for correct operation.
17. Service air cleaner. Check gaskets and element for damage.
18. Run and adjust mixture and top speed.
12

Most complaints concerning engine operation can be
classified as one or a combination of the following:
1. Will not start
2. Hard starting
3. Kicks back when starting
4. Lack of power
5. Vibration
6. Erratic operation
7. Overheating
8. High oil consumption
When the cause of malfunction is not readily apparent,
perform a check of the compression, ignition and
carburetion systems. This check-up, performed in a
systematic manner, can usually be done in a matter of
minutes. It is the quickest and surest method of
determining the cause of failure and averting future
problems. The basic check-up procedure is the same
for all engine models, while any variation, by model,
will be shown under the subject heading.
NOTE: What appears to be an engine malfunction
may be a fault of the powered equipment
rather than the engine. If equipment is
suspect, see "Equipment - Affecting En
gine Operation."
Check Compression
CHECK-UP
Check Ignition
WARNING
Unintentional sparking can result in
fire or electric shock.
Unintentional start-up can result in
entanglement, traumatic amputa
tion, or laceration.
Before checking compression, remove spark
plug wire from spark plug and ground to engine.
There is only one accurate method of checking the
sealing ability of the combustion chamber. This test
uses compressed air and a leakdown test tool. Refer to
Section 6, page 2, Cylinder Leakdown Test.
If compression is poor, look for:
1. Loose spark plug
2. Loose cylinder head bolts
3. Blown head gasket
4. Burned valves, valve seats
5. Insufficient tappet clearance
6. Warped cylinder head
7. Warped valve stems
8. Worn bore and/or rings
9. Broken connecting rod
jjfc WARNING
Unintentional sparking can result in
fire or electric shock.
Unintentional start-up can result in
entanglement, traumatic amputa
tion, or laceration.
WHEN TESTING FOR SPARK
• Use approved spark plug tester.
• DO NOT check for spark with spark plug
removed.
Connect spark plug wire to long terminal of tester, Tool
#19051 or #19368 and ground tester to engine with
alligator clip. Operate starter and observe spark gap in
tester. If spark jumps tester gap, you can assume
ignition is good. Try a new spark plug.
If spark does not occur, look for:
1. Improperly operating interlock system
2. Shorted ground wire (when so equipped)
3. Shorted stop switch (when so equipped)
4. Armature failure
5. Worn bearings and/or shaft on flywheel side only
NOTE: If engine runs but misses during operation,
a quick check to determine if ignition is at
fault can be made by inserting the #19051
or #19368 tester between the ignition
cable and the spark plug. A spark miss will
be readily apparent.
13

Check Carburetion
Before making a carburetion check, be sure the fuel
tank has an ample supply of fresh, clean gasoline. On
gravity feed (Flo-Jet) models, see that the shut-off
valve is open and fuel flows freely through the fuel line.
On all models, inspect and adjust the mixture needles
per specification. Check to see that the choke closes
completely. If engine will not start, remove and inspectthe spark plug.
If plug is wet, look for:
1. Over choking
2. Excessively rich fuel mixture
3. Water in fuel
4. Inlet valve stuck open (Flo-Jet carburetor)
If plug is dry, look for:
CHECK-UP, cont'd
Hard Starting, Kickback, or Will Not Start
1. Loose blade - blade must be tight to shaft or
adaptor. Check for partially sheared flywheelkey, damaged blade and hub.
2. Loose belt - a loose belt like a loose blade can
cause a back-lash effect, which will counteractengine cranking effort.
3. Starting under load - see if the unit is dis-engaged
when engine is started; if the unit isengaged, that it
does not have a heavy parasitic load.
4. Check remote Choke-A-Matic® or speed controlassembly for proper adjustment.
5. Check interlock system for shorted wires, loose or
corroded connections, or defective modules orswitches.
1. Leaking carburetor mounting gaskets
2. Gummy or dirty inlet screen or check valve (Pulsa-
Jet and Vacu-Jet carburetors)
3. Inlet needle stuck shut (Flo-Jet carburetors)
4. Inoperative pump (Pulsa-Jet carburetors)
5. Plugged fuel filter
6. Closed fuel tank valve
A simple check to determine if the fuel is getting to the
combustion chamber through the carburetor is to
remove the spark plug and pour a small quantity of
gasoline (1 teaspoon or 10 ml.) through the spark
plug hole. Install spark plug. If the engine fires a few
times and then quits, look for the same condition as
for a dry plug.
Equipment-Affecting Engine Operation
Frequently, what appears to be a problem with engine
operation, such as hard starting, vibration, etc., may be
caused by the equipment being powered rather than
the engine itself. Since many varied types of equip
ment are powered by Briggs & Stratton engines, it is
not possible to list all of the various conditions that may
exist. Listed are the most common effects of equip
ment problems, and what to look for as the most
common cause.
Vibration
1. Cutter blade bent or out of balance - remove and
balance. Check for partially sheared flywheel key.
2. Crankshaft bent - replace.
3. Worn blade coupling - replace if coupling allowsblade to shift.
4. Mounting bolts loose - tighten.
5. Mounting deck or plate cracked - repair or replace.
Power Loss
1. Bind or drag in unit - if possible, disengage engine
and operate unit manually to check for any bindingaction.
2. Grass cuttings build-up under deck.
3. No lubrication in transmission or gear box.
4. Excessive drive belt tension may cause seizure.
Noise
1. Cutter blade coupling or pulley - an oversize or
worn coupling can result in knocking, usually
under acceleration. Check for fit, or tightness.
2. No lubricant in transmission or gear box.
14

YOUR KEY TO THE WORLD'S FINEST ENGINES
This chart explains the unique Briggs & Stratton numerical model designation system. It is possible to determine most ofthe important mechanical features of the engine by merely knowing the model number. Here is how it works:
A. The first one or two digits indicate the approximate CUBIC INCH DISPLACEMENT.
B. The first digit after the displacement indicates the BASIC DESIGN SERIES, relating to
cylinder construction, ignition, general configuration, etc.
C. The second digit after the displacement indicates ORIENTATION OF CRANKSHAFT.
D. The third digit after the displacement indicates TYPE OF BEARINGS, and whether or not
the engine is equipped with REDUCTION GEAR or AUXIUARY DRIVE.
E. The last digit indicates the TYPE OF STARTER.
BRIGGS & STRATTON MODEL NUMBERING SYSTEM
FIRST DIGIT
AFTER DISPLACEMENT
CUBIC INCH
DISPLACEMENT
6
8
9
10
11
12
13
16
18
19
20
21
22
23
24
25
28
29
30
31
32
35
38
40
42
43
44
46
47
52
54
58
BASIC
DESIGN SERIES
0
1
2
3
4
5
6
7
8
9
AtoZ
EXAMPLE - To identify Model 303447:
3Q
30 Cubic Inch
3
Design Series 3
SECOND DIGIT
AFTER DISPLACEMENT
CRANKSHAFT
ORIENTATION
0 to 4 - Horizontal Shaft
5 to 9 - Vertical Shaft
AtoG - Horizontal Shaft
H to Z - Vertical Shaft
Horizontal Shaft
THIRD DIGIT
AFTER DISPLACEMENT
D
PTO BEARING,
REDUCTION GEAR,
AUXILIARY DRIVE,
LUBRICATION
0 - Plain Bearing/DUNon-Flange Mount
1 - Plain Bearing
Range Mounting
2 - Sleeve Bearing
Flange MountingSplash Lube
3 - Bail Bearing
Range Mounting
Splash Lube
4 - Ball Bearing
Flange Mounting
Pressure Lubrication
5 - Plain Bearing
Gear Reduction
(6 to 1)CCW Rotation
Flange Mounting
6 - Plain Bearing
Gear Reduction
(2 to 1)CCW Rotation
7 - Plain BearingPressure Lubrication
8 - Plain Bearing
Auxiliary Drive (PTO)Perpendicular to
Crankshaft
9 - Plain Bearing
Auxiliary Drive
Parallel to Crankshaft
A - Plain Bearing
Pressure Lubrication
Without Oil Filter
4
Ball Bearing
Flange Mounting
Pressure Lubrication
FOURTH DIGITAFTER DISPLACEMENT
TYPE OF STARTER
0 -Without Starter
1 - Rope Starter
2 - Rewind Starter
3 - Electric Starter Only110 or 230 Volt Gear
Drive
4 - Electric Starter/110 or
230 Volt Gear Drive
with Alternator
5 - Electric Starter Only12 or 24 Volt Gear
Drive
6 - Alternator Only
7 - Electric Starter12 or 24 Volt Gear
Drive with Alternator
8 - Vertical Pull Starter or
Side Pull Starter
9 - Mechanical Starter
A - Electric Starter
12 or 24 Volt Gear
Drive with Alternator
and Inverter
Electric Starter
12 or 24 Volt Gear Drive
with Alternator
TYPE 1234-01. The type number identifies the engines mechanical parts, color of paint, decals, governed speed, and
Original Equipment Manufacturer.
CODE 01061201. The code is the manufacturing date and is read as follows:YEAR MONTH DAY ASSEMBLY LINE AND MANUFACTURING PLANT
01 06 12 01
Revised 5/03
15

SECTION 2
Ignition
Section Contents
Page
FLYWHEELS
Remove
Except Model Series 80000 (with cast iron flywheel), 100700,100200,100900,
130000, and 280000 3Cast Iron Flywheel, Model Series 80000,100200,100900,110000,130000 4
Inspect Flywheel Key, Keyway and Crankshaft Keyway 5
Install
All Model Series 5
IGNITION
Check 2
Check for Spark Miss 2
Identification 6
Service
Magnetron® 6
Timing Ignition Armatures
Model Series 230000, 240000, 320000 burning gasoline 7
SPECIFICATIONS 15
SPARK PLUGS 3
STOP SWITCHES 8-13
Stop Switch Wire Routing 13
NOTE: SPECIFICATION TABLES BEGIN ON PAGE 15 OF THIS SECTION.

BRIGGS & STRATTON
IGNITION SYSTEM
1. Magnetron® ignition, a self-contained transistor
module (2), ignition armature, (1) and flywheel (3),
Fig. 1. Inset: current style
CHECK IGNITION
WARNING
Unintentional sparking can result in
fire or electric shock.
• Use approved spark plug tester.
• DO NOT check for spark with spark plug
removed.
1. Connect spark plug wire to long terminal of Spark
Tester tool #19051 (2) or #19368 (1), and ground
tester to engine with alligator clip, Fig. 2.
2. Operate starter and observe spark gap in tester.
3. If spark jumps gap, ignition is good.
NOTE: Flywheel must rotate at 350 RPM
minimum on engines equipped with
Magnetron® ignition.
If engine runs but misses during operation, a quick
check can determine if the miss is ignition or not.
Check For Spark Miss
1. Place Spark Tester tool #19051 (2) or 19368 (1), in
series with engine's spark plug and spark plug
wire, Fig. 3.
2. Intermittent spark will be readily apparent when
the engine is started and run.
3. If ignition is good, check compression and fuel
system.
Fig. 1
Fig. 2
Fig. 3
NOTE: SPECIFICATION TABLES BEGIN ON PAGE 15 OF THIS SECTION.
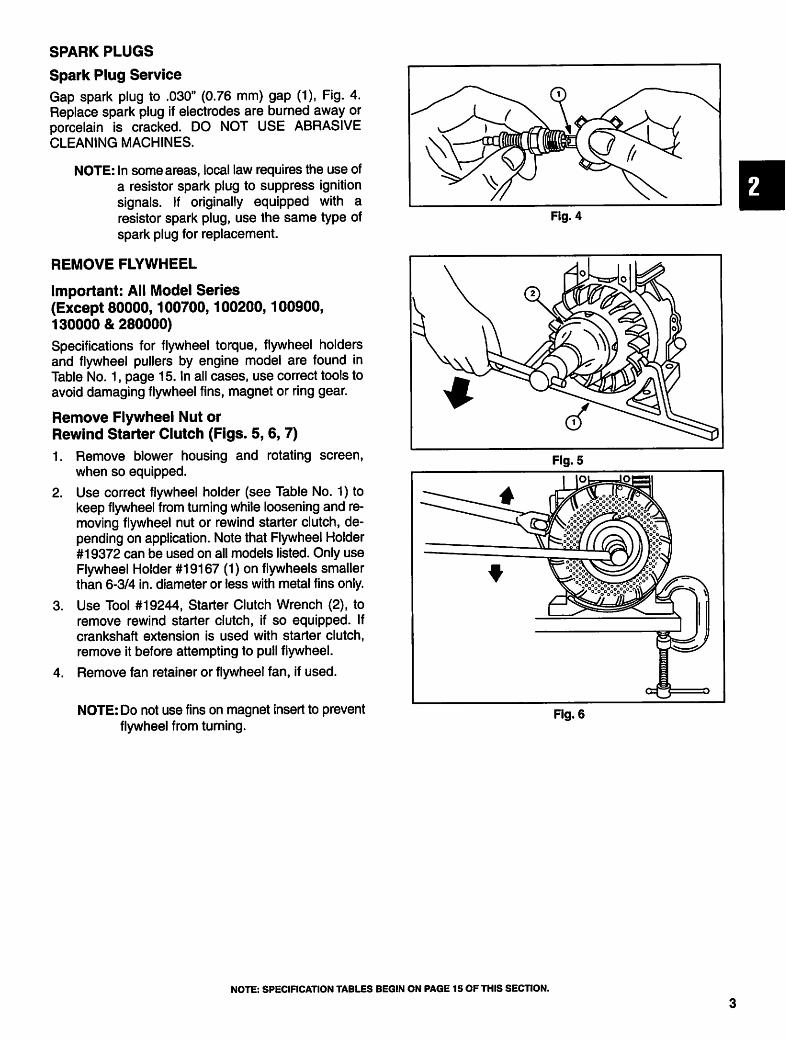
SPARK PLUGS
Spark Plug Service
Gap spark plug to .030" (0.76 mm) gap (1), Fig. 4.
Replace spark plug if electrodes are burned away or
porcelain is cracked. DO NOT USE ABRASIVE
CLEANING MACHINES.
NOTE: In some areas, local law requires the use of
a resistor spark plug to suppress ignition
signals. If originally equipped with a
resistor spark plug, use the same type of
spark plug for replacement.
REMOVE FLYWHEEL
Important: All Model Series
(Except 80000,100700,100200,100900,
130000 & 280000)
Specifications for flywheel torque, flywheel holders
and flywheel pullers by engine model are found in
Table No. 1, page 15. In all cases, use correct tools to
avoid damaging flywheel fins, magnet or ring gear.
Remove Flywheel Nut or
Rewind Starter Clutch (Figs. 5,6,7)
1. Remove blower housing and rotating screen,
when so equipped.
2. Use correct flywheel holder (see Table No. 1) to
keep flywheel from turning while loosening and re
moving flywheel nut or rewind starter clutch, de
pending on application. Note that Flywheel Holder
#19372 can be used on all models listed. Only use
Flywheel Holder #19167 (1) on flywheels smaller
than 6-3/4 in. diameter or less with metal fins only.
3. Use Tool #19244, Starter Clutch Wrench (2), to
remove rewind starter clutch, if so equipped. If
crankshaft extension is used with starter clutch,
remove it before attempting to pull flywheel.
4. Remove fan retainer or flywheel fan, if used.
NOTE: Do not use fins on magnet insert to prevent
flywheel from turning.
Fig. 4
Fig. 6
NOTE: SPECIFICATION TABLES BEGIN ON PAGE 15 OF THIS SECTION.

Remove Flywheel
NOTE: For Aluminum Series engines: 80000 (with
cast iron flywheel), 100200, 100900,
110000 and 130000, and also for kerosene
Model Series 135400,13K400, see text.
See Table No. 1, page 15 for correct flywheel puller.
Use flywheel nut to protect crankshaft threads and
for puller to bear against, Fig. 7.
Thread flywheel nut (1) onto crankshaft until top of
nut is flush with crankshaft threads or slightly
above end of threads.
NOTE: Care is required not to damage flywheel
fins, magnets or ring gear.
Fig. 7
4. Fasten flywheel puller to flywheel with two screws
(2). Turn down two nuts (3) to loosen flywheel.
Cast Iron Flywheel
Model Series 80000,100200,100900,110000,
130000
1. Support flywheel with a gloved hand or a shop rag
while exerting an upward pull.
2. Strike outside rim of flywheel with a soft faced
hammer using a sharp blow.
3. Several blows may be required on a tight or rusted
flywheel, Fig. 8.
DO NOT STRIKE MAGNETS OR FINS.
NOTE: If puller screws on Flywheel Puller #19203
are too short, use two head bolts from
Model Series 280000, Part #93723.
Model Series 280000
1. Remove blower housing and rotationg screen,
when so equipped.
2. Place Tool #19321, Flywheel Holder (1), on fan
retainer with lugs of flywheel holder engaging the
slots of the fan retainer, or use Tool #19372,
Flywheel Holder.
3. Loosen flywheel nut, flywheel screw, or rewind
starter clutch with socket and wrench or Tool
#19244, Starter Clutch Wrench, and wrench,
Fig. 9.
NOTE: If crankshaft extension, used with rewind
starter clutch, remains in crankshaft,
remove at this time.
4. Remove two screws and fan retainer. Refer to
Table No. 1, Page 15 for correct flywheel puller by
Model Series.
Fig. 8
Fig. 9
NOTE: SPECIFICATION TABLES BEGIN ON PAGE 15 OF THIS SECTION.
5. Use flywheel nut (1) to protect crankshaft threads
and for puller to bear on, Fig. 10.
6. Tighten both puller screws equally until flywheel is
loose.
NOTE: If puller screws on Tool #19203, Flywheel
Puller, are too short, use two head bolts
from Model Series 280000, Part #93723.
INSPECT - FLYWHEEL KEY, FLYWHEEL
AND CRANKSHAFT KEYWAYS
Inspect flywheel key for partial or complete
shearing. If damaged, replace. Inspect flywheel and
crankshaft keyways for damage. If damaged,
replace with new parts.
Install Flywheel
All Model Series
1. Clean flywheel taper and crankshaft taper of all
grease, oil, and dirt.
2. Slide flywheel onto crankshaft and line up both
keyways.
3. Insert flywheel key into keyway.
CAUTION
• DO NOT use a steel key under any
circumstances. Use only genuine replacement
flywheel keys.
Install Flywheel Nut or
Rewind Starter Clutch
1. Install fan retainer or rotating screen cup (when
used), then flat or Belleville washer (hollow side
toward flywheel), and flywheel nut, shoulder
screw, or rewind starter clutch.
NOTE: Some Model Series 280000 engines use a
crankshaft extension for the rewind starter
clutch. Install as follows:
Fig. 10
2.
A. Thread crankshaft extension into rewind starter
clutch.
B. Place flywheel washer on extension and
thread extension and rewind starter clutch into
crankshaft.
C. Go to Step 2.
Use tools as listed in Table No. 1, page 15 to hold
flywheel and torque nut or rewind starter clutch to
specifications listed in table.
NOTE: SPECIFICATION TABLES BEGIN ON PAGE 15 OF THIS SECTION.

MAGNETRON® IGNITION SYSTEM
Identification
Magnetron® has been produced in two versions,
composite Type I (Inset A), Type II (Inset B), and
replaceable module (2), Fig. 11.
NOTE: Magnetron® ignition armatures used on
Model Series 120000,280000 do not have
a visible trigger pole (3) and do not have a
Mylar spacer (1), Fig. 11.
Remove Magnetron® Ignition Armatures
Disconnect Stop Switch Wire
Removal of the flywheel is not required to remove
Magnetron® ignition armatures.
1. Remove ignition armature mounting screws.
2. For composite armatures: Disconnect stop switch
wire at spade terminal.
3. For replaceable module armatures: use breaker
point condenser from #294628 point set or a 3/16
inch (4.7 mm) diameter pin punch to release wires
from module, Fig. 12.
4. Unsolder stop switch wire from module wire and
ignition armature primary wire (1), Fig. 12.
Remove Magnetron® Module
1. Remove sealant and/or tape holding ignition
armature wires to ignition armature.
2. Unsolder and separate remaining wires.
NOTE: On some ignition armatures, the module
ground wire must be unsoldered from the
armature ground wire.
3. Move all wires so module will clear ignition
armature and laminations.
4. Lift module retainer (1) and push module off
laminations, Fig. 13.
Fig. 11
Fig. 12
Fig. 13
NOTE: SPECIFICATION TABLES BEGIN ON PAGE 15 OF THIS SECTION.

Install Module on Ignition Armature
Install the module with the retainer on the side of the
armature with small rivet ends (1), Fig. 14.
Ignition armature ground wire (2), Fig. 14.
Ignition armature primary wire (3), Fig. 14.
Install Stop Switch and
Ignition Armature Primary Wire
1. Remove all insulating material from ends of wires
to ensure good contact.
2. Use a 3/16 inch (4.7 mm) diameter pin punch (5) or
a condenser from point set Part #294628 to
compress wire retainer spring and insert stop
switch and ignition armature primary wire under
hook of wire retainer, Fig. 15. Module ground lead
(1), module wire (2), coil primary wire (3), wire to
stop switch (ground wire) (4).
3. Twist wires together and solder with 60/40 rosin
core solder. DO NOT OVERHEAT WIRES OR
MODULE BODY.
4. Install wires in module retainer.
5. Seal wires to ignition armature (1) with Permatex®
No. 2 or similar sealer to prevent wires from
vibrating and breaking, Fig. 16.
Timing Magnetron® Ignition
Timing of Magnetron® ignition is solely controlled by
the flywheel key on all Model Series except 230000,
240000 and 320000.
Timing Magnetron® Ignition Armature
Model Series 230000, 240000, 320000
Position adjustable ignition armature bracket (1) so
mounting screws are centered (2) in ignition armature
bracket slots (gasoline engines), Fig. 17. Ignition
armature with Magnetron® module assembly.
Fig. 14
Fig. 15
Fig. 16
Fig. 17
NOTE: SPECIFICATION TABLES BEGIN ON PAGE 15 OF THIS SECTION.

Timing Magnetron® Ignition Armature
Model Series 32K400
Position ignition armature bracket so mounting screws
are to the far left in the ignition armature bracket slots.
Tighten screws.
INSTALL IGNITION ARMATURES
Pneumatic (Fig. 18) and Mechanical (Fig. 19)
1. Install ignition armature and air vane or air guide
(3), when used. The mounting holes of the ignition
armature are slotted.
2. Push ignition armature away from flywheel (4) as
far as possible and tighten one mounting screw (1).
Ignition armature coil (2).
Adjust Ignition Armature Air Gap
1. Ignition armature air gaps are found in
Table No. 1, page 15.
2. With ignition armature away from flywheel as far
as possible and one screw (2) tightened, turn
flywheel so magnets (1) are away from armature
legs.
3. Place the proper thickness gauge (3) between rim
of flywheel and laminations of the ignition
armature.
4. While holding gauge, turn flywheel until magnets
are directly under legs.
5. Loosen the screw holding armature and let
magnets pull ignition armature down against
flywheel.
6. Tighten both mounting screws.
7. Rotate flywheel until gauge is free (4), Fig. 20.
STOP SWITCH IDENTIFICATION
Stationary (2), rotary (3), toggle (1), and key stop (4)
switches are used to meet various equipment needs,
Fig. 21.
Fig. 19
Fig. 20
Fig. 21
NOTE: SPECIFICATION TABLES BEGIN ON PAGE 15 OF THIS SECTION.

Stationary Stop Switch
Location
Stationary stop switches are located on fuel tankbrackets, governor control brackets, cylinder headbrackets, System 2® and System 4® band brakecontrol brackets, and brake shoe on Model Series100700,120000. Typical installation, Fig. 22.
Stop switch assembly (1), slot in bracket (2), insert stop
switch into slot (3), push down until it snaps into place
(4), stop switch in position (5). Reverse steps to
remove.
Mechanical Check, Typical Control
RUN Position
Move control lever away from stop switch using safety
control (1) shown on handle (2) in Fig. 23, or by moving
control lever (3) at engine in direction shown in Fig. 24.
Stop switch (4)
Control bracket (5)
Fig. 22
Fig. 24
1. For STOP position, release control completely.
Control lever (1) at engine must contact (2) stop
switch (3) at tang (5) shown in Fig. 25.
Control bracket (4)
Ground wire (6)
Direction of movement (7)
Fig. 25
NOTE: SPECIFICATION TABLES BEGIN ON PAGE 15 OF THIS SECTION.

Stationary Stop Switch, Electrical Check
1. Push down on wire retainer and remove stop
switch wire. On System 2®, System 3® and
System 4® engines, the band brake control cover
(2) must be removed, Figs. 26 and 27. If battery
(5) is mounted on the engine, it must be removed
from the battery holder before the cover can be
removed. On series 100700 engines, the flywheel
must be removed before the stop switch can be
tested.
Spark plug wire holding tab (3)
Spark plug (4)
Fig. 26
2. Battery holder bolt (6), connector (7), Fig. 27.
Fig. 27
WARNING
Disconnect battery before testing.
3. Using Tool #19464, Digital Multimeter, set meter to
ohms (Q) and connect test leads to engine ground
and other test lead to wire retainer. Move control
lever to run position Fig. 24.
NOTE: SPECIRCATION TABLES BEGIN ON PAGE 15 OF THIS SECTION.
10

NOTE: On System 2® and System 4® engines
operate safety control (operator presence
control) to move control lever away from
stop switch (4), Figs. 24, 28 and 29.
4. With control lever in run position, meter should
show no continuity (high ohms reading).
5. Move control lever or release safety control to
move control lever to stop position.
6. Meter should show continuity (low ohms reading).
7. If switch shows continuity in both run and stop
positions or no continuity in both positions, replace
stop switch and check stop switch wire for damage.
Rotary, Toggle and Key Operated Stop
Switch Check (Figs. 30, 31, typical)
1. Disconnect stop switch wire or wires from switch
terminals. If there is more than one terminal on
switch, mark wires/terminals for correct
reinstallation.
2. Using Digital Multimeter set to ohms (Q), connect
one test lead to switch terminal and the other to
ground. With switch "OFF there should be
continuity. With switch on "RUN", there should be
no continuity.
3. If there is no continuity in both the "OFF" and
"RUN" positions, or if there is continuity in both
positions, replace the switch and check the stop
switch wire for damage.
4. MULTI-TERMINAL TOGGLE SWITCH: Connect
test leads to either center terminal and either end
terminal on same side of switch as center terminal
selected. If meter shows continuity, move toggle
switch to other position and the meter should read
no continuity. Repeat test for other side of switch.
Fig. 29
Fig. 30
Fig. 31
NOTE: SPECIFICATION TABLES BEGIN ON PAGE 15 OF THIS SECTION.
11

5. METAL KEY SWITCH - FIVE OR SIX
TERMINALS: Meter must indicate continuity
between terminals as noted in keyswitch positions
as shown in Fig. 32.
6. SWITCH WITH PLASTIC KEY: Meter should
indicate no continuity with key pushed in, and
continuity with key pulled out.
Fig. 32 B-Terminal Positions: Terminal 1 grounded to
switch case. Meter must also indicate continuity
between terminal 1 and switch case.
Switch Position
1. OFF
2. RUN
3. START
Continuity
1+3+6
2+5+6
2+4+5
Fig. 32
NOTE: SPECIHCATION TABLES BEGIN ON PAGE 15 OF THIS SECTION.
12

Check Stop Switch Wire Continuity
To test, first place control lever or safety control in run
position.
1. Use a Digital Multimeter, set meter to ohms (Q)
and connect one test lead to ground (unpainted
bracket or engine surface).
2. Hold other test lead against stop switch tang,
Fig. 33, while moving stop switch wire up and
down. DO NOT pull on stop switch wire.
3. Meter should read less than 1 ohm or more than
0.3 ohms during stop switch wire movement.
4. If meter reads open circuit, check for proper
contact at stop switch tang (1) and engine ground.
5. Poor or no continuity requires replacing stop
switch wire and/or soldering stop switch wire to
ignition armature primary wire at MAGNETRON®
module terminal.
Stop Switch Wire Routings - Typical
To prevent stop switch wire damage, route as shown in
Fig. 34: System 2®, except Model Series 120000
Fig. 35: System 3®, System 4®, except Model Series
120000
Fig. 33
Fig. 34
Fig. 35
NOTE: SPECIFICATION TABLES BEGIN ON PAGE 15 OF THIS SECTION.
13

Fig 36: Model Series 100700 System 2®
Fig. 37: Model Series 120000 System 2®
Fig. 36
Fig. 37
NOTE: SPECIFICATION TABLES BEGIN ON PAGE 15 OF THIS SECTION.
14

SPECIFICATION TABLES
TABLE NO. 1
SPECIFICATIONS FOR ALL POPULAR ENGINE MODELS
1. Spark plug gap: .030"
BASIC MODEL SERIES
IGNITION ARMATURE
TWO-LEG
AIR GAP
THREE-LEG
AIR GAP
FLYWHEEL
PULLER
TOOL NO.
FLYWHEEL
HOLDER
TOOL NO.
FLYWHEEL
TORQUE
ALUMINUM CYLINDERS
60000, 80000
90000, 9K400, 10A900,
10B900, 10C900, 110000,
120000
100700
100200,100900,130000,
135400,13K400
170000,190000,19K400
220000, 250000*
280000
,006"-.010"
.006"-.010"
.006"-.010"
.010"-.014"
.010"-.014"
.010"-.014"
.010V014"
.012"-.016"
.012"-.016"
.012"-.016"
19069
19069
19069
none
19165
19203**
19203
19167 or
19372
19167 or
19372
19310 or
19372
19372
19372
19372
19321 or
19372
55 Ft. Lbs.*
(75 Nm)
55 Ft. Lbs.*
(75 Nm)
55 Ft. Lbs.*
(75 Nm)
65 Ft. Lbs. ♦
(88 Nm)
75 Ft. Lbs.*
(102 Nm)
75 Ft. Lbs.*
(102 Nm)
100 Ft. Lbs.*
(136 Nm)
CAST IRON CYLINDERS
233400
240000, 300000, 320000,
32K400
.010"-.014"
.010"-.014"
.022"-.026" 19068 or
19203
19068 or
19203
19372
19372
145 Ft. Lbs.*
(197 Nm)
145 Ft. Lbs.*
(197 Nm)
♦ Use 19244 starter clutch wrench on rewind starter engines.
• Use 19203, Flywheel Puller, on Model Series 250000 built after 1975 and all Model Series 220000.
* Use 19165^ Flywheel Puller, on Model Series 250000 built 1975 and before.
NOTE: SPECIFICATION TABLES BEGIN ON PAGE 15 OF THIS SECTION.
15

SECTION 3
Carburetion
Section Contents
Page
IDENTIFICATION 3-4. 5
FLO-JET CARBURETORS
LMS Types
Disassemble 39Assemble 43Install 46Adjust 47
LMT Types
Disassemble 39Assemble 43Install 46Adjust 47
One Piece (small, large)
Disassemble 51Assemble 55Adjust 57
Two Piece (small, medium, large)
Disassemble 52Assemble 55Adjust 57
Cross-Over Flo-Jet
Disassemble 50Assemble 56Adjust 57
TANK MOUNT CARBURETORS, VERTICAL CRANKSHAFT
Pulsa-Prime
Remove 7Disassemble 8Assemble 9Install 9
Pulsa-Jet
All-Temperature/Automatic Choke or Automatic Choke 10"11
Disassemble 14Assemble 18Install 23Adjust 25
Choke-A-Matic®
Remove
Disassemble 14Assemble 18Install 23
NOTE: SPECIFICATION TABLES BEGIN ON PAGE 63 OF THIS SECTION.
1

Section Contents, Cont'd.
TANK MOUNT CARBURETORS, VERTICAL CRANKSHAFT, CONT'DPulsa-Jet Cont'd
Choke-A-Matic® Cont'd
Adjust Carburetor 25
Adjust Remote Controls 25
Vacu-Jet
All-Temperature/Automatic Choke or Automatic Choke 10-11
Remove 12
Disassemble 14
Assemble 18
Install 23
Adjust 37
Choke-A-Matic®
Remove 12
Disassemble 14
Assemble 13
Install 23
Adjust Carburetor 37
Adjust Remote Controls 25
TANK MOUNT HORIZONTAL CRANKSHAFT
Pulsa-Jet, Fixed Jet
Remove 10
Disassemble 10
Assemble
Carburetor 32
Carburetor to Fuel Tank 35
Inspect 31
Install Carburetor & Tank to Engine 36
Adjust 37
High Altitude Compensation 31
Pulsa-Jet, Rotary Choke, Combined Adjustable Jet
Remove 28
Disassemble 31
Inspect 31
Assemble 32
Adjust Carburetor 37
Adjust Choke-A-Matic® !!.'.'.'.' 33Pulsa-Jet, Slide Choke, Combined Adjustable Jet
Remove 28
Disassemble 31
Inspect 31
Assemble 3g
Adjust Carburetor !!!! 37Adjust Choke-A-Matic® 36
Vacu-Jet
Remove Carburetor 28
Disassemble 30
Remove Spiral 30
Inspect 33Assemble 35
Adjust 37Kerosene Engines
Starting Procedures 64
NOTE: SPECIFICATION TABLES BEGIN ON PAGE 63 OF THIS SECTION.
CARBURETOR IDENTIFICATION
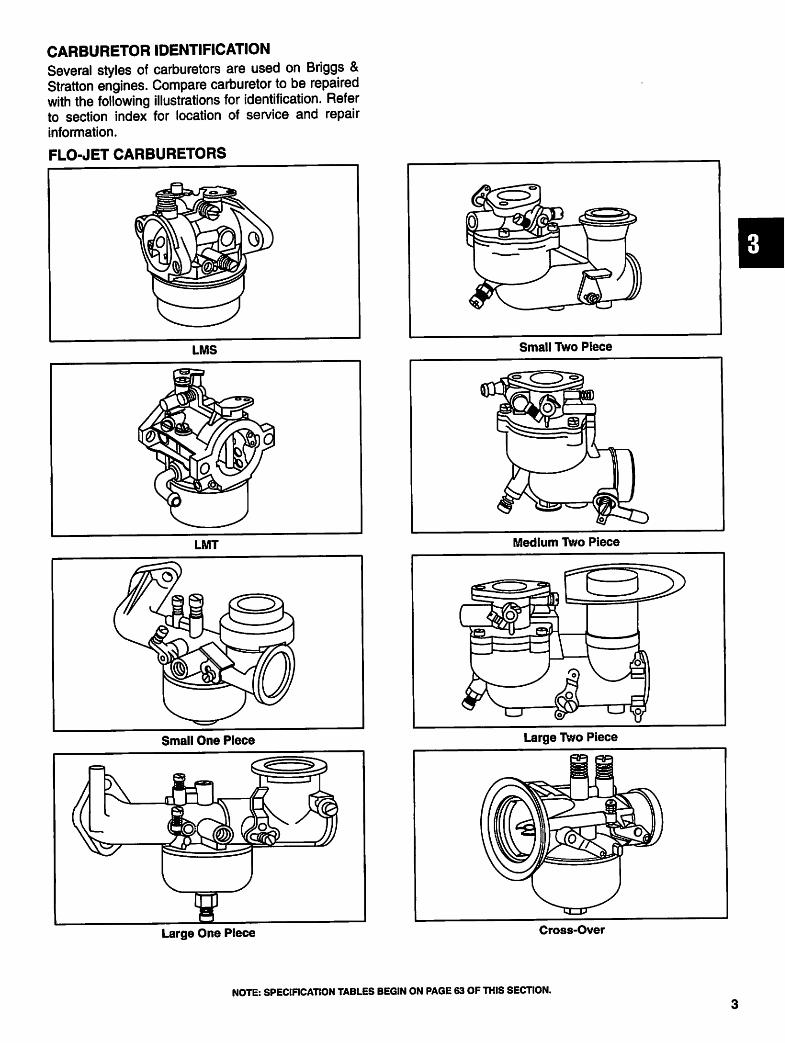
Several styles of carburetors are used on Briggs &Stratton engines. Compare carburetor to be repairedwith the following illustrations for identification. Refer
to section index for location of service and repair
information.
FLO-JET CARBURETORS
Small Two Piece
j
F
r—W
i
1
Medium Two Piece
Large One Piece Cross-Over
NOTE: SPECIFICATION TABLES BEGIN ON PAGE 63 OF THIS SECTION.
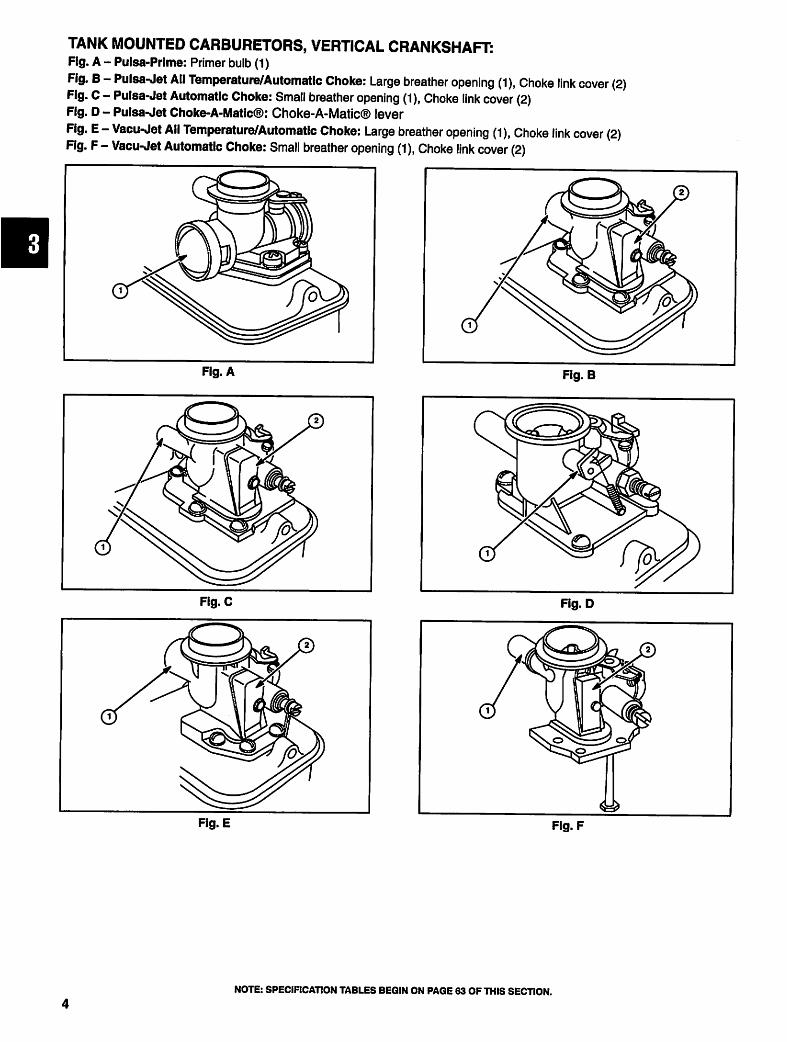
TANK MOUNTED CARBURETORS, VERTICAL CRANKSHAFT:Fig. A - Pulsa-Prime: Primer bulb (1)
Fig. B - Pulsa-Jet All Temperature/Automatic Choke: Large breather opening (1), Choke link cover (2)Fig. C - Pulsa-Jet Automatic Choke: Small breather opening (1), Choke link cover (2)
Fig. D - Pulsa-Jet Choke-A-Matic®: Choke-A-Matic® lever
Fig. E - Vacu-Jet All Temperature/Automatic Choke: Large breather opening (1), Choke link cover (2)
Fig. F - Vacu-Jet Automatic Choke: Small breather opening (1), Choke link cover (2)
Fig. A Fig. B
Flg.C Fig. D
Fig. E Flg.F
NOTE: SPECIFICATION TABLES BEGIN ON PAGE 63 OF THIS SECTION.

TANK MOUNTED CARBURETORS,
VERTICAL CRANKSHAFT
Fig. G - Pulsa-Jet Choke-A-Matic®: Choke-A-Matic®
lever.
Fig. G
TANK MOUNTED CARBURETORS, HORIZONTAL CRANKSHAFT
Fig. A: Air cleaner post (1), Welch plug (2), Idle mixture adjustment needle or fixed pilot jet (3)
Fig. B: Pulsa-Jet with Rotary Choke - Rotary choke (1)
Fig. C: Pulsa-Jet, Slide Choke: Fuel pump cover (1), Slide choke (2)
Fig. D: Vacu-Jet, Slide Choke
Fig.C Fig. D
NOTE: SPECIFICATION TABLES BEGIN ON PAGE 63 OF THIS SECTION.

BEFORE REMOVAL OF CARBURETOR
M WARNING
Gasoline and its vapors are extremely flammable and explosive.
Fire or explosion can cause severe burns or death.
• When removing the fuel hose from the carburetor on a machine without a fuel shut off drain any fuel fromthe tank first.
• Do not thread a a bolt or cap screw in the removed hose end. Screw threads will damage the hose ID andrubber particles will enter the fuel system.
Note position of governor springs, governor link, remote control or other attachments to facilitate reassembly Do notbend links or stretch springs. (See also Section 4, Governor Controls & Carburetor Linkages.)
CARBURETOR CLEANING RECOMMENDATIONS
1. Disassemble carburetor.
2. Remove all old gaskets, seals and sealing material.
3. Use commercial carburetor cleaning solvents
(such as Briggs & Stratton Spray Cleaner, Part
#100041 or 100042) to clean carburetor partsand body.
4. When cleaning non-metallic parts (plastic, nylon,
Minion™, etc.), do not leave in commercial
carburetor cleaner bath more than 15 minutes.
NOTE: Parts containing rubber, such as seals, "O"
rings or pump diaphragms should never be
placed in commercial carburetor cleanerbath.
5. Use only compressed air (blowing in both
directions) to clean out all openings and passages.
NOTE: Do not use wires, drills or any other devices
to clean out metering holes or passages.
NOTE: SPECIFICATION TABLES BEGIN ON PAGE 63 OF THIS SECTION.
TANK MOUNTED CARBURETORS -
VERTICAL CRANKSHAFT ENGINES
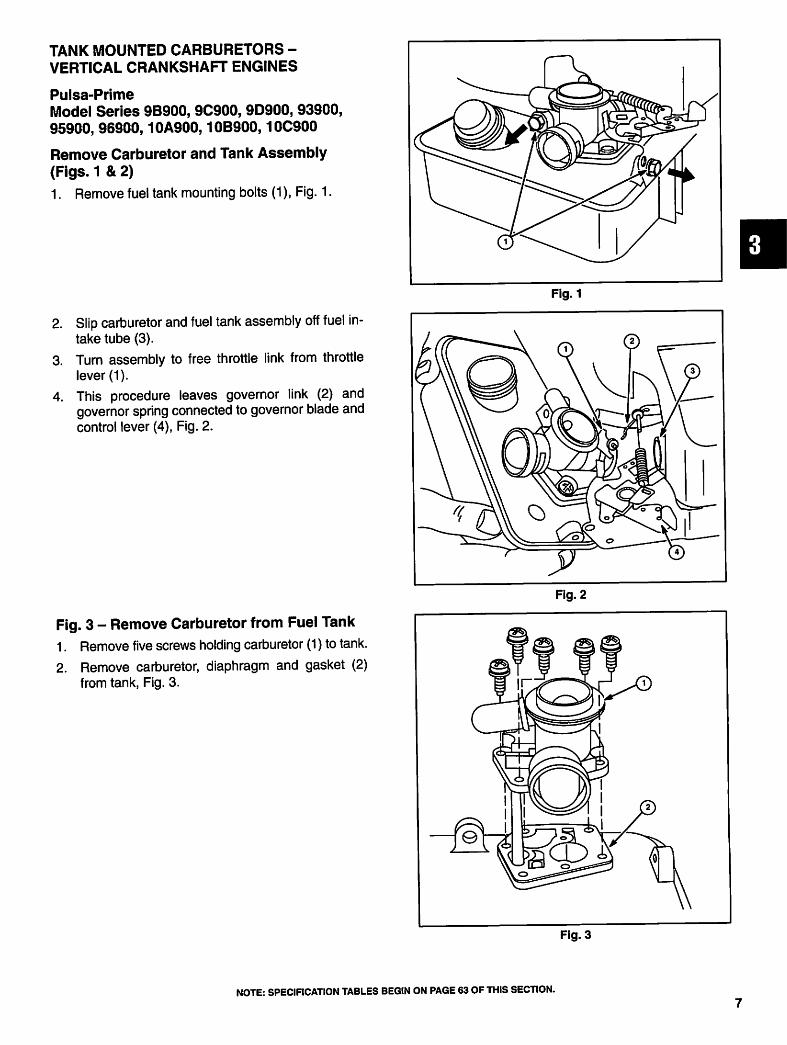
Pulsa-Prime
Model Series 9B900,9C900, 9D900, 93900,
95900, 96900,10A900,10B900,10C900
Remove Carburetor and Tank Assembly
(Figs. 1 & 2)
1. Remove fuel tank mounting bolts (1), Fig. 1.
2. Slip carburetor and fuel tank assembly off fuel in
take tube (3).
3. Turn assembly to free throttle link from throttle
lever (1).
4. This procedure leaves governor link (2) and
governor spring connected to governor blade and
control lever (4), Fig. 2.
Fig. 3 - Remove Carburetor from Fuel Tank
1. Remove five screws holding carburetor (1) to tank.
2. Remove carburetor, diaphragm and gasket (2)
from tank, Fig. 3.
Fig. 3
NOTE: SPECIFICATION TABLES BEGIN ON PAGE 63 OF THIS SECTION.

Install Primer, Disassemble Carburetor
1. Slide jet screen off carburetor body. Fixed main jet
is not a service part.
2. Press in from both sides of primer bulb cavity to
release retainer tabs (inset 4).
3. Pry retainer out and remove primer bulb from
primer seat groove (3).
4. Remove primer seat using a crochet hook or other
type of hook. Ball (2) and spring (1) will fall out,
Fig. 4.
5. Remove intake tube "O" ring from carburetor.
NOTE: Do not stretch, bend or compress primerspring.
Remove Throttle Plate and Shaft
1. Rotate throttle shaft lever to wide open throttleposition.
2. With a needle nose pliers, grasp center of throttle
plate and pull out of throttle shaft carefully.
3. Remove throttle shaft and foam dust seal.
Remove Fuel Pick-Up Tube (Fig. 5)
Pick-up tube (1) on Pulsa-Prime carburetor is the
snap-in design. Pipe requires considerable force tosnap out, Fig. 5.
INSPECTION
Inspect jet screen for clogging, varnish deposits, and
damage to screen. Thoroughly clean or replace
components if necessary. Inspect throttle shaft and
throttle shaft bearing for excessive wear. Replace
throttle shaft and/or carburetor body if required.
Inspect diaphragm for holes, tears or curled fuelvalves. Replace if necessary.
High Altitude Compensation
NOTE: If engine is operated at high altitudes,
performance may decrease. If poor
performance is experienced remove main
air bleed jet (1), Fig. 6.
Fig. 4
Fig. 5
Fig. 6
NOTE: SPECIFICATION TABLES BEGIN ON PAGE 63 OF THIS SECTION.

Assemble Carburetor
1. Place primer spring and ball in primer valve bore.
2. Press primer seat into bore with groove on seat
facing out, Fig. 4.
3. Insert primer bulb into retainer and moisten inside
diameter of primer bulb.
4. Press into primer cavity lining up locking tabs with
locking slot in cavity.
5. Press until both tabs are seated in locking slots.
Install Fuel Pick-Up Tube (Fig. 7)
Insert pick-up tube (1) in carburetor body. Place screen
squarely on a hard surface. Push firmly on carburetor
with palm of hand. Tube may require considerable
force to snap into place, Fig. 7.
Install Throttle Shaft and Plate (Fig. 8)
1. Insert throttle shaft and new foam dust seal into
carburetor body.
2. Insert throttle plate into throttle shaft with single
dimple in first. Push until two dimples contact
shaft.
3. Rotate shaft and plate to check for freedom of
movement and to center plate in shaft.
4. Slide jet screen (2) onto main jet tube and place
fuel pump spring (1) on spring boss, Fig. 8.
Install Carburetor to Fuel Tank
1. Place new diaphragm on tank top and new gasket
on top of diaphragm (2), Fig. 3.
2. Lower carburetor assembly down onto gasket and
diaphragm.
3. Install five screws (1) and tighten, Fig. 3.
Screw Tightening Sequence (Fig. 9)
1. During routine service and to assure that the
Pulsa-Prime carburetor diaphragm seals properly,
it is recommended that the carburetor mounting
screws be tightened in the following sequence,
Fig. 9. While tightening screws, be sure that
throttle shaft is held in wide open position.
2. After screws are tightened to 15 in. lbs. (2 Nm),push down on throttle shaft and rotate shaft to
closed throttle position. This will properly position
the throttle plate.
Assemble Carburetor and Fuel Tank to Engine
1. Insert throttle link into throttle lever and rotate
carburetor and fuel tank assembly.
2. Install "O" ring in carburetor intake opening and oil
"O" ring.
3. Slide carburetor onto intake tube until fuel tank
mounting boss is lined up. Insert breather tube into
breather grommet.
4. Install and tighten mounting screws securely, Fig. 1.
Fig. 7
Fig. 8
Fig. 9
NOTE: SPECIFICATION TABLES BEGIN ON PAGE 63 OF THIS SECTION.

Pulsa-Jet Carburetors
Model Series 92900,94900,110900,112900,113900,114900
Vacu-Jet Carburetors
Model Series 92500,93500, 94500, 95500
NOTE: Pulsa-Jet and Vacu-Jet carburetors for
vertical crankshaft models are combined in
this section. Issues specific to individual
models or types will be noted in the text and
corresponding illustrations.
Carburetor Types (Fig. 10)
There are three basic types of Pulsa-Jet and Vacu-Jet
carburetors used on above series engines. They are
(1) All-Temperature/Automatic Choke, (2) AutomaticChoke, and (3) Choke-A-Matic®, Fig. 10.
All-Temperature/Automatic Choke Operation
The All-Temperature/Automatic Choke carburetor isequipped with a bimetal spring, (inside cavity), (3)
which compensates for temperature and regulates
automatic choke action. The bimetal spring reacts to
crankcase air temperature via breather tube (1),attached to rubber elbow (2), Figs. 11 and 12.
Inspect bimetal spring cavity where indicated (4) for
damage or debris, Fig. 12.
Fig. 10
Fig. 12
10
NOTE: SPECIFICATION TABLES BEGIN ON PAGE 63 OF THIS SECTION.
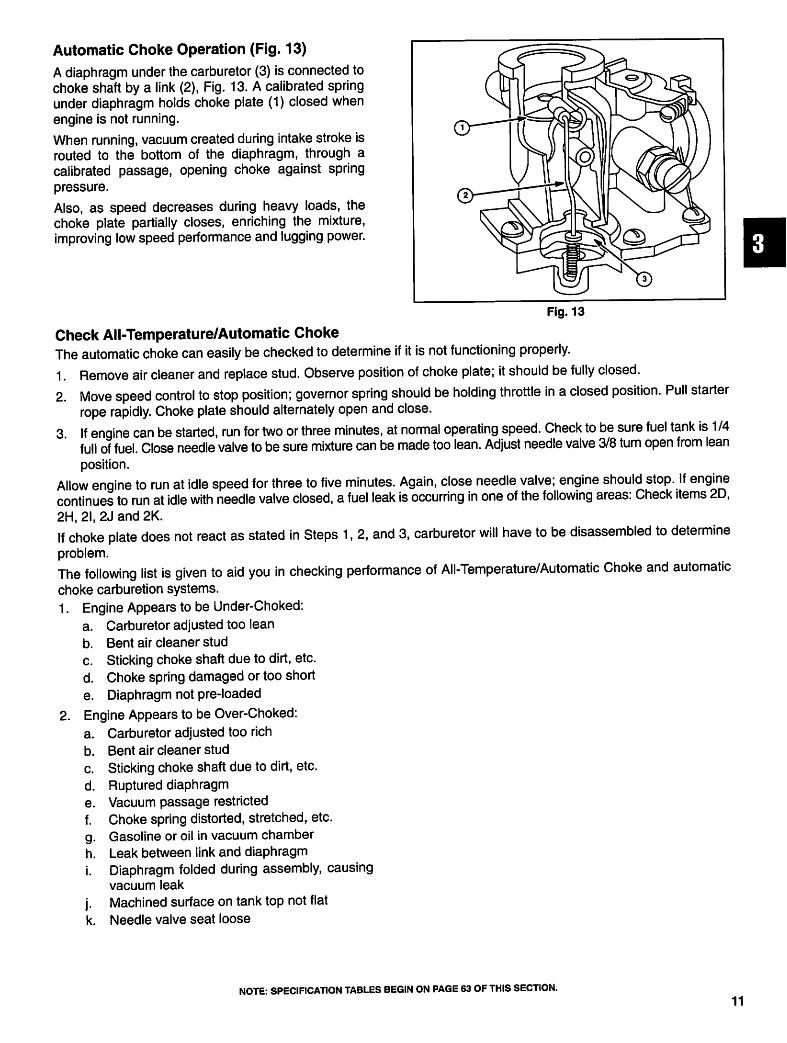
Automatic Choke Operation (Fig. 13)
A diaphragm under the carburetor (3) is connected to
choke shaft by a link (2), Fig. 13. A calibrated spring
under diaphragm holds choke plate (1) closed when
engine is not running.
When running, vacuum created during intake stroke is
routed to the bottom of the diaphragm, through a
calibrated passage, opening choke against spring
pressure.
Also, as speed decreases during heavy loads, the
choke plate partially closes, enriching the mixture,
improving low speed performance and lugging power.
Fig. 13
Check All-Temperature/Automatic Choke
The automatic choke can easily be checked to determine if it is not functioning properly.
1. Remove air cleaner and replace stud. Observe position of choke plate; it should be fully closed.
2. Move speed control to stop position; governor spring should be holding throttle in a closed position. Pull starter
rope rapidly. Choke plate should alternately open and close.
3 If engine can be started, run for two or three minutes, at normal operating speed. Check to be sure fuel tank is 1/4full of fuel. Close needle valve to be sure mixture can be made too lean. Adjust needle valve 3/8 turn open from lean
position.
Allow engine to run at idle speed for three to five minutes. Again, close needle valve; engine should stop. If enginecontinues to run at idle with needle valve closed, a fuel leak is occurring in one of the following areas: Check items 2D,
2H, 21, 2J and 2K.
If choke plate does not react as stated in Steps 1, 2, and 3, carburetor will have to be disassembled to determine
problem.
The following list is given to aid you in checking performance of All-Temperature/Automatic Choke and automatic
choke carburetion systems.
1. Engine Appears to be Under-Choked:
a. Carburetor adjusted too lean
b. Bent air cleaner stud
c. Sticking choke shaft due to dirt, etc.
d. Choke spring damaged or too short
e. Diaphragm not pre-loaded
2. Engine Appears to be Over-Choked:
a. Carburetor adjusted too rich
b. Bent air cleaner stud
c. Sticking choke shaft due to dirt, etc.
d. Ruptured diaphragm
e. Vacuum passage restricted
f. Choke spring distorted, stretched, etc.
g. Gasoline or oil in vacuum chamber
h. Leak between link and diaphragm
i. Diaphragm folded during assembly, causing
vacuum leak
j. Machined surface on tank top not flat
k. Needle valve seat loose
NOTE: SPECIFICATION TABLES BEGIN ON PAGE 63 OF THIS SECTION.
11

If engine on a mower with a high-inertia disc type cutter blade becomes hard starting when engine is warm, a leanercarburetor mixture may be required. See following note:
NOTE: A heavy, high-inertia disc type cutter blade rotates for a longer period of time, after governor control isplaced in "STOP" position. During this "coasting" period, engine continues to induct fuel-air mixture,even when choke is open.
If carburetor mixture is too rich, warm engine may flood and become hard starting. If original carburetor adjustment hasnot been changed, turn needle valve clockwise (leaner) approximately 1/8 turn. If original carburetor adjustment hasbeen changed, check previous list, this page, paragraph No. 2-A, B and C, then adjust 1/8 turn leaner.
Remove Carburetor and Fuel Tank
Pneumatic Governor (Figs. 14 & 15)
1. Remove fuel tank mounting bolts.
2. Slip carburetor and fuel tank assembly off end of
fuel intake tube and tum assembly to free throttle
link from throttle lever.
3. This will leave governor link (1) and governor
spring connected to governor blade and controllever (2), Fig. 14.
Mechanical Governor
Model Series 92900, 94000, 95000,112900,
113900 (Except Type Number 2999), 114900
1. Disconnect governor spring from control lever.
2. Slide carburetor and fuel tank assembly off end of
fuel intake tube and turn assembly to disconnectgovernor link (1) from bell crank lever.
3. This will leave governor spring and bell crank
assembly on carburetor and fuel tank assembly,Fig. 15.
Removing Carburetor Model Series 100900,113900
Type #2999,130900,131900,132900, VerticalCrankshaft
1. Disconnect stop switch wire and governor spring.
2. Remove two cylinder head bolts or studs and reartank mounting screw.
Fig. 14
Fig. 15
12
NOTE: SPECIFICATION TABLES BEGIN ON PAGE 63 OF THIS SECTION.

NOTE: Model Series 113900 Type #2999 has a
stud (at lower rear of fuel tank) and a
mounting screw (at top of fuel tank be
tween carburetor and fuel cap).
3. Slip carburetor over notch in cylinder shield (4) and
away from intake manifold (5), and seal (3),
Fig. 16. Rotate carburetor and tank assembly to
disconnect governor link (2) from throttle lever (1).
NOTE: On some models, it may be necessary to
remove blower housing.
Remove Carburetor from Fuel Tank
Model Series 92000, 93000, 94000, 95000,
96000,110900,111900,112900,113900
(Except Type Number 2999), 114900
1. Remove screws holding carburetor on tank body.
NOTE:On Model Series 110900,111900,113900
(except Type #2999), and 114900 a
mounting screw may be located under
choke plate. To gain access to screw, open
choke plate completely. Use a #2 Phillips
head screwdriver to remove screw,
Fig. 17.
NOTE: On Model Series 100900,130900,131900
and 132900, the Choke-A-Matic® valve
lever is operated by the carburetor control
plate. Removing the plate is all that is
required.
2. Lift carburetor straight up.
3. Remove pump spring, spring cup (when used) and
diaphragm.
Model Series 113900, Type #2999
1. Remove three screws holding carburetor to fuel
tank.
Remove choke lever and choke lever bracket.2.
3.
4.
Disconnect breather tube and grommet from
carburetor.
Lift carburetor straight up from fuel tank. Remove
and discard fuel tank gasket.
Model Series 92500, 93500, 94500, 95500
1. Remove screws holding carburetor on tank body.
2. Lift carburetor straight up.
3. Remove diaphragm.
Fig. 16
Fig. 17
NOTE: SPECIFICATION TABLES BEGIN ON PAGE 63 OF THIS SECTION.
13

Disassemble Pulsa-Jet, Vacu-Jet
Carburetors
Remove Needle Valve Assembly
NOTE: Metering holes in carburetor body (1)
should be cleaned with solvent and com
pressed air only, Fig. 18. Typical "O" ring
(2), early "O" ring (inset 3), Fig. 18.
DO NOT ALTER SIZE OF HOLES
Inspect mixture adjustment needle (1), Fig. 19, and
replace if bent (2), or grooved (3).
Screw-In Type (Fig. 20)
1. Remove and discard "O" ring.
2. Remove needle valve assembly (2) and inspect
needle valve and seat (1).
Minion™ Pressed-ln Type, Used On Some
Zinc Carbs (Fig. 21)
1. Remove and discard "O" ring (Fig. 18).
2. Back out mixture adjusting needle about four to
five turns counterclockwise.
3. Then pull needle and seat (3) assembly out (4).
4. Remove inner "O" ring (2).
Fig. 19
Fig. 20
Fig. 21
14
NOTE: SPECIFICATION TABLES BEGIN ON PAGE 63 OF THIS SECTION.

Remove Throttle Plate and Shaft
Throttle shaft, Fig. 22, is removed by backing out idle
speed adjusting screw and removing the throttle plate
screw (3). After removal of plate, throttle shaft may be
lifted out. Throttle (1), throttle plate (2), pencil (4).
Remove Fuel Pick-Up Tubes
Zinc Carburetors
Model Series 92000,110900,111900,112900,
113900 (except Type #2999), 114900,130900,
131900,132900
Short nylon fuel pipes (1) are threaded into carburetor
body. To remove, use six-point socket, (3/8" or 9mm),
as shown in Fig. 23.
Model Series 113900, Type #2999
1. Short nylon pick-up tube is threaded into
carburetor body. To remove, use socket as shown
in Fig. 23.
2. To remove nylon pick-up tube extension from
brass pipe, slide retaining clip (1) up onto brass
pipe (3), Fig. 24.
3. Cut end of nylon extension where it connects to
brass pipe and remove it.
4. Slide off old retaining clip and discard.
NOTE: Do not remove brass pipe.
Vacu-Jet Carburetors
Model Series 92500, 93500, 94500, 95500
Fuel pick-up tubes on Minion™ carburetors are the
snap-in design. Tubes may snap out with considerable
force, Fig. 25.
Fig. 23
Fig. 24
Fig. 25
NOTE: SPECIFICATION TABLES BEGIN ON PAGE 63 OF THIS SECTION.
15

Screw-in Type
Model Series 92500, 93500, 94500, 95500
NOTE: Vacu-Jet carburetors have a metal ferrule
(1) and check ball (3) in nylon fuel pick-up
tube (2). To function properly, screen (4)
must be clean and check ball free. Replace
tube if screen is clogged or check ball is not
free, Fig. 26.
Breather and Intake Manifold (Fig. 27)
Intake manifold (2) is bolted to cylinder on Model
Series 90000, 92000, 93000, 94000, 95000,100000,
110000, 110900, 111900, 112900, 113900, 114900,
130000, Fig. 27. Check for good fit or damaged
gaskets to prevent air leaks or entry of dirt.
NOTE: When installing reinforced plastic or metal
intake manifold (2) and new gasket (1),
torque screws to 30 in. lbs. (3.4 Nm) or 40
in. lbs (4.5 Nm). Breather tube (3).
Remove Automatic Choke (Fig. 28)
1. To remove choke parts, first remove automatic
choke link cover.
2. Then slide choke link (1) out choke shaft (2) lever.
Pull shaft out of plate, Fig. 28.
Remove All-Temperature/Automatic Choke
System
Remove rubber elbow which connects breather tube to
carburetor and inspect for leaks or damage. Inspect
bimetal spring assembly cavity. Clean if required,
Fig. 12.
Remove Bimetal Spring Assembly
1. Remove air cleaner assembly and rubber elbow.
2. Apply pressure on end of shaft to loosen as shown
in Fig. 29.
3. Remove bi-metallic spring from anchor post.
Assembly may now be removed for cleaning or
replacement.
Fig. 27
Fig. 28
Fig. 29
NOTE: SPECIFICATION TABLES BEGIN ON PAGE 63 OF THIS SECTION.
16

Remove Nylon Choke Plate and Shaft
Choke-A-Matic® or Manual Choke Model
Series 92000, 92500, 93500, 94500, 95500,
100900,113900 (Type #2999), 130900,
131900,132900
1. To remove choke parts, disconnect choke return
spring (2) (when used), from lever (1) Fig. 30.
2. Pull nylon choke shaft (4) sideways to separate
choke shaft from choke plate.
NOTE: If choke plate is heat-sealed to choke
shaft, loosen by sliding sharp pointed tool
(3) along edge of shaft.
Disassemble Fuel Pump, Pulsa-Jet
Model Series 113900, Type #2999
1. Remove fuel pump cover (1), diaphragm (2),
spring (4), and cup (3), Fig. 31.
2. Inspect diaphragm for punctures, cracks and fatigue.
Replace if damaged. Inspect all sealing surfaces
for nicks or damages and repair or replace as
required.
Inspect Tank
After removal of carburetor from fuel tank, inspect tank
for presence of water and deposits of dirt, rust, gum,
and/or varnish.
Check Diaphragm and Spring
The diaphragm is suitable for further use, provided it
has not developed wear spots, become stiff, or has
punctures. Check to ensure fuel pump flapper valves
are not damaged.
Also check choke spring length, NO TAG, Specifica
tions.
Fig. 30
Fig. 31
NOTE: SPECIFICATION TABLES BEGIN ON PAGE 63 OF THIS SECTION.
17

Check Tank Top
Machined surface on top of fuel tank must be flat in
order for diaphragm to provide an adequate seal
between carburetor and tank. If surface is not flat, it is
possible for gasoline to enter vacuum chamber and
into carburetor by passing between tank and
diaphragm.
Flatness can be checked with a straight edge (1) and
feeler gauge (2), as shown in Fig. 32. A .002" (.05 mm)
feeler gauge should not enter between straight edge
and machined surface, when checking at shaded
areas shown. Replace tank if gauge enters.
NOTE: Do not file tank top to restore flatness, this
will worsen condition.
Repair kit #391413 may be used to repair Pulsa-Jet
fuel tanks which are not flat. Install roll pin (1) and
Teflon washer (2) as shown in Fig. 33.
NOTE: This kit cannot be used on All-Tempera
ture/Automatic Choke carburetors.
Assemble Pulsa-Jet, Vacu-Jet Carburetors
Install Fuel Pick-Up Tubes
Zinc Bodies (except Model Series 113900
Type #2999) and Vacu-Jet, Metal Body
Thread tubes into carburetor body using either a 3/8"
or 9/16" wrench or socket, Fig. 34. No sealant is
required on threads of tubes.
Install Fuel Pick-Up Tube
Model Series 113900, Type #2999
1. Thread tube into carburetor body using a 3/8"
wrench or socket (2), Fig. 34. No sealant is re
quired on threads of tube.
2. Slide new retainer clip onto brass pipe. Heat small
end of new nylon tube in hot water and push onto
brass pipe. Slide retaining clip down onto nylon
tube over groove on brass pipe, Fig. 24.
Fig. 32
Fig. 33
Fig. 34
NOTE: SPECIFICATION TABLES BEGIN ON PAGE 63 OF THIS SECTION.
18

Install Pressed-ln Type Fuel Pick-Up Tube
(Vacu-Jet)
Insert pick-up tube in carburetor body. Place pick-up
tube screen squarely on a hard surface. Push firmly on
carburetor with palm of hand. Pick-up tube may snap
into place with considerable force, Fig. 35.
Install Throttle Shaft and Plate (Fig. 36)
Insert throttle shaft (1), place throttle plate (2) on flat
side of shaft and secure with throttle plate screw (3),
Fig. 36. Pencil (4).
Assemble Automatic Choke (Fig. 37)
1. Place choke plate in throat of carburetor placing
short shaft (1) in hole (2) next to breather inlet.
2. Insert choke shaft (3) into choke shaft bore with
automatic choke link hole (4) positioned as shown
in Fig. 37.
Assemble Choke Plate
(With Poppet Valve)
Do not reseal parts on assembly. When replacing
choke plate and shaft, install choke plate on short shaft
side (1) so poppet valve spring is visible when valve is
in full choke position on carburetors using poppet valve
(2), Fig. 38.
NOTE: All-Temperature Automatic choke plates
are supported by the bimetal spring
assembly on the breather tube side of the
carburetor. See next paragraph for
installation.
Fig. 36
Fig. 37
Fig. 38
NOTE: SPECIFICATION TABLES BEGIN ON PAGE 63 OF THIS SECTION.
19

Assemble Bimetal Spring
After cleaning, repairing and assembling of other
carburetor parts, bimetal spring and shaft assembly
may be installed.
1. Place choke plate (1) in choke (closed) position.
2. Position notch of shaft assembly so that free end of
spring loop will be within shaded area of cavity (5),
Fig. 39.
Fig. 39-A: Spring position when ambient temperature
is 80-120° Farenheit (27-49° Celsius).
Fig. 39 - B: Spring position when ambient temperature
is 40-80° Fahrenheit.
3. Insert shaft into carburetor until notch just slides on
choke plate.
4. Place spring loop (2) on anchor post (3).
5. Slide shaft on choke plate until it locks in position.
NOTE (Vacu-Jet): Some Minion™ type carbure
tors with short spring posts must be flared
on end to retain spring. Slightly flare with a
WARM soldering gun.
6. If a new diaphragm (1) is being installed, assemble
choke spring to diaphragm, as shown in Fig. 40.
See Table No. 4, specifications for correct spring
usage. Be careful not to bend or distort spring.
Assemble Carburetor Choke Shaft
Choke-A-Matic®
Model Series 92000
1. When assembling carburetor, use new "O" rings,
gaskets, and/or diaphragms.
2. Install choke plate and choke shaft.
3. Choke shaft lever should be as shown in Fig. 41.
4. If a new diaphragm is being installed, assemble
choke spring to diaphragm, as shown in Fig. 40.
See Table No. 2, specifications, for correct spring
usage. Be careful not to bend or distort spring.
Fig. 39
Fig. 40
Fig. 41
NOTE: SPECIFICATION TABLES BEGIN ON PAGE 63 OF THIS SECTION.
20

Assemble Carburetor to Fuel Tank Pulsa-Jet
(except Model Series 113900, Type #2999),
and Vacu-Jet (except Choke-A-Matic®)
1. Place "O"-ring (1) in groove in throttle bore, (Vacu-
Jet) Fig. 42. Cross section (2), new "O" ring (3),
Fig. 42.
2.
3.
4.
Holding carburetor body upside down, place
diaphragm on body while guiding choke link thru
link hole for link. Be sure that pump spring and cap
(1) are in fuel pump well, (Pulsa-Jet) Fig. 43.
Lower tank down onto carburetor, while guiding
choke spring into spring well, Pulsa-Jet shown,
Fig. 44.
While holding carburetor and body together, turn
assembly right side up.
5. Thread carburetor mounting screws into tank top
about two turns. DO NOT TIGHTEN.
Fig. 42
Fig. 43
Fig. 44
NOTE: SPECIFICATION TABLES BEGIN ON PAGE 63 OF THIS SECTION.
21

6. Close choke plate (1). Insert choke link (3) into
choke shaft (2) as shown, Fig. 45.
7. Install rubber elbow and assemble carburetor to
fuel tank including pre-loading automatic choke
diaphragm, see below.
Pre-Load Diaphragm
1. Move choke plate to an over center position as
shown in Fig. 46.
2. Hold choke while tightening carburetor mounting
screws in a staggered sequence.
NOTE: Opening choke to an over center position
places diaphragm in a pre-loaded
condition.
3. Move choke plate to normal closed position.
Choke plate should now remain fully closed,
Fig. 45.
4. If choke plate is not fully closed, check to be sure
choke spring is properly assembled to diaphragm,
and also properly inserted in its pocket in tank top.
5. Install choke link cover (5) and gasket (6) with
screw (4), Fig. 45.
Pulsa-Jet
Model Series 113900
Type #2999
1. Place two fuel tank mounting gaskets on fuel tank.
2. Lower carburetor onto fuel tank.
3. Rotate choke plate until plate is wide open.
NOTE: Use air cleaner stud to locate and hold
choke plate.
4. With choke lever in wide open position, place
choke lever bracket on fuel tank and engage
bottom tooth of choke lever in top tooth slot on
lever (1), Fig. 47.
5. Install three mounting screws and tighten
securely.
Fig. 45
Fig. 46
Fig. 47
NOTE: SPECIFICATION TABLES BEGIN ON PAGE 63 OF THIS SECTION.
22

Assemble Vacu-Jet Choke-A-Matic®
Carburetor to Fuel Tank
1. Place new tank mounting gasket on tank top.
2. Lower carburetor onto tank top.
3. Install two mounting screws and tighten.
Install Needle Valve Assembly,
Screw-in Type (Fig. 48)
1. Install needle valve seat (1) being sure not to
cause burrs in slot.
2. Insert needle valve into threaded nut assembly.
Turn clockwise 1-2 turns.
3. Install needle valve assembly (2), Fig. 48.
NOTE: On zinc carburetor bodies that use
pressed-in type Minion™ needle valve
assembly, see next.
Pressed-ln Type (Fig. 49)
1. To install pressed-in type needle valve assembly,
place "O" ring (2) on shoulder of needle seat (3).
2. Turn needle in until large seal washer (5) just
touches needle seat, Fig. 49.
3. Assemble needle valve assembly (4) and turn
screw until it just touches spring.
4. Install needle valve as an assembly being sure flat
on valve seat lines up with flat in carburetor body
(1), Fig. 49.
5.
NOTE: On later carburetors, a slot was added to
top of needle valve assembly bore to line
up with rib on needle valve assembly.
Oil fill tube, Part #280131 (1) will help firmly seat
valve assembly, Fig. 50.
Install Carburetor and Tank Assembly
Automatic Choke
Model Series 92000,92500, 93500, 94000,
95000,110900,111900,112900,113900
(except Type #2999), 114900
1. Apply light film of oil to "O" ring in throttle bore.
Then hook governor link (3) to governor blade (1)
(Pulsa-Jet), or bell crank into governor lever rod
(Vacu-Jet).
2. Align carburetor with intake tube (6) and breather
tube grommet (2).
3. Be sure "O" ring does not distort when fitting
carburetor to intake tube, Fig. 11. Install governor
spring as shown in Section 4, page 8.
Fig. 48
Fig. 49
Fig. 50
NOTE: SPECIFICATION TABLES BEGIN ON PAGE 63 OF THIS SECTION.
23

Pulsa-Jet, Vacu-Jet, Choke-A-Matic®
Model Series 92000
1. Put a light film of oil on "O" ring in throttle bore.
2. With governor link (3) hooked to governor blade
(1), connect link to throttle (4) and slip carburetor
into place.
3. Align carburetor with intake tube and breather tube
grommet.
4. Hold choke lever (5) as shown in Fig. 51, so it does
not catch on control plate.
5. Do not distort "O" ring when fitting carburetor to in
take tube.
6. Install mounting bolts. Fig. 52 shows routings of
stop switch wires (1).
NOTE: Route stop switch wire under and away
from governor spring.
Model Series 100900,113900,130900
Type #2999,131900, and 132900
1. Assemble carburetor and new gasket (3) to tank.
2. Hook throttle link (1) to throttle lever (2), Fig. 53.
3. Slip carburetor over notch in cylinder shield (5) and
around intake tube (6).
4. Oil seal (4) in carburetor body to prevent damage
when installing.
5. Mount carburetor and tank assembly to cylinder.
6. Torque two head bolts to 140 in. lbs. (16 Nm).
Install rear tank mounting screw.
NOTE: Model Series 113900, Type #2999 has a
stud and a tank mounting screw. Torque
stud and screw to 140 in. lbs. (16 Nm).
7. Connect stop switch wire and governor spring.
Fig. 51
Fig. 52
Fig. 53
NOTE: SPECIFICATION TABLES BEGIN ON PAGE 63 OF THIS SECTION.
24

Adjust Choke-A-Matic®
Model Series 92000
Choke-A-Matic® is standard on Model Series 92900
(type nos. lower than 0500), and Series 92500 (type
nos. lower than 600) engines. Remote control must be
of type in which control wire moves 2-1/8" (54 mm) (A)
out of casing when control lever is moved from "STOP"
position (2) to "CHOKE" or "STARr position (1) A
minimum travel of 1-3/8" (35 mm) (B) is required when
remote control is mounted, Fig. 54.
1. Remove air cleaner and move control lever to a
position about midway between idle and fast.
2. Mount remote control with casing clamp as shown
in Fig. 55.
To adjust remote control assembly proceed as follows:
3. Place control lever on equipment in "FAST (high
speed) position (5), Fig. 55.
NOTE: Control must be mounted on equipment to
make an accurate adjustment.
Fig. 54
Fig. 554. Lever (1) on carburetor should be just touching
choke shaft at (2), Fig. 55.
5. Move casing (4) forward or backward until correct
position is obtained.
6. Tighten screw (3). Recheck operation of controls
after adjustment, Fig. 55.
Choke-A-Matic® Linkage Model Series
100900,130900,131900,132900
Manual or remote control for choke and stop is done by
a lever on control plate mounted to carburetor by two
screws (2) Fig. 56. Lever for remote control has a
loose fit; for manual control, a friction fit.
1. To check lever action, move lever (1) to left until it
snaps into "RUN" detent.
2. Lever (3) should just touch choke lever at (4).
3. If it does not, loosen screws (2) slightly and move
control plate to right or left until lever just touches
choke lever at (4).
4. Tighten screws.
Carburetor Adjustment
Pulsa-Jet
NOTE: When making carburetor adjustments on Pulsa-Jet carburetors, air cleaner and stud must be installed on
carburetor.
Model Series 92500, 93500, 94500 and 95500 engines should be adjusted with fuel tank one-quarter (1/4) full of
gasoline.
Fig. 56
NOTE: SPECIFICATION TABLES BEGIN ON PAGE 63 OF THIS SECTION.25
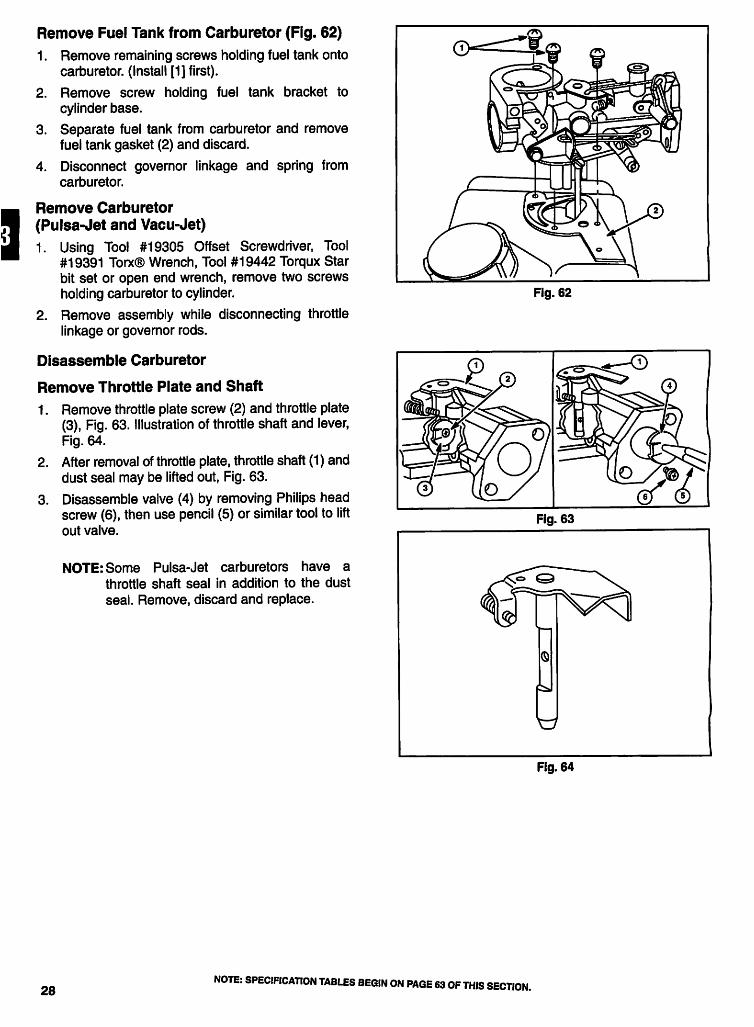
Remove Fuel Tank from Carburetor (Fig. 62)
1. Remove remaining screws holding fuel tank onto
carburetor. (Install [1] first).
2. Remove screw holding fuel tank bracket to
cylinder base.
3. Separate fuel tank from carburetor and remove
fuel tank gasket (2) and discard.
4. Disconnect governor linkage and spring from
carburetor.
Remove Carburetor
(Pulsa-Jet and Vacu-Jet)
1. Using Tool #19305 Offset Screwdriver, Tool
#19391 Tone® Wrench, Tool #19442 Torqux Star
bit set or open end wrench, remove two screws
holding carburetor to cylinder.
2. Remove assembly while disconnecting throttle
linkage or governor rods.
Disassemble Carburetor
Remove Throttle Plate and Shaft
1. Remove throttle plate screw (2) and throttle plate
(3), Fig. 63. Illustration of throttle shaft and lever,
Fig. 64.
2. After removal of throttle plate, throttle shaft (1) and
dust seal may be lifted out, Fig. 63.
3. Disassemble valve (4) by removing Philips head
screw (6), then use pencil (5) or similar tool to lift
out valve.
NOTE: Some Pulsa-Jet carburetors have a
throttle shaft seal in addition to the dust
seal. Remove, discard and replace.
Fig. 62
Fig. 64
28NOTE: SPECIFICATION TABLES BEGIN ON PAGE 63 OF THIS SECTION.

Pulsa-Jet
1. Remove idle mixture needle and spring.
NOTE: Low emissions carburetors use a pilot jet
instead of an idle mixture needle and
spring. Remove pilot jet.
2. Snap out choke plate and remove choke shaft.
3. Remove filter screen from well, when used.
4. With a modified 1/4 inch (3.9 mm) pin punch, re
move welch plug(s) (1) from carburetor body,
Fig. 65. DO NOT remove fixed jet.
Remove Needle Valve and Seat
1. Remove needle valve (1) to inspect.
2. Replace needle valve if needle is bent (2), grooved
(3), or broken, Fig. 66.
3. If carburetor is gummy or dirty, remove seat to
allow better access to metering holes (1).
Choke (2)
Throttle (3)
Needle valve (5)
Fig. 67.
4. Use only compressed air or solvents to clean
metering holes.
NOTE: Do not change metering hole sizes.
5. Replace seat (4) if screwdriver slot is damaged.
Fig. 65
Fig. 67
NOTE: SPECIFICATION TABLES BEGIN ON PAGE 63 OF THIS SECTION.
29
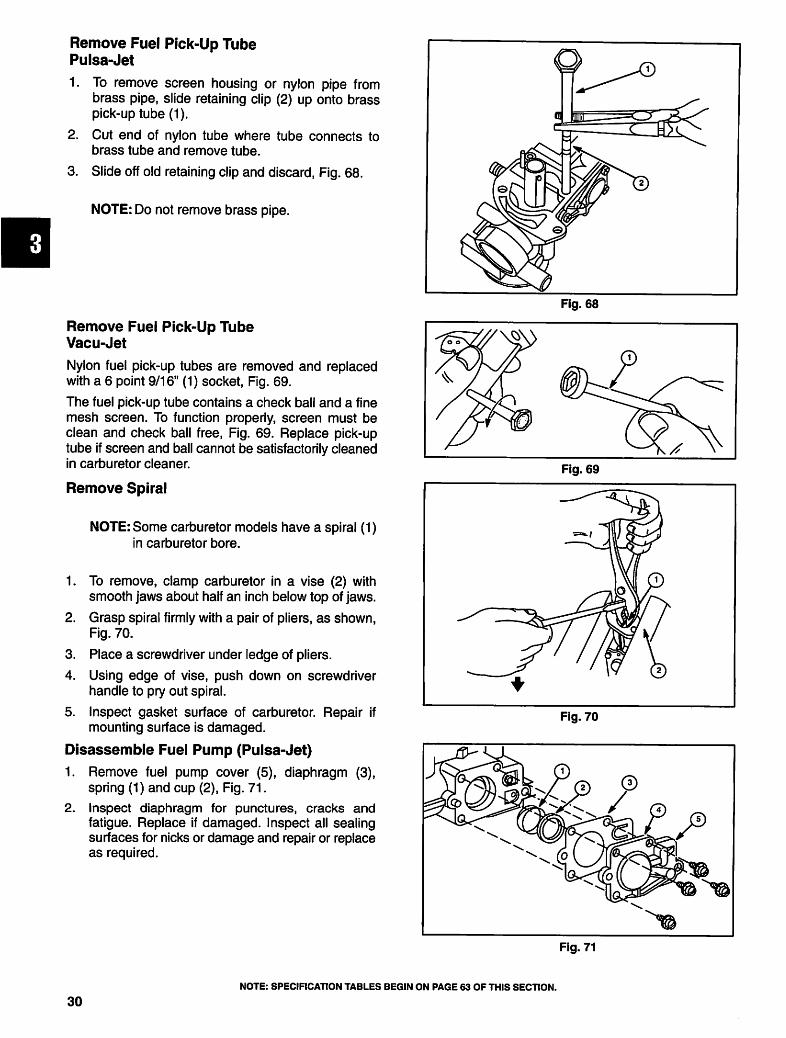
Remove Fuel Pick-Up Tube
Pulsa-Jet
1. To remove screen housing or nylon pipe from
brass pipe, slide retaining clip (2) up onto brass
pick-up tube (1).
2. Cut end of nylon tube where tube connects to
brass tube and remove tube.
3. Slide off old retaining clip and discard, Fig. 68.
NOTE: Do not remove brass pipe.
Remove Fuel Pick-Up Tube
Vacu-Jet
Nylon fuel pick-up tubes are removed and replaced
with a 6 point 9/16" (1) socket, Fig. 69.
The fuel pick-up tube contains a check ball and a fine
mesh screen. To function properly, screen must be
clean and check ball free, Fig. 69. Replace pick-up
tube if screen and ball cannot be satisfactorily cleaned
in carburetor cleaner.
Remove Spiral
NOTE: Some carburetor models have a spiral (1)
in carburetor bore.
1. To remove, clamp carburetor in a vise (2) with
smooth jaws about half an inch below top of jaws.
2. Grasp spiral firmly with a pair of pliers, as shown,
Fig. 70.
3. Place a screwdriver under ledge of pliers.
4. Using edge of vise, push down on screwdriver
handle to pry out spiral.
5. Inspect gasket surface of carburetor. Repair if
mounting surface is damaged.
Disassemble Fuel Pump (Pulsa-Jet)
1. Remove fuel pump cover (5), diaphragm (3),
spring (1) and cup (2), Fig. 71.
2. Inspect diaphragm for punctures, cracks and
fatigue. Replace if damaged. Inspect all sealing
surfaces for nicks or damage and repair or replace
as required.
Fig. 68
Fig. 70
Fig. 71
NOTE: SPECIFICATION TABLES BEGIN ON PAGE 63 OF THIS SECTION.
30

Disassemble Choke-A-Matic® Linkage
Slide Choke,
(Except Model Series 100900,130900,
131900,132900)
1. To remove choke link (2), remove speed adjust
ment lever (3) and stop switch insulator plate (4).
2. Remove speed adjustment lever from choke link.
3. Then pull out choke link through hole in choke slide
(6), Fig. 72.
Washers (5)
Choke return spring (1)
Choke slide (6)
NOTE: On some horizontal crankshaft Pulsa-Jet
carburetors, Tool #19305, Offset Screw
driver, or Tool #19391, Torx® Wrench, or
open end wrench can be used.
4. On models equipped with a stop switch, remove
stop switch wire.
Disassemble Choke-A-Matic® Linkage
Rotary Choke (Pulsa-Jet)
1. To remove choke link (2), remove speed adjust
ment lever (3) and stop switch insulator plate (4).
2. Work link out through hole in choke shaft (1),
Fig. 73.
Remove Nylon Choke and Shaft
Pulsa-Jet Rotary Choke-A-Matic®, Manual,
and Remote
Model Series 80000,110000,130000
1. Pull nylon choke shaft (2) sideways to separate
choke shaft from choke plate.
2. Remove spring (Choke-A-Matic® only), felt
washer (3), and metal washer (1) from choke
shaft, Fig. 74.
Fig. 72
Fig. 73
Fig. 74
Inspect Carburetor
After cleaning, inspect for wear, damage, cracks, or plugged openings. Replace body if any of above conditions exist.
Use only compressed air to clear plugged openings. Inspect idle mixture needle for bent needle point or a groove in tip
of needle, Fig. 66. Replace if bent or grooved. On Pulsa-Jet low emission carburetors, inspect pilot jet for dirt and
sealing in seat area. Do not use drills or wire when checking pilot jet.
Check all parts for wear and replace as needed. Examine fuel pick-up tube screens for gum deposits and dirt. Replace
if dirty. Replace diaphragm if worn, torn, punctured or stiff.
NOTE: SPECIFICATION TABLES BEGIN ON PAGE 63 OF THIS SECTION.
31

High Altitude Compensation (Pulsa-Jet)
NOTE: If engine is operated at high altitudes,
performance may decrease. If poor
performance is experienced remove main
air bleed jet (1), Fig. 75.
NOTE: For low emission carburetors (type num
bers ending in A1 through A9 or E1 through
E9) use the following procedure:
Remove end welch plug.
Using a #3-48 UNC tap, tap into main air bleed jet,
Fig. 75.
Clamp square end of tap in vise and turn
carburetor body clockwise to pull air bleed jet.
Press new high altitude air bleed jet in until flush
with boss.
Remove original pilot jet and install new high
altitude pi lot jet.
Assemble Carburetor
Install Welch Plug(s) (Pulsa-Jet)
1. Place a small amount of non-hardening sealant
such as Permatex® II or nail polish around outside
edge of welch plug(s) and place plug in metering or
bottom well.
2. With a 1/4" dia. (.64 mm), or larger, pin punch (1),
set welch plug with pin punch in center of plug. Do
not collapse plug, Fig. 76.
3.
4.
5.
Assemble Fuel Pump (Pulsa-Jet)
1. Smooth side of cup (1) must rest against
diaphragm (6), Fig. 77. This prevents spring (1)
from cutting diaphragm.
2. When installing pump cover (2), tighten screws
evenly in staggered sequence to ensure a good
seal.
3. Inspect all sealing surfaces for nicks or damages
and repair or replace as required. Long pump pipe
(3), bottom housing (4), short carburetor pipe (5),
Fig. 77.
Fig. 75
Fig. 77
NOTE: SPECIFICATION TABLES BEGIN ON PAGE 63 OF THIS SECTION.
32

PULSA-JET LOW EMISSION
CARBURETORS: (Engines with type numbers
ending in A1 through A9 or E1 through E9):
1. Install choke shaft as shown in Fig. 78.
2. Install pilot jet until it seats firmly.
Assemble Choke-A-Matic® Linkage
Rotary Choke (Pulsa-Jet)
1.
2.
3.
Insert "T bend of Choke-A-Matic® linkage (1) into
same hole (6) as return spring (2).
Slide washer on the end of linkage and then slide
Choke-A-Matic® lever onto shaft (3).
Install lever assembly and stop switch (4) on
carburetor, Fig. 79.
NOTE: Hook small end of spring (3) on spring post
(2) and long hook in bottom hole of choke
shaft (1), Fig. 80.
Slide Choke
1. To assemble, slip washers (2) and spring (1) over
choke link, Fig. 81.
2. Hook choke link through hole in choke slide. Place
other end of choke link through hole in speed
adjustment lever.
3. Mount lever and stop switch insulator plate to
carburetor.
Fig. 78
Fig. 81
NOTE: SPECIFICATION TABLES BEGIN ON PAGE 63 OF THIS SECTION.
33

Manual Choke
Note: Bottom tooth of choke shaft (1) should
engage top tooth on manual choke lever
(2), Fig. 82.
Install Spiral
When inserting spiral, top must be flush to 1/32"
(.8 mm) below carburetor flange (1), and spiral parallel
with fuel tank mounting surface, Fig. 83.
Install Throttle Shaft and Plate
Cast Throttle Shaft
1. If Pulsa-Jet carburetor body had a throttle shaft
seal, install new seal with sealing lip up.
2. Place new dust seal on throttle shaft (1) and install
in carburetor body.
3. Install throttle plate (3) in carburetor body and
install throttle plate screw (2), Fig. 84.
4. With pencil or similar tool (5), insert valve (4) and
tighten Philips head screw (6), Fig. 84.
Stamped Throttle Shaft
1. Press in new rubber throttle shaft seal with sealing
lip down until seal bottoms.
2. Place new foam seal on throttle and insert shaft in
carburetor body. Throttle plate is chamfered and
has an identification letter stamped on one side of
valve (1).
3. Place throttle plate in carburetor with stamped
letter as shown in Fig. 85, and install throttle plate
screw.
Fig. 82
Fig. 83
Fig. 85
NOTE: SPECIFICATION TABLES BEGIN ON PAGE 63 OF THIS SECTION.
34

Vacu-Jet
1. Place new dust seal on throttle shaft and install in
carburetor body.
2. Install throttle plate in carburetor body and install
screws.
Install Choke Shaft and Plate (Pulsa-Jet)
1. Place metal washer (2) next to choke lever and
then foam washer (1).
2. Insert shaft assembly in carburetor body with stop
against remote control boss (3).
3. Insert choke plate in shaft with hole up (6) and in
dentations towards large welch plug (7), Fig. 86.
NOTE: On Choke-A-Matic® carburetors, be sure
that both ends of choke spring are en
gaged before sliding shaft all the way into
carburetor. Lever end (4), body end (5),
Fig. 86.
Install Fuel Pick-Up Tube
Pulsa-Jet
Slide new retainer clip (1) onto brass pipe. Heat small
end of new nylon tube in hot water and push onto brass
pipe. Slide retaining clip onto nylon tube over groove
(2) on brass pipe, Fig. 87.
Vacu-Jet
Thread fuel pick-up tube into carburetor body using a
9/16" wrench or socket (1), Fig. 88. No sealant is
required on threads.
Assemble Carburetor to Fuel Tank
1. Place new tank gasket on fuel tank.
2. Lower carburetor into fuel tank and install
mounting screws closest to choke plate first.
Fig. 62, Pulsa-Jet shown.
Fig. 86
Fig. 87
Fig. 88
NOTE: SPECIFICATION TABLES BEGIN ON PAGE 63 OF THIS SECTION.
35

Install Carburetor and Fuel Tank
Rotary Choke (Pulsa-Jet)
1. Connect governor linkage to carburetor linkage
and using Tool #19305, Offset Screwdriver, Tool
#19391, Torx® Wrench, or open end wrench (2),
install two screws (1) holding carburetor to engine,Fig. 89.
2. Install screw to bottom of fuel tank bracket (3).
Choke-A-Matic® with Slide Choke (Pulsa-Jet)
1. Install carburetor and tank as one assembly.
2. Hook throttle link (1) into carburetor throttle and
governor blade.
3. Raise carburetor into place, insert a new gasket
and fasten with mounting screws.
4. Install governor spring (2), Fig. 90.
5. If choke slide does not fully close (1), replace link
or use flat nose pliers to bend choke link (2),Fig. 91 (do not over bend).
6. Speed adjustment lever must make good contact
against stop switch (3) when moved to stop
position.
Install Carburetor and Tank Assembly
Model Series 60000, 80000,110000,130000(Pulsa-Jet)
1. Install carburetor and fuel tank as an assembly.
2. Hook throttle link into carburetor throttle andgovernor lever. (For various hook-ups, see
Remote Control, Section 4.)
3. Raise carburetor into place, insert a new gasket
and fasten with mounting screws.
4. Install governor spring (1). Install stop wire (2) and
remote control where used, Fig. 92.
Fig. 92
36
NOTE: SPECIHCATION TABLES BEGIN ON PAGE 63 OF THIS SECTION.

Vacu-Jet
1. Place new carburetor to cylinder gasket on 2. Place new carburetor to fuel tank gasket on fuelcarburetor and install carburetor on cylinder with tank and lift tank up against bottom of carburetor,two mounting screws. Install two screws in carburetor and fuel tank.
Choke-A-Matic® Linkage
Adjust Choke-A-Matic® Linkage
Slide Choke
The following covers Choke-A-Matic® parts installed as a part of carburetor assembly. See Section 4 for
Choke-A-Matic® remote controls.
1. To check operation of Choke-A-Matic® linkage, 2. Install stop switch wire and remote control where
move speed adjustment lever to "CHOKE" used.
position.
Install Control Panel
Model Series 91200, 92200, 94200
(with Type Numbers ending in A1 through
A9 or E1 through E9)
1. Move throttle lever (top) to idle position and move
choke lever (bottom) to full choke position, Fig. 93.
2. Install stop switch wire. Install choke link in choke
lever and control panel choke (lower) lever.
3. Move choke shaft to full choke position.
4. Install governor spring on governor tang, Fig. 93.
5. Install control panel on fuel tank and carburetor
assembly. Install two screws using T-20 Star Bit
from Tool #19442, Star Bit Kit. Fig. 93
NOTE: If engine is used with fixed adjustable controls, move throttle lever to TOP-NO-LOAD position and bend
tang up to hold throttle lever.
Install Control Panel Mf% **MMModel Series 80200, 82200, 90200, 91200, 92200,112200,130200,132200,135200,136200,
137200
1. Connect control linkage to control panel, when used and place control panel on fuel tank and carburetor.
2. Install and tighten two screws securely.
Carburetor Adjustment
NOTE: On low emission carburetors (engine with date codes ending in A1 through A9 or E1 through E9), only idle
RPM adjustment is possible.
Initial Adjustment
(except Low Emissions Carburetors)
1. Turn needle valve clockwise until it makes light contact with the seat. DO NOT FORCE.
2. The initial setting of needle valve is made by turning out (counterclockwise) 1 -1/2 turn. Final adjustment is made
with engine running.
3. Install complete air cleaner assembly.
NOTE: When starting a Pulsa-Jet engine for first time, fill fuel tank completely full. This eliminates priming the fuel
pump, thus ensuring a quick start.
NOTE: SPECIFICATION TABLES BEGIN ON PAGE 63 OF THIS SECTION.
37

1.
2.
3.
Final Adjustment
Start and run engine at half throttle for five minutes
to bring engine up to operating temperature.
Place governor speed control lever in "FAST1
position.
Turn needle valve in until engine misses
(clockwise - lean mixture) then turn it out past
4.
smooth operation point until engine runs unevenly
(counterclockwise - rich mixture).
Turn needle valve to midpoint between rich andlean so engine runs smoothly.
Final Adjustment, except Low Emissions Carburetors
6. Hold throttle shaft in the idle position. Move speedcontrol to fast position.
7. Release throttle shaft. Engine should accelerate
without hesitation or sputtering.
8. If engine does not accelerate smoothly, carburetorshould be readjusted, usually to a slightly richermixture.
1. Place equipment control lever in "SLOW" position.
2. Turn needle valve in until engine slows (clock
wise - lean mixture).
3. Turn needle valve out past smooth operating point
until engine runs unevenly (rich mixture).
4. Turn needle valve to midpoint between rich and
lean so engine runs smoothly.
5. Adjust idle RPM. Rotate throttle shaft
counterclockwise and hold against idle stop while
adjusting idle speed adjusting screw to obtain
1750 RPM.
Final Adjustment, Low Emissions Carburetors (with Type Numbers ending in A1 through A9 or E1through E9)
1. Start and run engine for five minutes to warm up
engine before making final adjustments.
2. Place speed control in slow position.
3. Adjust idle RPM. Rotate throttle counterclockwise
and hold against the idle stop while adjusting idle
speed adjusting screw to obtain 1500 RPM.
NOTE: Current production carburetors have a
pilot jet. These can be identified by not
having an idle mixture needle spring.
4. Release throttle and bend governed idle bracket
(1) to obtain 1750 RPM, Fig. 94.
Fig. 94
38
NOTE: SPECIFICATION TABLES BEGIN ON PAGE 63 OF THIS SECTION.

LMS FLO-JET CARBURETORS (LMS, LMT)
NOTE:LMS and LMT Flo-Jet carburetors are
combined in this section. Issues specific to
individual models or types will be noted in
the text and corresponding illustrations.
LMS FLO-JET
Model Series 83400, 93400,133400
Horizontal Crankshaft
Model Series 90700, 91700,100700,110700,
111700,112700,114700,12A700 through
12W800,121700 through 129800,130700,
131700,133700,135700 Vertical Crankshaft
LMS Flo-Jet carburetors are made in three basic
types: Fixed Orifice Main Jet (Fig. 95), Adjustable Main
Jet (Fig. 96), and Fixed Main Jet with Dry Bulb Primer
Systems, (Fig. 97).
Figs. 95, 96, and 97
Throttle lever (1)
Idle speed adjustment screw (2)
Idle mixture screw (3)
Float bowl (4)
Choke plate (5)
Choke lever (6)
Adjustable main jet (7)
LMT FLO-JET
Model Series 176400,196400, 226400,
250400, 256400 Horizontal Crankshaft
Model Series 194700,195700,196700,
254700, 257700, 258700, 259700, 28A700
through 28M700 and 28R700, 28V700,
282700, 283700, 284700, 285700, 286700,
288700, 289700 Vertical Crankshaft
LMT carburetors have a Fixed Orifice Main Jet with
Adjustable Idle Jet, Fig. 98. The different carburetors
are identified as LMT 1 and up or by six (6) digit
number. The letters LMT are cast into the body of the
carburetor while the numbers are stamped into
carburetor mounting flange next to idle mixture screw.
Fig. 98
NOTE: SPECIFICATION TABLES BEGIN ON PAGE 63 OF THIS SECTION.
39
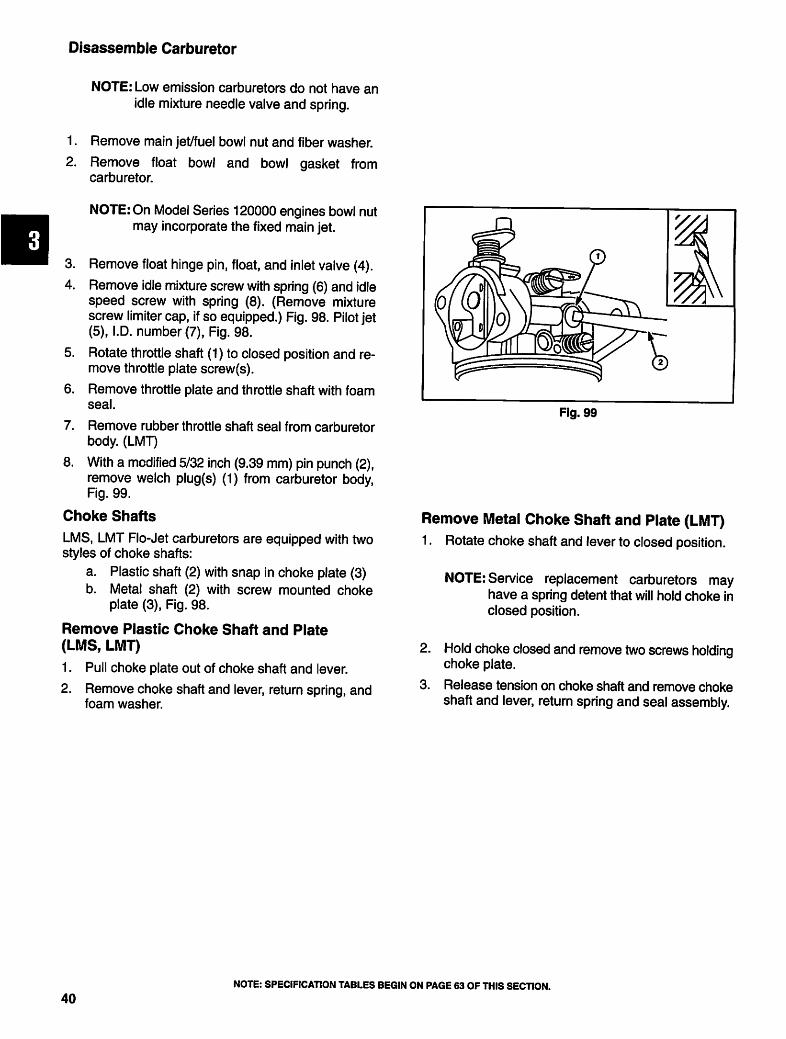
Disassemble Carburetor
NOTE: Low emission carburetors do not have an
idle mixture needle valve and spring.
1. Remove main jet/fuel bowl nut and fiber washer.
2. Remove float bowl and bowl gasket from
carburetor.
NOTE: On Model Series 120000 engines bowl nut
may incorporate the fixed main jet.
3. Remove float hinge pin, float, and inlet valve (4).
4. Remove idle mixture screw with spring (6) and idle
speed screw with spring (8). (Remove mixture
screw limiter cap, if so equipped.) Fig. 98. Pilot jet
(5), I.D. number (7), Fig. 98.
5. Rotate throttle shaft (1) to closed position and re
move throttle plate screw(s).
6. Remove throttle plate and throttle shaft with foam
seal.
7. Remove rubber throttle shaft seal from carburetor
body. (LMT)
8. With a modified 5/32 inch (9.39 mm) pin punch (2),
remove welch plug(s) (1) from carburetor body,
Fig. 99.
Choke Shafts
LMS, LMT Flo-Jet carburetors are equipped with two
styles of choke shafts:
a. Plastic shaft (2) with snap in choke plate (3)
b. Metal shaft (2) with screw mounted choke
plate (3), Fig. 98.
Remove Plastic Choke Shaft and Plate
(LMS, LMT)
1. Pull choke plate out of choke shaft and lever.
2. Remove choke shaft and lever, return spring, and
foam washer.
Fig. 99
Remove Metal Choke Shaft and Plate (LMT)
1. Rotate choke shaft and lever to closed position.
NOTE: Service replacement carburetors may
have a spring detent that will hold choke in
closed position.
2. Hold choke closed and remove two screws holdingchoke plate.
3. Release tension on choke shaft and remove choke
shaft and lever, return spring and seal assembly.
40
NOTE: SPECIFICATION TABLES BEGIN ON PAGE 63 OF THIS SECTION.

Remove Fuel Inlet Seat
LMS, LMT Flo-Jet Carburetors were manufactured
with two basic types of fuel inlet seats. One type
featured a replaceable Viton seat used with a metal-tipped float needle. The other type featured a pressed-in metal seat used with a Viton-tipped float needle.
To remove the replaceable Viton seat, use a smallcrochet hook (or similar tool), and hook/lift out the old
seat. Some carburetor models equipped with a Viton
seat also have a serviceable metal pressed-in seat
beneath. Consult Illustrated Parts List for application
and service as below.
To remove the pressed-in metal seat:
1. Use self-threading screw Part #93029 from Tool
#19165, Flywheel Puller, or 1/4-20 tap.
2. Thread screw or tap into fuel inlet seat 3-4 turns
and remove tool (1), Fig. 100.
3. Place 1/4" x 20 nut (1), Part #92278, and washer
(2), Part #224061 from 19332, Tool Kit, onto puller
screw.
4. Place a 1/4" drive 3/8" socket (3) over fuel inlet
seat.
5. Insert puller screw through socket into tapped inlet
seat and turn in until screw bottoms.
6. Thread nut against washer/socket and tighten nut
to pull out seat, Fig. 101.
Remove Pilot Jet Threaded Style (LMT)
Using a flat blade screwdriver, remove brass pilot jet
(1) from carburetor body, Fig. 102.
Fig. 100
Fig. 101
Fig. 102
NOTE: SPECIFICATION TABLES BEGIN ON PAGE 63 OF THIS SECTION.
41

NOTE: Some Low Emission LMT carburetors
have pressed in pilot jets (1) that are not
removable. DO NOT remove the pressed
in style pilot jet, Fig. 103.
Remove Emulsion Tube (LMT)
Using Tool #19280, Carburetor Screwdriver, remove
main carburetor emulsion tube (1), Fig. 104.
Inspect Carburetor
Inspect all components for wear, damage, cracks, or
plugged openings. Replace components if any of the
above conditions exist. Use only compressed air and
solvents to clear plugged openings.
Inspect idle mixture needle for bent needle point or a
groove in tip of needle. Replace if bent or grooved.
Inspect threaded type pilot jet and passages for debrisand dirt (LMT).
High Altitude Compensation
Engines set up for low altitude operation may
experience a decrease in performance if operated at
high altitudes.
For Engines:
LMS 1 through LMS-15, LMS-21, 22, 24, 28,
29, 30, 36
LMS 25,26,27, 31, 32, 34, 35, 37 and up
If poor performance is experienced refer to
Table No. 5, Page 64 or Table No. 6, Page 65,
Specifications, by basic Model Number and carburetor
I.D. number, and remove main air bleed jet (1),
Fig. 105, or fixed main jet (2), Fig. 106. If carburetor
I.D. number is not found, go to "Illustrated Parts List" byModel and Type number.
LMT
High altitude kits are available, consisting of a new pilotjet, emulsion tube and side main jet, or a new emulsion
tube with main jet. See "Illustrated Parts List" by Model
Series and type for correct kit part number.
Fig. 106
NOTE: SPECIFICATION TABLES BEGIN ON PAGE 63 OF THIS SECTION.
42

Assemble Carburetor
Install Welch Plug
1. Install welch plug(s) (1) with pin punch (2) slightly
smaller than outside diameter of plug.
2. Press in until plug is flat. DO NOT cave in plug.
3. After plug is installed, seal outside edge of plugwith fingernail polish or non-hardening sealant,
Fig. 107.
Install Fuel Inlet Seat
Viton Seat
These carburetors are equipped with a tan or black
inlet valve seat for gravity feed fuel systems and abrown inlet valve seat for fuel pump feed fuel systems.
Both seats are installed the same way.
1. Be sure inlet valve seat area is clean.
2. Install inlet needle seat with GROOVE DOWNusing Tool #19057, Bushing Driver (1), until seated
in groove (2), LMS shown, Fig. 108.
3. Check to be sure that inlet seat is fully seated.
Replaceable Metal Seat
Press fuel inlet seat (1) in until flush with surface shown
in (2), Fig. 109.
Fig. 107
Fig. 109
NOTE: SPECIFICATION TABLES BEGIN ON PAGE 63 OF THIS SECTION.
43

Install Choke Shaft and PlateLMS Models
(Return Spring on Lever)
1.
2.
3.
Install choke shaft (1) and felt washer (2).
Rotate choke shaft lever as shown in Fig. 110.
Insert choke plate in slot of choke shaft until valve
is centered on choke shaft with dimples (3) towardmain air jet (4).
(Return Spring on Shaft)
1. Install choke shaft, return spring (1), and feltwasher (3).
2. Rotate choke shaft counterclockwise until arm on
shaft is approximately 90° to carburetor bore.
3. Insert choke plate so numbers will be visible when
choke is closed, (2), Fig. 111.
(Manual Choke, Typical)
Install foam seal and choke shaft in carburetor body
with choke plate detent (1) against detent spring (2),(Low Emissions type shown) Fig. 112.
Fig. 110
Fig. 112
44
NOTE: SPECIFICATION TABLES BEGIN ON PAGE 63 OF THIS SECTION.

LMT Models
(Plastic Choke Shaft and Plate)
1. Insert spring inside large foam seal and slide sealand spring onto choke shaft with straight end of
spring up toward choke shaft lever (3).
2. Insert choke shaft into carburetor body until hook
of spring hooks on spring anchor (1).
3. Lift choke shaft and lever up slightly and turn
counterclockwise until stop on lever (2) clears
spring anchor (1) and push shaft down, Fig. 113.
4. Insert choke plate (4) into choke shaft and lever
with dimples (5) toward fuel inlet (6) side of
carburetor. Dimples help to hold and align choke
plate on shaft.
(Metal Choke Shaft and Plate)
1. Install foam seal and return spring on choke shaft
hooking small hook (1) in notch on choke lever,
Fig. 114, inset.
2. Insert choke shaft assembly into carburetor body
and engage large end of return spring on boss.
3. If carburetor has spring detent, guide detent spring
(2) into slot on choke shaft lever (4).
4. Place choke plate (5) on shaft with single notch on
edge towards fuel inlet. Two half moon dimples will
help to position valve on shaft.
Install Throttle Shaft
1. Install throttle shaft seal (2) with sealing lip down in
carburetor body until top of seal is flush with top of
carburetor (LMT), Fig. 115.
2. Install throttle shaft and small foam washer (1).
3. Turn shaft until flat is facing out.
4. Lay throttle plate (3) on shaft with numbers (4)
facing out and install screw (LMS).
5. Lay throttle plate on shaft with numbers (4) toward
idle mixture screw and dimples facing in, resting
on edge of shaft. Install two screws (LMT shown),
Fig. 115.
Fig. 113
Fig. 115
NOTE: SPECIFICATION TABLES BEGIN ON PAGE 63 OF THIS SECTION.
45

Install Emulsion Tube
1. Install emulsion tube (1) using Tool #19280, Car
buretor Screwdriver, until emulsion tube seats,
Fig. 116. Float (2), hinge pin (3), Fig. 116.
2. After installing emulsion tube, use compressed air
to blow out any chips or debris that may have been
loosened while installing emulsion tube.
Install Inlet Needle and Float
Insert inlet needle on float and install assembly oncarburetor body.
1.
2. Insert float hinge pin and center pin. Float height is
non-adjustable.
3. Install rubber gasket on carburetor and lay float
bowl on body.
4. Place fiber washer over bowl nut hole and install
main jet/bowl nut or bowl screw.
5. Tighten nut to 50 in. lbs. (6 Nm) torque (LMS).
6. Tighten screw to 40 in. lbs. (4.5 Nm).
Install Pilot Jet Threaded Style (LMT)
Install pilot jet until it seats securely, Fig. 102.
Install Carburetor Elbow (LMT)
• If carburetor elbow was removed, place newgasket and elbow on intake port and torquescrews to 100 in. lbs. (11 Nm).
Install Carburetor to Elbow (LMT)
1. Place two studs on carburetor and new gasket on
studs with long edge on side of gasket opposite
fuel inlet.
2. Hook governor link spring in throttle lever hole
without grommet.
3. Hook governor link in throttle lever hole with
grommet, with link on top of lever.
Install Carburetor (LMS)
Place fuel intake pipe seal in chamfer of carburetor (1)
and install carburetor with two mounting screws
torquing screws to 75 in. lbs. (9 Nm), Fig. 117.
Install Air Cleaner (LMS)
1. Install carburetor back plate with two sealant
coated screws (1) into carburetor. Do not tighten at
this time.
2. Then install third screw (2) but do not tighten.
3. Torque two screws into carburetor to 40 in. lbs.(5 Nm).
4. Torque remaining screw to 40 in. lbs. (5 Nm),Fig. 118.
Fig. 116
Fig. 117
Fig. 118
46
NOTE: SPECIFICATION TABLES BEGIN ON PAGE 63 OF THIS SECTION.

NOTE: On Choke-A-Matic® carburetors install
spring on choke shaft as shown in Fig. 110.
5. Install air cleaner cartridge, Pre-Cleaner (optional)
and cover making sure that three tabs engage
three slots in back plate.
Install Choke-A-Matic® Link (LMT)
Horizontal Control Plate
1. Insert "Z" bend of link (2) in outer hole of choke
lever from bottom of lever (4).
2. Slide "U" bend of link (1) into slot on governor
control bracket and place carburetor on intake
elbow.
3. Torque studs(3) to 65 in. lbs. (7 Nm), Fig. 119.
Vertical Control Plate
1. Insert "Z" bend of link (1) in inner hole of choke
lever from bottom of lever (3), Fig. 120.
2. Slide "U" bend of link into slot on governor control
bracket and place carburetor on intake elbow.
3. Torque studs to 65 in. lbs. (7 Nm), Fig. 120.
4. Install air cleaner body and torque nuts to
55 in. lbs. (6 Nm).
5. Be sure breather tube is on air cleaner body
opening.
6. Install air cleaner brace.
Carburetor Adjustment
Initial Adjustment
1. Install idle mixture screw and spring.
2. Turn screw in until it just touches needle seat.
3. Back out (counterclockwise) 1-1/4 to 1-1/2 turn.
NOTE: On carburetors with adjustable main jet
needle, turn main jet adjustment needle
clockwise until it just touches needle seat.
Then back off 1-1/4 turn.
Final Adjustment
NOTE: On carburetors with an adjustable main jet,
move speed control to fast position. Adjust
main jet mixture needle same as idle
mixture screw.
1. Start and run engine for 5 minutes at 1 /2 throttle to
bring engine up to operating temperature.
2. Move equipment speed control to idle position.
Fig. 120
NOTE: SPECIFICATION TABLES BEGIN ON PAGE 63 OF THIS SECTION.
47

3. Turn idle speed screw to obtain 1750 RPMminimum.
4. Turn idle mixture screw clockwise slowly until
engine just begins to slow.
5. Then turn screw opposite direction until enginejust begins to slow.
6. Turn screw back to midpoint.
7. Install limiter cap (1) at midpoint position, when
used, Fig. 121.
8. Move equipment speed control from idle to high
speed position.
9. Engine should accelerate smoothly.
10. If the engine stumbles or hesitates, open idle
mixture needle screw 1/8 turn.
NOTE: If engine is equipped with a governed idle
system, reset idle speed screw to
1200 RPM.
FLO-JET CARBURETORS (ONE-PIECE,
TWO-PIECE AND CROSSOVER)
NOTE: One-Piece, Two-Piece and Cross-Over
Flo-Jet carburetors carburetors are com
bined in this section. Issues specific to
individual models or types will be noted in
the text and corresponding illustrations.
Fig. 121
ONE-PIECE FLO-JET
Vertical Crankshaft
The small One-Piece Flo-Jet carburetor is illustrated in
Fig. 122 and was used on early Model Series 170700.
These are float feed carburetors with adjustable orifice
main jet needle valve and adjustable idle circuit needle
valve located on top of carburetor.
Main jet needle valve (1)
Idle mixture needle valve (2)
Throttle lever (3)
Idle speed adjusting screw (4)
Fuel inlet (5)
Choke lever (6)
Fig. 122
Fig. 122
NOTE: SPECIFICATION TABLES BEGIN ON PAGE 63 OF THIS SECTION.
48

The large One-Piece Floret carburetor is similar to the
small One-Piece Flo-Jet. The main difference is that
the main jet needle valve (1) is below fuel bowl,
Fig. 123.
Repair procedures for small and large One-Piece
Flo-Jet carburetors are similar except for location of
adjusting needles.
Fig. 123
TWO-PIECE FLO-JET
(SMALL, MEDIUM AND LARGE)
Figs. 124,125, and 126 illustrate the three sizes of
Two-Piece Flo-Jets used on Briggs & Stratton engines.
Fig. 124
Main jet needle valve (1)
Idle speed adjustment screw (2)
Idle circuit needle valve (3)
Choke lever (4)
Fig. 125
Main jet needle valve (1)
Idle speed adjustment screw (2)
Idle circuit needle valve (3)
Choke lever (4)
Fig. 126
Main jet needle valve (1) - (turn as directed to richen)
Idle speed adjusting screw (2)
Idle mixture screw (3) - (turn as indicated to open)
Choke (4)
Fig. 126
NOTE: SPECIFICATION TABLES BEGIN ON PAGE 63 OF THIS SECTION.
49

CROSS-OVER FLO-JET HORIZONTAL
CRANKSHAFT ENGINES
The cross-over Flo-Jet carburetor is used on Model
Series 253400, 255400 engines and is a float type
carburetor with idle circuit and main jet adjustment
needles. This carburetor also has an integral fuel
pump. All adjustments can be made from top of
carburetor, Figs. 127 and 128.
Fig. 127
Main jet needle valve (1)
Idle needle valve (2)
Idle speed adjustment (3)
Throttle lever (4)
Disassemble Cross-Over Flo-Jet (Fig. 128)
Fig. 128 (Sectional view)
Main jet needle valve (1)
Venturi (2)
Choke plate (3)
Float (4)
Main emulsion tube (5)
Float bowl nut (6)
Float bowl (7)
Throttle plate (8)
Idle mixture needle (9)
1. Remove idle and main jet adjustment needle
valves.
2. Remove float bowl mounting screw, washer and
float bowl.
3. Using a large blunt screwdriver, remove emulsion
tube.
4. Use screwdriver to remove two screws from choke
shaft.
5. Use screwdriver to remove screw from throttle
shaft.
6. Remove throttle plate and throttle shaft.
7. Remove fuel pump from carburetor taking care not
to lose pump flapper valve springs.
8. Use screwdriver to remove three screws from fuel
pump body.
Disassemble Carburetor
Small One-Piece Flo-Jet
1. Remove idle (2) and main jet needle valves (1),
Fig. 129.
2. Remove bowl nut (7) and fuel bowl (8).
3. Remove float pin to remove float and inlet needle
4. Use a large wide screwdriver to remove inlet valve
seat.
Fig. 129
Throttle plate (3)
Gaskets (4)
Float (5)
Emulsion tube (6)
Choke plate (9)
Venturi (10)
Fig. 128
Fig. 129
NOTE: SPECIFICATION TABLES BEGIN ON PAGE 63 OF THIS SECTION.
50

5. Small one-piece Flo-Jet (A): Use Tool #19280,
Carburetor Screwdriver, to remove emulsion tube
(3), Fig. 130 A.
Fig. 130
Main jet needle (1)
Venturi (2)
Emulsion tube (3)
Large One-Piece Flo-Jet
1. Remove idle circuit needle valve (1), Fig. 131.
2. Remove main jet needle valve assembly (4) from
float bowl and remove fuel bowl.
3. Use Tool #19280, Carburetor Screwdriver, to
remove emulsion tube (5), then remove jet from
top of carburetor.
4. Remove float pin to remove float (6) and inlet
needle.
Fig. 131
Throttle plate (2)
Gaskets (3)
Choke plate (7)
Venturi (8)
Idle circuit emulsion tube (9)
Small and Large One-Piece Flo-Jet
If necessary to remove choke shaft, venturi, or throttle
shaft, proceed in following sequence, Fig. 132.
1. Pry out welch plug (A, 1).
2. Insert sharp tool under choke shaft (B, 2), then pull
out choke valve with pliers, remove screw, spring,
and washer, and pull out nylon choke shaft (3).
3. Venturi can now be removed, Fig. 130. (Large
One-Piece Choke-A-Matic® carburetors have a
choke plate stop pin which must be pulled out to re
move venturi.)
4. Remove throttle shaft seals, when so equipped.
Fig. 130
Fig. 131
B
Fig. 132
NOTE: SPECIFICATION TABLES BEGIN ON PAGE 63 OF THIS SECTION.
51

Disassemble Two-Piece Flo-Jet
1. Remove idle circuit needle valve (2).
2. On early small model, loosen main jet needle valve
packing nut (6,7). Remove packing nut and main
jet needle valve together. On all current models,
remove main jet needle valve assembly.
3. Remove emulsion tube (8) with Tool #19280,
Carburetor Screwdriver. Use of Tool #19280 will
help to prevent damage to threads in lower
carburetor body.
NOTE: If threads have been damaged in lower
carburetor body, use Tool #19245, Tap Set,
to clean threads.
4. Because emulsion tube (8) projects diagonally into
a recess in upper body, it must be removed before
separating upper and lower bodies, Fig. 133.
5. Remove screws holding upper and lower bodies
together and separate the two bodies.
6. Remove float pin and remove float and inlet needle
as an assembly (9,10).
7. With a wide blade screwdriver that completely fills
slot, remove inlet seat (11).
8. On carburetors with pressed in seats, see
"Replacing Pressed in Fuel inlet Seats," page 42,
this Section.
9. Remove float hinge pin, float and inlet needle.
10. Remove choke plate and choke shaft.
On small two-piece Flo-Jets, venturi (3) is a separate
part and can be slipped out of lower body.
Some two piece Flo-Jets have a welch plug and it
should be removed only if choke shaft or choke plate
(5) is going to be removed. Some carburetors have a
nylon choke shaft. Remove as shown, Fig. 134 -A. Pry
out welch plug. B. Insert sharp tool under choke shaft
(2). C. Pull out choke plate (4) with pliers, remove screw,
spring, and washer, pull out nylon choke shaft (3).
Inspection
Reject idle and main jet needle valves if damaged (B),
Fig. 135.
Check float for leakage. If it contains fuel or is crushed,
it must be replaced. Replace float needle, if grooved
(4), bent (5) or worn. Replace inlet seat if damaged and
serviceable. On Cross-Over Flo-Jet, check pump body
for cracks or distortion and replace if damaged.
Fig. 135-A
Large Flo-Jet main jet (1)
Small Flo-Jet main jet (2)
Idle needle (3)
Fig. 133
B
Fig. 134
Fig. 135
NOTE: SPECIFICATION TABLES BEGIN ON PAGE 63 OF THIS SECTION.
52

Throttle Shaft, Plate and Bushings (Typical)
Excessive wear of the throttle shaft and/or throttle
shaft bushings can contribute to poor engine
performance.
Check Throttle Shaft and
Bushings for Wear
1. Wear between throttle shaft and bushings should
not exceed .010" (.25 mm).
2. Check wear by placing a short iron bar on upper
carburetor body as shown in Fig. 136.
3. Measure distance between bar and shaft with
feeler gauge (1) while holding shaft down and then
holding shaft up.
4. If difference is over .010" (.25 mm), either upper
body should be rebushed, throttle shaft replaced,
or both.
5. Wear on throttle shaft can be checked by
comparing worn and unworn portions of shaft.
6. To replace bushings, see next.
Throttle shaft should be removed only when necessary
to replace throttle shaft and/or bushings.
To remove throttle shaft, use a thin punch (1) to drive
out pin (2) holding throttle stop to shaft, remove throttle
plate, then pull out shaft, Fig. 137.
To Replace Throttle Shaft Bushings
1. Place a 1/4" x 20 tap (1) or an E-Z out in a vise.
2. Turn carburetor body to thread tap or E-Z out into
bushings (2) enough to pull bushings out of body,
Fig. 138.
3. Press new bushings into carburetor body with
a vise.
4. Insert throttle shaft to be sure it is free in bushings.
5. If not, run a size 7/32" drill through both bushings to
act as a line reamer.
6. Install throttle shaft, valve and stop.
Fig. 136
Fig. 138
NOTE: SPECIFICATION TABLES BEGIN ON PAGE 63 OF THIS SECTION.
53

Replace Inlet Seat, Pressed In Type
NOTE: Flo-Jet Carburetors were manufactured
with two basic types of fuel inlet seats. One
type featured a replaceable Viton seat
used with a metal-tipped float needle. The
other type featured a pressed-in metal seat
used with a Viton-tipped float needle.
To remove the replaceable Viton, use a small crochet
hook (or similar tool) to hook/lift out the old seat. Some
carburetor models equipped with a Viton seat also
have a serviceable metal pressed-in seat beneath.
Consult Illustrated Parts List for application and
service as below.
To remove the pressed-in metal seat:
1. Use a Part #93029 self-threading screw (1) or
remove one self-threading screw from Tool
#19069, Flywheel Puller, and clamp head of screw
in a vise (2).
2. Turn carburetor body to thread screw or screw
extractor into seat, Fig. 139.
3. Continue turning carburetor body to draw seat (4)
out.
4. Leave screw or screw extractor fastened to seat.
Insert new seat from repair kit Part #394682 into
carburetor body (seat has chamfer).
NOTE: If engine is equipped with a fuel pump, (as
indicated by letter "P" flange marking) (1),
install repair kit Part #394683, Fig. 140.
5. Press new seat flush with body using screw/screw
extractor and old seat as driver, Fig. 139.
6. Use care to ensure seat is pressed flush (3), and
not pressed below body surface or improper float
to float valve contact will occur.
Threaded Type
1. Remove float bowl nut and float bowl.
2. Remove float hinge pin and float assemble.
3. Remove inlet needle seat and gasket. Discardgasket.
4. Re-install and tighten inlet seat with new gasket in
place.
Repair Carburetor
Use new parts where necessary. Always use new
gaskets. Carburetor repair kits are available. See
Illustrated Parts List for particular model.
Fig. 139
Fig. 140
NOTE: SPECIFICATION TABLES BEGIN ON PAGE 63 OF THIS SECTION.
54

Install Float
1.
2.
Install inlet needle to float as shown, Fig. 141.
Open end of hook on spring must face away from
venturi.
Install float and inlet needle assembly and center
float hinge pin on two on hinge pin bosses.
Check Float Level
1. With body gasket in place on upper body and inlet
needle and float installed, float (2) should be
parallel to body mounting surface as shown in (1),
Fig. 142.
2. If not, bend tang on float (4) with needle nose pliers
(3) until surfaces are parallel. DO NOT PRESS ON
FLOAT.
3. Install new float bowl gasket and float bowl.
Tighten float bowl nut and washer.
Assemble One-Piece Flo-Jet
NOTE: On carburetors equipped with throttle shaft
seals, rubber lipped seals are installed with
lip out on both sides. Foam seals can be
installed either way.
1. If throttle shaft and/or venturi have been removed,
install throttle and throttle shaft first.
2. Install venturi.
3. Install jet on small One-Piece or emulsion tube on
large One-Piece Flo-Jet. The emulsion tube or jet
holds venturi in place, Fig. 130.
4. Replace choke shaft and plate.
5. Install new welch plug using sealer around edge of
plug.
6. Stake plug in eight places. Sealer is to prevent
entry of dirt into engine.
7. Install idle and main circuit adjustment needle
valves.
Assemble Two-Piece Flo-Jet
1. Assemble venturi (3) and venturi gasket, when
used, to lower body. Be sure holes in venturi and
venturi gasket are aligned. Most models do not
have a removable venturi.
2. Install choke parts and welch plug if previously
removed.
3. Use a sealer around welch plug to prevent entry of
dirt.
4. Stake welch plug at least twice on small two-piece
Flo-Jets and eight places on large two-piece Flo-
Jets.
Fig. 142
NOTE: SPECIFICATION TABLES BEGIN ON PAGE 63 OF THIS SECTION.
55

5. Fasten upper and lower bodies together with
mounting screws.
6. Screw in emulsion tube (8) with Tool #19280, Car
buretor Screwdriver, being careful that emulsion
tube tip enters recess in upper body, Fig. 143.
Tighten emulsion tube securely.
Assemble Cross-Over Flo-Jet
1. Install main emulsion tube using blunt screwdriver
to prevent damage to slot and metering hole.
2. Place bowl on carburetor and install bowl nut and
washer.
3.
4.
5.
Install one flapper valve spring on spring boss,
Fig. 144, and then place diaphragm (2) on
carburetor.
Place a pump valve spring (1) on spring boss in
pump body and place pump body on carburetor.
Place damping diaphragm (3), pump gasket (2),
and pump cover (1) on pump body (4) and install
three screws, Fig. 145. A fuel pump repair kit
is available. See Illustrated Parts List for part
number.
Fig. 145 - Pump diaphragm (5), pump valve spring (6),
spring and cup (7).
6. Place choke shaft in carburetor body and slide in
choke plate with notch out and dimples (1) down
toward float bowl, Fig. 146 - A.
Install two screws using a screwdriver.
Slide in throttle shaft and then slide in throttle plate
with dimples facing toward idle valve.
When valve is installed correctly, dimples will be
down and number on plate is visible with throttle in
closed or idle position, Fig. 146 - B.
10. Install idle and main jet needle valves.
Fig. 144
Fig. 145
Fig. 146-A Fig. 146-B
NOTE: SPECIFICATION TABLES BEGIN ON PAGE 63 OF THIS SECTION.
56
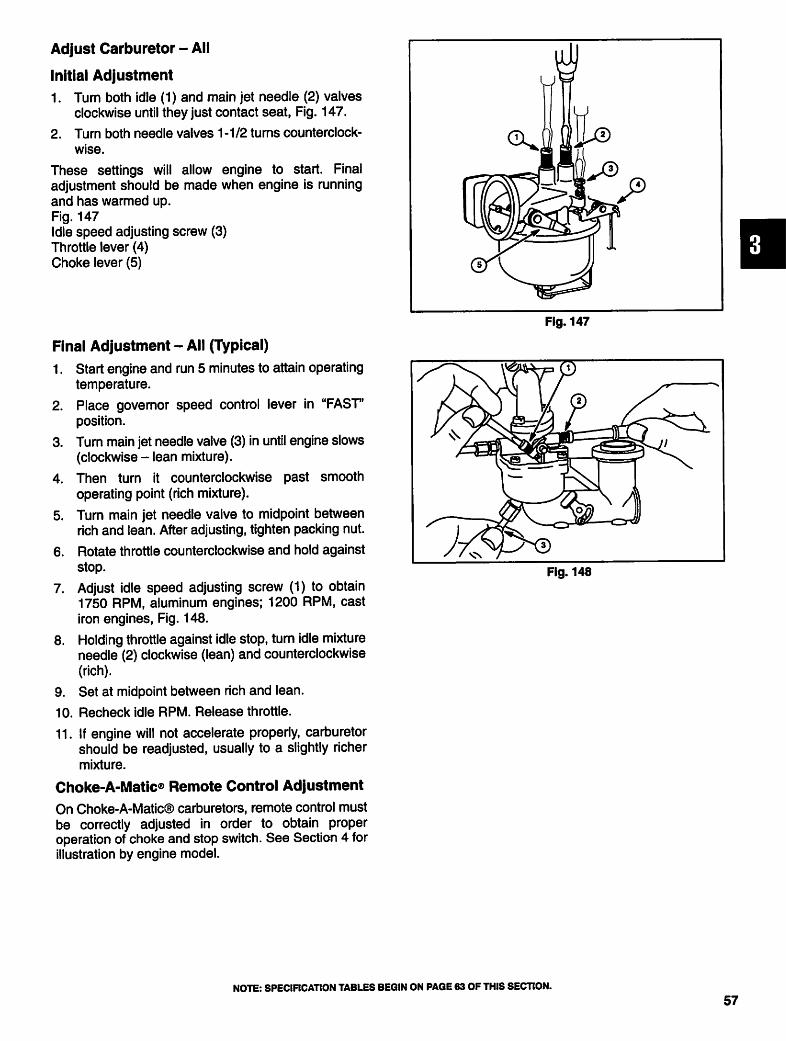
Adjust Carburetor - All
Initial Adjustment
1. Turn both idle (1) and main jet needle (2) valves
clockwise until they just contact seat, Fig. 147.
2. Turn both needle valves 1 -1/2 turns counterclock
wise.
These settings will allow engine to start. Final
adjustment should be made when engine is running
and has warmed up.
Fig. 147
Idle speed adjusting screw (3)
Throttle lever (4)
Choke lever (5)
Final Adjustment - All (Typical)
1. Start engine and run 5 minutes to attain operating
temperature.
2. Place governor speed control lever in "FAST'
position.
3. Turn main jet needle valve (3) in until engine slows
(clockwise - lean mixture).
4. Then turn it counterclockwise past smooth
operating point (rich mixture).
5. Turn main jet needle valve to midpoint between
rich and lean. After adjusting, tighten packing nut.
6. Rotate throttle counterclockwise and hold against
stop.
7. Adjust idle speed adjusting screw (1) to obtain
1750 RPM, aluminum engines; 1200 RPM, cast
iron engines, Fig. 148.
8. Holding throttle against idle stop, turn idle mixture
needle (2) clockwise (lean) and counterclockwise
(rich).
9. Set at midpoint between rich and lean.
10. Recheck idle RPM. Release throttle.
11. If engine will not accelerate properly, carburetor
should be readjusted, usually to a slightly richer
mixture.
Choke-A-Matic® Remote Control Adjustment
On Choke-A-Matic® carburetors, remote control must
be correctly adjusted in order to obtain proper
operation of choke and stop switch. See Section 4 for
illustration by engine model.
Fig. 147
Fig. 148
NOTE: SPECIFICATION TABLES BEGIN ON PAQE 63 OF THIS SECTION.
57

Idling Device and Throttle Control
(Two-Piece Flo-Jet)
A manual friction control (Fig. 149 - A) may be used to
limit throttle movement to any pre-set position. It is
commonly used for two purposes:
1. To return throttle to a "no-load" position on a pump,
generator, etc.
2. For cold weather starting on governed idle
engines. Throttle can easily be kept in a "near
closed" position while starting, which is most
favorable for cold weather starts, Fig. 149 - B.
Remote Throttle Control
Two Piece Flo-Jet
The remote throttle control opens carburetor throttle
until full governed speed is obtained, at which point
governor takes over control of throttle. At any point
beiow governed speed, throttle is held in fixed position
and engine speed will vary with load, Fig. 150. Idle
screw (1), remote choke control (2), throttle closes in
direction shown (3).
i
Fig. 149-A Fig. 149-B
Fig. 150
NOTE: SPECIFICATION TABLES BEGIN ON PAGE 63 OF THIS SECTION.
58

Fuel Pumps
(Crankcase Vacuum Operated)
Some models are factory or field equipped with fuel
pumps operated by crankcase vacuum. Fuel pumps
may be mounted on the blower housing, Fig. 151,
directly on carburetor, Fig. 152, or on a mounting
bracket, Fig. 153. Crankcase vacuum is obtained by a
fitting on crankcase cover, Fig. 154, a fitting on dipstick
tube, Fig. 153, a hollow bolt and fitting, Fig. 154, or
from crankcase breather valve, Fig. 152.
Briggs & Stratton engines have used three types of fuel
pump, integral with the carburetor, such as used on
Model Series 253400, 255400, page 55 of this section,
plastic bodied pumps, page 61, and metal body
pumps, page 70.
Fig. 151
Fig. 153
Fig. 152
Fig. 154
NOTE: SPECIFICATION TABLES BEGIN ON PAGE 63 OF THIS SECTION.
59

Operation
Typical operation of a fuel pump is illustrated in
Figs. 155,156, and 157. Any restriction in fuel or
vacuum lines will affect operation. Also any leaks that
cause air to get into fuel line or reduce vacuum in
vacuum line will reduce performance.
Fig. 155 - Fuel Flow Crankcase Pressure, Typical
Crankcase pressure and flow direction (1)
Atmospheric pressure acting on damping
diaphragm (2)
Fuel flow direction (3)
Fig. 156 - Fuel Flow Crankcase Vacuum, Typical
Crankcase suction and flow direction (1)
Atmospheric pressure acting on damping
diaphragm (2)
Suction fuel flow direction (3)
Atmospheric pressure-caused fuel flow (4)
Fig. 156
Fig. 157 - Exploded View - Typical Fuel Pump
Pump cover (1)
Cover gasket (2)
Fuel inlet (3)
Pump chamber body (4)
Pump diaphragm (5)
Pump gasket (6)
Vacuum inlet (7)
Outlet to carburetor (8)
Impulse chamber body (9)
Spring cup (10)
Valve springs (11)
Damping diaphragm (12)Fig. 157
NOTE: SPECiFiCATION TABLES BEGIN ON PAGE 63 OF THIS SECTION.
60

Fig. 158
Service Plastic Body Pump,
Disassemble Fuel Pump
1. Remove two screws holding pump to blower
housing.
2. Disconnect vacuum (2), fuel inlet (3) and fuel outlet
(1) hoses from pump, Fig. 158.
3. Remove three screws holding pump together,
Fig. 158.
4. Remove metal pump cover.
5. Remove and discard pump gasket and damping
diaphragm.
6. Remove pump body, diaphragm spring and spring
cup.
7. Remove pump diaphragm from pump base.
Inspect Fuel Pump
1. Check pump body and pump base for cracks or distortion of body. Replace if damaged.
2. Check vacuum and fuel hoses for cracks, softening or hardening. Replace, if any of the above are found.
Assemble Pump
1. Place new pump diaphragm on pump base.
2. Place pump cup and spring in center of pumping chamber, Fig. 158.
NOTE: When doing the next step, hold the pump base with the spring and cup up for ease of assembly.
3. Place pump body on pump base.
4. Place damping diaphragm on pump body and then pump gasket on diaphragm.
5. Install metal pump cover and three screws. Torque screws to 20 in. lbs. (2 Nm).
Service Metal Body Pump
1. To service fuel pump, remove pump from carburetor or mounting bracket.
2. When removing fuel supply line from tank to pump, be sure to plug fuel line or turn off fuel valve, if so equipped.
3. Disassemble fuel pump by removing four 1/4" head cap screws from pump cover.
4. Separate pump cover, pumping chamber and impulse chamber.
5. Discard old gaskets, diaphragms and springs. Clean pump parts in carburetor solvent or lacquer thinner.
A repair kit is available. See Illustrated Parts List. Kit includes all parts needed.
6. Install chamber gasket using locator pins.
7. Place springs (4) in spring recesses and install pump diaphragm on locator pins (Fig. 158).
8. Place pump chamber body on impulse body using locator pins.
9. Place damping diaphragm and cover gasket on pump body.
10. Install cover and four screws.
11. Torque screws to 10 to 15 in. lbs. (1 to 2 Nm). See Fig. 158 for exploded view.
NOTE: SPECIFICATION TABLES BEGIN ON PAGE 63 OF THIS SECTION.
61

KEROSENE ENGINES
NOTE: Kerosene engines are designed to start on
petrol and run on kerosene. Stop kerosene
engines by turning the kerosene shut-off to
the "off1 position to let the engine run out of
fuel.
Starting Procedures, Model Series 9K4000,
135400,13K400 and 19K400
Fig. 159 - To start Model Series 9K4000, 135400,
13K400 and 19K400, set the choke to the start
position. Prime the engine with petrol by depressing
the primer bulb (1) five times. Start and run the engine.
Open the kerosene shut-off valve (2) to continue
operation.
Fig. 160 - Model Series 9K4000,135400,13K400 and
19K400: the petrol is pumped by the primer bulb (4)
through the petrol hose from fuel tank (5) and petrol
hose to carburetor (3) into the carburetor bowl (2).
kerosene hose shut-off to carburetor (1)
Starting Procedures, Model Series 32K400
Fig. 161 - To start the engine, open the petrol shut-off
valve (7) and set the choke to the start position. Start
and run the engine. Close the petrol shut-off valve.
Open the kerosene shut-off valve (9) to continue
operation.
Kerosene filler (1)
Combination fuel tank (2)
Petrol filler (3)
Carburetor (5)
Fuel hose (6)
Filters (8)
NOTE: If the stop switch is used to stop the engine
before it has stopped from lack of kero
sene, the kerosene must be drained from
the carburetor fuel bowl by opening bleed
er screw (4), (Fig. 161), before restarting
engine. Restart using petrol only.
Fig. 159
Fig. 161
NOTE: SPECIFICATION TABLES BEGIN ON PAGE 63 OF THIS SECTION.
62

SPECIFICATION TABLES
DIAPHRAGM SPRING LENGTH
Color
None
Red
Blue
Green
Minimum
Length
15/16"
(23.8 mm)
1-1/8"
(28.6 mm)
1-5/16"
(33.3 mm)
1-7/64"
(28.2 mm)
Maximum
Length
1"
(25.4 mm)
1-7/32"
(30.9 mm)
1-3/8"
(35 mm)
1-3/8"
(35 mm)
TABLE NO. 2
DIAPHRAGM SPRINGS WHERE USED BY COLOR
Carburetor Type
Pulsa-Jet All Temperature
Automatic Choke
Pulsa-Jet Automatic Choke
Model Series
90000
BLUE, Standard
GREEN, See Service Bulletin
#533
RED, Standard
GREEN, See Service Bulletin
#533
110000
BLUE, Standard
GREEN, See Service Bulletin
#533
BLUE, Standard
GREEN, See Service Bulletin
#533
TABLE NO. 3
DIAPHRAGM SPRING LENGTH
Color
None
Red
Blue
Green
Minimum
Length
15/16"
(23.8 mm)
1-1/8"
(28.6 mm)
1-5/16"
(33.3 mm)
1-7/64"
(28.2 mm)
Maximum
Length
1"
(25.4 mm)
1-7/32"
(30.9 mm)
1-3/8"
(35 mm)
1-3/8"
(35 mm)
NOTE: If spring length is shorter or longer than
specified, replace diaphragm and spring.
NOTE: SPECIFICATION TABLES BEGIN ON PAGE 63 OF THIS SECTION.
63

TABLE NO. 4
DIAPHRAGM SPRINGS WHERE USED
BY COLOR
Carburetor Type
Vacu-Jet
All Temperature,
Automatic Choke
Vacu-Jet
Automatic Choke
Model Series
90000
Not Colored
Standard
GREEN
See Service Bulletin
#533
Not Colored
Standard
GREEN
See Service Bulletin
#533
HIGH ALTITUDE COMPENSATION CHART
(REMOVE AIR JET)
TABLE NO. 5
NOTE: Service Bulletin #533 covered installation
of choke plate and choke spring (GREEN)
(part #396227) to eliminate problems with
hot starting.
NOTE: On vertical crankshaft Model Series 92500
(Type Number 0600 and under) hook small
loop on post on carburetor body (2) and
long hook on choke shaft lever (1),
Fig. 162.
Fig. 162
Model Series
83400
90700
91700
100700
110700
111700
112700
114700
12A700
12A800
121700
121800
122700
122800
123700
123800
124700
124800
125700
126700
Carburetor
Identification #
LMS-22
LMS-30
LMS-3
LMS-10
LMS-13
LMS-14
LMS-3
LMS-14
LMS-5
LMS-15
LMS-1
LMS-10
LMS-11
LMS-2
LMS-7
LMS-12
LMS-1
LMS-3
LMS-11
LMS-14
LMS-1
LMS-2
LMS-4
LMS-7
LMS-12
LMS-5
LMS-24
LMS-5
LMS-24
LMS-24
LMS-5
LMS-24
LMS-24
LMS-5
LMS-24
LMS-24
LMS-5
LMS-24
LMS-24
LMS-5
LMS-5
NOTE: SPECIFICATION TABLES BEGIN ON PAGE 63 OF THIS SECTION.
64

TABLE NO. 5, (CONT'D.)
Model Series
127700
127800
128700
128800
129800
130700
131700
Carburetor
Identification #
LMS-24
LMS-24
LMS-24
LMS-24
LMS-24
LMS-9
LMS-19
LMS-9
LMS-19
MAIN JET HIGH ALTITUDE CHART
(CHANGE MAIN JET)
TABLE NO. 6
Model
Series
93400
93400
12A800
Carburetor
LMS or I.D.
#
LMS-38
6244
9208
LMS-25
LMS-32
LMS-35
3862
6291
7167
7623
8122
8126
Standard
Jet#
or Letter
Matter
Date
Code
96032400
27orE
before
Date
Code
96032500
Matter
Date
Code
96032400
27orE
before
Date
Code
96032500
28orF
C
26orD
C
26orD
High
Altitude
Jet # or
Letter
26orD
after Date
Code
96032400
L before
Date
Code
96032500
Latter
Date
Code
96032400
26orD
before
96032500
27orE
B
C
B
C
93400
12B800
12C700
12C800
12D800
12E700
TABLE NO. 6
7011
7167
7623
8122
8126
6975
8120
8124
8823
LMS-25
LMS-35
5849
6291
6975
8120
8124
8823
LMS-25
LMS-35
5849
6975
8120
8124
8823
LMS-31
3861
7167
8122
8124
(CONT'D.)
M after
Date
Code
96032400
27orE
before
Date
Code
96032500
C
26orD
C
26orD
L
R
28orF
C
28orF
L
28orF
L
R
28orF
C
L
R
28orF
C
L
Latter
Date
Code
96032400
26orD
before
96032500
B
C
B
C
B
B
27orE
A
27orE
B
26orD
B
B
27orE
A
B
B
26orD
B
B
NOTE: SPECIFICATION TABLES BEGIN ON PAGE 63 OF THIS SECTION.
65

Model
Series
12E800
12F700
12F800
12G700
TABLE NO.
Carburetor
LMS or I.D.
#
LMS-31
3861
7167
8122
8124
LMS-32
3862
7167
7623
8122
8124
8126
8844
LMS-32
3862
7167
7623
8122
8124
8126
8844
LMS-25
LMS-32
LMS-35
3862
5849
6291
6975
8120
8125
8823
8843
6 (CONT'D
Standard
Jet#
or Letter
28orF
C
L
28orF
C
26orD
C
L
26orD
T
28orF
C
26orD
C
L
26orD
T
28orF
C
28orF
L
C
R
S
.)
High
Altitude
Jet # or
Letter
26orD
B
B
27orE
B
C
B
B
C
M
27orE
B
C
B
B
C
M
27orE
A
27orE
B
A
B
T
Model
Series
12G800
12H700
12H800
12J700
12J800
12M800
TABLE NO.
Carburetor
LMS or I.D.
#
LMS-25
LMS-32
LMS-35
3862
5849
6291
6975
8120
8124
8125
8823
8843
7623
8126
8844
7163
7623
8121
8124
8126
7623
8126
8823
7163
7623
8121
8126
8823
6975
7623
8120
8126
6 (CONT'D.)
Standard
Jet#
or Letter
28orF
C
28orF
L
C
R
S
26orD
T
26orD
L
26orD
26orD
R
26orD
R
L
26orD
L
26orD
High
Altitude
Jet # or
Letter
27orE
A
27orE
B
A
B
T
C
M
C
B
C
C
B
C
B
B
C
B
C
66
NOTE: SPECIFICATION TABLES BEGIN ON PAGE 63 OF THIS SECTION.

Model
Series
12S700
12S800
12T700
12T800
12U800
TABLE NO. 6
Carburetor
LMS or I.D.
#
LMS-31
3861
7167
8122
8124
LMS-31
3861
7167
8122
8124
LMS-31
LMS-32
3861
3862
7167
7623
8122
8124
8126
8844
LMS-32
3862
7167
7623
8122
8124
8126
8844
7167
8122
8124
8823
(CONT'D.)
Standard
Jet#
or Letter
28orF
C
L
28orF
C
L
28orF
C
26orD
C
L
26orD
T
28orF
C
26orD
C
L
26orD
T
C
L
R
High
Altitude
Jet # or
Letter
26orD
B
B
26orD
B
B
26orD
B
C
B
B
C
M
27orE
B
C
B
B
C
M
B
B
B
Model
Series
12V800
12W800
121700
121800
122700
TABLE NO. 6
Carburetor
LMS or I.D.
#
7163
8121
8124
8823
6975
8120
8124
LMS-25
LMS-25
LMS-26
LMS-31
LMS-35
LMS-42
3466
6291
LMS-25
LMS-25
LMS-31
LMS-35
LMS-42
3466
3861
6291
LMS-25
LMS-25
LMS-31
LMS-35
LMS-42
3466
3861
6291
(CONT'D.)
Standard
Jet#
or Letter
26orD
L
R
L
28orF
28orF
27orE
28orF
28orF
28orF
28orF
28orF
28orF
28orF
28orF
28orF
28orF
28orF
28orF
28orF
28orF
28orF
High
Altitude
Jet # or
Letter
C
B
B
B
26orD
27orE
26orD
27orE
26orD
27orE
26orD
27orE
26orD
27orE
26orD
27orE
26orD
27orE
26orD
27orE
26orD
27orE
NOTE: SPECIFICATION TABLES BEGIN ON PAGE 63 OF THIS SECTION.
67

Model
Series
122800
123700
123800
124700
TABLE NO.
Carburetor
LMS or I.D.
#
LMS-25
LMS-25
LMS-31
LMS-35
3466
3861
6291
LMS-25
LMS-25
LMS-32
LMS-35
3466
3862
6291
LMS-25
LMS-25
LMS-32
LMS-35
3466
3862
6291
LMS-25
LMS-25
LMS-27
LMS-32
LMS-35
3466
3862
6291
6 (CONT'D.)
Standard
Jet#
or Letter
28orF
28orF
28orF
28orF
28orF
28orF
28orF
28orF
28orF
28orF
28orF
28orF
28orF
28orF
28orF
28orF
28orF
30orH
28orF
28orF
28orF
28orF
28orF
High
Altitude
Jet # or
Letter
26orD
27orE
26orD
27orE
26orD
27orE
26orD
27orE
27orE
26orD
27orE
26orD
27orE
26orD
27orE
26orD
27orE
29orG
27 or E
27orE
26orD
27orE
27orE
Model
Series
124800
125700
126700
126800
TABLE NO.
Carburetor
LMS or I.D.
#
LMS-25
LMS-25
LMS-32
LMS-35
3466
3862
6291
5849
LMS-27
LMS-32
3862
LMS-25
LMS-25
LMS-27
LMS-32
LMS-35
3466
3862
6291
LMS-25
LMS-25
LMS-32
LMS-35
3466
3862
5849
6291
6 (CONT'D.)
Standard
Jet#
or Letter
28orF
28orF
28orF
28orF
C
30orH
28orF
28orF
28orF
30orH
28orF
28orF
28orF
28orF
28orF
C
28orF
High
Altitude
Jet # or
Letter
26orD
27orE
26orD
27orE
A
29orG
27orE
26orD
27orE
29orG
27orE
26orD
27orE
26orD
27orE
A
27orE
68
NOTE: SPECIFICATION TABLES BEGIN ON PAGE 63 OF THIS SECTION.

Model
Series
127700
127800
127800
TABLE NO. 6
Carburetor
LMS or I.D.
#
LMS-25
LMS-32
LMS-35
3862
6291
7167
7623
8122
8124
8126
8844
LMS-25
LMS-32
LMS-35
3862
6291
7167
7623
8122
8124
8126
8844
► (CONT'D.)
Standard
Jet#
or Letter
28orF
C
26orD
C
L
26orD
T
28orF
28orF
C
26orD
C
L
26orD
T
High
Altitude
Jet # or
Letter
27orE
B
C
B
B
C
M
27orE
27orE
B
C
B
B
C
M
Model
Series
128700
128800
TABLE NO. 6
Carburetor
LMS or I.D.
#
LMS-25
LMS-35
LMS-41
LMS-40
6291
6292
6293
7163
7623
8121
8124
8126
8590
8844
LMS-25
LMS-35
LMS-41
LMS-40
6291
6292
6293
7163
7623
8121
8124
8126
8590
8844
(CONT'D.)
Standard
Jet#
or Letter
28orF
26orD
L
26orD
U
T
28orF
26orD
L
26orD
U
T
High
Altitude
Jet # or
Letter
27orE
C
B
C
C
M
27orE
C
B
C
C
M
NOTE: SPECIFICATION TABLES BEGIN ON PAGE 63 OF THIS SECTION.
69

Model
Series
129700
TABLE NO.
Carburetor
LMS or I.D.
#
LMS-25
LMS-35
LMS-40
LMS-41
6291
6292
6293
6975
7273
7288
7623
8120
8126
8823
8843
6 (CONT'D.
StandardJet#
or Letter
28orF
L
L
27orE
26orD
L
26orD
R
S
)
High
Altitude
Jet # or
Letter
27orE
B
B?
C
C
B
C
B
T
Model
Series
129800
133400
133700
135700
TABLE NO.
Carburetor
LMS or I.D.
#
LMS-25
LMS-35
LMS-40
LMS-41
6291
6292
6293
6975
7273
7288
7623
8120
8126
8823
8843
LMS-34
4732
7475
LMS-36
LMS-39
6285
8143
LMS-36
6 (CONT'D.)
Standard
Jet#
or Letter
28orF
L
L
27orE
26orD
L
26orD
R
S
33orK
N
30orH
29orG
30orH
High
Altitude
Jet # or
Letter
27orE
B
B?
C
C
B
C
B
T
31 orl
30orH
29orG
28orF
29orG
70
NOTE: SPECIFICATION TABLES BEGIN ON PAGE 63 OF THIS SECTION.

SECTION 4
Gov. Controls, Carb. Linkage &
Flywheel Brakes
Section Contents
Page
GOVERNOR CONTROL BRACKET IDENTIFICATION
Horizontal Crankshaft 2
Vertical Crankshaft 3
BAND BRAKE CONTROLS m
Disassemble 27
Remove
Current and Early Style 28
Assemble
Current and Early Style 28
Adjust 28System 4® Electric Start Controls 29
Test 29
FLYWHEEL BRAKES
Model Series 90000,100000 30on
Remove ou
Assemble 31Brake 31
Inspect
Switch 31Model Series 120000 29
Remove 31Assemble 30Inspect
Brake 31Switch 31
REMOTE CONTROLS 4
Operation
Remote Governor Control 4Remote Throttle Control 4Choke-A-Matic® Control 4
Adjustment
All Model Series (except 120000) 4
Dial Control 4Model Series 120000 4

GOVERNOR CONTROL BRACKET IDENTIFICATION
Horizontal Crankshaft
Fig. 1 -170400,190400,195400, 220400, 221400,
251400,252400 with Swivel Control before Date
Code 83121600
Fig. 2 -170400,171400,190400,194400,195400,221400, 222400, 252400, 254400 with Rack & Pinion
Control after Date Code 83121500,
except 253400, 255400
Fig. 4 - 253400, 255400
Fig. 5 - 230000, 240000, 300000, 320000
Fig. 3 -176400,192400, 226400, 250400, 256400Lever Control

GOVERNOR CONTROL BRACKET IDENTIFICATION, (CONT'D)
Vertical Crankshaft
Fig. 6 -194700,195700,196700, 254700, 257700,
258700,259700,28A700, 28B700,28C700, 28D700,
28E700, 28M700, 282700, 283700, 285700,286700,288700,289700 with Horizontal Rack & Pinion
control for Briggs & Stratton/Walbro
LMT Carburetors
Fig. 9 - Late Style, 170700,171700,190700,191700,
Swivel Control Bracket for Briggs & Stratton One
Piece Flo-Jet Carburetors
Fig. 7-170700,190700,191700,192700,193700,
194700,195700,196700, 220700, 252700, 253700,
254700, 257700, 256700,258700, 280700, 28A700,
28B700, 28C700,28D700,28M700, 283700, 286700,
289700 with Vertical Rack & Pinion Control forBriggs & Stratton/Walbro LMT Carburetors
Fig. 10 - Early Style, 170700,171700,190700,
191700, Swivel Control Bracket for Briggs & Strat
ton One Piece Flo-Jet Carburetors
Fig. 8 -170000,190000, 220000,250000, 280000,except 286700, Vertical Rack & Pinion Control forBriggs & Stratton One Piece Flo-Jet Carburetors

REMOTE CONTROLS
In general, there are three types of remote controls: remote governor control, remote throttle control, andChoke-A-Matic® control. See the carburetor section and following pages for specific control assemblies andinstallation hook-up by engine model.
REMOTE GOVERNOR CONTROL
The remote governor control regulates the engine speed by changing the governor spring tension, thus allowing thegovernor to control the carburetor throttle at all times and maintain any desired speed.
REMOTE THROTTLE CONTROL
The remote throttle control is used on an engine having a fixed no load governed speed setting such as 3600 or 4000 RPM.
This control enables an operator to control the speed of an engine, similar to an accelerator used on an automobile.However, when full governed speed is obtained, the governor prevents overspeeding and possible damage tothe engine. At any point below the governed speed, the throttle is held in a fixed position and the engine speed will varywith the load.
CHOKE-A-MATIC® REMOTE CONTROL
On Choke-A-Matic® carburetors, the remote control
must be correctly adjusted in order to obtain proper
operation of the choke and stop switch. See
Carburetor section for details.
Model Series 120000
1. Move control lever until a 1/8" (3.18 mm) dia. rod
can be inserted through hole (1) in control plate
and control lever, Fig. 11.
2. Place equipment control in "RUN" position and
install casing and wire on control lever and control
bracket, Fig. 11.
Travel of remote control wire must be a minimum of
1-3/8" (35 mm) (B) in order to achieve full "CHOKE1 (1)
and "STOP" (2) position, Fig. 12. Distance (A) is 2-1/8"
(54 mm).
DIAL CONTROLCHOKE-A-MATIC
ADJUSTMENTS
Dial controls seldom require adjustment unless blower
housing has been removed.
1. To Adjust: Place dial control knob in "START"
position.
2. Loosen control wire screw (4) - move lever (2) to
full choke position (1). Allow a 1/8" (3.18 mm) gap
between lever and bracket as shown (3), Fig. 13.
3. While holding lever, tighten screw (4). Stop
switch (5).
Fig. 13

GOVERNOR BRACKETS, LINKAGES, AND
CONTROLS
The following drawings of governor controls (Figs.
14 through 49 and 61 through 136) are to show how
governor links and springs are to be installed on
carburetors. For governor control adjustments, see
Section 5, GOVERNORS. Figs. 14-22 below show
Models 60100, 61100, 80100, 81100 Horizontal
Crankshaft. "A" indicates movement of cable or
linkage to increase speed, "B" to decrease speed.
Pull out rod (1) to increase speed. Governor spring
hooks in hole (2), Fig. 14.
Remote control assembly - turn screw (1) counter
clockwise to increase speed, Fig. 15.
Speed adjusting lever (1), with spring in #1 hole (2),
Fig. 16.
Hook spring in this hole (1), Fig. 17.
Place lever in choke detent. If choke is not fully closed,
bend link where shown (1) to attain full choke, Fig. 18.
Fig. 14
Fig. 18

Bell crank (1) and remote control lever (2) move in
directions shown to increase (A) or decrease (B)speed, Fig. 19.
Closed choke position (1)
Stop switch in "run" position (2)
Stop switch in "stop" position (3), insetFig. 20
Fig. 20
Idle adjustment screw (1)
Spring hooked in this hole (2)
Speed adjusting screw - turn in to increase speed (3)
Needle valve adjustment (4)
Fig. 21
Model Series 60200, 61200, 80200, 81200,
82200 Horizontal Crankshaft
Typical remote control choke, Fig. 22.
Fig. 22

Turn thumbscrew (1) counterclockwise as shown to
increase speed, spring hooked in #4 hole (2), Fig. 23.
Pull out rod (1) to increase speed (A), governor spring
in this hole (2) in speed adjusting lever, Fig. 24.
Turn in speed adjustment screw (2) to increase speed,
needle valve (3), idle adjustment screw (1), Fig. 25.
Inset shows spring attachments, Fig. 26.
Fig. 23
Fig. 25
Fig. 26

Choke position closed (1), Inset shows spring
attachment to stop switch, Fig. 27.
Model Series 83400 Horizontal Crankshaft
Turn speed adjusting screw (1) clockwise to increase,
counterclockwise to decrease, Fig. 28.
Model Series 80200, 82200, 90200 Horizontal
Crankshaft, Air Vane Governor
Standard controls, Fig. 29.
Manual choke, top mount remote control, Fig. 30.
Fig. 27
Fig. 30

Manual choke, manual friction throttle, Fig. 31.
Manual choke, remote control, governed idle. Fig. 32.
Choke-A-Matic®, Fig. 33.
Manual choke, bottom mount remote control, Fig. 34.
Fig. 31
Fig. 32
Fig. 33
Fig. 34

Model Series 60300,60400, 61300, 80300,80400, 81400 Horizontal Crankshaft
Fig. 35
Turn governor screw as
shown to increase speed.
Fig. 36
Top speed limit device (1).
Fig. 37
Turn governor screw as
shown to increase speed.
Fig. 38
Move remote control lever as
shown to increase speed.
Swivel screw, (1).
Fig. 39
Turn governor screw as shown to increase (A) or
decrease (B) speed.
Fig. 40
Move throttle cable as shown to increase (A) or decrease(B)speed.
10
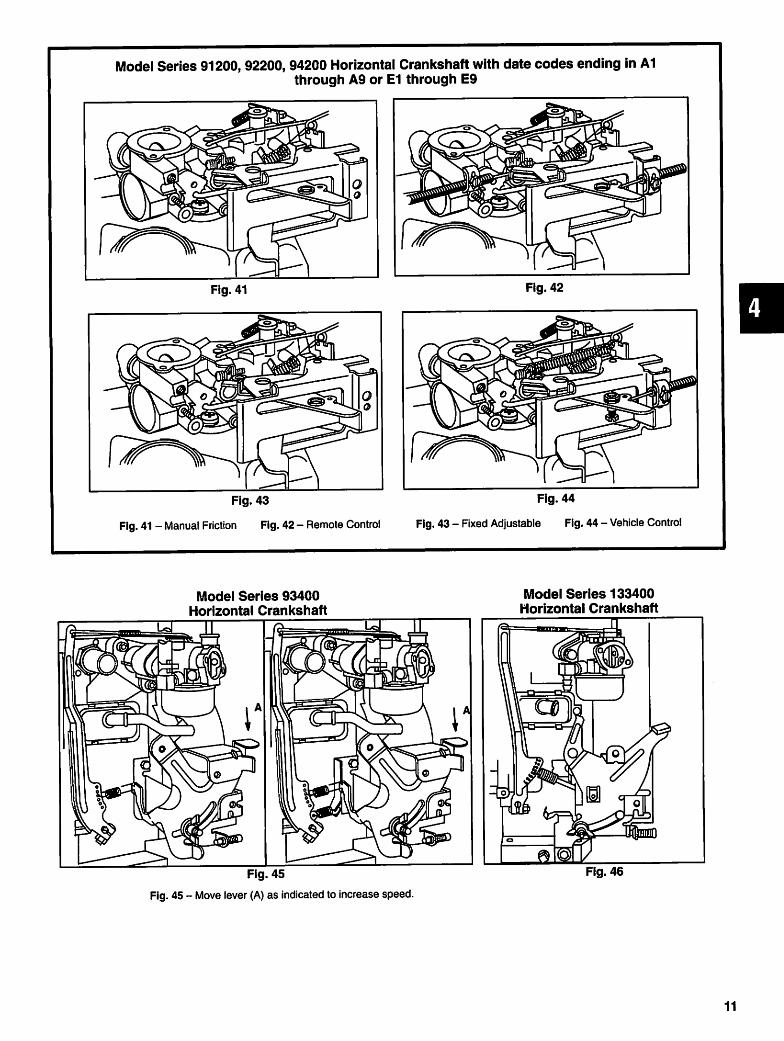
Model Series 91200,92200, 94200 Horizontal Crankshaft with date codes ending in A1through A9 or E1 through E9
Fig. 41
Fig. 43
Fig. 41 - Manual Friction Fig. 42 - Remote Control
Fig. 42
Fig. 44
Fig. 43 - Fixed Adjustable Fig. 44 - Vehicle Control
Model Series 93400
Horizontal Crankshaft
Model Series 133400
Horizontal Crankshaft
Fig. 45
Fig. 45 - Move lever (A) as indicated to increase speed.
Fig. 46
11

Model Series 80000,91200,110000,130000 Horizontal Crankshaft, Mechanical Governor
Fig. 47 - Standard Controls
Fig. 49 - Choke-A-Matic®
Fig. 48 - Manual Choke, Manual Friction
Fig. 50 - Manual Choke, Remote Controls
Fig. 51 - Manual Choke, Remote Control, Governed Idle Fig. 52 - Fixed Adjustable
Fig. 53 - Vehicle Controls, Throttle Return
12

Model Series 100200,130200 Horizontal Crankshaft
Manual friction governor control. Pull knob up as
indicated (A) to increase speed, Fig. 54.
Fig. 54
Remote control with governor, Fig. 55.
Fig. 55
Standard governor control. Turn thumbscrew clock
wise as indicated (A) to increase speed. Inset: remote
control cable moves as indicated to increase speed (A)
Fig. 56.
Fig. 56
13

Choke-A-Matic® remote control mounted on top of
engine showing casing clamp (1), (inset A), and
direction cable moves to close choke. Choke-A-Matic®
remote control (inset B) showing stop switch (2)
direction to choke, (3), and movement of linkage to
close choke, (4), Fig. 57.
Fig. 57
Pull throttle control knob up to run (1), push down to
stop (2), Fig. 58.
Fig. 58
Place lever (4) in choke detent (5). If choke (1) is not
fully closed, adjust nylon nut (2) with socket wrench
until choke just closes. Lever stop position (3), Fig. 59.
Fig. 59
Pull lever (1) to full choke position (2). The distance
between throttle stamping and throttle screw stop (4)
must be 9/16" (14.27 mm). To adjust, bend linkage
where shown (3), Fig. 60.
Fig. 60
14

Model Series 176400,19B400,19E400,19F400,
19G400,192400,196400,197400 with Bell CrankControls and One Spring, Horizontal Crankshaft
Model Series 176400,19B400,19E400,19F400,
19G400,192400,196400,197400 with Bell Crank
Controls and Two Springs, Horizontal Crankshaft
Fig. 61 Fig. 62
Model Series 226400, 250400, 256400 Horizontal
Crankshaft Control, One Spring
Model Series 226400, 250400, 256400
Horizontal Crankshaft Control, Two Springs
Fig. 63 Fig. 64
15
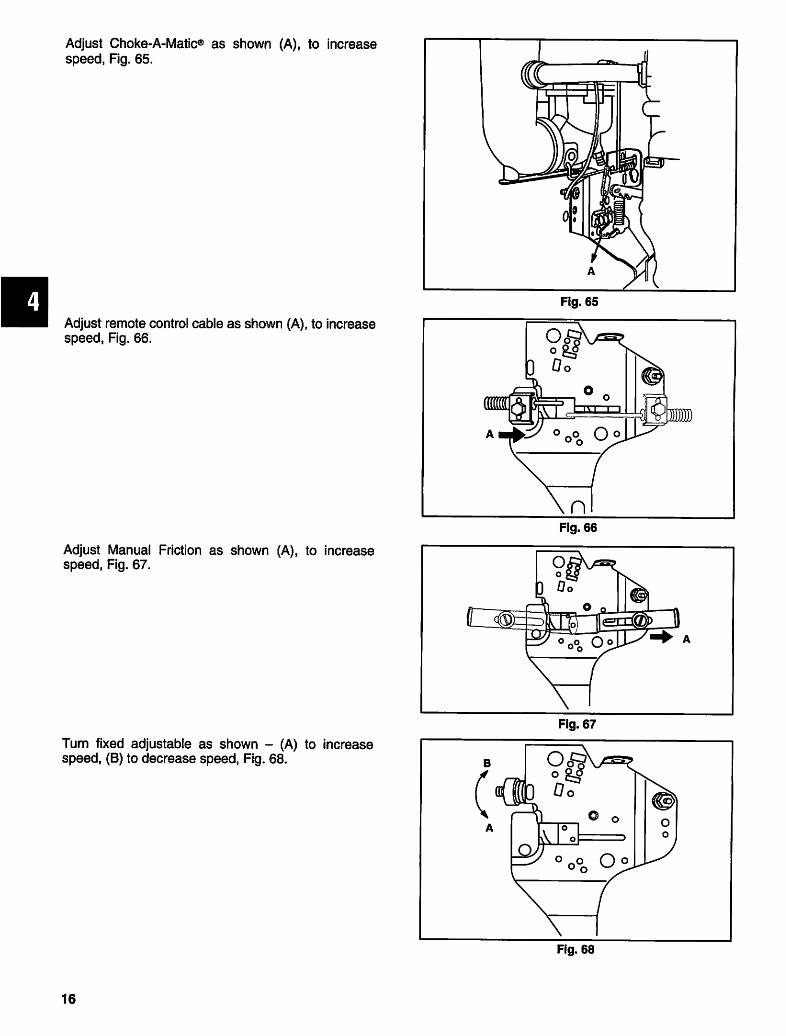
Adjust Choke-A-Matic® as shown (A), to increase
speed, Fig. 65.
Adjust remote control cable as shown (A), to increase
speed, Fig. 66.
Adjust Manual Friction as shown (A), to increase
speed, Fig. 67.
Turn fixed adjustable as shown - (A) to increase
speed, (B) to decrease speed, Fig. 68.
Fig. 65
Fig. 66
b °°r-\_^ o q|~j\J7oi I] <s
M[£/-*^a
Fig. 67
Fig. 68
16

Model Series 170400,190400,195400,
220400, 221400, 251400, 252400 Horizontal
Crankshaft with Swivel Lever Control before
Date Code 83121600
Adjust Choke-A-Matic® linkage and cable as shown
(A), to increase speed, Fig. 69.
Adjust cable or turn knob as shown (A) to increase
speed. Manual friction (1), fixed adjustable (2), remote
control (3), Fig. 70.
Adjust as shown (A) to increase speed. Manual friction
(1), fixed adjustable (2), remote control (3), Fig. 71.
Model Series 230000, 240000, 300000,
320000
Horizontal Crankshaft
Remote Governor Control
Attach remote control casing and wire as shown in
Figs. 72 or 73. Do not change the position of the small
elastic stop nuts below the thumb nut (1). They ensure
a governed idle speed and protection against over-
speeding. Move lever as shown to increase (A) or
decrease (B) speed.
Fig. 69
Fig. 70
Fig. 71
Fig. 72 Fig. 73
17

Thumb Nut Adjustment
Remove thumb nut and upper elastic stop nut (2),
Figs. 76 and 77. Replace thumb nut and adjust to
desired operating speed. (See Figs. 74-79). Do not
change the position of the lower elastic stop nut. It
provides protection against overspeeding.
Governed Idle
All engines in Model Series 243400,300400, 320400,
and some 233400 engines use two governor springs
(4), Fig. 78. The shorter spring keeps the engine on
governor, even at idle speed. If moderate loads are
applied at idle, the engine will not stall.
Fig. 79
18

Model Series 220000,250000 Horizontal Crankshaft with Rack & Pinion Control after Date code
83121500, Except 253400, 255400
Fig. 80
Fig. 80 - Choke-A-Matic®
Fig. 81
Fig. 81 - Remote Control Choke (1)
Fig. 82
Fig. 82 - Manual Friction
Fig. 83
Fig. 83 - Fixed Adjustable
Figs. 80 - 83: Move as shown (A) to increase speed, (B) to decrease speed.
19

Model Series 253400,255400 Horizontal Crankshaft
Fig. 84 Fig. 85
Fig- 86 Fig. 87 - Fixed speed screw (1)
Figs. 84 - 87: Move as shown (A) to increase speed, (B) to decrease speed.
20
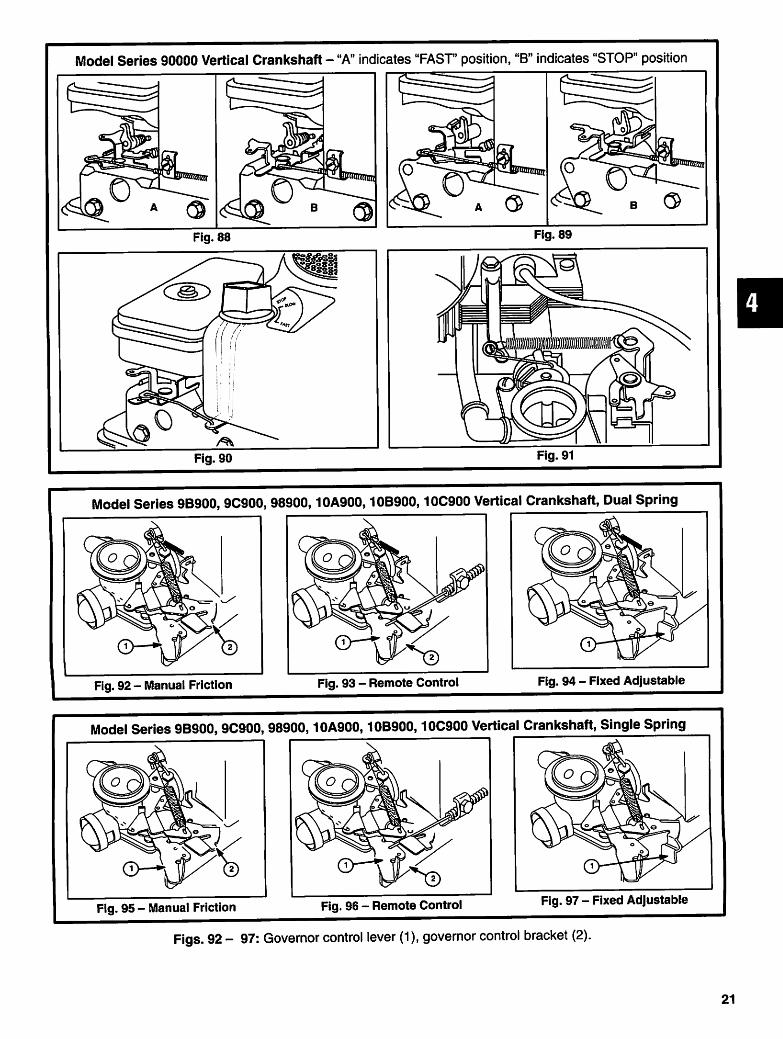
Model Series 90000 Vertical Crankshaft - "A" indicates "FASr position, "B" indicates "STOP" position
Model Series 9B900, 9C900, 98900,10A900,10B900,10C900 Vertical Crankshaft, Dual Spring
Fig. 92 - Manual Friction Fig. 93 - Remote Control Fig. 94 - Fixed Adjustable
Model Series 9B900, 9C900, 98900,10A900,10B900,10C900 Vertical Crankshaft, Single Spring
Fig. 95 - Manual Friction Fig. 96 - Remote ControlFig. 97 - Fixed Adjustable
Figs. 92 - 97: Governor control lever (1), governor control bracket (2).
21

Model Series 120000 Vertical Crankshaft
Fig. 98
"A" indicates increase speed, "B" indicates decrease speed.
Model Series 90700,110700,112700
Vertical Crankshaft
Model Series 91700,111700,114700
Vertical Crankshaft
Fig. 99 Fig. 100
22
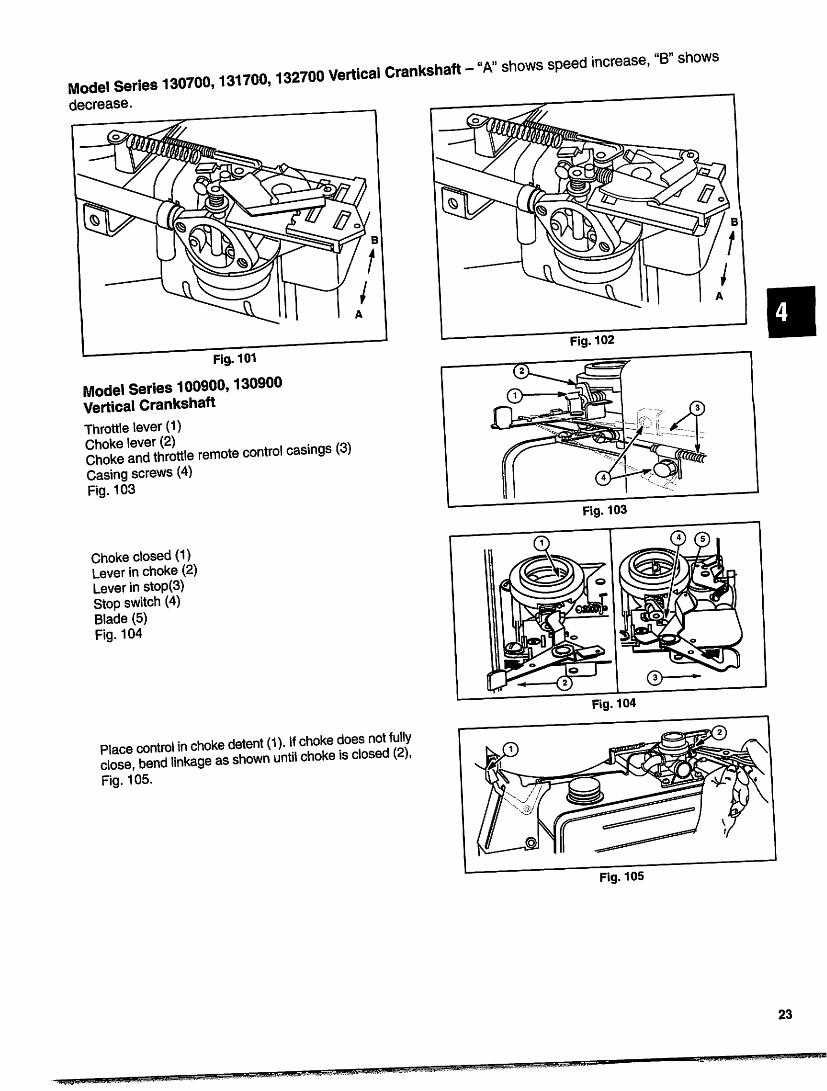
Model Series 130700,131700
decrease.
, 132700 Vert.cal Crankshaft - "A" shows speed increase, V shows
Fig. 101
Model Series 100900,130900
Vertical Crankshaft
Throttle lever (1)
ShokeanTthle remote control casings (3)Casing screws (4)
Fig. 103
Choke closed (1)
Lever in choke (2)
Lever in stop(3)
Stop switch (4)
Blade (5)
Fig. 104
Place3 control in choke detent (1). If choke doesmot fully
dose, bend linkage as shown until choke » closed (2),
Fig. 105.
Fig. 105
23

Model Series 170700,190700,191700,192700,193700, 220700, 252700253700,280000 Vertical Crankshaft with Rack & Pinion Control Except Model 286700
Move as shown (A) to increase speed, Fig. 107.
Fig. 106 Fig. 107
24

Model Series 194700,195700,254700,257700,283700 286700Vertical Crankshaft With Horizontal Control Rack & Pinten Control
Move as shown (A) to increase speed.Slide control (1), Fig. 109.
Fig. 109
Model Series 194700,195700,196700, 254700, 257700,283700, 286700Vertical Crankshaft With Vertical Rack & Pinion Control
Move as shown (A) to increase speed, Figs. 110-111.
Fig. 110
Fig.111

Model Series 170700,171700,190700,191700 Vertical Crankshaftwith Swivel Lever Control
Fig. 112Fig. 113
Fig. 114 Fig. 115
Move as shown (A) to increase speed, Figs. 112-115.

BAND BRAKE CONTROLS
Model Series 92000,93000,
94000,95000,110000
System 3® and 4® engines are equipped with the
band brake feature, Fig. 116. The band brake MUSTSTOP the engine (cutter blade) within three seconds
after operator releases equipment safety control,
Fig. 117.
If stopping time exceeds three seconds with
equipment speed control set in "FAST position,
remove blower housing (3), and brake cover (2), and
examine following for adjustment, alignment, or
damage:
a. Band brake worn or damaged.
b. Anchor post (5) or alternate type - inset (4)
misaligned or bent.
c. Brake spring not securely anchored or loose.
d. Control bracket lever (1) rivet worn or loose.
(Check ignition system as noted in Section 2.)
e. Control bracket (1) misadjusted.
f. Equipment controls (1) damaged, Fig. 117.
To examine, adjust, or replace band brake, disconnect
spark plug wire and place in holding tab. For System
4® engines, disconnect battery wires at connector,
loosen battery holder screws and remove battery.
DISASSEMBLY TO REMOVE BAND BRAKE
1. Remove brake control bracket cover.
2. Loosen cable clamp screw and remove cable from
control lever, Fig. 116.
NOTE: Contact equipment manufacturer for con
trol cable specifications or replacement.
3. Remove two switch cover screws. On System 4®
engines, move cover (1) as shown in Fig. 118.
Handle with care to prevent damage to lever
caused by link when moving switch cover.
Fig. 118
27

REMOVE BAND BRAKE
1. Remove blower housing and rotating screen,Fig. 116.
2. On current style band brake brackets, release
brake spring (1) and lift band brake (2) up off both
stationary and moving posts (3), Fig. 119.
3. On early style brake brackets, use tang bender
tool #19229 (1) to bend control lever tang (2) to
clear band brake loop, then release brake spring
tension and remove band brake (4), Fig. 120.
4. Replace band brake if brake material is damaged
or worn to less than .030" (.76 mm) thick, (inset,
Fig. 119).
5. Remove two screws. Remove control bracket fromcylinder.
NOTE: Disconnect control lever from starter link
(System 4® engines only) using care to
prevent switch cover lever damage.
6. Remove stop switch wire from stop switch
terminal.
ASSEMBLE CONTROL BRACKET AND
BAND BRAKE
1. Reinstall stop switch wire on control bracket.
2. Assemble control bracket to cylinder with screwsfinger tight.
3. On new style brackets, place band brake on
stationary post and hook over end of movable post
until band bottoms, Fig. 119.
4. On old style brackets, install brake on stationary
and movable posts, then use tool #19229 (2) to
bend retainer tang over band brake loop, Fig. 121.
NOTE: Brake material on steel band MUST be on
flywheel side after assembly.
Adjusting Band Brake
1. Place bayonet end of Band Brake Adjusting
Gauge, Tool #19256 (1), in control lever, Fig. 121.
Rotate control lever far enough to install other end
of gauge in cable clamp screw hole.
Install brake spring.
2.
3.
4.
NOTE: For ease of assembly, brake spring must
be temporarily removed from control
bracket spring anchor.
Re-attach brake spring to control bracket spring
anchor IMMEDIATELY after installing control
bracket screws finger tight.
Fig. 119
Fig. 120
Fig. 121
28

5. With brake spring installed, apply pressure to the
control bracket ONLY. Move it until gauge link
tension is JUST eliminated.
6. Hold control bracket in this position while torquing
screws to 30 in. lbs. (3 Nm).
7. Remove gauge.
NOTE: Some manufacturers install a cable clamp
bracket using a pop rivet in the control
bracket cable clamp screw hole. Place
bayonet end of gauge in control lever and
rotate control lever sufficiently to install other
end of gauge into pop rivet hole. Adjust as
noted above.
TEST BAND BRAKE
1. To test band brake adjustment, use Torque
Wrench, Tool #19197, Starter Clutch Wrench, Tool
#19244, and/or a 7/8" socket.
2. With band brake engaged, rotate flywheel clock
wise, Fig. 122, and note torque wrench reading.
3. If less than 45 in. lbs. (5 Nm) of torque is required to
rotate flywheel, check the following for damage,
misalignment, or misadjustment:
a. Band Brake Lining;
b. Band Brake Anchors;
c. Control Bracket;
d. Brake Spring;
e. Brake Spring Anchor. Correct, readjust and
repeat band brake test.
When band brake is released, engine must turn freely.
If band brake drags against flywheel, restricting
movement, check for damaged band brake or
anchors.
FINAL ASSEMBLY
Install rotating screen (3) and blower housing (2) on
engine. Tighten screws. Note location of blower
housing guard (1), Fig. 123.
INSTALL ELECTRIC STARTER CONTROLS
(System 4®)
1. Install starter link into control lever.
2. Insert other end of link in switch cover lever.
3. Rotate switch cover into position on starter motor.
4. Fasten screws securely.
NOTE: If equipped with key switch, ignition link
may be omitted.
5. Install equipment safety control cable to control
lever.
Fig. 122
Fig. 123
29

6. Tighten cable clamp screw securely.
7. Conduct Stop Switch and Stop Switch Wire Tests
described in Section 2, Ignition.
8. Install brake control bracket cover and tighten
screws.
9. Place battery in holder and tighten screws.
10. After engine is installed on equipment, connect
battery wires to connector and place wire on
spark plug.
11. Re-test stopping time.
FLYWHEEL BRAKE
MODEL SERIES 90000,10A900,10B900,
10C900,120000
Description
The flywheel brake is part of the safety control required
for some applications of this engine models. The
flywheel brake MUST stop the engine within three
seconds, while running at FAST speed position, when
the operator releases the equipment safety control.
Remove Flywheel Brake
All except Model Series 120000
1. Remove screw from brake cover (1) and lift brake
cover straight up, Fig. 124.
2. Remove three (3) blower housing screws and
remove blower housing.
3. Straighten stop switch wire (2) and remove from
stop switch (1). Remove brake spring (3), Fig. 125.
4. Remove two screws from brake bracket and
remove bracket.
MODEL SERIES 120000
1. Remove finger guard (1) and fuel tank (2),Fig. 126.
2. Remove dipstick and oil fill tube (1), Fig. 127.
\
Fig. 124
Fig. 126
30

3. Remove blower housing and rewind starter (3,2),
Fig. 127.
4. Disconnect spring (2) from brake anchor (3),
Fig. 128.
5. Disconnect stop switch wire (1) from stop switch.
NOTE: If engine is equipped with electric starter,
disconnect both wires (4) from starter
interlock switch (5). Remove two screws
from brake bracket (6) and remove
bracket.
Inspect Flywheel Brake and Switches
1. Inspect brake lining on brake lever. Replace brake
assemble if lining is less than .090" (2.29 mm).
2. Test stop switch as described in Section 2, STOP
SWITCH - REMOTE CONTROL.
3. Model Series 120000, test electric starter interlock
switch as described in Section 7B, INTERLOCK
SWITCH - ELECTRIC STARTER.
Assemble Flywheel Brake
1. Install brake assembly on cylinder and torque
mounting screws to 40 in. lbs. (5 Nm).
2. Install stop switch wire and bend end of wire 90°.
Install interlock switch wires on interlock switch,
if used.
3. Install brake spring.
4. Install blower housing as described in Section 7A,
SERVICE STARTER.
5. Model Series 120000, install dipstick tube and
dipstick.
6. Model Series 120000, install fuel tank and finger
guard.
7. ANSI requires blade to stop at 3 seconds or less.
Fig. 127
Fig. 128
31

SECTION 5
Governors
Section Contents
SAFETY Pa9©
Governed Speed Limits, All Model Series 3
MECHANICAL GOVERNORS
HORIZONTAL CRANKSHAFT
Disassemble
Model Series 60000, 80000, with governor lever and shaft mounted on crankcase cover 8
Model Series 80000, 83400, 93400,100200,130000,170000,190000, 220000, 250000, with
governor crank in cylinder 7Model Series 230000, 240000, 300000, 320000 18
Assemble
Model Series 60000, 80000 with governor lever and shaft mounted on crankcase cover 9
Model Series 80000, 83400, 93400,100200, 130000, 170000,190000, 220000, 250000, with
governor crank mounted in cylinder 8Model Series 230000, 240000, 300000, 320000 18
Adjust Governor, Static 11
Adjust Governor
Dynamic
Top No Load RPM, EXCEPT GENERATORS
Model Series 60000, 80000 with governor lever and shaft mounted on crankcase cover 9
Model Series 100200,130000,170000,190000, 220000, 250000 (except 253400, 255400) .. 14
Model Series 176400,19A400,19B400,19C400, 19E400,19F400,19G400, 196400,
197400, 226400, 250400, 256400, Two Spring System 14
Model Series 253400, 255400 16Model Series 233400, 243400, 300000, 320000 18
Top No Load RPM, GENERATORS
Model Series 83400 11Model Series 80000,112200,130000 (except 133400), 170000,190000, 220000, 250000
(except 253400, 255400) 17Model Series 93400,133400,176400,196400, 226400, 256400 11
Governed Idle
Model Series 170000,190000, 220000, 250000, Rack and Pinion Control 14
Model Series 170000,190000, 220000, 250000, Swivel Control 14
Model Series 133400, 176400, 196400, 226400, 256400 13
Model Series 253400, 255400 17Model Series 233400, 234300, 300000, 320000 19Model Series 93400, 133400, 176400, 196400, 226400, 256400 10
Model Series 130200,170000,190000, 220000, 250000, 280000 (except 253400, 255400) .. 14
Model Series 230000, 240000, 300000, 320000 18
Manual Friction
Model Series 93400,133400, 176400,196400, 226400, 256400 16
Remote Control
Model Series 93400,133400,176400, 196400, 226400, 256400 16
NOTE: SPECIFICATION TABLES BEGIN ON PAGE 28 OF THIS SECTION.

Section Contents, Cont'd.
HORIZONTAL CRANKSHAFT, (Cont'd) page
Model Series 80000, 83400, 93400,100200, 130000, 170000,190000, 220000, 250000,with governor crank mounted in cylinder 11
Governor Shaft Bushing, Replace
Model Series 80000, 83400,100200,100900,130000, 170000,190000, 220000, 250000 21
Model Series 230000, 240000, 300000, 320000 18
Governor Spring Hole Location
Model Series 93400,133400, 176400,196400, 226400, 250400, 256400 10-11
Governor Spring Hole Location - Generators only H
PNEUMATIC GOVERNORS
Adjust
Governed Idle
Model Series 80000, 90000 Horizontal Crankshaft with Control Panel 4Top No Load RPM
Model Series 9B900, 9C900, 93900, 95900, 96900, 98900,10A900,10B900,10C900 Single & DualSpring 5
Model Series 80000, 90200, 91200, 94200 Horizontal Crankshaft with Control Panel 5Governor Spring
Remove, Model Series 90000,110000, Vertical Crankshaft 6
Install, Model Series 90000,110000, Vertical Crankshaft 6MECHANICAL GOVERNORS
VERTICAL CRANKSHAFT
Disassemble
Model Series 91700, 94500, 94900, 95500,111700,113900,114700,114900 (Current & Early Style) .. 22Model Series 120000 21
Assemble
Model Series 91700, 94500, 94900, 95500,111700,113900,114700,114900 (Current & Early Style) .. 21Model Series 120000 22
Model Series 170000, 190000, 220000, 250000, 280000 20Adjust Governor - Static
Except Model Series 91700, 94500, 94900, 95500, 111700, 113900, 114700,114900, (Early) 20
Model Series 91700, 94500, 94900, 95500, 111700, 113900,114700,114900, (Current Style) ...... 20Adjust Governor
Dynamic
Top No Load RPM
Model Series 120000, Three-In-One 24
Model Series 120000, Early Style '.'.'."" 24Model Series 170000, 190000, 220000, 250000, 280000 '.'.'.'. 25Model Series 91700, 94500, 94900, 95500,111700, 113900, 114700,114900 (Current & Early Style) .. 24Model Series 120000 ^
Model Series 170000,190000, 220000, 250000, 280000 [[[ 11Governed Idle
Rack and Pinion Control, Horizontal & Vertical Slide 26Swivel Control 2fi
Governor Spring, Install
Model Series 91700, 94500, 94900, 95500,111700,113900, 114700,114900 (Current & Early Style) .. 23Governor Shaft Bushing, Replace
Model Series 91700, 94500, 94900, 95500, 111700,113900, 114700,114900, (Current & Early Style) ... 22
NOTE: SPECIFICATION TABLES BEGIN ON PAGE 28 OF THIS SECTION.

TOP NO LOAD GOVERNED SPEED LIMITS
To comply with specified top governed speed limits,
Briggs & Stratton supplies manufacturers with engines
using either calibrated governor springs or an
adjustable top no load speed. Both methods will
regulate top governed speed when the engine is
operated on a rigid test stand. However, the design of
the cutter blade, deck, etc., can affect engine speeds.
Therefore, the top no load speed should be checked
with a tachometer when the engine is operated on a
completely assembled machine. Lawn mowers should
be operated on a hard surface to eliminate cutting load
on the blade.
If a governor spring must be replaced, search the
appropriate Illustrated Parts List by engine type
number.
NOTE: Worn linkage or damaged governor
springs should be replaced to ensure
proper governor operation.
CAUTION:
After a new governor spring is installed, check
engine top no load speed.
Run engine at half throttle to allow the engine to reach
normal operating temperature before measuring
speed with a tachometer.
Table No. 1, Page 28, lists various lengths of rotary
lawn mower cutter blades, and the maximum bladerotational speeds, which will produce blade tip speeds
of 19,000 feet per minute.
If a service replacement engine is used, check the top
no load speed with the engine operating on a
completely assembled mower. If necessary, change
the governor spring or adjust the top no load speedlimit device, so the engine will not exceed therecommended speed. See page 6 for adjustment
procedure for mechanical governor. See TABLE
NO. 1, page 28 for RPM and blade length.
NOTE: For correct no load RPM by model and
type, see Engine Sales Manual, MS-4052
or MS-6225, Service Engine Sales Manual
microfiche under note column, or MAXI
MUM RPM TABLE at end of each manual
for the model engine.
NOTE: SPECIFICATION TABLES BEGIN ON PAGE 28 OF THIS SECTION.

PNEUMATIC GOVERNOR SYSTEMS
(FIGS. 1,2)
Adjust Top No Load Speed,
Model Series 80000,90000
Pneumatic Governor with Control Panel
1. Run engine until it reaches operating temperature
or for about 5 minutes.
2. Set control lever or remote controls to fast position
with engine running.
3. Adjust governed idle by turning stop nut (3) and
idle speed screw (2), Fig. 2. Turn stop nut clock
wise (A) to increase speed, counterclockwise (B)to decrease.
4. Use tool #19229 (4), to bend spring anchor tang (1,
Fig. 1), to obtain the proper top no load RPM,
Figs. 3 and 4. Fixed speed tang (5), Figs. 3 and 4.
Adjust Governed Idle
Some engines are equipped with governed idle.
Governed idle permits the governor to operate at idle
speeds while the engine is operating under light loads.
1.
2.
3.
Place control lever in minimum speed position with
engine running at operating condition.
80000 Series: Hold throttle lever against stop and
adjust idle speed screw (2), to obtain 1600 RPM.
Release throttle lever. Then, turn governed idlestop nut (3) to obtain 1750 RPM, Fig. 2.
90000 Series, Low Emissions Carburetors,
Type Numbers ending in A1-A9 or E1-E9
NOTE: Fixed adjustable control: before control
lever can be moved to slow position, fixed
speed tang (5), Figs. 3, 4, must be bent
down to move lever.
NOTE: Fixed adjustable control: After setting gov
erned idle, move control lever back to fast
speed position and bend fast speed tang
up to hold speed control lever.
Fig. 4
NOTE: SPECIFICATION TABLES BEGIN ON PAGE 28 OF THIS SECTION.

Adjust Top No Load Speed
Pneumatic Governor, Dual Spring Control
Model Series 9B900, 9C900, 98900,10A900,
10B900,10C900.
Single Spring Control
Model Series 9B900, 9C900, 93900, 95900,
96900, 98900,10A900,10B900,10C900
1. Run engine until it reaches operating temperature
or for about 5 minutes.
2. Move governor lever (1) to "Fast Position." Hole in
lever (2) will line up with hole in governor control
bracket (4). Insert 1/8" rod (3) through both holes
to lock lever position, Figs. 5, 6.
3. Dual Spring: Using Tool #19229 or 19352, Tang
Bender (5), bend secondary governor spring tang,
("A" to increase, "B" to decrease), until there is no
tension on secondary spring, Fig. 6.
4. Bend primary governor spring tang, ("A" to increase,
"B" to decrease), until engine speed is 200 RPM less
than 'TOP NO LOAD" RPM, Dual Spring, or at
'TOP NO LOAD" RPM, Single Spring, Fig. 7.
5. Dual Spring: Bend secondary governor spring
tang until 'TOP NO LOAD" RPM is obtained,
Fig. 6, as specified in Engine Sales Manual,
MS-4052 or MS-6225, Service Engine Sales
Manual microfiche.
Fig. 5
Fig. 7
NOTE: SPECIFICATION TABLES BEGIN ON PAGE 28 OF THIS SECTION.

Replace Governor Spring
Model Series 90000,110000
The governor springs used on engine Model Series
90000,110000 are made with double end loops for a
secure attachment and proper governor regulation.
Springs with double end loops are easily removed and
installed by following the procedure shown below.
CAUTION:
DO NOT use a needle-nosed pliers or the end loops
of the governor spring will be deformed. When the
governor spring is correctly installed, the spring will
be positioned as shown in Fig. 8, with loop (1)
horizontal, end of spring pointing down, and loop (2)
vertical, end of spring pointing toward engine.
Removing Spring (Fig. 9, typical)
1. Twist spring toward engine until end of loop can be
pushed under lever (A).
2. Push spring forward (B).
3. Twist spring toward engine until end of loop snapsout of hole in lever (C).
Installing Spring (Fig. 10, typical)
1. Steady link (1) with finger and grasp spring asshown, (A)
2. Assemble end of loop into link eyelet, (B).
3. Twist spring toward you to fully link as shown in
inset, (C).
Fig. 8
Fig. 10
NOTE: SPECIFICATION TABLES BEGIN ON PAGE 28 OF THIS SECTION.

MECHANICAL GOVERNOR SYSTEMHORIZONTAL CRANKSHAFT (Fig. 11, typical)
1. Fig. "A" shows engine not running, throttle open
(1), spring compressed (2), and counterweights
closed (3). Turning thumbscrew as shown (A)
increases speed.
2. Fig. "B" shows engine running, throttle closing (1),
spring stretching (2), and counterweights opening
(3).
Mechanical Governors Horizontal Crankshaft
Model Series 80000, 83400,100200,130000,
170000,190000, 220000, 251400, 252400,
254400
With Governor Crank in Cylinder
Typical governor components on horizontal shaft
models are illustrated in Fig. 12.
Carburetor (1)
Throttle link (2)
Manual governor control (3)
Governor link (4)
Cam gear (5)
Governor gear (6)
Governor lever (7)
Governor spring (8)
The only disassembly necessary is removing the
governor assembly as one unit from the governor gear
shaft on the crankcase cover on horizontal models,
Fig. 13. Governor crank should point down (1), as
shown.
Fig. 11
Fig. 12
Fig. 13
NOTE: SPECIFICATION TABLES BEGIN ON PAGE 28 OF THIS SECTION.

Assemble Horizontal Crankshaft
On horizontal crankshaft models, the governor rideson a short stationary shaft and is retained by the
governor shaft, with which it comes in contact after the
crankcase cover is secured in place.
1. Press governor cup (2), Fig. 13, against crankcasecover to seat retaining ring on shaft, prior to
installing crankcase cover.
NOTE: It is suggested that the assembly of the
crankcase cover be made with the crank
shaft in a horizontal position.
2. The governor crank should hang straight down
parallel to the cylinder axis (1), Fig. 13.
NOTE: If the governor crank is clamped in an
angular position, pointing toward the
crankcase cover, it is possible for it to be
jammed inside of the governor assembly,
resulting in damage when the engine is
started.
3. After the crankcase cover and gasket are in place,
install cover screws. Be sure that screw in hole (1)
Fig. 14, has nonhardening sealant, such as
Permatex® II, on threads of screw.
4. Complete installation of remaining governor link
ages and carburetor and then adjust governor
shaft and lever. See "Adjust Governor, Static",page 11.
NOTE: See page 21, 3/16" (4.7 mm) inside
diameter, or page 18, 1/4" (6 mm) inside
diameter, for procedure if necessary to
replace governor crank bushing.
MECHANICAL GOVERNORS
Model Series 60000,80000
With Governor Lever and Shaft Mounted on
Crankcase Cover
Disassemble
1. To service governor, remove crankcase cover.
2. Loosen the screw on the governor lever (1) and
pull lever from governor shaft (2).
3. Loosen the two mounting screws to remove gear
housing (8). As the housing is removed, thegovernor gear (6) will slip off the housing shaft.
Note the steel thrust washer (7) between the gear
and the governor housing.
4. Remove roll pin (3) and washer from governor
shaft.
5. Unscrew shaft from follower (4) by turning clockwise to remove.
Fig. 14
Fig. 15
NOTE: SPECIFICATION TABLES BEGIN ON PAGE 28 OF THIS SECTION.

Assemble
1.
2.
3.
4.
5.
6.
Push governor shaft (2) into crankcase cover, with
threaded end in.
Assemble small washer on the inner end of the
shaft, then screw shaft into governor follower (4)
by turning shaft counterclockwise.
Tighten securely. Turn shaft until follower (4)
points down as illustrated, Fig. 16.
Place washer on outside end of shaft.
Install roll pin (3). The leading end of the pin should
just go through the shaft so pin protrudes from only
one side of shaft.
Place thrust washer and then governor gear on
shaft in gear housing.
7. Hold governor housing in a vertical (normal)
position (8) and assemble housing with gear in
position so point of steel cup on gear (9) rests
against crank follower.
8. Tighten housing with two mounting screws.
9. Assemble governor lever to lever shaft with lever
pointing downward at about a 30° angle. Final
adjustment will be made later when carburetor
linkage is assembled.
Adjust Top No Load Speed
1. Start and run engine at half throttle for five minutes
to bring engine to operating temperature.
2. Move speed control lever to maximum RPM
position.
3. Turn knob (1) to increase (A) or decrease RPM to
desired speed, Fig. 17.
Fig. 16
Fig. 17
NOTE: SPECIFICATION TABLES BEGIN ON PAGE 28 OF THIS SECTION.

Governor Spring Location
Note: Consult Engine Sales Manual, MS-4052 or
Service Engine Sales Manual Microfiche
at the end of each manual to determine
specified RPM for engine, EXCEPT FOR
GENERATOR ENGINES. See text for Top
No Load Speed and Governed Idle
adjustments according to engine model
and application.
Model Series 93400
See Table 4, Specifications, Page 28, and placegovernor spring in holes 1 through 6, Fig. 18, to attain
required RPM.
Governor Spring Location
Model Series 133400
See Table 5, Specifications, Page 28, and place
governor spring in holes 1 through 8, Fig. 19, to attain
required RPM.
Fig. 18
Fig. 19
10
NOTE: SPECIFICATION TABLES BEGIN ON PAGE 28 OF THIS SECTION.
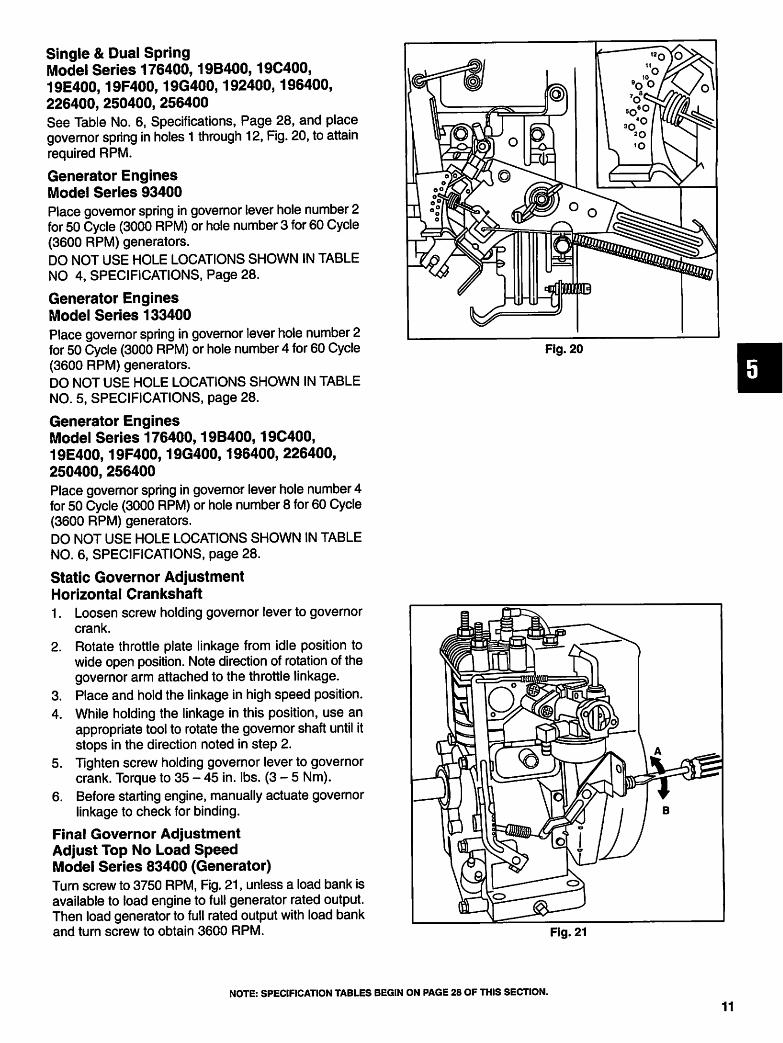
Single & Dual Spring
Model Series 176400,19B400,19C400,
19E400,19F400,19G400,192400,196400,
226400, 250400, 256400
See Table No. 6, Specifications, Page 28, and place
governor spring in holes 1 through 12, Fig. 20, to attain
required RPM.
Generator Engines
Model Series 93400
Place governor spring in governor lever hole number 2
for 50 Cycle (3000 RPM) or hole number 3 for 60 Cycle
(3600 RPM) generators.
DO NOT USE HOLE LOCATIONS SHOWN IN TABLE
NO 4, SPECIFICATIONS, Page 28.
Generator Engines
Model Series 133400
Place governor spring in governor lever hole number 2
for 50 Cycle (3000 RPM) or hole number 4 for 60 Cycle
(3600 RPM) generators.
DO NOT USE HOLE LOCATIONS SHOWN IN TABLE
NO. 5, SPECIFICATIONS, page 28.
Generator Engines
Model Series 176400,19B400,19C400,
19E400,19F400,19G400,196400, 226400,
250400, 256400
Place governor spring in governor lever hole number 4
for 50 Cycle (3000 RPM) or hole number 8 for 60 Cycle
(3600 RPM) generators.
DO NOT USE HOLE LOCATIONS SHOWN IN TABLE
NO. 6, SPECIFICATIONS, page 28.
Static Governor Adjustment
Horizontal Crankshaft
1. Loosen screw holding governor lever to governor
crank.
2. Rotate throttle plate linkage from idle position to
wide open position. Note direction of rotation of the
governor arm attached to the throttle linkage.
3. Place and hold the linkage in high speed position.
4. While holding the linkage in this position, use an
appropriate tool to rotate the governor shaft until it
stops in the direction noted in step 2.
5. Tighten screw holding governor lever to governor
crank. Torque to 35 - 45 in. lbs. (3-5 Nm).
6. Before starting engine, manually actuate governor
linkage to check for binding.
Final Governor Adjustment
Adjust Top No Load Speed
Model Series 83400 (Generator)
Turn screw to 3750 RPM, Fig. 21, unless a load bank is
available to load engine to full generator rated output.
Then load generator to full rated output with load bank
and turn screw to obtain 3600 RPM.
Fig. 20
Fig. 21
NOTE: SPECIFICATION TABLES BEGIN ON PAGE 28 OF THIS SECTION.
11
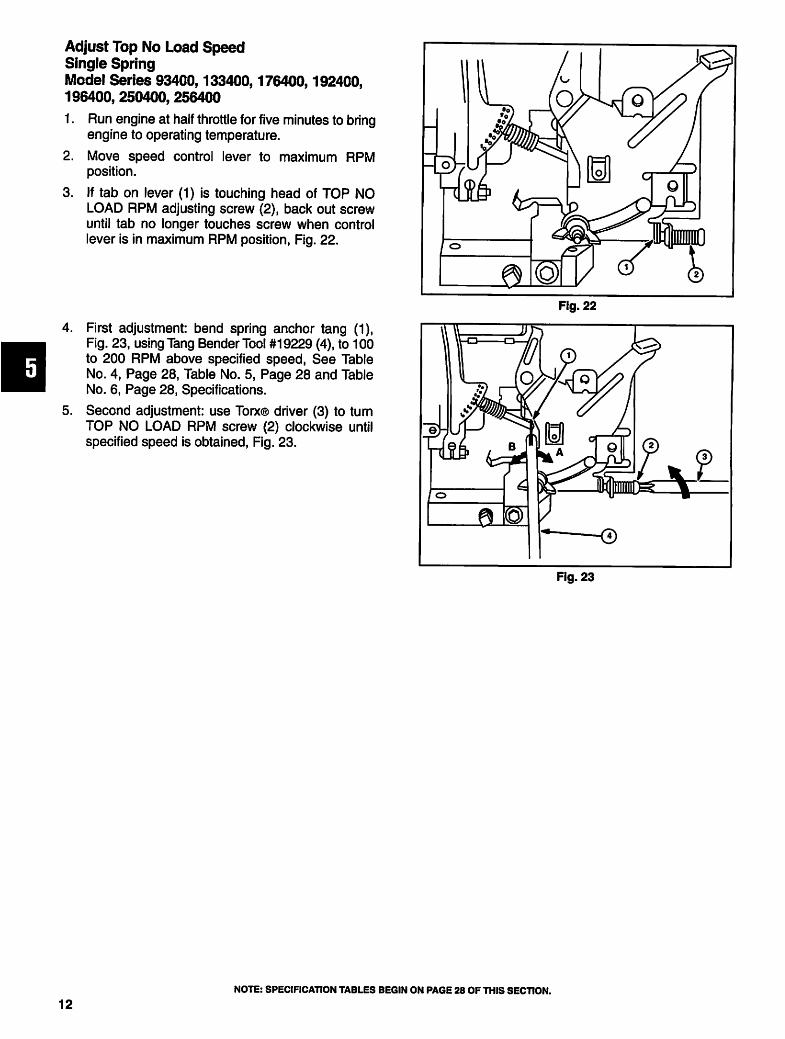
Adjust Top No Load Speed
Single Spring
Model Series 93400,133400,176400,192400,
196400, 250400, 256400
1. Run engine at half throttle for five minutes to bring
engine to operating temperature.
2. Move speed control lever to maximum RPM
position.
3. If tab on lever (1) is touching head of TOP NO
LOAD RPM adjusting screw (2), back out screw
until tab no longer touches screw when control
lever is in maximum RPM position, Fig. 22.
Fig. 22
First adjustment: bend spring anchor tang (1),
Fig. 23, using Tang Bender Tool #19229 (4), to 100
to 200 RPM above specified speed, See Table
No. 4, Page 28, Table No. 5, Page 28 and Table
No. 6, Page 28, Specifications.
Second adjustment: use Torx® driver (3) to turn
TOP NO LOAD RPM screw (2) clockwise until
specified speed is obtained, Fig. 23.
Fig. 23
12
NOTE: SPECIFICATION TABLES BEGIN ON PAGE 28 OF THIS SECTION.

Adjust Governed Idle
Model Series 93400 (Fig. 24)
Single Spring
Model Series 133400, (Fig. 25A)
Model Series 176400,192400,196400,
226400, 256400 (Fig. 25B)
1. If governed idle is specified, move speed control
down until engine is at minimum RPM and adjust
carburetor idle speed screw to 1600 RPM.
NOTE: See Section 3 for proper idle speed
adjusting procedure for small or large
Briggs & Stratton/Walbro carburetors.
2. Move speed control lever to obtain 1800 RPM.
Use Tool 19229 (4) to bend governed idle speed
tang up against speed control lever, ("A" to
increase, HB" to decrease), Figs. 24, 25.
Fig. 25
NOTE: SPECIRCATION TABLES BEGIN ON PAGE 28 OF THIS SECTION.
13

Adjust Dual Spring Governor (Figs. 26,27)
Model Series 176400,19B400,19C400,
19E400,19F400,19G400,192400,196400,
197400, 226400, 250400, 256400
NOTE: On dual spring system, governed idle must
be set before setting TOP NO LOAD RPM.
Adjust Governed Idle (Figs. 26, 27)
1. Run engine at half throttle for five minutes to bring
to operating temperature.
2. Move speed control lever (1) down to idle speed
position until there is slack on main governor
spring (2).
3. Hold throttle lever (3) against idle speed screw (4)
and turn idle speed screw until engine idles at
1750 RPM.
4. While holding throttle lever, adjust idle mixture
needle (5) to midpoint between too lean and too
rich.
5. Repeat Step 3. and reduce engine idle speed to
1200 RPM.
6. Bend governed idle speed tang (6) to obtain 1750
RPM.
Adjust Top No Load Speed - Dual Spring
(Figs. 26, 27)
1. Move speed control (1) to fast position. If control
lever stop is against high speed adjustment screw
(7), back out high speed adjustment screw until
TOP NO LOAD stop no longer touches screw.
2. Adjust main governor spring tang (8) until you
have 100 to 150 RPM over the final TOP NO LOAD
RPM required.
3. Adjust high speed adjustment screw (7) to obtain
correct TOP NO LOAD RPM.
Adjust Top No-Load Speed
Rack and Pinion or Swivel Control Plates
Model Series 100200,130000,170000,
190000, 220000,250000 (Except 253400,
255400) (Non-Generator Applications)
1. Set control lever to maximum speed position with
engine running.
2. Insert a 1/8" (3.18 mm) rod (2) through hole in
control plate and governor tang (3), Fig. 28, on
rack and pinion control plates. See note below for
engines using Top Speed Limit Screws.
Fig. 27
Fig. 28
14
NOTE: SPECIFICATION TABLES BEGIN ON PAGE 28 OF THIS SECTION.

3. Use Tool #19229, Tang Bending Tool, to bend
spring anchor tang to obtain the proper TOP NO
LOAD RPM, Fig. 29. For engines using Top Speed
Limit Screws, adjust tang to 4000 RPM. Top Speed
Limit screw must be removed while adjusting tang.
Choke-A-Matic® top speed range is 3700 to 4000
RPM with standard spring. (Top speed limit screw
cannot be used.)
NOTE: Refer to Figs. 29 and 30 to identify the type
of control. Then refer to Table No. 2, Page
28 (Fig. 29) or Table No. 3, Page 28
(Fig. 30) to find correct hole to use after
adjusting governor tang, Step 3, and
installing Top Speed Limit Screw (4).
NOTE: If specified TOP NO LOAD RPM cannot be
obtained, recheck spring anchor hole
location for that speed. If location is
correct, repeat procedure beginning at
Step 2.
Adjust Governed Idle
Rack and Pinion Control
Horizontal Crankshaft Models, Fig. 31
1. Make final carburetor mixture adjustment.
2. Place remote control in idle position.
3. Hold throttle in closed position with finger, adjust
idle speed screw (1) to 1550 RPM, ("A" to
increase, "B" to decrease).
4. Release throttle.
5. Set remote control to 1750 RPM. Turn screw in
until it contacts remote control lever, Fig. 31.
Fig. 30
Fig. 31
NOTE: SPECIFICATION TABLES BEGIN ON PAGE 28 OF THIS SECTION.
15

Adjusting Top No Load Speed
Generator Applications
1. Run engine at half throttle for five minutes to bring
to operating temperature.
2. Move speed control lever to maximum RPM
position.
3. If tab on lever is touching head of TOP NO LOAD
RPM adjusting screw (2), back out screw until tab
no longer touches screw when control lever is in
maximum RPM position, Fig. 23.
4. Bend spring anchor tang (1) using Tang Bender-
Tool #19229 (4), to 3300 for 50 cycle or 3800 for
60 cycle.
5. Turn TOP NO LOAD RPM screw clockwise until
3150 RPM, 50 Cycle or 3750 RPM, 60 Cycles is
obtained, no load.
NOTE: If available, use a load bank to load engine
to full generator rated output. With
generator at full rate output, turn screw to
obtain 3000 RPM, 50 Cycle or 3600 RPM,
60 Cycle.
Adjust for Manual
Friction Control
For fixed speed place speed control lever in maximum
RPM position and tighten wing nut (3) until lever cannot
be moved, Fig. 25.
For manual friction, tighten wing nut (3) until lever will
stay in any position without moving while engine is
running.
Adjust for Remote
Control Adjust
For remote control, loosen wing nut (3) until speed
control lever drops of its own weight down to idle,
Fig. 25.
Adjusting Top No Load Speed
Model Series 253400,255400
1. On Model Series 253400, 255400 with speed
control at fast position, turn screw (1) to set TOP
NO LOAD RPM, Fig. 32.
2. Turn "A" to increase or "B" to decrease speed.
NOTE: For correct top no load RPM by model and
type, see Engine Sales Manual, MS-4052
or MS-6225, Service Engine Sales Manual
microfiche under NOTE column, or MAXI
MUM RPM TABLE at end of each manual
for the engine model.
3. Set Speed control to desired RPM and tighten
fixed speed screw (1), Fig. 33.
Fig. 32
Fig. 33
NOTE: SPECIFICATION TABLES BEGIN ON PAGE 28 OF THIS SECTION.
16

Governed Idle (Non-Generator)
1. Turn carburetor idle speed adjusting screw to
obtain 1600 RPM while holding throttle lever
against screw.
2. Release throttle lever.
3. Align holes in control bracket and inside lever with
1/8" (3.18 mm) diameter rod. Governor speed
control lever of equipment should be in "IDLE"
position, Fig. 34.
Adjust if necessary. Bend spring tang to obtain
1750 RPM.
Remove 1/8" (3.18 mm) diameter rod.
4.
5.
Generator Applications Only
Governor regulation to within two cycles of either 60 or
50 cycles can be obtained if the procedures indicated
below are followed:
1. Push speed adjusting nut in and up to release
spring tension on nut.
2. Start engine and pull out on speed adjusting nut to
maximum length of travel, Fig. 35.
3. Set engine speed per Table No. 10, Specifica
tions, Page 30 by bending governor tang, Fig. 36.
4. With engine still running, return speed adjusting
nut to slot, push in to compress spring and push
nut down into slot.
5. Then turn speed adjusting nut to obtain:
1600 RPM Top No Load for 1500 RPM 50 cycle
generator
1875 RPM Top No Load for 1800 RPM 60 cycle
generator
3150 RPM Top No Load for 3000 RPM 50 cycle
generator
3750 RPM Top No Load for 3600 RPM 60 cycle
generator
Fig. 34
Fig. 36
NOTE: SPECIFICATION TABLES BEGIN ON PAGE 28 OF THIS SECTION.
17

Cast Iron Model Series
230000, 240000, 300000, 320000 (Fig. 37)
Disassemble
1. Remove engine base.
2. Loosen governor lever bolt and nut.
3. Remove governor lever from governor crank
assembly.
4. Remove cotter pin and washer from governor
crank (3).
5. Remove any paint or burrs from governor crank.
6. Remove governor crank.
NOTE: Current production engines have a spacer
(2) on the governor crank (3). Earlier
production engines have a long bushing
without spacer.
7. Slide governor gear assembly off governor shaft.
Replace Governor Shaft Bushing
1. Press old bushing (1) out of cylinder.
2. Press new bushing into cylinder until bushing is
flush with outside surface of cylinder.
3. Ream new bushing with Tool #19333, Finish
Reamer, using suitable lubricant.
Assemble Governor
1. Assemble governor gear (4) and cup assembly on
governor shaft in cylinder.
2. Slide governor crank (and spacer, when used)
through bushing from inside cylinder, Fig. 37.
3. Install lever, governor spring, and links.
Adjust Top No Load Speed
NOTE: Consult Engine Sales Manual, MS-4052 or
MS-6225, Service Engine Sales Manual
Microfiche under note column, or MAXI
MUM RPM TABLE at the end of each
engine manual for TOP NO LOAD RPM.
Fixed Speed Operation
1. Loosen lower stop nut (2).
2. Adjust top stop nut (1) to obtain specified TOP NO
LOAD RPM.
3. After speed is set, tighten lower stop nut, Fig. 38.
Idle speed screw (3).
Fig. 37
Fig. 38
18
NOTE: SPECIFICATION TABLES BEGIN ON PAGE 28 OF THIS SECTION.

Remote Control Operation
Adjust lower stop nut to obtain specified TOP NO
LOAD RPM.
Adjust Governed Idle
First make final carburetor mixture adjustments. Then
place remote control in idle position. Hold throttle shaft
in closed position and adjust idle screw (2) to 1000
RPM. Release the throttle. With remote control in idle
position, adjust upper elastic stop nut (1) to 1200 RPM,
Fig. 39.
MECHANICAL GOVERNOR SYSTEM
VERTICAL CRANKSHAFT
Model Series 100900,130000,170000
Disassemble 190000, 220000, 250000,
280000
The governor used on the vertical shaft models is
incorporated with the oil slinger, Figs. 40 and 41. It is
removed as part of the oil slinger, Fig. 42. Further
disassembly is unnecessary.
Fig. 40 - Model Series 100900,130000
Governor adjusting lever (1)
Throttle (2)
Governor spring (3)
Link (4)
Governor lever (5)
Governor shaft (6)
Governor gear (7)
Cup (8)
Cam gear (9)
Fig. 40
NOTE: SPECIFICATION TABLES BEGIN ON PAGE 28 OF THIS SECTION.
19

Fig. 41 - Model Series 170000, 190000, 220000,
250000, 280000, Typical
Throttle (1)
Link (2)
Governor bracket (3)
Governor spring (4)
Cam gear (5)
Cup (6)
Governor gear (7)
Governor shaft (8)
Governor lever (9)
Carburetor (10)
Fig. 41
Fig. 42 - Vertical Shaft Governor and Oil Slinger
Assembly, Typical
Governor crank (1)
Governor cup (2)
Crankshaft (3)
Spring washer (4)
Cam gear (5)
Governor slinger (6)
Assemble
Model Series 100900,130700,130900,
131900,132900,170000,190000, 220000,
250000, 280000
1. Before installing sump be sure that governor cup is
in line with governor shaft paddle.
2. Install sump and gasket being sure the screw that
enters the breather chamber has nonhardening
sealant on threads such as Permatex® II, (See
Fig. 47).
Fig. 43 shows spring on camshaft after governor is
installed, Model Series 100900, 130700, 130900,
131900, and 132900 only.
Governor crank (1)
Cup (2)
Crankshaft (3)
Spring washer (4)
Governor slinger (5)
NOTE: On right angle auxiliary drive power take
off models, screw (1) does not need
sealant, but the four screws holding the
gear sump cover require sealant, Fig. 47.
Fig. 42
Fig. 43
NOTE: SPECIFICATION TABLES BEGIN ON PAGE 28 OF THIS SECTION.
20

NOTE: Model Series 100900, 130700, 130900,
131900 and 132900 use spring washer as
shown in Fig. 42. On Model Series
130700, 130900, 131700 and 132900
equipped with right angle auxiliary drive
power take-off, the spring washer is not to
be used.
3. Complete installation of remaining governor
linkages and carburetor.
NOTE: If governor shaft bushing is replaced, it
must be finish reamed with Tool #19333,
Finish Reamer, for 1/4" (6.35 mm) gover
nor crank or with Tool #19058, Finish
Reamer, for 3/16" (4.74 mm) governor
crank.
Model Series 91700, 94500, 94900,111700,
113900,114700,114900
Current Style, Fig. 44: Oil slinger and governor
(1), governor crank (2).
Model Series 91700, 94500, 94900, 95500,
111700,113900,114700,114900
Early Style, Fig. 45
Disassemble
1. Remove engine sump.
2. (Current Style): Loosen governor lever bolt and
nut (5). Slide lever (3) off governor crank (1) and
snap out governor link (4), then remove cotter pin
(6) and washer (2) from governor crank.
(Early Style) Fig. 45: Remove lever adjusting
screw (2) and loosen lever clamp screw (6). Slide
off clamp, then lift up on governor lever (1) to
release lever from slot in governor crank (3).
3. Remove any paint and burrs from governor crank.
4. Remove governor crank, Fig. 46 (current), Fig. 45
(early).
Fig. 44
Fig. 45
NOTE: SPECIFICATION TABLES BEGIN ON PAGE 28 OF THIS SECTION.
21

Replace Governor Shaft Bushing
1. Press old governor shaft bushing (5), Fig. 45, out
of cylinder.
2. Press new bushing into cylinder until bushing is
1/16" (1.57 mm) above outside surface of cylinder.
3. Ream bushing using Tool #19058, Finish Reamer,
using suitable lubricant.
4. Place new gasket(s) same thickness as original
gasket(s) on cylinder.
Assemble
1. Install governor crank from inside cylinder.
2. (Current Style): Slide washer (2) onto governor
crank and install cotter pin (6). Slide governor lever
(3) onto governor crank and tighten bolt and nut (5)
on lever until crank turns with resistance. Turn
crank counterclockwise until paddle contacts
governor cup on oil slinger, Fig. 46, and snap
governor link (4) into retainer on governor lever.
3. (Early Style): Slide governor (1) lever on governor
crank (3) and slide lever down onto shaft slot.
Install lever clamp and torque lever clamp screw
(6) to 15 in. lbs. (2 Nm). Install governor gear and
oil slinger assembly making sure governor crank
(3) is against governor cup (4), Fig. 45.
4. Insert Tool #19334, Seal Protector, into seal of oil
sump and install oil sump on cylinder.
5. Place non-hardening sealant on screw (1) that
enters the breather chamber, Fig. 47, such as
Permatex® II, and install sump screws.
6. Torque screws to 90 in. lbs. (10 Nm).
7. Remove seal protector.
MODEL SERIES 120000 (Fig. 48)
Disassemble Governor
1. Remove engine sump.
2. Loosen governor lever bolt and nut (1).
3. Slide lever off governor crank (2) and disconnect
from governor link (5).
4. Remove push nut and washer (3) from governor
crank, remove burrs from governor crank, and
remove crank.
Assemble Governor
1. Install governor crank from inside cylinder.
2. Slide washer onto governor crank and install new
push nut on governor crank.
3. Slide governor lever onto governor crank and
tighten bolt and nut on lever until governor crank
turns with resistance.
Fig. 46
Fig. 47
Fig. 48
22
NOTE: SPECIFICATION TABLES BEGIN ON PAGE 28 OF THIS SECTION.

4. Turn crank until paddle (1) contacts governor cup
on oil slinger (2), Fig. 49.
5. Place new gasket(s) same thickness as original
gasket(s) on cylinder.
6. Insert Tool #19356, Orange Seal Protector, into
seal of oil sump and install oil sump on cylinder.
7. Place non-hardening sealant such as Permatex®
II, on screw (1) that enters the breather chamber,
Fig. 50, and install sump screws.
8. Torque screws to 85 in. lbs. (10 Nm). Remove seal
protector.
Model Series 91700, 94500, 94900, 95500,
111700,113900,114700,114900 (Early Style)
Static Governor Adjustment,Vertical Crank
shaft
(See Static Governor Adjustment, Horizontal Crank
shaft, page 11, except engines listed below.)
1. Move throttle control to wide open throttle position,
Fig. 45.
2. Loosen lever adjusting screw.
3. Turn governor crank counterclockwise and hold.
4. Torque lever adjusting screw to 15 in. lbs. (2 Nm.).
Final Governor Adjustment
Install Governor Spring
Model Series 91700,111700,114700
(Current Style)
Governor spring should be installed as shown in
Fig. 51, with large loop (1) horizontal, small loop (2)
vertical.
Model Series 94500, 94900, 95500,113900,
114900 (Current Style)
Governor spring should be installed as shown in
Fig. 52. Note position of spring loops (1) and (2).
Install Governor Spring (Early Style)
Model Series 91700,111700,114700
Install governor spring as shown in Fig. 51.
Fig. 49
Fig. 50
Fig. 51
Fig. 52
NOTE: SPECIFICATION TABLES BEGIN ON PAGE 28 OF THIS SECTION.
23

Install Governor Spring
Model Series 94500,94900, 95500,113900,
114900 (Early Style)
1. Hold governor spring with open end of small loop
down (1).
2. Hook large loop in throttle link loop as shown in (2),
Fig. 53, and pull loop toward throttle lever until end
of spring loop snaps on.
3. Hook small loop (3) in throttle control lever (4) as
shown in Fig. 54.
Adjust Top No Load Speed
Model Series 91700, 94500, 94900, 95500,
111700,113900,114700,114900 (Early Style)
Top No Load RPM is changed on these engines by
changing to governor spring. Start and run engine at
fast position. If RPM is not within specifications, as
listed in Service Engine Sales Manual, MS-4052 or
MS-6225, Service Engine Sales Manual microficheunder NOTE column.
Adjust Top No Load Speed
(Current Style) (120000)
1. Place throttle in fast position and insert a 1 /8" (3.18
mm) rod through holes in carburetor control
bracket and lever.
2. Start engine and adjust Top No Load RPM by turn
ing bending tang to decrease (B) or increase (A),
Fig. 55.
Adjust Top No Load Speed
(Early Style) (120000)
1. Place throttle in fast position and insert a 1 /8" (3.18
mm) rod (1) through holes in carburetor control
bracket (2) and lever.
2. Start engine and use #20 Torx® driver (3) to adjust
Top No Load RPM by turning screw clockwise to
decrease (B) or counterclockwise to increase (A),
Fig. 56.
NOTE: For correct TOP NO LOAD RPM by model
and type, see Engine Sales Manual,
MS-4052 or MS-6225, Service Engine
Sales Manual microfiche.
Fig. 53 Fig. 54
Fig. 55
Fig. 56
24
NOTE: SPECIFICATION TABLES BEGIN ON PAGE 28 OF THIS SECTION.

Adjust Top No Load Speed
Swivel Vertical Rack and Pinion Control
Bracket
Horizontal Rack and Pinion Control Bracket
Model Series 100900,130700,130900,
131900,132900,170000,190000, 220000,
250000, 280000
1. Set control lever to maximum speed position, with
engine running.
2. Use Tool #19229, Tang Bending Tool, to bend
spring anchor tang to obtain the proper TOP NO
LOAD RPM, Fig. 57, swivel and vertical rack and
pinion control brackets or Fig. 58, horizontal rack
and pinion control bracket. For engines using Top
Speed Limit Screw, adjust tang to 4000 RPM,
unless otherwise noted in Table No. 7, page 29 for
Model Series 197400, 195700, 196700, 254700,
257700, 259700, 28A700, 28B700, 28C700,
28D700, 28F700, 28M700, 28R700, 28T700,
28V700 or Table No. 8, page 29, for Model Series
170000, 190000, 220000, 250000, 280000 before
installing top speed limit screw.
3. Install Top No Load limit screw in correct hole after
adjusting governor tang.
NOTE: Refer to Fig.'s 59, 60 and 61 to identify the
type of control and refer to Table No. 7,
Page 29 for Fig. 59, Table No. 8, Page 29
for Fig. 60 and Table No. 9, Page 29 for
Fig. 61 for correct hole location.
Fig. 58
Fig. 59
Fig. 60 Fig. 61
NOTE: SPECIFICATION TABLES BEGIN ON PAGE 28 OF THIS SECTION.
25

Adjust Governed Idle
Rack and Pinion Control Horizontal Slide,Vertical Slide
1. To adjust, first make final carburetor mixture
adjustments.
2. Then place remote control in idle position.
3. Hold throttle shaft in closed position with finger,
adjusting idle speed screw to 1200 RPM
(Horizontal Slide), 1550 RPM (Vertical Slide).
4. Release throttle.
5. Set remote control to 1750 RPM and bend tang (1)
until it contacts remote control slide, Fig. 62
(Horizontal Slide), or turn screw until it contacts
remote control lever, Fig. 63 (Vertical Slide).
Adjust Governed Idle
Swivel Control
1. To adjust, first make final carburetor mixture
adjustment.
2. Place remote control in idle position.
3. Hold throttle in closed position with finger, adjust
idle speed screw (1) to 1550 RPM.
4. Release throttle.
Set remote control to 1750 RPM. Turn screw (1) in
until it contacts remote control lever, Fig. 64.
Fig. 63
Fig. 64
26
NOTE: SPECIFICATION TABLES BEGIN ON PAGE 28 OF THIS SECTION.

Adjust Spring Loaded Screw Type
Following steps 1 through 4 above, turn screw (1) until
it contacts remote control lever. See Fig. 65.
Adjust Governed Idle Stop
1. Set remote control to 1750 RPM.
2. Loosen governed idle stop and place against
remote control lever, Fig. 66.
3. Tighten governed idle stop.
Fig. 66
NOTE: SPECIFICATION TABLES BEGIN ON PAGE 28 OF THIS SECTION.
27

SPECIFICATION TABLES
TABLE NO. 1
Blade
Length
18"
(457 mm)
19"
(483 mm)
20"
(508 mm)
21"
(533 mm)
22"
(559 mm)
23"
(584 mm)
24"
(610 mm)
25"
(635 mm)
Maximum
Rotational RPM
3800
3600
3400
3250
3100
2950
2800
2700
TABLE NO. 2
Setting Top No Load Speed
Top Speed Limit
Screw Position
None
No. 1 Position
No. 2 Position
No. 3 Position
No. 4 Position
No Load Top Speed
Range
3800 to 4000 RPM
3400 to 3700 RPM
3000 to 3300 RPM
2500 to 2900 RPM
1800 to 2400 RPM
TABLE NO. 3
Setting Top No Load Speed
Top Speed Limit
Screw Position
None
No. 1 Position
No. 2 Position
No. 3 Position
No. 4 Position
No Load Top Speed
Range
4000 to 3800 RPM
3700 to 3400 RPM
3300 to 3000 RPM
2900 to 2500 RPM
2400 to 1800 RPM
TABLE NO. 4
Hole Location, Model Series 93400
RPM Range
2800-3000
3100-3500
3600-3900
4000 - 4200
Hole No.
2
3
4
5
6
Date Codes
-
-
-
After 94111300
Before
94111400
TABLE NO. 5
Hole Location, Model Series 133400
RPM Range
2800-3100
3200 - 3400
3500-3700
3800-4000
4100-4200
Hole No.
3
4
5
6
7
TABLE NO. 6
Hole Location, Model Series 176400,
196400, 226400, 250400, 256400
RPM Range
2600-2800
2900-3100
3200-3400
3500-3700
3800 - 4000
Hole No.
2
4
6
8
11
28
NOTE: SPECIFICATION TABLES BEGIN ON PAGE 28 OF THIS SECTION.

TABLE NO. 7
Setting Top No Load Speed
Top Speed
Limit Screw
Position
No. 1 Position
with governor
tang set to
4000 RPM
No. 1 Position
with governor
tang set to
3500 RPM
No. 2 Position
with governor
tang set to
4000 RPM
Model
Series
194700,
195700,
196700,
254700,
257700,
283700,
286700
194700,
195700,
196700,
254700,
257700,
283700,
286700
194700,
195700,
196700,
254700,
257700,
283700,
286700
No Load
Top Speed
Range
3300
2800
2850
TABLE NO. 8
Setting Top No Load Speed
Top Speed
Limit Screw
Position
None
No. 1 Position
No. 2 Position
No. 3 Position
Model
Series
170000,
190000,
220000,
250000,
280000
170000,
190000,
220000,
250000,
280000
170000,
190000
220000,
250000,
280000
No Load
Top Speed
Range
4000
3300
2800
2800
TABLE NO. 9
Setting Top No Load Speed
Top Speed Limit
Screw Position
None
No. 1 Position
No. 2 Position
No Load Top Speed
Range
4000 to 3800 RPM
3400 to 2900 RPM
2800 to 2400 RPM
NOTE: SPECIFICATION TABLES BEGIN ON PAGE 28 OF THIS SECTION.
29

TABLE NO. 10
ALUMINUM MODEL SERIES 80000,112200,130000
(EXCEPT 133400), 170000,190000, 220000, 250000
Model Series
80000
80000
112200
112200
130200,131200,
132200
130200 & 132200
130200 & 132200
131400
132400
170000 & 190000
170000 & 190000
170000 & 190000
220000 & 250000
220000 & 250000
Governor
Type
Mechanical
Mechanical
Mechanical
Mechanical
Mechanical
Mechanical
Mechanical
Mechanical
Mechanical
Mechanical
Mechanical
Mechanical
Mechanical
Mechanical
Governor
Pre-Set
RPM
4600
4400
4300
4400
4600
4000
3600
4200
4600
4250
4150
2400
4200
2400
Notes
Without Flat Cartridge Air Cleaner
With Flat Cartridge Air Cleaner
Type Numbers below 0799
Type Numbers above 0800
Without Flat Cartridge Air Cleaner
60 Cycle, 3600 RPM with Flat Cartridge Air Cleaner
50 Cycle, 3000 RPM With Flat Cartridge Air Cleaner
60 Cycle, 3600 RPM
50 & 60 Cycle, 3000 & 3600 RPM
50 & 60 Cycle, 3000 & 3600 RPM, with StandardAir Cleaner
50 & 60 Cycle, 3000 & 3600 RPM, with Front Mount AirCleaner
60 Cycle, 1800 RPM
50 & 60 Cycle, 3000 & 3600 RPM
60 Cycle, 1800 RPM
30
NOTE: SPECIFICATION TABLES BEGIN ON PAGE 28 OF THIS SECTION.

SECTION 6
Compression
Section ContentsPage
COMPRESSION TEST
Tool #19413, Cylinder Leak Down Tester 2
CYLINDER HEADS3
Remove
Torque
VALVES
Adjust Clearance
' . 10Conversions
From Standard Exhaust Valve Without Rotator to Standard Exhaust Valve with Rotator 14
From Standard Exhaust Valve to Cobalite™ Exhaust Valve without Rotator 15
From Standard Exhaust Valve to Cobalite ™ Exhaust Valve with Rotator 16
From Cobalite™ Exhaust Valve with Rotator and Pin or Split Retainers to Cobalite™
Exhaust Valve without Rotator 17From Cobalite™ Exhaust Valve with Keyhole Rotator to Cobalite™ Exhaust Valve without
Rotator 184
Reface
VALVE GUIDESService 1/4" (6.40 mm) Guides Model Series 60000, 80000, 90000,100000,110000,
120000,130000 6Service 5/16" (7.92 mm) Guides Model Series 170000,190000, 220000, 230000, 240000,
250000, 280000 7VALVE SEATS
Refaceo
Seat Inserts
NOTE: SPECIFICATION TABLES BEGIN ON PAGE 11 OF THIS SECTION.

Compression Test
Install Leak Down Tester Tool #19413
1. Run engine for approximately 5 minutes to allow
engine to reach operating temperature.
NOTE: If engine is cold or cannot be started,
compression components are not at
normal operating temperatures and gauge
readings may be lower.
2. Remove spark plug from engine. Remove air
cleaner and disconnect crankcase breather tube
from air cleaner base (if equipped). Remove
spacers (2) from 1" diameter crankshafts.
3. Rotate crankshaft in direction of operation until
piston is at top dead center of compression
stroke.
4. Assemble Tool #19415, Clamping Tool, on
crankshaft. Torque screws (1) to 150 in. lbs. (17
Nm). Insert a 1/2" drive breaker bar into squarehole in clamp (3), Fig. 1.
5.
6.
7.
CAUTION
Unintentional rotation may result in
entanglement or laceration.
► INJURY MAY occur if the crankshaft is notpositively locked from rotating, and the engineis not securely fastened to a stand or anapplication. The air pressure can create a
rotational force of up to 60 ft. lbs. (81 Nm) if thecrankshaft is not locked with the piston at topdead center. If the engine is installed in anapplication, many times the equipment canpositively lock the crankshaft from moving.
Pull regulator lock nut out and turn adjustment
knob counterclockwise as far as it will go (1),Fig. 2. Inlet gauge set point (1) is shown in Fig. 3.
Connect tester to the shop air source (minimum airpressure of 70 psi.) (49.2 KG/cm2).
Install outlet hose into spark plug hole of cylinder
being tested. Be sure O-Ring is seated to prevent
air leak at spark plug hole. Connect other end totester.
With breaker bar held securely, slowly turn regulator adjustment knob clockwise until tester's inlet
gauge needle is on the set point. Push in regulator
lock nut. Note position of outlet gauge needle (2),
Fig. 3 and refer to TABLE NO. 1, Specifications.
NOTE: (AIR LEAKS) Any air leaks at connections
or fittings will affect the accuracy of test. If a
high flow of air is leaking from exhaust and
carburetor, verify that piston is at TDC on
compression stroke.
Fig. 1
Fig. 2
Fig. 3
NOTE: SPECIFICATION TABLES BEGIN ON PAGE 11 OF THIS SECTION.

9. Complete test by performing steps 10 through 11.
10. Listen for air leaking from cylinder head gasket,
carburetor, exhaust system and either crankcase
breather or high oil fill dipstick tube.
a. Air flowing between cylinder and cylinder
head indicates that cylinder head gasket is
leaking.
b. Air flowing from carburetor indicates air is
leaking past intake valve and seat.
c. Air flowing from crankcase breather tube or
high oil fill dipstick tube indicates air is leaking
past piston rings.
d. Air flowing from exhaust system indicates air
is leaking past exhaust valve and seat.
11. Disconnect outlet hose from tester before
removing from spark plug hole.
12. When test is complete, push regulator lock nut in
and turn regulator lock nut counterclockwise as far
as it will go to release pressure in combustion
chamber.
Remove Cylinder Head and Shield
Note the position of individual cylinder head bolts
during removal to ensure proper reassembly. Bolts
used in the wrong position may be too short and not
engage enough threads, or may be too long and
bottom on a fin, either breaking the fin or leaving the
cylinder head loose. Position of long bolts (1), Fig. 4.
Cylinder Head Assembly and
Torque Procedure
Assemble the cylinder head with the cylinder head
shield and a new head gasket.
Do not use sealer of any kind on gasket. Install head
bolts and snug up evenly. Then use a torque wrench to
tighten head bolts to the torque specified in Table
No. 2, page 11, in the sequence shown, Fig. 4.
A: Model 100700, B: Aluminum cylinder engines 15 cu.
in. and less except 100700. C: Aluminum cylinder
engines 17-28 cu. in. D: Cast iron Models 230000,
240000, 300000, 320000.
If head bolts are not tightened in sequence, the
result could be a warped head.
VALVES
Remove Valves
CAUTION
ALWAYS wear Safety Glasses during valve
spring removal and installation.
Fig. 5 shows three methods used to hold valve spring
retainers or rotators.
Stem (1)
Pin (2)
Collars (3)
Retainer (4)
Fig. 4
Fig. 5
NOTE: SPECIRCATION TABLES BEGIN ON PAGE 11 OF THIS SECTION.

2.
3.
Use Valve Spring Compressor, Tool #19063, (see
[1], Figs. 6,7), adjusting jaws until they just touch
the top and bottom of the valve chamber. Push the
compressor in until the upper jaw slips over the
upper end of the spring, Figs. 6, 7. Apply grease
where shown (6). Inset, Fig. 6 - Cup (2), Spring
(3), Collar (4), Valve (5).
Tighten the jaws to compress the spring.
Remove collars (4) or retainers, Fig. 6, pull pins (3)
with needle nose pliers (2), Fig. 7, and lift out
valve. Pull out compressor and spring.
Reface Valves and Seats
Valve faces can be resurfaced on a commercially
available valve grinding tool. Briggs & Stratton does
not recommend this practice as a high quality repair
procedure. Valve replacement is recommended for
damaged or worn valves. Valve seats are cut using
Tool #19237 or #19343, Neway Valve Seat Cutter Kit,
to 45° on exhaust and some intake seats. Other intake
seats are cut to 30°. Valve and seat are lapped in using
Tool #19258, Valve Lapping Tool, and Part #94150,
Valve Lapping Compound, to assure a good sealbetween the valve face and the seat.
Valve seat width should be 3/64 to 1/16" (1.17 to 1.57
mm), Fig. 8. If the seat is wider, a narrowing cuttershould be used. If valve face or seat are badly burned,
the burned part should be replaced. Replace valve if
margin (3) is damaged, 1/64" (.40 mm) or less (2).Acceptable wear (1), Fig. 8.
Fig. 7
45" OR
30°
Fig. 8
NOTE: SPECIRCATION TABLES BEGIN ON PAGE 11 OF THIS SECTION.

Check and Adjust Tappet Clearance
NOTE: Check valve clearances while engine
is cold.
1. Place valves in their correct guides in cylinder.
2. Turn ^gnu-shaft (rnnpterdockwise as viewed from
PTO) until piston comes to top dead center, com
pression stroke. Both valves should be closed.
3. Check clearance of intake and exhaust valves to
tappets with feeler gauge, Table No. 7, page 13.
4. Turn crankshaft past top dead center until piston is
1/4" (6.4 mm) down from top of cylinder.
5. If there is insufficient clearance, grind ends of
valves square until correct clearance is obtained.
6. If clearance is too great, cut valve seat until correct
clearance is obtained.
7. Narrow the seat, if required, to maintain 3/64 to
1/16" (1.17 to 1.57 mm) seat width.
Install Valves
CAUTION
ALWAYS wear Safety Glasses during valve
spring removal and installation.
Some engines use the same spring for intake and
exhaust side, while others use a heavier spring on the
exhaust side. Compare springs before installing.
NOTE: Apply "LED-PLATE" or Part #93963, Valve
Guide Lubricant, to valve stems and
guides before installing. Be sure that no
"LED-PLATE" or Part #93963 is on the
ends of the valve stems or tappets.
Install Valves, Pin or Collar Retainers
Fig. 9
1. If retainers are held by a pin (2) or collars (3), place
valve spring and retainer (and cup on Model
Series 230000, 240000, 300000 and 320000) into
Tool #19063, Valve Spring Compressor.
2. Compress spring until it is solid.
3. Insert the compressed spring and retainer (and
cup when used) into valve chamber (1).
4. Drop the valve into place, pushing the stem
through the retainer (4).
5. Hold the spring up in the chamber, and the valve
down.
6. Insert the retainer pin with a needle nose pliers or
place the collars in the groove in the valve stem.
7. Lower the spring until the retainer fits around the
pin or collars, then pull out the spring compressor.
8. Be sure pin or collars are in place.
Self-Lock Retainers
Fig. 9, Illus. C
1. If self-lock retainer is used, compress retainer andspring with Valve Spring Compressor, Tool
#19063, until spring is solid.
2. Large hole of retainer should face toward opening in
Tool #19063, Valve Spring Compressor, Figs. 6,7.
3. Insert compressed spring and retainer into valve
chamber.
4. Lower valve stem through large hole of retainer
slot and then push down and in on compressor
until retainer bottoms on valve stem shoulder.
5. Release valve spring compressor until it is just free
of spring tension and withdraw compressor.
.9
NOTE: SPECIFICATION TABLES BEGIN ON PAGE 11 OF THIS SECTION.

VALVE GUIDES
Service 1/4" (6.40 mm) Valve Guides
Model Series 60000, 80000,90000,100000,
110000,120000,130000
If flat end of Valve Guide Plug Gauge, Tool #19122 (1),
can be inserted into valve guide a distance of 5/16"
(7.92 mm), Fig. 10, A, the valve guide is worn andshould be rebushed.
Rebush Worn Aluminum Guides
1. Place pilot of Tool #19064, Counterbore Reamer(2), in valve guide.
Slide Tool #19191, Pilot Bushing (4), down over
reamer until bushing rests on valve seat.
Hold a replacement guide bushing (3), Part
#63709, on top of pilot bushing and mark reamer
1/16" (1.57 mm) above it (5), Fig. 10, Illus. B.
Ream worn guide until mark on counterbore
reamer is even with top of pilot bushing. Use
kerosene or equivalent to lubricate reamer.
5. After counterboring guide, continue to turn reamer
in same direction while withdrawing it, Fig. 10,
Illus. C.
Position replacement bushing in guide.
Press bushing with Tool #19367, Valve Guide
Bushing Driver (6), until bushing is flush with top of
guide, Fig. 10, Illus. D.
Finish ream bushing through to breather chamber
with Tool #19066. Finish Reamer, using kerosene
or equivalent to lubricate reamer, Fig. 10, Illus. E.
Flush all chips away and remove reamer, as instep 5.
2.
3.
4.
NOTE: Tool #19191 (1), Pilot Bushing, can be
modified to provide more accurate
alignment with the valve seat. Counterbore
with Tool #19064, Counterbore Reamer.
Use #19367 Driver to press in bushing Part
#63709, and finish ream with Tool #19066,
Finish Reamer, Fig. 11.
Rebush Brass or Sintered Valve Guides
NOTE: To assure acetate alignment of Tool
#19273,7 mm Ta^Tool #19191 may need
to be modified. MeTasure shank of Tool
#19273, and either drill or bush Tool
#19191 for best fit and alignment.
1. Lubricate Tool #19273, 7 mm Tap, and bushing
with engine oil or kerosene.
2. With a tap wrench and Tool #19191, (modified),
turn tap into bushing clockwise until tap is 1/2" (13
mm) deep. DO NOT tap more than 3/4" (19 mm)deep.
Fig. 10
Fig. 11
NOTE: SPECIFICATION TABLES BEGIN ON PAGE 11 OF THIS SECTION.

3. Remove tap and flush chips out of bushing.
4. Assemble Tool #19272, Puller Nut (2), Tool
#19271, Puller Screw (1), and Tool #19270 Puller
Washer (3), Fig. 12.
5. Thread puller screw into tapped bushing until
screw bottoms in tapped hole.
6. Back off screw 1/8 to 1/4 turn and place a drop of
engine oil on threads of puller screw.
7. Hold puller screw stationary and turn puller nut
down on washer until bushing is removed.
8. Use Table No. 3, page 11 to select correct service
bushing.
9. Place grooved or tapered end of new bushing into
guide.
10. Press bushing into guide with Tool #19065 or
#19274, Bushing Driver, until bushing bottoms.
Rotate driver while pressing in bushing.
NOTE: #19065 drivers purchased before October
1983 must be modified by reducing driver's
tip to .240" (6.09 mm) when used to press in
sintered bushings.
11. Finish ream bushing with Tool #19066, Finish
Reamer, and Tool #19191, Reamer Guide
Bushing, (modified), Fig. 11.
12. Before removing reamer, flush all chips away.
13. Remove reamer, turning in same direction as
reaming while pulling up on reamer.
Service 5/16" (7.92 mm) Valve Guides
Model Series 170000,190000, 220000,
230000, 240000, 250000, 280000, 300000,
320000
If flat end of Valve Guide Plug Gauge, Tool #19151, can
be inserted into guide a distance of 5/16" (7.92 mm),
the guide is worn and should be rebushed.
Rebush Aluminum Guides and Cast Iron
Guides (Cast Iron Cylinders)
1. Place pilot of Counterbore Reamer #19231 (1) in
valve guide.
2. Slide Tool #19234, Reamer Guide (2), down over
counterbore reamer until Guide rests on valve
seat.
3. Hold replacement guide bushing, Part #231218,
on top of reamer guide and mark reamer (4) 1/16"
(1.57 mm) above replacement guide bushing,
Fig. 13.
4. Ream worn guide until mark on counterbore
reamer is even with top of reamer guide. Use
kerosene or equivalent to lubricate reamer.
5. After counterboring guide, continue to turn reamer
in same direction while removing it.
Fig. 12
Fig. 13
NOTE: SPECIFICATION TABLES BEGIN ON PAGE 11 OF THIS SECTION.

6. Position bushing in counterbored guide. Press
bushing with Tool #19204, Bushing Driver, until
bushing is flush with top of guide.
7. Finish ream bushing with Tool #19233, Finish
Reamer, using kerosene or equivalent to lubricatereamer.
8. Before removing reamer, flush all chips away.
9. Flush all chips and remove reamer as in step 5.
Replace Brass or Sintered Valve Guides
1. Lubricate Tool #19264, 9 mm Tap, and bushing
with engine oil or kerosene.
2. With a tap wrench, turn tap into bushing clockwise
until tap is 1/2" (13 mm) deep. DO NOT tap more
than 1" (50.8 mm) deep.
3. Remove tap and flush chips out of bushing.
4. Assemble Tool #19239, Puller Nut, Tool #19238,
Puller Screw, and Tool #19240, Puller Washer, ref.
Fig. 12 (typ.)-
5. Thread puller screw into tapped bushing until
screw bottoms in tapped hole.
6. Back off screw 1/8 to 1/4 turn. Place a drop of
engine oil on threads of puller screw.
7. Hold puller screw stationary and turn puller nut
down on washer until valve guide bushing is
removed, Fig. 12.
8. Use Table No. 4, page 11, to select correct service
bushing.
9. Place grooved or tapered end of new bushing into
guide.
10. Press bushing into cylinder with Tool #19204,
Bushing Driver, until bushing bottoms. Rotate
driver while pressing in bushing.
11. Finish ream bushings, Part #261961 and #231218
with Finish Reamer, Tool #19233, and Reamer
guide Bushing, Tool #19234 until reamer goes
through entire guide, Fig. 13.
NOTE: Bushing, Part #230655 does not need to
be reamed.
12. Before removing finish reamer, flush all chips
away.
13. Remove reamer, turning in same direction as
reaming while pulling up on reamer.
NOTE: Valve seating should be checked after
bushing the guide, and corrected if
necessary by refacing the seat.
VALVE SEAT INSERT REPLACEMENT
Model Series 233400, 243400, 300000,320000
Cast iron cylinder engines are equipped with aremovable exhaust valve seat insert. The intake side
must be counterbored to allow installation of a valveseat insert.
Aluminum alloy cylinder models are equipped withremovable inserts on both exhaust and intake side.See Table No. 5, page 12.
NOTE: SPECIFICATION TABLES BEGIN ON PAGE 11 OF THIS SECTION.

Remove Valve Seat Insert
1. Use Tool #19138, Valve Seat Puller, as shown in
Fig. 14, and select the proper puller nut (2). See
Table No. 5, page 12.
2. Be sure the puller body (1) does not rest on the
valve seat insert, Fig. 14.
3. Turn the 5/16" bolt with a wrench until insert (3) is
pulled out of the cylinder.
NOTE: On aluminum alloy cylinder models, it may
be necessary to grind the puller nut until
the edge is 1/32" (.80 mm) thick in order to
get the puller nut under the valve insert,
Fig. 14.
Install Valve Seat Insert
1. Select the proper valve seat insert and the correct
pilot and driver according to Tables 5 and 6, pages
12 and 13. You will note that one side of the seat
insert is chamfered at the outer edge. This side
should go down into the cylinder.
2. Insert the pilot (1) into the valve guide.
3. Drive the valve insert (2) into place with the driver
(3), as shown in Fig. 15.
4. Reface seat using Tool #19237 or #19343, Neway
Valve Seat Cutter Kit. Then lap valves and seat
lightly with grinding compound. Clean thoroughly.
NOTE: For aluminum alloy cylinder models only,
use the old valve seat insert as a spacer
between the driver and the new insert,
Fig. 15.
5. Drive new insert until it bottoms. Top of insert will
be slightly below cylinder head gasket surface.
Loose valve seat can be turned or moved up or
down. Check with feeler gauge (1). Use center
punch to tighten insert at three points, equally
spaced (2), Fig. 16.
6. Use a flat punch to peen over the edge so metal
squeezes around the entire insert (3) Fig. 16.
Fig. 14
Fig. 15
Fig. 16
NOTE: SPECIFICATION TABLES BEGIN ON PAGE 11 OF THIS SECTION.

Counterbore Cylinder for Intake Valve SeatInstallation
Cast Iron Cylinder Models
Cast iron cylinder models must be counterbored to
allow installation of the intake valve seat insert.
1. Select proper seat insert, cutter shank, counter-
bore cutter, pilot and driver according to Table 6.
2. Insert pilot (1) in intake valve guide, Fig. 17.
NOTE: The Model Series 320000 intake valve
seat is part of the cylinder. There is no
replacement valve seat.
3. Assemble correct counterbore cutter (1) to cutter
shank (2) as shown in Figs. 18,19.
4. Counterbore cylinder by hand until stop (3) on
cutter (1) touches top of cylinder, Fig. 19.
NOTE: Do not force the cutter to one side or it will
cut oversize.
5. Blow out all chips.
6. Use Knockout Pin, Tool #19135, to remove cutter
from cutter shank.
Valve Conversions
The life of a valve is considered to be the period of time
the valve will operate before repair or replacement is
necessary. The life of a standard exhaust valve is often
shortened because of burning, which occurs when
pieces of combustion deposit lodge between the valve
seat and valve face, preventing the valve from closing
completely. This is most likely to occur on engines
which are operated at constant speed and constant
load, for long periods of time. Exhaust valve life can beextended by using:
A valve rotator turns the exhaust valve a slight
bit on each lift, wiping away any deposits
which tend to lodge between the valve face
and seat, Table No. 8, page 14 and Fig. 20 or,
For LP or Natural gas, use a Cobalite™ valve
without rotator, see Table No's. 11 or 12,
pages 17 or 18, using Fig. 21 or Fig. 22 to
determine type of retainer being used.
A Cobalite™ exhaust valve which has a
greater resistance to heat, Table No. 9, page
15 or,
Or a combination of both the rotator and
Cobalite™ valve, Table No. 10, page 16.
a.
b.
c.
d.
Fig. 18
Fig. 19
10
NOTE: SPECIFICATION TABLES BEGIN ON PAGE 11 OF THIS SECTION.

SPECIFICATION TABLES
TABLE NO. 1
Results
Reading is Green. A
small amount of air is
leaking from head
gasket.
Reading is Green
Minimum air leakage.
Reading is Green/Red
or Red, and all the air is
leaking from one
component.
Reading is Red, and air
is leaking from several
components.
Replace head gasket,
then re-test.
Look for other problems
that are not
compression related.
Look for a possible
problem with that
component.
Check that piston is atTDC, on compression
stroke. If reading doesnot change, look forproblems beginning
with component that
appeared to leak themost air. Re-test after
repair.
TABLE NO. 2
Cylinder Head Torque
BASIC MODEL SERIES
ALUMINUM CYLINDER
60000, 80000, 90000,100000,
110000,120000,130000
170000,190000,220000,
250000, 280000
CAST IRON CYLINDER
230000, 240000,300000, 320000
Inch
Pounds
(Nm)
140
(16)
165
(19)
Inch
Pounds
(Nm)
190
(22)
Guide
TABLE r
Bushing
MO. 3
dentificatiori
BUSHING REMOVED FROM CYLINDER
Sint
ered
Guide
Gray
or
Copper
Col
ored
_
3/4"
(19.00
MM)—
Brass
Guide
1 or 2
Grooves
3/4"
(19.00
MM)
Brass
Guide
1 or 2
Grooves
1-1/16"
(26.97
MM)
Brass
Guide
No
Grooves
3/4"
(19.00
MM)
Alum.
Guide
or
Cast
Iron
Cylin
der
3/4"
(19.00
MM)
REPLACEMENT BUSHING
Use
Part
#262001
Use
Part
#231348
Use
Part
#231349
Use
Part
#63709
Use
Part
#63709
TABLE NO. 4
Guide Bushing Identification
BUSHING REMOVED FROM CYLINDER
Sintered
Guide
Gray or
Copper
Colored
Brass
Guide
1 or 2
Grooves
Brass
Guide
No
Grooves
D
Alum.
Guide
or Cast
Iron
Cylinder
REPLACEMENT BUSHING
Use Part
#261961
Use Part
#231218
Use Part
#230655
Use Part
#231218
NOTE: SPECIFICATION TABLES BEGIN ON PAGE 11 OF THIS SECTION.
11
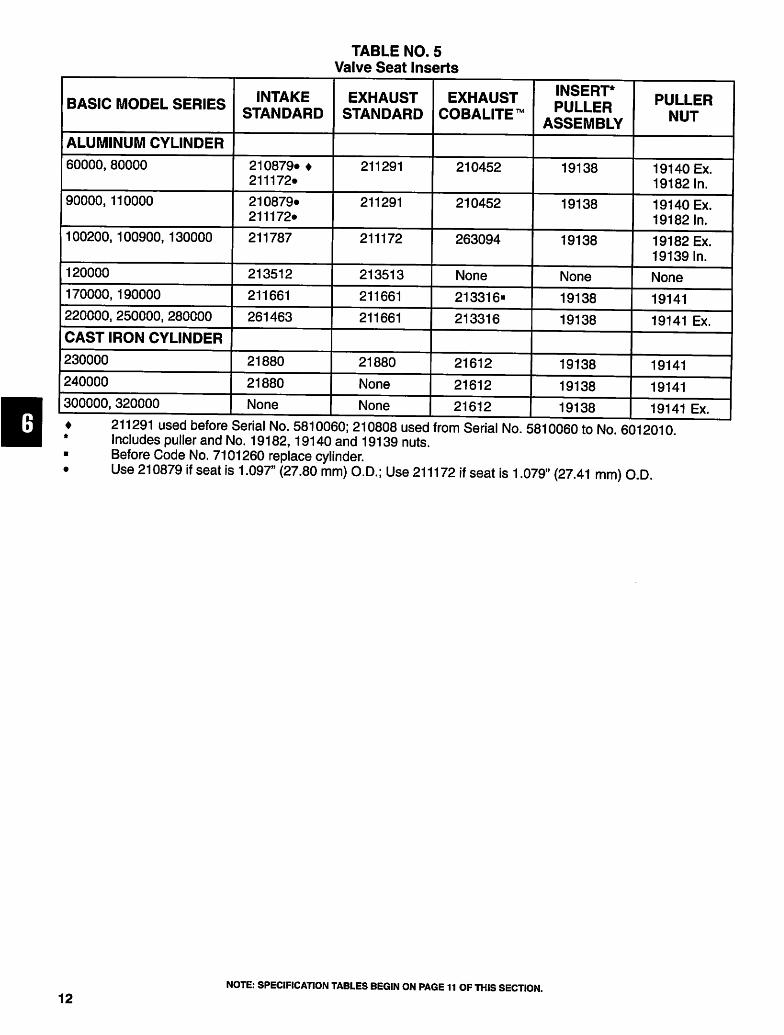
TABLE NO. 5
Valve Seat Inserts
i
BASIC MODEL SERIES
ALUMINUM CYLINDER
60000, 80000
90000, 110000
100200, 100900, 130000
120000
170000, 190000
220000, 250000, 280000
CAST IRON CYLINDER
230000
240000
300000, 320000
INTAKE
STANDARD
210879* ♦
211172*
210879*
211172*
211787
213512
211661
261463
21880
21880
None
EXHAUST
STANDARD
211291
211291
211172
213513
211661
211661
21880
None
None
EXHAUST
COBALITE™
210452
210452
263094
None
213316-
213316
21612
21612
21612
INSERT*
PULLER
ASSEMBLY
19138
19138
19138
None
19138
19138
19138
19138
19138
PULLER
NUT
19140 Ex.
19182 In.
19140 Ex.
19182 In.
19182 Ex.
19139 In.
None
19141
19141 Ex.
19141
19141
19141 Ex.
211291 used before Serial No. 5810060; 210808 used from Serial No. 5810060 to No 6012010Includes puller and No. 19182,19140 and 19139 nuts.
Before Code No. 7101260 replace cylinder.
Use 210879 if seat is 1.097" (27.80 mm) O.D.; Use 211172 if seat is 1.079" (27.41 mm) O.D
12
NOTE: SPECIFICATION TABLES BEGIN ON PAGE 11 OF THIS SECTION.

TABLE NO. 6
Valve Seat Insert and Counterbore Tools
BASIC MODEL SERIES
ALUMINUM CYLINDER
60000, 80000
90000
100000,130000
170000,190000
CAST IRON CYLINDER
230000, 240000
300000, 320000
COUNTER-
BORE
CUTTER
NONE
NONE
NONE
NONE
19131
NONE
SHANK
NOT USED
NOT USED
NOT USED
NOT USED
19129
NOT USED
CUTTER &
DRIVER PILOT
19126
19126
19126
19127
19127
19127
INSERT
DRIVER
19136
19136
19136
19136
19136
19136
TABLE NO. 7
Valve Tappet Clearance
BASIC MODEL SERIES
ALUMINUM CYLINDER**
60000, 80000, 90000*,
100000,110000, 120000
130000, 170000,190000,
220000, 250000*. 280000***
CAST IRON CYLINDER
230000, 240000, 300000,
320000
MIN.
.005
(.13)
.005
(.13)
.007
(.18)
INTAKE
MAX.
.007
(.18)
.007
(.18)
.009
(.23)
MIN.
.007*
(.18)*
.009
(.23)
.017
(.43)
EXHAUST
MAX.
.009*
(.23)*
.011
(.28)
.019
(.48)
*Some Model Series System 2®, System 3®, System 4® have been built with .005 (.13) to .007 (.18) exhaustvalve clearance. The breather on these engines are stamped on the inside surface.•On Model Series 253400, 255400 engines equipped with "both" electric start and rewind start, set VALVETAPPET clearance to "Rewind Start" specifications as listed in TABLE NO. 7. For Electric Start ONLY
engines, set valve clearance to .009" (.23) to .011" (.28).
**lncludes Cylinders with Cast Iron Sleeves****Model Series 286700 engines, set INTAKE VALVE TAPPET clearance to .004" (0.10) to .006" (0.15).
NOTE: SPECIFICATION TABLES BEGIN ON PAGE 11 OF THIS SECTION.
13
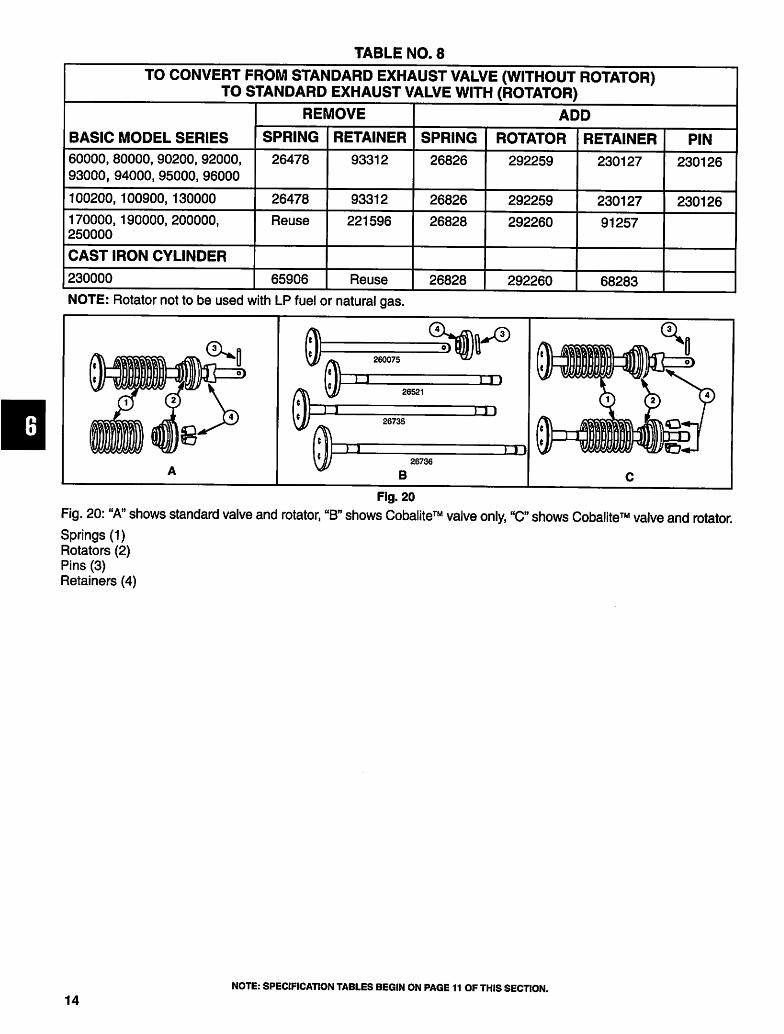
TABLE NO. 8
TO CONVERT FROM STANDARD EXHAUST VALVE (WITHOUT ROTATOR)TO STANDARD EXHAUST VALVE WITH (ROTATOR)
BASIC MODEL SERIES
60000, 80000, 90200, 92000,
93000, 94000, 95000, 96000
100200, 100900, 130000
170000,190000,200000,
250000
CAST IRON CYLINDER
230000
REMOVE
SPRING
26478
26478
Reuse
65906
RETAINER
93312
93312
221596
Reuse
ADD
SPRING
26826
26826
26828
26828
ROTATOR
292259
292259
292260
292260
RETAINER
230127
230127
91257
68283
PIN
230126
230126
NOTE: Rotator not to be used with LP fuel or natural gas.
260075
J_L26521
J-J.26735
JID
1 L J_D26736
B
Fig. 20
Fig. 20: "A" shows standard valve and rotator, "B" shows Cobalite™ valve only, "C" shows Cobalite™ valve and rotator.
Springs (1)
Rotators (2)
Pins (3)
Retainers (4)
14
NOTE: SPECIFICATION TABLES BEGIN ON PAGE 11 OF THIS SECTION.

TABLE NO. 9
TO CONVERT FROM STANDARD EXHAUST VALVE
TO COBALITE™ EXHAUST VALVE (WITHOUT ROTATOR)
Model
Series
60000-
80000-
90000-
100200-
100900-
130000-
170000*-
190000»-
220400*
221400*
250000*
280000*
280000
233000
243000*
300000*
320000*
REMOVE
Standard
Exhaust
Valve
296676
211119
390419
394434
Retainer
or
Rotator
93312
93312
Reuse
Split
Retainers
(93630)
Spring
26478
26478
Reuse
Spring
(26828)
ADD
Cobalite™
Exhaust
Valve
262580
262464
390420
Retainer
Collar
68293
Retainer
224450
224450
Reuse
Split
Retainers
(93630)
Spring
26478
26478
Reuse
Spring
(26828)
Pin
Not
Used
Not
Used
Cobalite™ Exhaust Valve and Seat with Rotator Standard
292260 Reuse
Spring
(26828)
Reuse
261185
68293 Reuse
Split
Retainers
(93630)
Reuse
Spring
(26828)
Not
Used
Cobalite™ Exhaust Valve and Seat with Rotator Standard
292260
68293
(Collar
Type)
Reuse
Spring
26828
65906
Reuse
262246
394436
Includes
Retainers
68293
68293
Reuse
Split
Retainers
93630
Reuse
Split
Retainers
(68283)
Reuse
Spring
(26828)
26828
Not
Used
Not
Used
Cobalite™ Exhaust Valve and Seat with Rotator Standard
Reuse
Split
Retainers
(93630)
Reuse
Spring
(26828)
Reuse
394436
68293 Reuse
Split
Retainers
(93630)
Reuse
Spring
(26828)
Not
Used
Some standard with Cobalite™ exhaust valve and seat with Rotator. Cobalite™ valves are usually marked
TXS," "XS" or "PP-XS" on head.
• Valve Rotator standard with standard exhaust valve.
* Standard with Cobalite™ exhaust valve and seat with Rotator.
NOTE: Apply Briggs & Stratton "Valve Guide Lubricant," Part #93963 to valve stems and guides before installing
valves especially when operating with LP fuel or natural gas. Rotator should not be used with LP fuel or
natural gas.
NOTE: SPECIFICATION TABLES BEGIN ON PAGE 11 OF THIS SECTION.
15

TABLE NO. 10
TO CONVERT FROM STANDARD EXHAUST VALVE
TO COBALITE™ EXHAUST VALVE (WITH ROTATOR)
Model
Series
60000-
80000-
90000-
110000-
100200-
100900-
130000-
170000*-
190000*-
220400*
221400*
250000*
280000*
233000
243000*
300000*
320000*
REMOVE
Standard
Exhaust
Valve
296676
212004 or
261913
211119
390419
Retainer
93312
93312
93312
Reuse
Split
Retainers
(93630)
Spring
26478
Reuse
260552
26478
Reuse
Spring
(26828)
ADD
Cobalite™
Exhaust
Valve
494187
261912
494191
390420
Rotator
292259
292259
Part of
494191
Reuse
Rotator
(292260)
Retainer
230127
(Sleeve
Type)
230127
(Sleeve
Type)
Reuse
Split
Retainers
(93630)
Spring
26826
Reuse
260552
Part of
494191
Reuse
Spring
(26828)
Pin
230126
230126
Not
Used
Not
Used
Cobalite™ Exhaust Valve and Seat
with Rotator Standard
23923 69293
(Collar
Type)
65906 394436
Includes
Retainers
292260 Reuse
Split
Retainers
(68283)
26828 Not
Used
Cobalite™ Exhaust Valve and Seat
with Rotator Standard
Some standard with Cobalite™ exhaust valve and seat with Rotator. Cobalite™ valves"TXS," "XS" or "PP-XS" on head.
Valve Rotator standard with standard exhaust valve.
Standard with Cobalite™ exhaust valve and seat with Rotator.
are usually marked
NOTE: Apply Briggs & Stratton "Valve Guide Lubricant," Part #93963 to valve stems and guides before installing
valves especially when operating with LP fuel or natural gas. Rotator should not be used with LP fuel ornatural gas.
NOTE: SPECIFICATION TABLES BEGIN ON PAGE 11 OF THIS SECTION.
16

TABLE NO. 11
TO CONVERT FROM COBALITE™ EXHAUST VALVE (WITH ROTATOR AND PIN OR
SPLIT RETAINERS) TO COBALITE™ EXHAUST VALVE (WITHOUT ROTATOR)
Model
Series
60000-
80000-
90000-
110000-
100200-
100900-
130000-
170000--
190000*-
220400*
221400*
250000*
280000*
233000
243000*
300000*
320000*
REMOVE
Rotator
292259
292259
292259
292260
292260
292260
292260
Retainer
230127
(Sleeve
Type)
230127
(Sleeve
Type)
230127
(Sleeve
Type)
Reuse Split
Retainers
(93630)
Reuse Split
Retainers
(93630)
Reuse Split
Retainers
(68283)
Reuse Split
Retainers
(68283)
Spring
26826
Reuse
Spring
(260552)
26826
Reuse
Spring
(26828)
Reuse
Spring
(26828)
26826
26826
Pin
230126
230126
230126
Not
Used
Not
Used
Not
Used
Not
Used
ADD
Retainer
23184
(Collar
Type)
23184
(Collar
Type)
23184
(Collar
Type)
68293
(Collar
Type)
68293
(Collar
Type)
68293
(Collar
Type)
68293
(Collar
Type)
Spring
26478
Reuse
Spring
(260552)
26478
Reuse
Spring
(26828)
Reuse
Spring
(26828)
65906
65906
Pin
23187
23187
23187
Not
Used
Not
Used
Not
Used
Not
Used
Some standard with Cobalite™ exhaust valve and seat with Rotator. Cobalite™ valves are usually marked
"TXS," "XS" or "PP-XS" on head.Valve Rotator standard with standard exhaust valve, not to be used with LP fuel or natural gas.
Standard with Cobalite™ exhaust valve and seat with Rotator.
260075
J_D26521
IJJ26735
26736
B
Fig. 21
Fig. 21: "A" shows standard valve and rotator, "B" shows Cobalite™ valve only, "C" shows Cobalite™ valve and rotator.
Springs (1)
Rotators (2)
Pins (3)
Retainers (4)
NOTE: SPECIFICATION TABLES BEGIN ON PAGE 11 OF THIS SECTION.
17

TABLE NO. 12
TO CONVERT FROM COBALITE™ EXHAUST VALVE (WITH KEYHOLE ROTATOR)TO COBALITE™ EXHAUST VALVE (WITHOUT ROTATOR)
REMOVE ADD
Model
SeriesRotator Retainer Spring Pin Retainer Spring Pin
60000-
80000-
90000-
491442 Not Used 262750 Not Used 224450 26478 Not Used
110000- 491442 Not Used 262750 Not Used 224450 26478 Not Used
100200'
100900-
130000-
491442 Not Used 262750 Not Used 224450 26478 Not Used
■ Some standard with Cobaiite™ exhaust valve and seat with Rotator. Cobaiite™ valves are usually markedTXS," "XS" or "PP-XS" on head.
CE
C
CE
Fig. 22
Fig. 22: "A" shows Cobaiite™ valve only, "B" shows Cobaiite™ valve and rotator.
NOTE: SPECIFICATION TABLES BEGIN ON PAGE 11 OF THIS SECTION.
18

SECTION 7A
Rewind StartersSection Contents
Page
All Except Model Series 100700,120000
Rope
Remove 4
Install 5
Spring
Remove, Install, Wind 4
Model Series 100700
Disassemble 8
Inspect 9
Assemble 9
Model Series 90000,10A900,10B900,10C900,120000 with Plastic Pawls
Disassemble 11
Inspect 12-13
Assemble 12
Model Series 120000 with Metal Pawls
Disassemble 13
Inspect 14
Assemble 15
Install Starter on Blowerhousing 16
Starter Clutches 6
Vertical Pull 16
Disassemble 16
Assemble 18
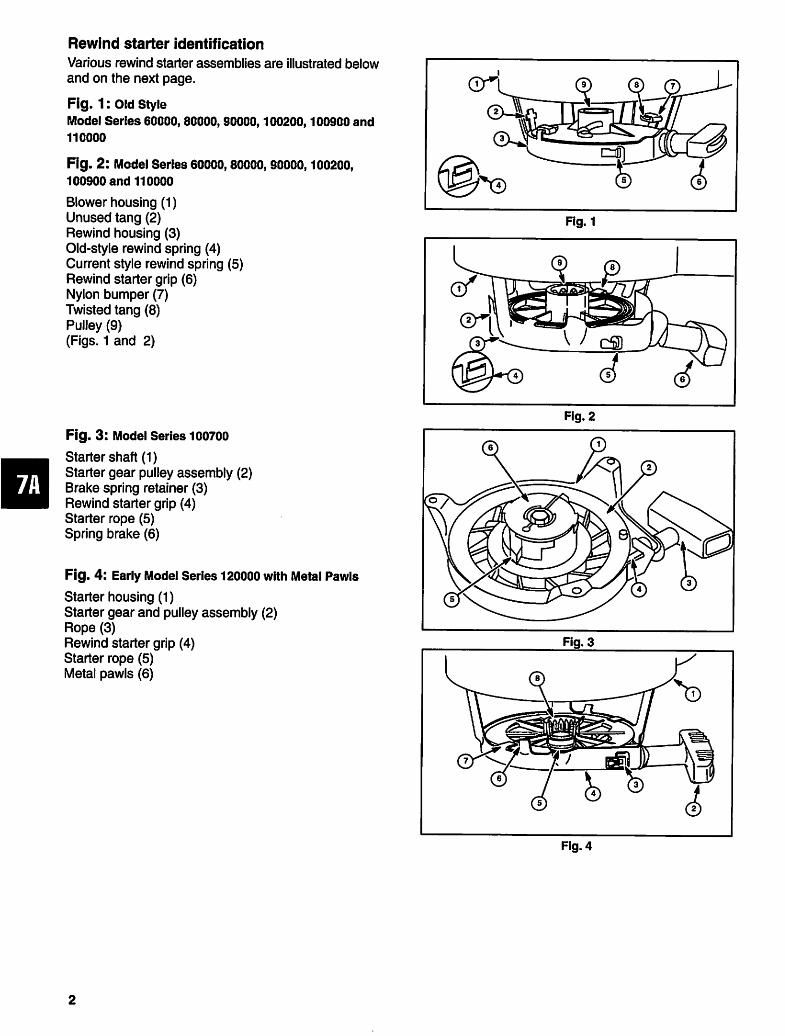
Rewind starter identification
Various rewind starter assemblies are illustrated below
and on the next page.
Fig. 1: Old Style
Model Series 60000,80000, 90O00,100200,100900 and
110000
Fig. 2: Model Series 60000,80000, 90000,100200,
100900 and 110000
Blower housing (1)
Unused tang (2)
Rewind housing (3)
Old-style rewind spring (4)
Current style rewind spring (5)
Rewind starter grip (6)
Nylon bumper (7)
Twisted tang (8)
Pulley (9)
(Figs. 1 and 2)
Fig. 3: Model Series 100700
Starter shaft (1)
Starter gear pulley assembly (2)
Brake spring retainer (3)
Rewind starter grip (4)
Starter rope (5)
Spring brake (6)
Fig. 4: Early Model Series 120000 with Metal Pawls
Starter housing (1)
Starter gear and pulley assembly (2)
Rope (3)
Rewind starter grip (4)
Starter rope (5)
Metal pawls (6)
Fig. 1
Fig. 4

Fig. 5: Current Model Series 90000,10B900,10C900,
120000 with Plastic Pawls
Starter housing (1)
Pulley and spring assembly (2)
Rope (3)
Rewind starter grip (4)
Plastic pawls (5)
Retainer (6)
Fig. 6: Model Series 130000,170000,190000,220000,
250000 and 280000
Blower housing (1)
Rewind starter grip (2)
Rewind spring (3)
Rewind housing (4)
Tension spring and hub (5) (not used on Model Series
130000)
Unused pulley tang (6)
Pulley tang (7)
Pulley (8)
Fig. 7*. Model Series 170000,190000,250000,
300000 and 320000
Blower housing (1)
Pulley (2)
Alternate style (3)
Rewind starter grip (4)
Rewind spring (5)
Rewind housing (6)
Pulley tang (7)
Fig. 6
E
Fig. 7
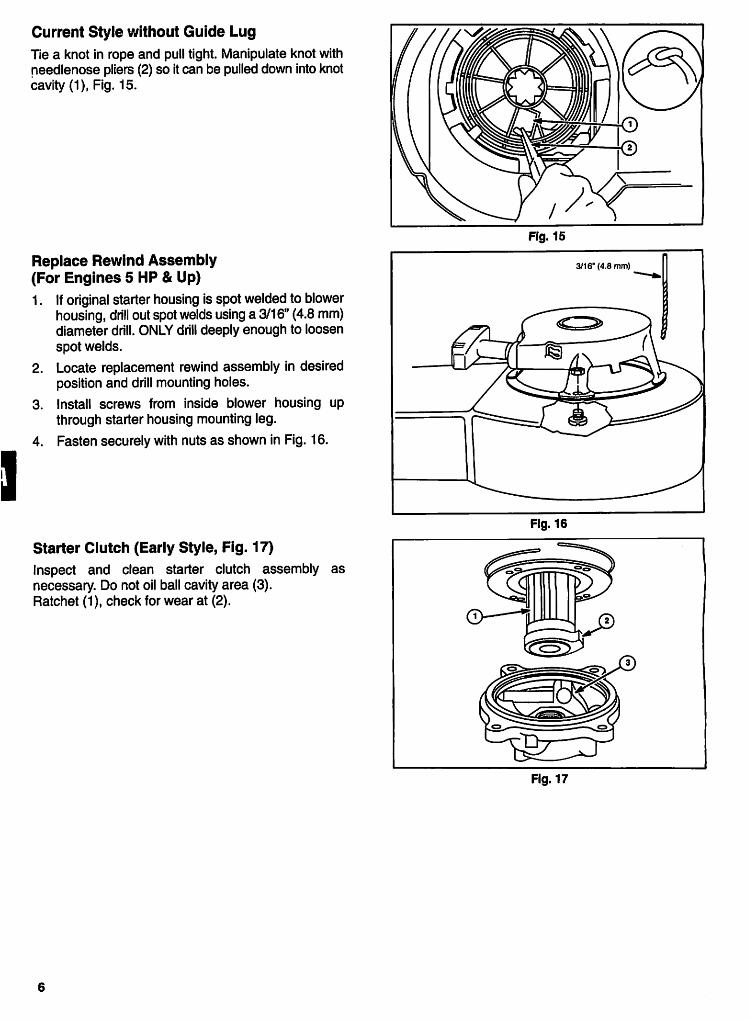
Current Style without Guide Lug
Tie a knot in rope and pull tight. Manipulate knot with
needlenose pliers (2) so it can be pulled down into knot
cavity (1), Fig. 15.
Replace Rewind Assembly
(For Engines 5 HP & Up)
1. If original starter housing is spot welded to blower
housing, drill out spot welds using a 3/16" (4.8 mm)
diameter drill. ONLY drill deeply enough to loosen
spot welds.
2. Locate replacement rewind assembly in desired
position and drill mounting holes.
3. Install screws from inside blower housing up
through starter housing mounting leg.
4. Fasten securely with nuts as shown in Fig. 16.
Starter Clutch (Early Style, Fig. 17)
Inspect and clean starter clutch assembly as
necessary. Do not oil ball cavity area (3).
Ratchet (1), check for wear at (2).
Fig. 17

Starter Clutch (Sealed, Fig. 18)
Seal(1)
Ratchet (2)
Clutch housing (3)
Retainer cover (4)
Six balls (5)
1. If necessary, the sealed clutch can be
disassembled by using a screwdriver or wedge to
pry the retainer cover from the housing, as shown
in Fig. 19.
2. Place one drop of a synthetic type engine oil on
end of crankshaft before replacing clutch
assembly on crankshaft.
3. Tighten clutch to torque noted on specification
sheet for your model engine.
CAUTION
DO NOT run engine without screen screws
assembled to clutch.
NOTE: Clean ratchet by wiping with cloth only.
NOTE: The sealed clutch may be installed on
older model engines, by modifying the
starter pulley and crankshaft. The old
pulley can be made to fit the new clutch by
cutting off the hub to a dimension of 1/2"
(12.7 mm) as shown in Fig. 20.
The crankshaft must be shortened 3/8"
(9.5 mm) (2) and the end chamfered as
shown in (1) Fig. 21. A new screen
#221661 is required with the new clutch.
CAUTION
ALWAYS wear Safety Glasses while
performing any rewind starter repair.
Fig. 19
Fig. 20
U*_ 1-63/64" *>| /7)I (50.4 mm) i<>-^
3/8" (9.5 mm)
Fig. 21

Model Series 100700 Starter
Disassemble
To remove the starter, it may be necessary to remove
or raise the fuel tank.
1. Loosen starter mounting screw (1) and remove
starter, Fig. 22.
2. Pull rope out as far as it will go and while holding
pulley and cover, remove rope from pulley.
3. Then slowly relieve spring tension by releasing
cover or pulley.
4. Remove and save decal.
Remove cover screw (1) by turning screw clock
wise (2): left hand thread.
6. Remove screw and washer, Fig. 23.
7. Bend anchor tang (1) out and turn cover counter
clockwise to disengage spring hook from cover
notch, Fig. 24.
NOTE: On early production starters, the tang was
bent in to retain the spring hook.
8. Lift cover off assembly.
Fig. 24

9. With a pair of needle nose pliers grasp spring as
close to spring hook on outside edge of pulley and
lift out spring, Fig. 25.
10. While gripping spring with pliers, slowly relieve
spring tension.
11. Remove plastic washers (1), steel washer (3),
pulley and gear (2) from starter shaft, (Fig. 26).
Inspect
Inspect pulley for cracks, sharp edges and nicks.
Inspect gear for broken or cracked teeth. Inspect
washers for cracks and sharp edges. Inspect spring for
kinks, cracks and nicks. Replace all damaged parts.
Assemble
1. Clamp starter shaft in vise with vise jaw protectors
or a shop rag to protect shaft.
2. Lubricate with a small amount of grease under
steel washer (4), Fig. 26.
3. Place steel washer and plastic washer on shaft,
Fig. 26.
4. Assemble pulley to gear with gear hub (2) and
brake spring (1) toward end of helix (3), Fig. 27.
5. Place gear and pulley assembly on shaft with
brake spring (1) between two posts on shaft (2),
Fig. 28.
6. Place plastic washer in center of pulley.
Fig. 28

NOTE: Service springs are held in a retainer (1).
For ease of assembly, outer hook (2) of
spring should be against end of retainer,
Fig. 29. If not, rotate spring until hook is
against retainer.
7. Place spring and retainer on pulley with hook over
spring notch (1) in pulley, Fig. 30.
8. Push spring down into pulley.
9. When reusing original spring, straighten spring.
Hook outer end of spring in spring notch and wind
spring into pulley.
10. Place a dab of grease in pulley.
11. Lay cover over pulley and start cover screw and
washer.
12. Turn screw counterclockwise (left hand thread)
until finger tight.
13. Locate Cover (Starter Handle on Top): Turn cover
clockwise until "O" or "Arrow" on cover (1) is in line
with starter shaft cam (2), Fig. 31.
Locate Cover (Starter Handle and Rope Come Out
Rope Guide on Cylinder Head): Turn cover clock
wise until "O" or "Arrow" is 90° from cam on starter
shaft, Fig. 32.
14. Hold cover in correct position and torque screw to
55 in. lbs. (6 Nm).
15. Install decal over cover hole.
16. Hold starter cover and turn gear and pulley
assembly clockwise until spring is tight.
Fig. 32
10

17. Turn gear and pulley back 1/2 to 1-1/2 turns until
rope knot pocket is in line with cover opening.
18. Insert unknotted end on rope thru rope pocket (1)
and pull rope thru until knot is seated in rope
pocket, Fig. 33.
19. While holding pulley and cover assembly, tie a slip
knot in rope and slowly let rope wind into pulley.
20. Install starter assembly on engine with "O" or
"Arrow" pointing at rope eyelet.
21. Torque starter mounting screw to 80 in. lbs.
(9 Nm).
22. Thread rope thru eyelet(s), handle and rope
handle insert.
23. Tie a single overhand knot in rope. Tail on knot
should not be more than 1/4 inch (6.4 mm) long.
24. Pull knot into insert and insert into handle.
Model Series 90000,10A900,10B900,
10C900,120000 with Plastic Pawls
CAUTION
ALWAYS wear Safety Glasses while
performing any rewind starter repair.
Remove Rope
1. Pull starter rope out as far as it will go.
2. While holding pulley and starter housing, pull
pulley end of rope out and untie knot at end of rope.
3. Remove rope and handle from starter.
4. Slowly release pulley to release spring tension.
Inspect Rope
1. Inspect rope. Replace if frayed.
2. If re-using old rope, burn ends of rope with a
match.
3. Using caution, wipe with waste cloth while it is still
hot, to prevent swelling and unravelling.
NOTE: When installing a new rope, check parts list
to be sure correct diameter and rope length
is used. The service replacement rope is cut
to length as required: see Table No. 1 on
page 20.
Remove Pulley And Spring
1. Remove shoulder screw (1) and retainer (2),
Fig. 34.
2. Lift out pawls (3) and pawl springs (4), Fig. 34.
3. Rotate pulley (5) on pivot post (6) until it turns
freely.
4. Carefully lift out pulley with spring, Fig. 35.
Fig. 33
Fig. 34
Fig. 35
11

Inspect Housing, Pulley and Spring
1. Inspect pulley for wear, cracks, rough edges or
burrs in pulley groove and wear on center hole.
2. Replace if damaged or worn.
3. Inspect spring for broken ends, kinks and burrs.
Replace if damaged.
CAUTION
ALWAYS wear Safety Glasses while
performing any rewind starter repair.
• Pulley and spring is serviced as an assembly.
• DO NOT REMOVE SPRING FROM PULLEY.
• The starter spring is still under tension after
the rope has been removed and the pulley hasunwound.
4. Inspect starter housing for wear or sharp edges at
rope eyelet (2), center pivot post (3), and inner
spring anchor tab (1), Fig. 36.
5. Replace if worn or damaged.
Assemble Starter
Install Pulley and Spring
1. Lay starter housing on bench.
2. Assemble starter pulley to center pivot post in
housing, Fig. 35.
3. Rotate pulley counter clockwise until slight
resistance is felt, indicating that spring is engaged
in spring tab in housing.
Install Pawls, Pawl Springs and Retainer
Assembly
1. Position springs (2) over posts in pulley (1) marked
"R", then install pawls (3), Fig. 37.
2. Install retainer (1) making sure that slots in retainer
(2) engage tabs on pulley (3), Fig. 38.
3. Hold retainer down, compressing pawl springs
and install retainer screw. Torque screw to 70 in. lbs.
(8 Nm).
Fig. 36
Fig. 37
Fig. 38
12

Wind Spring & Install Rope
1. Turn pulley counterclockwise (B) until spring is
wound tightly, Fig. 39.
2. Then rotate pulley CLOCKWISE (A) until rope hole
in pulley is in line with starter housing eyelet (1)
and hold pulley, Fig. 39.
3. Insert unknotted end of rope through knot cavity
and rope hole (2) in pulley.
4. Thread end of rope through starter housing eyelet
and pull rope until knot is in rope cavity.
5. While holding starter rope handle, slowly let pulley
pull starter rope into starter.
NOTE: If starter handle was removed, perform the
following steps:
1. While still holding pulley, tie a temporary knot (3)
part way out on rope.
2. Let pulley and spring slowly pull rope against
temporary knot.
3. Insert rope (2) through starter handle (1) and start
er handle insert, Fig. 40.
4. Tie knot on end of rope. Pull knot into handle insert
and pull insert into starter handle.
5. Untie temporary knot and slowly let rope rewind
into starter.
6. Operate starter to check for smooth operation,
Fig. 40.
Model Series 120000 with Metal Pawls
CAUTION
ALWAYS wear Safety Glasses while
performing any rewind starter repair.
Disassemble
1. Remove spark plug wire, finger guard and fuel
tank, Fig. 41.
2. Remove dipstick, oil fill tube (1), blower housing
(2), and starter (3).
NOTE: On early engines the starter housing must
be removed from the blower housing by
drilling out the four pop rivets holding the
starter on the blower housing. Service
starters include mounting hardware to
replace pop rivets.
Fig. 39
Fig. 40
Fig. 41
13

Remove Rope
1. Pull starter rope out as far as it will go.
2. While holding the pulley and starter housing, pull
pulley end of rope out and untie knot at end of rope.
3. Remove rope and handle from starter.
4. Slowly release pulley to release spring tension.
5. Support blower housing on Tool #19227, Cylinder
Support (2), and drive out center pin with 5/16" (7.9
mm) dia. pin punch (1), Fig. 42.
NOTE: On some models it may be necessary to
remove the label before center pin can be
removed.
6. Remove starter housing (9) from support tool while
holding rewind starter retainer and starterhousing.
7. Place starter upside down on bench.
8. Lift off retainer (4), by disassembling starter pin
(1), steel washer (2), torsion spring (3), dog (6),
and dog spring (5). Remove starter pawls andsprings.
9. Lift off pulley and spring assembly (8). Note plastic
washer on pulley (7), Fig. 43.
CAUTION
ALWAYS wear Safety Glasses while
performing any rewind starter repair.
• Pulley and spring is serviced as an assembly.
• DO NOT REMOVE SPRING FROM PULLEY.
• The starter spring is still under tension afterthe rope has been removed and the pulley hasunwound.
Inspect Rope
1. Inspect rope. Replace if frayed.
2. If re-using old rope, bum ends of rope with amatch.
3. Using caution, wipe with waste cloth while it is still
hot, to prevent swelling and unravelling.
Inspect Starter Housing and Pulley
Inspect pulley for cracks, rough edges, or burrs in
pulley groove (1), wear or cracks in center hole (2) orloose spring retainer (3), Fig. 44. Replace pulley ifdamaged or worn.
Fig. 44
14

Inspect starter housing for wear or burrs at rope eyelet
(1), center pivot post (2), and at inner spring retainer
(3), Fig. 45. Replace if worn.
Assemble Starter Housing and Pulley
1. Note location of free end of spring in pulley
assembly (2) and location of spring retainer (1) in
starter housing, Fig. 46.
2. Line up free end of spring with spring retainer in
housing and assembly pulley in housing.
3. Rotate pulley counterclockwise until spring
engages retainer.
4. Install dogs (3) and dog springs (4) in pulley
assembly, Fig. 46.
5. Place plastic washer in center of pulley hub.
6. Place retainer on pulley with pierced holes
between dogs and stops on pulley, Fig. 46.
7. Place metal washer and brake spring on new
starter pin and start pin in center hole.
8. Press or drive pin in until flush with retainer.
Install Rope
1. Wind spring and pulley counterclockwise until
spring is tight.
2. Back pulley off until rope eyelet in housing and
rope hole in pulley are in line.
3. Install end of rope through eyelet and pulley hole
and tie a single overhand knot.
4. Slowly let pulley and spring unwind.
Install Starter on Blower Housing
1. If starter housing was removed from blower
housing, use four (4) Part #92987 nuts and four
Part #94128 screws to attach rewind starter to
blower housing.
Install Blower Housing and Rewind Starter
1. Place blower housing on engine and start one
screw in extruded hole.
2. Hold blower housing with extruded hole in recess
of cylinder block, Fig. 47.
3. Tighten screw and then install three remaining
screws. Install dipstick tube and dipstick.
4. Install fuel tank, finger guard and spark plug wire.
5. Tighten screw and then install three remaining
screws. Install dipstick tube and dipstick.
6. Install fuel tank, finger guard and spark plug wire.
CAUTION
Fig. 45
Fig. 46
Fig. 47
ALWAYS wear Safety Glasses while
performing any rewind starter repair.
15

VERTICAL PULL STARTER
Vertical pull starters have been made in two versions:standard, Fig. 48, and alternate, Fig. 49.
NOTE: Before removing alternate style starter,
measure length of rope from starter
housing to rope handle at equipmenthandle bar.
DISASSEMBLE
Remove Rope or Spring
1. Before servicing starter, all tension must be
removed from rope and spring.
CAUTION
DO NOT pull rope with the pulley cover
removed, unless the spring is detached from
spring anchor.
2.
3.
Use a screwdriver to lift the rope up approximatelyone foot, Fig. 50.
Wind rope and pulley counterclockwise 4 turns, asshown in Fig. 50. This will completely releasetension from the starter spring.
Fig. 50
16

4. Note the warning on the plastic cover, then use a
screwdriver as shown in Fig. 51 to remove the
cover.
5. Remove anchor bolt (1) and anchor (2), Fig. 52.
6. Inspect starter spring for kinks or damaged ends.
Replace if damaged, carefully removing it from
the housing, and installing new spring per
assembly text.
7. Otherwise, replace cover to keep spring in
housing.
8. Remove rope guide and note position of link
before removing assembly from housing, Fig. 53.
9. Rope pulley and pin (Inset "A"), when used, may
be replaced if worn or damaged. Inset "B" shows
alternate style link. Typical link (1), rope guide (2),
Fig. 53.
10. Use a rope inserter tool and/or pliers to remove
rope from pulley, Fig. 54, Typical. You can make a
rope inserting tool as shown in Fig. 13, page 5.
11. Untie knot and remove rope from pulley.
12. Remove rope from grip by prying out insert (1),
Fig. 55.
Fig. 55
13. If pulley or gear is damaged, replace with new
assembly.
17

14. Assemble end of link loop (1) toward gear on link
assembly (2). Clean all dirty or oily parts and check
link for proper friction. Link should move gear to
both extremes of its travel. If not, replace link
assembly, Fig. 56.
NOTE: To repair vertical pull starters with INTER
LOCK SYSTEM, follow equipment
manufacturers' interlock repair procedure.
Assemble
Install Spring
1. Place pulley and gear assembly in starter housing.
2. Hook end of spring into spring retainer on outside
diameter of pulley, Fig. 57.
3. Rotate pulley clockwise to wind spring into pulley
while holding end of spring in outer spring retainer.
4. Install spring anchor (1) on free end of spring and
install pulley cover, Fig. 58. Do not install anchor
screw at this time.
Install Rope
NOTE: When installing a new rope, check parts list
to be sure correct diameter and length rope
is used.
1. Insert rope through housing and into pulley, using
rope inserter tool.
2. Tie a small knot, heat seal and pull tight into recess
in rope pulley. Maximum size shown. Rope must
not interfere with gear motion, Fig. 59.
3. Install pulley and gear assembly in housing, with
link (1) in pocket or hole of casting, as shown. Inset
"A" shows current style link, "B" shows alternatestyle.
4. Install small pulley (3), rope pulley pin, and ropeguides (2, 4), Fig. 60.
5. Thread rope through grip and into insert.
6. Tie a small, tight knot.
7. Heat seal the knot to prevent loosening.
Fig. 59
Fig. 60
18

8. Pull knot into insert pocket and snap insert (1) into
grip (2), Fig. 61.
NOTE: On alternate style starter, measure rope
from handle end to guide on starter, the
same distance as before it was removed
from engine. Tie a slip knot in the rope at
this point. DO NOT INSTALL HANDLE
AND INSERT AT THIS TIME.
9. Rotate pulley in a counterclockwise direction until
rope is fully retrieved, Fig. 62.
10. Remove cover from pulley.
11. If not already done, hook free end of spring to
spring anchor, and install screw.
12. Torque to 75 to 90 in. lbs. (9 to 10 Nm), Fig. 63.
13. Lubricate spring with a small quantity of engine oil
or lubricant.
14. Snap cover in place.
15. Tension starter spring by pulling rope out
approximately one foot, and winding rope and
pulley 2 or 3 turns clockwise, Fig. 64.
16. Install starter on engine.
17. After installing alternate style starter on engine,
route rope up to equipment control handle and
install handle and insert, Fig. 61.
Fig. 64
19

TABLE No. 1
Rewind Starter Rope Length
Model Series
90100
90200
91200
92200
93200
93400
9B900
9D900
98900
10A900
10B900
10C900
120000
Rewind Position
ALL
ALL
ALL
6 o'clock
9 o'clock
9 o'clock
ALL
ALL
ALL
ALL
ALL
ALL
ALL
Rope Size
#6
#4
#4
#4
#4
#4
#4
#4
#6
#4
#5-1/2
#6
#6
Starter Pawls
Plastic
Metal
Plastic
Metal
Metal
Metal
Metal or Plastic
Metal
Plastic
Metal
Metal
Metal or Plastic
Metal
Length
Inches
67
8&-5/8
88-5/8
100
68
68
88-5/8
88-5/8
67
88-5/8
72
78-3/4
72 or 99
Meters
1.7
2.25
2.25
2.54
1.7
1.7
2.25
2.25
1.7
2.25
1.8
2.0
1.8 or 2.5
20

SECTION 7B
Electric Starter Systems
Section Contents
Page
BATTERIES, GENERAL INFORMATION 45
Installation 6SYSTEM 4®
Troubleshooting 6
Operation
Starter Switch Test 9Test Interlock Switch, Model Series 120000 9
6 Volt Charger and Battery Testing 7
Starter Motor90
Disassemble *u
Test
Drive and Clutch 186 or 12 volt 10
99Assemble "
12V, DC STARTER MOTOR NYLON PINION MODEL SERIES 130000 10
Starter Motor
Disassemble
Drive 23Starter 24
Check
Drive 18Assemble
Starter 25Drive 23
Test 10"11GEAR DRIVE, STEEL PINION, 12V AND 120V, MODEL SERIES 130000 10-11
Starter Motor
Disassemble
Drive 26Starter 26
Check
Drive 18Assemble
Driver 26
NOTE: SPECIFICATION TABLES BEGIN ON PAGE 41 OF THIS SECTION.

Section Contents, Cont'd.Starter 28
Test
12 volt Starter 10_11
120 Volt Starter .'!!!.'.'.'.'.'!!!.'.'!!"!!!.. 1112V DC and 120V AC MODEL SERIES 170000,190000,
220000, 240000, 250000, 280000 AND 320000 12
120 volt Control Assembly
Disassemble -J4
Assemble 1g
Starter Motor
Disassemble, roll pin retainer on drive 36
Assemble, roll pin retainer on drive 33
Disassemble, C-ring retainer on drive 30
Assemble, C-ring retainer on drive 35
Disassemble housing 33 3$
Install brushes, 4-1/2" (111.0 mm) and 4-9/16" (115.9 mm) Housings 38Assemble housing
Roll pin retainer on drive, All Except 4-1/2" (111.0 mm), 4-9/16" (115.9 mm) Housings 38
Brush end cap, roll pin retainer on drive, 4-1/2" (111.0 mm), 4-9/16" (115.9 mm) Housings 38
Starter Identification 41
Specifications
12 volt 41
120 volt [[' [\ \] ' [\'' ' '']'[ 41Switch, Control Assembly 16
120 volt AC Starter Motor 12
Test
High Potential (HI-POT) Test 120 Volt AC Only 12
12 volt DC Starter Motor
(Grounded) 15
Rectifier Control Assembly Briggs & Stratton 120 Volt Starter Motor 14
12V AND 120V, AMERICAN BOSCH, MITSUBISHI MODEL SERIES 170000,190000 ............. 16
Disassemble
Starter Motor Drive 39
Starter Motor g
Assemble
Starter Motor Drive 40
Starter Motor 40
Test
12 volt DC Starter Motor 16
120 volt AC Starter Motor " 16Specifications
12 volt 42
120 voit !".'.'.'.'!!!.'!!"!!!!!! 42
NOTE: SPECIFICATION TABLES BEGIN ON PAGE 41 OF THIS SECTION.

EQUIPMENT AND TOOLS TO TEST
STARTER MOTORS
Digital Multimeter (DMM)
Available from Briggs & Stratton. Order Tool #19464.
The meter may be used to read volts, ohms or
amperes, and test diodes (rectifiers), Fig. 1.
Volt, Ohm, Ammeter (VOA Meter)
Not shown. Similar usage as DMM.
DC Shunt
Use with Digital Multimeter. The DC Shunt may be
used to read starter motor current draw on 12 volt
starter motors. Order as Tool #19359, Fig. 2.
AC Shunt
Use with Digital Multimeter. The AC Shunt may be
used to read starter motor current draw on 120 volt
starter motors. Order as Tool #19358, Fig. 3.
Tachometer
A Trysit Sirometer (Tachometer) is available from a
Briggs & Stratton source of supply. Order Part #19200.
The Sirometer measures from 800 to 25,000
revolutions per minute (RPM), Fig. 4.
□
Fig. 4
NOTE: SPECIFICATION TABLES BEGIN ON PAGE 41 OF THIS SECTION.

Test Fixture
A starter motor test fixture may be made of steel 1/4"
(6.0 mm) thick as shown in Fig. 5. Extra hole for
mounting starter brackets (1), two 3/8" (9.5 mm) holes
for starter mounting bracket (2), two #7 tap holes for
1/4-20 NC screws for mounting B&S #19200Tachometer (3), Fig. 5.
A known good 6 volt or 12 volt battery is required when
testing 6 or 12 volt starting systems.
Brush Retainers
Brush retainers may be made from scrap pieces of
rewind starter spring as shown in Fig. 6. Select the
retainer required.
General Information on Batteries
This section describes the different types of electric
starter motors used on the engines covered in this
manual. The starters are powered by either 6V DC
batteries, 12V DC batteries or 120V AC household
current. 12V systems are either lead-acid wet cell or
Nickel-Cadmium. Special battery, charger and test
procedures are covered by starter/system type.
The battery used to operate starter motors on most
Briggs & Stratton engines above 4 horsepower is the
12 volt, lead acid - wet cell type. This type is available
as a maintenance free or dry charged battery.
The maintenance-free battery is sealed and the levelof electrolyte cannot be checked.
The dry charge battery is manufactured with fully
charged plates. Electrolyte must be added when thebattery is placed in service. Before activating a dry
charge battery, read and follow the manufacturer'srecommended procedure.
3/8" (9.5mm)
* <57.0 mm!
3-1/2"
(89.0 mm)
1/4" (6.0 mm)
2" (51.0 mm)
Fig. 5
2-1/4" (57.0 mm) 2" (51.0 mm)
1/4"- 3/8"
.0-9.5mm)
1/4" (6.0
mm)
1/8" (3.0
mm)
1/8"
(3.0 mm)
1/4" (6.0
mm)
1" (25.4
mm)
1/2" (13.06
mm)
7/8" (22.0
mm)
n1-1/8"
(28.0 mm)
1"
(25.4
mm)
3/8" (9.5
mm)
Fig. 6
Battery Recommendations
These battery size recommendations are based on
minimum temperature expected and correct weightof oil being used. See Section 8.
30 Amp. Hr. +20° F (-6.6° C) or higher
40 Amp. Hr. -5° F (-20.5° C) or higher
50 Amp. Hr. -15° F (-26.1° C) or higher
Battery Cable Recommendations
These cable sizes are based on total length of cable
from battery positive post to starter switch or
solenoid, and to starter plus ground return to batterynegative post.
#6AWG-4ft. (1.2 M) or less
#5AWG-5ft. (1.5 M) or less
#4 AWG - 6 ft. (1.8 M) or less
NOTE: A battery of higher amperage may be
required for extremely cold weather
starting conditions.
NOTE: SPECIFICATION TABLES BEGIN ON PAGE 41 OF THIS SECTION.

WARNING
Batteries produce hydrogen, an
explosive gas.
DO NOT store, charge or use a
battery near an open flame or
devices which utilize a pilot light or
can create a spark.
Batteries contain corrosive fluids
and toxic materials and should be
handled with care.
Do not puncture, disassemble, mutilate or
incinerate.
As with all rechargeable batteries, explosive
gases could be vented during charge or
discharge. Use in a well ventilated area, away
from sources of ignition.
• Battery should be recharged by adults only.
> Use only the battery charger specified. Do not
make direct contact between the positive andnegative terminals as this could cause high
current flow, and the possibility of fire.
Checking Battery
1. Physical check - clean if necessary.
a. Corrosion
b. Dirt
c. Terminal and clamps (secure/good condition)
2. Bring battery to full charge.
CAUTION:
DO NOT exceed charge rate of 1/10 ampere for
every ampere of battery rating. Consult battery
manufacturer for charging recommendations.
a. Use a taper charger (automatically reduces
charge rate). Check all cells after charging (1).
Use a temperature compensated hydrometer.
b. Fill battery cells with distilled water or tap
water (unless maintenance free type).
NOTE: If battery gets "Hot" to the touch or is
spitting acid (gassing) excessively, unplug
charger periodically.
Fig. 7
3. With battery fully charged, check specific gravityreadings of each cell (1) with a Battery Hydrometer
and record readings, Fig. 7. All readings should be
above 1.250 (compensating for temperature). If
specific gravity readings varied .050 or if ALL cells
read less than 1.225, replace battery.
NOTE: SPECIFICATION TABLES BEGIN ON PAGE 41 OF THIS SECTION.

Installation:
1. Before installing battery, connect all equipment to
be operated.
2. Place battery in holder with a flat base. Tighten
hold down device evenly until snug. DO NOT over-
tighten.
3. Connect positive cable first to prevent accidental
grounding. Tighten connectors securely.
4. Connect negative cable to negative battery
terminal. Tighten connectors securely.
5. Use DMM (#19464) or VOA Meter.
6. Attach RED meter test clip to positive (+) battery
terminal.
7. Attach BLACK meter test lead to negative (-)
battery terminal.
8. With ignition switch "OFF," press starter button.
NOTE: If ignition switch and starter switch are
combined, disconnect wire from spark plug
and ground ignition using Ignition Tester,
Tool #19051 or #19368.
Turn switch to "START." Meter should display
9 volts or more while cranking engine. If less than
9 volts, replace battery.
9.
Power Cords, 120 Volt Starting Systems
The 120 volt electric starter is equipped with a
three-prong safety plug. The longer prong in this plug
is connected to the starter motor housing. When the
supplied three-wire cord is plugged into a properly
grounded receptacle, it will protect the user from shock
should the starter-motor insulation fail. If an extension
cord is used, it should also be a three-wire safety cord.
DO NOT USE extension cords longer than 25 feet
(7.6 m).
Troubleshooting 6,12, and 120 Volt Starting
Systems
WARNING
Unintentional sparking can result in
fire or electric shock.
IMPROPER TROUBLESHOOTING ofelectrical systems can lead to electric shock.
The following list is given to aid in diagnosing problems
for 6, 12, and 120 volt starting systems.
NOTE: If a starting problem is encountered, check
engine for freedom of rotation by removing
the spark plug and turning the crankshaft
over by hand.
1. Cranks Engine Slowly
a. Additional load affecting performance.
b. Discharged, defective, or incorrect size
battery (also, see alternators).
c. Faulty electrical connection (battery circuit).
d. Dirty or worn starter motor commutator,
bearing, weak magnets, etc.
e. Worn brushes or weak brush springs.
f. Wrong engine oil viscosity for ambient
temperature.
g. Defective starter clutch,
h. Band brake misadjusted.
i. Battery leads too long or wire diameter too
small,
j. Extension cord longer than 25 feet (7.6 m)
(120 volt AC only).
2. Engine Will Not Crank
a. Faulty safety interlocks.
b. Discharged or defective battery.
c. Faulty electrical connections.
d. Faulty starter motor switch (open circuit).
e. Open circuit in starter motor.
f. Defective rectifier assembly
(120 Volt AC only).
g. Brushes sticking, etc.
h. Faulty solenoid.
i. Power source inoperative (120 Volt AC only).
3. Starter Motor Spins; But Does
Not Crank Engine
a. Sticking pinion gear.
b. Damaged pinion or ring gear.
c. Starter motor clutch slipping.
d. Incorrect rotation due to reversed polarity (all
motors rotate counterclockwise viewed from
pinion gear).
4. Starter Motor Blows Fuses -
(120 Volt Starter Motor Only)
a. Parasitic load.
b. Shorted rectifier assembly.
c. Shorted 120 volt extension cord to startermotor.
d. Armature shorted.
e. Overloaded circuit.
5. Starter Motor Spins; Will Not Stop
a. Defective starter switch.
b. Defective starter solenoid.
NOTE: SPECIFICATION TABLES BEGIN ON PAGE 41 OF THIS SECTION.

STARTER ELECTRICAL INFORMATION AND
TEST PROCEDURES, BY SYSTEM
Note: Interpreting Starter Motor Test Results, All
Systems (Typical)
1. RPM below minimum and higher than normal
amps.
System 3®, System 4®
Briggs & Stratton System 3® and System 4® consist of
a starter motor (4), starter switch and/or starter
solenoid (5), wiring harness, (wire #6 goes to engine
alternator), 6 or 12 volt battery (rechargeable) (3),
alternator, and separate trickle type battery charger
(2). A typical System 3® or System 4® engine is shown
in Fig. 8.
NOTE: Some equipment manufacturers use a
battery and trickle charger of a different
style than illustrated. In such cases,
follow the equipment manufacturer's
recommendations.
The alternator maintains charge during operation. If
the battery needs additional recharging, plug the
trickle charger into a 120 volt AC household outlet,
then connect to the battery. The battery will be fully
charged within 72 hours. Charging is not recom
mended if temperatures are below 40° F (4.0° C). For
best results, charge the battery within temperature
limits of 40° F (4.0° C) to 105° F (40.0° C). Charge
overnight every two months during periods of storage.
Battery Load Test (6 volt only)
For 12 volt test procedures, contact the battery
manufacturer or the original equipment manufacturer.
Parts required:
14 AWG stranded wire test leads with #70
alligator clips, red (1), and black (2).
Resistor (3) - 0.15 ohms x 240 watts
(minimum).
DMM (#19464) or VOA Meter.
Briggs & Stratton Part #396372 wire harness.
Fig. 8
Fig. 9
Set meter to DC volts as shown in Fig. 9.
a. Excessive Friction. Check for tight, dirty, or
worn bearings, bent armature, misalignment
of motor bearings.
b. Shorted armature.
c. Grounded armature.
d. Broken magnets.
2. Higher than normal amps and starter does not
turn.
a. Direct ground of brush leads.
b. Armature can not turn, binding.
3. Starter does not turn and no amps,
a. Open armature windings.
4. RPM below minimum and low amps.
a. Open armature windings.
b. Burned commutator bars.
NOTE: SPECIRCATION TABLES BEGIN ON PAGE 41 OF THIS SECTION.

5. Place red wire (4) from Harness Wire Terminal
#396392 on one resistor lead and use alligator clip
on RED test lead wire from meter to hold it in place.
6. Place black wire (5) from Harness Wire Terminal
on resistor lead opposite from red wires and use
alligator clip on BLACK test lead wire from meter to
hold it in place.
WARNING
The resistor will become
hot during this test procedure.
Severe thermal burns can occur on
contact.
7. Assemble connector from wire harness to battery.
After one minute, battery should read 5.5 volts DC,
minimum.
8. If after one minute, test voltage reads less than 5.5
volts DC, charge battery as described in "Battery -
Fast Charge." (Battery may also be charged 72
hours with trickle charger.)
9. Remove battery from charger and allow to
normalize for two hours.
10. Retest battery.
Fast Charge Battery - 6 Volt Charger
1. Attach red (1) positive charger lead to positive
battery connector terminal, Fig. 10.
2. Attach black (2) negative charger lead to negative
battery connector terminal.
3. Charge battery at a rate not to exceed 1 ampere for
12 hours.
Fast Charge Battery -12 Volt Charger
1. Attach positive charger lead (1) to a #4001 sealed
beam headlight terminal as shown in Fig. 11.
2. Connect alligator clips of test lead from other
terminal of headlight to positive terminal of battery
connector (2).
3. Attach negative charger lead to negative battery
connector terminal (3).
4. Attach harness to battery connector (4). Charge
battery at a rate not to exceed 1 ampere for 12
hours.
NOTE: A meter reading of 4.5 volts DC or less after
charging and retest indicates a failed
battery cell. Replace battery.
A fully charged battery will have a minimum NO-LOAD
reading of 6.4 volts DC. During normal operation, the
alternator will keep the battery charged. During
storage, the battery should be recharged 72 hours
every two months using Part #395569 or #395585
trickle charger.
Fig. 11
NOTE: SPECIFICATION TABLES BEGIN ON PAGE 41 OF THIS SECTION.
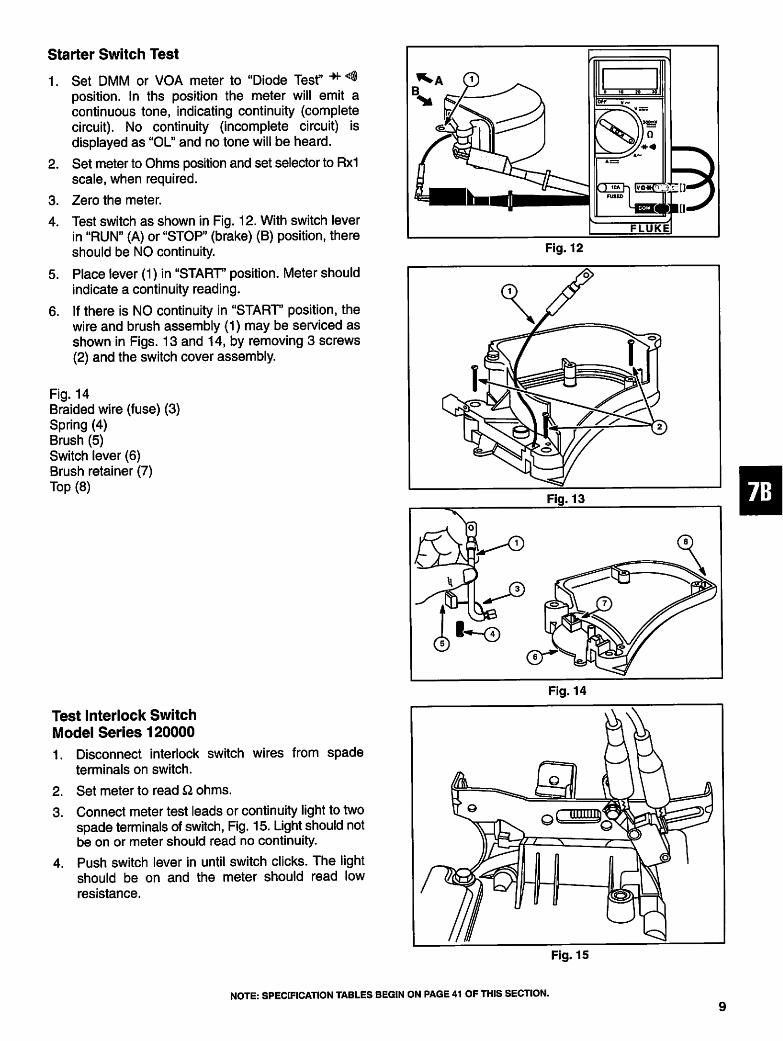
Starter Switch Test
1 Set DMM or VOA meter to "Diode Test" -* **position. In ths position the meter will emit a
continuous tone, indicating continuity (complete
circuit). No continuity (incomplete circuit) is
displayed as "OL" and no tone will be heard.
2. Set meter to Ohms position and set selector to Rx1
scale, when required.
3. Zero the meter.
4. Test switch as shown in Fig. 12. With switch lever
in "RUN" (A) or "STOP" (brake) (B) position, there
should be NO continuity.
5. Place lever (1) in "START' position. Meter should
indicate a continuity reading.
6. If there is NO continuity in "START' position, the
wire and brush assembly (1) may be serviced as
shown in Figs. 13 and 14, by removing 3 screws
(2) and the switch cover assembly.
Fig. 14
Braided wire (fuse) (3)
Spring (4)
Brush (5)
Switch lever (6)
Brush retainer (7)
Top (8)
Test Interlock Switch
Model Series 120000
1. Disconnect interlock switch wires from spade
terminals on switch.
2. Set meter to read Q ohms.
3.
4.
Connect meter test leads or continuity light to two
spade terminals of switch, Fig. 15. Light should not
be on or meter should read no continuity.
Push switch lever in until switch clicks. The light
should be on and the meter should read low
resistance.
Fig. 12
Fig. 15
NOTE: SPECIFICATION TABLES BEGIN ON PAGE 41 OF THIS SECTION.

Test Interlock Switch Wiring
Model Series 120000
1. Disconnect interlock switch wires from spade
terminals on switch and at starter motor connector.
2. Set meter to read Q. ohms.
3. Connect one meter test lead to end of one wire
inside connector and other test lead to second
connector terminal for the same wire. Light should
be on or meter should read low or no resistance.
Wiggle wire inside connector. Light should stay
constant or meter should not change value.
Replace or repair wiring if there is no continuity or
intermittent. Repeat for each wire in harness.
NOTE: Some equipment manufacturers provide a
key operated ignition switch. For servicing,
contact equipment manufacturer.
Test 6 or 12 Volt Starter Motor
Tools, Procedure
DMM (#19464)
Tachometer capable of reading 10,000 RPM.
Fully charged 6 or 12 volt battery.
See Table No. 2, Specifications.
Fig. 16 - Starter motor exploded view:
Roll pin (1)
Clutch retainer assembly (2)
Pinion gear (3)
Helix and drive assembly (4)
Thrust washer (5)
Spring washer (6)
Drive end cap (7)
Armature (8)
Thru bolts (9)
Housing (10)
Seam (11)
End cap (12)
1. Set the meter to read DC amps.
2. Connect the starter motor, battery and meter,Fig. 17.
3. Place the tachometer on the starter motor and
activate the motor.
If the motor does not perform satisfactorily, seeInterpreting Starter Motor Test Results, P. 7.
Fig. 16
12 Volt DC Starter Motor
Nylon Pinion
Model Series 130000
Test
Tools, Procedure
DC Shunt, Tool #19359 and DMM (#19464) or
VOA Meter.
Tachometer capable of reading 10,000 RPM.
Fully charged 12 volt battery.
See Table No. 3 (Nylon Pinion), Specifications.
10
NOTE: SPECIFICATION TABLES BEGIN ON PAGE 41 OF THIS SECTION.

1. Connect the starter motor, battery and meter as
shown in Fig. 17.
2. Activate the starter motor and note readings of
meter (Amps DC) and tachometer (RPM). If the
motor does not perform satisfactorily, see
Interpreting Starter Motor Test Results on page 7,
Fig. 17.
Fig. 17:
Optional starter switch (1)
Test fixture from P. 4 (2)
Black lead (3)
Red lead (4)
DC shunt terminal (5)
12 volt battery (6)
120 Volt AC Starter Motor, Steel Drive Pinion
MODEL SERIES 130000 Test
Tools, Procedure
DMM (#19464) with AC Shunt, Tool #19358
Tachometer capable of reading 10,000 RPM.
See Table No. 5, page 41, Specifications, for
maximum allowable amperage.
WARNING
Unintentional sparking can result in
fire or electric shock.
• Extreme care should be used in making thistest to minimize the hazard of electrical shock.
1. Clamp the starter motor in a vise as shown in
Fig. 18. Sirometer (1), AC Shunt Tool #19358 (2).
2. Set meter to AC amps.
3. Insert leads into meter and plug starter motor cord
into AC adapter.
4. Connect AC adapter to a 120 volt outlet.
5. Depress starter switch button. When meter
reading stabilizes (approximately 3 seconds),
amperage should not exceed the specification
shown.
CAUTION:
If amperage is higher than specification shown,
immediately stop the test! An amperage reading
higher than number in chart indicates a shorted
starter motor, which could be dangerous.
6. If amperage is within specification, check RPM of
starter motor using tachometer.
NOTE: If the 120 volt AC starter motor does not
meet the specifications listed, the motor
must be replaced.
Fig. 17
Fig. 18
NOTE: SPECIFICATION TABLES BEGIN ON PAGE 41 OF THIS SECTION.
11

Briggs & Stratton
Starter Motors
120 Volt AC; 12 Volt DC with Housings
3-1/16" (78.0 mm) to 4-9/16" (115.9 mm)
long
Model Series 170000,190000,220000,
240000, 250000, 280000 and 320000
See Figs. 19 and 20, and Tables No. 6 and 7,
Specifications, for motor identification and
performance standards. Motor identification code
shown (1), Fig. 20.
12 Volt DC Starter Motor
Test Starter Motor
Tools, Procedure
DMM (#19464) and Tool #19359, DC Shunt.
Tachometer capable of reading 10,000 RPM.
Fully charged 12 volt battery.
See Table No. 3 (Nylon Pinion) or Table No. 4
(Steel Pinion), Specifications.
1. Connect the starter motor, battery and meter asshown in Fig. 17.
2. Activate the starter motor and note readings of
meter (Amps DC) and tachometer (RPM). If the
motor does not perform satisfactorily, see
Interpreting Starter Motor Test Results page.
Test 120 Volt AC Starter Motor
WARNING
Unintentional sparking can result in
fire or electric shock.
• After servicing, the 120 volt starter motorshould be Hi-Pot tested by an electric motorrepair shop before reinstalling on engine todetermine if a shock hazard exists.
See Fig. 5 to make a starter mounting test fixture.
Fig. 19
Fig. 20
12
NOTE: SPECIFICATION TABLES BEGIN ON PAGE 41 OF THIS SECTION.

Tools, Procedure
DMM (#19464) with AC Shunt, Tool #19358.
Tachometer capable of reading 10,000 RPM.
See Table No. 8, Specifications, for maximum
allowable amperage.
WARNING
Unintentional sparking can result in
fire or electric shock.
■ The following test procedure must be used to
avoid any accidental shock hazard to the
service technician.
1. Set meter to AC amps position.
2. Insert leads into meter and plug starter motor cord
into AC shunt, Fig. 21.
3. Connect AC shunt (5) to a 120 volt outlet.
4. Depress starter switch button (1) on control box
(2). When meter reading stabilizes,
(approximately 3 seconds), amperage should not
exceed the specification shown.
5. If starter motor amperage is within specification,
check RPM with Tachometer. Test fixture.
Fig. 21
CAUTION:
If amperage is higher than specification shown,
immediately stop the test! An amperage reading
higher than number in chart indicates a shorted
starter motor, which could be dangerous.
NOTE: SPECIFICATION TABLES BEGIN ON PAGE 41 OF THIS SECTION.
13

Testing Rectifier Control Assembly
Briggs & Stratton 120 Volt Starter Motor
The AC control assembly housing contains a spring
loaded starter button, cord assembly and rectifier. It is
equipped with a three wire grounded receptacle.
Fig. 22.
Fig. 22
Disassemble Control Assembly
WARNING
Unintentional sparking can result in
fire or electric shock.
• Disconnect extension cord from AC outlet and
control assembly before disassembling.
1.
2.
With control assembly removed from mounting
surface, remove three screws holding back plate
to housing.
Note position of wires, Figs. 22 and 23.
Fig. 22, Exploded View:
Push button switch (1)
Rectifier block (2)
Slots for AC spade terminals (3)
Starter button (4)
Return spring (5)
Common side (6)
Normally open (N.O.) side (7)
Fig. 23, Wiring Diagram:
AC spade terminals (1)
Green wire (ground) (2)
Wire harness to starter motor (3)
Attach black wire to positive corner of block (4)
Short black wire (5)
Add white wire to remaining terminal marked "-" (6)
N.O. side of switch (7)
Common side of switch (8)
AC red lead (9)
AC marked on rectifier block (10)
Fig. 23
14
NOTE: SPECIFICATION TABLES BEGIN ON PAGE 41 OF THIS SECTION.

Test Rectifier (Shorts or Opens)
1. Remove all wires from rectifier before checking.
2. Use DMM (#19464) or VOA Meter.
3. Set meter to "Diode Test."
4. Using test leads, place RED test lead and BLACK
test lead on rectifier terminals in sequence shown
in Fig. 24, and TABLE NO. 8, Specifications.
5. If test results differ from those shown, the rectifier
is defective and must be replaced.
Test Rectifier (Grounded)
1. Leave DMM in Diode Test position.
2. With BLACK meter test lead contacting metal
rectifier case, touch RED meter test lead to each
rectifier terminal.
3. Meter should display "OL" at each terminal. If
meter makes a continuous tone when any terminal
is contacted, the rectifier is grounded and must be
replaced.
4. Set VOA meter to Ohms Position.
5. With one lead contacting metal rectifier case,
touch other lead to each rectifier terminal. There
should be no continuity from any terminal to case.
6. Replace rectifier if grounded.
7. To replace rectifier assembly, remove retainer
spring washer (1).
NOTE: If rectifier post should break, remove post
(2) and drill a 3/16" (5.0 mm) diameter hole
in post location (3).
8. Locate nut on inside of switch box. Attach rectifier
with plastic screw and nut (4). Assemble as shown
in Fig. 26.
Fig. 25
3/16" (5.0 mm)
Fig. 26
NOTE: SPECIFICATION TABLES BEGIN ON PAGE 41 OF THIS SECTION.
15
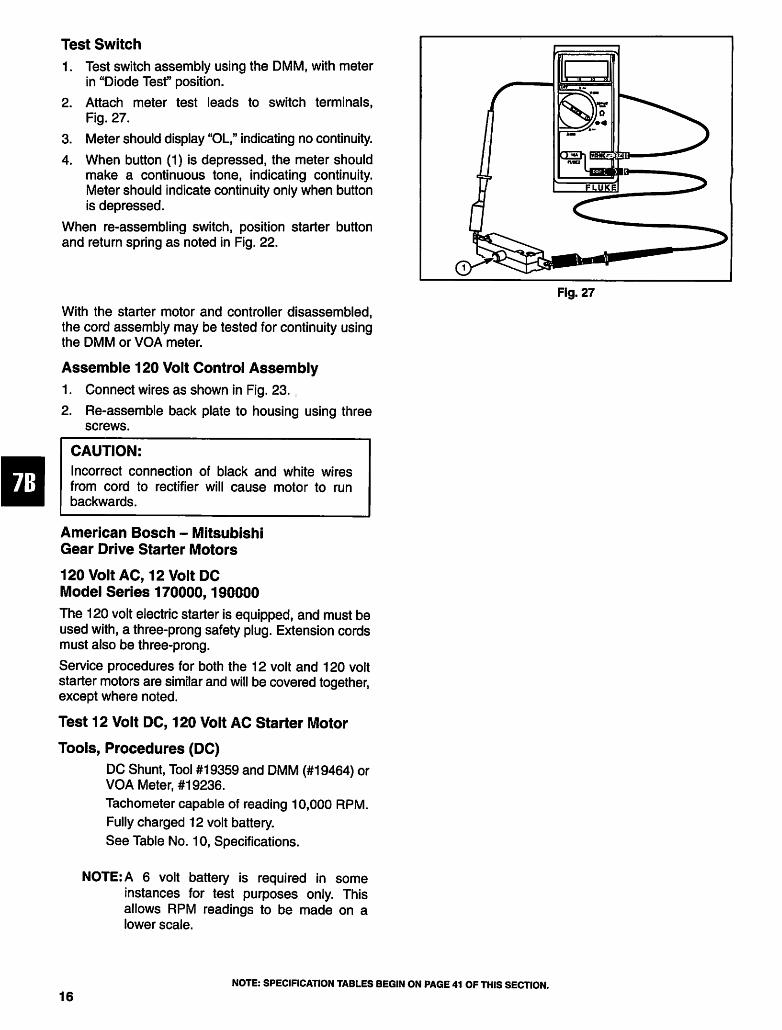
Test Switch
1. Test switch assembly using the DMM, with meter
in "Diode Test" position.
2. Attach meter test leads to switch terminals,
Fig. 27.
3. Meter should display "OL," indicating no continuity.
4. When button (1) is depressed, the meter should
make a continuous tone, indicating continuity.
Meter should indicate continuity only when button
is depressed.
When re-assembling switch, position starter button
and return spring as noted in Fig. 22.
With the starter motor and controller disassembled,
the cord assembly may be tested for continuity using
the DMM or VOA meter.
Assemble 120 Volt Control Assembly
1. Connect wires as shown in Fig. 23.
2. Re-assemble back plate to housing using three
screws.
CAUTION:
Incorrect connection of black and white wires
from cord to rectifier will cause motor to run
backwards.
American Bosch - Mitsubishi
Gear Drive Starter Motors
120 Volt AC, 12 Volt DC
Model Series 170000,190000
The 120 volt electric starter is equipped, and must be
used with, a three-prong safety plug. Extension cords
must also be three-prong.
Service procedures for both the 12 volt and 120 volt
starter motors are similar and will be covered together,
except where noted.
Test 12 Volt DC, 120 Volt AC Starter Motor
Tools, Procedures (DC)
DC Shunt, Tool #19359 and DMM (#19464) or
VOA Meter, #19236.
Tachometer capable of reading 10,000 RPM.
Fully charged 12 volt battery.
See Table No. 10, Specifications.
NOTE: A 6 volt battery is required in some
instances for test purposes only. This
allows RPM readings to be made on a
lower scale.
Fig. 27
16
NOTE: SPECIFICATION TABLES BEGIN ON PAGE 41 OF THIS SECTION.

1. Set the meter to read 300mV = (DC AMPS).
2. Connect the starter motor, battery and meter as
Shown in Fig. 28.
Optional starter switch (1)
Black lead (2)
Red lead (3)
DC shunt to negative terminal (4)
12 volt battery (5)
Test fixture (6) from P. 4.
WARNING
Unintentional sparking can result in
fire or electric shock.
After servicing, the 120 volt starter motor
should be Hi-Pot tested by an electric motor
repair shop before reinstalling on engine to
determine if a shock hazard exists.
It is recommended a battery of 32 ampere hour
capacity be used with the 12 volt starter. The battery
cable size should be #4 or #6.
NOTE: A battery of higher amperage may be
required for extremely cold weather
starting conditions.
3. Activate the starter motor and note readings of
meter and tachometer (RPM). Starter should be
within specifications. Disregard surge current.
If the motor does not perform satisfactorily, see
Interpreting Starter Motor Test Results, P. 7.
Tools, Procedures (AC)
See Fig. 5 to make a starter mounting test
fixture.
DMM (#19464) with AC Shunt, Tool #19358
(1), Fig. 29.
Tachometer capable of reading 10,000 RPM.
See Table No. 10, Specifications, for maxi
mum allowable amperage.
WARNING
Unintentional sparking can result in
fire or electric shock.
Extreme care should be used in making thistest to minimize the hazard of electrical shock.
1. Clamp the starter motor test fixture in a vise as
shown in Fig. 29.
2. Set meter to AC amps.
3. Insert leads into meter and plug starter motor cord
into AC adapter.
4. Connect AC adapter to a 120 volt outlet.
Fig. 28
Fig. 29
NOTE: SPECIFICATION TABLES BEGIN ON PAGE 41 OF THIS SECTION.
17

5. Depress starter switch. When meter reading
stabilizes (approximately 3 seconds), amperage
should not exceed the specification shown.
CAUTION:
If amperage is higher than specification shown,
immediately stop the test! An amperage reading
higher than number in chart indicates a shorted
starter motor, which could be dangerous.
6. If amperage is within specification, check RPM of
starter motor.
CAUTION, ALL SYSTEMS:
Starter motor housing may contain ceramic
magnets that can crack if motor housing is
clamped in a vise or struck with a hammer or hard
object.
CAUTION, ALL SYSTEMS:
Do not run starter motors for more than one
minute without cooling 15 minutes.
Test Starter Motor Drive and Clutch
(Typical, 12v and 120v)
When the starter is activated, the pinion gear should
engage the flywheel ring gear and crank the engine.
This can be observed by removing the starter cover, if
present. If the pinion gear does not engage the
flywheel, inspect the pinion gear and helix for freeness
of operation, Fig. 30. If any sticking occurs, the parts
may be washed in a solvent such as Stanisol® or
Varsol®. Do not lubricate drive parts except with dry
silicone spray. If the problem persists, check
disassembly, assembly instructions regarding serviceability of starter drive parts.
Inspect pinion gear for damaged teeth, and replace if
damaged.
If the spur gear engages the flywheel, but does notcrank the engine, the starter clutch may be defective.
The clutch should not slip during normal enginecranking.
Fig. 30
18
NOTE: SPECIFICATION TABLES BEGIN ON PAGE 41 OF THIS SECTION.

Replace Flywheel Ring Gear
(Typical, all systems)
Briggs & Stratton starter motors use either an aluminum
or plastic ring gear on the flywheel. American Bosch -
Mitsubishi Gear Drive starters use a steel flywheel ring
gear with a steel starter pinion gear. Make sure that you
get the correct parts for your starter model.
WARNING
Flying objects can cause personal
injury or property damage.
• Do not strike flywheel with a hard object or
metal tool as this may cause flywheel to
shatter in operation.
1. With a center punch, mark the center of the rivets
holding the ring gear (1) to flywheel (4).
2. Drill out the rivets using a 3/16" (5.0 mm) drill.
3. Clean holes after drilling, Fig. 31.
4. Attach new gear to flywheel using hardware (2,3)
provided with gear.
Fig. 31
Starter Motor Disassembly and Assembly,
by System
System 3® and System 4® starters wil be covered
together here. Individual differences will be noted in
the following art and text.
System 3®, System 4® (Fig. 32)
Fig. 32
NOTE: SPECIFICATION TABLES BEGIN ON PAGE 41 OF THIS SECTION.
19

Disassemble, Inspect and Clean
Starter Motor
1. Examine Fig. 33, Exploded View prior to
disassembly.
2. Remove the starter cover (1), nylon spur gear
retainer (2), and the nylon spur gear (4).
3. Remove the three screws (5) holding the starter
gear cover (6) and remove the cover.
4. Lift the clutch assembly- (gasket [7], felt washer
[8], and drive gear [9]) - and the pinion gear (11) off
their respective shafts.
Fig. 33: Starter gear helix (3)
Brake bandmounting post - early
Models (10)
Gray plastic end play washers (12)
Armature (13)
Housing (14)
Thrust washer (15)
Insulator (16)
Brush end cap with brushes and springs (17)
Thru bolts (18)
Fig. 33
20
NOTE: SPECIFICATION TABLES BEGIN ON PAGE 41 OF THIS SECTION.

5. Remove both starter motor thru bolts (1), Fig. 34,
and separate end cap (2) from housing.
6. Push motor armature out through bottom of starter
housing (3), taking care to slide rubber mounted
terminal (1) out of motor housing (3) along with end
cap (2), Fig. 35.
Armature shaft (4)
7.
8.
Before removing armature from end cap, check
brushes (1) for freedom of movement. If brushes
stick in their retainers, repair before reassembly,
Fig. 36.
If brushes are worn to a length of 5/64" (2.0 mm)(System 3®, 4®) or less, they should be replaced.
Check brush springs for proper tension
(sufficient force to keep brush in firm contact
with commutator).
10. Clean all residue from armature, end cap, motor
support, gears, etc. Do Not soak end cap bearings
and armature in solvent.
11. The armature commutator may be cleaned with a
fine sandpaper or commutator paper. DO NOT use
emery cloth, emery will embed in the commutator
causing rapid brush wear.
Slots between commutator bars may be cleaned
using aerosol spray carburetor cleaner and
compressed air after sanding or machining.
If the armature is suspect, and proper equipment is
available, test the suspect armature. If not, a new
armature should be tried in the motor.
14. Starter motor armatures have very low resistance,
usually below detection on available multimeters.
To check for shorted armatures, take starter to an
electric motor repair facility.
15. If the magnets appear to be weak, a new motor
housing should be tried.
12
13
Fig. 36
NOTE: SPECIFICATION TABLES BEGIN ON PAGE 41 OF THIS SECTION.
21

Assemble Starter Motor - Armature to End
Cap Assembly, Fig. 37
Lightly lubricate bearings with a #20 oil and
reassemble in the following manner.
1. Insert brush springs and brushes in holders as far
as possible, and hold them in position with brush
retainers (1), Fig. 37.
2. Place thrust washers on armature shaft in
sequence shown, Inset "A": felt washer (4), steel
washer (6), and add gray plastic washers (5) to
obtain dimension shown in Fig. 37, Inset "B"
(System 3®, 4®).
3. Using care to ensure brushes clear commutator,
slide armature shaft into end cap bearing, Fig. 37.
4. Support armature shaft and slide it slowly into
starter housing, as shown in Fig. 38.
5. Insert plastic insulator terminal (1) (System 3®,
4®) into starter housing.
6. Place remaining thrust washers on motor PTO
shaft, install end head cover and thru bolts.
7. Notches in end cap, housing and end head must
be aligned (2), Fig. 38.
8. Torque bolts to 25 in. lbs. (3 Nm).
9. If necessary, install or remove gray plastic
washers between armature and end head to
adjust end play for .005" (.13 mm) to .025" (.64
mm) armature movement (System 3®, 4®),Fig. 37.
10. Slip pinion and clutch gear on shaft.
11. Add approximately 3/4 ounce (22 ml) of high
temperature gear lubricant under large gear and
on gear teeth (1), Fig. 39.
12. Oil felt washer with electric motor oil (System 3®,
13. Install washer, gasket and cover, Fig. 39 (System3®, 4®).
Fig. 37
Fig. 39
22
NOTE: SPECIFICATION TABLES BEGIN ON PAGE 41 OF THIS SECTION.
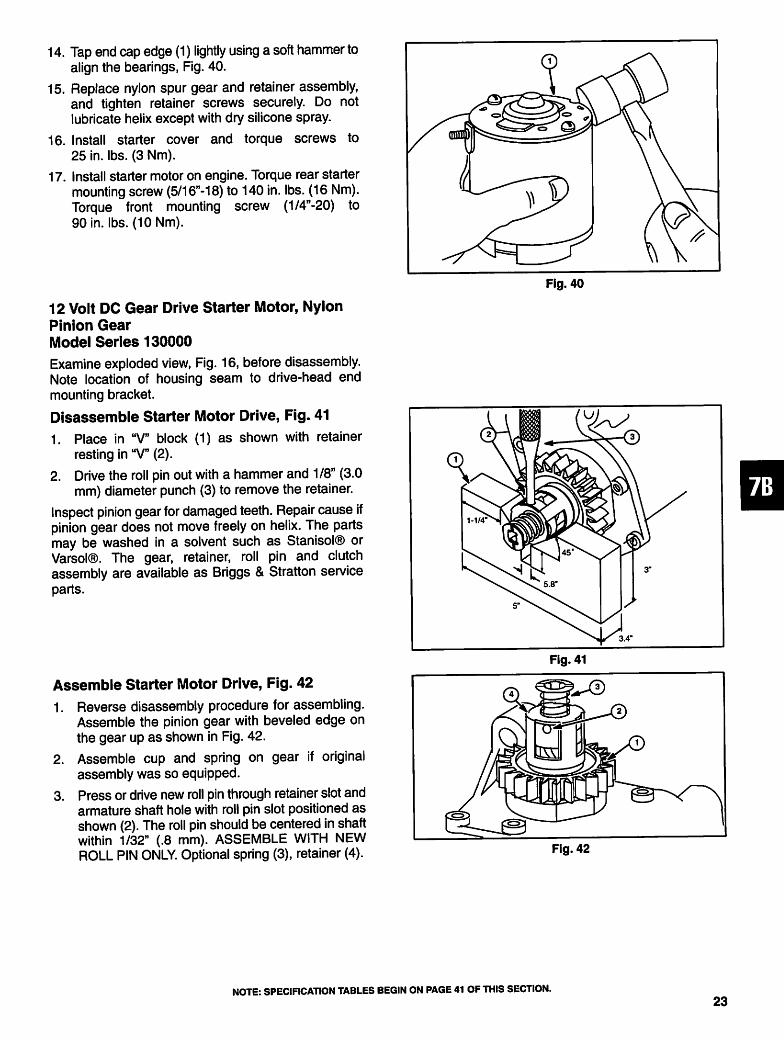
14. Tap end cap edge (1) lightly using a soft hammer to
align the bearings, Fig. 40.
15. Replace nylon spur gear and retainer assembly,
and tighten retainer screws securely. Do not
lubricate helix except with dry silicone spray.
16. Install starter cover and torque screws to
25 in. lbs. (3 Nm).
17. Install starter motor on engine. Torque rear starter
mounting screw (5/16"-18) to 140 in. lbs. (16 Nm).
Torque front mounting screw (1/4"-20) to
90 in. lbs. (10 Nm).
12 Volt DC Gear Drive Starter Motor, Nylon
Pinion Gear
Model Series 130000
Examine exploded view, Fig. 16, before disassembly.
Note location of housing seam to drive-head end
mounting bracket.
Disassemble Starter Motor Drive, Fig. 41
1. Place in "V" block (1) as shown with retainer
resting in "V" (2).
2. Drive the roll pin out with a hammer and 1/8" (3.0
mm) diameter punch (3) to remove the retainer.
Inspect pinion gear for damaged teeth. Repair cause if
pinion gear does not move freely on helix. The parts
may be washed in a solvent such as Stanisol® or
Varsol®. The gear, retainer, roll pin and clutch
assembly are available as Briggs & Stratton service
parts.
Assemble Starter Motor Drive, Fig. 42
1. Reverse disassembly procedure for assembling.
Assemble the pinion gear with beveled edge on
the gear up as shown in Fig. 42.
2. Assemble cup and spring on gear if original
assembly was so equipped.
3. Press or drive new roll pin through retainer slot and
armature shaft hole with roll pin slot positioned as
shown (2). The roll pin should be centered in shaftwithin 1/32" (.8 mm). ASSEMBLE WITH NEW
ROLL PIN ONLY. Optional spring (3), retainer (4).
Fig. 40
Fig. 42
NOTE: SPECIFICATION TABLES BEGIN ON PAGE 41 OF THIS SECTION.
23

Disassemble Starter Motor
1. Remove thru bolts. Note position of match marks
and thru bolts. They must be reassembled in same
position.
2. Remove drive-head end and inspect bushing for
wear. Replace drive-head end mounting bracket if
worn.
3. Press ("A") the armature and commutator end cap
against a work surface (1) while sliding housing
upward ("B") off the armature. This allows the ar
mature to remain in the end cap (2) for inspection
of brush/armature contact, Fig. 43.
4. Clean all residue from the armature, end cap,
motor support, etc. Do Not soak bearings, housing
or armature in solvent.
5. The commutator may be cleaned with a fine sand
paper such as flint or commutator paper. Do Not
use emery cloth. Emery will embed in the commu-
tator, causing rapid brush wear.
6. The commutator may be machined with a diamond
cutting tool to no less than 1.230" (31.24 mm) -12
volt, 1.320" (33.53 mm) - 120 volt, outside
diameter.
7. Slots between commutator bars should be
cleaned with blade (1) as shown in Fig. 44, or by
using aerosol carburetor cleaner or compressed
air, after sanding or machining.
8. If an armature or field coil is suspect, and proper
equipment is available, test the suspect armature
or field coil to determine if it is defective (opens orgrounds).
9. If magnets or motor housing are suspect, a new
part should be tried in the motor.
10. Check brushes for freedom of movement. If
brushes stick in their retainers, repair beforereassembly.
11. If brushes are worn to within 1/8" (3.0 mm) of wire
at closest point, replace brushes (1), Fig. 45. New
brush measurement shown (2).
Fig. 43
Fig. 44
1/8" (3.0 mm) (?) T
r> • l
Fig. 45
24
NOTE: SPECIFICATION TABLES BEGIN ON PAGE 41 OF THIS SECTION.

Assemble Starter Motor
Lightly lubricate bearings with #20 oil and reassemble
in the following manner.
1. Insert brush springs and brushes (1), Fig. 46, in
holders as far as possible, and hold them in this
position with brush retainers, Figs. 6,46.
2. Slide motor housing over armature with the notch
toward commutator end cap.
3.
4.
Match notch in housing with boss on brush end
cap. Remove brush holders, if used, and rotate
armature to be sure brushes are making full
contact with commutator.
Care should be used to prevent damage to
magnets in motor housing during assembly.
5. Assemble spacers (1) and drive head end bracket,
bearing shown - (2), aligning seam in housing with
drive end mounting bracket.
6. Assemble thru bolts and torque to 35 in. lbs. (4 Nm).
7. Armature end play should be .006" to .038" (.15 to
.97 mm) after assembly, Fig. 47.
Install starter on engine and torque mounting screws to
140 in. lbs. (16 Nm).
Fig. 47
NOTE: SPECIRCATION TABLES BEGIN ON PAGE 41 OF THIS SECTION.
25

12 Volt DC & 120 Volt AC Gear Drive Starter
Motor, Steel Drive Pinion, Exploded View
Fig. 48
Model Series 130000
This system uses either a 12v DC or 120v AC starter
motor. They are covered together in this section. Study
Fig. 48 prior to starter motor disassembly.
Drive housing (1)
Spacer and retainer (2)
Lock nut (3)
Helix and drive gear assembly (4)
Pinion gear (5)
Spring washer (6)
Motor pinion (7)
End head (8)
Thrust washer (9)
Armature (10)
Thru bolts (11)
Housing (12)
12 volt terminal (13)
12 volt end cap (14)
Inset "A" shows 120 volt end cap assembly -
Ground post (15)
Rectifier assembly (16)
End cap (17)
Disassemble Starter Motor Drive
1. Remove drive housing (1) from end head (8),Fig. 48.
2. Clamp the drive gear (4) in a vise with brass jaws,
to prevent damage to the gear teeth.
3. Remove the lock nut (3) and disassemble.
Assemble Starter Motor Drive
Reverse disassembly procedure for assembling. Be
sure drive spacer and retainer (2) are correctly
positioned in drive housing.
Do not lubricate drive assembly, except with a drysilicone spray.
Disassemble Starter Motor
NOTE: End head (1), end cap (2), and housing (4)
must be placed in the same position as
when removed. Assemble matching marks
(3) or interference may result, Fig. 49.
Fig. 48
Fig. 49
26
NOTE: SPECIFICATION TABLES BEGIN ON PAGE 41 OF THIS SECTION.

1. Remove thru bolts (1), Fig. 50, then remove end
head.
2.
3.
4.
5.
6.
Remove armature and end cap (2) by pushing up
on armature shaft (A) as shown in Fig. 51.
Clean all residue from the armature, end cap, end
head, etc.
Do not soak bearings, motor housing or armature
in a solvent solution.
The armature commutator may be cleaned with a
fine sand paper or commutator paper. Do not use
emery cloth, as emery will embed in the
commutator, causing rapid brush wear.
If it is suspected that the armature is defective, and
proper equipment is available, test the suspect
armature. If not, try a new armature in the motor.
7. Starter motor armatures have very low resistance,
usually below detection on available multimeters.
To check for shorted armatures, take starter to an
electric motor repair facility.
8. The brushes should be checked for poor seating,
weak springs, and contamination, Fig. 52 (Typ.).
9. If brushes are worn to less than 1 /4" (6.0 mm), they
should be replaced.
10. If the magnets appear to be weak, a new motor
housing should be tried. Fig. 52
NOTE: SPECIFICATION TABLES BEGIN ON PAGE 41 OF THIS SECTION.
27

Assemble Starter Motor
Lightly lubricate the bearings with #20 oil prior toreassembly.
1. Insert the brushes in their respective holders.Brush retainers, which can be made from scrap
piece of rewind starter spring, Figs. 6 and 53,should be used during assembly.
2. Support armature shaft and slide it slowly intohousing (1), Fig. 54 (Typ).
Insert rubber mounted terminal into housing.
Place thrust washer on motor PTO shaft.
Install end head and thru bolts.
6. Align end cap and end head match markscorrectly, Fig. 49, and tighten screws.
8.
9.
Tap edge of end cap using a soft hammer to alignmotor bearings if required, Fig. 40 (Typ).
Check armature shaft for end play. Armatureshould rotate freely.
Test performance of starter motor, Page 18. Ifstarter motor tests as specified, continueassembly.
10. Slip pinion gear on armature shaft.
11. Add a small amount of gear lubricant to gear teeth.
Position gasket, spring washer and drive housingassembly, Fig. 48.
12. Fasten drive housing to end head securely withthree screws.
Fig. 54
28
NOTE: SPECIRCATION TABLES BEGIN ON PAGE 41 OF THIS SECTION.

Briggs & Stratton
Starter Motors
12 Volt DC; 120 Volt AC with Housings
3-1/16" (78.0 mm) to 4-9/16" (115.9 mm)
long
Model Series 170000,190000, 220000,
240000, 250000, 280000 and 320000
See Figs. 19 and 20, and Table No. 6, Specifications,
for motor identification.
Study exploded view, Fig. 55 (Roll Pin Type), or Fig.
56, (Snap Ring Type) prior to starter motor
disassembly.
Fig. 55
Pinion gear (1)
Helix and drive gear assembly (2)
End head (3)
Housing (4)
End cap (5)
Starter switch (120 volt only) (6)
Thru bolts (7)
Armature (8)
Insulating washer (120 volt only) (9)
Thrust washer (10)
Inset "A" - end cap, 12 volt, (11).
Fig. 56
Snap ring (1)
Retainer (2)
Spring (3)
Pinion gear (4)
Spring washers (6)
Washer (7)
Drive end head (8)
Armature (9)
Housing (10)
Thru bolts (11)
End cap (13)
Fig. 56
Fig. 55
NOTE: SPECIRCATION TABLES BEGIN ON PAGE 41 OF THIS SECTION.
29

StarterMotorDrive,C-RingRetainerTypeDisassemble
1.RemoveC-ringretainerusingTool#19436,
C-RingRetainerRemovalTool,Fig.57.Place
counterboredsideoftooloverretainerandalign
drivepinswithopenendofC-ring.Placepalmofhandovertool.Pushdownontooltocompress
springwasherwhileturningscrewclockwise.
ContinueturningscrewuntilC-ringretainerpopsoff.DiscardoldC-ring.
WARNING
Flyingobjectscancausepersonal
injuryorpropertydamage.
•Topreventeyeinjuryalwaysweareyeprotectionwhenremovingc-ringretainer.
2.Removeretainer(1),returnspring(2),flatwasher
(3),springwasher(4),piniongear(5),andstarterclutch(6),Fig.58.
Thepiniongearshouldbeinspectedfordamaged
teeth.Ifastickingconditionexistsbetweenthepinion
gearandthehelix,correctbeforereassembly.The
partsmaybewashedinasolventsuchasStanisol®or
Varsol®.Donotlubricatehelixexceptwithdrysilicone
spray.Thegear,returnspring,wavewasher,flat
washer,retainer,retainerringandclutchassemblyareavailableasserviceparts.
InstallClutch
1.Placestarterclutchonstartershaft,Fig.59A,and
rotateclutchuntilitdropsintoplace,Fig.59B.
——^_
'^1
i
Fig.57
Fig.59
NOTE:SPECIFICATIONTABLESBEGINONPAGE41OFTHISSECTION.
30

2.Installstartergearwithbeveledsideofteethup
(1),Fig.60.Theninstallreturnspring(2)making
surespringisinrecessofstartergear(3).
3.Placespringwasher(2)withconcavesideup,then
placeflatwasher(1)onstarterclutchspline,
Fig.61.
4.InstallNEWC-ringretainerintogrooveusingTool
#19435,C-RingRetainerInstaller(2),Fig.62.
PlaceC-ringretaineroverchamferedendofshaft.
Alignoneoftheslots(3)ofC-ringretainerinstaller
withopenendofC-ring.PressordriveC-ringon
untilitsnapsintogrooveinshaft.
Fig.62
NOTE:SPECIFICATIONTABLESBEGINONPAGE41OFTHISSECTION.
31
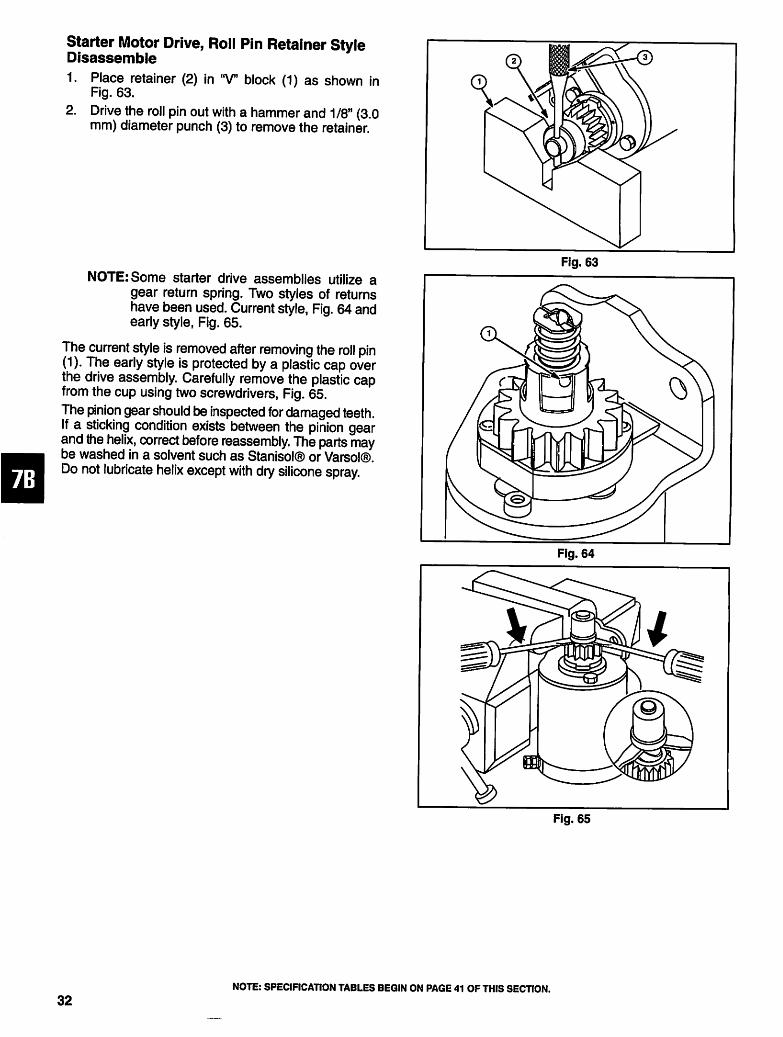
Starter Motor Drive, Roll Pin Retainer StyleDisassemble
1. Place retainer (2) in "V" block (1) as shown inFig. 63.
2. Drive the roll pin out with a hammer and 1/8" (3.0mm) diameter punch (3) to remove the retainer.
NOTE: Some starter drive assemblies utilize agear return spring. Two styles of returns
have been used. Current style, Fig. 64 andearly style, Fig. 65.
The current style is removed after removing the roll pin(1). The early style is protected by a plastic cap overthe drive assembly. Carefully remove the plastic capfrom the cup using two screwdrivers, Fig. 65.
The pinion gear should be inspected for damaged teeth.If a sticking condition exists between the pinion gearand the helix, correct before reassembly. The parts may
be washed in a solvent such as Stanisol® or Varsol®.Do not lubricate helix except with dry silicone spray.
Fig. 65
32
NOTE: SPECIHCATION TABLES BEGIN ON PAGE 41 OF THIS SECTION.

Assemble
1.Assemblepiniongearwithbevelededgeonthe
gear(1)upasshowninFig.66.
2.Assemblecup(2)andspring(3)ongeariforiginal
assemblywassoequipped,andfitretainer(4)on
shaft.
3.Drivenewrollpin(5)throughretainerslotand
armatureshafthole.Therollpinshouldbe
centeredinshaftwithin1/32"(.8mm).Assemble
withnewrollpinonly.
4.Iftheoriginalassemblyisequippedwithaspring
capassembly,assemblecapasfollows:
5.Toinstallplasticcap,fitasocket(2)overtheplastic
cap(3)andtapgently(1)asshowninFig.67.
6.Presscapinposition.Capshouldlockinposition
whenproperlyassembled.
DisassembleStarterMotor,
C-RingRetainer
1.Removedriveassemblyaspreviouslydescribed.
2.Removethrubolts,thendriveheadend.
3.Inspectbushingforwear.Ifworn,replacedrive
headendassembly.
4.Holdthearmature"A"andbearingendcap(2)
downagainstaworksurface(1)whilesliding
housingupandoffthearmature(B).Thisallows
thearmaturetoremaininthebearingendcapand
brushholder(3)forinspectionofbrushcontactto
armature,Fig.68.
Fig.66
"Mv>—^^^^
/W.
Fig.67□
Fig.68
NOTE:SPECIFICATIONTABLESBEGINONPAGE41OFTHISSECTION.
33

5.Whileholdingbrushholderandarmature,remove
bearingendcap(1)fromarmature,Fig.69.
6.Removebrushholderfromarmaturecommutator.
7.DoNotsoakbearings,housingorarmatureinsolvent.
8.Thearmaturecommutatormaybecleanedwitha
finesandpapersuchasflintorcommutatorpaper.
DoNotuseemerycloth,asemerywillembedin
thecommutatorcausingrapidbrushwear.
9.Thecommutatormayalsobemachinedwitha
diamondcuttingtooltonolessthan1.230"(31.24mm)outsidediameter.
10.SlotsbetweencommutatorbarsmaybecleanedasshowninFig.44,orusinganaerosolcarburetor
cleanerorcompressedairaftersandingormachining.
11.Ifitissuspectedthatthearmaturefieldcoil,magnetsormotorhousingisdefective,anewpart
shouldbetriedinthemotor.Ifpropertesting
equipmentisavailable,checkthesuspected
armatureorfieldcoiltodetermineifitisdefective(opensorgrounds).
12.Thebrushesshouldbecheckedforpoorseating,
weakbrushsprings,dirt,oilorcorrosion.
13.Ifbrushesareworntowithin1/8"(3.0mm)ofwire
atclosestpoint(B),replacebrushes,Fig.70.New,fullbrushsizeshown(A).
14.Brushesmustmovefreelyintheirholders.
Fig.69
1/8"(3.0mm)
Fig.70
NOTE:SPECIFICATIONTABLESBEGINONPAGE41OFTHISSECTION.
34

Assemble Starter Motor
C-Ring Retainer Type
Lightly lubricate the bearings with #20 oil prior to
reassembly.
1. Place brushes in their slots and hold brushes with
brush retainers, Figs. 6, 71.
2. Place armature commutator in brush holder and
remove brush retainers.
3. Align and install bearing end plate on armature
commutator journal.
4. Slide motor housing over armature with the notch
toward brush holder, Fig. 72.
5. Place spring washer (1) on armature shaft with
concave side up, Fig. 73. Then place flat washer
(2) on shaft.
Fig. 73
NOTE: SPECIFICATION TABLES BEGIN ON PAGE 41 OF THIS SECTION.
35

6.
7.
8.
9.
Place drive end cap on starter housing making
sure that mark on cap (1) lines up with housingseam (2), Fig. 74.
Install through bolts in starter.
Use starter clutch to rotate armature and check forbinding. Correct if necessary.
Install starter drive as previously described.
10. Install starter on engine and start mounting
screws(1). While holding starter against locating
lugs on cylinder (2), Fig. 75, torque mountingscrews to 140 in. lbs. (16 Nm).
Wire clip (3)
11. Reinstall starter guard, if used.
Disassemble Starter Motor,
Roll Pin Retainer Type
1. Mark drive end cap at seam on housing. Remove
thru bolts (3), noting position of bolts and match
marks (1) for reassembly. Hold housing and captogether (4), Fig. 76.
2. The drive head end (5) may now be removed.
Inspect bushing for wear. If worn, replace drivehead end assembly.
Fig. 75
Fig. 76
NOTE: SPECIFICATION TABLES BEGIN ON PAGE 41 OF THIS SECTION.
36

3. Hold down the armature "A" and commutator endcap against a work surface (1) while sliding
housing up "B" off the armature. This allows the
armature to remain in the end cap for inspection of
brush to armature contact, Fig. 77 (Typ).
Remove Armature from Brush End Cap
1. Clean all residue from the armature, end cap,
motor support, etc. Do Not soak bearings, housing
or armature in solvent.
2. The commutator may be cleaned with a fine sand
paper such as flint or commutator paper. Do Not
use emery cloth, as emery will become embedded
in the commutator, causing rapid brush wear.
3. The commutator may be machined with a diamond
cutting tool to no less than 1.230" (31.24 mm) -12
volt, 1.320" (33.53 mm) - 120 volt, outside
diameter.
4. Slots between commutator bars may be cleaned
as shown in Fig. 44, or using an aerosol spray
carburetor cleaner or compressed air after
sanding or machining.
5. If it is suspected that the armature field coil,
magnets or motor housing is defective, a new part
should be tried in the motor. If proper testing
equipment is available, check the suspected
armature or field coil to determine if it is defective
(opens or grounds).
6. The brushes should be checked for poor seating,
weak brush springs, dirt, oil or corrosion.
7. If brushes are worn to within 1/8" (3.0 mm) of wire
at closest point, replace brushes, Fig. 70.
8. Brushes must move freely in their holders.
Assemble Starter Motor
Lightly lubricate the bearings with #20 oil prior to
reassembly.
1. Assemble wiring in commutator end cap for 120
volt AC motor as shown in Fig. 78: white (1), black
(2), green (3).
2. Insert brushes and springs in their respective
holders, except 4-1/2" (111.0 mm) and 4-9/16"
(115.9 mm) housing starters.
Use brush retainers during assembly.
Fig. 77
Fig. 78
NOTE: SPECIFICATION TABLES BEGIN ON PAGE 41 OF THIS SECTION.
37

1.
2.
3.
4.
5.
6.
7.
Assemble Housing All Except 4-1/2"
(111.0 mm), 4-9/16" (115.9 mm) Housings
Slide motor housing over armature with the notchtoward commutator end cap.
Match alignment marks, Fig. 76.
Use care to prevent damage to magnets in motorhousing during assembly.
Assemble spacers and drive head end bracket,again aligning match marks.
Assemble thru bolts and washers.
Torque thru bolts, 45 to 55 in. lbs. (5 to 6 Nm) for
1/4-20 thru bolts and 40 to 45 in. lbs. (4 to 5 Nm) for10-24 thru bolts.
Armature end play is .006" (.18 mm) to .038" (1.22mm) after assembly.
Install Brushes, 4-1/2" (111.0 mm) and
4-9/16" (115.9 mm) Housings
With a small blade screwdriver, bend brush spring outand insert brush in brush holder, Fig. 79.
Assemble Housing to Brush End Cap 4-1/2"
(111.0 mm), 4-9/16" (115.0 mm) Housings
This design of starter housing has a large notch (1)
which indexes over the insulated terminal, Fig. 80.
1. While pushing down on armature and brush end
cap, slide starter housing down until large notch
indexes with insulated terminal boss. DO NOTdamage magnets in starter housing.
2. Assemble thru bolts and washers.
3. Torque thru bolts, 45 to 55 in. lbs. (5 to 6 Nm) for
1/4-20 thru bolts and 40 to 45 in. lbs. (4 to 5 Nm) for10-24 thru bolts.
Before and after repairing the 120 volt AC starter
motor, a Hi-Pot test must be made to prevent injury. If
the proper test equipment is not available, take the
starter motor to a qualified electric motor repair shopfor testing.
After assembly of the starter motor drive and Hi-Pot
test is passed, the starter motor is now ready for
installation to the engine.
Fig. 79
Fig. 80
NOTE: SPECIFICATION TABLES BEGIN ON PAGE 41 OF THIS SECTION.
38

American Bosch - Mitsubishi
Gear Drive Starter Motors
120 Volt AC, 12 Volt DC
Model Series 170000,190000 -
See exploded views, Fig. 81, before disassembly
Thru bolts (1)
Drive assembly (2)
Drive end cap (3)
Housing (4)
Armature assembly (5)
Brushes (6)
End cap commutator (7)
Pinion gear (8)
Helix (9)
Armature shaft (10)
Drive cap (11)
Thrust washer (12)
End cap (13)
Rectifier assembly (14)
□
Fig. 81
Disassemble Starter Motor Drive
Exploded Views - Fig. 81
WARNING
Unintentional sparking can result in
fire or electric shock.
• After servicing, the 120 volt starter motor
should be Hi-Pot tested by an electric motor
repair shop before reinstalling on engine to
determine if a shock hazard exists.
1. Clamp the pinion gear (8) in a vise having brass
jaws to prevent damage to the gear teeth.
2. Remove the lock nut and the starter drive (2) and
disassemble.
The pinion gear should be inspected for damaged
teeth. If a sticking condition exists between the pinion
gear and the helix (9), the parts may be washed in a
solvent such as Stanisol® or Varsol®. Do not lubricate
helix, except with dry silicone spray. If the sticking
condition persists, the complete drive assembly must
be replaced. Individual parts of the drive assembly are
not available.
NOTE: SPECIFICATION TABLES BEGIN ON PAGE 41 OF THIS SECTION.
39
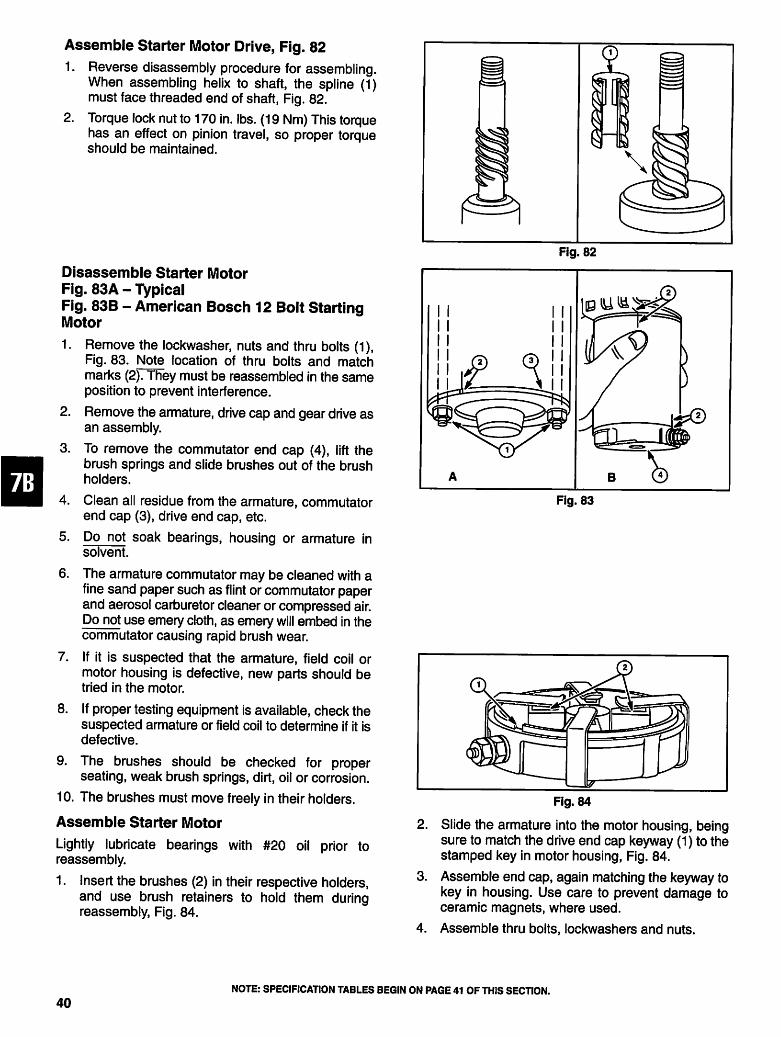
Assemble Starter Motor Drive, Fig. 82
1. Reverse disassembly procedure for assembling.
When assembling helix to shaft, the spline (1)
must face threaded end of shaft, Fig. 82.
Torque lock nut to 170 in. lbs. (19 Nm) This torque
has an effect on pinion travel, so proper torque
should be maintained.
2.
Disassemble Starter Motor
Fig. 83A-Typical
Fig. 83B - American Bosch 12 Bolt StartingMotor
1. Remove the lockwasher, nuts and thru bolts (1),
Fig. 83. Note location of thru bolts and match
marks (2). They must be reassembled in the same
position to prevent interference.
2.
3.
4.
Remove the armature, drive cap and gear drive asan assembly.
To remove the commutator end cap (4), lift the
brush springs and slide brushes out of the brushholders.
Clean all residue from the armature, commutator
end cap (3), drive end cap, etc.
5. Do not soak bearings, housing or armature insolvent.
6. The armature commutator may be cleaned with a
fine sand paper such as flint or commutator paper
and aerosol carburetor cleaner or compressed air.
Do not use emery cloth, as emery will embed in the
commutator causing rapid brush wear.
7. If it is suspected that the armature, field coil or
motor housing is defective, new parts should be
tried in the motor.
8. If proper testing equipment is available, check the
suspected armature or field coil to determine if it isdefective.
9. The brushes should be checked for proper
seating, weak brush springs, dirt, oil or corrosion.
10. The brushes must move freely in their holders.
Assemble Starter Motor
Lightly lubricate bearings with #20 oil prior to
reassembly.
1. Insert the brushes (2) in their respective holders,
and use brush retainers to hold them duringreassembly, Fig. 84.
Fig. 83
Fig. 84
2. Slide the armature into the motor housing, being
sure to match the drive end cap keyway (1) to the
stamped key in motor housing, Fig. 84.
3. Assemble end cap, again matching the keyway to
key in housing. Use care to prevent damage to
ceramic magnets, where used.
4. Assemble thru bolts, lockwashers and nuts.
40
NOTE: SPECIFICATION TABLES BEGIN ON PAGE 41 OF THIS SECTION.

SPECIFICATION TABLES
TABLE NO. 1
System 3® System 4®, 6 & 12 Volt
Specifications System
Voltage
6
12
Minimum
Motor RPM
800
1400
Maximum
Amps
18
(Disregard surge
current)
9
(Disregard surge
current)
TABLE NO. 2
12 Volt DC Starter Specifications
Nylon Pinion
Minimum
RPM
5250
Maximum
Amps
14
(Disregard surge current)
TABLE NO. 3
12 Volt Specifications
Steel Pinion
Minimum
Motor RPM
5600
Maximum
Amps
6
(Disregard surge current)
TABLE NO. 4
120 VOLT SPECIFICATIONS120 Volt
Specifications
Minimum
Motor RPM
8300
Maximum
Amps
1-1/2
(Disregard surge current)
TABLE NO. 5
Briggs & Stratton
Starter Motor Identification
Housing Length "L"
3-1/16"
(78.0 mm)
3-1/2"
(89.0 mm)
3-21/32"
(93.0 mm)
3-3/4"
(95.0 mm)
3-13/16"
(97.0 mm)
4-1/2"
(111.0 mm)
4-9/16"
(115.9 mm)
Motor Voltage
12
120
12
12
12
12
12
TABLE NO. 6
12 Volt DC Starter Specifications
Motor
Housing
Length
3-1/16"
(78.0 mm)
3-21/32"
(93.0 mm)
3-3/4"
(95.0 mm)
3-13/16"
(97.0 mm)
4-1/2"
(111.0 mm)
4-9/16"
(115.9 mm)
Minimum
RPM
6500
6500
6900
6900
6500
6500
Maximum
Amps
18
(Disregard surge
current)
18
(Disregard surge
current)
19
(Disregard surge
current)
19
(Disregard surge
current)
20
(Disregard surge
current)
35
(Disregard surge
current)
TABLE NO. 7
120 Volt AC Starter Specifications
Motor
Housing
Length
3-1/2"
(89.0 mm)
Minimum
RPM
6500
Maximum
Amps
2.7
(Disregard surge
current)
TABLE NO. 8
Digital Multimeter
Red Test
Lead
(+) Positive
A
B
B
C
C
D
D
A
Black Test
Lead
(-) Negative
B
A
C
B
D
C
A
D
"Beep"
(Continuity)
NO
YES
NO
YES
YES
NO
YES
NO
NOTE: SPECIFICATION TABLES BEGIN ON PAGE 41 OF THIS SECTION.
41

TABLE NO. 9
12 Volt Starter Motor Performance Chart
Starter Motor
Identification
American Bosch
SME-12A-8
American Bosch
SMH-12A-11
American Bosch
01965-23-MO-30-SM
Mitsubishi
MMO-4FL
MM0-5ML
MOO1TO2271
Voltage
Required
6V±0.1
12V ±0.3
12V ±0.3
6V±0.1
Minimum
Motor RPM
5000
4800
5500
6700
Maximum
Amps
25
(Disregard surge
current)
16
(Disregard surge
current)
16
(Disregard surge
current)
16
(Disregard surge
current)
TABLE NO. 10
120 Volt Starter Motor Performance Chart
Starter Motor
Identification
American Bosch
SME-110-C3
SME-110-C6
SME-110-C8
American Bosch
06026-28-M030SM
Mitsubishi
J282188
Voltage
Required
120
120
120
Minimum
Motor
RPM
7400
7400
7800
Maximum
Amps
3-1/2
(Disregard surge
current)
3
(Disregard surge
current)
3-1/2
(Disregard surge
current)
NOTE: SPECIFICATION TABLES BEGIN ON PAGE 41 OF THIS SECTION.
42

SECTION 7C
Alternators
Section Contents
Page
ALTERNATORS
Table No. 1 3
Identification, System Descriptions 4
AC Only Voltage Output Test 10
DC Only Amps Output Test 9
1/2 Amp 4
Test DC Amp Output 9
1.2 Amp 5
Test DC Amp Output 9
1-1/2 Amp 5
Replace
Rectifier 5
Stator 5
Test
DC Amp Output 9
Rectifier (Diode) 12
5/9 Amp Regulated
Test
AC Voltage Output 10
Regulator/Rectifier 15
10/16 Amp
Test
AC Voltage Output 10"10
Regulator/Rectifier 16
Dual Circuit
Test
AC Voltage Output 10
DC Amps Output 9
Diode 12
Quad Circuit
Test
AC Voltage Output 10
DC + Charging Circuit 14
DC - Light Circuit 15
System 3® & 4®
Test
DC Amps Output 9

Section Contents, Cont'd.Adjust (Current Style)
Stator Air Gap -j-j
Adjust (Early Style)
Stator Air Gap 11
Tri-Clrcult
Test
AC Voltage Output 10
Charging Circuit (Red Wire) 13
Diodes 13-14
Light Circuit (White Wire) 14
Wiring Diagrams
5/9 Amp, 6 Terminal Ignition Switch 20
16 Amp
5 Terminal Ignition Switch 20
6 Terminal Ignition Switch 21
6 Terminal Ignition Switch & Charge Indicator Light 21
Dual Circuit
5 Terminal Ignition Switch 19
6 Terminal Ignition Switch 19
Tri-Circuit
5 Terminal Ignition Switch with Resister 22
6 Terminal Ignition Switch 22
6 Terminal Ignition Switch with Resister 22
TEST EQUIPMENT
DC Shunt, Tool #19359 9
Digital Multimeter, Tool #19464 8
Tachometer, Tool #19389 9
Troubleshooting 8-8

Briggs & Stratton Alternator Systems
Single Cylinder Engine Models
The alternator systems used on Briggs & Stratton single cylinder engines can be identified by the color of the outputwire and connector. Table No. 1, lists the various alternator system, engine model applications. Test procedures are
listed by page number, reference illustrations by Fig. number.
TABLE NO. 1
Basic
Model
Series
System 3®
System 4®
1/2 Amp
1.2 Amp
(Current)
1-1/2 Amp
(Early)
DC
Only
AC
Only
Dual
Circuit
Tri-
Circuit
Quad
Circuit
5 & 9 Amp
Regulated
10&16
Amp
Regulated
90000
110000
Fig. 1
p. 4
120000
Fig. 3
p. 4
130000
Fig. 4
p. 5
Fig. 5
p. 5
170000
Fig. 6
p. 5
Fig. 8
p. 5
190000
Fig. 6
p. 5
Fig. 7
p. 6
Fig. 8
p. 5
Fig. 9
p. 6
Fig. 11
p. 7
Fig. 12
p. 7
220000
Fig. 6
p. 5
Fig. 7
p. 6
Fig. 8
p. 5
Fig. 9
p. 6
Fig. 12
p. 7
240000
Fig. 6
p. 5
Fig. 7
p. 6
Fig. 8
p. 5
Fig. 9
p. 6
Fig. 12
p. 7
250000
Fig. 6
p. 5
Fig. 7
p. 6
Fig. 8
p. 5
Fig. 9
p. 6
Fig. 10
p. 7
Fig. 11
p. 7
Fig. 12
p. 7
280000
Fig. 6
p. 5
Fig. 7
p. 6
Fig. 8
p. 5
Fig. 9
p. 6
Fig. 10
p. 7
Fig. 11
p. 7
Fig. 12
p. 7
320000
Fig. 6
p. 5
Fig. 7
p. 6
Fig. 8
p. 5
Fig. 9
p. 6
Fig. 11
p. 7
Fig. 12
p. 7
NOTE: All alternators are rated at 3600 RPM,
except Model Series 90000, 110000,
120000 which are rated at 2800 RPM.
Output is reduced as engine speed is
lowered.

IDENTIFICATION
Figs. 1 through 12 illustrate the different types of
alternator systems discussed in this section.
SYSTEM DESCRIPTIONS
System 3® and 4® Alternator
The DC alternator operates as an integral part of the
engine, separate from the starting and ignition
systems. It provides DC charging current to a 6 or 12
volt battery.
Two styles of stator have been used. The early style
was used before Date Code 84052300 on 6 volt
systems, Fig. 1.
The current style has been used since Date Code
84052200 on both 6 and 12 volt systems, Fig. 2.
• .5 Amps DC+ charging for battery
• One BLACK lead (1) from stator (3)• Full wave rectifier (2)
Fig. 1
• .5 Amps DC+ charging for battery
• One BLACK lead (1) from stator (3)
• WHITE connector output lead (4)
Fig. 2
1/2 AMP ALTERNATOR
Used on MODEL SERIES
121700-124700 (Fig. 3)
The 1/2 amp DC alternator is designed to operate as
an integral part of the engine and is separate from the
starting and ignition system. It is intended to provide
DC charging current for a 12 volt battery.
• .5 amps DC+ for charging battery
• One BLACK lead (1) from stator (3)
• WHITE connector output lead (4)
Fig. 3

1.2 AMP ALTERNATOR
Used on Model Series 130000
After Date Code 91032400 (Fig. 4)
The 1.2 amp DC alternator provides current for
charging a 12 volt battery. A12 ampere hour battery is
suggested for warm temperature operation and a 24
ampere hour for cold service.
• 1.2 amps DC+ for charging battery
• One BLACK lead (1) from stator (3)
• RED connector output lead (5)
Fig. 4
1-1/2 AMP ALTERNATOR
Used on Model Series 130000
Before Date Code 91032500 (Fig. 5)
The integral 1-1/2 amp alternator, with solid state
rectifier, is designed for use with a compact battery. A
12 ampere hour battery is suggested for warm
temperature operation and a 24 ampere hour for cold
service.
The alternator is rated at 3600 RPM. Output is reduced
at lower engine RPM.
• 1-1/2 amps DC+charging for battery
• Two RED leads (6) from stator (3)
• RED connector output lead (5)
Fig. 5
DC Only Alternator (Fig. 6)
The DC alternator provides DC current for charging a
12 volt battery. The current from the alternator is
unregulated and is rated at 3 amps at an engine speed
of 3600 RPM.
3 amps DC+ for charging battery
One RED lead (6) from stator (3)
Diode encased at connector
RED connector output lead (5)
FigTi
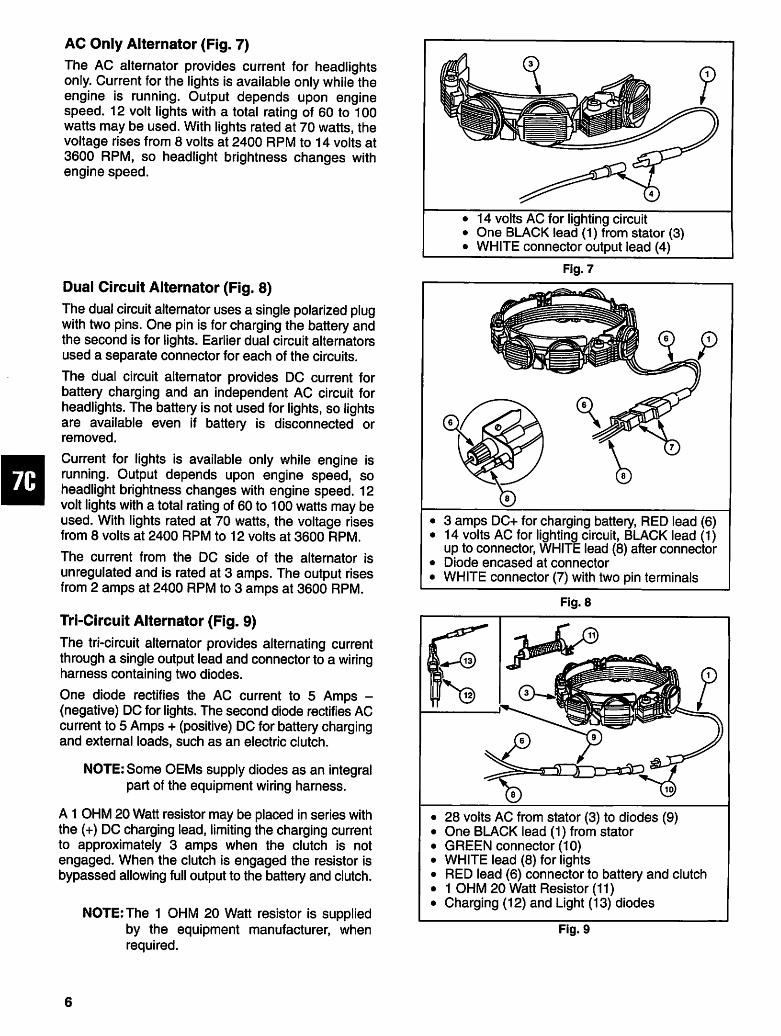
AC Only Alternator (Fig. 7)
The AC alternator provides current for headlights
only. Current for the lights is available only while the
engine is running. Output depends upon engine
speed. 12 volt lights with a total rating of 60 to 100
watts may be used. With lights rated at 70 watts, the
voltage rises from 8 volts at 2400 RPM to 14 volts at
3600 RPM, so headlight brightness changes with
engine speed.
Dual Circuit Alternator (Fig. 8)
The dual circuit alternator uses a single polarized plug
with two pins. One pin is for charging the battery and
the second is for lights. Earlier dual circuit alternators
used a separate connector for each of the circuits.
The dual circuit alternator provides DC current for
battery charging and an independent AC circuit for
headlights. The battery is not used for lights, so lights
are available even if battery is disconnected or
removed.
Current for lights is available only while engine is
running. Output depends upon engine speed, so
headlight brightness changes with engine speed. 12
volt lights with a total rating of 60 to 100 watts may be
used. With lights rated at 70 watts, the voltage rises
from 8 volts at 2400 RPM to 12 volts at 3600 RPM.
The current from the DC side of the alternator is
unregulated and is rated at 3 amps. The output rises
from 2 amps at 2400 RPM to 3 amps at 3600 RPM.
Tri-Circuit Alternator (Fig. 9)
The tri-circuit alternator provides alternating current
through a single output lead and connector to a wiring
harness containing two diodes.
One diode rectifies the AC current to 5 Amps -
(negative) DC for lights. The second diode rectifies AC
current to 5 Amps + (positive) DC for battery charging
and external loads, such as an electric clutch.
NOTE: Some OEMs supply diodes as an integral
part of the equipment wiring harness.
A 1 OHM 20 Watt resistor may be placed in series with
the (+) DC charging lead, limiting the charging current
to approximately 3 amps when the clutch is not
engaged. When the clutch is engaged the resistor is
bypassed allowing full output to the battery and clutch.
NOTE: The 1 OHM 20 Watt resistor is supplied
by the equipment manufacturer, when
required.
• 14 volts AC for lighting circuit• One BLACK lead (1) from stator (3)
• WHITE connector output lead (4)
Fig. 7
3 amps DC+ for charging battery, RED lead (6)
14 volts AC for lighting circuit, BLACK lead (1)up to connector, WHITE lead (8) after connector
Diode encased at connector
WHITE connector (7) with two pin terminals
Fig. 8
28 volts AC from stator (3) to diodes (9)
One BLACK lead (1) from stator
GREEN connector (10)
WHITE lead (8) for lights
RED lead (6) connector to battery and clutch
1 OHM 20 Watt Resistor (11)
Charging (12) and Light (13) diodes
Fig. 9

QuadCircuitAlternator(Fig.10)
ThequadcircuitalternatorsystemprovidesACcurrent
throughtwooutputleadstotheregulator-rectifier.The
regulator-rectifierconvertsACcurrenttoDCandprovidesunregulatedcurrent(5ampsDC-)forlighting
andregulatedcurrent(5ampsDC+)forchargingthe
battery.ThechargingratewillvarywithengineRPM
andtemperature.
NOTE:Thequadcircuitand10-16ampregulated
systemusethesamestator.
5&9AMPRegulatedAlternator(Fig.11)
The5&9ampregulatedalternatorsystemsprovide
ACcurrentthroughasingleleadtotheregulator-recti
fier.Theregulator-rectifierconvertstheACcurrentto
DC,andregulatescurrenttothebattery.Thecharging
ratewillvarywithengineRPM,batterystateofcharge,
andtemperature.
Alternatoroutput(5or9amp)isdeterminedbythe
flywheelalternatormagnetsize.Thestatorand
regulator-rectifierarethesameforthe5and9amp
system.
The5&9ampregulatedsystemandtheTri-Circuit
systemusethesamestator.
10&16AmpRegulatedAlternator(Fig.12)
The10&16ampregulatedalternatorsystemprovides
ACcurrentthroughtwooutputleadstotheregulator-
rectifier.Theregulator-rectifierconvertstheACcurrent
toDC,andregulatesthecurrenttothebattery.The
chargingratewillvarywithengineRPM,batterystate
ofcharge,andtemperature.
Alternatoroutput(10or16amp)isdeterminedby
flywheelalternatormagnetsize.Thestatorand
regulator-rectifierarethesameforthe10and16amp
system.
5ampsDC+regulatedforchargingbattery
5ampsDC-unregulatedforlights(Whitelead)TwoBLACKleads(3)fromstator(5)intoyellow
connector(4)
WHITEleadtolights(1)
REDleadtobattery(2)
Fig.10
5or9ampsDC+regulatedforchargingbattery
OneBLACKleadfromstator(1)
GREENconnector(2)fromstator
YELLOWlead(3)toregulator-rectifier
OneREDlead(4)fromregulator-rectifierwith
REDconnector
Fig.11
10or16ampsDC+regulatedforcharging
battery
TwoBLACKleads(4)fromstator(3)
YELLOWconnector(5)withtwopinterminals
TwoYELLOWleads(6)toregulator-rectifier
OneREDlead(2)fromregulator-rectifierto
REDconnectoroutputlead(1)
10and16ampsystemsusethesamestator,
colorcodingandregulator-rectifier(7)
Alternatoroutputisdeterminedbyflywheel
alternatormagnetsize
Fig.12

TROUBLESHOOTING
2.
4.
Battery Not Charging
a. Engine RPM too low
Defective battery
Loose or corroded battery ground leads
Open, shorted or grounded wires between output connector and battery
Defective diode (open or shorted)
Defective or improperly grounded regulator-rectifier
Diode installed incorrectly (reversed)
Excessive current draw from accessories
Low magnetic flux or damaged alternator magnets
Battery In State Of Overcharge
a. Severe battery vibration (missing or broken tie down straps)
Battery rate of charge not matched to alternator output
Damaged battery (shorted battery cells)
Defective regulator
One ohm resistor shorted or grounded (Tri-Circuit only)
Battery too small (Amp/Hour Rating)
b.
c.
d.
e.
f.
g-
h.
i.
3. Headlights Not Working
Inline fuse "blown" (if equipped)
Defective headlights
Loose or corroded wires
Open, shorted, or grounded wires between output connector and headlights
Defective diode (Tri-Circuit, open or shorted, white output lead side)
Low magnetic flux or damaged alternator magnets
Electric Clutch Not Working (Tri-Circuit)
a. Engine RPM too low
Inline fuse "blown" (if so equipped)
Loose or corroded wires
Open, shorted or grounded wires between output connector and electric clutch
Defective diode (open or shorted, red output lead side) NOTE: Battery will also not charge.Defective electric clutch switch
Open, shorted, or grounded clutch circuit
Low magnetic flux or damaged alternator magnets
a.
b.
c.
d.
e.
f.
b.
c.
d.
e.
f.
g-
h.
Equipment To Test Alternators
Digital Multimeter
The Digital Multimeter (DMM), Briggs & Stratton Tool
#19464, may be used to read volts, ohms or amperes,
and test diodes, Fig. 13.
NOTE: The DMM is equipped with two fuses to
prevent damage to the meter in the event
that the input limits are exceeded. If the
meter displays a reading of 0.00 when
testing DC output ( A= ), check fuses in
meter. Refer to FLUKE Operators Manual
for procedure for checking fuses.
Replacement fuses are available as
service part #19449.
FLUKEl
Fig. 13

DC Shunt
The DMM will withstand DC input of 10 to 20 Amps for
up to 30 seconds. When checking DC output on 16
Amp regulated system, use the DC shunt, Tool
#19359, Fig. 14, to avoid blowing fuse in meter.
Tachometer
Digital tachometer, Briggs & Stratton Tool #19389,
Fig. 15.
IMPORTANT NOTE: Check battery polarity.
Negative (-) side of battery should be
grounded to engine or frame; positive (+)
side of battery to starter motor and
alternator charge lead. If reversed, rectifier
and/or battery will be damaged.
Testing Alternator Output
Test Procedure Sequence:
1. Test alternator output.
2. Test diode(s) or regulator-rectifier (if equipped).
NOTE: All alternator output specifications are
rated at a specific RPM. Before testing
alternator output (volts, amps), first use an
accurate tachometer and temporarily
adjust engine speed to RPM specified in
test instructions.
System 3®, 4® and Dual Circuit Alternators
Alternator Output Test Procedures
Test DC Amp Output
1. Insert RED test lead (3) into 10 A receptacle in
meter.
Insert BLACK test lead (2) into COM receptacle in
meter.
2.
3.
4.
5.
Rotate selector to A= (DC amps) position.
Attach RED test clip to stator output lead (4),
Fig. 16 (Typical).
See Fig. 17 for Dual Circuit alternator. The RED
wire (5) is DC output. The bump on the connector
indicates the DC output terminal (6)
Attach BLACK test clip (2) to the positive (+)
battery terminal or charging harness lead (1).
Fig. 17

6.
7.
8.
With engine running at specified RPM, output
should be as listed in Table No. 2, Specifications.
If low or no output, check stator air gap, whenapplicable. See Table No. 2, Specifications.
If stator air gap is within specification and there islow or no output, replace stator.
Test AC Voltage Output
Procedures are common to all systems withexceptions noted below.
Temporarily disconnect stator wire harness fromregulator-rectifier. (5 & 9 amp Regulated Alternator)
1. Insert RED test lead (3) into VQ-W- receptacle inmeter.
2. Insert BLACK test (1) lead into COM receptacle inmeter.
3. Rotate selector to V~ (AC volts) position.
4. Attach RED test lead clip to AC output terminal (2),Fig. 18, Typical.
See Fig. 19 for Dual Circuit alternator.
5. The BLACK wire (1) is AC output. Connect the
RED lead (2) to the output lead or AC outputterminal (4).
Ground the BLACK lead (4) to the engine.
The bump on the connector indicates the ACoutput terminal (6)
a. (Quad Circuit and 10 & 16 amp Regulated
Alternators) Insert RED (2) and BLACK (3)
test lead probes into output terminals in yellow
connector (6), as shown in Fig. 20. (Meter test
clip leads may be attached to either terminal.)
6. Attach BLACK test lead clip to engine ground.
7. With engine running at 3600 RPM, AC output
should be as listed in Table No. 3, Specifications.
8. If no or low output is found, check for bare wires or
any other obvious defects. If "shorted" leads arenot visible, replace the stator.
9. If alternator output is good, test diodes located in
wiring harness. (Tri Circuit Alternator)
Fig. 20
10

Stator Air Gap Adjustment (Typical)
See Table No. 2, Specifications, if applicable.
1. Rotate flywheel until magnets are away from
stator.
2. Loosen both stator mounting nuts and move stator
away from flywheel and tighten one nut.
3. Place a .006" (.17 mm) or .010" (.25 mm) thick
gauge (7), depending on application, between
stator and flywheel.
4. Turn flywheel until magnets are under stator.
Loosen nut and let stator be pulled against
flywheel magnet.
5. Torque mounting nuts to 25 in. lbs. (3 Nm).
6. Turn flywheel to remove gauge, Fig. 21.
Replace Defective Stator
1-1/2 Amp Alternator
Used on Model Series 130000
Before Date Code 91032500
1. Remove the blower housing, rotating screen,
rewind clutch and flywheel (1).
Note: Location of stator wires: under one coil
spool and between starter and starter drive
housing as shown in Fig. 22.
2. Remove ground wire (5) or rectifier assembly (3,
early style) from starter drive housing.
3. Remove the two stator mounting screws (2) and
bushings.
4. Install new stator assembly (4) with stator
mounting screws and bushings. Be sure leads (7)
are properly positioned as shown in Fig. 23.
5. While tightening mounting screws (2), push stator
toward crankshaft to take up clearance in
bushings (6).
6. Torque mounting screws to 20 in. lbs. (2 Nm).
7. Before re-assembly, locate stator wires against
cylinder in order to clear ring gear and flywheel.
8. Attach ground wire or rectifier assembly (early
style) to drive housing.
9. Replace flywheel and torque rewind clutch as
noted on specification chart.
10. Reassemble rotating screen and blower housing.
Fig. 22
Fig. 23
11

Rectifier (Diode) Test
Note: In the Diode Test position, the DMM will
display the forward voltage drop across the
diode(s) in the rectifier. If the voltage drop
is less than 0.7 volts, the meter will "Beep"
once as well as display the voltage drop. A
continuous tone indicates continuity
(shorted diode). An incomplete circuit
(open diode) will be displayed as "OL"
1-1/2 Amp Alternator
Used on Model Series 130000
Before Date Code 91032500
1.
2.
Insert RED test lead (1) into VO-W- receptacle inmeter.
Insert BLACK test lead (2) into COM receptacle inmeter.
3. Rotate selector to -W- •»»))) (Diode Test) position.
4. Attach BLACK test lead clip to output terminal.
Leave BLACK test lead attached through Step 6,below.
5. Pierce one output wire with a pin and touch RED
test lead probe to pin as shown in Fig. 24, Typical.
a. Meter should "Beep."
b. If meter makes a continuous tone or displays"OL" rectifier is defective. Replace.
6. Repeat test with other output wire.
a. Meter should "Beep."
b. If meter makes a continuous tone or displays"OL" rectifier is defective. Replace.
7. Attach RED test lead clip to a clean unpainted area
on engine (good ground). Leave RED test lead clip
attached for remainder of test.
8. Pierce one stator output wire with a pin and touch
BLACK test lead probe to pin.
a. Meter should "Beep."
b. If meter makes a continuous tone or displays
"OL" rectifier is defective. Replace.
9. Repeat test with other stator output wire.
a. Meter should "Beep."
b. If meter makes a continuous tone or displays
"OL" rectifier is defective. Replace.
10. If rectifier tests OK, replace stator and re-test DCoutput.
Fig. 24
12

DC Only Alternator Test
Test procedures for both systems are identical.
1. Insert RED test lead (1) into V 0 -W- receptacle in
meter.
2. Insert BLACK test lead (2) into COM receptacle in
meter.
3. Rotate selector to-W- "»)))) (Diode Test) position.
4. Attach RED test lead clip to point "A" and Black test
lead clip to point "B," Fig. 25 (DC Only), Fig. 26(Dual Circuit). (It may be necessary to pierce the
red (3) wire with a pin as shown.)
a. If meter "Beeps" once, diode is OK.
b. If meter makes a continuous tone, diode is
defective (shorted).
c. If meter displays "OL," proceed to step 5.
5. Reverse test leads.
a. If meter "Beeps" once, diode is installed
backwards.
b. If meter still displays "OL," diode is defective
(open).
6. If diode tests OK, replace the stator.
NOTE: Service replacement diode harnesses are
available. Use Rosin Core solder when
installing new harness. Use shrink tubing
or tape for all connections. DO NOT USE
CRIMP CONNECTORS.
Tri-Circuit Alternator Test
NOTE: One diode is for the charging circuit and the
other diode is for the lighting circuit.
Charging Circuit (Red Wire B+)
Lighting Circuit (White Wire B-)
Procedures are identical except for steps 4 and 5
(see text).
1. Insert RED test lead into V 0 -H- receptacle in
meter.
2. Insert BLACK test lead into COM receptacle in
meter.
3. Rotate selector to~W- ■»))))) (Diode Test) position.
4. Charging Circuit (Red Wire B+) Attach BLACK
test lead (2) clip to point "A," Fig. 27. (It may be
necessary to pierce red wire (3) with a pin as
shown.) Insert RED test lead (1) probe into
harness connector.
Fig. 26
Fig. 27
13

a.
b.
c.
5. Lighting Circuit (White Wire B-) Attach RED test
lead (1) clip to point "A," Fig. 28. (It may be
necessary to pierce white wire (4) with a pin as
shown.) Insert BLACK test lead (2) probe intoharness connector.
If meter "Beeps" once, diode is OK.
If meter makes a continuous tone, diode isdefective (shorted). Replace.
If meter displays "OL," proceed to step 6.
6. Reverse test leads.
a. If meter "Beeps" once, diode is installed backwards.
b. If meter still displays "OL," diode is defective(open). Replace.
Quad Circuit Alternator
Test Charging Circuit (DC+)
NOTE: Regulator-rectifier will not function unless
it is grounded to engine. Make sure the
regulator-rectifier is securely mounted to
engine.
When testing regulator-rectifier for amperage output a
12 volt battery with a minimum charge of 5 volts is
required. There will be no charging output if batteryvoltage is below 5 volts.
NOTE: Connect test leads securely before starting
engine. If a test lead vibrates loose while
engine is running, regulator-rectifier maybe damaged.
Insert RED test lead into 10 A receptacle in meter.
Inset BLACK test lead into COM receptacle inmeter.
Rotate selector to A— (DC amps) position.
4. Attach RED test lead (1) clip to charging output pin(3, red wire), Fig. 29.
Attach BLACK test lead (2) clip to positive (+)battery terminal.
With engine running at 3600 RPM output should
be 3 to 5 amps. Amperage will vary with battery
voltage. A fully charged battery will show lessamperage.
If no output or low output is found, replace
regulator-rectifier.
1.
2.
3.
5.
6.
7.
Fig. 28
Fig. 29
14

Test Lighting Circuit (DC-)
The black wire from the regulator-rectifier provides 5
amps (-) DC and is used only for lighting. If the
headlights do not operate, first check bulbs, wiring
and/or light switch. To test lighting circuit requires a 1OHM 20 Watt resistor (4, available from an electrical
supply house) and a test harness (5, made from
393362) shown in Fig. 30.
1. Insert RED test lead (1) into 10 A receptacle in
meter.
2. Inset BLACK test lead (2) into COM receptacle in
meter.
3. Rotate selector to A= (DC amps) position.
4. Connect test harness (5) to output connector and
attach alligator clips to 1 ohm 20 watt resistor (4)
as shown in Fig. 31.
5. Attach RED test lead clip to resistor, and BLACK
test lead clip to positive (+) battery terminal.
6. With engine running at 3600 RPM output on the
meter should be approximately 8 amps.
7. If no output or low output is found, replace the
regulator-rectifier (6).
CAUTION
The resistor will become hot during
this test procedure, conduct test
quickly.
Severe thermal burns can occur on
contact.
5 & 9 AMP Regulated Alternator
Testing Regulator-Rectifier
NOTE: Regulator-rectifier will not function unless
it is grounded to engine. Make sure the
regulator-rectifier is securely mounted to
engine.
When testing regulator-rectifier for amperage output, a
12 volt battery with a minimum charge of 5 volts is
required. There will be no charging output if battery
voltage is below 5 volts.
NOTE: Connect test leads securely before starting
engine. If a test lead vibrates loose while
engine is running, the regulator-rectifier
may be damaged.
1. Insert RED test lead (1) into 10 A receptacle in
meter.
2. Insert BLACK test lead (2) into COM receptacle in
meter.
3. Rotate selector to A= (DC amps) position.
Fig. 31
15

5.
6.
7.
4. Attach RED test lead clip to DC output terminal on
the red output connector on the regulator-rectifier(3), Fig. 32.
Attach BLACK test lead clip to positive (+) batteryterminal.
With the engine running at 3600 RPM. The outputshould be:
* 3-5 Amps - 5 Amp System
* 3-9 Amps - 9 Amp System
Depending upon battery voltage. A fully chargedbattery will show less amperage.
If no output or low output is found, replace the regulator-rectifier.
10 & 16 Amp Regulated Alternator
Test Regulator-Rectifier
NOTE: The DMM will withstand DC input of 10 to
20 Amps for up to 30 seconds. When
checking DC output of 16 Amp regulated
system, use DC Shunt, Tool #19359, to
avoid blowing fuse in meter. See special
instructions for installation procedure on
16 Amp system.
NOTE: Regulator-rectifier will not function unless
it is grounded to engine. Make sure the
regulator-rectifier is securely mounted toengine.
When testing regulator-rectifier for amperage output, a12 volt battery with a minimum charge of 5 volts isrequired. There will be no charging output if batteryvoltage is below 5 volts.
NOTE: Connect test leads securely before starting
engine. If a test lead vibrates loose while
engine is running, the regulator-rectifiermay be damaged.
Testing Regulator-Rectifier
10 Amp System
1. Insert RED test lead (1) into 10 A receptacle inmeter.
Insert BLACK test lead (2) into COM receptacle inmeter.
Rotate selector to A= (DC amps) position.
Attach RED test lead clip to DC output terminal onregulator-rectifier (3), Fig. 33.
Attach BLACK test lead clip to positive (+) batteryterminal.
With the engine running at 3600 RPM. The outputshould be:
* 3-10 Amps -10 Amp System
* Depending upon battery voltage. A fully chargedbattery will show less amperage.
7. If no output or low output is found, replace theregulator-rectifier.
2.
3.
4.
5.
6.
Fig. 32
Fig. 33
16

16 Amp System
To avoid blowing fuse in meter when testing DC output
of 16 Amp system the DC Shunt, Tool #19359 (3) is
required.
The DC Shunt must be installed on the - (negative)
terminal of the battery, Fig. 34. All connections must be
clean and secure.
1. Install shunt on negative battery terminal.
2. Insert RED test lead (1) into VO-H- receptacle in
meter and connect to RED post terminal on shunt,
Fig. 34.
3. Insert BLACK test lead (2) into COM receptacle in
meter and connect to BLACK post terminal on
shunt.
4. Rotate selector to 300mV = position.
5. Attach RED test lead clip to DC output terminal on
regulator-rectifier, Fig. 34.
6. With the engine running at 3600 RPM. The output
should be:
* 3-16 Amps -16 Amp System
* Depending upon battery voltage. A fully charged
battery will show less amperage.
7. If no output or low output is found, replace the
regulator-rectifier.
Replacing Rectifier
1-1/2 Amp Alternator
Used on Model Series 130000
Before Date Code 91032500
NOTE: Early style rectifier box is replaced by
rectifier harness shown in Fig. 35.
1. Cut stator wires close to rectifier so that stator
wires remain as long as possible.
2. Discard old rectifier.
3. Strip insulation back 3/8" (9.5 mm) from stator
wires.
NOTE: Replacement rectifier has two exposed
wires which are already stripped of
insulation.
4. Twist and solder each stator wire to a rectifier wire.
5. Insulate each connection with electrical friction
tape or shrink tubing. Keep connected areas as
compact as possible.
6. Attach ground wire to drive housing using original
rectifier mounting screw, Fig. 22.
Fig. 34
Fig. 35
17

Suggested Wiring Diagrams
Components for typical starting systems are listedbelow:
1. 12 Volt Battery
2. Starter Motor
3. Solenoid
4. Ignition Switch
5. Upper Stator
6. Lower Stator
7. Anti-Afterfire Solenoid
8. Ammeter
9. Diode
10. Oil Gard® Float
11. Oil Gard® Module
12. Ignition Armature
13. Spark Plug
14. Alternator
15. Regulator Rectifier
16. Wire - Black/White Tracer
17. Wire - Yellow/Green Tracer
18. Wire - Red/White Tracer
19. Wire-Black
20. Wire - Yellow
21. Wire - Red
22. Wire - Green
23. Wire - Yellow
24. Wire - Red/Black Tracer
25. Wire - AC Output
26. Wire - DC Output
27. Headlights
28. Headlight Switch
29. Charge Indicator Light
30. Wire - Blue
31. Electric Clutch
32. Clutch Switch
33. Resistor
The following wiring diagrams are recommended waysof wiring either five or six terminal ignition switchessupplied by Briggs & Stratton.
Fig. 36 - Typical Dual Circuit Alternator Wiring Diagram
5 Terminal Switch
Fig. 37 - Typical Dual Circuit Alternator Wiring Diagram
6 Terminal Switch
Fig. 38 -Typical 5/9 amp Regulated Alternator WiringDiagram
6 Terminal Switch
Fig. 39 - Typical 16 amp Regulated Alternator WiringDiagram
5 Terminal Switch
Fig. 40 - Typical 16 amp Regulated Alternator WiringDiagram
6 Terminal Switch
Fig. 41 - Typical 16 amp Regulated Alternator WiringDiagram
With Charge Indicator Light and 6 Terminal Switch
Fig. 42 - Typical Tri-Circuit Alternator Wiring Diagram6 Terminal Switch
Fig. 43 - Typical Tri-Circuit Alternator Wiring DiagramWith Resistor and 5 Terminal Switch
Fig. 44 - Typical Tri-Circuit Alternator Wiring DiagramWith Resistor and 6 Terminal Switch
18

SPECIFICATIONS
The following wiring diagrams are recommended ways of wiring either five (5) or six (6) terminal ignition switches
supplied by Briggs & Stratton.
19
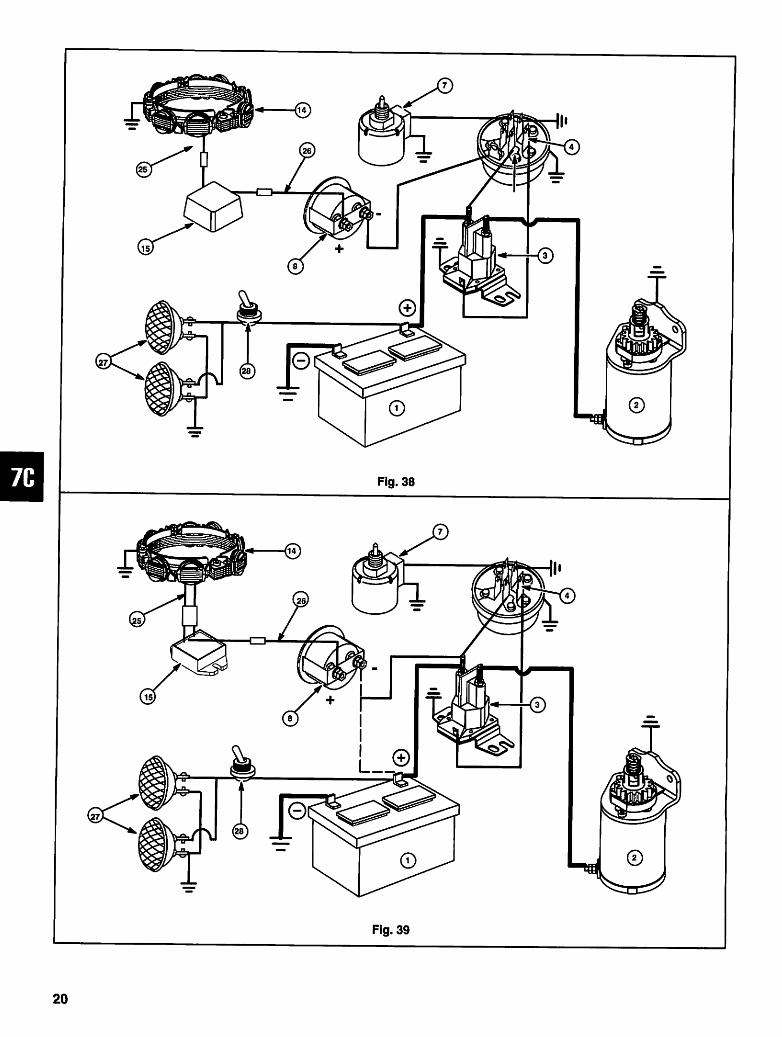

vz


m

TABLE NO. 2
Alternator DC Output and Stator Air Gap
(Where Applicable)
System 3® and 4® Alternator
Output: No less than .5 amp DC @2800 RPM.
Stator Air Gap: .010" (.25 mm), (current styleonly).
1/2 Amp Alternator
Model Series 121700 -124700
Output: No less than .5 amp DC @2800 RPM.
Stator Air Gap: .006" - .008" (.15 - .20 mm), (current style only)
1.2 Amp Alternator
Model Series 130000 - After Date Code
91032400
Output: No less than 1 amp DC @3600 RPM.
Output will vary with battery voltage.
At maximum battery voltage, output will be approximately 1 amp.
1-1/2 Amp Alternator
Model Series 130000 - Before Date Code
91032500
Output: No less than 1.2 amps DC @3600 RPM.
DC Only Alternator and Dual Circuit Alternator
Output: Between 2 to 4 amps DC @3600 RPM.
Output will vary with battery voltage. At maximum
battery voltage, output should be approximately 2amps.
TABLE NO. 3
Alternator AC Output
AC Only Alternator and
Dual Circuit Alternator
Output: No less than 14 volts AC @3600 RPM.
Tri-Circuit Alternator
Output: No less than 28 volts AC @3600 RPM,
Quad Circuit Alternator
Output: No less than 20 volts AC ©3600 RPM.
5 & 9 Amp Regulated Alternator
Output: No less than 28 Volts AC - 5 Amp
System @3600 RPM
40 Volts AC - 9 Amp System
10 & 16 Amp Regulated Alternator
Output: No less than 20 Volts -10 Amp System @3600 RPM
30 Volts -16 Amp System
NOTE: If alternator output test indicates a 16
Amp system, see special instructions for
testing regulator-rectifier.
24

SECTION 8
Lubrication
Section Contents
Page
BREATHER
Check 3EXTENDED OIL FILL AND DIPSTICKS 3
GEAR REDUCTIONS
Check Oil, Aluminum Engines
6 to 1 Gear Reduction, Model Series 60000, 80000,100200,130000 2
6 to 1 Gear Reduction, Model Series 170000,190000,221400 2
Check Oil, Cast Iron Engines
Model Series 233400, 243400 2
LUBRICATION SYSTEMS4
Dippers
Oil Slingers 5
OIL
Capacity
Change See Page 4, Section 1Recommendations See Page 5, Section 1
Viscosity Grades See Page 3, Section 1
OIL GARD®
Principles of Operation
Float Type
Spark Gap Type
Troubleshooting
Float Type
Spark Type

1.
2.
Oil capacities are listed in the OIL CAPACITY CHART,Specifications, Page 8 of this section.
NOTE: Always refill to full mark on dipstick.
GEAR REDUCTION UNITS
Change Oil, Aluminum Engines
(6 to 1 Gear Reduction Models)
Model Series 60000, 80000,
100200,130000
Every one hundred (100) hours of operation:
Remove oil level plug (3) and oil fill plug (1), Fig. 1.
Loosen four screws holding gear case cover todrain oil.
3. Retighten cover screws to 85 in. lbs. (10 Nm)torque.
4. Refill gear case with same oil as used in engine
crankcase. Refer to Section 1 for recommended
oil service specifications and viscosity.
5. Pour oil into filler hole until oil runs out of oil levelcheck hole.
6. Replace both plugs making sure oil fill plug with
vent hole (2) is installed in top hole, Fig. 1.
Model Series 170000,190000, 220000
Every one hundred (100) hours of operation:
1. Remove drain plug (4) in bottom of gear casecover and drain oil, Fig. 2.
2. Replace plug.
3. To refill, remove oil check plug (3) and oil fill plug
(1) and pour oil into filler hole until it runs out level
check hole. Refer to Section 1 for recommended
oil service specifications and viscosity.
4. Replace both plugs, making sure oil fill plug with
vent hole (2) is installed in top hole, Fig. 2.
Change Oil, Cast Iron Engines
(6 to 1 Gear Reduction Models)
Model Series 230000, 240000
The reduction gears are lubricated by engine crank-case oil. Remove drain plug (4) from gear case cover to
drain oil remaining in gear case when changing engineoil, Fig. 3.
Fig. 1
Fig. 2
Fig. 3

EXTENDED OIL FILL TUBE AND DIPSTICK
1 When installing the extended oil fill tube (1) and
dipstick assembly, the tube must be installed so
the "O" ring seal (2) is firmly compressed.
Push the tube downward toward the sump, then
tighten blower housing screw, securing the tube
and bracket.
3. When the cap and dipstick assembly is fully
seated, it seals the upper end of the tube, Fig. 4.
A faulty seal at either end of the dipstick tube can result
in a loss of crankcase vacuum, and smoke discharge
through the muffler.
DO NOT overfill the sump or crankcase with oil. Fill
only to mark indicated on dipstick. Excessive oil will
cause a smoking condition, as the engine attempts to
discharge the surplus oil.
BREATHER
The breather's function is to maintain crankcase
vacuum. It has a one way fiber disc valve, limiting the
direction of air flow caused by the piston moving back
and forth. It allows air to flow out of the crankcase, but
blocks the return flow, maintaining a vacuum in the
crankcase.
A partial vacuum must be maintained in the crankcase
to prevent oil from being forced out of engine at the
piston rings, oil seals, breaker plunger (if so equipped)
and gaskets.
Checking Breathers
If the fiber disc valve (2) is stuck or binding, the
breather cannot function properly and must be re
placed. Be sure the vent holes (1) are open. A .045"
(1.14 mm) wire (3) should not enter the space between
the fiber disc valve and body. (A wire spark plug gap
gauge may be used.) Check as shown in Fig. 5.
NOTE: The fiber disc valve is held in place by an
internal bracket which will be distorted if
pressure is applied to the fiber disc valve.
Use caution when checking gap.
If breather is removed for inspection or valve repair, a
new gasket should be used in reassembly. Tighten
screws securely to prevent oil leakage.
Most breathers are vented through the air cleaner, to
prevent dirt from entering the crankcase. Inspect
venting elbows or tube for damage and effective
sealing. Various breather assemblies (4) are illustrated
in Fig. 6.
Fig. 4
Fig. 6

LUBRICATION SYSTEMS
Splash Lubrication
Aluminum Alloy and Cast Iron Engines
In this system the dipper, attached to the connecting
rod, dips into the engine oil during rotation, splashing
oil on all moving parts. There is no oil pump. Install
connecting rod and dipper by engine model series asshown in Section 9.
Typical styles of dipper (5) are shown in Figures 7-11
Fig. 7, Aluminum Model Series 60000
Fig. 8, Aluminum Model Series 80000, 9K400,
111000, 112000, 120000, 190000, 19K400, 220000,250000
Fig. 9, Aluminum Model Series 100200, 130000,135400,13K400, 170000
Fig. 10, Early Cast Iron Model Series 230000, dipper ispart of connecting rod cap.
Fig. 11, Cast Iron Model Series 230000, 240000,
300000, 320000, 32K400
Fig. 7
Fig. 8 Fig. 9
Fig. 10 Fig. 11

Slinger Lubrication, Oil Slinger Aluminum
Alloy Engines
The oil slinger (2) is driven by the cam gear (1) and
splashes oil on all moving engine parts.
Early style slingers, Fig. 12. Illus. 1, using a die cast
bracket assembly have a steel bushing between the
slinger and the bracket. Replace bracket on which the
oil slinger rides if worn to a diameter of .490" (12.4 mm)
or less. Replace steel bushing if worn.
Current style oil slingers, Fig. 12. Illus. 2 and Fig. 13
(vertical crankshaft engines) have a stamped steel
bracket. Unit is a one piece assembly. Spring washer is
used only on Model Series 100900,130900. Inspect
gear teeth, both styles and replace if worn.
NOTE:On Model Series 130700,130900,131700,
132900 equipped with right angle drive
P.T.O. DO NOT USE SPRING WASHER on
oil slinger bracket.
OIL GARD®
Some models of Briggs & Stratton engines are
equipped with Oil Gard®, a low oil shut-off systemdesigned to prevent engine damage before the engine
becomes damaged by running with insufficient oil.
Two types of Oil Gard® have been used; float operated
type, Fig. 14 and spark gap type, Fig. 15.
Principles of Operation, Float Type
This Oil Gard® system uses a float to operate amagnetic switch, depending on oil level in engine
crankcase. When oil level is at correct level, the float
rises, opening the magnetic switch (1), Illustration 1.
When oil level drops below a minimum level, the float
drops, causing the magnetic switch to close (2),
Illustration 2.
When this happens,
1. The ignition primary current will cause the warning
light (3, when equipped) to flash.
2. The engine will stop.
The engine cannot be restarted until the oil level is
restored to correct level opening switch contacts,
Fig. 14. Fig. 14

Principles of Operation, Spark Gap Type
This Oil Gard® system uses an oil level sensor with aspark gap connected to a high tension lead from the
ignition armature (1). When oil is the correct level, the
spark gap (2) is filled with oil and a spark will not jump
the gap.
When oil level drops to the point where the spark gap is
exposed to air in the crankcase, the resistance of the
gap is lower than the spark plug (3) gap and spark will
fire across the Oil Gard® sensor instead of the sparkplug, stopping the engine. The engine cannot be
restarted until the oil level is returned to normal,
Fig. 15.
TROUBLESHOOTING OIL GARD® SYSTEMS
Troubleshooting an Oil Gard® system need not becomplicated or time-consuming. A basic understand
ing of how the Oil Gard® switch and its components
function is all that is needed in order to locate the
problem or the cause of failure with this low-oil warning
system. If a problem occurs, review the principle of
operation, Figs. 16 and 17.
USE THE CHARTS AND ILLUSTRATIONS TO
ASSIST IN TROUBLESHOOTING PROBLEMS
WHICH COULD OCCUR WITH THE LOW-OIL
WARNING SYSTEM .. .OIL GARD®. The chart liststhe failures that are most likely to occur first, with Fig. 16
references given by letter designation on the
illustration.
The table below lists possible problems with the probable cause and cure. Refer to Fig. 16.
PROBLEM
No Spark
No Spark - Correct Amount of
Oil in Crankcase
Spark Present- Low on Oil
Intermittent Spark
LETTER
A
B
C
D
E
F
C
D
C
CAUSE
Low Oil in Crankcase
Excessive Angle of Operation
Defective Oil Gard® Sensor
Stop Wire Grounded
Defective Magnetron® Armature
Defective Ground Wire
Defective Oil Gard® Sensor
Stop Wire Grounded
Defective Oil Gard® Sensor
CURE
Refill With Oil
Reduce Angle of Operation
Replace Sensor
Repair or Replace Wire
Replace Armature
Repair or Replace Wire
Replace Sensor
Repair or Replace Wire
Replace Sensor

Fig. 17
The table below lists possible problems with the probable cause and cure. Refer to Fig. 17.
PROBLEM
No Spark - Light Flashes,
(when equipped)
No Spark - Light (when
equipped) Does Not Flash -
Correct Amount of Oil in
Crankcase
Spark Present - Light (when
equipped) Does Not Flash -
Low on Oil
Intermittent Spark
No Spark - Light (when
equipped) Does Not Flash -
Low on Oil
LETTER
A
B
C
D
E
F
G
H
C
DorE
C
H
lorJ
CAUSE
Low Oil in Crankcase
Excessive Angle of Operation
Defective Oil Gard® Switch
Wiring Harness Grounded
Stop Wire Grounded
Defective Magnetron®Armature
Defective Light or Harness
Oil Gard® Switch Wire NotMaking Ground
Defective Oil Gard® Switch
Grounded Stop Wire or
Harness
Defective Oil Gard® Switch
Oil Gard® Switch Wire Not
Making Ground
Wiring Harness Connections
Reversed
CURE
Refill With Oil
Reduce Angle of Operation
Replace Switch
Repair or Replace Wiring
Harness
Repair or Replace Wire
Replace Armature
Replace Light
Adjust Wire
Replace
Repair or Replace Wire or
Harness
Replace Switch
Adjust Switch Wire
Reverse Connections

OIL CAPACITY CHART
Basic Model
Series
Capacity
Ounces (Liters)
Vertical Crankshaft Aluminum Cylinders
60000, 80000, 90000,10A900, 10B900,10C900,
100700,110000, 120000
100900,130000
170000,190000
220000, 250000, 280000
21
(.6)
28
(.8)
36
(1.1)
48
(1.4)
Horizontal Crankshaft Aluminum Cylinders
60000, 80000, 90000, 100200, 130000
170000,190000
220000, 250000
21
(6)
44
(1.3)
40
(1.2)
Horizontal Crankshaft Cast Iron Cylinders
230000, 240000, 300000, 32000064
(1.9)
8

SECTION 9
Pistons - Rings - Rods
Section Contents
Page
PISTONS
Remove 2
Check 3
Check Piston Ring Land Wear 3
Assemble 3
Install in Cylinder 5
PISTON PINS
Piston Pin Reject Sizes, Table No. 3 8
RINGS
Remove 3
Check Piston Ring End Gaps 3
Ring End Gap Reject Size, Table No. 1 8
Install 4
CONNECTING RODS
Remove 2Connecting Rod Reject Size, Table No. 2 8
Assemble 3
Connecting Rod Screw Torque, Table No. 4 8
Install in Cylinder 5
NOTE: SPECIFICATION TABLES BEGIN ON PAGE 8 OF THIS SECTION.

Remove Piston and Connecting Rod
1. Bend down rod bolt lock (1), when used, Fig. 1.
Connecting rods without rod bolt locks use one or
two thin washers, or washer-head bolts. On con
necting rods with dippers held by both connecting
rod bolts, no washers or rod bolt locks are used.
Remove connecting rod cap (2).
Remove any carbon or ridge at top of cylinder bore
to prevent ring breakage on cast iron sleeves or
cast iron cylinders. The ridge does not have to be
removed on aluminum cylinder bores.
Push piston and rod out through top of cylinder.
2.
3.
4.
NOTE: All pistons have oil drain slots or drilled
holes in the oil control ring groove except
for Model Series 120000 pistons, which
use drain slots in the ring lands.
NOTE: Pistons used in CAST IRON SLEEVE
BORE aluminum alloy engines CANNOT
BE USED in Kool Bore™ (aluminum bore)
engines. Pistons used in Kool Bore™ (alu
minum bore) engines are chrome plated.
These chrome plated pistons CANNOT
BE USED in SLEEVE BORE engines.
5. Use "Illustrated Parts Lists" to determine which
pistons to use based on Model, Type and Code.
Remove Connecting Rod
All Model Series Except Current Model
Series 170000,190000,220000, 250000,
280000
Some pistons use a piston pin with one end flat and the
other end recessed. All other pistons use a hollow
piston pin. Some pistons use two piston pin locks while
other pistons use one piston pin lock and a piston pin
stop in the piston.
1. Remove a piston pin lock (1) with needle nose
pliers (2). One end of the pin (3) is recessed (4) to
facilitate removal of the lock, Fig. 2.
2. Push piston pin out from other side.
Current Model Series 170000,190000,
220000, 250000, 280000
1. Rotate piston pin retainer (5) until one end is
exposed in notch in piston pin bore (6), Fig. 3.
2. Grasp end of piston pin retainer with needle nose
pliers, pull in and up to remove retainer.
3. Push piston pin out from other side.
Fig. 1
Fig. 2
Fig. 3
NOTE: SPECIFICATION TABLES BEGIN ON PAGE 8 OF THIS SECTION.

Remove Piston Rings
Remove piston rings using Piston Ring Expander Tool,
#19340, Fig. 4.
NOTE: Some oil control rings consist of two thin
steel rails and a spring expander. These
steel rails cannot be removed with Piston
Ring Expander, Tool #19340. Grasp one
end of the steel rail and wind the rail from
the oil ring groove into the next ring groove.
Repeat as necessary to remove from
piston.
Check Piston
If cylinder is to be resized, a new oversized piston
assembly will be used.
If cylinder will not be resized, inspect piston for signs of
wear or scoring. If condition is acceptable, check ring
land wear.
Check Piston Ring Land Wear
1. Clean carbon from top ring groove.
2. Place a NEW ring in the groove and measure the
space between the ring and the ring land (1). If a
.007" (.18 mm) thick feeler gauge, Model Series
60000 through 130000, or .009" (.23 mm) thick
feeler gauge, Model Series 170000 through
320000, can be inserted, the piston is worn and
should be replaced, Fig. 5.
Check Piston Ring End Gaps
1. Clean all carbon from the ends of the old piston
rings (2) and from the cylinder bore.
2. Insert rings one at a time 1" (25.4 mm) down into
the cylinder.
3. Check gap with feeler gauge (3), Fig. 6. If ring gap
(4) is greater than shown in Table No. 1, Page 8,
the ring should be rejected.
Connecting Rod and Piston Pin
Rejection sizes of crankpin bearing hole and piston pin
bearing hole are shown in Table No. 2, Page 8. If the
piston pin is worn .0005" (.01 mm) out of round or
below the rejection sizes listed in Table No. 3, Page 8,
it should be replaced. Piston pins .005" (.13 mm)
oversize are available in case the connecting rod and
piston are worn at the piston pin bearing. If the crankpin
bearing in the rod is scored or worn, the rod must be
replaced. Do not attempt to "file" or "fit" the rod.
Assemble Piston, Pin and Connecting Rod
Piston pins are slip-fit in the piston and connecting rod.
Some pistons use a piston pin with one end flat and the
other end drilled. All other pistons use a hollow piston
pin. Some pistons use two piston pin locks while other
pistons use one piston pin lock and a piston pin stop in
the piston.
Fig. 4
Fig. 5
Fig. 6
NOTE: SPECIFICATION TABLES BEGIN ON PAGE 8 OF THIS SECTION.

Piston Without Notch on Head
1. Install one pin lock in piston pin bore groove. (If
bore is grooved for two locks.)
2. Place rod inside piston and slide piston pin into
piston from side opposite lock or piston pin stop
then through piston and rod until pin seats on lock
or stop. Install (remaining) pin lock.
Piston With Notch on Head
The notch on the piston faces the magneto side of the
engine.
1. On pistons except Model Series 300000, 320000,
install one pin lock in bore groove opposite notch
(1). Place rod in piston with offset rod cap to left
side of piston, Fig. 7. Push piston pin from notch
side of piston through piston and rod until pin seats
on lock. Install second piston pin lock, (when
used).
2. Model Series 300000, 320000 have a notch (1)
and letter "P on the piston. Install pin lock (2) in pin
bore groove opposite the notch and letter "R"
Place rod in piston with assembly marks (3) on
same side as notch and letter "P. Install pin
through piston and rod until pin seats on lock.
Install second lock, Fig. 8.
NOTE: The top ring (4) and center ring (6) are the
same. Both rings use marks (5) to identify
the top of the rings.
Install Piston Rings
Install the oil control ring first, then the center
compression ring. Install the top compression ring last,
as shown in Fig. 9 and Fig. 10. Use Piston Ring
Expander, Tool #19340. Install expander under oil
control ring, when equipped. Typical piston ring cross
section for aluminum bore engines, Fig. 9.
Fig. 7
Fig. 8
Fig. 9
NOTE: SPECIFICATION TABLES BEGIN ON PAGE 8 OF THIS SECTION.

Typical piston ring cross section for cast iron sleeve
and cast iron bore engines, Fig. 10.
NOTE: Some compression rings have an iden
tifying dot on the top of the ring. Always
install ring(s) with dot facing top of piston.
NOTE: On oil rings that use two thin steel rails and
spring expander, install expander first.
Twist one steel rail at a time down from one
ring groove to the next and onto the
expander.
Install Piston and Rod Assembly in Cylinder
NOTE: See section 11 for additional information
regarding rings, cylinder honing and/or
resizing prior to reassembly.
Fit Ring Compressor to Piston Assembly
1. Oil piston rings and piston skirt.
NOTE: On aluminum bore engines, use ring
compressor with the projections (2) at the
top (1), as shown, Fig. 11, Illust. 2.
On cast iron sleeve and cast iron cylinder
engines, use ring compressor with the
projections (2) at the bottom (3), as shown,
Fig. 11, Illust. 1.
2. Insert the piston assembly (5) into the piston ring
compressor (4), Fig. 12. Use Ring Compressor,
Tool #19070 (Model Series 60000 through
130000), or Ring Compressor Tool #19230 (Model
Series 170000 and up).
a aa
aaa
Fig. 12
NOTE: SPECIFICATION TABLES BEGIN ON PAGE S OF THIS SECTION.

3. Place piston assembly (5) and compressor upside
down on bench and push piston down until head of
piston is even with edge of compressor (6),
Fig. 13.
4. Tighten compressor with wrench (7) until piston
cannot be turned in compressor.
5. Then loosen compressor until piston can be turned
with slight resistance.
Do not attempt to install piston and ring assembly
without ring compressor.
Install Piston Assembly
(Without Notch On Head)
1. Place connecting rod and piston assembly with
compressed rings into cylinder bore (8), Fig. 13.
2. Position rod so correct side is facing cam gear (A).
Turn crankshaft until crankpin is at top dead
center.
(With Notch On Head)
1. Place rod and piston assembly with compressed
rings into cylinder bore with notch on piston facing
magneto side of engine.
2. Turn crankshaft until crankpin is at top dead
center.
(Remaining Steps For Both Types)
3. Push piston down by hand until rod rests on
crankpin.
4. Oil crankpin and install rod cap with match marks
(9) or flats (12) aligned, Fig. 14.
5. Place shop rag over piston and ring compressor to
protect hands.
6. Assemble connecting rod bolt, rod bolt lock (10,
when used), and dipper (11, when used).
Typical styles of locks and dippers are shown in
Figures 14-18.
Fig. 14, Aluminum Model Series 60000
Fig. 15, Aluminum Model Series 80000, 111000,
112000, 120000,190000, 220000, 250000
Fig. 16, Aluminum Model Series 100200, 130000,
170000
Fig. 17, Early Cast Iron Model Series 230000
Fig. 18, Cast Iron Model Series 230000, 240000,
300000, 320000
NOTE: SPECIFICATION TABLES BEGIN ON PAGE 8 OF THIS SECTION.
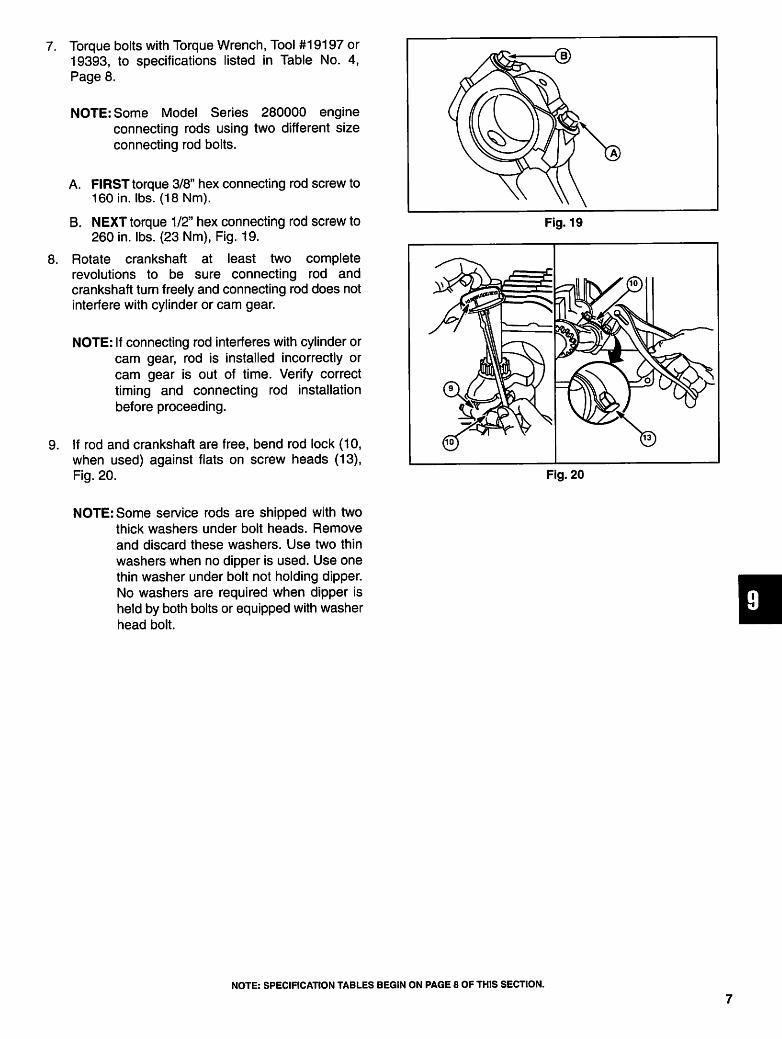
7. Torque bolts with Torque Wrench, Tool #19197 or
19393, to specifications listed in Table No. 4,
Page 8.
NOTE: Some Model Series 280000 engine
connecting rods using two different size
connecting rod bolts.
A. FIRST torque 3/8" hex connecting rod screw to
160 in. lbs. (18 Nm).
B. NEXT torque 1/2" hex connecting rod screw to
260 in. lbs. (23 Nm), Fig. 19.
8. Rotate crankshaft at least two complete
revolutions to be sure connecting rod and
crankshaft turn freely and connecting rod does not
interfere with cylinder or cam gear.
NOTE: If connecting rod interferes with cylinder or
cam gear, rod is installed incorrectly or
cam gear is out of time. Verify correct
timing and connecting rod installation
before proceeding.
9. If rod and crankshaft are free, bend rod lock (10,
when used) against flats on screw heads (13),
Fig. 20.
Fig. 19
Fig. 20
NOTE: Some service rods are shipped with two
thick washers under bolt heads. Remove
and discard these washers. Use two thin
washers when no dipper is used. Use one
thin washer under bolt not holding dipper.
No washers are required when dipper is
held by both bolts or equipped with washer
head bolt.
NOTE: SPECIFICATION TABLES BEGIN ON PAGE 8 OF THIS SECTION.

SPECIFICATION TABLES
TABLE NO. 1
Ring End Gap Reject Size
Aluminum
Cylinder Bores
Cast Iron
Cylinder Bores
Compres
sion
Rings
Inches
(mm)
.035
(.89)
.030
(■76)
Oil
Ring
Inches
(mm)
.045
(1.14)
.035
(.89)
TABLE NO. 2
Connecting Rod Reject Size
Basic Model
Series
Aluminum Cylinder
60000
80000
90000,100700,
110000,120000
with small crankpin
before Date Code
970113XX
120000 with large
crankpin after Date
Code 900112XX
100200,100900
130000
170000
190000
220000, 250000,
280000
Crank Pin
Bearing
Inches
(mm)
.876
(22.25)
1.001
(25.43)
1.001
(25.43)
1.097
(27.86)
1.001
(25.43)
1.001
(25.43)
1.095
(27.81)
1.127
(28.63)
1.252
(31.80)
Piston Pin
Bearing
Inches
(mm)
.492
(12.50)
.492
(12.50)
.492
(12.50)
.6271
(15.928)
.555
(14.10)
.492
(12.50)
.674
(17.12)
.674
(17.12)
.802
(20.37)
Cast Iron Cylinder
230000
240000
300000, 320000
1.189
(30.20)
1.314
(33.38)
1.314
(33.38)
.736
(18.69)
.674
(17.12)
.802
(20.37)
TABLE NO. 3
Piston Pin Reject Sizes
Basic Model
Series
Aluminum Cylinder
60000, 80000,
90000,100700,
110000, 120000 with
small pin before
Date Code
970113XX
120000 with large
pin after Date Code
970112XX
100200, 100900
130000
170000, 190000
220000, 250000,
280000
Piston Pin
O.D.
Inches
(mm)
.489
(12.42)
.6242
(15.855)
.552
(14.02)
.489
(12.42)
.671
(17.04)
.799
(20.29)
Pin
Bore I.D.
Inches
(mm)
.491
(12.47)
.6265
(15.913)
.554
(14.07)
.491
(12.47)
.673
(17.09)
.801
(20.35)
Cast Iron Cylinder
230000
240000
300000, 320000
.734
(18.64)
.671
(17.04)
.799
(20.29)
.736
(18.69)
.673
(17.09)
.801
(20.35)
TABLE NO. 4
Connecting Rod Screw Torque
Basic Model Series
Aluminum Cylinder
60000, 80000, 90000, 100000,
110000, 120000,130000
170000
190000,220000,250000
280000 Both Screws Same Size
280000, Two Sizes of Screws
Torque
in. lbs. (Nm)
100
(11)
165(19)
185(21)
185(21)
160, Small
(18) Small
260, Large
(23) Large
Cast Iron Cylinder
230000, 240000, 300000, 320000 190(22)
NOTE: SPECIFICATION TABLES BEGIN ON PAGE 8 OF THIS SECTION.

SECTION 10
Crankshafts, Cam Gears,
Gear Reductions & Auxiliary DrivesSection Contents
CRANKSHAFTS Pa9e
Removal 2
Reject Sizes, Table No. 1 24
Check 4
Install
Aluminum Cylinders, Plain Bearings and Ball Bearings 6
Cast Iron Cylinders, Plain Bearings and Ball Bearings 7
BALL BEARINGS
Remove and Install 5
BEARING SUPPORTS
Install, Cast Iron Cylinders 9
Check End Play 9
CAM GEARS
Removal
Aluminum Engines 2
Cast Iron Engines 3
Reject Sizes 26
Check, Compression Release
Mechanical Yoke Type 4
Install
Aluminum Cylinder, Plain Bearing, Ball Bearing 6
Cast Iron Cylinders, Plain Bearing, Ball Bearing 7
Adjust End Play, Model Series 300000,320000 8
GEAR REDUCTIONS
Model Series 60000, 80000,100200,110000,130000
Disassemble 10
Inspect HAssemble 11
Model Series 170000,190000, 220000, 230000, 240000, (CCW ROTATION)
Disassemble 13
Inspect 13
Assemble 13
Model Series 230000
Disassemble 1 ^
Inspect 16
Assemble 1 ^
Adjust Bearing Pre-load 17
NOTE: SPECIFICATION TABLES BEGIN ON PAGE 24 OF THIS SECTION.
1

Section Contents, Cont'd.AUXILIARY DRIVES
Without Clutch, Model Series 92580, 92980, 94580, 94980,
110980,111980,121780,122780,124780,
With Clutch, Model Series 110980
18
19
CRANKSHAFT REMOVAL
Remove Crankshaft and Cam Gear,
Aluminum Cylinder Engines
NOTE: On Models Series equipped with ball
bearing(s), the crankshaft and cam gear
must be removed together, Fig. 1.
1. Remove rust or burrs from the PTO end of crank
shaft.
2. Remove crankcase cover or sump. If sump or
cover sticks, tap lightly on alternate sides near
dowels with soft hammer.
3. Turn crankpin near top-dead-center (1) to align
crankshaft (3) and cam gear (2) timing marks.
4. Lift out cam gear.
5. Remove flywheel as described in Section 2.
6. Remove connecting rod and piston. Remove
crankshaft.
Remove Crankshaft
Cast Iron Cylinder Engines
Model Series 230000 - Plain Bearings
1. Remove rust or burrs from the PTO end of crank
shaft.
2. Remove crankshaft cover.
3. Rotate crankshaft to approximate position shown
in Fig. 2.
4. Pull out crankshaft from PTO side, turning as
needed to clear cam gear.
Model Series 230000, 240000, 300000,
320000,32K400 - Ball Bearings
NOTE: On 240000, 300000, 320000, 32K400 the
piston and connecting rod must be
removed from engine to allow crankshaft
removal.
1. Remove rust or burrs from the PTO end of the
crankshaft.
2. Remove crankcase cover and bearing support.
3. Rotate crankshaft to position shown, Fig. 2.
NOTE: On some models, it may be necessary to
position crankshaft approximately 180°
from position shown in Fig. 2.
4. Pull out crankshaft, turning as needed to clear cam
gear.
Fig. 1
Fig. 2
NOTE: SPECIFICATION TABLES BEGIN ON PAGE 24 OF THIS SECTION.

Camshaft Drive Gear Removal
Cast Iron Engines
Except Model Series 300000 and 320000
1. Use a long, blunt punch (1) to drive the cam gear
shaft (4) and plug (5) out from the PTO side (2)
toward the flywheel side (3), Fig. 3. Do not burr or
peen end of shaft while driving out.
2. Hold camshaft drive gear while removing punch to
avoid damage to the gear.
Model Series 300400, 320400
1. Remove short bolt (1) and Belleville washer (2)
from PTO drive gear (3), Fig. 4.
2. Loosen long bolt and Belleville washer two turns
on magneto side and tap head of bolt with hammer
to loosen cam gear shaft.
3. Turn bolt out while pushing out cam gear shaft,
Fig. 5.
4. Remove bolts from cam gear bearing, Fig. 6 and
while holding cam gear, remove cam gear bearing
and cam gear.
Model Series 301400, 302400, 325400, 326400,
32K400
1. Loosen long bolt and Belleville washer (2) two
turns and tap head of bolt with hammer (3) to
loosen cam gear (1) from shaft, Fig. 5.
2. Turn bolt out while pushing out cam gear shaft.
3. Remove bolts (5) from cam gear bearing, Fig. 6.
While holding cam gear, remove cam gear bearing
and cam gear.
Save any shims (4, if used).
Fig. 6
NOTE: SPECIFICATION TABLES BEGIN ON PAGE 24 OF THIS SECTION.

CHECK CRANKSHAFT
All Engines
Fig. 7 shows various crankshaft locations to bechecked. Table No. 1, Specifications, shows rejectsizes for those dimensions.
Inspect the gear teeth (1) for wear or damage.Measure the PTO end journal (2), crankpin journal (3)and magneto end journal (4).
Inspect the crankshaft plunger flat or keyway (5).Discard the crankshaft if the flat or keyway aredamaged.
Inspect the threads (6) for wear or damage.
Undersize crankpin journals may be suitable forre-grinding and re-fitting with undersize connecting
rod, see note below. Scrap the crankshaft if it is wornbeyond specification.
Check keyways for wear or deformation. Deburrkeyway edges to prevent scratching bearing and oilseals.
CAUTION:
DO NOT straighten bent crankshafts.
NOTE: .020" (.51 mm) undersize connecting rods
may be obtained for use on reground
crankpin journals. See Table No. 2, Page
25 for grinding dimensions. Complete
instructions are included with undersize
rod. (See Illustrated Parts List to find
appropriate undersize connecting rod.)
Check Cam Gear - All Engines
Inspect gear teeth for wear and nicks. Cam gearjournals and lobe rejection sizes are shown in TableNo. 3, Specifications, Page 26.
Checking Compression Release(Mechanical Yoke Type)
Mechanical yoke type compression releases use aspring loaded yoke (2) at the exhaust cam lobe (1) toopen the exhaust valve during starting. When enginestarts, centrifugal force causes the yoke to overcome
spring tension and swings away from exhaust tappetreturning engine to normal compression, Fig. 8.
To Check: To check, move yoke away from face ofcam gear and release. Yoke should return to
compression release position without binding or
sticking. Replace cam gear if yoke binds, yoke pivot pinis worn, or return spring is broken.
Fig. 7
Fig. 8
NOTE: SPECIFICATION TABLES BEGIN ON PAGE 24 OF THIS SECTION.

Model Series 111200,111900
This cam gear has a mechanical compression release
on the exhaust cam lobe plus Easy-Spin® (1). In thestarting position, the actuator cam (3) moves therocker cam (2) so it will open the exhaust valve at thesame time as the Easy-Spin® lobe opens the intakevalve. When the engine starts, the actuator cam
moves down and the exhaust valve operates normally.
1. To check, move actuator cam to the running
position, Fig. 9.
2. Push rocker cam against the actuator cam.
3. Release the actuator cam. Actuator cam spring (4)
should pull actuator cam against the shoulder pin
(5), causing rocker cam to raise up to starting
position, Fig. 10.
4. There should be no binding. Replace if binding
exists.
BALL BEARINGS
Remove
The ball bearing (3) is a press fit on the crankshaft (2). Ifbearing is to be removed, use an arbor press (1), as
shown in Fig. 11.
Install
1. Heat bearing in hot oil 250° F (120° C) max.
NOTE: Bearing must not rest on the bottom of the
pan in which it is heated.
WARNING
HOT OIL will cause severe burns if
splashed on skin.
• Always use protective gloves and shop rags
when handling hot ball bearings.
Fig. 11
NOTE: SPECIFICATION TABLES BEGIN ON PAGE 24 OF THIS SECTION.
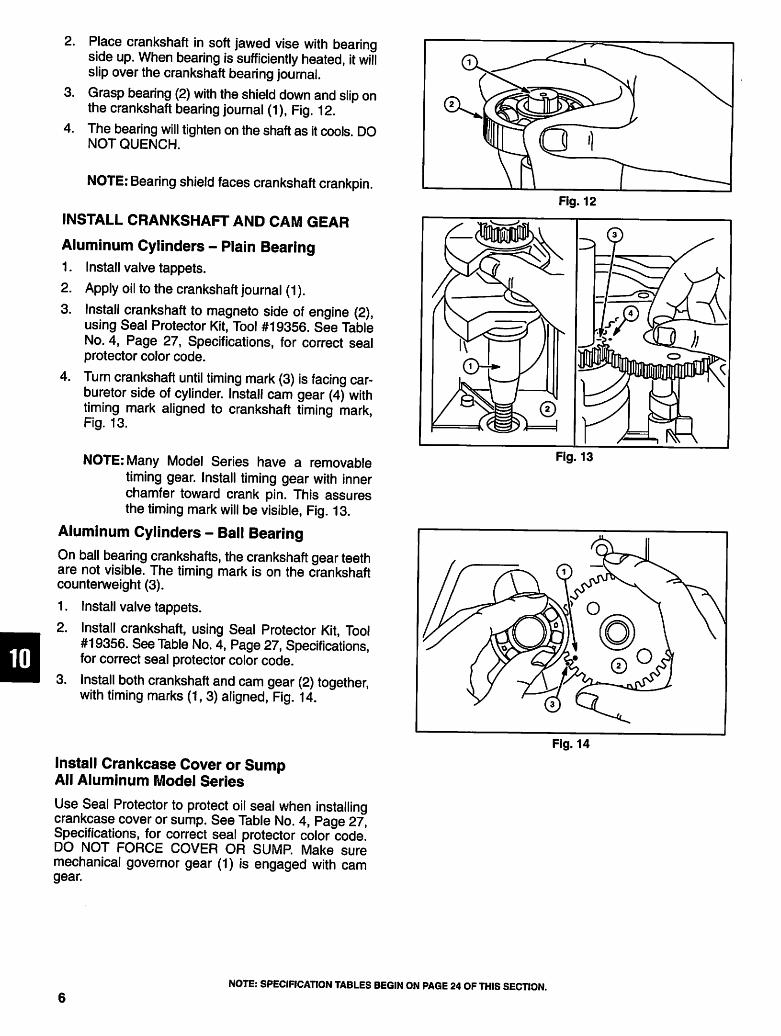
2.
3.
4.
0
Place crankshaft in soft jawed vise with bearing
side up. When bearing is sufficiently heated, it willslip over the crankshaft bearing journal.
Grasp bearing (2) with the shield down and slip onthe crankshaft bearing journal (1), Fig. 12.
The bearing will tighten on the shaft as it cools. DONOT QUENCH.
NOTE: Bearing shield faces crankshaft crankpin.
INSTALL CRANKSHAFT AND CAM GEAR
Aluminum Cylinders - Plain Bearing
Install valve tappets.
Apply oil to the crankshaft journal (1).
Install crankshaft to magneto side of engine (2),
using Seal Protector Kit, Tool #19356. See Table
No. 4, Page 27, Specifications, for correct sealprotector color code.
Turn crankshaft until timing mark (3) is facing car
buretor side of cylinder. Install cam gear (4) with
timing mark aligned to crankshaft timing mark,Fig. 13.
NOTE: Many Model Series have a removable
timing gear. Install timing gear with inner
chamfer toward crank pin. This assures
the timing mark will be visible, Fig. 13.
Aluminum Cylinders - Ball Bearing
On ball bearing crankshafts, the crankshaft gear teethare not visible. The timing mark is on the crankshaftcounterweight (3).
Install valve tappets.
Install crankshaft, using Seal Protector Kit, Tool#19356. See Table No. 4, Page 27, Specifications,for correct seal protector color code.
Install both crankshaft and cam gear (2) together,with timing marks (1,3) aligned, Fig. 14.
1.
2.
3.
4.
1.
2.
3.
Install Crankcase Cover or Sump
All Aluminum Model Series
Use Seal Protector to protect oil seal when installingcrankcase cover or sump. See Table No. 4, Page 27,Specifications, for correct seal protector color codeDO NOT FORCE COVER OR SUMP. Make suremechanical governor gear (1) is engaged with camgear.
Fig. 13
Fig. 14
NOTE: SPECIFICATION TABLES BEGIN ON PAGE 24 OF THIS SECTION.

Torque Crankcase Cover or Sump
All Aluminum Model Series
Torque crankcase cover or sump to specifications
listed in Table No. 6, Page 27, Specifications.
NOTE: On Model Series 100900, 130700,
131700, and 130900 a spring washer (3) is
used on cam gear (2) as shown in Fig. 15.
Model Series 130780, 130980, 131780,
and 132980 do not use a spring washer.
INSTALL CRANKSHAFT AND CAM GEAR
Cast Iron Cylinders
Plain Bearing
1. Assemble tappets in cylinder and insert cam gear.
2. Push camshaft into cylinder from flywheel
(magneto) side thru cam gear.
3. With a blunt punch and arbor press or hammer,
press or drive camshaft until end is flush with out
side of cylinder on power take-off side.
4. Place a small amount of sealer such as
Permatex 2® on camshaft plug, when used, and
press in plug on flywheel side of cylinder.
5. Install crankshaft aligning timing marks (1),
Fig. 16.
Ball Bearing Except
Model Series 300000, 320000
1. Install breaker plunger (when used) and tappets.
2. Insert cam gear (2) into cylinder.
NOTE: On some models, push cam gear forward
into recess in front of cylinder (3).
3. Install crankshaft (1) into cylinder.
4. Rotate crankshaft and cam gear until timing marks
align. Push cam gear into engagement with crank
shaft gear, maintaining alignment.
5. Install camshaft into cylinder and cam gear from
magneto side of cylinder until flush with PTO side
of cylinder.
6. Place a small amount of sealant on plug and press
into camshaft hole on flywheel side of cylinder,
Fig. 17.
Fig. 16
Fig. 17
NOTE: SPECIFICATION TABLES BEGIN ON PAGE 24 OF THIS SECTION.

Ball Bearing
Model Series 300000, 320000
1.
2.
3.
4.
5.
6.
Install breaker plunger (2, when used) and tappets
d).
Insert cam gear from PTO side of cylinder (3),Fig. 18.
Slide cam gear shaft (4) through PTO side and intocam gear, Fig. 19.
Install magneto side cam gear bearing on cylinder.
Torque bearing screws to 90 in. lbs. (10 Nm).
Install long cam gear bolt (5) 5-1/2" (140.00 mm)
finger tight to prevent loss of camshaft, Fig. 20.
Check Cam Gear End Play
Cam gear end play is machined at the factory andrequires no adjustment unless magneto side cambearing or cam gear is replaced. End play should be.002" (.05 mm) - .008" (.20 mm).
Push cam gear against magneto side of cylinderand insert feeler gauge between cam gear andPTO side of cylinder.
If end play is more than .008" (.20 mm), use service
bearing assembly Kit #299706. Kit contains a new
bearing and shims, .005" (.13 mm), .007' (.18 mm),
and .009" (.23 mm) thick to adjust end play. Install
new bearing without shims and measure end play.
If .002" (.05 mm) or less, add shims to obtain properend play.
Torque bearing screws to 90 in. lbs. (10 Nm).
1.
2.
3.
Install Crankshaft
Model Series 300000, 320000
Timing mark (1) is a notch on crankshaft throw directlyin line with gear tooth that will engage cam gear attiming mark on cam gear (2).
1. Mark top of tooth (3) with chalk or crayon.
2. Align timing marks and install crankshaft, usingcare not to damage crankpin, Fig. 21.
Fig. 21
NOTE: SPECIFICATION TABLES BEGIN ON PAGE 24 OF THIS SECTION.

Install Bearing Supports
Model Series 230000, 240000,
300000, 320000
Install bearing supports with new gaskets. Torque PTOside bearing support (2) bolts to 190 in. lbs. (21 Nm)and flywheel side bearing support (1) bolts to 90 in. lbs.
(10 Nm), Fig. 22.
Crankshaft End Play
All Model Series
Crankshaft end play is .002" - .008" (.05 mm - .20 mm)on all models except as listed in Table No. 5, Page 27.
Specifications. Procedures for adjusting end play differ
according to engine type. See Text.
Check and Adjust Crankshaft End Play
Aluminum Cylinders - Plain Bearings
When crankcase cover or sump is installed with a .015"(.38 mm) thick gasket, end play should be within
specification.
If end play is less than required, use additional gaskets
(2), .005" (.13 mm), .009" (.23 mm), or .015" (.38 mm)alone or in combination, to adjust, Fig. 23.
NOTE: If end play exceeds specification with one
.015" (.38 mm) thick gasket, a thrust
washer (1) is available for use on the PTO.
end of the crankshaft (except Model Series
100700, 120000, flywheel end only), with
additional .005" (.13 mm), .009" (.23 mm)
or .015" (.38 mm) gasket to reduce end
play, Fig. 23.
Gaskets (2) are available in thicknesses of:
.015" (.38 mm), .009" (.23 mm), 005" (.13
mm).
• 220624 .0625 thrust washer for .875" (22.23 mm)
dia. crankshaft.
• 220708 .0625 thrust washer for 1.000" (25.4 mm)
dia. crankshaft.
• 222949 .062 thrust washer for 1.181" (30.0 mm)dia. crankshaft.
• 222951 .062 thrust washer for 1.378" (35.0 mm)dia. crankshaft.
Fig. 22
Fig. 23
D
NOTE: SPECIFICATION TABLES BEGIN ON PAGE 24 OF THIS SECTION.

m
Aluminum Cylinders - PTO Ball Bearing
End play is adjusted the same way as on plain bearingengines. If thrust washer is required, it is used on themagneto end of the crankshaft.
NOTE: Thrust washers cannot be used on engine
with two ball bearings. Replace worn parts.
Model Series 230000, 240000Plain and Ball Bearing
With one .020" (.51 mm) thick gasket and magnetobearing support in place, use a feeler gauge (1) tomeasure end play. End play should be .002 - .008" (.05- .20 mm), Fig. 24.
If end play is less than required, use additionalgaskets, .005" (.13 mm), .009" (.23 mm) or .015" (.38mm) as needed, alone or in combination, to adjust.
If end play is more than specification, use a thinnergasket to adjust.
If end play is more than specification using one .005"(.13 mm) thick gasket, a thrust washer (2) can be usedon the PTO end of the crankshaft, Fig. 25. Afterinstalling a thrust washer measure the end play, andadjust as required.
NOTE: Thrust washers cannot be used on
crankshaft with two ball bearings. Replace
worn parts.
Model Series 300000, 320000
End play is machined at the factory and does not haveto be checked unless the bearing supports or crankshaft has been replaced.
If end play is less than .002" (.05 mm), add serviceshims .005" (.13 mm), .010" (.25 mm) or .015" (.38mm) to get proper end play. If end play is more than.008" (.20 mm), use service bearing support kit Part#299705, which includes the above shims to getproper end play.
GEAR REDUCTION DISASSEMBLE
Model Series 60000, 80000,100200,110000,130000
Drain and Disassemble Gear Reduction
1. Note position of gear reduction assembly onengine.
2. Remove oil vent plug (2).
3. Loosen four gear case cover screws (4).
4. Break cover (3) loose from gear case (1) assemblyto drain gear case.
5. After gear case is drained, remove screws andcover, Fig. 26.
Fig. 24
Fig. 25
Fig. 26
10
NOTE: SPECIFICATION TABLES BEGIN ON PAGE 24 OF THIS SECTION.

Remove Output Gear-PTO Shaft Assembly
and Gear Case Assembly
1. Remove shaft assembly (2) from gear case (4).
Bend down two screw locks (1, if equipped), and
remove two long cap screws (3).
Remove two short cap screws and lock washers
(5).
Slide gear case off engine, Fig. 27.
2.
3.
4.
Inspect Output Gear-PTO Shaft, Gear Case
and Cover Assemblies
Inspect seals for cracks, tears, or hardening.
Inspect crankshaft pinion gear and drive gear for worn,
cracked, or chipped teeth.
Inspect gear case and cover for cracks, damaged
mounting or gasket surfaces.
Replace any component if damaged or worn.
ASSEMBLE
Install Seals and Gear Case Assembly
1. Install seals with sealing lip (1) toward engine side
of gear case (2) or cover assemblies (3) until seal
is flush with case or cover, Fig. 28.
NOTE: The housing must be installed in the same
position as when removed, Fig. 30.
2. Install cork gasket on crankcase cover (when
used).
3. Slide gear case assembly onto crankshaft and
bearing housing assembly.
4. Bend lock tabs (if used) up against flats on head of
cap screws, Fig. 29.
5. Install two short screws (5) with lock washers.
6. Install two long screws (6) and screw locks (4, if
used) with lock tabs flat.
7. Torque four screws to 140 in. lbs. (16 Nm).
8. Slide output gear and PTO shaft assembly into
gear case bearing and engage crankshaft pinion
gear.
9. Insert seal protector into seal of gear case cover.
See Table No. 4, Page 27, Specifications, for
correct seal protector color code.
10. Place new gasket on gear case assembly.
11. Place the gear case assembly on the engine in the
original position.
Fig. 27
Fig. 28
m
Fig. 29
NOTE: SPECIFICATION TABLES BEGIN ON PAGE 24 OF THIS SECTION.
11

NOTE: Standard bearing housing position is 9
O'Clock (A), in relation to the engine
crankshaft (7). Optional positions are
12 O'Clock (B), 3 O'Clock (C) and 6
O'Clock (D).
12. Slide cover and seal protector on to gear case and
drive shaft until cover is seated on new gasket.Remove seal protector.
13. Torque cover screws (8) to 90 in. lbs. (10 Nm),Fig. 31.
m
Fill Gear Case with Lubricant
1. Remove oil level plug (2) and vent plug (1).
Fill gear case just to the point of overflowing at the
lower hole with proper oil. See Section 8,Lubrication.
Install oil level plug in lower hole and torque to 90in. lbs. (10 Nm).
Install vent plug in top hole and torque to 40 in. lbs.(5 Nm), Fig. 32.
2.
3.
4.
Fig. 31
Fig. 32
12
NOTE: SPECIFICATION TABLES BEGIN ON PAGE 24 OF THIS SECTION.

Disassemble and Drain Gear Reduction
Counterclockwise Rotation (CCR)
Model Series 170000,190000, 220000,
230000, 240000,
1. Remove oil vent plug (1, if equipped).
2. Remove drain plug (3) from bottom of cover
assembly (2).
3. After gear case is drained, loosen and remove four
cap screws and cover, Fig. 33.
Remove Drive Shaft and
Gear Case Assembly
1. Note position of gear case assembly, Fig. 36.
2. Remove drive shaft assembly (2) from gear case.
3. Bend down two screw locks (1, if equipped).
Remove four cap screws (3).
4. Slide gear case off engine, Fig. 34.
Inspect Output Gear - PTO Shaft, Gear Case
and Cover Assemblies
Inspect seals for cracks, tears, or hardening.
Inspect crankshaft pinion gear and drive gear for worn,
cracked, or chipped teeth.
Inspect gear case and cover assemblies for cracks,
damaged mounting or gasket surfaces.
Replace any component if damaged or worn.
Fig. 33
Fig. 34 - Removing Gear Case
D
NOTE: SPECIFICATION TABLES BEGIN ON PAGE 24 OF THIS SECTION.
13

ASSEMBLE
Install Seals and Gear Case Assembly
1. Install seal with sealing lip (1) towards engine side
of gear case (2) or cover (3) until seal is flush with
surface of case (when used) or cover, Fig. 35.
NOTE: The housing must be installed in the same
position as when removed.
NOTE: Standard bearing housing position is 9
O'clock (A), in relation to the engine
crankshaft (4). Optional positions are 12
O'Clock (B), 3 O'Clock (C) and 6 O'Clock(D), Fig. 36.
2. Slide gear case assembly and new gasket onto
crankshaft and crankcase cover assembly.
3. Install two short screws (6) and lock washers.
4. Install two long screws (7) and screw locks (5, if
used) with lock tabs flat.
5. Torque four screws to 140 in. lbs. (16 Nm).
6. Bend lock tabs up against flats on head of capscrews, Fig. 37.
0
7. Slide drive shaft assembly into gear case bearing
and engage crankshaft pinion gear.
8. Insert seal protector into seal of gear case cover.
See Table No. 4, Page 27, Specifications, forcorrect seal protector color code.
9. Place new gasket on gear case assembly.
10. Slide cover and seal protector unto gear case until
cover is seated on new gasket.
11. Remove seal protector (9).
Fig. 35 - Installing Seals
Fig. 36
Fig. 37
NOTE: SPECIFICATION TABLES BEGIN ON PAGE 24 OF THIS SECTION.
14

12. Torque cover screws (8) to 190 in. lbs. (21 Nm),
Fig. 38.
Fill Gear Case with Lubricant (Fig. 39)
1. Install drain plug (2) in bottom of gear case (if
equipped). Torque to 65 in. lbs. (7 Nm).
2. Remove oil level plug (3).
3. Fill gear case just to the point of overflowing at the
lower hole with the proper oil. See Section 8,
Lubrication.
4. Install oil level plug in lower hole (if equipped).
Torque to 90 in. lbs. (10 Nm).
5. Install vent plug (1) in top hole, (if equipped).
Torque to 40 in. lbs. (5 Nm).
NOTE: On Model Series 230000, 240000, the
gear reduction and the engine use the
same oil supply. After initial fill, start and
run engine briefly. Then stop engine,
recheck oil level and add oil as required to
bring level to full.
Model Series 230000
Clockwise PTO Rotation
Drain and Disassemble
Note position of gear reduction case on engine, Fig.
36.
1. Loosen all the cover cap screws (1) one to two
turns.
2. Break cover (2) loose from case. Drain oil.
3. After gear case is drained, remove cap screws and
cover, Fig. 40.
Fig. 39
Fig. 40
NOTE: SPECIFICATION TABLES BEGIN ON PAGE 24 OF THIS SECTION.
15
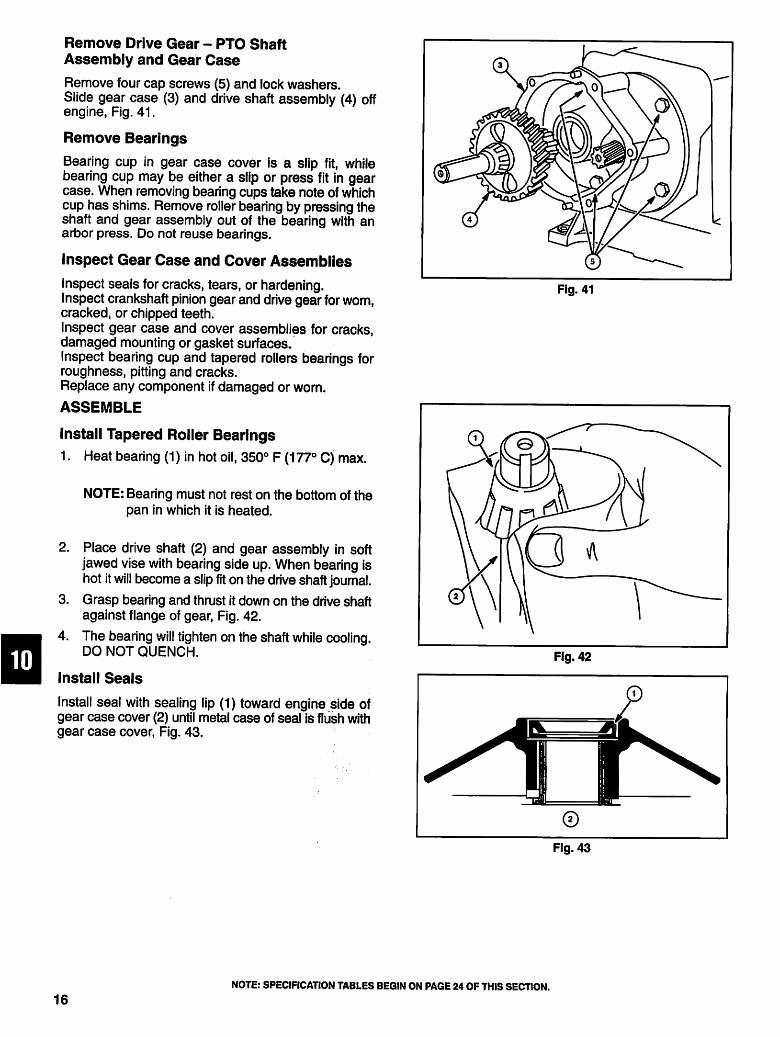
□
Remove Drive Gear - PTO Shaft
Assembly and Gear Case
Remove four cap screws (5) and lock washers.Slide gear case (3) and drive shaft assembly (4) offengine, Fig. 41.
Remove Bearings
Bearing cup in gear case cover is a slip fit, while
bearing cup may be either a slip or press fit in gearcase. When removing bearing cups take note of whichcup has shims. Remove roller bearing by pressing theshaft and gear assembly out of the bearing with anarbor press. Do not reuse bearings.
Inspect Gear Case and Cover Assemblies
Inspect seals for cracks, tears, or hardening.
Inspect crankshaft pinion gear and drive gear for worn,cracked, or chipped teeth.
Inspect gear case and cover assemblies for cracks,damaged mounting or gasket surfaces.
Inspect bearing cup and tapered rollers bearings forroughness, pitting and cracks.
Replace any component if damaged or worn.
ASSEMBLE
Install Tapered Roller Bearings
1. Heat bearing (1) in hot oil, 350° F (177° C) max.
NOTE: Bearing must not rest on the bottom of the
pan in which it is heated.
2. Place drive shaft (2) and gear assembly in soft
jawed vise with bearing side up. When bearing is
hot it will become a slip fit on the drive shaft journal.
3. Grasp bearing and thrust it down on the drive shaft
against flange of gear, Fig. 42.
4. The bearing will tighten on the shaft while cooling.
DO NOT QUENCH.
Install Seals
Install seal with sealing lip (1) toward engine side ofgear case cover (2) until metal case of seal is flush with
gear case cover, Fig. 43.
Fig. 41
Fig. 42
Fig. 43
NOTE: SPECIFICATION TABLES BEGIN ON PAGE 24 OF THIS SECTION.
16

Install Gear Case Assembly
Install gear case in same position as when removed
from engine, Fig. 44. Torque screws with lock washers
to 140 in. lbs. (16 Nm).
NOTE: Standard bearing housing position is 9
O'Clock (A), in relation to the engine
crankshaft (3). Optional positions are 12
O'Clock (B), 3 O'Clock (C) and 6 O'Clock
(D), Fig. 44.
Install Gear Case Cover Assembly
1. Place bearing cup in bearing cup counterbore of
gear case cover without shims.
2. Slide output gear PTO shaft assembly into gear
case bearing and engage crankshaft pinion gear.
3. Place bearing cup in bearing cup counterbore of
gear case assembly without shims.
4. Place a new cover gasket on gear case assembly
dowel pins.
5. Use Seal Protector (2) to protect oil seal when
installing crankcase cover or sump. See Table
No. 4, Page 27, Specifications, for correct seal
protector color code.
6. Slide gear case cover (3) assembly and seal
protector onto gear case assembly.
7. Install screws (1) and lock washers. Torque
screws to 190 in. lbs. (21 Nm), Fig. 45.
Adjust Roller Bearing Pre-load
1. Place a dial indicator (1) against end of drive shaft
(2), Fig. 46.
2. Push in on drive shaft and turn shaft slowly to seat
bearing in bearing cup, indicated by no further
needle movement on dial indicator.
3. Set dial indicator to zero.
4. Pull out on drive shaft and rotate drive shaft slowly
to seat bearing.
5. Note dial indicator reading.
6. Repeat both steps to verify dial indicator reading.
Fig. 44
Fig. 45
Fig. 46
NOTE: SPECIFICATION TABLES BEGIN ON PAGE 24 OF THIS SECTION.
17

NOTE: If a dial indicator is not available, use a
sprocket or pulley (3) and feeler gauge (4)
to check end play as shown in Fig. 47.
7. Remove gear case cover assembly and drive shaft
(if shims were behind bearing cup in gear case
assembly). Shims are available in .003" (.08 mm)
and .010" (.25 mm) thicknesses.
8. Use as many shims as needed to equal total end
play pJus .002" (.05 mm) to .005" (.13 mm).
9. Install shims behind bearing cup and reinstall cup,
drive shaft assembly and gear case cover
assembly.
Fill Gear Case with Lubricant
On Model Series 230000 the gear reduction and theengine use the same oil supply.
1. Fill the crankcase with the proper oil. See Section
8, Lubrication.
2. Start and run engine briefly.
3. Stop engine, recheck oil level. Add oil as required
to bring engine oil level up to full (1), Fig. 48.
Auxiliary PTO Without Clutch
Model Series 92580, 92980,
94580, 94980,110980,111980,
121780,122780,124780
This auxiliary PTO shaft (5) is perpendicular to thecrankshaft. It rotates at the rate of one revolution for
every 8-1/2 revolutions of the crankshaft. On thesemodels, the cam gear (3), worm gear (4) and oil slinger
(1) are supplied as an assembly and are notserviceable separately, Fig. 49.
NOTE: If rotation is counterclockwise, the thrust
washer (2) is placed next to the worm gear
on camshaft.
Remove Sump
All Model Series except 120000
1. Remove rust or burrs from the PTO end of the
crankshaft.
NOTE: One of the six sump mounting screws is
located under the auxiliary drive cover.
2. Remove the cover.
3. Lift out shaft stop (1), Fig. 50.
Fig. 48
Fig. 50
18
NOTE: SPECIFICATION TABLES BEGIN ON PAGE 24 OF THIS SECTION.

4. Slide gear and shaft (3) sideways to expose head
of sump mounting screw.
5. Use 7/16" socket to remove sump screw (4).
6. Remove remaining screws and remove sump.
NOTE: Use care when driving out roll pin (2) to
prevent damage to threads.
Replace gasket (7) when installing cover (6), Fig. 51.
Put non-hardening sealant on cover screws (5).
Remove Sump and Auxiliary PTO
Drive Shaft,
Model Series 120000
1. Remove all rust and burrs from crankshaft before
removing sump.
2. Remove seven sump bolts and lift off sump.
3. To remove auxiliary PTO shaft, remove Allen
screw from sump (1), Fig. 52.
4. With a 3/16" (4.75 mm) pin punch drive out roll pin
in bevel gear thru Allen screw hole.
5. Remove PTO shaft stop and slide out PTO shaft.
Remove Sump and Auxiliary Drive Shaft
with Clutch,
Model Series 110980
This auxiliary PTO shaft is perpendicular to the
crankshaft. It rotates at the rate of one revolution for
every 8-1/2 revolutions of the crankshaft. Rotation of
the shaft is controlled by a clutch on the cam gear. The
clutch is engaged or disengaged by a control lever
mounted on the oil sump.
Early production cam gears (A) has a groove (1) on the
clutch, Fig. 53, are serviced as an assembly consisting
of cam gear oil slinger, clutch hub, clutch spring and
clutch sleeve assembly. Later production cam gears
(B) eliminate the groove (2), and are serviced as
individual parts except for the cam gear which consists
of cam gear, oil slinger and clutch hub.
1. Remove rust or burrs from the PTO end of the
crankshaft.
NOTE: Sump is held on by six screws. Five screws
are exposed. The sixth screw is under the
auxiliary drive cover, Fig. 50.
2. Remove cover and lift out shaft stop, Fig. 51.
Fig. 51
Fig. 52
Fig. 53
NOTE: SPECIFICATION TABLES BEGIN ON PAGE 24 OF THIS SECTION.
19

3. Slide drive shaft and gear over to expose head of
cap screw. Cap screw can be removed with 7/16"
socket.
4. Remove remaining screws and remove sump.
Inspect Clutch Operation
1. Push on spring tang (3), Fig. 54, turning spring and
clutch sleeve in a counterclockwise direction.
2. Spring and sleeve should rotate approximately 1 /8
turn. Worm gear should not rotate in the same
direction.
3. With clutch released, worm gear should rotate
freely in both directions.
Check Cam Gear
Check worm gear end play using feeler gauges at point(4), Fig. 55. End play should not be less than .004" (.10mm), or more than .017" (.43 mm).
Cam Gear Disassembly - Early Design
1. Remove "E" ring retainer.
2. Slide off copper washer, thick thrust washer, worm
and thin thrust washer.
3. Cam gear, oil slinger, clutch sleeve and springs are
serviced as an assembly.
Inspect Parts
Inspect for worn, burred or broken parts and replace asrequired.
Assemble Cam Gear - Early Design
1. Slide worm gear with thin thrust washer on cam
gear.
2. Slide on thick thrust washer. Slide on copper
colored washer with gray coated side toward thick
thrust washer.
3. Install "E" ring retainer and check worm end play
as previously described. Inspect cam gear
assembly as previously described.
Disassemble Cam Gear - Current Design
1. Remove "E" ring.
2. Slide off thrust washers and worm gear.
3. Use thin blade screwdriver or similar tool to pry
lower clutch spring tab (2) out of hole in clutch
sleeve (1), Fig. 56.
4. Remove clutch sleeve.
Fig. 55 - Check Cam Gear
Fig. 56
20
NOTE: SPECIFICATION TABLES BEGIN ON PAGE 24 OF THIS SECTION.

5. Slide clutch spring down, Fig. 57 and lift out upper
spring tab (3) to remove spring. Cam gear, oil
slinger and clutch drive hub are serviced as an
assembly.
Inspect Parts
Inspect for worn, broken or burred parts. Replace as
required.
Assemble Cam Gear - Current Design
1. Assemble clutch spring as shown in Fig. 58.
2. Align hole in clutch sleeve (4) with tab or spring
and slide on.
3. Depress spring tab, if required. When clutch
sleeve is in place, spring tab (5) should be in
sleeve hole (6), Fig. 59.
4. Slide thin thrust washer and worm on cam gear.
Slide in thick thrust washer.
5. Slide on copper washer with gray coated side
toward thrust washer.
6. Install "E" ring and check worm gear end play as
previously described. Inspect cam gear assembly
as previously described.
Fig. 57
Fig. 58 - Assemble Clutch Spring
Fig. 59
NOTE: SPECIFICATION TABLES BEGIN ON PAGE 24 OF THIS SECTION.
21

Remove Control Lever Shaft
1. Remove "E" ring (1) from groove in shaft (2),Fig. 60.
2. Slide control lever and shaft (3) out slowly untillever clears boss on sump.
3. Slowly release spring tension and then remove
shaft, spring and "O" ring seal.
4. Inspect shaft assembly for loose lever, worn or
broken parts. Replace as needed.
Fig. 60
Assemble Control Lever and
Shaft Assembly
1. Install return spring (1) on shaft and lever
assembly (3) as shown in Fig. 61.
2. Install "O" ring seal (2) on shaft.
3. Lubricate "O" ring and shaft lightly with engine oil.
4. Slide control lever assembly (3) into shaft bore,Fig. 62, as far as it will go.
5. Rotate lever clockwise to put tension on returnspring.
6. When lever clears stop boss (4), push lever and
spring in until lever stops.
Fig. 62
22
NOTE: SPECIFICATION TABLES BEGIN ON PAGE 24 OF THIS SECTION.

7. Install "E" ring. Leg of spring (5) may need to be
pushed against sump, Fig. 63.
Fig. 63
Cylinder Clip Washer
When replacing clip washer in cylinder, be sure flat on
clip washer (1) is in line with flat on cam bearing boss
and spring tabs are on both sides of cam bearing web
(2), Fig. 64.
Fig. 64
□
NOTE: SPECIFICATION TABLES BEGIN ON PAGE 24 OF THIS SECTION.
23

SPECIFICATION TABLES
TABLE NO. 1 - CRANKSHAFT REJECT SIZES
MODEL SERIES
ALUMINUM CYLINDER
60000
80000*, 90200, 92000*.
93000*, 94000, 95000, 96000
110700*. 110900*, 111900*
100200,100900,130000
100700,120000 with smallcrankpin before Date Code
97011300
120000 with large crankpin .
after Date Code 97011200
170000
190000
220000, 250000, 280000
PTO JOURNAL
Inches
(Millimeters)
.873
(22.17)
.873
(22.17)
.873
(22.17)
.998
(25.35)
1.060
(26.92)
1.060
(26.92)
1.179
(29.95)
1.179
(29.95)
1.376
(34.95)
CRANKPIN JOURNAL
Inches
(Millimeters)
.870
(22.10)
.996
(25.30)
.996
(25.30)
.996
(25.30)
.996
(25.30)
1.097
(27.86)
1.090
(27.69)
1.122
(28.50)
1.247
(31.67)
MAGNETO JOURNAL
Inches
(Millimeters)
.873
(22.17)
.873
(22.17)
.873
(22.17)
.873
(22.17)
.873
(22.17)
.873
(22.17)
.997
(25.32)
.997
(25.32)
1.376
(34.95)
CAST IRON CYLINDER
230000*
240000*
300000, 320000
1.3769*
(34.97)
Balk
Ball
1.1844
(30.07)
1.3094
(33.25)
1.3094
(33.25)
1.3769
(34.97)
Ball
Ball
Auxiliary Drive Models PTO Journal Reject Size 1.003 in. (25.48 mm)
Synchro-Balance® Magneto Journal Reject Size 1.179 in. (29.95 mm)Gear Reduction PTO 1.179 in. (29.95 mm)
24
NOTE: SPECIFICATION TABLES BEGIN ON PAGE 24 OF THIS SECTION.

TABLE NO. 2, .020' (.51 mm) UNDERSIZE CONNECTING ROD CRANKPIN GRINDINGDIMENSIONS
CRANKSHAFT
MODEL SERIES
80000, 90000
100200, 100900
100700, 110000
120000, Small Crankpin
Before Date Code
97011300
120000, Large Crankpin
After Date Code
97011200
130000
170000
190000
220000
233400
240000
250000, 280000
300000, 320000
Crankpin Dia.
.9788A9783"
(24.862/24.849 mm)
.9788/.9783'1
(24.862/24.849 mm)
.9788/.97831'
(24.862/24.849 mm)
.9788A9783"
(24.862/24.849 mm)
1.0791/1.0783"
(27.409/27.389 mm)
.9788/.9783'1
(24.862/24.849 mm)
1.0724/1.0720"
(27.239/27.229 mm)
1.1043/1.1039"
(28.049/28.039 mm)
1.1293/1.1289"
(28.684/28.674 mm)
1.1668/1.1664"
(29.637/29.627 mm)
1.2918/1.2914"
(32.812/32.802 mm)
1.1293/1.1289"
(28.684/28.674 mm)
1.2918/1.2914"
(32.812/32.802 mm)
Fillet Radius
.130/.110"
(3.30/2.79 mm)
.088/.070"
(2.24/1.78 mm)
.130/.110"
(3.30/2.79 mm)
.130/.110"
(3.30/2.79 mm)
.085/.075"
(2.16/1.91 mm)
.130/.110"
(3.30/2.79 mm)
.130/.110"
(3.30/2.79 mm)
.130/.120"
(3.30/3.05 mm)
.130/.120"
(3.30/3.05 mm)
.130/.110"
(3.30/3.05 mm)
.130/.110"
(3.30/3.05 mm)
.130/. 120"
(3.30/3.05 mm)
.130/.120"
(3.30/3.05 mm)
Crankshaft Throw
(25.654/25.146 mm)
1.0645/1.0605"
(27.038/26.937 mm)
.9750/.9650"
(24.765/24.511 mm)
1.020"
(25.91 mm)
1.020"
(25.91 mm)
1.2210/1.2170"
(31.013/30.912 mm)
1.1895/1.1855"
(30.213/30.111 mm)
1.3770/1.3730"
(34.976/34.874 mm)
1.1895/1.1855"
(30.213/30.111 mm)
1.6350/1.6150"
(41.529/41.021 mm)
1.6350/1.6150"
(41.529/41.021 mm)
1.3145/1.3105"
(33.388/33.287 mm)
1.6350/1.6150"
(41.529/41.021 mm)
□
NOTE: SPECIFICATION TABLES BEGIN ON PAGE 24 OF THIS SECTION.
25

TABLE
MODEL SERIES
ALUMINUM CYLINDER
60000, 80000*
82500, 82900, 92000, 93000, 94000,95000, 96000
90200, 100700,120000
110000
100200,100900,130000
170000, 190000
220000, 250000, 280000
NO. 3 - CAM GEAR REJECT SIZES
CAM GEAR JOURNAL
Inches
(mm)
.498
(12.65)
.498
(12.65)
.498
(12.65)
.436 Mag.
.498 P.T.O.
(11.07 Mag.
12.65 P.T.O.)
.498
(12.65)
.498
(12.65)
.498
(12.65)
CAM LOBE
Inches
(mm)
.883
(22.43) or See Note Below
.883
(22.43)
See Note Below
.870
(22.10)
.950
(24.13)
.977
(24.82)
1.184
(30.07)
CAST IRON CYLINDER
230000
240000
300000, 320000
.497
(12.62)
.497
(12.62)
.8105 Mag.
.6145 P.T.O.
(20.59 Mag.
15.61 P.T.O.)
1.184
(30.07)
1.184
(30.07)
1.184
(30.07)
* Auxiliary Drive Models PTO .751 in. (19.08
NOTE: On Model Series 60000, 80000 with plastic cam gear and all 90200,100700,120000 replace cam gear ifcam lobes are pitted or galled.
NOTE: SPECIFICATION TABLES BEGIN ON PAGE 24 OF THIS SECTION.
26

TABLE NO. 4
Seal Protectors
Tool#
19334/1
19334/2
19334/3
19334/4
19334/5
19334/6
19334/7
19356/8
19356/9
Color
White
Red
Blue
Orange
Brown
Green
Yellow
Purple
Black
Crankshaft
Journal Size
.787
(19.99 mm)
.875
(22.23 mm)
.984
(24.99 mm)
1.000
(25.40 mm)
1.062
(26.97 mm)
1.181
(30.00 mm)
1.378
(35.00 mm)
1.317
(33.45 mm)
1.503
(38.18 mm)
TABLE NO. 5
MODEL SERIES
90000B
10A000,10B000,
10C000
100700
120000
130000,170000,
190000
220000, 250000
280000
CRANKSHAFT END PLAY
Horizontal .002-.010"
Vertical .002 - .030"
(Horizontal 0.05 - 0.25
mm)
(Vertical 0.05 - 0.76 mm)
.002 - .030"
(0.05-0.76 mm)
.002 - .030"
(0.05 - 0.76 mm)
.002 - .030"
(0.05 - 0.76 mm)
.002 - .030>
(0.05 - 0.76 mm)^
.002 - .030"
(0.05 - 0.76 mm)
.002 - .023"
(0.05 - 0.58 mm)
■ All Model Series 90000 engines with second to
last digit of date code being 5 (example,
88042151)
^ End Play for Horizontal Crankshaft Model
Series 130000,170000,190000 using threaded
crankshaft on pump applications is .002 - .008"
(0.05 - 0.20 mm)
TABLE
Crankcase Cover
NO. 6
or Sump Torque
Model Series
60000, 80000,
90000,120000
100200,100900
100700, 110000
130000
140000, 170000,
190000,220000,
250000, 280000
280000
o
Torque
In. Lbs.
(Torque Nrn)
85
(10)
120
(14)
85
(10)
120
(14)
140, see A below
(16)
200, see B below
(23)
Dog Point
bThread
Sealant
Pi*
Integral
Washer
NOTE: SPECIFICATION TABLES BEGIN ON PAGE 24 OF THIS SECTION.
27

SECTION 11
Cylinders & Bearings
Section Contents
Page
CYLINDERSp
Inspection
Resizing
Standard Bore Size
Aluminum Cylinders
Cast Iron Cylinders 10Hones TABLE NO. 8 13
BEARINGS
Ball 4Plain & DU
Plain Check 4PTO Bearing Repair Tool Chart, TABLE NO. 7 13
Reject Sizes, TABLE NO. 2 10Cam Gear, Check 5Install DU 8Install Steel Backed Aluminum 6Magneto Bearing Repair Tool Chart, TABLE NO. 6 12
Repair, Aluminum
NOTE: SPECIFICATION TABLES BEGIN ON PAGE 10 OF THIS SECTION.

INSPECTION
All Models
Always inspect the cylinder after engine disassembly.Visual inspection will show cracks, stripped bolt holes,broken fins or cylinder wall damage.
Use Telescoping Gauge (4), Tool #19404, shown in themiddle (2) position, Fig. 1, with a dial caliper, or use an
inside micrometer to measure bore size at right anglesto cylinder bore.
TABLE NO. 1, Specifications, lists the standard boresizes.
Measure the cylinder bore at right angles at each ofthree locations. Measure at the top (1), middle (2) andbottom (3) of piston ring travel.
If the bore is more than .003" (.08 mm) oversize, or.002" (.04 mm) out of round on cast iron cylinders, or.003" (.06 mm) out of round on aluminum cylinders, itmust be resized, or see NOTE below.
Fig. 1
NOTE: Chrome ring sets are available for some engine models. See Service Bulletin #479 or Illustrated Parts List.Chrome rings are used to control oil consumption in bores worn up to .005" (.13 mm) over standard. Thecylinder bore receiving chrome rings does not need glaze breaking or cross hatch. If glaze breaking orinstalling of cross hatch is desired, the entire engine block must be thoroughly cleaned in hot water usingcommon dish soap or other commercially available soap.
To install a proper Crosshatch, see "Cylinder Finish" on page 4.
NOTE: When installing new non-chrome piston rings in a cylinder bore that is within specification, the bore shouldbe reconditioned. Correct cylinder cross hatch ensures proper ring lubrication and break-in. See "CylinderFinish," page 4. Some engine models produced at the factory have diamond bored cylinders which do notexhibit a cross hatch finish. The diamond bore cylinders are reconditioned using the same procedure as aconventional cylinder.
RESIZING CYLINDER BORE
Ab^^?. T0 EXACTLY 01°" (-25 mm). -020" (.51 mm), OR .030" (.76 mm) OVER STANDARD BORE SIZEAS SHOWN IN TABLE NO. 1, SPECIFICATIONS. If this is done accurately, the stock oversize piston and rings will fitcorrectly and proper clearances will be maintained. Cylinders, either cast iron or aluminum, can be accurately resizedwith hone sets listed in TABLE NO. 8, Specifications.
Use stones and lubrication recommended by hone manufacturers for various cylinder bores to obtain proper cylinderwall finish. '
If a boring bar is used, a hone must be used after the boring operation to produce the correct cylinder wall finish.
Honing can be done with a portable electric drill, or a drill press.
NOTE: SPECIFICATION TABLES BEGIN ON PAGE 10 OF THIS SECTION.
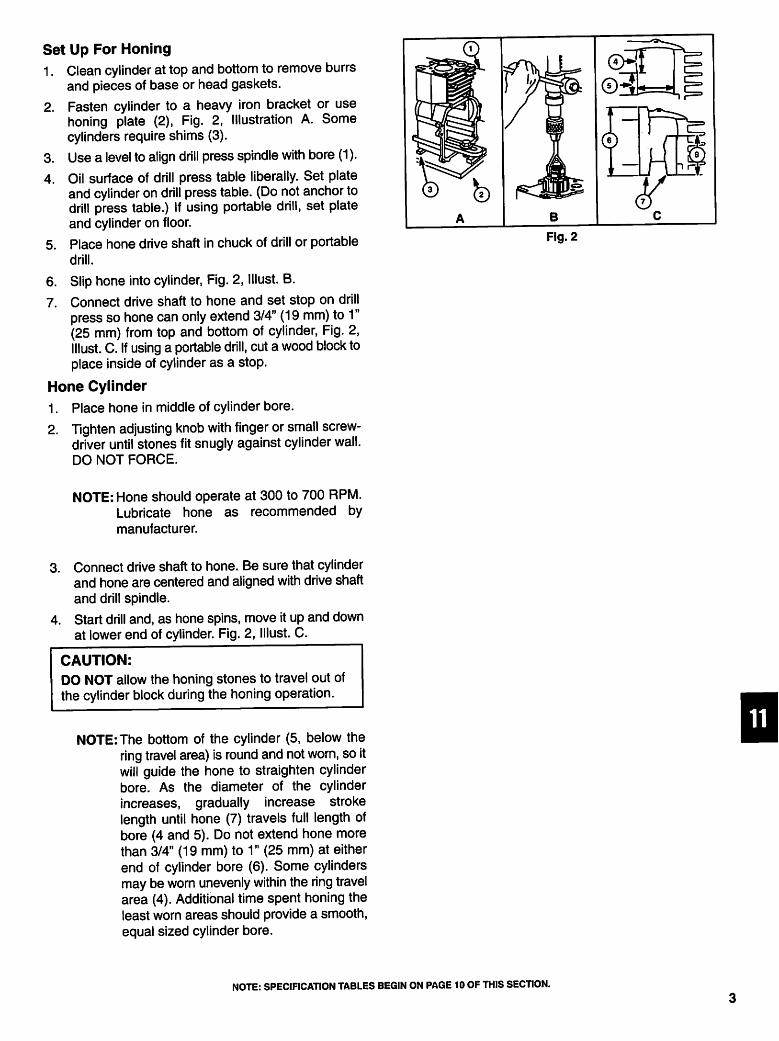
Set Up For Honing
1. Clean cylinder at top and bottom to remove burrs
and pieces of base or head gaskets.
2. Fasten cylinder to a heavy iron bracket or use
honing plate (2), Fig. 2, Illustration A. Some
cylinders require shims (3).
3. Use a level to align drill press spindle with bore (1).
4. Oil surface of drill press table liberally. Set plate
and cylinder on drill press table. (Do not anchor to
drill press table.) If using portable drill, set plate
and cylinder on floor.
5. Place hone drive shaft in chuck of drill or portable
drill.
6. Slip hone into cylinder, Fig. 2, Illust. B.
7. Connect drive shaft to hone and set stop on drill
press so hone can only extend 3/4" (19 mm) to 1"
(25 mm) from top and bottom of cylinder, Fig. 2,
Illust. C. If using a portable drill, cut a wood block to
place inside of cylinder as a stop.
Hone Cylinder
1. Place hone in middle of cylinder bore.
2. Tighten adjusting knob with finger or small screw
driver until stones fit snugly against cylinder wall.
DO NOT FORCE.
NOTE: Hone should operate at 300 to 700 RPM.
Lubricate hone as recommended by
manufacturer.
3. Connect drive shaft to hone. Be sure that cylinder
and hone are centered and aligned with drive shaft
and drill spindle.
4. Start drill and, as hone spins, move it up and down
at lower end of cylinder. Fig. 2, Illust. C.
CAUTION:
DO NOT allow the honing stones to travel out of
the cylinder block during the honing operation.
NOTE: The bottom of the cylinder (5, below the
ring travel area) is round and not worn, so it
will guide the hone to straighten cylinder
bore. As the diameter of the cylinder
increases, gradually increase stroke
length until hone (7) travels full length of
bore (4 and 5). Do not extend hone more
than 3/4" (19 mm) to 1" (25 mm) at either
end of cylinder bore (6). Some cylinders
may be worn unevenly within the ring travel
area (4). Additional time spent honing the
least worn areas should provide a smooth,
equal sized cylinder bore.
Fig. 2
D
NOTE: SPECIFICATION TABLES BEGIN ON PAGE 10 OF THIS SECTION.

5. As cutting tension decreases, stop hone andtighten adjusting knob.
6. Check cylinder bore frequently after cooling, withan accurate micrometer.
NOTE: On cast iron cylinders, change to finishing
stones when within .001" (.04 mm) of
desired size.
ALWAYS HONE .010" (.38 mm), .020" (.51 mm), OR.030" (.76 mm) ABOVE THE STANDARDDIMENSIONS IN TABLE NO. 1.
Cylinder Finish
The finish on a resized or reconditioned cylindershould have a 45 degree (1) Crosshatch appearance,Fig. 3. Proper stones, lubrication and drill speed alongwith rapid movement of hone within the cylinder duringthe last few strokes, will produce this finish.
Cylinder Cleaning
NOTE: It is most important that the entire cylinder
and crankcase be thoroughly cleaned afterhoning.
Fig. 3
Wash the cylinder and crankcase carefully incommercial parts cleaning solvent. Then washcylinder and crankcase thoroughly using a stiff brushwith SOAP AND HOT WATER. Clean until all traces ofhoning grit are gone.
D
NOTE: Honing grit is highly abrasive and will
cause rapid wear to all the internal engine
components unless it is completely
removed.
BEARINGS
Ball Bearings (See Section 10)
Plain Bearings
Checking
Bearings should be replaced if scored or if plug gauge(1) will enter. Try gauge at several locations in bearing,Fig. 4. See gauge listing in TABLE NO. 6 or 7,Specifications. If gauge is not available, refer toTABLE NO. 2, Specifications, for reject dimensions.
Fig. 4
NOTE: SPECIFICATION TABLES BEGIN ON PAGE 10 OF THIS SECTION.

Check Cam Gear Bearing
Check cam gear bearing using Tool #19164, Plug
Gauge (2), as shown, Fig. 5. If 1/4" (6 mm) or more ofgauge enters bearing bore, bearing is worn beyondreject, and the cylinder, sump or crankcase cover must
be replaced.
NOTE: On Model Series 111200,112200,111900,
112900, Tool #19164, Plug Gauge is used
on the sump or crankcase cover cam gear
bearing. Reject size for cylinder cam gear
bearing is .443" (11.00 mm) or larger. On
auxiliary drive Model Series 110980, PTO
reject size is .493" (12.52 mm.) No gauge is
available for these bearings.
REPAIR CYLINDER AND SUMP OR CRANK
CASE COVER BEARINGS
Aluminum Cylinder Engines
Most aluminum cylinder engines use the aluminumcylinder material as the bearing surface. If the bearingis worn beyond reject, as measured by plug gauge
listed in TABLE NO. 6, (Magneto side), or
TABLE NO. 7, (PTO side), the bearings can bereamed out and rebushed with either a steel backedaluminum or a DU bearing. If gauge is not available,refer to TABLE NO. 2, for reject dimensions. Refer toIllustrated Parts List by Model Series and Type
Number for bearing part numbers.
Some engines are built with replaceable DU or needlebearing. Measure DU bearings as noted above.
1. Select tools needed to repair bearing from Table
No. 6.
Typical tools include: flat washers (1), large valve
springs (2), wing nut (3), pilot, Tool #19066 (4),
counterbore reamer (5), threaded extension (6,
optional), reamer guide bushing (7), pilot guide
bushing (8), Fig. 6.
2. Remove and discard oil seal from bearing to be
repaired.
3. Place pilot guide bushing (8) in the bearing
opposite the bearing to be repaired (10). Flange of
bushing should be on the inside of the crankcase.
NOTE: Pilot (4), can be modified by welding a
4-1/2" (114 mm) long, 3/8" (9 mm) dia.
threaded extension (6), to the end of the
tool.
If the tool is modified, place pilot guide
bushing flange (8) on the outside of
crankcase, Fig. 6.
Fig. 5
000 0
? / i —L A
Fig. 6
D
4. Assemble the flat washers (1), large valve springs
(2), reamer (5), and wing nut (3) to pilot tool.
NOTE: SPECIFICATION TABLES BEGIN ON PAGE 10 OF THIS SECTION.
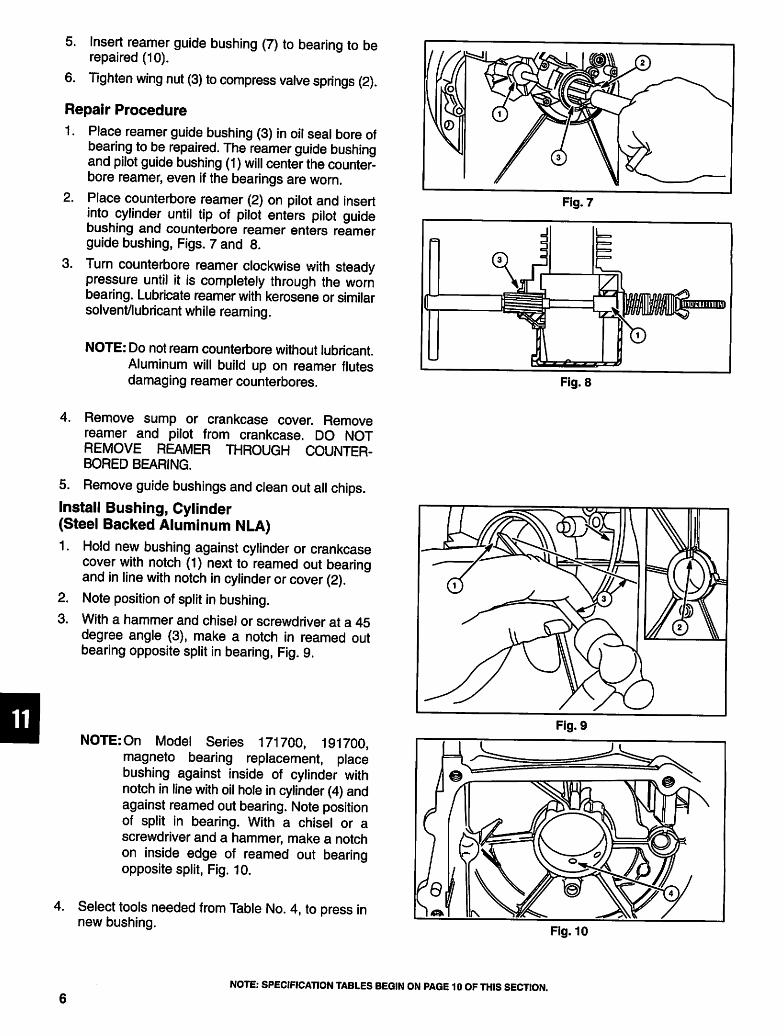
1.
2.
3.
5. Insert reamer guide bushing (7) to bearing to berepaired (10).
6. Tighten wing nut (3) to compress valve springs (2).
Repair Procedure
Place reamer guide bushing (3) in oil seal bore ofbearing to be repaired. The reamer guide bushing
and pilot guide bushing (1) will center the counter
bore reamer, even if the bearings are worn.
Place counterbore reamer (2) on pilot and insertinto cylinder until tip of pilot enters pilot guidebushing and counterbore reamer enters reamerguide bushing, Figs. 7 and 8.
Turn counterbore reamer clockwise with steadypressure until it is completely through the worn
bearing. Lubricate reamer with kerosene or similarsolvent/lubricant while reaming.
NOTE: Do not ream counterbore without lubricant.
Aluminum will build up on reamer flutes
damaging reamer counterbores.
4. Remove sump or crankcase cover. Removereamer and pilot from crankcase. DO NOT
REMOVE REAMER THROUGH COUNTER-BORED BEARING.
5. Remove guide bushings and clean out all chips.
Install Bushing, Cylinder
(Steel Backed Aluminum NLA)
1.
2.
3.
Hold new bushing against cylinder or crankcasecover with notch (1) next to reamed out bearing
and in line with notch in cylinder or cover (2).
Note position of split in bushing.
With a hammer and chisel or screwdriver at a 45
degree angle (3), make a notch in reamed outbearing opposite split in bearing, Fig. 9.
HI
4.
NOTE: On Model Series 171700, 191700,
magneto bearing replacement, place
bushing against inside of cylinder with
notch in line with oil hole in cylinder (4) and
against reamed out bearing. Note position
of split in bearing. With a chisel or a
screwdriver and a hammer, make a notch
on inside edge of reamed out bearing
opposite split, Fig. 10.
Select tools needed from Table No. 4, to press innew bushing.
Fig. 7
Fig. 8
Fig. 10
NOTE: SPECIFICATION TABLES BEGIN ON PAGE 10 OF THIS SECTION.
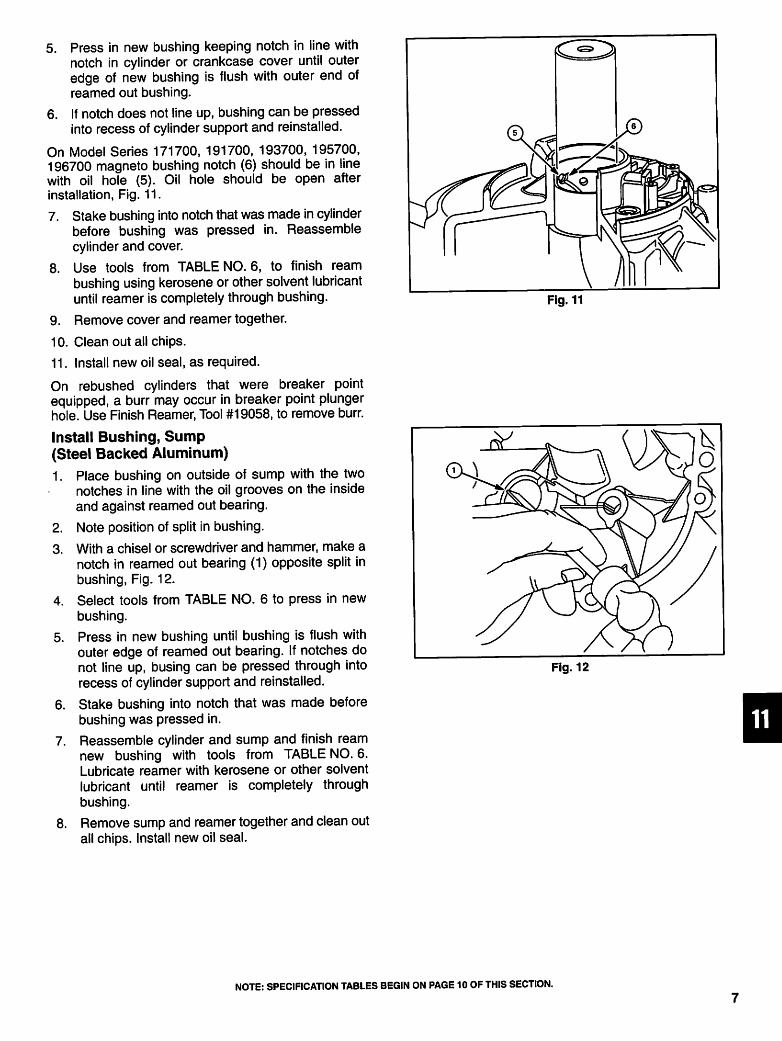
5. Press in new bushing keeping notch in line with
notch in cylinder or crankcase cover until outer
edge of new bushing is flush with outer end of
reamed out bushing.
6. If notch does not line up, bushing can be pressed
into recess of cylinder support and reinstalled.
On Model Series 171700, 191700, 193700, 195700,
196700 magneto bushing notch (6) should be in linewith oil hole (5). Oil hole should be open after
installation, Fig. 11.
7. Stake bushing into notch that was made in cylinder
before bushing was pressed in. Reassemble
cylinder and cover.
8. Use tools from TABLE NO. 6, to finish ream
bushing using kerosene or other solvent lubricant
until reamer is completely through bushing.
9. Remove cover and reamer together.
10. Clean out all chips.
11. Install new oil seal, as required.
On rebushed cylinders that were breaker point
equipped, a burr may occur in breaker point plunger
hole. Use Finish Reamer, Tool #19058, to remove burr.
Install Bushing, Sump
(Steel Backed Aluminum)
1. Place bushing on outside of sump with the two
notches in line with the oil grooves on the inside
and against reamed out bearing.
2. Note position of split in bushing.
3. With a chisel or screwdriver and hammer, make a
notch in reamed out bearing (1) opposite split in
bushing, Fig. 12.
4. Select tools from TABLE NO. 6 to press in new
bushing.
5. Press in new bushing until bushing is flush with
outer edge of reamed out bearing. If notches do
not line up, busing can be pressed through into
recess of cylinder support and reinstalled.
6. Stake bushing into notch that was made before
bushing was pressed in.
7. Reassemble cylinder and sump and finish ream
new bushing with tools from TABLE NO. 6.
Lubricate reamer with kerosene or other solvent
lubricant until reamer is completely through
bushing.
8. Remove sump and reamer together and clean out
all chips. Install new oil seal.
Fig. 11
Fig. 12
D
NOTE: SPECIFICATION TABLES BEGIN ON PAGE 10 OF THIS SECTION.
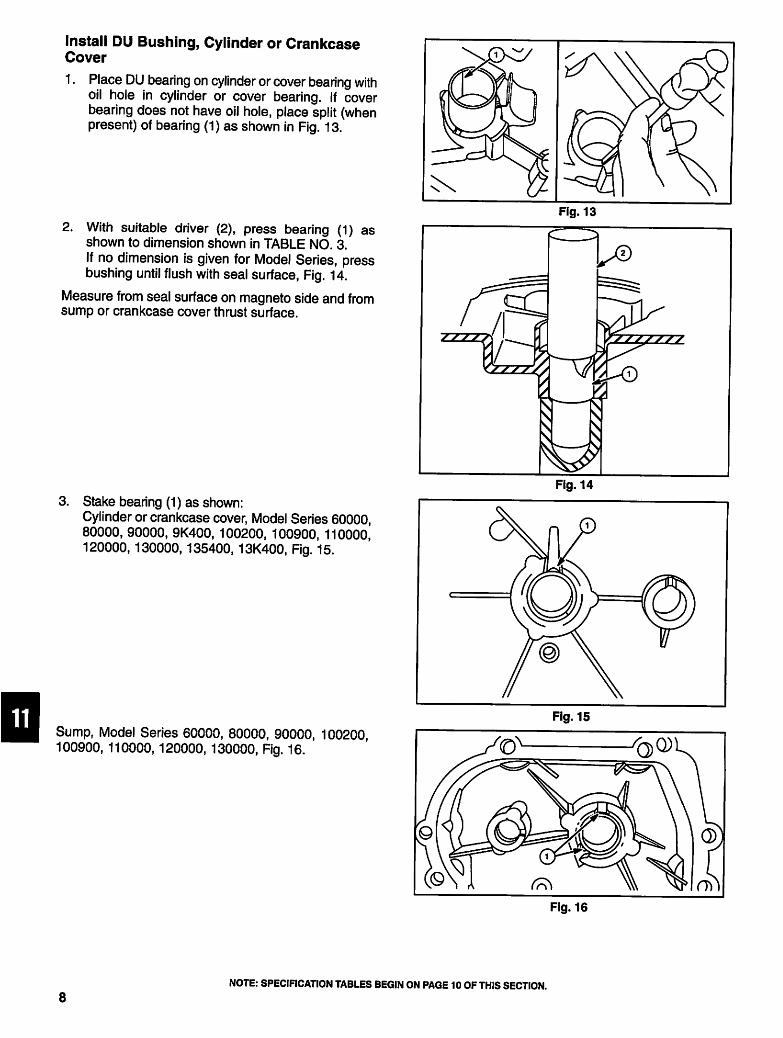
Install DU Bushing, Cylinder or CrankcaseCover
1. Place DU bearing on cylinder or cover bearing withoil hole in cylinder or cover bearing. If cover
bearing does not have oil hole, place split (whenpresent) of bearing (1) as shown in Fig. 13.
2. With suitable driver (2), press bearing (1) as
shown to dimension shown in TABLE NO. 3.
If no dimension is given for Model Series, pressbushing until flush with seal surface, Fig. 14.
Measure from seal surface on magneto side and fromsump or crankcase cover thrust surface.
3. Stake bearing (1) as shown:
Cylinder or crankcase cover, Model Series 60000,
80000, 90000, 9K400, 100200, 100900, 110000,
120000,130000,135400,13K400, Fig. 15.
D Sump, Model Series 60000, 80000, 90000, 100200,100900, 110000,120000, 130000, Fig. 16.
Fig. 16
NOTE: SPECIFICATION TABLES BEGIN ON PAGE 10 OF THIS SECTION.
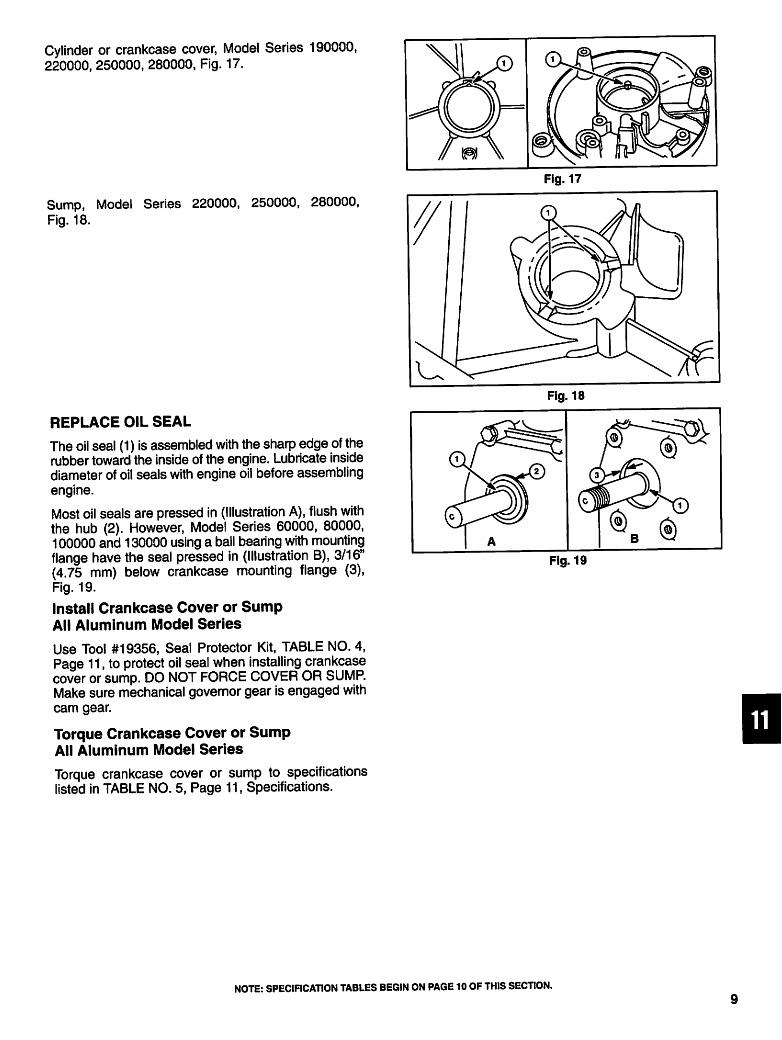
Cylinder or crankcase cover, Model Series 190000,
220000, 250000, 280000, Fig. 17.
Sump, Model Series 220000, 250000, 280000,
Fig. 18.
REPLACE OIL SEAL
The oil seal (1) is assembled with the sharp edge of therubber toward the inside of the engine. Lubricate insidediameter of oil seals with engine oil before assembling
engine.
Most oil seals are pressed in (Illustration A), flush withthe hub (2). However, Model Series 60000, 80000,100000 and 130000 using a ball bearing with mountingflange have the seal pressed in (Illustration B), 3/16"(4.75 mm) below crankcase mounting flange (3),
Fig. 19.
Install Crankcase Cover or Sump
All Aluminum Model Series
Use Tool #19356, Seal Protector Kit, TABLE NO. 4,Page 11, to protect oil seal when installing crankcase
cover or sump. DO NOT FORCE COVER OR SUMP.Make sure mechanical governor gear is engaged with
cam gear.
Torque Crankcase Cover or Sump
All Aluminum Model Series
Torque crankcase cover or sump to specifications
listed in TABLE NO. 5, Page 11, Specifications.
Fig. 19
D
NOTE: SPECIFICATION TABLES BEGIN ON PAGE 10 OF THIS SECTION.
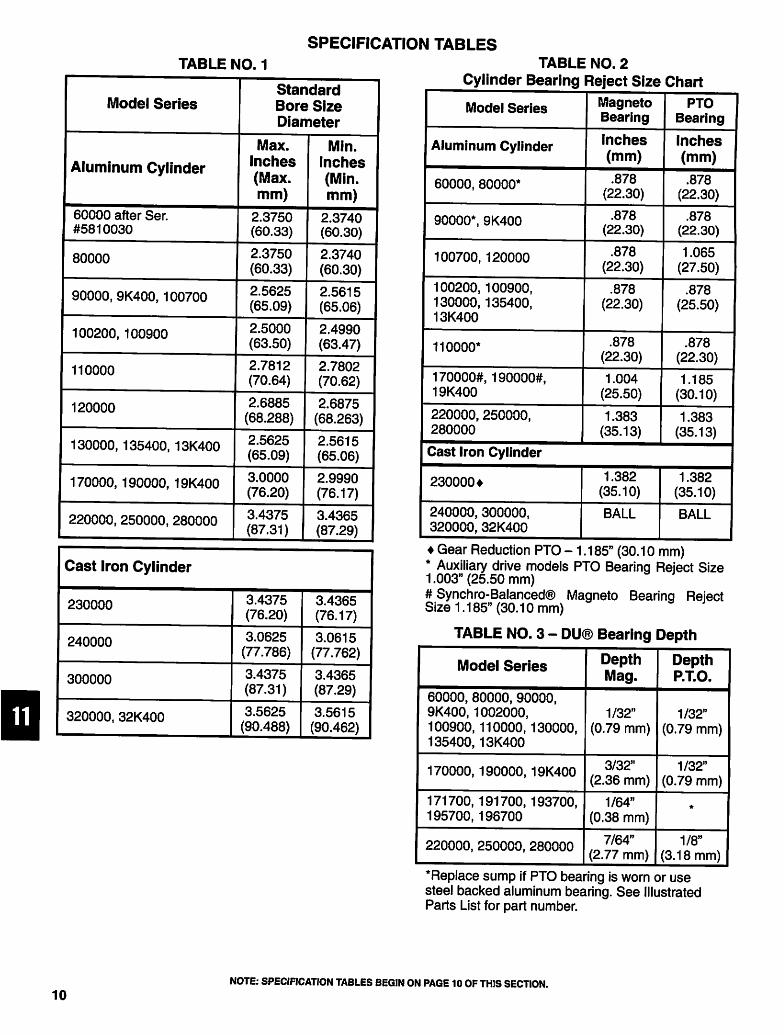
SPECIFICATION TABLES
TABLE NO. 1
D
Model Series
Aluminum Cylinder
60000 after Ser.
#5810030
80000
90000, 9K400,100700
100200, 100900
110000
120000
130000, 135400, 13K400
170000, 190000, 19K400
220000, 250000, 280000
Standard
Bore Size
Diameter
Max.
Inches
(Max.
mm)
2.3750
(60.33)
2.3750
(60.33)
2.5625
(65.09)
2.5000
(63.50)
2.7812
(70.64)
2.6885
(68.288)
2.5625
(65.09)
3.0000
(76.20)
3.4375
(87.31)
Min.
Inches
(Min.
mm)
2.3740
(60.30)
2.3740
(60.30)
2.5615
(65.06)
2.4990
(63.47)
2.7802
(70.62)
2.6875
(68.263)
2.5615
(65.06)
2.9990
(76.17)
3.4365
(87.29)
Cast Iron Cylinder
230000
240000
300000
320000, 32K400
3.4375
(76.20)
3.0625
(77.786)
3.4375
(87.31)
3.5625
(90.488)
3.4365
(76.17)
3.0615
(77.762)
3.4365
(87.29)
3.5615
(90.462)
TABLE
Cylinder Bearing
Model Series
Aluminum Cylinder
60000, 80000*
90000*. 9K400
100700, 120000
100200,100900,
130000,135400,
13K400
110000*
170000#, 190000#,
19K400
220000, 250000,
280000
.NO. 2
Reject Size
Magneto
Bearing
Inches
(mm)
.878
(22.30)
.878
(22.30)
.878
(22.30)
.878
(22.30)
.878
(22.30)
1.004
(25.50)
1.383
(35.13)
Chart
PTO
Bearing
Inches
(mm)
.878
(22.30)
.878
(22.30)
1.065
(27.50)
.878
(25.50)
.878
(22.30)
1.185
(30.10)
1.383
(35.13)
Cast Iron Cylinder
230000♦
240000, 300000,
320000, 32K400
1.382
(35.10)
BALL
1.382
(35.10)
BALL
♦ Gear Reduction PTO -1.185" (30.10 mm)
* Auxiliary drive models PTO Bearing Reject Size1.003" (25.50 mm)
# Synchro-Balanced® Magneto Bearing RejectSize 1.185" (30.10 mm)
TABLE NO. 3 - DU® Bearing Depth
Model Series
60000, 80000, 90000,
9K400, 1002000,
100900, 110000,130000,
135400,13K400
170000,190000,19K400
171700, 191700, 193700,
195700,196700
220000, 250000, 280000
Depth
Mag.
1/32"
(0.79 mm)
3/32"
(2.36 mm)
1/64"
(0.38 mm)
7/64"
(2.77 mm)
Depth
P.T.O.
1/32"
(0.79 mm)
1/32"
(0.79 mm)
*
1/8"
(3.18 mm)
*Replace sump if PTO bearing is worn or use
steel backed aluminum bearing. See IllustratedParts List for part number.
10
NOTE: SPECIFICATION TABLES BEGIN ON PAGE 10 OF THIS SECTION.

TABLE NO. 4
Seal Protectors
Tool #1
19334/1
19334/2
19334/3
19334/4
19334/5
19334/6
19334/7
19356/8
19356/9
Color
White
Red
Blue
Orange
Brown
Green
Yellow
Purple
Black
Crankshaft
Journal Size
.787"
(19.98 mm)
.875"
(22.23 mm)
.984"
(24.99 mm)
1.000"
(25.40 mm)
1.062"
(26.97 mm)
1.181"
(30.00 mm)
1.378"
(35.00 mm)
1.317"
(33.45 mm)
1.503"
(38.18 mm)
TABLE NO. 5
Crankcase Cover
or Sump Torque
Model Series
60000, 80000, 90000,
9K400, 120000
100200, 100900
100700,110000
130000, 135400, 13K400
140000, 170000, 190000,
19K400, 220000, 250000,
280000
280000, 32K400
Torque In. Lbs.
(Torque Nm)
85
(10)
120
(14)
85
(10)
120
(14)
140, see A below
(16)
200, see B below
(23)
Dog Point
Q
Thread
Sealant
/.eg
Washer
B
D
NOTE: SPECIFICATION TABLES BEGIN ON PAGE 10 OF THIS SECTION.
11

TABLE NO. 6
Magneto Bearing Repair Tool Chart
D
Aluminum
Model Series
60000, 80000, 90000
92590*. 92990*.
110900*, 111900*.
112900
100200, 100900,
130000
100700, 120000
170000, Steel
Backed
190000, Aluminum
192700, Bearing
170000, DU
190000, Bearing
192700
194700
171700, Steel
Backed
191700, Aluminum
193700, Bearing
171700, DU
191700, Bearing
193700
195700
196700
220000, 250000,
280000
Cylinder
Support
19123
19123
19123
19123
19227
19227
19227
19227
19227
Pilot
19096
19096
19096
19096
19096
-
19096
19096
19220*
Counter-
bore
Reamer
19099
19099
19099
19099
19172
-
19174
19281
19224*
Reamer
Guide
Bushing
Mag.
19101
19101
19101
19101
19170
-
19201
19301
19222*
Bushing
Driver
19124
19124
19124
19124
19179
19179
19179
19179
19226*
Pilot
Guide
Bushing
PTO
19094*
19097b
19168
19373
19169
-
19169
19169
19220*
Finish
Reamer
19095**
19095**
190954
19095*
19173**
-
19175**
-
-
Plug
Gauge
19166
19166
19166
19166
19178
19178
19178
19178
19219
Cast Iron
Model Series
300000, 320000 Replace Support and Cover 19117
♦ Tools for steel backed aluminum bushing, only in positions shown.e Use sump or crankcase cover with 7/8" (22 mm) diameter bearing and 19094 guide• Tools for DU Bushing only, in positions shown.* Plain bearing crankcase cover.
b Ball bearing crankcase cover.
NOTE.-Tools listed may be used to install either steel backed aluminum bushing or DU bushing except as notedabove.
12
NOTE: SPECIFICATION TABLES BEGIN ON PAGE 10 OF THIS SECTION.

TABLE NO. 7
PTO Bearing Repair Tool Chart
Aluminum
Model Series
60000, 80000,
90000, 9K400
92590*. 92990*,
110900*. 111900*.
112900
100200,100900,
130000. 135400,
13K400
100700,120000
170000,190000,
192700,194700,
171700,191700,
193700,195700,
196700, 19K400
220000, 250000,
280000
Cylinder
Support
19123
19123
19123
Pilot
19096
19096
19096
Counter-
bore
Reamer
19099
19099
19172
Reamer
Guide
Bushing
Mag.
19100
19101
19186V
19170H
Bushing
Driver
19124
19124
19124
Pilot
Guide
Bushing
PTO
19094
19094
19094
Finish
Reamer
19095**
19095*4
19173S
♦
Plug
Gauge
19166
-
19178
Replace Sump If Bearing is Worn or Damaged
19227
19227
19227
19096
19096
19223*
19174*
19174*
19224*
19171♦
19171♦
19222*
19179
19179
19226*
19168
19169
19220*
19175*
19175*
-
19178
19178
19219
Cast Iron Model Series
230000. 240000,
300000, 320000,
32K400
Replace Support and Cover 19117
♦ Tools for steel backed aluminum bushing, only in positions shown.
• Tools for DU Bushing only, in positions shown.
* Plain bearing crankcase cover.
■ Ball bearing crankcase cover.
NOTE:Tools listed may be used to install either steel backed aluminum
above.
TABLE NO. 8
Cylinder Hones
bushing or DU bushing except as noted
Hone Set #
19205
19205
19211
19211
Bore Material
Aluminum
Aluminum
Cast Iron
Cast Iron
Cast Iron
Cast Iron
Bore Size
1-7/8 to 2-3/4"
(48 mm to 70 mm)
2-5/8 to 3-1/2"
(67 mm to 89 mm)
1-7/8 to 2-3/4"
(48 mm to 70 mm)
1-7/8 to 2-3/4"
(48 mm to 70 mm)
2-1/2 to 3-5/16"
(63 mm to 84 mm)
3-5/16 to 4-1/8"
(84 mm to 105 mm)
Stone Set #
19206
19207
19303 (60 grit)
19304 (220 grit)
19212 (60 grit)
19213 (220 grit)
19212 (60 grit)
19213 (220 grit)
Carrier Set #
19205
19205
19205
19205
19214
19214
19215
19215
NOTE: SPECIFICATION TABLES BEGIN ON PAGE 10 OF THIS SECTION.
13
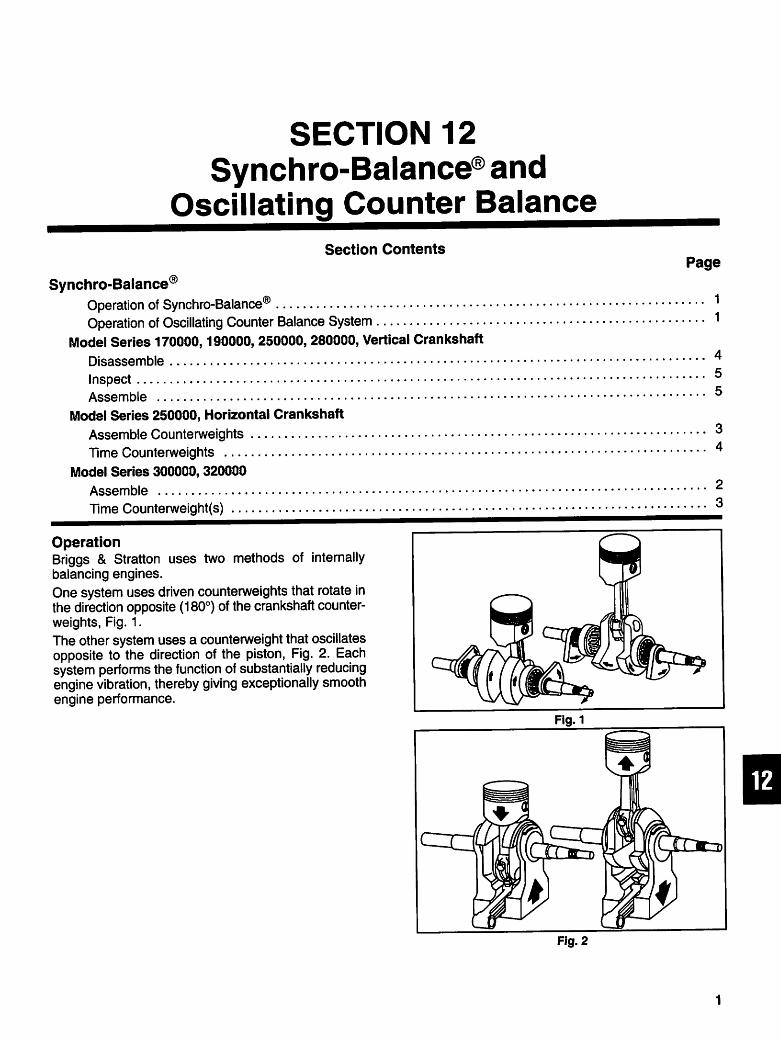
SECTION 12
Synchro-Balance® and
Oscillating Counter Balance
Section ContentsPage
Synchro-Balance®
Operation of Synchro-Balance® 1Operation of Oscillating Counter Balance System 1
Model Series 170000,190000,250000,280000, Vertical Crankshaft
Disassemble
Inspect
Assemble
Model Series 250000, Horizontal Crankshaft
Assemble Counterweights
Time Counterweights
Model Series 300000,320000
Assemble
Time Counterweight(s) 3
Operation
Briggs & Stratton uses two methods of internally
balancing engines.
One system uses driven counterweights that rotate in
the direction opposite (180°) of the crankshaft counter
weights, Fig. 1.
The other system uses a counterweight that oscillates
opposite to the direction of the piston, Fig. 2. Each
system performs the function of substantially reducing
engine vibration, thereby giving exceptionally smooth
engine performance.
Fig. 2

ASSEMBLE AND TIME ROTATING
SYNCHRO-BALANCE®, HORIZONTALCRANKSHAFT CAST IRON ENGINES
1.
2.
3.
4.
5.
6.
7.
m
WARNING
Rapid retraction of starter cord (kick
back) will pull hand and arm toward
engine faster than you can let go.
Broken bones: fractures, bruises or
sprains could result.
• On some Model Series 326400 engines, theSynchro-Balance® cover did not have thebalance gear and bearing.
DO NOT ATTEMPT TO START THESEENGINES until balance gear and bearing arereinstalled to prevent kickback when starting.
Remove all traces of oil or dirt from tapered
surfaces of drive gears and camshaft beforeassembling gears to camshaft.
Rotate crankshaft until piston is at top dead center.
Remove 5-1/2" (14 mm) cam gear shaft bolt (2).
Place magneto end timing gear (6) on cam geartaper.
Install bolt (2) with Belleville washer (1), fingertight, Fig. 3.
NOTE: On Model Series 300400 and 320400 only,
place PTO-end timing gear on the other
end of camshaft. Install short cam gear bolt
with Belleville washer, finger tight, Fig. 4.
To time drive gears, insert short pieces of 1/4" (6
mm) rod (3) through 1/4" (6 mm) holes in drive
gear, and into locating holes in crankshaft bearing
support plates, Fig. 3.
NOTE: For Model Series 300400 and 320400 alsosee Fig. 4.
With 1/4" (6 mm) rods in place and piston at
exactly TOP DEAD CENTER, torque drive gear
bolt(s) to 200 in. lbs. (23 Nm). Be certain pistondoes not move.
8. Remove the 1/4" (6 mm) rods.
9. Install idler gear(s) (5).
10. Install snap-in "E" rings (4) to retain gears. No
further timing is necessary, Fig. 3 and Fig. 4.
The counterweights and ball bearings are an integral
part of the covers and cannot be serviced. Lubricate
ball bearings and gears with a few drops of engine oil.
Fig. 4
NOTE: Piston must be at top dead center.

Time Counterweight
1. Remove the timing hole screw (5) from flywheel
cover (1) or PTO cover (2), Fig. 5.
2. Insert a short piece of 1 /8" (3 mm) rod (3) through
timing hole in cover and into machining hole in
counterweight, Fig. 5. The rod holds the
counterweight in the proper position while cover is
installed on engine.
NOTE: One of the screws holding the breather can
also be used, instead of 1/8" (3 mm) rods.
3. Install cover assembly and gasket, using seal
protector to avoid damage to oil seal. Make sure
that bolt holes line up with tapped holes in cylinder.
4. To minimize gear backlash, push magneto side
cover toward idler gear. Torque bolts to 120 in. lbs.
(14 Nm).
NOTE: For Model Series 300400 and 320400
repeat above for PTO cover. Torque bolts
to 200 in. lbs. (23 Nm).
Fig. 5
5. Remove timing rods or screws.
6. Coat threads of timing hole screws (5) with a non-
hardening sealant such as Permatex® II. Installscrew and fiber sealing washer (4).
ROTATING COUNTERBALANCE
HORIZONTAL CRANKSHAFT
MODEL SERIES 250000
This Model Series utilizes two gear driven counter
weights in constant mesh with the crankshaft gear.
The cut-away view illustrates these gears, mounted in
the crankcase cover. The Synchro-Balance® counterweights rotate in opposite direction to crankshaft
rotation, Fig. 6.
The gear driven counterweights must be properly
aligned when cover is installed.
If counterweights are removed from crankcase cover,
exercise care in handling or cleaning to prevent loss of
needle bearings.
Assemble Counterweights
1. Install counterweights on shafts in crankcase
cover.
2. Install counterweight retainers. Torque screws to
50 in. lbs. (6 Nm).
E3
Fig. 6

Time Counterweights Gears
1. Remove two small screws (1) from cover.
2. Insert 1/8" (3 mm) diameter locating pins (3)
through screw hole and into timing hole provided in
counterweights (2), Fig. 7.
NOTE: Breather screws and extended dipstick
tube screw may be used in place of
locating pins.
3. With piston at TOP DEAD CENTER, install the
crankcase cover assembly and cover gasket.
4. Remove the locating pins or screws.
5. Coat threads of timing hole screws with a non-
hardening sealant such as Permatex® II. Installscrews and fiber sealing washers.
OSCILLATING COUNTERBALANCE SYSTEMVERTICAL CRANKSHAFT
Disassemble
1. Remove sump.
2. Open connecting rod lock (when used) and
remove connecting rod screws.
3. Remove connecting rod and piston (1) fromengine.
4. Remove crankshaft and counterweight assembly(2), Fig. 8.
5. Remove crankshaft gear. If gear is tight, pry gear
off with two screwdrivers, Fig. 9. Do not damagegear.
NOTE: Save timing gear key on Model Series
171700. On current production Model
Series 252700, 253700, 255700, 256700,
and all 280000 engines the woodruff key
(3) can be removed if required, Fig. 9.
E3
Fig. 7 - Timing Counterbalance Gears
Fig. 9
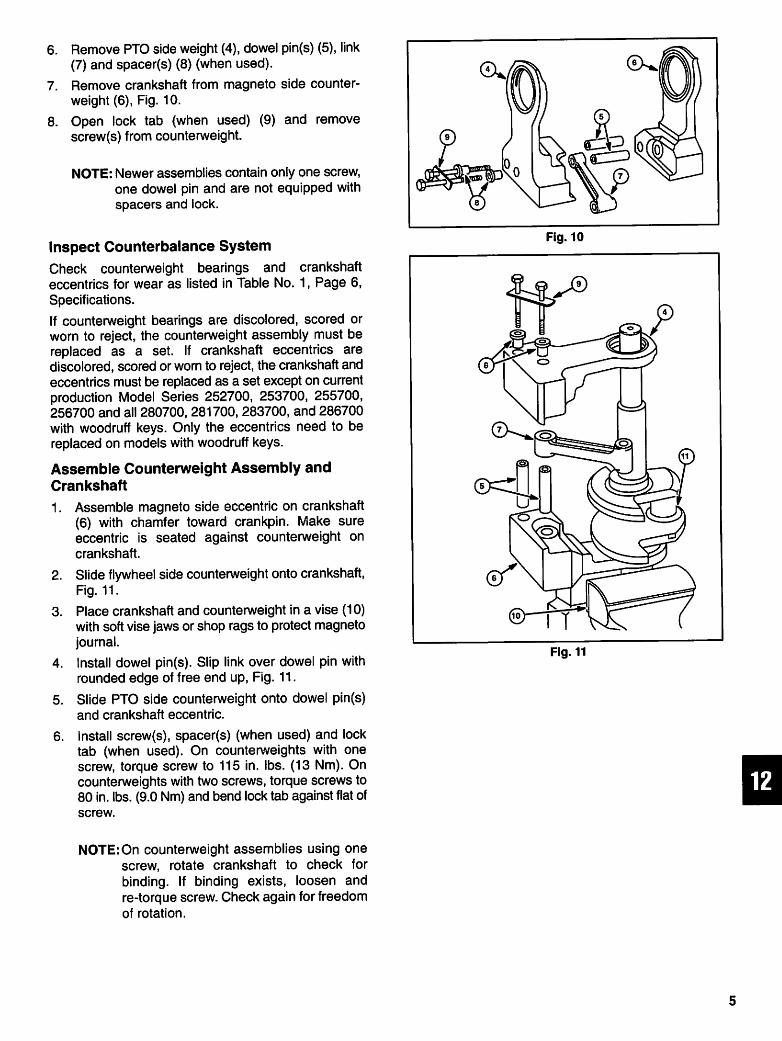
6. Remove PTO side weight (4), dowel pin(s) (5), link
(7) and spacer(s) (8) (when used).
7. Remove crankshaft from magneto side counter
weight (6), Fig. 10.
8. Open lock tab (when used) (9) and remove
screw(s) from counterweight.
NOTE: Newer assemblies contain only one screw,
one dowel pin and are not equipped with
spacers and lock.
Inspect Counterbalance System
Check counterweight bearings and crankshaft
eccentrics for wear as listed in Table No. 1, Page 6,
Specifications.
If counterweight bearings are discolored, scored or
worn to reject, the counterweight assembly must be
replaced as a set. If crankshaft eccentrics are
discolored, scored or worn to reject, the crankshaft and
eccentrics must be replaced as a set except on current
production Model Series 252700, 253700, 255700,
256700 and all 280700, 281700, 283700, and 286700
with woodruff keys. Only the eccentrics need to be
replaced on models with woodruff keys.
Assemble Counterweight Assembly and
Crankshaft
1. Assemble magneto side eccentric on crankshaft
(6) with chamfer toward crankpin. Make sure
eccentric is seated against counterweight on
crankshaft.
2. Slide flywheel side counterweight onto crankshaft,
Fig. 11.
3. Place crankshaft and counterweight in a vise (10)
with soft vise jaws or shop rags to protect magneto
journal.
4. Install dowel pin(s). Slip link over dowel pin with
rounded edge of free end up, Fig. 11.
5. Slide PTO side counterweight onto dowel pin(s)
and crankshaft eccentric.
6. Install screw(s), spacer(s) (when used) and lock
tab (when used). On counterweights with one
screw, torque screw to 115 in. lbs. (13 Nm). On
counterweights with two screws, torque screws to
80 in. lbs. (9.0 Nm) and bend lock tab against flat of
screw.
Fig. 11
NOTE: On counterweight assemblies using one
screw, rotate crankshaft to check for
binding. If binding exists, loosen and
re-torque screw. Check again for freedom
of rotation.

If woodruff key was removed, re-install in crank
shaft. Slide crankshaft gear onto crankshaft with
chamfer toward eccentric. If gear is tight, heat gearto expand it before installing.
Lay cylinder on its side with cylinder head to the
left. Use Seal Protector Kit, Tool #19334 or #19356in magneto crankshaft seal.
9. Place crankshaft and counterweight assembly into
cylinder. Start magneto journal into magnetobearing.
10. Align link with crankcase link pin and push
assembly into place, Fig. 12.
11. Install connecting rod and piston with lubrication
hole in rod toward magneto side. This will exposerod assembly marks to view.
12. Assemble the cap screws and screw locks with
dipper (Model Series 171700) toward cam gearside.
13. Torque screws and bend up locks. Install tappets,
cam gear, etc. in usual manner, Section 10.
TABLE NO. 1
Model Series
170000, 190000
250000
280000
Eccentric
1.870"
(47.51 mm)
2.120"
(53.85 mm)
2.202"
(55.93 mm)
Bearing
1.881"
(47.78 mm)
2.131"
(54.13 mm)
2.212"
(56.18 mm)
Fig. 12