Gateway ECU connectivity configuration Date - NHTSA
33
L636- A.08.19 To: Official After-Sales Network Subject: Gateway ECU connectivity configuration Date: 02 September 2019 Pages 33 Rev.00 This document and its contents are strictly confidential and private and are provided for informational purposes only and may not be cop- ied, recorded, transmitted, further distributed to any other subject, or published, in whole or in part, by any means or in any form and for any purpose, without the prior written authorization of Automobili Lamborghini S.p.A. All copyrights are the property of Automobili Lamborghini S.p.A based on the applicable laws. The company reserves the right to make updates and modifications doc. no.: L/V6_M06 Rev.[06] 1/33 Campaign code: L636-A.08.19. Campaign Name: Gateway ECU connectivity configuration. Model: Urus. Model year: MY 2019 Special or limited editions: All versions Markets: Australia, Hong Kong, Malaysia, New Zealand, Sin- gapore, Taiwan, Turkey. VIN identification: From KLA00282 to KLA01676 Important: before proceeding with the repair, con- nect to the warranty portal and use VIN Info to check that: The vehicle is actually affected by the instruc- tions given in this bulletin; some vehicles may not be, even when their VIN is included. Procedures are identified by a letter (e.g. A, B or C….etc., whose differences will be ex- plained later in this bulletin); make sure that the spare parts corresponding to the assigned procedure are used. Example N.B. Procedure A will be available only when the instruc- tions require a preliminary check to be performed to determine whether or not the vehicle actually needs updating. Network information notice. As a result of continuous product monitoring, Auto- mobili Lamborghini S.p.A. has detected that in some markets a warning messege about missing data con- nection may appear on the infotainment display. Solutions for the network: Replacement and update of the gateway ECU config- uration. IMPORTANT: Before carrying out the campaign in question, ensure that the campaigns “L636A0418” and “L636A0419” have been performed on the vehicle. In the event that it has not been performed and is in the “VIN identification” list, first carry out the campaigns “L636A0418” and“L636A0419”, and then the campaign “L636A0819”. Replacement parts: IMPORTANT! When the VIN is entered in the LIASS system, the specific operation to be performed on that vehicle will be specified. On the basis of the operation dis- played on LIASS, please order one of the following codes associated with the operations concerned, where suggested: Operation B, C, F: 4ML998049 Operation D, E, G: 4ML998049A
-
Upload
khangminh22 -
Category
Documents
-
view
4 -
download
0
Transcript of Gateway ECU connectivity configuration Date - NHTSA

L636-
A.08.19
To: Official After-Sales Network
Subject: Gateway ECU connectivity configuration
Date: 02 September 2019
Pages 33
Rev.00
This document and its contents are strictly confidential and private and are provided for informational purposes only and may not be cop-
ied, recorded, transmitted, further distributed to any other subject, or published, in whole or in part, by any means or in any form and for
any purpose, without the prior written authorization of Automobili Lamborghini S.p.A. All copyrights are the property of Automobili Lamborghini S.p.A based on the applicable laws. The company reserves the right to make updates and modifications
doc. no.: L/V6_M06 Rev.[06]
1/33
Campaign code:
L636-A.08.19.
Campaign Name:
Gateway ECU connectivity configuration.
Model:
Urus.
Model year:
MY 2019
Special or limited editions:
All versions
Markets:
Australia, Hong Kong, Malaysia, New Zealand, Sin-
gapore, Taiwan, Turkey.
VIN identification: From KLA00282 to KLA01676
Important: before proceeding with the repair, con-
nect to the warranty portal and use VIN Info to check
that:
The vehicle is actually affected by the instruc-
tions given in this bulletin; some vehicles may
not be, even when their VIN is included.
Procedures are identified by a letter (e.g. A, B
or C….etc., whose differences will be ex-
plained later in this bulletin); make sure that
the spare parts corresponding to the assigned
procedure are used.
Example
N.B. Procedure A will be available only when the instruc-
tions require a preliminary check to be performed to
determine whether or not the vehicle actually needs
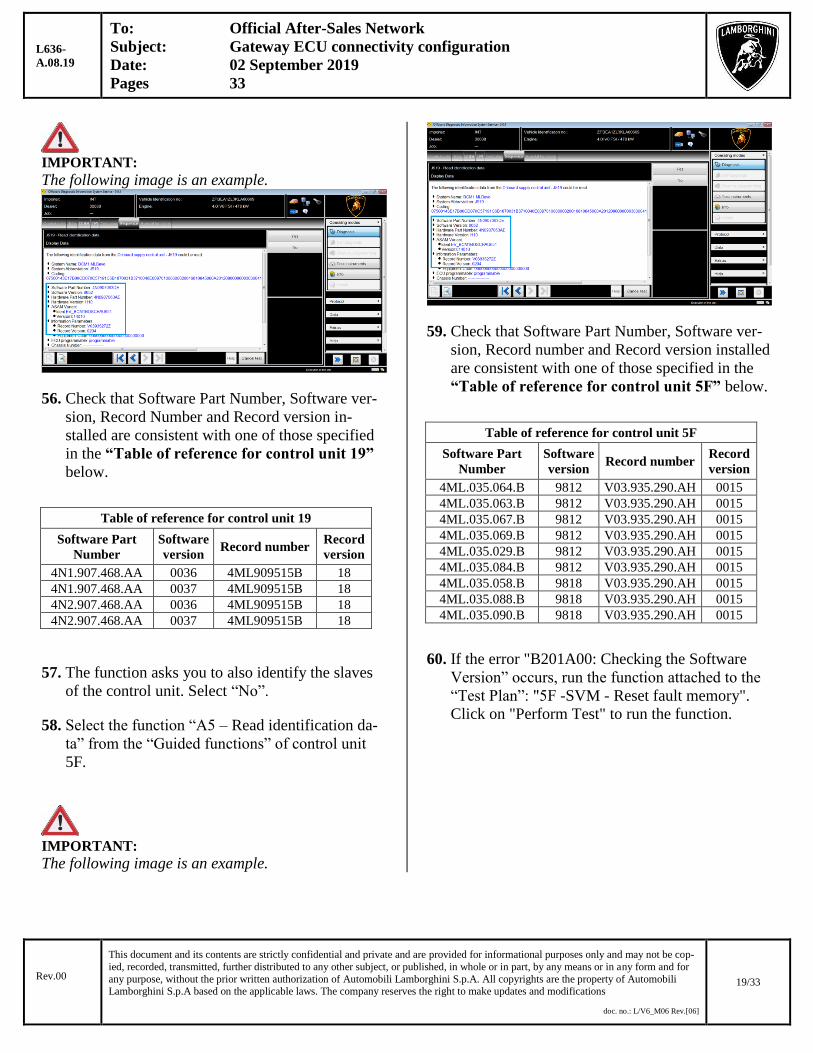
updating.
Network information notice.
As a result of continuous product monitoring, Auto-
mobili Lamborghini S.p.A. has detected that in some
markets a warning messege about missing data con-
nection may appear on the infotainment display.
Solutions for the network:
Replacement and update of the gateway ECU config-
uration.
IMPORTANT: Before carrying out the campaign in question, ensure that
the campaigns “L636A0418” and “L636A0419” have
been performed on the vehicle. In the event that it has not
been performed and is in the “VIN identification” list,
first carry out the campaigns “L636A0418”
and“L636A0419”, and then the campaign “L636A0819”.
Replacement parts:
IMPORTANT!
When the VIN is entered in the LIASS system, the
specific operation to be performed on that vehicle
will be specified. On the basis of the operation dis-
played on LIASS, please order one of the following
codes associated with the operations concerned,
where suggested:
Operation B, C, F: 4ML998049
Operation D, E, G: 4ML998049A

L636-
A.08.19
To: Official After-Sales Network
Subject: Gateway ECU connectivity configuration
Date: 02 September 2019
Pages 33
Rev.00
This document and its contents are strictly confidential and private and are provided for informational purposes only and may not be cop-
ied, recorded, transmitted, further distributed to any other subject, or published, in whole or in part, by any means or in any form and for
any purpose, without the prior written authorization of Automobili Lamborghini S.p.A. All copyrights are the property of Automobili Lamborghini S.p.A based on the applicable laws. The company reserves the right to make updates and modifications
doc. no.: L/V6_M06 Rev.[06]
2/33
P/N Kit Description Q
4ML998049
The kit contains:
- GW control unit; P/N: 4N1907468AA
- Clamp; P/N: 4ML971141
- Clamp; P/N: 4ML971141A
- Connector sponge; P/N: 191971790A
- Connector sponge; P/N: 3B0971790
- Clamps; P/N: 893971850C
- GW control unit bracket; P/N: 4M0907347
1
4ML998049A
The kit contains:
- GW control unit; P/N: 4N2907468AA
- Clamp; P/N: 4ML971141
- Clamp; P/N: 4ML971141A
- Connector sponge; P/N: 191971790A
- Connector sponge; P/N: 3B0971790
- Clamps; P/N: 893971850C
- GW control unit bracket; P/N: 4M0907347
1
Management of replaced parts:
Store the parts removed from the vehicle in a suitable
manner, marked with their barcode for identification
during visits by the competent Area Manager.
Labor:
- Operation B: 5 hours
- Operation C: 5.5 hours
- Operation D: 5. hours
- Operation E: 5.5 hours
- Operation F: 1.3 hours
- Operation G: 1.3 hours
Bulletins superseded:
None.
Warranty instructions:
To request reimbursement for the corrective action
performed, access the Warranties section of the Lam-
borghini Portal and follow the “Campaigns” entry in-
structions in the W.Claim manual which can be
downloaded from the Portal.
Select the required campaign and proceed with entry,
carefully reading the options present in the alert dis-
played by the system (see example) and select the op-
tion performed on the vehicle.
Depending on the option performed, the reimburse-
ment will be structured in the following manner:
- Operation B: Replacement of the Gateway
ECU WITHOUT SD-Creator download. Op-
erations to perform: I, II, III, IV, V, VI, VII.
Labor: 5 hours
Spare Parts: 4ML998049
- Operation C: Replacement of the Gateway
ECU WITH SD-Creator download. Proce-
dures to perform: I, II, III, IV, V, V.A, VI, VII.
Labor: 5.5 hours
Spare Parts: 4ML998049
- Operazione D: Replacement of the Gateway
ECU WITHOUT SD-Creator download. Pro-
cedures to perform I, II, III, IV, V, VI, VII.
Labor: 5 hours
Spare Parts: 4ML998049A
- Operation E: Replacement of the Gateway
ECU WITH SD-Creator download.Procedures
to perform: I, II, III, IV, V, V.A, VI, VII.
Labor: 5.5 hours
Spare Parts: 4ML998049A
- Operation F: Gateway ECU replacement.
Procedures to perform: III.
Labor: 1.3 hours

L636-
A.08.19
To: Official After-Sales Network
Subject: Gateway ECU connectivity configuration
Date: 02 September 2019
Pages 33
Rev.00
This document and its contents are strictly confidential and private and are provided for informational purposes only and may not be cop-
ied, recorded, transmitted, further distributed to any other subject, or published, in whole or in part, by any means or in any form and for
any purpose, without the prior written authorization of Automobili Lamborghini S.p.A. All copyrights are the property of Automobili Lamborghini S.p.A based on the applicable laws. The company reserves the right to make updates and modifications
doc. no.: L/V6_M06 Rev.[06]
3/33
Spare Parts: 4ML998049
- Operation G: Gateway ECU replacement.
Procedures to perform: III.
Labor: 1.3 hours
Spare Parts: 4ML998049A
NOTE:
Operations B, C, D, E, F, G identify the labor times
and do not relate to the operations described in the
Work Instructions (I, II, III, IV, V, V.A, VI,VII).
WARNING!
Attach all documents generated during the work car-
ried out as evidence of the work itself, for instance
workshop orders, diagnostic protocols etc. If one or
more of these is missing it may lead to a rejected re-
imbursement request.
Fill out the Service and Recall Campaign section in
the warranty booklet, which is shown in the figure be-
low.
Tools/Materials required
Code Description. Q
IMPORTANT:
Before following the instructions in the service cam-
paign, the SD-Creator program must be installed.
The SD Creator installation instructions are con-
tained in the bulletin: “BI.09.17_[ENG]_SD-Creator
installation package procedure”.

L636-
A.08.19
To: Official After-Sales Network
Subject: Gateway ECU connectivity configuration
Date: 02 September 2019
Pages 33
Rev.00
This document and its contents are strictly confidential and private and are provided for informational purposes only and may not be cop-
ied, recorded, transmitted, further distributed to any other subject, or published, in whole or in part, by any means or in any form and for
any purpose, without the prior written authorization of Automobili Lamborghini S.p.A. All copyrights are the property of Automobili Lamborghini S.p.A based on the applicable laws. The company reserves the right to make updates and modifications
doc. no.: L/V6_M06 Rev.[06]
4/33
Preliminary operations:
1. Ensure you have recently synced with the Mirror
server by checking the last synchronization date:
http://mirrorserver/maintenance/diagnosis.py
or by directly entering the Btac-box IP address:
http://[IP_address]/maintenance/diagnosis.py
if you have not previously set the IP alias of the
mirror server.
(e.g.
http://12.34.567.890/maintenance/diagnosis.py)
IMPORTANT: Make sure that the last synchronization was performed af-
ter Wednesday, June 19, 2019.
NOTE: The instructions contained in this bulletin are based on the
ODIS diagnosis software updated to version 5.1.5 and the
Lamborghini 2.19.0 or later database (refer to information
bulletin BI.13.19 and make sure that ODIS Service is
properly updated on the laptop).
2. It is essential that you connect an appropriate bat-
tery charger to the charge points available in the
engine hood (left side of the vehicle). Please refer
to the following figure.

L636-
A.08.19
To: Official After-Sales Network
Subject: Gateway ECU connectivity configuration
Date: 02 September 2019
Pages 33
Rev.00
This document and its contents are strictly confidential and private and are provided for informational purposes only and may not be cop-
ied, recorded, transmitted, further distributed to any other subject, or published, in whole or in part, by any means or in any form and for
any purpose, without the prior written authorization of Automobili Lamborghini S.p.A. All copyrights are the property of Automobili Lamborghini S.p.A based on the applicable laws. The company reserves the right to make updates and modifications
doc. no.: L/V6_M06 Rev.[06]
5/33
Work instructions:
The updating procedure described here includes the
following steps:
I. Control unit 15 update;
II. Control unit 09 update;
III. Replacement and updating of the ECU 19;
IV. Control unit 46 update;
V. Control unit A5 preconfiguration;
V.A Control unit A5 software download from SD-
Creator;
VI. Control unit A5 final update and update of
control units 13, 3C, CF, DB, DC;
VII. Fault memory deletion.
IMPORTANT:
Do not perform other types of activity on the car
while executing the campaign.
Before starting the campaign, delete and resolve any
other faults present.
Carrying out the procedure blindly implies unsolva-
ble damage to the control unit and resulting replace-
ments.
NOTE:
Secure the key On during the entire procedure for
updating the various listed systems. Start a diagnostic
session with ODIS Service and keep the diagnostic
interface connected to the OBD socket. Do not close
the ODIS program or use it for other purposes.
I. Control unit 15 update:
Refer to the procedure in the workshop manual re-
garding "Implementation of an SVM code".
IMPORTANT:
Improper use of this function can cause damage to the
ECUs.
1. To start the procedure to execute an SVM code,
select the “Special functions” card in ODIS.
2. Click on “SVM–Direct input: SVM for problem-
related update” and then on “Run test”.

L636-
A.08.19
To: Official After-Sales Network
Subject: Gateway ECU connectivity configuration
Date: 02 September 2019
Pages 33
Rev.00
This document and its contents are strictly confidential and private and are provided for informational purposes only and may not be cop-
ied, recorded, transmitted, further distributed to any other subject, or published, in whole or in part, by any means or in any form and for
any purpose, without the prior written authorization of Automobili Lamborghini S.p.A. All copyrights are the property of Automobili Lamborghini S.p.A based on the applicable laws. The company reserves the right to make updates and modifications
doc. no.: L/V6_M06 Rev.[06]
6/33
3. Enter the campaign code “L636A0819A” in the
appropriate space at the top right and click
“Adopt”.
4. The SVM code entered is again displayed in the
dialog box. If the entered code is correct, click on
“Yes”. Otherwise click on “No” to cancel the
SVM procedure.
5. Wait for data to be acquired from all the control
units. This operation requires a few minutes.
6. To run the SVM function and access the Lambor-
ghini servers, you must have a valid GeKo ac-
count. Ensure that the laptop is correctly connect-
ed to the Internet. Enter your GeKo username in
the "User name" field and the PIN 1324 + the 6-
digit code currently displayed on the GeKo token
in the "Password" field.
Click "Adopt" to confirm.
7. The SVM function will automatically continue
with identification of the control units in the vehi-
cle.
8. It might become necessary to perform one or
more of the following operations in the SVM pro-
cedure:
Coding;
Parameterization;
Calibration.
To perform these actions, it is usually necessary
to click on “Done/Continue” where requested and
to follow the instructions directly provided on the
ODIS dialog screens.
9. Click “Done/Continue” until the control unit 15
updating procedure is completed.
10. Click “Done/Continue”.
11. Switch the key OFF for a few seconds.
L636A0819A

L636-
A.08.19
To: Official After-Sales Network
Subject: Gateway ECU connectivity configuration
Date: 02 September 2019
Pages 33
Rev.00
This document and its contents are strictly confidential and private and are provided for informational purposes only and may not be cop-
ied, recorded, transmitted, further distributed to any other subject, or published, in whole or in part, by any means or in any form and for
any purpose, without the prior written authorization of Automobili Lamborghini S.p.A. All copyrights are the property of Automobili Lamborghini S.p.A based on the applicable laws. The company reserves the right to make updates and modifications
doc. no.: L/V6_M06 Rev.[06]
7/33
12. Switch the key ON.
13. Select the function “15 - Read identification data”
from the “Guided functions” of control unit 15.
IMPORTANT:
The following image is an example.
14. Check that Software P.N., Software version, Rec-
ord number and Record version installed are con-
sistent with the “Table of reference for control
unit 15” below.
Table of reference for control unit 15
Software P.N. Software
version Record number
Record
version
4N0.959.655.H 2710 4ML909602P 0001
4N0.959.655.R 2710 4ML909602P 0001
4N0.959.655.Q 2710 4ML909602P 0001
15. The function asks you to also identify the slaves
of the control unit. Select “No”.
16. Select the function “15-Basic setting – Inertial
sensors” from the “Guided functions” of control
unit 15 and follow the instructions until the pro-
cedure is completed.
17. Select the function “15-Finalize setup” from the
“Guided functions” of control unit 15 and follow
the instructions until the procedure is completed.
L636-
A.08.19
To: Official After-Sales Network
Subject: Gateway ECU connectivity configuration
Date: 02 September 2019
Pages 33
Rev.00
This document and its contents are strictly confidential and private and are provided for informational purposes only and may not be cop-
ied, recorded, transmitted, further distributed to any other subject, or published, in whole or in part, by any means or in any form and for
any purpose, without the prior written authorization of Automobili Lamborghini S.p.A. All copyrights are the property of Automobili Lamborghini S.p.A based on the applicable laws. The company reserves the right to make updates and modifications
doc. no.: L/V6_M06 Rev.[06]
8/33
II. Control unit 09 update:
18. To carry out the update of control unit 09, you
have to repeat the procedure from steps 1 to 12,
using the code “L636A0819B” under step 3.
19. Select the function “09-Read identification data”
from the “Guided functions” of control unit 09.
IMPORTANT:
The following image is an example.
20. Check that Software P.N., Software version, Rec-
ord number and Record version installed are con-
sistent with one of those specified in the “Table
of reference for control unit 09”.
Table of reference for control unit 09
Software P.N. Software
version Record number
Record
version
4N0.907.063.DG 0652 V03935272Z 0204
4N0.907.063.DE 0652 V03935272Z 0204
21. The function asks you to also identify the slaves
of the control unit. Select “No”.
22. Select the function “09-Basic setting for A/C
flaps” from the “Guided functions” of control unit
09.
23. Select option “2”.
24. Select “Done/Continue” until the procedure is
completed.
L636A0819B

L636-
A.08.19
To: Official After-Sales Network
Subject: Gateway ECU connectivity configuration
Date: 02 September 2019
Pages 33
Rev.00
This document and its contents are strictly confidential and private and are provided for informational purposes only and may not be cop-
ied, recorded, transmitted, further distributed to any other subject, or published, in whole or in part, by any means or in any form and for
any purpose, without the prior written authorization of Automobili Lamborghini S.p.A. All copyrights are the property of Automobili Lamborghini S.p.A based on the applicable laws. The company reserves the right to make updates and modifications
doc. no.: L/V6_M06 Rev.[06]
9/33
25. Select “No” when you are asked to make other
basic settings.
26. Select “Done/Continue” until the procedure is
completed.
III. Replacement and updating of the ECU 19;
27. Select the function “19-Read identification data”
from the “Guided functions” of control unit 19.
IMPORTANT:
The following image is an example.
28. The function asks you to also identify the slaves
of the control unit. Select “No”.
IMPORTANT:
If the Software Part Number and Hardware Part
Number identified under step 27 are those listed in
the table below:
Software Part Number Hardware Part Number 4N1.907.468.L 4N1.907.468.B 4N2.907.468.L 4N2.907.468.B
4N1.907.468.AB 4N1.907.468.AB
4N2.907.468.AB 4N2.907.468.AB
Ensure you have ordered the correct component, as
described in the point “Spare Parts”.
L636-
A.08.19
To: Official After-Sales Network
Subject: Gateway ECU connectivity configuration
Date: 02 September 2019
Pages 33
Rev.00
This document and its contents are strictly confidential and private and are provided for informational purposes only and may not be cop-
ied, recorded, transmitted, further distributed to any other subject, or published, in whole or in part, by any means or in any form and for
any purpose, without the prior written authorization of Automobili Lamborghini S.p.A. All copyrights are the property of Automobili Lamborghini S.p.A based on the applicable laws. The company reserves the right to make updates and modifications
doc. no.: L/V6_M06 Rev.[06]
10/33
Preliminary operations
Before starting the procedure, it will be necessary
to run and save a diagnostic protocol.
To perform this operation, follow the instructions
given in the workshop manual at the following
paths:
10 Diagnosis00 ODISSaving the diagnostic
protocolDescription
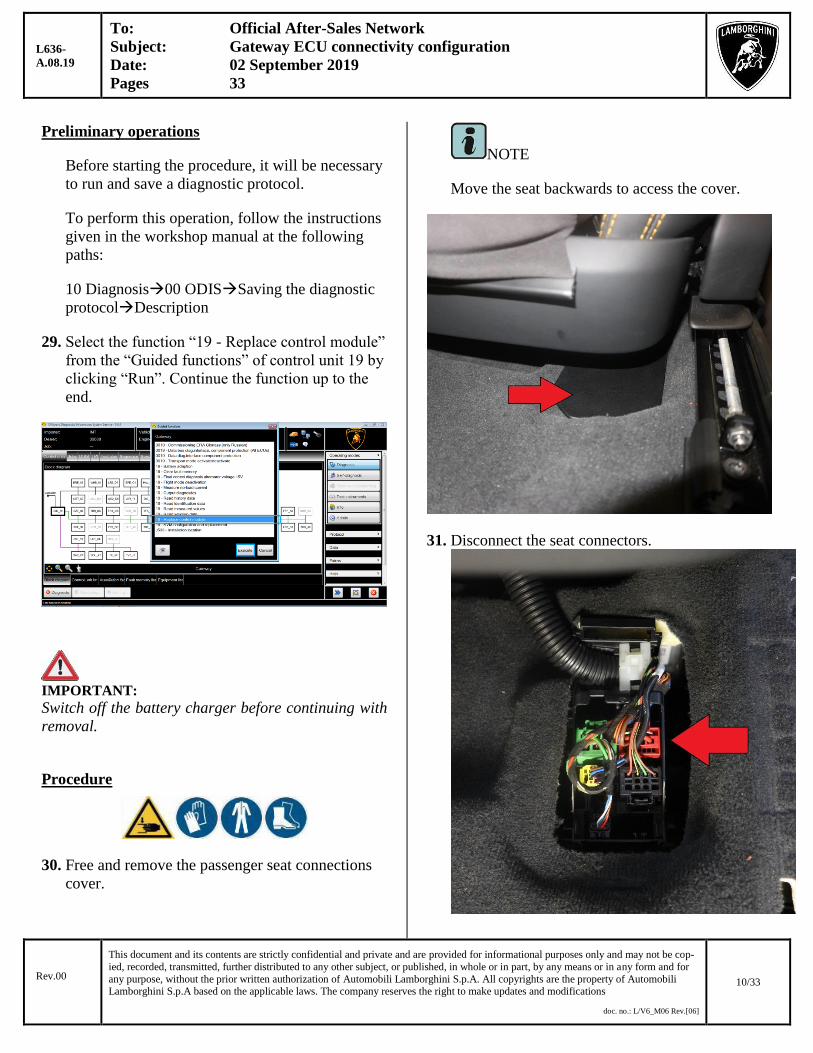
29. Select the function “19 - Replace control module”
from the “Guided functions” of control unit 19 by
clicking “Run”. Continue the function up to the
end.
IMPORTANT:
Switch off the battery charger before continuing with
removal.
Procedure
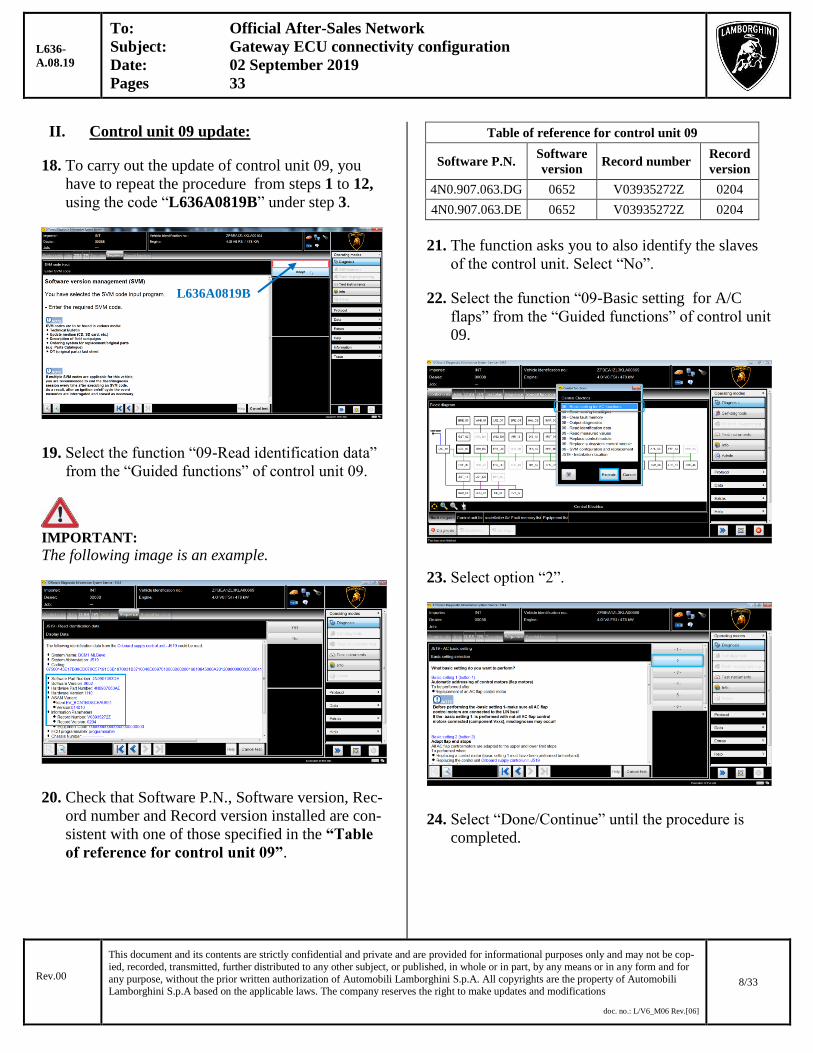
30. Free and remove the passenger seat connections
cover.
NOTE
Move the seat backwards to access the cover.
31. Disconnect the seat connectors.

L636-
A.08.19
To: Official After-Sales Network
Subject: Gateway ECU connectivity configuration
Date: 02 September 2019
Pages 33
Rev.00
This document and its contents are strictly confidential and private and are provided for informational purposes only and may not be cop-
ied, recorded, transmitted, further distributed to any other subject, or published, in whole or in part, by any means or in any form and for
any purpose, without the prior written authorization of Automobili Lamborghini S.p.A. All copyrights are the property of Automobili Lamborghini S.p.A based on the applicable laws. The company reserves the right to make updates and modifications
doc. no.: L/V6_M06 Rev.[06]
11/33
32. Remove the front and rear covers on the passen-
ger seat fasteners.
NOTE
Move the seat forwards and backwards to facili-
tate the operation.
33. Remove the 4 screws.
Tightening the screws.
Tightening torque: 40,00 Nm ( 29,5 lbf ft ) ± 5%
NOTE
Move the seat forwards and backwards to facili-
tate the operation.
34. Free the seat and remove it, passing it through the
passenger door.
WARNING
When performing this operation, have a second
operator.

L636-
A.08.19
To: Official After-Sales Network
Subject: Gateway ECU connectivity configuration
Date: 02 September 2019
Pages 33
Rev.00
This document and its contents are strictly confidential and private and are provided for informational purposes only and may not be cop-
ied, recorded, transmitted, further distributed to any other subject, or published, in whole or in part, by any means or in any form and for
any purpose, without the prior written authorization of Automobili Lamborghini S.p.A. All copyrights are the property of Automobili Lamborghini S.p.A based on the applicable laws. The company reserves the right to make updates and modifications
doc. no.: L/V6_M06 Rev.[06]
12/33
IMPORTANT
Take care during removal, movement and han-
dling of the component, as it could get damaged.
Perform the removal process with care, avoiding
any movements which could damage the internal
trim/upholstery etc.
35. You have to disconnect the battery in order to be
able to replace the control unit. To perform this
operation, follow the instructions given in the re-
pair manual at the following path: Repair Manu-
al Urus MY19 09 Electrical System Bat-
tery Electrical SystemA-12V Bat-
teryRemoval/Reinstallation.
36. Lift the mat in the area affected.
37. Remove the seat support and the ventilation duct.
38. Free and remove the battery inspection cover lo-
cated in the driver floor area.

L636-
A.08.19
To: Official After-Sales Network
Subject: Gateway ECU connectivity configuration
Date: 02 September 2019
Pages 33
Rev.00
This document and its contents are strictly confidential and private and are provided for informational purposes only and may not be cop-
ied, recorded, transmitted, further distributed to any other subject, or published, in whole or in part, by any means or in any form and for
any purpose, without the prior written authorization of Automobili Lamborghini S.p.A. All copyrights are the property of Automobili Lamborghini S.p.A based on the applicable laws. The company reserves the right to make updates and modifications
doc. no.: L/V6_M06 Rev.[06]
13/33
39. Slacken off the negative terminal nut.
Tighten the nut.
Tightening torque: 5.00 Nm (3.69 lbf ft)
40. Remove the negative terminal on the battery.
WARNING
Ensure that the instrument cluster has been
switched off before disconnecting the negative
pole.
WARNING
After the clamp has been disconnected, make sure
it cannot accidentally contact the negative termi-
nal on the battery.
41. Remove the Gateway control unit requiring re-
placement from its bracket by releasing the fas-
tener.
Disconnect the connectors and remove the control
unit.

L636-
A.08.19
To: Official After-Sales Network
Subject: Gateway ECU connectivity configuration
Date: 02 September 2019
Pages 33
Rev.00
This document and its contents are strictly confidential and private and are provided for informational purposes only and may not be cop-
ied, recorded, transmitted, further distributed to any other subject, or published, in whole or in part, by any means or in any form and for
any purpose, without the prior written authorization of Automobili Lamborghini S.p.A. All copyrights are the property of Automobili Lamborghini S.p.A based on the applicable laws. The company reserves the right to make updates and modifications
doc. no.: L/V6_M06 Rev.[06]
14/33
42. Free the support from its fasteners and remove it.
43. Position the Gateway ECU (4N1907468AA -
4N2907468AA) in the corresponding support
(4M0907347) and connect the connector.
44. Position the support with ECU in the correspond-
ing seat.
L636-
A.08.19
To: Official After-Sales Network
Subject: Gateway ECU connectivity configuration
Date: 02 September 2019
Pages 33
Rev.00
This document and its contents are strictly confidential and private and are provided for informational purposes only and may not be cop-
ied, recorded, transmitted, further distributed to any other subject, or published, in whole or in part, by any means or in any form and for
any purpose, without the prior written authorization of Automobili Lamborghini S.p.A. All copyrights are the property of Automobili Lamborghini S.p.A based on the applicable laws. The company reserves the right to make updates and modifications
doc. no.: L/V6_M06 Rev.[06]
15/33
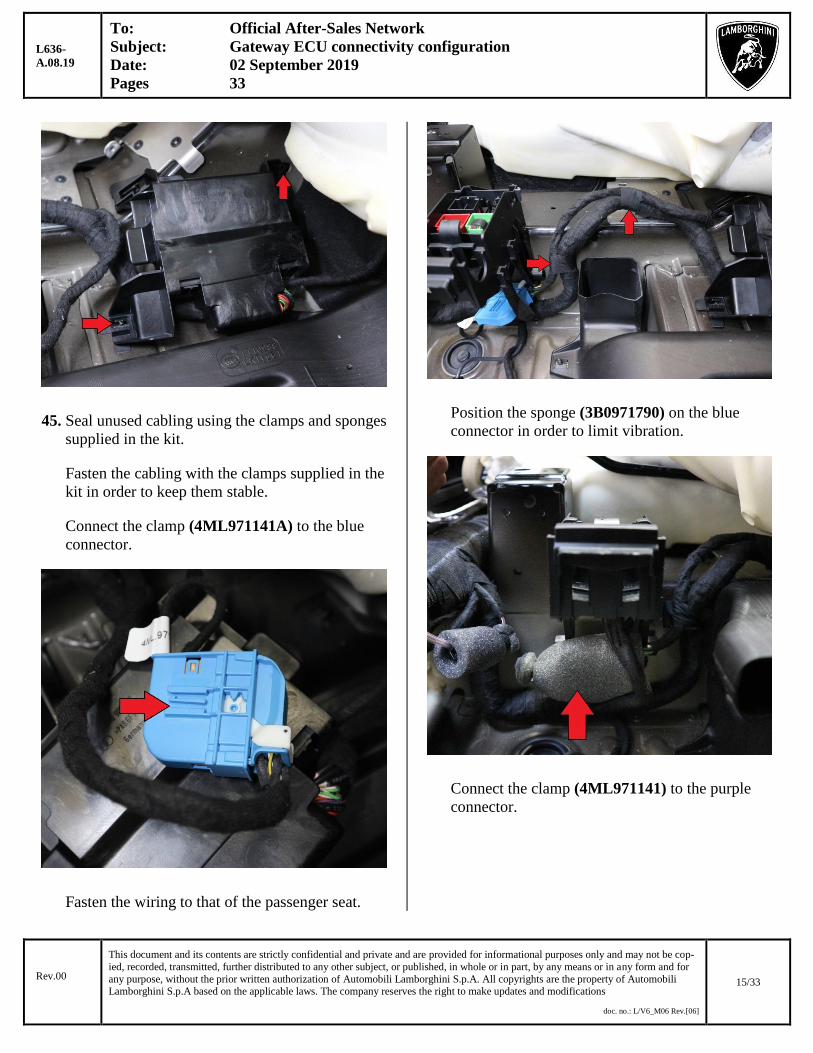
45. Seal unused cabling using the clamps and sponges
supplied in the kit.
Fasten the cabling with the clamps supplied in the
kit in order to keep them stable.
Connect the clamp (4ML971141A) to the blue
connector.
Fasten the wiring to that of the passenger seat.
Position the sponge (3B0971790) on the blue
connector in order to limit vibration.
Connect the clamp (4ML971141) to the purple
connector.

L636-
A.08.19
To: Official After-Sales Network
Subject: Gateway ECU connectivity configuration
Date: 02 September 2019
Pages 33
Rev.00
This document and its contents are strictly confidential and private and are provided for informational purposes only and may not be cop-
ied, recorded, transmitted, further distributed to any other subject, or published, in whole or in part, by any means or in any form and for
any purpose, without the prior written authorization of Automobili Lamborghini S.p.A. All copyrights are the property of Automobili Lamborghini S.p.A based on the applicable laws. The company reserves the right to make updates and modifications
doc. no.: L/V6_M06 Rev.[06]
16/33
Position the sponge (191971790A) on the pink
connector and fasten it with a clamp.
Fasten the wiring for both connectors with a
clamp, as shown in the image.
Then move the cable out of the way, positioning it
to the side of the gateway ECU support.
Final operations
46. To reinstall, follow the removal procedure in re-
verse order.

L636-
A.08.19
To: Official After-Sales Network
Subject: Gateway ECU connectivity configuration
Date: 02 September 2019
Pages 33
Rev.00
This document and its contents are strictly confidential and private and are provided for informational purposes only and may not be cop-
ied, recorded, transmitted, further distributed to any other subject, or published, in whole or in part, by any means or in any form and for
any purpose, without the prior written authorization of Automobili Lamborghini S.p.A. All copyrights are the property of Automobili Lamborghini S.p.A based on the applicable laws. The company reserves the right to make updates and modifications
doc. no.: L/V6_M06 Rev.[06]
17/33
47. When reinstallation is complete, carry out the
power window position learning routine.
To perform these operations, follow the instruc-
tions given in the workshop manual at the follow-
ing paths:
10 Diagnosis42 Driver door electron-
icsGuided Functions-Further Adapta-
tionsDescription
10 Diagnosis52 Passenger door electron-
icsGuided Functions-Further Adapta-
tionsDescription
10 DiagnosisBB Door Electronics Rear Driv-
er SideGuided Functions-Further Adapta-
tionsDescription
10 DiagnosisBB Door Electronics Rear Pas-
senger SideGuided Functions-Further Adap-
tationsDescription
IMPORTANT:
The documents which must be provided with the war-
ranty request are:
- Produced Repair Order
- Saved Diagnostic Protocol.
Failure to follow these procedures could lead to
the request being rejected.
For further information, please contact Technical
Support.
48. Reconnect the battery. To perform this operation,
follow the instructions given in the repair manual
at the following path: Repair Manual Urus
MY19 09 Electrical System Battery Electri-
cal SystemA-12V Bat-
teryRemoval/Reinstallation.
49. You can reconnect the battery charger to the vehi-
cle when the removal procedure is completed, as
described in the preliminary operations.
50. Check that the following functions to perform are
in the “Test plan” displayed on ODIS Service:
Service Immobilizer;
0019–Data bus diag interface, component pro-
tection (all ECUs);
SVM–Direct input: SVM code for problem-
related update;
SVM activations;
19 – Battery adaption;
15 – Basic settings –Inertial sensors;
19 – Flight mode deactivation;
Erase fault memory – overall system.
IMPORTANT:
Perform only the functions listed in the above step,
even if others might appear.
Perform the functions in the order in which they are
listed.
51. Perform the function “*-* Service immobilizer”
from the “Test plan”.

L636-
A.08.19
To: Official After-Sales Network
Subject: Gateway ECU connectivity configuration
Date: 02 September 2019
Pages 33
Rev.00
This document and its contents are strictly confidential and private and are provided for informational purposes only and may not be cop-
ied, recorded, transmitted, further distributed to any other subject, or published, in whole or in part, by any means or in any form and for
any purpose, without the prior written authorization of Automobili Lamborghini S.p.A. All copyrights are the property of Automobili Lamborghini S.p.A based on the applicable laws. The company reserves the right to make updates and modifications
doc. no.: L/V6_M06 Rev.[06]
18/33
IMPORTANT:
When the following message regarding execution of
the Immobilizer on NEW keys appears, select “No”.
To perform the immobilizer, follow the instruc-
tions given in the workshop manual at the follow-
ing path: Lamborghini PortalWorkshop manu-
alRepair manualsUrusMY 19
UrusChapter 10 Diagnosis 00 ODIS Im-
mobilizer.
IMPORTANT:
Make sure that the rear multimedia systems, where
present, are switched on.
52. Perform function “19 – Component protection
gateway (all ECUs)” from the “Test plan”. Follow
the instructions given in the workshop manual at
the following path: Lamborghini Por-
talWorkshop manualRepair manu-
alsUrusMY 19 UrusChapter 10 Diagnosis
00 ODIS Component protection.
IMPORTANT:
When the following message regarding execution of
Component protection on the 5F control unit ap-
pears, remove any SIMs or SD-cards located in their
slots under the armrest of the driver’s seat.
53. Select “2” when requested to continue the com-
ponent protection procedure.
54. To carry out the update of control unit 19, you
have to repeat the procedure from steps 1 to 12,
using the code “L636A0819C” under step 3.
55. Select the function “19-Read identification data”
from the “Guided functions” of control unit 19.
L636A0819C
L636-
A.08.19
To: Official After-Sales Network
Subject: Gateway ECU connectivity configuration
Date: 02 September 2019
Pages 33
Rev.00
This document and its contents are strictly confidential and private and are provided for informational purposes only and may not be cop-
ied, recorded, transmitted, further distributed to any other subject, or published, in whole or in part, by any means or in any form and for
any purpose, without the prior written authorization of Automobili Lamborghini S.p.A. All copyrights are the property of Automobili Lamborghini S.p.A based on the applicable laws. The company reserves the right to make updates and modifications
doc. no.: L/V6_M06 Rev.[06]
19/33
IMPORTANT:
The following image is an example.
56. Check that Software Part Number, Software ver-
sion, Record Number and Record version in-
stalled are consistent with one of those specified
in the “Table of reference for control unit 19”
below.
Table of reference for control unit 19
Software Part
Number
Software
version Record number
Record
version
4N1.907.468.AA 0036 4ML909515B 18
4N1.907.468.AA 0037 4ML909515B 18
4N2.907.468.AA 0036 4ML909515B 18
4N2.907.468.AA 0037 4ML909515B 18
57. The function asks you to also identify the slaves
of the control unit. Select “No”.
58. Select the function “A5 – Read identification da-
ta” from the “Guided functions” of control unit
5F.
IMPORTANT:
The following image is an example.
59. Check that Software Part Number, Software ver-
sion, Record number and Record version installed
are consistent with one of those specified in the
“Table of reference for control unit 5F” below.
Table of reference for control unit 5F
Software Part
Number
Software
version Record number
Record
version
4ML.035.064.B 9812 V03.935.290.AH 0015
4ML.035.063.B 9812 V03.935.290.AH 0015
4ML.035.067.B 9812 V03.935.290.AH 0015
4ML.035.069.B 9812 V03.935.290.AH 0015
4ML.035.029.B 9812 V03.935.290.AH 0015
4ML.035.084.B 9812 V03.935.290.AH 0015
4ML.035.058.B 9818 V03.935.290.AH 0015
4ML.035.088.B 9818 V03.935.290.AH 0015
4ML.035.090.B 9818 V03.935.290.AH 0015
60. If the error "B201A00: Checking the Software
Version” occurs, run the function attached to the
“Test Plan”: "5F -SVM - Reset fault memory".
Click on "Perform Test" to run the function.

L636-
A.08.19
To: Official After-Sales Network
Subject: Gateway ECU connectivity configuration
Date: 02 September 2019
Pages 33
Rev.00
This document and its contents are strictly confidential and private and are provided for informational purposes only and may not be cop-
ied, recorded, transmitted, further distributed to any other subject, or published, in whole or in part, by any means or in any form and for
any purpose, without the prior written authorization of Automobili Lamborghini S.p.A. All copyrights are the property of Automobili Lamborghini S.p.A based on the applicable laws. The company reserves the right to make updates and modifications
doc. no.: L/V6_M06 Rev.[06]
20/33
61. Wait for the automatic test procedure to complete.
62. Click “Done/Continue” to confirm the installa-
tion.
63. Click "Done/Continue" to terminate the proce-
dure.
64. Perform the function “SVM Activations” from the
“Test plan”.
65. Select option “2” when requested to enable al-
ready existing functions.
66. Select “Done/Continue” until the operation is
completed.
67. Perform the function “19 – Battery adaption”
from the “Test plan”. Follow the instructions giv-
en in the workshop manual at the following path:
Lamborghini Portal Workshop manu-
alRepair manualUrusMY 19
UrusChapter 10 Diagnosis 19 Databus di-
agnostic interface I-Guided Functions-Further
Adaptations19-Battery adaption.
68. Perform the function “15 – Basic setting – Inertial
sensors” from the “Test plan” and follow the in-
structions until the operation is completed.
L636-
A.08.19
To: Official After-Sales Network
Subject: Gateway ECU connectivity configuration
Date: 02 September 2019
Pages 33
Rev.00
This document and its contents are strictly confidential and private and are provided for informational purposes only and may not be cop-
ied, recorded, transmitted, further distributed to any other subject, or published, in whole or in part, by any means or in any form and for
any purpose, without the prior written authorization of Automobili Lamborghini S.p.A. All copyrights are the property of Automobili Lamborghini S.p.A based on the applicable laws. The company reserves the right to make updates and modifications
doc. no.: L/V6_M06 Rev.[06]
21/33
69. Perform the function “19 – Deactivate flight
mode” from the “Test plan” and follow the in-
structions until the operation is completed.
70. Perform the function “Erase overall fault
memory” from the “Test plan”. Follow the in-
structions given in the workshop manual at the
following path: Lamborghini PortalWorkshop
manualRepair manualsUrusMY 19
UrusChapter 10 Diagnosis 00 ODIS B-
Deleting the data in the fault memory of control
units.
71. Save a diagnosis protocol (“long version”). Fol-
low the instructions given in the workshop manu-
al at the following path: Lamborghini Por-
talWorkshop manualRepair manu-
alsUrusMY 19 UrusChapter 10 Diagno-
sis 00 ODIS H-Saving the diagnostic proto-
col.
72. Close the diagnosis session without saving it.
73. Disconnect the OBD socket from the vehicle.
74. Switch off the battery charger.
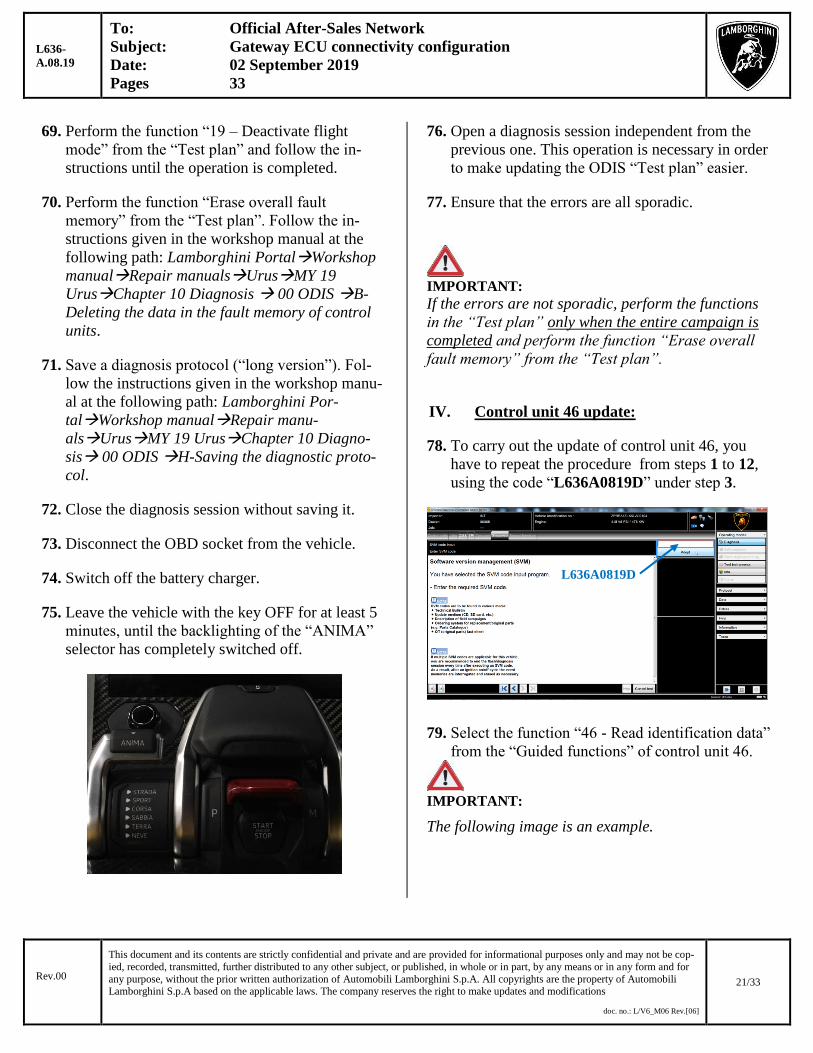
75. Leave the vehicle with the key OFF for at least 5
minutes, until the backlighting of the “ANIMA”
selector has completely switched off.
76. Open a diagnosis session independent from the
previous one. This operation is necessary in order
to make updating the ODIS “Test plan” easier.
77. Ensure that the errors are all sporadic.
IMPORTANT:
If the errors are not sporadic, perform the functions
in the “Test plan” only when the entire campaign is
completed and perform the function “Erase overall
fault memory” from the “Test plan”.
IV. Control unit 46 update:
78. To carry out the update of control unit 46, you
have to repeat the procedure from steps 1 to 12,
using the code “L636A0819D” under step 3.
79. Select the function “46 - Read identification data”
from the “Guided functions” of control unit 46.
IMPORTANT:
The following image is an example.
L636A0819D

L636-
A.08.19
To: Official After-Sales Network
Subject: Gateway ECU connectivity configuration
Date: 02 September 2019
Pages 33
Rev.00
This document and its contents are strictly confidential and private and are provided for informational purposes only and may not be cop-
ied, recorded, transmitted, further distributed to any other subject, or published, in whole or in part, by any means or in any form and for
any purpose, without the prior written authorization of Automobili Lamborghini S.p.A. All copyrights are the property of Automobili Lamborghini S.p.A based on the applicable laws. The company reserves the right to make updates and modifications
doc. no.: L/V6_M06 Rev.[06]
22/33
80. Check that Software P.N., Software version, Rec-
ord number and Record version installed are con-
sistent with one of those specified in the “Table
of reference for control unit 46” below.
Table of reference for control unit 46
Software Part
Number
Software
version Record number
Record
version
8W0.907.064.FH 0405 V03935244YC 0023
8W0.907.064.FR 0405 V03935244YC 0023
81. The function asks you to also identify the slaves
of the control unit. Select “No”.
V. Control unit A5 preconfiguration:
82. To carry out the preconfiguration of control unit
A5, you have to repeat the procedure from steps
1 to 12, using the code “L636A0819E” under step
3.
83. Select the function “A5 – Read identification da-
ta” from the “Guided functions” of control unit
A5.
IMPORTANT:
The following image is an example.
84. Check that the “Software version” is “B250”.
85. Check which “Version” corresponds to the
“Hardware Part Number” installed on the vehicle
in the “Table of reference for identifying control
unit A5 version”. Based on the control unit variant
identified, follow the corresponding procedure in-
dicated in the “Procedure” column of the follow-
ing table.
Table of reference for identifying control unit
A5 version
Hardware Part
Number Version Procedure
4N0.907.107.E A0 VI
4N0.907.107.F A VI
4N0.907.107.G B V.A
4N0.907.107.H C V.A
86. The function asks you to also identify the slaves
of the control unit. Select “No”.
L636A0819E
L636-
A.08.19
To: Official After-Sales Network
Subject: Gateway ECU connectivity configuration
Date: 02 September 2019
Pages 33
Rev.00
This document and its contents are strictly confidential and private and are provided for informational purposes only and may not be cop-
ied, recorded, transmitted, further distributed to any other subject, or published, in whole or in part, by any means or in any form and for
any purpose, without the prior written authorization of Automobili Lamborghini S.p.A. All copyrights are the property of Automobili Lamborghini S.p.A based on the applicable laws. The company reserves the right to make updates and modifications
doc. no.: L/V6_M06 Rev.[06]
23/33
V.A Control unit A5 software download from SD-
Creator:
If the Hardware Part Number of the control unit A5
you have corresponds to “4N0.907.107.G” or
“4N0.907.107.H”, you have to download the control
unit A5 software using the SD-Creator tool.
Otherwise it is possible to continue the procedure
from paragraph “F.Control unit A5 final update and
update of control units 13, 3C, CF, DB, DC;
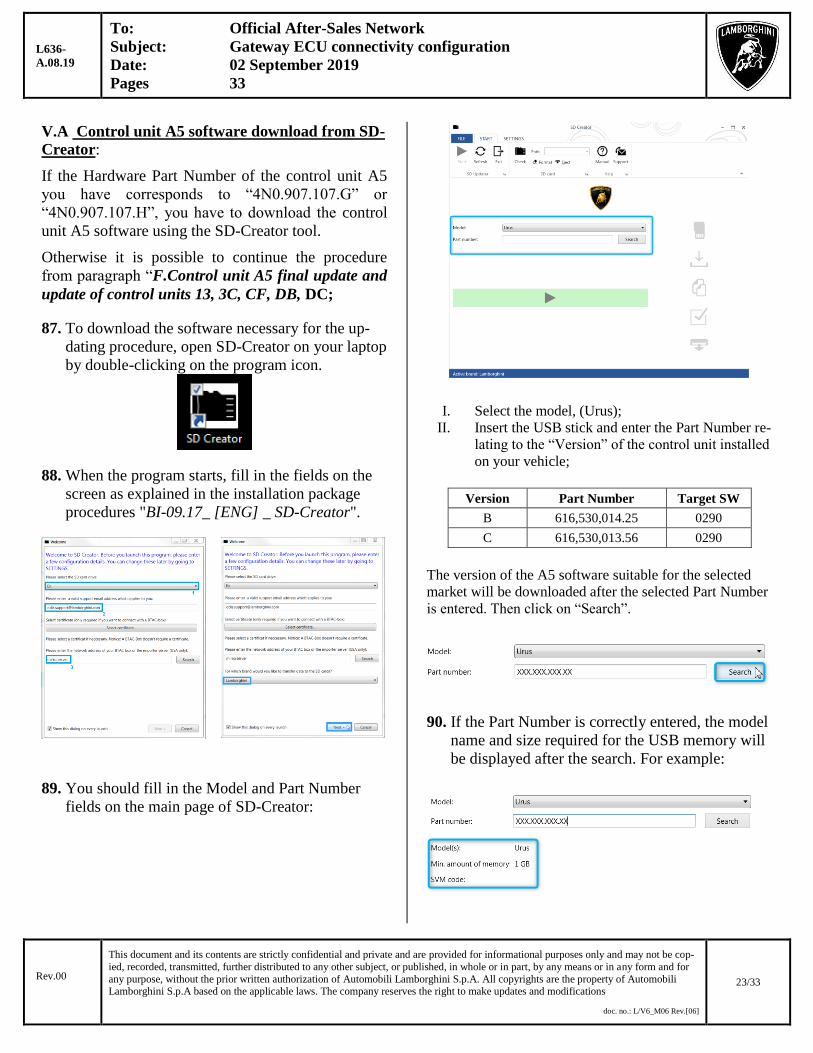
87. To download the software necessary for the up-
dating procedure, open SD-Creator on your laptop
by double-clicking on the program icon.
88. When the program starts, fill in the fields on the
screen as explained in the installation package
procedures "BI-09.17_ [ENG] _ SD-Creator".
89. You should fill in the Model and Part Number
fields on the main page of SD-Creator:
I. Select the model, (Urus);
II. Insert the USB stick and enter the Part Number re-
lating to the “Version” of the control unit installed
on your vehicle;
Version Part Number Target SW
B 616,530,014.25 0290
C 616,530,013.56 0290
The version of the A5 software suitable for the selected
market will be downloaded after the selected Part Number
is entered. Then click on “Search”.
90. If the Part Number is correctly entered, the model
name and size required for the USB memory will
be displayed after the search. For example:

L636-
A.08.19
To: Official After-Sales Network
Subject: Gateway ECU connectivity configuration
Date: 02 September 2019
Pages 33
Rev.00
This document and its contents are strictly confidential and private and are provided for informational purposes only and may not be cop-
ied, recorded, transmitted, further distributed to any other subject, or published, in whole or in part, by any means or in any form and for
any purpose, without the prior written authorization of Automobili Lamborghini S.p.A. All copyrights are the property of Automobili Lamborghini S.p.A based on the applicable laws. The company reserves the right to make updates and modifications
doc. no.: L/V6_M06 Rev.[06]
24/33
IMPORTANT:
Before starting to create your software!
The process involves formatting the USB stick, which will
cause any files stored on it to be lost. It is recommended to
use a blank USB stick to ensure you do not lose any data.
Make sure that the storage space available is greater or
equal to what SD-Creator requires, as explained in step
90.
91. Click on the Start button, , to
start the software downloading process. The soft-
ware will be automatically saved on the USB
stick.
92. At the end of the process, some green icons will
appear on the right and positive feedback will be
displayed, specifying that the downloading opera-
tion was successful. Click on the bar “
” to complete the downloading
process. The USB memory stick will automatical-
ly disconnected from the laptop.
93. To check the result of the operation, remove and
put back in the USB stick and make sure that the
required software is present. The following image
is an example of the folders created.
At this point, the downloaded software is availa-
ble on the USB stick and is ready to be uploaded
on the vehicle.
94. Move to the vehicle and insert the USB stick con-
taining the downloaded software in one of the
USB ports available under the armrest in the cen-
ter console.

L636-
A.08.19
To: Official After-Sales Network
Subject: Gateway ECU connectivity configuration
Date: 02 September 2019
Pages 33
Rev.00
This document and its contents are strictly confidential and private and are provided for informational purposes only and may not be cop-
ied, recorded, transmitted, further distributed to any other subject, or published, in whole or in part, by any means or in any form and for
any purpose, without the prior written authorization of Automobili Lamborghini S.p.A. All copyrights are the property of Automobili Lamborghini S.p.A based on the applicable laws. The company reserves the right to make updates and modifications
doc. no.: L/V6_M06 Rev.[06]
25/33
95. You have to access the “Red Menu” in order to
update the software. To access it, press the top
right corner on the MMI screen with two fingers
and keep it pressed for a few seconds. The MMI
display will switch off momentarily. Wait for the
display to automatically restart.
96. When the MMI is restarted, the Red Menu will be
displayed. Select “Update” using the main knob.
NOTE:
The main knob lets you navigate in the Red Menu.
Turn the knob to scroll the menu and press to select
an element.
97. Insert the USB stick in one of the appropriate
ports located in the center console under the arm-
rest (the associated row is highlighted). Select the
unit inserted to start the update.
IMPORTANT:
The following images are an example.

L636-
A.08.19
To: Official After-Sales Network
Subject: Gateway ECU connectivity configuration
Date: 02 September 2019
Pages 33
Rev.00
This document and its contents are strictly confidential and private and are provided for informational purposes only and may not be cop-
ied, recorded, transmitted, further distributed to any other subject, or published, in whole or in part, by any means or in any form and for
any purpose, without the prior written authorization of Automobili Lamborghini S.p.A. All copyrights are the property of Automobili Lamborghini S.p.A based on the applicable laws. The company reserves the right to make updates and modifications
doc. no.: L/V6_M06 Rev.[06]
26/33
98. Wait for the automatic procedure. Do NOT inter-
rupt the manifest file reading procedure by click-
ing on “Cancel Update”.
99. The files to be installed will be listed on the
screen. Scroll through the items displayed in the
MMI using the main knob until you select “Start
update”.
100. Start the software updating procedure by se-
lecting “Start update”.
IMPORTANT:
The updating procedure must not be in any case whatso-
ever canceled.
101. Wait for the updating procedure to complete.
102. The MMI unit display will restart when the
software has been completely updated.

L636-
A.08.19
To: Official After-Sales Network
Subject: Gateway ECU connectivity configuration
Date: 02 September 2019
Pages 33
Rev.00
This document and its contents are strictly confidential and private and are provided for informational purposes only and may not be cop-
ied, recorded, transmitted, further distributed to any other subject, or published, in whole or in part, by any means or in any form and for
any purpose, without the prior written authorization of Automobili Lamborghini S.p.A. All copyrights are the property of Automobili Lamborghini S.p.A based on the applicable laws. The company reserves the right to make updates and modifications
doc. no.: L/V6_M06 Rev.[06]
27/33
103. Wait for the automatic procedure. Do NOT
interrupt the manifest file reading procedure by
clicking on “Cancel Update”.
104. When the MMI is restarted, the file “Update
Summary” will be displayed. Scroll down and
click on “Resume”.
105. Click “Quit” to exit the “Red Menu”.
106. Switch the key OFF and then ON.
NOTE:
The MMI might have to be rebooted at the end of the
specified procedures. This can be done by pressing
and holding down the MMI knob.
107. Select the function “A5 – Read identification
data” from the “Guided functions” of control unit
A5.
IMPORTANT:
The following image is an example.

L636-
A.08.19
To: Official After-Sales Network
Subject: Gateway ECU connectivity configuration
Date: 02 September 2019
Pages 33
Rev.00
This document and its contents are strictly confidential and private and are provided for informational purposes only and may not be cop-
ied, recorded, transmitted, further distributed to any other subject, or published, in whole or in part, by any means or in any form and for
any purpose, without the prior written authorization of Automobili Lamborghini S.p.A. All copyrights are the property of Automobili Lamborghini S.p.A based on the applicable laws. The company reserves the right to make updates and modifications
doc. no.: L/V6_M06 Rev.[06]
28/33
108. Check that the Software Part Number and
Software Version match one of those specified in
the “Control unit A5 software table of refer-
ence” below.
Control unit A5 software table of
reference
Software Part
Number
Software
version
4KE.907.107.A 0290
4KE.907.107.B 0290
4KE.907.107.C 0290
109. The function asks you to also identify the
slaves of the control unit. Select “No”.

L636-
A.08.19
To: Official After-Sales Network
Subject: Gateway ECU connectivity configuration
Date: 02 September 2019
Pages 33
Rev.00
This document and its contents are strictly confidential and private and are provided for informational purposes only and may not be cop-
ied, recorded, transmitted, further distributed to any other subject, or published, in whole or in part, by any means or in any form and for
any purpose, without the prior written authorization of Automobili Lamborghini S.p.A. All copyrights are the property of Automobili Lamborghini S.p.A based on the applicable laws. The company reserves the right to make updates and modifications
doc. no.: L/V6_M06 Rev.[06]
29/33
VI. Control unit A5 final update and update of
control units 13, 3C, CF, DB, DC, CF:
110. To carry out the final update of control units
A5, 13, DB, DC, 3C, CF, you have to repeat the
procedure from steps 1 to 12, using the code
“L636A0819F” under step 3.
111. Select the function “A5–Read identification
data” from the “Guided functions” of control unit
A5.
IMPORTANT:
The following image is an example.
112. Check that Software Part Number, Software
version, Record number and Record version in-
stalled are consistent with one of those specified
in the “Table of reference for control unit A5”
below.
Table of reference for control unit A5
Software Part
Number
SW
version Record number
Record
version
4KE.907.107.A 0290 V03935271RX 0013
4KE.907.107.B 0290 V03935271RX 0013
4KE.907.107.C 0290 V03935271RX 0013
113. The function asks you to also identify the
slaves of the control unit. Select “No”.
114. Repeat the identification operation described
under step 111 for the control units 13, DB, DC,
3C, CF.
115. Check that the Software Part Number, Soft-
ware version, Record number and Record version
installed in the various control units are consistent
with those specified in the “Table of reference
for control units 13, DB, DC, 3C, CF, 5F” be-
low, where these control units are present in the
vehicle.
Table of reference for control units 13, DB, DC, 3C, CF
ECU Software Part
Number
SW
version
Record
number
Record
version
13 4ML.907.561.A 0330 4ML909863A 0006
DB 4N0.907.669.F 0266 V03935278FA 0001
DC 4N0.907.669.F 0266 V03935278FB 0001
3C 4N0.907.566.F 0266 V03935278EY 0001
CF 4N0.907.566.F 0266 V03935278F 0001
102. The function asks you to also identify the
slaves of the control unit. Select “No”.
VII. Fault memory deletion
103. Select the “Special Functions” card and then
“Erase fault memory - overall system” in order to
delete all stored faults.
L636A0819F

L636-
A.08.19
To: Official After-Sales Network
Subject: Gateway ECU connectivity configuration
Date: 02 September 2019
Pages 33
Rev.00
This document and its contents are strictly confidential and private and are provided for informational purposes only and may not be cop-
ied, recorded, transmitted, further distributed to any other subject, or published, in whole or in part, by any means or in any form and for
any purpose, without the prior written authorization of Automobili Lamborghini S.p.A. All copyrights are the property of Automobili Lamborghini S.p.A based on the applicable laws. The company reserves the right to make updates and modifications
doc. no.: L/V6_M06 Rev.[06]
30/33
The complete guide for deleting faults is available
in the workshop manual, chapter “10.00.B-
Deleting the data in the fault memory of con-
trol units”.
104. Go back to the “Block diagram” card and se-
lect “Read all fault memories” from one of the
vehicle’s control units in order to update the dis-
play of the faults present after deletion.
IMPORTANT:
Resolve any faults still present by performing the
functions listed in the “Test plan”. Perform the pro-
cedure “G. Fault memory deletion” again until all
faults are fully removed from the vehicle’s control
units.
/* Saving a diagnostic protocol */
105. Save the Diagnostic protocol as described in
the chapter “10.00.H-Saving the diagnostic pro-
tocol” when the procedure described in this doc-
ument is completed.
IMPORTANT:
The Diagnostic Protocol must be attached to the Corre-
sponding Warranty Request (to enter the request on the
web portal, refer to the W.Claim manual which you can
consult in the Warranty section of the portal).
Troubleshooting:
If the following error screen is displayed, i.
abort the guided function by clicking on
“Cancel Test” and contact Technical Support.
If an error is displayed that regards the hard-ii.
ware interface, and the "connection to vehi-
cle" and "key state" icons appear as shown in
the figure below:
- Click “Cancel”
- Repeat installation of the interface
VAS5054/6154/6154A per the instruc-
tions in procedure (*) “VCI Manager
v2.0”, selecting the right-hand “Extras”
menu in ODIS and clicking on the “Diag-
nostic interface” button.

L636-
A.08.19
To: Official After-Sales Network
Subject: Gateway ECU connectivity configuration
Date: 02 September 2019
Pages 33
Rev.00
This document and its contents are strictly confidential and private and are provided for informational purposes only and may not be cop-
ied, recorded, transmitted, further distributed to any other subject, or published, in whole or in part, by any means or in any form and for
any purpose, without the prior written authorization of Automobili Lamborghini S.p.A. All copyrights are the property of Automobili Lamborghini S.p.A based on the applicable laws. The company reserves the right to make updates and modifications
doc. no.: L/V6_M06 Rev.[06]
31/33
If one of the following connection errors is iii.
displayed like in the following example
screenshots:
- It is not possible to connect to the central
server; check that your laptop is correctly
connected to the Internet and retry by
clicking on “Yes” or “Done/Continue”, as
appropriate.
If the connection is dropped during the course iv.
of the target/actual comparison during the
SVM procedure:
- It is not possible to connect to the central
server; check that your laptop is correctly
connected to the Internet and retry by
clicking on “1”.
If the authentication error as shown in the follow-v.
ing screenshot is displayed (error code:
ODS1007E):
- Ensure you have a valid GeKO user
account
- Ensure that the “Geko” label is printed on
the token you are using
- Ensure you have entered the correct pass-
word

L636-
A.08.19
To: Official After-Sales Network
Subject: Gateway ECU connectivity configuration
Date: 02 September 2019
Pages 33
Rev.00
This document and its contents are strictly confidential and private and are provided for informational purposes only and may not be cop-
ied, recorded, transmitted, further distributed to any other subject, or published, in whole or in part, by any means or in any form and for
any purpose, without the prior written authorization of Automobili Lamborghini S.p.A. All copyrights are the property of Automobili Lamborghini S.p.A based on the applicable laws. The company reserves the right to make updates and modifications
doc. no.: L/V6_M06 Rev.[06]
32/33
- Click on “Cancel” and run the application
test (see document
“ODIS_ControlloConnessione_Server_S
VM_2.0” (*)
).
If the infrastructure error as shown in the follow-vi.
ing screenshot is displayed (error code:
ODS9212E):
- Ensure you have a valid GeKO user account
- Ensure that the “Geko” label is printed on the
token you are using
- Check that the Internet is set in ODIS settings
and not CPN (see document “Set-
up_Iniziale_ODIS_2.0” (*))
- Click on “Cancel” and run the application test
(see document
“ODIS_ControlloConnessione_Server_SVM_
2.0” (*)).
If the same error type should reoccur during the vii.
application test, try the following procedure:
- Exit ODIS
- Browse to the folder C:\Program Files
(x86)\Offboard_Diagnostic_Information_
System_Service\.automatic_sessions on
your diagnostic laptop
- Delete the only file which will be in the
folder
- Restart ODIS Service, ensuring that:
1. You have a network connection
2. The ODIS connection is set to Inter-
net
- Run the connection test again, and per-
form the SVM again with your GeKO To-
ken.
If the following error should occur, it is necessary viii.
to follow the instructions given in BI.25.18
(Rev.02), which can be downloaded on the Lam-
borghini HUB portal:

L636-
A.08.19
To: Official After-Sales Network
Subject: Gateway ECU connectivity configuration
Date: 02 September 2019
Pages 33
Rev.00
This document and its contents are strictly confidential and private and are provided for informational purposes only and may not be cop-
ied, recorded, transmitted, further distributed to any other subject, or published, in whole or in part, by any means or in any form and for
any purpose, without the prior written authorization of Automobili Lamborghini S.p.A. All copyrights are the property of Automobili Lamborghini S.p.A based on the applicable laws. The company reserves the right to make updates and modifications
doc. no.: L/V6_M06 Rev.[06]
33/33
IMPORTANT: If the error occurs again, repeat the procedure and
try with a second GeKO token, if available.
NOTE(*)
All ODIS technical documentation can be viewed on
the Lamborghini web portal, in the corresponding
ODIS section.
IMPORTANT:
The documents which must be provided with the war-
ranty request are:
- Produced Repair Order
- Saved Diagnostic Protocol.
Failure to follow these procedures could lead to the
request being rejected.