
garment production types of attachments - Department of ...
29
This short course was developed as a resource material for the trainer. This module is one in a series of nine, which covers all competences standard Types of Seams for level one Garment Production. Due to the demand STRU has developed this short course for the community and other stake holder to have better knowledge and skills in producing quality garments. Furthermore the course aim is to create a link for training those unskilled people in the community to have the opportunity to learn the basic construction skills in garment production. GARMENT PRODUCTION Types of Attachments RATIONALE The development of this short course was sponsored by the ADB-PNG EMPLOYMENT ORIENTED SKILLS DEVELOPMENT PROJECT (EOSDP) and produced by curriculum officers at the SKILLS TRAINING RESOURCES UNIT (STRU) TH007ii OCCUPATIONAL SKILLS DEVELOPMENT SHORT COURSE For Papua New Guinea Non-Formal Sector finishing p o box 1097, waigani national capital district papua new guinea. tel: (675) 323 2633 fax: (675) 323 0944 NOT FOR SALE
-
Upload
khangminh22 -
Category
Documents
-
view
0 -
download
0
Transcript of garment production types of attachments - Department of ...

This short course was developed as a resource material for the trainer. Thismodule is one in a series of nine, which covers all competences standard Types ofSeams for level one Garment Production. Due to the demand STRU hasdeveloped this short course for the community and other stake holder to havebetter knowledge and skills in producing quality garments. Furthermore thecourse aim is to create a link for training those unskilled people in the communityto have the opportunity to learn the basic construction skills in garmentproduction.
GARMENT PRODUCTIONTypes of Attachments
RATIONALE
The development of this short course was sponsored by the ADB-PNGEMPLOYMENT ORIENTED SKILLS DEVELOPMENT PROJECT (EOSDP) andproduced by curriculum officers at the SKILLS TRAINING RESOURCES UNIT(STRU)
TH007ii
OCCUPATIONAL SKILLS DEVELOPMENT
SHORT COURSEFor
Papua New Guinea Non-Formal Sector
finishing
p o box 1097, waiganinational capital districtpapua new guinea.
tel: (675) 323 2633fax: (675) 323 0944
NOT FOR SALE

EMPLOYMENT ORIENTED SKILLS DEVELOPMENT PROJECT - SKILLS TRAINING RESOURCE UNIT 1
Types of Attachments
TABLE OF CONTENT
Course Outline 2
Curriculum Guide 3
Competency Profile 3
• Types of Attachments
Overview of Learning Outcomes 6 – 8
• Facing
• Pockets
• Collars
• Sleeves
• Collars
• Cuffs
Appendix 7 9 – 26
• Instructional Notes
Attachments 26
• Safety rules
• Glossary
Acknowledgement 27
CONTENTS Pages
2
Types of Attachments
EMPLOYMENT ORIENTED SKILLS DEVELOPMENT PROJECT - SKILLS TRAINING RESOURCE UNIT
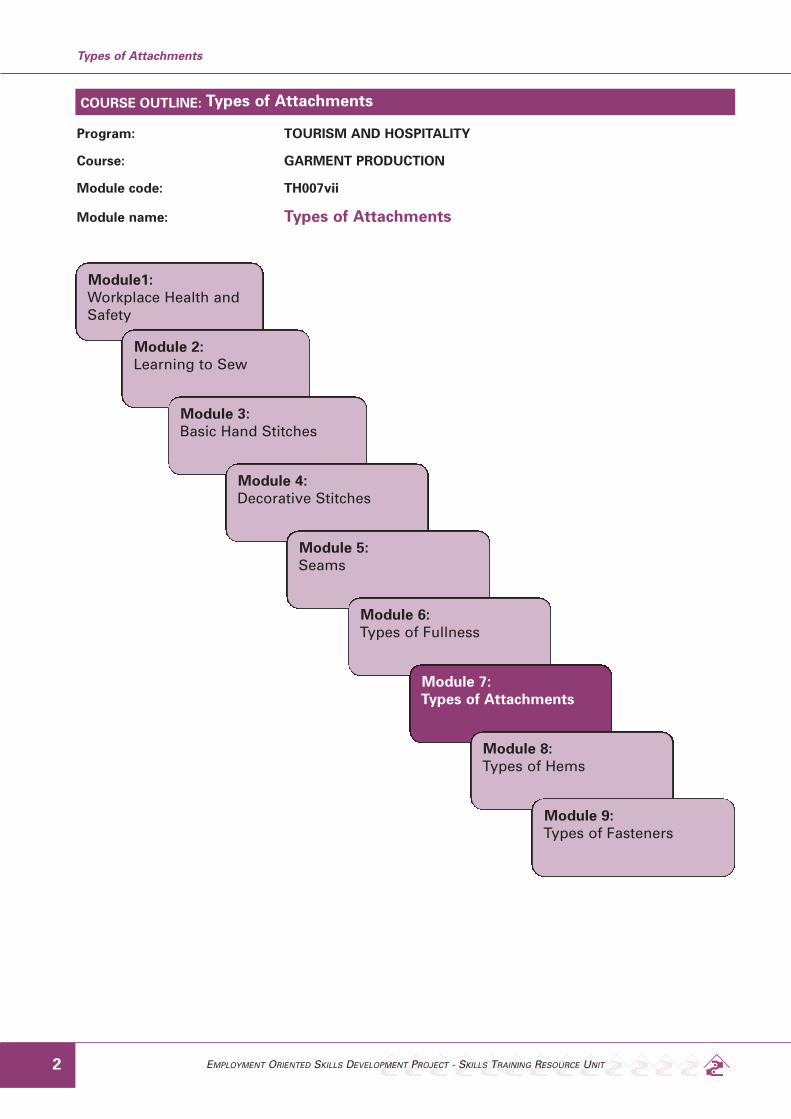
Program: TOURISM AND HOSPITALITY
Course: GARMENT PRODUCTION
Module code: TH007vii
Module name: Types of Attachments
COURSE OUTLINE: Types of Attachments
Module1:Workplace Health andSafety
Module 2:Learning to Sew
Module 3:Basic Hand Stitches
Module 4:Decorative Stitches
Module 5:Seams
Module 6:Types of Fullness
Module 7:Types of Attachments
Module 8:Types of Hems
Module 9:Types of Fasteners

EMPLOYMENT ORIENTED SKILLS DEVELOPMENT PROJECT - SKILLS TRAINING RESOURCE UNIT
Duty Task
3
Types of Attachments
COMPETENCY PROFILE: Types of Attachments
A. WorkplaceHealth andSafety
A1. Safety regulations A2. Hazard/risk A3. Contingencymeasures
B. Introductionto Sewing
[NECESSITIES OF
SEWING]
B1. Define sewing
B4. Sewing area
B2. Identify tools andsupplies
B3. Sewing machineoperation
C. Basic HandStitches
[BASIC CONSTRUCTION
TECHNIQUES]
C1. Tacking stitch
C4. Slip stitch
C2. Running stitch
C5. Overcasting stitch
C3. Back stitch
C6. Blanket stitch
D. Types ofDecorativeStitches
D1. Chain stitch
D4. Scross stitch
D7. French knot stitch
D2. Stem stitch
D5. Herringbone stitch
D8. Cretan stitch
D3. Satin stitch
D6. Lazy daisy stitch
E. Types ofSeams
E1. Open seam E2. French seam E3. Flat seam
F. Types ofFullness
F1. Construct darts
F4. Sew tucks
F2. Sew gathering F3. Sew pleats
EMPLOYMENT ORIENTED SKILLS DEVELOPMENT PROJECT - SKILLS TRAINING RESOURCE UNIT
Types of Attachments
4
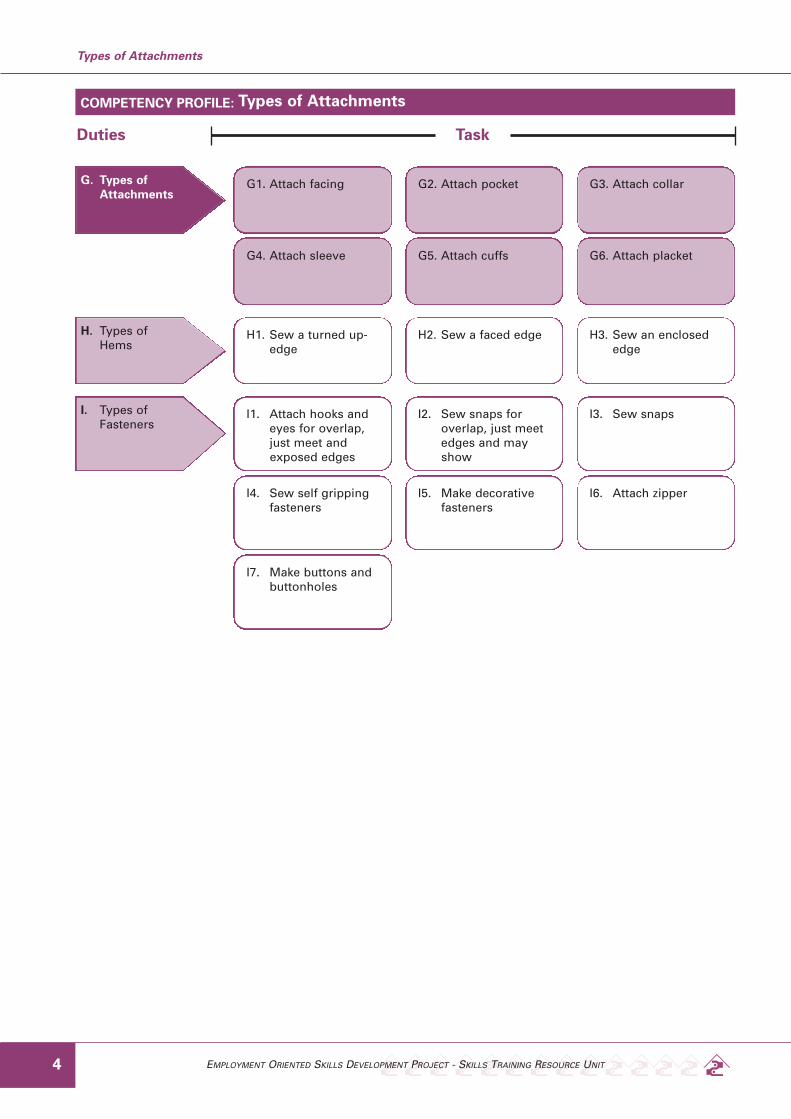
G. Types ofAttachments
G1. Attach facing
G4. Attach sleeve
G2. Attach pocket
G5. Attach cuffs
G3. Attach collar
G6. Attach placket
H. Types ofHems
H1. Sew a turned up-edge
H2. Sew a faced edge H3. Sew an enclosededge
I. Types ofFasteners
I1. Attach hooks andeyes for overlap,just meet andexposed edges
I4. Sew self grippingfasteners
I7. Make buttons andbuttonholes
I2. Sew snaps foroverlap, just meetedges and mayshow
I5. Make decorativefasteners
I3. Sew snaps
I6. Attach zipper
Duties Task
COMPETENCY PROFILE: Types of Attachments

Types of Attachments
Program: TOURISM AND HOSPITALITY
Course: GARMENT PRODUCTION
Module code: TH007vii
Module name: Types of Attachments
Module purpose: The purpose of the module is to provide and equip participants with thenecessary skills and knowledge in sewing different types of attachments.
Nominal duration: The module will take approximately 6 hours to be completed.
Prerequisites: There are no prerequisites for this module.
Content: G1. Facing
G2. Pockets
G3. Collars
G3. Sleeves
G3. Sleeve finishes/cuffs
G3. Making placket
Suggested delivery method: The short course will be delivered in a practical, hands-on manner.
1. Explanation (what we will do) 5%
2. Demonstration (how we will do it) 15%
3. Implementation (now you do it) 70%
4. Evaluation (how good did we do it) 10%
Instructor: The trainer preferred will be a recognized trainer from the communityor a trained vocational teacher who has sewing skill.
Assessment condition: In a training hall with proper:
• tables
• chair
• proper ventilation
Assessment condition: In a training hall with proper:
• lighting, ventilation
• table and chairs
• sewing tools and equipment
References: 1. Complete Guide to Sewing
2. Complete Book of Handcrafts
3. Basic Needlework – Winefride M. Bull
3. Implementation (now you do it) 70%
4. Extension Clothing and Textiles Specialist- Susan Wrigh
EMPLOYMENT ORIENTED SKILLS DEVELOPMENT PROJECT - SKILLS TRAINING RESOURCE UNIT 5
Types of Attachments

Overview of Learning OutcomesOn successfully completion of the course theparticipants will be able to;G1. Attached a facing to a blouse.G2. Sew a pocket to a shirt.G3. Attached a collar to a shirt.G4. Attached a sleeve to a shirt.G5. Attached a cuff to a band of a shirt.
APPENDIX 1: Training and Assessment Guide(Learning outcome).
Learning outcome G1.1:• Sew a sample of a facing to a blouse.
Teaching strategy:Learning activities for the participants mustinclude the instructor to;1.1 Identify tools and equipment to use.1.2 Identify the types of facings.1.3 Explain where the facings can be use.1.4 Demonstrate procedures in attaching a facing.
Assessment condition:In a classroom situation or a training hall whereall participants are provided with;• teaching notes• sewing machine• metre kaliko• scissors• threads• tacking pin
Assessment criteria:The participant has;1.1.1 Listed tools and equipment to use.1.1.2 Named the types of facings.1.1.3 Outlined where the facings can be applied
on a garment.1.1.4 Applied procedures in attaching a facing on
a garment.
Assessment method:• Written exercise• Observation• Oral questioning• Practical demonstration
APPENDIX 2: Training and Assessment Guide(Learning outcome).
Learning outcome G2.1:• Sew a sample of pocket.
Teaching strategy:Learning activities for the participants mustinclude the instructor to;2.1 Identify tools and equipment to use.2.2 Identify the types of pockets.2.3 Explain where the pockets can be attached on
garments.2.4 Demonstrate procedures in attaching a pocket.
Assessment condition:In a classroom situation or a training hall whereall participants are provided with;• teaching notes• bed• prepared skirt pattern• sample of a sewn pocket• scissors• threads• tacking pins
Assessment criteria:The participant has;2.1.1 Listed tools and equipment to use.2.1.2 Named the type of pockets.2.1.3 Outlined where the pockets can be applied
on a garment.2.1.4 Applied procedures in attaching a pocket.
Assessment method:• Written exercise• Observation• Oral questioning• Practical demonstration
EMPLOYMENT ORIENTED SKILLS DEVELOPMENT PROJECT - SKILLS TRAINING RESOURCE UNIT
Types of Attachments
6
Types of Attachments
Task G1: Facings
Suggested minimum instructional time: 1 hour
Task G2: Pockets.
Suggested minimum instructional time: 1 hour
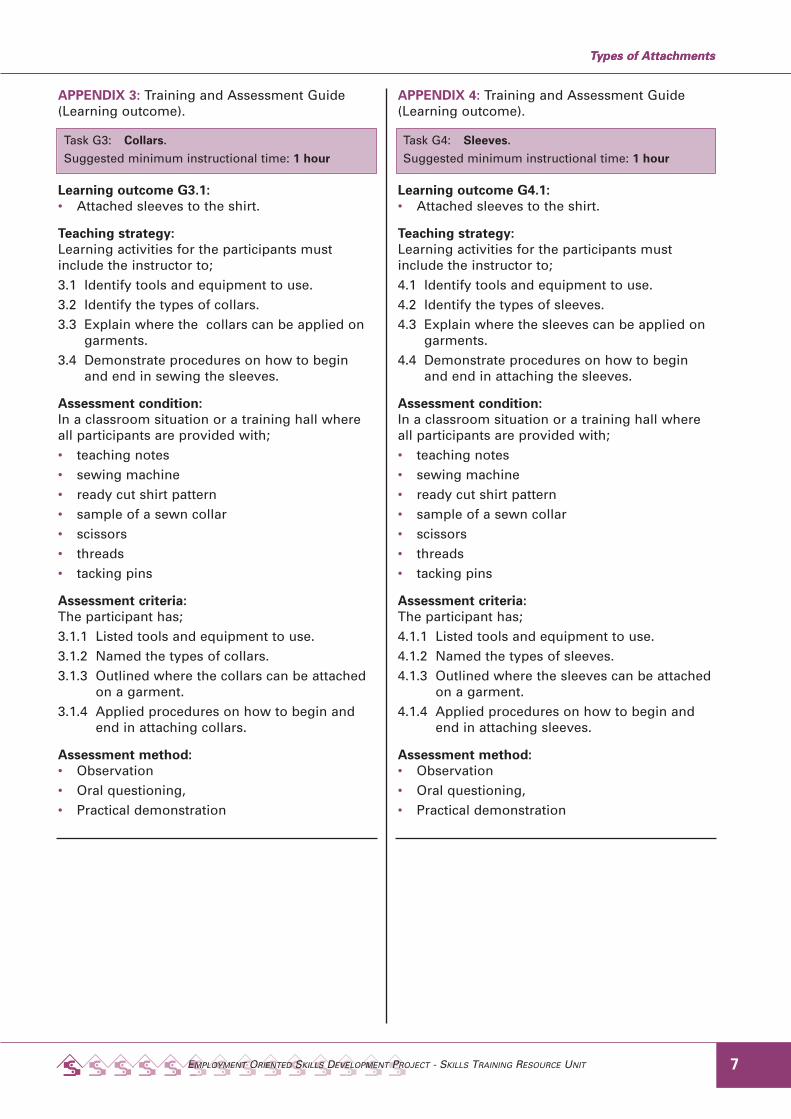
APPENDIX 3: Training and Assessment Guide(Learning outcome).
Learning outcome G3.1:• Attached sleeves to the shirt.
Teaching strategy:Learning activities for the participants mustinclude the instructor to;3.1 Identify tools and equipment to use.3.2 Identify the types of collars.3.3 Explain where the collars can be applied on
garments.3.4 Demonstrate procedures on how to begin
and end in sewing the sleeves.
Assessment condition:In a classroom situation or a training hall whereall participants are provided with;• teaching notes• sewing machine• ready cut shirt pattern• sample of a sewn collar• scissors• threads• tacking pins
Assessment criteria:The participant has;3.1.1 Listed tools and equipment to use.3.1.2 Named the types of collars.3.1.3 Outlined where the collars can be attached
on a garment.3.1.4 Applied procedures on how to begin and
end in attaching collars.
Assessment method:• Observation• Oral questioning,• Practical demonstration
APPENDIX 4: Training and Assessment Guide(Learning outcome).
Learning outcome G4.1:• Attached sleeves to the shirt.
Teaching strategy:Learning activities for the participants mustinclude the instructor to;4.1 Identify tools and equipment to use.4.2 Identify the types of sleeves.4.3 Explain where the sleeves can be applied on
garments.4.4 Demonstrate procedures on how to begin
and end in attaching the sleeves.
Assessment condition:In a classroom situation or a training hall whereall participants are provided with;• teaching notes• sewing machine• ready cut shirt pattern• sample of a sewn collar• scissors• threads• tacking pins
Assessment criteria:The participant has;4.1.1 Listed tools and equipment to use.4.1.2 Named the types of sleeves.4.1.3 Outlined where the sleeves can be attached
on a garment.4.1.4 Applied procedures on how to begin and
end in attaching sleeves.
Assessment method:• Observation• Oral questioning,• Practical demonstration
EMPLOYMENT ORIENTED SKILLS DEVELOPMENT PROJECT - SKILLS TRAINING RESOURCE UNIT 7
Types of AttachmentsTypes of Attachments
Task G3: Collars.
Suggested minimum instructional time: 1 hour
Task G4: Sleeves.
Suggested minimum instructional time: 1 hour
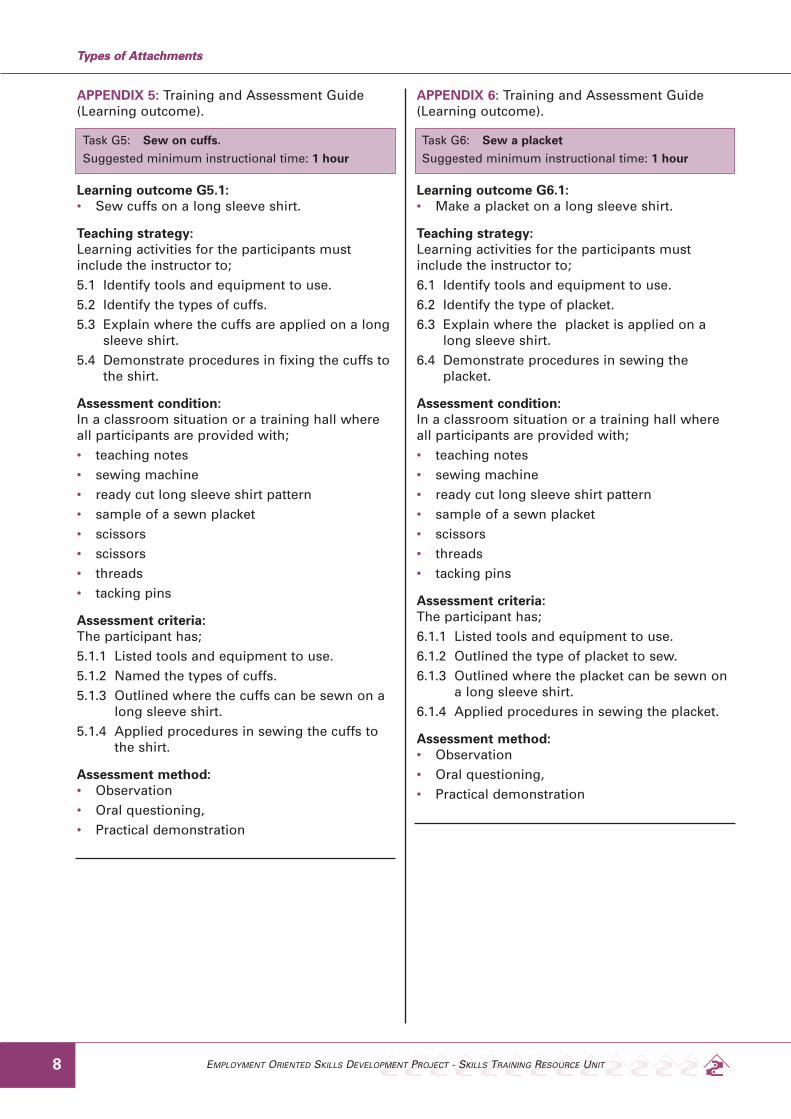
APPENDIX 5: Training and Assessment Guide(Learning outcome).
Learning outcome G5.1:• Sew cuffs on a long sleeve shirt.
Teaching strategy:Learning activities for the participants mustinclude the instructor to;5.1 Identify tools and equipment to use.5.2 Identify the types of cuffs.5.3 Explain where the cuffs are applied on a long
sleeve shirt.5.4 Demonstrate procedures in fixing the cuffs to
the shirt.
Assessment condition:In a classroom situation or a training hall whereall participants are provided with;• teaching notes• sewing machine• ready cut long sleeve shirt pattern• sample of a sewn placket• scissors• scissors• threads• tacking pins
Assessment criteria:The participant has;5.1.1 Listed tools and equipment to use.5.1.2 Named the types of cuffs.5.1.3 Outlined where the cuffs can be sewn on a
long sleeve shirt.5.1.4 Applied procedures in sewing the cuffs to
the shirt.
Assessment method:• Observation• Oral questioning,• Practical demonstration
APPENDIX 6: Training and Assessment Guide(Learning outcome).
Learning outcome G6.1:• Make a placket on a long sleeve shirt.
Teaching strategy:Learning activities for the participants mustinclude the instructor to;6.1 Identify tools and equipment to use.6.2 Identify the type of placket.6.3 Explain where the placket is applied on a
long sleeve shirt.6.4 Demonstrate procedures in sewing the
placket.
Assessment condition:In a classroom situation or a training hall whereall participants are provided with;• teaching notes• sewing machine• ready cut long sleeve shirt pattern• sample of a sewn placket• scissors• threads• tacking pins
Assessment criteria:The participant has;6.1.1 Listed tools and equipment to use.6.1.2 Outlined the type of placket to sew.6.1.3 Outlined where the placket can be sewn on
a long sleeve shirt.6.1.4 Applied procedures in sewing the placket.
Assessment method:• Observation• Oral questioning,• Practical demonstration
EMPLOYMENT ORIENTED SKILLS DEVELOPMENT PROJECT - SKILLS TRAINING RESOURCE UNIT
Types of Attachments
8
Types of Attachments
Task G5: Sew on cuffs.
Suggested minimum instructional time: 1 hour
Task G6: Sew a placket
Suggested minimum instructional time: 1 hour
EMPLOYMENT ORIENTED SKILLS DEVELOPMENT PROJECT - SKILLS TRAINING RESOURCE UNIT
APPENDIX 7: Instructional Notes
INTRODUCTIONTYPES OF ATTACHMENTSOne of the first things to be done in making up agarment is the arrangements of attachments.They are the facings, pockets, collars, sleeves,cuffs and plackets.
A facing is a piece of fabric used to finish rawedges of a garment at open areas, such as theneckline, armhole, and front and back plackets oropening. There are three basic types: shapedfacings, extended facings, and bias facings.
G1.1 Shaped FacingsA shaped facing is a separate piece of fabric cutfrom a pattern to the same shape and on thesame grain as the garment edge it will finish.
APPLYING A NECKLINE FACINGIf you are using a fabric where a fusible interfacingwill make a ridge if applied to the body of thegarment, apply the fusible interfacing to the facingbefore sewing the pieces together. If using a sew-in facing, apply the interfacing to the body of thegarment when staystitching is done. Do this beforeproceeding.1. Staystitch the neckline of the facing pieces and
the garment (fig. 1).
Figure 1
2. Prepare the facing by stitching the piecestogether, pressing, and finishing the edge (fig. 2).
Figure 2
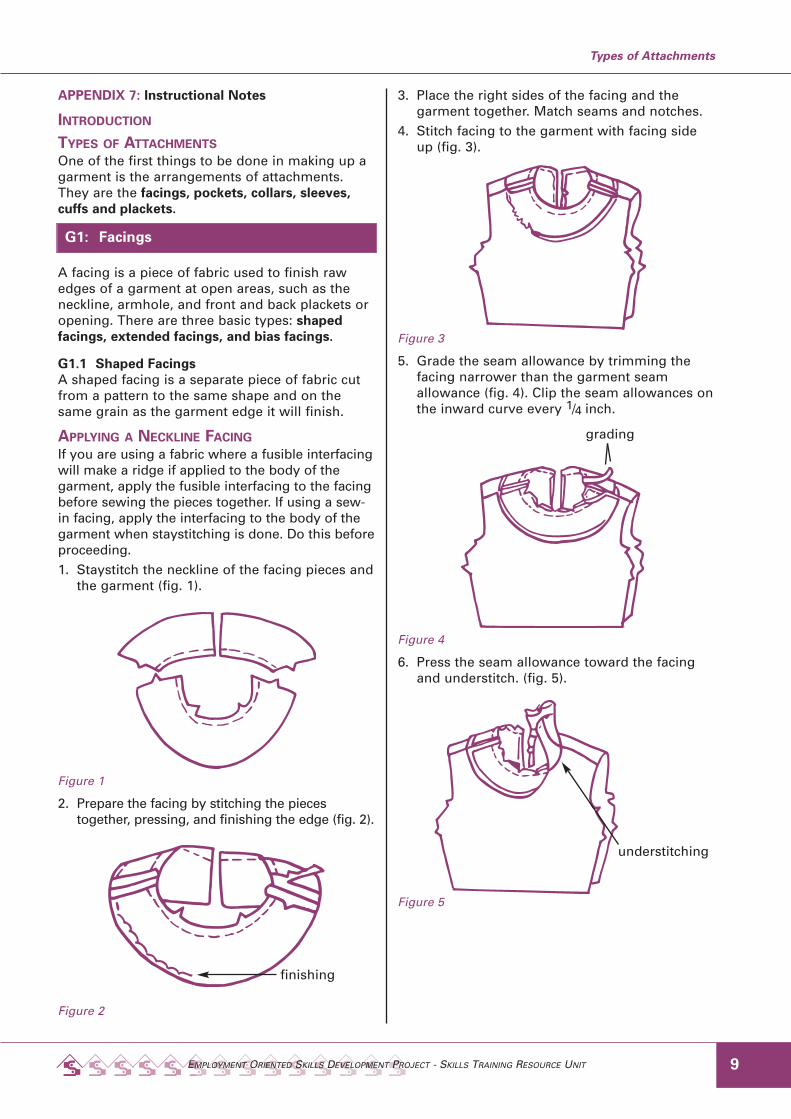
3. Place the right sides of the facing and thegarment together. Match seams and notches.
4. Stitch facing to the garment with facing sideup (fig. 3).
Figure 3
5. Grade the seam allowance by trimming thefacing narrower than the garment seamallowance (fig. 4). Clip the seam allowances onthe inward curve every 1/4 inch.
Figure 4
6. Press the seam allowance toward the facingand understitch. (fig. 5).
Figure 5
9
Types of Attachments
G1: Facings
finishing
grading
understitching
EMPLOYMENT ORIENTED SKILLS DEVELOPMENT PROJECT - SKILLS TRAINING RESOURCE UNIT
APPLYING A COMBINATION FACINGA combination facing is a shaped facing in whichboth the neckline and armholes are finished bythe same facing unit.7. Staystitch the neckline and armholes of the
facing pieces and the garment. Apply fusibleinterfacing to the facing, or sew sew-ininterfacing in place when staystitching.
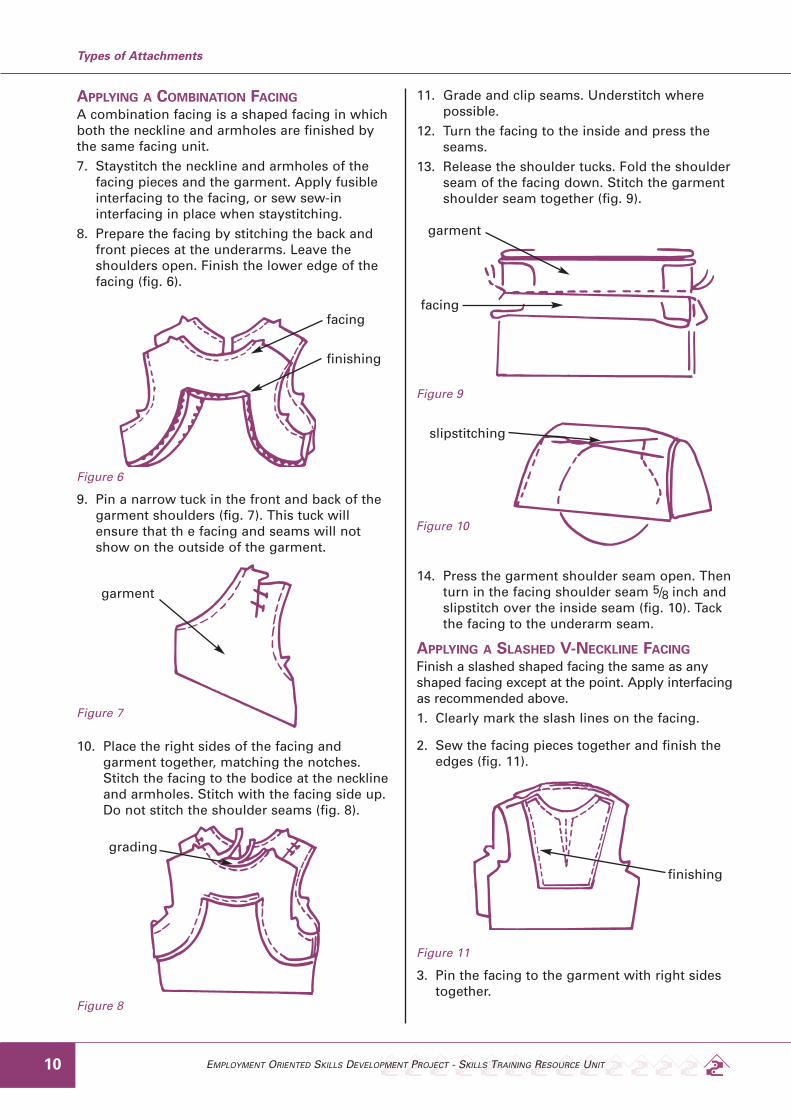
8. Prepare the facing by stitching the back andfront pieces at the underarms. Leave theshoulders open. Finish the lower edge of thefacing (fig. 6).
Figure 6
9. Pin a narrow tuck in the front and back of thegarment shoulders (fig. 7). This tuck willensure that th e facing and seams will notshow on the outside of the garment.
10. Place the right sides of the facing andgarment together, matching the notches.Stitch the facing to the bodice at the necklineand armholes. Stitch with the facing side up.Do not stitch the shoulder seams (fig. 8).
Figure 8
11. Grade and clip seams. Understitch wherepossible.
12. Turn the facing to the inside and press theseams.
13. Release the shoulder tucks. Fold the shoulderseam of the facing down. Stitch the garmentshoulder seam together (fig. 9).
Figure 9
14. Press the garment shoulder seam open. Thenturn in the facing shoulder seam 5/8 inch andslipstitch over the inside seam (fig. 10). Tackthe facing to the underarm seam.
APPLYING A SLASHED V-NECKLINE FACINGFinish a slashed shaped facing the same as anyshaped facing except at the point. Apply interfacingas recommended above.1. Clearly mark the slash lines on the facing.
2. Sew the facing pieces together and finish theedges (fig. 11).
Figure 11
3. Pin the facing to the garment with right sidestogether.
Types of Attachments
10
facing
finishing
garment
garment
facing
slipstitching
Figure 10
finishing
grading
Figure 7

EMPLOYMENT ORIENTED SKILLS DEVELOPMENT PROJECT - SKILLS TRAINING RESOURCE UNIT
4. Stitch the neckline seam to within 1 inch of thepoint. Shorten the stitch length and stitch topoint. Raise the presser foot and turn thefabric so you can take one stitch across thebase of the point. Raise the presser foot againand turn the fabric to stitch up other side.Stitch 1 inch with small stitches. Then changeto regular stitch length and continue stitchingthe neckline seam.
5. Grade the seam allowance by trimming thefacing seam narrower than the garment seamallowance. Cut the opening to, but notthrough, the stitch at the point. 6. Clip theseam allowance on the inward curve every 1/2inch. Turn the facing to the inside and press(fig. 12). Understitch where possible. Tack thefacing at the shoulder seams.
Figure 12
G1.2 Extended facingsAn extended facing is cut as an extension of thegarment and then folded back along the edge itfinishes (fig. 13). Extended facings often are usedon garments with front or back openings cut on astraight line. The neckline of an extended facingis a shaped facing and should be applied usingthe same techniques as other facings. Fusibleinterfacings may be applied to the facing side ofan extended facing. Conventional interfacing maybe used. It is applied to the body of the garmentand catchstitched in place. If you use fusibleinterfacing, apply it before proceeding.
Figure 13
1. Staystitch the neckline of the garment and thefacing pieces (fig. 14).
Figure 14
2. Prepare the facing by stitching the piecestogether, pressing, and finishing the edge. Ifusing conventional interfacing, catchstitch italong the fold line (fig. 15).
Figure 15
3. Fold the facing along the fold line to matchright sides together. Stitch along the necklineseam. Reinforce stitch near the folded edge(fig. 16).
Figure 16
11
Types of Attachments
right side ofgarment
front facing
back facing
catchstitching
finishing
reinforcestitching
fold line
EMPLOYMENT ORIENTED SKILLS DEVELOPMENT PROJECT - SKILLS TRAINING RESOURCE UNIT
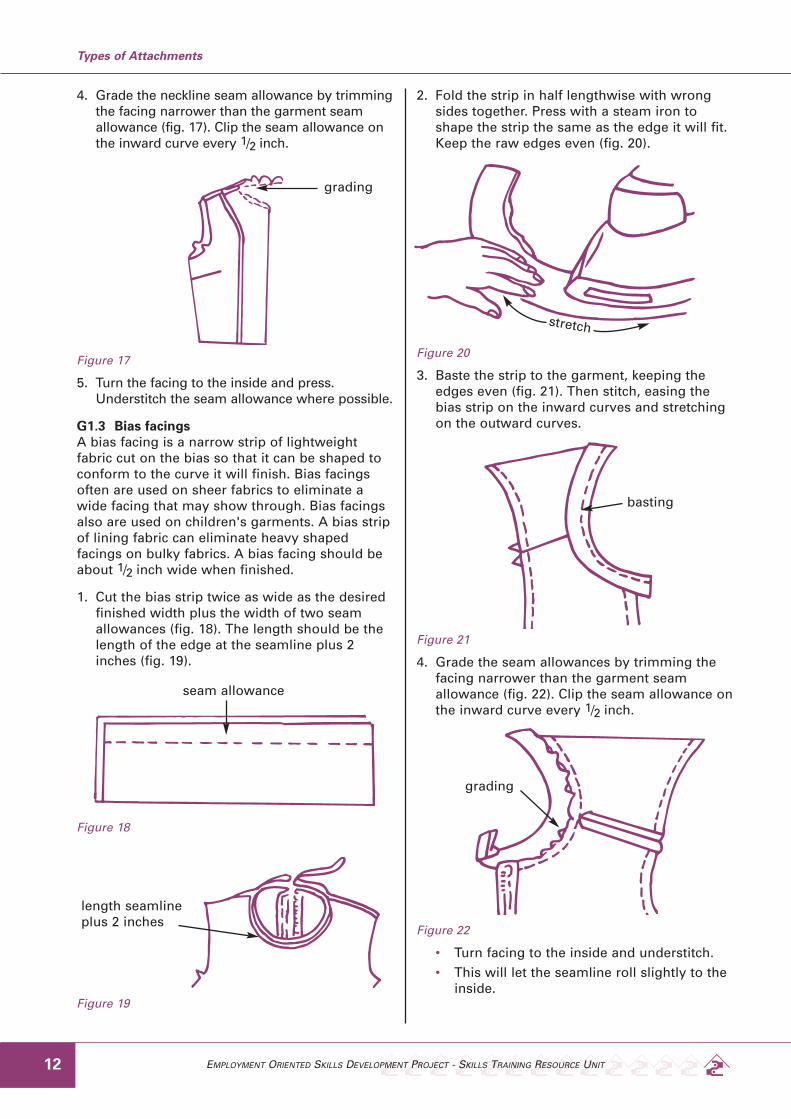
4. Grade the neckline seam allowance by trimmingthe facing narrower than the garment seamallowance (fig. 17). Clip the seam allowance onthe inward curve every 1/2 inch.
Figure 17
5. Turn the facing to the inside and press.Understitch the seam allowance where possible.
G1.3 Bias facingsA bias facing is a narrow strip of lightweightfabric cut on the bias so that it can be shaped toconform to the curve it will finish. Bias facingsoften are used on sheer fabrics to eliminate awide facing that may show through. Bias facingsalso are used on children's garments. A bias stripof lining fabric can eliminate heavy shapedfacings on bulky fabrics. A bias facing should beabout 1/2 inch wide when finished.
1. Cut the bias strip twice as wide as the desiredfinished width plus the width of two seamallowances (fig. 18). The length should be thelength of the edge at the seamline plus 2inches (fig. 19).
Figure 18
Figure 19
2. Fold the strip in half lengthwise with wrongsides together. Press with a steam iron toshape the strip the same as the edge it will fit.Keep the raw edges even (fig. 20).
Figure 20
3. Baste the strip to the garment, keeping theedges even (fig. 21). Then stitch, easing thebias strip on the inward curves and stretchingon the outward curves.
Figure 21
4. Grade the seam allowances by trimming thefacing narrower than the garment seamallowance (fig. 22). Clip the seam allowance onthe inward curve every 1/2 inch.
Figure 22
• Turn facing to the inside and understitch.• This will let the seamline roll slightly to the
inside.
Types of Attachments
12
grading
basting
grading
stretch
seam allowance
length seamlineplus 2 inches

EMPLOYMENT ORIENTED SKILLS DEVELOPMENT PROJECT - SKILLS TRAINING RESOURCE UNIT
• Trim ends and turn under 1/4 inch at thegarment opening.
• Slipstitch the edge of the facing to theinside of the garment (fig. 23).
Figure 23
TIPS FOR APPLYING FACINGS• Both shaped and bias facings can be cut from
a fabric lighter in weight than the garment toreduce bulk.
• If you have to alter the pattern, be sure to alterfacings and interfacings to match.
• Interface a facing that will have buttonholes in it.• Reduce bulk in the facing seam by trimming
and grading. The seam allowance next to thefacing should be the narrower one.
• Make facings smooth and flat by clippinginward curves and notching outward curves.
• Understitch shaped and extended facings tokeep facing from rolling to outside of garment.
• Finish outer edge of facings. Generally, thesame finish that is applied to seams can beused to finish facing edges. Use the least bulkyseam finish that will prevent raveling.
• Tack facings only at seams such as theunderarm seam or side seam. Do not handstitch the outer facing edge to garment all theway around. This gives garments a puckeredand unprofessional look.
• Finish neckline facings over zippers asillustrated in figure 24. Then sew a hook andeye or flying snap to hold edges closed.
Patch pockets may be used for decoration orfunction on blouses, shirts, and jackets.To prepare the pockets, cut the pocket as directedby the pattern. Patch pockets are generally cut onthe lengthwise grain; however, a bias-cut pocketmay be used on plaid or striped fabric to avoidhaving to match the fabric design.An interfacing will help preserve the shape of thepocket. If a fusible interfacing is used, cut it to thefinished pocket size and fuse in place. If a sew-ininterfacing is used, cut it by the pocket pattern,staystitched in place, then trim it close to thestaystitching. The hem of the pocket does notneed to be interfaced.
G2.1 Square pocket1. Apply interfacing.
2. Finish edge hem. Fold the hem to right side ofpocket and stitch around pocket on 5/8" line.Stitch from top to bottom on each side, thenstitch from side to side across the bottom (fig. 1).
Figure 1
3. Trim seam allowance of hem close to stitching(fig. 1). Turn hem right side out. Press pocketseam allowance along 5/8" stitching line.
4. To miter corners of pocket, fold bottomcorners diagonally to line up stitching linesand press (fig. 2). Trim points to 1/4" seamallowance. Turn side seam allowance up andpress to form mitered corners (fig. 3).
Figure 2 Figure 3
13
Types of Attachments
G2: Pockets
slipstitching
Figure 24
EMPLOYMENT ORIENTED SKILLS DEVELOPMENT PROJECT - SKILLS TRAINING RESOURCE UNIT
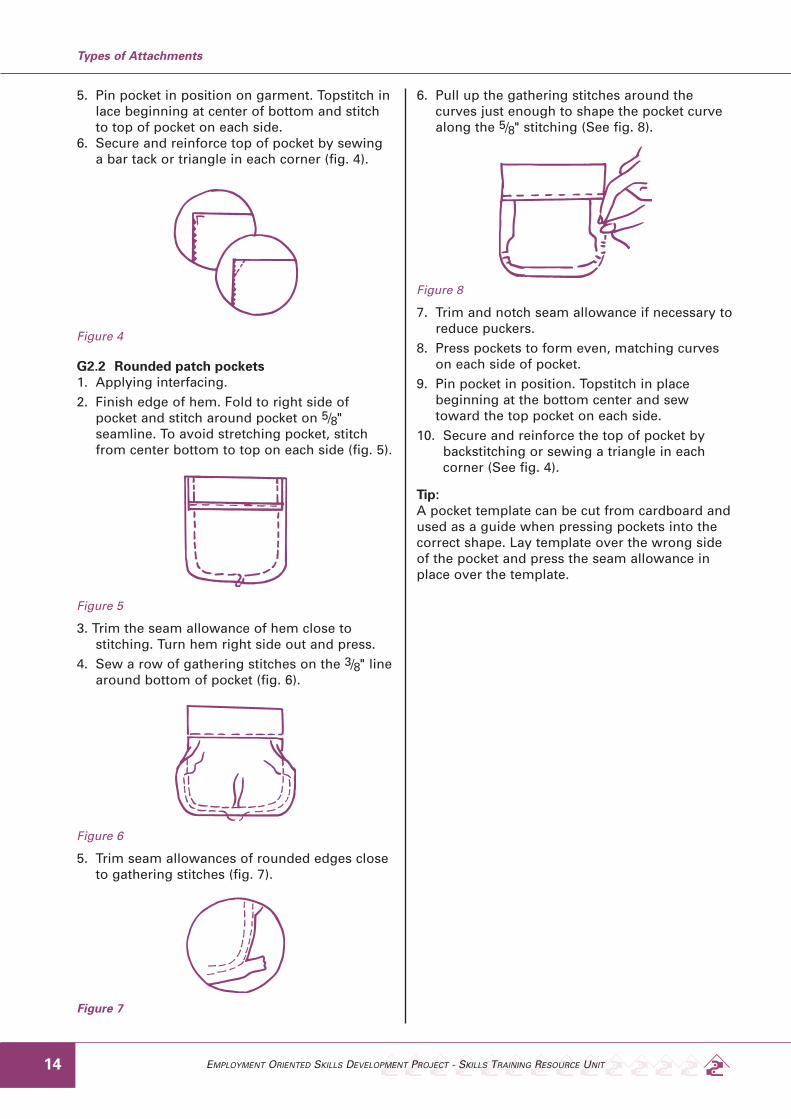
5. Pin pocket in position on garment. Topstitch inlace beginning at center of bottom and stitchto top of pocket on each side.
6. Secure and reinforce top of pocket by sewinga bar tack or triangle in each corner (fig. 4).
Figure 4
G2.2 Rounded patch pockets1. Applying interfacing.2. Finish edge of hem. Fold to right side of
pocket and stitch around pocket on 5/8"seamline. To avoid stretching pocket, stitchfrom center bottom to top on each side (fig. 5).
Figure 5
3. Trim the seam allowance of hem close tostitching. Turn hem right side out and press.
4. Sew a row of gathering stitches on the 3/8" linearound bottom of pocket (fig. 6).
Figure 6
5. Trim seam allowances of rounded edges closeto gathering stitches (fig. 7).
Figure 7
6. Pull up the gathering stitches around thecurves just enough to shape the pocket curvealong the 5/8" stitching (See fig. 8).
Figure 8
7. Trim and notch seam allowance if necessary toreduce puckers.
8. Press pockets to form even, matching curveson each side of pocket.
9. Pin pocket in position. Topstitch in placebeginning at the bottom center and sewtoward the top pocket on each side.
10. Secure and reinforce the top of pocket bybackstitching or sewing a triangle in eachcorner (See fig. 4).
Tip:A pocket template can be cut from cardboard andused as a guide when pressing pockets into thecorrect shape. Lay template over the wrong sideof the pocket and press the seam allowance inplace over the template.
Types of Attachments
14
EMPLOYMENT ORIENTED SKILLS DEVELOPMENT PROJECT - SKILLS TRAINING RESOURCE UNIT
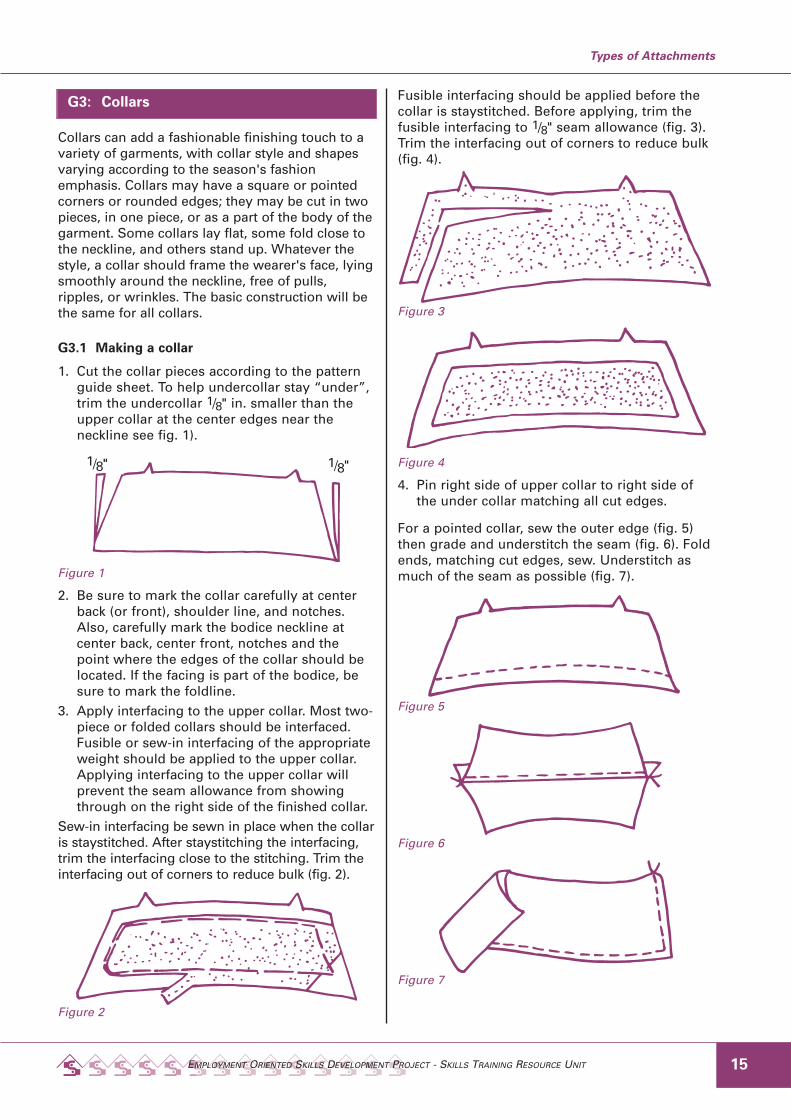
Collars can add a fashionable finishing touch to avariety of garments, with collar style and shapesvarying according to the season's fashionemphasis. Collars may have a square or pointedcorners or rounded edges; they may be cut in twopieces, in one piece, or as a part of the body of thegarment. Some collars lay flat, some fold close tothe neckline, and others stand up. Whatever thestyle, a collar should frame the wearer's face, lyingsmoothly around the neckline, free of pulls,ripples, or wrinkles. The basic construction will bethe same for all collars.
G3.1 Making a collar
1. Cut the collar pieces according to the patternguide sheet. To help undercollar stay “under”,trim the undercollar 1/8" in. smaller than theupper collar at the center edges near theneckline see fig. 1).
Figure 1
2. Be sure to mark the collar carefully at centerback (or front), shoulder line, and notches.Also, carefully mark the bodice neckline atcenter back, center front, notches and thepoint where the edges of the collar should belocated. If the facing is part of the bodice, besure to mark the foldline.
3. Apply interfacing to the upper collar. Most two-piece or folded collars should be interfaced.Fusible or sew-in interfacing of the appropriateweight should be applied to the upper collar.Applying interfacing to the upper collar willprevent the seam allowance from showingthrough on the right side of the finished collar.
Sew-in interfacing be sewn in place when the collaris staystitched. After staystitching the interfacing,trim the interfacing close to the stitching. Trim theinterfacing out of corners to reduce bulk (fig. 2).
Figure 2
Fusible interfacing should be applied before thecollar is staystitched. Before applying, trim thefusible interfacing to 1/8" seam allowance (fig. 3).Trim the interfacing out of corners to reduce bulk(fig. 4).
Figure 3
Figure 4
4. Pin right side of upper collar to right side ofthe under collar matching all cut edges.
For a pointed collar, sew the outer edge (fig. 5)then grade and understitch the seam (fig. 6). Foldends, matching cut edges, sew. Understitch asmuch of the seam as possible (fig. 7).
Figure 5
Figure 6
Figure 7
15
Types of Attachments
G3: Collars
1/8" 1/8"
EMPLOYMENT ORIENTED SKILLS DEVELOPMENT PROJECT - SKILLS TRAINING RESOURCE UNIT
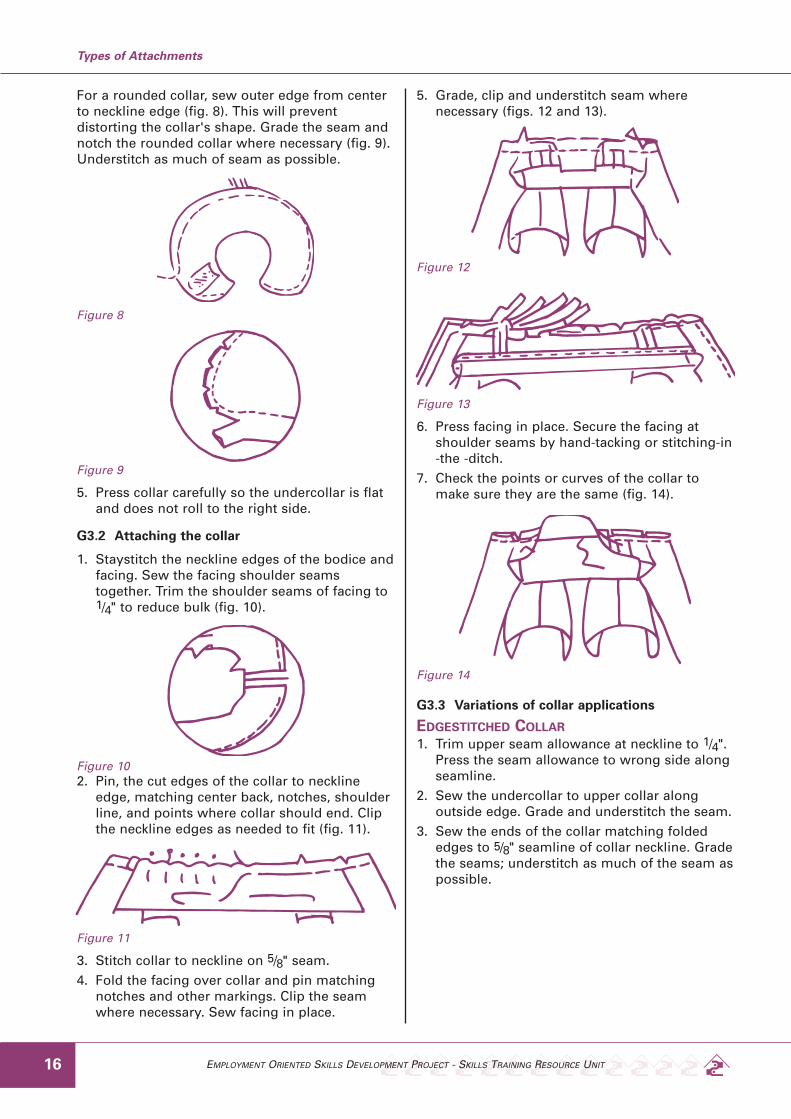
For a rounded collar, sew outer edge from centerto neckline edge (fig. 8). This will preventdistorting the collar's shape. Grade the seam andnotch the rounded collar where necessary (fig. 9).Understitch as much of seam as possible.
Figure 8
Figure 9
5. Press collar carefully so the undercollar is flatand does not roll to the right side.
G3.2 Attaching the collar
1. Staystitch the neckline edges of the bodice andfacing. Sew the facing shoulder seamstogether. Trim the shoulder seams of facing to1/4" to reduce bulk (fig. 10).
Figure 102. Pin, the cut edges of the collar to neckline
edge, matching center back, notches, shoulderline, and points where collar should end. Clipthe neckline edges as needed to fit (fig. 11).
Figure 11
3. Stitch collar to neckline on 5/8" seam.4. Fold the facing over collar and pin matching
notches and other markings. Clip the seamwhere necessary. Sew facing in place.
5. Grade, clip and understitch seam wherenecessary (figs. 12 and 13).
Figure 12
Figure 13
6. Press facing in place. Secure the facing atshoulder seams by hand-tacking or stitching-in-the -ditch.
7. Check the points or curves of the collar tomake sure they are the same (fig. 14).
Figure 14
G3.3 Variations of collar applications
EDGESTITCHED COLLAR1. Trim upper seam allowance at neckline to 1/4".
Press the seam allowance to wrong side alongseamline.
2. Sew the undercollar to upper collar alongoutside edge. Grade and understitch the seam.
3. Sew the ends of the collar matching foldededges to 5/8" seamline of collar neckline. Gradethe seams; understitch as much of the seam aspossible.
Types of Attachments
16
EMPLOYMENT ORIENTED SKILLS DEVELOPMENT PROJECT - SKILLS TRAINING RESOURCE UNIT
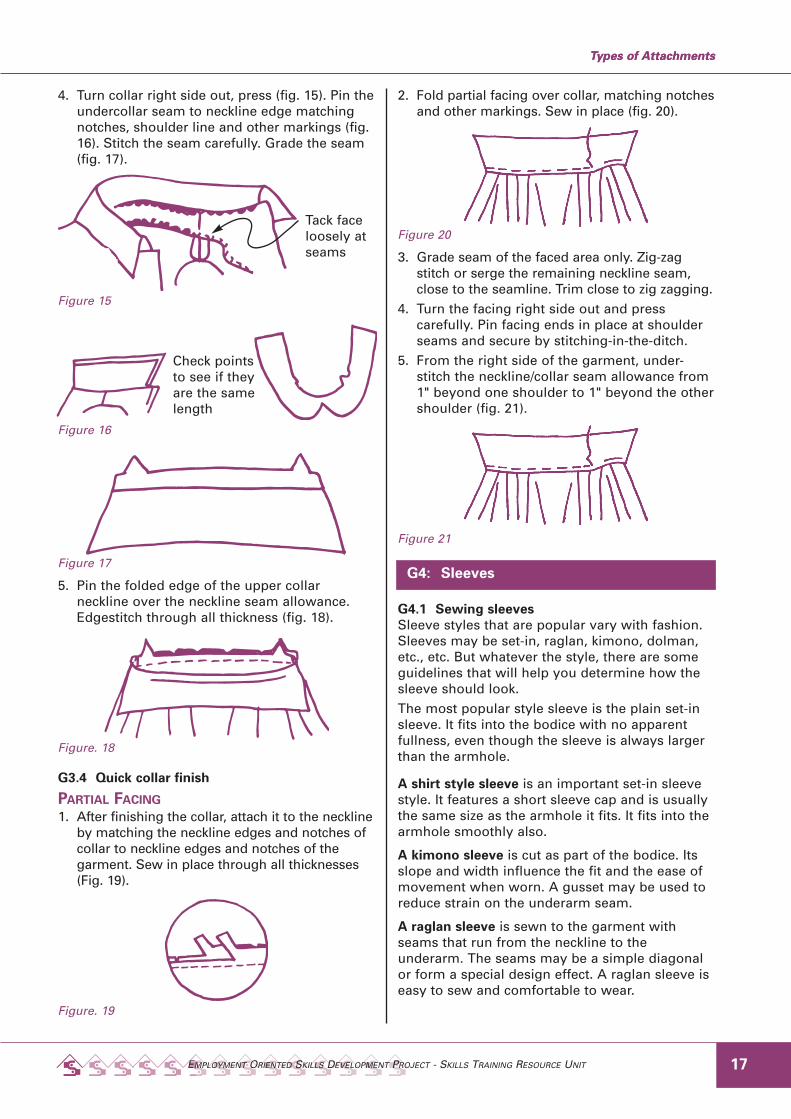
4. Turn collar right side out, press (fig. 15). Pin theundercollar seam to neckline edge matchingnotches, shoulder line and other markings (fig.16). Stitch the seam carefully. Grade the seam(fig. 17).
Figure 15
Figure 16
Figure 17
5. Pin the folded edge of the upper collarneckline over the neckline seam allowance.Edgestitch through all thickness (fig. 18).
Figure. 18
G3.4 Quick collar finish
PARTIAL FACING1. After finishing the collar, attach it to the neckline
by matching the neckline edges and notches ofcollar to neckline edges and notches of thegarment. Sew in place through all thicknesses(Fig. 19).
Figure. 19
2. Fold partial facing over collar, matching notchesand other markings. Sew in place (fig. 20).
Figure 20
3. Grade seam of the faced area only. Zig-zagstitch or serge the remaining neckline seam,close to the seamline. Trim close to zig zagging.
4. Turn the facing right side out and presscarefully. Pin facing ends in place at shoulderseams and secure by stitching-in-the-ditch.
5. From the right side of the garment, under-stitch the neckline/collar seam allowance from1" beyond one shoulder to 1" beyond the othershoulder (fig. 21).
Figure 21
G4.1 Sewing sleevesSleeve styles that are popular vary with fashion.Sleeves may be set-in, raglan, kimono, dolman,etc., etc. But whatever the style, there are someguidelines that will help you determine how thesleeve should look.The most popular style sleeve is the plain set-insleeve. It fits into the bodice with no apparentfullness, even though the sleeve is always largerthan the armhole.
A shirt style sleeve is an important set-in sleevestyle. It features a short sleeve cap and is usuallythe same size as the armhole it fits. It fits into thearmhole smoothly also.
A kimono sleeve is cut as part of the bodice. Itsslope and width influence the fit and the ease ofmovement when worn. A gusset may be used toreduce strain on the underarm seam.
A raglan sleeve is sewn to the garment withseams that run from the neckline to theunderarm. The seams may be a simple diagonalor form a special design effect. A raglan sleeve iseasy to sew and comfortable to wear.
17
Types of AttachmentsTypes of Attachments
G4: Sleeves
Tack faceloosely atseams
Check pointsto see if theyare the samelength
EMPLOYMENT ORIENTED SKILLS DEVELOPMENT PROJECT - SKILLS TRAINING RESOURCE UNIT
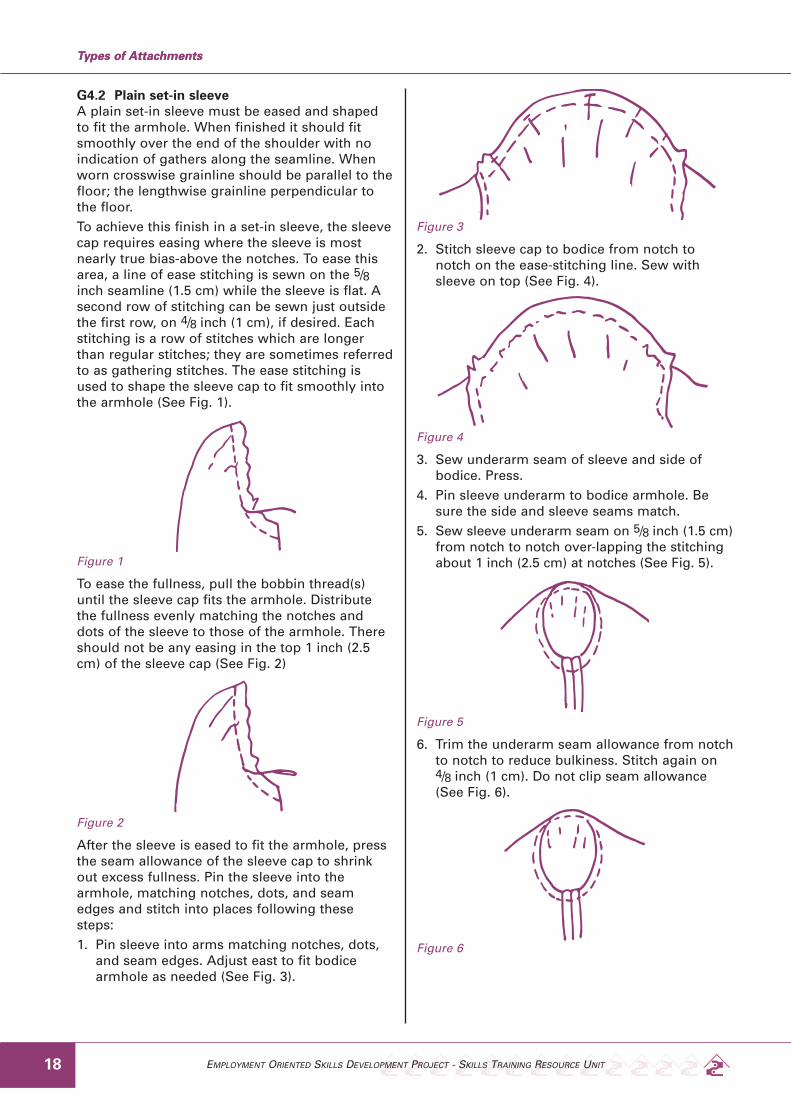
G4.2 Plain set-in sleeveA plain set-in sleeve must be eased and shapedto fit the armhole. When finished it should fitsmoothly over the end of the shoulder with noindication of gathers along the seamline. Whenworn crosswise grainline should be parallel to thefloor; the lengthwise grainline perpendicular tothe floor.To achieve this finish in a set-in sleeve, the sleevecap requires easing where the sleeve is mostnearly true bias-above the notches. To ease thisarea, a line of ease stitching is sewn on the 5/8inch seamline (1.5 cm) while the sleeve is flat. Asecond row of stitching can be sewn just outsidethe first row, on 4/8 inch (1 cm), if desired. Eachstitching is a row of stitches which are longerthan regular stitches; they are sometimes referredto as gathering stitches. The ease stitching isused to shape the sleeve cap to fit smoothly intothe armhole (See Fig. 1).
Figure 1
To ease the fullness, pull the bobbin thread(s)until the sleeve cap fits the armhole. Distributethe fullness evenly matching the notches anddots of the sleeve to those of the armhole. Thereshould not be any easing in the top 1 inch (2.5cm) of the sleeve cap (See Fig. 2)
Figure 2
After the sleeve is eased to fit the armhole, pressthe seam allowance of the sleeve cap to shrinkout excess fullness. Pin the sleeve into thearmhole, matching notches, dots, and seamedges and stitch into places following thesesteps:1. Pin sleeve into arms matching notches, dots,
and seam edges. Adjust east to fit bodicearmhole as needed (See Fig. 3).
Figure 3
2. Stitch sleeve cap to bodice from notch tonotch on the ease-stitching line. Sew withsleeve on top (See Fig. 4).
Figure 4
3. Sew underarm seam of sleeve and side ofbodice. Press.
4. Pin sleeve underarm to bodice armhole. Besure the side and sleeve seams match.
5. Sew sleeve underarm seam on 5/8 inch (1.5 cm)from notch to notch over-lapping the stitchingabout 1 inch (2.5 cm) at notches (See Fig. 5).
Figure 5
6. Trim the underarm seam allowance from notchto notch to reduce bulkiness. Stitch again on4/8 inch (1 cm). Do not clip seam allowance(See Fig. 6).
Figure 6
Types of Attachments
18
Types of Attachments
EMPLOYMENT ORIENTED SKILLS DEVELOPMENT PROJECT - SKILLS TRAINING RESOURCE UNIT
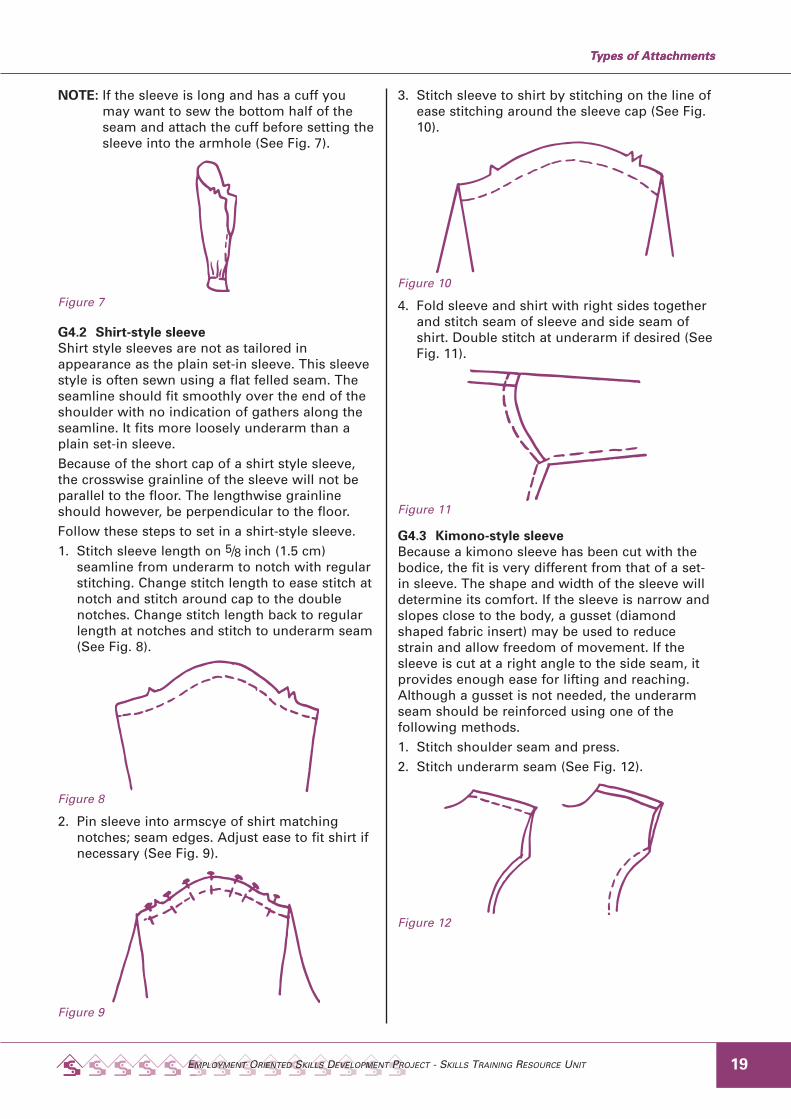
NOTE: If the sleeve is long and has a cuff youmay want to sew the bottom half of theseam and attach the cuff before setting thesleeve into the armhole (See Fig. 7).
Figure 7
G4.2 Shirt-style sleeveShirt style sleeves are not as tailored inappearance as the plain set-in sleeve. This sleevestyle is often sewn using a flat felled seam. Theseamline should fit smoothly over the end of theshoulder with no indication of gathers along theseamline. It fits more loosely underarm than aplain set-in sleeve.Because of the short cap of a shirt style sleeve,the crosswise grainline of the sleeve will not beparallel to the floor. The lengthwise grainlineshould however, be perpendicular to the floor.Follow these steps to set in a shirt-style sleeve.1. Stitch sleeve length on 5/8 inch (1.5 cm)
seamline from underarm to notch with regularstitching. Change stitch length to ease stitch atnotch and stitch around cap to the doublenotches. Change stitch length back to regularlength at notches and stitch to underarm seam(See Fig. 8).
Figure 8
2. Pin sleeve into armscye of shirt matchingnotches; seam edges. Adjust ease to fit shirt ifnecessary (See Fig. 9).
Figure 9
3. Stitch sleeve to shirt by stitching on the line ofease stitching around the sleeve cap (See Fig.10).
Figure 10
4. Fold sleeve and shirt with right sides togetherand stitch seam of sleeve and side seam ofshirt. Double stitch at underarm if desired (SeeFig. 11).
Figure 11
G4.3 Kimono-style sleeveBecause a kimono sleeve has been cut with thebodice, the fit is very different from that of a set-in sleeve. The shape and width of the sleeve willdetermine its comfort. If the sleeve is narrow andslopes close to the body, a gusset (diamondshaped fabric insert) may be used to reducestrain and allow freedom of movement. If thesleeve is cut at a right angle to the side seam, itprovides enough ease for lifting and reaching.Although a gusset is not needed, the underarmseam should be reinforced using one of thefollowing methods.1. Stitch shoulder seam and press.2. Stitch underarm seam (See Fig. 12).
Figure 12
19
Types of AttachmentsTypes of Attachments
EMPLOYMENT ORIENTED SKILLS DEVELOPMENT PROJECT - SKILLS TRAINING RESOURCE UNIT
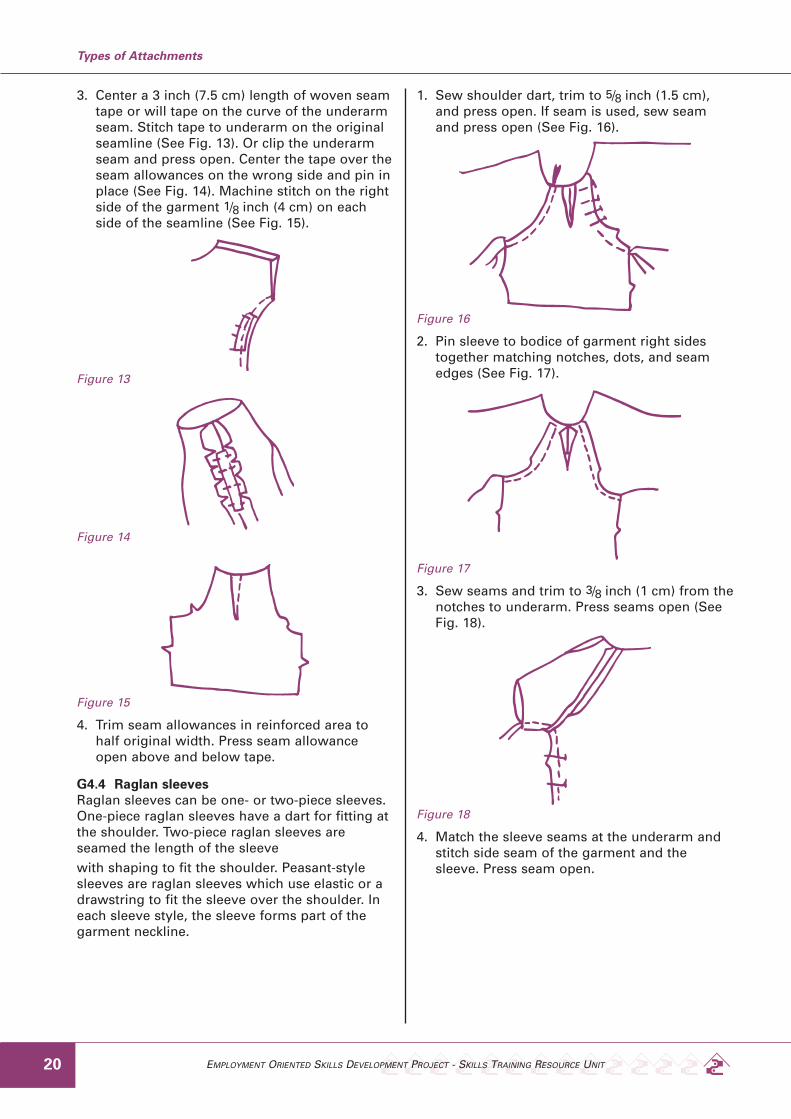
3. Center a 3 inch (7.5 cm) length of woven seamtape or will tape on the curve of the underarmseam. Stitch tape to underarm on the originalseamline (See Fig. 13). Or clip the underarmseam and press open. Center the tape over theseam allowances on the wrong side and pin inplace (See Fig. 14). Machine stitch on the rightside of the garment 1/8 inch (4 cm) on eachside of the seamline (See Fig. 15).
Figure 13
Figure 14
Figure 15
4. Trim seam allowances in reinforced area tohalf original width. Press seam allowanceopen above and below tape.
G4.4 Raglan sleevesRaglan sleeves can be one- or two-piece sleeves.One-piece raglan sleeves have a dart for fitting atthe shoulder. Two-piece raglan sleeves areseamed the length of the sleevewith shaping to fit the shoulder. Peasant-stylesleeves are raglan sleeves which use elastic or adrawstring to fit the sleeve over the shoulder. Ineach sleeve style, the sleeve forms part of thegarment neckline.
1. Sew shoulder dart, trim to 5/8 inch (1.5 cm),and press open. If seam is used, sew seamand press open (See Fig. 16).
Figure 16
2. Pin sleeve to bodice of garment right sidestogether matching notches, dots, and seamedges (See Fig. 17).
Figure 17
3. Sew seams and trim to 3/8 inch (1 cm) from thenotches to underarm. Press seams open (SeeFig. 18).
Figure 18
4. Match the sleeve seams at the underarm andstitch side seam of the garment and thesleeve. Press seam open.
Types of Attachments
20
EMPLOYMENT ORIENTED SKILLS DEVELOPMENT PROJECT - SKILLS TRAINING RESOURCE UNIT
G4.5 Sleeve finishes
TYPES OF SLEEVE FINISHESThe finishing of a sleeve usually depends on thepattern design. It may be simple self-hem orfaced finish (shaped or bias), or decorativedouble binding made from self or contrastingfabric. The finish is sometimes a design feature,as a casing or cuff.A self-hem edge is a simple sleeve finish. Afacing can also be used.
A double binding applied to a sleeve edge gives adecorative finish to the sleeve.
A casing sewed at the sleeve edge can be self-faced or it be separately appliedd
A cuff can have a placket opening or be loose-fitting with no opening.
G5.1 Sleeve finishes/cuffs
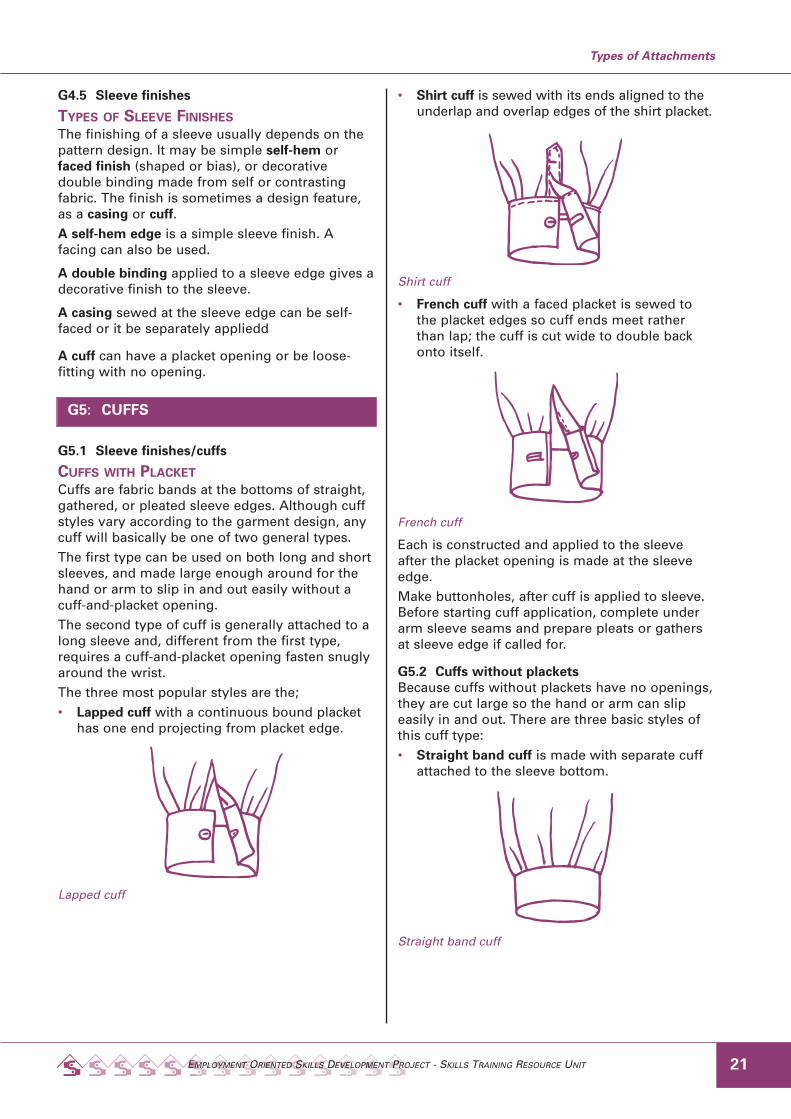
CUFFS WITH PLACKETCuffs are fabric bands at the bottoms of straight,gathered, or pleated sleeve edges. Although cuffstyles vary according to the garment design, anycuff will basically be one of two general types.The first type can be used on both long and shortsleeves, and made large enough around for thehand or arm to slip in and out easily without acuff-and-placket opening.The second type of cuff is generally attached to along sleeve and, different from the first type,requires a cuff-and-placket opening fasten snuglyaround the wrist.The three most popular styles are the;• Lapped cuff with a continuous bound placket
has one end projecting from placket edge.
Lapped cuff
• Shirt cuff is sewed with its ends aligned to theunderlap and overlap edges of the shirt placket.
Shirt cuff
• French cuff with a faced placket is sewed tothe placket edges so cuff ends meet ratherthan lap; the cuff is cut wide to double backonto itself.
French cuff
Each is constructed and applied to the sleeveafter the placket opening is made at the sleeveedge.Make buttonholes, after cuff is applied to sleeve.Before starting cuff application, complete underarm sleeve seams and prepare pleats or gathersat sleeve edge if called for.
G5.2 Cuffs without placketsBecause cuffs without plackets have no openings,they are cut large so the hand or arm can slipeasily in and out. There are three basic styles ofthis cuff type:• Straight band cuff is made with separate cuff
attached to the sleeve bottom.
Straight band cuff
21
Types of Attachments
G5: CUFFS

EMPLOYMENT ORIENTED SKILLS DEVELOPMENT PROJECT - SKILLS TRAINING RESOURCE UNIT
• Straight turning-back cuff is made by turningup the deep finish hem of a sleeve.Sometimes, instead of a deep self-hem, aseparate extension piece is added to thesleeve bottom to form the turnback cuff.
Straight turning-back cuff
• Shaped turnback cuff is a separate constructedcuff that is attached to the sleeve with a facing.
Shaped turnback cuff
G6.1 Sleeve plackets and bandIf the garment has sleeves with cuffs, it willrequire plackets unless the cuffs are made of astretch knit fabric or are “pull-on” cuffs. Thefollowing plackets are simple and quick.• The faced placket• Mocked placket• Continuous lap placket
MAKING A PLACKET
Faced placket1. Cut out sleeve and facing pieces and mark the
location of the placket (fig. 1).
Figure 1
2. If a facing pattern piece is not provided, cuttwo 3" x 4" rectangles of matching fabric.
3. Finish the side and the top edges of the facing(fig. 2).
Figure 2
4. Pin the facing to the sleeve with right sidestogether, centered over the facing markings(fig. 3).
Figure 3
5. Stitch along markings using very smallstitches near the point. For easier turning,stitch one small stitch across point (fig. 4).
Figure 4
6. Slash to the point of the “V” turn the placketto the wrong side and press. Understitch seamto facing.
7. Cut 2 stripes of fusible web about 1/2" square.8. Place the web between the facing and sleeve
side at the top and fuse (fig. 5).
Types of Attachments
22
G6: PLACKET

EMPLOYMENT ORIENTED SKILLS DEVELOPMENT PROJECT - SKILLS TRAINING RESOURCE UNIT
Figure 5
NOTE: Try this technique on a small swatch offabric. If it mars the fabric, hand stitch topcorners of patch to sleeve.
Mock placket1. Cut out the sleeve and make a mark at the
center of the placket (fig. 6).
Figure 6
2. Reinforce the opening by stitching 1" on eachside of the center along 5/8" seamline (fig. 7)
Figure 7
3. Clip to the reinforcement stitching 1/2" oneither side of the center mark (fig. 8). Place adrop of seam sealant on edges of each snip.Let dry.
Figure 8
4. Fold the resulting "placket" section twice to theinside. Topstitch or slipstitch in place (fig. 9).
Figure 9
Continuous lap placket1. Cut two pieces of binding fabric 1" wide and
twice the length of the placket. Cut thisbinding on lengthwise grain.
2. Fold binding in half lengthwise, then fold eachhalf matching edge to fold (fig. 10).
Figure 10
3. Reinforce the placket opening by sewing smallstitches on the stitching line. Stitch one stitchacross point of placket to make turning easier(fig. 11).
Figure 11
4. Slash placket through center of stitching to thepoint, but not through the point.
5. Pin the binding to the placket with right sidestogether. Match the first fold of the binding tothe stitching line.
6. With sleeve on top, stitch the binding toplacket sewing just inside reinforcementstitching (fig. 12).
23
Types of Attachments
EMPLOYMENT ORIENTED SKILLS DEVELOPMENT PROJECT - SKILLS TRAINING RESOURCE UNIT
Figure 12
Figure 13
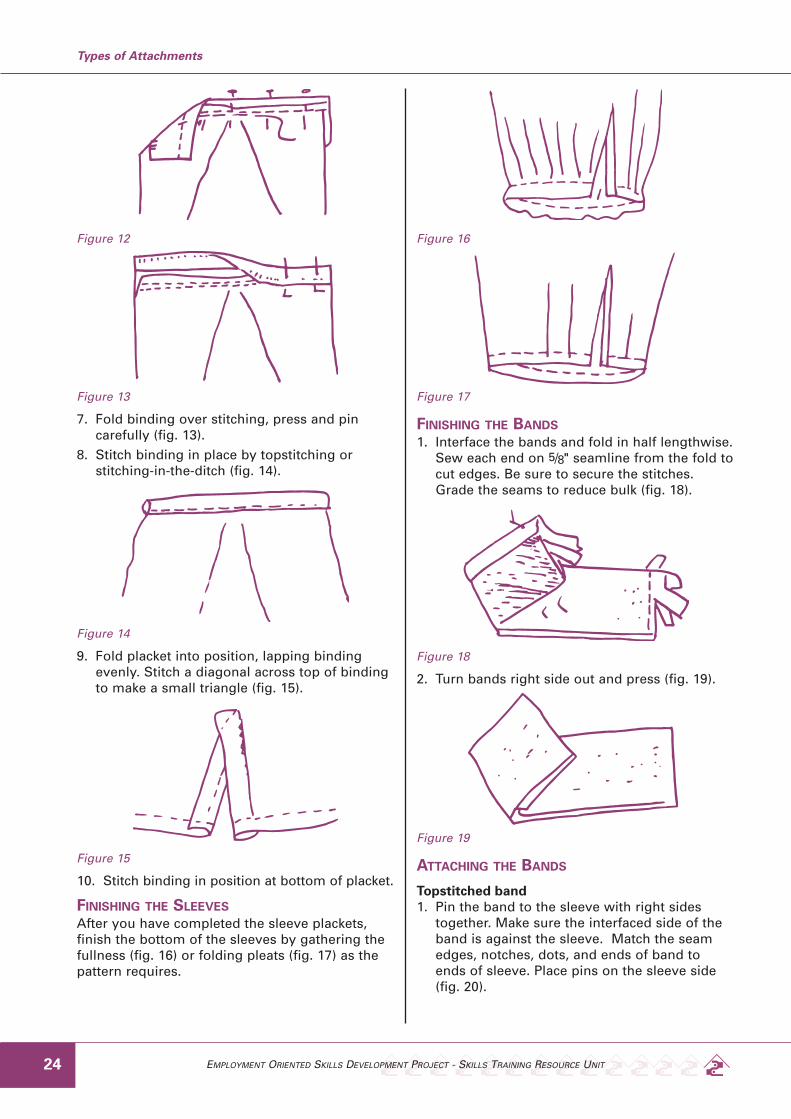
7. Fold binding over stitching, press and pincarefully (fig. 13).
8. Stitch binding in place by topstitching orstitching-in-the-ditch (fig. 14).
Figure 14
9. Fold placket into position, lapping bindingevenly. Stitch a diagonal across top of bindingto make a small triangle (fig. 15).
Figure 15
10. Stitch binding in position at bottom of placket.
FINISHING THE SLEEVESAfter you have completed the sleeve plackets,finish the bottom of the sleeves by gathering thefullness (fig. 16) or folding pleats (fig. 17) as thepattern requires.
Figure 16
Figure 17
FINISHING THE BANDS1. Interface the bands and fold in half lengthwise.
Sew each end on 5/8" seamline from the fold tocut edges. Be sure to secure the stitches.Grade the seams to reduce bulk (fig. 18).
Figure 18
2. Turn bands right side out and press (fig. 19).
Figure 19
ATTACHING THE BANDS
Topstitched band1. Pin the band to the sleeve with right sides
together. Make sure the interfaced side of theband is against the sleeve. Match the seamedges, notches, dots, and ends of band toends of sleeve. Place pins on the sleeve side(fig. 20).
Types of Attachments
24
EMPLOYMENT ORIENTED SKILLS DEVELOPMENT PROJECT - SKILLS TRAINING RESOURCE UNIT
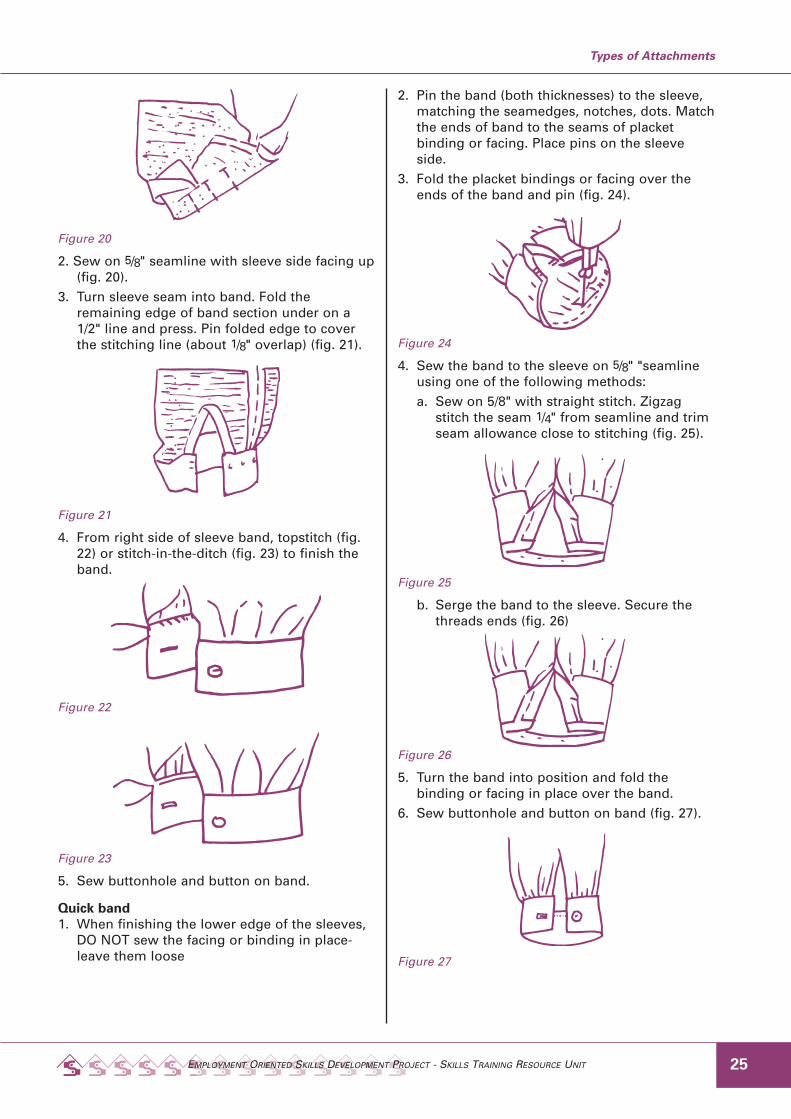
Figure 20
2. Sew on 5/8" seamline with sleeve side facing up(fig. 20).
3. Turn sleeve seam into band. Fold theremaining edge of band section under on a1/2" line and press. Pin folded edge to coverthe stitching line (about 1/8" overlap) (fig. 21).
Figure 21
4. From right side of sleeve band, topstitch (fig.22) or stitch-in-the-ditch (fig. 23) to finish theband.
Figure 22
Figure 23
5. Sew buttonhole and button on band.
Quick band1. When finishing the lower edge of the sleeves,
DO NOT sew the facing or binding in place-leave them loose
2. Pin the band (both thicknesses) to the sleeve,matching the seamedges, notches, dots. Matchthe ends of band to the seams of placketbinding or facing. Place pins on the sleeveside.
3. Fold the placket bindings or facing over theends of the band and pin (fig. 24).
Figure 24
4. Sew the band to the sleeve on 5/8" "seamlineusing one of the following methods:a. Sew on 5/8" with straight stitch. Zigzag
stitch the seam 1/4" from seamline and trimseam allowance close to stitching (fig. 25).
Figure 25
b. Serge the band to the sleeve. Secure thethreads ends (fig. 26)
Figure 26
5. Turn the band into position and fold thebinding or facing in place over the band.
6. Sew buttonhole and button on band (fig. 27).
Figure 27
25
Types of Attachments
EMPLOYMENT ORIENTED SKILLS DEVELOPMENT PROJECT - SKILLS TRAINING RESOURCE UNIT
ATTACHMENTSSAFETY RULES
Safety is very important in Sewing. To make surethat everyone can learn and have fun in a safeenvironment, keep the following rules in mind:1. ALWAYS: Place your coats, books and bags in
separate places, away from your sewing area.2. ALWAYS: Leave your shoes on during sewing
class. You do not want to accidentally step ona pin or needle.
3. ALWAYS: Look under your fabric beforecutting with scissors and carry scissors withthe sharp edge pointing towards the floor.When the scissors are not being used, placethem on the cutting table, sewing table, or inyour sewing box.
4. ALWAYS: Measure the thread to the length ofyour arm.
5. ALWAYS: Thread the needle with cautionbefore starting to sewing on your fabric.
6. ALWAYS: Remove the pins from your fabricas you sew and place them in the pin cushionafter you use them. NEVER put straight pinsor needles in your mouth.
7. ALWAYS: Place the iron in the uprightposition after use. When using the iron holdit by the handle only.
8. ALWAYS: Let your teacher/trainer help youuse the seam ripper (unpicker).
9. ALWAYS: Place your seam gauge, ruler,scissors and pins in the sewing box afterusing them.
10. ALWAYS: Listen to the teacher’s/trainer’sinstructions.
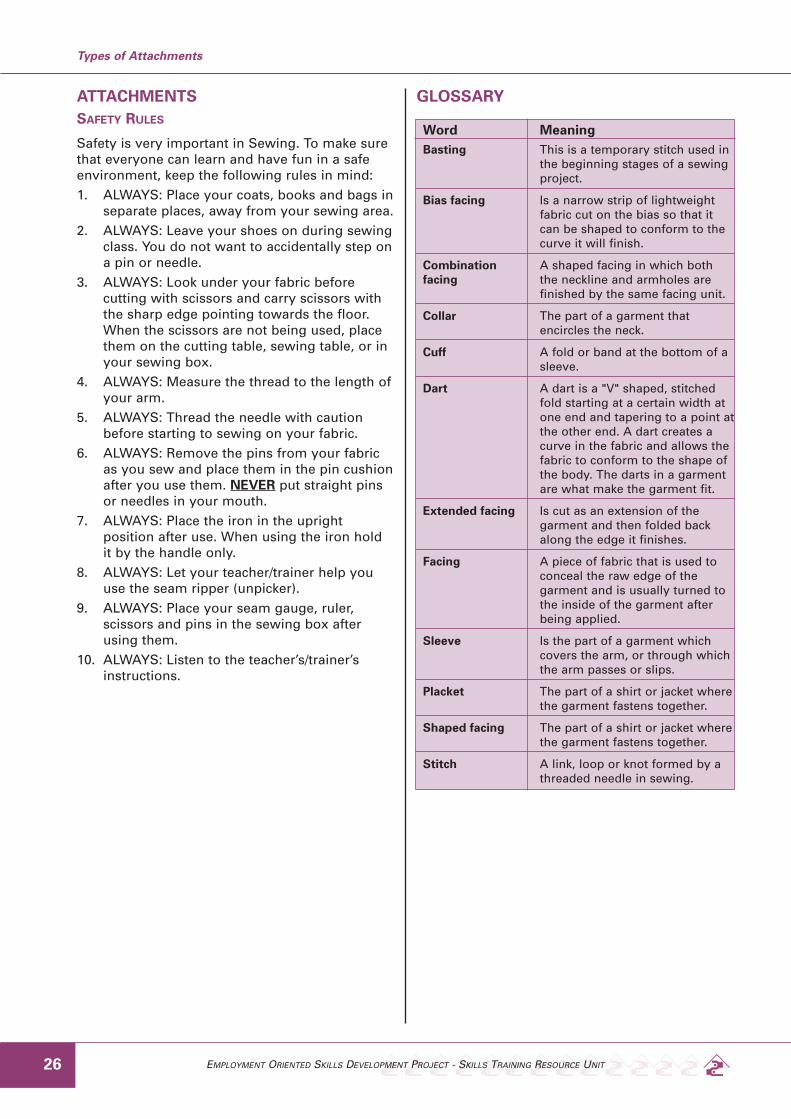
GLOSSARY
Types of Attachments
26
Word MeaningBasting This is a temporary stitch used in
the beginning stages of a sewingproject.
Bias facing Is a narrow strip of lightweightfabric cut on the bias so that itcan be shaped to conform to thecurve it will finish.
Combination A shaped facing in which bothfacing the neckline and armholes are
finished by the same facing unit.
Collar The part of a garment thatencircles the neck.
Cuff A fold or band at the bottom of asleeve.
Dart A dart is a "V" shaped, stitchedfold starting at a certain width atone end and tapering to a point atthe other end. A dart creates acurve in the fabric and allows thefabric to conform to the shape ofthe body. The darts in a garmentare what make the garment fit.
Extended facing Is cut as an extension of thegarment and then folded backalong the edge it finishes.
Facing A piece of fabric that is used toconceal the raw edge of thegarment and is usually turned tothe inside of the garment afterbeing applied.
Sleeve Is the part of a garment whichcovers the arm, or through whichthe arm passes or slips.
Placket The part of a shirt or jacket wherethe garment fastens together.
Shaped facing The part of a shirt or jacket wherethe garment fastens together.
Stitch A link, loop or knot formed by athreaded needle in sewing.

This short course module, developed in Papua New Guinea, is based on the competency-based trainingmodel.The Skill Training Resource Unit (STRU) of Employment Oriented Skills Development Project (EOSDP)in conjunction with Department (TVET) division and the implementing agency Department forCommunity Development Services wish to express their thanks to the people who have contributed inproducing the module.We hope it will provide basic knowledge and skills for the informal and the formal sectors especially thewomen, men and the youth to be employed or self-employed through having better skills for tomorrow.
Acknowledgement
EMPLOYMENT ORIENTED SKILLS DEVELOPMENT PROJECT - SKILLS TRAINING RESOURCE UNIT 27
Types of AttachmentsTypes of Attachments

p o box 1097, waiganinational capital districtpapua new guinea.
tel: (675) 323 2633fax: (675) 323 0944
The development of this short course wassponsored by the ADB-PNGEMPLOYMENT SKILLS DEVELOPMENTPROJECT (EOSDP) and produced bycurriculum officers at the SKILLSTRAINING RESOURCES UNIT (STRU)