
FortiManager New Features Guide - Amazon AWS
68
FortiManager - New Features Guide Version 6.2.1
-
Upload
khangminh22 -
Category
Documents
-
view
3 -
download
0
Transcript of FortiManager New Features Guide - Amazon AWS
FortiManager - New Features GuideVersion 6.2.1

FORTINET DOCUMENT LIBRARYhttps://docs.fortinet.com
FORTINET VIDEO GUIDEhttps://video.fortinet.com
FORTINET BLOGhttps://blog.fortinet.com
CUSTOMER SERVICE & SUPPORThttps://support.fortinet.com
FORTINET TRAINING & CERTIFICATION PROGRAMhttps://www.fortinet.com/support-and-training/training.html
NSE INSTITUTEhttps://training.fortinet.com
FORTIGUARD CENTERhttps://fortiguard.com/
END USER LICENSE AGREEMENThttps://www.fortinet.com/doc/legal/EULA.pdf
FEEDBACKEmail: [email protected]
August 29, 2019FortiManager 6.2.1 New Features Guide02-621-528939-20191015
TABLE OF CONTENTS
Change Log 4Fabric Connectors 5ClearPass SSO/Identity Connector 5
Configuring ClearPass server 6Configuring FortiManager 14
SD-WAN 17Zero Touch Provisioning - Firmware Rectification 17SD-WAN supports BGP Neighbor Configuration (per-devicemanagement mode) 19
Usability 22Explicit Proxy Authentication Configuration 22New IPS and Application Control Signature Filters 27
IPS Signatures 27Application Signatures 28FortiGuard IPS packages status 29
Enforce Firmware Version and assign Policy Package 29Clone ADOMDatabase 31Global Objects Reference Check 34Automatic update of custom objects 35FortiOS NGFWmode supported 40FortiSwitchManager support for per-devicemanagement mode 46AP Manager support for WPA3 and phishing SSIDs 53
SelectingWPA3 options for central management 53SelectingWPA3 options for per-devicemanagement 56Viewing rogue APs 58
Other 59Allow Custom IPS / App Signatures for Restricted Administrators 59Single Click ADOMUpgrade 60Support for FortiOS Next Generation Firewall VDOM Implementations 62
FortiManager 6.2.1 New Features Guide 3Fortinet Technologies Inc.

Change Log
Change Log
Date Change Description
2019-06-10 Initial release.
2019-06-21 Added Explicit Proxy Authentication Configuration on page 22.
2019-10-15 Added AP Manager support for WPA3 and phishing SSIDs on page 53.
FortiManager 6.2.1 New Features Guide 4Fortinet Technologies Inc.
Fabric Connectors
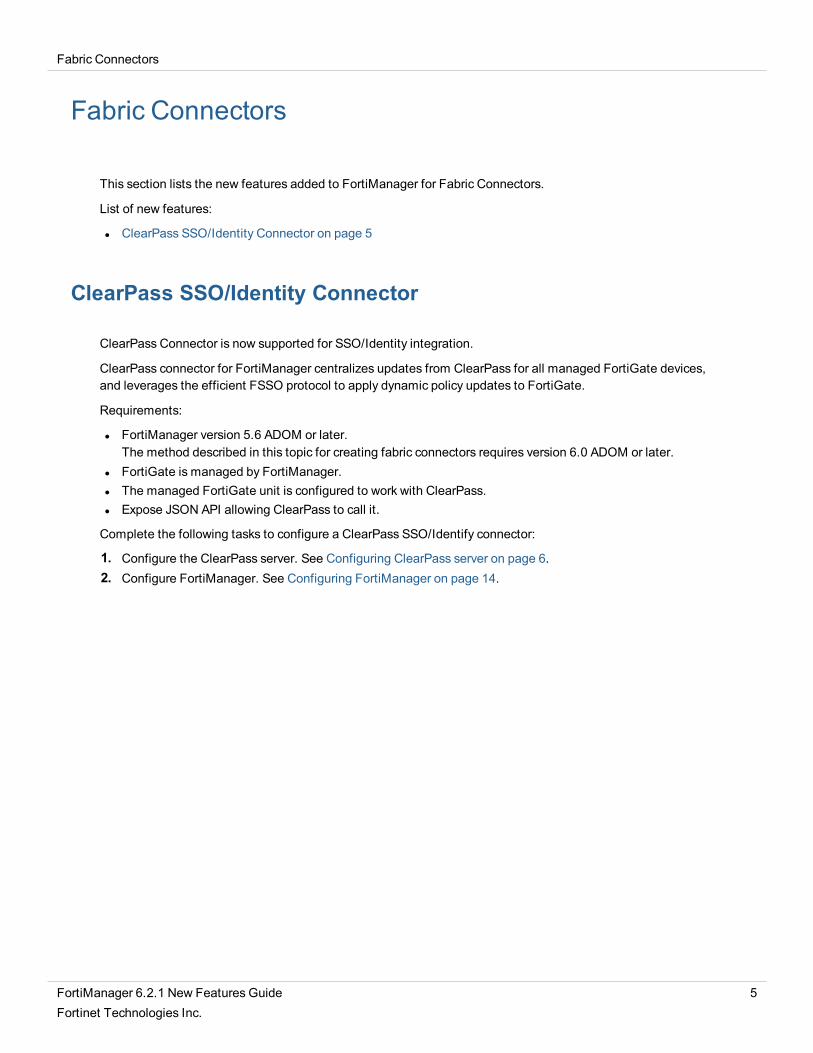
Fabric Connectors
This section lists the new features added to FortiManager for Fabric Connectors.
List of new features:
l ClearPass SSO/Identity Connector on page 5
ClearPass SSO/Identity Connector
ClearPass Connector is now supported for SSO/Identity integration.
ClearPass connector for FortiManager centralizes updates from ClearPass for all managed FortiGate devices,and leverages the efficient FSSO protocol to apply dynamic policy updates to FortiGate.
Requirements:
l FortiManager version 5.6 ADOM or later.The method described in this topic for creating fabric connectors requires version 6.0 ADOM or later.
l FortiGate is managed by FortiManager.l The managed FortiGate unit is configured to work with ClearPass.l Expose JSON API allowing ClearPass to call it.
Complete the following tasks to configure a ClearPass SSO/Identify connector:
1. Configure the ClearPass server. See Configuring ClearPass server on page 6.2. Configure FortiManager. See Configuring FortiManager on page 14.
FortiManager 6.2.1 New Features Guide 5Fortinet Technologies Inc.
Fabric Connectors
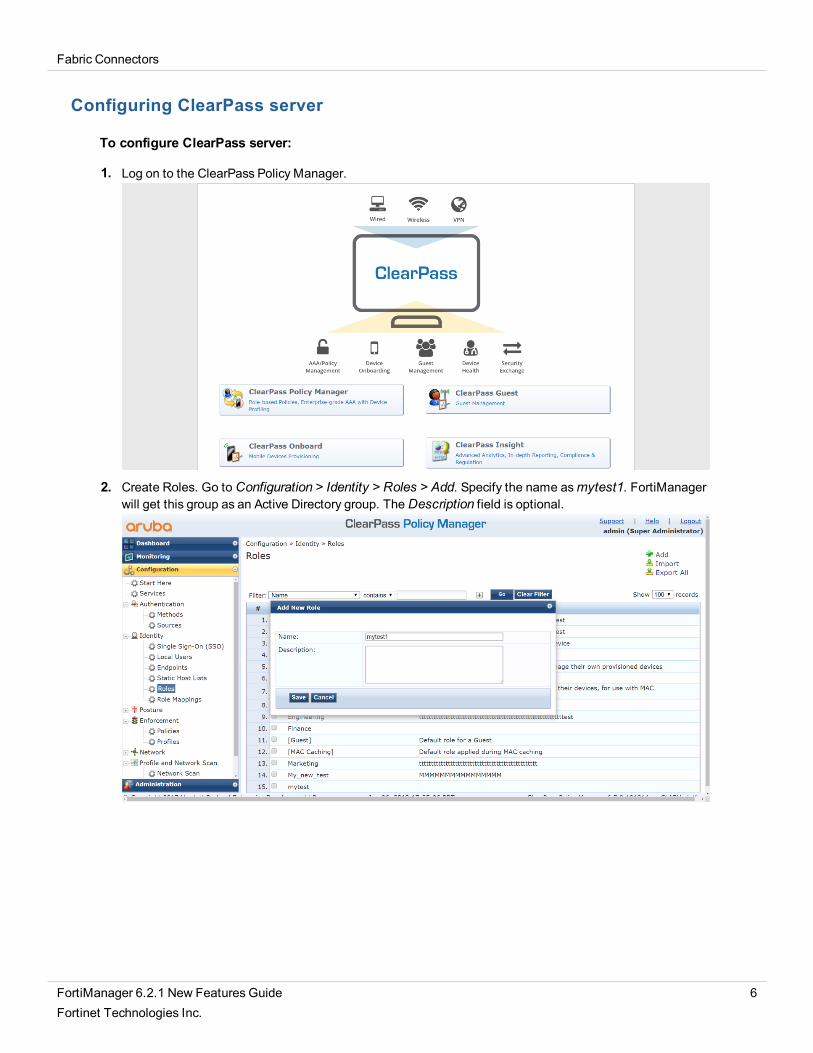
Configuring ClearPass server
To configure ClearPass server:
1. Log on to the ClearPass Policy Manager.
2. Create Roles. Go to Configuration > Identity > Roles > Add. Specify the name asmytest1. FortiManagerwill get this group as an Active Directory group. The Description field is optional.
FortiManager 6.2.1 New Features Guide 6Fortinet Technologies Inc.

Fabric Connectors
3. Create local users. Go to Configuration > Identity > Local Users > Add. Configure the following:
l User ID - specify the user ID as test1.l Name - specify the name as testUser1.l Password - specify the password as qa1234.l Enable - select the check box.l Role - specify the role asmytest1 (created in step 1).
4. Add Ubuntu Simulator. Go to Configuration > Network > Devices > Add. Configure the following settings:
l Name: specify the name asUbuntu_test.l IP or Subnet Address: specify as 10.3.113.61.l RADIUS Shared Secret: specify as qa1234.l Vendor name: specify asUnix.
5. Configure FortiManager to get packets from ClearPass.
FortiManager 6.2.1 New Features Guide 7Fortinet Technologies Inc.
Fabric Connectors
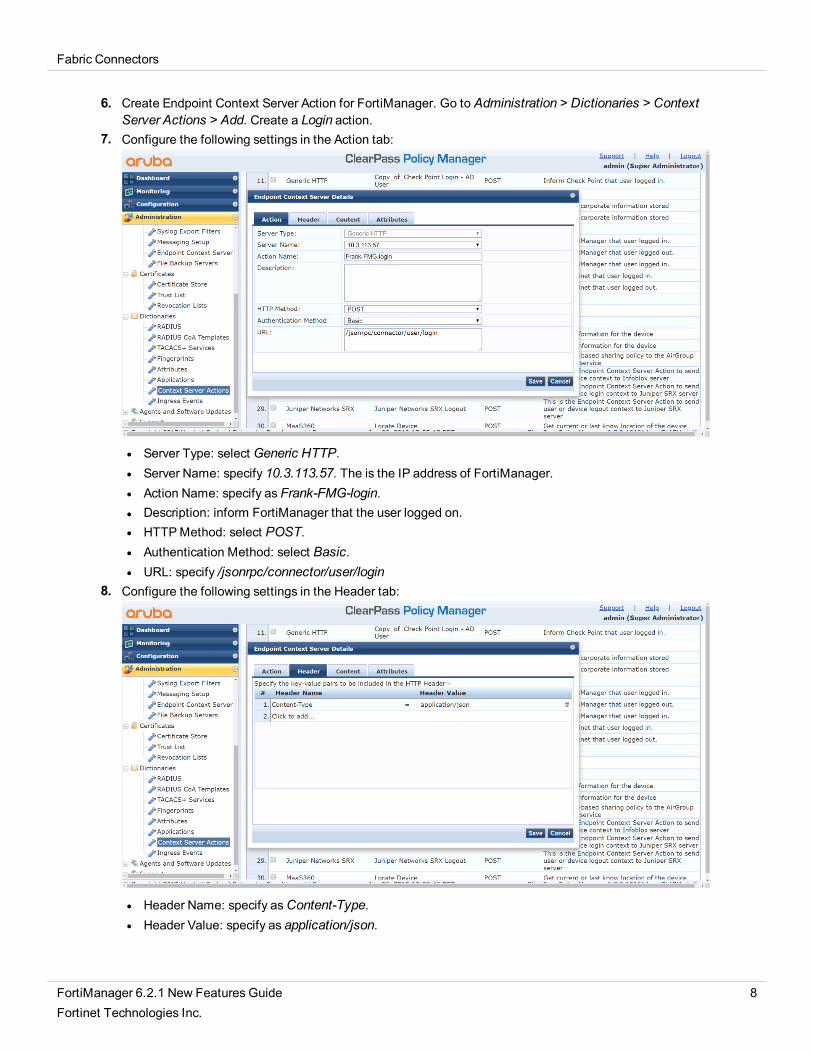
6. Create Endpoint Context Server Action for FortiManager. Go to Administration > Dictionaries > ContextServer Actions > Add. Create a Login action.
7. Configure the following settings in the Action tab:
l Server Type: select Generic HTTP.l Server Name: specify 10.3.113.57. The is the IP address of FortiManager.l Action Name: specify as Frank-FMG-login.l Description: inform FortiManager that the user logged on.l HTTPMethod: select POST.l Authentication Method: select Basic.l URL: specify /jsonrpc/connector/user/login
8. Configure the following settings in the Header tab:
l Header Name: specify asContent-Type.l Header Value: specify as application/json.
FortiManager 6.2.1 New Features Guide 8Fortinet Technologies Inc.

Fabric Connectors
l Content-Type: select JSON.l Content: specify the following:
{"adom": "root","connector": "test", <----------------this will be the connector name
created on FMG"user": "%{Authentication:Username}","role": "%{Tips:Role}","ip-addr": "%{ip}"
}
9. Create Endpoint Context Server Action for FortiManager. Go to Administration > Dictionaries > ContextServer Actions > Add. Create a Logout action.
FortiManager 6.2.1 New Features Guide 9Fortinet Technologies Inc.

Fabric Connectors
10. Configure the following settings in the Action tab:
l Server Type: select Generic HTTP.l Server Name: specify 10.3.113.57. The is the IP address of FortiManager.l Action Name: specify as Frank-FMG-logout.l Description: inform FortiManager that user logged out.l HTTPMethod: select POST.l Authentication Method: select Basic.l URL: specify /jsonrpc/connector/user/logout
11. Configure the following settings in the Header tab:l Header Name: specify asContent-Type.l Header Value: specify as application/json.l Content-Type: select JSON.l Content: specify the following:
{"adom": "root","connector": "test", <--this will be the connector name created on FMG"user": "%{Authentication:Username}","role": "%{Tips:Role}","ip-addr": "%{ip}"
}
12. Add FortiManager as the Endpoint Context Server. Go to Administration > External Servers > EndpointContext Servers > Add. Configure the following settings:l Server Type: select Generic HTTP.l Server Name: specify 10.3.113.57. This the FortiManager IP.l Authentication Method: select Basic.l Username: specify admin. This is the administrator on FortiManager.
13. Check Actions is added to the server. Go to Administration > External Servers > Endpoint ContextServers > 10.3.113.57 > Actions. You can now find Frank-FMG-login and Frank-FMG-Logout.
FortiManager 6.2.1 New Features Guide 10Fortinet Technologies Inc.

Fabric Connectors
14. Create profile. Go to Configuration > Enforcement > Profiles > Add.15. Configure the following settings in the Profile tab:
l Template: select Session NotificationManagement.l Name: specify FortiManager Login and Logout.l Description: specify FortiManager - Initial SSO integration testing.l Type: select Post_Authentication.
FortiManager 6.2.1 New Features Guide 11Fortinet Technologies Inc.

Fabric Connectors
16. Configure the following settings in the Attributes tab.
17.
Type Name Value
Session-Notify Server Type Generic HTTP
Session-Notify Login Action Frank-FMG-login
Session-Notify Logout Action Frank-FMG-logout
Session-Notify Server IP 10.3.113.57 (FortiManager IP)
18. Create a Policy. Go to Configuration > Enforcement > Policies > Add.19. Configure the following settings in the Enforcement tab.
l Name: specify FortiManager testing.l Enforcement Type: select RADIUS.l Default profile: Allow Access Profile.
FortiManager 6.2.1 New Features Guide 12Fortinet Technologies Inc.

Fabric Connectors
20. Configure the following settings in the Rules tab:
l Type: select Date.l Name: select Date-Time.l Operation: select EXISTS.l Profile Names: [Post Authentication][FortiManager-Login and Logout]
21. Create API Client. Log on from ClearPass Guest.
FortiManager 6.2.1 New Features Guide 13Fortinet Technologies Inc.

Fabric Connectors
22. Go to Administration > API Services > API Clients > Create API Client. Configure the following:
l Client ID: specify as test.l Description: FortiManager logs on from this client.l Operator Profile: Select Super Administrator.l Grand Type: select Username and password credentials (grant type=password).l Public Client: select the check box.l Refresh Tokens: select the check box.
Configuring FortiManager
To configure FortiManager:
1. Log on to FortiManager.2. Launch the command line and execute the following:
config system admin useredit adminset rpc-permit read-writeend
3. Create FortiManager GUI connector. Go to Fabric View > Create New. Select aruba ClearPass. ClickNext.
FortiManager 6.2.1 New Features Guide 14Fortinet Technologies Inc.

Fabric Connectors
4. Configure the following settings:
l Name: specify the name as test. This name must be same as used in ClearPass Endpoint ContextServer Actions > Frank-FMG-login/Frank-FMG-logout > Content >"Connector":" test".
l Status: toggle toON.l Server: specify the IP as 10.3.113.102. This is the ClearPass IP.l Client: specify as test. This is the name of the API Client created.l User: specify as admin. This is the ClearPass login name.l Password: specify asQa1234. This is the ClearPass password.
5. Get role and user from ClearPass. Go to Policy & Objects > Object Configurations > Fabric Connectors>SSO/Identity. Select the connector and click Import, or edit it then clickApply & Refresh. FortiManagerthen gets the roles and users from ClearPass. Green shows the user has logged on.
FortiManager 6.2.1 New Features Guide 15Fortinet Technologies Inc.

Fabric Connectors
6. Install adgrp from ClearPass to FortiGate. Policy & Objects > Object Configurations > User & Devices >User Groups. Create user group with type as FSSO/SSO Connectors, and select members asClearPassadgrp. Use the user group in a policy and install it to FortiGate.
FortiManager 6.2.1 New Features Guide 16Fortinet Technologies Inc.
SD-WAN
SD-WAN
This section lists the new features added to FortiManager for SD-WAN.
List of new features:
l Zero Touch Provisioning - Firmware Rectification on page 17l SD-WAN supports BGPNeighbor Configuration (per-device management mode) on page 19
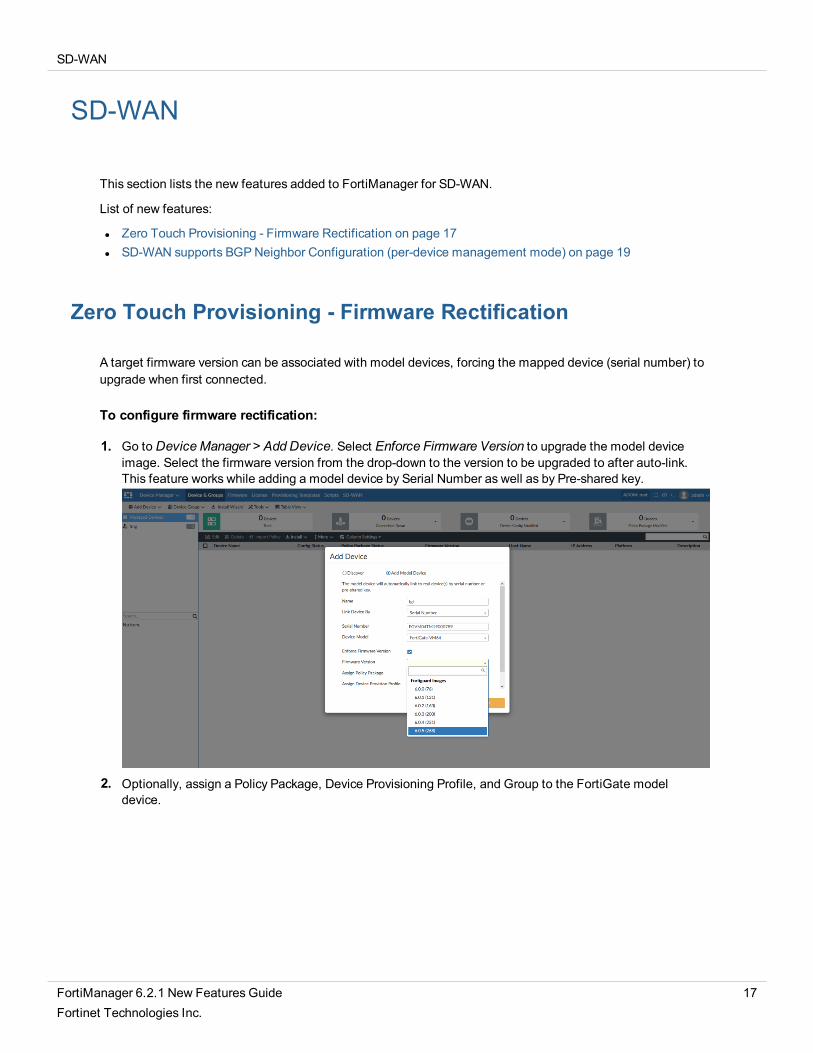
Zero Touch Provisioning - Firmware Rectification
A target firmware version can be associated with model devices, forcing the mapped device (serial number) toupgrade when first connected.
To configure firmware rectification:
1. Go to DeviceManager > Add Device. Select Enforce Firmware Version to upgrade the model deviceimage. Select the firmware version from the drop-down to the version to be upgraded to after auto-link.This feature works while adding a model device by Serial Number as well as by Pre-shared key.
2. Optionally, assign a Policy Package, Device Provisioning Profile, and Group to the FortiGate modeldevice.
FortiManager 6.2.1 New Features Guide 17Fortinet Technologies Inc.

SD-WAN
3. Go to DeviceManager > Device & Groups. Trigger model device auto-link from a real FortiGate usingone of the following methods:l Use FortiCloud to push the FortiManager serial number and IP address to FortiGate to trigger auto-
link.l Use DHCP to assign FortiManager IP address to FortiGate. Since there is no FortiManager serial
number, ensure the FortiManager Device Manager has the correct username and password for theFortiGate.
l Log on to FortiGate. Specify the FortiManager IP address.4. FortiManager will show the firmware upgrade path since the linked FortiGate is version 6.0.4 and the
Enforced Firmware Version is 6.0.5.
5. The model device configuration is auto-installed, the selected policy package is assigned, and thetemplate is also installed.
6. The model device is then synced to the real FortiGate, the firmware version is upgraded, and the packageis installed.
FortiManager 6.2.1 New Features Guide 18Fortinet Technologies Inc.
SD-WAN
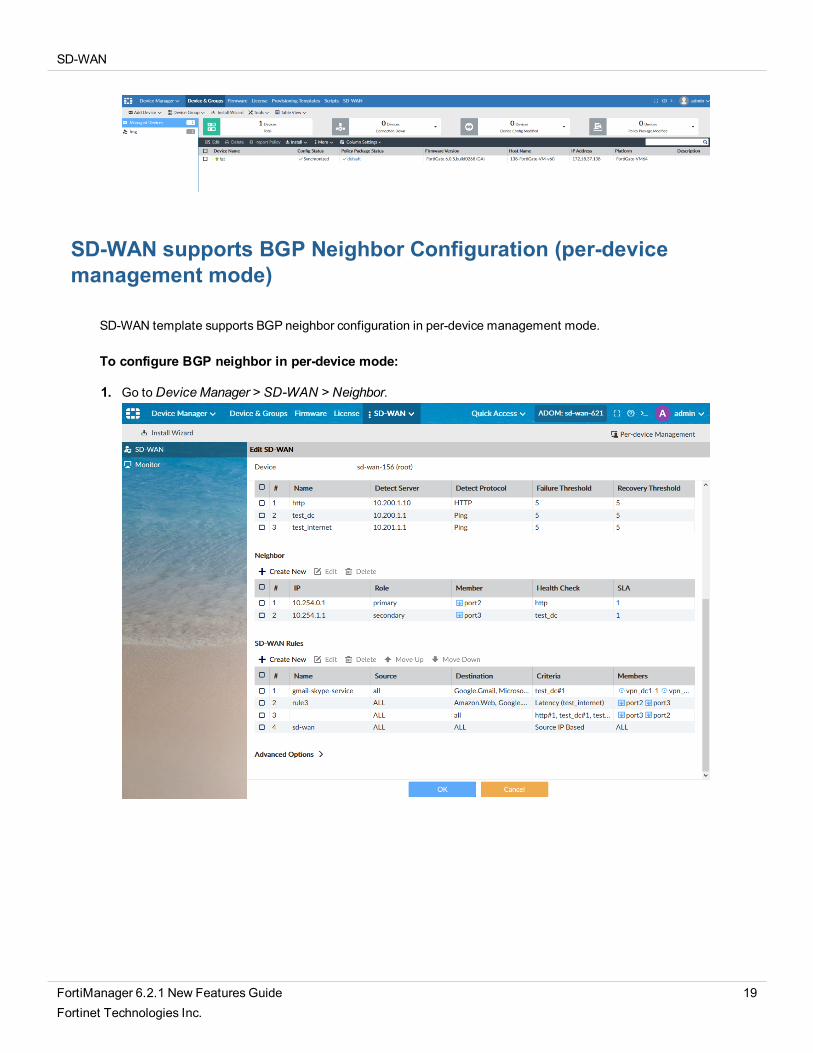
SD-WAN supports BGP Neighbor Configuration (per-devicemanagement mode)
SD-WAN template supports BGP neighbor configuration in per-device management mode.
To configure BGP neighbor in per-device mode:
1. Go to DeviceManager > SD-WAN > Neighbor.
FortiManager 6.2.1 New Features Guide 19Fortinet Technologies Inc.
SD-WAN
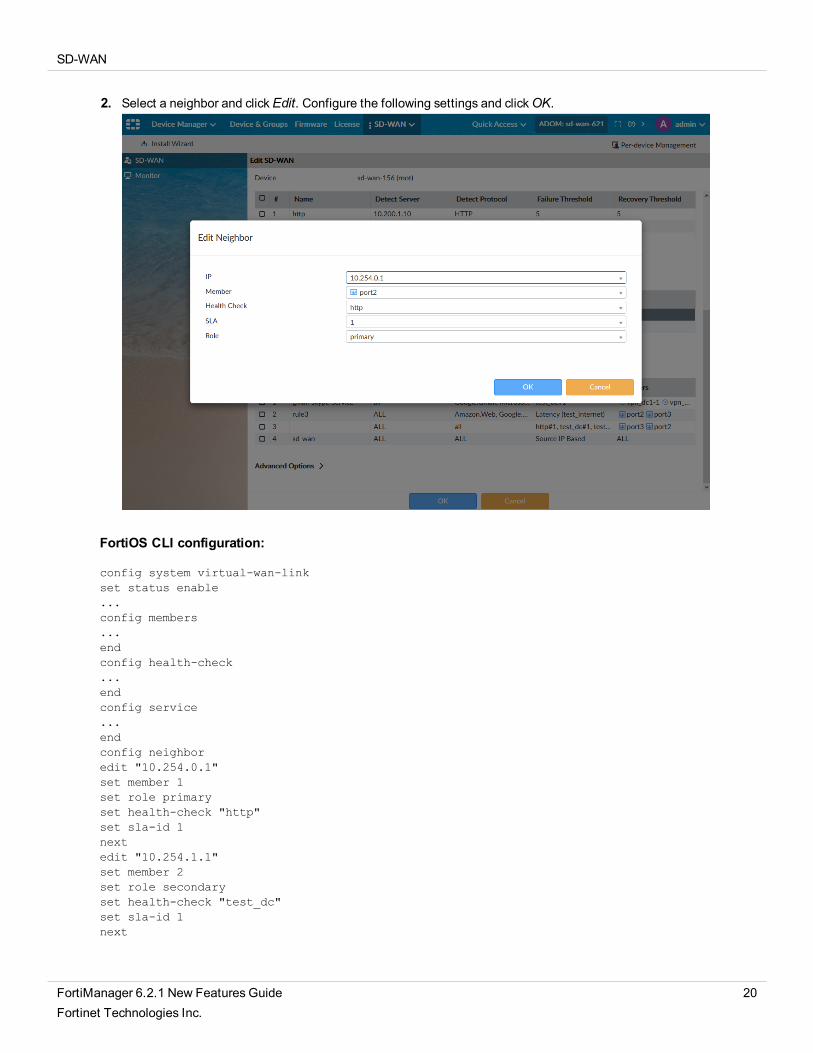
2. Select a neighbor and clickEdit. Configure the following settings and clickOK.
FortiOS CLI configuration:
config system virtual-wan-linkset status enable...config members...endconfig health-check...endconfig service...endconfig neighboredit "10.254.0.1"set member 1set role primaryset health-check "http"set sla-id 1nextedit "10.254.1.1"set member 2set role secondaryset health-check "test_dc"set sla-id 1next
FortiManager 6.2.1 New Features Guide 20Fortinet Technologies Inc.

SD-WAN
endend
FortiManager 6.2.1 New Features Guide 21Fortinet Technologies Inc.

Usability
Usability
This section lists the new features added to FortiManager for usability.
List of new features:
l Explicit Proxy Authentication Configuration on page 22l New IPS and Application Control Signature Filters on page 27l Enforce Firmware Version and assign Policy Package on page 29l Clone ADOM Database on page 31l Global Objects Reference Check on page 34l Automatic update of custom objects on page 35l FortiOS NGFWmode supported on page 40l FortiSwitch Manager support for per-device management mode on page 46l AP Manager support for WPA3 and phishing SSIDs on page 53
Explicit Proxy Authentication Configuration
In FortiManager 6.2.0, proxy authentication could only be configured per-device (in Device Manager), under theCLI Only section. In 6.2.1, this is now available in the Policy & Object database.
To configure explicit proxy authentication:
1. Go to Policy & Objects > Object Configurations > User & Device > LDAP Server / RADIUS Server.
FortiManager 6.2.1 New Features Guide 22Fortinet Technologies Inc.
Usability
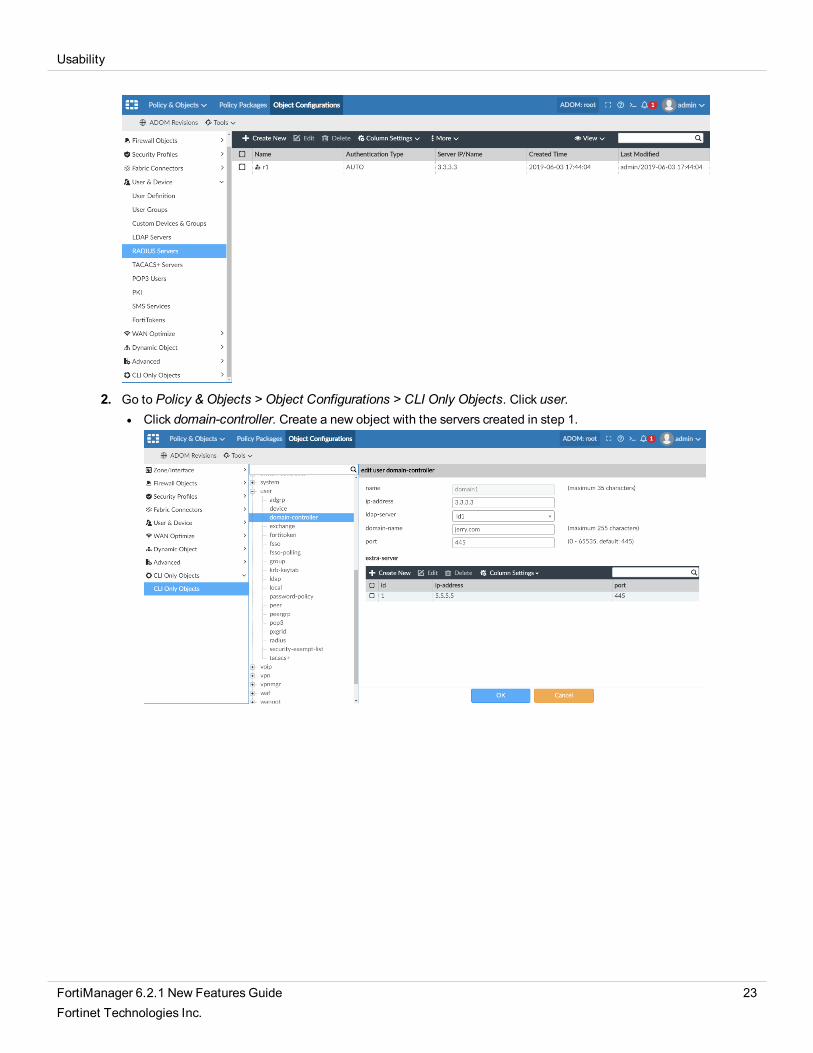
2. Go to Policy & Objects > Object Configurations > CLI Only Objects. Click user.l Click domain-controller. Create a new object with the servers created in step 1.
FortiManager 6.2.1 New Features Guide 23Fortinet Technologies Inc.

Usability
l Click krb-keytab. Create a new object with the servers created in step 1.
3. Go to Policy & Objects > Object Configurations > Fabric Connectors > SSO/Identity. Create differentkinds of connectors and an RSSO_Agent.
4. Go to Policy & Objects > Object Configurations > Authentication Scheme. Create different kinds ofschemes with multiple combinations and objects created in step 1, 2 , and 3.
FortiManager 6.2.1 New Features Guide 24Fortinet Technologies Inc.
Usability
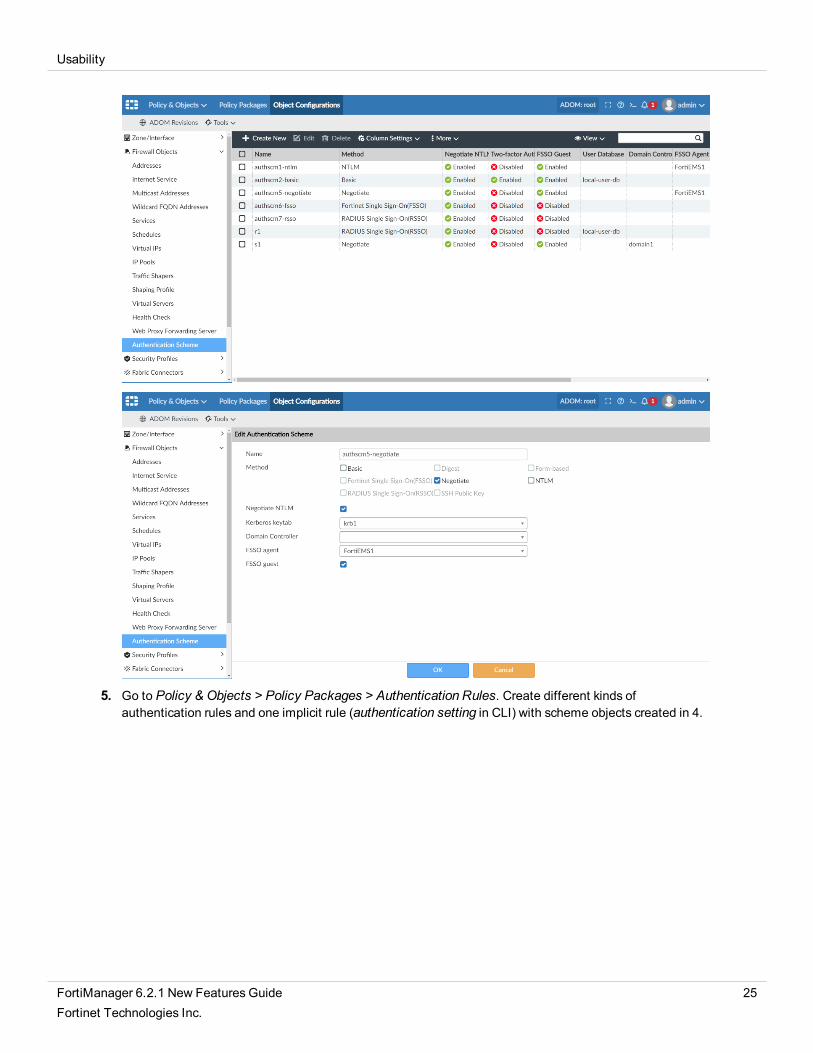
5. Go to Policy & Objects > Policy Packages > Authentication Rules. Create different kinds ofauthentication rules and one implicit rule (authentication setting in CLI) with scheme objects created in 4.
FortiManager 6.2.1 New Features Guide 25Fortinet Technologies Inc.

Usability
l Authentication Rules:
FortiManager 6.2.1 New Features Guide 26Fortinet Technologies Inc.

Usability
l Implicit Authentication Rule (Authentication Setting):
6. Install the policy package to the FortiGate device. This will install authentication settings, rules, andobjects to the FortiGate device.
New IPS and Application Control Signature Filters
Intrusion profile configuration now includes Regular, Extended and Industrial signature filters. ApplicationControl profile configuration now includes Regular and Industrial signature filters.
IPS Signatures
Go to Policy & Objects > Object Configurations > Security Profiles > Intrusion Prevention. Create/edit anIPS profile and add Signatures/Filters.
FortiManager 6.2.1 New Features Guide 27Fortinet Technologies Inc.

Usability
l Regular, Extended, and Industrial for corresponding database is show at the top of the dialog.l Version, DB, and Total number of signatures are shown at the bottom of the dialog.
Application Signatures
Go to Policy & Objects > Object Configurations > Security Profiles > Application Control. Create/edit anApplication Control profile and add Signatures/Filters.
l Regular, and Industrial for corresponding database is show at the top of the dialog.l Version, DB, and Total number of signatures are shown at the bottom of the dialog.
FortiManager 6.2.1 New Features Guide 28Fortinet Technologies Inc.

Usability
FortiGuard IPS packages status
In FortiGuard > PackageManagement > Receive Status, search for the NIDS object name. It shows currentIPSMeta Data file versions on FortiManager which FortiManager uses for the above configuration page.
l For 5.6 ADOM or older, find 05006000NIDS02400.l For 6.0 ADOM or later, find 06000000NIDS02400.
The following CLI can also shows the IPS version linked to device/ADOM:
# diagnose dvm device list# diagnose dvm adom list
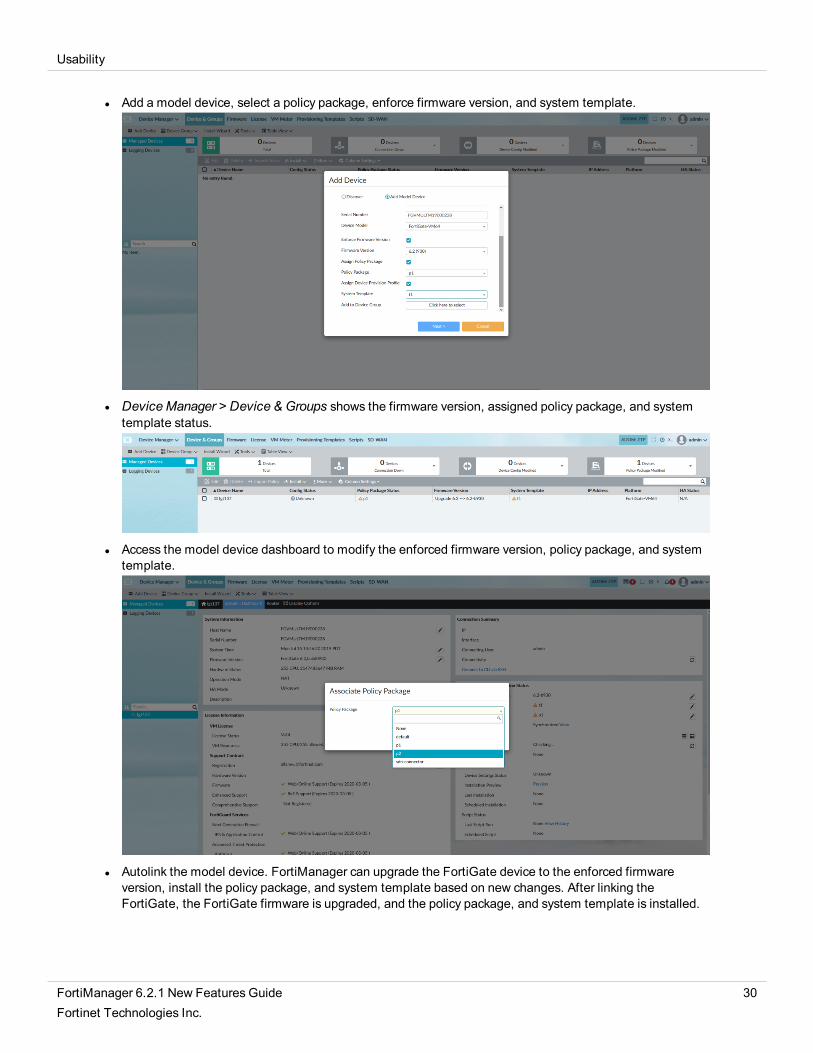
Enforce Firmware Version and assign Policy Package
Enforce Firmware Version and assign Policy Package to model device.
FortiManager 6.2.1 New Features Guide 29Fortinet Technologies Inc.
Usability
l Add a model device, select a policy package, enforce firmware version, and system template.
l DeviceManager > Device & Groups shows the firmware version, assigned policy package, and systemtemplate status.
l Access the model device dashboard to modify the enforced firmware version, policy package, and systemtemplate.
l Autolink the model device. FortiManager can upgrade the FortiGate device to the enforced firmwareversion, install the policy package, and system template based on new changes. After linking theFortiGate, the FortiGate firmware is upgraded, and the policy package, and system template is installed.
FortiManager 6.2.1 New Features Guide 30Fortinet Technologies Inc.

Usability
Clone ADOM Database
FortiManager supports cloning the ADOM database via CLI and API. Once the clone task completes, thecentral database is copied to the specified ADOM.
To Clone ADOM:
1. Launch FortiManager and add a FortiGate device.
The policy package settings are visible.
FortiManager 6.2.1 New Features Guide 31Fortinet Technologies Inc.

Usability
2. Clone the root ADOM to a new ADOM. You can now see the new ADOM.
A task monitor is created as well.
FortiManager 6.2.1 New Features Guide 32Fortinet Technologies Inc.

Usability
3. In the root-clone ADOM, there is no FortiGate device visible. However, other central databaseconfiguration settings are cloned. The interface mapping will not be cloned if the original ADOM had apolicy-interface mapping.
FortiManager 6.2.1 New Features Guide 33Fortinet Technologies Inc.
Usability
Global Objects Reference Check
FortiManager performs a reference check before a global object deletion. The GUI issues a warning if theobject is in use.
Scenario 1:
1. Assign a Global Policy with global header policy that includes an AntiVirus profile gAntiVirus_Vancouverto ADOM1. Now in ADOM1, there is header policy referencing gAntiVirus_Vancouver.
2. In ADOM1, use gAntiVirus_Vancouver in an local ADOM policy.3. Delete the header policy from Global level.4. Reassign the policy to ADOM1.l Before FortiManager 6.2.1:The reassigning of the policy fails because Global Object Database tries to
remove gAntiVirus_Vancouver but cannot since it is used at the ADOM level.l FortiManager 6.2.1 and higher: Assign successful. No error reported. Informational message can be found
in the task monitor:
Try to delete gAntiVirus_Vancouver in Global ADOM. It's not allowed, and an error message is shown.
FortiManager 6.2.1 New Features Guide 34Fortinet Technologies Inc.
Usability
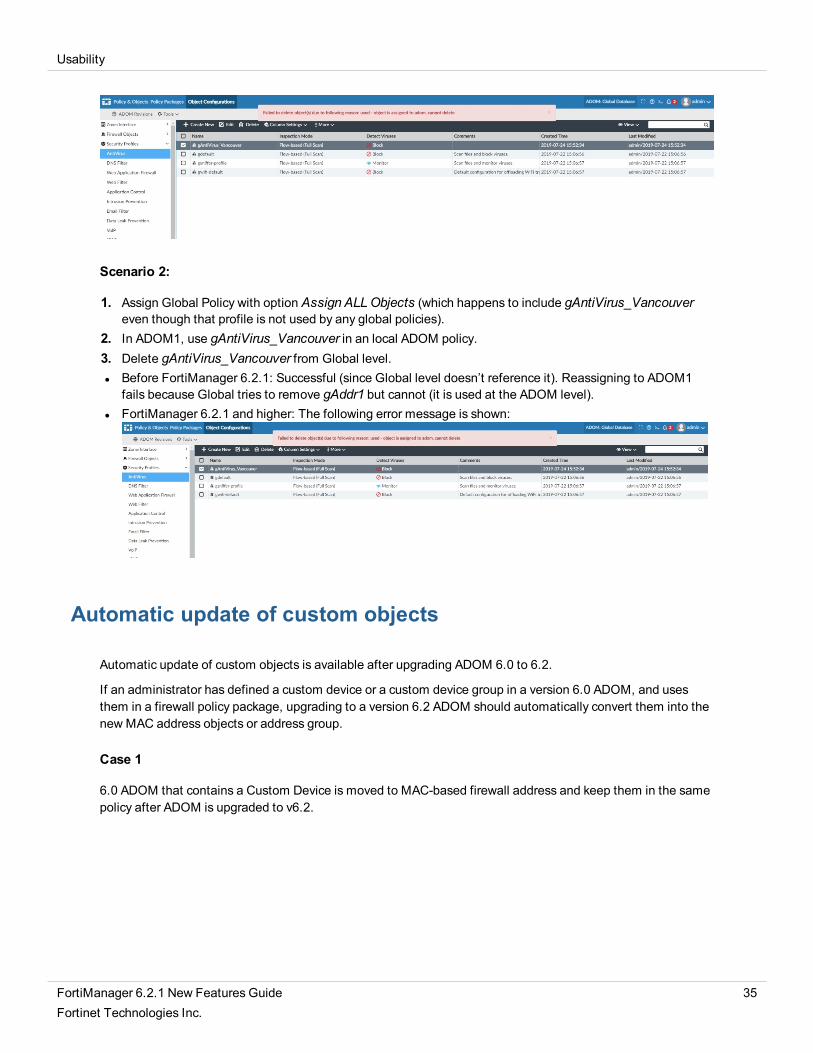
Scenario 2:
1. Assign Global Policy with option Assign ALLObjects (which happens to include gAntiVirus_Vancouvereven though that profile is not used by any global policies).
2. In ADOM1, use gAntiVirus_Vancouver in an local ADOM policy.3. Delete gAntiVirus_Vancouver from Global level.l Before FortiManager 6.2.1: Successful (since Global level doesn’t reference it). Reassigning to ADOM1
fails because Global tries to remove gAddr1 but cannot (it is used at the ADOM level).l FortiManager 6.2.1 and higher: The following error message is shown:
Automatic update of custom objects
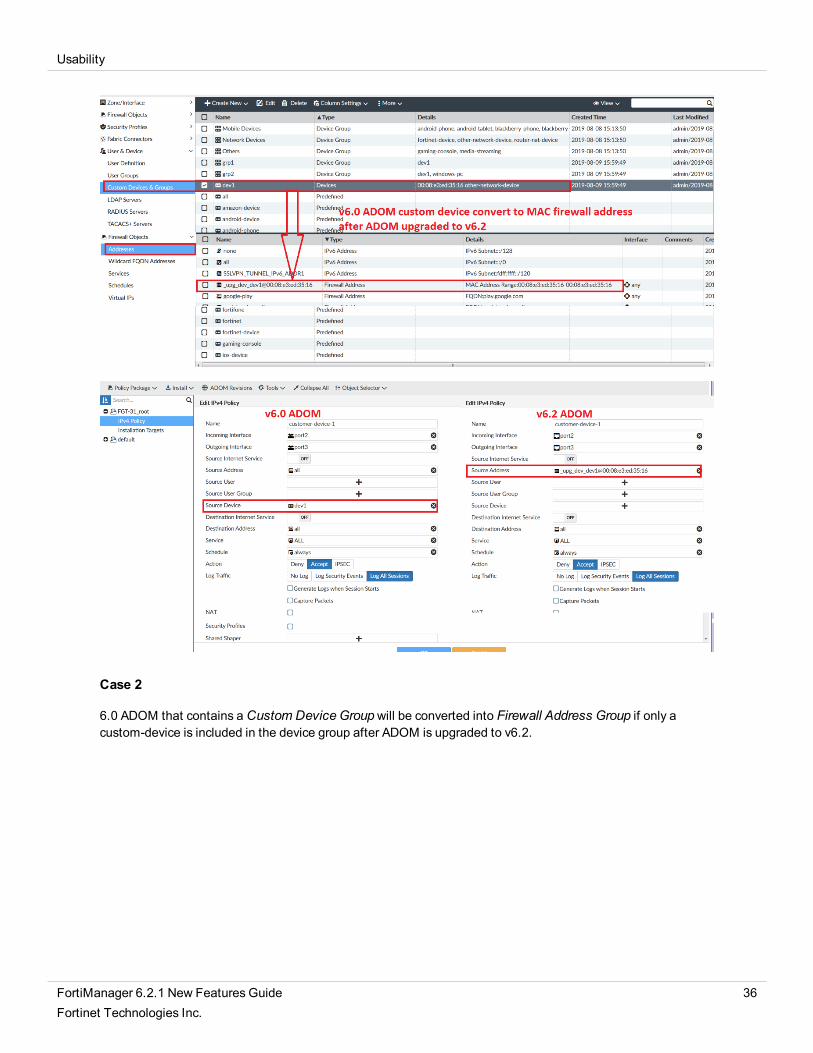
Automatic update of custom objects is available after upgrading ADOM 6.0 to 6.2.
If an administrator has defined a custom device or a custom device group in a version 6.0 ADOM, and usesthem in a firewall policy package, upgrading to a version 6.2 ADOM should automatically convert them into thenew MAC address objects or address group.
Case 1
6.0 ADOM that contains a Custom Device is moved to MAC-based firewall address and keep them in the samepolicy after ADOM is upgraded to v6.2.
FortiManager 6.2.1 New Features Guide 35Fortinet Technologies Inc.
Usability
Case 2
6.0 ADOM that contains a Custom Device Groupwill be converted into Firewall Address Group if only acustom-device is included in the device group after ADOM is upgraded to v6.2.
FortiManager 6.2.1 New Features Guide 36Fortinet Technologies Inc.

Usability
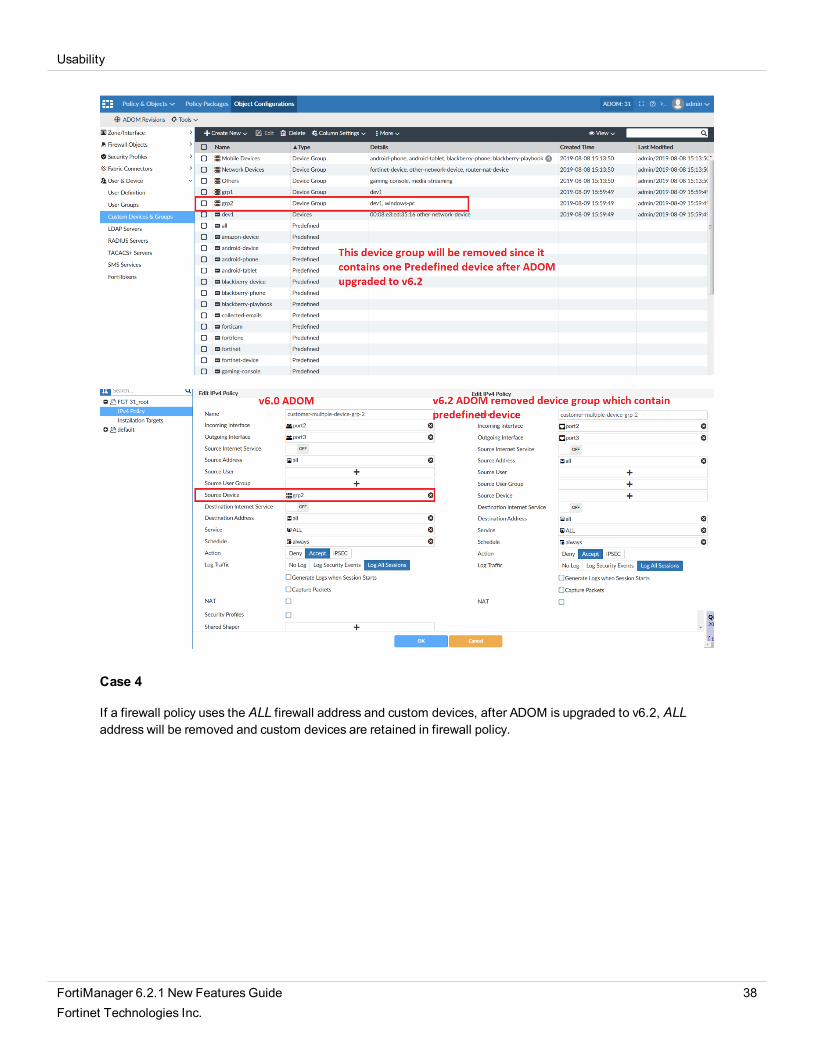
Case 3
6.0 ADOM that contains a Custom Device Groupwill be removed if the device group contains any pre-defineddevice-type or device-category after ADOM upgraded to v6.2.
FortiManager 6.2.1 New Features Guide 37Fortinet Technologies Inc.
Usability
Case 4
If a firewall policy uses the ALL firewall address and custom devices, after ADOM is upgraded to v6.2, ALLaddress will be removed and custom devices are retained in firewall policy.
FortiManager 6.2.1 New Features Guide 38Fortinet Technologies Inc.

Usability
Case 5
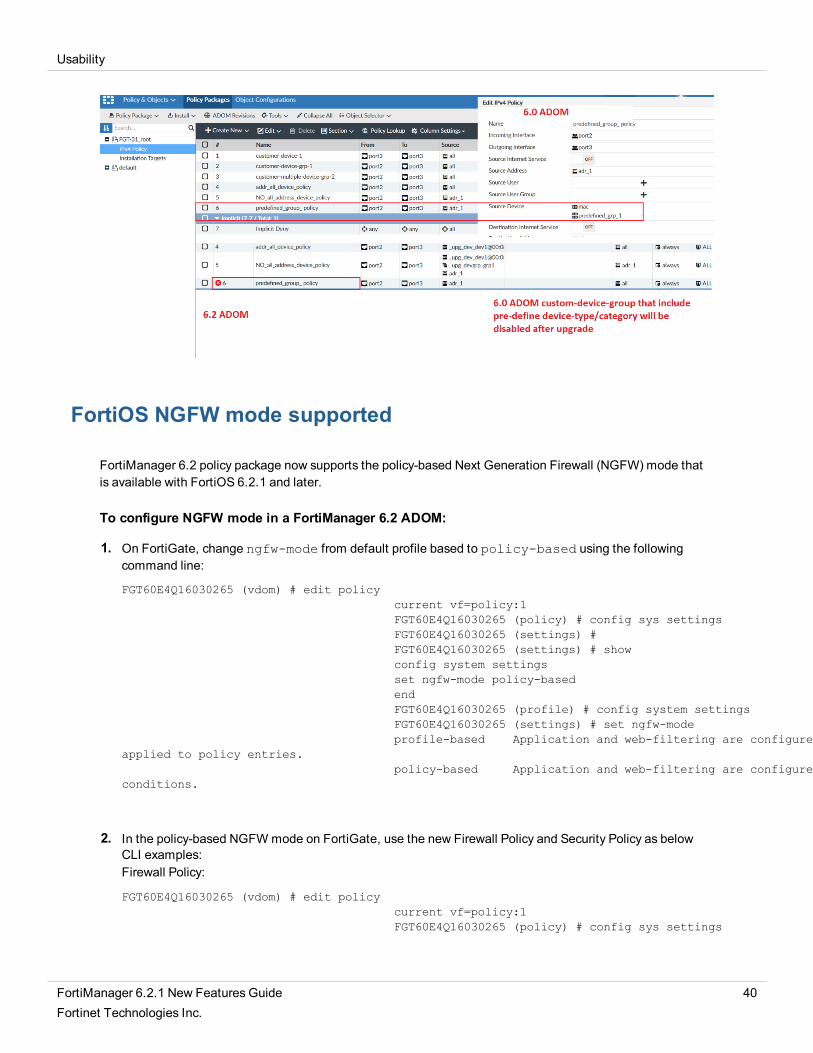
If firewall policy does not contain ALL firewall address, only custom devices and other defined address, bothfirewall address and custom devices are retained in firewall policy after ADOM is upgraded to v6.2.
Case 6
If firewall policy is as set pre-defined custom-device-group which includes pre-defined device-type/category, thefirewall policy will be disabled after ADOM is upgraded to v6.2.
FortiManager 6.2.1 New Features Guide 39Fortinet Technologies Inc.
Usability
FortiOS NGFW mode supported
FortiManager 6.2 policy package now supports the policy-based Next Generation Firewall (NGFW) mode thatis available with FortiOS 6.2.1 and later.
To configure NGFW mode in a FortiManager 6.2 ADOM:
1. On FortiGate, change ngfw-mode from default profile based to policy-based using the followingcommand line:
FGT60E4Q16030265 (vdom) # edit policycurrent vf=policy:1FGT60E4Q16030265 (policy) # config sys settingsFGT60E4Q16030265 (settings) #FGT60E4Q16030265 (settings) # showconfig system settingsset ngfw-mode policy-basedendFGT60E4Q16030265 (profile) # config system settingsFGT60E4Q16030265 (settings) # set ngfw-modeprofile-based Application and web-filtering are configured using profiles
applied to policy entries.policy-based Application and web-filtering are configured as policy match
conditions.
2. In the policy-based NGFWmode on FortiGate, use the new Firewall Policy and Security Policy as belowCLI examples:Firewall Policy:
FGT60E4Q16030265 (vdom) # edit policycurrent vf=policy:1FGT60E4Q16030265 (policy) # config sys settings
FortiManager 6.2.1 New Features Guide 40Fortinet Technologies Inc.

Usability
FGT60E4Q16030265 (settings) #FGT60E4Q16030265 (settings) # showconfig system settingsset ngfw-mode policy-basedend
FGT60E4Q16030265 (profile) # config system settingsFGT60E4Q16030265 (settings) # set ngfw-modeprofile-based Application and web-filtering are configured using profiles
applied to policy entries.policy-based Application and web-filtering are configured as policy match
conditions.
Security Policy:
config firewall security-policyedit 1set uuid f50fd6da-9eab-51e9-1065-7b37a4a17268set name "2"set srcintf "internal5"set dstintf "internal6"set srcaddr4 "all"set dstaddr4 "all"set enforce-default-app-port disableset service "ALL"set action acceptset schedule "always"set logtraffic-start enableset av-profile "g-default"set emailfilter-profile "default"set dlp-sensor "Content_Archive"set ips-sensor "default"set application 36481set app-category 28set url-category 64next
end
FortiManager 6.2.1 New Features Guide 41Fortinet Technologies Inc.

Usability
3. After importing this FortiGate/VDOM policy to FortiManager, imported policy package settings has samengfw-mode configuration, and also has the same firewall policies, and security policies.
FortiManager 6.2.1 New Features Guide 42Fortinet Technologies Inc.

Usability
FortiManager 6.2.1 New Features Guide 43Fortinet Technologies Inc.
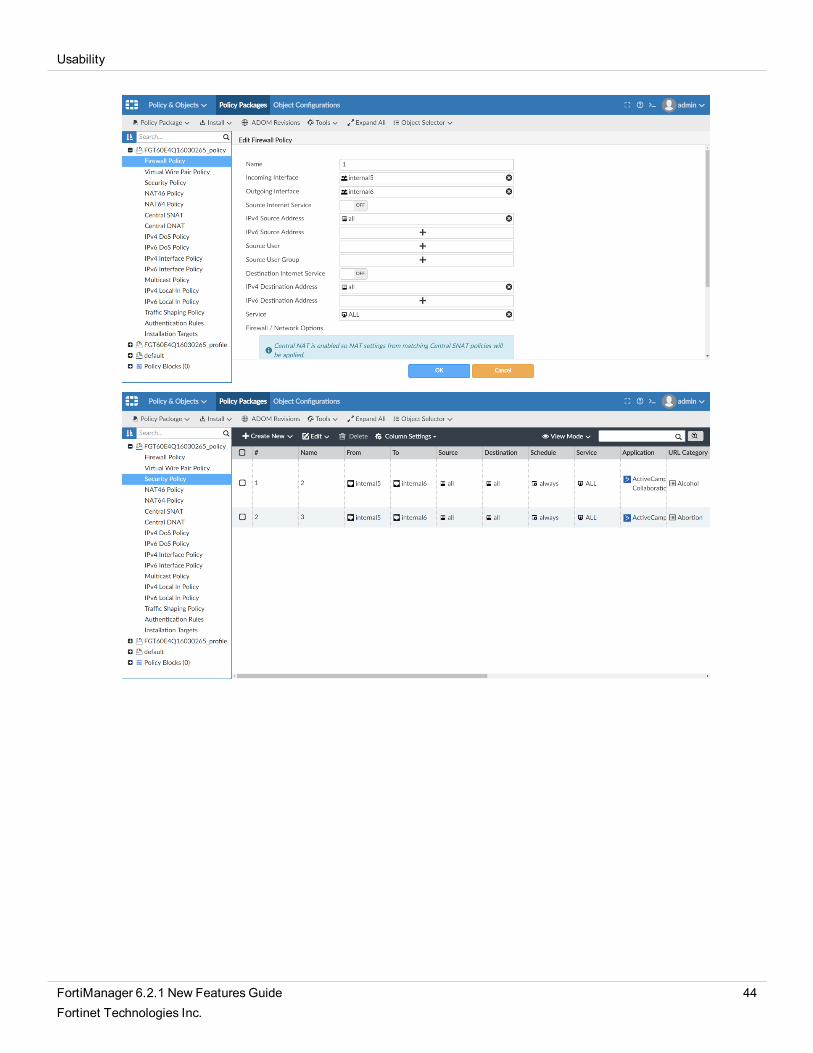
Usability
FortiManager 6.2.1 New Features Guide 44Fortinet Technologies Inc.
Usability
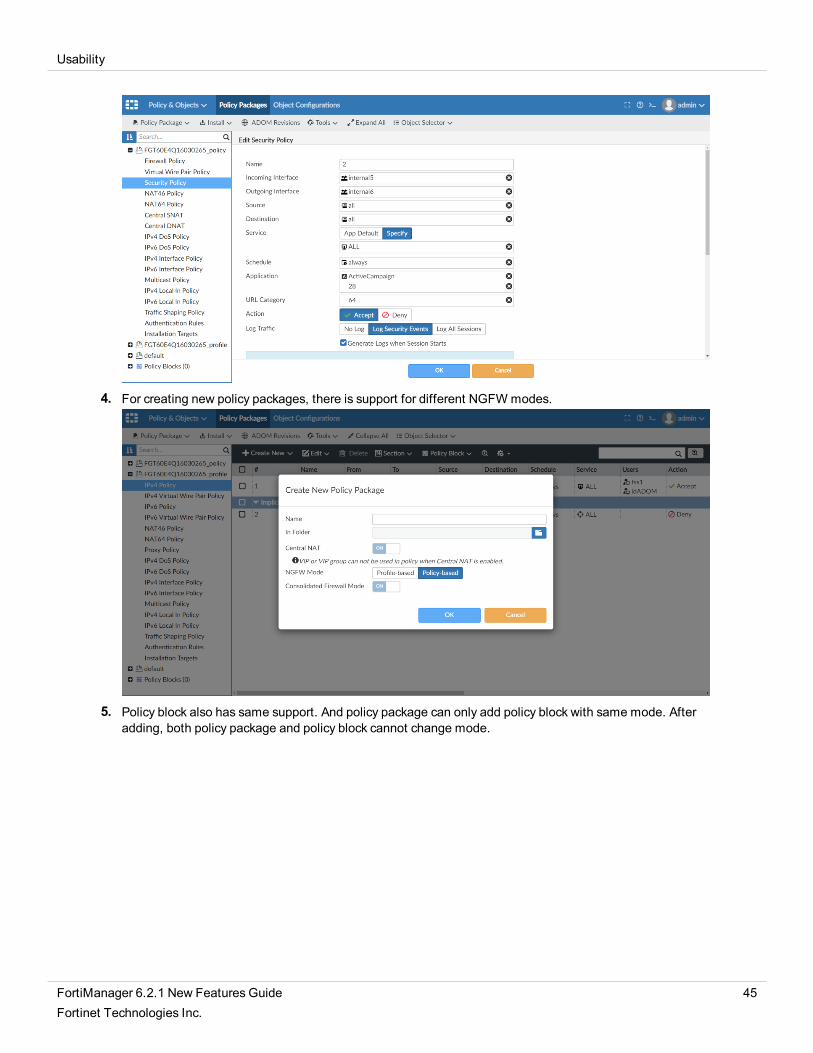
4. For creating new policy packages, there is support for different NGFWmodes.
5. Policy block also has same support. And policy package can only add policy block with same mode. Afteradding, both policy package and policy block cannot change mode.
FortiManager 6.2.1 New Features Guide 45Fortinet Technologies Inc.

Usability
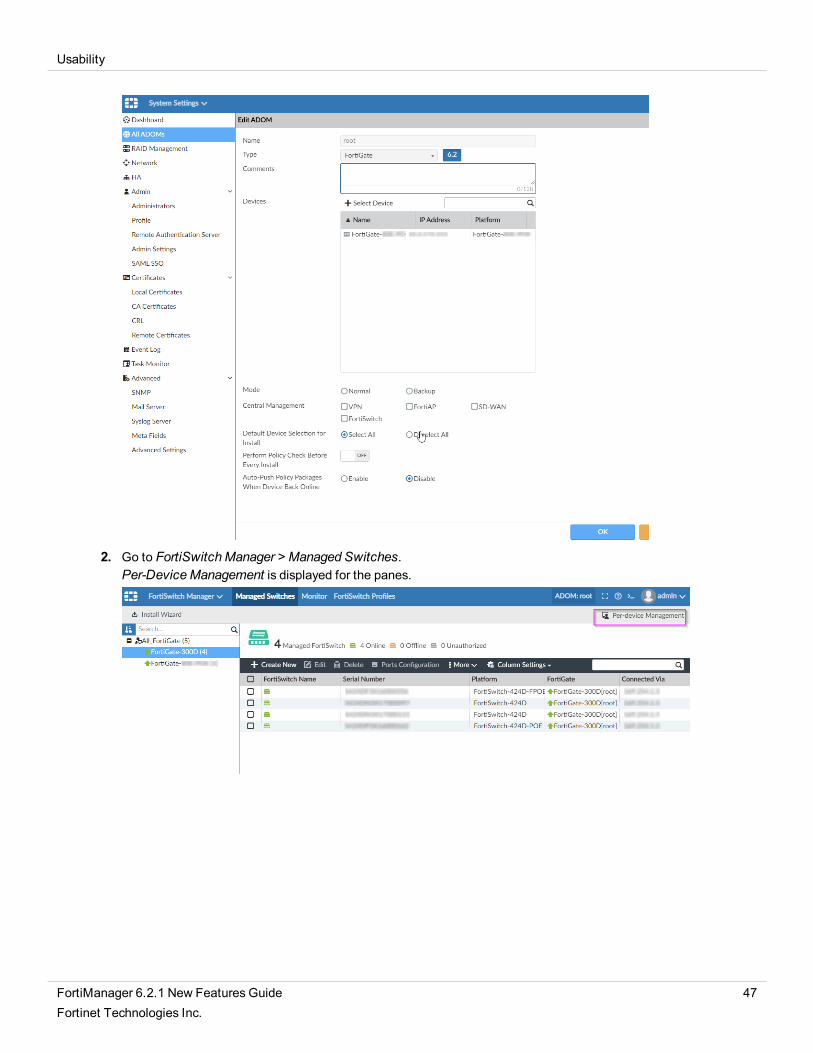
FortiSwitch Manager support for per-device management mode
You can use FortiSwitch Manager in per-device management mode. All changes saved to the FortiGatedatabase can be installed to the FortiGate.
To enable per-device management mode:
1. Ensure that central management is disabled for FortiSwitch Manager.a. Go to System Settings > All ADOMs.b. Double-click an ADOM to open it for editing.c. In the Central Management area, clear the FortiSwitch check box, and clickOK.
FortiManager 6.2.1 New Features Guide 46Fortinet Technologies Inc.
Usability
2. Go to FortiSwitchManager > Managed Switches.Per-DeviceManagement is displayed for the panes.
FortiManager 6.2.1 New Features Guide 47Fortinet Technologies Inc.
Usability
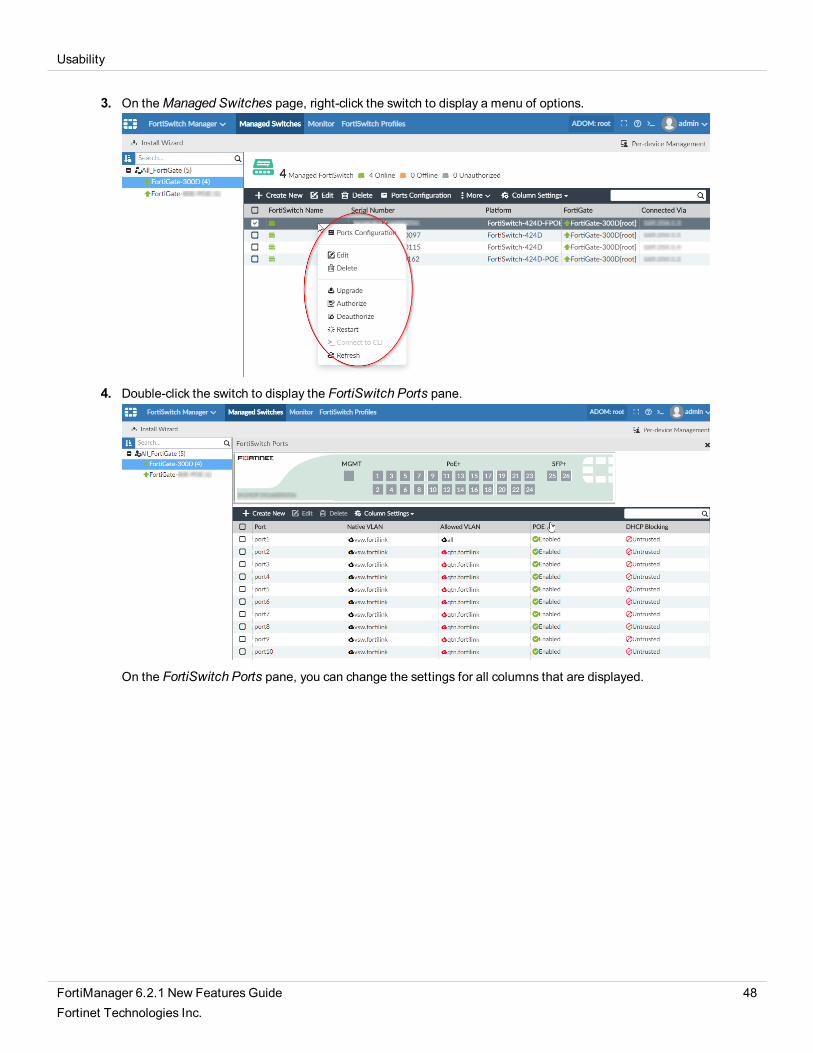
3. On theManaged Switches page, right-click the switch to display a menu of options.
4. Double-click the switch to display the FortiSwitch Ports pane.
On the FortiSwitch Ports pane, you can change the settings for all columns that are displayed.
FortiManager 6.2.1 New Features Guide 48Fortinet Technologies Inc.

Usability
5. On the FortiSwitch Ports pane, clickCreate New to create a new trunk interface.
On theManaged Switches pane, you can use the right-click menu to Edit, Delete, Upgrade, Authorize,Deauthorize, Restart, orRefresh a switch.
FortiManager 6.2.1 New Features Guide 49Fortinet Technologies Inc.
Usability
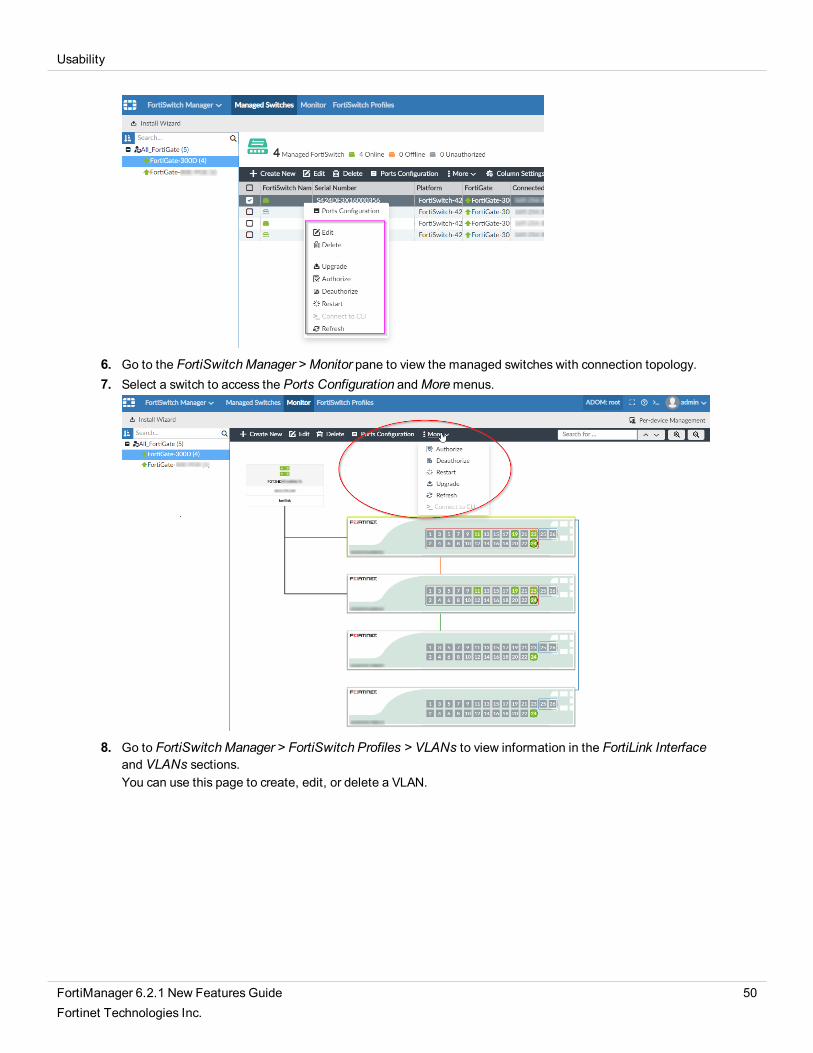
6. Go to the FortiSwitchManager > Monitor pane to view the managed switches with connection topology.7. Select a switch to access the Ports Configuration andMoremenus.
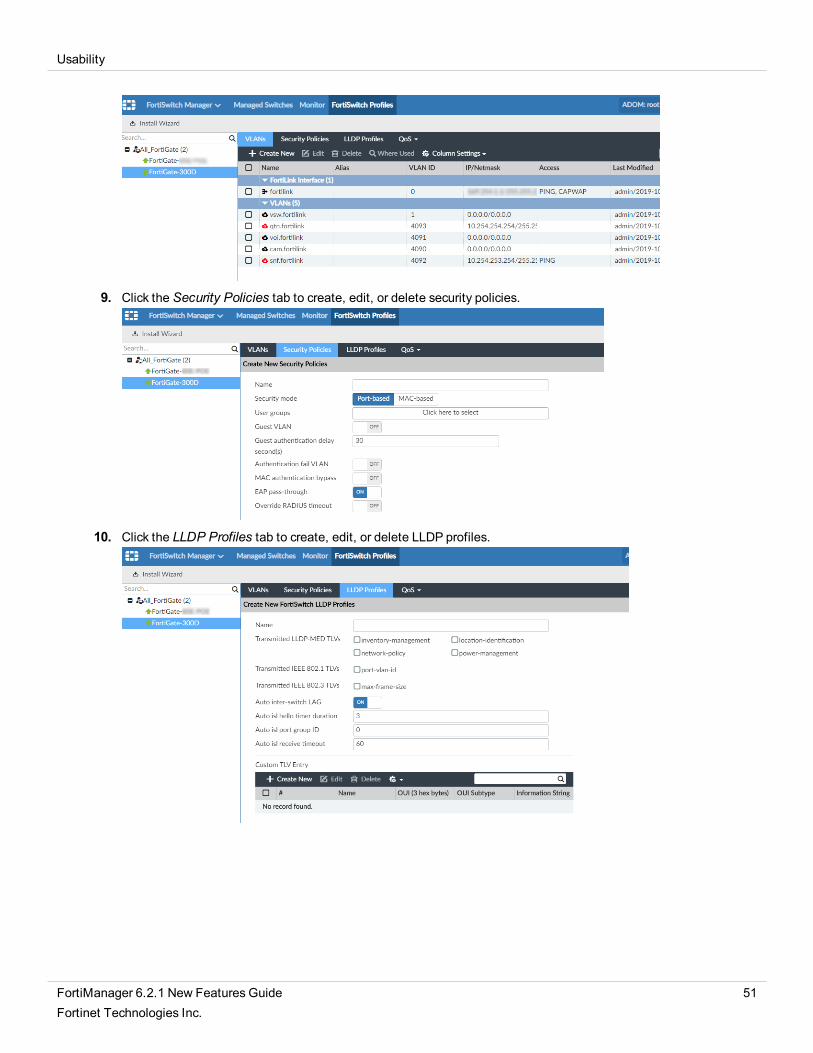
8. Go to FortiSwitchManager > FortiSwitch Profiles > VLANs to view information in the FortiLink Interfaceand VLANs sections.You can use this page to create, edit, or delete a VLAN.
FortiManager 6.2.1 New Features Guide 50Fortinet Technologies Inc.
Usability
9. Click the Security Policies tab to create, edit, or delete security policies.
10. Click the LLDP Profiles tab to create, edit, or delete LLDP profiles.
FortiManager 6.2.1 New Features Guide 51Fortinet Technologies Inc.

Usability
11. Click theQoSmenu, and select QoS Policy to create, edit, or delete QoS policies.
12. Click theQoSmenu, and select QoS Egress Queue Policy to create, edit, or delete QoS egress queuepolicies.
13. Click theQoSmenu, and select QoS IP Precedence/DSCP to create, edit, or delete these items.
14. Click theQoSmenu, and select QoS 802.11p page to create, edit, or delete these items.
FortiManager 6.2.1 New Features Guide 52Fortinet Technologies Inc.

Usability
AP Manager support for WPA3 and phishing SSIDs
You can use APManager to set WPA3 options when AP Manager is used for central management and for per-device management. You can also use AP Manager to report and suppress phishing SSIDs.
This topic contains the following sections:
l Selecting WPA3 options for central management on page 53l Selecting WPA3 options for per-device management on page 56l Viewing rogue APs on page 58
Selecting WPA3 options for central management
This section describes how to select WPA3 options with AP Manager when central management is enabled.
To select WPA3 options for central management:
1. Ensure that central management is enabled for AP Manager.a. Go to System Settings > All ADOMs.b. Double-click the ADOM to open it for editing.c. Beside Central Management, select FortiAP, and clickOK.
2. Go to AP Manager > WiFi Profiles > SSID.3. Create a new or edit an existing SSID.
FortiManager 6.2.1 New Features Guide 53Fortinet Technologies Inc.

Usability
4. Select one of the following options for WPA3, and clickOK:l OWEl WPA3 Enterprisel WPA3 SAEl WPA3 SAE TransitionFor example, selectWPA3SAE, and type a password in the SAE Password box.
5. Assign the SSID to an AP profile.a. ClickAP Profile.b. Create a new or edit an existing AP profile.
FortiManager 6.2.1 New Features Guide 54Fortinet Technologies Inc.
Usability
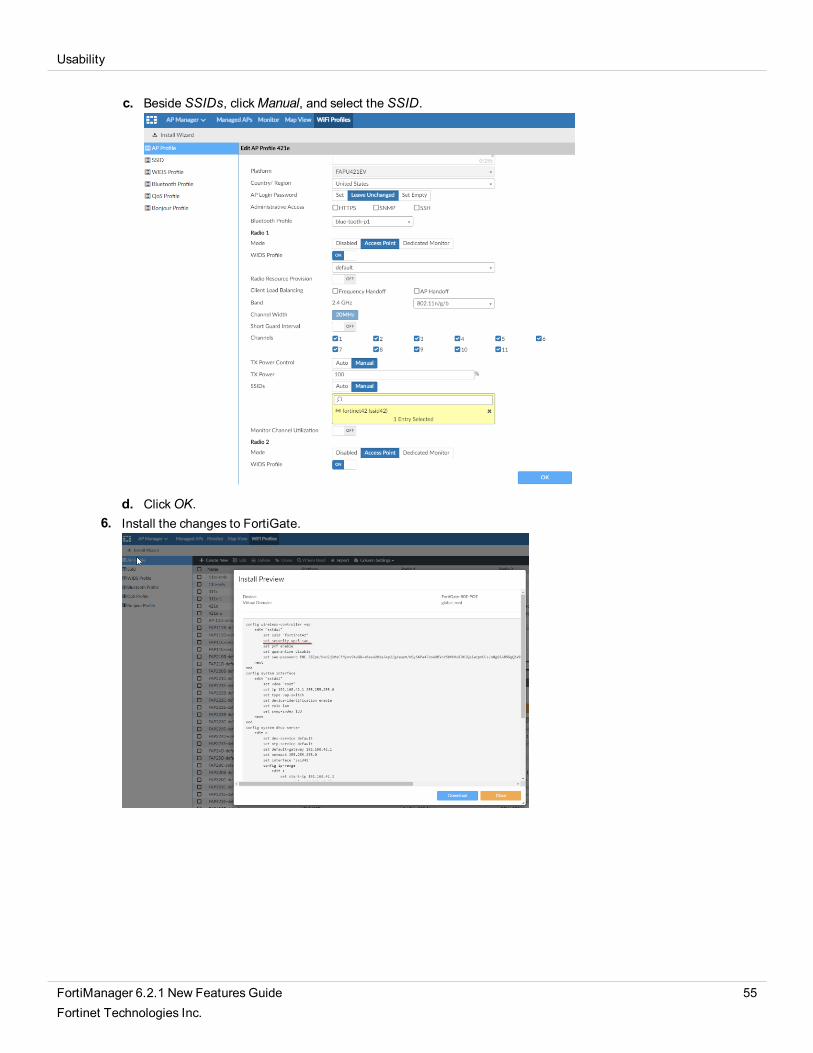
c. Beside SSIDs, clickManual, and select the SSID.
d. ClickOK.6. Install the changes to FortiGate.
FortiManager 6.2.1 New Features Guide 55Fortinet Technologies Inc.

Usability
7. Verify that the installation was successful.
Selecting WPA3 options for per-device management
This section describes how to select WPA3 options with AP Manager when central management is disabledand per-device management is enabled.
To select WPA3 options for per-device management:
1. Ensure central management is disabled for AP Manager.a. Go to System Settings > All ADOMs.b. Double-click the ADOM to open it for editing.c. Beside Central Management, clear the FortiAP check box, and clickOK.
2. Go to AP Manager > WiFi Profiles.
FortiManager 6.2.1 New Features Guide 56Fortinet Technologies Inc.
Usability
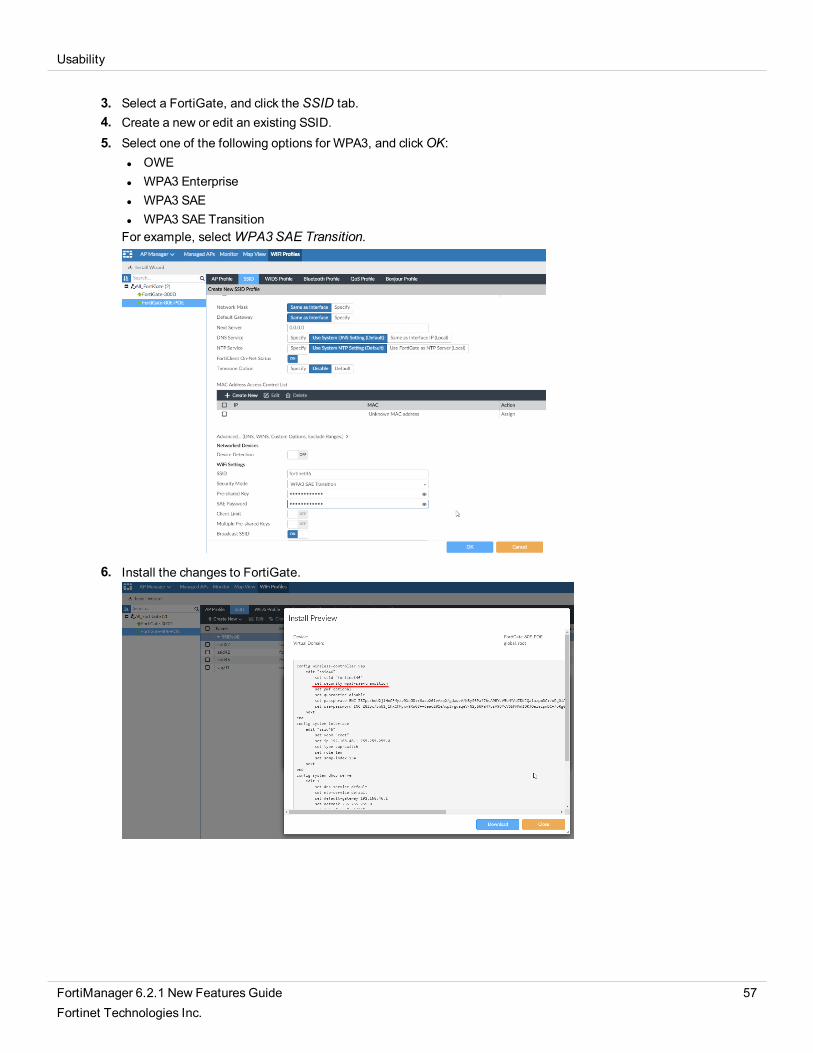
3. Select a FortiGate, and click the SSID tab.4. Create a new or edit an existing SSID.5. Select one of the following options for WPA3, and clickOK:
l OWEl WPA3 Enterprisel WPA3 SAEl WPA3 SAE TransitionFor example, selectWPA3SAE Transition.
6. Install the changes to FortiGate.
FortiManager 6.2.1 New Features Guide 57Fortinet Technologies Inc.

Usability
7. Verify the installation was successful.
Viewing rogue APs
When FortiManager is managing a FortiGate with phishing and fake SSID detection enabled, you can view theoffending SSIDs in FortiManager.
To view rogue APs:
1. Go to AP Manager > Managed APs.2. In the toolbar, clickRogue APs.
3. Click Close.
FortiManager 6.2.1 New Features Guide 58Fortinet Technologies Inc.

Other
Other
This section lists other new features added to FortiManager.
List of new features:
l Allow Custom IPS / App Signatures for Restricted Administrators on page 59l Single Click ADOM Upgrade on page 60l Support for FortiOS Next Generation Firewall VDOM Implementations on page 62
Allow Custom IPS / App Signatures for RestrictedAdministrators
A new option is added for Restricted administrators, enabling Read/Write access to Custom IPS and AppControl signatures.
To create a Restricted Administrator:
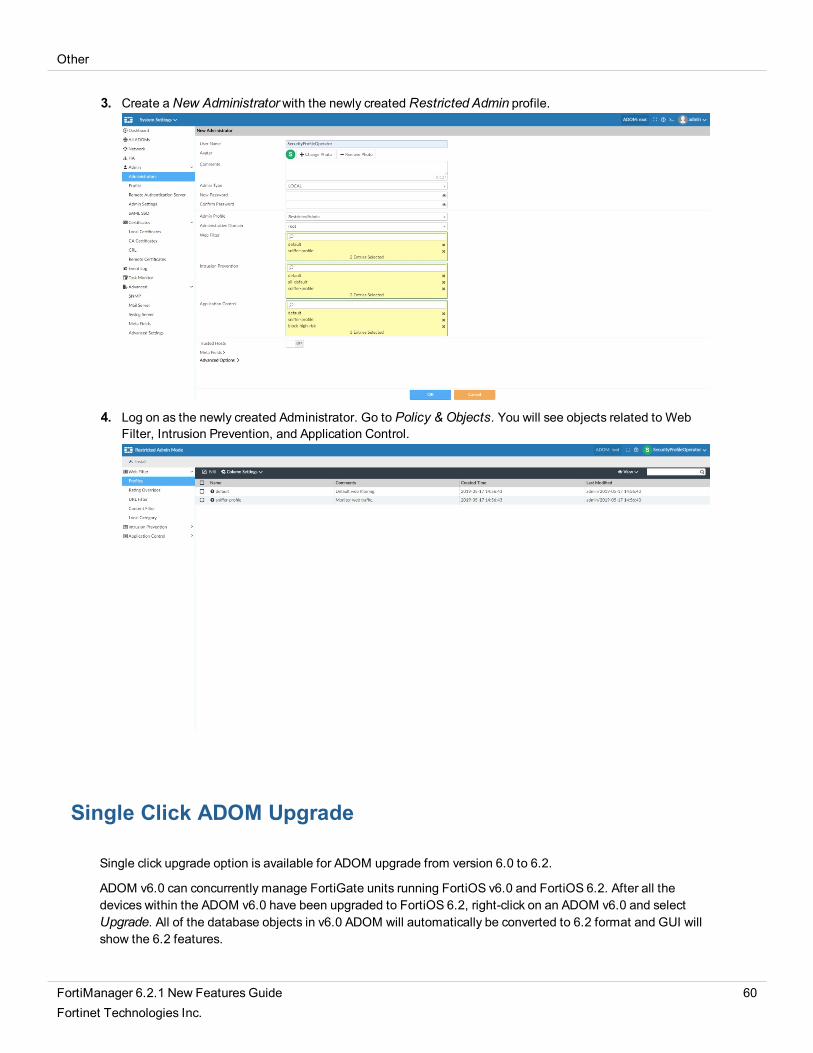
1. Go to System Settings > Admin > Profiles.2. ClickCreate New to create a Restricted Admin profile. Select the permissions as required.
FortiManager 6.2.1 New Features Guide 59Fortinet Technologies Inc.
Other
3. Create a New Administratorwith the newly created Restricted Admin profile.
4. Log on as the newly created Administrator. Go to Policy & Objects. You will see objects related to WebFilter, Intrusion Prevention, and Application Control.
Single Click ADOM Upgrade
Single click upgrade option is available for ADOM upgrade from version 6.0 to 6.2.
ADOM v6.0 can concurrently manage FortiGate units running FortiOS v6.0 and FortiOS 6.2. After all thedevices within the ADOM v6.0 have been upgraded to FortiOS 6.2, right-click on an ADOM v6.0 and selectUpgrade. All of the database objects in v6.0 ADOM will automatically be converted to 6.2 format and GUI willshow the 6.2 features.
FortiManager 6.2.1 New Features Guide 60Fortinet Technologies Inc.

Other
To upgrade an ADOM:
1. Go to System Settings >All ADOMs.2. Right-click on the ADOM and select Upgrade.
3. The ADOM is upgraded successfully.
After a successful ADOM upgrade:
The GUI shows FortiOS 6.2 features.
FortiManager 6.2.1 New Features Guide 61Fortinet Technologies Inc.

Other
When ADOM upgrade fails:
l A 6.0 ADOM can manage a mix of 6.0 and 6.2 devices.
l If all the devices are not upgraded to FortiOS 6.2, the ADOM upgrade fails showing an error.
Support for FortiOS Next Generation Firewall VDOMImplementations
FortiManager now supports FortiOS Next Generation Firewall (NGFW) VDOM implementations.
To configure NGFW VDOM implementation:
1. Change the ngfw-mode from profile based to policy based:
FGT60E4Q16030265 (vdom) # edit policycurrent vf=policy:1FGT60E4Q16030265 (policy) # config sys settingsFGT60E4Q16030265 (settings) #FGT60E4Q16030265 (settings) # show
FortiManager 6.2.1 New Features Guide 62Fortinet Technologies Inc.

Other
config system settingsset ngfw-mode policy-basedendFGT60E4Q16030265 (profile) # config system settingsFGT60E4Q16030265 (settings) # set ngfw-mode
2. In the policy-based NGFWmode, configure the new firewall policy and security policy:
config firewall consolidated policyedit 1set name "1"set uuid 272900ec-9f6f-51e9-ca7a-c3ca7250921dset srcintf "internal5"set dstintf "internal6"set srcaddr4 "all"set dstaddr4 "all"set service "ALL"nextend
config firewall security-policyedit 1set uuid f50fd6da-9eab-51e9-1065-7b37a4a17268set name "2"set srcintf "internal5"set dstintf "internal6"set srcaddr4 "all"set dstaddr4 "all"set enforce-default-app-port disableset service "ALL"set action acceptset schedule "always"set logtraffic-start enableset av-profile "g-default"set emailfilter-profile "default"set dlp-sensor "Content_Archive"set ips-sensor "default"set application 36481set app-category 28set url-category 64next
end
FortiManager 6.2.1 New Features Guide 63Fortinet Technologies Inc.

Other
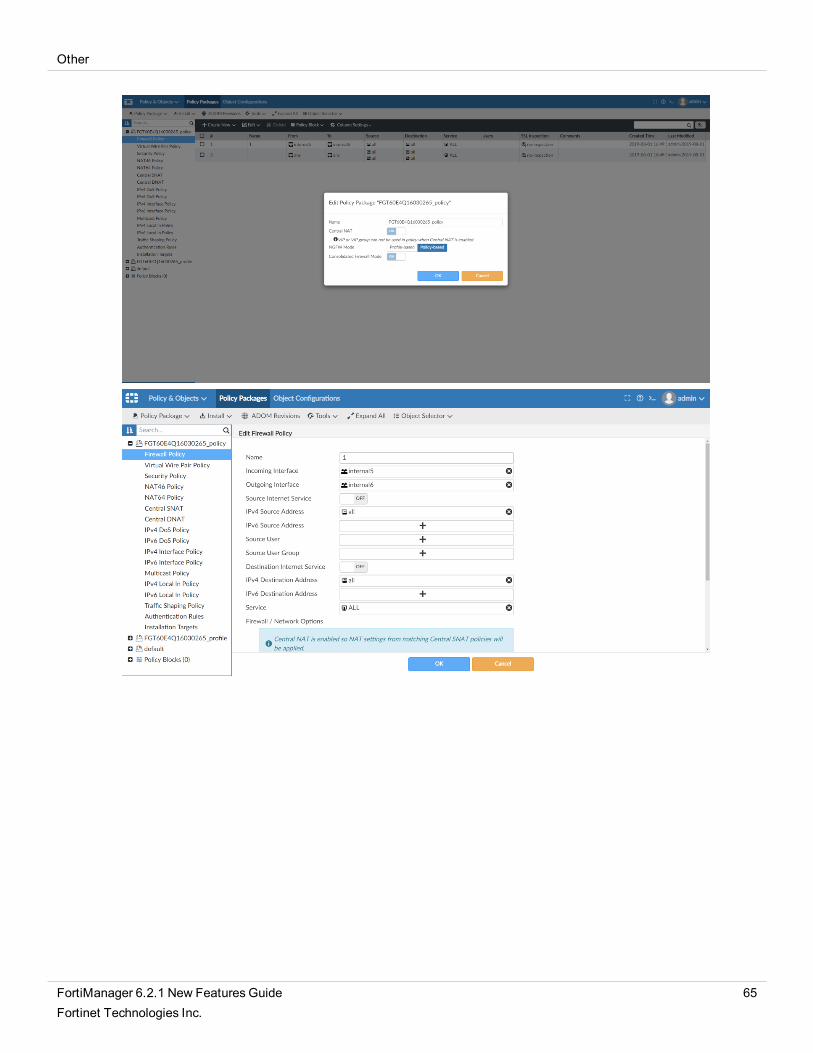
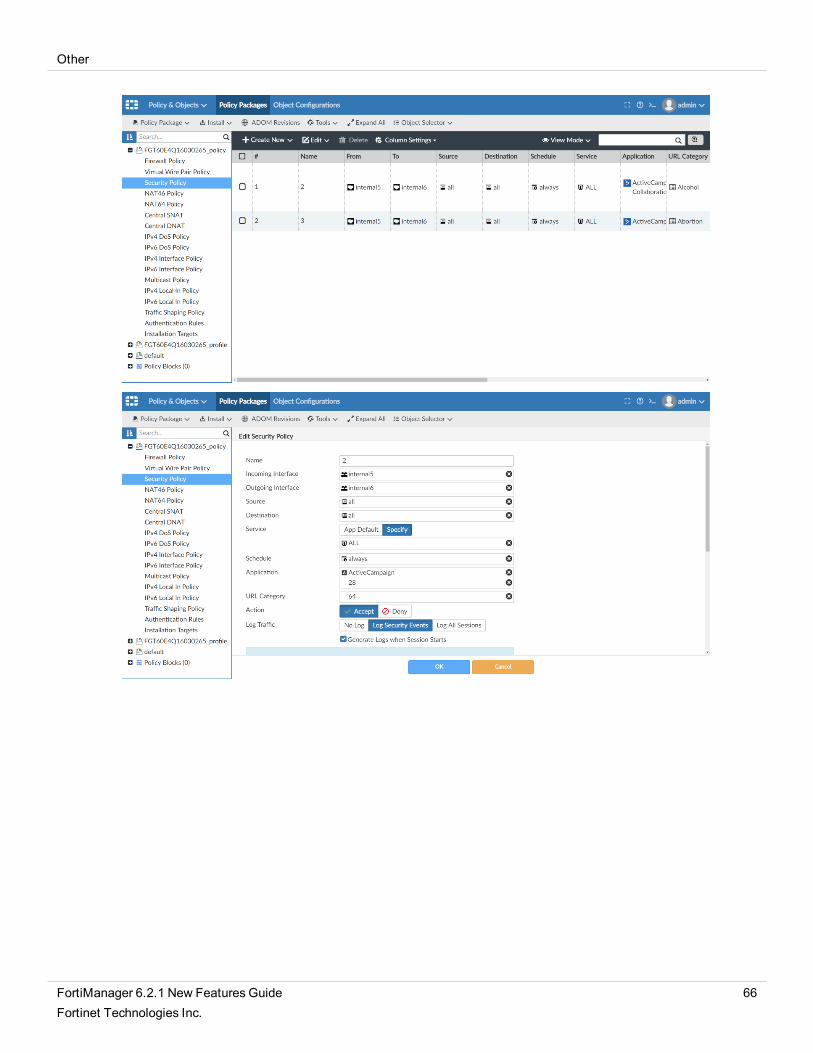
3. Import the FortiGate/VDOM policy to FortiManager. The imported policy package setting has the samengfw-mode configuration. And it also has the same firewall policies and security policies.
FortiManager 6.2.1 New Features Guide 64Fortinet Technologies Inc.
Other
FortiManager 6.2.1 New Features Guide 65Fortinet Technologies Inc.
Other
FortiManager 6.2.1 New Features Guide 66Fortinet Technologies Inc.

Other
4. Create a new policy package that supports a different NGFWmode.
5. Policy block also has the same support. Policy package can only add policy block in the same mode. Afteradding the policy package and policy block, both cannot be changed.
FortiManager 6.2.1 New Features Guide 67Fortinet Technologies Inc.

Copyright© 2020 Fortinet, Inc. All rights reserved. Fortinet®, FortiGate®, FortiCare® and FortiGuard®, and certain other marks are registered trademarks of Fortinet, Inc., inthe U.S. and other jurisdictions, and other Fortinet names herein may also be registered and/or common law trademarks of Fortinet. All other product or company names may betrademarks of their respective owners. Performance and other metrics contained herein were attained in internal lab tests under ideal conditions, and actual performance andother results may vary. Network variables, different network environments and other conditions may affect performance results. Nothing herein represents any bindingcommitment by Fortinet, and Fortinet disclaims all warranties, whether express or implied, except to the extent Fortinet enters a binding written contract, signed by Fortinet’sGeneral Counsel, with a purchaser that expressly warrants that the identified product will perform according to certain expressly-identified performancemetrics and, in suchevent, only the specific performancemetrics expressly identified in such binding written contract shall be binding on Fortinet. For absolute clarity, any such warranty will belimited to performance in the same ideal conditions as in Fortinet’s internal lab tests. In no event does Fortinet make any commitment related to future deliverables, features ordevelopment, and circumstances may change such that any forward-looking statements herein are not accurate. Fortinet disclaims in full any covenants, representations, andguarantees pursuant hereto, whether express or implied. Fortinet reserves the right to change, modify, transfer, or otherwise revise this publication without notice, and themostcurrent version of the publication shall be applicable.