Fluent in French - Bandworld
74
Fluent in French A Band Director’s Guide to Understanding and Teaching the French Horn Practical Application Project #1 MUSI 6285 Jonathan Bletscher
-
Upload
khangminh22 -
Category
Documents
-
view
0 -
download
0
Transcript of Fluent in French - Bandworld

Fluent in French A Band Director’s Guide to Understanding and Teaching the French Horn
Practical Application Project #1
MUSI 6285
Jonathan Bletscher

2

3
Introduction 4
Part One: Understanding the Horn 5
Horn History 5
Rotary Valves and Anatomy of the Horn 8
- Common Rotary Valve Problems 12
- Disassembling and Reassembling a Rotary Valve 14
- Replacing Rotary Valve String 21
Horn in F and Horn in Bb: Transposing Instruments 26
The Seven Chromatic Brass Fingerings 28 The Overtone Series 30
7 Fingerings, 7 Fundamentals, and 7 Series: Filling in the Gaps 35
The Partial Grouping Method 37
Horn Fingering Tricks 41
Trouble Fitting In: Why Horns Aren’t Like Everyone Else (In the Brass Family) 45
Part Two: Teaching the Horn 47
Picking Your Horn Players 47
Equipping for Success 48
Posture and Holding the Horn 49
Making a Sound on the Horn 53
Common Problems with Horn Embouchure 56
Horn Fingerings 58
Instrument Maintenance 61
Developing as a Horn Player 63
Teaching Strategies 67
More to Learn 70
About the Author 71
Bibliography 72
Table of Contents

4
Introduction
Consider a student who is about to begin the very first day of learning a foreign language. The student is pre-
sented with very basic vocabulary, is led to dabble in speaking and writing, and very slowly begins absorbing the
sound, feel, and structure of the language. This is not unlike the experience of a student learning his or her first
instrument. This slow and steady approach is designed to be the first step in a years-long sequence of instruction
and study for a student who is brand new to the subject.
Now consider the teacher who provided the student’s activities. A successful first lesson as described above
must be planned and executed by a teacher who is already an expert on the topic at hand. The teacher is able to
show the student where to start, what to do next, and which difficulties are likely to arise because the teacher
already has a thorough understanding of the language. The vocabulary, grammar rules, and intricacies of the lan-
guage’s structure are no mystery to the teacher. His or her expertise is what generates high quality, accurate,
and effective teaching to take place.
This prerequisite is just as true for teachers of band instruments. We know as band directors that we must
strive for expertise on each band instrument, a process of demystifying the vocabulary, fingerings, embouchures,
and intricacies of how each instrument functions. While there are no easy shortcuts to becoming an expert on
the French horn, this manual aims to accelerate the learning process by teaching to teachers, not beginners. Ra-
ther than beginning with “How to Play the Horn,” the goal is to jump right in to what makes the horn a challeng-
ing instrument to understand and teach. Please feel free to navigate and read this manual in the sequence that
best fits your curiosities and previous knowledge. My hope is that readers of this book will find the curtain of con-
fusion often surrounding this instrument
pulled back as rapidly and as easily as possible
and walk away feeling much better equipped
to teach students of any level about the horn.
Becoming an expert in every instrument is a
never-ending journey, but I believe you will
find this manual to be a waystation worth
your while.
-Jonathan Bletscher

5
Horn History
Part One: Understanding the Horn
It is helpful to understand the origin of the modern French horn because it provides insight into why the instru-ment works the way it does today. As one of the longest brass instruments with an average 12 feet of tubing, it is fitting that the history of the horn reaches far into the distant past. Long, long ago, when the horns of animals began to be hollowed out to create instruments playable by human lips, the “horn” was born. In one form or another, the horn has been played continuously for 6,000 years1. For many of those years, the horn was used as a communication device especially helpful for hunting. In truth, the use of the horn as a melodic musical instru-ment has only been taking place for a few hundred years.
By the late 15th century, the widespread use of the horn as a signaling instrument led to increasingly musical “horn calls”. At that time, during the reign of French King Louis the XI, composers began to incorporate these musical horn calls into orchestral scores, elevating the status of the ancient instrument2. The hunting horn began appearing on stage in scenes depicting hunting, but it still had a harsh timbre that did not blend well with other
orchestral pit instruments. In fact, the Scandinavian Lur, a bronze, horn-like instrument, had already been put to use as a war-horn designed to generate loud, obnoxious, and frightening noise3. As hunting caught on as an aristocratic trend in western Europe, Ger-man and Austrian aristocrats began to desire higher quality “French horns” and skilled horn players to bring back to their courts. This motivated new developments in design and construction materials. Fashioning horns from metal allowed inventors to innovate and experiment, generating a variety of shapes, timbres, and new features for the instrument. In 1636, French musical scholar Marin Mersenne described 4 types of horns3:
Le grand cor (the big horn) Cor à plusiers tours (the horn of several turns) Le cor qui n’a qu’un seul tour (the horn which has only one turn) Le huchet (the horn with which one calls from afar)
The cor de chasse (hunting horn) is in this last category
Despite these innovations, the horn remained a fixed-length instrument and limited horn players to the natural overtone series (discussed later in this manual). Because of the close succession of over-tones high in the overtone series, the high range of the instrument was the most useful for melodic playing. However, new designs were needed before the historic cor de chasse could become flexible enough to find a home with the orchestra. The earliest work-around to the overtone series limitation was to play multiple horns of varying lengths. The result was the combination of two or more overtone series, providing the musician (or group of musicians on different-length horns) some flexibility with a more complete set of notes. This allowed composers the option to write more complex melodic lines and parts for the horn in more than one key.
A

6
However, using multiple instruments was cumbersome and inefficient. The invention of the horn “crook”, an interchangeable piece of tubing available in varying lengths similar in construction to modern-day tuning slides, provided a way for musicians to change the length of the horn as needed3. Keep in mind that while this new control of the length of the horn allowed many more notes and keys to be played, it was still the close, upper overtones in the high range of the instrument that had to be used to play step-wise melodic passages. Remem-ber this point as it will help us understand why the most-used overtones (or par-tials) on the modern horn don’t seem to “match up” with the overtone system shared by the trumpet, trombone, euphonium, and tuba.
Following the development of the “crook” system, another notable innova-tion in pitch manipulation called “hand horn technique” was either discovered or perfected by Dresden hornist Anton Joseph Hampel sometime after 17504. Hand horn technique (the predecessor of today’s “stopped” horn technique) raised the pitch of the instrument by a half-step and made available a new set of chro-matic notes. Due to these developments, the horn could finally be established as a regular, reliable orchestral instrument. This valve-less horn design, often re-ferred to as the natural horn, played with crooks and hand horn technique re-mained in regular use until nearly the 20th century. Big names such as Haydn and Mozart took notice of the horn, which had finally matured, and wrote well known horn concertos3.
C
B
This instrument is from the Paris workshop of the famous Raoux family of brass instrument makers. They were especially noted for their hand-horns, which
they raised to the highest standard of design and workmanship D.

7
As the horn grew in popularity as an orchestral instrument, Ger-man horn player Heinrich Stölzel was preparing a revolutionary design that would become a cornerstone of brass technology for years to come. The “Stölzel valve” was first applied to the horn in 1814, and immediately following its patent there was a flurry of activity from instrument manufacturers looking to utilize this new technology5. Though most of the chromatic range had been possi-ble on the natural horn for some time, the “in-between” notes achieved via hand horn technique had a distinctly different timbre due to the required blockage inside the bell of the instrument. Shortly after the introduction of Stölzel’s valved horn, a writing appeared in the Leipzig periodical Allgemeine Musikalische
Zeitung (General Music Newspaper) remarking upon the improved consistency in tone and timbre Stölzel’s valve brought to the Waldhorn (German term for the French horn):
Due to this superior quality of sound, not to mention the convenience of doing away with manual swapping of crooks, it was only a matter of time until the valved version of the horn exceeded the natural horn in popularity. Stölzel’s piston-style valves are recognizable as the predecessor to the piston valves used in trumpets, euphoni-ums, and many tubas today. However, they are not the valves most commonly used today in the construction of the modern French horn. Rotary valves had been invented shortly after the debut of the Stölzel valve. Joseph Riedl of Vienna is credited with introducing a rotary valve design in 1832 which would lead to the modern form used today. Riedl’s rotary valve overtook the piston design by the end of the 19th century and the rotary valve has remained the standard in French horn manufacturing ever since.
Valves overcame most of the original limitations of the natural horn, but there was still a matter of the key in which the instrument would be built. Manufacturers settled primarily on the horn in F because of its frequent usage in the orchestra, although the horn in Bb remained in production as an alternative. Once the inclusion of three rotary valves became the norm, the single horn in F was finally established more or less in the form we see it today.
Today, modern horn players typically prefer a horn one step further down the path of innovation: the double horn, which emerged in the late 19th century. Fritz Kruspe, a German horn maker, was the first to manufacture both single and double horns with rotary valves3. In a manner reminiscent of the old crook system, an additional fourth valve on the double horn re-routes the air through shorter tubing, thereby transposing the entire instru-ment from horn in F to horn in Bb. This allows performers to swap at will between the F horn’s characteristic tone, “fatness” of sound, and accurate intonation and the Bb horn’s ease of playing, accuracy in the high range, and rapid response6. While the double horn is the standard for most horn players, the single horn is still common-ly used for its lightness, simplicity for beginners, and specialized use-cases in performance.
"Heinrich Stölzel, the chamber musician from Pless in Upper Silesia, in order to perfect the Waldhorn, has succeeded in attaching a simple mechanism to the
instrument, thanks to which he has obtained all the notes of the chromatic scale in a range of almost three octaves, with a good, strong and pure tone. All the artificial notes - which, as is well known, were previously produced by stopping the bell with the right
hand - are identical in sound to the natural notes and thus preserve the character of the Waldhorn. Any Waldhorn player will, with practice, be able to play on it."
-Gottlob Benedict Bierey
Stölzel Valves G

8
Rotary Valves: Become a Spin Doctor
The piston valves used by most brass instruments can be complicated at times, but they have a maintenance ad-vantage over the rotary valves of the horn. Piston valves are easily removed from their casings and can be opened up, examined, and put back in place in a matter of seconds. When piston valves have problems, it is rela-tively easy to inspect the valves, the valve casings, the valve guides, and the springs to start narrowing down the possible problems. The rotary valve offers no such convenience. The valve itself must be firmly seated within the valve casing in order to function properly, and the whole assembly is secured by a sizeable screw. However, the assumption that rotary valves are “too confusing” or “hard to understand” is really a reflection of the fact that few take the little bit of extra time required to actually sit down and learn about them. In reality, rotary valves are still made up of just a few pieces, which we will examine. Rotary valves need oil, just like piston valves, and both types of valves slow down when they get dry or dirty. The most truly specialized part of the ro-tary valve is probably the string which transfers the player’s finger motion into rotation of the valve, and with practice anyone can tie or replace these strings with ease. Let’s begin by looking at the pieces and parts of the horn and the rotary valve. Then we will move on to some common problems with rotary valves and figure out which ones you can learn to fix yourself.
Anatomy of the Horn
Bell Valve Keys
Pinky Hook
Leadpipe
Valve Cap
Valve Tuning Slides (F Horn)
Thumb Trigger

9
Anatomy of the Horn (continued)
Main Tuning Slide
Rotary Valves
F Horn Tuning Slide
Valve Tuning Slides (Bb Horn)
F Horn Tubing
Bb Horn Tubing
Stop Arm Stop Arm Screw Cork/Rubber Bumpers
Anatomy of the Rotary Valve
Valve Lever
Valve Lever Screw
String Linkage
Center Screw

10
Anatomy of the Rotary Valve (Valve diagram on previous page)
There are multiple variations on rotary valve design, but one of the first things you may notice when looking at different horn valves is whether they use string linkage or mechanical/metal linkage. “Linkage” is just the term for what links the movement of the valve key to the actual valve so that it rotates. You can tell right away when looking at a horn whether there is string tied on the valves or not. If not, you’re looking at metal linkage. String linkage is more common in general, but several quality models of single F horns are frequently produced with metal linkages. While the metal adds a little weight, the primary advantages are durability, simplicity, and gener-ally low maintenance. No strings to break means no string-tying expertise necessary to replace those strings. Metal linkages do, however, generate a slight clicking sound of metal-against-metal as they operate, even when properly lubricated.
Because valves with string linkage are more common and require a bit more knowledge to maintain, this sec-tion will focus on that design. However, most of the information to come about lubrication, maintenance, and the components of the actual valves will be consistent no matter the type of linkage.
Pieces and Parts
Valve keys – Operated by the player’s fingers to rotate the valves Springs – Lift the valve keys which are not in use Valve lever – Moves when a valve key is depressed. Must be
linked to the valve by either string or metal linkage Valve lever screw – Secures a part of the string linkage
Stop arm – Controls how far the valve is allowed to rotate Stop arm screw – Secures a part of the string linkage
Cork/Rubber bumpers – Receives the stop arm quietly and prevents the valve from rotating too far.

11
Center screw – Secures the stop arm to the rotor shaft
Rotor – A single piece that rotates inside the valve. The
two stems of the rotor are referred to as the short shaft and the long shaft. The long shaft on this rotor is shaped so that the stop arm will only fit one way. This aligns the rotation of the valve when fully assembled.
Bearing plate – Sits on the short shaft, bears the rotation of the valve, and has a notch for aligning the valve within the valve casing
Valve casing – Contains the rotor and bearing plate. Valve cap – Covers the bearing plate to prevent dryness and keep it clean.

12
Common Rotary Valve Problems Now that we have a shared vocabulary about rotary valves, let’s look at a few things that frequently go wrong or need regular upkeep.
Lubrication is typically the go-to solution for improving the action of slow rotary valves. While lubricating rotary valves is not as simple as piston valves, it’s also not rocket science. There are three main surfaces to lubricate, not including any metal joints in the linkage. You will need regular light valve oil (e.g. Al Cass Fast, like a trumpet might use) and a heavier bearing oil (e.g. Ultra-Pure Light Bearing Oil). Be aware that there are valve oils and bearing oils both labeled “Rotor oil”. Ask a technician or music store to help you if needed.
1. The bearing on the linkage side or “string” side (using bearing oil) A few drops on the surface just below the stop arm Work the valves to spread the oil (Photo on the right shows a valve currently without string, but
string does not need to be removed to apply oil) 2. The bearing plate under the valve cap (using bearing oil)
Remove the valve cap and place a few drops of oil onto the rotor surface that spins
Work the valves to spread the oil 3. The rotor itself (using valve oil)
Pull out the valve tuning slide and put a few drops of fine trumpet valve oil into the tubes of the tuning slide you just removed. Do not drop the oil into the tubes that lead down to the rotor. The oil can wash the tuning slide grease (which is exposed while the tuning slide is removed) into the rotor, causing sticky valves16.
Reinsert the tuning slide with oil in it and tip the instrument to run the oil down to the rotor
Work the valve to distribute the oil
Valves Get Sticky or Slow Metal-against-metal joints, especially ball joints common in metal linkage,
should be lubricated with a small amount of lanolin based cream (e.g.
Schilke Tuning Slide Grease) or a heavy weight oil (e.g. Hetman 15
Synthetic Ball joint Lubricant)
Where to Lubricate: 3 Surfaces, 2 Oils

13
Dust and dirt accumulation is the other top cause for sticky or slow valves on any instrument. If the instrument has been in regular use but has not been thoroughly cleaned in over a year, it may just need a bath. Flushing the horn with water about once a month should be a part of regular maintenance, but a full bath with the valves re-moved should be done about every six months. See the tutorial below to learn about how to remove rotary valves properly. Following a complete bath, remember to reapply all lubrications, including grease for each tun-ing slide. If lubrication doesn’t solve the slow-valves problem and removing the valves on your own seems too scary or doesn’t work, repair technicians will do full chemical or ultrasonic cleanings that remove dirt, oil, and even corro-sion from inside the instrument.
A hard metal-against-metal clicking or clanking usually means that something is loose in the valve assembly. The stop arm should sit snugly on the rotor shaft and be secured with a tightened center screw. It is possible for the plate that holds the rubber/cork bumpers to come a bit loose, so ensure it is tightly in place. Try listening closely to see if the sound is coming from any metal joints, especially if the horn uses a completely metal linkage system. If none of these pieces or parts seem loose, there may be some “play” in the rotor’s fit inside the valve casing20. This is not a problem you’ll want to try fixing yourself, so take the instrument to a qualified repair techni-cian.
The horn needs a complete cleaning about once every six months to avoid corrosion and build-up inside the instrument. A thorough cleaning and bathing of the horn should include removal of the rotary valves. There is no reason to be afraid of doing this, though it can be intimidating at first. If possible, it is always helpful to learn from a qualified repair technician the first time you try something like this.
Tools required
Small hammer or rawhide mallet The end of a roughly ¾” diameter dowel with
a roughly ½” hole drilled in the middle or the end of a similar diameter piece of PVC pipe (2-3” long)
— This is for tapping the valve back into place after it has been removed.
Flathead or Phillips screwdriver that fits your screws, multiple sizes
Make sure a small flathead is handy no matter what kind of screws you have.
Small metal punch (optional) Valve oil (like basic trumpet valve oil) Bearing oil (heavier oil usually dispensed through a needle-like tip on the bottle) Horn string (Recommendation: Cortland Greenspot Dacron Trolling Line – 50 lb. test) Old towel or some sort of cushion
“Clanking” sound when working or releasing a valve
Need to disassemble and reassemble the valves for bathing, cleaning, or other maintenance on the horn18

14
Disassembling a Rotary Valve
1. Cut the string and remove it from the valve . Loosen the valve lever screw and the stop arm screw, but don’t
remove them. To be sure they don’t come out, snug the screws back in place while working on the valve.
2. Remove the center screw from the rotor shaft. Use a slightly bigger screwdriver than you used for the valve
lever screw and the stop arm screw. If working on multiple valves at once, make small piles of any removed pieces to be sure they are returned to the correct valves. You can use small labeled containers for keeping the pieces separate.
3. Remove the valve cap, then lay the horn valve-side down, string-side up.

15
4. Remove the stop arm. Take note of which way the stop arm is currently positioned to ensure you put it back the same way when you reassemble the valve. Use a thin screwdriver head to lift the stop arm off of the ro-tor shaft. Do this by pushing a small flathead underneath the stop arm and twisting to separate the stop arm.
Note: The stop arm can sometimes get stuck and become difficult to remove from the rotor shaft. First, try to find a thinner flathead screwdriver to fit underneath the stop arm.
A less ideal solution for rare occasions is to tap out the rotor piece from the top through the stop arm. If using this method, be sure to place the old towel or cushion beneath the instrument before tapping. Simply take the instrument to a repair shop if you are not comfortable with this option.
Place the metal punch in the center hole of the rotor shaft and lightly tap the punch with your hammer to remove the rotor from the stop arm and valve casing.

16
5. Remove the rotor. Be sure to place the old towel or cushion beneath the instrument before tapping out the rotor. This with catch it when it drops out. Tap lightly but directly down on the rotor shaft until it comes out.
6. Separate the bearing plate from the rotor if necessary. The bearing plate is on the short shaft of the rotor
opposite the long shaft which you tapped on to remove the valve. It comes right apart from the rotor.

17
Reassembling a Rotary Valve
If the instrument has been bathed, brushed, and the valves wiped down and cleaned, lubrication will need to be reapplied during the reassembly process. If the valve was removed for a reason other than cleaning, re-lubricate as needed during reassembly.
1. Lay the horn down valve-side up, string-side down. 2. Separate the bearing plate from the rotor.
3. Apply a thin layer of valve oil directly onto the surface of the rotor
4. Put some oil down the sides of the valve casing.
5. Holding the shorter end of the rotor shaft, place the rotor back into the valve casing with the long shaft toward the string side. Twist back and forth once the rotor is in the casing to ensure it rotates freely. Add a little more oil if the rotation is not smooth—this is by far the easiest time to apply oil to this surface of the rotor.
6. Similar to valve guides on other brass instruments, the bearing plate needs to be lined up correctly when put back in place. First, put a small amount of oil into the underside of the bear-ing plate (the side which will face the ground when this piece is placed back on the rotor).

18
7. Most horns have a little notch in the valve and a little
notch in the bearing plate. Line up the two notches as evenly as you possibly can.
8. Remove the bell (if removable) or find a surface that allows the bell to hang off the edge.
9. Tap the rotor and bearing plate back into place.
1. Place the dowel with a hole in it or the piece of PVC pipe over the bearing plate
2. Check again that the notches on the bearing plate are lined up and have not been bumped out of place by the dowel/PVC.
3. Tap 3-4 times firmly but not too hard on top of the dowel/PVC. (This piece applies even pres-sure as you tap everything back into place)
4. The goal is to get the bearing plate “evenly seated” inside the valve casing. Look at the bearing plate from the side after tapping to check visually whether the plate is evenly seated (not sticking up high-er or sitting down lower on any side). Be advised, there is a bit of an optical illusion when inspecting this because of the sloping threads for the valve cap.
5. If done correctly, the rotor will be able to spin freely when twisted from the long end of the rotor shaft (currently on the underside of the instrument)
6. If the rotor does not spin easily, the valve has not been seated correctly. Tap the rotor out again as you did in the last step of the disassembly process and try again.
7. If you are unable to get the rotor and bearing plate seat-ed correctly in three or four tries or can’t figure why the valve doesn’t spin freely when seated, it’s time to take the instrument to a repair technician.

19
Bearing plate evenly seated. Rotor spins/twists freely.
10. Flip the horn over to string-side up, valve-side down. 11. Replace the stop arm on the rotor shaft. Most stop arms will only
go back on one way. If not, hopefully you took note of how the stop arm was positioned during disassembly.
12. Put the center screw back into the rotor shaft. 13. Flip the horn over to string-side down, valve-side up. 14. Oil the center of the bearing plate that rotates (if needed). 15. Screw the valve cap back on. 16. Re-string the valve (See page 21 about replacing strings on the horn)

20
String comes untied or breaks
Common Rotary Valve Problems (Continued)
Restringing the valves on the horn is worth doing at least once a year, if not every six months or so, to prevent old strings from breaking. Before you walk through the steps of tying or replacing a string, let’s get clear on the following terms and understand some basics of the string system:
The string: A durable piece of horn string or braided dacron trolling line. Monofilament line will not work. When replacing a string, cut a piece about 8 inches long so you have plenty of room to work.
Valve lever: The thin metal arm with two holes and a screw in it that is moved when depressing a valve key. Without the string, the valve lever is not attached to the rotary valve at all.
Valve lever screw: The small screw at the end of the valve lever.
Stop arm: The piece which visibly moves/pivots when the valve is rotated and allows only the proper amount of rotation to occur.
Stop arm screw: The small screw inside the stop arm.
[Center screw: The larger screw in the center of the valve. This screw is not involved in retying, replacing, or adjusting the string. It holds the stop arm firmly on the rotor shaft and is only removed when disassembling the entire valve (see page 14).]
1. Loosen both the stop arm screw and valve lever screw when completely replacing, removing, or retying the string.
2. Loosen the stop arm screw when you want to adjust the height of the valve key so that it lines up with the other valve keys.
3. Loosen the valve lever screw when you want to adjust the tension of the wrapped string. Too much ten-sion can cause abnormal wear on the valve. Too little tension and the string may slip out of place.
4. Notice the term loosen is used and not remove. Not only are these two stringing screws small and easy to lose, but also the string must be wrapped around each of them during the stringing process. Try not to remove these screws or leave them loose any longer than is necessary.
You can buy horn string at your local music store, or buy string in bulk by purchasing braided dacron trolling line (at least 50 lb. test). Dacron line is sold at most sporting goods stores. Monofilament line will not work.
The thicker the string, the slower the valve action. The thinner the string, the faster the valve action. Thinner string is more likely to fray and break, so look for the middle ground.
Parts of the Rotary Valve String System (Review from pages 9-11)
Basics when replacing or adjusting rotary valve strings
Buying horn string in bulk

21
Replacing rotary valve string19
What you’ll need...
A flathead or Phillips screwdriver that fits the smaller stop arm and valve lever screws
Something to cut the string (scissors should work just fine) String
If restringing multiple valves, it is highly recommended to work on one valve at a time instead of removing multiple strings at once. It helps to have another valve left properly strung to provide a model in case you run into trouble.
Some find it helpful to have a simple tool to hold all of the valve keys in line. By taping two semi-flexible flat objects together (popsicle sticks work great!), you can create a tool which will slip down onto the valve keys and keep them straight as you work on the strings.
1. Before you begin, cut the appropriate number of new strings from your supply. Each new string should be about 8” long.
2. Loosen the stop arm screw and the valve lever screw. 3. Remove the old string by simply cutting it and pulling the scraps
through the valve lever holes.
4. Tie a knot a couple of inches from the end of the string. You will probably need to tie one or two more additional knots on top of the first knot in order to make a knot large enough to avoid slipping through the hole in the valve lever. Thinner string may require even more additional knots.
5. Thread the string through the valve lever hole clos-est near the middle of the valve lever (not at the bottom). The string should be pulled through to-ward the valve leaving the knot away from the valve.
If the string became frayed in the cutting process, you can singe the end with a lighter or match and create a point by squeezing the singed end with a paper towel. Give the string a pull to be sure the knot doesn’t slip through the hole.

22
6. Pull the string down so that it is parallel with the valve lev-
er and wrap the string under the center of the valve (where you see the center screw).
7. Now, looking down from the top, wrap the string in the first loop (of
what will eventually be a figure-eight) that goes left around the stop arm screw (you may need to use both hands to help the string stay down as you wrap), and up between the stop arm screw and the cen-ter of the valve.
Clarification: After the string wraps around the stop arm screw, the string can’t go back the way it first came in under the center of the valve. Go the other way (up toward the valve keys).
8. Before going further, use your thumb to hold the stop arm
in its down position (away from the direction of the valve keys), lightly pull the string which is wrapped around the stop arm screw to remove excess slack, and snug the stop arm screw down to hold the string in place.
9. From here, wrap part-way around the center so that the string is headed
down toward the remaining hole in the valve lever. As you start to thread the string through the empty hole in the end of the valve lever, be sure that your loose end was fed under the piece of string which first travelled down parallel to the valve lever.
Note: The figure-eight you’re working toward consists of one small loop around the stop arm screw and one big “loop” around the center of the valve. This bigger “loop” is actually two segments of string on their way to the valve lever from either side of the center of the valve, unlike the continuous piece looped around the stop arm screw).

23
10. Take the loose end of the string after threading it through the hole and loop to the left around the valve lev-er screw. Feed the loose end of the string down through the loop you’re making (similar to a basic knot) be-fore pulling the loop tight around the screw.
11. Snug the valve lever screw down to hold the string in place. 12. Cut off excess string. Singing or melting the end of the string at this point can help prevent fraying of the
string in the future. 13. Check the tension of the string wrapped around the center of the valve. It should be able to move, but not
be so loose that there’s a lot of slack in it. If the tension needs adjustment, loosen the valve lever screw and either let a little slack in or pull a little slack through depending on the adjustment needed.
If the tension is good, the height of the valve key can be adjusted by simply loosening the stop arm screw, moving the valve to the desired height, and snugging the stop arm screw back into place.
Here’s an additional pair of diagrams for reference from the Paxman horns website. There are two sets of dia-grams because there are two possible (mirrored) layouts when working with rotary valves. The instructions laid out above are described based on the layout in diagram A.
A
B
J
K

24
Valve lever out of place
Common Rotary Valve Problems (Continued)
Just because a rotary valve rotates does not mean the stringing job is completely trustworthy. In order to
keep rotary valves working as quickly and smoothly as possible and to minimize wear on the string, check that
the valve lever (or lever arm) is not far from its proper position:
A is the correct position with the valve lever very close to the stop arm. B and C will force the string to rub on
itself and wear down more quickly.
A, B, and C are the three horizontal positions in proper valve lever action. A represents the valve before be-
ing pressed, B is half-way down, and C is fully pressed21.
The positioning of the valve lever is primarily a result of the way the string is tied. Adjust or replace the strings
to reposition the valve lever. The valve lever in a metal linkage is anchored in place and should not become misa-
ligned unless bent.
H
I

25
Stuffy sound or air does not flow through the horn (How to check for misaligned rotary valves)
Normal wear and tear on rotary valves can eventually result in misalignment of the rotor. If a horn has been
playing well until just recently, check to see if any of the rubber or cork bumpers for the stop arm have gone
missing. In an emergency situation, a small wad of paper can serve as a temporary bumper. Have the bumper
replaced at a music store, or purchase a length of rubber cord that can be cut to replace missing bumpers. Fric-
tion is usually sufficient to hold these in place, but you can use a very small drop of super glue if desired17.
Votaw Tool Company (votawtool.com) sells six inches of “rotary valve rubber stop cord” for about $2 (3/16” or
4.76mm diameter). If making your own replacement, be sure to consider the sponginess of the rubber. A bumper
that is too soft may not hold the valve in the correct position while a bumper that is too hard will probably be
noisy.
If no bumpers are missing, check the alignment of the valve by removing the valve cap. Check first that the
notch in the valve casing lines up with the notch on the bearing plate. If not, the valve needs to be reseated. You
can do this using the steps for disassembling rotary valves (on page 14) or take the instrument to the repair shop.
If the notches on the valve casing and bearing plate do line up, look for the grooves/notches that rotate in the
center of the bearing plate. There should be one notch that does not move and two grooves/notches set at a 90
degree angle that rotate when the valve is engaged. One of the 90-degree grooves should line up with the sta-
tionary notch when the valve is open, and the other should line up when the valve is engaged. If one or both of
these grooves are misaligned, you may have worn out or dried out bumpers that need to be replaced17.
Though there is no replacement for a trusted repair technician, knowing the horn inside and out can save you
money and headaches in the long run, especially when it comes to diagnosing or solving problems in an emergen-
cy before a performance or during class. The key to confident repair work should be very familiar to us as musi-
cians—practice! Try out basic repairs on your own time so that you are equipped when the time comes to use
these skills.

26
Horn in F and Horn in Bb: Transposing Instruments
Let us take just a moment to be sure we understand that the horn is a transposing instrument. A vast majority of music written for the horn is in F horn music which is transposed up a Perfect 5th from concert pitch.
The handiest trick I know for helping teach students to deal with this transposition is to use the built in five fingers of the hand. Looking at my palm and pointing my fingers sideways, I assign the written note for the horn to the thumb and the concert pitch to the pinky. Each finger represents a letter name, and I can quickly “count” the letters up or down the hand to make the transposition needed. Counting pinky up to thumb transposes a concert pitch to the F horn note. Counting thumb down to pinky transposes an F horn note to concert pitch. Ob-viously this doesn’t account for accidentals necessary to transpose a true Perfect 5th, but it gets students in the ballpark and it’s enough to remind me which way I need to transpose.
On a double horn, when a player uses the Bb side of the instrument by pressing the thumb trigger, the player continues to read the F horn part. You will notice that the “thumb” fingerings in most method books and finger-ing charts are matched up next to their F horn counterparts:
The goal is to allow double horn players to use the Bb side of the horn as needed to play their regular F horn music (the Bb side provides better responsiveness and ease in the higher register). The “trick” for figuring out fingerings on the Bb side of the horn presented later in this manual follows this standard practice.
Horn in F
Horn in F Concert Pitch Horn in F Concert Pitch
Double Horn

27
If you or a student ends up with a single horn in Bb, remember the following declaration about the world of horn playing from professional horn player and Arizona State University brass professor John Ericson:
Single Bb Horn
“Although pitched in B-flat, [fingerings on a single B-flat horn] are not thought of by the player as being in “B-flat” like a trumpet or baritone. For horn players,
the world is always conceived to be in F. We would think of the fingerings as being the fingerings that we would use on the B-flat side (“thumb down”) on a
double horn when notated in F.”
-John Ericson 15
Interlude: Before we go on... I’m guessing you’ve already seen a French horn fingering chart, but the fact that you’re reading this
guide leads me to believe you could use some more help internalizing all those fingerings. I won’t discount the
value of rote memorization, but there is much to discover and learn by delving into the mechanics behind brass
fingerings. The knowledge in the next few sections of this book covers far more than how to remember horn
fingerings, although that’s where this portion of the manual is eventually headed. If the information is new to
you, this in-depth approach to understanding brass fingerings will be valuable, exciting, and possibly somewhat
overwhelming. Take your time, look over the diagrams to let each topic soak in, and you will eventually master
the beautiful patterns that allow brass valves to do what they do.
E

28
The Seven Chromatic Brass Fingerings: How Valves Work
As you probably know, the purpose of a valve on a brass instrument is to change the length of the instru-ment’s tubing. Each valve is built with a specific length of tubing attached, and depressing a valve adds that valve’s tubing to the length of the whole instrument. The genius of the three-valve system is in the amount of tubing assigned to each valve. The 2nd valve has the shortest length of tubing attached and is long enough to low-er the sound of the instrument by 1 half step. The 1st valve’s tubing is long enough to lower the sound by 2 half steps (1 whole step). The 3rd valve has the longest length of tubing and lowers the sound by 3 half steps (1 and ½ whole steps). With these three lengths, we are able to achieve 7 different lengths of tubing by using the valves both individually and in combination with each other.
These combinations create the seven chromatic brass fingerings. Notice that by using these fingerings in order, a musician can play a short descending chromatic scale of 7 notes. Take a moment to be sure you understand the table above. The reason there is no “3rd valve alone” fingering in this sequence is because the com-bination of 1st and 2nd valve also lowers the sound by 3 half steps but tends to be more in tune. For now, accept that 1st and 2nd valve is almost always the preferred fingering between the two options. This is due to manufacturing compromises and some physics of sound you will understand soon. It is critical that you memorize this sequence of fingerings and be able to recall them in ascending or descending order:
Valve(s) pressed Sound lowered…
0 (open) None 2nd 1 half step 1st 2 half steps 1st + 2nd 3 half steps 2nd + 3rd 4 half steps 1st + 3rd (*) 5 half steps 1st + 2nd + 3rd (**) 6 half steps
Some brass instruments include a 4th valve which, when pressed down, adds
enough tubing to lower the sound by 5 half steps. This
valve is designed to replace the 1st and 3rd valve combi-nation which is, for a num-ber of reasons, notoriously sharp. When the 4th valve
is available, the last two valve combinations in the table above would be re-
placed by 4th (*), then 2nd + 4th (**). This type of 4th valve is typically found on
tubas and euphoniums and is not the same as the
thumb valve/trigger on a double horn.
123 13 23 12 1 2 0 0 2 1 12 23 13 123

29
To demonstrate these fingerings in action, let's look at an example of a brass instrument playing a 3rd space C
in treble clef with no valves pressed down. By adding valves according to our seven chromatic brass fingerings,
the following descending chromatic scale will result.
This concept is a very important reason for brass players to learn their chromatic scales. However, a full chro-
matic scale on any brass instrument is not as simple as repeating the entire set of seven chromatic fingerings
over and over. Come to think of it, how exactly do brass instruments use just 7 fingerings to generate so many
different notes? If you know something about partials, you’re on the right track. The key to unlocking the finger-
ing system for any brass instrument lies within a fascinating natural miracle we call The Overtone Series.

30
The Overtone Series: The Music Theory of Nature
Introduction To grasp how brass instruments achieve so many notes and to really understand how horn fingerings relate to fingerings on other brass instruments, you have to know the overtone series. If you haven’t learned about this before, you’re missing out on a deeper understanding of what’s going on when we create or hear the vibrations of sound. The pitch and tone color (or timbre) of a sound is due to not just one vibration, but a whole series of vibrations at different frequencies taking place simultaneously. The overtone series is a beautiful marriage be-tween the natural physics of sound and the bedrock foundations of music theory. This powerful tool will help you teach your students about pitch tendencies and alternate fingerings, and it will help you learn and remember the fingerings for brass instruments by understanding the pattern that makes them work.
The C Overtone Series
What you see above is a very elegant way of looking at the basic physics of sound. The low C on the far left determines the whole pattern, and we call that first note of the series the fundamental. We can choose any note to be the fundamental, but for the following examples we’ll stick with C. Because we’re using C as the fundamen-tal, we call the diagram above a “C Overtone Series”. What’s fascinating is that this pattern was not made up by a teacher or composer somewhere along the way. The C overtone series is a natural phenomenon that occurs any time a C is produced by a voice or instrument of any kind. By “occurs,” I mean that most or all of the notes you see in the series are produced simultaneously by that voice or instrument, even though what we hear is mostly the fundamental. We call the individual notes in the series which are above the fundamental overtones.
Depending on the source of the sound, certain overtones will vibrate louder or softer than the others in the series. Even though we hear a C played by a tuba and a C played by an upright bass as the same pitch, each sound is like a different recipe with overtones as ingredients. One sound may include a lot more of the low overtones and just a touch of the higher overtones. Another sound might have a more even mix of high and low overtones. Each combination results in a distinct timbre (or tone color) that helps us tell the difference between different sounds, like a human voice versus the sound of a bass clarinet. Even though there is a lot of math and science behind the overtone series, music notation allows us to illustrate this concept in an approachable way.
Timbre

31
Overtones, Harmonics, and Partials The term “fundamental” is specific and always refers to the lowest note in an overtone series above which all the other notes are built (think foundational). But there are a few different terms that get thrown around when referring to the other notes in a series. Here’s a clarification of the three most common:
Overtones – The additional notes/vibrations above the fundamental in an overtone series that combine to create the timbre of a sound. (The first overtone in an overtone series is the first note after the funda-mental. The fundamental is not an overtone.)
Harmonics – A general term used to refer to each of the notes/vibrations in an overtone series. (The first harmonic in an overtone series is the fundamental.)
Partials – A term used commonly by brass musicians to refer to each of the pitches in an overtone series which can be played with a single fingering by adjusting embouchure and airspeed. (The first partial in an overtone series is the fundamental.)
In the first part of this section about the overtone series, I discussed the fact that overtones combine all at once to create the timbre of a particular sound. Now it is time to focus on how these overtones are like a ladder that brass instruments can climb one at a time. As we move on from here, I will stick to the term partial to refer to the different notes in the overtone series which brass players move between as they play. Below is the over-tone series with numbers which label each partial. 1 is the 1st partial, 2 is the 2nd partial, 3 is the 3rd partial and so on.
The length of a brass instrument is what determines which fundamental, and therefore which overtone series, it is able to play. Recall the history of the natural horn which was played for years but had no valves. The natural horn took advantage of the higher partials in the overtone series because they are close enough together to be combined into step-wise melodic lines. Fortunately for natural horn players, there are many more partials beyond the 16th partial which the horn is capable of playing. In fact, the horn can generate well-defined resonances up to the 22nd partial or beyond7! For now, though, let’s stick to just 16 partials. After all, it’s time learn (and memorize) how exactly the overtone series is constructed.
Partials

32
Building the Overtone Series
If you would like continue studying how the overtone series specifically applies to brass fingerings, you can come back to this section about “Building the Overtone Series” later. It is my goal to provide enough information for you to become comfortable with the overtone series . I hope you will eventually use it as an everyday tool in your teach-ing, but it is not necessary to have the overtone series memorized before reading the rest of this manual!
The ability to visualize the overtone series quickly and easily is an asset for any band director working with
brass. Once learned, it aids in diagnosing pitch problems, fixing partial errors, and, of course, remembering brass
fingerings. Find a strategy below that helps you remember how to build the overtone series, or study and devel-
op your own!
Though there are imperfections in tuning which will be discussed later on, we are lucky that the overtone se-
ries is built out of the intervals we already use in everyday music theory. OK, to be fair, luck has nothing to do
with it. It is music theory that has been modeled after the physics of sound! You will see how the spacing be-
tween partials as they naturally occur in nature can be nicely described by intervals.
I find intervals to be the easiest way to remember how to build the first part of the overtone series because the
partials are so far apart near the beginning. How fascinating that our three perfect intervals appear in order from
biggest to smallest as the intervals between the first three partials. The list of intervals above may “click” for you
as the best way to remember how to build the overtone series. However, if you find the whole list of intervals
hard to remember, there is another way to think about the structure of the overtone series which unveils an even
clearer link between the science of sound and the origins of harmony.
Strategy #1: Intervals

33
Forgiving for some overlap, we can see that the overtone series forms a few well known musical structures. The first two partials obviously form a Perfect Octave as we just saw above. Next, the 2nd, 3rd, and 4th partials form an open-fifth chord. The next grouping of the 4th, 5th, 6th, and 7th partials forms a dominant 7th chord. Possi-bly the most important harmonic structure in Western Music is actually built into the natural overtone series. Mind blowing! Next we see the 8th, 9th, 10th, 11th, 12th, and 13th partials form six notes of a major scale with a sharp fourth scale degree (#4).
Due to the math behind the frequencies of each partial in the series, there are groups of partials which are re-lated to one another. Related partials are actually just different octaves of the same note in the overtone series. If you can remember these four groups of related partials, you can construct most of the overtone series, alt-hough the 9th, 11th, 13th, and 15th partials will be missing. It turns out that these groups of related partials each share the same pitch tendency (sharp, flat, or in tune). I will discuss the usefulness of this further in the section about horn fingering pitch tendencies. Note that each group is formed by repeatedly doubling the original partial number.
Partials 1, 2, 4, 8, and 16 are all octaves of the fundamental. In this case, C. These partials are generally in tune.
Partials 3, 6, and 12 are all octaves of the 3rd partial. The 3rd partial is always the “fifth” of the fundamental, in this case, G. These partials sound sharp.
Strategy #2: Groupings
Octave Open Fifth
Dominant 7th Major scale with #4
3 more half steps
Strategy #3: Related Partials

34
Partials 5 and 10 are both octaves of the 5th partial. The 5th partial is always the “third” of the fundamental, in this case, E. These partials sound flat.
Partials 7 and 14 are both octaves of the 7th partial. The 7th partial is always the “flat seven” of the fundamen-tal, in this case, B flat. These partials sound very flat.
It is critical to remember that the length of a brass instrument is what determines which fundamental, and
therefore which overtone series, it is able to play. In all the examples of the overtone series so far, we used C as
the fundamental and built the overtone series on top of that note. You may have noticed how low the fundamen-
tal C must be to keep the rest of the overtone series within or reasonably close to the grand staff. Oddly enough,
even though the fundamental is hugely important in determining which notes a brass instrument can play, play-
ers rarely need to actually play the fundamental! Brass players tend to refer to really low notes like the funda-
mentals as “pedal tones”, a name derived from the foot pedals on the pipe organ.
For more detailed information about the overtone series and brass pitch tendencies, check out “Partial To the Winds” (www.bandworld.org/pdfs/partialToTheWinds.pdf) and the video series that goes with it (www.bandworld.org/html/OvertoneIntro.html).
Conclusion: Fundamentals

35
7 Fingerings, 7 Fundamentals, and 7 Series: Filling in the Gaps
Armed with an understanding of the overtone series, the partials it creates, and the fact that an instrument’s length determines its fundamental, we can now do much more with our earlier discussion about the 7 chromatic brass fingerings. When all valves are open, the horn in F is constructed with C (F Concert) as its fundamental note (C written two ledger lines below the bass clef as in our overtone series examples earlier). Adding valves lowers this fundamental note a certain number of half steps depending on which valve combination is used. Refer to the chart on page 28 to review the effect of each of the 7 chromatic brass fingerings. Starting on C and using our 7 chromatic brass fingerings, we can see all seven fundamentals used by the horn in F:
When the fundamental is lowered, the entire overtone series moves with it. 7 fundamentals means 7 different overtone series, each with its own complete set of partials that can be played without ever moving the fingers! Did someone say lip slurs? Fair warning, the diagrams in the next section can be overwhelming at first glance. As a comparison, remember that musicians often write chords both horizontally (like an arpeggio) and vertically (stacked in thirds). So far we have seen the overtone series written out horizontally, but below we see all 7 over-tone series for the horn in F notated vertically. Only the first 12 partials in each series are shown for the sake of clarity. Notice the fundamentals at the bottom of each series match the set of 7 fundamentals shown in the dia-gram above:

36
What we are looking at is the complete spectrum of playable notes (up to the 12th partial) provided by the sev-en chromatic brass fingerings on the horn in F. It doesn’t take too much imagination to see that as we smash all of these series together, they fill in each other’s gaps and provide all the necessary notes to form three octaves of a continuous chromatic scale from Gb (bottom line of bass clef) up to G (on top of the treble clef).
There are even duplicate notes which appear in more than one of the 7 series. These duplicates are the basis of alternate fingerings. A note with alternate fingerings is a note which fits into more than one of the 7 overtone series, and therefore can be played with more than one fingering.
If we include notes up to the 16th partial, we gain an additional 5 notes for our chromatic scale that bring us up to C. Altogether, these 7 overtone series establish the primary playable range of the horn in F:
Once you understand how to construct the overtone series and know where the 7 fundamentals are on each brass instrument, you have enough information to determine the fingering for any note. It’s simply a matter of figuring out which of the 7 series the given note is a part of and using the associated fingering(s) from those se-ries. However, due to the frequent occurrence of alternate fingering options when using this system, especially with notes found in the higher partials, you also need three rules to determine which fingering is the best.
Choosing preferred brass fingerings8:
1. The fingering with the fewest valves possible, 2. but not if it involves 3rd valve 3. or is the 7th partial of a series
I believe that this technique is a complete and powerful method for determining fingerings on any brass instru-ment. However, in the interest of full disclosure, I also feel that using the overtone series in the way I have de-scribed is initially a very cumbersome way to determine brass fingerings. Until you memorize the construction of the series and practice enough to become an expert, finding fingerings this way can be too slow. In order to help you with horn fingerings in the meantime, I intend to provide you with alternate method that I find very helpful.
Conclusion: Finding Fingerings

37
The Partial Grouping Method: A Different Perspective
This method of learning and memorizing brass fingerings focuses on individual partials one at a time rather
than considering the entire series of partials generated by each fingering. The overtone series connects directly
to the experience of playing lip slurs on a brass instrument. The partial grouping method connects directly to the
experience of playing a chromatic scale which, as we well know, is incredibly useful for learning fingerings. Be-
cause there are seven chromatic brass fingerings, we can lay out all seven notes playable in the 1st partial, the 2nd
partial, the 3rd partial, and so on. Take a look at how each of the first 16 partials of the horn in F contains seven
possible notes:
These descending chromatic scales are an excellent way to visualize each individual partial throughout the range
of the horn in F. However, we’re looking at far more notes than are actually used when playing. To make this dia-
gram more useful, let’s switch from the descending pattern of the seven chromatic fingerings to the ascending
pattern.
Notes Per Partial
1st Partial 2nd Partial 3rd Partial 4th Partial
5th Partial 6th Partial 7th Partial 8th Partial
9th Partial 10th Partial 11th Partial 12th Partial
13th Partial 14th Partial 15th Partial 16th Partial

38
Now that each partial is laid out in ascending order, we start to see more clearly how brass instruments are able to piece together their chromatic scales. Take a moment to consider how each partial connects to the fol-lowing one. Some share many overlapping notes, while others share only a few. These overlapping notes are the origins of alternate fingerings. Notice that the 2nd and 3rd partials link perfectly together without any overlap!
As I said earlier, playing a chromatic scale with valves is not accomplished by repeating the entire sequence of seven chromatic brass fingerings over and over. That would generate something like the diagram we see above—not a proper, smooth scale of half steps. By selecting groups from each partial determined by the rules for preferred brass fingerings and the partials which are most in tune, we are able to piece together the standard chromatic scale one partial at a time.
Building the Chromatic Scale with Partial Groups
2nd Partial 3rd Partial
4th Partial 5th Partial 6th Partial 8th Partial
9th Partial 10th Partial 12th Partial 16th Partial

39
Some of the more obvious differences are the omissions of the entire 1st partial (the fundamentals which are rarely played), the entire 7th partial (in which, due to the mathematics of the overtone series, every note is ex-tremely flat), and the entire 11th, 13th, 14th, and 15th partials
Notice that each time the scale passes an open fingering, we are moving into the next partial. We then jump back in the ascending sequence of chromatic fingerings far enough to account for the number of notes in the next partial. The set fingerings in each partial group uses at least the 2nd valve alone and open fingerings. The open and single-valve fingerings are the most in tune. The other fingerings are all combinations of valves which cause an adverse effect on tuning (See page 28).
Now that we see how every partial grouping uses a predictable fingering pattern, we can memorize chunks of fingerings by simply knowing how many notes are in each partial group.
For example,
A partial group with 7 notes uses the following fingerings: 123, 1 3, 23, 12, 1, 2, 0 A partial group with 5 notes uses the following fingerings: 23, 12, 1, 2, 0. A partial group with 3 notes uses the following fingerings: 1, 2, 0.
It helps immensely to be able to quickly recognize which notes are generated by the open fingering when us-ing this system to remember fingerings (which should be no problem if you’ve mastered the overtone series!). In this way you can find the “top” of any group and work down the chromatic fingering sequence to figure out the fingering of any note you see on the page.
For some, the chromatic scale diagram on the previous page is enough to absorb and remember this partial grouping method. However, I have provided colored dots in the diagram below as an aid for visualizing and mem-orizing the number of notes in each partial group:
Fingerings from Partial Groups
2nd Partial 3rd Partial
4th Partial 5th Partial 6th Partial 8th Partial
9th Partial 10th Partial 12th Partial 16th Partial
7 Notes

40
Here are those dots laid out in sequence on their own.
The dividing lines in the sequence indicate which parts of this pattern I think makes sense together. The two
7’s are the lowest range of the horn from Gb to G. The 5, 4, 3, 5 in the middle bring us through the middle range
of the instrument up to third space C. In my experience, the most useful part of this entire pattern is the last part
on the right for the upper range of the horn beyond C. In a moment, I will explain that there is a quick trick for
horn fingerings if you are already confident with trumpet fingerings. However, this trick is not nearly as helpful in
the upper range. If you can remember that the last four partial groups have 2, 2, 3, then 5 notes respectively, the
fingerings above third space C will always be right at your fingertips.
Following third space C, we move up chromatically:
Partial group with 2 notes: 2, 0 Partial group with 2 notes: 2, 0 Partial group with 3 notes: 1, 2, 0 Partial group with 5 notes: 23, 12, 1, 2, 0
Voila! The chromatic scale from third space C to C above the staff in a neat little pattern. I won’t claim that the
patterns in the partial grouping method are totally obvious or that seeing them once should be enough to re-
member them. Some study is required. However, I have experienced firsthand the usefulness of the partial
grouping method for F horn fingerings, especially when remembering that last octave of fingerings from C to C.
Given enough time with the three diagrams in the last few pages, I expect you will be able to come up with the
way of thinking about this pattern that works best for you. Remember, the partial grouping method and the
overtone series are resources to make your life easier. They’re fantastic shortcuts, but they aren’t free! Spend
some time dabbling in this material daily for a week or two and see if you can start to use these tricks to help
both you and your students. Speaking of tricks, there are some even simpler systems for of working out horn
fingerings if you have at least some brass fingering knowledge already.

41
Convenient Relationships: Two Horn Fingering Tricks
Bb Horn Fingerings Up until now there has been a glaring absence of any information regarding Bb horn fingerings. As you may know, or may have read at the beginning of this manual, most horn players use a double horn. The double horn is a horn in F, but it includes extra tubing and a special thumb trigger. When the trigger is depressed, the air is re-routed through a shorter section of tubing that changes the instrument to a horn in Bb. When playing on the “Bb side”, there are also three additional pieces of valve tubing to account for the new, shorter length of the instru-ment . Consider the 2nd valve which is designed to add enough tubing to lower the fundamental of the instru-ment by 1 half step. A shorter amount of tubing is needed on the 2nd valve to lower the Bb side 1 half step be-cause the horn in Bb is a shorter instrument to begin with.
All minutia aside, there is nothing too complicated about learning the fingerings for the horn in Bb. Because we know the horn in Bb is shorter than the horn in F, we know that the pitch relationship when moving from F horn to Bb horn is a movement upward when we add the thumb trigger. The distance from F up to Bb is a Perfect 4th, and that interval defines the relationship between the two sides of the horn. If all of the diagrams and infor-mation about the horn in F presented in this document were transposed up a Perfect 4th, it would all be accurate for the Bb horn—the 7 fundamentals, the 7 overtone series, the 16 partials, and all of the fingerings (except two).
Because of this Perfect 4th relationship, we can use a simple trick to find the fingering for any note on a single horn in Bb or when using the thumb trigger on a double horn:
Exception: The only exception to this rule is second space Ab and A natural. Using this Perfect 4th trick results in T 2 for Ab (T = thumb, for double horn) and T 0 for A natural. Standard practice is to play these notes with T 2 3 for Ab and T 1 2 for A natural.
Examples on the next page...
To find a fingering for the horn in Bb, transpose the written note you wish to play down a Perfect 4th and use the F horn fingering for that note.

42
Bb Horn Fingering Trick Examples
F Horn Bb Horn
1 T 1
0 T 0
1 T 1
12 T 12
T 23
Exceptions…
T 12 (not T 2) (not T 0)
You now know the trick for finding any fingering on the Bb horn (or the Bb side of a double horn). This trick
does require that you already know the fingerings of the F horn. What if you’re still trying to learn your F horn
fingerings? If you know trumpet fingerings, you’re in luck!

43
Relationship Between Horn and Trumpet Fingerings Every brass instrument uses the overtone series in order to build a full chromatic range of notes. This means that there are set relationships to be found between every set of brass instrument fingerings. Horn in F and horn in Bb relate to the trumpet according to the following rules:
F Horn/Trumpet Fingering Trick Examples
To find an F horn fingering, transpose the written note up one octave and use the trumpet fingering for that note.
0 0
23 23
1 1
0 0
Trumpet F Horn

44
To find a Bb horn fingering, transpose the written note up a Perfect 5th and use the trumpet fingering for that note.
0 T 0
1 T 1
0 T 0
12 T 12
Trumpet Bb Horn
Bb Horn/Trumpet Fingering Trick Examples
Exception: The same exception to second space Ab and A natural is true for this trick too. Using this Perfect 5th/Trumpet fingering trick results in T 2 for Ab (T = thumb, for double horn) and T 0 for A natural. Standard practice on Bb horn is to play these notes with T 2 3 for Ab and T 1 2 for A natural.

45
Trouble Fitting In: Why Horns Aren’t Like Everyone Else (in the Brass Family)
Before leaving this extensive portion of the manual on fingerings, partials, and the overtone series, I want to be sure I address a unique aspect of the horn’s fingering system that caused me much confusion and frustration as a new band director. Coming to teaching as both a trombone and euphonium player, I found learning tuba and trumpet fingerings a snap. All the same partials lined up on all the same places on each instrument. But the horn just didn’t cooperate. I couldn’t figure out how the horn related to the other brass instruments and their finger-ings. I didn’t know any of the information you now know (assuming you’ve read the previous sections!). Fortu-nately, now that I understand the overtone series and have learned my horn fingerings, explaining why the horn doesn’t seem to “match up” with other brass instruments is relatively simple. Take a look at the overtone series on horn, trumpet, and tuba for the open fingering:
At first glance, each looks to be quite different. It may not be immediately apparent why the trumpet series and the tuba series relate to each other so easily. You may also be rightly suspicious about the effect of transposi-tions in this visual comparison. Take a look at what happens when we transpose to concert pitch. The additional measure on the far right is the tuba series transposed up two octaves.
Suddenly the mismatch becomes clear. Though trumpet and tuba (and trombone and euphonium for that mat-ter) sound in different octaves, they share a fundamental pitch (Bb Concert). Because of this, these instruments feel more or less the same to play, at least as far as partials are concerned. This is also a big reason why Bb Con-cert gets so much use in band. It’s a solid note on an open fingering for all the brass—except the F horn.
= Generally comfortable range

46
The brackets on the diagram indicate a roughly 1 and ½ octave comfortable range on each instrument. Notice
that the comfortable range for the horn lines up about a Perfect 4th away from the trumpet while the comforta-
ble range of the transposed tuba series lines up exactly with the trumpet. A Perfect 4th is about as far away from
“lining up” with the tuba and trumpet as one could possibly get, barring a frightening and awkward tritone sepa-
ration (being an octave apart in this type of comparison is essentially the same as no distance apart).
The bottom line is that most brass instruments are designed to use just the first 9 partials to cover the majority
of their playing ranges. The horn makes infrequent use of the 2nd and 3rd partials compared to how often those
partials are used by the other brass instruments. This means the 4th partial on the horn feels similarly comfortable
to the 2nd partial on other brass instruments (this point is, of course, a subjective one).
A most important take-away from these diagrams is not just understanding why this mismatch exists between
the horn and other brass instruments, but also understanding the effect this built-in preference for higher par-
tials has on the beginning horn student. When first learning the horn in F, most students begin with the 4th, 5th,
and 6th partials (C, E, and G) because they fall in the comfortable range of the horn. These partials are only a
Major 3rd and Minor 3rd apart, far more closely spaced than the Perfect 5th and Perfect 4th between the 2nd, 3rd,
and 4th partials learned by other brass beginners. This presents one of the many unique challenges we must learn
to overcome when trying to teach the French horn. From this point forward, this manual will attempt to identify
many more of these educational challenges and provide knowledge, practical solutions, and tools to help you
continue your journey toward becoming the kind of expert instructor we all wish to be.

47
Part Two: Teaching the Horn
Picking Your Horn Players It has been well established that playing the horn is no small feat. It has inherent difficulties that require a spe-cial kind of student who will go the extra mile to learn this wonderful instrument. A basic buzzing aptitude test is insufficient to really identify who qualifies as a horn player, whether they are brand new to playing an instrument or considering a conversion from something else.
The horn is a very long instrument, which means a lot of tubing weight. Beginners need to be large enough that they can handle the weight of the horn without propping up the instrument on their leg. Consider both strength and height. Physical size is a major determining factor when selecting an instrument for the beginner (single F or Bb horn, or a double horn). Supporting the horn on the leg will lead to posture problems and severely impede proper alignment of the embouchure and mouthpiece. Ideally, students should have hands large enough to wrap their whole hand around the main left-hand tubing area. The mouthpiece of the horn is small, which means smaller lips are preferable. Check students’ teeth by having them smile and consider whether the teeth will be able to support the embouchure where the rim of the mouthpiece meets the lips.
A major challenge of horn playing, especially for the beginner, is the close spacing of the partials. Feeling out the right partial is not as easy as it is on other brass instruments. The ideal horn student is self-motivated, a prob-lem solver, curious about the horn, and able to listen to and replicate pitches. Sing about four different pitches moving in skips and steps to see how quickly or easily your potential horn player can sing them back to you. If they are consistently unsure or unable to repeat any pitches accurately, they will find the horn very difficult and frustrating to play6.
Due to the similarities in shape and size between trumpet and horn mouthpieces, many directors choose to pull from the trumpet section when converting current students to horn players. This is not necessarily a bad choice, but it is far less ideal than many teachers think. The problem here lies in the differences between trumpet and horn embouchure, and the difficulty involved with making subtle embouchure changes. The trumpet embou-chure is ½ top lip, ½ bottom lip while the horn requires about 2/3 top lip and 1/3 bottom lip. The trumpet embou-chure also tends to be tighter in beginners, and horns need to be able to play lower notes with a more relaxed embouchure focused on firm corners and the eye teeth (aka the canines) 6. While all these adjustments are possi-ble for trumpet players to make, in practice it is difficult for beginners to get away from the original trumpet em-bouchure that was “working” and train themselves consistently to build a close-but-not-the-same horn embou-chure. Recommendations for better instrument conversions include moving flutes to horn (due to similar embou-chure formation) or starting aspiring horn players on percussion and moving to the horn later9.
Physical Considerations
Conversions from other instruments
Intellectual / Aural Skills

48
Equipping for Success
For the beginning student, it is common to begin with a single F horn. Why horn in F rather than horn in Bb? First of all, the F horn is the primary instrument for which parts are written these days. The F horn also possesses the most characteristic tone and demands the formation and development of a proper embouchure6.
Consider the fact that a full size double horn is about 8 pounds! That’s a whole lot of instrument for a high school or adult player, let alone smaller beginners. A single horn has significantly less tubing and is far easier to hold in proper playing position out and away from the body.
An additional advantage of the single horn is simpler fingerings. If you’ve read through or even looked at the first part of this manual, or ever been confused by horn fingerings in your own study, you know that horn finger-ings can be hard to master. Trying to use both sides of the double horn right off the bat can be too confusing. If the school can only provide double horns, simply have beginners ignore the thumb trigger for a year or so and learn single F horn fingerings. As with any instrument search, look for instruments built by trusted brands in good condition.
Recommendations: Farkas MC (Medium cup), Conn #2, Bach #7 Keep in mind that a mouthpiece that works for one student will not necessarily work for any student. Once a
mouthpiece is found to fit for a student, stick with it! Be sure your horn players have appropriate mouthpiec-es that are not dinged, dented, and especially not damaged on the playing surface. What you should know about horn mouthpieces6:
Wider rims allow for better endurance but also make the mouthpiece somewhat less responsive. Narrower rims are not as good for endurance but provide better accuracy. The inside diameter of the rim (size of the opening) affects the playing of different ranges. A wider
diameter makes lower notes easier while a smaller diameter helps with high notes. Deeper cups lead to darker, “fatter” sounding low notes while a more shallow cup makes high notes
easier and generates a brighter tone. A “bowl” shaped cup creates a euphonium-like sound while straighter sides provide a more horn-
like sound.
Selecting an Instrument
Selecting a Mouthpiece
“Lots of horn players, way too many, seem to not know what each slide on their horn does, some to such an extent that they don’t even know which slide is the main slide. There is an easy way to figure it out; just take the slides out and see which notes they impact. Removing the main slide will make it so you can’t play
any notes; removing an F horn tuning slide will make it so only the B-flat horn works, etc. Put some of your problem solving skills into it and learn what each
slide does, don’t just guess at something this important.”10
—John Ericson

49
A critical factor in establishing proper horn posture is to be clear about whether the horn should be played on-leg (with the bell resting on the leg) or off-leg (with the instrument suspended away from the body). For the purposes of discussing basic posture, and for beginners in almost all cases, off-leg playing is the best choice. It can be very helpful to have a beginner stand when first learning to hold the instrument. This promotes good upper body alignment and teaches them to support the instrument off-leg. In the sitting position, the upper body should remain aligned as it would be while standing. Encourage sitting toward the front of the chair (“hard on the bones”) and avoid leaning forward (sitting on the underside of the thighs) or leaning back (sitting on the glutes). With an upright sitting posture, a student should “allow” his bones to hold him upright rather than tensing muscles to “hold” his body up straight. Feet flat on the floor may work fine, but the knees must be at a downward angle from the hips. Taller students, or students sitting in very short chairs, may need to kick their feet back or cross their ankles to achieve this. The knees-below-hips requirement is essential for proper breathing.
Ensuring proper right hand position is not only a playing-quality issue, but also a health and safety issue. Im-proper hand position can lead to injuries in either hand when it leads to bearing the weight of the horn in the wrong places on the body.
Create a flat blade with the right hand, closing the thumb naturally against the index finger (not curled under, and no gap between finger and thumb).
Keeping the fingers straight, allow the first knuckles of the hand to relax, creating a natural angle between the palm and the fingers. Do not create a “claw” shape with the hand or allow the fingers to curl. The thumb should be in contact with the index finger.
Now turn the hand slightly clock-wise so that the pinky is closest to the floor and the thumb and index
finger are on top.
Posture
Posture and Holding the Horn
Right Hand Position
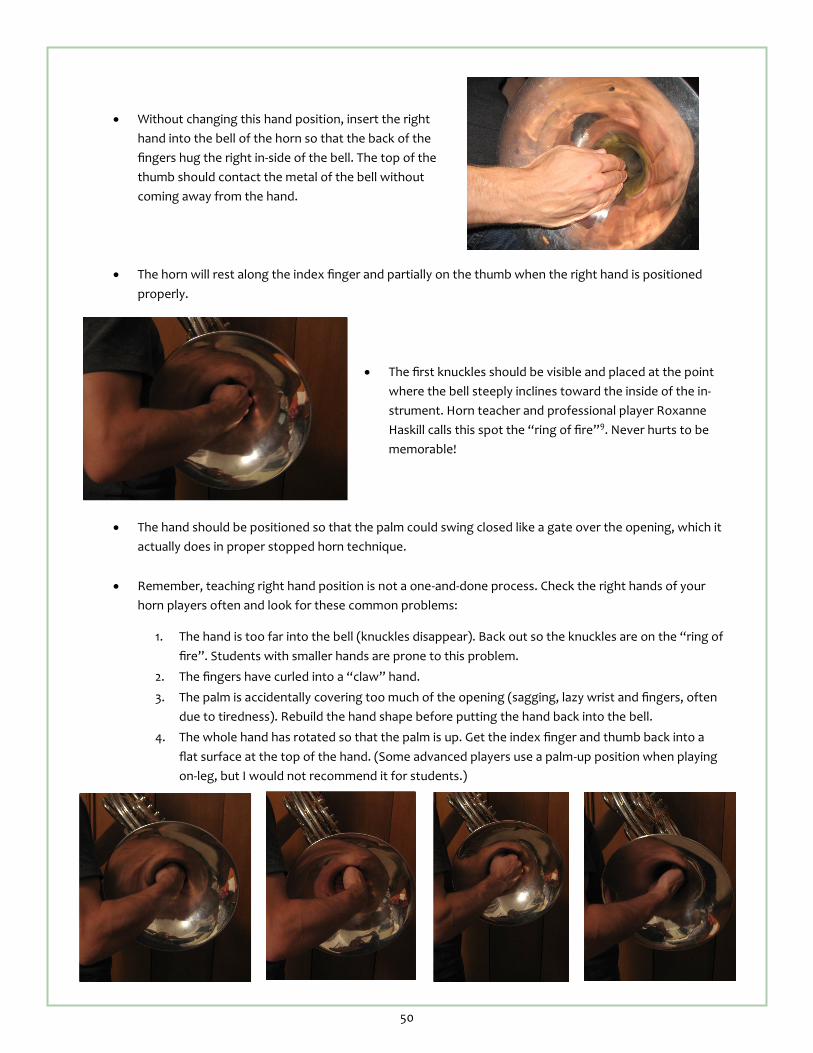
50
Without changing this hand position, insert the right
hand into the bell of the horn so that the back of the fingers hug the right in-side of the bell. The top of the thumb should contact the metal of the bell without coming away from the hand.
The horn will rest along the index finger and partially on the thumb when the right hand is positioned properly.
The first knuckles should be visible and placed at the point where the bell steeply inclines toward the inside of the in-strument. Horn teacher and professional player Roxanne Haskill calls this spot the “ring of fire”9. Never hurts to be memorable!
The hand should be positioned so that the palm could swing closed like a gate over the opening, which it actually does in proper stopped horn technique.
Remember, teaching right hand position is not a one-and-done process. Check the right hands of your
horn players often and look for these common problems:
1. The hand is too far into the bell (knuckles disappear). Back out so the knuckles are on the “ring of fire”. Students with smaller hands are prone to this problem.
2. The fingers have curled into a “claw” hand.
3. The palm is accidentally covering too much of the opening (sagging, lazy wrist and fingers, often due to tiredness). Rebuild the hand shape before putting the hand back into the bell.
4. The whole hand has rotated so that the palm is up. Get the index finger and thumb back into a flat surface at the top of the hand. (Some advanced players use a palm-up position when playing on-leg, but I would not recommend it for students.)

51
The horn is both heavy and large and can be difficult to grip, especially for younger players. Help your horn students succeed by ensuring their left hands are in the correct position and that they are not regularly strug-gling to hold up the instrument.
The left hand, arm, and shoulder should bear much of the weight of the horn.
Place the pinky in the hook, not on top as a player would on a trum-pet. The pinky needs to help hold up the horn and keep it in place.
The thumb goes under the main tubing, bringing the horn to rest in the webbing between the thumb and first finger. Be sure the stu-dent grips the horn in the soft, fleshy part of the hand.
On a double horn, the thumb should rest on the thumb trigger. However, if the player is ignoring the Bb side of the double horn (as
I recommend beginners do for at least their first year of playing), the thumb can be placed in front of the trigger and simply wrapped around the tubing. This is very similar to the thumb position for a single horn when there is no trigger or thumb rest built in.
To test the security of the left hand grip, the student should be able
to hold the horn with both the thumb and the pinky extended away from the instrument (the thumb still under the tubing). Be careful not to drop the instrument when testing this, and remind the stu-dent not to try holding the instrument this way while playing!
The remaining three fingers lay naturally onto the valves maintaining a curved hand shape. Flat fingers im-
pede finger facility and promote tension in the left hand.
Left Hand Position
In the event that holding the horn with the left hand is too difficult, there are support devices available to help. One is a left hand holding strap (Osmun music makes a good one). A more extreme solution is the Hornstick (hornstick.nl/en/) which attaches to the instrument and completely props its weight on the
player’s right leg.

52
The angle and direction of the leadpipe is critically important for proper embouchure development. Players should never have to move to the mouthpiece in order to play. Proper posture and hand position must bring the mouthpiece to the embouchure and angle the leadpipe slightly downward. A horn player who appears to be leaning back or craning his/her neck to play the instrument will have all kinds of problems that can be fixed by simply holding the instrument correctly. The chair a student plays in, whether it’s in the band room or at home during practice, either helps or harms proper posture and horn position. Be sure students have enough room to their right for the bell of the horn and are not being forced to lower it or prop it on their legs due to space con-straints.
The leadpipe should always run along the center of the player’s body, pointing directly toward the shaft of the music stand at a downward angle (assuming the stand is directly centered in front of the student).
The chin of the horn player should tip slightly down when playing. The combination of this facial tip and the
angle of the horn should be at least 30 degrees downward. The horn is a heavy instrument, and as students get tired their upper body posture is likely to crumble. Check that the student does not lean to one side or the other.
Check that the horn has not “pivoted” to one side or the other pointing the leadpipe in the wrong direction.
Move the right arm in order to reposition the instrument. The direction of the leadpipe is a dead giveaway.
The ultimate goal when it comes to posture can be summed up as helping a player look good. If a student looks uncomfortable or awkward, they won’t tend to sound very good either.
Direction of the Leadpipe

53
Making a Sound on the Horn
If sitting, ensure that the knees line up below the hips before working on breathing. Emphasize that while the breaths taken to play the horn are much larger than normal breaths, the focus should still be on relaxed, natural inhalation and exhalation in order to avoid excess tension in the body and throat. It’s like normal breathing, but much more air is involved. Practice breathing some with and some without the instrument. Breath should flow in and out through the mouth without much noise to ensure the throat is relaxed. Draw the student’s attention to the “inflating” or “stretching” sensation in the lower body during a deep, relaxed inhale. When playing the horn, always breathe in as much air as possible. There is no holding of the breath after a big breath is taken. Always proceed directly from the inhale to the exhale. Practice this flowing breath with a steady beat (8 beats in, 8 beats out for instance) to increase focus on breath control. Students should know that the horn is 12-16 feet long (depending on construction and which valves are pressed). They are responsible for getting all that air moving by blowing all the way through the instrument when they play. If a student is preparing to play the horn for the first time, have them take a deep breath and exhale into the leadpipe (without a mouthpiece) while imagining the air spinning through the instrument and out of the bell.
Proper breathing should be reinforced regularly in full rehearsals. Practice relaxed, full inhaling and exhaling with your whole band, but be sure to check on individual players. Help solve breathing problems, reduce tension in the body, and discover misconceptions students may have about breathing.
Without the development of a good embouchure, students will be unable to advance to intermediate or ad-vanced levels of playing which demand the higher and lower ranges of the horn more often. The basic horn em-bouchure is just one of three or four embouchure variations horn players must learn to achieve accuracy and characteristic tone in every register.
Just as proper posture is a prerequisite to any lesson or practice session focused on breathing techniques, the proper positioning of the instrument, and especially the leadpipe, are prerequisites to developing proper horn embouchure. Insist on the correct positioning of the instrument and never let a student “go to the mouthpiece”. Always bring the mouthpiece to you.
Breathing
Embouchure

54
The placement or “setting” of the lips can be achieved in a number of ways. Often, the syllable “EM” is em-ployed to bring the lips together and set them in the proper way. The speaking of the “EM” sound must be physi-cal enough to engage the lip muscles, but not so exaggerated that the lips are clamped shut. Try having the stu-dent say “EM” three or four times in a row with a little more vigor each time11. Another approach is to have the student recite the alphabet and “freeze” when they get to the letter M9. This should also result in teeth which are separated and set correctly inside the mouth.
Another description of proper horn embouchure is 50 percent smile and 50 percent pucker with the player focusing on the eye teeth (canines) and firm corners9 . Varying the language used to describe embouchure can especially help a student re-learning the embouchure or trying to overcome deeply ingrained bad habits.
Practice taking a proper, full, relaxed breath and exhaling the air through the set lips. A buzz may or may not occur. Some recommend spending enough time on this step to achieve a buzz of the lips before using a mouth-piece. This helps students understand that horn playing depends on vibrations of the lips11. In order to achieve this, the students should moisten the lips, breathe, set the lips, then let a sudden puff of air out. Do this multiple times with more vigorous air each time, demonstrating for the student as needed to help provide a goal. It may help to place fingers over the lips in a V shape or simply use the mouthpiece to get the buzz going11.
The initial placement of the mouthpiece is critical for a beginner. Once a spot is chosen, the student will find that same “groove” over and over. Have the student set his or her lips, then place the mouthpiece in the center of their lips so that it covers 2/3 top lip and 1/3 bottom lip. Place the mouthpiece for the student a few times, then allow them to try placing it correctly. The angle of the mouthpiece should be just slightly downward. Ask the stu-dent to dip the chin slightly below level to establish what will eventually be the correct angle of the leadpipe. Breathing through the corners of the mouth, have the student set the lips with the mouthpiece in place and let the air out quickly to find a buzz. Try this multiple times if necessary while checking the embouchure. Remove and then replace the mouthpiece repeatedly so that you can see the formation of the lips.
At this point it is typical to have a student firm up the lips and speed up the air to produce a “siren” on the mouthpiece. This is an excellent activity with the horn mouthpiece and the perfect time to go a little further to introduce a horn-specific embouchure skill.
Because the horn covers such a large range, there are variations of the embouchure that help a player achieve the lower and higher registers. A key component to these variations is a flexible jaw that pivots down and out or up and in (for lower or higher notes respectively). Establishing a flexible jaw is important for any horn player, and doing this right off the bat will help the student remain flexible in the future. Try some or all of the following tech-niques11:
Use a chewing motion while buzzing to experiment with the effect of the jaw on the buzz. This generates a sound similar to the mouthpiece siren.
Say or imagine (while playing) vocal syllables: “ee” for the high register, “oh” for the middle register as the
jaw moves downward, and “ah” for the low register moving the jaw further down and out. If the student can whistle, try whistling high and low using these different vocal syllables and jaw positions.
Teaching the Horn Embouchure
Jaw Flexibility

55
Jaw flexibility is the only way to achieve the complete range on the horn with the proper embouchure. Other-wise, students are forced to “stretch and pucker” or apply excessive pressure to the lips when trying to play up-per or lower register notes11.
Pedal Embouchure: Jaw low, lips back and held apart with much slack. For lowest notes. [First octave start-ing from 1st line bass clef Gb]
Middle Embouchure: The standard embouchure described in this section of the manual formed with the
“EM” syllable. [G below middle C to 4th line D] High Embouchure: A much firmer, tighter control of the aperture allowing a concentrated air stream. Imag-
ine the head of a pin as the aperture. [Notes above 4th line D]
Introduce articulation by having the student say “too, too, too” or “doo, doo, doo” and direct their attention to the tip of the tongue touching up behind the front teeth. Make the “too”/”doo” sound with air only and be sure the student blows a continuous airstream rather than “puffing” (breathing or stopping the air be-tween each articulation).
I remind my students not to “tongue with the embouchure.” The lips remain set without any sudden tensing
when the tongue articulates. Continue to check that the mouthpiece is being placed on 2/3 top lip and 1/3 bottom lip. Plug the mouthpiece into the instrument, establish proper posture and hand position, ensure the leadpipe
and head are at the appropriate downward angle, and try a loud buzz to play. Recall the necessity of blowing all the way through the very long tubing of the horn for proper air support.
Roxanne Haskill, horn teacher and professional player, compares the changing of the horn embouchure required to play in each register to “shifting gears” in a car9. Have
your intermediate and advanced horn students label in their fingering charts where they need to “shift gears” with their embouchure.
Next Steps

56
In this case, there may be too much space in the aperture or too much pucker in the lips. Dry lips or a lack of air can also cause this problem. Re-form the embouchure, have the student lick his or her lips, and review breathing exercises.
Usually the result of lips which are not firmly set, lips puckering too much, or an aperture that is much too large. Have the student say “EM” again and watch to see if the embouchure deforms when the student goes to play on the instrument.
The tension you hear in the sound is a reflection of the excess tension in the lips (or sometimes the entire body). The lips may be pinched together, formed in a hard “oo”, or the throat may be tense and constricted. Take a moment to help the student relax, then re-form the embouchure while avoiding any unnecessary tension. Check for a “smiling” embouchure that is too spread.
This can result when the lips are extremely tight or pinched together or the throat is closed/blocked. Also oc-curs when excessive mouthpiece pressure is applied by pulling on the pinky hook. Go back to natural breathing techniques to help the throat relax and re-form the embouchure with a goal of firmness rather than tightness.
Indicates weakness in the embouchure. The student may not be holding the lips set after forming the embou-chure. In other words, the muscles in the face are all going slack when the student begins to play. Try re-forming the “EM” with the lips and blowing air out through the embouchure without the instrument or mouthpiece. En-courage firmly holding the corners in place while forming a 50 percent smile, 50 percent pucker embouchure fo-cused on the eye teeth (canines).
Once playing on the full instrument, a beginner should use 2nd line G as a starting note. Middle C is a bit too low and unstable to serve as a good embouchure-training pitch right away9.
Common Problems with Horn Embouchure11
Puffed cheeks or inflated upper/lower lip
Completely stopped sound
Tight, thin tone
Airy tone
No tone, rushing air

57
Common Problems with Horn Embouchure (Examples)
Correct embouchure Embouchure too tight Smiling embouchure
Embouchure too loose Too much pucker Lips rolling over teeth
Mouthpiece too high Mouthpiece too low Mouthpiece off-center
Upper/lower lips inflated Cheeks puffed

58
Horn Fingerings
Because of the exhaustive discussion of fingerings in the first part of this manual, I will simply provide a few tips. Also, below is a simple fingering chart that includes the fingerings from the Bb side of the double horn com-monly used in place of F horn fingerings. Use a single F horn for total beginners, or avoid the thumb key on a double horn (see page 51). Students can
pick up Bb horn fingerings later once they already know how to play.
Educating your horn players about the overtone series at the right time is very beneficial for their under-standing of partials. Early on, consider sharing some of the basics like the size of the intervals between the 4th, 5th, 6th, and 8th partials (even if you don't use those labels or proper interval terms). For students who have been playing two or three years, seeing the partials “stacked up” all at once can unlock not only a bet-ter understanding of the theory behind partials, but also a greater confidence in finding the correct partial by feel.
Assuming you have read about and basically understood the overtone series (pages 30 and 31), we now have two sets of information we can use to predict the pitch tendency of any note on the horn. There are four finger-ing combinations which affect pitch, and there are four sets of related partials which are predictably sharp, flat, or in tune.
Pitch Tendencies

59
Predicting Brass Pitch Tendencies
Due to unavoidable imperfections in the three-valve system, the following fingerings always impact pitch in the following ways:
1st + 2nd valve combination is slightly sharp 2nd + 3rd valve combination is slightly flat 1st + 3rd valve combination is sharp 1st + 2nd + 3rd valve combination is very sharp
The following sets of partials are related to one another in the overtone series. Because of the way the over-tone series occurs in nature, each related group has a predictable pitch tendency (see pages 33 and 34 illustra-tions of these related groups):
Partials 1, 2, 4, 8, and 16 are all octaves of the fundamental. These partials are in tune.
Partials 3, 6, and 12 are all octaves of the 3rd partial. The 3rd partial is always the “fifth” of the funda-mental. These partials sound sharp.
Partials 5 and 10 are both octaves of the 5th partial. The 5th partial is always the “third” of the funda-mental. These partials sound flat.
Partials 7 and 14 are both octaves of the 7th partial. The 7th partial is always the “flat seven” of the fundamental. These partials sound very flat.
By combining our knowledge of valve-combination pitch tendencies and related-partial pitch tendencies, we can predict the pitch of any note on the horn fairly quickly. For most, the more challenging piece of this puzzle is determining which partial a given note is from. For help memorizing which notes are from which partial on the horn, see “The Partial Grouping Method” on pages 38-40.
This A flat is a part of the 8th partial, which is generally in tune, and uses the 2nd and 3rd valve combination, which is flat. The resulting pitch tendency is flat.
These fingerings are very infrequently used on the horn except in the lowest register.
Valve Combination Tendencies
Overtone Series Tendencies
Putting it Together
Examples:

60
This E is a part of the 5th partial, which is flat, and uses the open fingering, which is in tune. The resulting pitch ten-dency is in tune.
This C# is a part of the 5th partial, which is flat, and uses the 1st and 2nd valve combination, which is sharp. The result-ing pitch tendency is in tune. (The opposing tendencies of the valve combination and the partial mostly compensate for one another)
This F is a part of the 6th partial, which is sharp, and uses the 1st valve fingering, which is generally in tune. The result-ing pitch tendency is sharp.
For more detailed information about the overtone series and brass pitch tendencies, check out “Partial To the Winds” (www.bandworld.org/pdfs/partialToTheWinds.pdf) and the video series that goes with it (www.bandworld.org/html/OvertoneIntro.html).

61
Assembly and Disassembly
Instrument Maintenance
Students must be informed about proper maintenance practices from the first time they take a horn from its case. Start by teaching appropriate assembly and disassembly steps.
Firmly grasp the instrument when taking it out of its case.
Use only finger pressure and a quarter-twist to secure the mouth-piece into the leadpipe.
Keep the horn free of fingerprints and residue when putting the instrument away. Be sure you have a soft polishing cloth and use it daily.
If the mouthpiece gets stuck, do not try to force it out by using arm strength! Have a band director or instrument technician look at it and use a mouthpiece puller if necessary.
Always empty the main tuning slides and the valve tuning slides both before and after playing. To remove water which doesn’t seem to be inside a tuning slide, hold the instrument out with the valves away and “turn the car to the right” imagining the horn as the steering wheel. Some water may exit the bell, and more may collect in the main tuning slides9. Remember there are two sets of valve tuning slides on a double horn—one set for the F horn and one set for the Bb horn. Remove the F horn valve tuning slides to access the Bb horn set.
Students with “screw bells” (detachable bells) should take their time both when assembling and disassembling the instru-ment. Jamming or otherwise damaging the screw bell threads can lead to very costly repair work. Also, it is recommended that the threads remain dry and clean of any oil or cream product10. While these lubricants can help for a while, they also inevitably collect dust, dirt, and sometimes fuzz from the inside of the case. This gunk must later be cleaned out and can cause the bell to stick in place. If lubricant is needed, clean and dry the threads and run a graphite pencil over them (graphite is also sometimes used to lubricate saxophone necks).
F

62
The French horn requires frequent lubrication in a number of areas. Refer to page 12 for full instruc-tions.
Address broken solder joints as soon as possible to prevent further broken joints and additional damage or bending of the tubing.
Avoid leaving the horn in a hot car or in the trunk of a vehicle. Extreme hot and cold can wear down or damage brass instruments.
Use a mouthpiece brush and warm, soapy water to clean the mouthpiece at least once a month. Flush the horn with water at least once a month. Dust, dirt, and even pieces of food which make
their way into the horn are what cause corrosion. Use a snake brush to clean the leadpipe and tun-ing slides before your last flush with water.
Give the horn a full bath at least once every six months, preferably every three. If you (the teacher)
are the one bathing the horn, consider disassembling the rotary valves so that they can be removed for better cleaning access (see pages 13-16). Consider showing trustworthy advanced students how to remove rotary valves themselves.
Use mild soap in the bath water. Many technicians and musicians swear by Dawn dish soap.
Harsh cleaners can and will strip the lacquer off the instrument. Let the horn dry out inside before putting it back together.
Keep up With Regular Maintenance

63
Developing as a Horn Player
Due to the importance of partial control when playing the horn, it is very important for horn players to develop good flexibility and confident tone. To make matters more challenging, composers tend to task the horns with playing harmony parts which do not always sound melodic or intuitive.
There is a vicious cycle when horn players feel afraid of wrong notes. I have found that when some students worry that they will miss a partial, they back off the air support to avoid playing a loud mistake, which in turn makes it harder to hit the correct partials and play with good tone, which leads to further “hiding” that doesn’t contribute to the sound of the band or help that student improve. Providing horn players with the tools and at-tention needed to become confident sight readers, ensemble musicians, and even soloists is the sure-fire method to developing productive French horn players. Help your horns make the most out of their practice time by providing them with some or all of the following suggestions or by using these techniques during class time:
Any good practice session should begin with some physical warm up and breathing. Do some comfortable standing stretches to get the blood flowing and prepare to breathe by sitting or standing with proper relaxed posture. Turn on a metronome to about 60 beats per minute. Focusing on steady movement of the air, exhale completely and begin by inhaling through the mouth for 4 counts followed by a controlled exhale in the next 4 counts. Do this 3 or more times focusing on a smooth intake of air followed by a very steady exhale that empties the lungs in exactly the right number of beats. After using the 4-in 4-out pattern, try the same exercise inhaling and exhaling for 6 beats each, continuing to focus on breath control. Finally, do the same exercise with 8-in 8-out. Daily exercise of the breathing system strengthens the muscles involved. Focusing on steady, continuous exhalation will improve air support.
Do some buzzing on the mouthpiece! Buzzing accurately often takes more mental focus and fine embouchure control than playing the same notes on the horn. Think of buzzing like going running with weights strapped to your arms and legs. It’s hard work, but when those weights come off (going back to playing with the mouthpiece on the horn), often flexibility, accuracy, and/or tone have become stronger and easier. Another upside is that almost all buzzing requires use of the ear in order to play the correct notes, and horn players must always be working to develop a good ear14.
Work to extend and smooth out the “siren” sound on the mouthpiece with careful adjustments to air speed and embouchure, especially in the early days of brass playing. This is a good way to exercise the embouchure. Use lots of air and try for a very “buzzy” mouthpiece buzz. That means a fairly loud sound that is focused and stable on the desired pitch (or sliding steadily in the case of a siren exercise) without “blips” in the sound13.
Breathing
What to Work On
Buzzing

64
When buzzing a melody or a written exercise, play the desired starting note on the horn or another nearby reference to be sure the buzzing begins on the intended pitch. Any passage of music or scale can serve as a buzz-ing exercise. Here is a written exercise designed to improve flexibility and tone. In many ways it serves as a long tone exercise even though it changes notes frequently.
Long tones are essential for not only breath control, but also embouchure strength and the development of a strong characteristic tone quality. The focus should be on producing the clearest, steadiest, best tone possible. There are many long tone exercises which benefit horn players. One basic example is a 16-count long tone that crescendos from pp to ff in the first 8 counts followed by a decrescendo back to pp for the last 8 counts.
Repeat 5 times using the following fingerings on F horn: 0 (for the written note), 2, 1, 12, and 23
It is essential to work on crescendos and diminuendos on long tones. They may be boring, but if horn players don’t have great control of these they simply have no hope of playing great phrases10. There are endless varia-tions if we consider all the possible dynamic shapes we could incorporate on long tone exercises.
Playing long tones daily helps horn players get used to the amount of air required to make confident sound on their instruments. Listen for timid playing and encourage students who may feel intimidated to breathe big and play loud. Getting the air moving will never be more straight forward than during long tone exercises, so it’s a “now or never” moment!
Long Tones

65
Lip Slurs Lip slurs should be the horn player’s bread and butter when it comes to building a warmup routine. It is lip flexibility which provides partial control and improves note accuracy. Accuracy is one of those never-ending goals horn players should always work toward. While buzzing provides similar benefits to accuracy, lip slurs focus spe-cifically on flexibility between partials in the overtone series and are more akin to long tones due to the long, full airstream required to play them.
When first picking up the horn, beginners benefit from learning what I call “The Three Note Song”. It sounds like this:
The C E G triad uses all open fingerings and is the “traditional” way for horn players to get their bearings on the instrument when they are unsure about partials. After hearing these notes demonstrated and then playing them successfully a few times, the sound of the major triad becomes memorable enough for horn players to “check” if they’re playing the correct partials for C, E, and G. From there, they are able to more confidently navi-gate to other notes they see on the page. These three notes are a great way to start horn players on lip slurs so that they can start to earn all the associated benefits of lip slur exercises:
Teach lip slurs away from notated music before using any written exercises. The key is to focus on the feeling of moving smoothly from partial to partial without using the tongue. Lip slurs require the horn student to deter-mine which muscle movements in both the embouchure and the air support system control partial changes. When students are clearly and repeatedly presented with the goal of slurring with only the embouchure, the re-sulting focus builds muscle memory, strength, and flexibility over time.
Articulating on the horn most often resembles a “da” or “duh”. The “t” consonant can work, but often results in a harsh articulation not appropriate for lyrical playing14. Articulation exercises should be played often and in great variety. Adding simple rhythms and articulation patterns like the one below to major and minor scales pro-vides ample exercise material to explore and drill all kinds of articulation challenges. Teach students to create their own articulation patterns or assign patterns that specifically address challenges from their horn parts.
Articulation

66
Because the horn plays both very low and quite high, it is important to develop the ability to tongue clearly in any register. Practicing articulations on scales or in different octaves exposes horn players to the challenges of tonguing both up high and down low. Playing something like the articulation pattern (on the last page) in the low register, for example, requires a careful balance of setting the lips and jaw in a relaxed embouchure while releas-ing energetic air with the tongue that helps the staccato notes respond on time. Also, while “da” is an appropri-ate articulation syllable for the middle range, articulation down low needs to be closer to “doe” in order to open up the inner oral cavity appropriately for the low range. Conversely, the tongue position changes in the high range, leading to articulations more like “dee”14. Another great articulation exercise to apply to scales is the “Slur 2 Tongue 2” exercise:
The articulation pattern can be altered (Tongue 2 Slur 2 for instance) to keep this exercise interesting. Don’t forget to make dynamic choices to make this exercise more musical. Practicing articulation away from the instrument and mouthpiece altogether is also productive. Try speaking tough passages on an articulation syllable like “da” and then tonguing the same passage using only air and the tongue. Take care to avoid tonguing between the lower and upper teeth. The resulting “Th” at the front of the attack is too thick and does not help initiate the air through the aperture nearly as efficiently as a clearer “T” or “D” at-tack.
Due to their versatility and widespread use, scales have come up quite a bit already. The positive benefits of both learning and memorizing major, minor, and chromatic scales have been thoroughly established by teachers and performers alike for many years. One of the most direct advantages gleaned from scale study is comfort in multiple key signatures. For horn players specifically, there is probably no better way to learn how to negotiate the wide range of the instrument than the regular drilling of scales and scale exercises. Horn players who regularly practice scales will gain facility in the fingers, confidence in their knowledge of fingerings, and an increased understanding of how to overcome the difficulties of various key signatures and registers of the horn. Be sure to guide students in their approach to learning new scales. Asking a student who has only played for one or two years to learn multiple scales at a time is a recipe for frustration and disappointment. Encourage students to master one scale at a time, paying attention to not only fingerings, but also tone quality, note accuracy, breath management, and dynamic control.
Articulation (Continued)
Scales

67
Outside of Regular Rehearsal
Teaching Strategies: Supporting Your Horn Section In and Out of Class
Horn players need time to learn how their parts should sound so that their ears will help them move to the correct partials. If a player consistently struggles to find the right partial, they will benefit greatly from isolated help, whether that consists of a brief moment during rehearsal or a meeting after school. It is OK to help horn players “learn by ear” some of the time because the ear is so critical to horn playing. Play along and provide ex-amples on piano or horn. If you play along with them simultaneously, they can compare their notes to a refer-ence and detect errors more easily. If you play first and they echo you, they get to work on recalling pitches from memory.
In a lesson-type instructional scenario, it is very worthwhile to sight read for 5-10 minutes at the beginning or end of the session. There is no substitute for practice when developing the muscle memory for seeing a note on the page and finding the correct partial on the horn. Try simple melodies from a method book. Pull passages from easier horn parts or copy sight-reading exercises for intermediate and advanced students.
Because of the difficulties created by closely spaced partials and a partial system that does not line up nicely with all the other brass instruments, dedicating additional time outside regular rehearsal for horn students, espe-cially beginners, is a must. Have a “Horn Day” or hold weekly sectionals to be sure horn players are not flounder-ing or hiding their confusion.
Of course, finding “extra” time is always a challenge, and the majority of instructional time will always be dur-ing full band rehearsal. Consider some of these strategies for helping your horns during class.
Make a sticky note that says “LOOK AT THE HORNS” to remember to check on them. Don’t let them get lost. Demonstrate pitch as needed or provide a reference from the piano or another student so horn players can
match and develop their ears. Monitor the angle and direction of the leadpipes in the horn section! Horn bells face the wrong way as far as the audience is concerned. Horns need to play out loud to be heard
in the balance of the band. Instruct horn players to play twice as loud as what is written on the page, or at least a full dynamic level higher than written. They will also hear themselves better.
Be careful of criticisms, even more so than usual. Expect some partial mistakes from your horn players and give them a chance to fix their mistakes before you stop to try fixing them yourself. Provide reference pitch-es to help them find notes they are struggling with.
It’s OK to send a horn player or horn section to the practice room to work out difficult passages. At interme-diate or advanced levels, individual players will benefit from bringing a tuner with them (as a horn player, they should own a tuner, but provide one if they need it). Younger students may be much more successful if the struggling horn player is sent to work under the guidance of either a more confident member of the horn section or a strong alto saxophone player who shares the same part.
Encourage the horns about their important role in the band. They serve as a bridge when blending their mel-low brass tone with the woodwinds, especially alto saxophones. They provide a neat “distant” tone which is somewhat unique among the brass instruments.
During Regular Rehearsal

68
Horn Participation in Warmups and Exercises
“For Horns Only”
Many brass lip slurs are not designed to work with the F horn overtone series. The F horn uses the Concert F overtone series while the rest of your brass players are almost certainly playing instruments which use the Con-cert Bb overtone series.
If your horn players are using double horns, there is a fairly simple solution. By depressing the thumb trigger and playing on the Bb side of the horn, the horn players will be able to match the partial patterns being played by the other brass (depending on the range).
If there is a horn player on a single horn in F, try to provide a written horn part for lip slur exercises that either plays parallel partials in harmony or provides the fingerings necessary to match the notes the rest of the brass are playing.
As a consequence of the mismatch between the overtone series on the F horn and the rest of the brass family, horns can have difficulty finding the appropriate octave for basic scales, especially beginners with limited range. Once the beginning band triumphantly arrives to the one octave Concert Bb Scale, F horns have to decide wheth-er to attempt a high F major scale running all the way to the top of the staff or a low F major scale which dips into the lowest partial. The “split” style scale that plays one tetra-chord high and one low or some variation of that can be an alternative. Overall, keep a close eye on the horns during warmup and any exercises the band is work-ing through. If they look lost, they definitely are.
Avoid seating the horns directly in front of any percussion instruments or with bell-front brass directly behind them. The vibrations produced by these instruments travel through the air right into the open bell of the horn and interfere with the horn player’s ability to steadily control the sound of the instrument (both partials and tone in general). The horns are often placed in front of the tubas and euphoniums, bell-up brass instruments, to spare them from this frustration. Be sure to protect your horn section!
Some beginning method books include additional pages in the horn book. The purpose of “For Horns Only” pages is to provide exercises transposed to the middle register of the instrument, or whichever register is most appropriate for them for the exercise. Remember that the horn is the “odd man out” when it comes to matching up overtone series from each of the brass instruments. Due to the traditional use of Concert Bb Major as the first key for beginning bands, playing in unison with the full band frequently requires the beginning horn player to play higher or lower than is comfortable. This may be a contributing factor to why horn players are often convert-ed rather than started on the horn initially. In any case, there is no reason to ignore this great tool when it is available in the method book. Be sure beginning horn students understand why the “For Horns Only” pages exist and how to use them. I find them most helpful when assigning exercises for home practice and working with horns on their own (1-on-1 or in sectionals). These transposed pages in beginning band books are particularly helpful for reinforcing the use of “The Three Note Song” for partial orientation (see page 65).
Scales
Lip Slurs
Placement Within the Band

69
Extra Practice Challenges Improvement in both lip flexibility and well-developed articulation makes possible the performance of more technical passages and lyrical etudes. Finding etudes or playable solos for developing horn players to practice can really accelerate their progress. Sometimes, all it takes to help a student grow by leaps and bounds is a teacher who provides them with a special challenge or opportunity they can dig into.
Look in any horn method books stocked in your band room for usable material, or search the internet to find excerpts or melodies that either fit or just slightly exceed the current level of your horn players. Transcriptions of pop melodies can be extremely motivating “extras” for students and often require fairly robust technique and flexibility to be played well. Never for a moment allow a horn players to believe there is “nothing to practice.”

70
Lip Trills
More to Learn
There are a few special horn topics which you may or may not need to look into over your years as a band di-rector. However, it’s good to be well versed in advanced techniques since at some level or at some point (whether we know it or not), our job is to prepare students to become advanced or professional level players.
Because of the close spacing of horn partials, horns are capable of trilling using only the embouchure. This re-quires focused practice most students won’t want or won’t need to do, but I’m sure many horn students would be interested to at least hear about this technique. Basically, horns have so many alternate fingerings in the high-er register that using the fingers to trill relies on the embouchure anyway14. Lip trills are trills which can be accom-plished with just one fingering and a special working of the air and embouchure.
Stopped horn is both a special effect and a remnant of the days of hand horn technique on natural horns. The most important thing to know is that when a player properly “stops” the horn and continues to play with good air support, the desired result is a sound which is a full half-step higher than written. In order to compensate, horn players have to transpose down one half-step while playing any passage marked “stopped”. Also, stopped horn is only played on the F horn. Stopping on the Bb horn causes three-quarter-tone tuning problems that play-ers are not able to compensate for.
Playing the horn with a mute is not the same as playing stopped horn. Mutes will not cause the pitch of the horn to rise a half step, so students can carry on playing normally. Horn players sometimes hold on to the mute which is inside the bell to compensate for some of the support lost by removing the right hand.
Some advanced players play on-leg (playing with the bell resting on the knee) either in special cases or regular-ly as a tone-adjusting technique. The dampening of the bell can provide a somewhat darker tone. As far as stu-dents are concerned, playing stopped horn or playing with a mute is a convenient time to switch to on-leg play-ing, even if just temporarily. We are right as teachers to insist on off-leg playing from our students, not because on-leg playing is wrong or bad, but because off-leg playing generates fewer posture and embouchure problems due to the pivoting mobility of the horn6.
I came across two incredibly valuable sources of horn information in my research. The first is “The Art of Horn Playing” by Philip Farkas which is literally a treatise on horn playing. The other resource was the website www.hornmatters.com run by John Ericson, a professor at Arizona State University. Both resources I’m sure will serve me for years to come as I have questions or curiosities about the French horn.
Stopped Horn
Mutes
On-Leg Horn Playing
Books and Resources

71
Why I wanted to write this manual
Jonathan Bletscher is currently the band and choir director at Port Susan Middle School in Stanwood,
WA. He has directed middle school band for the past four years and served as the lead visual instructor for
the Stanwood High School marching band for three years. Jonathan has also served as a rehearsal conduc-
tor for the Mount Pilchuck Music Educators’ Association Middle-Level Honor Band. He graduated from
West Salem High School in Salem, OR and is a graduate of Seattle Pacific University. He is married and living
near Stanwood where he enjoys spending time with his wife, playing ultimate Frisbee, and keeping up his
skills as a classical pianist. He accompanies the choir at his church and regularly serves as an accompanist
for students participating in local Solo/Ensemble festivals. Jonathan recently started the process of earning
his master’s degree through the American Band College of Sam Houston State University.
It seems to me that there are many resources being created for student use in the band world these
days—even remarkable ones leveraging new technology. How to play the horn, how to switch to horn
from trumpet, how to develop specific horn techniques, etc. It feels to me that there’s an assumption that
band directors already “have it figured out” and know what they need to know about the French horn
(and all the other band instruments).
I know from personal experience that this assumption about all band directors doesn’t reflect reality. I
spent more of my first year than I’d like to remember fearing the moments in class I would be unable to
provide good instruction when a student clearly needed it, and frequently those students were my French
horn players. Just the process of trying to transition students to French horn was frustrating for both me
and those students brave enough to try the horn. I simply had inadequate information as a result of, quite
honestly, a huge deficiency in study hours on this instrument. My ineptitude for French horn was not com-
pletely due to lack of trying. I had practiced the instrument on my own, watched videos online, and studied
fingering charts. But I made very little progress toward becoming an expert. I really did want to know the
horn inside and out. So finally, with the added motivation of a project due for the American Band College, I
was able to really dig in to what the French horn is all about. I hope that the results will serve as a resource
for band directors in need of good information about this unique and wonderful instrument.
About the Author: Jonathan Bletscher

72
Bibliography Sources
1 "French Horns." Kanstul.com. Kanstul Musical Instruments, n.d. Web. 1 July 2015.
2 "French Horn - Brass Instruments." FEOLDS.com. FEOLDS Instruments, n.d. Web. 26 July 2015.
3 Bacon, Thomas. "A Brief History of Horn Evolution." The Cyberhorn Museum. Hornplanet.com, n.d. Web. 2 July 2015.
4 Ericson, John. "The Baroque Origins of Hand Horn Technique, and the Early Classical Horn." Horn Matters: A French Horn and Brass Site and Resource. Hornmatters.com, 59 Feb. 6456. Web. 66 July 6459.
5 Ericson, John. "Early Valve Designs." The Arizona State University Horn Studio. Arizona State University, n.d. Web. 26 July 2015.
6 Haskill, Roxanne. A Brief Practical Guide for the Teachers of Beginning Horn Students . N.d. ABC Clinician's Handout.
7 Nave, Rod. "The French Horn." HyperPhysics. Georgia State University, n.d. Web. 28 July 2015. 8 McKee, Max, and Scott McKee. "Partial to the Winds." American Band College (n.d.): n. pag. Bandworld.org. Band-world. Web. 28 July 15. 9 Haskill, Roxanne. "A Brief Practical Guide for the Teachers of Beginning Horn Students." ABC 2015. OR, Ashland. 20 June 2015. Lecture.
10 Ericson, John. "Playing Tips." Horn Matters: A French Horn and Brass Site and Resource . Hornmatters.com, n.d. Web. 29 July 2015.
11 Phillips, Val. "Horn Embouchure." Embou-sure: A Step-by-Step Method Complete with Tape. Ashland, Or.: W.I.B.C. Pub., 1987. 29-30. Print.
12 Farkas, Philip. The Art of French Horn Playing: A Treatise on the Problems and Techniques of French Horn Playing . Ev-anston, Il.: Summy-Birchard, 1956. Google Books. Books.google.com. Web. 29 July 2015.
13 Ericson, John. "The ‘Buzzy Buzz’." Horn Matters: A French Horn and Brass Site and Resource . Hornmatters.com, n.d. Web. 29 July 2015.
14 Ericson, John. Introducing the Horn. 2nd ed. Tempe, AZ: Horn Notes, 2013. PDF.
15 Ericson, John. "A Single B-flat Horn FAQ." Horn Matters: A French Horn and Brass Site and Resource . Horn-matters.com, n.d. Web. 30 July 2015.
16 "Brass Care & Maintenance." Music Showcase. Musicshowcaseonline.com, n.d. Web. 26 July 2015.
17 Everett, Micah. "A Short Guide to Maintaining Rotary Valves (and Other, Related Valves)." The Reforming Trombonist. Wordpress.com, 09 Mar. 2013. Web. 27 July 2015.
18 Boldin, James. "How to Remove Rotary Valves on the Horn." YouTube. YouTube, 26 July 2009. Web. 26 July 2015.
19 Boldin, James. "How to String Rotary Valves on the Horn." YouTube. YouTube, 26 July 2009. Web. 26 July 2015.
20 Weiner, Dave. "Ask Dave: Why Do Valves Clank." Horn Matters: A French Horn and Brass Site and Resource . Horn-matters.com, n.d. Web. 30 July 2015.
21 Baca, Robert, and John Huth. "Twelve Ways to Avoid the Brass Repair Shop Part 2." Kjos Band News. Neil A. Kjos Music Company, Fall 2001. Web. 30 July 2015.

73
Bibliography Images
A Scandinavian Lur. Digital image. The Cyberhorn Museum. Hornplanet.com, n.d. Web. 6 July 6459.
B Orchestra horn. Digital image. The Cyberhorn Museum. Hornplanet.com, n.d. Web. 6 July 6459.
C Cor Solo. Digital image. The Cyberhorn Museum. Hornplanet.com, n.d. Web. 6 July 6459.
D Blonk, Stefan. Raoux Orchestral Horn. Digital image. Stefan-blonk.com. N.p., n.d. Web. 74 July 6459.
E Ravel RSF201 Single French Horn. Digital image. Interstatemusic.com. Cascio Interstate Music, n.d. Web. 29 July 2015.
F JP261DRATH Bb/F double French Horn with Detachable Bell. Digital image. SP&S Online Store. Salvationist Publishing and Supplies, n.d. Web. 29 July 2015.
G Stölzel Valves. Digital image. Early Valve Designs. Arizona State University Website, n.d. Web. 66 July 6459.
H Lever arm vertical position. Digital image. Kjos Band News. Neil A. Kjos Music Company, Fall 2001. Web. 26 July 2015.
I Lever arm horizontal position. Digital image. Kjos Band News. Neil A. Kjos Music Company, Fall 2001. Web. 26 July 2015.
J Rotary valve stringing diagram (A). Digital image. Paxman. Paxman.co.uk, n.d. Web. 27 July 2015.
K Rotary valve stringing diagram (B). Digital image. Paxman. Paxman.co.uk, n.d. Web. 27 July 2015.

74


![[French] Travel in Capability - Voyage en Capabilité](https://static.fdokumen.com/doc/165x107/6331e635f0080405510435a3/french-travel-in-capability-voyage-en-capabilite.jpg)