Facilitator's Guide - MLA Instruction Design Module
22
1 Facilitator’s Guide
-
Upload
khangminh22 -
Category
Documents
-
view
1 -
download
0
Transcript of Facilitator's Guide - MLA Instruction Design Module

1
Facilitator’s
Guide

2
Table of Contents
Overview 3
Objectives 4
Before Beginning 6
Module Content 7
Wrapping Up 11
Wind Down 11
Appendix 12
Assessment Tools 15
Assessment Answer Key 22

3
MLA: Peripheral Blood Smear Preparation
OVERVIEW
The goal of this learning module is to re-develop and fine tune the smear making skills
of the Medical Laboratory Assistants within the Core Laboratory. The identified goal falls
into the Psychomotor domain of learning. This goal will require the learner to utilize both
mental and physical efforts to master the task. As this module will be used to expand the
utilization of MLA skills, the learners will be proficient with several entry level safe-
ty measures before beginning the module.
The instruction itself will con- sist of several steps
and judgments that the MLA will need to master in order
for this project to be success- ful. During original training at col-
lege level, the MLA would have been taught how to produce
a blood smear. However, in many cases this training may
have occurred over a dozen years ago or provided instruction
to produce a “bullet-shaped” smear; within our institution
“wedge-shaped” smears are deemed acceptable. In addition to
variation in smear shape, teaching institutions frequently
provide students with blood drop applicators; devices that are
inserted into the flexible por- tion of the vaccutainer tube to dis-
pense consist drop size at each attempt. These devices are
costly and, consequently, frequently not used in the hospital setting. As a result, most
MLA’s willingly accept basic instruction on blood smear preparation and introduction to
institution-specific smear quality criteria.
Safety Precautions:
● Use of appropriate per-
sonal protective equip-
ment (lab coats, glove,
face shield)
● Appropriate patient identi-
fication
● Safe disposal of sharps

4
OBJECTIVES
Identification/Selection of Tools and Materials
Based on recognition, the learner will select bevel edged glass slides that are clean and free of debris for
the purpose of preparing peripheral blood smears.
Having selected two slides, the learner will place one slide horizontally, so that the frosted end lies near-
est the dominant hand and points toward the non-dominant hand, and the other slide on vertically, so
that the frosted end is nearest the learner and points away from the learner.
Having been asked to produce a peripheral blood smear for microscopic examination on Cellavision, the learner will select clean, unused bevel edged glass slides from the slide box. The learner will lay the smear slide horizontally and the spreader slide vertically.
Based on personal preference, the learner will select one or two applicator stick(s), free of debris, for use as blood application tools.
Given a box of applicator sticks, the learner will select a stick(s) for the delivery of blood on to the smear slide.
Application of Blood Drop
Given a whole blood specimen, the learner will mix the same by inversion for a minimum of two minutes.
Using the appropriate PPE, the learner will remove the cap from the tube of blood and set aside using aseptic technique.
Given the selected applicator stick(s), the learner will insert the stick(s) into the tube of blood so that the end is completely submerged.
Using the submerged applicator stick, the learner will withdraw the sticks from the tube of blood, dab to remove excess blood and touch the blood coated tips to the smear slide 5 mm below the frosted edge.
Given an uncapped tube of blood, the learner will return the applicator sticks to the tube and rest it in a test tube rack to relieve the non-dominant hand.
Given a tube of whole blood and applicator sticks, the learner will apply a drop of blood 2-3 mm in diam-eter to the smear slide, approximately 5 mm below the frosted end.
Creating the Smear
Given a bevel edged glass slide, secure the smear slide with finger tips so that it does not shift once pres-sure from the spreader is exerted and so that finger tips do not impede the movement of the spreader.
Given a clean glass slide, the learner will firmly grasp the spreader slide with his/her dominant hand.
While holding the spreader slide in the dominant hand and anchoring the smear slide with the non-dominant hand, press the spreader slide against the smear slide just below the drop of blood so a 45° angle is created between the two slides.
With the spreader slide pressed firmly against the smear slide, the learner will pull the spreader slide backwards, incorporating the entire drop of blood.
Having pulled the spreader slide backward into the blood drop, the learner will pause long enough for the blood to spread evenly across the entire length of the spreader’s edge.
Having allowed the blood to spread evenly along the spreader, the learner will push the spreader with smooth and consistent pressure along the length of the smear slide.
Having incorporated the entire blood drop, the learner will smear the blood along the length of the smear slide so that it begins 3mm from the frosted end and terminates 10mm from the opposite edge.

5
Assessing the Quality
Given a blood smear, the learner will be able to state whether tails are present and correctly explain why this flaw makes the smear unacceptable.
Given a blood smear, the learner will be able to state whether the thin end is flat or curved and correctly ex-plain why this flaw makes the smear unacceptable.
Given a blood smear, the learner will be able to state whether there is pooling of blood at any point and cor-rectly explain why this flaw makes the smear unacceptable.
Given a blood smear, the learner will be able to state whether there are acceptable gaps on either side of the smear and correctly explain why this flaw makes the smear unacceptable.
Given a blood smear, the learner will be able to state whether the length is acceptable, correctly explain why length is important and accurately describe steps that can be taken to correct the length.
Given a set of example blood smears and a list of criteria for an acceptable smear, the learner will be able to identify acceptable smears and provide justification for the selection 100% of the time.
Discarding of Smears
Given a smear of unacceptable quality, the learner will correctly discard the slide according to “sharps” discard policy and withdraw two new, clean slides.
After completing an acceptable smear, the learner will correctly discard the used applicator stick(s) according to “sharps” discard policy.
Labeling and Staining of Smears
Having completed a successful smear and discarding used applicator sticks, the learner will promptly replace the cap of the tube of blood.
Having completed a successful blood smear, the learner will correctly copy the first name, last name, and speci-men number from the tube of blood on to the frosted portion of the slide.
Given a prepared blood smear and the corresponding tube of blood, the learner will label the slide according to patient identification protocols, and promptly place the finished smear on the slide warmer so that it will dry without artifact.
Given dry, labelled slides, the learner will load them on to the stainer rack so that the frosted side sits at the top of the rack.
Given a stainer rack loaded with unstained slides, the learner will slide the rack on to the stainer arm until locked in place.
Given the loaded stainer rack and the programming instructions provided on the top of the instrument, start the staining program for a peripheral blood smear.
Given a blood smear of acceptable quality that has been dried and labelled, the learner will be able to demon-strate the proper loading and programming of the stainer to stain peripheral blood smears.
Sara
Sticky Note
R1 noticed that "removal of stain pot lids" was not included in instructional analysis

6
Instruction Preparation
BEFORE BEGINNING
It is important that you prepare the learning materials and ensure that the work space can accommodate your intrusion.
Therefore, before beginning your instruction module:
In the interest of ensuring all MLA’s have an opportunity to complete the training module, it would be best if a spread-
sheet is created to keep track of which individuals have completed the module, as well as to tentatively schedule oth-
er MLA’s based on availability and adequate staffing.
On the day of instruction: Check schedules to ensure that there is adequate staffing; that the laboratory will still be
able to function while yourself and at least one other employee are completing this module. Discuss this with man-
ager/supervisor/senior technologist if there is any doubt or uncertainty. If staffing levels are acceptable, proceed with
module
If numbers are not adequate, re-schedule the MLA for a later date.
Consult with the technologist on the hematology bench—ensure that there are no scheduled preventative mainte-
nance appointments, and that both analyzers are fully functional—inform the technologist that you will be occupying
some of their work space to provide MLA’s with an introduction to their smear making module and to better familiar-
ize them with complete smear making process.
If there are any scheduled preventative maintenance appointments or if either analyzer is not functioning to at
full capacity, delay your instruction until things are all clear
Browse through completed sample records and select a normal, relatively full sample (one for each of the learners to
be involved that day).
Set up a small work area for the MLA(s) to practice in lab reception so they are out of the way of daily routines. Ensure
all materials are available for when the learner (s) are ready to practice (test tube rack, box of slides, box of applicator
sticks, sharps discard container, paper towel/absorbent padding, PPE)
Browse through completed sample records and select samples with cold agglutinins, samples with low volume, or a
leukocyte count exceeding 300 x109 /L—these samples can be used to provide enrichment to learners who easily mas-
ter the skills

7
Strategy and Delivery
MODULE CONTENT
Application of BloodCreating the SmearAssessing the
Quality
Identification/Selection of Tools &
Materials
Discarding the Smears
Labeling and Staining the Smears
1
2
Pre Instructional Activities [Gather learner (s) in hematology area]
Welcome to your blood smear learning module! It is with great hope and investment that this project returns. I hope you are as
pleased as I am. Before we begin, I would like you to take a moment to consider the depth and breadth this new skill will offer you.
Your involvement in patient care will be extended to play a more direct role in patient treatment. Consider your new role in terms
of this case study:
A 20-year-old female presents in the ED with shortness of breath and in a pain crisis. Her physician is particularly interested in her
leukocyte count, platelet count, and hemoglobin. She is a known leukemic and sickle cell patient. Upon analysis of her CBC, her
leukocyte and platelet counts are flagged by the analyzer, indicating that the results may not be valid and indicating that a blood
smear must be made. As these crucial results must be withheld, it is imperative that a good quality blood smear be prepared as
quickly as possible so a technologist can provide the physician with these results by means of manual counts.
In such a case, you will become an indispensable part of the Core Laboratory team!
Administer entry skill pre-test—for this just ask learner to respond verbally—make notes for self regarding the performance of the
learner
Introduction [Guide learners to stand in front of the LH750]
To begin your learning module, I would like to start by familiarizing you with the analyzer responsible for producing automated
CBC results and the process by which the CBC follows after it leaves laboratory reception.
[Indicate the analyzer]
This is the LH750. For every CBC sample that is loaded onto this analyzer, it provides counts of the red blood cells, white blood
cells, and platelets and measurements of the hemoglobin and white blood cell differential (the WBC differential includes neutro-
phils, lymphocytes, monocytes, eosinophils, and basophils) along with a few other components. The values the analyzer arrives at
are then transmitted to our Laboratory Information System (Meditech). From here, the technologist reviews and compares the
results to a list of criteria which indicates whether a smear is required.
*The following can be directly as a script, or as a guide, depending on facilitator comfort level
Sara
Sticky Note
R1 is concerned that re-arranging content like this may confuse some learners.
Sara
Sticky Note
R2 thought it would be simpler and easier to understand if instruction proceeded in order of the process.
Sara
Sticky Note
R2 was not motivated by this example. Found it stressful. Include examples of broadened work environment?

8
Creating the Smear and Assessing the Quality [Share with learners acceptable smear diagram—Appendix A]
Once the technologist determines that a smear is required, it is important that the smear meet specific criteria to ensure high
quality results are provided to the physician and front line care staff.
[Indicate smear diagram]
As you can see there are several criteria to meet in order to produce a smear of acceptable quality. You may have been originally
taught to make thumbprint smears (smears that are rounded on the thin side). This is fine, however, within our institution, wedge
smears are expected (smears that are flat or even across the thin side). It is even more important that these criteria be met as the
microscopic images of our slides are captured by Cellavision and then reviewed by a technologist. If the smear fails to meet some
of the criteria, Cellavision may not locate the appropriate area on the smear for which to review. This can result in delays, as
smears may need to be remade.
[Share pictures of smears with high and low hemoglobin—Appendix B]
Sometimes, the components of the CBC itself make it difficult to produce a good quality blood smear. If we look at these two ex-
amples, we can see that the first smear is very short, maybe only a centimeter in length, and is a very dark red. It is likely that this
patient has a high hemoglobin. This means that the ratio of RBC to plasma will be lower than expected.
The second smear is very long, so long that it runs right off the end of the slide, and is very faintly red. It is likely that this patient
has a low hemoglobin. This means that the ratio of RBC to plasma will be higher than expected.
[Share video demonstration of smear making with high and low hemoglobin and no troubleshooting—Appendix C]
In this video, the technologist is attempting to make the blood smear using the default technique. However, because these pa-
tients fall into extreme categories, this technique falls short.
In order to make an acceptable smear for a patient with a high hemoglobin, it is necessary to increase the drop size and decrease
the angle of approach. This will allow the thick sample to spread farther along the surface of the slide.
For a patient with a low hemoglobin, it is necessary to decrease the drop size and increase the angle of approach. This will allow
the thin sample to only travel the necessary distance.
[Share video with trouble shooting steps in place—Appendix D]
[Share the image of sample blood smears with the learners—Appendix E]
This image has 3 different blood smears on it. Which of these smears do you think is acceptable? For the smear (s) that are not
acceptable, can you offer an explanation as to what might have caused the flaw?
After we have prepared an acceptable blood smear, it is important to stain the smear. We use the Midas Stainer to stain our
blood smears.
[Guide learners over to Midas Stainer]
After being loaded into the stainer rack and onto the arm [Share video of how to load smears into stainer rack and onto stainer
arm] the smears move into a bucket full of methanol. This fixes the slide so it will not be washed away. The next bucket contains
Wright Giemsa stain. This stain infiltrates the RBC, WBCs, and platelets on the smear. The next bucket contains the buffer, a mix-
ture of Wright Giemsa stain, 6.8 pH buffer, and water. This bucket helps to develop and differentiate the colours in the various
components. Differentiation is particularly important when reviewing smears on the hematology-oncology patients at our hospi-
tal. These patients tend to have a variety of immature WBC in their peripheral blood. Differentiation allows the technologist to
distinguish between the various classifications of immature cells.
Sara
Sticky Note
R1 thought these videos were not necessary - the learner will have the time to practice this on their own.
Sara
Sticky Note
See previous comment

9
Practical Skills Now we can being smear making!
[Guide learner (s) to smear making area in Lab Reception]
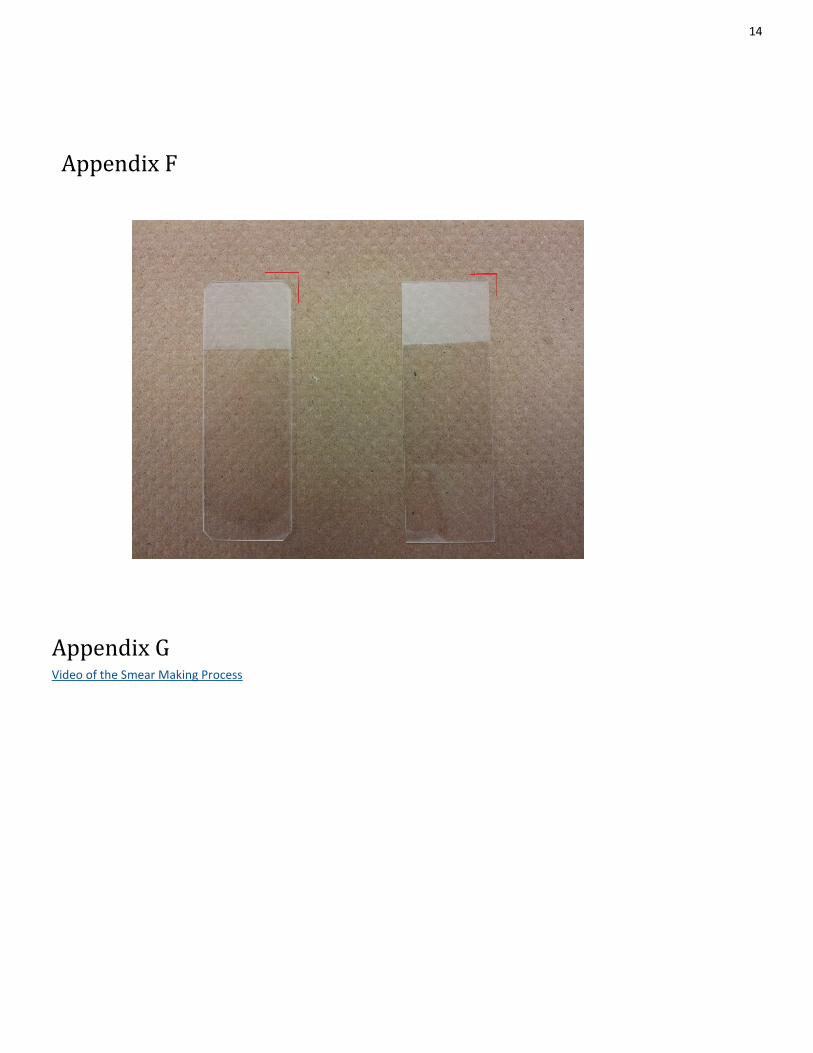
To begin, it is important that you are able to identify the slides we use for making blood smears: bevel edged glass slides.
[Share image comparing bevel edged slide to flat edged slides—Appendix F]
Both slides are kept in stock because the flat edged slides are used for urinalysis microscopy. Please make sure you remember
that these slides are not appropriate for use on Cellavision.
So, the first step to preparing a blood smear is to select two of the correct slides, ensuring they are clean and free of debris. Lay
the first slide, your smear slide, horizontally in front of you so that the frosted tip is closet to your dominant hand. Lay the sec-
ond slide, you spreader, vertically next to your dominant hand.
You may have had the luxury of using small plastic drop applicators when you were in school to prepare smears. Unfortunately,
these devices are expensive. We will be using wooden applicator sticks to delivery the drop of blood.
[Indicate to applicator sticks]
In time, you will come to find you are more comfortable using one or two sticks. This will not impact the quality of the smear but
will merely be a personal preference.
The next series of steps will be demonstrated via video clip so you can easily observe the smear making process. We will watch
the process several time before beginning to attempt our own smears. Now that we have our slides and applicator sticks, we can
begin!
[Begin video clip, narrate throughout the sequence—Appendix G]
Ensure the specimen has been adequately mixed – allow the specimen to be placed on the mixer for at least 2 minutes
before removing it.
Remove the cap of the vaccutainer tube using aseptic technique.
Using the applicator stick(s) from the previous step, insert them into the specimen, coat them in blood, then withdraw,
touch the side of the tube to remove excess blood.
Touch the blood coated tip(s) of the applicator stick(s) just below the frosted edge of the smear slide to create a blood
drop approximately 2mm in diameter
Rest the uncapped specimen, with applicator stick(s) inserted in the tube, in a test tube rack to free your hands
Anchor the smear slide with the fingertips of your non-dominant hand so that it does not shift once pressure is applied
with the spreader – this will prevent movement of the smear slide as the spreader moves along its surface.
Hold the spreader slide in your dominant hand with the frosted end closest to your palm – the frosted edge should not
make contact with the blood
Press the spreader slide against the smear slide just below (the side nearer the non-dominant hand) the blood drop so a
45° angle is created between the two slides – this angle provides acceptable smear length given the patient has an aver-
age or just below average hemoglobin.
Pull the spreader slide backwards towards the frosted end into the drop of blood incorporating the entire drop
Allow the drop to spread evenly along the length of the spreader’s edge – even spread allows for the “wedge-shape”
Push the spreader forward, away from the frosted end with even and consistent force – even and consistent motion cre-
ates clean smears.
Sara
Sticky Note
R1 thought this was excellent. Learner could watch, re-watch and pause easily.

10
Learner Participation Now that we have seen the demonstration, let’s all begin to familiarize ourselves with the feel and positioning materials.
[Provide students with complete patient samples]
I would like you to apply blood drops with both one and two applicator sticks so you can decide for yourself which you prefer.
Once you have a drop of blood on a slide, attempt to make a smear. I would like you to experiment with different angles of ap-
proach so that you can see for yourself the impact this has on the smear.
[As learners practice, observe their techniques. Ask them how they feel with the skill. Ask if they have questions or would like to
seen the demonstration again. Provide encouragement and recognition for good work. Gauge the activity level of the learners,
allow them with 5-10 minutes to manipulate the materials.]
Now that you are more comfortable with the tools and materials, I would like you to produce 5 acceptable smears.
[Leave the demonstration video available to be replayed through out the learners work so they can refer to it while they are
working on their attempts. Observe their attempts and offer guidance. Instruct leaners to set aside smears for evaluation. Once
all leaners have set aside at least two smears, begin to review the smears with them—prompting them for various criteria when
necessary. This process may take a while, allow them 10 minutes and request to move on. Further practice can be continued
later]
Now that we have some smears to use and some that we will not use, we can go through the next steps. For the smears that
you will not be using, they must be discarded in a “sharps” disposal container to prevent injury. Please discard your unaccepta-
ble smears now.
Select one of your acceptable smears. We can now label the smear. To do this, we will discard the applicator stick(s) into the
same “sharps” disposal, replace the cap on our sample tube, lay it down above the frosted tip of the slide so you can copy the
date, specimen number, and full name of the patient.
Once you have done this, the smear can be placed on the slide warmer to dry. This will prevent the development of artifact.
[Guide learners over to Midas Stainer]
Once the smears are dry, we can stain them. To do this: hold the stainer rack with the thick plastic portion at the top. Slide the
smear into the rack with the frosted tip at the top. Then, take our loaded rack and slide it on the stainer arm until it locks in
place. Remove the lids from the pots of stain, buffer, and methanol. On the number pad, press “run, 6, enter” to commence the
staining program. Once the staining program finishes your smears will be ready for microscopic review!
[Once instruction has been completed, allow learners the opportunity to continue to practice until they feel comfortable. For
learners that require extra guidance or further challenge, refer to the “Wrapping Up: Remediation and Enrichment” section.
Administer the summative assessment once the learner feels comfortable with the skill.]
Sara
Sticky Note
R3 would like to see even more pictures and examples.
Sara
Sticky Note
R1 thought this was a lot of material for 30-45 minutes
Sara
Sticky Note
R3 thought it might be a lot of work to complete in 30-45 minutes, especially if mastery is desired.
Sara
Sticky Note
R2 was not confident that learners would be able to master the task within allotted time. Less focus on theory?

11
Remediation and Enrichment
WRAPPING UP
Remediation If the learner is struggling to produce the smears, you can provide reinstruction working through the core applica-
tion and smear making steps (the steps in the instructional analysis) individually so that each is mastered independently.
This will help to identify the area that is causing the most difficulty for the learner and to break the task into smaller, more
manageable steps. The instructor can also show the learner different ways to anchor the slide, different styles of holding the
spreader, try using one applicator stick instead of two, etc.
Enrichment If the learner has mastered the skills with very little effort the instructor can present him/her with even more compli-
cated samples: samples that must be kept at 37° while attempting to make the smear, samples with less than 1 mL of vol-
ume, and samples with extremely elevated leukocyte counts. These samples provide a challenge to the most confident em-
ployees and will require a great deal more concentration and effort for the learner to master. Provide the learner with the
samples you selected prior to beginning instruction.
Post Instruction Activities
WIND DOWN
Once instruction and summative assessment are completed, document which MLA took part in the instruction and their suc-
cess. Archive patient samples that were selected for practice and enrichment. Clean up practice area; discard paper towel/
absorbent padding, dispose of sharps container, add slides and sticks to hematology bench stock.

12
Handouts
APPENDIX
Appendix A
Appendix B

13
Appendix E
Appendix C Smear Making without Troubleshooting
Appendix D Smear Making with Troubleshooting
14
Appendix G Video of the Smear Making Process
Appendix F

15
Summative Assessment Tools
ASSESSMENT TOOLS
Entry Skill Pretest Given the following pictures of a technologist in the process of creating a peripheral blood smear, state whether the technologist
is using the correct personal protective equipment for this task. If not, identify which pieces are not being used.
Given that blood smears are produced with glass slides, state how unacceptable smears should be discarded. How many pieces of identification are necessary to label a patient's blood smear? Provide examples of what information may be

16
Skill mastery requires “Yes” outcome for all behaviours in the task check list, correct identification of acceptable smears for #2, and
correct identification of flaws in #3.
Skills Checklist This test item will be administered as a practical demonstration of the learner’s skills. The learner will be asked to demonstrate,
from memory, the preparation of a blood smear. The learner is required to produce one acceptable smear before the conclusion
of the demonstration period. The learner will be allotted 15 minutes in which to complete this task.
Each “Yes” results in 1 point. Each “No” results in 0 points. Total of 35 points for this assessment.
Summative Assessment Tools

17

18

19

20
Short Answer Questions The following section will address the learner’s understanding of concepts required for decision making involved in this pro-
cess through short answer questions. Given the test paper and pen, the learner will be asked to complete the questions. The
learner will be given 30 minutes to complete this assessment.
2. For each of the smears depicted above: (10 points – 2 for each example smear)
A. State whether the smear is of acceptable quality.
B. Justify your answer.

21
3. (3 points)
A. Why is this smear unacceptable? Suggest possible CBC parameters which would cause this. Explain what steps you
may alter in your smear making process to correct for this flaw.
(3 points)
B. Why is this smear unacceptable? Suggest possible CBC parameters which would cause this. Explain what steps you
may alter in your smear making process to correct for this flaw.

22
ASSESSMENT ANSWER KEY
Entry Skills Pretest In the first image, the technologist is using all the appropriate personal protective equipment: gloves, lab coat, and face shield.
In the second image, the technologist is not using the face shield, but is using gloves and a lab coat.
In the third image, the technologist is only using the lab coat and not the gloves and face shield.
Glass slides and applicator sticks must be disposed of in puncture resistant containers to prevent other staff members from
accidental "stick" injuries.
Two pieces of patient information are required to safely label a blood smear. The patient's full name and specimen number can
be used.
Summative Assessment #2.
A. Unacceptable – too short, smear runs off side of slide
B. Acceptable – straight, even across bottom, good length, no tails or pooling
C. Unacceptable – too short, rounded bottom
D. Acceptable – straight, even across the bottom, good length, no tails or pooling
E. Unacceptable – significant pooling
#3 A. This smear is too short and the thin end is not even across the bottom. This patient likely has a high hemoglobin. In
order to produce an acceptable smear it will be necessary to decrease the angle of approach/increase drop size
#3 B. This smear is too long. This patient likely has a low hemoglobin. In order to make an acceptable smear it will be nec-
essary to increase the angle of approach/decrease drop size.