Event Management: Attendees - DonorPerfect - SofterWare
28
Event Management: Attendees DonorPerfect SofterWare, Inc. DonorPerfect Version 10.05 July 2009
-
Upload
khangminh22 -
Category
Documents
-
view
1 -
download
0
Transcript of Event Management: Attendees - DonorPerfect - SofterWare

Event Management: Attendees DonorPerfect
SofterWare, Inc.
DonorPerfect Version 10.05
July 2009
DonorPerfect Table of Contents
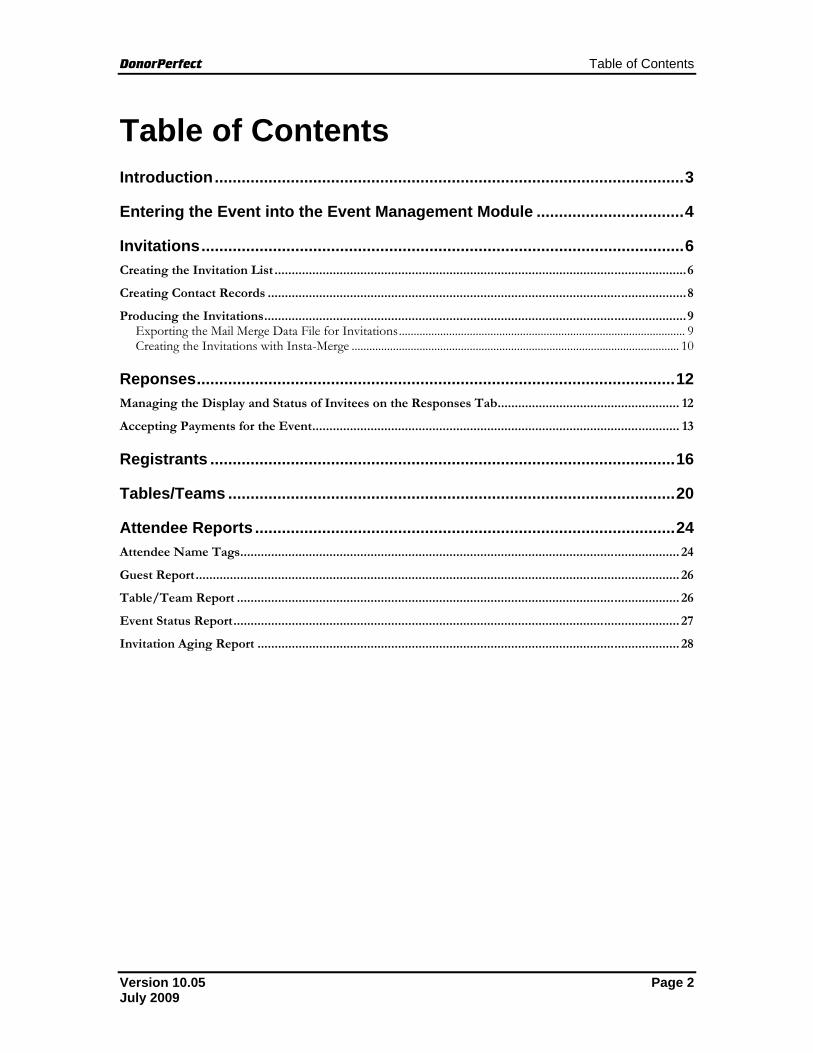
Table of Contents Introduction.........................................................................................................3
Entering the Event into the Event Management Module .................................4
Invitations............................................................................................................6 Creating the Invitation List ........................................................................................................................6 Creating Contact Records ..........................................................................................................................8 Producing the Invitations...........................................................................................................................9
Exporting the Mail Merge Data File for Invitations................................................................................................. 9 Creating the Invitations with Insta-Merge ............................................................................................................... 10
Reponses...........................................................................................................12 Managing the Display and Status of Invitees on the Responses Tab..................................................... 12 Accepting Payments for the Event........................................................................................................... 13
Registrants ........................................................................................................16
Tables/Teams ....................................................................................................20
Attendee Reports ..............................................................................................24 Attendee Name Tags................................................................................................................................ 24 Guest Report............................................................................................................................................. 26 Table/Team Report ................................................................................................................................. 26 Event Status Report.................................................................................................................................. 27 Invitation Aging Report ........................................................................................................................... 28
Version 10.05 Page 2 July 2009
DonorPerfect Introduction
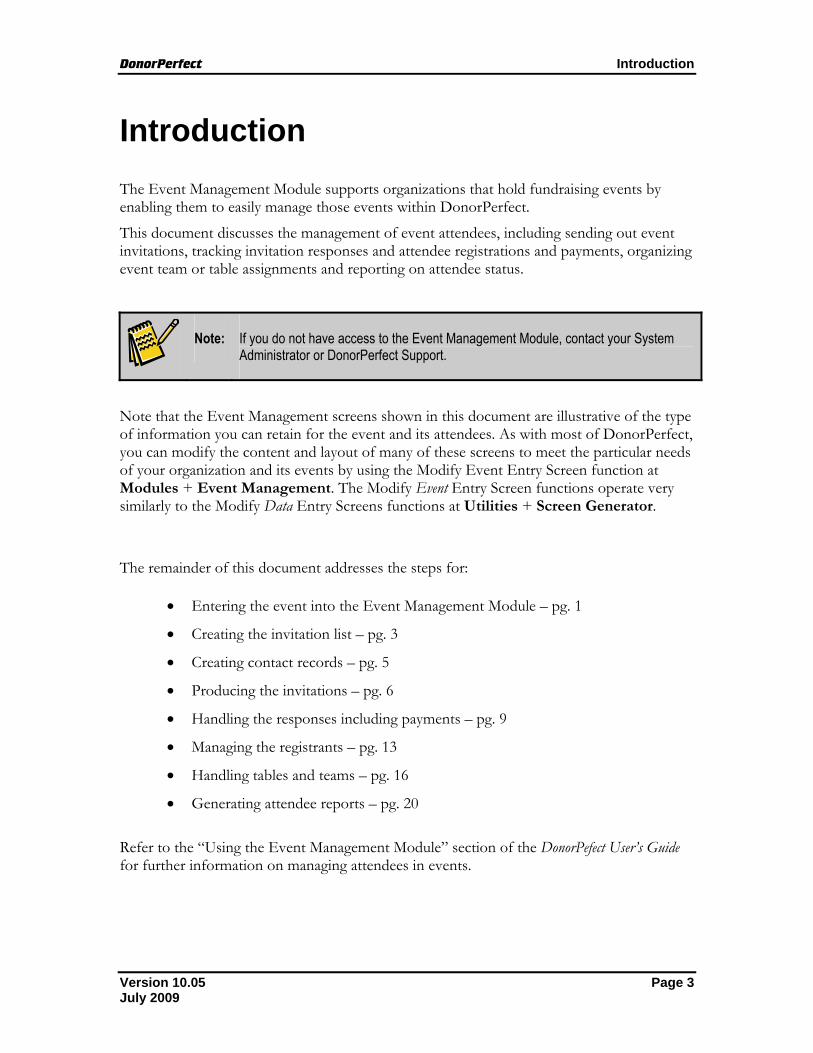
Introduction The Event Management Module supports organizations that hold fundraising events by enabling them to easily manage those events within DonorPerfect.
This document discusses the management of event attendees, including sending out event invitations, tracking invitation responses and attendee registrations and payments, organizing event team or table assignments and reporting on attendee status.
Note: If you do not have access to the Event Management Module, contact your System Administrator or DonorPerfect Support.
Note that the Event Management screens shown in this document are illustrative of the type of information you can retain for the event and its attendees. As with most of DonorPerfect, you can modify the content and layout of many of these screens to meet the particular needs of your organization and its events by using the Modify Event Entry Screen function at Modules + Event Management. The Modify Event Entry Screen functions operate very similarly to the Modify Data Entry Screens functions at Utilities + Screen Generator.
The remainder of this document addresses the steps for:
• Entering the event into the Event Management Module – pg. 1
• Creating the invitation list – pg. 3
• Creating contact records – pg. 5
• Producing the invitations – pg. 6
• Handling the responses including payments – pg. 9
• Managing the registrants – pg. 13
• Handling tables and teams – pg. 16
• Generating attendee reports – pg. 20
Refer to the “Using the Event Management Module” section of the DonorPefect User’s Guide for further information on managing attendees in events.
Version 10.05 Page 3 July 2009
DonorPerfect Entering the Event into the Event Management Module
Entering the Event into the Event Management Module The first step in managing event attendees is to add the event in the Event Management Module.
► To enter a new event into the event management module 1. Click Modules + Event Management + Manage Events to
open the Manage Event screen where all of the existing events are listed.
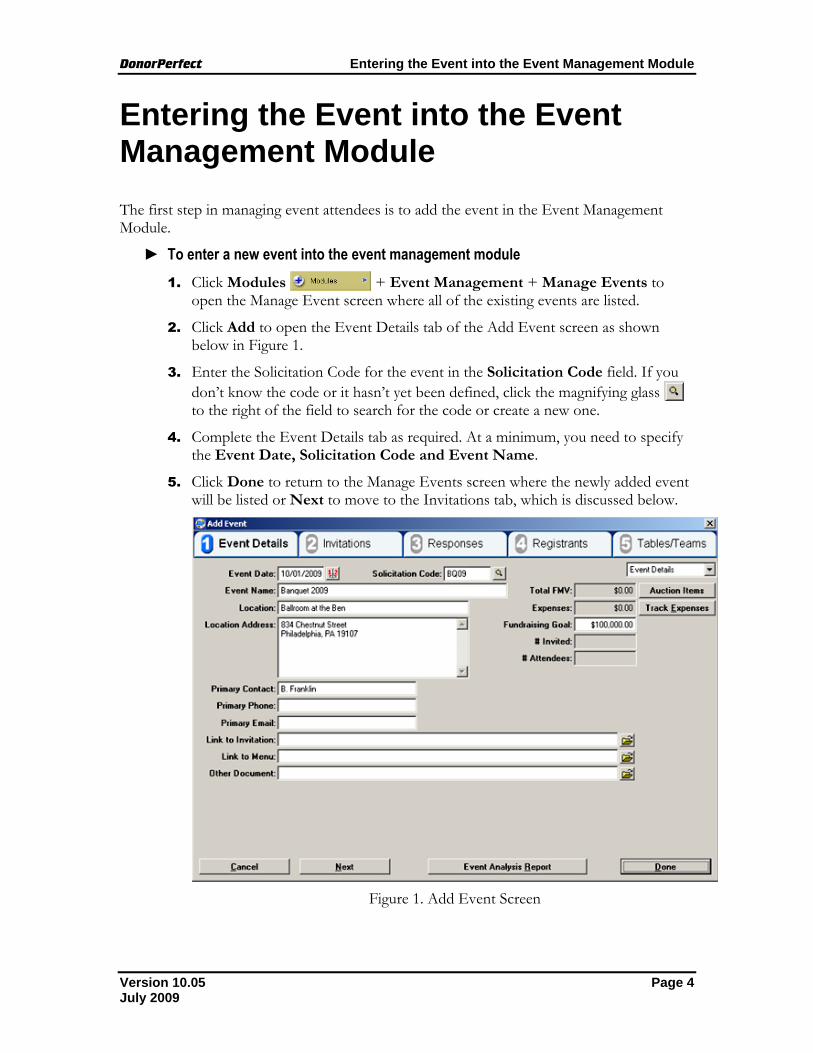
2. Click Add to open the Event Details tab of the Add Event screen as shown below in Figure 1.
3. Enter the Solicitation Code for the event in the Solicitation Code field. If you don’t know the code or it hasn’t yet been defined, click the magnifying glass to the right of the field to search for the code or create a new one.
4. Complete the Event Details tab as required. At a minimum, you need to specify the Event Date, Solicitation Code and Event Name.
5. Click Done to return to the Manage Events screen where the newly added event will be listed or Next to move to the Invitations tab, which is discussed below.
Figure 1. Add Event Screen
Version 10.05 Page 4 July 2009
DonorPerfect Entering the Event into the Event Management Module
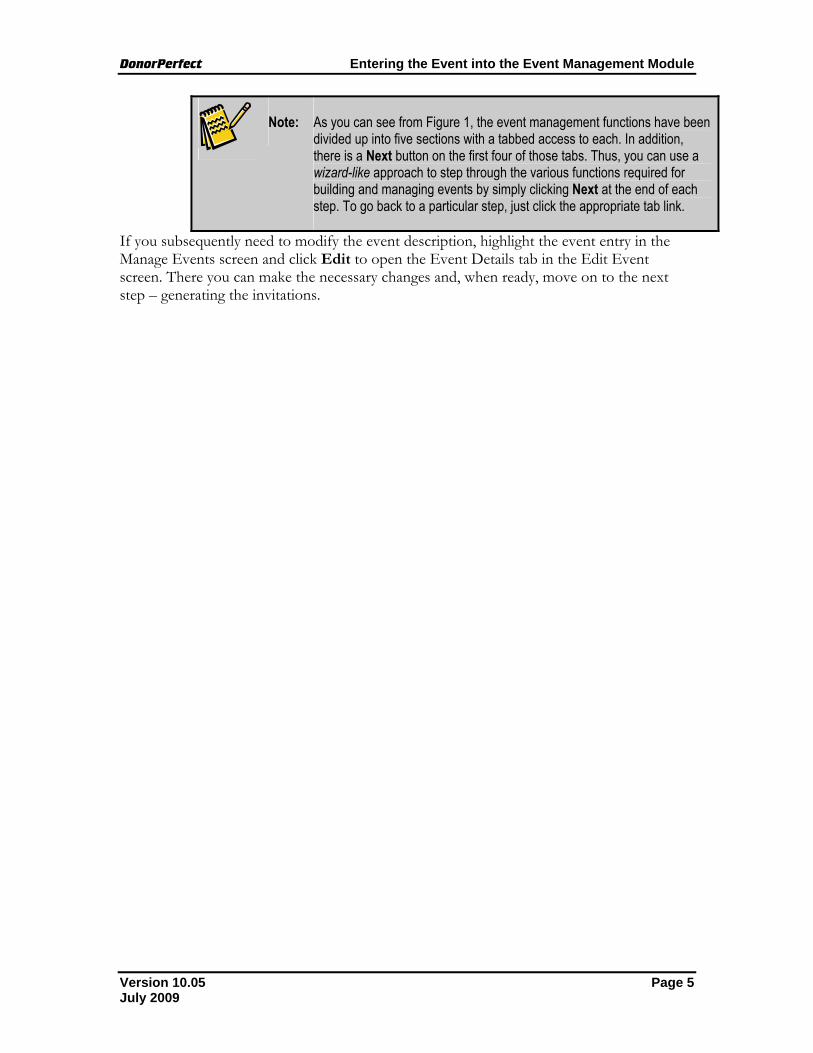
Note: As you can see from Figure 1, the event management functions have been divided up into five sections with a tabbed access to each. In addition, there is a Next button on the first four of those tabs. Thus, you can use a wizard-like approach to step through the various functions required for building and managing events by simply clicking Next at the end of each step. To go back to a particular step, just click the appropriate tab link.
If you subsequently need to modify the event description, highlight the event entry in the Manage Events screen and click Edit to open the Event Details tab in the Edit Event screen. There you can make the necessary changes and, when ready, move on to the next step – generating the invitations.
Version 10.05 Page 5 July 2009
DonorPerfect Invitations
Invitations Once you have added a new event to the system, your next step is to send out invitations to your constituents. The list of invitees and the mail merge data file for producing the invitations or the invitations themselves are all created within the Invitations tab of the Event Management Module.
Creating the Invitation List The event invitees will be drawn from your constituent database based on the action you take in the Invitations tab of the Add/Edit Event screen.
► To create the invitation list 1. Click Modules + Event Management + Manage Events to
open the Manage Events screen.
2. Highlight the event and click Edit to open the Edit Event screen.
3. Click the Invitations tab to open a blank Invitations screen as shown below in Figure 2.
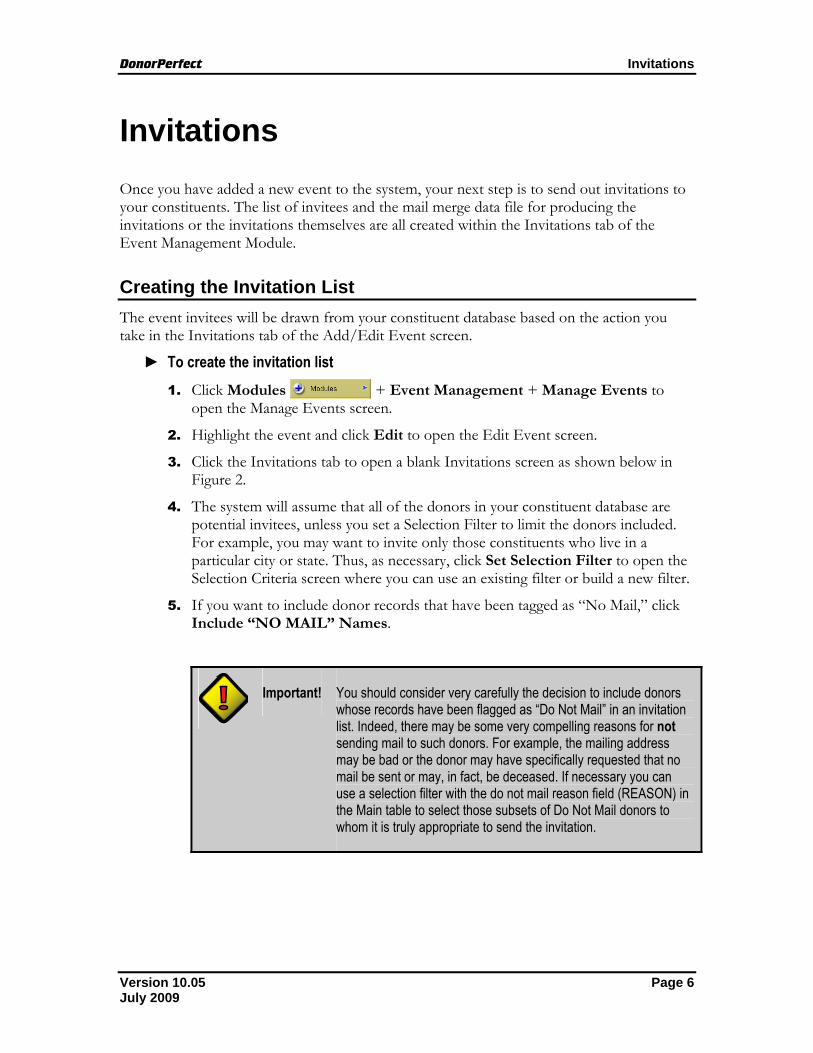
4. The system will assume that all of the donors in your constituent database are potential invitees, unless you set a Selection Filter to limit the donors included. For example, you may want to invite only those constituents who live in a particular city or state. Thus, as necessary, click Set Selection Filter to open the Selection Criteria screen where you can use an existing filter or build a new filter.
5. If you want to include donor records that have been tagged as “No Mail,” click Include “NO MAIL” Names.
Important! You should consider very carefully the decision to include donors whose records have been flagged as “Do Not Mail” in an invitation list. Indeed, there may be some very compelling reasons for not sending mail to such donors. For example, the mailing address may be bad or the donor may have specifically requested that no mail be sent or may, in fact, be deceased. If necessary you can use a selection filter with the do not mail reason field (REASON) in the Main table to select those subsets of Do Not Mail donors to whom it is truly appropriate to send the invitation.
Version 10.05 Page 6 July 2009
DonorPerfect Invitations
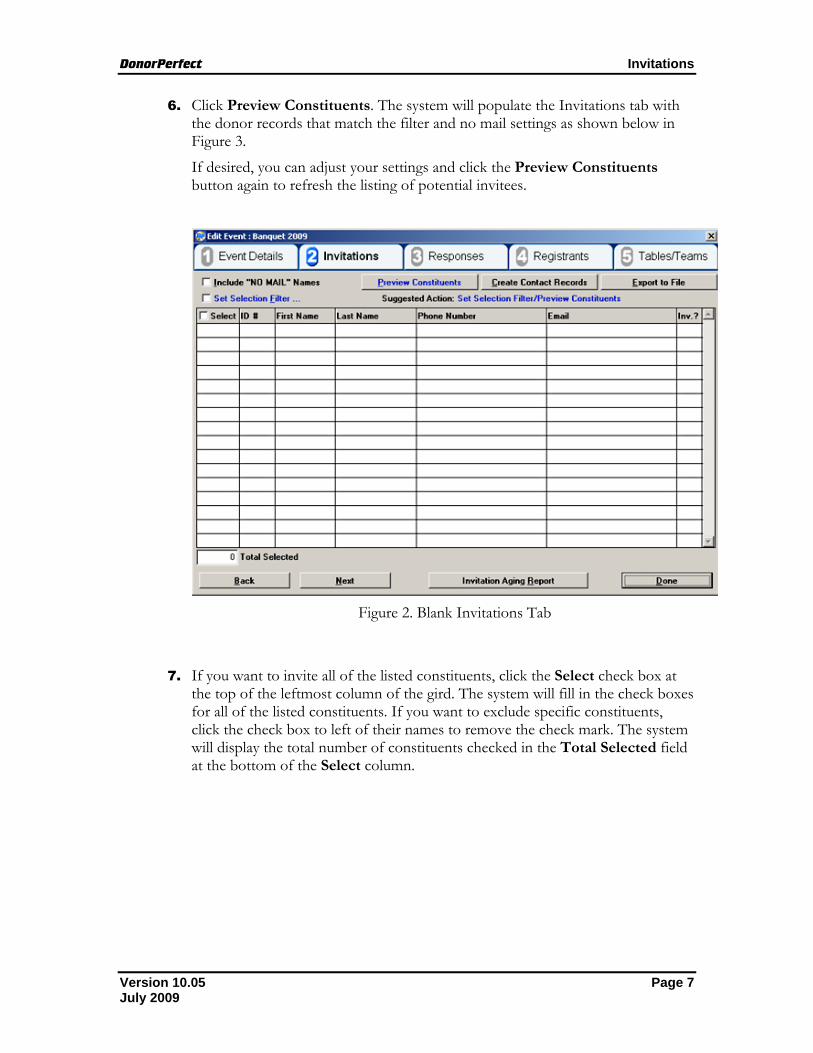
6. Click Preview Constituents. The system will populate the Invitations tab with the donor records that match the filter and no mail settings as shown below in Figure 3.
If desired, you can adjust your settings and click the Preview Constituents button again to refresh the listing of potential invitees.
Figure 2. Blank Invitations Tab
7. If you want to invite all of the listed constituents, click the Select check box at the top of the leftmost column of the gird. The system will fill in the check boxes for all of the listed constituents. If you want to exclude specific constituents, click the check box to left of their names to remove the check mark. The system will display the total number of constituents checked in the Total Selected field at the bottom of the Select column.
Version 10.05 Page 7 July 2009
DonorPerfect Invitations
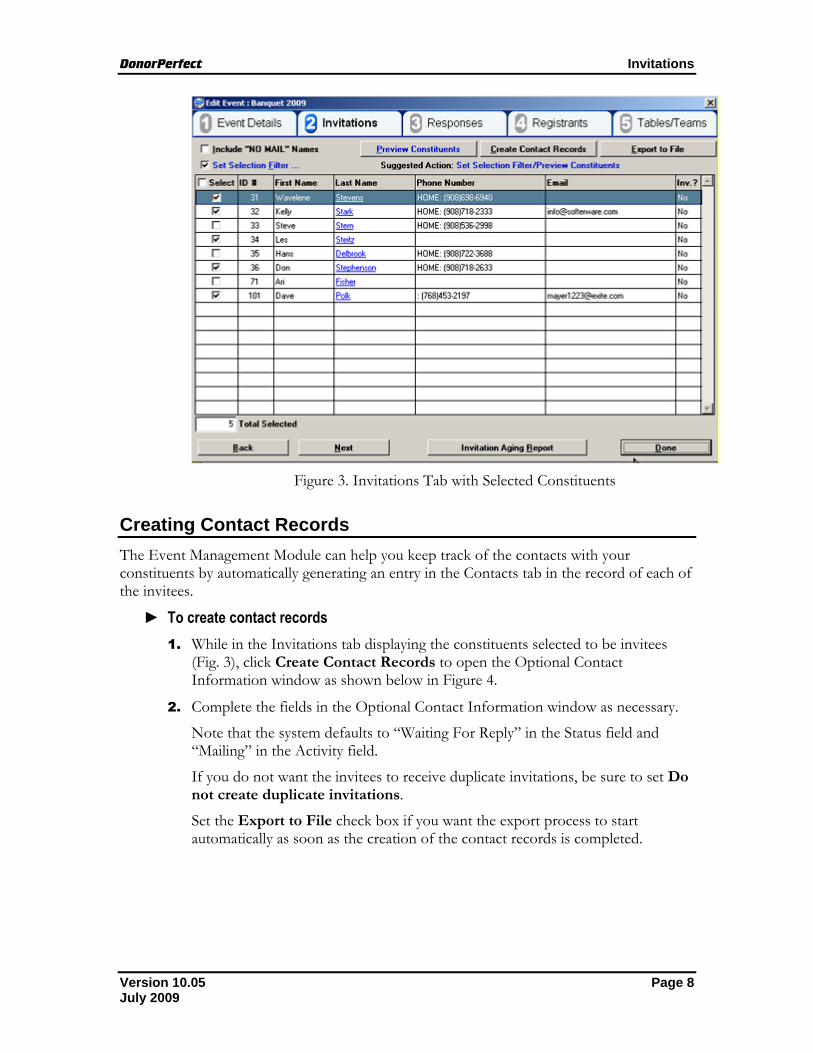
Figure 3. Invitations Tab with Selected Constituents
Creating Contact Records The Event Management Module can help you keep track of the contacts with your constituents by automatically generating an entry in the Contacts tab in the record of each of the invitees.
► To create contact records 1. While in the Invitations tab displaying the constituents selected to be invitees
(Fig. 3), click Create Contact Records to open the Optional Contact Information window as shown below in Figure 4.
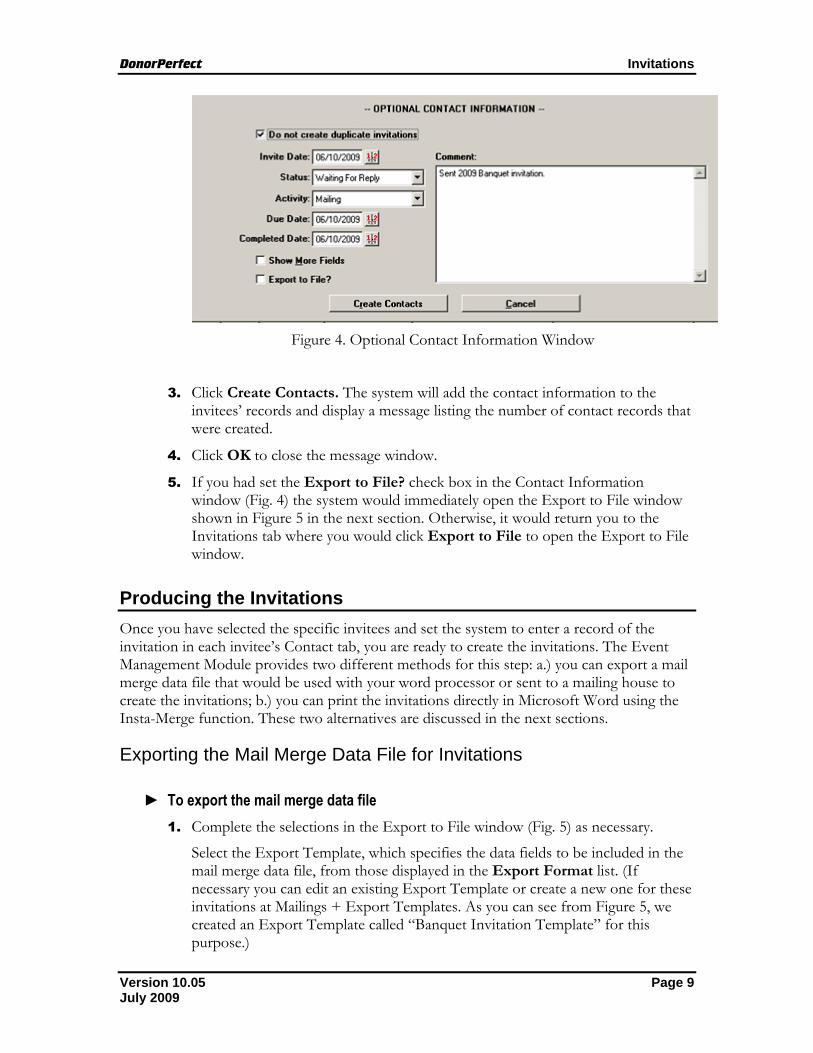
2. Complete the fields in the Optional Contact Information window as necessary.
Note that the system defaults to “Waiting For Reply” in the Status field and “Mailing” in the Activity field.
If you do not want the invitees to receive duplicate invitations, be sure to set Do not create duplicate invitations.
Set the Export to File check box if you want the export process to start automatically as soon as the creation of the contact records is completed.
Version 10.05 Page 8 July 2009
DonorPerfect Invitations
Figure 4. Optional Contact Information Window
3. Click Create Contacts. The system will add the contact information to the invitees’ records and display a message listing the number of contact records that were created.
4. Click OK to close the message window.
5. If you had set the Export to File? check box in the Contact Information window (Fig. 4) the system would immediately open the Export to File window shown in Figure 5 in the next section. Otherwise, it would return you to the Invitations tab where you would click Export to File to open the Export to File window.
Producing the Invitations Once you have selected the specific invitees and set the system to enter a record of the invitation in each invitee’s Contact tab, you are ready to create the invitations. The Event Management Module provides two different methods for this step: a.) you can export a mail merge data file that would be used with your word processor or sent to a mailing house to create the invitations; b.) you can print the invitations directly in Microsoft Word using the Insta-Merge function. These two alternatives are discussed in the next sections.
Exporting the Mail Merge Data File for Invitations
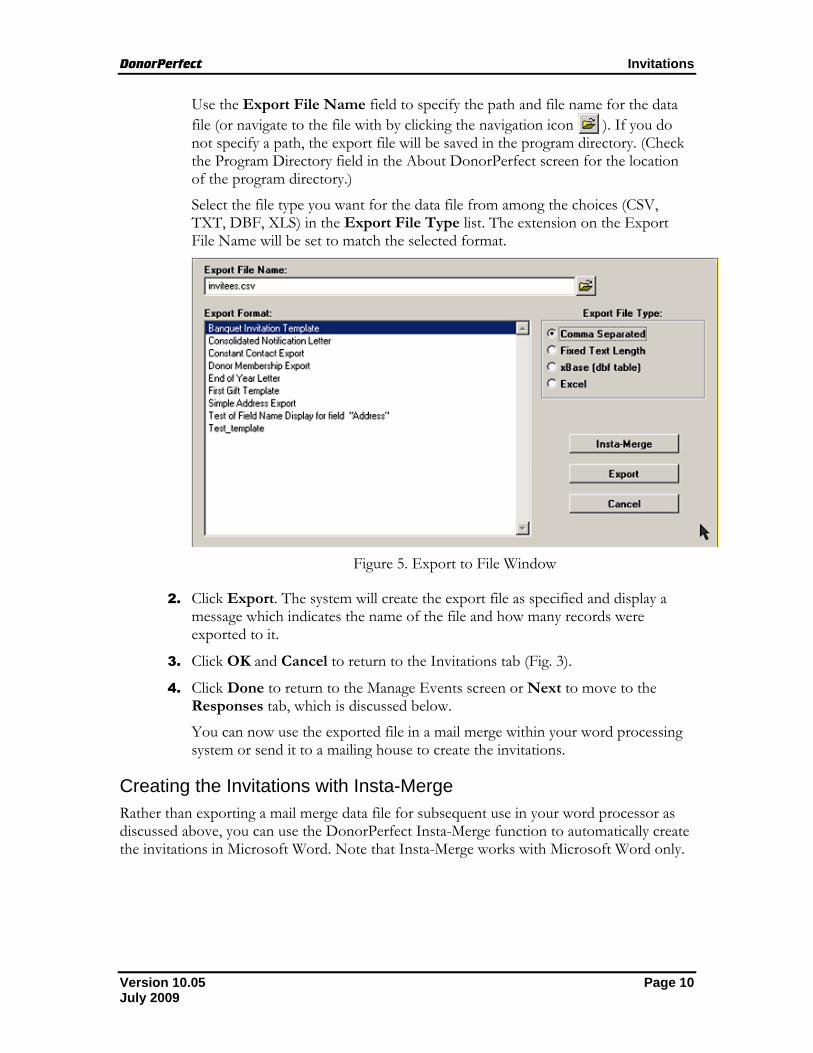
► To export the mail merge data file 1. Complete the selections in the Export to File window (Fig. 5) as necessary.
Select the Export Template, which specifies the data fields to be included in the mail merge data file, from those displayed in the Export Format list. (If necessary you can edit an existing Export Template or create a new one for these invitations at Mailings + Export Templates. As you can see from Figure 5, we created an Export Template called “Banquet Invitation Template” for this purpose.)
Version 10.05 Page 9 July 2009
DonorPerfect Invitations
Use the Export File Name field to specify the path and file name for the data file (or navigate to the file with by clicking the navigation icon ). If you do not specify a path, the export file will be saved in the program directory. (Check the Program Directory field in the About DonorPerfect screen for the location of the program directory.)
Select the file type you want for the data file from among the choices (CSV, TXT, DBF, XLS) in the Export File Type list. The extension on the Export File Name will be set to match the selected format.
Figure 5. Export to File Window
2. Click Export. The system will create the export file as specified and display a message which indicates the name of the file and how many records were exported to it.
3. Click OK and Cancel to return to the Invitations tab (Fig. 3).
4. Click Done to return to the Manage Events screen or Next to move to the Responses tab, which is discussed below.
You can now use the exported file in a mail merge within your word processing system or send it to a mailing house to create the invitations.
Creating the Invitations with Insta-Merge Rather than exporting a mail merge data file for subsequent use in your word processor as discussed above, you can use the DonorPerfect Insta-Merge function to automatically create the invitations in Microsoft Word. Note that Insta-Merge works with Microsoft Word only.
Version 10.05 Page 10 July 2009
DonorPerfect Invitations
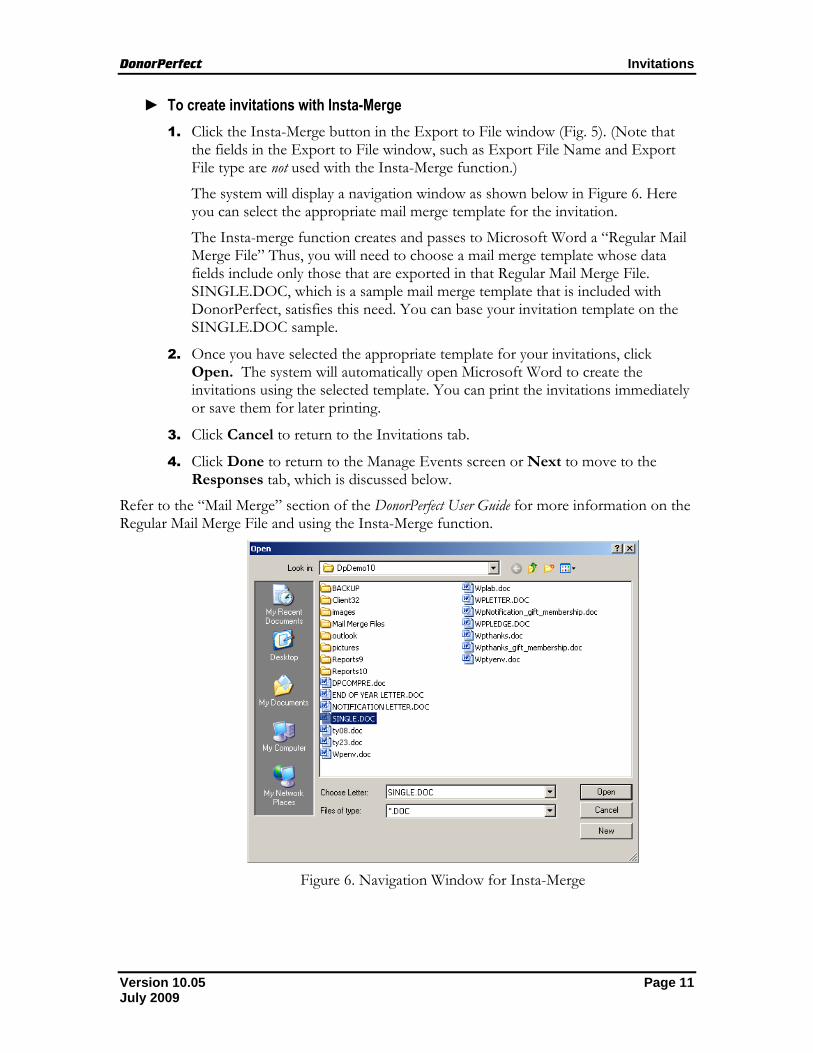
► To create invitations with Insta-Merge 1. Click the Insta-Merge button in the Export to File window (Fig. 5). (Note that
the fields in the Export to File window, such as Export File Name and Export File type are not used with the Insta-Merge function.)
The system will display a navigation window as shown below in Figure 6. Here you can select the appropriate mail merge template for the invitation.
The Insta-merge function creates and passes to Microsoft Word a “Regular Mail Merge File” Thus, you will need to choose a mail merge template whose data fields include only those that are exported in that Regular Mail Merge File. SINGLE.DOC, which is a sample mail merge template that is included with DonorPerfect, satisfies this need. You can base your invitation template on the SINGLE.DOC sample.
2. Once you have selected the appropriate template for your invitations, click Open. The system will automatically open Microsoft Word to create the invitations using the selected template. You can print the invitations immediately or save them for later printing.
3. Click Cancel to return to the Invitations tab.
4. Click Done to return to the Manage Events screen or Next to move to the Responses tab, which is discussed below.
Refer to the “Mail Merge” section of the DonorPerfect User Guide for more information on the Regular Mail Merge File and using the Insta-Merge function.
Figure 6. Navigation Window for Insta-Merge
Version 10.05 Page 11 July 2009
DonorPerfect Reponses
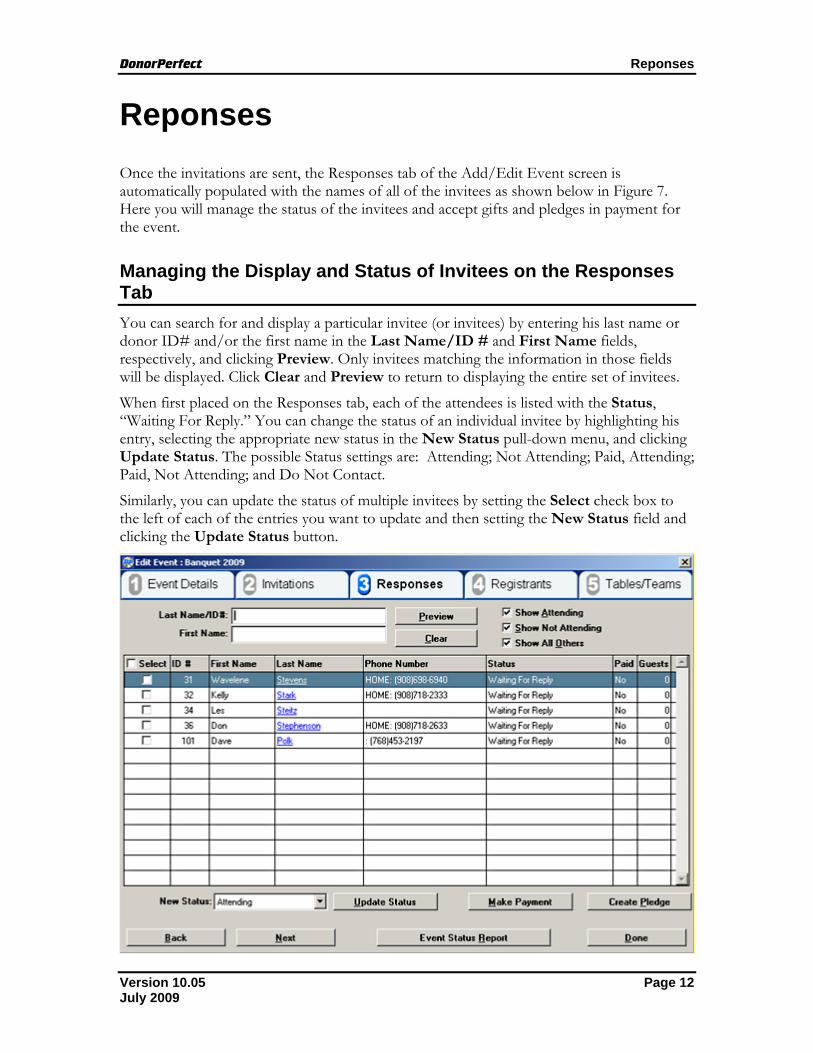
Reponses Once the invitations are sent, the Responses tab of the Add/Edit Event screen is automatically populated with the names of all of the invitees as shown below in Figure 7. Here you will manage the status of the invitees and accept gifts and pledges in payment for the event.
Managing the Display and Status of Invitees on the Responses Tab You can search for and display a particular invitee (or invitees) by entering his last name or donor ID# and/or the first name in the Last Name/ID # and First Name fields, respectively, and clicking Preview. Only invitees matching the information in those fields will be displayed. Click Clear and Preview to return to displaying the entire set of invitees.
When first placed on the Responses tab, each of the attendees is listed with the Status, “Waiting For Reply.” You can change the status of an individual invitee by highlighting his entry, selecting the appropriate new status in the New Status pull-down menu, and clicking Update Status. The possible Status settings are: Attending; Not Attending; Paid, Attending; Paid, Not Attending; and Do Not Contact.
Similarly, you can update the status of multiple invitees by setting the Select check box to the left of each of the entries you want to update and then setting the New Status field and clicking the Update Status button.
Version 10.05 Page 12 July 2009
DonorPerfect Reponses
Figure 7. Responses Tab
You can further control the set of invitees displayed by setting any of the three check boxes, Show Attending, Show Not Attending, and Show All Others, as needed, and clicking Preview.
• Show Attending will cause those invitees with a status of Attending or Paid, Attending to be included in the display.
• Show Not Attending will cause those invitees with a status of Not Attending or Paid, Not Attending to be included in the display.
Show All Others will cause those invitees with a status of Waiting for Reply or Do Not Contact to be included in the display.
Accepting Payments for the Event Payments for the event are accepted from the invitees in the Responses tab. Such payments are then automatically recorded in the invitees’ donor records as gifts or pledges, as appropriate.
► To accept a payment 1. Set the check box to the left of the invitee making the payment and click Make
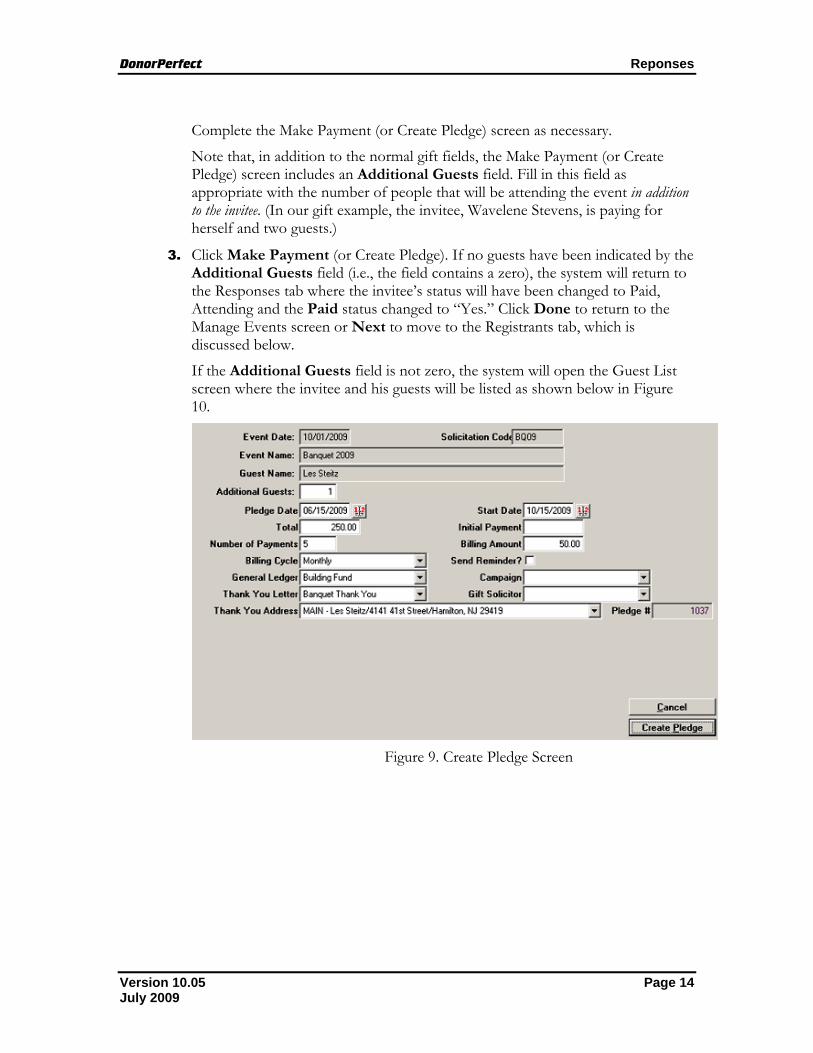
Payment. (If the donor is paying by making a pledge rather than an outright gift, click Create Pledge.)
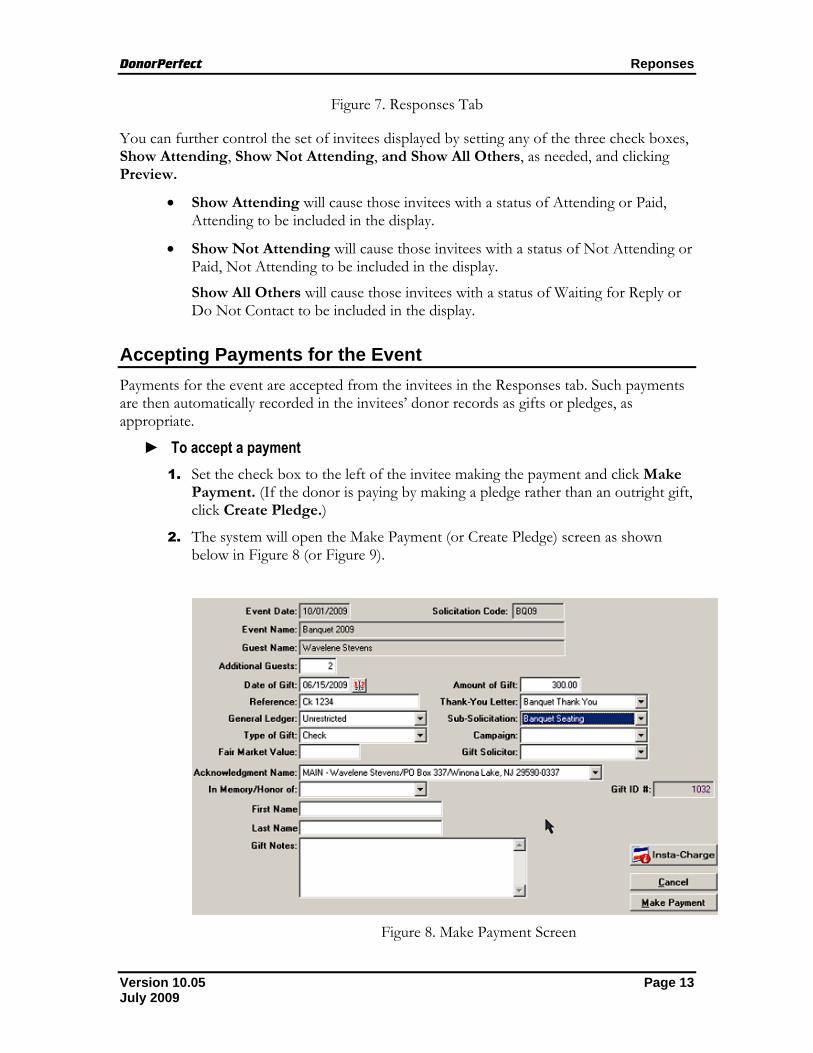
2. The system will open the Make Payment (or Create Pledge) screen as shown below in Figure 8 (or Figure 9).
Figure 8. Make Payment Screen
Version 10.05 Page 13 July 2009
DonorPerfect Reponses
Complete the Make Payment (or Create Pledge) screen as necessary.
Note that, in addition to the normal gift fields, the Make Payment (or Create Pledge) screen includes an Additional Guests field. Fill in this field as appropriate with the number of people that will be attending the event in addition to the invitee. (In our gift example, the invitee, Wavelene Stevens, is paying for herself and two guests.)
3. Click Make Payment (or Create Pledge). If no guests have been indicated by the Additional Guests field (i.e., the field contains a zero), the system will return to the Responses tab where the invitee’s status will have been changed to Paid, Attending and the Paid status changed to “Yes.” Click Done to return to the Manage Events screen or Next to move to the Registrants tab, which is discussed below.
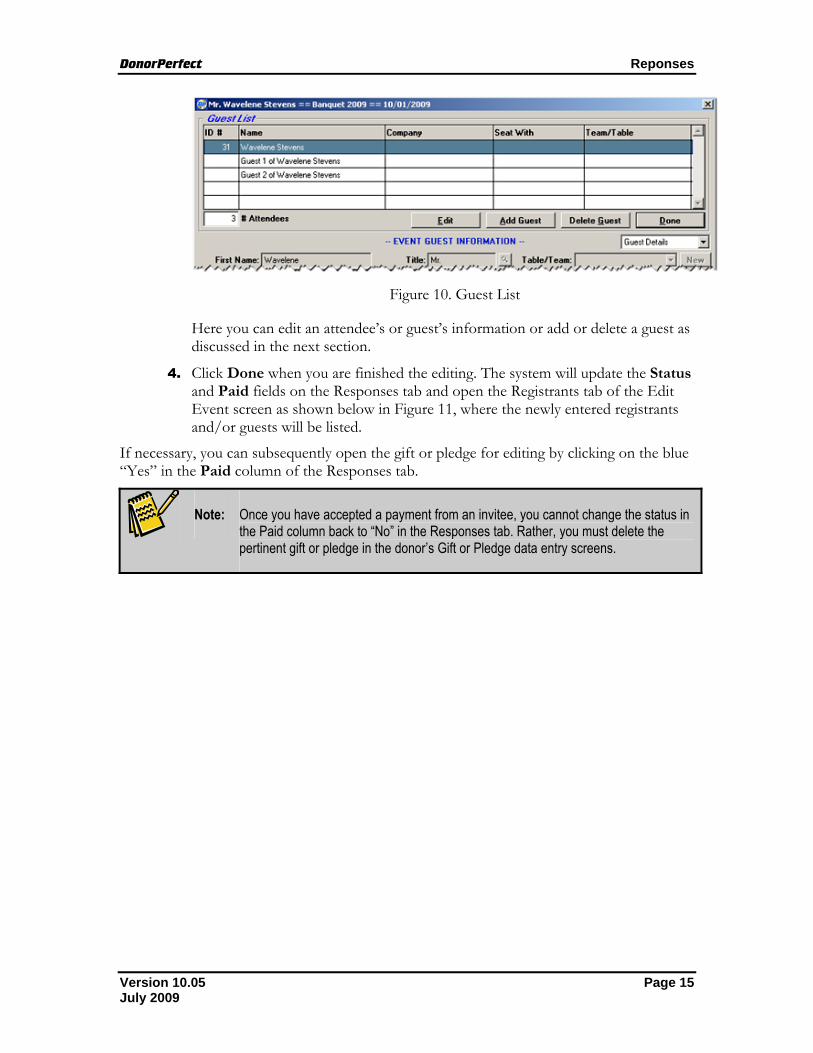
If the Additional Guests field is not zero, the system will open the Guest List screen where the invitee and his guests will be listed as shown below in Figure 10.
Figure 9. Create Pledge Screen
Version 10.05 Page 14 July 2009
DonorPerfect Reponses
Figure 10. Guest List
Here you can edit an attendee’s or guest’s information or add or delete a guest as discussed in the next section.
4. Click Done when you are finished the editing. The system will update the Status and Paid fields on the Responses tab and open the Registrants tab of the Edit Event screen as shown below in Figure 11, where the newly entered registrants and/or guests will be listed.
If necessary, you can subsequently open the gift or pledge for editing by clicking on the blue “Yes” in the Paid column of the Responses tab.
Note: Once you have accepted a payment from an invitee, you cannot change the status in
the Paid column back to “No” in the Responses tab. Rather, you must delete the pertinent gift or pledge in the donor’s Gift or Pledge data entry screens.
Version 10.05 Page 15 July 2009
DonorPerfect Registrants
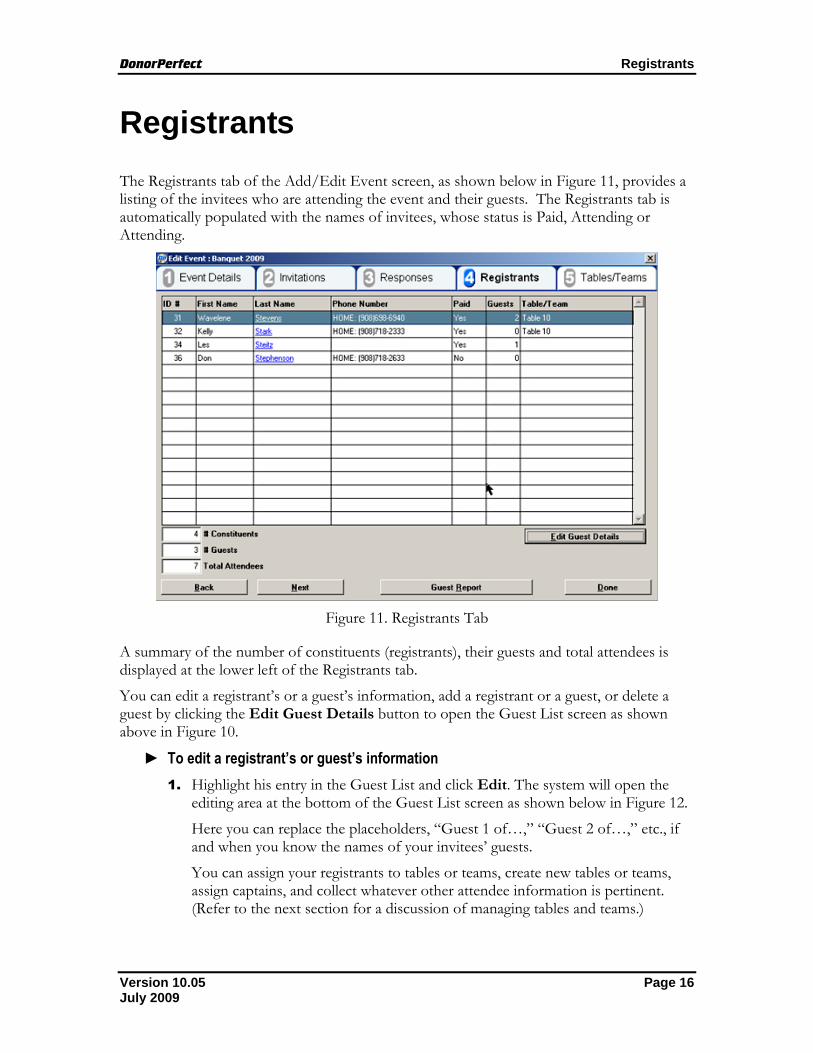
Registrants The Registrants tab of the Add/Edit Event screen, as shown below in Figure 11, provides a listing of the invitees who are attending the event and their guests. The Registrants tab is automatically populated with the names of invitees, whose status is Paid, Attending or Attending.
Figure 11. Registrants Tab
A summary of the number of constituents (registrants), their guests and total attendees is displayed at the lower left of the Registrants tab.
You can edit a registrant’s or a guest’s information, add a registrant or a guest, or delete a guest by clicking the Edit Guest Details button to open the Guest List screen as shown above in Figure 10.
► To edit a registrant’s or guest’s information 1. Highlight his entry in the Guest List and click Edit. The system will open the
editing area at the bottom of the Guest List screen as shown below in Figure 12.
Here you can replace the placeholders, “Guest 1 of…,” “Guest 2 of…,” etc., if and when you know the names of your invitees’ guests.
You can assign your registrants to tables or teams, create new tables or teams, assign captains, and collect whatever other attendee information is pertinent. (Refer to the next section for a discussion of managing tables and teams.)
Version 10.05 Page 16 July 2009
DonorPerfect Registrants
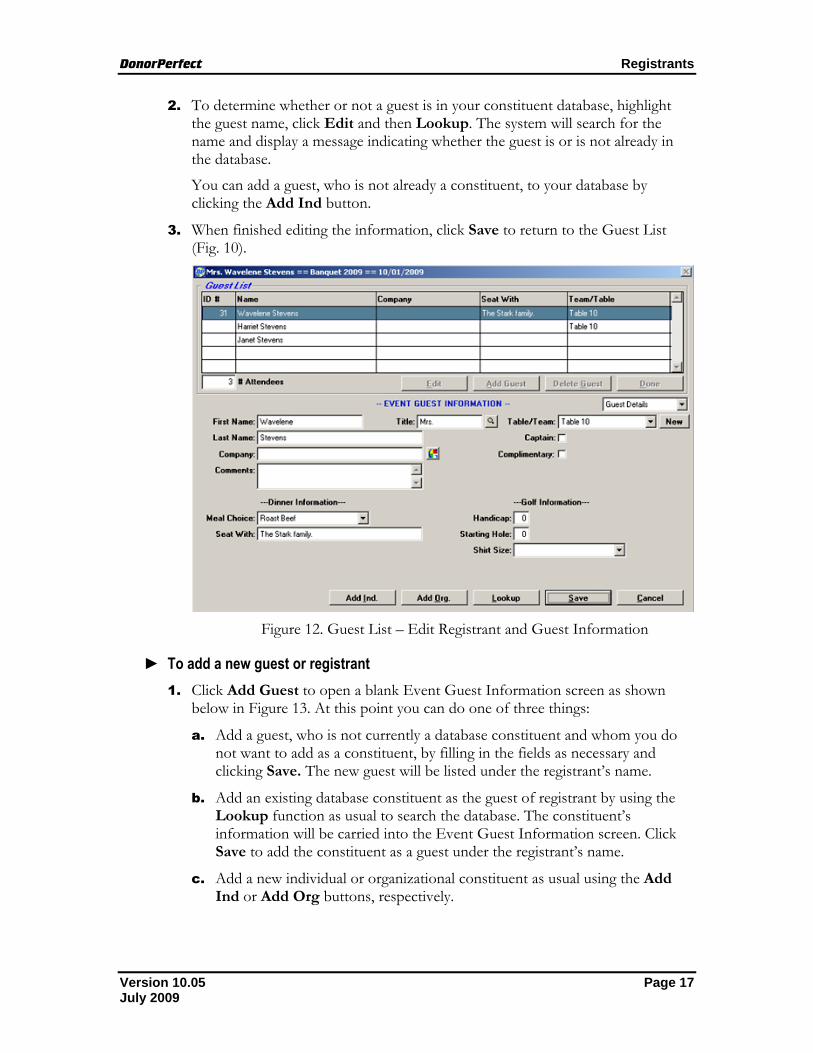
2. To determine whether or not a guest is in your constituent database, highlight the guest name, click Edit and then Lookup. The system will search for the name and display a message indicating whether the guest is or is not already in the database.
You can add a guest, who is not already a constituent, to your database by clicking the Add Ind button.
3. When finished editing the information, click Save to return to the Guest List (Fig. 10).
Figure 12. Guest List – Edit Registrant and Guest Information
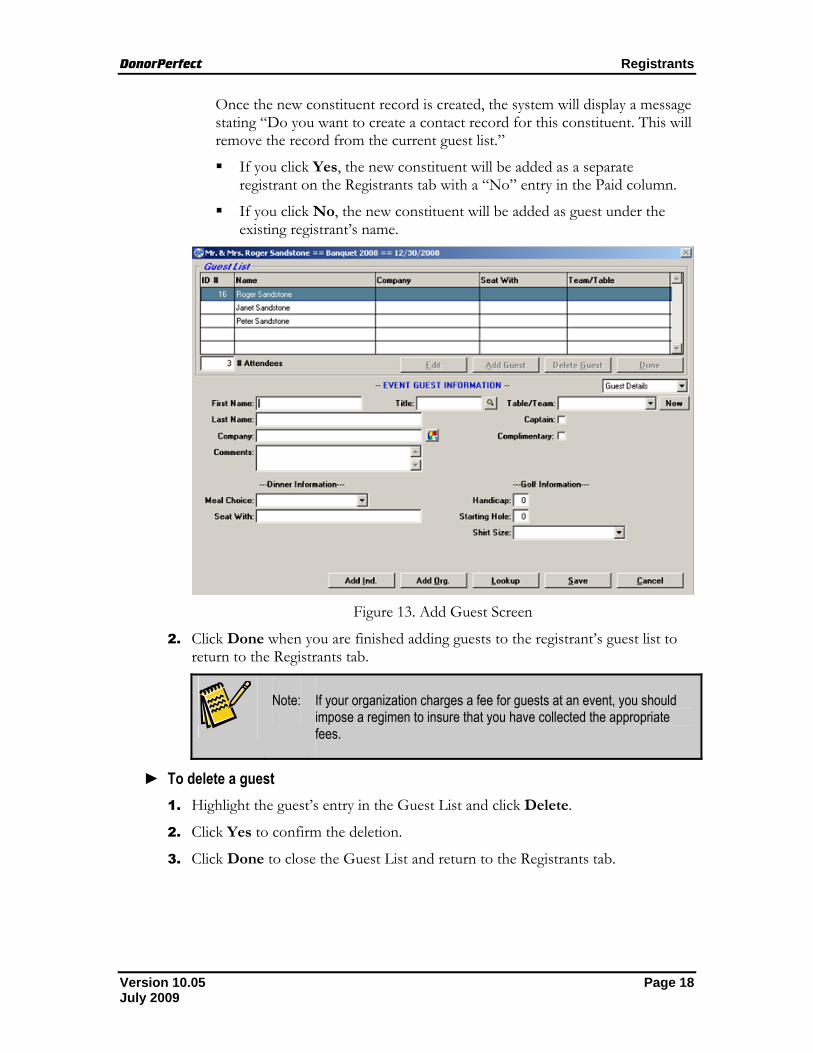
► To add a new guest or registrant 1. Click Add Guest to open a blank Event Guest Information screen as shown
below in Figure 13. At this point you can do one of three things:
a. Add a guest, who is not currently a database constituent and whom you do not want to add as a constituent, by filling in the fields as necessary and clicking Save. The new guest will be listed under the registrant’s name.
b. Add an existing database constituent as the guest of registrant by using the Lookup function as usual to search the database. The constituent’s information will be carried into the Event Guest Information screen. Click Save to add the constituent as a guest under the registrant’s name.
c. Add a new individual or organizational constituent as usual using the Add Ind or Add Org buttons, respectively.
Version 10.05 Page 17 July 2009
DonorPerfect Registrants
Once the new constituent record is created, the system will display a message stating “Do you want to create a contact record for this constituent. This will remove the record from the current guest list.”
If you click Yes, the new constituent will be added as a separate registrant on the Registrants tab with a “No” entry in the Paid column.
If you click No, the new constituent will be added as guest under the existing registrant’s name.
Figure 13. Add Guest Screen
2. Click Done when you are finished adding guests to the registrant’s guest list to return to the Registrants tab.
Note: If your organization charges a fee for guests at an event, you should impose a regimen to insure that you have collected the appropriate fees.
► To delete a guest 1. Highlight the guest’s entry in the Guest List and click Delete.
2. Click Yes to confirm the deletion.
3. Click Done to close the Guest List and return to the Registrants tab.
Version 10.05 Page 18 July 2009
DonorPerfect Registrants
Note: You can delete a registrant’s guests in the Guest List screen. However, you cannot delete the registrant himself. Rather, to delete the registrant you must change his status from Attending or Paid, Attending to some non-attending status in the Responses tab.
When you are finished editing registrants, click Done to return to the Manage Events screen or Next to open the Tables/Teams tab.
Version 10.05 Page 19 July 2009
DonorPerfect Tables/Teams
Tables/Teams As you add attendees – registrants and their guests – in the Responses or Registrants tabs, you have the option to assign them to tables or teams. However, if you have not already done so, you can make these assignments in the Tables/Teams tab, as shown below in Figure 14. In addition, the Tables/Teams tab enables you to view, edit and delete existing tables/teams, add new tables/teams, and manage the assignment of attendees to tables/teams.
Note that there is no functional difference between a “table” and a “team;” both are simply devices for identifying and managing groups of attendees.
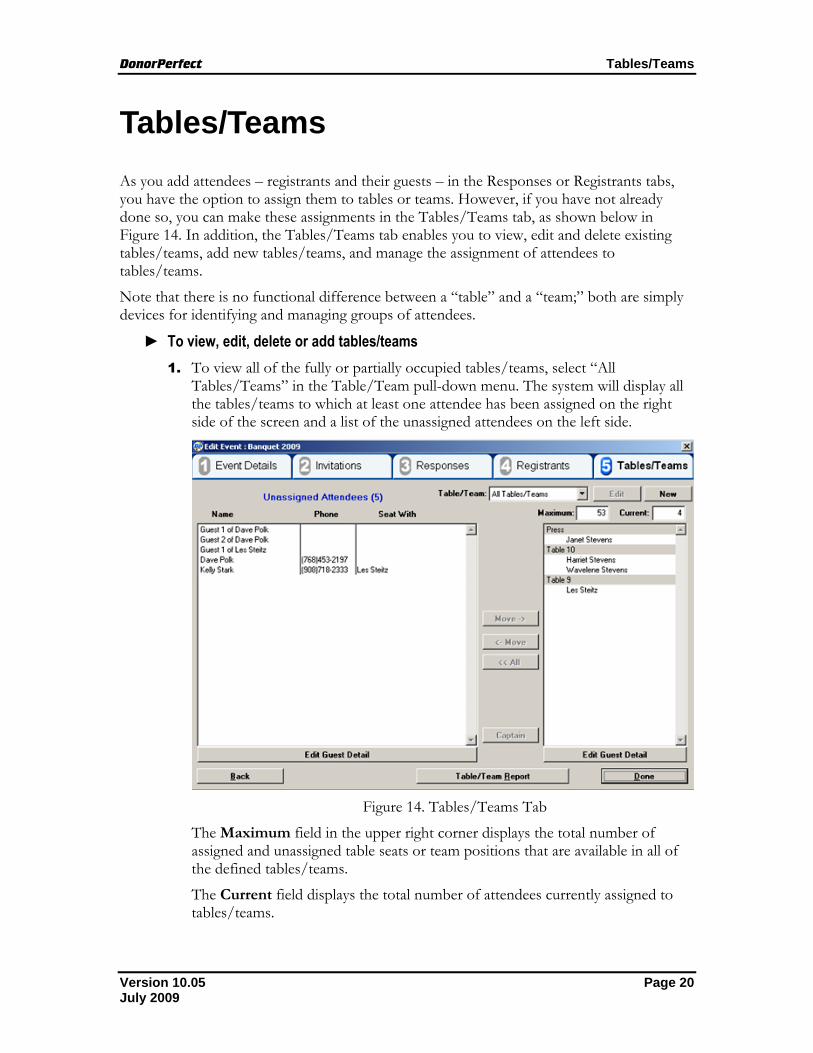
► To view, edit, delete or add tables/teams 1. To view all of the fully or partially occupied tables/teams, select “All
Tables/Teams” in the Table/Team pull-down menu. The system will display all the tables/teams to which at least one attendee has been assigned on the right side of the screen and a list of the unassigned attendees on the left side.
Figure 14. Tables/Teams Tab
The Maximum field in the upper right corner displays the total number of assigned and unassigned table seats or team positions that are available in all of the defined tables/teams.
The Current field displays the total number of attendees currently assigned to tables/teams.
Version 10.05 Page 20 July 2009

DonorPerfect Tables/Teams
2. To view an individual table/team, select that table/team in the Table/Team pull-down. The system will display the attendees that have been assigned to the selected table/team, if any, on the right side or the tab and the unassigned attendees on the left.
3. To add a new team, click New. The system will open the One Table/Team Creation window as shown below in Figure 15.
a. To create a single table/team, select One Table/Team and fill in the remainder of the fields. Enter the table/team name or number in the Table field and the maximum number of attendees allowed in that table/team in the Maximum field.
When you are finished completing the fields, click Create. The system will create the specified table/team and return to the Tables/Teams tab with the newly defined table selected in the Table/Team pull-down. You can then assign attendees to the new table/team, as discussed below.
Figure 15. One Table/Team Creation Window
b. To create a series of tables/teams, select Multiple Tables/Teams. The system will open the Multiple Tables/Teams Creation window as shown below in Figure 16.
Version 10.05 Page 21 July 2009
DonorPerfect Tables/Teams
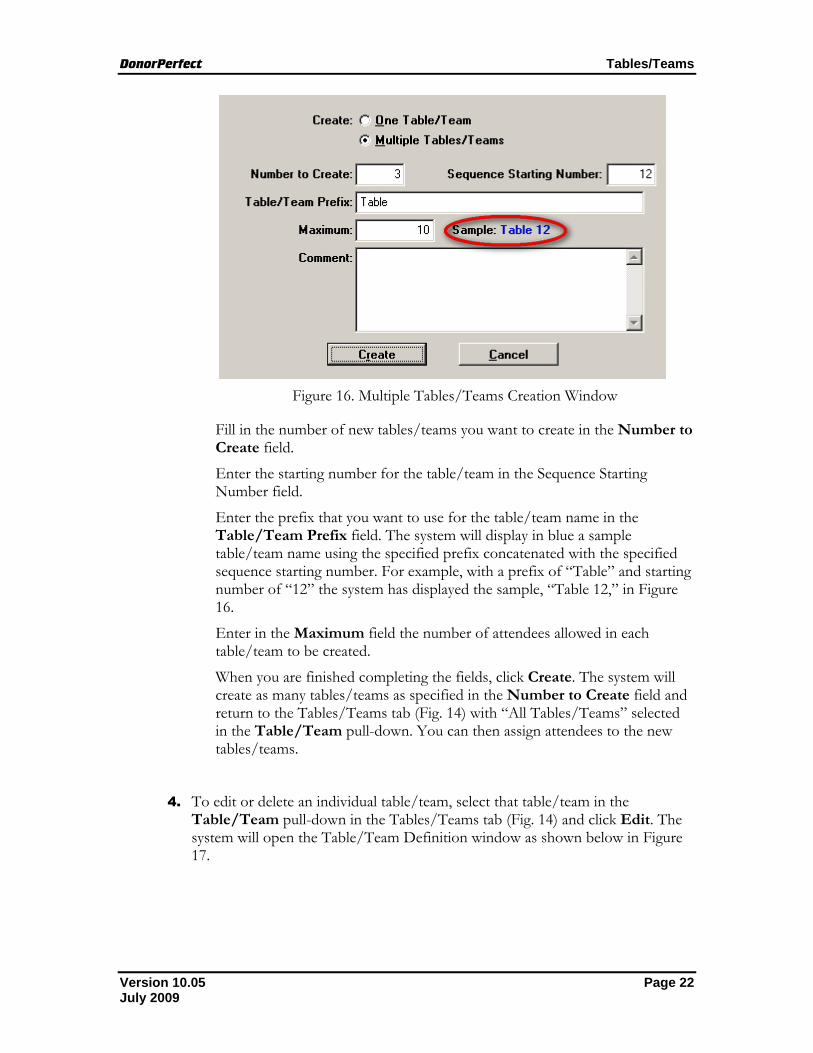
Figure 16. Multiple Tables/Teams Creation Window
Fill in the number of new tables/teams you want to create in the Number to Create field.
Enter the starting number for the table/team in the Sequence Starting Number field.
Enter the prefix that you want to use for the table/team name in the Table/Team Prefix field. The system will display in blue a sample table/team name using the specified prefix concatenated with the specified sequence starting number. For example, with a prefix of “Table” and starting number of “12” the system has displayed the sample, “Table 12,” in Figure 16.
Enter in the Maximum field the number of attendees allowed in each table/team to be created.
When you are finished completing the fields, click Create. The system will create as many tables/teams as specified in the Number to Create field and return to the Tables/Teams tab (Fig. 14) with “All Tables/Teams” selected in the Table/Team pull-down. You can then assign attendees to the new tables/teams.
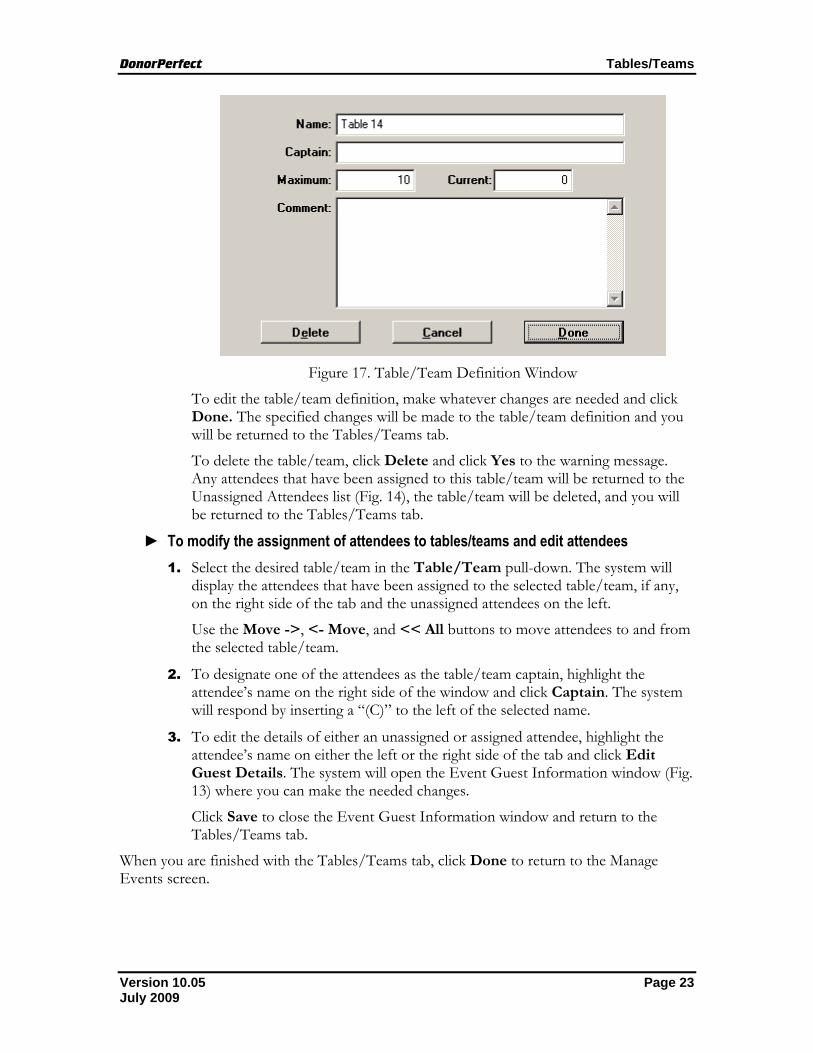
4. To edit or delete an individual table/team, select that table/team in the Table/Team pull-down in the Tables/Teams tab (Fig. 14) and click Edit. The system will open the Table/Team Definition window as shown below in Figure 17.
Version 10.05 Page 22 July 2009
DonorPerfect Tables/Teams
Figure 17. Table/Team Definition Window
To edit the table/team definition, make whatever changes are needed and click Done. The specified changes will be made to the table/team definition and you will be returned to the Tables/Teams tab.
To delete the table/team, click Delete and click Yes to the warning message. Any attendees that have been assigned to this table/team will be returned to the Unassigned Attendees list (Fig. 14), the table/team will be deleted, and you will be returned to the Tables/Teams tab.
► To modify the assignment of attendees to tables/teams and edit attendees 1. Select the desired table/team in the Table/Team pull-down. The system will
display the attendees that have been assigned to the selected table/team, if any, on the right side of the tab and the unassigned attendees on the left.
Use the Move ->, <- Move, and << All buttons to move attendees to and from the selected table/team.
2. To designate one of the attendees as the table/team captain, highlight the attendee’s name on the right side of the window and click Captain. The system will respond by inserting a “(C)” to the left of the selected name.
3. To edit the details of either an unassigned or assigned attendee, highlight the attendee’s name on either the left or the right side of the tab and click Edit Guest Details. The system will open the Event Guest Information window (Fig. 13) where you can make the needed changes.
Click Save to close the Event Guest Information window and return to the Tables/Teams tab.
When you are finished with the Tables/Teams tab, click Done to return to the Manage Events screen.
Version 10.05 Page 23 July 2009
DonorPerfect Attendee Reports
Attendee Reports The Event Management Module provides attendee-related reports that enable you to:
• print out attendee name tags
• view the seating arrangements or team assignments and gifts and pledges by attendee
• view the table/team assignments by table/team
• view a summary of responses to the invitations by response status
• view a summary of how long it has taken constituents to respond to invitations
To run any of the attendee-related reports, open the Event Reports at Modules + Event Management + Event Reports.
Attendee Name Tags You can print name tags for all or a subset of the attendees of a single event or all events.
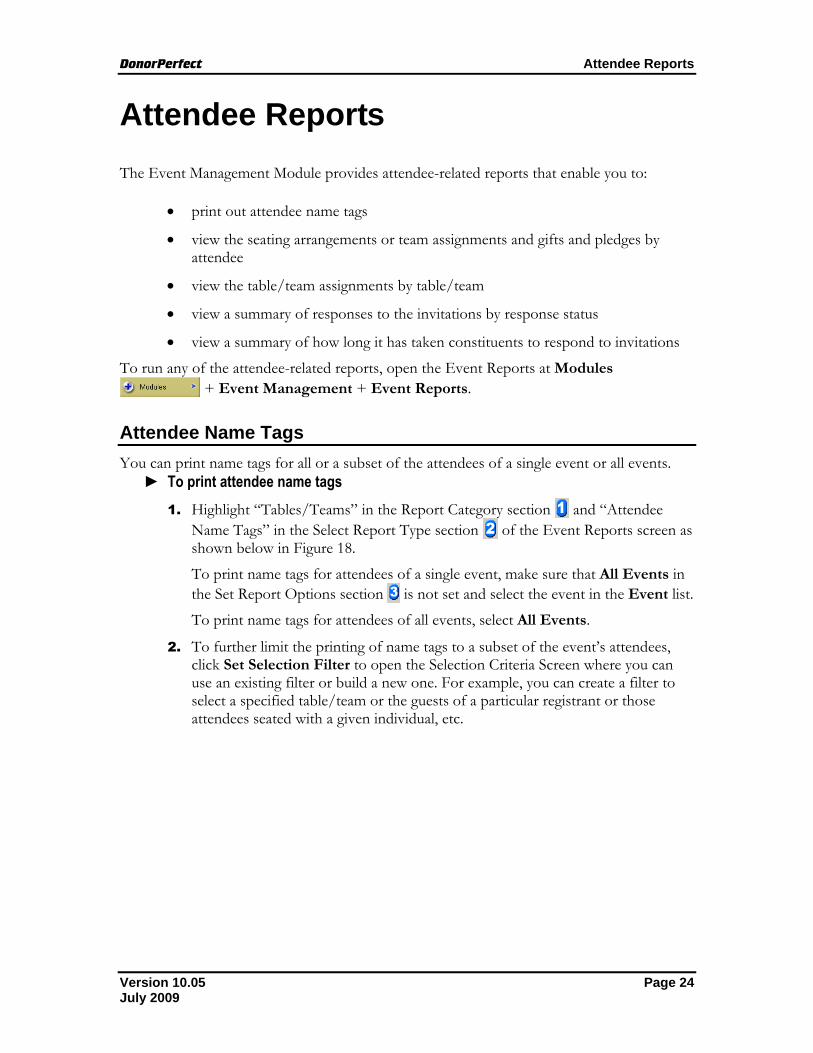
► To print attendee name tags 1. Highlight “Tables/Teams” in the Report Category section and “Attendee
Name Tags” in the Select Report Type section of the Event Reports screen as shown below in Figure 18.
To print name tags for attendees of a single event, make sure that All Events in the Set Report Options section is not set and select the event in the Event list.
To print name tags for attendees of all events, select All Events.
2. To further limit the printing of name tags to a subset of the event’s attendees, click Set Selection Filter to open the Selection Criteria Screen where you can use an existing filter or build a new one. For example, you can create a filter to select a specified table/team or the guests of a particular registrant or those attendees seated with a given individual, etc.
Version 10.05 Page 24 July 2009
DonorPerfect Attendee Reports
Figure 18. Attendee Name Tags Report Set Up
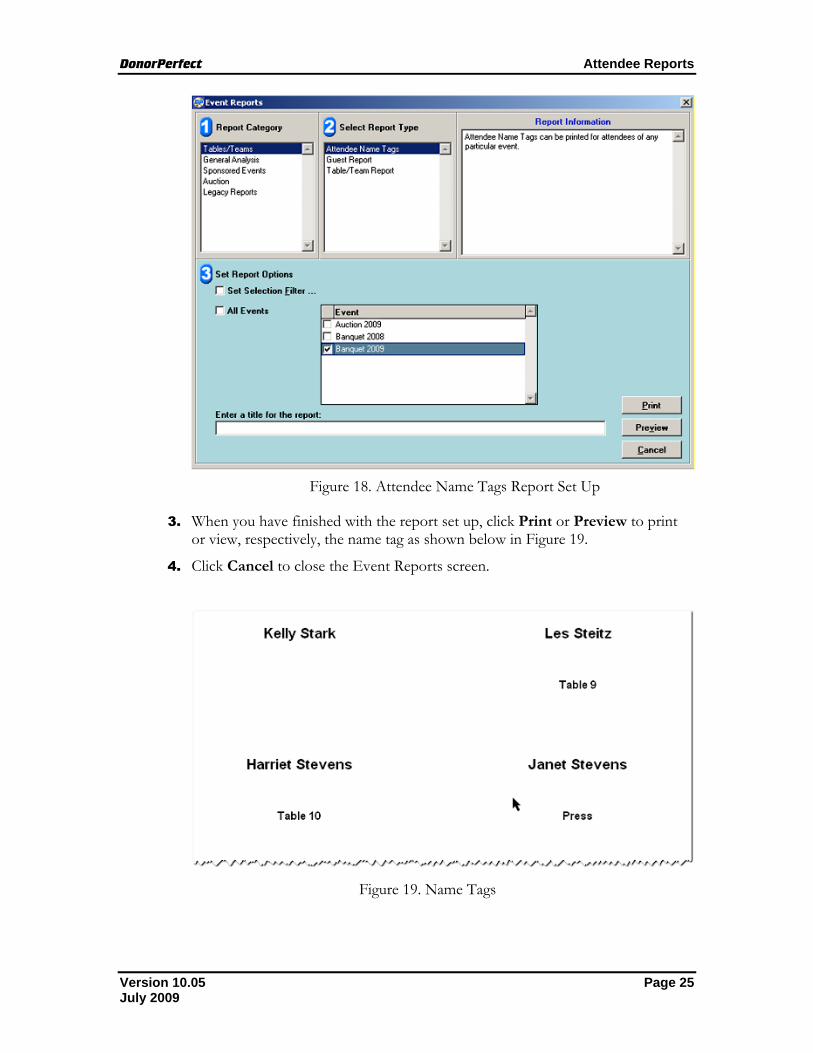
3. When you have finished with the report set up, click Print or Preview to print or view, respectively, the name tag as shown below in Figure 19.
4. Click Cancel to close the Event Reports screen.
Figure 19. Name Tags
Version 10.05 Page 25 July 2009
DonorPerfect Attendee Reports
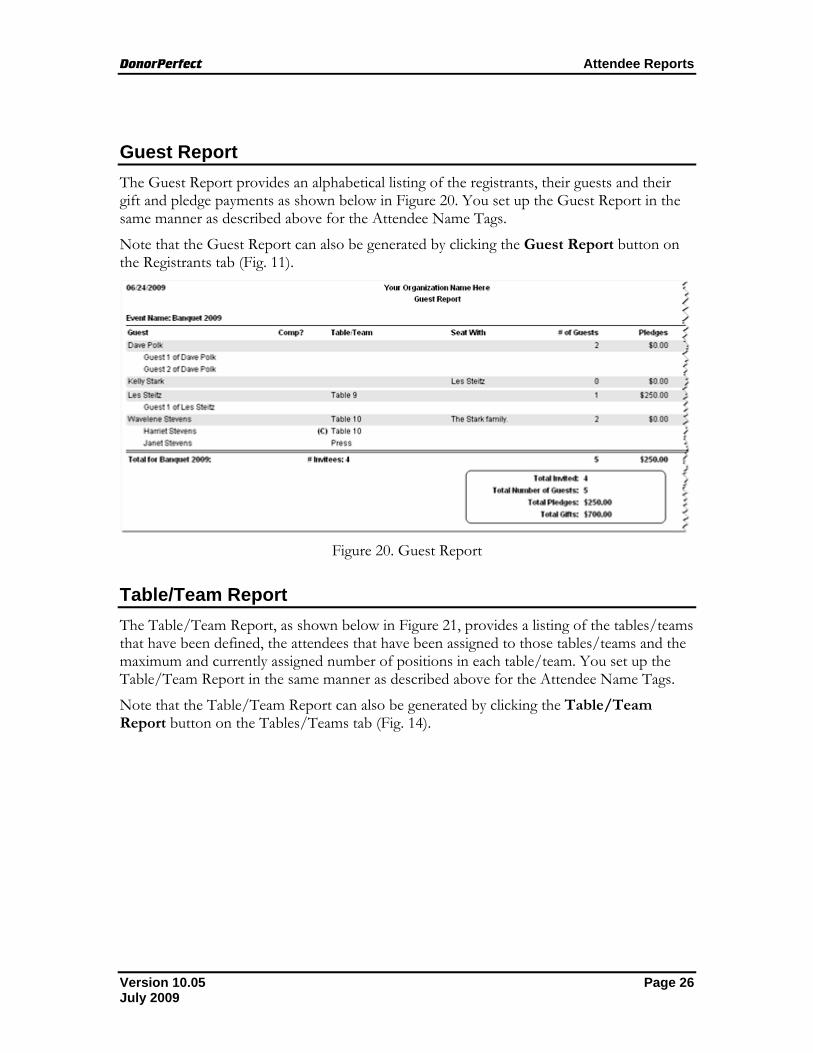
Guest Report The Guest Report provides an alphabetical listing of the registrants, their guests and their gift and pledge payments as shown below in Figure 20. You set up the Guest Report in the same manner as described above for the Attendee Name Tags.
Note that the Guest Report can also be generated by clicking the Guest Report button on the Registrants tab (Fig. 11).
Figure 20. Guest Report
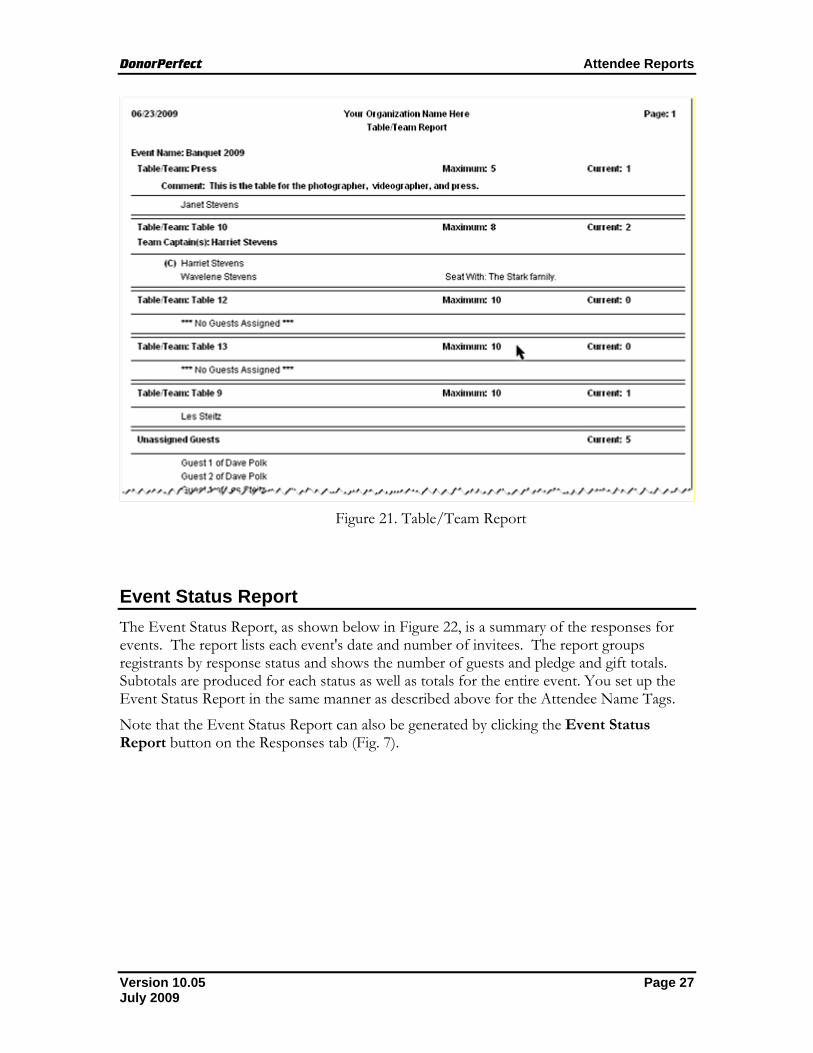
Table/Team Report The Table/Team Report, as shown below in Figure 21, provides a listing of the tables/teams that have been defined, the attendees that have been assigned to those tables/teams and the maximum and currently assigned number of positions in each table/team. You set up the Table/Team Report in the same manner as described above for the Attendee Name Tags.
Note that the Table/Team Report can also be generated by clicking the Table/Team Report button on the Tables/Teams tab (Fig. 14).
Version 10.05 Page 26 July 2009
DonorPerfect Attendee Reports
Figure 21. Table/Team Report
Event Status Report The Event Status Report, as shown below in Figure 22, is a summary of the responses for events. The report lists each event's date and number of invitees. The report groups registrants by response status and shows the number of guests and pledge and gift totals. Subtotals are produced for each status as well as totals for the entire event. You set up the Event Status Report in the same manner as described above for the Attendee Name Tags.
Note that the Event Status Report can also be generated by clicking the Event Status Report button on the Responses tab (Fig. 7).
Version 10.05 Page 27 July 2009

DonorPerfect Attendee Reports
Figure 22. Event Status Report
Invitation Aging Report The Invitation Aging Report, as shown below in Figure 23, indicates how long it has taken constituents to respond to invitations. Aging is done by comparing the invitation date to the response date and calculating the age range in which the response fits. The report breaks down the responses into three ranges: 0-30 days, 31-60 days and over 60 days. For each range, the report lists the number of responses, number and amount of pledges and gifts and totals for each event. Grand totals for the date ranges are included at the end of the report.
Note that the Invitation Aging Report can also be generated by clicking the Invitation Aging Report button on the Invitations tab (Fig. 3).
Figure 23. Invitation Aging Report
Version 10.05 Page 28 July 2009