
emCluster computing - Sonnet Software
100
-
Upload
khangminh22 -
Category
Documents
-
view
2 -
download
0
Transcript of emCluster computing - Sonnet Software


At Sonnet, we've been developing 3D planar high frequency EM software since 1983, and our software has earned a solid reputation as the world's most accurate commercial planar EM analysis package for single and multi-layer planar circuits, packages and antennas.
Sonnet Software Inc., founded by Dr. James C. Rautio, is a private company, entirely dedicated to the development of commercial EM software. We take great pride in providing quality technical support for our products with timely response--which we believe to be very important for high-end technical software products.
Sonnet is based in Syracuse, NY, USA with representatives across the globe.

EMCLUSTER COMPUTING Published: May 2018
Release 16
Sonnet Software, Inc.
126 N. Salina Street
Syracuse, NY 13202
Phone: (315) 453-3096
Fax: (315) 451-1694
www.sonnetsoftware.com
Copyright 1989,1991,1993, 1995-2018 Sonnet Software, Inc. All Rights Reserved
Registration numbers: TX 2-723-907, TX 2-760-739
Rev 16.56
Copyright Notice
Reproduction of this document in whole or in part, without the prior express written authorization of Sonnet Software, Inc. is prohibited. Documentation and all authorized copies of documentation must remain solely in the possession of the customer at all times, and must remain at the software designated site. The customer shall not, under any circumstances, provide the documentation to any third party without prior written approval from Sonnet Software, Inc. This publication is subject to change at any time and without notice. Any suggestions for improvements in this publication or in the software it describes are welcome.
Trademarks
The program names, xgeom, emstatus, emvu, patvu, dxfgeo, ebridge, emgraph, gds, cvbridge, emserver, emclient, sonntcds, and sonntawr, sonntawr64, Blink, Co-calibrated, Lite, LitePlus, Level2 Basic, Level2 Silver, and Level3 Gold are trademarks of Sonnet Software, Inc.
Sonnet®, em®, and emCluster® are registered trademarks of Sonnet Software, Inc.Windows XP, Windows Vista, Windows 7, Windows 8, Windows 10 and Internet Explorer® are U.S.
registered trademarks of Microsoft Corporation.AutoCAD and Drawing Interchange file (DXF) are trademarks of Auto Desk, Inc.Cadence® and Virtuoso® are registered trademarks of Cadence Design Systems, Inc.GLOBALFOUNDRIES® is a registered trademark of GlobalFoundries, Inc.Agilent, ADS, and Touchstone are trademarks of Keysight Technologies.NI AWR and Microwave Office are registered trademarks and EM Socket is a trademark of National
Instruments, Inc.HSPICE is a registered trademark of Synopsys, Inc.GDSII is a trademark of Calma Company.Flexera Software, Flexlm, FlexNet, InstallShield, are trademarks of Flexera Software, Inc. and/or
InstallShield Co.Inc. in the United States of America and/or other countries.OSF/Motif is a trademark of the Open Software Foundation.X Window System is a trademark of The Open GroupLinux® is a registered trademark of Linus Torvalds.Red Hat® is a registered trademark of Red Hat, Inc. SUSE®, openSUSE® and SLES® are registered trademarks of SUSE LLC.OpenGL® is a registered trademark owned by Silicon Graphics, Inc.MATLAB is a registered trademark of The MathWorks, Inc. in the United States and/or other countries.Acrobat® is a registered trademark of Adobe Systems Incorporated.Xpeedic® and IRIS® are registered trademarks of Xpeedic Technology.ODB++® is a registered trademark of Mentor Graphics Corporation.Modelithics® is a registered trademark of Modelithics, Inc.
Table of Contents
5
TABLE OF CONTENTS . . . . . . . . . . . . . . . . . . . . . . . . 5
1 SETTING UP SONNET CLUSTER . . . . . . . . . . . . . . . . . . . 7
Introduction . . . . . . . . . . . . . . . . . . . . . . . . . . . . . . 7
Sonnet Cluster Overview . . . . . . . . . . . . . . . . . . . . . . 9
Sonnet Cluster Requirements . . . . . . . . . . . . . . . . . . . 11
Floating Licenses . . . . . . . . . . . . . . . . . . . . . . . . 11
Cluster Node Networking . . . . . . . . . . . . . . . . . . . 12
Firewalls. . . . . . . . . . . . . . . . . . . . . . . . . . . . . . 12
Sonnet Cluster Setup . . . . . . . . . . . . . . . . . . . . . . . . 13
Install Sonnet . . . . . . . . . . . . . . . . . . . . . . . . . . 13
Configuring the Master Computer . . . . . . . . . . . . . 13
Starting sonnetcluster on the master computer. . . . . 17
Adding a Slave to the Cluster . . . . . . . . . . . . . . . . 18
Configuring a Slave (Done on Each Slave) . . . . . . . . 22
Setting up a Client Computer . . . . . . . . . . . . . . . . 30
Testing the Sonnet Cluster . . . . . . . . . . . . . . . . . . . . 37
Configuring Slaves Using a Common Installation. . . . . . . 37
Cluster Slave Versus Remote em Server . . . . . . . . . . . . 42
2 ANALYZING USING SONNET CLUSTER . . . . . . . . . . . . . . . 43
Running an Analysis on your Sonnet Cluster . . . . . . . . . 43
An Analysis Example . . . . . . . . . . . . . . . . . . . . . . 46
Frequency Splitting . . . . . . . . . . . . . . . . . . . . . . . . . 51
ABS Processing . . . . . . . . . . . . . . . . . . . . . . . . . . . . 52
Automatic Calculation of Discrete Data Points . . . . . 52
User Defined Discrete Data Points . . . . . . . . . . . . . 53
Overriding Cluster Options. . . . . . . . . . . . . . . . . . . . . 54
Controlling Cluster Programs from a Command Line . . . . 57
3 SETTING UP LSF CLUSTER . . . . . . . . . . . . . . . . . . . . 59
Requirements . . . . . . . . . . . . . . . . . . . . . . . . . . . . . 62
LSF Setup . . . . . . . . . . . . . . . . . . . . . . . . . . . . . . . . 62
Sonnet Setup . . . . . . . . . . . . . . . . . . . . . . . . . . . . . 62
TABLE OF CONTENTS
Setting Up emCluster
6
Defining a Resource to Handle Sonnet Licensing . . . . . . 70
Windows Firewall . . . . . . . . . . . . . . . . . . . . . . . . . . 71
Troubleshooting LSF Cluster . . . . . . . . . . . . . . . . . . . 72
Testing the LSF Cluster. . . . . . . . . . . . . . . . . . . . 72
Testing Sonnet from the Command Line. . . . . . . . . 73
Testing the emclusterlsf Script File. . . . . . . . . . . . 74
4 ANALYZING USING LSF CLUSTER . . . . . . . . . . . . . . . . 77
Running emCluster . . . . . . . . . . . . . . . . . . . . . . . . . . 77
Frequency Splitting . . . . . . . . . . . . . . . . . . . . . . 77
ABS Processing . . . . . . . . . . . . . . . . . . . . . . . . . 78
Automatic Calculation of Discrete Data Points . . . . 79
Using Queues . . . . . . . . . . . . . . . . . . . . . . . . . . 80
Limitations. . . . . . . . . . . . . . . . . . . . . . . . . . . . 81
Running an Analysis on your LSF Cluster. . . . . . . . . 81
Overriding Cluster Computing Options . . . . . . . . . . 82
Cleaning the emCluster Shared Directory . . . . . . . . 85
APPENDIX I THE LSF Cluster INITIALIZATION FILE . . . . . . . . . . . . . .87
APPENDIX II THE SONNET CLUSTER INITIALIZATION FILE . . . . . . . . . . .97

7Rev 16.56
Chapter 1 Setting up Sonnet Cluster
Chapter 1 Setting up Sonnet Cluster
Introduction
Sonnet’s emCluster using Sonnet networking, also referred to as Sonnet Cluster, provides you with the ability to split your analysis project into multiple jobs which may then be processed in parallel on multiple computers to greatly reduce your processing time. This feature allows you to make the most efficient use of your processing resources and solver licenses, producing results in a fraction of the time it would take to run an analysis on a single computer.
This document assumes that you are familiar with using Sonnet. If you have not used Sonnet previously, we recommend going through the tutorials in the Getting Started manual before attempting to use Sonnet Cluster.
Sonnet Cluster provides a cluster computing capability for Sonnet that is based on the existing TCP/IP socket communication system already used in Sonnet’s Remote EM Computing capability. Sonnet Cluster has the following features:
• The cluster computing queue may be shared by all users on your network, ensuring that your solver licenses are utilized as efficiently as possible.
• The status of each emCluster processing slave may be monitored at any time by any network user.
• All computing and hard disk utilization is local to each computing node; there are no shared file systems required for the emCluster computing nodes.

Setting Up emCluster
8Rev 16.54
• Minimal network bandwidth is required.
• Sonnet EM analysis jobs may be submitted either for parallel frequency point computation, or to compute entirely on one of the cluster processing nodes.

9Rev 16.56
Chapter 1 Setting up Sonnet Cluster
Sonnet Cluster Overview
The Sonnet Cluster is made up of a master, clients and slaves. There is only one master computer, but you may have any number of client computers and slave computers. The setup of a Sonnet cluster is pictured below.
The different parts of the Sonnet cluster are defined below. Note that any computer running an OS supported by Sonnet can be a Client, Slave or Master.
User submits an analysis job
Master splits the analysis by
frequencies and sends
subjobs to the processing
cluster Response data from subjobs is
returned to the Master
Master combines
and returns response
data for the analysis
Processing Cluster
Sonnet User
Master
Client
Slave
User Desktops and Workstations
Sonnet Cluster
Setting Up emCluster
10Rev 16.54
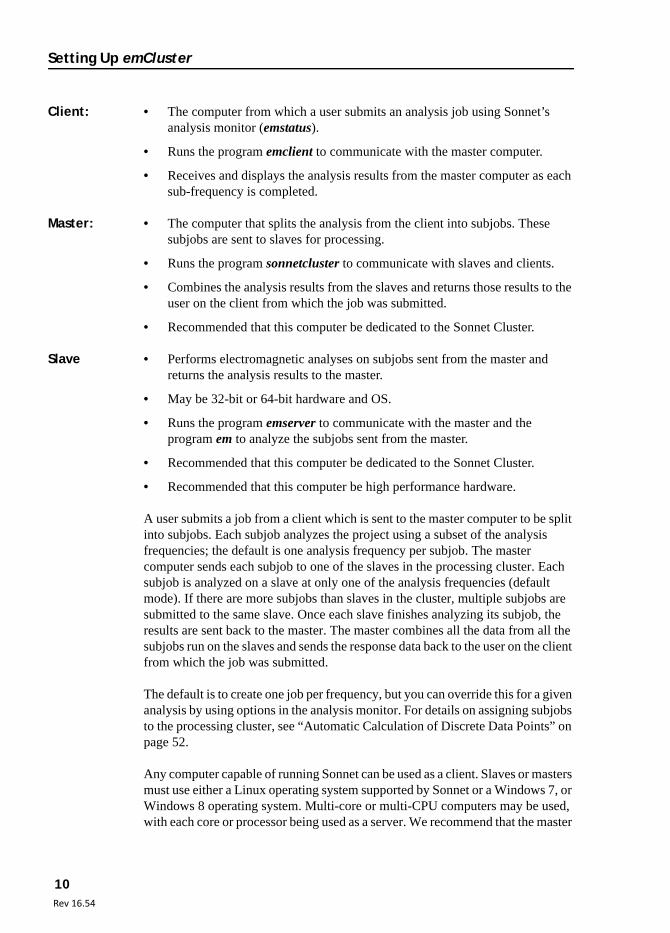
Client: • The computer from which a user submits an analysis job using Sonnet’s analysis monitor (emstatus).
• Runs the program emclient to communicate with the master computer.
• Receives and displays the analysis results from the master computer as each sub-frequency is completed.
Master: • The computer that splits the analysis from the client into subjobs. These subjobs are sent to slaves for processing.
• Runs the program sonnetcluster to communicate with slaves and clients.
• Combines the analysis results from the slaves and returns those results to the user on the client from which the job was submitted.
• Recommended that this computer be dedicated to the Sonnet Cluster.
Slave • Performs electromagnetic analyses on subjobs sent from the master and returns the analysis results to the master.
• May be 32-bit or 64-bit hardware and OS.
• Runs the program emserver to communicate with the master and the program em to analyze the subjobs sent from the master.
• Recommended that this computer be dedicated to the Sonnet Cluster.
• Recommended that this computer be high performance hardware.
A user submits a job from a client which is sent to the master computer to be split into subjobs. Each subjob analyzes the project using a subset of the analysis frequencies; the default is one analysis frequency per subjob. The master computer sends each subjob to one of the slaves in the processing cluster. Each subjob is analyzed on a slave at only one of the analysis frequencies (default mode). If there are more subjobs than slaves in the cluster, multiple subjobs are submitted to the same slave. Once each slave finishes analyzing its subjob, the results are sent back to the master. The master combines all the data from all the subjobs run on the slaves and sends the response data back to the user on the client from which the job was submitted.
The default is to create one job per frequency, but you can override this for a given analysis by using options in the analysis monitor. For details on assigning subjobs to the processing cluster, see “Automatic Calculation of Discrete Data Points” on page 52.
Any computer capable of running Sonnet can be used as a client. Slaves or masters must use either a Linux operating system supported by Sonnet or a Windows 7, or Windows 8 operating system. Multi-core or multi-CPU computers may be used, with each core or processor being used as a server. We recommend that the master

11Rev 16.56
Chapter 1 Setting up Sonnet Cluster
computer be a dedicated core which does not also serve as a client or slave in the Sonnet Cluster. The same core may be used as both a slave and a client in the Sonnet cluster although typically slaves and clients should be on different cores.
Sonnet Cluster Requirements
In order to use Sonnet Cluster, you must have the following:
• A emCluster license. The Sonnet Cluster option is available only with the Sonnet Professional suite and must be purchased separately. This license will be used by the master computer. Please see your system administrator if you are unsure of the availability of this program.
• A Sonnet em license available for each slave in the network. Note that if you use node-locked licenses, then you will need one license for each slave in your network. If you have a floating license, then each slave must be able to simultaneously check out an em license.
• Each client will need access to an xgeom license in order to edit and submit jobs to the network.
• If you are using Modelithics model components, then a Modelithics license is required for the client and each slave. If you have a floating license for Modelithics, then each slave must be able to simultaneously check out a Modelithics license.
Sonnet Cluster is available on all Linux and Window operating systems supported by this release. For information about Sonnet requirements, please refer to the appropriate installation manual or go online:
http://www.sonnetsoftware.com/requirements
Floating Licenses
We do not recommend using a floating license for both general network use and for cluster slave use. If a non-cluster computer checks out an em license, and there are not enough em licenses left for all the slaves in the cluster, one or more of the slaves will wait until a license is available in order to analyze its subjob. Therefore, the analysis job submitted to the cluster will be delayed for the length of time that the non-cluster computer uses the em license.
Setting Up emCluster
12Rev 16.54
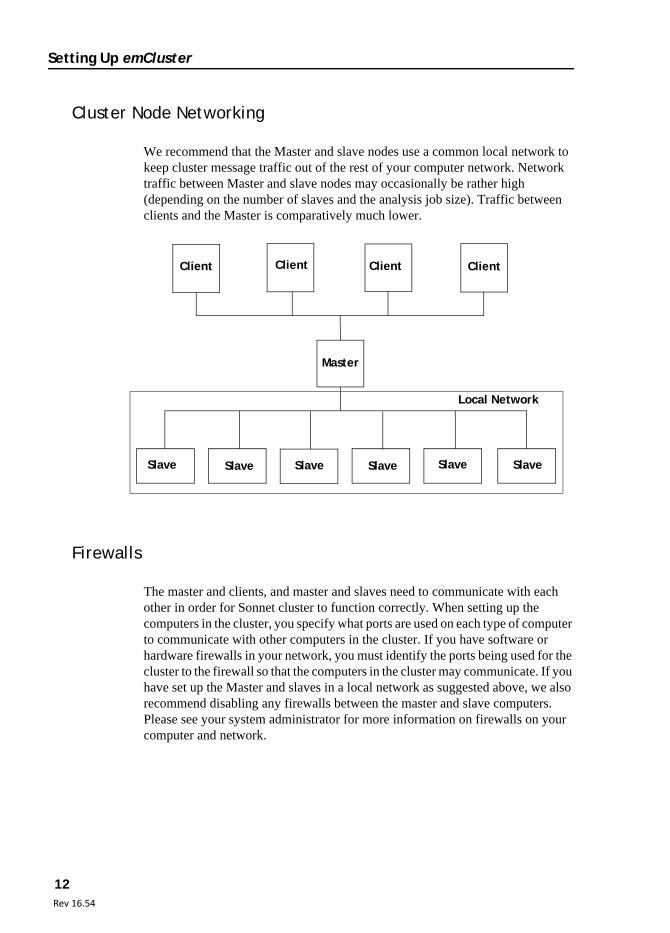
Cluster Node Networking
We recommend that the Master and slave nodes use a common local network to keep cluster message traffic out of the rest of your computer network. Network traffic between Master and slave nodes may occasionally be rather high (depending on the number of slaves and the analysis job size). Traffic between clients and the Master is comparatively much lower.
Firewalls
The master and clients, and master and slaves need to communicate with each other in order for Sonnet cluster to function correctly. When setting up the computers in the cluster, you specify what ports are used on each type of computer to communicate with other computers in the cluster. If you have software or hardware firewalls in your network, you must identify the ports being used for the cluster to the firewall so that the computers in the cluster may communicate. If you have set up the Master and slaves in a local network as suggested above, we also recommend disabling any firewalls between the master and slave computers. Please see your system administrator for more information on firewalls on your computer and network.
Client Client Client Client
Master
Slave Slave Slave Slave Slave Slave
Local Network
13Rev 16.56
Chapter 1 Setting up Sonnet Cluster
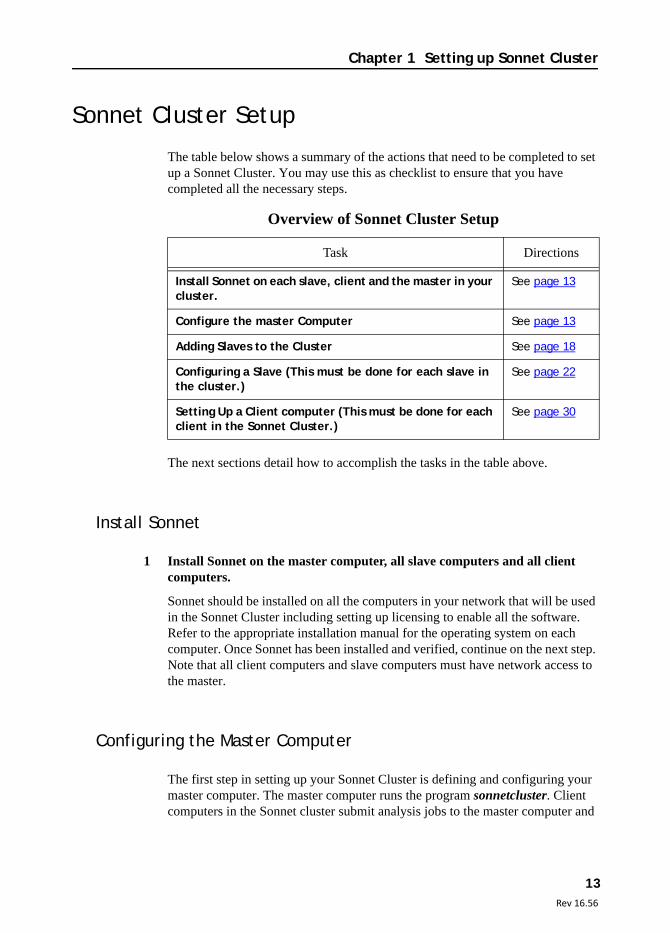
Sonnet Cluster Setup
The table below shows a summary of the actions that need to be completed to set up a Sonnet Cluster. You may use this as checklist to ensure that you have completed all the necessary steps.
The next sections detail how to accomplish the tasks in the table above.
Install Sonnet
1 Install Sonnet on the master computer, all slave computers and all client computers.
Sonnet should be installed on all the computers in your network that will be used in the Sonnet Cluster including setting up licensing to enable all the software. Refer to the appropriate installation manual for the operating system on each computer. Once Sonnet has been installed and verified, continue on the next step. Note that all client computers and slave computers must have network access to the master.
Configuring the Master Computer
The first step in setting up your Sonnet Cluster is defining and configuring your master computer. The master computer runs the program sonnetcluster. Client computers in the Sonnet cluster submit analysis jobs to the master computer and
Overview of Sonnet Cluster Setup
Task Directions
Install Sonnet on each slave, client and the master in your cluster.
See page 13
Configure the master Computer See page 13
Adding Slaves to the Cluster See page 18
Configuring a Slave (This must be done for each slave in the cluster.)
See page 22
Setting Up a Client computer (This must be done for each client in the Sonnet Cluster.)
See page 30

Setting Up emCluster
14Rev 16.54
receive analysis results back from the master computer. Slave computers receive subjobs from the master computer and send back analysis results. The master computer combines these results before returning them to the submitting client.
2 Open the Sonnet task bar on the master computer.
For instructions on opening the Sonnet task bar, please refer to “Invoking Sonnet” on page 38 of the Getting Started manual.
3 Select Admin Cluster Computing Server Configuration/Control from the main menu of the Sonnet task bar.
The Sonnet Cluster Status/Control window appears on your display as shown below.
4 If it is not already selected, click on the Master tab in the window.
5 Click on the “Use this machine as a SonnetCluster Master computer” check box.
Selecting this checkbox designates this computer as the master computer in the Sonnet network.
MasterTab
SetupTab
Use this machinecheckbox

15Rev 16.56
Chapter 1 Setting up Sonnet Cluster
Cluster Settings
6 Click on the Setup tab in the SonnetCluster Status/Control window.
The appearance of the window below is updated.
7 Enter the Server name or IP address of this computer in the Server name or IP address text entry box in the Cluster Settings section of the window.
If you enter a server name, the name must be recognized by all slaves and clients in the Sonnet Cluster. This name is the same as the computer would use in a domain or on a Windows network.
8 If you do not wish to use the default port number of 56300, enter the desired port number in the Port text entry box.
This is the port on the Master used by the slave and client computers to communicate with the master computer. This is the same port number which should be entered when you add the cluster as a server to your client in Step 9 on page 34. The master port number cannot be the same as the slaves. Keep a record of this port number to use when you later set up your slaves.
Setting Up emCluster
16Rev 16.54
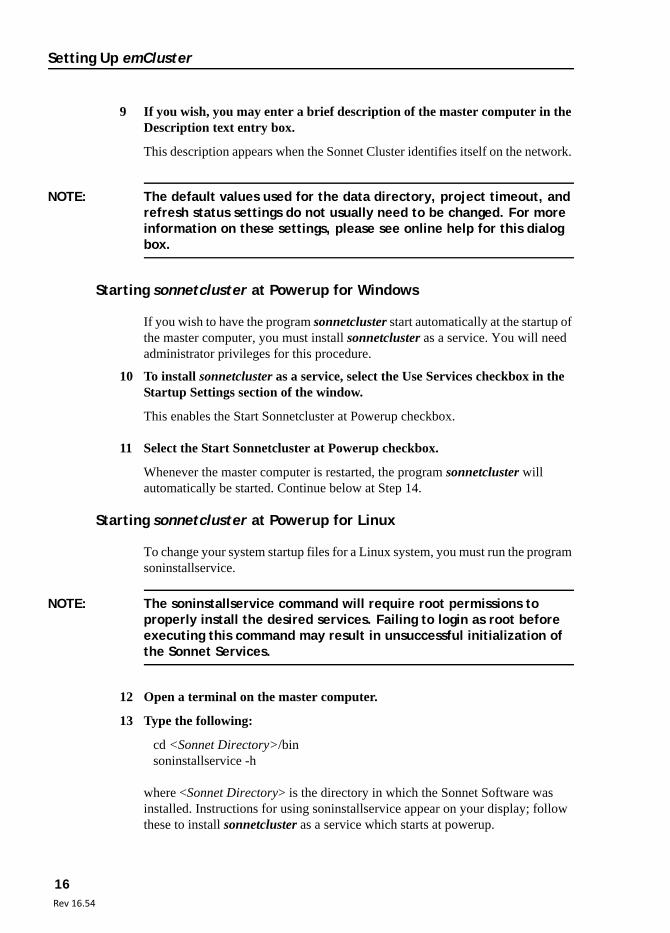
9 If you wish, you may enter a brief description of the master computer in the Description text entry box.
This description appears when the Sonnet Cluster identifies itself on the network.
NOTE: The default values used for the data directory, project timeout, and refresh status settings do not usually need to be changed. For more information on these settings, please see online help for this dialog box.
Starting sonnetcluster at Powerup for Windows
If you wish to have the program sonnetcluster start automatically at the startup of the master computer, you must install sonnetcluster as a service. You will need administrator privileges for this procedure.
10 To install sonnetcluster as a service, select the Use Services checkbox in the Startup Settings section of the window.
This enables the Start Sonnetcluster at Powerup checkbox.
11 Select the Start Sonnetcluster at Powerup checkbox.
Whenever the master computer is restarted, the program sonnetcluster will automatically be started. Continue below at Step 14.
Starting sonnetcluster at Powerup for Linux
To change your system startup files for a Linux system, you must run the program soninstallservice.
NOTE: The soninstallservice command will require root permissions to properly install the desired services. Failing to login as root before executing this command may result in unsuccessful initialization of the Sonnet Services.
12 Open a terminal on the master computer.
13 Type the following:
cd <Sonnet Directory>/binsoninstallservice -h
where <Sonnet Directory> is the directory in which the Sonnet Software was installed. Instructions for using soninstallservice appear on your display; follow these to install sonnetcluster as a service which starts at powerup.

17Rev 16.56
Chapter 1 Setting up Sonnet Cluster
Starting sonnetcluster on the master computer.
You need to start the sonnetcluster program in order to test the connections as you set up the slaves and clients.
14 Click on the Queue tab of the Sonnet Cluster Status/Control window.
The appearance of the window changes. The present status of sonnetcluster is displayed just below the tab as shown below.
Time when the status was last updated.
Present status of sonnetcluster
Start buttonStatus graphic
Setting Up emCluster
18Rev 16.54
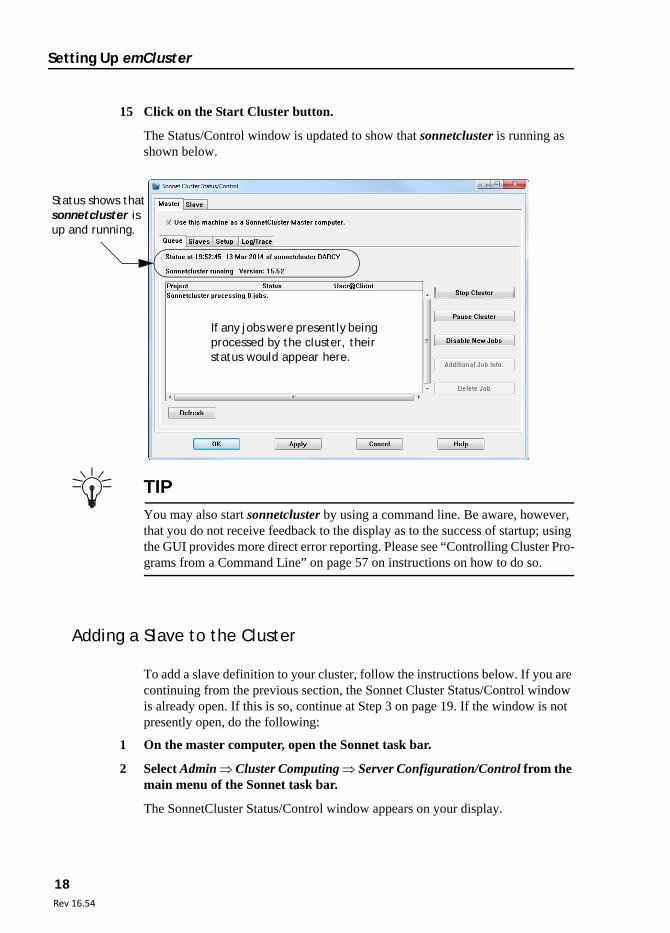
15 Click on the Start Cluster button.
The Status/Control window is updated to show that sonnetcluster is running as shown below.
TIPYou may also start sonnetcluster by using a command line. Be aware, however, that you do not receive feedback to the display as to the success of startup; using the GUI provides more direct error reporting. Please see “Controlling Cluster Pro-grams from a Command Line” on page 57 on instructions on how to do so.
Adding a Slave to the Cluster
To add a slave definition to your cluster, follow the instructions below. If you are continuing from the previous section, the Sonnet Cluster Status/Control window is already open. If this is so, continue at Step 3 on page 19. If the window is not presently open, do the following:
1 On the master computer, open the Sonnet task bar.
2 Select Admin Cluster Computing Server Configuration/Control from the main menu of the Sonnet task bar.
The SonnetCluster Status/Control window appears on your display.
Status shows that sonnetcluster is up and running.
If any jobs were presently being processed by the cluster, their status would appear here.
19Rev 16.56
Chapter 1 Setting up Sonnet Cluster
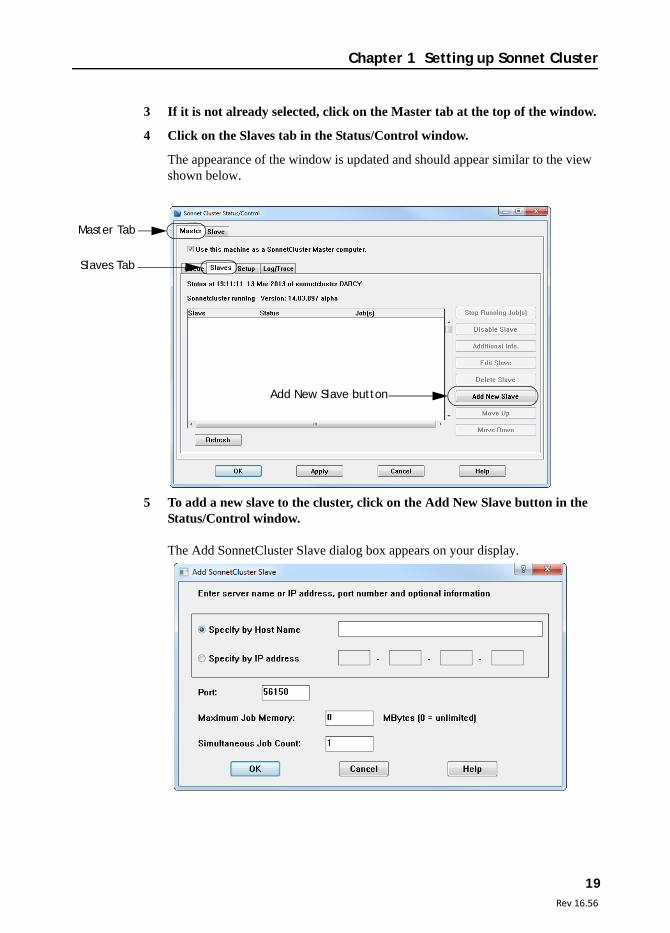
3 If it is not already selected, click on the Master tab at the top of the window.
4 Click on the Slaves tab in the Status/Control window.
The appearance of the window is updated and should appear similar to the view shown below.
5 To add a new slave to the cluster, click on the Add New Slave button in the Status/Control window.
The Add SonnetCluster Slave dialog box appears on your display.
Master Tab
Slaves Tab
Add New Slave button

Setting Up emCluster
20Rev 16.54
6 Enter the host name or IP address of the slave computer you wish to add to your Sonnet Cluster.
Click on the appropriate radio button, then enter the host name or IP address. If you enter a host name, it must be defined on the master computer. This name is the same as the computer would use in a domain or on a Windows network.
7 Enter the Port number that will be used to communicate with the slave computer.
This should match the port number entered when setting up the slave computer in Step 11 on page 26.
8 Enter the maximum amount of memory which may be used for an analysis on the slave.
The default value of zero allows an unlimited amount of memory on the slave computer to be used so that an analysis is only limited by the amount of physical memory on the slave computer. This setting ensures that the slave analyzes any size problem. If you wish to limit the size of the analysis subjobs that can be performed on this slave, enter the amount of memory to which you wish to limit the analysis in the Maximum Job Memory text entry box. The amount of memory should be entered in MBytes. Note that if you have a multi-core computer, you must assume that the total amount of memory allocated is the memory limit times the number of processing cores.
9 Enter the simultaneous job count allowed on this slave.
Enter the number of jobs that you wish to allow this slave to process at any given time. The default value is one. The value you enter is the number of jobs the master is permitted to send to this slave at the same time.
10 Click on the OK button to close the dialog box and apply the changes.
A confirmation message is displayed.

21Rev 16.56
Chapter 1 Setting up Sonnet Cluster
11 Click on Apply Now.
The slave computer just added now appears in the status window.
If the host name is not recognized, you receive the error message shown below. In this case, you should make sure that the host name is defined on your master computer.
Slave entry

Setting Up emCluster
22Rev 16.54
You should repeat this procedure until all the slaves are added to your Sonnet Cluster. The Sonnet Cluster Status/Control window is shown below listing four slave computers in the cluster. Note that jobs are submitted to the slaves in the
order in which the slaves appear in this list. The only exception is that if the master computer also functions as a slave, this is always the last slave to be used. You can override this setting in the sonnetcluster initialization file; please see the UseThisServerAsSlaveLast entry in Appendix II, “The Sonnet Cluster Initialization File” on page 98.
Configuring a Slave (Done on Each Slave)
Once the master computer is defined and running, the next step in setting up your Sonnet Cluster is configuring the slaves that will do the analysis processing. The slave computers run the programs emserver and em. Slave computers receive subjobs from the master computer and send back analysis results. The master
List of slaves in the Sonnet Cluster.

23Rev 16.56
Chapter 1 Setting up Sonnet Cluster
computer combines these results before returning them to the user at the client from which the job was submitted. You will have to perform the procedure below on each slave computer in your Sonnet Cluster network.
NOTE: If you are using a cluster comprised of computers all of which are using the same installation of the software (this would typically be computers using Linux operating systems), you can simplify setting up your slaves by using the “Apply slave configuration to ALL SonnetCluster Slave computers.” checkbox. If this is the case, please see “Configuring Slaves Using a Common Installation” on page 37 for instructions on setting up your slaves instead of using the next section.
Selecting a Computer as a Slave
1 Open the Sonnet task bar on the computer which you wish to setup as a slave in the cluster.
2 Select Admin Cluster Computing Server Configuration/Control from the task bar main menu.
The Sonnet Cluster Status/Control window appears on your display.
3 Click on the Slave tab at the top of the window.
This tab allows you to designate this computer as a slave and identify the master computer in the Sonnet Cluster. The appearance of the window changes and should appear similar to the view shown below.
Slave Tab
Slave Checkbox
SetupTab
MasterTab

Setting Up emCluster
24Rev 16.54
4 Select the Use this machine as a SonnetCluster Slave computer checkbox.
This selects the computer as a slave in the cluster. All the controls in the window are enabled when this checkbox is selected.
5 Click on the Master tab below the Use this machine as a SonnetCluster Slave computer checkbox.
6 Specify the master computer in the Sonnet Cluster.
You may identify the master computer by a host name or IP address. This name is the same as the computer would use in a domain or on a Windows network. Select the type of identification by clicking on the appropriate radio button, then entering the host name or IP address in the corresponding entry field.
7 Enter the port number by which this slave computer communicates with the master computer.
This should be the same value entered as the port number when setting up the master computer. The default value is 56300.
Testing the Master/Slave Connection
8 Click on the Test Connection to SonnetCluster Process button in the window.
If the slave is able to communicate with the master computer across your network, then you will receive a PASSED message as shown below.

25Rev 16.56
Chapter 1 Setting up Sonnet Cluster
If the Host name or IP address entered is not valid, you will receive an error message as shown below.
If you receive an error message, check to ensure that you are using the correct Host name or IP address for the master computer. If you are using a host name, you should check to see that the correct IP address is being used for the Host name. If the host name and IP address are correct, check your firewall configuration to make sure that the host name is correct. You should not continue the setup until you have established communications between the slave and master computer.
Slave Settings
9 Click on the Setup tab in the Sonnet Cluster Setup/Control window.
The appearance of the window is updated as shown below.

Setting Up emCluster
26Rev 16.54
10 Enter the Server name or IP address of this computer in the Server name or IP address text entry box in the Server Settings section of the window.
The server name is the host name of this slave computer. If you enter a server name, the name must be recognized by the master computer. This name is the same as the computer would use in a domain or on a Windows network.
11 If you do not wish to use the default port number of 56150, enter the desired port number in the Port text entry box.
This is the port used by this slave computer to communicate with the master computer of the Sonnet Cluster. This is the port number used when defining a slave on the master computer, see Step 7 on page 20. The port number of the slave cannot be the same port used for the matter. If you change the port number for the slave, retain a record of the port number used in order to complete the master configuration.
NOTE: The default values used for the data directory and refresh status settings do not usually need to be changed. For more information on these settings, please see online help for this dialog box.
Starting emserver at Powerup Windows
If you wish to have the program emserver start automatically at the startup of this slave computer, you must install emserver as a service. You will need administrator privileges to do so.
12 To install emserver as a service, select the Use Services checkbox in the Startup Settings section of the window.
This enables the Start EmServer at Powerup checkbox.
13 Select the Start EmServer at Powerup checkbox.
Whenever this slave computer is restarted, the program emserver will automatically be started. Continue below at Step 16.
Starting emserver at Powerup for Linux
To change your system startup files for a Linux system, you must run the program soninstallservice.
NOTE: The soninstallservice command will require root permissions to properly install the desired services. Failing to login as root before executing this command may result in unsuccessful initialization of the Sonnet Services.

27Rev 16.56
Chapter 1 Setting up Sonnet Cluster
14 Open a terminal on the slave computer.
15 Type the following:
cd <Sonnet Directory>/binsoninstallservice -h
where <Sonnet Directory> is the directory in which the Sonnet Software was installed. Instructions for using soninstallservice appear on your display; follow these to install emserver (“install the remote em service”) as a service which starts at powerup.
Starting emserver
Once you have entered all the setup values, you may start the emserver program on this slave as directed below.
16 Click on the Status tab of the Sonnet Cluster Status/Control window.
The appearance of the window changes. The present status of emserver is displayed just below the tab as shown below.
Time when the status was last updated.
Present status of emserver
Start button

Setting Up emCluster
28Rev 16.54
17 Click on the Start emserver button.
Since you have made changes to your slave setup, a query appears on your display.
18 Click on the Yes button in the query box.
The window is updated to indicate that emserver is running as shown below.
19 Click on the OK button to close the dialog box and apply the changes.
This completes setting up the slave computer.
NOTE: You must repeat this process for each slave you have added to the cluster.
emserver Status
The status of any running analysis subjobs appears here.
29Rev 16.56
Chapter 1 Setting up Sonnet Cluster
TIP
You may also start emserver by using a command line. Be aware, however, that you do not receive feedback to the display as to the success of startup; using the GUI provides more direct error reporting. Please see “Controlling Cluster Pro-grams from a Command Line” on page 57 on instructions on how to do so.
Checking the Slaves
Once you have completed adding all the slave computers to your Sonnet Cluster, you should check to ensure that all the slaves are enabled.
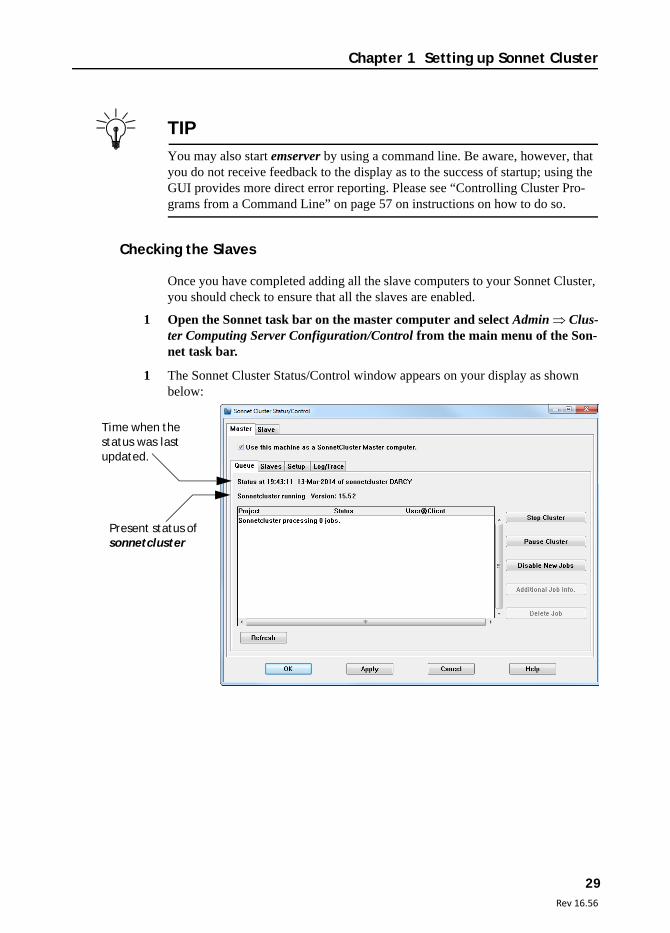
1 Open the Sonnet task bar on the master computer and select Admin Clus-ter Computing Server Configuration/Control from the main menu of the Son-net task bar.
1 The Sonnet Cluster Status/Control window appears on your display as shown below:
Time when the status was last updated.
Present status of sonnetcluster
Setting Up emCluster
30Rev 16.54
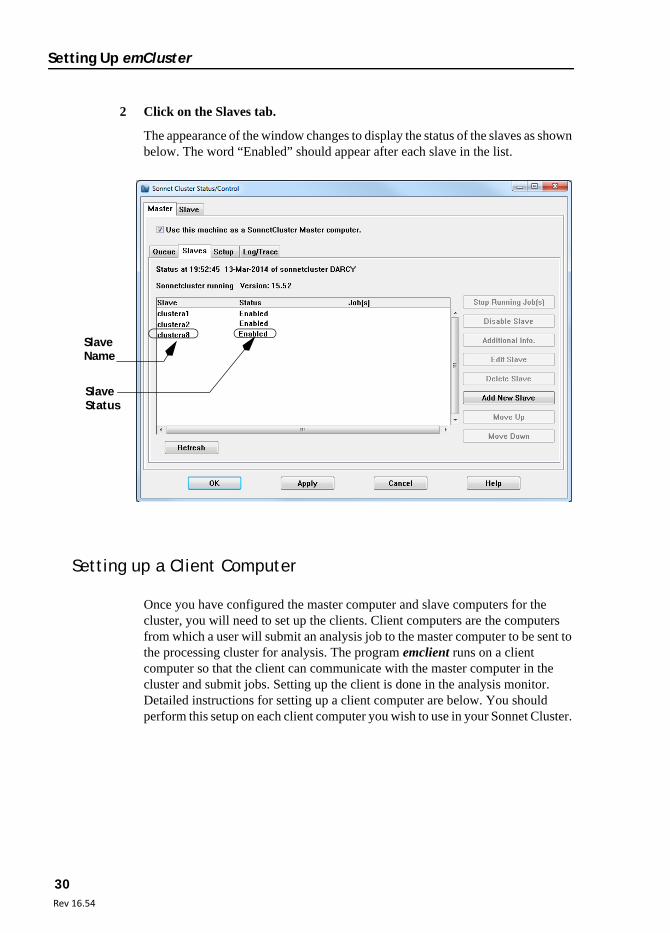
2 Click on the Slaves tab.
The appearance of the window changes to display the status of the slaves as shown below. The word “Enabled” should appear after each slave in the list.
Setting up a Client Computer
Once you have configured the master computer and slave computers for the cluster, you will need to set up the clients. Client computers are the computers from which a user will submit an analysis job to the master computer to be sent to the processing cluster for analysis. The program emclient runs on a client computer so that the client can communicate with the master computer in the cluster and submit jobs. Setting up the client is done in the analysis monitor. Detailed instructions for setting up a client computer are below. You should perform this setup on each client computer you wish to use in your Sonnet Cluster.
SlaveName
SlaveStatus

31Rev 16.56
Chapter 1 Setting up Sonnet Cluster
1 Open the Sonnet task bar on the computer you wish to setup as a client.
2 Click on the Analyze Project button, then select New Batch from the pop-up menu.
If the New Batch Creation window appears, select <Local Computer> from the list of servers. The analysis monitor appears on your display.
3 Select File Client Configuration from the main menu of the analysis monitor.
The Emstatus Monitor Server Client Configuration dialog box appears on your display.
4 Click on the SonnetCluster tab in the dialog box.
The appearance of the dialog box is updated.
SonnetClustertab
Setting Up emCluster
32Rev 16.54
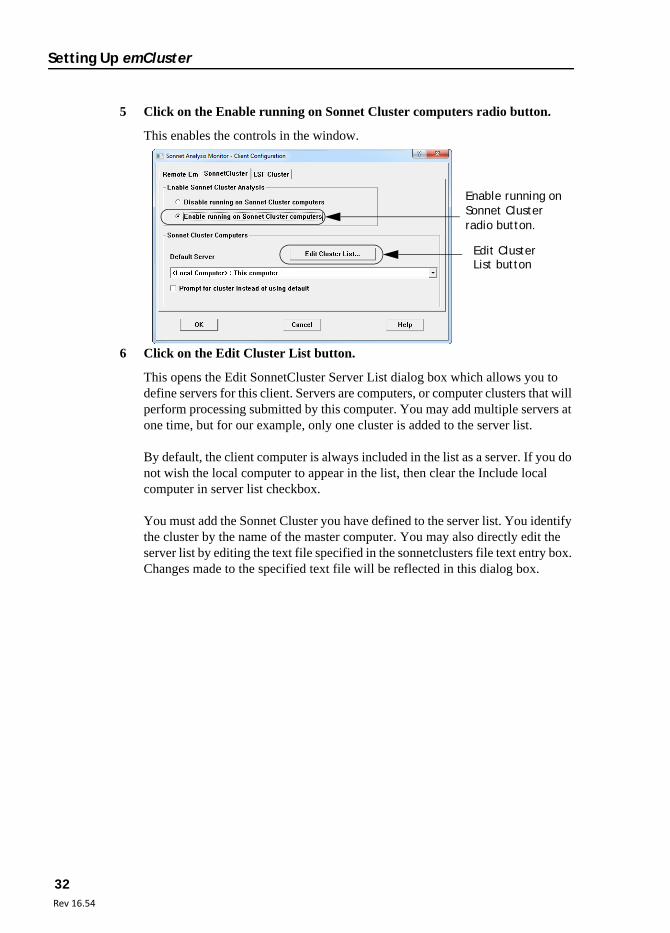
5 Click on the Enable running on Sonnet Cluster computers radio button.
This enables the controls in the window.
6 Click on the Edit Cluster List button.
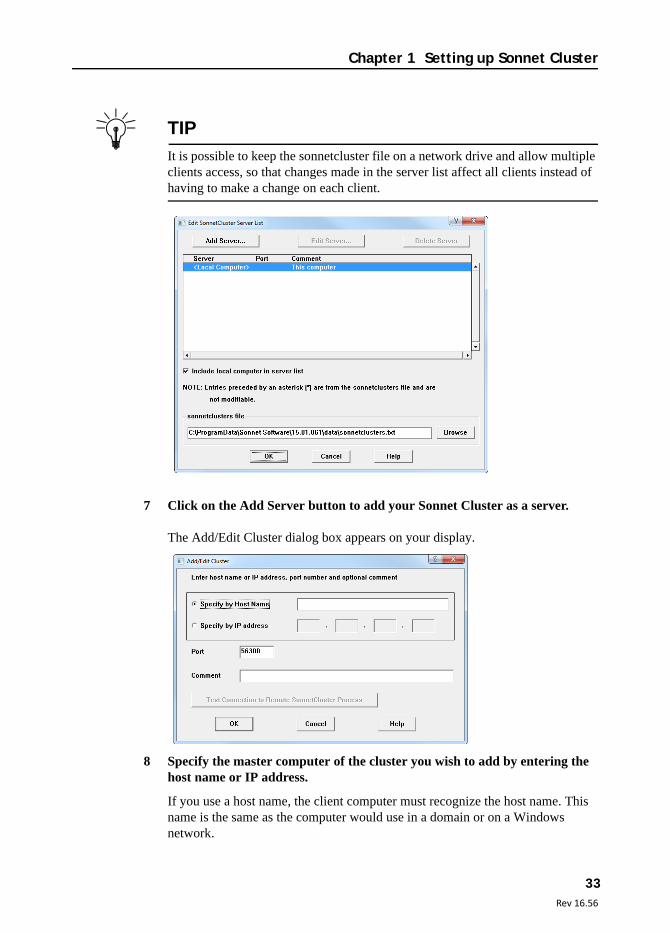
This opens the Edit SonnetCluster Server List dialog box which allows you to define servers for this client. Servers are computers, or computer clusters that will perform processing submitted by this computer. You may add multiple servers at one time, but for our example, only one cluster is added to the server list.
By default, the client computer is always included in the list as a server. If you do not wish the local computer to appear in the list, then clear the Include local computer in server list checkbox.
You must add the Sonnet Cluster you have defined to the server list. You identify the cluster by the name of the master computer. You may also directly edit the server list by editing the text file specified in the sonnetclusters file text entry box. Changes made to the specified text file will be reflected in this dialog box.
Enable running on Sonnet Cluster radio button.
Edit ClusterList button
33Rev 16.56
Chapter 1 Setting up Sonnet Cluster
TIP
It is possible to keep the sonnetcluster file on a network drive and allow multiple clients access, so that changes made in the server list affect all clients instead of having to make a change on each client.
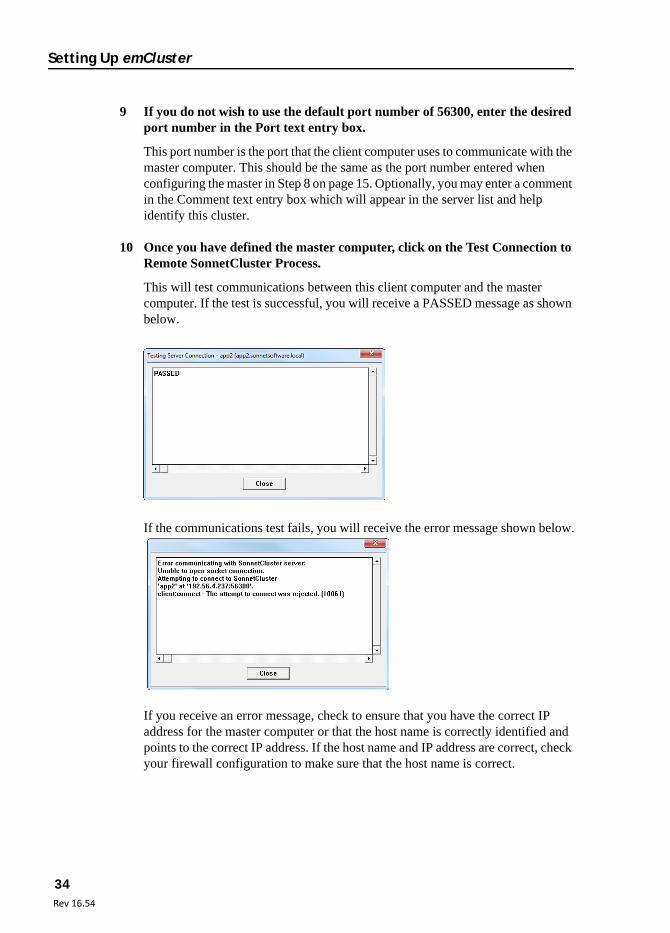
7 Click on the Add Server button to add your Sonnet Cluster as a server.
The Add/Edit Cluster dialog box appears on your display.
8 Specify the master computer of the cluster you wish to add by entering the host name or IP address.
If you use a host name, the client computer must recognize the host name. This name is the same as the computer would use in a domain or on a Windows network.
Setting Up emCluster
34Rev 16.54
9 If you do not wish to use the default port number of 56300, enter the desired port number in the Port text entry box.
This port number is the port that the client computer uses to communicate with the master computer. This should be the same as the port number entered when configuring the master in Step 8 on page 15. Optionally, you may enter a comment in the Comment text entry box which will appear in the server list and help identify this cluster.
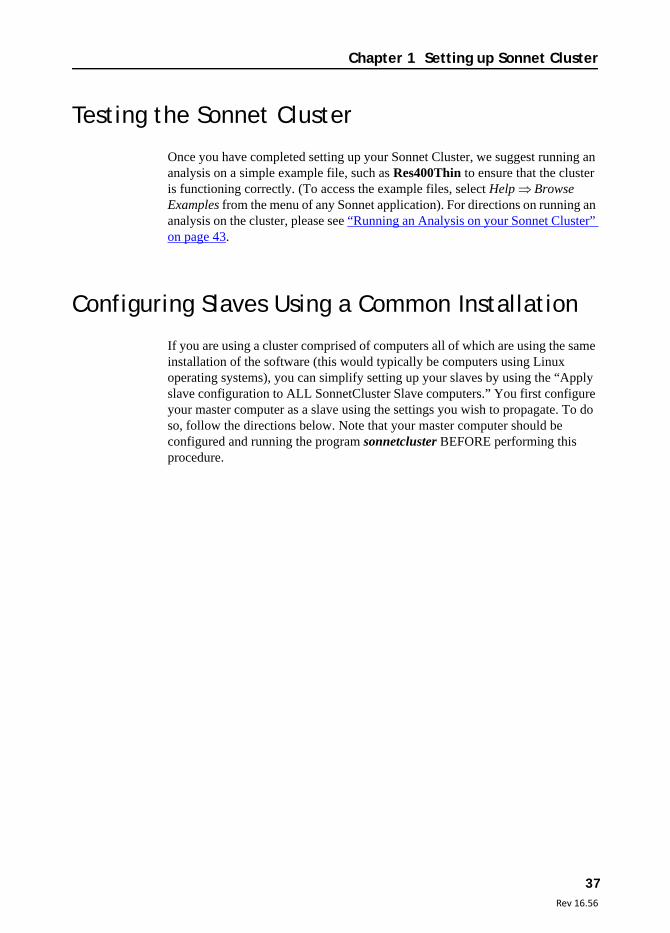
10 Once you have defined the master computer, click on the Test Connection to Remote SonnetCluster Process.
This will test communications between this client computer and the master computer. If the test is successful, you will receive a PASSED message as shown below.
If the communications test fails, you will receive the error message shown below.
If you receive an error message, check to ensure that you have the correct IP address for the master computer or that the host name is correctly identified and points to the correct IP address. If the host name and IP address are correct, check your firewall configuration to make sure that the host name is correct.

35Rev 16.56
Chapter 1 Setting up Sonnet Cluster
11 Click on the OK button to close the dialog box and apply the changes.
The Sonnet Cluster you defined as a server now appears in the server list.
NOTE: You may define multiple Sonnet Clusters as servers for any given client.
Sonnet Cluster defined as a server for this client.

Setting Up emCluster
36Rev 16.54
12 Click on the OK button to close the dialog box.
13 Select the desired default server from the drop list.
The Sonnet Cluster that you just added as a server appears in this list. Analysis jobs will default to being run on the server selected here. If you wish to choose
which server to use each time you submit a job from this client, select the “Prompt for cluster instead of using default” checkbox. When you run an analysis from this client, a window appears which allows you to choose on which server you wish to run your analysis. For more details, see “Running an Analysis on your Sonnet Cluster” on page 43.
14 Click on the OK button to close the Client Configuration dialog box.
A notice appears on your display. In order to use the cluster you have just set up, you will need to exit from this session of the analysis monitor (batch) and open a new batch.
15 Click on the OK button to close the notice.
This completes the setup of Sonnet Cluster.
37Rev 16.56
Chapter 1 Setting up Sonnet Cluster
Testing the Sonnet Cluster
Once you have completed setting up your Sonnet Cluster, we suggest running an analysis on a simple example file, such as Res400Thin to ensure that the cluster is functioning correctly. (To access the example files, select Help Browse Examples from the menu of any Sonnet application). For directions on running an analysis on the cluster, please see “Running an Analysis on your Sonnet Cluster” on page 43.
Configuring Slaves Using a Common Installation
If you are using a cluster comprised of computers all of which are using the same installation of the software (this would typically be computers using Linux operating systems), you can simplify setting up your slaves by using the “Apply slave configuration to ALL SonnetCluster Slave computers.” You first configure your master computer as a slave using the settings you wish to propagate. To do so, follow the directions below. Note that your master computer should be configured and running the program sonnetcluster BEFORE performing this procedure.
Setting Up emCluster
38Rev 16.54
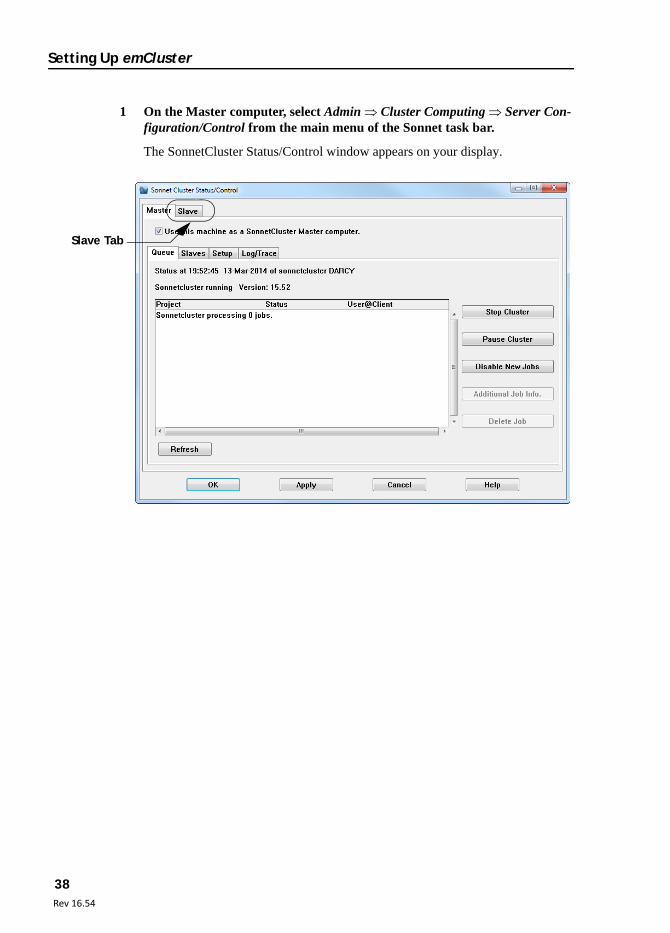
1 On the Master computer, select Admin Cluster Computing Server Con-figuration/Control from the main menu of the Sonnet task bar.
The SonnetCluster Status/Control window appears on your display.
Slave Tab

39Rev 16.56
Chapter 1 Setting up Sonnet Cluster
2 Click on the Slave tab in the Sonnet Status/Control window.
The appearance of the window is updated.
Setting Up emCluster
40Rev 16.54
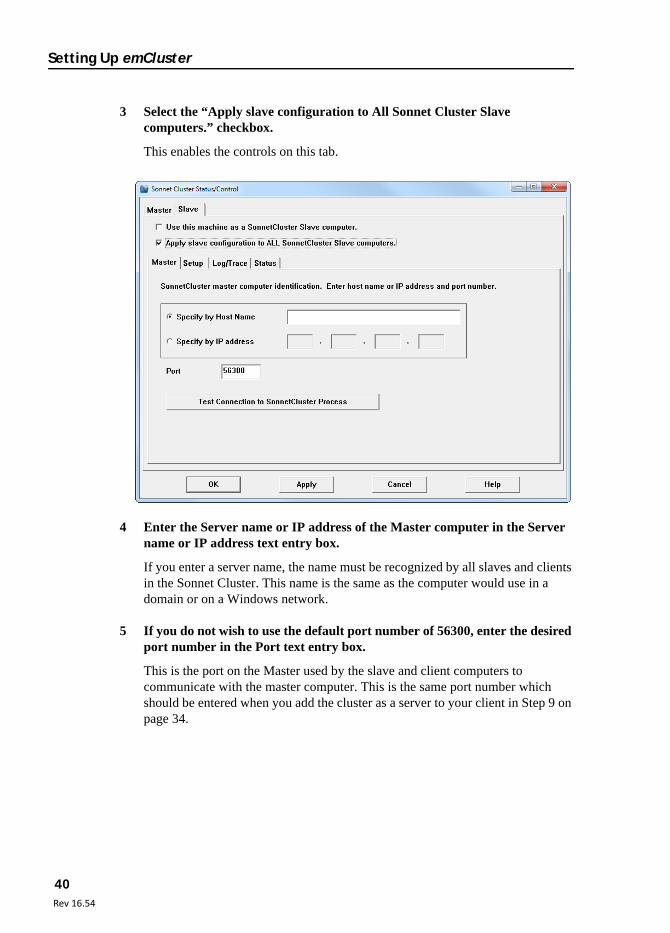
3 Select the “Apply slave configuration to All Sonnet Cluster Slave computers.” checkbox.
This enables the controls on this tab.
4 Enter the Server name or IP address of the Master computer in the Server name or IP address text entry box.
If you enter a server name, the name must be recognized by all slaves and clients in the Sonnet Cluster. This name is the same as the computer would use in a domain or on a Windows network.
5 If you do not wish to use the default port number of 56300, enter the desired port number in the Port text entry box.
This is the port on the Master used by the slave and client computers to communicate with the master computer. This is the same port number which should be entered when you add the cluster as a server to your client in Step 9 on page 34.

41Rev 16.56
Chapter 1 Setting up Sonnet Cluster
6 Click on the Setup tab in the Sonnet Cluster Setup/Control window.
The appearance of the window is updated as shown below.
7 Enter the Server name or IP address of this computer in the Specify by Host Name or IP address text entry box in the Server Settings section of the window.
The server name is the host name of this slave computer. If you enter a server name, the name must be recognized by the master computer. This name is the same as the computer would use in a domain or on a Windows network.
8 If you do not wish to use the default port number of 56150, enter the desired port number in the Port text entry box.
This is the port used by this slave computer to communicate with the master computer of the Sonnet Cluster. This is the port number used when defining a slave on the master computer, see Step 7 on page 20. If you change the port number for the slave, retain a record of the port number used in order to complete the master configuration.
NOTE: The default values used for the data directory and refresh status settings do not usually need to be changed. For more information on these settings, please see online help for this dialog box.
Setting Up emCluster
42Rev 16.54
9 Once you have completed entering the settings, click on the “OK” button.
When you click on the OK or Apply button in the window, all of the settings here are applied to all of the slaves in the cluster.
You will still need to go to each slave and start the program emserver. For instructions on how to do this, see “Starting emserver” on page 27. Also, if you wish to have emserver start up automatically after reboot, you need to go to each slave and install emserver as a service. For instructions on how to do this, see “Starting sonnetcluster at Powerup for Windows” on page 16 for Windows systems and “Starting emserver at Powerup for Linux” on page 26 for Linux systems and.
Once you have configured all your slaves, you should continue your setup at “Checking the Slaves” on page 29.
Cluster Slave Versus Remote em Server
You should not define the same computer as both a slave in a Sonnet Cluster and as a remote em server. A slave in a Sonnet Cluster may not run simultaneous jobs. Therefore, if a remote em job is submitted by a remote user ahead of a subjob from the cluster master, the subjob will be queued behind the remote em job and is not processed until the remote em job is completed. Since the master computer must wait until data from all the subjobs is returned from the slaves before combining the analysis data and sending it back to the submitting client, the analysis on the cluster is delayed for the amount of time it takes to complete the remote em job on that one slave. This reduces the efficiency of your Sonnet cluster.
43Rev 16.56
Chapter 2 Analyzing using Sonnet Cluster
Chapter 2 Analyzing using Sonnet Cluster
Using a Sonnet Cluster allows you to take advantage of your computer cluster to improve the efficiency of your Sonnet em analysis. The discussion below provides some suggestions on how to use a Sonnet Cluster for analysis followed by instruc-tions on running an analysis and overriding the default setting of one analysis fre-quency per subjob.
You should be aware, however, that there is an overhead cost to splitting the job to run on the cluster and assembling the analysis results. Using a Sonnet cluster for analysis of small jobs requiring a low number of frequency samples may show smaller efficiency gains due to cluster overhead. Larger analyses that are dominated by solve time show better gains. Therefore, we recommend small jobs be processed directly on the user’s local computer and larger jobs be analyzed on the Sonnet cluster.
Running an Analysis on your Sonnet Cluster
In order to run an analysis on the cluster, Sonnet must be installed and configured on all the cluster computers: master, slaves and clients. The program sonnetclus-ter must be running on the master and the program emserver must be running on all the slaves. For directions on doing this, refer to “Sonnet Setup” on page 62.

Setting Up emCluster
44Rev 16.54
To run an analysis on the Sonnet cluster, do the following:
1 On a cluster client, open a Sonnet project that is ready for analysis in the project editor and click on the Analyze button on the project editor’s tool bar.
2 The New Batch Creation dialog box appears on your display.
Note that this dialog box only appears if you have selected the Prompt for server checkbox in the Client Configuration dialog box of the analysis monitor when you setup your cluster computing. This dialog box contains a list of Sonnet clusters available to which you may submit jobs.
If you are not prompted, then the Sonnet cluster is your default processing server, and you may continue at Step 5.
3 Click on the Sonnet Cluster to select it for the analysis.
The selected server is highlighted. In the picture above, the cluster “clusterA1” is selected.
4 Click on the OK button in the New Batch Creation dialog box.
This closes the dialog box. The Sonnet cluster is now associated with the analysis monitor window which will subsequently open. All jobs added to the batch list of the analysis monitor will be analyzed on the Sonnet cluster.
45Rev 16.56
Chapter 2 Analyzing using Sonnet Cluster
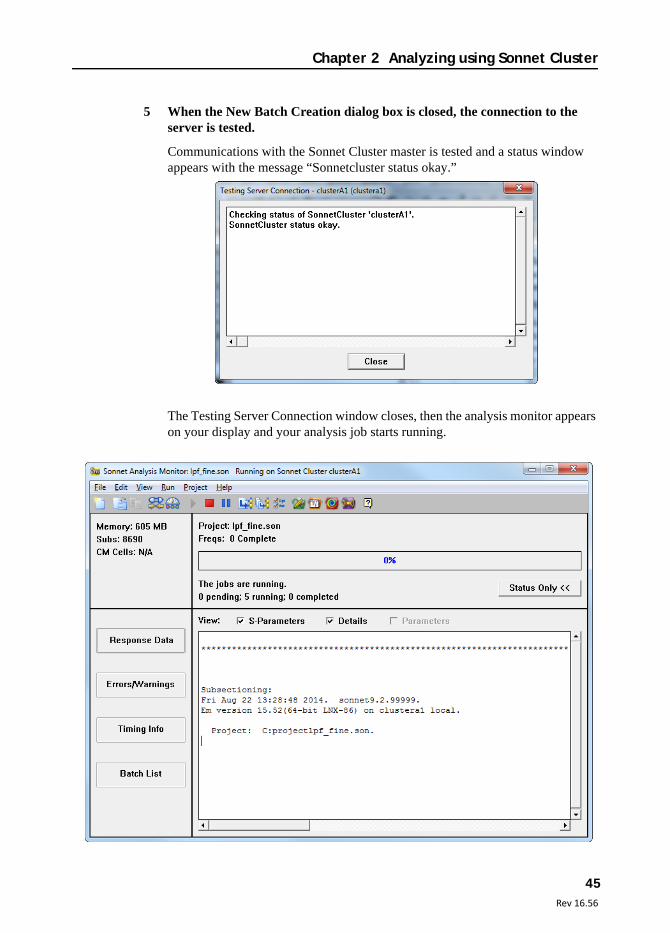
5 When the New Batch Creation dialog box is closed, the connection to the server is tested.
Communications with the Sonnet Cluster master is tested and a status window appears with the message “Sonnetcluster status okay.”
The Testing Server Connection window closes, then the analysis monitor appears on your display and your analysis job starts running.

Setting Up emCluster
46Rev 16.54
Information is returned to the analysis monitor on the client as it is processed by the master computer. The types of information which appear depend on the splitting, if any, of your project. If any errors occur with the cluster, a status message is posted in the status section of the analysis monitor just under the progress bar.
If there is a loss of communication between the master computer and the submitting client while an analysis is running, it is possible to reconnect to an ongoing analysis or recover the results of a completed analysis. For details on reconnecting or recovering disconnected jobs, please see online Help for the analysis monitor.
An Analysis Example
An example of running an analysis on a cluster with examples of output received during the analysis is shown below. This example shows an ABS analysis, from 0.2 GHz to 2 GHz, of the example project spiral_fine.son (part of the spiral_tutorial example) analyzed on the “mendoza” Sonnet cluster which consists of seven slaves: clustera3, clustera5, clustera6, clustera7, clustera8, clustera9, and clustera10. The circuit is pictured below.
Once the job is submitted to the cluster, the master computer subsections the circuit and calculates the five discrete frequencies at which to analyze the circuit in order to create the adaptive response data for the ABS analysis. Seven discrete
Note: This circuit is using a much smaller cell size than needed to accurately model the response in order to make the processing time significant per frequency.
47Rev 16.56
Chapter 2 Analyzing using Sonnet Cluster
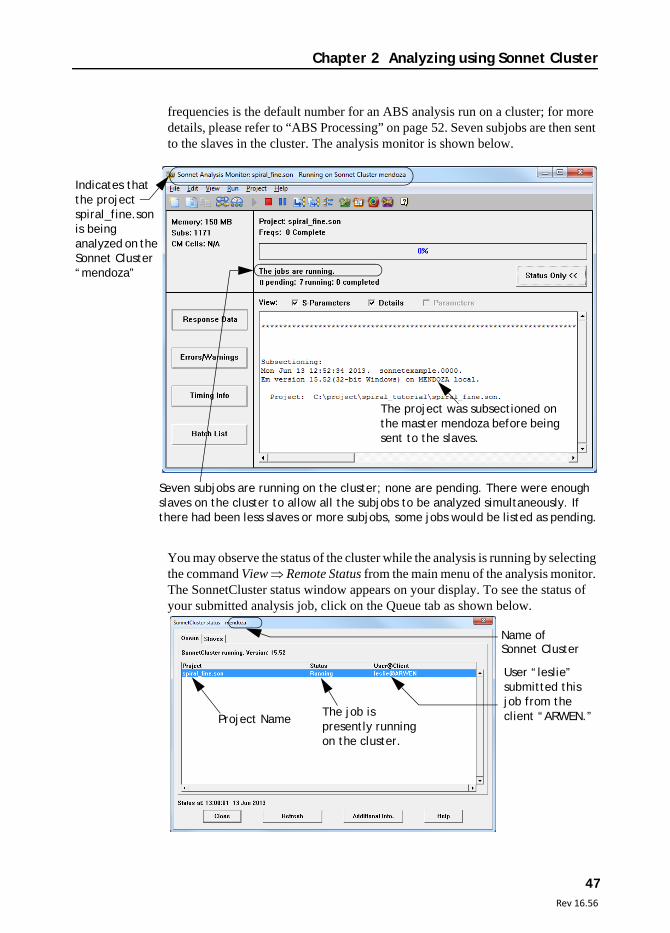
frequencies is the default number for an ABS analysis run on a cluster; for more details, please refer to “ABS Processing” on page 52. Seven subjobs are then sent to the slaves in the cluster. The analysis monitor is shown below.
You may observe the status of the cluster while the analysis is running by selecting the command View Remote Status from the main menu of the analysis monitor. The SonnetCluster status window appears on your display. To see the status of your submitted analysis job, click on the Queue tab as shown below.
Seven subjobs are running on the cluster; none are pending. There were enough slaves on the cluster to allow all the subjobs to be analyzed simultaneously. If there had been less slaves or more subjobs, some jobs would be listed as pending.
The project was subsectioned on the master mendoza before being sent to the slaves.
Indicates that the project spiral_fine.son is being analyzed on the Sonnet Cluster “mendoza”
Project Name
Name of
User “leslie” submitted this job from the client “ARWEN.”The job is
presently running on the cluster.
Sonnet Cluster

Setting Up emCluster
48Rev 16.54
If you click on the “Slaves” tab in the status window, the status of the subjobs on the slaves is shown as pictured below.
As each slave finishes a subjob, the results are returned to the master computer and the response data is output to the analysis monitor window. An example is shown below.
List of slaves in the cluster. The name of each slave is followed by the port through which the slave is communicating with the master. All of these slaves are using the default port 56150.
This entry line indicates that a subjob of the analysis job spiral_fine.son, submitted to the cluster by user “leslie” from client “Arwen,” is running on the slave “clustera10.”
Version of the software being run on the Sonnet cluster.
Job 6:Tue Jun 13 17:09:51 2015. Frequency Sweep Combinations.Em version 16.54 on clustera3 (Lnx-86) cluster.
Frequency sweep 1.
Frequency: 1.7 GHzFrequency completed Mon Apr 30 17:16:27 2007.De-embedded S-Parameters. 50.0 Ohm Port Terminations.Magnitude/Angle. Touchstone Format. (S11 S21 S12 S22).1.70000000 0.798105 -55.05 0.570045 -153.5 0.570045 -153.5 0.797264 -70.31
Job 6 completed Tue Jun 13 17:16:27 2015.
Sonnet Version and Slave ID
Analysis Frequency
Completion Time of Subjob
Response Data
Sonnet Version and Slave IDStart Time
49Rev 16.56
Chapter 2 Analyzing using Sonnet Cluster
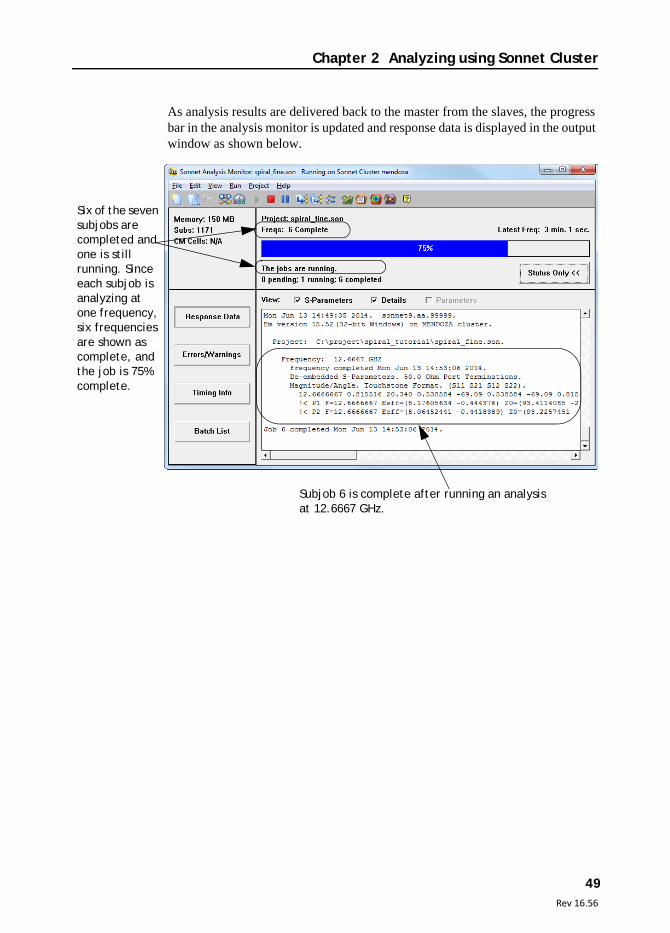
As analysis results are delivered back to the master from the slaves, the progress bar in the analysis monitor is updated and response data is displayed in the output window as shown below.
Six of the seven subjobs are completed and one is still running. Since each subjob is analyzing at one frequency, six frequencies are shown as complete, and the job is 75% complete.
Subjob 6 is complete after running an analysis at 12.6667 GHz.

Setting Up emCluster
50Rev 16.54
When running an ABS analysis, as in this example, once all the subjobs have been returned to the master, the master combines the analysis results from the slaves and sends a single subjob with the combined discrete data to one of the slaves to fit the polynomial and create the adaptive data for the ABS analysis. This is shown in the analysis monitor pictured below.
If the seven discrete data points are not enough to produce a model, then em runs an analysis at additional discrete data points until there is sufficient data to create an accurate model. In this case, the additional frequencies are analyzed sequential-ly on the same slave until the model is achieved.
The seven discrete frequencies are complete, and the ABS job-fitting the polynomial and creating the adaptive data-is being run. The analysis is 87% complete.

51Rev 16.56
Chapter 2 Analyzing using Sonnet Cluster
Once the adaptive data has been calculated and sent back to the master, the master combines the discrete data and adaptive data and sends the analysis results for the job back to the submitting client.
Frequency Splitting
One way to increase the efficiency of your processing using the Sonnet Cluster is frequency splitting as described above. Multiple duplicate projects are created, each analyzing at a single frequency point and simultaneously submitted to the Sonnet cluster so that you are performing your em processing in parallel. There-fore, if you are analyzing at 10 discrete frequencies, 10 em jobs, each containing the same circuit, are submitted to the Sonnet cluster, one for each frequency. This is the default mode for a Sonnet Cluster.
You may override the one job per frequency setting for a particular batch window by using the Run Override Cluster Options command in the analysis monitor window. This window allows you to run the analysis interactively on only one slave computer, or to limit the number of subjobs the analysis can be split into. In this case, each subjob is analyzed at some subset of the analysis frequencies. For example, if you are analyzing a circuit from 1 to 8 GHz with 1.0 GHz steps and limiting the analysis to two subjobs, each subjob would analyze the circuit at four frequencies.
Analysis is complete and the status bar is at 100%.
The final ABS analysis was processed on a slave.
The final output shows how many discrete frequencies were analyzed, how many adaptive frequencies were calculated, and the total running time on the cluster.

Setting Up emCluster
52Rev 16.54
For more details on using the overrides, please see “Automatic Calculation of Discrete Data Points” on page 52.
NOTE: You may not use frequency splitting when running an optimization or parameter sweep; the analysis is automatically run interactively on one slave.
ABS Processing
The Adaptive Band Synthesis (ABS) technique provides a fine resolution re-sponse for a frequency band requiring only a small number of analysis points. Em performs a full analysis at a few points and uses the resulting internal, or cache, data to synthesize a fine resolution band. The output data consists of the discrete data points, frequencies at which the analysis engine, em, performs an electromag-netic analysis, and the adaptive data, which is data calculated using a rational polynomial fit. This is often the most efficient process in Sonnet by which you can obtain response data over a band. For more information about ABS, please refer to Chapter 8, “Adaptive Band Synthesis (ABS)” in the Sonnet User’s Guide.
By using your cluster to perform the analyses at the discrete data points in parallel, you can further increase the efficiency of an ABS sweep. There are two ways of accomplishing an ABS sweep when using a computer cluster. You may submit an ABS sweep and allow sonnetcluster to automatically calculate at which discrete data points to run a full analysis (automatic) or you may define linear sweeps or single frequency points in which you determine, in advance, at which discrete data points you run an analysis before attempting the ABS sweep (user-defined). You must use the Frequency Sweep combinations to combine the different types of sweeps when doing the user-defined ABS. The ABS sweep should be the last sweep specified.
Automatic Calculation of Discrete Data Points
The automatic calculation of discrete data points is used when you submit an Adaptive sweep to the Sonnet cluster for analysis. In this case, em defaults to an-alyzing at seven discrete data points. These discrete data points always include the starting and ending frequencies of the band and the rest of the points are evenly distributed across the band. These discrete data points are then split up into one job per frequency point and submitted for analysis to the Sonnet cluster. Once all the results from the discrete data points are complete, em solves for the rational polynomial and produces the adaptive data. The default of seven data points is

53Rev 16.56
Chapter 2 Analyzing using Sonnet Cluster
conservative to ensure that there are enough data points to produce an accurate model. An adaptive sweep run on your local computer would solve one discrete data point at a time and attempt to “fit” a polynomial after solving at each data point. Setting up seven discrete data points beforehand allows you to take advan-tage of the frequency splitting capabilities of cluster computing.
If the seven discrete data points are not enough to produce a model, then em runs an analysis at additional discrete data points until there is sufficient data to create an accurate model. In this case, the additional frequencies are done sequentially on the same server until the model is achieved.
User Defined Discrete Data Points
For some ABS sweeps, you may have knowledge about your circuit such that you know the number of discrete data points needed or you have specific data points at which you desire a full analysis. In these cases, it may be more efficient to set up your analysis with a linear sweep first which analyzes the circuit at the desired frequency points before performing the ABS sweep. The linear sweep and the ABS sweep should be set up together using the Frequency Sweep Combinations option for Analysis Control.
For example, you are going to do an ABS analysis of a circuit from 2.0 to 4.0 GHz and are aware from previous analyses that analyzing the discrete data points 2.0 GHz, 4.0 GHz, 2.7 GHz, and 3.4 GHz provide enough discrete data for a polynomial fit. Therefore, there is no need to analyze at the default seven discrete

Setting Up emCluster
54Rev 16.54
data points used for an ABS analysis on a cluster. You only need to analyze at four discrete points saving the processing time of analyzing at an additional three frequencies. In this case, your analysis setup would be as pictured below:
Note that the first entry in the Frequency Sweep Combinations analyzes the circuit at 2.0 GHz and 4.0 GHz, and the next entry is a Frequency List which analyzes at 2.7 GHz and 3.4 GHz, followed by the ABS sweep. The ABS sweep will use the data obtained from the previous sweeps to attempt a polynomial fit before performing an analysis at any additional discrete data points.
This method also allows you to produce data for a specific frequency that is critical in your design.
Overriding Cluster Options
When running an analysis on the cluster, you may override the default settings. To do so, perform the following:
1 Open the Sonnet task bar and click on the Analyze Project button.
A pop-up menu appears on your display.
55Rev 16.56
Chapter 2 Analyzing using Sonnet Cluster
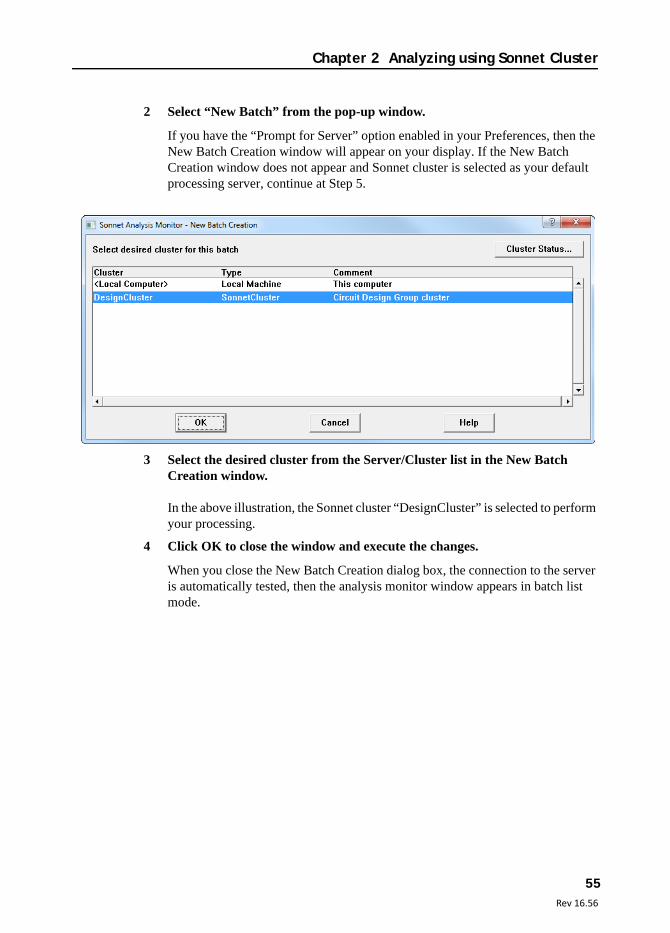
2 Select “New Batch” from the pop-up window.
If you have the “Prompt for Server” option enabled in your Preferences, then the New Batch Creation window will appear on your display. If the New Batch Creation window does not appear and Sonnet cluster is selected as your default processing server, continue at Step 5.
3 Select the desired cluster from the Server/Cluster list in the New Batch Creation window.
In the above illustration, the Sonnet cluster “DesignCluster” is selected to perform your processing.
4 Click OK to close the window and execute the changes.
When you close the New Batch Creation dialog box, the connection to the server is automatically tested, then the analysis monitor window appears in batch list mode.
Setting Up emCluster
56Rev 16.54
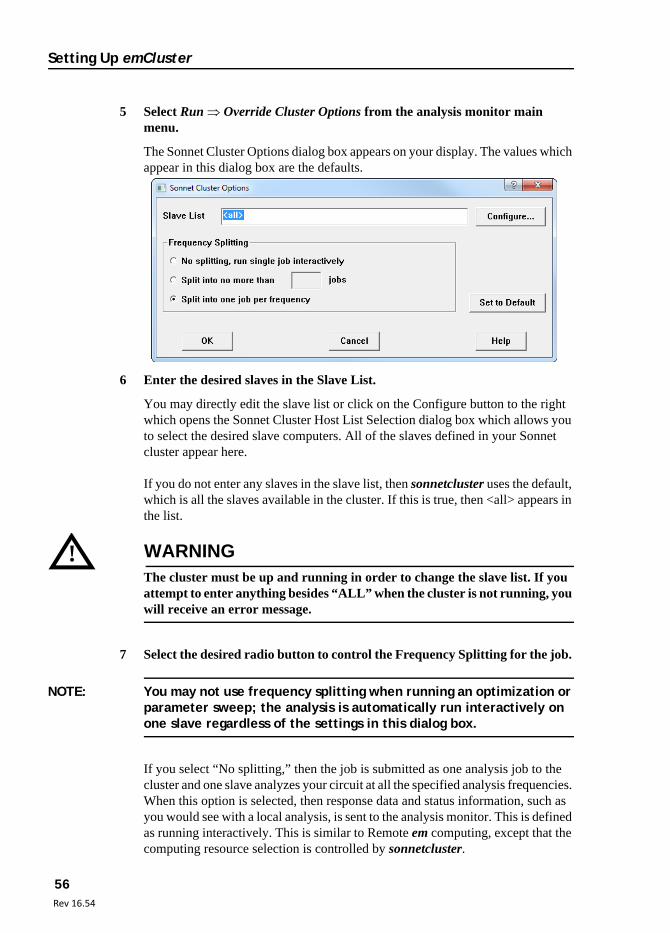
5 Select Run Override Cluster Options from the analysis monitor main menu.
The Sonnet Cluster Options dialog box appears on your display. The values which appear in this dialog box are the defaults.
6 Enter the desired slaves in the Slave List.
You may directly edit the slave list or click on the Configure button to the right which opens the Sonnet Cluster Host List Selection dialog box which allows you to select the desired slave computers. All of the slaves defined in your Sonnet cluster appear here.
If you do not enter any slaves in the slave list, then sonnetcluster uses the default, which is all the slaves available in the cluster. If this is true, then <all> appears in the list.
! WARNINGThe cluster must be up and running in order to change the slave list. If you attempt to enter anything besides “ALL” when the cluster is not running, you will receive an error message.
7 Select the desired radio button to control the Frequency Splitting for the job.
NOTE: You may not use frequency splitting when running an optimization or parameter sweep; the analysis is automatically run interactively on one slave regardless of the settings in this dialog box.
If you select “No splitting,” then the job is submitted as one analysis job to the cluster and one slave analyzes your circuit at all the specified analysis frequencies. When this option is selected, then response data and status information, such as you would see with a local analysis, is sent to the analysis monitor. This is defined as running interactively. This is similar to Remote em computing, except that the computing resource selection is controlled by sonnetcluster.

57Rev 16.56
Chapter 2 Analyzing using Sonnet Cluster
The Split into no more than <n> jobs selection limits the number of jobs your anal-ysis may be split into. The project is duplicated the number of times you enter in the adjacent text entry box and each duplicate project analyzes the circuit for a subset of the requested analysis frequencies. For example, if your analysis is for the frequencies 2, 4, 6, 8, 10, 12, 14, and 16 GHz and you have entered 4 as the maximum number of jobs then the first job analyzes at 2 and 4 GHz, the second project at 6 and 8 GHz and so on.
The “Split into one job per frequency” option splits the project into one job per requested analysis frequency; this is the default mode. If more jobs are created than there are server hosts in your cluster, then multiple jobs will be submitted to some server hosts. If you have a sufficient number of server hosts in your cluster, this option results in the greatest efficiency for your processing.
8 If you want to reset the dialog box to the original values, then click on the Set to Defaults button.
You will lose any changes made up until then in the dialog box.
9 Once all your entries are complete, click on the OK button to close the dialog box and apply the changes.
This batch window will now run any jobs submitted to the cluster using the operating parameters input to the Override Cluster Options dialog box. These changes will only apply to this batch window. If a new batch window is opened, it will use the default values unless you once again override those options.
10 Add the projects you wish to use the cluster to analyze to the batch list.
You may add projects by selecting File Add Project(s) from the main menu of the analysis monitor window or by clicking on the Add Projects button on the analysis monitor tool bar.
11 Click on the Run button on the analysis monitor tool bar to analyze the projects in the batch list.
Controlling Cluster Programs from a Command Line
It is possible to start and stop both the sonnetcluster program, which runs on the Master, and the emserver program, which runs on all slaves, from a command line. Be aware, however, that you do not receive feedback to the display as to the success of the startup; using the GUI provides more direct error reporting. For instructions on starting each program, see the instructions below.
Setting Up emCluster
58Rev 16.54
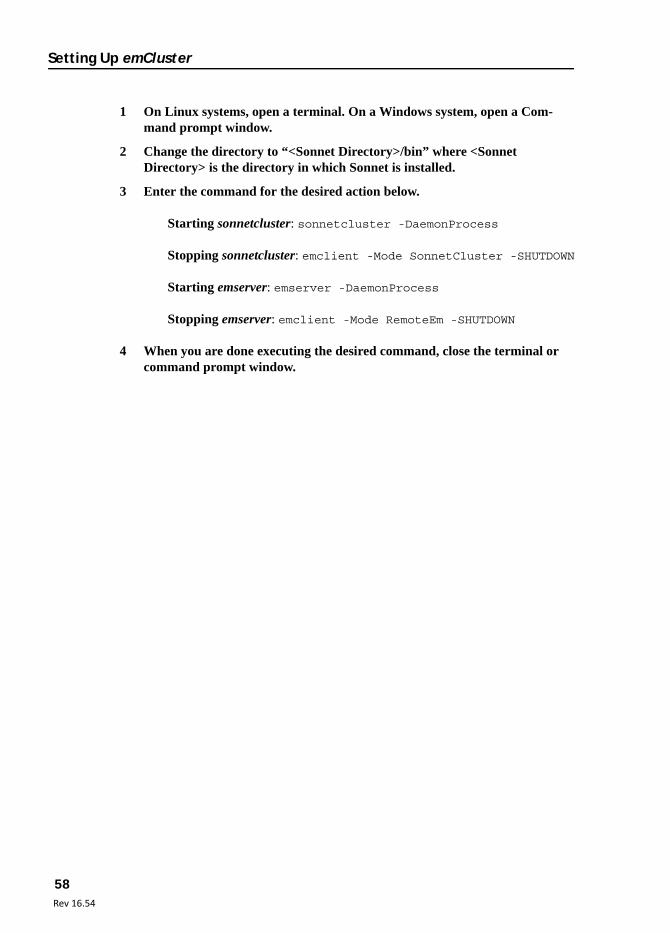
1 On Linux systems, open a terminal. On a Windows system, open a Com-mand prompt window.
2 Change the directory to “<Sonnet Directory>/bin” where <Sonnet Directory> is the directory in which Sonnet is installed.
3 Enter the command for the desired action below.
Starting sonnetcluster: sonnetcluster -DaemonProcess
Stopping sonnetcluster: emclient -Mode SonnetCluster -SHUTDOWN
Starting emserver: emserver -DaemonProcess
Stopping emserver: emclient -Mode RemoteEm -SHUTDOWN
4 When you are done executing the desired command, close the terminal or command prompt window.

59Rev 16.56
Chapter 3 Setting up LSF Cluster
Chapter 3 Setting up LSF Cluster
Sonnet’s emCluster using Platform LSF (LSF Cluster) allows your Sonnet em analysis to interface with Platform Computing’s Load Sharing Facility (LSF) cluster computing software to improve the efficiency and processing time of your Sonnet analyses. The LSF Cluster feature provides you with the ability to split your analysis project into multiple jobs which may then be processed in parallel to greatly reduce your processing time. You may also take advantage of Sonnet LSF Cluster’s ability to choose a server host computer based on analysis size, licensing considerations, loading, time of day, etc. For example, smaller jobs may be sent to a computing host reserved just for them to avoid waiting behind a larger job which requires substantially more processing time.
Your processing cluster is made up of Server hosts and Client hosts. Servers are the computers, of any platform type, that are available as a computing resource. In our case, the servers would be used to actually run the em analysis jobs. Clients are computers in the cluster from which a user may submit jobs but they do not themselves perform processing tasks. Clients may not be used as servers, but all servers may act as clients to the cluster.
You will use the analysis monitor on your client server to submit your em jobs to the computer cluster for processing. The program, emCluster, provides the interface between the analysis monitor and your processing cluster server hosts upon which the Sonnet analysis engine, em, will run. The relationship between the

Setting Up emCluster
60Rev 16.54
programs is shown in the illustration below. Note that this illustration contains only one Server host. Your processing cluster will have multiple Server hosts and possibly multiple client hosts.
When you submit your job for processing, emCluster copies your project to an emCluster shared directory. There, depending on the mode in which you are operating, your project is split into multiple copies and/or sent to specified servers in your computer cluster for processing. The results are written to the emCluster shared area. If post-processing is needed, emCluster again submits your project to the computer cluster using the shared area for the project data. Once all processing is complete, the project, including its newly calculated response data, is copied
Client Host Server Host
Sonnet’sAnalysis Monitor
Sonnet’semcluster
Platform Computing’sLSF
Sonnet’s analysis engine,
em

61Rev 16.56
Chapter 3 Setting up LSF Cluster
back to the client machine from which the em job originated. Once this transfer is complete, the temporary files in the emCluster shared area are deleted. The data flow in a cluster with one client and four servers is pictured below.
Which server host(s) the job is submitted to depends on the way in which the computer cluster is being used. One possible way to increase your processing efficiency, when analyzing a large circuit which requires a long processing time per frequency, is to have your project split into multiple identical projects, each analyzed at a subset of the analysis frequencies. For example, you have 4 frequencies specified in your analysis, so the project is split into four jobs, each analyzed at one of the frequencies. These jobs are then submitted to the processing cluster and analyzed in parallel, reducing the analysis of the whole circuit to the time required to analyze at only one frequency. The interface between emCluster and LSF allows you to control how your frequencies are split so that you may maximize your efficiency based on how your computer cluster is configured. See “Frequency Splitting” on page 77 for details on controlling the frequency splitting.
CLIENT HOST1
SERVER HOST2
LSF Software and Sonnet’s em run here.
Jobs submitted and Sonnet’s emstatus and emcluster run here.
emCluster’s
Project data is stored here while performing the analyses on the cluster controlled by LSF. All clients and servers must have read, write, and execute privileges in this directory
FILE SERVER
Shared Directory SERVER HOST4
LSF Software and Sonnet’s em run here.
SERVER HOST3
LSF Software and Sonnet’s em run here.
SERVER HOST1
LSF Software and Sonnet’s em run here.
Setting Up emCluster
62Rev 16.54
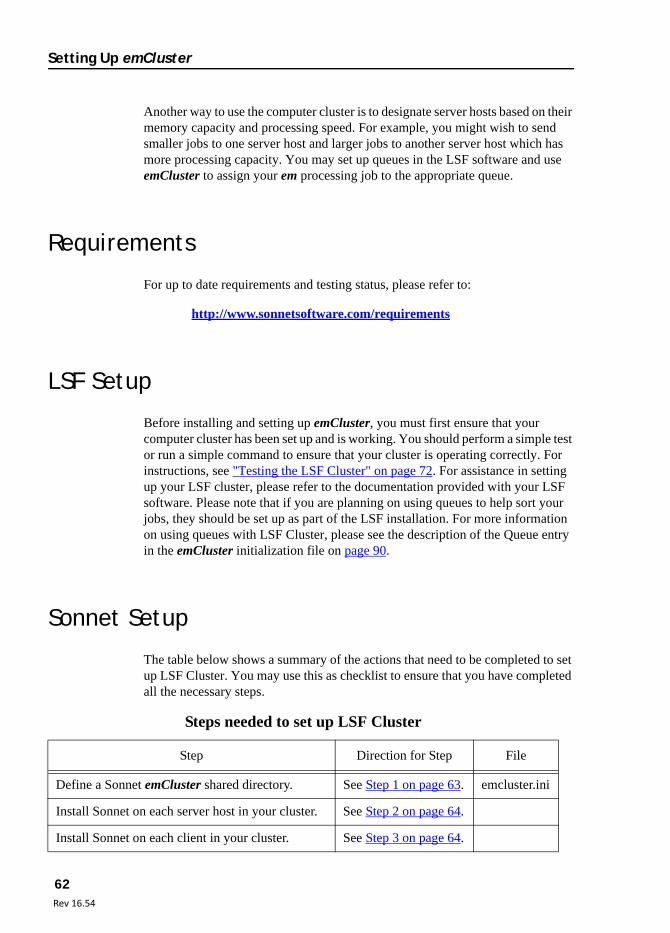
Another way to use the computer cluster is to designate server hosts based on their memory capacity and processing speed. For example, you might wish to send smaller jobs to one server host and larger jobs to another server host which has more processing capacity. You may set up queues in the LSF software and use emCluster to assign your em processing job to the appropriate queue.
Requirements
For up to date requirements and testing status, please refer to:
http://www.sonnetsoftware.com/requirements
LSF Setup
Before installing and setting up emCluster, you must first ensure that your computer cluster has been set up and is working. You should perform a simple test or run a simple command to ensure that your cluster is operating correctly. For instructions, see "Testing the LSF Cluster" on page 72. For assistance in setting up your LSF cluster, please refer to the documentation provided with your LSF software. Please note that if you are planning on using queues to help sort your jobs, they should be set up as part of the LSF installation. For more information on using queues with LSF Cluster, please see the description of the Queue entry in the emCluster initialization file on page 90.
Sonnet Setup
The table below shows a summary of the actions that need to be completed to set up LSF Cluster. You may use this as checklist to ensure that you have completed all the necessary steps.
Steps needed to set up LSF Cluster
Step Direction for Step File
Define a Sonnet emCluster shared directory. See Step 1 on page 63. emcluster.ini
Install Sonnet on each server host in your cluster. See Step 2 on page 64.
Install Sonnet on each client in your cluster. See Step 3 on page 64.

63Rev 16.56
Chapter 3 Setting up LSF Cluster
You must follow the steps below to install and run emCluster.
Because LSF is a very powerful tool which provides the user a great deal of flexibility and control over how their cluster is structured, we have documented a simple installation in which the server hosts are identically configured. The advanced user may take advantage of the LSF flexibility and customize his setup to a greater degree than shown herein.
1 You must define a Sonnet emCluster shared directory for which each server host and each client host has permission to read, write and execute.
This directory will be the location to which emCluster writes the Sonnet project submitted by the client and LSF will return the response data from the em job run on the server host before transfer back to the client. You may choose any location on your network, but it is required that all servers and clients in your computer cluster have read, write, and execute privileges in this directory. This shared area should be different from the shared area used by the LSF software.
You must enter the location of this directory in the emCluster initialization file. See Step 5 on page 67.
The emCluster software will create two directories in this Sonnet shared directory,
<Shared_Directory>/sonnet_emcluster/sonnet_emcluster_lsf
The temporary data of an ongoing analysis is stored here.
You may have multiple types of platforms included in your computing cluster. If your cluster uses a mixture of Linux and Windows platforms, then your Sonnet shared directory should be on a Linux platform or your Linux systems must be able to access a Windows file server.
Edit and Install the emCluster script files on each server host.
See Step 4 on page 64. emclusterlsf
Set up operating parameters by editing the emCluster Initialization file.
See Step 5 on page 67. emcluster.ini
Set up the emCluster controls in the analysis mon-itor on each client server.
See Step 6 on page 68.
Steps needed to set up LSF Cluster
Step Direction for Step File
Setting Up emCluster
64Rev 16.54
2 Sonnet should be installed on each server host in your cluster.
For instructions on installing Sonnet, please refer to the appropriate Installation manual. We recommend that the Sonnet installation be done using the same path for all Linux server hosts and the same path for all Windows server hosts to make the setup simpler for emCluster. For example, if you have installed Sonnet on two different Windows PCs whose host names are gizmo and gadget, then Sonnet would be installed at
\\gizmo\C\Program Files\sonnet.16.54
\\gadget\C\Program Files\sonnet.16.54
You may still use the LSF software if Sonnet is installed in different locations, but it will require you to create more batch files (see Step 4 on page 64) in multiple locations which will increase the difficulty of maintenance or upgrades on your system.
Once the installation is complete, you should run the command “em -test” from a command line on each server to ensure that the Sonnet software is installed and running correctly from a command line. For instructions on how to do so, see "Testing Sonnet from the Command Line" on page 73.
3 Sonnet should be installed on each client in your cluster.
The client needs to have access to the Sonnet project editor, xgeom, the analysis monitor, emstatus, and the LSF Cluster program, emCluster, in order to edit circuits and submit them for analysis to the analysis engine, em, installed on the server hosts. For instructions on installing Sonnet, please refer to the appropriate Installation manual. We recommend that Sonnet be installed in the same path as it is installed on the server hosts of the same type of installation. This makes for simpler installation and maintenance. At the end of the installation, you should ensure, on each client, that you may open a new geometry project in the Sonnet project editor. Instructions on how to do so are included in the Installation manual.
4 The emCluster script files need to be edited and installed on each server host.
Linux systems need to run a script file, “emclusterlsf,” to analyze jobs using the LSF cluster and Windows systems need to run a batch file, “emclusterlsf.bat.” These files are provided as part of your installation and are located at <Sonnet Directory>/data where <Sonnet Directory> is the location at which you installed Sonnet software. You will need to copy and modify the contents of the script files for each server host. There is a section below which details doing so on a Linux system and another section which explains how to do so on a Windows system.
Once you have finished modifying the script files, they should be written to the following directory, discussed in Step 1 on page 63:
<Sonnet Shared Directory>

65Rev 16.56
Chapter 3 Setting up LSF Cluster
Linux: If you installed Sonnet software in the same path on Linux, then you will only require one script file for all your Linux server hosts. We recommend that the script file be placed in the shared directory for emCluster and a link to the script be placed in one of the following four directories:
/bin /usr/bin /sbin /usr/sbin/
When you submit the “emclusterlsf” command to the LSF software, LSF searches the four directories above and will use the link to locate the script file. By using links to the location of a single script file, you will only need to modify the one script file if you need to make changes.
You may also set up access on each server and client to the script file by placing the location of the script file in each user’s path. But, be aware that this will require you to edit every user’s profile on every server host and client host to ensure that their path contains the location of the script file.
If Sonnet is not installed in the same location on all your Linux server hosts, you will have to create a separate script file for each server host. Ensure that its location or a link to its location may be found in either the directories listed above or in each user’s path.
There are two entries you must modify in the script file provided by Sonnet to customize the script for your use: the emCluster shared directory <Sonnet Shared Directory> and the location at which Sonnet software is installed. The beginning of the script file with the two entries you must modify are shown below. The part you must edit is shown in bold.
In the example above, the first entry, the shared directory, is
/diskb/sonnet_lsf_share
#!bin/sh## Batch file for executing an LSF job on a Linux machine.## The user must set the following items in this file:## The project will have this shared directory path prepended to it.LSF_SHARE=/diskb/sonnet_lsf_share## The location for Sonnet.SONNET_DIR=/diskj/app/Sonnet/16.54

Setting Up emCluster
66Rev 16.54
For the <Sonnet Shared Directory> example above, the two directories created by Sonnet will be:
/diskb/sonnet_lsf_share/sonnet_emcluster/sonet_emcluster_lsf
The second entry, the location at which Sonnet is installed, is:
/diskj/app/Sonnet/16.54
You should replace these strings with the locations which you will be using.
Windows: If you installed Sonnet software in the same location on all Windows systems in your cluster, then you will only require one batch file for all your Windows server hosts. We recommend that the batch file be placed in the Sonnet shared directory for LSF as discussed in Step 1 on page 63. When you submit the “emclusterlsf” command to the LSF software, it must be able to locate the batch file; therefore, you must add the directory in which you store the batch file to your path on the client. If you are using only one batch file for all Windows server hosts, you should create a local batch file on each server, also named “emclusterlsf.bat,” which calls the master emCluster batch file and place it on the server in a location referenced by your client’s path.
For example, the master batch file, “emclusterlsf.bat,” which will be used by all the server hosts is located at \\gadget\c\sonnetlsf\emclusterlsf.bat. You will create a batch file, “emclusterlsf.bat,” on each server host which calls the master batch file. The server batch file is located at c:\ emclusterlsf.bat; therefore c:\ should be in the path of each user on the client. The contents of the server batch file should be similar to the content shown below:
You may also utilize one master batch file by placing the location of the master batch file in each user’s path, but be aware that this will require you to edit every user’s account in the Control Panel to ensure that their path contains the location of the script file.
If Sonnet is not installed in the same location on all your Windows server hosts, you will have to create a separate batch file for each server host, and ensure that its location or a link to its location may be found in each user’s path.
@echo off\\gadget\c\sonnetlsf\emcluster.bat %1 %2 %3 %4 %5 %6 %7 %8 %9

67Rev 16.56
Chapter 3 Setting up LSF Cluster
There are two entries you must modify in the batch file provided by Sonnet to customize the batch file for your use: the emCluster shared directory, <Sonnet Shared Directory> and the location at which Sonnet software is installed. The beginning of the batch file with the two entries you must modify are shown below. The part you must edit is shown in bold.
In the example above, the first entry, the shared directory, is
\\gizmo\sonnet_lsf_share
and the second entry, the location at which Sonnet is installed, is:
c:\Program Files\Sonnet.16.54
You should replace these strings with the locations which you will be using.
5 Edit the emCluster Initialization file, emCluster.ini, to set up operating parameters for emCluster.
Settings in this initialization file will control how emCluster usually operates. You may override some of these settings by using the Run Override Cluster Options command in the analysis monitor for any given batch window, see "Overriding Cluster Computing Options" on page 82 for details. Changes made to the initialization file will affect only the client upon which the changes are made. You may find the file at
<Sonnet Directory>/data/emcluster.ini
where <Sonnet Directory> is the directory on the client where Sonnet software was installed. Note that on Windows the file is found in the Sonnet application data folder. To open this folder, select Admin Diagnostics Explore Sonnet AppData Folder. For details on the contents of the initialization file, see Appendix I, “The LSF Cluster Initialization File,” on page 87. For more information on controlling the frequency splitting, see “Frequency Splitting” on page 77.
@echo off
rem Batch file for executing an LSF job on a PC.
rem The user must set the following items in this file:
rem The project will have this shared directory path prepended to it.set LSF_SHARE="\\gizmo\sonnet_lsf_share"
rem The location for Sonnet.set SONNET_DIR="c:\Program Files\Sonnet.16.54"
Setting Up emCluster
68Rev 16.54
You must enter the location of the emCluster shared directory (discussed in Step 1 on page 63) in the emCluster initialization file before emCluster will operate correctly. You should define the SharedDirectoryUnix on Linux systems and the SharedDirectoryWindows for Windows systems. The path entered must use the appropriate syntax for its platform.
For example, if your shared directory is defined as a location on a Linux file server, /diskb/sonnet_lsf_share, the entry in your initialization file for a Linux system would be:
SharedDirectoryUnix=/diskb/sonnet_lsf_share
An example of an entry for a Windows directory from a windows platform would be
SharedDirectoryWindows="\\gizmo\datastore\sonnet_lsf_share"
NOTE: The path must be in quotes if there is a space in the path name. See the SharedDirectoryWindows=<pathname> and SharedDirectoryUnix=<pathname> entries in the initialization file for syntax and details.
Once this is complete, you should test the batch or script file on each server. For instructions on doing so, see "Testing the emclusterlsf Script File" on page 74.
6 Set up the emcluster controls in the analysis monitor on each client server in your computing cluster.
You must configure the analysis monitor so that when you submit an analysis job, the job is handled by emCluster and submitted to your computer cluster for processing. To do so, follow the instructions below:
a Open the Sonnet task bar, and click on the Analyze Project button.
A pop-up menu appears on your display.
b Select “New Batch” from the pop-up menu.
If you have the “Prompt for Server” option enabled in your Client Configuration, then the New Batch Creation window will appear on your display. In that case, select <Local Computer> before clicking on OK. A new analysis monitor window appears on your display.
c Select File Client Configuration from the main menu of the analysis monitor.
The Client Configuration dialog box appears on your display.
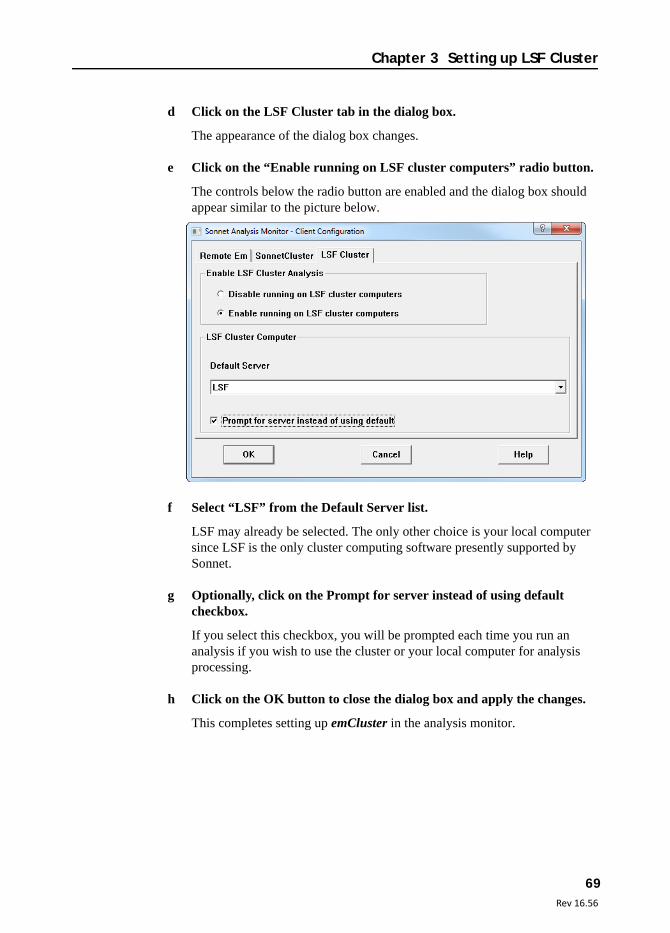
69Rev 16.56
Chapter 3 Setting up LSF Cluster
d Click on the LSF Cluster tab in the dialog box.
The appearance of the dialog box changes.
e Click on the “Enable running on LSF cluster computers” radio button.
The controls below the radio button are enabled and the dialog box should appear similar to the picture below.
f Select “LSF” from the Default Server list.
LSF may already be selected. The only other choice is your local computer since LSF is the only cluster computing software presently supported by Sonnet.
g Optionally, click on the Prompt for server instead of using default checkbox.
If you select this checkbox, you will be prompted each time you run an analysis if you wish to use the cluster or your local computer for analysis processing.
h Click on the OK button to close the dialog box and apply the changes.
This completes setting up emCluster in the analysis monitor.

Setting Up emCluster
70Rev 16.54
7 You should submit a simple analysis job from each client running emCluster to each server host to ensure that the script file has been properly installed and is functioning correctly.
For instructions on running an analysis using the LSF Cluster feature, please refer to “Running an Analysis on your LSF Cluster” on page 81. We recommend using the example Res400Thin from the Sonnet examples (Help Browse Examples). It is a small project with low memory requirements which requires little processing time.
Defining a Resource to Handle Sonnet Licensing
This setup is optional; if you have a Sonnet em license for each host in your computing cluster, you do not need to do this. However, if there are more computers in your cluster than you have Sonnet licenses, you may wish to ensure that a Sonnet analysis job is not submitted to the cluster if a Sonnet license is not presently available. The LSF software allows you to define a resource which can be used to track the usage of a commodity on your cluster network. In the case of Sonnet, the commodity is a Sonnet em license. This section demonstrates one of the ways in which you may use the LSF software to track your Sonnet license usage; as mentioned before, the LSF software is complex and highly flexible; other methods of obtaining the same result are possible. Please refer to your LSF software documentation for complete details on configuring and using resources.
If all the Sonnet jobs are being submitted to the LSF software, then LSF can be used to allocate the licenses so that a job is not submitted for processing unless a Sonnet license is available. A static resource is used in the LSF software to hold the total number of licenses that are available. For example, you have 10 Sonnet licenses to be shared by all the computers in your cluster. Therefore, you define a resource, sonnetlic, whose initial value is 10, the number of your licenses. Each time a job is started then sonnetlic is reduced by one. When a job is completed, sonnetlic is increased by one. If sonnetlic is reduced to zero, than no more Sonnet analysis jobs are started until a license to process it is available.
You define the resource by editing the LSF configuration file, lsf.shared. This file is located at
<LSF Directory>/conf/lsf.shared

71Rev 16.56
Chapter 3 Setting up LSF Cluster
where <LSF Directory> is the directory in which the LSF software is installed. You should add the following lines to define the resource sonnetlic. Note that if another resource has already been defined, then some of the entries below will already exist. In that case, you only need to add the line beginning with “sonnetlic.”
You must also add a resource map to the LSF configuration file, lsf.cluster.<cluster_name> located at
<LSF Directory>/conf/lsf.cluster.<cluster_name>
where <LSF Directory> is the directory in which the LSF software is installed and <cluster_name> is the name of your cluster. To this file you should add the lines displayed below:
When you edit your emCluster initialization file, “emcluster.ini,” you should add the following entry:
LSFResourceRequirements="rusage[sonnetlic=1]"
This entry tells LSF that a Sonnet processing job requires a Sonnet license.
Windows Firewall
If you are running Sonnet’s cluster computing on a Windows platform, and your Windows firewall is enabled, you will be asked if you wish to block two programs: nios and bsub. Both of these programs are run by the LSF software and should not be blocked.
Additional adjustments to the Firewall may be necessary in order to ensure that LSF functions properly. Please refer to your LSF documentation for details.
Begin ResourceRESOURCENAME TYPE INTERVAL INCREASING DESCRIPTIONsonnetlic Numeric ( ) N (Floating licenses for Sonnet)End Resource
Begin ResourceMapRESOURCENAME LOCATIONsonnetlic (<n>@[all])End ResourceMap
where <n> is the total number of Sonnet licenses.
Setting Up emCluster
72Rev 16.54
Troubleshooting LSF Cluster
The sections below provide some simple LSF commands and tests that you may use to determine if your LSF cluster, Sonnet software and Sonnet’s LSF Cluster are operating correctly. If you are unable to determine the source of a problem using these instructions, please contact Sonnet support personnel for assistance.
Testing the LSF Cluster
To see if the LSF cluster is up and running, do the following:
1 Open a Command Prompt window on a Windows system or a Terminal on a Linux system.
A window with a prompt should appear on your display.
2 Enter the command “lshosts” at the prompt.
This command lists all the server hosts and client hosts in your LSF network. To obtain the cluster name and the identity of the master server, you would use the command “lsid.” To output a list of only server hosts, use the command “bhosts.”
3 Run the command “hostname” on each server host from each client in the LSF cluster.
The syntax for the command is as follows:
lsrun -m <hostname> hostname
where <hostname> is the name of the server host which you are testing. When the command is executed, then the hostname should be output in the window in which you entered the command.
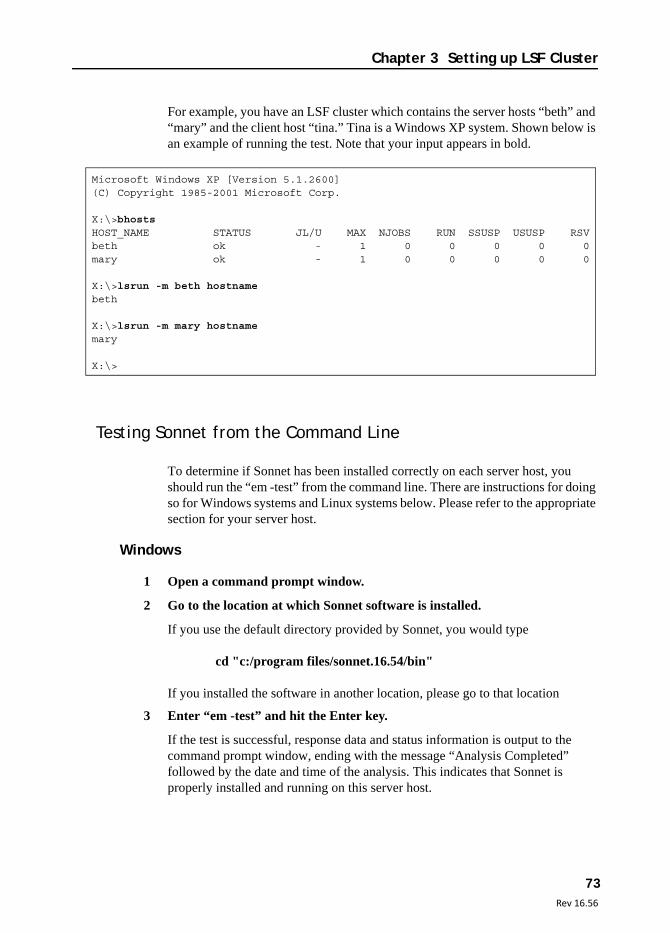
73Rev 16.56
Chapter 3 Setting up LSF Cluster
For example, you have an LSF cluster which contains the server hosts “beth” and “mary” and the client host “tina.” Tina is a Windows XP system. Shown below is an example of running the test. Note that your input appears in bold.
Testing Sonnet from the Command Line
To determine if Sonnet has been installed correctly on each server host, you should run the “em -test” from the command line. There are instructions for doing so for Windows systems and Linux systems below. Please refer to the appropriate section for your server host.
Windows
1 Open a command prompt window.
2 Go to the location at which Sonnet software is installed.
If you use the default directory provided by Sonnet, you would type
cd "c:/program files/sonnet.16.54/bin"
If you installed the software in another location, please go to that location
3 Enter “em -test” and hit the Enter key.
If the test is successful, response data and status information is output to the command prompt window, ending with the message “Analysis Completed” followed by the date and time of the analysis. This indicates that Sonnet is properly installed and running on this server host.
Microsoft Windows XP [Version 5.1.2600](C) Copyright 1985-2001 Microsoft Corp.
X:\>bhostsHOST_NAME STATUS JL/U MAX NJOBS RUN SSUSP USUSP RSVbeth ok - 1 0 0 0 0 0mary ok - 1 0 0 0 0 0
X:\>lsrun -m beth hostnamebeth
X:\>lsrun -m mary hostnamemary
X:\>

Setting Up emCluster
74Rev 16.54
If the command fails, the last line of the output will be “Analysis failed due to error.” If you receive this error, it indicates that something is wrong with your Sonnet installation on this server host. Please refer to the troubleshooting section of the Windows Installation manual for help.
Linux
1 Open a terminal
2 Enter “em -test” and hit the Enter key.
If the test is successful, response data and status information is output to the terminal, ending with the message “Analysis Completed” followed by the date and time of the analysis. This indicates that Sonnet is properly installed and running on this server host.
If the command fails, the last line of the output will be “Analysis failed due to error.” If you receive this error, it indicates that something is wrong with your Sonnet installation on this server host. Please refer to the Linux Installation manual to ensure that the software was installed correctly. If you continue to experience problems in getting Sonnet to run on a server host, please contact your Sonnet support representative.
Testing the emclusterlsf Script File
To test the “emclusterlsf” script file or “emclusterlsf.bat” batch file, you will submit the emclusterlsf with a test command. To do so, perform the following.
1 Open a Command Prompt window on a Windows system or a Terminal on a Linux system.
A window with a prompt should appear on your display.
2 Run the script or batch file directly on each server host.
Do this by entering “emstatuslsf -test” in the command window or terminal.
If the test is successful, the shared emCluster directory and Sonnet directory settings used by emclusterlsf are output to the command prompt window followed by response data and status information, ending with the message “Analysis Completed” followed by the date and time of the analysis. This indicates that the script file is properly installed and running on this server host.
If this command fails on a server host, then there is either a problem with the script file or the server host is not correctly accessing the script file.

75Rev 16.56
Chapter 3 Setting up LSF Cluster
3 Once the batch file has been tested directly on each server host, run the command “emstatuslsf -test” on each server host from each client host in the LSF cluster using the LSF software.
The syntax for the command is as follows:
bsub -I -m <hostname> emclusterlsf -test
where <hostname> is the name of the server host which you are testing.
If the test is successful, the shared emCluster directory and Sonnet directory settings used by emclusterlsf are output to the command prompt window followed by response data and status information, ending with the message “Analysis Completed” followed by the date and time of the analysis. This indicates that Sonnet is properly installed and running on this server host.
If the command fails, the last line of the output will be “Analysis failed due to error.”

Setting Up emCluster
76Rev 16.54

77Rev 16.56
Chapter 4 Analyzing Using LSF Cluster
Chapter 4 Analyzing Using LSF Cluster
For an overview of LSF Cluster and instructions on setting up your LSF Cluster, see Chapter 3, Setting up LSF Cluster, on page 59.
Running emCluster
Using emCluster allows you to take advantage of your computer cluster to im-prove the efficiency of your Sonnet em analysis. The discussion below provides some suggestions on how to use Sonnet with a computer cluster followed by sev-eral sections with instructions on the interface to emCluster.
Frequency Splitting
One way to increase the efficiency of your processing using LSF Computing is frequency splitting. Multiple duplicate projects are created, each analyzing at some subset of the desired frequency points and simultaneously submitted to the LSF cluster so that you are performing your em processing in parallel.

Setting Up emCluster
78Rev 16.54
The default setting in the emCluster initialization file for running emCluster is to split the analysis into one em job per analysis frequency submitted to the LSF clus-ter. Therefore, if you are analyzing at 10 discrete frequencies, 10 em jobs, each containing the same circuit, are submitted to the LSF cluster, one for each frequen-cy. The setting in the emCluster initialization file which controls frequency split-ting is SplitJob. In order to submit one job per analysis frequency, the SplitJob field is set to “-1.”
You may also turn the frequency splitting off so that the analysis is submitted to the cluster as one job. SplitJob should be set equal to “0” in order to turn frequen-cy splitting off.
You may want to the limit the number of jobs into which you split an analysis. For example, if you want to limit the number of jobs to the number of server hosts in your cluster. To do so, you set SplitJob in the emCluster initialization file to the upper limit of the number of jobs. For example, if you set SplitJob to 5, and are analyzing 10 frequencies, each em job will analyze 2 frequencies.
NOTE: You may not use frequency splitting when running an optimization or parameter sweep.
ABS Processing
The Adaptive Band Synthesis (ABS) technique provides a fine resolution re-sponse for a frequency band requiring only a small number of analysis points. Em performs a full analysis at a few points and uses the resulting internal, or cache, data to synthesize a fine resolution band. The output data consists of the discrete data points, frequencies at which the analysis engine, em, performs an electromag-netic analysis, and the adaptive data, which is data calculated using a rational polynomial fit. This is often the most efficient process in Sonnet by which you can obtain response data over a band. For more information about ABS, please refer to Chapter 8, “Adaptive Band Synthesis (ABS)” in the Sonnet User’s Guide.
By using your cluster to perform the analyses at the discrete data points in parallel, you can further increase the efficiency of an ABS sweep. There are two ways of accomplishing an ABS sweep when using a computer cluster. You may submit an ABS sweep and allow emCluster to automatically calculate at which discrete data points to run a full analysis (automatic) or you may define linear sweeps or single frequency points in which you determine at which discrete data points you run an analysis before attempting the ABS sweep (user-defined). You must use the Fre-quency Sweep combinations to combine the different types of sweeps when doing the user-defined ABS. The ABS sweep should be the last sweep specified.
79Rev 16.56
Chapter 4 Analyzing Using LSF Cluster
Automatic Calculation of Discrete Data Points
The automatic calculation of discrete data points is used when you submit an Adaptive sweep to the LSF cluster for analysis. In this case, em analyzes at 7 dis-crete data points. These discrete data points always include the starting and ending frequencies of the band and the rest of the points are evenly distributed across the band. These discrete data points are then split up according to your present fre-quency splitting settings (see , “SplitJob=<nsplit>,” in Appendix I, “The LSF Cluster Initialization File,”) and submitted for analysis to the LSF cluster. Once all the results from the discrete data points are complete, em solves for the rational polynomial and produces the adaptive data. The default of seven data points is conservative to ensure that there are enough data points to produce an accurate model. An adaptive sweep run on your local computer would solve one discrete data point at a time and attempt to “fit” a polynomial after solving at each data point. Setting up seven discrete data points beforehand allows you to take advan-tage of the frequency splitting capabilities of cluster computing.
If the seven discrete data points are not enough to produce a model, then em runs an analysis at additional discrete data points until there is sufficient data to create an accurate model. In this case, the additional frequencies are done sequentially on the same server until the model is achieved.
You may use the NumFixedAbsFreq entry in the emCluster initialization file to control the number of data points used when automatically calculating the discrete data points for an ABS sweep. The default values is seven. If you consistently see that an ABS sweep could produce adaptive data using less data points, you can change the default so that your analyses can complete using less processing time. Alternately, if you find that seven discrete data points is often not enough, you can raise the number of discrete data points.
User Defined Discrete Data Points
For some ABS sweeps, you may have knowledge about your circuit such that you know the number of discrete data points needed or you have specific data points at which you desire a full analysis. In these cases, it may be more efficient to set up your analysis with a linear sweep first which analyzes the circuit at the desired frequency points before performing the ABS sweep. The linear sweep and the ABS sweep should be set up together using the Frequency Sweep Combinations option for Analysis Control. The linear sweep will be split according to your fre-quency splitting settings and sent to the cluster. Once those analyses are complete the ABS sweep is submitted. Since em always uses data already calculated in pro-cessing the Frequency Sweep Combinations in its first attempt to create a “fit” to the data, em will attempt to complete the ABS sweep without analyzing any more discrete data points.
Setting Up emCluster
80Rev 16.54
This method will be faster than the automatic algorithm if the number of user de-fined discrete data points is less than the number estimated by the algorithm. The algorithm is designed to be conservative so that enough data is usually available to produce an accurate rational polynomial. Therefore, the number of points cho-sen by the algorithm will typically be higher than the number required by an ABS sweep on a local machine. If you know how many data points are needed to per-form an adaptive sweep on your circuit, you may be able to obtain results in less processing time than the automatic algorithm.
This method also allows you to produce data for a specific frequency that is criti-cal in your design.
Limiting the Discrete Data Points
Using the AbsMaxDiscrete entry in the emCluster initialization file is another way to improve your efficiency when performing an analysis on a cluster. This op-tion controls how many more discrete frequencies are analyzed before solving for the ABS solution. If this setting indicates that no additional frequencies are to be analyzed, then if pre-existing cache data is sufficient to get converged ABS solu-tion, that solution is written to output. Otherwise, no processing is performed. You may also set this option so that em will continue analyzing at discrete data points until an ABS solution can be produced; this is the default setting. You may also set a maximum number of additional points. See the entry in the emCluster Ini-tialization File appendix for details.
Using Queues
You may use queues in a number of ways to make your Sonnet processing more efficient. Queues allow you to sort your jobs based on processing time or time of day. You will first define the desired queues in your LSF software, then use the queue entry in the emcluster initialization file to map the LSF queues.
NOTE: If specify a queue for your LSF job, any computer which appears in your HostList MUST also be included in the queue. If you have a computer in your host list upon which your queue may not run, LSF issues an error message and does not process the job.
For example, you may wish to designate one or more of your computers for small processing jobs and other computers for the larger processing jobs to prevent your smaller jobs from being stuck behind a large processing job which requires signif-icantly more processing time. In this case, you would use the memory settings in the queue entry to define what size file is assigned to what LSF queue.
81Rev 16.56
Chapter 4 Analyzing Using LSF Cluster
Another example of using a queue would be use some of your computing resourc-es for Sonnet only during night or weekend hours. If you have a server host in your cluster which is used by an individual during the day for all their computer needs, but would normally sit idle during the night or on weekends, you can define a queue that is only available during certain hours on certain days.
Limitations
NOTE: If you lose your connection to the cluster when an analysis submitted from your client machine is running, it is not possible to reconnect to the ongoing job. You must re-submit the job to the cluster. If this occurs, “orphan” files may be left in the emCluster shared memory. You should occasionally clean out the emCluster shared directory. For directions on how to do so, see “Cleaning the emCluster Shared Directory” on page 85.
When you run an optimization or a parameter sweep in your analysis, you may not use ABS Processing. The job must be submitted to one server host in the cluster and run interactively. When running interactively, response data and status infor-mation, such as you would see with a local analysis, is sent to the analysis monitor during the processing.
You may only use LSF Computing with geometry projects. LSF Computing is not available for Netlist projects. Analyzing netlist projects would require a separate em license not associated with the LSF cluster.
The use of external frequency files is not supported by LSF Computing.
All optional files are calculated locally, not on your cluster.
Running an Analysis on your LSF Cluster
In order to run an analysis on the cluster, LSF must be up and Sonnet must be in-stalled and configured on all the cluster server hosts and clients. For directions on doing this, refer to “Sonnet Setup” on page 62 in the "Sonnet Setup" on page 62 which is available in PDF format from the Help menu of any Sonnet application.
To run an analysis on the cluster, do the following:
1 Open a Sonnet project that is ready for analysis in the project editor and click on the Analyze button on the project editor’s tool bar.

Setting Up emCluster
82Rev 16.54
2 The New Batch Creation dialog box appears on your display.
Note that this dialog box only appears if you have selected the Prompt for server checkbox in the Client Configuration dialog box of the analysis monitor when you setup your cluster computing. This dialog box contains a list of clusters available to which you may submit jobs. (Only LSF is presently supported). If any remote servers have been configured they will also appear in this list.
If you are not prompted, then the LSF cluster is your default processing server, and you may continue at Step 5.
3 Click on the LSF Cluster to select it for the analysis.
The selected server is highlighted.
4 Click on the OK button in the New Batch Creation dialog box.
This closes the dialog box. The LSF cluster is now associated with the analysis monitor window which will subsequently open. All jobs added to the batch list of the analysis monitor will be analyzed on the LSF cluster.
5 When the New Batch Creation dialog box is closed, the analysis monitor appears on your display and your analysis job starts running.
Status is posted to the analysis monitor at the polling interval set in your emCluster initialization file. The types of information which appear will depending on the splitting, if any, of your project. If any errors occur with the cluster, a status message is posted in the status section of the analysis monitor just under the progress bar.
Overriding Cluster Computing Options
When installing Sonnet’s cluster computing software, you should configure the emCluster initialization file, “emcluster.ini,” with the control parameters that you would like to use on the majority of your cluster computing. However, it may be necessary in some cases, to change the parameters with which you perform your cluster computing. There is a command available in the analysis monitor which allows you to override some of the more frequently used settings in the initializa-tion file. These changes will only apply to jobs run out of that batch window. If you open another batch window, the parameters from the initialization file will be used. To override your initialization file settings, do the following:
1 Open the Sonnet task bar and click on the Analyze Project button.
A pop-up menu appears on your display.
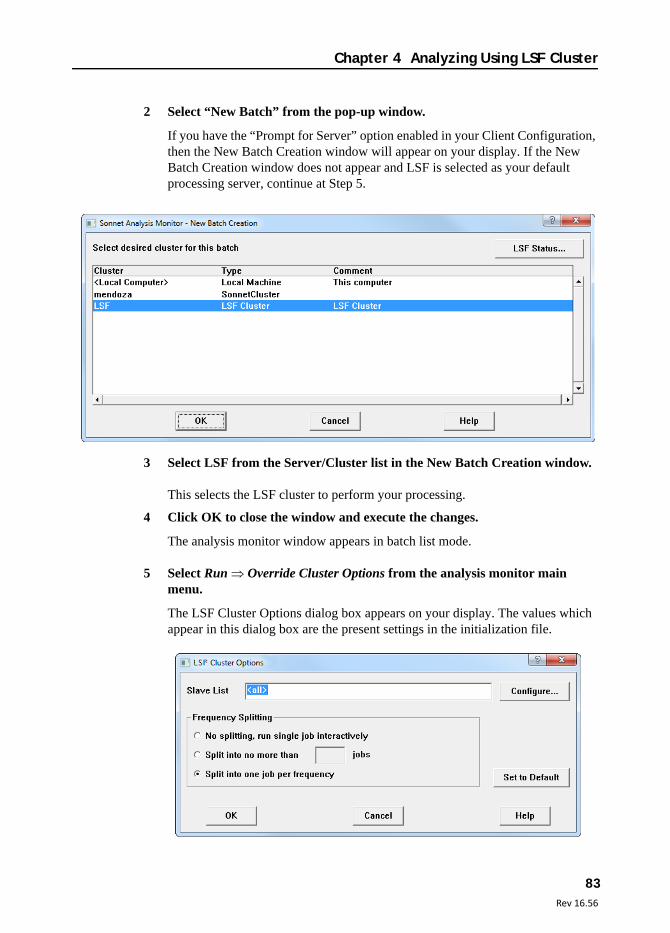
83Rev 16.56
Chapter 4 Analyzing Using LSF Cluster
2 Select “New Batch” from the pop-up window.
If you have the “Prompt for Server” option enabled in your Client Configuration, then the New Batch Creation window will appear on your display. If the New Batch Creation window does not appear and LSF is selected as your default processing server, continue at Step 5.
3 Select LSF from the Server/Cluster list in the New Batch Creation window.
This selects the LSF cluster to perform your processing.
4 Click OK to close the window and execute the changes.
The analysis monitor window appears in batch list mode.
5 Select Run Override Cluster Options from the analysis monitor main menu.
The LSF Cluster Options dialog box appears on your display. The values which appear in this dialog box are the present settings in the initialization file.
Setting Up emCluster
84Rev 16.54
6 Enter the desired server host(s) in the Host List.
You may directly edit the host list or click on the Configure button to the right which opens the Host List Selection dialog box which allows you to select the desired server hosts. All of the server hosts in your LSF cluster appear here. Note that it is possible to have a server host in your list which is not capable of running a Sonnet analysis. Check with your system administrator to determine which servers on your cluster may run em.
If you do not enter any hosts in the host list, then emCluster uses the default, which is all the servers available in the cluster. If this is true, then <all> appears in the list.
NOTE: If you specify a queue for your LSF job, any computer which appears in your HostList MUST also be included in the queue. If you have a computer in your host list upon which your queue may not run, LSF issues an error message and does not process the job.
7 Enter the desired Queue in the Queue text entry box.
You may enter the desired LSF queue for this job in the Queue text entry box. The queue name should be the name of a queue defined in the LSF software. If there are no entries in this field, then the default “normal” queue is used. If this is true, then <default> appears in this field.
8 Select the desired radio button to control the Frequency Splitting for the job.
If you select No splitting then the job is submitted as one analysis job to the cluster and one server host analyzes your circuit at all the specified analysis frequencies. When this option is selected, then response data and status information, such as you would see with a local analysis, is sent to the analysis monitor. This is defined as running interactively.
The Split into no more than <n> jobs selection limits the number of jobs your anal-ysis may be split into. The project is duplicated the number of times you enter in the adjacent text entry box and each duplicate project analyzes the circuit for a subset of the requested analysis frequencies. For example, if your analysis is for the frequencies 2, 4, 6, 8, 10, 12, 14, and 16 GHz and you have entered 4 as the maximum number of jobs then the first job analyzes at 2 and 4 GHz, the second project at 6 and 8 GHz and so on.
The Split into one job per frequency option splits the project into one job per requested analysis frequency. If more jobs are created than there are server hosts in your cluster, then multiple jobs will be submitted to some server hosts. If you have a sufficient number of server hosts in your cluster, this option results in the greatest efficiency for your processing.
85Rev 16.56
Chapter 4 Analyzing Using LSF Cluster
9 Enter the desired time for the poll interval.
Enter the amount of time, in seconds, between updates from emCluster on the progress of the analysis. The value should be an integer between the values of 5 and 300.
10 If you want to reset the dialog box to the original values obtained from the initialization file, then click on the Set to Defaults button.
You will lose any changes made up until then in the dialog box.
11 Once all your entries are complete, click on the OK button to close the dialog box and apply the changes.
This batch window will now run any jobs submitted to the cluster using the operating parameters input to the Override Cluster Options dialog box. These changes will only apply to this batch window. If a new batch window is opened, it will use the default values from the emCluster initialization file unless you once again override those options.
12 Add the projects you wish to use the cluster to analyze to the batch list.
You may add projects by selecting File Add Project(s) from the main menu of the analysis monitor window or by clicking on the Add Projects button on the analysis monitor tool bar.
13 Click on the Run button on the analysis monitor tool bar to analyze the projects in the batch list.
Cleaning the emCluster Shared Directory
If communication errors occur while running an em analysis job on the LSF clus-ter, the job may not complete. If this happens, then “orphan” projects may be left in the emCluster shared directory, since the temporary project files are not deleted until the job is successfully completed. You should periodically check the shared directory and clear out any leftover projects by deleting all files in the following directory:
<Shared_Directory>/sonnet_emcluster/sonnet_emcluster_lsf
where <Shared_Directory> is the emCluster Shared Directory.

Setting Up emCluster
86Rev 16.54

87Rev 16.56
Appendix I The LSF Cluster Initialization File
Appendix I The LSF Cluster Initialization File
The emCluster initialization file, “emcluster.ini,” is supplied with your software installation and may be found at
<Sonnet Directory>/data/emcluster.ini
where <Sonnet Directory> is the location at which Sonnet software application data is installed. You may edit the file using a text editor. The options set in this file control how emCluster operates and are detailed below. This file must be edited by the user in order for emCluster to run as desired.
The initialization file contains sections. The default section is [Sonnet]. All programs will read values from this section, unless a section exists for the specific machine emCluster is running on. For example, the [Tina] section would be read and used by emCluster on a machine with the host name Tina. If a machine host name is not available, then you may use the IP address as the section title. For example, if your server host computer has the IP address 168.92.0.1, then the section should start with [168.92.0.1]. In order to create a unique section for a particular computer, you would copy the default [Sonnet] section, then edit the entries as needed for your specific host.
The entries are listed in the order that they appear in the initialization file.
Setting Up emCluster
88Rev 16.54
Entry SharedDirectoryWindows=<pathname>
Definition This parameter is required for Windows systems, and refers to the emCluster shared directory into which the job will be split or copied. The <pathname> is a character string which defines the location of the shared directory for a Windows system. The response data from the analysis is also written here before being transmitted back to the client who submitted the job. We also recommend that your emCluster batch file be stored here.
You must input this location in order to use emCluster. This directory should be read, write, and execute accessible from all clients submitting jobs and server hosts in your cluster on which you will be executing em.
Entry SharedDirectoryUnix=<pathname>
Definition This parameter is required for Linux systems, and refers to the emCluster shared directory into which the job will be split or copied. The <pathname> is a character string which defines the location of the shared directory for a Linux system. The response data from the analysis is also written here before being transmitted back to the client who submitted the job. We also recommend that your emCluster batch file be stored here.
You must input this location in order to use emCluster. This directory should be read, write, and execute accessible from all clients submitting jobs and server hosts in your cluster on which you will be executing em.
Entry SplitJob=<nsplit>
Definition This entry defines how many jobs the submitted project is split into. <nsplit> is an integer value which controls the split. The project is split into identical geometries each of which is analyzed at a subset of the original analysis frequencies.
If <nsplit> is set to 0, then the job is not split; the project is submitted to the cluster as is and will be analyzed on one server host. If <nsplit> is equal to -1, then the job will be split into a job for each frequency; this is the default setting. For instance, if there are 6 server hosts in your cluster, and 10 analysis frequencies, then your project will be split into 10 jobs which means that some server hosts will analyze more than one of the submitted jobs. If <nsplit> is set to any other integer value > 0, then that value sets the upper limit on the number of jobs your project is split into. For example, if you have 8 analysis frequencies but SplitJob=4, then the project is split into four jobs each analyzed at two frequencies. The analysis frequencies are usually split in ascending order. For example if you are analyzing a project at 2, 4, 6, and 8 GHz and you split the submitted project into two jobs,

89Rev 16.56
Appendix I The LSF Cluster Initialization File
then one is analyzed at 2 and 4 GHz and the other is analyzed at 6 and 8 GHz. You may override this setting in the Override Cluster Options dialog box. See "Overriding Cluster Computing Options" on page 82 for details.
Entry DetermineMemory=[TRUE|FALSE]
Definition This entry controls whether em determines the memory requirements of the processing job before analyzing the circuit. This is useful if you have processing queues set up based on the amount of memory needed for a processing job. Set the entry equal to “TRUE” if you wish to check memory requirements and to “FALSE” if you do not wish to check the memory requirements. Please be aware that on a very large circuit, the processing time for ascertaining the amount of memory can be significant.
Entry NumFixedAbsFreq=<nfreqs>
Definition This entry allows you to specify the number of discrete data points at which to analyze a circuit when allowing em to automatically determine the discrete data points solved when performing an ABS sweep. <nfreqs> is a non-zero integer number. The default number is 7.
Entry AbsMaxDiscrete=<nfreq>
Definition This entry defines the maximum number of additional discrete frequencies a final ABS run will analyze in order to calculate the adaptive data. The default value for <nfreq> is “-1” which indicates that there is no limit. Additional analysis of discrete frequency points continues until convergence occurs and adaptive data may be produced. If <nfreq> equals “0” then no additional analysis of discrete frequencies occurs. Adaptive data is only calculated if the existing discrete data is sufficient to achieve an ABS solution. If <nfreq> is a positive integer n, then additional frequencies, up to a maximum number of n, are analyzed in order to achieve an ABS solution. If the maximum number of additional discrete frequencies have been analyzed and no solution has been reached, the job ends and no further processing is done.
Entry PollInterval=<nsec>
Definition This entry defines how often emCluster provides job status in the analysis monitor window. <nsec> is an integer number of seconds between the values of 5 and 300 with a default value of 30 seconds. You may override this setting in the Override Cluster Options dialog box. See "Overriding Cluster Computing Options" on page 82 for details.

Setting Up emCluster
90Rev 16.54
Entry HostList=<hostname hostname ... hostname>
Definition This is the host list which contains the name of the server hosts available on your computer cluster to perform processing. The hostnames cannot contain a space. The hostnames should be separated by a space. If you are specifying more than one host, the list should be in quotes. For example
HostList="host_1 host_2 mary"
The default is an empty list, in which case all server hosts on the LSF cluster will be used. You may override this setting in the Override Cluster Options dialog box. See "Overriding Cluster Computing Options" on page 82 for details.
NOTE: If you specify a queue for your LSF job, any computer which appears in your HostList MUST also be included in the queue. If you have a computer in your host list upon which your queue may not run, LSF issues an error message and does not process the job.
Entry Queue<queuenum>=<name>[:[<lowermem>-<uppermem>][:<days>:<starttime>-<stoptime>]]
Definition This entry defines a processing queue for emCluster, which corresponds to a processing queue defined in the LSF software. This command allows you to define the conditions used to assign a job to an LSF queue. The default queue in LSF is “normal” so the default for this entry is Queue0=normal. You may define up to 10 queues.
NOTE: If you specify a queue for your LSF job, any computer which appears in your HostList MUST also be included in the queue. If you have a computer in your host list upon which your queue may not run, LSF issues an error message and does not process the job.
The fields in the entry are described below.
<queuenum>: An integer value 0 - 9. The queue number (Queue0, Queue1, etc. is used by emCluster to identify the processing queues.
<name>: A character string which contains the name of the LSF queue to which you wish to assign this queue number.
<lowermem>-<uppermem>: The range of memory in Mbytes that is required to analyze your circuit. <lowermem> and <uppermem> are both non-negative integer values. If <uppermem> is not present than any job larger than the lower

91Rev 16.56
Appendix I The LSF Cluster Initialization File
limit is input into this queue. If <lowermem> is not present, than any job smaller than the upper limit is sent to this queue. For example, the input “-500” would mean any file requiring less than 500 Mbytes of memory to analyze would be routed to this queue.
<days>: This is a seven-digit field. Each digit represents a day of the week starting with Sunday and continuing through Saturday. If the digit is set to “1” then this queue is available on that day. If the digit is set to “0” then the queue is not available. For instance, if you wished to use the queue only on weekends, then this field would be “1000001.” If you wished to use the queue only on weekdays, then it would be “0111110.”
<starttime>-<stoptime>: The time period during the days specified in the <days> field at which this queue is available to accept jobs for processing. <starttime> and <stoptime> are both 4 digit fields which are integer values which represent the time based on a 24 hour clock. For example, 0515 would represent 5:15 AM and 2020 would represent 8:20 PM. Both fields are required.
Entry JobName=f1f2f3...fn
Definition This entry allows you to specify how the unique job name for each analysis submitted by this client is constructed. You may use up to 12 different fields, defined in the syntax above as f1, f2 through fn. Each of the fields may be used only once in the definition. The values available to use in the definition are shown in the table below. The definition must be defined in such a way that each job name is unique. For example, if you wish to define the file name using the username, date, and time, you would use the following entry:
Command Entry Meaning
Queue0=normal This assigns Queue0 to the LSF default queue “normal”. There are no time or memory restrictions on using this queue.
Queue0=small_job:0-100 This assigns Queue0 to the LSF queue “small job.” Jobs whose memory requirements are between 0 to 100 Mbytes will be sent to this queue. There are no day or time restrictions on this queue.
Queue1=large_job:101- This assigns Queue1 to the LSF queue “large_job.” Jobs whose memory requirements are greater than 100 Megabytes are sent to this queue. There are no day or time restrictions on this queue.
Queue3=max_job:1000-:1111111:1800-0500 This assigns Queue3 to the LSF queue “max_job.” Jobs whose memory requirements are greater than 1000 Megabytes are sent to this queue on any day of the week between the hours of 6:00 PM to 5:00 AM.
Setting Up emCluster
92Rev 16.54
JobName=%u%d%m%y%H%M
Entry JobNameCase=<casesetting>
Definition This entry is used to set the case of the job name. This is necessary because Windows returns host names as all uppercase and some environments will force lowercase directory and filenames when sharing across platforms. This setting helps you to make all your filenames consistent. There are three options to set the case:
• UPPER - the name appears in uppercase• LOWER - the name appears in lowercase• ASIS - to leave the name as is
For example, if you wish all the filenames to be lowercase, you would put the entry JobNameCase=LOWER in your initialization file.
Entry emAnalyzeOptions="-<runoption1> -<runoption2> ... -<runoptionn>"
Definition This entry allows you to input the run options you wish the analysis engine, em, to use when analyzing your circuit. Each option should be preceded by a space followed by a dash ( -). If you are specifying multiple run options, you should enclose the list in quotes. For available options and their definitions, please refer to Appendix I in the Sonnet User’s Guide which is available in PDF format.
Field Definition Field Definition
%a Day of the week “Sun” “Mon” ... “Sat” %H Two digit hour ('00' .. '23')
%b Month ('Jan' .. 'Dec') %M Two digit minute ('00' .. '59')
%y Two digit year (e.g. '05') %S Two digit second ('00' .. '59')
%Y Four digit year (e.g. '2005') %P Process id (e.g. '32745')
%m Month (’01’ ’02 ...’12’) %n Hostname (e.g. 'beth')
%d Two digit day ('01' .. '31') %u Username (e.g. 'tom')

93Rev 16.56
Appendix I The LSF Cluster Initialization File
Entry emCommand=<batch_scriptfilename>
Definition This is the entry which defines the script file used by emCluster to run the analysis engine, em. The default for <batch_scriptfilename> is emclusterlsf. If you write your own script files to invoke em, then that file should be entered for <batch_scriptfilename> in this entry. This allows you to customize your interface with the cluster.
Entry emCommandOptions=<options>
Definition This entry allows you to pass user-defined controls to the script file executed by emCluster if you have customized your script file. You do not need to use this command if you are using the batch and/or script file delivered with your software.
Entry EmClusterEmVerificationTimeout=<nsec>
Definition This entry sets the amount of time emCluster will allow for em to perform the subsectioning necessary to determine the memory requirements for the analysis. <nsec> is an integer value greater than 0 and is the amount of time in seconds which you wish to allow for the timeout. A value of zero (0) for <nsec> disables the timer; this is the default setting.
Entry EmClusterEmFinalRunTimeout=<nsec>
Definition This entry sets the amount of time emCluster will allow for em to output any optional files. <nsec> is an integer value greater than 0 and is the amount of time in seconds which you wish to allow for the timeout. A value of zero (0) for <nsec> disables the timer; this is the default setting.
Entry CancelSplitRunOnError=[on|off]
Definition This entry controls how emCluster behaves when an analysis error occurs on one or more of the server hosts processing a job that is using frequency splitting. When set to “on,” an em analysis error on any server host will terminate the entire analysis. When set to “off,” the analysis will continue, which includes any ABS data and optional file generation.
Entry ErrorFile=<filename>
Definition This entry specifies the error file to which emCluster errors are written. <filename> is a character string which specifies the name of the error file with optional path. The default location of the error file is

Setting Up emCluster
94Rev 16.54
<emCluster Shared Directory>\emcluster.err
Entry EmClusterTraceFile=<location>
Definition This entry defines the location of the emCluster trace file. Status and error messages relating to the operation of emCluster will be written to this file. The default location is $SONNET_DIR/log/emcluster_trace.txt where $SONNET_DIR is the location at which Sonnet software is installed. You may use the default or enter any desired directory. This file will normally only be used at the direction of Sonnet support personnel.
Entry EmClusterTraceLevel=<ivalue>
Definition This entry defines the trace level written to the trace file defined in the previous entry. <ivalue> is an integer value from 0 to 5 where 0 is no tracing and 5 provides maximum tracing.
Entry EmClusterLogFile=<location>
Definition This entry defines the location of the emCluster log file. Status and error messages relating to the operation of emCluster will be written to this file. The default location is $SONNET_DIR/log/emcluster_log.txt where $SONNET_DIR is the location at which Sonnet software is installed. You may use the default location or enter any desired path.
Entry LSFOptions=<options>
Definition This entry allows you to pass on user-defined controls for the LSF software through the emCluster interface.
Entry LSFResourceRequirements="rusage[<resource>=<roption>]"
Definition This entry allows you to pass along to LSF any resource requirements. The <resource> field is the name of any resource that you have defined in the lsf.shared file in your LSF software installation. <roption> is the value assigned to that resource for this job. For example, if you are using the sonnetlic resource as discussed in "Defining a Resource to Handle Sonnet Licensing" on page 70, the entry would look as follows:
LSFResourceRequirements="rusage[sonnetlic=1]"
which says that one Sonnet license is needed to execute this job.

95Rev 16.56
Appendix I The LSF Cluster Initialization File
You may have other user defined resources; this entry is what you would use to pass the resource and its value to the LSF software.
Entry ExitSaveFiles=[off|on]
Definition This entry should only be set to “on” at the direction of Sonnet support personnel. The default setting is “off.”

Setting Up emCluster
96Rev 16.54
97Rev 16.56
Appendix II The Sonnet Cluster Initialization File
Appendix II The Sonnet Cluster Initialization File
The Sonnet Cluster initialization file, “sonnetcluster.ini,” is supplied with your software installation and may be found at
<Sonnet Directory>/data/sonnetcluster.ini
where <Sonnet Directory> is the location at which Sonnet software is installed. You may edit the file using a text editor. The options set in this file control how sonnetcluster operates and are detailed below.
The only entries documented herein are those which may not be set using the software interface. The entries are listed in the order that they appear in the initialization file.
The [Sonnet] section is the default section. All programs will read values from this section, unless a section exists for the specific server on which the program is running. For example, the [galaxy] section will be read by a sonnetcluster running on the server with the host name galaxy and the [Sonnet] section will note be used. If the server host name cannot be determined then the IP address will be used, such as [192.168.0.10]. The task bar will initially create the specific server section when default values are modified for a server.If you want to make changes to this file for a particular server then you must make them in the specific section for the desired server in order for that server to read and use those values.
Setting Up emCluster
98Rev 16.54
Entry SonnetClusterRecoverUserJobsOnly=TRUE|FALSE
Definition This setting controls whether only the user which submitted a job may recover that job or if another user may recover the job. Valid settings are “TRUE” or “FALSE” and the default setting is “TRUE.” If this setting is set equal to “TRUE,” then only the user who submitted the job to the cluster can recover the job in the case of a disconnection. If this setting is set equal to “FALSE,” then another user can recover a disconnected job from the cluster using the same client machine as that from which the job was originally submitted.
Entry UseThisServerAsSlaveLast=TRUE|FALSE
Definition This setting controls the place that a slave running on the same server as the sonnetcluster process holds in the slave list for the cluster. This would typically occur if the master computer is a multi-core or multi-processor computer and one processor is being used as the master and another as a slave. Jobs are assigned to slaves in the order in which they appear in the slave list on the master computer. When the sonnetcluster program sorts the list of slaves, the default placement of a slave on the same server as sonnetcluster is determined by this setting. Setting this value as “TRUE,” which is the default value, places this slave at the bottom of the list. If this value is set to “FALSE,” then the slave is used in the position in which it was placed in the slave list.
Entry NumFixedAbsFreq=<numoffreq>
Definition This setting controls the number of discrete frequencies which are analyzed in an ABS analysis on the cluster before attempting to fit the polynomial and create the adaptive data. <numoffreq> is an integer value of 2 or greater which defines how many discrete frequencies are analyzed. The default is seven, chosen since seven discrete frequencies provide enough discrete data in the majority of cases to obtain an ABS solution.
If you wish to change this setting, the most optimal setting is to use the number of cores or a multiple of the number of cores in your cluster. This ensures that the ABS solution can be achieved in the least number of process cycles.
For example, if you have five processing cores in your cluster, this number should be set to five or ten. Since five discrete frequencies are processed in parallel by your cluster, if you can use only five discrete frequencies to achieve the ABS solution, it will take only the time needed to analyze one frequency for the project to be analyzed. If five is not enough, then using ten is the most efficient since if

99Rev 16.56
Appendix II The Sonnet Cluster Initialization File
you have to do a second pass through the cluster, maximizing the amount of discrete data ensures the likelihood of achieving the ABS solution and creating the adaptive data.
NOTE: Setting this value on a client overrides the value set on the master computer.
Entry AbsMaxDiscrete=<maxnum>
Definition This setting controls how many additional discrete frequencies are analyzed on the cluster if the original discrete frequencies analyzed failed to yield an ABS solution. If the original discrete data points are not enough to produce a model, then em runs an analysis at additional discrete data points until there is sufficient data to create an accurate model. In this case, the additional frequencies are done sequentially on the same server. The number of additional frequencies analyzed is controlled by this setting. <maximum> is an integer value defined as shown in the table below.
NOTE: Setting this value on a client overrides the value set on the master computer.
Value Definition
-1 (default value) Unlimited. Will continue analyz-ing discrete frequencies one at a time until an ABS solution is achieved.
0 None. No additional frequencies are analyzed and no adaptive data is created.
n Integer of 2 or greater. Additional frequencies are analyzed until a solution is achieved or n additional frequencies have been analyzed.

Setting Up emCluster
100Rev 16.54