
Earth First! - Digital Library of Nonviolent Resistance
160
Earth First! Direct Action Manual First Edition Uncompromising Nonviolent Resistance in Defense of Mother Earth!
-
Upload
khangminh22 -
Category
Documents
-
view
2 -
download
0
Transcript of Earth First! - Digital Library of Nonviolent Resistance

Earth First! Direct Action
Manual
First Edition
Uncompromising Nonviolent Resistance in Defense of Mother Earth!

Distributed by:
Cascadia Summer www.cascadiasumnier.org
Contact one of the groups below:
Cascadia Forest Alliance POB 4946; Portland, OR 97208
www.cascadiaforestalliance.org; 503-241-4879
Cascadia Forest Defenders POD 11122; Eugene, OR 97440
www.forestdefenders.org; 541-684-8977
Mazama Forest Defenders 1257 Siskiyou Blvd #1158; Ashland, OR 97520 www.mazamaforestdefense.org; 541.482,2640
Blue Mountains Biodiversitv Project NCR 82; Fossil, OR 97830
541-468-2028 or 541-385-9167
Earth First! Direct Action Manuals $6 - $600 sliding scale
plus $2 postage
printed on 100% post-consumer or liberated paper

• ' :.... • ---, • • ;-:.-.!-- One fourth of the world's ...../,
species of mammals are threatened -. .,.: with extinction, and about half of ..1,1 . „... ,
. .- ,7 -7.., those may be gone in as little as a • .. 1r decade, according to the most
• .".. ., .— complete global analysis of %Vali' • 7p . . -• .,. endangered species ever compiled. -'
• - - The report was released by the 1 - i IUCN World Conservation Union.
Do You Understand What We Are Losing?
At some point we must draw a tine across the ground of our home and our being, drive a spear into the land, and say to the bulldozers,
earthmovers, government and corporations, "thus far and no farther." If we do not, we shall later feel, instead of pride, the regret of Thoreau, that good but overly-bookish man, who wrote, near the end of his life,
"If I repent of anything it is likely to be my good behaviour." — Ed Abbey
DISCONTENTS ARE You SAFE? LEGAL DISCLAIMER AND LICENSE AGREEMENT 11 INTRODUCTION 1 NONVIOLENCE 3 SECURITY 21 SCOUTING 38 BACKWOODS/BACKCOUNTRY ACTION 41 LOCK DOWN DEVICES AND APPLICATIONS 50
U-LOCKS COBRA LINK MOTORCYCLE LOCKS CHAINS AND HEAVY DUTY CABLES LOCK BOXES AND BRACELETS
BARRELS 63 BATMOBILES 70 SLEEPING DRAGONS 74
45 DEGREE LOUNGE LIZARD VERSION MORRISON VERSION BATMOBILE VERSION
RAIL BLOCKADES 81 TRIPODS 84 BIPODS 97 MONO POLES 103 CANTILEVERS 105 TREE SITS 109 INTERNETS 116 ROAD ❑CCUFATIONS/FREE STATES 118 HELICOPTER BLOCKADES 122 SHIP BLOCKADES 124 CAT AND MOLISE 126 CRITICAL MASS BIKE RIDES 128 HUNT SABOTAGE 131 MASS ACTIONS 137 MISCELLANEOUS DEVILTRY 138
YARNING DEBRIS ROAD RIP TRUCKER FUCKERS HOT ROCKS GATE CLOSURES DOOR CLOSURES MANURE DUMPS, PUKE-INS AND SAWDUST DELIVERIES
CONCLUSION 145 CONTACTS 147 NOTES 149

ARE YOU SAFE? Asking ourselves if we are safe means asking ourselves if we are pre-
pared, individually and as a group to take direct action and accept the consequences of it. Put safety first! Activists have been killed and seriously injured putting their bodies on the line! Locking down to moving vehicles or equipment is not safe. The noise made by the machinery drowns out the sound of anything you need to communicate to the operators and cops—especially whether or not they may kill you if the machine keeps moving! Never suspend yourself from anything by locking yourself to it. You could easily hang or severly injure yourself this way! Wear long, warm clothing and carry eye and ear protection.
Cops and operators of vehicles and equipment that people are locking down to must be fully aware that if they are heavy-handed with nonviolent people, especially those in dangerous lock down positions, that they could injure or kill these people. Furthermore, the operators and the cops must be told (repeat-edly!) that if they do interfere with these peaceful protesters that they will be held personally responsible for any injuries they inflict on them.
Activists should be prepared for physical and psychological torture from the police and other violent opposers. Tripods have been rammed, knocked over and cut down with people on them. People have been dragged by their necks from the gates they're locked to. Others have been wheeled from their blockades while still connected to 1,200-pound concrete barrels. People have sustained countless injuries from pain compliance (torture) holds, over-tightened hand cuffs, being maced, beaten with batons and tire irons, hog-tied and psychologically tortured. These sadistic means of physical control are only authorized by the police to be used on subjects which are violent and are flight risks. As nonviolent activists we are neither. We are making a political statement and standing our ground, and we have every constitutional right in the book to do it!
This sick legacy of abuse will only be perpetuated unless we aggressively challenge every instance of violence against us. When violence occurs, isolate the situation and use conflict management tools to diffuse it. Use cameras and take written notes to intimidate people who are violent with activists and document everything that occurs during actions. Get medical attention and documentation of injuries. Contact a good lawyer. Fite police reports. Trash the hate mongers in the media. Then, make an example of them by hauling their butts to court and taking them for all you can! A sizeable claim will intimidate other thugs from attacking activists and will fund full-time activism.

DISCLAIMER AND LICENSE AGREEMENT READ THE FOLLOWING IMPORTANT REGISTRATION INFORMATION
The attached document, the "Earth First! Direct Action Manual," hereby referred to as "The Manual," has been written for entertainment purposes only. No one involved with the production and distribution of "The Manual-" the DAM Collective editors, contribu-tors, artists, publisher, distributors, retailers, or anyone- encourages anyone to do any of the ridiculous, illegal things described herein. The Manual" or any part thereof may not be reproduced or distributed without this license agreement attached. This license agree-ment and/or The Manual may not be altered in any manner that changes, eliminates, or seeks to nullify or void this license agreement.
Friendly User Agreement
If you are an individual end user whose commitment to environmental and/or social justice issues is demonstrable through your actions and whose use is not on behalf of a business, organization, or governmental agency/body, and you are not providing any con-sultation or service (voluntarily or contractually) to said entities, this license agreement will hereby refer to you as "Our Friend." As "Our Friend," you may read, possess, or reproduce only full and complete copies of 'The Manual" without an explicit license agreement from the DAM Collective. As "Ow- Friend," you may also only distribute full and complete copies of 'The Manual" to other individual end users of similar commitment to environmental and/or social justice issues freely, or only at the cost of reproduction to you.
Corporate/Institutional/Government User Agreement
If you are a business, institution, or government agency/bodyy, or are otherwise em-ployed by, contracted to, or provide any consultation (voluntary or contractually) to such an entity relating in any way to any of the following: environmental or social justice is-sues, law enforcement, national security, the military, manufacturing, or any activities which directly or indirectly impact the environment in any way, shape or form, this license agree-ment will hereby refer to you as 'The Company" and the following pertains to you.
'The Company" is required to read this agreement and comply with its terms and immedi-ately destroy in its entirety any copies of 'The Manual" existing in 'The Company's" posses-sion (electronic or otherwise), or in the possession of an individual working with 'The Com-pany," until such time as The Company" has fulfilled its registration requirements. A form to request registration agreements is provided at the end of this contract. The cost to 'The Com-pany" is $50,000 U.S. per page, per user. Note that use or possession of 'The Manual" by "The Company" is strictly conditional upon receipt of payment in full of the aforementioned speci-fied fee as acknowledged in a letter of confirmation from the DAM Collective.
"The Manual" may not be distributed by "The Company" to any outside business, organi-zation, government agency/body, or individual. This agreement authorizes 'The Company" to use and possess only the specified page(s) and specified number of copies of said page(s) described in the confirmation letter from the DAM Collective. This agreement requires re-newal on an annual basis. That is, 'The Company" must pay the aforementioned fee every year, for every year of use. Renewal of licensing is contingent upon receipt of a confirmation letter from the DAM Collective authorizing such continued use. If 'The Company" does not obtain a confirmation letter from the DAM Collective and pay the applicable agreement fee, 'The Company" is in violation of applicable United States copyright laws.
"The Manual" is protected by U.S., copyright laws and international treaty provisions. "The Company" acknowledges that no title to the intellectual property in "The Manual" is transferred to "The Company" "The Company" further acknowledges that full owner
• • ship rights to 'The Manual" will remain the exclusive property of the DAM
11 Collective, and 'The Company" will not acquire any rights to "The Manual" ex-

cept as expressly set forth in this agreement, 'The Company" agrees that any copies of "The Manual' or sections thereof made by "The Company" will contain the same propri-etary notices which appear in this document. In the event of invalidity of any provision of this agreement, the parties agree that such invalidity shalt not affect the validity of the remaining portions of this agreement.
In no event shall the DAM Collective be made liable for consequential, incidental direct or indirect damages of any kind arising out of the delivery, performance or use of the information contained within the copy of "The Manual" or sections thereof, even if the DAM Collective has been advised of the possibility of such damages. In no event will the DAM Collective's liability for any claim, whether in contract, tort, or any other theory of liability, exceed the government fee paid by "The Company."
This agreement will be governed by the laws of the State of Oregon as they are applied to agreements to be entered into and to be performed entirely within Oregon. The United Nations Convention on Contracts for the International Sale of Goods is specifically dis-claimed herein as well.
This agreement together with any confirmation letter from The DAM Collective consti-tute the entire agreement between 'The Company" and the DAM Collective. This entire agreement supersedes any prior agreement, including any prior agreement from the DAM Collective, or understanding, whether written or oral, relating to the subject matter of this agreement. The terms and conditions of this agreement shall apply to all orders for 'The Manual" submitted to the DAM Collective and shall supersede any different or additional terms on purchase orders from "The Company."
This disclaimer and license agreement is publicly available by writing to: DAM Collec-tive CIO Southern Willamette Earth First! P.O. Box 10384, Eugene OR 97440 (541) 343-7305; e-mail: [email protected].
Copyright (P 1997 by DAM Collective. All rights reserved including the right of reproduction in whole or in part in any form and bound entirely by the explicit condi-tions of this Disclaimer and License Agreement . r 7
Corporate/Institutional/Governmental User Registration Form I wish the following number of site licenses for the following pages: (A) Page Numbers (B) Number of Users
Total= A x B x $50,000 U.S. Enclosed is $
Name: Dept.: Company: Address: City/State/Province: Country/Postal Code: Telephone: Fax:
111

INTRODUCTION So, you and your band of happy ragged folk want to stop the wholesale destruc-
tion of the Earth? Well, this manual does not even pretend to be the end all, be all, of tactics that will work, much less halt corporate greed and governmental corrup-tion. Corporations and governments will go to any length to meet their own economic goals. But, the nonviolent direct action techniques explained in this manual are challenging the greed heads more today than ever before.
Whether it is locking down to a 1,200-pound barrel of concrete on the door-step of corporate amerikkka or occupying a forest with tree sitters, direct action is a powerful expression of resistance to business as usual. It is a tactical advance on any campaign to hold corporations and governments accountable for destroying Mother Earth. What's more direct action gets the goods! It has saved wild places and shut evil operations down. It inspires and raises aware-ness among diverse groups of people, costs the corporations lots of money and buys people's campaigns time to further organize. For these reasons, people all over the world are pushing the limits of Gandhi's revolutionary "truth force" maxim and the Quaker concept of "bearing witness" to injustice with technol-ogy assisted civil disobedience. They are rising up and redefining their com-mitment to the Earth by reinforcing their political actions with devices that are very difficult, expensive and dangerous to remove.
This manual is a first edition. It was created to be a helpful guide to, and clearinghouse of, tried, true and still emerging techniques. Think of it as a cook book of sorts and regard it as a forum for sharing the actions which define our movement. As such, this manual is the consolidation of a tremendous amount of information. In the interest of keeping the manual concise (so t'a'll will actually read it!), several sections, particularly the nonviolence and security sections, simply serve as introductions to concepts. Check the references for these sec-tions. Gather more information and share your knowledge with all your friends.
Look before you leap! This manual was written by activists, not technical geniuses! It will not prepare you for direct action. You and your group have to prepare yourselves. Just as a chain is only as strong as it's weakest link; the tactics, techniques and devices in this manual are only as effective as the emotional and physical preparations made by the people using them. Fear, anxiety, discomfort, intimidation and harassment are all feelings that activists and their groups experience. Turn these negative feelings on end with strategic planning arid advanced preparation. Assess your group's skills and resources. Share your concerns. Err on the side of caution. Maintain a process of clear communica-tion within your group. Visualize your actions. Distribute the responsibilities.
%""'. :twit" ookkvi .;.vin m; ini 411.111il
I

For direct action to be effective it must be strategic. To paraphrase one of America's greatest community organizers, the late Saul Alinsky, pick your target, freeze it, personalize it and polarize it. Act offensively as well as defensively. Is locking down a first resort or a last? Think in terms of what you want. Set your goals and develop an action plan and a timeline for realizing these. The whole of our efforts rests on a foundation of strong community-based organizing.
Direct action carries legal challenges for activists. Typical misdemeanor charges people may face for blockading include; criminal trespass, disorderly conduct, resisting arrest, criminal mischief, interfering with commerce, obstruction of governmental administration and conspiracy. Jail time may be a reality. Strategic Lawsuits Against Public Participation, SLAP? suits, may also be pressed. These are civil suits pressed by corporations against activists to intimidate, discourage, interrupt and exhaust them. Grand juries may even convene in a town near you!
But don't be thwarted by all this, be awakened! Persistent support people, with the names and information of those arrested on actions usually can get people out of jail fairly quick and pro bono (free) lawyers can often have charges dropped or reduced to mere infractions. Know your rights! Read, "War at Home" and "If an Agent Knocks." Cops will pry you with questions. Be ready. Remember, you are only required to give them your name and address, and only if you are being detained or being pulled over in a car. If they knock on your door, show them how well it closes.
Video and written documentation of an action is crucial for evidence, media distribution and preventing violence from erupting at an action. Consider this reverse intimidation. Loggers and cops will think twice before kicking your tripod over if they know the whole world is watching and their career is on the line. And, since the whole world is watching, your individual actions will reflect those of the entire group. Weapons, drugs and alcohol have no place on actions. Be responsible. Practice nonviolence. Stay cairn, cool and collected.
On media, is your action set up so that your people, the target and the banner can be aligned to create an image, that in one powerful photo, will tell your whole story to the world? What is your message? Craft sound bites that are simple but urgent, tightly focused and that clearly explain your issue. Spin themes with current affairs. Don't let the media manipulate you. No matter what they ask; just force your sound bite. Take your time, practice and find strength in knowing that life herself is on our side.
Ultimately, blockading is just as much an art as it is a science. The ideas and formulas for different devices and techniques presented here are fluid and completely open to creative expansion. Adapt them to your needs and use them as a springboard for action.
dardirOTZ.'4.;:;:rill if 11‘ //ir ....141 111b,.. —Ad& 2
3
NONVIOLENCE Nonviolence is active resistance to injustice. In it's purest form it is a strategy of
sheer noncooperation with business as usual. Noncooperation is an extremely powerful tool in dismantling the golden pillars of industrial civilization that glorify and protect materialism, institutionalized greed, hatred and the political elements that are killing the Earth. The system will never have all the resources needed to ever fully control the people. When the people mobilize, the whole system crashes!
Ask yourself, is our enemy the individual logger, agency official, corporate executive, or even cop? Or, is our enemy this filthy rotten system that casts people in oppressive roles? We can build suprising and diverse coalitions with individuals and groups and work towards common goals on many levels. But, the system will never allow us to ever pursue true freedom. Think about this the next time you're nose to nose with a logger in the woods or an industrial worker on the street. Focus your emotions with nonviolent skills. They are just the minions of the system. Even though their ignorance and apathy may frustrate us we must keep in mind that they are brainwashed by the system. They are taught to believe that activists want to steal their "job", their means of survival. But, in virtually ever instance they are getting screwed by the same system or "company" that is destroying the Earth. Now, is our challenge to insult and anger them or recruit them?
Throughout history nonviolence has played a vital role in shaping the actions of many movements for social change. People have waged incredibly successful nonviolent campaigns with lots of preparation, practice, and discipline. In America, nonviolent action helped abolitionists defeat slavery, laborers secure rights in the workplace, and womin win sufferage. It is a cross movement philosophy. The authors strongly encourage a thorough review of the theory and application of nonviolence because it certainly isn't gonna be found in these few wards on this incredibly broad topic. This is simply a brief introduc-tion to nonviolence skills and a reference that should lead you to the many awesome works on nonviolent action. Confronting the issues of sexism, agism, racism, homophobia and elitism that may arise within and challenge our movements is not discussed here. This is not meant to delegitimize these issues. Working through them is simply more complex than this section means to be. But, it is extremely important to identify these issues and work through them. Respect for each other is the foundation of our ability to organize together! Herein you will find that respect is also the core of nonviolence.
The following information includes a nonviolence training outline and introduces consensus decision making, conflict management, affinity group support responsibilities and the legal process.
NONVIOLENCE TRAINING OUTLINE 3 1/2 HOUR TRAINING OUTLINE
I. I NTRODUCTIONS (5-10 MINUTES) • Name, where from, experience with nonviolent direct action, explain
briefly something that's empowered you
II. A GENDA 0 VERVIEW (2 mmarrEs) ■ Explain process of meeting, hand signals
III. EXPLAIN CAMPAIGN NONVIOLENCE C ODE (5 MINUTES) SAMPLE CODE: ■ Our attitude is one of openness, friendliness and respect toward all beings ■ We will not use violence, either verbal or physical, towards any being • We will not carry or use alcohol or drugs other than for medical purposes
during actions • We will carry no weapons • We will strive to create an atmosphere of cairn and dignity • We will not condone senseless acts of sabotage
IV. A FaRmAnoN (15-20 MINUTES) • Ask people to go around and give a short statement about why they are here
to take direct action (if more than 20-30 people in group this can be done in pairs)
V. E XPLAIN HISTORY OF NONVIOLENCE (5-10 MINUTES) ■ Ask people to give examples of nonviolent movements, i.e. suffragettes,
abolitionists, laborers, civil rights, Quakers, anti-nuclear, Chipkos, etc....
VI. D Iscuss V IOLENCE AND NONVIOLENCE (20 NINNIES) • What do you consider examples of violence/nonviolence? Why? • Define nonviolence (way of life, personal commitment, action against
injustice/oppression, etc...). ■ Brainstorm nonviolent tactics that different movements have used?
F rats (15-20 MINUTES) • Split into groups of 3-5 and share personal fears of direct action. Discuss
nonviolent responses to violence. Have one person take notes and report summary of group's discussion to large group.

5
BREAK- 5 MINUTES
Ask people to find a stick about 8" long, 1/2" thick and return with it after the break.
VIII_ P LAY THE S TICK GAME (5 mriqu'rEs) Ask each person to try and break the end off the stick. Then ask the person in the
group who feels the strongest to gather up all the sticks and put them in a bundle. Ask the person try to break them all at once. They won't be able to. This is a great lesson in realizing that divided we can be broken but united we are strong.
IX. E XPLAIN C ONSENSUS DECISION MAKING (20-30 MINUTES) • Demonstrate with a role play from an everyday life example: ordering a
sandwich, deciding which movie to go to, good idea for an action tomorrow, etc... • What are people's roles in a consensus meeting? Facilitator, note taker,
vibes watcher and time keeper. • Fishbowl Exercise. Split up into groups of 8-10. Each group splits in half
and forms two concentric circles. The inside circle will have a short 10 minute consensus meeting to develop an action plan. The outside circle will carefully observe the inside circle's consensus process. Then, the groups will break and debrief what each group observed about the consensus process. Switch groups and repeat exercise.
X. D IFFERENCFS (10-15 MINUTES) • Discuss age, cultural, spiritual, religious, sexual differences and the importance
of respect for each other and not pushing our opinions on others. Avoiding racism, sexism, ageism, etc... Explain egalitarian/non-hierarchical structure of campaign.
XI. E XPLAIN C ONPLICT RESOLUTION (1 HOUR) • How do we act under pressure in an angry situation? First demonstrate role
play of bad example with two persons quarreling (one person borrowed neighbor's bike without permission and flattened the tire). Then redo it with conflict management effort. Talk about anger escalation and 4 minute height of anger. Try to de-escalate the anger before it reaches height. Discuss examples from personal experience. Share what works/doesn't work.
• Needs of all Humans- ourselves and our opponents. Conflict arises when these are threatened.
— to be safe — material well being (food, clothing, and shelter) — to belong to a group

— to be respected and recognized — to have control over our lives — meaning to our lives: values, beliefs, spiritualism
• Role plays on conflict resolution. Do the first one with full anger and disre-spect. Get fellow activists to diffuse it. Form "Hassle Lines" and practice verbal confrontations and responses. Reverse roles so everyone gets a chance to under-stand what it is like to be on both sides of conflict and in someone else's shoes.
BREAK- 10 MINUTES
XII. AFFINITY GROUPS AND THE B UDDY S YSTEM (15 MIN- UTES)
• What is an affinity group (AG)? Emphasize tight group of people joined by common interest and political strategy, non-hierarchical, consensus-based decision making and strict adherence to nonviolence.
• Inside Roles: Guide, Arrest, Support, Medic and Camera. ▪ Outside Roles: Driver, Jail Support and Media. • Explain importance of the buddy system and support system. Talk about
the danger of "going it alone" to the person and the group. • Spontaneous action is fine if well thought out, but ask people to tell at least
one person beforehand. One poorly thought out act could harm the whole group.
XIII. SAFETY IN A CTION (10 MINUTES) • Personal safety preparedness: Have an "action buddy/partner," medica-
tion, clothes, gear, food, water. Remove jewelry, tie back hair, etc. • No weapons, drugs or alcohol! • Short discussion of responses to medical emergencies
XIV, A RREST S CENARIO (20 MINUTES) • What are the 1-'s/-'s of getting arrested? Discuss ways of minimizing • Review Arrest Flow Chart and discuss legal process. Ask people to hold
questions until you're finished.
XV. C LOSING (10 MINUTES) • Evaluation go-around: What you liked? Didn't like? What you learned?
What could be done better/included for next training? • Suggest how people interested in organizing an action/assisting one can
now get involved. ■ Join hands, thank everyone, group Howl!
7
CONSENSUS STEP-BY-STEP 1.) Problem stated (What are we talking about?) 2.) Question clarified (What needs to be decided?) 3.) Discussion (What are all views?) 4.) Proposal made (What action will the group take?) 5.) Discussion (speak to the proposal, clarify questions, good points, concerns) 6.) Modify proposal by amendments or withdraw 7.) Test for consensus:
A.) Restate proposal B.) Call for concerns C.) Call for objections within consensus, reservations, standing aside "This
may be a mistake, but I can live with it" D.) Call for blocks E.) Attempt to incorporate objections or blockers F.) If unable, decision blocked. Come up with an alternative G.) Consensus reached. Show verbal, visual agreement
8.) Decision implemented, assign tasks
CONFLICT MANAGEMENT TOOLS • Show them respect • Take a few deep breaths • Ask them to show you respect • Use a low calm tone of voice • Use non-inflammatory language • Use a non-threatening body posture (sit down, give them space) • Be honest and sincere • Ask what it is they want and how you can help • Listen intently and don't talk until they're through venting • Without necessarily agreeing, let them know you understand their position • Tell them what it is you think they are trying to tell you
Tell them what it is you like about their position • Validate and show an understanding of their situation • Don't debate the issue or confront their complaint directly, instead calmly communicate your personal reasons for this action • If you feel frustrated or you're not getting anywhere, step back and let another peacekeeper take over • Clarify any possible misunderstandings

• Clearly tell them what it is that you want • Assure them that you want them to be treated fairly • Look them in the eye, but let them avoid eye contact if they want • Tell them your first name, ask for theirs and use it often • If person is out of control, shift their attention away from source of anger ■ Find a common ground to build trust on • Agree to disagree • Avoid substances that interfere with clear thinking • Don't take yourself too seriously • Don't make sudden movements ■ Sit down or ask others to sit down ■ Keep people from crowding around and talking over one another • If you're already sitting down arid you need to get up, do so slowly • Be flexible • Walk away • Be aware of other people's boundaries • Adjust your attitude • State the obvious (I don't want to fight) • Leave them an honorable way out • Explore other options ■ Get advice from someone you trust
AFFINITY GROUP SUPPORT PEOPLE'S CHECKLIST:
The role of support in an action is crucial. Support people accept the responsibil-ity of being a visible, involved contact to the outside world once a member of their affinity group is arrested. They embody the care and concern an affinity group shares among its members. This means making sure that activists are not isolated, neglected and overburdened because of their political actions. The following is a breakdown of such responsibilities of support people throughout an action.
BEFORE THE ACTION ■ Know the people in your Affinity Grou,p (AG) by name and face. • Know any pertinent medical information for each person. • Know who the support coordinators are (if applicable). ■ Know where people who are arrested are likely to be taken. ■ Know contact phone numbers to update the organizers. • Be sure your name, phone number where you can be reached, and how
long you will be available for support work are written on your AG data list.

DURING THE A CITON At the site: • Give emergency info about yourself and your supportee to another supporter • Know the boundaries of arrest and non-arrest areas. ■ Hold $, keys, other personal items (including IDs, if desired) for CDers. ■ Bring lots of food for yourself and others: people just released from jail may
want nourishment (hugs work well for this too). • Be sure you know who to contact for each person arrested: family, job,
friends, pets, etc. • Bring a paper and pen! • Once arrests begin, write down each individuals name, the time and nature
of the arrest, the activity of the person arrested, and the treatment of the arresting officer (try to get a badge number if there are questionable circumstances).
• At least one support person from your AG should stay at the place of arrest until all CDers in your group are arrested. At least one should go to where those being arrested are being taken, as soon as the first member of your AG is arrested.
At the Courthouse: • Try to keep track of all the following info for each person in your AG:
1) Name of judge or magistrate. 2) Name of CDer (Doe # if applicable). 3) Charge. 4) Plea (Not Guilty, Guilty, Nolo Contendere, Creative Plea, etc.) 5) If found guilty: sentence imposed. 6) If pleads not guilty:
- Amount of bail, if applicable - Whether the person pays the bail or is released - Date, time, and place of trial - Any further info
7) If there is a lawyer in the courtroom, and his or her name. 8) Any other info that seems relevant.
• Call all this info into the action office immediately.
AFTER THE A CTION • Call whomever needs to know about each person who was arrested. • Be prepared to bring medication to the jail or courthouse for whomever
needs it and follow up on whether it has been administered. • Keep action office updated: People in jail, OR, bail, etc.

10
THE LEGAL PROCESS WARNING
Sometimes, but not always, immediately prior to the arrest of demonstrators, a warning will be given by the police. They will say which law(s) is (are) being broken, and will say that anyone remaining will be arrested.
CHOICES: 1.) Stay and be arrested. 2.) Leave.
ARREST You will be taken to transportation vehicles, may be hand-cuffed and frisked,
and have large possessions removed. CHOICES:
1.) Cooperate and walk. 2.) Don't cooperate and go "limp" (Additional charges may be involved
for going "limp," but often they are not added). BOOKING
Name, address, and birthdate will be asked. Other information may also be asked (Social Security number, employer, etc.) Fingerprinting and strip- searches may occur here.
CHOICES: 1.) Give specific amount and accuracy of information. 2.) Non-cooperation (possibly incurring additional charges). 3.) Citing out (signing a citation release saying you will return for
arraignment at a future date). 4.) Staying in jail until arraignment.
ARRAIGNMENT This is where the charges are officially given to you (often, you may already
know the charges and the probable sentencing because of pre-arraignment bargaining), and you enter in your choice of plea.
CHOICES: 1.) GUILTY- you will be sentenced now. 2.) NO CONTEST / NOLO CONTENDERE ("NOLO"). This means
you do not challenge the charges, and is treated the same as a GUILTY plea. 3.) NOT GUILTY or CREATIVE PLEA. With this plea you wish to
challenge the charges brought against you. The judge will set a trial date and choose whether to release you on O.R. (Own Recognizance - your verbal promise to show up for your trial), set BAIL or BOND (a monetary or physical security put up to "insure" your appearance on the trial date) or (rarely) require

11
you to REMAIN IN CUSTODY until the trial date. It is up to you to accept or not accept O.R., Bail, or Bond as offered by the judge and you can choose to remain in custody until the trial date.
Nom The choice to take a case to trial should not be made lightly, or without prior study and the willingness to commit time, energy, and money to your defense. TRIAL
Those who have plead Guilty or No Contest do not have a trial. The judge or jury will either find you Guilty or Not Guilty (acquittal). If you are Not Guilty, you are free to go out and celebrate. If you are Guilty, the judge will then. sentence you. For those who have plead Not Guilty, or have made a creative plea, the type of trial is up to you.
CHOICES: I.) INDIVIDUAL TRIAL or REPRESENTATIVE TRIAL. This is an
option for anyone. Sometimes a number of individuals that have been charged with the same offenses under similar circumstances choose this. If this is true, the one case can be tried, with the verdict applied to the group.
2.) COURT TRIAL. This involves does not involve a jury. Rather, a judge will hear the case and give the verdict. This form allows for the individual circumstances to be heard without the time and expense of a full jury trial.
3.) JURY TRIAL. This involves the court selecting a jury. The jury listens to the case, and gives its verdict. This is the most involved and costly form of trial both for the individual and the government. You may have to pay the costs if found guilty. S ENTENCING
After Guilty or No Contest pleas, or Guilty verdicts, the judge chooses your sentence:
I.) JAIL (often time served - which means the length of time already spent in jail),
2.) FINE 3.) PROBATION or COMMUNITY SERVICE (work with human needs
agencies instead of time in jail). CHOICES:
I.) Accept sentencing. 2.) Not accept Fines, Probation, or Community Service and leave court
with the only option of putting you in jail and giving you credit for each day you spend there.

12
NONVIOLENT ACTION REFERENCE BIBLIOGRAPHY: Bay, Christian and Walker, Charles, Civil Disobedience: Theory and Practice, 1975. Read pages 32-46 for a good outline on organizing for civil disobedience.
Cooney, Robert, and Michalowski, Helen, eds. The Power of the People, The Peace Press, 1977, History of nonviolent actions and activists in the U.S.
Coover, Moore, Esser, Deagan, Resource Manual for a Living Revolution, New Society Publish-ers, 1985. Ways to analyze and improve group dynamics, exercises for developing strategies.
Deming, Barbara, On Anger, A.J. Muste Memorial Institute, one of the series of pamphlets on nonviolent action, available 339 Lafayette St., New York, NY 10012.Prison Notes, Grossman Publishers, NY, 1966. Revolution and Equilibrium, 1968. One of the best csays on the dynam-ics of nonviolence. We Cannot Live Without Our Lives, Grossman Publishers, NY, 1974.
Douglass, James Resistance and Contemplation, Doubleday, 1972. A vision of nonviolent revolution based on Ghandian and Christian radicalism.
Garland, Anne Witte, Women Activists Challenging the Abuse of Power, The Feminist Press, 1988.
Gandhi, Mohondas K. Nonviolent Resistance, Shocken Books, 1962. A collection of essays.
Gregg, Richard, The Power of Nonviolence, 1966. A classic study and explanation of the psychology of nonviolence.
Hedemann, Ed ed., War Resisters League Organizers Manual, War Resisters League, 1981. Practical information and details on organizing actions and local activities. Available from War Resisters League 339 Lafayette Ave., New York, NY 10012.
King, Martin Luther, Jr., Where Do We Go Prom Here: Chaos or Community?, Bantam Books, NY, 1967. Why We Can't Wait, Signet Books, NY, 1964. Strength to Love, Harper and Row, NY, 1967. The Thmtpet of Conscience, Harper and Row, NY, 1967. Stride Towards Freedom, Harper and Row, NY, 1958.
Lynd, Stoughton, Nonviolence in America: A Documentary of History, Bobbs-Merrill, Indianapolis, 1966.
McAllister, Pam, ed., Reweaving the Web of Life, New Society Publishers, 1982. Essays on feminism and nonviolence. You Can't Kill the Spirit, New Society Publishers, 1988. Stories of women and nonviolence.
Rowbotham, Sheila, Women, Resistance, and Revolution, Vintage Press, 1972. A feminist classic.
Seeley, Robert, The Handbook of Nonviolence, 1986. Includes Aldous Huxley's classic 104-page "An Encyclopedia of Pacifism."
Sharp, Gene, The Politics of Nonviolent Action, Porter Sargent, 1973. A detailed (3 volume) analysis of of specific methods of nonviolence.
Thoreau, Henry David, On the Duty of Civil Disobedience, 1848. The classic.
Zietlow, Carl, A Reflective History of 7)-aining for Nonviolent Action in Me Civil Rights and Peace Movements 1942-1972, 1977. Also available from ISTNA. An excellent study and analysis.

Legal Flow Chart
Wffni9g
Stay Leave — You're Outta There!
Arrest
Cooperation Noncooperation
Go to Jail — Booking I
Give Info Withhold Info — L i
Give Info Withhold Info
Cite & Release
F-1 1 Unconditional Conditional
H Accept Refuse
Released Jail -
Arraignment

Arraignment I
Verdict Trial r I ' Not Guilty' No Contest Guilty
Not
Guilty Guilty
Individual or Group
Court or Jury
Attorney or Self
You're Fre . Sentencing
i
Probation Community Service
You're Done! Fine
Accept Refuse
L You're Done!

Activist Legal Defense form Vital information to help get you out of jail
Please fill out front side of form and give to the jail support/legal coordinator before your action.
Name: Alias: Action Name: Affinity Group: Attorney: Phone:
Support Person (your outside contact person; friend, family member, housemate, etc...): Name: Phone:
If questioned by investigators, your reference person needs to be prepared to state that you are not a "high flight risk." Your reference person needs to verify in a letter of recommenda-tion that you are a responsible, forthright person; that you are a hard worker, pay your bills, are a registered voter, are an active participant in the community, are not leaving the area and are committed to making your court dates.
Driver's License Number: State: Social Security Number: Date of birth: Age:
Current Address: How long there: Phone:

Housemate contact person: Previous address: How long there: Workplace (Current/Former): Position Workplace address/phone: How long worked there: Workplace contact person:
Personal needs (medical conditions, allergies, diet, religious affiliations, etc...):
Things to think about: Have you had nonviolence training? Are you fully committed to verbal and physical nonviolence? Do you intend to cooperate with the police or practice noncooperation? Do you want to give your real name, present personal identification? Are you committed to jail solidarity? For how long? Have you made bail arrangements? Do you have pets that need to be taken care of? Do you have a personal attorney lined up to defend you? Who do you want/not want contacted upon your arrest?

Post Arrest Information
Date Arrested: Tune: Date Released: Time: Time in Custody: Released on Own Recognisance? Bail Posted: Bail Paid: Jail/Facility Location: Jane/John Doe #: Booking #: Were You Mistreated in Jail? Description of Forms of Cooperation/Noncooperation:
Charges:
Arresting Officer(s) and Badge Number(s):
Assisting Officer(s) and Badge Number(s):
Did You Experience/Witness any Police BnztalityNiolence?

Did You Sustain any Injuries? Was Anyone else Involved or Witness this?
Was there Physical Documentation of the Incident?,
Have You seen a Doctor, Lawyer, Turned in a Declaration Form or Filed a Police Report?
Aftomey/Public Defender & Phone Number:
Court: Judge:
District Attorney: Prosecutor:
Arraignment Date/Time: Results:
Pretrial DateJTime: Results:
Trial Date/Time: Results:
Plea:

19
AFFINITY GROUP SUPPORT FORM EXTREMELY CONFIDENTIAL! KEEP OUT OF ACTION!
BURN WHEN EVERYONE IS ACCOUNTED FOR AFTER ACTION!
ACTION NAME: DATE; PLACE OF ACTION• AFFINITY GROUP NAME;
AG MEMBER INFO: (Same Gender "Buddies" for Arrestees) Name & Alias Role Emer. Ph. # buddy Support Person/Ph. #
NUMBER OF PEOPLE IN GROUP:
DRIVER(S):_
PHONE # - - -
JAIL SUPPORT PERSON(S):
PHONE # _

NOTES

4spio0 _ADA - SECURITY
Our movements for radical political change and liberation of the Earth build power through people taking action. It shouldn't be any surprise that the corporate/government power structure doesn't like this. In fact, it has always worked around the clock and in many ways to disrupt and undermine grassroots movements under the guise of "crime fighting." Their strategy throughout history in maintaining the status quo and dealing with revolution-ary movements such as the Black Panthers, American Indian Movement, and Earth First! has been one of violent harassment and intimidation. Leading the attack on activists are federal investigators and agents, infiltrators, cops, private secuxity companies, corporate "wise use" front groups, hate mongers and thugs. Protecting our movements from these scum bags means protecting ourselves and each other. Doing so means knowing and exerting our constitu-tional rights in fighting corporate plutocracy and protectionism. It also means knowing and combating the corporate/governmental tactics of intimidation with good nonviolent security measures.
Good action security measures include; sharing action information on a need to know basis and only within your affinity group, reserving sensitive issue discus-sions to be held person to person and never over the phone, adopting alias's, selectively using code language when needed (Warning! The FBI has used code Language evidence against nonviolent activists to accuse them of plotting violent acts), never bringing drugs or weapons to actions, and not alienating new people. Good security tools include; wrist watches, pens and paper notepads, video and still cameras, audio recorders, binoculars, two-way radios, scanners, frequency counters, cell phones, pagers, report forms and journals.
Above all the techno gadgetry, arm yourself first and foremost with instinct. Develop active listening and mental recall and imaging skills. Cultivate a heightened sense of perception. Maintain clear and solid communication within your affinity group and establish a process to deal with harassment and intimidation. So often we find ourselves caught up in the stress of everyday organizing and the senseless paranoia that "they" are after us that we alienate new people who genuinely care about the issues and want to help out. There can never be enough of us to stop the madness. If we fail to invite new people into our movements and even shun them, who will be there to carry on the struggle of defending Mother Earth and tackling corporate power when we are gone? Get to know new people and gradually extend your relationship with them. Honor people's efforts to get involved. Act with just as much respect and humility as you act with caution.
oz. 0 21 1.,, 4e;z ki

COMMON SENSE SECURITY
Popular consciousness of environmental issues has seen tremendous growth in the past few years. People organizing or speaking out against environmental degradation in this country and abroad are facing an escalating pattern of harassment. Increasing also is the number of arsons, robberies, burglaries, and attacks on environmental activists, especially on women- who are often on the front lines in isolated rural areas. Investigators learned of more than one hundred cases between 1989 and 1992 alone. A pattern is emerging in these attacks which is similar to attacks on civil rights, anti-war, and Central Ameri-can activists in the past.
As our movements have become stronger and more sophisticated, the techniques of the state, corporations and right wing groups have also become more sophisticated. We have seen government agents, corporate security and right wing intelligence networks share information as well as ideology. For instance, the FBI's COINTELPRO operations targeted dissidents in America in the 1960's and 1970's. Caution and common sense security measures in the face of the concentrated efforts to stop us, is therefore both prudent and necessary.
Spend a few minutes to assess your work from a security point of view: understand your vulnerabilities; assess your allies and your adversaries as objectively as possible; do not underestimate the opposition. Try to assess your organizational and personal strengths and weaknesses. Do not take chances. Plan for the worst; work and hope for the best.
Here are some specific suggestions for protecting yourself and your projects:
OFFICE • Keep your desk and work area clean. Don't leave documents lying around
to be removed or read. • Never leave the only copy of a document or list behind; take a minute to
duplicate an important document and keep the duplicate in a safe place off-site. • Keep mailing and donor lists and personal phone books out of sight.
Always maintain a duplicate at a different location; update it frequently. • Know your printer if you are about to publish and know your mailing
house if you contract for distribution. The loss of camera ready copy or a change in text could feel like a disaster.
• Back up and store important computer disks off-site. Sensitive data and membership lists should be kept under lock and key. Do not leave sensitive files on the hard disk; use floppies, back them up and store the disks in secure
22

s •
,/ I N . N" WiO To. 1.A. ;VIA 110 ilea Irina 1
spots. Use an encryption program to protect your data. • Know the background of anyone you are trusting to work on any part of a
project that is sensitive. Projects have been bungled because an untrustworthy person has purposefully intervened or inadvertently screwed up.
• Don't hire a stranger as a messenger. Your message might not arrive or could arrive after being duplicated for an unintended party.
• Sweeps for electronic surveillance are only effective for the time they are being done, and are only effective as they are being done if you are sure of the person(s) doing the sweep. Sweeps tend to be expensive because to be effective one must sweep a large area. Many experts contend that the most sophisticated federal government and private agency taps cannot be detected.
• Keep a camera, loaded with film, handy at all times. • If you are the last person to leave the office late at night, leave the light on
when you depart. Do not advertise your departure.
TRASH • What you consider trash could be a real treasure to someone looking for
information about you or your projects. Don't throw information about you or your projects in your trash. Garbology has become a tactic because it is so useful.
• Keep a "Burn File" in a secure place and occasionally burn it or use a shredder. Make sure your shredder creates confetti because strips can easily be reconstructed with a little patience.
TELEPHONE • Do not list your address with your phone number in the directories.
Consider having yourself unlisted. • If you receive threatening calls on your answering machine, immediately
remove and save the tape. • Never respond to a query over the telephone from an unknown person-
lottery tickets, fabulous prizes, jury questionnaires, etc. notwithstanding. Ask for a telephone number and call the party back considerably later or the follow-ing day. Check the phone book to see if the phone number they gave you is legitimate. Check it out. Do the same if a reporter calls.
• Never say anything you don't want to hear repeated where there is any possibility of being recorded or overheard. Don't say anything on the phone you don't want to hear in open court.
• Don't talk in code on the telephone. If you are being tapped and the transcript is used against you in court, the coded conversation can be alleged to

, "
--40‘k
mean anything by government code "experts." • Don't gossip about sensitive people or projects on the telephone. All
information that can make an outsider "in the know" about you and your projects is valuable and makes everyone vulnerable.
• Keep a pad and pen next to the telephone. Jot down details of threatening or suspicious calls immediately. Note the time, date and keep a file.
• Don't waste time worrying about phone taps or imagining that strange clicks or hums or other noises indicate a phone tap. Many taps are virtually impossible to detect. Trust your instincts. If you think your phone is tapped, act accordingly.
• Remember: It is very easy to eavesdrop on cellular and mobile phones. Scanners have been developed specifically for that purpose. Neighbors report overhearing telephone calls via the radio, television and even the stove.
MAIL • Get a mail box through the Post Office or a private concern. Be aware that
the United States Post Office will give your street address to inquirers under certain circumstances.
• If you receive a threatening letter, handle it as little as possible. Put both the letter and the envelope in a plastic bag or file folder. Give the original to the police only if they agree to fingerprint it. Give them a copy otherwise because you may wish to have your own expert examine it.
A UTOM OREL ES • Keep your automobile clean so you can see if there is an addition or loss. • Put no bumper stickers on your car which identify you as an organizer.
Make your car look ordinary. • Put your literature in the trunk or in a closed box. • Keep your car locked at all times. • When traveling, put your purse or briefcase out of reach of the windows.
Put them behind your legs or tuck them up under the dash against the fire wall.
POLICE • Report any incidents to the local police and ask for protection if you feel
it is warranted. • Report threats or harassment to your local police. Demand that they take a
report and protect you if that is necessary Talk to the press and report the police response as well as the incident(s).
• Report thefts of materials from your office or home to the police; these
21

.4,;; • 4r • Awir
are criminal acts.
UNDER S URVEILLANCE? • Brief your membership on known or suspected surveillance. Be scrupulous
with documentation. Do not dismiss complaints as paranoia without careful investigation. The opposition can and frequently does have informants join organizations to learn about methods and strategy
• Discuss incidents with colleagues, family and membership Call the press if you have information about surveillance and harassment. Discussion makes the secret dirty work of the intelligence agencies and private spies easier to spot.
■ If you wish to have a private conversation, leave your home or office and take a walk or go somewhere very public and notice who can hear you.
• If you know a secret, keep it to yourself. As the World War 11 poster warned: Loose lips sink ships.
• Photograph the person(s) following you or have a friend do so. Use caution_ If someone is overtly following you or surveilling, they are trying to frighten you. Openly photographing them makes them uncomfortable. If you are covertly being followed, have a friend covertly photograph them.
• If you are being followed, get the license plate number and state. Try to get a description of the driver and the car as well as passengers. Notice anything different about the car.
• If you are followed or feel threatened, call a friend; don't "tough it out" alone. "They" are trying to frighten you. It is frightening to have someone threatening your freedom.
• Debrief yourself immediately after each incident. Write details down; time, date, occasion, incident, characteristics of the person(s), impressions, anything odd about the situation.
• Keep a "Weirdo" file with detailed notes about unsettling situations and see if a pattern emerges.
BREAK-INS • Check with knowledgeable people in your area about alarm systems, dogs,
surveillance cameras, motion sensitive lights, dead bolt locks and traditional security measures to protect against break-ins.
VISITS FROM THE FBI • Don't talk to the FBI or any government investigator without your attorney
present. Get the names and addresses of the agents and tell them you will have your attorney contact them to set up a meeting. If you have an attorney, give
ope. 0 - k ,
25 i.• vo f!z' fyi

•
them the name and phone number. Under any circumstance, get the agents names and addresses.
• Information gleaned from a conversation can be used against you and your co-workers. The agents' report of even an innocuous conversation could "put words in your mouth" that you never uttered or your words could be distorted or made up if you don't have your attorney present.
• Call the National Lawyers Guild, American Civil Liberties Union or other sympathetic legal organizations if you need assistance locating a reliable attorney in your area.
• The FBI rarely set up interviews with counsel present. Often when the demand is made to have an interview with counsel, the FBI loses overt interest.
• Don't invite agents into your home. Speak with the agents outside. Once inside they glean information about your perspective and lifestyle.
• Don't let agents threaten you or talk you into having a short, personal Conversation without your lawyer. Don't Iet them intimidate or trick you into talking. If the FBI wants to empanel a Grand Jury, a private talk with you will not change the strategy of the FBI. Don't try to outwit the FBI; your arrogance could get you or others into serious trouble.
• FBI agents sometimes try to trick you into giving information "to help a friend". Don't fall for it; meet with the agents in the presence of your attorney and then you can help your friend.
• Lying to the FBI is a criminal act. The best way to avoid criminal charges is to say nothing.
• Any information you give the FBI can and will be used against you. • Write for your government files under the Freedom of Information Act
(FOIA) and keep writing to the agencies until they give you all the documents filed under your name.
• Don't let the agents intimidate you. What if they do know where you live or work and what you do? We have a Constitutional right to lawful dissent. You are not required to speak with the FBI. They intend to frighten you; don't let them..
• Do not overlook the fact that government agencies sometimes share infor-mation within the government and with the private sector, particularly right-wing organizations. This has been documented.
REMEMBER- If you feel you are being surveilled, your phones are tapped or that you are
being followed, the best overall advice is to trust your instincts. If you feel something is wrong, trust the feeling. Your instincts are usually right. Most of us recall the times when we "felt something was wrong" or we "knew better
26

but did it anyway". Talk to colleagues and make yourself as secure as you can. Experts claim that people who resist get away from attackers more often than those who do not. The same logic applies to keeping outsiders out of your business; it is a more subtle form of attack. Trust your instincts and resist when possible. One of the biggest blocks of resistance is the failure to recog-nize we are under attack.
None of this advice is intended to frighten but to create an awareness of the problems. A knowledge of the strategies and tactics of your adversaries will strengthen your movement. Cover yourself; it's a tough world out there.
S UGGESTED READINGS: Caignon, Denise and Groves, Gail. Her Wits About Her; Self Defense Success
Stories by Women, New York, Harper Sr Row, 1987; Churchill, Ward and Vander Wall, Jim. Agents of Repression; The FBI's Secret Wars Against the Black Panther Party and The American Indian Movement. Boston: South End Press, 1988; Donner, Frank J. The Age of Surveillance. New York: Random House, 1981; Gelbspan, Ross. Break-ins, Death Threats and the FBI; the Covert War Against the central America Movement. South End Press, 1991; Glick, Brian. War at Home; Covert Action Against U.S. Activists and What We can Do About it. Boston: South End Press, 1989.
• This information was compiled by Sheila O'Donnell in 1992. She is a licensed private investigator and partner at ACE INVESTIGATIONS, P.Q. Box 1633, Pacifica, California 94044, Phone; (415) 359-0900. This information may be copied in its entirety without permission. However, any adaptation must be approved in writing by the author.
KNOW YOUR RIGHTS!
How many of us know what our legal rights are when a cop stops us on the street, or when he or she tells us they want to search us? We need not only to KNOW our rights, we also need to know HOW to assert them in a real situa-tion. And we need to know how to actively DEMAND our rights over and over again, if we hope to have them respected, given that many officers are ready and willing to ignore them. This is a short introduction to a complex legal subject. Call us at Berkeley COPWATCH for more info (510) 548-0425.
S TREET G UIDELINES If the police stop you or a friend, or if you're watching the police stop
someone you don't know, do what you can to cairn the situation down. Offic-ers often feel a need to be in control. If they get too agitated, you or someone

•
1/" • • • ipm gh,
414 IF 1 1 --411111101‘ ir
else could end up hurt, in jail, or worse. Keep your hands visible at all times. If you have to go into your pockets tell the cop, "I'm going to reach into my pocket now to get my ID." Don't make any sudden moves, don't move behind an officer, and walk instead of running whenever possible. Speak slowly, calmly, and loudly, so any witnesses can hear your words. Be polite but be insistent too.
• Write down all the details of any incident involving the police immediately afterwards. You may think you'll never forget what happened, but unpleasant memories and important details sometimes fade fast. ALWAYS get the cops names and badge numbers, as well as car numbers and the name of their police department. Take photos of any injuries and go to a doctor to get a medical report on them.
• Don't voluntarily come into physical contact with a police officer. In fact, if you as so much touch a cop, or their uniform or equipment, even accidentally, you can be legally charged with assault on a police officer. That's often charged as a violent felony, which is a strike if you are convicted. Also, police become very angry when they meet resistance, and they know that if they use their weapons the system will back them up, not you. Physically resisting an arrest will mean much more force from the cops and more charges in court.
• If you see the police stopping someone, stop and watch, and try to get other people to stop too. Let the person who's been stopped know you're willing to be a witness. Get the names and numbers of other witnesses.
• If the cops search you or detain you illegally, tell both the cops and any witnesses that it is against your consent, and repeat that over and over again. But you may not want to tell the cops exactly what they are doing wrong, because they could find a more legal way to search or detain you. Instead, just refuse your consent, take note of what happens, and if you get arrested, tell your lawyer later what the police did that was illegal. The cop's mistakes could invalidate the charges against you, and it will probably help more to talk about it in court that in the street.
• If you see someone consenting to a search or a stop by the police, let them know they have the right to refuse their consent.
• If you see severe misconduct, such as the police beating someone, you can call 911. The 911 dispatchers must record your call and it could be useful evidence later.
YOUR RIGHTS AND How TO USE T HEM LAW: You have the right to watch the police when they stop someone. REALITY: The police get very nervous when people watch their actions.
They may threaten you with arrest for "interfering" (Penal Code
, • . 111 k I( • •
28

/--- 4N, gr, 11••• I* 40'4 section 148). Tell them politely but firmly that you don't want to interfere, but you have the right to observe. Step back if necessary.
LAW: Police must identify themselves to the public. Officers must wear a nameplate or badge number while on duty (PC 830.10).
REALITY: Those tiny little plates are hard to read, and cops will often refuse to give you their name and number. Ask insistently until you get it. If you are being ticketed, one of the officer's names will be on the ticket. If you are arrested, most of them should be in the police report which you can get from your lawyer or your public defender.
LAW: There are three ways you can be stopped by police. In a casual encoun-ter, the cop has no legal right to talk to you, but is "inviting" you to talk. A detention is when the police have "reasonable suspicion": specific reasons (not a hunch, not a generalization) to believe that you have committed a specific crime or to believe that you're about to commit a specific crime. Finally, the police can arrest you when they have "probable cause" to believe that you have committed a crime. This is more than reasonable suspicion, but Less than complete proof. They don't need to have a warrant to already arrest you. If you were just a witness to a crime, the cops cannot legally detain you.
REALITY: Stay away from consensual encounters. If a cop starts talking to you, for whatever reason, ask "Am I free to go?" If yes, don't talk. Just leave. If not, you are being detained. Ask, "Can you explain why you are detaining me?" and memorize the exact words of the cop's response- this could be helpful in court if you are arrested. If there are any witnesses, repeat the cop's response (Oh, so I am being detained for...?) so that they can hear it.
LAW: You have the right to remain silent. REALITY: Even if the police don't read your rights, they are in effect. People
often talk to the cops because they don't know they don't have to. Although it can be difficult to refuse to answer any questions, it really is the best idea. Tell the police you don't have anything to hide, but that you've been told by your lawyer not to answer any questions without your lawyer present. Don't try to talk your way out of anything. Even the truth can be manipulated and used against you. If you get confused and start talking, you can stop and assert your right to silence at anytime. The police may tempt you by saying that if you just answer a certain question, they will let you go, but this is often just a trick. Cops Lie! When you don't answer questions, the police may threaten to arrest you for refusing to cooperate with their investigation. This threat is illegal.
LAW: You don't have to show ID to the police, although you do have to show your driver's license if you're pulled over while driving.
• •• 4to ,-ro 41:
REALITY: In a casual encounter, don't even give the police your name- just walk away. If you're being detained, you may want to give your name, but nothing more; the police have a right to take you in until you have been identi-fied. If you're being ticketed, you should probably show your ID. If you're being arrested and taken in, you may have to show your ID to be released. If you're citizenship is not secure (such as you are an undocumented immigrant), don't even give your name.
LAW: When the police get your ID, they can run a warrant check. This basically checks if you have tickets you haven't paid for a long time, or charges against you which you may not be aware of. If you have a warrant, they will arrest you.
REALITY: The computer system, or the cops, may make a "mistake" and say you have a warrant when you don't. Keep copies at home of all your tickets and of the checks you paid the tickets with.
LAW: If the cops arrest you for an infraction (such as jaywalking or posses-sion of less than an ounce of marijuana), they should give you a ticket and let you go. You may get a pat-down for weapons, but you should not be searched. If you don't have an ID, the police may take you to the station to "verify your identity." If you're arrested for a misdemeanor, you may or may not be taken in. If the cops arrest you for a felony, you will be taken to the station and booked.
REALITY: Whether you are charged with a misdemeanor or a felony often depends on how the cop feels about you, not on what you've done or not done. It is common for the police to "over-book" people by adding on extra charges like resisting arrest or blocking the sidewalk.
S EA RCH ES LAW: When you are detained, the police are allowed to do a pat-down search
of your outer clothes to check for weapons. REALITY: The cops may claim they feel a weapon when they don't, and use
this as an excuse to go inside your pockets. This is an illegal search (see "If the cops search you illegally" above).
LAW: Other than a pat-down search, the police are only allowed to legally search you if you have been arrested, if they have a search warrant, or if you have a search clause as a condition of your probation or parole. This is true whether they're trying to search you or your bags or possessions. The police can also search you if you consent to a search.
REALITY: Never consent to a search. Silence can be consent, so whenever the cops start searching anything, say repeatedly to them and to
A Vt 30 -Ns'aqb: y ft. • .71 • II

- a V 11.1,0 • •
k
bystanders, that "I don't consent to this search." Sometimes the police try to trick you into consenting; sometimes they just go ahead and search anyway. If you're arrested after an illegal search, some of your charges could be dropped. A great many searches happen when people give consent without realizing it. The cops may ask for your consent in a way that does not sound like a ques-tion, such as, "I want to look in that bag" Say no anyway. Police may threaten to arrest you if you don't let them search. This is illegal.
LAW: The police can search your car if you're in it when they arrest you, or if they have probable cause to believe there is evidence of a crime inside.
REALITY: The cops may ask you for keys to the trunk or glove compartment. If you're not under arrest, tell them "no." If they threaten to break it open, say, "Since you say you will break the car open, I will give you the keys but I do not consent to the search." Again, make sure witnesses can hear you.
LAW: Without your consent, the police can only enter your home if they have a search warrant, if they're arresting you, or if they have probable cause to believe there is evidence of a crime or an emergency in your house (for ex-ample, someone just called 911 with your address." The landlord or manager of where you live can't give legal permission for a police search. If you walk into your house when you're about to be arrested, they can search every room you walk through.
REALITY: If the police come to your door, step outside and lock the door behind you. If they have a search warrant, read it: check that the address is correct and the date is within the last several weeks. If they ask for consent to enter ("Mind if we come in?" or "We need to come in, OK?"), block the doorway with your body and say you'd prefer to talk outside. If they say they must enter and will break the door down, open the door, but repeat that you don't consent. Follow the cops if they search, to see if they try to plant anything.
• This info was contributed BY COP WATCH 2022 Blake St. Berkeley, CA. 94704. Phone: (510) 548-0425.
THE F OUR MAIN METHODS OF HARASSMENT: While much FBI and police harassment was blatant during the 1960s, and
surveillance and infiltration were suspected, talk of CIA-style covert action against domestic dissidents was generally dismissed as "paranoia." It was not until the 1970s, after the damage had been done, that the sordid history of COINTELPRO began to emerge.
1. Infiltration: Agents and informers did not merely spy on political activ-ists. Their main purpose was to discredit and disrupt. Their very presence served to undermine trust and scare off potential supporters. The FBI and

• Is 11. ft* cit 2r
police exploited this fear to smear genuine activists as agents. 2. Psychological Warfare From the Outside: The FBI and police used a
myriad of other "dirty tricks" to undermine progressive movements. They planted false media stories and published bogus leaflets and other publications in the name of targeted groups. They forged correspondence, sent anonymous letters, and made anonymous phone calls. They spread misinformation about meetings and events, set up pseudo movement groups run by government agents, and manipulated or strong-armed parents, employers, landlords, school officials and others to cause trouble for activists.
3. Harassment Through the Legal System: The FBI and police abused the legal system to harass dissidents and make them appear to be criminals. Officers of the law gave perjured testimony and presented fabricated evidence as a pretext for false arrests and wrongful imprisonment. They discriminatorily enforced tax laws and other government regulations and used conspicuous surveillance, "investigative" interviews, and grand jury subpoenas in an effort to intimidate activists and silence their supporters.
4. Extralegal Force and Violence: The FBI and police threatened, instigated, and themselves conducted break-ins, vandalism, assaults, and beatings. The object was to frighten dissidents and disrupt their movements. In the cases of radical Black and Puerto Rican activists (and later Native Americans), these attacks- including political assassinations- were so extensive, vicious, and calculated that they can accurately be termed a form of official "terrorism."
• This information is reprinted from War at Home.
MINIMIZE THE E FFECTS OF HARASSMENT 1. Check out the authenticity of any disturbing letter, rumor, phone call,
or other communication before acting on it. Ask the supposed source if she or he is responsible. [ed. note: Please re-read this one again. It is very important!]
2. Keep records of incidents which appear to reflect COINTELPRO-type activity. [ed. note: Also, report your experiences to groups that document repression].
3. Deal openly and honestly with the differences within our movements (race, gender, class, age, religion, national origin, sexual orientation, personal-ity, experience, physical and intellectual capacities, etc.) before the FBI and police can exploit them.
4. Don't try to expose a suspected agent or informer without solid proof. Purges made on mere suspicion only help the FBI and police create
.• r • oNel. - -:•41 32 "4k • ((
1/.:•N • l'-' . 11 aro • , p., - -- IC " N 1110 V.10 , 1 4''' • 0 :AIDA
distrust and paranoia. It generally works better to criticize what a disruptive person says and does, without speculating as to why.
5. Support all movement activists who come under government attack Don't be put off by political slander, such as recent attempts to smear some militant opponents of government policy as "terrorists." Organize public opposition to all FBI witch hunts, grand jury subpoenas, political trials, and other forms of government and right -wing harassment.
6. Cultivate relationships with sympathetic journalists who seem willing to investigate and publicize domestic covert operations. Let them know when you are harassed. Since the FBI and police thrive on security, public exposure can undermine their ability to subvert our work.
7. Don't tough it out alone. Don't let others fret and suffer by themselves. Make sure that activists who are under extreme stress get the help they need (someone to talk to, rest, therapy, etc.). It is crucial that we build support networks and take care of one another.
8. Above all, do not let our movements be diverted from their main goals. Our most powerful weapon against political repression is effective organizing around the needs and issues which directly affect people's lives [ed. note: And the lives of animals and the Earth tool].
• This advice is reprinted from War at Home.
DON' T T ACKLE GOVERNMENT HARASSMENT A LONE! Call the Animal Liberation League's (ALL) 24-Hour Crisis Hotline at: 1-800-
338-7827. After the beep dial 9299. Then, enter the phone number where you can be reached and hit the pound sign. Someone will call you back and help give you the resources necessary to Fight Back! You can also call ALL di-rectly at 612-9534293 during business hours. Please call if you or someone you know is arrested for ALE activity or wrongfully arrested or visited by federal agents; if someone is suspected to be an agent/informer or if you experience anything that could be considered to be government harassment. Even if you know how to handle the situation, please let us know so we can better monitor the authorities' activity against eco-animal activists.

4-4*.a.11.* :zwalk v Suspicious Experience Report Form
Date of Incident: Time: Date Reported:
Precise Location•
What Did You Observe/Experience:
Audio/Visual Documentation of Incident:
Description of Person(s) Involved: Number Involved: Name of Person(s) if Known:
Approximate Age: Sex: Race• Height: Build/Weight- Hair Length & Color: Body Marks: Demeanor: Clothing• Equipment/Weapons: Suspected Affiliation (law enforcement, industry, private security, wise use,ete,..):
Description of Vehicle(s) Involved: Make: Year: Style. Color: Details: License Plate Number: State/Special Plate ID:
Reported By: Phone:
31

IF THE FBI DROPS BY: JUST SAY No!
1. You do not have to talk to FBI agents, police, or other investigators. You do not have to talk to them in your house, on the street, if you've been arrested, or even in jail. Only a court or grand jury has legal author-ity to compel testimony.
2. You don't have to let the FBI or police into your house or office unless they show you an arrest or search warrant which authorizes them to enter that specific place.
3. If they do present a search warrant, you do not have to tell them anything other than your name and address. You have a right to observe what they do. Make written notes, including the agents' badge num-bers. Try to have other people present as a witness, and have them make written notes too. [ed. note: by observing them and writing down everything they touch and do, it helps prevent them from planting incriminating evidence.]
4. Anything you say to an FBI agent or other law enforcement officer may be used against you or other people.
5. Giving the FBI or police information may mean that you will have to testify to the same information at a trial or before a grand jury.
6. Lying to an FBI agent or other federal investigator is a crime.
7. The best advice, if the FBI or police try to question you or to enter your home or office without a warrant, is to JUST SAY NO. FBI agents have a job to do, and they are highly skilled at it. Attempting to outwit

them is very risky. You can never tell how a seemingly harmless bit of information can help them hurt you or someone else.
8. The FBI or police may threaten you with a grand jury subpoena if you don't give them information- But you may get one anyway, and anything you've already told them will be the basis for more detailed ques-tioning under oath.
9. They may try to threaten or intimidate you by pretending to have information about you: "We know what you have been doing, but if you cooperate it will be alright." [ed. note: if they had evidence against you, they wouldn't want to talk to you, they would just arrest you. However, by talking to them, you would open yourself up to giving them incriminating information about you or others.1
10. If you are nervous about simply refusing to talk, you may find it easier to tell them to contact your lawyer. Once a lawyer is involved, the FBI and police usually pull back since they have lost their power to intimidate.
• The above suggestions are reprinted from a must read book for activists-War at Home: Covert Action Against U.S. Activists and What We Can Do About It by Brian Glick. Published by South End Press, 116 Saint Botolph St., Boston, MA 02115. It is available for only $5.
SO, WHAT DO YOU SAY?
"YOU'LL HAVE TO SPEAK TO MY LAWYER. II LL TAKE YOUR BUSINESS CARD AND S/ HE WILL
CONTACT YOU."
THEN CLOSE THE DOOR!

/ I:\ , • , i;:. -• 11110 10 IIILAV 0 4741.111" ..„.. er
NOTES

SCOUTING Scouting or reconaissance is the art of surveying an area for it's action poten-
tial. The information you will be gathering on the scoutirecon of the target area and the daily goings on there will provide the foundation for developing a strategic action plan. Successfully scouting a site requires reaearch and prac-tice. The idea is to blend into your surroundings when scouting as to not attract suspicion of what you are really up to. Disguise yourself. Dress for success! Your ability to naturally blend in will dictate whether you operate solo or with a group on the scout. Act natural. Attitude is everything!
Choosing when to scout is also very important. Not only does it make sense to scout the site weeks, even months in advance of the action, but also around the same time of the year, month, week, and day that the action is going to take place. A 24-hour surveillance of the site will provide a more complete picture of what the site looks and functions like. Think of where things will need to be and how they will move into position on the day of action. Create a map. Whether you are scoping out a corporate office building for a banner hang and lock down or monitoring a timber sale, it is crucial to know the lay of the land well in advance of your day of action. Act with forethought and intent. Be careful. Don't get caught!
S ITE S ELECTION Ask yourself lots of questions when selecting a site for an action. First,
consider the appropriateness of the site. Is the place of political significance to your issue? How will an action there further your campaign goals? Is the place located at the point of the destruction you are working to stop? What repercus-sions will an action at the place cause? Who will be affected by an action at the place and are they your target? Then, consider the potential for an action there. Do you want to shut down business as usual there for the day with a blockade? Or, do you want to hang a banner and cause a ruckus for a few hours? How many people will be needed? Is the place of high visibility in the community? How accessable is the place for an action and the media?
PRE-S cour P REPARATION - Meet with your affinity group. Discuss long term and immediate goals of
campaign, motivations for an action, possible targets - Research targets, security (theirs), similar scenarios and actions from past - Analyze target research. Select target - Define goals of scout. Brainstorm list of information to get, things to bring - Develop plan, contingency plan, believable alibi- student art project!
)
10113 101i 38

WHAT TO B RING - Instinct! Good attitude! Open mind! - Disguise (power suit/dress, rags, uniform, fake id/press credentials...) - Discreet mode of transportation (ie. bus, car, bike, walk...) - Wrist watch - Cameras- video and still - Extra film and batteries - Audio recorder - Pen and paper/notepad - Measuring tape - Binoculars - Range finder - TWo-way radios with earphones - Scanner - Frequency counter - Cell phone - Pager - Maps - Compass or Global Positioning System (GPS) Unit - First aid kit - Food and water
WHAT N OT TO B RING - Drugs or weapons - Suspicious gear/clothing (political T-shirts...) - Your passport
WHAT TO LOOK F OR - Site layout (get building design maps from county planning dept./library,
timber sales from appropriate agency ..) - Blockade positions (ie. narrow points in road, distance from work area,
points of entry, machinery/vehicles on site, etc....) - Transportation corridors - Entrances/exits (including emergency, fire, disabled, employee...) - Security posts - Worker posts - Parking lots - Office suites
39

- Heavy Machinery Locations - Landmarks - Timber sale unit boundaries - Public closure boundaries - Ridges, peaks, valleys, slopes, water courses, trails, indicator trees/rocks,
snags, stumps, meadows, soil types and textures - Escape valves - Private vs public spaces - Places to avoid - Staging areas - Pretty picture banner spot - Media access and positioning - Telephones
Rest rooms - Hotels to stage from - Film developers in area - Hardware/equipment stores in area - Rental centers in area - Hospital in area - Cop shop and jail in area
POST S cour E VAL'UATION - Meet with your affinity group. Review goals of scout. Discuss information
obtained - Reanalyze target. Rescout target. Choose target/discuss other target
options - Propose and discuss action scenarios - Develop strategic action plan
NOTES
I I's. 'Tylitor 0,115.1,00' .
40
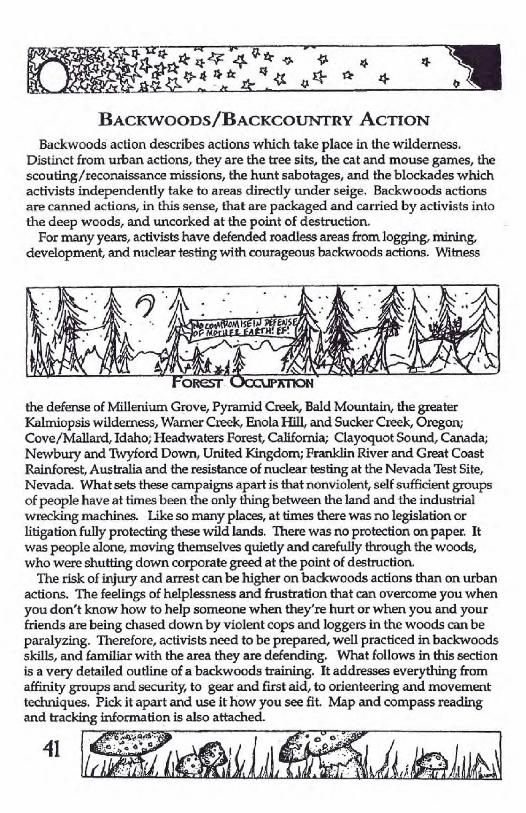
04 , 111 it al' (4; *4. ;1 71:7. * *
4 apA 1•1" *
BACKWOODS/BACKCOUNTRY ACTION Backwoods action describes actions which take place in the wilderness.
Distinct from urban actions, they are the tree sits, the cat and mouse games, the scouting/reconaissance missions, the hunt sabotages, and the blockades which activists independently take to areas directly under seige. Backwoods actions are canned actions, in this sense, that are packaged and carried by activists into the deep woods, and uncorked at the point of destruction.
For many years, activists have defended roadless areas from logging, mining, development, and nuclear testing with courageous backwoods actions. Witness
FoResi- accuPA71011
the defense of Milleniurn Grove, Pyramid Creek, Bald Mountain, the greater Kairniopsis wilderness, Warner Creek, Enola Hill, and Sucker Creek, Oregon; Cove/Mallard, Idaho; Headwaters Forest, California; Clayoquot Sound, Canada; Newbury and Twyford Down, United Kingdom; Franklin River and Great Coast Rainforest, Australia and the resistance of nuclear testing at the Nevada Test Site, Nevada. What sets these campaigns apart is that nonviolent, self sufficient groups of people have at times been the only thing between the land and the industrial wrecking machines. Like so many places, at times there was no legislation or litigation fully protecting these wild lands. There was no protection on paper. It was people alone, moving themselves quietly and carefully through the woods, who were shutting down corporate greed at the point of destruction.
The risk of injury and arrest can be higher on backwoods actions than on urban actions. The feelings of helplessness and frustration that can overcome you when you don't know how to help someone when they're hurt or when you and your friends are being chased down by violent cops and loggers in the woods can be paralyzing. Therefore, activists need to be prepared, well practiced in backwoods skills, and familiar with the area they are defending. What follows in this section is a very detailed outline of a backwoods training. It addresses everything from affinity groups and security, to gear and first aid, to orienteering and movement techniques. Pick it apart and use it how you see fit. Map and compass reading and tracking information is also attached.
11 1„,

44.4..ip* *2;g tr 0 1111 4.41y,
&'11•_113L *,tfc * 4x 0*
BACKWOODS /13ACKCOUNTRY ACTION WORKSHOP 3 1/2 hour training outline
1-2 trainers and 3-6 roleplay assistants
WELCOME! (5 MINUTES) Form circle. Give a brief overview of backwoods actions on this and other campaigns (ie. tree sits, lock downs, blockades, etc...) and their importance. Emphasize that this workshop is only an introduction to backwoods direct action. Nothing can take the place of real life experience.
I. INTRODUCTIONS (5-10 MINUTES) Name, where from, any backwoods experience, ie. backpacking, survival, first aid, or direct action. Had a nonviolence training.
II. REVIEW THE AGENDA (5 MINUTES) Consensus workshop, Raise hands to speak in turn.
III. kTIATE DISCUSSION OF BACKWOODS ACTION (10 MINUTE DIS-CUSSION. ENTIRE 5 ECTION= 70 MINUTES) What words come to mind when you hear someone say backwoods/deep woods action? Define it. Types of backwoods actions- scouting/reconaissance, blockades, cat and mouse, tree sits, etc.... Emphasize self sufficiency, confronta-tion at point of destruction, and nonviolence.
A. Affinity Group Structure (10 minutes) Who knows what an affinity group is? Define it. Emphasize a tight group of people joined by common interest and political strategy, non hierarchical, consensus based decision making and nonviolence.
1. Inside Roles: Guide, Arrest, Support, Medic, Camera and Film runner.
2. Outside Roles: Driver, Jail Support, Media. B. Good Security = Good Action! "Loose lips sink ships!" (10 minutes)
What are good security measures? 1. Action information shared on a need to know basis and only within
your affinity group. 2. Sensitive discussions held person to person; never over phones. 3. Adopting forest names/alias's. 4, Using code language. Warning! The FBI has used code language
I /1,0141, 42

LA\ 43
OA'
Filleftr; ky 441-A.4c 4 •""" * 4 11- r14111044 4 -r
evidence against nonviolent activists to accuse them of plotting violent acts (Check with Center for Constitutional Rights, New York, NY).
5. Never bring illegal drugs, alcohol or weapons into an action. 6. Don't alienate new people!!! Get to know new people and gradually
extend your relationship with them. Honor people's efforts to get involved. Act with respect and humility.
C. Personal Gear (10 minutes) Show and Tell- Baseline gear everyone needs to have to survive at least an overnight stay in the woods.
1, Clothing: Wool or synthetic polypropylene layers of clothing will wick moisture away from your skin and keep you warm, even if you get wet, Cotton will retain moisture, creating a negative layer of clothing on your skin, chilling you. Remember- Cotton Kills! A bottom layer of polypro long underwear and wool/ polypro socks is very important! Camouflage/drab colored outer layers of cloth-ing, Camo/wool pants and shirts, polar fleece, and rain gear.
2. Boots: Good, light-midweight, water-proofed hiking boots with solid ankle support are essential.
3. Hat: A large percentage of your body's heat is radiated from your head. A wool /polarfleece hat is key.
4. Bandana: Used for warming face, wrapping a wound, marking a frail, signaling or face concealment.
5. Camouflaged Day Pack: Think small, compact and easy to run with. Should include: Emergency space blanket, primary first aid kit, comprehensive wilderness trauma response guide, compass, topographical map, camping knife, safety pins, water purification tablets/pump filter, water bottle, flash-light/headlamp with red/blue lens, extra batteries, waterproof matches, needle and thread, cheap instamatic 35mm camera, and modest provision of compact, non perishable, high carbohydrate food, ie., energy bars, dried fruit, nuts, seeds, granola, trail mix, seaweed, vitamins, chocolate and garlic. Ginger root is good to chew on for dry mouth.
NOTE: SLEEPING BAGS ARE MG, BULKY AND WILL SLOW YOU DOWN, ESPECIALLY IF YOU ARE
BEING CEASED! THEY ARE ONLY NEEDED FOR EXTENDED BACKWOODS TRIPS. BIVY SACKS ARE A
VERY NICE LUXURY.
6. Wrist watch: Keep track of your distance and don't be late!!! D. Group Gear (10 minutes)
1. Blockade Equipment: Lock boxes, climbing gear, poles, etc... 2. Communications Equipment: 2-way radios, cell phones, pagers,
binoculars. 3. Food: Compact, non perishable, high carbohydrate foods like pasta,
granola, trail mix, tortillas, dried seaweed, dehydrated vegetable flakes and

'.ewP44 h 0.* tr rt 4. tr
14 IP* 21- tc 11
mixes of hummus and tabouli, vitamins/minerals, wheat grass or chlorella tablets, soy milk, dried tofu, peanut butter (shatterproof containers!), dried fruits, nuts, seeds, energy bars, chocolate, tea, coffee, etc...
4. Group First Aid Kit and Injury Response Manual. 5. Documentation Equipment: Hi-8 video and 35mm still cameras and
audio recorders. 6. Backwoods Satellite Camp Equipment: Tarps, ropes, plastic water/
animal proof stash buckets, topo maps, compasses, safety pins, duct tape, bow saw/hachet, shovel, stove, fuel, headlamps/flashlights, batteries, first aid supplies, sewing kit, concentrated soap, water bladders, water purification tablets/pump filter, cookware and utensils, waterproof matches/lighter.
E. Stashing Food/Gear (5 minutes) 1. Always stash food/gear in water/animal proof plastic bucket with
tightly sealed lid. Duct tape loose seals. 2. Select landmark stash spot that's easy to describe and find in close
proximity to intended area of use. Camouflage it. 3. Be responsible for your own and the group's gear; especially in
arrest scenarios. F. First Aid Response (15 minutes)
1. What are injuries we could anticipate occuring in the wilderness? Blisters, cuts and deep lacerations, bums, nosebleeds, poison oak, hypothermia, frostbite, shock, fractures, sunburn, fevers, colds /flu's, diarrhea, sprains/ strains, dislocations, fractures, snake bites, insect bites and stings, heat illness, choking, dehydration and emotional burnout.
2. The single most important thing for everyone to remember in dealing with any of these injuries is to remain calm and keep the group calm. Take your own pulse first! Then, reassure the victim that you are going to help them. What are the recommended responses to some of these injuries?
a. Cuts: Stop the bleeding and prevent infection and shock. For minor cuts, apply direct pressure to the wound with a clean dressing. If the wound is persistently bleeding, elevate it above the level of the victim's heart. Clean the wound and apply bandages. For major cuts, in addition to direct pressure, apply arterial pressure at one of the four arterial pressure points in proximity to the cut; right and left arm brachial arteries and right and left leg femural arteries. Pack the wound with clean dressings and seek professional medical care.
b. Hypothermia: In mild cases, immediately warm and rehy-drate the victim. Rehydrate victim with water, not caffeinated fluids. Give the victim sugary foods for internal heat. Remove any wet clothing and insulate the victim from the ground with padding and from the cold with warm, dry
1 a A JI
44

45 `1‘47rcir-.1-
c . ca •
AAN
4 • tc * .tc * zl- teICILLJN-
clothing or direct body heat. Treat victim for shock. For profound hypother-mia, rewarming is best done by professionals in a controlled environment because victim may experience or is experiencing cardiac arrest.
c. Shock: If there is no visible head or neck trauma, prostrate the victim and elevate their feet to increase blood flow to the brain. Warm the person. Roll the victim on their side if they are vomiting. Raise the victim's chest if they are having difficulty breathing.
d. Sprains: Stabilize and compress sprained joint area with bandanas, ace bandages, etc... Tighten shoes for sprained ankles. Elevate joint. Apply cold pack and/or anti-inflammatory cream. Administer pain killers.
e. Fractures: Control any bleeding. Immobilize fractured area by applying structural support with splints, towels, blankets, etc... Administer pain killers. Care for shock.
NOTE: DEHYDRATION IS VERY COMMON. ALWAYS CARRY SUFFICIENT WATER AND
DRINK REGULARLY. REMEMBER, "A HAPPY MOUNTAINEER ALWAYS PEES CLEAR!'
3. What do you do if you become separated from the group or get lost? a. Remain Calm! b. Think backwards, retracing your steps in your mind, pin
pointing landmarks, recognizing the time you have taken to get to where you are, look at your topo map and compass.
c. Unless you are 100% sure of where you need to go? stay put and someone will find you.
d. Prepare a pine bow shelter for yourself or locate a dry warm area (a hollowed out snag is great) to possibly stay overnight and mark it for the search party. Pile 1-2 feet of dry forest floor debris/duff over you, and stuff it inside your clothes for insulation.
Nom: NEVER START A FIRE INSIDE A SNAG TO KEEP YOU WARM! THIS IS AN EXTREME
FIRE HAZARD! FIRES ARE ONLY SAFE ON CLEAR, BARREN SOIL SURROUNDED BY A RING OF
ROCKS.
e. Gather water from gently flowing sources of water, not too fast, not dead still. Natural springs from the ground are best, but always purify, if possible.
4. First aid kit supply list a. Comprehensive first aid manual/guide b. 1- Emergency space blanket, 2- 40" triangular bandages, 1-
2"-3" roller gauze, 3- 3"x4" telfa pads, 1- 8"x10" surgi pad, 3- 2" gauze com-presses, 6- 4" gauze compresses, 6- 1" bandaids, 5- butterfly bandaids, 8- steri strips, 1- elastic 3" Ace bandage, 2- 3"x4" moleskin pads, 1- roll waterproof tape, 1- pair tweezers, 2- packets instant hand warmers, 1- cold/ice pack, 6- salt

46
31.ZKVIC4--• 4 Et:tr 4- 13 i4 rl" et '4- 21.
51# ar• "Lir. „ 4.4 4-1;r* Dv far 4
. 4 241640* 4: 4 tr
tablets with dextrose, 6- antacid tablets, 6- large safety pins, 12- Acetaminophen and/or aspirin tablets, 6 antihistimine tablets, 1 tube antibiotic ointment, 4 antiseptic cleansing wipes or small container of antiseptic solution-Betadine, homeopathic and herbal remedies, 25 cents for emergency phone call, and paper and pencil for emergency rescue info.
Break- 10 minutes
IV. H ow To TvIovE 13 ACKwOODS (1 HOUR AND 15 mrrafrEs) A. Orienteering: Non-Technical Navigation in the Wilderness (10
minutes) 1. Move in full awareness of your surroundings: Don't get lost! 2. Compass reading: Excellent, but a whole training in itself. A com-
pass will always point you North. 3. Sun cycle: Rises in East, sets in West. 4. Landmarks: Peaks, ridges, roads, trails, indicator trees/rocks, snags,
stumps, meadows, wildlife trails, water courses, soil types and textures. 5. Topographical Map Reading: Superimposed grid usually covers 1
square mile within each square. Top of map points northward. 6. Stop Watch Distance Timing: You can keep track of the distance you
are traveling by using a stop watch and correlating the minutes you travel with the speed at which you are traveling. A person hikes at an average speed of 3 miles per hour.
B. Affinity Group Movement (5 minutes) 1. Structure: 4-6 people with specific roles and responsibilities. If
bigger, split up and stagger group departures 10-15 minutes. 2. Buddy/Partner System: Pair up with someone in your group and
stick together through thick and thin. Bail together so that no one is left isolated in the wilderness.
C. Movement Techniques Demonstration (10 minutes) 1. Move with full awareness! Like a deer, move cautiously; stop, look,
listen, and wait. Use all of your senses to their fullest. Tap into that sixth sense of intuition we all have; that "little voice" that tells us when something is right or wrong.
2. As a group, move single file, spaced approximately 10 feet from each other to effectively hear and see everything around you and avoid bumping into each other if you are ambushed and have to bail in any direction right away.
3. Blend into your environment. Camouflage yourself in clothing and in movement. If you are detected, most often it is your movement and the

11,4
tf P44 . itx noise you are making while moving that gives you away. Stop and fade into your environment. Crouch and freeze behind a bush, under a tog or between rocks. Climb a tree or cover yourself in duff and lay motionless on the forest floor; watch, listen, wait and escape when the coast is clear.
4. Move silently. Use a verbal signal to get the group's attention. Mock animal sounds, ie. squirrels, ravens, owls, etc... work best in the woods. Only raise your voice if you have to alert the group of an emergency. Avoid making loud, high pitched sounds. Clanking metal, like caribiners, sloshing water in bottles, and especially sticks snapping, are all sounds that travel far and wide. Low pitched thuds dissipate quickly.
5. Crouch at knees, not at waist, to keep back straight and head up for Full observation. Raise legs up, out, and down like a soldier to avoid tripping and enable you to focus more attention on things around you.
6. Place each foot down on its outside edge and roll it slowly inward it's flat on the ground. Compress your weight gradually to avoid snapping sticks and making loud steps. Moving slowly on the balls of the feet is also very quiet.
7. Move from one point to the next, either as a group, or in 1 by 1 or 2 by 2 relays. Choose path as far ahead as you can see.
8. Use hands/arms in front of face in dense brush to protect eyes. Always hand pulled aside branches back to the person behind you- never let these snap back and hit your friend in the face?
9. Use hand signals to stop (raised fist/flat palm), slow down (back-ward waving palm), drop (down swinging palm), point with finger (left, right, forward, back), tighten or widen group spacing (flat palms moving together like playing an accordian or flat palms moving in opposing directions), listen (touch ear and point in direction of sound), and look (touch eye and point in direction of sight). Keep an eye constantly on one another and the group as you move, looking for anyone's signals.
10. Always bail uphill and scatter from the group with your buddy to disorient those pursuing you. Rendezvous 150 feet or so away in a half or three quarter circle point from the spot you dispursed to regroup and survey the scene.
11. Have contingency plans well thought out in advance. Select rendezvous spots and meeting times. Schedule back up pick up times and places. Establish signals or indicators for your group that mean specific things, ie. piled sticks, rocks, arrows drawn in the trail, etc...
12. Know when to call an action off for whatever reason; whether someone gets seriously hurt, the security risks are too high, the weather turns bad, whatever. Chances are you will be able to regroup, increase your prepara
47 01,1A T4i I 11\1

or Ie . 4,21
Pk* 21 4F 4 ft v.
4 A 13 0-
13
r
rE AV- ILL" .re * 41 4*
tion, and hit your target twice as hard the next time. D. Backwoods Action Roleplay (30 minutes minimum)
Call together the roleplay assistants. They will act as aggressive cops and loggers, intervening in the action roleplays.
1. Explain that now we're going to break down into affinity groups and practice a backwoods action, simulating it as best we can here. In a half hour we'll regroup to debrief and discuss how it went. Then, we'll close the work-shop together.
2. Break group down into 4-6 member affinity groups by adding up total number of people and counting off for the number of affinity group trainers you have. For instance, a group of 18 could be divided into 3 groups of 6. There would be 3 trainers; one to lead each group through the roleplay as their guide. The circle would count off 1,2,3...1,2,3... and so on.
3. Each trainer should quickly lead their group off with a fast round of name introductions and then encourage the group to pick a fantasy backwoods action, ie., reconaissance for a site to establish a satelite base camp, setting up a tree sit, locking down to heavy equipment, hugging trees or playing cat and mouse with loggers and caps. Next, everyone should commit to a specific "inside" role, ie., arrest, support, camera, camera support and diversion, and medic. Assume that the group has outside people with their own roles already taken care of, and that the group has just been dropped off. The trainer should be the guide.
4. Line up single file, based on everyone's role; guide on point, arrest and video safely nuzzled in the middle, medic, and support on back. Then, buddy/partner up in two's or three's. Run through the visual signals together and pick a verbal one.
5. The guide should give the group pointers, advice and encourage collective decision making on contingency plans, escape routes, etc.... as the group heads out.
6. Be back on time to debrief! E. Backwoods Action Debrief (15 minutes)
1. Summary reports from each groups trainer/guide. 2. Questions and comments to and from each group.
F. Closing Circle Comments (10 minutes) 1. What you liked, learned, what could be improved? 2. Suggest how people who are interested in really doing
backwoods actions can now get involved. 3. Join hands, thank everyone, Howl!
ow‹..4eA • CP'? ,a a '
48 FF
, 4giet d7f#1iiri .411fir . A

4t4?̀ rt• n
pki.r * 4, 4
NOTES
111
49

4.4 74.
,44.41044- 41' t't te •;t
&*_,Ek4t1 4U.-°-* 11- 4 )r t44- fr -
I
HUPIAXM °c :s
LOCK DOWN DEVICES AND APPLICATIONS
KRYPTONITE BIKE U-LOCKS II-locks are perhaps the most popular and versatile lock down devices
known to activists and law enforcement agencies alike. They were the first real devices, besides chains, that activists used to blockade, and they have been used on countless urban and backwoods blockades. Anti-nuke activists can be credited for first innovating the use of U-locks for direct action. Earth First!ers borrowed the technique in 1986 and successfully shut down the corporate headquarters of Willamette Industries in Portland, Oregon the day after the company began logging Millenium Grove.
U-locks are easy to get, but costly! Check thrift stores, classified ads, bike stores, campus ad boards, etc... for used locks or post wanted signs. Ask friendly bike store people if they will sea them to you in bulk at wholesale. If they will, you
101111% can get high quality locks for as
cheap as $9 each. Don't be cheap! Unless you have high quality U-locks, the cops will cut right through them.
U-locks come in several sizes and can be con- cealed very neatly under shirts, on waistlines, around necks, or in discreet bags. They are attachable by the neck to vehicles at various points including the steering wheel, door window frames, and under carriage wheel axles. Other applications include; door handles (not knobs), rail tracks, storefront signs, bulldozer/heavy equip-ment/ship parts, boardroom tables and chairs, office furniture, gates, fences, railing, bridges, friends, and infinite other possibilities.
A single U-lock is usually sufficient for a lock down. However, where more room is need to maneuver and extend the reach of the lock around the object one is locking to, ie. vehicle axles, use two intersecting locks. Just loop the lock
111V-' ,1101.11411
16.W.1.110.../INE4174
9 .7 pr
1
50

around your neck with another lock that you attach to the object.
Multiple person sit down block-ades, once easily broken up by the cops, can now be sealed in steel with intersecting locks around people's necks, Two to any number of people, six to eight works well, can lock neck to neck, forming a line or a circle with all members either seated or laying head to head. Animal rights activists successfully used this technique to shut down the Seattle Fur Ex- change in 1996 and called it the KR re 11 /413:KUM Human Octopus.
Unfortunately, activists can be cut out of U-locks and removed from their positions quickly and easily if officials are equipped to do so. Diamond saws or the "jaws of Life" will have to be sent for because these are the only tools that can cut high quality U-locks. For less experienced, unequipped law enforce-ment schmucks, U-locks can be much more of a headache. Blockades can easily last for hours or even until your demands are met if they aren't ready to deal with you! Keeping the key to the lock close by is very important in case an emergency arises, plans change (what? never!?1) or you want to make a quick get away. But, beware, they will search you for it. One of the keys is best kept by a nearby support person. Some people say they are boring and out of date. But, even in very intense situations U-locks can be quickly whipped out for instant lock downs, flying in the face of authority.
CAUTION!!! USING U-LOCKS AROUND THE NECK IS EXTREMELY DANGER-
OUS!!! A PERSON'S NECK IS EXTREMELY FRAGILE! SOMEONE CAN EASILY SUSTAIN
A SEVERE NECK INJURY OR HAVE THEIR AIRWAY COMPLETELY RESTRICTED IF THE
U-LOCK IS MANIPULATED WITH FORCE! THIS IS ESPECIALLY TRUE IF THE LOCK
DOWN PERSON HAS MEDICAL CONDITIONS, IS SUSPENDED UNSAFELY FROM THE
GROUND, OR IS ATTACHED TO A POTENTIALLY MOVING OBJECT, LIKE A DOOR,
GATE, OR VEHICLE. REMEMBER, IT IS ONLY SAFE TO LOCK DOWN TO EQUIP-
MENT/VEHICULES WHEN THEY ARE NOT RUNNING AND WHEN THE OPERATORS
ARE POSITIVELY AWARE THAT SOMEONE HAS LOCKED TO THEM!
51 1W-4*10'--.111.--;",r•V '-. riAIT4tr ir-l'
64' tin k 44111 11.b7' . r g4

COBRX LISS
COBRA LINK MOTORCYCLE LOCKS
Cobra Links and kryptonite bike lock cables are relatively new devices which lend you the strength of a kryptonite U-lock but the flexibility of a cable! A
Cobra Link is a hardened steel cable encased by overlapping
hardened steel plates. They are
actually stronger than U-locks and have been known to break the blades on "the jaws of life" multiple times before being cut through. Kryptonite bike Lock cables are simply carbon steel cables.
Both of these devices expand U-lock applications for those to hard to fit places and increase personal comfort! Cobra Links were used very effectively by Rainforest Action Network (RAN) activists in shutting down a mahogany import yard in Los Angeles, CA in 1993. From sitting positions, the activists locked the Cobra Links around their waists and through the main poles of the entry fence.
Like U-locks these devices come in various lengths and sizes and are easily concealed under a shirt or in a bag. Better yet, they tend to confuse law enforcement officers who have largely never dealt with them before! The "jaws of life" or a diamond saw are needed to cut them. As with U-locks, it is very important to keep keys close by in case of an emergency and to give you other
options. The catch is Cobra Links are extremely expensive, ranging in price from $170-$280. Kryptonite cables are more affordable, ranging in price from $20-$100. But, the cables need to be thick to be effective. Check classified ads, salvage/wrecking/recycling yards, or motorcycle stores for used links. Post want ads. Plan your bake sales early!
Fr
••• .47z.iiii -7-.74TI • -,1 - v - ii,14-f ......,J,•-•,-,;..c ) __- r..fne......nt.,. '. VW' ... -
t -.A.v......_ A —.0114..4 ---.A. . . rOperiZ\m (
(F-- 52

53
CHAIN AND CABLE
Case hardened or cobalt chains are mainly symbolic lock down devices. Chains were used as the first lock down devices and since then have been mostly replaced with stronger devices. The media understands chain blockades better than the other devices activists use and they tend to regard the use of chains as radical, ie. "Activists Chain Themselves to Bulldozers!" Chains are not as strong as kryptonite, but if the links are 19 big enough they can hinder even the largest bolt cutters. Chains do work well for joining large groups of people, waist to waist, in blockades, but they are very heavy and hard to conceal. Buying chain brand new is expensive. Try picking it up used through county disposal sites, ads, or salvage/wrecking/ recycling yards. It is often available at construction sites.
Heavy duty logging-type cable or 1" wire rope can also be used to create custom lock down devices. Cables are much stronger than chains and are extremely difficult to cut without the proper tools. Figure out exactly what length of cable you'll need and acquire it at a logging/ship supply store. Craft a tight story about needing it to lock up a gate on your property or tie off your boat. Have them cut it to length and "swedge" a loop on each end of it that you will lock shut with a T..7-lock or disc Iock
The padlock you will use to close the chain or cable can usually be quickly
U F LAAO
A'1".142 4'•6M•E'ry -r
DRessED roR. Success

cut through. It is often the weakest link in a solid chain or cable. However, case hardened circular disc locks are available for around $15, and are not easily cut through. Padlocks will work if you are willing to go to the trouble of protecting them with small lock tubes. Make the lock tube from a short length of steel pipe or box tube that is sealed at one end. Cut two narrow holes in the top for the chain to slip through and weld a steel rod or pin inside the pipe. Place it perpendicular to the pipe near the top for the lock to clip around.
LOCK BOXES AND BRACELETS
Lock boxes are the hardcore lock down devices essential for uncompromising blockades. They are special sized steel pipes designed for activists to reach their arms through and lock their hands together inside of, around a metal pin, at the center point. The pin is what the lock down person clips their wrists to with chain bracelets. It prevents the cops from pulling the person's arms out far enough to cut their chain bracelets off with bolt cutters.
Lock boxes were innovated to overcome the ease of which law enforcement
Fir.r IL'''. •1113,10.,,,,,,„,.. .--.„- :;,...- 1.,,A ,
.,,10--4-..' ,.., lob -.7., .;;,:y --f,-.7?).:/- ......,",,...-. 41(-. ,,---- , IL ." 4 L11-' ....."2_,,,,t_.../ lir j?,•,, • 111.,
;:if41.14V
54

had in cutting through chains and U-locks. Greenpeace and RAN used lock boxes very successfully throughout the 1980's and 1990's to blockade chemical plants and Mitsubishi dealers at car shows. There are several different types of lock boxes. These are the straight box, the 90 degree Black Bear, and the hybrid concrete super box. Weighing in at approximately 20-25 lbs., lock boxes are not light! They are big and heavy. Unless you are in a crowd, they are difficult to conceal; although not impossible. Backpacks, shoulder bags, specialty handle bags, even baby buggies have been used by activists to smuggle them into convention centers and corporate and governmental buildings. Nothing seems to work better to lock down to vehicles, heavy equipment, or metal gates with than lock boxes. But, because of their weight and bulkiness, be extremely careful moving with them, especially around cops who may misconstrue them as weapons. A diamond saw is required to cut them, and it will take much longer to do so than a U-lock. It's also one big hassle!
Cheap, used materials are easily found at salvage/wrecking/recycling yards. The type of scrap steel you are looking for is usually about $.25/119. Check construction sites too. If you do not have access to a welding torch you can have the welding done through any machine shop as an "art project." Do not use real names. Pay only in cash. If your group sees the ongoing need for lock boxes or feels it could supply them to others in your area, it is best to invest in a modest arc welder or an acetylene cutting torch. You can find them used in classified ads or through machine shops and they are very useful tools.
S TRAIGHT B OXES Acquire a 24"-26" length of schedule 40, 1/4" thick, 4" diameter steel pipe.
This can be cut down from a larger piece of scrap pipe by any metal shop. Cuts cost approximately $2-$3 each. The length of the pipe should be custom sized to the lock down person's arm reach. Prepare a 3.5" metal pin, for the inside of
LOCK Box
the lock box, from a steel rod or piece of 3/8" rebar. Use a hack saw to cut the pin to size. Drill a slightly off of center hole through the pipe, perpendicular to the length of the pipe, at the centerpoint of its length. Insert the rod or rebar pin. It should sit slightly closer to one wall of the pipe than the other, if you
55 pr-,:•--.."7- -,10, --,-,4-1.c,....
... . it, Iii,.. ,L-,‘1 7 . . - - ''''"- .' 1 .• • • ;ANL... t-T-iVieP

56
drilled the hole correctly, off of center. This creates more hand room inside the box at the pin point where the lock down person will have to be maneuvering their hands to clip in and out of the box.
Spot weld the ends of the pin to the walls of the box. File smooth the pin-end welds and the pipe-end cuts. A thin layer of foam padding can be glued to the inside walls of the box, or rags can be duct taped to the ends of the box to increase comfort for the lock down person and obscure internal inspection of the box by those trying to break them out.
BILA.CK B EARS Ninety degree Lock boxes, or Black Bears (as they are called where they were
born in Cascadia) expand lock down opportunities and make more difficult lock down positions less difficult to hold. Black Bears have been used success-fully in forest defense campaigns throughout the Pacific Northwest and 1995/ 96 anti-Hyundai actions in Oregon. The 90 degree angle is naturally more comfortable for the position of your arms and will riot put as much strain on a person's shoulders, elbows, or wrists as a straight box. The angle also allows people more room to reach around bigger objects, ie. heavy equipment parts, vehicle axles, steel gates, etc....
Take a 30" length of schedule 40, 1/4" thick, 4" diameter steel pipe and cut it in half at a 45 degree angle. Flip one piece 180 degrees so that you have a 90 degree box when you rejoin the cut pieces. Grind the outer edges of the cut pieces of pipe to create a very subtle groove along the outside perimeter of the box where the two pieces will join. This groove is needed to lay the weld into that will rejoin the two pieces. Gently file and sand the inside edges of the cut pieces of pipe so that the lock down person does not cut their hands. Prepare a 3.5" metal pin, for the inside of the lock box, from a steel rod or piece of 3/8" rebar. Use a hack saw to cut the pin to size. Wedge the pin into one of the cut ends, perpendicular to where the two pieces of pipe will join, on the center point of the cut edge and spot weld it into place. Slightly off setting the pin from center is not necessary because the 90 degree angle created by the rejoining of the two cut edges naturally provides more hand room at the pin point for the lock down person to maneuver.

Grinding shallow seats for the pin ends into the cut edges of the pipe and spot welding the pin ends in place in these seats will keep the pin strongly seated in place once the two pieces of pipe are re-welded together. Tack the two cut pieces of pipe together with a few spot welds. Weld a thick bead into the groove where the two pieces join. Bring it all the way around and back to where you started. File down the sharp edges so no one gets cut.
NOTE: ACTIVISTS HAVE EXPERIENCED PROBLEMS WITH PINS BREAKING OUT OF BLACK BEARS. THIS COULD BE EXTREMELY DANGEROUS IF SOMEONE IS CARRY-ING A BLACK BEAR BY THE PIN WITH ONE HAND. IF THE PIN BROKE OUT, THE BOX WOULD DROP, POTENTIALLY LANDING ON THE PERSON'S FOOT. OUCH!!!
S UPER B OXES Concrete super boxes are straight boxes at the core, reinforced by an sheath of
concrete and coiled bailing wire that is encased in an outer sleeve of metal pipe or plastic drain tubing. They were innovated in 1995 by Headwaters Forest activists in Northern California whose Straight Boxes were being repeatedly cut through by Humboldt County Sheriffs. Now, Sheriffs spend hours cutting, chipping, grinding, hammering and chiseling activists out of these concrete reinforced Super Boxes.
Super Boxes are more difficult for law enforcement to dis- mantle than regular boxes, but they can be more uncomfortable fora person to use and should be used with extreme caution.
STEEL Identifying safe • PIPE DRXIN lock down
positions, Tong CEMENT TuBni SUPER LOCK Box before the action, which will not injure, even break, the lock down person's wrists or dislocate that person's shoulders is essential. Resting points for the weight of the Super Box are especially important in this respect, be-cause the Super Box, not the person using it, must carry the weight of the Box while the person is locked down. The best position is for the Box to be laying on flat ground. This can usually be achieved around a gate or connected to a line of other people on a road. The additional advantage of the Super Box is
57 ,q,'‘..:::•trt,k...,...

nook I WiNnow FRIME Si CRING WH€E1
Xne
Pin Your Body on the Bullseye!
VEHICLE LOCICDOWN TX GETS
that if they break you free from what you're attached to, by breaking/cutting what you're attached to, you are still blockading because the Super Box is now a dead weight anchor attached to you!
Even though Super Boxes are extremely heavy, regular heavy duty steel pipe should be used if possible for the inside pipe and outer casing. If regular pipe is not attainable in the 8"-10" diameter size, the outer casing can be be made from thin aluminum or plastic drain tubing. The strength of the super box is in the combination of materials used, not any one material. A diamond saw will cut through a regular steel lock box. Multiple toots are required to cut through the different materials in a super box.
Start by acquiring the materials you'll need to make the Super Box; 1-24"-26" length of schedule 10 to 40 thickness, 4" diameter aluminum or steel pipe, 1-24"-26" length of schedule 10 to 40 thickness, 8" diameter aluminum or steel pipe or corrugated plastic drain tubing, 1-8" long steel rod for the lock box pin (3/8" rebar works), 1-bag 2" flat head nails, 1-coil of bailing wire or a 2' xl` length of
orr _.1._...„..,31 6 __ F --.-• .... N. crie,,Z.11111P •Ame •Vt.,.._ (
600 ° . . - ' 7 0 I - .74 .7C. 6 j __ . .. 1_ : _..1[-_Y4 . f.
., ?,, , ,I.,,, ...4,/,„,. 4 Nla .r7- '4'/,---4 irr 'AIN.r'-' 4" 45 " •, .., —.. .:•••.e..--1
58

chicken wire, 1-small ball of yarn, 1-small bag premix concrete. Tools you'll need include; hack saw, hi-speed metal drill, 1-5 gallon mixing bucket, mixing stick or trowel, heavy rubber gloves, air respirator, large pouring cup, wire cutters, 2- 4" diameter plastic container lids, 1-tube crazy glue, 1-roll of duct tape.
Next, size the lock box to the lock down person. It should be approximately 24"-26" in length. Cut the lock box and the outer sleeve to size. Prepare a 8" metal pin, for the inside of the lock box, from a steel rod or piece of 3/8" rebar. Use a hack saw to cut the pin to size. Drill a hole slightly off center through the lock box pipe, perpendicular to the length of the pipe, at the centerpoint of its length. Insert the rod or rebar pin. It should fit tight so concrete does not flow in around the edges when poured between the box and the outer sleeve. It should also sit slightly closer to one wall of the pipe than the other to create extra hand room, just as was explained for the Straight Box construction.
Insert the lock box in the 8" outer sleeve. The pin should protrude approxi-mately 1.5" from either side of the lock box and rest flush against either side of the outer sleeve. Remove the outer sleeve. Super glue the 2" nails to the outside of the lock box by their flat heads, spacing each nail about one square inch from the others. The lock box should look like a pin cushion now. Insert the lock box in the outer sleeve again. The pin and nails should be protruding equally and rest flush against the outer sleeve. Remove the outer sleeve. Now, coil the bailing wire up and down the length of the lock box on the nails. This will complicate law enforcement efforts to cut/break through the concrete. Zigzag it from one end of the box to the other, but avoid wrapping it around the box. The idea is to create a wire web within the 2" sheath of concrete that will exist between the lock box and the outer sleeve. Don't make the weave too thick or else the concrete will not pour evenly and there will be air pockets which will weaken the concrete.
The concrete sheath is made by standing the entire Super Box upright on a flat smooth surface over a piece of plastic. Do this in a discreet, warm area where the concrete can set for three days. Cap the two ends of the lock box with the plastic container lids and duct tape them down to prevent concrete from falling into the lock box. Insert the lock box, armored with the nails and wire, in the outer sleeve. The lock box should fit snug inside the outer sleeve.
Prepare the premix concrete to a thick, oatmeal consistency in the 5 gallon bucket. Use rubber gloves and a respirator. Pour the concrete with a large cup into the 2" space between the lock box and the outer sleeve. Make sure that the wire doesn't bunch up and that the concrete is spreading evenly. Pound the sides of the outer sleeve to fill in any air pockets that may form. Add pieces of yarn as you pour the concrete. This will complicate destruction of the Super
59 ............_. -----....e, q_.s," e./' r
6 -:-.--:,;:---2.. V 4 calf/LII I Pe a 1 •
• I, • - - 6,. . 4 i . - ./111/1\.__ r'.4-...11$ 4

Box as well. Finish filling in and packing the concrete and leave the whole thing to dry three days before moving. Use quick set concrete activator if your action is two days away and you are pressed for time.
BRACELETS
How do you lock into a lock box? There are several ways. The first way involves hand cuffing your wrists around the center pin of the lock box. This may sound sexy, but it is very dangerous and extremely uncomfortable over time. If an emergency arises, the blockade fails, you have a chance to make a run for it, or your demands are met, you will need to be able to release yourself.
A much safer, more comfortable, and surprisingly inexpensive way to lock yourself into a lock box is to make two chain bracelets. A bracelet is made with a 12"-15" length of 1/8" thick steel chain, a large 3.25" spring clip and either a 5/16" nut and 1"x 5/16" bolt or a small 2.5" dip (See drawings 1-3). Climbing carabiners or dog-leash clips also work in place of the spring clip. Carabiners are pricey and the strength they afford is unnecessary Clips are spring-loaded, open-gate devices that resemble a mini carabiner. They sell for about one-third the price of a carabiner and will not break before your wrist does under pressure. Make sure the large clips open wide enough to clip around the lock box pin. All these
materials are available at any hardware store.
Attach the large clip to one end of the chain. Wrap the chain around your wrist joining the
free end link with another link at the point that the chain is snug around
your wrist. Now, fasten these two links together with either the nut and bolt or a small clip. The nut and bolt method is Iess expensive and will bind the chain nice and
"MMES.'S S-reet_ Jeweuo' snug around your wrist. Pass the bolt or the small dip through the two links, screwing
the nut onto the bolt, or releasing the clip, through the other end of the links. The chain should be joined around your wrist now with the large dip dan-
gling from the excess chain. You should be able to hold the large clip with you thumb and index finger (See drawing 4). Keep your thumb on the open gate side of the clip and practice opening and closing it. If the clip dangles beyond your thumb, there is too much slack in your chain. Move the clip up the links
e_:,..., .11010 1 ' % '., '..rn. • • -..e:_..- - ... V
1 IklIN,1_...3 i ..../fe , --.. • 1.. '. . -1i, —+mi • • !‘", 1
`....01 -.ft ,rya ..... y` :,/,)•;,,rj. pr. • ,? 4-1,4J0 144. P•
60

61
of the chain to take in the slack. Repeat this process for the other wrist. Now, just reach your arms into the lock box and clip each large clip around the center pin.
Bracelets are inexpensive, completely adjustable, and allow blockaders fast, safe, in- and-out lock down access. But, there are two things to keep in mind when using bracelets: The chain length must be as short as possible and the amount of space between a persons arm and the wall of the lock box must be minimal. It is ex- tremely important to keep the chain length as short as possible, because if someone can pull your arm out of the box far enough to expose, or even simply reach the chain link, it will be easily cut with a 1 ordinary pair of bolt cutters. If a person's arm is not snug with the wall of the box, someone could reach a tool down through this space to get at a person's chain and cut it. Measure the diam-eter of the lock down person's forearm before you select the pipe. People with smaller forearms may fit more snugly into 3.5" diameter pipe instead of 4". Fill the space between the person's forearm and the wall of the box by wrapping rags and duct tape around the person's forearms. These essential measures will prevent all your hard work from going down the toilet.
Nom: BRACELETS HAVE ALSO BEEN MADE WITH WEBBING OR ROPE INSTEAD
OF CHAIN, BUT THESE MATERIALS ARE POSSIBLE TO CUT EVEN WHILE YOU'RE
LOCKED INTO THE BOX.
NOTES
3

111•1:4:4In
1:01- p - L'T
62 6 :7-ir:I.
areal
)171{1/46/&-°1:41MR
NOTES

44iL, CoticgeTE" rYC 6i et or REIBOR bRuti sraL ?OF Pipes
4 .apP f‘ggg . Gott. AC.T1 Y 151;5
BAKE TS
eir g 1:rtl$11117 M 1) 7 k 42113/AMP/111111AMAIMUIMSUALSSZ4 11
BARRELS Barrels are concrete filled 55 gallon drums fitted with lock boxes. Each barrel
weighs in at approximately 1,200 lbs. Barrels are excellent for both urban and backwoods blockades. They work very well on roads, in front of gates and building entrances, and across train tracks and boat launches. Katuah Earth First! used three whopping barrels and a tripod to blockade the entrance of the Watts Bar nuclear power plant being constructed in Tennessee in 1994. With lots of support, they shut down operations for hours. In the end, over 58 people were arrested. "Way to go EP!"
How many barrels you use is dependent upon the width of the passage that needs to be blocked and the number of people committed to locking down. Even at the narrowest sections, most logging roads, gate entrances, etc... require 2-3 barrels. Three barrels with 4 people locked down to them creates a solid blockade and powerful visual image.
63

+ Very difficult to dismantle + Fairly easy to construct + Incredible sneak attack - Difficult to transport and deploy - Uncomfortable for blockaders over time - Exposes blockaders to copslopponents
PREPARATION T IME: One month to 1 week without Concrete Quick Set, 3 days with. PEOPLE N EEDED: Six to construct, and 2-4 to lock down to 3 barrels. Cost: Around $50/barrel ( Except concrete, materials easily found/liberated). MATERIALS N EEDE.D PER B ARREL:
One- 55 gallon drum Ten- 90 pound bags premix concrete Two- 15%17" lengths of 4" diameter PVC or steel/aluminum pipe, or rolled
cardboard Eight- 2' lengths of 3/8" rebar Two- 5 gallon plastic mixing buckets Two- Large plastic drop cloths /tarps Two- Concrete mixing trowels One to two- 5 gallon water jugs Two- 4" diameter PVC pipe caps ie., duct tape, plastic containers/lids Six- Pair work gloves Six- Air respirators/bandanas Two- Buckets very small debris; 1/4" rock/brick/gravel chips, nails, nuts,
bolts, golf balls, cable, chicken and bailing wire, etc.... One- Ball yarn
How T 0: PREPARE THE B ARRELS: There are two systems of barrel design. These are
the single and twin lock box systems. Both systems use either PVC or alumi- num/light steel pipes or rolled cardboard and rebar. The twin lock box system is stronger than using one long lock box that two people share. With the single box system, if one person is forced out, the other person is easily removed by reach- ing through the removed person's side and cutting the other locked down person's chain which is exposed. With the twin system, each person is locked into an independent box that is reachable from only one side of the barrel. Conversely though, two boxes side by side, or even one on top of the other, displace more concrete and can weaken the shatterproofness of the barrel.
fi 1111: •{1 q .71 B ljr.a.7 yre. • IPIV[ 'JR -1.7
436.1. 1:''17411111)111
4 11ilkiak
1 ..--- 14, .-1111 11K.,-,1....,
INC0:4 1. 4114 411W . I 4. • *:11,11
64
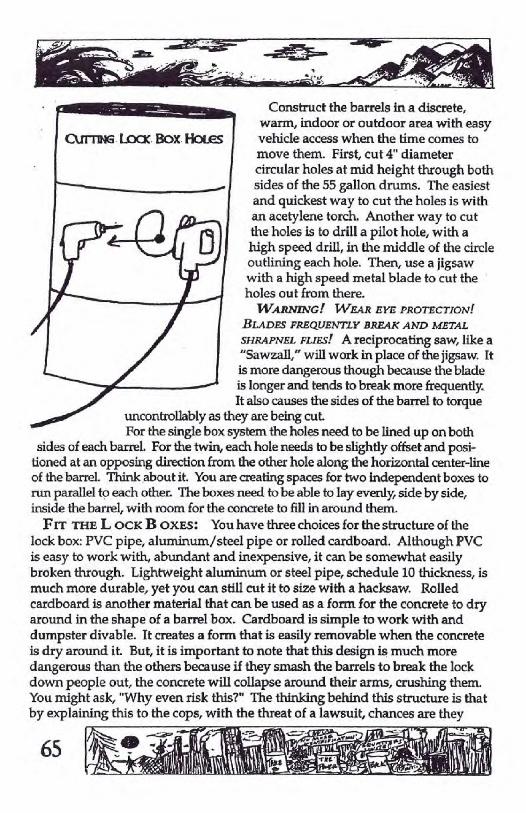
65
Construct the barrels in a discrete, warm, indoor or outdoor area with easy vehicle access when the time comes to move them. First, cut 4" diameter circular holes at mid height through both sides of the 55 gallon drums. The easiest and quickest way to cut the holes is with an acetylene torch. Another way to cut the holes is to drill a pilot hole, with a high speed drill, in the middle of the circle outlining each hole. Then, use a jigsaw with a high speed metal blade to cut the holes out from there.
WARNING! WEAR EYE PROTECTION!
BLADES FREQUENTLY BREAK AND METAL
SHRAPNEL FLIES! A reciprocating saw, like a "Sawzall," will work in place of the jigsaw. It is more dangerous though because the blade is longer and tends to break more frequently. It also causes the sides of the barrel to torque
uncontrollably as they are being cut. For the single box system the holes need to be lined up on both
sides of each barrel. For the twin, each hole needs to be slightly offset and posi-tioned at an opposing direction from the other hole along the horizontal center-line of the barrel. Think about it. You are creating spaces for two independent boxes to run parallel to each other. The boxes need to be able to lay evenly, side by side, inside the barrel, with room for the concrete to fill in around them.
FIT THE L OCK B AXES: You have three choices for the structure of the lock box: PVC pipe, aluminum/steel pipe or rolled cardboard. Although PVC is easy to work with, abundant and inexpensive, it can be somewhat easily broken through. Lightweight aluminum or steel pipe, schedule 10 thickness, is much more durable, yet you can still cut it to size with a hacksaw. Rolled cardboard is another material that can be used as a form for the concrete to dry around in the shape of a barrel box. Cardboard is simple to work with and dumpster divable. It creates a form that is easily removable when the concrete is dry around it. But, it is important to note that this design is much more dangerous than the others because if they smash the barrels to break the lock down people out, the concrete will collapse around their arms, crushing them. You might ask, "Why even risk this?" The thinking behind this structure is that by explaining this to the cops, with the threat of a lawsuit, chances are they

won't try shattering the barrels. Once you have chosen your lock box pipe structure, you are
ready to choose either the single or twin lock box system. Cut the pipe to the hill width of the barrel for the single system. The single system is one continuous lock box, spanning the full width of the barrel, cut flush at the hole ends of the barrel. Then, set the 2' long, 3/8" rebar pin at a perpen- dicular angle through the middle of the pipe, at the pipe's center point. For the twin system, cut the pipes at approximately 17" lengths. The pins are set per-pendicular through the pipes as well, but 2" from the inner ends of each of the pipes. Set the pins by first drilling 3/8" holes completely through the pipes at the inner ends and then wedging the pins through the holes. The rebar pins can also be heated and burned through the ends of the PVC pipes. Beware of the toxic smoke this creates. Only burn through the PVC in well ventilated areas. With the cardboard forms, simply push the pins through with a twisting motion. Cap the inside ends of the twin lock box pipes with tight fitting plastic containers/lids and duct tape these on securely to prevent concrete from getting inside the lock boxes.
Insert the pipes to fit lengthwise through the holes in the barrel. The single box should fit securely from hole end to hole end. The twin box system is a hi trickier to set. Wiggle the twin boxes into place side by side. The inside pin ends of the boxes should termi- na te 1 in the middle of the barrels where they will he safely sur- rounded by as much concrete as possible. The outside ends of the boxes
should be nearly flush with the hole ends 1 of the barrel, just slightly protruding from each of the hole ends. Once you find the right fit remove the lock boxes.
POUR THE C ONCRETE; Begin by laying down drop cloths/tarps and mixing concrete with water in the mixing buckets. Stir the water into the concrete until a thick, lumpy, oatmeal consistency is reached. Then, pour the crete into the barrels. Alternate a bucket of straight concrete with a generous sprinkling of chip gravel and small, random debris. Big, bulky debris weakens the structural integrity of the crete. Add 6 or so 2' lengths of rebar into the mix at opposing angles and weave yam and bailing wire all around them through
1. ill'`.7.,-4,6ofxr...fiTtT I? nil p.= ,46 10114111,11-
bil*A41`. O'utiM11\ k 4 fre'Pra', irqs 66

67
the mix. Chicken wire should also be laid around the lock box area. When the fill reaches the level of the lock box hole cuts, reinsert the lock boxes. Finish pouring the 0 crete and debris, filling the barrels to the brim. Deco- rate the top of the wet crete with art, messages, etc.... Let the concrete dry and set. This takes up to a month for real strength; no less than a week, without quick set. Remember, crete needs time! If your action is less than a week away, use a catalyst concrete quick set accelerator.
TRANSPORT AND D EPLOYMENT: Arrange for the use or rental of a heavy duty, 1.5-2 ton truck/van to move the barrels. Remember, the barrels weigh over 1,200 lbs. each. Wheat paste warning signs on the barrels stating that the barrels weigh 1,200 lbs. each and that the slightest disturbance of them could cause death or dismemberment to those attached or those causing the disturbance.
There are two ways to move the barrels onto the transportation vehicle. The first is to pull the vehicle up to where you made the barrels and raise them onto the vehicle with an engine hoist. Lift the barrels onto the trans- porta ti on vehicle by running a heavy duty chain through the en- gine hoist and tightly around the mid section of each barrel. Slowly and carefully raise and swing the barrels onto the vehicle. Secure the barrels on the vehicle by wedging them together and strapping them down with heavy duty canvass, rope, or chain. No one should ride with the barrels. If they roll, you die! It may be possible to pull up to your deployment spot and crudely roll the barrels off of or out of the vehicle. Roll them into
BKRRa. Loac Box SYSTeltS

Rua TRInsPoit-r
68
place and muscle them upright, then lock down (Be extremely careful!!!). This way is slow and requires incredible group coordination and strength. It is also very dangerous. Someone could easily be crushed, pull muscles, get badly cut on a sharp edge, etc... Have a back up plan and pay extremely close attention to everyone's safety.
The other way to move the barrels is with heavy duty moving dollies (the kind with a clamp strap and wheel drop-out lever designed for moving large, heavy objects like refrigerators). The vehicle will need to have a hydraulic deck that can be lowered to the ground to be able to roll the barrels directly onto it. Any moving agency has these trucks and dollies available for rent. The dollies allow you the freedom to wheel right up to your transportation vehicle and load the barrels while keeping them on the dollies by dropping out the wheels. To unload the barrels, simply raise the wheel lever and wheel them off the lowered truck gate. This way is much faster and a whole lot safer than rolling the barrels around by tooth and claw and muscling them upright and into place. Dollies are also quiet and somewhat discreet. Disguised as delivery persons with sheets covering the barrels, activists have successfully delivered barrel blockades in even the busiest urban settings.
In setting the barrels in place, it is very helpful to have two people stretch a measured string across the length of the blockade area, which has been pre-marked where the barrels should stand. The string should be marked at the distance each barrel needs to be placed from the next in order for the lock down people to fit their arms into the barrels comfortably. If everything goes well, and you have the ability to reload the barrels, you may even have the opportu-nity to reclaim them after your demands are met!
Mare: Smaller 30-35 gallon garbage cans also work for concrete barrel forms and are easier to transport and less expensive to construct than 55 gallon drum barrels. Lock boxes can also be sealed into refrigerators, sofas, washing machines, etc.... to create free standing, mobile lock down devices like barrels. Pick a theme like "The American Family" affinity group that blockaded entry to the Rocky Brooke timber sale in Washington I

69
state in 1996. They set up a living room on the access road with a one ton sofa that the family members locked their arms into while casually reclining in front of their TV set,
Giant log sections also work very well as lock down devices. New Jersey/New York Earth First! activists successfully deployed a giant stump sit, blockading the entrance to a local Georgia Pacific lumber yard in 1991 with a line of three-foot high log sections which were stood upright between the activists and locked into. They drilled 4' diameter holes into the sides of the stumps with a huge auger bit then screwed eye bolts into the roofs of the holes at the centers of the stumps. The eye bolts functioned as lock box pins that the activists clipped their bracelets onto. This one stumped fern at the yard for hours!
NOTES
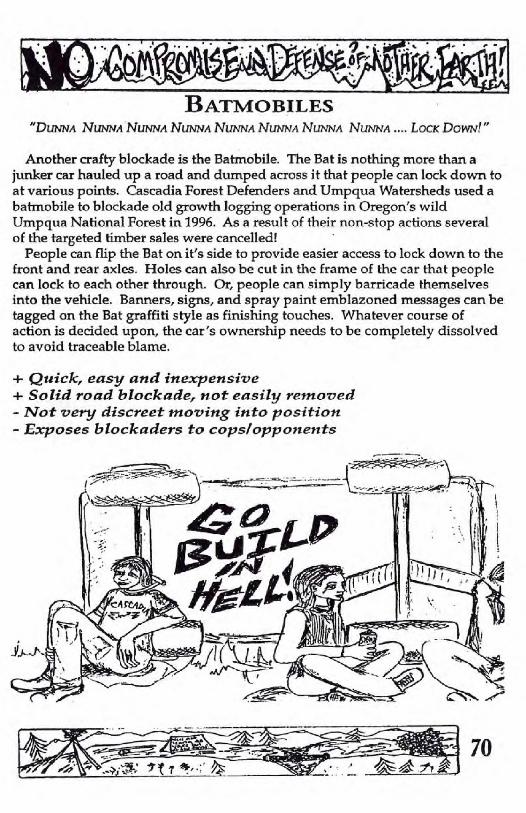
70
BATMOBILES "MINNA NLINNA MINNA NUNNA MINNA NLINNA NLINNA MINNA LOCK DOWN?"
Another crafty blockade is the Batmobile. The Bat is nothing more than a junker car hauled up a road and dumped across it that people can lock down to at various points. Cascadia Forest Defenders and Umpqua Watersheds used a batmobile to blockade old growth logging operations in Oregon's wild Umpqua National Forest in 1996. As a result of their non-stop actions several of the targeted timber sales were cancelled!
People can flip the Bat on it's side to provide easier access to lock down to the front and rear axles. Holes can also be cut in the frame of the car that people can lock to each other through. Or, people can simply barricade themselves into the vehicle. Banners, signs, and spray paint emblazoned messages can be tagged on the Bat graffiti style as finishing touches. Whatever course of action is decided upon, the car's ownership needs to be completely dissolved to avoid traceable blame.
+ Quick, easy and inexpensive + Solid road blockade, not easily removed - Not very discreet moving into position - Exposes blockaders to copslopponents

71
P REPARATION T IME: 4-6 hours PEOPLE N EEDED: 2-8 to transport and deploy. 2-3 to lock down COST: Car acquisition, improvement, lock boxes, towing: $25-$250 MATERIALS N EEDED:
One- Junker car Two- Tow vehicle One- Tow rope /cable Two to three- Lock boxes Two to three- Sleep pads/butt cushions Acetylene cutting torch or high speed drill and jig saw Miscellaneous tools; hammer, screw drivers, hack saw, cable and bolt cutters Banners, signs, spray paint
How T o: S ITE S ELECTION: Picking a spot in a road that one or two junker cars can
successfully blockade is key. Look for narrow points in roads around turns, over bridges, even at gates. Visualize what the blockade could look like; how should the Bat could be positioned, where should people lock down to It. Keep in mind the proximity of the blockade to the point of whatever destruc-tive operations the blockade aims to disrupt. A healthy distance would be a couple of miles from this point, or at least out of reasonable walking range to it. Avoid wide points in roads or areas with flat, broad shoulders which are easily traversable. High speed zones should also be avoided to minimize accident risk. Additional blockades or warning systems should be placed ahead of the Bat blockade to ensure everyone's safety.
PREPARE THE BAT: Once the site and blockade scenario have been chosen, the Bat must be improved to meet your blockade needs. First and foremost, locate each and every vehicle identification/registration number, engine serial number, etc... that could potentially link the vehicle to any one person or group of people. These numbers will be found on the dashboard, door frame, under the hood on the car frame and on the engine. Grind them off! Next, holes may be cut through the floor board, back seat, or trunk of the car to accommodate people wishing to attach themselves to each other from either ends of these holes through lock boxes. If people intend to barricade themselves in the Bat, all key holes must be jammed and all window crank cables and door handle and door lock cables must be cut or disconnected to prevent, or at least delay, any unwanted break-ins.
The wheels should be removed, or at least the tires flattened, to make re-

72
QUICK TRNNSPORT
moval of the Bat more difficult than it already will be. Because removal of the wheels may only be possible on site, a wheel removal and relocation team needs to be ready to move with tire irons, wheel jacks and a vehicle to relocate the removed wheels.
TRANSPORT AND D EPLCYYM ENT: Use a Batmobile that can be safely hooked and towed into position by another vehicle. Junker cars on their last legs of life can also be bought for as little as $100421)0 and may actually be driven into position. If the Bat is dressed for success with lots of glitzy painted slogans before you tow it, you may need to disguise it with a cheap car cover, tarps, sheets or plastic bags. Before you reach your destination, have a plan as to how you are going to dump the Bat. You may need to back it into place to avoid being trapped behind it. Activists should caravan to the spot in stages. Security look outs should be posted with radios to prevent any sudden surprises by law enforcement. People may need to be dropped off ahead of the Bat in preparation to deploy it quickly on arrival. It's a good idea to have the driver remain in the tow vehicle while the Bat is being deployed in case a fast get away is necessary.
The Bat is easiest to move with the tow car, so try and move it as close as possible with the tow car to the drop spot. Once the Bat is dropped, the tow vehicle should take off and people should muscle the Bat around. Flipping it on it's side is very dramatic and gains lock down people easy access to the front and rear axles of the Bat. It also makes a pretty picture for the media. Be extremely careful though. Make sure the Bat is sitting solidly on its side and will not be blown over or easily knocked over before people lock down to it. In the heat of the moment, someone could easily get hurt or even crushed as the Bat is being tossed around. Lock down positions may be uncomfortable. Wear warm, protective clothing and use a sleep pad or cushion for butt comfort.

73
NOTES

71
SLEEPING DRAGONS Dragons are essentially concrete reinforced lock boxes embedded in dirt/
gravel roads. Dragons simulate barrels in that they are extremely heavy and difficult to remove devices. In addition, they are easily concealed and actually built on the site they are to be used. Australian activists devised these sneak attack devices fighting to protect Australia's great coast rainforests from road building and development throughout the 1980's and 1990's.
Essentially, there is one "Sleeping Dragon" design and several variations of it that have come to be known by North American activists as the 45 degree "Lounge Lizard," "Morrison," and Batmobile versions. Warner Creek, China Left and Horse Byars forest defenders in Oregon have all used these devices with varying degrees of success. Each dragon version is easily adaptable to fit the needs of a particular scenario. It is important to remember that installing dragons is strictly a night time operation. Like all "night work," security is a serious issue. Only 8-12 very dose, trustworthy friends should be involved.
+ Extremely difficult to remove + Ultimate surprise - Requires "night work" - Exposes blockader to copslopponents
PREPARATION T ImE: One month to one week PEOPLE NEEDED: One to lock down, 8-12 to construct, several to support COST: $35-$50 MATERIALS N EEDED:
Five to eight- 90 lbs. bags premix concrete One- 2' length 4" diameter PVC pipe Two- 4" diameter plastic lids to' seal ends of PVC pipe One- 2' length of duct tape - Four- 3' steel concrete pins or 1/4" rebar lengths One- Steel mallet/hammer One- 2.5' length of 3/8" rebar for lock box pin Two- Large plastic tarps Three to four- 5 gallon water jugs to carry concrete water Two to four- 5 gallon plastic buckets for mixing concrete Two to four- Concrete mixing trowels Eight- Pair work gloves
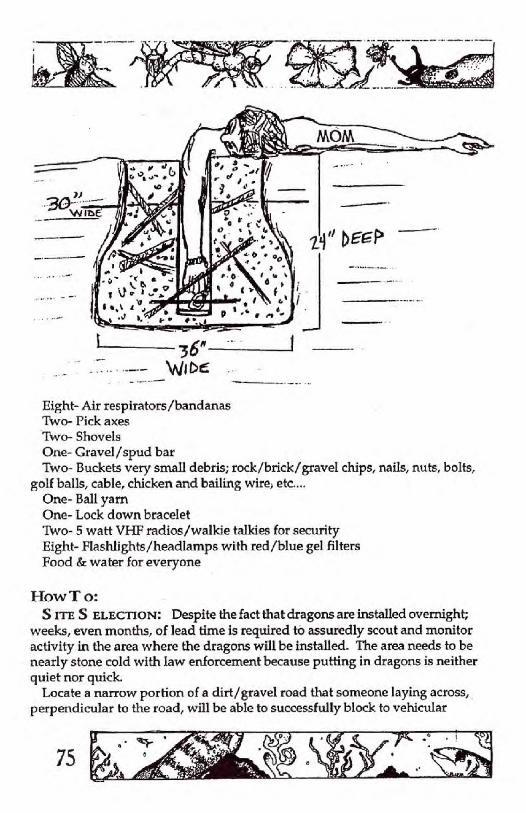
75
365
Eight- Air respirators/bandanas Two- Pick axes Two- Shovels One- Gravel/spud bar Two- Buckets very small debris; rock/brick/gravel chips, nails, nuts, bolts,
golf balls, cable, chicken and bailing wire, etc... One- Ball yarn One- Lock down bracelet Two- 5 watt VI-IF radios/wailde talkies for security Eight- Flashlights/headlamps with red/blue gel filters Food & water for everyone
How T 0: S ITE S ELECTioN: Despite the fact that dragons are installed overnight;
weeks, even months, of lead time is required to assuredly scout and monitor activity in the area where the dragons will be installed. The area needs to be nearly stone cold with law enforcement because putting in dragons is neither quiet nor quick.
Locate a narrow portion of a dirt/gravel road that someone laying across, perpendicular to the road, will be able to successfully block to vehicular

76
01, 1:1#.
passage. Turns in the road, points at either ends of bridges, and even spots in close proximity to gates are good locations. Visualize the scenario. If the road is wide two or even three dragons can be placed side by side. The spot should be at least 1 mile from the point of anticipated logging, mining, development, etc... operations. Make certain your position is at least out of reasonable walking range from the point of the operations you're blockading or they'll just walk right past you. Avoid high speed zones and set up additional blockades to prevent accidents.
PRE- DEPARTURE P REPARATION: Before you depart, gather the materi-als and 8-12 very close, trustworthy friends. Assemble the dragon's lock box from the 2' length of 4" PVC pipe and the 2.5' length of 3/8" rebar. Like the barrel lock box, the pin is placed perpendicular to the pipe. Drill a 3/8" hole through the PVC 2" from the bottom end and push the rebar pin through it into place or heat the end of the rebar and melt it through the pipe. Beware of the toxic smoke this creates. Only burn through the PVC in well ventilated areas. Cap the pin end of the pipe securely with one of the plastic container lids and some duct tape. Fitting a 45 degree Lounge Lizard will require cutting the top of the pipe off, 4" from the top, at a 45 degree angle.
ARRIVAL AND INSERTION: Carefully, drive up to the spot you selected. Take your time. When you are certain that no one else is in the area, unload and send the vehicles back down the road with 2 security people. It's good to work in 3 groups; security, digging, and mixing concrete. Someone in the digging or mixing crew also needs to be on security and in radio communication with the roving security team. Mark off an approxi-mately 2.5' diameter circle in the dirt where the dragon's gonna go and start digging. The hole should be slightly more than 2' deep, making the top of the lock box nearly flush with the surface of the road when the dragon is complete. Four people can alternate digging, shoveling, and shinning lights into the hole.
POINTS or INTEREST ON THE ROM) TO RUIN

77
Work quickly, digging down and out making an hour glass shaped hole approximately 3' wide at the bottom. The road may be hard. Digging can easily take 1-1.5 hours depending on the quality of the road and the shape you're in. Really, the size of the hole is dependent upon what lengths law enforcement is wiling to go to dig someone out of the dragon. More often than not, they will try starving the lock down people out and torturing them before they resort to digging them out. Document this!
Two people can begin mixing the concrete nearby while others dig. Concrete dust is toxic and can irritate the respiratory system. Use respira-tors or bandanas to help protect everyone. Mix the concrete in the S gallon buckets over the tarps. Prevent the concrete from spilling off the tarps and ail over the road. Dry concrete on a dirt road is very conscipuous. Use the trowels to mix the crete to a thick, lumpy, oatmeal consistency. Two people can gather rock and grave!, no bigger than tennis ball size, to be added to the concrete as aggregate. When the hole is complete, lower the lock box into it for a size check. The rebar pin extend-ing from the sides of the box will help stabilize it in the hole. The top of the box should rise nearly flush with the surface of the road. It should be submerged about an inch from the road's surface so it can be covered over very well with fine gravel, dirt, and leaves, etc.... Remove the box when the fit is right and drive the 4 steel pins into the walls of the hole at oppos-ing angles to each other, spiraling upward, around where the lock box will be. Reinsert the box into the hole and cap the top with the other container lid and the rest of the duct tape.
Now, you're ready to pour the concrete. Alternate a bucket of Crete with a sprinkling of gravellrock. Fill the hole around the box to the very top, packing It with the shovel and trowel as it is being filled. When this is complete, cover over the top of the fill and the lock box with fine gravel, dirt, and leafy debris to camouflage the dragon and let it sleep until it is needed. Pick up and clean up everything. One mislaid glove could ruin everything, Cover your tracks and head home. Discreetly monitor your dragon and any other positions you may have up until the time of they are needed. Your dragon can sleep for weeks, months, even years to be awoken whenever needed.
45 Degree Lounge Lizard Version Maintaining your position on a dragon over any extended period of time
may be very uncomfortable. The force of gravity alone will draw blood down into your arm and cause it go to sleep unless you are regularly

78
flexing your hand around the lock box pin, making a fist. A design innovation to overcome this lock down
41.5 DEGREE complication is the placement of the dragon lock box at a 45 LONGL1ZW.D
degree angle to the ground. Simply make a regular dragon lock box and cut the top end of it off at a 45 degree angle. This will allow the top of the lock box to lay flush with the surface of the road. The high and low points of the cut should align parallel with the portruding rebar pin at the bottom end of the box so that the pin can support the position of the box while the concrete is poured around it.
MORRISON VERSION
When the time comes to use the dragon, you may want to bring a metal fire door with you. "The Door" serves as a barrier between the dragon and your body that effectively obstructs any tampering with the dragon. Use either an acetylene torch or a high speed drill and jig saw to cut a 4" diameter arm hole out of the door. Cut the hole the same way you would cut a hole in the side of a barrel. Simply place the door over the dragon when you go to use it. Adjust the length of chain on your bracelet to give you a little extra reach. Two small holes can also be drilled into the bottom end of the door to allow a U-Iock to pass down over one of your ankles and through the door, locking the U-lock off on the under side of the door. This will securely lock your leg to the door to prevent any unpleasant attempts at separating you from the door in order to get at the dragon. You should wear layers of extra warm clothes

79
and have a steep pad between your body and the door to keep warm and comfortable because the cops aren't gonna "light your fire."
Batmobile Version Drive up to your dragon in style and dump a batmobile over it for this
one. The Batmobile makes those wide, hard to block roads easy! Just remove the vehicle's seats and cut an arm hole in the floor board of the car
for the lock down person to reach through and down into the dragon. Tow the batmobile into position over the dragon and either dig holes for the wheels to fall into, or lack the car up and pull the wheels off, to bring the chassis as close to the ground as possible. From a prone position, the lock down person needs to be able to somewhat comfortably reach their arm through the floor board of the car and into the dragon. Be sure the length of the person's bracelet chain is long enough to allow them to reach the lock box pin, yet not so long as to expose the person's chain to the point where it could be cut by law enforcement. Also, make sure that the lock box fits tightly enough around the person's arm to prevent the cops from getting down the dragon's throat and cutting the person's chain. Extra warm layers of clothing and a cush sleep pad are essential for the lock down person's comfort and an uncompromising blockade.
NOTE: CATTLE GUARDS, LARGE CAR HOODS, FENCES, GATES AND OTHER ONECTS CAN BE
PLACED OVER DRAGONS AND LOCKED DOWN THROUGH, AS WELL AS DOORS AND BATMOBILES, TO
CREATE MORE CHALLENGING BLOCKADES FOR THOSE EXTRA PERSISTENT LAW ENFORCEMENT TYPES
THAT WILL GO TO ANY LENGTH TO EXTRACT YOU.

80
NOTES

81
RAIL BLOCKADES Many of the raw materials for destructive industrial operations are moved by
freight trains. For years, activists have sat on train tracks in attempts to block rail shipments of chemicals, military weapons and waste. These blockades are extremely dangerous. Trains weigh millions of tons and cannot stop on a dime. In fact, they can take over a mile to stop. Courageous peace activist Brian Wilson was run down by a train shipping military weapons to Central America from Concord, CA in 1987 and had both of his legs severed. Conductors also have very poor visibility from the engine cars. What's more, the law prohibits a conductor from stopping the train in most instances. And, since trains use specialized communications systems, it is difficult for activists to contact and alert the operators of a rail blockade.
However, trains are stoppable. Major shipments of CPC's and other chemicals have been disrupted with rail blockades. Unfortunately, detailed accounts are missing here, but the general idea is to stop the train by setting up a blockade on the train tracks. People have achieved
RAIL Box
•
this by occupying the tracks or by U-locking their necks to the tracks. But, the most successful rail blockades have been those where people used rail boxes.
A rail box is a lock box designed to lock a person's arm to the rail of a train track. It is a modified lock box constructed from scrap sheet metal and welded together with a swinging hinge on top to open and close the box over a section of rail. It has an arm hole cut through the side panel for the lock down person to reach into and lock onto an eye bolt, which has been welded into place. The box locks shut with a standard padlock. The padlock is located on the inside of the box, at either the front or back end, and secures 2 intersecting posts which have

82
been welded on each side of the swinging hinge. The rail box works by open-
ing it up and setting it over a section of rail and closing it shut. Next, the lock down person reaches their ami. through the side panel hole, with a padlock in hand, and locks the intersecting posts on each side of the hinge together
7-77--4 with the padlock. The lock zdown is complete when the lock down person clips their bracelet
onto the eye bolt. By this design, the box is only openable from the inside by
the lock down person. Variations of this design have been locked shut from the inside with U-locks,
but U-locks are tricky to maneuver inside the box with only one hand. The rail box can be cut through with the jaws of life or a diamond saw, but it is more complex than grinding through an ordinary lock box.
Giant rail boxes have also been constructed that people can live in for days. These have been fully equipped with food and water, sleeping pads, communi-cations equipment, and camping toilets. They are wheeled out along the tracks on a special frame of bicycle wheels and raised onto the tracks by stretcher poles. One box was so large that a crane had to physically lift it onto the tracks. These giant boxes are secured to the track by a large auger which is screwed through a custom hole in the floor of the box, down into the ground between the rail ties, below the tracks. Once the train is stopped people can lock down on it at various points with U-locks and lock boxes.
Lots of time and energy needs to be invested in a rail blockade. You can figure out when a particular train is going to be somewhere by tracking the numbers on the tanks of the freight cars. Because freight communications systems transmit messages over specific frequencies with special codes, months of preparation is required to establish solid communication with the train company and conductor.

NOTES
83
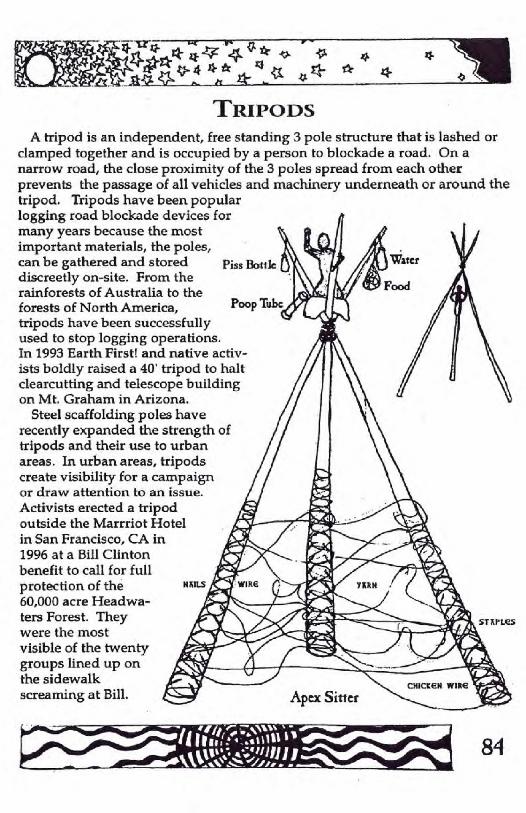
84
4r.4_ 11-irr4L P V A vig 14.4 0- 4 *
rfv.
" ̀U-• h — 4 's•
TRIPODS A tripod is an independent, free standing 3 pole structure that is lashed or
clamped together and is occupied by a person to blockade a road. On a narrow road, the close proximity of the 3 poles spread from each other prevents the passage of all vehicles and machinery underneath or around the tripod. Tripods have been popular logging road blockade devices for
l can be gathered and stored Piss Bonk Water
ir
Food
many years because the most \ A , important materials, the poles,
discreetly on-site. From the rainforests of Australia to the forests of North America, Poop Tube
i 1,4 41
, _ ti 4a•
filik lipit tripods have been successfully used to stop logging operations. In 1993 Earth First! and native activ- ists boldly raised a 40' tripod to halt clearcutting and telescope building on Mt. Graham in Arizona.
Steel scaffolding poles have recently expanded the strength of tripods and their use to urban areas. In urban areas, tripods create visibility for a campaign a or draw attention to an issue. ea, Activists erected a tripod il.•
Al
I.
, It\
outside the Marrriot Hotel AV WAV:.
OP; in San Francisco, CA in AV Vii ,..1 1996 at a Bill Clinton OW clOk
I.
benefit to call for full ,..11Fti' -". tarth protection of the tisn_s Atillb API -1 60,000 acre Headwa- ice. el 51,1ERN ik' ters Forest. They A siWOPP''''
Atak 4 drellt
AMP.
rer,;it sTsptes
were the most --"1.11102111mwe 0.4
visible of the twenty WW1
los groups lined up on , the sidewalk ■ -4,0,'S screaming at Bill. Apex Sitter .f., ' ..-.40

85
Ti 12-* rt
aerlf4-
__A•7 a t' 4- I' *
+ Overnight assembly + On site storage + Powerful visual - Quickly taken out without armoring - Cops familiar with device - Uncomfortable for sitter over long periods
PREPARATION T IME: 6-8 hours to gather and prep poles, 10 minutes to lash and assemble PEOPLE N EEDED: 1 to sit. 6-8 to prep and set up COST: Around $25 without climb gear. $50 with. (Salvage/liberate armoring materials, and get gear heads to kick down carabiners and gear!) MATERIALS NEEDED:
Three- 25' to 40' poles One- Bow saw One- Axe One to three- Steel mallets/hammers One- Bolt cutter One hundred and fifty- 6" nails Forty five- Fence staples Three- l'x 6' lengths of chicken wire One hundred ft.- Barbed wire Four to six- Work gloves One- Ball yarn Twenty five ft.-1 Ir nylon/polypropylene boat line for lashing poles (working
load can't be less than 450 lbs.) Twenty five to forty ft.-Strong 1 /2"-3/4" polypropylene rope for climbing
(working load no less than 1,200 lbs.) Optional gear:
One- Climb harness tied together from 14'-16' webbing 'IWO- 5' to 6' lengths of 6 mm perlon climbing rope for prusiks Two- 5' to 6' lengths webbing for leg loop & prusilc extensions Three- Locking carabiners
How T 0: S ITE S ELECTION: Pick a spot on a road at least 1 mile from the site of the
industrial logging, mining, developing, etc,.. operations you will be blockading.
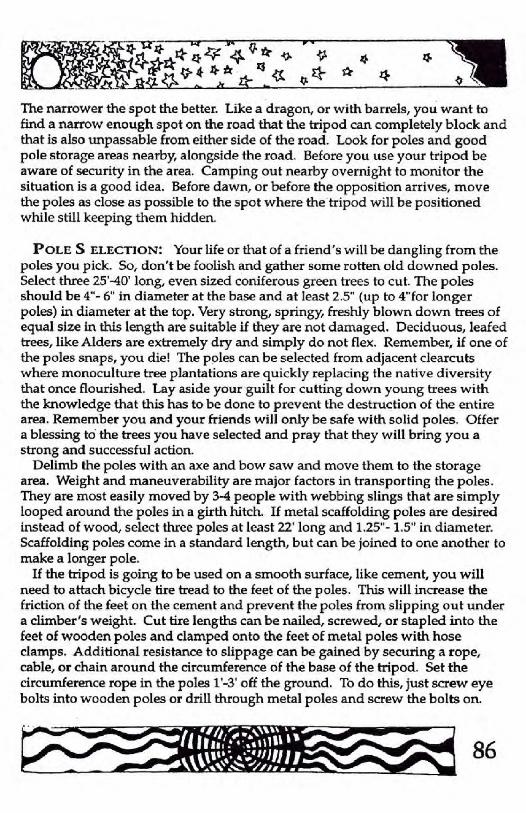
44-4- 11. 4.-urri. wg j.,
z AF v• ' .ti,
The narrower the spot the better. Like a dragon, or with barrels, you want to find a narrow enough spot on the road that the tripod can completely block and that is also unpassable from either side of the road. Look for poles and good pole storage areas nearby, alongside the road. Before you use your tripod be aware of security in the area. Camping out nearby overnight to monitor the situation is a good idea. Before dawn, or before the opposition arrives, move the poles as close as possible to the spot where the tripod will be positioned while still keeping them hidden.
POLE S ELECTION: Your life or that of a friend's will be dangling from the poles you pick. So, don't be foolish and gather some rotten old downed poles. Select three 25'-40' long, even sized coniferous green trees to cut. The poles should be 4"- 6" in diameter at the base and at least 2.5' (up to 4"for longer poles) in diameter at the top. Very strong, springy, freshly blown down trees of equal size in this length are suitable if they are not damaged. Deciduous, leafed trees, like Alders are extremely dry and simply do not flex. Remember, if one of the poles snaps, you die! The poles can be selected from adjacent clearcuts where monoculture tree plantations are quickly replacing the native diversity that once flourished. Lay aside your guilt for cutting down young trees with the knowledge that this has to be done to prevent the destruction of the entire area. Remember you and your friends will only be safe with solid poles. Offer a blessing to the trees you have selected and pray that they will bring you a strong and successful action.
Delimb the poles with an axe and bow saw and move them to the storage area. Weight and maneuverability are major factors in transporting the poles. They are most easily moved by 3-4 people with webbing slings that are simply looped around the poles in a girth hitch. If metal scaffolding poles are desired instead of wood, select three poles at least 22' long and 1.25"- 1.5" in diameter. Scaffolding poles come in a standard length, but can be joined to one another to make a longer pole.
If the tripod is going to be used on a smooth surface, like cement, you will need to attach bicycle tire tread to the feet of the poles. This will increase the friction of the feet on the cement and prevent the poles from slipping out under a climber's weight. Cut tire lengths can be nailed, screwed, or stapled into the feet of wooden poles and clamped onto the feet of metal poles with hose clamps. Additional resistance to slippage can be gained by securing a rope, cable, or chain around the circumference of the base of the tripod. Set the circumference rope in the poles 1'-3' off the ground. To do this, just screw eye bolts into wooden poles or drill through metal poles and screw the bolts on.
fliet r e; %VIVI .111 111111 lit 11
411111111111 4.V..-cee:te 4.;4111111) • -411I■
86

1*- 44.
_VrV dre'
//
87
ARMOR AND S TORE THE P OLES : Once in place, begin armoring the poles. If the poles are not reinforced with metal, wire, and yam your tripod will be cut down by workers and cops with a chainsaw. Leg by leg, a foot at a time will be Cut from the bottom of each of the poles, reducing your once glorious creation to a pissy little ground level stick that you are quickly pulled from.
To armor the poles, first intertwine the yarn up and down the base of each leg. Next, lay the chicken wire over the yarn by wrapping it around the base of each leg and secure it with the fence staples. Cover the legs 6*-8' up. Then, drive about fifty 6" nails through the wire into the legs. You can also wrap barb wire up the legs, but this makes the tripod difficult to carry and climb. The barbed wire is best saved to run around all three legs when the tripod is up. Store the poles near your blockading spot, strewn about to resemble regular fallen trees.
Camouflage the poles with branches, 1/ leaves, etc... The sooner the tripod is used
the better. Even in a short period of time,
ARMOR DETKIL %poles will rot and weaken. Metal scaffold- ing poles need no am oring.
Unfortunately, not much can be done from a tripod to prevent an attack by a
cop in a cherry picker or boom truck. But, lots can be done to stop this equipment from the ground. Gue-
rilla lock box affinity groups can tackle these machines when they arrive
on the scene. REMEMBER, IT IS ONLY SAFE TO LOCK
DOWN TO EQUIPIvfENT/VEHICULES WHEN THEY
ARE NOT RUNNING AND THE OPERATORS ARE
AWARE THAT SOMEONE HAS LOCKED TO THEM!
LASH THE P OLES: This next set of directions on lashing and raising the tripod can be very confusing unless you follow
I along, actually simulating each step, with a less than life size model of a real tripod. To do this, grab 3 one foot long sticks and
a shoelace. We'll refer to the sticks as the poles and the shoelace as the rope, as if you were actually setting up a real tripod. Putting a
tripod up in real life can be extremely dangerous unless the group doing it is able to anticipate each step in the process. So, everyone
involved should participate in assembling the stick and shoelace model

Dal THE POLES OH THE GROUND
4 I:- ec •tt tr- 111
before practicing with the real thing. Lashing the poles will take 5-10 minutes, and is best done as near to the spot
the tripod will be placed as possible without being visible if a car or someone goes by. Stack the poles in a pyramid, two on the bottom, one on top. Let's call the top pole #1, the bottom left pole #2, and the bottom right pole #3 (Follow the drawings). Line up the bottoms of each pole so they are flush with one another. This way the tripod will stand level when raised into position. Don't worry if the tops of the poles are a bit higher or lower. Wedge a rock or stick under the bottom two poles and between the top and bottom poles about 6' from the top to create space to pass the lashing rope through. Reduce any measurements to scale for the stick and shoelace model.
The idea in lashing the poles together is to equally distribute the tension on the poles and the rope itself. This concept applies to metal scaffolding poles as well. If the tension in the rope is too great on any one of the metal poles, there won't be enough forgiveness in the rope to swing pole #3 out and set the metal tripod in place, The tendency with metal poles is to lash them tighter because smooth metal is much more frictionless than wood. Wrapping duct tape very loosely around the area of each pole that the lashing will cover and then twisting it on tightly with the hands will create a high friction surface on the poles that will prevent the rope from slipping down them.
Start by tying a clove hitch knot in one end of the lashing rope around pole #1 (See knot illustrations, pages 112-113). This is an easy, quickly tied, func-tional slip knot that will create a nice loop in the rope and sinch down to the pole securely. Straddle the poles as you tie the knot so that you are looking up toward the top of the poles. Sinch it tight about 5' down from the top of the pole. Now, you are ready to begin weaving the rope
11 .;4
_JsmiAkt".01". "Tin" '11%‘ 101.w...*111°1111%111,0111■ "Air • 0 darn..
88
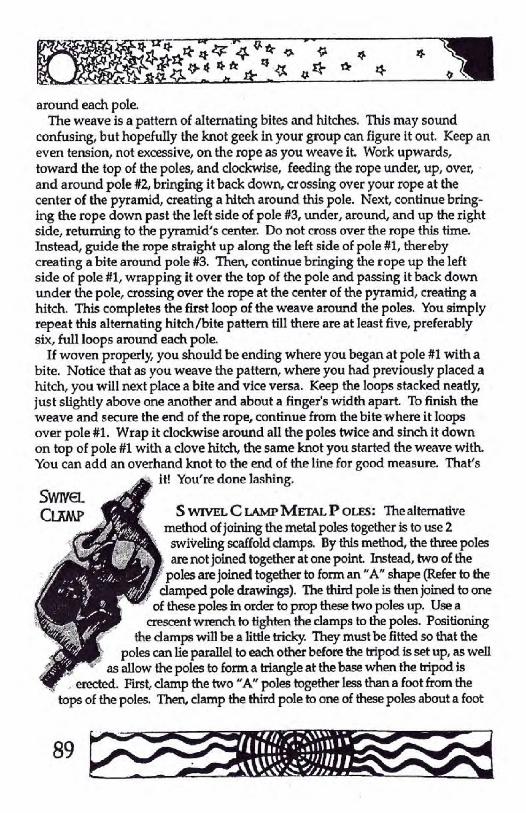
• *tt. 4. 1;1•1$ te 13 Alt * * °-
around each pole. The weave is a pattern of alternating bites and hitches. This may sound
confusing, but hopefully the knot Beek in your group can figure it out. Keep an even tension, not excessive, on the rope as you weave it. Work upwards, toward the top of the poles, and clockwise, feeding the rope under, up, over, and around pole #2, bringing it back down, crossing over your rope at the center of the pyramid, creating a hitch around this pole. Next, continue bring-ing the rope down past the left side of pole #3, under, around, and up the right side, returning to the pyramid's center. Do not cross over the rope this time. Instead, guide the rope straight up along the left side of pole #1, thereby creating a bite around pole #3. Then, continue bringing the rope up the left side of pole #1, wrapping it over the top of the pole and passing it back down under the pole, crossing over the rope at the center of the pyramid, creating a hitch. This completes the first loop of the weave around the poles. You simply repeat this alternating hitch/bite pattern till there are at least five, preferably six, full loops around each pole.
If woven properly, you should be ending where you began at pole #1 with a bite. Notice that as you weave the pattern, where you had previously placed a hitch, you will next place a bite and vice versa. Keep the loops stacked neatly, just slightly above one another and about a finger's width apart. To finish the weave and secure the end of the rope, continue from the bite where it loops over pole #1. Wrap it clockwise around all the poles twice and sinch it down on top of pole #1 with a clove hitch, the same knot you started the weave with. You can add an overhand knot to the end of the line for good measure. That's
it! You're done lashing.
S WIVEL C LAMP METAL P OLES : The alternative method of joining the metal poles together is to use 2 swiveling scaffold clamps. By this method, the three poles are not joined together at one point. Instead, two of the
poles are joined together to form an "A" shape (Refer to the damped pole drawings). The third pole is then joined to one
of these poles in order to prop these two poles up. Use a crescent wrench to tighten the clamps to the poles. Positioning
the clamps will be a little tricky. They must be fitted so that the poles can lie parallel to each other before the tripod is set up, as well
as allow the poles to form a triangle at the base when the tripod is erected. First, clamp the two "A" poles together less than a foot from the
tops of the poles. Then, clamp the third pole to one of these poles about a foot
89
...01111 ti #7,"••••14111P
Swiva CLAMP

PLACE THE F OOT WEDGES: The final step before you move the tripod into position is to place foot wedges
SPREZ POLES ON GROUND
POLES NaT DRA- NN TO SCALE RELKTIVE TO PEOPLE
"4./4 Hne. R. 1PG r4
ZF b:ct 0 4. rallerit 4-14, #41;.421-er II- ‘a. P4 WM 7'4 )1A—ii4 below the "A" clamp so that the "A" poles have room to close over the third pole clamp. The axis of the central swivel for the third pole clamp should be located roughly 120 degrees around the third pole from that of the "A" clamp. All this will take some tweeking, but eventually you should be able to get it to work just fine.
S ECURE THE CLIMBING ROPE: Anchor the climbing rope above the area of the lashing at the apex. This is where the tops of the poles will cross when the bottoms of the poles are spread apart. Tie a rewoven figure-8 knot in the top end of the climbing rope and sinch it down snugly around the apex, just above the lashing. This will securely anchor the climbing rope to the apex and safely support your weight as you ascend the rope to the top. When the tripod is raised and the poles are spread, the climbing rope will not slip down past the apex. Now, you're ready gi sc4, to move.
on the poles for the tripod climber to use in ascending into the cross pole roost above the apex. Make the foot wedges from small pieces of wood and nail them securely into the poles under the apex. Be careful not to split the poles in
IdIP—.1 .1-111041111P 1111 1.111.1g 1 1114:: ,I.ei tilt t tow
-AMON -,a.1% _41111k Po • • 90

111 .21- 11' 47 1'4 * Jr *- 4
the process of driving the nails into them! For metal poles, drill holes through each pole just under the apex that the 6" long pieces of 5/8" threaded rod can be pushed through and held in place from both sides with wingnuts (Not your friends, actual wingnuts). Secure the wingnuts with duct tape.
RAISE THE T RIPODI You'll need 6-8 people to muscle the lashed tripod up onto the road and into position. This is a real group effort. Make absolute sure the coast is clear. After all this, the last thing that you want to happen is to have someone pull around the corner and catch you off guard. Everyone should have gloves and long sleeves on to protect themselves from the sharp edges and the armoring. Use the webbing slings to carry the tripod onto the road. Lay the tripod down diagonally on the road so that the bottom of the tripod is on left side of the road and the top is in the middle of the road. The bottom of the tripod should be resting above the spot you have chosen to set up. Remove the webbing carry slings. The poles should still be stacked in the pyramid shape they were lashed in. If not, roll them into this position and check to see that the lashing is snug.
Now, spread the poles across the road. One person should straddle the tripod at the apex while two people drag the bottoms of pole #1 and pole #3 to the right side of the road so that the tops of these poles cross over the top of pole #2. The lashing will begin stretching and equalizing, and the apex person will need to guide the tops of poles #1 and #3 over the top of pole #2. Poles #1 and #3 should now lay side by side over pole #2 with #1 below #3. Dig shallow but solid holes below the bottom ends of poles #2 and #1. These holes will stabilize the feet of the tripod, keeping the poles from sliding forward as you raise the top end of the tripod. If the road is very hard or paved, and digging holes isn't an option; one person each will be needed to hold the feet physically in place. RTISE THE TRIPOD
91

-1171Cr-* w. Arle; 4 2" 1,4 p "oir 41Pire3
Four to six people should get ready to lift the poles from below the apex. These people will form two lines.
Two to three people need to line up next SWING THIRD to pole #2 and two to three people next to
POLE poles #1 and #3. These people will lift the poles up over their heads and walk their hands down towards the bottoms of the poles, lifting and walking as they go. IWo people should hold the end of the
climb rope out in front of the bottom end of the tripod. These people will pull the poles
up into position with the rope as the other people lift arid walk them for-ward. On the count of three, everyone begins
lifting, pushing, and pulling with all their might. Force needs to be constant as the
tripod pod begins to rise. Move slowly and thoughtfully. It is a really good idea to
have someone directing the show as it is going up, watching for problems. Raise the
tripod to approximately an 80 degree angle to the road, then stop momentarily. This is the crucial point where pole # 3 will be swung into position. Be careful! Everyone has adrenaline blasting through their system at this time. If you raise the tripod too far, the whole thing will fall forward, KABOOM!
One person from the poles #1 and #3 gr oup needs to lift pole #3 and care-fully walk it forward and around to the middle of the road. The pole may need to be jiggled a bit to free it from any obstructions with the other poles at the apex. As this person begins walking pole #3, the lashing at the apex will rapidly adjust and displace the tension being exerted on it. Everyone should have their attention focused on the lashing as it adjusts watching to make sure nothing goes wrong. If the poles are weak or the lashing is tied to tightly, the poles could explode under the stress of swinging pole #3 into position. Every-one should be prepared to dive out of the way if this happens! The second pole #3 begins to swing successfully toward the center of the road, everyone needs to gently resume pushing and pulling the tripod the last 20 or so degress into place. The person on pole #3 basically guides the tripod into place. Once the tripod has landed in place, quickly align the poles equal distances from each other. Reinforce the rear leg holes and dig and reinforce a center leg hole. Once every
if :toot's cco NNwl • 47"..„7-
-411■
92

TTTRES
„Ay** * 4F— w-'4. .•>. * 01' II:Mr-4-
A. _al* e 11-0Ter *7_,t( ift.
thing looks good, everyone but the immediate ground support people and the climber can take off down the road to meet the security support people and help create a diversion that will buy the climber time in reaching the top of the tripod.
CLIMB INTO P OSITTON: There are several ways to climb the tripod. The climber can either ascend a rope ladder made from the climb rope called an attrais, use technical climbing equipment and prusik up the rope, or monkey climb one of the legs of the tripod to reach the cross pole seat above the apex. Someone can also reach the top of the tripod if they are hauled up with the rope by a group of people. Safety is a major issue with any of these methods. Whatever method is chosen by the group, it should be practiced until it can be
done spontaneously with the utmost attention paid to everyone's safety. To make the attrais, simply tie a series of giant figure-8 loop
knots along the climb rope at 2' long intervals. This will form a chain of foot and hand loops the climber will use to reach the apex. This method of climbing the tripod requires a great deal of physical strength and agility When the climber reaches the apex she needs to switch her body weight gradually off of the rope and onto the foot wedges and the poles. The climber needs to actually be able to reach her arms up onto the poles where they cross over the apex. This requires the climber to get as close as she can under the apex as possible before making the transition. From there, it is simply a matter of crawling onto the foot wedges, pulling oneself up to the level of the lashing and swinging a leg over the apex, into the natural seat created by the pole crossing. Don't forget a cushion! The natural seat can be unnaturally uncomfortable over a long period of time. A good rain poncho or sun hat increases the climber's comfort as well. Once the climber is seated, she should haul up the climb rope and secure the end to one of the poles. Ascending the tripod with the help of technical climbing
equipment can be somewhat less physically demanding than free climbing an attrais. However, as with all technical climbing, the person doing it must have an intimate knowl-edge of certain knots and devices that will safely support up to 2 tons of weight (See tree sit section, page 110). Basically, the climber needs a harness, 3 locking carabiners, 2 prusik slings and 2 webbing slings. An inexpensive harness can be as
93 414,•—• ,7•‘”
1 all"—'14140,40011F- ism -4411.4111111111111
46.111111011101111111111111i;!' :1111111
W - 1W11011/47k IL,:::11)1/ ... .

4. Go get 'eml
44-ort 4 4
Home Made Diaper Seat Harness
it
I. Join 16' of I" tvbular 2. Hold locking carol:liner 3. Clip arm loopa and crotch webbing w/ water knot and in right hand Ind stick arms loop together in carabiner in
hold behind waist. through top of loop sling. icft-ccnterright sequence.
sembled from just 16' of 1" tubular webbing and a locking carabiner (See diaper seat illustration).
Before you begin your ascent, do an inline safety check of the ABCDE's. These letters stand for the safety of the climb rope Anchor, a doubled-back harness Belt, closed Carabiners securely attached to the harness belt, and properly tied prusik Devices. The climber can ascend safely by prusiking up the climb rope to the same point described previously for the attrais climber, maneurvering to get as close under the apex as possible. Then, without unclipping from the climb rope, the climber should shift her weight over to the foot wedges and the poles, gradually crawling up into the cross pole seat. Finally, set the butt cushion and haul up the rope. The real advantage with this method is that if the climber slips, the climb rope she is tied into will catch her.
A fast way to get the climber up to the apex is to haul the person up. This can be done by running a longer length of climb rope through a locking carabiner attached to a loop of webbing that is girth hitched around the apex. This anchoring device needs to be rigged to the tripod before it goes up. One end of the rope is then tied off with a figure-8 knot to a locking carabiner on the climber's harness and the other end is drawn through a figure-8 descender, attached by locking carabiner, to the belt of an anchor person. Several other people will help the anchor person hoist the climber quickly up to the apex. As the climber is being held in place, she should make the transition to the foot wedges and the poles, then crawl freely up into the cross pole seat, set the cushion and haul in the rope.
One other way to reach the top of the tripod is to free climb
1.41 '‘‘‘" 1.1;; .1 Z01.1411111111011.1 sill!' *WM
14111111111111 41kk °1111:111NAnik
FREE QJMB
91

4 zi- **A. —114 *.,,t̀ 4- * * re kw , PIE 3i
one of the poles like a monkey. This way is not encouraged, simply because it is so dangerous and requires incredible physical
strength and coordination.
TUE F WISHING T OUCHES: Once the climber is safely seated in the tripod, finish armoring the tripod by running barbed wire
Butt around the perimeter of the tripod and up and down it's legs. If this isn't enough to satisfy
Bench your hardcore blockade fantasies, the climber can lock her arms over the apex of
the tripod with a 90 degree Black Bear lock box. This will prevent the tripod
from. being lowered without the climbers arms being ripped off. Be
sure that this point is hammered home to anyone trying to
disturb the tripod! The climber and support people
need to firmly emphasize how fragile the device is
and that any disturbance of the tripod could cause the
climber to fall. To accomplish this a hammock sling or small bench will need to be designed for
the climber to sit on, underneath the apex. From the hammock or the bench the climber can reach her arms around and over the apex and into the lock box, which will rest on top of the lashing between the poles. The hammock sling can be made from strong lightweight material, such as rip-stop nylon and a length of static or dynamic climbing rope. Tie overhand knots in both ends of the nylon material, then tie the two ends of the climbing rope around the insides of these knots with rewoven figure-8 knots. The rope is simply slung over the apex in a way that enables the hammock to dangle underneath the apex. The bench can be constructed from a 24" long piece of 2.x8" wood that is
reinforced from the bottom by two 8" slats of 1"x4" wood and two 6'-8' lengths of climbing rope. Secure the 1"x4" slats with large eyebolts and lock washers at the four corners of the bench. Tie the ends of the support ropes into the eyebolts with rewoven figure-8 knots. Each rope should connect two eyebolts. Now, join the two mid length points of the ropes with a locking carabiner. This carabiner can clip into an anchoring carabiner that is attached to a webbing
4, „•0" ep„serii.
I .111111111
111411111111111.!1...."411111.0 Z ,t,/ 4 " 1 1
_ armr.""lkii..•1110116, -AL 95

464irr
_att. 0- 4 4- er 3 ft it El- Or 21.
sling which is girth hitched around the apex. The climber can haul the Black Bear up the climb rope from her seated position. The ground support people simply have to attach the lock box to the bottom of the rope from the ground.
NOTES
Plerlik10147117islVit t AiwykkOs".1 96

BIPODS
Another logging road special is the bipod. Bipods are anchor-dependent, two pole structures that are occupied by a person and are counter balanced to roads by aircraft cable, scaffolding guide lines or rope. A platform can be suspended from the cross pole lashing and is readied from below by a climb rope that is set above the lashing. Bipods have a unique potential in that they must be attached or anchored to something. That something may be two 2.5' lengths of heavy duty .5" rebar driven at least 18"-24" deep into a road. The bipod could also be securely anchored to a gate, cattle guard, bridge or piece of heavy equipment.
Bipods pose much more difficulty for law enforcement to remove because they cannot be cut down or drawn apart like an independent, free standing tripod. Additionally, the great length of the support cables/ropes prevents cherry pickers and boom trucks from reaching the biped climber.
Contrary to first notions, the two cables/ropes attached to the bipod are the primary blockade, not the two poles. The support cables/ropes trisect a road into three narrow lanes that are unpassable with vehicles or equipment. Any interference with the support cables/ropes or the object that these are anchored to will offset the precarious balance of the two poles and cause the whole thing
97

98
••••;`-'
614
to come crashing down. This needs to be made painfully clear to anyone attempt-ing to interfere with a bipod. In addition, the structure cannot be lowered even if sufficiently strong tiedown lines are used. As the angle of the bipod with respect to the surface of the road decreases, the force on the tiedown lines and the base of the poles increases dramatically and the structure becomes inherently unstable. The legs will violently kick out by the time the structure reaches 45 degrees.
Australian and British activists seem to have been throwing bipods up for years to block logging and road building. American Earth Firstlers put up the original "Bison" bipod at the Warner Creek blockade in Oregon in 1995 and a variation of it was erected on the Jack Squat in Idaho in 1996, Keep in mind that bipods are still largely on the drawing board and under development, Experiment lots before you actually try this one in real life.
+ New, seldom seen + Very risky to dismantle + On site storage - Still under development - Requires precise engineering - Not instantly set up
PREPARATION T IME: 4-6 hours to gather and prepare poles. 15 minutes to lash and assemble PEOPLE N EEDED: 11 to sit, 6-8 to prepare, and 10-12 to set up COST: Around $75, including platform and climbing gear MATERIALS N EEDED:
Two- 30' to 50' poles One- Bow saw One- Axe One to two- Steel mallets/hammers One- Bolt cutter One hundred- 6" nails Thirty- Fence staples Two- l'x 6' lengths of chicken wire Seventy five ft.- Barbed wire One- Ball yarn Twenty five ft.- Nylon boat line, 1/2" to 3/4" thickness for lashing poles
(working load should be no less than 700 lbs.) Thirty to forty ft.- 11 mm static climbing rope

t i r
Two- 50' to 100' lengths of aircraft cable for guide lines Eight- Heavy duty cable clamps One- Climb harness (homemade webbing diaper or commercial model) Two- 5' to 6' lengths of 6 mm perlon climbing rope for prusiks Two- 5' to 6' lengths of 1" tubular webbing leg loop and prusik slings One-12' length of 1" tubular webbing for platform anchor Four- Locking carabiners One- Fully rigged platform (55' of parachute cord required for rigging) One- Figure-8 descender (optional)
How T o:
FOLLOW THE G UIDELINES FOR TRIPODS ON SITE SELECTION.
POLE S ELECTION: Because the bipod is suspended at an angle, there is an incredible amount of force being exerted on the poles themselves. For this reason, the poles need to be solid green coniferous poles, approximately one inch in diameter at the base and six inches in diameter at the top, 30'-60' in length. Delimb them and move them to your storage site as you would a tripod. They will be very heavy, and a pain in the neck to move. Consider using a leverage tool like a "come-along." to move the poles where necessary Otherwise, bite your lip, strap on your haul slings and enjoy it. Just think of the expression on the Freddies faces when they first see your creation in the morning.
A RMOR THE P OLES: Since no one will physically climb either of the poles, and you don't want anyone messing with them, armor the poles with barbwire and four to six inch long 15d nails. The nails should be driven at an angle, about three-quarters of the way in, along a seven foot long section on each pole three feet from the base of each pole. The unarmored three feet of the poles will give people room to carry the lower ends of the poles. Using a bolt cutter, snip the heads of the nails off at an angle to create a series of sharp tines spanning the entire seven foot length. Then, wrap copious amounts of barbwire up and down the lower 15' of the poles, from where the nails start. Use fence staples every six to eight inches to secure the wire to the poles.
LASHING: The lashing weave you use on the bipod is not as complex as the tripod. First, lay the poles down side by side. Straddle the poles looking upward toward the top ends. About three feet from the top, cinch a clove hitch down around the two poles. Pull in the knot until the poles are about an inch
99
G),Lco ke

100
ft
atjd
apart so you have room to weave the rope in and around them. Now, instead of weaving the rope around the poles in alternating bites and hitches as you would with a tripod, simply weave a series of hitches spiraling clockwise up the poles. Start by feeding the rope under, up, over, and around the left hand pole, bringing it back down, crossing over your rope at center, creating a hitch around this pole. Then, continue bringing the rope down past the inside of the right pole, under, around, and up the backside, crossing over your rope at center, creating another hitch. This has also brought you back to your starting point. Simply repeat this hitch weave until you count six full loops around the poles. Wrap the line clock-wise around all the poles twice and tie it off around the top pole with a clove hitch and an overhand knot. That's it. You're done lashingl
Next, secure your climb rope by tying a rewoven figure-8 knot in the end of the static climbing rope and loop it around both the poles, above the lashing. As with the tripod, the bipod climb rope will double as the haul rope in raising it into position. Now, set the webbing platform anchor. Tie the two ends of the 12' piece of webbing together with a water knot and girth hitch it around the poles above the lashing. Clip one of the locking carabiners through the end loop of the webbing anchor. The climber can haul the platform up and clip it into this carabiner from the top of the climb rope.
The final attachments to the poles are the support cables/ropes. Take a bite of each cable and loop them around the cross pole lashing. Then, clamp the ends of each cable back on themselves at two points with the cable clamps. Both the cables are now independently looped around the cross pole lashing. Take bites out of the bottom ends of the cables and clamp these back on themselves as well, in prepara-tion for looping them around the rebar stakes you'll drive into the ground once the bipod is in position. If you are using rope instead of cable, tie all of the ends off with rewovewn figure-8 knots. Now, you're ready to move.
RAISE THE B 'Pori: Like the tripod, muscle the lashed poles and all the dangling rope and cable onto the road and spread the legs apart, paying close attention to security. Dig two shallow holes to stabilt7e the bottom pole ends when you lift the bipod into position. Depending on the length of the poles, the distance of the rebar stakes should be 40'-90' from the base of the poles. Measure the distance (D) from the base of the poles to the point where the stakes will be placed down the road. Drive the rebar stakes at least 18"-24" into the road at a 45 degree angle with a sledge hammer. The rebar stakes should be approximately four to six feet apart from each other in the middle of the road. Make sure the stakes evenly trisect the road and will effectively block vehicular passage when the support cables/ropes are attached to them.

)4P4,9001
Four to six people will be needed to be able to lift the poles from below the lashing. Two to three of these people will be needed to lift each pole up over their heads and walk their hands down toward the bottom, lifting and walldng as they go. At the bottom, three to six other people will be needed to pull from the climb rope and the two support cables/ropes, helping to lift the poles as the other people walk them up into position. The alternative is to attach the climb /haul rope to one end of a "come along" tool that is attached by it's other end to a third rebar stake placed midway between the other two rebar stakes in the road. Use the come along to winch the bipod up into position. If a gate is being used, be sure it is locked (with your lock?). Then, attach the come along to the gate and begin winching. Come along's require less effort, but people power is faster. In any case, people will be needed to at feast lift the top end of the bipod up off the ground.
On the count of three everyone begins lifting, pushing and pulling with all their might. As with tripods, the force needs to be constant as the bipod begins to rise. Move slowly and thoughtfully. It is a really good idea to have someone directing the show as it is going up, watching for problems. Lift it to approximately a 75 degree angle to the road, then stop. This is the crucial moment. The ends of the support cables/ropes should be lined up over the rebar stakes at this point. Loop the ends of the the support cables/ropes over the ends of the rebar stakes and gradually release the tension on therm Reinforce the feet of the poles in their holes and pile rocks around them. Rebar can even be counter-sunk in the road around the base of the poles for added support. If everything is solid, people can haul butt down the road and support the diversion while the climber springs into action.
CLIMB IIVFO P OSITION: The climber should first do an inline safety check of their ABCDE's. A stringer or parachute cord tow line attached to the platform should be attached to the climber's harness with a carabiner. This will allow the climber to haul the platform up to the webbing anchor that should be dangling below the lashing. After prusiking up to the lashing point, the climber can clear the webbing anchor if it is fouled and begin hauling up their platform. The platform carabiner is clipped into the anchor carabiner and the parachute cord is undone. With the platform now secured to the webbing anchor, the climber can crawl onto the platform. At no time should the climber ever unclip from their two safety points on the climb rope. The climber should haul the climb rope up to prevent any unpleasant interactions from below. Vwalla! Instant bipod blockade!
NOTE! BIPODS ARE NEW AND COMPLEX DEVICES. THEY REQUIRE A HIGH DEGREE OF
ENGINEERING AND CALCULATION. BE CAREFUL! PRACTICE LOTS BEFORE ACTUALLY ATTEMPTING
THIS ONE ON AN ACTION.
101 "N- 1),4L- hg‘f GTh

Lvh
102
NOTES

BIPOD ILIMP STRUT
mortoPoie
me Mow Pole
MONO POLES As if dangling from two poles wasn't enough, try doing it from only one! A mono pole is a 30P-50' anchor-depen-
dent pole, that a person occupies, which is set in a hole in a road and is held in place by four aircraft
cable guide lines. The guide lines can be secured to large two and one half foot rebar stakes, driven at least 18" into the road, or tied off to nearby trees. Although they have been successfully used In Australia and the United Kingdom, solid information on monopole construction could not be obtained for this manual. As such, any
group wanting to construct a mono pole should craft a design for their needs that the group feels safe and
comfortable using after much practice. Because the mono pole carries a person's full weight plus their gear, a wooden pole must be
approximately one foot in diameter at the base and six inch in diameter at the top. Remem-
er, only fresh, green coniferous poles are strong enough and flexible enough to use.
However, metal scaffolding poles that are joined together reportedly work very well and
PLITFORIA SITTER
can take the place of a green tree pole. A climb rope is secured by a figure-8 knot to a locking
carabiner that is clipped into a loop of one inch tubular webbing, girth hitched near the top of the pole. A second girth-hitched loop of webbing with a locking carabiner can support a platform that the climber hauls up and clips into this anchor as described in the bipod explanation.
Raising the mono pole is complicated. You'll need to run the climb rope
103 CF.aN4sG-,L"g

104
around a nearby tree and attach it to a truck as a haul line or pull it up by truck with a mini bipod acting as a jumper strut. The ends of each of the guide lines should be secured to several people to stabilize the pole as it is raised into position. The lines can also be run around adjacent trees for leverage. Once the pole is perpendicular to the road, stake it down and haul in the slack on the guide lines with cable tightening devices or come-alongs. Reinforce the hole the pole is now seated in and cross your fingers before ascending to the top.
NOTES

%NI ilti>."0,;; •
CANTILEVERS The cantilever is an anchor dependent pole device which a person occupies
that is extended horizontally across and off the edge of a road or bridge. Over half the length of the cantilever extends over the edge and into space. From the far end of the pole, a climber is suspended on a platform or in a hammock. Variations of the cantilever can be constructed using mini bipods or barrels to elevate the cantilever to automobile bumper level on the road. Additionally, a batmobile can be dumped over the cantilever to weight it down and provide a more substantial blockade on the road. Canadian forest activists used this cantilever with car variation on Vancouver Island in 1993 defending the wild forests of Carmanah and the Walbran.
Lf
OunLeveR ON Rom
+ Very difficultIdangerous to remove + Fairly simple to construct - Requires a road with a steep drop off and rising slope or a bridge - Difficult to support sitter
PREPARATION T '&1E: 3-5 hours to get pole, secure base in roadside slope and move into place. PEOPLE N EEDED: 1 to sit, 4-6 to prep and set up. COST: Around $35 without platform, $60 with.
105 0

.444101/ MATERIALS N EEDED:
One- 25' to 35' pole One- Bow saw One- Axe One to two- Steel hammers/mallets One- Pair of bolt cutters Seventy five- 6" nails Thirty- Fence staples One- 2'x 8' length of chicken wire Thirty five ft.- Barbed wire One- Ball yarn Two- 10. Lengths of strong 9mm-11mm static climbing rope to tie down the
base of the pole Two- 3' lengths of heavy duty rebar to stake down the base of the pole Twenty five ft.- 11 mm static climbing rope One- Climb harness tied together from 14'-16' webbing Two- 5' to 6' lengths of 6 mm perlon climbing rope for prusiks Two- 5' to 6' lengths of webbing for leg loops and prusik extensions One- 18" to 24" length of 1" tubular webbing for the top rope anchor Four- Locking carabiners One- Figure 8 descender (opptional) One- Fully rigged platform (optional)
How T co: S ITE S ELECTION: A road leading to a timber sale with a steep drop off
on one side and a sheer rising slope on the other is screaming for a cantilever to be run across it. A bridge is also a prime target. Measure the width of the road/bridge to help you choose the size pole you will use. Your spot should be located at least a mile from the destructive operations you are blockading.
POLE P OSITION: Since the force being exerted on the cantilever is not being displaced by other poles or ropes, it is extremely important to use a solid green coniferous tree pole or multiple metal scaffolding poles that can be securely joined together. Select a wooden pole that is 25'-35' long, around 9"-12" in diameter at the base, and 6"-8" in diameter at the top. Choose a metal scaffolding pole of equal length. It is important to pick a long, straight wooden pole that is roughly 5' longer than twice the width of the road. This will actually place the balancing point out in space beitond the edge of the road. It will displace more force on the point where the cantilever is anchored to the
106

OrtmLeveR OH BRIDGE
107
fi
ItIgi,„ 001
64.
road/bridge, increasing the sheer strength of the pole. If a thick enough tree is not available, then several thinner trees can be tightly lashed together with strong wire to create a composite pole of the desired strength. Delimb the pole and move it to your storage area. Armor the section that will be stretched across the road, as you would the legs of a tripod or bipod.
TRANSPORT AND D EPLOYM ENT: Move the pole with webbing slings. You may have to move the pole by vehicle if your site is not close enough to where you have stored the pole. If the cantilever is being deployed on a road, begin digging a support hole in the rising slope next to the road that the base of the pole will fit into once the pole is moved to the blockade spot. While this is being done, the climber can set his/her climb rope and platform on the end of the pole. First, girth hitch one loop of webbing around the end of the pole, clip a locking carabiner through the loop and tie off the climb rope to the carabiner with a figure 8 knot. Then, set another webbing loop and carabiner on the pole and clip the carabiner attached to the platform to it. Make sure the carabiners are reversed and opposed in position to each other. A platform, bench or
hammock will give the climber the support they need to stay perched on the end of the cantilever for any extended period of time. The climber should be holding, but not attached to, the end of the climb rope as she is waiting for the pole to be swung into position. Think about it. If the pole accidentally slips over the edge, you wouldn't want your climber friend to go over with itl
Next, people should line up along the pole and muscle it out onto the road/ bridge. They need to be holding it down as they swing the end of the pole over the edge of the road/bridge to prevent the pole from swinging out of control and falling over this edge. Don't drop it! Guide the climber's platform over the edge with the anchor end of the pole. Wedge the anchor end of the pole in
04
108
the hole you have dug in the rising slope face and reinforce it. If the cantilever is being deployed on a bridge make sure the pole is lashed securely to the bridge railing from two points. The climber's end side of the pole should be lashed at a lower point of the bridge than the base end side of the pole (see the bridge drawing). The angle of the pole across the road creates the blockade. Friction will keep the pole from slipping through the lashing. Drive the rebar at least 18" into the road at 45 degree angles to the road's surface along both the far and the near edges/sides of the road. 'Fie the securing ropes around the pole and loop them around the rebar with solid rewoven figure-8 knots. Test the cantilever for stability by weighing on the pole at the road's edge before climbing out onto the end of it.
CLIMB ONTO THE P OLE: The climber should first do an inline safety check of the ABCDE's, as explained in the tripod climbing section. A good way to get out on the end of the pole is to inch out along it on one's butt. The climber's prusiks should be loosely attached to the climb rope and moved up the rope as the climber moves out onto the cantilever, Once the climber is on her way, several people can take off down the road to support the diversion. Direct support to the climber will be difficult, so the climber should have lots of food, water and supplies on them (see Tree Sit Equipment Per Person P. 110). The climber can complicate removal of the cantilever by moving around on the pole and up and down their rope. Beware of attempts by law enforcement to attach ropes to the climber's end of the cantilever to stabilize it before trying to move it. A climber with a sharp pocket saw or knife can usually remedy this. Cherry pickers and boom trucks can also be a nuisance. When the games become futile, the climber may have the opportunity to repel off the end of the pole into the canyon below and make a run for it! Before attempting this, the climber needs to make sure the rope is long enough so they don't repel right off the end of it! As hard as it may be to believe; this has happened!
NOTES

""d atiqel
TREE SITS- CANOPY CAMPING Tree sitting is an action that speaks to the highest level of forest defense.
Nothing beats the image of a woman or man sitting on a platform lashed to a Doug Fir or Ponderosa Pine with a raised fist in the air and a banner hanging below. The media loves it and the timber beasts hate it! Tree sits have been very successful in halting logging all over the world. Tree sit forest occupations have lasted weeks on end in Northern California, Canada, Australia and England. Technical sits were first used in 1985 by North American activists defending Millenium Grove and Pyramid Creek in Oregon.
Any affinity group that attempts a sit must be highly trained and competent in the skills of climbing. Training and acquiring gear can take months. The informa-tion presented below is only an introduction to the gear and basic concepts required for this type of action that is again, highly dangerous, technical and expensive. If you and your affinity group decide that trcc-sitting can work in your bioregion, please waste no time in finding climbers who will take the time to teach you the actual climbing skills! experience in climbing skills is everything when you're dangling 80 feet above the forest floor!
+ Strong media/public relations image + Can tie up the canopy and prevent logging for days on end + Extremely difficult to remove sitters - Expensive technical climbing equipment needed - Requires extensive training and preparation - Supporting the sit from the ground can be very difficult
Preparation T ime: Weeks to months depending on climbing skills and access to required gear. PEOPLE N EEDED: 1. sitter per set of gear (plus 2-3 support folks per sitter to assist in gear hauling and setting of platforms), Cost: Retail for one set of required gear can be as high as $500. Waste no time seeking donations and kick-downs.
109

110
EQUIPMENT NEEDED P ER P ERSON (T WO TON TEST S TRENGTH !) 1- Climbing harness w/buckle and leg loops (diaper seat harness can be
made from 14'716' of webbing. See P. 94) 4- Stirrups to climb up tree and set up anchors (size depends on tree diam-
eter. Some tree climbers/sitters prefer spurs and a lanyard system to ascend a tree. Stirrups are required in any climbing situation)
2- Ropes (165', llnirn, dynamic for hauling and static for traverse) 6- Webbing slings: 1 inch tubular webbing tied with a water knot 3- Prusiks: 6mm climbing access/perlon cord, tied w/an double fisherman's
knot 3- Large locking carabiners 8- Non-locking carabiners ( 2 opposed and reversed for anchor) 1- Figure-8 rappel device 1- Rigged platform/hammock w/ tubular webbing support and rain fly 100'- Parachute cord to retrieve anchors/stirrups 1- Poop bucket or tube with paper 1- Piss bottle 1- Daypack for evading freddies and loggers w/water, raingear, granola bars,
headlamp, radio, etc.... 5+ Gallons of water (minimum, spread through many containers) - Food (enough for planned occupation, cold/ready to eat. No stoves should
be used on your platform. Ground support can provide hot food) - Radio (to comunicate w/ support) and cell phone (for media interviews) - Wool /poIypro/fleece/capilene under and outerwear. - Rain gear - Sleeping bag w/bivy sack or rain tarp (no down filter, useless when wet) - Headlamp w/ extra batteries and bulbs - Book/recreational items
KNOTS (* ILLUSTRATED ON P . 111-112) - Water Knot (to tie webbing)* - Double Fisherman's (to tie prusiks)* - Butterfly Knot (to take slack out of lines) - Figure-8 (to make a safety line)* - Girth Hitch (to use for stirrups and anchors around trees)*
Prusik Knot (to climb rope)* - Half Hitch (to create a traverse) - Bowline (not encouraged but good to know, often tied wrong)*

f~zv oTs
Used to join 2 ends of webbing.
CLove Hitch Simple knot to
finish line secured to object.
Prusik Best friction knot for rope
ascent without jumars. Loop a sling of 5-7 mm rope around top rope
and feed it back through itself 2 or 3 times.
Double Fisherman's Used to join 2 ends of rope.
Single Bowline Non-slip loop knot used to haul objects.

Rewovcn Figure-8 Safe knot for anchoring o or around some
Girth Hitch Knot used to anchor rope /webbing sling
around objects.
Figure-8 Loop Creates loop in rope for hauling equipment.
Double Rewoverifi Figure-8
Used for tying rope directly to
anchor. (
Square Simple, all-purpose knot. Not
for weight-bearing-can slip!

How To SET Up A TREE Srr (rw mu) 1) Stirrup or spur up a tree, towing a rope (set around 80' for a 165' rope).
2) Set double anchors and sling a rap line (rope slung w/carabiners, not directly on
sling.) 3) Use set rap line to haul platform (use prusik back-up)
4) Haul platform and clip into 2nd set of anchors below
established rap anchors. 5) Haul gear/ water (clip/tie all items into
anchor system). 6) Tie and secure
traverse lines. 7) Set up tarp over
platform, hang banners.
113
11111111 Lightweight Tubular Aluminum +
.25" Vet= Platform
TREE S LTTING LOGISTICS AND ISSUES - Appropiate time and place to sit - Confident of safety, ability/skills (-; in In runl
and commitment of affinity group - Excellent scouting of site and
secured route/ access - Committed Gound Support (for
resupply, cat & mouse, and witnesses to any possible violent situations)
- Media exposure and access to the site (if access is denied we must be capable of getting pictures and video to the media)
- Solid image, message and SO undbites
- Jail and Legal sup-port (lawyers, jail crew, etc)

114
kill Jokitth seperate safety lines/points (even when sleeping)
- Always 2 anchors - Doubled back buckles - ABCDE's memorized and used to check system w/ every procedure (A-
Anchor, two points at all times, B - Buckles on harness, doubled back, C-Carabiners, locked, D- Devices, prusik knots or stirrups are girth and tied correctly, E-End of rope, length is sufficient).
- Nothing is dropped (deliberately or accidently, injury to ground parties or additional Iaw enforcement charges could occur)
EQUIPMENT C ARE AND S AFETY - Don't tread on the rope - Don't store rope or webbing anywhere near car batteries or anywhere they
have been (ie. car trunks, pick-up beds, etc...) because the acidic fluids and fumes can invisibly weaken the rope/webbing fibers.
- Don't leave the rope or webbing exposed to UV radiation for long periods - Don't use equipment that is faded, discolored, stained, ragged or oily, - Don't use equipment of unknown origin (with donated gear we are obvi-
ously grateful but must ask many question of past abuses, especially ropes) - Be honest and retire gear that is exposed to extreme stress (a good example
is a carabiner dropped 80').
NOTES

CLIMBING HARNESS
LOCKING Cr NON-LOCKING CARABINERS
FIGURE-8 DESCENDER
j UMAR ASCENDER (two needed)
6 MM PERLON
ROPE
115
02 AA CLIMBING GEAR

116
fih INTERNETS
One to two people can occupy a tree sit, but up to a dozen can surf an Internet! Internets are strong nylon webbing cargo nets, trawler fishing nets or circus nets that people occupy which are suspended from the sub-canopy of a grave of trees to be protected. Forest activists in the U.K. first developed this creative alterna-tive to single tree, single person tree sits, and California Headwaters Forest defenders maintained an Internet "Ewok Village" for 21. days in 1996.
Select 5-15 trees surrounding an open area the net can envelop. Weave slings of strong climbing rope through the corners and along the edges of the net. The edges of the net should be folded tinder and bound for strength at the points at which they are to be lashed to each tree. Run traverse lines above the net that people can clip their harnesses into while they are in the net. If the net fails these traverse safeties will save them.
Stirrup up each tree and attach the slung together corners and edges of the net, carabiner to carabiner, to a sling of rope or webbing that you have girth hitched to the tree. This is the same way you anchor the climb rope to the anchor when setting a tree sit.
Food, water, supplies and equipment can be hung over the sides of the net. Platforms can be set on the surrounding trees for resting and sleeping on and can be reached by traverse lines. At all times, the people occupying the net should be clipped into safety traverse lines running above the net in case the net fails. Have fun! Watch out for sharp scissors from below!

117
JA
eJ A

118
ROAD OCCUPATIONS AND FREE STATES Since roads pave the way for the logging,
mining, grazing, development and the utter destruction of wild, natural places, they must be stopped, seized or ripped. Creating a people's road occupation is an effective way of protecting a given area. The occupation or blockade enables activists to consistently monitor the area while creating a climate of strong resistance to the proposed annihi-lation of it.
Nonviolent road occupations have arisen in every shape and size. The first Earth First! road blockades were at Cahto Peak, northern California in 1988. Enormous debris barricades, a 4' wide 3' deep "tank trap," and roving cat and mouse blockaders completely shut down logging for three days without any arrests. This pressured the BLM to review the sale and eventually the area was protected.
Some road occupations are as simple as small shanty towns of tents. Others are quasi-sophisticated villages with living and cooking shelters and elaborate blockades. What's important is that a road occupation be located strategically and that it be secure. Access to the area must be effectively sealed off from all points to the forces that want to destroy it. The blockade needs to be situated far enough from the area being protected that destroyers could not easily walk to it. The road occupation can begin over night with the installation of one or more road blockades by a tight affinity group. From this point forth the continual presence of activists is needed to prevent law enforcement from crushing the blockade. With time, the defenses can be multiplied and fortified as people will be living on the blockade.
Some would say the road is now an autonomous zone, liberated from the government, reclaimed by the people. The blockade usually attracts a diverse group of people and a progressive community of resistance quickly forms in what has been identified as a Free State. Now, security is a priority. Not only does the blockade defend the land; it also guards the people on it from ren-egade attacks by Forest Service, BLM, police and anti-environmental/wise-use thugs. A schedule should be worked out within the group that ensures a 24-hour security watch of the area. Those on watch need to be ready to sound the

119
alarm and spring into action at any given moment Security camp watchdog posts situated above and below the blockade will help in alerting the core residents of the blockade of any sudden events that may develop. Whistles and noisemakers are essential security tools for everyone to have. Two-way VHF radios and cellular phones are very handy yet expensive. What's important is that there be a process of communication on the blockade that is respected for security, safety and action preparedness. Activists should always pair up and rotate through security shifts, always keeping close radio communication with the main camp. This can be hard when there is a small number of people at the blockade. It is essential to have a tight affinity group that is dedicated to occupying the sight and to reaching out to additional, trustworthy people to help hold the blockade.
b" 'W 2?"514/C 115>tib C4WD
The surrounding area needs to be carefully surveyed and mapped. People need to be familiar with the blockade Depending on the remoteness of the blockade, mountain bikes, motorcycles or even cars may be used to reach help, while the cellular phone instantly sends word of fast-breaking events to your support networks and the media. Documentation of "visits" is also key. This is best accomplished with video cameras, still cameras and pocket audio recorders. Integral to the occupation are devices that will keep people and the blockade from being easily breathed, ie. concrete lock down barrels, dragons, tripods, etc.... Barricades that may have taken months to construct are quickly removed with heavy equipment unless people are physically attached to them.
The story of the 1995-1996 Warner Creek Cascadia Free State in Oregon is a good example of a full blown road occupation. The heart of the blockade was the main tipi village guarded by a pole wall, complete with watch tower, cat walk, draw bridge and mote. There was a pole hut built further up on the road with several other less livable structures. Scores of trenches were dug into the road and culverts were pulled and plugged to wash it out. A wooden bridge allowed people to pass over one of the biggest trenches. Rock and wood debris

120
walls and artistic obstacles were built up and down the road as well. There were two tripods on the blockade, as well as one bipod. A May Pole was
erected for dancing around, not climbing as you would a mono pole. Several steel barrels were fitted around the forest service gate and filled with concrete. The gate was originally placed on the road by the government to lock the public out of the area while it would have been destroyed. But, the concrete-improved gate enabled activists to lock down to the barrels at any time. There were three sleeping dragons in the road, one covered by a steel fire door which had an arm hole cut through it with an acetelene torch. This lock down was known as "Morrison," affectionately named after Jim Morrison of The Doors, A concrete crawl space with lock down positions, known as "the dog house," was built into a large rock and wood debris pile at the lower security camp.
In all, the Cascadia Free State was a blockader's playground. Many ideas were tested and techniques perfected there and applied in other forest defense campaigns throughout Northern California, Oregon, Washington and Idaho. Many of these ideas were inspired by the U.K. and Australian road campaigns. People on the U.K.'s A30 occupation even dug an elaborate system of under-ground tunnels. For nearly one year, courageous people and their ecotopian Cascadia Free State protected the Northern forests of Warner Creek before they were forcibly removed by Forest Service Iaw enforcement on August 16, 1996. For better or worse, now an executive order blocks all logging in the area. Unfortunately, the southern forests of Warner Creek, containing the largest, oldest trees there, are not covered by this order.
However, it goes without saying that this protection would not have been declared if people had not moved themselves to nonviolently seize the access road to the area and made Warner Creek an international incident. Thousands of people from all over the world were inspired to visit and support the outra-geous blockade activists had built to defend Warner Creek. The local commu-nity sustained the blockade the entire time with endless food, gear and equip-ment donations and lots of financial and political support. Because of this, activists were able to focus their lives on defending the forest, keeping the story

121
in the media, and the politicians and the Forest Service on the run. Organizing a road occupation is challenging and requires a core group of
committed, trustworthy friends, reliable supply lines of food, tools and equip-ment and an extended support network of people willing to rise to the defense of the area. The occupation will only be as strong as peoples dedication to fulfilling these and other campaign needs. Once in place however, a road occupation affords activists a means to be not just a random, short-lived inconvenience to the Earth rapers. The blockade offers a creative space, a base camp, for activists to strategically plan and launch action after action. The blockade has the potential to truly become an enduring, uncompromising, nonviolent land occupation that successfully resists any form of destruction.
NOTES

HELICOPTER BLOCKADES HELLicopters are used to build dams, spray toxic chemicals, transport
military arms shipments and especially to log. Helicopter logging is promoted as an "environmental solution" to the impacts of industrial forestry. It's said to reduce erosion and prevent road building, both good things. But, the cold, hard truth is that helicopter logging is a hoax. Anyone who has experienced first hand the ear splitting roar of logging helicopter engines, the noxious diesel pollution they spew into the pristine forest canopy, the furious pace at which they extract trees, and the violent thrashing of the canopy that the wind from the blades causes, knows that helicopter logging is nothing but evil. How a bird or other forest creature can survive, much less endure the assault of these hulking machines of destruction is beyond comprehension.
HaJCOPTER IMPROVEMENTS
Logging helicopters can be blockaded in several ways. The first is by preventing them from ever taking off by locking down to them where they are landed and housed with U-locks and lock boxes. This applies to darn building, military and chemical-spraying helicopters as well. Once the copters are up and flying other tactics must be employed. People running around in the logging area, cat and mouse style, can at least delay operations until cops and workers arrest them all. More concrete measures should be employed by a group intent on stopping helicopters, because all helicopters need landing pads in the logging area. People can lock down to concrete barrels and dragons on the pad or throw up a tripod, bipod or mono pole. Tree sitting works too. Canadian forest activists successfully repelled helicopters with tree sitting on Vancouver Island.
A variation of a tree sit is to have the sitters occupy the trees adjacent to the landing pad and run intersecting traverse lines above and across the landing
e e eee 122
123
pad to prevent the copters from landing, and thus even operating in the area. Although these blockade ideas are elaborate, the Syracuse Women's Affinity Group blockaded the airstrip of the Seneca Army Depot in New York in 1983 by simply sitting down on the airstrip with their arms joined together.
In addition, the rotor blades, air speed indicators and cargo hooks of helicop-ters are extremely sensitive. The pilots are acutely aware of this and thor-oughly check the helicopters before flying. Furthermore, they will steer com-pletely clear of anything that the strong winds created by the copter blades could potentially suck up into them. With this knowledge, tree sitters have successfully suspended weather balloons and flags from the forest canopy. Along with ground support people, sitters have also heavily and widely dispersed six inch square pieces of linoleum that is brightly colored flourescent orange on the landing pad and in the trees. All of these objects have kept helicopters out of the forest.
Next to the landing pad being ripped up, pilots, corporations and law enforcement really hate it when people scatter objects and debris in the areas where the helicopters operate. Be sure to anonymously announce to the media, helicopter corporation and law enforcement that this act has been done, and exactly where it has been done, for safety sake. Throwing something at a moving helicopter is extremely dangerous and ridiculous when you consider that helicopters are on the ground without people in them more often than they are in the air anyway. The best way to extend the effectiveness of the linoleum is to brightly color two-thirds of all the pieces of it and camouflage color the other one-third of the pieces. This way, they can never be sure that they picked up all the pieces. Letting the copters in would simply be unsafe.
Helicopters cost $250-$2,000 a flight hour. Any disruption of their scheduled work time is going to cost the responsible corporations lots of money. Further-more, spare part replacements could take days, or even longer to complete.
NOTES

SHIP BLOCKADES Ships, like freight trains, transport many boycott products and materials,
such as raw logs and tropical timber, oil, plastics, chemicals and waste. Ships also dump waste, even radioactive waste, at sea and are responsible for whal-ing and industrial fishing. Fortunately, they are very blockadable. Earth First!, RAN and Greenpeace activists teamed up in 1992 and successfully blockaded and hung a huge banner off of a ship importing tropical timber at Long Beach, California. This action was very successful and drew international attention to the destruction of rainforests.
Like trains, communicating with ships is very challenging. Ship blockaders must also be extremely cautious of the dangers involved in taking action on ships. Not only could anyone in your group sustain the typical land-based injuries, they could also drown. Because of this, Personal Floatation Devices (FPO's), or life jackets, should be worn by everyone. Establishing solid commu-nications with ships can take weeks of research. A well coordinated ship action
"AL 7 124

125
takes a couple of months to plan, much less fundraise for it. The group needs to delegate responsibilities to cover the needs of scouting and reconnaisance, researching and monitoring communications, developing action scenarios with arrest and support roles, acquiring needed equipment, creating media packets and other things, in addition to practicing for the big day.
Blockading ships usually involves using ships. In 1989, Sea Shepherd Con-servation Society crew members very bravely and defiantly deployed from their zodiacs and chained themselves to the anchor chain of the Venezuelan tuna seiner Pan Pacific in Costa Rica's Puntarenas harbor. This action helped Sea Shepherd later leverage an agreement with the captain of the seiner to hand over the coordinates of the operating Mexican and Latin American tuna fleets in the Eastern Tropical Pacific tuna grounds. Sea Shepherd then moved there to harass and chase the tuna boats from the area, successfully preventing the boats from setting their nets on dolphins.
A flotilla of small crafts can also hold a monster ship at bay for some time, until the coast guard clears them away. Australian activists have blockaded tropical timber import ships for hours with nothing more than their kayaks. For more lasting blockades, climbers can board the ship from zodiacs and lock down to the ship or hang a banner off the side of it. The masts, cranes and towers of the ship are also good targets for banners. Ships usually have emer-gency ladders hanging off of their sides as well which make for easy boarding.
A multitude of U-lock and lock box lock down opportunities exist on a ship from the railing, to the paint and eye hooks, the rudderstock, even the anchor itself can be locked to. Large caroming devices that rock climbers use to wedge into crevices can be used to lock into drain or discharge pipes on the side of the ship as well. It is important to stuff tight fitting tupperware containers into these drains before you lock into them though, to prevent the ship's crew from discharging water or waste onto you. A long line of climbers can also repel off a bridge in the port, blocking a ship's passage in or out of the port. Ships have also been known to sink in port as a result of nonviolent direct action.
NOTES

cAT xNE) maiuse
14*-4.1.*0 Aok1 CAT AND MOUSE
"lie who fights and runs away... lives to fight another day."— Bob Marley
Cat and mouse describes a peoples occupation of a timber sale that includes dodging and running from law enforcement and loggers to keep them from logging and to keep you from being caught. Stealth, fit, woods-wise eco warriors running around in a timber sale while logging is in progress can bring the destruction to a screeching hault. The Siskiyou Forest Defenders resisted the Hoxie Griffin timber sale in Southern Oregon for weeks on end during 1996 by filling the logging area with people. Up to fifty people at a time would hike backwoods and spring into the units, putting themselves between the chainsaws and the trees. Although logging operations continued, the activists constantly impeeded the destruction of the sacred and beautiful Indian Plateau and inspired many others to take direct action in defense of their watershed.
Cat and mouse is even more effective if people occupy the units within a sale before the day's logging begins since the early morning hours are the most important work hours for the corporations. Law enforcement will announce to everyone that the forest is closed for public use (but open for corporate abuse!), and that everyone must exit the forest. When people don't comply, the cops usually escort the loggers into the forest, let them get to work and then they come after you. Even though it is illegal and extremely dangerous for logging

44.• 101 AP* I/ IN • to proceed when the public is in the forest, the cops will typically allow it to proceed. If you have video and still cameras to document this obscene collu-sion between the cops and the corporations, media outlets will almost always run the footage. Sometimes they will even pay you for it. Make sure there are fast runners on the action, who know foolproof escape routes and can get the film out of the woods in one piece.
Some of the best things about cat and mouse are that it costs very little and can be planned overnight. People teamed up in affinity groups can coordinate their own actions in the woods, which may include hugging or chaining themselves to trees, dodging and exhausting cops and loggers, talking to loggers, unarresting restrained friends or liberating weapons of destruction, such as chainsaws and axes. Pure and simple: it is chaotic. In fact, with over 20 people in a tight area, it's mass pandamoniuna. If you are arrested, going limp is the most hasslesome option you have until a friend can unarrest you. Be-cause of the terrain, they may have to drag you out on a stretcher.
Like all blockading, you need to be prepared physically and emotionally. To avoid arrest you may be locked out in the woods all day and night. Bring backwoods dried food, water, camouflage clothes and warm, wet weather gear, a space blanket, flashlight, lighter, knife, first aid kit, topo maps of the area, a compass and a camera. Have an escape route mapped out and establish contingency plans with your group. Be safe. Be aware. Be fast. Don't get caught!
NOTES

CRITICAL MASS BIKE RIDES
Cars kill everything! Cars cause air, water and noise pollution. Conservative estimates reveal that every year in the U.S. cars kill four times more animals than vivisectors and two times more animals than hunters, for a total of 400 million animals. Only america's meat eaters take a larger toll on animals than its motorists. Most of these animals are wildlife species whose critical habitat has been fragmented and destroyed by the road building projects necessitated by private-car transport demands. Deriving the raw materials for cars alone produces the devastating impacts of strip mining and extraction of metals, ores and textiles. In addition to all this are the vast quanti-ties of petroleum needed to fuel them that is ripped, torn and sucked out of the Earth. Among other things, cars are perhaps the biggest industrial icon of the modem world, connecting the oil, mining, chemical, textiles, electronics, advertising and development industries. But cars, and car culture, are being subverted by bicyclists in cities across the world.
-f-roppir •-. vsmilicarliora 4.0 •
'P" Tit _ • 1141JIMAtV ) a At 10711- e014f;STII I 11114111
128
129
Bicyclists are taking direct action against cars by simply banding together and taking back the streets in what have come to be known as Critical Mass Bike Rides. Many cities already have organized rides that convene on a par-ticular day of the week or month. The rides usually originate from public landmarks at a city center where hundreds of riders can casually gather around rush hour. When a critical mass of riders is reached, the ride begins. The San Francisco, CA rides have been consistently going on since 1992 and attract up to 3,000 riders at any given time! In smaller towns, where the ride is not yet popularized, the mass may not be reached until some point in the ride. Sometimes flyers and maps for the ride are helpful to distribute, but these usually tip the cops off.
The bikes may completely or partially block traffic along any given route they choose, spontaneously creating car-free zones. What's important is that the riders don't become fragmented by cars trying to get around and between riders in traffic. The tighter the mass of riders, the more successful the road blockade. Core riders typically cycle through town, carrying banners and signs, chanting, singing, shouting and pouring out their love for bikes and the Earth and their disdain of cars, roads and industrial society. Other bicyclists join in and drop out as they please. The whole circus usually proceeds slightly quicker than a snail's pace to the rider's delight as the traffic piles up behind them.
You, or your group, can start a critical mass ride by simply spreading the idea by word of mouth and postering for it. Pick a consistent day, time, and starting point. For instance, "The Last Friday of Every Month, at 5 P.M., in Front of the Clock Tower." Be prepared to deal with cops, even arrests, car hassels, crazy, irresponsible individuals and the media. Practicing noncooperation with the cops while juggling your bike and the traffic at the same time can be tricky. Make sure you have strong support. And, if there are enough riders, the cops may try avoiding an arrest confrontation. If the entire mass keeps riding, even in defiance of strict orders, chances are the cops will abandon making vain arrests and focus their efforts on stopping the next ride before it even begins. They will try and single out organizers and crush the movement. Don't let them. No one's in charge, right?
Remember, it is ethical to let emergency vehicles and sources of mass transportaion, such as buses and trollies pass (not taxi's!). Have fun! People usually go wild on the rides, dressing up in costumes, singing, chanting, promoting issues with signs and banners, and building and riding funky people powered contraptions.

130
NOTES

44.. dP AMP , . . .
Hurry SASS: THE BEST DEFENSE IS A GOOD OFFENSE!
"...a militant minority of wilderness-minded citizens must be on watch throughout the nation and available for action in a pinch."
— Aldo Leopold
The defense of wilderness and ecosystems means not only protecting forests, deserts, prairies and oceans but also the critters that live in them. Everything from pigeons to bison to bears, wolves, coyotes, snakes, alligators, geese, sharks, mountain lions, elk, whales, sting rays, moose, deer and foxes have been hunted, chased, poisoned, blown up or trapped. Predators have been especially targeted by hunters, farmers and governments (U.S. Fish gz Wildlife, Animal Damage Control, etc...) because of either their perceived threat to humans or the mystique of killing a fellow predator.
An effective tactic to stopping or inhibiting and drawing attention to this massacre is hunt sabotage... hunt sabs! Hunt sabs often mean direct intervention
and are meant to disrupt or stop a hunt. Actions can take the form of blockades, harassment, propaganda, etc... But, hunt sabs alone don't stop the hunt forever, campaigns do! A hunt sab is one tactic to interrupt an annual hunt. To effectively end a hunt, it takes long-term, strategic planning. The sab itself is used to
I 4,14411 0/11, 4Q..:k7i,
-51,k47„ draw attention to and expose these unjust and immoral murders. If we use the media, for what its
worth, to get the public incensed about the hunt, we may be able to create enough public pressure to cancel the annual hunt.
There are several ways to effectively sab a hunt. The choice of tactic depends on the desired results. Ideally, hunts are sabbed before they happen by deterring the hunters. If the hunters know beforehand that they will have a difficult time, they may decide not to hunt. If the hunters do show, make them regret it.

- • , dp.
.r.
How TO DO A HUNT sAB: 1) Research the species you are trying to protect.
The tactic for the sab depends on the species and is different for every species. To sab a dove hunt, one group on the east coast had 60 people fly kites (some shaped like hawks, the dove's natural predator) to keep the doves away from the hunting area. People wearing blaze orange vests and shining flashlights into the sky reportedly works great to warn ducks, who have a keen eyesight. Staying near the hunters magnifies the amount of human scent in the air, alerting deer who have a sharp sense of smell and keeping them out of the vicinity of the hunters. Speak in regular tone voices though. Making lots of noise could scare the deer into the range of another hunter. Be sensitive to what the animal will respond to best Pick whatever tactic is best for the situation.
2) Every state has an agency that publishes regula-tions for hunting season that includes the opening and closing dates for every season. The regulations can be found at a K-Mart or Wal*Mart or bought from a small, mom and pop hardware store. The local library would have them too.
3) Get maps and scout the area of the sab beforehand if possible. 4) Always form affinity groups and know how far people are willing to
take it. 5) Prepare for the media assault: assign spokespeople, write press releases,
prepare visuals, practice soundbites, etc... 6) Find a lawyer to defend people "pro bono" (for free). 7) Always have a video camera with spare, charged batteries. 8) Utilize communications equipment; hand-held two-way radios, cellular
phones, c.b. radios, scanner, etc...
GOALS OF H UNT S ABS: 1) Stop, interfere or intervene in the hunt. 2) Use the media to draw attention to the atrocity. 3) Build the movement and strengthen affinity groups. 4) No one gets hurt, neither the hunters nor the sabs.
132

THINGS TO CONSIDER: 1.) Safety: If you are around hunters with weapons, do not make fast,
aggressive movements. Communicating clearly and calmly can diffuse a dangerous situation. Do not risk becoming a martyr. A public commitment to nonviolence is good.
2.) Media: With hunt sabs, just as with any direct action, there is a lot of media preparation and outreach work to do. Hunt sabs are generally a very juicy topic for the media. Typically, the media responds very favorably. The issue is so morally cut and dry that to not expose it would be throwing a great story opportunity away. Also, most people like animals and don't like to see animals suffering, dying, agonizing and writhing in pain. Use this to your advantage, Give the media background images that they can use to frame the story the way you want.
NUT+.413Elt or P EOPLE N EEDED: A minimum of three and as many as hundreds of people are needed to
effectively attempt a hunt sab action. For safety, it is a good idea to have at least one person with you out in the field and one person who knows where you are and who can contact the media. Affinity groups are an effective way to organize a group of potential hunt saboteurs. Lining up proper affinity group support and legal defense is important. Avoid working with people you are uncomfortable with or don't know.
TOOLS/T OYS FOR HUNT S ABS: 1.) Video cameras (Hi-8 is best) and still cameras. 2.) Noise-makers, ie. compressed-gas air horns, car horns, whistles, trumpets,
trombones, drums, etc... 3.) Smoke bombs/flares (paint ball suppliers are a good source. Not avail-
able in CA and some other states).
0 0.• .1114 e 133 1. A146 ...4;: A
f(•(

•
4,1•1*0 -r•A r •
4.) Assault prevention devices/personal body alarms—your voice! 5.) Anything else that would dissuade hunters from hunting. Be creative.
There is no limit to creative things that can be done to stop or hinder the senseless killing of animals.
LEGAL ISSUES: Interfering with a legal hunt is illegal. Typical charges are trespassing (for
private land), disorderly conduct, defiant trespass, resisting arrest, criminal conspiracy and interfering with a legal hunt. These so called "hunter harass-ment" laws must be challenged in the courts. Massachusetts and Idaho are the only states with no or limited hunter harassment laws respectfully.
S OME EXAMPLES OF EFFECTIVE HUNT S ABS: • Big Horn Sheep hunt sab, Mojave, CA • Shark and Sting Ray hunt sab, California • Black/Grizzly Bear hunt sab, British Columbia • Bison hunt sab in the prairies of Montana and Idaho • Pigeon shoot hunt sab, Higgins, Pennsylvania • Prairie Dog hunt sab near Boulder, Colorado • Sea Lion hunt sab, Seattle, Washington • Canada Geese hunt sab up and down the North American East coast
WARNING: THIS IS NOT A GAME! THESE HUNTERS ARE ARMED WITH WEAP-
ONS AND ARE TRAINED AND PRACTICED AT KILLING WITH RIFLES, SHOTGUNS, PISTOLS ANO
ROWS. You MUST TREAT THEM WITH RESPECT. ALso, THE POLICE ARE ON THE SIDE OF THE
HUNTERS. NEVER MISTAKE THIS. SABRING A HUNT IS AGAINST THE LAW. BE CAREFUL our THERE. WEAR RIAzE-ORANGE VESTS!
, A u • 6,,„„.. .• , (i 134

i, VsN • ''' so* 1...• riP.M a%
Is I: tarki .:t- 4111*" ,. ..-- .0,....., • 6r ..•
F OR MORE INFO ON H LINT S ABS/A NIMAL DEFENSE CONTACT:
Bear Watch: Black and grizzly bears in BC, Canada-1850 Commercial Drive, Box 21598, Vancouver, British Columbia V5N 4A0, Canada, PH: 800-836-5501 or PH: 604-873-4868, Fax: 604-873-4801, e-mail: bearwtchettelixnet, SeDnA: Regional ocean defense-FOB 67121, Scotts Valley, CA 95067, Sea Shepherd Conservation Society: Uncompromis-ing high seas campaigns in defense of whales, seals, and oceanic ecosystems.-3107A
Washington Blvd., Marina Del Rey, CA 90292, PH:310-301-7325, Fax 574-3161, e-mail: [email protected], Web Site: http:/ /www.seashepherd.org, Committee to Abolish Sport Hunting: Deer and sport hunting-PO Box 562, New Paltz, NY 12561, PH: 914-255-4227, The Fund for Animals, Inc: Hunt sabs, animal advocacy, legislation, etc!-850 Sligo Avenue, Suite 300, Silver Spring, MD 20910, e-mail: MikeMafund.org, Mike Markarian, Campaign Director PH: 301-585-2591, Fax: 585-2595, People for the Ethical Treatment of Animals: Anti-vivisection, anti-fur, and all animal rights campaigns except anti-hunting: A great info clearinghouse!-501 Front Street, Norfolk, VA 23510, PH: 757-622-7382, Animal Rights Resource Web-Site: http:f /envirolink.org/arrs/. The Bear Project: PO Box 332, Williams, OR 97544, Animal Liberation League: Radical resource group for direct action animal rights campaigns, publishes "No Compromise!" PO Box 240655, Apple Valley, MN 55124, Freeman Wickland: H-PH: 612-953-4293, e-mail: wick00343tgoid.pc.urnmectu, Animal Rights Direct Action Coalition/Vegan Front Line: PO Box 11492, Costa Mesa, CA 92627, Gina Lynn: 714-574-0174, Vegan Action : Publishes "Vegan News." Organizes media campaigns and subvertising-P.O. Box 4353, Berkeley, CA 94704, 510-548-7377, e-mail: [email protected], Coalition to Prevent the Destruction of Canada Geese: PO Box 562, New Paltz, 12561 PH: 914-255-4227, ARK H PO Box 687, Station Q St. Jacobs, Ontario, CAN, NTH 3A3, ALF Support-ers Group: POB 69597, 5845 Yonge St., Willowdale, Ontario MKM 41(3, Canada, ALF Supporters Group-UK: BCM 1160, London WC1N 3XX, U.K.
STOP THE WAR ON WILDLIFE!- Contributed by Black Panther

).1:-..: i, • i,-, - 1\ ,\
S., t• ip i%
Sr -Allii i .. ,
NOTES
Aki , . 1((,r ,7
11 136

- * • "P.M ik
91111111 .e. •
MASS ACTIONS
Actions involving large masses of people pioneered civil disobedience and nonviolent direct action worldwide. Campaigns led with mass actions have abolished slavery and apartheid, won Iaborer's rights in the work place and forced governments to give women and people of color their civil rights, including the right to vote. Mass action campaigns have also shut down operations of destruction and prevented the ruination of many wild, pristine places. Thousands of people have mobilized for the Healing Global Wounds gatherings at the Nevada Test Site to resist the proliferation of nuclear weap-ons; thousands more for the ancient redwoods of Northern California during Redwood Summer 1990; thousands more stood up for Clayoquot Sound in 1993; and thousands more to fight road building and "Reclaim the Streets" in the United Kingdom today.
UNITY SOLIDARITY REVOLUTION
Sit ins, building and land occupations, die-ins, marches, rallies, demonstra-tions and survival and freedom walks, rides and caravans have all played vital roles in creating social change and holding greedy corporations and corrupt governments accountable to the people. All these actions are just as important today as they have always been. Work those phone trees! Do it!

138
4„,esort- 41..1-9F tc r
A4 k 4' _ 44 q" TIr 4
MISCELLANEOUS DEVILTRY
YARNING Chainsaws destroy millions of years of
evolution every time they tear into the flesh 8EW4RE of ancient forests. However, this insanity and the corporate greed it feeds can be WE NITER SIEEP...
stopped instantaneously by a single strand of acrylic yarn. Infuriated loggers with high testosterone levels will not even think twice before going to cut a spider web of yarn protecting the forest they intend to destroy. But, if a chainsaw is used to cut through yarn, the yarn immediately gums up the chain and the blades and is very unpleasant to remove. In 1992 alone, the Northern California Albion Nation uprising in defense of ancient redwoods probably wrapped enough yarn around gates, trucks, heavy equipment and trees to stretch from WE NEVER FORGET... Humboldt county to Washington, D.C.
Running balls of yam through a forest slated to be cut will effectively slow down logging operations. The yarn can only be cut with scissors or a sharp knife, which takes time and costs them money. But, just because you are using something as harmless as yam to stem the destruction doesn't mean that you shouldn't be careful! Yarning may leave a group of activists momentarily with standing trees, but also with one very angry crew of loggers. Check for ultra cheap bags of scrap yarn at thrift stores and fabric outlets. Acrylic yarn is the strongest.
DEBRIS Roads are often naturally cluttered with rocks, boulders and downed trees
which block vehicular passage. But, with a little effort, roads can become unnaturally cluttered with these materials to block vehicular traffic. Things that are very helpful in moving heavy objects into place are come-alongs or block and tackles, bow saws, axes, shovels, spud/gravel bars, crow bars, pick axes, shovels, six to ten inch diameter round roller logs, rope and gloves. Things that are very helpful in keeping heavy objects in place are chicken and barbed wire, concrete, rebar, nails, staples, yarn and rope. Elaborate debris

*
blockades, especially successive ones on a road, can spring to life overnight. One person can move massive logs or rocks with the Egyptian roller method. Slip round roller logs under the massive log or rock and push it or pull it with a rope from the end.
Think big like an Egyptian! Several people can move a large log by girth hitching long rope/webbing slings around it and carrying it straight-armed from their wrists. Use wide webbing and thick gloves over wrists for pad-ding. Static blockades, in and of themselves, are a strong sign of resistance to business as usual. Symbols and letters can also be created on the road with debris to empower the resistance and to psychological impact the opposition. Debris blockades also buy time and create diversions for more complex, people-involved blockades, like tripods and barrels, being deployed further up the road.
ROAD RIP Just as storms can wash away and remove huge
stretches of roads, so can you! Logging roads or dirt roads leading to new developments are prime for ripping. Survey the scene. Use the natural topogra-phy to your advantage. Culverts, running water, steep drop offs, rocky overhangs, and downed trees are all things to look for. A culvert can be stuffed with rocks and wood debris, or car tires and truck tire fit elisrAtsvi inner tubes, to flood a flat stretch of road. Running water alone will naturally cut away even hardpan dirt Rog) Peek
e*"

CUYERT1T1S €XTREMOUS
110
•P' OW A. V 241.A. 4- 4r. ‘'L& }LT* AZ
rl 44 '#.14t1
0 4' 4
if directed across it. Better yet, culverts can be entirely removed from under a road, creating a trench, even a chasm, which can be easily deepened and widened by simply channeling running water through it. Witness the Grand Canyon!
Removing culverts is the prefered method to stuffing culverts. Stuffing may cause erosion into streams and other watercourses. Remember the fish, and make your road improvements accordingly! Gravity, pick axes, spud/gravel bars, axes, crow bars, sledge hammers and shovels help narrow sections of road disappear over steep drop-offs. Overhanging rocks are also encouraged onto roads with these same tools and downed trees can easily be dragged onto roads with come-alongs to create dams to collect water that will flood, soften and erode
the road— witness the Warner Creek and Jack Squat blockades of 1996! Don't stop when you're done with the dirt/gravel roads leading into the
wilderness; there are lots of paved roads around and connecting urban centers that need "improvement" too! Remember, roads pave the way for destruction! Decommission a road near you soon for the wild ones. Save Paradise! Tear up a parking lot! Plant an organic community garden! Squat!

141
TRUCKER FUCKERS What could be more disappointing to a logging crew, Freddy (Forest Service
stooge) or a road surveyor than downed trees and boulders strewn across the roads they use? Trucker Puckers! Several brightly colored, 5 foot long steel pipes which fit into a custom steel pipe tripod sleeve structure that are imbed-ded vertically in a road, will at least momemtarily stop any vehicle or piece of equipment. Trucker fuckers are not intended to catch the vehicle by surprise, around a corner, and cause an accident. On the contrary, trucker fuckers are intended to loudly announce themselves just beyond rack and wood debris blockades and prevent the vehicles from proceeding into an area. Vehicle/ equipment operators will naturally stop the machines momentarily to clear the first debris blockade, then shouldn't help but to notice the flourescent orange, flag flying, message laden steel trucker fucker blockade just beyond the second debris blockade before proceeding. They're lucked!
Construct the trucker fucker's sleeve from three, one-foot long, three to four inch diameter, schedule 40-60 thickness pipes which are cut and welded together in the shape of a tripod apex. Three slightly narrower in diameter pipes or bars, around five-feet in length, should fit through the sleeve and be embedded two-feet deep in the road. The bottom ends of these pipes should be cut at a sharp 45 degree angle with a cutting torch to penetrate the road. These pipes are also opened with a cutting torch, or cold chisel, at various spots along the bottom two-feet of the pipe to create barb like holds that will resist reversal once driven into the road. Brightly color the pieces and the sleeve with fluorescent paint and attach wild flags, stream-
ers and messages to them. To install the trucker fuckers, slide the pipes into the "---- 9 II
\\••
tripod sleeves one at a time and sledge i hammered them two feet deep into the road.
I2.*
NI.,,K The finished product should be three feet high t1
4.- off the ground. Post holes can be dug for the
11*' pipes in the road and filled with quick set ,
di .En,--41-ev-LI
concrete for extra reinforcement. For deluxe trucker
0 /
fuckers, set the pipes in the road in an
.;,. tirj•-• / .. .....
.. entire trench of quick
/ —TRUCKER"
set concrete.
FUCKER

142
.(u..); 4- 4- it 13 * 4 4- a- 1111
HOT RoCKS This one's sure to turn up the heat on your campaign. Build a giant fire as near
to the road you want to blockade as possible. A spur road off the main road is an ideal spot for the fire. Pile lots of porous rocks onto the fire. Be extremely careful! Nonporous rocks will explode! Let the rocks reach the highest tempera-ture possible. Then, move them by shovels, wheelbarrow or truck to the target spot in the road and spread them out in a rectangular shape. Better yet,if you think you can get away with it build the bonfire on the road at your particular point of interest and heap the rocks on. This way you won't have to transport the red hot rocks. The hot rocks will retain their high temperatures and prevent rubber tires from passing (;) over them for a long time. Pick a spot that is typically a slow speed spot with no dangerous drop offs. Like the trucker fuckers, for everyone's safety, the hot rocks shouldn't be a surprise. Hot rocks work best combined with other devices, like tri pods, barrels, dragons or even trucker fuckers. What hot rocks do best isact as a diversion that buys a group time to get people into position at other defenses that have been set up.
GATE CLOSURES The Deforestation Service and Bureau of Looting and Mining install closure gates
on public roads when a logging corporation moves into an area to destroy public forests accessable by these roads. The keys to the gates are strictly controlled by the agencies and the timber beasts. The gates essentially lock the public out. But, a bolt cutter and a new replacement lock can turn their closure on end. Circular disk locks are spendy, but work best as replacements. Better yet, seal their closure, by order of the people, in concrete!
Dawn a pair of rubber gloves and pour some quick set concrete into a light-weight plastic grocery bag that can sealed and easily hiked with in a backpack. When you get to the gate, stir water into the concrete until it reaches an extra thick and lumpy consistency. Cut slits all around the bag and ram it up into the lock guard pipe. Make sure the concrete fills the inside of the lock guard and encases the lock. Metal nuts and bolts can be mixed into the concrete for additional reinforcement. Duct tape over the bottom of the lock guard and punch small holes

143
4,4 n
T- ,c_4*11,isp* 4
111111"41 4 11' tr
in it to help support the concrete as it dries. Don't forget to wrap your surprise for the Freddies in yam!
DOOR CLOSURES Corporate and governmental doors are
usually dosed to a critical public demand-ing change. So, in all fairness, their doors should be dosed to them as well, not just the people. One nifty way to accomplish this is to utilize the popular car security device, "The Club." The Club will only work on long handled double doors; but it will work quite well. Simply slide the dub between the two door handles, rotate
1
I TSv ft lel
it, and extend it into the locking position ea on so that both ends are firmly wedged against the handles. Make sure before you do this that no one is going to be locked in the building. Nearly all buildings have multiple exits. If no one is in the building and your goal is to keep it that way, any door lock can be jammed with either epoxy super glue, liquid metal, tooth picks, or paper dips.
Use security precautions and rubber gloves. Be discreet. Squeeze as much glue as possible into the key holes from a small hole in the glue tube. Or, snap off as many tooth picks and paper clip ends as possible into the locks. Leave no signs of your tampering. Clean up and split! This is sticky business. If your work is detected before the glue sets, you could be foiled.
MANURE DUMPS, PUKE-INS, SAWDUST DELIVERIES Let your imagination run wild!

144
/4.74. :etc tt,14- 11-2x*-LW A -
NOTES

115
kikVOIr A **-ort- wil4 4
4. 11 Tit t,t 4AL "4 Az i"
fi L`r ii."
CONCLUSION Will the revolution against corporate domination of the Earth be led by a
vanguard of driven individuals or by the masses when the breakdown arrives? One thing is certain; direct action gets the goods! It is the one thing throughout history that has always provoked social change. The exploitation and destruc-tion of the Earth's land, air, water and biodiversity is threatening the very foundations of our existence. As such, we must confront the violence of greed and destruction with nonviolent direct action.
It is encouraging that just as furiously as corporations and governments are destroying the Earth, people from all walks of life, cultures, races and ages are courageously putting their bodies on the frontlines of the war on nature. People are boldly moving themselves to defend the Earth with creative new forms of radical nonviolent action. Teenagers and raging grannies are locking down side by side. Loggers and forest activists are joining together to speak out against industrial forestry crimes and to take control of logging practices. These people are being moved by the love they feel for the Earth and the rage bubbling inside them because of what corporations are doing to her. And because they are, wild places are being saved. There is truly a global move-ment of resistance to the destruction of Mother Earth.
Nonviolent direct action expedited the acquisition of labor rights, the abolition of slavery and the victory of womin's sufferage. The work of movements against the Vietnam war and for civil rights, nuclear disarmament and ecological protection was catalyzed with massive civil disobedience actions. As a result, a myriad of environmental achievements have been won including the cancellation of old growth timber sales, the rise to popular consciousness of environmental justice, the termination of parts of the Hydro-Quebec project, the enactment of regulatory bans on whaling, drifnetting and purse seine tuna fishing on dolphins, the dosing of nuclear power facilities and many million dollar settlements against corporate polluters such as Shell, Chevron and Exxon. All of these victories have energized our movement. Across the board, direct action played a vital role in influencing these decisions at the time they were made. Even if some of them have been piecemeal progressions within the system and continue to be severely rolled back and grossly abused today; the point is that history has demonstrated that nonvio-lent direct action creates change. When people mobilize and resist, shit happens.
It is also important to note that successful nonviolent direct action has traditionally provoked violence. Just because we want wilderness forever doesn't mean people will simply disagree with us. On the contrary, there are corporate and governmental interests after us. We are tackling corporate power

Organize. Agitate. Activate Now! 1Hasta La Victoria!
1.* *.vi.E.4.* 4F 4:7* 0J. iA 4
13
and working to overthrow the government. As activists committed to revolu-tion, we must not delude ourselves in thinking that there aren't highly orches-trated overt and covert efforts well underway trying to crush this movement before we do subvert that paradigm. The stakes are always high in any social movement. For our own sanity, we need to accept this and deal with it to do the work we do. As Gertrude Stein has said, "considering how dangerous everything is, nothing is really very frightening."
Please, reread the section on security in the manual. Copy it, post it on the refrigerator and encourage all your friends to read it so we are prepared if an agent knocks. Everytime we screw up, say something wrong, let our security slip or cause an accident because we weren't being safe on an action, the more we open ourselves up to their abuse and the harder it becomes for us to jam the gears of the corporate machine. This is not said to lay blame on people, or to cause paranoia. It is just there to remind us of the vital importance of our struggle. Our commitment to each other needs to be as strong as our resistance to industrial expansion, exploitation and injustice.
Direct action is dangerous! Putting our bodies on the line requires lots of physical and emotional preparation. You can't practice enough to be ready for an action because there are so many uncontrollable factors involved in every action. But, the one thing most of us have is the ability to control ourselves. Practice, roleplay, and train in advance of your actions. Be prepared and be careful.
Just as much as direct action is exciting and empowering, it is also emotion-ally and physically exhausting. Do you remember peaking out in excitement during an action and then crashing at some point soon there after? Being a full time activist, constantly fighting transnational corporations and brutal governmen-tal regimes is incredibly challenging. Many of us overwork ourselves. Tension between activists can destroy a campaign, ruin friendships and even cause people to get hurt. Overcome these obstacles to action. Take time for yourself. Cultivate strong forms of communication with your group and create a process to strategi-cally plan your actions and divide the responsibilities. Everyone will feel healthier; even if a few dominating personalities need to be held accountable.
Direct action is a means to an end. Strategically planned actions can bring a group boldly closer to achieving their goals. Study the colorful history of nonvio-lent social change movements such as the Diggers, Luddites, Quakers, Plow-shares and Chipkos . The most successful movements throughout history have been those that waged unshaking campaigns of nonviolent resistance that grew, matured and diversified from a core of truth and direct action.

US Earth First! Directory ALLIEA (6081 nza-rI i 1 P014101. ?mammal. NIS 03402 Autonomy lions. 1804) 1343055 Mlenael. A. Lewis LIU= TLEWJP ItEE-Y PO8 11015, 51.6 UT 44147 wAssrmoToar KA 40071. told/antis. Ah 947011 Noretient itocidel Preservation Plo4ect PAW Pinelandn Entatiny Proleet Wild Wasatch Front Seattle Er silk& or Utile FOB 625. nese. I 0I4170 I. P011 506, Bloomfield, N107003 847 w. 700 N. Brigham Cry. LeT IA= POI 951(3, Seattle, WA 91145 POO 6197. 5 Ina Ak. 99035 etrpptilleshoiscom MO 7464321 VER6a0915` phifax (2061632-11.k Seoefikneineg Urea Mullis Cove/Mallard Coalition Given Viglarine BiodIvenity Libernnin Freen Olympia Ell do Alaska Acrion Cum POS na, Himont ID 113483 46 E. Monroe. /At_ Halt N7 080613 P01 V, Borlingwor VT 03021 P01 12391. Olympus WA 99.506 P09230914. Anchorage_ An 99523 (308)18297S* Pax 653-0727 (6091 245-0392 Save die Cargo-rano. MO 667.906et (9071566-2466. htheregilelaskann coeggroedrog.,,c044 NEW 61911,1113 169 kialn St, 9063369640. VT 05301 olwarthiBninhien0Lonn ALIZOIA 1LLINDIS Land of DEtefici..e.ent ER OM 2544147: lax 2.54-73.01 WEST VIRGINIA Arizona Wilillanda Museum Chleispo 831 P0672295. All..1‘..1..• NH 87193 Vi Oxon 4pin...him Rialwrsey ?mho PCB 2491/1 Tarim, AZ SSW Clo The Autonomous Zone (5051568-8126 Virginia Er 41 3, box 390, Iledgewille, NW 25437 Tiernan Er 1573 N. knhanskee Ave, 44213 New Muftis Direct &Moo Rt I r am 240. StinntOn. VA 22001 13041 754-9161 4011 3412_ Moon, AZ 1.5722 Chimp, IL 60622 PCB 22468. &Una Se.. NM usox-mi (541615-6981 WI) Litaiti ructornegilunnoorn (773) 252-601* anaogibro acorn (SOS) 911-811E PAW Southwest Virginia Midwest Headwaters ACtiOn Ps7endenrra Winghtda lied Gat! xEW rO=i 101 13792, Rmar069. VA 21031.3192 MIAMI fitddiOVIRen fooa-rm4
2155 L Maple 4 1 7, F14112221 AL 86004 3403 W Mr. St OM, 01.1101no. IL 60653 NYC Ell cno Weinnds Preserve (340)912-0492 731 State Si, 74adhon WI 51711 (520) 774.6542: ropinarnomniuntu Pitendaibenterannom Ill Hudson sr, 149. NY 10013 OF Coll ectlae@vCu (601) 235-676-5,1 CALIMILLILL Shawnee 151 (212)9664724 lax 923.8715 Student Anwhies Cornet Box 93 anne.6.101001.40rtgrolfiNiva1N101 Northman Er 913 S.111111011. C&Iteattlait.11. 61901 watlandmorkpteleraMinfitt.[Thst POB 412035. klehinond, VA 23244 North Foetal 419 POO 21, Arses. CA 95318 OM 3514312; speldbluesulann Foghorn Unthedrogadasedu 741 Algoma Riad, Oshkosh, WI 54901 ODD 125-6598: nsiashelwertholdll.uxo Coles C0u1519 Ell FOB 689, Wrotharn plop 'kWh, NY (804) 333.5055 1910) 424-0265 Luna kieeds-Aulla Butte:n.19 Oa Jeiftry Halt 11976: (516)2164,668 literen Was Denting Er cin W9A P01 1.256., Eureka, CA 95502 451 Taylor Hall, 2321 401 Sweet Gave Canal IF! 5435 &gag Crown% Norfolk vA 23.505 P012761. LaCrosse, W154607.2711 17071 8394974; www.lunynce.c.ej Clue/m*0n, IL 6192044164 (71 6) 2.112-7777 haver2.90dnetanrent. 16611) 782.6997 lunarawhinnuentildt from 1181211211 OM Earth rein Coiltactne Chippewa Valley Er Redwood &Mon Tenn Indium knelt Alf lance Off Campus College Office 57.61011ACtla3de3 Center, VC-41 493 008 141 74mannweve. WI 34751.0790 Darryl Cheney. 106 34 P01 10/4, PlcomIngton, IN 47402 SUM' Binginesvon, NY, 13902-60E0 PO1142034 907 Floyd Ave. Sand Candy Er Csarhernns Casuists 95542 (51 27 3324878 (6117) 777-206D offedSeerithounsikons Eichnwnd vA 23264 501 Nds. Han Simens Pant W154011 Sonoma Counre ErAintech Wit Project Harmony 17.mite1rrallniaanno Ochuri99innesp.edis P013321, Santa 114m. CA 93402 LOYAL 2l6 West 12219 Stites, HY HY 10327 1•11graas N13.4. ER 1707) 523-4196 (2121 6622E78; hala.2166/a91 unst POR 1503, 164.4 City. IA 52244 International EF! Directory Henn Er Mora Gardertil Coalition 224 Cornanaa[tal 5.t. Don 4174 .11621114.1. 50 Avenue EL NY NY 'POMP Chock 0•1 OM LliCrilitiOala 600.91, 484-25415
Tornado Arty Resistance Nevada Gay, CA 93989 trsoregarciensIPhotroall-com Earth flan! web page an R.ntler Satiana NO 821.5073 P354.8233 (pager! Diva EPJF0W.Caktamctla ( oe
1123liaCiagiaill •irerw.Y.InetLir.ak/ef Near Miura LoS PATNA-60) 071 11111rt rAPIA
(5304 753-1674
' A.122118ALLA Ilhas, Post Roe 223 LOulliarla at Fairfax Action Team POB 1485, &headier NC 28802 Painforeulufannottun Contra Single Knit F ti. POR 113242, Metairie, 11011.3262 108. 393. Lagann. CA 94914 LA 7 (1291 E45-o631 PO1 1.6a. Llunore, NSW 1.480 Greet. Koeva United
FAL F__7412, of Nature Er NAM DOB 601, Athens CA 30601 (1166)21 65 OS 109. Carden Tow. illd. 11.78 . Mains EF! IC 3493, CamriVskarLal4CA972414413 Y.atiokh Highlands El! Amsrawilan EFI. Ankm Vpdatt Womil-donn Clanogno-6u
RED 1, 406 4000, Arhou, ME 04442 Bay Area ER MB 223. Deep Cap, NC 29.511 of ausitos Mil Isom Seoul 110.331k envnonleitholllan.ran Watsunneth PORIO, Canyon, CA 94-516 Er (9104 973-7032 nerranalyeatellkeaner lama green netzu/osetuilale, itILILIWIERIAM25 FOS 869, Seirsport, 01E04974 (sus' 54s-8724
=IQ Er! Australia Community Groton Front! norrastahracadianet
Pay Arco &OHM Hotlines Cleveland Er La 9 maikni Ad. VI. Dahn,Cgd 4403 Postbus 8.9369. 3304 Mk Utrechi (51015944300 x2.72: ots)ar-sgoa .324 KWACIU251171 17305 Oroammod Ave phifax 61 (03 7 1201 0013 htircateienh.hUlatfkadlat/
Mara EF1 Santa Crux Ell
Cleveland, OH 4411* (2161 313-9945 [email protected] leNTLIPPINER FOR 3S, 61 .3400-4. MA 01351 POO 344. Same Cruz_ CA 93061
Ohio Valley ES! Ustitslilds Ariel Beton, Gwen Forum Direct
(4081 474-3205 Masa Amino FOS O. Unit.. 0. Gni:W.211 Er Prince George led (loot, Merry Building 406461, SOtnerSel. MA 02726 Santa Rarbara Er Clnelndsti. OH 65711-1001 Boa 1762, Prime Grog_ IC1722497 Pany Ed-, Mahan, Metro Manna
La PM u Heather Carla799. Santa Larbara. CA 93107 (513) 26141192 Weal 0.4 a) 1116-0986., 134110. 11/43207 155 Eutaw St 93, anion MA (121.23
wenasbnaturaLcontlel Ems
(617)369-3969 Oberlin Ell Box 1053, Eamamph EC V2C HU Softened, for &ash Defense Stemmata Er W114. 80x. 76. Onerlin, OH 44074 ,, EF! Manitoba 13.222 Otonse Si. ire Ws Maoris En. Snini

Boston 63) POD 37d Camel/had. 94609 CA 1-., "Idea Ell POD 39E060. Ca:Mirk:18v MA W119 ,....,.. v. ,,., 0E TItHAREISTRoterilatedu SoatiL Winnlpt-g. Manitoba 13L 175 11101:Luc= CDT
POD 4341, H. Heilmmod CA 91617 6517).1506.7547 2233 Partwoci4, Toledo. OH 43620 1204145.19052 F}. Tomato POD 195 Sm. 5, 1.19 Workshop for All 'Wag, tanceeinhlrebitracrnallamm WM 569,5592 Heck-lia;king Ell Sparlina Ave, Toronto, ON 7.15T PO8 40, 43-300 Bao)d)o, 84144; phi
Alluvial FP. Chance 23 Ligon SI., ALheris, OH 45701 2.5.41; eunitgrsterifeillOgeinea fax 04&31-16.31S3; 90677027, 4102, Pasadena, CA 91107 72 Peesdaorough SUM. Apt31, So-Ron (740, 59.,..,,g1 wanieracaPprsmn.rnost.org.p1 MA 02215, (6171 359-11.51.
EP Ottawa Vox 4612, Mahon E (9051 422.1637; rnere,atgerOuntli.colo Flankatha ER Ottawa. Ontario B1S 5I-18 in Defame of the Earth Tribes ER sib OR Our= lochardegustnei 7992.Hortstm Rd Cinelnswei, OH 45255 Aittortoramd Green Anion Tmvanysnoo Elsologierne Fos 10417. San swradino, CA 92423 1411.01"11 ORMRON PON 4721, Seal kin E .1.9 0112ONTEZIEM? Donmenka Paryla 01Chanee30.01,e0rn Wend 1 Psxco Cana Southern Willamette EP Ottawa. Ontario KIS SFr; 4. Lirriamneskiego 136/42, 91434, MoMve EP POB 492. Lareralitt CA 91314
POD 30814, ICUarisaand MI 49105 1616)1E19117 POD 10334. tugene, OR 97440 446914.4seenelaa ca dmon. wioda.....16„15-4,and,,,,,,.......(i-11.7...4210.13 1-38.1.5
0411 143.7305; swrigelmorg Horan Rlver Valley Eft EP Montreal, 731ffusion Noire (805)9486291 Cascrdia Forest Defenders do Waffle Alternative ISJSSJA P01 1735, Ann Adam, 1.11 4106 Peninsular Ranges EP P011 4711, !mine, CA 92616-4738 MINNESOTA
...,446,11)61.1112Z6up4 „......,01197,4441,..0.{.511)6144.8997ran 2035 St Laurent 2e HAN IforiseiaL Quebec 5E2X 213
RaInbser Keepers Offlerni lymph POD It, thann1 Tionorcel 4110E2
710546 koveritan ALL Poets Office Ilala Ecologdi Er Falnelopsts Er P131 103, Osseo. hi N 55369 163171 14-3240
POIS 7745, San Diego, CA /2107 905 2091 Cal* JuAction. 01 97523 1:712.enle."Preditineriit if RAJ NINNY keepers ildesscrns) (760) 740.1174; solerlfcemmbnleorg 4662) 601.0975; essalfpoOvassaorg 10951 154-9 1.93. nagglasapcors L2Lialing Forcer Ecosyment Action Group 04 1) 59E31116; MEAPRitdulet.net
glue Meru, BlodIversity Peeled PC111 237. 1E43 41 Prague 6
ECODEFENIE! 2441 Lynda/a Are SO, Mpix. MN 53405 ternepredevarrskitth.Ca San loan Er NCR 12 Fog. OR 97910 fla P4Ogravaly penprkl 120-34236006 1,01 3204• Durango, CO 31(02 46127 450-9176; paanseresmin.org Blue Heron EF! An Talanth Gies do Mae itahningra4lluaempherg
Dig Woods EF? Wilderneu Defense need Coll., SAD, Penland. OR 9720.2 61:416yg. itallinephe, Cowry Mayo preilax .7 (0112(43 71. 86 706 460101, Aueora, CO 1/04647101 P0151°936. "P1,- MN 55451-0916 (60.11 7711112 67171 Limerick lalsmh Glas rcorletrasreglaeapLorg )612) 342.3187; be...01.10n3un.Lecai MIdemmajklenteeernail_com 41 Clasp,. Para, Li menet IT.123:111113 Wilderness Find Goodin Forest Alliance ..... gencleutscorniralMoires01 441 901 4946. Portland. 01 97304 00353 SI 313308 Glasgow Er! PON 16075, S t_ Paul. P MN 55116 Ali Goodeirstm f5031 2414E79; lax 235-9976 DiraLaili POD 160, Glasgow 04 9A1 4a 011041
.6nrn POD 1008„ Telbrride„ CO 511 95 settummu14601 ZENNIILYANI.di Oser IS LP poup raise in Loilask 636 1924839 11079: fan 44 16941 424
Tim Nougat. www.losiscnim.consrliarn Fein1/7094 Allegheny ER 3646, 5C CA reeiktn.apcmg POD 21. -Gemare, CO 60342 .741ISOLLRI PO/ 81011. Putsteugh, P4 15217
Fr cornare
Bay O. McCall EP Actlers UpetainCornersione SLOVAKIA, Gunnison Basin EF1 Aneolnelie Owings Ittouree Centre Siolxvina alternative POD 592 Craned Sons. CO 11224 RA I Ica ESP,Mountalra Glom M06571? 442 Library- Ave. Camegre PA 15106 16.5holetweise Ave., Chant-Innen Slasummall 6/0, Ell 03 Bratislava Culebra EP Pink Planarians Allegheny Defense Prelim Leeds, 137 3HD; 0113 262 9365 101ITR AFRICA P06 762. Sin bah, CO 91152 POD 7651 CalurriNa, MO 652064633 PO3 245, Canon, PA 16214 Earn Action! afrgansgn net
weric1176.7,reetuPsW-co"Adurnelleani'llintherni P011 111034, Eligtridge, Menne 601.6 (573) 4434332 74 7472:052skomp.ser.e......m (514} 164.5 779: alpiarnvirolintorg
EL911111A I.EN NESS EE MEI
PON 63232. 51. Louis,. MO 63163
Weed EP. Box E. III. Magdalen Rd., Big Bend EP Glainnuapin Renstance Katisah EP Manuel A. Dernandes. Tiber ale E A.
PO11205E2 Tallahassee_ FL 32316 Tennant Valley Faction Wont 0X4 191CL {016163) 79139 l A C1.11111XA. J. I., Xrdmuer1, Campus
Oemsrater Er POD 111138, Clearriseset FL 34622
IELOIIK.nh.T...ellAwou. (314) 772'4463 sandKerary p,01.0 uF13rp..71,2(trtal....3C:han.,6.934m6r500;,,gbrenmhprN 3741:F14.... „Sosno.hDriz. EP, Dead TreesEY! 1.11nernhava. 13701 Santiago
1611164321 En 114533 131121al
(904) 4214559
1,014431, Whtivilsh. IF
59937 MB 2971 , Brighton 1452 .2.0T cm (3) 339-9050 Morgan LAIry1.1 Alachtm Efl (406) 562-4941
Wild Rockies E17 Sprn)90114.114 37/72 mr.."*L"'"u:ke Cu
Lagmarugateri 9C 46-37 Varenborg 1902 Westgate Dr.
POD 9216, Missoula. MT 5980/
c...h..als1NCEwva,.. POD 1638, Atachua, a 32616 1.12L&S Acton For Social Ecology
4406) 722-3731 44 me lordeas, 59001 Lyon: (33) 4 Box 14689 (0026 Sicald'adm: [904) 462.3374 55! Atnthi
Yelleneslone EF! 72 00 2157 carhustensiev Banjo, ft .44-70.7560195: araemorkraltnet 14Men I. EP 25'00 lafayene 5.... Austin. TX 75722:
EarthrestMiarngehouned.core (51.21 4 76-7654; ettrworRenen.com 0.13LIIANY vreenr_morktariorthea/ mwrigodheiramVTahtFunds/AwksiT667 " 6" 1 ' 1141'"m1X AST 597" South Texas Conan £1) Germany loo Avalon] IIKLiDiE
BRASV. 4114 Camelia Corpus Ghent., TX 75418 Filedrlchalert Sir 24, 45127 EMIR Painbow Keepers 45 local peeps)
st.,,,,C421"10 For Bmn:,...,..,n.„ A......., !.z..nerien Lai ge,,.....„....source Curler , cs , 2, 917.,01., EMU Pima Senwiwatias PO& 122. KM. 252/17 Oslo, a 040r911. Tine Student Canter '''' ••"''''''' '''' P'"-- "---"''"`"' r'rE59.' Fast Tara, Er Anand Saaria .7 3.1 10441 2657628 tax 31 (044) Athens. GA 3050.1 OOP 412.3151 RI 1. Ike 2120, ARM Ignit, TX 77364 Pil RI 4, Cochin 642.001, Kerala 5506068: deLarvigkairecru Drti1ah Foothill' EP KEXASId Limns Hannan Environments! "a,
Western Shoshone Cvledie 1.10140
HAWAII Collet-Inv 1421 5,
NoudeOli. TX 770E0 1,01 606, Atheis. CA 30603 MD 211104 Car.ennt va.u.ey. NY 69E21 L
Osrandrea en Media Faun dad 0 n 117C111 468"°23°, "dPOIr-OrN luunniourre71(vhcma,Lcorn POD 1440. Hamlet, H1 96714
;mow RA kirS THIrr 1112d1 New Hampshire EF!
Donate to the Earth First! Journal the IF P31.1341 rrlirl or your too...1mm m COnligkt re mums.. For Mr
WM 19 room .e Rove born 0614 la plobtiLN cif we after ell Lie .ilh row (rip. reirdralirldbre 40.1141iM11 7511. 65 sent iv the Voter, Wild Fein) rio
EP', LOB 1415, Eugene, OR 97440; (541) 3448004

149
v.- a
_24 .ot \
NOTES

150
'4,16ti:k4. "1 4 71- A;% V, 4. 111 4.1̀
-11Le"atg * 'M 44- T*
NOTES

T'A tr 4-Ork Wr 11- T1. 4. _114 cti'•
NOTES

This information was inspired by the countless nonviolent acts of conscious resistance to the destruction of the land boldly taken by individuals and
groups of people throughout history. By the people who moved themselves in defiance of greed, power and vanity to shake filthy rotten regimes to the ground
and create free states of mind and love for the Earth. By all the Australian, British, and American activists of our time who are pushing the limits of civil
disobedience as they passionately fight for all things wild. And, by those Austrailians in particular who crafted a work called "The Inter Continental
Deluxe Guide to Blockading," which this manual expands upon.
In the western world, people are privileged to be able to engage openly in nonviolent direct action. Courageous activists in the other two-thirds of the world are being ruthlessly killed, yet continue to give their lives for
their political actions in defense of the Earth and freedom. This manual is dedicated to them.
Copyright m 1997 by the DAM Collective, c/o SWEFI P.O. Box 10384, Eugene, CR 97440 (541)343-7305; e-mail: swefiliefri.org. All rights reserved including the right of reproduction in whole or in part, in any form, and bound entirely by the explicit conditions of the Disclaimer and License Agreement contained on pages ii-iii.

COnfliet GYPSY read is the new green this publication anr, many more can be
found orconflict.4YPsY.cvn, the free archive of oid ik rare direct action news