
E-Post Print & Send - User Manual
51
E-POST PRINT & SEND USER MANUAL November 2017
-
Upload
khangminh22 -
Category
Documents
-
view
1 -
download
0
Transcript of E-Post Print & Send - User Manual
E-POST PRINT & SENDUSER MANUAL
November 2017
2 E-Post Print & Send
1 Abbreviations 5
2 What is E-Post Business? 6
3 E-Post Print & Send standards 7
3.1 Processing characteristics 7
3.2 Posting and delivery 7
3.3 Postage categories 7
4 The “E-Post Business” online service 8
4.1 Connection 8
4.2 Overview 9
4.3 Process sequence 10
5 Printer driver: E-Post Print & Send 11
5.1 System requirements 11
5.2 Installation 11
5.2.1 Download 11
5.2.2 Setup 12
5.2.3 Login 14
5.3 Mail item preparation 15
5.3.1 Valid file formats 15
5.3.2 Areas to be kept free 15
5.3.3 Addresses 15
5.3.4 Inpayment slips 19
5.3.5 Logo template 21
5.4 Handling process 21
5.5 User interface and functions 22
5.5.1 “File” menu 23
5.5.2 “Edit” menu 24
5.5.3 “Page” menu 24
5.5.4 “View” menu 25
5.5.5 “?” menu 25
5.5.6 Order data 26
5.5.7 Master data 27
5.5.8 Address data 27
5.5.9 Keyboard shortcuts 27
CONTENTS
E-Post Print & Send 3
5.6 Working with E-Post Print & Send 28
5.6.1 Starting E-Post Print & Send 28
5.6.2 Adding orders 28
5.6.3 Selecting a document class 29
5.6.4 Grouping orders 29
5.6.5 Arranging orders in the file list 29
5.6.6 Removing orders or items 29
5.6.7 Reorganizing orders 30
5.6.8 Incorporating inserts 30
5.6.9 Removing inserts 31
5.6.10 Adjusting settings for orders 31
5.6.11 Sending orders 31
5.6.12 Printing orders locally 31
5.6.13 Exporting orders 31
5.6.14 Quitting E-Post Print & Send 31
5.6.15 Changing the language settings 32
5.6.16 Help 32
5.7 Document check 32
6 Data processing and mailing in E-Post Business 34
6.1 Channel allocation 34
6.2 Order processing 34
6.2.1 Electronic mail items 34
6.2.2 Physical mail items 35
6.3 The E-Reprint process in the event of electronic undeliverability 35
6.4 Undeliverable items from early detection 35
6.5 Receiving replies 36
7 E-Post Business order management 37
7.1 Order overview 37
7.2 Search 38
7.3 Detailed order view 39
7.3.1 “Order” area 39
7.3.2 “Print & Send order characteristics” area 40
7.3.3 “Files” area 40
7.3.4 “Receipt” area 40
7.3.5 “Prepared mail items/pages” area 40
7.3.6 “E-Reprints” area 41
7.3.7 “Undeliverable letters from early detection” area 42
7.3.8 “History” area 42
7.3.9 “Status” area 42

4 E-Post Print & Send
8 Reporting 43
9 Business customer profile 44
9.1 Master data 44
9.2 Display in the recipient portal 45
9.3 E-Post Business settings 45
9.4 E-Post Print & Send settings 46
9.4.1 Order data 46
9.4.2 Reply-to addresses 47
9.4.3 Password 47
9.5 Discounts 47
9.6 Invoice data 47
9.7 User administration 47
9.8 Change log 48
10 Software and documents 49
11 Invoices 50
E-Post Print & Send 5
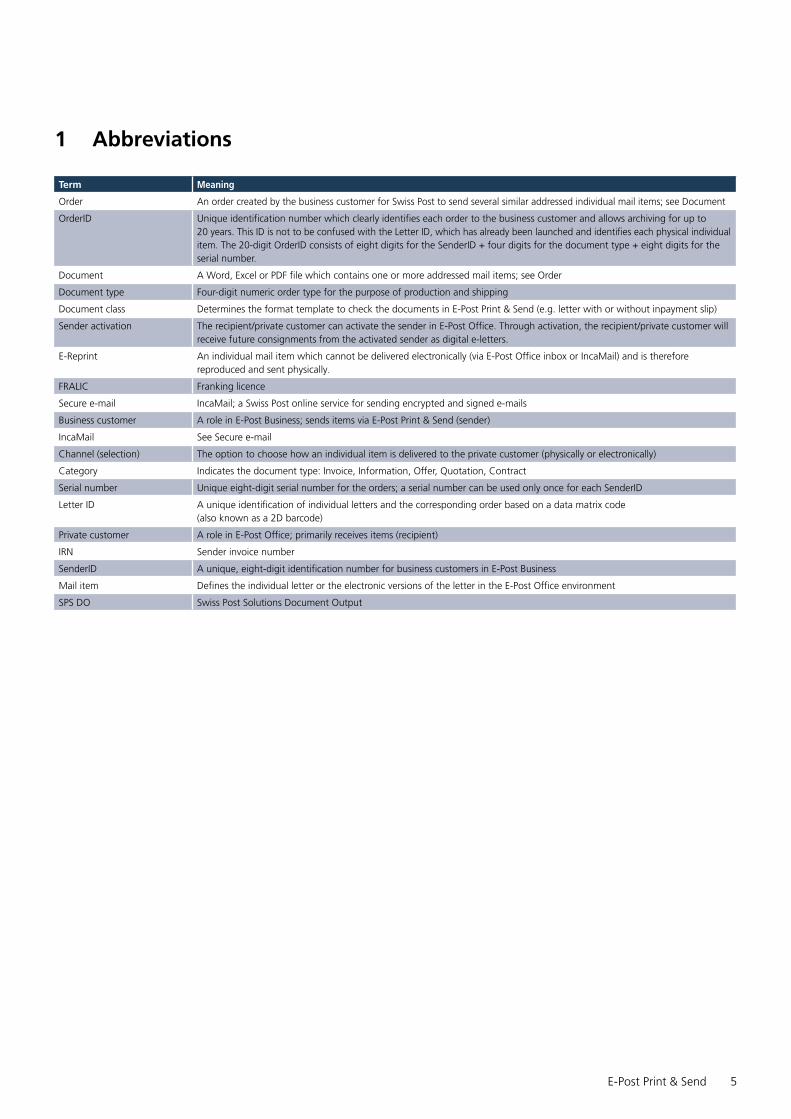
1 Abbreviations
Term Meaning
Order An order created by the business customer for Swiss Post to send several similar addressed individual mail items; see Document
OrderID Unique identification number which clearly identifies each order to the business customer and allows archiving for up to 20 years. This ID is not to be confused with the Letter ID, which has already been launched and identifies each physical individual item. The 20-digit OrderID consists of eight digits for the SenderID + four digits for the document type + eight digits for the serial number.
Document A Word, Excel or PDF file which contains one or more addressed mail items; see Order
Document type Four-digit numeric order type for the purpose of production and shipping
Document class Determines the format template to check the documents in E-Post Print & Send (e.g. letter with or without inpayment slip)
Sender activation The recipient/private customer can activate the sender in E-Post Office. Through activation, the recipient/private customer will receive future consignments from the activated sender as digital e-letters.
E-Reprint An individual mail item which cannot be delivered electronically (via E-Post Office inbox or IncaMail) and is therefore reproduced and sent physically.
FRALIC Franking licence
Secure e-mail IncaMail; a Swiss Post online service for sending encrypted and signed e-mails
Business customer A role in E-Post Business; sends items via E-Post Print & Send (sender)
IncaMail See Secure e-mail
Channel (selection) The option to choose how an individual item is delivered to the private customer (physically or electronically)
Category Indicates the document type: Invoice, Information, Offer, Quotation, Contract
Serial number Unique eight-digit serial number for the orders; a serial number can be used only once for each SenderID
Letter ID A unique identification of individual letters and the corresponding order based on a data matrix code (also known as a 2D barcode)
Private customer A role in E-Post Office; primarily receives items (recipient)
IRN Sender invoice number
SenderID A unique, eight-digit identification number for business customers in E-Post Business
Mail item Defines the individual letter or the electronic versions of the letter in the E-Post Office environment
SPS DO Swiss Post Solutions Document Output
6 E-Post Print & Send
2 What is E-Post Business?
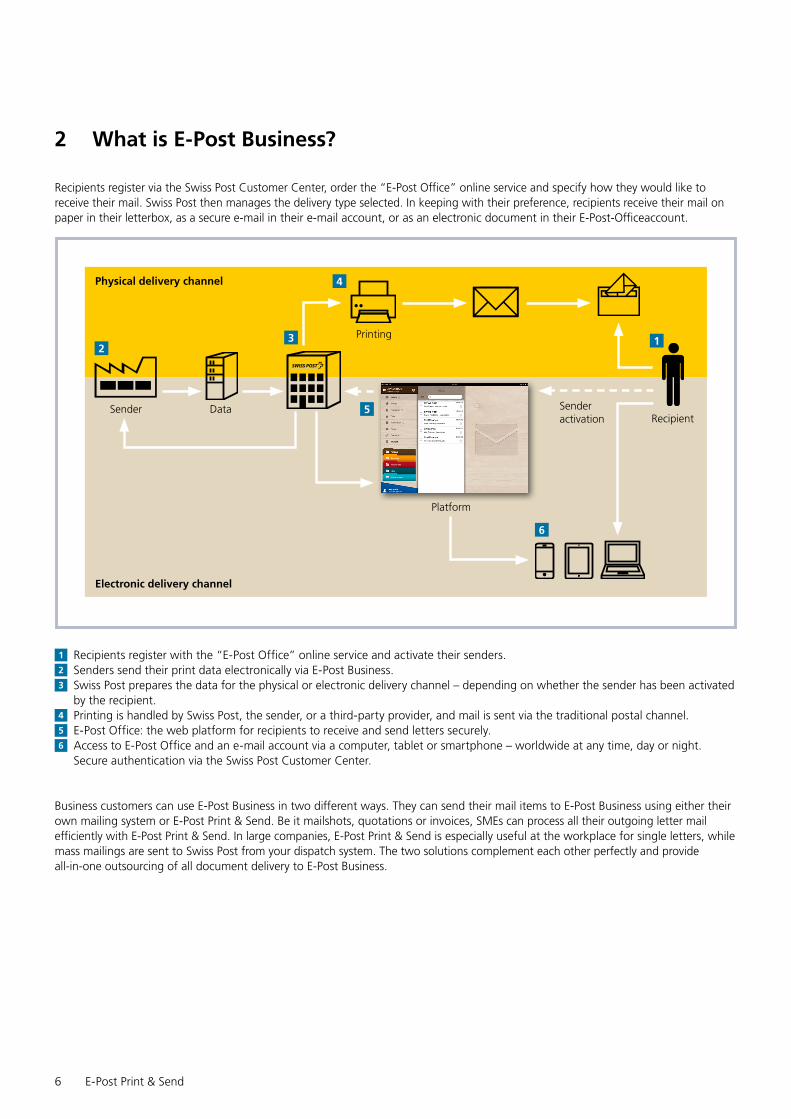
Recipients register via the Swiss Post Customer Center, order the “E-Post Office” online service and specify how they would like to receive their mail. Swiss Post then manages the delivery type selected. In keeping with their preference, recipients receive their mail on paper in their letterbox, as a secure e-mail in their e-mail account, or as an electronic document in their E-Post-Officeaccount.
1 Recipients register with the “E-Post Office” online service and activate their senders.2 Senders send their print data electronically via E-Post Business.3 Swiss Post prepares the data for the physical or electronic delivery channel – depending on whether the sender has been activated
by the recipient. 4 Printing is handled by Swiss Post, the sender, or a third-party provider, and mail is sent via the traditional postal channel.5 E-Post Office: the web platform for recipients to receive and send letters securely.6 Access to E-Post Office and an e-mail account via a computer, tablet or smartphone – worldwide at any time, day or night.
Secure authentication via the Swiss Post Customer Center.
Business customers can use E-Post Business in two different ways. They can send their mail items to E-Post Business using either their own mailing system or E-Post Print & Send. Be it mailshots, quotations or invoices, SMEs can process all their outgoing letter mail efficiently with E-Post Print & Send. In large companies, E-Post Print & Send is especially useful at the workplace for single letters, while mass mailings are sent to Swiss Post from your dispatch system. The two solutions complement each other perfectly and provide all-in-one outsourcing of all document delivery to E-Post Business.
SenderRecipient
Data
Printing
Platform
Physical delivery channel
Electronic delivery channel
213
6
4
Sender activation
5
E-Post Print & Send 7
3 E-Post Print & Send standards
3.1 Processing characteristics
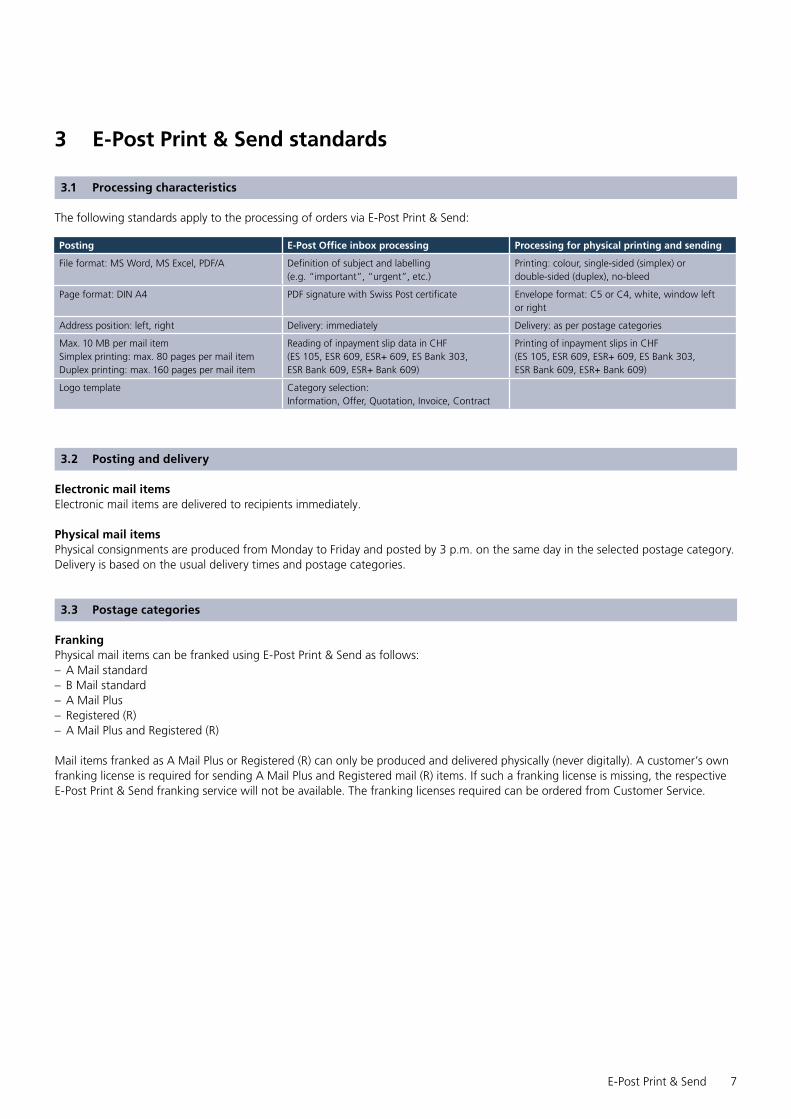
The following standards apply to the processing of orders via E-Post Print & Send:
3.2 Posting and delivery
Electronic mail itemsElectronic mail items are delivered to recipients immediately.
Physical mail itemsPhysical consignments are produced from Monday to Friday and posted by 3 p.m. on the same day in the selected postage category. Delivery is based on the usual delivery times and postage categories.
3.3 Postage categories
Franking Physical mail items can be franked using E-Post Print & Send as follows: – A Mail standard – B Mail standard – A Mail Plus – Registered (R) – A Mail Plus and Registered (R)
Mail items franked as A Mail Plus or Registered (R) can only be produced and delivered physically (never digitally). A customer’s own franking license is required for sending A Mail Plus and Registered mail (R) items. If such a franking license is missing, the respective E-Post Print & Send franking service will not be available. The franking licenses required can be ordered from Customer Service.
Posting E-Post Office inbox processing Processing for physical printing and sending
File format: MS Word, MS Excel, PDF/A Definition of subject and labelling (e.g. “important”, “urgent”, etc.)
Printing: colour, single-sided (simplex) or double-sided (duplex), no-bleed
Page format: DIN A4 PDF signature with Swiss Post certificate Envelope format: C5 or C4, white, window left or right
Address position: left, right Delivery: immediately Delivery: as per postage categories
Max. 10 MB per mail item Simplex printing: max. 80 pages per mail item Duplex printing: max. 160 pages per mail item
Reading of inpayment slip data in CHF (ES 105, ESR 609, ESR+ 609, ES Bank 303,ESR Bank 609, ESR+ Bank 609)
Printing of inpayment slips in CHF (ES 105, ESR 609, ESR+ 609, ES Bank 303,ESR Bank 609, ESR+ Bank 609)
Logo template Category selection: Information, Offer, Quotation, Invoice, Contract
8 E-Post Print & Send
4 The “E-Post Business” online service
4.1 Connection
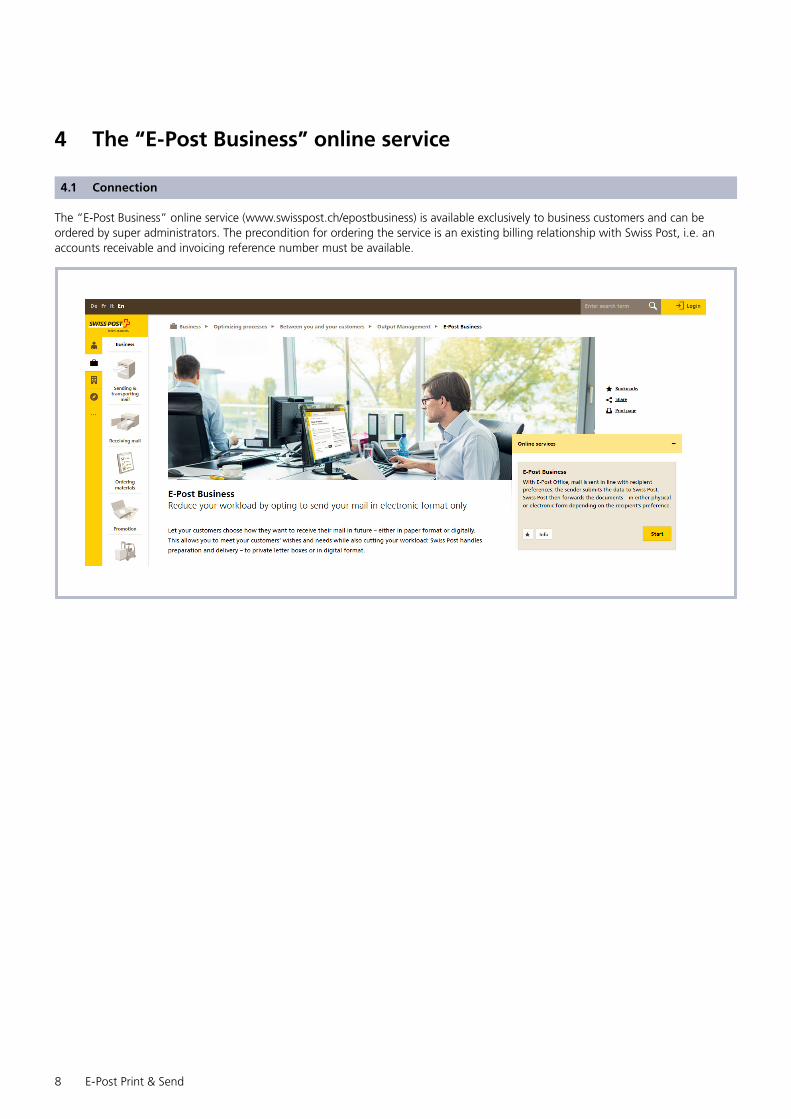
The “E-Post Business” online service (www.swisspost.ch/epostbusiness) is available exclusively to business customers and can be ordered by super administrators. The precondition for ordering the service is an existing billing relationship with Swiss Post, i.e. an accounts receivable and invoicing reference number must be available.
E-Post Print & Send 9
4.2 Overview
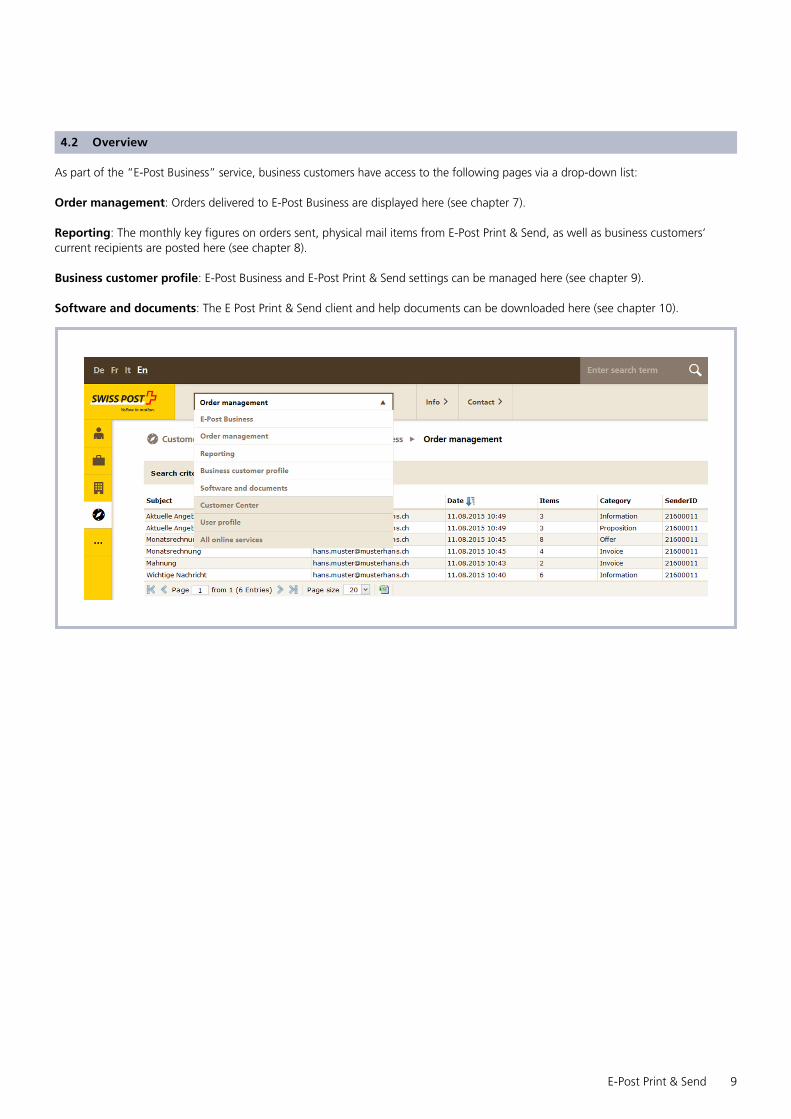
As part of the “E-Post Business” service, business customers have access to the following pages via a drop-down list:
Order management: Orders delivered to E-Post Business are displayed here (see chapter 7).
Reporting: The monthly key figures on orders sent, physical mail items from E-Post Print & Send, as well as business customers’ current recipients are posted here (see chapter 8).
Business customer profile: E-Post Business and E-Post Print & Send settings can be managed here (see chapter 9).
Software and documents: The E Post Print & Send client and help documents can be downloaded here (see chapter 10).
10 E-Post Print & Send
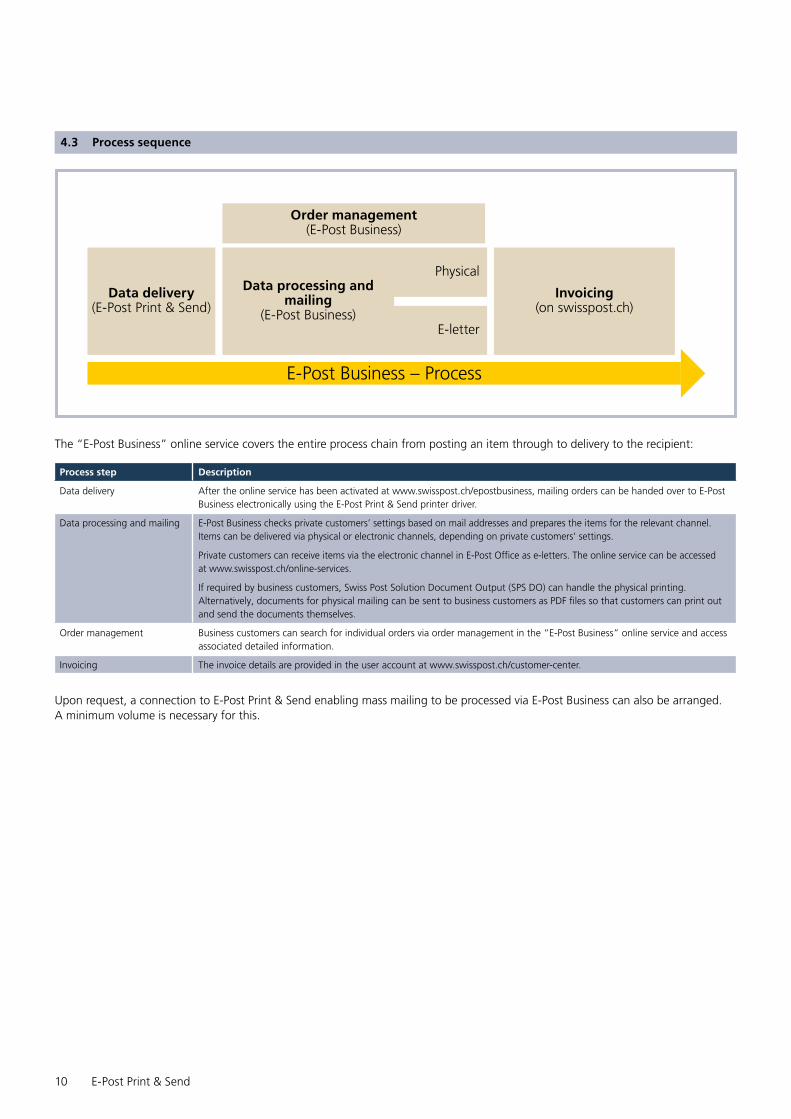
The “E-Post Business” online service covers the entire process chain from posting an item through to delivery to the recipient:
Upon request, a connection to E-Post Print & Send enabling mass mailing to be processed via E-Post Business can also be arranged. A minimum volume is necessary for this.
Process step Description
Data delivery After the online service has been activated at www.swisspost.ch/epostbusiness, mailing orders can be handed over to E-Post Business electronically using the E-Post Print & Send printer driver.
Data processing and mailing E-Post Business checks private customers’ settings based on mail addresses and prepares the items for the relevant channel. Items can be delivered via physical or electronic channels, depending on private customers’ settings.
Private customers can receive items via the electronic channel in E-Post Office as e-letters. The online service can be accessed at www.swisspost.ch/online-services.
If required by business customers, Swiss Post Solution Document Output (SPS DO) can handle the physical printing. Alternatively, documents for physical mailing can be sent to business customers as PDF files so that customers can print out and send the documents themselves.
Order management Business customers can search for individual orders via order management in the “E-Post Business” online service and access associated detailed information.
Invoicing The invoice details are provided in the user account at www.swisspost.ch/customer-center.
4.3 Process sequence
E-Post Business – Process
Order management(E-Post Business)
Physical
E-letter
Data processing andmailing
(E-Post Business)
Data delivery(E-Post Print & Send)
Invoicing(on swisspost.ch)

E-Post Print & Send 11
5.1 System requirements
5.2 Installation Administrator rights on the installation computer are required for the installation. Business customers can perform as many installations as they wish themselves. The users can only use the print driver if they have saved a password for E-Post Print & Send in the E-Post Business business customer profile (see chapter 5.2.3 Login).
5.2.1 Download The installation file for E-Post Print & Send can be downloaded under Software and documents in E-Post Business.
5 Printer driver: E-Post Print & Send
Connection Execution
Operating system MS Windows 7, 8 and 10, 32 bit and 64 bit
Hard drive memory 170 MB
Screen resolution Min. 1024 × 768 pixels
12 E-Post Print & Send
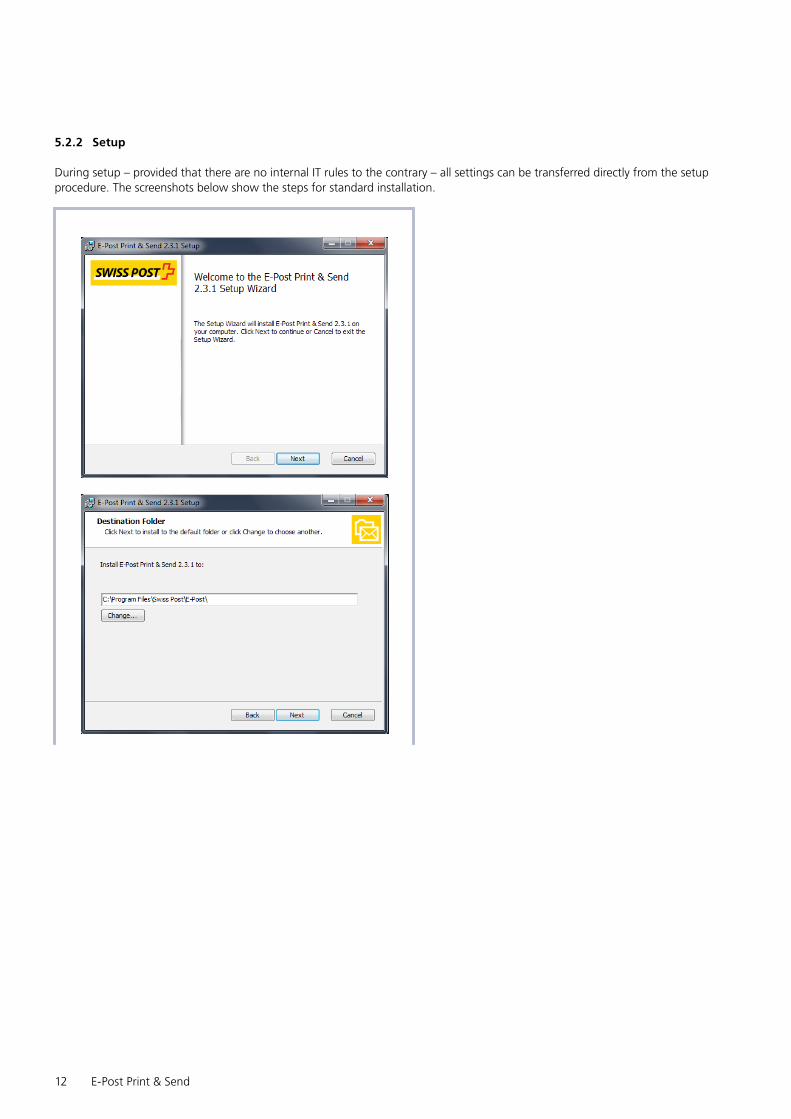
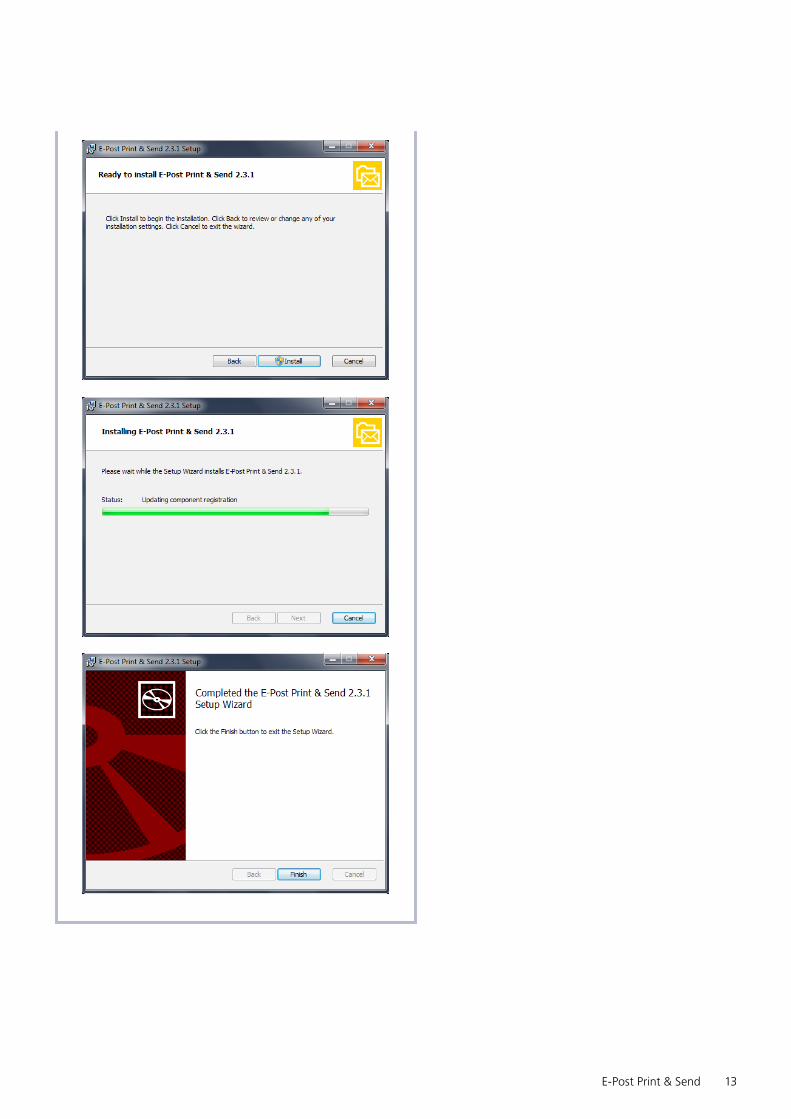
5.2.2 Setup During setup – provided that there are no internal IT rules to the contrary – all settings can be transferred directly from the setup procedure. The screenshots below show the steps for standard installation.
E-Post Print & Send 13
14 E-Post Print & Send
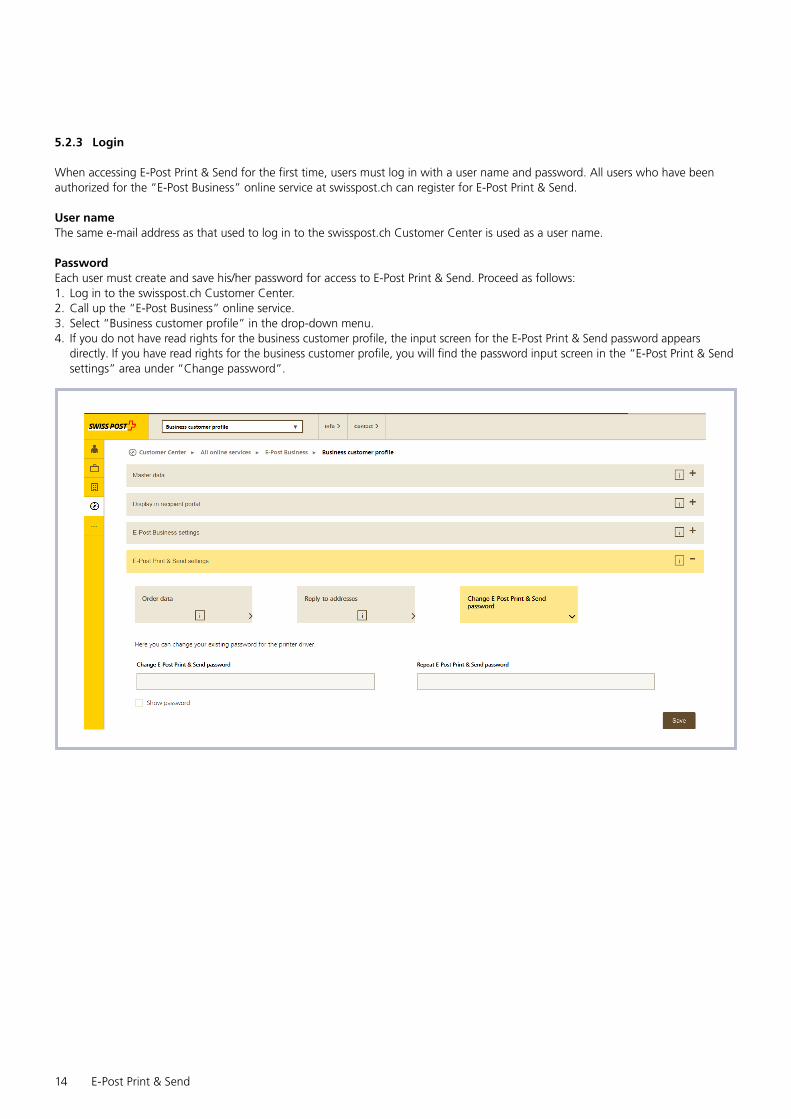
5.2.3 Login When accessing E-Post Print & Send for the first time, users must log in with a user name and password. All users who have been authorized for the “E-Post Business” online service at swisspost.ch can register for E-Post Print & Send.
User nameThe same e-mail address as that used to log in to the swisspost.ch Customer Center is used as a user name.
PasswordEach user must create and save his/her password for access to E-Post Print & Send. Proceed as follows:1. Log in to the swisspost.ch Customer Center.2. Call up the “E-Post Business” online service.3. Select “Business customer profile” in the drop-down menu.4. If you do not have read rights for the business customer profile, the input screen for the E-Post Print & Send password appears
directly. If you have read rights for the business customer profile, you will find the password input screen in the “E-Post Print & Send settings” area under “Change password”.
E-Post Print & Send 15
5.3 Mail item preparation Documents which are to be processed via the printer driver can contain one or more mail item. A mail item can consist of a maximum of 80 pages with simplex printing and 160 pages for duplex printing in DIN A4 format (max. 10 MB; see chapter 3.1 Processing characteristics). For physical mail items of up to 14 simplex pages or 28 duplex pages, a C5 or C4 envelope can be used. From 15 simplex pages or 29 duplex pages or more, a C4 envelope is used automatically. The printer driver splits the document up into individual items based on the addresses identified. A document is therefore processed as an order.
It is recommended that no more than 1,000 pages (100 MB) be processed in any one order.
5.3.1 Valid file formats The printer driver can process the following file formats:− Word 2003, 2010, 2013, Office 365− Excel 2003, 2010, 2013, Office 365− PDF/A
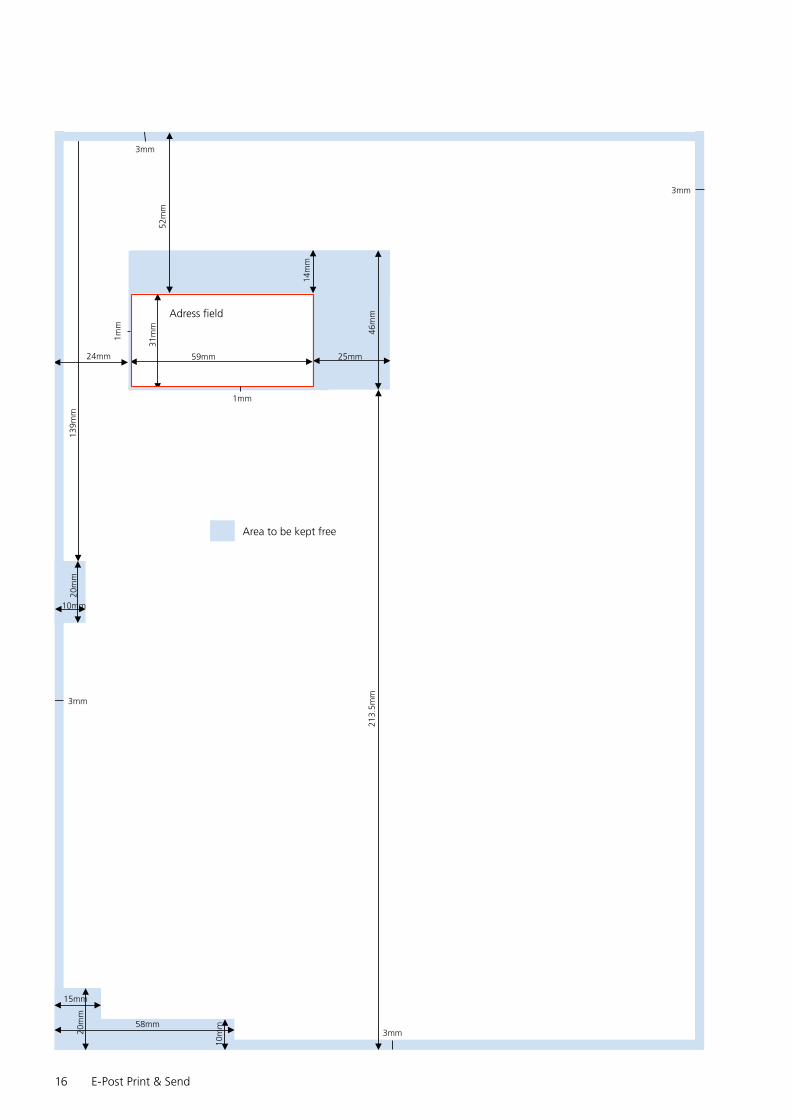
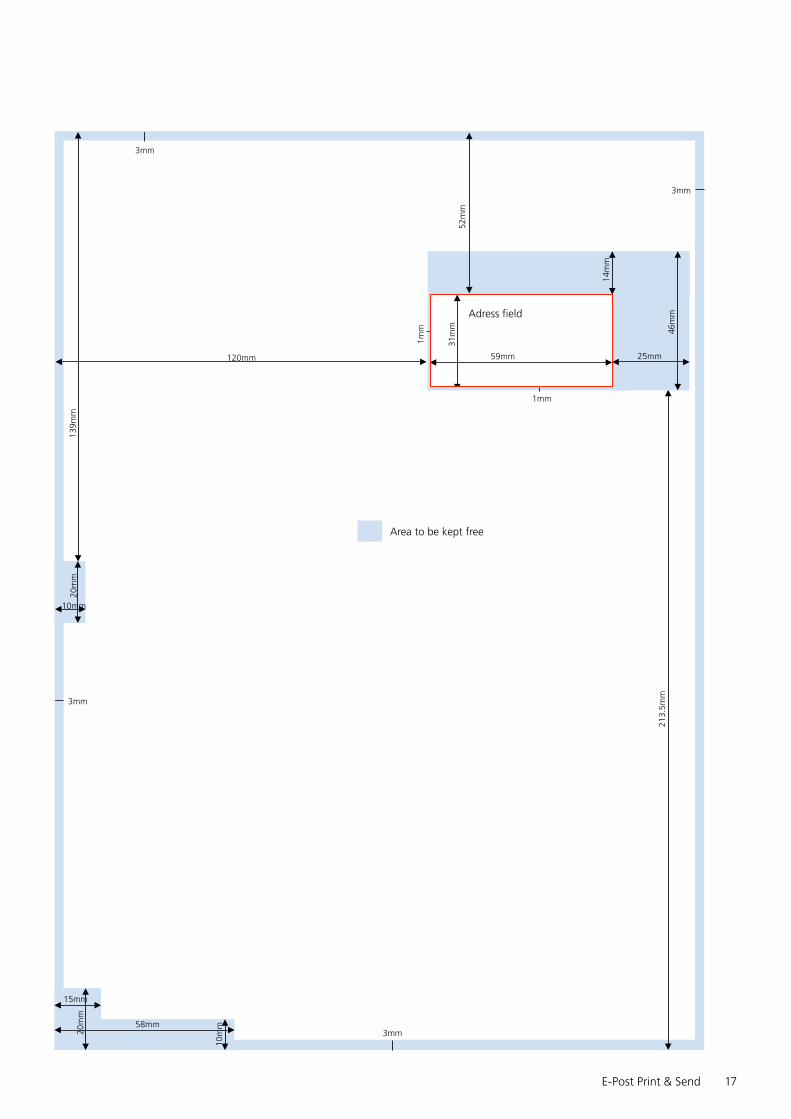
5.3.2 Areas to be kept free The area kept free on the page ensures that mail items can be printed, packed and sent physically. Because the pages will be no-bleed printed, a margin of 3 mm from the edges of the page must be kept free. In some places identification marks are added for production and packaging. These areas should also remain blank. On the bottom left edge of every mail item (digital and physical), the remark “E-Post” will be added in addition to the control characters so that the item is identifiable as an “E-Post Print & Send” mail item. The space above and to the right of the address field must also be kept blank. Franking and details for returns are added in these places.
The space to be kept free is illustrated on the following two pages.
5.3.3 Addresses To ensure that addresses can be recognized and the document can be split up correctly into individual mail items, the address must be positioned in either the left- or right-hand field determined by E-Post Print & Send. An order is only correctly processed if the address is on the same side (left or right) on all the items concerned. The exact address positions are detailed on the next two pages.
Please note: Only the address of the recipient should appear in the address field. An error could occur if, for example, the sender’s address is also put in this field.
16 E-Post Print & Send
3mm
3mm
3mm
213.
5mm
25mm
14m
m
59mm
31m
m
46m
m
10mm
20m
m
139m
m
58mm
15mm
20m
m
10m
m
Adress field
Area to be kept free
3mm 52
mm
24mm
1mm
1mm
E-Post Print & Send 17
3mm
3mm
3mm
3mm
213.
5mm
120mm
10mm
20m
m
139m
m
58mm
15mm
20m
m
10m
m
Area to be kept free
25mm
14m
m
59mm
31m
m
46m
m
Adress field
52m
m
1mm
1mm
18 E-Post Print & Send
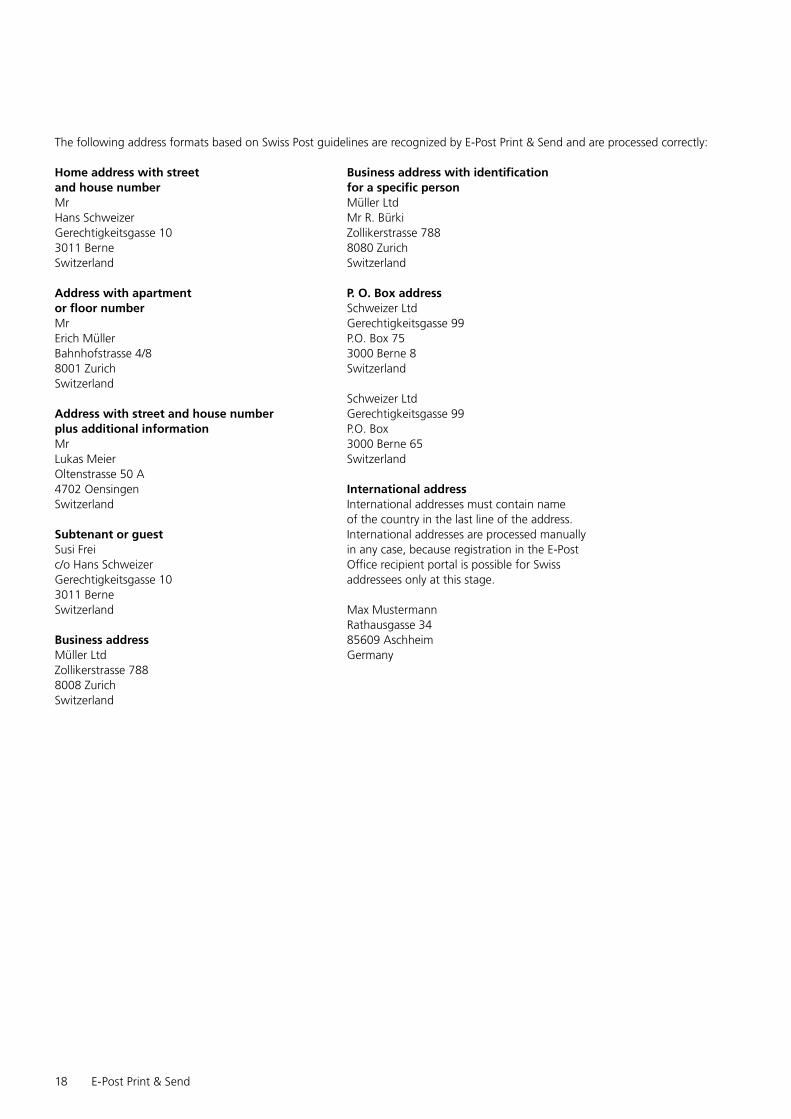
The following address formats based on Swiss Post guidelines are recognized by E-Post Print & Send and are processed correctly:
Home address with street and house numberMrHans SchweizerGerechtigkeitsgasse 103011 Berne Switzerland
Address with apartment or floor numberMrErich MüllerBahnhofstrasse 4/88001 Zurich Switzerland
Address with street and house number plus additional informationMrLukas MeierOltenstrasse 50 A4702 Oensingen Switzerland
Subtenant or guestSusi Freic/o Hans SchweizerGerechtigkeitsgasse 103011 Berne Switzerland
Business addressMüller LtdZollikerstrasse 7888008 Zurich Switzerland
Business address with identification for a specific personMüller LtdMr R. BürkiZollikerstrasse 7888080 Zurich Switzerland
P. O. Box addressSchweizer LtdGerechtigkeitsgasse 99P.O. Box 753000 Berne 8 Switzerland
Schweizer LtdGerechtigkeitsgasse 99P.O. Box3000 Berne 65 Switzerland
International addressInternational addresses must contain name of the country in the last line of the address. International addresses are processed manually in any case, because registration in the E-Post Office recipient portal is possible for Swiss addressees only at this stage.
Max MustermannRathausgasse 3485609 AschheimGermany
E-Post Print & Send 19
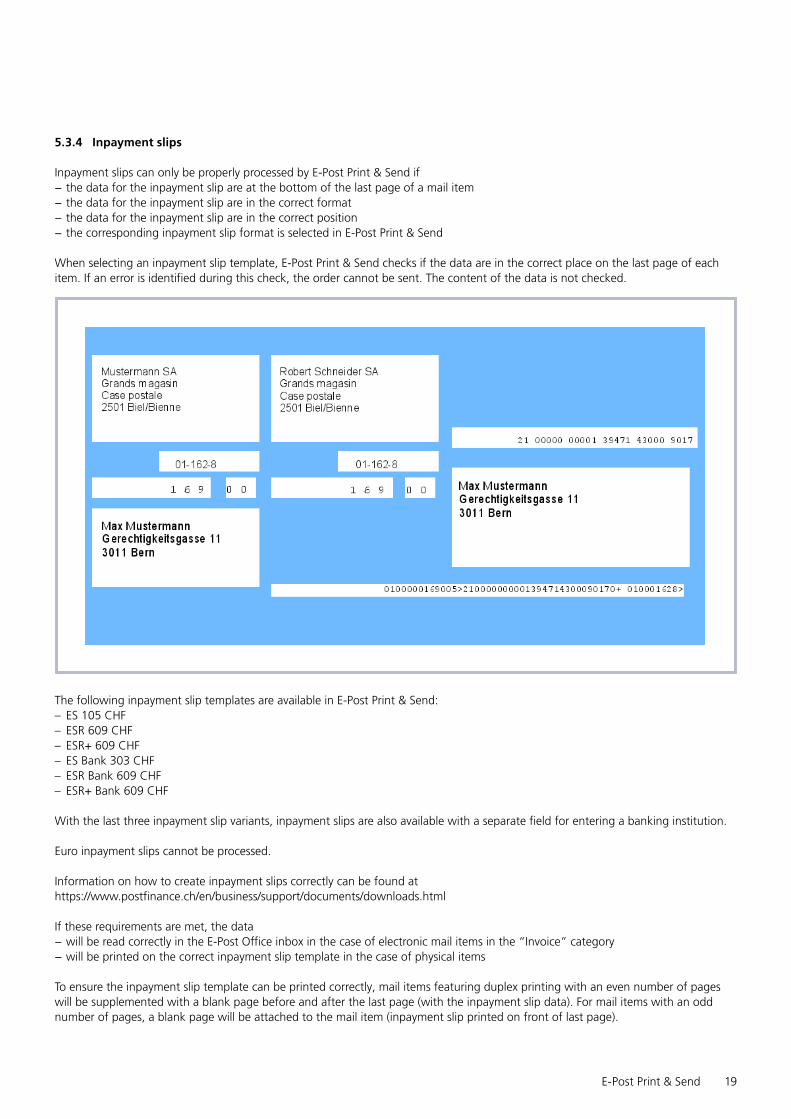
5.3.4 Inpayment slips Inpayment slips can only be properly processed by E-Post Print & Send if− the data for the inpayment slip are at the bottom of the last page of a mail item− the data for the inpayment slip are in the correct format− the data for the inpayment slip are in the correct position− the corresponding inpayment slip format is selected in E-Post Print & Send
When selecting an inpayment slip template, E-Post Print & Send checks if the data are in the correct place on the last page of each item. If an error is identified during this check, the order cannot be sent. The content of the data is not checked.
The following inpayment slip templates are available in E-Post Print & Send:– ES 105 CHF– ESR 609 CHF– ESR+ 609 CHF– ES Bank 303 CHF– ESR Bank 609 CHF– ESR+ Bank 609 CHF
With the last three inpayment slip variants, inpayment slips are also available with a separate field for entering a banking institution.
Euro inpayment slips cannot be processed.
Information on how to create inpayment slips correctly can be found at https://www.postfinance.ch/en/business/support/documents/downloads.html
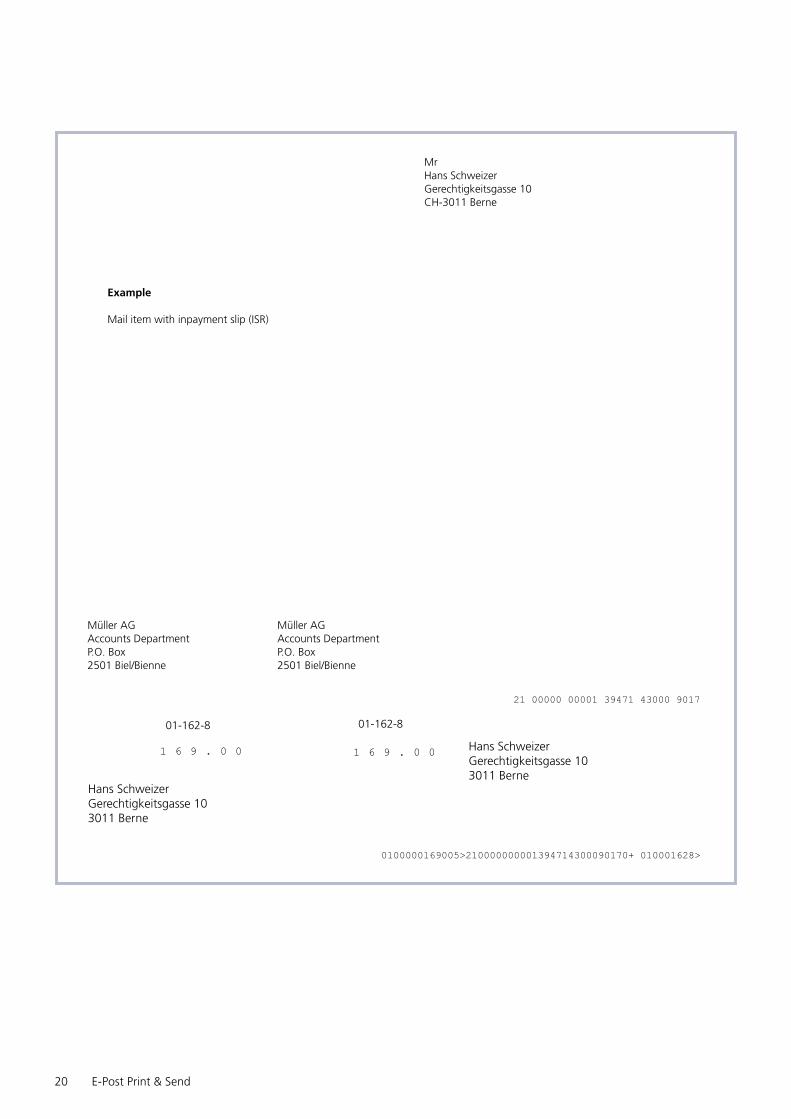
If these requirements are met, the data− will be read correctly in the E-Post Office inbox in the case of electronic mail items in the “Invoice” category− will be printed on the correct inpayment slip template in the case of physical items To ensure the inpayment slip template can be printed correctly, mail items featuring duplex printing with an even number of pages will be supplemented with a blank page before and after the last page (with the inpayment slip data). For mail items with an odd number of pages, a blank page will be attached to the mail item (inpayment slip printed on front of last page).
20 E-Post Print & Send
MrHans SchweizerGerechtigkeitsgasse 10CH-3011 Berne
Hans SchweizerGerechtigkeitsgasse 103011 Berne
Hans SchweizerGerechtigkeitsgasse 103011 Berne
Müller AGAccounts DepartmentP.O. Box2501 Biel/Bienne
Müller AGAccounts DepartmentP.O. Box2501 Biel/Bienne
Example
Mail item with inpayment slip (ISR)
1 6 9 . 0 0
01-162-8 01-162-8
21 00000 00001 39471 43000 9017
1 6 9 . 0 0
0100000169005>210000000001394714300090170+ 010001628>
E-Post Print & Send 21
5.3.5 Logo template A logo template for E-Post Print & Send can be saved in the “E-Post Business” online service. The content of the logo template (logo, claim, address, etc.) is defined by the business customer and created as a PDF file. If a logo template is saved in the business customer profile, it is automatically incorporated into each page of the mail items. The logo template should not interfere with the designated free space.
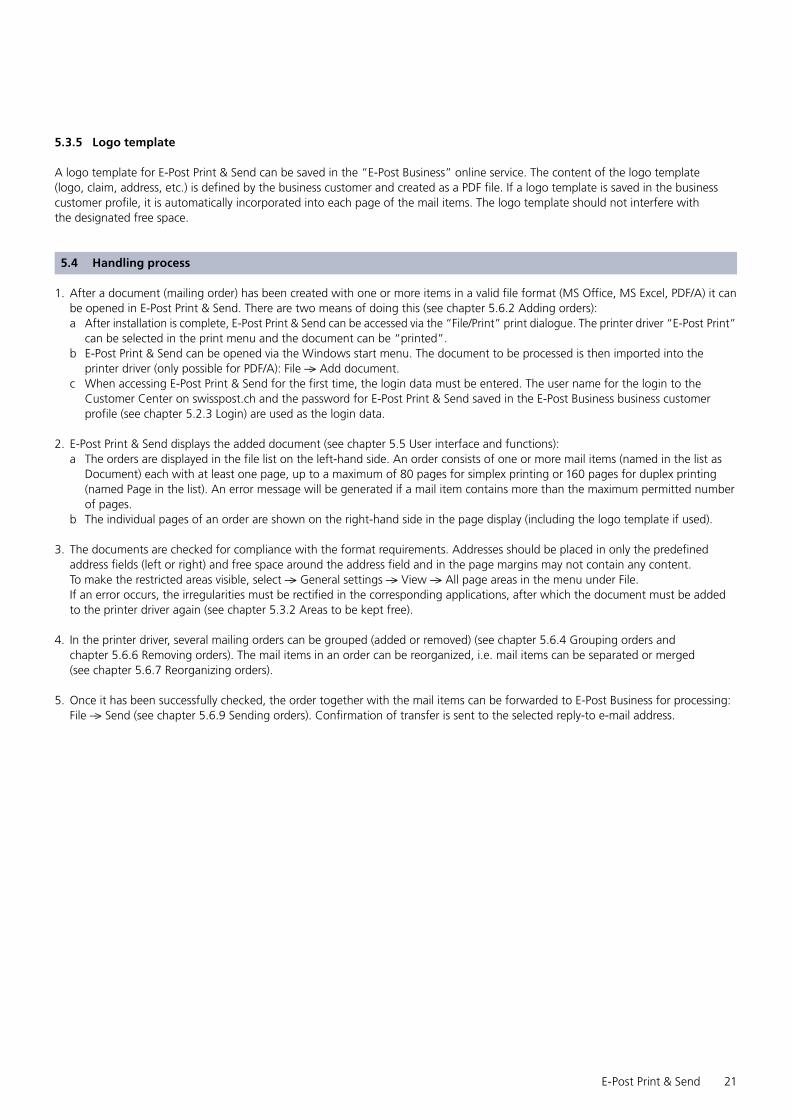
5.4 Handling process
1. After a document (mailing order) has been created with one or more items in a valid file format (MS Office, MS Excel, PDF/A) it can be opened in E-Post Print & Send. There are two means of doing this (see chapter 5.6.2 Adding orders):a After installation is complete, E-Post Print & Send can be accessed via the “File/Print” print dialogue. The printer driver “E-Post Print”
can be selected in the print menu and the document can be “printed”.b E-Post Print & Send can be opened via the Windows start menu. The document to be processed is then imported into the
printer driver (only possible for PDF/A): File ––> Add document.c When accessing E-Post Print & Send for the first time, the login data must be entered. The user name for the login to the
Customer Center on swisspost.ch and the password for E-Post Print & Send saved in the E-Post Business business customer profile (see chapter 5.2.3 Login) are used as the login data.
2. E-Post Print & Send displays the added document (see chapter 5.5 User interface and functions):a The orders are displayed in the file list on the left-hand side. An order consists of one or more mail items (named in the list as
Document) each with at least one page, up to a maximum of 80 pages for simplex printing or 160 pages for duplex printing (named Page in the list). An error message will be generated if a mail item contains more than the maximum permitted number of pages.
b The individual pages of an order are shown on the right-hand side in the page display (including the logo template if used).
3. The documents are checked for compliance with the format requirements. Addresses should be placed in only the predefined address fields (left or right) and free space around the address field and in the page margins may not contain any content. To make the restricted areas visible, select ––> General settings ––> View ––> All page areas in the menu under File. If an error occurs, the irregularities must be rectified in the corresponding applications, after which the document must be added to the printer driver again (see chapter 5.3.2 Areas to be kept free).
4. In the printer driver, several mailing orders can be grouped (added or removed) (see chapter 5.6.4 Grouping orders and chapter 5.6.6 Removing orders). The mail items in an order can be reorganized, i.e. mail items can be separated or merged (see chapter 5.6.7 Reorganizing orders).
5. Once it has been successfully checked, the order together with the mail items can be forwarded to E-Post Business for processing: File ––> Send (see chapter 5.6.9 Sending orders). Confirmation of transfer is sent to the selected reply-to e-mail address.
22 E-Post Print & Send
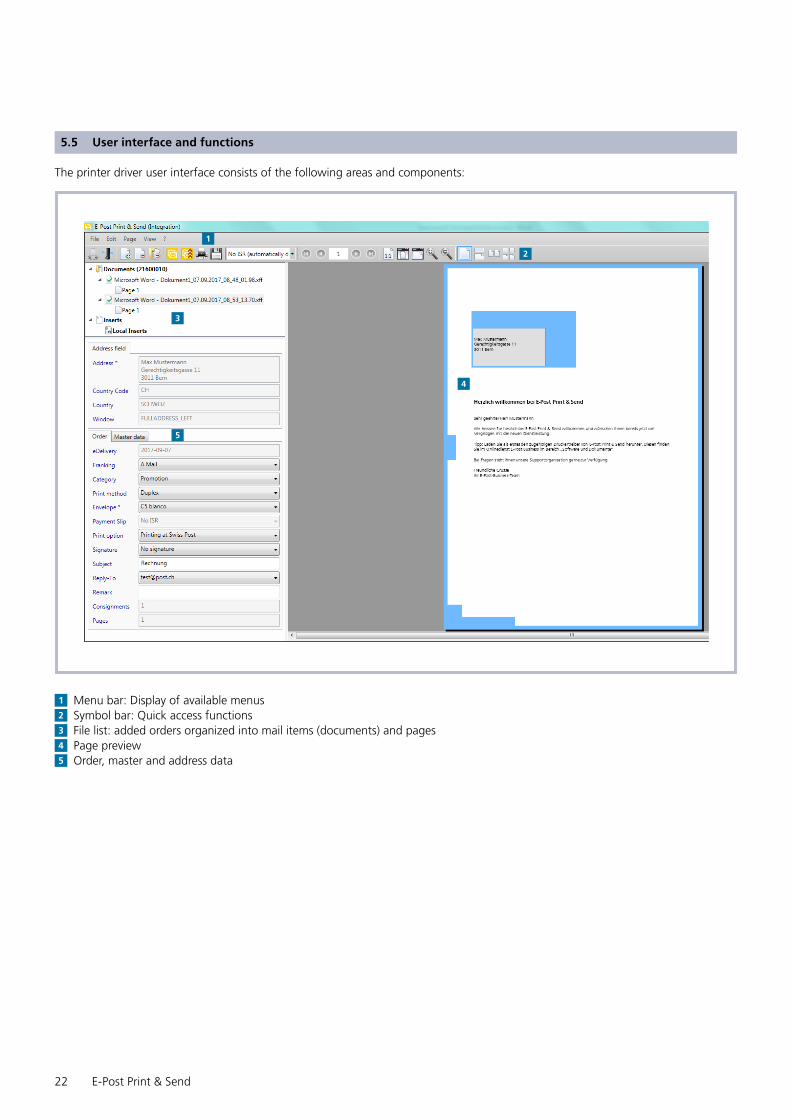
5.5 User interface and functions The printer driver user interface consists of the following areas and components:
1
2
3
4
5
1 Menu bar: Display of available menus2 Symbol bar: Quick access functions3 File list: added orders organized into mail items (documents) and pages4 Page preview5 Order, master and address data
E-Post Print & Send 23
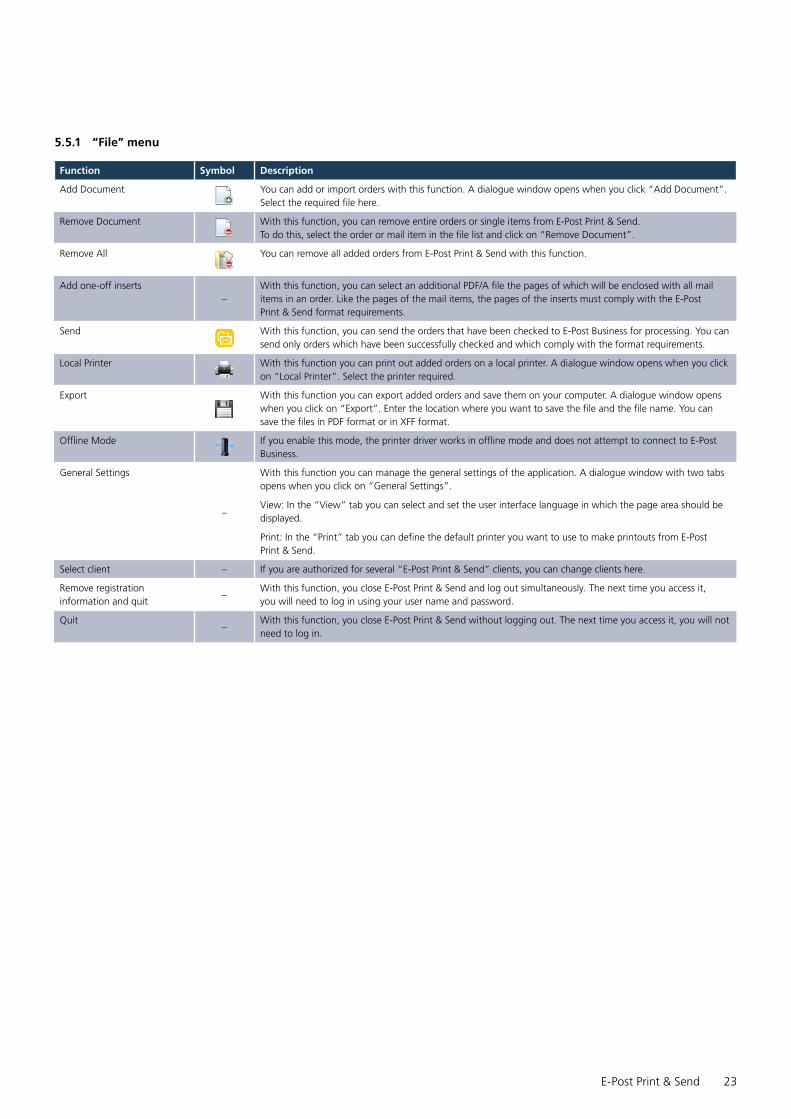
5.5.1 “File” menu
Function Symbol Description
Add Document You can add or import orders with this function. A dialogue window opens when you click “Add Document”. Select the required file here.
Remove Document With this function, you can remove entire orders or single items from E-Post Print & Send. To do this, select the order or mail item in the file list and click on “Remove Document”.
Remove All You can remove all added orders from E-Post Print & Send with this function.
Add one-off inserts–
With this function, you can select an additional PDF/A file the pages of which will be enclosed with all mail items in an order. Like the pages of the mail items, the pages of the inserts must comply with the E-Post Print & Send format requirements.
Send With this function, you can send the orders that have been checked to E-Post Business for processing. You can send only orders which have been successfully checked and which comply with the format requirements.
Local Printer With this function you can print out added orders on a local printer. A dialogue window opens when you click on “Local Printer”. Select the printer required.
Export With this function you can export added orders and save them on your computer. A dialogue window opens when you click on “Export”. Enter the location where you want to save the file and the file name. You can save the files in PDF format or in XFF format.
Offline Mode If you enable this mode, the printer driver works in offline mode and does not attempt to connect to E-Post Business.
General Settings
–
With this function you can manage the general settings of the application. A dialogue window with two tabs opens when you click on “General Settings”.
View: In the “View” tab you can select and set the user interface language in which the page area should be displayed.
Print: In the “Print” tab you can define the default printer you want to use to make printouts from E-Post Print & Send.
Select client – If you are authorized for several “E-Post Print & Send” clients, you can change clients here.
Remove registration information and quit
–With this function, you close E-Post Print & Send and log out simultaneously. The next time you access it, you will need to log in using your user name and password.
Quit–
With this function, you close E-Post Print & Send without logging out. The next time you access it, you will not need to log in.
24 E-Post Print & Send
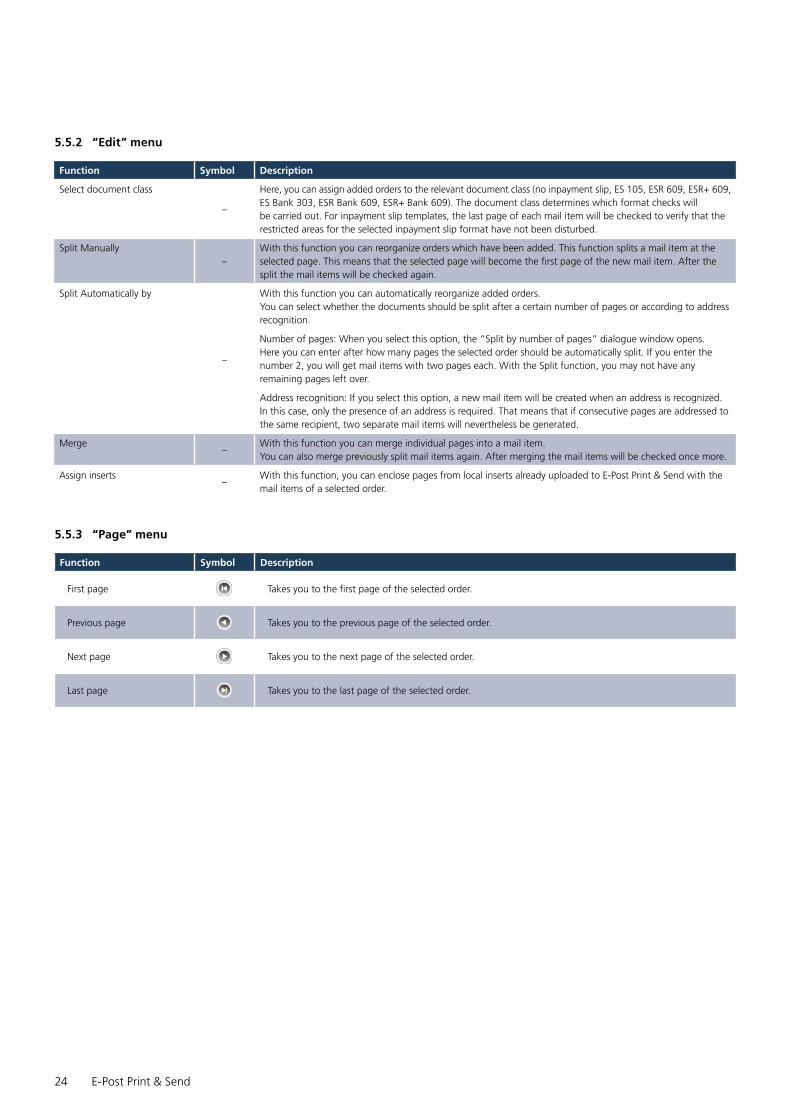
5.5.2 “Edit” menu
5.5.3 “Page” menu
Function Symbol Description
Select document class
–
Here, you can assign added orders to the relevant document class (no inpayment slip, ES 105, ESR 609, ESR+ 609, ES Bank 303, ESR Bank 609, ESR+ Bank 609). The document class determines which format checks will be carried out. For inpayment slip templates, the last page of each mail item will be checked to verify that the restricted areas for the selected inpayment slip format have not been disturbed.
Split Manually–
With this function you can reorganize orders which have been added. This function splits a mail item at the selected page. This means that the selected page will become the first page of the new mail item. After the split the mail items will be checked again.
Split Automatically by
–
With this function you can automatically reorganize added orders. You can select whether the documents should be split after a certain number of pages or according to address recognition.
Number of pages: When you select this option, the “Split by number of pages” dialogue window opens. Here you can enter after how many pages the selected order should be automatically split. If you enter the number 2, you will get mail items with two pages each. With the Split function, you may not have any remaining pages left over.
Address recognition: If you select this option, a new mail item will be created when an address is recognized. In this case, only the presence of an address is required. That means that if consecutive pages are addressed to the same recipient, two separate mail items will nevertheless be generated.
Merge–
With this function you can merge individual pages into a mail item. You can also merge previously split mail items again. After merging the mail items will be checked once more.
Assign inserts–
With this function, you can enclose pages from local inserts already uploaded to E-Post Print & Send with the mail items of a selected order.
Function Symbol Description
First page Takes you to the first page of the selected order.
Previous page Takes you to the previous page of the selected order.
Next page Takes you to the next page of the selected order.
Last page Takes you to the last page of the selected order.
E-Post Print & Send 25
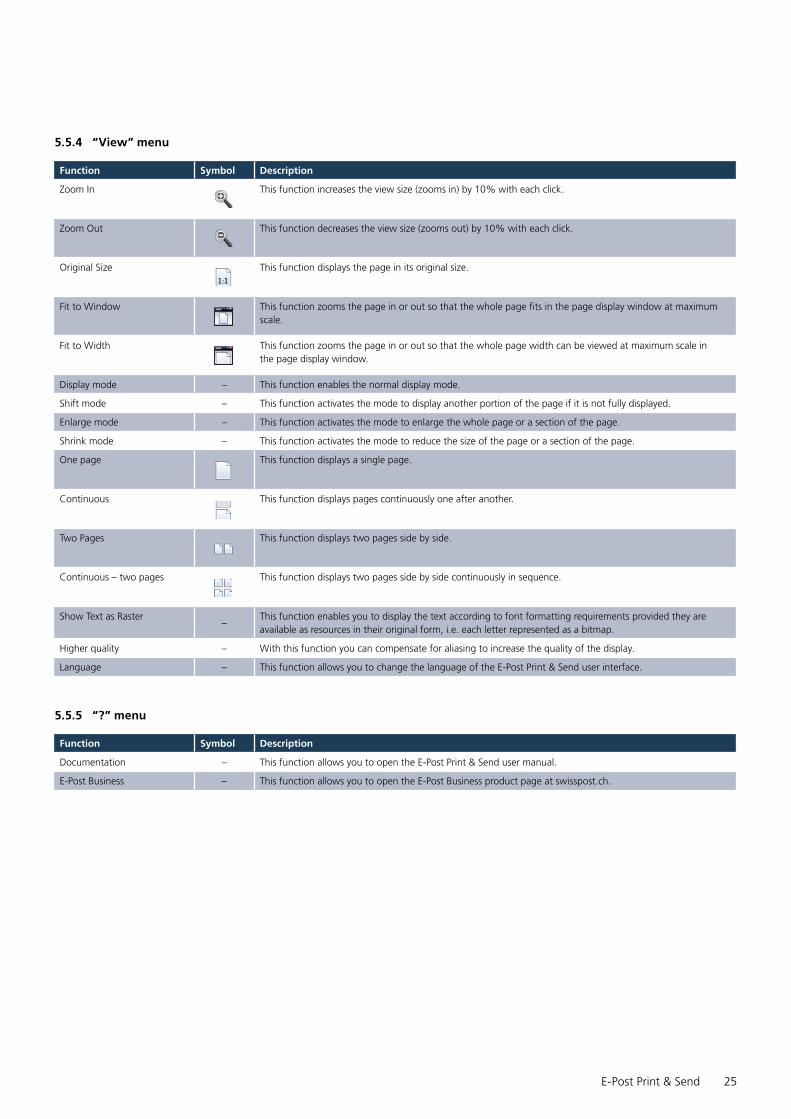
5.5.4 “View” menu
Function Symbol Description
Zoom In This function increases the view size (zooms in) by 10% with each click.
Zoom Out This function decreases the view size (zooms out) by 10% with each click.
Original Size This function displays the page in its original size.
Fit to Window This function zooms the page in or out so that the whole page fits in the page display window at maximum scale.
Fit to Width This function zooms the page in or out so that the whole page width can be viewed at maximum scale in the page display window.
Display mode – This function enables the normal display mode.
Shift mode – This function activates the mode to display another portion of the page if it is not fully displayed.
Enlarge mode – This function activates the mode to enlarge the whole page or a section of the page.
Shrink mode – This function activates the mode to reduce the size of the page or a section of the page.
One page This function displays a single page.
Continuous This function displays pages continuously one after another.
Two Pages This function displays two pages side by side.
Continuous – two pages This function displays two pages side by side continuously in sequence.
Show Text as Raster–
This function enables you to display the text according to font formatting requirements provided they are available as resources in their original form, i.e. each letter represented as a bitmap.
Higher quality – With this function you can compensate for aliasing to increase the quality of the display.
Language – This function allows you to change the language of the E-Post Print & Send user interface.
5.5.5 “?” menu
Function Symbol Description
Documentation – This function allows you to open the E-Post Print & Send user manual.
E-Post Business – This function allows you to open the E-Post Business product page at swisspost.ch.
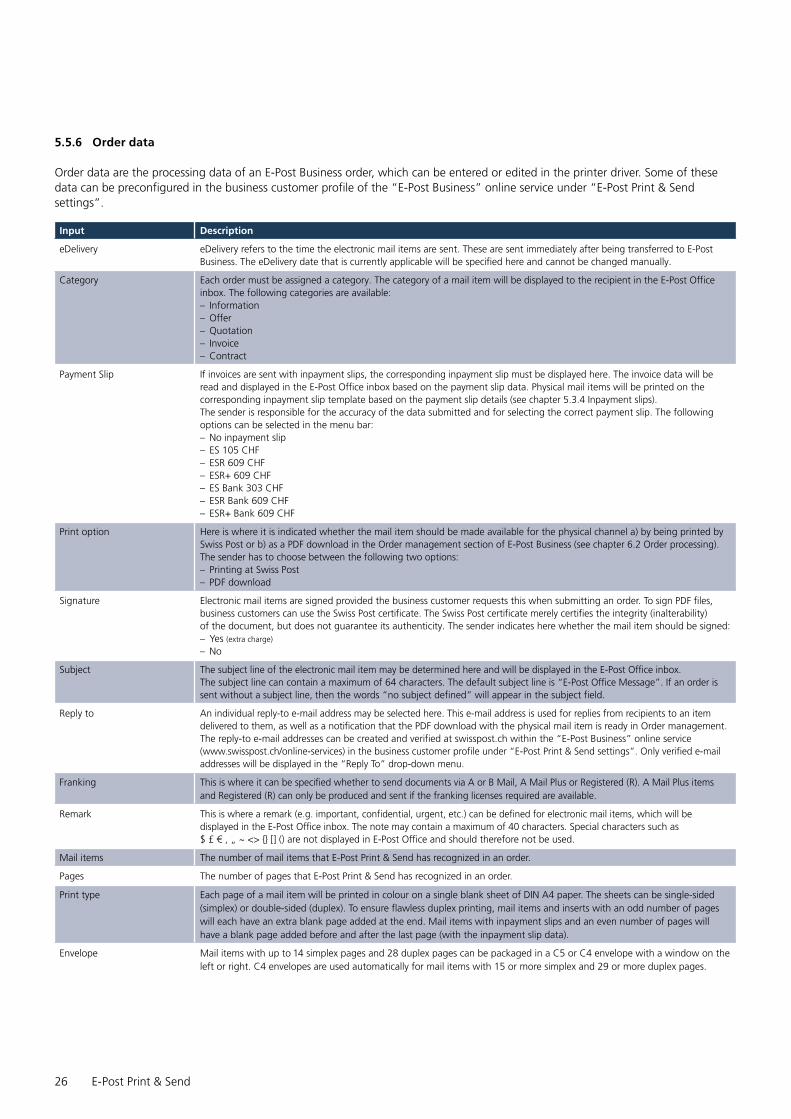
26 E-Post Print & Send
5.5.6 Order data Order data are the processing data of an E-Post Business order, which can be entered or edited in the printer driver. Some of these data can be preconfigured in the business customer profile of the “E-Post Business” online service under “E-Post Print & Send settings”.
Input Description
eDelivery eDelivery refers to the time the electronic mail items are sent. These are sent immediately after being transferred to E-Post Business. The eDelivery date that is currently applicable will be specified here and cannot be changed manually.
Category Each order must be assigned a category. The category of a mail item will be displayed to the recipient in the E-Post Office inbox. The following categories are available:– Information– Offer– Quotation– Invoice– Contract
Payment Slip If invoices are sent with inpayment slips, the corresponding inpayment slip must be displayed here. The invoice data will be read and displayed in the E-Post Office inbox based on the payment slip data. Physical mail items will be printed on the corresponding inpayment slip template based on the payment slip details (see chapter 5.3.4 Inpayment slips). The sender is responsible for the accuracy of the data submitted and for selecting the correct payment slip. The following options can be selected in the menu bar:– No inpayment slip– ES 105 CHF – ESR 609 CHF– ESR+ 609 CHF– ES Bank 303 CHF– ESR Bank 609 CHF– ESR+ Bank 609 CHF
Print option Here is where it is indicated whether the mail item should be made available for the physical channel a) by being printed by Swiss Post or b) as a PDF download in the Order management section of E-Post Business (see chapter 6.2 Order processing). The sender has to choose between the following two options:– Printing at Swiss Post– PDF download
Signature Electronic mail items are signed provided the business customer requests this when submitting an order. To sign PDF files, business customers can use the Swiss Post certificate. The Swiss Post certificate merely certifies the integrity (inalterability) of the document, but does not guarantee its authenticity. The sender indicates here whether the mail item should be signed:– Yes (extra charge)
– No
Subject The subject line of the electronic mail item may be determined here and will be displayed in the E-Post Office inbox. The subject line can contain a maximum of 64 characters. The default subject line is “E-Post Office Message”. If an order is sent without a subject line, then the words “no subject defined” will appear in the subject field.
Reply to An individual reply-to e-mail address may be selected here. This e-mail address is used for replies from recipients to an item delivered to them, as well as a notification that the PDF download with the physical mail item is ready in Order management. The reply-to e-mail addresses can be created and verified at swisspost.ch within the “E-Post Business” online service (www.swisspost.ch/online-services) in the business customer profile under “E-Post Print & Send settings”. Only verified e-mail addresses will be displayed in the “Reply To” drop-down menu.
Franking This is where it can be specified whether to send documents via A or B Mail, A Mail Plus or Registered (R). A Mail Plus items and Registered (R) can only be produced and sent if the franking licenses required are available.
Remark This is where a remark (e.g. important, confidential, urgent, etc.) can be defined for electronic mail items, which will be displayed in the E-Post Office inbox. The note may contain a maximum of 40 characters. Special characters such as $ £ € ‚ „ ~ <> {} [] () are not displayed in E-Post Office and should therefore not be used.
Mail items The number of mail items that E-Post Print & Send has recognized in an order.
Pages The number of pages that E-Post Print & Send has recognized in an order.
Print type Each page of a mail item will be printed in colour on a single blank sheet of DIN A4 paper. The sheets can be single-sided (simplex) or double-sided (duplex). To ensure flawless duplex printing, mail items and inserts with an odd number of pages will each have an extra blank page added at the end. Mail items with inpayment slips and an even number of pages will have a blank page added before and after the last page (with the inpayment slip data).
Envelope Mail items with up to 14 simplex pages and 28 duplex pages can be packaged in a C5 or C4 envelope with a window on the left or right. C4 envelopes are used automatically for mail items with 15 or more simplex and 29 or more duplex pages.
E-Post Print & Send 27
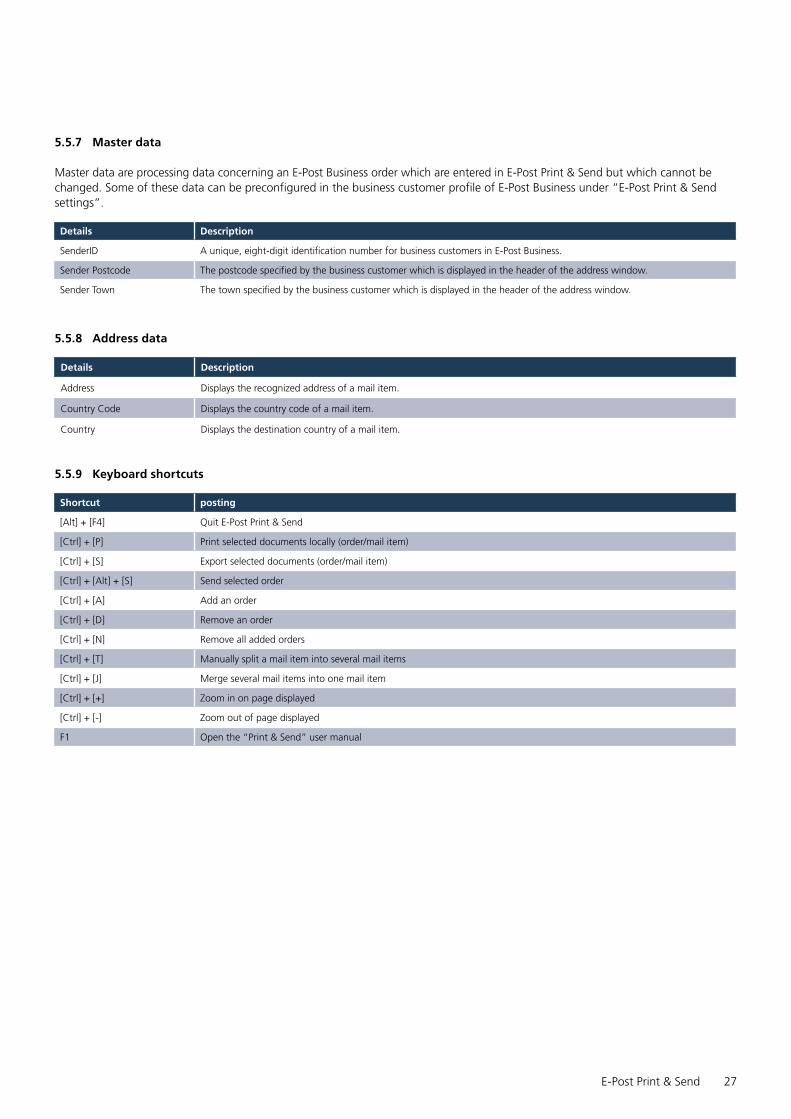
5.5.7 Master data Master data are processing data concerning an E-Post Business order which are entered in E-Post Print & Send but which cannot be changed. Some of these data can be preconfigured in the business customer profile of E-Post Business under “E-Post Print & Send settings”.
5.5.8 Address data
5.5.9 Keyboard shortcuts
Details Description
SenderID A unique, eight-digit identification number for business customers in E-Post Business.
Sender Postcode The postcode specified by the business customer which is displayed in the header of the address window.
Sender Town The town specified by the business customer which is displayed in the header of the address window.
Details Description
Address Displays the recognized address of a mail item.
Country Code Displays the country code of a mail item.
Country Displays the destination country of a mail item.
Shortcut posting
[Alt] + [F4] Quit E-Post Print & Send
[Ctrl] + [P] Print selected documents locally (order/mail item)
[Ctrl] + [S] Export selected documents (order/mail item)
[Ctrl] + [Alt] + [S] Send selected order
[Ctrl] + [A] Add an order
[Ctrl] + [D] Remove an order
[Ctrl] + [N] Remove all added orders
[Ctrl] + [T] Manually split a mail item into several mail items
[Ctrl] + [J] Merge several mail items into one mail item
[Ctrl] + [+] Zoom in on page displayed
[Ctrl] + [-] Zoom out of page displayed
F1 Open the “Print & Send” user manual
28 E-Post Print & Send
5.6 Working with E-Post Print & Send
5.6.1 Starting E-Post Print & Send You can start E-Post Print & Send in different ways:1. Start E-Post Print & Send via the Windows start menu.2. E-Post Print & Send starts automatically when you print a document as well as by selecting the E-Post Office Print printer in the
printer driver.
LoginWhen accessing E-Post Print & Send for the first time, users must log in with a user name and password. All users who have been authorized for the “E-Post Business” service at swisspost.ch can register for E-Post Print & Send.
User nameThe same e-mail address as that used to log in to swisspost.ch is used as a user name.
PasswordEach user must create and save his/her password for access to E-Post Print & Send. Proceed as follows:1. Log in to swisspost.ch.2. Access the “E-Post Business” service.3. Select “Business customer profile” in the drop-down menu.4. If you do not have read rights for the business customer profile, the input screen for the E-Post Print & Send password appears
directly. If you have read rights for the business customer profile, you will find the password input screen in the “E-Post Print & Send settings” area under password.
5.6.2 Adding orders There are several methods of adding an order in E-Post Print & Send:1. You can print the order which is to be added in your application and transfer it to the printer driver by selecting the printer E-Post
Print. After you have started Print, the order automatically opens in the printer driver.2. You can also save the created document locally and add it manually in E-Post Print & Send.
Only documents in PDF/A format (or in XFF format) can be added this way. To do this, proceed as follows:a In the “File” menu, click on “Add Document”.b The “Add Document” dialogue window opens.c Select the document that you want to add.d Click on “Open”.e The document is opened in E-Post Print & Send.f After adding, the document will open in the document display, the relevant settings will be loaded and all checks performed.
E-Post Print & Send 29
5.6.3 Selecting a document class Orders added must be assigned a document class in order for the relevant layout checks to be performed.
The following document classes are available in the E-Post Print & Send menu bar:– No inpayment slip– ES 105 CHF– ESR 609 CHF– ESR+ 609 CHF– ES Bank 303 CHF– ESR Bank 609 CHF– ESR+ Bank 609 CHF
The document class is displayed on the left-hand side with the order data in the “Payment slip” field. If you want to change the default document class, simply select a new input in the drop-down menu in the menu bar. Alternatively, you can proceed as follows:1. In the “Edit” menu, click on “Document Class”.2. The “Document Class” dialogue window opens. 3. Enable or disable the check box next to Document Class in order to select or deselect a Document Class for the selected document.
5.6.4 Grouping orders You can group orders in E-Post Print & Send in order to send them to E-Post Business together at a later point in time. Grouping orders means adding more orders in E-Post Print & Send and, if necessary, removing them again. Orders already added remain in E-Post Print & Send until they are sent to E-Post Business. If you close E-Post Print & Send before sending, all previously added orders will appear in the file list when you next open it.
5.6.5 Arranging orders in the file list You can change the order in which orders appear in the file list. To do this, proceed as follows:1. Select the order you wish to move.2. Drag the order to where you would like it to appear on the list.3. Release the mouse button (drag and drop).
5.6.6 Removing orders or items You can remove orders or mail items added to the printer driver from the file list. To do this, proceed as follows:1. Select the order or mail item. 2. In the “File” menu, click on “Remove Document”.3. The document will be removed from the list.
You can remove all added orders from E-Post Print & Send. To do this, proceed as follows:1. In the “File” menu, click on “Remove All”.2. The “Remove All” dialogue window will open.3. Confirm the action.4. All orders will be removed from the file list.
30 E-Post Print & Send
5.6.7 Reorganizing orders You can reorganize orders in E-Post Print & Send, i.e. create several items from one item. Mail items that are split up can be joined together again.
Splitting ordersYou can split orders in E-Post Print & Send into several mail items. You can split the added orders manually or use the appropriate function to split them automatically.
To split manually, proceed as follows:1. Select the page where you would like to split the mail item.2. In the “Edit” menu, click on “Split Manually”.3. The selected page becomes the first page of the new mail item.
To split automatically, proceed as follows:1. Select the page where you would like to split the mail item automatically.2. In the “Edit” menu, click on “Split Automatically”. Then select one of the splitting options. 3. The selected order will automatically be split into items according to the criterion selected (number of pages or address recognition;
see chapter 5.5.2 “Edit” menu).
Merging mail itemsYou can merge mail items, i.e. combine several mail items into one mail item, thereby reversing the automatic or manual split. For this process to be successful, the mail items must follow each other consecutively. If necessary, arrange the items accordingly in advance (see chapter 5.6.5 Arranging orders in the file list).
If you select the first or last page of an item instead of a whole item, the item will merge with the previous mail item if you select the first page. If you select the last page of a mail item, it will be merged with the next mail item.
To merge individual mail items, proceed as follows:1. Select the mail item which you want to add to the previous mail item.2. In the “Edit” menu click on “Merge”.3. The selected mail item and the previous mail item will be merged into one mail item.
If you want to reverse a split, .i.e. when merging mail items with another mail item, proceed as follows:1. Select the split mail item which you wish to merge again.2. In the “Edit” menu click on “Merge”.3. All selected mail items will automatically be merged again into one mail item.
5.6.8 Incorporating inserts You can incorporate several insert files per order. The pages of the insert files will be enclosed with all mail items in the order. To incorporate only one insert into an order, proceed as follows:1. Select the order into which the insert is to be incorporated.2. In the “File” menu, click on “Add one-off insert”.3. Select a PDF/A file which satisfies the E-Post Print & Send format requirements.4. Every mail item in the selected order is supplemented with the insert pages.
If you want to incorporate one or more inserts into different orders proceed as follows:1. Right click on the “Local inserts” input in the detailed list on the left.2. Click on “Import inserts”.3. Select a PDF/A file which satisfies the E-Post Print & Send format requirements.4. The imported inserts are displayed under “Local inserts” in the detailed list.5. Select the order into which the insert is to be incorporated.6. In the “Edit” menu click on “Assign insert”.7. Select the inserts you want to incorporate into the order and click on “Add”.8. Every mail item in the selected order is supplemented with the insert pages.
E-Post Print & Send 31
5.6.9 Removing inserts To remove inserts from an item, proceed as follows:1. Right click on an insert page in the order.2. Click on “Remove”.
To remove several inserts from an item, proceed as follows:1. Select the order from which the insert is to be removed.2. In the “Edit” menu click on “Assign insert”.3. Select the inserts you want to remove and click on “Remove”.
To remove insert files from local inserts in E-Post Print & Send, proceed as follows:1. Right click on an insert file.2. Click on “Remove”.
5.6.10 Adjusting settings for orders When you add an order in E-Post Print & Send, information concerning the order is displayed in the “Order data” field. This includes the processing data as well as address information and customer data. In this area, you can enter control information concerning the dispatch of the items (see chapters 5.5.6 to 5.5.8 Order, master and address data).
5.6.11 Sending orders After successful checking, you can send your order to E-Post Business. You cannot transfer your mail items individually to E-Post Business. The sending function will automatically send the whole order. To send manually, proceed as follows:1. Select the order you want to send to E-Post Business.2. In the “File” menu, click on “Send”.3. The order will be sent to E-Post Business.4. The transfer of the items is confirmed by means of a message to the selected reply-to e-mail address.
5.6.12 Printing orders locally You can print out orders added in E-Post Print & Send on a local printer. To do this, proceed as follows:1. Select the page or the mail item that you want to print. If you select a mail item, all pages of that mail item will be printed.
If you select an order, all mail items and pages of those mail items will be printed.2. In the “File” menu, click on “Print locally”.3. The Print dialogue window opens.
5.6.13 Exporting orders For archiving purposes you can save the selected order to a directory on your hard drive or another location as a PDF (or in XFF format). To do this, proceed as follows:1. Select the mail item or order.2. In the “File” menu, click on “Export”.3. The “Export” dialogue window will open.4. Enter the target directory and a file name.5. The order will be exported in the format selected.
5.6.14 Quitting E-Post Print & Send You can quit E-Post Print & Send manually by selecting “Quit” in the “File” menu.
32 E-Post Print & Send
5.6.15 Changing the language settings To change the language settings, click on “Language” in the “View” menu and select the desired language. Alternatively, you can change the language settings under File ––> Settings in the “View” tab.
5.6.16 Help You can view the E-Post Print & Send user manual by clicking on the “?” menu and then clicking on “Documentation”.
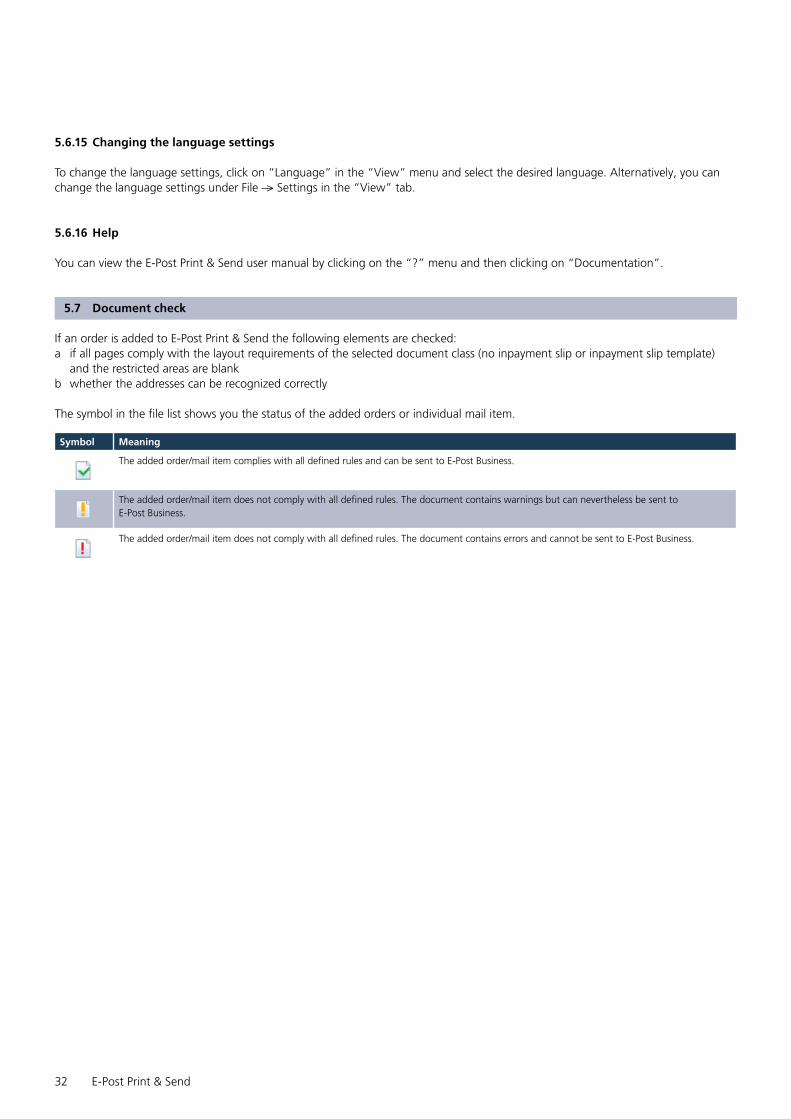
5.7 Document check If an order is added to E-Post Print & Send the following elements are checked:a if all pages comply with the layout requirements of the selected document class (no inpayment slip or inpayment slip template)
and the restricted areas are blankb whether the addresses can be recognized correctly
The symbol in the file list shows you the status of the added orders or individual mail item.
Symbol Meaning
The added order/mail item complies with all defined rules and can be sent to E-Post Business.
The added order/mail item does not comply with all defined rules. The document contains warnings but can nevertheless be sent to E-Post Business.
The added order/mail item does not comply with all defined rules. The document contains errors and cannot be sent to E-Post Business.
E-Post Print & Send 33
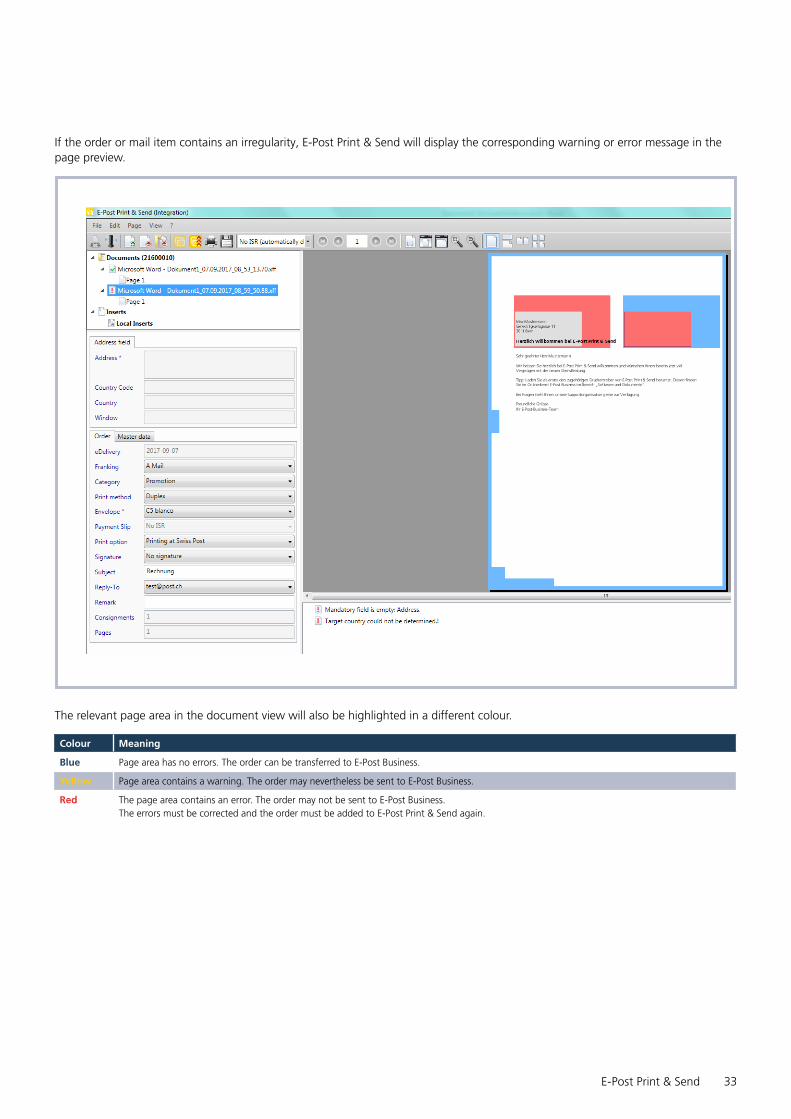
If the order or mail item contains an irregularity, E-Post Print & Send will display the corresponding warning or error message in the page preview.
The relevant page area in the document view will also be highlighted in a different colour.
Colour Meaning
Blue Page area has no errors. The order can be transferred to E-Post Business.
Yellow Page area contains a warning. The order may nevertheless be sent to E-Post Business.
Red The page area contains an error. The order may not be sent to E-Post Business. The errors must be corrected and the order must be added to E-Post Print & Send again.
34 E-Post Print & Send
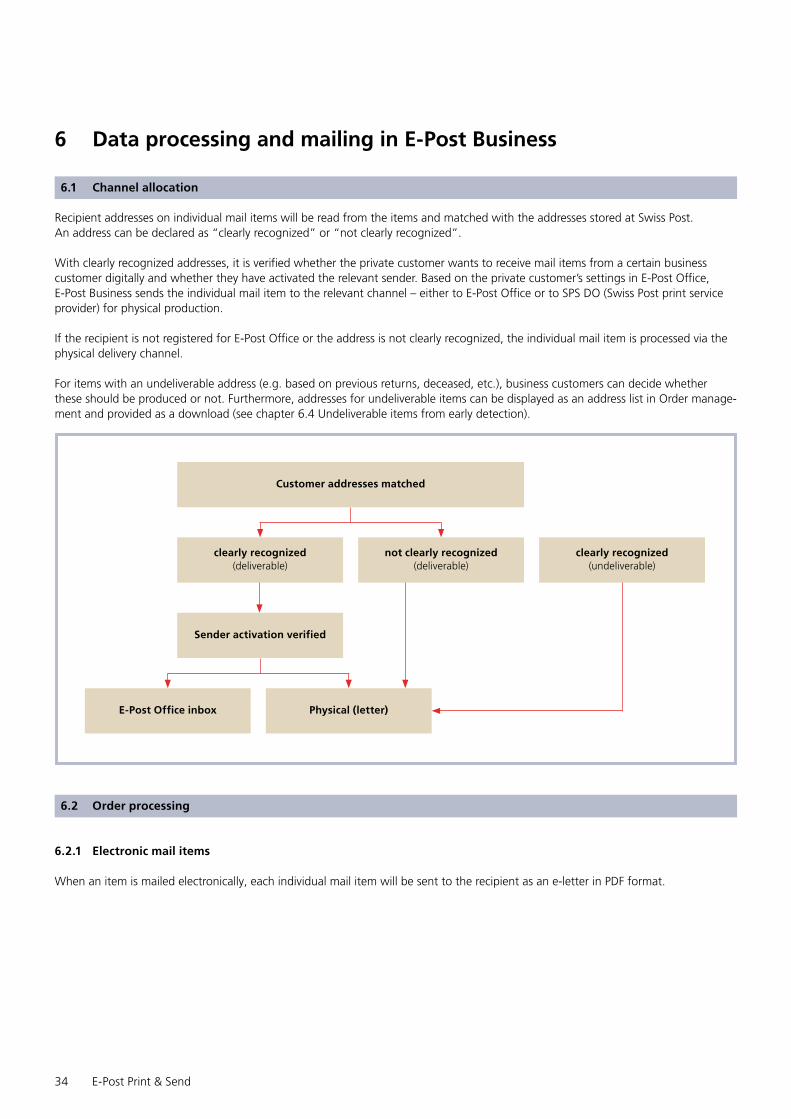
6.1 Channel allocation Recipient addresses on individual mail items will be read from the items and matched with the addresses stored at Swiss Post. An address can be declared as “clearly recognized” or “not clearly recognized”.
With clearly recognized addresses, it is verified whether the private customer wants to receive mail items from a certain business customer digitally and whether they have activated the relevant sender. Based on the private customer’s settings in E-Post Office, E-Post Business sends the individual mail item to the relevant channel – either to E-Post Office or to SPS DO (Swiss Post print service provider) for physical production.
If the recipient is not registered for E-Post Office or the address is not clearly recognized, the individual mail item is processed via the physical delivery channel.
For items with an undeliverable address (e.g. based on previous returns, deceased, etc.), business customers can decide whether these should be produced or not. Furthermore, addresses for undeliverable items can be displayed as an address list in Order manage-ment and provided as a download (see chapter 6.4 Undeliverable items from early detection).
6.2 Order processing
6.2.1 Electronic mail items When an item is mailed electronically, each individual mail item will be sent to the recipient as an e-letter in PDF format.
6 Data processing and mailing in E-Post Business
clearly recognized(deliverable)
Customer addresses matched
not clearly recognized(deliverable)
Sender activation verified
clearly recognized(undeliverable)
E-Post Office inbox Physical (letter)
E-Post Print & Send 35
6.2.2 Physical mail items If the recipient has not activated the sender or the recipient address sent by the business customer is “not clearly recognized”, the individual item is produced physically. This generally corresponds to the physical production as it is already processed now. For this the business customer can choose between two models. In the first case, the data are delivered to the print service provider SPS DO, who will print and send the mail items. The mail items will be produced according to the standards listed in chapter 3.1.
In the second case, the data is prepared for physical mailing as a PDF download in Order management, so that business customers can print the documents themselves or hand them over to a third-party print service provider.
6.3 The E-Reprint process in the event of electronic undeliverability In isolated cases a mail item in an electronic channel (E-Post Office inbox) may be returned with an undeliverability notification or rejected. The most common reasons for this are:– A mail item is larger than 10 MB.− The signature service is not functioning (an E-Reprint is only triggered in agreement with the business customer).− E-Post Office inbox: the E-Post Office recipient account has been deactivated due to the private customer deregistering.
In such cases the E-Reprint process will be triggered. The individual mail item in question in each case will be sent to SPS DO (even if the business customer works with another print service provider). SPS DO prints the electronic individual item, puts it in an envelope it and mails it physically. A letter (also serving as an address label) detailing the undeliverability and the alternative delivery channel is also attached to the E-Reprint item. This guarantees that an item is delivered in each case.
6.4 Undeliverable items from early detection When comparing addresses, Swiss Post recognizes items which cannot be delivered before they are sent. Business customers can specify in the business customer profile of the “E-Post Business” online service (www.swisspost.ch/online-services) whether or not these items should be produced. Furthermore, they can have a list created for each order in the Order Management area containing the recipient addresses which are undeliverable according to the early detection. This list will also be delivered to the sender via e-mail using the reply-to address. Items may be recognized as undeliverable in early detection for the following reasons:– Deceased– Recipient could not be determined– Company gone out of business– Moved away, forwarding order expired– Moved away, no forwarding order available
36 E-Post Print & Send
6.5 Receiving replies In the E-Post Office inbox, private customers have the option of replying directly to the business customer who sent an item without having to leave E-Post Office. Business customers can specify in the business customer profile of “E-Post Business” (www.swisspost.ch/online-services) whether they would like to receive replies physically or electronically via the “IncaMail” online service (secure e-mail). IncaMail allows a company to set up its account so that any IncaMails received are allocated to a user group, e.g. customer service. Details concerning the options for integration into Outlook or Lotus Notes are described at www.swisspost.ch/incamail > Product information > Product variants > Mail gateway integration.
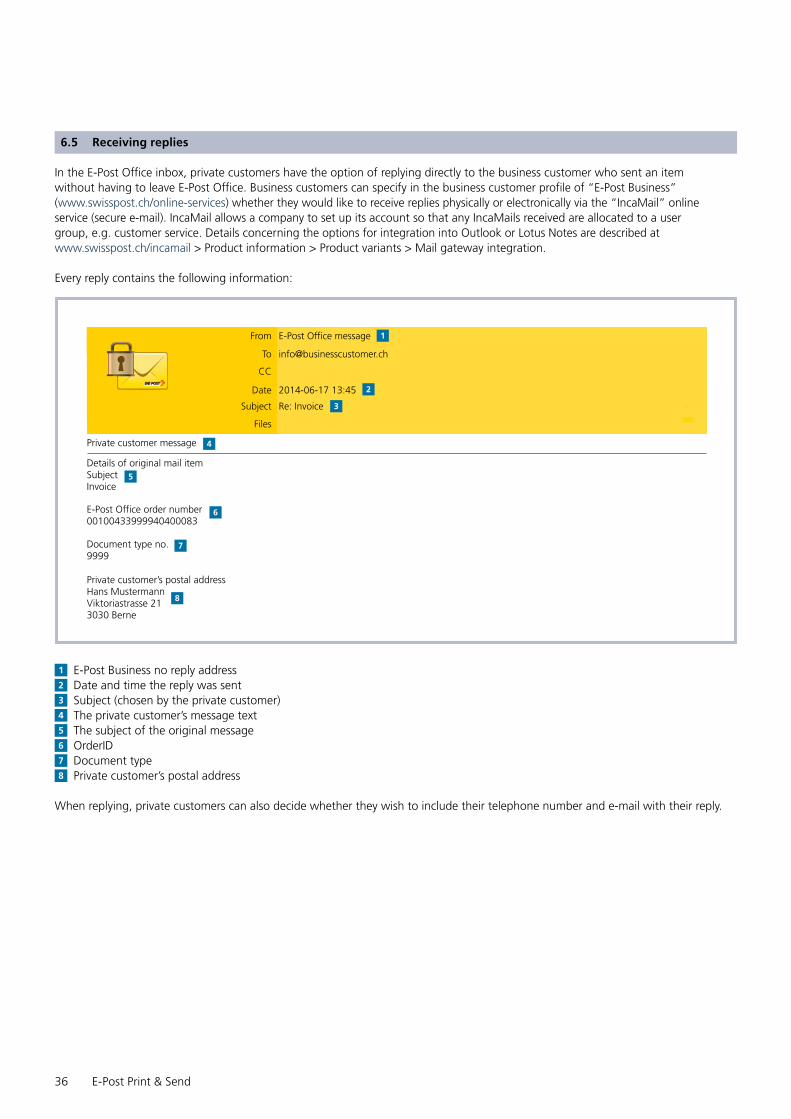
Every reply contains the following information:
E-Post Office messageFrom
To
CC
Date
Subject
Files
2014-06-17 13:45
Re: Invoice
Private customer message
Details of original mail itemSubjectInvoice
E-Post Office order number00100433999940400083
Document type no.9999
Private customer’s postal addressHans MustermannViktoriastrasse 213030 Berne
1
2
3
4
5
6
7
8
1 E-Post Business no reply address2 Date and time the reply was sent3 Subject (chosen by the private customer)4 The private customer’s message text5 The subject of the original message6 OrderID7 Document type8 Private customer’s postal address
When replying, private customers can also decide whether they wish to include their telephone number and e-mail with their reply.
E-Post Print & Send 37
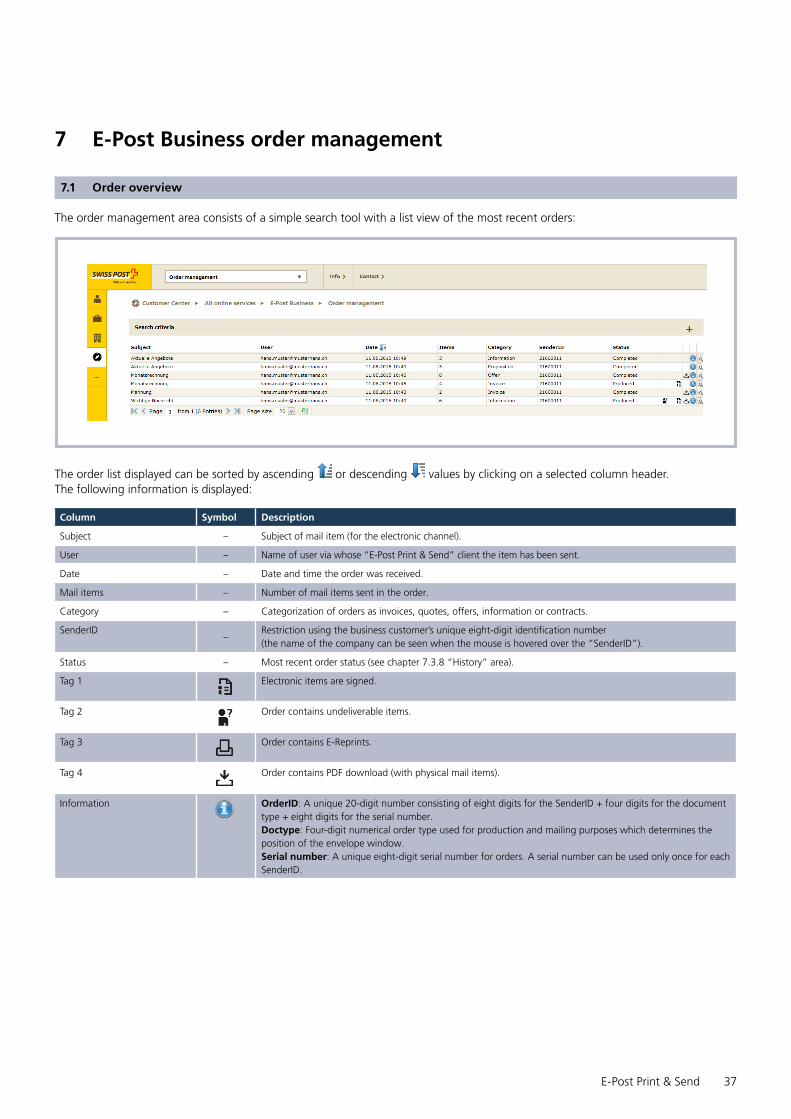
7.1 Order overview The order management area consists of a simple search tool with a list view of the most recent orders:
7 E-Post Business order management
Column Symbol Description
Subject – Subject of mail item (for the electronic channel).
User – Name of user via whose “E-Post Print & Send” client the item has been sent.
Date – Date and time the order was received.
Mail items – Number of mail items sent in the order.
Category – Categorization of orders as invoices, quotes, offers, information or contracts.
SenderID–
Restriction using the business customer’s unique eight-digit identification number (the name of the company can be seen when the mouse is hovered over the “SenderID”).
Status – Most recent order status (see chapter 7.3.8 “History” area).
Tag 1 Electronic items are signed.
Tag 2 Order contains undeliverable items.
Tag 3 Order contains E-Reprints.
Tag 4 Order contains PDF download (with physical mail items).
Information OrderID: A unique 20-digit number consisting of eight digits for the SenderID + four digits for the document type + eight digits for the serial number.Doctype: Four-digit numerical order type used for production and mailing purposes which determines the position of the envelope window.Serial number: A unique eight-digit serial number for orders. A serial number can be used only once for each SenderID.
The order list displayed can be sorted by ascending or descending values by clicking on a selected column header. The following information is displayed:
38 E-Post Print & Send
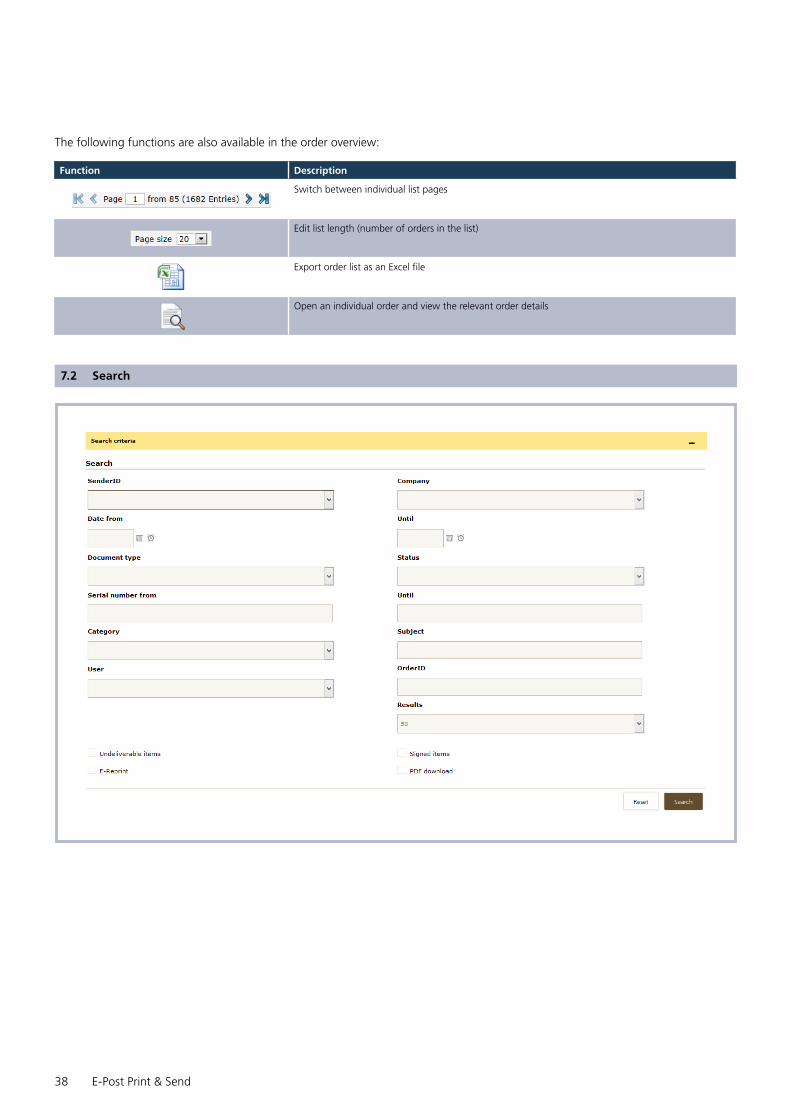
Function Description
Switch between individual list pages
Edit list length (number of orders in the list)
Export order list as an Excel file
Open an individual order and view the relevant order details
The following functions are also available in the order overview:
7.2 Search
E-Post Print & Send 39
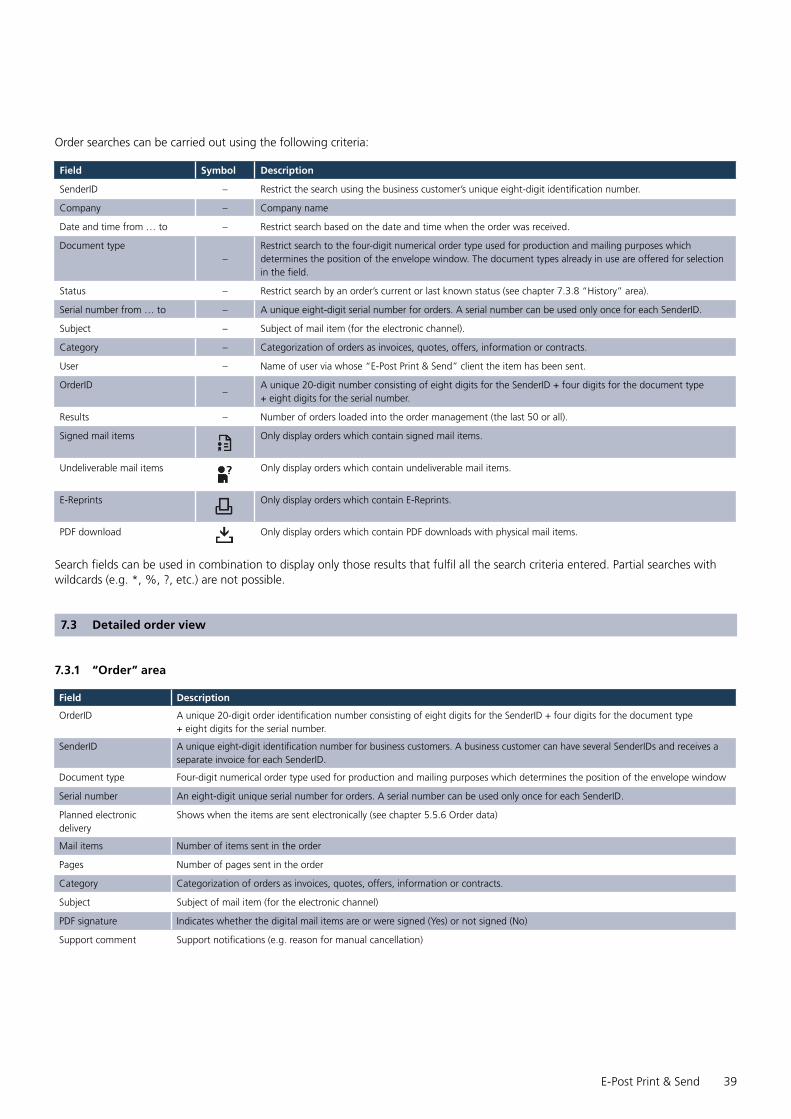
Order searches can be carried out using the following criteria:
Field Symbol Description
SenderID – Restrict the search using the business customer’s unique eight-digit identification number.
Company – Company name
Date and time from … to – Restrict search based on the date and time when the order was received.
Document type–
Restrict search to the four-digit numerical order type used for production and mailing purposes which determines the position of the envelope window. The document types already in use are offered for selection in the field.
Status – Restrict search by an order’s current or last known status (see chapter 7.3.8 “History” area).
Serial number from … to – A unique eight-digit serial number for orders. A serial number can be used only once for each SenderID.
Subject – Subject of mail item (for the electronic channel).
Category – Categorization of orders as invoices, quotes, offers, information or contracts.
User – Name of user via whose “E-Post Print & Send” client the item has been sent.
OrderID–
A unique 20-digit number consisting of eight digits for the SenderID + four digits for the document type + eight digits for the serial number.
Results – Number of orders loaded into the order management (the last 50 or all).
Signed mail items Only display orders which contain signed mail items.
Undeliverable mail items Only display orders which contain undeliverable mail items.
E-Reprints Only display orders which contain E-Reprints.
PDF download Only display orders which contain PDF downloads with physical mail items.
Search fields can be used in combination to display only those results that fulfil all the search criteria entered. Partial searches with wildcards (e.g. *, %, ?, etc.) are not possible.
7.3 Detailed order view
7.3.1 “Order” area
Field Description
OrderID A unique 20-digit order identification number consisting of eight digits for the SenderID + four digits for the document type + eight digits for the serial number.
SenderID A unique eight-digit identification number for business customers. A business customer can have several SenderIDs and receives a separate invoice for each SenderID.
Document type Four-digit numerical order type used for production and mailing purposes which determines the position of the envelope window
Serial number An eight-digit unique serial number for orders. A serial number can be used only once for each SenderID.
Planned electronic delivery
Shows when the items are sent electronically (see chapter 5.5.6 Order data)
Mail items Number of items sent in the order
Pages Number of pages sent in the order
Category Categorization of orders as invoices, quotes, offers, information or contracts.
Subject Subject of mail item (for the electronic channel)
PDF signature Indicates whether the digital mail items are or were signed (Yes) or not signed (No)
Support comment Support notifications (e.g. reason for manual cancellation)
40 E-Post Print & Send
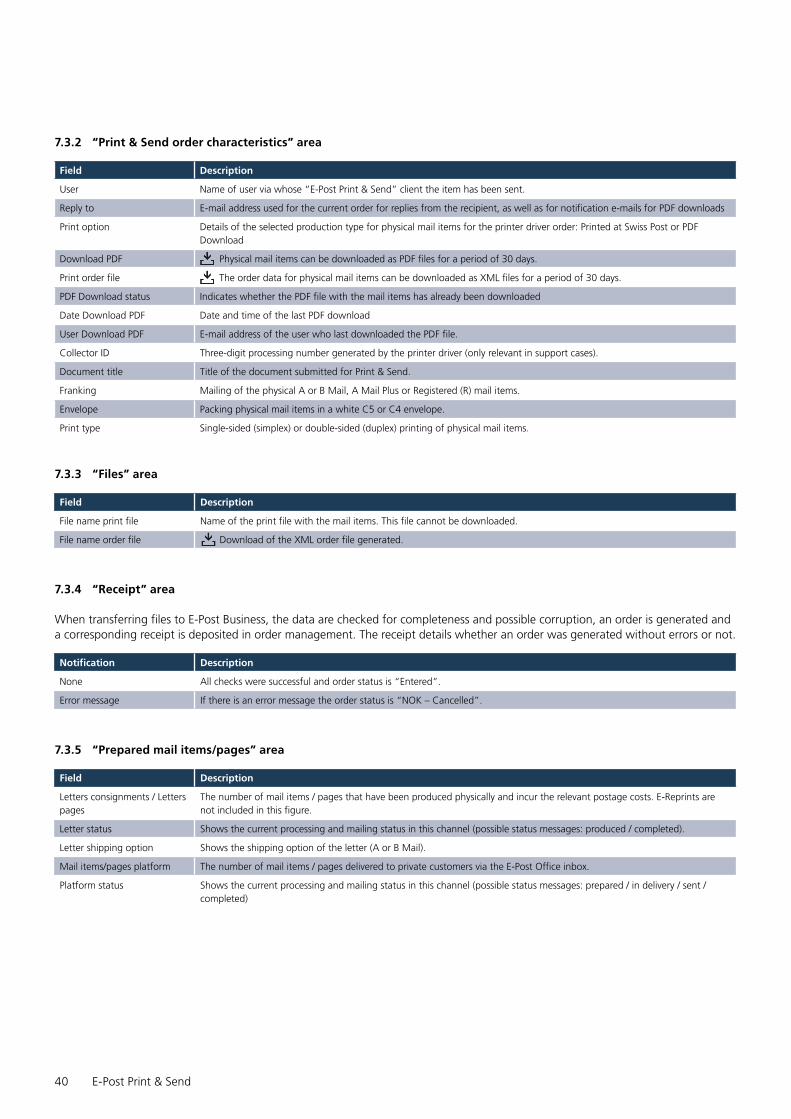
Field Description
User Name of user via whose “E-Post Print & Send” client the item has been sent.
Reply to E-mail address used for the current order for replies from the recipient, as well as for notification e-mails for PDF downloads
Print option Details of the selected production type for physical mail items for the printer driver order: Printed at Swiss Post or PDF Download
Download PDF Physical mail items can be downloaded as PDF files for a period of 30 days.
Print order file The order data for physical mail items can be downloaded as XML files for a period of 30 days.
PDF Download status Indicates whether the PDF file with the mail items has already been downloaded
Date Download PDF Date and time of the last PDF download
User Download PDF E-mail address of the user who last downloaded the PDF file.
Collector ID Three-digit processing number generated by the printer driver (only relevant in support cases).
Document title Title of the document submitted for Print & Send.
Franking Mailing of the physical A or B Mail, A Mail Plus or Registered (R) mail items.
Envelope Packing physical mail items in a white C5 or C4 envelope.
Print type Single-sided (simplex) or double-sided (duplex) printing of physical mail items.
7.3.2 “Print & Send order characteristics” area
Field Description
File name print file Name of the print file with the mail items. This file cannot be downloaded.
File name order file Download of the XML order file generated.
Notification Description
None All checks were successful and order status is “Entered”.
Error message If there is an error message the order status is “NOK – Cancelled”.
Field Description
Letters consignments / Letters pages
The number of mail items / pages that have been produced physically and incur the relevant postage costs. E-Reprints are not included in this figure.
Letter status Shows the current processing and mailing status in this channel (possible status messages: produced / completed).
Letter shipping option Shows the shipping option of the letter (A or B Mail).
Mail items/pages platform The number of mail items / pages delivered to private customers via the E-Post Office inbox.
Platform status Shows the current processing and mailing status in this channel (possible status messages: prepared / in delivery / sent / completed)
7.3.3 “Files” area
7.3.4 “Receipt” area
When transferring files to E-Post Business, the data are checked for completeness and possible corruption, an order is generated and a corresponding receipt is deposited in order management. The receipt details whether an order was generated without errors or not.
7.3.5 “Prepared mail items/pages” area
E-Post Print & Send 41
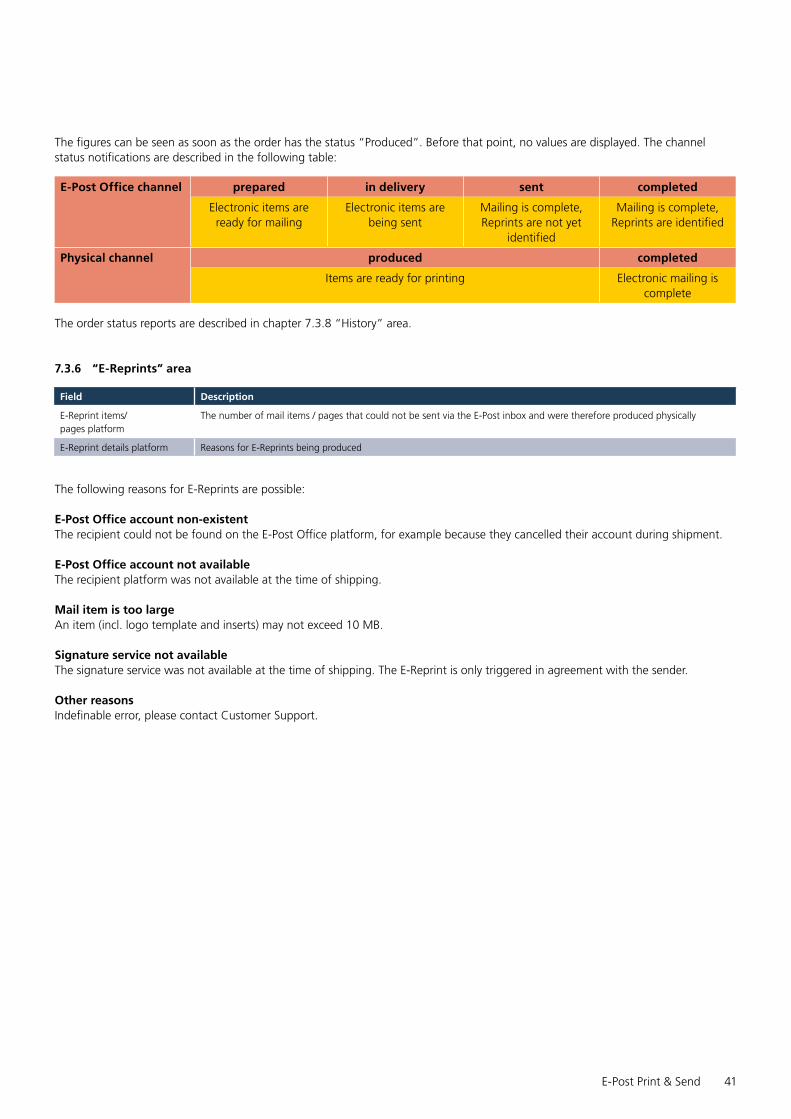
The figures can be seen as soon as the order has the status “Produced”. Before that point, no values are displayed. The channel status notifications are described in the following table:
Field Description
E-Reprint items/ pages platform
The number of mail items / pages that could not be sent via the E-Post inbox and were therefore produced physically
E-Reprint details platform Reasons for E-Reprints being produced
The order status reports are described in chapter 7.3.8 “History” area.
7.3.6 “E-Reprints” area
The following reasons for E-Reprints are possible: E-Post Office account non-existentThe recipient could not be found on the E-Post Office platform, for example because they cancelled their account during shipment. E-Post Office account not availableThe recipient platform was not available at the time of shipping. Mail item is too largeAn item (incl. logo template and inserts) may not exceed 10 MB.
Signature service not availableThe signature service was not available at the time of shipping. The E-Reprint is only triggered in agreement with the sender. Other reasonsIndefinable error, please contact Customer Support.
E-Post Office channel prepared in delivery sent completed
Electronic items are ready for mailing
Electronic items are being sent
Mailing is complete, Reprints are not yet
identified
Mailing is complete, Reprints are identified
Physical channel produced completed
Items are ready for printing Electronic mailing is complete
42 E-Post Print & Send
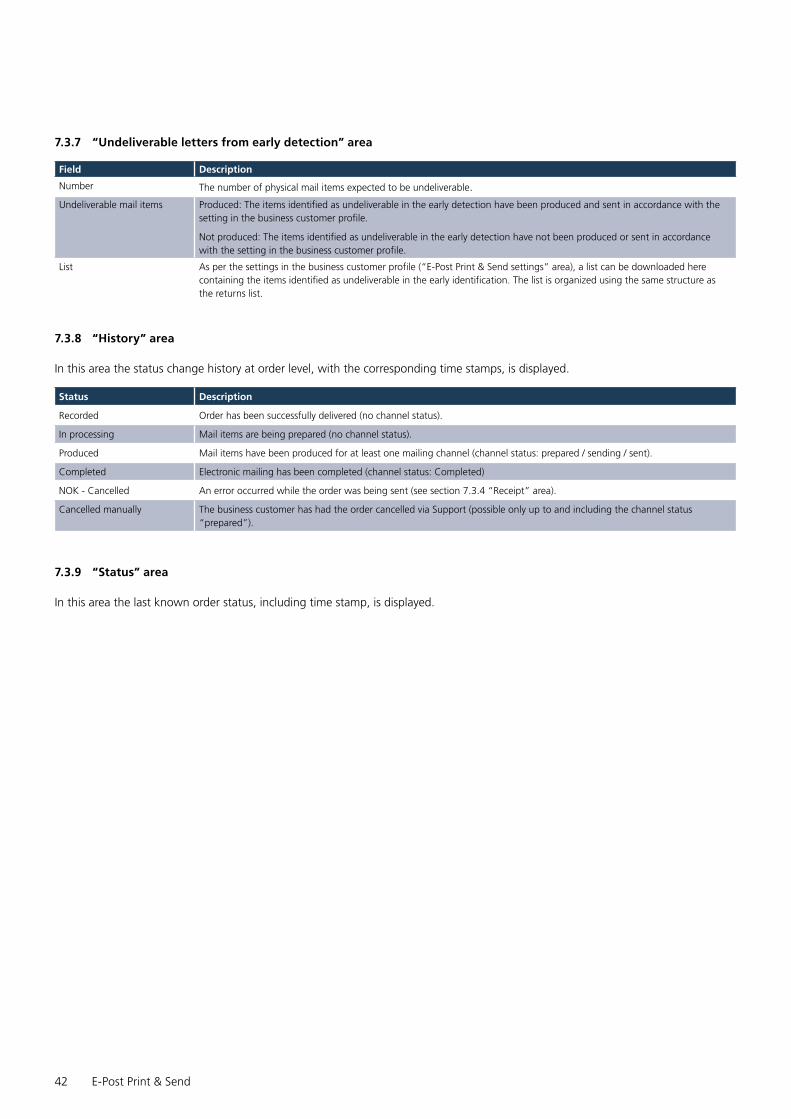
Status Description
Recorded Order has been successfully delivered (no channel status).
In processing Mail items are being prepared (no channel status).
Produced Mail items have been produced for at least one mailing channel (channel status: prepared / sending / sent).
Completed Electronic mailing has been completed (channel status: Completed)
NOK - Cancelled An error occurred while the order was being sent (see section 7.3.4 “Receipt” area).
Cancelled manually The business customer has had the order cancelled via Support (possible only up to and including the channel status “prepared”).
Field Description
Number The number of physical mail items expected to be undeliverable.Undeliverable mail items Produced: The items identified as undeliverable in the early detection have been produced and sent in accordance with the
setting in the business customer profile.
Not produced: The items identified as undeliverable in the early detection have not been produced or sent in accordance with the setting in the business customer profile.
List As per the settings in the business customer profile (“E-Post Print & Send settings” area), a list can be downloaded here containing the items identified as undeliverable in the early identification. The list is organized using the same structure as the returns list.
7.3.8 “History” area
In this area the status change history at order level, with the corresponding time stamps, is displayed.
7.3.7 “Undeliverable letters from early detection” area
7.3.9 “Status” area
In this area the last known order status, including time stamp, is displayed.
E-Post Print & Send 43
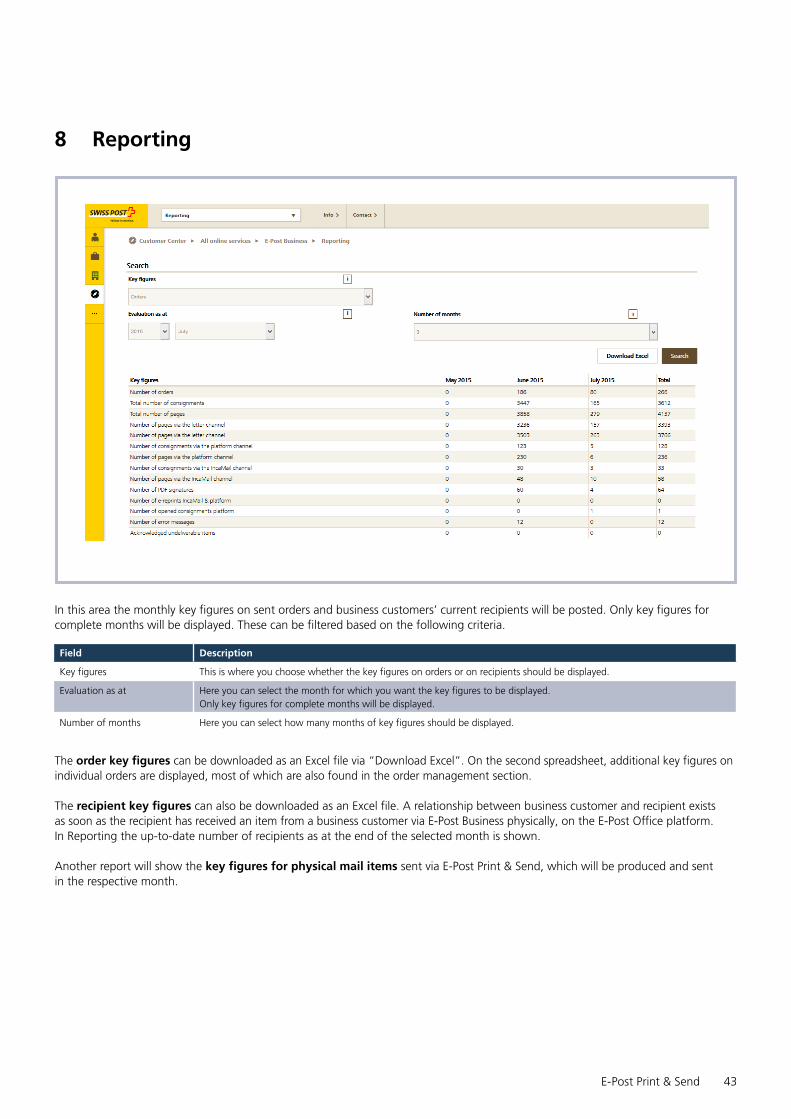
In this area the monthly key figures on sent orders and business customers’ current recipients will be posted. Only key figures for complete months will be displayed. These can be filtered based on the following criteria.
The order key figures can be downloaded as an Excel file via “Download Excel”. On the second spreadsheet, additional key figures on individual orders are displayed, most of which are also found in the order management section.
The recipient key figures can also be downloaded as an Excel file. A relationship between business customer and recipient exists as soon as the recipient has received an item from a business customer via E-Post Business physically, on the E-Post Office platform. In Reporting the up-to-date number of recipients as at the end of the selected month is shown.
Another report will show the key figures for physical mail items sent via E-Post Print & Send, which will be produced and sent in the respective month.
8 Reporting
Field Description
Key figures This is where you choose whether the key figures on orders or on recipients should be displayed.
Evaluation as at Here you can select the month for which you want the key figures to be displayed. Only key figures for complete months will be displayed.
Number of months Here you can select how many months of key figures should be displayed.
44 E-Post Print & Send
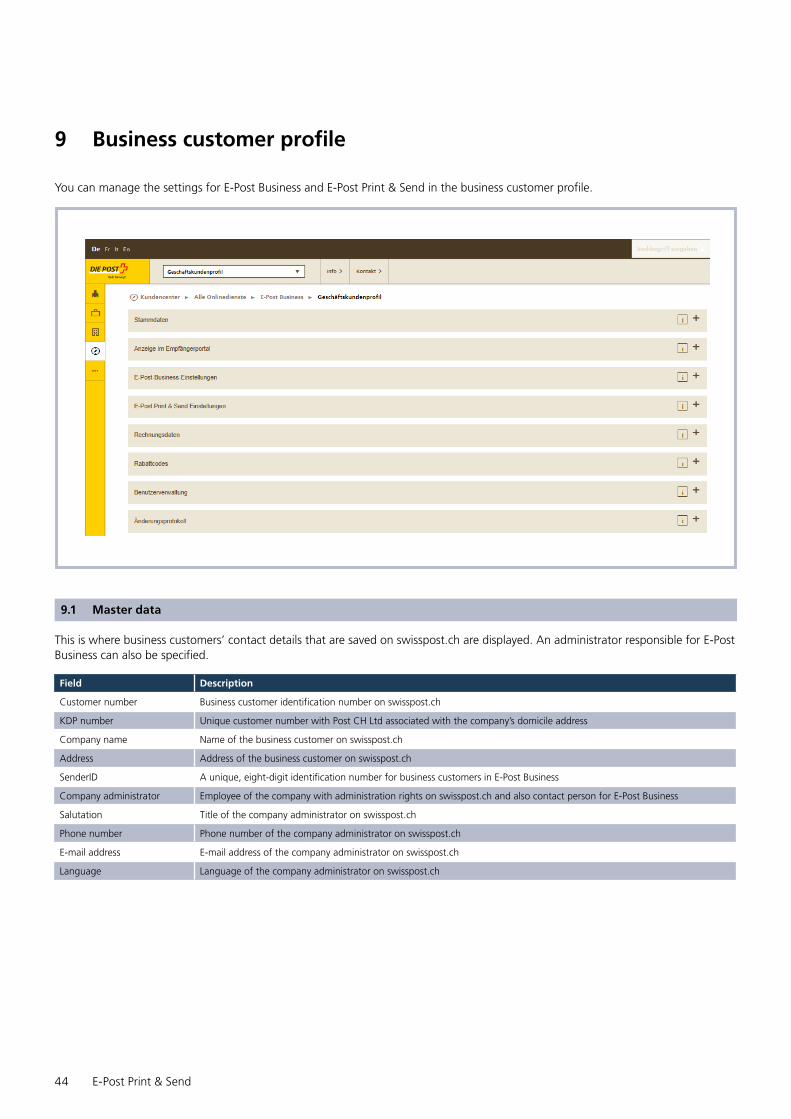
You can manage the settings for E-Post Business and E-Post Print & Send in the business customer profile.
9.1 Master data This is where business customers’ contact details that are saved on swisspost.ch are displayed. An administrator responsible for E-Post Business can also be specified.
9 Business customer profile
Field Description
Customer number Business customer identification number on swisspost.ch
KDP number Unique customer number with Post CH Ltd associated with the company’s domicile address
Company name Name of the business customer on swisspost.ch
Address Address of the business customer on swisspost.ch
SenderID A unique, eight-digit identification number for business customers in E-Post Business
Company administrator Employee of the company with administration rights on swisspost.ch and also contact person for E-Post Business
Salutation Title of the company administrator on swisspost.ch
Phone number Phone number of the company administrator on swisspost.ch
E-mail address E-mail address of the company administrator on swisspost.ch
Language Language of the company administrator on swisspost.ch

E-Post Print & Send 45
9.2 Display in the recipient portal This is where company data which is displayed to private customers in E-Post Office can be entered in German, French, Italian and English. The defined standard applies to all languages, provided the language fields have not been individually defined.
By using the “Preview” button, business customers can view how the data will be displayed in the E-Post Office mailbox.
Field Description
Standard language The data from the “Standard language” area will be used for all languages which have selected the attribute “As per standard” in the “Display” field.
Display Here you can define whether the data from the “Standard language” area will be displayed for the selected language or whether the data fields will be completed individually for the language.
Company logo Company logos matching the following criteria can be uploaded to the profile and displayed in E-Post Office:
Maximum length: 175 pixelsMaximum width: 175 pixelsMaximum file size: 100 KB
Address fields If the physical reply channel is selected under “Receive replies” in the “E-Post Business settings” area, the address data entered here will be used for the replies from the E-Post Office recipient portal.
E-mail address Enter any e-mail address
Phone number Enter any phone number
Website Enter any URL
Additional information Blank field which can be used for company slogans, details about the company or mail items processed via E-Post Business
9.3 E-Post Business settings In this area, you can adjust the general settings for E-Post Business.
Field Description
Major customers Major customers include business customers who transfer mass mailings from their own dispatch system to E-Post Business. Major customers are bound to E-Post Business by a separate contract. Further information on the major customer solution is available from your personal Swiss Post customer advisor.
E-Post Print & Send customer E-Post Print & Send customers include business customers who use E-Post Print & Send to send their daily mail to E-Post Business.
Receiving replies The channel used to send replies to an E-Post Office item from the recipient portal to business customers:
Digital: For digital replies, the current reply-to e-mail address is used.
Physical: For physical replies, the address in the “Display in recipient portal ” area is used.
Undeliverable items following early recognition
Undeliverable items are largely recognized by E-Post Business before they have even been mailed. Here you can specify whether these mail items should be produced (printed and sent) anyway or not. You can also choose whether a list with mail items identified early as undeliverable is produced, is sent as an e-mail to the reply-to address and made available as a down-load in the order administration section (in order details). It is not possible to select the options not to have the items produced and not to generate a list simultaneously.
Status This indicates whether the E-Post Business service can be used. If you would like to enable or disable the service, please contact your personal customer advisor or the Swiss Post Customer Service.
Time when the profile is opened
Date and time when the profile was opened.
46 E-Post Print & Send
9.4 E-Post Print & Send settings
9.4.1 Order data In this area, the “E-Post Print & Send” profile can be configured. This is where you set the values for mailing orders which will be displayed when requested by the printer driver client. Most values can be adjusted manually for each individual E-Post Print & Send order.
Field Description
Logo template The logo template is a PDF page which can include your logo, advertising claim or address details. If a logo template is saved here, every single page processed by E-Post Print & Send will be printed on this template. The logo template will be displayed in the E-Post Print & Send print preview. The “white space” exclusion zones in the printer driver must be observed, as must the maximum 2 MB file size. The resolution of the logo should be sufficiently high to achieve a good-quality image in physical mail items. Vector graphics should be avoided because they cannot be processed correctly.
Category Here you can determine the type of document you use most frequently and select it as the standard setting:
– Information– Invoice– Offer– Quote– Contract
Print option Here you can select whether physical items should be printed and sent by Swiss Post or whether they should be provided as PDF files in the order management section (in the order details) to be printed out by you or forwarded to a print service provider.
Inpayment slip:– No inpayment slip– ES 105 CHF– ESR 609 CHF– ESR+ 609 CHF– ES Bank 303 CHF– ESR Bank 609 CHF– ESR+ Bank 609 CHF
If mail item orders include inpayment slips, the format specifications for the inpayment slip type indicated are checked on the last page of each mail item. For physical items, the inpayment slip data will be printed on the corresponding template and, for digital mail items in the “Invoice” category for the E-Post Office recipient portal, are sorted for simple further processing. Inpayment slips are available only in CHF. Information on how to create inpayment slips correctly can be found via the following link: https://www.postfinance.ch/en/cust/download/bizdoc.html.
Subject The subject line of the message in the E-Post Office recipient portal should contain no more than 64 characters.
Remark Marking of the message in the E-Post Office recipient portal (e.g. urgent, payable until, application deadline, confidential, etc.) may contain no more than 40 characters. Special characters such as $ £ € ‚ „ ~ <> {} [] () are not displayed in E-Post Office and should therefore not be used.
Signature Here you can decide whether the PDFs of your digital mail items should be signed with the Swiss Post certificate. The Swiss Post certificate gives a guarantee to the recipient that the PDFs were not altered after posting. A signed PDF also guarantees compliance with VAT regulations.
PP line postcode Here you can determine which postcode should be in the PP line of a physical consignment.
PP line location Here you can determine which location should be in the PP line of a physical consignment.
Swiss Post customer number (KDP number) for returns
Returns will be sent to the address corresponding to this KDP number.
Franking This is where you decide whether your mail items should be sent as A Mail or B Mail, A Mail Plus or Registered (R) as standard. Individual franking licenses are required for sending A Mail Plus mail items and Registered mail (R).
Envelope This is where you decide whether your mail items should be packed in a C5 or C4 envelope as standard. Mail items with up to 14 simplex pages and 28 duplex pages can be packaged in a C5 or C4 envelope with a window on the left or right. C4 envelopes are used automatically for consignments with 15 or more simplex and 29 or more duplex pages.
Print type This is where you decide whether your consignments should be printed single-sided (simplex) or double-sided (duplex) as standard. If duplex is selected, mail items and inserts with an odd number of pages will have an additional blank page inserted at the end during printing. In addition, to ensure flawless production of inpayment slips, mail items with an even number of pages will have a blank page added before and after the last page (page with inpayment slip data).
E-Post Print & Send 47
E-Post Business user Access to order management Access to business customer profile
Access to reporting
Admin– Super administrators– User administrators
Yes, all orders Yes (read and edit) Yes (read and edit)
Standard user– Employees– Service providers
– Yes, all orders– Yes, own orders– No
– Yes (read only)– No
– Yes (read only)– No
9.4.2 Reply-to addresses In this area, you can enter e-mail addresses which will subsequently appear in E-Post Print & Send as reply-to address options. The e-mail address in the “Default” column is displayed in E-Post Print & Send as the standard reply-to address. Reply-to addresses are used for digital replies from recipients of E-Post Office items and for notifications concerning a specific order. Only verified e-mail addresses can be selected in E-Post Print & Send. To verify the address, the address owner will be sent an e-mail containing a link on which he must click to confirm that the address is functional. After 20 days, the status of addresses which are not verified will change from “pending” to “expired”.
9.4.3 Password In this area the password for E-Post Print & Send login can be managed and changed (see section 5.2.3 Login).
9.5 Discounts If you have a discount code, you can store it here within the period of validity. It is possible to check the status and validity of individual discounts.
Discounts are always valid on the day (working day) following input.
9.6 Invoice data In this area invoicing data as well as the currently selected pricing package will be displayed. This is where franking licenses for sending A Mail Plus and Registered mail (R) items are shown in addition to the franking license for E-Post Print & Send. If missing, these can be ordered from Customer Service. The pricing packages include a monthly fee and the E-Post Business products. The product prices are dependent on the monthly fee. As a general rule, the higher the monthly fee paid, the lower the prices of digital products are.
A newly-selected pricing package will only be activated on the first day of the following month. Changing a pricing package to a higher monthly fee cannot be reversed after the first day of the following month. Changing back to a pricing package with a lower monthly fee is only possible again after six months.
9.7 User administration This is where user authorizations that have been issued for the “E-Post Business” service at swisspost.ch can be managed. In general, all authorized users of E-Post Business have access to the E-Post Print & Send download. After the individual password has been saved in the business customer profile, the user can use E-Post Print & Send.
All other access rights can be configured from within E-Post Business. A distinction is made between standard users (corresponding to the “employee” and “service provider” roles at swisspost.ch) and administrators (corresponding to the “super administrator” and “user administrator” roles at swisspost.ch). While administrators receive all access rights, the authorizations for standard users can be set as follows:
48 E-Post Print & Send
9.8 Change log In this area you can see which users changed which fields in which areas of the business customer profile and when. Changed values are shown only in the “Selected pricing package” field. Entries to the change log can be filtered as follows:
Field Description
User Defines the log entries according to the selected user.
Details Determines the detail level of log. Entries are displayed either per area (e.g. master data, E-Post Business settings, etc.) or per area and field.
Period Restricts the log entries to the specified time period.
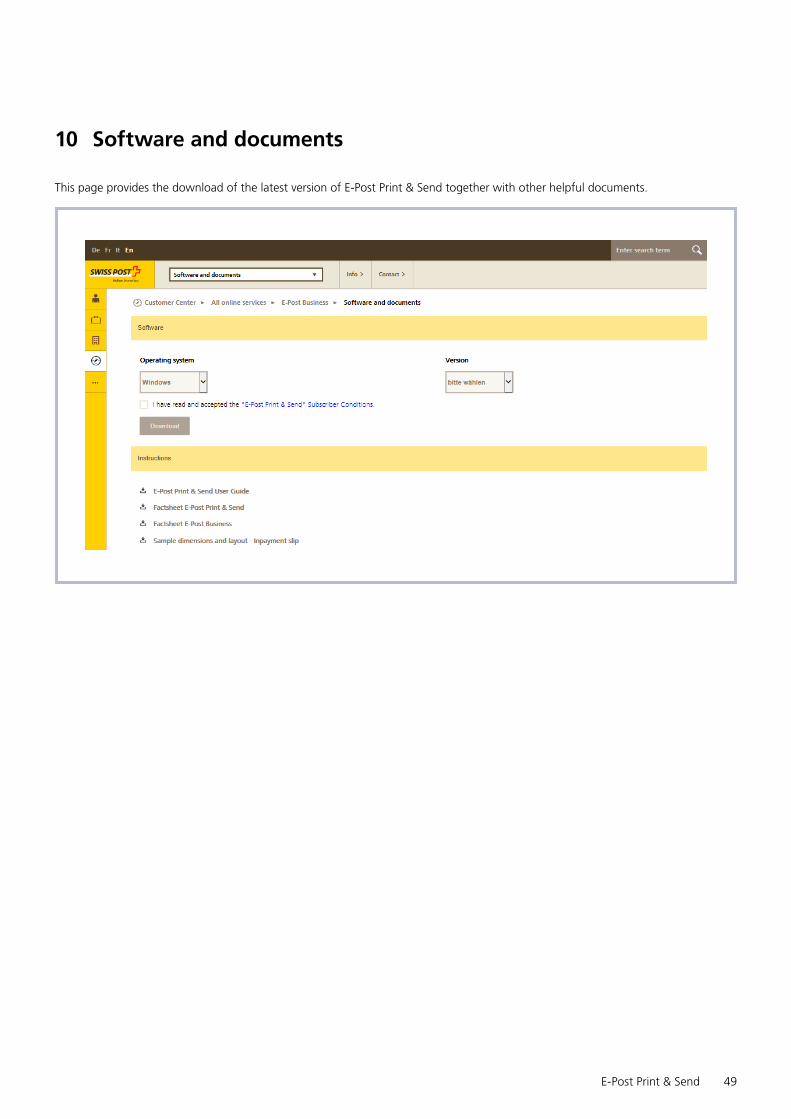
E-Post Print & Send 49
This page provides the download of the latest version of E-Post Print & Send together with other helpful documents.
10 Software and documents
50 E-Post Print & Send
Invoicing for all E-Post Business services is shown as a cost item in the monthly collective invoice (any discounts are shown separately). Individual E-Post Business orders are itemized in the detailed invoice view. In E-Post Business, the following invoicing items can be listed:1. Invoicing of the individual mail items transferred to the E-Post Office inbox (including or excluding PDF signature)2. Invoicing of the production of individual mail items (printing and envelope costs)3. Invoicing of individual mail items that were sent physically (= postage costs)
11 Invoices

51 E-Post Print & Send
www.swisspost.ch/printandsendPhone +41 (0)800 789 [email protected]
Post CH LtdPostMailE-PostWankdorfallee 43030 Berne Switzerland20
14-2
20 (P
M) 0
5.20
18