DRC INSIGHT Portal User Guide
157
DRC INSIGHT Portal User Guide Louisiana Common Portal Tasks and Functions Data Recognition Corporation (DRC) 13490 Bass Lake Road Maple Grove, MN 55311 Service Line: 1-888-718-4836 Email: [email protected] Louisiana Portal Website: https://la.drcedirect.com Revision Date: August 27, 2019
-
Upload
khangminh22 -
Category
Documents
-
view
3 -
download
0
Transcript of DRC INSIGHT Portal User Guide

DRC INSIGHT Portal User Guide
Louisiana
Common Portal Tasks and Functions
Data Recognition Corporation (DRC)13490 Bass Lake Road
Maple Grove, MN 55311
Service Line: 1-888-718-4836Email: [email protected]
Louisiana Portal Website: https://la.drcedirect.com Revision Date: August 27, 2019

COPYRIGHTCopyright © 2019 Data Recognition Corporation
The following items in DRC INSIGHT are protected by copyright law:
• The User Guide• All text and titles on the software’s entry and display, including the look and feel of the interaction of the windows, supporting menus,
pop-up windows, and layout
DRC INSIGHT Online Learning System and DRC INSIGHT Portal are trademarked by Data Recognition Corporation.
Any individuals or corporations who violate these copyrights and trademarks will be prosecuted under both criminal and civil laws, and any resulting products will be required to be withdrawn from the marketplace.
The following are trademarks or registered trademarks of Microsoft Corporation in the United States and/or other countries:
Internet ExplorerMicrosoftMicrosoft EdgeWindows, Windows Vista, Windows XP, Windows 7, Windows 8, Windows 10Windows 10 S
The following are trademarks or registered trademarks of Apple Corporation in the United States and/or other countries:
AppleiOS*iPadMacintoshMacOS X and macOSSafari
*iOS is a trademark or registered trademark of Cisco in the United States and other countries and is used under license.
The following are trademarks or registered trademarks of Google Corporation in the United States and/or other countries:
ChromeChrome OSChromebookGoogle Play
Firefox is a trademark or registered trademark of Mozilla Corporation in the United States and/or other countries.
Linux is a registered trademark of Linus Torvalds.Ubuntu and Canonical are registered trademarks of Canonical Ltd.Gnome is a trademark of the Gnome Foundation.

Page 3
Contents
n Introduction About This Guide ......................................................................................7Information for Specific Administrations .................................................7Audience ...................................................................................................7Required Fields in the Portal .....................................................................7Sample School for Training ......................................................................7Portal Permissions Matrix .........................................................................7What’s in This Guide?.............................................................................13
Accessing the Portal ................................................................................16Managing Your Account .........................................................................18
Managing Your Account—Changing Your Name or Email Address ...........................................................................19Managing Your Account—Changing Your Password .......................20Managing Your Account—Displaying Your Agreements .................21
Displaying the Security Agreement ........................................................22Displaying the Minimum Browser Requirements ..................................23
Introduction .............................................................................................25
Introduction .............................................................................................28Adding Permissions for a Single User ....................................................29Editing a Single User’s Permissions .......................................................31Update Multiple Profiles, Copy Users, Mass Assign Roles, & Export User Data ....................................................33Adding a User .........................................................................................35Adding Multiple Users ............................................................................36Inactivating a User ..................................................................................37Activating a User ....................................................................................38
Additional Materials ...............................................................................40Accountability Form ...............................................................................44Receipt Notice .........................................................................................47Enrollments .............................................................................................49
Introduction .............................................................................................54Adding a Student to Portal ......................................................................55Uploading Multiple Students to Portal ...................................................56Editing a Student’s Information—Student Detail ...................................59Editing a Student’s Information—Accommodations & Accessibility Options ..........................................................................60Editing a Student’s Information—Demographics ...................................61Editing a Student’s Information—Testing Codes ...................................63Editing a Student’s Test Session Information .........................................64
n GeneralInformation Menu
n UserManagementMenu
n Materials Menu &Enrollments
n StudentManagementMenu
n Working withthe Portal

Page 4
Contents
Introduction .............................................................................................66Dashboard Access in the Portal ...............................................................66Access the Dashboard .............................................................................67Selecting a School in the Dashboard ......................................................68Using the Dashboard ...............................................................................69Filtering the Dashboard ...........................................................................71
Introduction .............................................................................................73Creating a Test Session ...........................................................................74Editing the Testing Window ....................................................................75Adding Students to a Test Session ..........................................................76Exporting a Test Session .........................................................................79Viewing and Exporting Test Session Status Details ...............................80Copying a Test Session ...........................................................................82Printing Test Tickets and Rosters ............................................................84Uploading Multiple Test Sessions to the Portal ......................................85Unlocking a Student’s Test Ticket ..........................................................88Invalidating a Student’s Test Ticket ........................................................90Ending Incomplete Tests .........................................................................91
Test Administrator Management System Overview ...............................94The Test Administrator Management Option ..........................................95
Editing a Test Administrator’s Information ......................................96Adding a Test Administrator to the Portal ........................................97
Introduction .............................................................................................99Work with Student Groups ....................................................................100Add a Student Group ............................................................................103Uploading Multiple Student Groups to the Portal ................................105Editing Student Group Information ......................................................108Create a Test Session from a Student Group .........................................109Reassign a Test Administrator to Multiple Student Groups ..................110
Uploading Multiple Test Administrators to the Portal ....................111
Introduction ...........................................................................................115What’s in This Section? ........................................................................115Scoring Icons Enabled When Responses are Ready to Score ...............115Portal Permissions for Educator Scoring ..............................................115Print Student Responses ........................................................................115Reset Student Scores .............................................................................115General Notes about Educator Scoring .................................................116Working With Student Responses in Educator Scoring ........................116Providing Feedback in Educator Scoring .............................................116
n TestAdministratorManagementMenu
n Student GroupManagementMenu
n Educator Scoring
n Test ManagementMenu
n Student StatusDashboard

Page 5
Contents
n Report DeliveryMenu
n StudentCorrectionSystem
Introduction to Score Reset ...................................................................117View Test Statuses ................................................................................118Print Student Responses ........................................................................121Scoring Tests in Educator Scoring ........................................................122Reset Scores ..........................................................................................124
Introduction ...........................................................................................127Online Testing Statistics ........................................................................128Status Reports .......................................................................................129Student Reports .....................................................................................130View Reports .........................................................................................131
Introduction ...........................................................................................133Using Page Filters .................................................................................134Adding LASID Values in Bulk .............................................................135Using Data Column Sorting and Filters ................................................136Student History Report .........................................................................137Response Lookup Report ......................................................................138Report Viewer .......................................................................................140
Student Reports ...............................................................................141Multi-Level Reports ........................................................................144
Introduction ...........................................................................................147Correcting a Student’s Record ..............................................................148
Correcting a Student’s Record—Student Demographics ................151Correcting a Student’s Record—Test Results for Impending Zero .........................................................153
Status Report .........................................................................................155
n InteractiveReporting
n Educator Scoring(cont.)

Page 6
Introduction

Page 7
Introduction
n About ThisGuide
This guide discusses the common tasks performed in the DRC INSIGHT Portal (Portal).
This guide is intended to help you with tasks as you work in the Portal. Although screen shots in this guide may display one particular administration, it is intended to be used with all administrations (with exceptions noted).
Important: Throughout this guide, administration-specific information (and important information for all admins) is called out using the format of this note, the Important style, for easy identification.
The primary users of the Portal are District Test Coordinators (DTCs) and School Test Coordinators (STCs).
In the Portal, all required fields to perform tasks are marked with a red asterisk. (*). If a required field is not completed, the Portal displays a reminder message. The reminders help to ensure all of the proper information is selected or entered for the specific task you are performing.
For training purposes, a sample school with a code of 777 has been added to each district in the Practice Test 2018 administration. As shown in the example below, if the district is DRC USE ONLY - 999, the sample school name is DRC USE ONLY Sample School - 777. DRC has uploaded 10 students to each sample school. These student have LASIDs that begin with 000 and they are distributed in different grades from grade 3 to high school.
For online testing, the Portal categorizes people into various roles—District Test Coordinator, School Test Coordinator, District Technology Coordinator, School Technology Coordinator, and Test Administrator. Within the Portal, users in each role can be assigned permissions to handle the testing responsibilities associated with the role.
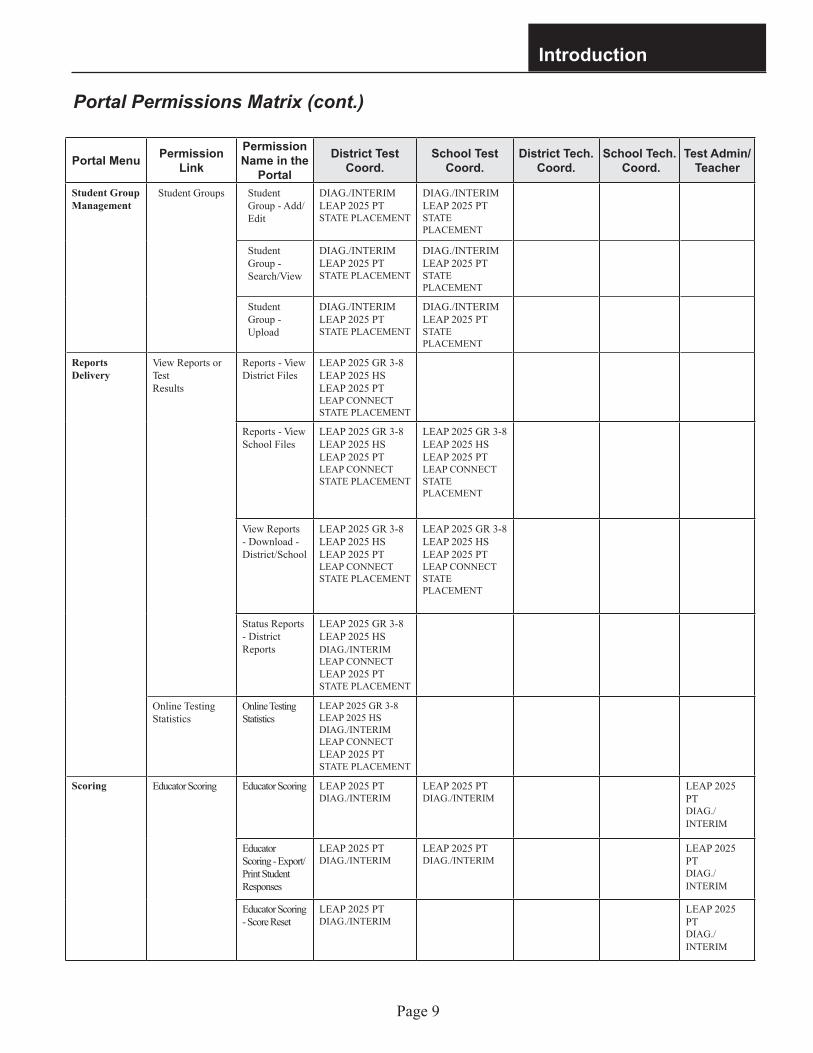
The matrix on the following page lists the current permissions,the Portal path for the function related to the permission, the permission’s name in the Portal, and the recommended permissions for each role.
n Audience
n Informationfor SpecificAdministrations
n Required Fieldsin the Portal
n SampleSchool forTraining
n PortalPermissionsMatrix

Page 8
Introduction
Portal Permissions Matrix (cont.)
Portal Menu PermissionLink
Permission Name in the
Portal
District TestCoord.
School TestCoord.
District Tech. Coord.
School Tech. Coord.
Test Admin/Teacher
GeneralInformation
Documents or Training Materials
Documents - View
LEAP 2025 Gr 3-8LEAP 2025 HS LEAP 2025 PTDIAG./INTERIMLEAP CONNECTSTATE PLACEMENT
LEAP 2025 GR 3-8LEAP 2025 HS LEAP 2025 PTDIAG./INTERIMLEAP CONNECTSTATE PLACEMENT
LEAP 2025 GR 3-8LEAP 2025 HS LEAP 2025 PTDIAG./INTERIMLEAP CONNECTSTATE PLACEMENT
LEAP 2025 GR 3-8LEAP 2025 HS LEAP 2025 PTDIAG./INTERIMLEAP CONNECTSTATE PLACEMENT
LEAP 2025 GR 3-8LEAP 2025 HS LEAP 2025 PTDIAG./INTERIMLEAP CONNECTSTATE PLACEMENT
Downloads Online Testing - SecuredResources
LEAP 2025 GR 3-8LEAP 2025 HS LEAP 2025 PTDIAG./INTERIMLEAP CONNECT
LEAP 2025 GR 3-8LEAP 2025 HS LEAP 2025 PTDIAG./INTERIMLEAP CONNECT
LEAP 2025 GR 3-8LEAP 2025 HS LEAP 2025 PTDIAG./INTERIMLEAP CONNECT
LEAP 2025 GR 3-8LEAP 2025 HS LEAP 2025 PTDIAG./INTERIMLEAP CONNECT
User Management
User Administration
Administrator LEAP 2025 GR 3-8LEAP 2025 HS LEAP 2025 PTDIAG./INTERIMLEAP CONNECTSTATE PLACEMENT
LEAP 2025 GR 3-8LEAP 2025 HS LEAP 2025 PTDIAG./INTERIMLEAP CONNECTSTATE PLACEMENT
Administrator -Mass Assign Role
LEAP 2025 GR 3-8LEAP 2025 HS LEAP 2025 PTDIAG./INTERIMLEAP CONNECTSTATE PLACEMENT
LEAP 2025 GR 3-8LEAP 2025 HS LEAP 2025 PTDIAG./INTERIMLEAP CONNECTSTATE PLACEMENT
Materials Accountability Formand/orReceipt Notice
Materials - PrimaryWindow
LEAP 2025 GR 3-8LEAP 2025 HS LEAP 2025 PTDIAG./INTERIMLEAP CONNECTSTATE PLACEMENT
Additional Materials
Materials -Additional View/ Edit
LEAP 2025 GR 3-8LEAP 2025 HS LEAP 2025 PTDIAG./INTERIMLEAP CONNECTSTATE PLACEMENT
Materials -Additional – PrimaryWindow
LEAP 2025 GR 3-8LEAP 2025 HS DIAG./INTERIMLEAP 2025 PTLEAP CONNECTSTATE PLACEMENT
Enrollments or Materials Ordering
Enrollment - PrimaryWindow
LEAP 2025 GR 3-8 LEAP 2025 GR 3-8
Page 9
Introduction
Portal Menu PermissionLink
Permission Name in the
Portal
District TestCoord.
School TestCoord.
District Tech. Coord.
School Tech. Coord.
Test Admin/Teacher
Student Group Management
Student Groups Student Group - Add/Edit
DIAG./INTERIMLEAP 2025 PTSTATE PLACEMENT
DIAG./INTERIMLEAP 2025 PTSTATE PLACEMENT
Student Group - Search/View
DIAG./INTERIMLEAP 2025 PTSTATE PLACEMENT
DIAG./INTERIMLEAP 2025 PTSTATE PLACEMENT
Student Group - Upload
DIAG./INTERIMLEAP 2025 PTSTATE PLACEMENT
DIAG./INTERIMLEAP 2025 PTSTATE PLACEMENT
Reports Delivery
View Reports or TestResults
Reports - ViewDistrict Files
LEAP 2025 GR 3-8LEAP 2025 HS LEAP 2025 PTLEAP CONNECTSTATE PLACEMENT
Reports - ViewSchool Files
LEAP 2025 GR 3-8LEAP 2025 HS LEAP 2025 PTLEAP CONNECTSTATE PLACEMENT
LEAP 2025 GR 3-8LEAP 2025 HS LEAP 2025 PTLEAP CONNECTSTATE PLACEMENT
View Reports- Download -District/School
LEAP 2025 GR 3-8LEAP 2025 HS LEAP 2025 PTLEAP CONNECTSTATE PLACEMENT
LEAP 2025 GR 3-8LEAP 2025 HS LEAP 2025 PTLEAP CONNECTSTATE PLACEMENT
Status Reports - DistrictReports
LEAP 2025 GR 3-8LEAP 2025 HSDIAG./INTERIMLEAP CONNECTLEAP 2025 PTSTATE PLACEMENT
Online Testing Statistics
Online Testing Statistics
LEAP 2025 GR 3-8LEAP 2025 HS DIAG./INTERIMLEAP CONNECTLEAP 2025 PTSTATE PLACEMENT
Scoring Educator Scoring Educator Scoring LEAP 2025 PTDIAG./INTERIM
LEAP 2025 PTDIAG./INTERIM
LEAP 2025 PTDIAG./INTERIM
Educator Scoring - Export/Print Student Responses
LEAP 2025 PTDIAG./INTERIM
LEAP 2025 PTDIAG./INTERIM
LEAP 2025 PTDIAG./INTERIM
Educator Scoring - Score Reset
LEAP 2025 PTDIAG./INTERIM
LEAP 2025 PTDIAG./INTERIM
Portal Permissions Matrix (cont.)

Page 10
Introduction
Portal Menu PermissionLink
Permission Name in the
Portal
District TestCoord.
School TestCoord.
District Tech. Coord.
School Tech. Coord.
Test Admin/Teacher
Students Correction System
Students Correction System orData Validation
Correction PrimaryWindow
LEAP 2025 GR 3-8LEAP 2025 HS LEAP CONNECT
LEAP 2025 GR 3-8LEAP 2025 HS LEAP CONNECT
Student Status Dashboard
Student Status Dashboard
Test Setup - View Student Status
LEAP 2025 GR 3-8LEAP 2025 HSDIAG./INTERIMLEAP CONNECTLEAP 2025 PTSTATE PLACEMENT
LEAP 2025 GR 3-8LEAP 2025 HSDIAG./INTERIMLEAP CONNECTLEAP 2025 PTSTATE PLACEMENT
DIAG./INTERIM
Device Tool Kit
Central Office Services (COS)
Test Setup -Device Toolkit
LEAP 2025 GR 3-8LEAP 2025 HS LEAP 2025 PTDIAG./INTERIMLEAP CONNECTSTATE PLACEMENT
LEAP 2025 GR 3-8LEAP 2025 HS LEAP 2025 PTDIAG./INTERIMLEAP CONNECTSTATE PLACEMENT
LEAP 2025 GR 3-8LEAP 2025 HSLEAP 2025 PTDIAG./INTERIMLEAP CONNECTSTATE PLACEMENT
LEAP 2025 GR 3-8LEAP 2025 HSLEAP 2025 PTDIAG./INTERIMLEAP CONNECTSTATE PLACEMENT
NA No navigation;this is a time driven permission
Test Setup - PrimaryWindow
LEAP 2025 GR 3-8LEAP 2025 HS LEAP 2025 PTDIAG./INTERIMLEAP CONNECTSTATE PLACEMENT
LEAP 2025 GR 3-8LEAP 2025 HS LEAP 2025 PTDIAG./INTERIMLEAP CONNECTSTATE PLACEMENT
LEAP 2025 GR 3-8LEAP 2025 HSLEAP 2025 PTDIAG./INTERIMLEAP CONNECTSTATE PLACEMENT
LEAP 2025 GR 3-8LEAP 2025 HSLEAP 2025 PTDIAG./INTERIMLEAP CONNECTSTATE PLACEMENT
LEAP 2025 GR 3-8LEAP 2025 HS LEAP 2025 PTDIAG./INTERIMLEAP CONNECTSTATE PLACEMENT
NA No navigation; this is a time driven permission
View/Edit Sensitive Data
LEAP 2025 GR 3-8LEAP 2025 HS LEAP 2025 PTDIAG./INTERIMLEAP CONNECTSTATE PLACEMENT
LEAP 2025 GR 3-8LEAP 2025 HS LEAP 2025 PTDIAG./INTERIMLEAP CONNECTSTATE PLACEMENT
LEAP 2025 GR 3-8LEAP 2025 HSLEAP 2025 PTDIAG./INTERIMLEAP CONNECTSTATE PLACEMENT
LEAP 2025 GR 3-8LEAP 2025 HSLEAP 2025 PTDIAG./INTERIMLEAP CONNECTSTATE PLACEMENT
LEAP 2025 GR 3-8LEAP 2025 HS LEAP 2025 PTDIAG./INTERIMLEAP CONNECTSTATE PLACEMENT
Portal Permissions Matrix (cont.)

Page 11
Introduction
Portal Menu PermissionLink
Permission Name in the
Portal
District TestCoord.
School TestCoord.
District Tech. Coord.
School Tech. Coord.
Test Admin/Teacher
Student Management
Student Status Test Setup - ViewStudent Status
LEAP 2025 GR 3-8LEAP 2025 HS LEAP 2025 PTDIAG./INTERIMLEAP CONNECTSTATE PLACEMENT
LEAP 2025 GR 3-8LEAP 2025 HS LEAP 2025 PTDIAG./INTERIMLEAP CONNECTSTATE PLACEMENT
LEAP 2025 GR 3-8LEAP 2025 HS LEAP 2025 PTDIAG./INTERIMLEAP CONNECT
Manage Students Students - Search/View
LEAP 2025 GR 3-8LEAP 2025 HS LEAP 2025 PTDIAG./INTERIMLEAP CONNECTSTATE PLACEMENT
LEAP 2025 GR 3-8LEAP 2025 HS LEAP 2025 PTDIAG./INTERIMLEAP CONNECTSTATE PLACEMENT
LEAP 2025 GR 3-8LEAP 2025 HS LEAP 2025 PTDIAG./INTERIMLEAP CONNECT
Students - Add/Edit
LEAP 2025 GR 3-8LEAP 2025 HS LEAP 2025 PTDIAG./INTERIMLEAP CONNECTSTATE PLACEMENT
LEAP 2025 GR 3-8LEAP 2025 HS LEAP 2025 PTDIAG./INTERIMLEAP CONNECTSTATE PLACEMENT
Students -Download
LEAP 2025 GR 3-8LEAP 2025 HS LEAP 2025 PTDIAG./INTERIMLEAP CONNECTSTATE PLACEMENT
LEAP 2025 GR 3-8LEAP 2025 HS LEAP 2025 PTDIAG./INTERIMLEAP CONNECTSTATE PLACEMENT
Students - Upload
LEAP 2025 GR 3-8LEAP 2025 HS LEAP CONNECT
LEAP 2025 GR 3-8LEAP 2025 HS LEAP CONNECT
Test Administrator Management
Test Administrators
Teachers - Add/Edit
LEAP 2025 GR 3-8LEAP 2025 HS LEAP CONNECTDIAG./INTERIMLEAP 2025 PTSTATE PLACEMENT
LEAP 2025 GR 3-8LEAP 2025 HS LEAP CONNECTDIAG./INTERIMLEAP 2025 PTSTATE PLACEMENT
Teachers - Search/View
LEAP 2025 GR 3-8LEAP 2025 HS LEAP CONNECTDIAG./INTERIMLEAP 2025 PTSTATE PLACEMENT
LEAP 2025 GR 3-8LEAP 2025 HS LEAP CONNECTDIAG./INTERIMLEAP 2025 PTSTATE PLACEMENT
Teachers - Upload
LEAP 2025 GR 3-8LEAP 2025 HS LEAP CONNECTDIAG./INTERIMLEAP 2025 PTSTATE PLACEMENT
LEAP 2025 GR 3-8LEAP 2025 HS LEAP CONNECTDIAG./INTERIMLEAP 2025 PTSTATE PLACEMENT
Portal Permissions Matrix (cont.)

Page 12
Introduction
Portal Permissions Matrix (cont.)
Portal Menu PermissionLink
Permission Name in the
Portal
District TestCoord.
School TestCoord.
District Tech. Coord.
School Tech. Coord.
Test Admin/Teacher
Test Management
Manage Test Sessions
Test Session - Search/View
LEAP 2025 GR 3-8LEAP 2025 HS LEAP 2025 PTDIAG./INTERIMLEAP CONNECTSTATE PLACEMENT
LEAP 2025 GR 3-8LEAP 2025 HS LEAP 2025 PTDIAG./INTERIMLEAP CONNECTSTATE PLACEMENT
LEAP 2025 GR 3-8LEAP 2025 HS LEAP 2025 PTDIAG./INTERIMLEAP CONNECTSTATE PLACEMENT
Test Session - Add/ Edit
LEAP 2025 GR 3-8LEAP 2025 HS LEAP 2025 PTDIAG./INTERIMLEAP CONNECTSTATE PLACEMENT
LEAP 2025 GR 3-8LEAP 2025 HS LEAP 2025 PTDIAG./INTERIMLEAP CONNECTSTATE PLACEMENT
Test Session - Upload
LEAP 2025 GR 3-8LEAP 2025 HS LEAP 2025 PTDIAG./INTERIMLEAP CONNECTSTATE PLACEMENT
LEAP 2025 GR 3-8LEAP 2025 HS LEAP 2025 PTDIAG./INTERIMLEAP CONNECTSTATE PLACEMENT
Test Tickets - View/Print
LEAP 2025 GR 3-8LEAP 2025 HS LEAP 2025 PTDIAG./INTERIMLEAP CONNECTSTATE PLACEMENT
LEAP 2025 GR 3-8LEAP 2025 HS LEAP 2025 PTDIAG./INTERIMLEAP CONNECTSTATE PLACEMENT
Test Tickets – Invalidate/Validate
LEAP 2025 GR 3-8LEAP 2025 HS LEAP 2025 PTDIAG./INTERIMLEAP CONNECTSTATE PLACEMENT
Test Tickets -Unlock
LEAP 2025 GR 3-8LEAP 2025 HS LEAP 2025 PTDIAG./INTERIMLEAP CONNECTSTATE PLACEMENT
LEAP 2025 PTDIAG./INTERIMLEAP CONNECT
Test Tickets -View QuestionsAttempted
LEAP 2025 GR 3-8LEAP 2025 HS LEAP 2025 PTDIAG./INTERIMLEAP CONNECTSTATE PLACEMENT
LEAP 2025 GR 3-8LEAP 2025 HS LEAP 2025 PTDIAG./INTERIMLEAP CONNECTSTATE PLACEMENT
LEAP 2025 GR 3-8LEAP 2025 HS LEAP 2025 PTDIAG./INTERIMLEAP CONNECT
Test Tickets - End Incomplete Test
LEAP 2025 PTDIAG./INTERIM
Interactive Reporting
DRC INSIGHT Interactive Reporting
DRC IRS - Access
DIAG./INTERIMLEAP 2025 PTSTATE PLACEMENT
DIAG./INTERIMLEAP 2025 PTSTATE PLACEMENTLEAP 2025
DIAG./INTERIMLEAP 2025 PTSTATE PLACEMENT
DRC IRS - District
DIAG./INTERIMLEAP 2025 PTSTATE PLACEMENT
DRC IRS - School
DIAG./INTERIMLEAP 2025 PTSTATE PLACEMENT
DIAG./INTERIMLEAP 2025STATE PLACEMENT
DRC IRS - Teacher
DIAG./INTERIMLEAP 2025 PTSTATE PLACEMENT
DIAG./INTERIMLEAP 2025 PTSTATE PLACEMENT
DIAG./INTERIMLEAP 2025 PTSTATE PLACEMENT
DIAG./INTERIMLEAP 2025 PT

Page 13
Introduction
Section Description Assessments
Introduction Lists information for working with the Portal, explains the audience for this guide, and What’s in this Guide?
• Diagnostic/Interim• LEAP 2025 GR 3-8• LEAP 2025 HS• LEAP Connect• LEAP Practice Test• State Placement Test
General Information Menu
Briefly describes the options available from the General Information menu: Announcements, Documents, Downloads, and Test Tutorials.
• Diagnostic/Interim• LEAP 2025 GR 3-8• LEAP 2025 HS• LEAP Connect• LEAP Practice Test• State Placement Test
User Management Menu
Details the various administrative tasks that CTCs, STCs, and TAs can perform using the Portal. These tasks include editing and updating user permissions, activating and de-activating users, and adding users.
• Diagnostic/Interim• LEAP 2025 GR 3-8• LEAP 2025 HS• LEAP Connect• LEAP Practice Test• State Placement Test
Materials Menu / Enrollments
Describes how to access and work with the Accountability form, the Receipt Notice form, and ordering additional materials. Enrollments explains how to mark whether testing for an administration will be completed online or using paper and pencil.
• Diagnostic/Interim• LEAP 2025 GR 3-8• LEAP 2025 HS• LEAP Connect• LEAP Practice Test• State Placement Test
Student Management Menu
The Student Management topics describe the options that users have for searching for students and displaying student information; editing student information and test sessions; and adding individual and multiple students to the Portal.
• Diagnostic/Interim• LEAP 2025 GR 3-8• LEAP 2025 HS• LEAP Connect• LEAP Practice Test• State Placement Test
Student Status Dashboard
Explains how to display student testing status by school and administration.
• Diagnostic/Interim• LEAP 2025 GR 3-8• LEAP 2025 HS• LEAP Connect• LEAP Practice Test• State Placement Test
n What’s in This Guide?
This guide is divided into various sections based on the Portal menu options. The table below lists the sections of the guide, a description of the section, and the assessments relevant to the section.

Page 14
Introduction
Section Description AssessmentsTest Management Menu
The Test Management Menu topics outline the various options available from this menu, including viewing the test sessions for which a student is enrolled, viewing the status of a test session, editing student information, and more.
• Diagnostic/Interim• LEAP 2025 GR 3-8• LEAP 2025 HS• LEAP Connect• LEAP Practice Test• State Placement Test
Test Administrator Management Menu
Describes the Test Administrator System. STCs use this system to upload the names and numbers of Test Administrators to the Portal for the tests they administer.
• Diagnostic/Interim• LEAP 2025 GR 3-8• LEAP 2025 HS• LEAP Connect• LEAP Practice Test• State Placement Test
Student Group Management
Explains how to work with, edit, and add student groups. Creating a test session from a student group, reassigning a test administrator to multiple student groups, and uploading multiple student groups are covered, too.
• Diagnostic/Interim• LEAP Practice Test• State Placement Test
Educator Scoring
Outlines how TAs display student test data and access Educator Scoring, and how TAs print student responses, score tests using the Educator Scoring application, and reset scores when necessary.
• Diagnostic/Interim• LEAP Practice Test
Report Delivery Menu
Describes how the Portal users can access online testing statistics, status reports, student reports, and other reports.
• Diagnostic/Interim• LEAP 2025 GR 3-8• LEAP 2025 HS• LEAP Connect• LEAP Practice Test• State Placement Test
Interactive Reporting
Explains how to sort and display student testing data, including student responses to test questions. Lists instructions for On Demand reports
• Diagnostic/Interim• LEAP Practice Test• State Placement Test
Student Corrections System Menu
Lists steps necessary to identify student demographic and test result records that could potentially contain errors and provides a process for corrective action.
• LEAP 2025 GR 3-8• LEAP 2025 HS (Fall
and Spring)• LEAP Connect
n What’s in This Guide? (cont.)

Page 15
Working with the Portal

Page 16
Working with the Portal
Accessing the PortalYou access the Portal from the Welcome to the DRC INSIGHT Portal page.
1. Enter the URL https://la.drcedirect.com in a supported browser. The Welcome to the DRC INSIGHT Portal page displays.
2. Enter your username and password then click Sign In.
Click Forgot your password to receive an email with instructions on how to reset your password.

Page 17
Working with the Portal
Accessing the Portal (cont.)
3. The Application menu displays the Portal options you have permission to use. Initially, the menu displays My Applications. As shown below, when you select a menu option, the Application menu displays the name of the selected option.
After a successful log in, the Welcome to the DRC INSIGHT Portal page reappears with menu options for navigating the site.
The Product menu displays the active DRC product.

Page 18
Working with the Portal
Managing Your AccountThis topic describes how to change your name, email address, or password for the Portal.
1. To manage your account, sign in to the Portal and click your initials (based on your first and last name in Portal) in the right-hand corner of any page to display a menu of options.

Page 19
Working with the Portal
Managing Your Account—Changing Your Name or Email Address
2. On the Manage my profile page, you can enter a new first, middle, or last name.
If you enter a new email address, remember that the email address you enter is also your Portal username.
Click Save.
1. Select Edit Profile to change your name or email address within the Portal.

Page 20
Working with the Portal
Managing Your Account—Changing Your Password
This topic describes how to change your password within the Portal (for existing Portal users only).
2. Enter your current password in the Previous Password field, your new password in the New Password and Confirm New Password fields, then click Save.
1. Select Change Password to change your Portal password. The password must meet the following conditions:
• The password must contain at least eight characters, including:
- At least one numeric character
- At least one lowercase character and at least one uppercase character
- At least one of the following special characters: !@#$%^&*
• The password cannot contain your username, first name, middle, or last name.

Page 21
Working with the Portal
Managing Your Account—Displaying Your Agreements
This topic describes how to display the agreements for your DRC products.
1. Select View My Agreements to display DRC product agreements.
2. Click a product to display its agreement.

Page 22
Working with the Portal
Displaying the Security AgreementYou can click the Security and Confidentiality Agreement link at the bottom of any Portal page to display the Security and Confidentiality Agreement for DRC Applications. The first time you access the Portal, you must agree to the terms of the agreement to continue using the Portal.
Click Security and Confidentiality Agreement to display the Security and Confidentiality Agreement for DRC Applications.

Page 23
Working with the Portal
Displaying the Minimum Browser RequirementsYou can click the Minimum Browser Requirements link at the bottom of any page to display the Minimum Web Browser Requirements page listing browser requirements, with links to browser pages and additional information. This page details Portal web browser requirements for the Windows, Mac (OS X and macOS), and Linux operating systems.
The Additional Information section contains links to descriptions of other items such as JavaScript and session-based cookies that are required for browsers to use the Portal.
The page contains links to web browser home pages, organized by operating system that you can use to learn about and download different web browsers.
When you click the Minimum Browser Requirements link at the bottom of the page, the Minimum Web Browser Requirements page displays a list of the web browsers that are certified to use with the Portal.

Page 24
General Information Menu

Working with the WIDA AMS
Page 25
General Information Menu
IntroductionWhen you open the Portal Applications menu bar and click the General Information menu, four options are available: Announcements, Documents, Downloads, and Test Tutorials. Note: The Documents and Test Tutorials tabs are always enabled in the Portal. The Announcements and Downloads tabs are enabled only after you log in to the Portal.
Click Announcements to display the latest information regarding Louisiana testing.
Click Documents to select, open, and download various training items from the Documents page.

Page 26
General Information Menu
Introduction (cont.)
Click Downloads to display the DRC INSIGHT System Requirements, and to access the installers for Central Office Services (COS) and DRC INSIGHT for various operating systems, as well as the Capacity Estimator.
Use the buttons at the bottom of the screen to display Supported System Requirements and to test the monitor of a testing device to ensure it’s ready for online testing.
Click Test Tutorials to watch a test demo and become familiar with the online testing environment.

Page 27
User Management Menu

Page 28
User Management Menu
This section of the user guide discusses the various user administration tasks you can perform from the User Management menu of the All Applications menu bar.
• Add and edit permissions for a user
• Upload multiple users to the Portal
• Update multiple profiles at the same time
• Assign a new role to all selected users
• Export selected user data to a spreadsheet
• Add a single user to the Portal
• Add multiple users to the Portal
• Inactivate a user
• Activate a user
n Introduction

Page 29
User Management Menu
Adding Permissions for a Single UserFrom the Edit User tab, you can add permissions to a user’s account.
1. Click User Management to display the User Administration page.
2. Click on the Edit User tab, use the various drop-down menus and fields to enter search criteria to help locate the user and click Find User. Select All in the Administration field to search all administrations.
3. In the Action column click the View/Edit icon ( ) to display the Edit User dialog box.
4. Click the Add button to display the Add Permissions Screen.

Page 30
User Management Menu
Adding Permissions for a Single User (cont.)
6. Click Save when you are finished to save your changes or Cancel to cancel them.
5. When the Add Permissions dialog box displays, select permissions from the Available Permissions list to add to the user. Use the Add Selected arrow ( ) to add the permissions, and click the Save button.
• To select multiple permissions in sequence, hold down the Shift key while you select them.
• To select multiple permissions that are not in sequence, hold down the Ctrl key while you select them.
• Use the Add All arrow ( ) to add all permissions.
• Click the Clone from Another User icon ( ) to copy another user’s set of permissions.

Page 31
User Management Menu
Editing a Single User’s PermissionsFrom the Edit User tab, you can add or remove permissions for any user in the system that you created.
2. In the Action column click the View/Edit icon ( ).
1. To edit a user’s permissions, click the Edit User tab, use the various drop‑down menus and fields to enter search criteria to help locate the user, and click Find User. In the Action column click the View/Edit icon ( ). The user displays in the Edit User window.

Page 32
User Management Menu
Editing a Single User’s Permissions (cont.)
3. When the Edit Permissions dialog box displays, select permissions from the Available Permissions list to add to the user, or permissions from the Assigned Permissions list to remove from the user. Use the Add Selected ( ) or Remove Selected ( ) arrows to change the permissions, and click the Save button.
• To select multiple permissions in sequence, hold down the Shift key while you select them.
• To select multiple permissions that are not in sequence, hold down the Ctrl key while you select them.
• Use the Add All ( ) and Remove All ( ) arrows to add or remove all permissions.
• Click the Clone from Another User icon ( ) to copy another user’s set of permissions.
4. Click Save when you are finished to save your changes or Cancel to cancel them.

Page 33
User Management Menu
Update Multiple Profiles, Copy Users, Mass Assign Roles, & Export User DataFrom the User Administration page, you can update multiple user profiles at once. You also can select users and then copy the selected users to a new administration, mass assign the selected users a new role, or export the selected user data to a spreadsheet.
1. To update multiple user profiles, from the User Administration page, select the Edit User tab.
2. Select an administration and use the other drop‑down filters, such as User Role, to find users, then Click Find User.
4. Click the Profiles tab. Select the checkbox for each user / profile that you want to update.
3. The users that match the selection criteria display on the Users tab at the bottom of the page.

Page 34
User Management Menu
Update Multiple Profiles, Copy Users, Mass Assign Roles, & Export User Data (cont.)Use the buttons at the bottom of the page to perform the profile updates.
5. Click Copy to New Administrations to copy the selected users with the current permissions to new administrations.
Note: If you don’t want the copied users to have the same permissions in the new administration, after copying the users, delete the permissions and add the appropriate permissions for the new administration.
6. Click Assign Permissions to assign the same permissions to all selected users.
7. Click Remove Permissions to remove the same permissions from all selected users.
8. Click Assign Role to assign all selected users the same new role.
9. Click Export to Excel to export all selected users to a Excel (a .csv spreadsheet).

Page 35
User Management Menu
Adding a UserWhen you add a user, specify the permissions the user will have.
1. To add a user, from the Manage Users menu select the User Administration option and click on the Add Single User tab. 2. Fill out the required fields and required
options from the drop-down menus.
Note: A required field or menu option has a red asterisk (*) next to it.
3. Select a permission from the Available Permissions list and click the Add Selected icon ( ) to assign the permission to the user ( “Editing a Single User’s Permissions” on page 21).
Note: A description of the permission selected displays beneath the list of permissions.
Click Save when you are finished assigning permissions.

Page 36
User Management Menu
Adding Multiple UsersFrom the User Administration window, you can upload a file containing multiple user profiles to DRC. The file must meet certain requirements. For help, or more information about this process, click the File Layout and Sample File links at the top of the Upload Multiple Users tab.
1. To create and upload a users file, select User Administration from the Manage Users menu to display the User Administration page and select the Upload Multiple Users tab.
3. Select the appropriate test administration and click Browse... to select the file to upload.
4. Click Upload when you are ready.
Note: If there are errors in the file, a message displays containing details about the errors. You must resolve the errors and repeat Steps 3 and 4.
2. For help with or more information about the upload process, click the File Layout and Sample File links in the light blue bar at the top of the Upload Multiple Users tab.

Page 37
User Management Menu
Inactivating a UserYou can inactivate Portal users that are currently active. When a user is inactivated, the user is unable to access the Portal (to reactivate a user, see “Activating a User” on page 38).
Note: When a user is inactivated, the user does not receive an email.
3. When the Inactivate User dialog box displays, click Inactivate to make the user inactive or Cancel to cancel the process.
1. To inactivate a user, click the Edit User tab, use the various drop-down menus and fields to enter search criteria to help locate the user, and click Find User.
2. In the Action column, click the Inactivate icon ( ) for the user you want to make inactive. When the user is inactivated, the following message displays: The user has been inactivated.

Page 38
User Management Menu
Activating a UserYou can activate a Portal user that is currently inactive so the user can access the Portal again (to inactivate a user, see “Inactivating a User” on page 37). When the user is activated, an email notification is sent to indicate that the account has been reset and to provide a new temporary password.
Note: Users are activated automatically when they first log in to the Portal. Only users that were previously inactivated need to be activated manually.
1. To activate a user, click the Edit User tab, use the various drop‑down menus and fields to enter search criteria to help locate the user, and click Find User.
2. In the Action column, click the Activate icon ( ) for the user you want to make active. When the user is activated, the following message displays: The user has been activated.

Page 39
Materials Menu

Page 40
Materials Menu
Additional MaterialsFor non-summative assessments, users must use the Additional Materials option to order testing materials. For summative assessments, users are sent materials automatically, but can order additional materials when necessary.
• The District Test Coordinator, after using any district overage, should request additional materials through the Portal.
• School Test Coordinators should request additional materials through their District Test Coordinator, using the school Additional Materials Request form.
2. To place a new order, select an Administration, District, and School and click Add Order.
1. To order additional materials, click Materials then the Additional Materials tab. The Search Additional Materials page displays.

Page 41
Materials Menu
Additional Materials (cont.)
3. In the order tables, enter material counts for the additional materials the district requires. If you want to add a note, select the Notes tab. Otherwise, when you are finished, click Submit to submit the order or Cancel to cancel the process.

Page 42
Materials Menu
Additional Materials (cont.)
4. You can select the Notes tab to view and add notes for the order. Click Add Note to add a note to the order.
Note: If you click Cancel, you will return to the Search Additional Materials window.
5. To add a note, enter your user initials, a short description and a long description, and click Save. Or, click Cancel to return to the Notes tab.

Page 43
Materials Menu
Additional Materials (cont.)
6. To edit or delete an existing order, select an Administration and click Find Orders. In the Action column, click the View/Edit icon ( ) to display an order or the Delete icon ( ) to delete an order. You can only update orders that have a status of Submitted. If the order status is Under Review, Pending, or Completed, you must place a new order.
Note: If you need to update an order after it has a status of Under Review, Pending, or Completed, please contact DRC Customer Service at [email protected] or 1-888-718-4836.

Page 44
Materials Menu
Accountability FormThe Accountability Form is used to verify the return of materials and communicate any discrepancies such as soiled documents.
Note: The Accountability Form functionality is used only for paper and pencil assessments.
1. To complete the form, click Materials then the Accountability Form tab. The Accountability Form page displays.
2. Select an Administration and District, and click Show. A grid displays on the Enter Counts tab.

Page 45
Materials Menu
Accountability Form (cont.)
5. Click Complete to submit the form to DRC.
4. List all secure materials soiled with bodily fluids in the Record reasons for discrepancies here field to ensure that they are not reported as missing materials.
Always provide both the barcode number and the date the document was destroyed,
3. All secure materials received by Data Recognition Corporation must be returned to DRC. Enter the box counts returned to DRC in the Exact Number of Boxes Returned to DRC column.

Page 46
Materials Menu
Accountability Form (cont.)
To change the quantity counts, select the Enter Counts tab.
The Status Report tab displays the completion status at the district level. The possible status values are:
Status Description
Not Started District has not completed the data entry.
Complete District has completed the data entry.
The Summary tab displays summarized data from the Enter Counts tab and is for review only.
Page 47
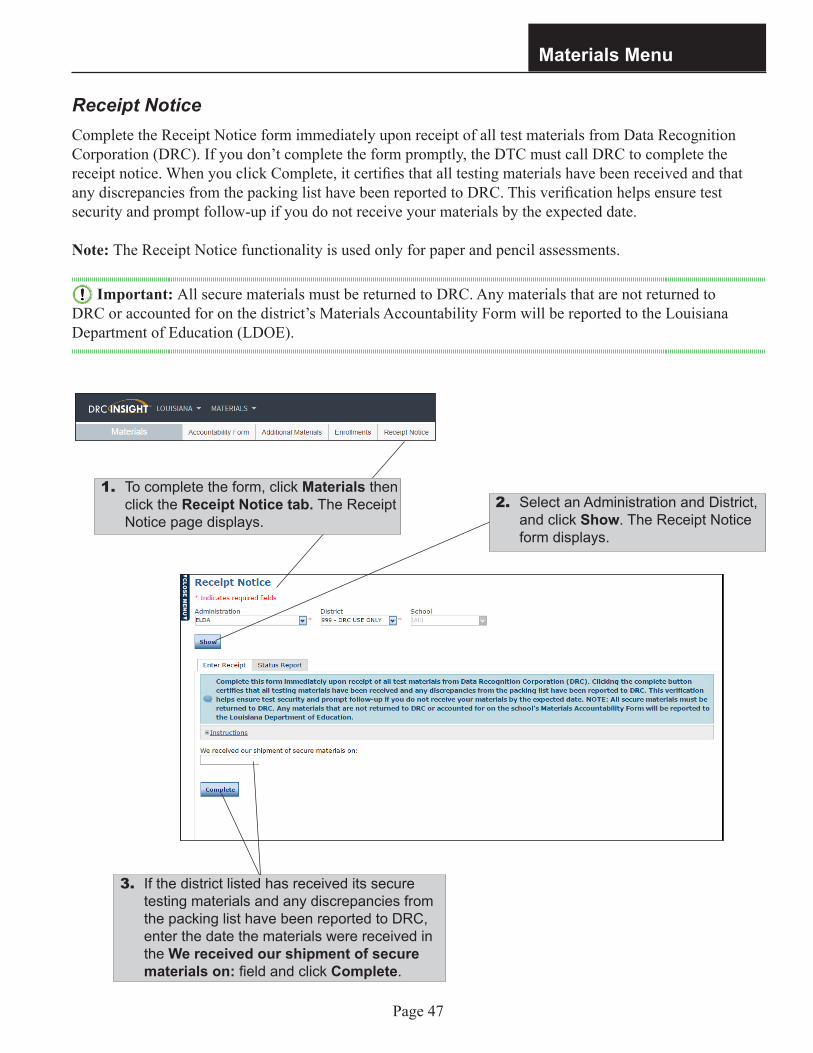
Materials Menu
Receipt NoticeComplete the Receipt Notice form immediately upon receipt of all test materials from Data Recognition Corporation (DRC). If you don’t complete the form promptly, the DTC must call DRC to complete the receipt notice. When you click Complete, it certifies that all testing materials have been received and that any discrepancies from the packing list have been reported to DRC. This verification helps ensure test security and prompt follow-up if you do not receive your materials by the expected date.
Note: The Receipt Notice functionality is used only for paper and pencil assessments.
Important: All secure materials must be returned to DRC. Any materials that are not returned to DRC or accounted for on the district’s Materials Accountability Form will be reported to the Louisiana Department of Education (LDOE).
1. To complete the form, click Materials then click the Receipt Notice tab. The Receipt Notice page displays.
2. Select an Administration and District, and click Show. The Receipt Notice form displays.
3. If the district listed has received its secure testing materials and any discrepancies from the packing list have been reported to DRC, enter the date the materials were received in the We received our shipment of secure materials on: field and click Complete.

Page 48
Materials Menu
Receipt Notice (cont.)
The receipt progress status is displayed at the district level on the Status Report tab. The following are the possible statuses:
Status DescriptionNot Started District has not completed the data entryCompleted District has completed the data entry
5. Click Export to Excel to download the Receipt Notice status as an Excel spreadsheet file.
4. Select the Status Report tab to display the district’s receipt status. The receipt progress status is displayed in the Status column.

Page 49
Materials Menu
EnrollmentsThe Enrollments option of the Materials menu allows users to indicate whether Grade 3 and Grade 4 testing for the LEAP 2025 administration will be completed online or using paper and pencil.
Important: Schools that do not meet the enrollment window deadline will default to paper testing.
If necessary, you can save and continue entering enrollment information at a later date. To do so, click the Save button at the bottom of the Enrollment window. When the information is complete, click the Complete button.
2. To enter enrollment information, select the LEAP 2025 administration and then select a district.
3. Select a participating school from the school drop-down menu and click Show Enrollments.
1. Click Materials then the Enrollments tab. The Enrollment page displays.

Page 50
Materials Menu
Enrollments (cont.)Use the enrollments grid to verify or update the counts for the current year to ensure the proper quantities of materials in the initial shipment for the school. You can modify enrollments during the enrollment window. If modifications are made, DRC uses the final enrollment counts at the close of the enrollment window.
5. On the Enter Enrollments tab, select how Grade 3 and Grade 4 students will test at the selected school: Online or Paper.
4. When you click Show Enrollments, the Enter Enrollments, Summary, and Status Report tabs display.
6. In the Enrollments grid, counts for the previous year display. Confirm or update the numbers as needed. For online testing, verify the Braille and/or CAS counts. If the school no longer hosts a grade, use zeros in place of the previous year’s numbers.
Note: Include counts for students that require the accommodated version of the consumable test booklet, including students with an English Learner Accommodations Plan, students with a PNP, or students who require the test to be read aloud. In addition, where applicable, be sure to include test booklets for Test Administrators who will read the paper test aloud.
7. Click Save to save your changes. Click Complete when you are finished making all of your updates. Confirmation messages display to verify that the enrollment information has been saved and completed.

Page 51
Materials Menu
Enrollments (cont.)The Summary tab displays the enrollment information previously entered for your school. You can print the information for reference.
Click Print to print the information displayed on the page.
Click the Summary tab.

Page 52
Materials Menu
Enrollments (cont.)The Status Report tab displays the progress of your school’s and district’s enrollment process.
Select the Status Report tab to view the Enrollment status. Status is displayed at the School level and the District level. The following table describes these statuses.
School Status Description Not Started School has not saved or completed enrollment data
In Progress School has saved data
Completed School has completed enrollment data
District Status Description Not Started No schools in the selected district have saved or completed enrollment data
In Progress At least 1 school in the selected district has saved or completed enrollment data
Completed All schools in the selected district have saved or completed enrollment data
Click Export to Excel to download the information into a spreadsheet to view, print, or email.

Page 53
Student Management Menu

Page 54
Student Management Menu
IntroductionFrom the Student Management menu, Portal users can search for students and add one or more students to Portal. Note: For non-summative assessments, student information and most accommodations are managed automatically through eScholar and SIS/SER. Students can be edited individually, however, the Multiple Student Upload function is not available for non-summative assessments. Updates to eScholar and SIS/SER are refreshed nightly in Portal.
To filter the display based on whether students have been assigned to a test session, use the Session Assignment drop-down menu. You can select one of the following values:
Value Description
Online Displays the students that have been assigned to a test session (the default value).
None Displays the students that have not been assigned to a test session.
(Blank) Leave the field blank to display all students, both assigned and unassigned.
Click Student Management then click the Manage Students tab. The Manage Students page displays.
To search for one or more student records, use the various drop-down menus and fields to enter search criteria and click Find Students.

Page 55
Student Management Menu
Adding a Student to PortalThere are two ways to add student records to Portal: add a single student using this procedure or to upload multiple students at once (see the next page).
Notes: If you need to add a student who transferred from another district, for more information refer to these documents in Portal: For summative assessments, see the Test Coordinators Manual (available in Portal under the General Information menu —Documents). For LEAP 360 assessments, students added in eSCHOLAR are automatically available for any LEAP 360 assessment in the Portal.
Important: If your district has not opted in to DRC’s data sharing agreement with LDOE, provide only the following student information: • The first three characters of the last name • The first character of the first name • The LASID • The grade • 01/DD/1900, where DD is the student’s actual day of birth.
REPLACE IMAGE
To add a student to Portal, do the following:
1. Select a district and school from the Manage Students page and click the Add Student button at the bottom of the page to display the Add Student window.
2. Enter or select the necessary information in the Student Detail tab to add the student.
3. When you are finished, click Save to save your information and end the process, Save & Add Another to save your information and continue the process to add another student, or Cancel to cancel the process without saving your information.

Page 56
Student Management Menu
Uploading Multiple Students to PortalFor LEAP 2025 Grades 3 - 8 and LEAP 2025 High School (summative) assessments, prior to testing, students are uploaded by DRC via the precode file; however, additional students can be uploaded by the schools using this procedure.
For all other (non-summative) assessments, which includes LEAP Practice Test, students will be loaded nightly from the eSCHOLAR database. When you enter new student information into eSCHOLAR, it is available in Portal the night after submission.
To upload multiple student records at once, you can upload a file containing student information to Portal. The file must be in the comma-separated value (.csv) format used by Microsoft Excel and the fields in the file must be in specific columns. After a file is uploaded successfully, the students will automatically be added to Portal.
Important: If your district has not opted in to DRC’s data sharing agreement with LDOE, provide only the following student information: • The first three characters of the last name • The first character of the first name • The LASID • The grade • 01/DD/1900, where DD is the student’s actual day of birth.
To create and upload a student file, do the following:
1. Manage Students from the Student Management menu to display the Manage Students page and select the Upload Multiple Students tab.
2. The Upload Multiple Students tab contains links to both a sample PDF file that contains instructions and a sample .csv file that you can use to create the actual file.
Click the Download the File Layout link to display the Multiple Student Upload File Layout.pdf file.
This file displays the required layout of the .csv file you will upload to DRC with rules, instructions, and examples describing how to create and format the file.

Page 57
Student Management Menu
Uploading Multiple Students to Portal (cont.)
4. Use the sample .csv file to create, rename, and save a student file to upload.
Note: Be sure to keep the header column rows in the file you upload.
3. Click the Sample File link to download or display the sample .csv file.
This file is only a sample of the type of file you will upload to DRC.
Depending on the browser you are using, a dialog box may appear for you to use to open or download the file.

Page 58
Student Management Menu
Uploading Multiple Students to Portal (cont.)
5. After you have created a students file, click Browse to locate it, select the file, and click Open to display it in the File field of the Upload Multiple Students tab.
6. Click Upload. A message displays indicating the file has been transferred and is being checked for errors.
After the file has been validated, you can review its status. If the file contains errors, you must correct them and repeat Steps 5 and 6.

Page 59
Student Management Menu
Editing a Student’s Information—Student DetailAll administrations use the Student Detail tab. You can perform the following tasks from the Edit Student window:
• Modify a student’s detail information (see below).
• Mark a student’s accommodations and accessibility options (see “Editing a Student’s Information—Accommodations & Accessibility Options” on page 60).
• View the test sessions for which the student is enrolled (see “Editing a Student’s Test Session Information” on page 64).
• View the student’s test session status information (see “Viewing and Exporting Test Session Status Details” on page 80).
To view or edit a student’s detail information, do the following:
1. Click the Manage Students link from the Student Management menu and select your search criteria.
2. Click the Find Students button.
3. Click the View/Edit icon ( ) in the Action column for the student whose information you want to edit.
4. In the Edit Student window, edit the information in the Student Detail tab.
5. Click Save to save your changes, Save & Add Another to save your changes and add another student, or Cancel to cancel your changes.

Page 60
Student Management Menu
Editing a Student’s Information—Accommodations & Accessibility OptionsAll administrations use the Accommodations tab. For students who are approved to use accommodations during online testing, some accommodations and accessibility options must be recorded within the online system for planning or reporting purposes. Of these accommodations, indicate which accommodations they will use, by content area. Note: For summative assessments, DRC uploads accommodations for precode students. In addition, prior to test setup opening, for retester students DRC does a one-time upload to the Portal, which includes their accommodations from SIS and SER.
Important: If the student was already placed in a test session, the student must be removed from the test session before the correct accommodation can be applied to the student’s record in the Portal.
Use the Accommodations checkboxes to indicate some of the accommodations the student will require.
To view or edit a student’s accommodation information, follow the steps below. Note: If you are adding accommodations, you must enter testing codes. For more information, see “Editing a Student’s Information—Testing Codes” on page 63.
1. Click the Manage Students link from the Student Management menu and select your search criteria.
2. Click the Find Students button.
3. Click the View/Edit icon ( ) in the Action column for the student whose information you want to edit.
4. In the Edit Student window, edit the information in the Accommodations tab.
5. Click Save to save your changes, Save & Add Another to save your changes and add another student, or Cancel to cancel your changes.

Page 61
Student Management Menu
Editing a Student’s Information—DemographicsThe Demographics tab is used for Diagnostic, Interim, LEAP 2025 Grades 3 - 8, LEAP Connect, and LEAP 2025 High School assessments. Note: Demographic data can be updated only for students who were uploaded by the district. For students added manually, selections must be made for all demographic options except for Expected to Test and Expected to Retest fields. If you need to edit demographic information, first check the dates specifying when the information can edited. Refer to the Test Coordinators Manual (in Portal: General Information—Documents) for more information.
1. To view or edit a student’s demographic information, open the All Applications menu, click the Manage Students option from the Student Management menu, and select your search criteria.
2. Click Find Students.
3. Click the View/Edit icon ( ) in the Action column for the student whose information you want to edit.
4. In the Edit Student window, edit the information in the Demographics tab.
5. Click Save to save your changes or Cancel to cancel your changes.
Expected to Retest options are at the bottom of the page. Scroll to display all demographic options. Expected to Test is at the top of the page.

Page 62
Student Management Menu
Editing a Student’s Information—Demographics (cont.)Use the procedure below to display selected students and their Demographic information. For example, you can display students with the Demographic option Expected to Retest - Algebra I. You have the option to export the information to a spreadsheet.
1. To display selected students by demographic information, open the All Applications menu, click the Manage Students option from the Student Management menu, and select your search criteria.
2. In the Subject/Demographic menu, select an option.
3. Click Find Students. All the students who meet the selection criteria display at the bottom of the page.
4. Select one or more students from the list and click Export to Excel. A spreadsheet file that includes the selected students and their Demographic information displays. You can print the file or save it to your system.

Page 63
Student Management Menu
Editing a Student’s Information—Testing CodesThe Testing Codes tab is used only for the LEAP 2025 Grades 3 - 8 and the LEAP 2025 High School assessments. The tab serves two purposes:
• To capture student accountability codes
• For LEAP 2025 High School: To capture the student’s teacher, course, and section.
Important: You cannot view or edit a student’s testing code information until the student has been added to a test session.
1. To view or edit a student’s demographic information, open the All Applications menu, click the Manage Students option from the Student Management menu, and select your search criteria.
2. Click Find Students.
3. Click the View/Edit icon ( ) in the Action column for the student whose information you want to edit.
4. In the Edit Student window, edit the information in the Demographics tab.
5. Click Save to save your changes or Cancel to cancel your changes.
For student’s who require an accountability code, select the appropriate code from the drop-down list.
For LEAP 2025 High School: To manually add a single student, use the Testing Codes tab and enter Teachers, Course, and Section information. Note: DRC will upload students via the LEAP 2025 High School Enrollment File. To manually add multiple students not in the Enrollment File, you must add students using the Multiple Student Upload process (for students with accommodations, you will need their testing codes to add them to the Portal).

Page 64
Student Management Menu
Editing a Student’s Test Session InformationThe Test Sessions tab is used with all administrations.
1. To view a student’s Test Sessions, click Manage Students from the Student Management menu and select your search criteria.
2. Click the Find Students button.
3. From the Test Sessions tab, click the Edit/Print Ticket Status icon ( ) in the Action column for the student whose information you want to edit. The Testing Status window displays.
4. From the Testing Status window you can print one or more student test tickets in the test session.

Page 65
Student Status Dashboard

Page 66
Student Status Dashboard
n Introduction
n Dashboard Access in the Portal
This section of the guide outlines how to access and use the Student Status Dashboard, which is used for the following administrations:
• Diagnostic
• Interim
• LEAP 2025
• LEAP 2025 High School
• LEAP 2025 Practice Test
The Student Status Dashboard (or simply Dashboard) allows you to display student testing status by school and administration. You can filter information on the Dashboard by testing status, grade, content area and assessment (or any combination of these).
Note: Dashboard data displays in real time as test scores are populated in the database.
You need the Test setup - view student status permission in the Portal to use the Dashboard.

Page 67
Student Status Dashboard
Access the DashboardYou access the Dashboard from the Student Management menu in the Portal.
1. Click Student Management then click Student Status Dashboard to display the Dashboard.

Page 68
Student Status Dashboard
Selecting a School in the DashboardUse the Site Search search box to search for a school and display its testing status data in the Dashboard. You must enter at least 3 characters of a school name or school code in the search box to display matches. After you select a school, you can select an administration.
The selected school and administration display at the top of the page.
2. For the selected school, select an administration to display the testing results in the Dashboard.
1. Enter all or part of a school name or code. In the list of matches, direct text matches are highlighted. Click the Select button to choose a school.
If there are no results for the selected school, a message displays.

Page 69
Student Status Dashboard
Using the DashboardBy default, the Dashboard displays data for the following: Status, Grade, Content Area, and Assessment. A grid of students displays below the graphs.
As shown below, you can click to toggle the information between graph and table format. In addition, you can hover the mouse cursor over a graph or part of a graph to display numerical values for testing status.
Click to toggle the information from graph to table format.
For the Status graph, hover the cursor over the Not Started (red) portion of the graph, for example, to display the number of students who have not started testing.
For the Grade, Content Area, and Assessment graphs, hover the cursor over a specific area of the graph to see the testing status for that specific area.
In the example below, the Content Area graph is shown. The cursor is over Science part of the graph and the testing status for Science is shown.

Page 70
Student Status Dashboard
Using the Dashboard (cont.)Below the graphs, a grid of students for the selected school displays. You can sort the student grid by column heads and export the grid to a spreadsheet (.csv) file.
Click a column head to sort the grid by that column’s data. An arrow displays on the selected sort column. The direction of the arrow indicates whether the column’s data is sorted in ascending or descending order based on that column’s numeric or alphabetic data. See common examples below.
Grade (Numeric) You can sort the column to ascend from grade 3 to grade 12, for example, or vice versa.
Last Name (Alphabetical) You can sort the column to descend from the last name Alpha to the last name Zeta, for example, or vice versa.
Status (By Status) You can sort the column to group all equal statuses together: Not Started, In Progress, or Completed.
Click to export the student grid to a spreadsheet file.
As you scroll down, more student data displays (if applicable). A message indicates the number of students shown out of the total number of students.
Click to jump to the top of the Dashboard.
In this example, Status is the selected sort criteria.

Page 71
Student Status Dashboard
Filtering the DashboardCreating Dashboard filters is dynamic: When you click a specific graph area, the Dashboard automatically creates a filter and updates Dashboard data based on that filter. For example, if you click the Grade 6 area of the Grade graph and click the Math area of the Content Area graph, the Dashboard creates the filters and displays Status data only for Grade 6 Math Assessments (see the example below).
Current filters, if any, display at the top of the Dashboard. You can click to remove a filter. Each time you add or remove a filter, the Dashboard updates based on the active filters.
1. Click the Grade 6 area of the Grade graph and click the Math area of the Content Area graph.
2. The Dashboard display updates based on the filters, which display in the Filters section of the Dashboard.
The Grade graph displays only grade 6.
The Content Area graph displays only Math.
The Assessments graph displays only Math Assessments.
Click X to close a filter. If all filters are closed, the Dashboard returns to the default display (all statuses display in all graphs, which are unfiltered).
The Status graph is not filtered in this example: All 3 statuses display in the other graphs. You can click one status and filter all graphs by that status.

Page 72
Test Management Menu

Page 73
Test Management Menu
IntroductionFrom the Test Management menu, you can view and manage test sessions and testing windows. The window displays the status of the session—Not Started, In Progress, or Completed.
Status DescriptionNot Started* The test session has not started.In Progress The test session is in progress.Completed** The test session is finished. The start time, end time, and length of the test session are also displayed.Locked At the end of each day, all sessions with a status of In Progress are automatically locked.
*A status of Not Started means that no student in the session has started the test.**A status of Completed means that all of the students in the session have completed the test.
Enter your search criteria, and click the Show Sessions button. Sessions that match the search criteria display on the Sessions tab.
Click Test Management then click Manage Test Sessions. The Test Sessions page displays.

Page 74
Test Management Menu
Creating a Test SessionFirst, test sessions must be created for each assessment. Then, students must be added to the test session. If they exist, you can select a Test Administrator or Student Group for the test session.
To add a test session, do the following:
1. Click the Manage Test Sessions tab on the Test Sessions page. Select a district and school (these fields are required to add a test session).
2. Click the Add Session button at the bottom of the page. The Add Test Session window displays.
3. Enter the required information (indicated by an asterisk [*] next to the field). Note: All sites must update the test session beginning and end dates based on the sites’ designated testing window. See “Editing the Testing Window” on page 75 for details.
4. Enter any other student search criteria.
5. Click the Find Students button.
6. Select a student from the Available Students list.
Note: To select multiple students in sequence, press the Shift key while you select them. To select multiple students that are not in sequence, press the Ctrl key while you select them.
7. Use the Add Selected ( ), Remove Selected ( ), Add All ( ), and Remove All ( ) icons with the Available Students and Students in Session lists to select one or more students to remove from or add to the test session.
8. Click Save or Save & Add Another.
School Test Coordinators: For the LEAP 2025 Practice Test and LEAP 360 assessments, if you are creating a test session for a Test Administrator (TA) to use with Educator Scoring, enter the TA name, the relevant grade and content area in the Session Name field. Example:
Sue Smith_Grade 3_ELA.
This allows the TA to filter Educator Scoring test sessions by their name and details instead of displaying all sessions for their school.
For more information on Educator Scoring, see the Educator Scoring for LEAP 2025 Computer Based Practice Tests user guide.

Page 75
Test Management Menu
Editing the Testing WindowUsers must enter the designated beginning and end dates (when students are actively taking tests for the assessment) for each test session. The Portal system only allows dates to be selected within the state testing window, which is listed in the Test Coordinators Manual for each administration. The designated testing window will control when the test can be accessed through INSIGHT. If the scheduled dates need to change after a test session has been created and saved, the user will need to go back into the test session to adjust the dates. The test tickets will automatically update to access the assessment within the adjusted time frame.
Users must select a Begin Date, then select an End Date. The dates must be within the state testing window.

Page 76
Test Management Menu
Adding Students to a Test SessionAfter you have added a test session, you can add new students to it. Each student is added automatically to the session when you click Save or Save & Add Another.
You can select Demographic or Accommodation filters to limit the number of students that display in the Available Students column. For example, for LEAP 2025 High School assessments, you can display students with the Demographic option Expected to Retest - Algebra I.
Use the Subject / Demographic drop down‑to filter students by content area or demographics while creating the test session.
Before You Begin (for LEAP Connect ELA Grades 3 - 4 assessments only): All test sessions must be grouped by students who are verbal or nonverbal. Under the Assessment drop down, select either the verbal or nonverbal assessment option to ensure the group of students who are verbal or nonverbal receive the correct form.

Page 77
Test Management Menu
Adding Students to a Test Session (cont.)
To add one or more new students to an existing test session, do the following:
1. Select an existing test session for the student’s grade level.
2. Click View/Edit and click the New Student button. The Add Student window displays.
3. Enter the student’s information into the fields on the Student Detail tab.
4. Click Save. The student you added is automatically placed in the Students in Session list for that test session.
Important: Remember to click Save again when the Edit Test Session window re-displays.

Page 78
Test Management Menu
Adding Students to a Test Session (cont.)You also must add the student to the other tests sessions for any other content areas for which they will test.
To add one or more new students to an existing test session, do the following:
1. Select an existing test session for the student’s grade level.
2. Click View/Edit and click the Find Students button. The student’s name displays under Available Status.
3. Click on the student’s name to highlight it and click the Add Selected ( ) icon to move the student to the Students in Session column.
4. Click Save. After the student is added, you can print a test ticket for the student.

Page 79
Test Management Menu
Exporting a Test SessionYou can export the details of a test session as an Excel file (.xls) to save, view, edit, or print in a spreadsheet.
To export a test session, do the following:
1. Click Manage Test Sessions from the Test Management menu and select your search criteria.
2. Click the Show Sessions button.
3. Click the Export Details icon ( ) in the Action column for the test session that you want to export. The test session details are exported to an Excel file (.xls) that you can save, view, edit, or print.
Note: Depending on the browser you are using, a dialog box may appear for you to use to open or download the file.

Page 80
Test Management Menu
Viewing and Exporting Test Session Status DetailsThe test session status display provides the following information: each student’s test ticket status; the time the student started the test; and the time the student completed the test. You can use this information to verify that all of the students in a session have completed their tests.
To view or export the status of a test session, do the following:
1. Click Manage Test Sessions from the Test Management menu and select your search criteria.
2. Click the Show Sessions button.
3. Click the Edit/Print Ticket Status icon ( ) in the Action column for the test session details you want to view or export. The details for the test session you selected display in the Testing Status window.
You can search for students on the Testing Status window by Last Name, Status, or Status by Module.
Enter your search criteria or select from the drop-down menus. Click Filter to display the results or Clear to clear your selections.

Page 81
Test Management Menu
Viewing and Exporting Test Session Status Details (cont.)
4. To export one or more test session statuses to a spreadsheet file (.xls) that you can save, view, edit, or print, check the Select checkbox next to each test session status you want to export and click the Export to Excel button.

Page 82
Test Management Menu
Copying a Test SessionYou can use an existing test session as a template to create a new test session. For example, assume that the students in a class originally were going to perform Geometry testing online. Now, they are going to do Algebra testing online. You can make a copy of the Geometry test session and edit it to create the new Algebra test session.
To copy a test session, do the following:
1. Click Manage Test Sessions from the Test Management menu and enter your search criteria.
2. Click the Show Sessions button to display the Testing Status window.
3. Click the Copy Session icon ( ) in the Action column for the test session that you want to copy.

Page 83
Test Management Menu
Copying a Test Session (cont.)
The Add Test Session window displays.
4. Enter a name for the session in the Session Name field.
5. Edit the required information to match your new session, and add or remove students if necessary.
6. Click Save to save your changes, Save & Add Another to save your changes and add another student, or Cancel to cancel your changes..

Page 84
Test Management Menu
Printing Test Tickets and RostersYou can print test tickets for the students in a test session. You can print all of the tickets for all of the students in a session, or you can select specific students and print their tickets. You must have a student test ticket for each assessment.
To print test tickets for the students in a test session, do the following:
1. Click Manage Test Sessions from the Test Management menu and select your search criteria.
2. Click the Show Sessions button. From the Sessions tab you can print all of the tickets in the test session or selected tickets.
To print all of the tickets for the test, session, click the Print All icon ( ) in the Action column for the test session you want to print tickets for. A Portable Document Format (PDF) version of the Student Test Session Ticket displays that you can view, save, and print.
You can search for students on the Testing Status window by Last Name, Status, or Status by Module.
Enter your search criteria or select from the drop-down menus. Click Filter to display the results or Clear to clear your selections.
To print selected test tickets, click the Edit/Print Ticket Status icon ( ) in the Action column for the test session you want. In the Testing Status window, select one or more students by clicking the checkbox next to their name in the Select column. Then, click the Print Selected button.

Page 85
Test Management Menu
Uploading Multiple Test Sessions to the PortalFrom the Test Sessions window, you can upload a file containing multiple test sessions to DRC. The filemust be in comma-separated value (.csv) format (a file format used by Microsoft Excel) and the fields in thefile must be in specific columns. The Test Sessions window contains links to both a PDF layout that containsinstructions and a sample template file that you can use to create the actual file.
To create and upload a test sessions file, do the following:
1. Click the Upload Multiple Test Sessions tab on the Test Sessions page and select your search criteria.
2. Click the Download the File Layout link to display the LATestSessionLayout.pdf file.
This file displays the required layout of the .csv file you will upload to DRC with rules, instructions, and examples describing how to create and format the file.

Page 86
Test Management Menu
4. Use the LASampleTestSessionFile.csv file to create and save a test session file to upload.
Note: Be sure to keep the header column rows in the file you upload.
3. Click the Sample File link to download or display the LASampleTestSessionFile.csv file.
Note: This file is only a sample of the type of file you will upload to DRC.
Depending on the browser you are using, a dialog box may appear for you to use to open or download the file.
Uploading Multiple Test Sessions to the Portal (cont.)

Page 87
Test Management Menu
Uploading Multiple Test Sessions to the Portal (cont.)
5. After you have created a test sessions file, click Browse to locate it, select the file you created, and click Open to display it in the File field of the Upload Multiple Test Sessions tab.
6. Click Upload. A message displays indicating the file has been transferred and is being checked for errors. After the file has been validated, you can review its status.
• If the file contains errors, an error report detailing the errors will be available for you to review. You must correct the errors and repeat steps 5 and 6.
• If the file does not contain errors, a system message displays indicating that the file has been accepted.

Page 88
Test Management Menu
Unlike non-summative test tickets, summative test tickets lock at midnight. For summative assessments/tickets only: a student’s test ticket must be unlocked in the following situations:
• A student exited the test by using the End Test function in INSIGHT. If either the Test Administrator or the student needs to log back into the test, the student’s test ticket must be unlocked. When the student logs in after the ticket is unlocked, the student can use the login informa-tion from the original test ticket.
• Either the student exited the test by using the Pause/Exit function, or the student was inactive on the system for more than twenty minutes. The student can log in using the original login information and the test ticket does not need to be unlocked.
- If this happened on the same day as the student’s first login, the student can log in using the original login information and the test ticket does not need to be unlocked.
- If this happened the day after the student’s first login, the student’s test ticket must be unlocked. After it is unlocked, the student can log in using the original login information from the previous day.
In all of these situations, INSIGHT saves the student’s data.
Note: Special permissions are required to unlock a test ticket.
n Unlocking a Student’s Test Ticket

Page 89
Test Management Menu
Unlocking a Student’s Test Ticket (cont.)
To unlock one or more test tickets, do the following:
1. Click the Manage Test Sessions from the Test Management menu and enter your search criteria.
2. Click the Show Sessions button.
3. Click the Edit/Print Ticket Status icon ( ) in the Action column for the student’s test session. The Testing Status window displays.
4. Click the Unlock icon ( ) for the student whose ticket you want to unlock.
• To unlock more than one student ticket, check the checkbox in the select column for each student and click the Unlocked Selected button.
• To unlock all of the student tickets, click the Unlock All button—you do not need to select any students.

Page 90
Test Management Menu
Invalidating a Student’s Test TicketYou can invalidate a test ticket, which invalidates the student’s test. The student cannot continue testing and cannot be given a new test ticket, but all student data is saved. Typically, you invalidate a test ticket when a testing irregularity occurs and the student’s score is no longer valid. Note: If you have questions regarding invalidation, call LDOE at 1-844-268-7320.
To unlock one or more test tickets, do the following:
1. Click the Manage Test Sessions from the Test Management menu and enter your search criteria.
2. Click the Show Sessions button.
3. Click the Edit/Print Ticket Status icon ( ) in the Action column for the student’s test session. The Testing Status window displays.
4. Click the Invalidate icon ( ) for the student you want to invalidate.
5. When the Confirm Invalidate dialog box displays, click Invalidate to invalidate the student’s test ticket or Cancel to cancel the process.

Page 91
Test Management Menu
Ending Incomplete TestsFor LEAP Practice Test and Diagnostic / Interim assessments only, you can use the End Incomplete Test option when a student is not going to complete a part or a session of a multi-part assessment or test. For example: When the students needs to complete only 1 of 2 parts of a test, you can end the test for the part the student will not complete and force a status of “complete” even though certain parts of a test were not administered or taken.
1. To end an incomplete test, click the Edit/Print Ticket Status icon ( ) from the Session Detail window in the Action column for the test session. The details for the test session you selected display in the Testing Status window.
2. You can search for students on the Testing Status window by Last Name, Status, or Status by Module. Enter your search criteria or select from the drop-down menus. Click Filter to display the results or Clear to clear your selections.

Page 92
Test Management Menu
Ending Incomplete Tests (cont.)
3. Click the End Incomplete Tests icon ( ) for the student. A confirmation dialog box displays.
4. Click End Incomplete Test to force the test status to Complete. Click Cancel to cancel the action.

Page 93
Test Administrator Management System

Page 94
Test Administrator System
The Portal Test Administrator System is managed through the Portal Test Administrator Management functionality. In the Portal, for non-summative assessments consider “teacher” to be synonymous with “Test Administrator.” The “teacher” role requires a Test Administrator number to manage Student Groups.
Before testing, the School Test Coordinator will assign each Test Administrator a three-digit Test Administrator number. The Test Administrator System allows School Test Coordinators to upload Test Administrators’ names and assigned three-digit numbers for any tests they administer—LEAP 2025, and so forth, including both paper-based tests (PBT) and computer-based tests (CBT).
• For PBT, after the names and assigned numbers have been uploaded to the Portal, Test Administrators will instruct students to bubble that number on the answer document or consumable test booklet for the test(s) they are taking.
• For CBT, after the names and assigned numbers have been uploaded to the Portal, a Test Administrator must be selected and assigned to all Test Sessions upon Test Session creation.
This section describes how to use the Test Administrator System.
n Test Administrator Management System Overview

Page 95
Test Administrator System
The Test Administrator Management OptionUsing the Test Administrator Management option of the All Applications menu bar, School Test Coordinators can upload the names and three-digit numbers for Test Administrators.
Click Test Administrator Management to display the Manage Test Administrators page.

Page 96
Test Administrator System
Editing a Test Administrator’s Information
You can view or edit a Test Administrator’s information from the Edit Test Administrator window.
4. The Edit Test Administrator window displays. Use the window to edit the information.
5. Click Save to save your changes or Cancel to cancel your changes.
To view or edit a Test Administrator’s information, do the following:
1. Click Test Administrator Management on the All Applications menu bar and enter your search criteria, for example, the Test Administrator’s first and last name and TA number.
2. Click the Find Test Administrators button.
3. Click the View/Edit icon ( ) in the Action column for the Test Administrator whose information you want to edit.

Page 97
Test Administrator System
Adding a Test Administrator to the Portal
There are two ways to add Test Administrators to the Portal: add a single Test Administrator, or upload multiple Test Administrator records at once. Follow the steps below to add a single Test Administrator.
To add a Test Administrator to the Portal, do the following:
1. Select an administration, district, and school from the Manage Test Administrators page, and click Add Test Administrator at the bottom of the page to display the Add Test Administrator window.
2. Enter or select the necessary information in the Add Test Administrator window to add the Test Administrator.
3. When you are finished, click Save to save your information and end the process, Save & Add Another to save your information and continue the process to add another Test Administrator, or Cancel to cancel the process without saving your information.

Page 98
Student Group Management Menu

Page 99
Student Group Management Menu
Student Group Management Menu
n Introduction Student groups are created to associate students and teachers within the Portal. Through this association, teachers can quickly access their students’ information, testing status, and Interactive Reports. Any teacher participating in the LEAP 360 - Diagnostic/Interim assessments should create student groups for their students.
Test Administrators/Teachers must be added to the Portal via Test Administrator Management menu before student groups can be created.
Note: The person who adds users to the Portal (via the User Management menu) should be the same person to add Test Administrators/Teachers to the Portal to ensure the user and test administrator information is in synch.
In the Portal, for Diagnostic/Interim assessments consider “teacher” to be synonymous with “test administrator.”
From the Student Group Management option, the Portal users can search for students and perform the following tasks:
• Work with student groups
• Add a student group
• Upload multiple student groups
• Edit student group information
• Create a test session from a student group
• Reassign a test administrator to multiple student groups

Page 100
Student Group Management Menu
Work with Student GroupsUsing the Student Group Management menu, you can search for student groups, view the test sessions in which a student is currently enrolled, and view the status of the session. You also can edit and delete student groups.
1. Click Student Group Management to display the Manage Student Groups page.

Page 101
Student Group Management Menu
Work with Student Groups (cont.)
2. To search for one or more student groups, use the various drop-down menus and fields to enter search criteria and click Find Student Groups.

Page 102
Student Group Management Menu
Work with Student Groups (cont.)Using the icons in the Action column you can edit or delete a student group.
Click the Delete icon ( ) to delete a student group.
3. Click the View/Edit icon ( ) in the Action column for the student group whose information you want to edit. The Edit Student Group window displays. For details about how to use the Edit Student window, see “Editing Student Group Information” on page 108 for more information.

Page 103
Student Group Management Menu
Add a Student GroupStudent groups should be named such that other users of the system can clearly distinguish one student group from another. The combination of the group name and the test administrator must be unique to the administration, district, and school selected.
Student Group Name Recommendation: <Subject> <Class Name> or <Subject> <Room Number>Examples: Math Grade 6 Period 1 or Math Grade 6 Room 456
1. On the Manage Student Groups page, click Add Student Group. The Add Student Group page displays.

Page 104
Student Group Management Menu
Add a Student Group (cont.)
2. Enter a Group Name for the student group.
4. Enter search criteria and click Find Students. The students that meet your criteria display in the Available Students column.
5. Select a student and double-click to edit the student’s information, or use the Add Selected ( ), Remove Selected ( ), Add All ( ), and Remove All ( ) icons with the Available Students and Students in Session lists to select one or more students to remove or add.
Note: To select multiple students in sequence, press the Shift key, select the students, and click the mouse button. To select multiple students not in sequence, press the Ctrl key, select the students, and click the mouse button.
6. Click Save to save your changes or Cancel to cancel them.
Click New Student to display the Add Student page, which you use to add students to the Portal. After adding the student you then can add the student to a student group.
3. Select a new test administrator (TA) from the dropdown menu or click Add to add a TA to the Portal, then select the TA for the student group.

Page 105
Student Group Management Menu
Uploading Multiple Student Groups to the PortalTo upload multiple student group records at once, you can upload a file containing student group information to the Portal. The file must be in the comma-separated value (.csv) format and the fields in the file must be in specific columns.
1. Click Student Group Management to display the Manage Student Groups page. Select the Upload Student Groups tab.
2. The Upload Student Groups tab contains links to both a sample PDF file that contains instructions and a sample .csv file that you can use to create the actual file.
Click the Download the File Layout link to display the StudentGroupsFileLayout.pdf file.
This file displays the required layout of the .csv file you will upload to DRC with rules, instructions, and examples describing how to create and format the file.

Page 106
Student Group Management Menu
Uploading Multiple Student Groups to the Portal (cont.)
4. Use the SampleStudentGroupsFile.csv file to create, rename, and save a student group file to upload.
Note: Be sure to keep the header column rows in the file you upload.
3. Click the Sample File link to download or display the SampleStudentGroupsFile.csv file.
This file is only a sample of the type of file you will upload to DRC.
Depending on the browser you are using, a dialog box may appear for you to use to open or download the file.

Page 107
Student Group Management Menu
Uploading Multiple Student Groups to the Portal (cont.)
5. After you have created a students file, click Browse... to locate it, select the file, and click Open to display it in the File field of the Upload Student Groups tab.
6. Click Upload. A message displays indicating the file has been transferred and is being checked for errors.
After the file has been validated, you can review its status. If the file contains errors, you must correct them and repeat Steps 5 and 6.

Page 108
Student Group Management Menu
Editing Student Group InformationThe Edit Student Group window allows you to edit student group details and add or remove students from a group. You also can select (or add then select) a test administrator for a group. When your changes are complete, you can save them or save them and add the group to a test session.
Click Save to save your changes or Cancel to cancel your changes.
You can select a new test administrator (TA) from the dropdown menu or click Add to add a TA to the Portal, then select the TA for the student group.
You can search for and add available students to the student group.
You can add students to the Portal, and then add them to student groups.
Click Save & Add to Session to save your changes to the group and then add a test session.

Page 109
Student Group Management Menu
Create a Test Session from a Student GroupYou can create test session for a student group using the Add Test Session page.
1. On the Manage Student Groups page, in the Action column, click the Add to Session ( ) icon. The Add Test Session page displays.2. Enter a Session Name for the
test session and other details. Fields with a red asterisk (*) are required.
3. The students in the selected student group display in the Available Students column.
4. Use the Add Selected ( ), Remove Selected ( ), Add All ( ), and Remove All ( ) icons with the Available Students and Students in Session lists to select one or more students to remove or add.
5. Click Save to save your changes or click Save & Add Another to save your changes and create another test session for the select student group. Click Cancel to cancel your changes.

Page 110
Student Group Management Menu
Reassign a Test Administrator to Multiple Student GroupsYou can perform this procedure any time a new test administrator needs to be assigned to existing student groups.
1. On the Manage Student Groups page, select the student groups to reassign and click Reassign Group.
2. On the Assign Teacher to Student Groups dialog, select the test administrator for the selected student groups and click Assign.

Page 111
Test Administrator System
Uploading Multiple Test Administrators to the Portal
To upload multiple Test Administrator names and numbers at once, you can upload a file containing test administrator information to the Portal. The file must be in the comma-separated value (.csv) format used by Microsoft Excel and the fields in the file must be in specific columns. After a file is uploaded successfully, the Test Administrators will automatically be added to the Portal.
2. The Upload Multiple Test Administrators tab contains links to both a sample PDF file that contains instructions and a sample .csv file that you can use to create the actual file.
Click the Download the File Layout link to display the Louisiana Upload Multiple Test Administrators File Layout.pdf file.
This file displays the required layout of the .csv file that you will upload to DRC with rules, instructions, and examples describing how to create and format the file.
To create and upload a test administrator file, do the following:
1. Click Test Administrator Management to display the Manage Test Administrators page. Select the Upload Multiple Test Administrators tab.

Page 112
Test Administrator System
Uploading Multiple Test Administrators to the Portal (cont.)
4. Use the sample .csv file to create, rename, and save a test administrator file to upload.
Note: Be sure to keep the header column rows in the file you upload.
3. Click the Sample File link to download or display the sample .csv file. This file is only a sample of the type of file you will upload to DRC.
Depending on the browser you are using, a dialog box may appear for you to use to open or download the file.

Page 113
Test Administrator System
Uploading Multiple Test Administrators to the Portal (cont.)
5. After you have created a test administrator file, click Browse to locate it, select the file, and click Open to display it in the File field of the Upload Multiple Test Administrators tab.
6. Click Upload. A message displays indicating the file has been transferred and is being checked for errors.
After the file has been validated, you can review its status. If the file contains errors, you must correct them and repeat Steps 5 and 6.

Page 114
Educator Scoring

Page 115
Educator Scoring
Educator Scoring is used with the Diagnostic, Interim, and LEAP Practice Test administrations.
Students’ written responses to constructed response questions must be scored by Test Administrators using the Educator Scoring application. Although it is a separate application, Educator Scoring is accessed directly from the Portal.
This section outlines how Test Administrators display student test statuses, print student responses, and access Educator Scoring. Finally, this section describes how users score tests using the Educator Scoring application and how to reset scores.
Prior to / during testing, the scoring icons in Educator Scoring are disabled. When students complete sections of a test and their responses (at the test session or student level) are ready to be scored, the Score Session or Score Student icons are enabled.
These are the Portal permissions needed to use Educator Scoring, student response batch printing, and scoring reset functions:
• Educator Scoring
• Educator Scoring - Export/Print Student Responses
• Educator Scoring - Score Reset
Portal Administrators can refer to the User Management Menu section, earlier in this guide, for instructions on how to assign user permission.
Test Administrators have the option to batch print student responses and hand score them on paper prior to entering the scores in Educator Scoring. Note: Student responses are not available to print after scores are entered in Educator Scoring.
After scoring responses in Educator Scoring, users have the option to reset the score for select questions, perhaps based on new information, and re-score the question based on updated information.
n Introduction
n What’s in This Section?
n Print Student Responses
n Scoring Icons Enabled When Responses are Ready to Score
n Portal Permissions for Educator Scoring
n Reset Student Scores

Page 116
Educator Scoring
The following are general notes about using the Educator Scoring application:
• A scoring session is directly associated with the test session. A scoring session may include up to 100 student responses. If a session has over 100 responses, once the 100th response has been scored, the previous student responses are not available to the scorer. When unavailable, student responses cannot be edited or printed.
• While scoring students one at a time, you can open multiple tabs of Educator Scoring and access multiple student responses at the same time.
• You can toggle between the Test Session status information (in the Portal) and the scoring work-flow in Educator Scoring to check how many students remain to be scored.
• Most test responses are available in Educator Scoring within two hours of the student completing the test.
• Scoring is to be completed using a computer or laptop with Chrome or Internet Explorer 11 installed.
• DRC INSIGHT does not need to be installed on the machine used for scoring.
• The ability to print student responses is available to users when scoring activity is live.
• Numeric (lithocode) identifiers are used instead of names in Educator Scoring to facilitate anonymous and objective response scoring. Educators can associate a student’s name with their responses if desired. If you want to associate a student’s responses with the student, instruct the student to begin all essay responses with their name. Student names and numeric (lithocode) identifiers are present on the Batch print files to assist with correctly transcribing scores.
• Several tools in Educator Scoring, such as the Note and Highlighter tools, allow the Educator to provide comments and other notations for the student.
• To provide a student with a copy of their online test response with scoring annotations, use the export to PDF tool prior to submitting the score. Once the score has been submitted, the response and scoring feedback is not available in the scoring system. Scores do not print, but can be annotated on the response.
• Once you export the PDF of the student’s responses, you can save the file.
n Working With Student Responses in Educator Scoring
n Providing Feedback in Educator Scoring
n General Notes about Educator Scoring

Page 117
Educator Scoring
If necessary, Test Administrators can reset the score for select questions to blank and later re-score the question. Here are a few sample situations where resetting a score may apply:
• A Test Administrator made a mistake while scoring and they want to reset one or more questions so they can re-score them correctly.
• After scoring, a Test Administrator wants to align a score with other Test Administrators based on new information. For example, a Test Administrator finished scoring and then met with a school user group and realized their scores were too generous or strict, and they need to reset scores to align with other scorers.
• To correct scores that were incorrectly transferred from hand scoring on paper to Educator Scoring.
Miscellaneous notes about resetting item scores in Educator Scoring:
• Resetting a score in Educator Scoring does not affect student responses; it temporarily sets the question score (for all associated items/parts of the question) to blank so the question can be re-scored.
• After re-scoring, the previous score(s) cannot be recovered. If a score was reset by mistake, the question must be rescored.
• After re-scoring, new score reports are generated for the next regular report cycle.
• If a score is reset and the question is not rescored, the score reports displays a blank and the report will remain available (into the next reporting cycle, if necessary) until all reset questions are re-scored. Therefore, promptly re-score all questions, wait until the system registers the reset scores, and then you can display score reports that reflect the re-scored questions.
• All score reset activity is logged by user / scorer ID and is available from DRC Customer Service upon request.
n Introduction to Score Reset

Page 118
Educator Scoring
View Test StatusesThe Educator Scoring menu option in the Portal allows Test Administrators to display testing status data and access the Educator Scoring application to score the constructed response answers (by content area) for their students.
Note: When you display test sessions on the Educator Scoring window, you see all sessions for the selected school. However, to help Test Administrators find their own sessions, STCs create sessions using the Test Administrator name and session details as the test session name. For example: Sue Smith_Grade 3_ELA. As shown below, you can enter your name in the Session field to display only your test sessions. For information on creating test sessions, see “Creating a Test Session” on page 74. Test Administrators should contact their STC if they want the Test Session - Add Edit permission, which allows users to add, edit, delete, and name their own test sessions.
2. To determine the testing status of a student or test session, select an administration, district, and content area (required). Enter your name in the Session field then click Show Sessions. Your test sessions, if any, display in the Session Details section.
1. Click Educator Scoring. The Educator Scoring page displays.
Be sure to enter a name here to display only test sessions for that Test Administrator.
Select the checkbox to display all test sessions regardless of testing status.

Page 119
Educator Scoring
View Test Statuses (cont.)3. Check the status of the test session and decide how to proceed. Statuses are as follows:
Not Started: At least one student has not completed any session of a test.
In Progress: At least one student has not completed all sessions of a test.
Complete: All students in the session have completed all parts of the test.
4. To display the status for individual students, in the Action column, when enabled click the Show Students icon ( ). The Scoring Status window displays (shown on the following page).
The Item Counts column displays the status of items (tests) in Educator Scoring as follows:
Available: Number of items that have not been scored.
In Progress: Number of student responses with scores submitted that are being processed. It may take up to 15 minutes for the status to be set to Complete.
Complete: Number of student responses that have been scored and have passed the DRC internal checks. It may take up to 2 hours from when a response is set to Complete to when the scores are available in the reporting system. See Step 4 to display which students, if any, have completed the test.
When enabled, you can click the Score Session icon ( ) to sign in to Educator Scoring to begin scoring. For more information, see “General Notes about Educator Scoring” on page 116.

Page 120
Educator Scoring
View Test Statuses (cont.)The Scoring Status window displays testing statuses for individual students.
6. Click Close to return to the Educator Scoring window.
5. On the Scoring Status window, check the status of each student in the Item Counts column.
Note: If you are returning to this window from the Educator Scoring application, click Refresh to update the Item Counts data.
When enabled, you can click the Score Student icon ( ) to sign in to Educator Scoring to begin scoring. For more information, see “General Notes about Educator Scoring” on page 116.

Page 121
Educator Scoring
Print Student ResponsesWhen testing is complete, you can batch print student responses at the session level, or student level, and hand score them before entering the scores in Educator Scoring. Note: You can print student responses while scoring them in Educator Scoring, but not after you submit scores.
1. Select an administration, district, and content area (required). Enter your name in the Session field then click Show Sessions. Your test sessions, if any, display in the Session Details section.
2. To print all responses for all students in a test session, in the Action column click the Print Student Responses icon ( ). A PDF report of the selected responses displays. Click the Print icon to print the report / responses.
3. To print responses for specific students in a test session, in the Action column click the Show Students icon ( ). The Scoring Status window displays.
4. In the Action column for the selected student, click the Print Student Responses icon ( ). A PDF report of the student’s responses displays. Click the Print icon to print the report / responses.

Page 122
Educator Scoring
Scoring Tests in Educator ScoringWhen the Score Session or Score Student icons are enabled, you can score student responses for a session or student in Educator Scoring. Note: Printing student responses is not available after you submit score in Educator Scoring: Print responses prior to scoring or submitting scores. For more information, see “Print Student Responses” on page 121.
Important: Prior to using the Educator Scoring application, Test Administrators should retrieve the scoring rubrics in the answer key documents on the Practice Test web page or from the Portal, where the answer keys are available in the Teacher Study guides found under General Information > Documents.
1. Select an administration, district, and content area (required). Enter your name in the Session field then click Show Sessions. Your test sessions, if any, display in the Session Details section.
3. To score responses for specific students in a test session, in the Action column click the Show Students icon ( ). The Scoring Status window displays.
2. To score all students in a test session, in the Action column, when enabled click the Score Session icon ( ). You will be signed in to Educator Scoring to begin scoring.
4. To score one student’s responses, in the Action column, when enabled click the Score Student icon ( ). You will be signed in to Educator Scoring to begin scoring.

Page 123
Educator Scoring
Scoring Tests in Educator Scoring (cont.)
7. To end the scoring session, click Exit Scoring. The system asks whether you want to log out:
• If you select No, your session pauses and you can resume the same scoring session (within 30 minutes).
• If you select Yes, your session ends, and the scores are submitted so that student reports may be produced.
Important: The system times out (you are automatically logged out) after 30 minutes of inactivity. After you log out (and after system time out), Educator Scoring will not allow you to review your submitted responses.
5. Evaluate the student’s responses and select the appropriate score. Click the Print icon to print the test, if desired.
6. Click Submit. The next student’s responses display automatically. After you have scored all available responses for the test session, Educator Scoring prompts you to log out of the working session.

Page 124
Educator Scoring
Reset ScoresFollow this procedure to reset scores entered in Educator Scoring. First you select the test session or specific students, then you select the questions for which to reset the score. After re-setting the scores, all reset questions must be re-scored in Educator Scoring.
1. Select an administration, district, and content area (required). Enter your name in the Session field then click Show Sessions. Your test sessions, if any, display in the Session Details section.
3. To reset scores for specific students in a test session, in the Action column click the Show Students icon ( ). The Scoring Status window displays.
4. Click the Score Reset icon ( ) for a student. The Score Reset window (shown on the following page) displays.
2. To reset scores for all students in a test session, in the Action column click the Score Reset icon ( ). The Score Reset window (shown on the following page) displays.

Page 125
Educator Scoring
Reset Scores (cont.)
5. Select the question(s) for which you want to reset the score and click Score Reset. The Confirm Score Reset dialog displays.
6. Click Reset to reset the score for the selected questions. Click Cancel to cancel the reset.
Note: Each question with a reset score must be re-scored in Educator Scoring.

Page 126
Report Delivery Menu

Page 127
Report Delivery Menu
IntroductionFrom the Report Delivery menu, Portal users can access online testing statistics, status reports and other reports.
Click Report Delivery to display the Report Delivery options.
Select Status Reports from the Report Delivery menu to display status reports that track testing activity for a test administration in a particular district and school.
Select Online Testing Statistics to display online testing statistics and information for a selected assessment.
Select View Reports from the Report Delivery menu to display reports by administration, district, school, and report name.
Select Student Reports from the Report Delivery menu to display score reports for a particular student.

Page 128
Report Delivery Menu
Online Testing StatisticsPortal users can display testing statistics for the entire test period up to the previous day, or statistics for the previous day, sorted by student and grade, or by district and date.
1. Select Online Testing Statistics from the Report Delivery menu to display the Online Testing Statistics page.
3. Select Student/Grade to view reports sorted by student and grade, or District/Date to view reports sorted by district and date.
Click Export to display the statistics in .csv format.
2. Select an administration.3. Select and administration then select
Cumulative to view reports for the entire testing period up to the previous day or select Yesterday to view reports for the previous day.

Page 129
Report Delivery Menu
Status ReportsPortal users can use status reports to track testing activity for a test administration in a particular district and school. During testing, these reports are updated daily at the end of each testing day.
1. Select Status Reports from the Report Delivery menu to display the Status Reports page.
3. When the Status Reports page displays, in the Action column click the report icon ( ) next to the report you want to display.
2. Select an administration and district.

Page 130
Report Delivery Menu
Student ReportsPortal users can display testing scores for students and save the results in Portable Document Format (PDF).
1. Click Student Reports to display the Student Reports page.
2. Specify an administration, district, school, and report. You can complete other fields on the window, if needed. Click Find Students.
3. From the search results, you can select one or more students. Click Open Selected to open the reports for the selected students.
Click Save Selected to save the reports for the selected students in .pdf format.

Page 131
Report Delivery Menu
View ReportsPortal users can display reports by administration, district, school, and report name.
1. Click View Reports from the Report Delivery menu to display the View Reports page.
2. Specify an administration, district, school and report from the drop-down menus and click Show Reports.
3. The reports that match your selection criteria display at the bottom of the window. In the Action column, click the Open PDF icon ( ) to display the report in PDF format. Click the Save PDF ( ) icon to save the report to your system. Click the Delete ( ) icon to delete the report from the Portal.
Click the Download Reports button to download a .zip file that includes all reports displayed on the window.

Page 132
Interactive Reporting

Page 133
Interactive Reporting
IntroductionDRC Interactive Reporting includes the Student History report, which includes the current and previousyear’s student test scores, and the Response Lookup report, which displays student testing and responsedata. The Report Viewer options include student-level and multi-level reports.
Interactive Reporting is used with following administrations: Diagnostic/Interim and EAGLE.
Select Response Lookup to display student responses from the current year’s administrations.
To access Interactive Reporting options, click Interactive Reporting.
Select Student History to display student test scores from the current year and previous year’s administrations.
The Dashboard tab displays the Interactive Reporting homepage and related messages.
Select Report Viewer to display student reports and multi-level reports by school and assessment.

Page 134
Interactive Reporting
Using Page FiltersInteractive Reporting uses dynamic filters. You can filter the information displayed on a page by one or more filters. As you add or remove filters, the information on the page updates accordingly. The filtering options you see depend on your Portal permissions. For example, under the Admin filter, the options are the Admins for which you have permission. The example below shows how to filter Response Lookup by Admin names.
These are the available filters.
Select the Response Lookup option, then click (Select) next to Admin to display the Admin filtering options.
Filtering options, which are based on your Portal permissions, display in alphabetical order.
You can click to select individual Admins or click Select all to filter by all Admins.
Click Clear all to remove all filtering options.
Enter all or part (at least 3 characters) of an Admin name. All matches display below the Search field.
You can choose to Include or Exclude the filtered options.
Show all possible values: When selected, you will you see every possible option in the system, regardless of filters.
Make sure this check box is not selected when you want to display only the options that match the existing filters.
Click Done to apply the filters to the display. Click Cancel to close the dialog box (without filters). When you return to Response Lookup, the selected filters display.Click Add values in bulk to create your
own filtering options. See the following page for more information.

Page 135
Interactive Reporting
Adding LASID Values in BulkIf you want to focus on a particular group of students, you can add student LASIDs and filter the Student History report and Response Lookup report by those LASIDs. You have to add the LASIDs separately for each report. You can manually enter or copy LASIDs from another source and paste them into the filter; either way, LASIDs must be separated by commas.
Select Student History or Response Lookup, then click the LASID filter.
Enter or paste the LASIDs (separated by a comma) into the box values box and click Done.
When the page re‑displays, it is filtered by the LASIDs you entered.

Page 136
Interactive Reporting
Using Data Column Sorting and FiltersYou can change the sort order of each column in a data table (one column at-a-time) and set filters at the data column level.
To sort a column in a data table, click the column head. The column heading displays an arrow to indicate the direction of the sort. Click the column head again to change the direction of the sort.
To remove a column sort (reset the data to the default sort criteria), click this arrow.
To filter column data, hover your cursor over the column heading until three dots display, click the dots to display the Filters dialog, then click Filter.
Select only the options that you want to display in the column, then click Done.

Page 137
Interactive Reporting
Student History ReportThe Student History report allows you to display student and test information from the current and previous year’s administrations. You must have permission for the current administration to display results from last year’s administration.
The information is displayed in 3 areas: Student History (displays students/student information based on the filters set for the report), Scores per Assessment (displays points possible/points earned per assessment), and Score Detail (displays assessment details, including percent correct, content area, objective, and testing date.
1. Select the Student History option. 2. Apply filters as needed.
3. In each section of the display, you can click to display a menu of download options for the information.
4. You can right-click a cell of information, such as a test score, and display options for that line, including the ability to copy the information to the clipboard.
You may need to scroll to the right or down to the bottom of the page to display all student information.

Page 138
Interactive Reporting
Response Lookup ReportThe Response Lookup report allows you to display student responses and other testing information from the current year’s administrations. The Response Lookup section displays test score data, such as Test Points Earned and Test Points Possible.
The Response Lookup Detail displays item type and item points detail, and allows you to display the student’s response and the correct item response. Teachers / Test Administrators can display responses for the students in their test sessions only. The filtered information can be downloaded in CSV, XLSX, and PDF formats.
1. Select the Response Lookup option. 2. Apply filters as needed.
3. In each section of the display, you can click to display a menu of download options for the information.
You need to scroll to the right or down to the bottom of the page to display all student information.

Page 139
Interactive Reporting
4. In the Response Lookup Detail section, scroll to the far right to display a student’s response to a test item. Either the student’s answer displays or a reference to the Details Link column displays.
Response Lookup Report (cont.)
6. Click Next to display the correct response. You can toggle back and forth between the student’s response and the correct response. Close the response browser window when you are finished.
5. Click the details link to display the student’s response for the item in a new browser window.

Page 140
Interactive Reporting
Report ViewerUse the Report Viewer option to display Student reports and Multi-Level reports on demand.
1. Click Interactive Reporting then click Report Viewer to display a report selector.
3. From the dropdown menu, select Student Reports or Multi Level Reports. Instructions for these reports are on the following pages.
2. Select Report Viewer to display a dropdown menu.

Page 141
Interactive Reporting
Student Reports
The Student report options include assessment-specific Response Map and Summary reports.
2. Enter a school name or code (at least 3 characters). Matching schools display in a drop-down list. Click to select a school from the list.
1. To display Student reports, select Report Viewer, then select Student Reports.

Page 142
Interactive Reporting
Student Reports (cont.)
3. Select a report from the Report dropdown menu.
4. After you select a report, you can enter selection criteria to narrow the list of students. Click Find Students.
If you want to search using a different school or selection criteria, click Clear to clear the information and return to Step 2.

Page 143
Interactive Reporting
Student Reports (cont.)
Students that match your search criteria displays at the bottom of the window. You can display or download a PDF of a student’s report. If you select multiple students, you can display of download a PDF report for all selected students.
5. To display a report for student, click the icon. The report is generated, then displays on a separate browser tab. You can use the save and/or print options on the browser as needed. To download a report for student, click the icon. The report is generated. If you are using the Google Chrome browser, the file displays at the bottom of the window. For other browsers, the file may display in the Downloads folder.
6. To display a report for multiple students, select the box for each student to include in the report and click Open Selected. The report is generated, then displays on a separate browser tab. You can use the save and/or print options on the browser as needed.
To download a report for multiple students, select the box for each student to include in the report and click Save Selected. The report is generated. If you are using the Google Chrome browser, the file displays at the bottom of the window. For other browsers, the file may display in the Downloads folder.

Page 144
Interactive Reporting
Multi-Level Reports
The Multi-Level report options include assessment-specific Test Session Response Map, Test Session Summary, Test Session Roster, School Summary, Test Session List, School List, and Data File reports.
1. To display Multi Level reports, select Report Viewer, then select Multi Level Reports.
2. Select a report.
3. Enter a school name or code (at least 3 characters). Matching schools display in a drop-down list. Click to select a school from the list.

Page 145
Interactive Reporting
Multi-Level Reports (cont.)
4. After you select a school, select an assessment. If you selected the Test Session Roster report, select a test session.
Note: After you select an assessment (and test session, if applicable), if there is data for the assessment/test session, the buttons at the bottom of the screen are enabled. If there buttons are not enabled (displayed in gray), there is no data for the report. You can select a different assessment or click the Clear button at the bottom of the window to select a different school and/or report.
5. To display the report, click View Report. The report is generated, then displays on a separate browser tab. You can use the save and/or print options on the browser as needed.
To download the report, click Save Report. The report is generated. If you are using the Google Chrome browser, the file displays at the bottom of the window. For other browsers, the file may display in the Downloads folder.

Page 146
Student Correction System

Page 147
Student Correction System
The Student Corrections process is designed to identify student demographic and test result records that could potentially contain errors and provide the opportunity for corrective action.
For example, if a district-school label was adhered to a booklet, but demographic information was not bubbled (or bubbled incorrectly), this information could be added or edited during Student Corrections.
Important: You must correct the data for all students flagged in the Student Records Correction System.
Normally, school-level users make the student corrections first. Then, district-level users review the corrections and approve them by clicking Complete (see page 152).
Important: It is strongly recommended that you retrieve the preliminary data file prior to starting the corrections process. The data file is used as a reference for the current record for the student. To retrieve the data file, in the Portal go to Report Delivery - View Reports and for Report Type select Data Files.
If the School Test Coordinator is not available to enter student corrections (because they are a nine-month employee, are on vacation, or for other reasons), either the District Test Coordinator, the school principal, or the principal’s designee can enter this information, whichever the district prefers. If necessary, the District Test Coordinator can issue a new user account to the school principal.
After the student corrections have been entered, the District Test Coordinator is responsible for reviewing the student corrections for each school in their district.
If you have questions or need assistance with the online Student Corrections process, please call (888)–718–4836, or email [email protected], or [email protected], or [email protected].
n Introduction

Page 148
Student Correction System
Correcting a Student’s RecordThis section describes the process of accessing and correcting a student’s record.
2. Select an administration from the drop-down menu (required). You also can select a school and grade to refine the search results.
3. Click Show Students. The Edit Students tab displays the students that match the search criteria.
To access and display students records that require updates in the Student Records Correction System, do the following:
1. From the All Applications menu, select Student Management, then select Student Correction System. The Student Records Correction System page displays.

Page 149
Student Correction System
Correcting a Student’s Record (cont.)
Important: In the search results, the Status column displays the status of the data correction for the student. The Correction Status filter default is Update Needed. As a school-level user updates and saves records, the status changes to Review Needed. After the District Test Coordinator reviews and approves the updates by selecting Complete, the status changes to Completed. Remember: You must correct the data for ALL students. By setting the status and filtering using Update Needed and/or Review Needed, you can see the amount of work remaining. Note: The status does not affect DRC’s acceptance of your data updates. At the close of the Student Records Correction System window, DRC will make any saved edits whether or not records are marked Completed. Keep in mind, these edits may affect the District Performance Score.
4. If needed, select additional filtering options from the Edit Students tab, including Correction Reason, Correction Status, Last Name, First Name, and LASID. Then, click Find Students to display your search results.
Note: Select All in the Correction Status field to see all correction statuses.

Page 150
Student Correction System
Correcting a Student’s Record (cont.)
5. Click the View and Edit Student icon ( ) in the Action column next to each student’s record to display the Edit Student window.
The Student Demographics and Test Results tabs for the selected student display in the Edit Student window.
Note: All hand‑coded paper‑based testers are automatically flagged for demographic review and/or updates under the Student Demographics tab. Not all hand-coded paper-based testers are assigned impending zeros. The students who are assigned impending zeros are flagged under the Test Results tab.

Page 151
Student Correction System
Correcting a Student’s Record—Student Demographics
XXYZZZAB Imaging
Important: If your district has not opted into DRC’s data-sharing agreement with LDOE, complete the following student information only: the first three characters of Last Name, the first character of First Name, LASID, Grade, and 01/DD/1900 for Birthdate (where DD is the student’s actual day of birth).
This screen shows an example of an error caused by the fact that the LASID captured by the Imaging System did not match the current LASID that will be used for reporting.
6. The demographic fields associated with a student display in the Student Demographics tab.
• All student demographic fields can be edited.
• Fields marked with a red asterisk (*) are required and must be filled in before a student record in Student Records Correction System can be marked Complete.
• The Reporting Value column includes the current value that will be included on reports, unless it is updated during Student Corrections.
• The Value column includes the original value, which is different from the Reporting Value.
• The Source column includes where the original value was captured.

Page 152
Student Correction System
Correcting a Student’s Record—Student Demographics (cont.)
ImagingXXYZZZAB
The District Test Coordinator clicks Complete to finalize the status of the student record.
At the close of the Student Records Correction System window, any saved changes are applied regardless of whether Complete was clicked. Use the Complete button to help track your work and to indicate records that require no further review.
Note: Both Save and Complete records may be edited before the end of the Student Records Correction System window, but the Save button must be used after each edit to update the information in the database.
Click Back to Student List to return to the previous Edit Student search results.
Note: Corrected student records are removed from the Student List if changes were made that no longer satisfy the criteria of the Edit Student filter options.
7. After you have entered your corrections, click the appropriate button at the bottom of the page, as shown below.
School-level users click Save to save changes for the District Test Coordinator to review.
When the Student Records Correction System window closes, the system will lock and saved edits will be submitted to DRC.

Page 153
Student Correction System
Correcting a Student’s Record—Test Results for Impending Zero
Table: Test Results Tab Column HeadingsColumn Head Description
Subject The subject for which the student was tested.
Testing Mode Indicates whether the test result comes from a paper or online record
Grade The grade cluster of the online test or the paper test booklet used
Lithocode
The lithocode is an 8-digit number located in the lower right corner of the answer document. Note: Students and associated lithocodes are on the data file in .csv format from the Report Delivery menu.
Accountability Refer to the Accountability Code documents (see page 154).
8. Select the Test Results tab to see a record of the test results for the student.
On the Test Results tab, you can add the Accountability Codes by content area for students with impending zeros.
Note: Use caution when adding Accountability Codes—adding these codes incorrectly may result in a student’s test score being incorrectly suppressed or reported. You must maintain documentation at the school / school system to support the use of the code.
The table below describes the column heading values for the Test Results tab.

Page 154
Student Correction System
Correcting a Student’s Record—Test Results for Impending Zero (cont.)
9. For a description of the Accountability Codes, from the Portal main menu select General Information–Documents.
Then, select an administration from the drop-down menu, Memos/Documents from the Document Type drop-down menu, and click Show Documents.
When the documents display, for all administrations, click the Open PDF icon ( ) or Save PDF icon ( ) for Accountability Codes for 2018–2019.

Page 155
Student Correction System
Status ReportThis topic describes the process of displaying a student correction status report to help determine the progress of student corrections within a district or school.
The status displays as a percentage amount complete, by school.
To display a student corrections status report, do the following:
1. Select Student Correction System from the Student Management menu. The Student Correction System page displays.
2. Select an administration from the Administration drop-down menu (required). District Test Coordinators also can select a school.
3. Click Show Students. The Edit Students and Status Reports tabs display. Select the Status Report tab.

Page 156
Notes

Data Recognition Corporation (DRC)13490 Bass Lake Road
Maple Grove, MN 55311
Service Line: 1-888-718-4836Email: [email protected]
Louisiana Portal Website: https://la.drcedirect.com Revision Date: August 27, 2019