DR-15-07 1 March 2015 Using Safe Software's FME ...
12
DR-15-07 1 March 2015 Using Safe Software’s FME Workbench to update a dataset hosted on Data.Austintexas.Gov DR-15-07; March 2015 Robert W Clayton Water Resource Evaluation Section City of Austin Watershed Protection Department Introduction The data portal (data.austintexas.gov) is a branded third-party solution to assist in providing City of Austin data in an electronically consumable format. The Water Quality Sampling Dataset is a simplified representation of the data stored in the Field Sampling Database (FSDB) and is the latest electronic distribution format. The data is a copy of the source, hosted on secure servers outside of the City of Austin network and as such becomes available to the app-development community, bloggers, scientists and the like with very little barrier and with a persistent “endpoint.” Filtered views can be established and charts and graphs which then may be easily embedded into other online documents. Data.Austintexas.Gov continues to evolve as the toolset is enhanced and subscriptions to additional modules are made available to city staff. The Old Way Initial dataset creation and quarterly updates were performed via a manual process that took about 3 hours. 1. Running a query on the FSDB (over 1,004,000 records and growing). 2. Exporting data to a .tsv or .csv file. 3. Running a Visual Basic script to split that file in half so that it could be ingestible. 4. In the data.austintexas.gov site with publisher privileges create a “Working Copy” of the existing dataset. 5. Start editing the working copy. 6. Launch the “Append and Replace Wizard.” 7. Choose “Replace.” 8. Load the first half file; confirm that fields mapped properly to their destinations. 9. Instruct the wizard to coerce the location field using the Latitude and Longitude values. 10. Run Load ... 11. Wait ... (keep that browser open ... just in case) ... and wait while it loads. 12. When complete, check the number of records in the working copy, ensure that it matches the first-half load file. 13. Launch the “Append and Replace Wizard” again. 14. Choose “Append.”
-
Upload
khangminh22 -
Category
Documents
-
view
1 -
download
0
Transcript of DR-15-07 1 March 2015 Using Safe Software's FME ...

DR-15-07 1 March 2015
Using Safe Software’s FME Workbench to update a dataset hosted on Data.Austintexas.Gov
DR-15-07; March 2015
Robert W Clayton
Water Resource Evaluation Section
City of Austin Watershed Protection Department
Introduction
The data portal (data.austintexas.gov) is a branded third-party solution to assist in providing City of
Austin data in an electronically consumable format. The Water Quality Sampling Dataset is a simplified
representation of the data stored in the Field Sampling Database (FSDB) and is the latest electronic
distribution format.
The data is a copy of the source, hosted on secure servers outside of the City of Austin network and as
such becomes available to the app-development community, bloggers, scientists and the like with very
little barrier and with a persistent “endpoint.” Filtered views can be established and charts and graphs
which then may be easily embedded into other online documents.
Data.Austintexas.Gov continues to evolve as the toolset is enhanced and subscriptions to additional
modules are made available to city staff.
The Old Way
Initial dataset creation and quarterly updates were performed via a manual process that took about 3
hours.
1. Running a query on the FSDB (over 1,004,000 records and growing).
2. Exporting data to a .tsv or .csv file.
3. Running a Visual Basic script to split that file in half so that it could be ingestible.
4. In the data.austintexas.gov site with publisher privileges create a “Working Copy” of the existing
dataset.
5. Start editing the working copy.
6. Launch the “Append and Replace Wizard.”
7. Choose “Replace.”
8. Load the first half file; confirm that fields mapped properly to their destinations.
9. Instruct the wizard to coerce the location field using the Latitude and Longitude values.
10. Run Load ...
11. Wait ... (keep that browser open ... just in case) ... and wait while it loads.
12. When complete, check the number of records in the working copy, ensure that it matches the
first-half load file.
13. Launch the “Append and Replace Wizard” again.
14. Choose “Append.”

DR-15-07 2 March 2015
15. Load the second half file; confirm that fields are mapped properly, location field is coerced, wait
... confirm.
16. Publish the working copy.
This process worked. It worked well. But it took focus throughout to ensure timely performance, a series
of resources had to be assembled and there was a good deal of institutional knowledge that needed to be
summoned at each update.
Potential Enhancement
The City of Austin has invested in the Feature Manipulation Engine (FME) suite produced by Safe
Software through their agreements with ESRI. The FME Workbench and Server products are key tools in
keeping track of our many “copies” of spatial and tabular data in various databases. There is a desktop
product (hands-on) and a server product (unattended). Desktop workbenches can be deployed on the
server platform.
The software consists of a modeling workspace, sets of “Readers” and “Writers” and “Transformers”
which can be piped together in a workflow (linear, parallel, multi-branched) and can log and pause along
the way. The tool is incredibly powerful and seemingly limitless. However, there is a steep learning
curve.
The recommendation is to use FME Desktop Workbench to enable push-of-a-button routinized workflows
for all publishing to Socrata for the Water Resources Evaluation section.
What is described in this document is a very modest transformation, but the pieces had to be put together
“just right” and as such – documentation is in order.
Preparation and Preconditions
The City of Austin Watershed Protection Department Field Sampling Database (FSDB) is in an Oracle
database (10g) with a pre-existing query to create nearly* the exact-same data format as is on Socrata.
This document assumes that you have already:
1. Installed FME Workbench 2015 64-bit.
2. Installed and configured the 64-bit Oracle Instant Client. << FmePedia was helpful getting this
right!
3. Successfully tested the 64-bit Oracle client using the 64-bit SQL-Plus client.
*Getting Location information mapped to the Location field in Socrata requires an FME Transformer
To proceed, you must have a Socrata account and the permissions to create and update datasets – if you
aren’t in the habit of creating datasets in Socrata, I suggest you take what you learn here and ask the
person you would call on to do that task to learn this FME way OR make some time to learn that manual
way referenced above first.
The New Way – SQL Query
Open FME Desktop and Start with a Blank Workspace
Click on the Blank Workspace and type “SqlCreator” and choose that text and hit enter.

DR-15-07 3 March 2015
Click on the Gear and you’ll get the Parameters dialog.
Change the transformer name to a useful label.
Leave the Coord. System set to “Unknown.”
In “Format” choose “More Formats” and filter the Reader Gallery to find the “Oracle Non-Spatial”
reader.
DR-15-07 4 March 2015
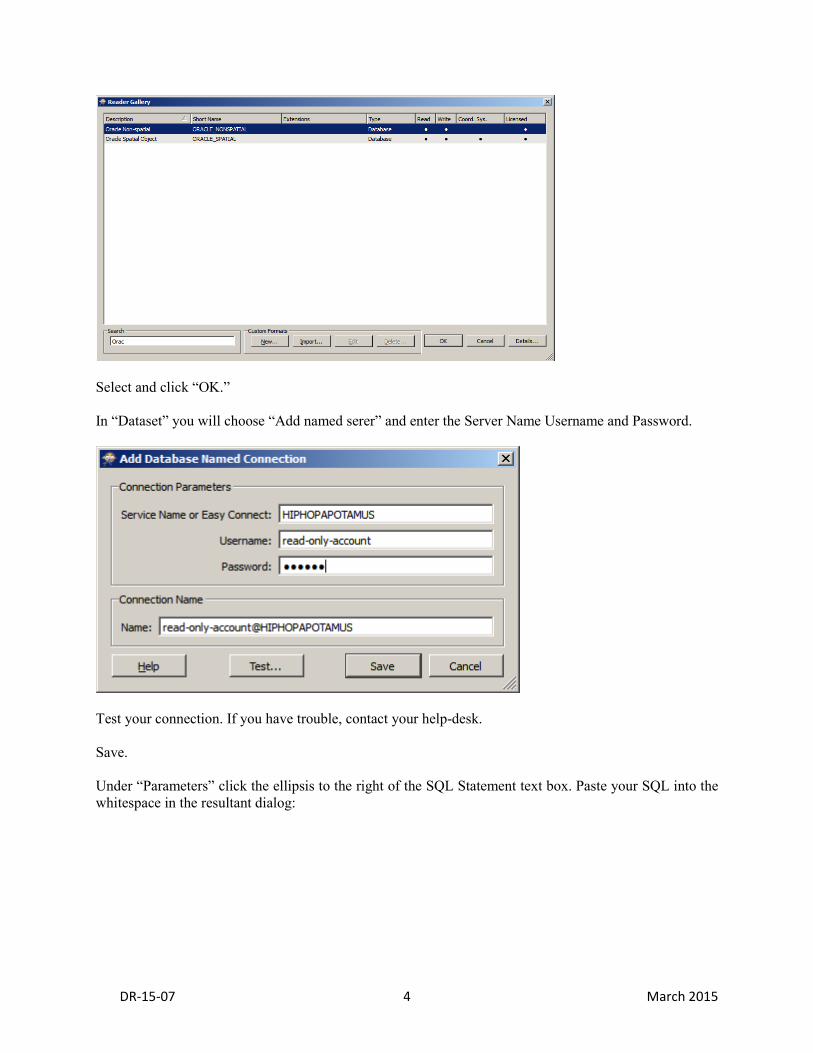
Select and click “OK.”
In “Dataset” you will choose “Add named serer” and enter the Server Name Username and Password.
Test your connection. If you have trouble, contact your help-desk.
Save.
Under “Parameters” click the ellipsis to the right of the SQL Statement text box. Paste your SQL into the
whitespace in the resultant dialog:

DR-15-07 5 March 2015
Click the ellipsis to the right of the “Attributes to Expose” box and choose “Populate from SQL Query”
and keep clicking OK.
-- query trimmed for clarity
–- does not function SELECT
W.NAME WATERSHED, replace(to_char(FV.visit_date,'YYYY-MM-
DD')||'T'||(ltrim(substr(to_char( FS.sample_time,'0999'),1,3)))||':'||substr(to_ch
ar(FS.sample_time,'0999'),4,2)||':00','99:99:00','00:00:00') SAMPLE_DATE,
SS.NAME SITE_NAME, ST.DESCRIPTION SITE_TYPE,
SM.DESCRIPTION MEDIUM, PT.DESCRIPTION PARAM_TYPE,
PA.DESCRIPTION PARAMETER, SR.QUALIFIER_CODE QUALIFIER,
SR.PARAM_VALUE RESULT ...
FROM
SAMPLE_RESULT SR, FIELD_SAMPLE FS,
FSDB_FIELD_VISIT FV, FSDB_PROJECT PR,
SAMPLE_SITE SS ...
WHERE PA.PARAM_TYPE_NO =
PT.PARAM_TYPE_NO AND PR.PROJECT_NO = FV.PROJECT_NO
AND SS.SITE_TYPE_NO = ST.SITE_TYPE_NO

DR-15-07 6 March 2015
Please note that the date-format for data going into Socrata is one of the most problematic data types to
properly transform. I recommend constructing your date coming out of your database to meet a format
like so:
YYYY-MM-DDTHH:MI:SS << Note the T in between the day and the Hour.
More information about Socrata datatypes can be found at: https://support.socrata.com/hc/en-
us/articles/202949918-Importing-Data-Types-and-You-
Your SQLCreator will now look something like this:
The New Way – Geometry
As described for the manual workflow of using the Append-And-Replace wizard, the Latitude and
Longitude fields are used to create the “Location” field in our Socrata dataset. You cannot put a text
representation of the location information into the Socrata writer and expect it to become a “Location”
field ... Location must be in the FME_GEOMETRY field – which won’t exist unless you are pulling from
a geospatial dataset. You must “populate” the geometry for each feature.
Click in the white space to the right of your query widget and start typing VertexCreator and choose it
from the list. You will get something like this:
Connect the output of the query widget to the input of the VertexCreator by clicking on the output arrow
from the query widget and dragging a line to the input on the VertexCreator like so:
DR-15-07 7 March 2015
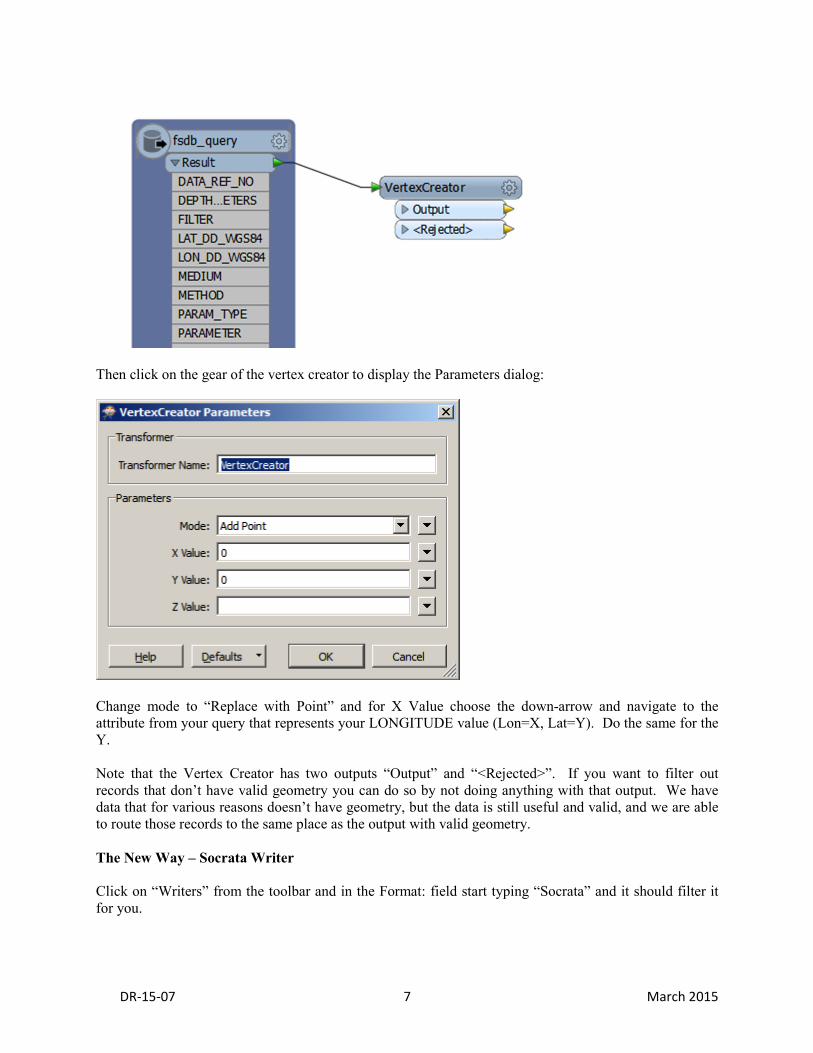
Then click on the gear of the vertex creator to display the Parameters dialog:
Change mode to “Replace with Point” and for X Value choose the down-arrow and navigate to the
attribute from your query that represents your LONGITUDE value (Lon=X, Lat=Y). Do the same for the
Y.
Note that the Vertex Creator has two outputs “Output” and “<Rejected>”. If you want to filter out
records that don’t have valid geometry you can do so by not doing anything with that output. We have
data that for various reasons doesn’t have geometry, but the data is still useful and valid, and we are able
to route those records to the same place as the output with valid geometry.
The New Way – Socrata Writer
Click on “Writers” from the toolbar and in the Format: field start typing “Socrata” and it should filter it
for you.

DR-15-07 8 March 2015
Set the “Coord. System” to “LL-WGS84.” Leave “Dataset Definition” to “Automatic.”
Click the “Parameters” button and fill in the key (valid) credentials:
Click OK.
Now join your outputs from Vertex Creator to the input for Socrata:

DR-15-07 9 March 2015
Click the “Gear” and make sure the “Dataset Name” field is set to the Socrata Name of your dataset. For
instance, this is the dataset name for the Water Quality Sampling Data dataset: “5tye-7ray”
FOR TESTING PURPOSES – I suggest you change the dataset name to a NON-EXISTING dataset that
you can update later. Call it anything. “testDataset” for instance ... and see where it shows up. Also, I

DR-15-07 10 March 2015
highly recommend using a very small subset of the data while you work out any kinks (add a date criteria
to your query, for instance).
Lastly, check your Format Parameters for the Socrata Writer.
If your dataset is already published and public, changing the first to fields to No will not make a “working
copy” ... it will still edit the production data. Keep that in mind.
Make sure the “Geometry Column Name(s):” field matches the name of the “location” column in your
dataset.
USE “UPSERT” on the Writer Mode.
At the outset, I recommend you set Truncate Dataset First to “Yes.” (I ran an UPSERT with this set to No
on a dataset with no primary key identified and got twice as many records as I needed). You may
significantly trim the workflow execution time by setting this to “No” IF you have a primary key or “Row
Identifier” for the dataset identified in Socrata http://dev.socrata.com/docs/row-identifiers.html. This
unveils the real power of this method – the Socrata Writer will take your query datablock, and save it to a
local .csv temp file and then download the Socrata data into a local datablock (file or memory, not sure)
and run a comparison, and pump out a script with the relevant updates, inserts and deletes.

DR-15-07 11 March 2015
Lastly ... get to know your Translation Log. It will be the most useful window. Click the little gear to the
right of the Translation Log window and choose “Log timestamp information” and “Log Debugging
Information”
Note that sometimes there will be errors “Bad News” in red that may not be fatal. So wait until the end
and see if you get “Successful” or “Failed.” If you have the verbose logging enabled you will get a lot of
information ... but the answer is in there.
Future Application
Any City of Austin dataset that is currently stored in Oracle or GIS that has a wider applicability to the
public can be instantiated and updated on Data.Austintexas.Gov. If the dataset is purely tabular, you can
skip the Vertex Creator step and go with the steps illustrated in the tutorial from the References section.
References
Safe Software: http://www.safe.com/
FME Desktop (aka FME Workbench) 2015 64-bit Windows: http://www.safe.com/fme/fme-desktop/
FmePedia Knowledge Base: http://fmepedia.safe.com/knowledgeoverview
Data.Austintexas.Gov: https://data.austintexas.gov/

DR-15-07 12 March 2015
Water Quality Sampling Data: https://data.austintexas.gov/Environmental/Water-Quality-Sampling-
Data/5tye-7ray
Using the Socrata Writer Tutorial: http://dev.socrata.com/publishers/examples/fme-socrata-writer.html
Socrata: http://www.socrata.com/