
Double Station Vice - Wixroyd
8
Double Station Vice ReLock 2 - with hard jaws 19756 wixroyd.com Created 2022-06-14 Material Body: 80000 PSI ductile cast iron. Sideways flame hardened to 40 HRc max. Carrier jaws: aluminium. Hard jaws: steel. Technical Notes Replacement parts available. Tips Supplied with actuation handle, hex key and wrench. Important Notes All dimensions are in inches. Order No. Vice size Set contents Max. clamp pressure lbs. Jaw capacity l 1 l 2 l 3 ±0,001 19756.W0004 4" Vice - 1 x 19752.W0004, Carrier jaws - 1 x 19796.W0403, Hard jaws - 1 x 19892.W0401 6000 3,00 to 16,00 16,0 9 10 19756.W0006 6" Vice - 1 x 19752.W0006, Carrier jaws - 1 x 19796.W0603, Hard jaws - 1 x 19892.W0601 12000 4,00 to 20,50 20,5 12 10 19756.W0008 8" Vice - 1 x 19752.W0008, Carrier jaws - 1 x 19796.W0803, Hard jaws - 1 x 19892.W0801 16000 6,00 to 28,50 28,5 16 14 Order No. l 4 w 1 +0,00 0 -0,002 w 2 ±0,03 w 3 h 1 ±0,0005 h 2 h 3 d 1 d 2 d 3 19756.W0004 0,190 4 3 3 2,50 0,375 0,50 0,501 0,56 5/16-18 19756.W0006 0,250 6 5 4 3,25 0,562 0,75 0,501 0,63 3/8-16 19756.W0008 0,312 8 6 6 4,00 0,652 0,75 0,751 0,90 1/2-13
-
Upload
khangminh22 -
Category
Documents
-
view
1 -
download
0
Transcript of Double Station Vice - Wixroyd

Double Station ViceReLock 2 - with hard jaws
19756
wixroyd.comCreated 2022-06-14
Material
Body: 80000 PSI ductile cast iron.
Sideways flame hardened to 40 HRc
max.
Carrier jaws: aluminium.
Hard jaws: steel.
Technical Notes
Replacement parts available.
Tips
Supplied with actuation handle, hex
key and wrench.
Important Notes
All dimensions are in inches.
Order No.Vice
sizeSet contents
Max.
clamp
pressure
lbs.
Jaw
capacityl1
l2
l3
±0,001
19756.W0004 4" Vice - 1 x 19752.W0004,
Carrier jaws - 1 x
19796.W0403,
Hard jaws - 1 x 19892.W0401
6000 3,00 to 16,00 16,0 9 10
19756.W0006 6" Vice - 1 x 19752.W0006,
Carrier jaws - 1 x
19796.W0603,
Hard jaws - 1 x 19892.W0601
12000 4,00 to 20,50 20,5 12 10
19756.W0008 8" Vice - 1 x 19752.W0008,
Carrier jaws - 1 x
19796.W0803,
Hard jaws - 1 x 19892.W0801
16000 6,00 to 28,50 28,5 16 14
Order No. l4
w1
+0,00
0
-0,002
w2
±0,03w
3
h1
±0,0005h
2h
3d
1d
2d
3
19756.W0004 0,190 4 3 3 2,50 0,375 0,50 0,501 0,56 5/16-18
19756.W0006 0,250 6 5 4 3,25 0,562 0,75 0,501 0,63 3/8-16
19756.W0008 0,312 8 6 6 4,00 0,652 0,75 0,751 0,90 1/2-13

The compact design of the ReLock Vice allows you to mount the vices very closely to each other without interferance. The SnapLock line of jaws allows you to literally “snap” jaws and accessories on and off the vice without the use of bolts or pins.
Jaw type/configuration Vice size
Machinable jaws 4” 6” 8”
4.125 5.125 7.625
6.875 9.060 12.812
9.500 11.625 17.125
12.250 15.562 22.312
15.000 19.500 27.500
Carrier and hard jaws 4” 6” 8”
3.000 4.000 6.000
7.375 9.500 13.250
7.250 9.500 14.000
11.625 15.000 21.250
16.00 20.500 28.500
Maximum workpiece
capacities for selected
vice configuration. All
dimensions in inches.
Workpiece
Vice jaws
ReLock 2 and 8-Station capacities
wixroyd.com
Relock 2 and 8-Station Capacities 19752-19766
ov-1975
2-1976
6-a - U
pd
ated - 1
2-0
1-2
017

The ReLock® Vice System combines high manufactured tolerances with unequalled versatility in providingtwo-station and 8-station production vices.
ReLock CNC Vices, available with machinable soft jaws, hard jaws, master jaws and parallels, or fi xture plates, allow the machinist a variety of confi gurations with the same vice. Bodies are manufactured from 80,000 PSI ductile cast iron, and guide parts are fl ame hardened and ground to accuracies of ±0.0005”.
Manual and hydraulic two-station and 8-station vices are available in widths of 4”, 6” and 8.
19752 Double Station Vice.
19754 Double Station Vice
with soft jaws.
19756 Double Station Vice
with hard jaws.
• Reduce set-up times: used with our SnapLock system jaws can be changed or indexed in a matter of seconds.
• Extremely versatile: comprehensive array of jaws and accessories for vertical or horizontal machining.
• Accurate and durable: designed and precision manufactured from high grade materials.
Advantages
19764 8-Station Vice with soft jaws
0845 26 66 577 [email protected]
Relock® Vice System19752-19768
ov-1975
2-1976
8-relo
ck-vice-system - U
pd
ated - 1
2-0
1-2
017

Optimised table spaceCompact modular design allows a multitude of mounting confi gurations. Vices can be mounted close together without hindering removal or attachment of jaws. The ReLock 8-station (shown) is ideal for horizontal machining centres, as well as with rotary indexers on vertical machining centres.
Locating and mountingLocating and mounting options are simple and accurate. The bottom surface of the system has four precision dowel pin holes for locating and four drilled and counter bored holes drilled through from the top surface for rugged mounting. Side toe clamp slots are also incorporated for mounting.
ReLock chip shieldsReLock’s unique three piece telescoping chip shield wraps completely around the SnapLock knuckles, keeping chips from getting into the vice’s clamping mechanism. Shields can quickly and easily removed for maintenance purposes.
Single station conversionUsed in conjunction with SnapLock carrier jaws, the conversion plate allows the ReLock system to beconverted from a double to a single station vice – ideal for larger workpieces.
Centre jaw locationThe ReLock’s center jaw locating studs allow quick jaw mounting and indexing to accuracies of ±0.0005”. Fool proof pin eliminates the possibility of the jaws being accidentally mounted in reverse.
SnapLock knuckleExclusive SnapLock Knuckle allows SnapLock soft jaws and SoftLock carrier to be attached and removed in seconds.
Auto offset mechanismExclusive automatic offset mechanism allows non simultaneous workpiece clamping and unclamping to one of the three optional offset settings: 4” and 6”: 0.030”, 0.125”, or 0.250”; 8”: 0.125”, 0.250”, or 0.375”. The offset setting is the distance the rear jaw backs away from the workpiece before the front jaw begins to back away from the workpiece.
Features and benefi ts
wixroyd.com
ov-relo
ck-mo
du
lar-wo
rk-ho
ldin
g - U
pd
ated - 1
2-0
1-2
017
Relock® Modular Workholding

20
1928
27
1718
3
1
29
3031
2
15 25
24
26
1614
13
12
6
32
1110
5
48
9
7
33
34
42
41
44
22
20
35
8“ only
8“ vise handle
4 and 6” handle
20
1928
27
1718
3
1
29
3031
2
15
25
24
26
1614
13
12
6
32
1110
5
48
9
7
42
41
33
34
35
43
44
22
20
45
46
47
8“ only
Spares available on
request. Please contact our
sales office.
Spares available on
request. Please contact our
sales office.
wixroyd.com
ReLock Vice Parts ListReLock 2
19762-19766
ReLock Vice Parts ListReLock 8
19752-19756
ov-1975
2-1976
6-relo
ck-vice-parts-list-relo
ck-2-relo
ck-8 - U
pd
ated - 1
2-0
1-2
017
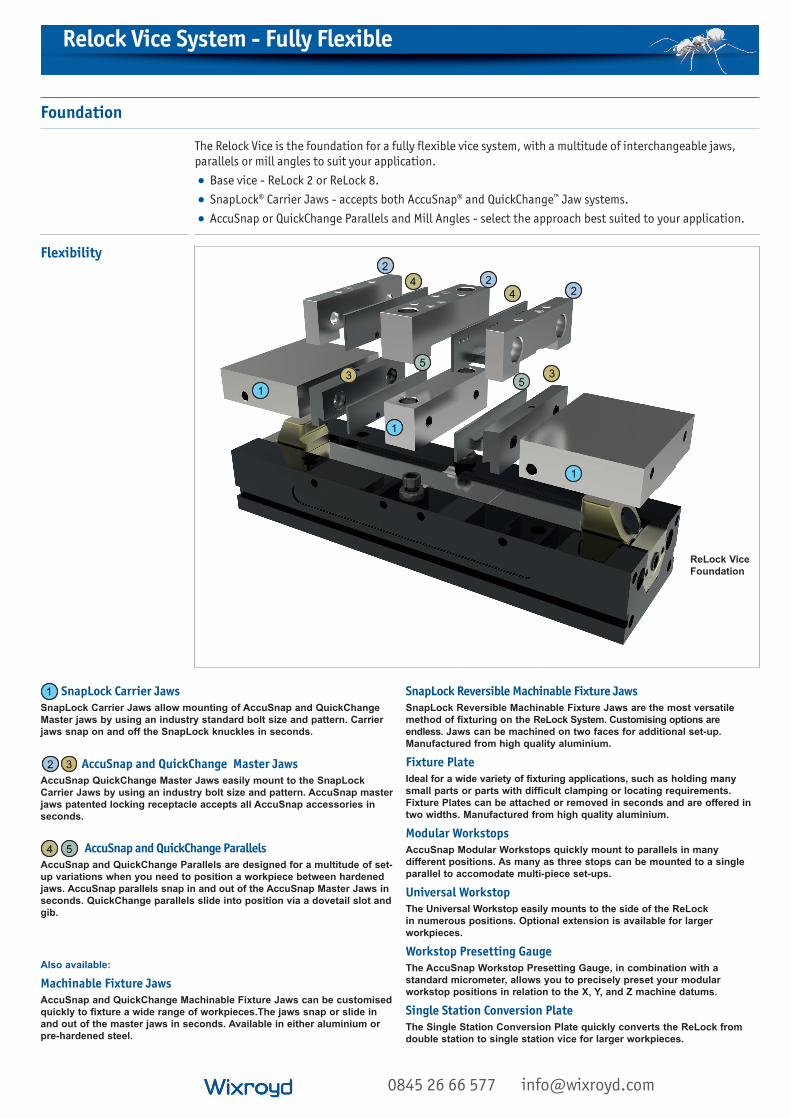
The Relock Vice is the foundation for a fully fl exible vice system, with a multitude of interchangeable jaws,
parallels or mill angles to suit your application.
• Base vice - ReLock 2 or ReLock 8.
• SnapLock® Carrier Jaws - accepts both AccuSnap® and QuickChange™ Jaw systems.
• AccuSnap or QuickChange Parallels and Mill Angles - select the approach best suited to your application.
Flexibility
Also available:
Machinable Fixture Jaws
AccuSnap and QuickChange Machinable Fixture Jaws can be customised
quickly to fixture a wide range of workpieces.The jaws snap or slide in
and out of the master jaws in seconds. Available in either aluminium or
pre-hardened steel.
AccuSnap and QuickChange Master Jaws
AccuSnap QuickChange Master Jaws easily mount to the SnapLock
Carrier Jaws by using an industry bolt size and pattern. AccuSnap master
jaws patented locking receptacle accepts all AccuSnap accessories in
seconds.
c3b2
SnapLock Carrier Jaws
SnapLock Carrier Jaws allow mounting of AccuSnap and QuickChange
Master jaws by using an industry standard bolt size and pattern. Carrier
jaws snap on and off the SnapLock knuckles in seconds.
a1
AccuSnap and QuickChange Parallels
AccuSnap and QuickChange Parallels are designed for a multitude of set-
up variations when you need to position a workpiece between hardened
jaws. AccuSnap parallels snap in and out of the AccuSnap Master Jaws in
seconds. QuickChange parallels slide into position via a dovetail slot and
gib.
d4 e5
ReLock Vice
Foundation
a1
a1
b2
b2
b2
c3c3
d4
d4
e5
e5
a1
Foundation
SnapLock Reversible Machinable Fixture Jaws
SnapLock Reversible Machinable Fixture Jaws are the most versatile
method of fixturing on the ReLock System. Customising options are
endless. Jaws can be machined on two faces for additional set-up.
Manufactured from high quality aluminium.
Fixture Plate
Ideal for a wide variety of fixturing applications, such as holding many
small parts or parts with difficult clamping or locating requirements.
Fixture Plates can be attached or removed in seconds and are offered in
two widths. Manufactured from high quality aluminium.
Modular Workstops
AccuSnap Modular Workstops quickly mount to parallels in many
different positions. As many as three stops can be mounted to a single
parallel to accomodate multi-piece set-ups.
Universal Workstop
The Universal Workstop easily mounts to the side of the ReLock
in numerous positions. Optional extension is available for larger
workpieces.
Workstop Presetting Gauge
The AccuSnap Workstop Presetting Gauge, in combination with a
standard micrometer, allows you to precisely preset your modular
workstop positions in relation to the X, Y, and Z machine datums.
Single Station Conversion Plate
The Single Station Conversion Plate quickly converts the ReLock from
double station to single station vice for larger workpieces.
0845 26 66 577 [email protected]
Relock Vice System - Fully Flexible

CLAM
PING
& H
EIGH
T SETTING
5 wixroyd.com [email protected]
19752 - 19772 Clamping & Height Setting setup and operating instructions
Relock® Vices
Initial Cleaning
After unpacking your vice and checking the contents, wipe all surfaces with a clean rag or cloth to
remove any debris or rust inhibitor that is present. This will ensure that the vice will operate at its maximum efficiency.
Operating Instructions
Behind the rear knuckle (opposite the handle end) you will find two hex screws. One is to adjust the automatic offset mechanism (discussed later) and the other is to adjust the brake mechanism for the vice (see drawing A).
Tighten Brake Mechanism
Simply tighten the brake screw in a clockwise rotation until it is snug. DO NOT OVERTIGHTEN. Failure to set brake properly will:g not allow vice to open and close properly and/org will not allow the automatic offset mechanism to operate correctly.
Do not fully close vice without jaws properly mounted on vice knuckles.
The ReLock vice should only be fully closed when:g a three piece SnapLock Machine Jaw Set is on viceg a SnapLock Carrier Jaw Set and AccuSnap or QuickChange Master Jaw configuration is on vice
Failure to do this could result in damage to the centre chip shield.
1
1
2
Automatic Offset Mechanism
Behind the rear knuckle (opposite the handle end) you will find two hex screws. One is to adjust the
automatic offset mechanism and the other is to adjust the brake mechanism for the vice (see drawing A
on previous page). The automatic offset mechanism allows the user to set the distance that one jaw will
break (i.e. open) before the next jaw breaks. The offset can be set to three distances: .030, .125, .250.
The automatic part of the mechanism allows the user to change workpiece sizes without any further
adjustment to the offset mechanism. For example: You set your offset to .250 and you are setting up a
job that the workpiece is a 3” square then you switch to the next job where the workpiece is 4” square,
the offset mechanism will automatically break the back jaw .250 for both workpieces. Similarly, you can
change the offset for both jobs simply by turning the adjustment screw to the desired distance. This
feature is especially useful in a horizontal machining centre application. This will prevent both workpieces
from falling out of your fixture at the same time and allows you to set the distance.
Jaw Opening & Closing
When closing the vice, the front jaw (handle end) will open first. Once contact is made to the workpiece,
the back jaw will move. When contact is made by the back jaw both jaws will tighten together to your desired pressure. DO NOT OVER-TORQUE VICES. Over-torqueing will cause damage to the vice and could cause harm to the operator.
Recommended clamping pressures:
4”: 0-6,000 lbs. 6”: 0-12,000 lbs. 8”: 0-16,000 lbs.
Drawing A
Offset Mechanism
Break assembly
ov-1975
2-197
72-relo
ck-vices-a-Up
dated
-08
-12
-20
20
2

CLA
MPI
NG
& H
EIG
HT
SETT
ING
CLA
MPI
NG
& H
EIG
HT
SETT
ING
60333 207 4497 [email protected]
19752 -13772 Clamping & Height Settingsetup and operating instructions
Relock® Vices
Mounting Information
2-station Vices
This vice has two, standard mounting options:
1. The bottom of the vice has four (4) locating holes and four (4) cap screw holes for mounting. The cap
screw holes can be accessed through the top of the vice. When SnapLock Jaws are mounted on the
vice the cap screw holes are completely covered preventing any coolant, fluid or chips from entering
the holes. This option will allow you to mount vices very close to each other without interference.
2. The other option is to utilise the slots on either side of the vice in conjunction with toe or
strap clamps.
8-station Vices
All standard baseplates come with a 50mm centre bushing and edge locating. Please refer to catalogue for
specific mounting specifications.
Maintenance and Cleaning
Like any piece of quality equipment, the ReLock vice will need to periodic cleaning and maintenance to prevent
lock-up and ensure maximum efficiency. The entire side segment of the vice can be easily removed and replaced.
1. Remove all jaws and accessories from the vice.
2. Remove the two retaining screws on one of the ends (or top only of 8-Station Vice).
3. Loosen the brake mechanism to allow the segment to slide freely. Do not remove screw.
4. Use the SnapLock pry wrench to lift and slide the centre chip shield locking wings onto bed of vice.
5. Slide the entire segment out of the vice way.
6. Be sure to set the chip shields aside until needed for re-assembly.
7. Place segment on table or flat surface.
8. Use the vice handle to separate the two sections of the slide segment making sure that the segment
does not turn with the lead screw.
9. Remove rubber seal from the lead screw and inspect for damage.
10. Completely clean all surfaces and holes from all coolant, fluids and chips.
11. Grease both the external and internal threads of the lead screw.
12. Remove the two screws from the handle end of the front segment and remove plate.
13. Push the lead screw through the front segment to expose thrust washers.
14. Grease all thrust washers, push front segment back onto lead screw and replace plate with screws.
15. Remove the screw from the top of each knuckle and grease the SnapLock plunger assembly.
16. Re-assemble plunger assembly.
17. Clean entire vice body especially the centre way before re-assembling vice.
18. Place seal back onto the lead screw making sure to push it past the threads.
19. Assemble two slide segment units back together by again preventing the segments from turning while
screwing the lead screw back into the rear segment.
20. Once external threads are not visible, place the seal back into the slot provided by using a small
screwdriver or tool. Make sure that the seal is properly installed. Failure to do this can result in
damage to the vices’ internal mechanisms.
21. Place the outside chip shields onto the proper knuckles. Shields are notched to fit only one end.
Failure to do this will allow coolant and chips into the lead screw area and cause binding.
22. Slide rear segment into the vice.
23. Place the centre chip shield into the slot prying the wings onto the bed of the vice.
24. Slide the rest of the segment in to position making sure that the outside chip shields slide under the
centre chip shield.
25. Replace retaining screws in vice.
This maintenance procedure should be done periodically.
The frequency of this procedure depends on how much you use your vice.
ov-
1975
2-1
9772
-rel
ock
-vic
es-b
-Up
dat
ed -
08
-12
-20
20