Domains and Accounts Reference - Download IceWarp ...
132
Printed on 16 April, 2012 IceWarp Unified Communications Domains and Accounts Reference Version 10.4
-
Upload
khangminh22 -
Category
Documents
-
view
1 -
download
0
Transcript of Domains and Accounts Reference - Download IceWarp ...

Printed on 16 April, 2012
IceWarp Unified Communications
Domains and Accounts Reference
Version 10.4


Contents
Domains & Accounts 1
Management .................................................................................................................................................................. 2
Domains ............................................................................................................................................................. 3
Domain .................................................................................................................................................. 4
Limits ..................................................................................................................................................... 5
Policies................................................................................................................................................... 8
Options ................................................................................................................................................ 10
Aliases ................................................................................................................................................. 16
Templates ............................................................................................................................................ 17
DKIM .................................................................................................................................................... 17
DKIM – How it Works .................................................................................................................... 18
Directory Service ................................................................................................................................. 18
syncad.dat File .............................................................................................................................. 23
Synchronizing Users with LDAP / Active Directory ........................................................................ 23
Rules .................................................................................................................................................... 27
Information ......................................................................................................................................... 28
New Domain Wizard ............................................................................................................................ 29
User Accounts .................................................................................................................................................. 32
User ..................................................................................................................................................... 32
Groups ................................................................................................................................................. 34
Card ..................................................................................................................................................... 35
Limits ................................................................................................................................................... 35
Policies................................................................................................................................................. 38
Options ................................................................................................................................................ 42

ii Contents
Mail ..................................................................................................................................................... 46
VoIP ..................................................................................................................................................... 49
Rules .................................................................................................................................................... 49
New User Wizard ................................................................................................................................. 49
Groups ............................................................................................................................................................. 53
Group .................................................................................................................................................. 53
External Contacts in GAL ............................................................................................................... 55
Members ............................................................................................................................................. 56
Message .............................................................................................................................................. 58
Options ................................................................................................................................................ 59
Rules .................................................................................................................................................... 61
Resources ......................................................................................................................................................... 62
Resource .............................................................................................................................................. 62
Card ..................................................................................................................................................... 63
Users .................................................................................................................................................... 63
Rules .................................................................................................................................................... 64
Mailing List ....................................................................................................................................................... 65
Definition ............................................................................................................................................. 65
Members ............................................................................................................................................. 68
Message .............................................................................................................................................. 70
Security ................................................................................................................................................ 72
Options ................................................................................................................................................ 74
Rules .................................................................................................................................................... 76
List Server ........................................................................................................................................................ 77
List Server ............................................................................................................................................ 77
Lists...................................................................................................................................................... 80
Options ................................................................................................................................................ 81

Domains & Accounts iii
Rules .................................................................................................................................................... 82
Example ............................................................................................................................................... 82
Executable ....................................................................................................................................................... 83
Executable ........................................................................................................................................... 83
Rules .................................................................................................................................................... 84
Remote Account .............................................................................................................................................. 85
Remote Account .................................................................................................................................. 85
Options ................................................................................................................................................ 87
Domain POP ........................................................................................................................................ 89
Rules .................................................................................................................................................... 90
Static Route ...................................................................................................................................................... 91
Definition ............................................................................................................................................. 91
Rules .................................................................................................................................................... 92
Notification ...................................................................................................................................................... 93
Notification .......................................................................................................................................... 93
Options ................................................................................................................................................ 94
Rules .................................................................................................................................................... 95
Catalog ............................................................................................................................................................. 96
Definition ............................................................................................................................................. 96
Maintenance ................................................................................................................................. 97
Options ................................................................................................................................................ 98
Multiple Commands ............................................................................................................................ 99
Rules .................................................................................................................................................. 101
Global Settings ........................................................................................................................................................... 102
Domains ......................................................................................................................................................... 102
Templates ...................................................................................................................................................... 106
Creating Template ............................................................................................................................. 106

iv Contents
Applying Templates to new accounts ................................................................................................ 109
Template Scenario ............................................................................................................................. 110
Domain Clusters ............................................................................................................................................. 111
Advanced ....................................................................................................................................................... 114
Policies ....................................................................................................................................................................... 116
Login Policy .................................................................................................................................................... 116
Password Policy ............................................................................................................................................. 118
Limits – Explanation ................................................................................................................................................... 121
Limits – Which One Is Used? .......................................................................................................................... 122
Limits – Max Message Size ............................................................................................................................. 123
Simple RegEx Tutorial ................................................................................................................................................. 124
^' and '$' ............................................................................................................................................ 124
'*', '+', and '?' ..................................................................................................................................... 124
Braces { } ............................................................................................................................................ 124
'|' OR operator .................................................................................................................................. 125
('.') ..................................................................................................................................................... 125
Bracket expressions ........................................................................................................................... 125

1
The Domains and Accounts node contains the nodes Management, Global Settings and Policies, which are discussed in detail in this manual.
Legend
Icon Description
Warning – very important!
Note or tip – good to know.
Note within a table.
Figure link – click the link to reveal the figure. Click it again to close it. (Works only in the CHM
format.)
In This Chapter
Management .......................................................................................... 2 Global Settings ....................................................................................... 102 Policies ................................................................................................... 116 Limits – Explanation ............................................................................... 121 Simple RegEx Tutorial............................................................................. 124
C H A P T E R 1
Domains & Accounts

2 Domains and Accounts Reference
Management
Selecting the Management node causes the right hand pane to split into a tree hierarchy view of domains on the left and the settings for the selected domain (or account) on the right. (See the Administrative Console section.)
Within the Management node you can administer all your domains and accounts, modifying any settings as required.
Right-clicking in the middle pane will open the Accounts menu where you can add a new domain or account, make the selected domain the primary one and import and export account, amongst others.
Domains are expandable to a list of account types, which are in turn expandable if any of that type of account are defined within the domain. Items are expandable/collapsible by clicking the (+) or (-) symbol next to them, or by double-clicking.
Selecting a domain or account will effect the right hand pane to display any settings for the item and you can modify these settings here.
You can use SHIFT/CTRL + click to multi-select accounts and change a certain setting for all at once (this setting shows highlighted yellow when doing so).
You can also create a group account, define members and use the Templates (on page 106) feature within the Options tab of a group account to do mass changes. For example, one can add all domains as members of a temporary group account and apply a template to set all accounts of all domains to the IMAP type instead of POP3.
Another way how to perform mass changes is to use tool.exe/tool.sh.
The easiest way how to move users from one domain to another one is to cut and paste them. Use with care – big numbers of cut/pasted users (say hundreds and more) can cause long waiting without seeing any progress.
In This Chapter
Domains ................................................................................................. 3 User Accounts ........................................................................................ 32 Groups .................................................................................................... 53 Resources ............................................................................................... 62 Mailing List ............................................................................................. 65 List Server ............................................................................................... 77 Executable .............................................................................................. 83 Remote Account..................................................................................... 85 Static Route ............................................................................................ 91 Notification ............................................................................................ 93 Catalog ................................................................................................... 96
Management 3
Domains
To create a new domain you can either:
Select the Accounts – Create new – Domain menu item
Right-click in the middle pane when you have the Domains and Account – Management node selected and select Create new – Domain.
Press CTRL+D
To modify the settings of an existing domain you should select the Domains and Account –> Management node, then select the domain you wish to modify.
Whether you are creating a new domain or modifying an existing one you will be presented with the settings panels for the domain in the right-hand pane.
Be aware that one of your domains must be assigned as the primary domain. The primary domain administrator is also regarded as the server administrator and any system messages (license warnings, System Reports, etc.) will be sent to this account.
You can change the primary domain by selecting a domain and selecting the Accounts -> Make Primary menu item
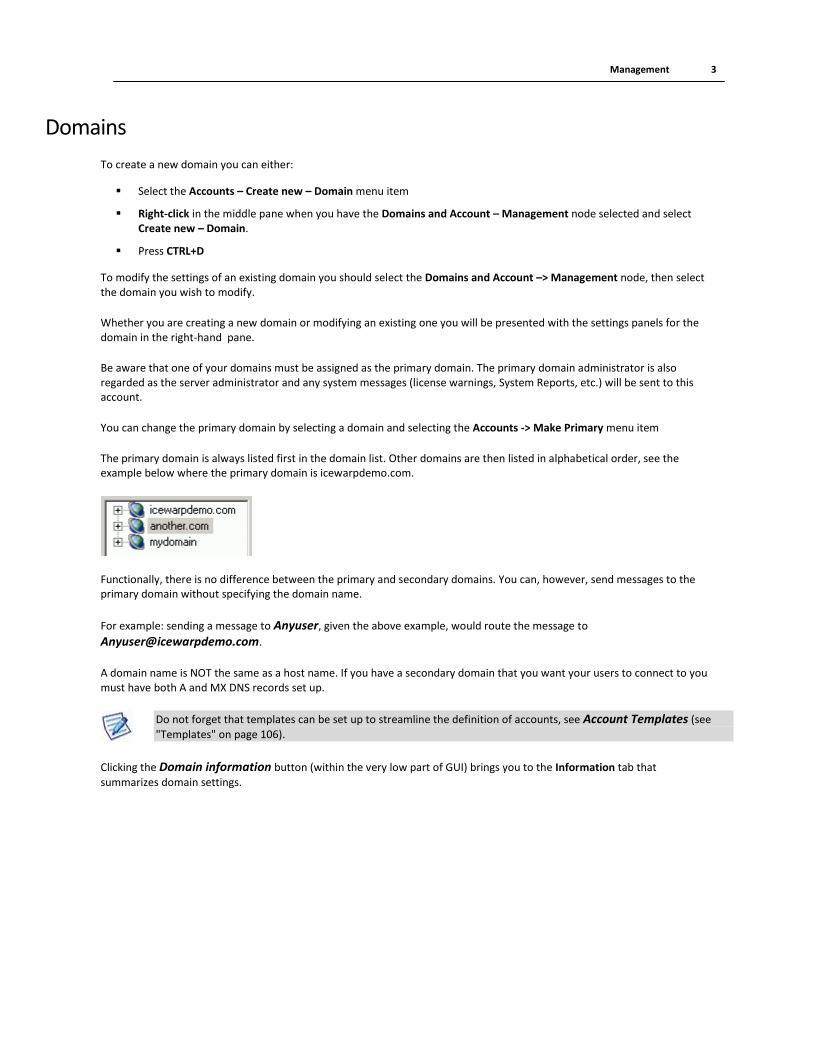
The primary domain is always listed first in the domain list. Other domains are then listed in alphabetical order, see the example below where the primary domain is icewarpdemo.com.
Functionally, there is no difference between the primary and secondary domains. You can, however, send messages to the primary domain without specifying the domain name.
For example: sending a message to Anyuser, given the above example, would route the message to
A domain name is NOT the same as a host name. If you have a secondary domain that you want your users to connect to you must have both A and MX DNS records set up.
Do not forget that templates can be set up to streamline the definition of accounts, see Account Templates (see
"Templates" on page 106).
Clicking the Domain information button (within the very low part of GUI) brings you to the Information tab that
summarizes domain settings.

4 Domains and Accounts Reference
In This Chapter
Domain ................................................................................................... 4 Limits ...................................................................................................... 5 Policies ................................................................................................... 8 Options ................................................................................................... 10 Aliases .................................................................................................... 16 Templates .............................................................................................. 17 DKIM ...................................................................................................... 17 Directory Service .................................................................................... 18 Rules ....................................................................................................... 27 Information ............................................................................................ 28 New Domain Wizard .............................................................................. 29
Domain
The Domain section of the Domain tab shows basic information about the domain:
Field Description
Name This is the name of the domain.
Messages can be only delivered to created domains.
If a message arrives for a domain that does not exist, the message will be forwarded (relayed) outside your server.
Description A short informational description of the domain.
Default alias Specifies the administrator aliases for the email address specified in the E-mail field.
Multiple aliases can be separated by semi-colons, without spaces.
Any aliases you specify here do not need to have accounts created for them.
E-mail Specifies the account that messages to a postmaster alias should be delivered to.
Multiple accounts can be specified (separated by semicolons).
Remote email addresses can be used.
The primary domain must have an administrator email defined. It is used by the system for notification emails and system reports.
Use the '...' button to select accounts and/or groups. Read more about the Select Accounts dialog.

Management 5
For more information about personal data synchronization with AD/LDAP, refer to the Domain – Directory Service – Personal Data Synchronization (on page 27) chapter.
Limits
NOTE: In most options, value of 0 means unlimited.
The following domain limits are checked regardless of any user-level limits you have set. For example, if you have a
domain Disk quota limit set to 100MB and set a user mailbox size to 500MB it will be capped at 100MB (assuming
no other mailboxes are using part of the 100MB for the domain).
NOTE: Most of fields are active only if the appropriate domain, user or expiration limits are enabled upon the Global Settings – Domains (see "Domains" on page 102) tab.
Field Description
Domain admin account limit
Limits the number of user accounts that can be defined in this domain by a domain administrator.
This number does not include other account types (mailing lists, catalogs, etc.).
Disk quota Limits the amount of disk space that this domain will use.
Input a value and select Kilobytes, Megabytes or Gigabytes from the dropdown box.
Once this amount is exceeded no further messages will be accepted by the domain, a 4xx temporary error is issued and the sending server should retry after a period of time.
Temporary errors showing can be changed via API. The appropriate variable is
c_mail_smtp_other_fullmailboxpermanenterror.
Send out data limit per day
Select an amount of data this domain can send out in one day.
Send out messages limit (#/Day)
Specify a maximum number of messages that this domain can send in one day.
Disable login to this domain
Stops all users from logging in to this domain.
This option is only available if the Use domain limits option is checked in Global Settings – Domains is checked.

6 Domains and Accounts Reference
Field Description
NOTE The following limits for users in a domain are only accessible if the Use domain limits option is checked in Global Settings – Domains.
These limits are only checked if the corresponding limit in <user> – Limits is set to zero or not enabled – this applies for the <user> – Limits – Account size feature.
In the case some user has set a different value (differing form 0), this setting (i. e. user level) is used as it has higher priority.
Account size Limits the size of a user's mailbox.
Input a value and select Kilobytes, Megabytes or Gigabytes from the drop-down box.
Once exceeded no further messages will be accepted for that user.
Max message size Limits the size of ANY message SENT by a user.
Input a value and select Kilobytes, Megabytes or Gigabytes from the drop-down box.
It is also possible to enable checking of user size limits of incoming messages using API and setting C_Mail_SMTP_Other_IncomingMessageLimits to 1. If this option is enabled and the message violates limits of any of the recipients, the whole message is rejected with a SMTP permanent error.
Be aware that all attachments are Base64 Encoded, which adds a size overhead of around one third, so if you wish to limit your users to a message size of 1MB you should set the limit to 1.3MB.
Send out data limit per day
Limits the amount of data that any single user can send out in 1 day.
Input a value and select Kilobytes, Megabytes or Gigabytes from the drop-down box.
Once a user exceeds the limit no further messages will accepted from that user.
It should be noted that a message sent to multiple recipients will be counted for each recipient, i.e. a 1MB message sent to 10 recipients will be counted as 10MB towards the limit.
NOTE: Local emails are not included.
Send out messages limit (#/Day)
Limits the number of messages that a single user can send out in one day.
Once exceeded no further messages will be accepted from that user.
It should be noted that a message sent to multiple recipients will be counted as 1 message for each copy, i.e. a message sent to 20 users counts as 20 messages towards the limit.
NOTE: Local emails are not included.
NOTE: This feature can be used as an anti-spam security measure. Defining a reasonable day

Management 7
message limit (say hundreds) can prevent account abuse for sending spam.
The Expiration feature allows you to define an expiration date for the domain. When a domain expires, only the login to the
domain is disabled, you can still perform other actions on the domain.
Field Description
Expiration on Specifies the date on which the domain will expire.
Notify before expiration
You have the option to notify the domain administrator before the actual expiration – specify the number of days before expiration that the message should be sent.
NOTE: If no domain administrator email is specified (<domain> – Domain – Administrator – E-mail), then the server administrator (the same field of your primary domain) will be notified. The notification email will contain the domain name and the number of days until expiration.
Delete Domain when expired
If this box is checked the domain will be deleted at midnight at the end of the day it expires.
All accounts and settings will be lost at this time, so use with extreme care!

8 Domains and Accounts Reference
Policies
This tab lets you enable or disable selected services for the whole domain.
NOTE: You can select multiple users from the middle pane in Management using Shift+click and Ctrl+click mouse operations to perform a bulk modification.
Field Description
Services Tick the services you want to enable on the domain level.
For more details about Activation Keys, refer to the User – Services (see "Policies" on page 38) section.
NOTE: Check boxes are enabled only if the access modes for the single services are set either to
Use domain options or to Advanced mode.
NOTE: To enable activation keys for IceWarp Outlook Sync and/or Desktop Client, it is necessary to tick check boxes here and under the <user> – Services (see "Policies" on page 38) tab too.
ActiveSync Devices Click this button to reveal the ActiveSync Devices dialog. This dialog lists all devices of all domain users that use ActiveSync. See lower.
You can set Domain Policies (for all devices of all domain users), set Device Policies (for the
selected user's device), remove devices from the list (Delete Device), set remote wipe for
selected devices (Set Remote Wipe) and cancel remote wipe once set provided that it has not
been executed yet (Clear Remote Wipe).
NOTE: Remote wipe is a total remote deletion of all device data. It is executed when the device

Management 9
contacts the server first time after setting it. Within this period, it is possible to cancel it.
SMS account settings Click the SMS Settings button to open the SMS Account dialog where you can set SMS account
options.
For more information about this dialog, refer to the User Accounts – Policies (see "Policies" on page 38) chapter – SMS Account Dialog section.
FTP account settings Click the FTP Settings button to reveal the User dialog, where you can define settings for all
system accounts.
For more information about this dialog, refer to the User Accounts – Policies (see "Policies" on page 38) chapter – User Dialog section.
Instant Messaging shared roster (Populate with all domain users)
Tick the box if you want all domain users to be added into their instant messaging rosters. By default, this option is enabled.
If the box is ticked, the roster.dat file (<install_dir>/config/<domain>) is edited, so users included here need not to authorize each other.
NOTE: It is possible to add a group (or more) to this file. Use the following syntax:
[group_name]. Use a single line for each group. You can even delete the domain from the
roster.dat file.
IM Roster Click the button to open the domain roster.dat file where you can enter any groups, domains or users that should be present for this domain users. Regarding the file syntax, see the note above. Single users are to be added without brackets.
NOTE: The caption of the very left button is variable according to the level we are accessing the dialog from.
There are following (self-explanatory) possibilities:
Global Policies (GroupWare – ActiveSync – Device Management)
Domain Policies (Domains and Accounts – Management –<domain> – Policies – ActiveSync Devices)
User Policies (Domains and Accounts – Management –<user> – Policies (on page 38) – ActiveSync Devices)
For more details about security policies, refer to the ActiveSync Guide – Security Policies section.

10 Domains and Accounts Reference
Options
Field Description
Type The type of domain – there are five domain Types:
Standard This specifies a standard domain with users who have separate mailboxes. This is the default domain type and probably the most commonly used.
Domain alias The Domain alias type is used to immediately forward any received messages to another domain.
The domain to be forwarded to must be specified in the Value box.
Forwarding can only be done to local domains (i.e. on the same IceWarp Server).
This domain is useful where you have registered multiple combinations of a domain name but want all messages to be collected from one point.
For example, if you own
MyShop.com
MyShop.net
MyShop.org
and you want all messages to go to MyShop.com.
You should set up a standard domain for .com, and alias domains for .net and .org.
Both the .net and .org domains should specify MyShop.com in the Value field.
Standard MX and A records should be set up for all three domains.
All messages received to the .net and .org domains will be immediately forwarded to the .com domain.
NOTE: This type of domain does NOT need to have an account defined within it. However, if an account is defined then any mail sent to that account will NOT be forwarded!
NOTE: For backwards compatibility reasons and for having possibility to define different rules for a domain alias, this option is still retained. To find additional information, go to the Domain – Aliases (see "Aliases" on page 16) section.
Backup domain The basic function of a backup domain is to accept messages and forward them immediately to another server. If the other server cannot be contacted then the messages are queued for delivery when the server is back online.
This can be useful in three suggested scenarios:
Backup Server
This is a backup to ensure no messages are lost if your primary server is offline.
You have your main server and a backup domain on different servers. Note that both servers
Management 11
should have the same domain name (e.g. mail.mydomain.com).
MX records are defined for both servers but the backup domain server's MX has a lower priority. For example, 2 MX records are created for mydomain.com, one points to mail.MainServer.com and has priority 5 and the second points to mail.BackupServer.com and has priority 10.
The backup domain is set to forward all messages to your main server.
Now, if your main server is down for any reason, any remote connections should contact your backup server to deliver messages. When your main server is running correctly again the backup one will deliver all messages collected during the down-time.
Domain Gateway
This allows you to have a server between your "real" server and the internet.
You have a backup domain server connected to the internet and your main server is internal to your company.
An MX record exists for the backup domain server only.
The Value field should contain the internal IP address of your main server.
The backup domain is set to forward messages to your main server.
Now, all messages sent to your company will be initially processed by your backup domain server.
The backup domain server can do all the IceWarp Anti-Virus and AntiSpam processing and only deliver messages that you really want to your internal server.
Migration Scenario
The third scenario where the backup server can be implemented is to help implement a phased migration of users from one email server to IceWarp Server.
Set the system up the same as a domain gateway (see above) with the backup domain set up on the IceWarp Server you are migrating to.
Create user accounts in the backup domain for the users you want to migrate to the new server. Any messages for defined accounts will NOT be forwarded to the old server. When a user account is not defined (i.e. not migrated) the message will be forwarded as normally.
So now, as you define user accounts, they will effectively migrate to the new server.
NOTE: An important difference between the distributed domain and the backup domain is how they respond when they cannot connect to the receiving server:
A backup domain will save the message and deliver it when the server is back online.
A distributed domain will issue a 4xx warning to the originating server, effectively telling it to try again later.
NOTE: If you define a user on a backup domain then any messages for that user will not be
forwarded, but will be stored in that domain.
NOTE: Domain aliases can be used. This can cause inconsistence between the address used for verification and address used for delivery.
Use the c_system_services_smtp_rewrite_backup_recipients API variable. When set to
false, domain aliases (used within email addresses) are not rewritten; when set to true, domain
aliases are changed to a domain name.
Distributed domain The distributed domain is designed to be used where a business is spread across multiple locations and you wish to distribute your IceWarp email servers around your locations, each with a subset of your users.

12 Domains and Accounts Reference
At each location you should set up IceWarp Server.
On each server, you should set up a distributed domain, each with the same name (i.e. all called mydomain.com)
An MX record should be set up for each server in the distributed domain.
The Value field should contain the internal IP addresses of all related distributed domains
separated by semicolon.
Now, when a message is delivered to the receiving server, it will:
Use the SMTP VRFY or RCPT command (see Verification option further down) on all the other
servers in the distributed domain to locate the recipient of the message (unless the user is a local one to this instance).
If the user is not found the message is rejected and a 5xx permanent error is reported to the sending server.
If any of servers in the distributed system cannot be contacted and none of the other servers (that can be contacted) has the appropriate recipient, then a 4xx temporary error is reported to the sending server, which should retry after a period of time.
If the user is found then any IceWarp Anti-Virus and AntiSpam processing is performed and the message is delivered to the distributed server that the user is defined on.
NOTE: Important difference between a distributed domain and a backup domain is how they respond when they cannot connect to the receiving server:
A backup domain will save the message and deliver it when the server is back online.
A distributed domain will issue a 4xx warning to the originating server, effectively telling it to try again later.
NOTE: Distributed domains REQUIRE recipient real time verification. If one of the destination
servers defined in the Value field is inaccessible, the email will NOT be sent out and the user will get the "4xx – try again later" error, until the destination server (where the appropriate account is)
is available. For WebClient, there is a work-around – use Bounce back messages for failed recipients (Administrator Options – Mail – General). Other option is to use backup domains,
however you lose the IM/VoIP functionality of the distributed scenario.
NOTE: Anti-Spam is not performed for external recipients of distributed domains, this can be
disabled by API variable C_AS_BypassDistributedDomain (set to 0). If disabled, Anti/Spam is
performed provided that it is set for outgoing messages.
SEE the NOTE to domain aliases and verification within the Backup domain field.
ETRN/ATRN queue This type of domain is used to hold all messages to be collected by another mail server using the ETRN or ATRN SMTP Client commands. This type would usually be used by ISPs.
One user account must be created to allow the collecting server to log in and collect mail.
This user account MUST have the ETRN/ATRN account option selected in the User – Options tab.
If a password is set for this account, the collecting server must specify the password in the ATRN command.
Value This option is valid for all domains except the standard one.
Multiple values can be specified in this field, separated by semicolons.
Port values can also be specified by adding a colon and the port at the end of the host name. This can be useful if your ISP blocks standard ports.

Management 13
Syntax - <domain><:port>;<domain><:port>
Example - mydomain.com:81;192.168.0.1
NOTE: It is recommended to use host names here. Using of IP addresses could cause problems in the case, it is changed.
ETRN/ATRN queue
If the collecting server has a static IP address then this field should contain the IP address. If the IP
address is dynamic, the Value field should be left blank.
Domain alias
Field must contain the domain name of the server that you are aliasing.
Backup domain
Field can contain the host name or IP address of the server that email is to be forwarded to. If the field is left blank then an MX lookup is performed.
NOTE: You can use the authentication as described in the Use relay server field – Mail Service –
General – Delivery section.
Distributed domain
Field should contain the IP addresses of the other servers in the distributed domain or can be left blank if MX DNS records are defined for all domains in the distributed system.
NOTE: You may want to use defined patterns (System – Advanced – Patterns) in this field. Use a
pattern name in brackets – [pattern_name].
NOTE: This field is disabled for standard type domains. Although it is possible to access and edit it in WebAdmin, it is meaningless for this type.
Verification Applies only to the Distributed domain and Backup domain types.
Distributed domain – initially the Default verification is assigned to it. This means that the
VRFY command is used.
This domain uses the VRFY command or RCPT one to locate the server where the user is defined. It is recommended to use the VRFY command. The RCPT command should be used
on servers that do not support the VRFY command (very rare nowadays). Selecting of Use Minger with password for Distributed domain enables the password field and lets you to set it. For more information about Minger server, refer to the System – Services – SOCKS and Minger Server – Minger Server section.
Backup domain – initially the Default verification is assigned to it. For this type of domain it means that NO verification is used.
Selecting of Use Minger with password for this domain type is senseless.
NOTE: For both domain types you can use the response cache. Result of a performed query is cached and the next query can be answered without necessity of another connection to a remote server.
Use the following API variables:
c_accounts_global_distributed_accounts_cache_enabled – bool – true/false
c_accounts_global_distributed_accounts_cache_max – integer – maximal number of cached

14 Domains and Accounts Reference
items (zero means no limit)
c_accounts_global_distributed_accounts_cacheexpire – integer – cache expiration in seconds
Set values are used for both Distributed and Backup domains.
NOTE: Older MS Exchange versions (2000, 2003) do not support the VRFY command by default.
This command can be disabled on newer versions, as VRFY* could be used for email harvesting. In
this case, use the RCPT command instead.
Field Description
IP Address Enter an IP address here to bind this domain to that IP.
The IP address is also used for authentication, if this is not set correctly then none of your users will be able to authenticate.
NOTE: For binding of the IP address for outgoing connections, you have to enable the Use domain IP address for outgoing connections option. See the Domains and Accounts – Global Settings – Domains (on page 102) tab.
NOTE: For binding of the IP address for logging in, the
C_Accounts_Policies_Login_DisableDomainIPLogin property has to be set to 0 using API.
This applies only for logging in when user names are used. When logging in with whole email addresses, setting to 0 is not necessary as IP address binding is ignored.
Hostname Enter a domain hostname to be used for outgoing connections.
This setting can be essential for domain identification by various AntiSpam technologies, including Greylisting, SPF and Intrusion Prevention. If defined here, the hostname defined under System – Services – Smart Discover – SMTP is bypassed.
NOTE: This option can be used just in the case the Use domain hostname for outgoing connections option (Domains & Accounts - Global Settings – Domains (on page 102) – Other)
is enabled.
Folder Domain folder, used for all domain settings and user accounts directories.
(By default, the path defined under System – Storage – Directories – Mail path is used.)
This acts as a prefix and is added to the mailbox path for all newly created accounts (within this
domain).
NOTE: In the case you have mailboxes with non-standard mailbox paths in a domain, create the

Management 15
externaldirs.dat file with these paths and put it into the IceWarp/config directory.
E. g. you have most of users in a standard path but others are on a different disk (for example e)
in the other_accounts folder. Add the e:\other_accounts path to the externaldirs.dat file.
Header / Footer You have the option to specify a domain header and a footer. Enable the global header/footer option (Mail – General – Advanced tab – even if you do not use it globally) and open the domain Header/Footer dialog to specify your footer and header information. If the domain header and footer are not defined, the global will be used. You can see more in the global Header/Footer settings.
The Unknown Accounts section of the Options tab specifies how to handle messages that arrive for delivery to undefined
accounts:
Field Description
Action Specifies the action to take with any message that is destined for an account that is not defined on the server:
Reject mail
The message is rejected and returned to the sender. This is the recommended setting.
Forward to email address (catch-all)
The message is forwarded to the specified account. This can be useful if you wish to monitor these incoming messages but you could end up monitoring a lot of spam messages.
This is also a way an ISP can offer unlimited email aliases since messages can be sent to [email protected] and it will be delivered to the this catch-all account. When using a
catch-all account, it is suggested to switch on the Add X-Envelope-To option for that account
(<account> – Options tab).
Enter the email address to use. Multiple addresses can be entered, separated by semicolons.
You can also use the '...' button to select accounts or groups with a dialog (see Select Accounts for more information).
Delete mail
The message is deleted, the sender will NOT be notified.
E-mail Specifies the email address that messages should be delivered to if the Forward to email address action is selected.
Send information to administrator
If this box is checked then the administrator's account will receive a copy of any message sent to any account that does not exist.
NOTE: This applies only in the case the Reject mail option or Delete mail is selected in the
Action filed.

16 Domains and Accounts Reference
Aliases
The Aliases tab lets you define multiple domain aliases for existing domains on the IceWarp Server. In the screenshot bellow,
you can see aliases defined for mycompany.com. Email messages sent e. g. to [email protected] will be delivered to
[email protected]. (Provided that this account exists.)
NOTE: For domain aliases defined here you cannot set different rules than for the original domain. If you want to,
create a new domain and on the Options (on page 10) tab select the Domain alias Type.
NOTE: Using domain aliases can cause inconsistence between the address used for verification and address used
for delivery. (For more details, see the Options (on page 10) tab – Backup domain field.)
Use the c_system_services_smtp_rewrite_backup_recipients API variable. When set to false, domain aliases
(used within email addresses) are not rewritten; when set to true, domain aliases are changed to a domain name.
Field Description
Add Click the button to add a new domain alias. The Domain Alias dialog opens.
Edit Select a domain alias and click the button to edit this alias. The Domain Alias dialog opens.
Delete Select a domain alias and click the button to remove this alias.
Arrows Use these buttons to move an alias up or down in the list.
Field Description
Domain Alias Fill in a domain alias of the current domain.
Management 17
Templates
Templates are discussed in the Global Settings – Templates (see "Templates" on page 106) section.
NOTE: Templates created within a domain can only be used for new accounts within that domain.
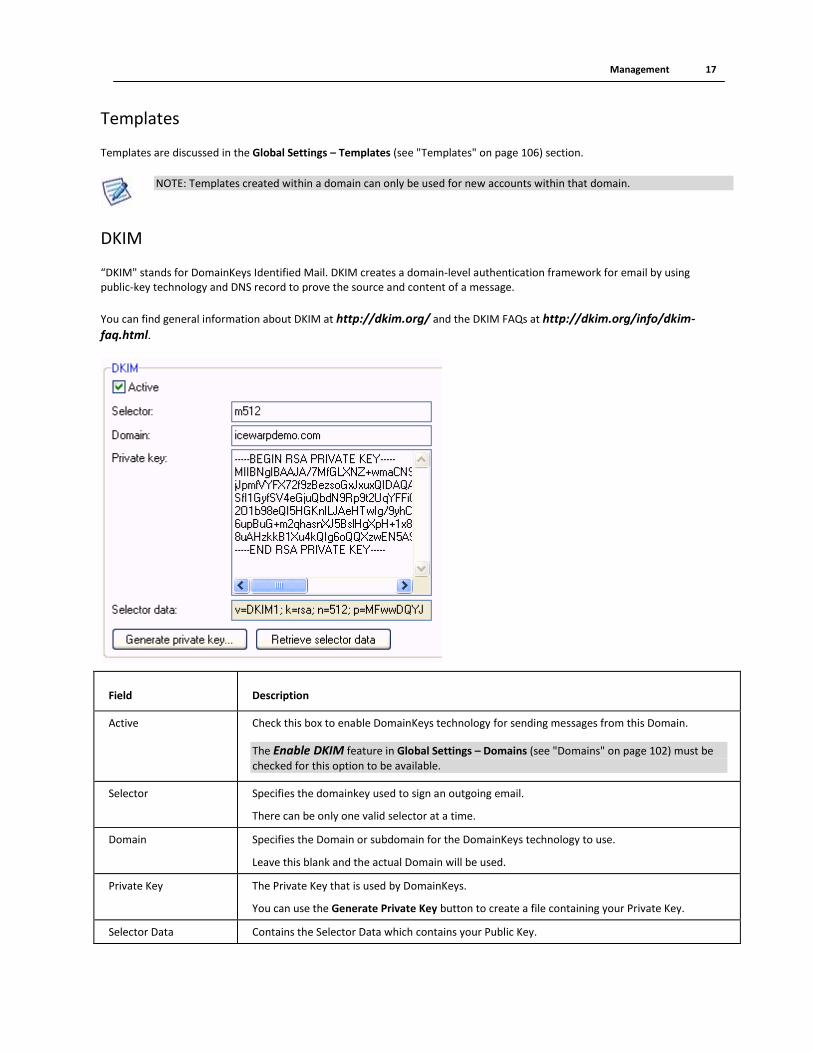
DKIM
“DKIM" stands for DomainKeys Identified Mail. DKIM creates a domain-level authentication framework for email by using public-key technology and DNS record to prove the source and content of a message.
You can find general information about DKIM at http://dkim.org/ and the DKIM FAQs at http://dkim.org/info/dkim-faq.html.
Field Description
Active Check this box to enable DomainKeys technology for sending messages from this Domain.
The Enable DKIM feature in Global Settings – Domains (see "Domains" on page 102) must be
checked for this option to be available.
Selector Specifies the domainkey used to sign an outgoing email.
There can be only one valid selector at a time.
Domain Specifies the Domain or subdomain for the DomainKeys technology to use.
Leave this blank and the actual Domain will be used.
Private Key The Private Key that is used by DomainKeys.
You can use the Generate Private Key button to create a file containing your Private Key.
Selector Data Contains the Selector Data which contains your Public Key.
18 Domains and Accounts Reference
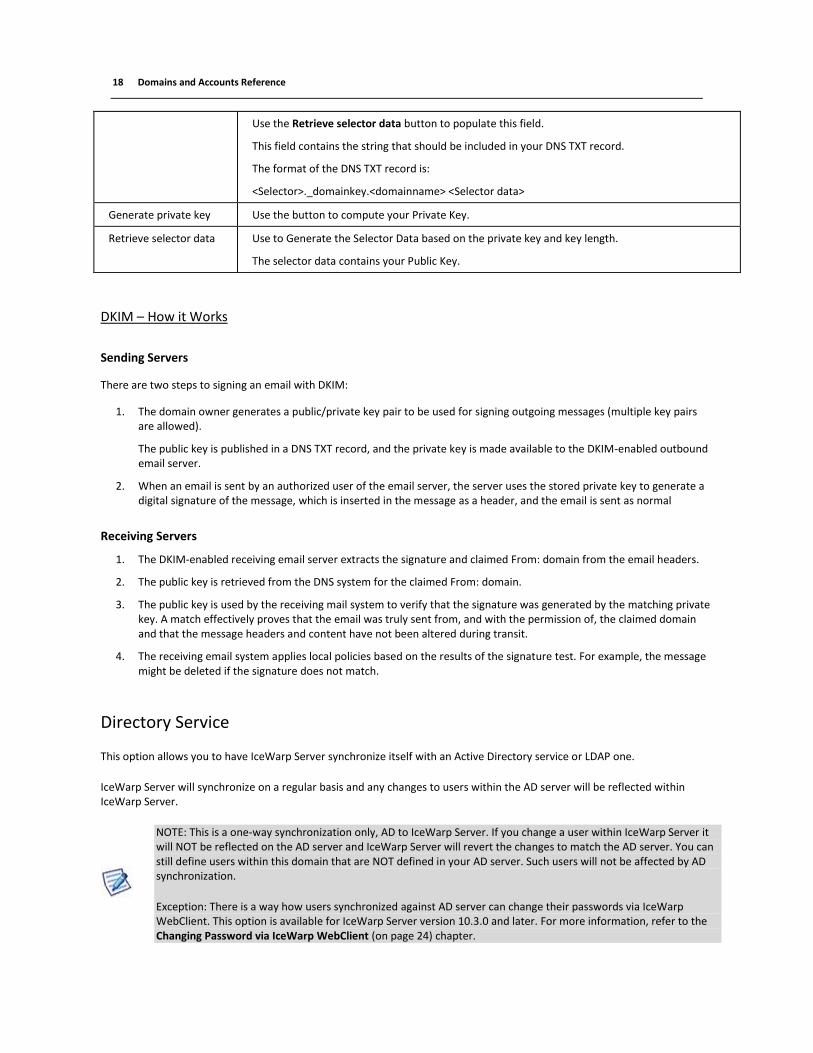
Use the Retrieve selector data button to populate this field.
This field contains the string that should be included in your DNS TXT record.
The format of the DNS TXT record is:
<Selector>._domainkey.<domainname> <Selector data>
Generate private key Use the button to compute your Private Key.
Retrieve selector data Use to Generate the Selector Data based on the private key and key length.
The selector data contains your Public Key.
DKIM – How it Works
Sending Servers
There are two steps to signing an email with DKIM:
1. The domain owner generates a public/private key pair to be used for signing outgoing messages (multiple key pairs are allowed).
The public key is published in a DNS TXT record, and the private key is made available to the DKIM-enabled outbound email server.
2. When an email is sent by an authorized user of the email server, the server uses the stored private key to generate a digital signature of the message, which is inserted in the message as a header, and the email is sent as normal
Receiving Servers
1. The DKIM-enabled receiving email server extracts the signature and claimed From: domain from the email headers.
2. The public key is retrieved from the DNS system for the claimed From: domain.
3. The public key is used by the receiving mail system to verify that the signature was generated by the matching private key. A match effectively proves that the email was truly sent from, and with the permission of, the claimed domain and that the message headers and content have not been altered during transit.
4. The receiving email system applies local policies based on the results of the signature test. For example, the message might be deleted if the signature does not match.
Directory Service
This option allows you to have IceWarp Server synchronize itself with an Active Directory service or LDAP one.
IceWarp Server will synchronize on a regular basis and any changes to users within the AD server will be reflected within IceWarp Server.
NOTE: This is a one-way synchronization only, AD to IceWarp Server. If you change a user within IceWarp Server it will NOT be reflected on the AD server and IceWarp Server will revert the changes to match the AD server. You can still define users within this domain that are NOT defined in your AD server. Such users will not be affected by AD synchronization.
Exception: There is a way how users synchronized against AD server can change their passwords via IceWarp WebClient. This option is available for IceWarp Server version 10.3.0 and later. For more information, refer to the Changing Password via IceWarp WebClient (on page 24) chapter.
Management 19
Field Description
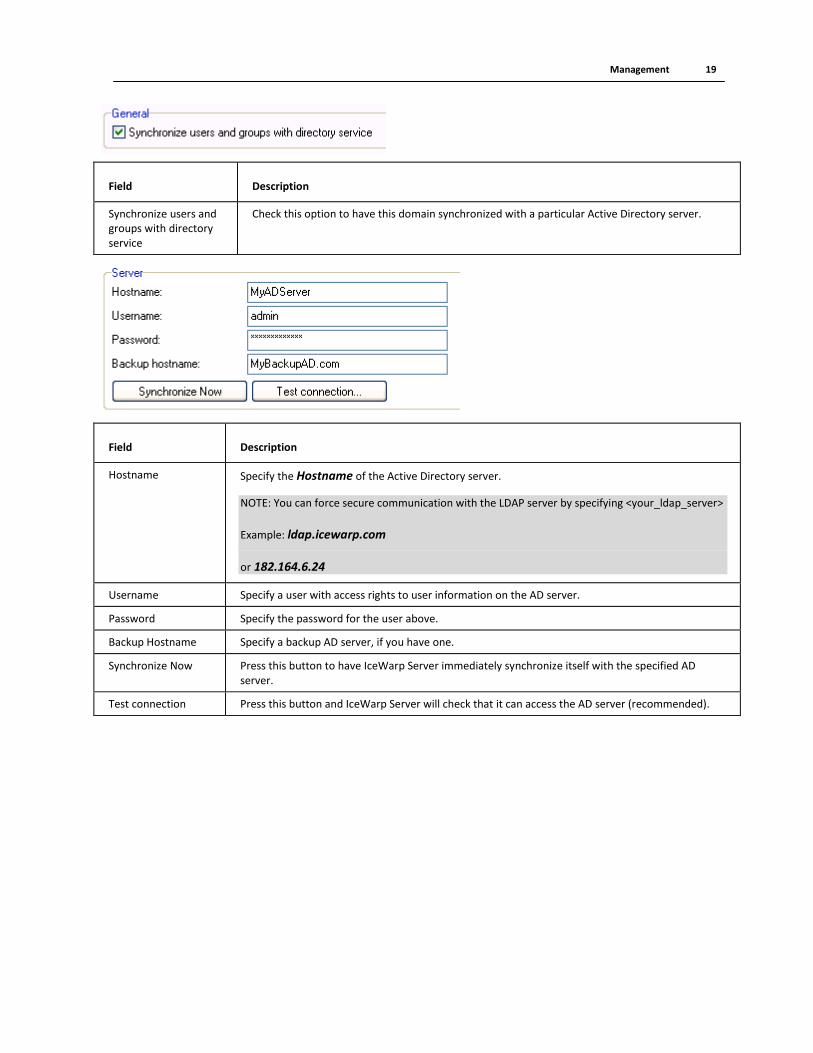
Synchronize users and groups with directory service
Check this option to have this domain synchronized with a particular Active Directory server.
Field Description
Hostname Specify the Hostname of the Active Directory server.
NOTE: You can force secure communication with the LDAP server by specifying <your_ldap_server>
Example: ldap.icewarp.com
or 182.164.6.24
Username Specify a user with access rights to user information on the AD server.
Password Specify the password for the user above.
Backup Hostname Specify a backup AD server, if you have one.
Synchronize Now Press this button to have IceWarp Server immediately synchronize itself with the specified AD server.
Test connection Press this button and IceWarp Server will check that it can access the AD server (recommended).

20 Domains and Accounts Reference
Example of a file with connection test results:

Management 21
Field Description
Filter In this field, you can specify the full LDAP filter for objects to be synchronized. Multiple objects (not more than two – they must be of the same type, i. e. AD one) should be separated with semicolons.
IceWarp Server is able to synchronize 3 types of objects:
User – typically used by AD.
Group – typically used by AD.
inetOrgPerson – objects typically used by LDAP. (For more information, refer to RFC 2798
– http://www.faqs.org/rfcs/rfc2798.html http://www.faqs.org/rfcs/rfc2798.html or
to RFC 2254 – http://www.faqs.org/rfcs/rfc2254.html http://www.faqs.org/rfcs/rfc2254.html which describes LDAP search filter syntax.)
E. g.: (&(objectClass=inetOrgPerson)(mail=domain.com))
Example for LDAP:
domain: teste.com
dn: dc=teste,dc=com
Objects: inetOrgPerson
Generally, use the right syntax expression that the directory service (LDAP, AD, ...) uses for the desired category. See the appropriate RFC.
The server needs to know what type of directory service you are connecting to (ActiveDirectory, LDAP). It will parse the LDAP filter and guess the object type automatically.
DN: This field should be used if you need more control over the Active Directory domain you access.
If you do need to enter anything here then it should be a complete DN, e.g.
cn=Users,dc=icewarp,dc=com
or
dc=icewarp,dc=com for all accounts in all subnodes.
Again, your AD administrator should be able to help you with this.
Directory service domain is different from this domain name
Check this option if the domain names in IceWarp Server and your AD server do not match.
For example:
To synchronize icewarpdemo.com users on IceWarp Server with MyDomain.com on your AD
server you should check this option and enter MyDomain.com in the Domain text box.
Domain If your AD Domain name is different from your IceWarp Server Domain name, you should specify it here., you can also specify a second AD Domain name here, separated with a semi-colon, if required (this is an unusual case, your AD administrator will know whether it is necessary or not).
Example 1
IceWarp Server domain = icewarpdemo.com
AD server domain = ADDomain
email addresses in ADDomain are *@icewarpdemo.com
you should enter ADDomain
22 Domains and Accounts Reference
Example 2
IceWarp Server domain = icewarpdemo.com
AD server domain = ADDomain
email addresses in ADDomain are *@mydomain.com
you should enter ADDomain;mydomain.com
AD login source Select AD login source:
Use userprincipalname – see the example of a connection test file (above).
Use samaccountname – see the example of a connection test file (above).
Use DN – see above.
Local username source Select what type of user identification will be used for the IceWarp Server Username field when synchronized to AD:
Primary Alias of AD Account – only alias is used
Login of AD Account – the selected AD login source (see above) is used
CN of AD account – the Common Name of AD account is used
Add AD login to local alias
Tick this box if you want the user's AD login name (only alias – not whole email address if used)
to be added to the Alias field within the Management – <domain> – <user> – User tab.
Field Description
Enabled Tick the box if you want to use Single Sign-On.
Service name Fill in the service name.
Its syntax is: <server_name>@<ACTIVE_DIRECTORY_SERVER_DOMAIN>
Example: [email protected]
(May be, but need not to be the same server.)
Remote account matching
Select the way how IceWarp Server users will be matched with accounts in Active Directory.
Match with username – user's IceWarp Server Username will be used.
Match with alias – user's IceWarp Server Alias will be used.
Match with AD user's connection string – the Authentication field (when LDAP / Active Directory selected) will be used. See the <user> – Options tab – Account
department.
Place keytab files under "config/_keytabs"
Click the Manage keytabs button to open a file manager. Into the
<InstallDirectory>/config/_keytabs/ folder, place files with keys generated by Active Directory

Management 23
directory for individual protocols (SMTP, IMAP, POP, XMPP, HTTP) using the ktpass command.
Each file name has this format:
<protocol>#<server_name>@<ACTIVE_DIRECTORY_SERVER_DOMAIN>
Examples:
xmpp#[email protected]
HTTP#[email protected]
NOTE: The HTTP protocol is to be written by capitals, while other ones are to be written by lower case.
syncad.dat File
Besides of tags with self-explanatory names, this file (<InstallDirectory> – config) includes ones that are not so clear:
<USERNAMEFROMADUSERNAME>1</USERNAMEFROMADUSERNAME> – if enabled (1), account name is imported
from givenname and sn.
<ALLDATADELETION>0</ALLDATADELETION> – if enabled (1), also emails are deleted for accounts deleted from AD.
Synchronizing Users with LDAP / Active Directory
Use the <domain> - Directory Service - Synchronize users and groups with directory service option and IceWarp Server will synchronize on a regular basis and any changes to Users within the directory server will be reflected within IceWarp Server.
Many organizations use a central Active Directory (AD) server so they can manage their user accounts centrally. IceWarp Server's synchronization function allows you to regularly synchronize the user accounts in the AD to a specific domain in the server. This synchronization by default occurs every 5 minutes. This value can be changed using the
C_Accounts_Global_ActiveDirectorySyncInterval API.
Basic Scenario
It assumed that in most cases that:
the domain name in AD matches the domain name in IceWarp Server.
the users are located in the “Users” organization unit (OU) in the AD structure
the email domain in AD user properties matches the domain in IceWarp Server that you are synchronizing with.
In these cases you only need to setup:
the hostname of your AD
the AD user and password (the AD user has to have rights to list users of the AD OU).
a backup AD domain name - if there is one - which will be used if the connection to primary AD fails.

24 Domains and Accounts Reference
Synchronized users (which are in the LDAP/AD mode) will be authenticated against AD, so IceWarp Server will not store their password.
Notes:
1. The “Test connection...” button lists all available users in the specified AD OU. This list doesn't necessarily match the users being synchronized in IceWarp Server. Where a user's email domain doesn't match the IceWarp Server domain, that user will not be synchronized.
2. The “Synchronize Now” button will do exactly that. The synchronization may take some time. You should refresh the interface to see the changes that have been made by synchronization.
Secure Connection
If you want to connect to your AD server using SSL connection you should use following syntax for the Hostname specification: Example:
ldaps://ad.icewarpdemo.com
or ldaps://182.164.6.24
You also have to have the trusted SSL certificate on the AD server.
Changing Password via IceWarp WebClient
It is possible to set IceWarp Server (version 10.3.0 and later) to a two-way mode, so users can change their passwords (via WebClient – Tools – Accounts) although these are stored on an Active Directory/LDAP server. This requires secured
connection to AD/LDAP server (ldaps).
To set it, follow these steps:
1. Modify the LDAP client config file (IceWarp\ldap\ldap.conf) – add the TLS_REQCERT allow line.
(This directive forces IceWarp Server to accept SSL certificate even if its not signed by a trusted certificate authority.)
2. Tell the OpenDAP library where to find this modified ldap.conf file.
IceWarp Server uses OpenLDAP libraries. They expect the ldap.conf file in a specific path. It is searched for this file in the current working directory of the process that calls it and in the location defined by LDAPCONF environment variable.

Management 25
The easiest way how to configure it properly is to set it to IceWarp\ldap\ldap.conf. In Windows open Control Panel/System/Advanced System Settings/Advanced/Environment Variables and add a new system variable
named LDAPCONF. Fill in the path and file name as a value of this variable e. g. c:\Program Files\IceWarp\ldap\ldap.conf (without quotation marks).
You need to reload the server administration console and restart all modules to apply.
3. Set the secured connection to AD/LDAP server using the following syntax: ldaps://[your_AD/LDAP_server]:636
your_AD/LDAP_server – use IP address
636 – default port for secured LDAP communication. May differ on your system.
AD Domain Different from IceWarp Server Domain
When the AD domain name is different from the IceWarp Server domain name you need to specify it using different syntax.
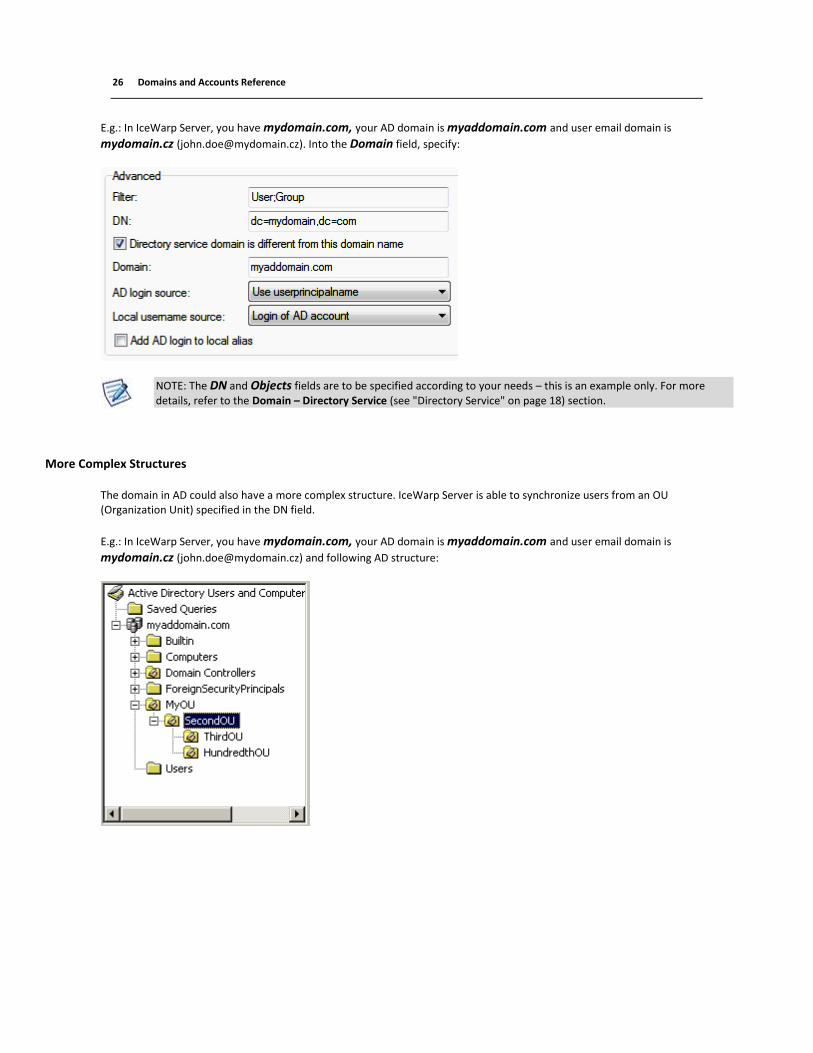
E.g.: In IceWarp Server, you have mydomain.com, your AD domain is myaddomain.com. Into the Domain field, specify:
NOTE: The DN and Objects fields are to be specified according to your needs – this is an example only. For more
details, refer to the Domain – Directory Service (see "Directory Service" on page 18) section.
User Email Domain Different from AD Domain
When the user email in AD has a different email domain, you again need to specify this using a different syntax, with a second
parameter in the Domain field delimited by ; (semicolon).
26 Domains and Accounts Reference
E.g.: In IceWarp Server, you have mydomain.com, your AD domain is myaddomain.com and user email domain is
mydomain.cz ([email protected]). Into the Domain field, specify:
NOTE: The DN and Objects fields are to be specified according to your needs – this is an example only. For more details, refer to the Domain – Directory Service (see "Directory Service" on page 18) section.
More Complex Structures
The domain in AD could also have a more complex structure. IceWarp Server is able to synchronize users from an OU (Organization Unit) specified in the DN field.
E.g.: In IceWarp Server, you have mydomain.com, your AD domain is myaddomain.com and user email domain is
mydomain.cz ([email protected]) and following AD structure:

Management 27
If you want to synchronize the SecondOU's users with OUs, the settings in IceWarp Server will be:
Personal Data Synchronization
Personal data (phone numbers, addresses, etc.) are involved into synchronization with AD/LDAP. These data are synchronized during the first connection to AD/LDAP and (after it) when they are changed in AD/LDAP. In the case a user changes their personal data (after the first synchronization) on the IceWarp Server side, his/her data are no longer synchronized even in the case, they are later changed in AD/LDAP too.
To restore data synchronization, delete the appropriate user row in the config/adsyncrec.dat file.
Example:
[email protected];SQECoeoqbEShnKME2rdJrg==;20110616110044.0Z;20110620T134034Z
Synchronization consists in replacement of data on IceWarp Server with those from AD/LDAP.
NOTE: To ensure this works properly, you have to check existence of the objectGUID and whenCanged items within the LDIF export from AD/LDAP. (Which is a default setting.)
Rules
Rules are common to all domain types and user accounts and are described in detail in the Rules section.

28 Domains and Accounts Reference
Information
The Information tab displays summary of general information about the selected domain, as well as information about its DNS records and running services ports (both TCP and UDP ones plus port ranges). This tab can help you to configure all settings needed for smooth server running.
The information shown is self-explanatory. Green lines represent properly set records, while red ones announce missing configuration.
The number of accounts shown here includes only user accounts.
For more information about service ports, refer to the System Node – Services – Service Ports chapter.

Management 29
New Domain Wizard
There is the New Domain wizard located in the Wizards node of the IceWarp Server console where you can quickly add a domain whose setting you can modify at a later stage.
Double-click the New Domain icon to start the wizard.
Type the Name of the new domain, a fill in the Description field and press Next.

30 Domains and Accounts Reference
Select the Domain Type from the drop-down list.
Specify a Domain value, dependant on the Domain type (see the Domains – Domain (see "Domain" on page 4) section),
and press Next.

Management 31
Enter an Email address of the domain administrator and press Next.
Check your settings and press Next.
Check the screen for any error messages. If the above screen is shown, then your domain has been created successfully!

32 Domains and Accounts Reference
User Accounts
User accounts are the most common accounts on the IceWarp Server.
All accounts are defined within a domain and an email address consists of a user name and domain one –
[user]@[domain_name].
Do not forget that templates can be set up to streamline the definition of accounts, see Account Templates (see "Templates" on page 106).
In This Chapter
User ........................................................................................................ 32 Groups .................................................................................................... 34 Card ........................................................................................................ 35 Limits ...................................................................................................... 35 Policies ................................................................................................... 38 Options ................................................................................................... 42 Mail ........................................................................................................ 46 VoIP ........................................................................................................ 49 Rules ....................................................................................................... 49 New User Wizard ................................................................................... 49
User

Management 33
Field Description
Alias A unique identifier for the account within this domain. This alias becomes part of the Users email address.
Example: Entering an Alias of Support into Domain Mydomain.com would give this User an email address of [email protected]
Multiple aliases can be used by separating them with semi-colon:
e.g. support;help;bugs;info - meaning that messages to any of these accounts will be delivered to this one mailbox.
NOTE: Maximal length of this field is limited to 255 characters. If you want to use more aliases, you can use a pattern.
Syntax: Alias: <primary_alias>; <[pattern_name]>
E.g.: Alias: support; [support_aliases]
For more information, refer to the System Node Reference – Advanced – Patterns chapter.
Phone # Here you can enter the number for the User's unique SIP phone, if he has one.
Multiple phone numbers are supported, delimited with semi-colons.
Username This is the IceWarp Server identification name of the mailbox, which is used for authenticating access to IceWarp Server services.
It is usually the same as the Alias of the account, but does not have to be.
Name The user's real name or an identifier of the account.
This field is used by WebClient and can be changed there (Tools – Accounts – Primary – Name).
It is the FROM header shown to users that receive emails from WebClient.
Description Enter account description.
This can also be seen/changed in WebClient (Tools – Accounts – Primary – Description).
Password The password for the mailbox.
The : button Press this button to let IceWarp Server generate a random password for you. IceWarp Server will generate a password according to the password policy, if you have one defined in Domains & Accounts – Policies – Password Policy.
Permissions Click the button to set access rights for the account where emails are forwarded to. It is possible to set rights for either whole email account or selected folders (e.g. Inbox, Contacts, Calendar, etc.).
For detailed information on permissions, refer to the GroupWare – Reference – Public Folders – General – Permissions Tab and also see bellow.
Photo Click the field to reveal the Open dialog and insert a user's photo.
For more information about personal data synchronization with AD/LDAP, refer to the Domain – Directory Service – Personal Data Synchronization (on page 27) chapter.

34 Domains and Accounts Reference
Permissions
Access Right Description
Lookup basic right just to see folders (not to see items); this allows users to open subfolders they have been given access to
Read right only to read messages
Keep Seen Flag right to mark messages as read
Write right to set or clear flags other than seen and deleted
Insert right to insert a new email message
Post right to send an email via SMTP
Create right to create a new mailbox
Delete right to delete messages
Expunge mails can be removed from a folder (Inbox, Sent, ...) and sent to Trash for example versus deleted at all; this right allows final deleting of mails
Delete Mailbox right to delete a mailbox
Administer full rights
Groups
The Groups tab displays a sortable list of all groups or mailing lists that this user is a member of.
Select one of the radio buttons – Groups or Mailing Lists – to see the appropriate list.
Button Description
Add This button allows you to add groups or mailing lists via the Select Item dialog.
Edit Select a group and click the button to modify settings.
Delete Select a group and click the button to delete this group from a list.

Management 35
Card
This tab allows you to summarize user's personal information. As this feature is integrated with GAL, all data presented here will be shown also within the user's GAL contact.
Fill in the appropriate fields – all of them are optional ones. Their labels are self-explanatory.
Choosing the Address type (Home/Work) allows you to insert, save and lately show both addresses. The same mechanism
you can use for up to three email addresses.
Limits
NOTE: The following limits do not override any domain-level limits that are set.
However, if they are set to a non-zero value, they do override any domain-user limits.

36 Domains and Accounts Reference
Field Description
Account size Limits the size of a user's account. Both email messages and groupware items are included in this limit.
Enter a value and select Kilobytes, Megabytes or Gigabytes from the drop-down box.
Once exceeded no further messages will be accepted for that user.
NOTE: If the box is ticked, zero values override domain-user limits (of account size) and mean that the account has unlimited disk space available. If not ticked, values are inherited from a domain level (<domain> – Limits – Users – Account size).
Max message size Limits the size of ANY message SENT by a user.
Enter a value and select Kilobytes, Megabytes or Gigabytes from the drop-down box.
It is also possible to enable checking of user size limits of incoming messages using API and setting C_Mail_SMTP_Other_IncomingMessageLimits to 1. If this option is enabled and the message violates limits of any of the recipients, the whole message is rejected with a SMTP permanent error.
Be aware that attachments to messages are Base64 Encoded, which adds a size overhead of around 30%, so if you wish to limit your users to attachments of 1MB you should set the limit to 1.3MB.
Send out data limit per day
Limits the amount of data that any single user can send out in 1 day.
Enter a value and select Kilobytes, Megabytes or Gigabytes from the drop-down box.
Once a user exceeds the limit no further messages will accepted from that user.
NOTE: A message sent to multiple recipients will be counted for each recipient, i.e. a 1MB message sent to 10 recipients will be counted as 10 MB towards the limit.
NOTE: Limits smaller than 1 MB can not be saved. It means that you can use limits in kB, but values have to be higher or equal to 1024 kB.
Also NOTE that values are rounded down. E.g. value of 3000 kB is saved as 2 MB.
NOTE: Local emails are not included.
Send out messages limit (#/Day)
Limits the number of messages that a single user can send out in one day.
Once exceeded no further messages will be accepted from that user.
NOTE: Local email sent by the user is not considered. The number of recipients is considered because each recipient can be on a different server and it means that IceWarp Server has to send mail out additional times.

Management 37
NOTE: This value corresponds with Account Statistics – Sent Out.
Field Description
State Enabled
Fully working account.
Disabled (Login)
Partially disabled account. Mail is received, but the user cannot log-in and access any messages. It is very suitable for ISP providers, if they need to disable accounts temporarily.
Disabled (Login, Receive)
Completely disabled account. The user is unable to login and incoming messages are rejected.
Disabled (Spam Trap)
If email is delivered to this account, the sender is considered as an "Intruder" (see Intrusion Prevention) and his IP address is blocked according to the Intrusion Prevention settings.
Expires if inactive for [Days]
The account expires if it is not used for the specified number of days.
When expired, the account is disabled after midnight at the end of the next day after expiration.
Expires on (yyyy/mm/d)
Specifies that the account will expire on the specified date.
The account will be disabled at midnight at the end of the day.
Notify before expiration (Days)
If the account is set to Expire on a specific date then a notification message can be sent the
specified number of days before the account expires.
Delete account when expired
Expired accounts will be deleted if this option is on.
USE WITH CARE, you may not be able to retrieve account information once it is deleted.
Notification file This specifies the full path and file name of a report that will be sent to the user informing them that their account will soon expire.
If this field is blank then a standard report will be generated.

38 Domains and Accounts Reference
Policies
This tab lets you enable or disable selected services for the user. These settings are also considered by the licensing engine when comparing the license size with the amount of activated user seats – only user accounts are licensed.
NOTE: You can select multiple users from the middle pane in Management using Shift+click and Ctrl+click mouse operations to perform a bulk modification.
Field Description
Services Tick the services you want to enable on the user level.
NOTE: Check boxes are enabled only if the accesses to services are granted on higher levels (domain).
NOTE: To enable activation keys for IceWarp Outlook Sync and/or Desktop Client, it is necessary to have ticked check boxes under the <domain> – Services (see "Policies" on page 8) tab first.
NOTE: After upgrade from 10.3.x to 10.4 in the case the previous access mode was Accounts from the list, the appropriate services appear disabled here, but settings are kept. To find out
these settings, use API Console (global level – File menu) – filter variables using the filter value of
processinggroup.
In the case the Advanced mode was used, users will have their modes set to

Management 39
[service_user10.3.x XNOR service_domain10.3.x] in 10.4.
ActiveSync Devices Click this button to reveal the ActiveSync Devices dialog. This dialog lists all user's devices that use ActiveSync. See below.
You can set User Policies (for all user devices), set Device Policies (for the selected user's
device), remove devices from the list (Delete Device), set remote wipe for selected devices (Set Remote Wipe) and cancel remote wipe once set provided that it has not been executed yet
(Clear Remote Wipe).
NOTE: Remote wipe is a total remote deletion of all device data. It is executed when the device contacts the server first time after setting it. Within this period, it is possible to cancel it.
SyncML push settings This button opens the Device dialog that lets you set the SyncML Push settings.
For detailed information about this dialog, refer to the SyncML Push – Server Configuration – Settings and User Accounts section.
SMS account settings This button opens the SMS Account dialog where you can set SMS account options.
See below.
FTP account settings This button opens the User dialog where you can define FTP Service settings.
See bellow.
Activation keys Clicking this button opens the License dialog (see lower) that allows you to transfer activation keys for IceWarp Outlook Sync and IceWarp Desktop Client to the user. The Activation Keys can be distributed by the following means:
by email, click Activation Keys... and Send Key to User by Email
available to the user from WebClient - Tools - License dialog
automatically installed by SmartDiscover with no user intervention
Once you have obtained a license with some amount of possible client activations (see Help – License...), tick Outlook Sync – Activation Key or Desktop Client - Activation Key for users that should be allowed to activate the corresponding application. This will automatically generate an Activation Key for the user and make it available by SmartDiscover and WebClient.
You need to tick the Activation Key checkboxes in Services tab on both the domain level and user level to have the Activation Keys generated automatically. You can still have them unticked on either level and generate activation keys manually in Activation Keys... - Generate Key.
NOTE: Unticking the checkbox will not unregister an already licensed application, it will only disallow the distribution of the Activation Key by SmartDiscover and WebClient.

40 Domains and Accounts Reference
ActiveSync Devices Dialog
NOTE: The caption of the very left button is variable according to the level we are accessing the dialog from.
There are following (self-explanatory) possibilities:
Global Policies (GroupWare – ActiveSync – Device Management)
Domain Policies (Domains and Accounts – Management –<domain> – Services – ActiveSync Devices)
User Policies (Domains and Accounts – Management –<user> – Services – ActiveSync Devices)
For more details about security policies, refer to the ActiveSync Guide – Security Policies section.
SMS Account Dialog
These settings are used in the case the SMS service on the domain level ([domain] – Policies) is enabled.
Field Description
Gateway Select from the list.
Expire Select the date of the account expiration.

Management 41
Monthly message limit Enter the maximum number of messages that can be sent per month; if "0" (zero) is left, there is no limit set.
For example evaluation accounts can be created by limiting a number of sent messages to 10 and/or setting a 7 day expiration.
Number of sent messages this month (Auto adjusted)
The use is two-fold:
1 Message counter.The value shown here tells you how many messages have been sent this month by users or groups within this account. It is automatically reset to 0 at each month's end.
2 Counter reset. Type 0 or any other value and click OK to reset the monthly counter.
Number of sent messages previous month (Auto adjusted)
1 The value shown here tells you how many messages have been sent in the previous month by users or groups within this account. If there has been no activity in that month, it is automatically reset to 0 at each calendar month's end.
2 Counter reset. Type 0 or any other value and click OK to reset the monthly counter.
Last sent Shows the date and time when the last message was sent through this SMS account.
User Dialog
The User tab lets you set the directory the system users will have granted access to.
Field Description
Home directory You have the following possibilities:
leave the field blank – same as the next option
use the &&homedir&& variable – users are directed to their email folders (<InstallDirectory>/mail/<domain>/<user>)
use the &&sitedir&& variable – users have access to the whole site, by default they have the read, write and delete rights
enter some path – users are directed to this directory regardless of the site(s) defined lower
For description of the Permissions tab, refer to the FTP Service – General Tab – FTP Service Dialog – Users – Permissions section.

42 Domains and Accounts Reference
For description of the Options tab, refer to the FTP Service – General Tab – FTP Service Dialog – Users – Options section.
Options
Field Description
Alternate email Fill in an external email address where a password will be sent in the case a user has forgotten it.
Also editable in WebClient – Tools – Accounts – Primary – Alternate Email.
Permissions Restricts the level of access this user has to server resources:
Standard
A standard user account can access all services and can manage his/her quarantine queue, whitelist and blacklist using the WebAdmin interface.
Settings can be changed using IceWarp WebClient.
Domain Administrator
Domain administrators can also maintain accounts within the domains they administer but they cannot perform changes within IceWarp Server's Global Settings.
The Rights button becomes active if this option is selected.
Administrator
Administrator permissions grant this user full access to the IceWarp Server without limitation.
Rights Pressing this button opens the Domain Admin Rights dialog where you can specify which particular account types the administrator can modify, and also whether this account is a spam
administrator account (the Spam queue option).
NOTE: This button is only active when the Domain Administrator permission is selected.
Authentication The authentication mode lets you specify how the IceWarp Email Server authenticates login requests for this user.
Standard
This is the default mode.
The IceWarp Email Server uses its own authentication engine, which supports many authentication schemes such as CRAM-MD5, MD5, DIGEST-MD5, PLAIN, LOGIN, etc.
NT Domain
The NT domain mode specifies that the NT Domain controller should be used to authenticate the user.

Management 43
The IceWarp Email Server must have the SE_TCB_NAME privilege.
By default, the local machine domain controller and user will be used.
If necessary, the domain controller and user can be explicitly identified in the text box to the right, in the following format: NT Controller;NT username
LDAP / Active Directory
The Active Directory mode authenticates against an AD server.
By default the localhost AD server and username of the email address is used.
If the AD server name, username or domain differs, you can explicitly set it in the text box to the right, in the following format:
ADserver;ADusername@ADdomain
NOTE: You can specify multiple servers;users here (maybe a backup server) separated by the | character (pipe character).
E.g. Server1;[email protected]|Server2;[email protected]
Any Password
This mode specifies that any password will be accepted.
This option is not recommended as it can lead to account abuse, but could be used for a trial account or similar.
Expire Password Now Click the button if you want to force this user to change his/her password right now.
NOTE: This button is enabled when the Password Expiration – Active box is ticked (Domains
and Accounts – Policies – Password Policy (on page 118)).
Field Description
Type Specifies the mailbox type:
POP3
Standard POP3 access to the account.
IMAP
Standard IMAP access to the account.
All folders can be accessed from the email client.
IMAP & POP3

44 Domains and Accounts Reference
Access via IMAP or POP3.
Remember that POP3 normally deletes the messages from the Inbox folder unless it is configured not to do so by the user.
NOTE: If you convert POP accounts to IMAP, these accounts can lose the read/unread status in WebClient Inbox folders. All messages become UNREAD.
To resolve it, you can:
run the pop_to_imap.html script (in c:\icewarp\html\admin\tools) prior to converting accounts. While running the script, select these accounts. Then change account(s) type here.
or run the script (mentioned above) and do multiple changes using Tool.exe.
E. g. tool modify account *@* u_accounttype 1
– which means that accounts will become Type of POP+IMAP.
ALSO: Beware, if you use accounts that are of POP type only, the read/unread status is kept in
the PDO database. If you start a new PDO database or drop tables, the read/unread status of
messages will be lost. So for example, in WebClient Pro, all emails will show as UNREAD.
If you really need to start a new PDO database or migrate to a new database type (for example from SQLite to MySQL), you can first convert all accounts to POP+IMAP (using the
pop_to_imap.html script (IceWarp\html\admin\tools\)).
Mailbox Path This specifies the location of the user account's mailbox, where all files and messages related to the account will be stored. By default, the path is inherited from System – Storage – Directories – Mailbox path or from Domain – Options – Folder if enabled.
IceWarp Server automatically defaults this to a path based on the domain name and user alias but you can change it to anything you wish, including a fully qualified path.
NOTE: You can specify a network location for a user mailbox, but this must be specified in UNC format.
Example: \\ComputerName\SharedFolder\Resource
NOTE: Shared drive letters are not supported.
Remote Address This specifies that mail will not be stored in the mailbox but sent on to a remote address instead.
This address should be of the format [email protected].
This field may contain multiple addresses separated with semi-colons.
NULL This option specifies that this is a dummy account and any messages sent to this account will be deleted, but any forwarding and auto responder functions will work as normal.
Refresh Directory Cache
Files/folders copied into mailboxes will not appear to users unless the directory cache is updated.
Use this button to update it.

Management 45
Field Description
Spam reports mode Select the Spam report mode for this user:
Disabled
The user will not receive spam reports.
Default
The user will receive spam reports with either new items only or all items listed – according to
the settings specified in the Antispam – Action – Reports node – Report mode.
New Items
The user will receive a listing of new spam items received since the last report was produced.
All Items
The user will receive a listing of all spam items.
Spam folder mode See the IceWarp Server Anti-Spam section for more details about spam folders.
You can choose one of three modes:
Default
The default setting set in Anti-Spam – Action will be used.
Do not use Spam Folder
A spam folder will not be used for this account.
Use Spam Folder
A spam folder will be used for this account.
Spam administrator This checkbox is only enabled if your anti-spam settings allow.
A user can be a Spam Administrator, allowing him/her to administrate quarantine and
approve message indexing.
For more details, see the Anti-Spam section.
Mailboxes Enabled only if the account is defined as a spam administrator.
Pressing this button opens a dialog where you can specify additional mailboxes this user can maintain or moderate via the AntiSpam access.
Examples are included in the dialog.

46 Domains and Accounts Reference
Field Description
ETRN/ATRN account If this domain is ETRN/ATRN one, then this option is required and this account should be the only account defined in the domain.
This is the account where all incoming messages are kept for the collecting server.
Add X-Envelope-To header to all received messages
Check this option and all messages received will have the X-Envelope-To header added, containing the recipient.
This option is useful for Catch All accounts so the collector of messages can see who the intended recipient was.
NOTE: Use with care as it can reveal Bcc recipients in the header.
User can send mail to local domains only
Check this option to limit the user to sending messages only within the local domains.
NOTE: Do not use this option together with the Bounce back messages for failed recipients
one (WebClient – Administrator Options – Mail – General). For detailed information, refer to the WebClient Administration Guide – Administration Options – Forcing Options on Other
Users chapter – Bounce back messages for failed recipients option.)
Field Description
Forward to All incoming messages will be forwarded to any address(es) specified in this field.
This provides a mechanism for automatically copying messages to other users, both remote or local.
Multiple addresses can be specified with semi-colons as delimiters.
NOTE: The original message is also delivered to a local account. If you do not want a copy in a local mailbox, you should use the User – Options – Remote Address (see "Options" on page 42) option.
NOTE: This setting is accessible via IceWarp WebClient GUI.
NOTE: The Sender header is set to noreply to prevent forwarding the message back to the
original forwarder.
Copy incoming mail Specifies either:
· an email addresses that all incoming messages will be copied to
· or, a path to a directory where message copies will be stored.

Management 47
NOTE: For this feature, content filters can be applied. (Set the mailinusecf API variable to true.)
NOTE: Copying of incoming messages (for local users) is not logged.
Copy outgoing mail Specifies either:
· an email addresses that all outgoing messages will be copied to
· or a path to a directory where message copies will be stored.
Field Description
Mode Specifies whether an auto-response is sent or not. There are four options:
Do Not Respond
No response is sent.
Respond Always
Every message will be responded to.
NOTE: Use with care! If the original sender has an autoresponder doing the same thing, you could create a message loop.
Respond Once
A response will be sent once to each individual sender of a message, so the second and subsequent messages from another person will not receive a response.
Respond after a period
This option will send multiple responses to individual senders, but only the specified number of
days after the previous response to the same sender. The number of days is specified in the
text box to the right.
For example: Assume Respond after a period is selected and 7 is specified in the text box.
If a user sends multiple message every day he/she will receive a response after the first message, then again after the first message 7 days later, then again 7 days later and so on.
Respond again after (Days)
The minimum number of days between responses.
Maximal supported period between responses is 63 days.
Respond only if between
This option lets you specify exact dates when a response will be sent.

48 Domains and Accounts Reference
Click the "..." buttons to open a date-picker dialog.
Respond to messages sent to user's email address only
Check this option and a response will only be sent if the To: header contains the email address
associated with this account.
Message... Press this button to create the response message.
A dialog is displayed where you can specify the message properties.
No Responder For... This button opens a file where you can specify a list of email addresses and/or domains that should not have responses sent to them.
Each email address or domain must be on a separate line.
NOTE: In some cases, IceWarp Server sends out "robotic" messages back to their sender. For example autoresponder, challenge response, bounce back messages. This is OK as far as the sender is a genuine one – NOT a spammer.
There are antispam services (SpamCom, SenderBase.org) that might blacklist the mail server if is set up to send out these robotic messages.
Scenario
1. Spammer sends a spam message to an IceWarp server local account.
2. Spammer forged the sender address.
3. Message is not recognized as spam.
4. Robotic message is generated and sent to spoofed innocent email address (because of autoresponder/challenge response/bounce back).
5. Antispam services like SenderBase.org and others once find this out, they list IceWarp server to a list of suspicions
servers.
6. Because of bad "karma" SMTP communication from the IceWarp server might be rejected by a recipient who uses the
AntiSpam service like the SenderBase.org.
Available solution – disable all "robotic" messages:
Challenge Response in AntiSpam – Quarantine – Send Challenge response email for messages to be quarantined.
Any automatic respond to sender set via Content Filter, Rule or Responder in user settings under the Domains and Accounts – Management – <domain> – <user> – Options tab.
Set Bounce Back messages to be sent to local senders only (in the Mail Service – General – Delivery – NDR section).
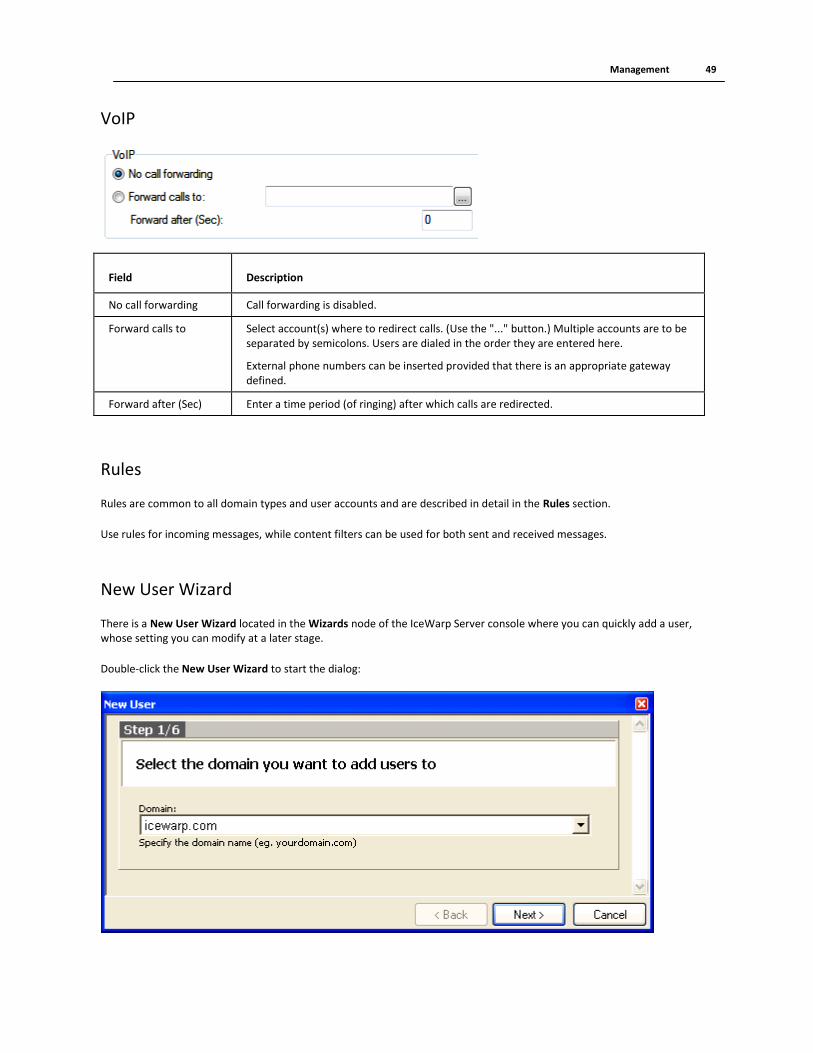
Management 49
VoIP
Field Description
No call forwarding Call forwarding is disabled.
Forward calls to Select account(s) where to redirect calls. (Use the "..." button.) Multiple accounts are to be separated by semicolons. Users are dialed in the order they are entered here.
External phone numbers can be inserted provided that there is an appropriate gateway defined.
Forward after (Sec) Enter a time period (of ringing) after which calls are redirected.
Rules
Rules are common to all domain types and user accounts and are described in detail in the Rules section.
Use rules for incoming messages, while content filters can be used for both sent and received messages.
New User Wizard
There is a New User Wizard located in the Wizards node of the IceWarp Server console where you can quickly add a user, whose setting you can modify at a later stage.
Double-click the New User Wizard to start the dialog:
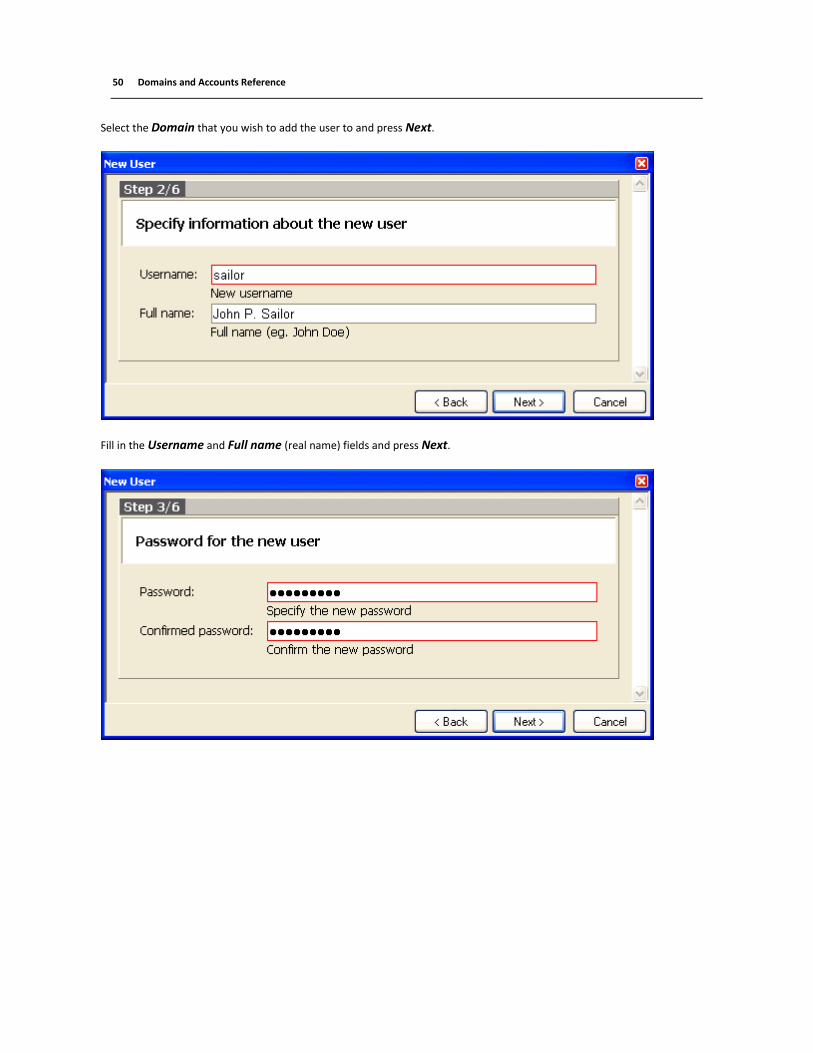
50 Domains and Accounts Reference
Select the Domain that you wish to add the user to and press Next.
Fill in the Username and Full name (real name) fields and press Next.

Management 51
Enter the user's password (in both fields) and press Next.
Select the Permissions from the drop-down list.

52 Domains and Accounts Reference
Select the Account type from the drop-down list and press Next.
Check the entered information and press Next if it is correct.
Check the screen for error messages.
If the screen is shown as above, then the user has been successfully added, press Finish to exit the wizard.
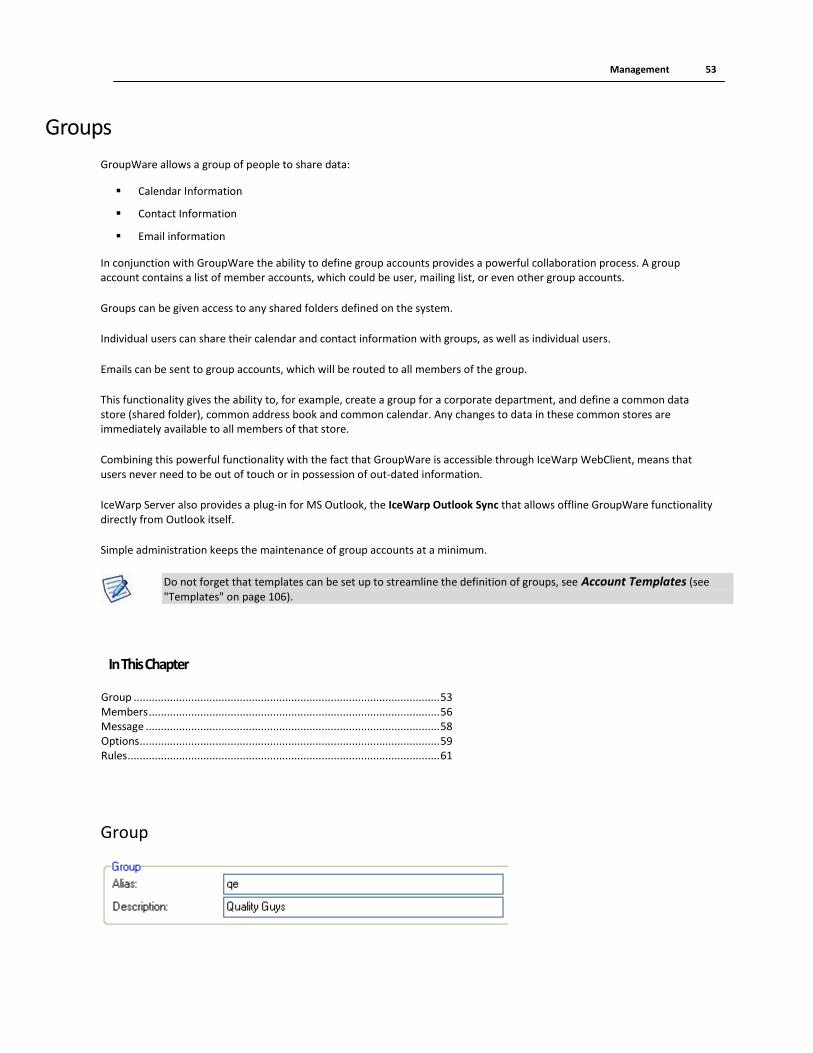
Management 53
Groups
GroupWare allows a group of people to share data:
Calendar Information
Contact Information
Email information
In conjunction with GroupWare the ability to define group accounts provides a powerful collaboration process. A group account contains a list of member accounts, which could be user, mailing list, or even other group accounts.
Groups can be given access to any shared folders defined on the system.
Individual users can share their calendar and contact information with groups, as well as individual users.
Emails can be sent to group accounts, which will be routed to all members of the group.
This functionality gives the ability to, for example, create a group for a corporate department, and define a common data store (shared folder), common address book and common calendar. Any changes to data in these common stores are immediately available to all members of that store.
Combining this powerful functionality with the fact that GroupWare is accessible through IceWarp WebClient, means that users never need to be out of touch or in possession of out-dated information.
IceWarp Server also provides a plug-in for MS Outlook, the IceWarp Outlook Sync that allows offline GroupWare functionality directly from Outlook itself.
Simple administration keeps the maintenance of group accounts at a minimum.
Do not forget that templates can be set up to streamline the definition of groups, see Account Templates (see "Templates" on page 106).
In This Chapter
Group ..................................................................................................... 53 Members ................................................................................................ 56 Message ................................................................................................. 58 Options ................................................................................................... 59 Rules ....................................................................................................... 61
Group

54 Domains and Accounts Reference
Field Description
Alias A unique identifier for the group within the domain.
The Alias is the first part of the email address of the group.
In the above screenshot an email to [email protected] would be the email address of the group.
Multiple aliases can be used by separating them with semi-colon:
support;help;bugs;info
NOTE: Maximal length of this field is limited to 255 characters. If you want to use more aliases, you can use a pattern.
Syntax: Alias: <primary_alias>; <[pattern_name]>
E.g.: Alias: support; [support_aliases]
For more information, refer to the System Node Reference – Advanced – Patterns chapter.
Description A short description of the group.
Create a public folder Check this box to create a public shared folder for this group.
A shared GroupWare and IMAP folder will be created for the group members.
By default, this option is enabled.
Name The name of the public shared folder for this group. This is the name displayed in the email client.
NOTE: You may want to create large amount of similar folders for the same purpose and do not want to have all these folders in the folder tree root, you can nest folders into one created for this and placed to the root. Use backslash in the folder name.
E.g.: Customers\Customer1
Customers\Customer2
etc.
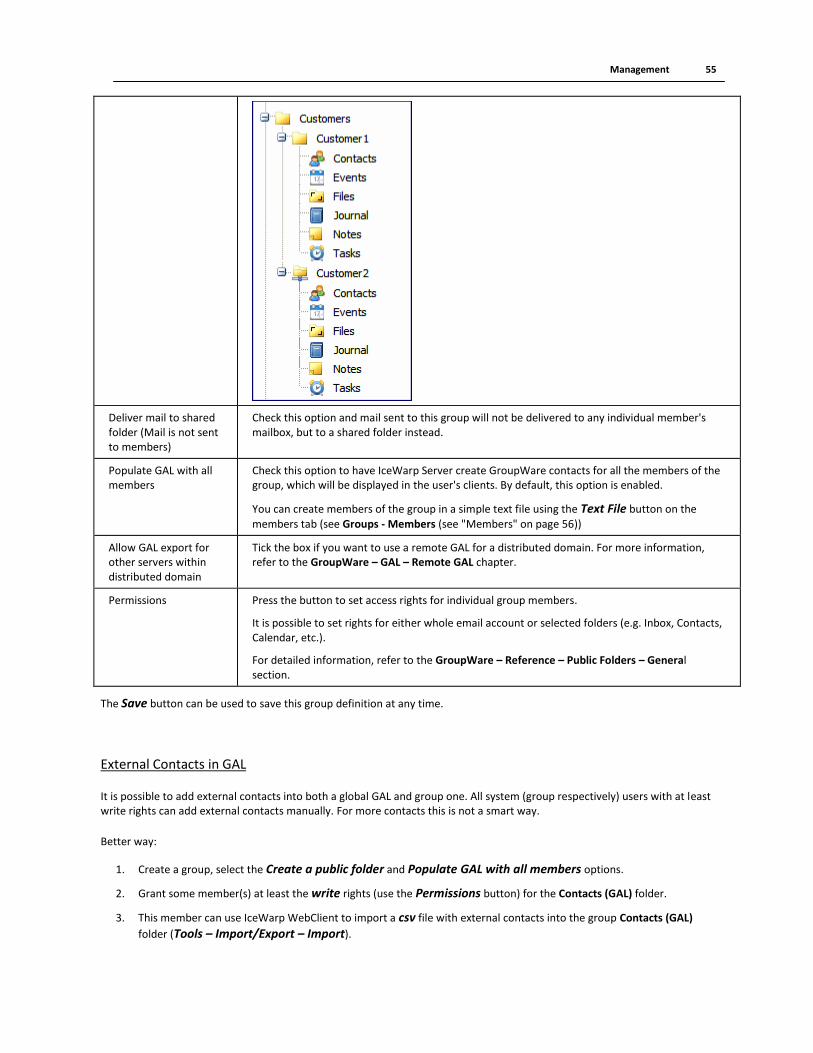
Management 55
Deliver mail to shared folder (Mail is not sent to members)
Check this option and mail sent to this group will not be delivered to any individual member's mailbox, but to a shared folder instead.
Populate GAL with all members
Check this option to have IceWarp Server create GroupWare contacts for all the members of the group, which will be displayed in the user's clients. By default, this option is enabled.
You can create members of the group in a simple text file using the Text File button on the
members tab (see Groups - Members (see "Members" on page 56))
Allow GAL export for other servers within distributed domain
Tick the box if you want to use a remote GAL for a distributed domain. For more information, refer to the GroupWare – GAL – Remote GAL chapter.
Permissions Press the button to set access rights for individual group members.
It is possible to set rights for either whole email account or selected folders (e.g. Inbox, Contacts, Calendar, etc.).
For detailed information, refer to the GroupWare – Reference – Public Folders – General section.
The Save button can be used to save this group definition at any time.
External Contacts in GAL
It is possible to add external contacts into both a global GAL and group one. All system (group respectively) users with at least write rights can add external contacts manually. For more contacts this is not a smart way.
Better way:
1. Create a group, select the Create a public folder and Populate GAL with all members options.
2. Grant some member(s) at least the write rights (use the Permissions button) for the Contacts (GAL) folder.
3. This member can use IceWarp WebClient to import a csv file with external contacts into the group Contacts (GAL)
folder (Tools – Import/Export – Import).
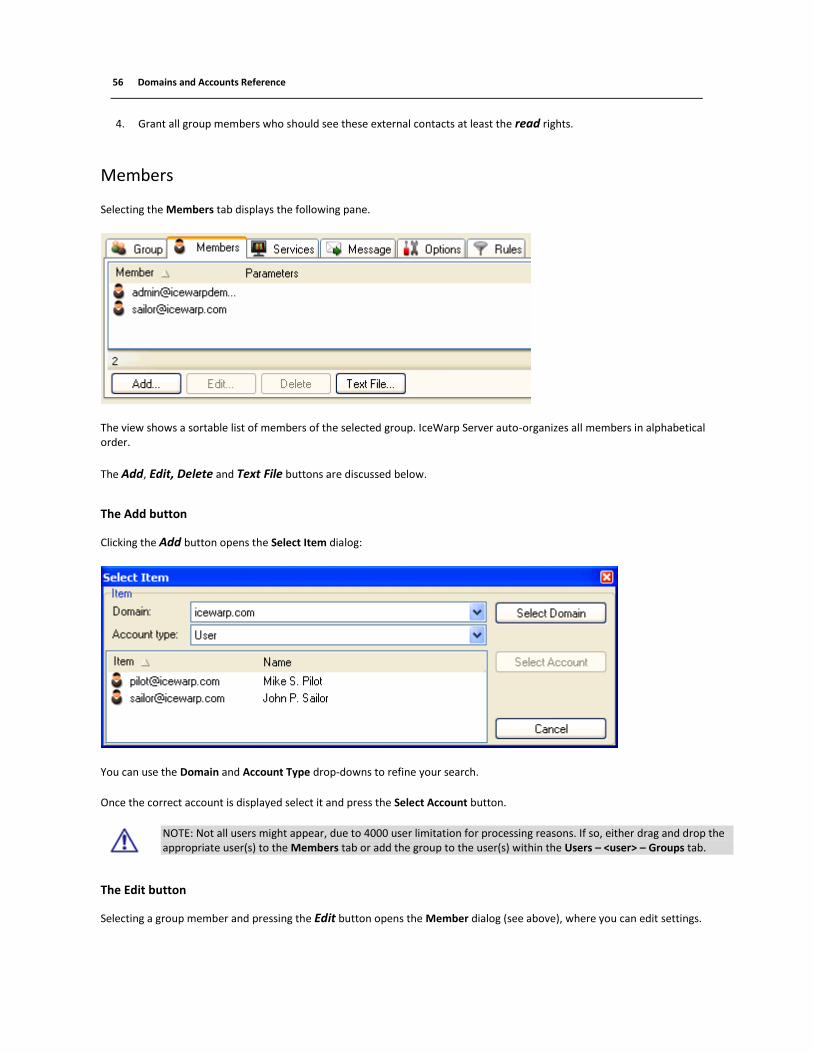
56 Domains and Accounts Reference
4. Grant all group members who should see these external contacts at least the read rights.
Members
Selecting the Members tab displays the following pane.
The view shows a sortable list of members of the selected group. IceWarp Server auto-organizes all members in alphabetical order.
The Add, Edit, Delete and Text File buttons are discussed below.
The Add button
Clicking the Add button opens the Select Item dialog:
You can use the Domain and Account Type drop-downs to refine your search.
Once the correct account is displayed select it and press the Select Account button.
NOTE: Not all users might appear, due to 4000 user limitation for processing reasons. If so, either drag and drop the appropriate user(s) to the Members tab or add the group to the user(s) within the Users – <user> – Groups tab.
The Edit button
Selecting a group member and pressing the Edit button opens the Member dialog (see above), where you can edit settings.

Management 57
The Delete button
Selecting a group member and pressing the Delete button will delete that member from the group. Confirm deletion in the
Question dialog.
The Text File Button
Pressing the Text File button displays the text file that with defined group members:
The file can be edited directly in this window. To see syntax information, press the Comment button.
NOTE: To save any changes you make to the file, you have to select File – Save.

58 Domains and Accounts Reference
Message
Field Description
From: Header
Action
You can specify changes to the From: header of a message:
No Change
No change will be made.
Set to sender
The header will be set to the address of the message sender.
Set to Value
Set the header to the value specified in the Value: box.
Reply-To: Header
Action
You can specify changes to the Reply-To: header of a message:
No Change
No change will be made.
Set to sender
The header will be set to the address of the message sender.
Set to Value
Set the header to the value specified in the Value: box.
Message
Add to Subject
This prefixes the Subject: header with the specified string.
If the text is already present, it does not duplicate it.
If the Subject: header is not present, it is created.
Edit headers You can add any number of custom headers to the message.

Management 59
System variables can be used here.
This field is limited in size, so if you need to add many headers you should use a file to specify the headers to add, like this:
Enter %%include <FileName>%% in the Add headers: text area, where <FileName> is a fully
qualified path to the file.
Create the file specified, as a simple text file, and add the headers you wish to add to messages.
Originator This is an advanced SMTP option. You can specify the exact content of the SMTP MAIL FROM command.
The possible options are:
Blank - the MAIL FROM command offers an empty field.
Sender - the Sender's address is used.
Owner - the List Owner's address is used.
NOTES:
If the Blank option is selected (the default) some email servers might reject the message.
When you choose the Sender or Owner all bounce backs of failed messages will be sent to that email address.
Header / Footer The Header/Footer dialog is opened where you can specify text and html files (for text and html messages respectively) that will be inserted at the start and end of all messages sent through the mailing list.
You should always specify a fully qualified path to the file.
NOTE: HTML files should only contain HTML BODY content (without the BODY tags).
Options
Field Description
Only members can post new messages
Check this option and only members of the Group will be allowed to post new messages to the Group.
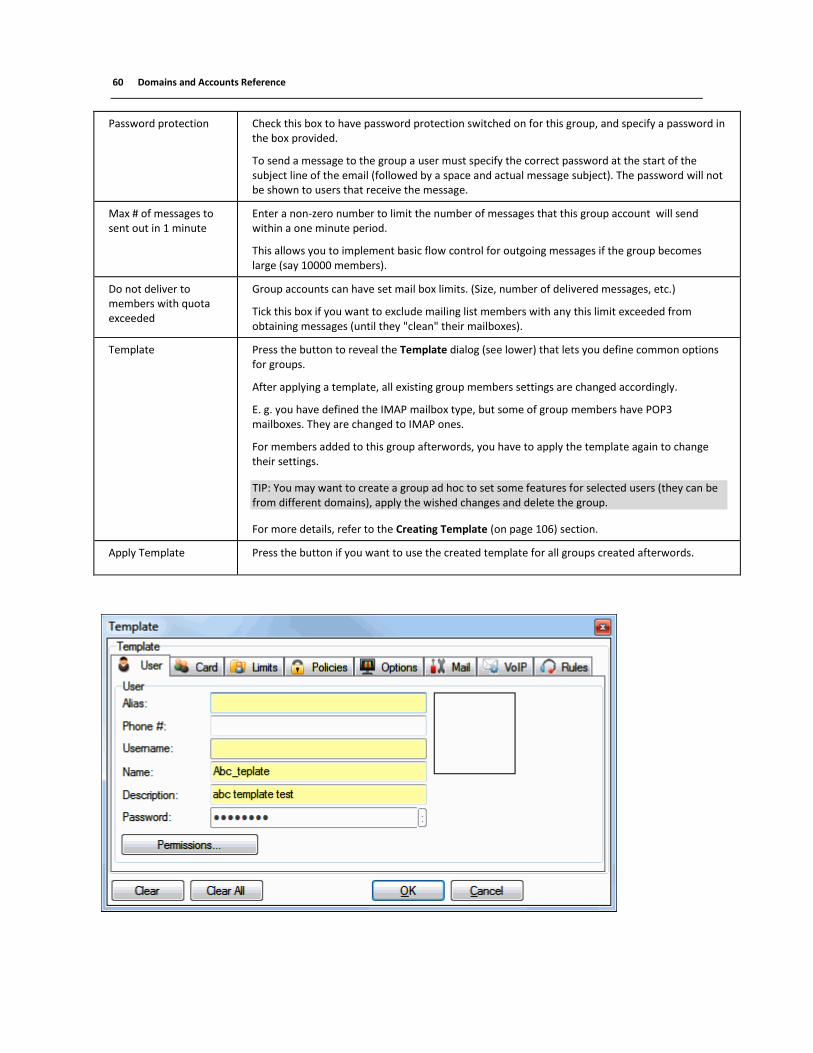
60 Domains and Accounts Reference
Password protection Check this box to have password protection switched on for this group, and specify a password in the box provided.
To send a message to the group a user must specify the correct password at the start of the subject line of the email (followed by a space and actual message subject). The password will not be shown to users that receive the message.
Max # of messages to sent out in 1 minute
Enter a non-zero number to limit the number of messages that this group account will send within a one minute period.
This allows you to implement basic flow control for outgoing messages if the group becomes large (say 10000 members).
Do not deliver to members with quota exceeded
Group accounts can have set mail box limits. (Size, number of delivered messages, etc.)
Tick this box if you want to exclude mailing list members with any this limit exceeded from obtaining messages (until they "clean" their mailboxes).
Template Press the button to reveal the Template dialog (see lower) that lets you define common options for groups.
After applying a template, all existing group members settings are changed accordingly.
E. g. you have defined the IMAP mailbox type, but some of group members have POP3 mailboxes. They are changed to IMAP ones.
For members added to this group afterwords, you have to apply the template again to change their settings.
TIP: You may want to create a group ad hoc to set some features for selected users (they can be from different domains), apply the wished changes and delete the group.
For more details, refer to the Creating Template (on page 106) section.
Apply Template Press the button if you want to use the created template for all groups created afterwords.

Management 61
Rules
Rules are common to all domain types and user accounts and are described in detail in the Rules section.
Field Description
Active Tick the box to enable rules executing.

62 Domains and Accounts Reference
Resources
This IceWarp Server feature allows smoothing and easing resource management process. This process consists in reservation of company resources and allocation of them.
Resources are meeting rooms, projectors, cars, etc.
For more details, refer to the GroupWare Reference – Scheduling and Resource Management chapter.
In This Chapter
Resource ................................................................................................ 62 Card ........................................................................................................ 63 Users ...................................................................................................... 63 Rules ....................................................................................................... 64
Resource
Field Description
Alias Fill in a resource alias.
Description Fill in a short resource description.
Type Select the appropriate resource type:
Room – use this type for meeting rooms, conference ones, etc.
Equipment – use this type for other items such as projectors, computers, etc.
Car – use this type for cars.
Temporarily unavailable Tick this box in the case of temporary unavailability of the item – e.g. the item is under repair.
Ticking this box causes that organizers are not able to add the resource when sending a

Management 63
reservation.
Allow conflicts Tick this box if you want to allow situations when reservation requests can overlap. The resource manager resolves eventual conflicts.
If the box is not ticked, an automatic iMIP agent rejects requests that coincide with accepted ones.
Send notification to user Tick the box if you want some user to be notified about every accepted or declined request. This user can act as a resource manager. In this case, give him/her a full rights
(use the Permission button).
Select this user clicking the "..." button. You can enter more accounts separated by semicolon (or multi-select them in the Select Item (see "Members" on page 56) dialog using CTRL + click or SHIFT + click).
Permissions Press the button to set access rights for individual users, groups or domains.
For detailed information, refer to the GroupWare – Reference – Public Folders – General section.
NOTE: All resource users are added with lookup, read, insert and post rights (even
system or domain administrators). In the case you want to grant someone higher
permissions, do it here manually. The same applies for the user(s) selected in the Send notification to user field.
Card
This tab allows you to summarize resource's information.
Fill in the appropriate fields – all of them are optional ones. Their labels are self-explanatory.
For more details, refer to the User Accounts – Card (on page 35) chapter.
Users
This tab lets you define resource users. You can choose individual accounts as well as groups and even whole domains. Under the Resource tab – Permissions, you can set different rights for individual users.
Button Description
Add Click the button to add a new organizer. Clicking reveals the usual Select Item dialog that allows you to add accounts, groups and domains from the server. (For the dialog description, refer to the Group – Members (see "Members" on page 56) section.)
64 Domains and Accounts Reference
Edit This button is not active here.
Delete Click the button to remove the selected organizer.
Text File Click the button to reveal a text file with all organizers. To see syntax rules and examples, click
the Comment button here.
Rules
For description of this tab, refer to the Rules section.

Management 65
Mailing List
The Mailing List Account enables you to define a list of email addresses that you can send to using one email address.
They can be used for discussion groups, departmental announcements, etc.
The members of a Mailing List can be stored in a plain text file, a database or they can be IceWarp Server User Accounts on the same server.
Variable names and values can be stored for each member, which can then be used within messages to customize individual messages for the receiver.
A Mailing List can be a member of a Mailing List account, but care should be taken not to include a Mailing List within itself as you may end up with a recursive mailing situation.
Do not forget that templates can be set up to streamline the definition of accounts, see Account Templates (see "Templates" on page 106).
In This Chapter
Definition ............................................................................................... 65 Members ................................................................................................ 68 Message ................................................................................................. 70 Security .................................................................................................. 72 Options ................................................................................................... 74 Rules ....................................................................................................... 76
Definition
Field Description
Alias A unique identifier for the account within the domain.
Description A short descriptive text for the account.
Owner The email address of the mailing list owner – multiple addresses can be specified here, separated

66 Domains and Accounts Reference
by semicolons.
The account owner has special rights to this account.
You can use the '...' button open the Select Accounts dialog.
Source A drop-down box allowing to quickly add a pre-defined set of members:
Members from Text file
Allows you to specify, or create, a simple text file containing the member email addresses. each address should be specified on a single line of the file.
Members from ODBC
Select this option to have IceWarp Server interrogate a database for list members.
If you choose this option you will need to supply the SQL that IceWarp Server should use to extract addresses and variables from the database. see the next section for more information.
NOTE: The commands chosen at the Allowed Commands section (Management – List Servers – <list server> – List Server), e.g. Join (Subscribe), Leave (Unsubscribe), etc., are not available when this option is selected.
All current Domain Users
Messages will be sent to all users defined within this Domain.
All System Users
Messages will be sent to all Users defined with all Domains within this IceWarp Server.
All System Domain Administrators
Messages will be sent to all Domain Administrators within this IceWarp Server.
All System Administrators
Messages will be sent to all System Administrators within this IceWarp Server.
List file A simple text file containing all members of the group, one per line.
SQL statements If you choose the Members from ODBC option in the previous section then you need to supply the SQL that IceWarp Server should use to extract information from the database.
For example:
SELECT <YourData> FROM <YourTable> WHERE <YourCriteria>
<YourData> should specify which columns you need data extracted from.
<YourTable> should specify the table containing your data.
Management 67
<YourCriteria> should specify any criteria you need to apply to your data.
NOTE: Variable values can be stored within the database and extracted within this SQL to create personalized messages, but:
the first field returned MUST be the email address
the second field returned (if at all) MUST be the member Rights or blank
subsequent fields should be any variable values you wish to use.
If you also wish to use the Remove dead emails option in the Options tab you will need to specify a second SQL statement here which IceWarp Server will use to delete addresses as required. The %s system variable should be used to specify the email address.
For example:
DELETE FROM <YourTable> WHERE <YourEmailField> = '%s'
<YourEmailField> should specify the column containing the email address of the member.
The two statements should be separated by a single line with a semicolon.
Example:
SELECT <YourData> FROM <YourTable> WHERE <YourCriteria>
;
DELETE FROM <YourTable> WHERE <YourEmailField> = '%s'
If your SQL is particularly long you can specify it within a simple text file and enter the fully qualified filename in this area. IceWarp Server will recognize this as a file name and read it to collect the SQL.
Test SQL query Performs an SQL state command to see if everything has been setup properly.
ODBC settings Sets the ODBC source for the database connection.

68 Domains and Accounts Reference
Members
This tab displays a sortable list of members of the selected mailing list. By default, members are listed in alphabetical order.
Button Description
Add Click the button to add a new mailing list member. The Member dialog opens.
Edit Select a member and click the button to edit his/her settings. The Member dialog opens.
Delete Select a member and click the button to delete this mailing list member.
Text File Click the button to open and edit a plain text file listing the mailing list members. To reveal
the syntax rules, click the Comment button there.
NOTE: You have to use UTF-8 format for this file, if you want to import it.
Field Description
Member The email address of the member.
It can contain the users full name, in the following format:

Management 69
"John Doe"<[email protected]>.
You can use the Select button to open the Select Account dialogue.
NOTE: You also can send SMS messages to mailing list members. For more information, see lower.
Access Determines what the member can do.
Default
Member will have default rights as defined in the Mailing List - Security (see "Security" on
page 72) tab of mailing list settings.
Or various combinations of the following can be chosen from:
Receive
Member will receive all messages sent to the list, and cannot post messages to the list.
Post
Member can post message to the mailing list.
Digest
Member will receive all messages sent to the list, in a single "digest" message, and cannot post messages to the list.
NOTE: If a mailing list has a group entered as a member, then any rights defined in the mailing list for that group will override any rights defined in the group definition.
Parameters Defines variables which can be used within a message to create personalized messages.
Variables can be included within a message by including the variable name enclosed within double braces.
For example: in the above screenshot, any occurrence of {{name}} within the message is
replaced with John.
Sending SMS Messages to Mailing List Members
Besides email messages, you can set sending SMS messages to mailing list members. I this case, use the following syntax:
<sms:<number>?user=<username>&pass=<password>>
Where:
<number> – user's phone number,
<username> – is a valid username for authentication (can be an account created for this purpose) – only required if SMS
server authentication is active,
<password> – is the valid password associated with the username – only required if SMS server authentication is active.
Example:
<sms:+15551234567?user=john&pass=johnspw>

70 Domains and Accounts Reference
Message
Field Description
From: Header You can specify changes to the From: header of a message:
No Change
No change will be made.
Set to sender
The header will be set to the address of the message sender.
Set to Value
Set the header to the value specified in the Value box.
Reply-To: Header You can specify changes to the Reply-To: header of a message:
No Change
No change will be made.
Set to sender
The header will be set to the address of the message sender.
Set to Value
Set the header to the value specified in the Value box.
Field Description
Set recipient To: When a message is sent to a mailing list, the To: header will contain the address of the mailing

Management 71
header list itself.
Checking this option will cause the To: header of each message to be modified to contain the actual address of the recipient.
Add to Subject This prefixes the Subject: header with the specified string.
If the text is already present it does not duplicate it.
If a Subject: header is not present it is created.
Edit headers You can add any number of custom headers to the message.
System variables can be used here.
This field is limited in size, so if you need to add many headers you should use a file to specify the headers to add, like this:
Enter %%include <FileName>%% in the Add headers: text area, where <FileName> is a fully qualified path to the file.
Create the file specified, as a simple text file, and add the headers you wish to add to messages.
NOTE: Some systems (like Hotmail) dislike receiving messages from a list where the FROM header is one their customer's address, however, message was not sent through recipient's
(Hotmail in this case) mail server's SMTP. One solution is to change the FROM to something
static and define for example Subject: %%subject%% - sent by %%sender_email%% within
the Edit headers field.
This keeps the original subject that the user has typed and add the actual sender next to it.
Originator This is an advanced SMTP option. You can specify the exact content of the SMTP MAIL FROM command.
The possible options are:
Blank - the MAIL FROM command offers an empty field.
Sender - the Sender's address is used.
Owner - the List Owner's address is used.
NOTES:
If the Blank option is selected (the default) some email servers might reject the message.
When you choose the Sender or Owner all bounce backs of failed messages will be sent to that email address.
Header / Footer A dialog is opened where you can specify text and html files (for text and html messages respectively) that will be inserted at the start and end of all messages sent through the mailing list.
You should always specify a fully qualified path to the file.
NOTE: HTML files should only contain HTML BODY content (without the BODY tags).

72 Domains and Accounts Reference
Security
Field Description
Only members can post new messages
Check this option to stop non-members of the Mailing List from sending messages to the Mailing List.
NOTE: This option does not override any member rights set in Mailing List – Members (see
"Members" on page 68). A member must also have posting rights to be able to post.
NOTE: If you do not check this option then anyone can send a message to the mailing list and it
will be accepted (after usual rules, AntiSpam and IceWarp Anti-Virus checking).
NOTE: One can forge the sender as being one of the list members and be able to send. To avoid
it, use the Reject if originators domain is local and not authorized option (Mail Service –
Security – General).
Also, you can use the Reject if SMTP AUTH different from sender option (Mail Service –
Security – Advanced) to prevent local users from mailing list misuse.
Password protection Select a level of password protection you require for this Mailing List.
Not password protected
Users do not need to specify a password to post to the list.
There are two types of Moderated Lists which require a password to be included either at the start of the Subject: header, or in the X-Approved MIME header. The difference between the two types is in the way that a message is treated when no password is given:
Server Moderated
A server moderated list will store a non-passworded message and send a copy to the list owner. If the owner wants to allow the message then he should reply to it (no password required) and the server will distribute the message.
This is a way of having a list moderated by a real person.
Client Moderated
A client moderated list will send a non-passworded message back to the sender, effectively as a prompt to re-send the message with the password included.

Management 73
NOTE: Some mail clients support the X-Approved MIME header which can contain the password. IceWarp Server will automatically check that header and allow the message if the password is correct.
Password The password which IceWarp Server will check for.
Allow subscribers As an extra security you can specify a Fully qualified path to a file of addresses which are allowed to subscribe to this list.
Default Rights Determines what rights a member will have if you chose Default rights for the member.
Various combinations of the following options are available:
Receive
Member will receive all messages sent to the list
Post
Member can send any message to the mailing list.
Digest
Member receives messages once a day (at midnight) in a package.
Max message size Select a maximum message size that can be sent.
Max members count Specify a maximum number of members for this mailing list.
NOTE: Limiting max members always applies to static members sources, such as all domain users or all system users.
Deny EXPN Normally, if a client issues the EXPN command the list members will be returned.
As a security precaution you can check this option and IceWarp Server will respond with a "No such Mailing List" message.

74 Domains and Accounts Reference
Options
Field Description
Send to sender When a list member sends a message to the list he will only receive a copy himself if this option is checked.
Forward copy to owner If the owner of the list is not a member of the list then checking this option will copy messages to the owner.
We suggest, however, that list owners subscribe to the their own lists.
Digest mailing list Checking this option will allow a User to subscribe to this mailing list as a "Digest" service.
At midnight a single message will be sent to the members containing all the messages of the day.
Relay local messages Checking this option will instruct IceWarp Server to send all messages to local users via the outgoing queues and back to the local server.
This means that all locally-bound messages will go through all the standard IceWarp Anti-Virus, AntiSpam, and Rules processing.
Process mailing list variables
Check this option if you want to allow variables to be processed within messages sent to this list.
Personalized mailing list – variable fields
The personalized mailing list option lets you customize your messages with variables linked to the members of the list.
Variables included within a message, in the format {{VariableName}} will be replaced with the corresponding value of the variable for each member.
Variables are set when you define a member (see Mailing List – Members (see "Members" on page 68)).

Management 75
Personalized Mail Example:
Dear {{name}},
Congratulations!
Your sales last month exceeded ${{totalsales}}.
We are pleased to offer you a special price for your next purchases.
Please use pricecode {{pricecode}} with your next order.
Your Team.
In the above example the values for variables name, totalsales and pricecode will be substituted.
Update Date: header When using vast mailing lists, last messages can be significantly older than ones sent earlier.
Tick this box if you want to have the time of sending updated.
Remove dead email addresses
Check this option to have IceWarp Server permanently remove any members from the list if it encounters a permanent error while attempting delivery.
NOTE: FULL MAILBOX at the receiving address can issue a fatal error and cause a legitimate address to be deleted – care should be taken in using this option.
NOTE: If you are using a Database to store your lists you must also have specified the SQL to delete a user from the database – see Mailing List – Definition.
NOTE: Dead email addresses are not removed immediately after the first unsuccessful delivery attempt. They are removed before the next delivery action.
NOTE: This option does not work in the case the Deliver messages via relay server when direct delivery fails option (Mail Service – SMTP Service – General) is enabled.
Do not deliver to members with quota exceeded
Users can have set mail box limits. (Size, number of delivered messages, etc.)
Tick this box if you want to exclude mailing list members with any this limit exceeded from obtaining messages (until they "clean" their mailboxes).
Max # of messages to send out in 1 min.
Enter a non-zero number here to limit the number of messages that this list will send within a one minute period.
This allows you to implement basic flow control for outgoing messages if your list becomes large (say 10000 members)
Notify owner Check the Join and/or Leave boxes to automatically send a notification of these events to the
list owner. (Applies in the case, the administrator has setup a listserver account.)
Join & Leave Files Specify fully qualified file names to customized Join and Leave Files and they will be used to create messages to new and departing members of the list.
You can use the buttons to edit the files once they have been specified.
Join message Press this button to define a message that is sent to all new joiners.
Leave message Press this button to define a message that is sent to mailing list leavers.
76 Domains and Accounts Reference
Rules
Rules are common to all domain types and user accounts and are described in detail in the Rules section.

Management 77
List Server
A List Server account is an account used to allow users to control their access to any Mailing List accounts.
Various commands, such as Join and Leave, can be issued via emails.
A Moderated List Server option is available which verifies all commands by means of a password.
Do not forget that templates can be set up to streamline the definition of accounts, see Account Templates (see
"Templates" on page 106).
In This Chapter
List Server ............................................................................................... 77 Lists ........................................................................................................ 80 Options ................................................................................................... 81 Rules ....................................................................................................... 82 Example .................................................................................................. 82
List Server
Field Description
Alias A unique identifier for the Account within the Domain.
Description A short description of the Account.
Owner The email address of the owner of the List Server.
Multiple addresses can be specified, separated by semi-colons.
This address is used for replies from the List Server and also for confirmation messages.
Source Will this list server serve all Mailing Lists on this server or only a sub-set?

78 Domains and Accounts Reference
All domain mailing lists
Select this to have this single List Server serving all Mailing lists on this domain.
Mailing lists from text file
Select this option if you want to have multiple list servers serving different sub-sets of domains or you only want this list server to serve a subst of Mailing Lists. The text file containing the Mailing list(s) to be served is selected in the next option
List file By default this option is left blank, allowing all mailing lists within the domain to be administered just by this one List Server.
If you need to have multiple List Servers controlling different sets of Mailing Lists, then you should create a List file specifying which Mailing List Accounts are controlled by this List Server.
Each Mailing List address should be specified on a separate line, as shown below:
[email protected] [email protected]
Subscription No confirmation
Subscription (or Join) requests are processed without any confirmation.
User confirmed
Subscription requests will only be processed if the Subscribing email came directly from the subscribing email address. This stops Users from subscribing other people to the list.
Owner confirmed
Subscriptions requests must be confirmed via email by the owner of the Mailing List.
Command in Subject Checked by default, only the Subject Header of an incoming message will be checked for a command.
If you uncheck this option commands must be contained within the body of the message and multiple commands can be issued.
Check all the commands you wish to allow people to use on this list server.
NOTE: Join, Leave and Vacation/NoVacation commands (only these) are not available when the Source feature
(Management – Mailing Lists – <mailing list> – Mailing List) is set on Members from database.
Detailed descriptions of each command are given below:
Command Description Usage
JOIN,
SUBSCRIBE,
The join or subscribe commands are issued by users who wish to join a Mailing
JOIN|SUBSCRIBE [password] {list
name}, [email address], [full

Management 79
JOIN-DIGEST,
SUBSCRIBE- DIGEST
List.
Adding - DIGEST to the command will cause the subscriber to receive one daily message containing all the messages for that day.
NOTE: This option only works if the Mailing List has the Digest mailing list option set.
When the Owner confirmed subscription option is set a confirmation message is sent to the owner of the list for approval.
name], [rights],[parameters]
Values in italics are optional.
The action on omission of a password will depend on the
Subscription option selected (see above)
If email address is omitted, the
sending address will be used.
Rights are set as follows:
0 - no access at all
1 - Read only
2 - Post only
3 - Read and Post
4 - Digest only
5 - Read and Digest
6 - Post and Digest
7 - Read, Post and Digest
If rights are omitted the default
value of 3 - Read and Post are used.
Parameters are used for
personalized Mailing Lists, multiple variables can be entered using & as a delimiter
Example: JOIN listpass [email protected],[email protected],My Name,7,name=John&city=London
LEAVE,
UNSUBSCRIBE
LEAVE-DIGEST
UNSUBSCRIBE-DIGEST
Allows Users to leave a Mailing List UNSUBSCRIBE|LEAVE [password]
{list name}, [mail address]
LISTS Allows a User to obtain a list of all the mailing lists that are served by this List Server.
LISTS [password]
WHICH Allows a User to retrieve a list of all Mailing Lists to which he is subscribed
WHICH [password] [mail address]
REVIEW,
RECIPIENTS
Allows a User to retrieve a list of subscribers to a Mailing List
REVIEW|RECIPIENTS [password]
{list}

80 Domains and Accounts Reference
HELP Allows a User to retrieve a list of all List Server commands (as on this page).
This response can be customized using the List server help under the Options tab.
HELP [password]
BLACKLIST or WHITELIST (BL or WL)
Allows a User to add/remove email addresses to/from his individual Black & White List Rules.
BLACKLIST [password] {email}, [sender], ["remove"] or WHITELIST [password],{email}, [sender], ["remove"]
VACATION or NOVACATION
Allows a User to temporarily stop receiving messages.
Issue the VACATION command to stop receiving and the NOVACATION command to start receiving again.
This can also be used where somebody is Subscribed to a Mailing List with two addresses but only wishes to receive messages to one account. He should issue the VACATION command from the other address.
VACATION [password] {list name}, [mail address]
NOVACATION [password] {list
name}, [mail address]
Lists
This tab allows you to select which lists are to be managed by this list server. You are presented with a list of managed lists:
Use the Delete button to delete a list from this list server.
Use the Add button to add a list to this server. The standard Select Item dialog opens to allow you to chose lists to add.
The Edit button is non-functional on this tab.
NOTE: Other buttons are enabled only if the Source feature (the List Server tab) is set to the Mailing lists from text file option.

Management 81
Select the list(s) and press the Select Account button to add them.
Options
Field Description
Moderated list server When checked all list server commands are protected by a password (see the previous topic for command syntax).
If the password is omitted or an incorrect password is given the command will not be processed.
Password Specify the password here.
List server help If a user sends the HELP command to the list server, the server responds with a standard help message.
You can customize the content of the message by specifying a text file here.
A second file can be added here which will be used as the confirmation message from the List Server if confirmed subscriptions are in use.
helpfile;confirmationfile
Originator Here you can choose the content of the SMTP MAIL FROM command.
The possible values are:
Blank - Some mail servers may reject a message with an empty MAIL FROM header.
Sender - The Senders address will be used
Owner - The Owners address will be used
NOTE: If you choose Sender or Owner any bounced messages will be sent to that address.
Suppress command Failure and Success responses to commands are suppressed and not sent to the sender of the

82 Domains and Accounts Reference
responses command.
This might be useful when processing web form requests by emails.
Rules
Rules are common to all domain types and user accounts and are described in detail in the Rules section.
Example
Here is an example of how to use a list server.
Assume the following for the list server:
Domain icewarpdemo.com
List Server Alias ls1
List server password lspass
Command in Subject Yes
Mailing lists served by this server
announcements
tech_news
general
To get a list of mailing lists send an email to [email protected] with a subject of lists.

Management 83
Executable
Executable Accounts are designed to allow you to run jobs or processes on a server without using any remote access tools. A job is defined in advance on the server and it can be executed by sending an email to the Executable Account.
Be aware that the process must exit correctly by itself without any need for user input, so the Server can complete the task correctly.
It is highly recommended that a password is set for the Executable Account and/or Rules are set up to restrict email access to the account.
Do not forget that templates can be set up to streamline the definition of accounts, see Account Templates (see "Templates" on page 106).
In This Chapter
Executable .............................................................................................. 83 Rules ....................................................................................................... 84
Executable
Field Description
Alias A name for the account within this domain.
Description A short description of the account.
Application Specifies the fully qualified file name (or URL) of the executable, which can be a DOS, Win32 application or a DLL.
It must not be a GUI application which requires user input.
Type You must choose the correct type of application here for the executable to be processed correctly.
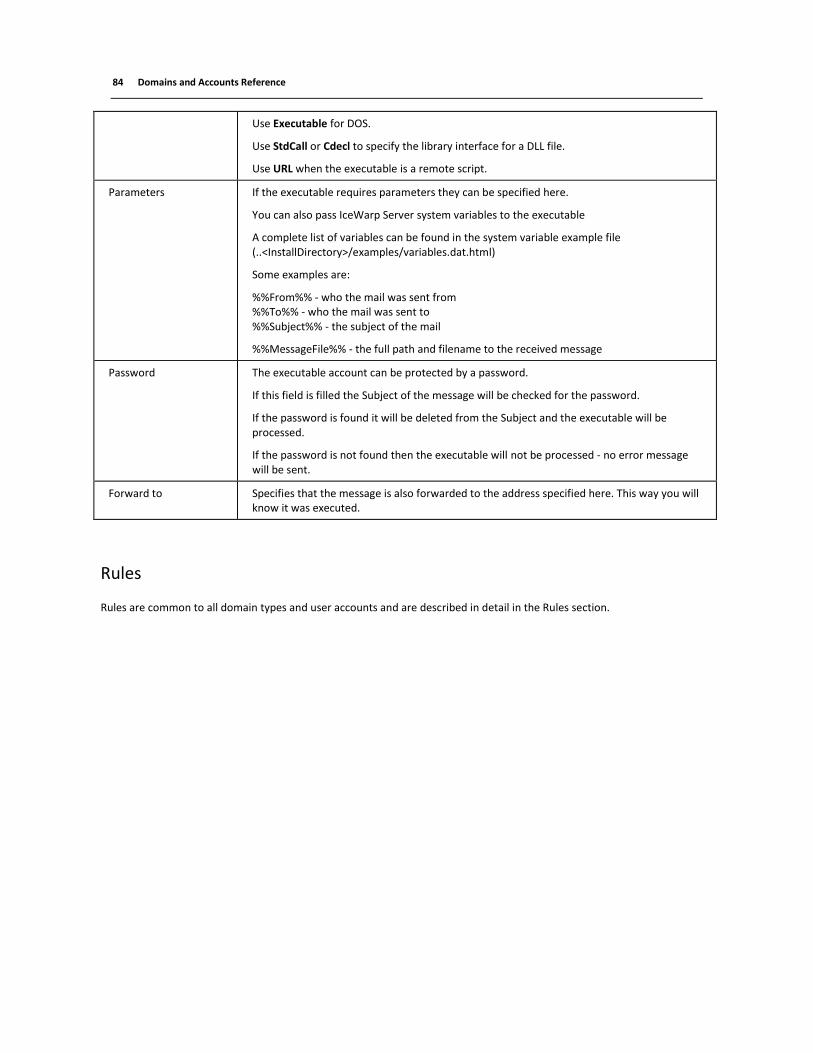
84 Domains and Accounts Reference
Use Executable for DOS.
Use StdCall or Cdecl to specify the library interface for a DLL file.
Use URL when the executable is a remote script.
Parameters If the executable requires parameters they can be specified here.
You can also pass IceWarp Server system variables to the executable
A complete list of variables can be found in the system variable example file (..<InstallDirectory>/examples/variables.dat.html)
Some examples are:
%%From%% - who the mail was sent from %%To%% - who the mail was sent to %%Subject%% - the subject of the mail
%%MessageFile%% - the full path and filename to the received message
Password The executable account can be protected by a password.
If this field is filled the Subject of the message will be checked for the password.
If the password is found it will be deleted from the Subject and the executable will be processed.
If the password is not found then the executable will not be processed - no error message will be sent.
Forward to Specifies that the message is also forwarded to the address specified here. This way you will know it was executed.
Rules
Rules are common to all domain types and user accounts and are described in detail in the Rules section.

Management 85
Remote Account
Remote Accounts are used to fetch mail from accounts on external POP3 and IMAP servers.
A Forward To can be set to receive messages that cannot be distributed correctly.
If the remote account is a catch-all account and you set IceWarp Server to use Domain POP processing it will distribute the messages accordingly.
A copy of all messages can be sent to an address for audit or archive purposes.
Do not forget that templates can be set up to streamline the definition of accounts, see Account Templates (see
"Templates" on page 106).
In This Chapter
Remote Account..................................................................................... 85 Options ................................................................................................... 87 Domain POP ........................................................................................... 89 Rules ....................................................................................................... 90
Remote Account
Field Description
Active Check this box to make this remote account active.
Name A unique name for the account within this Domain.

86 Domains and Accounts Reference
Server Specify here the host name of the server that this remote account should collect messages from.
Examples:
pop3.demo.com
imap.demo.com
NOTE: In the case pop3/imap run on non-standard ports, you can specify them:
pop3.demo.com:966
Server type Specify the protocol that should be used to collect messages:
POP3
Use the POP3 protocol to collect messages.
IMAP4
Use the IMAP4 protocol to collect messages.
NOTE: The local account (specified in the Forward to: field, see below) must be an IMAP4
account.
ALSO: When the POP3 protocol for a remote server is used, message downloads can overlap – it can cause a message dupe. If so, use POP3 with POP3 locking – enable it using API Console (the
c_system_pop3_locking variable). In this case, only one connection at a time is realized.
Username You need to specify the Username that is used to access the remote server to collect mail.
Password The password for the Username specified above.
Log in using APOP For extra security, and if the remote server supports it, you can specify that APOP is used for the login process.
APOP is a secure login method using md5 encryption.
TLS/SSL Specifies whether to use a TLS/SSL connection to access the remote account.
We recommend leaving this option as the default (Detect TLS/SSL).
Detect TLS/SSL
The remote connection will be checked using the CAPA command for TLS support.
If supported the connection will continue in TLS/SSL mode
Direct TLS/SSL
The connection will be made using TLS/SSL.
Disable TLS/SSL
No TLS/SSL will be used - a non-secured TCP/IP connection will be established.
Forward to An account should be specified here where messages will be forwarded if the local recipient cannot be found.
In the case you use DOMAIN POP, the email address specified here receives emails where IceWarp Server cannot DISCERN to whom to send mails fetched via a remote account to.
NOTE: If you specify a path to a mailbox here, the folder structure of the remote server is created within this mailbox and no filters or AntiSpam processing is applied.
You should also be aware that original receive times are only kept for IMAP collection as POP3

Management 87
does not provide this information.
Schedule Use the Schedule button to open the standard Schedule dialog where you can define a schedule
for mail collection.
NOTE: You can also set a global schedule , allowing you to default to that schedule rather than defining one for each remote account.
NOTE: Choosing the Every x minutes option for email download and setting it to a short interval (say 5 or 10 minutes) can cause download overlaps.
If this situation occurs, you can resolve it by enabling POP3 locking:
C_System_POP3_Locking = $31E; // Bool POP3 does not allow multiple login of one account
0
Use this command:
tool modify system C_System_POP3_Locking 1
Connect Now Use this button to connect to the remote server and collect mail immediately.
NOTE: You may want/need to reset a downloaded emails index for a specific user. In the
<install_dir>/config/<domain> directory, find the remote.<user_name>.<alphanumeric_string> file and delete
it.
Options
Field Description
Notify administrator... Check this option and the administrator will receive email messages if there are any problems connecting to the remote server.
Dedupe collected mail IceWarp Server will store Message-ID headers and if duplicates are found only the first will be processed.
Storage of headers is only for the current connection session, so the Dedupe is per session.
This option is recommended for Domain POP mode to avoid duplication of messages sent to multiple local recipients.
Leave messages on server
IceWarp Server will not delete messages from the remote server after collection.
A log of downloaded messages and their IDs is kept so that messages are not downloaded in

88 Domains and Accounts Reference
subsequent sessions.
NOTE: If you want to re-download all messages delete (or rename) the remote.cfg file (IceWarp/config). This action clears indexes for ALL remote accounts!
Delete message if older than
If the message on the remote server is older than the specified number of days it will be deleted.
Useful in conjunction with Leave messages on server as simple server message storage management.
Delete messages if more than
If there is more than the specified number of messages on the server, messages are deleted.
Field Description
Forward extra copy to
All messages received by the remote account can also be forwarded to a given email address using this option.
This could be useful as an archive solution.
Convert domain names
IceWarp Server expects the domain name on the remote server to be the same as the name of this server.
You can create a set of rules to convert domain names that are not defined, each rule on a separate line.
Example:
what.com=here.com
would cause any email to [email protected] to be re-routed to [email protected]
Email address routing
This option lets you specify routing rules for messages received by the remote account.
Pressing the Routing button opens a dialog to create these rules, with examples.
Examples:
[email protected][email protected]
Mymail.com=icewarpdemo.com
The above rules have the following affects:
messages to [email protected] are routed to [email protected]
messages to Mymail.com are routed to icewarpdemo.com
messages to usa.net are routed to [email protected]
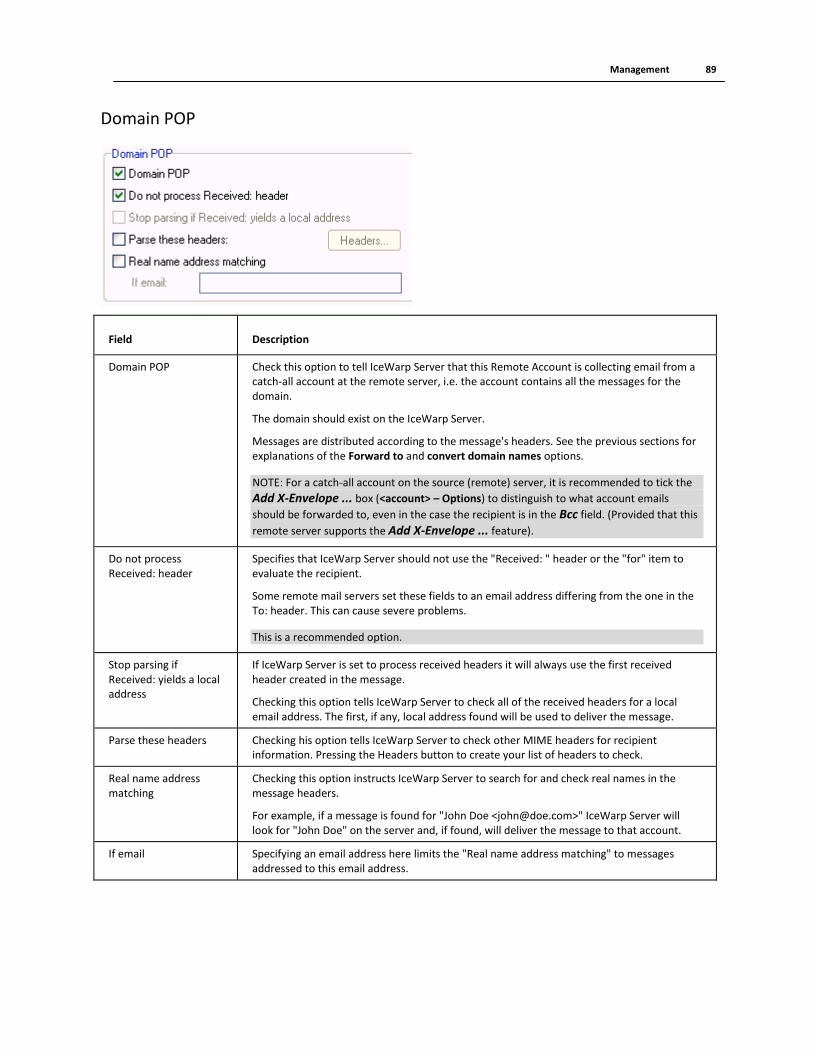
Management 89
Domain POP
Field Description
Domain POP Check this option to tell IceWarp Server that this Remote Account is collecting email from a catch-all account at the remote server, i.e. the account contains all the messages for the domain.
The domain should exist on the IceWarp Server.
Messages are distributed according to the message's headers. See the previous sections for explanations of the Forward to and convert domain names options.
NOTE: For a catch-all account on the source (remote) server, it is recommended to tick the
Add X-Envelope ... box (<account> – Options) to distinguish to what account emails
should be forwarded to, even in the case the recipient is in the Bcc field. (Provided that this
remote server supports the Add X-Envelope ... feature).
Do not process Received: header
Specifies that IceWarp Server should not use the "Received: " header or the "for" item to evaluate the recipient.
Some remote mail servers set these fields to an email address differing from the one in the To: header. This can cause severe problems.
This is a recommended option.
Stop parsing if Received: yields a local address
If IceWarp Server is set to process received headers it will always use the first received header created in the message.
Checking this option tells IceWarp Server to check all of the received headers for a local email address. The first, if any, local address found will be used to deliver the message.
Parse these headers Checking his option tells IceWarp Server to check other MIME headers for recipient information. Pressing the Headers button to create your list of headers to check.
Real name address matching
Checking this option instructs IceWarp Server to search for and check real names in the message headers.
For example, if a message is found for "John Doe <[email protected]>" IceWarp Server will look for "John Doe" on the server and, if found, will deliver the message to that account.
If email Specifying an email address here limits the "Real name address matching" to messages addressed to this email address.

90 Domains and Accounts Reference
Rules
Rules are common to all domain types and user accounts and are described in detail in the Rules section.
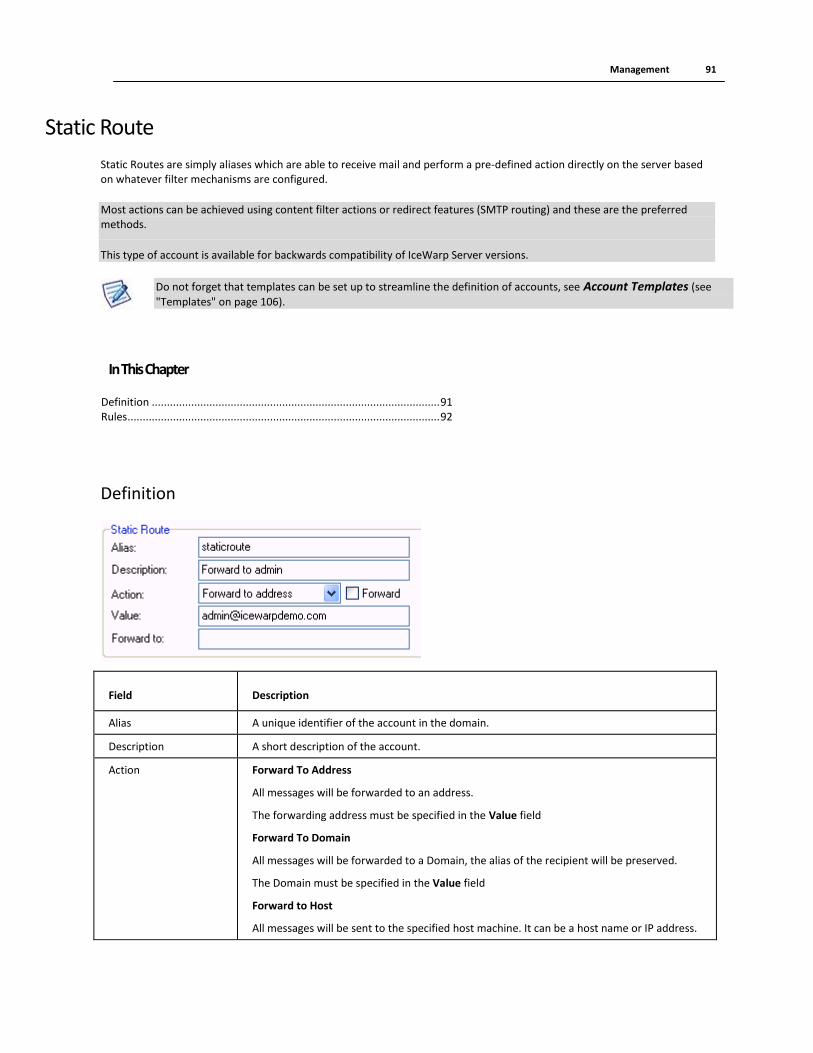
Management 91
Static Route
Static Routes are simply aliases which are able to receive mail and perform a pre-defined action directly on the server based on whatever filter mechanisms are configured.
Most actions can be achieved using content filter actions or redirect features (SMTP routing) and these are the preferred methods.
This type of account is available for backwards compatibility of IceWarp Server versions.
Do not forget that templates can be set up to streamline the definition of accounts, see Account Templates (see
"Templates" on page 106).
In This Chapter
Definition ............................................................................................... 91 Rules ....................................................................................................... 92
Definition
Field Description
Alias A unique identifier of the account in the domain.
Description A short description of the account.
Action Forward To Address
All messages will be forwarded to an address.
The forwarding address must be specified in the Value field
Forward To Domain
All messages will be forwarded to a Domain, the alias of the recipient will be preserved.
The Domain must be specified in the Value field
Forward to Host
All messages will be sent to the specified host machine. It can be a host name or IP address.
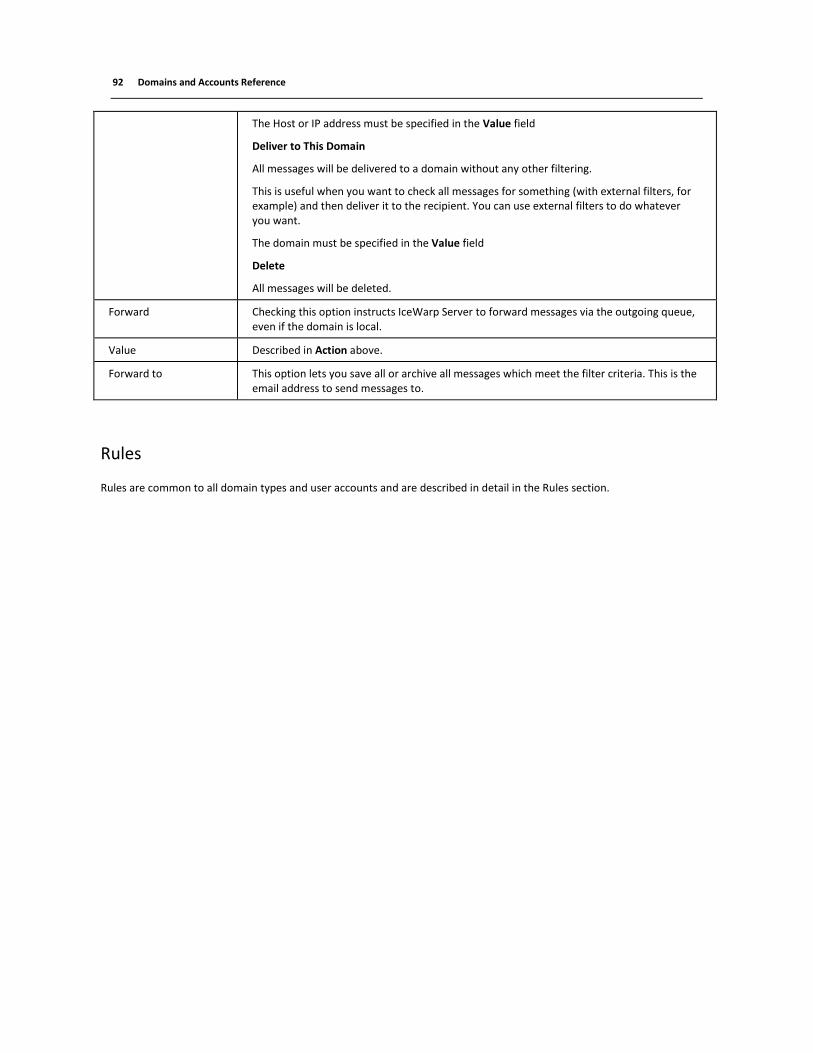
92 Domains and Accounts Reference
The Host or IP address must be specified in the Value field
Deliver to This Domain
All messages will be delivered to a domain without any other filtering.
This is useful when you want to check all messages for something (with external filters, for example) and then deliver it to the recipient. You can use external filters to do whatever you want.
The domain must be specified in the Value field
Delete
All messages will be deleted.
Forward Checking this option instructs IceWarp Server to forward messages via the outgoing queue, even if the domain is local.
Value Described in Action above.
Forward to This option lets you save all or archive all messages which meet the filter criteria. This is the email address to send messages to.
Rules
Rules are common to all domain types and user accounts and are described in detail in the Rules section.

Management 93
Notification
The Notification account is an account you can use to convert an incoming message into a format suitable for delivery to a gateway server, such as an SMS or instant messaging server.
In essence, this usually means chopping the message into notification chunks, stripping off attachments, changing the subject and defining the body of the message to be sent.
In order to use this option, you need an email gateway from your provider. (Even if you do not have one, you can use IceWarp SMS Server to deliver messages to such devices. Exchange Active Sync is another way how to deliver emails with push). This means you need to have an email address you can send messages to which will be forwarded to your notification device. These devices can be PDAs, cell phones or any other device capable of receiving short messages.
The same can be achieved using the content filters. This is a simplified object to be used for such requirements.
Do not forget that templates can be set up to streamline the definition of accounts, see Account Templates (see
"Templates" on page 106).
In This Chapter
Notification ............................................................................................ 93 Options ................................................................................................... 94 Rules ....................................................................................................... 95
Notification
Field Description
Alias A unique identifier for the account within the domain.
Description A short description of the account.
Notify to Specifies the email address that the formatted notification message will be sent to.
NOTE: You can also send an instant message or an SMS using this option:
sms – use sms:<number> e.g. sms:0123456789

94 Domains and Accounts Reference
IM – use xmpp:<jabberid> e.g. [email protected]
The example above shows how to send an sms to phone number 1234567890.
Multiple addresses can be specified, separated by semicolons.
Max message size This specifies the maximum number of characters that can be accepted in a single notification. This is specific to the gateway provider.
Split to multiple messages
The option specifies the number of chunks a message should be split to when the length of the notification message text exceeds the Max size.
Options
Field Description
Insert into Subject The Subject of the notification message will be compiled from the options below
To The original To header will be placed into the notification.
From The original From header will be placed into the notification.
Subject The original Subject header will be placed into the notification.
Date/Time The original Date header will be placed into the notification.
Body The original body content will be placed into the notification.
Message Pressing the Message button will open the Message dialog, allowing you to specify your own
content for various parts of the message, as described next.
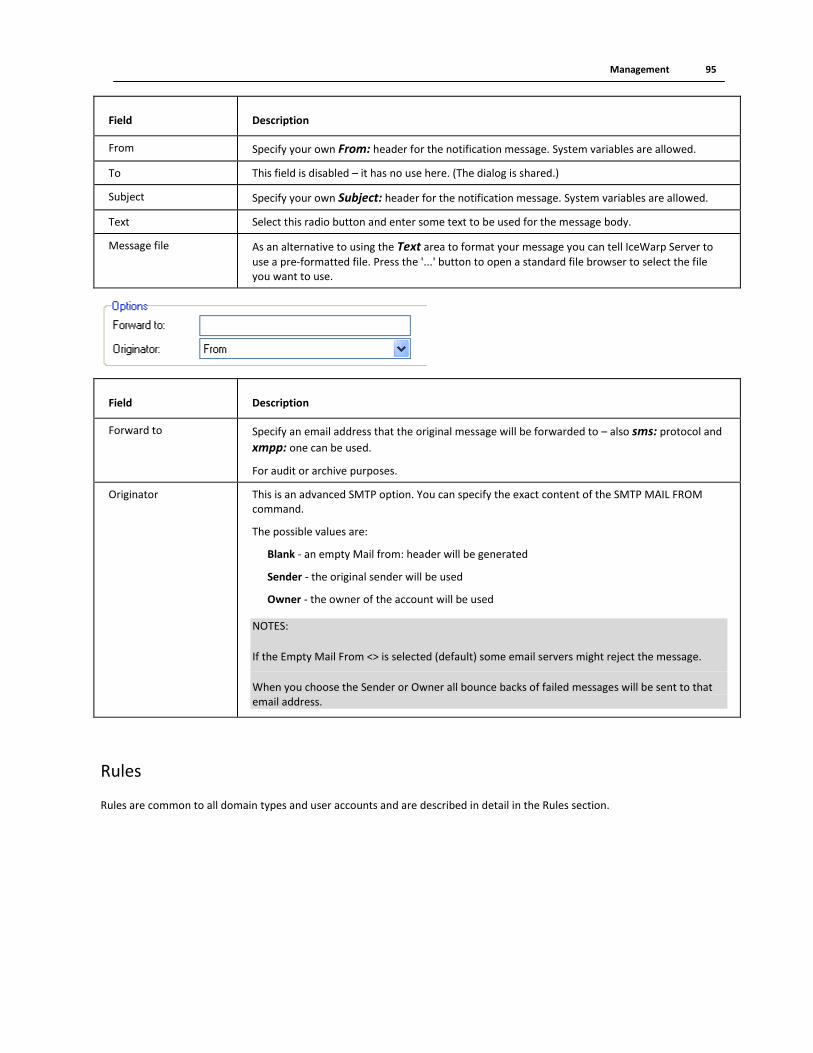
Management 95
Field Description
From Specify your own From: header for the notification message. System variables are allowed.
To This field is disabled – it has no use here. (The dialog is shared.)
Subject Specify your own Subject: header for the notification message. System variables are allowed.
Text Select this radio button and enter some text to be used for the message body.
Message file As an alternative to using the Text area to format your message you can tell IceWarp Server to
use a pre-formatted file. Press the '...' button to open a standard file browser to select the file you want to use.
Field Description
Forward to Specify an email address that the original message will be forwarded to – also sms: protocol and
xmpp: one can be used.
For audit or archive purposes.
Originator This is an advanced SMTP option. You can specify the exact content of the SMTP MAIL FROM command.
The possible values are:
Blank - an empty Mail from: header will be generated
Sender - the original sender will be used
Owner - the owner of the account will be used
NOTES:
If the Empty Mail From <> is selected (default) some email servers might reject the message.
When you choose the Sender or Owner all bounce backs of failed messages will be sent to that email address.
Rules
Rules are common to all domain types and user accounts and are described in detail in the Rules section.

96 Domains and Accounts Reference
Catalog
Catalog is a type of "FTP via email", where you define catalogs that point to directories on the server drive(s) and users can send emails with commands to GET or LIST files in a catalog. If they choose to GET a file, it is sent to them as an attachment.
For syntax examples, refer to the Options (on page 98) chapter.
In This Chapter
Definition ............................................................................................... 96 Options ................................................................................................... 98 Rules ....................................................................................................... 101
Definition
Field Description
Alias A unique identifier for the account within the domain.
Description A short description of the account.
Password You can specify a global password which must be used for all commands sent to this catalog account.
We recommend you protect all your catalogs with passwords.
You should also take care to protect the passwords themselves.
Command in Subject
By default, all commands are read from the Subject header.
If you uncheck this option, the message body will be checked for commands.
Possible command within the Subject header is ignored, in this case.
This allows multiple commands to be issued within the body text.
Catalogs This button brings up the catalog configuration dialog where you can define all the catalog stores and items. See Catalog – Maintenance (see "Maintenance" on page 97).

Management 97
Maintenance
To define/modify files and directories within the catalog account, press the Catalogs button.
In the catalog dialog you can add, edit and delete particular catalogs.
In this dialog you can configure the whole catalog.

98 Domains and Accounts Reference
Field Description
Name Specifies the catalog name or ID which will be used in the commands. This should be unique within the catalog account.
Password Specifies the password required to GET this item (the DIR command does not require a password).
Folder Specifies that this item is a Folder. All files within the folder will be available individually within the catalog.
You must enter a fully qualified path in the text box.
Allow subdirectories Only available if the item is a folder, checking this will include files within subfolders of the specified folder.
Folder ZIP file If checked, all files in this item will be compressed using ZIP compression.
You must fill in the ZIP file name field for the file.
This option is useful when you have a large amount of data within a catalog.
The ZIP file, if sent as an attachment via email, can be automatically decompressed by a Content
Filter. See the Actions list of the Content Filter options.
ZIP file name The file name to which the folder will be compressed.
Item Choose a unique identifier for the item within the catalog - available when adding or editing an item (via the Add or Edit buttons.
This is the item name that is used within a GET command
Filename Specifies the full path to the file which is linked to this Item.
Use the "..." button to browse to the file.
Options
Field Description
Get Check this box to allow users to retrieve files from the catalog.
Syntax:
GET [Catalog_Account_Password] Catalog_Name Item [Catalog_Password]
Example:
GET marketing23 Prices PriceList2 Prices2010
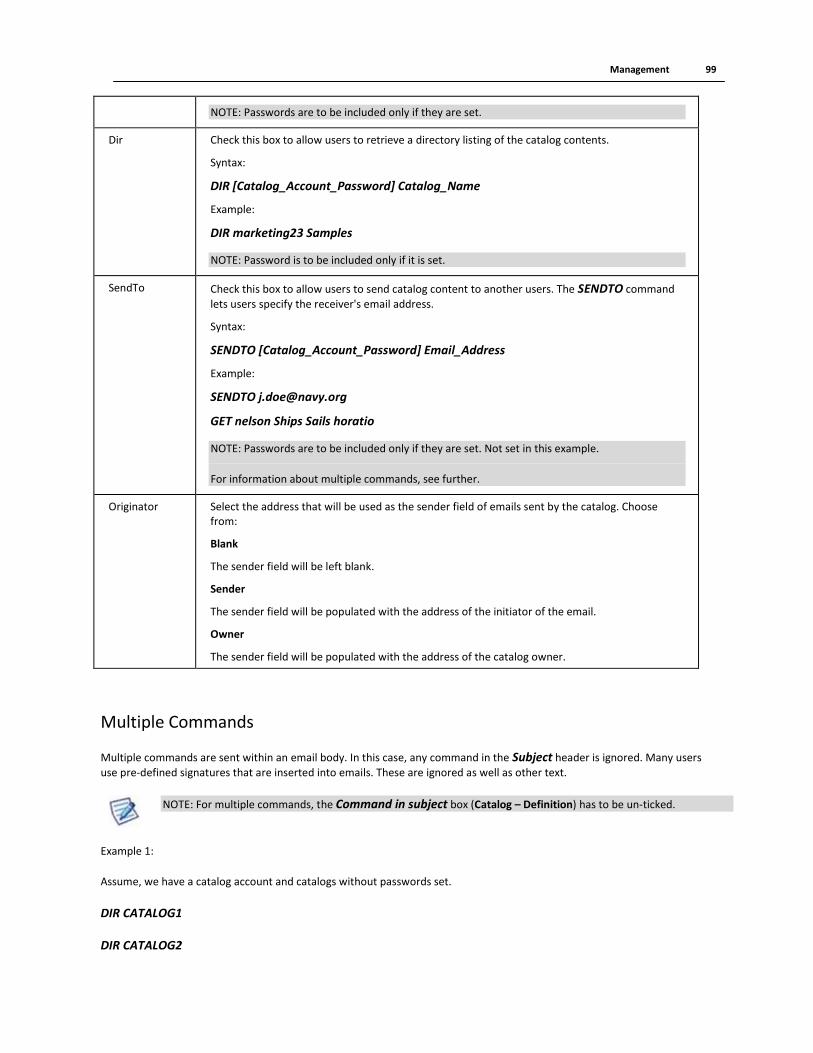
Management 99
NOTE: Passwords are to be included only if they are set.
Dir Check this box to allow users to retrieve a directory listing of the catalog contents.
Syntax:
DIR [Catalog_Account_Password] Catalog_Name
Example:
DIR marketing23 Samples
NOTE: Password is to be included only if it is set.
SendTo Check this box to allow users to send catalog content to another users. The SENDTO command
lets users specify the receiver's email address.
Syntax:
SENDTO [Catalog_Account_Password] Email_Address
Example:
SENDTO [email protected]
GET nelson Ships Sails horatio
NOTE: Passwords are to be included only if they are set. Not set in this example.
For information about multiple commands, see further.
Originator Select the address that will be used as the sender field of emails sent by the catalog. Choose from:
Blank
The sender field will be left blank.
Sender
The sender field will be populated with the address of the initiator of the email.
Owner
The sender field will be populated with the address of the catalog owner.
Multiple Commands
Multiple commands are sent within an email body. In this case, any command in the Subject header is ignored. Many users
use pre-defined signatures that are inserted into emails. These are ignored as well as other text.
NOTE: For multiple commands, the Command in subject box (Catalog – Definition) has to be un-ticked.
Example 1:
Assume, we have a catalog account and catalogs without passwords set.
DIR CATALOG1
DIR CATALOG2
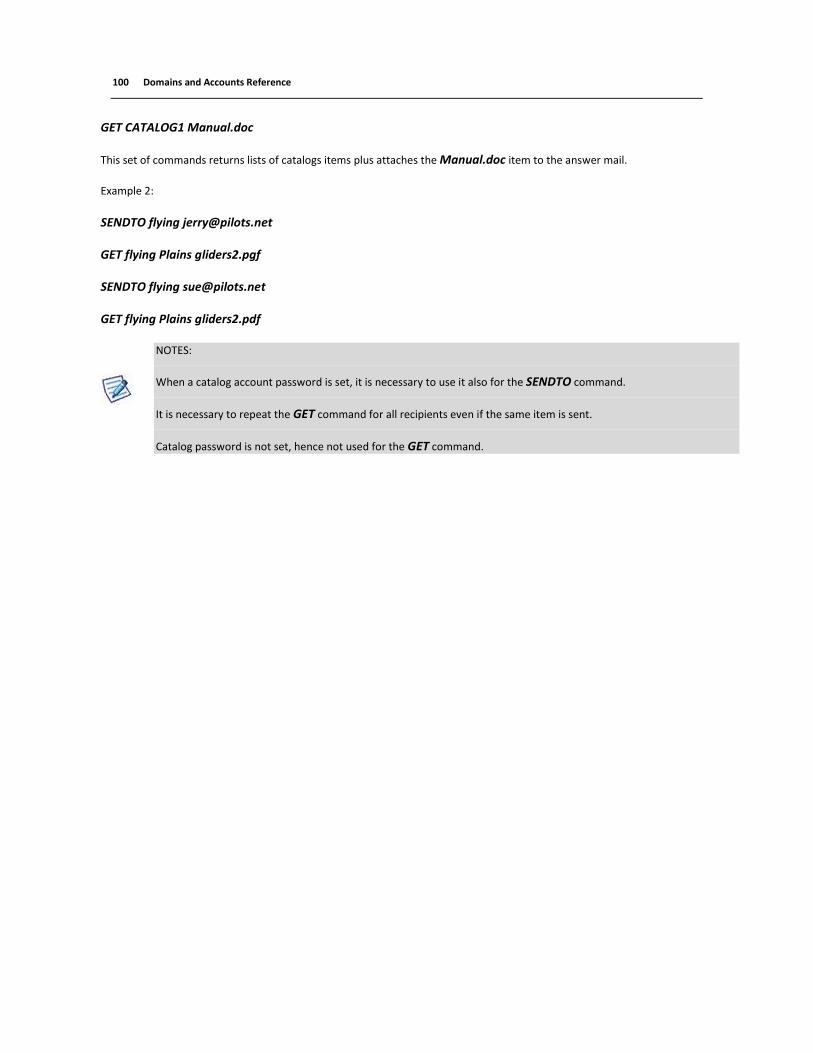
100 Domains and Accounts Reference
GET CATALOG1 Manual.doc
This set of commands returns lists of catalogs items plus attaches the Manual.doc item to the answer mail.
Example 2:
SENDTO flying [email protected]
GET flying Plains gliders2.pgf
SENDTO flying [email protected]
GET flying Plains gliders2.pdf
NOTES:
When a catalog account password is set, it is necessary to use it also for the SENDTO command.
It is necessary to repeat the GET command for all recipients even if the same item is sent.
Catalog password is not set, hence not used for the GET command.

Management 101
Rules
Rules are common to all domain types and user accounts and are described in detail in the Rules section.

102 Domains and Accounts Reference
Global Settings
The Global Settings area allows you to set certain options which can affect all accounts, all domains and some console display areas.
Some of these global options affect whether further Domain and Account options are available for use.
In This Chapter
Domains ................................................................................................. 102 Templates .............................................................................................. 106 Domain Clusters ..................................................................................... 111 Advanced ............................................................................................... 114
Domains
Do not forget that templates can be set up to streamline the definition of accounts, see Account Templates (see "Templates" on page 106).
Field Description
Use domain disk quota Check this option to have IceWarp Server check for domain disk quota information when messages are received.
Domain quotas are defined in a file called diskquot.dat, which can be edited by using the Disk
Quota button (described below). Quotas can also be defined in Domain - Limits (see "Limits" on page 5).
NOTE: Not all domains have to have a disk quota defined and you can specify a default disk quota for domains that have no individual quota defined.
Use domain limits Check this option to allow domain limits to be set and applied.
Use user limits Check this option to allow domain-level limits to be set and applied.

Global Settings 103
Use domain expiration Check this option to enable domain expiration dates.
Override global limits Check this option to have non-zero domain-level limits override global ones.
This option applies for Max message size set globally (Mail – General – Delivery; for both sent and received messages) versus the same feature set on the domain level (<domain> – Limits – Users – Max message size ; for sent out messages).
Field Description
Enable DKIM Enables use of DKIM AntiSpam technology within a domain (see Domain - DKIM (see "DKIM"
on page 17))
Enable domain literals Checking this option virtually bind all your domain names to IP addresses. The effect of this is that your domain will be capable of receiving emails in the following format:
user@[IP]
The real IP value depends on your IP Binding settings and system IP addresses.
This can be useful for testing – you may want to send emails to a domain without DNS records.
Field Description
Use domain hostname for outgoing connections
Check this option to force IceWarp Server to use the hostname defined on domain level in the SMTP HELO command. Contrary to globally defined one (System – Services – SmartDiscover – SMTP).
Use domain IP address for outgoing connections
Checking this option will force all emails from a domain to be defined as coming from the IP
address specified for the Domain in Domain - Options (see "Options" on page 10).
This is helpful when trying to connect to external servers using AntiSpam technologies which check the sending server.
Use welcome message Check this option to have a welcome message sent to the mailbox of all newly created users.
Message content is specified in a simple text file which you should create with a text editor.
Domains and text files are linked in a file called messages.dat, which you can edit by pressing the

104 Domains and Accounts Reference
Welcome Messages button. Examples are given and you can specify different welcome messages for different Domains.
Welcome Messages Press this button to open the messages.dat file where the Welcome Message files can be linked to domains.
The structure of the file is as follows:
domain=filename
Example:
icewarpdemo.com=c:\<InstallDirectory>\welcome.tmp
If a line specifies an asterisk as the domain, the specified welcome file will be used for any domains not specified individually. This line must be the last one in the file.
Welcome Message files.
A welcome message file can contain system variables and system functions. The same logic as for Content Filter action Send Message applies. You can use the Sender and Recipient variables and include attachments.
A list of variables can be found in file <InstallDirectory>\examples\variables.dat
Example:
From: Support <[email protected]>
To: %%Recipient%%
Subject: Welcome %%Recipient%%
Dear %%Recipient%% user,
We would like to welcome .....
The account was created on %%Date%% %%Time%%
NOTE: Use one empty line between the email header and its body. Plus, do not use any empty line within the header part of this message.
Warn domain administrator when domain size exceeds quota (%)
Specify a percentage value and a warning message will be sent to the domain administrator (specified on the Domain tab) when the domain exceeds that percentage of its quota.
A value of 0 means no warning will be sent.
For example, set value to 85 to have the warning message sent when the domain space reaches 85% of the quota
Warn user when mailbox size exceeds
Check this option and specify a percentage value and a warning message will be sent to the user when their mailbox exceeds that percentage of its quota.
A value of 0 means no warning will be sent.
For example, set value to 85 to have the warning message sent when the domain space reaches 85% of the quota. (Plus another message is sent when the defined treshold is reached.)

Global Settings 105
Disk Quota Press this button to edit file diskquot.dat (in the Config subdirectory). This file contains all the Domain Disk Quota data in a simple format that you can modify.
Examples are included
The format of the file is as follows:
Domain=limit
Example:
usa.net=5000
*=10000
This would specify that all domains have a 10MB limit apart from usa.net which has 5MB.
The default (*) line should be the last line in the file.
Default Admin Rights Press this button to select the default domain administrator rights.
See the Domain Admin Rights dialog.
NOTE: If you want to change default domain administrator rights here and you have some domain administrators already set, you have to change their rights manually. All domain administrators created after this change will obtain correct rights.
In the case you have too many domain administrators to change rights manually, use some find
and replace tool to replace all domain.dat files within the IceWarp/mail folder. The correct
domain.dat file you can find after rights setting in the IceWarp/config folder.
Another way is to set the rights here properly and delete all domain.dat files. Domain
administrators will inherit global rights.
Field Description
Account Management & Rights
Here you can set the default domain administrator rights for single items of the Domains and Accounts module.
Besides the domain items explained in this manual (see the Accounts section), there are two

106 Domains and Accounts Reference
other check boxes:
Disable mailbox view – tick this checkbox if you want to prevent domain administrators from viewing domain users mailboxes and their emails.
Spam queue – tick this checkbox if you want to allow domain administrators to administer spam queues (quarantines) of domain users.
Advanced Press this button to edit the domain.dat file.
Templates
Using templates can ease your work and make it more productive. This section will be referred back to more times in the manual and it is probably worth familiarizing yourself with these ideas.
Most of the examples given further deal with account templates but other ones (group, domain, etc.) are used alike.
Creating Template
Account templates are used to define a standard set of properties that can be applied to a new account.
Account templates can be defined in two places within the IceWarp Server console:
1. The Global Settings -> Templates tab:
2. With a domain selected, in the Templates tab:
Both these areas allow you to create and edit templates via the same dialogs but you should be aware that:
In Global Settings, you can create domain account templates, within the <domain> node, you cannot.
Each template only applies to a specific account type (user, group, etc.).

Global Settings 107
You can create templates of the same name within Global Settings and also within multiple domains, and these are
NOT the same templates.
You can create a default template for account types. When an account of that type is created, this default template
will be applied. There should only be one default template for each account type.
Selecting the Templates tab will present you with a list of all templates defined within the selected domain (or Global) as shown below:
The above screenshot shows that we have two templates defined:
Contractors – which can only be applied to user accounts, and is not a default template, so will be applied to new user accounts only if selected..
Customers – which applies to group accounts, and is a default one, so will be applied automatically.
Selecting a template and pressing Delete deletes this template (or templates if more than one is selected).
Pressing the Add or Edit button will open the Template dialog:
In the top area, above the tabs, you choose the Name of the template, the Type of account it can be applied to, and
whether it is a Default template (i.e. automatically applied to all newly created accounts of the type selected.

108 Domains and Accounts Reference
NOTE: The above screenshot shows the Type drop-down expanded so you can see all the account types shown. As this
dialog was accessed via the Management – <domain> tab, this list does not offers the Domain type, which is only available when defining a template in Global Settings.
The tabbed area changes according to the account type selected and reflects the options available for that account type. These options are explained in the relevant manual sections related to the appropriate account types. Note that not all options are available as it is not sensible to have them in a template.
Below is the Template dialog when the Groups type is selected:

Global Settings 109
And here when the Users type is selected:
Applying Templates to new accounts
Whenever you create a new account, and if there are any templates that can be applied to that type of account, the following
Template drop-down is displayed:
The drop-down box will list all global and domain-specific templates that can be applied to this account type.

110 Domains and Accounts Reference
To apply a template, just select it.
NOTE: Default templates are applied when you create users not only via the console, but also via WebAdmin, the API, Active Directory, etc. The API can also specify a template to use when creating an account.
Template Scenario
This example shows how careful setup of templates could dramatically reduce effort setting up new accounts:
Scenario:
Worried about disk space
You have many small domains with hundreds of users in each, and one domain (BigDomain) with a few users who want to email large files to each other. So you want to set the Users in the small domains to have a mailbox size of 20Mb, and the Users in BigDomain to have a mailbox size of 1Gb.
Solution:
Set up a Template in Global settings called mailbox, for account type User, as Default and set the mailbox size to 20Mb.
Set up a Template in BigDomain, also called mailbox, for account type User, as Default and set the mailbox size to 1Gb.
Explanation:
Whenever you setup a new User account, IceWarp Server will see the Global default Template mailbox and apply it to
the new user settings, unless the new account is in BigDomain, in which case the Domain Template mailbox will
override the Global Template mailbox.
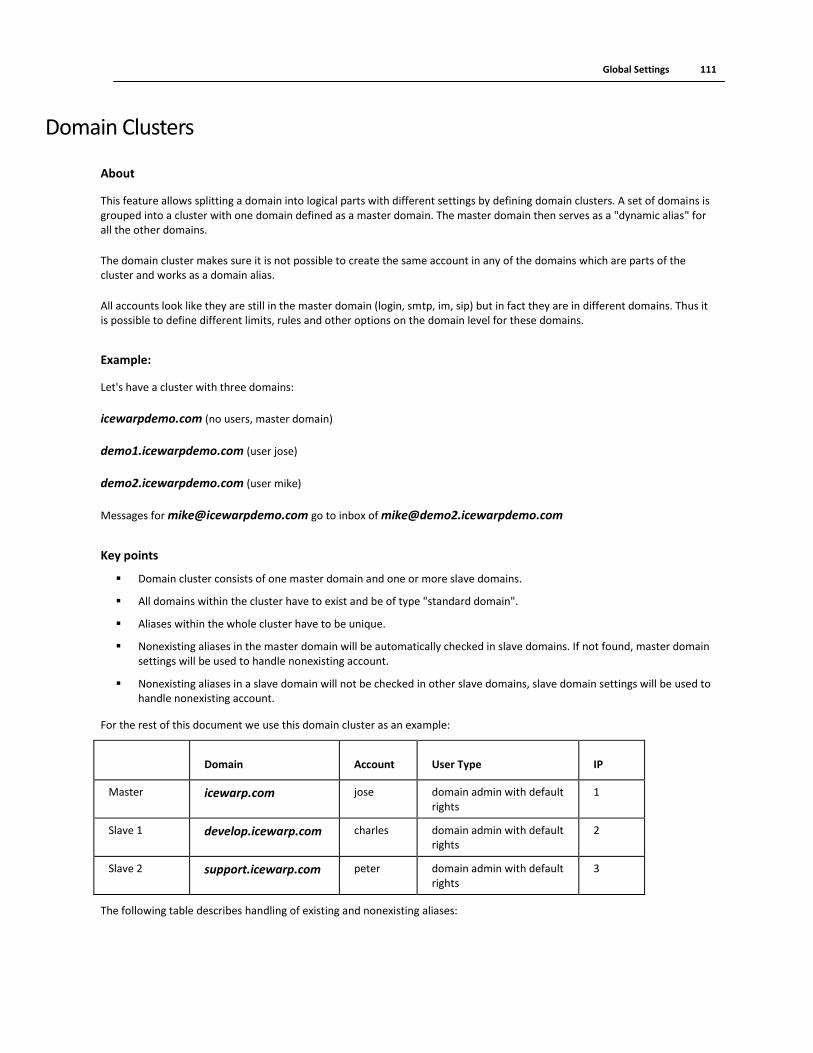
Global Settings 111
Domain Clusters
About
This feature allows splitting a domain into logical parts with different settings by defining domain clusters. A set of domains is grouped into a cluster with one domain defined as a master domain. The master domain then serves as a "dynamic alias" for all the other domains.
The domain cluster makes sure it is not possible to create the same account in any of the domains which are parts of the cluster and works as a domain alias.
All accounts look like they are still in the master domain (login, smtp, im, sip) but in fact they are in different domains. Thus it is possible to define different limits, rules and other options on the domain level for these domains.
Example:
Let's have a cluster with three domains:
icewarpdemo.com (no users, master domain)
demo1.icewarpdemo.com (user jose)
demo2.icewarpdemo.com (user mike)
Messages for [email protected] go to inbox of [email protected]
Key points
Domain cluster consists of one master domain and one or more slave domains.
All domains within the cluster have to exist and be of type "standard domain".
Aliases within the whole cluster have to be unique.
Nonexisting aliases in the master domain will be automatically checked in slave domains. If not found, master domain settings will be used to handle nonexisting account.
Nonexisting aliases in a slave domain will not be checked in other slave domains, slave domain settings will be used to handle nonexisting account.
For the rest of this document we use this domain cluster as an example:
Domain Account User Type IP
Master icewarp.com jose domain admin with default rights
1
Slave 1 develop.icewarp.com charles domain admin with default rights
2
Slave 2 support.icewarp.com peter domain admin with default rights
3
The following table describes handling of existing and nonexisting aliases:

112 Domains and Accounts Reference
Recipient Action
[email protected] goes to [email protected]
[email protected] goes to [email protected]
[email protected] handled as a nonexisting alias using support.icewarp.com settings
[email protected] handled as a nonexisting alias using icewarp.com settings
Domain administrator has by default rights only for their real (slave) domain.
Administrator Rights
[email protected] can administer only icewarp.com, not the slave domains
[email protected] can administer only develop.icewarp.com
[email protected] can administer only support.icewarp.com
[email protected] can administer only support.icewarp.com
Domain IP binding should work according to the real domain:
* [email protected] can log only to IP 2
* [email protected] can log only to IP 1
* mail from [email protected] is initiated from IP 3
* mail from [email protected] is initiated from IP 2
DKIM works according to the master domain:
* mail from [email protected] –> DKIM of icewarp.com is used
WebClient behaves so that any slave domain user can assume he belongs to the master domain.
* After Charles logs in as [email protected], he is presented as [email protected]. Address
[email protected] is also put into header of any created email and used as "sender".
Authentication − only emails consisting of alias and master domain can be authenticated.
* User name [email protected] is not authenticated
* [email protected] is authenticated
Domain rule of the true user domain will be used.
* develop.icewarp.com domain rules are used for mails going to [email protected]
Changing domain type option is to be disabled for domains in cluster.

Global Settings 113
Setup
Click the Delete button to remove the selected domain cluster.
Use the Add... and Edit... buttons to open the Domain Clusters dialog.
Field Description
Main Domain Use the "..." button to select the master domain.
Slave Domains Use the "..." button to select slave domains.
NOTE: These domains have to be created in advance.

114 Domains and Accounts Reference
Advanced
This feature allows synchronization of IceWarp Server users to an LDAP server, which can be IceWarp Server itself (LDAP service has to be running) or a 3rd party server such as OpenLDAP.
Field Description
Active Check this box to activate LDAP User Synchronization.
LDAP Host Enter the hostname of your LDAP Server.
NOTE: If the LDAP server you are accessing does not use the standard port 389 you should specify it here after the hostname, separated with a colon.
E.g. 123.456.789.876:489 would use port 489 to access the ldap server.
Base DN Enter the Base DN of your LDAP Server. The default setting is dc=root.
User DN Enter the User DN required to access your LDAP Server.
Password Enter the password associated with the given User DN.
Synchronize All Users To LDAP Now
Press this button to have IceWarp Server immediately synchronize itself with your LDAP Server.
Field Description
Max number of accounts in a domain to display
How many accounts are shown at one time within the IceWarp Server Console, within a Domain.
NOTE: The higher the number you specify here, the longer the list will take to load and display.
Database account display start position
The start position of the Account list.
Used in conjunction with the Max number of accounts.

Global Settings 115
Example:
Assume you have Max number of accounts set to 1000 and are displaying a domain containing 3000 accounts -
Your display will show the accounts 1 to 1000. If you want to see the next 1000 you should set start position to 1001 and accounts 1001 to 2000 will be displayed.
Domain list display mode
There are three ways to display domain list in the Domains & Accounts section - you should choose whichever suits your need:
Domain
Only domain names are displayed.
Domain + Description
Domain Name and Description is displayed
Example:
doc.icewarpdemo.com (Documentation Server)
Description + Domain
Domain Description and Name are displayed
Example:
(Documentation Server) doc.icewarpdemo.com
NOTE: If the System – Storage – Accounts feature is set to Database, Administration Console does not display description of domains in the domains tree. It works if the Account Storage is
set either to Standard file system or to Professional memory file system.
Account list display mode
There are three ways to display account list in the Domains & Accounts section - you should choose whichever suits your need:
Email address is displayed.
Alias
User's alias as filled in to the appropriate field is displayed.
Name
User's name as filled in to the appropriate field is displayed.

116 Domains and Accounts Reference
Policies
You may need to be more restrictive to make your server more secure. There are policies to do this for you. Read particular options carefully as they offer you powerful ways to secure your users against attacks or misuse. If your policies are set incorrectly, it may take some time to find out the causes of your problems. (E.g. If you setup your Login policy with the email address option chosen, and then your users try to login with their common username, they will no longer be able to log on until you resolve your policy settings.)
In This Chapter
Login Policy ............................................................................................ 116 Password Policy ...................................................................................... 118
Login Policy
Field Description
Block user login for accounts that exceed a number of failed attempts
Check this option to block users for a specified length of time, if they exceed the given number of consecutive failed login attempts. Set the value in the text box to the number of allowed attempts (5 in the above screenshot)
Block user login for (Min):
Specify how many minutes a user should be blocked for, if they exceed the failed login attempts number (10 minutes in the above screenshot).
Account is blocked each time for the whole specified interval. Correct password entering does not decrease the interval.
Login policy mode Choose one of two options:
Do not block but delay authentication process
If a user enters an incorrect password, the authentication procedure will be delayed by 30 seconds.
If the user then enters the correct password, they are still delayed by 30 seconds but after that there is no delay.
Block account for specified amount of time

Policies 117
If a user enters an incorrect password, the account access is blocked for the amount of time specified above.
If a user is blocked, login.dat file is created in their mail folder. Also, it is shown on the <user> –
User tab. The Unblock button is presented to unblock the user. Clicking it deletes the users
login.dat file. User blocking is logged in the Maintenance logs (Status – Logs) – can be enabled
in System – Logging.
Require administrator authentication to access the system settings
Check this option to have the IceWarp Server console ask for a user/password combination when it is started.
The user entered must be an administrator.
NOTE: In the case you have forgotten your administrator password (definitely very rare
situation), you can use the following command to disable it: tool modify system c_gui_auth 0.
NOTE: Login Policy settings apply to all types of authentication in IceWarp Server (SMTP, POP3, IMAP, HTTP, etc.)
Field Description
Users login with their usernames/ email addresses
You can choose whether users have to use their email addresses or their usernames to login to the system.
If you have a large number of domains and accounts, it is advisable to use login with email address. This will reduce mail authentication and login time as IceWarp Server will be able to locate the account more quickly. Using this option also allows you to have the same user/password combination in different domains.
Convert characters % and / to @ in usernames
Some older mail clients (Netscape and Mac) do not allow using @ in a username.
If you wish to use the login with email address option then you should check this option so that your users have the option to login with % or / in the email address.
Example:
user%icewarpdemo.com would be converted to [email protected]
Field Description
Use account login IP restrictions
Enabling this option offers you an IP security system to ensure that particular accounts can only access the IceWarp Server from specific IP addresses. Rules are stored in a file which can be created and edited by pressing the Login Restriction button.
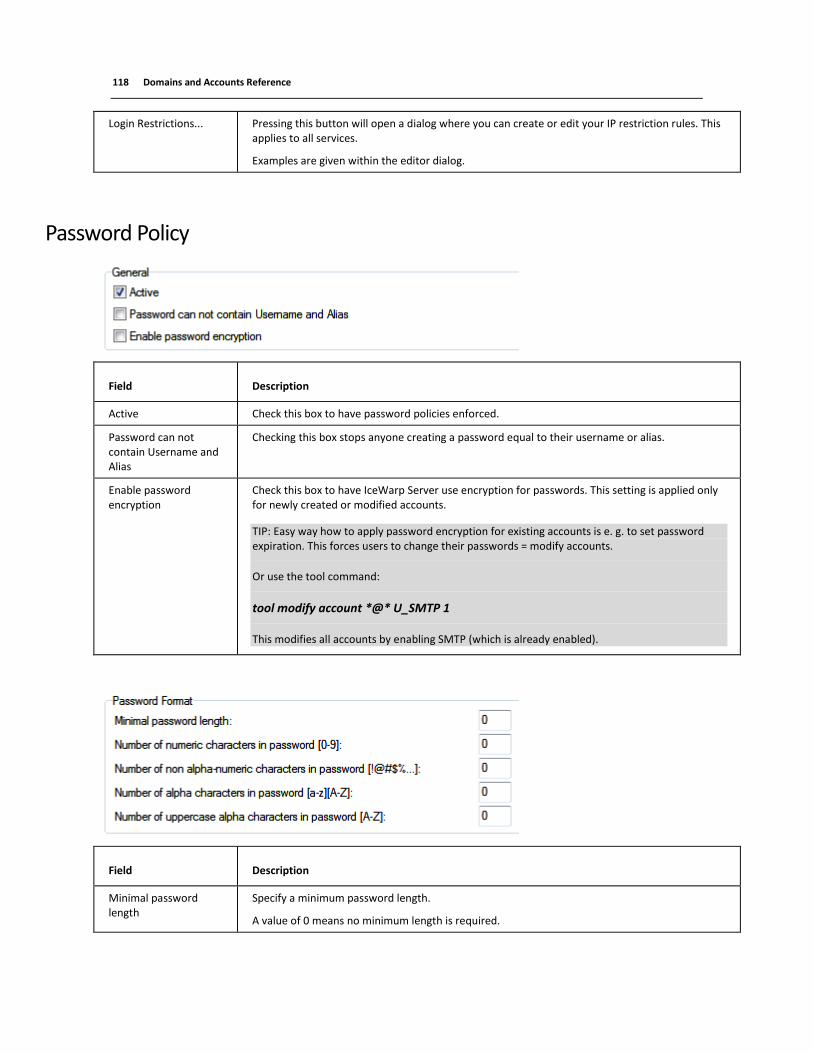
118 Domains and Accounts Reference
Login Restrictions... Pressing this button will open a dialog where you can create or edit your IP restriction rules. This applies to all services.
Examples are given within the editor dialog.
Password Policy
Field Description
Active Check this box to have password policies enforced.
Password can not contain Username and Alias
Checking this box stops anyone creating a password equal to their username or alias.
Enable password encryption
Check this box to have IceWarp Server use encryption for passwords. This setting is applied only for newly created or modified accounts.
TIP: Easy way how to apply password encryption for existing accounts is e. g. to set password expiration. This forces users to change their passwords = modify accounts.
Or use the tool command:
tool modify account *@* U_SMTP 1
This modifies all accounts by enabling SMTP (which is already enabled).
Field Description
Minimal password length
Specify a minimum password length.
A value of 0 means no minimum length is required.

Policies 119
Number of numeric characters in password [0-9]
Specify the minimum number of numeric characters that must be present in the password.
A value of 0 means no numeric characters are required (but they can still be used).
Number of non alpha-numeric characters in password [!@#$%...]
Specify the minimum number of non alpha-numeric characters that must be present in the password.
A value of 0 means no non alpha-numeric characters are required (but they can still be used).
Number of alpha characters in password [a-z] [A-Z]
Specify the minimum number of non alpha characters that must be present in the password.
A value of 0 means no alpha characters are required (but they can still be used).
Number of uppercase alpha characters in password [A-Z]
Specify the minimum number of uppercase alpha characters that must be present in the password.
A value of 0 means no uppercase alpha characters are required (but they can still be used).
Field Description
Active Check this option to enable password expiration.
Passwords will expire after the specified number of days, forcing your users to regularly change them via IceWarp WebClient.
This can increase security.
NOTE: This box has to be ticked if you want to use the Expire Password Now button
(Management – <Domain> – <User> – Options (see "Options" on page 42)). In the case, you
want to have this feature active, but still want passwords not to expire, set the Password expires after field to 0 (zero).
Password expires after (Days)
Specify the number of days after which the password expires.
Zero means that a password does not expire even if the Active box is checked.
Notify before expiration (Days)
Check this box to have Users notified of their imminent password expiration.
Specify the number of days before expiration that the notification should be sent.
Custom Notification Message File
Press this button to open a file where you can specify the content of the expiration notifications.
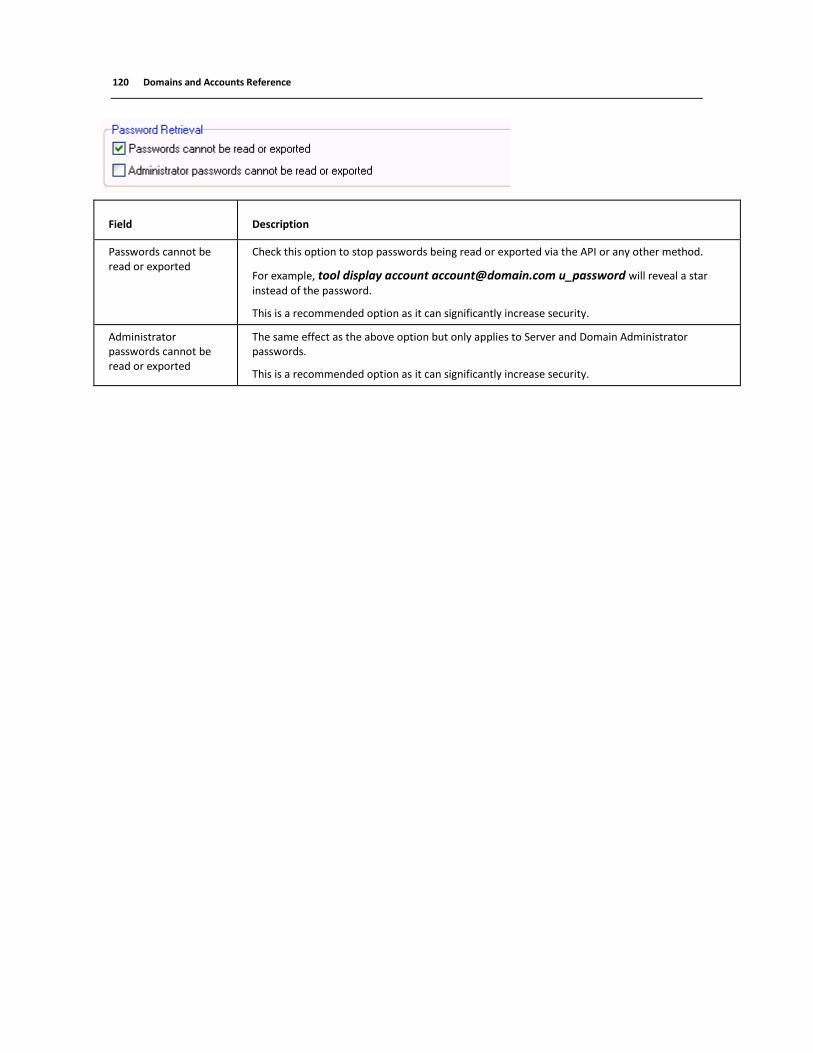
120 Domains and Accounts Reference
Field Description
Passwords cannot be read or exported
Check this option to stop passwords being read or exported via the API or any other method.
For example, tool display account [email protected] u_password will reveal a star instead of the password.
This is a recommended option as it can significantly increase security.
Administrator passwords cannot be read or exported
The same effect as the above option but only applies to Server and Domain Administrator passwords.
This is a recommended option as it can significantly increase security.

Limits – Explanation 121
Limits – Explanation
This section is designed to give a very brief overview of how the various limits (Global, Domain and User) in IceWarp Server are applied, enabled, and which limit overrides which.
There are 5 areas where limits are enabled and/or set
Global Settings – Domains
Domains - Limits – Domain
Domains - Limits – Users
User – Limits
Mail – SMTP – Limits
The following diagram attempts to clarify how limits are enabled:
The diagram shows all the areas where Limits are enabled and set, The straight arrows indicate a dependancy from one item to another, e.g. Checking Item B (Use Domain Limits) will enable Items G, H and I.

122 Domains and Accounts Reference
The two curved arrows are to indicate the three places where a maximum message size can be set. This is the only true "Global limit" that can be set at the moment.
In This Chapter
Limits – Which One Is Used? .................................................................. 122 Limits – Max Message Size ..................................................................... 123
Limits – Which One Is Used?
The following should explain how the limits are applied:
Assume that Use domain limits and Use user limits are checked.
User limits
are always checked.
Domain user limits
are only checked if the corresponding User limit is set to zero
Domain Limits
are always checked, and you should bear in mind that a Domain limit may cause a failure even though a User limit or Domain
User limit has not been breached, as the Domain limits consider all messages sent by all users in the domain.
Example:
a) Use domain limits is checked.
b) Use user limits is checked.
c) DomainA has Domain Limit of Send out data limit per day set to 500MB.
d) DomainA has User Limit of Send out data limit per day set to 20MB.
e) UserA has Send out data limit per day set to 100MB.
f) UserB has Send out data limit per day set to zero.
If UserA tries to send out a message of size 200MB it will not be sent as it will break the User limit (e).
If UserA tries to send out a message of size 99MB it will be accepted unless the Domain limit of 500MB (c) has been broken (the Domain limit considers the totals of all messages sent by all the Domain Users), the Domain User limit (d) is not checked.
If UserB tries to send a message over 20MB in size it will fail as it breaks the Domain User limit (d).
If UserB tries to send a message under 20MB it will be successful unless the Domain Limit (c) has been broken.

Limits – Explanation 123
Limits – Max Message Size
The Max message size limit is a special case worth mentioning, as it can be set as a Global limit as well as a Domain user limit and a User limit.
If the Global limit is checked and set in Mail Service - SMTP - Limits and Override Global limits is not checked then the limit
set will be applied to all messages from all users in all domains on this server. Any message larger than the size set will be
rejected.
If Override global limits is checked then the limits are checked in the following order until a non-zero value is found (if only zero values are found then the message is passed).
1. User limit
2. Domain User limit
3. Mail SMTP limit
Example 1:
a) Mail Service - SMTP - Limits has Max message size checked and set to 10MB
b) Override Global limits is not checked
Any message with a size greater than 10MB will be rejected.
Example 2:
a) Mail Service - SMTP - Limits has Max message size checked and set to 10MB
b) Override Global limits is checked
c) Use Domain limits is checked
d) Use User limits is checked
e) DomainA has the Domain user limit of Max message size set to 20MB
f) UserA has the User limit of Max message size set to 50MB
g) DomainB has the Domain user limit of Max message size set to zero
h) UserB (in DomainB) has a User limit of Max message size set to zero.
If UserA tries to send a message of size 40MB it will be accepted as his User limit (f) takes priority
If any other user in DomainA tries to send a message of size 40MB it will be rejected as it breaks the Domain limit (e) of 20MB
If UserB tries to send a message of size 40MB it will fail as it breaks the Mail Service Limit (a)

124 Domains and Accounts Reference
Simple RegEx Tutorial
Regular Expression can be used in Content Filter conditions.
Regular Expressions can be extremely complex but they are very flexible and powerful and can be used to perform comparisons that cannot be done using the other checks available.
There follows some very basic examples of regular expression usage. For a complete description please visit
http://www.regular-expressions.info/.
^' and '$'
First of all, let's take a look at two special symbols: '^' and '$'. These symbols indicate the start and the end of a string, respectively:
"^The" matches any string that starts with "The".
"of despair$" matches a string that ends in with "of despair".
"^abc$" a string that starts and ends with "abc" - effectively an exact match comparison.
"notice" a string that has the text "notice" in it.
You can see that if you do not use either of these two characters, you are saying that the pattern may occur anywhere inside the string -- you are not "hooking" it to any of the edges.
'*', '+', and '?'
In addition, the symbols '*', '+', and '?', denote the number of times a character or a sequence of characters may occur. What they mean is: "zero or more", "one or more", and "zero or one." Here are some examples:
"ab*" matches a string that has an a followed by zero or more b's ("ac", "abc", "abbc", etc.)
"ab+" same, but there is at least one b ("abc", "abbc", etc., but not "ac")
"ab?" there might be a single b or not ("ac", "abc" but not "abbc").
"a?b+$" a possible 'a' followed by one or more 'b's at the end of the string:
Matches any string ending with "ab", "abb", "abbb" etc. or "b", "bb", etc. but not "aab", "aabb", etc.
Braces { }
You can also use bounds, which appear inside braces and indicate ranges in the number of occurrences:
"ab{2}" matches a string that has an a followed by exactly two b's ("abb")
"ab{2,}" there are at least two b's ("abb", "abbbb", etc.)
"ab{3,5}" from three to five b's ("abbb", "abbbb", or "abbbbb")

Simple RegEx Tutorial 125
Note – you must always specify the first number of a range (i.e., "{0,2}", not "{,2}"). Also, as you might have noticed, the symbols '*', '+', and '?' have the same effect as using the bounds "{0,}", "{1,}", and "{0,1}", respectively.
Now, to quantify a sequence of characters, put them inside parentheses:
"a(bc)*" matches a string that has an a followed by zero or more copies of the sequence "bc"
"a(bc){1,5}" one through five copies of "bc."
'|' OR operator
There is also the '|' symbol, which works as an OR operator:
"hi|hello" matches a string that has either "hi" or "hello" in it
"(b|cd)ef" a string that has either "bef" or "cdef"
"(a|b)*c" a string that has a sequence of alternating a's and b's ending in a c
('.')
A period ('.') stands for any single character:
"a.[0-9]" matches a string that has an a followed by one character and a digit
"^.{3}$" a string with exactly 3 characters
Bracket expressions
Specify which characters are allowed in a single position of a string:
"[ab]" matches a string that has either an a or a b (that's the same as "a|b")
"[a-d]" a string that has lower case letters 'a' through 'd' (that's equal to "a|b|c|d" and even "[abcd]")
"^[a-zA-Z]" a string that starts with a letter
"[0-9]%" a string that has a single digit before a percent sign
",[a-zA-Z0- 9]$"
a string that ends in a comma followed by an alphanumeric character
You can also list which characters you DO NOT want -- just use a '^' as the first symbol in a bracket expression (i.e., "%[^a- zA-Z]%" matches a string with a character that is not a letter between two percent signs).
In order to be taken literally, you must escape the characters "^.[$()|*+?{\" with a backslash ('\'), as they have special meaning. On top of that, you must escape the backslash character itself in PHP3 strings, so, for instance, the regular expression "(\$|A)[0-9]+" would have the function call: ereg("(\\$|A)[0-9]+", $str) (what string does that validate?)

126 Domains and Accounts Reference
Just do not forget that bracket expressions are an exception to that rule -- inside them, all special characters, including the backslash ('\'), lose their special powers (i.e., "[*\+?{}.]" matches exactly any of the characters inside the brackets). And, as the regex manual pages tell us: "To include a literal ']' in the list, make it the first character (following a possible '^'). To include a literal '-', make it the first or last character, or the second end point of a range."