DocuSign User Guide | Equitable
46
DocuSign User Guide for Equitable Advisors Internal - User Manual
-
Upload
khangminh22 -
Category
Documents
-
view
0 -
download
0
Transcript of DocuSign User Guide | Equitable

DocuSign User Guide
for Equitable Advisors
Internal - User Manual

Table of contents
Overview……………………….…..…......................................................................................3
How to Access DocuSign…….…..…......................................................................................4
DocuSign Home Page…………………....…...........................................................................5
DocuSign Manage Page………………...................................................................................6
DocuSign Template Page ……..............................................................................................7
DocuSign Reports Page.........................................................................................................8
Terminology & Application ID.................................................................................................9
Certificate of Completion……………………………..............................................................10
Access Authentication………………..……………….............................................................11
Life New Business – Templates Available...........................................................................12
Life New Business – Upload Forms or Illustration...............................................................13
Life Inforce Business – Templates Available …………………............................................14
Group Retirement – Inforce & New Business……………….................................................15
Individual Retirement – Inforce & New Business………………...........................................16
Additional Templates Available……………...……………….................................................17
Use a Template – QRC……….……………...……………….................................................18
How to upload an Illustration & Send an Envelope………...................................................23
How to Resend an Envelope……………...………………....................................................30
Download a Document from the Email Notification..............................................................31
Download a Document from DocuSign………….................................................................32
How to use Shared Envelopes……………………................................................................33
Use a Template with Advanced Edit – QRC..…...…….......................................................34
Void an Envelopes – QRC………..………..……...…….......................................................40
Correct an Envelopes – QRC……………………...…….......................................................42
Client’s DocuSign Experience……..……………...…….......................................................44
Resources & Contacts………….……………...……............................................................46
2
DocuSign

Overview
Overview:
DocuSign allows Financial Professionals and their assistants the ability to obtain signatures in a secure manner electronically for the following:
• Life New Business outstanding requirements including the conforming illustration.
• Specific approved service forms that will automatically be sent to the Service Centers for processing through the use of Integrated DocuSign Templates.
• Individual Retirement Transfer Form for LPL related transfers.
Financial Professionals must continue to use eApp for life and annuity new business applications, STP (Straight Through Process) via Salesforce and the Equitable Client Portal (OAA) for online transactions when possible.
• Link to the Equitable Online Functionality Flyer .
All forms sent to clients through this process will require an added layer of security as described in this guide. See Access Authentication.
Some Benefits:
• The client experience will be improved with a consistent digital experience.
• The new business requirement will be received faster.
• Reduce NIGO items with mandatory fields on the templates.
• Create efficiencies in the service centers by directly sending the form meta data, signed form and certificate of completion into the New Business and Inforce Service Centers for processing.
• Reduce the cost of mail and overnight express.
• Reduce the cost associated with paper documents (paper, ink, toner, time spent, faxing, etc.).
• Environmental Savings
• Wood, Water, CO2 and Waste.
• Example of Environmental Savings on 20,000 envelopes:
3
DocuSign

How to Access DocuSign
4
Steps to obtain access to DocuSign
TOC
1. Complete the Required DocuSign Training on EAVU• All Financial Professionals and their assistants will have access to
the training.
• The Wealth Management Project Management Team will pull daily
reports from EAVU and provide access to DocuSign based on
course completion until July 1, 2020. After this date, access can be
requested by calling ASK I.T. or requesting access through
Service Now.
• The Training path is as follows:
EAVU > Course Catalog > Practice Management >
Technology for Financial Professionals > DocuSign
Training
3. Log into Equitable.com• Click on “Tools”.
• Click on “See all tools & pick favorites”.
• Scroll down to “D” and drag “DocuSign” to your favorites.
• Launch “DocuSign”. 1. Enter your Equitable.com email address and the password you
created.
2. If you have a DBA email, that email address will be used.
After your initial activation, you will
continue to access DocuSign from the
“Tools” section on Equitable.com.
2. Activate your DocuSign Account• You will receive an email from DocuSign to activate your account.
• Click on the “Activate” action button in the email and follow the
directions to set up your credentials.
• Then, Log out.
In the coming month
SSO will be
implemented which
will eliminate step 1 &
2.
DocuSign

DocuSign Home Page
5
Home
TOC
DocuSign will be
rebranded after 6/15/20
1. Home – The Home Page is the page that will launch when you log into DocuSign.
2. Overview – This section will display the following categories in the Last 6 Months. Click on
the number next to the category to access the information.
• Action Required – Any envelope requiring your action. Templates require the user
in most cases to sign or complete the form before sending the form to the client.
• Waiting for Others – Envelopes sent and you are waiting for others to sign.
• Expiring Soon – Envelopes that are going to expire. Envelopes expire after 120
days.
• Completed – Envelopes completed within the last 6 months.
3. NEW – Quick Access to the following:
• Send an Envelope – Use this option to upload an illustration or upload approved
New Business Form.
• Sign a Document – This is used if you are the only signor of a document.
• Use a Template – Always use this option for inforce service forms.
• If the template is not available, then the form is not approved.
• Create a PowerForm – This should not be used.
4. My Preference – the three main items you will use in this section are as follows:
• Personal information – update your name or upload a picture.
• Regional Setting – update your time zone.
• Contacts – add or edit individuals in your directory/address book. As you send
envelopes the name and email address of recipients will be saved to your directory.
5. My DocuSign ID – Click “Edit” and access My Preference “Personal Information”.
• Click on the picture icon to upload a photo.
1
2
3
4
5

DocuSign Manage Page
6
Manage
TOC
1. Manage – This page allows the user to manage all envelopes.
2. NEW – Quick Access to the following:
• Send an Envelope – Use this option to upload an illustration or upload approved New
Business Form.
• Sign a Document – This is used if you are the only signor of a document.
• Use a Template – Always use this option for inforce service forms.
• If the template is not available, then the form is not approved.
• Create a PowerForm – This should not be used.
3. Search Inbox and Folders– Type in any part of the envelope information (ex: Client’s Name).
4. FILTERS – Click on “Filter” to expand your search status, sent and date.
5. Shared Envelopes – Allows one or more users to share envelopes.
6. ENVELOPES – Section on the left list the following options:
• Inbox – Default page and will show envelopes in your inbox for the last 6 months.
• Sent – Envelopes sent in the last 6 months. Click “Edit” or “Filter” to see all sent.
• Drafts – Envelopes started and saved. Drafts can be deleted.
• Deleted – Do not delete envelopes. Move to a folder instead.
• PowerForms – Do not use PowerForms. The account Admin will use this.
7. QUICK VIEWS –
• Action Required – Any envelope requiring your action. Templates require the user in most
cases to sign or complete the form before sending the form to the client.
• Waiting for Others – Envelopes sent and you are waiting for others to sign.
• Expiring Soon – Envelopes that are going to expire. Envelopes expire after 120 days.
• Completed – Envelopes completed within the last 6 months.
• Authentication Failed – If a client does not complete the authentication process correctly.
• Ex: Client clicks incorrect phone # or disconnects before authentication is complete.
8. FOLDERS – Click the + action to add a folder. You can move envelopes into the folder.
9. Action buttons – Click “SIGN” to finish completing an envelope. Click the dropdown for additional
action.
23
1
4
5
7
6
8
9

DocuSign Templates Page
7
Templates
TOC
1. Templates – This page allows the user to search and use templates.
2. NEW – Always use this action button from the HOME Page to Use a Template – easier to use!
• Create Template – The functionality will be used by the Account Administrator.
• Upload Template – The functionality will be used by the Account Administrator.
• Create a PowerForm – The functionality will be used by the Account Administrator.
3. Shared with Me – Always use the templates shared with you by the Admin (Ex: “Kelly Esposito”).
4. Hover over the Name – the complete name of the template will display. Use “NEW” – Use a
Template instead for a better experience.
5. Search Templates – Search “Shared with Me” by typing in the name or part of the name and click
your enter key.
6. FILTERS – Ability to search by owner or specific dates.
7. USE – Click “USE” - This is the only function you should use!
• Never take another action on shared templates.
• The Account Administrator will update documents in the Shared with Me templates. If you
create a copy, you will not have the up to date version. If you notice an out of date form,
please email: [email protected] or [email protected].
1
2
3
4
65
7
“USE” –Only
action you should
take
Always use Templates available for Inforce Service Forms for Protection Solutions – Life, Individual Retirement and
Group Retirement!
Never change the default ApplicationId and LAN_Typein a template!
See “Terminology & Application ID” for an explanation of these
fields.

DocuSign Reports Page
8
Reports
TOC
1. Reports – This page allows the user to pull an Envelope, Recipient or Usage Report.
2. TYPE – List the types of reports available and the number of reports in each section. Most used
reports are as follows:
• Envelope– The Envelope Report will provide you information on the envelopes you sent
including the Subject, Status, Sender Name, Recipient, Sent On, Last Activity and Completed
On.
• Recipient – The Recipient Activity Report will provide you information on the Recipient’s
Name, Email Address, Envelope Received date, Envelope Requiring Signature, Envelope
Not Signed, Completions Rate, and Average Completion Time.
• Usage – The User Activity Report will be provide you information on Envelopes Sent,
Envelopes Completed and Last Envelope Sent.
3. Date – The default is month to date. Click the dropdown arrow to select other options. Ex: Custom
Date Range.
4. EDIT FILTERS – Click to edit filters. Ex: change “Any” to “Completed” Envelope Status.
5. EDIT COLUMNS – Click to edit columns. Click “ADD” to add from the available list to the selected
list. Click “REMOVE” to remove from the selected list. The items can be arranged by changing the
number or click and dragging the column name up or down.
1
2
4 5
67
3

Terminology & Application ID
9
TOC
Envelope• An envelope is a fundamental object used in DocuSign transactions. Envelopes contain recipient
information, document fields and timestamps that indicate delivery progress. Envelopes contain
information about the sender, security authentication information and more. One document or
many documents can be uploaded into one envelope. One recipient or many recipients can
receive an envelope to sign.
• We are changed for each envelope sent even if that envelope is voided.
Template• Templates are created with a work flow with placeholder roles identified for each recipient. The
templates that are shared with you are created for specific document that are sent to the Service
Center for processing. Templates should always be used for Inforce Service Forms. Templates
are available for New Business.
• In most templates, the first recipient role is the “Sender”. When the template is selected, your
name and email will be populated as the “Sender”. You will have an action to sign. In most
cases, you are completing the information required on the document inside the envelope.
• When you click the “Send” action button, you are asked at that point to “SIGN NOW” to complete
the document.
ALWAYS “USE A TEMPLATE” for Inforce Service Forms!
Envelope Custom Fields
ApplicationId• LAN – This is used for Admin Created Templates for Life and Annuity documents. When this code
is used, the document is sent to the Service Center as long as the template is used. There are
other meta data fields in the template.
• Do not upload a document and add this field, the envelope will not go to the Service
Center and will create an error in the system.
• Do not change the ApplicationId and LAN_Type information in any templates.
• Other – This is used with all other envelopes that are uploaded by the end user. There are
templates that have the ApplicationId of “Other”. If a template has the ApplicationId “Other”, it is
the senders responsibility to get the document to the appropriate party for processing.
LAN_Type• Only mandatory in templates with “LAN” selected. Do not change this field in templates.
• nBA_PS = New Business Life
• nBA_IR = New Business Individual Retirement
• nBA_GR = New Business Group Retirement
• Inforce_PS = Inforce Life
• Inforce_IR = Inforce Individual Retirement
• Inforce_GR = Inforce Group Retirement
If you upload a
document, always use “OTHER”!
DocuSign

Certificate of Completion
10
TOC
1. This section provides information about the completed envelope. Each envelope has a unique
Envelope Id.
2. Recipient’s information is provided. Important Information: name, email address, IP address, and
the date and time the envelope was sent, viewed and signed. In this example, the sender is the
FP or FP’s assistant and Authentication is not required.
3. Recipient’s information is provided. Important Information: name, email address, IP address, and
the date and time the envelope was sent, viewed and signed. In this example, the recipient is a
client, Authentication was completed.
• Mandated by Equitable Fraud Office – all client’s must authenticate.
1
2
3
The Certificate of Completion will automatically be sent to the Service Center for all templates with the
ApplicationId of “LAN” with a specific “LAN_Type”. The Service Center will be able to match the
Certificate of Completion with the document submitted. This is another reason the “TEMPLATES” must
be used.
DocuSign

Access Authentication
11
TOC
When sending any documents to a client through this DocuSign Account, an extra layer of security
must be added. This process is mandated by the Equitable Fraud Department. The Financial
Professional (FP) or the FP’s assistant will add the Access Authentication and enter the client’s
known telephone number. On the DocuSign Screen, there is a note that indicates “$ A fee will be
charged per usage”, however no additional fee will be charged for using this service.
1. Log into DocuSign > NEW > “Use a Template” or “Send an Envelope” > Add Recipient’s names
and email addresses > Next to the client’s name – click the dropdown next to “MORE” > “Add
access authentication”.
2. Select “Phone $” under Send access authentication and add the client’s known telephone
number.
3. Once all recipient information and email information is completed, click “SEND”.
4. The client receives the email from DocuSign and clicks on “View Document”.
5. The client will receive a pop up message and click “CALL”.
6. The client will receive this second pop up with an automated 6-digit Authentication Code and the
client’s telephone will ring within 10 seconds. The client will answer and speak or type in the 6-
digit code, provide their name and the phone authentication will be complete.
Steps to add “Access Authentication”
1
5
6
See video in #7 – Review the Client’s Experience in
EAVU: EAVU > Course Catalog > Practice
Management > Technology for Financial
Professionals > DocuSign Training
Or – Click on the link below to access the video in
SharePoint:
DocuSign
2
3
4
Review the Client’s Experience

Protection Solutions – Life New BusinessDocuSign templates available
12
All Financial Professionals should continue to use the existing STP eApp process via Salesforce and
Life eApp to submit Life New Business. This process is already integrated with electronic signature
capabilities.
New Business Applications that are available in eApp should not be uploaded directly into DocuSign
for signature. All New Business Applications must be completed through the Life eApp Tool.
If there are additional requirements, the Financial Professional can follow the process below.
Use the DocuSign Integrated Templates available. These templates will automatically be sent to Life
New Business Service Center for processing. Templates are available for the following type of forms:
• Acknowledgement & Disclosure – EOLI Policy
• Client Replacement Info Authorization Form 10A
• Definition of Replacement Form
• FP Certification
• HIPAA Authorization Form
• Notice & Consent Form
• Notice of Replacement Form
• Sales Material Used Form
• Supplemental Entity Ownership Form
• Supplemental Entity Payee Form
• System-Matic Form (EFT)
• Trusted Contact Person Authorization Form
• W-9
Note: The DocuSign Templates will have an Application ID of “LAN” and a LAN_Type of “nBA_PS”.
Do not change this information as it is required by the Service Center for processing. For DocuSign
templates, the certificate of completion is automatically sent to the Service Center.
Follow the process “Use A Template – QRC”.
See video in #2 - How to Use a Template in EAVU:
EAVU > Course Catalog > Practice Management > Technology for Financial Professionals >
DocuSign Training
Or – Click on the link below to access the video in SharePoint:
TOC
DocuSign
How to Use a Template
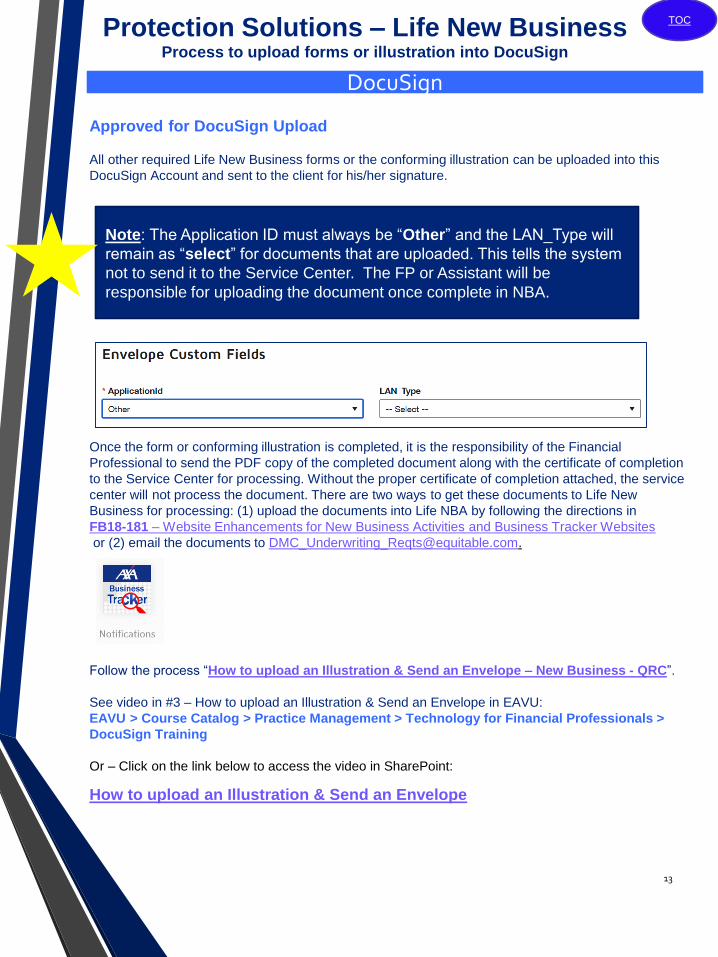
Protection Solutions – Life New BusinessProcess to upload forms or illustration into DocuSign
13
Approved for DocuSign Upload
All other required Life New Business forms or the conforming illustration can be uploaded into this
DocuSign Account and sent to the client for his/her signature.
Once the form or conforming illustration is completed, it is the responsibility of the Financial
Professional to send the PDF copy of the completed document along with the certificate of completion
to the Service Center for processing. Without the proper certificate of completion attached, the service
center will not process the document. There are two ways to get these documents to Life New
Business for processing: (1) upload the documents into Life NBA by following the directions in
FB18-181 – Website Enhancements for New Business Activities and Business Tracker Websites
or (2) email the documents to [email protected].
Follow the process “How to upload an Illustration & Send an Envelope – New Business - QRC”.
See video in #3 – How to upload an Illustration & Send an Envelope in EAVU:
EAVU > Course Catalog > Practice Management > Technology for Financial Professionals >
DocuSign Training
Or – Click on the link below to access the video in SharePoint:
TOC
Note: The Application ID must always be “Other” and the LAN_Type will
remain as “select” for documents that are uploaded. This tells the system
not to send it to the Service Center. The FP or Assistant will be
responsible for uploading the document once complete in NBA.
DocuSign
How to upload an Illustration & Send an Envelope

Protection Solutions – Life Inforce BusinessDocuSign templates available
14
All Financial Professionals and their assistants will have access to the following DocuSign Life Inforce
Templates:
• Beneficiary Change Form – Cat# 137177
• Broker Transfer Authorization Form – X03837_BTA
• Non-Financial Change – 049548E
• One-Time Transfer Change of Allocations – Cat# 114771
• Ownership Change – Cat# 137178
• Systematic Payment Plan – 060739E
The DocuSign Templates will have an Application ID of “LAN” and a LAN_Type of “Inforce_PS”. Do
not change this information as it is required by the Service Center for processing. For DocuSign
templates, the certificate of completion is automatically sent to the Service Center.
Do not complete these documents and upload your own into DocuSign. This action will cause the
document to fail and the Service Center will reject the document.
An email with the document will not be accepted.
All documents received prior to 4:00pm ET will be indexed and sent to the Service Center for
processing with the effective date for that business day if in good order. All documents received after
4:00pm ET will be indexed and sent to the Service Center the next business day.
The Financial Professional will be contacted by email, if any document received is not in good order.
Follow the process “Use A Template – QRC”.
See video in #2 - How to Use a Template in EAVU:
EAVU > Course Catalog > Practice Management > Technology for Financial
Professionals > DocuSign Training
Or – Click on the link below to access the video in SharePoint:
TOC
DocuSign
How to Use a Template
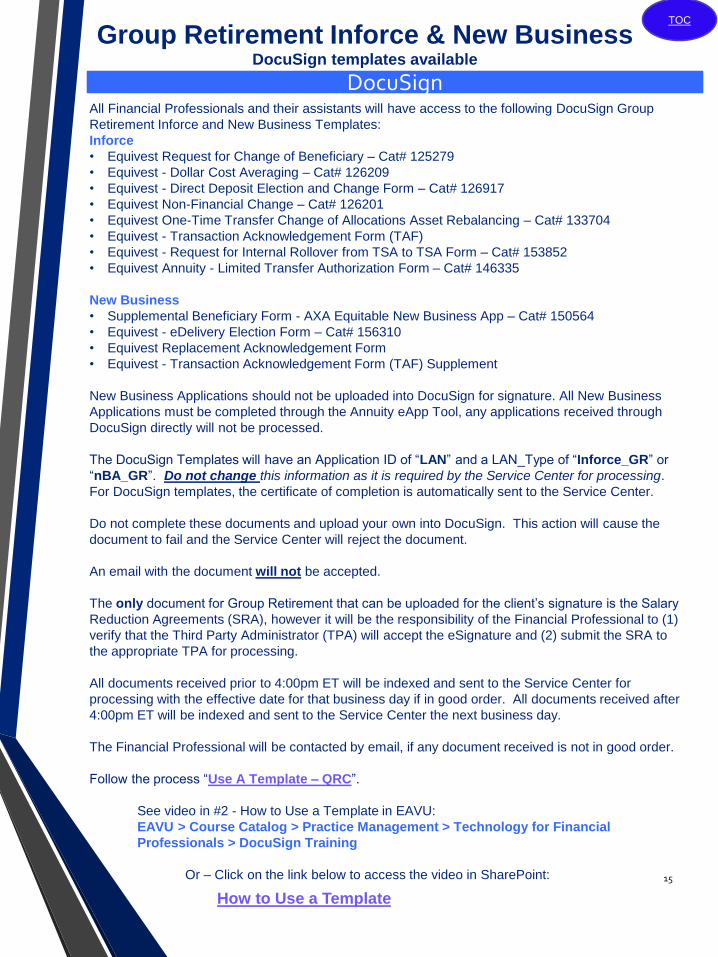
Group Retirement Inforce & New BusinessDocuSign templates available
15
All Financial Professionals and their assistants will have access to the following DocuSign Group
Retirement Inforce and New Business Templates:
Inforce
• Equivest Request for Change of Beneficiary – Cat# 125279
• Equivest - Dollar Cost Averaging – Cat# 126209
• Equivest - Direct Deposit Election and Change Form – Cat# 126917
• Equivest Non-Financial Change – Cat# 126201
• Equivest One-Time Transfer Change of Allocations Asset Rebalancing – Cat# 133704
• Equivest - Transaction Acknowledgement Form (TAF)
• Equivest - Request for Internal Rollover from TSA to TSA Form – Cat# 153852
• Equivest Annuity - Limited Transfer Authorization Form – Cat# 146335
New Business
• Supplemental Beneficiary Form - AXA Equitable New Business App – Cat# 150564
• Equivest - eDelivery Election Form – Cat# 156310
• Equivest Replacement Acknowledgement Form
• Equivest - Transaction Acknowledgement Form (TAF) Supplement
New Business Applications should not be uploaded into DocuSign for signature. All New Business
Applications must be completed through the Annuity eApp Tool, any applications received through
DocuSign directly will not be processed.
The DocuSign Templates will have an Application ID of “LAN” and a LAN_Type of “Inforce_GR” or
“nBA_GR”. Do not change this information as it is required by the Service Center for processing.
For DocuSign templates, the certificate of completion is automatically sent to the Service Center.
Do not complete these documents and upload your own into DocuSign. This action will cause the
document to fail and the Service Center will reject the document.
An email with the document will not be accepted.
The only document for Group Retirement that can be uploaded for the client’s signature is the Salary
Reduction Agreements (SRA), however it will be the responsibility of the Financial Professional to (1)
verify that the Third Party Administrator (TPA) will accept the eSignature and (2) submit the SRA to
the appropriate TPA for processing.
All documents received prior to 4:00pm ET will be indexed and sent to the Service Center for
processing with the effective date for that business day if in good order. All documents received after
4:00pm ET will be indexed and sent to the Service Center the next business day.
The Financial Professional will be contacted by email, if any document received is not in good order.
Follow the process “Use A Template – QRC”.
See video in #2 - How to Use a Template in EAVU:
EAVU > Course Catalog > Practice Management > Technology for Financial
Professionals > DocuSign Training
Or – Click on the link below to access the video in SharePoint:
TOC
DocuSign
How to Use a Template

Individual Retirement Inforce & New BusinessDocuSign templates available
16
All Financial Professionals and their assistants will have access to the following DocuSign Individual
Retirement Inforce and New Business Templates:
Inforce
• Retirement Cornerstone SCS Investment Edge - Direct Deposit – Cat# 146196
• Accumulator Non-Financial Change – Cat# 130037
• Retirement Cornerstone Non-Financial Change – Cat# 143999
• Accumulator One-Time Transfer Change of Allocations – Cat# 133588
• Individual Retirement Replacement Acknowledgement Form
• IR Annuity - Limited Transfer Authorization Form – Cat# 146335
New Business
• ACORD - 1035 Exchange Rollover and Transfer Form
• (For LPL Transfers Only)
New Business Applications should not be uploaded into DocuSign for signature. All New Business
Applications must be completed through the Annuity eApp Tool, any applications received through
DocuSign directly will not be processed.
The DocuSign Templates will have an Application ID of “LAN” and a LAN_Type of “Inforce_IR”. Do
not change this information as it is required by the Service Center for processing. For DocuSign
templates, the certificate of completion is automatically sent to the Service Center.
Do not complete these documents and upload your own into DocuSign. This action will cause the
document to fail and the Service Center will reject the document.
An email with the document will not be accepted.
All documents received prior to 4:00pm ET will be indexed and sent to the Service Center for
processing with the effective date for that business day if in good order. All documents received after
4:00pm ET will be indexed and sent to the Service Center the next business day.
The Financial Professional will be contacted by email, if any document received is not in good order.
Follow the process “Use A Template – QRC”.
See video in #2 - How to Use a Template in EAVU:
EAVU > Course Catalog > Practice Management > Technology for Financial
Professionals > DocuSign Training
Or – Click on the link below to access the video in SharePoint:
TOC
DocuSign
How to Use a Template

Additional Templates Available
Additional Templates that are not integrated
The following templates are not integrated which means they have an Application Id of “Other” and
the documents are not sent to the Service Center. It is the Financial Professionals responsibility to
send these documents to the appropriate area if applicable.
• Authorization to Share ATS
• AXA Morningstar Standard Risk Tolerance Questionnaire
• Client Profile
• Life Insurance Illustration Certification
The Financial Professional will be contacted by email, if any document received is not in good order.
Follow the process “Use A Template – QRC”.
See video in #2 - How to Use a Template in EAVU:
EAVU > Course Catalog > Practice Management > Technology for Financial
Professionals > DocuSign Training
Or – Click on the link below to access the video in SharePoint:
TOC
DocuSign
How to Use a Template

Use a Template – QRC
18
TOC
1
Note: If you forgot your password and are unable to reset your password prior to the
SSO implementation, please email [email protected].
2
Log into Equitable.com• Click on “Tools”.
• Click on “See all tools & pick favorites”.
• Scroll down to “D” and drag “DocuSign” to your favorites.
• Launch “DocuSign”
Log into DocuSign• Enter your Equitable.com email (If you have a DBA email, that email will be used.)
• Click “CONTINUE”.
• Type in your password, click “LOG IN”.
3 From the DocuSign Home Page • Click “NEW”.
• Click “Use a Template”.
DocuSign

Use a Template – QRC
19
TOC
4
5
Click on “Shared with Me”• Type in the name or part of the name of the template in the search window – hit
the “enter key” on your computer.
• Click “ADD SELECTED” on the bottom left.
The role for each recipient will be displayed.• As the sender, your name and email will automatically populate. Add the name
and email of each recipient (The role could be an Insured, Owner, Client,
Participant.)
6 Click the dropdown next to “MORE”.• Click “Add access authentication”.
• Click the dropdown under “Select access authentication”.
• Type in the client’s known telephone number.
Notice you have an
action of “NEED TO
SIGN”. Even if you are
not signing the
document, you have
an action to complete
the document or part
of it.
DocuSign

Use a Template – QRC
20
TOC
7 Envelope Custom Fields • The ApplicationID for an integrated template is always “LAN”.
• DO NOT CHANGE THE TEMPLATE AppliationID of “LAN” or LAN_TYPE.
Note: These codes tell the system where to send the document. Do not
upload your own document and assign the ApplicationID and LAN_Type, it
will error. There are other codes within the template that will allow this
template to be passed to the Service Centers.
DocuSign
This example is
nBA_PS since it is a life
New Business.
Use a Template – QRC
21
TOC
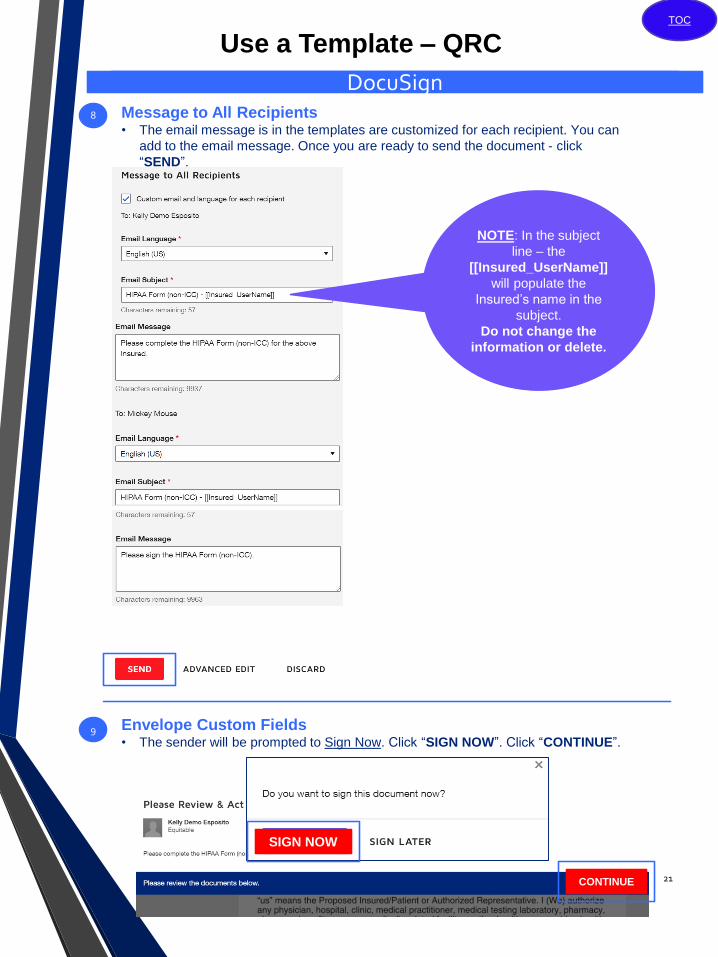
8 Message to All Recipients• The email message is in the templates are customized for each recipient. You can
add to the email message. Once you are ready to send the document - click
“SEND”.
Envelope Custom Fields • The sender will be prompted to Sign Now. Click “SIGN NOW”. Click “CONTINUE”.
NOTE: In the subject
line – the
[[Insured_UserName]]
will populate the
Insured’s name in the
subject.
Do not change the
information or delete.
DocuSign
CONTINUE
9
SIGN NOW

Use a Template – QRC
22
TOC
11
Complete the Form• Complete the form where indicated. Mandatory fields are in red. Optional fields
are in gray.
• Once completed, click “FINISH”.
• If you are unable to complete the form at this time, click the “OTHER ACTIONS”
dropdown and select “Finish Later”.
• To complete the document at a later time
• Log into DocuSign > Go to MANGE > Find the envelope you
sent in your “Inbox” or “Sent” folder > Click “SIGN” on the right
side.
Once completed by the Sender• The envelope will be sent to all recipients in the specific order and then sent to the
Service Center for processing.
• The sender will receive an email when each recipient reviews and signs the
document(s).
• When the envelope is complete, all recipients will received an email with the
completed document. Click on “View in DocuSign” and download the document to
be stored in PaperClip. Or, you can log into DocuSign > Go to “MANAGE” > find
the envelope and click document name, then click on the download icon to the
right. See # 5 Video on EAVU or click on the link below to access the video in
SharePoint.
10
FINISH
DocuSign
How to Download a completed Envelope

How to upload an Illustration & Send an Envelope – New Business – QRC
23
TOC
1
Note: If you forgot your password and are unable to reset your password prior to the
SSO implementation, please email [email protected].
2
Log into Equitable.com• Click on “Tools”.
• Click on “See all tools & pick favorites”.
• Scroll down to “D” and drag “DocuSign” to your favorites.
• Launch “DocuSign”
Log into DocuSign• Enter your Equitable.com email (If you have a DBA email, that email will be used.)
• Click “CONTINUE”.
• Type in your password, click “LOG IN”.
3 From the DocuSign Home Page • Click “NEW”.
• Click “Send an Envelope”.
DocuSign

How to upload an Illustration & Send an Envelope – New Business – QRC
24
TOC
4
5
Click on “Upload”• Select the folder where you document is saved.
• Select the illustration or document by double clicking on the document or click
“Open”.
If an interactive PDF is uploaded• A pop up will display “We found form fields for…”.
• If you would like to add another required form, click “UPLOAD” (follow step 4 above).
6 Add yourself as the first recipient• Check the box in front of “Set signing order”.
• Add your name and email address.
• Click “ADD RECIPIENT” to add the next recipient.
DocuSign

How to upload an Illustration & Send an Envelope – New Business – QRC
25
TOC
7
Add the 3rd Recipient• Click “ADD RECIPIENT”.
• Add Financial Professionals name and email address.
Add the 2nd Recipient (Client’s name & email address)• Click the dropdown next to “MORE”
• Click “Add access authentication”.
• Click the dropdown under “Select access authentication”.
• Add the client’s known telephone number.
• This is mandated by the Equitable Fraud Department.
Access
Authentication
is required for
Clients.
8
DocuSign
Envelope Custom Fields• Select the “ApplicationId” – “Other” - Must always be “Other” when upload a
document.
• Do not add a “LAN_Type” – leave “-Select-”
The ApplicationId of “Other” means that the document is not sent to the Service Center.
The sender must download the completed documents and certificate of completion to send
to Life New Business or upload into NBA.
9

How to upload an Illustration & Send an Envelope – New Business – QRC
26
TOC
Message to All Recipients• The name of the illustration and document will be populated automatically in the
“Email Subject”. This information can be update for a better client experience.
• Best Practice: Add the Client’s Name to the Subject Line.
• Type an email message such as: Please review and sign the Illustration and
Follow-up Medical Evidence Form.
• If you would like a different email message for each recipient, check box in front of
“Custom email and language for each recipient”.
• Once you are ready to send the document - click “SEND”.
10
DocuSign
11 Click “NEXT” to continue the process• If you would like to save the envelope as a “Draft” and complete the envelop later, click
the dropdown next to “ACTIONS” and select “SAVE AND CLOSE”.
• “RECIPIENT PREVIEW” can be select to preview the recipient experience, at this point it
is not the best time to preview since there are a few additional steps required.
How to upload an Illustration & Send an Envelope – New Business – QRC
27
TOC
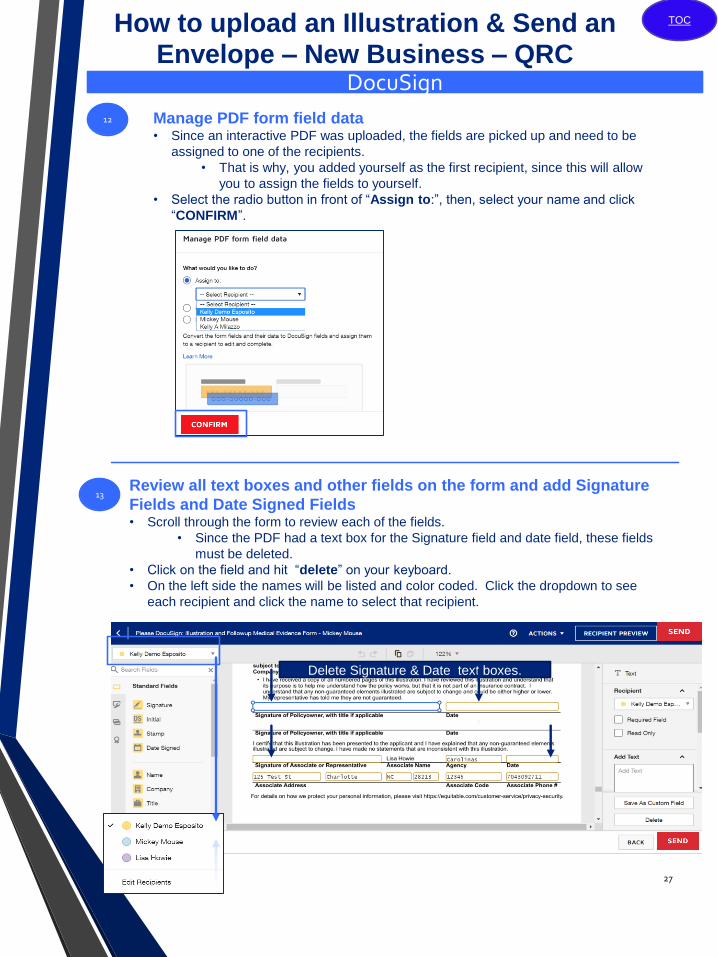
Manage PDF form field data• Since an interactive PDF was uploaded, the fields are picked up and need to be
assigned to one of the recipients.
• That is why, you added yourself as the first recipient, since this will allow
you to assign the fields to yourself.
• Select the radio button in front of “Assign to:”, then, select your name and click
“CONFIRM”.
12
DocuSign
13Review all text boxes and other fields on the form and add Signature
Fields and Date Signed Fields• Scroll through the form to review each of the fields.
• Since the PDF had a text box for the Signature field and date field, these fields
must be deleted.
• Click on the field and hit “delete” on your keyboard.
• On the left side the names will be listed and color coded. Click the dropdown to see
each recipient and click the name to select that recipient.
Delete Signature & Date text boxes.

How to upload an Illustration & Send an Envelope – New Business – QRC
28
TOC
14 Add Signatures and Date Signed fields to the documents• Select each recipient that must sign the document.
• Under the “Standard Fields” > Drag and drop each “Signature” and “Date Signed”
fields.
• Be sure the correct color is added to the correct signature line on the document.
• In this example, some of the text fields were completed prior to uploading this
document.
DocuSign
15Review all text boxes• All text boxes are assigned to you and are in yellow. You can select and assign the text
box to one of the other recipients.
• To make the field mandatory, select the text box and click on “Required Field”.
• Additional fields to the right:
• Character Limit – The maximum for any text field is 4000.
• Formatting – The formatting of the text can be changed.
• Data Label – This field is automatically labeled. This can be changed.
• Tooltip – Type in the name that you would like the recipient to see.
• Validations – The default is “None”. Standard options are: SSN, Email, Numbers,
Letters, Date, Zip+4 and Zip.
• Note: Since you are coming the text fields as the first Recipient, no need to spend too
much time updating these fields.

How to upload an Illustration & Send an Envelope – New Business – QRC
29
TOC
16 Add additional fields • Drag the “Signatures”, “Date Signed”, “Full Name”.
• Reassign the “City, State” field to the Client and make the field a “Required Field” by
check the box as indicate above.
• Click “SEND”.
Be sure to allow space for the date stamp. The date stamp includes
the hours, minutes and seconds. Moving the date will prevent the
date from covering or stamping over the signature.
DocuSign
17 Envelope Custom Fields • The sender will be prompted to Sign Now. Click “SIGN NOW”. Click “CONTINUE”.
• Click “START” and complete all the appropriate fields.
• Then, click “FINISH”.
• The envelope will be sent to the client.
CONTINUE
SIGN NOW

How to Resend an Envelope – QRC
30
TOC
1
2
Log into Equitable.com• Click on “Tools” > Click on “See all tools & pick favorites” > Scroll down to “D” and drag
“DocuSign” to your favorites. Launch “DocuSign” > Log into DocuSign > Enter your
Equitable.com email (If you have a DBA email, that email will be used.) > Click “CONTINUE” >
Type in your password, click “LOG IN”.
Go to “Manage”• Search for the envelope the “Inbox” or “Send” box.
• Type the name of the client or the name of the document in the “Search Inbox
and Folders” search box.
3 Once the envelope has been found• Hover over the “Waiting for Others” to see the name of the recipient.
• Click “RESEND”.
• A message will display to confirm the envelope has been sent to the recipient.
DocuSign

Download a document from the email notification
The completed email is received from DocuSign. Click on the “View in DocuSign” link in the
completed email.
Click the down arrow on the top of the document and select “Combined PDF” and save the
document. If “Separate PDFs” is selected, you will see a zip file with the document along with
the certificate of completion.
Select “Save as” and save the pdf copy to your one drive or save a copy in PaperClip in the
client’s file.
31
DocuSign1
2
3

Download a document from DocuSign
Go to DocuSign.com and log in with your email address and password. Go to “MANAGE” and
click on the document name in the subject column with the “Completed” status that you would
like to download.
Click the download icon on the right side of the screen.
Select “Combined PDF” and click “DOWNLOAD”. If “Separate PDFs” is selected, you will see a
zip file with the document along with the certificate of completion.
The download will appear on the bottom left of your screen. Click the arrow and select “Show in
folder”. At this point, you can right click and copy and paste into your one drive or drag and drop
it into PaperClip in the client’s file. Or, open – click print and save as a PDF.
32
DocuSign1
2
3
4

How to Use Share Envelopes – QRC
33
TOC
1
2 Go to “Manage” • Click on “Shared Envelopes”.
3 Click the radio button in front of the name• Click “SELECT”.
DocuSign
Log into Equitable.com• Click on “Tools” > Click on “See all tools & pick favorites” > Scroll down to “D” and drag
“DocuSign” to your favorites. Launch “DocuSign” > Log into DocuSign > Enter your
Equitable.com email (If you have a DBA email, that email will be used.) > Click “CONTINUE” >
Type in your password, click “LOG IN”.
Shared Envelopes – Allows one or more users to share envelopes.
4 In the “Manage” section of another user• The menu bar will display “Envelopes belonging to... Return to my envelopes.
• To go back to your “Manage” section, click “Return to my envelopes”.
• You can take the following actions: resend, correct, void or transfer ownership of an
envelope.
• You cannot create a new envelope or use a template.

Use a Template with Advanced Edit – QRC
34
TOC
1
2
3
From the DocuSign Home Page • Click “NEW”.
• Click “Use a Template”.
DocuSign
Log into Equitable.com• Click on “Tools” > Click on “See all tools & pick favorites” > Scroll down to “D” and drag
“DocuSign” to your favorites. Launch “DocuSign” > Log into DocuSign > Enter your
Equitable.com email (If you have a DBA email, that email will be used.) > Click “CONTINUE” >
Type in your password, click “LOG IN”.
Click on “Shared with Me”• Type in the name or part of the name of the template in the search window – hit
the “enter key” on your computer.
• Click on the column header “Name” to sort by the name.
• Click the radio button in front of the template, click “ADD SELECTED” on the
bottom left.

Use a Template with Advanced Edit – QRC
35
TOC
4
5
The role for each recipient will be displayed.• As the sender, your name and email will automatically populate.
• Add the name and email of each recipient (The role could be an Insured, Owner,
Client, Participant.)
• Click “ADVANCED EDIT”.
• Click the dropdown next to “MORE”.
• Click “Add access authentication”.
• Click the dropdown under Select access authentication, select “Phone $”.
• Type in the client’s known telephone number.
DocuSign
If another recipient should be added
• Click “ADD RECIPIENT”.
• Add the name and email address.
• In this example, the spouse’s name is being added to sign the
Beneficiary Change.
• Click the dropdown next to “MORE”.
• Click “Add access authentication”.
• Click the dropdown under Select access authentication, select
“Phone $”.
• Type in the client’s known telephone number.

Use a Template with Advanced Edit – QRC
36
TOC
6
Envelope Custom Fields • The ApplicationID for an integrated template is always “LAN”.
• DO NOT CHANGE THE TEMPLATE AppliationID of “LAN” or LAN_TYPE.
Note: These codes tell the system where to send the document. Do not
upload your own document and assign the ApplicationID and LAN_Type, it
will error. There are other codes within the template that will allow this
template to be passed to the Service Centers.
DocuSign
7
If another recipient should be added
• Click “ADD RECIPIENT”.
• Add the name and email address.
• In this example, the Plan Administrators is also being added.
• Click the dropdown next to “MORE”.
• Click “Add access authentication”.
• Click the dropdown under Select access authentication, select
“Phone $”.
• Type in the client’s known telephone number.
This example is
Inforce_GR since it is an
Inforce Group
Retirement form.
Use a Template with Advanced Edit – QRC
37
TOC
8
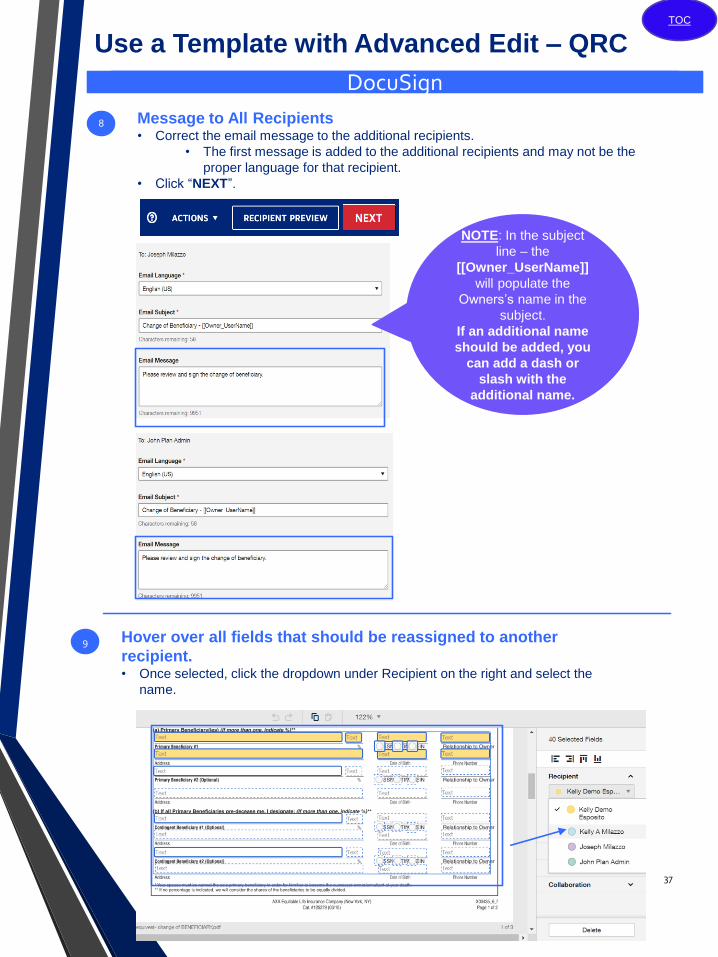
Hover over all fields that should be reassigned to another
recipient.• Once selected, click the dropdown under Recipient on the right and select the
name.
DocuSign
9
Message to All Recipients• Correct the email message to the additional recipients.
• The first message is added to the additional recipients and may not be the
proper language for that recipient.
• Click “NEXT”.
NOTE: In the subject
line – the
[[Owner_UserName]]
will populate the
Owners’s name in the
subject.
If an additional name
should be added, you
can add a dash or
slash with the
additional name.
Use a Template with Advanced Edit – QRC
38
TOC
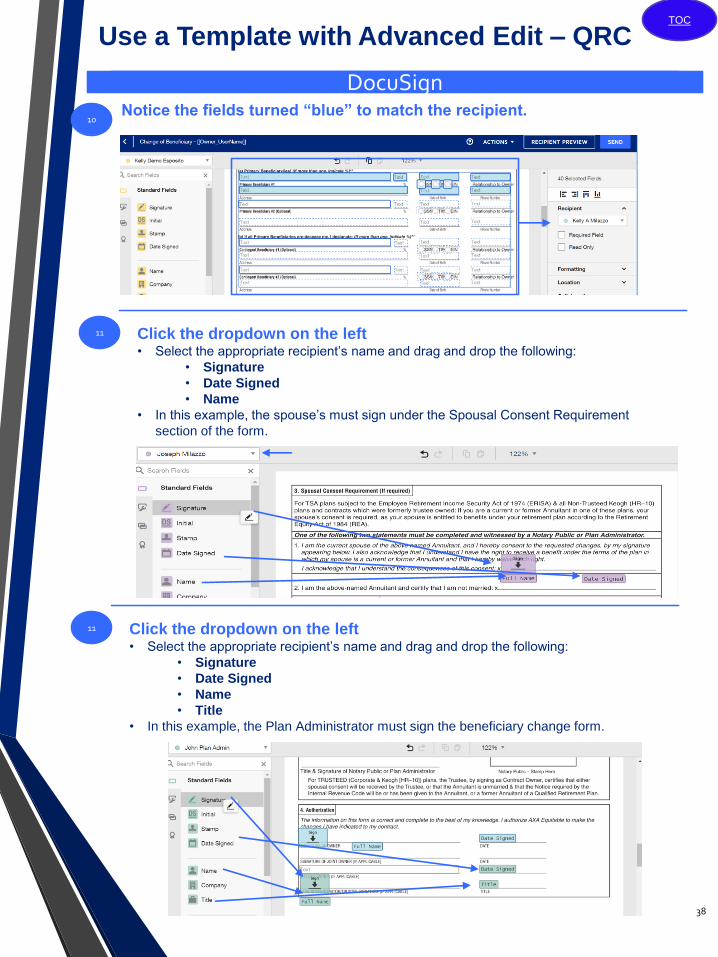
11
Notice the fields turned “blue” to match the recipient.
Click the dropdown on the left• Select the appropriate recipient’s name and drag and drop the following:
• Signature
• Date Signed
• Name
• In this example, the spouse’s must sign under the Spousal Consent Requirement
section of the form.
10
DocuSign
11 Click the dropdown on the left• Select the appropriate recipient’s name and drag and drop the following:
• Signature
• Date Signed
• Name
• Title
• In this example, the Plan Administrator must sign the beneficiary change form.

Use a Template with Advanced Edit – QRC
39
TOC
13
Once all changes are completed• Click “SEND”.
A pop up will display “Do you want to sign this document now?”• An email will be sent to the sender as well.
• Click “SIGN NOW” to complete the documents.
• The sender has an action of completing the document and will not sign the
document.
12
DocuSign
SIGN NOW
14
Click “CONTINUE”.• All mandatory fields are in red and all optional fields are in gray.
• When you hover over the field, a tip will display the field name to be completed.
• Example: Contract Number, First Name, Last Name, etc.
• Once all fields are accurately completed, click “FINISH”.
• The envelope will be sent to all recipients in the specific order and then sent to the Service
Center for processing.
• The sender will receive an email when each recipient reviews and signs the document(s).
• When the envelope is complete, all recipients will received an email with the completed
document. Click on “View in DocuSign” and download the document to be stored in
PaperClip. Or, you can log into DocuSign > Go to “MANAGE” > find the envelope and click
document name, then click on the download icon to the right. See # 5 Video on EAVU or
click on the link below to access the video in SharePoint.
How to Download a completed Envelope

Void an Envelope – QRC
40
TOC
DocuSign
1 Log into Equitable.com• Click on “Tools” > Click on “See all tools & pick favorites” > Scroll down to “D” and drag
“DocuSign” to your favorites. Launch “DocuSign” > Log into DocuSign > Enter your
Equitable.com email (If you have a DBA email, that email will be used.) > Click “CONTINUE” >
Type in your password, click “LOG IN”.
2 Go to “Manage”• Search for the envelope the “Inbox” or “Send” box.
• Type the name of the client or the name of the document in the “Search Inbox
and Folders” search box.
3 Once the envelope has been found• Click the dropdown next to the action button on the right.
• Select “VOID”.
• Type in the reason for voiding the envelope.
• Click “VOID”.

Void an Envelope – QRC
41
TOC
DocuSign
4 The envelope will be updated• The status will display “Voided”.
5 An email will be sent to all that received the envelope• Below is an example of a Voided Email Message.
Correct an Envelope – QRC
42
TOC
DocuSign
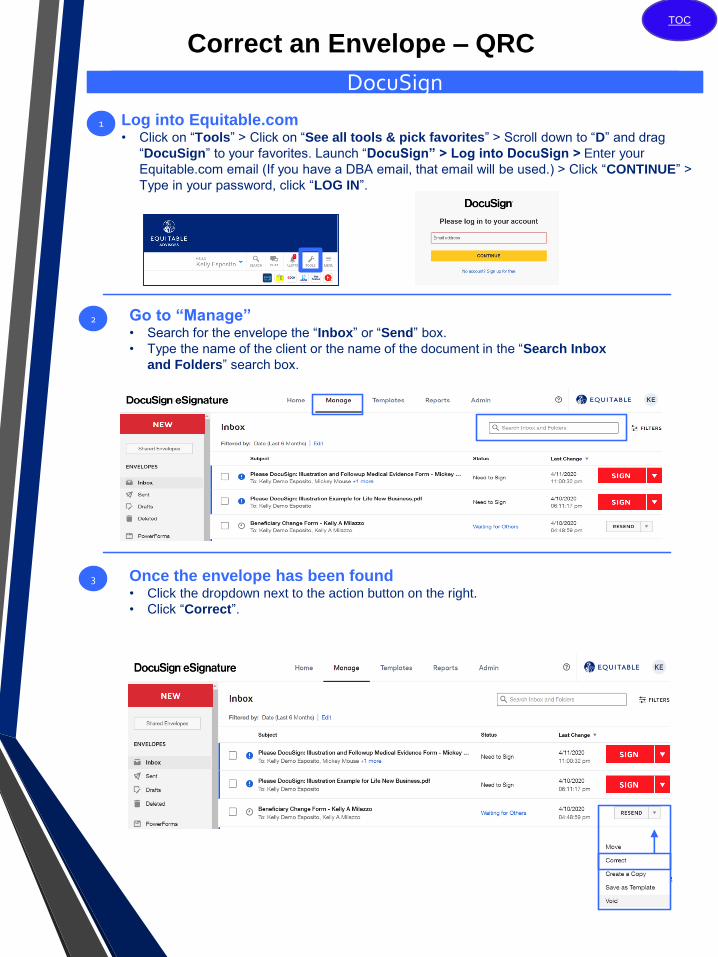
1 Log into Equitable.com• Click on “Tools” > Click on “See all tools & pick favorites” > Scroll down to “D” and drag
“DocuSign” to your favorites. Launch “DocuSign” > Log into DocuSign > Enter your
Equitable.com email (If you have a DBA email, that email will be used.) > Click “CONTINUE” >
Type in your password, click “LOG IN”.
2 Go to “Manage”• Search for the envelope the “Inbox” or “Send” box.
• Type the name of the client or the name of the document in the “Search Inbox
and Folders” search box.
3 Once the envelope has been found• Click the dropdown next to the action button on the right.
• Click “Correct”.

Correct an Envelope – QRC
43
TOC
DocuSign
4 The menu bar will display “Correcting”.• Scroll down and make any corrections to the recipient information or email messages.
• Click “NEXT”.
5 Click on the Access Authentication if correcting this section• Type in the correct telephone number.
• Correct the email address if incorrect.
• Click “NEXT”.
6 Click “CORRECT”.• A message will display “Your envelope has been corrected”.
• A message will be sent to the recipient.

44
Client’s DocuSign Experience
1 Client opens the email message from DocuSign.
• The client clicks on “View Document”.
2Call Pop up Message
• The client clicks on the “CALL” action button.
• If the telephone number is incorrect, the client will click “CANCEL” and contact the
Financial Professional.
DocuSign
3 Call to the Client
• The client will receive this second pop up with an automated 6-digit Authentication Code and
the client’s telephone will ring within 10 seconds. The client will answer and speak or type in
the 6-digit code, provide their name and the phone authentication will be complete.

45
Client’s DocuSign Experience
4
5
Electronic Records and Signatures
• The client clicks on the “Electronic Records and Signature Disclosure” – clicks “Close”.
• The client clicks the checkbox in front of the “I agree to use electronic records and
signatures.”
• The client clicks “Continue”.
Form Completion and Signature
• The client will completes the mandatory fields and clicks on the “Sign” action button.
Adopt and Sign
• The client selects a signature style and clicks “Adopt and Sign”. Or, signs with
their finger on a tablet or phone.
• The client clicks “FINISH”.
Download a PDF Copy
The client can click on the download icon to save a PDF copy or “X” out. If the client
clicks “CONTINUE”, he/she will be brought to the company website.
7
DocuSign
6

46
DocuSign
Resources and Contacts
Resources:
• FB 20-074 – DocuSign for Equitable Advisors’ Financial Professionals
• DocuSign User Guide for Equitable Advisors’ Financial Professionals
• Quick Reference Cards
• Training on EAVUThe Training path is as follows:
• EAVU > Course Catalog > Practice Management > Technology for
Financial Professionals > DocuSign Training
• Links to Training Videos on SharePoint:
Contact the following individuals for additional information:
• Your Branch Digital Champion or Branch Operations Manager
• Kelly Esposito – [email protected]
• Daniel Zubrowski – [email protected]
How to Access DocuSign
How to Use a Template
How to upload an Illustration & Send an Envelope
Review the Client’s Experience
How to Resend an Envelope
How to Download a completed Envelope
How to Use Shared Envelopes
Use a Template with Advanced Edit
Void an Envelope
Correct an Envelope
4
2
3
1
6
5
7
8
9
10
Rev. 4/26/2020