![ICND10S08A [Read-Only]](https://static.fdokumen.com/doc/165x107/6316f88cf68b807f880375d2/icnd10s08a-read-only.jpg)
Do not remove this Owner's Manual from the vehicle. Read ...
68
Do not remove this Owner’s Manual from the vehicle. Read this manual carefully before operating the vehicle as it contains important safety information.
-
Upload
khangminh22 -
Category
Documents
-
view
3 -
download
0
Transcript of Do not remove this Owner's Manual from the vehicle. Read ...

Do not remove this Owner’s Manual from the vehicle. Read this manual carefullybefore operating the vehicle as it contains important safety information.

Read this manual carefully.This Owner’s Manual contains important information on safety, operation and maintenance of your KYMCO motorcycle.Any one who operates your motorcycle should carefully read and understand the contents of this manual before riding the motorcycle.For your safety, understand and follow all of the warnings contained in this Owner’s Manual and the labels applied to your motorcycle.This Owner’s Manual should be considered a permanent part of the vehicle. Keep it with your motorcycle at all times.ON-ROAD USE ONLY. This motorcycle has been designed to be used on the road.Particularly important information is called out in this manual by the following icons and notations:
WARNING
CAUTION
NO NO NO NO NOTETETETETE
The SAFETY ALERT symbol with the exclamation point in the triangle means ATTENTION!BE ALERT! YOUR SAFETY CAN BE AFFECTED.
Failure to follow instructions associated with a WARNING symbol could result in severe injury ordeath to the rider, a passenger, a bystander, or a person inspecting or repairing the motorcycle.
A CAUTION symbol indicates that special precautions must be taken to avoid damagingthe motorcycle.
The NOTE symbol indicates key information about a procedure or to clarify an operation.
California Proposition 65WARNING
This product contains or emits chemicals known to the State of California to causecancer and birth defects or other reproductive harm.
WARNINGTo avoid damage to the motorcycle’s electrical system, do not remove or install abattery wire when the ignition switch is in the “ON” position.
Battery & Electrical System Damage Alert

1
Manual Icon Legend ................................................... (inside of front-cover)CA Prop 65 & Battery Warning .................................. (inside of front-cover)Table of Contents .......................................................................................... 1SECTION 1 - SAFETY ................................................................ 2 - 8Forward ......................................................................................................... 2Motorcycle Safety ................................................................................... 3 - 4Load Limits & Guidelines ............................................................................. 5Accessories & Modifications ........................................................................ 6Caution & Warning Labels ............................................................................ 6Locations of Parts & Controls ................................................................ 7 - 8SECTION 2 - CONTROLS & FEATURES ............................... 9 - 21Serial Numbers ............................................................................................. 9Keys ............................................................................................................. 10Ignition Switch ............................................................................................. 10Steering Lock ....................................................................................... 10 - 11Right-hand Handlebar Switch .................................................................... 12Left-hand Handlebar Switch ....................................................................... 13Helmet Lock ................................................................................................ 14Seat Lock .................................................................................................... 14Tool Kit ......................................................................................................... 14Multifunction Meter ............................................................................ 15 – 21Speedometer ............................................................................................... 17Odometer/Trip meter/Service meter ................................................. 18 – 19Fuel Level Gauge ....................................................................................... 20Clock .................................................................................................... 20 - 21SECTION 3 - OPERATION ..................................................... 22 - 40Pre-ride Inspection ............................................................................ 22 – 31Engine Oil Inspection ................................................................................. 23Brake Inspection ......................................................................................... 24Tire Inspection ............................................................................................ 25Fuel Level Inspection & Refilling ............................................................... 26Steering Inspection ..................................................................................... 27Lights Inspection ......................................................................................... 27
TABLE OF CONTENTSHorn Inspection ........................................................................................... 28Drive Chain Inspection ............................................................................... 28Clutch Lever & Cable Inspection ............................................................... 29Throttle Inspection ...................................................................................... 30Chassis Inspection ..................................................................................... 31Starting the Engine ............................................................................. 31 - 33Riding Your Motorcycle ....................................................................... 37 - 40Stopping & Parking Your Motorcycle ................................................. 37 - 38Break-in Recommendations ............................................................... 39 - 40Tire Break-in ................................................................................................ 40SECTION 4 - MAINTENANCE ............................................... 41 - 58Importance of Maintenance ....................................................................... 41Maintenance Schedule ....................................................................... 42 - 43Engine Oil Recommendation ..................................................................... 44Engine Oil Change .............................................................................. 44 - 45Spark Plug ........................................................................................... 46 - 47Air Filter Element ................................................................................ 47 - 48Throttle Free-play Adjustment .................................................................... 49Brake Fluid .......................................................................................... 49 - 50Battery ................................................................................................. 50 - 51Battery Removal & Service ........................................................................ 51Wire Connectors ......................................................................................... 52Fuses ........................................................................................................... 52Cleaning Your Motorcycle .................................................................. 53 - 54Storage ................................................................................................ 55 - 56Maintenance Record ......................................................................... 57 – 58Specifications .............................................................................................. 59Exhaust Emissions System ................................................................. 60 -61Clean-air System ........................................................................................ 61Emission Information & EPA Warranty ...................................................... 62KYMCO Limited Motorcycle Warranty ....................................................... 63Index ............................................................................................................ 64Identification Numbers Record .................................. (inside of back-cover)

2
Thank you for purchasing this KYMCO Quannon motorcycle, and welcome to the KYMCO riding family.
Please read this Owner's Manual carefully before riding so that you will be thoroughly familiar with theproper operation of your motorcycle’s controls, its features, capabilities, and limitations.
To ensure a long, trouble-free life for your motorcycle, provide it with the proper care and maintenance asdescribed in this manual.
For replacement parts and accessories, you should always use genuine KYMCO products, as they havebeen specially designed for your vehicle and manufactured to meet KYMCO's demanding standards.
Keep this Owner's Manual aboard your motorcycle at all times so that you can refer to it whenever youneed information. This manual should be considered a permanent part of the motorcycle and should re-main with the motorcycle when it is sold.
All information, illustrations, photographs and specifications contained in this manual are based on thelatest product information available at the time of publication. Due to improvements or other changes, theremay be information in this manual that differs slightly from your vehicle. KYMCO reserves the right to makeproduct and publication changes at any time without notice and without incurring any obligation.
SECTION 1 -FORWARD & SAFETY INTRODUCTION

3
IMPORTANT SAFETY INFORMATIONYour motorcycle can provide you many years of service andpleasure if you take responsibility for your own safety and un-derstand the challenges that you can meet on the road. Thereis much that you can do to protect yourself when you ride. Youwill find many helpful recommendations throughout thismanual. Here are some very important safety tips:Wear a helmetMotorcycle safety equipment starts with a quality helmet. Oneof the most serious injuries you can suffer in a crash is a headinjury. Always wear a properly approved helmet. You shouldalso wear suitable eye protection.Make yourself easy to seeTo make yourself more visible, wear bright reflective clothing,position yourself so other drivers can see you, signal beforeturning or changing lanes, and use your horn when it will helpothers notice you.Know your limitsRide within the boundaries of your own skill at all times. Know-ing these limits and staying within them will help you to avoidaccidents.
MOTORCYCLE SAFETY
Keep your motorcycle in safe conditionFor safe riding, it's important to inspect your motorcycle beforeevery ride and perform all recommended maintenance. Neverexceed load limits, and only use accessories that have beenapproved by KYMCO for this motorcycle.
Inspect your motorcycle before ridingDo not forget to perform an entire safety inspection to ensurethe safety of you and your passenger before each ride.
Be extra safety conscious on bad weather daysRiding on bad weather days, especially wet ones, requires ex-tra caution. Braking distance can double on a rainy day. Stayoff of the painted surfaces, manhole covers and greasy ap-pearing areas on the pavement, as they can be especially slip-pery. Use extreme caution at railway crossings and on metalgratings and bridges. Whenever your are in doubt about theroad conditions, slow down.ModificationModification of your motorcycle, or removal of original equip-ment may render the vehicle unsafe or illegal. Obey all appli-cable equipment regulations in your area.

4
MOTORCYCLE SAFETYPROTECTIVE APPARELFor your safety, always wear an approved motorcycle helmet,eye protection, boots, gloves, long pants, and a long-sleevedshirt or jacket whenever you ride your motorcycle.Helmets and protectionYour helmet is your most important piece of riding gear be-cause it offers the best protection against head injuries. Yourhelmet should fit your head comfortably and securely. Alwayswear a face shield or goggles to protect your eyes and to aidyour vision.Additional riding gearIn addition to a helmet and eye protection, you should also use:
• Sturdy boots with nonslip soles to help protect yourfeet and ankles
• Leather gloves to keep your hands warm and help pre-vent blisters, cuts, burns and bruises
• A motorcycle riding suit or jacket that has been de-signed for comfort as well as protection. Bright coloredand reflective clothing can help make you more notice-able in traffic. Be sure to avoid any loose clothing thatmight get caught on any part of your motorcycle.
1 Wear bright or reflective clothing. Your clothes should fitproperly (not too tight or loose)
2 Always wear a helmet and wear eye protection
3 Your footwear should be the proper size, have low heels,and offer ankle protection
4 Wear gloves and always ride with both hands graspingthe handlebars
Not wearing a helmet increases your chance of seriousinjury or death in a crash.
Be sure you and your passenger always wear approvedmotorcycle helmets that fit properly. You should also weareye protection and other protective apparel when you ride.
11111 22222
3333344444

5
RIDING & LOADING GUIDELINES
Load limitsThese specifications are the load limits for your Quannon motor-cycle. These general guidelines may help you decide how to addaccessories to your motorcycle and how to load it properly.
Loading guidelinesImproperly loading your motorcycle will affect its stability and han-dling. You should ride at reduced speeds when you are carrying apassenger or cargo. Follow these guidelines whenever you carrya passenger or cargo:
• Check that both tires are properly inflated• To prevent loose items from creating a hazard, make
sure all cargo is securely tied down before you ride• Balance cargo weight evenly on the motorcycle
Your riding positionThe riding stability of your motorcycle is influenced by yourriding position. When riding, you should sit on the center of theseat. If you sit on the rear of the seat you could reduce theamount of weight on the front wheel. This could affect the han-dling and steering characteristics of the motorcycle.Your motorcycle will turn more smoothly if you lean your bodyinto the turn. Use caution with extreme leaning or handlebarinputs that could upset the chassis.When riding your motorcycle on a rough or slippery road, re-duce your speed and hold the handlebars firmly. Be preparedto brake or turn to avoid a road hazard.
Overloading will affect the motorcycle’s stability and handling,be sure to stay within the limits given below:Maximum weight capacity (Includes the weight of the rider,passenger, cargo and accessories): ...... 810 lbs (368 kg)
Maximum cargo weight: ........................... 308 Ibs (140 kg)
Overloading or improper loading will affect vehicle han-dling, stability and braking, and can lead to an accident.Never exceed the stated load capacity of your motorcycle.Cargo should be properly distributed and securely at-tached. Reduce speed when carrying cargo. Allow greaterdistance for braking.
6
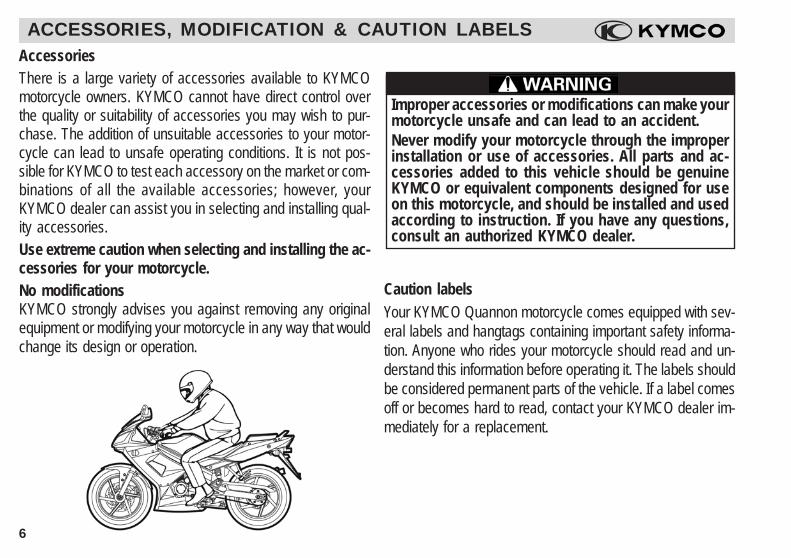
ACCESSORIES, MODIFICATION & CAUTION LABELSAccessoriesThere is a large variety of accessories available to KYMCOmotorcycle owners. KYMCO cannot have direct control overthe quality or suitability of accessories you may wish to pur-chase. The addition of unsuitable accessories to your motor-cycle can lead to unsafe operating conditions. It is not pos-sible for KYMCO to test each accessory on the market or com-binations of all the available accessories; however, yourKYMCO dealer can assist you in selecting and installing qual-ity accessories.Use extreme caution when selecting and installing the ac-cessories for your motorcycle.No modificationsKYMCO strongly advises you against removing any originalequipment or modifying your motorcycle in any way that wouldchange its design or operation.
Caution labels
Your KYMCO Quannon motorcycle comes equipped with sev-eral labels and hangtags containing important safety informa-tion. Anyone who rides your motorcycle should read and un-derstand this information before operating it. The labels shouldbe considered permanent parts of the vehicle. If a label comesoff or becomes hard to read, contact your KYMCO dealer im-mediately for a replacement.
Improper accessories or modifications can make yourmotorcycle unsafe and can lead to an accident.Never modify your motorcycle through the improperinstallation or use of accessories. All parts and ac-cessories added to this vehicle should be genuineKYMCO or equivalent components designed for useon this motorcycle, and should be installed and usedaccording to instruction. If you have any questions,consult an authorized KYMCO dealer.

7
LOCATION OF PARTS & CONTROLS
1 Headlight dimmer switch, pass-ing button, turn signal switch,and horn button
2 Headlight
3 Ignition switch4 left front turn signal5 Transmission shift lever6 Fuel tank cap
NOTE: Your motorcycle may differ slightly in appearance from the images in this manual.
11111
22222
33333
44444
55555
66666
77777
88888
99999
ATATATATAT
7 Taillight/Stoplight8 Left rear turn signal9 Helmet lockAT Side stand

8
LOCATION OF PARTS AND CONTROLS
NOTE: Your motorcycle may differ slightly in appearance from the images in this manual.
1 Taillight/Stoplight2 Right rear turn signal3 Exhaust muffler
4 Rear brake pedal5 Engine stop switch and starter
motor button6 Fuel tank
11111
22222
33333
44444
55555
66666
77777
88888
99999
7 Right front turn signal8 Oil level window9 VIN (frame number)

9
Vehicle identification numberThe vehicle identification number (also known as the VIN orframe number) is a 17-digit number stamped on the right sideof the frame. At this same location is the VIN compliance label.When you take delivery of your motorcycle, check that the VINstamped on your motorcycle and imprinted on the label is thesame as the VIN listed in the bill-of-sale and the warranty docu-ments you receive from your dealer.
Engine serial numberThe engine serial number (also known as the ESN) is stampedon left side of the engine case.
SECTION 2 - CONTROLS & FEATURES
NOTE: Write your motorcycle’s VIN and ESN in the boxesprovided in the inside, rear cover of this Owner's Manual.

10
CONTROLS & FEATURESKEYSYour Quannon motorcycle is supplied with two identical igni-tion switch keys that operate the ignition switch, the steeringlock, the fuel filler cap, and the helmet lock.
Both keys have a unique code stamped on the tab suppliedwith the keys. For security reasons this code is not stampedon the motorcycle or recorded in the vehicle's basic docu-mentation. Since the code is required if you need replace-ment keys, record these important codes in the boxes pro-vided on the inside, rear cover of this Owner's Manual.
NOTE: Apply a lock lubricant with antifreeze propertiesto key openings if the outside air temperature drops be-low freezing (32o F, 0o C).
IGNITION SWITCH & STEERING LOCKTo operate the ignition switch and the steering lock:
1 1 1 1 1 “OFF”: In this position, the motorcycle’s electrical system isoff, and the engine cannot be started. The key canbe removed from the ignition switch in this position.
2 2 2 2 2 “ON”: In this position ,the motorcycle’s electrical system ison, and the engine can be started. The key cannotbe removed from the ignition switch in this position.
3 3 3 3 3 “LOCK”: In this position, the ignition switch locks the steer-ing of the motorcycle. The key can be removedfrom the ignition switch in this position.
1111122222
Key code

11
CONTROLS & FEATURES
33333
Using the steering lock:LOCKING: Turn the handlebars fully to the left, then push in
and turn the ignition switch ley to the “LOCK” 3position. Remove the key. The steering should nowbe locked.
UNLOCK: Turn the ignition switch key to the “OFF” 1 orthe “ON” 2 position to unlock the steering.
After locking the steering, gently turn the handle-bars to make sure the lock is engaged.
Do not turn the ignition switch to the “OFF” or“LOCK” positions while riding, as this may cause anaccident.
When parking (and locking) your motorcycle, do notleave it in a place where it can hinder pedestrian orvehicular traffic.
12
CONTROLS & FEATURES
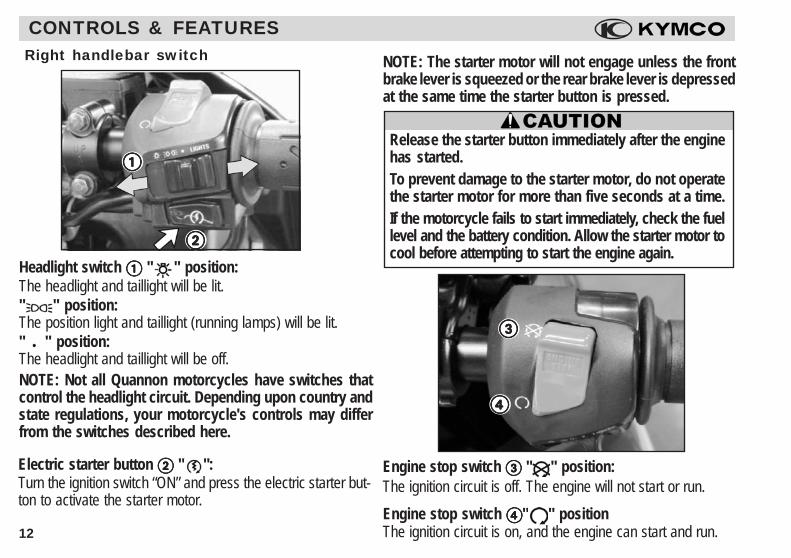
Headlight switch 11111 " " position:The headlight and taillight will be lit." " position:The position light and taillight (running lamps) will be lit." " position:The headlight and taillight will be off.NOTE: Not all Quannon motorcycles have switches thatcontrol the headlight circuit. Depending upon country andstate regulations, your motorcycle's controls may differfrom the switches described here.
NOTE: The starter motor will not engage unless the frontbrake lever is squeezed or the rear brake lever is depressedat the same time the starter button is pressed.
Release the starter button immediately after the enginehas started.To prevent damage to the starter motor, do not operatethe starter motor for more than five seconds at a time.If the motorcycle fails to start immediately, check the fuellevel and the battery condition. Allow the starter motor tocool before attempting to start the engine again.
Engine stop switch 33333 " " position:The ignition circuit is off. The engine will not start or run.
Electric starter button 22222 " ":Turn the ignition switch “ON” and press the electric starter but-ton to activate the starter motor.
Right handlebar switch
11111
22222
33333
44444
Engine stop switch 44444" " positionThe ignition circuit is on, and the engine can start and run.

13
CONTROLS & FEATURESLeft handlebar switch
Turn signal switch:Use the turn signal indicator to signal to other traffic that youintend to turn or change lanes. The turn signal light on thedash will flash to alert the rider that the switch is engaged.
" " for turning to the "left" 5.
" " for turning to the "right" 6.
To cancel the turn signal, press the switch in when it is in thecenter position 7.
NOTE: The turn signals do not automatically cancel. Besure to cancel your signals each time you complete a turnor lane change.
55555
66666
77777
Dimmer switch:" " switch position 9 turns the headlight low beam on." "switch position AT turns the headlight high beam on. Thehigh beam indicator light on the dash is activated as well.
Passing light button:Use this button AK to rapidly flick the headlamp high beam onand off to signal other vehicles that you wish to pass.
99999ATATATATAT
88888
Horn button 88888 " ":Press the horn button to sound the horn.
AKAKAKAKAK

14
CONTROLS & FEATURESHelmet lock
To use the helmet lock:1. Insert the ignition switch key and rotate it clockwise to open
the lock
2. Put the helmet’s strap ring into the lock’s pin 1 and pushthe outside of the pin 2 in to secure the lock.
3. To remove the helmet, use the key to open the lock.
11111
22222
Do not ride your motorcycle with a helmet attachedto the helmet lock. The lock is not intended to be ahelmet holder. A helmet hanging from the lock couldinterfere with the motorcycle’s operation and maycause a loss of control and an accident.
Seat Lock & tool kit
To open the seat (passenger section):1. Insert the ignition switch key into the seat lock 3 and ro-
tate it clockwise to open the seat latch
2. Lift up on the back edge of the passenger seat 4 andremove it from the motorcycle
3. To replace the seat, engage the hooks on the bottom of theseat with the loops on the frame. Press down on the seatuntil you hear the seat latch “clicks” indicating it is engaged.
NOTE: Lift gently up on the back of the seat to make surethe seat is secured in the latch.
The tool kit 5 is located under the seat in the tray on the topof the fender.
NOTE: The weight capacity of the tool tray is 3.3 lb (1.5 kg).
33333
44444
55555

15
CONTROLS & FEATURES
11111
1 1 1 1 1 Tachometer: Indicates engine revolutions per minute (RPM).2 2 2 2 2 Odometer / Tripmeter / Oil Service Meter Display: The odometer displays the vehicle’s total operating mileage. The
tripmeter displays the amount of mileage since the rider last reset the display to “zero”. The oil service meter can be set toalert the rider that oil service is required.
33333 Clock: Displays the time in 12-hour format (AM/PM).44444 Speedometer: Indicates the vehicle speed in kilometers per hour (Km/h) or in miles per hour (MPH), depending upon the
setting chosen by the rider.5 5 5 5 5 Adjustment buttons: Used to set the time display on the clock, and to access or clear the tripmeter display.6 6 6 6 6 Fuel level gauge: indicates the approximate amount of fuel in the fuel tank. If the gauge indicates “E”, the fuel level is low
and gasoline must be added.
222223333344444
44444
55555
66666
Multifunction meter display
NOTE: The indicator needle of the tachometer’s analog dial will sweep from zero to the maximum reading then backto zero when the ignition switch is turned "ON" (or when the battery is reconnected following service). This is anormal function of this type of meter and is required to calibrate the dial before the engine is operated.

16
CONTROLS & FEATURESMultifunction meter display
11111 22222 33333 44444 55555
1 1 1 1 1 Side Stand Indicator Light: Indicates that the motorcycle’sside stand is in the “down” position.
2 2 2 2 2 Neutral Position Indicator Light: Indicates that themotorcycle’s transmission is in the “neutral” position. Thelight will only illuminate if the ignition switch is “ON” and thetransmission is in “neutral”.
33333 Left Turn Signal Indicator Light: When the turn signalswitch on the left handlebar switch is pushed to the left, theleft turn signal and this indicator light will flash.
44444 Right Turn Signal Indicator Light: When the turn signalswitch on the left handlebar switch is pushed to the right,the right turn signal and this indicator light will flash.
5 5 5 5 5 High Beam Indicator Light: When the headlight switchon the left handlebar switch is pressed to the “HI” position,the headlight high beam and this indicator will light. Theindicator will also light if the passing lamp switch is pressedon the left handlebar switch.

17
CONTROLS & FEATURESMultifunction meter displayThe liquid crystal display (LCD) portion of the multifunctionmeter has the following functions:
1 1 1 1 1 Speedometer
2 2 2 2 2 Fuel Level Gauge
33333 Odometer / Tripmeter / Oil Service Meter
44444 Digital Clock
44444
11111
22222
33333
Initial displayWhen the ignition switch is turned “ON”, the multifunction dis-play will temporarily display all of the elements for each func-tion so you can be sure that the display is functioning properly.
SpeedometerThe speedometer displays the road speed of the motorcyclein MPH or Km/h.
To toggle the speedometer display between MPH or Km/h, pressand hold the MODE button for more than two seconds.See item “5” on page 15.
MPH
Km/h

18
CONTROLS & FEATURESOdometer / Tripmeter / Oil Service meterTo select MPH, Km/h or the oil service reminder display on theLCD panel, press and hold the MODE button for more thantwo seconds.See item “5” on page 15.
Odometer:The odometer displays the vehicle’s total operating mileage.
Tripmeter:The tripmeter displays the amount of mileage since the riderlast reset the display to “zero”.
Oil Service meter:The oil service meter shows the mileage for oil service fre-quency. The oil service meter can be set to alert the rider thatoil service is required.
To select the Odometer/Tripmeter/Oil Service meter:1. Press and hold the ADJ. (Adjust) button for more than two
seconds to select the odometer, tripmeter or oil servicemeter display on the LCD.
MPH
Km/h

19
CONTROLS & FEATURES
To reset the tripmeter:1. Press and hold the ADJ. (Adjust) button for more than two
seconds to select TRIP.
2. Press and hold the MODE and the ADJ. (Adjust) button atthe same time until the tripmeter resets to “zero”.
To reset the oil service meter:1. Press and hold the ADJ. (Adjust) button for more than two
seconds to select the oil service meter.
2. Press and hold the MODE and the ADJ. (Adjust) button atthe same time until the oil service meter resets to “zero”.

20
CONTROLS & FEATURESFuel level gaugeThe fuel level gauge shows the approximate fuel supply avail-able via a segmented display on the LCD. The normal operat-ing range of the gauge is between the “E segment” 1 and the“F segment” 2. When the “E segment” or the fuel pump icon3 flashes, the fuel level is low and you should refill the fueltank as soon as possible.
1 Segment E - indicates “Empty”
2 Segment F - indicated “Full”
3 Fuel pump icon
22222
33333
11111
Digital clockThe clock displays the time (in hours and minutes) when theignition is ON.To adjust the clock’s time, follow this procedure:1. Turn the ignition switch ON.
2. Press and hold the ADJ. (Adjust) button for more than twoseconds to select the ODO mode.
NOTE: The digital clock can only be adjusted in the ODOmode. Do not select the tripmeter or oil service meter modesif you wish to adjust the clock’s time display.
3. Press and hold both the MODE and the ADJ. (Adjust) but-tons at the same time for more than two seconds. You willknow that the clock is in the adjustment mode when thehour display begins to flash.

21
CONTROLS & FEATURES
4. To set the hour, press the ADJ. (Adjust) button until thedisplay cycles to the desired hour number.
5. Press the MODE button and the minute display will beginto flash.
6. To set the minutes, press the ADJ. (Adjust) button until thedisplay cycles to the desired minutes number.
7. To end the clock adjustment, press and hold both the MODEand the ADJ. (Adjust) buttons at the same time. The clockdisplay will stop flashing and any further adjustment will becancelled if the MODE or the ADJ. (Adjust) button is notpushed within ten seconds.

22
Pre-ride inspectionFor your safety, it is very important to take a few momentsbefore each ride to walk around your motorcycle and check itscondition. If you detect any problem, be sure to address it im-mediately, or have it corrected by your KYMCO dealer.
Improperly maintaining your motorcycle or failing tocorrect a problem before riding can cause a crash inwhich you can be seriously hurt or killed.Always perform a pre-ride inspection before every rideand correct any problems.
SECTION 3 - OPERATION
To prolong the service life of your motorcycle, be sure tohave a an initial service performed on your motorcycleafter it has been ridden for 300 miles (500km).
1. Engine oil inspection: Add engine oil if required (page 23).
2. Front and rear brakes: Check lever operation and free-play,and check the condition of the brake pads (page 24).
3. Tires: Check condition and inflation pressure (page 25).
4. Fuel level: Fill fuel tank when necessary (page 26).
5. Steering: Check for condition and smoothness (page 27).
6. Lights and horn: Check that headlight, tail/brake light, turnsignals and horn function properly (pages 27 & 28).
7. Drive chain: Inspect condition and adjustment (page 28).
8. Clutch lever: Inspect free play adjustment (page 29).
9. Throttle: Check for smooth operation and that the throttlecloses completely in all steering positions (page 30).
10. Chassis inspection: Perform general inspection to rearsuspension, brakes, rear view mirrors, license plate andother chassis items (pages 30 & 31).
NOTE:Refer to the break-in recommendations on pages 39 and40 of this manual before riding your motorcycle for thefirst time.

23
OPERATIONEngine oil inspectionCheck the oil level each time you ride your motorcycle.1. Place your motorcycle on its center stand (on level ground).
2. Check the oil level at the oil level window in the right enginecover.
3. Verify that the oil level is between the “upper limit” and the“lower limit” in the window.
4. If the oil level is below the “lower limit”, add engine oil untilthe oil level rises to the “upper limit”.
Specified Oil Type: SAE 15W-40
API Rating: SJ (or greater)
Oil Capacity: 1.30 qt (1.2L)
Oil Capacity (during oil change): 0.95 qt (0.9L)
The engine and exhaust can become very hot after use.Be very careful when inspecting the engine oil level soyou do not burn yourself.
Use a motor oil that has been formulated for use in afour-stroke motorcycle engine. Automotive oils willnot meet your motorcycle’s requirements and cancause premature wear of the engine components.Contact your KYMCO dealer if you have any oil-re-lated service questions or needs.

24
Brake inspectionRide your motorcycle at low speed on a dry road and alternatelyapply the front and rear brakes to check their performance.
The front and rear brake levers should have the proper freeplay. “Free play” is the distance the lever can move from anat-rest position until the brake mechanism engages when pres-sure is applied to the brake lever.
1. Measure the free play of the front brake lever end 1 andthe rear brake lever 2.
OPERATION
11111
22222
Brake lever play: 0.4 - 0.8 in (10 - 20mm)
3. Inspect the brake master cylinders, hoses and brake calli-pers 3 for any fluid leaks.
4. Inspect the brake pads to make sure there is adequatematerial left 4. If the pad wears to the point that the grooveson the pad disappears, replace both pads immediately.
33333
Proper brake operation is essential for your riding safety.Contact your KYMCO dealer immediately if you haveany brake-related service needs.
44444

25
Tire inspectionInspect the tire inflation pressure and the tire’s condition beforeeach ride.
Tire pressure1. Use a quality tire pressure gauge to check the tire pressure
before riding. Check the pressure when the tires are cold.
2. Check the pressure when the motorcycle is at rest on itsstand and the tires are touching the ground.
3. Adjust the tire pressure to the specified amounts.
OPERATION
Front tire pressure (rider only): 25 psi (1.75 kg/cm2)
Front tire pressure (rider & passenger): 25 psi (1.75 kg/cm2)
Rear tire pressure (rider only): 28 psi (2.0 kg/cm2)
Rear tire pressure (rider & passenger): 33 psi (2.5 kg/cm2)
Tire condition1. Inspect the tire tread for foreign objects 5 (such as a nails,
glass, gravel or other embedded objects). Check for otherdamage 6 in the tire tread area or cracks in the tire sidewallarea 7.
55555
66666
2. Use the indicator arrows 8 on the tire sidewall to locatethe wear indicator bars in the tire’s tread. As the tire wears,the grooves at the wear indicator bar 9 will disappear,indicating the tire requires immediate replacement.
66666
77777
9999988888
Proper tire inflation and condition is essential for yourriding safety. Contact your KYMCO dealer immediatelyif you have any tire-related service needs.

26
Fuel level inspection/refillingIf the low fuel level indicator on the dash begins to flash, refill the fuel tankwith unleaded gasoline as soon as possible.
Refilling the fuel tank1. Open the cap lock protective cover on the gas cap. Insert the
ignition key 1 into the cap lock and rotate the key counterclock-wise to unlock the cap. Lift it from the fuel tank to add unleadedgasoline of the specified type into the tank.
2. To replace the cap, align the tab 2 on the cap with the groove 3in the tank’s filler neck.
3. Press down on the cap until you sense the tab “clicking into place”.This indicates that the cap has been properly secured to the tank.Remove the key 4 from the cap.
OPERATION
11111
2222233333
44444
Fuel recommendationUse unleaded gasoline with a research octane number of 91 or higher.Unleaded gasoline will extend spark plug life.
Gasoline is highly flammable and explosive. You can be burnedor seriously injured while handling fuel.* Stop the engine and keep heat, sparks, and flame away.* Refuel only out doors.* Clean up fuel spills immediately.Do not overfill the tank. There should be no fuel in the fillerneck. Excess fuel can contaminate the evaporative emissioncanister, resulting in poor driveability.

27
OPERATIONSteering inspectionBefore each ride, inspect the handlebars and steering on yourmotorcycle.
1. Visually inspect the handlebars for damage.
2. Grasp the front brake and push the suspension up anddown, listening for any abnormal noise.
3. Move the handlebar upwards, downwards, and to left andright to check for any loose or restricted movement.
4. Make sure that the steering moves freely through its fullrange of motion from full left to full right.
Proper handlebar, steering component, and front sus-pension action is essential for your riding safety. Con-tact your KYMCO dealer immediately if you have anysteering or suspension-related service needs.
Lights & horn inspectionBefore each ride, check the light and horn operation on your mo-torcycle.
Headlight/taillight inspectionStart the engine to make sure the headlights 5 and thetaillight 7 illuminate. Check the lens for damage, dirt ormoisture condensation.
Turnsignal inspectionOperate the turn signal rocker switch on the left handlebarcontrols to make sure that both the left and right turn sig-nals 6 illuminate and flash. Check the lens for damage,dirt or moisture condensation.
Stoplight inspectionSqueeze the front brake lever, and then press down on therear brake lever to make sure the stoplight in the taillight7 illuminates.
55555
66666
77777

28
Horn inspection1. Press the horn button 1 on the left handlebar control to
confirm that the horn sounds and it has adequate volume.
OPERATION
11111
Proper light and horn function is essential for your ridingsafety. So you can properly see the road, and otherscan see you, replace any failed bulbs immediately. Cleanor replace any damaged or dirty lenses immediately. Ifyour horn fails to operate, or the sound is weak, have itadjusted or replaced. Contact your KYMCO dealer im-mediately if you have any lights or horn-related serviceneeds.
Drive chain inspectionBefore each ride, check the drive chain on your motorcycle.
1. Check the drive chain slack 2 and confirm that is not tooloose or is too tight.Drive chain slack: 0.4 - 0.8 in (10 - 20mm)
2. To adjust the chain slack, loosen the rear axle nut 3.
3. Turn the adjuster nuts 4 in equal increments at the backof the swingarm until the proper amount of drive chain slackis achieved. Use the punch marks stamped into theswingarm for reference while adjusting the slack. Once theproper slack is set, tighten the axle nut.
22222
22222
33333
44444
Improper drive chain slack adjustment will cause pre-mature chain wear. Clean the drive chain with kero-sine. To prevent premature wear and rust, use a chainlubricant approved for use on O-ring type drive chains.

29
OPERATIONClutch lever & cable inspectionBefore each ride, check the clutch lever free play and operationon your motorcycle.
Clutch lever free play inspection1. Check the lever’s free play 5 and make the free play falls
within the specified range. If not, follow the adjustment pro-cedures listed here.
55555
55555
Clutch lever free play: 0.2 - 0.4 in (5 - 10 mm)
Clutch cable free play adjustment1. Loosen the lock nut 6 on the clutch lever perch and turn
the adjuster nut 7 clockwise until it is seated to the perch.
2. Make sure that the clutch cable action is smooth as yousqueeze the clutch lever. If not, lubricate the clutch cableand readjust the free play.
Improper clutch lever and cable free play adjustmentwill cause premature clutch wear. Lubricate and ad-just the clutch control often to prevent failures.
6666677777
2. Loosen the cable lock nut 8 and rotate the adjuster nut9 until you achieve the proper clutch lever free play.Tighten the adjuster nut 9.
99999 88888
3. Make any fine adjustments in the clutch lever free playusing the adjuster 7 on the clutch lever perch. Once thefree play is set, tighten the adjuster nut 6.

30
THROTTLECLOSE
OPERATIONThrottle inspectionBefore each ride, make sure that the throttle returns to its fullyclosed position at all steering angles.
Proper throttle operation is essential for your ridingsafety. Do not ride your motorcycle if the throttle doesnot operate smoothly or fails to close fully when releasedContact your KYMCO dealer immediately if you haveany throttle-related service needs.
Chassis inspectionBefore each ride, check the operation and condition of other com-ponents on your motorcycle’s chassis.
Rear suspension inspectionPress down on the seat several times to make sure therear suspension action is smooth. Visually inspect the reardamper for fluid leaks.
Brake performance inspectionPress down on the rear brake pedal and squeeze the frontbrake lever to verify that the brakes prevent the wheelsfrom turning. Visually inspect the brake components forfluid leaks.
Rear view mirror inspectionAdjust the mirrors so you have a clear rear view. Makesure the mirrors are secured to the fairing so they will notvibrate excessively and cause difficulty seeing the usingthe mirrors.

31
OPERATION
License plate inspectionMake sure the license plate is secure on the motorcycleand is in plain view. Make sure any other required inspec-tion labels or tags are positioned as required by law.
Lubrication point checkVisually check that all of the motorcycle’s lubrication pointshave been lubricated properly.
Damaged items or needed repairsShould you discover any damage to your motorcycle, orthat the motorcycle is in need of repair, take action to haveit serviced immediately. Keeping your motorcycle in properworking condition is essential for your safety and for main-taining the value of your vehicle.
Starting the engineAlways follow the proper starting procedure as described here.
NOTE: Your motorcycle is equipped with a side stand ig-nition cutoff system. The engine cannot be started if theside stand is down. A running engine will shut off if theside stand is lowered.
Your motorcycle's exhaust emits poisonous carbonmonoxide gas. High levels of carbon monoxide cancollect rapidly in enclosed areas such as a garage. Donot run the motorcycle's engine with the garage doorclosed. Even with the door open, run the engine only longenough to move your motorcycle out of the garage.
To prevent damage to the starter motor, do not operate thestarter motor for more than five seconds at a time. If themotorcycle fails to start immediately, check the fuel leveland the battery condition, and allow the starter motor tocool before attempting to start the engine again.
NOTE: Always check the engine oil level and the fuel levelBEFORE attempting to start your motorcycle’s engine.

32
11111
Starting - When the engine is cold1. Use the ignition key to unlock the steering lock on the steer-
ing head.
OPERATION
2. Make sure the engine stop switch 1 is “ON”.
3. Turn the ignition switch 2 to “ON”.
4. The engine must be started with the transmission in theneutral position. When the transmission is in “NEUTRAL”the neutral indicator on the dash will illuminate.
22222
5. With the throttle closed, squeeze the clutch lever and pressthe starter button 2. Release the starter button as soonas the engine starts.
22222

33
OPERATION
Operating your motorcycle’s engine with insufficient oilpressure can cause serious engine damage.
NOTE: The low oil pressure indicator on the dash shouldgo off within a few seconds of starting the engine. If thelight stays on, stop the engine immediately and check theengine oil level.
6. Release the clutch lever and keep the throttle closed whilethe engine warms up. Allow the engine to warm until theidle speed is stable and smooth.
Do not press the starter button while the engine is run-ning, as the engine will be damaged.
Starting - When the engine is warmStarting a warm engine is the same as starting a cold engine,except that the throttle must be held partially open during starting.
1. Follow steps 1 through 4.
2. Rotate the throttle grip open 1/8 to 1/4 open, squeeze theclutch lever and press the starter button 2. Release thestarter button as soon as the engine starts.
3. Follow step 6, being careful to adhere to the caution andwarning notes.
Riding the motorcycleBefore each ride, follow the pre-ride inspection guidelines listedon pages 22 through 31 of this manual.1. Start the engine following the procedures on pages 31
through 33 of this manual.
Do not press the starter button 3 3 3 3 3 while the engine isrunning, as the engine will be damaged. Keep the trans-mission in neutral while the engine warms up.
NOTE: After starting the engine, allow time for the engineoil to circulate before riding your motorcycle. Allow suffi-cient idling time after warm or cold engine start up beforeapplying load or revving the engine. This allows time forthe lubricating oil to reach all critical engine components.NOTE: Review all of the safety recommendations that arelisted in this manual before you ride.

34
OPERATION
2. Retract the side stand 1.
11111
Wear a helmet and other safety equipment as recom-mended in this Owner’s Manual.Mount the motorcycle from the left side and firmly graspthe handlebars with both hands. Once you are seated,sit upright and touch the ground with both feet to pre-vent slipping. Retract the side stand and ride off to be-gin your ride.Make sure that the throttle is closed before moving themotorcycle off of its stand.
3. Squeeze the clutch lever 2, and press down on the shiftlever 3 with your left foot, to move the transmission from“NEUTRAL” into first gear.
22222
33333
44444
4. Slowly rotate the throttle grip 4 while simultaneously re-leasing the clutch lever. The motorcycle will begin to moveforward.

35
OPERATION
The throttle grip must be returned to the fully closedposition each time you shift. Squeeze the clutch le-ver and press down or lift up with your left foot toshift the transmission.
5. Before moving into traffic, indicate your intended directionwith your turn signals, and check the conditions to see if itis safe to proceed.
THROTTLECLOSE
THROTTLEOPEN
Moderate riding habits will prolong the service life ofyour motorcycle. Aggressive riding will prematurelywear items such as the clutch and the brake pads.During the first 600 miles of riding, keep your road speedbelow 50 MPH to allow the engine to break in fully, so itwill perform properly in the future.
6. You must coordinate your use of the throttle, and the front5 and rear 6 brakes in order to safely decrease yourmotorcycle’s speed as you ride. Both the front and rearbrakes should be applied simultaneously. Independent useof only the front or rear brake reduces stopping perfor-mance.
55555
66666
36
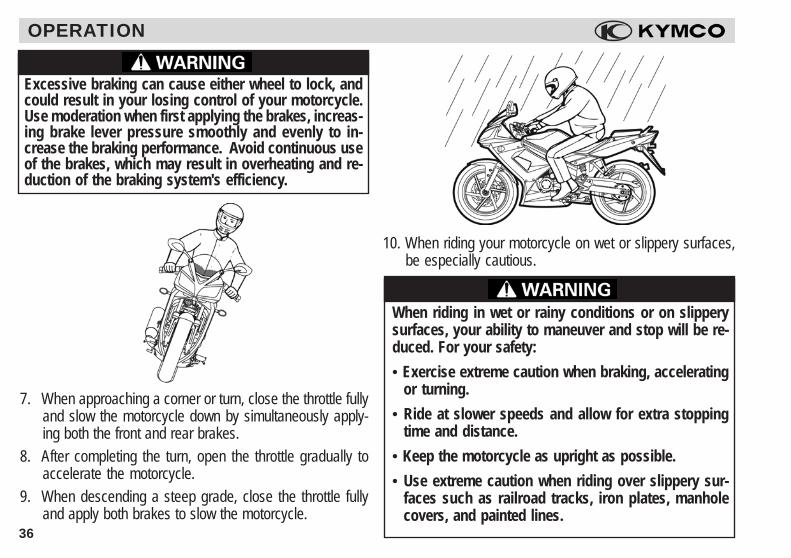
10. When riding your motorcycle on wet or slippery surfaces,be especially cautious.
When riding in wet or rainy conditions or on slipperysurfaces, your ability to maneuver and stop will be re-duced. For your safety:
• Exercise extreme caution when braking, acceleratingor turning.
• Ride at slower speeds and allow for extra stoppingtime and distance.
• Keep the motorcycle as upright as possible.
• Use extreme caution when riding over slippery sur-faces such as railroad tracks, iron plates, manholecovers, and painted lines.
OPERATION
Excessive braking can cause either wheel to lock, andcould result in your losing control of your motorcycle.Use moderation when first applying the brakes, increas-ing brake lever pressure smoothly and evenly to in-crease the braking performance. Avoid continuous useof the brakes, which may result in overheating and re-duction of the braking system's efficiency.
7. When approaching a corner or turn, close the throttle fullyand slow the motorcycle down by simultaneously apply-ing both the front and rear brakes.
8. After completing the turn, open the throttle gradually toaccelerate the motorcycle.
9. When descending a steep grade, close the throttle fullyand apply both brakes to slow the motorcycle.

37
OPERATION
Always park your the motorcycle on firm, level groundto help prevent it from falling over.
If you must park on an incline, aim the front of yourmotorcycle uphill, and place it on the center stand.
Stopping & parking the motorcycleUse care when concluding your ride and parking your motorcycle.
1. To alert other drivers in plenty of time, use your turn signalin advance of your intended turn.
2. Use your mirrors and turn your head in order to see othervehicles that are to your side or behind you.
3. Reduce your speed by closing the throttle and then applyboth the front 1 brake and rear 2 brakes evenly andsmoothly. As you brake, the motorcycle’s brake light willilluminate.
4. Remember to return the turn signal switch to the center(off) position after completing your stop.
11111
22222Never operate the ignition switch while riding. Doing sowill result in a sudden loss of power to your motorcycleand could cause you to lose control. Only operate theignition switch after the motorcycle has come to a com-plete and safe stop.
5. After you have come to a full stop, turn the ignition switchto the “OFF” position.

38
The exhaust pipe and muffler become very hot duringoperation and remain so for some time after stopping.Be careful that you or others do not come into contactwith these parts of the motorcycle when you first stopthe motorcycle, and for enough time thereafter to allowthese parts to cool. Touching these parts before theyhave cooled can result in serious burns.Park your motorcycle where pedestrians or children arenot likely to touch the muffler.Make sure flammable materials such as dry grass orleaves do not come in contact with the exhaust systemwhen parking your motorcycle.
6. Squeeze the front brake lever 1, flip the side stand down2 and dismount the motorcycle from the left side.
OPERATION
11111
22222
7. Turn the handlebars to the left and rotate the ignition keyin the ignition switch to lock the steering. Remove the key.
8. Verify that your motorcycle is parked safely and that it willnot tip over.

39
OPERATIONBreak-in recommendationsThe first 1000 miles (1600 km) of riding are the most impor-tant in the life of your motorcycle. Proper break-in operationduring this time will help ensure maximum life and performancefrom your new motorcycle. Proper break-in operation allowsthe machined surfaces to polish each other and mate smoothly.
Your motorcycle’s reliability and performance depend on spe-cial care and restraint exercised during the break-in period. Itis especially important that you avoid operating the engine ina manner which could expose the engine parts to excessiveheat.
The following guidelines should be followed during the break-in period:
Maximum throttle operation:Initial 500 miles (800 km): ........ Less than 1/2 throttleUp to 1000 miles (1600 km): .... Less than 3/4 throttle
Vary the engine speed:The engine speed should be varied and not held at a constantrate for long periods of time. This allows the parts to be "loaded"with pressure, and then unloaded, allowing the parts to cool.This aids in the mating process of the engine and transmis-sion components. It is essential that some stress be placedon these components during break-in to ensure this matingprocess. Do not, however, apply excessive load on themotorcycle's drive line.
Avoid constant low speed:Operating the engine at constant low speed (light load) cancause parts to glaze and not seat in properly. Allow the engineto accelerate freely through the gears, without exceeding therecommended throttle openings.
Avoid using full throttle for the first 1600 km (1000 miles).
The initial service:Observe your first and most critical service The 300 mile (500km) initial service is the most important service your motor-cycle will receive. During the break-in period all of the enginecomponents will have worn in, and all of the other parts willhave seated in, so adjustments will be required. All fastenerswill be tightened, and the contaminated engine oil will be re-placed.
NOTE: Completion of the 300 mile (500 km) initial servicewill ensure optimum service life and performance fromyour motorcycle. Do not delay in having this service per-formed once your motorcycle reaches this mileage.

40
OPERATION
Breaking in the new tiresNew tires need proper break-in to assure maximum perfor-mance, just as your motorcycle’s engine does. Scuff in thetires’ tread surface by gradually increasing your cornering leanangles over the first 100 miles (160 km) before attemptingmaximum lean angles. Avoid hard acceleration, hard corner-ing, and hard braking for the first 100 miles (160 km).
The 300 mile (500 km) service should be performed asoutlined in the maintenance schedule section of thisOwner's Manual. Pay particular attention to the cau-tion and warning in maintenance schedule section.
Unless you have formal training as a service techni-cian, and have access to KYMCO technical referencematerials, it is strongly suggested that you have theinitial service performed by a KYMCO dealer.
Failure to break in your tires could cause the tires to slipand could result in you losing control of the motorcycle.
Use extra care when riding on new tires. Ride your mo-torcycle properly and safely as described in this Owner’sManual and avoid hard acceleration, hard cornering, andhard braking for the first 100 miles (160 km).

41
SECTION 4 -MAINTENANCE
The importance of maintenanceMaintaining your motorcycle properly is essential for safe, eco-nomical and trouble-free riding. It will also help reduce air pol-lution and maximize fuel economy.
To help you properly care for your motorcycle, the followingpages in this Owner's Manual include a maintenance sched-ule to help you make sure your motorcycle is serviced at theappropriate intervals.
These instructions are based on the assumption that yourmotorcycle will be used exclusively for its designed purpose.Sustained high speed operation or operation in unusually wetor dusty conditions will require more frequent service thanspecified in the maintenance schedule. Consult your KYMCOdealer for recommendations applicable to your individual needsand use.
NOTE: Always follow the inspection and maintenance rec-ommendations and schedules in this Owner's Manual.
When performing maintenance on your motorcycle youmay need to start the engine. Running yourmotorcycle's engine indoors, or in a garage, can behazardous. Exhaust gas contains carbon monoxide, agas that is colorless and odorless, and can cause deathor severe injury. Operate the engine only where thereis adequate ventilation, preferably outdoors.
If your motorcycle tips over or becomes involved in acrash, be sure your KYMCO dealer inspects all majorparts, even if you are able to make some repairs.
Improperly maintaining this motorcycle or failing to cor-rect a problem before you ride, could result in a crashin which you could be seriously hurt or killed.

42
MAINTENANCE
Maintenance schedulePerform the pre-ride inspection (see page 22) at each scheduled maintenance period. This interval should be judged by theodometer reading.
Maintenance schedule legend (see page 43): I: INSPECT AND CLEAN, ADJUST, LUBRICATE OR REPLACE IF NECESSARYC: CLEAN R: REPLACE A: ADJUST L: LUBRICATEThe maintenance schedule on the opposite page specifies the maintenance required to keep your Quannon motorcycle inpeak operating condition. Maintenance work should be performed in accordance with KYMCO standards and specifications byproperly trained and equipped technicians. Your KYMCO dealer meets all of these requirements.
* Should be serviced by your KYMCO dealer, unless you have the proper tools, service data, and aretechnically qualified.
* * In the interest of safety, we recommend these items be serviced only by your KYMCO dealer.
KYMCO USA recommends that your KYMCO dealer road test your motorcycle after each periodic main-tenance service is completed.
Maintenance schedule notes (see page 43):1. At higher odometer readings, repeat at the frequency interval established here.
2. Service more frequently if the motorcycle is ridden in unusually wet or dusty areas.
3. Service more frequently when riding in rain or at full throttle.

43
Maintenance schedule
MAINTENANCE

ENGINE OIL VISCOSITIES
Engine oilEngine oil recommendationUse a premium quality 4-stroke engine oil to ensure longerservice life of your motorcycle. Only use oils that have beenformulated for use in a motorcycle, and have a SJ rating perthe API service classification.
Engine oil changeEngine oil quality is the primary factor that affects engine lon-gevity. Change your motorcycle’s engine oil as specified in themaintenance schedule (see pages 42 and 43).NOTE: When riding your motorcycle in very dusty condi-tions, oil changes should be performed more frequentlythan specified in the maintenance schedule.NOTE: Always dispose of used engine oil in an environ-mentally responsible manner. You should take the drainoil in a sealed container to your local recycling center orservice station for reclamation. Do not throw the oil in thetrash, pour it on the ground, or pour it down a drain.NOTE: Change the engine oil with the engine at normaloperating temperature, and the motorcycle on its centerstand (or suitable service lift) to assure complete and rapiddraining.
The engine and related components can become veryhot. Use care when inspecting the oil level so you donot burn yourself. If needed, let the engine and exhaustsystem cool before working in those areas.Prolonged contact with used engine oil can cause skincancer. Although rare, this possibility exists if youhandle oil on a frequent basis. Thoroughly wash yourhands with soap and water as soon as possible afterhandling used oil.
MAINTENANCE
If this viscosity is not available, select an alternative engineoil, according to the chart shown below.
Specified Oil Type: SAE 15W-40API Rating: SJ (or greater)Oil Capacity: 1.30 qt (1.2L)Oil Capacity (during oil change): 0.95 qt (0.9L)
NOTE: Contact your KYMCO dealer for engine oil screenservice.

MAINTENANCE
1. Start the engine and let it idle for a few minutes. Make surethe red low oil pressure indicator goes off. If the light re-mains on, stop the engine immediately.
Oil drain plug torque: 18 lb-ft (25 N-m)
Running the engine with insufficient oil pressure cancause serious engine damage.
2. Stop the engine and put the motorcycle on its center stand(or a suitable service lift) on level ground.
3. Remove the oil drain bolt 1, and drain the engine oil into asuitable container.
4. Reinstall the drain plug, and tighten it to the specified torque.
5. Remove the oil filler cap. Add oil to the engine per thespecified amount, and reinstall the oil filler cap.
6. Verify that the oil level reaches the upper mark in the oillevel window 2.
7. Start the engine and let it idle for 2 - 3 minutes.
8. Stop the engine and check the oil level in the oil level win-dow, on the right engine cover (with the motorcycle parkedon the center stand, on level ground).
9. Adjust the oil level as required (so the level reaches theupper mark in the oil level window 2). Replace the oilfiller cap and inspect for any leaks.
11111
22222

46
MAINTENANCESpark plugThe spark plug should be inspected, cleaned and replacedperiodically. Whenever servicing the spark plug 1, be sure toobserve the color of the removed spark plug's porcelain tip.
An improper spark plug may have an incorrect fit orheat range for your motorcycle’s engine. This may causesevere engine damage, which will not be covered underwarranty. Never use a spark plug with an improper heatrange, as severe engine damage could result.
Recommended spark plugQuannon 150 models: CR8ESpark plug gap: 0.024 - 0.028 in
(0.6 - 0.7 mm)
This color tells you whether or not the standard spark plug issuitable for your type of riding. Under normal usage, a sparkplug's porcelain tip should be light brown or tan color. If thespark plug porcelain tip is very white or glazed appearing, thenthe spark plug has been operating too hot. In such a situation,you should replace the standard spark plug with a spark plugthat has a colder heat range (usually a higher number; consultwith your KYMCO dealer when selecting an alternate sparkplug).
11111Spark plug service & replacement:1. Remove the spark plug with a suitable spark plug socket
2. Inspect the spark plug for cracks in the porcelain insulator,damage to the main threads, and for worn, fouled or carbon-ized ground electrode.
22222

47
MAINTENANCEAir cleaner filter elementThe air cleaner filter element should be serviced at regularintervals. Service the element more often when riding in un-usually wet or dusty areas.
1. Open the passenger seat (see page 14).
3. If the spark plug has only been removed once it is acceptableto reuse (removal and reinstallation more than two times willcompromise the sealing washer’s ability to seal combustionchamber gases).
4. Remove the carbon deposits from the spark plug with a smallwire brush or a spark plug cleaning machine. After cleaning(or when installing a new spark plug), readjust the spark pluggap 2 to the specified limit by using a spark plug gap thick-ness gauge.
5. Reinstall the cleaned (or new) spark plug in the cylinder head,and tighten securely to the specified torque..
Spark plug torque: 8 lb-ft (11.2 N-m)
2. Remove the bolt securing the rider’s seat 2.
3. Remove the six air cleaner case cover screws 3.
33333
22222

48
MAINTENANCE
4. Remove the air cleaner element 4 by lifting it out of the aircleaner case.
5. Based upon the element’s condition and the Periodic Mainte-nance Schedule, clean or discard the element. If the elementis not being replaced, blow the debris from the element withcompressed air.
6. Before installing the cleaned or new element, use a clean clothto wipe the interior of the air cleaner box 5.
7. Install a new air cleaner element. Use a genuine KYMCO aircleaner element, or an equivalent air cleaner element speci-fied for your motorcycle.
8. Complete the installation by reinstalling the air cleaner partsin the reverse order of removal.
Never use oil or solvent to wash the paper-type element.
Be careful to keep water from entering the air cleaner,as this may may result in hard starting, or prematureengine wear.
If the air cleaner element or cover is not installed prop-erly, dirt may be drawn into the engine. This dirt cancause premature engine wear and affect engine perfor-mance.
Using the wrong KYMCO air cleaner element or otherair cleaner element which is not of equivalent qualitymay cause premature engine wear or performance prob-lems.
44444
55555

49
MAINTENANCEBrake fluidWith the motorcycle in an upright position, check the front andrear brake fluid level. The level should be above the lower levelmark in both brake fluid reservoir. If the level is at or below thelower level mark "L", check the front and rear brake pads forwear (see page 24).
Throttle free play adjustmentBefore each ride and during periodic maintenance, check forsmooth throttle grip rotation from the fully open to the fully closedposition at both full steering positions.
1. Measure the throttle grip free play at the throttle grip flange(per the illustration above).
Throttle free play: 0.08-0.24 in (2.0 - 6.0 mm)
2. Slide the protective rubber sleeve back on the throttle cableto expose the throttle cable adjuster.
2. Loosen the lock nut on the throttle cable, then turn theadjuster to obtain the correct free play.
3. Tighten the lock nut and reinstall the sleeve. Brake fluid type: DOT 4 (from a sealed container)
1. To adjust the brake fluid level to the upper level 6 in thefront brake master cylinder reservoir, remove the twoPhillips screws and lift off the cover.
To adjust the brake fluid level to the upper level 7 in therear brake fluid reservoir, unscrew the plastic cap.
66666
77777

50
MAINTENANCEBatteryYour KYMCO motorcycle is equipped with a maintenance-free(sealed) type battery, so it is not necessary to check thebattery's electrolyte level or add distilled water.
Brake fluid can damage plastic items, and painted andpolished surfaces on your motorcycle. When servicingthe brake fluid, use towels to cover and protect compo-nents on your motorcycle.
Your motorcycle’s battery gives off explosive hydrogengas during normal operation. A spark or flame can causethe battery to explode with enough force to kill or seri-ously hurt you. Wear protective clothing and a faceshield, or have a qualified technician perform the bat-tery maintenance.
Worn brake pads should be replaced immediately. If thepads are not worn, have your brake system inspectedfor leaks. Do not ride your motorcycle unless the brakesare in perfect working order.Do not mix brake fluids of different brands or ratings.This may cause brake failure and is very dangerous.
NOTE: Other brake system checks: Make sure there are nofluid leaks. Check for deterioration or cracks in the hosesand fittings. Contact your KYMCO dealer for any brake-related service needs.
Your battery is a maintenance-free type battery and canbe permanently damaged if the cap strip is removed.
NOTE: If your battery seems weak and/or is leaking elec-trolyte (causing hard starting or other electrical troubles),contact your KYMCO dealer immediately.
NOTE: If your motorcycle is not going to be ridden forlong period of time, the battery may discharge electricityby itself. Disconnect the battery’s negative terminal andcharge the battery periodically during storage.
NOTE: Always use a battery charger specifically designedfor use on a maintenance-free type battery.
51
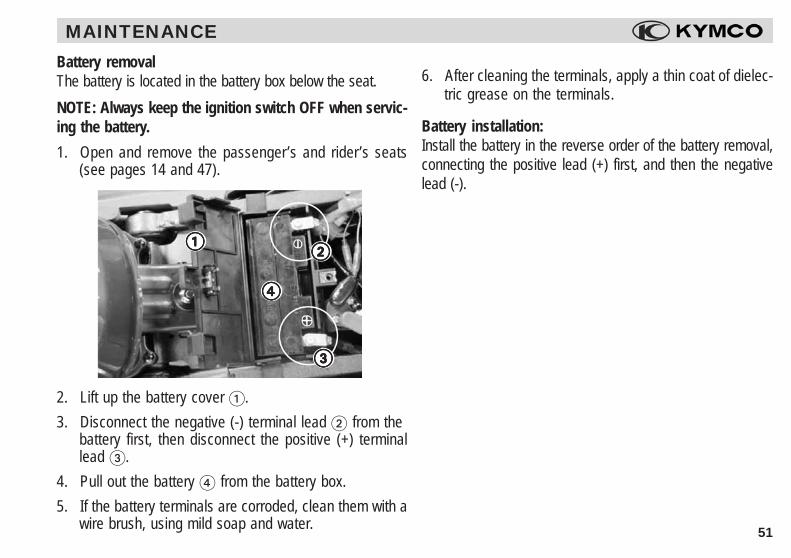
MAINTENANCEBattery removalThe battery is located in the battery box below the seat.
NOTE: Always keep the ignition switch OFF when servic-ing the battery.
1. Open and remove the passenger’s and rider’s seats(see pages 14 and 47).
2. Lift up the battery cover 1.
3. Disconnect the negative (-) terminal lead 2 from thebattery first, then disconnect the positive (+) terminallead 3.
4. Pull out the battery 4 from the battery box.
5. If the battery terminals are corroded, clean them with awire brush, using mild soap and water.
Battery installation:Install the battery in the reverse order of the battery removal,connecting the positive lead (+) first, and then the negativelead (-).
22222
33333
44444
11111
6. After cleaning the terminals, apply a thin coat of dielec-tric grease on the terminals.

52
MAINTENANCEFusesWhen frequent fuse failures occur, it usually indicates a shortcircuit or an overload in the electrical system.Fuse list15A ... CHARGE fuse protects battery charging system.15A ... IGNITION fuse protects the ignition system and other
systems.
Never use a fuse with a different rating from that specified.Serious damage to the electrical system or a fire may re-sult, causing a dangerous loss of lights or engine power.
Wire connectors & rubber coversDuring the periodic maintenance check, make sure that wireconnectors are secure, and that protective rubber covers arein good condition.
The tabs 1 on the connectors should be engaged to ensurethat the connectors stay fastened during riding, so there is noloss of electrical power.
While washing the motorcycle, take care to avoid spraying wa-ter directly on the connectors 2.
During service, pull the covers 3 back to clean off any mois-ture or debris.
22222 3333311111
6 ���� The spare fuse is located on the inside of the batterycover
4 Ignition fuse (15A)5 Charge fuse (15A)
44444
55555
66666

53
MAINTENANCEWashing your motorcycle1. Rinse the motorcycle thoroughly with cool water to remove
any loose dirt.
2. Clean the motorcycle with a sponge or soft cloth using coolwater. Avoid directing water at the muffler outlet and elec-trical parts.
3. Clean the plastic parts using a cloth or sponge dampenedwith a solution of mild detergent and water. Rub the soiledarea gently, rinsing it frequently with fresh water. Take careto keep brake fluid or other chemical solvents away fromthe motorcycle, as they will damage the plastic and paintedsurfaces.
4. After cleaning, rinse the motorcycle thoroughly with plentyof clean water. This rinsing is required to remove detergentresidue which can corrode alloy parts.
5. Dry the motorcycle and then start the engine, allowing it torun for several minutes.
CleaningClean your motorcycle regularly to protect the surface finishes,and inspect for damageor wear, and oil, coolant or brake fluidleakage.
Avoid cleaning products that are not specifically designed formotorcycle, scooter, or automobile surfaces. Nonspecific clean-ers may contain harsh detergents or chemical solvents thatcan damage the metal, paint, and plastic on your motorcycle.
NOTE: If your motorcycle is still warm from recent opera-tion, give the engine and exhaust system time to cool offbefore washing. Avoid the use of high pressure waterspray (typical in coin-operated car washes), as the pow-erful spray can damage components on your motorcycle.
NOTE: The inside of the headlight lens may become cloudedimmediately after washing the motorcycle. Moisture conden-sation inside the headlight lens will disappear gradually as itis heated by the headlight. After washing, run the enginewhile keeping the headlight on, to dissipate any condensa-tion.

54
MAINTENANCE
Finishing touches:After washing your motorcycle, consider using a commercially-available spray cleaner/polish or a quality liquid or paste waxto enhance and protect the paint's finish. Use only a nonabra-sive polish or wax made specifically for motorcycles, scooters,or automobiles. Apply the polish or wax according to the in-structions on the container.
Removing road saltThe salt used in some areas to prevent road icing can be verycorrosive to your motorcycle. Wash your motorcycle as soonas possible if it comes in contact with road salt (or sea water).1. Clean the motorcycle using cool water (see page 53). Do
not use warm water, as this will increase the corrosive ef-fect of the salt.
2. Dry the motorcycle and protect painted and metal surfaceswith wax or polish.
Exhaust pipe maintenanceThe exhaust system is painted and polished stainless steel,but it can become stained by oil or mud. If necessary, removeheat stains with a liquid kitchen-counter abrasive.
Painted aluminum wheel maintenanceEven if protected by paint, aluminum may corrode from con-tact with dirt, mud, or road salt. Clean the motorcycle's wheelswith a wet sponge and mild detergent. Avoid stiff brushes, steelwool, or cleaners containing abrasives or chemical compounds.After washing, rinse with plenty of water, and dry with a cleancloth. Apply touch-up paint to the wheels where damage hasoccurred.
6. Test the brakes before riding the motorcycle. Several appli-cations of the brakes may be necessary to restore normalbraking performance.
NOTE: Braking efficiency may be temporarily impairedimmediately after washing the motorcycle, because thebrake components are wet. Anticipate longer stoppingdistances to avoid a possible accident.
Windshield cleaningUsing plenty of water, clean with windshield with a soft cloth orsponge (avoid using detergents or any kind of chemicalcleaner). Dry with a soft, clean cloth.

55
MAINTENANCESTORAGE GUIDEExtended storage, such as for the winter months, requires thatyou take certain steps to reduce deterioration resulting fromyour motorcycle’s inactivity. Whenever possible, perform anynecessary periodic maintenance or repairs before storage, sothe motorcycle will be in good condition when it is removedfrom storage.
Storage1. Change the engine oil and filter.
2. Empty the fuel tank into an approved gasoline container,using a commercially available hand siphon, or an equiva-lent method. Spray the inside of the tank with an aerosolrust-inhibiting oil. Close the fuel filler cap on the fuel tank
Gasoline is highly flammable and explosive. You can beburned or seriously injured when handling fuel. Stop theengine and keep heat, sparks, and flame away. Refuel themotorcycle outdoors and wipe up any spills immediately.
Pour a tablespoon (15 - 20 cc) of clean engine oil into thecylinder and cover the spark plug hole with a piece of cloth.
Crank the engine several times to distribute the oil.
Reinstall the spark plug and spark plug cap.
5. Remove the battery. Store it in an area protected from freez-ing temperatures and direct sunlight. Slow charge the bat-tery once a month (use a quality charger designed for useon a maintenance-free type battery).
6. Wash and dry the motorcycle. Wax all painted surfaces.Coat the chrome or bare aluminum parts with rust inhibit-ing oil.
7. Inflate the tires to their recommended pressures. Place themotorcycle on blocks to raise both tires off the ground.
8. Cover the motorcycle (don't use plastic or other coated ma-terials) and store in an unheated area, free of excessivemoisture, with a minimum of daily temperature variation.Do not store the motorcycle in direct sunlight, as the sun'sUV rays can damage the body work and other components.3. To prevent rusting in the cylinder, perform the following:
Remove the spark plug cap from the spark plug, and usetape or string to secure the cap to any convenient plasticbody part so that it is positioned away from the spark plugs.
Remove the spark plug from the engine and store it in asafe, dry place. Do not connect the spark plug to the sparkplug cap.

56
Removal from storage1. Uncover and clean the motorcycle.2. Change the engine oil if mtore than one month has passed
since the start of storage.3. Charge the battery as required (use a quality charger de-
signed for use on a maintenance-free type battery). Installthe battery.
MAINTENANCE
4. Drain any excess aerosol rust-inhibiting oil from the fueltank. Fill the fuel tank with fresh gasoline.
5. Perform a pre-ride inspection (see page 22). Test ride themotorcycle at low speeds in a safe riding area, away fromtraffic.
Gasoline is highly flammable and explosive. You can beburned or seriously injured when handling fuel. Stop theengine and keep heat, sparks, and flame away. Refuel themotorcycle outdoors and wipe up any spills immediately.
Your battery is a maintenance-free type and can be per-manently damaged if the cap strip is removed.Charge the battery with a charger specifically designedfor use with a maintenance-free type battery. Using an-other type of charger can damage the battery.
TroubleshootingIt can be fustrating if your motorcycle fails to start, or stopsrunning while your are riding. In the rare instance this hap-pens, take a few moments to check some items, and youmay be back to riding your motorcycle soon.
√√√√√ Do you have enough gasoline in the fuel tank?√√√√√ Did you follow the correct procedure for starting the
engine?√√√√√ Is the side stand in the “UP” position?√√√√√ Is the battery voltage low?√√√√√ Is the main fuse in good condition?
NOTE: Use this Owner’s Manual to check components andmake adjustments that are within your technical ability. Ifyou cannot resolve the problem, do not hesitate to con-tact your KYMCO dealer for assistance.
?????

57
MAINTENANCE RECORD DATE MILEAGE SERVICE PERFORMED & NOTES

58
MAINTENANCE RECORD DATE MILEAGE SERVICE PERFORMED & NOTES

59
SPECIFICATIONS - Quannon 150DimensionsOverall length ........................................... 80.9 in (2057mm)Overall width .............................................. 28.5 in (725 mm)Overall height .......................................... 46.2 in (1174 mm)Wheel base .............................................. 53.3 in (1355 mm)Seat height ................................................ 31.4 in (800 mm)Dry weight ................................................ 299.8 lbs (136 kg)
CapacitiesEngine oil ........................................................ 1.26 qt (1.2 L)Fuel tank ................................................. 3.5 US gal (13.5 L)Maximum weight capacity .......................... 810 lbs (368 kg)
EngineType ........................................ Four-stroke, air-cooled OHCDisplacement ........................................ 149.1 cc (9.1 cu. in)Bore and stroke ............. 2.44 in X 1.94 in (62 X 49.5 mm)Compression ratio .......................................................... 10:1Carburetion .................................................. Kymco CV typeSpark plug ......................................................... NGK CR8EIdle speed (dealer adjustment only) ................... 1600 RPMStarting system.................................... Electric starter motorTransmission ........................................... 5-speed, foot shiftClutch ................................................ Manual, wet multi-disc
ChassisTire size, front ..................................................... 110/80 - 17Tire size, rear ...................................................... 140/70 - 17Chassis material ............................................................SteelFront suspension ........................ Telescopic, dual tube-typeFront suspension travel ............................... 4.9 in (125 mm)Rear suspension .............................. Single shock absorberRear suspension travel ............................. 1.7 in (42.5 mm)Brake (front) .......................................... Disc type (276 mm)Brake (rear) ........................................... Disc type (220 mm)
ElectricalIgnition type .............................................................. DC-CDIBattery ..................................................................... 12v-7AhHeadlight .....................................................12v 60/55W X 2Tail/brake light ............................................. 12v5W/12v21WTurn signal light ................................................ 12v 10W X 4Fuse (CHARGE) ............................................................ 15AFuse (IGNITION) ............................................................ 15A

60
EXHAUST EMISSION CONTROL SYSTEMExhaust emission control systemmaintenanceThe exhaust emission control system does not require ex-traordinary care to ensure its proper function. Adhere tothe following procedures to make sure the system func-tions properly, so your motorcycle will not cause excessivepollution tothe environment.
1. Make sure the air cleaner filter element is kept in goodcondition. See page 47 for cleaning procedures.
2. The engine oil should be changed regularly to promoteproper engine efficiency and reduce pollutants that ac-cumulate in used engine oil. Change the engine oil asspecified in the maintenance schedule on pages 42 - 43of this manual.
3. Use the proper type of gasoline. Your motorcycle’s en-gine has been developed to use unleaded gasoline (seepage 26 for the fuel recommendations). Using the im-proper type of fuel, such as a leaded fuel or fuel withperformance-enhancing additives, will increase exhaustpollutants, and will reduce the efficiency of yourmotorcycle’s engine.
Immediately repair or replace any fuel or emission sys-tem component that will affect the efficiency and emis-sion of your motorcycle.
Never modify your motorcycle, as improper modifica-tions will affect the safety, the performance and emis-sion output of your motorcycle.
Be aware that only an authorized KYMCO dealer hasthe tools, the expertise and the technical resources toproperly diagnose and repair the emission system com-ponents on your Quannon motorcycle. Do not attemptto effect repairs of this type yourself or you might en-danger the environment or your own safety.

61
EXHAUST EMISSION CONTROL SYSTEMKYMCO Clean-Air SystemThe KYMCO Clean-Air System is a secondary air suction system that helps the exhaust gases to burn more completely.When the engine's exhaust is sent into the exhaust system, it contains some unused fuel. This exhaust is still hotenough to burn the unused fuel. The Clean-Air system introduces more air so the oxygen will then permit the unused fuelto burn in the exhaust system. This continued burning action uses up a great deal of the normally unused fuel and othergases, as well as changing a significant portion of the poisonous carbon monoxide into harmless carbon dioxide. TheClean-Air system does not use any energy from the engine and does not affect the motorcycle's performance.
2222233333 44444
1111155555
66666
77777
1 Exhaust muffler
2 Carburetor
3 Vacuum hose
4 Air injection cutoff valve
5 Secondary air cleaner
6 Reed valve
7 Secondary air inlet into exhaust

62
Crankcase Emission Control SystemYour motorcycle’s engine is equipped with a closed crankcase system. Blowby gases are routed back into the com-bustion chamber via the intake system. This system does not allow the blowby gases to enter the atmosphere.
Exhaust Emission Control SystemThe exhaust emissions from your Quannon motorcycle are controlled by engine design, factory-set fuel delivery,ignition settings, and exhaust system design.
Noise Exhaust Emission Control SystemThe engine, intake and exhaust systems of your motorcycle were designed to comply with federal, state and localnoise level requirements. Do not modify the engine, intake or exhaust components, as doing so will affect compliancewith these noise level requirements.
Please do not modify or change any KYMCO-designed components that may alter the sound or emissionlevels of your Quannon 150 motorcycle.
EMISSION CONTROL & WARRANTY INFORMATION
KYMCO LIMITED WARRANTYNOISE EMISSIONS
KYMCO USA Inc, 5 Stan Perkins Road, Spartanburg, SC 29307, USA, warrants that this vehicle was designed, manufac-tured and equipped so that when new, it conforms with the applicable Motorcycle Noise Regulations of the UnitedStatesEnvironmental Protection Agency (“EPA”).
This warranty is not limited to any particular part, component or system of the vehicle. Defects in design, assembly, or in anypart, component or system of the vehicle which, at the time of sale to the first purchaser, caused noise emission levels toexceed applicable Federal standards in effect at the time of manufacture, are covered by this warranty.

63
KYMCO LIMITED WARRANTY

64
INDEXAccessories & Modifications .................................. 6
Air Filter Element .......................................... 47 - 48
Battery Removal & Service .................................. 51
Battery ........................................................... 50 - 51
Brake Fluid .................................................... 49 - 50
Brake Inspection ................................................... 24
Break-in Recommendations ......................... 39 - 40
CA Prop 65 & Battery Warning(inside of front-cover)
Caution & Warning Labels ...................................... 6
Chassis Inspection ............................................... 31
Clean-air System .................................................. 61
Cleaning Your Motorcycle ............................ 53 - 54
Clock .............................................................. 20 - 21
Clutch Lever & Cable Inspection ......................... 29
Drive Chain Inspection ......................................... 28
Emission Information & EPA Warranty ................ 62
Engine Oil Change ........................................ 44 - 45
Engine Oil Inspection ........................................... 23
Engine Oil Recommendation ............................... 44
Exhaust Emissions System ........................... 60 -61
Forward ................................................................... 2
Fuel Level Gauge ................................................. 20
Fuel Level Inspection & Refilling ......................... 26
Fuses ..................................................................... 52
Helmet Lock .......................................................... 14
Horn Inspection ..................................................... 28
Identification Numbers Record...(inside of back-cover)
Ignition Switch ....................................................... 10
Importance of Maintenance ................................. 41
Index ...................................................................... 64
Keys ....................................................................... 10
KYMCO Limited Motorcycle Warranty ................. 63
Left-hand Handlebar Switch ................................. 13
Lights Inspection ................................................... 27
Load Limits & Guidelines ....................................... 5
Locations of Parts & Controls .......................... 7 - 8
Maintenance Record .................................... 57 - 58
Maintenance Schedule ................................. 42 - 43
Manual Icon Legend ............. (inside of front-cover)
Motorcycle Safety ............................................. 3 - 4
Multifunction Meter ....................................... 15 - 21
Odometer/Trip meter/Service meter ............ 18 - 19
Pre-ride Inspection ....................................... 22 - 31
Riding Your Motorcycle ................................. 37 - 40
Right-hand Handlebar Switch .............................. 12
Seat Lock .............................................................. 14
SECTION 1 - SAFETY ..................................... 2 - 8
SECTION 2 - CONTROLS & FEATURES ..... 9 - 21
SECTION 3 - OPERATION .......................... 22 - 40
SECTION 4 - MAINTENANCE ..................... 41 - 58
Serial Numbers ....................................................... 9
Spark Plug ..................................................... 46 - 47
Specifications ........................................................ 59
Speedometer ......................................................... 17
Starting the Engine ....................................... 31 - 33
Steering Inspection ............................................... 27
Steering Lock ................................................ 10 - 11
Stopping & Parking Your Motorcycle ........... 37 - 38
Storage .......................................................... 55 - 56
Table of Contents .................................................... 1
Throttle Free-play Adjustment .............................. 49
Throttle Inspection ................................................ 30
Tire Break-in .......................................................... 40
Tire Inspection ...................................................... 25
Tool Kit ................................................................... 14
Wire Connectors ................................................... 52

The ignition switch key identification code is stamped on tab 1 supplied with the key. If you require a replacement key, you willneed this code to obtain a new key from your authorized KYMCO dealer. Record the key number in the box above.
Record the Vehicle Identification Number 2 and Engine Serial Number 3 in the boxes above for future reference (to assistyou in ordering parts from your authorized KYMCO dealer or for reference in case the vehicle is stolen).
Identification Numbers Record
1. IGNITION SWITCH KEY IDENTIFICATION NUMBER
2. VEHICLE IDENTIFICATION NUMBER (VIN)
3. ENGINE SERIAL NUMBER (ESN)
3
11111
2

5 Stan Perkins RoadSpartanburg, SC 29307Telephone: (888) 235-3417FAX: (864) 327-4745
Prepared October 2008
T300-RA30FA-US-A5


![sequential.ppt [Read-Only]](https://static.fdokumen.com/doc/165x107/6319ca5fc51d6b41aa04902b/sequentialppt-read-only.jpg)


![Bles.ppt [Read-Only]](https://static.fdokumen.com/doc/165x107/633bffc7197a6737f10ceddf/blesppt-read-only.jpg)

