Digital Acquisition through intergenerational learning
49
1 | Page 1.
-
Upload
khangminh22 -
Category
Documents
-
view
0 -
download
0
Transcript of Digital Acquisition through intergenerational learning

1 | P a g e
1.

2 | P a g e
3 | P a g e
CONTENTS
1. ............................................................................................................................................................. 1
1. Basic Hardware, Software and Connection ........................................................................................ 4
1.1 Get started with computers .............................................................................................................. 4
Operate a computer (basic hardware and software) ......................................................................... 4
1.2 Go online ......................................................................................................................................... 28
Connect to the Internet using Wi-Fi or Ethernet .............................................................................. 28
Learn about antivirus ........................................................................................................................ 32
Use a web browser ........................................................................................................................... 33
1.3 Learn how to use peripherals ......................................................................................................... 35
Printer ............................................................................................................................................... 35
Scanner ............................................................................................................................................. 36
External drives .................................................................................................................................. 37
Web cameras .................................................................................................................................... 38
Speakers/Headphones ...................................................................................................................... 39
1.4 Other devices .................................................................................................................................. 41
Smartphones ..................................................................................................................................... 41
Tablets ............................................................................................................................................... 41
2. Solving Computer Related Problems ................................................................................................ 42
2.1 Problem Solving in Computers........................................................................................................ 42
Basic problem solving tips and techniques ....................................................................................... 42
2.2 Most common computer related problems and suggested solutions ........................................... 44

4 | P a g e
1. BASIC HARDWARE, SOFTWARE AND CONNECTION
1.1 Get started with computers Operate a computer (basic hardware and software) Computers nowadays are part of our daily lives. Technology is getting better, faster and more necessary in our day to day routines. Luckily, computers have gotten simpler over the years and as a result they can be easily used by a variety of individuals regardless their technological knowledge, educational level and age. This lesson aims to help you get started with your computer training by following simple steps. You will learn how to operate computers, whether it is a desktop computer or laptop and how to use peripherals and external devices. You will be instructed on how to connect to the Internet and how to go online using web browsers. Finally, you will be informed about common problems that you may encounter on this primary stage of your training and suggestions on how to solve them. An operating system (OS) is system software that manages computer hardware and software resources and provides services for computer programs. The most popular operating system is Microsoft Windows. In this lesson we will use Windows operating system and specifically Windows 10, for demonstration purposes. This video can help you get started with Windows 10 and do the initial set up in case your computer is new.
Figure 1: Desktop Computer

5 | P a g e
STEP 1: Set up your computer. a. If you are planning to use a new desktop computer there are a few steps that you need to
follow before you start.
At first you need to decide where you are going to place its components. In order to use a desktop computer, you need four components:
- The tower, which needs to be plugged into a power source, - a monitor - a keyboard and - a mouse.
More peripherals and accessories can be added later.
If you are a new desktop user and you need more detailed information on how to set up the computer we recommend watching this videο. You can also find information at this link.
Figure 2: Laptop Computer
b. If you are planning to use a laptop, you have less to set up.
In this case the monitor, keyboard and mouse (mouse pad) are already incorporated to your computer.
In order to start, just plug the laptop into a power source to ensure it is charged.
If you are a new laptop user you can find detailed information to this link
STEP 2: Create a user account. a. The first time you will use your computer and once you turn it on (if you don’t know how to
turn on your computer click on this link), you will be asked to create a user account. This account will hold your personal documents and files and your personal settings. It is recommended to use a password to secure your personal data, especially if other persons use your computer or it is in public setting. This video can help you do the initial set up.
b. If you wish to add a new account in an already set up computer follow the instructions in this
link.
6 | P a g e
We recommend that you advance a little with your training before attempting to create a user account. You can always come back any time later.
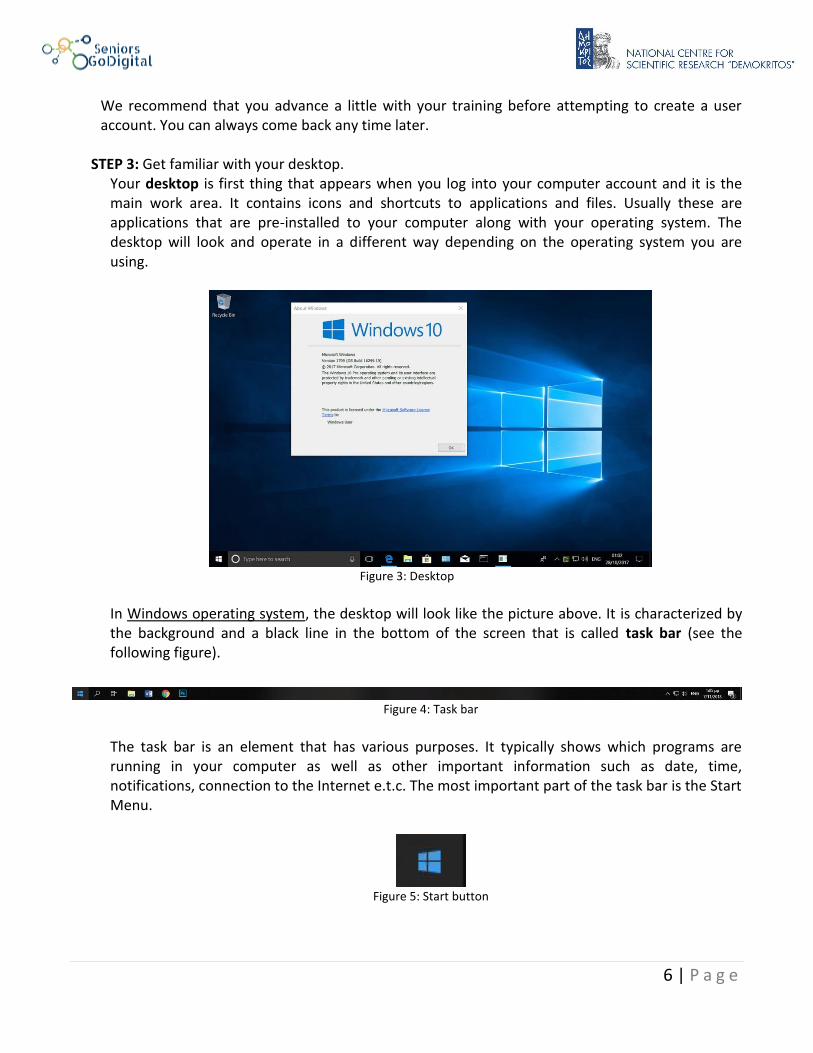
STEP 3: Get familiar with your desktop.
Your desktop is first thing that appears when you log into your computer account and it is the main work area. It contains icons and shortcuts to applications and files. Usually these are applications that are pre-installed to your computer along with your operating system. The desktop will look and operate in a different way depending on the operating system you are using.
Figure 3: Desktop
In Windows operating system, the desktop will look like the picture above. It is characterized by the background and a black line in the bottom of the screen that is called task bar (see the following figure).
Figure 4: Task bar
The task bar is an element that has various purposes. It typically shows which programs are running in your computer as well as other important information such as date, time, notifications, connection to the Internet e.t.c. The most important part of the task bar is the Start Menu.
Figure 5: Start button

7 | P a g e
The Start-Menu can be found in the left lower corner of the monitor. The Start icon opens the menu of installed programs and settings. In the following paragraphs you will learn how to find, open and operate programs and applications. But first let’s proceed with learning basic controls of the mouse and keyboard.
STEP 4: Learn mouse basics.
In order to interact with your computer, you will mostly use your mouse and keyboard. When starting your computer training you should take some time to get familiar with these devices so you can easily interact with your operating system, programs and files.
Figure 6: Computer mouse
Your mouse is used for pinpoint navigation and control and it is necessary for a wide variety of activities. You should familiarize with your mouse in order to be able to use your computer.
Figure 7: Computer mouse buttons
The front of the mouse has two clickable buttons, one on the left (1) and one on the right (2) and one small wheel (3) that allows you to scroll up and down. These buttons are used to open programs and menus. Depending on what program you are currently using clicking the left or the right button may have different options. You should use your index and middle fingers for the buttons. On the bottom of the mouse there is a censor that allows the pointer of the button to know how to move on the screen while you move the mouse device. You should place your mouse on a clean, smooth surface. This will allow the mouse to move without interference and scroll smoothly. We advise that you use a mouse pad.

8 | P a g e
Figure 8: Using the mouse
You should now practice using the mouse with your hand. Moving the mouse and clicking the buttons doesn’t request a lot of pressure. You should keep your hand relaxed and keep the mouse at elbow level. Whenever you feel tired you should take breaks.
STEP 5: Plug in your mouse.
In order to use the mouse, you have to plug it in to your computer. A mouse can be wired or wireless. A wired mouse connects to the computer with a cable whereas a wireless mouse connects to the computer with a USB connector.
Figure 9: Wired computer mouse
a. A wired mouse has a cable extending from it that ends with a USB connector as you see in
the picture above.

9 | P a g e
Figure 10: Wireless computer mouse
b. A wireless mouse has a small USB connector that connects the mouse via Bluetooth. In
both cases, you have to connect your mouse whether with the cable or with the small USB connector.
Figure 11: USB ports and USB cable
You will have to connect the USB connector to a USB port of your computer. USB ports are located in different areas on every computer. Look for the USB port in your computer, it is a small square port that has the same size with your connector. You can see how the USB cable and port looks like in the picture above.
a. Desktops usually have the USB ports on the front and back of the tower and sometimes on
either side of the monitor.
b. Laptops will have USB ports on the left and right sides of the keyboard. Laptops have a mouse pad incorporated already, but you can also connect a mouse. You can click this link to find detailed information on how to use the mouse pad:

10 | P a g e
In both cases, insert the USB and if it doesn’t fit the first time try to flip it upside down. Be careful not to use a lot of pressure when inserting the connector. Turn your computer on and once you plug your mouse the mouse software will be installed and you will get notified that your device is ready to use. If this doesn’t happen automatically click on this link to see how to do it manually.
Figure 12: Mouse cursor
After installation you should see a cursor on the screen which you can control by moving the mouse. If the mouse isn’t working, try to plug the USB again or try a different port. If you are using a wireless mouse, make sure it has batteries and that it is ON.
STEP 6: Practicing the mouse.
Now you should start practicing with the mouse.
Figure 13: Practicing the mouse
The left button is the primary button for right-handed users and the right button for left-handed users accordingly.
a. Click the primary button once to click on something and click the button twice in a row to
“double click” on a program or menu. Single clicking of the primary button often selects an item or opens a menu whereas double clicking usually opens items, folders or programs.
b. Clicking the secondary button most of the times displays a list of things you can do with a selected item.
The exact things you can do with a click depend on what program you are working at the moment. Don’t worry, as you proceed with your training, you will acquire knowledge by experience.

11 | P a g e
Figure 14: Scrolling and dragging procedure
You should also start practicing on scrolling and dragging items with the mouse. This is possible by moving the aforementioned wheel that is located between the buttons. You can use the wheel to scroll up and down pages or menus. If you want to move an item, place the cursor on it, press and hold down the primary button and drag the item to your desirable location.
STEP 7: Customize the mouse (optional).
Figure 15: Mouse Settings
Finally, you may need to customize the mouse as needed. You may wish to change the speed of the cursor’s movement, its size or appearance and which will be the primary and secondary button. You can do so by your computer’s settings. You can find detailed information for mouse customization in this link.
STEP 8: Learn keyboard basics.

12 | P a g e
Figure 16: Computer keyboard
At first you should place the keyboard in front of you and center it by making sure that the spacebar is right in front of you, centered with your body. This will allow you to use the keyboard easily.
Remember to keep the keyboard at elbow level. Your hands should float above the keys. Try to rest your wrists on your office and move them as needed instead of stretching your fingers.
Touch the keys softly, no pressure is needed for the keys to register. You should try to keep your hands relaxed.
Figure 17: Home position
In order to start using the keyboard find the Home position. This position indicates the place where your fingers start when typing and where they return after striking keys. Most keyboards have raised bumps on the F and J keys. Try to find them now! The picture above indicates the correct position. You should place your index fingers on F and J and your other three fingers on the keys left and right of them accordingly. Your thumbs rest on the spacebar key.
Your keyboard has a lot of different keys that allow many actions. There are the alphanumerical keys that allow you to input text or special characters as well as special function keys.
13 | P a g e
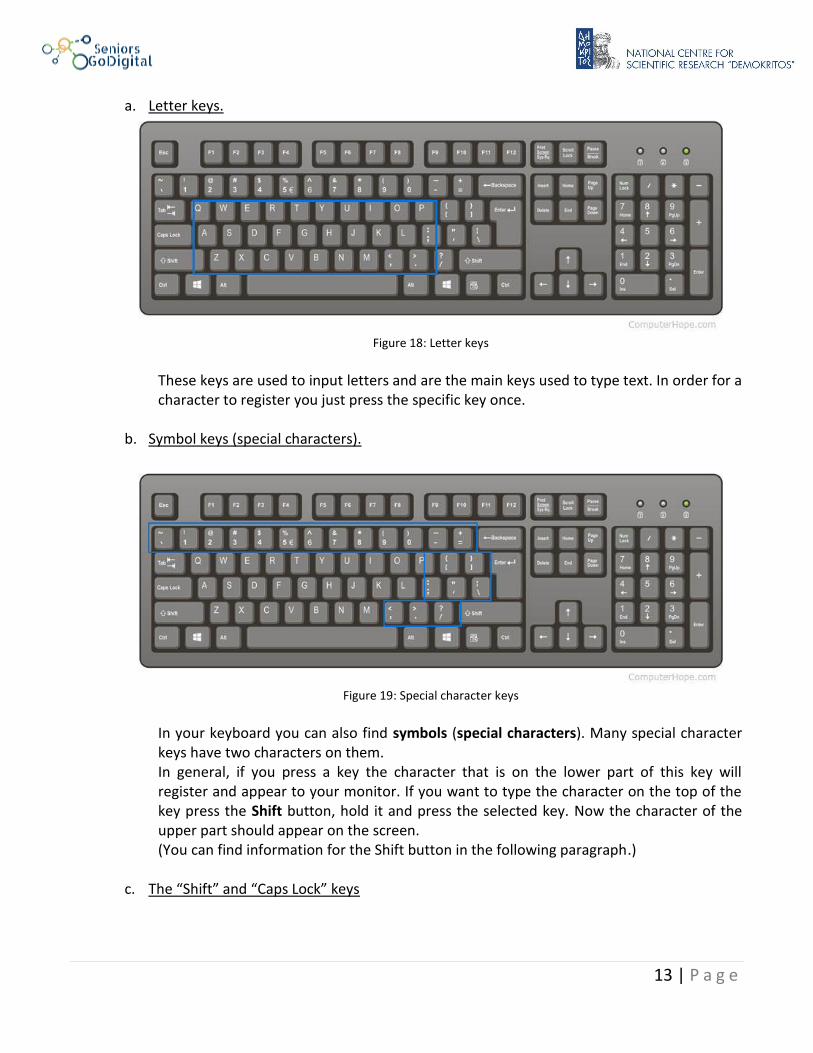
a. Letter keys.
Figure 18: Letter keys
These keys are used to input letters and are the main keys used to type text. In order for a character to register you just press the specific key once.
b. Symbol keys (special characters).
Figure 19: Special character keys
In your keyboard you can also find symbols (special characters). Many special character keys have two characters on them. In general, if you press a key the character that is on the lower part of this key will register and appear to your monitor. If you want to type the character on the top of the key press the Shift button, hold it and press the selected key. Now the character of the upper part should appear on the screen. (You can find information for the Shift button in the following paragraph.)
c. The “Shift” and “Caps Lock” keys
14 | P a g e
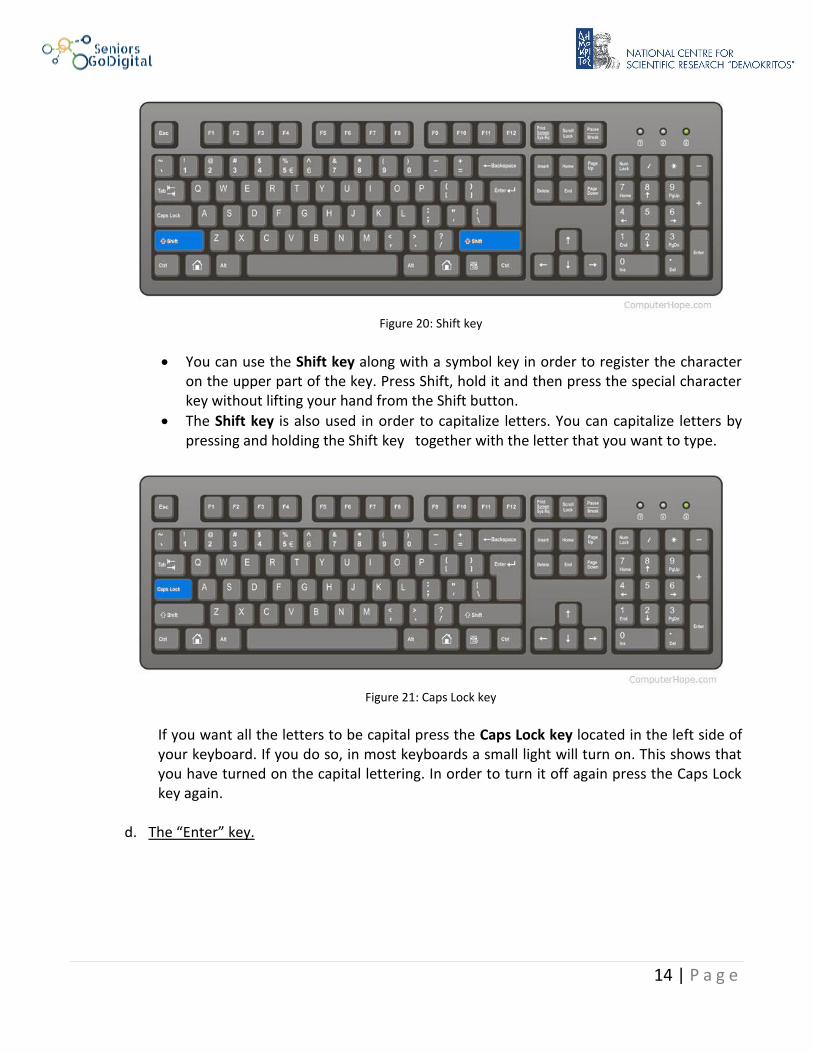
Figure 20: Shift key
You can use the Shift key along with a symbol key in order to register the character on the upper part of the key. Press Shift, hold it and then press the special character key without lifting your hand from the Shift button.
The Shift key is also used in order to capitalize letters. You can capitalize letters by pressing and holding the Shift key together with the letter that you want to type.
Figure 21: Caps Lock key
If you want all the letters to be capital press the Caps Lock key located in the left side of your keyboard. If you do so, in most keyboards a small light will turn on. This shows that you have turned on the capital lettering. In order to turn it off again press the Caps Lock key again.
d. The “Enter” key.

15 | P a g e
Figure 22: Enter key
The Enter key has different functions depending on the program or application you are using at that time. Generally as you proceed with your training you will learn the different functionalities of the Enter key. For now, we will focus on what the Enter key does when typing text. In this case, the Enter key is used for changing line or paragraph.
e. The “Backspace” key
Figure 23: Backspace key
If you type something wrong and you wish to erase it use the Backspace key. This will erase the character to the left of the cursor. If you just want to erase one character, a small simple press is enough. If you hold the Backspace button for some time, more characters will get erased.
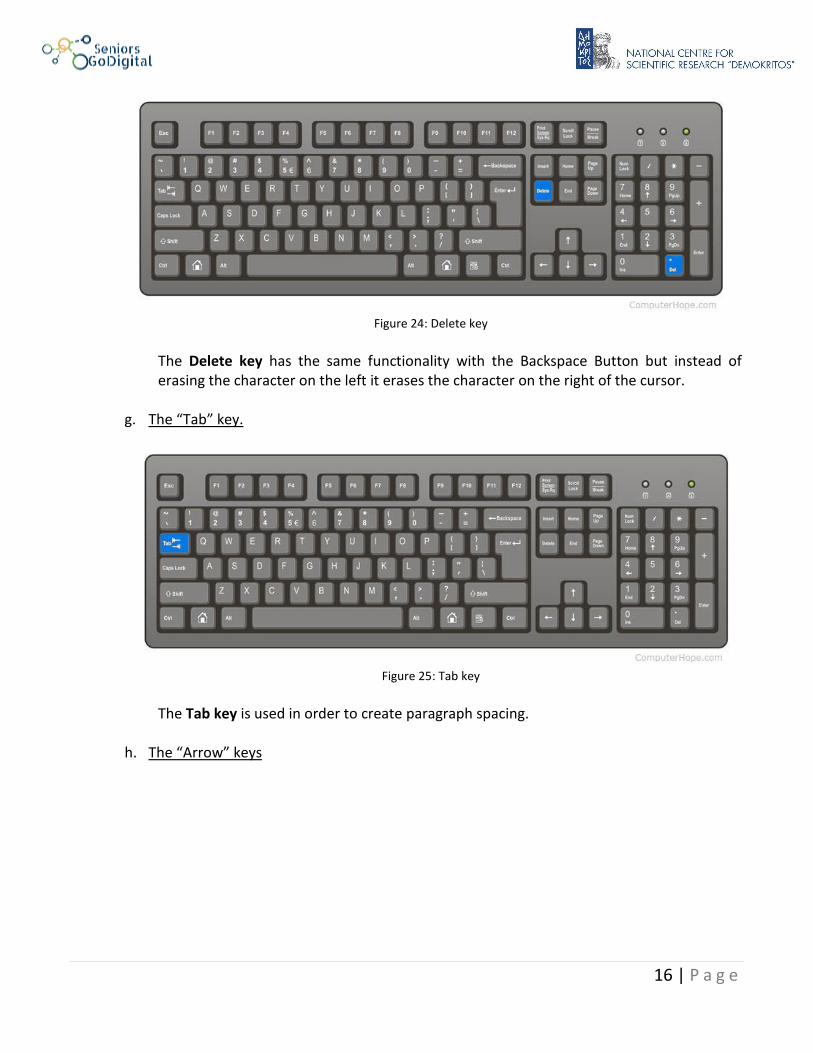
f. The “Delete” key.
16 | P a g e
Figure 24: Delete key
The Delete key has the same functionality with the Backspace Button but instead of erasing the character on the left it erases the character on the right of the cursor.
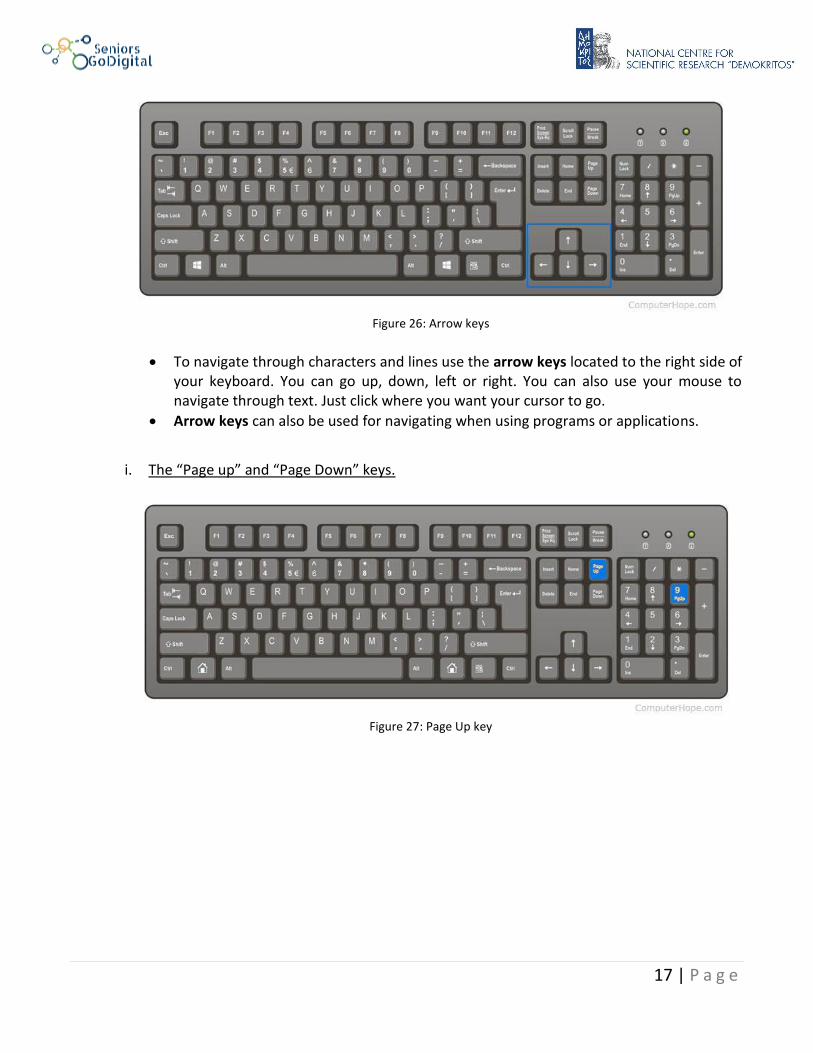
g. The “Tab” key.
Figure 25: Tab key
The Tab key is used in order to create paragraph spacing.
h. The “Arrow” keys
17 | P a g e
Figure 26: Arrow keys
To navigate through characters and lines use the arrow keys located to the right side of your keyboard. You can go up, down, left or right. You can also use your mouse to navigate through text. Just click where you want your cursor to go.
Arrow keys can also be used for navigating when using programs or applications.
i. The “Page up” and “Page Down” keys.
Figure 27: Page Up key

18 | P a g e
Figure 28: Page Down key
The Page Up (or PgUp) and Page Down (or PgDn) buttons are used to navigate more quickly in a page. Instead of scrolling with the mouse, you can press the Page Down button and move down on the screen about a page in length. The same goes for the Page Up button. If you press it, you can go up about a page length on the screen.
j. The “NumLock” key and “number” keys.
Figure 29: Num Lock key
The Numeric Pad is on the right side of the keyboard. It is used to enter numbers and perform calculations. If you are using a laptop it may not have a Numeric Pad.
Press the NumLock key to enable or disable the Numeric pad.
Pressing the number keys allows number to register and appear to the screen.
k. The “Start” key.

19 | P a g e
Figure 30: Start key
If you press the Windows Start key (the one with the Windows symbol on), you can open the Start Menu. The Windows button can be found left of the Spacebar.
l. The “Esc” button
Figure 31: Esc key
Short for Escape, Esc is a key found on the top-left corner of a computer keyboard and allows the user to abort or cancel an operation. For example if you press the start button and you want to close it you can press Esc.
Esc button is also used for toggling full screen in applications.
Another example is if a slow web page is loading on an Internet browser you could press the Esc button in order to stop the download instead of waiting to time out. In the following picture you can see where the Esc button is and what it looks like.
STEP 9: Plug in the keyboard (only for desktop).
In order to use the keyboard, you have to plug it in to your computer. A keyboard can be wired or wireless. A wired keyboard connects to the computer with a cable whereas a wireless keyboard connects to the computer with a USB connector.

20 | P a g e
Figure 32: Wired keyboard
Nowadays almost all wired keyboards use USB cables to connect to the computer. Older keyboards may connect to your computer using PS/2. Following, we provide these links (link1, link2) that describe how to connect both types respectively. If you are planning to use a wireless keyboard it can connect to your computer via Bluetooth, radio frequency or infrared technology. Following, we provide a link that will help you connect a wireless keyboard:
Turn your computer on and once you plug your keyboard the keyboard software will be installed and you will get notified that your device is ready to use. Laptops have keyboards already incorporated, thus no additional actions are required.
STEP 10: Practice typing.
You can now practice some typing by opening the Notepad. Notepad is a desktop application that is installed in all Windows computer and it is used for typing documents. You can find the Notepad by clicking the Start menu and scrolling through your available programs.
At first, press the “Start” key, this will open a catalogue of the available programs, applications and folders that appear alphabetically.
Scroll down to the letter “W”, find the folder “Windows Accessories” and click on it.

21 | P a g e
Figure 33: Windows Accessories in Start Menu
This will open a sub folder, as the following picture shows. Find “Notepad” and click on it. By clicking the “Notepad” a new window will open that will look like the one in the following picture.
Figure 34: Notepad

22 | P a g e
You can also open “Notepad” by searching through the available programs and applications. In order to do this follow the step:
Press the Start button but now instead of scrolling just start typing the word “Notepad”. By typing your computer searches through the available programs. The search is dynamic and automatic, which means that with every letter you type the computer searches again without your interference. Thus, before typing all the world, “Notepad” appears as a search result. In the red area in the bottom of the picture you can see what you have typed.
Figure 35: Notepad Start Menu search
Again, click the “Notepad” in order to open it.
Now it is time to practice typing using Notepad: a. Try typing a small paragraph, starting on the Home position and moving your fingers
to near buttons. Keep your own pace and try to memorize where each key is located. Practice is essential! Remember to keep your wrists elevated and take breaks whenever you feel tired.
b. You can type your name, your address and your phone number. You can either type a small paragraph.

23 | P a g e
c. Remember the use of keys that was described in the previous paragraph. If you don’t feel sure, go back to the previous paragraph and read again the functionality of each key.
d. When you are done press the button that looks like an “X” in the top right corner of the “Notepad” window. In the message that appears click “Don’t save”.
The following video can help you learn how to type:
STEP 11: Practice calculations.
Open the “Calculator” to use the Numeric Pad and practice calculations. The “Calculator” is an application that is installed in all Windows computers and is used to execute simple or even scientific calculations. You can find the “Calculator” by clicking the Start menu and scrolling through your available programs.
As before, press the “Start” key, this will open a catalogue of the available programs, like applications and folders that appear alphabetically.
Scroll down to the letter “C”, find the “Calculator” and click on it.
You can either search, as instructed before, but typing “Calculator” this time.
24 | P a g e
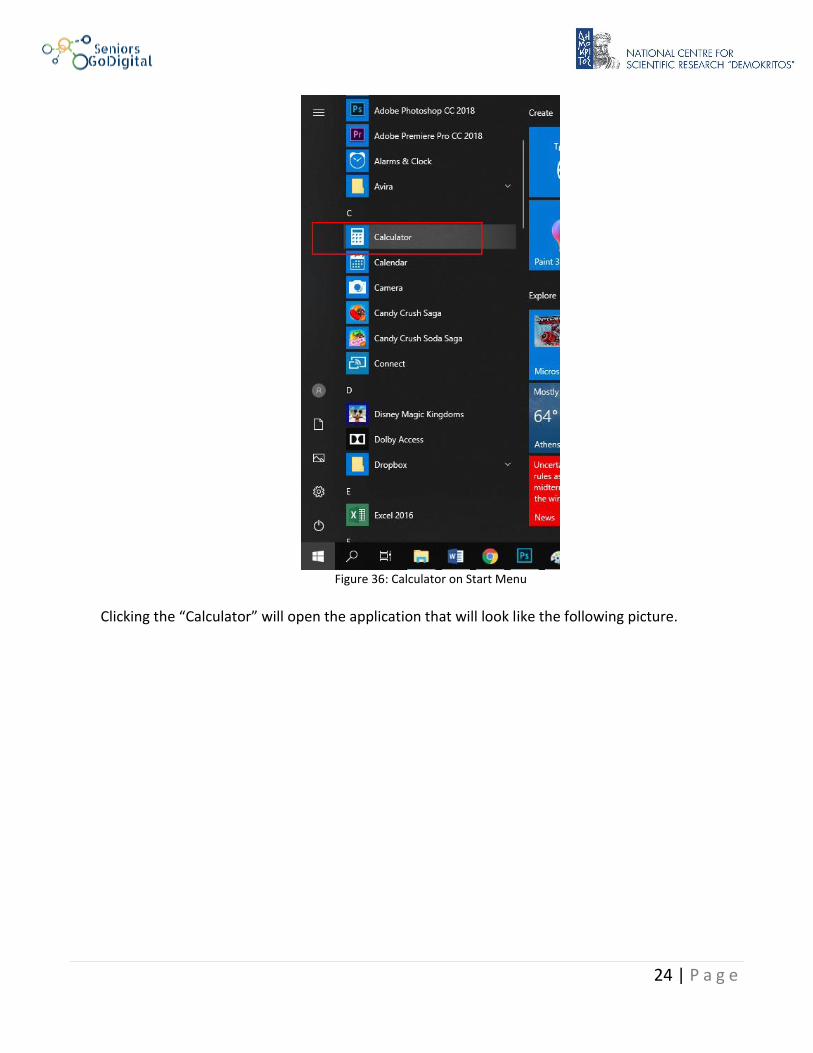
Figure 36: Calculator on Start Menu
Clicking the “Calculator” will open the application that will look like the following picture.
25 | P a g e
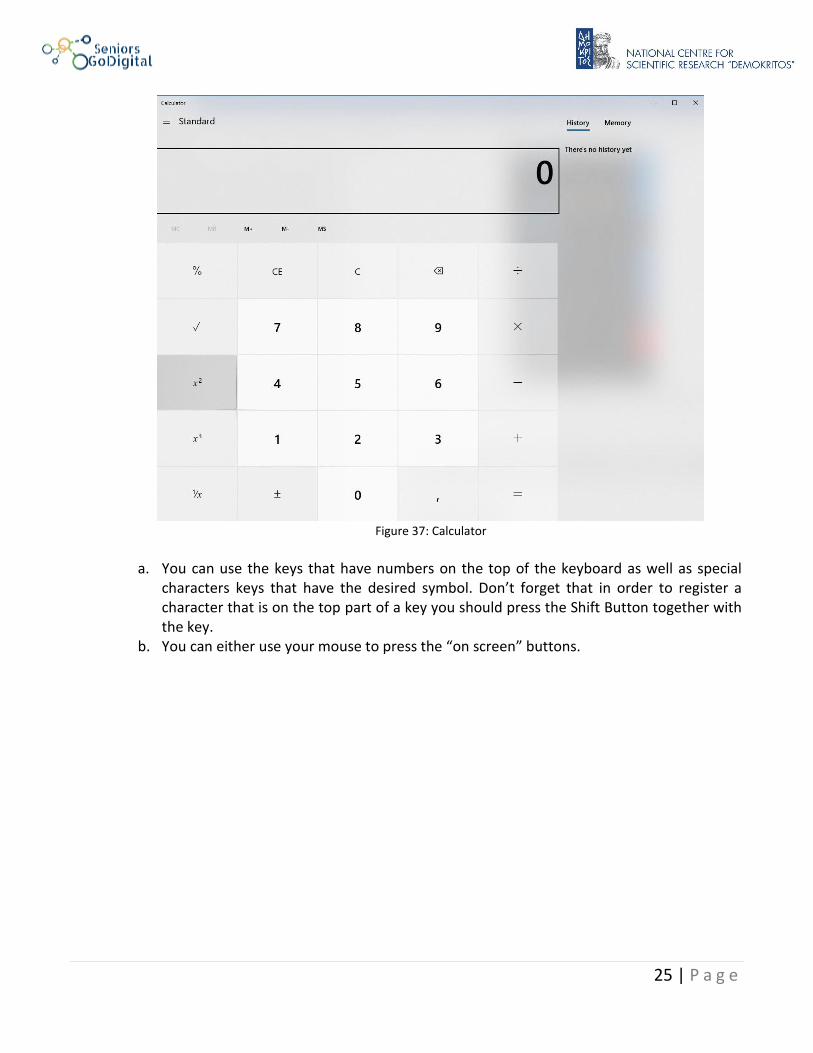
Figure 37: Calculator
a. You can use the keys that have numbers on the top of the keyboard as well as special
characters keys that have the desired symbol. Don’t forget that in order to register a character that is on the top part of a key you should press the Shift Button together with the key.
b. You can either use your mouse to press the “on screen” buttons.

26 | P a g e
STEP 12: Learn basic keyboard shortcuts. There are a lot of keyboard shortcuts that help do things faster and easier. At this stage of your training we will just show you the shortcut that helps you Change input language.
Figure 38: Changing Language key combination
To change the input language when typing, you hold the Alt button and then press the Shift button. The same way you can change the language back.
STEP 13: Launch pre-installed applications.
Usually computers have some pre-installed applications and utilities. In Windows, you can find them by clicking the Start menu. You can now browse through your programs. As you proceed with your training you will learn how to use applications and utilities. You have already been instructed to use the Notepad and the Calculator. Soon you will gradually start to use more programs. Windows applications and programs are characterized by a bar on the top of the Window that usually contains information about the program. On the right corner there are three buttons that have different functionalities. In the following Figure you can see these three buttons.
Figure 39: Three control buttons on applications
a. Starting from the left the first button minimizes the window of the file, application or
program. This means that the Windows “disappears” but the program still remains open. You can make it appear again by clicking on its icon in the task bar.
Figure 40: Minimize application button

27 | P a g e
b. The second button toggles full screen appearance of the file, program or application. A window of a “running” application can appear in the whole screen or in just a small part of the screen. This depends on if you want to use only one application at a time or use many applications on the same time. The figure on the left below is the one that makes the window appear full screen whereas the one on the right is the one that makes it appear in a section of the screen.
Figure 41: Toggle full screen buttons
c. Finally the button that looks like an “X” closes the application. Usually at this point you
will be asked if you want to save the work that you have done.
Figure 42: Close application button
STEP 14: Install programs.
Not all programs that you will need to use on your computer are already installed. Users very often need to install programs on their own. Usually programs come with clear instructions on installation.
Figure 43: Microsoft Office
For demonstration purposes we provide a link with detailed instructions for installing Microsoft Office. Microsoft Office 365 is a service that provides Windows users with tools in order to work in a computer. It contains apps like Excel and PowerPoint which help you create documents, spreadsheets and presentations. Bear in mind that many Windows computers have Office already installed. We advise you to advance in your learning before trying to install a program in the way the link shows. You can always come back later to follow the procedure.

28 | P a g e
1.2 Go online
Connect to the Internet using Wi-Fi or Ethernet
Figure 44: Internet Connecting to the Internet can be really confusing for someone that is not familiar with it. However, considering how important the Internet is nowadays, it's a must to know how to go online and use the Internet in a secure and safe way.
In the next chapters, you will learn about types of internet connection and how you can connect to them. You will learn how to reach sites and perform Internet search. You will, finally, learn about antivirus, a program that helps you browse the Internet safely.
STEP 1: Set up your router.
At first you need to set up your router. This link provides detailed information on how to set up your router:
STEP 2: Connect to the Internet.
You can connect to the Internet in two ways, via Wi-Fi or via Ethernet cable. We will describe both types of connection in the following paragraphs. Bear in mind that some devices, especially portable devices, can connect to the internet only wirelessly. For information on how to connect to the Internet you can visit the link.
a. Connect using Ethernet
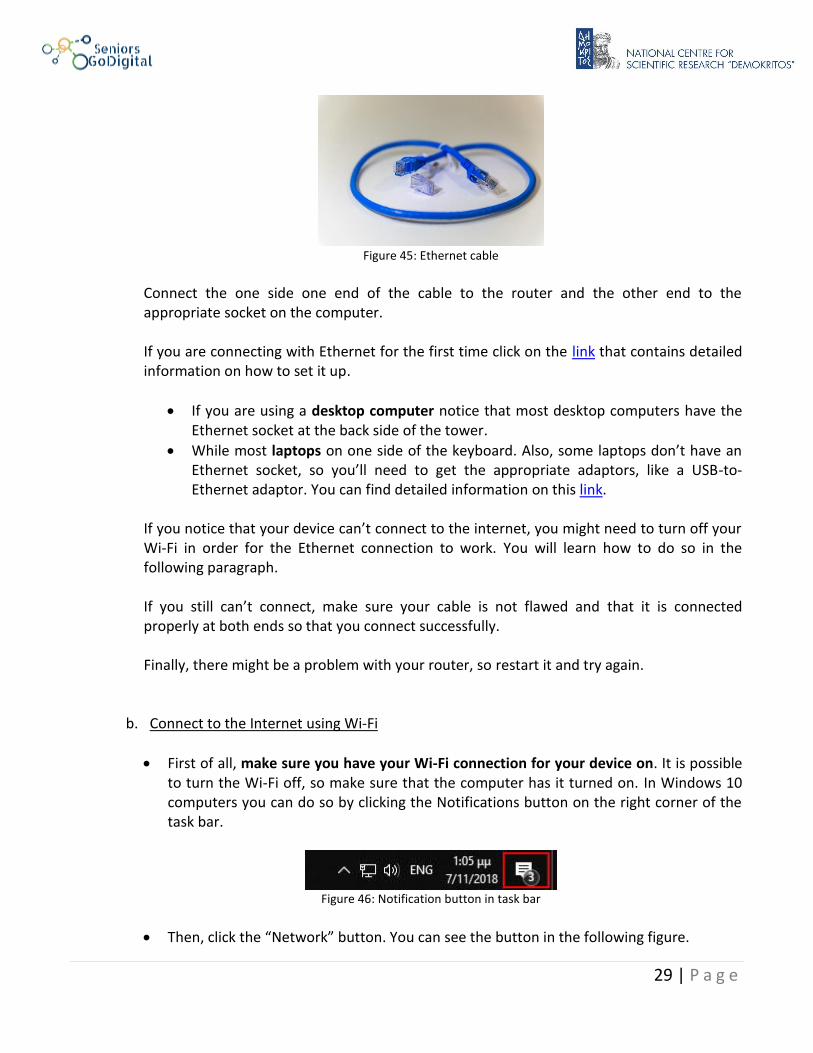
To connect to the internet via Ethernet, you will need to connect your computer and the router with an Ethernet cable that looks like the one in the following picture.
29 | P a g e
Figure 45: Ethernet cable
Connect the one side one end of the cable to the router and the other end to the appropriate socket on the computer. If you are connecting with Ethernet for the first time click on the link that contains detailed information on how to set it up.
If you are using a desktop computer notice that most desktop computers have the Ethernet socket at the back side of the tower.
While most laptops on one side of the keyboard. Also, some laptops don’t have an Ethernet socket, so you’ll need to get the appropriate adaptors, like a USB-to-Ethernet adaptor. You can find detailed information on this link.
If you notice that your device can’t connect to the internet, you might need to turn off your Wi-Fi in order for the Ethernet connection to work. You will learn how to do so in the following paragraph. If you still can’t connect, make sure your cable is not flawed and that it is connected properly at both ends so that you connect successfully. Finally, there might be a problem with your router, so restart it and try again.
b. Connect to the Internet using Wi-Fi
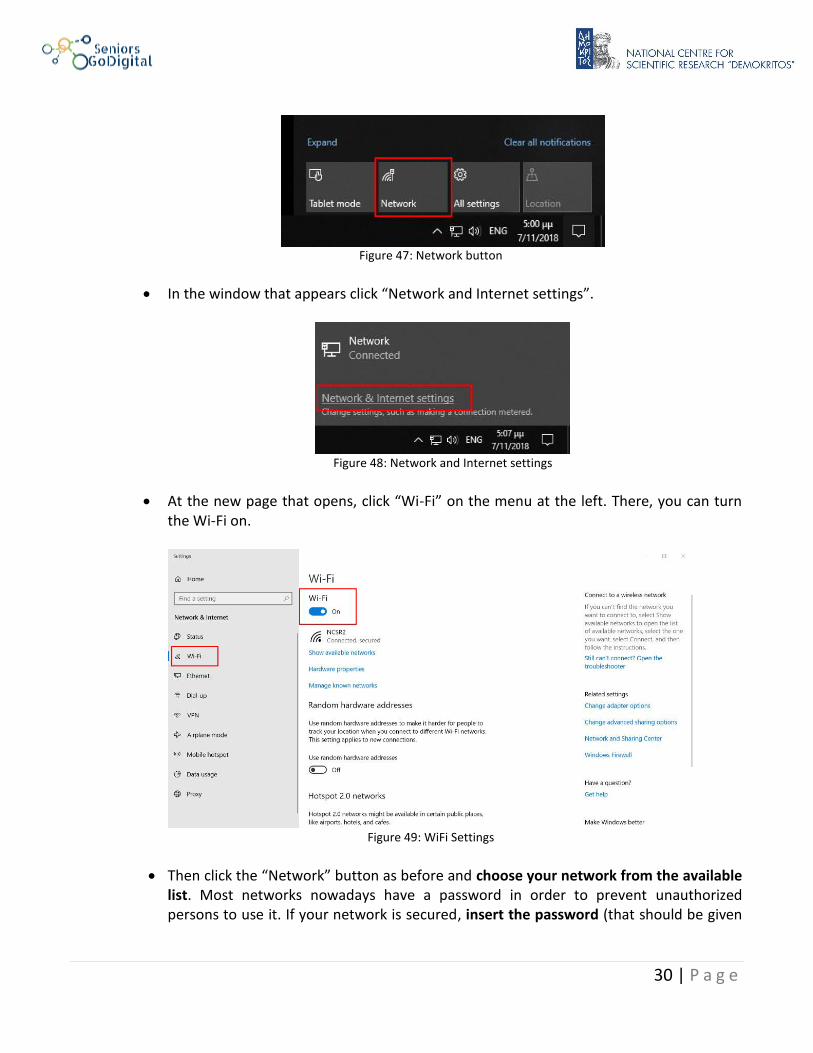
First of all, make sure you have your Wi-Fi connection for your device on. It is possible to turn the Wi-Fi off, so make sure that the computer has it turned on. In Windows 10 computers you can do so by clicking the Notifications button on the right corner of the task bar.
Figure 46: Notification button in task bar
Then, click the “Network” button. You can see the button in the following figure.
30 | P a g e
Figure 47: Network button
In the window that appears click “Network and Internet settings”.
Figure 48: Network and Internet settings
At the new page that opens, click “Wi-Fi” on the menu at the left. There, you can turn the Wi-Fi on.
Figure 49: WiFi Settings
Then click the “Network” button as before and choose your network from the available list. Most networks nowadays have a password in order to prevent unauthorized persons to use it. If your network is secured, insert the password (that should be given

31 | P a g e
to you by the provider or the owner of the network) to connect. This video can help you connect to WiFi.
Figure 50: WiFi Connection
Usually most devices connect immediately to the network. However, if you are out of range or the connection is too slow, your device might not connect to the Wi-Fi and you’ll need to connect via an Ethernet cable.

32 | P a g e
Learn about antivirus
STEP 1: Learn what an antivirus software is.
Figure 51: Antivirus
An antivirus software is a program or set of programs used to protect your computer of malicious software or as it is called malware. The term malware refers to all types of malicious software like viruses, worms, Trojans, adware and more. Malware, like viruses, can be programmed to cause damage to your device, prevent you from accessing data or take control of your computer. Nowadays, having an antivirus software is critical because computers without it will be “infected” within minutes of connecting to the Internet. An antivirus program will keep your computer protected and will prevent malware from harming it. Depending on the type of antivirus you are using the functionality may vary but all antivirus software perform some essential functions like scanning files or directories for any malware or know malicious content and removing it. Nowadays most antivirus can provide data concerning your computer’s “health” informing for things like your computer’s performance etc. For more information, please check ‘Safety’ module, Section 2.2, p.9-10
STEP 2: Learn about Windows Defender.
As a Microsoft Windows user you can use the built-in Windows Defender, an antivirus software that is pre-installed in all Windows computers nowadays. For more information, please check ‘Safety’ module, Section 3.4, p.19-21

33 | P a g e
Use a web browser
STEP 1: Install Google Chrome.
Figure 52: Google Web Browser
In order to connect to the Internet, we need a browser. In this lesson will use Google Chrome for demonstration purposes. If Google Chrome is not installed in your computer, follow these instructions to download and install it! Once installed you can find Google Chrome on the Start Menu.
STEP 2: Visit a Web Page.
a. Open Google Chrome by searching on the Start Menu and clicking it.

34 | P a g e
Figure 53: Google Chrome Address bar
b. Then go to the address bar (red area indicated in the above Figure) and type seniorsgodigital.eu to access the project’s website.
c. When you are done typing press the Enter key. d. You will get directed to the project’s website.
Figure 54: Seniors Go Digital Web Page
e. You can type any address you want in this bar.
STEP 3: Perform a Google Search. In case you don’t know the exact address of the website you want to visit or you just want to search for information regardless the website you can type the word or phrase you are interested about instead of typing the address.
For example if you want to search information about a product you can type the product’s name and press Enter. Google will search the Web for you and provide a list of sites that relate to the phrase or word you typed.
The following tips will help you perform a search
TIP 1: Start with the basics.
Regardless of what you are looking for start with a simple search like “where is the closest hospital?”. You can always add descriptive words later if necessary. It might be a good idea to add a location to your search. For example “hospital in Athens”.
35 | P a g e
TIP 2: Choose words carefully and be specific. When you are choosing the phrase or word that you are going to type try to keep it simple and at the same time be specific. For example instead of “what is the temperature in Athens” type “weather forecast for Athens”.
TIP 3: Don’t worry about little things.
Capitalization of words and spelling mistakes don’t affect your search. The later can affect your search only in cases that are severe.
For more information on how to use a web browser please refer to the Information and Data Literacy Module.
1.3 Learn how to use peripherals
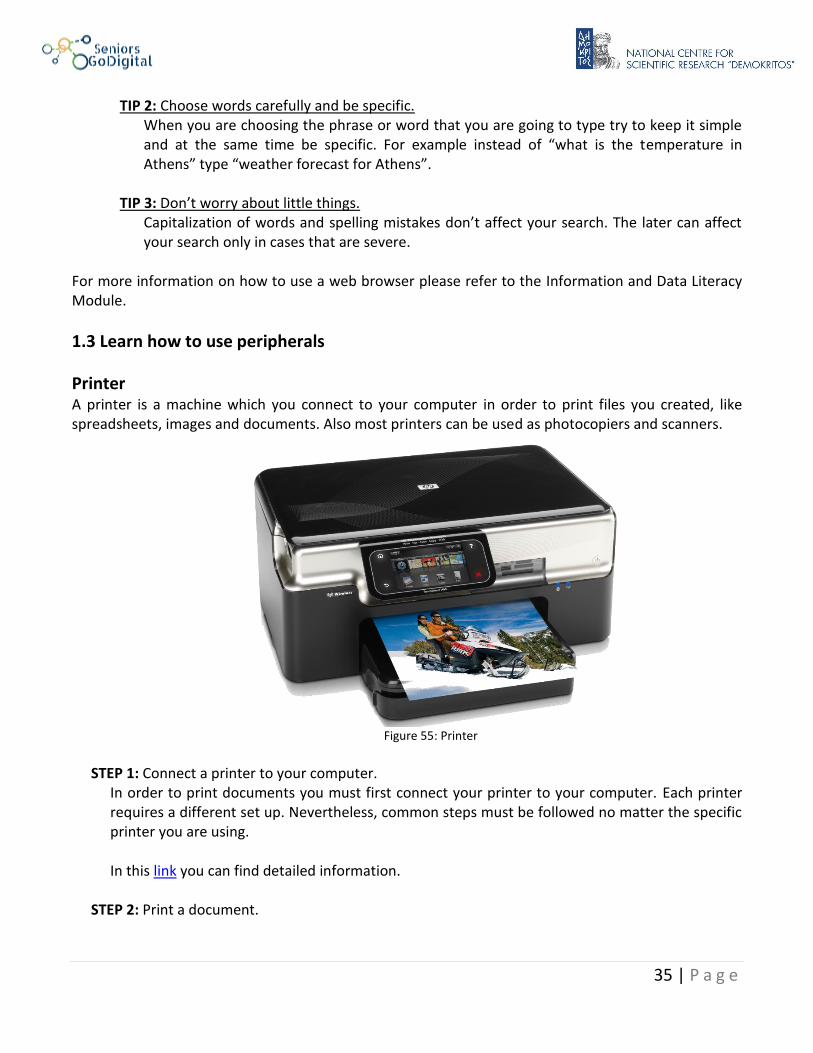
Printer A printer is a machine which you connect to your computer in order to print files you created, like spreadsheets, images and documents. Also most printers can be used as photocopiers and scanners.
Figure 55: Printer
STEP 1: Connect a printer to your computer.
In order to print documents you must first connect your printer to your computer. Each printer requires a different set up. Nevertheless, common steps must be followed no matter the specific printer you are using. In this link you can find detailed information.
STEP 2: Print a document.
36 | P a g e
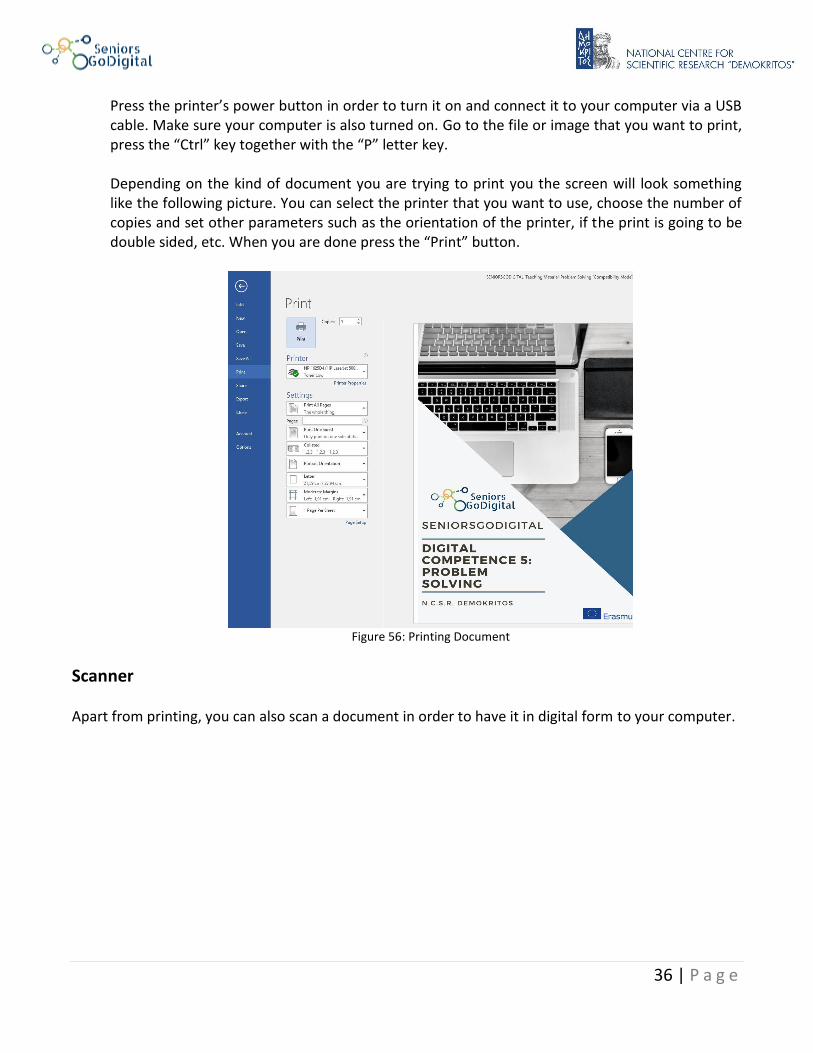
Press the printer’s power button in order to turn it on and connect it to your computer via a USB cable. Make sure your computer is also turned on. Go to the file or image that you want to print, press the “Ctrl” key together with the “P” letter key.
Depending on the kind of document you are trying to print you the screen will look something like the following picture. You can select the printer that you want to use, choose the number of copies and set other parameters such as the orientation of the printer, if the print is going to be double sided, etc. When you are done press the “Print” button.
Figure 56: Printing Document
Scanner Apart from printing, you can also scan a document in order to have it in digital form to your computer.

37 | P a g e
Figure 57: Scan
STEP 1: Connect a scanner to your computer. In order to scan documents you must first connect your scanner to your computer. Each scanner requires a different set up. Nevertheless, common steps must be followed no matter the specific scanner you are using.
In this link you can find detailed information:
STEP 2: Scan a document.
First, you need to make sure that your scanner is turned on. To scan a document, place it on your scanner face-down. You can find detailed information on how to scan documents in this link.
External drives
An external drive is just a hard drive (HDD) or solid-state drive (SSD) that is connected to a computer on the outside rather than on the inside. It’s like taking the drive inside your computer and plugging it in from the outside. External drives function like internal disks and are used in order to provide more storage. Moreover, they are portable and thus they can be used to transfer files and data between devices.

38 | P a g e
Figure 58: External Drive
External provide a lot of storage space. Also, you can plug the external drive to other computers and share files easily even if they are really large.
STEP 1: Connect an external hard drive.
In order to use your external drive you first need to connect it to your computer. The process is easy. Hard drives usually come with a double ended USB cable. Just plug the one end on the external drive and the other on a free USB port of your computer.
On most computers it takes a few moments before contents of the external drive appear on screen. For more information see this link.
STEP 2: Use an external hard drive.
Once the hard drive connects to your computer you can start moving files to and from the drive.
This video shows how to connect and use an external hard drive.
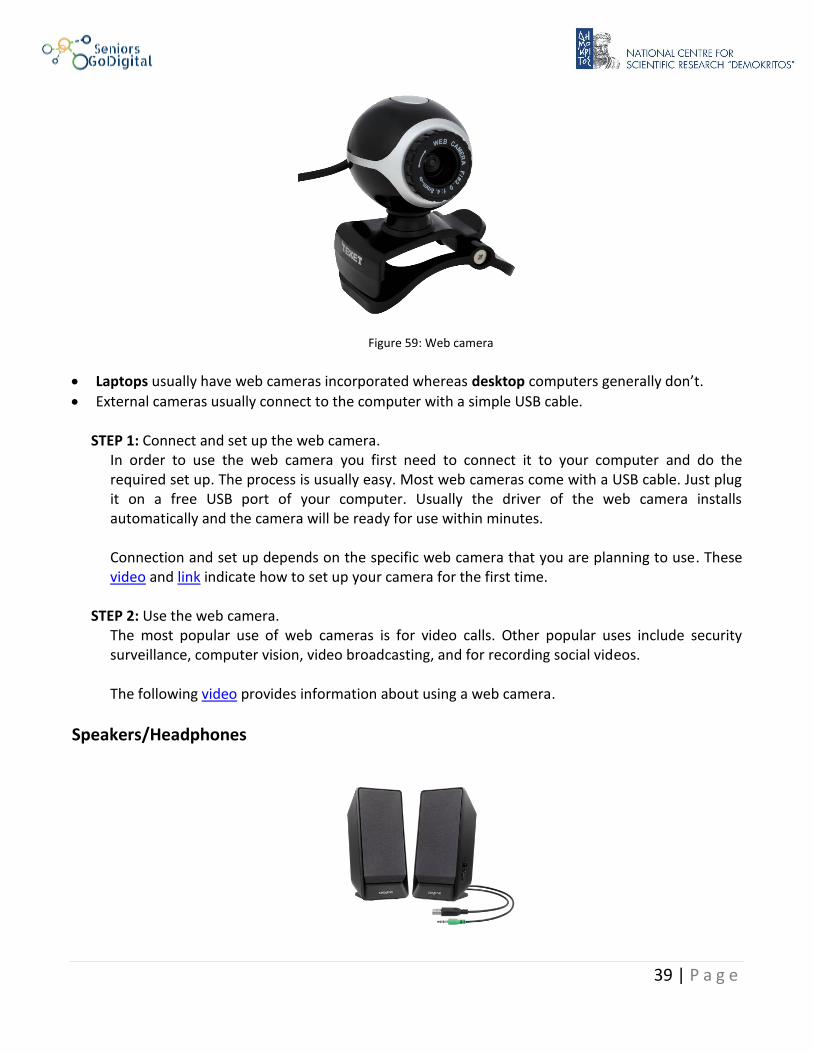
Web cameras A web camera is a video camera that streams its image in real time through a computer. When "captured" by the computer, the video stream may be saved, viewed or sent via the internet or an e-mail.
39 | P a g e
Figure 59: Web camera
Laptops usually have web cameras incorporated whereas desktop computers generally don’t.
External cameras usually connect to the computer with a simple USB cable.
STEP 1: Connect and set up the web camera. In order to use the web camera you first need to connect it to your computer and do the required set up. The process is usually easy. Most web cameras come with a USB cable. Just plug it on a free USB port of your computer. Usually the driver of the web camera installs automatically and the camera will be ready for use within minutes. Connection and set up depends on the specific web camera that you are planning to use. These video and link indicate how to set up your camera for the first time.
STEP 2: Use the web camera.
The most popular use of web cameras is for video calls. Other popular uses include security surveillance, computer vision, video broadcasting, and for recording social videos. The following video provides information about using a web camera.
Speakers/Headphones

40 | P a g e
Figure 60: Speakers
A speaker is a device that we connect to a computer in order to have sound as the output. It can be connected via a USB port or a 3.5mm jack plug (usually the one with a light green color).
STEP 1: Connect and use speakers. The following videos provide a step-by-step tutorial on how to connect speakers to a computer whether desktop or laptop. Note that laptops have speakers incorporated already. Video 1 Video 2 After you connect the speakers they driver of the device will install automatically and you will soon be able to use them. In the following figure you can see where you can adjust the speaker volume.
Figure 61: Sound Volume icon
By clicking the arrow in the task bar and selecting the speaker icon from the menu that appears you will be able to find the sound manager in order to access sound settings accordingly.
Figure 62: Arrow icon in task bar
Figure 63: Sound Manager icon
Another way to hear through the computer is using headphones, which are used to hear directly in your ears without diffusing the sound.
Figure 64: Headphones

41 | P a g e
STEP 1: Connect and use headphones.
Headphones, just like speakers, connect to the computer via the 3.5mm jack plug or a USB port. This link provides step-by-step instruction on how to connect and use headphones.
1.4 Other devices Smartphones
Figure 65: Smartphone
A smartphone is a mobile phone with highly advanced features. A typical smartphone has a high-resolution touch screen display, Wi-Fi connectivity, Web browsing capabilities, and the ability to accept software applications. The majority of these devices run on any of these popular mobile operating systems: Android, Symbian, iOS, BlackBerry OS and Windows Mobile.
In this link you can find information on how to use an Android phone.
In this link you can find information on how to use an Iphone.
Tablets
Figure 66: Tablet
42 | P a g e
A tablet is a wireless touch screen personal computer that is smaller than a desktop computer but larger than a smartphone. Tablets nowadays have wireless Internet and a variety of software applications, including Web browsers and games. Usually they are of the slate style which has an integrated electronic touch screen. Of course, there are other styles like the convertible and the hybrid.
In this link you can find information on how to use an Android tablet.
In this link you can find information on how to use an iOS tablet, which is called ipad.
2. SOLVING COMPUTER RELATED PROBLEMS
2.1 Problem Solving in Computers Basic problem solving tips and techniques
Troubleshooting Do you know what to do whenever you have a problem with your computer? First of all, don't panic. There are many basic troubleshooting techniques you can use to fix them. In this chapter, we'll talk about some simple things to try when troubleshooting.
General tips There are several different things that could cause your computer to not function properly. No matter what's causing the problem, troubleshooting is all about trial and error. In some cases, you might need to use many different ways to approach the problem and find a solution. Some problems may be easier to fix than they seem. Try using the following tips as a starting point.
TIP 1: Write down the steps you’ve followed.
Figure 67: Writing down the steps
Once you start troubleshooting, you may want to write down the steps you took. This way, you'll know exactly what you've done and can avoid repeating previous mistakes again. If you end up asking others for help, it will be easier for them if you inform them about the actions you took and anything you tried. TIP 2: Make notes of error messages.
43 | P a g e
Figure 68: Make notes of error messages
If your computer gives you an error message, make sure you write it down. You may be able to use this information in finding out if the same error appeared to other people as well. TIP 3: Check the cables.
Figure 69: Check the cables
If you're having problems with a specific piece of computer hardware, you should check all related cables and make sure they're properly connected.
TIP 4: Restart the computer.
Figure 70: Restart the computer
When all else fails, restart your computer. This can solve a lot of issues and problems you experience.
TIP 5: Use the process of elimination.
Figure 71: Use the process of elimination
If you're having problems with your computer, you can find out what's wrong by using the process of elimination. First make a list of the things you think could be causing the problem and then test them to eliminate the ones not causing the problem. This way you can identify the source of your computer issue, and it will be easier to find a solution.
44 | P a g e
2.2 Most common computer related problems and suggested solutions
Simple solutions to common computer related problems
Most times, problems can be fixed using simple troubleshooting techniques, like restarting the program or application. It's important to try the simple solutions first before attempting something more difficult or advanced. If you still can’t fix the problem, then you can try other troubleshooting techniques or ask for help.
PROBLEM: Power button does not start the computer.
Figure 72: Power button does not start the computer
SUGGESTED SOLUTIONS:
a. If your computer does not start, begin by checking if the power cord is plugged securely into the back of the tower and the power outlet.
b. Make sure said outlet is one that works. To check your outlet, you can try using another way, like charging your mobile phone.
c. If you are using a laptop, the battery may not be charged. Plug the AC adapter to it and then try to turn on the laptop again.
PROBLEM: Mouse or keyboard does not work.
Figure 73: Keyboard or mouse doesn’t work
SUGGESTED SOLUTIONS:
a. If you're using a wired mouse or keyboard, make sure it's connected properly with the computer.
b. If the mouse or keyboard you’re using is wireless, make sure it's turned on and fully charged. c. You should also make sure that your device is installed correctly.
PROBLEM: Screen is blank.

45 | P a g e
Figure 74: Blank Screen
SUGGESTED SOLUTIONS:
a. If your screen is blank while the computer is turned on, means that maybe the computer is in Sleep mode. Click the mouse or press any button on the keyboard to wake it.
b. Also, make sure the monitor and the computer are connected properly and both turned on.
PROBLEM: No sound is generated.
Figure 75: No sound is generated
SUGGESTED SOLUTIONS:
a. Check the volume level. Click the audio button at the bottom-right corner of the screen to make sure the sound is turned on and that the volume is up.
b. Also, don’t forget to check the cables in order to make sure the speakers are connected to the correct port and turned on.
c. Plug in your headphones to find out if you can hear through them.
PROBLEM: Application is running slowly.
Figure 76: Application is running slowly
SUGGESTED SOLUTIONS:
a. First, try closing and reopening the application. b. Also, you can try updating the application by clicking the Help menu and looking for the
option “Check for updates”.
PROBLEM: Application stops responding.

46 | P a g e
Figure 77: Application stops responding (task manager)
SUGGESTED SOLUTION:
Sometimes an application may become “stuck”, or “frozen”. If this happens, you won't be able to close the application window or click any buttons within the application. To fix this, force quit the application by pressing the Ctrl + Alt + Delete buttons simultaneously on your keyboard to open the Task Manager. There, you can select the unresponsive application and click “End task” to close it.
PROBLEM: All programs and applications run slowly.
Figure 78: All applications and programs run slowly
SUGGESTED SOLUTIONS:
a. You could try running a virus scanner. There may be a malware program running in the background and thus slowing down the system.
b. Also, your drive may be running out of space. You may want to delete some unneeded files or programs.
PROBLEM: Computer stops responding.
Figure 79: Computer stops responding (power button)
SUGGESTED SOLUTION:

47 | P a g e
Sometimes your computer may become completely unresponsive, or “frozen”. If this happens, you won't be able to click anywhere on the screen, open or close applications, or shut it down through the usual options.
a. To shut down the computer, press and hold the Power button. The Power button is the big button usually located on the front of the tower, typically indicated by the power symbol. Press and hold the Power button for about 5 seconds to force the computer to shut down.
b. If the computer still won't shut down, unplug the power cable from the electrical outlet. c. If you're using a laptop, try removing the battery to force the computer to turn off. Note:
The solution of unplugging the computer to force shut down should be avoided and only tried as a last resort after all the other suggestions above fail.
48 | P a g e
REFERENCES https://www.computerhope.com/issues/ch001688.htm
https://en.wikipedia.org/wiki/Operating_system
https://www.youtube.com/watch?v=cPt0HLQ-G7I
https://www.youtube.com/watch?v=KdQeU5QTfYE
https://www.wikihow.com/Set-Up-a-New-Computer
https://www.wikihow.com/Use-Laptops
https://www.howtogeek.com/226540/how-to-create-a-new-local-user-account-in-windows-10/
https://www.digitalunite.com/technology-guides/computer-basics/using-computer/how-turn-computer
https://www.nidirect.gov.uk/articles/keyboard-and-mouse-basics
https://www.digitalunite.com/technology-guides/computer-basics/using-computer/how-use-mouse
https://www.wikihow.com/Use-a-Computer-Mouse
https://www.computerhope.com/issues/ch001693.htm
https://www.computerhope.com/issues/ch000448.htm
https://www.dummies.com/computers/for-seniors-how-to-use-the-touchpad-your-laptops-built-in-mouse/
https://www.wikihow.com/Connect-a-Wireless-Mouse
https://www.wikihow.com/Change-Mouse-Settings
https://www.digitalunite.com/technology-guides/computer-basics/using-computer/how-use-computer-keyboard
https://www.wikihow.com/Use-a-Computer-Keyboard
https://www.computerhope.com/issues/ch001689.htm
https://www.computerhope.com/jargon/l/letter.htm
https://www.computerhope.com/jargon/s/shiftkey.htm
https://www.computerhope.com/jargon/c/capslock.htm
https://www.computerhope.com/jargon/e/enterkey.htm
https://www.computerhope.com/jargon/b/backspac.htm
https://www.computerhope.com/jargon/d/delete.htm
https://www.computerhope.com/jargon/a/arrowkey.htm
https://www.computerhope.com/jargon/p/pgupkey.htm
https://www.computerhope.com/jargon/p/pgdnkey.htm
https://www.computerhope.com/jargon/n/numlock.htm
https://www.computerhope.com/jargon/k/key.htm
https://www.computerhope.com/jargon/e/esc.htm
https://www.computerhope.com/issues/ch000449.htm
https://www.dummies.com/computers/pcs/how-to-connect-your-keyboard-and-mouse-to-your-pc/
https://www.computerhope.com/issues/ch000449.htm#usb
https://www.computerhope.com/issues/ch000449.htm#ps2
https://www.youtube.com/watch?v=vXsutlz0GIQ
https://www.computerhope.com/shortcut.htm
https://www.techopedia.com/definition/20737/microsoft-office
https://en.wikipedia.org/wiki/Microsoft_Office
https://www.wikihow.com/Install-Microsoft-Office
https://www.wikihow.com/Set-up-a-Router
https://www.wikihow.com/Connect-to-the-Internet
https://www.wikihow.com/Set-up-Ethernet

49 | P a g e
https://www.wikihow.tech/Connect-an-Ethernet-Cable-to-a-Laptop
https://www.digitalunite.com/technology-guides/using-internet/connecting-internet/how-connect-wifi
https://iihelp.iinet.net.au/Connecting_to_a_WiFi_Network
https://www.youtube.com/watch?v=swpliG-ZMmI
https://searchsecurity.techtarget.com/definition/antivirus-software
https://www.techopedia.com/definition/5416/anti-virus-software
https://www.microsoft.com/el-gr/windows/comprehensive-security
https://m.wikihow.com/Download-and-Install-Google-Chrome
https://support.google.com/websearch/answer/134479?hl=en
https://www.computerhope.com/jargon/p/printer.htm
https://www.wikihow.com/Connect-a-Printer-to-Your-Computer
https://www.digitalunite.com/technology-guides/creating-documents/how-use-microsoft-word/how-print-document
https://www.computerhope.com/jargon/o/optiscan.htm
https://www.dummies.com/computers/for-seniors-how-to-install-a-scanner/
https://www.wikihow.com/Scan-Documents
https://www.lifewire.com/what-is-an-external-drive-2625867
https://www.techopedia.com/definition/2940/external-hard-drive
https://www.youtube.com/watch?v=tZqlyyTCcIc
https://www.techopedia.com/definition/5333/webcam
https://money.howstuffworks.com/how-to-connect-webcam-to-computer.htm
https://www.youtube.com/watch?v=dHHOiAdDWrA
https://www.youtube.com/watch?v=ryoKpCgtwQo
https://www.computerhope.com/jargon/s/speaker.htm
https://www.youtube.com/watch?v=V-kE091cizg
https://www.youtube.com/watch?v=WdfIp9OAbEg
https://www.computerhope.com/jargon/h/headphon.htm
https://www.techopedia.com/definition/7551/headphones
https://www.wikihow.com/Connect-a-Headset-to-PC
https://www.techopedia.com/definition/2977/smartphone
https://www.wikihow.tech/Use-an-Android-Phone
https://www.wikihow.com/Use-an-iPhone
https://www.techopedia.com/definition/2353/tablet
https://www.lifewire.com/what-is-a-tablet-4157433
https://www.wikihow.com/Use-an-Android-Tablet
https://www.macworld.co.uk/how-to/ipad/how-use-ipad-3671323/
https://www.pcworld.com/article/2047667/how-to-solve-the-10-most-common-tech-support-problems-yourself.html
https://www.toptenreviews.com/software/articles/5-common-computer-problems-solutions/
http://www.ba-bamail.com/content.aspx?emailid=15244
https://www.hongkiat.com/blog/pc-hardware-problems-solutions/