Device Log Service User Guide - Fujifilm
239
Device Log Service User Guide September 2021 Edition 1 (GM1234E2-2) ©FUJIFILM Business Innovation Corp. All rights reserved.
-
Upload
khangminh22 -
Category
Documents
-
view
0 -
download
0
Transcript of Device Log Service User Guide - Fujifilm

Device Log ServiceUser Guide
September 2021 Edition 1 (GM1234E2-2)©FUJIFILM Business Innovation Corp. All rights reserved.
2
Adobe, Acrobat, Adobe Reader and PostScript are trademarks or registered trademarks of Adobe in the United States and other countries.AirPrint is trademark of Apple Inc., registered in the U.S. and other countries.Firefox is a registered trademark or a trademark of Mozilla Foundation Corporation in the United States and/or other countries. Google Chrome is a trademark or a registered trademark of Google LLC.Microsoft, Windows, Azure, Active Directory, Outlook, Excel, PowerPoint and Internet Explorer are registered trademarks of US Microsoft Corporation in the U.S. and other countries.Oracle and Java are registered trademarks of Oracle Corporation and affiliates in the United States and/or other countries.Other company names or product names are registered trademarks or trademarks of each company.Microsoft product screen shots reprinted with permission from Microsoft Corporation.
FUJIFILM and FUJIFILM logo are registered trademarks or trademarks of FUJIFILM Corporation.Apeos, ApeosWare, DocuWorks, Netprint are registered trademarks or trademarks of FUJIFILM Business Innovation Corp.
[1]This manual may not be edited, modified or copied in whole or part without the written consent of the publisher.
[2]Parts of this manual is subject to change without prior notice.[3]The screen shots and the illustrations in this manual are used as examples. They may differ from yours
depending on the model, the software, or the OS.
3
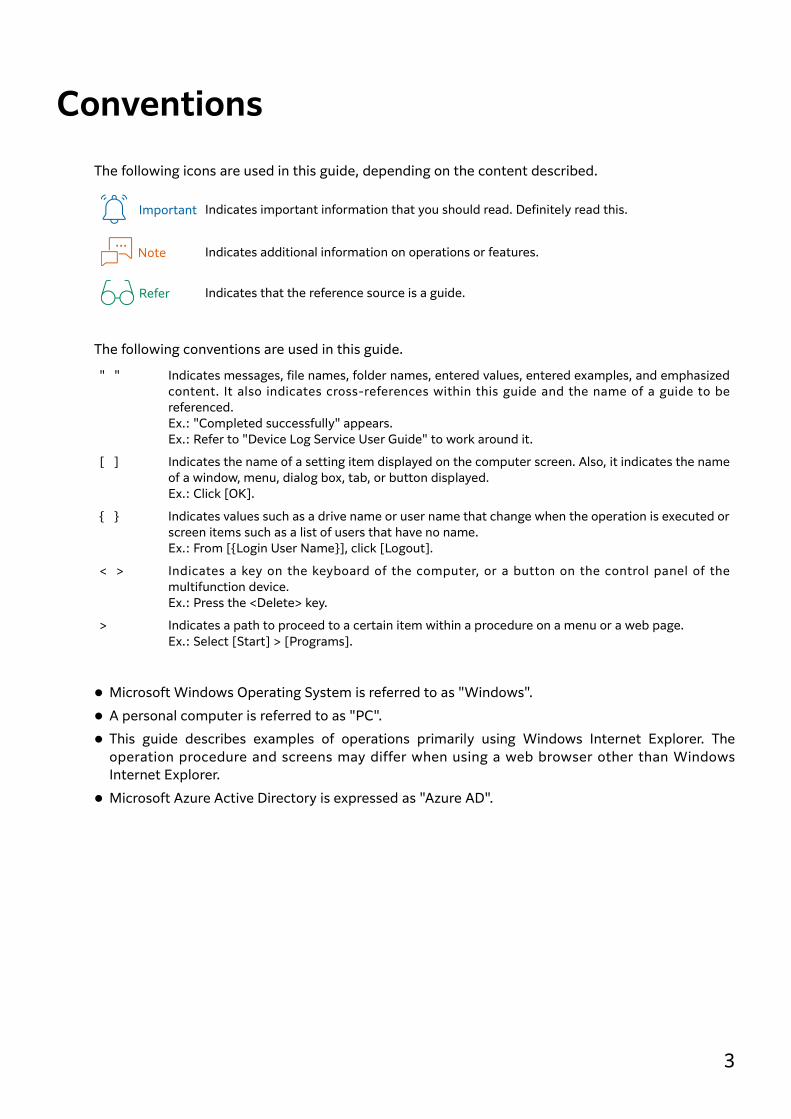
ConventionsThe following icons are used in this guide, depending on the content described.
The following conventions are used in this guide.
Microsoft Windows Operating System is referred to as "Windows". A personal computer is referred to as "PC". This guide describes examples of operations primarily using Windows Internet Explorer. The
operation procedure and screens may differ when using a web browser other than WindowsInternet Explorer.
Microsoft Azure Active Directory is expressed as "Azure AD".
Indicates important information that you should read. Definitely read this.
Indicates additional information on operations or features.
Indicates that the reference source is a guide.
" " Indicates messages, file names, folder names, entered values, entered examples, and emphasizedcontent. It also indicates cross-references within this guide and the name of a guide to bereferenced. Ex.: "Completed successfully" appears.Ex.: Refer to "Device Log Service User Guide" to work around it.
[ ] Indicates the name of a setting item displayed on the computer screen. Also, it indicates the nameof a window, menu, dialog box, tab, or button displayed. Ex.: Click [OK].
{ } Indicates values such as a drive name or user name that change when the operation is executed orscreen items such as a list of users that have no name.Ex.: From [{Login User Name}], click [Logout].
< > Indicates a key on the keyboard of the computer, or a button on the control panel of themultifunction device. Ex.: Press the <Delete> key.
> Indicates a path to proceed to a certain item within a procedure on a menu or a web page. Ex.: Select [Start] > [Programs].
Important
Note
Refer

Device Log Service User Guide
4
11Device Log Service Overview
What You Can Do with Device Log ServiceThis section outlines what you can do with Device Log Service.
Device Log Service is a service that allows you to tally up usage data and job logs notified from devices,depending on your purpose, and view the tallied results (accounting results) via a web browser.
Our companyCustomer
Display accounting results
Device
EP Centre
Notify device usage
Run accounting (tally)

1 Device Log Service Overview
5
Device Usage Can Be TalliedYou can specify conditions such as a period and used functions to tally up usage data that is notifiedfrom devices via a MFD management Service, EP-BB, and display the accounting (tallied) results intable and chart form. The accounting results can be color coded according to color modes or focusedon a certain device or user. The results can be printed via a web browser. The specified condition can be registered as an "accounting pattern" with Device Log Service. Theaccounting pattern can be used to run accounting repeatedly in the same condition.
Refer"Usage Data Accounting" (P.16)
Usage Can Be Tallied Up by Devices, by Users, or by Accounting LabelsUsage data notified from devices contains information about devices and users that run jobs such ascopy and print. Device Log Service uses this information to tally up usage by devices and users. You can also set "accounting labels" on Device Log Service as user information by registering user IDsof who use a device. An "accounting label" which can contain a string can be used as an accountingkey. For example, in order to tally usage by departments, you can set "accounting labels" to names ofdepartments to which users belong.
This sample chart shows the accounting results by individual users, with usage by color modes stacked.
By using accounting labels, you can tally up the usage by departments.
Device Log Service User Guide
6
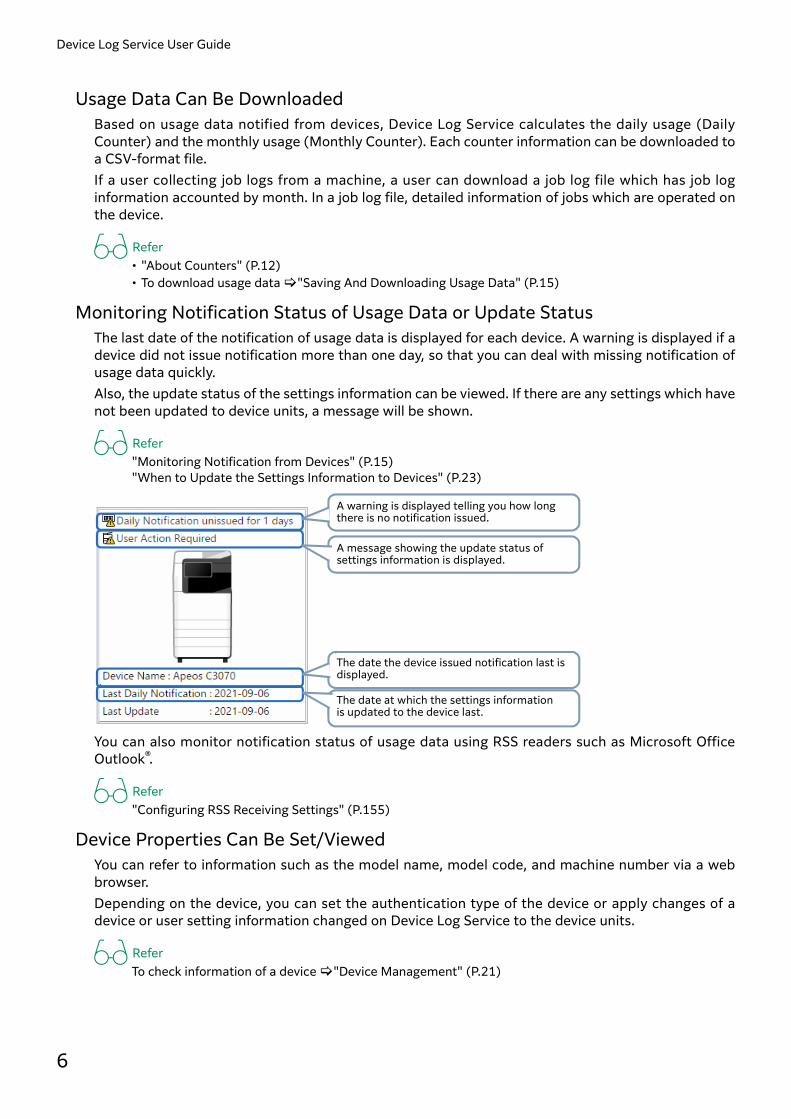
Usage Data Can Be DownloadedBased on usage data notified from devices, Device Log Service calculates the daily usage (DailyCounter) and the monthly usage (Monthly Counter). Each counter information can be downloaded toa CSV-format file. If a user collecting job logs from a machine, a user can download a job log file which has job loginformation accounted by month. In a job log file, detailed information of jobs which are operated onthe device.
Refer• "About Counters" (P.12)• To download usage data "Saving And Downloading Usage Data" (P.15)
Monitoring Notification Status of Usage Data or Update StatusThe last date of the notification of usage data is displayed for each device. A warning is displayed if adevice did not issue notification more than one day, so that you can deal with missing notification ofusage data quickly.Also, the update status of the settings information can be viewed. If there are any settings which havenot been updated to device units, a message will be shown.
Refer"Monitoring Notification from Devices" (P.15)"When to Update the Settings Information to Devices" (P.23)
You can also monitor notification status of usage data using RSS readers such as Microsoft OfficeOutlook®.
Refer"Configuring RSS Receiving Settings" (P.155)
Device Properties Can Be Set/ViewedYou can refer to information such as the model name, model code, and machine number via a webbrowser.Depending on the device, you can set the authentication type of the device or apply changes of adevice or user setting information changed on Device Log Service to the device units.
ReferTo check information of a device "Device Management" (P.21)
A warning is displayed telling you how long there is no notification issued.
The date at which the settings informationis updated to the device last.
A message showing the update status of settings information is displayed.
The date the device issued notification last isdisplayed.
1 Device Log Service Overview
7
Operation And Communication Logs Are RecordedOperation logs of Multifunction Device Log Service, as well as results of communications originatedfrom devices and processing periodically performed, are recorded in the system log. The system logcan be downloaded as necessary.
Refer"System Log" (P.23)
Usage Can Be Checked on DeviceWith "Device Linkage Tool" available as a custom service, you can check the device usage in currentmonth on the operation panel on the device.
Refer"Usage Check on Device" (P.25)
Integrated value of Printer MIB can be accountedBy registering a multifunction device in which the Device Log Service plug-in (XCP) is installed as aparent device and device supporting the Printer MIB as a child device, a multifunction devicemanufactured by another company can be monitored and the value of the counter can be accounted.
Refer"Tallying Device Usage" (P.74)

Device Log Service User Guide
8
System Configuration and Operating EnvironmentThis section describes the system configuration and operating environment required to use DeviceLog Service.
System ConfigurationThe figure below shows the system configuration for Device Log Service.
DevicesDevices use EP-BB, our MFD management service, to notify EP Centre of their usage data.
Important• A multifunction device is required to be connected on a network and to be in the environment that is
accessible to the Internet.• If you filter or monitor the communication with a proxy server or firewall, set to permit the
communication with the EP centre. For details, check our sales representative.• If you use Detailed Notification (P.11) or "Usage Check on Device" (P.25) on the machine, you are also
required to set to permit the communication with a Device Log Service server other than EP centre. Theserver information is as follows: service-fb.fujifilm.com Port 443
Client PCA PC to operate Device Log Service in your environment. Your system administrator for Device LogService uses this PC.
MFD management service EP-BB This service connects your devices to FUJIFILM Business Innovation EP Centre via internet to supportyou to manage the devices by using information notified from the devices.
EP Centre
Customer
User
User
SystemAdministrator
Accounting results
Execute accounting
FUJIFILM BI DirectDevice Log
Service server
Client PC
EP-BB: MFD Management Service
Operational flow
Data flow
Device
Device
Our company
Usage
Usage
Authentication

1 Device Log Service Overview
9
EP CentreThe Centre processes information notified from devices.
Device Log Service serverDevice Log Service runs on this server. It tallies device usage based on data notified to EP Centreaccording to your purpose. The system administrator accesses this server via a web browser.
FUJIFILM BI Direct A membership-based internet service provided by FUJIFILM Business Innovation. The systemadministrator accesses Device Log Service by using his/her account for FUJIFILM BI Direct.
NoteThe account is common to all services provided by FUJIFILM BI Direct.
Operating EnvironmentThis section describes the environment required to use Device Log Service.
*1 Our local representative configures the EP-BB settings on your device.
Item Operating Environment
Device Devices must support Device Log Service and have EP-BB settingsconfigured. *1
NoteSome functions may not be available depending on the device orthe firmware version.
ReferFor more information about supported devices, contact your localrepresentative of our company.
Client PC OS For more information about the operating environment, refer to ourproduct information page for Device Log Service.
Note• JavaScript™ of the web browser must be enabled.• The minimum recommended display resolution for using the web
browser is XGA (1024 x 768).
WebBrowser
RSS Reader
Device Log Service User Guide
10
What is System Administrator?This section describes the system administrator for Device Log Service.
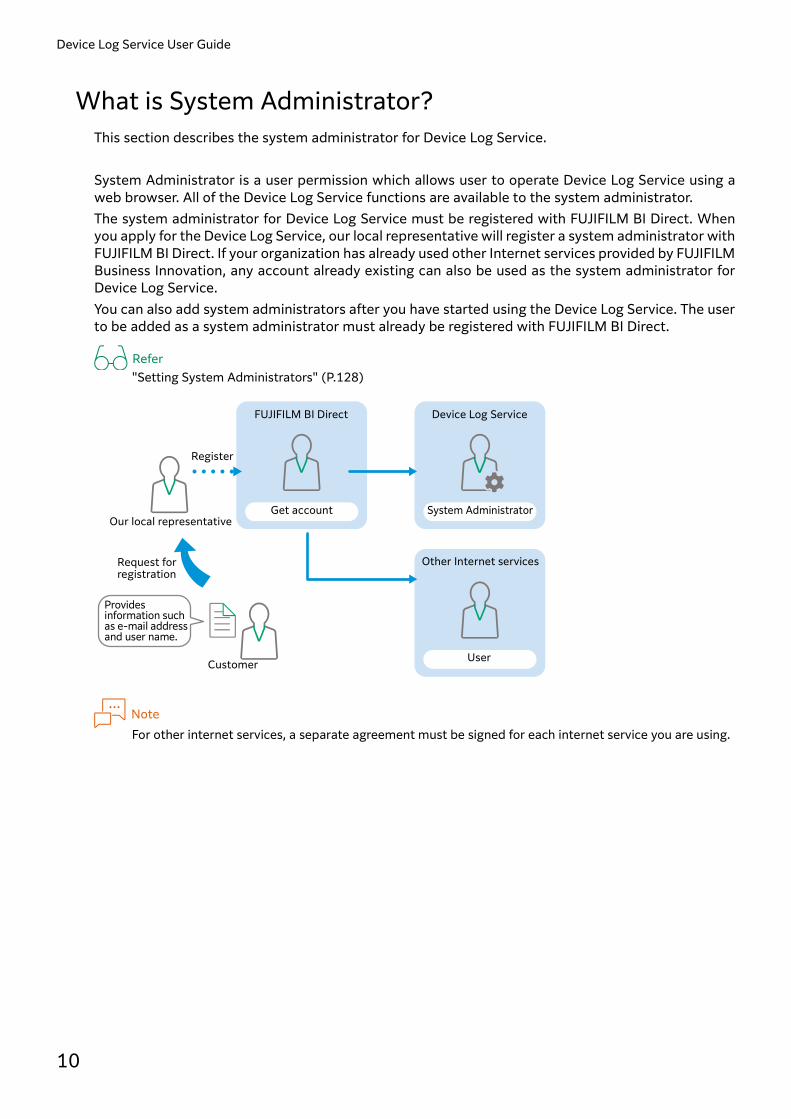
System Administrator is a user permission which allows user to operate Device Log Service using aweb browser. All of the Device Log Service functions are available to the system administrator. The system administrator for Device Log Service must be registered with FUJIFILM BI Direct. Whenyou apply for the Device Log Service, our local representative will register a system administrator withFUJIFILM BI Direct. If your organization has already used other Internet services provided by FUJIFILMBusiness Innovation, any account already existing can also be used as the system administrator forDevice Log Service. You can also add system administrators after you have started using the Device Log Service. The userto be added as a system administrator must already be registered with FUJIFILM BI Direct.
Refer"Setting System Administrators" (P.128)
NoteFor other internet services, a separate agreement must be signed for each internet service you are using.
Provides information such as e-mail address and user name.
Request for registration
Our local representative
Register
FUJIFILM BI Direct Device Log Service
Customer
Get account System Administrator
User
Other Internet services
1 Device Log Service Overview
11
Device Log Service FunctionsThis section describes detailed information on each of the Device Log Service functions.
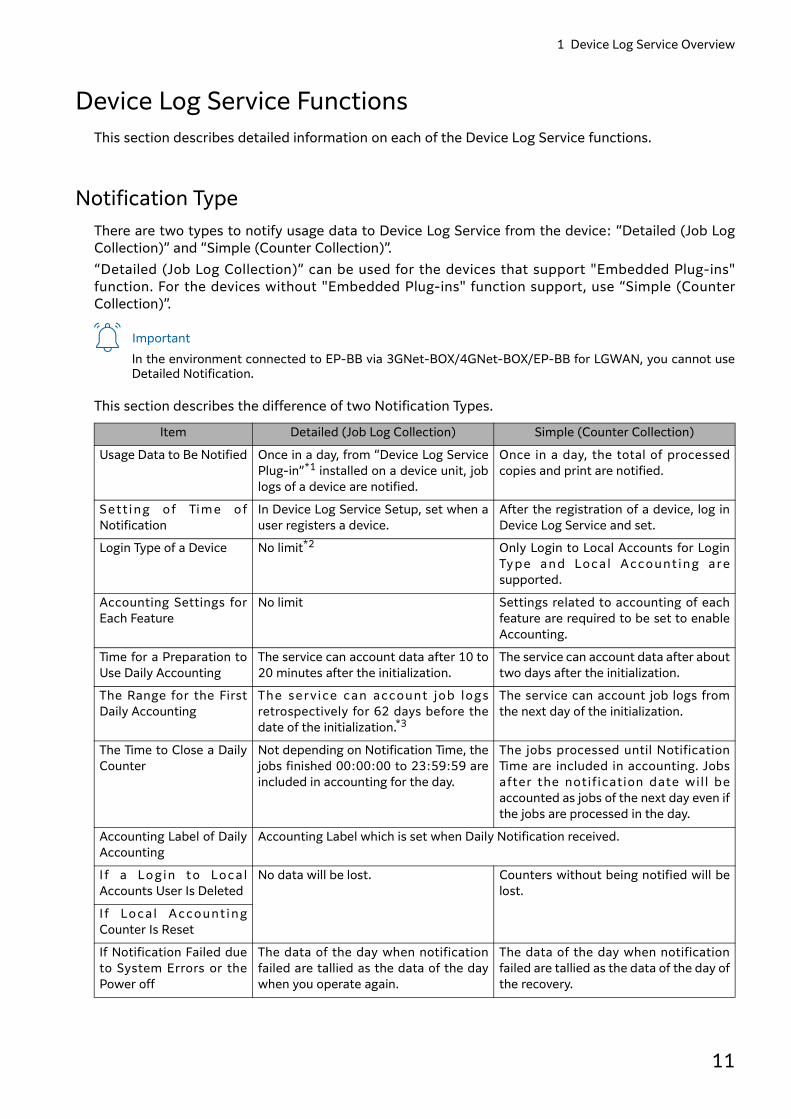
Notification TypeThere are two types to notify usage data to Device Log Service from the device: “Detailed (Job LogCollection)” and “Simple (Counter Collection)”.“Detailed (Job Log Collection)” can be used for the devices that support "Embedded Plug-ins"function. For the devices without "Embedded Plug-ins" function support, use “Simple (CounterCollection)”.
ImportantIn the environment connected to EP-BB via 3GNet-BOX/4GNet-BOX/EP-BB for LGWAN, you cannot useDetailed Notification.
This section describes the difference of two Notification Types.
Item Detailed (Job Log Collection) Simple (Counter Collection)
Usage Data to Be Notified Once in a day, from “Device Log ServicePlug-in”*1 installed on a device unit, joblogs of a device are notified.
Once in a day, the total of processedcopies and print are notified.
Se tt i ng o f Tim e ofNotification
In Device Log Service Setup, set when auser registers a device.
After the registration of a device, log inDevice Log Service and set.
Login Type of a Device No limit*2 Only Login to Local Accounts for LoginTy pe and Loca l Account ing aresupported.
Accounting Settings forEach Feature
No limit Settings related to accounting of eachfeature are required to be set to enableAccounting.
Time for a Preparation toUse Daily Accounting
The service can account data after 10 to20 minutes after the initialization.
The service can account data after abouttwo days after the initialization.
The Range for the FirstDaily Accounting
The service can account job logsretrospectively for 62 days before thedate of the initialization.*3
The service can account job logs fromthe next day of the initialization.
The Time to Close a DailyCounter
Not depending on Notification Time, thejobs finished 00:00:00 to 23:59:59 areincluded in accounting for the day.
The jobs processed until NotificationTime are included in accounting. Jobsafter the notif ication date wil l beaccounted as jobs of the next day even ifthe jobs are processed in the day.
Accounting Label of DailyAccounting
Accounting Label which is set when Daily Notification received.
I f a Login t o Loca lAccounts User Is Deleted
No data will be lost. Counters without being notified will belost.
I f Loca l Account i ngCounter Is Reset
If Notification Failed dueto System Errors or thePower off
The data of the day when notificationfailed are tallied as the data of the daywhen you operate again.
The data of the day when notificationfailed are tallied as the data of the day ofthe recovery.

Device Log Service User Guide
12
*1 This can be installed with "Device Log Service Setup"*2 If you want to account usage data of copies and fax by each user or each accounting label, set to an item
except for “No Login Required”.*3 If job logs stored on a device exceeds the upper limit, the job logs may be deleted even in a target period. For
more information about the upper limit of job logs stored, refer to manuals of your device.
About CountersDevice Log Service generates Counter from device usage data notified from a device. There are severaltypes of counters: Daily Counter
You can check the amount of usage accounted by every user or operation per day. Monthly Counter
A total value in the period from the 1st day of the month to the end of the month. You can check theamount of monthly usage.
For more information about how to generate counters and the period of the accounting for eachNotification Type, refer to "Usage Collection (In the Case of Detailed Notification)" (P.12) or "UsageCollection (In the Case of Simple Notification)" (P.14).
Usage Collection (In the Case of Detailed Notification)This section describes the detail of processing of a collection of Detailed Notification.
Data to Be NotifiedWith Detailed Notification, once in a day on the time set, job logs in a device will be notified. All thejob logs that are not notified yet among all job logs collected on a device will be notified. If a devicepower was turned off of if the error occurred on the network, all job logs will be notified when thesystem is recovered.
The Timi ng Whe nMont hl y C ounte r IsGenerated
If usage data of all the devices are collected, on the second day of the month,Monthly Counter of the month before this month will be generated.If usage data of some of the devices are not collected, the service will be waiting bythe sixth day of the month. By the sixth day, if all the devices are recovered, MonthlyCounter will be generated on the next day of the recovery. If some of the devices arenot recovered, Monthly Counter will be generated on the sixth day.
N-up Accounting Usable not depending of models orsettings
Not usable depending on models orsettings
Usage Check on Device You can select from [Partial Display] and[Full Screen].
You can select [Full Screen].
Updat ing Se tt ingsInformation to DevicesImmediately
Usable despite of the settings on adevice
Usable when the SSL / TL Scommunicat ion i s e nabl ed. T hecertificate of a device is required to beimported on a PC.
Item Detailed (Job Log Collection) Simple (Counter Collection)

1 Device Log Service Overview
13
Data to be notified with Detailed Notification is following.
If Notification Failed for a Certain PeriodDue to the Power off of a device or network errors, if notification failed for a certain period, some ofthe job logs are not going to be accounted. The situations that disable accounting and the data to belost are following. You can check the condition of notification on Device Log Service or Internet Services.
Generation of a Counter in Detailed NotificationIn "Detailed Notification", the service generates each counter by information recorded on job logs.
Daily CounterAt the same time as notification of the day, generating Daily Counter will be started. After a fewminutes, an accounting can be operated with Daily Counter.The storage period of the daily counter is two months.
Monthly CounterWhen job logs from all devices are notified after a month changed to a next month, Monthly Counterof the month before this month will be generated. If job logs from all the devices cannot be received,Monthly Counter will be generated when the date turned into the sixth day of a month.The storage period of the monthly counter is three years.
Item Description
Job Log Detailed usage data such as impressions the number of pages, and executeddate and time. Privacy information indicates User ID, Account ID, DocumentName, Destination Information of Fax, Address on Addressbook, networkaddresses of a host and destination, and E-mail addresses.
NoteWhether privacy information other than user IDs and account IDs will benotified or not can be switched. Other than the memory of a job log file,the document name is also used for accounting by Document Type.
ReferFor detail "Formats of Job Log Files" (P.196)
Configuration Information ofa Device
Hardware configuration of a device and data of software settings.
Usage Data for Every Feature Data of impressions accounted by job logs
Condition Lost Data
If a Period When No Notification IssuedContinued for 5 days to 61 days
After 5 days passed, the service confirms accounting data per a dayand month to download. No data without notification included inthis accounting data.
Refer"Downloading Device Usage Data" (P.89)
If a Period When No Notification IssuedContinued for 62 days and Over
The data for 62 days before the recovered day will be deleted.In this case, daily notification will stop automatically.
If Not-notified Job Logs Are Over theUpper Limit to Store on a Device
Job logs will be deleted from the oldest ones.

Device Log Service User Guide
14
Usage Collection (In the Case of Simple Notification)Generation of a Counter in Simple Notification
Usage data notified from devices provides the integrated counter values, for example the number ofimpressions copied or printed by users. Device Log Service generates each counter from the numbersnotified.
Daily CounterAccounting target devices for Daily Counter notify of their integrated copy or print counts once a day,at a time of day specified by the system administrator. The notification time can be set on the [DeviceManagement] page of Device Log Service, on a device basis. When the integration values are notified, Device Log Service generates Daily Counter by calculatingthe difference from integration values as of the previous day. When the power of a device is turned off at the notification time, the device will notify the next timeit is turned on of integration values as of that time. If a device fails to perform notification for somereason, such as a network failure, it will automatically continue to attempt to notify. In case a few dayshave elapsed before the power is turned on or an attempt to renotify has failed, usage on these dayswill be added to daily counter the next time the device successfully performs notification. For those days in which a device could not notify of usage, daily counter related to the device for allusers is set to 0. The storage period of the daily counter is two months.
Note• Integration values are notified even if the device is in Low Power or Sleep mode at the notification time. • Daily counter is generated based on the difference from the integration values previously notified.
Therefore, Device Log Service starts recording on the next day of the day of first notification afteraccounting has been started.
Monthly CounterMonthly Counter is generated by adding daily counter values of a month from the first day of themonth to the end of the month.At the beginning of the next month, after all of the accounting target devices notify of daily integrationvalues for the previous month, a monthly counter for the previous month is generated. If one or moredevices failed to notify of their integration values due to power disconnection or network failure, amonthly counter for the previous month will be generated on the 6th of the month.
50
100
150
200
50
100
200
50
0
100
Day 1st
Day 2nd
Day 3rd
Day 4th
Device Device Log ServiceIntegration value Daily counter
Notification failed
—
—
Integration value
1 Device Log Service Overview
15
The storage period of the monthly counter is three years.
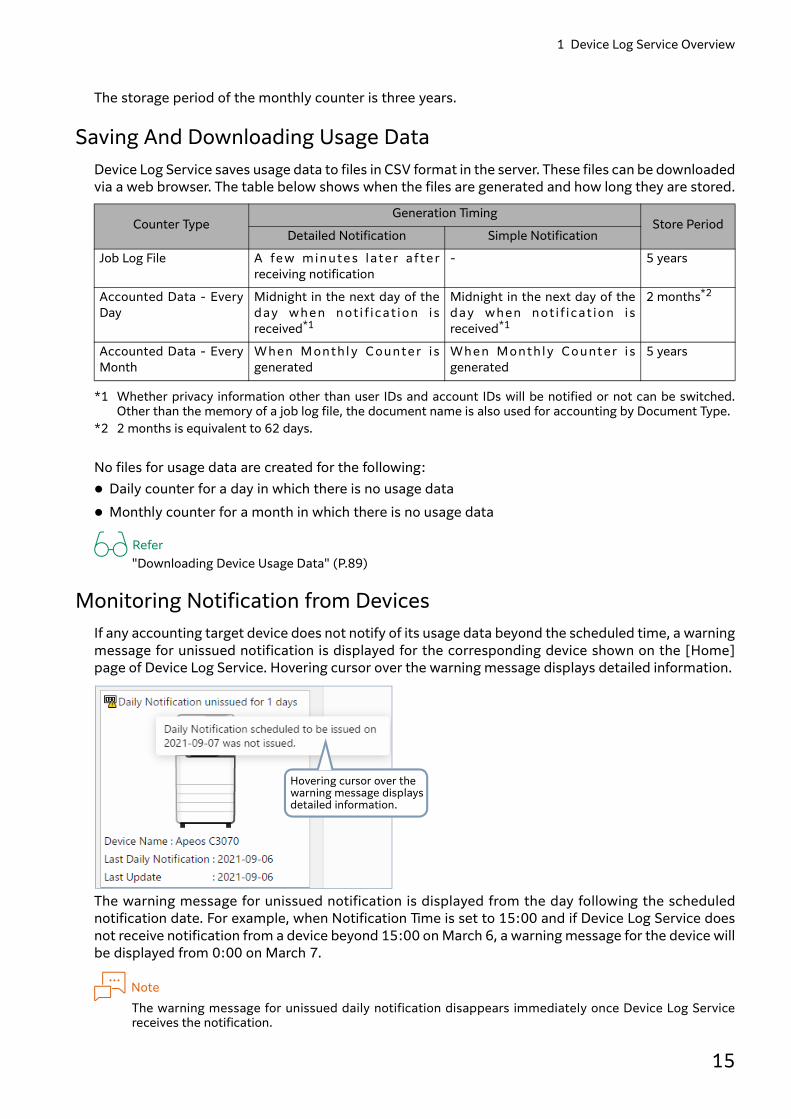
Saving And Downloading Usage DataDevice Log Service saves usage data to files in CSV format in the server. These files can be downloadedvia a web browser. The table below shows when the files are generated and how long they are stored.
*1 Whether privacy information other than user IDs and account IDs will be notified or not can be switched.Other than the memory of a job log file, the document name is also used for accounting by Document Type.
*2 2 months is equivalent to 62 days.
No files for usage data are created for the following: Daily counter for a day in which there is no usage data Monthly counter for a month in which there is no usage data
Refer"Downloading Device Usage Data" (P.89)
Monitoring Notification from DevicesIf any accounting target device does not notify of its usage data beyond the scheduled time, a warningmessage for unissued notification is displayed for the corresponding device shown on the [Home]page of Device Log Service. Hovering cursor over the warning message displays detailed information.
The warning message for unissued notification is displayed from the day following the schedulednotification date. For example, when Notification Time is set to 15:00 and if Device Log Service doesnot receive notification from a device beyond 15:00 on March 6, a warning message for the device willbe displayed from 0:00 on March 7.
NoteThe warning message for unissued daily notification disappears immediately once Device Log Servicereceives the notification.
Counter TypeGeneration Timing
Store PeriodDetailed Notification Simple Notification
Job Log File A few minute s late r af te rreceiving notification
- 5 years
Accounted Data - EveryDay
Midnight in the next day of theday whe n not i f icat ion i sreceived*1
Midnight in the next day of theday when not i f icat ion i sreceived*1
2 months*2
Accounted Data - EveryMonth
When M onthl y C ounte r i sgenerated
Whe n Month l y Count er i sgenerated
5 years
Hovering cursor over the warning message displays detailed information.

Device Log Service User Guide
16
ReferFor how to troubleshoot usage collection problem "Unable to Collect Job Log from Devices" (P.187),"Unable to Collect Counter from Device" (P.188)
Usage Data AccountingDevice Log Service tallies up usage data notified from devices on a web browser. This sectiondescribes the accounting functions provided by Device Log Service.
ImportantFigures on a billing statement that are based on the device's billing meter counts do not necessarily matchthe accounting results for that device derived from Device Log Service. However, if the difference betweenfigures on a billing statement and the accounting results is distinct, there may be problem in the settingsor device conditions. In this case, refer to "Device Billing Meter Does Not Match Device Log ServiceAccounting Results" (P.189) for more information.
Usage Data AccountingThe [Home] page, the first screen you will see after logging in Device Log Service, shows you transitionof usage of the device features, such as Copy, Print, and Fax Print, and the top 10 usage in chart form.You can switch between views by simply selecting one of preset accounting methods such as by users,by devices, and by accounting labels. Usage displayed in [This Month's Usage] indicates the accounting results based on daily counters inthe period from the 1st day of the month, to the previous day of your login. Usage is automaticallytallied and updated once every day at night.
NoteAfter the first five days of the month, this view displays the accounting results for the period form the 1stday of the month to that day. For the period until the 5th day of the month, this view displays theaccounting results based on daily counters for the previous one month.
ReferAccounting methods available "This Month’s Usage" (P.73)
Accounting Based on Criteria
This Month's Usage

1 Device Log Service Overview
17
On the [Usage Data Accounting] page, you can tally device usage data according to your purpose, byusing an Accounting Pattern registered with Device Log Service or setting Accounting Criteriaincluding Accounting Targets, Displayed Items such as copy or print count, and Drawing Method. Onceyou have set criteria for accounting, you can register it as an Accounting Pattern with Device LogService for later use.
A summary of the available accounting criteria is shown below.
Display TypeSelect from among Table, Column Chart, Bar Chart, Pie Chart, Line Chart, and Area Chart.
Accounting Period
Target
Displayed ItemsSelect items from among color modes and functions (copy/print/fax/scan) used to specify them asaccounting targets. A combination of multiple items can be selected.
Drawing MethodSpecify a Key item to use in accounting and a layout method. For more information on available accounting criteria, refer to "Setting the Accounting Method"(P.74).
Criteria Description
Daily Accounting Specify an accounting period to tally daily usage data in the specified period.
Monthly Accounting Tallies up daily usage data in the entire specified month to generate MonthlyCounter. Usage in the specified month can be obtained.
Device Running Time Accounting Account the device running time from the start and end times of a job.
Criteria Description
Accounting Label Select accounting labels to be included in accounting results.
NoteFor example, when an accounting label indicating departments towhich users belong to is set, you can tally usage per department.
User Select users to be included in accounting results.
Refer"Accounting Target Users" (P.18)
Device Select devices to be included in accounting results.
Example 1:Accounting results per user in the bar chart
Example 2:Accounting results per department in the pie chart

Device Log Service User Guide
18
Accounting Target UsersThe table below lists user types you can select as accounting target, and how they are handled inaccounting.
*1 When a user name is set, the user name is displayed instead in accounting results.*2 Accounting labels that are being set at the time of receipt of usage are used in tally. If you change an
accounting label after starting tally, the usage received before the change will be tallied based on the previousaccounting labels.
*3 If a type of notification is set to [Detailed (Job Log Collection)], System Administrator will be treated as aregistered user.
*4 If no accounting label is set under [Accounting Settings] in the device properties, the device usage is talliedas "Accounting Label Not Set".
Refer• For details on Registered and Unregistered Users "User Management" (P.19)• For details on Print Report, Receive Fax, Fax Relay Broadcast, and Receive Internet Fax Manuals for the
device
Accounting of usage data of Printer MIBIt is possible to register a device for detail notification as a parent device and another company'sdevice supporting the Printer MIB as a child device and account the usage data.
Refer"Set Printer MIB accounting method" (P.95)
User Type DescriptionHandling in Accounting
Accounting Per User Accounting Per Accounting Label
Registered Users Tallies operations of users whose userID being registered is identical on bothdevices and Device Log Service.
User ID*1 Accounting Label setin user information*2
Registered Users(Accounting LabelNot Set)
Accounting Label NotSet
Unregistered Users Tallies operations of users whose userID is registered on devices but not onDevice Log Service.
User ID that was usedfor authentication ondevice
Unregistered Users
System Administrator*3
Tallies operations of the device'ssystem administrator.
System Administrator Accounting Label set under [Accounting Settings] in the device properties*2*4Print Report Tallies counts of automatic printing of
various reports. Print Report
Receive Fax Tallies counts of Fax Receive Print. Receive Fax
Fax Relay Broadcast Tallies counts of Fax Relay BroadcastReceive Print.
Fax Relay Broadcast
Receive Internet Fax Tallies counts of Internet Fax ReceivePrint.
Receive Internet Fax
1 Device Log Service Overview
19
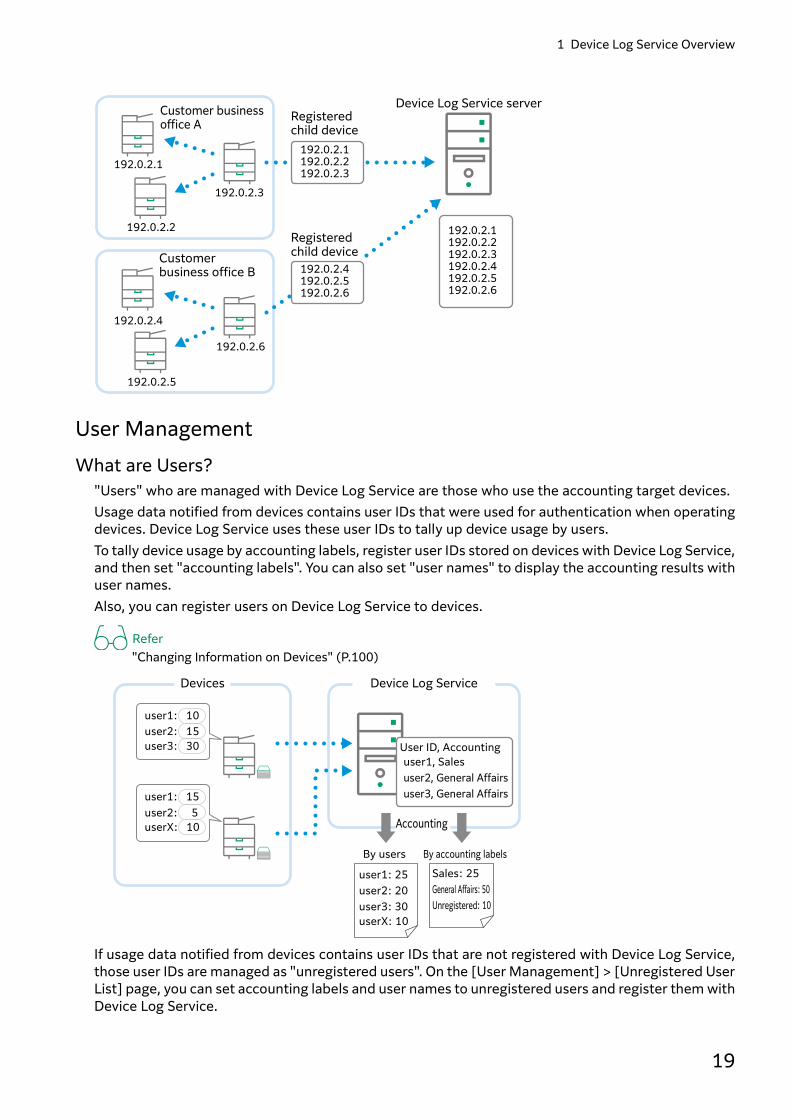
User ManagementWhat are Users?
"Users" who are managed with Device Log Service are those who use the accounting target devices. Usage data notified from devices contains user IDs that were used for authentication when operatingdevices. Device Log Service uses these user IDs to tally up device usage by users. To tally device usage by accounting labels, register user IDs stored on devices with Device Log Service,and then set "accounting labels". You can also set "user names" to display the accounting results withuser names. Also, you can register users on Device Log Service to devices.
Refer"Changing Information on Devices" (P.100)
If usage data notified from devices contains user IDs that are not registered with Device Log Service,those user IDs are managed as "unregistered users". On the [User Management] > [Unregistered UserList] page, you can set accounting labels and user names to unregistered users and register them withDevice Log Service.
Customer business office A Registered
child device
Device Log Service server
Customer business office B
Registered child device
192.0.2.1192.0.2.2192.0.2.3
192.0.2.4192.0.2.5192.0.2.6
192.0.2.1192.0.2.2192.0.2.3192.0.2.4192.0.2.5192.0.2.6
192.0.2.2
192.0.2.3
192.0.2.1
192.0.2.5
192.0.2.4
192.0.2.6
user1: 10user2: 15user3: 30
user1: 15user2: 5userX: 10
User ID, Accounting
Devices Device Log Service
user1, Salesuser2, General Affairsuser3, General Affairs
user1: 25user2: 20user3: 30userX: 10
Sales: 25General Affairs: 50Unregistered: 10
By users By accounting labels
Accounting

Device Log Service User Guide
20
Refer"Adding Users from a List of Unregistered Users" (P.120)
Sync of LDAP user informationRetrieve the user data from the existing LDAP server and upload them to the Device Log Serviceserver. By this, if there is a change in the user information of LDAP, the change can be reflected to theDevice Log Service automatically. If a device is operated in remote authentication, the systemadministrator can avoid the trouble of having to input user data.
Refer"Set LDAP server synchronization" (P.171)
Azure ID LinkageIf the user of a multifunction device is managed with the Azure tenant of Microsoft, the userinformation has been registered in Azure AD.If accounting per department is executed with Device Log Service, the user information of theaccounting must registered to Device Log Service beforehand.The user information of Device Log Service can be registered also on the Device Log Service side. If the[Azure ID Linkage] feature is used, the user information of Azure AD can be imported as the userinformation of Device Log Service. If the user information of Azure AD is updated, also the userinformation of Device Log Service is updated automatically.If the [Azure ID Linkage] feature is used, the user management is unified, so advantages as shown inthe following are obtained. No notification of information sharing is required between the administrator of Azure AD and the
system administrator of Device Log Service. The user ID is used commonly in Azure AD and Device Log Service, so no difference is caused in the
information.
Refer[Device Log Service User Guide Azure Active Directory Connection Settings]
Customer business office
u001 Accounting Divisionu002 Sales Divisionu003 Information System
Outside authentication
User information acquisition
User information Device Log Service

1 Device Log Service Overview
21
Downloading User InformationUser information can be downloaded by using either of the following methods:
Refer• To download CSV "Downloading User Information" (P.117)• To download backup data "Downloading Backup Data of User Information" (P.138)
Device ManagementViewing and Setting of Device Properties
Device Log Service allows you to view properties of a managed device using a web browser.Accounting settings for the device or authentication settings can also be changed.Properties you can change or view include: Display/Comm. Settings Accounting Settings Authentication Settings Device Update Settings Configuration Information
NoteProperties for authentication settings is not available depending on the device.
ReferTo update the changed settings information to the device "When to Update the Settings Information toDevices" (P.23)
Operation Description
[User Management] page >[CSV Download]
Download registered user information.The downloaded information can be used as template for CSV format files withwhich to register in a batch user information with Device Log Service.
[System Sett ings] page >[Download Backup Data]
If you modify user information registered with Device Log Service, acompressed file for user information will be created at night on the day. Then,download this compressed file. 10 modifications are saved as compressed file. The backup file can be used to restore user information you modified bymistake, and check previous user information.
Customer business office
[email protected] [email protected] [email protected] General Affairs
Outside authentication
User information is retrieved
Our company
Device Log ServiceUsage(job log)
Cloud operation service of Microsoft
Azure AD
Multifunction device Authentication [email protected] Sales
[email protected] [email protected] General Affairs
Device Log Service User Guide
22
Display/Comm. SettingsInformation required to distinguish or access the device on Device Log Service, such as displayedname, Setting Group, host name, or IP address of the device. In [Device Name], [Host Name / IP Address] and [HTTP Port Number], values set on the device unitare displayed. Any changes to these settings on the device unit will be notified to Device Log Serviceand updated automatically. However, if you change these settings on your web browser, it causes a mismatch between settings onDevice Log Service and on the device. And, the device's URL is also displayed as long as the host name or IP address of the device as well asthe port number of the internet service are displayed. Clicking the device's URL opens InternetServices.
Accounting SettingsYou can set, for example, accounting labels for accounting the users other than authenticated userssuch as not authenticated users or System Administrator. And also you can refer to the last DailyNotification.If a notification type of a device is Simple Notification, set whether to include the selected device inthe group of accounting target devices for Daily Counter, and also set every day's Notification Time. Ifyou change these settings, the settings will be applied to the selected device, and then you can receivenotification of usage data according to the settings.
Authentication SettingsYou can select either on Device Log Service, or control panel on the device and other software toconfigure authentication settings of devices or register users. Also, you can configure the settings toprompt passwords or permit printing without specifying a user.
Note• If you set to operate authentication settings and user registration on Device Log Service, a device’s Login
Type will be changed to “Login to Local Accounts”, Accounting Type will be changed to "LocalAuthentication".
Device Update SettingsThe update status of the settings information of a device or a user configured on Device Log Servicecan be viewed. Depending on your device, the period of time in which the settings information isautomatically updated to the device can be specified.
Configuration InformationModel name, model code, and machine number (serial number), the version of the system, availabilityof N-Up accounting, availability of settings information update, and usage Notification type can beviewed.
Note• This manual includes restricted functions depending on the device. Refer to the configuration information
to see your devices support the functions.• If updating settings information is available, the authentication settings of devices or settings information
of users changed on Device Log Service can be updated to devices.

1 Device Log Service Overview
23
When to Update the Settings Information to DevicesChanges you make to accounting settings for a device on the web page of Device Log Service (whetherto enable accounting of Daily Counter and the daily notification time), authentication settings andsettings information of users are first saved in Device Log Service. The changes you save will beupdated to the device unit on a periodical polling basis. The information changed on a web page can be immediately updated to devices by clicking [UpdateSettings to Device] on [Device Management] page when the following conditions are satisfied:
NoteWith update on a periodical polling basis, the changes could be updated to the device on or after thefollowing day of the changes. To check whether the changes have been updated to the device unit, click [Update Log] on [Device UpdateSettings], or download Centre Processing Log to check for confirmation.
Refer• To set the [Display/Comm. Settings] properties "Managing Devices" (P.98)• To check device settings Manuals for the device• For details on Centre Processing Log "System Log" (P.23)• To immediately update the changed settings information to the devices " Updating Settings
Information to Devices Immediately" (P.106)
System LogDevice Log Service records two types of logs as the system log.
Condition 1 Condition 2
SSL certificate is installed on the device unit.
Refer"An Error Appears When Attempting to Set Device Properties"(P.182)
Necessary for Simple Notification
[HTTP SSL/TLS Communication] in the [Display/Comm. Settings]properties is set to "Enabled"
Necessary for Simple Notification
Both [Host Name / IP Address] and [HTTP Port Number] in the [Display/Comm. Settings] properties match the values set on the device unit.
Ne ce ssa ry for both S imp leNotification and Detailed Notification
Type Recorded Events
Operation Log Operation logs of Device Log Service, operation logs of Device Log Service Setup
Device Log Service server
Customer
Change settings information
EP CentreImmediate update
Immediate update Update on a periodical polling basis
Customer
Updated device
EP Centre
Device Log Service serverIf immediate update
is disabled, update is made at the next periodical polling.
Update changes soon after retrieving

Device Log Service User Guide
24
The system log is recorded on a daily basis, and stored on the server for three years. The system logcan be downloaded to check operation logs of Device Log Service and details of communicationbetween Device Log Service and devices. For two months since the first generation of the system log, it can be downloaded on a daily basis.After the two months, a compressed file is created, which includes Operation Log and CentreProcessing Log for a month. These compressed files can be downloaded on a monthly basis. Anycompressed files are saved for three years, and then automatically deleted.
ReferTo download the system log "Downloading the System Log" (P.136)
Center Processing Log Details of communication between Device Log Service and devices, results ofprocessing periodically performed, causes of errors experienced, etc.
Type Recorded Events

1 Device Log Service Overview
25
Usage Check on DeviceIf you set up Multifunction Device Linkage Tool to the device, you can check the device usage in currentmonth on the operation panel on the device.
ImportantIn the environment that connects EP-BB with 3GNet-BOX/4GNet-BOX/EP-BB for LGWAN, you cannot usethe usage check feature.
Multifunction Device Linkage Tool will be installed when the device is set [Panel Display of AccountingResults] to [Partial Display] or [Full Screen] with Device Log Service Setup.The following is an example when you set [Panel Display of Accounting Results] to [Full Screen].
The following is an example when you set [Panel Display of Accounting Results] to [Partial Display].
Item Description
(1) Accounting Targets Displays device usages and accounting targets.The accounting period is from the beginning of the month including the day onwhich you displayed This Month's Usage (hereinafter called the operationday) to the day before the operation day. However, the operation day is one ofthe first five days of the month, the usage during the previous one month isdisplayed.
(2) Message Displays the message registered in [Multifunction Device Linkage ToolSettings].
Refer"Specifying the Message and the Pie Chart Displayed on the Device"(P.144)
(2)(3)
(4)
(1)
(4)
(3)
(2)
(5)
(1)

Device Log Service User Guide
26
(3) User Ranking and AverageOutput Impression
Displays user ranking of the output impressions and group/overall averageoutput impressions.
(4) Output Impressions incurrent month
Displays the usage ratio set in [Multifunction Device Linkage Tool Settings].
(5) Services Buttons Displays the services buttons set at the service installation. To start a service,press the corresponding service button.
Item Description

2 Getting Started
27
22Getting Started
Flow of Usage This section shows the flow before using Device Log Service.
Application for Using the ServiceIn order to user Device Log Service, you need to apply for using the service.Provide information with regards to user to be registered as System Administrator and manageddevices to our local representative.When System Administrator is registered, you will receive an e-mail to notify you a start of usingDevice Log Service.
NoteIt takes about one week from the application for using to notification of the start of using the service.
Flow of Settings
PC Operation
Set System Administrator’s Password (P.30)
Preparation (P.29)
Register a Device to Device Log Service (P.37)
Do your requirements match at least one followingsentence?• You prefer “Detailed” notification for Notification
Type (P.11).• You want to check a result of accounting on the
control panel of a device.
Yes, my requirements match one sentence or both of sentences.
No
Environment Settings (P.34)
Device Operation
Depending on Notification Type or Login Type of a device, prepare required information.
(Next Page)
Device Log Service User Guide
28
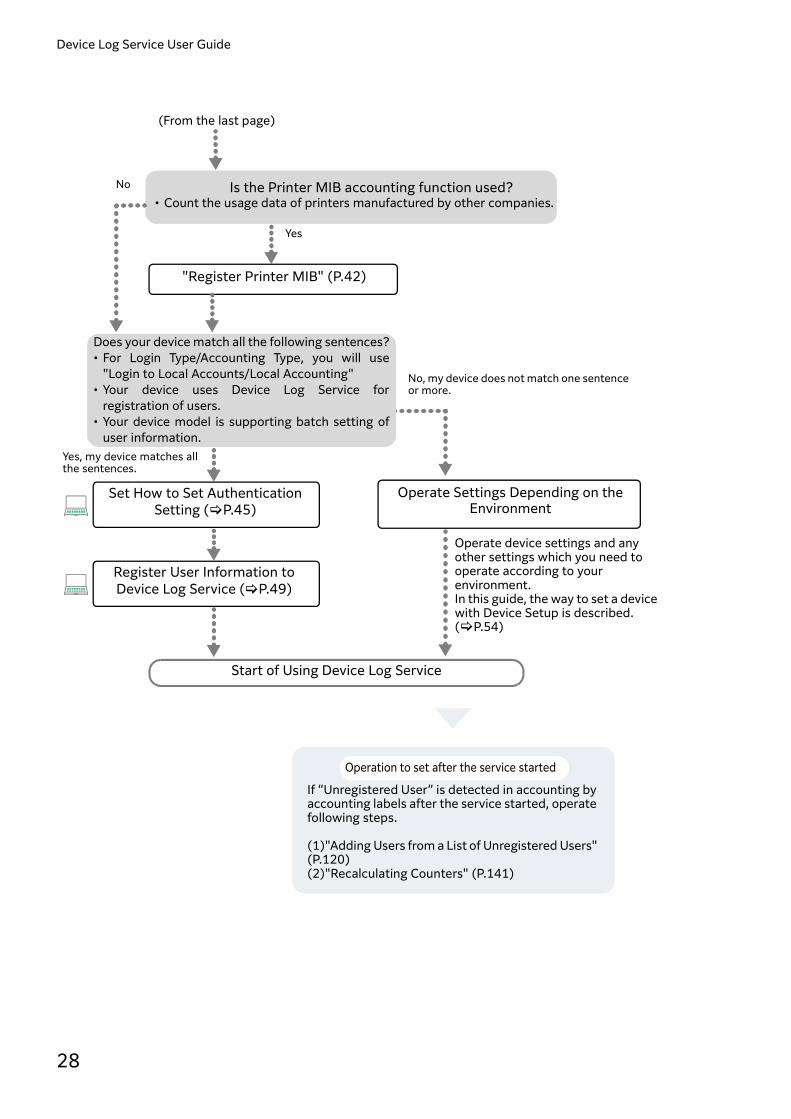
Start of Using Device Log Service
Does your device match all the following sentences?• For Login Type/Accounting Type, you will use
"Login to Local Accounts/Local Accounting"• Your device uses Device Log Service for
registration of users.• Your device model is supporting batch setting of
user information.Yes, my device matches allthe sentences.
No, my device does not match one sentence or more.
Set How to Set Authentication Setting (P.45)
Register User Information to Device Log Service (P.49)
Operate Settings Depending on the Environment
(From the last page)
Operate device settings and any other settings which you need to operate according to your environment.In this guide, the way to set a device with Device Setup is described. (P.54)
Operation to set after the service started
If “Unregistered User” is detected in accounting by accounting labels after the service started, operate following steps.
(1)"Adding Users from a List of Unregistered Users" (P.120)(2)"Recalculating Counters" (P.141)
Is the Printer MIB accounting function used?• Count the usage data of printers manufactured by other companies.
Yes
No
"Register Printer MIB" (P.42)

2 Getting Started
29
PreparationThis section describes preparation before you start operation of Device Log Service.
Preparing Settings of DevicesCheck System Administrator IDs and Passwords of all the devices to be accounted.And also, depending on the features you will use, prepare information to be required for theinitialization such as the notification time of usage data and the time to apply the settings.Depending on models you use, usable features differ, so that we recommend to check the followinglist in advance.1. Whether the Embedded Plug-ins are supported by a device
You can use [Detailed (Job Log Collection)] for Notification Type with supported devices.2. Whether a custom service is supported by a device
You can use the [Panel Display of Accounting Results] feature with supported devices.3. Whether a batch registration of user information is supported by a device model
You can register user information on Device Log Service by a device which supports a batch settingof user information.
NoteIf you set to operate authentication settings and user registration on Device Log Service, a device’s LoginType will be changed to “Login to Local Accounts”, Accounting Type will be changed to "LocalAuthentication".
1 and 3 can be checked on "Operating Environment" on the service information page("SystemConfiguration and Operating Environment" (P.8)).
Preparing User InformationPrepare user information to be registered in Device Log Service If you register user information with Device Log Service If you need an accounting by every accounting labels, or if you need User Name to be displayed on
a accounting result
According to features you use, prepare following information. User IDs and User Name Information to be set as accounting labels (such as department names) Initial password, information regarding restriction of device use (user permission) on a user basis,
E-mail address of a user, and IntelligentCard information and others as necessary.
Device Log Service User Guide
30
Access Device Log ServiceThis section describes how to set the initial password of System Administrator and login Device LogService.
Setting Initial Password of System AdministratorAs you are notified the start of using Device Log Service, set the initial password of SystemAdministrator at first.
Note• Setting of the initial password is not required if you use an existing account already registered with
FUJIFILM BI Direct in Device Log Service. • Set an initial password as the same way as the way to set a password forgot.
1.Access the URL indicated in the e-mail message via a web browser. The URL of Device Log Service and FUJIFILM BI Direct is listed. Whichever you access, the initialpassword can be set. The URL of the Device Log Service is as shown in the following.https://service-fb.fujifilm.com/device-log/login
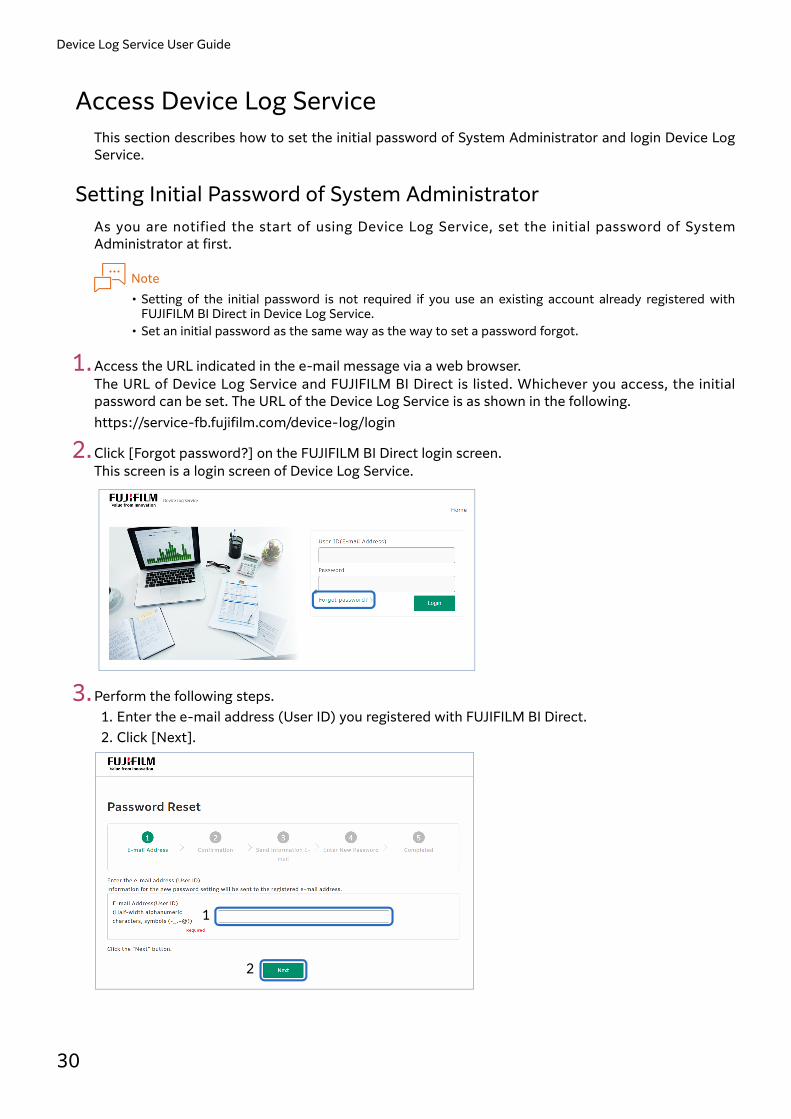
2.Click [Forgot password?] on the FUJIFILM BI Direct login screen.This screen is a login screen of Device Log Service.
3.Perform the following steps.1. Enter the e-mail address (User ID) you registered with FUJIFILM BI Direct.2. Click [Next].
1
2
2 Getting Started
31
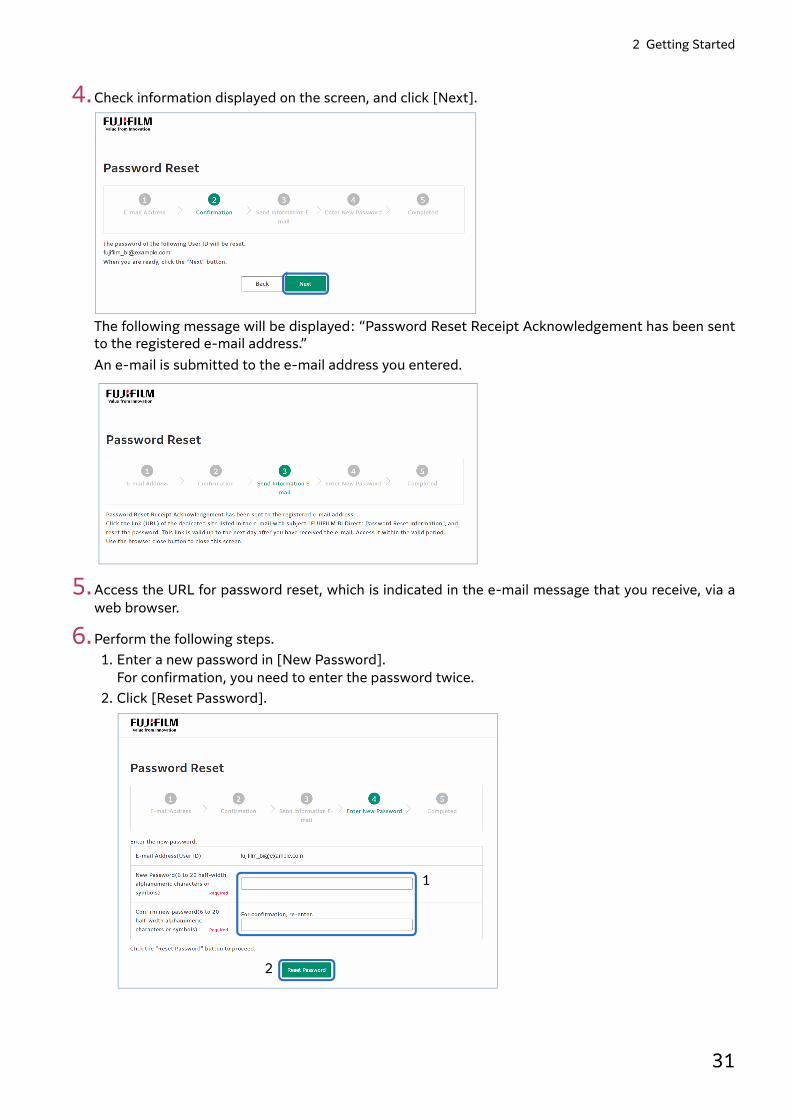
4.Check information displayed on the screen, and click [Next].
The following message will be displayed: “Password Reset Receipt Acknowledgement has been sentto the registered e-mail address.”An e-mail is submitted to the e-mail address you entered.
5.Access the URL for password reset, which is indicated in the e-mail message that you receive, via aweb browser.
6.Perform the following steps.1. Enter a new password in [New Password].
For confirmation, you need to enter the password twice. 2. Click [Reset Password].
1
2
Device Log Service User Guide
32
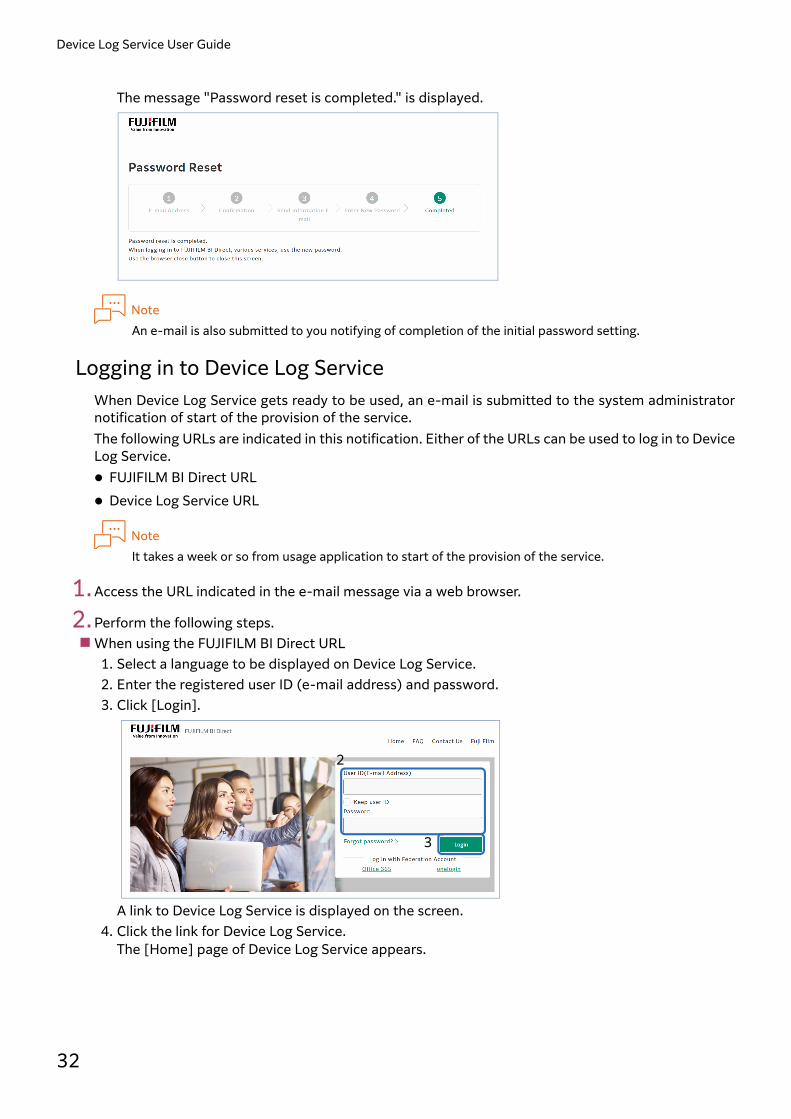
The message "Password reset is completed." is displayed.
NoteAn e-mail is also submitted to you notifying of completion of the initial password setting.
Logging in to Device Log ServiceWhen Device Log Service gets ready to be used, an e-mail is submitted to the system administratornotification of start of the provision of the service. The following URLs are indicated in this notification. Either of the URLs can be used to log in to DeviceLog Service. FUJIFILM BI Direct URL Device Log Service URL
NoteIt takes a week or so from usage application to start of the provision of the service.
1.Access the URL indicated in the e-mail message via a web browser.
2.Perform the following steps.When using the FUJIFILM BI Direct URL
1. Select a language to be displayed on Device Log Service.2. Enter the registered user ID (e-mail address) and password. 3. Click [Login].
A link to Device Log Service is displayed on the screen.
4. Click the link for Device Log Service. The [Home] page of Device Log Service appears.
2
3

2 Getting Started
33
When using the Device Log Service URL1. Select the display language of Device Log Service. 2. Enter the registered user ID (e-mail address) and password. 3. Click [Login].
The web page of Device Log Service will be displayed.
2
3
Device Log Service User Guide
34
Environment Settings for a Device UnitThis section describes environmental settings for a device needed to use [Detailed (Job LogCollection)] or [Panel Display of Accounting Results].
Required SettingsIf you use [Detailed (Job Log Collection)] or [Panel Display of Accounting Results], your device isrequired to be set as a following list.
NoteThough the items listed on "Device Settings That Are Not Always Necessary to Be Changed" (P.194) arenecessary to be set correctly, usually you do not need to set.
Item and Reference Required Setting
Proxy Server Settings (P.36) Set this item if you access the Internet using a proxy server.If you register a device with Device Log Service Setup, you can set later with DeviceLog Service Setup, so that operating the procedures in advance is not necessary.
Note• Depending on your network environment, to change a proxy server or
firewall settings may be necessary.• If you enable the filtering feature, set "service-fb.fujifilm.com" open and
accessible.• If you decrypt and inspect the communication, remove "service-
fb.fujifilm.com" from the targets of inspection.
Device Access (P.36) Set this item if you enable [SetasDefaultScreenafterAuthentication] of[PanelDisplayofAccountingResults].If it is not set, the Device Log Service screen may not be displayed as the defaultscreen.
2 Getting Started
35
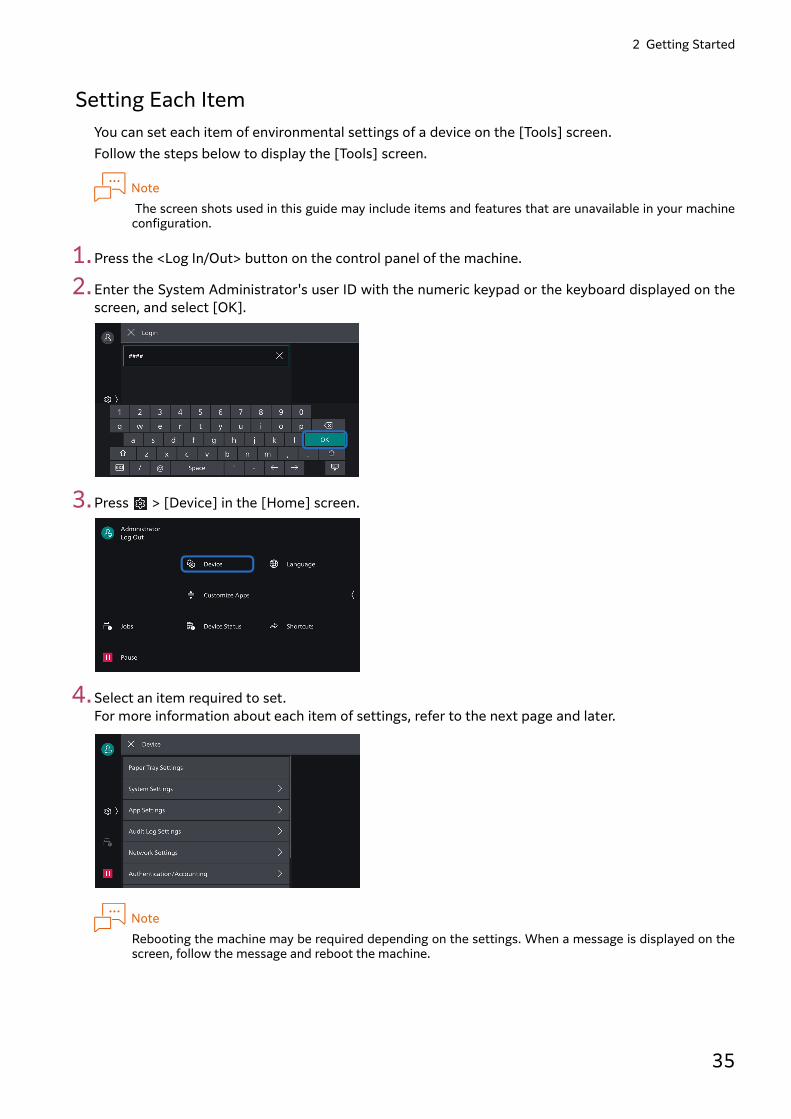
Setting Each ItemYou can set each item of environmental settings of a device on the [Tools] screen.Follow the steps below to display the [Tools] screen.
Note The screen shots used in this guide may include items and features that are unavailable in your machineconfiguration.
1.Press the <Log In/Out> button on the control panel of the machine.
2.Enter the System Administrator's user ID with the numeric keypad or the keyboard displayed on thescreen, and select [OK].
3.Press > [Device] in the [Home] screen.
4.Select an item required to set.For more information about each item of settings, refer to the next page and later.
NoteRebooting the machine may be required depending on the settings. When a message is displayed on thescreen, follow the message and reboot the machine.
Device Log Service User Guide
36
Proxy Server Settings
1.Select [Proxy Server Settings] in [Proxy Server List] > [Connectivity & Network Setup] under [Device],and then set a server name, port number, login name and passcode (settings for the use in HTTPSenvironment).
NoteMultifunction Device Linkage Tool may not be used on device when authentication is required for the proxyserver connection.
2.Select [Addresses to Bypass Proxy Server] in [Proxy Server Settings] under [Device] > [Proxy ServerList] > [Connectivity & Network Setup], and then select [Change Settings].
3.Enter "localhost" and select [Save].
NoteDo not delete "localhost" for using this feature.
4.Select [Close].
Setting Device Access
1.Press [Device] > [Authentication/Accounting] > [Authentication/Security Settings] > [Authentication]> [Access Control] > [Device Access].
2.Select [Locked].
3.Press the Home button to go back to the [Home] screen.

2 Getting Started
37
Registering a Device to Device Log ServiceThis section describes two ways how to register a device to Device Log Service.
How to Register a Device to Device Log ServiceRegistering a Device with a PCRegister devices with Device Log Service Setup. This way is useful when the device is on a remotelocation or you want to register multiple devices at once. And also, if you use [Simple] notification, orif you use [Partial Display] for [Panel Display of Accounting Results], select this way.
Refer"Registering a Device with a PC" (P.37)
Registering a Device with a Control Panel of a DeviceSome models can be registered on a control panel of a device without a PC.For more information of supported devices, contact your local representative of our company.
Refer"Registering a Device with a Control Panel of a Device" (P.43)
Registering a Device with a PCDownloading Device Log Service Setup
Download Device Log Service Setup by logging in Device Log Service.
1.Log in Device Log Service with User ID of System Administrator and Password.
Refer"Logging in to Device Log Service" (P.32)
2.Operate following procedures. If a device is not registered
Click [Download Device Log Service Setup].A zipped file will be downloaded.
If a device is already registered1. Click [Help].

Device Log Service User Guide
38
2. Click [Device Log Service Setup]. A compressed file will be installed.
3.Extend the downloaded file to a folder.“DLSSetupTool.exe” and “DLSSetupTool.exe.config” is unzipped.
NoteWhen you execute Device Log Service Setup, “DLSSetupTool.exe” and “DLSSetupTool.exe.config” areneeded to be in the same folder. Do not move these files to other folders.
Registering a DeviceRegister devices to Device Log Service with Device Log Service Setup, and then set Notification Type.Such as Notification Time of Detailed Notification or whether to use the display results of accountingon the panel can be set.
Note• While a device is operated or processing jobs, a device cannot be registered. Wait for a while, and then
execute Device Log Service Setup.• The control panel of a device cannot be controlled while Device Log Service Setup is installing the
software on the device.
1. Execute “DLSSetupTool.exe”, and then start Device Log Service Setup.
2. Operate following procedures.1. Enter Device Log Service’s System Administrator’s User ID and Password.2. Click [Log In].
2
1

2 Getting Started
39
3.Operate following procedures.1. Select [Register New Device].2. Click [Next].
4.Enter a host name or IP address, click [Add].
5.Operate following procedures.1. Enter the administrator information of the device to register.2. If any other device can use the common administrator information, check [Use the same
Administrator information for subsequent devices also].When you register a device after this device, you can skip entering the administrator information.
3. Click [OK].
Device Log Service Setup will connect to the device, and then check the settings.
6. If you register multiple devices, operate from Step 4 repeatedly.If the administrator information of the device is required, enter the information of the device toregister.
1
2
1
32

Device Log Service User Guide
40
7. If the device to register is lack of some features or settings, check the detail displayed in the [CheckResult] area.If the message is not displayed completely, hover on the [Check Result] area, and then you will see thecomplete message.
8. If you register all the devices to register, click [Next].
9.Set a device to register.1. Set the following items.
Item Description
Usage Notification Type Select a notification type. Usually, set [Detailed] for this item.
Refer"Notification Type" (P.11)
Notification Time Set the time to notify the usage to Device Log Service from a device.In [Simple (Counter Collection)], if you turn off a device every day, set thetime during the device is turned on. In other cases, you are not required to change the default value.
Logged Document Name Select whether to notify document names in printing or the direct fax.The notified document names are used for recording job log files andaccounting by Document Type.Due to the security reason, if you do not want to notify the data, uncheck thisitem.
Logged Network Address Select whether to notify an address of a PC or server to Device Log Service.The notified network address is used for recording the job log file.Due to the security reason, if you do not want to notify the data, uncheck thisitem.
Logged Fax Address Select whether to notify the fax number or Common Name.The fax address is used for recording the job log file and accounting oftelephone charge by Job Log Analyzer.Due to the security reason, if you do not want to notify the data, uncheck this item.
2 Getting Started
41
2. Click [Next].
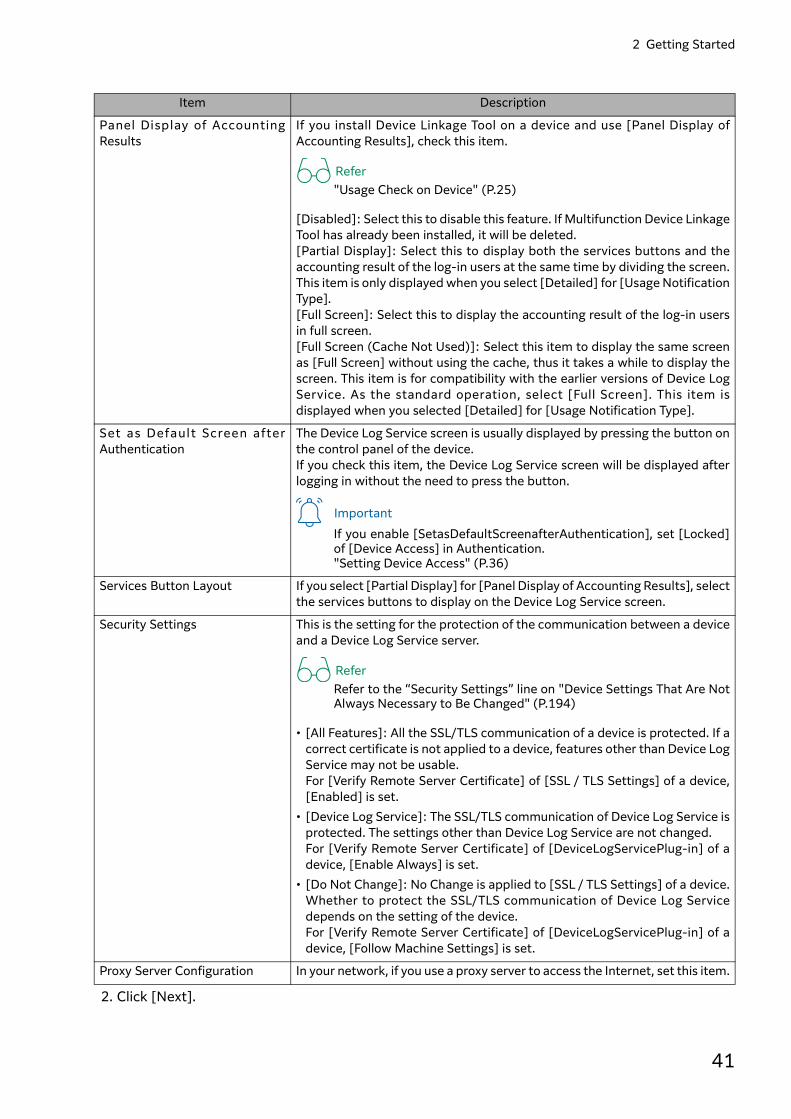
Panel Display of AccountingResults
If you install Device Linkage Tool on a device and use [Panel Display ofAccounting Results], check this item.
Refer"Usage Check on Device" (P.25)
[Disabled]: Select this to disable this feature. If Multifunction Device LinkageTool has already been installed, it will be deleted.[Partial Display]: Select this to display both the services buttons and theaccounting result of the log-in users at the same time by dividing the screen.This item is only displayed when you select [Detailed] for [Usage NotificationType].[Full Screen]: Select this to display the accounting result of the log-in usersin full screen.[Full Screen (Cache Not Used)]: Select this item to display the same screenas [Full Screen] without using the cache, thus it takes a while to display thescreen. This item is for compatibility with the earlier versions of Device LogService. As the standard operation, select [Full Screen]. This item isdisplayed when you selected [Detailed] for [Usage Notification Type].
Set as Default Screen afterAuthentication
The Device Log Service screen is usually displayed by pressing the button onthe control panel of the device.If you check this item, the Device Log Service screen will be displayed afterlogging in without the need to press the button.
ImportantIf you enable [SetasDefaultScreenafterAuthentication], set [Locked]of [Device Access] in Authentication."Setting Device Access" (P.36)
Services Button Layout If you select [Partial Display] for [Panel Display of Accounting Results], selectthe services buttons to display on the Device Log Service screen.
Security Settings This is the setting for the protection of the communication between a deviceand a Device Log Service server.
ReferRefer to the “Security Settings” line on "Device Settings That Are NotAlways Necessary to Be Changed" (P.194)
• [All Features]: All the SSL/TLS communication of a device is protected. If acorrect certificate is not applied to a device, features other than Device LogService may not be usable.For [Verify Remote Server Certificate] of [SSL / TLS Settings] of a device,[Enabled] is set.
• [Device Log Service]: The SSL/TLS communication of Device Log Service isprotected. The settings other than Device Log Service are not changed.For [Verify Remote Server Certificate] of [DeviceLogServicePlug-in] of adevice, [Enable Always] is set.
• [Do Not Change]: No Change is applied to [SSL / TLS Settings] of a device.Whether to protect the SSL/TLS communication of Device Log Servicedepends on the setting of the device.For [Verify Remote Server Certificate] of [DeviceLogServicePlug-in] of adevice, [Follow Machine Settings] is set.
Proxy Server Configuration In your network, if you use a proxy server to access the Internet, set this item.
Item Description

Device Log Service User Guide
42
10.Check the items to be processed, click [Register].
The device will be registered on Device Log Service.Also, required software is installed on a device according to selected features. As the registration finished, the number of the registered devices and the licenses that are notallocated will be displayed.
NoteIf you did not set the passcode for software options and the environmental settings of the devicebeforehand, the lacking items will be displayed on the screen. Follow the instruction on the screen, set theitems required again.
11.If you go on to configure RSS receiving settings, click [Next]. If you finish the process, deselect the[Proceed to RSS Receiving Settings] check box, and then click [Close]. If you continue otheroperations, click [Main Menu].
Refer"Configuring RSS Receiving Settings" (P.155)
NoteIf there is a device which is failed to be registered, cause and remedy will be displayed. Follow theinstruction on the screen, execute Device Log Service Setup again.
Register Printer MIBIf another company's device supporting the Printer MIB is registered to a parent device registered inthe Device Log Service as a child device by detail notification, the usage data can be accounted.
ImportantAs for child devices, 20 units can be registered to one parent device at a maximum and 100 units can beregistered to one tenant at a maximum (the number of units including parent devices). A networkenvironment which can execute SNMP communication is required between a parent device and childdevice.
Refer"Register Printer MIB device" (P.168)

2 Getting Started
43
Registering a Device with a Control Panel of a DeviceIf you register a device on the control panel of a device, [Detailed] notification is set for [UsageNotification Type]. And also, [Panel Display of Accounting Results] becomes available.
1.Log in a device as an administrator, and then click [Device Log Service] on the Services Home screen.
2.Click [Install] > [Start].
NoteIf the screen is not changed though [Start] is pressed, check whether the network environment of yourdevice is OK. And also, if you access the Internet via proxy server, check whether the setting of your proxyserver, referring to "Proxy Server Settings" (P.37). After you pressed [Start], if "Device is not registered" isdisplayed, your device does not support registering with a control panel of a device unit. For moreinformation on supported models, contact your local representative of our company.
3.Enter the user ID and password of the system administrator of Device Log Service, and then press[Login].The setup of Device Log Service is started.
4.Push [Next] or [Reboot].The Device Log Service plug-in is installed on the device, and then the device is rebooted.Depending on the machine condition, rebooting multiple times is necessary.
NoteEither [Next] or [Reboot] is displayed depending on the device.
5.After rebooting, log in a device as the system administrator, and then press [Device Log Service] onthe Services Home Screen.

Device Log Service User Guide
44
6.Operate the following procedure.1. Set the following items.
2. Press [Next].
7.Press [Register].The registering process is executed. It takes several tens of seconds.
8. If the following screen is displayed, push [OK].
Item Description
Notification Time Set the time to notify the usage to Device Log Service from a device.
Logged Document Name Select whether to notify document names in printing or the direct fax.The notified document names are used for recording job log files andaccounting by Document Type.Due to the security reason, if you do not want to notify the data, uncheck thisitem.
Logged Network Address Select whether to notify an address of a PC or server to Device Log Service.The notified network address is used for recording the job log file.Due to the security reason, if you do not want to notify the data, uncheck thisitem.
Logged Fax Address Select whether to notify the fax number or Common Name.The fax address is used for recording the job log file and accounting oftelephone charge by Job Log Analyzer.Due to the security reason, if you do not want to notify the data, uncheck this item.
2 Getting Started
45
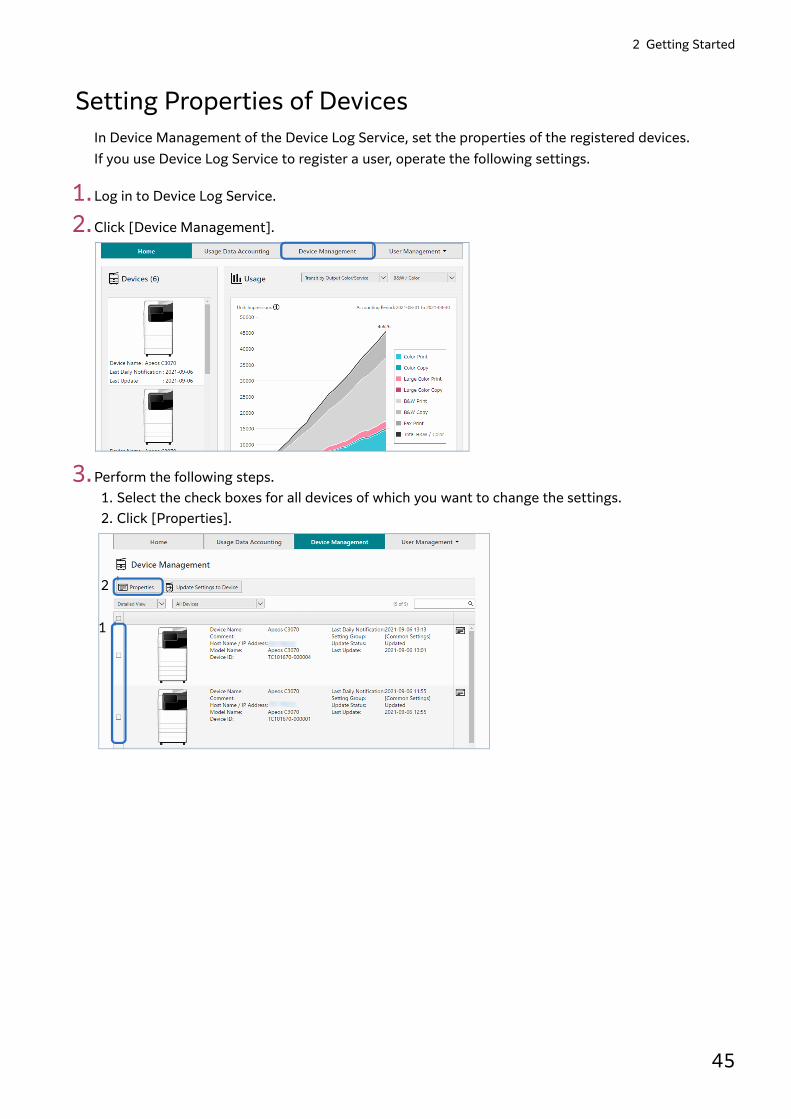
Setting Properties of DevicesIn Device Management of the Device Log Service, set the properties of the registered devices.If you use Device Log Service to register a user, operate the following settings.
1.Log in to Device Log Service.
2.Click [Device Management].
3.Perform the following steps.1. Select the check boxes for all devices of which you want to change the settings.2. Click [Properties].
2
1
Device Log Service User Guide
46
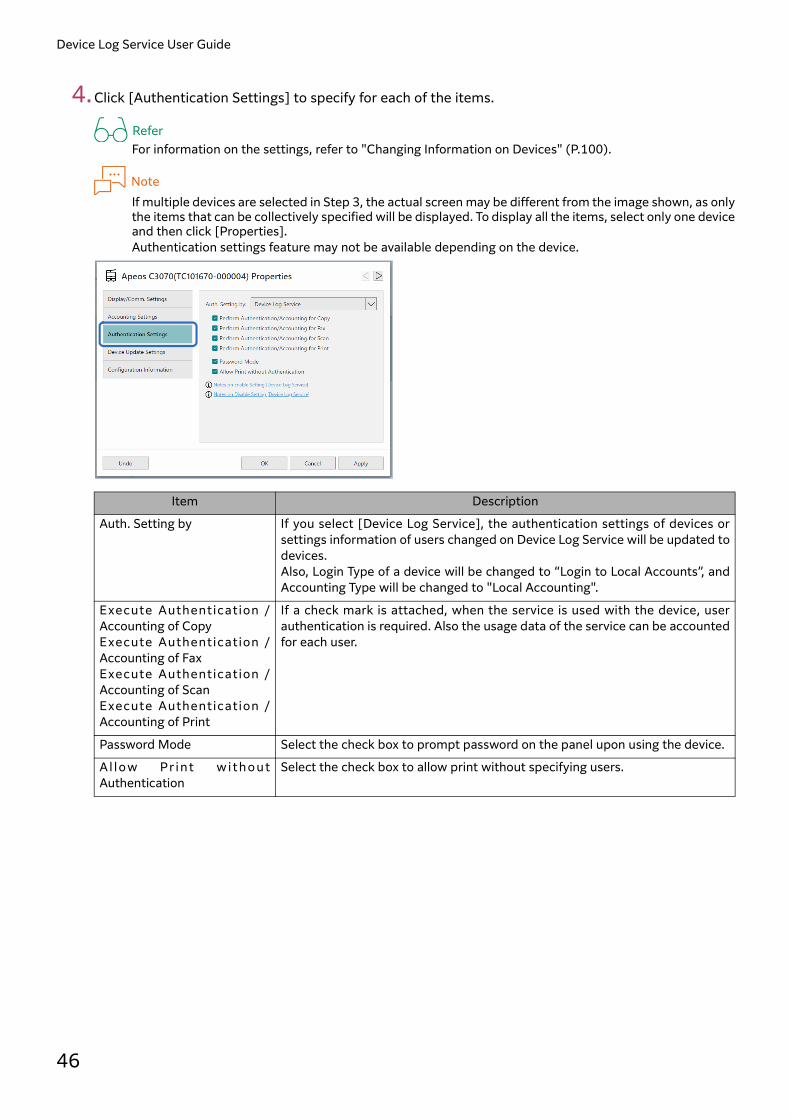
4.Click [Authentication Settings] to specify for each of the items.
ReferFor information on the settings, refer to "Changing Information on Devices" (P.100).
NoteIf multiple devices are selected in Step 3, the actual screen may be different from the image shown, as onlythe items that can be collectively specified will be displayed. To display all the items, select only one deviceand then click [Properties].Authentication settings feature may not be available depending on the device.
Item Description
Auth. Setting by If you select [Device Log Service], the authentication settings of devices orsettings information of users changed on Device Log Service will be updated todevices. Also, Login Type of a device will be changed to “Login to Local Accounts”, andAccounting Type will be changed to "Local Accounting".
Execute Authentication /Accounting of CopyExecute Authentication /Accounting of FaxExecute Authentication /Accounting of ScanExecute Authentication /Accounting of Print
If a check mark is attached, when the service is used with the device, userauthentication is required. Also the usage data of the service can be accountedfor each user.
Password Mode Select the check box to prompt password on the panel upon using the device.
A l low Pr int withoutAuthentication
Select the check box to allow print without specifying users.
2 Getting Started
47
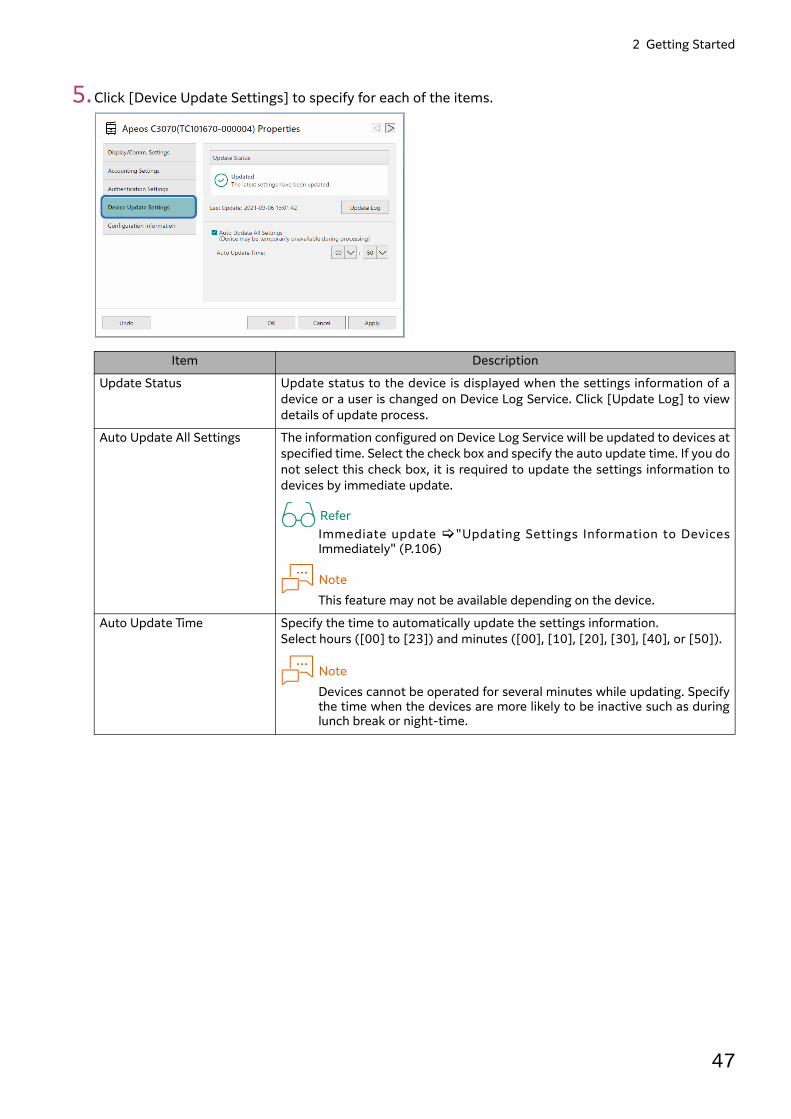
5.Click [Device Update Settings] to specify for each of the items.
Item Description
Update Status Update status to the device is displayed when the settings information of adevice or a user is changed on Device Log Service. Click [Update Log] to viewdetails of update process.
Auto Update All Settings The information configured on Device Log Service will be updated to devices atspecified time. Select the check box and specify the auto update time. If you donot select this check box, it is required to update the settings information todevices by immediate update.
ReferImmediate update "Updating Settings Information to DevicesImmediately" (P.106)
NoteThis feature may not be available depending on the device.
Auto Update Time Specify the time to automatically update the settings information.Select hours ([00] to [23]) and minutes ([00], [10], [20], [30], [40], or [50]).
NoteDevices cannot be operated for several minutes while updating. Specifythe time when the devices are more likely to be inactive such as duringlunch break or night-time.

Device Log Service User Guide
48
6.Click [OK].
The device properties are changed on Device Log Service.If any of the following settings are changed, the changed settings will be updated to the device at thenext periodical polling.
Note• The change made in Step 7 will not be updated immediately. If you want to update immediately, perform
immediate update. • The authentication settings will not be updated until it is updated by immediate update unless the [Auto
Update All Settings] check box is selected in Step 7.
Refer• Details on updating the settings information to the devices " When to Update the Settings Information
to Devices" (P.23)• "Updating Settings Information to Devices Immediately" (P.106)• What to do when you encounter a problem "An Error Appears When Attempting to Set Device
Properties" (P.182)

2 Getting Started
49
Registering User Information with Device Log ServiceRegister user information of users to operate target devices on Device Log Service.
About Registration of User InformationIf you set [Device Log Service] in [Auth. Setting by] of a device, user information will be registered onthe device by registering user information on Device Log Service.If you set [Machine Control Panel / Other SW] in [Auth. Setting by] of a device, registration of userinformation is not essential.Registering users with the same User IDs on a device and Device Log Service enables you to useaccounting by accounting labels. As needed, register user information.User information can be registered by using any one of the following methods: Register user information on the [Add] tab on the [User Management] page.
You can register information for a single user at one time. Register user information in a batch on the [CSV Upload] tab on the [User Management] page, by
using a CSV format file in which user information is entered (user information file). You can register information for multiple users at one time.
Register user information by selecting the user displayed on the [User Management] >[Unregistered User List] page. You can select multiple users from the list of unregistered users, and register them at one time.
Upload the user information of the LDAP server to the server of the Device Log Service. Synchronize the user information of Azure AD of the customer to the server of Device Log Service.
This procedure shows you an example of how to register user information in a batch by using a userinformation file in which user information is entered. For information on other methods, refer to "Managing Users" (P.111).
Note• If you want to use “Setting Group” when you apply user information with a device, making “Setting
Group” beforehand and set the “Setting Group” to a device are needed in advance.• If you check user information [Auto Update All Settings] in properties of [Device Update Settings], user
information will be automatically updated on the time when you set. If you want to update immediately,execute updating immediately.
Refer• Making setting groups "Managing Groups" (P.132)• Setting to devices "Setting Properties of Devices" (P.45)• Updating Now "Updating Settings Information to Devices Immediately" (P.106)• User information sync of LDAP server "Set LDAP server synchronization" (P.171)• Synchronization of user information of Azure AD of customer "Set [Azure ID Linkage]" (P.147)
Device Log Service User Guide
50
Registering User Information
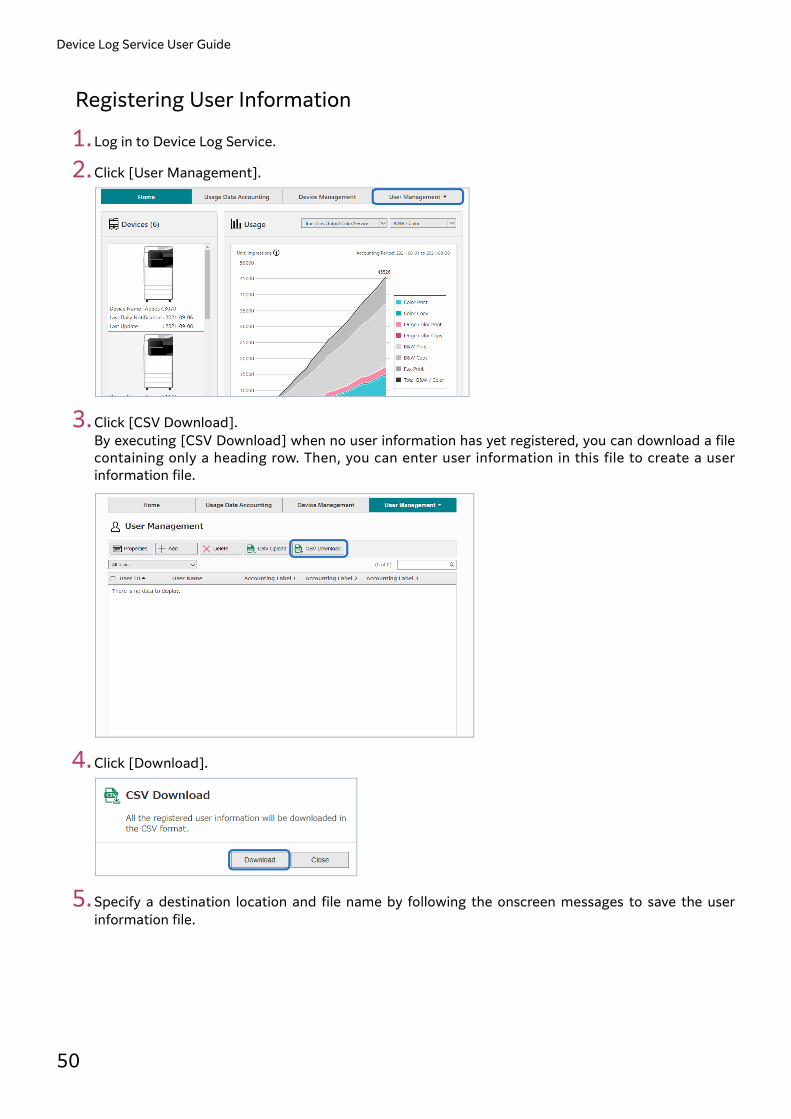
1.Log in to Device Log Service.
2.Click [User Management].
3.Click [CSV Download]. By executing [CSV Download] when no user information has yet registered, you can download a filecontaining only a heading row. Then, you can enter user information in this file to create a userinformation file.
4.Click [Download].
5.Specify a destination location and file name by following the onscreen messages to save the userinformation file.
2 Getting Started
51
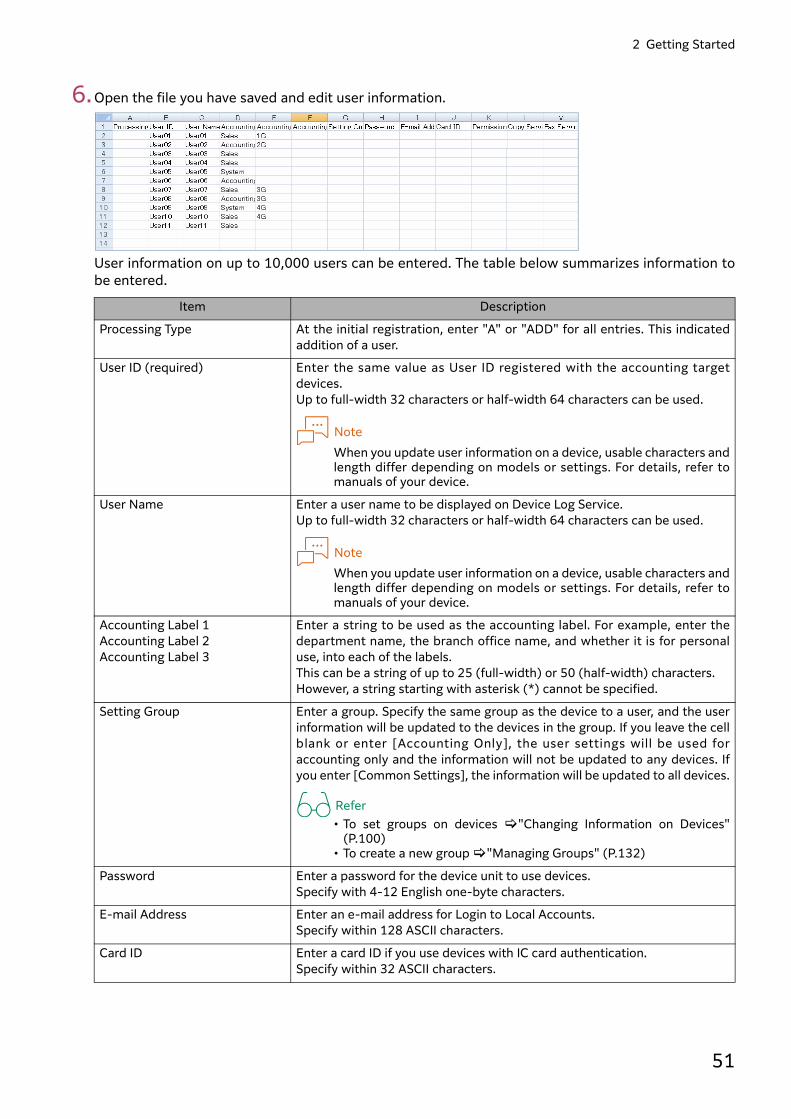
6.Open the file you have saved and edit user information.
User information on up to 10,000 users can be entered. The table below summarizes information tobe entered.
Item Description
Processing Type At the initial registration, enter "A" or "ADD" for all entries. This indicatedaddition of a user.
User ID (required) Enter the same value as User ID registered with the accounting targetdevices. Up to full-width 32 characters or half-width 64 characters can be used.
NoteWhen you update user information on a device, usable characters andlength differ depending on models or settings. For details, refer tomanuals of your device.
User Name Enter a user name to be displayed on Device Log Service.Up to full-width 32 characters or half-width 64 characters can be used.
NoteWhen you update user information on a device, usable characters andlength differ depending on models or settings. For details, refer tomanuals of your device.
Accounting Label 1Accounting Label 2Accounting Label 3
Enter a string to be used as the accounting label. For example, enter thedepartment name, the branch office name, and whether it is for personaluse, into each of the labels. This can be a string of up to 25 (full-width) or 50 (half-width) characters. However, a string starting with asterisk (*) cannot be specified.
Setting Group Enter a group. Specify the same group as the device to a user, and the userinformation will be updated to the devices in the group. If you leave the cellblank or enter [Accounting Only], the user settings will be used foraccounting only and the information will not be updated to any devices. Ifyou enter [Common Settings], the information will be updated to all devices.
Refer• To set groups on devices "Changing Information on Devices"
(P.100)• To create a new group "Managing Groups" (P.132)
Password Enter a password for the device unit to use devices. Specify with 4-12 English one-byte characters.
E-mail Address Enter an e-mail address for Login to Local Accounts. Specify within 128 ASCII characters.
Card ID Enter a card ID if you use devices with IC card authentication. Specify within 32 ASCII characters.

Device Log Service User Guide
52
Note• User information files can be edited using an application such as Microsoft® Excel® or a text editor. When
using Microsoft Excel, please note that the leading "0" might be deleted. • Specify the following items if using Device Log Service with [Auth. Setting by] set to [Device Log Service]
on compatible devices: [Setting Group], [Password], [E-mail Address], [Card ID], [Permission Settings],[Copy Service], [Fax Service], [Scanner Service] and [Print Service]. No configuration is required for non-supported devices.
ReferFor more information on allowable format and content of user information files, refer to "User InformationFile Format" (P.122).
7.Overwrite save the user information file.
8.Click [CSV Upload].
Permission Settings Enter permission settings. If you leave the cell blank or enter [Default], thedefault setting for permission settings will be applied. If you enter [By User],restriction of function use can be specified for [Copy Service], [Fax Service],[Scan Service] and [Print Service] for each user.
ReferDefault permission settings " Restricting the Device Use" (P.143)
Copy Service Enter either of the following permissions for copy service: "Free Access", "Black & White Only", "Color Only" or "No Access"
Fax Service Enter either of the following permissions for fax service: "Free Access" or "No Access"
Scan Service Enter either of the following permissions for scan service: "Free Access", "Black & White Only", "Color Only" or "No Access"
Print Service Enter either of the following permissions for print service: "Free Access", "Black & White Only" or "No Access"
Item Description

2 Getting Started
53
9.Perform the following steps. 1. Click [Browse] and select the user information file you saved in step 7. 2. Select [Add and Modify] in [Handling Differences].
All of the content in the user information file is added. 3. Click [Upload].
10.Check the content to be registered, and click [OK].
11.Click [Close] in the [CSV Upload] dialog box. User information is added to Device Log Service.
NoteThe user information file can also be used to modify or delete registered user information.
ReferTo modify user information by using a file "Adding/Updating/Deleting Users in a User Information File"(P.115)
12
3

Device Log Service User Guide
54
Setting Login Type/Register a User to a DeviceThis section describes how to set Login Type or register users to a device.If you register user information with Device Log Service, this operation is not needed.
NoteThis operation is not required if you use Device Log Service to register a user on a device.
About SettingsDepending on Notification Type or Login Type, following settings are required.
How to Set Up DevicesThere are several ways to configure device settings without Device Log Service. Some of them areshown below. 1. Using Device Setup
Device Setup is a device settings tool provided by FUJIFILM Business Innovation. This tool allowsyou to set Login Type for the multiple devices on your network in a batch. With this tool, you canalso use a mb4 format file to register user information in a batch.
2. Using Internet ServicesThis tool allows you to access devices via a web browser to make settings. With this tool, LoginType and user information must be set for devices one by one.
3. Using the control panel on the devices Make settings on the control panel on the devices. With this type, Login Type and user informationmust be set for devices one by one.
Notification Type Required Settings
[Detailed (Job Log Collection)] • Login TypeIf you want to tally usage of copy and fax by user or AccountingLabel, set other than [Disabled],
• User informationIf Login Type is [Login to Local Accounts], registering userinformation is required.
[Simple (Counter Collection)] • Login TypeSet Login Type to [Login to Local Accounts].set Accounting Settings to [Local Accounting].
• Accounting SettingsSet Accounting Type to [Local Accounting], and set AccountingSettings to enable Accounting for each feature.
• User informationRegistering user information is required.

2 Getting Started
55
The table below summarizes these methods.
This section shows you an example of how to set Login Type for the multiple devices and then registeruser information defined in a file by a batch with Device Setup.
ImportantTo use Device Setup to register user information in a batch, Microsoft Excel is required.
Refer• To use Device Setup "Using Device Setup to Configure Device Settings" (P.55)• To use Internet Services Internet Services help• To set on the device control panel Manuals for the device• To change the settings of devices on Device Log Service "Changing Information on Devices" (P.100)
Using Device Setup to Configure Device SettingsWorkflow
Follow the workflow shown below to use Device Setup to set Login Type for devices and userinformation.
Method Where to operate Login Typebatch settings
Multiple users information registration Installation
(1) PC Yes Yes Required
(2) PC No No Not required
(3) Devi ce contro lpanel
No No Not required
Register devices to be managed byDevice Log Service with Device Setup.P.57
Set Login Type for devices. P.59
Registering Devices with Device Setup
Setting Login Type
Installing Device Setup From FUJIFILM Business Innovation'sSolution & Service site, downloadDevice Setup and install it. P.56
In order to connect Device Setup todevices, check the settings of thedevices. P.56
Checking the Settings of the Devices
Use Device Setup InputTool to create afile to register user information in abatch. P.61
Creating a Batch Creation File
Import a batch creation file to registeruser information with devices. P.62
Register User Information with Devices

Device Log Service User Guide
56
Installing Device SetupDevice Setup can be downloaded for free from FUJIFILM Business Innovation's Solution & Service site.Download it to your PC and install it.
NoteOperating environment for Device Setup can be checked on the Operating Environment page, which islinked from the Download page.
1.Log on to the PC on which you want to install Device Setup as a user that belongs to the Administratorsgroup.
2.Log in FUJIFILM BI Direct and download Device Setup from the ApeosWare Management Suite page.
3.Double-click the file you have downloaded.
4.Double-click the "Launcher.exe" file inside the Setup folder.
5.Follow the onscreen instructions to install Device Setup.
NoteAfter you install Device Setup, the manual for Device Setup is available by clicking the Windows [Start]button and select [All Programs] > [FUJIFILM] > [Device Setup] > [User Guide]. Refer to this guide asnecessary during the following procedure.
Checking the Settings of the Devices For Device Setup to recognize the devices, they must be set as described below. After checking thesettings of the devices, if you find one or more devices do not satisfy these conditions, change thosesettings. A fixed IP address is set
Every device that is set to get a dynamic IP address must be set so that it can get an IP address fromDNS host name.
The SNMP port is enabled by UDP The SOAP port or the Internet Service port (Internet Services) is enabled.
ImportantIf the System Administrator ID and password set on a device has been changed from the factory default,the settings of the device cannot be changed with Device Setup. In this case, change the SystemAdministrator ID and password registered with Device Setup.
Refer• To check and change device settings Manuals for the device• To change the System Administrator ID and password registered with Device Setup "Device Setup
User Guide"

2 Getting Started
57
Registering Devices with Device SetupUse the following procedure to register devices whose settings you want to change with Device Setup.This procedure shows you an example of how to specify subnet addresses to search for devices.
1.Log on to the PC to which you installed Device Setup, as a user that belongs to the Administratorsgroup.
2.Select [Start] > [All Programs] > [FUJIFILM] > [Device Setup].
3.Perform the following steps.1. In [Password], enter the password required to start Device Setup.2. Click [OK].
4. In the Tree view, select [Settings] > [General Device Settings] > [Basic Information].
5.Select [Edit] > [Search and Add Device].
6.Perform the following steps.1. Click [Search Condition].
2. In [Add a subnet address], enter the broadcast address of the subnet to search. 3. Click [Add].
The address you entered in step 2 is added to [Search the following subnet addresses]. 4. To search multiple subnets, repeat the steps 2 and 3.
Tree view
1

Device Log Service User Guide
58
5. Click [OK].
7.Click [Search].
8.Perform the following steps.1. Make sure that the check box for the devices to be managed by Device Log Service is selected. 2. Click [OK].
9.Click [Yes] in the [Add Device - Get Device Attributes] dialog box. Retrieving of device attributes begins.
23
5
1
2
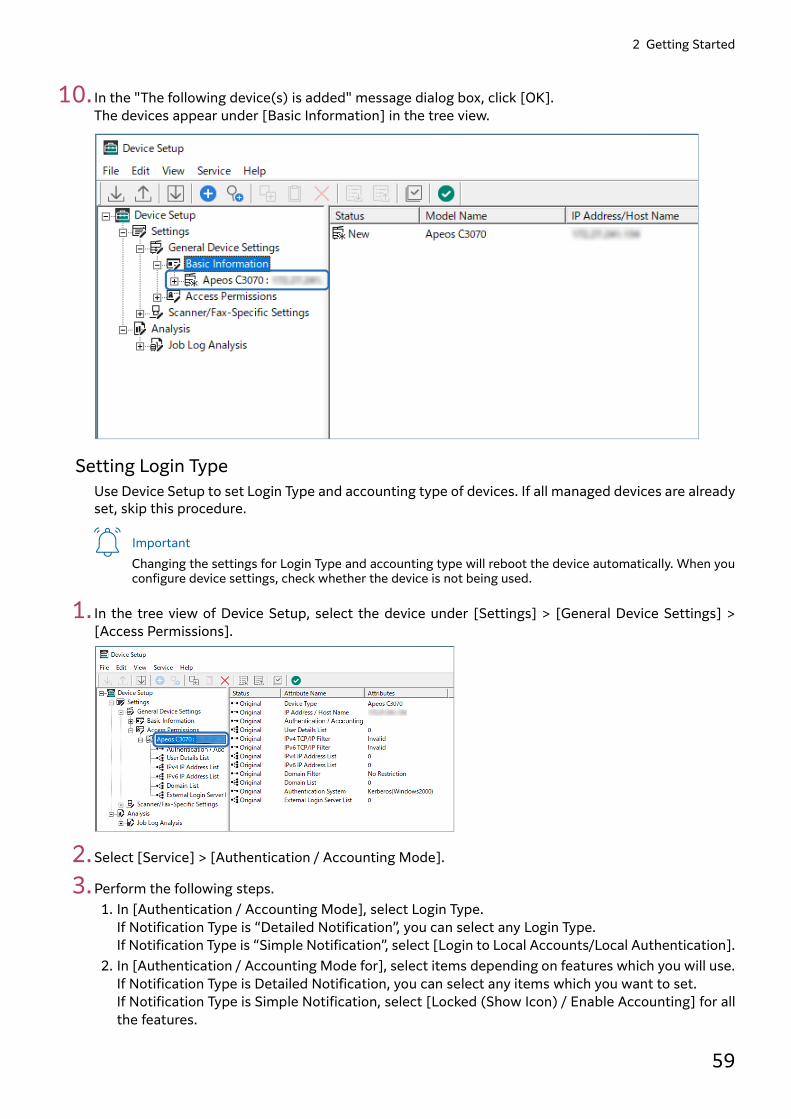
2 Getting Started
59
10.In the "The following device(s) is added" message dialog box, click [OK]. The devices appear under [Basic Information] in the tree view.
Setting Login TypeUse Device Setup to set Login Type and accounting type of devices. If all managed devices are alreadyset, skip this procedure.
ImportantChanging the settings for Login Type and accounting type will reboot the device automatically. When youconfigure device settings, check whether the device is not being used.
1. In the tree view of Device Setup, select the device under [Settings] > [General Device Settings] >[Access Permissions].
2.Select [Service] > [Authentication / Accounting Mode].
3.Perform the following steps.1. In [Authentication / Accounting Mode], select Login Type.
If Notification Type is “Detailed Notification”, you can select any Login Type.If Notification Type is “Simple Notification”, select [Login to Local Accounts/Local Authentication].
2. In [Authentication / Accounting Mode for], select items depending on features which you will use.If Notification Type is Detailed Notification, you can select any items which you want to set.If Notification Type is Simple Notification, select [Locked (Show Icon) / Enable Accounting] for allthe features.

Device Log Service User Guide
60
3. To require a password when users attempt to use the device, select the [Passcode/Password]check box.
4. Click [OK].
4.To set Login Type for more than one device, repeat the steps 1 to 3 for each of the devices.
5.After you set Login Type for all devices, in the tree view or list view, select the device to apply the newsettings To select more than one devices, select them in the list view. To do this, press the <Shift> key or <Ctrl>key while clicking the device name.
6.Select [Edit] > [Save Attributes to Device].
7.Check to confirm the items in the displayed dialog box, and click [Yes]. The device is automatically rebooted to apply Login Type.
1
2
3
4
List View
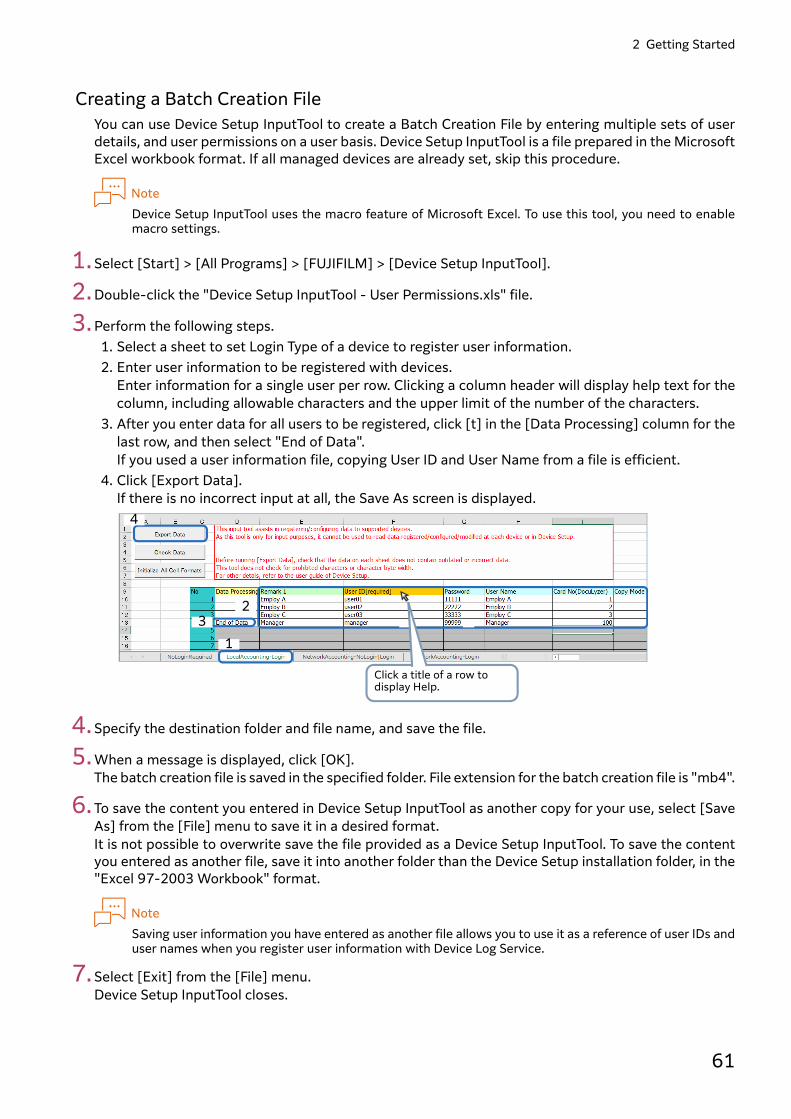
2 Getting Started
61
Creating a Batch Creation FileYou can use Device Setup InputTool to create a Batch Creation File by entering multiple sets of userdetails, and user permissions on a user basis. Device Setup InputTool is a file prepared in the MicrosoftExcel workbook format. If all managed devices are already set, skip this procedure.
NoteDevice Setup InputTool uses the macro feature of Microsoft Excel. To use this tool, you need to enablemacro settings.
1.Select [Start] > [All Programs] > [FUJIFILM] > [Device Setup InputTool].
2.Double-click the "Device Setup InputTool - User Permissions.xls" file.
3.Perform the following steps.1. Select a sheet to set Login Type of a device to register user information.2. Enter user information to be registered with devices.
Enter information for a single user per row. Clicking a column header will display help text for thecolumn, including allowable characters and the upper limit of the number of the characters.
3. After you enter data for all users to be registered, click [t] in the [Data Processing] column for thelast row, and then select "End of Data". If you used a user information file, copying User ID and User Name from a file is efficient.
4. Click [Export Data]. If there is no incorrect input at all, the Save As screen is displayed.
4.Specify the destination folder and file name, and save the file.
5.When a message is displayed, click [OK]. The batch creation file is saved in the specified folder. File extension for the batch creation file is "mb4".
6.To save the content you entered in Device Setup InputTool as another copy for your use, select [SaveAs] from the [File] menu to save it in a desired format.It is not possible to overwrite save the file provided as a Device Setup InputTool. To save the contentyou entered as another file, save it into another folder than the Device Setup installation folder, in the"Excel 97-2003 Workbook" format.
NoteSaving user information you have entered as another file allows you to use it as a reference of user IDs anduser names when you register user information with Device Log Service.
7.Select [Exit] from the [File] menu. Device Setup InputTool closes.
1
23
4
Click a title of a row to display Help.

Device Log Service User Guide
62
Important• Files that contain user information you entered in Device Setup InputTool as well as batch creation files
output from Device Setup InputTool must be protected so that personal information will not be leaked toany third party. It is advisable to save these files to a folder to which only specific users can access.
• Batch creation files output from Device Setup InputTool is in unique format for Device Setup. Do notattempt to edit it in other applications.
Register User Information with DevicesImport a batch creation file into Device Setup, and register user information with devices. If userinformation is already registered with all managed devices, skip this procedure.
1. In the tree view of Device Setup, select the device under [Settings] > [General Device Settings] >[Access Permissions].
2.Select [Service] > [Import User Permissions].
3.Select the batch creation file you created in "Creating a Batch Creation File" (P.61), and then click[Open].A batch creation file is a file having the file extension "mb4".
4.Perform the following steps.1. Check information about users and limitations to be registered. 2. Click [OK].
1
2
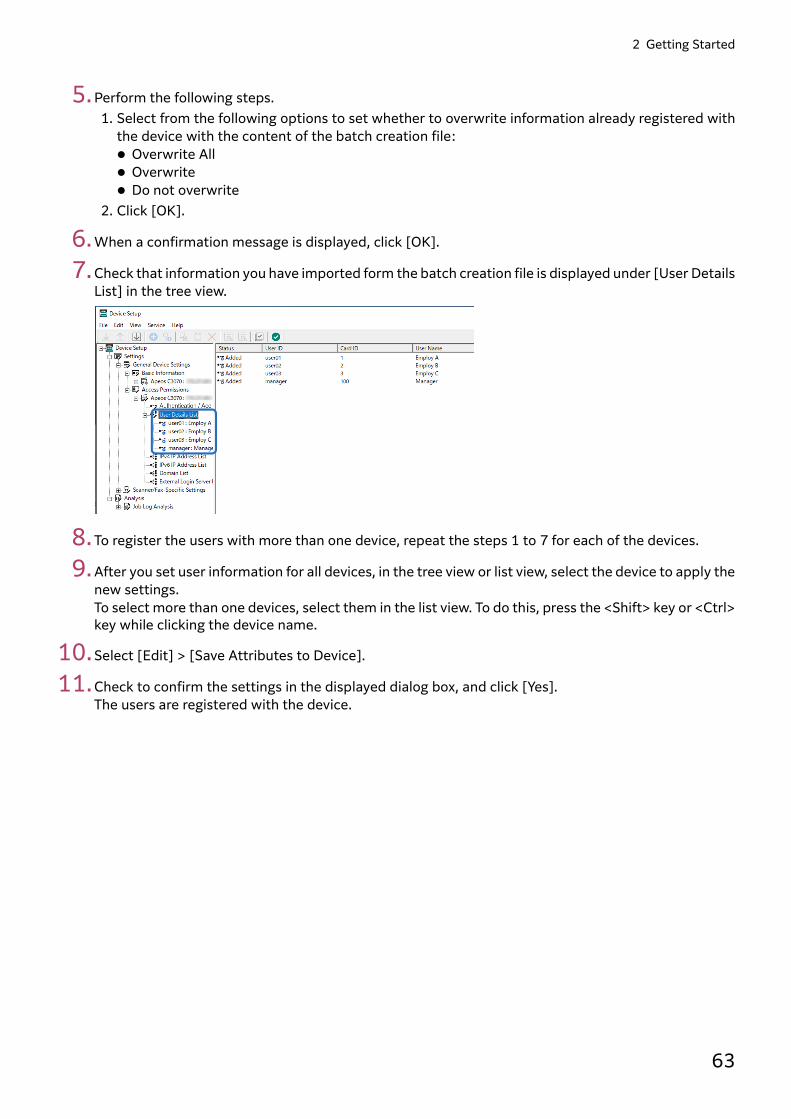
2 Getting Started
63
5.Perform the following steps.1. Select from the following options to set whether to overwrite information already registered with
the device with the content of the batch creation file: Overwrite All Overwrite Do not overwrite
2. Click [OK].
6.When a confirmation message is displayed, click [OK].
7.Check that information you have imported form the batch creation file is displayed under [User DetailsList] in the tree view.
8.To register the users with more than one device, repeat the steps 1 to 7 for each of the devices.
9.After you set user information for all devices, in the tree view or list view, select the device to apply thenew settings. To select more than one devices, select them in the list view. To do this, press the <Shift> key or <Ctrl>key while clicking the device name.
10.Select [Edit] > [Save Attributes to Device].
11.Check to confirm the settings in the displayed dialog box, and click [Yes]. The users are registered with the device.

Device Log Service User Guide
64
33Daily Operation
Screen Elements and Basic OperationThis section describes the screen elements and the basic operation of Device Log Service.
Screen ElementsThe first screen you will see after logging in Device Log Service is the [Home] page. From the [Home]page, you can use the global menu and submenus to navigate to the desired function page. On thepage, clicking a tool button displays the corresponding dialog box to make settings.
NoteThe item displayed on the global menu varies depending on whether there are Printer MIB registration andaccounting data.
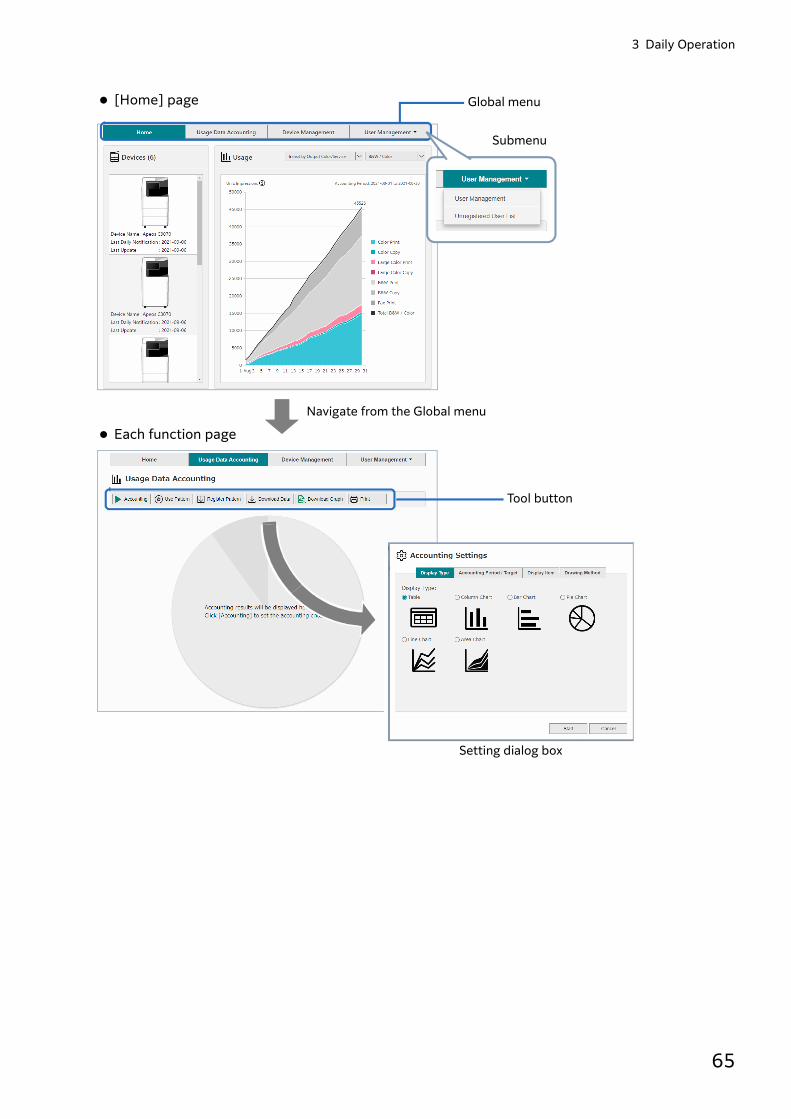
3 Daily Operation
65
Global menu
Submenu
Tool button
Navigate from the Global menu
Setting dialog box
[Home] page
Each function page
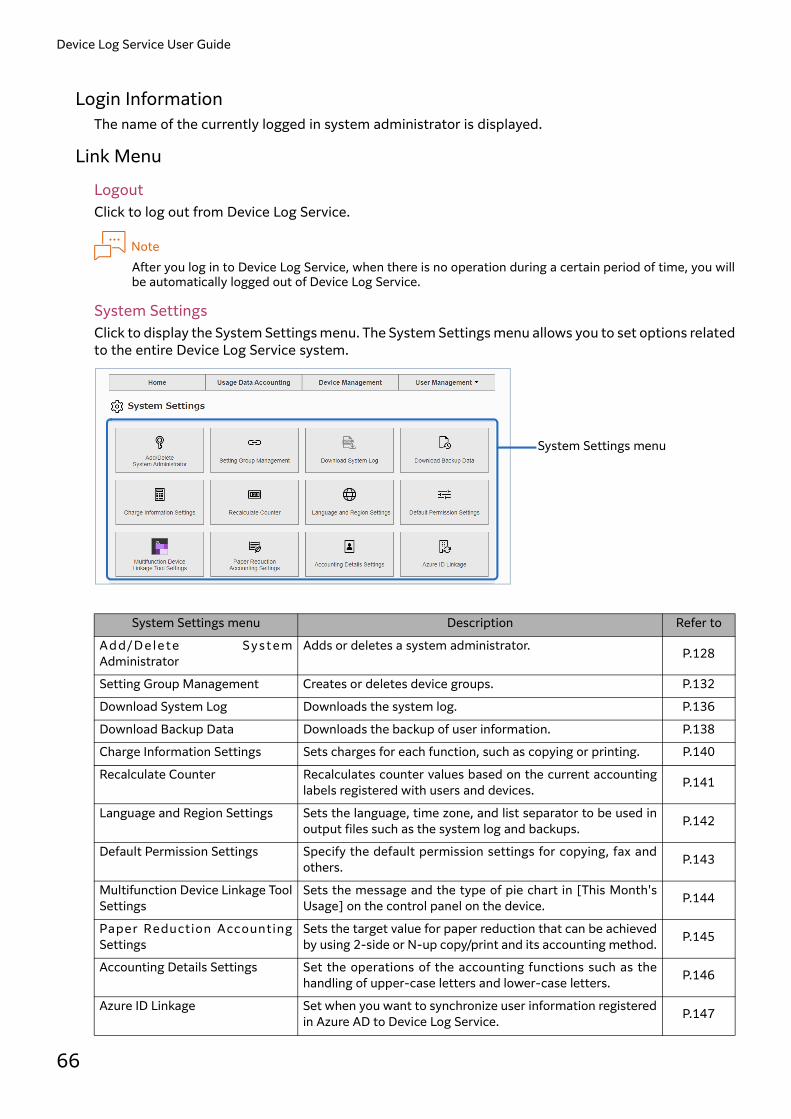
Device Log Service User Guide
66
Login InformationThe name of the currently logged in system administrator is displayed.
Link Menu
LogoutClick to log out from Device Log Service.
NoteAfter you log in to Device Log Service, when there is no operation during a certain period of time, you willbe automatically logged out of Device Log Service.
System SettingsClick to display the System Settings menu. The System Settings menu allows you to set options relatedto the entire Device Log Service system.
System Settings menu Description Refer to
Add/Dele te Syst emAdministrator
Adds or deletes a system administrator. P.128
Setting Group Management Creates or deletes device groups. P.132
Download System Log Downloads the system log. P.136
Download Backup Data Downloads the backup of user information. P.138
Charge Information Settings Sets charges for each function, such as copying or printing. P.140
Recalculate Counter Recalculates counter values based on the current accountinglabels registered with users and devices. P.141
Language and Region Settings Sets the language, time zone, and list separator to be used inoutput files such as the system log and backups. P.142
Default Permission Settings Specify the default permission settings for copying, fax andothers. P.143
Multifunction Device Linkage ToolSettings
Sets the message and the type of pie chart in [This Month'sUsage] on the control panel on the device. P.144
Paper Reduction AccountingSettings
Sets the target value for paper reduction that can be achievedby using 2-side or N-up copy/print and its accounting method. P.145
Accounting Details Settings Set the operations of the accounting functions such as thehandling of upper-case letters and lower-case letters. P.146
Azure ID Linkage Set when you want to synchronize user information registeredin Azure AD to Device Log Service. P.147
System Settings menu

3 Daily Operation
67
Account InformationClick to display links to pages of FUJIFILM BI Direct, such as [Update Account Information] and[Change Password].
HelpClick to display a list of links to materials such as the Device Log Service manual (PDF) and releasenotes. Clicking the link displays the manual and each information page. And also, you can download Device Log Service Setup and Job Log Analyzer.
NoteYou will need Adobe® Reader® to view the manual.
Global Menu/Submenus/Tool ButtonsUse these menus and buttons to navigate to the page of the function you want to set.
Global Menu > Submenu Tool Button Description Refer to
Home - Displays a list of your devices, as well as thetransition of usage and top 10 usage in thatmonth.
P.72
Usage Data Accounting
Accounting Set options such as accounting period andaccounting targets, displayed items, and drawingmethod to perform accounting.
P.74
Use Pattern Call an accounting pattern you have registered totally usage of the devices. P.87
Register Pattern Register a combination of accounting settings asan accounting pattern. P.86
Download Data Export usage data collected from devices to a CSVformat file. If Notification Type of a device is DetailedNotification, you can also download job logs.
P.89
Download Graph Export lists and graphs of the accounting results toa CSV format file. P.91
Print Displays the print page for accounting results. P.92
Usage Data Accounting> Printer MIB Accounting
Accounting Account the usage data of the Printer MIB device.This function is displayed if the Printer MIB deviceis registered.
P.95
Download Graph Export lists and graphs of the accounting results toa CSV format file. P.95
Device Management Properties Displays the device properties. Change settings asnecessary. P.98
Update Sett ings toDevice
Updates the settings information changed onDevice Log Service immediately to the device. P.106
Device Management> Printer MIB DeviceManagement
Properties Displays the Printer MIB device properties.Change settings as necessary.This function is displayed if the Printer MIB deviceis registered.
P.108
Delete Delete a selected Printer MIB device. P.110

Device Log Service User Guide
68
Basic OperationThis section describes basic operations on each page.
Sorting a ListYou can sort items displayed in a list. Clicking a column header sorts the items based on the values in that column, in ascending order. [s]will appear to the right of the header. Clicking the column header again sorts the items based on the values in that column, in descendingorder. [t] will appear to the right of the header.
User Management > User Management
Properties Display user properties and change them asnecessary. P.111
Add Register users with Device Log Service. P.118
Delete Delete users from Device Log Service. P.122
CSV Upload Import user information from a CSV format file toregister it with Device Log Service. P.115
CSV Download Export user information registered with DeviceLog Service to a CSV format file. P.117
User Management > Unregistered Users
Register Register unregistered users with Device LogService. P.120
Global Menu > Submenu Tool Button Description Refer to
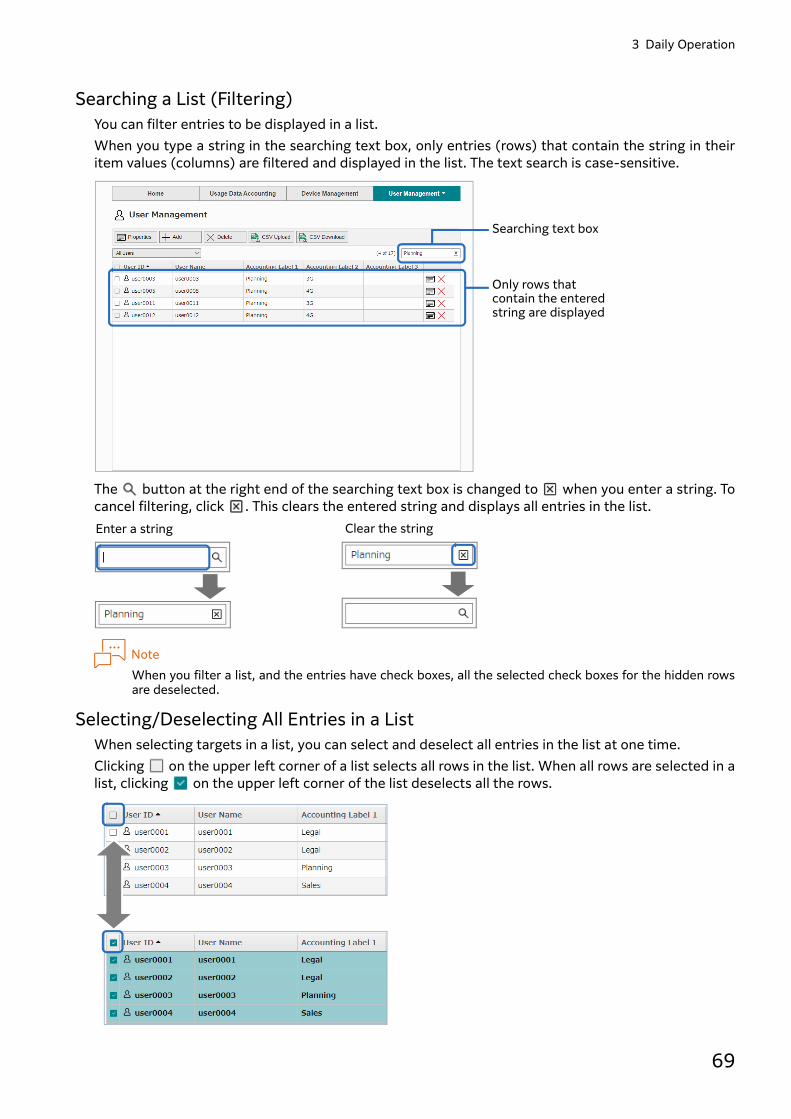
3 Daily Operation
69
Searching a List (Filtering)You can filter entries to be displayed in a list. When you type a string in the searching text box, only entries (rows) that contain the string in theiritem values (columns) are filtered and displayed in the list. The text search is case-sensitive.
The button at the right end of the searching text box is changed to when you enter a string. Tocancel filtering, click . This clears the entered string and displays all entries in the list.
NoteWhen you filter a list, and the entries have check boxes, all the selected check boxes for the hidden rowsare deselected.
Selecting/Deselecting All Entries in a ListWhen selecting targets in a list, you can select and deselect all entries in the list at one time. Clicking on the upper left corner of a list selects all rows in the list. When all rows are selected in alist, clicking on the upper left corner of the list deselects all the rows.
Searching text box
Only rows that contain the entered string are displayed
|
Enter a string Clear the string
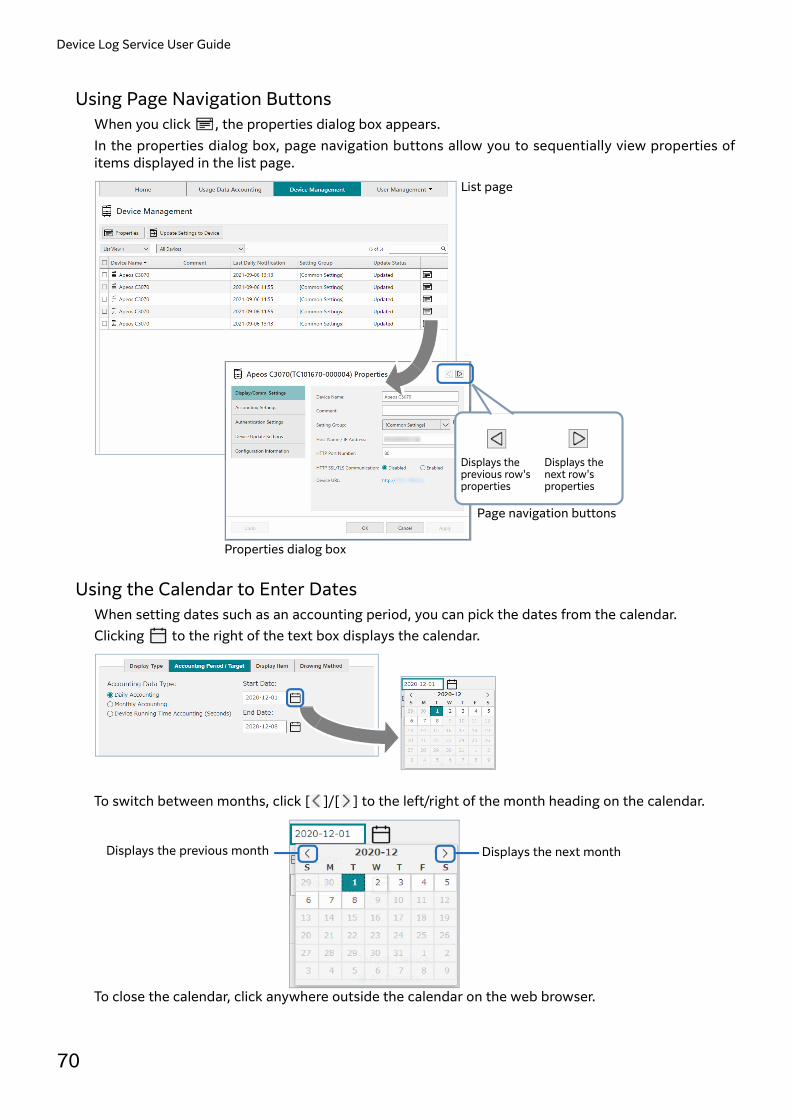
Device Log Service User Guide
70
Using Page Navigation Buttons When you click , the properties dialog box appears. In the properties dialog box, page navigation buttons allow you to sequentially view properties ofitems displayed in the list page.
Using the Calendar to Enter Dates When setting dates such as an accounting period, you can pick the dates from the calendar. Clicking to the right of the text box displays the calendar.
To switch between months, click [ ]/[ ] to the left/right of the month heading on the calendar.
To close the calendar, click anywhere outside the calendar on the web browser.
Page navigation buttons
Displays the previous row's properties
Displays the next row's properties
Properties dialog box
List page
Displays the next monthDisplays the previous month

3 Daily Operation
71
Displaying ToolTip TextHovering cursor over an operation button displays the tool tip text.
Hovering cursor over a chart highlights the area the cursor is pointing, and displays the "item name,legend item name, and value" (if the chart does not have a legend, "item name and value").
Showing/Hiding an Area of ChartOn a chart page, clicking a legend string hides the corresponding chart area. Clicking the legend stringagain redisplays the hidden area.
Click a legend string "B&W Print"
"B&W Print" areas are hidden
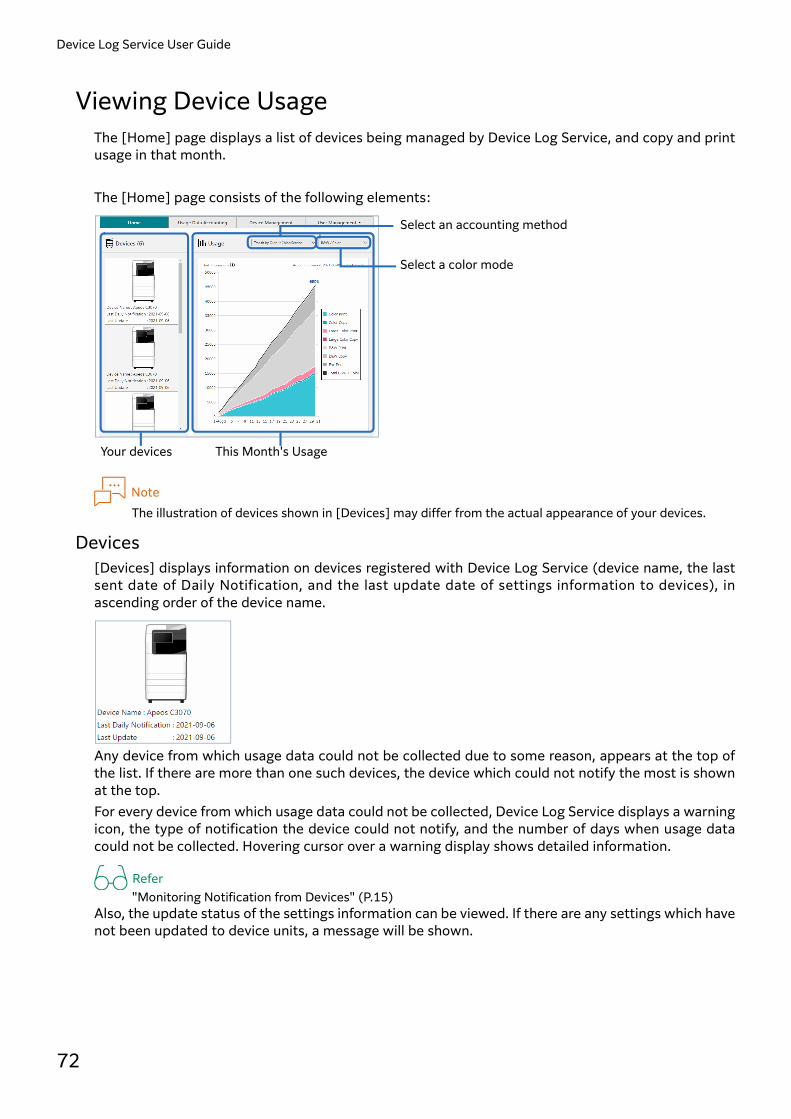
Device Log Service User Guide
72
Viewing Device UsageThe [Home] page displays a list of devices being managed by Device Log Service, and copy and printusage in that month.
The [Home] page consists of the following elements:
NoteThe illustration of devices shown in [Devices] may differ from the actual appearance of your devices.
Devices[Devices] displays information on devices registered with Device Log Service (device name, the lastsent date of Daily Notification, and the last update date of settings information to devices), inascending order of the device name.
Any device from which usage data could not be collected due to some reason, appears at the top ofthe list. If there are more than one such devices, the device which could not notify the most is shownat the top.For every device from which usage data could not be collected, Device Log Service displays a warningicon, the type of notification the device could not notify, and the number of days when usage datacould not be collected. Hovering cursor over a warning display shows detailed information.
Refer"Monitoring Notification from Devices" (P.15)
Also, the update status of the settings information can be viewed. If there are any settings which havenot been updated to device units, a message will be shown.
Your devices This Month's Usage
Select an accounting method
Select a color mode

3 Daily Operation
73
Refer"When to Update the Settings Information to Devices" (P.23)
This Month’s Usage[This Month's Usage] shows you transition of usage such as copying and printing in that month, andthe top 10 usage in chart form. The transition of usage is displayed in an area chart, and the top 10usage is displayed in a stacked bar chart. You can switch between views by simply selecting one of preset accounting methods such as by usersand by devices. The accounting period is from the beginning of the month including the day on which you displayed the[Home] page (hereinafter called the operation day) to the day before the operation day. However, theoperation day is one of the first five days of the month, the usage during the previous one month is displayed. Example: When the operation day is October 5: Usage from September 1 to September 30 is displayed. When the operation day is October 6: Usage from October 1 to October 5 is displayed. When the operation day is October 20: Usage from October 1 to October 19 is displayed.
Note• The Top 10 Usage shows the top 10 highest usage in descending order. If there are multiple devices of the
same 10th usage, "(Another {n} records with same ranking)" appears on the bottom left corner of thescreen, where n indicates the number of charts that are not being displayed.
• The Transition of Usage by User/Device/Accounting Label shows top nine entries having the highesttransition rate in descending order, and "Others" which indicates the sum of the transition rate of the10th and subsequent entries.
• The unit displayed in the charts can be changed from [Impressions] to [Charges].
Refer• To set charges "Setting Charge Information" (P.140)
Transition by User - Total Black & White / Color display example
Top 10 Devices - Total Black & White display example
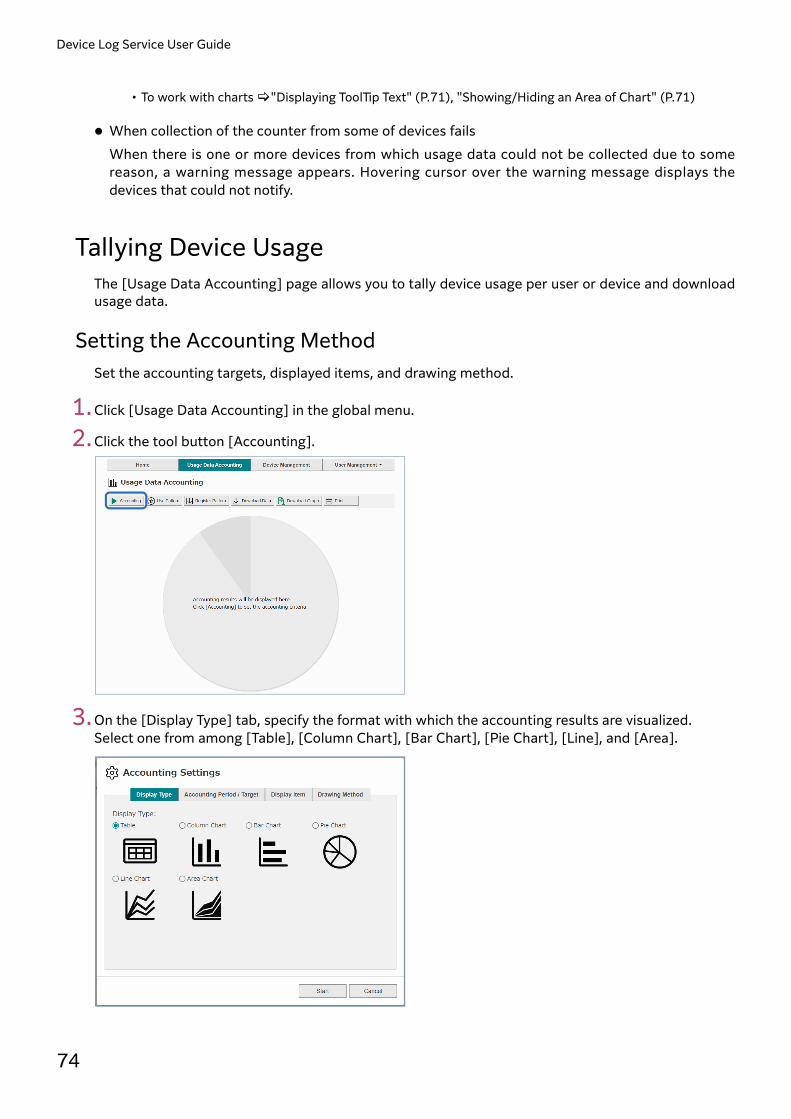
Device Log Service User Guide
74
• To work with charts "Displaying ToolTip Text" (P.71), "Showing/Hiding an Area of Chart" (P.71)
When collection of the counter from some of devices failsWhen there is one or more devices from which usage data could not be collected due to somereason, a warning message appears. Hovering cursor over the warning message displays thedevices that could not notify.
Tallying Device UsageThe [Usage Data Accounting] page allows you to tally device usage per user or device and downloadusage data.
Setting the Accounting MethodSet the accounting targets, displayed items, and drawing method.
1.Click [Usage Data Accounting] in the global menu.
2.Click the tool button [Accounting].
3.On the [Display Type] tab, specify the format with which the accounting results are visualized. Select one from among [Table], [Column Chart], [Bar Chart], [Pie Chart], [Line], and [Area].
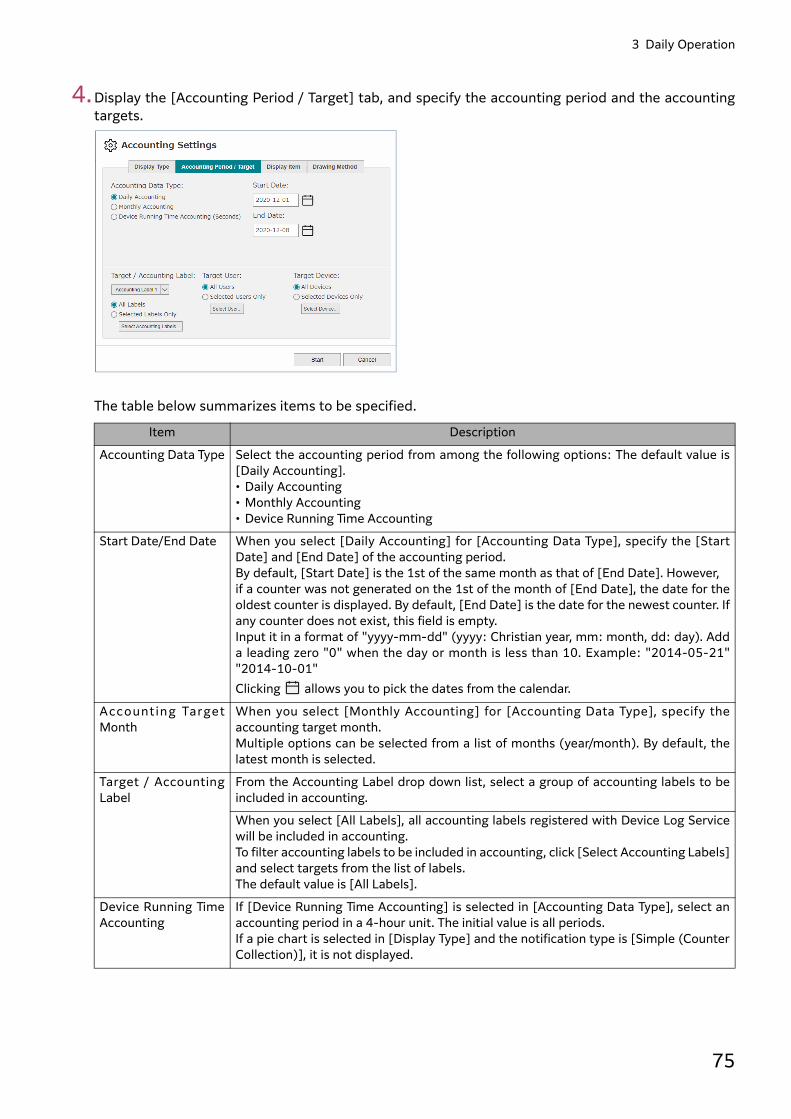
3 Daily Operation
75
4.Display the [Accounting Period / Target] tab, and specify the accounting period and the accountingtargets.
The table below summarizes items to be specified.
Item Description
Accounting Data Type Select the accounting period from among the following options: The default value is[Daily Accounting]. • Daily Accounting• Monthly Accounting• Device Running Time Accounting
Start Date/End Date When you select [Daily Accounting] for [Accounting Data Type], specify the [StartDate] and [End Date] of the accounting period. By default, [Start Date] is the 1st of the same month as that of [End Date]. However, if a counter was not generated on the 1st of the month of [End Date], the date for theoldest counter is displayed. By default, [End Date] is the date for the newest counter. Ifany counter does not exist, this field is empty. Input it in a format of "yyyy-mm-dd" (yyyy: Christian year, mm: month, dd: day). Adda leading zero "0" when the day or month is less than 10. Example: "2014-05-21""2014-10-01"Clicking allows you to pick the dates from the calendar.
Accounting TargetMonth
When you select [Monthly Accounting] for [Accounting Data Type], specify theaccounting target month. Multiple options can be selected from a list of months (year/month). By default, thelatest month is selected.
Target / AccountingLabel
From the Accounting Label drop down list, select a group of accounting labels to beincluded in accounting.
When you select [All Labels], all accounting labels registered with Device Log Servicewill be included in accounting. To filter accounting labels to be included in accounting, click [Select Accounting Labels]and select targets from the list of labels. The default value is [All Labels].
Device Running TimeAccounting
If [Device Running Time Accounting] is selected in [Accounting Data Type], select anaccounting period in a 4-hour unit. The initial value is all periods.If a pie chart is selected in [Display Type] and the notification type is [Simple (CounterCollection)], it is not displayed.

Device Log Service User Guide
76
When you clicked [Select Accounting Labels] in [Target / Accounting Label]Accounting labels that are set for users registered with Device Log Service are displayed in the list. Select the check box for each accounting label you want to include in accounting, and click [OK].
When you clicked [Select User] in [Target User]Users registered with Device Log Service and users contained in usage data notified from manageddevices are displayed in the list. Select the check box for each user you want to include in accounting, and click [OK].
The following table lists user icons and their meaning.
ImportantIf there are thousands of unregistered users in the system, some of the unregistered users may not bedisplayed in the list of users in the [Select User] dialog box. In this case if target users are not displayed,select [All Users] in [Target User] for accounting.
ReferFor details on user types "Accounting Target Users" (P.18)
When you clicked [Select Device] in [Target Device]Devices being managed by Device Log Service are displayed in the list. Select the check box for each device you want to include in accounting, and click [OK].
Target Device When you select [All Devices], all devices being managed by Device Log Service will beincluded in accounting. To filter devices to be included in accounting, click [Select Device] and select targetsfrom the list of devices. The default value is [All Devices].
Icon Description
Registered Users
System Administrator
Unauthenticated Users, Unregistered Users
- Users other than above
Item Description

3 Daily Operation
77
5.Display the [Display Item] tab, and specify elements to be displayed in the table and chart.
Items you must specify depend on the option you selected for [Display Type] in step 3. When you select [Table] in [Display Type]
Item Description
By Service Select the check box for one or more items to be displayed.
Print • B&W Print Impressions-Total Print Impressions• Color Print Impressions-Total Printed Sheets• Large Color Print Imp.
Copy • B&W Copy Impressions-Total Copy Impressions• Color Copy Impressions-Total Copied Sheets• Large Color Copy Imp.
Fax • Fax Print Impressions• Fax Print Sheets
Tota l Charge s for A l lSelected Services
Select this check box to display the total charges for the selected services in thetable.
By Output Color Select the check box for an item to be displayed. • Total Black & White Impressions• Total Color Impressions• Total Large Color Imp.
By Serv ice (N-UpImpressions)
Select this check box to display the accounting result of 2-Up, 4-Up, 8-Up or morefor copy and print.
NoteIf Notification Type is [Simple (Counter Collection)], depending on themodel, N-Up Impressions cannot be tallied. The accounting result will be "0"for the devices which do not support N-Up accounting.
By Serv ice ( 2 S idedSheets)
Select this check box to display the accounting result of 2-sided output for copy,print or fax print.
Paper Reduction Select this check box to display the accounting result of paper reduction and paperreduction rate.
NoteIf Notification Type is [Simple (Counter Collection)], [Paper Reduction]cannot be tallied on all models.

Device Log Service User Guide
78
When you select other than [Table] in [Display Type]
She et s Pr inte d byDocument Type
Select this check box to display the accounting result of printed sheets bydocument type.
NoteIf Notification Type is [Simple (Counter Collection)], [Sheets Printed byDocument Type] cannot be tallied on all models.
Numbe r of J obs byNumber of Sets
If displaying the accounting results of the number of jobs by the number of sets,attach a check mark.
NoteThe separation of the number of sets is four types: 1, 2 to 5, 6 to 10 and 11sets or more.
Total Sheets Select this check box to display the total number of output sheets.
Accounting Per iod ofDevice Running Time
Select an accounting period in a 4-hour unit.
Item Description
Accounting Unit Select the accounting unit from among [Impressions], [Impressions (N-Up)],[Sheets], [Sheets (2 Sided / 1 Sided)], [Charges], [Sheets (Paper Reduction)] and[Sheets Printed (Document Type)]. The default value is [Impressions].
Note• If Notification Type is [Simple (Counter Collection)], depending on the
model, N-Up Impressions cannot be tallied. In that case, [Sheets (PaperReduction] and [Sheets Printed (Document Type)] cannot be tallied on allmodels. The accounting result will be "0" for the devices which do notsupport above features.
• If [Device Running Time Accounting] is selected in [Accounting Data Type],no accounting unit can be selected and it is fixed to [Seconds].
(When you s e le ct[ Impre ss ions] in[Accounting Unit])
Select the check box for one or more items to be displayed. • B&W Print-B&W Scan• Color Print-Color Scan• Black & White Copy-Send Fax• Color Copy-Fax Print• Large Color Print-Large Color Copy
(When you s e le ct[Impressions (N-Up)] in[Accounting Unit])
Select the check box for one or more items to be displayed.• Print-Copy
(When you select [Sheets(Paper Reduction)] in[Accounting Unit])
Select the check box for one or more items to be displayed. • Actual Paper Reduction-Possible Paper Reduction• Sheets Out of Reduction Scope
(When you s e le ct[Sheets] or [Sheets (2Si de d / 1 S ided)] in[Accounting Unit])
Select the check box for one or more items to be displayed. • Print-Fax Print• Copy
(When you s e le ct[Charges] in [AccountingUnit])
Select the check box for one or more items to be displayed. • B&W Print-Color Copy• Color Print-Fax Print• B&W Copy-Large Color Print• Large Color Copy
Item Description
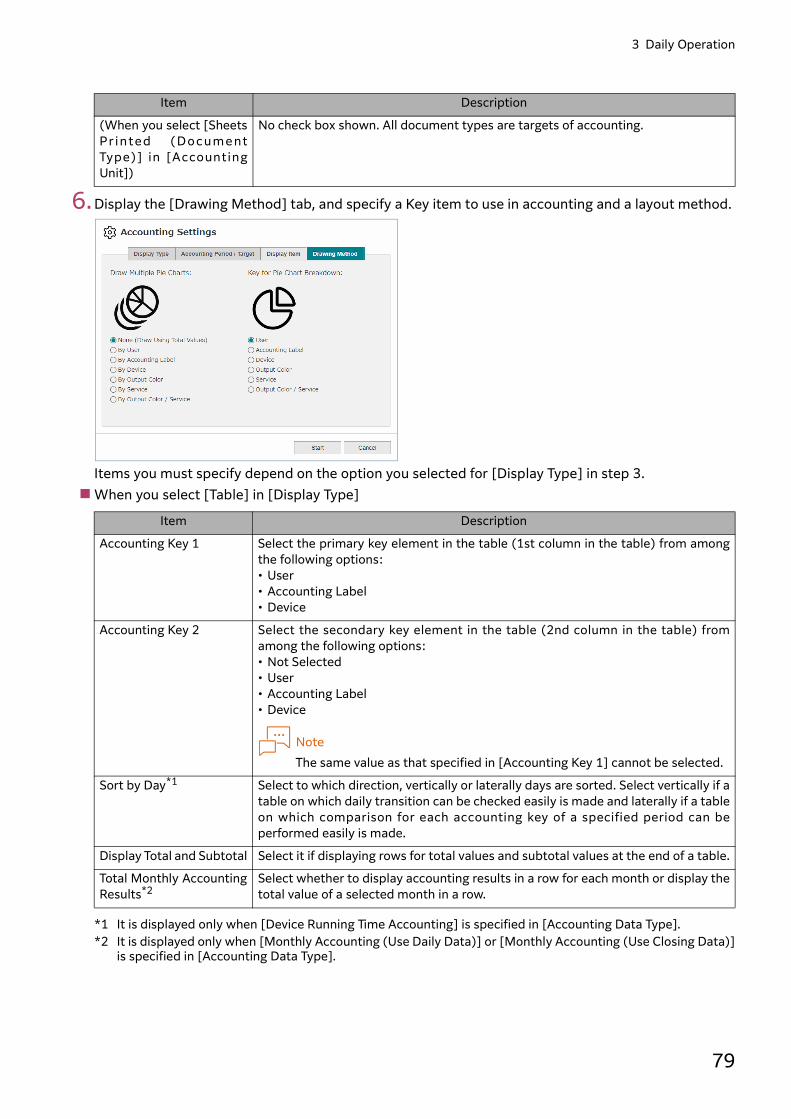
3 Daily Operation
79
6.Display the [Drawing Method] tab, and specify a Key item to use in accounting and a layout method.
Items you must specify depend on the option you selected for [Display Type] in step 3. When you select [Table] in [Display Type]
*1 It is displayed only when [Device Running Time Accounting] is specified in [Accounting Data Type].*2 It is displayed only when [Monthly Accounting (Use Daily Data)] or [Monthly Accounting (Use Closing Data)]
is specified in [Accounting Data Type].
(When you select [SheetsPr inted (Docume ntType)] in [AccountingUnit])
No check box shown. All document types are targets of accounting.
Item Description
Accounting Key 1 Select the primary key element in the table (1st column in the table) from amongthe following options: • User• Accounting Label• Device
Accounting Key 2 Select the secondary key element in the table (2nd column in the table) fromamong the following options: • Not Selected• User• Accounting Label• Device
NoteThe same value as that specified in [Accounting Key 1] cannot be selected.
Sort by Day*1 Select to which direction, vertically or laterally days are sorted. Select vertically if atable on which daily transition can be checked easily is made and laterally if a tableon which comparison for each accounting key of a specified period can beperformed easily is made.
Display Total and Subtotal Select it if displaying rows for total values and subtotal values at the end of a table.
Total Monthly AccountingResults*2
Select whether to display accounting results in a row for each month or display thetotal value of a selected month in a row.
Item Description
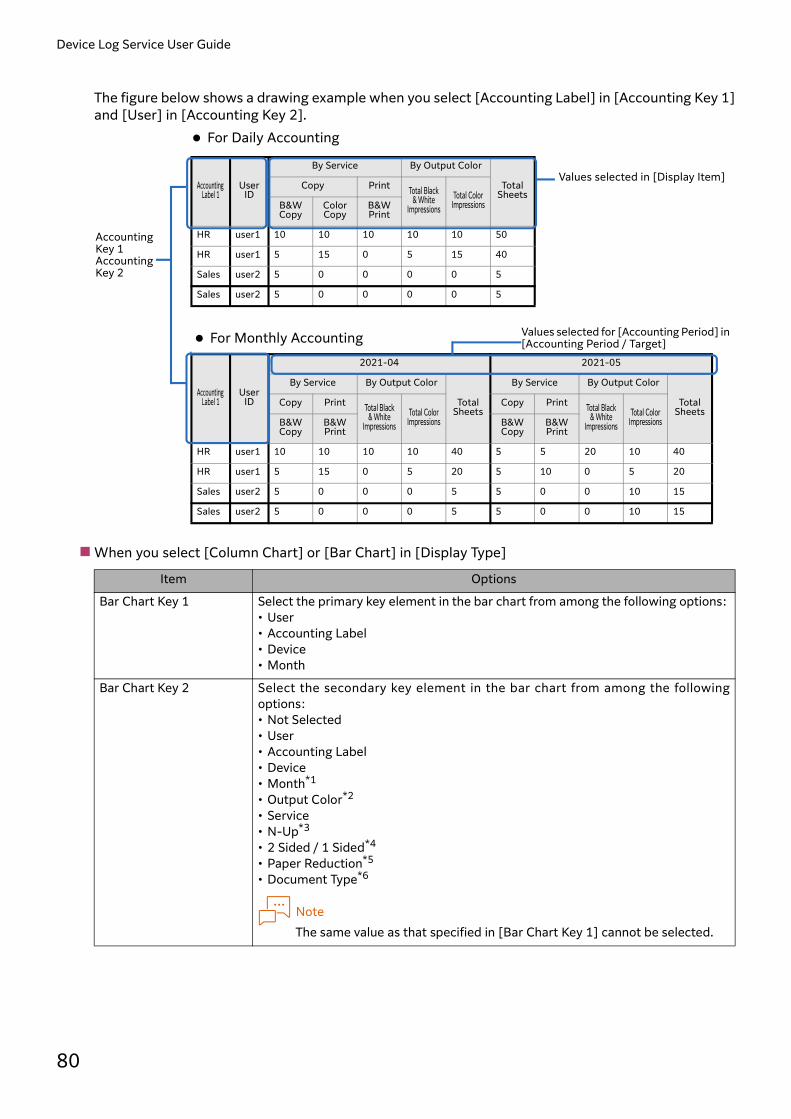
Device Log Service User Guide
80
The figure below shows a drawing example when you select [Accounting Label] in [Accounting Key 1]and [User] in [Accounting Key 2].
When you select [Column Chart] or [Bar Chart] in [Display Type]
Item Options
Bar Chart Key 1 Select the primary key element in the bar chart from among the following options: • User• Accounting Label• Device• Month
Bar Chart Key 2 Select the secondary key element in the bar chart from among the followingoptions: • Not Selected• User• Accounting Label• Device• Month*1
• Output Color*2
• Service• N-Up*3
• 2 Sided / 1 Sided*4
• Paper Reduction*5
• Document Type*6
NoteThe same value as that specified in [Bar Chart Key 1] cannot be selected.
Accounting Label 1
User ID
By Service By Output Color
Total Sheets
Copy Print Total Black & White
ImpressionsTotal Color
ImpressionsB&W Copy
Color Copy
B&W Print
HR user1 10 10 10 10 10 50
HR user1 5 15 0 5 15 40
Sales user2 5 0 0 0 0 5
Sales user2 5 0 0 0 0 5
Values selected in [Display Item]
For Daily Accounting
Accounting Label 1
User ID
2021-04 2021-05
By Service By Output Color
Total Sheets
By Service By Output Color
Total Sheets
Copy Print Total Black & White
ImpressionsTotal Color
Impressions
Copy Print Total Black & White
ImpressionsTotal Color
ImpressionsB&W Copy
B&W Print
B&W Copy
B&W Print
HR user1 10 10 10 10 40 5 5 20 10 40
HR user1 5 15 0 5 20 5 10 0 5 20
Sales user2 5 0 0 0 5 5 0 0 10 15
Sales user2 5 0 0 0 5 5 0 0 10 15
For Monthly Accounting Values selected for [Accounting Period] in [Accounting Period / Target]
Accounting Key 1Accounting Key 2

3 Daily Operation
81
*1 Displayed only when [Accounting Data Type] is set to [Monthly Accounting].*2 Displayed only when [Display Item] is set to [Impressions] or [Charges].*3 Displayed only when [Display Item] is set to [Impressions (N-Up)].*4 Displayed only when [Display Item] is set to [Sheets (2 Sided / 1 Sided)].*5 Displayed only when [Display Item] is set to [Sheets (Paper Reduction)].*6 Displayed only when [Display Item] is set to [Sheets Printed (Document Type)].
When Bar Chart Stacked is selected, color-coded bars based on the specified keys are displayed.
The figure below shows a drawing example when you select [Accounting Label] in [Bar Chart Key 1],[Output Color] in [Bar Chart Key 2], and [By Service] in [Bar Chart Stacked].
Bar Chart Stacked Select whether to combine values of Displayed Items or stack the results talliedwith the specified Key into stacked bar charts. • None (Draws chart to show combined values) • By Output Color*2
• By Service• By Output Color / Service*2
• By N-Up impressions*3
• By 2 Sided / 1 Sided output*4
• By Paper Reduction*5
• By Document Type*6
NoteThe same value as that specified in [Bar Chart Key 2] cannot be selected.
Item Options
Stacking not selected Stacking selected
Bar Chart Key 1Bar Chart Key 2
Bar chart stacking Keys

Device Log Service User Guide
82
When you select [Pie Chart] in [Display Type]
*1 Displayed only when [Accounting Data Type] is set to [Monthly Accounting].*2 Displayed only when [Display Item] is set to [Impressions] or [Charges].*3 Displayed only when [Display Item] is set to [Impressions (N-Up)].*4 Displayed only when [Display Item] is set to [Sheets (2 Sided / 1 Sided)].*5 Displayed only when [Display Item] is set to [Sheets (Paper Reduction)].*6 Displayed only when [Display Item] is set to [Sheets Printed (Document Type)].
The figure below shows an example of the pie chart breakdown.
Item Description
Draw Multiple Pie Charts Specify whether to draw a single pie chart or multiple pie charts. When youselect to draw a single pie chart, all Displayed Items are combined into a piechart. When you select to draw multiple pie charts, select the Key to be usedin accounting. • None (Draws chart to show combined values) • By User• By Accounting Label• By Device• By Month*1
• By Output Color*2
• By Service• By Output Color / Service*2
• By N-Up impressions*3
• By 2 Sided / 1 Sided output*4
• By Paper Reduction*5
• By Document Type*6
Key for Pie Chart Breakdown Specify the keys to be used as the breakdown in pie chart. • User• Accounting Label• Device• Month*1
• Output Color*2
• Service• Output Color / Service*2
• N-Up*3
• 2 Sided / 1 Sided*4
• Paper Reduction*5
• Document Type*6
NoteThe same value as that specified in [Draw Multiple Pie Charts] cannotbe selected.
Breakdown

3 Daily Operation
83
The figure below shows a drawing example when you select [By Service] in [Draw Multiple Pie Charts]and [Accounting Label] in [Key for Pie Chart Breakdown].
When you select [Line Chart] or [Area Chart] in [Display Type]
*1 Displayed only when [Display Item] is set to [Impressions] or [Charges].*2 If [Impressions (N-Up)] is selected for [Display Item], [N-Up] will be fixed to [Accounting Key].*3 If [Sheets (2 Sided / 1 Sided)] is selected for [Display Item], [2 Sided / 1 Sided] will be fixed to [Accounting
Key].*4 If [Sheets (Paper Reduction)] is selected for [Display Item], [Accounting Key] will be fixed to [Paper
Reduction].*5 If [Sheets Printed (Document Type)] is selected for [Display Item], [Accounting Key] will be fixed to
[Document Type].
The figure below shows a drawing example of a line chart when you select [Device] in [AccountingKey].
Item Description
Accounting Key Select the key element in the chart from among the following options: • User• Accounting Label• Device• Output Color*1
• Service• Output Color / Service*1
• N-Up*2
• 2 Sided / 1 Sided*3
• Paper Reduction*4
• Document Type*5
Keys for drawing multiple charts
Key for Pie Chart Breakdown
Accounting Key
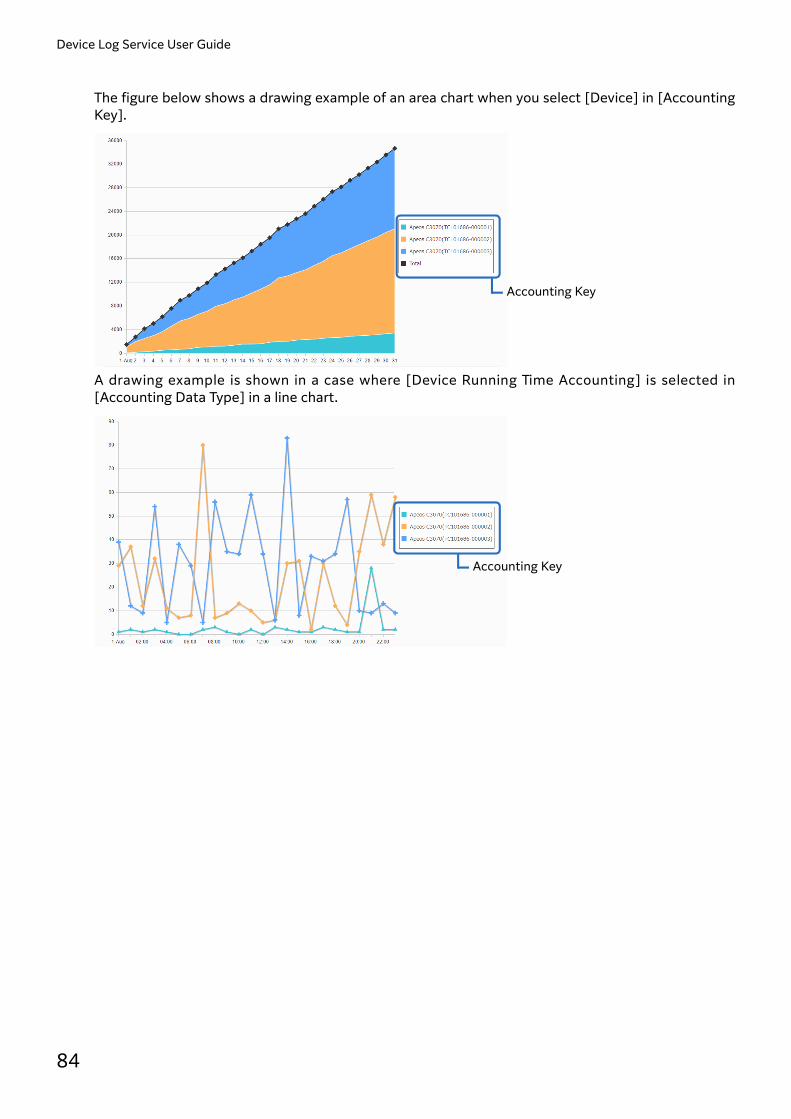
Device Log Service User Guide
84
The figure below shows a drawing example of an area chart when you select [Device] in [AccountingKey].
A drawing example is shown in a case where [Device Running Time Accounting] is selected in[Accounting Data Type] in a line chart.
Accounting Key
Accounting Key
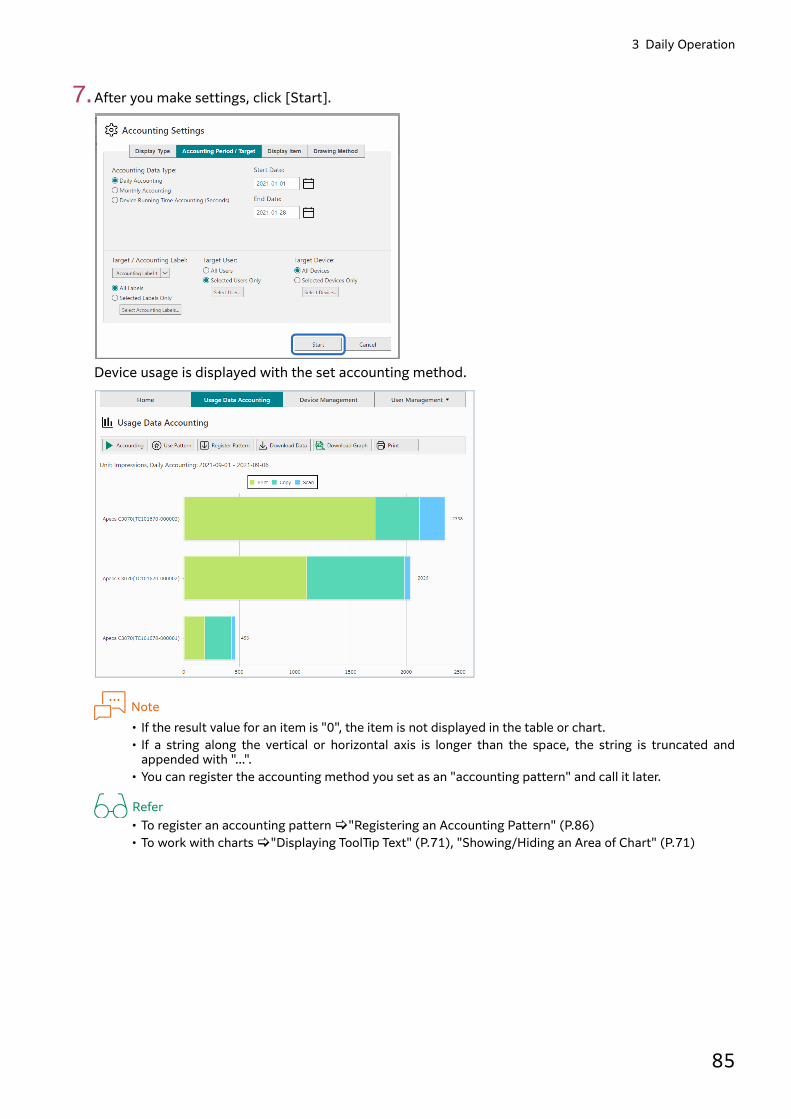
3 Daily Operation
85
7.After you make settings, click [Start].
Device usage is displayed with the set accounting method.
Note• If the result value for an item is "0", the item is not displayed in the table or chart. • If a string along the vertical or horizontal axis is longer than the space, the string is truncated and
appended with "...".• You can register the accounting method you set as an "accounting pattern" and call it later.
Refer• To register an accounting pattern "Registering an Accounting Pattern" (P.86)• To work with charts "Displaying ToolTip Text" (P.71), "Showing/Hiding an Area of Chart" (P.71)
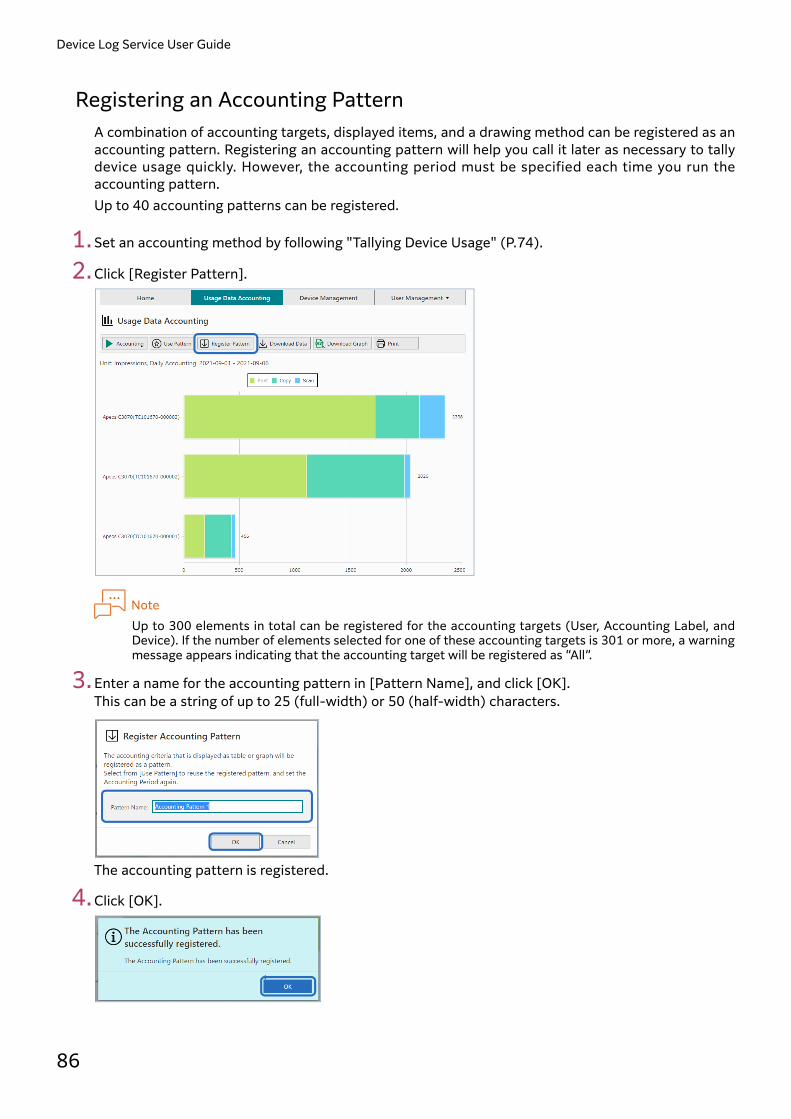
Device Log Service User Guide
86
Registering an Accounting PatternA combination of accounting targets, displayed items, and a drawing method can be registered as anaccounting pattern. Registering an accounting pattern will help you call it later as necessary to tallydevice usage quickly. However, the accounting period must be specified each time you run theaccounting pattern. Up to 40 accounting patterns can be registered.
1.Set an accounting method by following "Tallying Device Usage" (P.74).
2.Click [Register Pattern].
NoteUp to 300 elements in total can be registered for the accounting targets (User, Accounting Label, andDevice). If the number of elements selected for one of these accounting targets is 301 or more, a warningmessage appears indicating that the accounting target will be registered as “All”.
3.Enter a name for the accounting pattern in [Pattern Name], and click [OK]. This can be a string of up to 25 (full-width) or 50 (half-width) characters.
The accounting pattern is registered.
4.Click [OK].

3 Daily Operation
87
Tallying Device Usage By Selecting an Accounting Pattern Call a registered accounting pattern to tally device usage and draw charts and tables.
NoteBy default, the following eight accounting patterns are registered: • Charges by Output Color / Device (Area Chart)• By User / Output Color (Bar Chart)• Charges by Device (Line Chart) • By Accounting Label / Output Color (Pie Chart)• By Accounting Label / User in detail (Table)• N-Up Ratio By Accounting Label (Pie Chart)• 2-Sided Ratio By Accounting Label (Pie Chart)• By Accounting Label in detail (Column Chart)
1.Click [Usage Data Accounting] in the global menu.
2.Click the tool button [Use Pattern].
3.Perform the following steps. 1. Select an accounting pattern you want to run. 2. Click [OK].
1
2
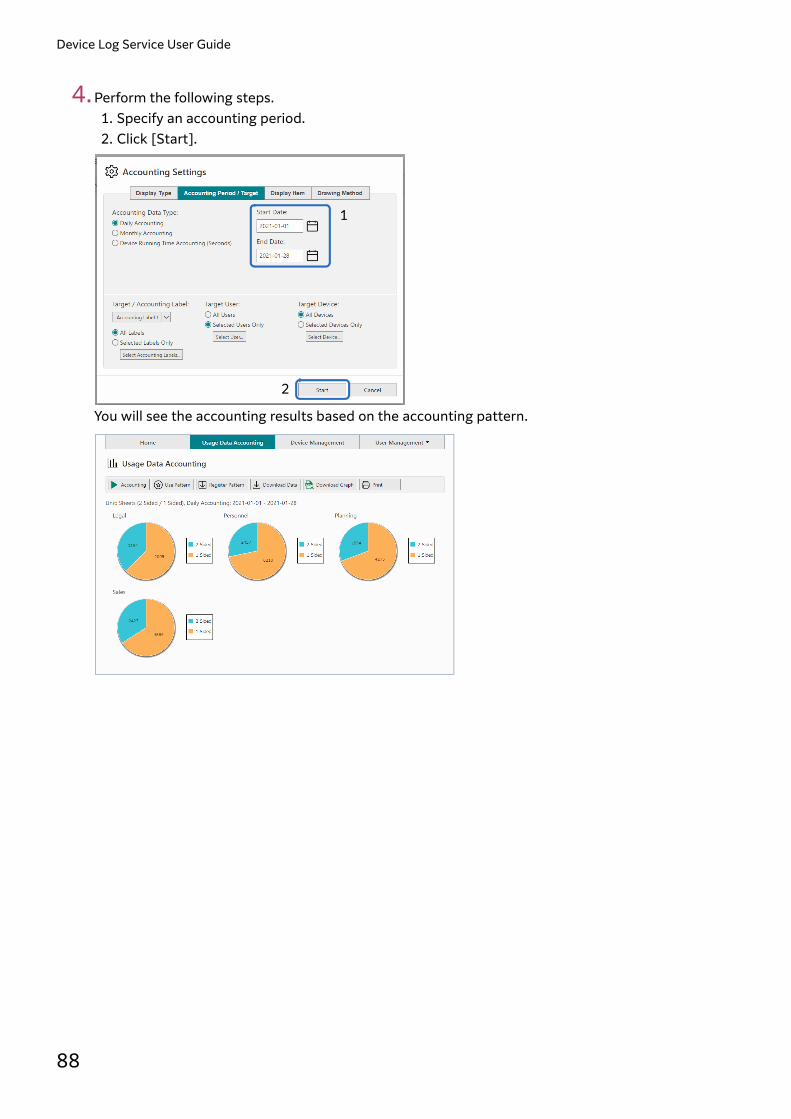
Device Log Service User Guide
88
4.Perform the following steps. 1. Specify an accounting period. 2. Click [Start].
You will see the accounting results based on the accounting pattern.
1
2

3 Daily Operation
89
Downloading Device Usage DataThe following describes how to download usage data from devices, for which counter accounting isenabled, to a CSV format file.The file name of the downloaded file can be set as necessary. The default value is: Job Log File
You can download usage data for a month which is collected from devices.DLS-JobLogs-yyyy-mm.zipwhere, yyyy and mm are year and month of job logs were collected, respectively.
Per day (for the last 2 months)You can download usage data for two months which is collected from devices.DLS-dailyCounters-yyyy-mm-dd.zipwhere, yyyy, mm, and dd are year, month, and day of the date the usage data was created,respectively.
Per monthYou can download usage data for five years which is collected from devices.DLS-counterMonthly-yyyy-mm.zipwhere, yyyy and mm are year and month of the date the usage data was created, respectively.
Refer• For details on usage data "Usage Collection (In the Case of Detailed Notification)" (P.12), "Usage
Collection (In the Case of Simple Notification)" (P.14)• For details of the file format "Usage Data File Format" (P.218)
1.Click [Usage Data Accounting] in the global menu.
2.Click [Download Data].

Device Log Service User Guide
90
3.Perform the following steps. If there is a device which is set [Detailed (Job Log Collection)] for Notification Type
1. Select a unit in which data you want to download is saved.It can be selected from [Job Log File], [Device Running Time], [Accounting Data - By Day (Last 2Months)], [Accounting Data - By Month] and [Accounting Data - By Closing Date].
2. Click the usage data you want to download.
If all the devices are set [Simple (Counter Collection)] for Notification Type1. Select a unit in which data you want to download is saved, from either [Daily (Last 2 months)] or
[Monthly]. Daily or monthly data records are listed.
2. Click the usage data you want to download.
4.Specify a destination location and file name by following the onscreen messages to save the usagedata file.
5.Click [Close] in the [Download Data] dialog box.
1
2
1
2
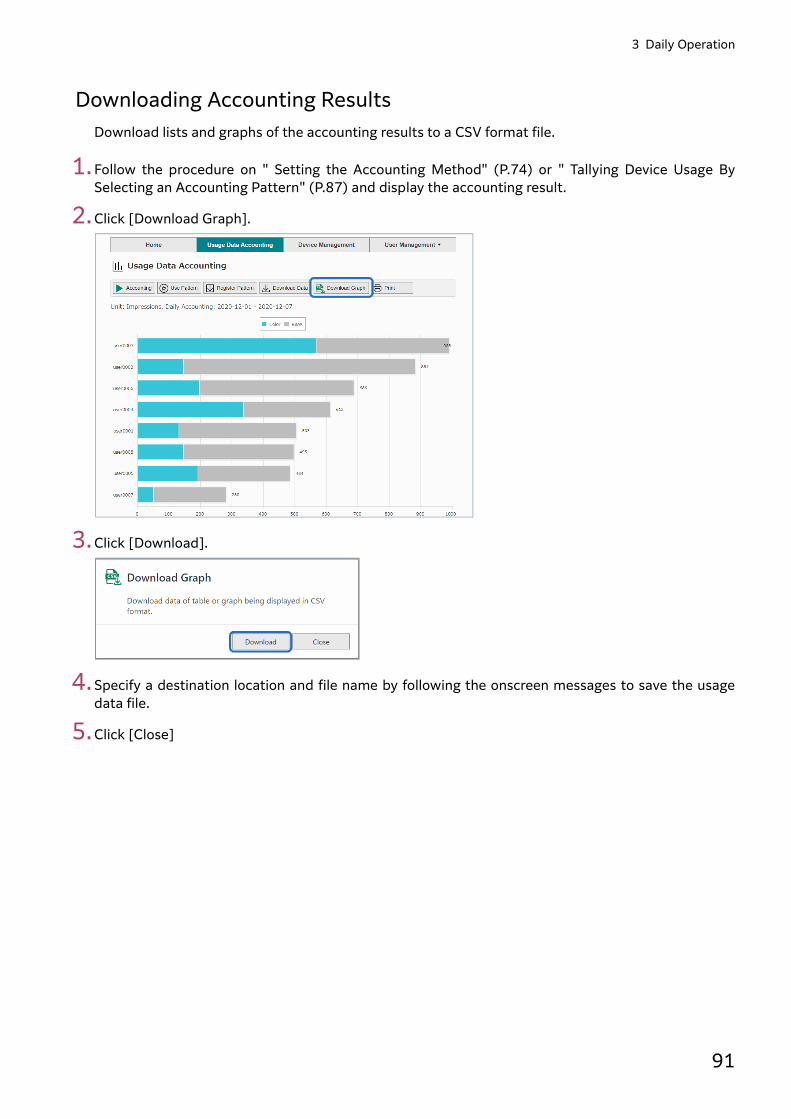
3 Daily Operation
91
Downloading Accounting ResultsDownload lists and graphs of the accounting results to a CSV format file.
1.Follow the procedure on " Setting the Accounting Method" (P.74) or " Tallying Device Usage BySelecting an Accounting Pattern" (P.87) and display the accounting result.
2.Click [Download Graph].
3.Click [Download].
4.Specify a destination location and file name by following the onscreen messages to save the usagedata file.
5.Click [Close]

Device Log Service User Guide
92
Printing Accounting ResultsDisplay the print page for accounting results and print the result.
1.Follow the procedure on "Setting the Accounting Method" (P.74) or "Tallying Device Usage BySelecting an Accounting Pattern" (P.87) and display the accounting result.
2.Click [Print].
[Print Settings] screen is displayed.
3.Perform the following procedure.When you print the tallied result with default print settings of the margin and header/footer on the
web browserSelect [Simple Setting] radio button, and select a desired option from [Paper Size] and [Orientation]respectively.
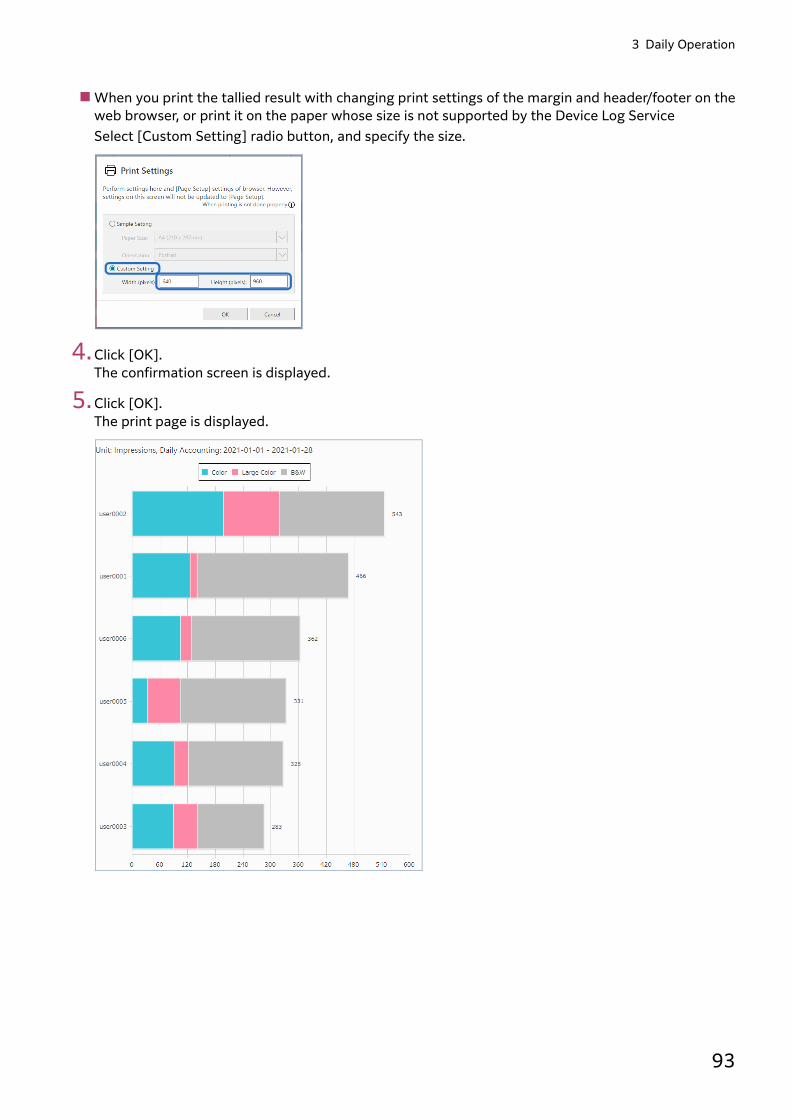
3 Daily Operation
93
When you print the tallied result with changing print settings of the margin and header/footer on theweb browser, or print it on the paper whose size is not supported by the Device Log ServiceSelect [Custom Setting] radio button, and specify the size.
4.Click [OK].The confirmation screen is displayed.
5.Click [OK].The print page is displayed.

Device Log Service User Guide
94
6.Print the accounting result with the print function on a web browser.
Note• The background color and images will not be printed if the "Print background colors and images" option
is not selected on the web browser. Change the settings to print as shown on the screen. For details, referto " Background Colors and Images Not Printed" (P.191).
• If [Custom Setting] is selected in step3 and larger value is specified, the print result is enlarged. If thespecified value is too large, some image may not be printed or the printed result may become blankedsheet of paper. Please adjust the value and preview the printed image on the Print Preview beforeprinting.
When using Internet Explorer1. Select [Print Preview] from the Menu bar or the Command bar.2. Click [Tool] button on the Print Preview window.3. Specify the paper size and orientation, and click [OK].4. Click [Print] button on the Print Preview window.
When using Microsoft Edge or Chrome1. Right-click on the list or the graph, select [Print] from the right-click menu, and then display the
Print Preview window.2. Change the paper size on the Print Preview window, and click [Print].
When using Firefox1. Select [Print] from the menu, and display the Print Preview window.2. Click [Page Setup] on the Print Preview window.3. Change the paper orientation according to the graph type, and click [OK].4. Click [Print] on the Print Preview window.

3 Daily Operation
95
Set Printer MIB accounting methodSet an accounting method for another company's device supporting the Printer MIB registered as achild device.
1.Click [Printer MIB Accounting] in the global menu.
2.Click the tool button [Account].
3.Designate a format for displaying accounting results in the [Display Type] tab.[Table], [Column Chart], [Bar Chart], [Pie Chart], [Line Chart] or [Area Chart] can be selected.

Device Log Service User Guide
96
4.Display the [Accounting Period / Target] tab and designate an accounting period and accountingtarget.
The designated items are as shown in the following.
Item Explanation
Accounting Data Type Select an accounting period from the following. The initial value is [DailyAccounting].• Daily Accounting• Monthly Accounting
Start Date / End Date If [Daily Accounting] is selected in [Accounting Data Type], designate [StartDate] and [End Date] of the accounting.The initial setting of [Start Date] is the first day of the same month of [EndDate]. If the counter of the first day of the same month of [End Date] hasnot been created, the date of the oldest counter is displayed. The initialsetting of [End Date] is the date of the newest counter. If there is no counter,it becomes a blank.Input it in a format of "yyyy-mm-dd" (yyyy: Christian year, mm: month, dd:day).If the number of digits of a month or day is one, attach "0" to the top so thatthe number of digits will be two and input it. Example: "2014-05-21""2014-10-01"If is clicked, a date can be selected from the calendar.
Account ing Per iod ( Targe tMonth)
If [Monthly Accounting (Use Daily Data)] is selected in [Accounting DataType], designate the accounting month.Several ones can be selected from the list of months (year/month). In theinitial setting, the newest month has been selected.
Accounting Period (Issue Date) If [Monthly Accounting (Use Closing Data)] is selected in [Accounting DataType], designate the issue date of the accounting month.Several ones can be selected from the list of the issue dates of closing data(year/month/day). In the initial setting, the newest date has been selected.
Target Device If [All Devices] is selected, all devices supporting the Printer MIB managedby the Device Log Service are the targets of accounting.When narrowing down devices to be accounted, click [Select Device] andselect a target from the list of devices.The initial value is [All Devices].

3 Daily Operation
97
If [Select Device] is clicked in [Target Devices]Devices supporting the Printer MIB of the management target of the Device Log Service are displayedon the list.Attach a check mark to a device to be an accounting target and click [OK].
5. If the setting is completed, click [Start].
With the set accounting method, the usage data of devices are displayed.
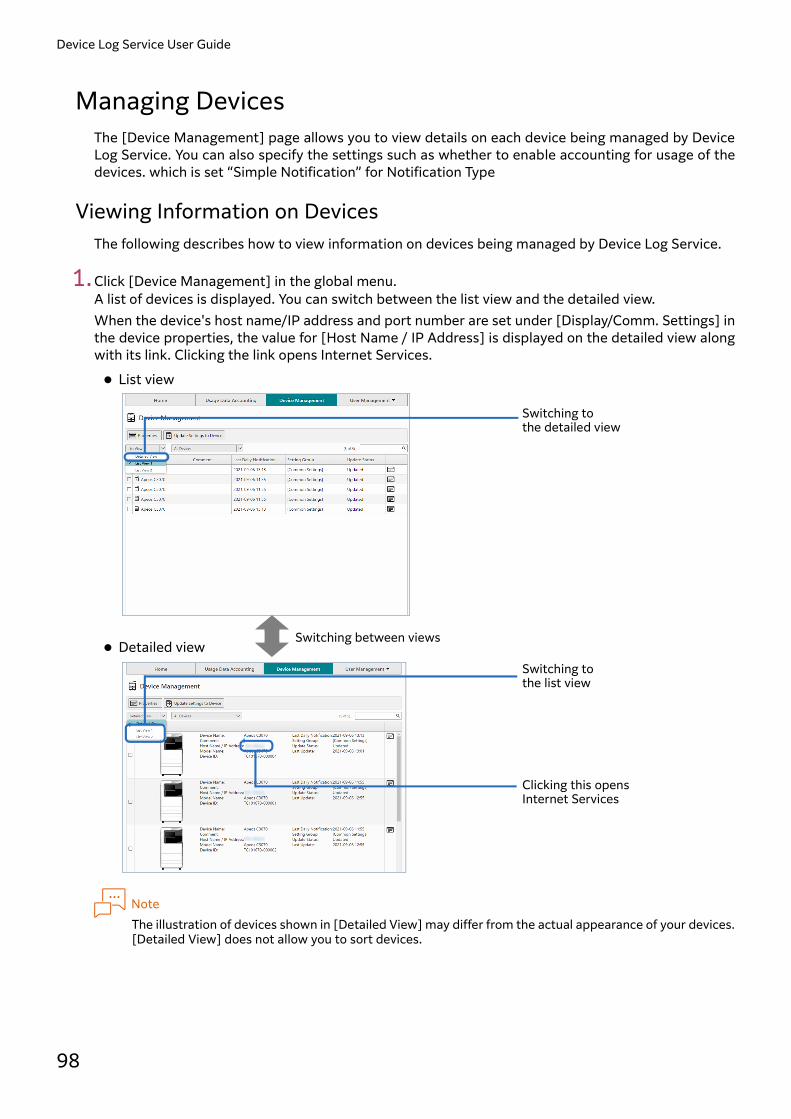
Device Log Service User Guide
98
Managing DevicesThe [Device Management] page allows you to view details on each device being managed by DeviceLog Service. You can also specify the settings such as whether to enable accounting for usage of thedevices. which is set “Simple Notification” for Notification Type
Viewing Information on Devices The following describes how to view information on devices being managed by Device Log Service.
1.Click [Device Management] in the global menu. A list of devices is displayed. You can switch between the list view and the detailed view. When the device's host name/IP address and port number are set under [Display/Comm. Settings] inthe device properties, the value for [Host Name / IP Address] is displayed on the detailed view alongwith its link. Clicking the link opens Internet Services.
NoteThe illustration of devices shown in [Detailed View] may differ from the actual appearance of your devices.[Detailed View] does not allow you to sort devices.
Switching to the detailed view
Switching between views
List view
Detailed view Switching to the list view
Clicking this opens Internet Services

3 Daily Operation
99
2.To display properties of a device, click in the right end column of the row for the device.
The properties dialog box appears.Clicking the property type on the side bar switches between views.
The types of device properties are as follows: Display/Comm. Settings
Indicates information for identifying or accessing the device, such as the display name and IPaddress of the device.
Accounting SettingsYou can set accounting labels to account users other than authenticated users, and also you can setthe last Daily notification.If you use a device which is set to “Simple Notification” for Notification Type, set whether DailyCounter includes the device, and set the time of daily notification. Only devices for which [Enabled]is selected in this field will be processed in Daily Accounting and Monthly Accounting.
Authentication SettingsYou can select to perform authentication settings either on Device Log Service, or control panel onthe device or other software.
NoteAuthentication settings feature may not be available depending on the device.
Side bar

Device Log Service User Guide
100
Device Update SettingsThe update status of the settings information of a device or a user configured on Device Log Servicecan be viewed. Depending on your device, the period of time in which the settings information isautomatically updated to the device can be specified.
Configuration InformationModel name, model code, machine number, the version of the system, availability of N-Upaccounting, availability of settings information update, and a type of notification are displayed.
Refer• For details on each item "Device Management" (P.21)• To change properties "Changing Information on Devices" (P.100)
Changing Information on DevicesThe following shows how to change the device properties.
1.Display the properties dialog box for the device.
Refer"Viewing Information on Devices" (P.98)
2.Click [Display/Comm. Settings] to specify for each of the items. At start of the service, the display name, IP address, and port number set on the device unit aredisplayed in [Display/Comm. Settings]. And, every time you change the IP address or port number ofthe device unit, the changes are updated to [Display/Comm. Settings].
Important• Depending on your network environment, web browsers may not be able to access the device, thus fail
to immediately update settings onto the device or to display Internet Services, even if the device unitsettings are updated to [Display/Comm. Settings]. In such environment, use [Display/Comm. Settings] tosetup the IP address or host name for accessing the device from web browsers. The values you setup willnot be updated to the device unit.
• When other than the default port number (443) is used, and if you switch between enable/disable of theSSL configuration on the device unit, the port number is not updated to [Display/Comm. Settings]. In thiscase, you must setup the port number set in [Display/Comm. Settings] to match the value set on thedevice unit.
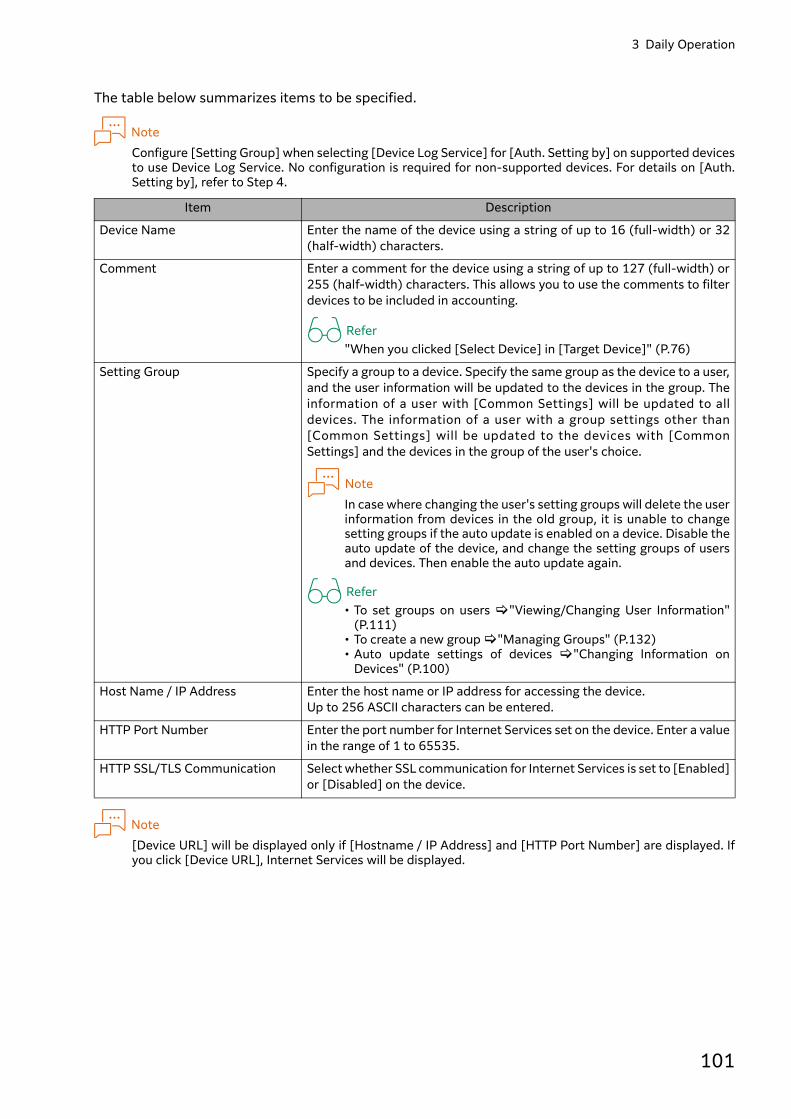
3 Daily Operation
101
The table below summarizes items to be specified.
NoteConfigure [Setting Group] when selecting [Device Log Service] for [Auth. Setting by] on supported devicesto use Device Log Service. No configuration is required for non-supported devices. For details on [Auth.Setting by], refer to Step 4.
Note[Device URL] will be displayed only if [Hostname / IP Address] and [HTTP Port Number] are displayed. Ifyou click [Device URL], Internet Services will be displayed.
Item Description
Device Name Enter the name of the device using a string of up to 16 (full-width) or 32(half-width) characters.
Comment Enter a comment for the device using a string of up to 127 (full-width) or255 (half-width) characters. This allows you to use the comments to filterdevices to be included in accounting.
Refer"When you clicked [Select Device] in [Target Device]" (P.76)
Setting Group Specify a group to a device. Specify the same group as the device to a user,and the user information will be updated to the devices in the group. Theinformation of a user with [Common Settings] will be updated to alldevices. The information of a user with a group settings other than[Common Settings] will be updated to the devices with [CommonSettings] and the devices in the group of the user's choice.
NoteIn case where changing the user's setting groups will delete the userinformation from devices in the old group, it is unable to changesetting groups if the auto update is enabled on a device. Disable theauto update of the device, and change the setting groups of usersand devices. Then enable the auto update again.
Refer• To set groups on users "Viewing/Changing User Information"
(P.111)• To create a new group "Managing Groups" (P.132)• Auto update settings of devices "Changing Information on
Devices" (P.100)
Host Name / IP Address Enter the host name or IP address for accessing the device. Up to 256 ASCII characters can be entered.
HTTP Port Number Enter the port number for Internet Services set on the device. Enter a valuein the range of 1 to 65535.
HTTP SSL/TLS Communication Select whether SSL communication for Internet Services is set to [Enabled]or [Disabled] on the device.

Device Log Service User Guide
102
3.Click [Accounting Settings] to specify for each of the items. If you use a device which is set to “Simple Notification” for Notification Type, you must set [AccountingSettings] before you can start services with Device Log Service. Also, you must change the settings ifyou added managed devices or replaced the existing devices, or if you want to stop accountingtemporarily for maintenance.
The table below summarizes items to be specified.
*1 This item is displayed when the Notification Type of a device is “Simple Notification”. This setting will beapplied with the device.
Item Description
Enable Daily Counter Accounting*1
Specify whether to tally the device's daily counter. Only devices for which this check box is selected will be processed in DailyAccounting and Monthly Accounting.
Notification Time*1 When you select the [Enable Daily Counter Accounting] check box, specifywhat time the device should inform Device Log Service of Daily Counter.
Accounting Labels ExcludingAuthenticated Users- Accounting Label 1- Accounting Label 2- Accounting Label 3
Enter a string to be used as the accounting label for device usage by otherthan registered and unregistered users (Unauthenticated Users, SystemAdministrator, Print Report, etc.). This can be a string of up to 25 (full-width) or 50 (half-width) characters. If this option is omitted, no labels are set.
NoteUsers for which no accounting label is set will be displayed as"Accounting Label Not Set" in an accounting result by accountinglabels.
ReferFor details on user types "Accounting Target Users" (P.18)
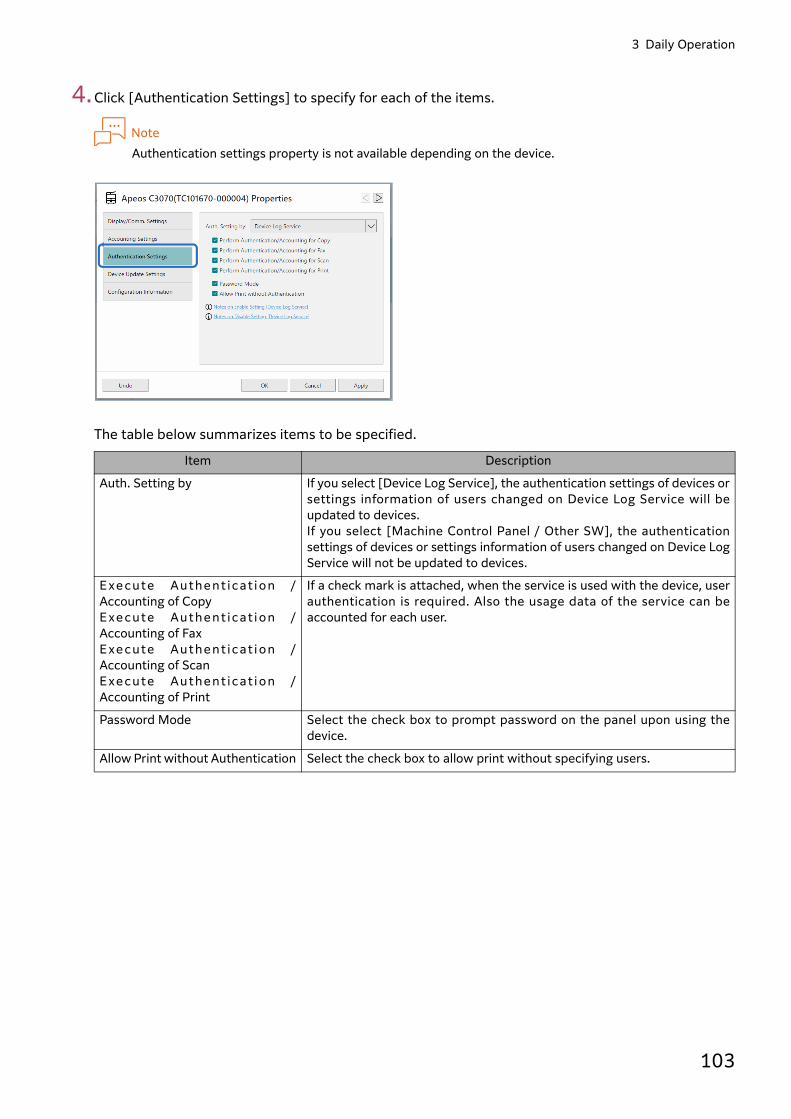
3 Daily Operation
103
4.Click [Authentication Settings] to specify for each of the items.
NoteAuthentication settings property is not available depending on the device.
The table below summarizes items to be specified.
Item Description
Auth. Setting by If you select [Device Log Service], the authentication settings of devices orsettings information of users changed on Device Log Service will beupdated to devices. If you select [Machine Control Panel / Other SW], the authenticationsettings of devices or settings information of users changed on Device LogService will not be updated to devices.
Exe cute Authe nt icat i on /Accounting of CopyExe cute Authe nt icat i on /Accounting of FaxExe cute Authe nt icat i on /Accounting of ScanExe cute Authe nt icat i on /Accounting of Print
If a check mark is attached, when the service is used with the device, userauthentication is required. Also the usage data of the service can beaccounted for each user.
Password Mode Select the check box to prompt password on the panel upon using thedevice.
Allow Print without Authentication Select the check box to allow print without specifying users.

Device Log Service User Guide
104
5.Click [Device Update Settings] to specify for each of the items.
The table below summarizes items to be specified.
Item Description
Auto Update All Settings The information configured on Device Log Service will be updated todevices at specified time. Select the check box and specify the auto updatetime. If you do not select this check box, it is required to update the settingsinformation to devices by immediate update.
ReferImmediate update "Updating Settings Information to DevicesImmediately" (P.106)
NoteAuto Update All Settings may not be available depending on thedevice.
Auto Update Time Specify the time to automatically update the settings information.Select hours ([00] to [23]) and minutes ([00], [10], [20], [30], [40], or[50]).
NoteDevices cannot be operated for several minutes while updating.Specify the time when the devices are more likely to be inactive suchas during lunch break or night-time.

3 Daily Operation
105
6.After you make settings, click [OK] or [Apply].
The device properties are changed on Device Log Service. If any of the following settings are changed, the changed settings will be updated to the device at thenext periodical polling: accounting settings for Daily Counter, authentication settings, and deviceupdate settings.
Note• The change made in Step 5 will not be updated immediately. If you want to update immediately, perform
immediate update. • The authentication settings will not be updated until it is updated by immediate update unless the [Auto
Update All Settings] check box is selected in Step 5.
Refer• "When to Update the Settings Information to Devices" (P.23)• "Updating Settings Information to Devices Immediately" (P.106)• What to do when you encounter a problem "An Error Appears When Attempting to Set Device
Properties" (P.182)

Device Log Service User Guide
106
Updating Settings Information to Devices ImmediatelyThe changes you make to the settings information on the web page of Device Log Service is updatedto the device immediately when the following conditions are satisfied:
If immediate update fails due to some reason, such as incorrect settings or a communication failurebetween your PC and the device, the changes are updated to the device unit at the next periodiccommunication (within 24 hours).
Refer"When to Update the Settings Information to Devices" (P.23)
1.Click [Device Management] in the global menu.A list of devices is displayed.
2.Perform the following procedure.1. Select the check box for the device to which settings information is updated immediately.2. Click [Update Settings to Device].
[Update to Device] screen is displayed.
Condition 1 Condition 2
SSL certificate is installed on the device unit.
ReferRefer to "An Error Appears When Attempting to Set DeviceProperties" (P.182).
Necessary for Simple Notification
[HTTP SSL/TLS Communication] in the [Display/Comm. Settings]properties is set to "Enabled"
Necessary for Simple Notification
Both [Host Name / IP Address] and [HTTP Port Number] in the [Display/Comm. Settings] properties match the values set on the device unit.
Ne cess ary for both S imp leNot i f icat ion and Det a i le dNotification
1
2

3 Daily Operation
107
3.Perform the following procedure.1. Select [Update only differences from previous update].
NoteIf the settings on a device unit is deleted, including hard disk initialization, select [Overwrite AllSettings] and update not only the changed settings but all of the settings information.
2. Click [Start Update].
A process to update the settings information will start. This process usually takes several minutes.
NoteIf you select the multiple devices that are set "detailed notification" for the notification type, the devicescommunicate with each other.If [Communication Error] occurs due to miscommunication of the devices, update the devices one by one.
4.Close the window.
1
2

Device Log Service User Guide
108
Manage Printer MIB devicesOn the [Printer MIB Device Management] page, the list of Printer MIB devices (child devices) can bedisplayed and added newly.
Refer to/Change Printer MIB device informationRefer to and change device information registered in the Device Log Service as a child device.
1.Click [Device Management] in the global menu.Information on Printer MIB devices is displayed on a list.
2. If changing properties, perform the following operation.1. Attach only one check mark to a device whose properties will be changed.2. Click [Properties].
1
2
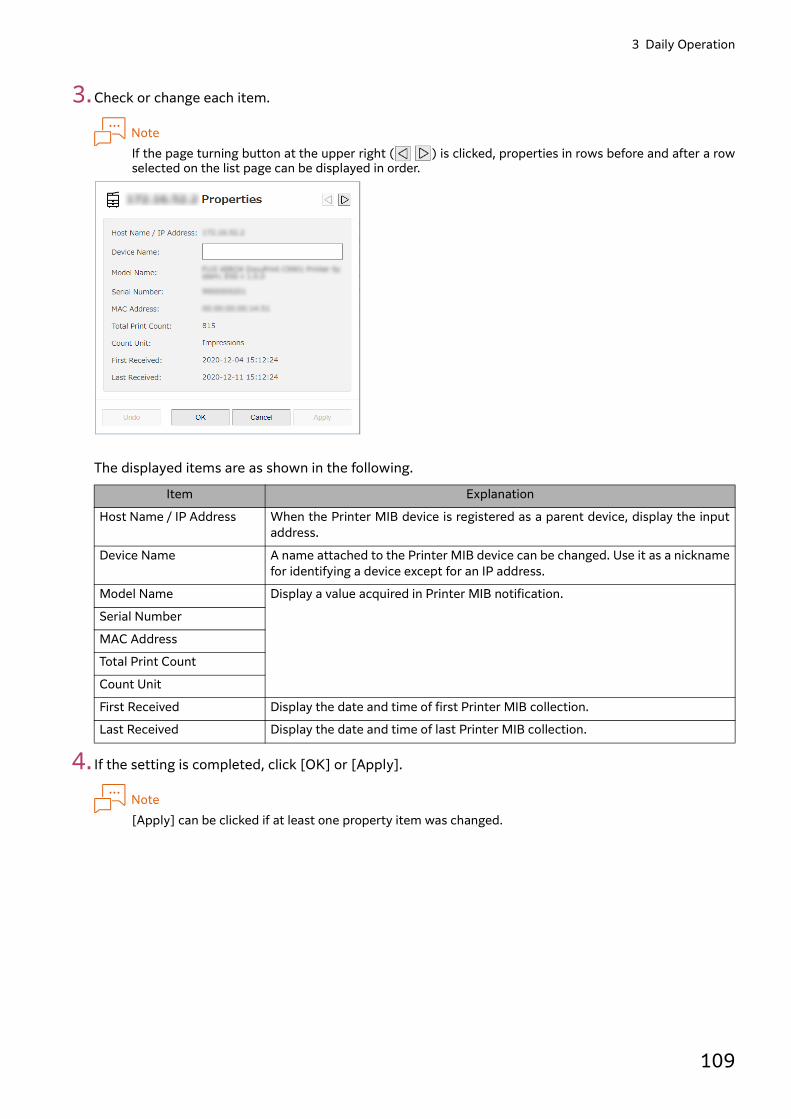
3 Daily Operation
109
3.Check or change each item.
NoteIf the page turning button at the upper right ( ) is clicked, properties in rows before and after a rowselected on the list page can be displayed in order.
The displayed items are as shown in the following.
4. If the setting is completed, click [OK] or [Apply].
Note[Apply] can be clicked if at least one property item was changed.
Item Explanation
Host Name / IP Address When the Printer MIB device is registered as a parent device, display the inputaddress.
Device Name A name attached to the Printer MIB device can be changed. Use it as a nicknamefor identifying a device except for an IP address.
Model Name Display a value acquired in Printer MIB notification.
Serial Number
MAC Address
Total Print Count
Count Unit
First Received Display the date and time of first Printer MIB collection.
Last Received Display the date and time of last Printer MIB collection.
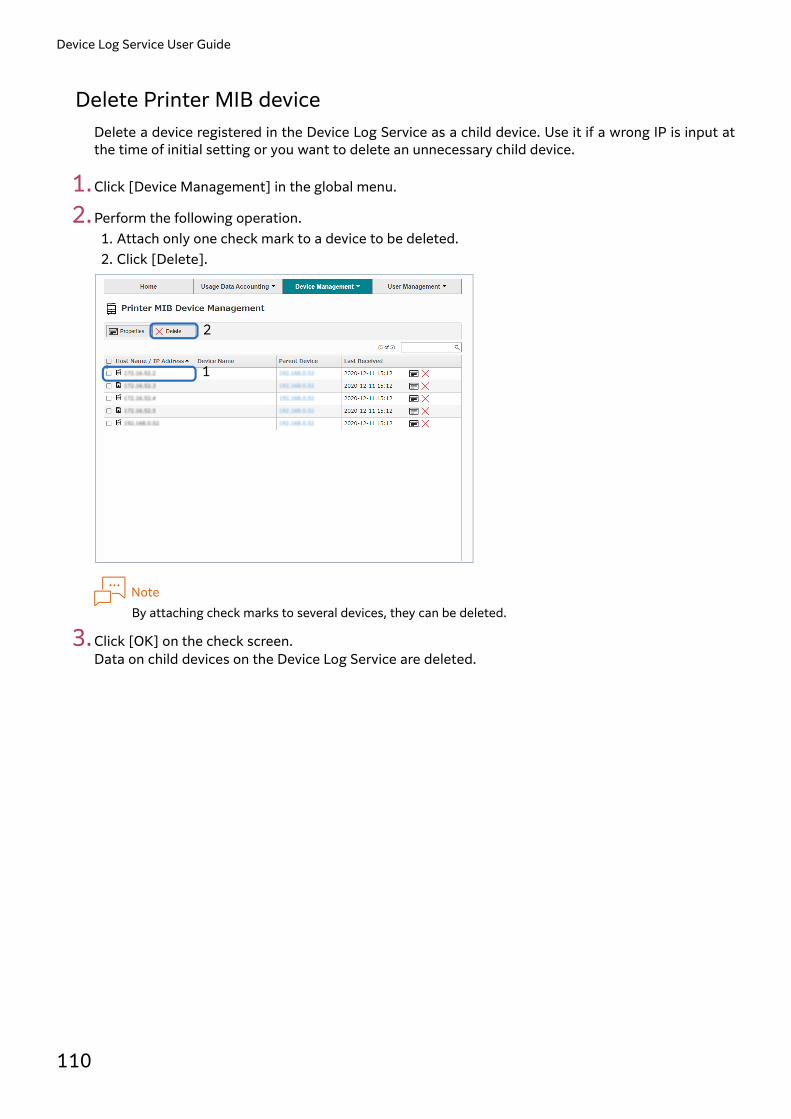
Device Log Service User Guide
110
Delete Printer MIB deviceDelete a device registered in the Device Log Service as a child device. Use it if a wrong IP is input atthe time of initial setting or you want to delete an unnecessary child device.
1.Click [Device Management] in the global menu.
2.Perform the following operation.1. Attach only one check mark to a device to be deleted.2. Click [Delete].
NoteBy attaching check marks to several devices, they can be deleted.
3.Click [OK] on the check screen.Data on child devices on the Device Log Service are deleted.
1
2

3 Daily Operation
111
Managing Users The [User Management] page allows you to display a list of users and add new users to Device LogService.
Viewing/Changing User InformationYou can view and change user information registered with Device Log Service.
NoteSpecify the following items if using Device Log Service with [Auth. Setting by] set to [Device Log Service]on compatible devices: [Setting Group], [Password], [E-mail Address], [Card ID], [Permission Settings],[Copy Service], [Fax Service], [Scanner Service] and [Print Service].No configuration is required for non-supported devices.For information on [Auth. Setting by], refer to Step 4 of "Setting Properties of Devices" (P.45).
1.Click [User Management] in the global menu. This lists user information on the screen.
2.To change properties, perform the following steps.1. Select a single user whose properties you want to change, by selecting the check box. 2. Click [Properties].
NoteYou can select multiple users by selecting check boxes to change properties. In this case, only theaccounting label for the selected users can be changed.
1
2

Device Log Service User Guide
112
3.Click [Basic Information] and specify each item.
The table below summarizes items to be entered.
Item Description
User ID(Required)
Enter the user ID. If you plan to tally device usage by accounting labels, you mustenter the same value as the user ID registered with devices. Within 32 full-width characters and 64 half-width characters can be entered. Theuser ID is case-sensitive.
NoteWhen you update user information on a device, usable characters and lengthdiffer depending on models or settings. For details, refer to manuals of yourdevice.
User Name Enter the name of the user. Within 32 full-width characters and 64 half-width characters can be entered.
NoteWhen you update user information on a device, usable characters and lengthdiffer depending on models or settings. For details, refer to manuals of yourdevice.
Accounting Label 1Accounting Label 2Accounting Label 3
Enter an accounting label to use to categorize the user based on the department orgroup that the user belongs to. This can be a string of up to 25 (full-width) or 50 (half-width) characters. However, astring starting with asterisk (*) cannot be specified. If this option is omitted, no labels are set.
NoteUsers for which no accounting label is set will be displayed as "AccountingLabel Not Set" in an accounting result by accounting labels.
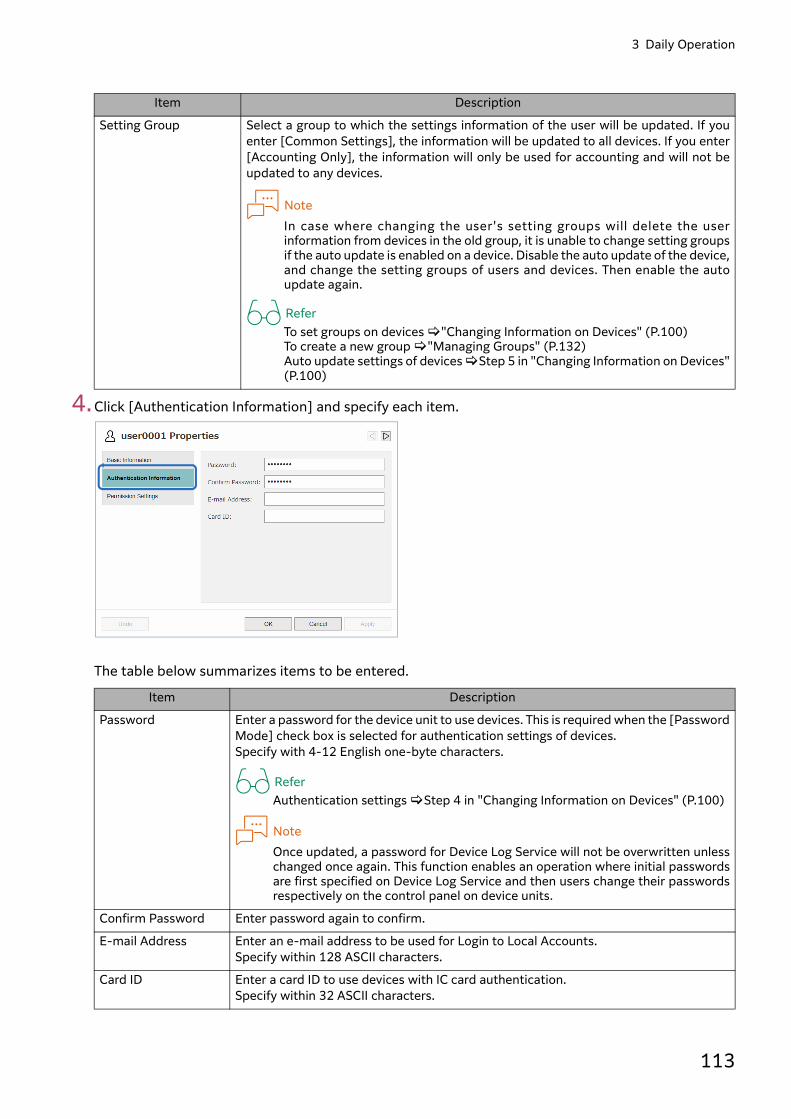
3 Daily Operation
113
4.Click [Authentication Information] and specify each item.
The table below summarizes items to be entered.
Setting Group Select a group to which the settings information of the user will be updated. If youenter [Common Settings], the information will be updated to all devices. If you enter[Accounting Only], the information will only be used for accounting and will not beupdated to any devices.
NoteIn case where changing the user's setting groups will delete the userinformation from devices in the old group, it is unable to change setting groupsif the auto update is enabled on a device. Disable the auto update of the device,and change the setting groups of users and devices. Then enable the autoupdate again.
ReferTo set groups on devices "Changing Information on Devices" (P.100)To create a new group "Managing Groups" (P.132)Auto update settings of devices Step 5 in "Changing Information on Devices"(P.100)
Item Description
Password Enter a password for the device unit to use devices. This is required when the [PasswordMode] check box is selected for authentication settings of devices. Specify with 4-12 English one-byte characters.
ReferAuthentication settings Step 4 in "Changing Information on Devices" (P.100)
NoteOnce updated, a password for Device Log Service will not be overwritten unlesschanged once again. This function enables an operation where initial passwordsare first specified on Device Log Service and then users change their passwordsrespectively on the control panel on device units.
Confirm Password Enter password again to confirm.
E-mail Address Enter an e-mail address to be used for Login to Local Accounts. Specify within 128 ASCII characters.
Card ID Enter a card ID to use devices with IC card authentication. Specify within 32 ASCII characters.
Item Description

Device Log Service User Guide
114
5.Click [Permission Settings] and specify each item.
The table below summarizes items to be entered.
6.Click [OK] or [Apply] when the setting is completed.
Item Description
Permission Settings Select the permission settings for devices by users. If you enter [Default], the restrictionspecified as [Default Permission Settings] will be applied. If you enter [By User],restriction of device use can be specified for each user.
ReferDefault permission settings "Restricting the Device Use" (P.143)
Copy Service If you select [By User], select either of the following permissions: "Free Access", "Black & White Only", "Color Only" or "No Access"
Fax Service If you select [By User], select either of the following permissions: "Free Access" or "No Access"
Scan Service If you select [By User], select either of the following permissions: "Free Access", "Black & White Only", "Color Only" or "No Access"
Print Service If you select [By User], select either of the following permissions: "Free Access", "Black & White Only" or "No Access"

3 Daily Operation
115
Adding/Updating/Deleting Users in a User Information FileYou can import a user information file created in the CSV format into Device Log Service to add users.You can also update or delete user information. For example, at start of operation or reorganization, you can use a user information file to efficientlyadd, update, or delete multiple users without duplication or missing.
Refer"User Information File Format" (P.123)
1.Click [User Management] in the global menu.
2.Click [CSV Upload].
3.Perform the following steps. 1. Click [Browse] to specify the user information file. 2. In [Handling Differences], select how you want to add or update user information described in the
user information file to Device Log Service. [Add and Modify]
Adds or modifies user information that are recorded in the user information file. Users will neverbe deleted from Device Log Service. This prevents from deleting users by uploading an old fileby mistake. Select this for normal cases.
[Add, Modify and Delete]Replaces user information that are recorded in the user information file with the userinformation on Device Log Service. The users not found in the file are deleted from the DeviceLog Service. Select this to restore the information to a former state with information such asbackup data.
[Specify Processing Type]Process user information that are recorded in the user information file according to the value inthe [Processing Type] row in the file. You can specify to add / update / delete by users. Unwantedupdate can be prevented, as error will occur when there is any mismatch between the user'srecord status and the processing type.
ReferFor details on the processing "How differences are processed at uploading" (P.125)

Device Log Service User Guide
116
3. Click [Upload].
4.Check the content to be registered, and click [OK].
User information is uploaded.
5.Click [Close] in the [CSV Upload] dialog box.
2
3
1
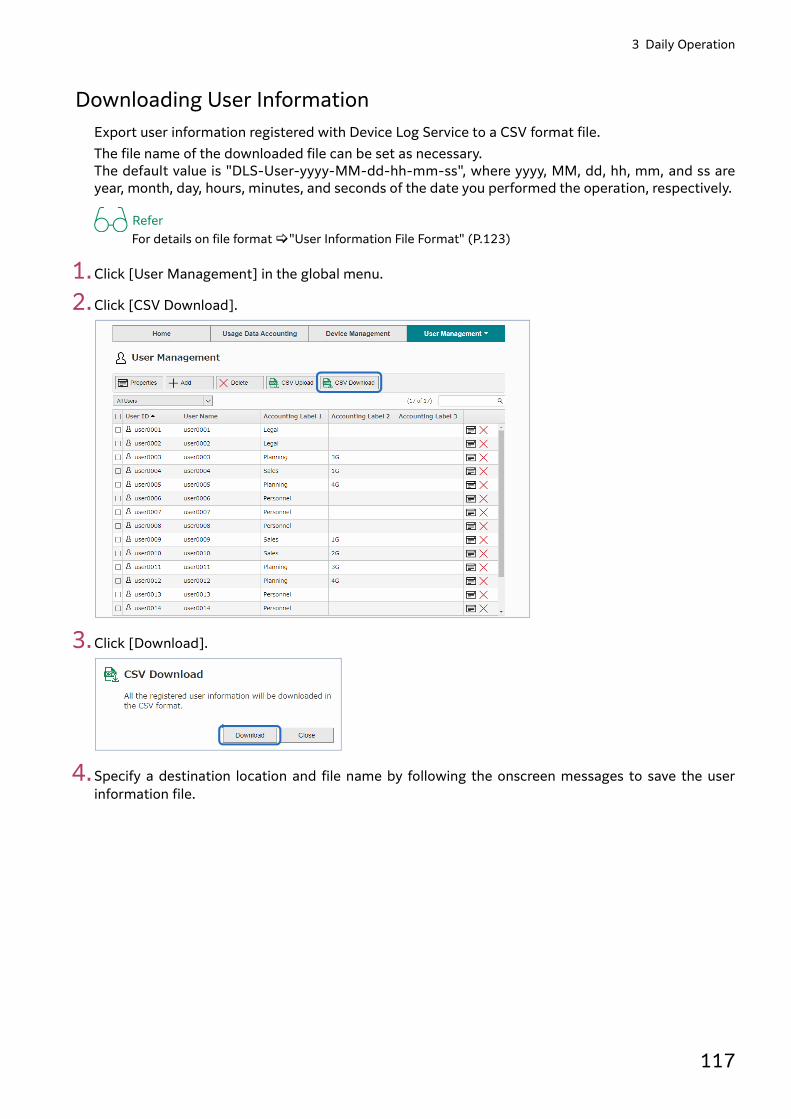
3 Daily Operation
117
Downloading User InformationExport user information registered with Device Log Service to a CSV format file. The file name of the downloaded file can be set as necessary. The default value is "DLS-User-yyyy-MM-dd-hh-mm-ss", where yyyy, MM, dd, hh, mm, and ss areyear, month, day, hours, minutes, and seconds of the date you performed the operation, respectively.
ReferFor details on file format "User Information File Format" (P.123)
1.Click [User Management] in the global menu.
2.Click [CSV Download].
3.Click [Download].
4.Specify a destination location and file name by following the onscreen messages to save the userinformation file.

Device Log Service User Guide
118
Adding Users Individually from the Settings ScreenThe following shows how to enter user information one by one to add new users to Device Log Service.Up to 10,000 users can be added.
ReferDetails on items for user information and available characters "Viewing/Changing User Information"(P.111)
1.Click [User Management] in the global menu.
2.Click [Add].
3.Click [Basic Information] and specify each item.

3 Daily Operation
119
4.Click [Authentication Information] and specify each item.
5.Click [Permission Settings] and specify each item.
6.Click [OK].
The user is added to Device Log Service.
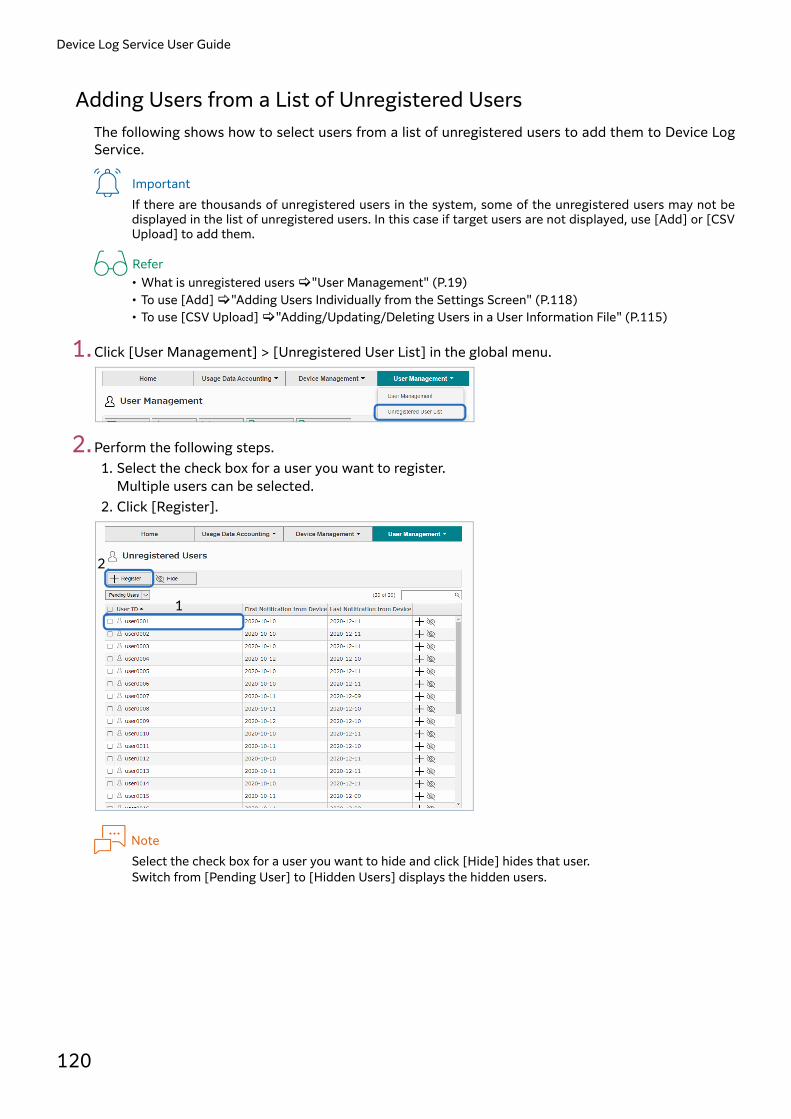
Device Log Service User Guide
120
Adding Users from a List of Unregistered Users The following shows how to select users from a list of unregistered users to add them to Device LogService.
ImportantIf there are thousands of unregistered users in the system, some of the unregistered users may not bedisplayed in the list of unregistered users. In this case if target users are not displayed, use [Add] or [CSVUpload] to add them.
Refer• What is unregistered users "User Management" (P.19)• To use [Add] "Adding Users Individually from the Settings Screen" (P.118)• To use [CSV Upload] "Adding/Updating/Deleting Users in a User Information File" (P.115)
1.Click [User Management] > [Unregistered User List] in the global menu.
2.Perform the following steps.1. Select the check box for a user you want to register.
Multiple users can be selected. 2. Click [Register].
NoteSelect the check box for a user you want to hide and click [Hide] hides that user.Switch from [Pending User] to [Hidden Users] displays the hidden users.
1
2

3 Daily Operation
121
3.Perform the following steps. When you selected a single user in step 2
1. Fill in [User Name] and [Accounting Label].
ReferFor details on items and allowable characters "Viewing/Changing User Information" (P.111)
2. Click [OK].
When you selected multiple users in step 2 1. Fill in [Accounting Label].
The user name field is populated with the same value as the user ID.
NoteYou can change the user name after registration, by displaying the properties on the [UserManagement] page.
ReferFor details on items and allowable characters "Viewing/Changing User Information" (P.111)
2. Click [OK].
The users are added to Device Log Service. Refer to "Viewing/Changing User Information" (P.111) and configure the user information asnecessary.
1
2
1
2
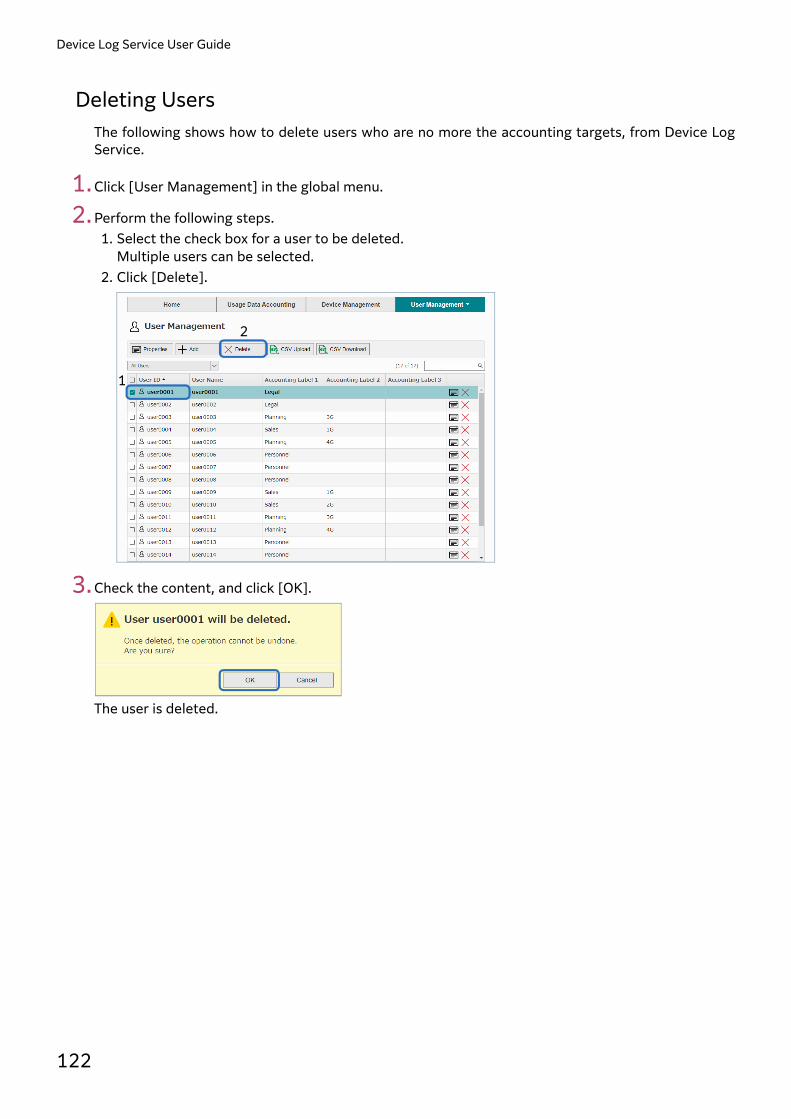
Device Log Service User Guide
122
Deleting Users The following shows how to delete users who are no more the accounting targets, from Device LogService.
1.Click [User Management] in the global menu.
2.Perform the following steps.1. Select the check box for a user to be deleted.
Multiple users can be selected. 2. Click [Delete].
3.Check the content, and click [OK].
The user is deleted.
1
2

3 Daily Operation
123
User Information File FormatA user information file is a CSV format file in which user information is described. This file is used whenyou perform the following procedures: [CSV Download] on the [User Management] page [CSV Upload] on the [User Management] page [Download Backup Data] on the [System Settings] page
Note• When creating a new user information file, an efficient way is to execute [CSV Download] first and then
use the downloaded file as template for editing. • User information files can be edited using an application such as Microsoft Excel or a text editor. When
using Microsoft Excel, please note that the leading "0" might be deleted.
Refer• To download CSV "Downloading User Information" (P.117)• To upload CSV "Adding/Updating/Deleting Users in a User Information File" (P.115)• To download backup data "Downloading Backup Data" (P.138)
The following describes the file format.
File formatCSV (comma-delimited) format file
File contentThe first row in the file describes the headers. The second and subsequent rows describe information shown in the table below.
Note Specify the following items if using Device Log Service with [Auth. Setting by] set to [Device Log Service]
on compatible devices: [Setting Group], [Password], [E-mail Address], [Card ID], [Permission Settings],[Copy Service], [Fax Service], [Scanner Service] and [Print Service]. No configuration is required fornonsupported devices. For information on [Auth. Setting by], refer to Step 6 of "Setting Properties ofDevices" (P.45).
Header Description
Processing Type This item is required when [Specify Processing Type] is selected at uploading. Specifyeither of the following options: The string is not case-sensitive. • "ADD" or "A"
Adds user information. • "MODIFY" or "M"
Updates user information. • "DELETE" or "D"
Deletes user information.
For details on process for each of the processing types, refer to "How differences areprocessed at uploading" (P.125).
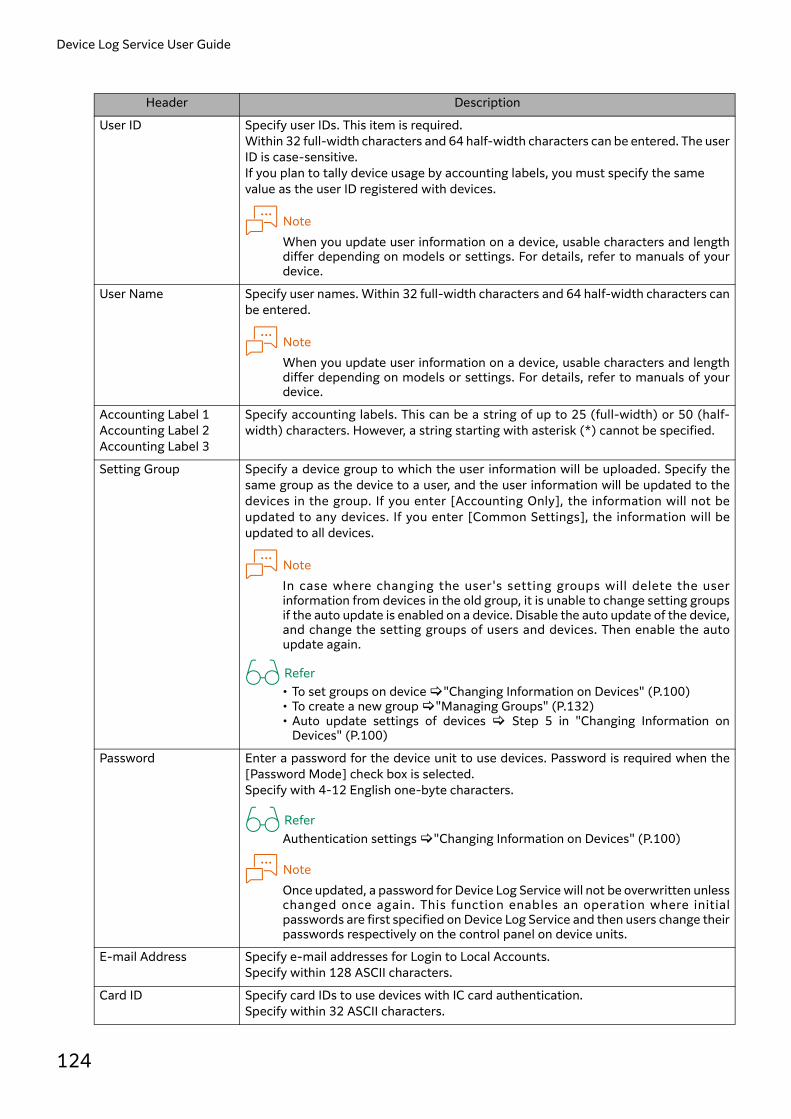
Device Log Service User Guide
124
User ID Specify user IDs. This item is required. Within 32 full-width characters and 64 half-width characters can be entered. The userID is case-sensitive. If you plan to tally device usage by accounting labels, you must specify the samevalue as the user ID registered with devices.
NoteWhen you update user information on a device, usable characters and lengthdiffer depending on models or settings. For details, refer to manuals of yourdevice.
User Name Specify user names. Within 32 full-width characters and 64 half-width characters canbe entered.
NoteWhen you update user information on a device, usable characters and lengthdiffer depending on models or settings. For details, refer to manuals of yourdevice.
Accounting Label 1Accounting Label 2Accounting Label 3
Specify accounting labels. This can be a string of up to 25 (full-width) or 50 (half-width) characters. However, a string starting with asterisk (*) cannot be specified.
Setting Group Specify a device group to which the user information will be uploaded. Specify thesame group as the device to a user, and the user information will be updated to thedevices in the group. If you enter [Accounting Only], the information will not beupdated to any devices. If you enter [Common Settings], the information will beupdated to all devices.
NoteIn case where changing the user's setting groups will delete the userinformation from devices in the old group, it is unable to change setting groupsif the auto update is enabled on a device. Disable the auto update of the device,and change the setting groups of users and devices. Then enable the autoupdate again.
Refer• To set groups on device "Changing Information on Devices" (P.100)• To create a new group "Managing Groups" (P.132)• Auto update settings of devices Step 5 in "Changing Information on
Devices" (P.100)
Password Enter a password for the device unit to use devices. Password is required when the[Password Mode] check box is selected.Specify with 4-12 English one-byte characters.
ReferAuthentication settings "Changing Information on Devices" (P.100)
NoteOnce updated, a password for Device Log Service will not be overwritten unlesschanged once again. This function enables an operation where initialpasswords are first specified on Device Log Service and then users change theirpasswords respectively on the control panel on device units.
E-mail Address Specify e-mail addresses for Login to Local Accounts.Specify within 128 ASCII characters.
Card ID Specify card IDs to use devices with IC card authentication.Specify within 32 ASCII characters.
Header Description
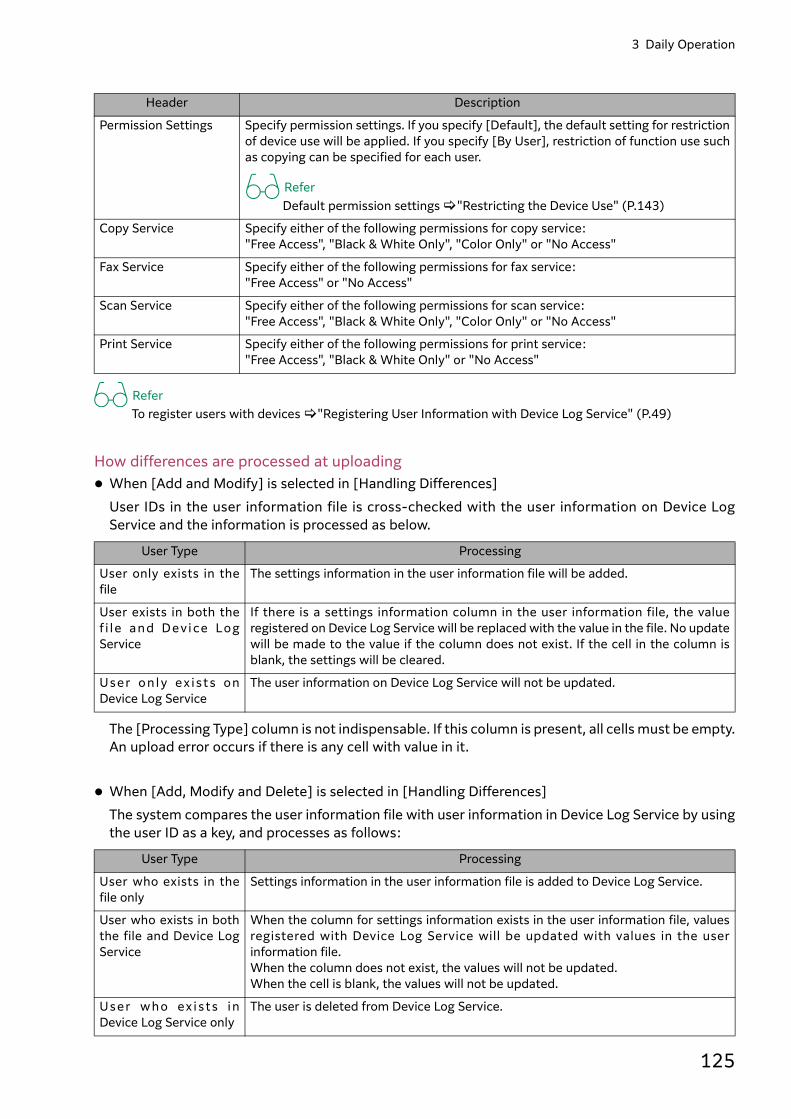
3 Daily Operation
125
ReferTo register users with devices "Registering User Information with Device Log Service" (P.49)
How differences are processed at uploading When [Add and Modify] is selected in [Handling Differences]
User IDs in the user information file is cross-checked with the user information on Device LogService and the information is processed as below.
The [Processing Type] column is not indispensable. If this column is present, all cells must be empty.An upload error occurs if there is any cell with value in it.
When [Add, Modify and Delete] is selected in [Handling Differences]The system compares the user information file with user information in Device Log Service by usingthe user ID as a key, and processes as follows:
Permission Settings Specify permission settings. If you specify [Default], the default setting for restrictionof device use will be applied. If you specify [By User], restriction of function use suchas copying can be specified for each user.
ReferDefault permission settings "Restricting the Device Use" (P.143)
Copy Service Specify either of the following permissions for copy service: "Free Access", "Black & White Only", "Color Only" or "No Access"
Fax Service Specify either of the following permissions for fax service: "Free Access" or "No Access"
Scan Service Specify either of the following permissions for scan service: "Free Access", "Black & White Only", "Color Only" or "No Access"
Print Service Specify either of the following permissions for print service: "Free Access", "Black & White Only" or "No Access"
User Type Processing
User only exists in thefile
The settings information in the user information file will be added.
User exists in both thef i le and Devi ce LogService
If there is a settings information column in the user information file, the valueregistered on Device Log Service will be replaced with the value in the file. No updatewill be made to the value if the column does not exist. If the cell in the column isblank, the settings will be cleared.
User on l y ex ist s onDevice Log Service
The user information on Device Log Service will not be updated.
User Type Processing
User who exists in thefile only
Settings information in the user information file is added to Device Log Service.
User who exists in boththe file and Device LogService
When the column for settings information exists in the user information file, valuesregistered with Device Log Service will be updated with values in the userinformation file.When the column does not exist, the values will not be updated. When the cell is blank, the values will not be updated.
User who ex i sts inDevice Log Service only
The user is deleted from Device Log Service.
Header Description

Device Log Service User Guide
126
The [Processing Type] column may or may not exist. However, if this column exists, all cells in thecolumn must be empty. If even one cell has data, uploading fails.
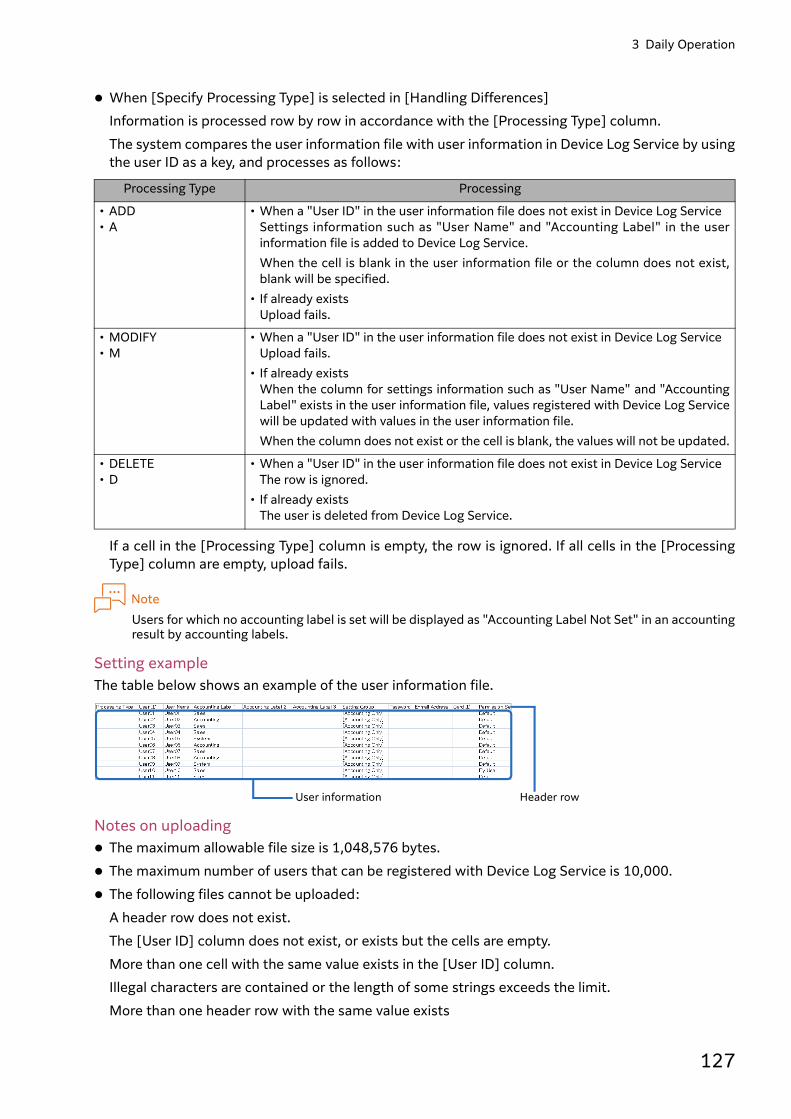
3 Daily Operation
127
When [Specify Processing Type] is selected in [Handling Differences]Information is processed row by row in accordance with the [Processing Type] column. The system compares the user information file with user information in Device Log Service by usingthe user ID as a key, and processes as follows:
If a cell in the [Processing Type] column is empty, the row is ignored. If all cells in the [ProcessingType] column are empty, upload fails.
NoteUsers for which no accounting label is set will be displayed as "Accounting Label Not Set" in an accountingresult by accounting labels.
Setting exampleThe table below shows an example of the user information file.
Notes on uploading The maximum allowable file size is 1,048,576 bytes. The maximum number of users that can be registered with Device Log Service is 10,000. The following files cannot be uploaded:
A header row does not exist. The [User ID] column does not exist, or exists but the cells are empty. More than one cell with the same value exists in the [User ID] column. Illegal characters are contained or the length of some strings exceeds the limit. More than one header row with the same value exists
Processing Type Processing
• ADD• A
• When a "User ID" in the user information file does not exist in Device Log ServiceSettings information such as "User Name" and "Accounting Label" in the userinformation file is added to Device Log Service. When the cell is blank in the user information file or the column does not exist,blank will be specified.
• If already existsUpload fails.
• MODIFY• M
• When a "User ID" in the user information file does not exist in Device Log ServiceUpload fails.
• If already existsWhen the column for settings information such as "User Name" and "AccountingLabel" exists in the user information file, values registered with Device Log Servicewill be updated with values in the user information file. When the column does not exist or the cell is blank, the values will not be updated.
• DELETE• D
• When a "User ID" in the user information file does not exist in Device Log ServiceThe row is ignored.
• If already existsThe user is deleted from Device Log Service.
User information Header row
Device Log Service User Guide
128
44Maintenance
Setting System AdministratorsIn case if your organization needs more than one system administrators or needs to change thecurrent system administrator due to a reason such as reorganization, system administrators can beadded or deleted using the System Settings menu.
Registering User Information with FUJIFILM BI DirectBefore registering a system administrator with Device Log Service, register the information of the userto be a system administrator with FUJIFILM BI Direct.Access the following URL using a web browser, and the login screen for FUJIFILM BI Direct will bedisplayed.https://service.fujixerox.com/direct_app/Enter the user ID (e-mail address) and password of a registered system administrator and log in toFUJIFILM BI Direct.When the screen to submit a request to register a new administrator is displayed, follow theinstruction on the screen and register the information of the user who is to be a system administrator.
NoteThe registered user will receive an e-mail notifying of completed registration. Access the URL indicated inthe e-mail and specify the initial password for FUJIFILM BI Direct.
Refer"Setting Initial Password of System Administrator" (P.30)

4 Maintenance
129
Adding System AdministratorsThe following shows how to add system administrators to Device Log Service. Up to 30 systemadministrators can be registered.
ImportantOnly users already registered with FUJIFILM BI Direct can be added as system administrators.
Refer"What is System Administrator?" (P.10)
1.Click [System Settings] in the link menu.
2.Click [Add/Delete System Administrator].
3.Click [Add].
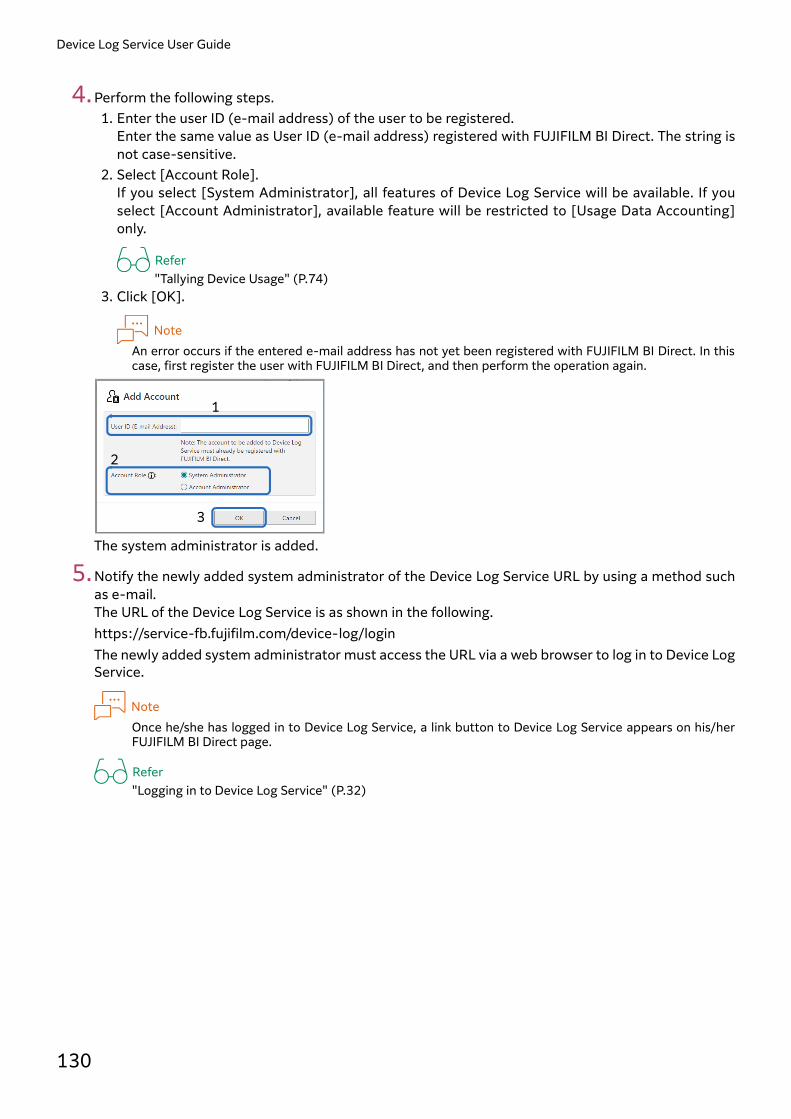
Device Log Service User Guide
130
4.Perform the following steps. 1. Enter the user ID (e-mail address) of the user to be registered.
Enter the same value as User ID (e-mail address) registered with FUJIFILM BI Direct. The string isnot case-sensitive.
2. Select [Account Role].If you select [System Administrator], all features of Device Log Service will be available. If youselect [Account Administrator], available feature will be restricted to [Usage Data Accounting]only.
Refer"Tallying Device Usage" (P.74)
3. Click [OK].
NoteAn error occurs if the entered e-mail address has not yet been registered with FUJIFILM BI Direct. In thiscase, first register the user with FUJIFILM BI Direct, and then perform the operation again.
The system administrator is added.
5.Notify the newly added system administrator of the Device Log Service URL by using a method suchas e-mail. The URL of the Device Log Service is as shown in the following.https://service-fb.fujifilm.com/device-log/loginThe newly added system administrator must access the URL via a web browser to log in to Device LogService.
NoteOnce he/she has logged in to Device Log Service, a link button to Device Log Service appears on his/herFUJIFILM BI Direct page.
Refer"Logging in to Device Log Service" (P.32)
1
2
3
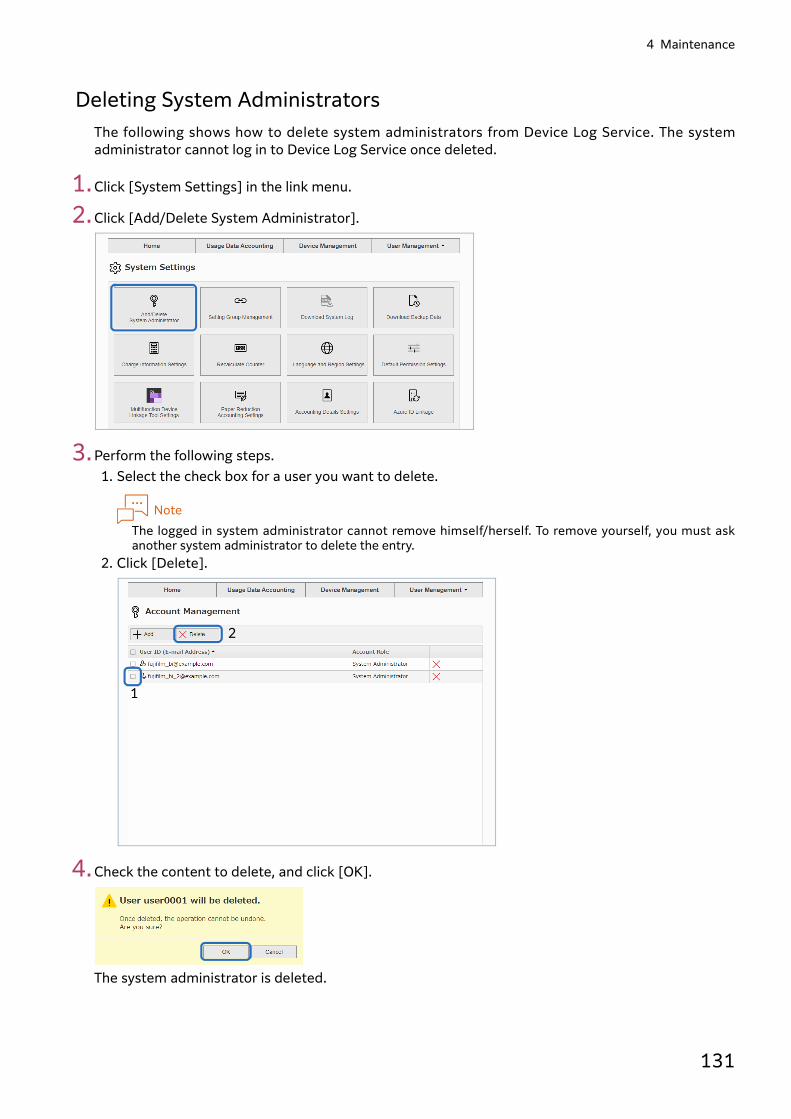
4 Maintenance
131
Deleting System AdministratorsThe following shows how to delete system administrators from Device Log Service. The systemadministrator cannot log in to Device Log Service once deleted.
1.Click [System Settings] in the link menu.
2.Click [Add/Delete System Administrator].
3.Perform the following steps.1. Select the check box for a user you want to delete.
NoteThe logged in system administrator cannot remove himself/herself. To remove yourself, you must askanother system administrator to delete the entry.
2. Click [Delete].
4.Check the content to delete, and click [OK].
The system administrator is deleted.
1
2
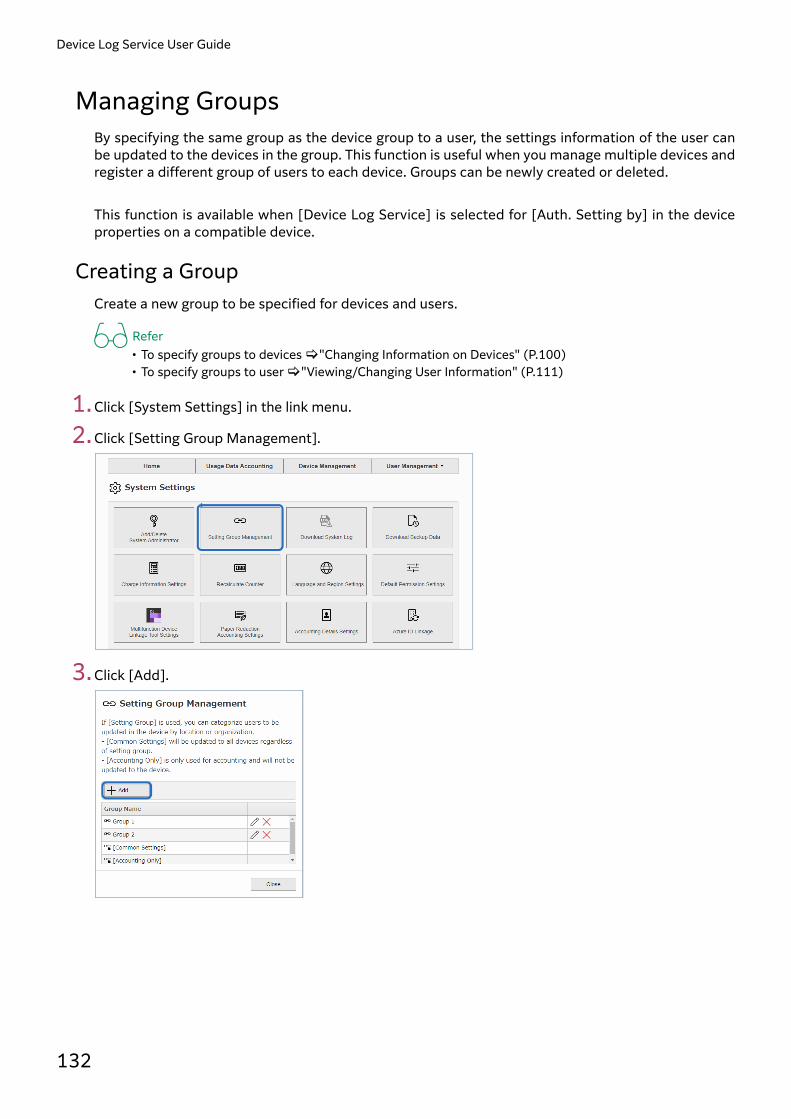
Device Log Service User Guide
132
Managing GroupsBy specifying the same group as the device group to a user, the settings information of the user canbe updated to the devices in the group. This function is useful when you manage multiple devices andregister a different group of users to each device. Groups can be newly created or deleted.
This function is available when [Device Log Service] is selected for [Auth. Setting by] in the deviceproperties on a compatible device.
Creating a GroupCreate a new group to be specified for devices and users.
Refer• To specify groups to devices "Changing Information on Devices" (P.100)• To specify groups to user "Viewing/Changing User Information" (P.111)
1.Click [System Settings] in the link menu.
2.Click [Setting Group Management].
3.Click [Add].
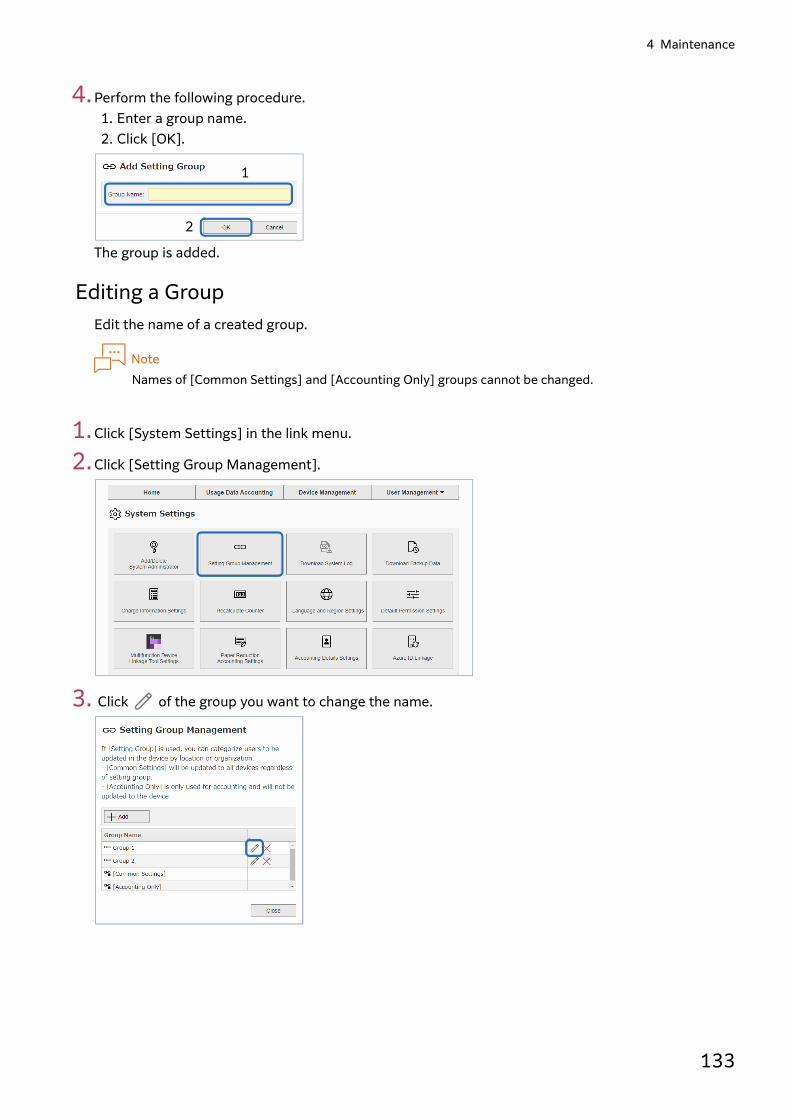
4 Maintenance
133
4.Perform the following procedure.1. Enter a group name.2. Click [OK].
The group is added.
Editing a GroupEdit the name of a created group.
NoteNames of [Common Settings] and [Accounting Only] groups cannot be changed.
1.Click [System Settings] in the link menu.
2.Click [Setting Group Management].
3. Click of the group you want to change the name.
1
2

Device Log Service User Guide
134
4.Perform the following procedure.1. Enter a new group name.2. Click [OK].
The group name is changed.
Deleting a GroupDelete a group that has been created.
Note• [Common Settings] and [Accounting Only] groups cannot be deleted.• You cannot delete a group to which a device belongs. Specify a different group to the device before
deleting the group.
1.Click [System Settings] in the link menu.
2.Click [Setting Group Management].
3. Click of the group you want to delete.
1
2
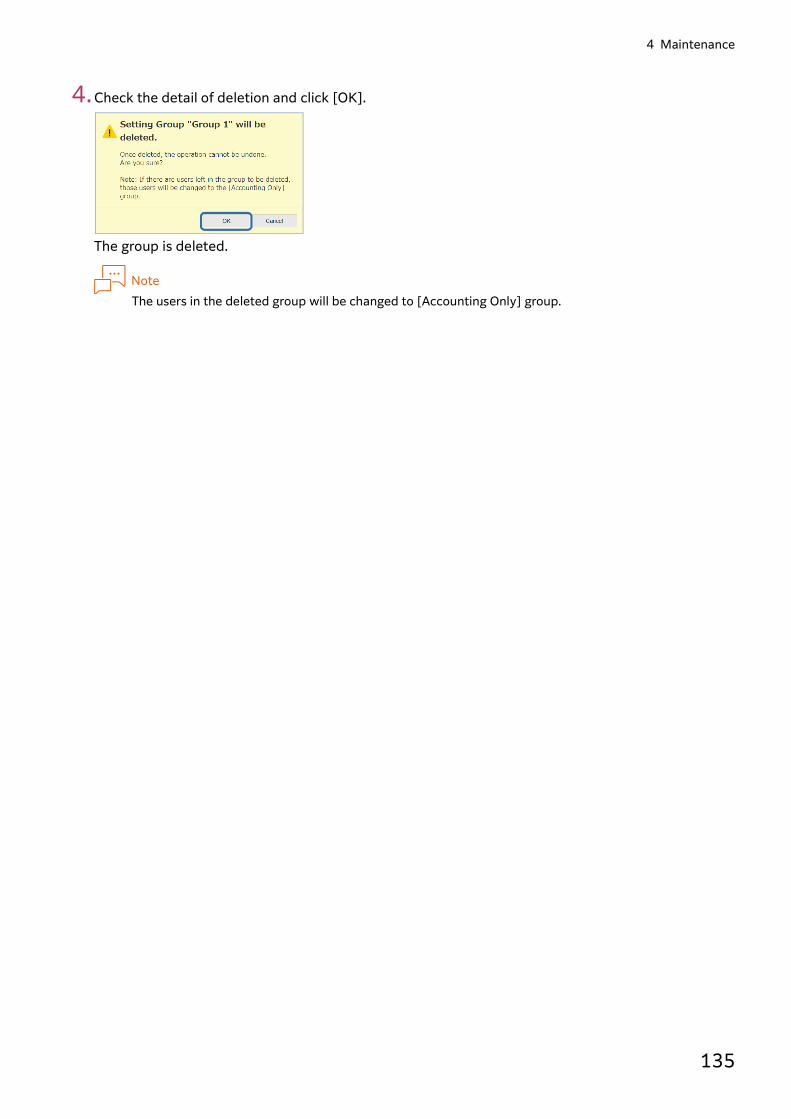
4 Maintenance
135
4.Check the detail of deletion and click [OK].
The group is deleted.
NoteThe users in the deleted group will be changed to [Accounting Only] group.

Device Log Service User Guide
136
Downloading the System LogThe system log can be downloaded to check operation logs of Device Log Service and details ofcommunication between Device Log Service and devices.
There are two types of system logs: Operation Log and Center Processing Log. Each log can bedownloaded on a daily or monthly basis.Past logs older than two months are compressed to one file for each month. Compressed files can bedownloaded from past logs.The file name of the downloaded file can be set as necessary. The default value is as shown below,where, yyyy, mm, and dd are year, month, and day of the date the log was created, respectively.
Operation Log: DLS-webui-yyyy-mm-dd.logCentre Processing Log: DLS-system-yyyy-mm-dd.logPast logs: DLS-logArchive-yyyy-mm.zip
NoteMonthly logs are saved for three years.
Refer"System Log" (P.23)
1.Click [System Settings] in the link menu.
2.Click [Download System Log].

4 Maintenance
137
3.Perform the following steps. 1. Select a unit to save the logs you want to download in, from either of the following: [Operation
Log], [Center Processing Log] or [Archive].Daily or monthly logs are listed.
2. Click the log you want to download.
4.Specify a destination location and file name by following the onscreen messages to save the systemlog file.
5.Click [Close] in the [Download System Log] dialog box.
1
2

Device Log Service User Guide
138
Downloading Backup Data of User InformationIf you deleted users by mistake or if you need to view the past user information records for a purposesuch as an audit, backup data of user information can be downloaded and used.
Downloading Backup DataBackup data is automatically created each time you update user information. Up to the past 10backup data can be downloaded. The file name of the downloaded file can be set as necessary. The default value is "DLS-backup-yyyy-mm-dd.zip", where, yyyy, mm, and dd are year, month, andday of the date the backup data was created, respectively.
NoteIf you modify user information registered with Device Log Service, a compressed file for user informationwill be created at night on the day. The user information records registered at the time is backed up.
Refer"Downloading User Information" (P.21)
1.Click [System Settings] in the link menu.
2.Click [Download Backup Data].
3.Click the backup data you want to download.
4.Specify a destination location and file name by following the onscreen messages to save the backupdata file.
5.Click [Close] in the [Download Backup Data] dialog box.

4 Maintenance
139
Restoring User Information from Backup DataBackup data is created as a file in CSV format. The format is the same as that of the file you downloadusing [CSV Download] on the [User Management] page. To update user information in Device Log Service with backup, upload the backup file using [CSVUpload] on the [User Management] page.
Refer• For details on file format "User Information File Format" (P.123)• To upload CSV "Adding/Updating/Deleting Users in a User Information File" (P.115)

Device Log Service User Guide
140
Setting Charge InformationThis section describes how to set charges for each function, such as copying and printing.
Charge information you set is updated to the accounting results displayed under [This Month's Usage]on the [Home] page as well as the accounting results displayed when you perform tally of deviceusage under [Usage Data Accounting].
Refer• "Viewing Device Usage" (P.72)• "Tallying Device Usage" (P.74)
1.Click [System Settings] in the link menu.
2.Click [Charge Information Settings].
3.Enter the unit cost for each service. Enter in the range from 0 to 9999.99.
NoteWhen you select the [Convert the unit for the graph in [Home] page to [Charges]] check box, theaccounting unit applied under [This Month's Usage] will be changed from [Impressions] to [Charges], fromthe next day.
4.Click [OK]. Charge information is set.
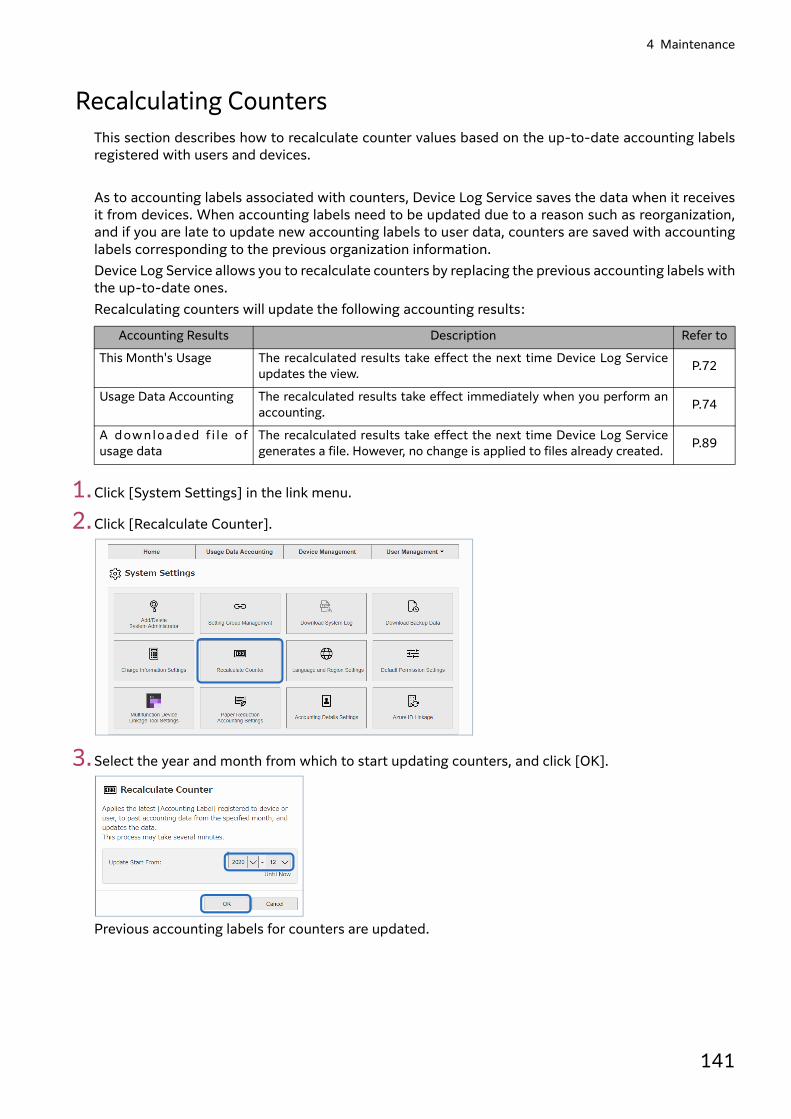
4 Maintenance
141
Recalculating CountersThis section describes how to recalculate counter values based on the up-to-date accounting labelsregistered with users and devices.
As to accounting labels associated with counters, Device Log Service saves the data when it receivesit from devices. When accounting labels need to be updated due to a reason such as reorganization,and if you are late to update new accounting labels to user data, counters are saved with accountinglabels corresponding to the previous organization information. Device Log Service allows you to recalculate counters by replacing the previous accounting labels withthe up-to-date ones. Recalculating counters will update the following accounting results:
1.Click [System Settings] in the link menu.
2.Click [Recalculate Counter].
3.Select the year and month from which to start updating counters, and click [OK].
Previous accounting labels for counters are updated.
Accounting Results Description Refer to
This Month's Usage The recalculated results take effect the next time Device Log Serviceupdates the view. P.72
Usage Data Accounting The recalculated results take effect immediately when you perform anaccounting. P.74
A downloaded f i le ofusage data
The recalculated results take effect the next time Device Log Servicegenerates a file. However, no change is applied to files already created. P.89

Device Log Service User Guide
142
Setting Language and RegionThis section describes how to set the language, time zone, and list separator to be used in output filessuch as the system log and backups.
The settings are applied to the data files shown in the table below.
1.Click [System Settings] in the link menu.
2.Click [Language and Region Settings].
3.Select an option from [Language], [Time Zone] or [List Separator], and click [OK].
The file format is set.
NoteThe new settings will be applied to data files output after you perform the operation.
Data Refer to
Device usage data file P.89
User information data file P.117
System log data file P.136
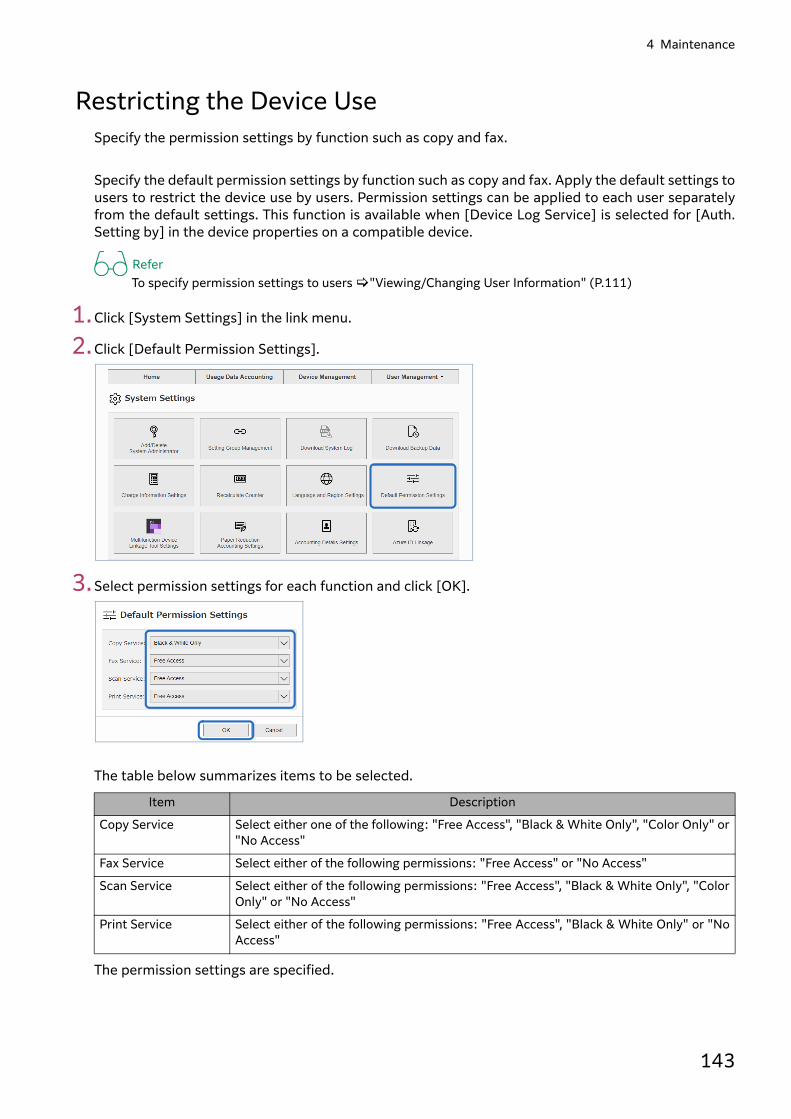
4 Maintenance
143
Restricting the Device UseSpecify the permission settings by function such as copy and fax.
Specify the default permission settings by function such as copy and fax. Apply the default settings tousers to restrict the device use by users. Permission settings can be applied to each user separatelyfrom the default settings. This function is available when [Device Log Service] is selected for [Auth.Setting by] in the device properties on a compatible device.
ReferTo specify permission settings to users "Viewing/Changing User Information" (P.111)
1.Click [System Settings] in the link menu.
2.Click [Default Permission Settings].
3.Select permission settings for each function and click [OK].
The table below summarizes items to be selected.
The permission settings are specified.
Item Description
Copy Service Select either one of the following: "Free Access", "Black & White Only", "Color Only" or"No Access"
Fax Service Select either of the following permissions: "Free Access" or "No Access"
Scan Service Select either of the following permissions: "Free Access", "Black & White Only", "ColorOnly" or "No Access"
Print Service Select either of the following permissions: "Free Access", "Black & White Only" or "NoAccess"
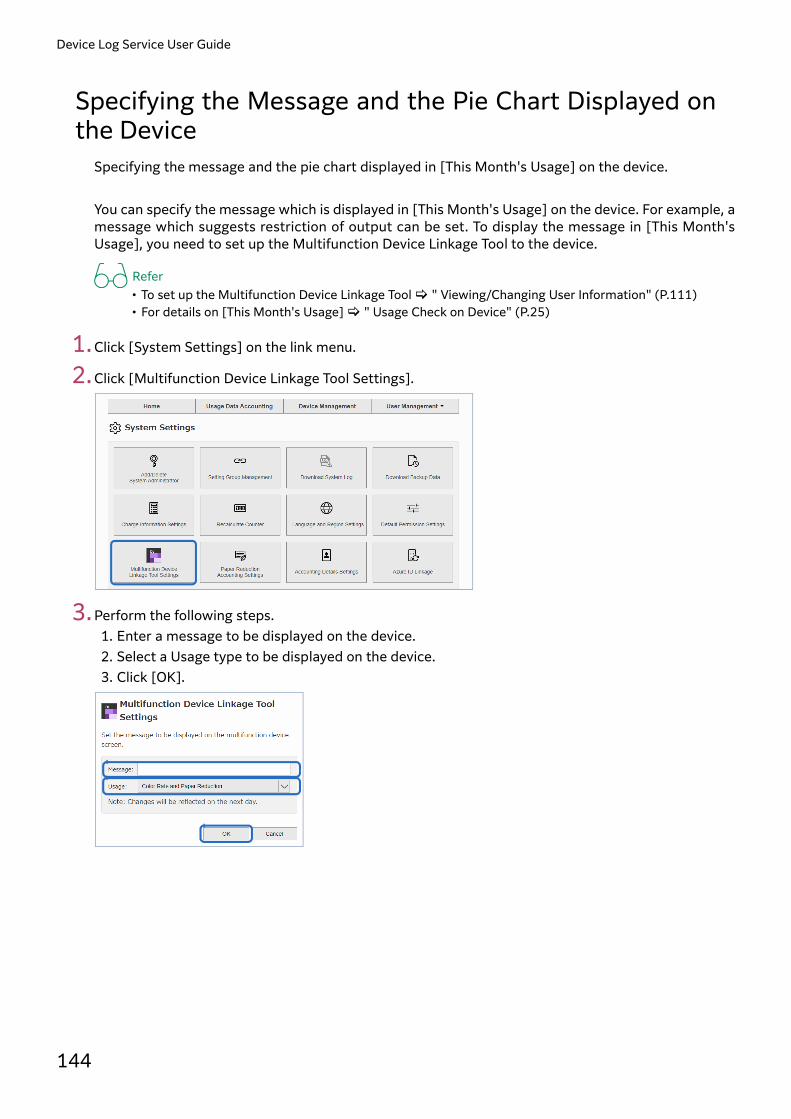
Device Log Service User Guide
144
Specifying the Message and the Pie Chart Displayed onthe Device
Specifying the message and the pie chart displayed in [This Month's Usage] on the device.
You can specify the message which is displayed in [This Month's Usage] on the device. For example, amessage which suggests restriction of output can be set. To display the message in [This Month'sUsage], you need to set up the Multifunction Device Linkage Tool to the device.
Refer• To set up the Multifunction Device Linkage Tool " Viewing/Changing User Information" (P.111)• For details on [This Month's Usage] " Usage Check on Device" (P.25)
1.Click [System Settings] on the link menu.
2.Click [Multifunction Device Linkage Tool Settings].
3.Perform the following steps.1. Enter a message to be displayed on the device.2. Select a Usage type to be displayed on the device.3. Click [OK].

4 Maintenance
145
Setting a Target Value for Paper Reduction and theCalculation Method
Setting a target value for paper reduction achieved by using 2-sided or N-up copy/print and itscalculation method.
1.Click [System Settings] on the link menu.
2.Click [Paper Reduction Accounting Settings].
3.Perform the following steps.1. Select a target value for paper reduction.2. Select whether to convert the paper size.
If you select [Convert into A4 Size] and print an A3 size document, it is calculated as two sheets.3. Click [OK].
Refer"Calculation of Paper Reduction" (P.220)
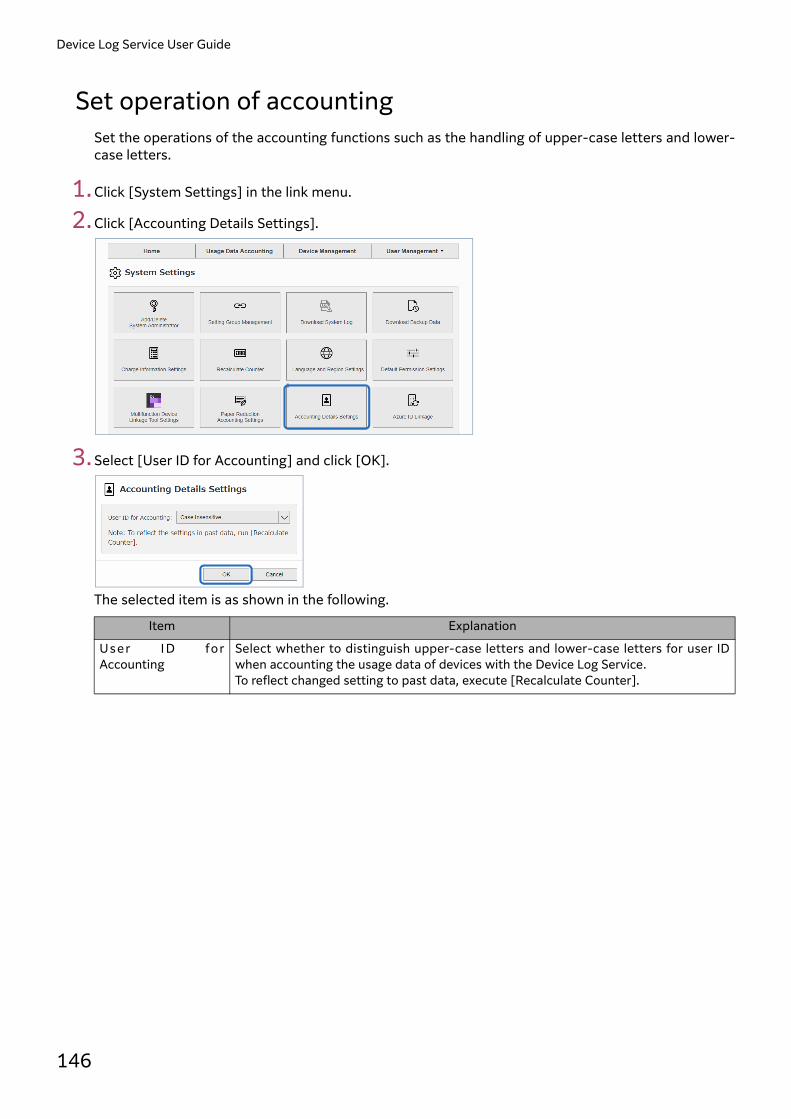
Device Log Service User Guide
146
Set operation of accountingSet the operations of the accounting functions such as the handling of upper-case letters and lower-case letters.
1.Click [System Settings] in the link menu.
2.Click [Accounting Details Settings].
3.Select [User ID for Accounting] and click [OK].
The selected item is as shown in the following.
Item Explanation
User I D forAccounting
Select whether to distinguish upper-case letters and lower-case letters for user IDwhen accounting the usage data of devices with the Device Log Service.To reflect changed setting to past data, execute [Recalculate Counter].

4 Maintenance
147
Set [Azure ID Linkage]Set when you want to synchronize the user information of the accounting registered in both ActiveDirectory and Device Log Service respectively.
1.Click [System Settings] in the link menu.
2.Click [Azure ID Linkage].
Refer[Device Log Service User Guide Azure Active Directory Connection Settings]

Device Log Service User Guide
148
Setting Device AgainWith Device Log Service Setup, change the [Usage Notification Type] and [Panel Display ofAccounting Results] settings of the registered devices.
For more information about downloading Device Log Service Setup, refer to "Downloading Device LogService Setup" (P.37).
1.Boot Device Log Service Setup.
2.Operate following procedures.1. Enter registered User ID(E-mail address) and Password.2. Click [Log In].
3.Operate following procedures.1. Select [Set Device Again].2. Click [Next].
1
2
1
2

4 Maintenance
149
4.Check a device to change the setting.
5.Operate following procedures.1. Enter [Administrator ID] and [Password].
NoteIf you check [Use the same Administrator information for subsequent devices also] when you changemultiple devices, you can skip entering [Administrator ID] and [Password] from a next device.
2. Click [OK].
1
2
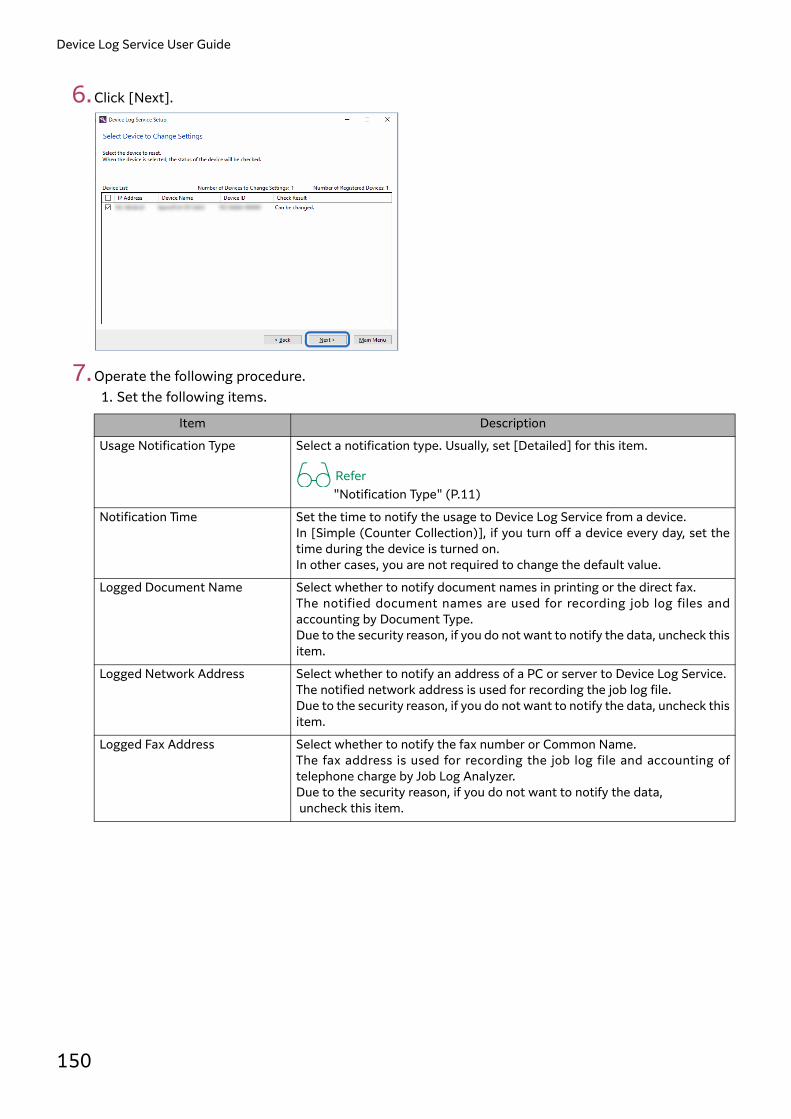
Device Log Service User Guide
150
6.Click [Next].
7.Operate the following procedure.1. Set the following items.
Item Description
Usage Notification Type Select a notification type. Usually, set [Detailed] for this item.
Refer"Notification Type" (P.11)
Notification Time Set the time to notify the usage to Device Log Service from a device.In [Simple (Counter Collection)], if you turn off a device every day, set thetime during the device is turned on. In other cases, you are not required to change the default value.
Logged Document Name Select whether to notify document names in printing or the direct fax.The notified document names are used for recording job log files andaccounting by Document Type.Due to the security reason, if you do not want to notify the data, uncheck thisitem.
Logged Network Address Select whether to notify an address of a PC or server to Device Log Service.The notified network address is used for recording the job log file.Due to the security reason, if you do not want to notify the data, uncheck thisitem.
Logged Fax Address Select whether to notify the fax number or Common Name.The fax address is used for recording the job log file and accounting oftelephone charge by Job Log Analyzer.Due to the security reason, if you do not want to notify the data, uncheck this item.

4 Maintenance
151
2. Click [Next].
Panel Display of AccountingResults
If you install Device Linkage Tool on a device and use [Panel Display ofAccounting Results], check this item.
Refer"Usage Check on Device" (P.25)
[Disabled]: Select this to disable this feature. If Multifunction Device LinkageTool has already been installed, it will be deleted.[Partial Display]: Select this to display both the services buttons and theaccounting result of the log-in users at the same time by dividing the screen.This item is only displayed when you select [Detailed] for [Usage NotificationType].[Full Screen]: Select this to display the accounting result of the log-in usersin full screen.[Full Screen (Cache Not Used)]: Select this item to display the same screenas [Full Screen] without using the cache, thus it takes a while to display thescreen. This item is for compatibility with the earlier versions of Device LogService. As the standard operation, select [Full Screen]. This item isdisplayed when you selected [Detailed] for [Usage Notification Type].
Set as Default Screen afterAuthentication
The Device Log Service screen is usually displayed by pressing the button onthe control panel of the device.If you check this item, the Device Log Service screen will be displayed afterlogging in without the need to press the button.
Services Button Layout If you select [Partial Display] for [Panel Display of Accounting Results], selectthe services buttons to display on the Device Log Service screen.
Security Settings This is the setting for the protection of the communication between a deviceand a Device Log Service server.
ReferRefer to the “Security Settings” line on "Device Settings That Are NotAlways Necessary to Be Changed" (P.194).
• [All Features]: All the SSL/TLS communication of a device is protected. If acorrect certificate is not applied to a device, features other than Device LogService may not be usable.For [Verify Remote Server Certificate] of [SSL / TLS Settings] of a device,[Enabled] is set.
• [Device Log Service]: The SSL/TLS communication of Device Log Service isprotected. The settings other than Device Log Service are not changed.For [Verify Remote Server Certificate] of [Device Log Service Plug-in] of adevice, [Enable Always] is set.
• [Do Not Change]: No Change is applied to [SSL / TLS Settings] of a device.Whether to protect the SSL/TLS communication of Device Log Servicedepends on the setting of the device.For [Verify Remote Server Certificate] of [Device Log Service Plug-in] of adevice, [Follow Machine Settings] is set.
Proxy Server Configuration In your network, if you use a proxy server to access the Internet, set this item.
Item Description

Device Log Service User Guide
152
8.Check a detail of a process, and then click [Change Settings].
As you selected, necessary software is installed on a device.When the process is finished, the number of devices with changed settings will be displayed.
9. If you finish the process, click [Close]. If you continue other operations, click [Main Menu].
NoteIf the system failed to change settings, cause and remedy will be displayed. Follow the instructiondisplayed on the screen, execute Device Log Service Setup again.

4 Maintenance
153
Deletion of plug-in or custom servicesUsing the Device Log Service Setup, plug-in or custom services installed in devices can be deleted.
For more information about downloading Device Log Service Setup, refer to "Downloading Device LogService Setup" (P.37).
Deleting
1.Boot Device Log Service Setup.
2.Operate following procedures.1. Check [Proceed without login (only device maintenance can be performed)].2. Click [Log In].
3.Operate following procedures.1. Check [Delete Device Log Service from Device].2. Click [Next].
1
2
1
2

Device Log Service User Guide
154
4.Operate following procedures.1. Enter [Device Host Name/IP Address], [Administrator ID], and [Password] as information of
devices to be deleted.2. Click [Next].
5.Check a detail of a process, and then click [Delete].
After processing, the number of deleted devices will be displayed.
6. If you finish the process, click [Close]. If you continue other operations, click [Main Menu].
NoteIf the system failed to change settings, cause and remedy will be displayed. Follow the instructiondisplayed on the screen, execute Device Log Service Setup again.
1
2

4 Maintenance
155
Configuring RSS Receiving SettingsYou can configure RSS receiving settings with Device Log Service Setup.By configuring RSS receiving settings, you can quickly check latest information such as dailyaccounting results and errors.
NoteTo receiving RSS feeds from Device Log Service, an RSS reader described in "Operating Environment" (P.9)is required.
ImportantDo not share URLs to receive RSS feeds with anyone.
1.Start Device Log Service Setup.
2.Perform the following steps.1. Enter registered User ID (E-mail address) and Password.2. Click [Log In].
3.Perform the following steps.1. Select [Other Maintenance Tasks].2. Click [Next].
4.Perform the following steps.1. Select [RSS Receiving Settings].2. Click [Next].
5.Select an RSS reader from [RSS Reader Used].
6.Start the RSS reader selected in step 5.
NoteThe following describes the screens and procedures when using Microsoft Office Outlook 2016. Itemnames on the screen of other RSS readers may differ. If you use other RSS readers, refer to Help or manualsfor your RSS reader.
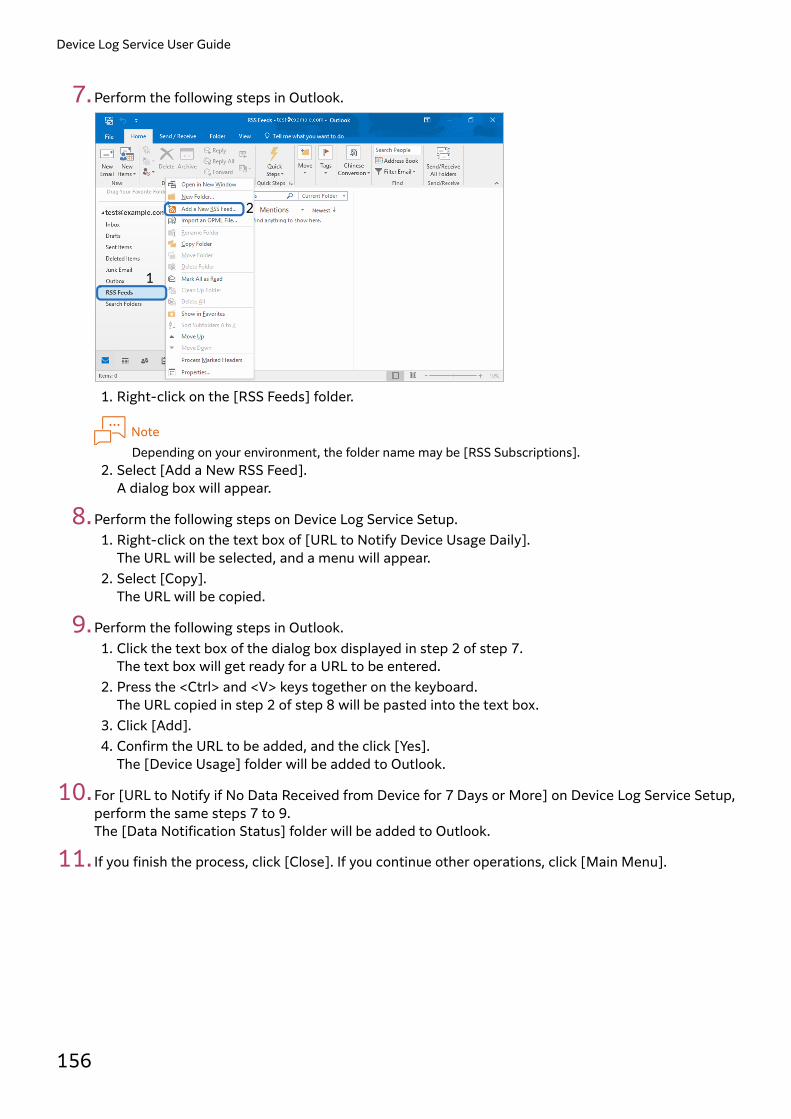
Device Log Service User Guide
156
7.Perform the following steps in Outlook.
1. Right-click on the [RSS Feeds] folder.
NoteDepending on your environment, the folder name may be [RSS Subscriptions].
2. Select [Add a New RSS Feed].A dialog box will appear.
8.Perform the following steps on Device Log Service Setup.1. Right-click on the text box of [URL to Notify Device Usage Daily].
The URL will be selected, and a menu will appear.2. Select [Copy].
The URL will be copied.
9.Perform the following steps in Outlook.1. Click the text box of the dialog box displayed in step 2 of step 7.
The text box will get ready for a URL to be entered.2. Press the <Ctrl> and <V> keys together on the keyboard.
The URL copied in step 2 of step 8 will be pasted into the text box.3. Click [Add].4. Confirm the URL to be added, and the click [Yes].
The [Device Usage] folder will be added to Outlook.
10.For [URL to Notify if No Data Received from Device for 7 Days or More] on Device Log Service Setup,perform the same steps 7 to 9.The [Data Notification Status] folder will be added to Outlook.
11.If you finish the process, click [Close]. If you continue other operations, click [Main Menu].
2
1
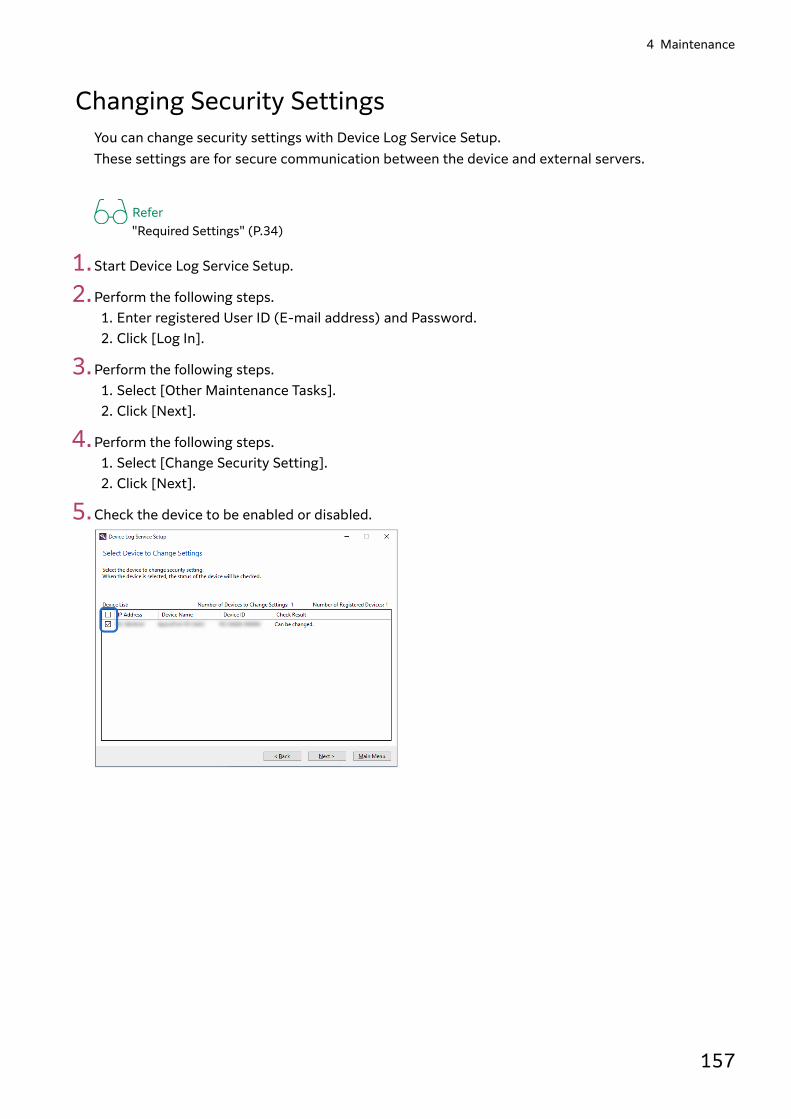
4 Maintenance
157
Changing Security SettingsYou can change security settings with Device Log Service Setup.These settings are for secure communication between the device and external servers.
Refer"Required Settings" (P.34)
1.Start Device Log Service Setup.
2.Perform the following steps.1. Enter registered User ID (E-mail address) and Password.2. Click [Log In].
3.Perform the following steps.1. Select [Other Maintenance Tasks].2. Click [Next].
4.Perform the following steps.1. Select [Change Security Setting].2. Click [Next].
5.Check the device to be enabled or disabled.
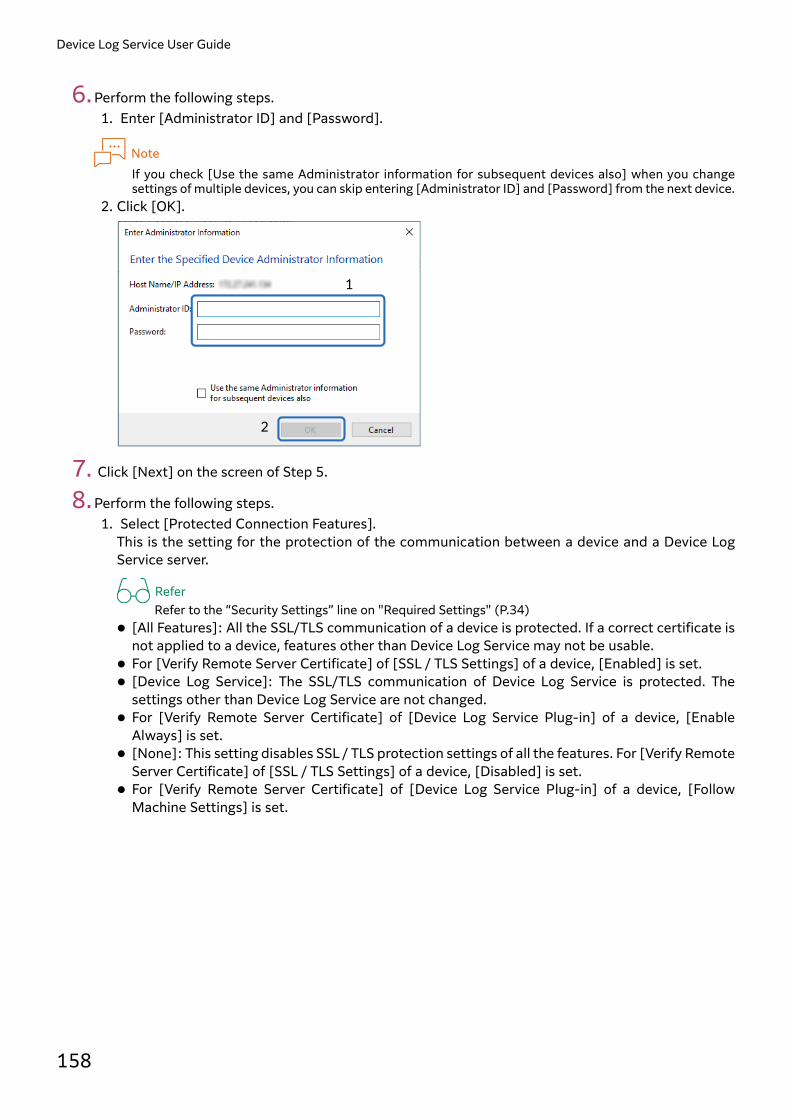
Device Log Service User Guide
158
6.Perform the following steps.1. Enter [Administrator ID] and [Password].
NoteIf you check [Use the same Administrator information for subsequent devices also] when you changesettings of multiple devices, you can skip entering [Administrator ID] and [Password] from the next device.
2. Click [OK].
7. Click [Next] on the screen of Step 5.
8.Perform the following steps.1. Select [Protected Connection Features].
This is the setting for the protection of the communication between a device and a Device LogService server.
ReferRefer to the “Security Settings” line on "Required Settings" (P.34)
[All Features]: All the SSL/TLS communication of a device is protected. If a correct certificate isnot applied to a device, features other than Device Log Service may not be usable.
For [Verify Remote Server Certificate] of [SSL / TLS Settings] of a device, [Enabled] is set. [Device Log Service]: The SSL/TLS communication of Device Log Service is protected. The
settings other than Device Log Service are not changed. For [Verify Remote Server Certificate] of [Device Log Service Plug-in] of a device, [Enable
Always] is set. [None]: This setting disables SSL / TLS protection settings of all the features. For [Verify Remote
Server Certificate] of [SSL / TLS Settings] of a device, [Disabled] is set. For [Verify Remote Server Certificate] of [Device Log Service Plug-in] of a device, [Follow
Machine Settings] is set.
1
2

4 Maintenance
159
2. Click [OK].
9.Check the detail of the process, and then click [Change Settings].After processing, the number of processed devices will be displayed.
10.If you finish the process, click [Close]. If you continue other operations, click [Main Menu].
NoteIf the system failed to change settings, the cause and the remedy will be displayed. Follow the instructiondisplayed on the screen and execute Device Log Service Setup again.
1
2

Device Log Service User Guide
160
Changing Settings of a Proxy ServerYou can change proxy server settings with Device Log Service Setup.
Refer"Required Settings" (P.34)
1.Start Device Log Service Setup.
2.Perform the following steps.1. Enter registered User ID (E-mail address) and Password.2. Click [Log In].
3.Perform the following steps.1. Select [Other Maintenance Tasks].2. Click [Next].
4.Perform the following steps.1. Select [Change Proxy Settings].2. Click [Next].
5.Check the device to be enabled or disabled.

4 Maintenance
161
6.Perform the following steps.1. Enter [Administrator ID] and [Password].
NoteIf you check [Use the same Administrator information for subsequent devices also] when you changesettings of multiple devices, you can skip entering [Administrator ID] and [Password] from the next device.
2. Click [OK].
7. Click [Next] on the screen of Step 5.
8.Check the detail of the process, and then click [Change Settings].After processing, the number of processed devices will be displayed.
9.Perform the following steps.1. Set this if you connect to the Internet via proxy server in your network.2. Click [Next].
10.If you finish the process, click [Close]. If you continue other operations, click [Main Menu].
NoteIf the system failed to change settings, the cause and the remedy will be displayed. Follow the instructiondisplayed on the screen and execute Device Log Service Setup again.
1
2
1
2
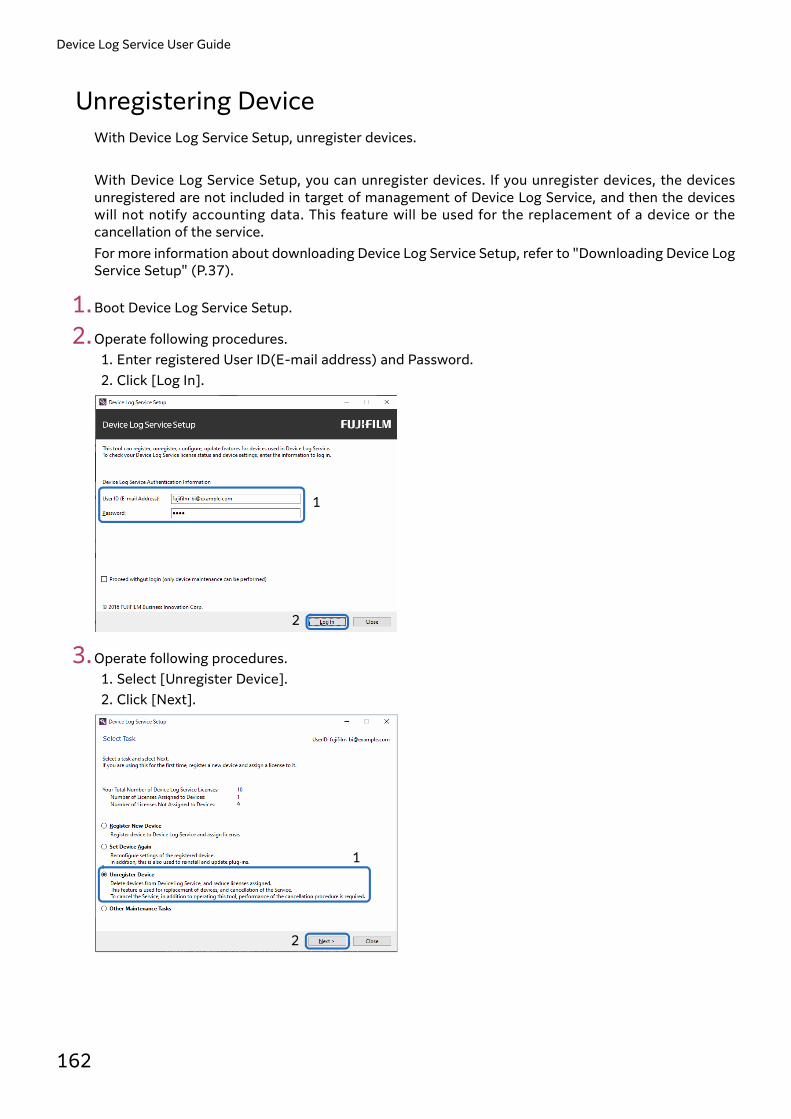
Device Log Service User Guide
162
Unregistering DeviceWith Device Log Service Setup, unregister devices.
With Device Log Service Setup, you can unregister devices. If you unregister devices, the devicesunregistered are not included in target of management of Device Log Service, and then the deviceswill not notify accounting data. This feature will be used for the replacement of a device or thecancellation of the service.For more information about downloading Device Log Service Setup, refer to "Downloading Device LogService Setup" (P.37).
1.Boot Device Log Service Setup.
2.Operate following procedures.1. Enter registered User ID(E-mail address) and Password.2. Click [Log In].
3.Operate following procedures.1. Select [Unregister Device].2. Click [Next].
1
2
1
2

4 Maintenance
163
4.Check devices to delete on Device Log Service.
5.Operate following procedures.1. Enter [Administrator ID] and [Password].
NoteIf you check [Use the same Administrator information for subsequent devices also] when you changemultiple devices, you can skip entering [Administrator ID] and [Password] from a next device.
2. Click [OK].
1
2

Device Log Service User Guide
164
6.Click [Next].
7.Check a detail of a process, and then click [Unregister].
After processing, the number of devices unregistered will be displayed.
8. If you finish the process, click [Close]. If you continue other operations, click [Main Menu].
NoteIf the system failed to change settings, cause and remedy will be displayed. Follow the instructiondisplayed on the screen, execute Device Log Service Setup again.

4 Maintenance
165
Checking Condition of the Plug-inYou can check the condition whether the Plug-in is working properly on a device which is installed thePlug-in, and also you can change basic settings.
Showing the Plug-in informationYou can check the condition of Daily Notification of the Plug-in.If you want to account job logs today immediately, or if some problems occur in Daily Notification, youcan operate the notification process by yourself.
1.Boot Internet Services.
ReferFor more information to boot Internet Services, refer to “Administrator Guide” of your device.
2.Operate following procedures.1. Log in to System Administrator mode.
ReferFor information on how to log in to System Administrator mode, refer to manuals for your device.
2. Select [System] > [Plug-in Settings].3. Select [Device Log Service Plug-in], and click [Show].
3.Status of notification processing of the Plug-in is displayed.
1. The result of the last notification processing is displayed.
Condition Description
OK Means the last notification processing finished properly.
Notification in Progress Means the notification processing is working now.
Not Registered to Service Means this device is unregistered on Device Log Service.
Unexpected Error Means an unexpected error has occurred.
1
2

Device Log Service User Guide
166
2. If you click [Run Notification Processing Now], notification processing will start, and then the joblogs until the current time will be notified.
Changing Basic SettingsTime of Daily Notification and authentication information of Device Log Service can be changed.
1.Boot Internet Services.
ReferFor more information to boot Internet Services, refer to “Administrator Guide” of your device.
2.Operate following procedures.1. Log in to System Administrator mode.
ReferFor information on how to log in to System Administrator mode, refer to manuals for your device.
2. Select [System] > [Plug-in Settings].3. Select [Device Log Service Plug-in], and click [Show].
Communication error Means a communication error has occurred. Check "Protocol Settings" (P.195)and "Proxy Server Settings" (P.36) in ""Environment Settings for a Device Unit"(P.34).
SSL/TLS CommunicationError
Means a SSL/TLS communication error with Device Log Service server hasoccurred. Refer to " Setting Security Settings" (P.195), and then check SecuritySettings.
Condition Description

4 Maintenance
167
3.Click [Basic Settings] and set each item.
The table below summarizes items to be entered.
Item Description
Notification Time Set the time to notify the usage to Device Log Service from a device.In [Simple (Counter Collection)], if you turn off a device every day, set the timeduring the device is turned on. In other cases, you are not required to change the default value.
Logged Document Name Select whether to notify document names in printing or the direct fax.The notified document names are used for recording job log files andaccounting by Document Type.Due to the security reason, if you do not want to notify the data, uncheck thisitem.
Logged Network Address Select whether to notify an address of a PC or server to Device Log Service.The notified network address is used for recording the job log file.Due to the security reason, if you do not want to notify the data, uncheck thisitem.
Logged Fax Address Select whether to notify the fax number or Common Name.The fax address is used for recording the job log file and accounting oftelephone charge by Job Log Analyzer.Due to the security reason, if you do not want to notify the data, uncheck this item.
• Administrator ID• Administrator Password
Enter [Administrator ID] and [Administrator Password].
Ve r i f y Re mot e Se rverCertificate
This is the setting for the protection of the communication between a deviceand a Device Log Service server.• [Enable Always]: Despite of the settings on a device, all the communication
of this plug-in and the Device Log Service server is protected. If you selected[Device Log Service] in [Security Settings] when installing, this option isenabled.
• [Follow Machine Settings]: According to the setting of [Verify Remote ServerCertificate] of [SSL / TLS Settings] of a device, switch whether to protect thecommunication. If you selected [Do Not Change] in [Security Settings] wheninstalling, this option is enabled.

Device Log Service User Guide
168
4.When settings are finished, click [Save].
Register Printer MIB deviceIf another company's device supporting the Printer MIB is registered, the usage data can be accountedon the Device Log Service.
NoteIf comparing the usage data of a multifunction device manufactured by FUJIFILM Business Innovation orby Fuji Xerox and another company's device on the same screen, register also the parent device as a targetof Printer MIB collection.
1.Run the Internet Services.
ReferFor the running method for the Internet Services, refer to the "Administrator Guide" for the used device.
2.Perform the following operation.1. Log in to System Administrator mode.
ReferFor information on how to log in to System Administrator mode, refer to manuals for your device.
2. Select [System] > [Plug-in Settings].3. Select [Device Log Service Plug-in], and click [Show].
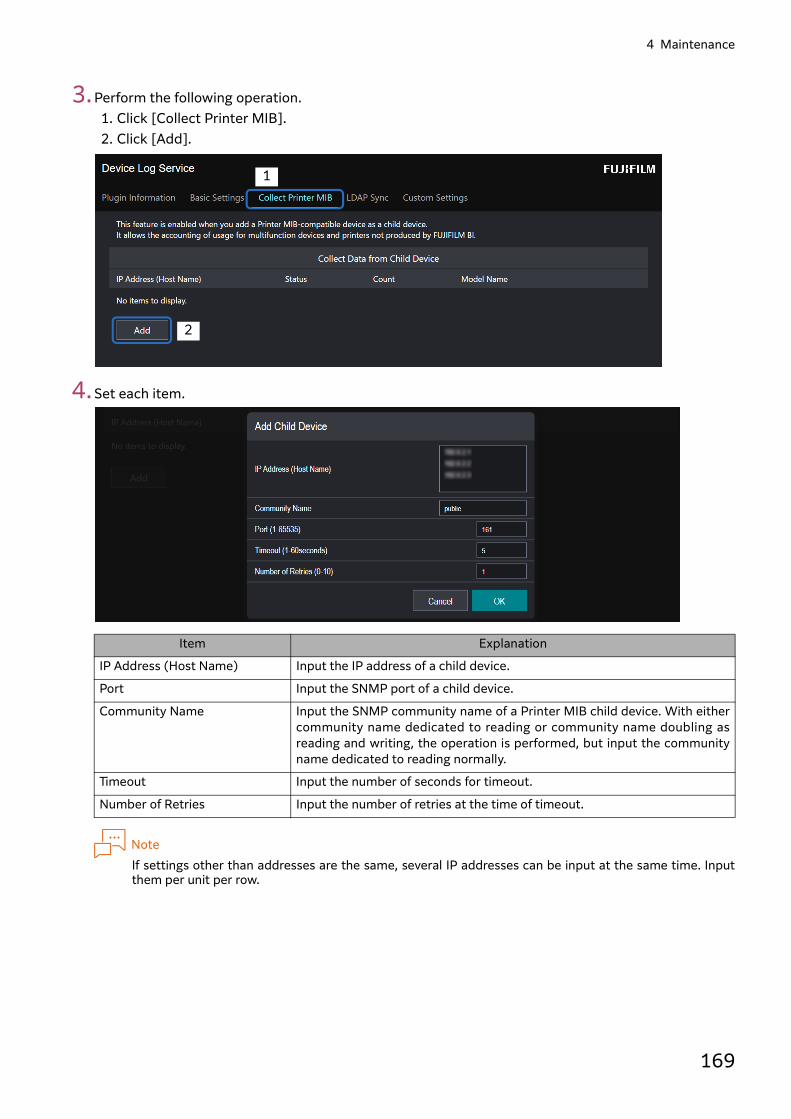
4 Maintenance
169
3.Perform the following operation.1. Click [Collect Printer MIB].2. Click [Add].
4.Set each item.
NoteIf settings other than addresses are the same, several IP addresses can be input at the same time. Inputthem per unit per row.
Item Explanation
IP Address (Host Name) Input the IP address of a child device.
Port Input the SNMP port of a child device.
Community Name Input the SNMP community name of a Printer MIB child device. With eithercommunity name dedicated to reading or community name doubling asreading and writing, the operation is performed, but input the communityname dedicated to reading normally.
Timeout Input the number of seconds for timeout.
Number of Retries Input the number of retries at the time of timeout.
1
2

Device Log Service User Guide
170
5.When settings are finished, click [OK].
Check notification status of Printer MIBThe operation status of the notification function of the Printer MIB can be checked. Immediatenotification can be executed manually.
1.Run the Internet Services.
ReferIf comparing the usage data of a multifunction device manufactured by FUJIFILM Business Innovation orby Fuji Xerox and another company's device on the same screen, register also the parent device as a targetof Printer MIB collection.
2.Perform the following operation.1. Log in to System Administrator mode.
ReferFor information on how to log in to System Administrator mode, refer to manuals for your device.
2. Select [System] > [Plug-in Settings].3. Select [Device Log Service Plug-in], and click [Show].
3.Click [Collect Printer MIB].
4.The status of [Collect Printer MIB] is displayed.1. The previous status is displayed.
Status name Explanation
OK It indicates that previous Printer MIB notification has been completednormally.

4 Maintenance
171
2. If [Run Notification Processing Now] is clicked, the notification processing function is run and theDevice Log Service is notified of the Printer MIB data at the time.
Set LDAP server synchronizationIt is possible to synchronize the user information of the LDAP server to the Device Log Service.
1.Run the Internet Services.
ReferFor the running method for the Internet Services, refer to the "Administrator Guide" for the used device.
2.Perform the following operation.1. Log in to System Administrator mode.
ReferFor information on how to log in to System Administrator mode, refer to manuals for your device.
2. Select [System] > [Plug-in Settings].3. Select [Device Log Service Plug-in], and click [Show].
Running It indicates that the Printer MIB collection timer is running.
Not Registered to ServiceUnexpected ErrorCommunication ErrorSSL / TLS Communication Error
Same as the plug-in status notification.
ReferRefer to "Showing the Plug-in information" (P.165).
Communication Error (ChildDevice)
It indicates that there is a child device which failed in Printer MIB collection.Check the status of the child device failing from the list.
Status name Explanation
2
1
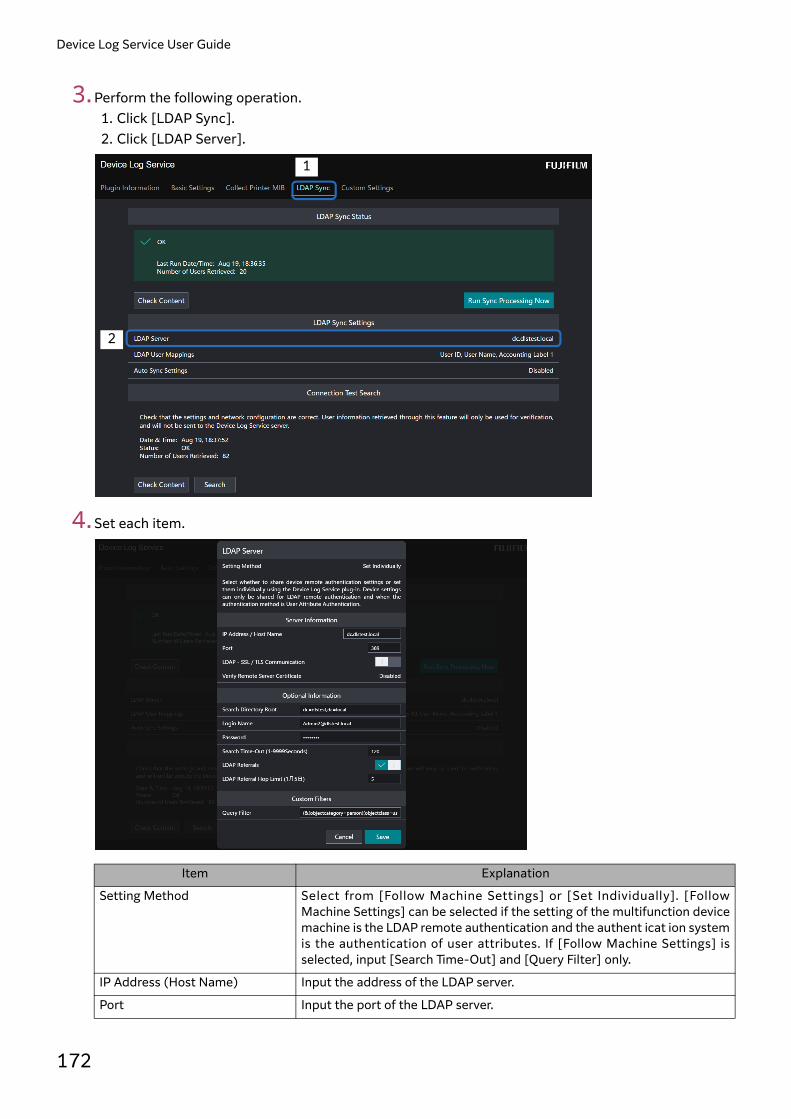
Device Log Service User Guide
172
3.Perform the following operation.1. Click [LDAP Sync].2. Click [LDAP Server].
4.Set each item.
Item Explanation
Setting Method Select from [Follow Machine Settings] or [Set Individually]. [FollowMachine Settings] can be selected if the setting of the multifunction devicemachine is the LDAP remote authentication and the authent icat ion systemis the authentication of user attributes. If [Follow Machine Settings] isselected, input [Search Time-Out] and [Query Filter] only.
IP Address (Host Name) Input the address of the LDAP server.
Port Input the port of the LDAP server.
2
1

4 Maintenance
173
LDAP - SSL / TLS Communication If enabling LDAP which used SSL / TLS communication, attach a check mark.
ImportantEnable also the SSL / TLS communication on the LDAP server side.Also if the certificate on the LDAP server side is a self certificate, theserver certificate must be imported beforehand to the multifunctiondevice.
Verify Remote Server Certificate If the SSL / TLS communication on the LDAP server side is enabled, whetherto verify the SSL certificate to prevent the communication data from beingeavesdropped and manipulated is displayed. Perform a setting change fromthe multifunction device machine.
Search Directory Root Input the DN (identification name) of a search directory root. Usablecharacter encoding is ASCII (printable characters) and the number ofcharacters is up to 255 characters.
Login Name Input a login name.
Password Input a password.
Search Time-Out Input the number of seconds for search time-out.
LDAP Referrals If enabling the LDAP referral (a function for a server which received arequest from a client to let another server connect depending on thesituation), put a check mark. Set it based on the specifications and structureof the LDAP server of the communication destination. In the Azure AD, it isdetermined depending on whether there are several domain controllers,whether the server which set the address to the Device Log Service is aglobal catalog etc.
LDAP Referral Hop Limit It is an upper limit number for preventing a load from being applied to theLDAP server due to the circulation of the referral. Set it based on thestructure of the LDAP server of the communication destination.
Query Filter Input the search filter condition expression of LDAP. A user correspondingto this condition expression is the target of sync. The initial value is for theAzure AD and a disabled user is not the target of sync. Usable characterencoding is ASCII (printable characters) and the number of characters is upto 1024 characters.
ImportantIf the escape of special characters is performed, input a hexadecimalASCII value after two escape characters "\\".Example: If it is input as an LDAP attribute value, a backslashbecomes "\\5c" and a comma becomes "\\2c".
Item Explanation

Device Log Service User Guide
174
5.When settings are finished, click [Save].
6.Click [LDAP User Mappings].
7.Set each item.
Item Explanation
User ID Attribute Designate an LDAP attribute name corresponding to the user ID of theDevice Log Service.
User Name Attribute Designate an LDAP attribute name corresponding to the user name of theDevice Log Service.
Accounting Labels 1 to 3 Designate a method to convert to the accounting label of the Device LogService from the LDAP account.
Setting Group*1 Designate a setting group for Device Log Service.

4 Maintenance
175
*1 This item needs to be set when using Device Log Service with [Auth. Setting by] set to [Device Log Service]on compatible devices. No setting is required if your organization does not use this feature. [Auth. Setting by]is a feature to be used when using Device Log Service to register users, who will log in to local accounts, withthe device.
8.When settings are finished, click [Save].
9.Click [Auto Sync Settings].
Length of Initial Password*1 Designate the number of digits for the default password to be used to log into the local account for the device, using 0 or a value between 4 and 12.If you designate a number of 4 or more, a separate password will begenerated for each user.Generated passwords can be viewed using the"Downloading User Information" (P.117) feature.
E-mail Address Attribute*1 Designate the name of an LDAP attribute to be mapped to e-mail addressesfor Device Log Service.
Card ID Attribute*1 Designate the name of an LDAP attribute to be mapped to IC card IDs forDevice Log Service.
Item Explanation
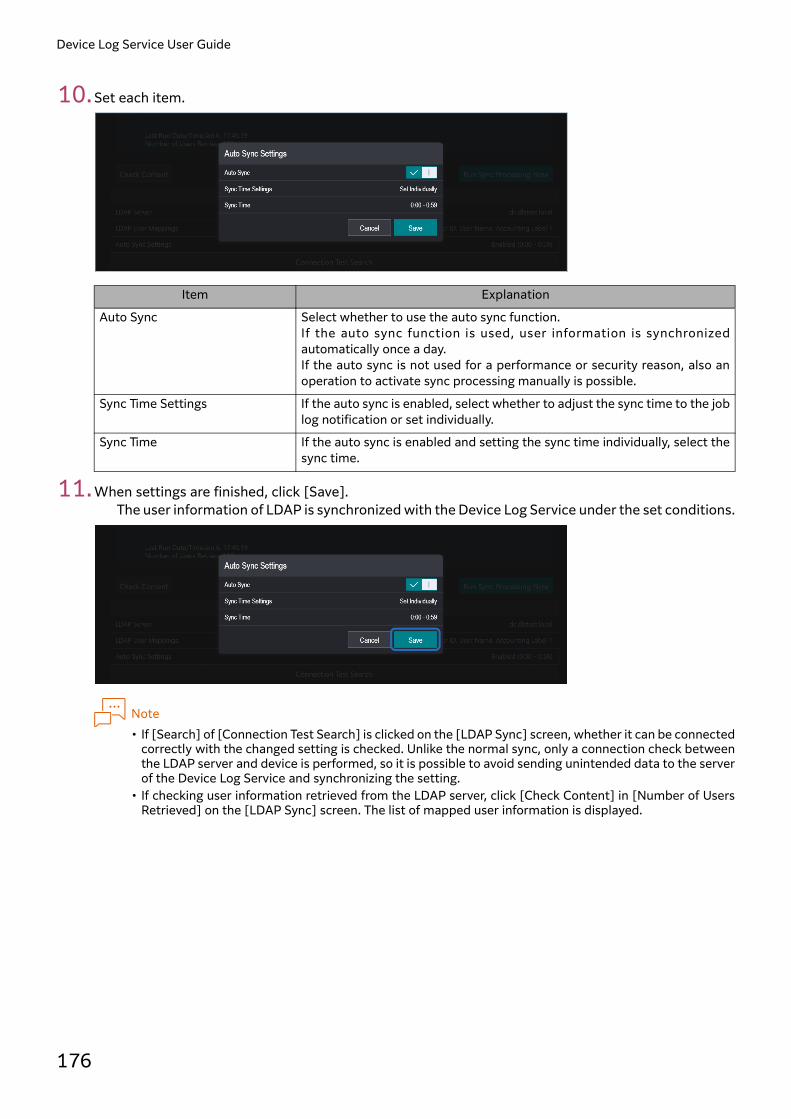
Device Log Service User Guide
176
10.Set each item.
11.When settings are finished, click [Save].The user information of LDAP is synchronized with the Device Log Service under the set conditions.
Note• If [Search] of [Connection Test Search] is clicked on the [LDAP Sync] screen, whether it can be connected
correctly with the changed setting is checked. Unlike the normal sync, only a connection check betweenthe LDAP server and device is performed, so it is possible to avoid sending unintended data to the serverof the Device Log Service and synchronizing the setting.
• If checking user information retrieved from the LDAP server, click [Check Content] in [Number of UsersRetrieved] on the [LDAP Sync] screen. The list of mapped user information is displayed.
Item Explanation
Auto Sync Select whether to use the auto sync function.If the auto sync function is used, user information is synchronizedautomatically once a day.If the auto sync is not used for a performance or security reason, also anoperation to activate sync processing manually is possible.
Sync Time Settings If the auto sync is enabled, select whether to adjust the sync time to the joblog notification or set individually.
Sync Time If the auto sync is enabled and setting the sync time individually, select thesync time.
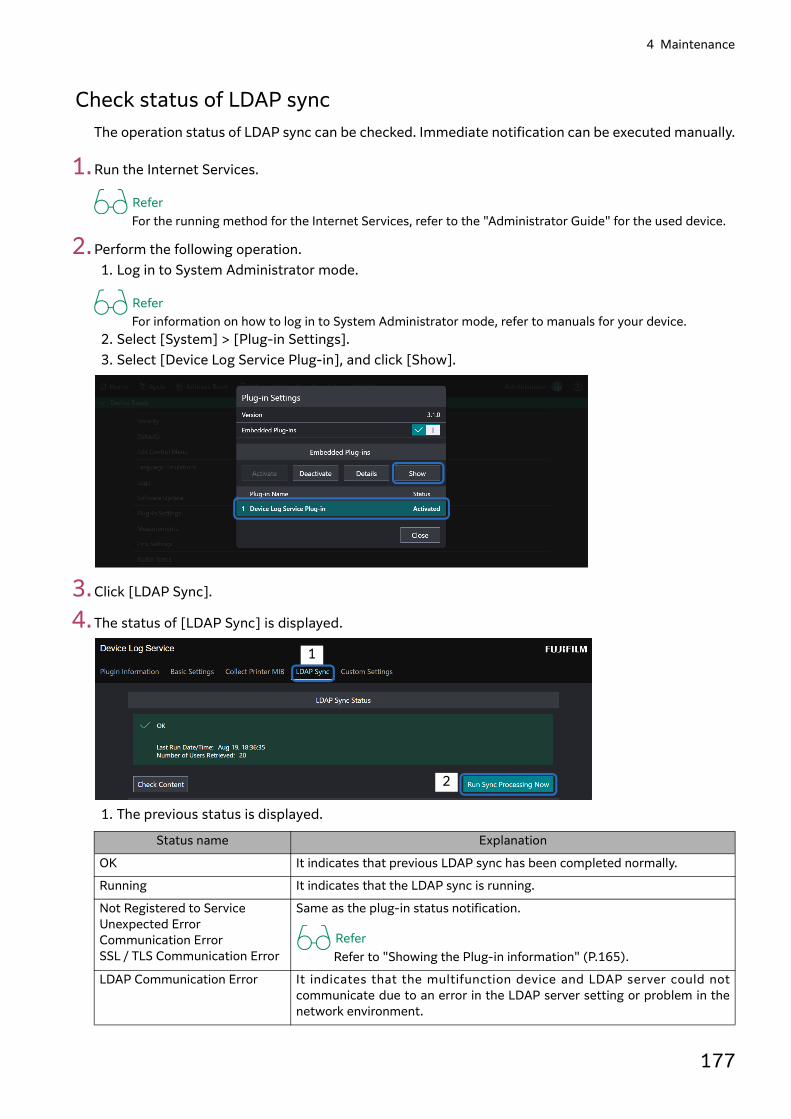
4 Maintenance
177
Check status of LDAP syncThe operation status of LDAP sync can be checked. Immediate notification can be executed manually.
1.Run the Internet Services.
ReferFor the running method for the Internet Services, refer to the "Administrator Guide" for the used device.
2.Perform the following operation.1. Log in to System Administrator mode.
ReferFor information on how to log in to System Administrator mode, refer to manuals for your device.
2. Select [System] > [Plug-in Settings].3. Select [Device Log Service Plug-in], and click [Show].
3.Click [LDAP Sync].
4.The status of [LDAP Sync] is displayed.
1. The previous status is displayed.
Status name Explanation
OK It indicates that previous LDAP sync has been completed normally.
Running It indicates that the LDAP sync is running.
Not Registered to ServiceUnexpected ErrorCommunication ErrorSSL / TLS Communication Error
Same as the plug-in status notification.
ReferRefer to "Showing the Plug-in information" (P.165).
LDAP Communication Error It indicates that the multifunction device and LDAP server could notcommunicate due to an error in the LDAP server setting or problem in thenetwork environment.
2
1
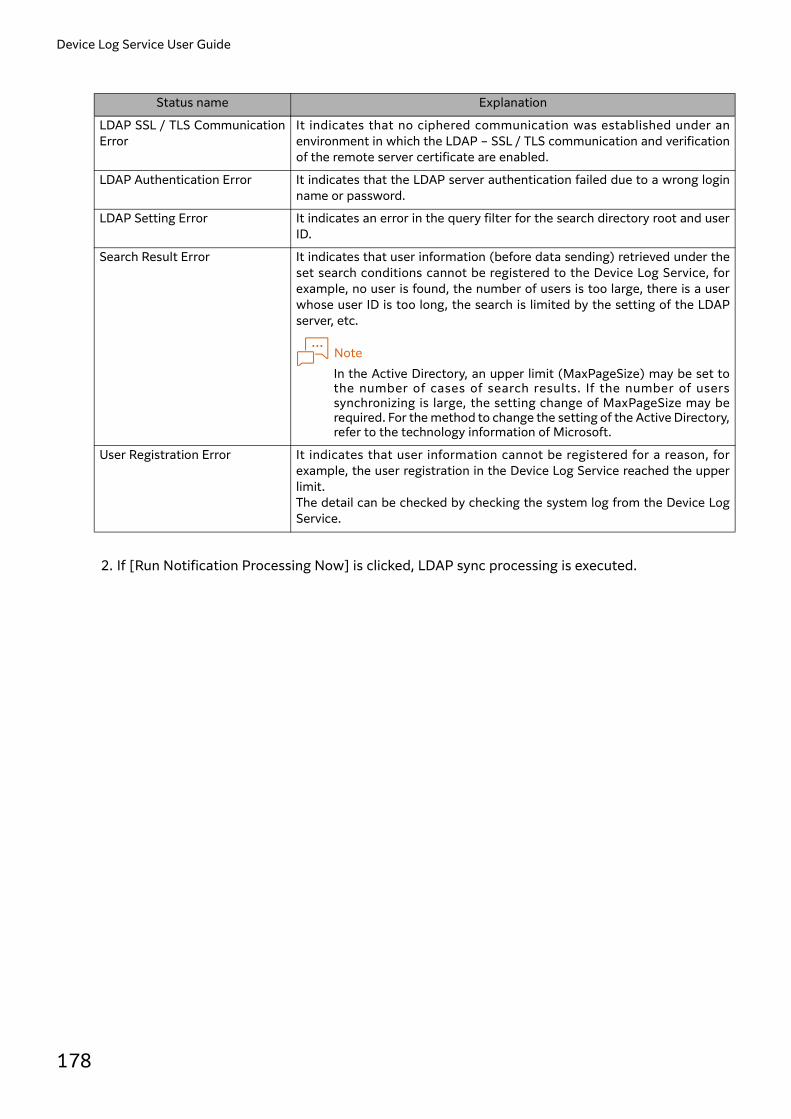
Device Log Service User Guide
178
2. If [Run Notification Processing Now] is clicked, LDAP sync processing is executed.
LDAP SSL / TLS CommunicationError
It indicates that no ciphered communication was established under anenvironment in which the LDAP – SSL / TLS communication and verificationof the remote server certificate are enabled.
LDAP Authentication Error It indicates that the LDAP server authentication failed due to a wrong loginname or password.
LDAP Setting Error It indicates an error in the query filter for the search directory root and userID.
Search Result Error It indicates that user information (before data sending) retrieved under theset search conditions cannot be registered to the Device Log Service, forexample, no user is found, the number of users is too large, there is a userwhose user ID is too long, the search is limited by the setting of the LDAPserver, etc.
NoteIn the Active Directory, an upper limit (MaxPageSize) may be set tothe number of cases of search results. If the number of userssynchronizing is large, the setting change of MaxPageSize may berequired. For the method to change the setting of the Active Directory,refer to the technology information of Microsoft.
User Registration Error It indicates that user information cannot be registered for a reason, forexample, the user registration in the Device Log Service reached the upperlimit.The detail can be checked by checking the system log from the Device LogService.
Status name Explanation

5 Troubleshooting
179
55Troubleshooting
Troubleshooting FlowIf you encounter a problem while using or operating Device Log Service, troubleshoot by following thesteps in the flowchart shown below.

Device Log Service User Guide
180
Contact your local representative of our company.
EndSolved
Not solved
A problem occurs
Step 3: Ask Online Support for assistance
Unable to connect to Device Log Service"Troubleshooting Server Connection Problems"
Step 2: Troubleshooting
Operating environment is appropriate
Not supported
Try again in a supported
environment
Check whether your OS and web browser are supported. P.9
Step 1: Check Operating Environment
Device information is wrong"Troubleshooting Device Information Problems" (P.182)
Accounting results are wrong"Troubleshooting Accounting Functions Problems
(Common in Each Notification Type)" (P.186)"Troubleshooting Accounting Functions Problems
(In Case of Detailed Notification)" (P.187)"Troubleshooting Accounting Functions Problems
(In Case of Simple Notification)" (P.188)
Drawing layout appears distorted; print fails"Troubleshooting Draw/Print Problems" (P.190)
A problem other than above occur"Troubleshooting Other Problems" (P.191)
The same problem occurs again
Solved
5 Troubleshooting
181
TroubleshootingThis section describes problems you may encounter while using Device Log Service and how toaddress them. If an error message is displayed, follow the instructions shown in the message.
Troubleshooting Server Connection Problems Unable to Log In to Device Log Service
Are the login name and password entered incorrect?Enter the correct login name and password. In particular, please note that the password is case-sensitive. (The login name is not case-sensitive.) If you forgot the password, access the FUJIFILM BI Direct Login screen and obtain a new password. Forinstructions, refer to "Setting Initial Password of System Administrator" (P.30).
Unable to Connect to Device Log Service
Has a network problem occurred?First, check whether you can connect to other websites. If you cannot connect to other websites, then it is likely a network problem. Check whether the LANcable is connected properly and if a network failure has occurred. In addition, check whether network environments of your PC (subnet mask, DNS, and proxy server)are set correctly. If the Device Log Service page does not appear despite successful access to other pages, check thefollowings:
Is Device Log Service under maintenance? Device Log Service may be offline on a temporary basis due to maintenance and other circumstances.For maintenance information, check the login screen of FUJIFILM BI Direct.When the service is under maintenance, try accessing the service again after a while.
"An unexpected error has occurred." Appears During OperationTry again after a while. If the problem persists, contact our Online Support. For contact information, contact your local representative of our company.
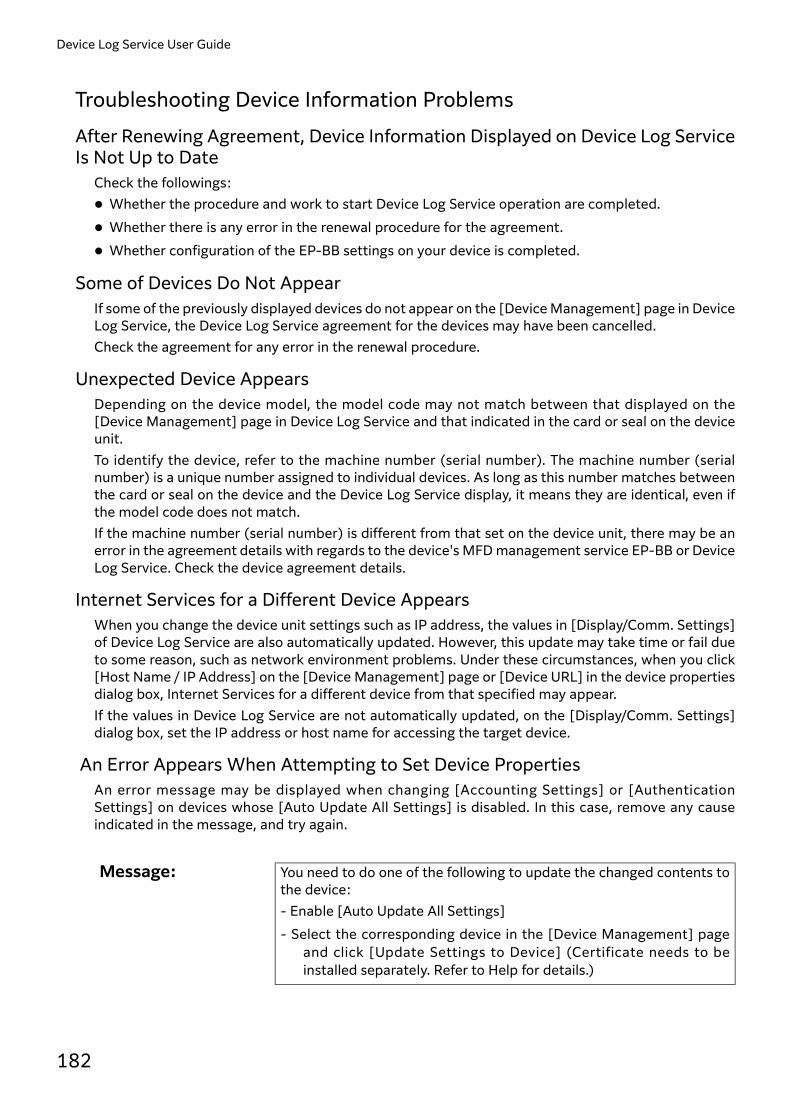
Device Log Service User Guide
182
Troubleshooting Device Information Problems After Renewing Agreement, Device Information Displayed on Device Log ServiceIs Not Up to Date
Check the followings: Whether the procedure and work to start Device Log Service operation are completed. Whether there is any error in the renewal procedure for the agreement. Whether configuration of the EP-BB settings on your device is completed.
Some of Devices Do Not AppearIf some of the previously displayed devices do not appear on the [Device Management] page in DeviceLog Service, the Device Log Service agreement for the devices may have been cancelled. Check the agreement for any error in the renewal procedure.
Unexpected Device AppearsDepending on the device model, the model code may not match between that displayed on the[Device Management] page in Device Log Service and that indicated in the card or seal on the deviceunit. To identify the device, refer to the machine number (serial number). The machine number (serialnumber) is a unique number assigned to individual devices. As long as this number matches betweenthe card or seal on the device and the Device Log Service display, it means they are identical, even ifthe model code does not match. If the machine number (serial number) is different from that set on the device unit, there may be anerror in the agreement details with regards to the device's MFD management service EP-BB or DeviceLog Service. Check the device agreement details.
Internet Services for a Different Device AppearsWhen you change the device unit settings such as IP address, the values in [Display/Comm. Settings]of Device Log Service are also automatically updated. However, this update may take time or fail dueto some reason, such as network environment problems. Under these circumstances, when you click[Host Name / IP Address] on the [Device Management] page or [Device URL] in the device propertiesdialog box, Internet Services for a different device from that specified may appear. If the values in Device Log Service are not automatically updated, on the [Display/Comm. Settings]dialog box, set the IP address or host name for accessing the target device.
An Error Appears When Attempting to Set Device PropertiesAn error message may be displayed when changing [Accounting Settings] or [AuthenticationSettings] on devices whose [Auto Update All Settings] is disabled. In this case, remove any causeindicated in the message, and try again.
Message: You need to do one of the following to update the changed contents tothe device: - Enable [Auto Update All Settings] - Select the corresponding device in the [Device Management] page
and click [Update Settings to Device] (Certificate needs to beinstalled separately. Refer to Help for details.)

5 Troubleshooting
183
An Error Appears when Clicking [Update Settings to Device]An error message may be displayed when clicking [Update Settings to Device]. In this case, removeany cause indicated in the message, and try again.
Cause and Remedy: Enable [Auto Update All Settings] in [Device Update Settings] of thedevice properties. The settings will be updated on a periodical pollingbasis.
ReferStep 5 in "Changing Information on Devices" (P.100)
To immediately update the settings, select the applicable device on the[Device Management] page and click [Update Settings to Device]. Toimmediately update the settings, SSL certificate is required to beinstalled on the device unit.
Refer• Immediate update "Updating Settings Information to Devices
Immediately" (P.106)• Installing SSL certificate "An Error Appears when Clicking
[Update Settings to Device]" (P.183)
Message: To use this feature, you need to do some settings in the device. Refer toHelp for details.Note: When [Auto Update All Settings] is enabled, the settings will beupdated to the device in the next periodic communication (within 24hours).
To use this feature, you need to do some settings in the device. Refer toHelp for details.
Device Log Service User Guide
184
Cause and Remedy: This message appears when the device SSL/TLS communication isdisabled. Perform the following steps. (1) Operate the steps 1 and 2 of "Setting Security Settings" (P.195) to
enable the SSL/TLS communication of the device.(2) Reload Internet Services on a web browser, and then check whether
the security alert is displayed.If the security alert is displayed, go on to (3) because the import ofthe certificate of the device is required.If the security alert is not displayed, go on to (9).
(3) Click [Properties] > [Security] > [Certificate Management] onInternet Services.
(4) Select [Local Device], and then click [Display the list].The list of the device certificates is displayed.
(5) If there is only one device certificate, select the line.If there are multiple device certificates, select the line with [*].
(6) Click [Certificate Details].(7) Click [Export this certificate].
The certificate is saved.(8) Import the saved certificate on [Trusted Root Certification
Authorities] of Certificate Stores of the PC on that you operated[Update Settings to Device].For the information of the procedure, refer to the help of Windows.
(9) On the [Device Management] page of Device Log Service, display[Display/Comm. Settings] in the device properties.
(10)Check whether the settings you made in the step (1) are updated.Also, if the port number for SSL on the device is set to a value otherthan the default value (443), the port number is not correctlyupdated to Device Log Service. In this case, match the value in[Display/Comm. Settings] > [HTTP Port Number] with that set onthe device unit.
Message: Unable to update again to device with [Updating] status.If you want to update again, check the properties of [Update Log].
Cause and Remedy: Refer"[Update Status] of a Device Remains [Updating]" (P.185)
Message: Unable to update to device with [Update Failed] status. Check the properties in [Update Log] for details of the problem.
Cause and Remedy: Refer"[Update Status] of a Device Remains [Updating]" (P.176)
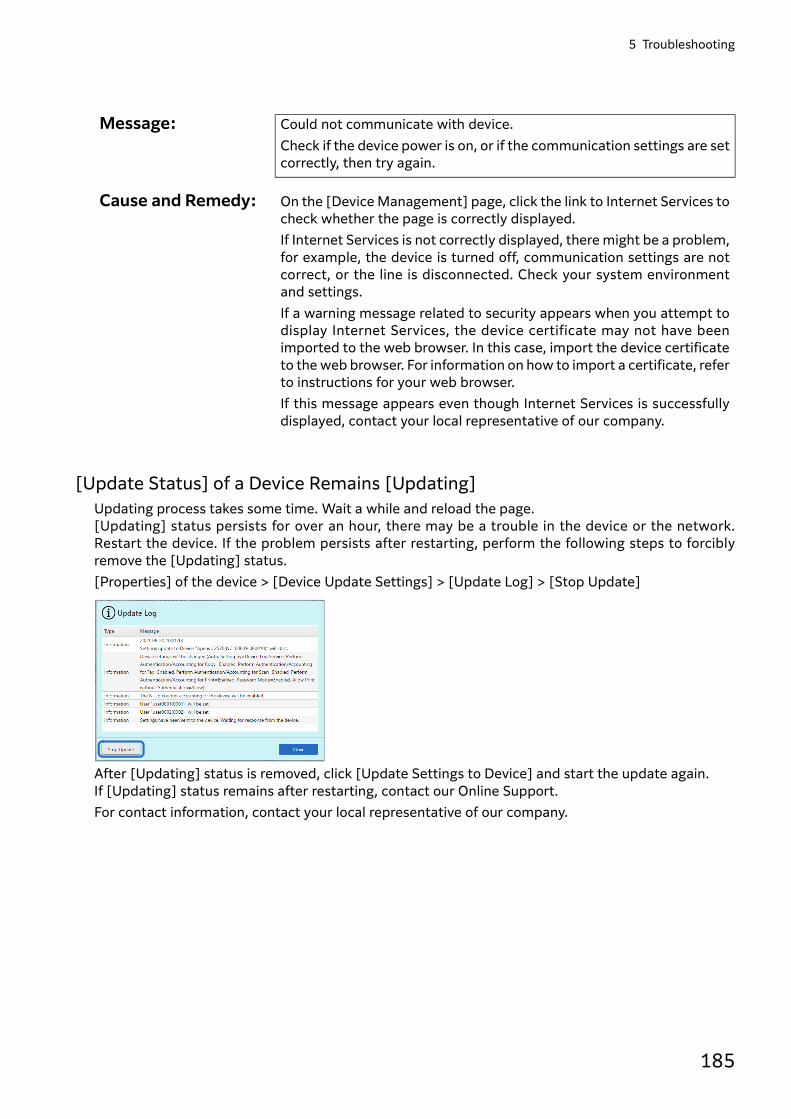
5 Troubleshooting
185
[Update Status] of a Device Remains [Updating]Updating process takes some time. Wait a while and reload the page. [Updating] status persists for over an hour, there may be a trouble in the device or the network.Restart the device. If the problem persists after restarting, perform the following steps to forciblyremove the [Updating] status.[Properties] of the device > [Device Update Settings] > [Update Log] > [Stop Update]
After [Updating] status is removed, click [Update Settings to Device] and start the update again. If [Updating] status remains after restarting, contact our Online Support.For contact information, contact your local representative of our company.
Message: Could not communicate with device. Check if the device power is on, or if the communication settings are setcorrectly, then try again.
Cause and Remedy: On the [Device Management] page, click the link to Internet Services tocheck whether the page is correctly displayed. If Internet Services is not correctly displayed, there might be a problem,for example, the device is turned off, communication settings are notcorrect, or the line is disconnected. Check your system environmentand settings. If a warning message related to security appears when you attempt todisplay Internet Services, the device certificate may not have beenimported to the web browser. In this case, import the device certificateto the web browser. For information on how to import a certificate, referto instructions for your web browser. If this message appears even though Internet Services is successfullydisplayed, contact your local representative of our company.

Device Log Service User Guide
186
[Update Status] of a Device Becomes [Update Stopping]If the settings changed on a control panel on a device or software other than Device Log Serviceconflict with the settings on Device Log Service, updating process of Device Log Service stops toprevent the settings from being overwritten.The conflicting settings will be displayed on [Properties] of the device > [Device Update Settings] >[Update Log]. Follow the instruction message and undo the settings changed on a control panel orsoftware other than Device Log Service.After undoing, click the [Resume Update] button in the same update log window.This operation will remove the [Update Stopping] status. Click [Update Settings to Device] and startthe update again.
NoteIf you specify Device Log Service for the authentication settings, do not change authentication settings ona control panel on a device or other software.
Troubleshooting Accounting Functions Problems (Common in EachNotification Type)A User is Treated as Multiple Different Users/No User Displayed
Did you change user information due to a reason such as reorganization?If you change user information for Device Log Service in the middle of an accounting period, deviceusage of a user may be tallied with different Accounting Keys. For example, if you change the accounting label for a user from "A" to "B" in the middle of anaccounting period, and perform accounting by accounting labels, device usage notified before changewill be tallied as "A" and that after change will be tallied as "B". To sum up such a usage into usage ofa single user, you need to recalculate counters.
Refer"Recalculating Counters" (P.141)
Is there usage by the particular user actually?If an accounting result that should include both User A and User B only shows User A, this may becaused by the following reasons: User B actually did not use devices Device Log Service cannot collect usage from the devices that User B usesDownload usage of the user to check he/she actually uses devices.
Refer"Downloading Device Usage Data" (P.89)
Are accounting targets set correctly?In [Accounting Period / Target] on the [Usage Data Accounting] page, check whether target users,target devices, and target accounting labels are set correctly.
Refer"Setting the Accounting Method" (P.74)

5 Troubleshooting
187
Information on Users and Departments Not Updated in Accounting ResultsCorrectly
Is department information (accounting labels) set correctly in Device Log Service?On the [User Management] page, check the [Accounting Label] for the user is set correctly. Please note that the accounting label, which is set at the time when the counter is received, is updatedto the accounting result. To renew the previous accounting results to update the up-to-dateaccounting labels, you need to recalculate counters.
Refer• "Recalculating Counters" (P.141)• "Viewing/Changing User Information" (P.111)
Does user IDs match between devices and Device Log Service?To tally device usage by accounting labels, user IDs must match between users registered with devicesand users registered with Device Log Service. In particular, please note that user IDs are case-sensitive. You can check whether the registered user IDs are the same as that set on the devices by viewing thelist of unregistered users on the [User Management] > [Unregistered User List] page. If a user youregistered is displayed in the list of unregistered users, the user ID registered for the user is incorrect. In this case, add the unregistered user, and delete the existing user you registered by mistake.
Refer• "Adding Users from a List of Unregistered Users" (P.120)• "Deleting Users" (P.122)
Troubleshooting Accounting Functions Problems (In Case of DetailedNotification)Unable to Collect Job Log from Devices
NoteThe receiving status is recorded in Center Processing Log. By downloading and checking Center ProcessingLog, you may see the cause of the problem.
ReferDownloading Center Processing Log> " Downloading the System Log" (P.136)
Is the device working? Check whether the device is turned on. Also, check if an error such as a hard disk failure occurs on thedevice.
Is the Plug-in working correctly?In order to tally usage data on Device Log Service, the Plug-in installed on a device is needed to workcorrectly.Check the Plug-in information of a device on Internet Services, and then check whether the Plug-in isworking correctly. If error occurs, follow the instruction displayed on the screen and solve the problem.
ReferTo check whether the system is working correctly " Showing the Plug-in information" (P.165)To correct settings " Changing Basic Settings" (P.166)
Device Log Service User Guide
188
Are the proxy server settings configured on the device correctly?If proxy servers are used to access Internet in your network, the proxy server settings must be configuredon the device. Make sure that the proxy server settings are correctly configured on the device.
Refer"Proxy Server Settings" (P.36)
Is communication blocked by a network equipment or security software?Depending on your network environment, settings of proxy server or firewall may need to be changed.Make sure that communication from the device to the Device Log Service server is allowed.
Refer"Required Settings" (P.34)
Troubleshooting Accounting Functions Problems (In Case of SimpleNotification)Unable to Collect Counter from Device
NoteCounter receiving status is recorded in the Centre Processing Log. Downloading the Centre Processing Logand checking the details may help you to identify the cause of the collection failure.
ReferTo download the Centre Processing Log "Downloading the System Log" (P.136)
Is the device working? Check whether the device is turned on. Also, check if an error such as a hard disk failure occurs on thedevice.
Is the Login Type set correctly on the device? To use Device Log Service to tally device usage, in addition to setting Login Type of a device to "Loginto Local Accounts/Local Accounting", you need to set all services to "Enable" under the LocalAccounting settings. Check the settings on the device by using a utility such as the Device Setup orInternet Services, and select the correct Login Type.
ReferFor details on required settings on devices "Setting Login Type/Register a User to a Device" (P.54)

5 Troubleshooting
189
Is counter collection enabled in the accounting settings for the device?View the device properties on the [Device Management] page of Device Log Service to check whetherthe [Enable Daily Counter Accounting] check box is selected in [Accounting Settings]. Counterinformation whose check box is not selected in this field will not be collected.
Even if the [Enable Daily Counter Accounting] check box is selected, the device counters are notcollected until the settings are updated to the device. For any device whose address and other items are not set in [Display/Comm. Settings], Device LogService will apply the settings from [Accounting Settings] at the next polling. Thus, it may take timefor the device settings to be updated.
Refer• To set device properties "Changing Information on Devices" (P.100)• To update the device settings "Device Management" (P.21)
Device Billing Meter Does Not Match Device Log Service Accounting ResultsA device's billing meter counts do not necessarily match the accounting results for that device derivedfrom Device Log Service. (With Device Log Service, consistency with billing meters is not guaranteed.) However, if the difference is distinct, check the followings:
Have you newly started using Device Log Service?Difference can occur immediately after starting the service, because the start date of the service donot match the beginning of the billing period.
Have you performed maintenance on your device lately? Maintenance performed on the device, such as replacement of boards and initialization of memoryand hard disk may cause difference between billing meters and accounting results.
Are Device Log Service receiving counters from devices?On the [Home] page or the [Device Management] page of Device Log Service, check the Last Senttime of counters. If Device Log Service has not received counters lately, check the followings: Whether the device is turned on Whether an error such as a hard disk failure occurs on the device.
Refer• "Viewing Device Usage" (P.72)• "Managing Devices" (P.98)

Device Log Service User Guide
190
Did you change Login Type set on the device? Changing Login Type of device to an option other than "Login to Local Accounts/Local Accounting" orchanging Accounting Type other than “Local Accounting” in the middle of an accounting period maycause difference between the device's billing meters and Device Log Service's accounting results. Even if you change Login Type temporarily and then restore it, device usage data for that period willnot be notified to Device Log Service, and thus, it causes difference in the accounting results.
Did you delete users set on the device?Deleting users who use Local Authentication on the device in the middle of an accounting period maycause difference between the device's billing meters and Device Log Service's accounting results.After deleting users, even if you register again the same user IDs as that of users you deleted, therecan be difference in the accounting results.
Did you clear accounting management data for the device?Clearing accounting management data for the device in the middle of an accounting period may causedifference between the device's billing meters and Device Log Service's accounting results.
Troubleshooting Draw/Print ProblemsUnable to Display Charts
Is JavaScript enabled in your web browser?JavaScript is required to display charts in Device Log Service. When JavaScript is disabled, enable it inyour web browser.
Page Layout Appears Distorted
Did you resize the web browser window?Reducing the window size of the web browser may cause the layout to be distorted. In such case, enlarge the window size.
ReferFor recommended operating environment "Operating Environment" (P.9)
Text in Charts Not Legible/Incomplete SentenceDepending on the elements set in [Accounting Settings] as well as the counter accounting results, youmay see the following charts: In pie chart, the breakdown text is overlapped because it is too long, causing legible characters. In column/bar chart, the display area on the axis cannot accommodate item names, and the item
names are shown as if they are empty. There are too many legend items, and the legend is displayed truncated. In these cases, hovering cursor over a chart displays the "item name, legend item name, and value" (ifthe chart does not have a legend, "item name and value").
Refer"Displaying ToolTip Text" (P.71)

5 Troubleshooting
191
Background Colors and Images Not Printed By default, Internet Explorer and Mozilla Firefox are set "not to print backgrounds" to improvelegibility of the printed characters. When printing accounting results using Device Log Service, if your web browser is set "not to printbackgrounds", the background colors and images shown on your screen are not printed. To print withbackground as shown on your screen, make the following settings:
NoteThe procedure below may vary from version to version of your web browser. For detailed procedure, referto Help or other documents for your web browser.
Troubleshooting Other ProblemsUnable to Download Files
For Internet Explorer 9, is [Do not save encrypted pages to disk] enabled? In Internet Explorer 9, files cannot be downloaded when [Do not save encrypted pages to disk] isenabled under Internet Options. Therefore, if this option is enabled, downloading files fail when you execute [Download Data],[Download System Log], [CSV Download], or [Download Backup Data], in Device Log Service. When downloading the Device Log Service files, on the [Advanced] tab under Internet Options,disable [Security] > [Do not save encrypted pages to disk].
Some Device Information Missing in Downloaded Usage DataIf the target devices are not included in the files you downloaded using [Download Data] on the[Usage Data Accounting] page of Device Log Service, check the followings:
Is there usage of the particular device actually?As long as the device has not been used at all, no information for the device is described in thedownloaded file. If no information is shown in the files even though the device has been actually used, there may beproblems with usage collection from the device or the settings for the device. Troubleshoot by following the steps in "Unable to Collect Counter from Device" (P.188).
There are Accounting Items Not Included in Usage DataThe accounting results tallied by methods described in "Setting the Accounting Method" (P.74) or"Tallying Device Usage By Selecting an Accounting Pattern" (P.87) include items which are not in theusage data. Each of these items shows the result of tallying multiple items of usage data as one item.Accounting result items and calculating formula not included in usage data are shown below.
Web Browser Setting
Internet Explorer (1)Click [File] > [Page Setup]. (2)Select the [Print background colors and images] check box in the [Page Setup]dialog box, and click [OK].
Mozilla Firefox (1)Click [Print] on the browser and click [Page Setup] in the preview window. (Ifyou use the menu bar, click [Page Setup] in the [File] menu.)(2)Display the [Format & Options] tab in the [Page Setup] dialog box, select the[Print Background (colors & images)] check box, and click [OK].
Device Log Service User Guide
192
Login Type Cannot Be Changed from Login to Local AccountsA device which is set Login Type to [Login to Local Accounts] with Device Log Service sometimescannot be changed other than [Login to Local Accounts].If you want Login Type changed, our customer engineer will set, contact your local representative ofour company.
Item Formula
Print Sheets (2-Sided) (Color Print Impressions + Large Size Color Print Impressions + B&W PrintImpressions) - Print Sheets
Print Sheets (1-Sided) Print Sheets x 2 - (Color Print Impressions + Large Size Color Print Impressions +B&W Print Impressions)
Copy Sheets (2-Sided) (Color Copy Impressions + Large Size Color Copy Impressions + B&W CopyImpressions) - Copy Sheets
Copy Sheets (1-Sided) Copy Sheets x 2 - (Color Copy Impressions + Large Size Color Copy Impressions +B&W Copy Impressions)
Fax Print Sheets (2-Sided) (Fax Print Impressions + Receive Fax Relay Broadcast Print Impressions + ReceiveFax Print Impression + Receive Internet Fax Print Impression) - (Fax Print Sheets+ Receive Fax Relay Broadcast Print Sheets + Receive Fax Sheets + ReceiveInternet Fax Print Sheets)
Fax Print Sheets (1-Sided) (Fax Print Sheets + Receive Fax Relay Broadcast Print Sheets + Receive Fax Sheets+ Receive Internet Fax Print Sheets) x 2 - (Fax Print Impressions + Receive FaxRelay Broadcast Print Impressions + Receive Fax Print Impression + ReceiveInternet Fax Print Impression)
1-Up Print Impressions (Color Print Impressions + Large Size Color Print Impressions + B&W PrintImpressions) - (Print Impressions (2-Up) + Print Impressions (4-Up) + PrintImpressions (8-Up or more))
1-Up Copy Impressions (Color Copy Impressions + Large Size Color Copy Impressions + B&W CopyImpressions) - (Copy Impressions (2-Up) + Copy Impressions (4-Up) + CopyImpressions (8-Up or more))

5 Troubleshooting
193
Notes and RestrictionsThis section describes the notes and restrictions to observe when you use Device Log Service.
Figures on a billing statement that are based on the device's billing meter counts may be differentfrom those tallied by means of Device Log Service.
To register yourself as the system administrator for Device Log Service, first you must register aUser ID (your e-mail address) at FUJIFILM BI Direct. The User ID registration is required for each ofthe Device Log Service agreements. You cannot register a single User ID as system administrator forseveral Device Log Service instances.
If your organization subscribes to several Device Log Service instances, more than one Device LogService cannot share the same devices as management targets.
The maximum number of devices that can be managed by Device Log Service is 100. The maximum number of users that can be registered with Device Log Service is 10,000. To update the settings information in the device properties to the device immediately, you must
enable SSL/TLS communication on the device unit. If your organization replaces a device, a procedure for Device Log Service to manage the new device
is required. There is a certain period before completion of the procedure, for which device usagedata cannot be collected.
"Receive Internet Fax, Transfer Fax" users are outside the scope and thus not displayed in theaccounting results, although they are displayed on the screen where you select the accountingtarget users.
When you use the zoom function of Internet Explorer to zoom in or out the Device Log Service webpage, some characters and images may not be displayed correctly. It is advisable to maintain 100%zoom level when using the zoom function of Internet Explorer.
Authorization to use the fax service including the Internet Fax Service(SIP)/ServerFAX will not bereflected with models without fax features.
Depending on firmware of a device, the Plug-in page of a device which enabled SSL may not be ableto opened on Google Chrome and Mozilla Firefox. In this situation, open with Internet Explorer.
If you reset a hard disk of a device, stored job logs and counters will be deleted, so that the countersthat are not notified yet cannot be tallied.When Notification Type is Detailed Notification, execute [Run Notification Processing Now], onInternet Services and then all the stored job logs can be notified.When Notification Type is Simple Notification, counter cannot be notified immediately. To minimizenot notified counters, do not reset a hard disk right after Daily Notification.
Refer" Device Management" (P.21)
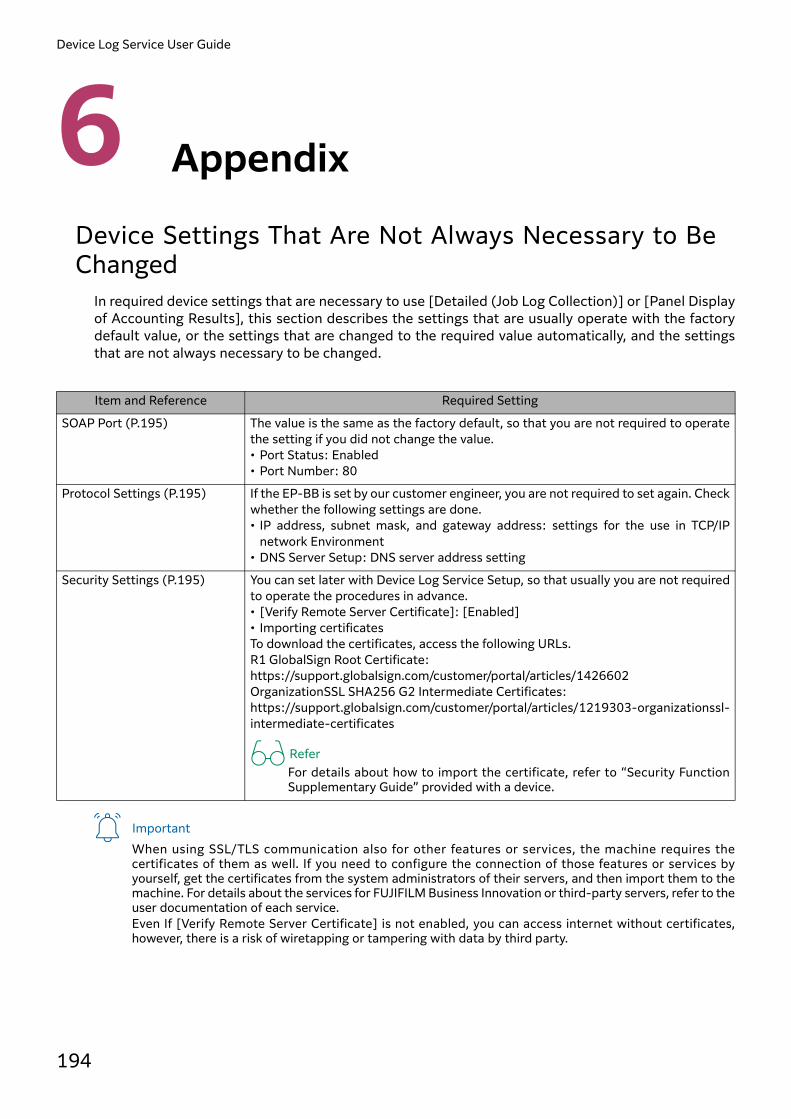
Device Log Service User Guide
194
66Appendix
Device Settings That Are Not Always Necessary to BeChanged
In required device settings that are necessary to use [Detailed (Job Log Collection)] or [Panel Displayof Accounting Results], this section describes the settings that are usually operate with the factorydefault value, or the settings that are changed to the required value automatically, and the settingsthat are not always necessary to be changed.
ImportantWhen using SSL/TLS communication also for other features or services, the machine requires thecertificates of them as well. If you need to configure the connection of those features or services byyourself, get the certificates from the system administrators of their servers, and then import them to themachine. For details about the services for FUJIFILM Business Innovation or third-party servers, refer to theuser documentation of each service.Even If [Verify Remote Server Certificate] is not enabled, you can access internet without certificates,however, there is a risk of wiretapping or tampering with data by third party.
Item and Reference Required Setting
SOAP Port (P.195) The value is the same as the factory default, so that you are not required to operatethe setting if you did not change the value.• Port Status: Enabled• Port Number: 80
Protocol Settings (P.195) If the EP-BB is set by our customer engineer, you are not required to set again. Checkwhether the following settings are done.• IP address, subnet mask, and gateway address: settings for the use in TCP/IP
network Environment• DNS Server Setup: DNS server address setting
Security Settings (P.195) You can set later with Device Log Service Setup, so that usually you are not requiredto operate the procedures in advance.• [Verify Remote Server Certificate]: [Enabled]• Importing certificatesTo download the certificates, access the following URLs.R1 GlobalSign Root Certificate: https://support.globalsign.com/customer/portal/articles/1426602OrganizationSSL SHA256 G2 Intermediate Certificates: https://support.globalsign.com/customer/portal/articles/1219303-organizationssl-intermediate-certificates
ReferFor details about how to import the certificate, refer to “Security FunctionSupplementary Guide” provided with a device.

6 Appendix
195
SOAP Port
1. In the [Home] screen of a device, select [SOAP] in [Port Settings] under > [Device] > [Connectivity& Network Setup].
ReferHow to display the [Tools] screen "Setting Each Item" (P.35)
2.Select below value for each item.[Port Status]: [Enabled][Port Number]: [80]
3.Press the Home button to go back to the [Home] screen.
Protocol Settings
1. In the [Home] screen of a device, select [Protocol Settings] in [Connectivity & Network Setup] under > [Device] and then set an IP address, subnet mask, and gateway address (settings for the use in
TCP/IP network environment).
ReferHow to display the [Tools] screen "Setting Each Item" (P.35)
2.Select [IPv4-DNS Server Setup] or [IPv6-D+NS Server Setup] in [TCP/IP-Network Setup] under[Device] > [Connectivity & Network Setup] > [Protocol Settings].
3.When [Get IP Address from DHCP] is set to [Disabled], specify your DNS server address in [DNSServer IP Address].
4.Press the Home button to go back to the [Home] screen.
Setting Security SettingsTo set security settings, use Internet Services.
1.Start Internet Services on your PC.
2. Import a certificate for the external server.1. Select [System] > [Security Settings] > and click [Certificate Settings].2. Select the type of the certificate to import and click [Import].3. Specify a certificate file to be imported in [Certificate].4. Enter the password and click [Execute].
After a while, the certificate is imported to the device.
NoteTo import multiple certificates, repeat step 1 to 4.
3.Secure communication with the external server.1. Select [Properties] > [Security] > [SSL/TLS Settings].2. Set the following item.
[Verify Remote Server Certificate]: Enabled

Device Log Service User Guide
196
Formats of Job Log FilesThis section describes the formats of job log files collected by Detailed Notification.
Basic Structure of Job Log FilesThis section describes the rows comprising job log files and the file formats of job log files.
Rows comprising job log filesJob log files are comprised of the following rows. Title Row
Item names of job logs such as "Printer Name", "Branch Number", and "MIB Type" are entered. Document Data Row
Information such as the document size, original impressions, document type, and output color oforiginal impressions is recorded in these rows. The document data row is not recorded for jobs thatdo not include original sheets such as print jobs.
Impression Data RowInformation such as the number of impressions, output color, and size of impressions is recorded.The impression data row is not recorded for jobs that do not include print sheets such as file transferof scanned documents.
Paper Data RowInformation such as the number of sheets, paper size, and paper type to be printed is recorded. Thepaper data row is not recorded for jobs that do not include print sheets such as file transfer ofscanned documents.
Fax Data RowInformation such as the recipient telephone number, Fax image size, and Fax images sent isrecorded. This is recorded only for fax jobs.
Basic Data RowOnly basic information of jobs such as the printer name and service type is recorded. This row isrecorded only when information does not exist in the Fax data row, paper data row, impression datarow, or document data row, such as for jobs for which print data is stored on a device or print jobsthat are aborted.
Example of copy jobThis section describes job log files when copying is executed.
This example is a job for copying an A4 size document on A4 size paper. The name of the device that executed the job is recorded in "Printer Name". Print job is not always limited to 1 row. 2 or more rows may be recorded depending on the selection
of output color and size of the paper.
Printer Branch No. ... Job
ID ... Printing Size ... Paper
size ... Document Size ...
Apeos1 Abbreviated 123 Abbreviated A4 Abbreviated A4 Abbreviated A4 the rest isomitted

6 Appendix
197
Example of print jobThis section describes job log files when printing is executed from a computer.
This example is a job for printing on A4 size paper from a computer. The name of the device that executed the job is recorded in "Printer Name". Print job is not always limited to 1 row. 2 or more rows may be recorded depending on the selection
of output color and size of the paper.
Example of fax jobThis section describes job log files when a document is scanned and sent by a fax.
This example is a job for faxing A4 size paper. This job is comprised from a document data row and faxdata row. The name of the device that executed the job is recorded in "Printer Name". Since the job is comprised of 2 rows, values are recorded in "Branch No." of each row such "1 of 2"
(first of two rows) and "2 of 2" (second of two rows). Since it is 1 print job comprised of 2 rows, the same value is recorded in "Job ID". Since information concerning the document is recorded in the document data row, a value is
recorded in "Original Size" and values are not recorded in the fax items. Since information concerning the fax processing is recorded in the fax data row, a value is recorded
in "Fax Recipient Phone Number" and "Fax Images Size", and a value is not recorded in the originalitems.
NoteFax jobs comprised on one row with a branch number of “blank” also exist.
Format of job log filesA job log file is a text file of CSV format.
NoteYou can set delimiters in [Language and Region Setting].
Printer Branch No. ... Job
ID ... Printing Size ... Paper
size ... Document Size ...
Apeos1 1 of 2 Abbreviated 234 Abbreviated A4 Abbreviated A4 Abbreviated the rest isomitted
Printer Branch No. ... Job
ID ... Document Size ...
Recipient Fax
Number...
Fax Image Size
...
Apeos1 1 of 2 Abbreviated 345 Abbreviated A4 Abbreviated Abbreviated the rest isomittedApeos1 2 of 2 345 XXXXXXXX A4
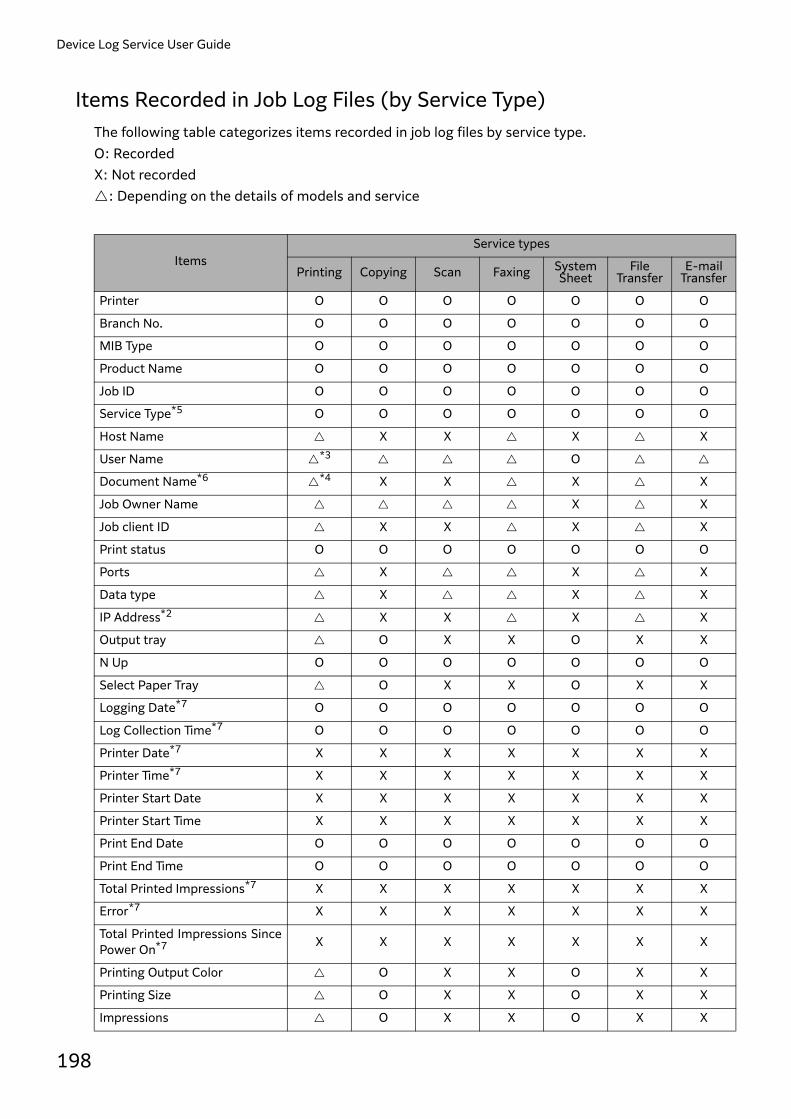
Device Log Service User Guide
198
Items Recorded in Job Log Files (by Service Type)The following table categorizes items recorded in job log files by service type.O: RecordedX: Not recorded: Depending on the details of models and service
ItemsService types
Printing Copying Scan Faxing System Sheet
File Transfer
E-mail Transfer
Printer O O O O O O O
Branch No. O O O O O O O
MIB Type O O O O O O O
Product Name O O O O O O O
Job ID O O O O O O O
Service Type*5 O O O O O O O
Host Name X X X X
User Name *3 O
Document Name*6 *4 X X X X
Job Owner Name X X
Job client ID X X X X
Print status O O O O O O O
Ports X X X
Data type X X X
IP Address*2 X X X X
Output tray O X X O X X
N Up O O O O O O O
Select Paper Tray O X X O X X
Logging Date*7 O O O O O O O
Log Collection Time*7 O O O O O O O
Printer Date*7 X X X X X X X
Printer Time*7 X X X X X X X
Printer Start Date X X X X X X X
Printer Start Time X X X X X X X
Print End Date O O O O O O O
Print End Time O O O O O O O
Total Printed Impressions*7 X X X X X X X
Error*7 X X X X X X X
Total Printed Impressions SincePower On*7 X X X X X X X
Printing Output Color O X X O X X
Printing Size O X X O X X
Impressions O X X O X X

6 Appendix
199
Paper Type O X X O X X
Paper Size O X X O X X
Sheets O X X O X X
Job Template Name X X X X
Copies O O X X O X X
Staple Count O O X X O X X
Original Color X O O X O
Original Pages X O O X O
Original Type X O X X
Document Size X O X X
Recipient IP Address X X X X O
Mailbox Number X
Recipient Fax Number X X X X
Fax Remote Terminal Name X X X X
F Code X X X X
Fax Line X X X X
Fax Start Date X X X X
Fax Start Time X X X X
Fax End Date X X X X
Fax End Time X X X X
Fax Duration X X X X
Remote ID X X X X
Fax Images Sent X X X X X X
Fax Image Size X X X X
Fax Speed Dial Number X X X X X X
Service Details O O O O O O O
Related Job ID*1 X X X
Account ID
Card Number
Meter 1*7 X X X X X X X
Meter 2*7 X X X X X X X
Meter 3*7 X X X X X X X
Billing Meter Number O O X X O X X
Recipient Information X X X X X O O
Staple Type O O X X O X X
Fold Type O O X X O X X
Fold Count O O X X O X X
Punch Type O O X X O X X
Punch Count O O X X O X X
ItemsService types
Printing Copying Scan Faxing System Sheet
File Transfer
E-mail Transfer
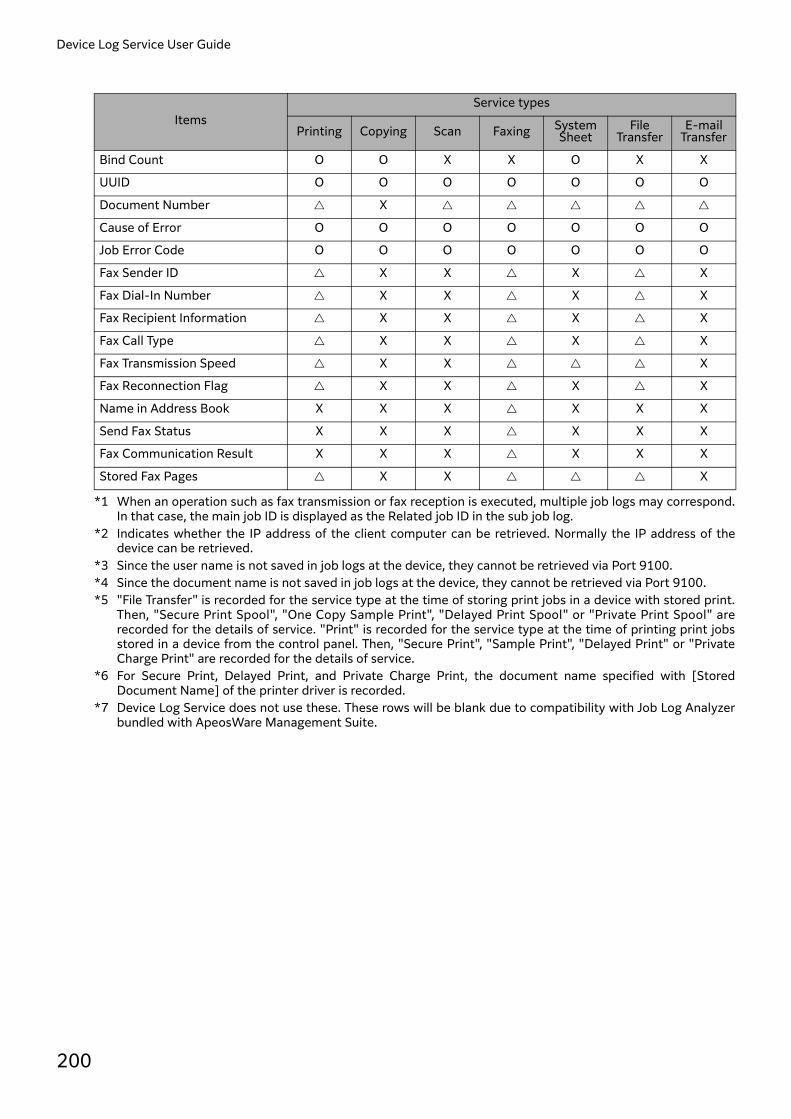
Device Log Service User Guide
200
*1 When an operation such as fax transmission or fax reception is executed, multiple job logs may correspond.In that case, the main job ID is displayed as the Related job ID in the sub job log.
*2 Indicates whether the IP address of the client computer can be retrieved. Normally the IP address of thedevice can be retrieved.
*3 Since the user name is not saved in job logs at the device, they cannot be retrieved via Port 9100.*4 Since the document name is not saved in job logs at the device, they cannot be retrieved via Port 9100.*5 "File Transfer" is recorded for the service type at the time of storing print jobs in a device with stored print.
Then, "Secure Print Spool", "One Copy Sample Print", "Delayed Print Spool" or "Private Print Spool" arerecorded for the details of service. "Print" is recorded for the service type at the time of printing print jobsstored in a device from the control panel. Then, "Secure Print", "Sample Print", "Delayed Print" or "PrivateCharge Print" are recorded for the details of service.
*6 For Secure Print, Delayed Print, and Private Charge Print, the document name specified with [StoredDocument Name] of the printer driver is recorded.
*7 Device Log Service does not use these. These rows will be blank due to compatibility with Job Log Analyzerbundled with ApeosWare Management Suite.
Bind Count O O X X O X X
UUID O O O O O O O
Document Number X
Cause of Error O O O O O O O
Job Error Code O O O O O O O
Fax Sender ID X X X X
Fax Dial-In Number X X X X
Fax Recipient Information X X X X
Fax Call Type X X X X
Fax Transmission Speed X X X
Fax Reconnection Flag X X X X
Name in Address Book X X X X X X
Send Fax Status X X X X X X
Fax Communication Result X X X X X X
Stored Fax Pages X X X
ItemsService types
Printing Copying Scan Faxing System Sheet
File Transfer
E-mail Transfer

6 Appendix
201
Details of Job LogsWhen the authentication/accounting features are being used, the retrieved log information such asUser name and User ID may differ from the intended result depending on the authentication status ofjobs received by the device, or the setting status of the authentication/accounting features at thedevice.Examples are shown below.Ex. 1: The login user name of the client computer, not the user name corresponding to User ID registered onthe device, is recorded in User name.Ex. 2:"Unknown User", not User ID set with the printer driver, is recorded in Job owner name.Ex. 3:A stored document name is recorded in Document name.Log information differs when "Print Accounting/Management" is set to "Off" and when it is set to "On"for the authentication/accounting features at the device.This section describes each case.
When "Print Accounting/Management" is set to "Off"This section describes the case in which "Print Accounting/Management" is set to "Off" for theauthentication/accounting features at the device.When "Print Accounting/Management" is set to "Off", job log information becomes as followsregardless of the print job type or whether the authentication/accounting features are being used.
Job log items Values recorded in job logs
Service types Printing
Service Details Printing
Print status Complete
Job Owner Name When [Al ways Use the SameAuthentication Information] is set onthe [Default Settings] tab of theprinter driver
User ID set with the printer driver
When [Display Authentication EntryScreen per Job] is set on the [DefaultSettings] tab of the printer driver,and only the stored ID is specified
Unknown User
User Name Login user name of client computer
Account ID Account ID set with the printer driver
Card Number Blank
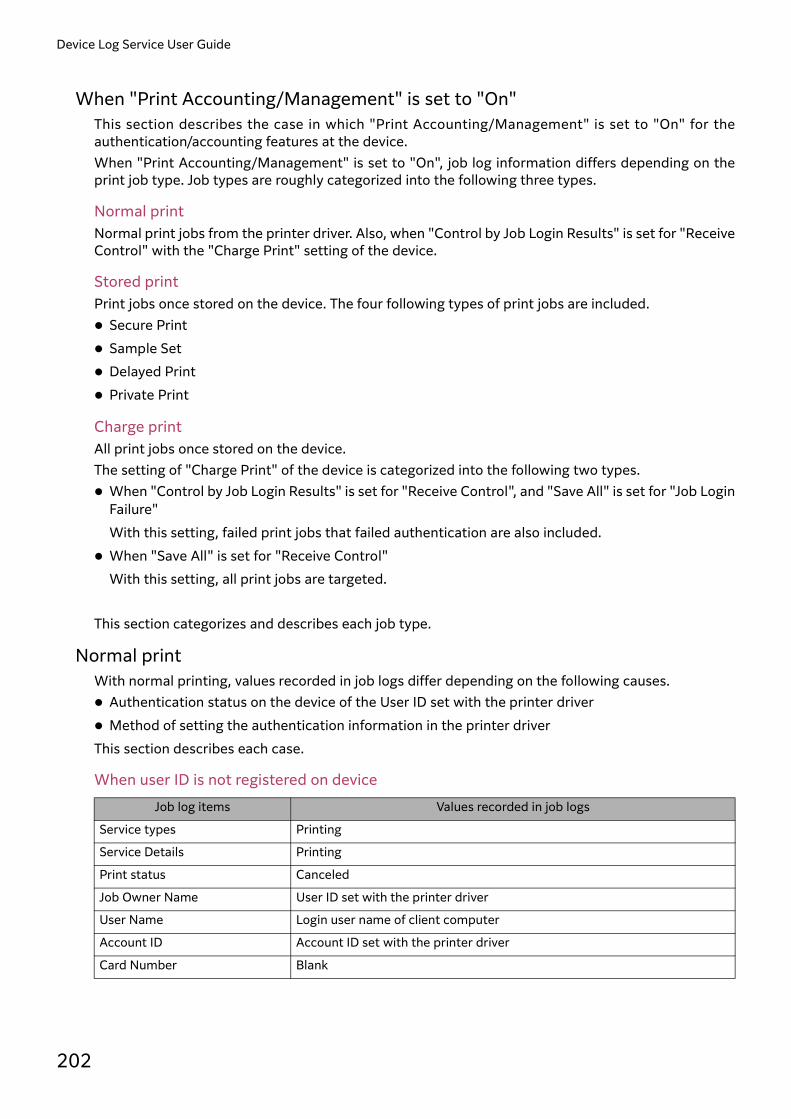
Device Log Service User Guide
202
When "Print Accounting/Management" is set to "On"This section describes the case in which "Print Accounting/Management" is set to "On" for theauthentication/accounting features at the device.When "Print Accounting/Management" is set to "On", job log information differs depending on theprint job type. Job types are roughly categorized into the following three types.
Normal printNormal print jobs from the printer driver. Also, when "Control by Job Login Results" is set for "ReceiveControl" with the "Charge Print" setting of the device.
Stored printPrint jobs once stored on the device. The four following types of print jobs are included. Secure Print Sample Set Delayed Print Private Print
Charge printAll print jobs once stored on the device.The setting of "Charge Print" of the device is categorized into the following two types. When "Control by Job Login Results" is set for "Receive Control", and "Save All" is set for "Job Login
Failure"With this setting, failed print jobs that failed authentication are also included.
When "Save All" is set for "Receive Control"With this setting, all print jobs are targeted.
This section categorizes and describes each job type.
Normal printWith normal printing, values recorded in job logs differ depending on the following causes. Authentication status on the device of the User ID set with the printer driver Method of setting the authentication information in the printer driverThis section describes each case.
When user ID is not registered on device
Job log items Values recorded in job logs
Service types Printing
Service Details Printing
Print status Canceled
Job Owner Name User ID set with the printer driver
User Name Login user name of client computer
Account ID Account ID set with the printer driver
Card Number Blank

6 Appendix
203
When user ID is registered on device
When "Display Authentication Entry Screen per Job" is set on the default settings tab of theprinter driver, and only the stored ID is specified
Job log items
Values recorded in job logs
When password is incorrect
When password is correct
For Login to Local Accounts/Local
Accounting
Login to Local Accounts /Net
Accounting and AccountID Is Correct
Login to Local Accounts /Network
Accounting and AccountID Is Wrong
Service types Printing
Service Details Printing
Print status Canceled Complete Canceled
Job Owner Name User ID set with the printer driver
User Name Login user name ofclient computer
User name corresponding to user IDregistered on device
Login user name ofclient computer
Account ID Account ID set with the printer driver Account IDcorresponding t ouser ID registered ondevice
Account ID set withthe printer driver
Card Number Blank Card ID corresponding to user ID registeredon device(only when card authentication also is used)
Blank
Job log items Values recorded in job logs
Service types Printing
Service Details Printing
Print status Canceled
Job Owner Name Unknown User
User Name Login user name of client computer
Account ID Account ID set with the printer driver
Card Number Blank
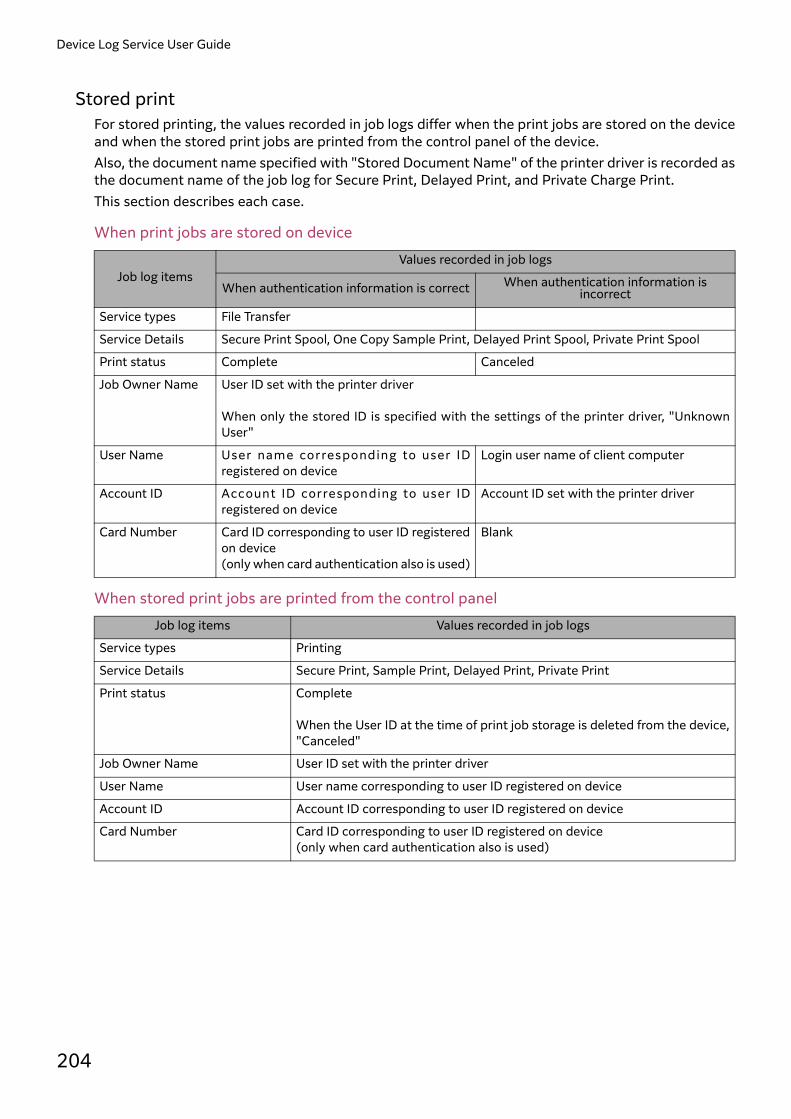
Device Log Service User Guide
204
Stored printFor stored printing, the values recorded in job logs differ when the print jobs are stored on the deviceand when the stored print jobs are printed from the control panel of the device.Also, the document name specified with "Stored Document Name" of the printer driver is recorded asthe document name of the job log for Secure Print, Delayed Print, and Private Charge Print.This section describes each case.
When print jobs are stored on device
When stored print jobs are printed from the control panel
Job log itemsValues recorded in job logs
When authentication information is correct When authentication information is incorrect
Service types File Transfer
Service Details Secure Print Spool, One Copy Sample Print, Delayed Print Spool, Private Print Spool
Print status Complete Canceled
Job Owner Name User ID set with the printer driver
When only the stored ID is specified with the settings of the printer driver, "UnknownUser"
User Name User name corresponding to user IDregistered on device
Login user name of client computer
Account ID Account ID corresponding to user IDregistered on device
Account ID set with the printer driver
Card Number Card ID corresponding to user ID registeredon device(only when card authentication also is used)
Blank
Job log items Values recorded in job logs
Service types Printing
Service Details Secure Print, Sample Print, Delayed Print, Private Print
Print status Complete
When the User ID at the time of print job storage is deleted from the device,"Canceled"
Job Owner Name User ID set with the printer driver
User Name User name corresponding to user ID registered on device
Account ID Account ID corresponding to user ID registered on device
Card Number Card ID corresponding to user ID registered on device(only when card authentication also is used)

6 Appendix
205
Charge printFor charge printing, the values recorded in job logs differ when the print jobs are stored on the deviceand when the stored print jobs are printed from the control panel of the device.
When print jobs are stored on device
When stored print jobs are printed from the control panel
Job log items Values recorded in job logs
Service types File Transfer
Service Details Charge Print
Print status Complete
Job Owner Name User ID set with the printer driver
When only the stored ID is specified with the settings of the printer driver,"Unknown User"
User Name Login user name of client computer
Account ID Account ID set with the printer driver
Card Number Blank
Job log items Values recorded in job logs
Service types Printing
Service Details Charge Print
Print status Complete
When printing is unavailable due to the setting of "Output Color" set on thedevice, "Canceled"
Job Owner Name User ID set with the printer driver
When only the stored ID is specified with the settings of the printer driver,"Unknown User"
User Name Login user name of client computer
Account ID Account ID set with the printer driver
Card Number Blank
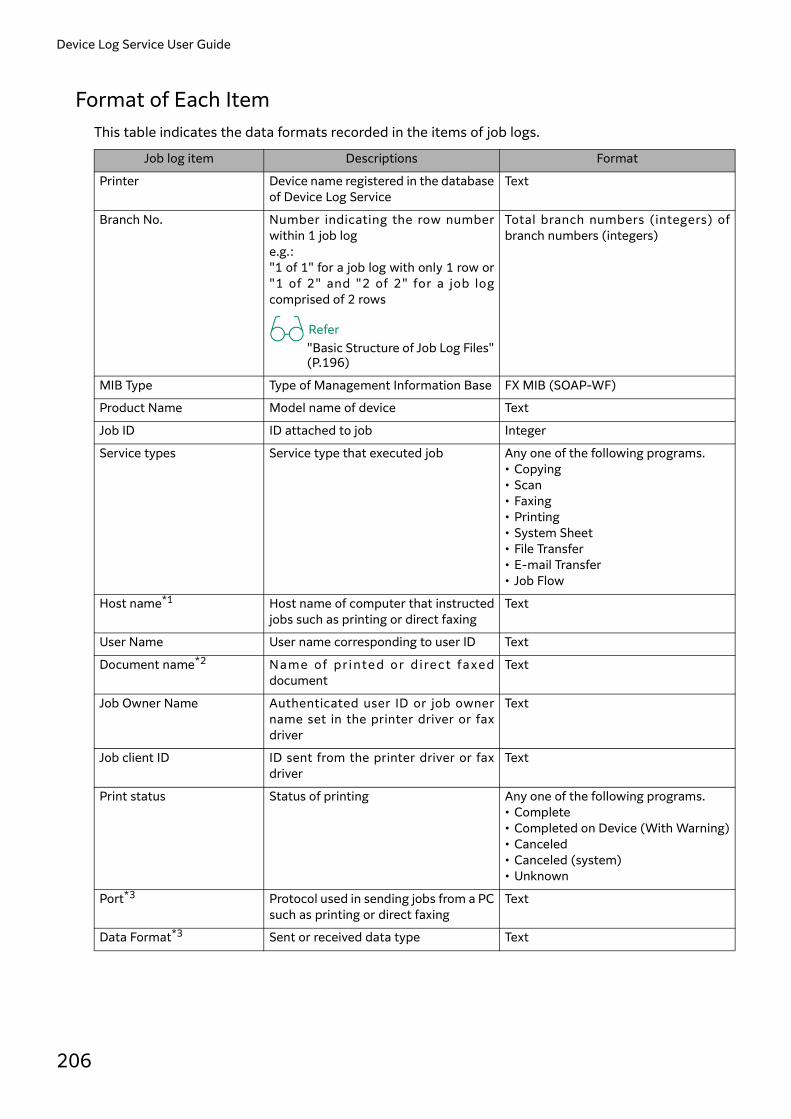
Device Log Service User Guide
206
Format of Each ItemThis table indicates the data formats recorded in the items of job logs.
Job log item Descriptions Format
Printer Device name registered in the databaseof Device Log Service
Text
Branch No. Number indicating the row numberwithin 1 job loge.g.:"1 of 1" for a job log with only 1 row or"1 of 2" and "2 of 2" for a job logcomprised of 2 rows
Refer"Basic Structure of Job Log Files"(P.196)
Total branch numbers (integers) ofbranch numbers (integers)
MIB Type Type of Management Information Base FX MIB (SOAP-WF)
Product Name Model name of device Text
Job ID ID attached to job Integer
Service types Service type that executed job Any one of the following programs. • Copying• Scan• Faxing• Printing• System Sheet• File Transfer• E-mail Transfer• Job Flow
Host name*1 Host name of computer that instructedjobs such as printing or direct faxing
Text
User Name User name corresponding to user ID Text
Document name*2 Name of pr inted or d irect faxeddocument
Text
Job Owner Name Authenticated user ID or job ownername set in the printer driver or faxdriver
Text
Job client ID ID sent from the printer driver or faxdriver
Text
Print status Status of printing Any one of the following programs. • Complete• Completed on Device (With Warning)• Canceled• Canceled (system)• Unknown
Port*3 Protocol used in sending jobs from a PCsuch as printing or direct faxing
Text
Data Format*3 Sent or received data type Text

6 Appendix
207
IP Address*4 IP address of device and IP address ofclient computer
IP address of device\IP address of clientcomputer.When an IP address of client computerdoes not exist, only the IP address ofthe device is included, without thedelimit symbol (\)
Output Tray*3 Output destination of paper Text
N Up*3 Setting of pages per side Text
Input Tray*3 Name of paper tray Text
Printer Start Date Date on which printing started yyyy/mm/dd
Printer Start Time Time at which printing started hh:mm:ss
Print End Date Date on which printing ended yyyy/mm/dd
Print End Time Time at which printing ended hh:mm:ss
Printing Output Color*3 Output color of the printed impression Text
Printing Size*3 Size of the printed impression Text
Impressions Number of impressions processed Integer
Paper Type*3 Type of paper Text
Paper Size*3 Size of paper Text
Sheets Sheets of paper Integer
Job Template Name*1 Name of job template used Text
the Number of Copies Number of prints Integer
Staple Count Number of staples Integer
Original Output Color*3 Color of document Text
Original Pages Impressions of document Integer
Original Type*3 Original Type Text
Original Size*3 Size of document Text
Recipient IP Address*1 Recipient IP address for file transfer ore-mail transmission
IP address of recipient
Mailbox Number Folder number of own terminal orremote terminal
Integer
Recipient Fax Number*5 Fax number of recipient Text
Fax Re mote TerminalName*5
Name registered in remote terminal Text
F Code*5 F code used in communication Text
Fax Line Categorized as extension, external line,or IP fax (SIP)Existence of IP fax (SIP) feature differsdepending on your model
Any one of the following programs. • Number (Extension)• Number (External Line)• Number (IP Fax (SIP))• Number• Unknown
Fax Start Date Date on which faxing started yyyy/mm/dd
Fax Start Time Time at which faxing started hh:mm:ss
Fax End Date Date on which faxing ended yyyy/mm/dd
Fax End Time Time at which faxing ended hh:mm:ss
Job log item Descriptions Format

Device Log Service User Guide
208
Fax Duration Time elapsed from start of faxing untilfaxing ends
Integer
Remote ID*5 ID for identifying own terminal Text
Fax Images Sent Images sent or received Integer
Fax Images Size*3 Size of sent or received fax image Text
Fax Speed Dial Number Speed dial number of remote terminal Integer
Detailed Service Type*3 Type of serv ice for which job i sexecuted
Text
Related Job ID ID of parent job recorded in child jobwhen a parent job and child job aregenerated
Integer
Account ID Account ID entered with the controlpanel, printer driver, or fax driver
Text
Card Number For the mode l s o f Japanesespecification, the card No. is any of:Card number of valid cardCard ID of IC card read by IC Card Gate1.0. It must be maximum 7 digits (0 to9999999).For t he mode ls o f A s ia Pac i f icspecification, no value is recorded.
Integer when a value is recorded.(Blank) when no value is recorded.
Billing Meter Number Number of meter targeted for charging Any one of the following programs. • 0• 1• 2• 3• 101• 102• 103• 104
Recipient Information*1 Recipient address for a file transfer ore-mail transmission
Text
Staple Type*3 Type of stapling Text
Fold Type*3 Type of paper folding Text
Fold Count Number of folds executed in job Integer
Punch Type*3 Type of hole-punching of paper Text
Punch Count Number of hole-punches executed forjob
Integer
Bind Count Number of binds executed for job Integer
UUID Printed on paper, this is an ID foridentifying job logs
Text
Document Number The numbe r o f t he d ocume ntautomatically attached within a folder
Text
Cause of Error Reason job completed with an error Text
Job Error Code Code expressing the content of theerror that occurred dur ing jobexecution
Text
Fax Sender ID*5 Own fax sender ID Text
Job log item Descriptions Format
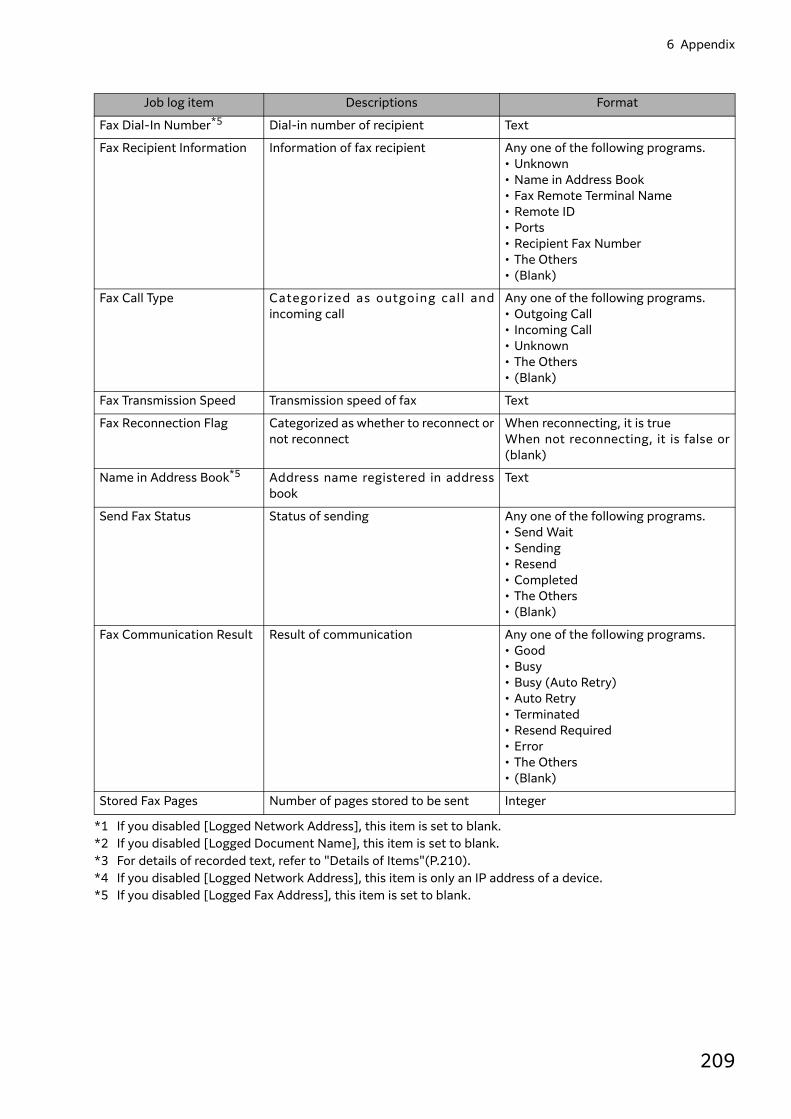
6 Appendix
209
*1 If you disabled [Logged Network Address], this item is set to blank.*2 If you disabled [Logged Document Name], this item is set to blank.*3 For details of recorded text, refer to "Details of Items"(P.210).*4 If you disabled [Logged Network Address], this item is only an IP address of a device.*5 If you disabled [Logged Fax Address], this item is set to blank.
Fax Dial-In Number*5 Dial-in number of recipient Text
Fax Recipient Information Information of fax recipient Any one of the following programs. • Unknown• Name in Address Book• Fax Remote Terminal Name• Remote ID• Ports• Recipient Fax Number• The Others• (Blank)
Fax Call Type Categorized as outgoing call andincoming call
Any one of the following programs. • Outgoing Call• Incoming Call• Unknown• The Others• (Blank)
Fax Transmission Speed Transmission speed of fax Text
Fax Reconnection Flag Categorized as whether to reconnect ornot reconnect
When reconnecting, it is trueWhen not reconnecting, it is false or(blank)
Name in Address Book*5 Address name registered in addressbook
Text
Send Fax Status Status of sending Any one of the following programs. • Send Wait• Sending• Resend• Completed• The Others• (Blank)
Fax Communication Result Result of communication Any one of the following programs. • Good• Busy• Busy (Auto Retry)• Auto Retry• Terminated• Resend Required• Error• The Others• (Blank)
Stored Fax Pages Number of pages stored to be sent Integer
Job log item Descriptions Format
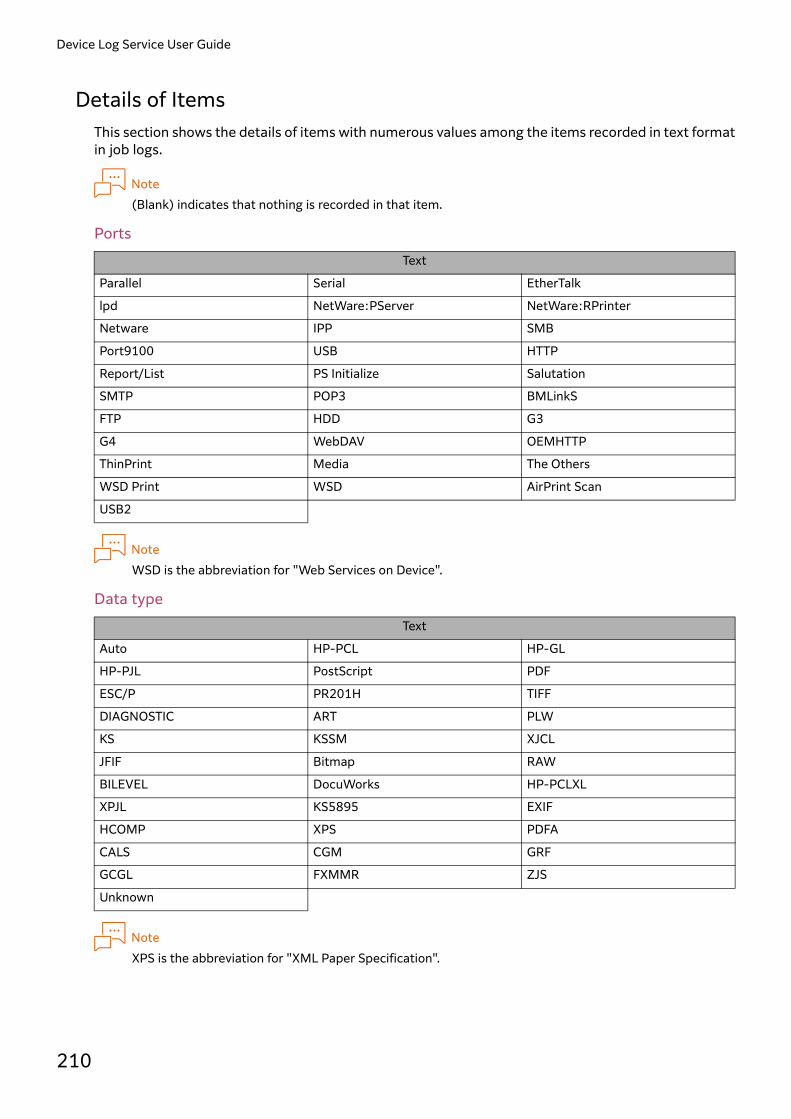
Device Log Service User Guide
210
Details of ItemsThis section shows the details of items with numerous values among the items recorded in text formatin job logs.
Note(Blank) indicates that nothing is recorded in that item.
Ports
NoteWSD is the abbreviation for "Web Services on Device".
Data type
NoteXPS is the abbreviation for "XML Paper Specification".
Text
Parallel Serial EtherTalk
lpd NetWare:PServer NetWare:RPrinter
Netware IPP SMB
Port9100 USB HTTP
Report/List PS Initialize Salutation
SMTP POP3 BMLinkS
FTP HDD G3
G4 WebDAV OEMHTTP
ThinPrint Media The Others
WSD Print WSD AirPrint Scan
USB2
Text
Auto HP-PCL HP-GL
HP-PJL PostScript PDF
ESC/P PR201H TIFF
DIAGNOSTIC ART PLW
KS KSSM XJCL
JFIF Bitmap RAW
BILEVEL DocuWorks HP-PCLXL
XPJL KS5895 EXIF
HCOMP XPS PDFA
CALS CGM GRF
GCGL FXMMR ZJS
Unknown

6 Appendix
211
Output tray
N Up
NoteIf the job log MIB type is "FX MIB (SOAP-WF)", "1 Up" is always recorded.
Select Paper Tray
Original Type
Output color
Text
Auto Output Tray SideTray
Sorter Bin XX is the number of the bin
Stacker Bin XX is the number of the bin
Finisher (Blank)
Text
Auto 1 Up 2 Up
4 Up 8 Up 16 Up
32 Up (Blank)
Text
Auto Tray XX is the number of the tray
Tray 2-XTray 2 is a multi-trayX is the number of the tray
Tray (Bypass) Interposer Roll XX is the Roll number
(Blank)
Text
Mixture of Photo and Text Photo Text
Map Graphic Highlighter
Inkjet Picture Diazo
Transparent Uneven Toned Original Unknown
Text
Full Color 2-Color Single Color
Black and white The Others Specific Color
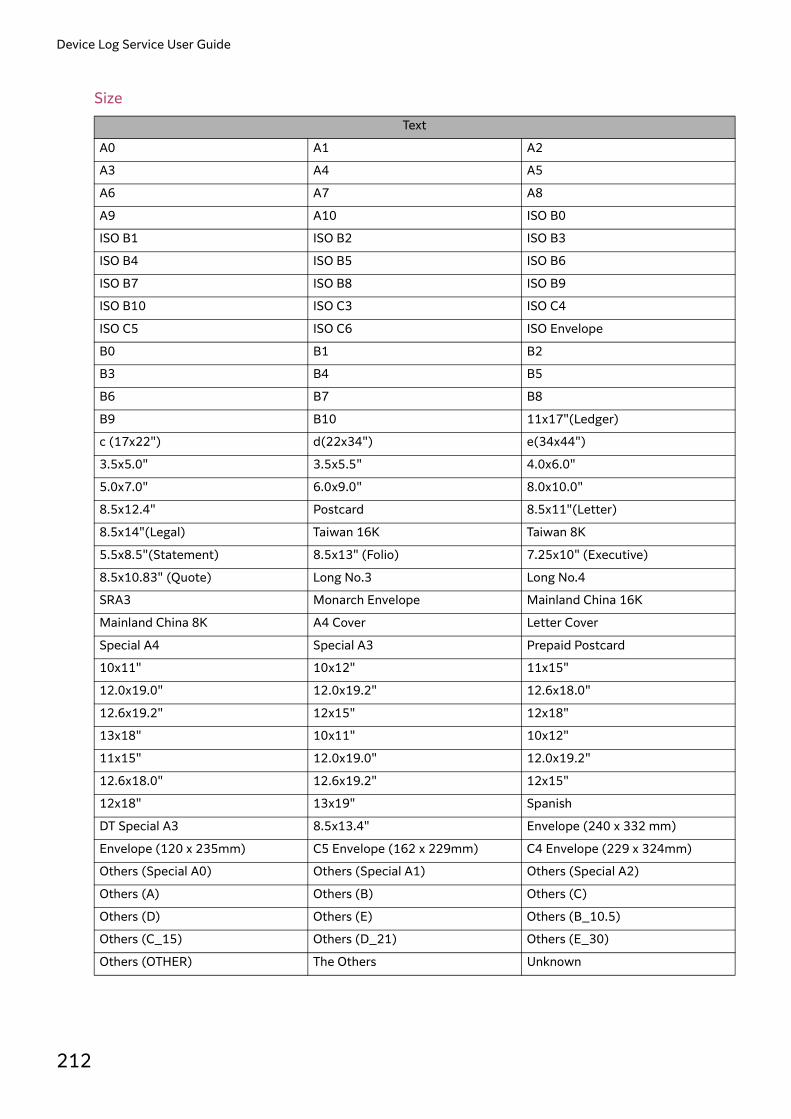
Device Log Service User Guide
212
Size
Text
A0 A1 A2
A3 A4 A5
A6 A7 A8
A9 A10 ISO B0
ISO B1 ISO B2 ISO B3
ISO B4 ISO B5 ISO B6
ISO B7 ISO B8 ISO B9
ISO B10 ISO C3 ISO C4
ISO C5 ISO C6 ISO Envelope
B0 B1 B2
B3 B4 B5
B6 B7 B8
B9 B10 11x17"(Ledger)
c (17x22") d(22x34") e(34x44")
3.5x5.0" 3.5x5.5" 4.0x6.0"
5.0x7.0" 6.0x9.0" 8.0x10.0"
8.5x12.4" Postcard 8.5x11"(Letter)
8.5x14"(Legal) Taiwan 16K Taiwan 8K
5.5x8.5"(Statement) 8.5x13" (Folio) 7.25x10" (Executive)
8.5x10.83" (Quote) Long No.3 Long No.4
SRA3 Monarch Envelope Mainland China 16K
Mainland China 8K A4 Cover Letter Cover
Special A4 Special A3 Prepaid Postcard
10x11" 10x12" 11x15"
12.0x19.0" 12.0x19.2" 12.6x18.0"
12.6x19.2" 12x15" 12x18"
13x18" 10x11" 10x12"
11x15" 12.0x19.0" 12.0x19.2"
12.6x18.0" 12.6x19.2" 12x15"
12x18" 13x19" Spanish
DT Special A3 8.5x13.4" Envelope (240 x 332 mm)
Envelope (120 x 235mm) C5 Envelope (162 x 229mm) C4 Envelope (229 x 324mm)
Others (Special A0) Others (Special A1) Others (Special A2)
Others (A) Others (B) Others (C)
Others (D) Others (E) Others (B_10.5)
Others (C_15) Others (D_21) Others (E_30)
Others (OTHER) The Others Unknown

6 Appendix
213
Paper Type
Service Details
Text
Plain paper Transparencies Envelope
Labels Forms Coated
Tracing Paper Recycled Roll
Tab Opaque Film Tack Film
Lightweight Bond Custom Paper 1
Custom Paper 2 Custom Paper 3 Custom Paper 4
Custom Paper 5 Noshi Paper Glossy Paper
Heavyweight Postcard Special
Reverse Perforated Index
The Others Unknown
Service types Text
Copying Copying
Copy Server Copy
Scan SCAN
Xdom Scan
Xdom Copy
Fax Polling Reserve
Fax Mailbox Polling Reserve
Scan To Mailbox
Copy Server Scan
Web Scan
Scan To BMLinkS
Adjust Scan
AirPrint Scan
Faxing Fax
Outgoing Direct Fax
Mailbox To Fax
E-mail to Fax
Fax Broadcast
Auto Send Fax
Manual Send Fax
Fax Immediate Send
Auto Send Fax - Remote Folder
Fax Polling Send
Fax Mailbox Polling Send
Send Fax Report
Fax Relay Broadcast
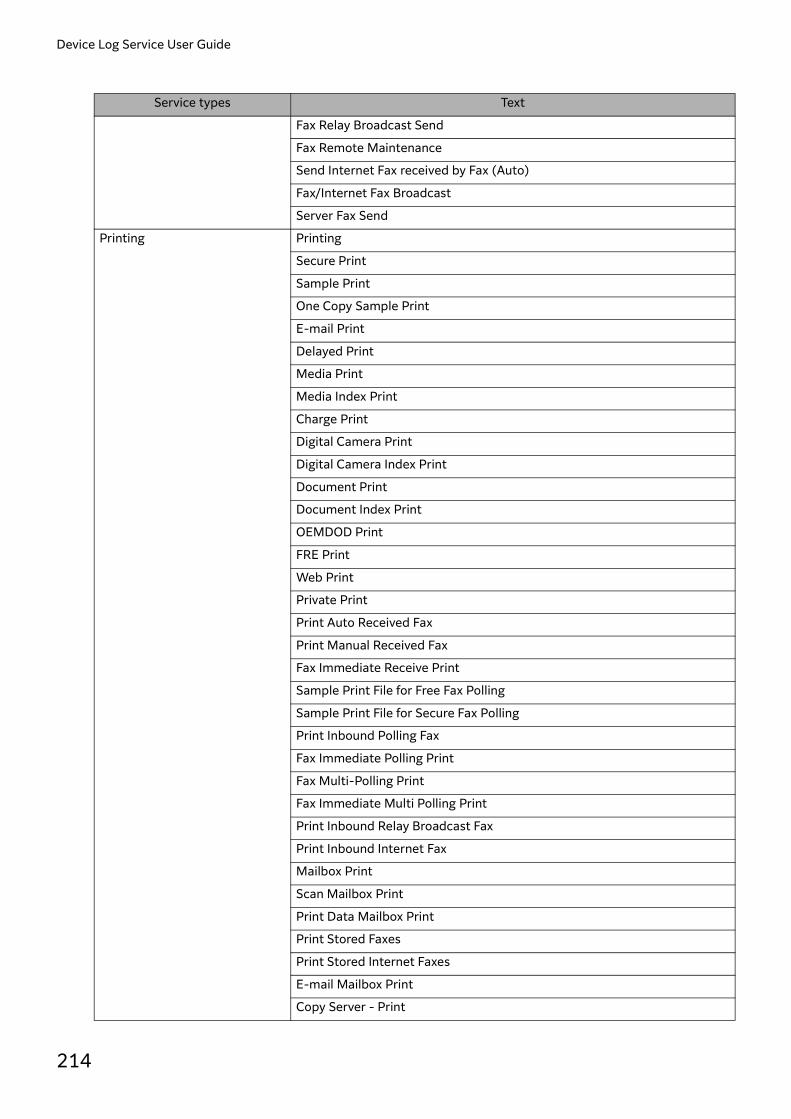
Device Log Service User Guide
214
Fax Relay Broadcast Send
Fax Remote Maintenance
Send Internet Fax received by Fax (Auto)
Fax/Internet Fax Broadcast
Server Fax Send
Printing Printing
Secure Print
Sample Print
One Copy Sample Print
E-mail Print
Delayed Print
Media Print
Media Index Print
Charge Print
Digital Camera Print
Digital Camera Index Print
Document Print
Document Index Print
OEMDOD Print
FRE Print
Web Print
Private Print
Print Auto Received Fax
Print Manual Received Fax
Fax Immediate Receive Print
Sample Print File for Free Fax Polling
Sample Print File for Secure Fax Polling
Print Inbound Polling Fax
Fax Immediate Polling Print
Fax Multi-Polling Print
Fax Immediate Multi Polling Print
Print Inbound Relay Broadcast Fax
Print Inbound Internet Fax
Mailbox Print
Scan Mailbox Print
Print Data Mailbox Print
Print Stored Faxes
Print Stored Internet Faxes
E-mail Mailbox Print
Copy Server - Print
Service types Text

6 Appendix
215
BMLinkS Pull Print
System Sheet PostScript Initialization Print
Print Report
Options List
Job History Report
Error History Report
Startup Report
Font List
Stored Documents List
DV Report
Maintenance Report
Fax Activity Report
Fax Broadcast Report
Fax Relay Broadcast Report
Fax Multi-Polling Report
Fax Transmission Report
Fax Protocol Monitor Report
Fax Unsent Report
Internet Fax Transmission Report
Internet Fax Unsent Report
Calibration Chart
Test Print
Stamp List
File Transfer MAILBOX
Secure Print Spool
Delayed Print Spool
Charge Print Spool
Scan to CenterTool
Scan to File
Fax Auto Receive
Fax Manual Receive
Fax Mailbox Receive
Fax Polling
Secure Polling Fax Receive
Fax Relay Broadcast Receive
Internet Fax Mailbox Receive
Mailbox To File
Mailbox To PC
E-mail To Mailbox
Print Mailbox Documents
Service types Text
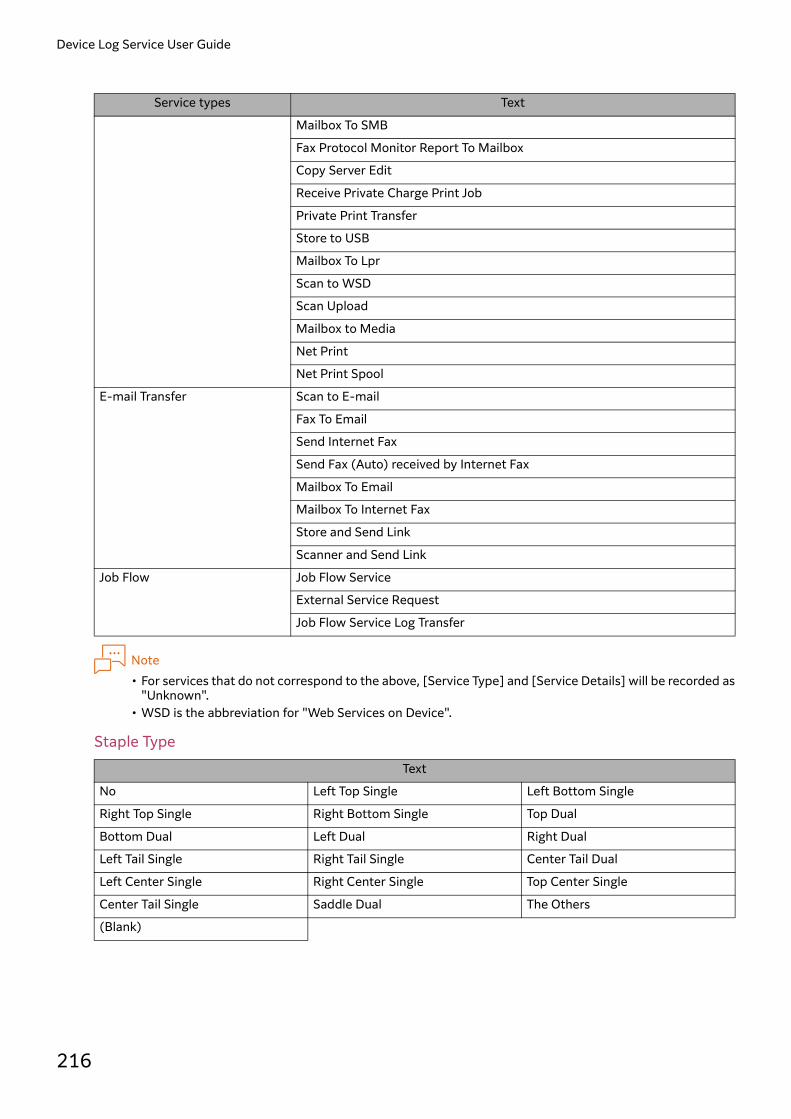
Device Log Service User Guide
216
Note• For services that do not correspond to the above, [Service Type] and [Service Details] will be recorded as
"Unknown".• WSD is the abbreviation for "Web Services on Device".
Staple Type
Mailbox To SMB
Fax Protocol Monitor Report To Mailbox
Copy Server Edit
Receive Private Charge Print Job
Private Print Transfer
Store to USB
Mailbox To Lpr
Scan to WSD
Scan Upload
Mailbox to Media
Net Print
Net Print Spool
E-mail Transfer Scan to E-mail
Fax To Email
Send Internet Fax
Send Fax (Auto) received by Internet Fax
Mailbox To Email
Mailbox To Internet Fax
Store and Send Link
Scanner and Send Link
Job Flow Job Flow Service
External Service Request
Job Flow Service Log Transfer
Text
No Left Top Single Left Bottom Single
Right Top Single Right Bottom Single Top Dual
Bottom Dual Left Dual Right Dual
Left Tail Single Right Tail Single Center Tail Dual
Left Center Single Right Center Single Top Center Single
Center Tail Single Saddle Dual The Others
(Blank)
Service types Text

6 Appendix
217
Fold Type
Punch Type
Text
No Bi-Fold Z-Fold
Letter C-Fold Letter Z-Fold The Others
(Blank)
Text
No Top-* Left-*
Right-* Bottom-* On-*

Device Log Service User Guide
218
Usage Data File FormatThe following describes format of the downloaded usage data files for every day and month.
File formatCSV (comma-delimited) format file
File contentThe first row in the file records the headers. The second and subsequent rows record the accounting results by devices, by accounting labels, andby users.
Header File content
Date • When [Daily (Last 2 months)] is selected"year/month/day" of the date Daily Counter wasreceived
• When [Monthly] is selected"year/month/day" of that monthThe first day of the month will be output.
Model code The model code of the target device
Machine number The machine number of the target device
User ID The user ID set for the target user
Accounting Label 1 The accounting label set for the target user
Accounting Label 2
Accounting Label 3
Color Print These rows record the corresponding values for thedevice, accounting label, and user. • When [Daily (Last 2 months)] is selected
The Daily Counter value for the specified date• When [Monthly] is selected
The Monthly Counter value for the specified month
B&W Print
Print Sheets
Print Impressions (2-Up)
Print Impressions (4-Up)
Print Impressions (8-Up and more)
Color Copy Impressions
Black & White Copy Impressions
Copy Sheets
Copy Impressions (2-Up)
Copy Impressions (4-Up)
Copy Impressions (8-Up and more)
Color Scan Impressions
Black & White Scan Impressions
Fax Send Impressions
Fax Print Impressions
Fax Print Sheets
Fax Relay Broadcast Receive Print Impressions
Fax Relay Broadcast Receive Print Sheets

6 Appendix
219
*1 Recorded when Notification Type is Detailed Notification.
The accounting results tallied by methods described in "Setting the Accounting Method" (P.74) or"Tallying Device Usage By Selecting an Accounting Pattern" (P.87) include items which are notincluded in the usage data. Each of these items shows the result of tallying multiple items of usagedata as one item.
ReferAccounting result items and calculating formula not included in usage data "There are Accounting ItemsNot Included in Usage Data" (P.191)
Internet Fax Receive, Fax Transfer Impressions These rows record the corresponding values for thedevice, accounting label, and user. • When [Daily (Last 2 months)] is selected
The Daily Counter value for the specified date• When [Monthly] is selected
The Monthly Counter value for the specified month
Fax Receive Print Impressions
Fax Receive Print Sheets
Internet Fax Receive Print Impressions
Internet Fax Receive Print Sheets
Sheets Printed (Word)*1
Sheets Printed (Excel)*1
Sheets Printed (PowerPoint)*1
Sheets Printed (PDF)*1
Sheets Printed (DocuWorks)*1
Sheets Printed (E-mail)*1
Sheets Printed (Internet)*1
Sheets Printed (Others)*1
Original Sheets*1
Actual Paper Reduction*1
Possible Paper Reduction*1
Header File content

Device Log Service User Guide
220
Calculation of Paper ReductionThis section describes the calculation of paper reduction.
Calculated Value of Paper Reduction
ImportantPrinting with special paper type such as "Bond", "Postcard", and "Envelope" is considered as special usage,and is not in the scope of the calculation.
How to Calculate Paper ReductionPaper reduction is calculated by [Paper Reduction Criteria] and [Conversion by Paper Size].
Paper Reduction CriteriaSelect [Paper Reduction Criteria] from [Reduce to Half] and [Reduce to Quarter]. The [Reduce to Half] goal is to reduce printed sheets to half of the quantity of the sheets, compared
to the number of printed sheets by 1 Sided and 1-Up. If you execute all the sheets printed in 2 Sidedor N-up (, in other word, 2-Up and over), Actual Reduction Rate becomes 100 %.
The [Reduce to Quarter] goal is to reduce printed sheets to quarter of the quantity of the sheets,compared to the number of printed sheets by 1 Sided and 1-Up. If you execute all the sheets printedin 2 Sided and 2-Up (, or more than 4-Up), Actual Reduction Rate becomes 100 %.
Conversion by Paper SizeSelect [Conversion by Paper Size] from [No Conversion] and [Convert into A4 Size]. If [No Conversion] is set, the number of printed sheets is used for a calculation regardless of the
difference of sheet size. If [Convert into A4 Size] is set, in calculating the sheets other than A4, the number considering the
area ratio compared to A4 is used for a calculation. For example, one sheet of A3 is converted intotwo A4 sheets.
ReferSetting procedure "Setting a Target Value for Paper Reduction and the Calculation Method" (P.145)
Term Description
Act ua l Pape rReduction
This is the value for actual paper reduction by 2 sided printing or pages per side printingcompared to printing only 1 image on only 1 side per sheet of paper.
Poss ib le PaperReduction
This is the value for possible paper reduction by 2 sided with pages per side printing, pagesper side printing, or 2 sided printing referencing the number of sheets actually printed.
She et s Out ofReduction Scope
This describes the number of sheets that are out of scope. This is the number of printedsheets that are required even if the reduction goal is accomplished.
Rat io o f Pape rReduction
This is the ratio of how much the paper is reduced, compared with the case if all the printsare executed as 1 Sided and 1-Up.
Paper Reduction This is the ratio of how much the paper is reduced, compared with possible paper reductionnumber if all the prints are executed as 1 Sided and 1-Up.

6 Appendix
221
How Are Actual Paper Reduction and Possible Paper ReductionCalculated?
This section describes two examples of basic methods of calculating actual paper reduction andpossible paper reduction.
ReferFor more detailed calculation "Setting a Target Value for Paper Reduction and the Calculation Method"(P.145)
Ex. 1: When 1 set is printed of a document printed with 4 pages printing on threesides of 2 sheets of paper
To calculate actual paper reduction and possible paper reduction, information of the number oforiginal sheets of the job is required. However, information of the number of original sheets of the jobis not included in the job log. Thus, an assumed number of original sheets is calculated from thenumber of impressions and the pages per side number.In this example, since three sides are printed with 4 pages printing, the number of original sheets is 9,10, 11, or 12 sheets.
Side 2=Rear of Sheet 1
Side 3=Front of Sheet 2
Side 1=Front of Sheet 1
1 2
3 4
1 2
3 4
1 2
3 4
Side 2=Rear of Sheet 1
Side 3=Front of Sheet 2
Side 1=Front of Sheet 1
Possibility 1Original sheets of Side 3 = 1
Total original sheets = 4 + 4 + 1 = 9
Possibility 2Original sheets of Side 3 = 2
Total original sheets = 4 + 4 + 2 = 10
Possibility 3Original sheets of Side 3 = 3
Total original sheets = 4 + 4 + 3 = 11
Possibility 4Original sheets of Side 3 = 4
Total original sheets = 4 + 4 + 4 = 12
1 2
3 4
1 2
3 4
1 2
3 4
1 2
3 4
1 2
1
1 2
3
1 2
3 4
1 2
3 4
1 2
3 4
1 2
3 4
1 2
3 4

Device Log Service User Guide
222
The assumed number of original sheets is calculated as the mean of the smallest possible number andthe largest possible number.Assumed number of original sheets= (Smallest possible number + Largest possible number) ÷ 2= (9 + 12) ÷ 2 = 10.5Actual paper reduction is calculated with "number of sheets necessary for printing only 1 image ononly 1 side per sheet of paper" as the assumed number of original sheets.
Actual Paper ReductionActual Paper Reduction = Number of sheets necessary for printing only 1 image on only 1 side persheet of paper - Number of sheets of paper printed= 10.5 - 2 = 8.5Accordingly, actual paper reduction is 8.5 sheets.
Possible Paper ReductionPossible paper reduction is calculated with any of the following formulas. Which formula to be used isdetermined by [Paper Reduction Criteria]. In the case of [Paper Reduction Criteria] is set to [Reduce to Quarter]:
Number of printed sheets - Number of sheets necessary for printing by 2-Up and 2 Sided In the case of [Paper Reduction Criteria] is set to [Reduce to Half]:
Number of printed sheets - Number of sheets necessary for printing by 2-Up or 2 Sided In example 1, since you are printing 2 sided with 4 pages printing, and no sheets can be reduced inany of the above-described cases, possible paper reduction is 0.
Ex. 2: When 1 set is printed of a document printed with 2 pages per side printingon only 1 side each of 2 sheets of paper
Identically to example 1, the assumed number of original sheets is calculated.Since 2 sides are printed with 2 pages per side printing, the number of original sheets becomes 3 or 4.
Side 2=Front of Sheet 2
Side 1=Front of Sheet 1
1 2 1 2
Side 2=Front of Sheet 2
Side 1=Front of Sheet 1
Possibility 1Original sheets of Side 2 = 1Total original sheets = 2 + 1 = 3
Possibility 2Original sheets of Side 2 = 2Total original sheets = 2 + 2 = 4
1 2
1 2
1
1 2

6 Appendix
223
The assumed number of original sheets is calculated as the mean of the smallest possible number andthe largest possible number.Assumed number of original sheets= (Smallest possible number + Largest possible number) ÷ 2= (3 + 4) ÷ 2= 3.5
Actual Paper ReductionActual Paper Reduction = Number of sheets necessary for printing only 1 image on only 1 side persheet of paper - Number of sheets of paper printed= 3.5 - 2 = 1.5Accordingly, actual paper reduction is 1.5 sheets.
Possible Paper ReductionPossible paper reduction is calculated any of the following formulas. In the case of [Paper Reduction Criteria] is set to [Reduce to Quarter]:
Number of printed sheets - Number of sheets necessary for printing by 2-Up and 2 Sided In the case of [Paper Reduction Criteria] is set to [Reduce to Half]:Number of printed sheets - Number of sheets necessary for printing by 2-Up or 2 SidedThis is an example of [Paper Reduction Criteria] is set to [Reduce to Quarter].The number of sheets actually printed is 2 sheets. Since the original job is printed 1 sided with 2 pagesper side printing, 1 sheet of paper is used if you print 2 sided with 2 pages per side printing.Possible paper reduction = Sheets of paper printed - Sheets of paper required for 2 sided printing with2 pages per side printing= 2 - 1 = 1Accordingly, possible paper reduction is 1 sheet.
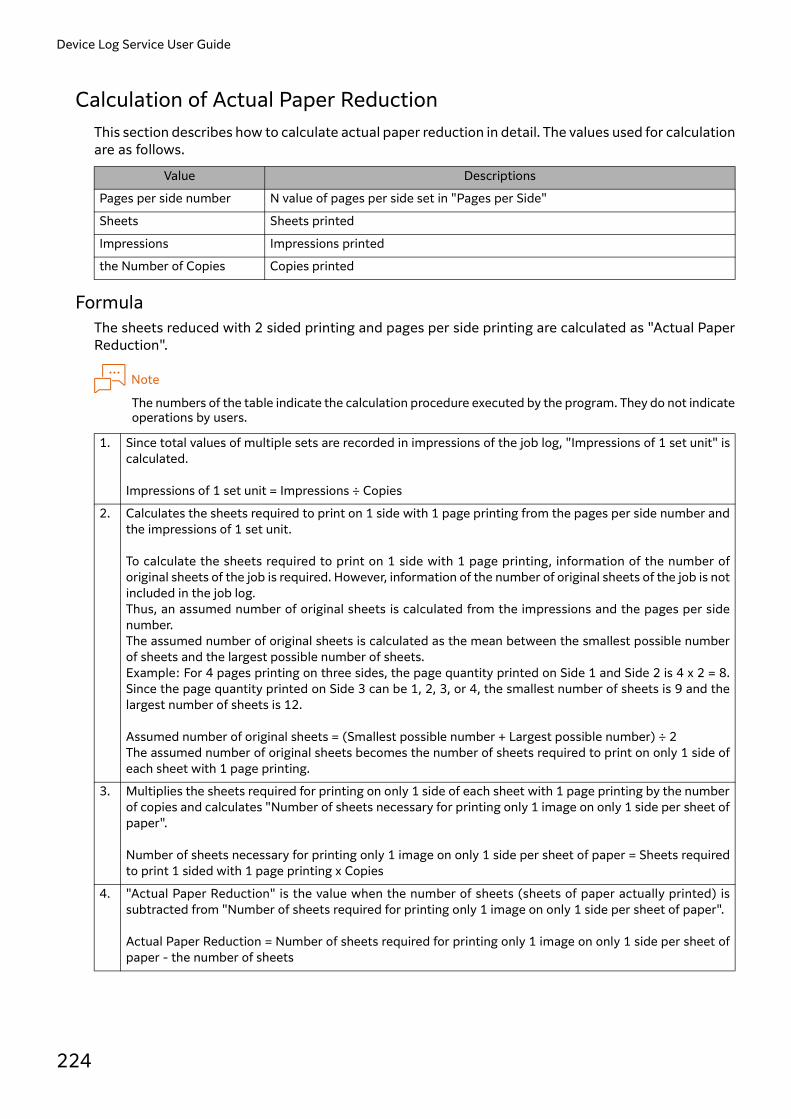
Device Log Service User Guide
224
Calculation of Actual Paper ReductionThis section describes how to calculate actual paper reduction in detail. The values used for calculationare as follows.
FormulaThe sheets reduced with 2 sided printing and pages per side printing are calculated as "Actual PaperReduction".
Note
The numbers of the table indicate the calculation procedure executed by the program. They do not indicateoperations by users.
Value Descriptions
Pages per side number N value of pages per side set in "Pages per Side"
Sheets Sheets printed
Impressions Impressions printed
the Number of Copies Copies printed
1. Since total values of multiple sets are recorded in impressions of the job log, "Impressions of 1 set unit" iscalculated.
Impressions of 1 set unit = Impressions ÷ Copies
2. Calculates the sheets required to print on 1 side with 1 page printing from the pages per side number andthe impressions of 1 set unit.
To calculate the sheets required to print on 1 side with 1 page printing, information of the number oforiginal sheets of the job is required. However, information of the number of original sheets of the job is notincluded in the job log.Thus, an assumed number of original sheets is calculated from the impressions and the pages per sidenumber.The assumed number of original sheets is calculated as the mean between the smallest possible numberof sheets and the largest possible number of sheets.Example: For 4 pages printing on three sides, the page quantity printed on Side 1 and Side 2 is 4 x 2 = 8.Since the page quantity printed on Side 3 can be 1, 2, 3, or 4, the smallest number of sheets is 9 and thelargest number of sheets is 12.
Assumed number of original sheets = (Smallest possible number + Largest possible number) ÷ 2The assumed number of original sheets becomes the number of sheets required to print on only 1 side ofeach sheet with 1 page printing.
3. Multiplies the sheets required for printing on only 1 side of each sheet with 1 page printing by the numberof copies and calculates "Number of sheets necessary for printing only 1 image on only 1 side per sheet ofpaper".
Number of sheets necessary for printing only 1 image on only 1 side per sheet of paper = Sheets requiredto print 1 sided with 1 page printing x Copies
4. "Actual Paper Reduction" is the value when the number of sheets (sheets of paper actually printed) issubtracted from "Number of sheets required for printing only 1 image on only 1 side per sheet of paper".
Actual Paper Reduction = Number of sheets required for printing only 1 image on only 1 side per sheet ofpaper - the number of sheets
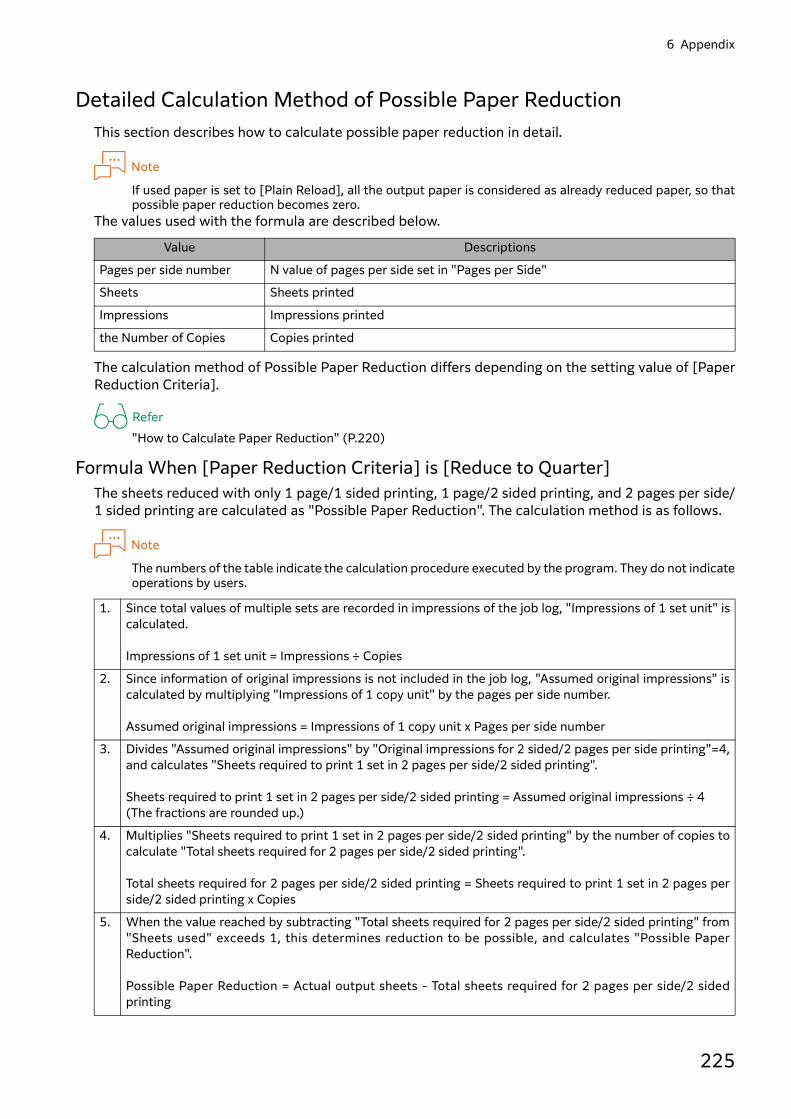
6 Appendix
225
Detailed Calculation Method of Possible Paper ReductionThis section describes how to calculate possible paper reduction in detail.
Note
If used paper is set to [Plain Reload], all the output paper is considered as already reduced paper, so thatpossible paper reduction becomes zero.
The values used with the formula are described below.
The calculation method of Possible Paper Reduction differs depending on the setting value of [PaperReduction Criteria].
Refer"How to Calculate Paper Reduction" (P.220)
Formula When [Paper Reduction Criteria] is [Reduce to Quarter]The sheets reduced with only 1 page/1 sided printing, 1 page/2 sided printing, and 2 pages per side/1 sided printing are calculated as "Possible Paper Reduction". The calculation method is as follows.
Note
The numbers of the table indicate the calculation procedure executed by the program. They do not indicateoperations by users.
Value Descriptions
Pages per side number N value of pages per side set in "Pages per Side"
Sheets Sheets printed
Impressions Impressions printed
the Number of Copies Copies printed
1. Since total values of multiple sets are recorded in impressions of the job log, "Impressions of 1 set unit" iscalculated.
Impressions of 1 set unit = Impressions ÷ Copies
2. Since information of original impressions is not included in the job log, "Assumed original impressions" iscalculated by multiplying "Impressions of 1 copy unit" by the pages per side number.
Assumed original impressions = Impressions of 1 copy unit x Pages per side number
3. Divides "Assumed original impressions" by "Original impressions for 2 sided/2 pages per side printing"=4,and calculates "Sheets required to print 1 set in 2 pages per side/2 sided printing".
Sheets required to print 1 set in 2 pages per side/2 sided printing = Assumed original impressions ÷ 4(The fractions are rounded up.)
4. Multiplies "Sheets required to print 1 set in 2 pages per side/2 sided printing" by the number of copies tocalculate "Total sheets required for 2 pages per side/2 sided printing".
Total sheets required for 2 pages per side/2 sided printing = Sheets required to print 1 set in 2 pages perside/2 sided printing x Copies
5. When the value reached by subtracting "Total sheets required for 2 pages per side/2 sided printing" from"Sheets used" exceeds 1, this determines reduction to be possible, and calculates "Possible PaperReduction".
Possible Paper Reduction = Actual output sheets - Total sheets required for 2 pages per side/2 sidedprinting

Device Log Service User Guide
226
Formula When [Paper Reduction Criteria] is [Reduce to Half]The sheets reduced with only 1-Up/1 Sided printing are calculated as "Possible Paper Reduction". Thecalculation method is as follows.
Note
The numbers of the table indicate the calculation procedure executed by the program. They do not indicateoperations by users.
1. Since total values of multiple sets are recorded in impressions of the job log, "Impressions of 1 set unit" iscalculated.
Impressions of 1 set unit = Impressions ÷ Copies
2. By dividing "1 set unit of impressions" by "Original impressions for 1 Sided/1-Up printing"=2, "Sheetsrequired to print 1 set in 1 Sided/1-Up printing" is calculated.
Sheets required to print 1 set in 1 Sided/1-Up printing = 1 set unit of impressions ÷ 2(The fractions are rounded up)
3. By multiplying "Sheets required to print 1 set in 1 Sided/1-Up printing" by the number of copies, "Totalsheets required for 1 Sided/1-Up printing" is calculated.
Total sheets required for 1 Sided/1-Up printing = Sheets required to print 1 set in 1 Sided/1-Up printing xCopies
4. When the value reached by subtracting "Total sheets required for 1 Sided/1-Up printing" from "Sheetsused" exceeds 1, the value is assumed that reduction is possible, so that the value is decided as "PossiblePaper Reduction".
Possible Paper Reduction =Sheets used - Total sheets required for 1 Sided/1-Up printing

6 Appendix
227
About LicensesThis section describes the OSS (Open Source Software) licenses used for Device Log Service. Pleasebe sure to read this section
jQuery 1.10.2Copyright 2005, 2013 jQuery Foundation, Inc. and other contributorshttp://jquery.com/
Permission is hereby granted, free of charge, to any person obtaining a copy of this software andassociated documentation files (the "Software"), to deal in the Software without restriction, includingwithout limitation the rights to use, copy, modify, merge, publish, distribute, sublicense, and/or sellcopies of the Software, and to permit persons to whom the Software is furnished to do so, subject tothe following conditions:
The above copyright notice and this permission notice shall be included in all copies or substantialportions of the Software.
THE SOFTWARE IS PROVIDED "AS IS", WITHOUT WARRANTY OF ANY KIND, EXPRESS OR IMPLIED,INCLUDING BUT NOT LIMITED TO THE WARRANTIES OF MERCHANTABILITY, FITNESS FOR APARTICULAR PURPOSE AND NONINFRINGEMENT. IN NO EVENT SHALL THE AUTHORS ORCOPYRIGHT HOLDERS BE LIABLE FOR ANY CLAIM, DAMAGES OR OTHER LIABILITY, WHETHER IN ANACTION OF CONTRACT, TORT OR OTHERWISE, ARISING FROM, OUT OF OR IN CONNECTION WITHTHE SOFTWARE OR THE USE OR OTHER DEALINGS IN THE SOFTWARE.
jQuery UI 1.10.4Copyright 2014 jQuery Foundation and other contributorshttp://jqueryui.com/
Permission is hereby granted, free of charge, to any person obtaining a copy of this software andassociated documentation files (the "Software"), to deal in the Software without restriction, includingwithout limitation the rights to use, copy, modify, merge, publish, distribute, sublicense, and/or sellcopies of the Software, and to permit persons to whom the Software is furnished to do so, subject tothe following conditions:
The above copyright notice and this permission notice shall be included in all copies or substantialportions of the Software.
THE SOFTWARE IS PROVIDED "AS IS", WITHOUT WARRANTY OF ANY KIND, EXPRESS OR IMPLIED,INCLUDING BUT NOT LIMITED TO THE WARRANTIES OF MERCHANTABILITY, FITNESS FOR APARTICULAR PURPOSE AND NONINFRINGEMENT. IN NO EVENT SHALL THE AUTHORS ORCOPYRIGHT HOLDERS BE LIABLE FOR ANY CLAIM, DAMAGES OR OTHER LIABILITY, WHETHER IN ANACTION OF CONTRACT, TORT OR OTHERWISE, ARISING FROM, OUT OF OR IN CONNECTION WITHTHE SOFTWARE OR THE USE OR OTHER DEALINGS IN THE SOFTWARE.

Device Log Service User Guide
228
normalize.css 2.1.1Copyright 2013 Nicolas Gallagher and Jonathan Nealhttp://necolas.github.io/normalize.css/
Permission is hereby granted, free of charge, to any person obtaining a copy of this software andassociated documentation files (the "Software"), to deal in the Software without restriction, includingwithout limitation the rights to use, copy, modify, merge, publish, distribute, sublicense, and/or sellcopies of the Software, and to permit persons to whom the Software is furnished to do so, subject tothe following conditions:
The above copyright notice and this permission notice shall be included in all copies or substantialportions of the Software.
THE SOFTWARE IS PROVIDED "AS IS", WITHOUT WARRANTY OF ANY KIND, EXPRESS OR IMPLIED,INCLUDING BUT NOT LIMITED TO THE WARRANTIES OF MERCHANTABILITY, FITNESS FOR APARTICULAR PURPOSE AND NONINFRINGEMENT. IN NO EVENT SHALL THE AUTHORS ORCOPYRIGHT HOLDERS BE LIABLE FOR ANY CLAIM, DAMAGES OR OTHER LIABILITY, WHETHER IN ANACTION OF CONTRACT, TORT OR OTHERWISE, ARISING FROM, OUT OF OR IN CONNECTION WITHTHE SOFTWARE OR THE USE OR OTHER DEALINGS IN THE SOFTWARE.
Apache Commons LangCopyright 2001-2011 The Apache Software Foundation.http://commons.apache.org/proper/commons-lang/
Licensed under the Apache License, Version 2.0 (the "License");you may not use this file except in compliance with the License.You may obtain a copy of the License at
http://www.apache.org/licenses/LICENSE-2.0
Unless required by applicable law or agreed to in writing, softwaredistributed under the License is distributed on an "AS IS" BASIS,WITHOUT WARRANTIES OR CONDITIONS OF ANY KIND, either express or implied.See the License for the specific language governing permissions andlimitations under the License.

6 Appendix
229
Apache Commons IOCopyright 2002-2008 The Apache Software Foundation.https://commons.apache.org/proper/commons-io/
Licensed under the Apache License, Version 2.0 (the "License");you may not use this file except in compliance with the License.You may obtain a copy of the License at
http://www.apache.org/licenses/LICENSE-2.0
Unless required by applicable law or agreed to in writing, softwaredistributed under the License is distributed on an "AS IS" BASIS,WITHOUT WARRANTIES OR CONDITIONS OF ANY KIND, either express or implied.See the License for the specific language governing permissions andlimitations under the License.
Apache Commons CodecCopyright 2002-2011 The Apache Software Foundation.https://commons.apache.org/proper/commons-codec/
Licensed under the Apache License, Version 2.0 (the "License");you may not use this file except in compliance with the License.You may obtain a copy of the License at
http://www.apache.org/licenses/LICENSE-2.0
Unless required by applicable law or agreed to in writing, softwaredistributed under the License is distributed on an "AS IS" BASIS,WITHOUT WARRANTIES OR CONDITIONS OF ANY KIND, either express or implied.See the License for the specific language governing permissions andlimitations under the License.
Device Log Service User Guide
230
Apache JackrabbitCopyright 2015 The Apache Software Foundation. https://jackrabbit.apache.org/jcr/
Licensed under the Apache License, Version 2.0 (the "License");you may not use this file except in compliance with the License.You may obtain a copy of the License at
http://www.apache.org/licenses/LICENSE-2.0
Unless required by applicable law or agreed to in writing, softwaredistributed under the License is distributed on an "AS IS" BASIS,WITHOUT WARRANTIES OR CONDITIONS OF ANY KIND, either express or implied.See the License for the specific language governing permissions andlimitations under the License.
Apache Log4jThe Apache Software License, Version 1.1
Copyright (c) 1999-2002 The Apache Software Foundation. All rights reserved.
Redistribution and use in source and binary forms, with or withoutmodification, are permitted provided that the following conditionsare met:
1. Redistributions of source code must retain the above copyright notice, this list of conditions and the following disclaimer.
2. Redistributions in binary form must reproduce the above copyright notice, this list of conditions and the following disclaimer in the documentation and/or other materials provided with the distribution.
3. The end-user documentation included with the redistribution, if any, must include the following acknowledgment: "This product includes software developed by the Apache Software Foundation (http://www.apache.org/)." Alternately, this acknowledgment may appear in the software itself, if and wherever such third-party acknowledgments normally appear.

6 Appendix
231
4. The names "Xerces" and "Apache Software Foundation" must not be used to endorse or promote products derived from this software without prior written permission. For written permission, please contact [email protected].
5. Products derived from this software may not be called "Apache", nor may "Apache" appear in their name, without prior written permission of the Apache Software Foundation.
THIS SOFTWARE IS PROVIDED ``AS IS'' AND ANY EXPRESSED OR IMPLIEDWARRANTIES, INCLUDING, BUT NOT LIMITED TO, THE IMPLIED WARRANTIESOF MERCHANTABILITY AND FITNESS FOR A PARTICULAR PURPOSE AREDISCLAIMED. IN NO EVENT SHALL THE APACHE SOFTWARE FOUNDATION ORITS CONTRIBUTORS BE LIABLE FOR ANY DIRECT, INDIRECT, INCIDENTAL,SPECIAL, EXEMPLARY, OR CONSEQUENTIAL DAMAGES (INCLUDING, BUT NOTLIMITED TO, PROCUREMENT OF SUBSTITUTE GOODS OR SERVICES; LOSS OFUSE, DATA, OR PROFITS; OR BUSINESS INTERRUPTION) HOWEVER CAUSED ANDON ANY THEORY OF LIABILITY, WHETHER IN CONTRACT, STRICT LIABILITY,OR TORT (INCLUDING NEGLIGENCE OR OTHERWISE) ARISING IN ANY WAY OUTOF THE USE OF THIS SOFTWARE, EVEN IF ADVISED OF THE POSSIBILITY OFSUCH DAMAGE.
This software consists of voluntary contributions made by manyindividuals on behalf of the Apache Software Foundation and wasoriginally based on software copyright (c) 1999, InternationalBusiness Machines, Inc., http://www.ibm.com. For moreinformation on the Apache Software Foundation, please see<http://www.apache.org/>.
SNMP4J Apache LicenseVersion 2.0, January 2004http://www.apache.org/licenses/
TERMS AND CONDITIONS FOR USE, REPRODUCTION, AND DISTRIBUTION
1. Definitions.
"License" shall mean the terms and conditions for use, reproduction, and distribution as defined by Sections 1 through 9 of this document.

Device Log Service User Guide
232
"Licensor" shall mean the copyright owner or entity authorized by the copyright owner that is granting the License.
"Legal Entity" shall mean the union of the acting entity and all other entities that control, are controlled by, or are under common control with that entity. For the purposes of this definition, "control" means (i) the power, direct or indirect, to cause the direction or management of such entity, whether by contract or otherwise, or (ii) ownership of fifty percent (50%) or more of the outstanding shares, or (iii) beneficial ownership of such entity.
"You" (or "Your") shall mean an individual or Legal Entity exercising permissions granted by this License.
"Source" form shall mean the preferred form for making modifications, including but not limited to software source code, documentation source, and configuration files.
"Object" form shall mean any form resulting from mechanical transformation or translation of a Source form, including but not limited to compiled object code, generated documentation, and conversions to other media types.
"Work" shall mean the work of authorship, whether in Source or Object form, made available under the License, as indicated by a copyright notice that is included in or attached to the work (an example is provided in the Appendix below).
"Derivative Works" shall mean any work, whether in Source or Object form, that is based on (or derived from) the Work and for which the editorial revisions, annotations, elaborations, or other modifications represent, as a whole, an original work of authorship. For the purposes of this License, Derivative Works shall not include works that remain separable from, or merely link (or bind by name) to the interfaces of, the Work and Derivative Works thereof.

6 Appendix
233
"Contribution" shall mean any work of authorship, including the original version of the Work and any modifications or additions to that Work or Derivative Works thereof, that is intentionally submitted to Licensor for inclusion in the Work by the copyright owner or by an individual or Legal Entity authorized to submit on behalf of the copyright owner. For the purposes of this definition, "submitted" means any form of electronic, verbal, or written communication sent to the Licensor or its representatives, including but not limited to communication on electronic mailing lists, source code control systems, and issue tracking systems that are managed by, or on behalf of, the Licensor for the purpose of discussing and improving the Work, but excluding communication that is conspicuously marked or otherwise designated in writing by the copyright owner as "Not a Contribution."
"Contributor" shall mean Licensor and any individual or Legal Entity on behalf of whom a Contribution has been received by Licensor and subsequently incorporated within the Work.
2. Grant of Copyright License. Subject to the terms and conditions of this License, each Contributor hereby grants to You a perpetual, worldwide, non-exclusive, no-charge, royalty-free, irrevocable copyright license to reproduce, prepare Derivative Works of, publicly display, publicly perform, sublicense, and distribute the Work and such Derivative Works in Source or Object form.
3. Grant of Patent License. Subject to the terms and conditions of this License, each Contributor hereby grants to You a perpetual, worldwide, non-exclusive, no-charge, royalty-free, irrevocable (except as stated in this section) patent license to make, have made, use, offer to sell, sell, import, and otherwise transfer the Work, where such license applies only to those patent claims licensable by such Contributor that are necessarily infringed by their Contribution(s) alone or by combination of their Contribution(s) with the Work to which such Contribution(s) was submitted. If You institute patent litigation against any entity (including a cross-claim or counterclaim in a lawsuit) alleging that the Work or a Contribution incorporated within the Work constitutes direct or contributory patent infringement, then any patent licenses granted to You under this License for that Work shall terminate as of the date such litigation is filed.

Device Log Service User Guide
234
4. Redistribution. You may reproduce and distribute copies of the Work or Derivative Works thereof in any medium, with or without modifications, and in Source or Object form, provided that You meet the following conditions:
(a) You must give any other recipients of the Work or Derivative Works a copy of this License; and
(b) You must cause any modified files to carry prominent notices stating that You changed the files; and
(c) You must retain, in the Source form of any Derivative Works that You distribute, all copyright, patent, trademark, and attribution notices from the Source form of the Work, excluding those notices that do not pertain to any part of the Derivative Works; and
(d) If the Work includes a "NOTICE" text file as part of its distribution, then any Derivative Works that You distribute must include a readable copy of the attribution notices contained within such NOTICE file, excluding those notices that do not pertain to any part of the Derivative Works, in at least one of the following places: within a NOTICE text file distributed as part of the Derivative Works; within the Source form or documentation, if provided along with the Derivative Works; or, within a display generated by the Derivative Works, if and wherever such third-party notices normally appear. The contents of the NOTICE file are for informational purposes only and do not modify the License. You may add Your own attribution notices within Derivative Works that You distribute, alongside or as an addendum to the NOTICE text from the Work, provided that such additional attribution notices cannot be construed as modifying the License.
You may add Your own copyright statement to Your modifications and may provide additional or different license terms and conditions for use, reproduction, or distribution of Your modifications, or for any such Derivative Works as a whole, provided Your use, reproduction, and distribution of the Work otherwise complies with the conditions stated in this License.

6 Appendix
235
5. Submission of Contributions. Unless You explicitly state otherwise, any Contribution intentionally submitted for inclusion in the Work by You to the Licensor shall be under the terms and conditions of this License, without any additional terms or conditions. Notwithstanding the above, nothing herein shall supersede or modify the terms of any separate license agreement you may have executed with Licensor regarding such Contributions.
6. Trademarks. This License does not grant permission to use the trade names, trademarks, service marks, or product names of the Licensor, except as required for reasonable and customary use in describing the origin of the Work and reproducing the content of the NOTICE file.
7. Disclaimer of Warranty. Unless required by applicable law or agreed to in writing, Licensor provides the Work (and each Contributor provides its Contributions) on an "AS IS" BASIS, WITHOUT WARRANTIES OR CONDITIONS OF ANY KIND, either express or implied, including, without limitation, any warranties or conditions of TITLE, NON-INFRINGEMENT, MERCHANTABILITY, or FITNESS FOR A PARTICULAR PURPOSE. You are solely responsible for determining the appropriateness of using or redistributing the Work and assume any risks associated with Your exercise of permissions under this License.
8. Limitation of Liability. In no event and under no legal theory, whether in tort (including negligence), contract, or otherwise, unless required by applicable law (such as deliberate and grossly negligent acts) or agreed to in writing, shall any Contributor be liable to You for damages, including any direct, indirect, special, incidental, or consequential damages of any character arising as a result of this License or out of the use or inability to use the Work (including but not limited to damages for loss of goodwill, work stoppage, computer failure or malfunction, or any and all other commercial damages or losses), even if such Contributor has been advised of the possibility of such damages.

Device Log Service User Guide
236
9. Accepting Warranty or Additional Liability. While redistributing the Work or Derivative Works thereof, You may choose to offer, and charge a fee for, acceptance of support, warranty, indemnity, or other liability obligations and/or rights consistent with this License. However, in accepting such obligations, You may act only on Your own behalf and on Your sole responsibility, not on behalf of any other Contributor, and only if You agree to indemnify,defend, and hold each Contributor harmless for any liabilityincurred by, or claims asserted against, such Contributor by reasonof your accepting any such warranty or additional liability.
END OF TERMS AND CONDITIONS
APPENDIX: How to apply the Apache License to your work.
To apply the Apache License to your work, attach the followingboilerplate notice, with the fields enclosed by brackets "[]"replaced with your own identifying information. (Don't includethe brackets!) The text should be enclosed in the appropriatecomment syntax for the file format. We also recommend that afile or class name and description of purpose be included on thesame "printed page" as the copyright notice for easieridentification within third-party archives.
Copyright [yyyy] [name of copyright owner]
Licensed under the Apache License, Version 2.0 (the "License");you may not use this file except in compliance with the License.You may obtain a copy of the License at
http://www.apache.org/licenses/LICENSE-2.0
Unless required by applicable law or agreed to in writing, softwaredistributed under the License is distributed on an "AS IS" BASIS,WITHOUT WARRANTIES OR CONDITIONS OF ANY KIND, either express or implied.See the License for the specific language governing permissions andlimitations under the License.

6 Appendix
237
The LDAP Class Libraries for Java (JLDAP)The OpenLDAP Public License Version 2.8, 17 August 2003
Redistribution and use of this software and associated documentation("Software"), with or without modification, are permitted providedthat the following conditions are met:
1. Redistributions in source form must retain copyright statements and notices,
2. Redistributions in binary form must reproduce applicable copyright statements and notices, this list of conditions, and the following disclaimer in the documentation and/or other materials provided with the distribution, and
3. Redistributions must contain a verbatim copy of this document.
The OpenLDAP Foundation may revise this license from time to time.Each revision is distinguished by a version number. You may usethis Software under terms of this license revision or under theterms of any subsequent revision of the license.
THIS SOFTWARE IS PROVIDED BY THE OPENLDAP FOUNDATION AND ITSCONTRIBUTORS ``AS IS'' AND ANY EXPRESSED OR IMPLIED WARRANTIES,INCLUDING, BUT NOT LIMITED TO, THE IMPLIED WARRANTIES OF MERCHANTABILITYAND FITNESS FOR A PARTICULAR PURPOSE ARE DISCLAIMED. IN NO EVENTSHALL THE OPENLDAP FOUNDATION, ITS CONTRIBUTORS, OR THE AUTHOR(S)OR OWNER(S) OF THE SOFTWARE BE LIABLE FOR ANY DIRECT, INDIRECT,INCIDENTAL, SPECIAL, EXEMPLARY, OR CONSEQUENTIAL DAMAGES (INCLUDING,BUT NOT LIMITED TO, PROCUREMENT OF SUBSTITUTE GOODS OR SERVICES;LOSS OF USE, DATA, OR PROFITS; OR BUSINESS INTERRUPTION) HOWEVERCAUSED AND ON ANY THEORY OF LIABILITY, WHETHER IN CONTRACT, STRICTLIABILITY, OR TORT (INCLUDING NEGLIGENCE OR OTHERWISE) ARISING INANY WAY OUT OF THE USE OF THIS SOFTWARE, EVEN IF ADVISED OF THEPOSSIBILITY OF SUCH DAMAGE.
The names of the authors and copyright holders must not be used inadvertising or otherwise to promote the sale, use or other dealingin this Software without specific, written prior permission. Titleto copyright in this Software shall at all times remain with copyrightholders.

Device Log Service User Guide
238
OpenLDAP is a registered trademark of the OpenLDAP Foundation.
Copyright 1999-2003 The OpenLDAP Foundation, Redwood City,California, USA. All Rights Reserved. Permission to copy anddistribute verbatim copies of this document is granted.

Reference site for support information and latest information.Product information is provided at our Internet homepage https://fujifilm.com/fbglobal/eng/support