developing a science unit plan that is both interesting and
113
i DEVELOPING A SCIENCE UNIT PLAN THAT IS BOTH INTERESTING AND EFFECTIVE FOR SECONDARY SCHOOLS A thesis submitted to the Kent State University Honors College in partial fulfillment of the requirements for General Honors by Margaret Quinn Evans May, 2015
-
Upload
khangminh22 -
Category
Documents
-
view
0 -
download
0
Transcript of developing a science unit plan that is both interesting and
i
DEVELOPING A SCIENCE UNIT PLAN THAT IS BOTH INTERESTING AND EFFECTIVE FOR SECONDARY SCHOOLS
A thesis submitted to the
Kent State University Honors College in partial fulfillment of the requirements
for General Honors
by
Margaret Quinn Evans
May, 2015

ii
Thesis written by
Margaret Quinn Evans
Approved by
_______, Advisor
______________ _ , Director, School of Teaching,
Learning and Curriculum Studies
Accepted by
, Dean, Honors College
iii
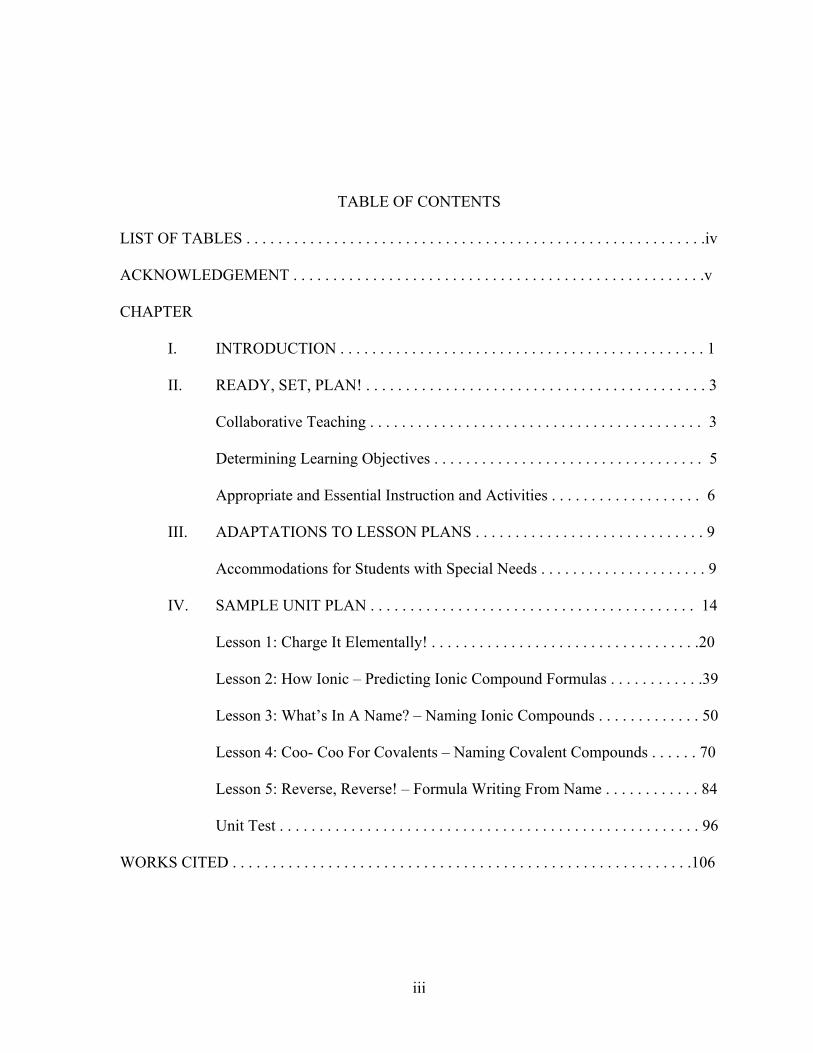
TABLE OF CONTENTS
LIST OF TABLES . . . . . . . . . . . . . . . . . . . . . . . . . . . . . . . . . . . . . . . . . . . . . . . . . . . . . . . . . .iv ACKNOWLEDGEMENT . . . . . . . . . . . . . . . . . . . . . . . . . . . . . . . . . . . . . . . . . . . . . . . . . . . .v CHAPTER
I. INTRODUCTION . . . . . . . . . . . . . . . . . . . . . . . . . . . . . . . . . . . . . . . . . . . . . . 1
II. READY, SET, PLAN! . . . . . . . . . . . . . . . . . . . . . . . . . . . . . . . . . . . . . . . . . . . 3
Collaborative Teaching . . . . . . . . . . . . . . . . . . . . . . . . . . . . . . . . . . . . . . . . . . 3 Determining Learning Objectives . . . . . . . . . . . . . . . . . . . . . . . . . . . . . . . . . . 5 Appropriate and Essential Instruction and Activities . . . . . . . . . . . . . . . . . . . 6
III. ADAPTATIONS TO LESSON PLANS . . . . . . . . . . . . . . . . . . . . . . . . . . . . . 9 Accommodations for Students with Special Needs . . . . . . . . . . . . . . . . . . . . . 9
IV. SAMPLE UNIT PLAN . . . . . . . . . . . . . . . . . . . . . . . . . . . . . . . . . . . . . . . . . 14 Lesson 1: Charge It Elementally! . . . . . . . . . . . . . . . . . . . . . . . . . . . . . . . . . .20 Lesson 2: How Ionic – Predicting Ionic Compound Formulas . . . . . . . . . . . .39 Lesson 3: What’s In A Name? – Naming Ionic Compounds . . . . . . . . . . . . . 50 Lesson 4: Coo- Coo For Covalents – Naming Covalent Compounds . . . . . . 70 Lesson 5: Reverse, Reverse! – Formula Writing From Name . . . . . . . . . . . . 84 Unit Test . . . . . . . . . . . . . . . . . . . . . . . . . . . . . . . . . . . . . . . . . . . . . . . . . . . . . 96
WORKS CITED . . . . . . . . . . . . . . . . . . . . . . . . . . . . . . . . . . . . . . . . . . . . . . . . . . . . . . . . . .106

iv
LIST OF TABLES
Table 1. Collaboration with Other Teachers . . . . . . . . . . . . . . . . . . . . . . . . . . . . . . . . . 4
Table 2. Categories and Examples of Accommodations . . . . . . . . . . . . . . . . . . . . . . . 10

v
AKNOWLEDGMENTS
First and foremost I would like to thank Dr. Lisa Borgerding for being such a crucial part of helping me write and edit this thesis. I would also like to take the time to thank Dr. Pritha Sumraminian, Dr. Paul Sampson, and Dr. Sarah Raven for taking the time to be a part of my defense committee. I would also like to thank my Fall 2013 and Spring 2013 Supplemental Instruction Classes for being the test dummies for my lesson activities. You have all been extremely supportive and helpful throughout this process. For that, I thank you.

1
CHAPTER ONE: INTRODUCTION
One of the most essential events in teaching is creating effective lessons and unit
plans. The process of creating these lessons can be tedious, difficult, and time-consuming.
This is why many teachers ask themselves why they need to take time from their already
busy schedules to create them. Aside from the fact that is part of a teacher’s job, there are
many positive and necessary reasons for lesson planning.
It is one thing to write a daily lesson plan simply to meet the requirements of a
supervisor or cooperating teacher, which is what a lot of pre-service teachers say they do
(Richards, 2002) and another to take the time to create a good, interactive, and effective plan.
The teachers who take the time to do the latter and have the skills to create these types of
lessons are the ones who are the most prepared, organized, and successful in the classroom.
As students who are learning how to become teachers, the idea of creating lesson
plans is constantly placed into their heads from the very first teaching course. Students are
expected to write detailed plans with different templates, different sections to include, and
different styles. Very rarely though, do they get a chance to talk in depth about effective
practices to consider when we are writing these plans. Emerging teachers should have the
opportunity to be creative, to see what works and what doesn’t work, and to try new things!
Lesson planning gives these teachers, as well as more experienced teachers, a way to get
creative in a structured and organized way, rather than entering the classroom without a plan,
which may lead to problems during the lesson. Sitting down and thinking about the lesson in

2
advance is a way to resolve problems and difficulties before they arise in the classroom
(Richards, 2002)
3
It becomes another task entirely when teachers lesson plan for science classrooms.
Science can be very difficult for students to learn and understand. There are many abstract
ideas, information is constantly changing as new facts are discovered, and there is “too much
to learn and understand” (Vahia, 2013). It is the teachers’ job to create lessons that will
effectively drive student learning and interest in the topics. To be able to do this, teachers
need to be able to find content that is significant and worthwhile (that also fits within the
content standards for the specific state), encourage collaboration and active learning among
students, be certain that the content and activities are appropriate for the level of the students’
knowledge, keep a pace that maximizes student learning and understanding, and be able to
have the lesson reflect careful planning and organization (Tweed, 2009). Science, more than
any other subject, should be demonstrated in the classroom with hands-on learning activities.
Rather than giving students notes to copy, teachers should give them experiences. As
Benjamin Franklin once said “tell me and I forget. Teach me and I remember. Involve me
and I learn.”
This paper investigates helpful hints and suggestions for new, and veteran, teachers to
keep in mind while lesson planning for science instruction. In addition to the paper, a sample
unit plan on the topic of ionic and covalent bonds has been included and will be referenced in
the paper for examples.
4
CHAPTER TWO: READY, SET, PLAN!
Let’s set the stage. It is a week before your students’ first day in their new high school
science class. It is one of the most exciting and stressful times of the year. Teachers haven’t
received classroom schedules from administration quite yet, but are ready to start planning
for the school year. Where is an effective and logical starting point? It is one of the most
stressful times of the year. New teachers, especially, have so many questions and very few
answers when they are just starting out.
COLLABORATIVE TEACHING
The first step in planning units and individual lessons should be to look at the
schools’ curriculum and connect with other teachers in the same subject or grade level. One
of the greatest resources new teachers can have will be returning, veteran teachers in the
district. They have, more than likely, tried different activities or labs for each lesson (some
successful, some not so successful). Being able to connect with other teachers builds a
support system in which gaining insight and assistance comes naturally with troublesome
topics. This allows returning staff members to ease the staff turnover strain by providing
systematic professional assistance to beginners and by socializing newcomers, and veteran
teachers, to values, traditions, and other resources available at the district (Inger, 1993). In
addition to building a support system, there has been research, which shows that teachers
who have worked together see improvements in student achievement, behavior, and attitude
(Inger, 1993).
5
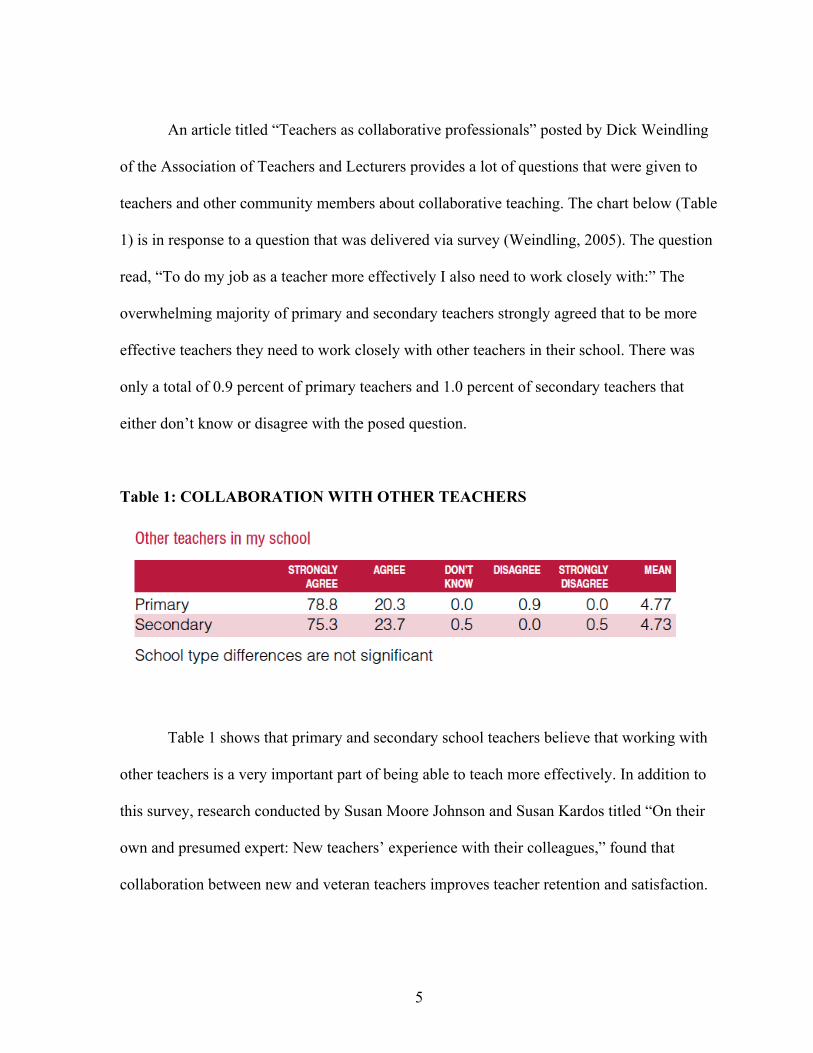
An article titled “Teachers as collaborative professionals” posted by Dick Weindling
of the Association of Teachers and Lecturers provides a lot of questions that were given to
teachers and other community members about collaborative teaching. The chart below (Table
1) is in response to a question that was delivered via survey (Weindling, 2005). The question
read, “To do my job as a teacher more effectively I also need to work closely with:” The
overwhelming majority of primary and secondary teachers strongly agreed that to be more
effective teachers they need to work closely with other teachers in their school. There was
only a total of 0.9 percent of primary teachers and 1.0 percent of secondary teachers that
either don’t know or disagree with the posed question.
Table 1: COLLABORATION WITH OTHER TEACHERS
Table 1 shows that primary and secondary school teachers believe that working with
other teachers is a very important part of being able to teach more effectively. In addition to
this survey, research conducted by Susan Moore Johnson and Susan Kardos titled “On their
own and presumed expert: New teachers’ experience with their colleagues,” found that
collaboration between new and veteran teachers improves teacher retention and satisfaction.
6
An integrated professional culture allows the new teachers’ needs to be recognized and all
teachers share the responsibility for student success.
DETERMINING LEARNING OBJECTIVES
Now that good connections with other teachers in the school have been established, it
is time to start planning lessons. To start planning a lesson, it is essential to look at the
school’s curriculum and the state’s standards (make sure these stay in line with each other).
This is something that veteran teachers will be able to guide new teachers with. When
teachers are beginning to develop lessons and unit plans they should start by determining the
major learning outcomes that students will take away (again seeking assistance from other
teachers may provide insight). Having a goal is essential for planning good and effective
lessons. It allows teachers, as well as the students, to know what they will be learning as the
topic progresses. Without clearly defined learning outcomes, students may become confused
at what they are supposed to focus on and get lost in the material.
According to an article found on the Gavilan College website “Writing Measurable
Learning Outcomes” (Osters, 2003) objectives are brief, clear statements that describe the
desired learning outcomes of instruction. Effective objectives should have the following
characteristics.
1. Objectives have measurable learning outcomes.
2. Objectives should select appropriate assessment methods.
3. Objectives should use simple action verbs.
4. Objectives should be specific.
5. Objectives should not join more than one outcome.
7
These objectives should remain in line with the specific state’s standards. Ohio’s New
Learning Standards for Science have content statements, content elaborations, and much
more built into each grade topic. It is important to not simply take exactly what they have
written (the majority of the time they are not simple statements), but take the ideas and make
them into objectives so that students know exactly what is expected of them by the end of the
lesson. For example, a good objective would read: by the end of this lesson students will be
able to name different types of compounds.
The sample unit includes lesson objectives (in each lesson) directly under the
standards and summary of sections. All lesson plans, based on what a teacher prefers, look
different. However, in each lesson it is imperative to clearly state the objectives. In the
classroom, these objectives can be posted on a white board, chalkboard, or an objective
board. An objective board allows students to know exactly what is expected of them as they
are working through a lesson. It also allows teachers to remain on task and check for
understanding on the right material.
APPROPRIATE AND ESSENTIAL INSTRUCTION AND ACTIVITIES
Teachers today are extremely lucky to have the resources available to them: Internet,
magazines, Pinterest, and thousands upon thousands of books dedicated to lesson ideas.
However, with the extensive amounts of ideas out there, it is important to be able to
recognize activities that students will equally enjoy and learn from. Being able to engage
students and have them enjoy every single activity or lesson is almost impossible and
teachers cannot use an activity just for activity sake. It must have a purpose.
8
Planning lesson activities must follow guidelines. First, activities must connect to the
objectives of the lesson. If the lesson covers a broad topic and can only be tied to the lesson
loosely, it is not going to be a good activity for the objective in discussion. That is not to say
that it would not be good at a later time, but it is not connected to current material well
enough to be used effectively. Second, it is never a good idea to use an activity just to have
an activity. What this means is that there is some material that cannot be presented any way
except using a traditional lecture format. This is not a bad thing and can be the best tool to
deliver certain information to students. Teachers now can, however, put a spin on traditional
lecture and present information in the form of a PowerPoint or an incomplete outline format.
Many adjustments can be made in this aspect to make the normal lecture format more
involved and interactive.
Finally, lesson plan activities should be appropriate for the grade level that it will be
implemented in. It is typical to find a seemingly good idea or activity and want to use it in the
classroom, but it is either too low or too high for the grade level. When this happens, it is
okay to chalk it up as a missed opportunity and continue searching for new activities, but it is
also a good idea to collaborate with other teachers (this is where collaborative learning can
be extremely useful) to see how the activity can be modified to meet the grade level it is to be
used in.
As a note, it is also important that activities do not take away from student learning.
While teachers are making the change to more interactive and inquiry based learning, it is
essential that students understand the content that is embedded into the activities. Teachers
cannot rely completely on activities to teach students material. If this were true, we wouldn’t
need teachers anymore. Students could simply go to school and have someone give them the
9
directions to a game or activity and hope they learn everything they need to. There must be a
reason to use particular activities in a lesson to make it effective.
Throughout the example unit plan, activities have been included to support the
various lessons. For example, in lesson 5, the activity is titled “Flyswatter.” It is an
interactive way for students to practice finding formulas for given compounds. This activity
could have been given in a worksheet format, but allowing students to get competitive brings
a new feel to the classroom. Taking normally dry material and creating a fun way to present
it allows students to connect and understand it more effectively. This activity can be adapted
to almost any content and any subject. Teachers can change the formulas for vocabulary
words, images, etc. Rather than having students simply memorizing flashcards or using drill
worksheets over and over, getting students up and actively learning can work very
effectively. According to a study done at the University of Washington active learning in
science leads to increased examination performance and a 55% increase in failure rates under
traditional lecturing (Freeman, 2014).

10
CHAPTER THREE: ADAPTATIONS TO LESSON PLANS
In the perfect world, all students would learn at the same pace and would all be on the
same page at the same time. However, we do not live in a perfect world and not all students
learn the same. As educators, we must prepare our lessons for all types of learners. Many
classrooms and school districts are leaning towards or have already shifted to an inclusive
type of classroom. This is where differently abled students are not isolated in the special
education classroom all day, but are integrated into the classrooms with their fellow
classmates.
While the inclusion vision continues to grow, this means that general education
teachers and special education teachers are becoming more and more collaborative in the
classroom setting. Many school districts have intervention specialists that integrate
themselves into the general education teachers’ classrooms (much like the students
themselves) by helping to adapt lessons to each student with disability’s individualized
education plan or better known as an IEP. These IEPs are developed with each individual
student in mind and are designed to best help the student learn the material the most effective
way for that particular student.
ACCOMMODATIONS FOR STUDENTS WITH SPECIAL NEEDS
It is crucial to point out that while we are adjusting lessons for students with special
needs, we do not give these students an unfair advantage over the other students in the
classroom. The accommodations are made to “level the playing field” said Dr. Sheldon
11
Horowitz and content should not be altered in any way for the given assignment. The
National Center for Learning Disabilities breaks down possible accommodations into six
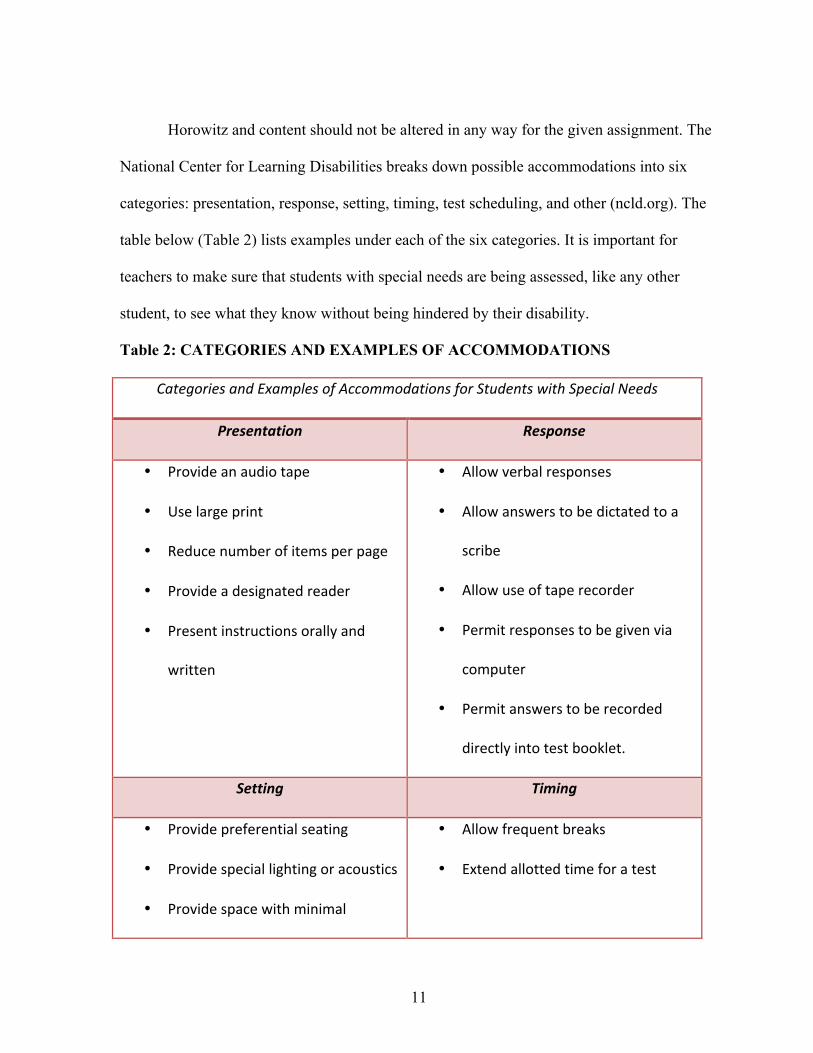
categories: presentation, response, setting, timing, test scheduling, and other (ncld.org). The
table below (Table 2) lists examples under each of the six categories. It is important for
teachers to make sure that students with special needs are being assessed, like any other
student, to see what they know without being hindered by their disability.
Table 2: CATEGORIES AND EXAMPLES OF ACCOMMODATIONS
Categories and Examples of Accommodations for Students with Special Needs
Presentation Response
• Provide an audio tape
• Use large print
• Reduce number of items per page
• Provide a designated reader
• Present instructions orally and
written
• Allow verbal responses
• Allow answers to be dictated to a
scribe
• Allow use of tape recorder
• Permit responses to be given via
computer
• Permit answers to be recorded
directly into test booklet.
Setting Timing
• Provide preferential seating
• Provide special lighting or acoustics
• Provide space with minimal
• Allow frequent breaks
• Extend allotted time for a test
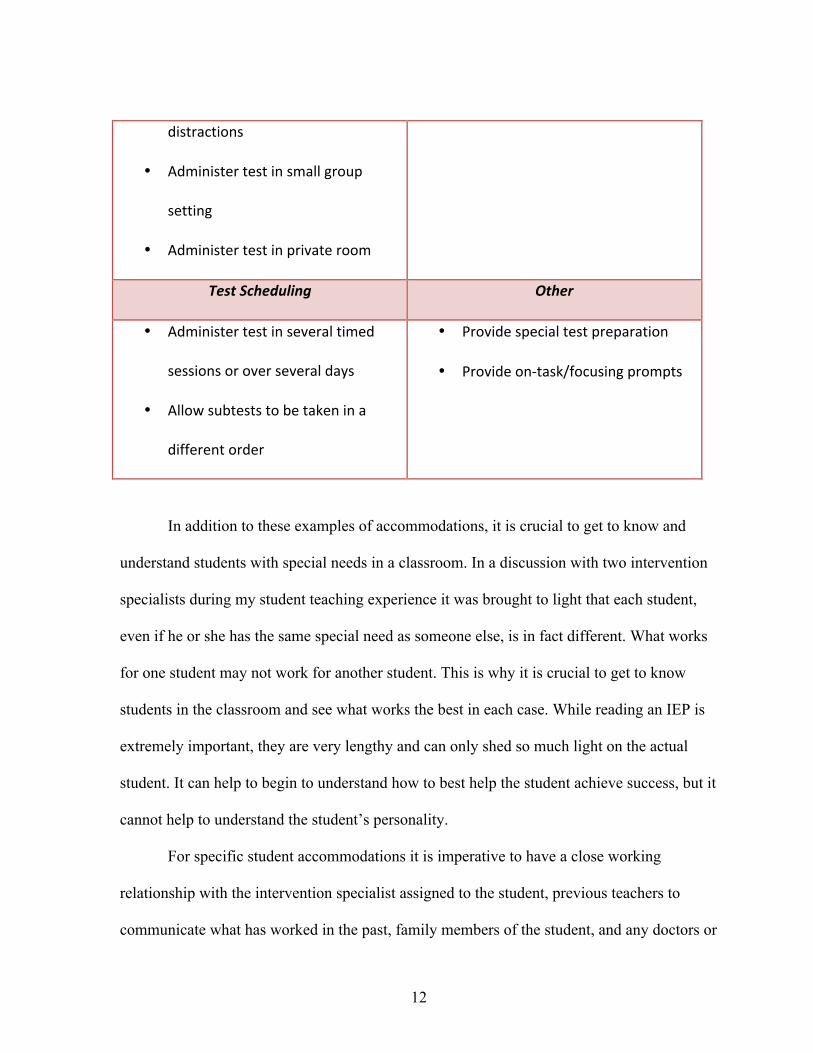
12
distractions
• Administer test in small group
setting
• Administer test in private room
Test Scheduling Other
• Administer test in several timed
sessions or over several days
• Allow subtests to be taken in a
different order
• Provide special test preparation
• Provide on-‐task/focusing prompts
In addition to these examples of accommodations, it is crucial to get to know and
understand students with special needs in a classroom. In a discussion with two intervention
specialists during my student teaching experience it was brought to light that each student,
even if he or she has the same special need as someone else, is in fact different. What works
for one student may not work for another student. This is why it is crucial to get to know
students in the classroom and see what works the best in each case. While reading an IEP is
extremely important, they are very lengthy and can only shed so much light on the actual
student. It can help to begin to understand how to best help the student achieve success, but it
cannot help to understand the student’s personality.
For specific student accommodations it is imperative to have a close working
relationship with the intervention specialist assigned to the student, previous teachers to
communicate what has worked in the past, family members of the student, and any doctors or
13
guidance counselors that are listed in the student’s IEP. The student’s best interest should be
what all of the individuals should be working towards. With so many people working to
achieve one goal, lines can get blurred and the goal may be lost. All individuals must
remember that everyone is working towards what is best for student.
Four out of five lessons in the sample unit plan include a PowerPoint presentation,
which serves as a visual for students. Built into the PowerPoint slides are practice problems
for students to work on at different parts of the lecture. This strategy breaks up the lecture so
that students with trouble keeping on task for long periods of time can focus better. In
addition to this feature, lessons 2, 3, and 4 include incomplete outlines that can assist students
who may need visual or written accommodations. As discussed earlier, teachers must
communicate with intervention specialists to best accommodate lessons to specific or
particular student needs.
14
CHAPTER FOUR: SAMPLE UNIT
The creation of this unit plan was based on research studies conducted on the best
ways to present information in ways that will keep students attention. Lecturing has been the
predominant mode of instruction since universities were founded over 900 years ago
(Brockliss, 1996). Based on research completed students are 1.5 times more likely to fail
under traditional lecture style classes rather than classrooms that make use of active learning
techniques (Freeman, 2014). The study took two classes, both taught by the same teacher,
with one class being taught by traditional lectures and the second making use of active
learning strategies. One important statistic showed that students in the active learning
classroom received six percentage points higher than students in the traditional lecture
classroom on an identical test. Simply by making the classroom environment more engaging
students can retain more of the lesson than when they are passively listening to a lecture. In
the sample unit, there are multiple activities that will reinforce student learning and keep
their attention through active learning strategies.
Based on research conducted in an organic chemistry class by Donald Paulson at
California State University in Los Angeles, Paulson explained that “despite this interest in
new teaching methods, the majority of college science classes are still taught in a
predominantly lecture format” (Paulson, 1999). He continued to explain that teachers fear
they will lose control of the classroom by using new strategies such as active learning, and
cooperative learning. While others were skeptical of the new techniques, Paulson
incorporated cooperative learning and active learning into his chemistry classes and he said,
“the results have been astounding” (Paulson, 1999). His students were able to enjoy and
participate in more in-depth discussions about chemistry.
15
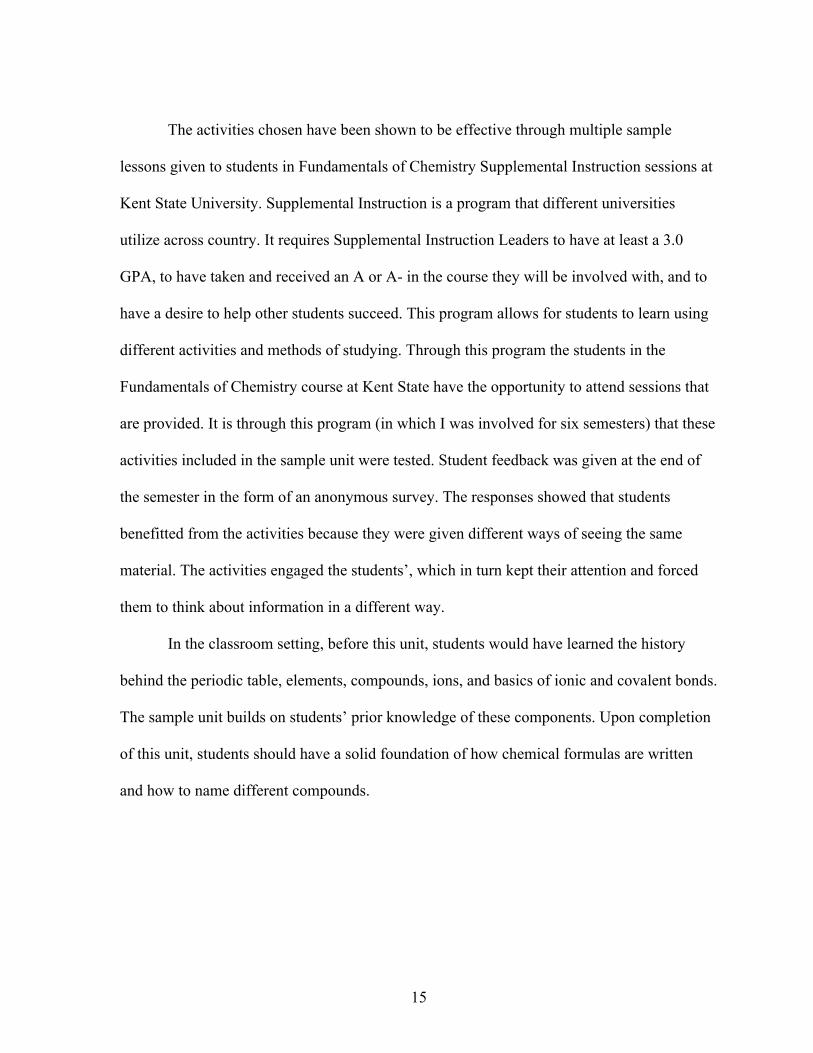
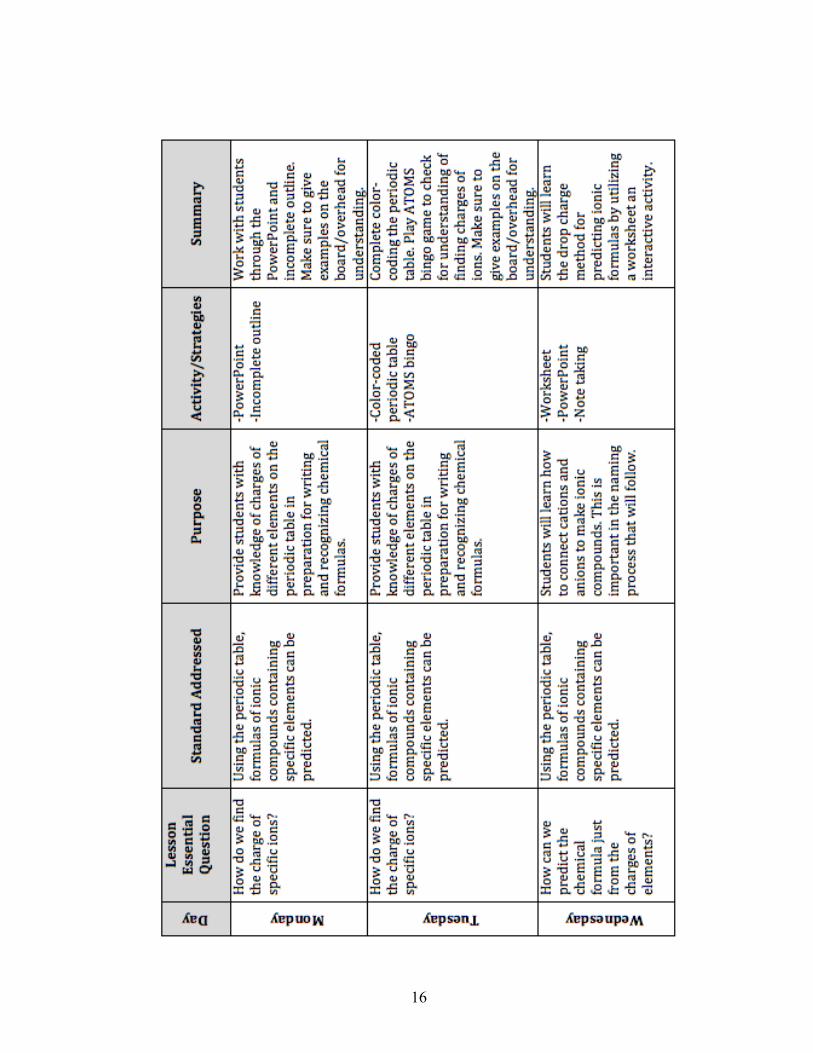
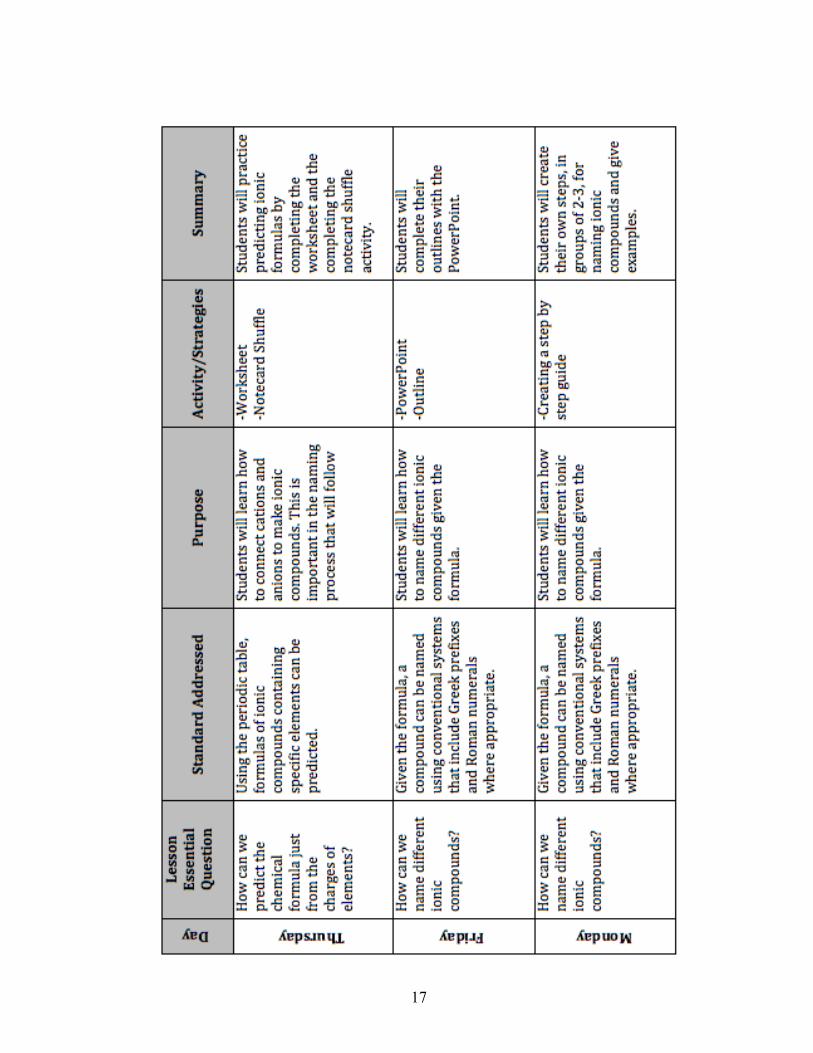
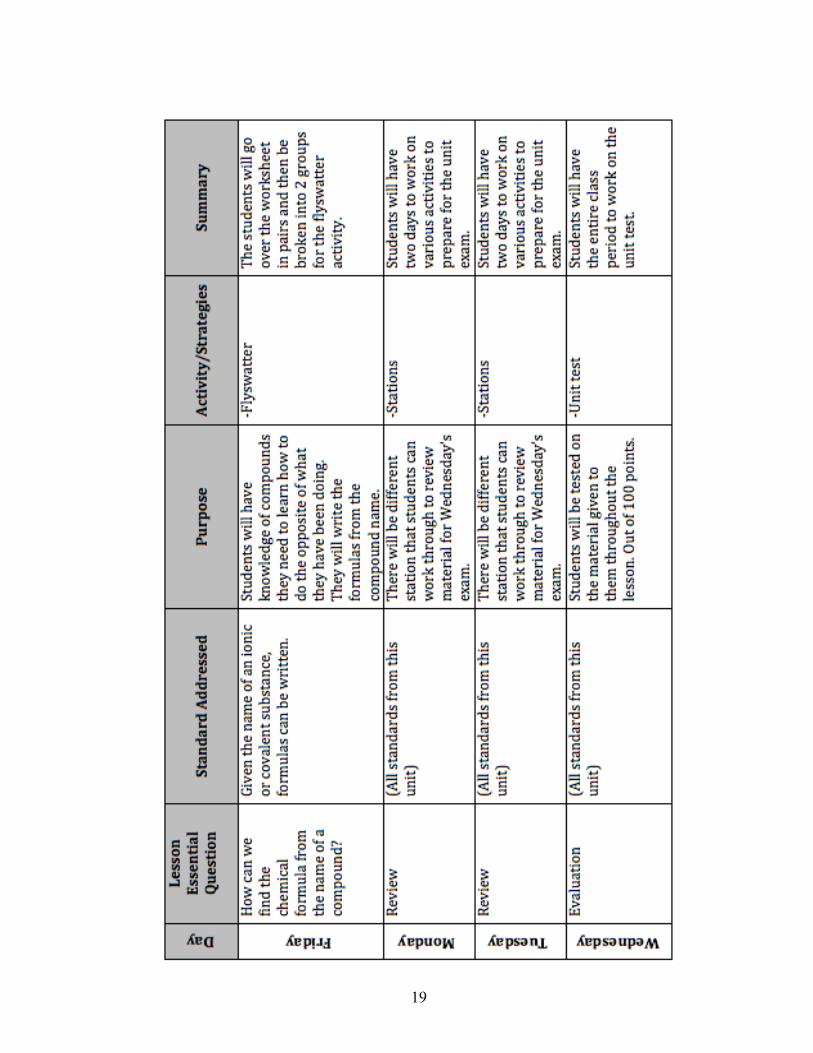
The activities chosen have been shown to be effective through multiple sample
lessons given to students in Fundamentals of Chemistry Supplemental Instruction sessions at
Kent State University. Supplemental Instruction is a program that different universities
utilize across country. It requires Supplemental Instruction Leaders to have at least a 3.0
GPA, to have taken and received an A or A- in the course they will be involved with, and to
have a desire to help other students succeed. This program allows for students to learn using
different activities and methods of studying. Through this program the students in the
Fundamentals of Chemistry course at Kent State have the opportunity to attend sessions that
are provided. It is through this program (in which I was involved for six semesters) that these
activities included in the sample unit were tested. Student feedback was given at the end of
the semester in the form of an anonymous survey. The responses showed that students
benefitted from the activities because they were given different ways of seeing the same
material. The activities engaged the students’, which in turn kept their attention and forced
them to think about information in a different way.
In the classroom setting, before this unit, students would have learned the history
behind the periodic table, elements, compounds, ions, and basics of ionic and covalent bonds.
The sample unit builds on students’ prior knowledge of these components. Upon completion
of this unit, students should have a solid foundation of how chemical formulas are written
and how to name different compounds.
16
17

18
19
20
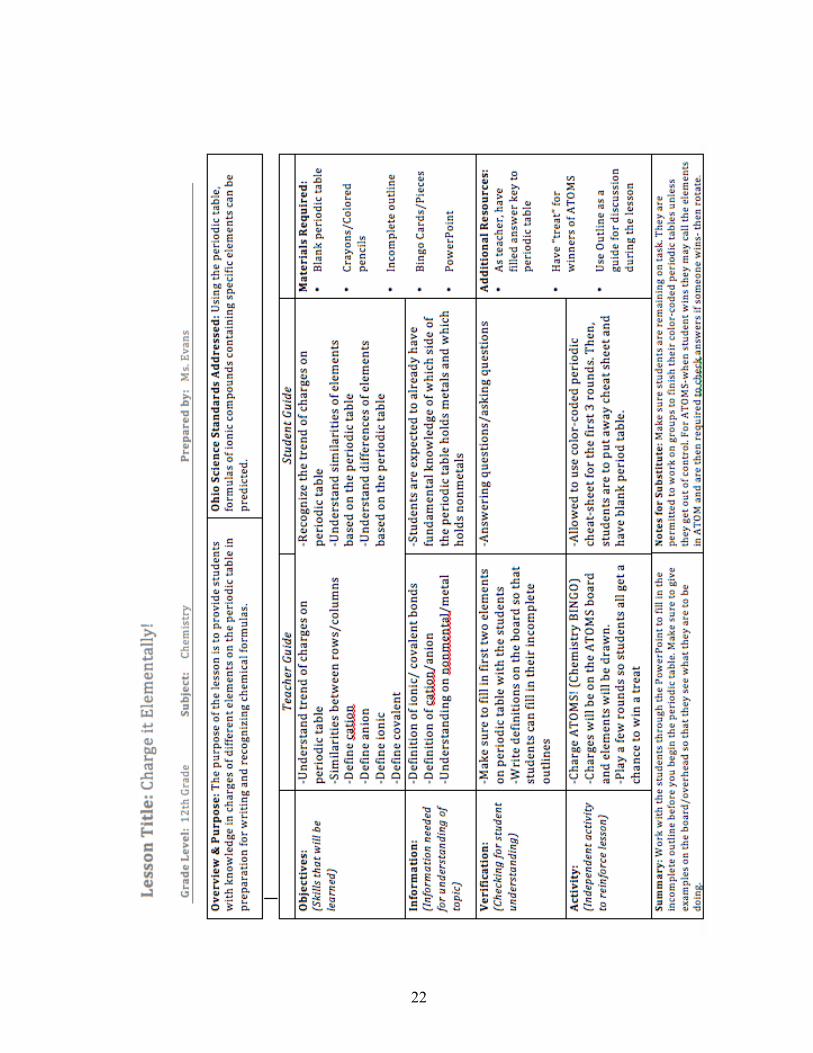
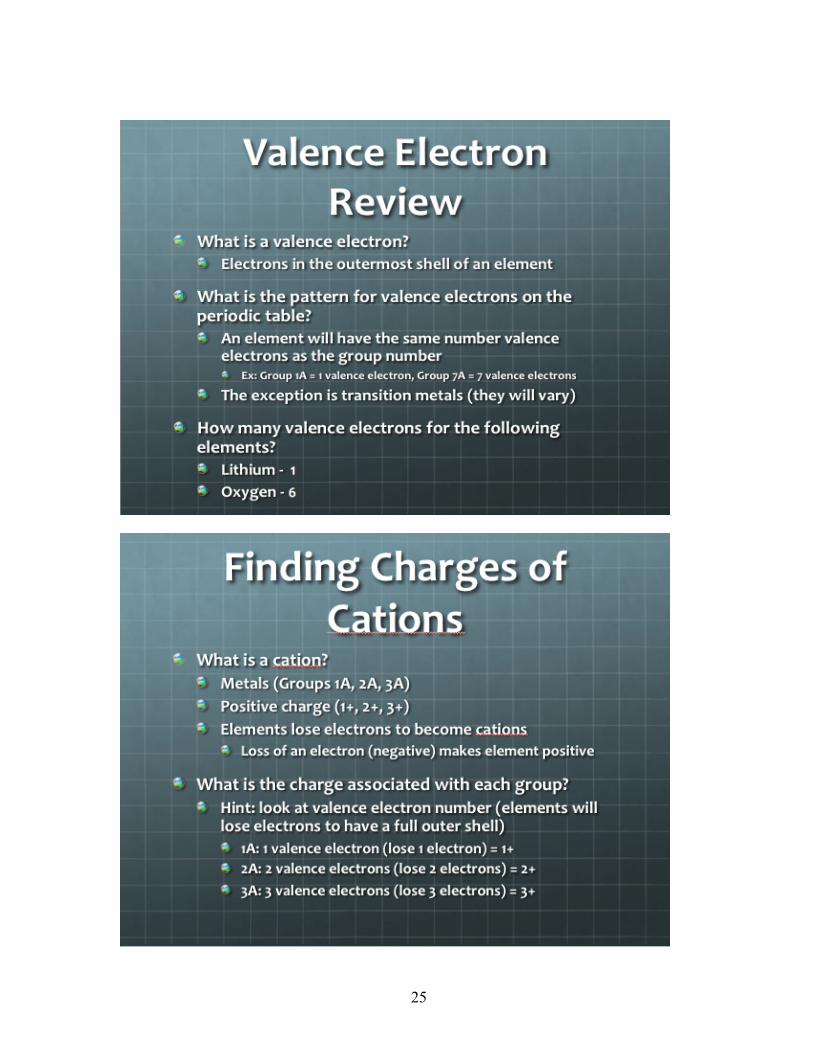
LESSON 1: CHARGE IT ELEMENTALLY!
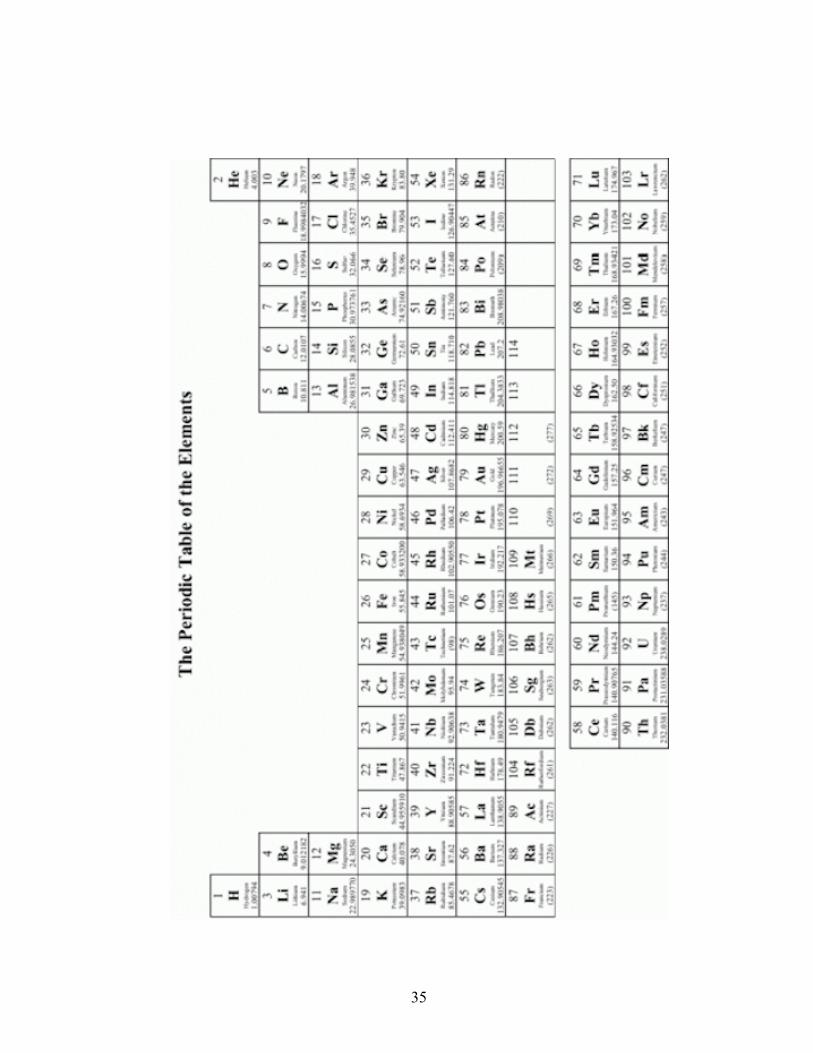
The introductory lesson for this unit is focused on introducing students to the periodic
table. This is a table that any chemistry class should be familiar with to some degree. A 12th
grade chemistry class should begin to look at it more in depth and be able to recognize
similarities and differences between elements in the rows and columns, understand the trend
of charges of ions, recognize where cations and anions are, and use the periodic table to
predict which elements will be used to create ionic and covalent compounds.
During the first day of the lesson, students will listen and actively learn with an
interactive PowerPoint presentation. The PowerPoint is designed to keep students attention
by being coupled with an incomplete outline. In addition to the outline, the PowerPoint itself
is interactive and should be used as a guide. For example, on the sixth slide, key points about
cations are listed. The teacher should insert comments on why cations want to lose electrons
to add context to student learning. Instead of simply giving notes, it is designed to ask a
question or bring up a broad point without giving the answer. This set up will allow for a
discussion to introduce students’ prior ideas or knowledge about the subject. It is a good way
to informally assess what level the students are at. In opposition to the informal assessment,
students will complete a matrix activity (activity 1.1 in the incomplete outline) in groups at
the end of the PowerPoint lecture. Depending on the length and depth of the discussion
students may or may not have time to complete the activity in class. This can then be given
for homework and discussed the following day.
The second day of lesson one will be more exciting for the students. To begin, there
should be a quick (2-3 minutes) informal review of the terms and information discussed the
previous day. A review at the beginning of a class is good to remind students of material that
21
is important for the assessment at the end of the unit. Students will then begin to work on
their color-coded periodic table in pairs. It is essential to complete one to two rows with the
students so that they know exactly what is expected of them. Making a bullet point list on the
board of things to include on their tables will also deter students from repetitively asking
what to include. This periodic table will not only help students in this unit, but in many other
units and many other chemistry classes. It is a great visual to aid in student learning. A
sample color-coded periodic table has been included in the sample lesson to show one way it
can be completed.
The periodic tables should only take approximately half of the class. The other half of
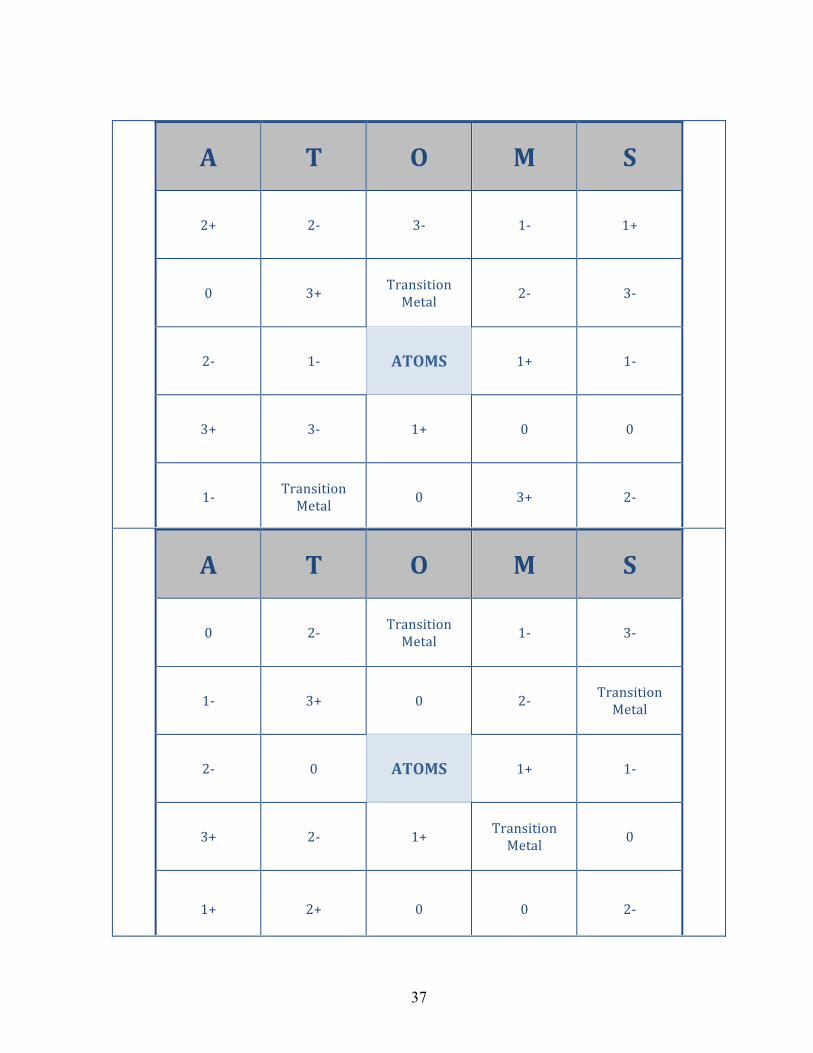
the class should be spent playing “ATOMS” which is chemistry version of “BINGO.”
Included in the lesson are a sample “ATOMS” game board, playing pieces, and a teacher
guide to the game. It is important to note that during the first three rounds of play students
are permitted to use their color-coded periodic table. This will allow students to be
introduced to the game. After the third round, students should put away their color-coded
periodic tables and only use a blank periodic table to aid them in the game. Not only is this a
great way to check for understanding and get students excited and involved in learning, but
also this game can be revisited before the unit assessment to review material. “ATOMS” can
also be modified as material progresses through the unit and be used as a more cumulative
review game.
22
23

24
25

26
27
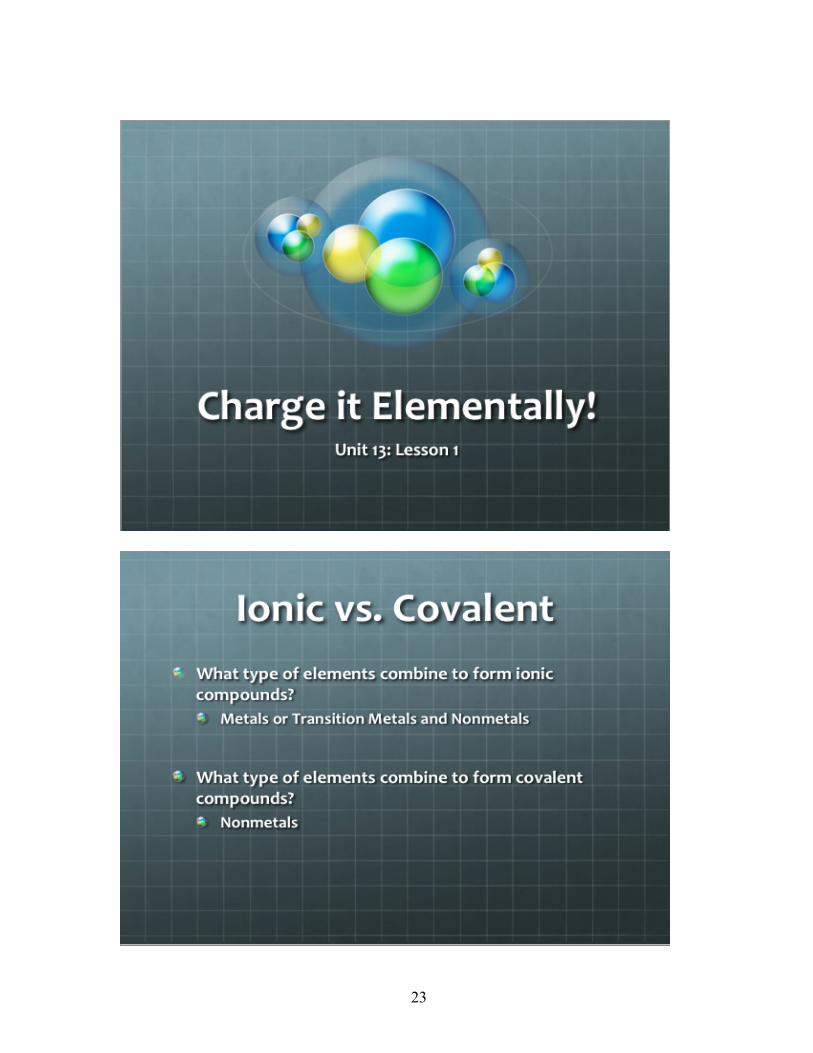
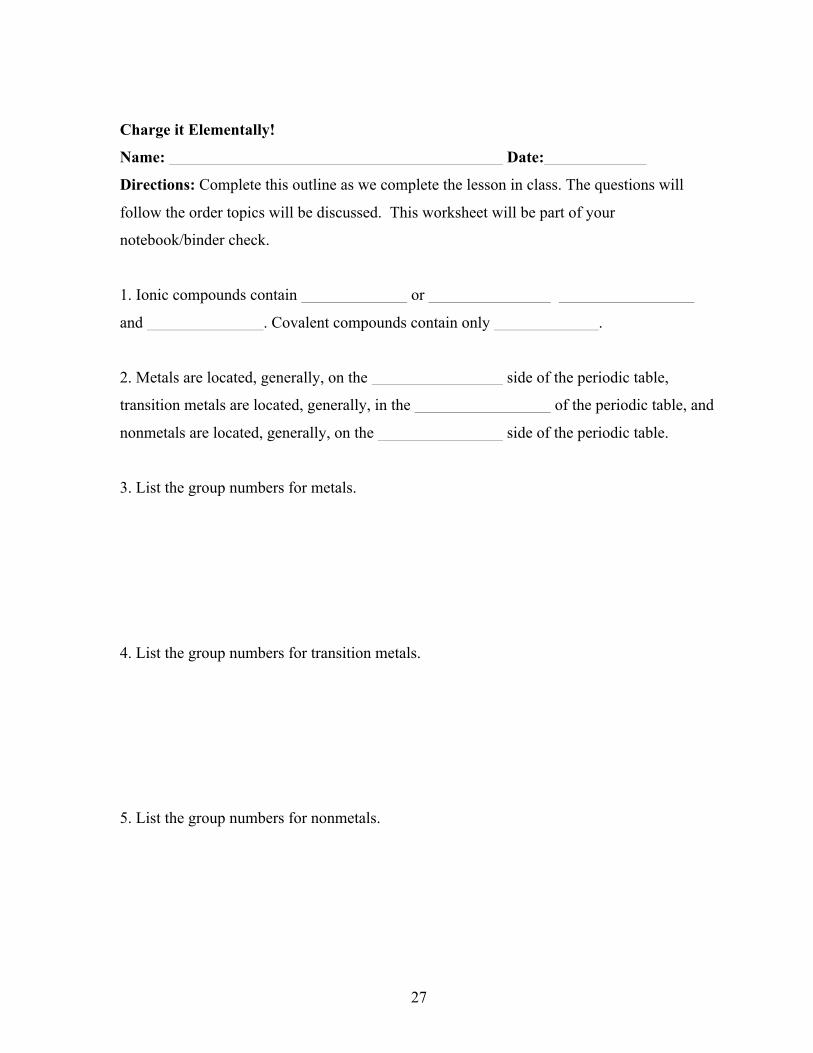
Charge it Elementally!
Name: Date:
Directions: Complete this outline as we complete the lesson in class. The questions will
follow the order topics will be discussed. This worksheet will be part of your
notebook/binder check.
1. Ionic compounds contain or
and . Covalent compounds contain only .
2. Metals are located, generally, on the side of the periodic table,
transition metals are located, generally, in the of the periodic table, and
nonmetals are located, generally, on the side of the periodic table.
3. List the group numbers for metals.
4. List the group numbers for transition metals.
5. List the group numbers for nonmetals.
28
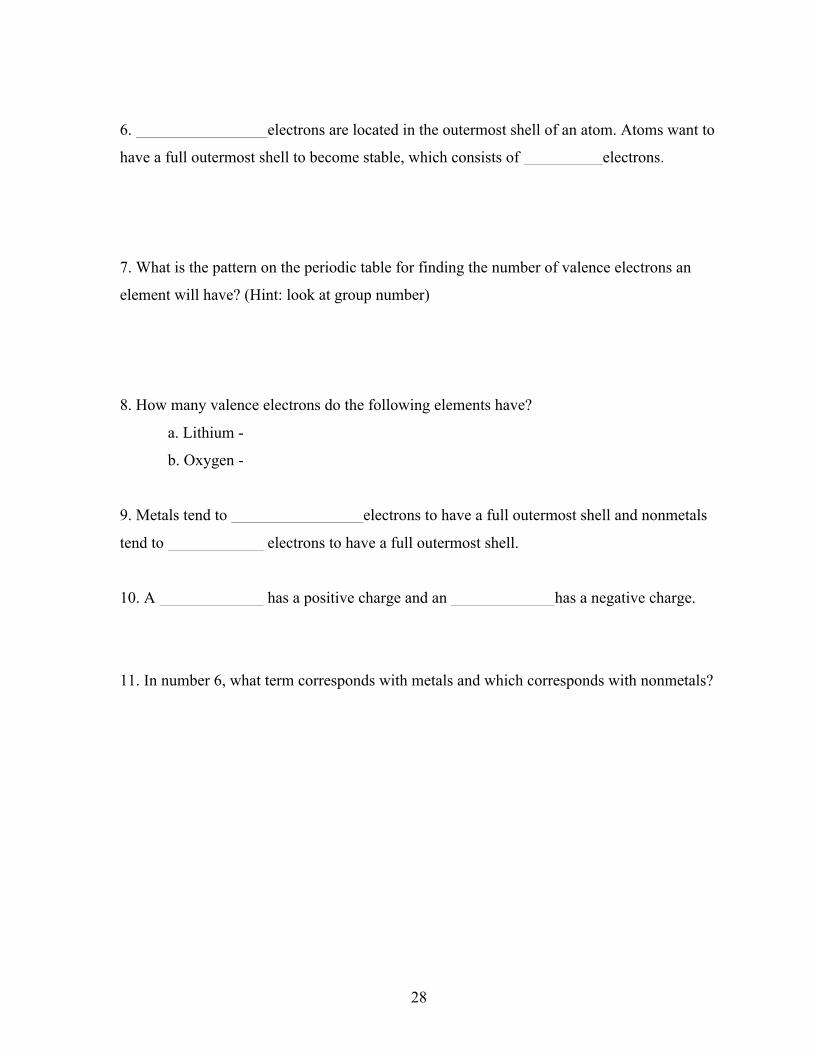
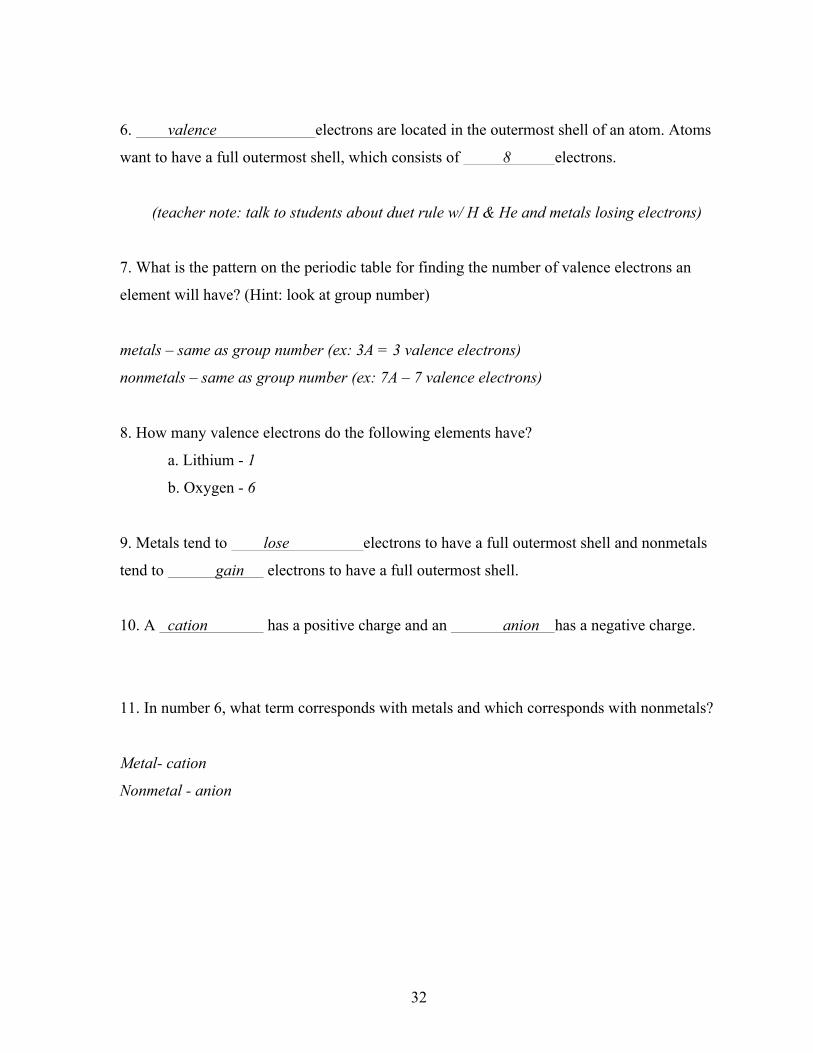
6. electrons are located in the outermost shell of an atom. Atoms want to
have a full outermost shell to become stable, which consists of electrons.
7. What is the pattern on the periodic table for finding the number of valence electrons an
element will have? (Hint: look at group number)
8. How many valence electrons do the following elements have?
a. Lithium -
b. Oxygen -
9. Metals tend to electrons to have a full outermost shell and nonmetals
tend to electrons to have a full outermost shell.
10. A has a positive charge and an has a negative charge.
11. In number 6, what term corresponds with metals and which corresponds with nonmetals?
29
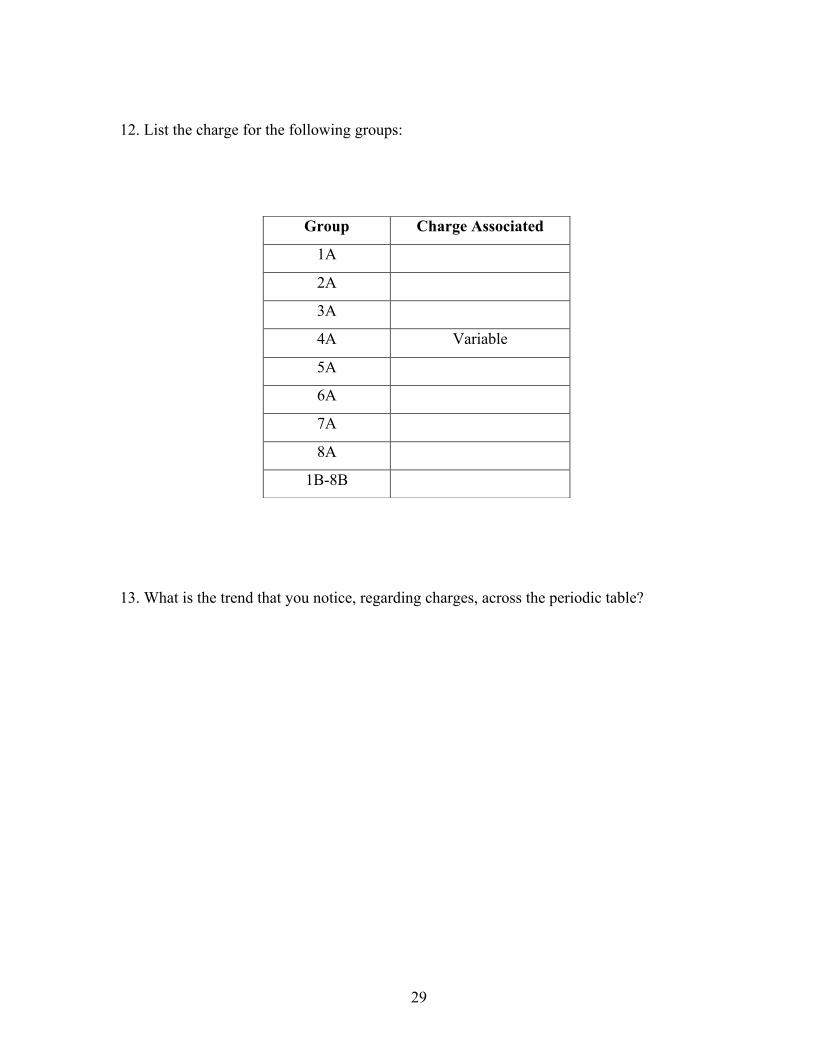
12. List the charge for the following groups:
13. What is the trend that you notice, regarding charges, across the periodic table?
Group Charge Associated
1A
2A
3A
4A Variable
5A
6A
7A
8A
1B-8B
30
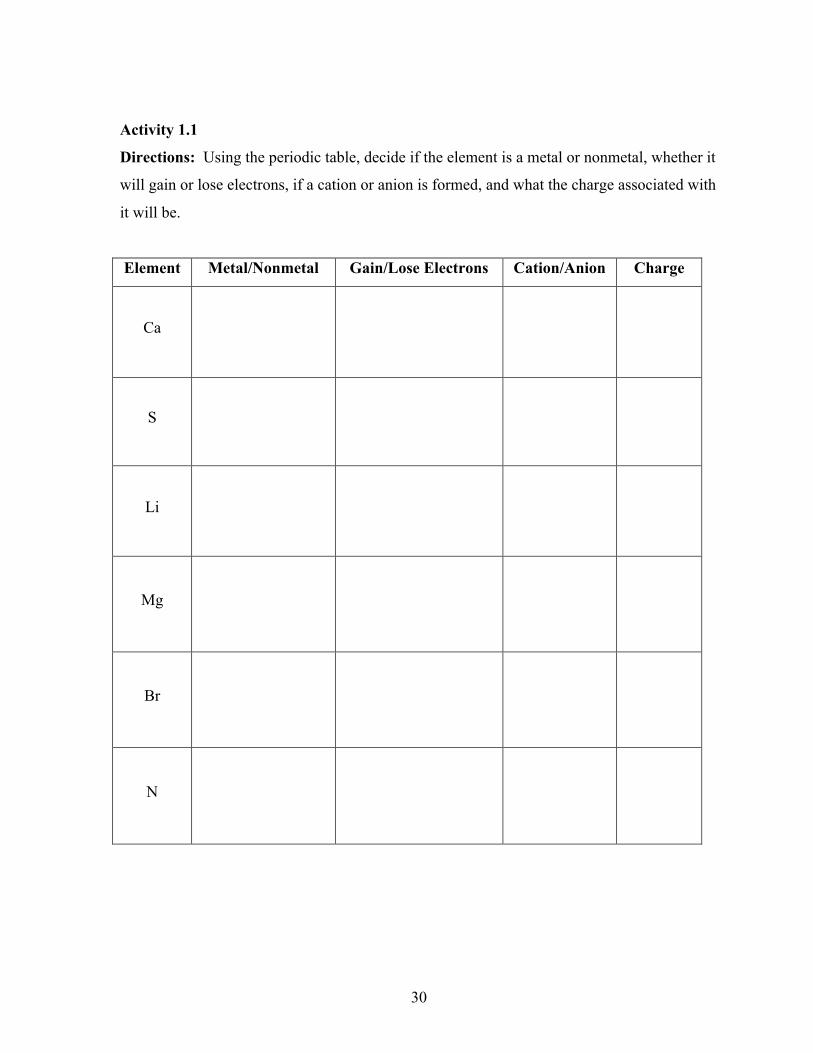
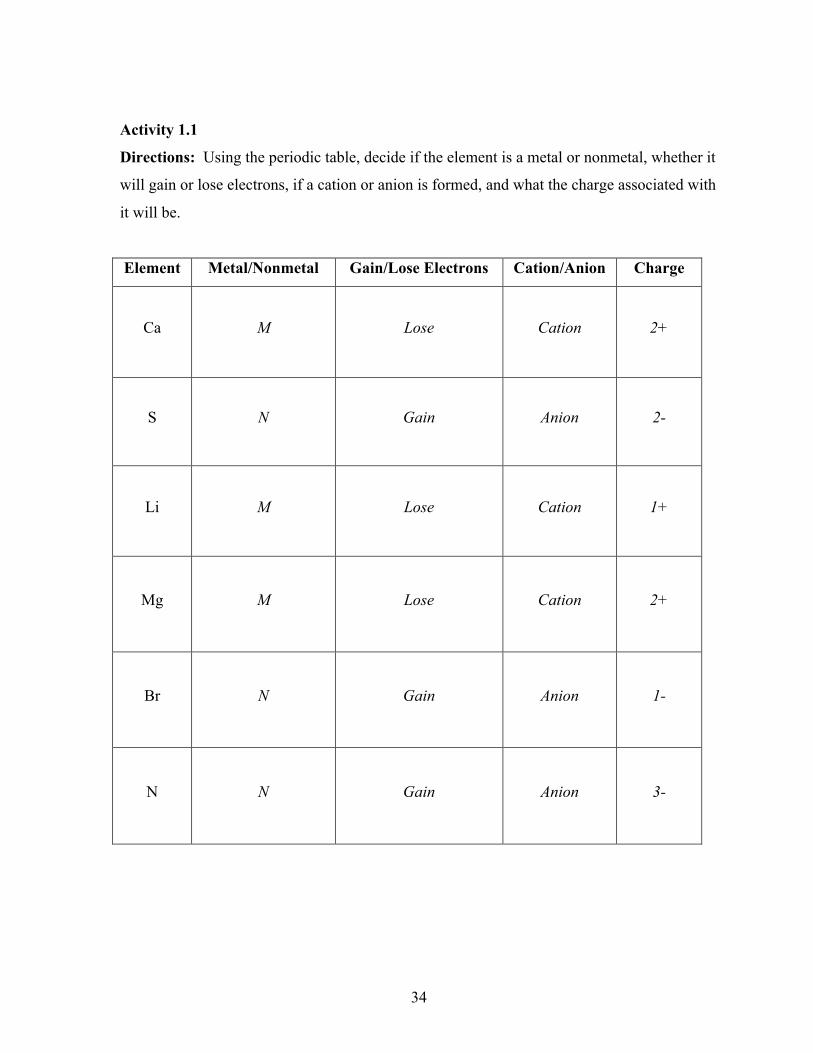
Activity 1.1
Directions: Using the periodic table, decide if the element is a metal or nonmetal, whether it
will gain or lose electrons, if a cation or anion is formed, and what the charge associated with
it will be.
Element Metal/Nonmetal Gain/Lose Electrons Cation/Anion Charge
Ca
S
Li
Mg
Br
N

31
Charge it Elementally!
Name: KEY! Date:
Directions: Complete this outline as we complete the lesson in class. The questions will
follow the order topics will be discussed. This worksheet will be part of your
notebook/binder check.
1. Ionic compounds contain metals or transition metals
and nonmetals . Covalent compounds contain only nonmetals .
2. Metals are located, generally, on the right side of the periodic table,
transition metals are located, generally, in the middle of the periodic table, and
nonmetals are located, generally, on the left side of the periodic table.
3. List the group numbers for metals.
1A, 2A, 3A (1,2,13)
*exclude Hydrogen & Boron
4. List the group numbers for transition metals.
1B - 8B (3-12)
5. List the group numbers for nonmetals.
5A, 6A, 7A, 8A (non-reactive)
(15-18)
32
6. valence electrons are located in the outermost shell of an atom. Atoms
want to have a full outermost shell, which consists of 8 electrons.
(teacher note: talk to students about duet rule w/ H & He and metals losing electrons)
7. What is the pattern on the periodic table for finding the number of valence electrons an
element will have? (Hint: look at group number)
metals – same as group number (ex: 3A = 3 valence electrons)
nonmetals – same as group number (ex: 7A – 7 valence electrons)
8. How many valence electrons do the following elements have?
a. Lithium - 1
b. Oxygen - 6
9. Metals tend to lose electrons to have a full outermost shell and nonmetals
tend to gain electrons to have a full outermost shell.
10. A cation has a positive charge and an anion has a negative charge.
11. In number 6, what term corresponds with metals and which corresponds with nonmetals?
Metal- cation
Nonmetal - anion

33
12. List the charge for the following groups:
13. What is the trend that you notice, regarding charges, across the periodic table?
Metals (cations) – same as group number and positive (ex: 3A = 3+)
Nonmetals (anions) – 8-group number and negative (ex: 6A = 8-6 = 2-)
Exception: transition metals vary
Group Charge Associated
1A 1+
2A 2+
3A 3+
4A Variable
5A 3-
6A 2-
7A 1-
8A 0
1B-8B Variable
34
Activity 1.1
Directions: Using the periodic table, decide if the element is a metal or nonmetal, whether it
will gain or lose electrons, if a cation or anion is formed, and what the charge associated with
it will be.
Element Metal/Nonmetal Gain/Lose Electrons Cation/Anion Charge
Ca M Lose Cation 2+
S N Gain Anion 2-
Li M Lose Cation 1+
Mg M Lose Cation 2+
Br N Gain Anion 1-
N N Gain Anion 3-
35
36
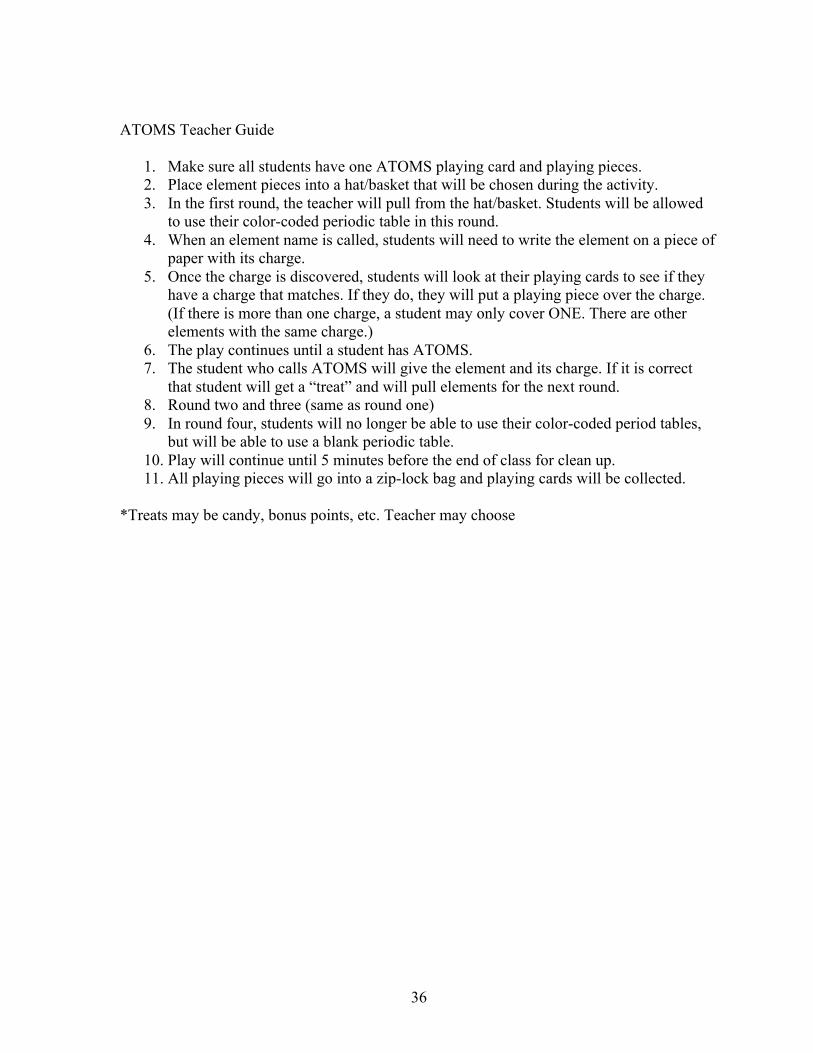
ATOMS Teacher Guide
1. Make sure all students have one ATOMS playing card and playing pieces. 2. Place element pieces into a hat/basket that will be chosen during the activity. 3. In the first round, the teacher will pull from the hat/basket. Students will be allowed
to use their color-coded periodic table in this round. 4. When an element name is called, students will need to write the element on a piece of
paper with its charge. 5. Once the charge is discovered, students will look at their playing cards to see if they
have a charge that matches. If they do, they will put a playing piece over the charge. (If there is more than one charge, a student may only cover ONE. There are other elements with the same charge.)
6. The play continues until a student has ATOMS. 7. The student who calls ATOMS will give the element and its charge. If it is correct
that student will get a “treat” and will pull elements for the next round. 8. Round two and three (same as round one) 9. In round four, students will no longer be able to use their color-coded period tables,
but will be able to use a blank periodic table. 10. Play will continue until 5 minutes before the end of class for clean up. 11. All playing pieces will go into a zip-lock bag and playing cards will be collected.
*Treats may be candy, bonus points, etc. Teacher may choose
37
A T O M S
2+ 2-‐ 3-‐ 1-‐ 1+
0 3+ Transition Metal 2-‐ 3-‐
2-‐ 1-‐ ATOMS 1+ 1-‐
3+ 3-‐ 1+ 0 0
1-‐ Transition Metal 0 3+ 2-‐
A T O M S
0 2-‐ Transition Metal 1-‐ 3-‐
1-‐ 3+ 0 2-‐ Transition Metal
2-‐ 0 ATOMS 1+ 1-‐
3+ 2-‐ 1+ Transition Metal 0
1+ 2+ 0 0 2-‐
38
39
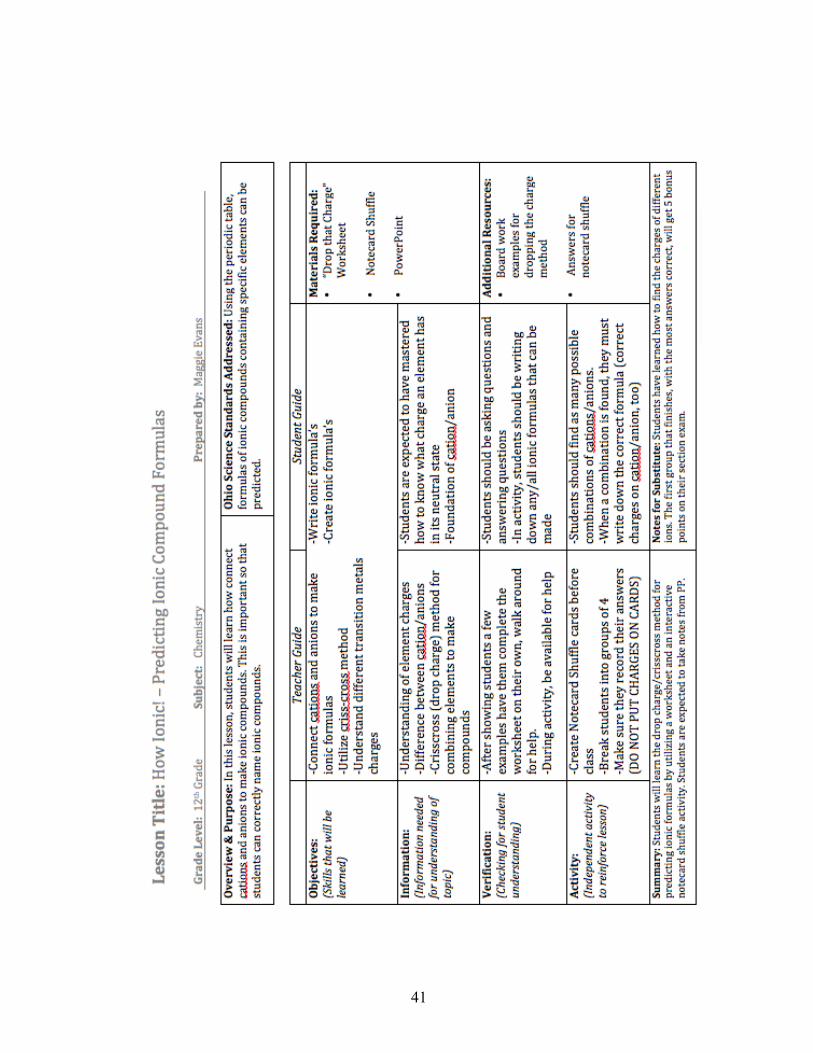
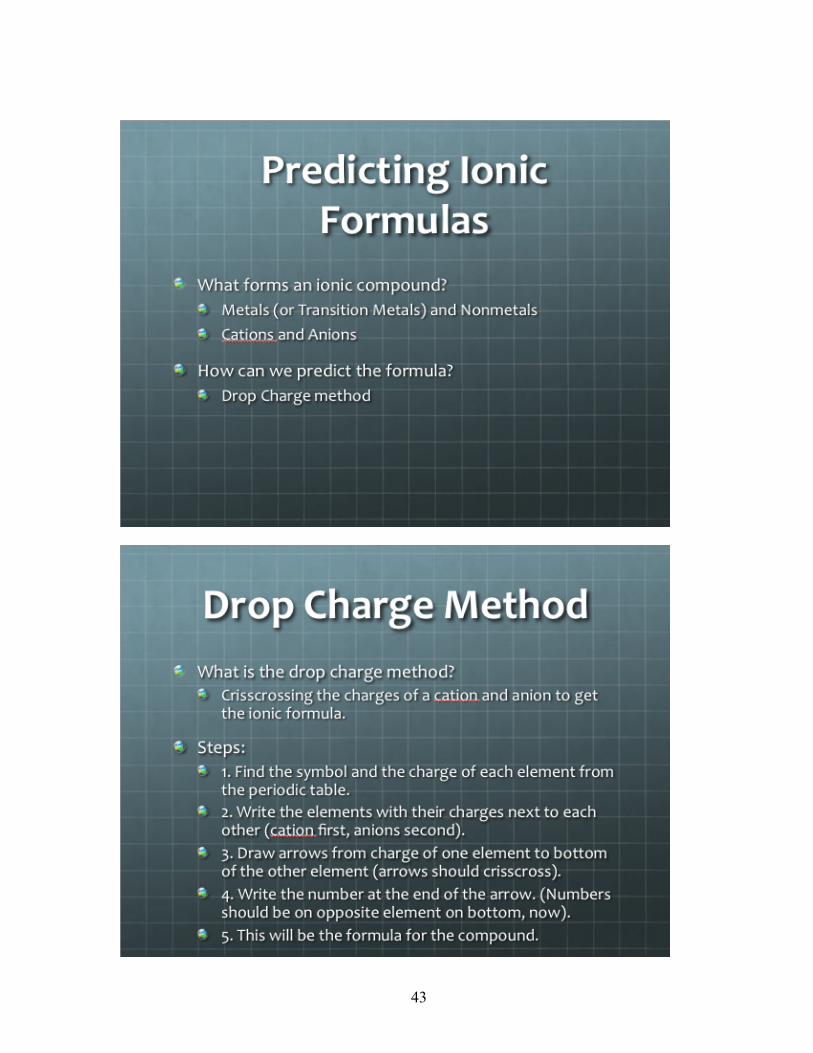
LESSON 2: HOW IONIC! – PREDICITING IONIC COMPOUND FORMULAS
This lesson will begin to build on students’ knowledge of ionic compounds and
relative charges associated with each element. While the material is not so heavy in this
lesson, it is still a very crucial part of the unit. This lesson is when students will begin to
make the connection between cations and anions to form ionic compounds, utilize the
crisscross method for predicting formulas, and understand how to write ionic formulas based
on a series of steps.
The first day of this lesson will again begin with an interactive PowerPoint. This time,
however, students should not be given an incomplete outline to work with. If there are
students in the classroom with vision impairments or difficulty writing, though, they should
be given an outline to remove potential learning barriers. Students who are preparing to
continue their education at a college or university will need to learn essential note-taking
skills. By alternating note-taking strategies, students can become more familiar with what is
important to write down while at the same time taking good, comprehensive notes.
Predicting ionic formulas is a problem-based learning content area. The most
effective way for students to learn the crisscross method is by seeing and completing several
practice problems. Upon completion of the PowerPoint the teacher should work through
several examples with the students to make sure they have a basic understanding before
allowing them to begin working on the “Drop that Charge!” worksheet. When class is going
over the example problems, they should be writing them in their notes so that they can refer
to these if they need assistance on the worksheet that will be assigned for homework. As the
teacher, it is important to notice if students are struggling through the example problems and
need more assistance. When there is a clear divide in the class of students who understand
40
the material and students who do not, it is a good strategy to mix the two when completing
group work. This will allow students who understand the material to assist the students who
are struggling.
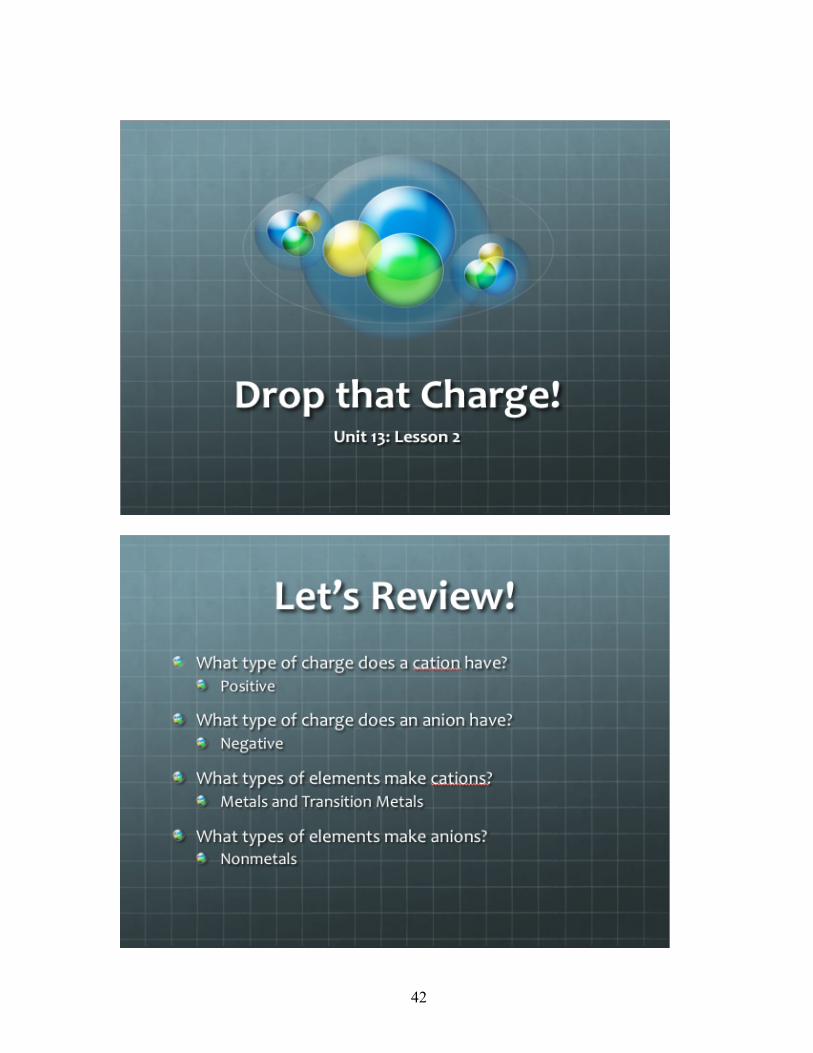
The second day of this lesson will begin with reviewing the previous nights
homework, the “Drop that Charge!” worksheet. Rather than simply asking for the answers it
can be beneficial to have volunteers come up to the board and show their work. Allowing
students to come to the board to show their work serves two purposes. First, it allows the
teacher to check for understanding and any common errors students are making. Second, it
promotes student involvement and acts as a visual for the other students to check their own
work.
The remainder of the second day should be fun for the students. Notecard shuffle is
an activity that will test the students on essential skills for creating chemical formulas. They
will need to be able to determine if an element is a metal or nonmetal, if the element can
form a cation or anion, and the charge of the element. With this information students will be
required to make as many compounds as possible in their group. To deter students from
simply guessing, each correct compound is worth one point and each incorrect compound is
worth negative one point. The lesson includes an answer key with all of the possible
combinations. It is also important that when the activity is completed the class has a
discussion of why any incorrect answers were wrong so that the same mistakes will not be
made on the unit assessment.
41
42
43

44
45
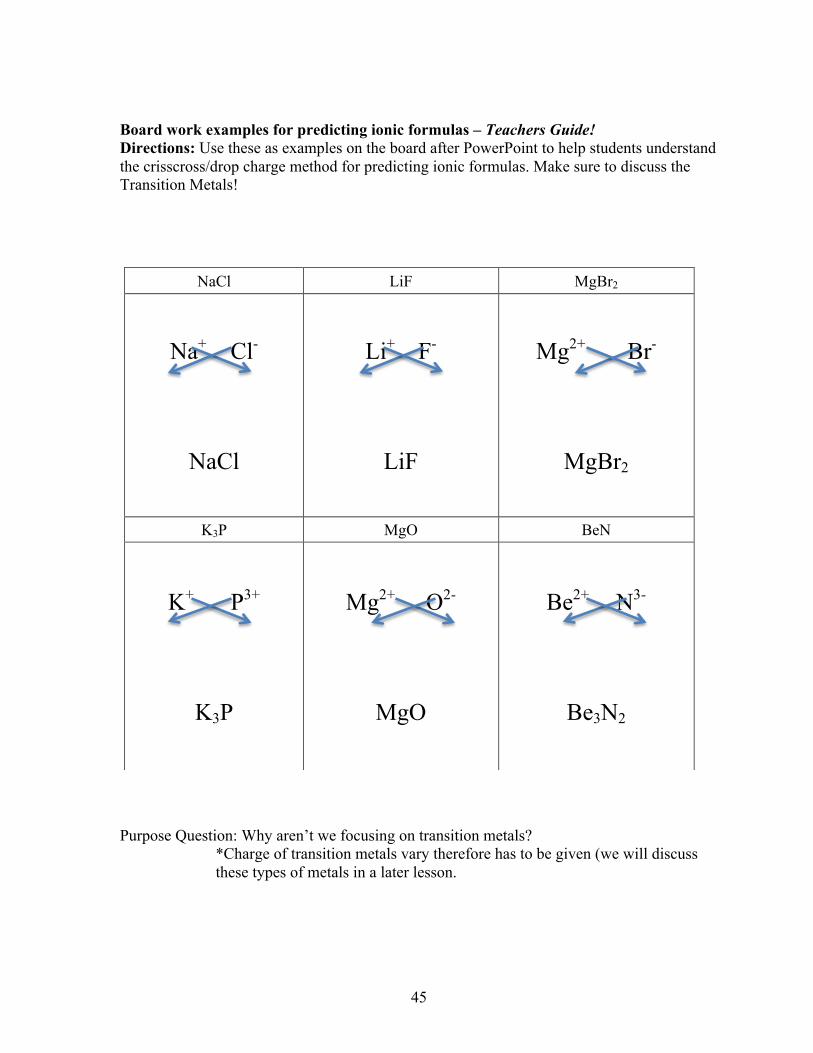
Board work examples for predicting ionic formulas – Teachers Guide! Directions: Use these as examples on the board after PowerPoint to help students understand the crisscross/drop charge method for predicting ionic formulas. Make sure to discuss the Transition Metals!
Purpose Question: Why aren’t we focusing on transition metals?
*Charge of transition metals vary therefore has to be given (we will discuss these types of metals in a later lesson.
NaCl LiF MgBr2
Na+ Cl-
NaCl
Li+ F-
LiF
Mg2+ Br-
MgBr2
K3P MgO BeN
K+ P3+
K3P
Mg2+ O2-
MgO
Be2+ N3-
Be3N2
46
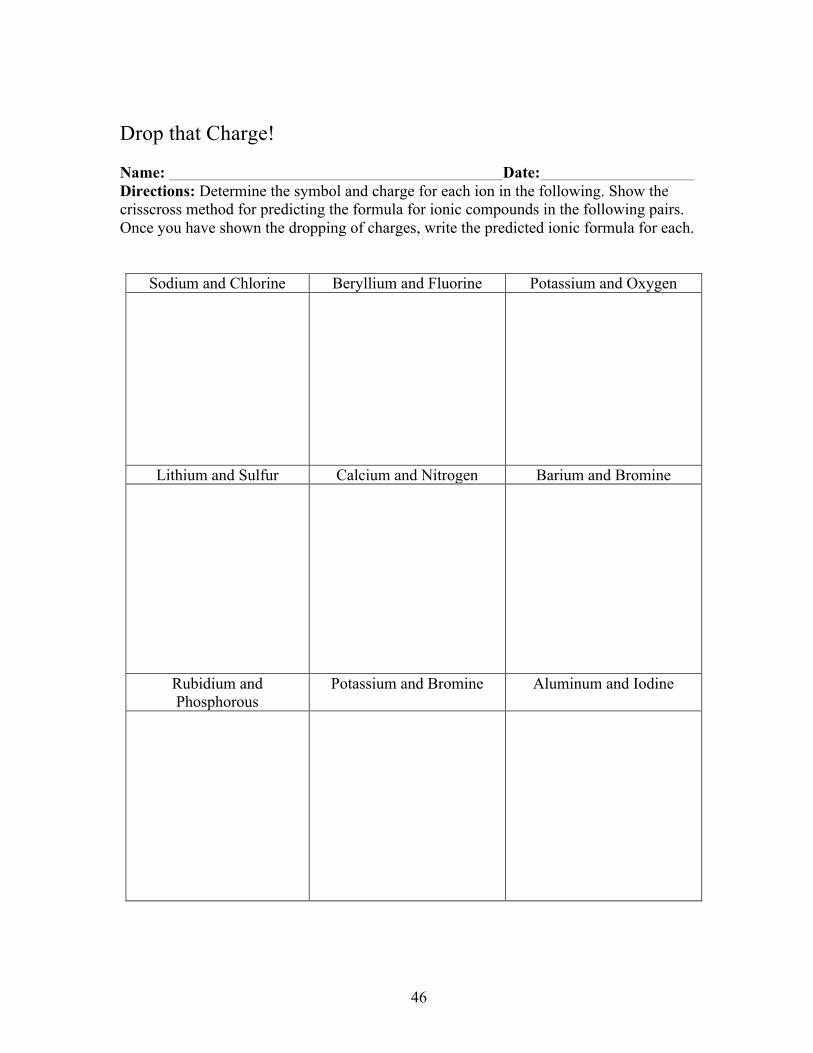
Drop that Charge! Name: Date: Directions: Determine the symbol and charge for each ion in the following. Show the crisscross method for predicting the formula for ionic compounds in the following pairs. Once you have shown the dropping of charges, write the predicted ionic formula for each.
Sodium and Chlorine Beryllium and Fluorine Potassium and Oxygen
Lithium and Sulfur Calcium and Nitrogen Barium and Bromine
Rubidium and Phosphorous
Potassium and Bromine Aluminum and Iodine
47
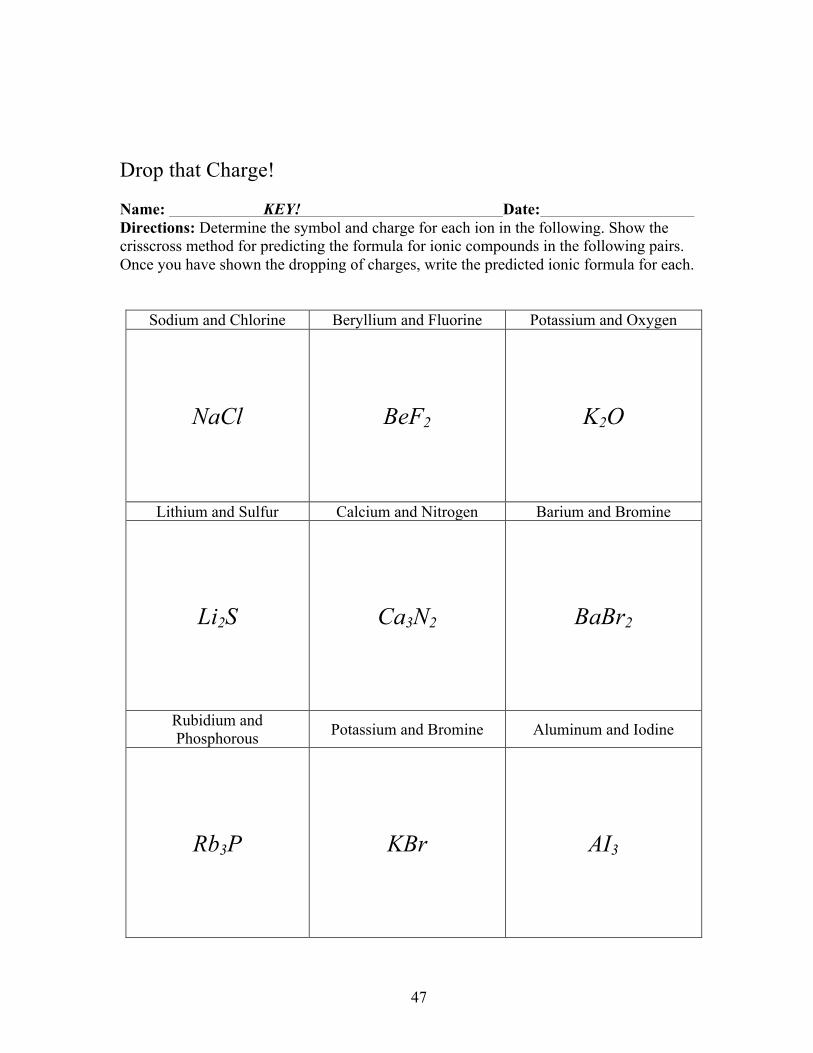
Drop that Charge! Name: KEY! Date: Directions: Determine the symbol and charge for each ion in the following. Show the crisscross method for predicting the formula for ionic compounds in the following pairs. Once you have shown the dropping of charges, write the predicted ionic formula for each.
Sodium and Chlorine Beryllium and Fluorine Potassium and Oxygen
NaCl BeF2 K2O
Lithium and Sulfur Calcium and Nitrogen Barium and Bromine
Li2S Ca3N2 BaBr2
Rubidium and Phosphorous Potassium and Bromine Aluminum and Iodine
Rb3P KBr AI3

48
Notecard Shuffle Guide Purpose: For students to understand which elements can combine to create ionic compounds.
1. Before the lesson, write element symbols from group 1,2,3,5,6, and 7 on notecards. There should be enough notecards for as many groups as you will have in your class. Each group will receive the same notecards. DO NOT INCLUDE CHARGES ON CARDS!
2. Break the class into teams and have them sit in different areas of the room. 3. Pass out notecard sets to each group and tell them not to start until you tell them to. 4. The groups will be expected to:
a. Determine if the element is a metal or nonmetal b. Determine if the element is a cation or anion c. Determine the charge of the element d. Make as many combinations of elements that make compounds as possible.
5. Groups will write down all of the possible compounds that they find. 6. Incorrect answers are minus 1 point; correct answers are worth 1 point. 7. The group with the highest score at the end wins!
49
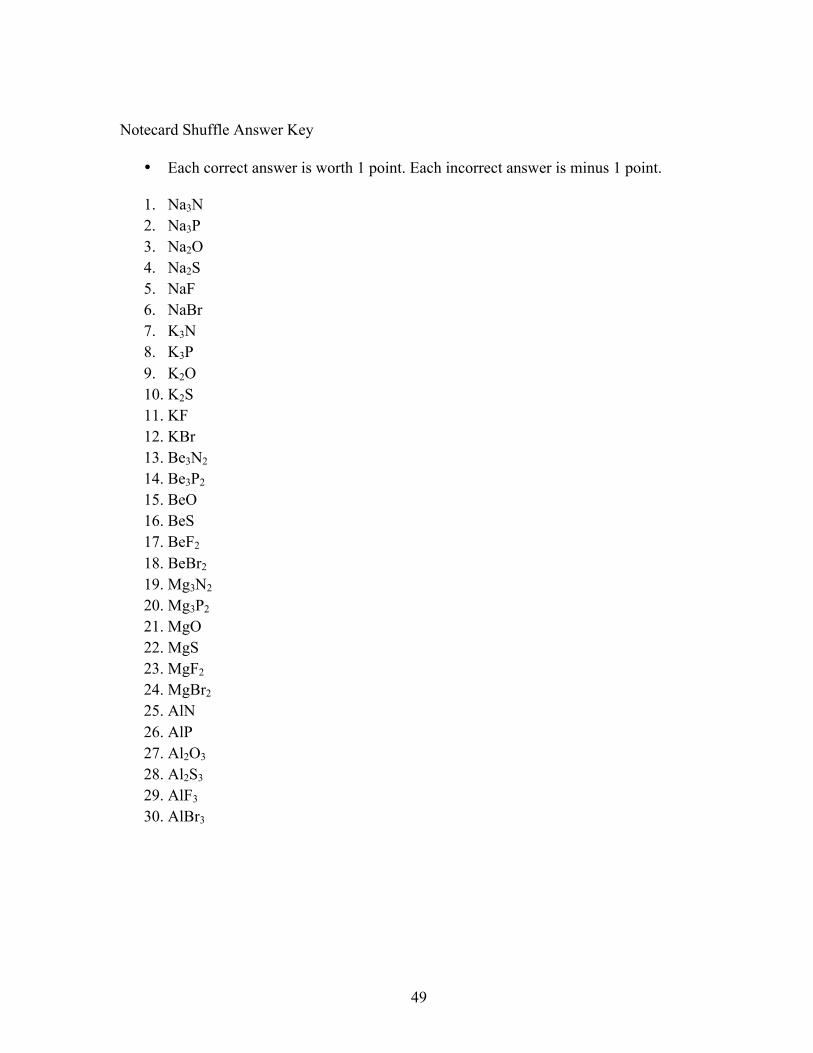
Notecard Shuffle Answer Key
• Each correct answer is worth 1 point. Each incorrect answer is minus 1 point.
1. Na3N 2. Na3P 3. Na2O 4. Na2S 5. NaF 6. NaBr 7. K3N 8. K3P 9. K2O 10. K2S 11. KF 12. KBr 13. Be3N2 14. Be3P2 15. BeO 16. BeS 17. BeF2 18. BeBr2 19. Mg3N2 20. Mg3P2 21. MgO 22. MgS 23. MgF2 24. MgBr2 25. AlN 26. AlP 27. Al2O3 28. Al2S3 29. AlF3 30. AlBr3

50
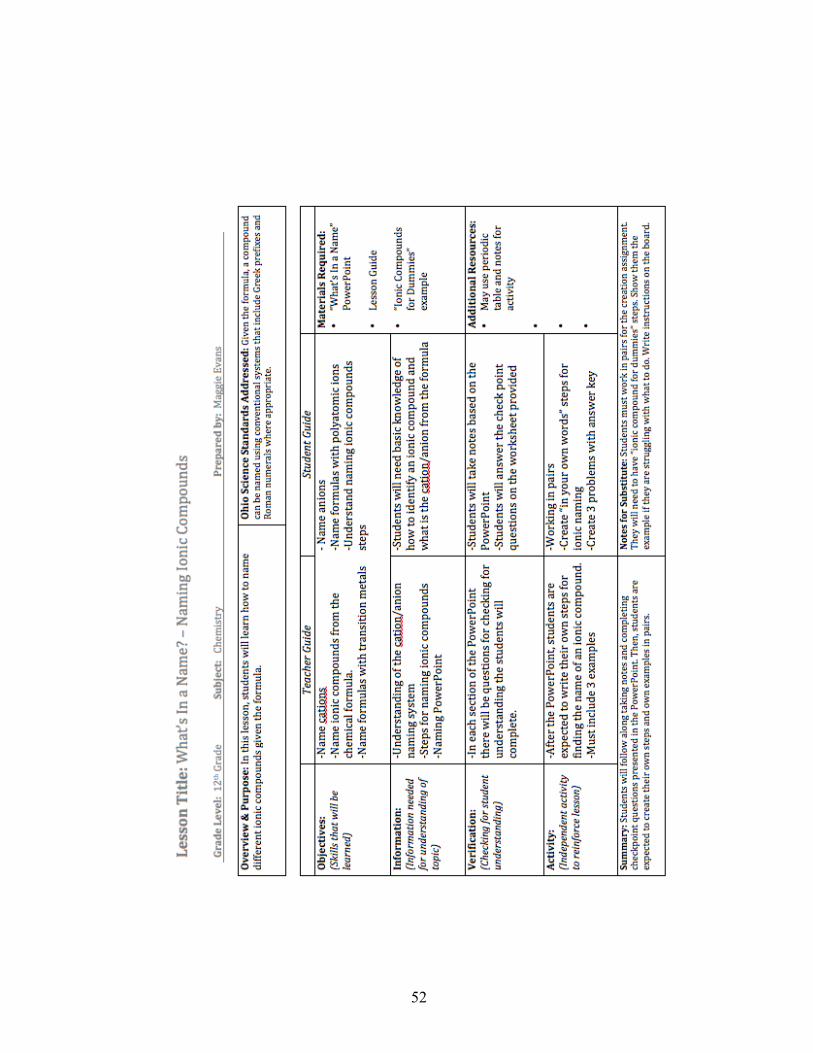
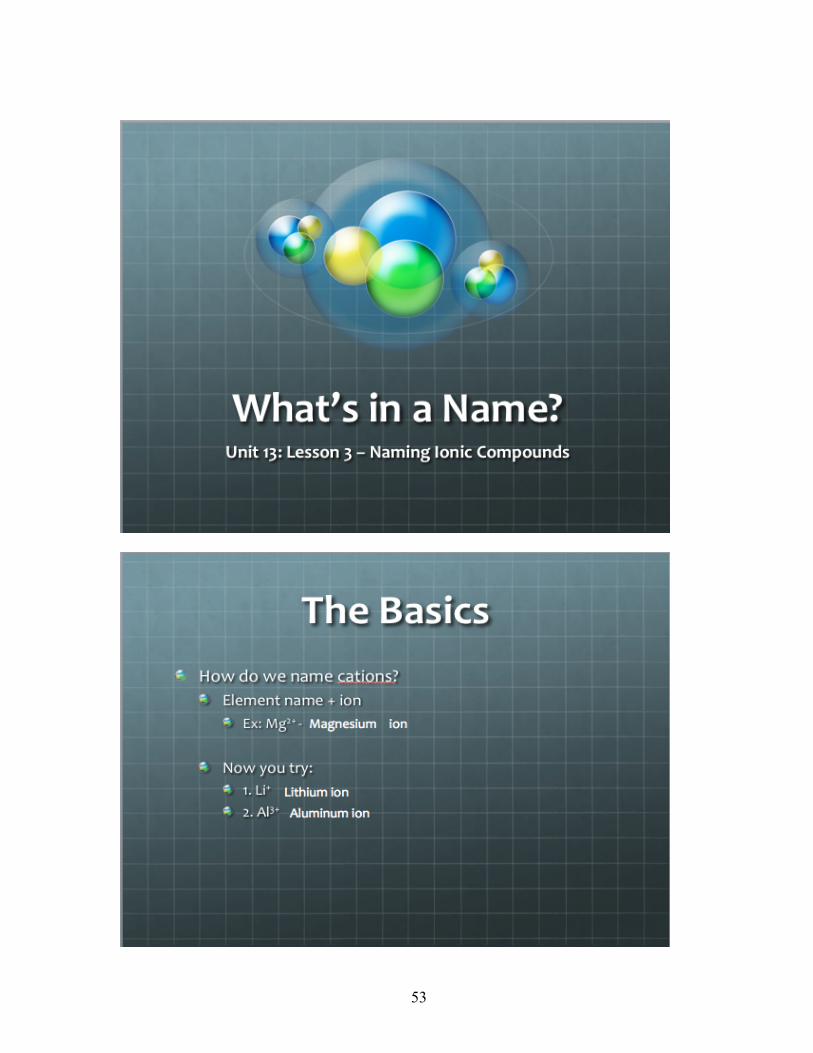
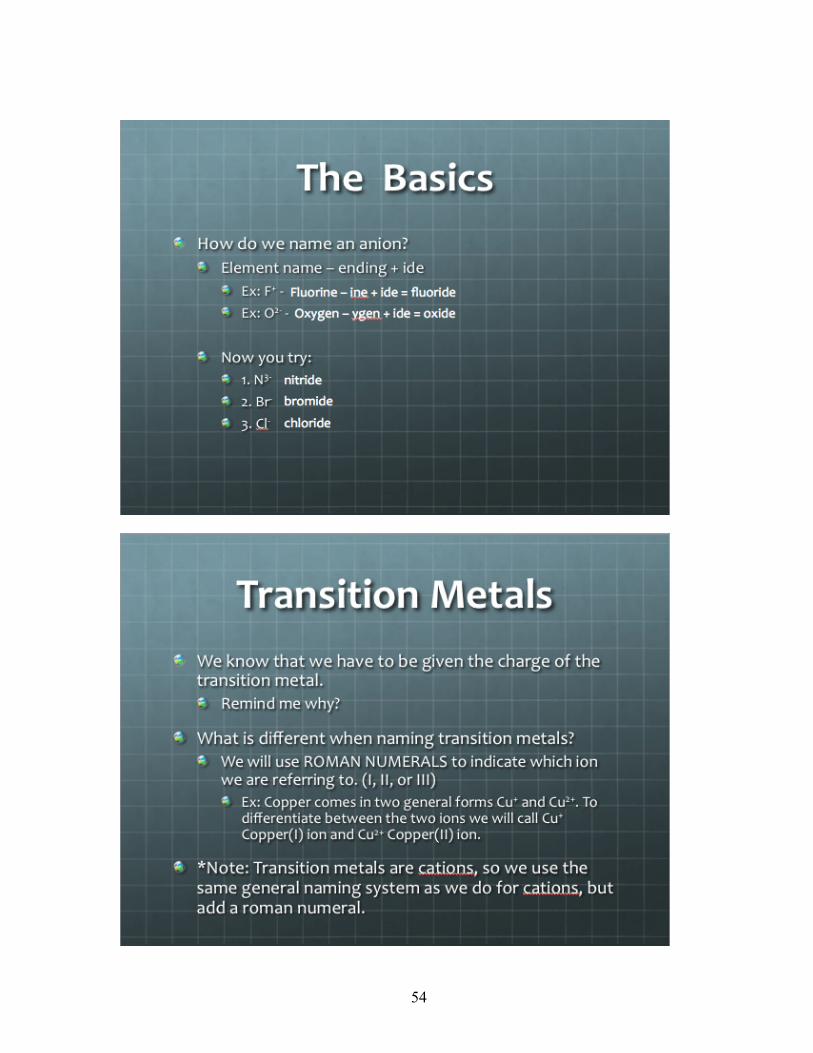
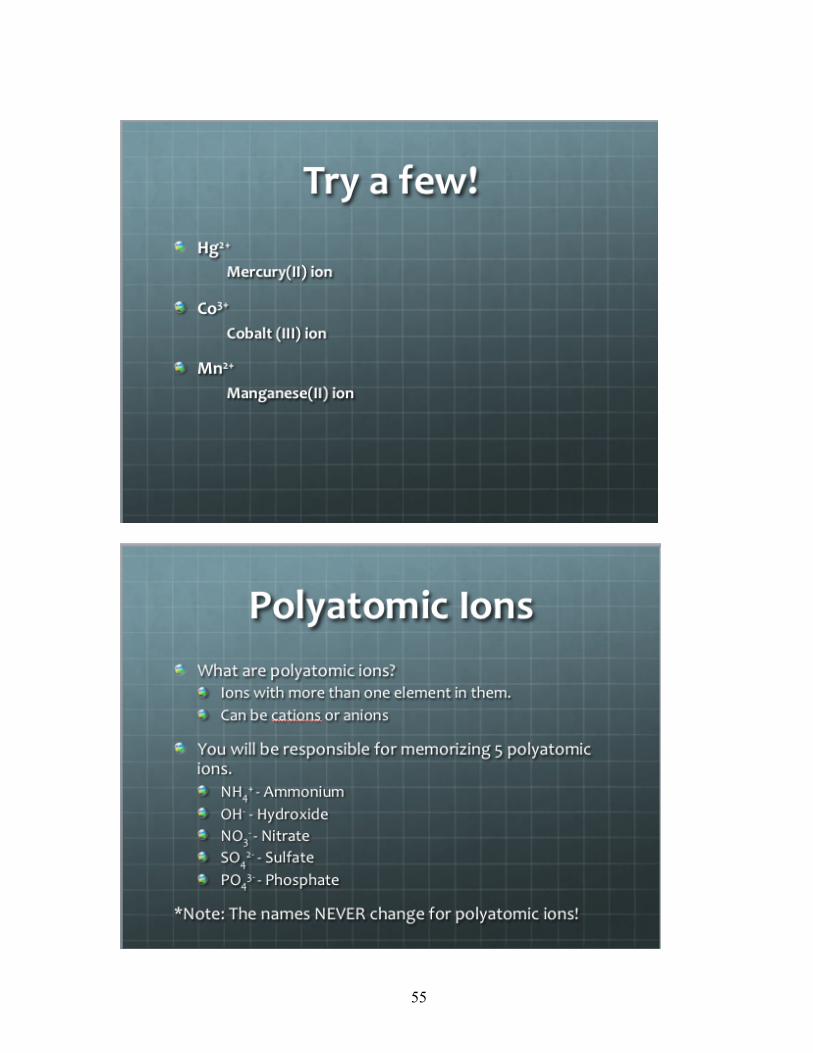
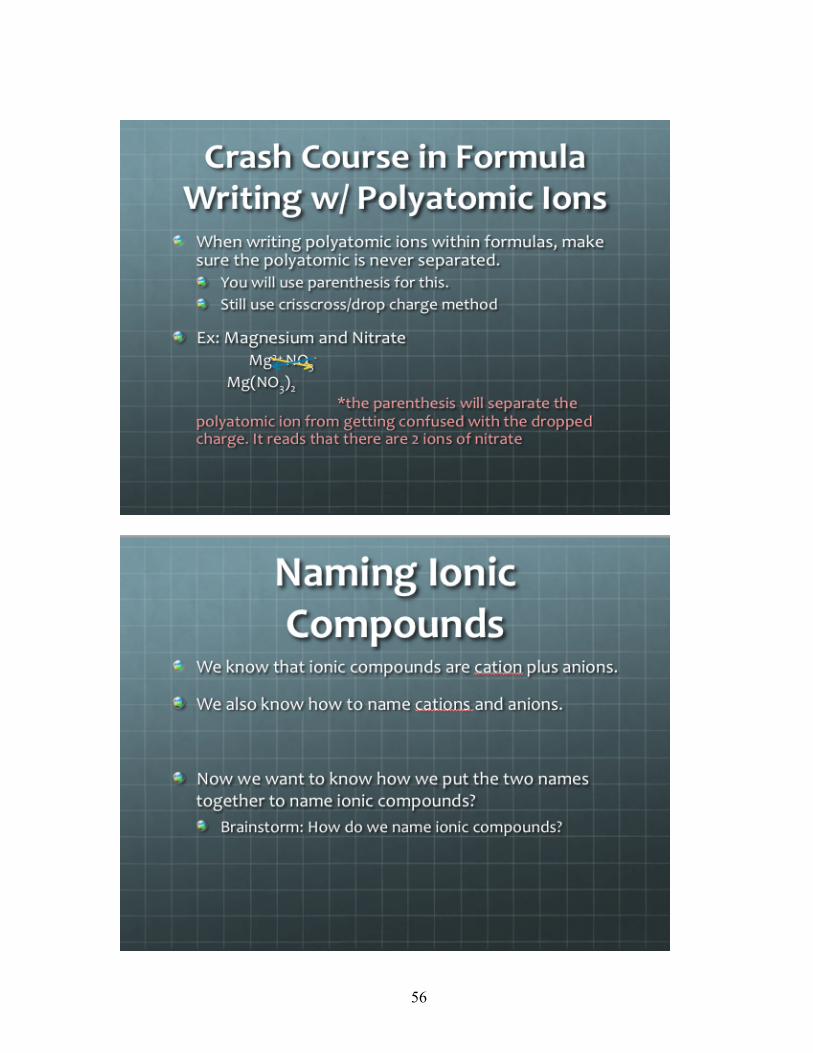
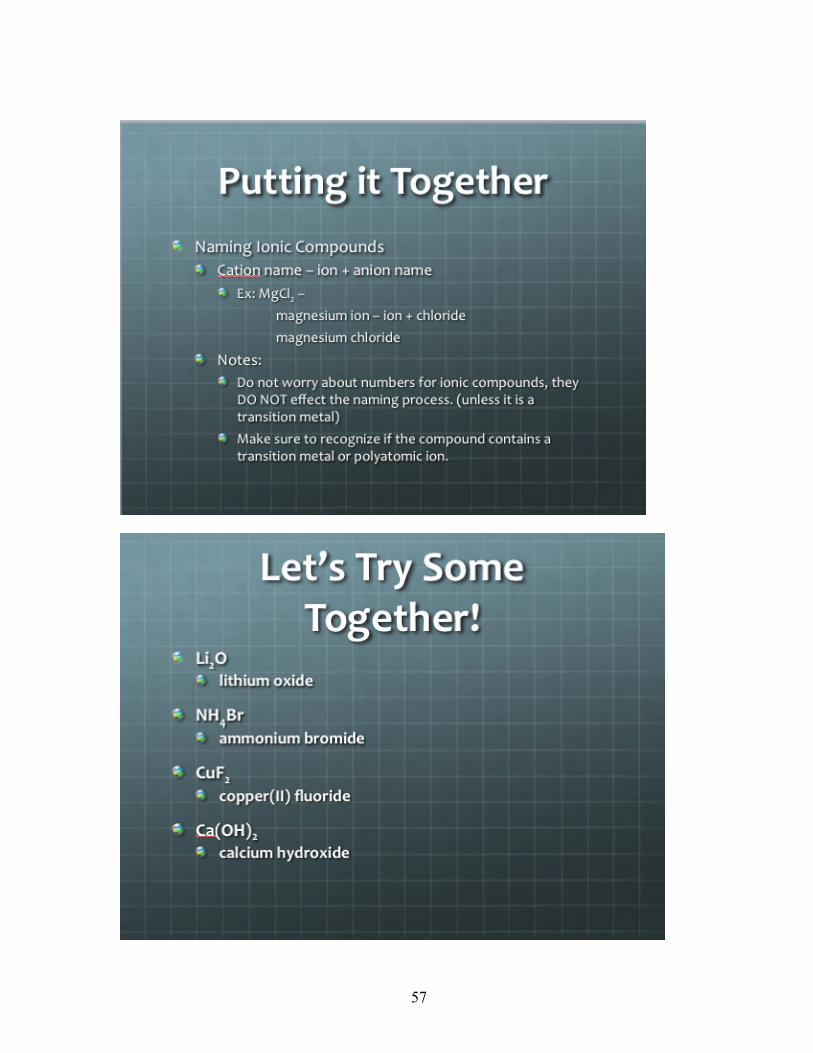
LESSON 3: WHAT’S IN A NAME? –NAMING IONIC COMPOUNDS
Now that students understand how to predict formulas and understand how to find
charges of different ions, it is time to learn how to name ionic compounds. To successfully
name ionic compounds, students must first know how to name specific anions and cations.
Again, an interactive PowerPoint was created to promote student involvement and attention.
Also, an incomplete outline has been created for students to follow along and complete
various practice problems throughout the lecture. This lesson can get very tricky for students
because of the different types of elements that are present: cations, anions, transition metals,
and polyatomic ions. With all of the material in this lesson, it is important to move through
each portion slowly and completely.
Seeing information multiple times in different ways is an important strategy for
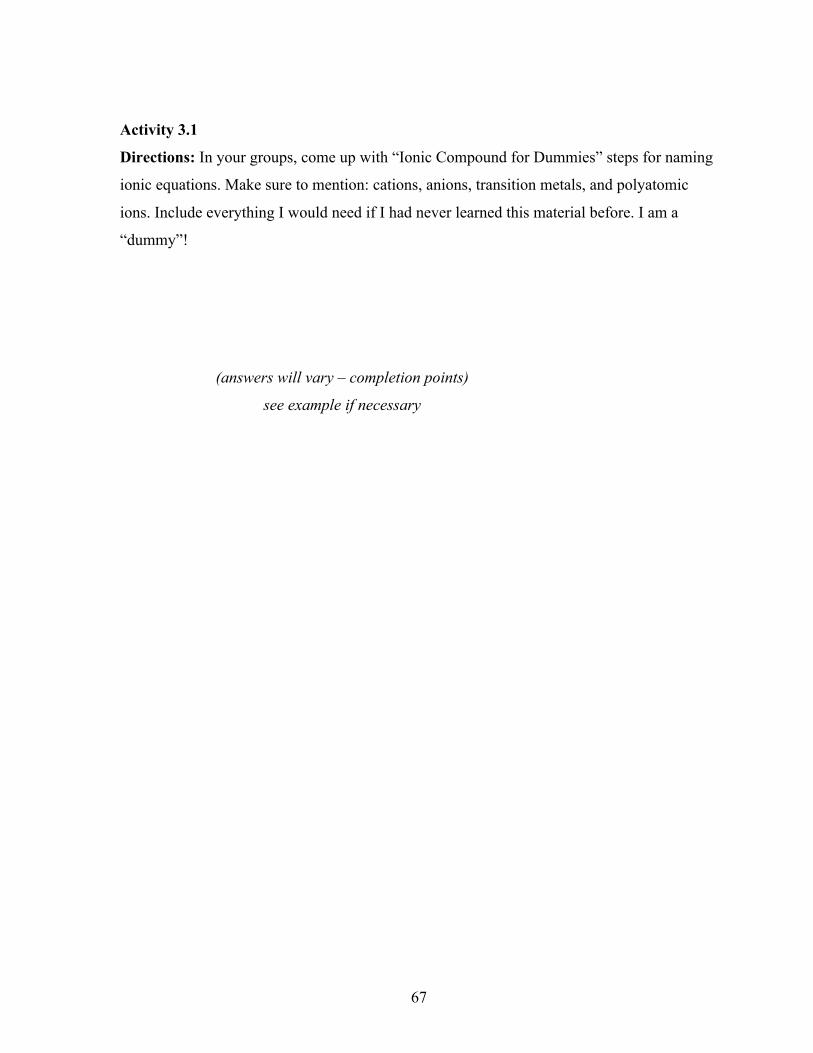
students to learn material. This lesson (activity 3.1) will allow students to create their own
guides, “Ionic Compounds for Dummies”, for naming ionic compounds. Every person has a
different way of thinking things through because every brain is different. Rather than giving
a set of steps, allowing students to create their own will let them think the material through
the way that makes the most sense to them. The teacher should ask students to present their
guides to the class the following day. This allows for students to hear the different methods
their classmates have come up with that they may not have considered. It also insures that
rather than simply memorizing facts students understand the methodology.
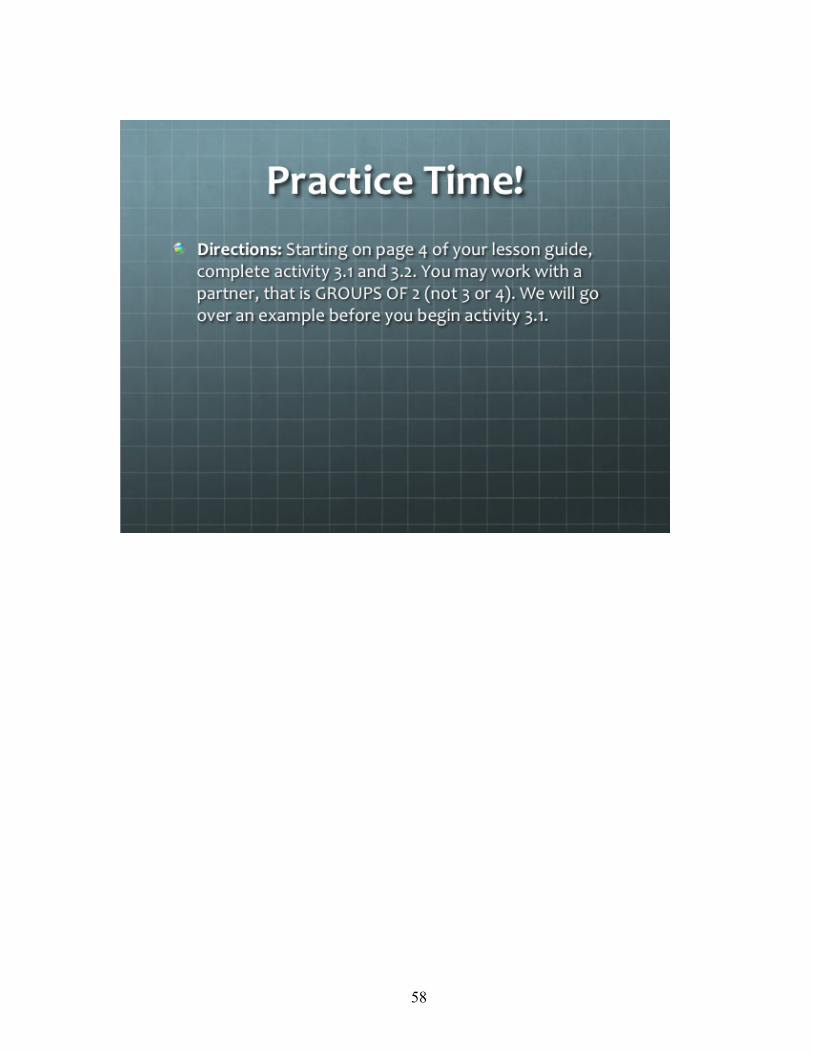
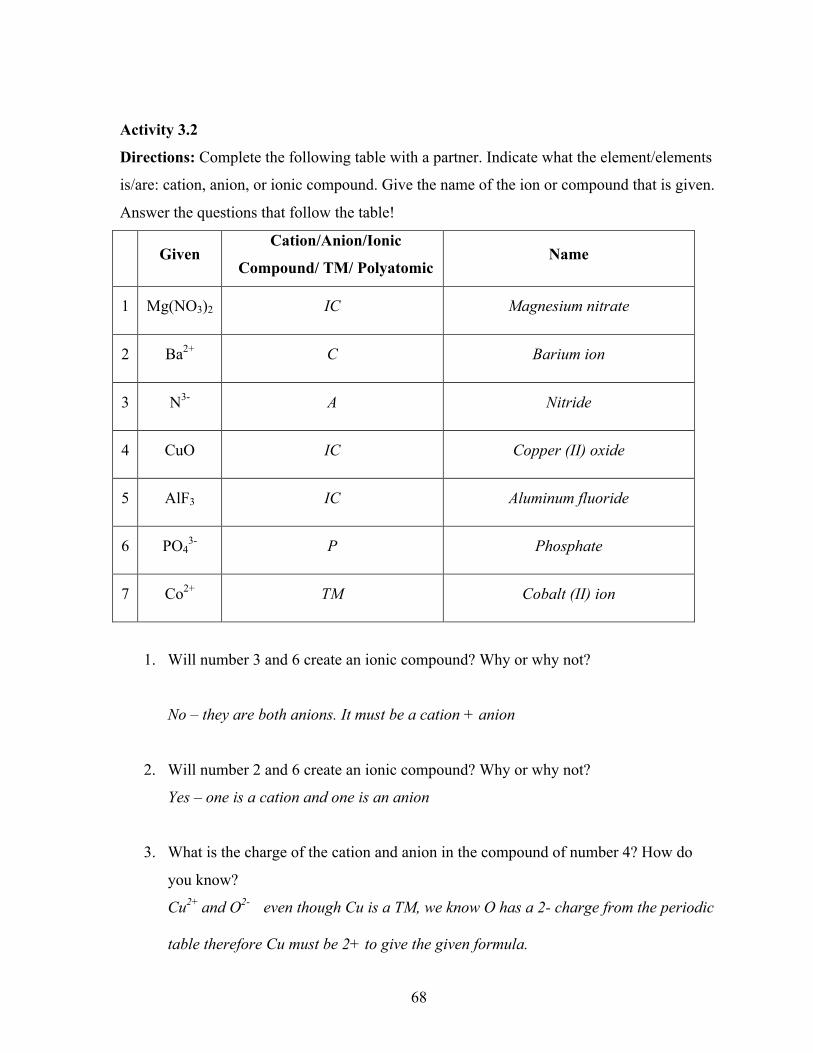
After the groups have presented their naming guides, students will complete activity
3.2 in their incomplete outlines. This assignment will tie together the lesson and allow
students to show their knowledge on the material. The teacher should collect the assignment
and then go over the answers as a class. Going over material before the assignment is

51
collected will allow students to change their answers. This will not be a good assessment of
where students stand with the material. Anther option could be to allow students to trade
papers and grade each other’s work and then collect it for completion points. Either way, this
will allow the teacher to see where students are struggling and adjust lessons according to
what may need to be covered in more depth before the unit assessment.
Due to the amount of papers and notes students will be taking in this unit, it is a good
idea to spot check students. Teachers can do this by having a binder or notebook check at the
end of each lesson or in the middle of the unit (after lesson 3). Having this check will require
students to be responsible for their notes and incomplete outlines. With any unit that is heavy
with notes and new material it is important to make sure students are not missing sections of
notes. Missing sections of notes could be detrimental in a unit that builds on previous
material through each lesson. Even spot checking certain questions or portions of a particular
outline or activity can make students accountable for everything they are doing inside and
outside of the class.
52
53
54
55
56
57
58
59
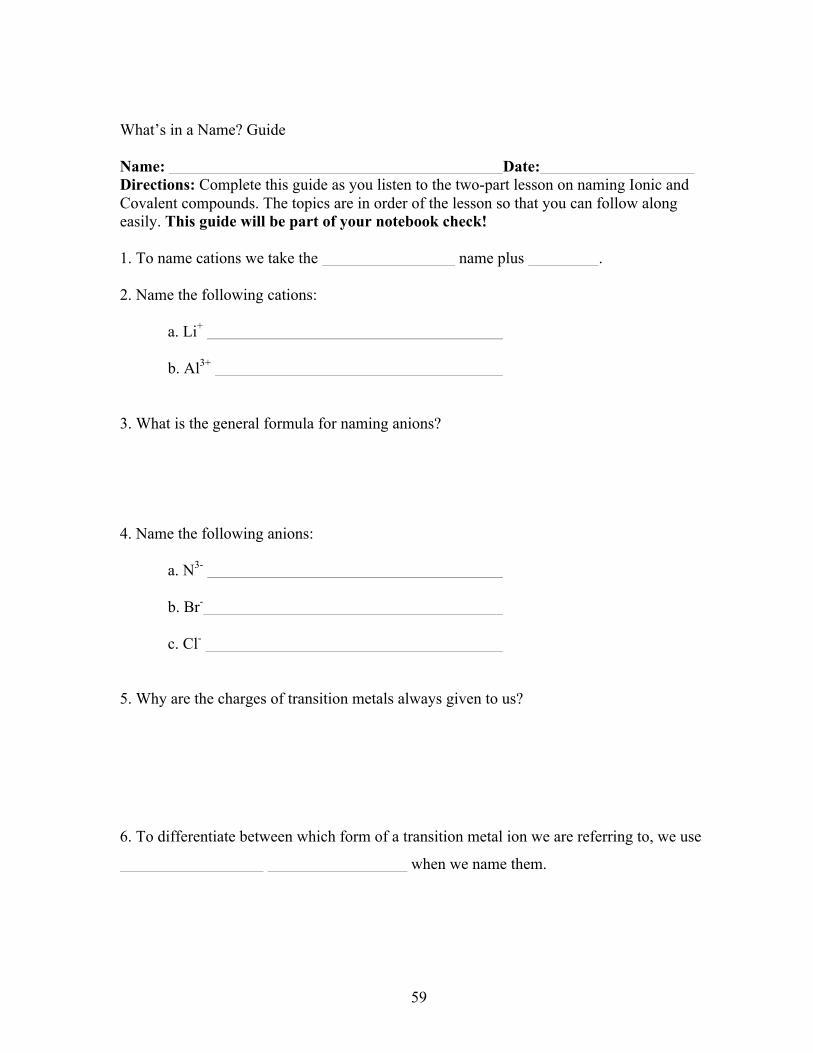
What’s in a Name? Guide Name: Date: Directions: Complete this guide as you listen to the two-part lesson on naming Ionic and Covalent compounds. The topics are in order of the lesson so that you can follow along easily. This guide will be part of your notebook check! 1. To name cations we take the name plus . 2. Name the following cations: a. Li+
b. Al3+ 3. What is the general formula for naming anions? 4. Name the following anions: a. N3-
b. Br-
c. Cl-
5. Why are the charges of transition metals always given to us?
6. To differentiate between which form of a transition metal ion we are referring to, we use
when we name them.
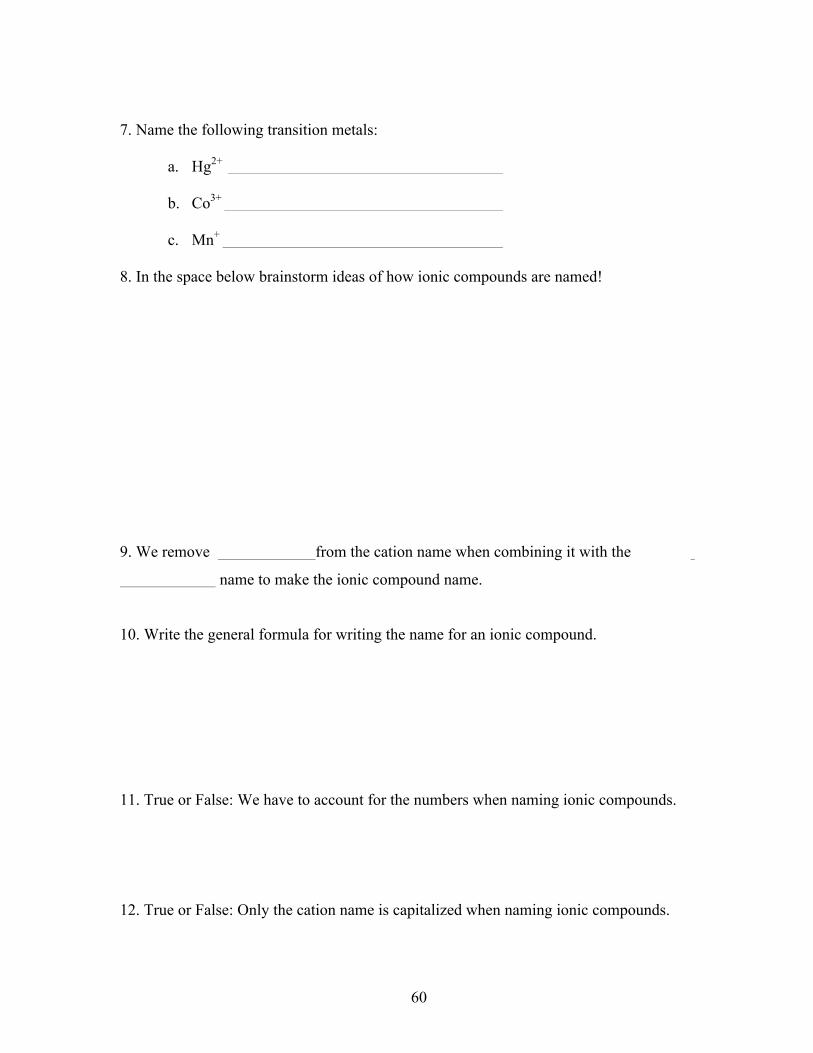
60
7. Name the following transition metals:
a. Hg2+
b. Co3+
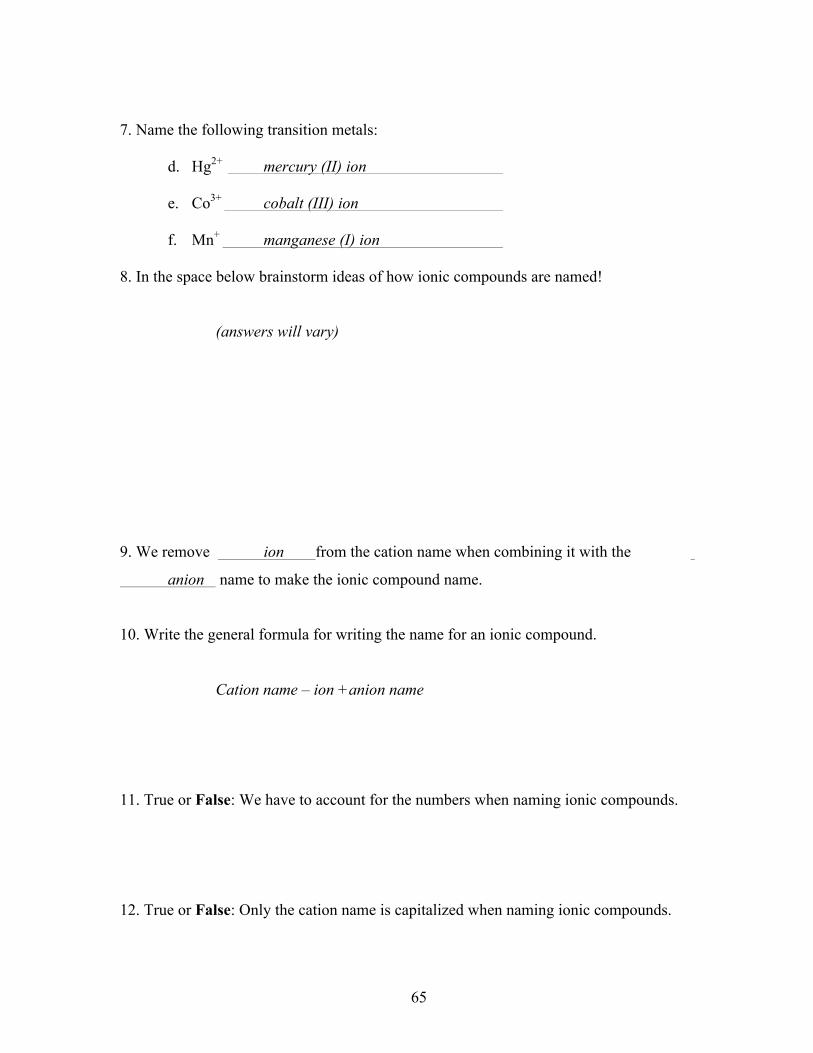
c. Mn+ 8. In the space below brainstorm ideas of how ionic compounds are named! 9. We remove from the cation name when combining it with the
name to make the ionic compound name.
10. Write the general formula for writing the name for an ionic compound.
11. True or False: We have to account for the numbers when naming ionic compounds.
12. True or False: Only the cation name is capitalized when naming ionic compounds.
61
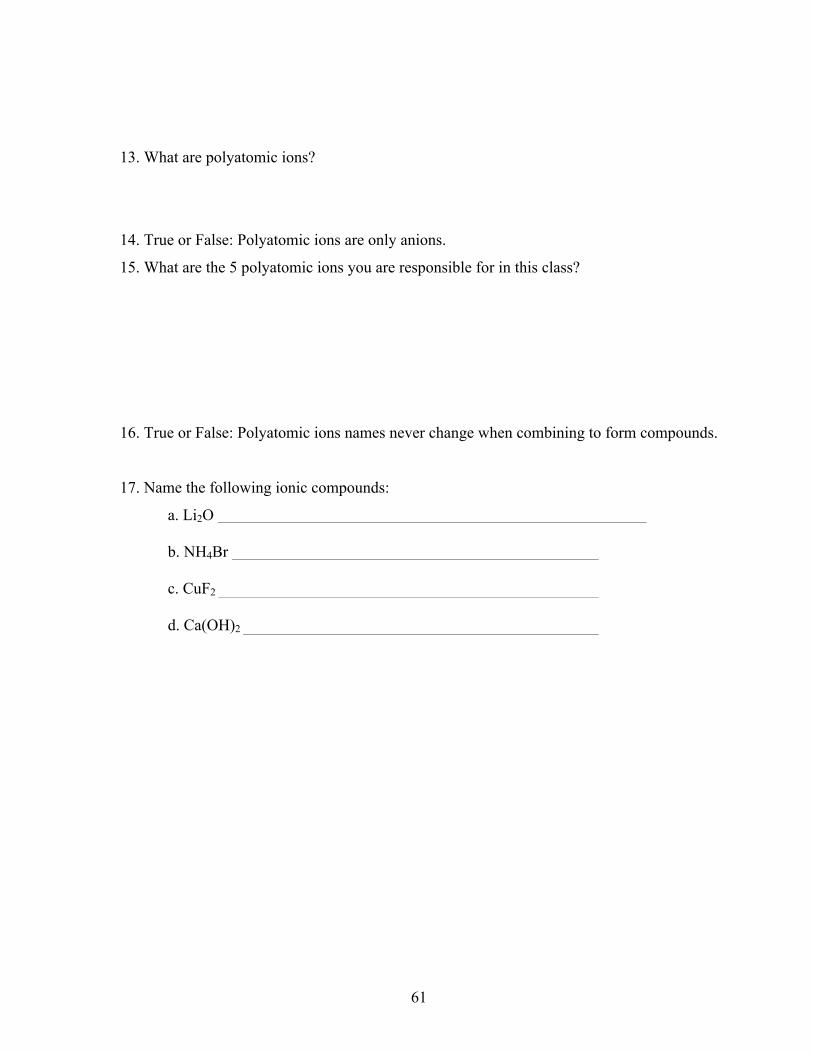
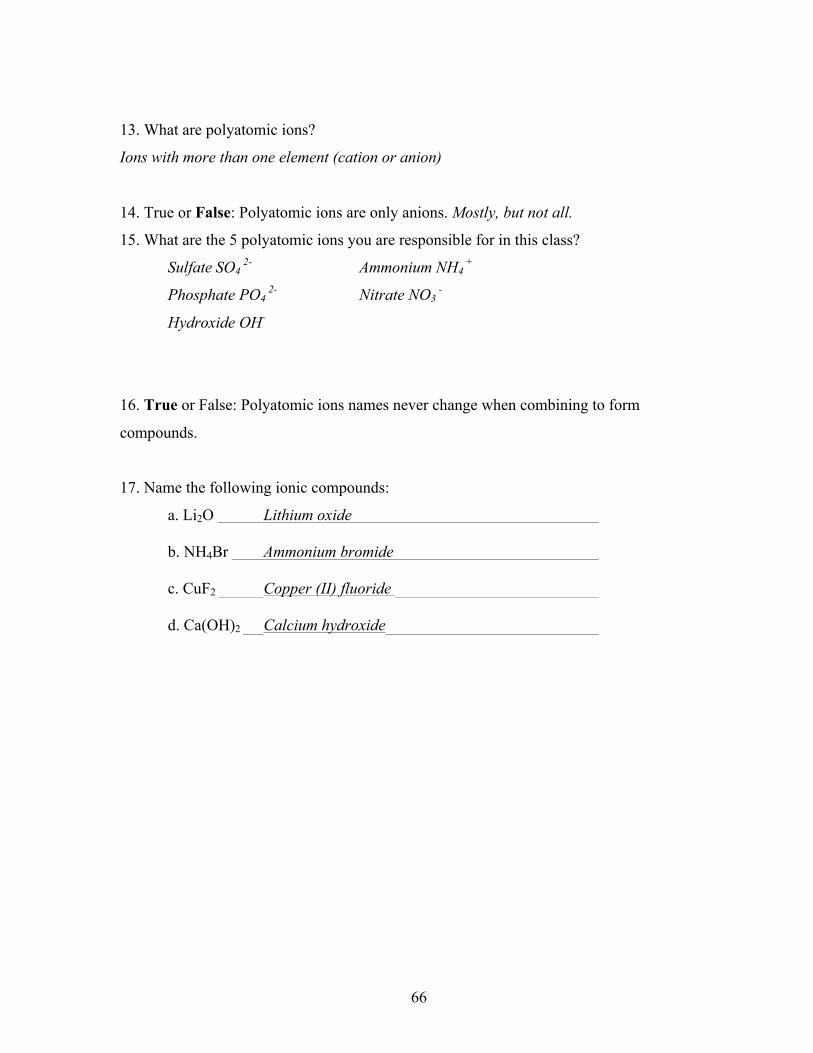
13. What are polyatomic ions?
14. True or False: Polyatomic ions are only anions.
15. What are the 5 polyatomic ions you are responsible for in this class?
16. True or False: Polyatomic ions names never change when combining to form compounds.
17. Name the following ionic compounds:
a. Li2O
b. NH4Br c. CuF2
d. Ca(OH)2

62
Activity 3.1
Directions: In your groups, come up with “Ionic Compound for Dummies” steps for naming
ionic equations. Make sure to mention: cations, anions, transition metals, and polyatomic
ions. Include everything I would need if I had never learned this material before. I am a
“dummy”!
63
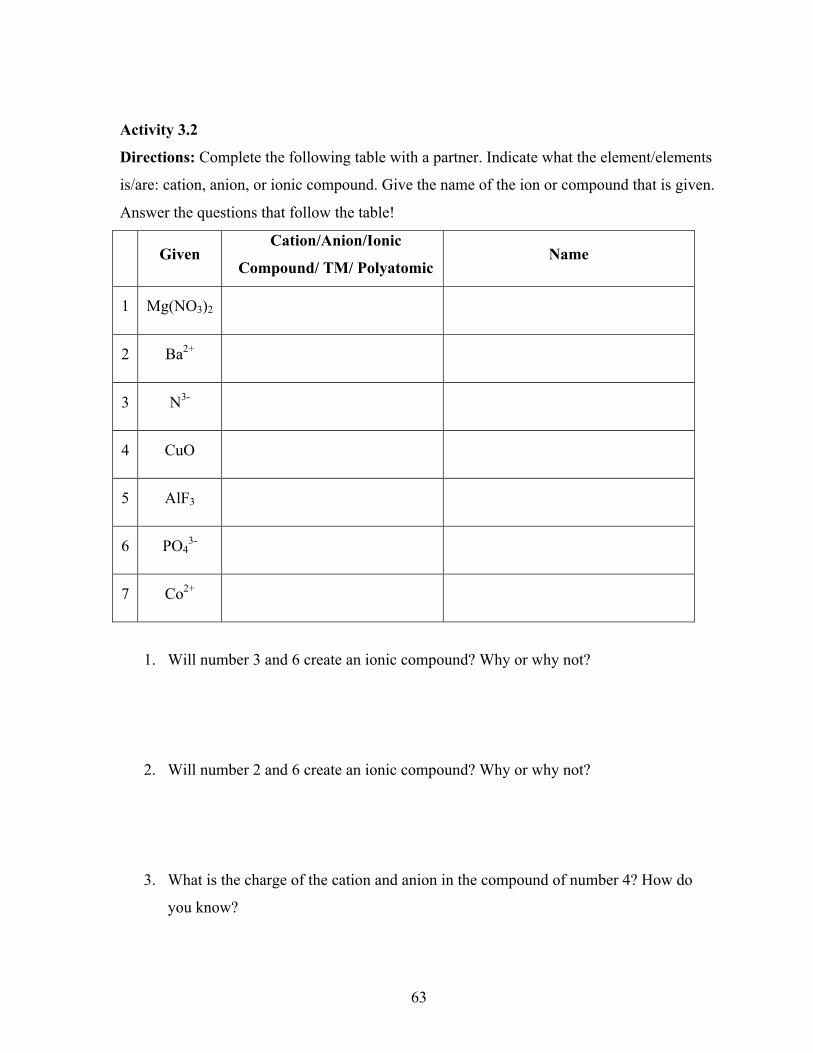
Activity 3.2
Directions: Complete the following table with a partner. Indicate what the element/elements
is/are: cation, anion, or ionic compound. Give the name of the ion or compound that is given.
Answer the questions that follow the table!
Given
Cation/Anion/Ionic
Compound/ TM/ Polyatomic Name
1 Mg(NO3)2
2 Ba2+
3 N3-
4 CuO
5 AlF3
6 PO43-
7 Co2+
1. Will number 3 and 6 create an ionic compound? Why or why not?
2. Will number 2 and 6 create an ionic compound? Why or why not?
3. What is the charge of the cation and anion in the compound of number 4? How do
you know?
64
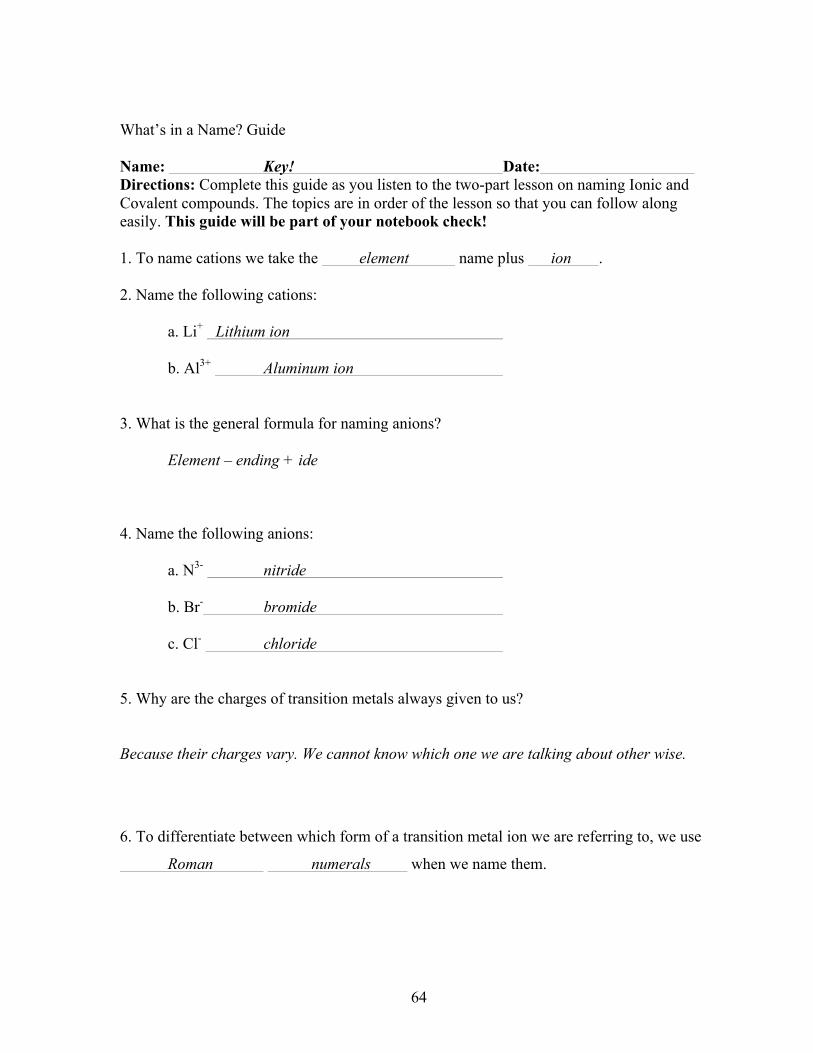
What’s in a Name? Guide Name: Key! Date: Directions: Complete this guide as you listen to the two-part lesson on naming Ionic and Covalent compounds. The topics are in order of the lesson so that you can follow along easily. This guide will be part of your notebook check! 1. To name cations we take the element name plus ion . 2. Name the following cations: a. Li+ Lithium ion
b. Al3+ Aluminum ion 3. What is the general formula for naming anions?
Element – ending + ide 4. Name the following anions: a. N3- nitride
b. Br- bromide
c. Cl- chloride
5. Why are the charges of transition metals always given to us?
Because their charges vary. We cannot know which one we are talking about other wise.
6. To differentiate between which form of a transition metal ion we are referring to, we use
Roman numerals when we name them.
65
7. Name the following transition metals:
d. Hg2+ mercury (II) ion
e. Co3+ cobalt (III) ion
f. Mn+ manganese (I) ion 8. In the space below brainstorm ideas of how ionic compounds are named!
(answers will vary) 9. We remove ion from the cation name when combining it with the
anion name to make the ionic compound name.
10. Write the general formula for writing the name for an ionic compound.
Cation name – ion +anion name
11. True or False: We have to account for the numbers when naming ionic compounds.
12. True or False: Only the cation name is capitalized when naming ionic compounds.
66
13. What are polyatomic ions?
Ions with more than one element (cation or anion)
14. True or False: Polyatomic ions are only anions. Mostly, but not all.
15. What are the 5 polyatomic ions you are responsible for in this class?
Sulfate SO4 2- Ammonium NH4
+
Phosphate PO4 2- Nitrate NO3
-
Hydroxide OH-
16. True or False: Polyatomic ions names never change when combining to form
compounds.
17. Name the following ionic compounds:
a. Li2O Lithium oxide
b. NH4Br Ammonium bromide c. CuF2 Copper (II) fluoride
d. Ca(OH)2 Calcium hydroxide
67
Activity 3.1
Directions: In your groups, come up with “Ionic Compound for Dummies” steps for naming
ionic equations. Make sure to mention: cations, anions, transition metals, and polyatomic
ions. Include everything I would need if I had never learned this material before. I am a
“dummy”!
(answers will vary – completion points)
see example if necessary
68
Activity 3.2
Directions: Complete the following table with a partner. Indicate what the element/elements
is/are: cation, anion, or ionic compound. Give the name of the ion or compound that is given.
Answer the questions that follow the table!
Given
Cation/Anion/Ionic
Compound/ TM/ Polyatomic Name
1 Mg(NO3)2 IC Magnesium nitrate
2 Ba2+ C Barium ion
3 N3- A Nitride
4 CuO IC Copper (II) oxide
5 AlF3 IC Aluminum fluoride
6 PO43- P Phosphate
7 Co2+ TM Cobalt (II) ion
1. Will number 3 and 6 create an ionic compound? Why or why not?
No – they are both anions. It must be a cation + anion
2. Will number 2 and 6 create an ionic compound? Why or why not?
Yes – one is a cation and one is an anion
3. What is the charge of the cation and anion in the compound of number 4? How do
you know?
Cu2+ and O2- even though Cu is a TM, we know O has a 2- charge from the periodic
table therefore Cu must be 2+ to give the given formula.
69
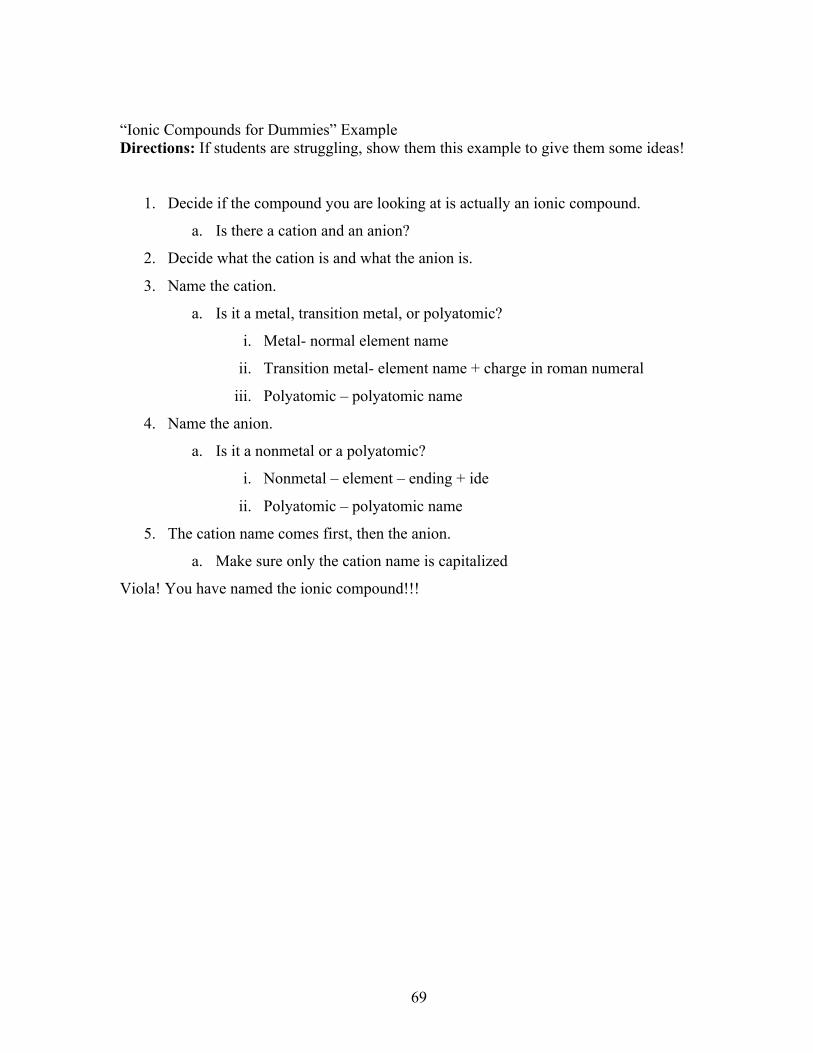
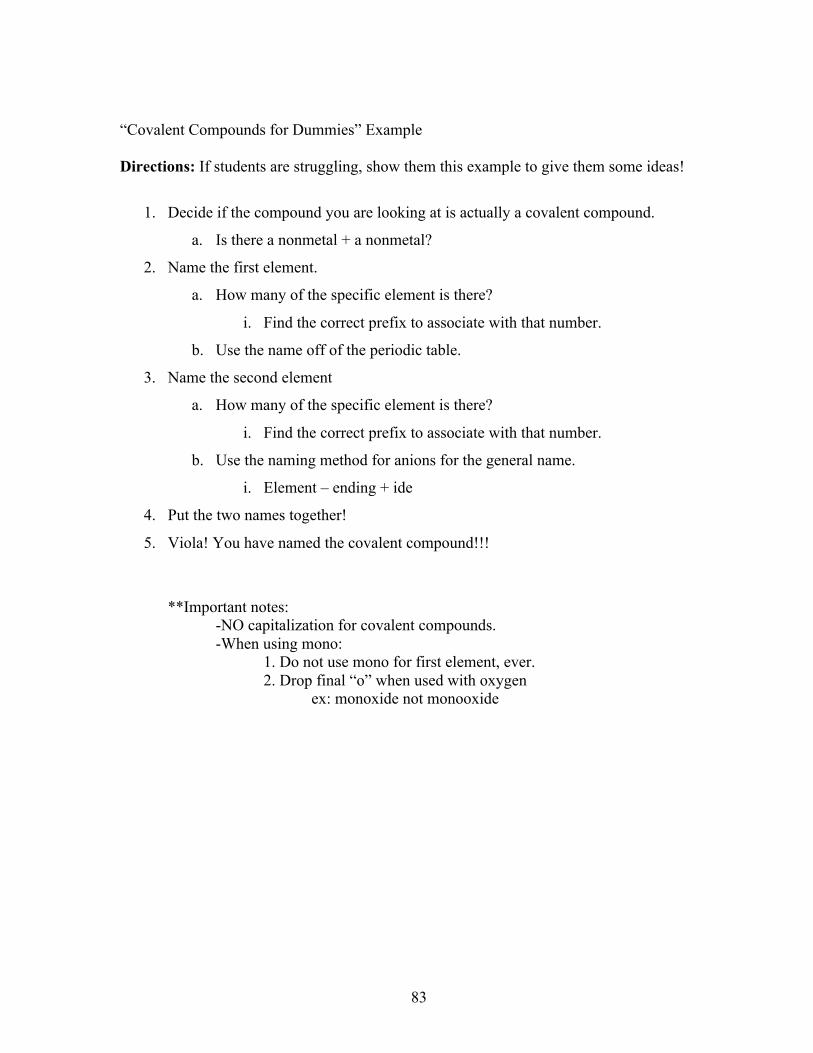
“Ionic Compounds for Dummies” Example Directions: If students are struggling, show them this example to give them some ideas!
1. Decide if the compound you are looking at is actually an ionic compound.
a. Is there a cation and an anion?
2. Decide what the cation is and what the anion is.
3. Name the cation.
a. Is it a metal, transition metal, or polyatomic?
i. Metal- normal element name
ii. Transition metal- element name + charge in roman numeral
iii. Polyatomic – polyatomic name
4. Name the anion.
a. Is it a nonmetal or a polyatomic?
i. Nonmetal – element – ending + ide
ii. Polyatomic – polyatomic name
5. The cation name comes first, then the anion.
a. Make sure only the cation name is capitalized
Viola! You have named the ionic compound!!!
70
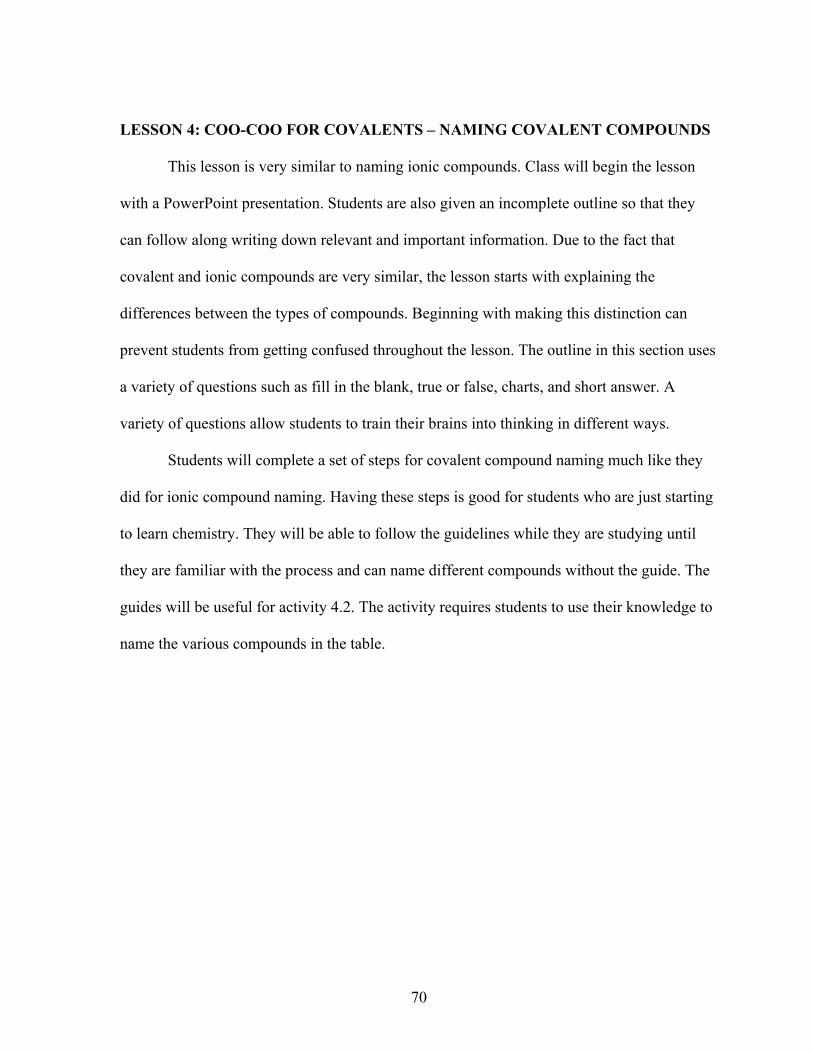
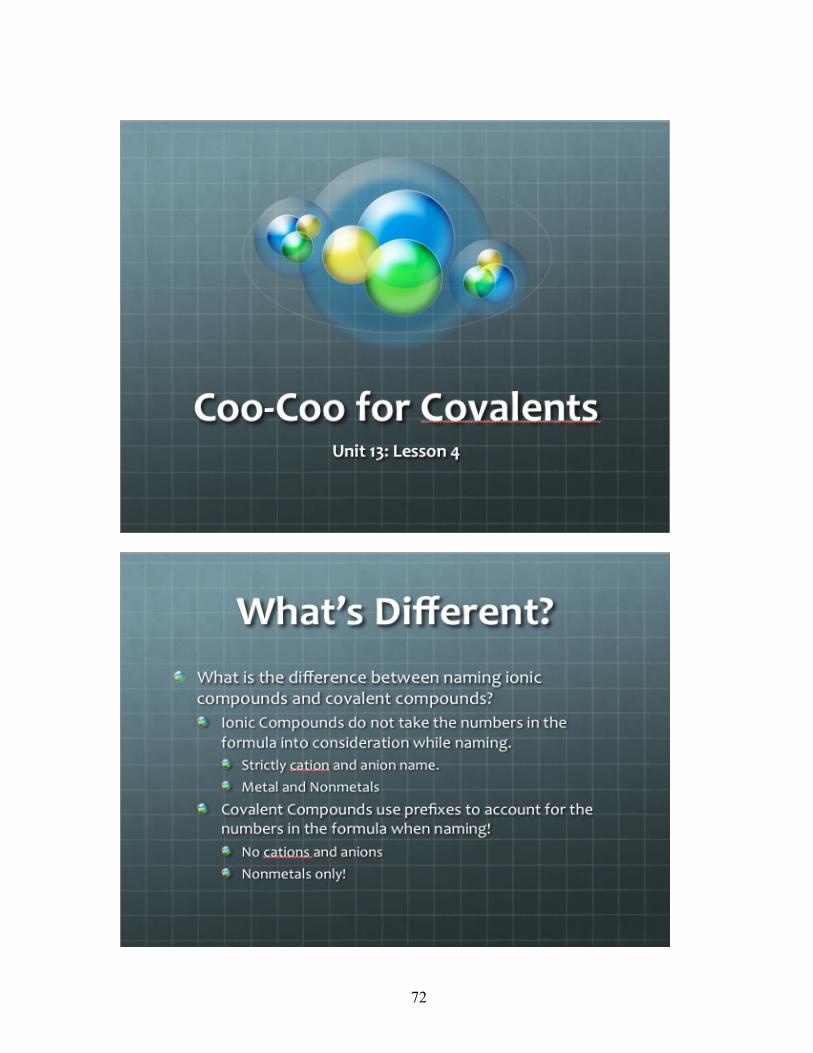
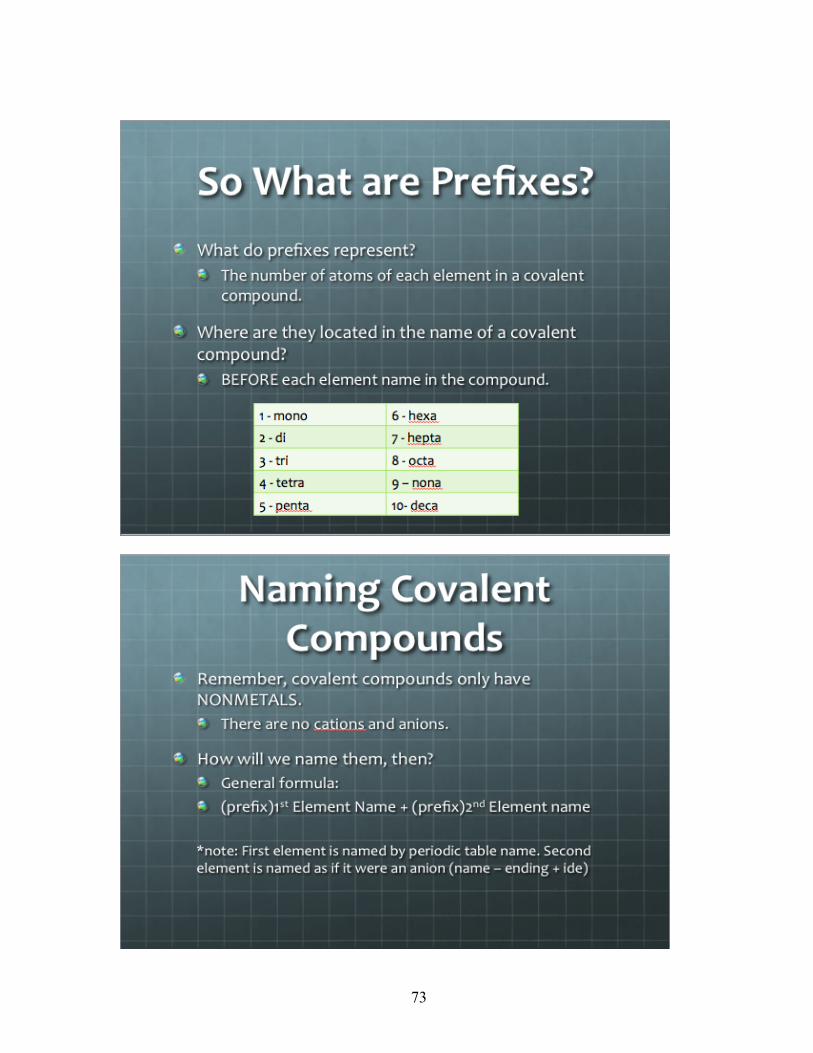
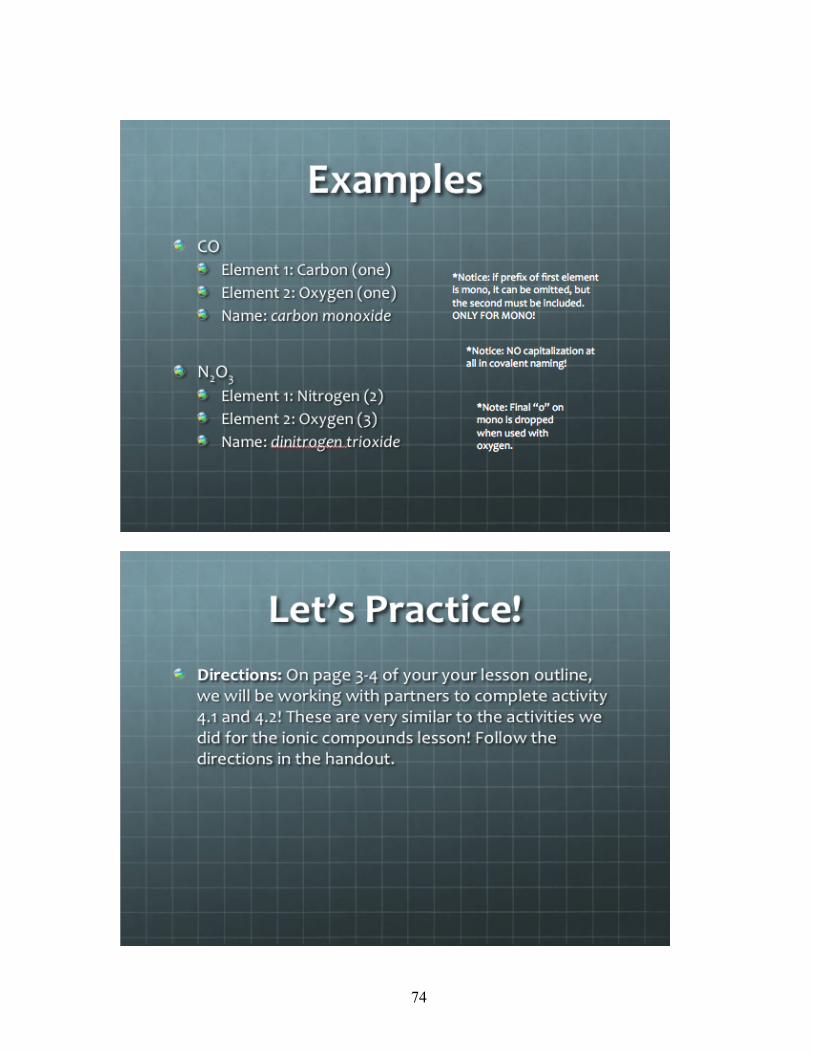
LESSON 4: COO-COO FOR COVALENTS – NAMING COVALENT COMPOUNDS
This lesson is very similar to naming ionic compounds. Class will begin the lesson
with a PowerPoint presentation. Students are also given an incomplete outline so that they
can follow along writing down relevant and important information. Due to the fact that
covalent and ionic compounds are very similar, the lesson starts with explaining the
differences between the types of compounds. Beginning with making this distinction can
prevent students from getting confused throughout the lesson. The outline in this section uses
a variety of questions such as fill in the blank, true or false, charts, and short answer. A
variety of questions allow students to train their brains into thinking in different ways.
Students will complete a set of steps for covalent compound naming much like they
did for ionic compound naming. Having these steps is good for students who are just starting
to learn chemistry. They will be able to follow the guidelines while they are studying until
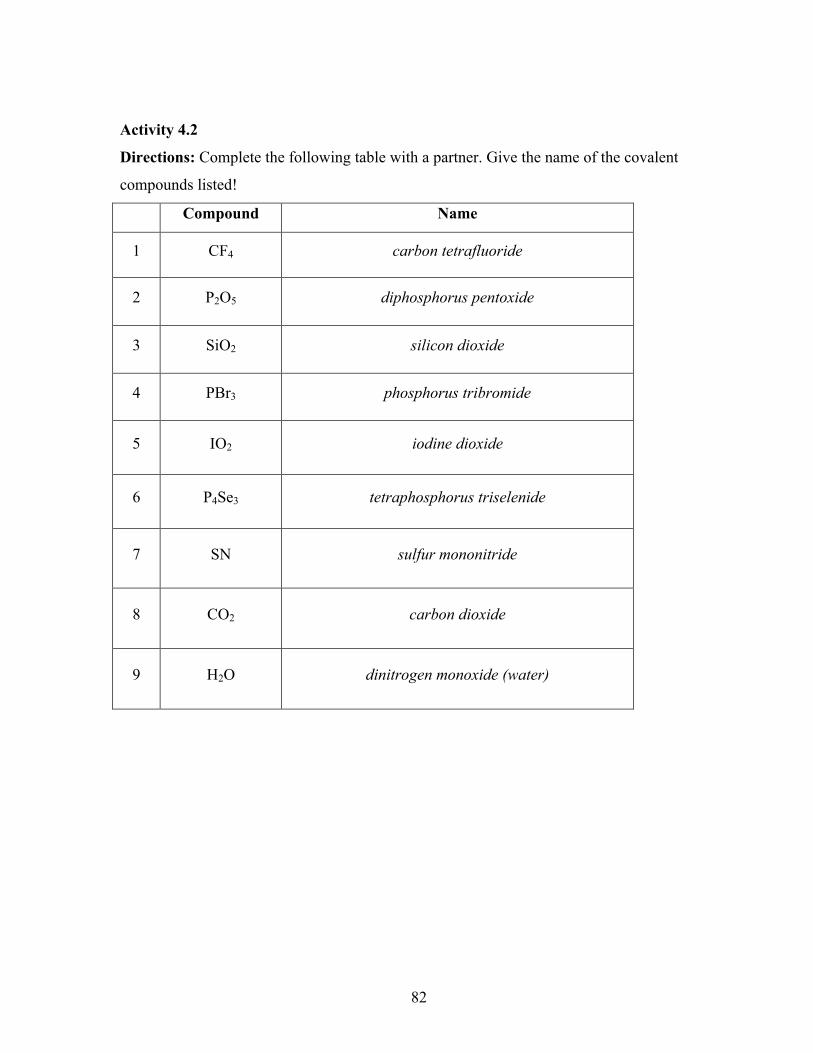
they are familiar with the process and can name different compounds without the guide. The
guides will be useful for activity 4.2. The activity requires students to use their knowledge to
name the various compounds in the table.

71
72
73
74
75
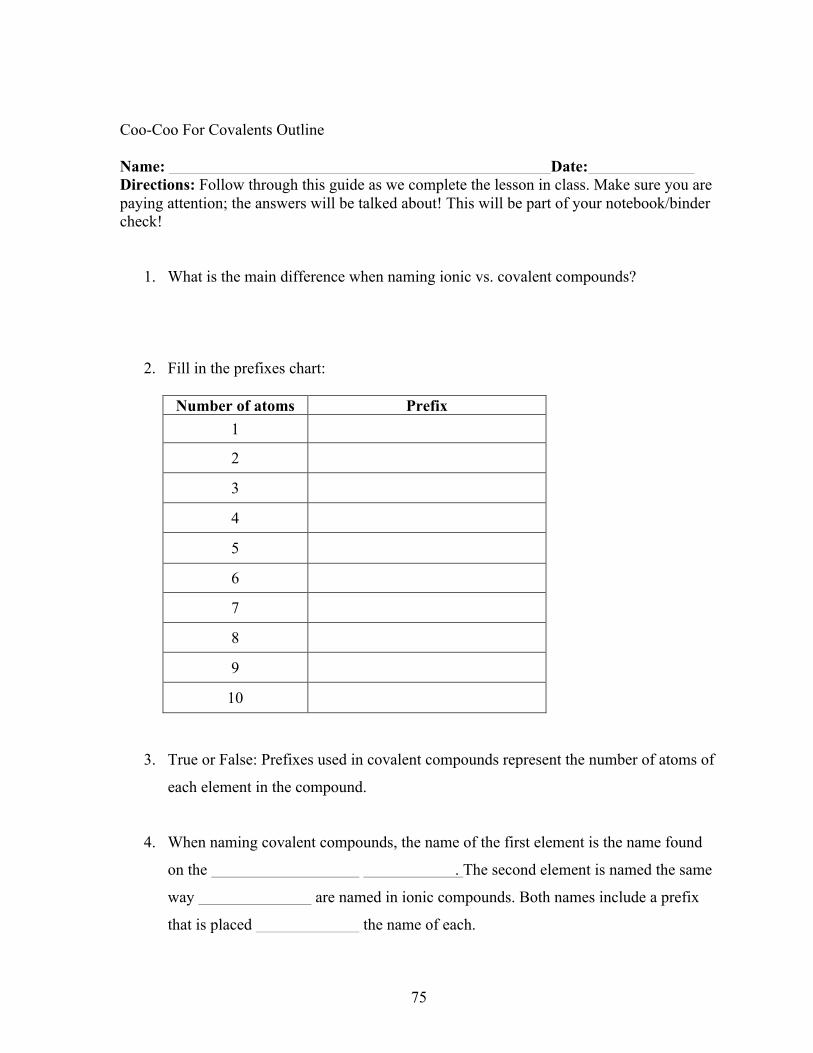
Coo-Coo For Covalents Outline Name: Date: Directions: Follow through this guide as we complete the lesson in class. Make sure you are paying attention; the answers will be talked about! This will be part of your notebook/binder check!
1. What is the main difference when naming ionic vs. covalent compounds?
2. Fill in the prefixes chart:
Number of atoms Prefix 1
2
3
4
5
6
7
8
9
10
3. True or False: Prefixes used in covalent compounds represent the number of atoms of
each element in the compound.
4. When naming covalent compounds, the name of the first element is the name found
on the . The second element is named the same
way are named in ionic compounds. Both names include a prefix
that is placed the name of each.
76
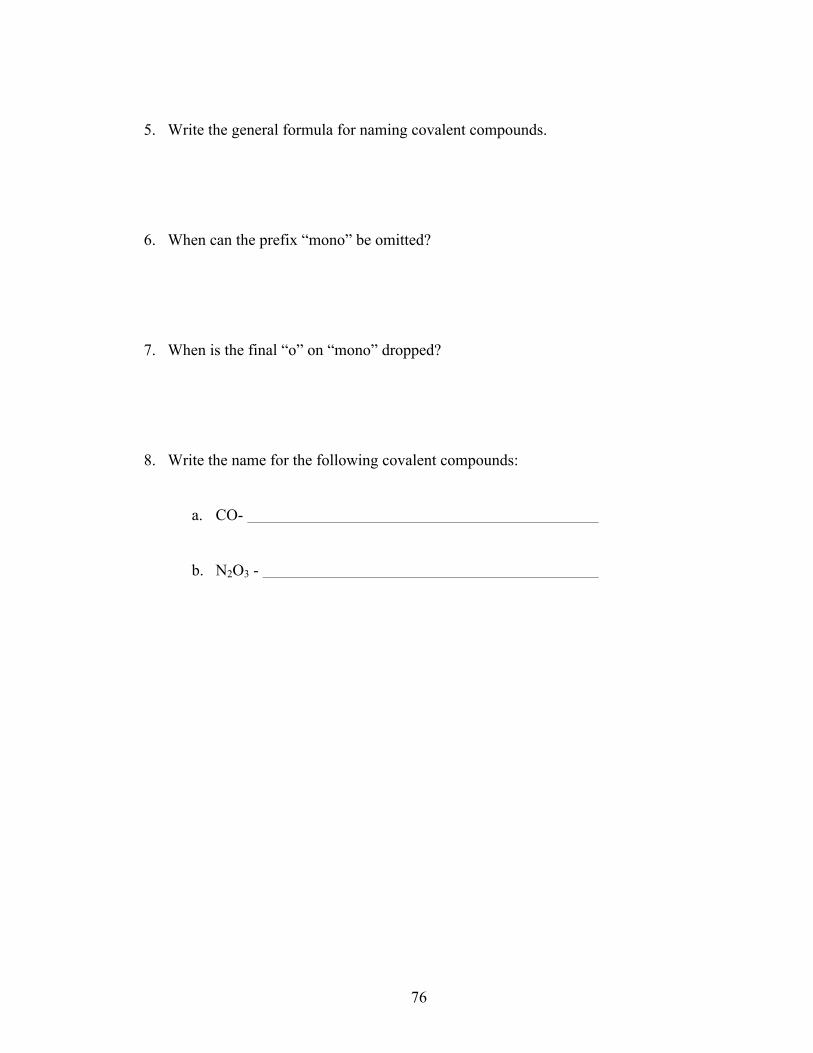
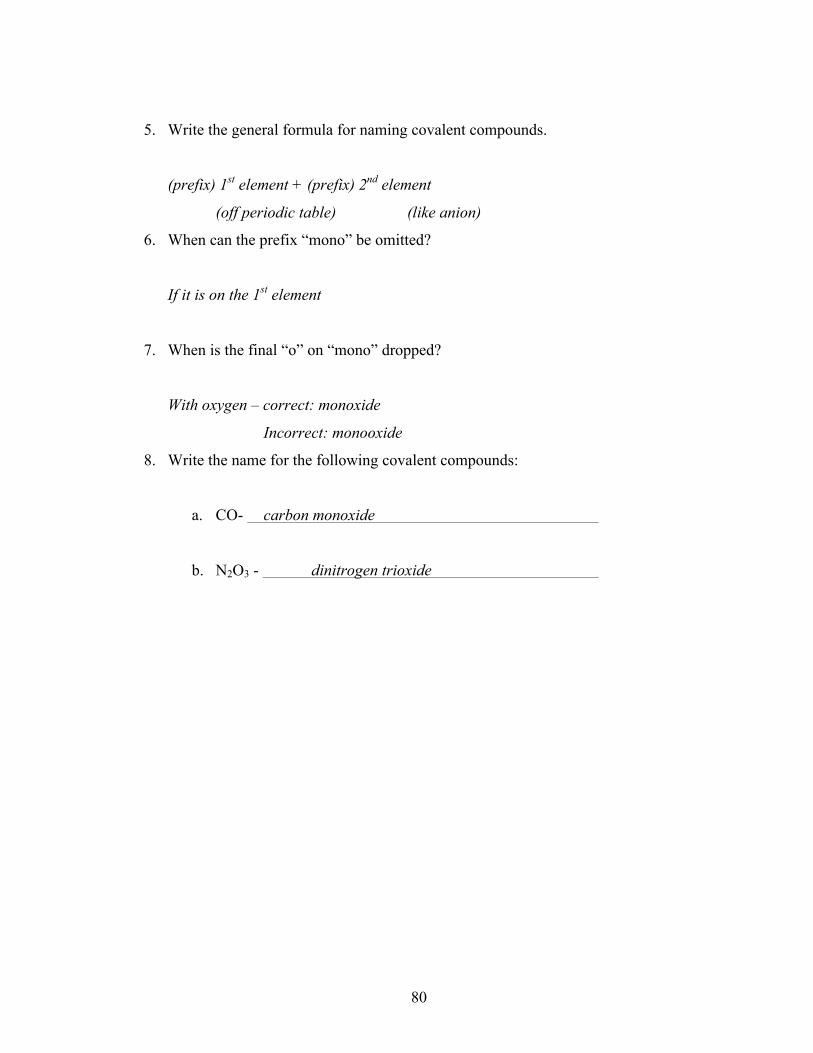
5. Write the general formula for naming covalent compounds.
6. When can the prefix “mono” be omitted?
7. When is the final “o” on “mono” dropped?
8. Write the name for the following covalent compounds:
a. CO-
b. N2O3 -

77
Activity 4.1
Directions: In your groups, come up with “Covalent Compound for Dummies” steps for
naming ionic equations. Make sure to mention: prefixes, exceptions of mono, similarity to
anion naming, and any other relevant information. Include everything I would need if I had
never learned this material before. I am a “dummy”!

78
Activity 4.2
Directions: Complete the following table with a partner. Give the name of the covalent
compounds listed!
Compound Name
1 CF4
2 P2O5
3 SiO2
4 PBr3
5 IO2
6 P4Se3
7 SN
8 CO2
9 H2O
79
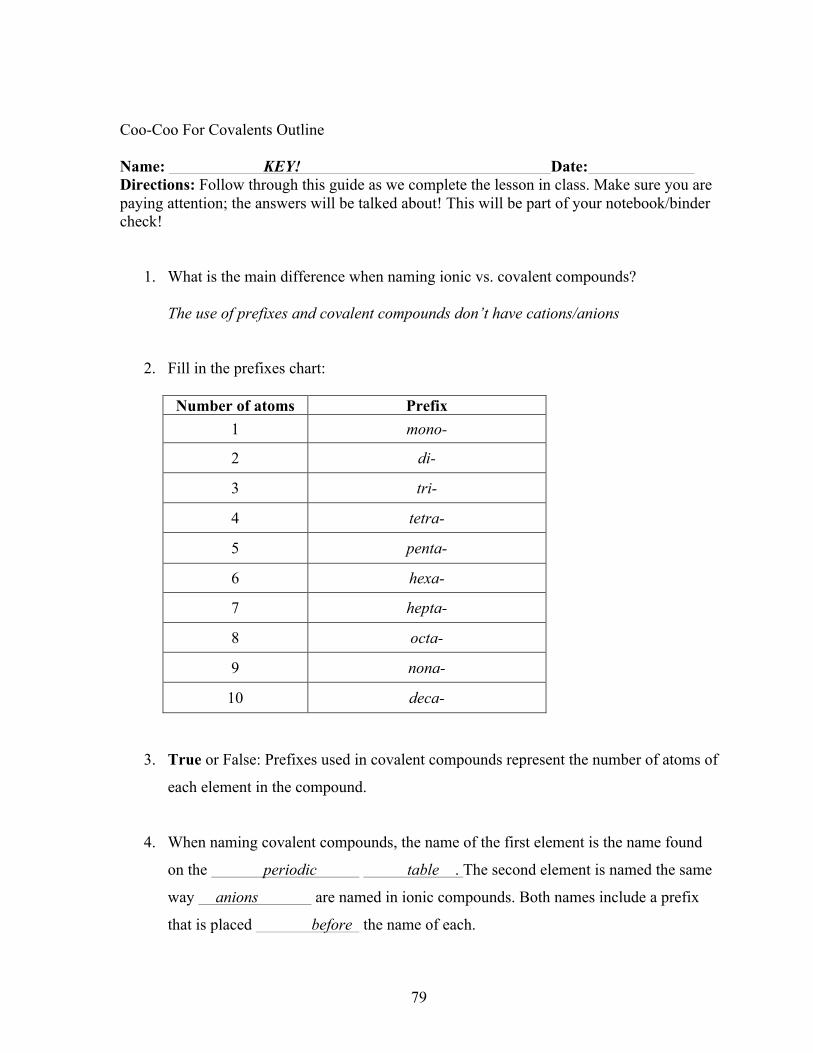
Coo-Coo For Covalents Outline Name: KEY! Date: Directions: Follow through this guide as we complete the lesson in class. Make sure you are paying attention; the answers will be talked about! This will be part of your notebook/binder check!
1. What is the main difference when naming ionic vs. covalent compounds? The use of prefixes and covalent compounds don’t have cations/anions
2. Fill in the prefixes chart:
Number of atoms Prefix 1 mono-
2 di-
3 tri-
4 tetra-
5 penta-
6 hexa-
7 hepta-
8 octa-
9 nona-
10 deca-
3. True or False: Prefixes used in covalent compounds represent the number of atoms of
each element in the compound.
4. When naming covalent compounds, the name of the first element is the name found
on the periodic table . The second element is named the same
way anions are named in ionic compounds. Both names include a prefix
that is placed before the name of each.
80
5. Write the general formula for naming covalent compounds.
(prefix) 1st element + (prefix) 2nd element
(off periodic table) (like anion)
6. When can the prefix “mono” be omitted?
If it is on the 1st element
7. When is the final “o” on “mono” dropped?
With oxygen – correct: monoxide
Incorrect: monooxide
8. Write the name for the following covalent compounds:
a. CO- carbon monoxide
b. N2O3 - dinitrogen trioxide
81
Activity 4.1
Directions: In your groups, come up with “Covalent Compound for Dummies” steps for
naming ionic equations. Make sure to mention: prefixes, exceptions of mono, similarity to
anion naming, and any other relevant information. Include everything I would need if I had
never learned this material before. I am a “dummy”!
(answers will vary – completion points)
see example if necessary
82
Activity 4.2
Directions: Complete the following table with a partner. Give the name of the covalent
compounds listed!
Compound Name
1 CF4 carbon tetrafluoride
2 P2O5 diphosphorus pentoxide
3 SiO2 silicon dioxide
4 PBr3 phosphorus tribromide
5 IO2 iodine dioxide
6 P4Se3 tetraphosphorus triselenide
7 SN sulfur mononitride
8 CO2 carbon dioxide
9 H2O dinitrogen monoxide (water)
83
“Covalent Compounds for Dummies” Example Directions: If students are struggling, show them this example to give them some ideas!
1. Decide if the compound you are looking at is actually a covalent compound.
a. Is there a nonmetal + a nonmetal?
2. Name the first element.
a. How many of the specific element is there?
i. Find the correct prefix to associate with that number.
b. Use the name off of the periodic table.
3. Name the second element
a. How many of the specific element is there?
i. Find the correct prefix to associate with that number.
b. Use the naming method for anions for the general name.
i. Element – ending + ide
4. Put the two names together!
5. Viola! You have named the covalent compound!!!
**Important notes: -NO capitalization for covalent compounds. -When using mono: 1. Do not use mono for first element, ever. 2. Drop final “o” when used with oxygen ex: monoxide not monooxide
84
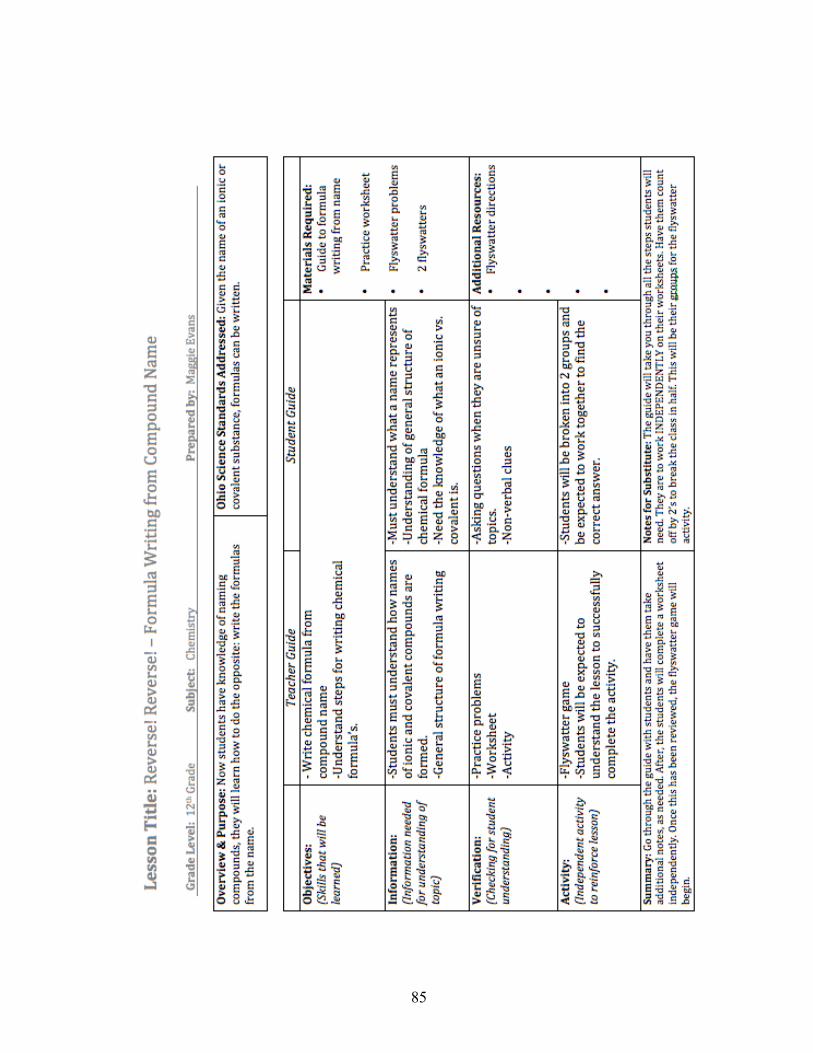
LESSON 5: REVERSE, REVERSE! – FORMULA WRITING FROM COMPOUND
NAME
The final lesson in this unit is taking all of the information students have learned in
lessons one through four and doing the reverse process. Prior to this point, students should
have mastered naming compounds from the given formulas. Now, students will write the
formulas from the compound name.
It is important for students to be exposed to different teaching styles. This lesson still
makes use of an incomplete outline, but students are required to pay close attention to the
teacher’s lecture and examples that are given. Even though there is not a PowerPoint
associated with the lesson, it is still very interactive and keeping students on task since they
are responsible for filling in their outlines. The outline is set up in a step-by-step manner so
that is also serves as a guide for students to refer to as they are completing practice problems.
After the lecture, students will be directed to complete the formula writing worksheet.
There may be enough time for students to complete the worksheet in class, but if there is not
they should complete it for homework. If it is completed for homework, it should be gone
over the next day so that students can check their work.
The activity in this section of the unit brings out student’s competitive nature and
allows them to have a little bit of fun while they are still learning. Flyswatter is a game that
requires students to understand the material, but ties in the group work aspect to help students
who are still struggling. The game is also designed to get students up and out of their seats
instead of sitting down constantly. The rules sheet and a list of possible compounds to use are
provided in the lesson materials.
85
86
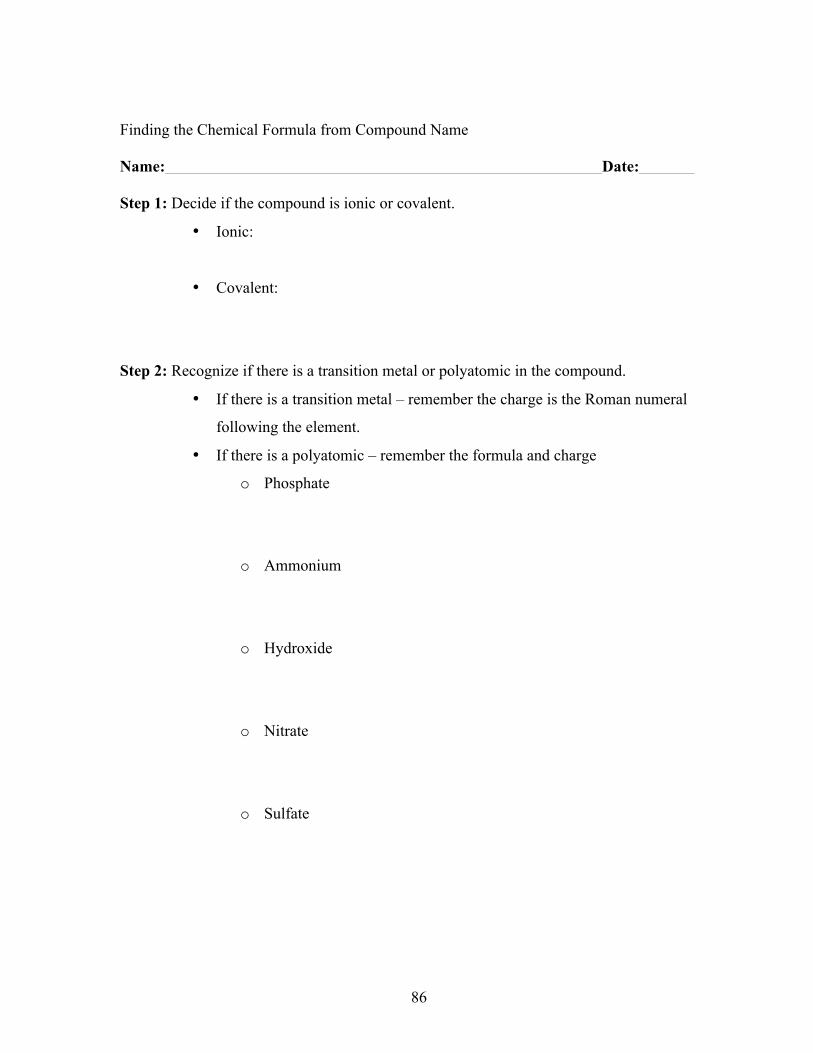
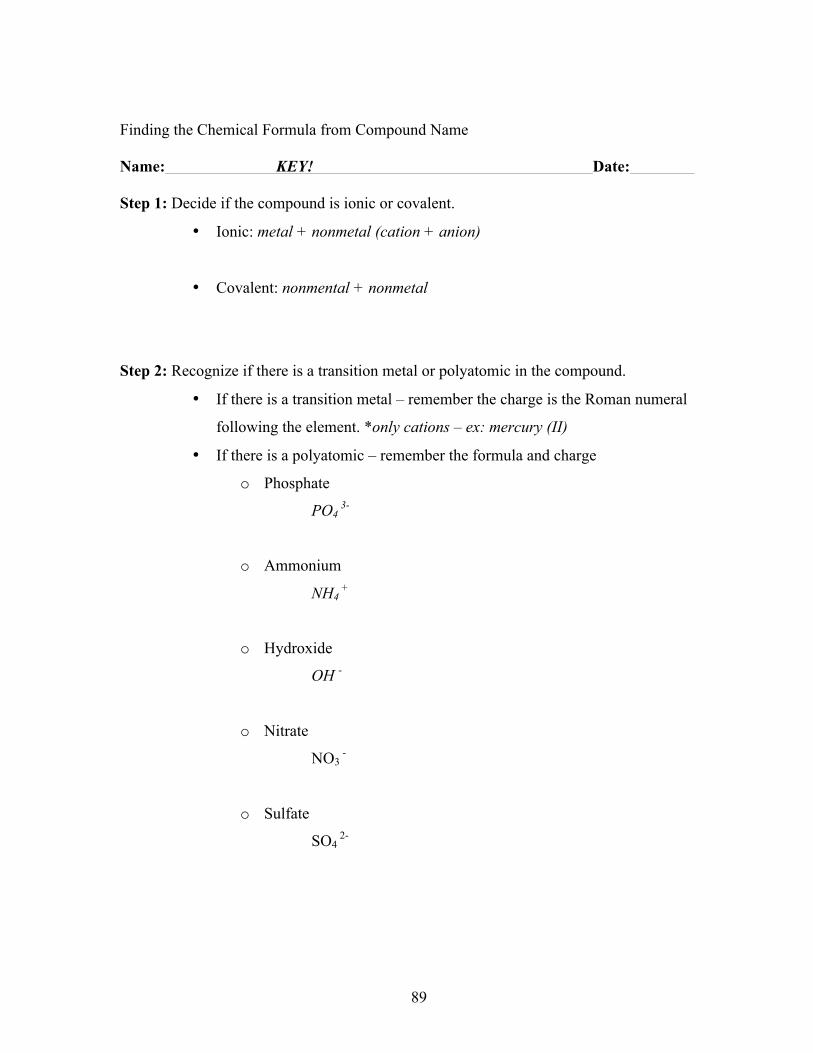
Finding the Chemical Formula from Compound Name Name: Date: Step 1: Decide if the compound is ionic or covalent.
• Ionic:
• Covalent:
Step 2: Recognize if there is a transition metal or polyatomic in the compound.
• If there is a transition metal – remember the charge is the Roman numeral
following the element.
• If there is a polyatomic – remember the formula and charge
o Phosphate
o Ammonium
o Hydroxide
o Nitrate
o Sulfate
87
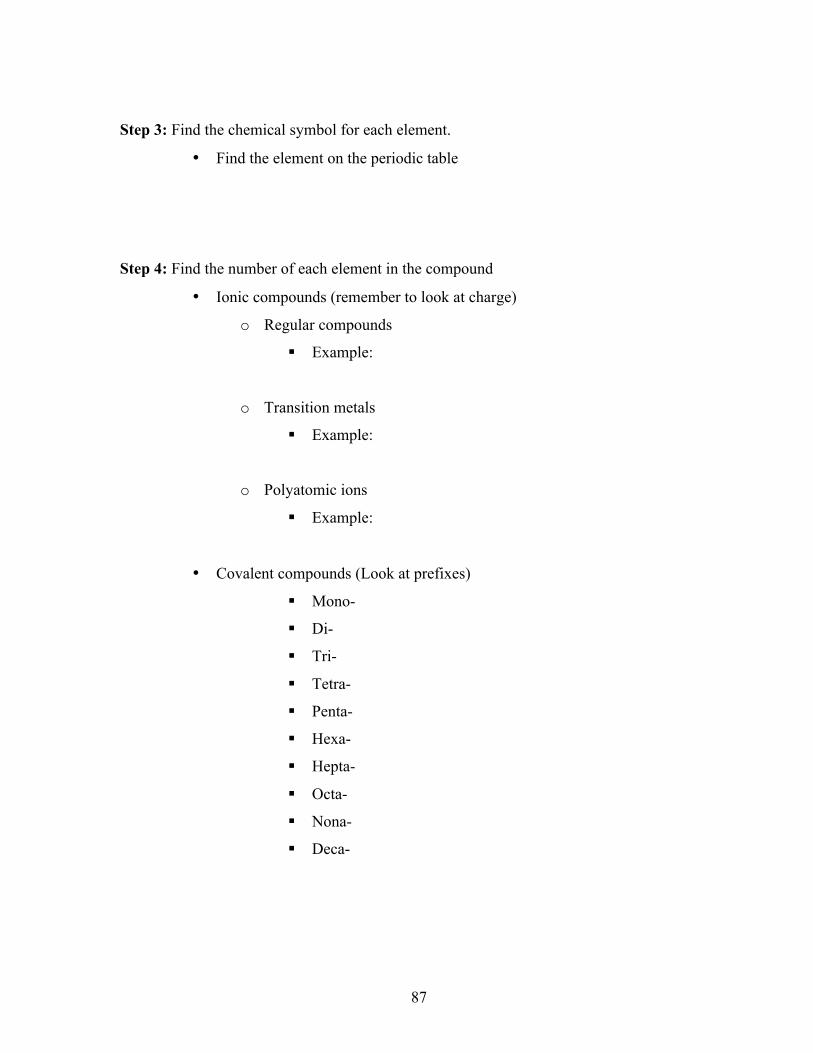
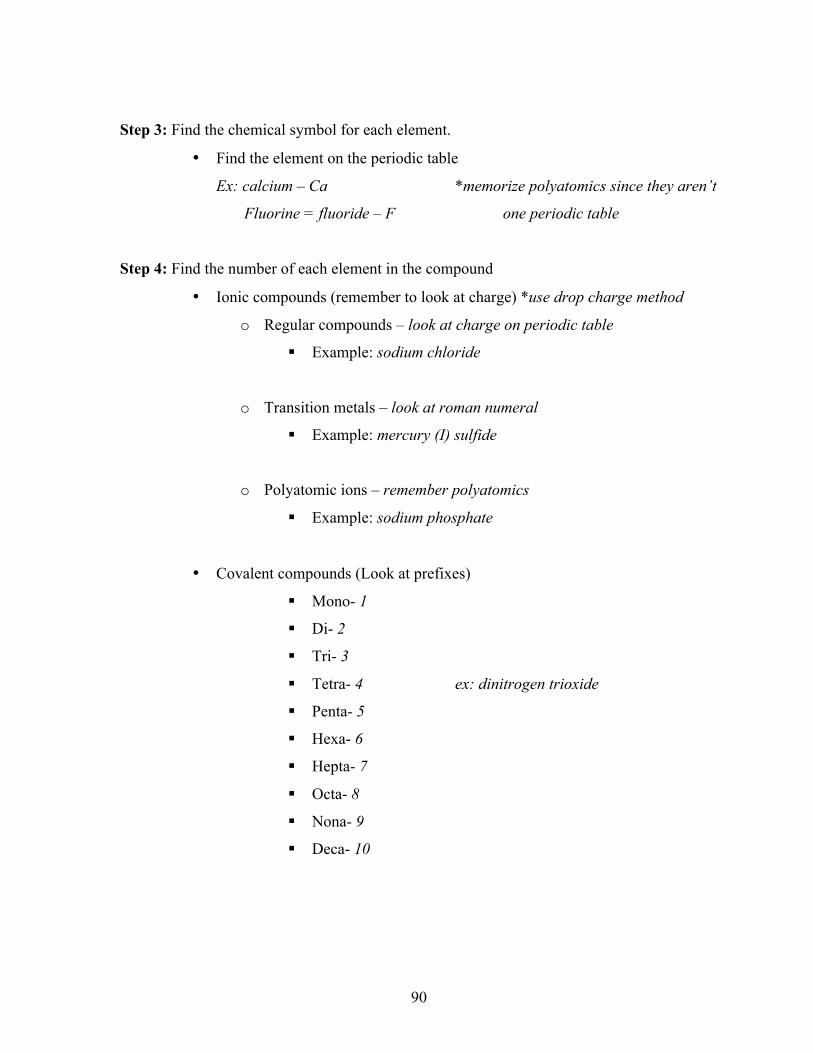
Step 3: Find the chemical symbol for each element.
• Find the element on the periodic table
Step 4: Find the number of each element in the compound
• Ionic compounds (remember to look at charge)
o Regular compounds
§ Example:
o Transition metals
§ Example:
o Polyatomic ions
§ Example:
• Covalent compounds (Look at prefixes)
§ Mono-
§ Di-
§ Tri-
§ Tetra-
§ Penta-
§ Hexa-
§ Hepta-
§ Octa-
§ Nona-
§ Deca-

88
Step 5: Put everything together • Element order from name is the order for the formula, too.
o Example:
• Make sure numbers of each element is a subscript o Example:
89
Finding the Chemical Formula from Compound Name Name: KEY! Date: Step 1: Decide if the compound is ionic or covalent.
• Ionic: metal + nonmetal (cation + anion)
• Covalent: nonmental + nonmetal
Step 2: Recognize if there is a transition metal or polyatomic in the compound.
• If there is a transition metal – remember the charge is the Roman numeral
following the element. *only cations – ex: mercury (II)
• If there is a polyatomic – remember the formula and charge
o Phosphate
PO4 3-
o Ammonium
NH4 +
o Hydroxide
OH -
o Nitrate
NO3 -
o Sulfate
SO4 2-
90
Step 3: Find the chemical symbol for each element.
• Find the element on the periodic table
Ex: calcium – Ca *memorize polyatomics since they aren’t
Fluorine = fluoride – F one periodic table
Step 4: Find the number of each element in the compound
• Ionic compounds (remember to look at charge) *use drop charge method
o Regular compounds – look at charge on periodic table
§ Example: sodium chloride
o Transition metals – look at roman numeral
§ Example: mercury (I) sulfide
o Polyatomic ions – remember polyatomics
§ Example: sodium phosphate
• Covalent compounds (Look at prefixes)
§ Mono- 1
§ Di- 2
§ Tri- 3
§ Tetra- 4 ex: dinitrogen trioxide
§ Penta- 5
§ Hexa- 6
§ Hepta- 7
§ Octa- 8
§ Nona- 9
§ Deca- 10

91
Step 5: Put everything together • Element order from name is the order for the formula, too.
o Example: sodium oxide Na + O 2-
• Make sure numbers of each element is a subscript
o Example: sodium oxide Na2O
*other examples: copper (II) oxide and ammonium phosphate

92
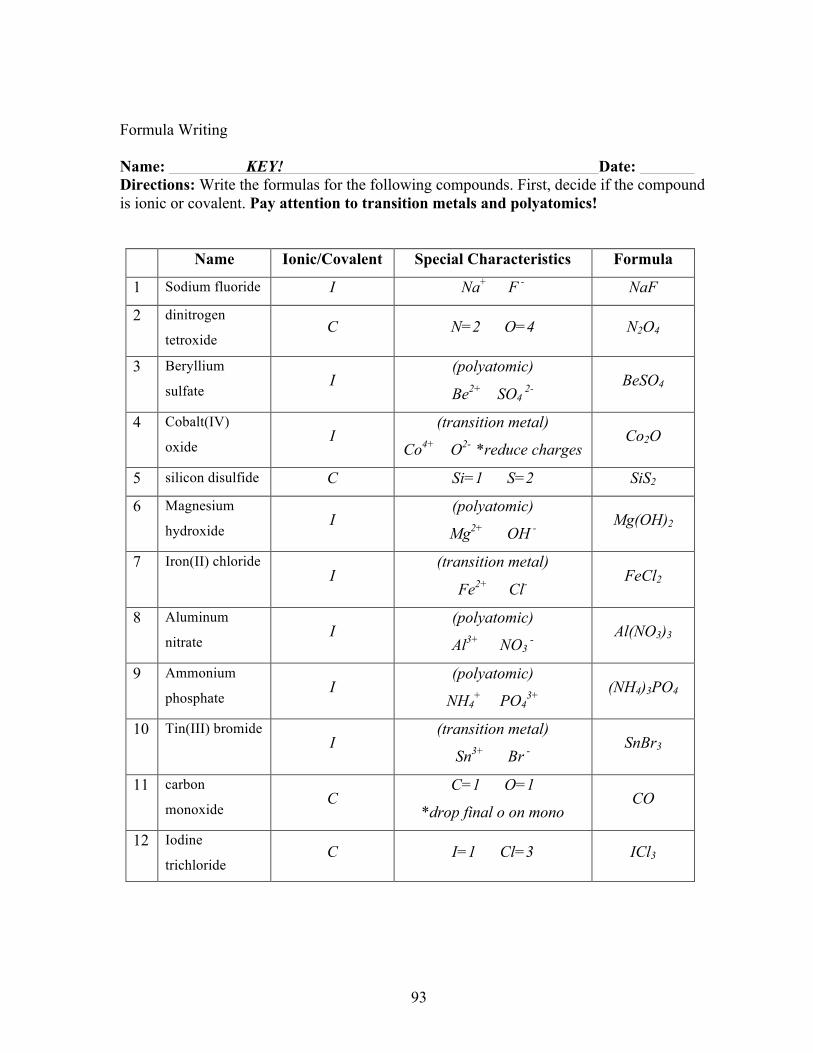
Formula Writing Name: Date: Directions: Write the formulas for the following compounds. First, decide if the compound is ionic or covalent. Pay attention to transition metals and polyatomics!
Name Ionic/Covalent Special Characteristics Formula
1 Sodium fluoride
2 dinitrogen
tetroxide
3 Beryllium
sulfate
4 Cobalt(IV)
oxide
5 silicon disulfide
6 Magnesium
hydroxide
7 Iron(II) chloride
8 Aluminum
nitrate
9 Ammonium
phosphate
10 Tin(III) bromide
11 carbon
monoxide
12 Iodine
trichloride
93
Formula Writing Name: KEY! Date: Directions: Write the formulas for the following compounds. First, decide if the compound is ionic or covalent. Pay attention to transition metals and polyatomics!
Name Ionic/Covalent Special Characteristics Formula
1 Sodium fluoride I Na+ F - NaF
2 dinitrogen
tetroxide C N=2 O=4 N2O4
3 Beryllium
sulfate I
(polyatomic)
Be2+ SO4 2- BeSO4
4 Cobalt(IV)
oxide I
(transition metal)
Co4+ O2- *reduce charges Co2O
5 silicon disulfide C Si=1 S=2 SiS2
6 Magnesium
hydroxide I
(polyatomic)
Mg2+ OH - Mg(OH)2
7 Iron(II) chloride I
(transition metal)
Fe2+ Cl- FeCl2
8 Aluminum
nitrate I
(polyatomic)
Al3+ NO3 -
Al(NO3)3
9 Ammonium
phosphate I
(polyatomic)
NH4+ PO4
3+ (NH4)3PO4
10 Tin(III) bromide I
(transition metal)
Sn3+ Br - SnBr3
11 carbon
monoxide C
C=1 O=1
*drop final o on mono CO
12 Iodine
trichloride C I=1 Cl=3 ICl3

94
Flyswatter Directions
1. While students are working on the worksheet, use the compounds from the list below
to begin preparing for the activity.
2. Write the formulas for those compounds on the board, as well as a few incorrect
formulas.
3. Students will break off into 2 groups.
a. Let them choose their group names!
4. When students are ready explain their responsibilities:
a. Each round, groups will designate 1 representative to be the flyswatter.
b. All students are required to find the formula for the compound given, but only
the flyswatter can swat the correct answer on the board.
5. When the groups have designated their first flyswatter, the two students will take the
flyswatter and prepare for their compound.
6. Choose a compound from the list and write the name on the sideboard, or project it so
that everyone can see.
7. The first student to swat the correct answer will receive 1 point for the team.
a. Incorrect answers are not worth anything, but the other team will get a chance
to swat the correct answer.
8. If both students swat the incorrect answer, the round becomes open to the groups.
(This is why it is important for groups to find the formula as well)
a. For this, the first group to raise their hand will get the chance to go first.
9. Play continues until all the correct answers are swatted!
*Notes: Make sure to use different colored markers and circle each formula on the board so
that they are easier to read.
95
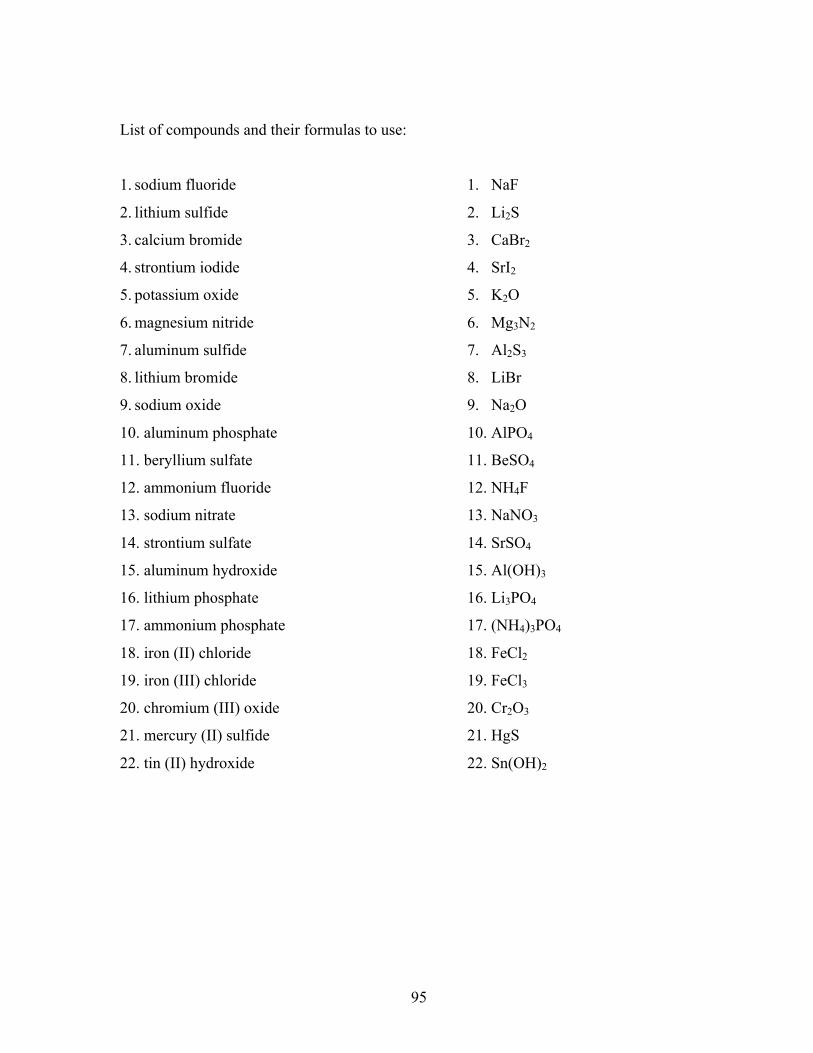
List of compounds and their formulas to use:
1. sodium fluoride
2. lithium sulfide
3. calcium bromide
4. strontium iodide
5. potassium oxide
6. magnesium nitride
7. aluminum sulfide
8. lithium bromide
9. sodium oxide
10. aluminum phosphate
11. beryllium sulfate
12. ammonium fluoride
13. sodium nitrate
14. strontium sulfate
15. aluminum hydroxide
16. lithium phosphate
17. ammonium phosphate
18. iron (II) chloride
19. iron (III) chloride
20. chromium (III) oxide
21. mercury (II) sulfide
22. tin (II) hydroxide
1. NaF
2. Li2S
3. CaBr2
4. SrI2
5. K2O
6. Mg3N2
7. Al2S3
8. LiBr
9. Na2O
10. AlPO4
11. BeSO4
12. NH4F
13. NaNO3
14. SrSO4
15. Al(OH)3
16. Li3PO4
17. (NH4)3PO4
18. FeCl2
19. FeCl3
20. Cr2O3
21. HgS
22. Sn(OH)2
96
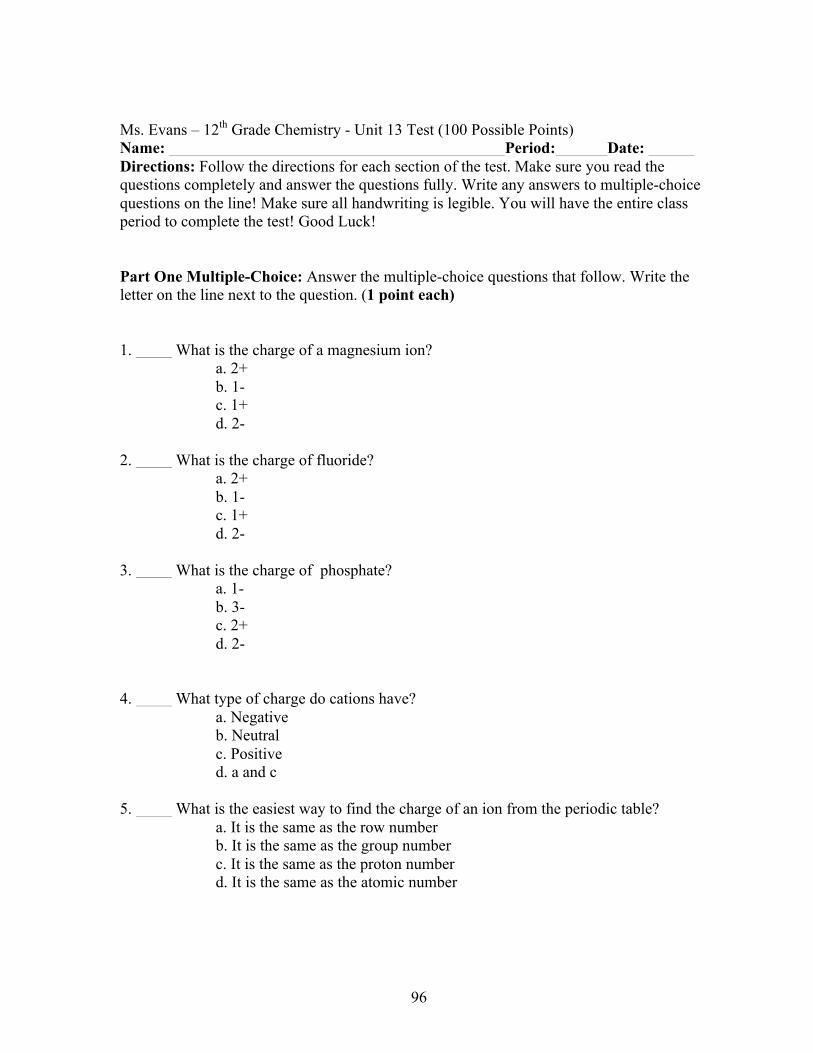
Ms. Evans – 12th Grade Chemistry - Unit 13 Test (100 Possible Points) Name: Period: Date: Directions: Follow the directions for each section of the test. Make sure you read the questions completely and answer the questions fully. Write any answers to multiple-choice questions on the line! Make sure all handwriting is legible. You will have the entire class period to complete the test! Good Luck! Part One Multiple-Choice: Answer the multiple-choice questions that follow. Write the letter on the line next to the question. (1 point each) 1. What is the charge of a magnesium ion? a. 2+ b. 1- c. 1+ d. 2- 2. What is the charge of fluoride? a. 2+ b. 1- c. 1+ d. 2- 3. What is the charge of phosphate? a. 1- b. 3- c. 2+ d. 2- 4. What type of charge do cations have? a. Negative b. Neutral c. Positive d. a and c 5. What is the easiest way to find the charge of an ion from the periodic table? a. It is the same as the row number b. It is the same as the group number c. It is the same as the proton number d. It is the same as the atomic number
97
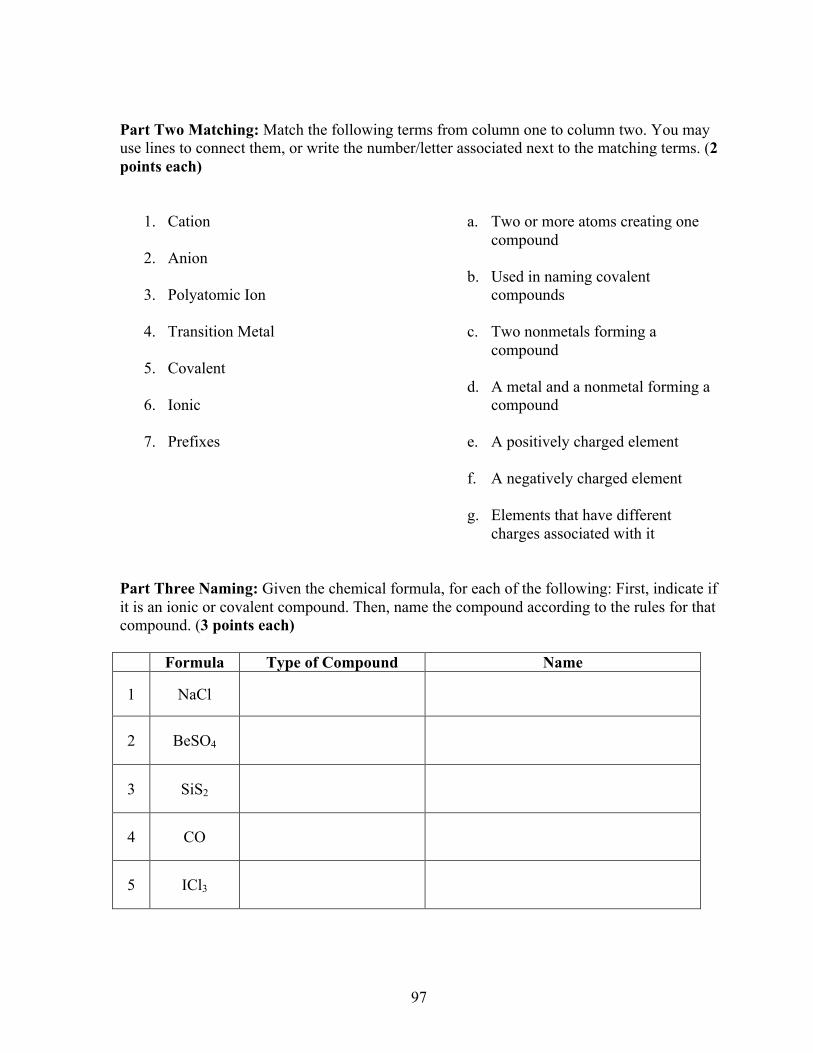
Part Two Matching: Match the following terms from column one to column two. You may use lines to connect them, or write the number/letter associated next to the matching terms. (2 points each)
1. Cation
2. Anion
3. Polyatomic Ion
4. Transition Metal
5. Covalent
6. Ionic
7. Prefixes
a. Two or more atoms creating one compound
b. Used in naming covalent compounds
c. Two nonmetals forming a
compound
d. A metal and a nonmetal forming a compound
e. A positively charged element
f. A negatively charged element
g. Elements that have different charges associated with it
Part Three Naming: Given the chemical formula, for each of the following: First, indicate if it is an ionic or covalent compound. Then, name the compound according to the rules for that compound. (3 points each)
Formula Type of Compound Name
1 NaCl
2 BeSO4
3 SiS2
4 CO
5 ICl3
98
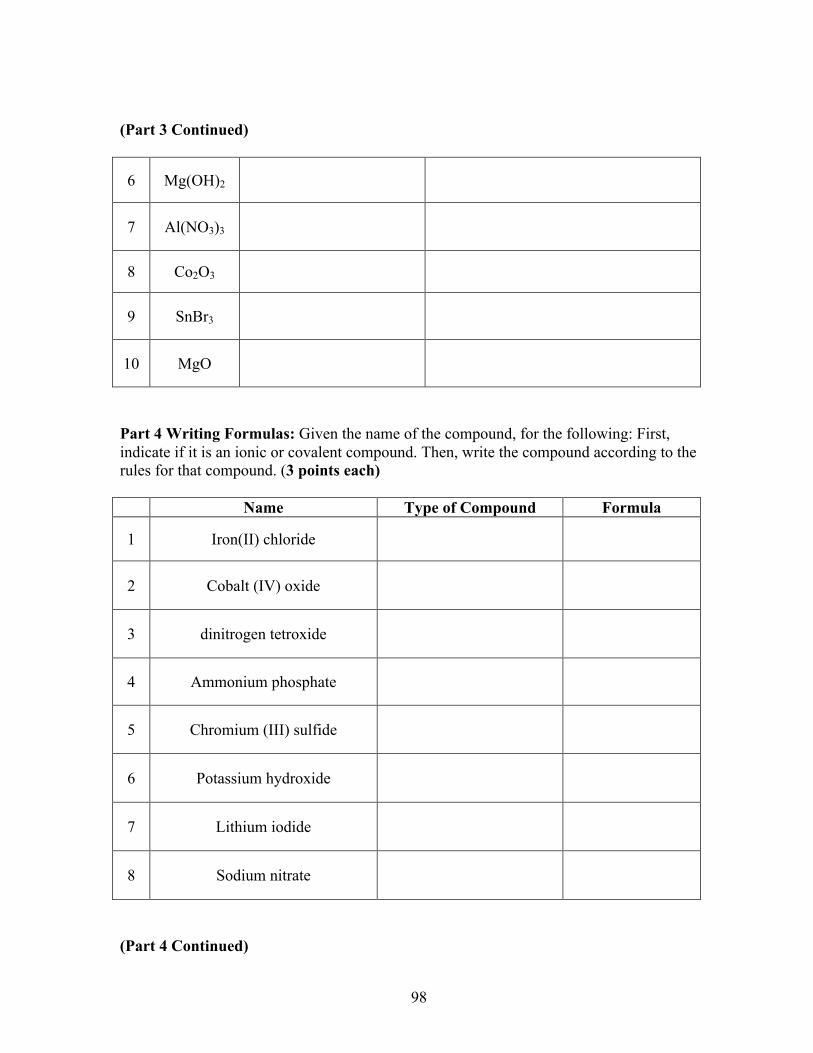
(Part 3 Continued)
6 Mg(OH)2
7 Al(NO3)3
8 Co2O3
9 SnBr3
10 MgO
Part 4 Writing Formulas: Given the name of the compound, for the following: First, indicate if it is an ionic or covalent compound. Then, write the compound according to the rules for that compound. (3 points each)
Name Type of Compound Formula
1 Iron(II) chloride
2 Cobalt (IV) oxide
3 dinitrogen tetroxide
4 Ammonium phosphate
5 Chromium (III) sulfide
6 Potassium hydroxide
7 Lithium iodide
8 Sodium nitrate
(Part 4 Continued)
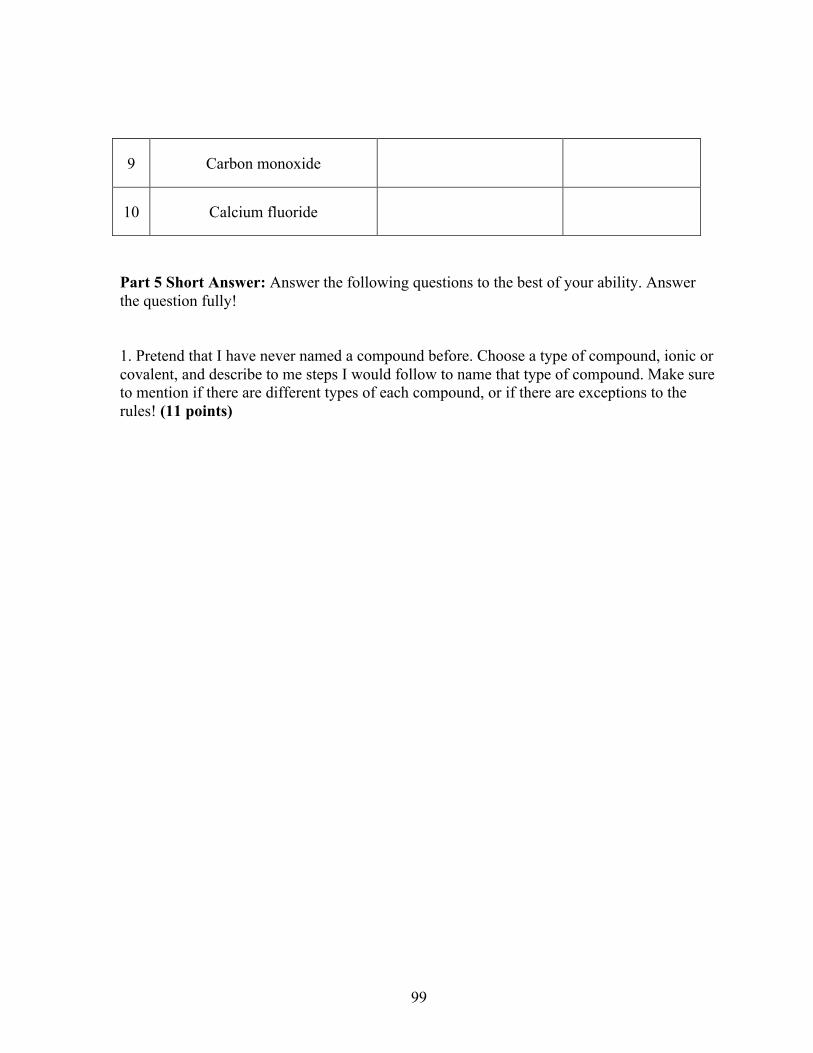
99
9 Carbon monoxide
10 Calcium fluoride
Part 5 Short Answer: Answer the following questions to the best of your ability. Answer the question fully! 1. Pretend that I have never named a compound before. Choose a type of compound, ionic or covalent, and describe to me steps I would follow to name that type of compound. Make sure to mention if there are different types of each compound, or if there are exceptions to the rules! (11 points)
100
2. Explain the trends in the periodic table of the following items: metals, nonmetals, transition metals, charges of cations, and charges of anions. You may use visual aids if you choose! (10 points) *Bonus: Give the steps for finding the name of the other type of compound in short answer question 1. If you chose covalent, you must now give steps for ionic. If you chose ionic, you must now give steps for covalent. (6 possible points)
101
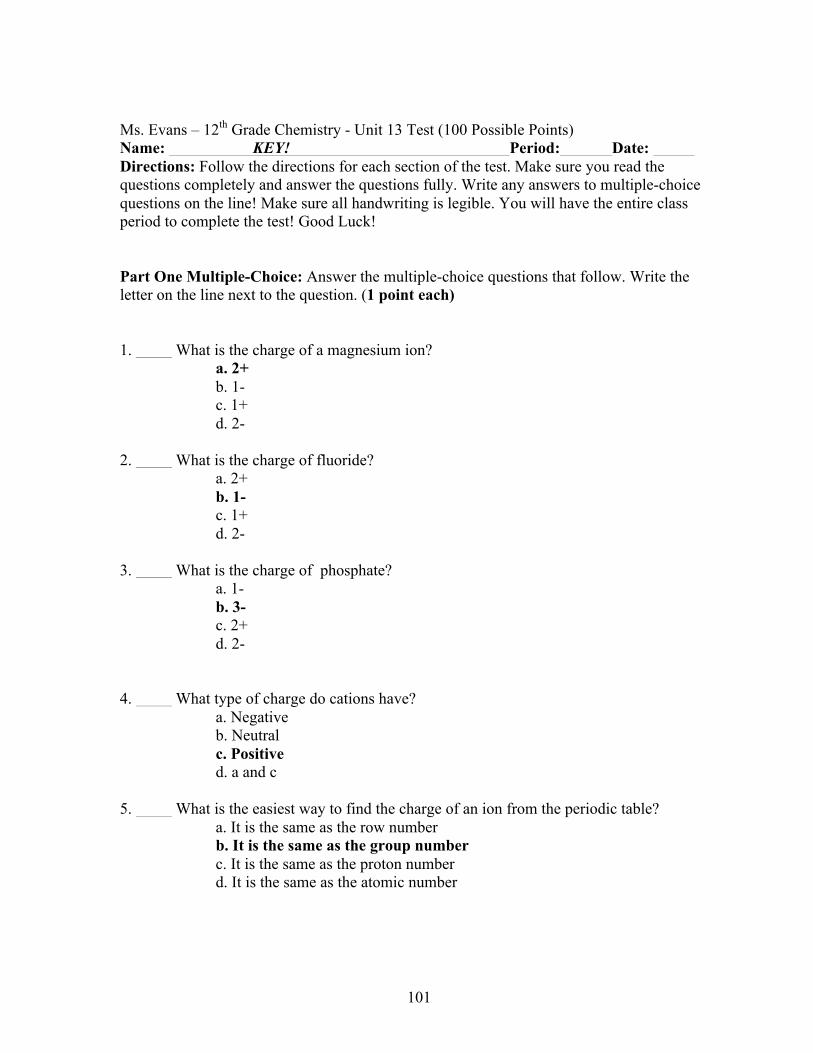
Ms. Evans – 12th Grade Chemistry - Unit 13 Test (100 Possible Points) Name: KEY! Period: Date: Directions: Follow the directions for each section of the test. Make sure you read the questions completely and answer the questions fully. Write any answers to multiple-choice questions on the line! Make sure all handwriting is legible. You will have the entire class period to complete the test! Good Luck! Part One Multiple-Choice: Answer the multiple-choice questions that follow. Write the letter on the line next to the question. (1 point each) 1. What is the charge of a magnesium ion? a. 2+ b. 1- c. 1+ d. 2- 2. What is the charge of fluoride? a. 2+ b. 1- c. 1+ d. 2- 3. What is the charge of phosphate? a. 1- b. 3- c. 2+ d. 2- 4. What type of charge do cations have? a. Negative b. Neutral c. Positive d. a and c 5. What is the easiest way to find the charge of an ion from the periodic table? a. It is the same as the row number b. It is the same as the group number c. It is the same as the proton number d. It is the same as the atomic number
102
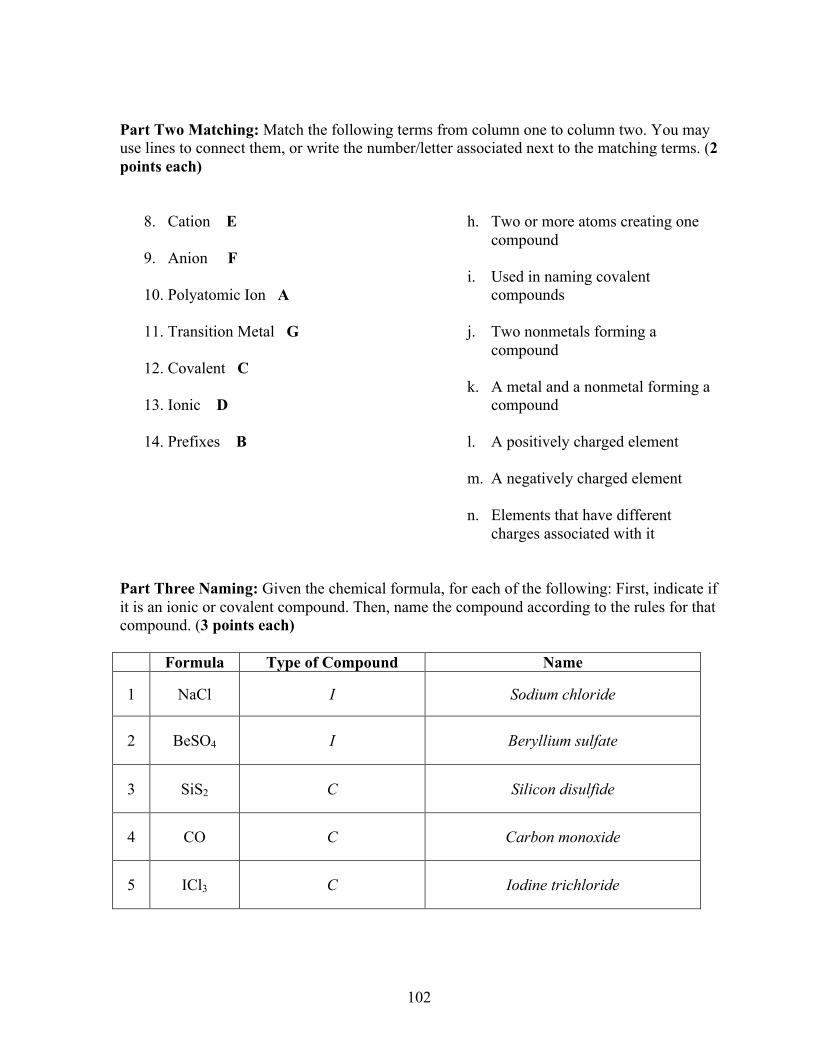
Part Two Matching: Match the following terms from column one to column two. You may use lines to connect them, or write the number/letter associated next to the matching terms. (2 points each)
8. Cation E
9. Anion F
10. Polyatomic Ion A
11. Transition Metal G
12. Covalent C
13. Ionic D
14. Prefixes B
h. Two or more atoms creating one compound
i. Used in naming covalent compounds
j. Two nonmetals forming a
compound
k. A metal and a nonmetal forming a compound
l. A positively charged element
m. A negatively charged element
n. Elements that have different charges associated with it
Part Three Naming: Given the chemical formula, for each of the following: First, indicate if it is an ionic or covalent compound. Then, name the compound according to the rules for that compound. (3 points each)
Formula Type of Compound Name
1 NaCl I Sodium chloride
2 BeSO4 I Beryllium sulfate
3 SiS2 C Silicon disulfide
4 CO C Carbon monoxide
5 ICl3 C Iodine trichloride
103
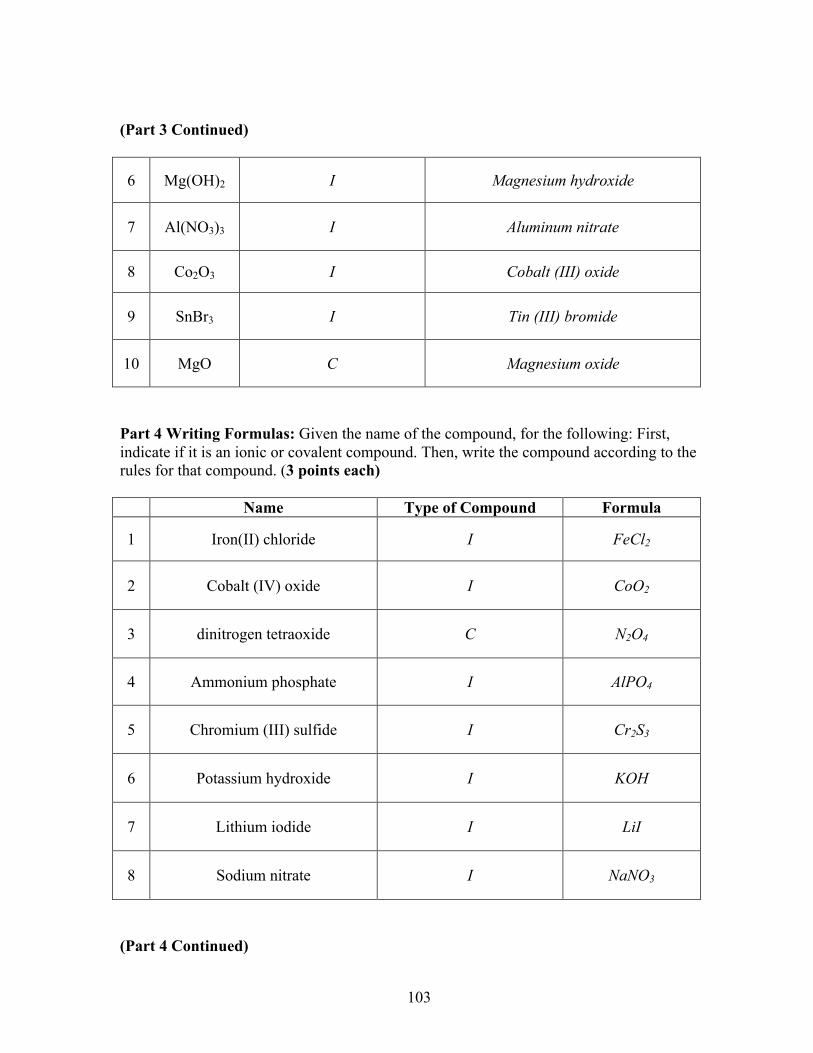
(Part 3 Continued)
6 Mg(OH)2 I Magnesium hydroxide
7 Al(NO3)3 I Aluminum nitrate
8 Co2O3 I Cobalt (III) oxide
9 SnBr3 I Tin (III) bromide
10 MgO C Magnesium oxide
Part 4 Writing Formulas: Given the name of the compound, for the following: First, indicate if it is an ionic or covalent compound. Then, write the compound according to the rules for that compound. (3 points each)
Name Type of Compound Formula
1 Iron(II) chloride I FeCl2
2 Cobalt (IV) oxide I CoO2
3 dinitrogen tetraoxide C N2O4
4 Ammonium phosphate I AlPO4
5 Chromium (III) sulfide I Cr2S3
6 Potassium hydroxide I KOH
7 Lithium iodide I LiI
8 Sodium nitrate I NaNO3
(Part 4 Continued)
104
9 Carbon monoxide C CO
10 Calcium fluoride I CaF2
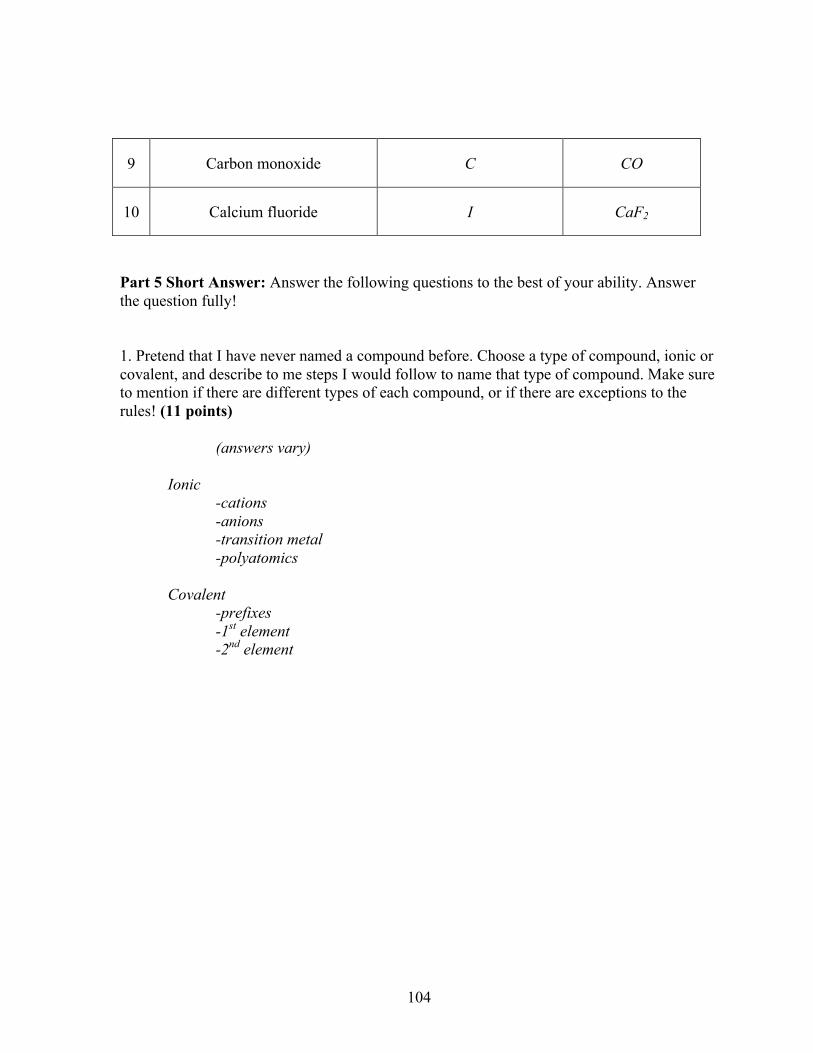
Part 5 Short Answer: Answer the following questions to the best of your ability. Answer the question fully! 1. Pretend that I have never named a compound before. Choose a type of compound, ionic or covalent, and describe to me steps I would follow to name that type of compound. Make sure to mention if there are different types of each compound, or if there are exceptions to the rules! (11 points) (answers vary) Ionic -cations -anions -transition metal -polyatomics Covalent -prefixes -1st element -2nd element
105
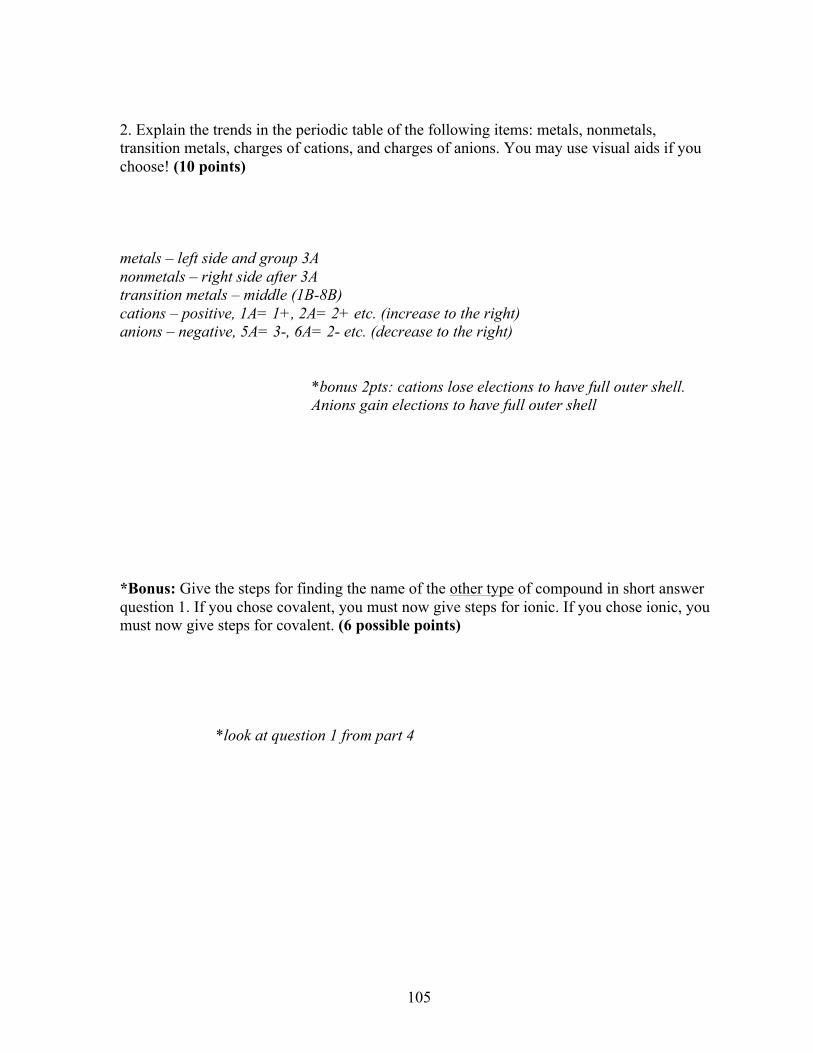
2. Explain the trends in the periodic table of the following items: metals, nonmetals, transition metals, charges of cations, and charges of anions. You may use visual aids if you choose! (10 points) metals – left side and group 3A nonmetals – right side after 3A transition metals – middle (1B-8B) cations – positive, 1A= 1+, 2A= 2+ etc. (increase to the right) anions – negative, 5A= 3-, 6A= 2- etc. (decrease to the right)
*bonus 2pts: cations lose elections to have full outer shell. Anions gain elections to have full outer shell
*Bonus: Give the steps for finding the name of the other type of compound in short answer question 1. If you chose covalent, you must now give steps for ionic. If you chose ionic, you must now give steps for covalent. (6 possible points)
*look at question 1 from part 4
106
WORKS CITED
Brockliss L (1996) Curricula. A History of the University in Europe, ed de Ridder-Symoens H (Cambridge Univ Press, Cambridge, UK), Vol II, pp 565–620. Davies, Dan. Teaching Science Creatively. London: Routledge, 2011. Print.
Dowdy, Joanne Kilgour., and Sarah Kaplan. Teaching Drama in the Classroom: A Toolbox for Teachers. Rotterdam: Sense, 2011. Print
Druger, M. (2004). Teaching tips: Innovations in undergraduate science instruction. Arlington, Va.: NSTA, National Science Teachers Association Press.
Freeman, S., Sarah, E., McDonough, M., Smith, M., Okoroafor, N., Jordt, H., & Wenderoth, M. (2014). Active learning increases student performance in science, engineering, and mathmatics. PNAS, 111(23), 8410-8415.
Hargreaves, D. (1994) The new professionalism: The synthesis of professional and institutional development. Teaching and Teacher Education. 10(4): 423–38.
Herr, Norman. The Sourcebook for Teaching Science: Grades 6-12: Strategies, Activities, and Instructional Resources. San Francisco, CA: Jossey-Bass, 2008. Print.
Herron, J. Dudley, and I. Dwaine Eubanks. The chemistry classroom: formulas for successful teaching. Washington, DC: American Chemical Society, 1996. Print. Kardos, S. M., & Johnson, S. M. (2007). On their own and presumed expert: New teachers’
experience with their colleagues. Teachers College Record, 109(9), 2083-2106. Killen, Roy. Effective Teaching Strategies. South Melbourne, Vic.: Thomson Learning
Australia, 2006. Print. Levinson, Ralph. Teaching Science. London: Routledge in Association with the Open
University, 1994. Print. Linz, E., & Heater, M. (2011). Team teaching science: Success for all learners. Arlington,
VA: National Science Teachers Association. Little, J.W. (1987). Teachers as colleagues. In V. Richardson-Koehler (Ed.), Educators'
handbook: A research perspective (491-510). New York: Longman. Llewellyn, D. (2011). Differentiated science inquiry. Thousand Oaks, Calif.: Corwin Press.
107
Moore, Kenneth D. Effective Instructional Strategies: From Theory to Practice. Thousand Oaks: SAGE Publications, 2005. Print.
Marzano, R. (2007). The art and science of teaching a comprehensive framework for
effective instruction. Alexandria, Va.: Association for Supervision and Curriculum Development.
Newsome, J. (2009). Reforming secondary science instruction. Arlington, Va.: NSTA Press. Nutta, J., & Bautista, N. (2011). Teaching science to English language learners. New York:
Routledge. Osters, S. (2003). Writing Measurable Learning Outcomes. Retrieved September 13, 2014,
from http://www.gavilan.edu/research/spd/Writing-Measurable-Learning-Outcomes.pdf
Paulson, Donald, R. “Active Learning and Cooperative Learning in the Organic Chemistry
Lecture Class.” Journal of Chemical Education 76.8 (1999): 1136-1140. Print. Pomeroy, Deborah. "Implications Of Teachers' Beliefs About The Nature Of Science:
Comparison Of The Beliefs Of Scientists, Secondary Science Teachers, And Elementary Teachers." Science Education 77.3 (1993): 261-278. Print.
Tobin, Kenneth George. Teaching and Learning Science: A Handbook. Westport, CT:
Praeger, 2006. Print. Richards, J. (2002). Methodology in language teaching: An anthology of current practice.
New York: Cambridge University Press. Rosebery, A. (2008). Teaching science to English language learners: Building on students'
strengths. Arlington, Va.: NSTA, National Science Teachers Association.
Rosenholtz, S. (1989) Teacher’s workplace: The social organization of schools. New York: Longman.
Roy, K. (2012). The NSTA Ready-Reference Guide to Safer Science, Vol 3. Arlington: National Science Teachers Association.
Sammons, P., Thomas, S. and Mortimore, P. (1997) Forging links: Effective schools and effective departments. London: Paul Chapman Publishing.
Silberberg, M. (2006). Chemistry: The molecular nature of matter and change. S.l.: Mcgraw-Hill.
108
Tweed, A. (2009). Designing effective science instruction: What works in science classrooms. Arlington, Va.: NSTA Press, NSTA Press, National Science Teachers Association/McREL.
Vahia, M. (2013, November 16). Why is science such a difficult subject? | Latest News &
Updates at Daily News & Analysis. Retrieved October 20, 2014. Weindling, D. (2005). Teachers as collaborative professionals: A survey of the views of ATL
members. London: Association of Teachers and Lecturers.