DEVARAJ-THESIS-2015.pdf - The University of Texas at Austin
77
DISCLAIMER: This document does not meet the current format guidelines of the Graduate School at The University of Texas at Austin. It has been published for informational use only.
-
Upload
khangminh22 -
Category
Documents
-
view
2 -
download
0
Transcript of DEVARAJ-THESIS-2015.pdf - The University of Texas at Austin

DISCLAIMER:
This document does not meet the current format guidelines of
the Graduate School at The University of Texas at Austin.
It has been published for informational use only.

Copyright
by
Varun Devaraj
2015
The Thesis Committee for Varun Devaraj
Certifies that this is the approved version of the following
thesis:
A Hands-On Manufacturing Curriculum for High School
Students
APPROVED BY
SUPERVISING COMMITTEE:
Richard H. Crawford, Supervisor
Joseph. J. Beaman
A Hands-On Manufacturing Curriculum for High School
Students
by
Varun Devaraj, B.E.
Thesis
Presented to the Faculty of the Graduate School of
The University of Texas at Austin
in Partial Fulfillment
of the Requirements
for the Degree of
Master of Science in Engineering
The University of Texas at Austin
December 2015

Dedication
As a child hailing from India above all I learnt above almighty there are three
more important things. They are MATHA, PITHA, GURU & DEIVAM. I would like
to dedicate this to them in the same order age old saints few thousand years back have
penned down in the Upanishad (Old textbooks on way of life). MOM, DAD,
TEACHERS and finally GOD!
V
Acknowledgements
My internship with Dr. Beaman during my undergraduate degree and his recommendation
letter are two of the reasons for my admission to The University of Texas at Austin. I am
always grateful to him for that. Dr. Richard Crawford has been a turning point in my career.
I have never been interested in pure equations or fascinated by pure academic content
where the real life application is not seen. As first-year students in graduate school most of
us tried to pursue research projects with funding. I too got caught in that trap and initially
took up a research project under a renowned professor on a highly mathematics and
equation oriented project. Although I did not like the project, the alluring funding in that
project made me accept it. Sometimes the course of life is shaped by the circumstances and
when we are about to crash, fortunately we enter into the Auto Pilot mode! Dr. Crawford’s
research was one such blessing. When I learned from another student that his research was
developing hands-on curricula for high school students, I was attracted by it. I immediately
met him and suggested my own research topic to him. Although the project did not have
funding, I worked under the same professor as a Teaching Assistant and did what I love
without compromising on the funds. I learned a lot from Dr. Crawford and saw my
transition from a child to an adult. He gave me complete independence, and when I got
feedback towards the end on the success of the curriculum as tested at Bowie High School,
I guess that made all my hard work worth it. I would next like to thank my brother who
played the role of my dad and taught me relentlessly without losing patience whenever I
did not understood some lessons or concepts. I would also like to mention Sathan, my
friend, who motivated me, believed in me and made me realize my potential. Special thanks
to my dear friend Mansi who played a pivotal part in motivating me and encouraging till
the very end. Finally I would like to thank my mom, without whom none of the above
would have been possible. She has been my backbone, pillar, support and strength in my
entire life.

vi
Abstract
A Hands-On Manufacturing Curriculum for High School Students
by
Varun Devaraj, M.S.E
The University of Texas at Austin, 2015
Supervisor: Richard H. Crawford
The UTeachEngineering program in the Cockrell School of Engineering of The University of
Texas at Austin has developed a high school engineering curriculum, Engineer Your World (EYW),
with the intent of interesting students in pursuing Science, Technology, Engineering, and
Mathematics (STEM) careers. However, EYW currently contains no curriculum modules on
manufacturing. In fact, a literature review shows very few high school manufacturing curricula,
and these typically require state-of-the-art manufacturing facilities, thus making the curricula
unaffordable to many schools. Thus, there is a need to develop a new manufacturing curriculum
module to provide all schools with the opportunity to teach the breadth of the core concepts of
manufacturing without being limited by constraints, such as finance, materials, facilities, etc. This
thesis presents the details of such a module. The hands-on approach for teaching manufacturing
bridges the gap between theory and practice. Students first learn manufacturing techniques in
detail, and then manufacture a simple product using simple setups designed to provide concrete
experience with a particular manufacturing process. The hypothesis is that, after completing the
module, students’ understanding of manufacturing is increased compared to that before the
module. This thesis describes the curriculum and its evaluation. The capstone module of the
curriculum features an inexpensive surrogate manufacturing machine that can be assembled
quickly by teachers or students to provide hands-on experience. The capstone module of the
curriculum was tested with students from an engineering class in a high school in Austin, TX,
USA. A pre-test/post test was conducted to evaluate the effectiveness of the curriculum. It was
found that the curriculum was simple to understand and implement and also provided insights into
manufacturing which are similar to what could be attained with a module using more expensive
manufacturing equipment.
vii
Table of Contents CHAPTER 1: Introduction............................................................................................................. 1
1.1 UTeachEngineering ....................................................................................................... 1
1.2 Engineering in High Schools in Austin ............................................................................ 2
1.3 Significance of Manufacturing....................................................................................... 3
1.4 Requirements of the Module ........................................................................................ 4
1.4.1 Duration of the Curriculum Module ......................................................................... 4
1.4.2 Cost of the Curriculum ............................................................................................. 5
1.5 Curriculum Development Process ................................................................................. 5
CHAPTER 2: Literature Review..................................................................................................... 7
2.1 Pre-College Engineering Education ............................................................................... 7
2.1.1 Existing Curricula and Their Problems. ..................................................................... 7
2.1.2 Benefits of Engineering to High School Students ...................................................... 8
2.1.3 Need for High School Engineering Curricula ............................................................. 8
2.1.4 Other Initiatives to Expose High School Students to Engineering .............................. 9
2.1.5 Insights from Existing High School Engineering Curricula ........................................ 10
2.2 Manufacturing Education in High Schools ................................................................... 12
2.2.1 Need for Manufacturing in High Schools: ............................................................... 13
2.3 Key Concepts for Learning Manufacturing .................................................................. 15
CHAPTER 3: Methodology for Design of the Curriculum ............................................................ 17
3.1 Knowing and Learning ................................................................................................ 17
3.1.1 Types of Learning ................................................................................................... 17
3.1.2 Approaches to Learning ......................................................................................... 18
3.1.3 Approaches to Teaching......................................................................................... 19
3.1.4 Methods of Teaching ............................................................................................. 20
3.2 Framework for the Curriculum .................................................................................... 22
viii
CHAPTER 4: The Curriculum Module ......................................................................................... 23
4.1 Customer Needs Analysis ............................................................................................ 23
4.2 Manufacturing Processes ............................................................................................ 24
4.3 Goals of the Curriculum .............................................................................................. 26
4.4 Overview of the Curriculum ........................................................................................ 27
CHAPTER 5: Capstone Project.................................................................................................... 33
5.1 Problems with Existing Lathes ..................................................................................... 33
5.1.1 Analysis of Existing Lathes ...................................................................................... 34
5.2 Design of the Desktop Mini-Lathe ............................................................................... 36
5.2.1 Design Decisions .................................................................................................... 37
5.2.2 Make and Take Kits ............................................................................................... 38
CHAPTER 6: Verification and Validation of The Curriculum ........................................................ 40
6.1 Definition of Verification and Validation. .................................................................... 40
6.2 The need for Validation .............................................................................................. 40
6.2.1 Developing a model for Verification and Validation................................................ 41
6.3 Content of the Pilot curriculum module ...................................................................... 41
6.4 The Pre-test and Post-test questions .......................................................................... 42
6.4.1 SURVEY: Fundamentals of Lathe ................................................................................
6.5 Results & Discussion ................................................................................................... 44
CHAPTER 7: Conclusion And Future Work ................................................................................. 47
7.1 Conclusion .................................................................................................................. 47
7.2 Future work ................................................................................................................ 48
REFERENCES ............................................................................................................................. 49
APPENDIX A: Principles of Manufacturing Curriculum Outline from Project Lead the Way 15..... 54
APPENDIX B: Demo Class Presentation at Bowie High School .................................................... 59
APPENDIX C: Test Results and IRB Proposal ...................................................................................

ix
APPENDIX D: Link to the Instructions for Lathe Construction ..................................................... 64
APPENDIX E: Dimensional Drawings and Bill of Materials for Lathe ........................................... 65
1
CHAPTER 1: Introduction
There has been considerable interest in Science, Technology, Engineering, and
Mathematics (STEM)1 education in the past few years. According to Forbes, “Only 5%
of U.S workers are employed in fields related to science and engineering, yet they are
responsible for more than 50% of our sustained economic expansion”2. With advances
in science and technology, the need for more specialized employees is on the rise. It is
here that the need for engineering graduates is imperative. Schools have taken
initiatives to expose students at an early level to STEM education. As part of these
initiatives, engineering curricula have been developed which give students a broad
introduction to topics. The Engineer Your World (EYW) curriculum, developed by the
UTeachEngineering program at The University of Texas at Austin focuses on
engineering design. However, EYW contains no curriculum modules on manufacturing.
As a mechanical engineer fascinated with manufacturing I was curious to develop a
short module for manufacturing to be added to the EYW curriculum. This served as the
starting point for the research reported in this thesis. In fact, a literature review showed
very few high school manufacturing curricula, and these typically require state-of-the-
art manufacturing facilities, thus making the curricula unaffordable to many schools.
This validated the need to develop a new manufacturing curriculum module to provide
all schools with the opportunity to teach the breadth of the core concepts of
manufacturing without financial, material, or facilities constraints.
1.1 UTeachEngineering
UTeachEngineering is a project at The University of Texas at Austin funded by
the National Science Foundation’s Math and Science Partnership program. It has been
an innovator in the field of high school education since 2008. Engineer your World is
one aspect UTeachEngineering.3 EYW is an innovative student-centered curriculum
that facilitates student engagement in authentic engineering scenarios and inspires the
students to think like engineers.3 The goal of the curriculum is to combine concepts
across various disciplines to deliver content that is relevant and as close to the real life
challenges the student could face. The goal of EYW is to not turn all students into future
engineers but to inspire the students to adopt an engineering approach in solving real
world problems in any discipline.4 The curriculum covers a breadth of different
2
engineering topics, such as engineering design, reverse engineering, systems
engineering, programming micro-controllers, etc.5
Manufacturing is not covered in this curriculum, providing an opportunity for
research to enhance the existing EYW curriculum. The literature review in the next
chapter justifies the need for such a module. As part of the background research I visited
two high schools in Austin, TX, USA, to gain insights on how engineering is taught at
the high school level and to gage the interest in manufacturing. This is discussed in the
next section.
1.2 Engineering in High Schools in Austin
The schools visited were Anderson High School and Bowie High School, both
public schools in the Austin Independent School District (Austin ISD). At the time of
writing this thesis, Mr. John Sperry teaches Manufacturing to students at Anderson
High School. On visiting his class on manufacturing, I learned that some schools indeed
teach manufacturing. The problem is not whether it is taught, but how it is taught.
Manufacturing by its nature involves fabricating physical objects. I understood from
Mr. Sperry that having students actually use basic manufacturing equipment, such as a
milling machine and lathe, is imperative. Substitutes, such as videos, are not as
effective as manufacturing an actual part. Mr. Sperry’s opinion is consistent with the
literature, and explains why very few high school curricula on manufacturing exist.
Very few schools have access to a complete manufacturing laboratory, such as the one
at Anderson, which is equipped with a lathe, a milling machine and even a state-of-the-
art 3D printer. This barrier to accessibility of manufacturing to all schools results from
the very high initial equipment investment. The course taught at Anderson High School
is a one year long in-depth course on manufacturing based on the Texas Essential
Knowledge and Skills (TEKS) standards as dictated by the Texas Education Agency
(TEA).36
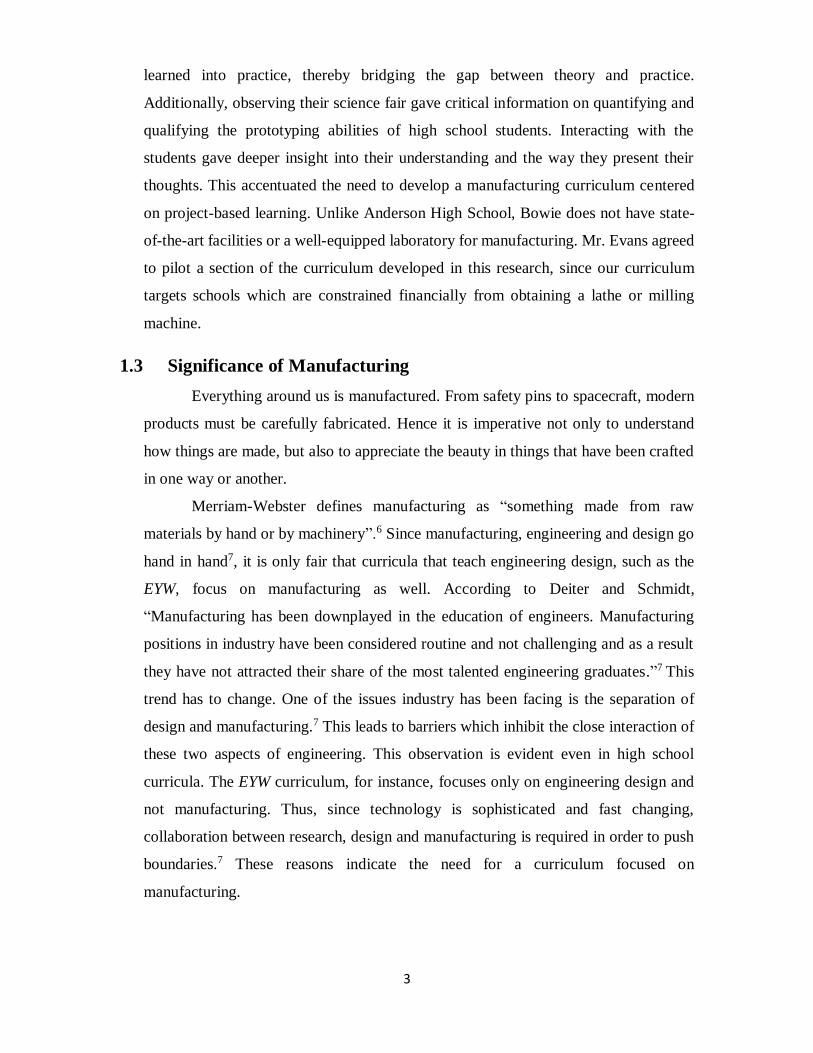
The second school visited was Bowie High School, where Mr. Mike Evans
teaches an introduction to engineering course. On observing that class I understood that
project-based learning was essential for the success of any engineering curriculum. The
students in that class were working in teams of four to build rockets, which was a
project based on one of the previous lessons in that course. Mr. Evans explained that
this hands-on approach gives students a platform to put the academic skills they have
3
learned into practice, thereby bridging the gap between theory and practice.
Additionally, observing their science fair gave critical information on quantifying and
qualifying the prototyping abilities of high school students. Interacting with the
students gave deeper insight into their understanding and the way they present their
thoughts. This accentuated the need to develop a manufacturing curriculum centered
on project-based learning. Unlike Anderson High School, Bowie does not have state-
of-the-art facilities or a well-equipped laboratory for manufacturing. Mr. Evans agreed
to pilot a section of the curriculum developed in this research, since our curriculum
targets schools which are constrained financially from obtaining a lathe or milling
machine.
1.3 Significance of Manufacturing
Everything around us is manufactured. From safety pins to spacecraft, modern
products must be carefully fabricated. Hence it is imperative not only to understand
how things are made, but also to appreciate the beauty in things that have been crafted
in one way or another.
Merriam-Webster defines manufacturing as “something made from raw
materials by hand or by machinery”.6 Since manufacturing, engineering and design go
hand in hand7, it is only fair that curricula that teach engineering design, such as the
EYW, focus on manufacturing as well. According to Deiter and Schmidt,
“Manufacturing has been downplayed in the education of engineers. Manufacturing
positions in industry have been considered routine and not challenging and as a result
they have not attracted their share of the most talented engineering graduates.”7 This
trend has to change. One of the issues industry has been facing is the separation of
design and manufacturing.7 This leads to barriers which inhibit the close interaction of
these two aspects of engineering. This observation is evident even in high school
curricula. The EYW curriculum, for instance, focuses only on engineering design and
not manufacturing. Thus, since technology is sophisticated and fast changing,
collaboration between research, design and manufacturing is required in order to push
boundaries.7 These reasons indicate the need for a curriculum focused on
manufacturing.
4
1.4 Requirements of the Module
There are numerous concepts which might be included in a manufacturing
module. Adequate presentation of these concepts at the high school level requires
varying time spans and depth of coverage. We must ensure that the concepts taught
provide adequate depth to equip the student with the essential information needed for
understanding manufacturing processes. In particular, the concepts should serve as
tools to assess the capstone project included in the module and provide depth of
understanding of the various manufacturing processes.
There are several ways of teaching these concepts. A key is to connect these
concepts directly to real manufacturing processes. High school students are really
inquisitive as compared with the college students.8 According to Mr. Evans’
observation, students become very engrossed in a topic if they find it engaging.
However, they may lose interest right away if they think the topic is not intriguing
enough. Hence, it is imperative to support the teaching of a concept with concrete
rationale and justification of its relationship to manufacturing. The value of the concept
to the students should be clear. Once the students are able to connect the dots and see
the real life application of the concept, it will improve their engagement.8
1.4.1 Duration of the Curriculum Module
The question then arose as to the length of the curriculum module designed to
be plugged into the existing engineering curriculum. More details on the requirements
and constraints are discussed in Chapter 4. Mr. Evans provided enlightenment on the
role that teachers play in adopting any new curriculum module. Since teachers serve as
gatekeepers to the curriculum, any new module should not be too time intensive as the
teachers may find it hard to fit it into their existing curriculum. Thus, he suggested that
the curriculum module be designed for three weeks. However, modules in EYW are
generally longer to allow schools to teach the concepts in some depth. So it was decided
that the length of the manufacturing module should not exceed six weeks. This
timespan gives schools some flexibility in length and depth of coverage of the subject.
The module is structured with basic concepts and more advanced topics. If the module
must be taught at a quicker pace, then the basic curriculum can be taught to cover the
concepts in three weeks. Alternatively, schools can choose to delve a little further into
the subject by teaching the full six week module.
5
1.4.2 Cost of the Curriculum
Based on the literature review and benchmarking at Austin ISD high schools, it
is clear that cost is indeed a barrier for integrating a manufacturing curriculum at the
high school level. Even low cost curricula such as EYW require an annual license fee
and have upfront costs for permanent equipment..5 Since Bowie High School was our
target customer, and as they do not have manufacturing facilities, Bowie provided an
excellent benchmark for the cost of the module. Mr. Evans suggested that $20 per
student for six weeks is a fair cost. With about 20 students in the class, the total target
cost is $400. Compared to other available curricula, this is a relatively low cost
curriculum.
1.5 Curriculum Development Process
A systematic approach is needed to develop a successful curriculum9.
According to Stabback et al.9, four broad areas must be addressed:
1. Focus on learning and learners in the curriculum
2. Content and delivery of the curriculum
3. Documentation of the curriculum
4. Curriculum development processes, including monitoring and
evaluation.
Point 1 can be covered by emulating the tried and tested learning strategies as
discussed further in the literature review chapter. The initial interactions with students
at the science fair, in their classes and observing their projects further assisted in this
process. The second point calls for a special framework called the “Understanding by
Design” approach which focuses on the end goal first and working backwards.50 This
is discussed further in Chapters 2 and 4. As for the documentation of the curriculum,
Mr. Evans suggested that most of curriculum modules are hard to implement as they
end up being too verbose and difficult to understand. Instead, he suggested videos and
presentations are more effective and usable forms of documentation of the curriculum.
This approach was validated when a sample section of the module was taught by Mr.
Evans to his students using the presentation slides developed as part of this research
(see Appendix B) and a demonstration of the capstone project was conducted. The
outline of the curriculum so developed and its Performance Tasks are documented in
Chapter 4. The final point in the curriculum development process discusses monitoring

6
and evaluation. As discussed above, a section of the curriculum was evaluated using
pre-tests and post-tests. The results of this evaluation are discussed in Chapter 6 and
general conclusions drawn from the research are discussed in Chapter 7.
7
CHAPTER 2: Literature Review
This chapter reviews the existing literature on teaching manufacturing at the
high school level. The purposes of this review are to identify the current shortcomings
in any existing curricula and to give a broader understanding of the goals of preparing
such a curriculum. The review uncovered a lack of broad curricula on manufacturing
that meet the constraints discussed in Chapter 1.
Thus, the literature review gives deeper insight into the overall picture and
challenges of teaching engineering in high school. This background lays a strong
foundation for identifying the different methodologies adopted for teaching
manufacturing and understanding the extent to which manufacturing has been covered
at the high school level. The literature review focuses on the following areas.
1. Engineering in high school.
2. Manufacturing education in high schools.
3. Key concepts for learning manufacturing.
2.1 Pre-College Engineering Education
2.1.1 Existing Curricula and Their Problems.
There are several commercially available engineering curricula, such as Project
Lead the Way (Indianapolis, IN, USA, https://www.pltw.org/), the Infinity Project
(Dallas, TX, USA, http://www.smu.edu/Lyle/Institutes/CaruthInstitute/K-
12Programs/InfinityProject), and digital libraries funded by NSF and ASEE, such as
TeachEngineering (https://www.teachengineering.org/), Community for Advancing
Discovery Research in Education (CADRE, cadrek12.org), and eGFI (http://www.egfi-
k12.org/). The research team for the Innovation Curriculum for Engineering in High
School (ICE-HS) was developed to address the need of defining an engineering
curriculum in a charter high school. As a part of their research, the team reviewed
several vendor prescribed curricula, such as those mentioned above. According to ICE-
HS, “the inflexibility of vendor sold curricula and lack of structure with the digital
libraries posed some challenges for teaching engineering in high school.”33 This finding
was supported by their study at Davinci School for Science and the Arts (El Paso, TX,
8
USA), which found the vendor specific engineering curricula expensive to implement.
More details on this study are discussed later in this chapter. Although the teachers in
the school received training from the vendors of these curricula, they lacked the
structure to introduce a discreet engineering course in high schools which catered to all
the students. ICE-HS hence concluded that the school needed to customize available
curricula for implementing a discrete engineering course in high schools.33 ICE-HS
was asked to address this need.
2.1.2 Benefits of Engineering to High School Students
The idea that engineering increases creativity in students was supported as early
as 1976 based on a five week summer program offered at the Christian Brothers
University.10 Engineering provides the skills needed to solve any problem or meet any
challenge.9 Engineering also helps students make connections to understand the
complementary relationships between science, technology, engineering and
mathematics.9 Most importantly the spatial skills of students can be significantly
increased when exposed to engineering at the high school level.12 Spatial intelligence
is the ability to visualize the shapes and geometry in one’s mind. In a study conducted
by Brudigam and Crawford, 207 high school students in a geometry class, some of
whom were also enrolled in an introductory engineering course, were administered a
standard test of spatial reasoning. The study found significantly higher test scores for
those students enrolled in the engineering course.12 Research suggests that spatial
thinking is an important prerequisite of achievement in STEM coursework and careers.9
Numerous experiments report that after a short training period (ranging from hours to
a few weeks), students of both sexes improve their spatial skills.13 Spatial training also
improves children's mathematics abilities.14 Based on these studies, it is reasonable to
assume that engineering activities can increase the spatial intelligence in high school
students as well.
2.1.3 Need for High School Engineering Curricula
According to the U.S. Bureau of Labor, the estimated number of jobs to be filled
in engineering and science will grow at more than three times the rate of other
professions. According to the U.S. Department of Commerce, by the year 2018, jobs
in STEM fields will have grown by 17 percent.15 This is expected to almost double the
growth rates for non-STEM majors. 15 Additionally, the U.S. Department of Commerce

9
predicts that there will be about 1.2 million vacant STEM positions in the United States
by the year 2018. 15 These predictions suggest that STEM is where jobs are today and
where job growth potentially will be in the future. To cater to this need and motivate
budding engineers to take up engineering as a career path, early introduction to
engineering at high schools would be useful.
It is also interesting to note that 40 to 50 percent of college engineering students
switch to other majors or drop out of college after enrolling in an engineering school.16.
A recent study of 113 undergraduates from large top tier institutions in the eastern
United States, who left engineering in 2004, 2007, and 2008, pointed to three key
reasons: poor teaching and advising; the difficulty of the engineering curriculum; and
a lack of a sense of belonging within engineering.17 These factors affect a student’s
self-confidence in his or her ability to perform.15, 16 This accentuates the need for
introduction of high school engineering programs and curricula to bridge that gap.
Colleges may have state-of-the-art laboratories and professors may be experts in
solving complex problems. But a freshman in college is not far removed from a high
school student in terms of engineering intellect. The demands of a college engineering
curriculum can be overwhelming to the point that a student is left with no option but to
quit. High school engineering courses provide one way to bridge the gap between the
education in high schools and colleges.
2.1.4 Other Initiatives to Expose High School Students to Engineering
Several organizations have already taken the initiative in this regard. One of the
early ones to take initiative in this space was mentioned above: the Christian Brothers
University.10 Their Early Identification Program seeks to introduce high school
students to engineering. It is a five week summer program that has evolved over the
years. The students were given a capstone project of building a scaled-down version of
an actual tower. In addition, the students attended seminars by eminent engineers and
were taken on field trips. Many such enrichment programs are offered by various
universities, including summer camps. Many, however, are paid programs or rigorously
screen applicants so that only a select few are admitted. The University of Alabama
charges $1850, for one such program.19 My Introduction to Engineering is another
program organized by The University of Texas at Austin for students with strong
interests in engineering, science or mathematics.20 The program especially targets
10
populations who are underrepresented in engineering. Other noteworthy colleges to
offer such initiatives include MIT and Stanford. These camps are generally organized
during the summer and have limited admission. Many are also expensive to attend.
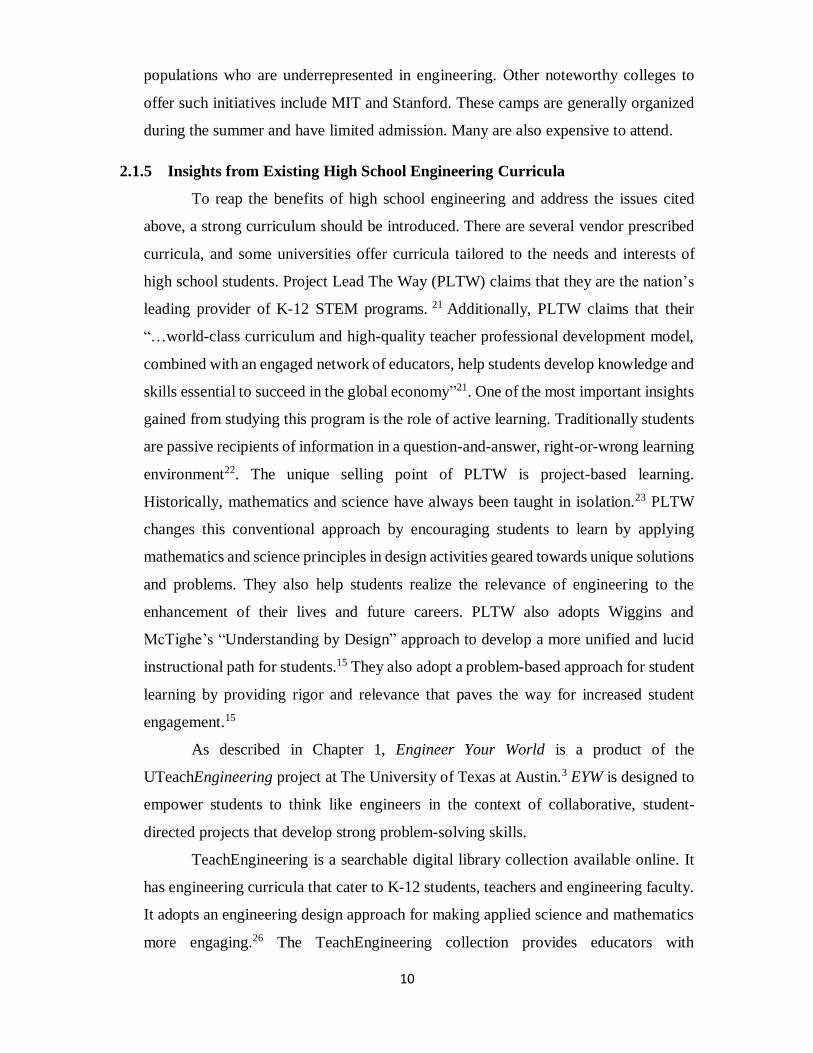
2.1.5 Insights from Existing High School Engineering Curricula
To reap the benefits of high school engineering and address the issues cited
above, a strong curriculum should be introduced. There are several vendor prescribed
curricula, and some universities offer curricula tailored to the needs and interests of
high school students. Project Lead The Way (PLTW) claims that they are the nation’s
leading provider of K-12 STEM programs. 21 Additionally, PLTW claims that their
“…world-class curriculum and high-quality teacher professional development model,
combined with an engaged network of educators, help students develop knowledge and
skills essential to succeed in the global economy”21. One of the most important insights
gained from studying this program is the role of active learning. Traditionally students
are passive recipients of information in a question-and-answer, right-or-wrong learning
environment22. The unique selling point of PLTW is project-based learning.
Historically, mathematics and science have always been taught in isolation.23 PLTW
changes this conventional approach by encouraging students to learn by applying
mathematics and science principles in design activities geared towards unique solutions
and problems. They also help students realize the relevance of engineering to the
enhancement of their lives and future careers. PLTW also adopts Wiggins and
McTighe’s “Understanding by Design” approach to develop a more unified and lucid
instructional path for students.15 They also adopt a problem-based approach for student
learning by providing rigor and relevance that paves the way for increased student
engagement.15
As described in Chapter 1, Engineer Your World is a product of the
UTeachEngineering project at The University of Texas at Austin.3 EYW is designed to
empower students to think like engineers in the context of collaborative, student-
directed projects that develop strong problem-solving skills.
TeachEngineering is a searchable digital library collection available online. It
has engineering curricula that cater to K-12 students, teachers and engineering faculty.
It adopts an engineering design approach for making applied science and mathematics
more engaging.26 The TeachEngineering collection provides educators with
11
complimentary access to a growing curricular resource of activities, lessons, units and
laboratories. Research on effective learning in K-12 classrooms demonstrates that an
engineering approach to identifying and solving problems is valuable across all
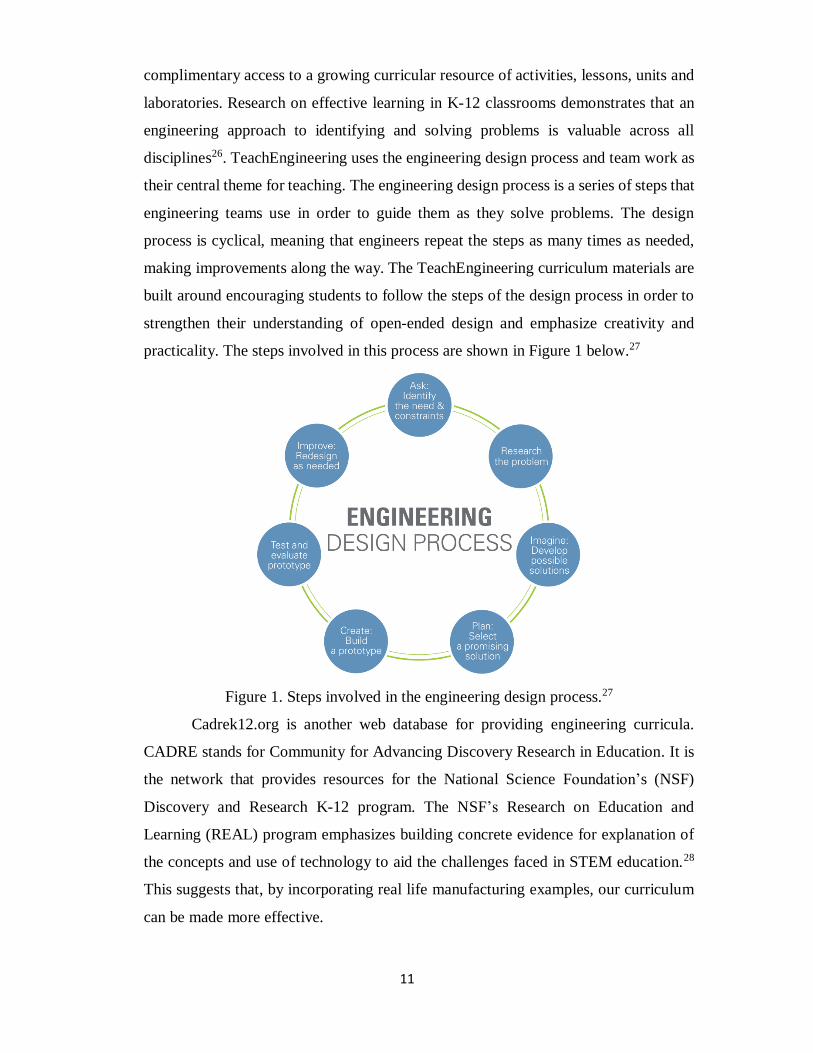
disciplines26. TeachEngineering uses the engineering design process and team work as
their central theme for teaching. The engineering design process is a series of steps that
engineering teams use in order to guide them as they solve problems. The design
process is cyclical, meaning that engineers repeat the steps as many times as needed,
making improvements along the way. The TeachEngineering curriculum materials are
built around encouraging students to follow the steps of the design process in order to
strengthen their understanding of open-ended design and emphasize creativity and
practicality. The steps involved in this process are shown in Figure 1 below.27
Figure 1. Steps involved in the engineering design process.27
Cadrek12.org is another web database for providing engineering curricula.
CADRE stands for Community for Advancing Discovery Research in Education. It is
the network that provides resources for the National Science Foundation’s (NSF)
Discovery and Research K-12 program. The NSF’s Research on Education and
Learning (REAL) program emphasizes building concrete evidence for explanation of
the concepts and use of technology to aid the challenges faced in STEM education.28
This suggests that, by incorporating real life manufacturing examples, our curriculum
can be made more effective.

12
Another key insight was obtained from the Davinci School case study
introduced in section 2.1.1. The Davinci School for Science and the Arts is a designated
STEM academy funded by the Texas Education Agency’s T-STEM Initiative.29 The
school required help to develop an engineering curriculum and teaching methodology
that could be offered to all students in the high school by teaching them problem solving
and design thinking skills present in all engineering fields.29 This is different in the fact
that the course was offered to all students of the high school as opposed to the
traditional method of students’ electing a course of their own choice. The course had
to be offered for at least three hours a week. As part of the research, the school reviewed
the existing engineering curricula sold by vendors and found it cost prohibitive to
implement with their budget. It is interesting to note that although, the teachers were
exposed to the “tried and tested” approaches like LEGO® Robotics and similar
activities, they were unable to introduce a discrete engineering course that catered to
all students in their school.29 It was then concluded that along with an “Understanding
by Design” approach, a “systems approach” was imperative for the successful
implementation of engineering in high schools.
2.2 Manufacturing Education in High Schools
It is evident that all the engineering programs reviewed so far provide a broad
view of engineering, particularly engineering design, but focus little on manufacturing.
This section critically analyzes available manufacturing curricula. The depth and
breadth to which manufacturing is taught, and how educators address financial
constraints, student engagement and lack specialized manufacturing equipment, are
discussed.
Many schools like Wheeling High School (Wheeling, Illinois, USA) have
developed specific career pathway curricula for students. These typically include
yearlong intensive courses that focus only on manufacturing and are geared towards
students who already have decided to pursue advanced manufacturing as their future
career. Their model, which they claim is based on the Nebraska Career Education
model, is shown below.30 Career pathways are grouped into six fields. These six fields
are subdivided into groups of careers that require similar skills, known as Career
Clusters. Other states have started similar initiatives.
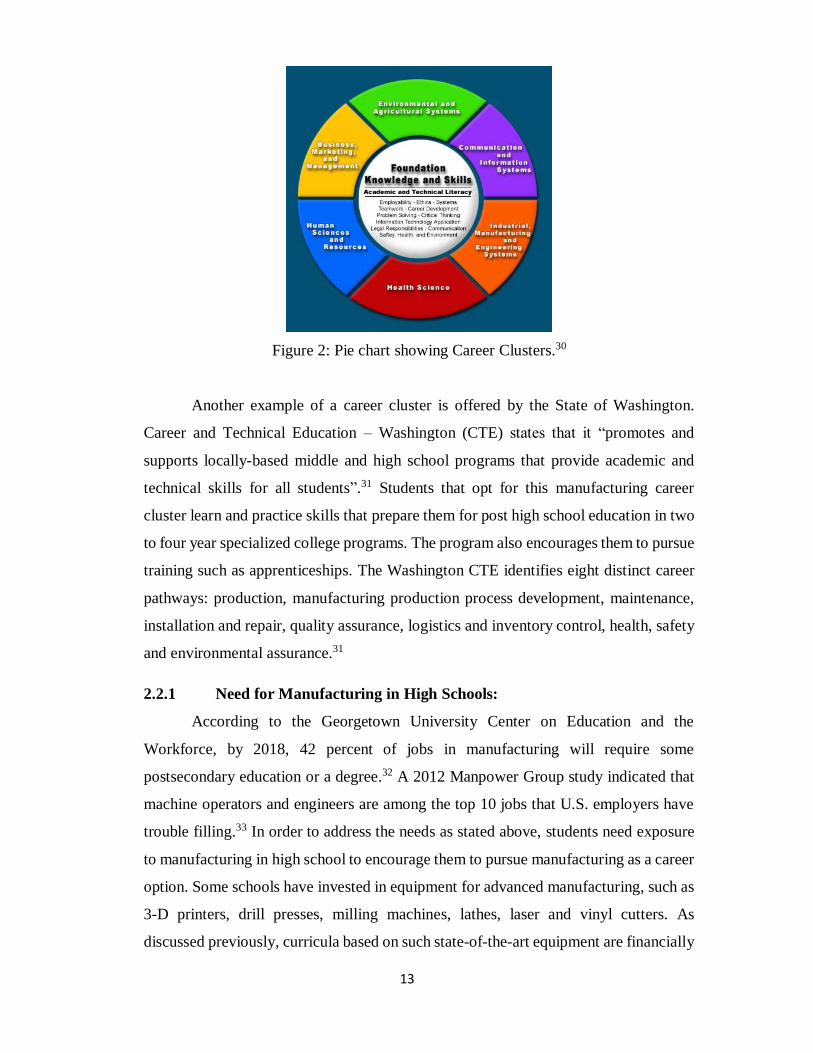
13
Figure 2: Pie chart showing Career Clusters.30
Another example of a career cluster is offered by the State of Washington.
Career and Technical Education – Washington (CTE) states that it “promotes and
supports locally-based middle and high school programs that provide academic and
technical skills for all students”.31 Students that opt for this manufacturing career
cluster learn and practice skills that prepare them for post high school education in two
to four year specialized college programs. The program also encourages them to pursue
training such as apprenticeships. The Washington CTE identifies eight distinct career
pathways: production, manufacturing production process development, maintenance,
installation and repair, quality assurance, logistics and inventory control, health, safety
and environmental assurance.31
2.2.1 Need for Manufacturing in High Schools:
According to the Georgetown University Center on Education and the
Workforce, by 2018, 42 percent of jobs in manufacturing will require some
postsecondary education or a degree.32 A 2012 Manpower Group study indicated that
machine operators and engineers are among the top 10 jobs that U.S. employers have
trouble filling.33 In order to address the needs as stated above, students need exposure
to manufacturing in high school to encourage them to pursue manufacturing as a career
option. Some schools have invested in equipment for advanced manufacturing, such as
3-D printers, drill presses, milling machines, lathes, laser and vinyl cutters. As
discussed previously, curricula based on such state-of-the-art equipment are financially
14
prohibitive for many high schools. Examples of schools which have such state-of-the-
art dedicated manufacturing facilities include Sherwood High School in Sherwood OR,
and the previously mentioned Anderson High School in Austin, TX.
Other manufacturing curricula reviewed either delve too deep into the subject
or merely give an introduction without hands-on experience. One interesting
curriculum is an introduction to manufacturing course offered by the Mid-South
Community College (West Memphis, Arkansas).34 The course supplements direct
teaching with some hands-on activities. However, it too requires specialized
equipment. Furthermore, it did not provide an overview of the different processes used
in manufacturing. Other manufacturing courses offered by them such as Production
Processes, Power and Equipment Systems, and Manufacturing Enterprise were
advanced and detailed, time consuming, and provided depth, not breadth.
The course offered at Anderson High School in Austin, TX is aligned with the
Texas Essential Knowledge and Skills (TEKS) for a manufacturing course. The TEKS,
maintained by the Texas Education Agency, outline the curriculum content and
outcomes for every approved course in the state of Texas.35 Of the TEKS listed, those
which provide the closest match for our target area are the courses “Principles of
Manufacturing” and “Manufacturing Engineering”. Most of the other TEKS listed are
for advanced and highly specialized topics, such as welding, precision metal
manufacturing, and flexible manufacturing. The Principles of Manufacturing course is
an introductory course offered for one half to one credit. It provides a strong foundation
in the essential concepts such as manufacturing systems, precision measuring
instruments, quality controls, manufacturing standards, and safety. However the
concepts taught in this course are more academic and theoretical and do not give
exposure to the manufacturing processes as such. The tools used for this course are
laboratory test equipment. It does not delve deeply into manufacturing processes or
provide any hands-on activities to supplement the students’ understanding of
manufacturing.
On the other hand, the TEKS for Manufacturing Engineering do provide an
elaborate level of detail on manufacturing processes36. . However, this course appears
to be more intensive in terms of time and effort, and highly specialized. From the
TEKS, it was evident that students are expected to gain advanced skills in working with
programmable logic controls and use of computer-integrated manufacturing techniques
15
to simulate manufacturing processes. Other topics in the course include design and
production on computer numerical controlled lathes and milling machines.
From this review of the literature it appears there is an opportunity to develop
a manufacturing curriculum covering the different processes at the high school level.
The courses that do justice to the subject are time intensive, or require expensive
laboratory equipment. On the other hand, the curricula which give breadth are too
superficial and lack emphasis on project-based learning. To address these challenges,
and based on feedback from current high school engineering teachers, there is a need
to develop a new six-week module on manufacturing which could be plugged into an
engineering course. The course will provide an optional three-week module to schools
which do not have a dedicated engineering course.
2.3 Key Concepts for Learning Manufacturing
To develop the six-week module on manufacturing, we intended to identify the
essential concepts required for learning manufacturing. Existing curricula and the
TEKS provided a starting point. There are also various comprehensive textbooks on
manufacturing, such as De Garmo et al.18 and Grover.24 These resources provide a
strong foundation for developing the six-week curriculum module.
Sparks et al. provide key insights based on the concepts they focused on in a
workshop conducted for high school teachers and students on advanced manufacturing
at the University of Missouri-Rolla.37 The purpose of the workshop was to expose
teachers to manufacturing technology in the hope of impacting the career choices of
their students. The crucial topics covered in the workshop included CAD modeling,
rapid prototyping, and lean manufacturing.37 Since industrial representatives interacted
with participants during the workshop as well, it is a fair assumption to conclude that
some of these topics and the corresponding concepts would be beneficial to students.
Hence these topics are included in our curriculum module, as outlined in Chapter 4.
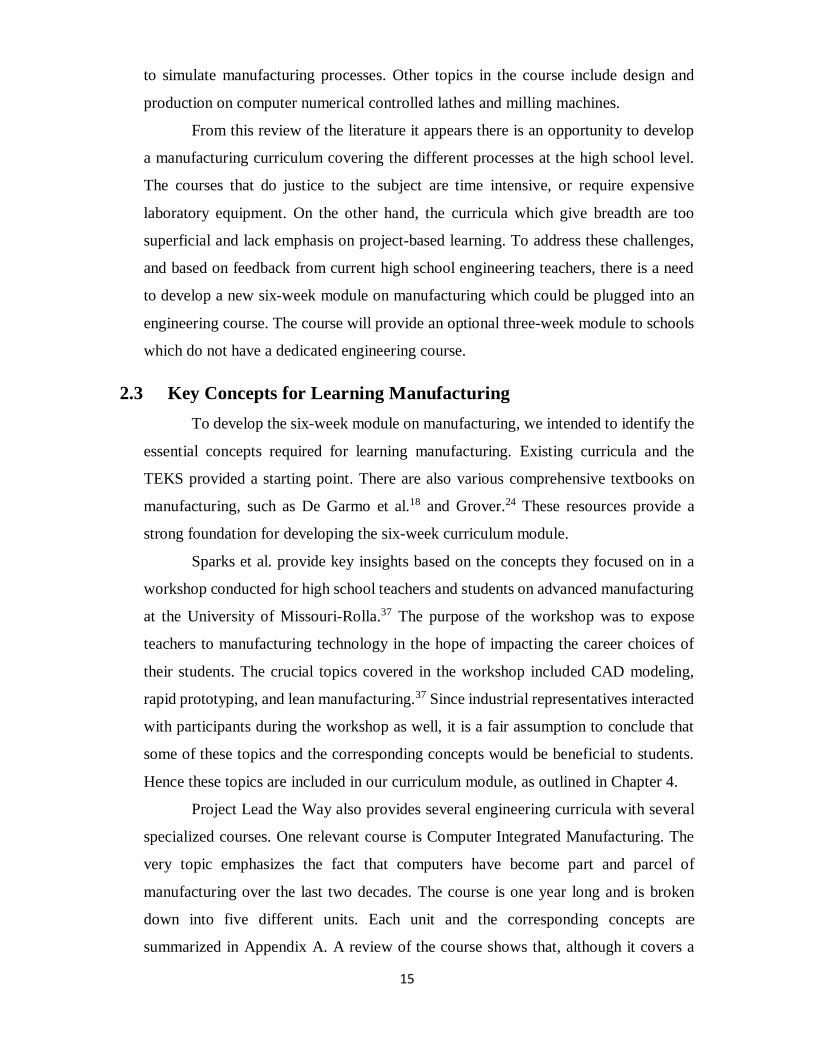
Project Lead the Way also provides several engineering curricula with several
specialized courses. One relevant course is Computer Integrated Manufacturing. The
very topic emphasizes the fact that computers have become part and parcel of
manufacturing over the last two decades. The course is one year long and is broken
down into five different units. Each unit and the corresponding concepts are
summarized in Appendix A. A review of the course shows that, although it covers a
16
wide range of concepts on manufacturing in detail, it does not give much information
about all types of manufacturing processes. It does make the student proficient in
Computer Integrated Manufacturing programming and gives them a concrete
foundation on the concepts of manufacturing, such as dimensioning, tolerances,
materials, automation, cost, flowcharting, prototyping and accuracy. These are
important concepts that could be included in our curriculum module as well. On the
other hand, the curriculum did not demonstrate the difference between additive and
subtractive manufacturing processes, consider when one manufacturing approach is
better than the other, or identify the different classifications of subtractive
manufacturing and additive manufacturing. Furthermore, the course does not discuss
the different parameters that affect each manufacturing process, or methods and tools
that can be employed to choose one manufacturing process over another. These
potential shortcomings were addressed in the curriculum module we developed.

17
CHAPTER 3: Methodology for Design of the
Curriculum
3.1 Knowing and Learning
Although at first glance they both might seem like synonyms, knowing and
learning are entirely different concepts and have different methodologies. On taking
the course on Knowing and Learning from Dr. Susan Empson of the College of
Education at The University of Texas at Austin, significant insights were gained which
proved to be of great use during the development of the curriculum module. The most
important lesson from the course was that, in order for a curriculum to be effective, it
must facilitate the right approach in the student’s education. The approach serves as the
foundation for this curriculum. Just like a great building with a weak foundation is
bound to fail, a curriculum framework built with a weak approach would not be
effective in educating students.
3.1.1 Types of Learning
According to Leite et al.,38 one of the most widely used systems to describe
varying learning methods is a model developed by Neil D. Fleming. Fleming proposes
that there are four major types or styles of learners: visual, auditory, reading-writing
preference and tactile or kinesthetic learners. The so-called VARK model expands on
earlier neuro-linguistic programming models while stressing the development of
curricula based on these learning styles. Fleming proposes the resulting curricula will
prove to be beneficial for the entire classroom, which can be assumed to be a mixture
of these four learning styles.
Fleming suggests that visual learners think in pictures, so for these learners,
curriculum elements should include methods of idea representation such as diagrams,
pictures, charts, and other graphic representations, creating visual reinforcement for
key concepts.38 Likewise, he proposes that auditory style learners are most successful
in an academic setting in which auditory elements, like lectures, discussions or
discussion sections, tapes and even music, are used as part of the curriculum. Tactile
learners prefer experience-based learning methods like moving, touching, active

18
exploration, projects and experiments. The reading-writing learner not surprisingly
shows a preference to written material.38 The VARK model’s use in instruction allows
teachers and curriculum developers to prepare classroom and follow-up materials that
provide a path to understanding key concepts for all four styles of learners.
Additionally, it has been noted that students can also use the VARK model to identify
their personnel preferred learning style, in theory allowing more effective studying.
3.1.2 Approaches to Learning
Several approaches to learning have been developed over the years. Cognitive
science plays an important role in improving the learning of the student. Before we
delve into the approaches it is important to understand the difference between knowing
something and knowing about something. There are several courses every adult will
have completed during their education. Some courses, like Geography, do not remain
in the memory or the picture is vague. On the other hand, there are some courses which
leave an everlasting impact and still remain etched in our brains. It could be that the
course was taught by a teacher who was the student’s favorite. If we delve deeper, we
might find that the teacher followed a much more effective approach to teaching that
facilitated the learning of the student. The most common approaches in the science of
learning are classified as Deep and Surface approaches. The most common traits and
processes of the approaches are directly quoted in the Table 1 below.39
Deep Approach Surface Approach
Relates to ideas of previous knowledge
and experience.
Treating the course as unrelated bits of
knowledge.
Looking for patterns and underlying
principles.
Routinely memorizing facts and
carrying out procedures.
Checking evidence and relating it to
conclusions.
Focusing narrowly on the minimum
syllabus demands.
Examining logic and argument
cautiously and critically.
Seeing little value or meaning in the
course or set tasks.
Memorizing whatever is essential to
understanding.
Studying without reflecting on either
purpose or strategy
Monitoring understanding as learning
progresses.
Table 1: Common traits and processes of Deep and Surface Approach39
19
If we look at the summed up characteristics of both approaches, it is clear that
the deep approach is a much stronger approach to learning and is justified as the basis
for the new curriculum that we designed. According to Entwistle and Peterson, “When
the emphasis is on the retention of information without any cognitive reorganization,
then ‘knowing’ is the word used.”39 This is a consequence of the Surface approach.
Learning is expected to be facilitated if the educational content presented to the student
promotes cognitive organization of the information studied.40
3.1.3 Approaches to Teaching
Teaching and learning are very closely connected with each other. Just as there
are different methods, styles and approaches to learning, so there are different methods,
styles and approaches to teaching. At the very highest level, teaching theories can
primarily be divided into two broad categories or “approaches” — teacher-centered and
student-centered:
Teacher-Centered Approach to Learning
As the name suggests, this style of teaching is centered on the teacher. The
course instructor is the main expert and information is transferred from teacher to
student though lectures, assignments and other traditional forms of direct instruction.
In a sense students are viewed as “empty vessels” to be filled,41 where the information
is received in a passive manner. In this approach the teachers’ ultimate goal is preparing
the student to excel in tests. In this teacher-centered model, teaching and assessment
are viewed as two separate entities.
Student-Centered Approach to Learning
In the Student-Centered model, teachers are still authority figures; however,
both teachers and students expect to play equally engaging roles in the process of
learning. In contrast to the Teacher-Centered model, the teacher’s primary role in the
Student-Centered model is redefined as a coach or facilitator, with the goal of helping
the student achieve overall comprehension of the material.42 Student learning is
quantified through both formal and informal forms of assessment, including group
projects, student portfolios, and class participation.
20
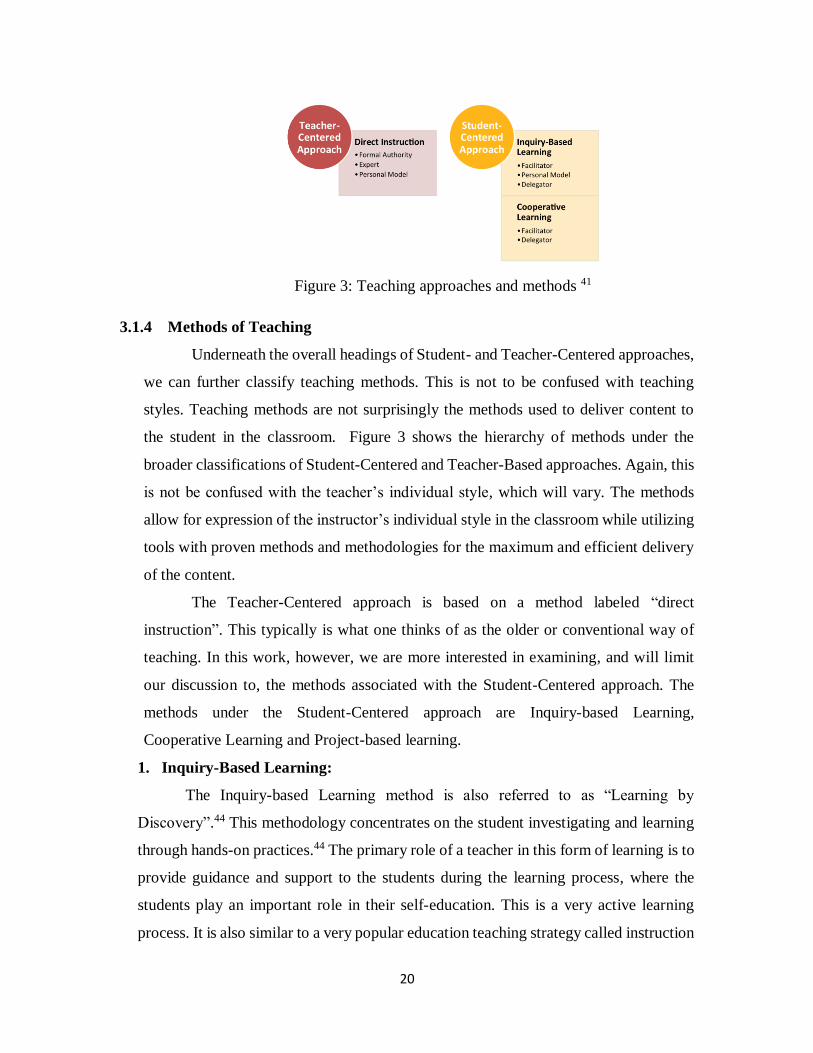
Figure 3: Teaching approaches and methods 41
3.1.4 Methods of Teaching
Underneath the overall headings of Student- and Teacher-Centered approaches,
we can further classify teaching methods. This is not to be confused with teaching
styles. Teaching methods are not surprisingly the methods used to deliver content to
the student in the classroom. Figure 3 shows the hierarchy of methods under the
broader classifications of Student-Centered and Teacher-Based approaches. Again, this
is not be confused with the teacher’s individual style, which will vary. The methods
allow for expression of the instructor’s individual style in the classroom while utilizing
tools with proven methods and methodologies for the maximum and efficient delivery
of the content.
The Teacher-Centered approach is based on a method labeled “direct
instruction”. This typically is what one thinks of as the older or conventional way of
teaching. In this work, however, we are more interested in examining, and will limit
our discussion to, the methods associated with the Student-Centered approach. The
methods under the Student-Centered approach are Inquiry-based Learning,
Cooperative Learning and Project-based learning.
1. Inquiry-Based Learning:
The Inquiry-based Learning method is also referred to as “Learning by
Discovery”.44 This methodology concentrates on the student investigating and learning
through hands-on practices.44 The primary role of a teacher in this form of learning is to
provide guidance and support to the students during the learning process, where the
students play an important role in their self-education. This is a very active learning
process. It is also similar to a very popular education teaching strategy called instruction

21
scaffolding46, where the teacher allows the students to come to their own conclusions
with minimum input.
In this method, the learning depends greatly on the facilitator; learning is seen
as a symbiotic process and communication is two way. Students explore various
concepts through practical hands-on activities that invoke Kinesthetic Learning.
Research has shown that instruction methods that are more stimulating than auditory
learning (for example, kinesthetic learning) are more likely to enhance learning in a
heterogeneous student population. 47
2. Cooperative Learning:
The Cooperative Learning method is based on team work. It is often said TEAM
stands for “Together everyone achieves more”. In the classroom context the Cooperative
Learning method refers to a teaching methodology and a set of classroom management
techniques that emphasize working together and a strong sense of community21. This
model’s intent is to foster students’ academic and social growth. It uses teaching
techniques such as “Think-Pair-Share”48 and reciprocal teaching. Again, like Inquiry-
based Learning, Cooperative Learning is considered a Student-Centered approach since
learners take responsibility for their learning and development. Interacting and learning
alongside fellow class students is the focus of this method of instruction.
3. Project-based Learning:
This method can been seen as an extension of Inquiry-based Learning. However,
it differs in that there is more emphasis on hands-on activities. Project-based Learning
(PBL) is a dynamic classroom approach in which students explore real-world problems
and challenges in an active manner and acquire a deeper knowledge for solving them. It
is sometimes even referred to as “learning by doing”. Confucius and Aristotle were early
advocates of learning by doing.49 Socrates’ model is based on “questioning, inquiry, and
critical thinking to aid the process of learning”.49 These strategies have stood the test of
time and remain very relevant even in today’s PBL classrooms. Project-based Learning
may also be cooperative, thus promoting active and engaged learning.
It is evident that the manufacturing curriculum should be based on certain proved
methodologies and approaches to be successful. It must have an end goal of achieving
a deep approach. The learning must be active and the approach must be Student-
Centered, using teaching methods that facilitate this learning approach. A combination
of Inquiry-based, Project-based and Cooperative Learning must be developed. The
22
curriculum must have a fair share of auditory, visual and kinesthetic activities to cater
to the widely-varied learning styles of students. When used in combination, these
approaches provide a concrete foundation for the curriculum.
3.2 Framework for the Curriculum
These different approaches for teaching and learning can be used to create
a curriculum framework. A framework provides a skeleton structure and acts like a
template to form the curriculum. Of the various frameworks available, the most
widely used is the one developed by Wiggins and McTighe called “Understanding
by Design”.50 According to the authors, “Over 250,000 educators own the book and
over 30,000 Handbooks are in use”.50Understanding by Design, or UbD, is a tool
utilized for educational planning focused on “teaching for understanding”.
According to Ubd, “Teachers traditionally start curriculum planning with
activities and textbooks, instead of identifying classroom learning goals and
planning towards that goal”.50 Backward design is the process advocated by
Wiggins and McTighe to be followed when designing a curriculum. In backward
design, the teacher first defines what the classroom outcomes are and then plans the
curriculum, thus choosing activities and materials that will help determine the
student’s ability and facilitate student learning. This approach breaks down the
entire curriculum into smaller chunks called units. Each unit is designed via a
template in three main stages.50 We adopted this approach for designing the
curriculum module, as shown in Chapter 4. The concepts and performance tasks in
Chapter 4 were designed with the end goal in mind.
23
CHAPTER 4: The Curriculum Module
The curriculum module described in this chapter was designed by adopting the
tried and tested methodologies and approaches and the Understanding by Design (UbD)
framework. Interactive course content with hands-on experience is the key to the
success of this curriculum. Before describing the curriculum in detail, let us review the
requirements and constraints for the curriculum.
4.1 Customer Needs Analysis
The main goal of this curriculum module is to teach manufacturing in a manner
that is accessible to all schools which do not have access to state-of-the-art facilities
and manufacturing equipment. The customer needs are based on interviews with Mr.
Evans of Bowie High School, Austin, TX. Bowie is a good model for the population
of schools we are targeting. The interviews with Mr. Evans produced the following
customer needs:
Curricula most often than not is very verbose. Hence, an important need is
to make use of graphics in the curriculum. This is an important strategy for
keeping students engaged. Remember, “A picture is worth a thousand
words.”
The curriculum could have illustrative videos. This will facilitate the
teachers’ understanding. Most teachers are not familiar with manufacturing
equipment and it is difficult to communicate concepts that are beyond their
expertise.
The curriculum must clearly state the cost and timeframe for every week.
Costs are sometimes overlooked. As far as possible, try to recycle the
materials. This way purchases can be viewed as investments rather than
expenditures.
Make judicious use of the materials to minimize the mess. Most
importantly, minimize waste.
Any activity which takes more than an hour to set up will probably not be
adopted. Teachers are the gatekeepers for the curriculum module and there
is a “time to reward” ratio which must be evaluated. For example, if an

24
activity takes 15 minutes to set up as opposed to one hour, the shorter setup
time is highly preferred.
More emphasis should be placed on hands-on activities. This will facilitate
student understanding of the manufacturing processes.
The cost per student for six weeks should be no more than $20 per student
for a class of 20-24 students.
Requirements and Constraints
Based on the customer needs analysis, the following specification sheet was
developed.
REQUIREMENTS CONSTRAINTS
Curriculum should not be verbose and
should provide vivid graphics. Video for
capstone project is a plus.
The timeframe for the module must not
exceed 6 weeks in length.
Clean-up time after any learning activity
must be minimized.
The cost for implementing the
curriculum should not exceed $20 per
student for a 25 member class for the 6
week module.
Cost and timeframe must be clearly
stated for every unit.
Setup time should be minimized for each
activity.
Focus on hands-on learning activities.
Table 2: Requirements and Constraints for the Curriculum
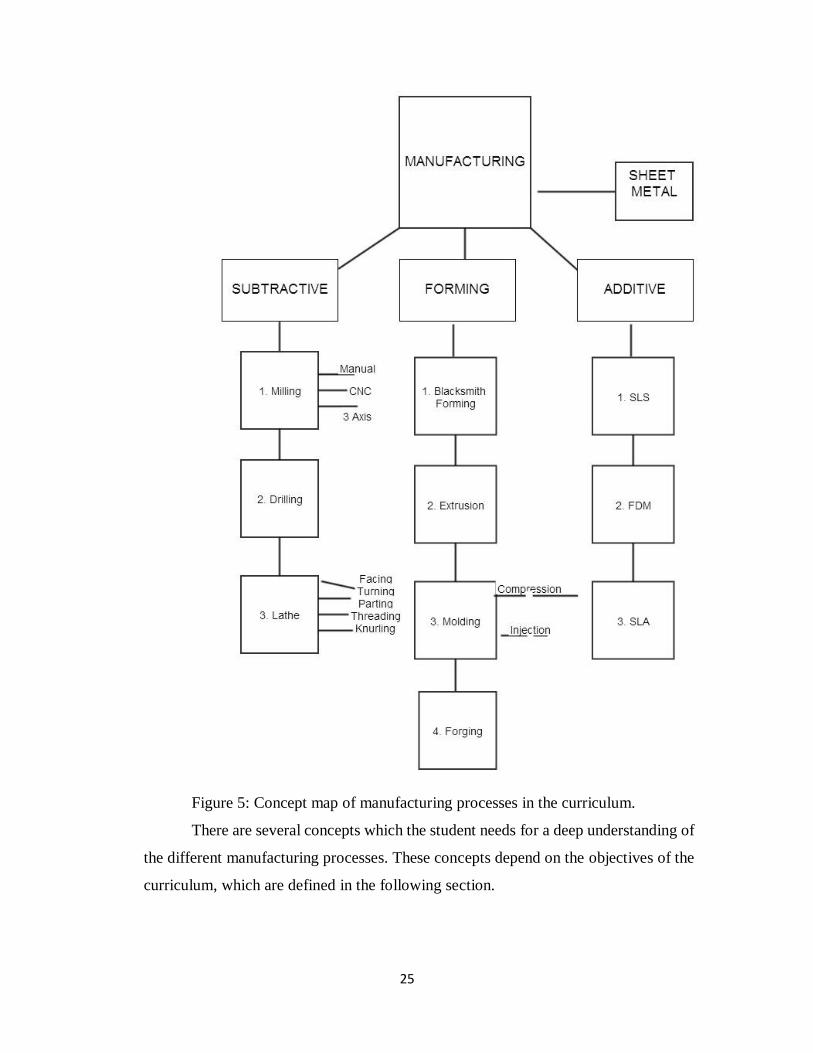
4.2 Manufacturing Processes
Since the overall goal of this curriculum is to give students a complete overview
of manufacturing processes, this was the starting point, as dictated by the UbD
approach. The following concept map was developed to organize the manufacturing
technologies addressed in the curriculum from the traditional subtractive
manufacturing techniques to the state-of-the-art advanced additive manufacturing.
25
Figure 5: Concept map of manufacturing processes in the curriculum.
There are several concepts which the student needs for a deep understanding of
the different manufacturing processes. These concepts depend on the objectives of the
curriculum, which are defined in the following section.

26
4.3 Objectives of the Curriculum
The list below provides details on the objectives of the curriculum module.
These were developed as the first step of the UbD approach.
The student will understand the history, important milestones, and economic
impacts of manufacturing.
The student will have an understanding of the different manufacturing
processes widely used in the industry.
The student will have an understanding of how common, familiar products
are made.
The student will provide rationale explaining why certain manufacturing
processes are better than others for a given type of product.
The student will develop an understanding of the use of different materials
for manufacturing and their selection criteria.
The student will used structured decision-making tools, such as decision
tree analysis.
The student will be able to describe the role of manufacturing in meeting
the consumer’s needs, wants and expectations
The student will understand the strategies for making tradeoffs and for
optimization.
The student will be able to distinguish the various parameters that affect
production time and quality of end products.
The student will have an understanding of Computer Integrated
Manufacturing.
The student will understand the various career paths available in
manufacturing and will be familiar with the educational requirements for
these careers.
The student will understand the basic principles underlying manufacturing
production.
The student will demonstrate the ability to use elementary tools to produce
a manufactured product to given tolerances.
The student will demonstrate an awareness of quality control measures.
27
The student will demonstrate an understanding of Standard International
(metric) and US customary units of measurement.
The student will demonstrate an understanding of basic safety techniques
and responsibilities during manufacturing.
The student will develop interpersonal and presentation skills.
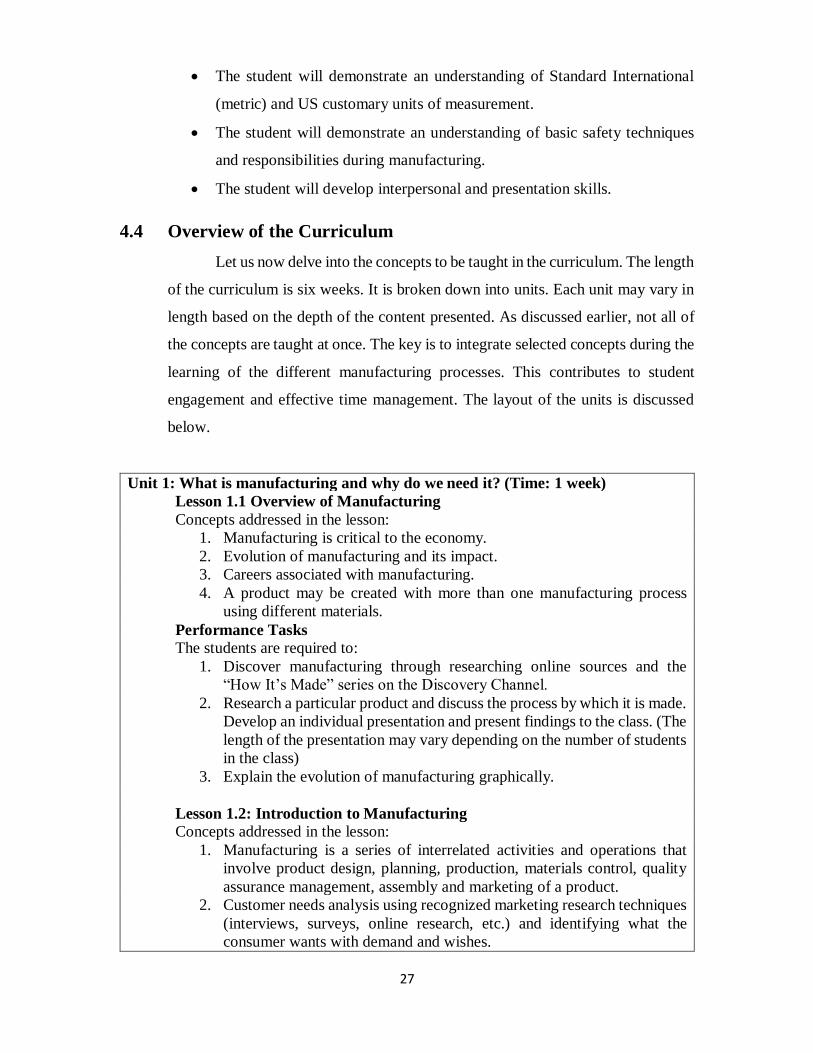
4.4 Overview of the Curriculum
Let us now delve into the concepts to be taught in the curriculum. The length
of the curriculum is six weeks. It is broken down into units. Each unit may vary in
length based on the depth of the content presented. As discussed earlier, not all of
the concepts are taught at once. The key is to integrate selected concepts during the
learning of the different manufacturing processes. This contributes to student
engagement and effective time management. The layout of the units is discussed
below.
Unit 1: What is manufacturing and why do we need it? (Time: 1 week)
Lesson 1.1 Overview of Manufacturing
Concepts addressed in the lesson:
1. Manufacturing is critical to the economy.
2. Evolution of manufacturing and its impact.
3. Careers associated with manufacturing.
4. A product may be created with more than one manufacturing process
using different materials.
Performance Tasks
The students are required to:
1. Discover manufacturing through researching online sources and the
“How It’s Made” series on the Discovery Channel.
2. Research a particular product and discuss the process by which it is made.
Develop an individual presentation and present findings to the class. (The
length of the presentation may vary depending on the number of students
in the class)
3. Explain the evolution of manufacturing graphically.
Lesson 1.2: Introduction to Manufacturing
Concepts addressed in the lesson:
1. Manufacturing is a series of interrelated activities and operations that
involve product design, planning, production, materials control, quality
assurance management, assembly and marketing of a product.
2. Customer needs analysis using recognized marketing research techniques
(interviews, surveys, online research, etc.) and identifying what the
consumer wants with demand and wishes.
28
3. Overview of safety in manufacturing.
Performance Tasks
Students are required to:
1. Engage in an activity to understand the needs of customers before
manufacturing a product. Application of recognized market research
techniques.
2. Conduct an interactive quiz on safety for the students. This is conducted
by the students for the students.
Lesson 1.3: Basics needed for Manufacturing.
Concepts addressed in the lesson:
1. Strength of materials must be understood qualitatively, e.g.,
understanding the difference between hard, soft, brittle and ductile
materials.
2. Quality control is a key process in manufacturing. Overlooking quality
control can lead to catastrophes.
3. Jigs and fixtures are vital in maintaining consistency and quality control.
4. Knowledge of measurement, calibration, accuracy, precision and
tolerances, and difference between SI and metric units.
Performance Tasks
Students are required to:
1. Bring samples each of hard, soft, brittle and ductile materials to present
to class.
2. Complete a hands-on activity with Go-No go gauging to demonstrate
understanding of the concept.
3. Complete photo assignment on jigs and fixtures.
Unit 2: Introduction to Manufacturing Processes (Time: 1 week)
Lesson 2.1 Design for Manufacturing.
Concepts addressed in the lesson:
1. Design for manufacturing – manufacturing must be considered as part of
the design process.
2. Material properties must be considered as part of the design process.
3. Analysis of case studies on previous manufacturing failures as a way for
engineers to avoid failures in the future.
4. Reverse engineering and its potential benefits for manufacturing.
Performance Tasks
Students are required to:
1. Present (in teams) a one-page report on an interesting case study of a
manufacturing failure.
2. Disassemble and analyze a simple product to understand the concept of
Reverse Engineering.
Lesson 2.2 Types of Manufacturing Processes.
Concepts addressed in the lesson:
1. Difference between additive and subtractive manufacturing.
2. Understanding the mechanism by which material is removed from stock.
3. Classification of subtractive manufacturing processes.
4. Classification of additive manufacturing processes.
29
5. Classification of forming – is forming additive or subtractive
manufacturing?
Performance Tasks
Students are required to:
1. Prepare an individual concept map on types of manufacturing processes.
2. Complete a hands-on activity for demonstrating the mechanics of
material removal using a foam block and X-ACTO® knifes.
Lesson 2.3 How Conventional Manufacturing Works
Concepts addressed in the lesson:
1. The process of material removal in subtractive manufacturing.
2. Heat generation due to friction and control of temperature during
manufacture.
Performance Tasks
Students are required to:
1. Brainstorm different ways to control the temperature during manufacture.
Lesson 2.4: Computer Integrated Manufacturing.
Concepts addressed in the lesson:
1. Mass production is used when there is a set of repetitive steps involved
in making large numbers of a given product.
2. Robots are used to perform diverse functions and work in diverse
environments.
3. Computers have distinct advantages over humans in some industrial
settings (e.g., hazardous environments, repetitive motion, or long hours).
4. The technique of “handshaking” is used to allow robots and other
machines to communicate and coordinate their activities smoothly.
Performance Tasks
Students are required to:
1. Complete a photo assignment on mass-manufactured products where
robots are possibly used.
Unit 3: Subtractive Manufacturing (Time: 1 week)
Lesson 3.1 Milling and Drilling
Concepts addressed in the lesson:
1. The difference between milling and drilling.
2. The history of the lathe.
3. Knowledge of the tools required for milling.
4. CNC milling and the tolerances it can achieve.
5. 3-axis milling and its automation.
Performance Tasks:
Students are required to:
1. Complete a hands-on activity using a Dremel® tool and laser engraver.
Lesson 3.2 Lathe
Concepts addressed in the lesson:
1. Definition and construction of a lathe.
2. Examples of common objects that were made on a lathe.

30
3. The difference between two of the most basic operations, facing and
turning.
4. The process of threading, with examples.
5. Left-hand and right-hand threads and their uses.
6. The process of knurling.
Performance Tasks:
Students are required to:
1. Participate in a demonstration activity on a lathe (or lathe model).
2. Complete a quiz on the basics of lathes and lathe operations.
Unit 4: Forming (Time: 3 days)
Lesson 4.1 Introduction to forming.
Concepts addressed in the lesson:
1. The mechanism of forming.
2. Scenarios where forming is advantageous.
3. Process parameters and costs of forming.
Lesson 4.2 Blacksmith Forming
Concepts addressed in the lesson:
1. History of blacksmiths and their impact on weapons development and the
industrial revolution.
2. Process parameters for forming, such as heat and force.
3. Costs associated with forming
Lesson 4.3 Extrusion
Concepts addressed in the lesson:
1. Mechanisms of extrusion and evolution of the process (and its use in
restaurants!).
2. Materials that can be extruded.
3. Factors that affect the quality and finish of extruded products.
4. Automation of extrusion.
Performance Tasks
Students are required to:
1. Complete a hands-on activity to understand extrusion – make clay strings
using a Play-Doh® syringe extruder.
Lesson 4.4 Molding
Concepts addressed in the lesson:
1. Mechanisms of molding, casting, pattern making
2. The history and evolution of molding.
3. Difference between compression molding and injection molding.
4. Knowledge of the key terms, such as pattern, riser, runner, cooling time,
etc.
5. The impact of molding on mass production and how it is achieved.
6. Introduction to allowances, such as shrinkage allowance, draft allowance,
finishing or machining allowance, shake allowance and distortion
allowance.
7. Materials that are commonly molded.
8. Costs involved in molding.
31
Performance Tasks
Students are required to:
1. Complete a hands-on activity on molding – demonstrate the use of a
cookie mold using modeling clay.
2. Complete a photo assignment on commonly molded objects.
Lesson 4.5 Forging
Concepts addressed in the lesson:
1. Definition, history and evolution of forging.
2. Mechanism process parameters of forging.
3. Common applications of forging in everyday products.
4. Material and tooling costs for forging.
Performance Tasks
Students are required to:
1. Complete a hands-on activity on forging – demonstrate forging using
modeling clay and simple shaped molds.
2. Prepare an estimate for material and tooling costs required for a forging
example.
Unit 5: Sheet Metal Forming (Time:2 days)
Lesson 5.1 Basics of Sheet Metal Forming
Concepts addressed in the lesson:
1. The concept of malleability in materials.
2. Is sheet metal forming an additive or subtractive manufacturing process?
3. Commonly used tools for sheet metal forming.
4. Materials and tooling costs for sheet metal forming.
Performance Task
Students are required to:
1. Complete a hands-on activity – make an envelope using cardboard and
scissors, mimicking the sheet metal and snips used commonly in industry.
Unit 6: Additive Manufacturing (Time: 1 week)
Lesson 6.1: Introduction to Additive Manufacturing.
Concepts addressed in the lesson:
1. Why is there so much hype around 3D Printing?
2. Prototyping and how it has revolutionized product design and
development.
3. Key advantages and limitations of additive manufacturing.
4. Time, cost and labor required for additive manufacturing.
Performance Tasks
Students are required to:
1. Complete a video assignment on the latest trends in 3D Printing.
2. Complete a quiz on the advantages of additive manufacturing.
Lesson 6.2: 3D Printing & Fused Deposition Modelling
Concepts addressed in the lesson:
1. Mechanism of 3D Printing.
2. Process of fused deposition modeling and its similarities to extrusion.
32
3. An introduction to commercially available tabletop FDM printers.
Performance Tasks
Students are required to:
1. Complete a hands-on activity on 3D printing using 3Doodler 3D Printing
pen.
Lesson 6.3: Selective Laser Sintering
Concepts addressed in the lesson:
1. Qualitative physics of powder sintering.
2. Build direction and scanning patterns.
3. Advantages of Selective Laser Sintering (SLS) process.
4. Materials choices for SLS.
5. Introduction to Direct Metal Laser Sintering.
Lesson 6.4: Stereolithography
Concepts addressed in the lesson:
1. Qualitative physics and chemistry of solidifying photosensitive resins.
2. Build direction and scanning patterns for Stereolithography (SLA).
3. Advantages of SLA process.
4. Materials choices for SLA.
Performance Tasks
Students are required to:
1. Review pictures of objects made with different additive manufacturing
processes and identify the process with which each was made.
Unit 7: Capstone Project (Time: 1 week)
Concepts addressed in the lesson:
1. Teamwork and collaboration in manufacturing.
2. Hands-on skills, dexterity and creativity involved in manufacturing.
3. Application of concepts previously learned, such as tolerance, waste,
material choice, quality control, etc.
4. Practice of the common principles of manufacturing processes, such as
assembly, lines and work cells, via integration of the parts produced for
a finished product.
Performance Tasks
Students are required to:
1. Work in teams to fabricate a product using the mini-lathe (described in
Chapter 5), such as drumsticks or a wand.
2. Make an iPhone or an iPad stand using the mini-lathe and rubber bands.
33
CHAPTER 5: Capstone Project
The capstone project is sometimes referred to as a capstone experience, culminating
project, senior exhibition, etc., among other names used.55 According to the glossary of
education reform, a capstone project is defined as “a multifaceted assignment that tests the
student across various concepts thus serving as an intellectual experience for students,
typically during their final year of high school.”55 Capstone projects56 also help teachers to
incorporate engineering principles in classrooms. Such a project is analogous to a research
project in a broad sense but differs because the solution is open-ended. We adopted this
approach in our curriculum to encourage students to think critically, solve intriguing yet
challenging problems, and develop skills such as experimentation and prototyping, oral
communication and public speaking, goal setting, research skills, media literacy,
teamwork, project planning and creativity. A capstone project also serves as a good
performance task towards the end of the curriculum to assess the students’ knowledge on
the various domains of manufacturing. We tried to connect the theme of the project to real
student needs. At the demonstration session at Bowie High School, the students showed
interest in a magic wand or a drum stick.
Of the several hands-on activities, the best was saved for the last. The capstone
project involves designing and manufacturing a product with a miniature desktop wood
lathe which is assembled by the students. This chapter describes design and development
of the mini-lathe for this capstone project.
5.1 Problems with Existing Lathes
There are no intrinsic problems with commercially available lathes. They quickly
manufacture goods with high quality and precision. However, they are expensive and
require specialized training to operate. A conventional lathe forms the backbone for
understanding manufacturing, and a hands-on experience with a lathe is a demand for our
curriculum. MIT offers online videos on the operation of lathes and other machine tools,25
and these may be a good solution for schools with limited finances. However, Mr. Evans
of Bowie High School said that students tend to lose engagement during the process of
watching videos. Thus, the requirement was to at least simulate a lathe in a live experience
so the students can observe its basic operation. Additionally, providing students with the

34
experience of making a product with their own hands can only deepen their knowledge of
manufacturing concepts.
5.1.1 Analysis of Existing Lathes
The first step was to benchmark the cost of mini-lathes available on the market. The
price of a lathe depends on its operation and purpose. Although complex operations such
as threading can be performed on some high end mini-lathes, our goal is to design a lathe
to give the student a firm grasp of the fundamentals of machining. The cost also depends
on the type of material the lathe is capable of processing. Different materials, including
metal, wood, plastics and even composites, can be turned on a lathe. Since our goal is not
to manufacture a high-end product with high strength, any material which reduces the cost
of the lathe is preferred.
Based on commonly used materials, lathes can be broadly classified as metal lathes
and wood lathes. Of the several desktop metal lathes considered, the Shop Fox® M1015 6"
x 10" Mini Metal Lathe made by Woodstock International, Inc. (Bellingham, WA) is a
good option for our curriculum. It does not include a thread-cutting kit. This lathe retails
for $740.58 Some key specifications are shown in the Table 3. Other metal lathes average
around the same price and have high end features such as a powered carriage, rugged
construction, variable spindle speed, etc. A list of the lathes with details that were
considered is shown in Table 4.
SPECIFICATIONS
Motor: 1/5" HP, 110V, single-phase
Swingover bed: 6"
Distance between
centers:
10"
Cross slide travel: 2-3/8"
Spindle bore: 3/8"
Spindle speed: 100-2000 RPM
Approximate
shipping weight:
106 lbs.
Table 3: Specification sheet for Mini Metal Lathe.58

35
Make and name of
metal lathe
Price in US$ Key Specs
Grizzly G8688 574 Variable speed, 16 TPI
Reversible Lead screw
and Chip Tray.
RIKON 70-100 12” x 16”
420 Laser engraved ram with 2-1/2-Inch travel, 1/2HP
Motor and ability to add
multiple extensions.
Generic 7” x 12” Mini
Metal Lathe
600 Swing Over Bed: 7" ,
Chuck Diameter: 3.15"
Distance between center:
12"/8"
Table 4: Key specifications and prices of other metal lathes considered.45, 51, 52
The next type of lathe benchmarked was a wood lathe. The average pricing on a
desktop wood lathe is considerably cheaper than a metal lathe as the construction is not as
robust. A good option for our purposes is the Central Machinery (Harbor Freight Tools,
Calabasas, CA) 8 in. x 12 in. 1/3 HP Benchtop Wood Lathe, which retails for $125 online.
Note that this product received negative reviews for its poor design and strength.43 The
specification sheet for this product is given below.
SPECIFICATIONS
Motor 1/3 HP, 110V, single-phase
Distance between centers:
12"
Tool rest size (in.): 4", 7"
Spindle bore: 3/4"
Variable speed: 750-3200 RPM
Table 5: Specification sheet for Mini Wood Lathe.43
These options are good for providing a hands-on experience. Since there is an
average of 20 students in the class, teams of four will require five lathes. This represents
an investment of over $3000 for metal lathes and over $600 for wood lathes. This exceeds
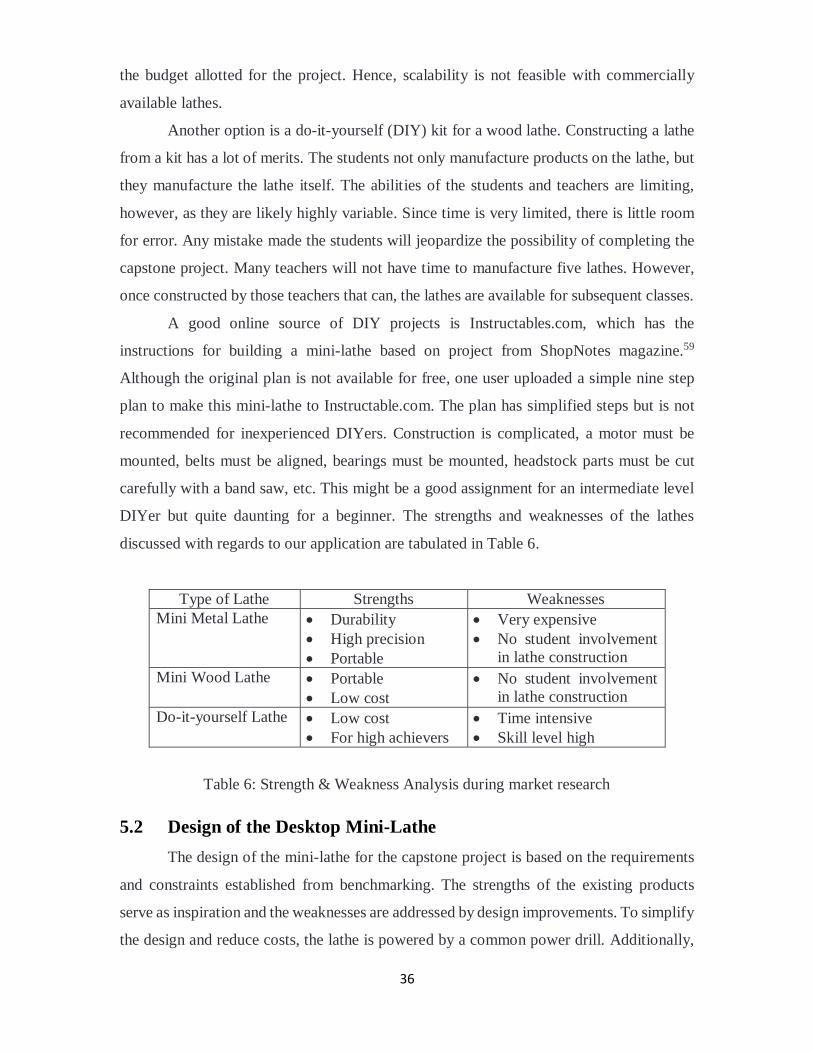
36
the budget allotted for the project. Hence, scalability is not feasible with commercially
available lathes.
Another option is a do-it-yourself (DIY) kit for a wood lathe. Constructing a lathe
from a kit has a lot of merits. The students not only manufacture products on the lathe, but
they manufacture the lathe itself. The abilities of the students and teachers are limiting,
however, as they are likely highly variable. Since time is very limited, there is little room
for error. Any mistake made the students will jeopardize the possibility of completing the
capstone project. Many teachers will not have time to manufacture five lathes. However,
once constructed by those teachers that can, the lathes are available for subsequent classes.
A good online source of DIY projects is Instructables.com, which has the
instructions for building a mini-lathe based on project from ShopNotes magazine.59
Although the original plan is not available for free, one user uploaded a simple nine step
plan to make this mini-lathe to Instructable.com. The plan has simplified steps but is not
recommended for inexperienced DIYers. Construction is complicated, a motor must be
mounted, belts must be aligned, bearings must be mounted, headstock parts must be cut
carefully with a band saw, etc. This might be a good assignment for an intermediate level
DIYer but quite daunting for a beginner. The strengths and weaknesses of the lathes
discussed with regards to our application are tabulated in Table 6.
Type of Lathe Strengths Weaknesses
Mini Metal Lathe Durability
High precision
Portable
Very expensive
No student involvement
in lathe construction
Mini Wood Lathe Portable
Low cost
No student involvement
in lathe construction
Do-it-yourself Lathe Low cost
For high achievers
Time intensive
Skill level high
Table 6: Strength & Weakness Analysis during market research
5.2 Design of the Desktop Mini-Lathe
The design of the mini-lathe for the capstone project is based on the requirements
and constraints established from benchmarking. The strengths of the existing products
serve as inspiration and the weaknesses are addressed by design improvements. To simplify
the design and reduce costs, the lathe is powered by a common power drill. Additionally,
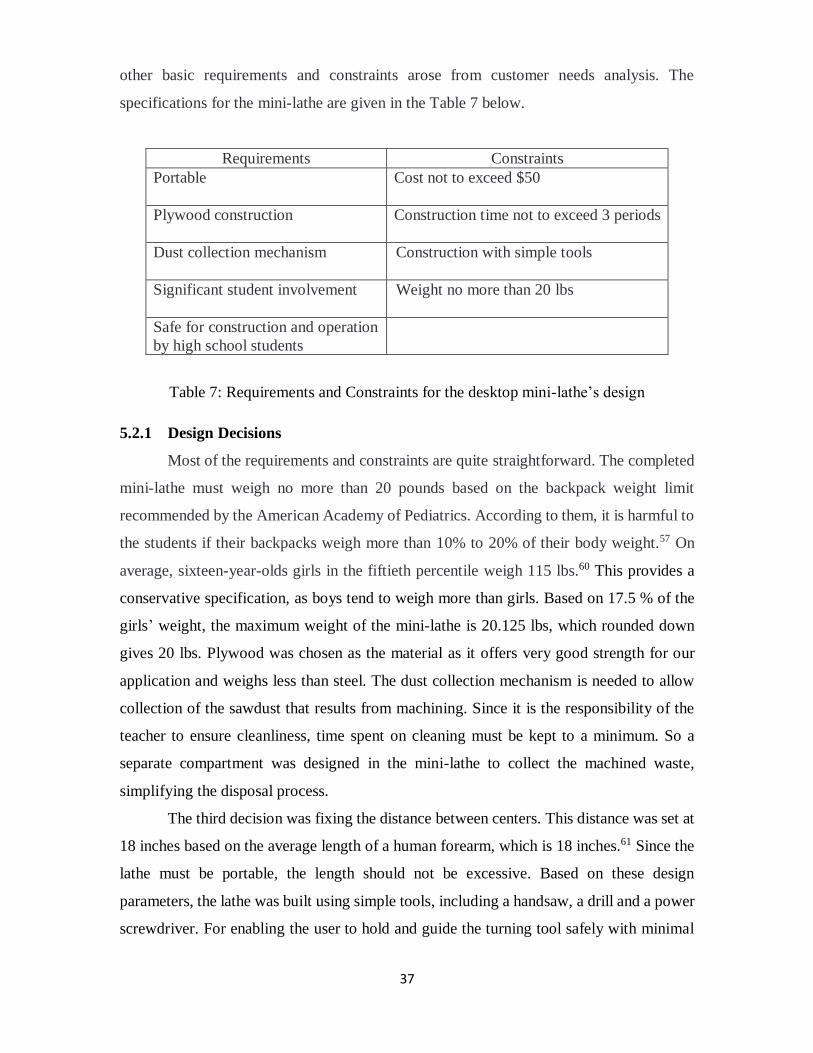
37
other basic requirements and constraints arose from customer needs analysis. The
specifications for the mini-lathe are given in the Table 7 below.
Requirements Constraints
Portable Cost not to exceed $50
Plywood construction Construction time not to exceed 3 periods
Dust collection mechanism Construction with simple tools
Significant student involvement Weight no more than 20 lbs
Safe for construction and operation
by high school students
Table 7: Requirements and Constraints for the desktop mini-lathe’s design
5.2.1 Design Decisions
Most of the requirements and constraints are quite straightforward. The completed
mini-lathe must weigh no more than 20 pounds based on the backpack weight limit
recommended by the American Academy of Pediatrics. According to them, it is harmful to
the students if their backpacks weigh more than 10% to 20% of their body weight.57 On
average, sixteen-year-olds girls in the fiftieth percentile weigh 115 lbs.60 This provides a
conservative specification, as boys tend to weigh more than girls. Based on 17.5 % of the
girls’ weight, the maximum weight of the mini-lathe is 20.125 lbs, which rounded down
gives 20 lbs. Plywood was chosen as the material as it offers very good strength for our
application and weighs less than steel. The dust collection mechanism is needed to allow
collection of the sawdust that results from machining. Since it is the responsibility of the
teacher to ensure cleanliness, time spent on cleaning must be kept to a minimum. So a
separate compartment was designed in the mini-lathe to collect the machined waste,
simplifying the disposal process.
The third decision was fixing the distance between centers. This distance was set at
18 inches based on the average length of a human forearm, which is 18 inches.61 Since the
lathe must be portable, the length should not be excessive. Based on these design
parameters, the lathe was built using simple tools, including a handsaw, a drill and a power
screwdriver. For enabling the user to hold and guide the turning tool safely with minimal

38
effort, a guide rail was designed as a support. A CAD model of the mini-lathe is shown
below.
Figure 7: Computer CAD model of the mini-lathe.
5.2.2 Make and Take Kits
Since we were limited by time and the curriculum requires student involvement in
the building of the lathe, the student activity was optimized by designing a simple kit. The
lathe has five plywood parts cut with a miter saw. They are simple 90° square cuts. These
can be cut by a teacher with minimal experience or precut wood can be purchase from a
building supply store. This will prevent accidents and eliminate the need for safety training
classes on power tools.62 Only two plywood parts of the five require a profile to be cut for
mounting the drill. The profile can be cut with a portable jig saw. Although the semi-
circular profile is tricky and ideally should be cut with a band saw, we developed a very
easy way to create it. The students can use a holesaw, which produces a circular hole. They
then trim off the extra cross section using a handsaw. This leaves a semi-circular cross
section. A common handsaw and a hole-saw are shown in Figures 8 and 9. The prototype
lathe is powered by a HILTI UH 700 ½” Hammer Drill. This removes the need for a motor
mount, belt mechanism, etc. Drills often have variable speed settings. For our given
operation, a high speed drill was chosen, as we wanted the removal of material to be
dramatic so that the students develop a better understanding of the material removal
process. Cordless drills, although cheaper, are not ideal for this application as they do not
perform well enough. They are, however, good for drilling holes and screwing the plywood
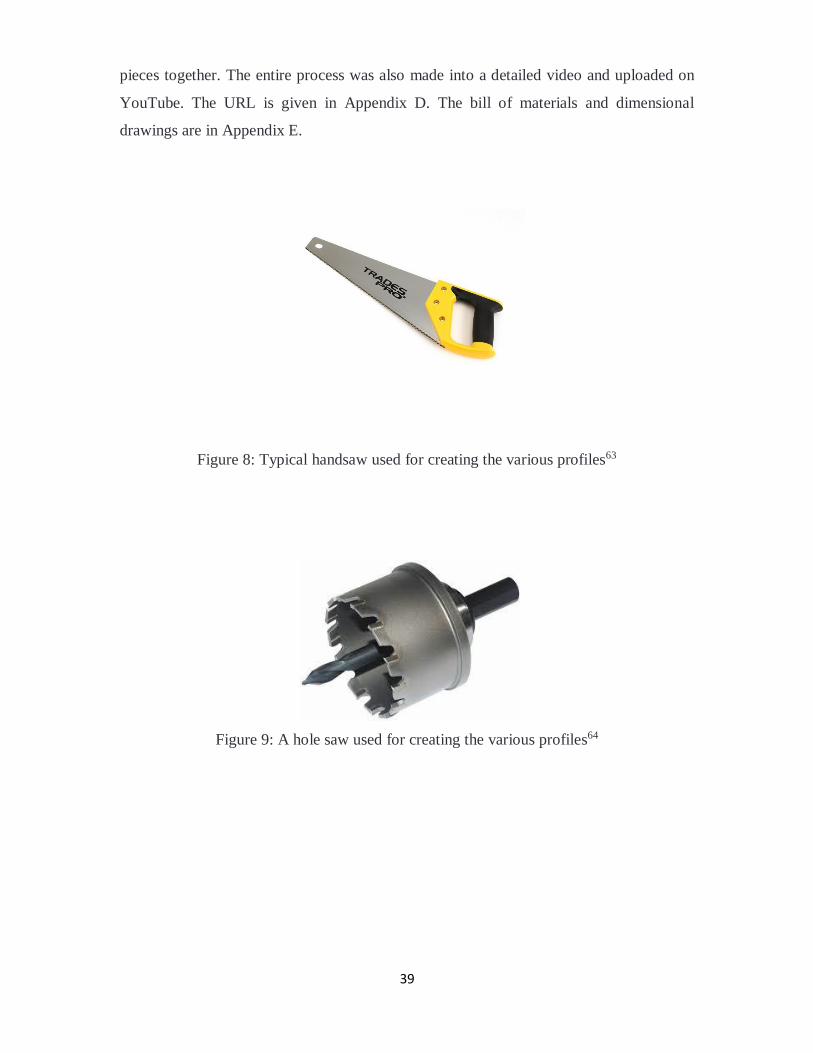
39
pieces together. The entire process was also made into a detailed video and uploaded on
YouTube. The URL is given in Appendix D. The bill of materials and dimensional
drawings are in Appendix E.
Figure 8: Typical handsaw used for creating the various profiles63
Figure 9: A hole saw used for creating the various profiles64
40
CHAPTER 6: Verification and Validation of the Curriculum
6.1 Definition of Verification and Validation.
Since our research is focused on developing a new engineering curriculum module,
it seems reasonable that we use established engineering procedures such as verification and
validation. According to Fraenkel, “Verification and validation are independent procedures
that are used together for checking that a product, service, or system meets requirements
and specifications and that it fulfills its intended purpose”65. These are key components in
a quality management system such as ISO 9000.65 Although ISO 9000 is typically used for
products and is intended to increase business efficiency and customer satisfaction, these
standards share the same purpose and goal for the curriculum developed. The objective of
ISO 9000 is to use a quality management system to increasing productivity, reducing
unnecessary costs, and ensure and document the quality of processes and products. 65 These
same goals are valid and desirable for curriculum development as well. In other words, the
product or curriculum must meet the needs of the customer. Since in this case the customers
are students and teachers, we developed a model to test the curriculum with the customers.
6.2 The Need for Validation
Validation is a key element in research that bridges the gap between what we
predict and what the actual results are. One of the problems in research is that the scope is
so broad and things may be overlooked, which may lead to errors during execution. Thus,
validation proves imperative. A concept or a curriculum can be pilot tested using a base
model. This serves as a feedback mechanism to direct improvement of the curriculum. Just
like an engine can be calibrated for optimal performance, the curriculum can be tailored
based on feedback received from students and teachers.
Validation also sets a benchmark for research. One of the challenges in education
research like this is to quantify the evaluation results. It is easy to qualitatively assess an
element in research. However, qualitative assessment is relative and varies from person to
person when there is no standard or benchmark for a good curriculum. Quantitative
validation eliminates this issue by establishing a strong rationale for directing the
curriculum development effort.

41
6.2.1 Developing a Model for Verification and Validation
One of the prerequisites for verification and validation is that the product must be
tested by a third party. In some sense this is similar to the process of third-party verification
(TPV). A central premise of TPV is that validation must be conducted by someone other
than the developer to avoid conflict of interest. The customers in this case are the students
and the teachers. Therefore, the model adopted for this research is based on soliciting
feedback from students via a sample curriculum module delivered by their teacher.
To obtain quantitative feedback, a pre-test and post-test strategy was adopted. A
randomized pre-test/post-test study is suggested by Franekel, Jack and Norman 65. The
study is randomized to avoid bias. During evaluation it is possible that the grader might
know which of the answers are from the pre-test and which of the answers are from the
post-test. Furthermore, the name of the student may cause the individual to be partial in
some way during grading. To eliminate such potential biases, the students were assigned
numbers for the study. Also, the grader was not the author. To facilitate this, the test was
based on multiple choice answers so that third party grading was feasible. Since the third
party is not directly involved in the research, the grading can be assumed to be fair. The
answer sheets graded by the grader were not identified as pre-test or post-test.
6.3 Content of the Pilot Curriculum Module
Based on this model for verification and validation, a pilot module was developed
to evaluate the concepts and structure of the curriculum outlined in the previous chapter.
The test population was the students in the junior-level engineering class taught by Mr.
Evans at Bowie High School. Ideally, the entire six week module would have been
evaluated. However, we were limited by the constraints discussed below.
Schools are on a busy schedule. Teachers face pressure to complete their existing
curriculum within severe time constraints in order to prepare the students for exams. The
students are also not available after school hours for validating this curriculum as most are
busy with various extracurricular activities. Additionally, an out-of-school evaluation
would likely require parental consent.
To address the severe time constraints, the pilot module was designed to fit within
a single 45 minute class period and was presented by Mr. Evans. The evaluation consisted
of the following tasks:
1. Introduction to the curriculum.
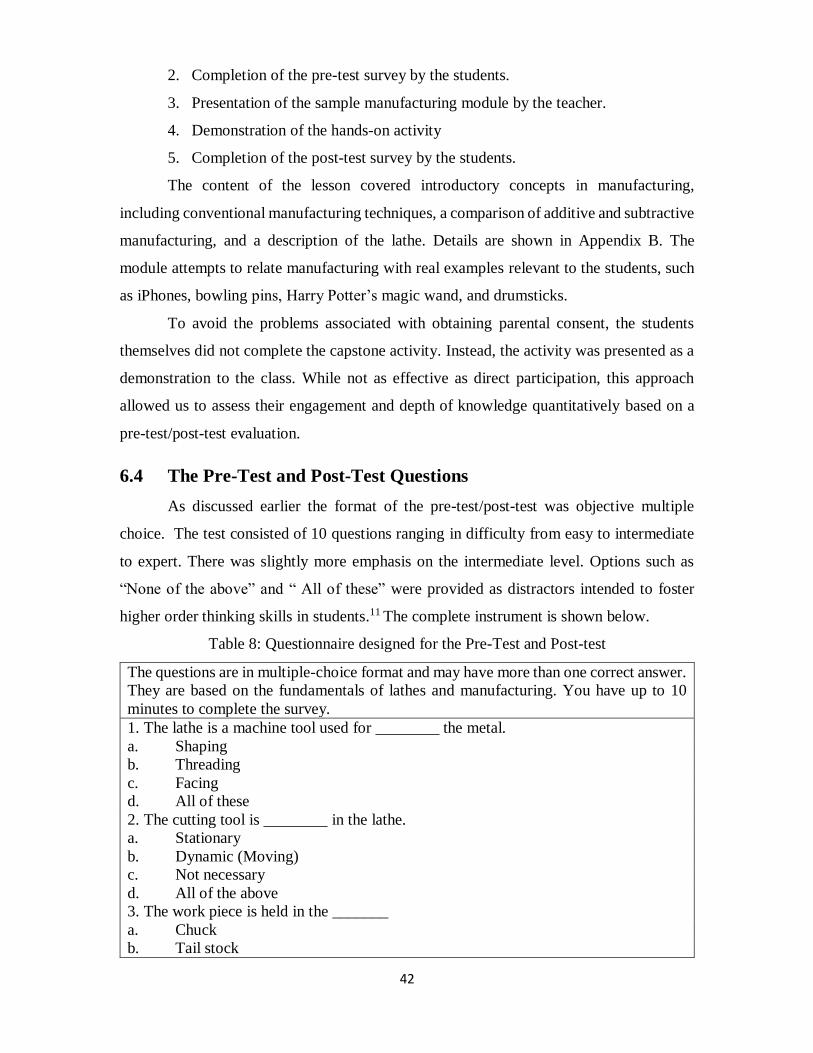
42
2. Completion of the pre-test survey by the students.
3. Presentation of the sample manufacturing module by the teacher.
4. Demonstration of the hands-on activity
5. Completion of the post-test survey by the students.
The content of the lesson covered introductory concepts in manufacturing,
including conventional manufacturing techniques, a comparison of additive and subtractive
manufacturing, and a description of the lathe. Details are shown in Appendix B. The
module attempts to relate manufacturing with real examples relevant to the students, such
as iPhones, bowling pins, Harry Potter’s magic wand, and drumsticks.
To avoid the problems associated with obtaining parental consent, the students
themselves did not complete the capstone activity. Instead, the activity was presented as a
demonstration to the class. While not as effective as direct participation, this approach
allowed us to assess their engagement and depth of knowledge quantitatively based on a
pre-test/post-test evaluation.
6.4 The Pre-Test and Post-Test Questions
As discussed earlier the format of the pre-test/post-test was objective multiple
choice. The test consisted of 10 questions ranging in difficulty from easy to intermediate
to expert. There was slightly more emphasis on the intermediate level. Options such as
“None of the above” and “ All of these” were provided as distractors intended to foster
higher order thinking skills in students.11 The complete instrument is shown below.
Table 8: Questionnaire designed for the Pre-Test and Post-test
The questions are in multiple-choice format and may have more than one correct answer.
They are based on the fundamentals of lathes and manufacturing. You have up to 10
minutes to complete the survey.
1. The lathe is a machine tool used for ________ the metal.
a. Shaping
b. Threading
c. Facing
d. All of these
2. The cutting tool is ________ in the lathe.
a. Stationary
b. Dynamic (Moving)
c. Not necessary
d. All of the above
3. The work piece is held in the _______
a. Chuck
b. Tail stock

43
c. Carriage
d. Head Stock
4. The lathe center is used for _______
a. Cutting
b. Supporting
c. All of these
d. Holding
5. During facing the tool must be moved ________ to the work piece.
a. Parallel
b. Perpendicular
c. At an angle
d. None of the above
6. The drill used in the demo lathe must be at the following speed setting during its
operation.
a. High Speed
b. Low Speed
c. Hammer Drill
d. Medium Speed.
7. During the operation of a lathe, do not use ________________ .
a. Glasses
b. Bracelet
c. Safety Gloves
d. Watch
8. A ___________ must be used to tighten the work piece.
a. Safety Key
b. Chuck Key
c. Slot Key
d. None of the above
9. The work piece rotates ________ with respect to the axis of the drill in the demo lathe.
a. Clockwise
b. Counterclockwise
c. Both
10. The demo lathe has a compartment in the center. Its purpose is to
a. Store the waste
b. Store the dust filings
c. Store the tools
d. For aesthetic use. No Specific Functionality.

44
6.5 Results & Discussion
Figure 8: Percentage of correct responses in pre-test (blue) and post-test (red)
Figure 8 highlights the results from the pre-test and post-test. The sample size
was 24 students. The average scores for the Pre-Test and Post-Test are also shown in
Figure 9. For the pre-test, an average of only 22.1% of the students got an answer right.
However, after the sample module was presented, an average of 80.3% answered
correctly. This verifies our hypothesis that the students’ understanding of
manufacturing is increased as compared to before the module. For questions 4, 5, and
7, the percentages of correct answers were 91.7%, 91.7% and 95.0%. The
corresponding pre-test percentages were 20.8%, 25.0% and 20.8%, respectively. The
data for the evaluation are tabulated below.
0
20
40
60
80
100
120
1 2 3 4 5 6 7 8 9 10
% o
f p
eo
ple
wh
o a
nsw
ere
d r
igh
t
Question Number
PRE-TEST VS POST-TEST RESULTS
PRE-TEST
POST TEST

45
Table 9: Cumulative average for the individual questions in the Pre-Test and Post-Test
Question number Pre-Test (% of class that
answered correct)
Post-Test (% of class that
answered correct)
1 8.33 70.83
2 29.17 66.67
3 25 75
4 25 91.67
5 20.83 91.67
6 25 79.17
7 20.83 95.83
8 20.83 87.5
9 37.5 79.17
10 8.33 70.83
Average 22.082 80.83
The students performed best on questions dealing with safety, the lathe center
and facing operations. One explanation for these results is that, since these concepts
were during the live demonstration, the students had a firm grasp of the concepts. It is
also interesting to observe how the students performed with difficult questions
requiring higher order thinking skills. The options for these questions were not
straightforward and were designed to trick the student. An example is the question on
whether the tool was stationary or dynamic with respect to the lathe. The answer can
be either as it depends on the perception of the operation. For facing, the tool is
stationary with only vertical depth given as feed. For turning, the tool is dynamic but
does not have perpendicular motion. The right option for this question is “Not
necessary”. About 66.7% of the students answered this correctly on the post-test, an
improvement from 29.2% on the pre-test.
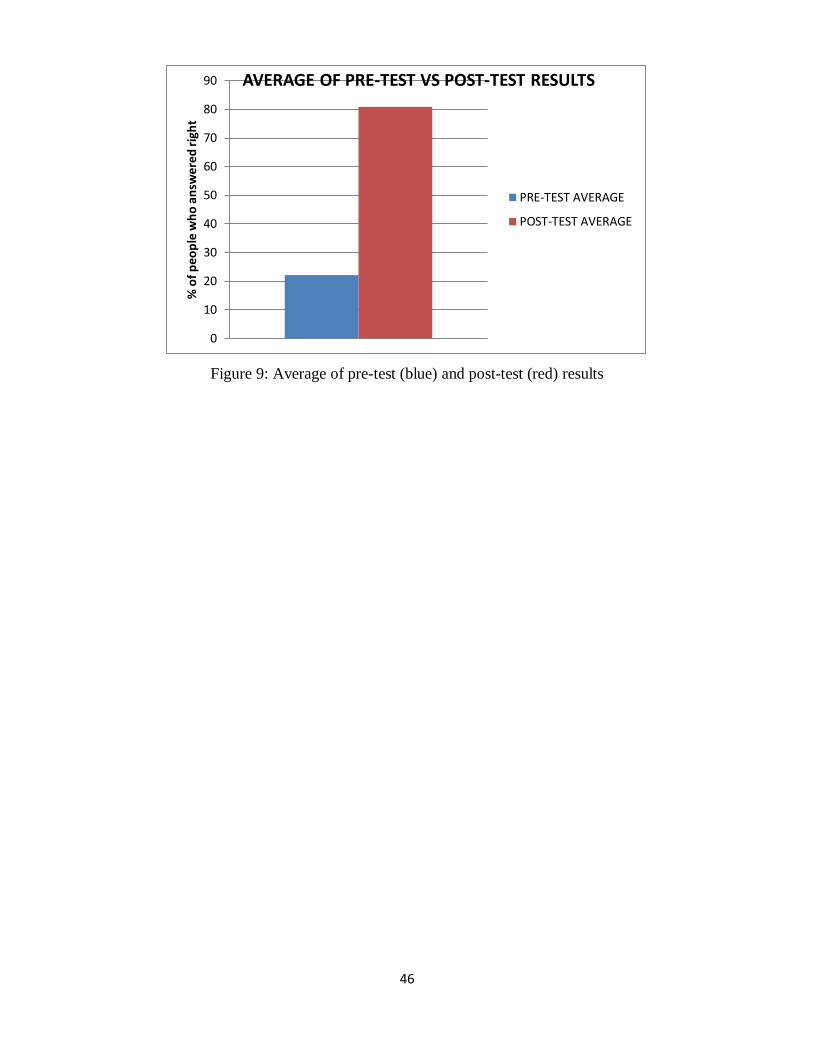
46
Figure 9: Average of pre-test (blue) and post-test (red) results
0
10
20
30
40
50
60
70
80
90
% o
f p
eo
ple
wh
o a
nsw
ere
d r
igh
t
AVERAGE OF PRE-TEST VS POST-TEST RESULTS
PRE-TEST AVERAGE
POST-TEST AVERAGE
47
CHAPTER 7: Conclusion and Future Work
7.1 Conclusion
Our hypothesis was that the completed module would increase students’
understanding of manufacturing. The literature provided an understanding of the
challenges faced by current curricula that cater to manufacturing and helped me think of
solutions to cater to them. The visits to Bowie High School and Anderson High School in
Austin, TX, further deepened my understanding in the area of teaching manufacturing to
high school students. I could see clearly see that finance served as a constraint in making
manufacturing accessible to high school students, as a huge amount of capital is needed to
set up a manufacturing facility. With the goal focused on low cost, the manufacturing
curriculum was developed. Several manufacturing curricula currently in existence were
studied to understand their strengths and weaknesses, and to better address these. The
successful strategies discovered in the research were emulated and implemented into our
curriculum. The “Understanding by Design” approach was followed for the curriculum
development, keeping the end goals of the student in mind. The course I had previously
taken on “Knowing and Learning” from Dr. Empson, helped me to think from the
perspective of the high school student. This was vital for the design of the tasks for the
curriculum. As a Teaching Assistant for the Senior Design Laboratory under Dr. Crawford,
I understood how imperative the capstone project was. This was implemented in our
curriculum, thus giving the high school students a taste of what college students do. All of
these aspects provided for the development of a very strong curriculum. All that was left
for the curriculum was validation. Using a standard approach, the curriculum was validated
using the Pre-Test and Post-Test approach. With some constraints, it was decided to
validate the curriculum at Bowie High School. Having validated the test results from a pilot
study at Bowie High School, it can be concluded that the students gained deeper insight
into manufacturing from the sample module as compared with any prior knowledge they
had on manufacturing. This evaluation provides evidence to support the hypothesis.
Furthermore, an interview with the teacher at Bowie High School provided evidence that
a six-week module was easy to plug into the existing curriculum and did not require access
to any state-of-the-art machinery, which served as a limitation previously. However, a more
complete evaluation is necessary to understand the effectiveness of the entire curriculum.

48
7.2 Future work
The first step in continuing this work is to test the pilot module with a larger sample
size. A sample of 24 students was tested with Bowie High School as the pilot school. This
represents a very small portion of the available student population in Austin, let alone the
entire country. The module should be evaluated across different demographics based on
location, gender and age group.
Next, the entire curriculum needs to be fully developed and evaluated. As different
lessons in the curriculum are developed, each can be evaluated and modified as necessary.
This process will not only improve developed lessons, but will provide guidance on
creating other lessons.
The capstone project is another area where significant feedback is needed. The first
step is to pilot the entire activity with a group of students, with particular focus on the
degree of difficulty of the activity for the students. This evaluation will also provide a
benchmark for the time required to complete the activity. The mini-lathe project was also
made very simple to facilitate the students’ engagement and involvement while not
requiring extensive training in construction skills. However, for schools with appropriate
facilities, training and access to these construction tools would provide the students with
skills and experience in manufacturing beyond that provided by the base curriculum.
The current six week curriculum does not include field trips to manufacturing sites
due to differences in availability of such sites among high schools. Obviously, the addition
of field trips would greatly enhance the curriculum and the students’ understanding of real
world manufacturing. A post-survey conducted after such a field trip would provide
insights on the benefits to students.

49
REFERENCES
1. "Prepare And Inspire: K-12 Education in Science, Technology, Engineering, and
Math (STEM) For America’s Future," The President’s Council of Advisors on
Science and Technology, September 2010, Accessed August 3, 2015,
https://www.whitehouse.gov/sites/default/files/microsites/ostp/pcast-stemed-
report.pdf
2. Rodney, Adkins C., "America Desperately Needs More STEM Students. Here's
How to Get Them," July 2012, Accessed August 3, 2015,
http://www.forbes.com/sites/forbesleadershipforum/2012/07/09/america-
desperately-needs-more-stem-students-heres-how-to-get-them/
3. "Engineer Your World", Engineer Your World, Accessed August 3, 2015,
http://engineeryourworld.org/
4. "Why Engineer Your World?," Engineer Your World, Accessed August 3, 2015,
http://engineeryourworld.org/why-engineer-your-world/
5. "Course Description," Engineer Your World, Accessed August 3, 2015,
http://engineeryourworld.org/course-description/
6. "Definition of Manufacture,” Merriam-Webster, Accessed August 3, 2015,
http://www.merriam-webster.com/dictionary/manufacture
7. Deiter, George E., and Linda, Schmidt C., Engineering Design, 5th ed, NY, NY:
McGraw Hill Higher Education, 2012
8. "Benefits and Strategies of Student Engagement," Edufena.net, Accessed August
3, 2015, http://edufena.net/benefits-and-strategies-of-student-engagement/
9. Stabback, Philip et al.,"What Makes a Good Quality School Curriculum?",
November 2011, Accessed August 3, 2015,
http://www.academia.edu/3008064/What_makes_a_good_quality_school_curricul
um
10. Terry, Fred, and Siripong Malasri, "Introducing Engineering to High-School
Students," In IEEE Mid-South Annual Engineering and Science Conference
Proceedings, Christian Brothers University, Memphis, TN, 1999
11. Hopson, Michael H., Richard L. Simms, and Gerald A. Knezek, "Using a
technology-enriched environment to improve higher-order thinking skills," Journal
of Research on Technology in education 34, no. 2 (2001): 109-119
12. Brudigam, K. L., and Crawford, R. H., “Spatial Ability in High School Students,”
Proceedings of the 2012 ASEE Annual Conference and Exposition, San Antonio,
TX, June 10-13, 2012
13. Cheng, Yi-Ling, and Kelly S. Mix, "Spatial Training Improves Children's
Mathematics Ability," Journal of Cognition and Development 15, no. 1 (2014): 2-
11
14. Cherney, I. D., “Mothers’, Fathers’, and their Children’s Perceptions and
Reasoning about Nurturance and Self-Determination Rights,” The International
Journal of Children’s Rights, no. 18 (2010): 79-99
50
15. "Our Approach,” Project Lead The Way, Accessed August 3, 2015,
https://www.pltw.org/about-us/our-approach
16. Matthews, Mark., "Keeping Students in Engineering: A Research to Practice
Belief," American Society for Engineering Education, Accessed August 3, 2015,
https://www.asee.org/retention-project/keeping-students-in-engineering-a-
research-guide-to-improving-retention#sthash.MRaFTQE2.dpuf
17. Marra, Rose M., Kelly A. Rodgers, Demei Shen, and Barbara Bogue, "Leaving
Engineering: A Multi‐Year Single Institution Study," Journal of Engineering
Education 101, no. 1 (2012): 6-27
18. De Garmo, Ernest P., J. Temple Black, and Ronald A. Kohser, DeGarmo's
materials and processes in manufacturing, John Wiley & Sons, 2011
19. "Student Introduction to Engineering,” SITE, Accessed August 3, 2015,
http://site.eng.ua.edu/
20. "My Introduction to Engineering Enrichment Program," MITE, Accessed August
3, 2015, http://www.engr.utexas.edu/eoe/precollege/mite
21. "Preparing Students for the Global Economy," Project Lead The Way, Accessed
August 3, 2015,
https://www.pltw.org/sites/default/vfiles/PLTW%20Detailed%20Overview_DO_1
402.pdf
22. Forest, J., University teaching: International perspectives, Garland Publishing,
1998, 35-72
23. Ronis, Diane L., Problem-based learning for math & science: Integrating inquiry
and the internet, Corwin Press, 2007
24. Groover, Mikell P., Fundamentals of modern manufacturing: materials processes,
and systems, John Wiley & Sons, 2007
25. "Manufacturing Processes: Hands On to Hands Off," MIT News Office, Accessed
August 11, 2015, http://video.mit.edu/watch/manufacturing-processes-hands-on-
to-hands-off-13643/
26. "Why K-12 Engineering?,” TeachEngineering.org, Accessed August 3, 2015,
https://www.teachengineering.org/whyk12engr.php
27. "The Engineering Design Process,” TeachEngineering.org, Accessed August 3,
2015, https://www.teachengineering.org/engrdesignprocess.php
28. "Home,” Community for Advanced Discovery Research in Education, Accessed
August 3, 2015, http://cadrek12.org/
29. Virani, Shamsnaz, and Iris B. Burnham, "Innovative Curriculum for Engineering
in High School(ICE-HS)-Status Update," Proceedings of the 2012 ASEE Annual
Conference and Exposition, American Society for Engineering Education, 2012
30. "Career Pathways,” Wheeling High School, Accessed August 11, 2015,
http://whs.d214.org/academics/career_pathways_home.aspx
31. "21st Century Skills”, Career and Technical Education, Accessed August 3, 2015,
http://www.k12.wa.us/CareerTechEd/TwentyFirstCenturySkills.aspx
51
32. Carnevale, Anthony P., Nicole Smith, and Jeff Strohl, "Projection of Jobs and
Education Requirements Through 2018," Georgetown University Center on
Education and the Workforce, June 2010, Accessed August 3, 2015,
https://cew.georgetown.edu/wp-content/uploads/2014/12/fullreport.pdf
33. "2012 Talent Shortage Survey Research Results," Manpower Group, 2012,
Accessed August 3, 2015, http://www.manpowergroup.us/campaigns/talent-
shortage-2012/pdf/2012_talent_shortage_survey_results_us_finalfinal.pdf
34. "Mid-South Community College,” The Manufacturing Institute, Accessed August
3, 2015, http://www.themanufacturinginstitute.org/Skills-Certification/Educator-
Resources/M-List/State-Profiles/Arkansas/Mid-South-CC.aspx
35. "Career and Technical Education Texas Essential Knowledge and Skills," Texas
Education Agency, Accessed August 3, 2015,
http://tea.texas.gov/Curriculum_and_Instructional_Programs/Curriculum_Standard
s/Career_and_Technical_Education_Texas_Essential_Knowledge_and_Skills/
36. "Principles of Manufacturing," Texas Education Agency, §130.322, Accessed
August 3, 2015, http://ritter.tea.state.tx.us/rules/tac/chapter130/ch130m.html
37. Sparks et al., "An advanced manufacturing workshop for high-school teachers and
students," In Proceedings of the 2005 ASEE Annual Conference & Exposition,
American Society for Engineering Education ASEE, 2005
38. Leite, Walter L., Marilla Svinicki, and Yuying Shi, "Attempted Validation of the
Scores of the VARK," Learning Styles Inventory With Multitrait–Multimethod
Confirmatory Factor Analysis Models, pg 2 (2009)
39. Entwistle, Noel J., and Elizabeth R. Peterson, "Conceptions of learning and
knowledge in higher education: Relationships with study behavior and influences
of learning environments," International Journal of Educational Research 41, no.
6 (2004): 407-428
40. Howe, Michael JA., Introduction to human memory: A psychological approach,
Harper & Row, 1970
41. "Teaching Methods,” Teach.com, Accessed August 3, 2015,
http://teach.com/what/teachers-teach/teaching-methods
42. "Which is Best: Teacher-Centered or Student-Centered Education?," Concordia
Online Education, Accessed August 3, 2015, http://education.cu-
portland.edu/blog/classroom-resources/which-is-best-teacher-centered-or-student-
centered-education/
43. "8 in. x 12 in. 1/3 HP Benchtop Wood Lathe," Harbor Freight Tools, Accessed
August 11, 2015, http://www.harborfreight.com/8-inch-x-12-inch-bench-top-
wood-lathe-95607.html
44. Coffey, Heather, "Discovery Learning,” The UNC School of Education, Accessed
August 3, 2015, http://www.learnnc.org/lp/pages/5352
45. “Grizzly G8688 – 7” x 12” Mini Metal Lathe,” Grizzly Industrial, Accessed
August 24, 2015, https://www.grizzly.com/products/7-x-12-Mini-Metal-
Lathe/G8688

52
46. Sawyer, R. Keith, The Cambridge handbook of the learning sciences, Cambridge
University Press, 2005
47. Benzion, G., "Does a Change in Mathematics Instructional Strategies Lead
Struggling Third Grade Students to Increase Their Performance on Standardized
Tests," PhD diss., University of Maryland at College Park, 2010
48. Schul, James E., "Revisiting an old friend: The practice and promise of cooperative
learning for the twenty-first century," The Social Studies 102, no. 2 (2011): 88-93
49. Boss, Suzie, "Project-Based Learning: A Short History," Edutopia, Accessed
August 3, 2015, http://www.edutopia.org/project-based-learning-history
50. Wiggins, Grant P., and Jay McTighe, Understanding by design, Alexandria:
Association for Supervision and Curriculum Development, 2005
51. “Model 70-100 12” x 16” Mini Lathe,” Rikon Tools, Accessed August 24, 2015,
http://www.rikontools.com/productpage_70-100.html
52. “7 x 12 Mini Metal lathe,” Generic Tools, Accessed August 24, 2015,
http://www.amazon.com/12-Mini-Metal-
Lathe/dp/B004Q70CP6/ref=pd_sim_sbs_469_3?ie=UTF8&refRID=08VCMN1EN
D29WE9P5JDA
53. Nash, Sean, "Continuum of Assessment (from UbD Keynote," Accessed August 3,
2015, https://www.flickr.com/photos/nashworld/2856419504
54. Brown, John L., Making the most of understanding by design, Alexandria:
Association for Supervision and Curriculum Development, 2004
55. "Capstone Project,” The Glossary of Education Reform, Accessed August 3, 2015,
http://edglossary.org/capstone-project/
56. Robinson, Mike, M. Sami Fadali, J. Carr, and C. Maddux, "Engineering principles
for high school students," In Frontiers in Education Conference, 1999, FIE'99,
29th Annual, vol. 3, pp. 13A7-20, IEEE, 1999
57. Huggins, Charnicia E., “Most Parents Don’t Know Weight of Child’s Backpack,”
Accessed August 24, 2015,
www.montclair.edu/Detectives/curriculum/docs/4.4arts2.doc
58. "Shop Fox Mini Lathe – 6 in. x 10 in., Model# M1015," The Northern Tool
Company, Accessed August 24, 2015,
http://www.northerntool.com/shop/tools/product_200419822_200419822/
59. "Mini Wood Lathe,” Instructables.com, Accessed August 3, 2015,
http://www.instructables.com/id/Mini-Wood-Lathe/
60. "2 to 20 years: Boys Stature-for-age and Weight-for-age Percentiles," Centers for
Disease Control and Prevention, 2000, Accessed August 3, 2015,
http://www.cdc.gov/growthcharts/data/set2clinical/cj41c071.pdf
61. W. Gunther Plaut, Bernard J. Bamberger, William W. Hallo (eds.) (1981), The
Torah, New York: Union of American Hebrew Congregations, ISBN
9780807400555
62. "Miter Saw Design, Poor Safety Training Lead to Student's Severed Thumb,”
Machinedesign.com, Accessed August 3, 2015,

53
http://machinedesign.com/archive/miter-saw-design-poor-safety-training-lead-
student-s-severed-thumb
63. "831408 20' Hand Saw," Alltrade Corporation, Accessed August 3, 2015,
http://www.alltradetools.com/catalog/blades/352-831408-20-hand-saw.html
64. "Hole Saw,” ALFRA Tools, Accessed August 3, 2015,
http://www.directindustry.com/prod/alfra/product-19772-47112.html
65. Fraenkel, Jack R., and E. Norman, "How to Design and Evaluate Research in
Education," Wallen, 1993
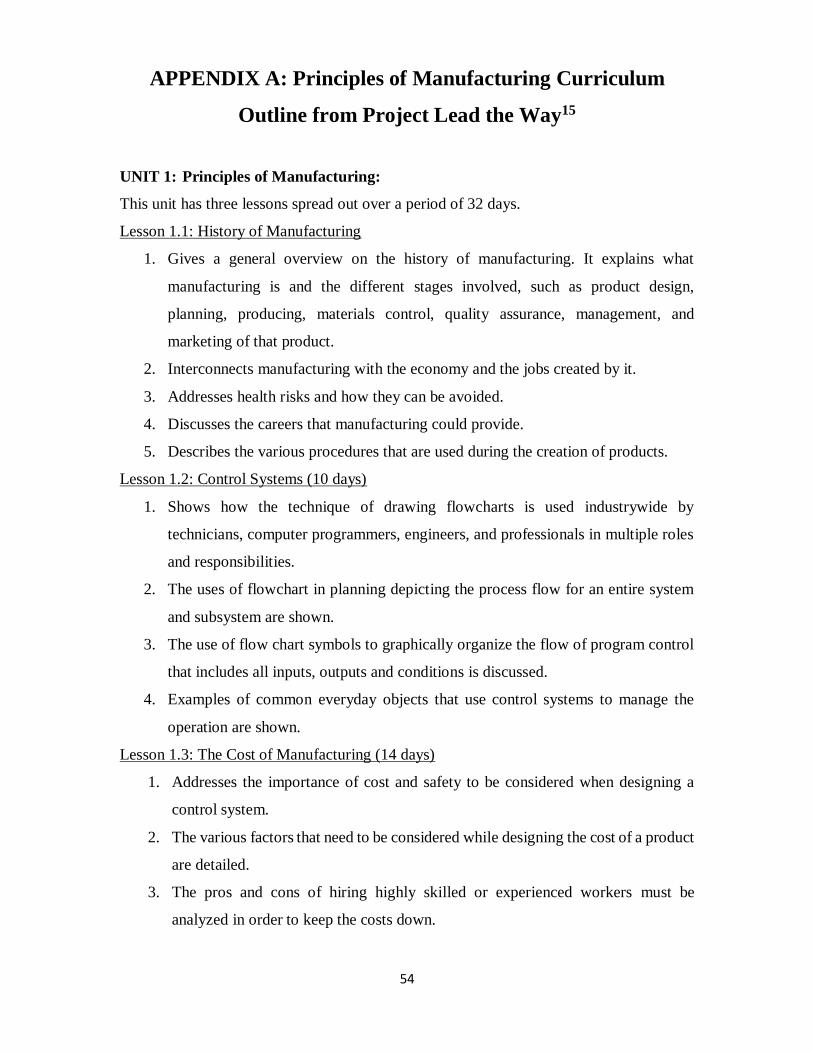
54
APPENDIX A: Principles of Manufacturing Curriculum
Outline from Project Lead the Way15
UNIT 1: Principles of Manufacturing:
This unit has three lessons spread out over a period of 32 days.
Lesson 1.1: History of Manufacturing
1. Gives a general overview on the history of manufacturing. It explains what
manufacturing is and the different stages involved, such as product design,
planning, producing, materials control, quality assurance, management, and
marketing of that product.
2. Interconnects manufacturing with the economy and the jobs created by it.
3. Addresses health risks and how they can be avoided.
4. Discusses the careers that manufacturing could provide.
5. Describes the various procedures that are used during the creation of products.
Lesson 1.2: Control Systems (10 days)
1. Shows how the technique of drawing flowcharts is used industrywide by
technicians, computer programmers, engineers, and professionals in multiple roles
and responsibilities.
2. The uses of flowchart in planning depicting the process flow for an entire system
and subsystem are shown.
3. The use of flow chart symbols to graphically organize the flow of program control
that includes all inputs, outputs and conditions is discussed.
4. Examples of common everyday objects that use control systems to manage the
operation are shown.
Lesson 1.3: The Cost of Manufacturing (14 days)
1. Addresses the importance of cost and safety to be considered when designing a
control system.
2. The various factors that need to be considered while designing the cost of a product
are detailed.
3. The pros and cons of hiring highly skilled or experienced workers must be
analyzed in order to keep the costs down.

55
4. A part that has been manufactured in the least time, has the potential to make the
maximum profit.
5. Investments that are geared towards the long term may involve upfront costs but
may provide additional savings in the future.
UNIT 2: Manufacturing Processes (Time: 54 days)
This unit has three lessons spread out over a period of 54 days.
Lesson 2.1: Designing for Manufacturability (10 days)
1. Explains what design is and how it can be used to systematically solve problems.
2. Discusses the different considerations for manufacturing a quality part.
3. Lists the material properties that must be considered during the design process.
4. Discusses the ethical responsibility of manufacturers to provide safety information
about the product to the consumer.
5. Describes the legal responsibility of manufacturers to provide safety information
about the product to the consumer
6. The code of conduct and the code of ethics that members of different engineering
disciplines are expected to follow are discussed.
7. The study of previous engineering failures could help avoid future failures.
Lesson 2.2: How We Make Things (6 days)
1. Defines prototyping and describes its purpose in the design process.
2. Addresses the need to process a raw material before it can be used for manufacturing.
3. Explains one of the oldest processes used in manufacturing, the separating process.
4. Discusses subtractive processes such as milling and shearing to create products.
5. Explains the use of latest technologies such as ECM, EDM, laser and water cutting
for improving accuracy and increasing the efficiency of material removal rate.
6. Discusses the common types of materials that are well-suited for manufacturing,
such as metals, plastics and ceramics.
7. The material properties of a product play a key role in the selection of the
manufacturing process for the product.
Lesson 2.3: Product Development (38 days)
1. Manufacturing processes can be performed by a variety of machines.
2. Communication to the machine occurs via machine code.
3. Consistency and quality control are maintained via the use of jigs and fixtures.

56
4. Computer Aided Design (CAD) programs make use of Computer Aided
Manufacturing (CAM) tools to make physical models.
5. The continuous advancement in machines and technology has greatly influenced
the way products are manufactured today.
6. There are several variables and parameters in machining operations which affect
the end product in manufacturing.
7. Any manufacturing firm needs a profit margin from a product for its survival.
8. Prototyping processes have been improved over the years and play a key role in
the design cycle of manufactured goods.
Unit 3: Elements of Automation (46 days)
Lesson 3.1: Introduction to Automation (19 Days)
1. Automation has evolved and has been influenced by many factors.
2. There are various careers in automation.
3. Various types of robots speed up and improve the production of
manufactured goods.
4. Robots have an edge over humans in certain scenarios, such as hazardeous
working conditions, monotonous motions, or long hours of work.
5. The process called handshaking enables machines and robots communicate
with each other.
Lesson 3.2: Elements of Power (10 Days)
1. Power is produced in several ways and is transmitted in various forms, such
as electrical, pneumatic, hydraulic, and mechanical motion.
2. Fluid power is inversely proportional to the area upon which the force is
being applied.
3. Feedback in the control systems and products is provided by sensors.
4. There are several forms of fluid power, of which pneumatics is commonly
preferred and can be used to operate machines.
Lesson 3.3: Robotic Programming and Usage (17 Days)
1. Certain basics must be learned in programming, such as variable declaration,
loops and debugging.
2. The manufacturing industry employs a variety of robots and programming
languages that are unique.
3. Most common products are made by employing microcontrollers.

57
4. Robots perform diverse functions in diverse environments.
5. Parameters such as payload and work envelope, which depend on the type of
the task, determine the size of the robot.
Unit 4: Integration of Manufacturing Elements (Time: 47 Days)
Lesson 4.1: Integration of Manufacturing Elements (10 Days)
1. Mass production is a key concept for products that are created using the same set
of steps.
2. A group of machines that perform similar operations together is called a workcell.
3. A system that can be adapted to manufacture various products is called a flexible
manufacturing system.
4. When a system is preferred over another, certain tradeoffs can be made.
5. Process flow design is an important process that impacts the overall production time
and profit of the product.
6. The design and development process uses flowcharting to plan and depict the
detailed process flow for an entire system and all of its subsystems.
7. The different phases of the product development process are illustrated using
flowcharting.
8. Manufacturing and automation careers vary by scope and location.
Lesson 4.2: Manufacturing Application (37 Days)
1. Process flow design impacts the overall production time and product profit
substantially.
2. During the design and development process, flowcharting is used to plan and depict
the detailed process flow for an entire system as well as all of its subsystems.
3. The overall phases of the product development process can be illustrated via
flowcharting.
4. Serious injury can be avoided by addressing safe operating procedures in a
Computer Integrated Manufacturing environment.
5. Efficiency and cost are important parameters to be considered when choosing a
manufacturing system.
6. Appropriate sensors aid an engineer in various processes in manufacturing to ensure
high quality part production.
7. Automated operation in the factory must have proper sequencing.

58
8. Prior identification of the electrical and fluid power systems is required, to complete
the desired manufacturing system.
From the above course outline we see that, although it covers a wide range of
concepts on manufacturing in detail, it does not give much information about the
various types of manufacturing processes. It does introduce the students to Computer
Integrated Manufacturing programming and gives them a concrete foundation on such
concepts as dimensioning, tolerances, materials, automation, cost, flowcharting,
prototyping and accuracy. These are important concepts that could for the curriculum
developed in this research. Alternatively, the curriculum does not expose the difference
between additive and subtractive manufacturing processes; discuss when one process
is preferred over another, or the methods and tools employed to choose a manufacturing
process; present the different classifications of subtractive manufacturing or additive
manufacturing; describe the different parameters that affect each manufacturing
process. These potential shortcomings were addressed in the curriculum we developed.
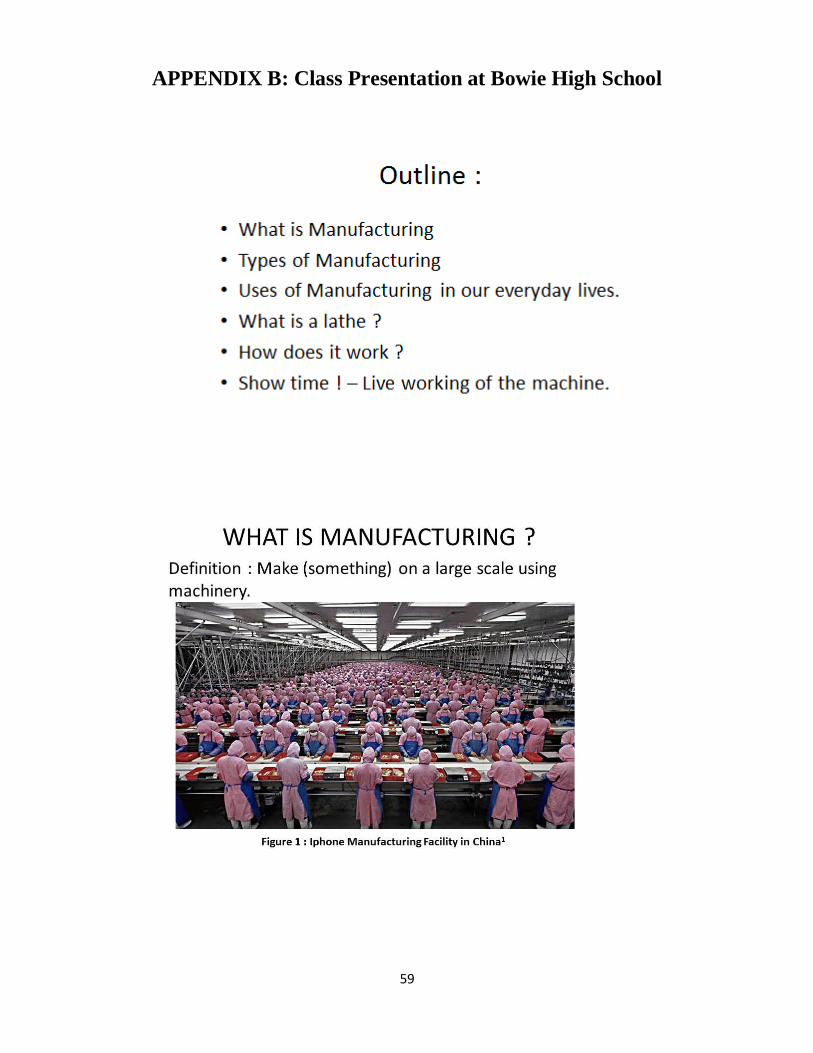
59
APPENDIX B: Class Presentation at Bowie High School
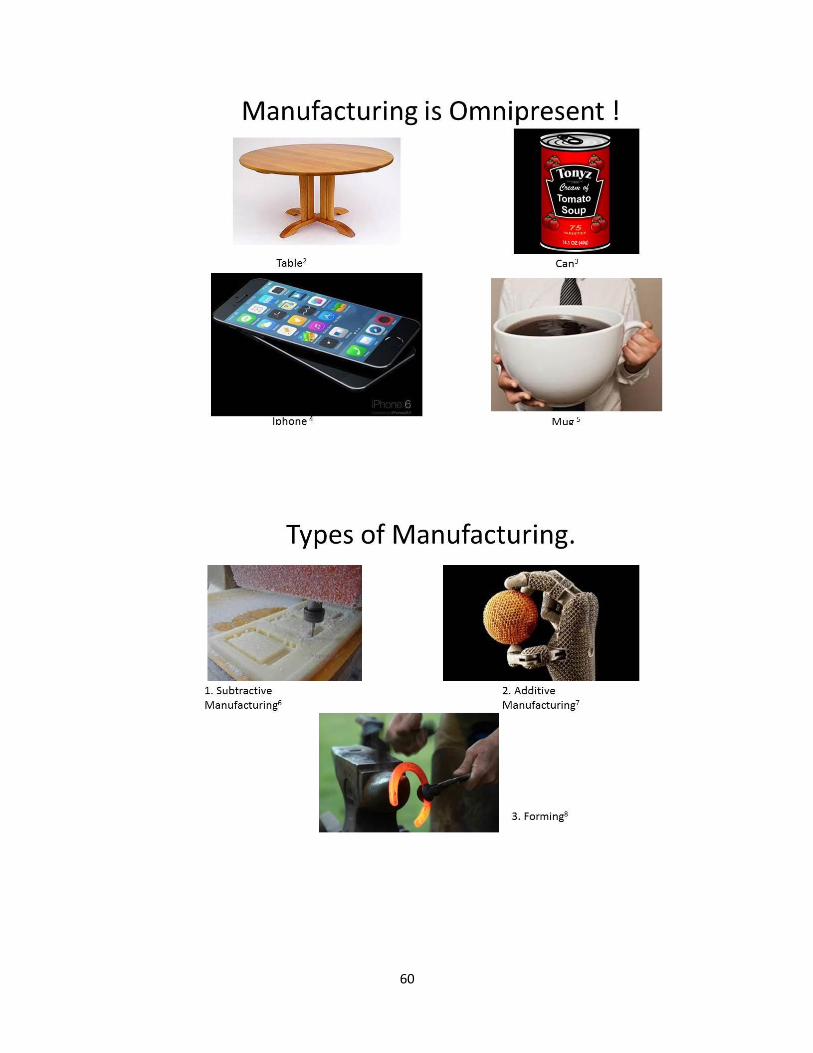
60
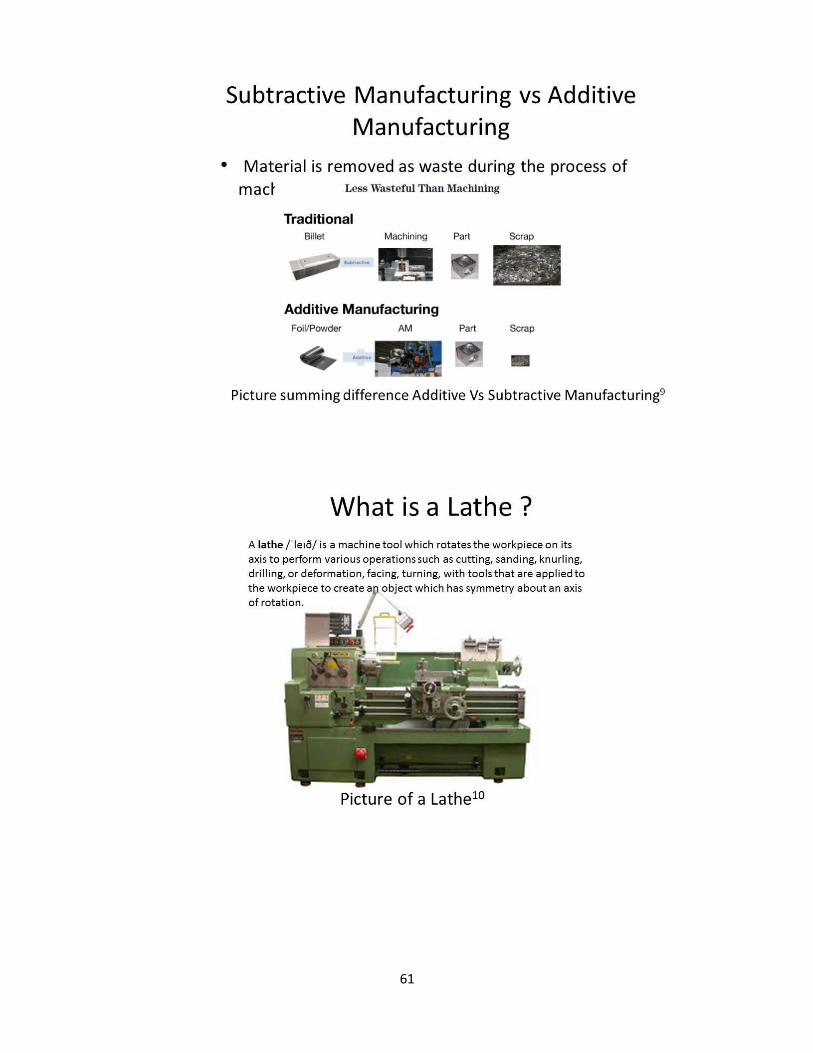
61
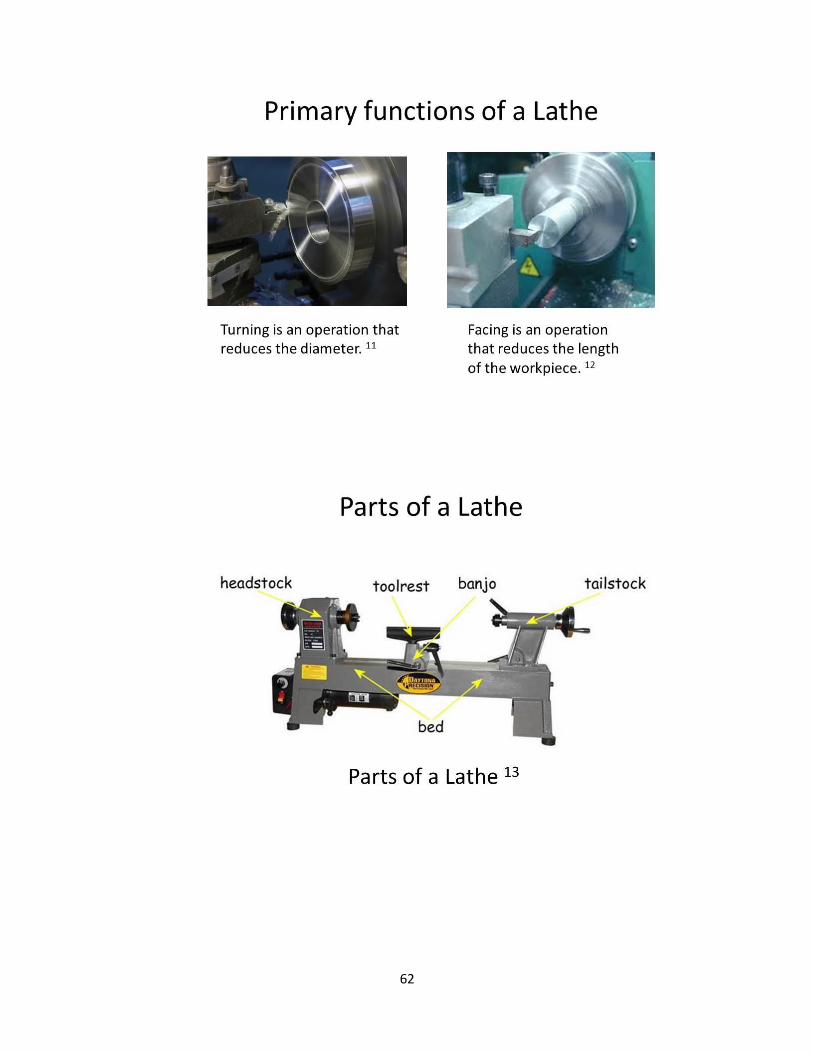
62

63

64
APPENDIX C: Link to the Instructions for Lathe
Construction
The link to the video containing the construction, assembly and testing of the
‘Make and Take Lathe kit’ is:
https://www.youtube.com/watch?v=5DIhQN4MLMk&feature=youtu.be
The video is titled “Lathe Instructables Final Video”.
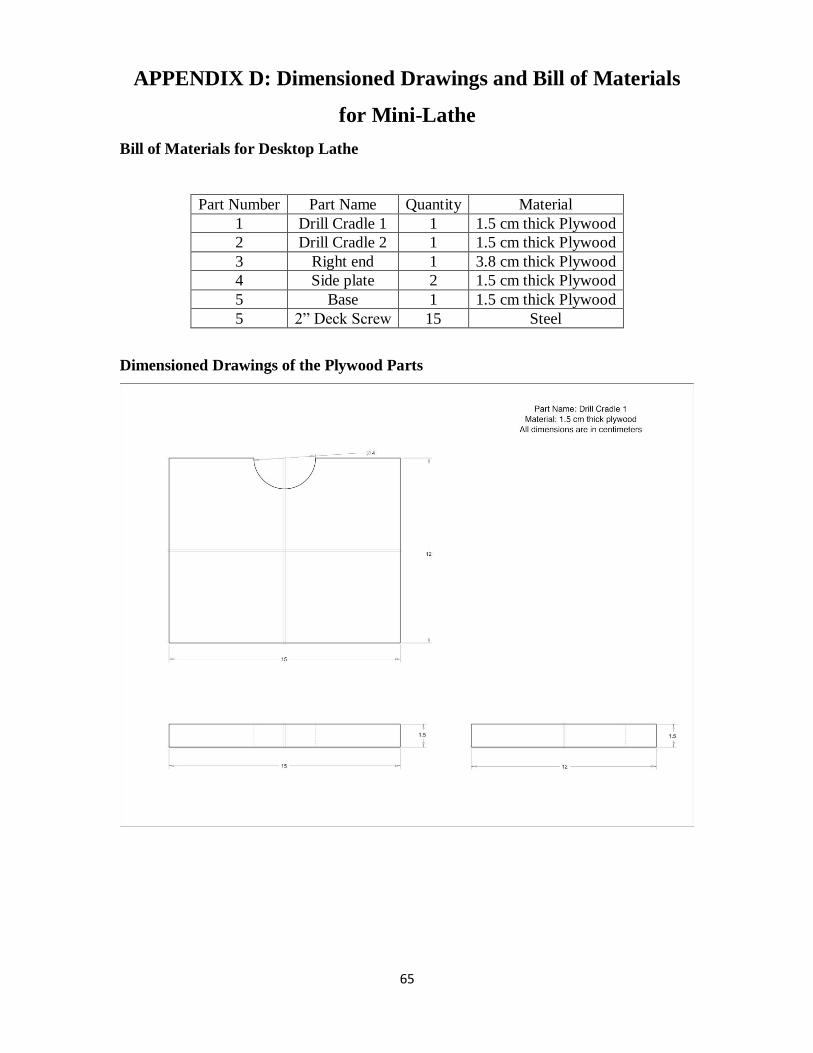
65
APPENDIX D: Dimensioned Drawings and Bill of Materials
for Mini-Lathe
Bill of Materials for Desktop Lathe
Part Number Part Name Quantity Material
1 Drill Cradle 1 1 1.5 cm thick Plywood
2 Drill Cradle 2 1 1.5 cm thick Plywood
3 Right end 1 3.8 cm thick Plywood
4 Side plate 2 1.5 cm thick Plywood
5 Base 1 1.5 cm thick Plywood
5 2” Deck Screw 15 Steel
Dimensioned Drawings of the Plywood Parts

66
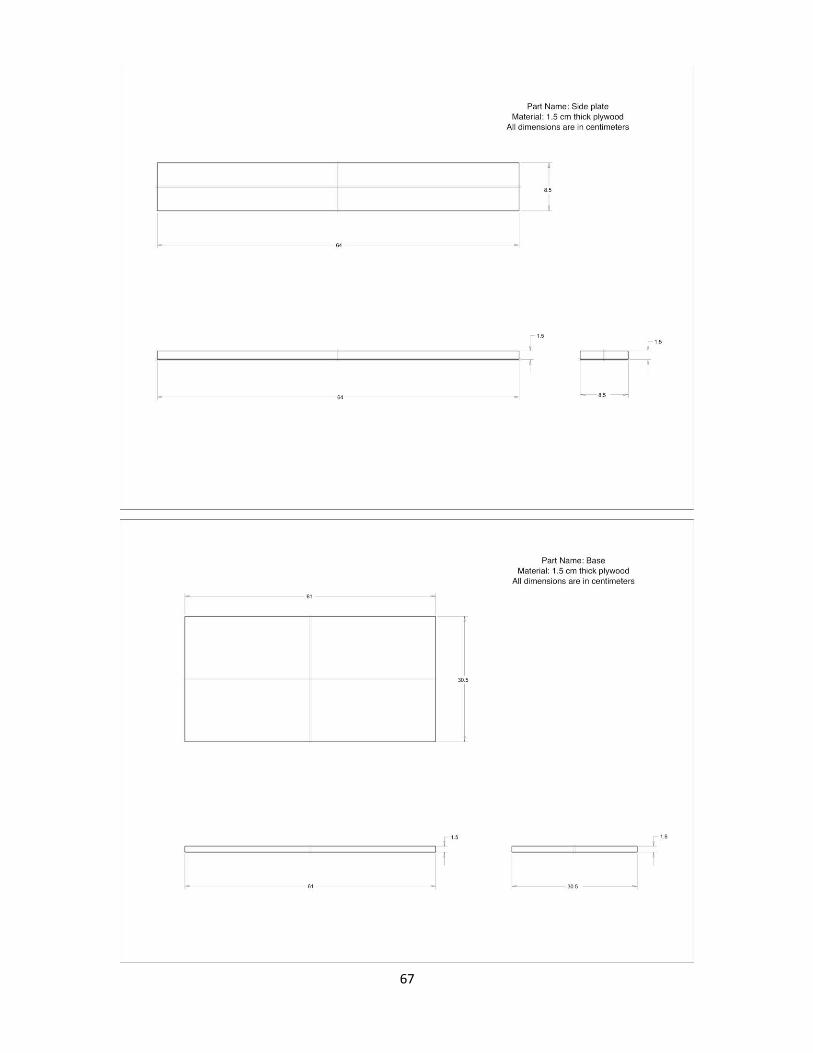
67