CSPro User's Guide - Census Bureau
686
CSPro User's Guide Version 7.5.0 International Programs Population Division U.S. Census Bureau 4600 Silver Hill Road Washington, DC 20233 [email protected]
-
Upload
khangminh22 -
Category
Documents
-
view
0 -
download
0
Transcript of CSPro User's Guide - Census Bureau

CSPro User's Guide
Version 7.5.0
International ProgramsPopulation DivisionU.S. Census Bureau
4600 Silver Hill Road
Washington, DC 20233
12020202122242424262829313436363637373738414141424343444546485253535555555656575757575858585859
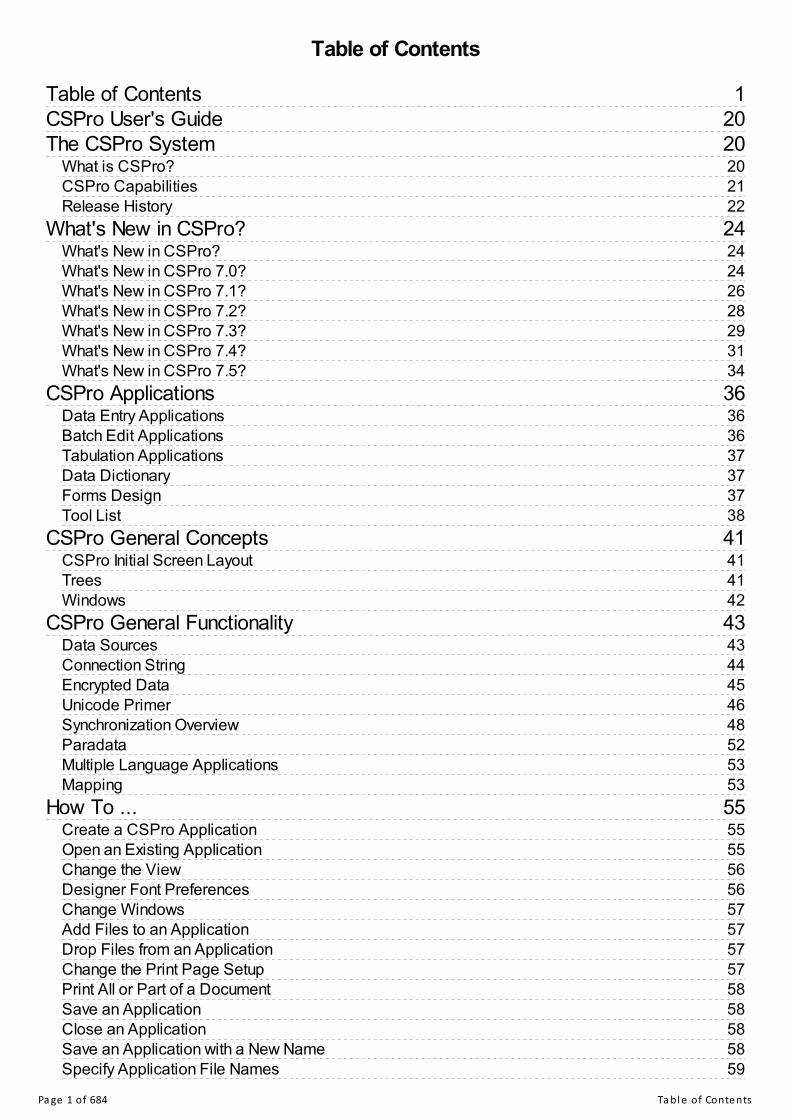
Table of Contents
Table of ContentsCSPro User's GuideThe CSPro System
What is CSPro?CSPro CapabilitiesRelease History
What's New in CSPro?What's New in CSPro?What's New in CSPro 7.0?What's New in CSPro 7.1?What's New in CSPro 7.2?What's New in CSPro 7.3?What's New in CSPro 7.4?What's New in CSPro 7.5?
CSPro ApplicationsData Entry ApplicationsBatch Edit ApplicationsTabulation ApplicationsData DictionaryForms DesignTool List
CSPro General ConceptsCSPro Initial Screen LayoutTreesWindows
CSPro General FunctionalityData SourcesConnection StringEncrypted DataUnicode PrimerSynchronization OverviewParadataMultiple Language ApplicationsMapping
How To ...Create a CSPro ApplicationOpen an Existing ApplicationChange the ViewDesigner Font PreferencesChange WindowsAdd Files to an ApplicationDrop Files from an ApplicationChange the Print Page SetupPrint All or Part of a DocumentSave an ApplicationClose an ApplicationSave an Application with a New NameSpecify Application File Names
Pa ge 1 of 684 Ta bl e of Conte nts

60606060626263636465676767676768686870707071717173737373747575757576767678787879808080818181828282
Pack an ApplicationCSPro SettingsGet HelpCollaborating on CSPro Development
Data Dictionary ModuleIntroduction to Data Dictionary
OrganizationQuestionnaire and Dictionary OrganizationData File Type StructureDictionary Hierarchy
Dictionary ConceptsGeneral
LabelsNamesNotes
LevelsLevel DescriptionLevel Properties
RecordsRecord DescriptionRecord PropertiesRecord TypeRequired RecordMaximum Number
ItemsItem DescriptionIdentification ItemsSubitemsItem PropertiesStarting PositionLengthData TypeOccurrencesDecimal PlacesDecimal CharacterZero Fill
Value SetsValue Sets DescriptionValue Set PropertiesValue Set Images
ValuesValue DescriptionValue Properties
RelationsRelation DescriptionRelation Properties
Data Dictionary ApplicationCreating a Dictionary for a New FileCreating a Dictionary for an Existing File
Pa ge 2 of 684 Ta bl e of Conte nts

83848485858787878788888889898990919192929292939393949494949595959596979899999999
101102
103103103103104105105105107
Data Dictionary Screen LayoutData Dictionary TreeRelative and Absolute ModeDictionary TypesReconciling Dictionary Changes
How to ...Open an Existing Dictionary ApplicationMove Around a DictionaryView the Dictionary LayoutAdd Dictionary ElementsModify Dictionary ElementsAdd or Modify LevelsAdd or Modify RecordsAdd or Modify ItemsAdd or Modify Value SetsLinked Value SetsGenerate Numeric Value SetAdd or Modify ValuesUndo and Redo ChangesSelect Several Dictionary ElementsInsert Dictionary ElementsDelete Dictionary ElementsMove Dictionary ElementsFind Dictionary ElementsDocument Dictionary ElementsConvert Items to SubitemsSelect Relative or Absolute PositioningCreate Dictionary with No Record TypesOccurrence LabelsAdd or Modify RelationsPrint the Dictionary FileSave Dictionary as New FileMultiple Language DictionariesDictionary MacrosDictionary AnalysisDictionary Security Options
The CSPro LanguageIntroduction to CSPro LanguageData RequirementsCSPro Program StructureProgramming StandardsDebugging CSPro Applications
Declaration SectionCompiler ModeVariablesAlias StatementEnsure StatementUser-Defined FunctionsArray ObjectAudio ObjectFile Object
Pa ge 3 of 684 Ta bl e of Conte nts

108109110112113113
115115115116117117118118
120120120121121
122122122122
125125125125126126
128128128129130130
132132132133134134135
136136136137
138138
139
HashMap ObjectList ObjectMap ObjectPff ObjectSystemApp ObjectValueSet Object
Procedural SectionsStatementsProc StatementPreProc StatementOnFocus StatementOnOccChange StatementKillFocus StatementPostProc Statement
LogicView LogicCreate and Edit LogicFind and Replace LogicCompile Logic
Language ElementsDelimitersCommentsLogic Preprocessor
Variables and ConstantsData ItemsThis Item ($)SubscriptsNumbersText Strings
ExpressionsExpressionsSubstring ExpressionsBoolean ValuesSpecial ValuesRefused Value
OperatorsOperatorsIn OperatorHas OperatorIf and Only If OperatorOperator PrecedenceAnd/Or Truth Table
FilesExternal FilesLookup FilesWorking Storage File
Data Entry ModuleIntroduction to Data Entry
Data Entry Application
Pa ge 4 of 684 Ta bl e of Conte nts

139139139140140
141141141142143145146
148148149149151152153154157
158158158160160162163164165165166
167167
168168168168169169170
171171171172173173174174174
General Data Entry ConceptsData Entry PhilosophiesSkip IssuesErrors at Data EntryAdding Logic
CSPro Data Entry ConceptsOperator vs. System ControlledData Entry PathData Entry ElementsBlocksIssues to Consider When Designing a FormTips on Reviewing Data Entry Applications
Create a Data Entry ApplicationCreate a New Data Entry ApplicationGenerate Default Data Entry FormsDrag Option MenuData Entry Forms Screen LayoutData Entry TreeRun a Data Entry ApplicationRun Production Data EntryGenerate Binary Data Entry Application
Change Data Entry CharacteristicsChange the Order of EntryChange Data Entry OptionsData Source OptionsParadata OptionsSimple SynchronizationsDisplay the Case Listing on a MapChange Default Text FontChange Field ColorsChange Field FontChange Error Sound
Forms DesignerIntroduction to Forms Design
Add Things to a FormAdd a FormAdd Fields to a FormAdd a Roster to a FormAdd Things to a RosterAdd Text to a FormAdd Lines or Boxes to a Form
Modify Things in a FormSelecting ItemsMove ThingsAlign ThingsCut, Copy, or Paste ThingsResize and Reposition Things in a RosterJoin and Split Roster ColumnsDelete Form ElementsMatching the Application to the Data Dictionary
Pa ge 5 of 684 Ta bl e of Conte nts

175175175175176177179180181182183183
185185
186186187187188
189189190190192192192193194
196196196196200
201201201201202202202202203203
204204204205205205206
Change Form PropertiesChange Forms File PropertiesChange Level PropertiesChange Form PropertiesChange Block PropertiesChange Field PropertiesChange Field Properties for Multiple FieldsChange Keyboard InputChange Roster PropertiesChange Column Heading PropertiesChange Row Heading PropertiesChange Text Properties
Data Entry EditingIntroduction to Data Entry Editing
Editing ConceptsType of Edits in Data EntryStructure EditsConsistency EditsChecking Errors
Writing LogicData Entry Logic Screen LayoutMoving Around a Logic ApplicationOrder of Executing Data Entry EventsSequence Dictated by DesignerCompile an ApplicationOnKey Character MapUser and Configuration SettingsRun as Batch
CAPI Data EntryIntroduction to CAPICAPI FeaturesExtended ControlsMultimedia Features
CAPI StrategiesFormsFieldsQuestionsValuesOrganization of the InstrumentUsing Multiple LanguagesBreaking Off the InterviewComing Back LaterPrefilling Values
How to ...Create a New CAPI ApplicationDefine LanguagesOrganize FormsEnter Question TextCreate Fills In QuestionsCreate Standard Forms
Pa ge 6 of 684 Ta bl e of Conte nts

207207208208208209209209210210210211211212
213213
215215215220
222222
223223224226226
228228228229
230230230231231232233235236
239239239240240241242243
246246
Change FormattingAdd PicturesQuestion Text MacrosResource FoldersUse Multiple LanguagesCreate Conditional QuestionsDisplay Questions Without ScrollingStructure MovementCreate Helps for FieldsShow Values for SelectionHandle Multiple AnswersChoose Topic SectionsCreate General HelpsTest Application
Network Data EntryNetwork Data Entry
Android Data EntryAndroid DevelopmentAndroid NavigationCSEntry Settings Modification
Batch Editing ApplicationsIntroduction to Batch Editing
Create a Batch Edit ApplicationCreate a New Batch Edit ApplicationBatch Application Screen LayoutBatch Edit TreeRun a Batch Edit Application
Order of EditingOrder of Executing Batch Edit EventsBatch Edit OrderChange Edit Order
Correcting ErrorsMethods of Correcting DataGuidelines for Correcting DataImputationStatic ImputationDynamic Imputation (Hot Deck)DeckArraysDeckArray Leftover RowsTypes of Edits in Batch Editing
How to ...Manipulate Automatic ReportsCreate a Specialized ReportUse Hot DecksInitialize Hot Decks in Program LogicInitialize Hot Decks Using Saved ArraysInterpret ReportsRun Production Batch Edits
Steps in Developing a Batch Editing ProgramGeneral Batch Editing Issues
Pa ge 7 of 684 Ta bl e of Conte nts

246246247247247247248
249249249250251251
251253253253254254255255255255255256256256257258
259259260262263264265269271272272272
272272273
275275276276278278279280
Review Edit SpecificationsDefine Coding StandardsCode Edits of Individual Data ItemsDevelop Comprehensive Test FileTest CSPro ProgramRe-Test with Live DataBegin Production Editing
Tabulation ApplicationsIntroduction to TabulationParts of a Table
Design/Data View ContentsAdditional Contents for Print ViewAdditional Table Terms
Common Uses of TabulationCapabilities of Tabulation
Cross TabulationsTabulate Counts or PercentsTabulate Values and/or WeightsProduce Summary StatisticsRestrict a UniverseFormat Tables for PrintingLoad and Save Formatting PreferencesProduce Tables by AreaSave Tabulations in Different FormatsCopy Table to Other FormatsCopy and Paste Table SpecificationCreate Multiple SubtablesChange Unit of TabulationTally Items from Related Records
Creating TablesCreate a New Tabulation ApplicationCreate a TableCreate Tables with Multiple VariablesImplications of Data Dictionary Value SetsTabulate Items with Multiple OccurrencesTally Attributes for a VariableTally Attributes for a TableAdd, Insert, and Delete Tables
Add TableInsert TableDelete Table
Move Between TablesRun a Tabulation ApplicationRenaming Tables and Table Applications
How To ...Add a Variable to a TabulationRemove a Variable from a TabulationDefine a Universe for a TableAdd Weights to a TableTabulate Values Instead of FrequenciesInclude/Exclude Special Values in a VariableHide or Change the Position of the Total
Pa ge 8 of 684 Ta bl e of Conte nts

280281282282
284284286287288290292
294294294296296297297298298299300300301302303303304305305306
308308308310311313
316316316
318318318319320321323324
326326
Add Percents to a TableAdd Summary Statistics to a TableInclude/Exclude Tables from RunDebug Table Totals
Formatting TablesFormats for a Part of a TableFormatting Row, Column, or Cell DataFormats for a TableFormats for an ApplicationFormats for PrintingViews of Tables
How To ...Customize Table TextHide or Show a Row or ColumnHide Rows Containing All ZerosChange the Number of Decimal Places DisplayedAdd a Footnote (Pagenote or Footnote)Add Header/Footer Text to a TableAdd a SubtitleAdd Stub LeaderingAdd BordersAdd Reader BreaksChange the Way Numbers are DisplayedChange the Automatically Generated TextChange Fonts or ColorsChange Indentation or AlignmentAdd Borders to CellsMake Captions Span Data CellsReset Format of Table Item to DefaultChange the Repeating of BoxheadsChange Stub Column Position
Creating Tables by Geographic AreaArea ProcessingCreate an Area Names FileArea Dialog BoxArea CaptionsCustom Consolidation
How To ...Display Results for One Geographic AreaTabulate only Certain Levels of Geography
Printing TablesUsing Print PreviewNavigating Between Pages, Tables, and AreasViewing Multiple and Facing PagesModifying Row and Column Spacing for PrintingPrint Preview OptionsPrint SetupSending Tables to the Printer
How To ...Undo or Reset Changes in Print Preview
Pa ge 9 of 684 Ta bl e of Conte nts
326327327328328
330330
331331331332
334334334334
335335335336339340
343343343
345345345346347348349350
352352353353357
359359
361361362363367370
372372372379
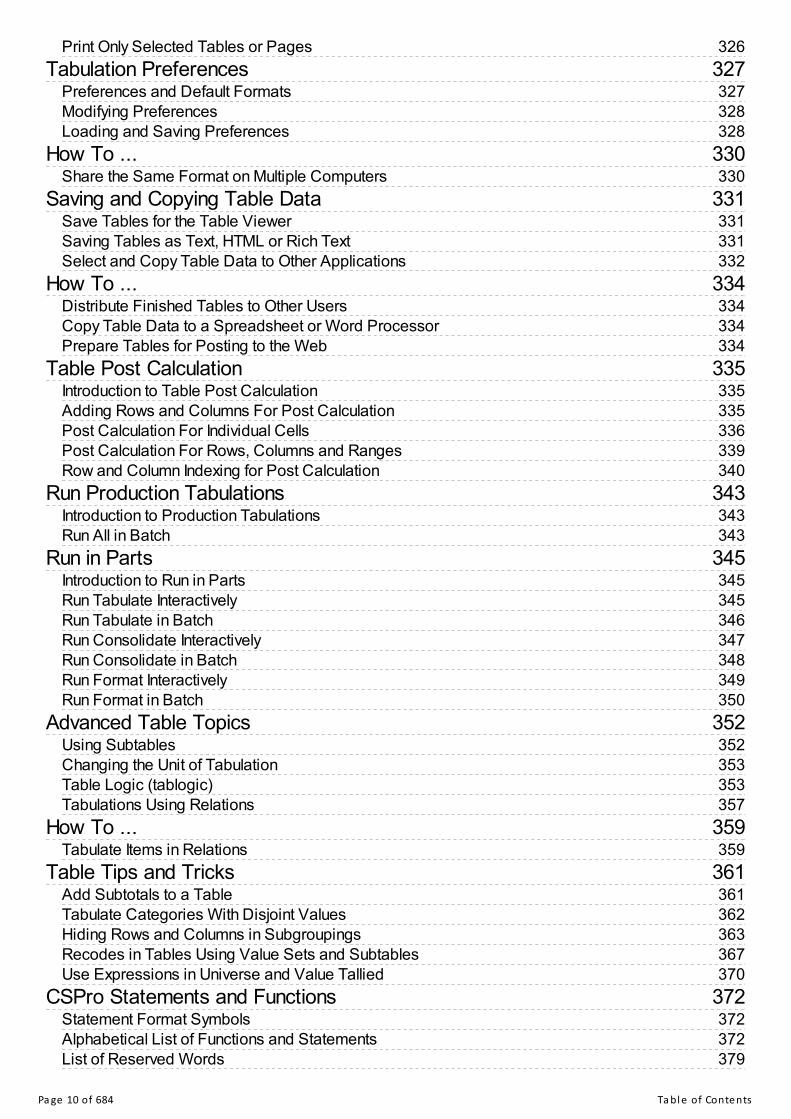
Print Only Selected Tables or PagesTabulation Preferences
Preferences and Default FormatsModifying PreferencesLoading and Saving Preferences
How To ...Share the Same Format on Multiple Computers
Saving and Copying Table DataSave Tables for the Table ViewerSaving Tables as Text, HTML or Rich TextSelect and Copy Table Data to Other Applications
How To ...Distribute Finished Tables to Other UsersCopy Table Data to a Spreadsheet or Word ProcessorPrepare Tables for Posting to the Web
Table Post CalculationIntroduction to Table Post CalculationAdding Rows and Columns For Post CalculationPost Calculation For Individual CellsPost Calculation For Rows, Columns and RangesRow and Column Indexing for Post Calculation
Run Production TabulationsIntroduction to Production TabulationsRun All in Batch
Run in PartsIntroduction to Run in PartsRun Tabulate InteractivelyRun Tabulate in BatchRun Consolidate InteractivelyRun Consolidate in BatchRun Format InteractivelyRun Format in Batch
Advanced Table TopicsUsing SubtablesChanging the Unit of TabulationTable Logic (tablogic)Tabulations Using Relations
How To ...Tabulate Items in Relations
Table Tips and TricksAdd Subtotals to a TableTabulate Categories With Disjoint ValuesHiding Rows and Columns in SubgroupingsRecodes in Tables Using Value Sets and SubtablesUse Expressions in Universe and Value Tallied
CSPro Statements and FunctionsStatement Format SymbolsAlphabetical List of Functions and StatementsList of Reserved Words
Pa ge 10 of 684 Ta bl e of Conte nts

381383383383384384385386388389391392
394394395396
397397398399399400401402403404405
407407407
409409409410410411
413413414415416417418
420420420421421422422
Deprecated FeaturesDeclaration Statements
Numeric StatementString StatementConfig StatementAlpha StatementRelation StatementFunction StatementOptional Function ParametersPassing Function Arguments by ReferenceAdditional Examples of User-Defined FunctionsLogic Objects and Dot Notation
Array ObjectArray StatementArray.Length FunctionArray.Clear Function
Audio ObjectAudio StatementAudio.Load FunctionAudio.Save FunctionAudio.Play FunctionAudio.RecordInteractive FunctionAudio.Record FunctionAudio.Stop FunctionAudio.Concat FunctionAudio.Length FunctionAudio.Clear Function
BarcodeBarcode NamespaceBarcode.Read Function
File ObjectFile StatementFile.Open FunctionFile.Close FunctionFile.Read FunctionFile.Write Function
HashMap ObjectHashMap StatementHashMap.GetKeys FunctionHashMap.Contains FunctionHashMap.Length FunctionHashMap.Remove FunctionHashMap.Clear Function
List ObjectList StatementList.Add FunctionList.Insert FunctionList.Seek FunctionList.Remove FunctionList.RemoveDuplicates Function
Pa ge 11 of 684 Ta bl e of Conte nts

423424424425425
427427427428429430430431432433433434435437437438440441442443444445446446447448448449
451451451452452453453
455455455456456457458
460460460461
List.RemoveIn FunctionList.Clear FunctionList.Length FunctionList.Show FunctionList.Sort Function
Map ObjectMap StatementMap.Show FunctionMap.Hide FunctionMap.AddMarker FunctionMap.RemoveMarker FunctionMap.ClearMarkers FunctionMap.SetMarkerDescription FunctionMap.SetMarkerImage FunctionMap.GetMarkerLatitude FunctionMap.GetMarkerLongitude FunctionMap.SetMarkerLocation FunctionMap.SetMarkerOnClick FunctionMap.GetLastClickLatitude FunctionMap.GetLastClickLongitude FunctionMap.SetMarkerOnClickInfoWindow FunctionMap.SetMarkerOnDrag FunctionMap.SetMarkerText FunctionMap.SetOnClick FunctionMap.AddImageButton FunctionMap.AddTextButton FunctionMap.RemoveButton FunctionMap.ClearButtons FunctionMap.SetBaseMap FunctionMap.SetTitle FunctionMap.ShowCurrentLocation FunctionMap.ZoomTo FunctionOffline Maps
PathPath NamespacePath.Concat FunctionPath.GetDirectoryName FunctionPath.GetExtension FunctionPath.GetFileName FunctionPath.GetFileNameWithoutExtension Function
Pff ObjectPff StatementPff.Load FunctionPff.Save FunctionPff.GetProperty FunctionPff.SetProperty FunctionPff.Exec Function
SystemApp ObjectSystemApp StatementSystemApp.SetArgument FunctionSystemApp.Exec Function
Pa ge 12 of 684 Ta bl e of Conte nts

462462
464464464465466466467468468
470470470471472473473474475475476477
478478478479482483484
485485486486487487488488488489
489490490491491492492493493494494
SystemApp.GetResult FunctionSystemApp.Clear Function
ValueSet ObjectValueSet StatementValueSet.Add FunctionValueSet.Remove FunctionValueSet.Clear FunctionValueSet.Length FunctionValueSet.Randomize FunctionValueSet.Show FunctionValueSet.Sort Function
Program Control StatementsBreak StatementDo StatementExit StatementFor StatementForCase StatementFor (Dictionary) StatementIf StatementNext StatementUniverse StatementWhen StatementWhile Statement
Assignment StatementsAssignment StatementRecode StatementRecode Statement (Deprecated)Impute FunctionSetValue FunctionGetValue Function
Data Entry Statements and FunctionsAccept FunctionAdvance StatementAsk StatementChangeKeyboard FunctionConnection FunctionDeMode FunctionDisplay Orientation
Display OrientationSetOrientation Function
EditNote FunctionEndLevel StatementEndGroup StatementEnter StatementGetCaptureType FunctionGetCaseLabel FunctionGetDeviceID FunctionGetImage FunctionGetNote FunctionGetOperatorId FunctionGetOS Function
Pa ge 13 of 684 Ta bl e of Conte nts

495495496497498498499499500500501502505506507507508509509510511512513514515515516517518519520521521523526
527527527528528529529530
531531531532533533534534
GetRecord FunctionGetUserName FunctionGPS FunctionHideOcc FunctionHighlighted FunctionIsPartial FunctionIsVerified FunctionMove StatementNoInput StatementOnChangeLanguage Global FunctionOnChar Global FunctionOnKey Global FunctionOnStop Global FunctionOnSystemMessage Global FunctionPrompt FunctionProtect FunctionPutNote FunctionRandomizeVS FunctionReenter StatementSavePartial FunctionSelCase FunctionSet Attributes StatementSet Behavior CanEnter StatementSetCapturePos FunctionSetCaptureType FunctionSetCaseLabel FunctionSet ErrMsg StatementSetFont FunctionSetOperatorId FunctionShow FunctionShowArray FunctionShowOcc FunctionSkip StatementUserbar FunctionVisualValue Function
Batch Edit StatementsEndCase StatementExport StatementGetDeck FunctionPutDeck FunctionSet Behavior Export StatementSetOutput FunctionSkip Case Statement
Numeric FunctionsABS FunctionCMCode FunctionCountNonSpecial FunctionExp FunctionHigh FunctionInc FunctionInt Function
Pa ge 14 of 684 Ta bl e of Conte nts

535535535536536537537538
539539539540540541541542543545546546547548548549549550
551551551552552553554555555556556557557557558558559560560560
562562562563563
Log FunctionLow FunctionRandom FunctionRandomIn FunctionRound FunctionSeed FunctionSqrt FunctionSet Behavior SpecialValues Statement
String FunctionsCompare FunctionConcat FunctionString Concatenation OperatorEdit FunctionGetBuffer FunctionLength FunctionMakeText FunctionMessage Formatting OptionsPos FunctionPosChar FunctionRegExMatch FunctionReplace FunctionStartsWith FunctionStrip FunctionToLower FunctionToNumber FunctionToUpper Function
Multiple Occurrence FunctionsAverage FunctionCount FunctionCurOcc FunctionDelete FunctionGetOccLabel FunctionInsert FunctionMax FunctionMaxOcc FunctionMin FunctionNOccurs FunctionSeek FunctionSeekMax FunctionSeekMin FunctionSetOccLabel FunctionSOccurs FunctionSort FunctionSum FunctionSwap FunctionTotOcc Function
General FunctionsCompress FunctionDecompress FunctionDiagnostics FunctionEncode Function
Pa ge 15 of 684 Ta bl e of Conte nts

564566567568569571572572572573574574575576576577577578579580580581582584585586587588588591592592593595595596
598598598599599600600601602602603603604605605
ErrMsg FunctionExecSystem Function (Desktop)ExecSystem Function (Mobile)ExecPFF FunctionGetProperty FunctionGetLabel FunctionGetLanguage FunctionGetSymbol FunctionGetValueLabel FunctionHash FunctionInValueSet FunctionIsChecked FunctionLoadSetting FunctionLogText FunctionMaxValue FunctionMinValue FunctionParadata FunctionPathConcat FunctionPathName FunctionReport FunctionSaveSetting FunctionSetLanguage FunctionSetProperty FunctionSetReportData FunctionSetValueSet FunctionSetValueSet Function With ArraysSetValueSets FunctionSpecial FunctionSqlQuery FunctionStop FunctionSysParm FunctionTr FunctionTrace FunctionUUID FunctionView FunctionWarning Function
Date and Time FunctionsAdjLBA FunctionAdjLBI FunctionAdjUBA FunctionAdjUBI FunctionDateAdd FunctionDateDiff FunctionDateValid FunctionPublishDate FunctionSetLB FunctionSetUB FunctionSysDate FunctionSysTime FunctionTimestamp FunctionTimeString Function
Pa ge 16 of 684 Ta bl e of Conte nts

607607607608608609609610610611611612612613613614615615616616617618618619619620621622622623624625625626627
628628628629630630631631632633634635636637638639
External File FunctionsClear FunctionClose FunctionCountCases FunctionDelCase FunctionDirCreate FunctionDirDelete FunctionDirExist FunctionDirList FunctionFileConcat FunctionFileCopy FunctionFileCreate FunctionFileDelete FunctionFileEmpty FunctionFileExist FunctionFileName FunctionFileRead FunctionFileRename FunctionFileSize FunctionFileTime FunctionFileWrite FunctionFind FunctionKey FunctionKeyList FunctionLoadCase FunctionLocate FunctionNMembers FunctionOpen FunctionRetrieve FunctionSet Access StatementSetFile FunctionSet First StatementSet Last StatementWrite FunctionWriteCase Function
Synchronization FunctionsSyncConnect FunctionSyncConnect Function (CSWeb)SyncConnect Function (Bluetooth)SyncConnect Function (Dropbox)SyncConnect Function (LocalDropbox)SyncConnect Function (LocalFiles)SyncConnect Function (FTP)SyncServer FunctionSyncDisconnect FunctionSyncData FunctionSyncFile FunctionSyncMessage FunctionSyncParadata FunctionSyncApp FunctionGetBluetoothName Function
Pa ge 17 of 684 Ta bl e of Conte nts
641641643
645645645645645646646
647647648649650
653653653655656657
659659659660661661
663663663664664664
666666666
669669670672672673
676676676676676677678
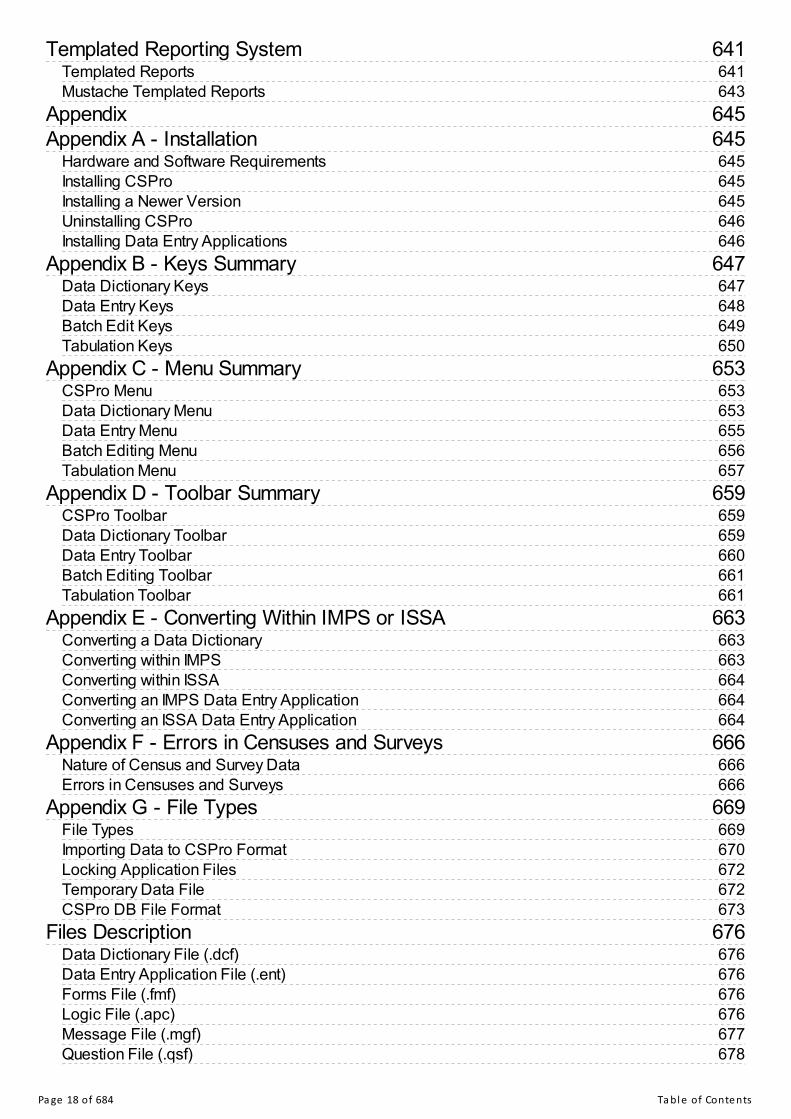
Templated Reporting SystemTemplated ReportsMustache Templated Reports
AppendixAppendix A - Installation
Hardware and Software RequirementsInstalling CSProInstalling a Newer VersionUninstalling CSProInstalling Data Entry Applications
Appendix B - Keys SummaryData Dictionary KeysData Entry KeysBatch Edit KeysTabulation Keys
Appendix C - Menu SummaryCSPro MenuData Dictionary MenuData Entry MenuBatch Editing MenuTabulation Menu
Appendix D - Toolbar SummaryCSPro ToolbarData Dictionary ToolbarData Entry ToolbarBatch Editing ToolbarTabulation Toolbar
Appendix E - Converting Within IMPS or ISSAConverting a Data DictionaryConverting within IMPSConverting within ISSAConverting an IMPS Data Entry ApplicationConverting an ISSA Data Entry Application
Appendix F - Errors in Censuses and SurveysNature of Census and Survey DataErrors in Censuses and Surveys
Appendix G - File TypesFile TypesImporting Data to CSPro FormatLocking Application FilesTemporary Data FileCSPro DB File Format
Files DescriptionData Dictionary File (.dcf)Data Entry Application File (.ent)Forms File (.fmf)Logic File (.apc)Message File (.mgf)Question File (.qsf)
Pa ge 18 of 684 Ta bl e of Conte nts

678679679680680680681681682682682683683683683683684684
Program Information File (.pff)Binary Data Entry Application File (.pen)Index File (.csidx)Notes File (.csnot)Status File (.sts)Paradata Log File (.cslog)Operator Statistics File (.log)Listing FileBatch Edit Application File (.bch)Edit Order File (.ord)Saved Arrays File (.sva)Tabulation Application File (.xtb)Table Specifications File (.xts)Tables File (.tbw)Area Names File (.anm)Table Matrices File (.tab)Table Matrices Index File (.tabidx)Frequency Specification File (.fqf)
Pa ge 19 of 684 Ta bl e of Conte nts

CSPro User's Guide
The CSPro SystemWhat is CSPro?The Census and Survey Processing System (CSPro) is a software package for entering, editing, tabulating, anddisseminating data from censuses and surveys. Using CSEntry, the data collection component, you can run a data entryoperation in the Windows and Android environments. CSPro combines the features of the Integrated MicrocomputerProcessing System (IMPS) and the Integrated System for Survey Analysis (ISSA).
CSPro runs under Windows Vista, 7, 8, and 10. It does not run under other operating systems such as Linux or MacOS. It is a public domain product, so it can be used and distributed at no cost.
CSPro can be used to process data from censuses and surveys, both small and large. Typical subject areas include:
Housing and Population
Demographic Characteristics
Health and Nutrition
Agriculture
Labor Force
Business Establishments
Education
Living Standards
Energy
Immigration
Household Income and Expenditure
Community
Institutional
Post-Enumeration
Vital Statistics
CSPro uses data dictionaries to provide a common description of each data file used. CSPro encodes data in UTF-8format. CSPro provides tools to view data and text files, to view tables created by CSPro, to convert IMPS and ISSA datadictionaries to and from CSPro.
CSPro is not intended to provide database management capabilities. However, the data generated and/or manipulated bya CSPro application can be imported into a database system. While CSPro provides some tabulation capabilities, it isnot intended to replace more sophisticated statistical analysis software such as R, SAS, SPSS, Stata, etc.
CSPro includes the following modules:
Data Entry Applications
Batch Edit Applications
Pa ge 20 of 684 CSPro Us e r's Gui de
Tabulation Applications
Tools
If you have never used CSPro before, you can refer to the Getting Started Guide, a tutorial that gives an overview ofCSPro's capabilities. If you are a previous user, you may want to look at a list of this version's new features.
This section includes the following information:
CSPro Capabilities
CSPro Applications
General Concepts
General Functionality
How to ...
CSPro CapabilitiesProcess Census or Survey Data
Given an existing data file, a user can develop a CSPro application that will examine the file for inconsistencies,structural defects, or other errors. CSPro permits the user to generate detailed reports on all errors found; the user mayalso create subfiles from the original data, and may use multiple look-up files during the validation and/or report-generation process.
Enter, Modify, and Verify Data
CSPro users can create data entry forms (screens) for data capture. The application designer has full control over formlayout. CSPro supports rosters, consistency checks and skip patterns of unlimited complexity, user-defined messagesand menus, multiple lookup files, and produces operator statistics.
Once a case has been completely entered, the operator can modify any part of the existing data and can add or removeinformation, as well (subject to application constraints).
CSPro supports both dependent and independent verification (double keying) to ensure the accuracy of the data entryoperation. Using independent verification, operators can key data into separate data files and use CSPro utilities tocompare them. Using dependent verification, operators can key data a second time and have CSPro immediatelycompare it to what was keyed the first time on a field-by-field basis.
Manipulate Data Files
CSPro permits the user to re-structure existing data files and to create subsets of data in separate files. New files can becreated by merging two or more case-related files. Data files in software-specific formats may be created for import intospreadsheets and some statistical packages.
Tabulate Data
The user can create an application to produce frequency distributions or cross-tabulations using two to four variables.Results can be displayed either globally (for the totality of the data file) or according to one or more elements of thegeographic hierarchy. Tabulations may show only percentages, or percentages in conjunction with counts. Data may beweighted or unweighted.
Use and Share External Files
When a data file is to be used by more than one person, a CSPro dictionary can be created and distributed among usersof the data to facilitate access. Including multiple value sets for variables can cater to the different needs of individualusers so that each user's requirements are met.
Pa ge 21 of 684 CSPro Us e r's Gui de

Examine Data Files
CSPro provides language elements that will permit the specification of logic to carry out a detailed examination of a datafile. Elements of the file may be tested against other elements of the same file or against elements of one or more otherfiles, and the user may generate reports showing the results of the examination. CSPro also provides a facility forcomparing the contents of two data files. This utility will generate a detailed report to the user documenting anydifferences found.
Interactive Editing
CSPro language elements can be used to construct a series of tests to be carried out on a case-by-case basis using theCSEntry module. Whether adding a new case or modifying an existing case, CSPro instructions permits interactiveediting and correction of data elements. If the user desires, a report on editing activity may be generated and saved forprinting after the session is completed.
Examine Results of Editing
Whether the user is carrying out interactive or batch editing, the CSPro language permits the preparation of reports withdetailed information on cases tested, errors found, and errors corrected. These reports are written to disk in text formatand may be viewed (or printed) with any text viewer, such as CSPro's utility Text Viewer. They provide documentation ofwork carried out and permit analysis of types and frequency of errors.
Release HistoryCSPro was first released in 2000. Over the years, many new features have been added to the software, and in addition tothe Windows desktop version, new versions have been released for Android. The following table shows the software'srelease history:
Version First Release Last Release Releases Notable Features2.0 May 5, 2000 October 30, 2000 8 First version of CSPro2.1 April 20, 2001 July 18, 2001 62.2 November 7, 2001 December 18,
200216
2.3 January 24, 2003 May 7, 2003 6 Improved form designer2.4 August 6, 2003 April 30, 2004 82.5 May 19, 2004 February 24, 2005 7 CAPI mode2.6 June 13, 2005 September 29,
20057 Export tool
3.0 November 30,2005
March 27, 2006 5 Improved tabulation system
3.1 May 17, 2006 August 29, 2006 33.2 October 25, 2006 February 8, 2007 23.3 May 11, 2007 June 4, 2008 34.0 December 17,
2008June 11, 2010 4 Windows CE (Pocket PC) version
4.1 May 5, 2011 December 12,2011
2 Improved CAPI features
5.0 July 30, 2012 August 8, 2013 3 Unicode support6.0 September 25,
2014September 25,2014
1 Android version
6.1 April 1, 2015 April 1, 2015 16.2 November 26,
2015November 26,2015
1
6.3 May 5, 2016 May 5, 2016 1
Pa ge 22 of 684 CSPro Us e r's Gui de

7.0 May 8, 2017 June 29, 2017 3 CSPro DB and CSWeb7.1 March 15, 2018 July 2, 2018 4 CSDeploy, paradata, and templated
reports7.2 February 22, 2019 April 1, 2019 2 Blocks7.3 September 3, 2019 November 1, 2019 2 Mapping and logic objects7.4 May 5, 2020 July 13, 2020 2 Encrypted and relational data files7.5 October 8, 2020 October 8, 2020 1 Audio recording and new listing file
formats
See also: What's New in CSPro?
Pa ge 23 of 684 CSPro Us e r's Gui de
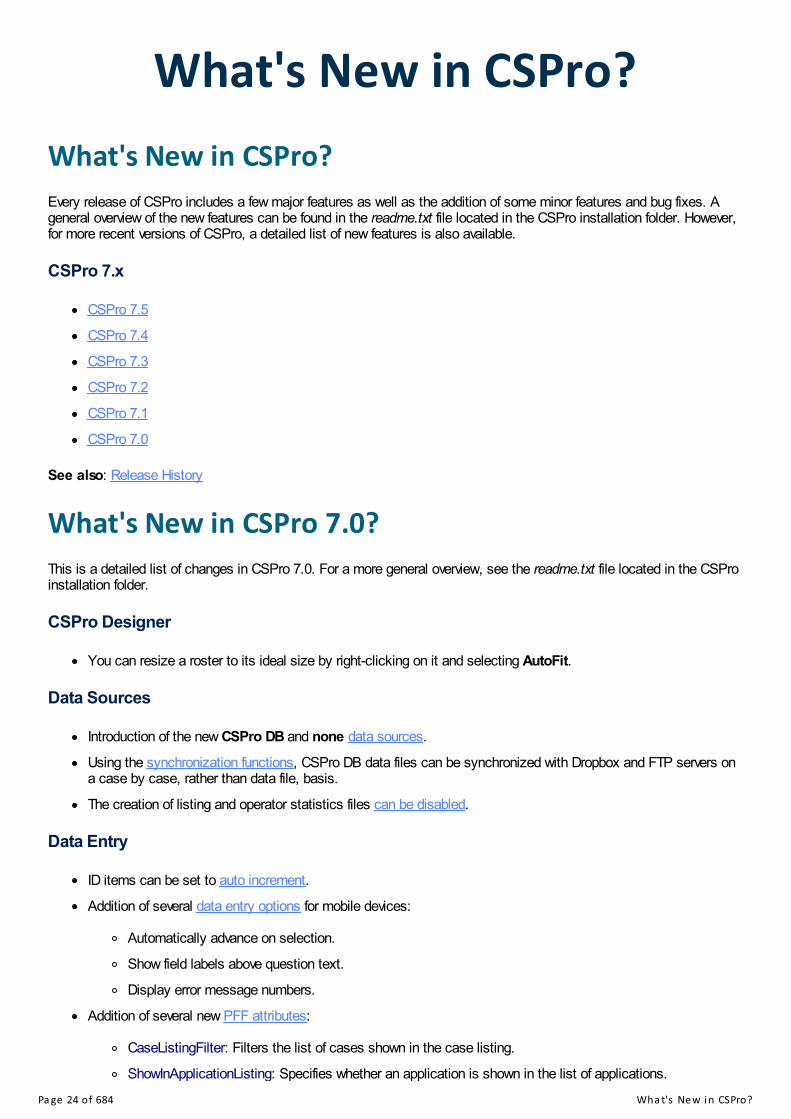
What's New in CSPro?What's New in CSPro?Every release of CSPro includes a few major features as well as the addition of some minor features and bug fixes. Ageneral overview of the new features can be found in the readme.txt file located in the CSPro installation folder. However,for more recent versions of CSPro, a detailed list of new features is also available.
CSPro 7.x
CSPro 7.5
CSPro 7.4
CSPro 7.3
CSPro 7.2
CSPro 7.1
CSPro 7.0
See also: Release History
What's New in CSPro 7.0?This is a detailed list of changes in CSPro 7.0. For a more general overview, see the readme.txt file located in the CSProinstallation folder.
CSPro Designer
You can resize a roster to its ideal size by right-clicking on it and selecting AutoFit.
Data Sources
Introduction of the new CSPro DB and none data sources.
Using the synchronization functions, CSPro DB data files can be synchronized with Dropbox and FTP servers ona case by case, rather than data file, basis.
The creation of listing and operator statistics files can be disabled.
Data Entry
ID items can be set to auto increment.
Addition of several data entry options for mobile devices:
Automatically advance on selection.
Show field labels above question text.
Display error message numbers.
Addition of several new PFF attributes:
CaseListingFilter: Filters the list of cases shown in the case listing.
ShowInApplicationListing: Specifies whether an application is shown in the list of applications.
Pa ge 24 of 684 Wha t's Ne w i n CSPro?

OnExit: Automatically launches a CSPro application after executing the current one.
Lock: New lock flags CaseListing (does not show the case listing screen) and Delete (prevents the userfrom deleting cases).
A case note can be defined, which will display in the case listing.
Multiple operators can leave notes on the same field.
On Windows, the dialog box for the accept (and selcase, show, and showarray) function has been redesigned tobe more tablet friendly.
Cases can now be verified on a case by case basis, rather than having to verify cases in file order.
Portuguese language strings added to Android.
Batch
A new PFF attribute, InputOrder, allows you to override the default order in which cases are processed in a datafile.
Logic
Introduction of new functions and statements:
ask: A new way to skip fields by programming using enablement conditions.
compress and decompress: A pair of functions to compress and decompress .zip files.
config: A way to initialize string variables to values defined on a local machine.
diagnostics: A troubleshooting function for getting information about the CSEntry build.
forcase: A loop that simplifies the processing of each case in an external data file.
getcaselabel and setcaselabel: Functions to set and retrieve a human readable label associated with acase.
isverified: A way to determine whether a case has been verified.
keylist: A function that returns a list of keys in a data file, including the input file in a data entryapplication.
setoperatorid: A way to set the operator ID in logic.
syncconnect, syncconnect, syncdata, syncdisconnect, syncfile, and syncserver: A set of functionsto support the new synchronization functionality.
timestamp: A way to easily calculate time spans by working with UNIX times.
The skip statement can be called without an argument, which will skip to the next field in the application.
The systime function can take an optional argument to extract just the current time's hours, minutes, or seconds.
The ispartial function can return the partial save status of cases in external dictionaries.
Passing ID arguments to writecase is deprecated and the arguments are ignored.
The key function can be called on the main input dictionary of an application.
All settings can be removed by calling savesetting with the argument clear.
The select options of an errmsg can now be used to skip to a field instead of only reentering a field.
You can manipulate the location and order that external dictionary and batch input data sources are processedusing: set access, set first, and set last.
The setfile, open, and close functions can be used on the input dictionary in a data entry and batchapplication, allowing you to dynamically modify the data source being processed.
The execsystem function on Android can send SMS text messages.
ToolsPa ge 25 of 684 Wha t's Ne w i n CSPro?
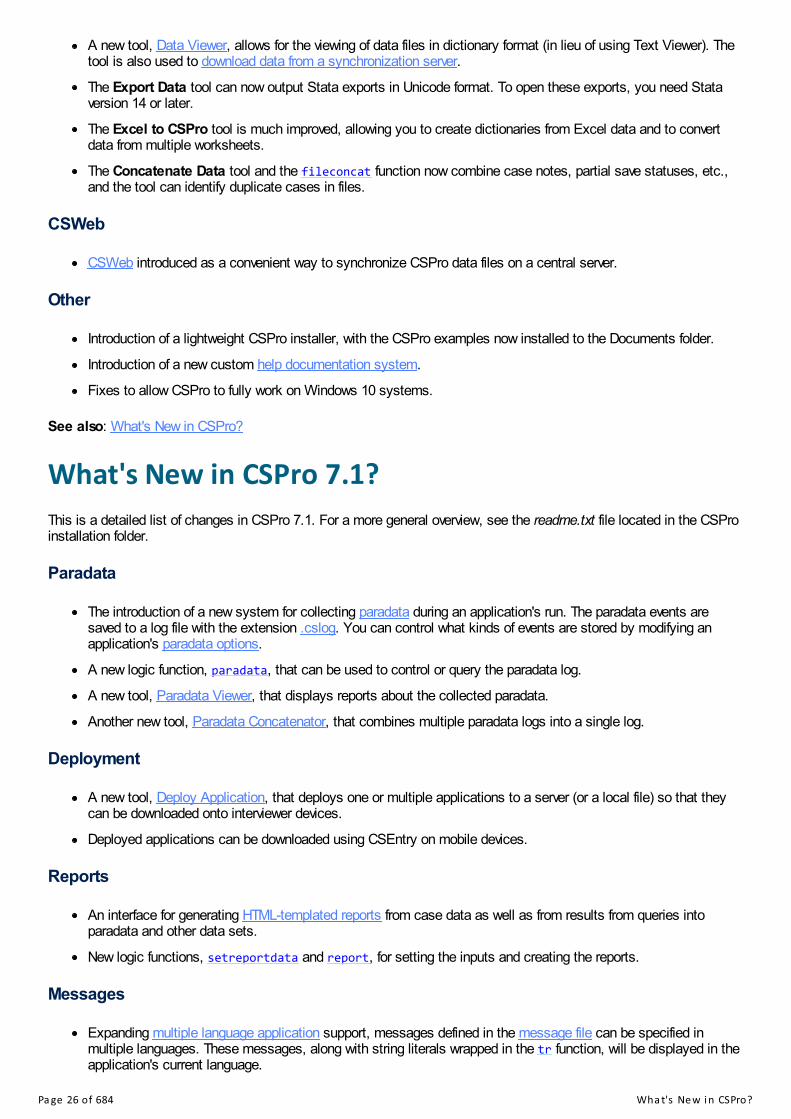
A new tool, Data Viewer, allows for the viewing of data files in dictionary format (in lieu of using Text Viewer). Thetool is also used to download data from a synchronization server.
The Export Data tool can now output Stata exports in Unicode format. To open these exports, you need Stataversion 14 or later.
The Excel to CSPro tool is much improved, allowing you to create dictionaries from Excel data and to convertdata from multiple worksheets.
The Concatenate Data tool and the fileconcat function now combine case notes, partial save statuses, etc.,and the tool can identify duplicate cases in files.
CSWeb
CSWeb introduced as a convenient way to synchronize CSPro data files on a central server.
Other
Introduction of a lightweight CSPro installer, with the CSPro examples now installed to the Documents folder.
Introduction of a new custom help documentation system.
Fixes to allow CSPro to fully work on Windows 10 systems.
See also: What's New in CSPro?
What's New in CSPro 7.1?This is a detailed list of changes in CSPro 7.1. For a more general overview, see the readme.txt file located in the CSProinstallation folder.
Paradata
The introduction of a new system for collecting paradata during an application's run. The paradata events aresaved to a log file with the extension .cslog. You can control what kinds of events are stored by modifying anapplication's paradata options.
A new logic function, paradata, that can be used to control or query the paradata log.
A new tool, Paradata Viewer, that displays reports about the collected paradata.
Another new tool, Paradata Concatenator, that combines multiple paradata logs into a single log.
Deployment
A new tool, Deploy Application, that deploys one or multiple applications to a server (or a local file) so that theycan be downloaded onto interviewer devices.
Deployed applications can be downloaded using CSEntry on mobile devices.
Reports
An interface for generating HTML-templated reports from case data as well as from results from queries intoparadata and other data sets.
New logic functions, setreportdata and report, for setting the inputs and creating the reports.
Messages
Expanding multiple language application support, messages defined in the message file can be specified inmultiple languages. These messages, along with string literals wrapped in the tr function, will be displayed in theapplication's current language.
Pa ge 26 of 684 Wha t's Ne w i n CSPro?

Applications can link to multiple external message files, which can include messages that override the defaultsystem messages.
CSPro Designer
You can move a value set to the first position, to become the default one shown in a data entry application, byright-clicking on a value set and selecting Make Primary Value Set.
If you right-click on a dictionary in the tree, an option, View Data, allows you to open in Data Viewer the data filelast associated with that dictionary (as stored in the PFF file).
Data Entry
A data source option that allows you to specify the number of minutes after which a case will automatically bepartially saved.
Question text fills can show the return values of user-defined functions.
A data entry option, Validate alpha fields, instructs CSEntry to validate values entered into alphanumeric fieldsusing an item's value set, as happens to numeric fields by default.
A mobile option, Display value set codes alongside labels, displays a value set's codes in addition to thelabels when displaying a field using a control other than a text box.
Logic
An errmsg-like function, warning, that can be used for "soft check" error messages. These messages will not bedisplayed to the operator when advancing in the case (such as when resuming from a partial save).
A multiple language application function, tr, for correctly displaying string literals or numbered messages in theapplication's current language.
A new function, countcases, counts the number of cases in an external file that meet a certain criterion.
New functions, getproperty and setproperty, for accessing and changing the properties of fields or the entireapplication.
A new function, logtext, for writing user-defined messages to the paradata log file.
A new function, sqlquery, that executes a query on a SQLite database and returns a result set in a variety offormats. Paradata logs are SQLite databases.
A new message formatter, "%v", that displays items in the format specified in the dictionary.
The timestamp function returns the number of milliseconds in addition to the seconds.
A new function, timestring, returns a custom formatted date and time string based on a given timestamp.
The sysdate and systime functions can return a formatted local date or time from a UNIX time value returned bythe timestamp function.
The uuid function can return the UUID (internal key) associated with a case.
The loadcase and delcase functions will give compiler warnings if the zero fill settings of the arguments do notmatch the settings of the external dictionary's IDs.
The writecase and delcase functions now work in a forcase loop.
Multiple string literals are automatically concatenated into a single string when separated by whitespace (e.g.,"A" "B" is evaluated as "AB").
The selcase, show, and showarray functions can display title headings.
The setfont function now sets the number pad's font differently from that of the other extended controls.
In a data entry application, when splitting items from a multiply occurring record into multiple groups, you nolonger have to specify an occurrence number when referring to items on the split groups (assuming that you wantthe value of the current occurrence).
ToolsPa ge 27 of 684 Wha t's Ne w i n CSPro?

From Data Viewer's Tools menu, you can launch the Export Data and Tabulate Frequencies tools to directlyprocess the cases of the open file.
Data Viewer can display each value's label instead of only the code.
Data Viewer now shows additional information about data files, including the synchronization history. The tool alsohas new filtering options and can show deleted or duplicate cases and can display the contents of a file in sortedkey order.
Excel to CSPro conversions can now be run via PFF files to streamline deployment conversions.
The Excel to CSPro tool has two new options, one for conditionally running conversions based on the existence offile changes, and the other to allow you to update existing files rather than to always create new files.
Synchronization
Faster Bluetooth transfer speeds.
Fix to allow faster transfer speeds when calling syncdata or syncfile in the GET direction across allsynchronization options (Bluetooth, CSWeb, Dropbox, and FTP).
See also: What's New in CSPro?
What's New in CSPro 7.2?This is a detailed list of changes in CSPro 7.2. For a more general overview, see the readme.txt file located in the CSProinstallation folder.
General
A new concept, blocks, for grouping several fields into a related unit. Blocks can be used in various ways in logicand can have question text that appears when entering any of the fields in the block. On mobile devices, all fieldson a block can be displayed on the same screen and the operator can enter values into these fields in any order.
Dictionary names can be longer than 32 characters.
CSPro Designer
Several reports about dictionary completeness can be generated using dictionary analysis.
A variety of tasks can be performed and reports generated from CAPI question text using question text macros.
Data Entry
The Windows desktop version of CSEntry has options to view cases with duplicate case IDs and to view deletedcases. Cases can be undeleted.
A new option specifies that combo boxes should display only discrete (non-range) values.
Logic
A function, dirdelete, deletes an empty directory or group of empty directories.
A function, getbluetoothname, returns the name of the device as broadcast to other Bluetooth devices.
A function, getvaluelabel, returns the label from the value set corresponding to an item's current value.
A function, regexmatch, returns whether a string matches the regular expression.
Additional variables (array, list, and file) can be declared locally. The value of each variable is reset uponentry to the PROC or function where it is declared.
The gps function, when called with the read argument, returns the most accurate reading, not the most recentreading, after timing out.
Pa ge 28 of 684 Wha t's Ne w i n CSPro?

The exit statement takes an optional argument that simplifies setting a user-defined function's return value.
Implicitly declaring variables (using set implicit) is no longer allowed.
The ensure statement allows for the conditional creation of temporary numeric variables.
Loops using forcase can be nested as long as they operate on different dictionaries.
The randomizevs function can operate on a specific value set (instead of only a field's current value set).
Arrays of more than three dimensions can be declared. The length function returns the size of an array'sdimensions.
Alpha and string arrays, and arrays of more than three dimensions, can be stored as saved arrays. The format ofthe saved arrays file has changed but CSPro will correctly read pre-7.2 .sva files.
A new property can disable the updating of saved arrays files.
DeckArrays can be used in data entry applications.
User-defined functions accept list variables in the parameter list.
Multiple sorting keys can be used in the sort function.
Weeks can be used as time periods with the dateadd and datediff functions.
Error messages using variable-numbered message numbers can include denom specifiers.
Synchronization
The synchronization functionality from CSPro 6.x (.pnc files and the sync function) has been removed. Syncingfiles and data must be done with the approaches introduced in CSPro 7.0.
Messages
Translations of some runtime messages added for Chinese, French, Portuguese, Russian, and Spanish. You canhelp translate additional messages or add messages in another language.
Android
CSEntry is distributed in both 32-bit and 64-bit versions.
When making calls to the gps function, if the device's GPS receiver is not enabled, the operator will be promptedto enable location services.
The properties and behaviors of CSEntry's menus can be modified via logic. The way that hidden applications areshown is now controlled using this mechanism.
Automatically launching an application, when only one exists on the device, is no longer the default behavior.
The Start New Case option is now a floating green icon.
CSWeb
Add many users at once by uploading a .csv file that specifies user details.
See also: What's New in CSPro?
What's New in CSPro 7.3?This is a detailed list of changes in CSPro 7.3. For a more general overview, see the readme.txt file located in the CSProinstallation folder.
Mapping
Pa ge 29 of 684 Wha t's Ne w i n CSPro?

The introduction of a new mapping module for displaying maps and allowing users to interact with points. Thisfeature is only available on Android.
A simple version, the map case listing, replaces the text-based case listing with a map-based one.
Advanced users can use the map object to create dynamic and responsive maps in logic.
CSPro Designer
Replacement of the logic editor with a Scintilla-derived editor with better performance and functionality, includingthe ability to change the font size, view line numbers, go to a specific line, display autocomplete suggestions, andmore. There are additional keyboard shortcuts to improve efficiency while writing logic, and the reference windowhas been reworked to provide more useful information.
When right-clicking on the main dictionary of a batch application, an option allows you to view the output data inData Viewer.
Data Entry
A field's capture type is now considered when validating fields. Date fields must now contain a valid date andcheck box fields can now only contain values that exist in the value set.
The Force Out-of-Range field property has been renamed to the Validation Method field property. This changeallows you to specify out-of-range fields without operator confirmations directly from the form designer (rather thanrequiring logic).
The Validate alpha fields data entry option has been removed. If an alphanumeric field has a capture type otherthan textbox, it will automatically be validated.
A new PFF attribute, Key, combines the functionality of StartMode along with the ability to automatically fill in IDsfor new cases.
Batch
The default listing width has been increased from 80 to 120 and the space allocated to displaying denominatorsnow supports 10-digit values.
Logic
Introduction of logic objects with functions that can be called on the object using dot notation.
New functions for arrays: clear and length.
New functions for files: close, open, read, and write.
The list object is now fully functional, with assignment and new functions: add, clear, insert, length, remove,seek, and show.
Simplified creation of dynamic value sets with the new valueset object that has the functions: add, clear, length,remove, and show.
Easier way to manipulate and run PFF files with the new pff object that has the functions: exec, getproperty,load, save, and setproperty.
A new map object that allows the displaying of maps on Android that has the functions: addImageButton,addMarker, addTextButton, clearButtons, clearMarkers, getLastClickLatitude, getLastClickLongitude,getMarkerLatitude, getMarkerLongitude, hide, removeButton, removeMarker, setBaseMap,setMarkerDescription, setMarkerImage, setMarkerLocation, setMarkerOnClick,setMarkerOnClickInfoWindow, setMarkerOnDrag, setMarkerText, setOnClick, setTitle, show,showCurrentLocation, zoomTo.
A new function, pathconcat, simplifies combining multiple strings into a single string representing a file path.
A new function, view, launches the system's default viewer to display a file or website.
A new message formatter, "%l", that displays an item's label from the value set corresponding to an item'scurrent value.
Pa ge 30 of 684 Wha t's Ne w i n CSPro?

A logical condition can be specified in for loops to restrict the universe of the loop. Additionally, the occurrencecounting variable can be declared local to the for loop.
Boolean values true and false translate to the numeric values 1 and 0.
Several of the file functions take string lists as arguments, allowing mass concatenating (fileconcat), copying(filecopy), deleting (filedelete), and renaming (filerename) of files. The filerename function also accepts afolder as the new file name target.
The fileread and filewrite functions also take string lists as arguments, allowing for the simple reading of allthe lines of a file, or the writing out of multiple lines to a file.
Android
Reading GPS coordinates now uses Google's Fused Location Provider, which makes it easier to capturecoordinates while indoors.
The way that hidden applications are shown has been restored to the behavior used up to CSPro 7.1.
The add/insert/delete occurrence options on the case tree has been restored to the behavior used up to CSPro7.1 (displaying in both operator- and system-controlled modes), though these options can be disabled via logic.
Tools
The Map Viewer and Convert Shape to Map tools have been removed from the CSPro installation. Users stillneeding these tools can find them on www.csprousers.org.
The Export Data tool now writes labels at the end of processing, so if an item's value set is changed during therun, labels from that value set will be exported.
The Reformat Data and Sort Data tools allow you to output data to a different data source type than the inputdata. The Concatenate Data tool no longer requires the specification of the data source type of the output file.
The Excel to CSPro PFF parameters have changed from InputData to Excel.
The Paradata Concatenator PFF parameters have changed from InputData to InputParadata and OutputData toOutputParadata.
The ExportXMLMetadata tool's HTML export properly outputs Unicode question text.
See also: What's New in CSPro?
What's New in CSPro 7.4?This is a detailed list of changes in CSPro 7.4. For a more general overview, see the readme.txt file located in the CSProinstallation folder.
General
A new special value, refused, allows for processing refusals differently from other numeric responses. Refusals aredefined in a dictionary value set, referenced in logic using refused, and are conditionally shown to operators. Theentry of refusals can be overridden using the OnRefused function.
A CSPro Settings dialog, accessible in the CSPro Designer as well as in CSEntry, allows users to clear savedsynchronization and data source credentials.
Licenses for open-source software that CSPro uses have been included and can be accessed using the Help ->About menu in the CSPro Designer.
Data Sources
Change to the format of the CSPro DB data source to store data in a relational database format that can bequeried using SQL. CSPro DB files created in version 7.4 cannot be read in earlier versions of CSPro.
Introduction of the new Encrypted CSPro DB data source, allowing for file-based data encryption with the ability to
Pa ge 31 of 684 Wha t's Ne w i n CSPro?

cache passwords.
Ability to include, as part of a PFF or in a setfile function call, a connection string that details how to open adata source.
Dictionary options include the ability to disallow use of a dictionary to modify data in Data Viewer or to export datato another output format.
CSPro Designer
Enhancements to the logic editor, including parentheses matching and improvements to the find and replacedialogs.
The synchronization options have been updated. Synchronization can be removed from an application byunchecking the Enable Synchronization box. The options for downloading application files has been removed infavor of the new Update Installed Applications.
Question text occurrence values can be harmonized with dictionary records using a new question text macro.
Data Entry
When starting a new case, fields can be prefilled from values specified in a PFF's Parameters section.
The compiler no longer issues an error when reentering a protected field.
The Combo Box extended control can now be used on discrete numeric fields and alphanumeric fields.
On Windows, the search bar on extended control popup windows is now hidden by default.
Inserting a case now only allows for the addition of a single case at a time (regardless of the PFF's AutoAddvalue).
Data Viewer
The tool has been rewritten with additional features including multiple language support and additional ways toview case data.
A case's notes can be extracted as another CSPro data file, which can then be used for exporting or other dataoperations.
Ability to download or synchronize data from the local Dropbox folder or a local FTP server folder which can befaster than downloading data over the Internet.
Logic
A new function, ischecked, returns whether a code is checked as part of a check box field's selections.
A new function, protect, simplifies changing the protected property of a field.
A new function, filetime, returns the last modification date/time of a file or a directory.
A new function, hash, returns the hash value of a string.
A new statement, when, executes a statement based on the value of one or more other variables.
A new version of recode, sharing the syntax of when, with additional options for what the recoded value can beassigned to.
A new function, startswith, that returns if a string begins with a specified prefix.
A new function, syncapp, for downloading new versions of an application from a deployment server.
A new function, syncmessage, sends and receives string messages from a Bluetooth server.
A new function, barcode.read, reads a barcode using an Android device's camera.
A new object, SystemApp, that simplifies interacting with external applications. It has the functions: clear, exec,getResult, and setArgument.
Using valueset.add it is possible to add a single value or a range of values from an existing value set.
Pa ge 32 of 684 Wha t's Ne w i n CSPro?

New options for the syncconnect function to connect to a local Dropbox or FTP folder.
A range of occurrences can be supplied to insert for mass insertions or delete for mass deletions.
The tolower and toupper functions work properly with accented characters.
The view function, on Windows, now displays webpages in an embedded browser.
The field name of the last location of a partial save can now be retrieved in any procedure or function.
The loadcase and delcase functions can now load or delete cases based on a full key string argument.
The countcases and keylist functions can now be called, in certain circumstances, on the input dictionary.
The find and locate functions have a new relational operator option, uuid, that allows loading cases by a case'sUUID.
The set access function, or optional arguments to the dictionary argument of countcases, forcase, keylist, orselcase, allows permanent or temporary modification of the dictionary access parameters, which control theorder and what kinds of cases are processed.
The set first and set last functions now use the dictionary access parameters when determining what is thefirst or last case.
The sysparm function can be used to determine the presence of command line arguments on Windows.
Messages
Messages can be defined for multiple languages by including multiple language names in the Language directive.
Translations of some runtime messages added for Vietnamese. You can help translate additional messages oradd messages in another language.
Android
An operator (or respondent) can sign the Android screen using the execsystem function and have the signaturesaved as an image file.
A new menu option, Update Installed Applications, to automatically check for and install new versions of anapplication that has been updated on a deployment server.
Applications can be added to the device by scanning a QR code.
A new Settings screen, accessed via the menu on the Entry Applications screen, allows user to clear savedcredentials.
The option for selecting that hidden applications are shown has been moved to the Settings screen.
The default setting for whether or not the case tree shows on phones and tablets can be modified via logic.
Tools
The Concatenate Data, Index Data, and Reformat Data tools now allow the saving of PFFs with the specifiedsettings and the loading of the settings of previous runs.
The Reformat Data tool has been completely rewritten. If using a data source with an embedded dictionary, suchas a CSPro DB file, you do not need to specify the input dictionary. The dictionary differences are displayed withmore detailed information, including information on destructive changes that would occur during a reformat.
The Index Data tool has also been completely rewritten. It has a new interface that simplifies running the programon multiple input files; it now works with non-text data files; and there is a more modern interface for viewingcases while selecting which duplicate cases to keep.
The Sort Data tool allows case sorts on non-text data files that have duplicates.
When the Sort Data tool processes a sorting key item that does not exist, it treats it as the lowest possible value,sorting it first when sorting in ascending order. In the past, such values were sorted as 0 (so they would be sortedafter negative values when sorting in ascending order).
The Deploy Application tool supports setting files to only be updated when an application is first installed and noton subsequent updates.
Pa ge 33 of 684 Wha t's Ne w i n CSPro?

The Deploy Application tool can generate a QR code that can be used to install applications on mobile devices.
Case Processing
Items not defined in the dictionary are not written out when a case is saved. In the past, when using absolutepositioning, contents of a record that were not defined in the dictionary were still written out when the case wassaved.
Items that are not valid for the item type are not written as they initially appeared in the input data. For example, ifthe value for a numeric item was "XX," previously, as long as it was not modified, it would be written as "XX." Now,because it cannot be represented as a valid numeric value, it will be written as default.
CSPro processes items using the item type specified in the dictionary. Previously, some tools processed itemsby using the text representation of the item. For example, the Compare Data tool would indicate that "05" and " 5"were different values because of the differing zero fill setting, but now the tool treats those values as equal.
When values are saved, special values are converted only based on linkages defined in the item's primary valueset. Any special value specifications defined in non-primary or dynamic value sets are ignored.
Case construction is more forgiving of errors, allowing level 2+ records to appear before their parent level's records.Additionally, level 2+ nodes are joined (by ID) even if some records from a different node separate the nodes. Forexample, if there is a case with a first level ID of 1 and second level IDs of A and B, in the past, 1/1A/1B/1A wouldbe processed as three second-level nodes, but now they will be handled as two second-level nodes (1/1A+1A/1B).
The notes and status files, used when processing text data files, are now created only when necessary. (Forexample, if there are no notes to save, the file is not created.) The information in those files can now be accessedin non-entry applications using functions like getnote. Case labels are also now supported for text data files, withthe labels saved to the status file.
CSWeb
A Sync Report summarizes the total number of cases uploaded to CSWeb.
Create custom roles that specify dashboard and dictionary permissions.
Downloading data from a CSWeb server is now faster.
See also: What's New in CSPro?
What's New in CSPro 7.5?This is a detailed list of changes in CSPro 7.5. For a more general overview, see the readme.txt file located in the CSProinstallation folder.
General
On Android devices it is possible to record and play audio in two modes: interactive mode, with the enumeratorable to control the recording; and background mode, with the recording controlled by logic functions using the newaudio object.
Listing files can now be written as comma-separated values (CSV) or CSPro data files. Traditional listing files intext format are still supported.
Android
The csentry directory on Android has moved. For new installations the csentry directory will be located at:<external storage>/Android/data/gov.census.cspro.csentry/files/csentry
If you are upgrading from an earlier version of CSEntry, the csentry directory will remain at:<external storage>/csentry
This change is required to support the more stringent security requirements introduced in the latest versions ofAndroid.
Pa ge 34 of 684 Wha t's Ne w i n CSPro?

Logic
A new object, audio, that allows for recording or playing audio. It has the functions: clear, concat, length, load,play, record, recordInteractive, save, and stop.
A new object, hashmap, that facilitates storage of numbers or strings in an associative array. It has the functions:clear, contains, getKeys, length, and remove.
A new function, syncparadata, similar in behavior to syncdata, allows for the syncing of paradata betweendevices over Bluetooth, or between a device and a CSWeb, Dropbox, or FTP server.
A new function, replace, returns a string with one of more instances of a substring replaced with new text.
A new function, encode, escapes special characters to facilitate writing to HTML or CSV files, or encodescharacters when writing out URIs or URI components.
A new namespace, path, has functions for interacting with file paths: path.concat, path.getDirectoryName,path.getExtension, path.getFileName, and path.getFileNameWithoutExtension.
User-defined functions now support optional parameters as well as passing numeric and string values byreference.
Conditional compilation of logic is now possible due to the addition of a logic preprocessor.
New functions for list objects: list.removeDuplicates removes duplicate values; list.removeIn removesvalues specified in an in list; and list.sort sorts a list.
The list.show and valueset.show functions work with string lists and string value sets.
The valueset.randomize function is a new way to randomize value sets (which previously could be done usingrandomizevs). These value set randomizations now obey any seed value provided using the seed function.
The valueset.sort function sorts the order of entries in the value set by either label or code.
The randomin function now accepts non-integer values in the input in list.
New numeric and string variables can be declared inline in the recode statement's destination variables section.
A new callback function, OnSystemMessage, provides a way to override the displaying of system error messages.
It is possible to check a value against all special values using the code special in an in list (which are also usedby recode and when statements).
Lists can also be used as inputs of an in list.
The loadsetting and savesetting functions accepts numeric values as part of the attribute-value pair.
The hash function accepts numeric values as inputs.
Tools
The Deploy Application tool has options to refresh all files or all data entry applications within a folder.
CSWeb
CSWeb can convert case data to MySQL/MariaDB relational tables using a command line process, allowing formore dynamic reporting.
See also: What's New in CSPro?
Pa ge 35 of 684 Wha t's Ne w i n CSPro?

CSPro ApplicationsData Entry Applications A Data Entry application contains a set of forms (screens) and logic that a data entry operator uses to key data to a diskfile. Data entry applications can be used to add new data and to modify existing data. You can have the following run-time features in your data entry application: • Add new cases (questionnaires) or retrieve and modify existing cases • Logic can be executed and messages displayed after any field is entered • Consistency checks and skip patterns of unlimited complexity • Multiple look-up files • Cases indexed to avoid duplication and for easy retrieval • Operator statistics You use CSPro to develop the data entry application. You use CSEntry to run the data entry application. For smallsurveys and for testing applications, you can run CSEntry directly from CSPro, on the same computer. For large surveysand censuses, which require a production environment, you can transfer the application files to other computers and runCSEntry on them. See also: Create a New Data Entry Application
Batch Edit ApplicationsA batch edit application contains logic that you can apply against one set of files to produce another set of files andreports. Batch editing applications can be used to gather information about a data file. You can incorporate the followingrun time features in your batch editing application:
Write edits (logic) using powerful CSPro language
Validate individual data items
Test consistency between items
Check case/questionnaire structure
Modify data values
Use arrays for hot deck or cold deck imputation
Generate imputation statistics
Generate edit reports automatically or create a customized report
Create additional variables
Read/write to multiple lookup files
You use CSPro to develop the batch edit application. You use CSBatch to run the application. For small surveys and fortesting applications, you can run CSBatch directly from CSPro, on the same computer. For large surveys and censuses,which require a production environment, you can transfer the application files to other computers and run CSBatch onthem.
Pa ge 36 of 684 CSPro Appl i ca ons

See also: Create a New Batch Edit Application
Tabulation Applications A Tabulation application contains a set of table specifications and a data dictionary describing a data file to betabulated. When you create your application, you can use an existing data dictionary or you may create one as youcreate the application. In a Tabulation application, you can: • Cross-tabulate a virtually unlimited number of variables. • Tabulate variables created "on the fly" under program control. • Select the universe of tabulation. • Tabulate values and weights. • Tabulate simple counts and percents . • Tabulate mean, median, mode, standard deviation, variance, n-tiles, proportions, min, max . • Perform table cell manipulation after tabulation . • Define detailed table formatting . • Save tabulations in several file formats. • Copy tables to spreadsheets or word-processing documents. • Produce tables by geographic area.
See also: Create a New Tabulation Application
Data Dictionary A Data Dictionary describes the overall organization of a data file, in other words, it gives a description of how data arestored in a file. CSPro requires that a data dictionary be created for each different file being used. A Data Dictionary filehas the extension .DCF. In the Data Dictionary you can: • Define simple or complex hierarchical file organization. • Define hierarchical levels, identification items, records, items (fields or variables), value sets (categories of values), and
values. • Create descriptive notes for documentation. • Define multiple-occurring items. • Produce reports of file organization. See also: Creating a Dictionary for a New File, Creating a Dictionary for an Existing File
Forms DesignPa ge 37 of 684 CSPro Appl i ca ons

You can create an unlimited number of forms (screens) for data entry. These can be designed independently or as part ofthe data entry application.
Forms may be any size. CSEntry will scroll as necessary.
Forms may contain fields from different physical records.
Physical records may be split among different forms.
Forms may contain individual fields or rosters.
There is usually one forms file (.fmf) per application, but there may be multiple forms files. Each forms file contains onedata dictionary file (.dcf) that represents the primary data file that is being created or modified.
See also: Introduction to Forms Design
Tool ListTo run a tool, open the Tools menu and select one of the tools listed below. There is a user's guide for most of the tools.
Data Viewer
View the contents of a CSPro data file, displayed in tables based on the dictionary contents. The tool allows you to view,but not modify, all of the cases in the file. You can filter the cases based on a search key. In addition to showing thedata described by the dictionary, the tool also display the notes and other metadata saved for each case.
Text Viewer
View the contents of any text file up to a maximum of 32,000 characters wide and up to two gigabytes in size. You cancopy, save, or print all or part of the contents of the text file. You can also find text in the file, identify line and characterposition in the file, and copy tabular reports to spreadsheet programs. The file cannot be modified within the Text Viewerutility.
Table Viewer
Examine, but not change, the contents of any CSPro tables file. A table file is produced by running tabulationapplications or using the Tabulate Frequencies tool. You can copy, save, or print all or parts of the tables in RTF (forword processing programs), or HTML (for Internet), or TAB delimited (for spreadsheet) formats.
Table Retrieval
Retrieve and display tables, maps, and other previously prepared documents from a large database of documents basedon geography, subject matter, and title. It is very useful as a data dissemination tool.
Deploy Application
Deploy one or multiple applications to a server so that they can be downloaded onto interviewer devices.
Pack Application
Pack all the files in a CSPro application into a ZIP file so the application can be moved to another computer or sent asan email attachment.
Tabulate Frequencies
Produce frequency distributions of all or some of the variables in a data file. You simply select the variables (value sets)you want to tabulate and provide the name of the data file. More than one data file can be tabulated.
Pa ge 38 of 684 CSPro Appl i ca ons

Sort Data
Sort a data file by questionnaires or by records. The data may be sorted based on ID items, record types, or singly-occuring items.
Export Data
Export selected data records or parts of data records to tab- or comma- delimited files. These files can be imported intospreadsheets or databases. The tool also allows you to export data to SAS, SPSS, Stata, or R formats.
Reformat Data
Reformat data from one file format to another using an input and output data dictionary. Fields with corresponding namesare copied from the input to output file. This is useful for reorganizing data records or lengthening data items.
Compare Data
Compare the contents of two data files and identify the differences. The data files must have the same structure, that is,the same CSPro dictionary must describe both data files.
Concatenate Data
Concatenate (join end-to-end) two or more CSPro or text files. You do not need a dictionary for this tool when workingwith text-based files.
Table Retrieval Setup
Create and modify a set of tables and other documents organized by geographic area, subject and title for use by theTable Retrieval tool.
Paradata Viewer
Display reports about the paradata collected during an application's run.
Paradata Concatenator
Combine multiple paradata logs into a single log.
Index Data
Generate indices for data files or identify duplicate cases in a data file.
Excel to CSPro
Convert data from Excel workbooks to CSPro data files. The tool can also create a CSPro dictionary for the data in anExcel worksheet, performing an analysis to determine the best CSPro format for the data.
PFF Editor
Edit and view all options available when running a CSPro application file via a PFF file.
Production Runner
Set up a series of CSPro processing tasks and then run them all at once.
Operator Statistics ViewerPa ge 39 of 684 CSPro Appl i ca ons

View one or more operator statistics files. These files are created when keying in data and can be used to track theprogress of a keying operation. Reports can be viewed for the whole operation or on a per-keyer or per-day basis.
Save Array Viewer
View and modify saved arrays. If batch editing a census or survey, this tool can be used to view and modify the hotdecksused in the edits.
Deprecated ToolsThese tools are no longer distributed with CSPro but are instead available on www.csprousers.org.
Convert Dictionary
Convert IMPS and ISSA data dictionaries to CSPro dictionaries, or convert CSPro dictionaries to IMPS or ISSAdictionaries. You can also convert ISSA dictionaries to CSPro dictionary and data entry forms.
Form Viewer
View snapshots of the data collected during a data entry application.
Map Viewer
View, create, and manipulate thematic maps of data.
Convert Shape to Map
Convert ESRI ArcView or ArcInfo polygon shape files to a format for Map Viewer.
Pa ge 40 of 684 CSPro Appl i ca ons

CSPro General ConceptsCSPro Initial Screen LayoutTo open CSPro, click on the CSPro icon on your desktop. The screen will be subdivided into two parts: the left isreserved to display file trees; and the right window is reserved to display the actual application. Initially both windows areempty.
Create a new application: This allows you to create a new application when CSPro is launched. After you specify thenames of the applications files, the new application is opened.
Open an existing application: This allows you to open an existing application either by selecting a recently usedapplication from the list provided or to select, using other files, any CSPro application available on the computer orconnected servers.
If you cancel the dialog box, CSPro will remain open so that you can use CSPro tools or at a later time open anapplication or create a new application.
Trees After you create an application, the tree will display the application(s) that are currently open, all the files that belong tothat application and their relationships with one another. The files tree is always present. When you close the applicationor file, it is removed from the files tree. There are five kinds of trees in CSPro: • Files tree shows all the applications that are open, and the files they contain.
Pa ge 41 of 684 CSPro Ge ne ra l Conce pts

• Dictionaries tree shows all the dictionaries that are open, and their contents. • Data entry forms tree shows all the form specifications that are open, and their forms and fields. • Batch edits tree shows all the edits specifications that are open, and the order of edits. • Tables tree shows all the table specifications that are open, and their contents. The files tree is always available. The other four trees are available only if appropriate applications are open.
To change the tree on the left side, click the tab of the tree you want to see. The tabs at the bottom of the tree indicate which file tree is displayed. To change the tree, click the tab of the tree youwant to see. Use Ctrl+T to see the full file names (labels) of the files you have open. Double-click on the files tree toswitch the frame on the right side of the screen. See also: Data Dictionary Tree, Data Entry Tree, Batch Edit Tree
WindowsThe window on the right side of the screen allows you modify the contents of a dictionary or application. Each differentwindow has different functions associated with it. That is, you will see a different menu and toolbar with each differentwindow.
Part of the toolbar to the left of the help button shown below allows you to switch between different types of windows:Dictionary, Forms Design, Batch Editing, and Tabulation.
To change the contents on the right side of the screen press the button of the type of window you want to view. If there ismore than one window of that type, the most recent one viewed will be displayed.
If you need to select a particular window, from the Window menu, select the file name you want to view.
Pa ge 42 of 684 CSPro Ge ne ra l Conce pts

CSPro General FunctionalityData SourcesPrior to version 7.0, CSPro only processed data files that were represented as ASCII and later UTF-8 text files. Inaddition to the main text data file, CSEntry would create additional files to store information such as the notes, partialsave statuses, and other case metadata. To support more dynamic data entry possibilities, there are now multiple datasources to which data can be entered and from which data can be read.
CSPro DB is now the default type for newly created data files, and future CSPro features may only be added for theCSPro DB type. When a file exists, CSPro attempts to determine what kind of file it is and then opens it with theappropriate data source handler.
Data sources are described using connection strings, which are generally simply file names. There are four types of datasources:
Text
The text data source is what was always used in CSPro prior to version 7.0. Cases are stored as text in UTF-8 format.Supporting text data sources allows CSPro to maintain backwards compatibility with existing data files. Text datasources can use any file extension with the exception of .csdb. If other programs directly use the CSPro data file (asopposed to using exported data), you may still want to use a text data source as other programs will not be able to reada CSPro DB file.
CSPro DB
The CSPro DB data source is the default type used for newly created data entry files. Files created using this type havethe extension .csdb and are not text files so they cannot be viewed in Text Viewer. All information about a case is storedin this file, including the case contents, case labels, notes, partial save statuses, verification information, revision history,and a copy of the dictionary. The CSPro DB data source simplifies data collection, particularly if conducting a CAPIsurvey, as all information about cases is stored in a single place and the revision history allows CSPro, when syncingdata, to only sync data that has changed.
If you use the CSPro DB type, then the data you collect cannot be directly used with previous versions of CSPro or toolsthat process text files. You can use the Data Viewer tool to convert data from the CSPro DB type to text and vice versain case you need to use a previous version of CSPro or a preexisting tool that only works with text files.
Starting with CSPro 7.4, the CSPro DB file format stores the data captured in a relational database file using SQLite.See CSPro DB File Format for details.
Encrypted CSPro DB
The Encrypted CSPro DB data source is a CSPro DB file that is encrypted with a password and can only be opened withthat password. Files created using this type have the extension .csdbe. Without the password there is no way to recoverdata from the file so it is important to implement a sufficient password management policy.
None
The none data source is not associated with a file and allows you to run programs without needing to associate adictionary with a file, usually with the assumption that the file association will be determined during the program andassigned using the setfile function. Adding cases to a none data source will result in nothing happening and anyattempt to load or write cases to the file will appear successful but nothing will happen. This data source is useful formenu programs or instances when you do not initially know what an external dictionary should be set to.
See also: Connection String, Data Source Options, CSPro DB File Format
Pa ge 43 of 684 CSPro Ge ne ra l Func ona l i ty

Connection StringA connection string is a text string that details how to open a data source. Generally a connection string is just a filename. Connection strings are used in PFF files as well as in logic when data sources are specified, such as when usingsetfile. A connection string is made up of several components:
file_name | property_name1=property_value1 & property_name2=property_value2
The file_name is the file name of the data source. It can be specified as a relative or absolute path. If only the file nameis specified, then the connection string is complete. However, if any properties are specified, then the properties must beseparated from the file name by a pipe | character.
Multiple properties can be specified, with each grouping separated by the ampersand & character. The property name islisted, followed by an equals = sign, and then the property value is given. Most property values can be defined in human-readable text, but if the value contains special characters such as & or = characters, it must be percent-encoded.
The property "type" is used by CSPro to specify the type of a data file. Generally this is not necessary to define becausethe data file type can be deduced from the file extension, but in one case it is necessary. This, for example, is how thenone data source is specified in a PFF:
InputData=|type=None
Other properties are documented in the topics describing the data sources. An example of one property is the"password" property for encrypted data files. It can be specified in logic:
string pin_number = prompt("Enter your PIN number:", password, numeric);
setfile(HOUSEHOLD_DICT, "Household.csdbe|password=" + pin_number);
Or specified for the PFF:
Properties List
Properties include:
Property Descriptionpassword The password that opens an encrypted data file.cache Indicates to CSPro that cases should be cached in memory. This may be useful to advanced users who
want to optimize programs that do a lot of case lookups.
See also: Data Sources
Pa ge 44 of 684 CSPro Ge ne ra l Func ona l i ty

Encrypted DataOverview
Using the Encrypted CSPro DB data source, you can read from and write to a data file that is protected by a password.The file cannot be opened without the password, meaning that it is important to implement a sufficient passwordmanagement policy to ensure that you do not lose data during the data collection process.
An Encrypted CSPro DB file is like a CSPro DB file and can be used in any CSPro application. The only difference isthat, upon opening the file, CSPro requires the specification of a password. There are two ways to specify a password:
Password entry: A dialog box will appear allowing the user to enter the password. The password must be at least fourcharacters. If the data file does not exist and is being created for the first time, the user must enter the password twiceto ensure that the password is entered correctly. You can reduce the number of times that a user must enter thepassword by allowing the password to be cached for a specified duration on the machine. When opening an existing file,if the password is not correct, the user will be prompted to enter the password again.
Connection string: The password can be specified in a connection string used in a PFF file or by setfile. If thepassword is specified in the connection string, then the user will not be prompted to enter a password. If the data filedoes not exist and is being created for the first time, the specified password will be used to encrypt the file. Whenopening an existing file, if the password is not correct, the opening of the file will fail. For example, the followingconnection string opens the file pilot-data.csdbe with the password jiw~d_fpF9.
While the data in the file is encrypted, it is also a good idea:
To encrypt the entire drive where the CSPro application and data files reside, using encryption such as WindowsBitLocker or Android's full-disk encryption.
Not to store passwords in plaintext anywhere (such as in a CSPro logic file or in a PFF file, as is done in theabove image).
To synchronize your data using a secure protocol (such as CSWeb over https). If you encrypt your data file on atablet but then transfer the data over http using syncdata, that defeats much of the purpose of encrypting.
Technical Details
Encrypted CSPro DB files are SQLite files encrypted using the SQLite Encryption Extension (SEE) using "AES-256 inOFB mode." The specified password is not used as the key input to SEE but is instead hashed to create a 256-byte keythat is used to encrypt the file. If allowed, this hash, not the password, is cached on the machine. A fixed salt is usedduring the hashing process because there is no suitable place to store a dynamic salt. This means that the samepassword will always result in the same encryption key.
See also: Dictionary Security Options, Data Sources, Connection String
Pa ge 45 of 684 CSPro Ge ne ra l Func ona l i ty
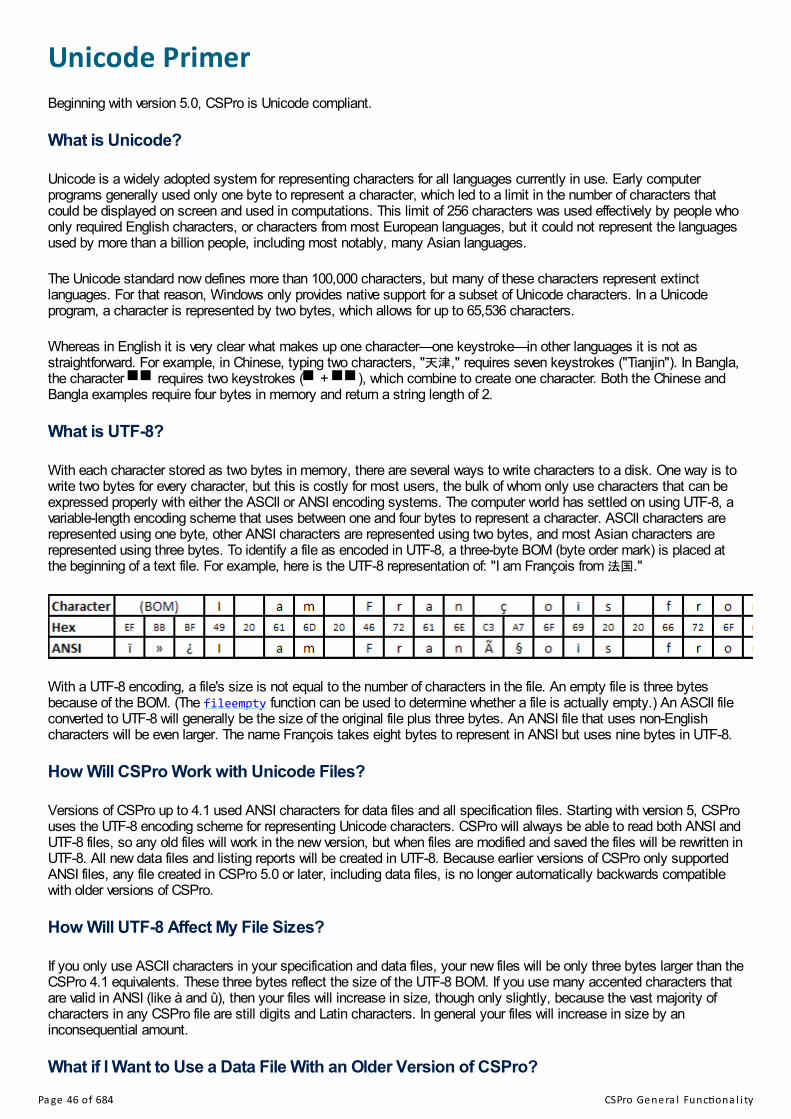
Unicode PrimerBeginning with version 5.0, CSPro is Unicode compliant.
What is Unicode?
Unicode is a widely adopted system for representing characters for all languages currently in use. Early computerprograms generally used only one byte to represent a character, which led to a limit in the number of characters thatcould be displayed on screen and used in computations. This limit of 256 characters was used effectively by people whoonly required English characters, or characters from most European languages, but it could not represent the languagesused by more than a billion people, including most notably, many Asian languages.
The Unicode standard now defines more than 100,000 characters, but many of these characters represent extinctlanguages. For that reason, Windows only provides native support for a subset of Unicode characters. In a Unicodeprogram, a character is represented by two bytes, which allows for up to 65,536 characters.
Whereas in English it is very clear what makes up one character—one keystroke—in other languages it is not asstraightforward. For example, in Chinese, typing two characters, "天津," requires seven keystrokes ("Tianjin"). In Bangla,the character requires two keystrokes ( + ), which combine to create one character. Both the Chinese andBangla examples require four bytes in memory and return a string length of 2.
What is UTF-8?
With each character stored as two bytes in memory, there are several ways to write characters to a disk. One way is towrite two bytes for every character, but this is costly for most users, the bulk of whom only use characters that can beexpressed properly with either the ASCII or ANSI encoding systems. The computer world has settled on using UTF-8, avariable-length encoding scheme that uses between one and four bytes to represent a character. ASCII characters arerepresented using one byte, other ANSI characters are represented using two bytes, and most Asian characters arerepresented using three bytes. To identify a file as encoded in UTF-8, a three-byte BOM (byte order mark) is placed atthe beginning of a text file. For example, here is the UTF-8 representation of: "I am François from 法国."
With a UTF-8 encoding, a file's size is not equal to the number of characters in the file. An empty file is three bytesbecause of the BOM. (The fileempty function can be used to determine whether a file is actually empty.) An ASCII fileconverted to UTF-8 will generally be the size of the original file plus three bytes. An ANSI file that uses non-Englishcharacters will be even larger. The name François takes eight bytes to represent in ANSI but uses nine bytes in UTF-8.
How Will CSPro Work with Unicode Files?
Versions of CSPro up to 4.1 used ANSI characters for data files and all specification files. Starting with version 5, CSProuses the UTF-8 encoding scheme for representing Unicode characters. CSPro will always be able to read both ANSI andUTF-8 files, so any old files will work in the new version, but when files are modified and saved the files will be rewritten inUTF-8. All new data files and listing reports will be created in UTF-8. Because earlier versions of CSPro only supportedANSI files, any file created in CSPro 5.0 or later, including data files, is no longer automatically backwards compatiblewith older versions of CSPro.
How Will UTF-8 Affect My File Sizes?
If you only use ASCII characters in your specification and data files, your new files will be only three bytes larger than theCSPro 4.1 equivalents. These three bytes reflect the size of the UTF-8 BOM. If you use many accented characters thatare valid in ANSI (like à and û), then your files will increase in size, though only slightly, because the vast majority ofcharacters in any CSPro file are still digits and Latin characters. In general your files will increase in size by aninconsequential amount.
What if I Want to Use a Data File With an Older Version of CSPro?
Pa ge 46 of 684 CSPro Ge ne ra l Func ona l i ty

The CSPro installation includes a tool, the Unicode Text Converter, that allows you to change the encoding of text files.This utility allows you to convert ANSI files to UTF-8, though this is not necessary because CSPro 5.0 or later does thisautomatically. You will more likely use the tool to convert UTF-8 files to ANSI. If you use non-ANSI characters in yourspecification or data files, these characters will be converted to question marks during the conversion to ANSI. Forinstance, "I am François from 法国." will become "I am François from ??." Converting files from UTF-8 to ANSI is notnecessary a lossless conversion, so it should be done only if absolutely necessary of if you are confident that you didnot use any Unicode-only characters.
Some text editors, including Notepad, allow a user to change the encoding of a text file. These editors can be used toconvert text files from UTF-8 to ANSI. If using Notepad, open the file and then select Save As. At the bottom of the dialogbox is an option to change the encoding.
What about CSPro's Binary Files?
The important binary files created by CSPro are compiled data entry applications (.pen), file indices (.idx), andintermediary tabulation files (.tab and .tai). These formats have changed and CSPro can no longer read binary fileswritten by CSPro 4.1 or previous versions. CSPro can determine if a compiled data entry application is of the correctformat and will present an error message to an operator who tries to open an old version in CSEntry. CSPro can alsodetermine if an old index is being used and will automatically generate a new index. If you use intermediary tabulationbinary files (e.g., if you run tables in parts), you should delete and regenerate them when upgrading to a Unicode versionof CSPro. The Unicode Text Converter will not work correctly on binary files.
Can I Still Write and Save to ANSI Format?
Outside of the Export Data tool, CSPro no longer supports writing to ANSI format, though it can still read files encoded inANSI. CSPro automatically converts files from ANSI to UTF-8 formats as needed. CSPro will convert only files that maybe modified by a program. For example, if you use an external file in your application but only call fileread and neverfilewrite, CSPro will keep the input file in its original format. However, if there is a filewrite statement and the file isencoded in ANSI, CSPro will convert the file to UTF-8 before opening it. The old ANSI file will be sent to the Recycle Binin case you want to recover it.
Distributing CSPro Data Files
Most applications support Unicode so you may not have a problem using external applications with your data orspecification files. However, if you must use an application that is not Unicode compliant, run the Unicode Text Converteron the necessary files.
If you are distributing files to a broad audience and if your data file does not contain any non-ANSI characters, you mightconsider converting it to ANSI for maximum compatibility. To illustrate an example of what might happen with a non-Unicode program reading a UTF-8 file, imagine a CSPro data file that has two record types, P (population) and H(housing). The ANSI file might look like this:
P<case id><data>P<case id><data>P<case id><data>H<case id><data>
The UTF-8 file might look like this:
<BOM>P<case id><data>P<case id><data>P<case id><data>H<case id><data>
An older version of CSPro would regard the first row of data as an invalid record because the BOM was in the place of therecord type. It would thus register the household as having two members instead of three. If any non-ASCII charactersexisted in the data file, it would further shift the data and then items would not be read correctly.
If you release a UTF-8-encoded data file widely, you may want to include a documentation file with text similar to thefollowing:
Pa ge 47 of 684 CSPro Ge ne ra l Func ona l i ty

Warning: This CSPro data file is encoded in UTF-8. UTF-8 is a text encoding format widely used torepresent characters from any language. If you use this data file with a software package that does notsupport Unicode and UTF-8, you must first convert the data file to an ANSI encoding. Without thisconversion there is a risk that the software package will misread parts of the data file.
Synchronization OverviewSynchronization Strategies
When using mobile devices for a survey or census it is important to be able to transfer data collected in the field back tothe head office. This allows for faster processing and analysis as well as better monitoring of the progress of the fieldoperation.
In CSPro, transferring data between devices in the field and the head office is referred to as synchronization. CSProsupports data synchronization over the Internet between interviewers' devices in the field and a central server. Interviewersuse CSEntry to collect data on tablets, phones, or laptops and then use the Internet to synchronize the data on theirdevices with a server at the head office or in the cloud. In CSPro, the data collection itself may be done entirely offline,with no Internet connection. When an interviewer is able to connect to the Internet they may synchronize with the serverand transfer any data collected since the last synchronization. Synchronization may be done using Wi-Fi or a mobiledata connection (2G/3G/4G).
Direct synchronization between interviewers and central server over the Internet
In situations where an interviewer rarely or never has access to the Internet, CSPro supports peer-to-peersynchronization between devices using Bluetooth. Bluetooth synchronization does not require an Internet connection. Itis a direct connection between two devices that are in close proximity. Using Bluetooth, an interviewer may synchronizetheir device with a supervisor's device, transferring their data to the supervisor. Later, the supervisor travels to a locationwhere they are able to connect their device to the Internet in order to synchronize with the central server. In this scenario,a supervisor might visit multiple interviewers in order to synchronize with them and later upload their data to the server atthe head office.
Pa ge 48 of 684 CSPro Ge ne ra l Func ona l i ty

Synchronization with supervisor over Bluetooth when interviewers do not have Internet access
CSPro supports both one-way and two-way data synchronization. This means that is possible to send data from theinterviewer's device to the server as well as to download data from the server to the interviewer's device. You canconfigure your synchronization to only send data to the server, to only receive data from the server, or to both send andreceive data.
It is possible to synchronize both CSPro data files and other non-data files such as application files, images, and textfiles. It is possible to update data entry applications in the field by downloading the latest .pen and .pff files from theserver. This way, modifications to the application at the head office can easily be distributed to interviewers in the field. Itis, however, simpler to deploy and update application files on mobile devices using the Deploy Application tool. This toolpackages application files for deployment, uploads them to a server and allows interviewers in the field to install andupdate them on a tablet by choosing Add Application from the menu on their mobile device.
Synchronization Server
For synchronization over the Internet, a central server is required. CSPro supports three types of servers: CSWeb,Dropbox, and FTP.
CSWeb: CSWeb is a web server running the CSPro synchronization server software. It is best for very largesurveys and censuses. The server software is written in PHP and can be run on any web server that has PHP andthe MySQL database software installed. The server can be set up on a computer at the head office that isconnected to the Internet or it may be set up on a hosted website or virtual server in the cloud. Setting andmaintaining a server for CSWeb requires knowledge and experience with web server maintainence and cybersecurity. Users that do not have these skills should consider using Dropbox or FTP instead. For more informationabout CSWeb servers, see the CSWeb help documentation.
Dropbox: Dropbox is a free cloud based synchronization service. It is ideal for those doing small and mediumsurvey operations. Dropbox requires no server setup or maintenance and avoids the cost and difficulty of settingup a CSWeb server.
FTP: CSPro synchronization can be used with a FTP (file transfer protocol) server. For those doing small andmedium survey operations who do not want to use Dropbox and are not able to configure a server to use CSWeb,FTP can be used for synchronization.
Pa ge 49 of 684 CSPro Ge ne ra l Func ona l i ty

When synchronizing CSPro data files, synchronization is done at the case (questionnaire) level. CSPro keeps track ofwhich cases have been added or updated and only sends cases that are new or have been modified since the lastsynchronization. This significantly reduces the amount of data transferred and therefore reduces bandwidth and the costof air time. It also reduces the chance that two interviewers overwrite each other's work by both syncing to the same datafile on the server. As long as two interviewers do not modify the same case at the same time, they may bothsynchronize to the same server without overwriting each other's data.
Once interviewers in the field have used data synchronization to upload data to the server, you can use the Data Viewertool to download the data. When using CSWeb for data file synchronization, data is stored in a MySQL database on theserver. When using either Dropbox or FTP, data will be stored on the server in a set of files in the directoryCSPro/DataSync. In both cases, the data on the server cannot be opened directly by CSPro. In order to retrieve the datathat has been uploaded to the server, use the Data Viewer's download function. This will download all the data on theserver into a single CSPro data file that can be used by other CSPro applications and tools.
Simple Synchronizations
Basic synchronizations can be set up by specifying a few options documented here.
Advanced Synchronizations
For more advanced synchronization scenarios, CSPro has logic functions that can be used to implement data and filesynchronizations. Using logic, it is possible to synchronize data files, including those associated with externaldictionaries, and non-data files over either the Internet or Bluetooth.
Synchronization from Logic
There are several logic functions used for synchronization with a server:
syncconnect is used to connect to the server and initiate the synchronization session.
syncdisconnect is used after synchronizing to end the session.
syncdata is used to synchronize cases in CSPro data files with the server.
syncfile is used to upload/download non-data files to/from the server.
syncparadata is used to synchronize paradata to/from the server.
syncapp is used to update an application on the device from a new version on the server.
syncmessage is used to send to and receive string messages from a Bluetooth server.
While it is possible to use syncfile to synchronize CSPro data files, it is more efficient to use syncdata since it willonly send/receive cases that have been modified whereas syncfile always sends the entire file.
You will generally call syncconnect once to start the session followed by multiple calls to syncdata, syncapp, andsyncfile, followed by a call to syncdisconnect. In the example below, we connect to the server, download the latestapplication files and upload cases from the data file associated with the data dictionary SURVEY_DICT.
string cswebServerUrl = "https://www.myserver.org/api";
// connect to the CSWeb serverif syncconnect(CSWeb, cswebServerUrl) then
// send the latest cases to the CSWeb server syncdata(PUT, SURVEY_DICT);
syncdisconnect();
endif;
Bluetooth Synchronization from Logic
Bluetooth synchronization is done between two devices. One device, called the client, has logic similar to what is used
Pa ge 50 of 684 CSPro Ge ne ra l Func ona l i ty

for web synchronization. The second device plays the role of server. With Bluetooth synchronization, the server ispassive. The device acting as the server runs only a single logic function, syncserver, which waits and processescommands from the client device. Only the client device runs syncconnect, syncdisconnect, syncdata, syncfile,syncparadata, syncapp, and syncmessage.
The client and server devices must be in close physical proximity in order to connect to each other. The server devicemust first execute the syncserver function which causes it to wait for connections from nearby devices. Then the clientdevice executes syncconnect which initiates the connection between the two devices. The client then executes one ormore calls to syncdata and/or other sync functions, followed by a call to syncdisconnect, which ends the session. Thisrequires that the two operators using the devices coordinate to start the synchronization routines on the two devices atroughly the same time.
The following example shows the logic that would be written for the client and for the server:
Client Logic:
// connect to supervisor via Bluetoothif syncconnect(Bluetooth) then
// send the latest cases to the supervisor syncdata(PUT, SURVEY_DICT);
syncdisconnect();
endif;
Server Logic:
// start peer-to-peer Bluetooth serversyncserver(Bluetooth);
Application Deployment over the Internet
Pa ge 51 of 684 CSPro Ge ne ra l Func ona l i ty

The synchronization functions all assume that your CSPro application is already installed on the interviewers device. Thismeans that it is not possible to use the above methods to download a new application for initial installation. While it ispossible to simply copy the application to the interviewers device by connecting it to a PC via USB, in some cases it ispreferable for the interviewer to download applications over the Internet. To download an application onto a device, useAdd Application from the menu in the Entry Applications screen in CSEntry on an interviewer's mobile device. Topackage and upload an application to a server from where it can be downloaded, use the Deploy Application tool. Inaddition, once an application has been installed on a mobile device using the Deploy Application tool, it can easily beupdated by re-deploying the application to the server and then using Update Installed Applications from the menu on themobile device or by using syncapp in application logic.
Troubleshooting
Many errors that you encounter during synchronization are caused by lack of network connectivity. An easy way tocheck if an error is a problem with your CSPro program rather than a general network error is to try to connect to thesync server in the web browser on the device you are trying to synchronize. For example, if you are trying to synchronizedata on a tablet using Dropbox, try to connect to https://www.dropbox.com in the web browser on your tablet. If you areunable to connect in the web browser then there is a problem with your connection to the Internet rather than a problemwith your CSPro application.
To get additional details on synchronization errors you can look at the sync.log file. This files lists all synchronizationoprtations along with any errors encountered. This includes errors in uploading/downloading applications in ApplicationDeployment and data download in Data Viewer. On Android devices you can find the sync.log file in the CSEntrydirectory on your tablet or phone. On Windows you can find the file in the directory %AppData%\CSPro. On Windowsyou can also locate the sync.log file from the Help menu in CSPro Designer under Troubleshooting. When asking fortechnical support with synchronization issues, please attach the sync.log file from your device to your email or forumpost.
See also: Simple Synchronizations, SyncConnect Function, SyncData Function, SyncApp Function, SyncFileFunction, SyncParadata Function, SyncMessage Function, SyncDisconnect Function, SyncServer Function
ParadataIntroduction to Paradata
CSPro can automatically collect paradata for your application. Paradata is defined as "data about the process by whichthe survey data [was] collected." In CSPro this includes information about fields and values entered, error messagesencountered, and the state of the data collection device.
The paradata log, with the extension .cslog, is not a typical data file but is instead a SQLite file. Advanced users with anunderstanding of SQL can query the file from tools outside of CSPro. Alternatively, there is a tool, the Paradata Viewer,which allows you to look at the contents of paradata logs. If you have several paradata logs coming from multipledevices, you can combine these using another tool, the Paradata Concatenator. You can also query the paradata logfrom within CSPro using the paradata or sqlquery functions. Reports can be generated from paradata by creating atemplated report. Paradata can be synchronized between devices or servers by using the syncparadata function.
CSPro collects information about many different kinds of events, which are described in more detail in the ParadataOptions page. You may wish to collect information about only a subset of possible events.
Enabling Paradata Collection
To turn on paradata collection, you must:
1. Open you application and then select Options -> Paradata. This will bring up the Paradata Options dialog.
2. Using that dialog, indicate that you want to collect paradata events and specify any additional options. By default,when creating a new system-controlled data entry application, paradata will be collected, though with a limited setof options.
3. The action in step #2 only indicates that CSPro may collect paradata. To actually turn on the collection, you mustspecify a filename for the paradata log when running your application. CSPro may suggest a default filename,which you can modify.
Pa ge 52 of 684 CSPro Ge ne ra l Func ona l i ty

Paradata can be collected for data entry or batch edit applications. The paradata log is flexible and can be usedsimultaneously by multiple applications or users.
Uses of Paradata
If you conduct a pilot census or survey, you may find it useful to collect paradata on all devices. By analyzing this data,you may be able to improve and streamline operations for the actual census or survey. You can use paradata to answercertain questions about your application, such as:
Which questions in my survey take the longest to collect? Should I to change the wording of the question to makeit simpler?
What out-of-range values are interviewers entering? Should these be valid values?
What error messages are being triggered the most frequently?
Where were interviewers located at a given time?
How long did interviewers work?
Which tablets had the best battery life?
This is just a sampling of questions that can be answered based on the events that are stored in the paradata log. Inaddition to storing previously unavailable data, the paradata log also contains all of the information that was traditionallysaved to the listing file, the operator statistics log (.log), and the imputation frequencies listing file (.freq.lst).
See also: Paradata Options, Paradata Function, SyncParadata Function, LogText Function
Multiple Language ApplicationsCSPro supports the creation of applications that target multiple languages. The main areas where you can customizetext include:
Question text: In a data entry application, the question text for each field can be defined in multiple languages.
Dictionary labels: Dictionary labels can be specified in multiple languages. When a field's screen text is linked tothe dictionary item, then the form text will also change when a data entry application's language changes.
Messages: Messages displayed or created using functions such as errmsg and maketext can be defined inmultiple languages.
Logic string literals: Using the tr function, string literals can be be specified in multiple languages.
In addition to the above functionality, there are several logic functions for working with multiple language applications,including getlanguage, setlanguage, and OnChangeLanguage.
The default starting language can also be specified in the application's PFF file using the Language parameter.
MappingCSEntry supports displaying interactive maps during data entry on Android. There are two ways to integrate maps into adata entry application:
Display the case listing on a map (enabled using the mapping options), where each case in the data file isrepresented by a marker on the map.
Use the map object in your application logic to display a map with markers and buttons that can be customizedusing map functions.
Maps can use Google Maps for base maps if the device has an Internet connection or you can supply an offline map fileto use if there is no connection.
Pa ge 53 of 684 CSPro Ge ne ra l Func ona l i ty

See also: Display the Case Listing on a Map, Map Object, Offline Maps
Pa ge 54 of 684 CSPro Ge ne ra l Func ona l i ty

How To ...Create a CSPro ApplicationClick on the toolbar; or from the File menu, select New; or press Ctrl+N. The following dialog box will appear:
Select the type of application you want to create and press OK. You can create one of the following applications:
Data Entry Application: To enter data, generally from a paper questionnaire.
CAPI Data Entry Application: To enter data, generally by using computer-assisted personal interviewing (CAPI).
Batch Edit Application: To detect and correct errors in data file.
Tabulation Application: To produce publication ready tables.
You will then be prompted to enter the file name of the application. Enter the file name of the application and pressCreate.
The File Associations dialog will be displayed. Specify the names of other files that make up the application, such as thedata dictionary file and any additional external lookup dictionaries.
Open an Existing ApplicationClick on the toolbar, from the File menu select Open, or press Ctrl+O. Select from the "Files of type" at the bottomof the dialog box. In CSPro you can open either an application or a file. Select the name of the file you want to open.Each time you open or create an application or file, it is added to the files tree. Any other files belonging to theapplication or file will also be opened and added to the appropriate trees.
You may open a data dictionary and make changes to it, even if it already belongs to an application. Be aware that if youlater open an application to which it belongs, CSPro will automatically make necessary adjustments in other files. Forexample, if you delete or rename a dictionary item, then later open an application that contains the data dictionary, anycorresponding fields on forms will be deleted.
You may open a forms file and make changes to it, even if it already belongs to an application. However, you will not
Pa ge 55 of 684 How To ...

have access to the associated Logic file and you will not be able to run it.
Any changes you make to applications and files are not made permanent until you save the file or application that youmodified.
Change the ViewIn the File Tree
The file tree can display the label or name of the file(s) and the contents of the applications currently open. To togglebetween labels and names in trees, open the View menu select Names in Trees, or press Ctrl+T. A check markappears next to the Names in Trees menu item when names are displayed instead of labels. The setting affects all thetrees.
If you would like to view both the name and the label for each item in the tree, select the Append Labels to Names inTree option.
Screen
To toggle between trees on left (i.e., split screen) and full screen, open the View menu and select Full Screen, or pressCtrl+J. A check mark appears next to the Full Screen menu item when the display is in full screen mode. This settingaffects all applications.
Designer Font PreferencesVersions of CSPro prior to 5.0 supported some languages that used non-Latin alphabets such as Armenian and Russian.With the switch to Unicode support in CSPro 5.0, this feature has been removed. Old applications that used theselanguage specific ANSI fonts will no longer look correct in the CSPro Designer. For example, this is a value set in anArmenian dictionary:
To view these old applications correctly, you can manually change the font used to render the text in the dictionary grid,the dictionary and form tree, and, if the font is monospaced, the application's logic.
With no application open, select Tools -> Preferences -> Fonts.
In this example, an Arial Armenian font has been selected, at an increased zoom rate. After this selection, the dictionaryeditor displays the contents better:
Pa ge 56 of 684 How To ...
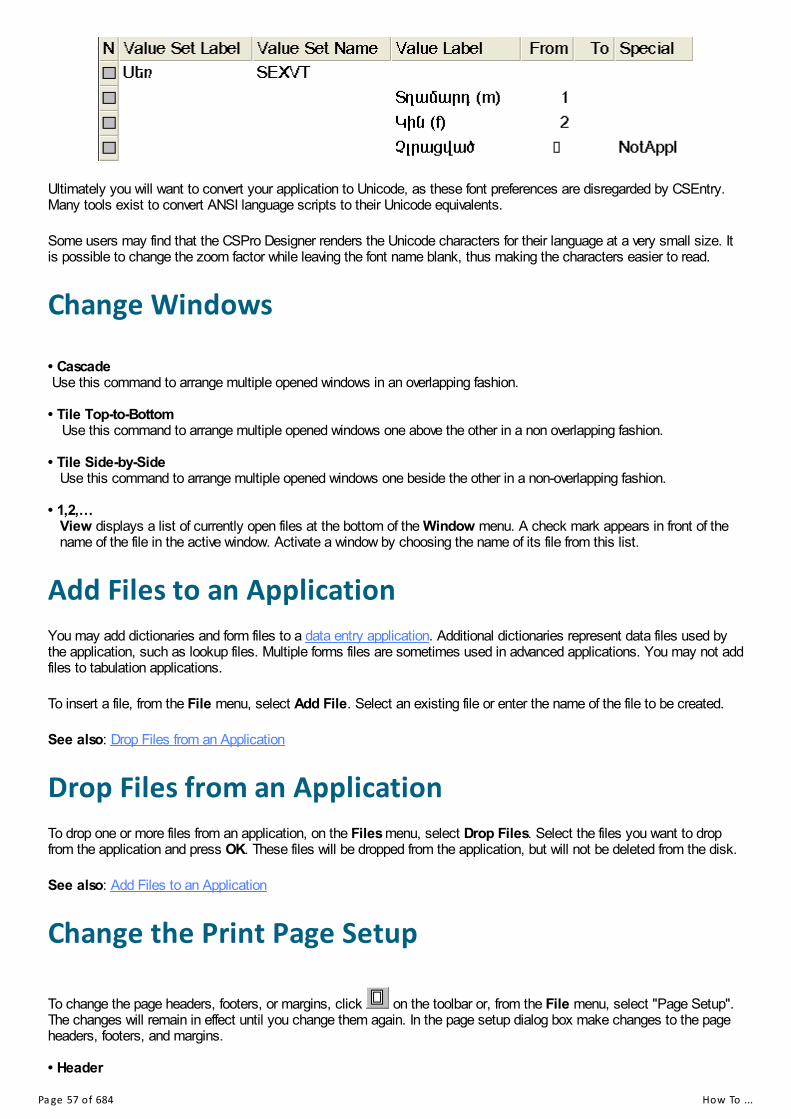
Ultimately you will want to convert your application to Unicode, as these font preferences are disregarded by CSEntry.Many tools exist to convert ANSI language scripts to their Unicode equivalents.
Some users may find that the CSPro Designer renders the Unicode characters for their language at a very small size. Itis possible to change the zoom factor while leaving the font name blank, thus making the characters easier to read.
Change Windows • Cascade Use this command to arrange multiple opened windows in an overlapping fashion. • Tile Top-to-Bottom
Use this command to arrange multiple opened windows one above the other in a non overlapping fashion. • Tile Side-by-Side
Use this command to arrange multiple opened windows one beside the other in a non-overlapping fashion. • 1,2,…
View displays a list of currently open files at the bottom of the Window menu. A check mark appears in front of thename of the file in the active window. Activate a window by choosing the name of its file from this list.
Add Files to an ApplicationYou may add dictionaries and form files to a data entry application. Additional dictionaries represent data files used bythe application, such as lookup files. Multiple forms files are sometimes used in advanced applications. You may not addfiles to tabulation applications.
To insert a file, from the File menu, select Add File. Select an existing file or enter the name of the file to be created.
See also: Drop Files from an Application
Drop Files from an ApplicationTo drop one or more files from an application, on the Files menu, select Drop Files. Select the files you want to dropfrom the application and press OK. These files will be dropped from the application, but will not be deleted from the disk.
See also: Add Files to an Application
Change the Print Page Setup
To change the page headers, footers, or margins, click on the toolbar or, from the File menu, select "Page Setup".The changes will remain in effect until you change them again. In the page setup dialog box make changes to the pageheaders, footers, and margins. • Header
Pa ge 57 of 684 How To ...

Edit the text to be placed at the top left, top center, and top right of each page. You can use the Date, Time, File,and Page buttons to insert the current date, time, file name, and page number.
• FooterEdit the text to be placed at the bottom left, bottom center, and bottom right of each page. You can use the Date,Time, File, and Page buttons to insert the current date, time, file name, and page number.
• MarginsChange the size of the top, bottom, left and right margins. Your printer may not allow margins below certain values.
To change the page orientation or size, open the File menu and select "Print Setup". In the print setup dialog box makechanges to orientation (portrait or landscape) and paper size.
Print All or Part of a Document
To print an entire document click on the toolbar; or from the File menu, select "Print"; or press Ctrl+P.
To print part of a document select the text you want to print then click on the toolbar; or from the File menu, select"Print"; or press Ctrl+P.
To preview the printing, click on the tool bar; or from the File menu, select "Print Preview."
Save an ApplicationClick on the toolbar; or, from the File menu, select Save; or press Ctrl+S.
The file associated with the current frame (right side of the screen) will be saved. If that file belongs to an application thatis open, the entire application will be saved. If the file belongs to more than one application, CSPro will ask you whichone you want to save. In that case, select the file or files you wish to close or save and click on OK.
To choose all of the files, click on the Select All button. To choose several files, hold down the Ctrl key and click onfiles you wish to select.
See also: Open an Existing Application
Close an ApplicationFrom the File menu, select Close.
The file associated with the current frame (right side of the screen) will be closed. If that file belongs to an application thatis open, the entire application will be closed. If the file belongs to more than one application, CSPro will ask you whichone you want to close. In that case, select the file or files you wish to close or save and click on "OK."
To choose all of the files, click on the Select All button. To choose several files, hold down the Ctrl key and click onfiles you wish to select.
See also: Open an Existing Application
Save an Application with a New NameTo save an application under a new name:
Make sure the application is showing in the current frame (right side of the screen).
Pa ge 58 of 684 How To ...

From the File menu, select Save As.
Enter the file name for the new application in the file open dialog box.
Using the File Associations Dialog specify the names of other files in the application.
When the Save As is complete you will be editing the new dictionary.
See also: Save Dictionary as New File
Specify Application File Names New Application
When a new application is created, a files dialog box like the one below is displayed.
Only the name of the input dictionary must be supplied. A default input dictionary file name is given, but it may bechanged. Other external dictionary file names are specified as needed. If any of the files names specified already exist, those files will be attached to the application. If any of the file namesspecified are new, those files will be created.
Save As Application
When an application is saved under a new name, a files dialog box like the one below is displayed.
Names for all the files requested must be supplied. Default file names are given, but they may be changed.
Pa ge 59 of 684 How To ...

If any of file names specified are new, those files will be created for the new application. If any of the files names is thesame as the name in the original application, those files will be shared with the new application. If any other of the filesnames specified already exists, those files will be overwritten. See also: New Application, Save As Application
Pack an ApplicationThere are instances when it is helpful to collect all the files in an application to:
Move them to another computer (for example to move data entry applications to all your data entry computers).
Give the application to a colleague to use.
Send the application when requesting help.
There is a CSPro tool to perform this function. This tool copies all the files in the application into a ZIP file. To use thistool go to the Tools menu and select Pack Application.
See also: Pack Application
CSPro SettingsThe CSPro Settings dialog is accessed from the CSPro Designer or from CSEntry by selecting CSPro Settings from theFile menu. The dialog has the following options:
Saved Credentials: By selecting Clear Credentials, any cached credentials saved to secure storage will be removed.These credentials include access tokens to CSWeb servers and Dropbox, passwords to FTP servers, and hashedpassword keys used to open encrypted data files.
Get HelpTo contact the CSPro development team with comments, questions, or to report problems, please contact:
International ProgramsPopulation DivisionU.S. Census Bureau 4600 Silver Hill RoadWashington, DC 20233
Phone: +1 301-763-1451
Support email: [email protected]
Official website: www.census.gov/data/software/cspro.html
CSPro Users forum: www.csprousers.org/forum
When you contact us, please mention that you are using CSPro 7.5.0.
Collaborating on CSPro DevelopmentCSPro 7.5 is not an open source project but it is in the public domain, meaning that it can be used and distributed at nocost. However, if you are interested in collaborating on the CSPro development, there are currently three projects,changes to which are distributed with CSPro.
Pa ge 60 of 684 How To ...

Multiple Language Runtime Messages
The runtime messages that CSPro displays are added by the development team in English, but we welcome translationsof these messages into other languages. Partial translations exist for French, Portuguese, and Spanish, and minimaltranslations exist for Chinese. If you would like to help translate these messages, please [email protected] for additional details.
Help Documentation
The help documentation that you are currently reading is created using a custom tool, Help Generator. The tool, alongwith the documentation, is hosted on GitHub:
https://github.com/CSProDevelopment/helps
The repository has all the tools needed to develop the help documentation. The Help Generator tool is built using VisualStudio. Microsoft distributes a free version, the community edition, that you can use to create the tool. If you do not haveVisual Studio, but want to collaborate on help documentation, email [email protected] and you will be sent theHelp Generator executable and a guide on modifying the help documentation.
CSPro Examples
The CSPro Examples folder is also hosted on GitHub:
https://github.com/CSProDevelopment/examples
If you want to modify any existing example, or want to add a new example that you think will be useful to the broaderCSPro community, you can collaborate on this project.
Pa ge 61 of 684 How To ...

Data Dictionary ModuleIntroduction to Data DictionaryA Data Dictionary describes the overall organization of a data file. In other words, it gives a description of how data arestored in a file. CSPro requires that a data dictionary be created for each different file being used.
Each dictionary will allow you to give text labels for all levels, records, items, and value sets in the file. It also allows youto describe the organization of each record in the file and the characteristics of each item in the record: names, positionin the data record, type of data, length, number of decimal places, valid values, and other documentation.
Before you convert the information from a questionnaire to computer-readable form, you usually create a data dictionary.You can also create a data dictionary for an existing data file if you have a description of its contents showing thelocation of each item.
CSPro requires that a Data Dictionary be created for each different file being used.
This section contains the following information:
Organization
Dictionary Concepts
Levels
Records
Items
Value Sets
Values
Relations
Data Dictionary Application
How to ...
Pa ge 62 of 684 Da ta Di c ona ry Modul e
OrganizationQuestionnaire and Dictionary OrganizationQuestionnaire: Form
A questionnaire is a collection of information relating to the same unit of observation (such as a household, person, orfactory). A typical questionnaire consists of an identification section followed by other sections grouped by topic. Eachsection includes a set of related questions, each of which is associated with a list of response values. A questionnaireusually constitutes a case.
Questionnaire: Section
Any type of questionnaire will have an identification section that uniquely identifies the form, as well as one or moresections on different topics. Some sections may occur once per questionnaire while other sections are repeated manytimes. For example, in a typical housing and population census, a questionnaire would contain a section for the housingquestions, and a section for the population questions. The questions in the housing section will be answered once perquestionnaire [household], while the questions on the population section will be answered by every person in thehousehold. If the census is collecting information on vacant housing units then the questions on the population sectionwill not be answered. In a school survey, for example, the questionnaire would have an identification section and only onesection to collect basic information for each student. The questionnaires for the different students are not related.
Questionnaire: Identification
The identification section identifies the questionnaire, usually with numeric geographic codes. The combination ofidentification codes (such as province, district, village, household) on a questionnaire uniquely identifies the form. Theseare the codes you would need to locate a specific questionnaire.
Questionnaire: Questions
The basic element of the questionnaire is the question. Each section of the questionnaire contains a set of one or morequestions being asked for this census or survey.
Questionnaire: Responses
The valid options in response to a question are usually listed in the questionnaire. Some responses are quantitative,such as "size of farm" or "age of person," and some are qualitative, such as "relationship to head of household" or "cropgrown." Responses can be numeric or alphanumeric. Most descriptive responses are equated to numeric codes that areplaced on the questionnaire. However, some descriptive responses remain as alphabetic text.
Data Dictionary: File
In the data dictionary a topic section is usually equivalent to a record. A record includes data items (questions) that areassociated with one or more value sets (response values). Records with the same identification codes (i.e., questionnaireIDs) comprise a single questionnaire.
Data Dictionary: Records
Similarly, a data dictionary may have records that occur once and records that repeat many times. The typical housingand population census will have one housing record and as many population records as people in the household; thehousing and population records will equate to one questionnaire, and these records are related. If our study permitsvacant housing units, then the data file will not include a population record for an unoccupied housing unit. In the schoolsurvey each questionnaire will only have one record, and there is no relationship between records in the data file. Thistype of data file is known as a "flat data file." The records for the different sections will most likely have different
Pa ge 63 of 684 Orga ni za on

structures. Using the data dictionary module you can identify each record structure using a record type name and code.
Data Dictionary: File Identification
Similarly in the data dictionary, you first define the identification items to uniquely identify the questionnaire. These datawill appear on every record in a data file, as they are "common" to all of the records. In a data file, if a group ofquestionnaire ID fields uniquely identify the unit under observation, then those records make up one questionnaire. In thecase of the student survey the student identification number could serve as the questionnaire identification.
Data Dictionary: Data Items
In the data dictionary, the data item contains the response to a question, and is therefore the most basic element of aquestionnaire; AGE, INCOME, and CROP_CODE are all examples of items. Related items should be placed in the samerecord. And, just like records and levels, data items possess properties (such as a unique name, label, etc.). Items indata files must be fixed format, that is, items must have the same starting position and length in every record where theyoccur.
Data Dictionary: Value Sets
In the data dictionary, the responses in the questionnaire are defined as value sets. A single value set can contain one ormore values. The valid values can be defined as individual values or ranges of values.
See also: Record Description, Item Description, Value Sets Description
Data File Type Structure There are two basic types of data file structures: Those that contain single-record questionnaires, or those that containmultiple-record questionnaires. The following is a brief description of these two types. • A single record type per questionnaire
In a single-record data file, each line of data from the data file equates to a distinct questionnaire. This means there isno relationship between records in the data file—each record stands on its own and is distinct from another.
One usage for a single-record questionnaire would be a student survey at a university. In this scenario, a single recordwould be created based on the student. The student identification number could serve as the questionnaireidentification. A data file produced from this type of dictionary is known as a flat data file. Example:
00011122122 � (first student)00021122122 � (second student)00031122122 � (third student)
blue text refers to the student identification number.black text describes the individual data items for each specific record.
Notice there is no need to have a record type identifier.
• Multiple record types per questionnaire
In a multiple-record data file, several lines of data (and therefore several records) from the data file equate to onequestionnaire. This means there is a relationship between records in the data file—and information identifying them assuch in the form of Questionnaire Ids will be needed.
For example, in a typical housing and population census, a questionnaire might consist of the following records:
- one housing record - multiple (zero or more) population records
For a given questionnaire there would be one or more population records for one household record, dependent on thenumber of people in the household. However, if you allowed vacant housing units, then those questionnaires would nothave any corresponding population record.
Pa ge 64 of 684 Orga ni za on

A sample (and recommended) file structure could be as follows (not all fields are defined for this example):
11010011122122 � (household with 3 persons)21010011201091961382101001212105196732210100131170719920711010031211212 � (vacant household)11010021111121 � (household with 2 persons)21010021107161930692101002220812192871
In the example above:
Red text refers to the record type. In our example, 1 is a household record, and 2 is a
population record.
Blue text refers to the (Id Items). Note that the numbers are unique for eachquestionnaire: the 101001 household contains three people whereas the 101002household contains two people.
Black text describes the individual data items for each specific record. A questionnaire designed for an agricultural census might consist of the following records: - one farm household record - multiple (one or more) crop records - multiple (one or more) farm worker records
A questionnaire for a reproductive health survey might consist of the following records: - one record for data on the woman - multiple (zero or more) children-ever-born records - one contraceptive use record - one immunization record
Dictionary HierarchyA data dictionary is structured in a hierarchical order. The top hierarchy is the case, followed by the level, then record.
Case
A case is the primary unit of data in the data file. A case usually corresponds to a questionnaire. However, somecomplex applications might have a hierarchical set of questionnaires, or many levels. For example, the mainquestionnaire may consist of a household roster and other household information, and there may be a separatequestionnaire for each woman in the household. The data entry application may then contain two levels — one for thehousehold and one for each woman in the household. The set of forms corresponding to the household make up levelone. The set of forms corresponding to each woman make up level two. Each case would consist of two type ofquestionnaires: a single level one and a variable number of occurrences for level two.
Most applications consist of a single level.
Level
A level is a type of questionnaire. By default, all new dictionaries have one level. This is normally sufficient to describe,for example, a population or agriculture census. However, if you have a hierarchically-structured set of questionnaires,you will probably need to use additional levels. A level can have many records corresponding to different record types.
Record
Pa ge 65 of 684 Orga ni za on

A record usually corresponds to a section of a questionnaire, and consists of a group of related data items. Forexample, data items related to housing would form a housing record; data items related to individuals would form thepopulation records; data items related to production of a particular crop would form the crop record, and so on. If adictionary contains more than one record, then you must use the record type item to identify one record from another inthe data file.
See also: Level Description, Record Description
Pa ge 66 of 684 Orga ni za on

Dictionary Concepts
GeneralLabelsLabels are descriptive text used to identify the dictionary and its elements. Labels are required for the dictionary andmost of its elements. Labels can contain any printable character and spaces and can be up to 255 characters long.
The dictionary tree displays either the labels or names of dictionary elements. You can press Ctrl+T or from the Viewmenu, select Names in Trees at any time to toggle between labels and names.
NamesNames identify the dictionary and its elements when they are referenced in CSPro procedures. Names are required forthe dictionary and most of its elements. Names consist of upper case letters (A-Z), digits (0-9), and embeddedunderscores (_). The first character of a name must be a letter; the last character cannot be an underscore.
Names can be any length but must not be CSPro reserved words. Names cannot be duplicated within a dictionary.However, the same name can be used in different dictionaries, and in some cases, it maybe desirable to do so.
Examples: SEX, RELATIONSHIP, MOTHER_ALIVE, Q102_AGE_CHILD
The dictionary tree displays either the labels or names of dictionary elements. You can press Ctrl+T or from the Viewmenu, select Names in Trees at any time to toggle between labels and names.
NotesNotes document the dictionary and its elements. The designer may create notes for the dictionary as a whole and/or anyof its elements: levels, records, items, value sets, values. Notes may contain any printable character and spaces, andcan be up to 65,000 characters in length.
Pa ge 67 of 684 Di c ona ry Conce pts

LevelsLevel Description A level is a type of questionnaire. By default, all new dictionaries only have one level. The maximum number is three. Agood use for a three-level dictionary might be a reproductive health survey that has the following questionnaires:
A housing questionnaire
A questionnaire for each woman of reproductive age in the household
A questionnaire for each woman's child in the household
A pictorial representation of this scenario is as follows:
In this example, you would want each child to be associated with its mother, rather than the household record. If youwere to structure your dictionary in a single level, there would be no way to easily identify which mother and child(ren)belonged together during data entry or during tabulation. To accomplish this, you would want to design your dictionarywith three levels, each level containing a single type of record, as follows: Level 1 Household Record Level 2 Woman of Reproductive Age Record Child Record (one for each child) In the Forms Designer you will be required to place each record's data on different forms. However, this facilitates thedesired data entry behavior. You will first be asked to enter information from Level 1, i.e., the household. After completingthe household form(s), you will then enter information for the first woman and her children (Level 2). When data entry isfinished for this woman record the keyer will advance to the child record, and enter information for each child (if any) forthis women. If there are no further children (or no children at all for this female), finish the level by pressing F12 (EndLevel Occurrence)and resume entering information for the second woman and her children. Continue in this manner until all women andtheir children have been entered for the household—when finished, press Ctrl+F12 (EndLevel) from the Woman Form tocomplete data entry for this case. Keep in mind that, when using more than one level, there are implications with respect to the order of executing logic in adata entry application or in a batch edit application. See also: Dictionary Hierarchy, Level Properties, Add or Modify Levels
Level PropertiesLevel properties are visible when the dictionary has been selected in the tree tab. To reflect your intended usage for a
Pa ge 68 of 684 Le ve l s

level we suggest you change the level properties pressing Ctrl+M, which will activate the appropriate entry in the right-hand screen.
Property MeaningLabel A descriptive text label which identifies this level.Name The name given to this level for use in the CSPro language procedures.
See also: Dictionary Hierarchy, Level Description, Add or Modify Levels
Pa ge 69 of 684 Le ve l s

RecordsRecord DescriptionA record is a group of related data items. In the process of creating a record to define (a portion of) the questionnaire,you will also be defining the physical layout of the data file. For example, suppose your (very simple) population recordlooks like the following (only item name, starting position, and length properties are shown; starting positions show thatID items occupy the first 9 positions in the record):
Item Name Start Pos LengthRELATIONSHIP 10 1SEX 11 1AGE 12 2
If an operator had keyed a questionnaire for a 35-year-old female (Sex = 2) head of household (Relationship = 1), youwould see a line in the data file, corresponding to the population record defined above:
12345678901234567890 (position)-------------------- 1235 (line in data file)
In deciding on a file structure, there is often the choice of defining a record type which occurs once within a questionnairebut contains repeating sets of data, or to define a record type which occurs multiple times within a questionnaire, eachwith a single occurrence of the data. The application designer should take into consideration the amount of informationthat recurs and the probable number of occurrences.
A common example in a Housing and Population Census is information about deaths in the household during the 12months prior to the census. If this information (usually sex and age at death of the deceased) is collected duringenumeration, the expectation is that 95% of households will have no more than one, or at most two, deaths during theprevious 12 months. With this volume of information, it would be practical to have one record type that occurs once withinthe questionnaire and allows for repeating occurrences of the data, since it is unlikely that even the maximum number ofoccurrences, multiplied by the number of positions occupied by each occurrence, will exceed the length of the already-existing household and population records.
However, in the case of an agricultural survey, a section on crops may include questions about acreage planted, yields,etc., whose cumulative length for each crop mentioned may be quite large in relation to other records in the file. In such acase, it would be more practical to define a record type that occurs multiple times within the questionnaire. Within eachoccurrence of the record would be found the information relating to one specific crop.
See also: Dictionary Hierarchy, Record Properties, Add or Modify Records
Record PropertiesYou can view a record's properties by selecting the questionnaire to which it belongs (via the dictionary tree tab). Youmay change the default record properties by positioning the cursor in the right window and pressing Ctrl+M.
Property MeaningLabel A descriptive text label which identifies this record.Name The name given to this record for use in the CSPro language procedures.Type Value The record type value (code) that identifies this kind of record.Required Must a questionnaire contain this kind of record? (Yes/No)Max The maximum number of times this type of record can appear in any one questionnaire.
Pa ge 70 of 684 Re cords
See also: Dictionary Hierarchy, Record Description, Add or Modify Records
Record TypeThe Record Type is an alphanumeric item that uniquely identifies a dictionary record, and therefore helps describe yourdata file's organization.
If your dictionary contains more than one record, CSPro needs to be able to differentiate one record from another in thedata file. The Record Type provides the means for doing this.
For example, a typical Housing and Population census data file would most likely have a housing record (describingdetails of the living unit) and a person record (to describe details on each individual in the household). You could assign aRecord Type of '1' to the Housing record and '2' to the Person record to distinguish between them.
If your dictionary contains only one record, you do not need to use a Record Type. Therefore, you can 'reclaim' thelocation that was set aside for the Record Type as follows:
1. Select the (ID Items) set or the one-and-only record your dictionary contains from the dictionary tree.
2. In the view on the right, you'll notice the first line is (record type). Only three values are used, Starting Position,Length, and Data Type. Of these three values, you can only modify the start position and length. Change thelength to 0. This will effectively "remove" the record type. (You can always reinstate it later by resetting the startposition and length to non-zero values).
Similarly, if you would like to modify the length of the Record Type, proceed as above.
The record type value is always alphanumeric. Upper- and lowercase letters are distinct Record Type values (i.e., 'A' isnot the same as 'a'). Blank is also a valid Record Type value.
See also: Record Description, Record Properties
Required RecordOne of a record's properties is whether or not the record is required; the options are Yes or No. If a record is required(Yes), it means that for a given questionnaire, there must be at least one occurrence of this record. If there is not at leastone occurrence of this record, the questionnaire will not be complete and the system will issue an error message toinform the keyer. If the record is not required (No), the questionnaire may or may not contain an occurrence of thisrecord. The questionnaire can be considered complete without an occurrence of this record.
Suppose you are designing a dictionary for a census. You'll probably have at least two types of records: one for thehousehold, and one for each person in that household. You can have four scenarios:
If you allow vacant housing units (i.e., you collect information on unoccupied housing units), then the householdrecord is required and the person record is not required.
If you allow homeless people, then the household record is not required and the person record is required.
If you allow homeless persons and vacant housing units, then neither the housing record nor the population recordwill be required record types, but because the two conditions will never occur simultaneously, you will never havea questionnaire without one of the other type of record.
If you allow neither homeless persons nor vacant housing units, then both the housing record and the populationrecord will be required record types. This means that a valid questionnaire will always have one housing recordand at least one population record.
See also: Record Description, Record Properties
Maximum NumberPa ge 71 of 684 Re cords

This record property specifies, for the given record, the maximum number of occurrences of that record allowed in onequestionnaire.
For example, suppose you are designing a dictionary for a census. You will probably have at least two types of records:one for the household, and one for each person in that household. There should be only one occurrence of the householdrecord, but for the person record you will of course need more than one occurrence, as there will likely be more than oneperson in a household. Thus, the maximum for the person record could be 25, if limiting yourself to a family unit, orlarger, if enumerating group facilities (military barracks, hospitals, mental institutions, etc.).
The maximum number of occurrences that may be specified for any record is 9,999. However, for greater programefficiency we recommend that you never have this many occurrences and that you keep the maximum to the lowestvalue that is appropriate for your particular application.
See also: Record Description, Record Properties
Pa ge 72 of 684 Re cords

ItemsItem DescriptionAn item describes the response to a question or helps identify the questionnaire. The item is the most basic element ofa questionnaire: age, income, and crop code are all examples of items. Related items should be placed in the samerecord. And, just like records and levels, data items possess properties (such as a unique name, label, etc).
An item can be redefined into subitems.
See also: Identification Items, Item Properties, Add or Modify Items
Identification Items Identification items (i.e., ID items) are those data items that uniquely identify the questionnaire and define hierarchicallevels. They are usually geographic items, such as Province, District, or Enumeration Area, or other unique identification,such as Survey ID Number. These data will appear on every record in a data file, as they are "common" to all of therecords. The maximum number of ID items is fifteen. If you are using absolute mode, you will typically want to structure your dictionary so that the ID items begin in column2; in this way they will precede a record's data items (column 1 is usually reserved for the record type identifier). If youare using relative mode, you have no choice but to place the ID Items first; the system assigns a consecutive position inthe order in which the items are created. For a pictorial representation, open a dictionary in CSPro and press Ctrl+L (L=layout). Press Ctrl+L again to toggle thisview off. See also: Item Description, Sub-Items, Item Properties, Add or Modify Items
Subitems This item property specifies whether the data is an Item or a Subitem. Subitems allow items to be broken up into smaller pieces, or across broad categories. In this respect, they let youredefine data items and refer to the same data field in several different ways. The start position of a subitem must bewithin its parent item (the previous item). One useful application of subitems involves date and time fields. A date item, for example, could be referred to as asingle 8-digit entity: DDMMYYYY. However, this does not allow you to easily manipulate or refer to a portion of the date(such as the day, month, or year itself). Suppose you had the following definition for date (for demonstrative purposes,not all item properties are being shown): Item Label Item Type Starting_Position Len Date of birth Item 20 8 To redefine this item into subitems, you only need to add the following subitems: Item Label Item Type Starting_Position Len Day of birth Subitem 20 2 Month of birth Subitem 22 2 Year of birth Subitem 24 4 Another reason for using subitems is to make data references available across larger categories. Censuses and surveys
Pa ge 73 of 684 Ite ms

often have items of three or four digits in length representing categories such as industry, occupation, or ethnicity. Foroccupation codes, the full value refers to a very detailed occupation, such as bus driver. The first digit alone refers to the'major' division, such as 'public service'. The first two digits together refer to a more detailed 'major' division, such as'public transportation'. It may be useful to test the ranges with the CSPro language at the item level. In tabulationapplications, tables can be made at the major (1- or 2-digit) or minor (3- or 4-digit) divisions. The following example couldrepresent part of an economic survey: Item Label Item Type Starting_Position Len Occupation Item 45 4 Occupation, Major Subitem 45 1 Occupation, Sub-major Subitem 45 2 Occupation, Minor Subitem 45 3 In IMPS 3.1, the predecessor to CSPro, it was very common to use subitems to redefine data items. This is now moreeasily accomplished with value sets. NOTE: Identification items cannot have subitems. See also: Item Description, Identification Items, Item Properties, Add or Modify Items
Item Properties You can view an item's properties by selecting the record to which it belongs (via the dictionary tree tab). When creatingan item, the following fields must be set: Property Meaning
Label A descriptive text label that identifies the item. It is used as default field
text in data entry forms and in default titles in tabulation.
Name The name given to this item for use in CSPro language procedures.
Start Indicates the starting position of the item within the record
Len Indicates the length of the data item (i.e., the number of charactersnecessary to represent the values for the item).
Data Type Indicates the type of data (numeric or alphanumeric) that will be found inthe item.
Item Type Indicates whether the item is or is not subordinate to, or part of, anotheritem. If the item is part of another item, it is considered a "subitem". Ifnot, it is identified as an "item". Identification items cannot havesubitems.
Occ The number of times this item will repeat within the record. The defaultvalue is "1". Identification items cannot have multiple occurrences.
Dec The number of decimal places (if any) in the item. The default number ofdecimals is "0". Identification items cannot have decimals.
Dec Char This specifies whether the item should be stored in the data file with anexplicit decimal character. This applies only to items or subitems whichhave been defined with the "Dec" property grater than zero (i.e., Dec >=1).
Zero Fill This item property states whether the numeric data item should containleading zeros or blanks.
Press the Esc key to quit modifying without making changes. Press Ctrl+Enter to finish making changes. Use undo if
Pa ge 74 of 684 Ite ms
you completed the modification incorrectly. There is no limit on the number of items within a record. See also: Item Description, Sub-Items, Identification Items, Add or Modify Items
Starting PositionThis item property indicates the starting location of a data item. In conjunction with the Length property, it specifies thelocation of the item in a record. In absolute positioning mode, you cannot give a starting position that will cause the itemto overlap with another item.
The start position of a subitem must be within its parent item (the previous item).
See also: Select Relative or Absolute Positioning, Item Properties
LengthThis item property indicates the total length of the data item (i.e., the number of characters necessary to represent thevalues for the item). In conjunction with the Start property, it specifies the location of the item in a record. In absolutepositioning mode, you cannot give a length that will cause the item to overlap with another item.
The maximum length of a numeric item is 15 digits. The maximum length of an alpha item is 255 characters.
See also: Item Properties
Data TypeThis item property specifies the type of data (numeric or alphanumeric) that will be found in the item. The default itemtype is numeric.
Numeric items can contain numbers or blanks, and they may be negative or positive in value. Numeric values willbe right-justified and, if requested, zero-filled.
Alphanumeric items can contain any combination of characters, letters, numeric digits, blanks, or specialcharacters. These values will be left-justified and are blank-filled, whether or not zero-fill has been selected.Declaring M or F for SEX is an example of an alphanumeric value.
Some responses are quantitative, such as size of farm, and some are qualitative, such as relationship to head ofhousehold. Most descriptive responses, such as "head of household," are given numeric codes that are placed on thequestionnaire. However, some descriptive responses remain as alphabetic text.
Numeric responses can be discrete values or continuous values. An example of a discrete value is sex, 1 (male) or 2(female). An example of a continuous value is yearly income, which can range from zero to a value limited only by thenumber of digits permitted for the response. A discrete value may be used to represent a grouping of continuous values.For example, when asking income, one may be asked to select from a choice of ranges of incomes rather than specifythe exact income. Thus, the possible responses to the income question could, for example, be a code between 1 and10.
See also: Item Properties
OccurrencesThis item property defines the number of consecutive repetitions of the item in the data record. The dictionary will reservespace equal to the product of the length of the item times the declared number of occurrences for the item.
For example: A census collects information on births and deaths, and each questionnaire can list the ages of up to adozen household members who died during the past year. By defining an item "Age at death" with a length of 2 digits
Pa ge 75 of 684 Ite ms
and 12 occurrences, the dictionary will reserve a location 24 characters in length for this item.
Be aware that if fewer than 12 people died in the household, then the unused portion of this item will be blank. If you haveseveral items that use occurrences and they are often unused, you are increasing the size of your data file. Therefore,you should always specify the number of occurrences with care.
If an item has multiple occurrences, then its subitems may not have multiple occurrences. Conversely, if a subitem hasmultiple occurrences, then its parent item may not have multiple occurrences.
ID items cannot have multiple occurrences.
See also: Item Properties
Decimal Places This item property lets you specify how many digits of the numeric item represent the decimal portion of the item. CSProdoes not expect the decimal point to be in the data file; if your data file does contain the decimal point, you will need toset the decimal character property. Therefore, the length of the item is not affected by the number of decimal places. For example: Suppose you had two data files, each containing an item in the format "##.##". One file has an implieddecimal point, the other file physically contains the decimal point. Here are the two ways to define the item (using 12.75as an example)
Length Dec Dec Char4 2 No (decimal implied; number would appear as "1275")5 2 Yes (decimal present; number would appear as "12.75")
NOTE: ID items cannot have decimals.
See also: Item Properties
Decimal Character This item property applies to those numbers specified as decimal. If the number is a decimal value, this states whetheror not the decimal point is present in the data file. Your valid choices are: • Yes the data file contains a decimal point for this item, or • No the data file does not contain a decimal point for this item. Note that if your item does not have a "numeric" data type, the Data Dictionary will not allow any value other than No.You can set this option for all items by clicking on "DecChar Default 'Yes'" on the Option menu. See also: Item Properties
Zero FillThis item property states whether the numeric data item should contain leading zeros or blanks.
For example: During data entry a numeric item with a length of 3 is encountered. A value of "92" was keyed. How willthis value be stored in the data file?
If Zero Fill had been set to Yes, the value would appear as: "092"
If Zero Fill has been set to No, the value would appear as: " 92"
Pa ge 76 of 684 Ite ms

You can set this option for all items by clicking on ZeroFill Default 'Yes' on the Options menu.
See also: Item Properties
Pa ge 77 of 684 Ite ms

Value SetsValue Sets DescriptionValue sets let you specify one or more groups of values for a data item or subitem. When using tabulation applications,you will want to choose value set labels to tabulate, as it will give you more descriptive results. The resulting tables willcontain row and column labels (or region labels) that correspond to the value labels (or numeric distributions, if no valuelabel is present). In a batch edit applications, the use of value sets can help you when using the vset option to theimpute function.
For example, suppose you have a survey that needs to classify people's ages three different ways: by discrete value, by5-year cohorts, or by category, such as "Child," "Adult," etc. This is easily done by adding value sets for the AGE dataitem:
Value Set Label Value Set Name Value Label From ToAge AGE 0 98 Not Reported 99Age by 5 years AGE_5YRS 0 to 4 years 0 4 5 to 9 years 5 9 10 to 14 years 10 14 15 to 19 years 15 19 20 to 24 years 20 24 25 to 29 years 25 29 30 to 34 years 30 34 35 to 39 years 35 39 40 to 44 years 40 44 45 to 49 years 45 49 50 to 55 years 50 54 55 to 59 years 55 59 60 years and over 60 98Age by Category AGE_CATEGORY Infant 0 0 Child 1 12 Teenager 13 19 Adult 20 59 Senior 60 98
The AGE item now has three defined value sets: AGE, AGE_5YRS, and AGE_CATEGORY. The first value set definesthe acceptable range for data entry, while the second and third value sets give a breakdown as you might want to see thedata tabulated.
The value set will always be added to the end of the item's value set listings. If you add to the wrong place, press the Esckey to stop the add. Use undo if you added at the wrong place.
See also: Value Set Properties, Value Set Images
Value Set PropertiesYou can view a value set's properties by selecting the item to which it belongs (via the dictionary tree tab). Whencreating a value set, the following must be set.
Property MeaningValue Set Label A descriptive text label for a collection of categories of an item. This is used in tabulation
applications in table titles.
Pa ge 78 of 684 Va l ue Se ts

Value Set Name The name of this item for use in the CSPro language procedures.
See also: Value Sets Description, Value Set Images
Value Set ImagesIn addition to the response values for a field, you can associate an image with some or all of the values. In this way, anthe interviewer can select a response based on the picture. This can be helpful, for example, in CAPI situations where aninterview must select units of measure or other things that may best be described visually. This is also useful for askingsensitive questions of people who may be illiterate (e.g., "What political party do you favor?").
To associate an image with a value, click on the "..." button at the end of the value row and then select the image.Images in five file formats are supported: .jpg, .gif, .bmp, .png, and .tif.
If you are deploying a data entry application to another computer or an mobile device, you must remember to distributethe images along with the CSEntry data entry application. If you want CSPro to automatically bundle the images with thedata entry .pen file, you may want to put the images in a special folder and then denote that folder as a resource folder.
See also: SetValueSet Function
Pa ge 79 of 684 Va l ue Se ts

ValuesValue DescriptionA single value set can contain one or more values. To add multiple ranges to a value, enter one or more spaces as thevalue label on the next value(s), and the values that follow will become part of the previous value. Multiple ranges areindicated by the lack of a notes box at the beginning of the value line.
Zeroes should be avoided in assigning codes to identification items that identify geographic areas, because zeroes areused in CSPro to describe summarized geographic levels. If zeroes are already in the data, they can be recoded to othervalues using the CSPro logic.
You can assign a negative number to a value or the starting and/or ending value of a range. Negative numbers have aleading minus (-) sign. Positive numbers have no sign. The minus sign will be displayed in the data file immediately tothe left of the value. If the item is "zero-fill," the minus sign will be displayed in the left-most position.
New values will always be added to the end of the existing value set listings. If you add to the wrong place, press theEsc key to stop the add. Use undo if you added at the wrong place.
See also: Value Properties
Value PropertiesProperty MeaningValue Label The descriptive text for a single value or range of values. This label is used when showing value sets or by
the tabulation applications module when creating column headings and stubs.From This is the single value, or starting value of a range associated with the value label. To add multiple
ranges to a value, enter one or more spaces as the value label on the next value(s), the values whichfollow become part of the previous value. Multiple ranges are indicated by the lack of a "notes" box atthe beginning of the value line.
To This value is the upper limit of the range of values being defined. It must always be greater than the"From" value on the same line. Where only a single value is associated with the "value label," the "to"value may be blank.
Special A numeric data item can be assigned one of four special values in the data dictionary. These are:missing, refused, notappl, and default.
Image An image that is displayed along with the value label when running a CAPI application.
See also: Value Description
Pa ge 80 of 684 Va l ue s

RelationsRelation DescriptionRelations provide a way of linking one multiple record or item to one or more multiple records or items. For example,suppose a questionnaire contains two record types, child records and mother records. Each child record contains a dataitem that gives the sequence number of the mother record of the child's mother. A relation can be defined which linkschild records to mother records so that when data items from a child record are processes, the corresponding motherrecord data items are available for processing. Relations work much like database joins.
Relations have one primary multiple record or item. Each instance of the primary element in a case is processed one ata time. A relation has one or more secondary records or items. The corresponding secondary elements are linked to theprimary element during processing.
There are four types of linking that can defined by relations.
Type DescriptionOccurrence to Occurrence Corresponding occurrences of the primary record or item and secondary record or item
are linked, that is first occurrences are linked, second occurrences are linked and so on.Item to Occurrence The value of an item on the primary record is a pointer to the occurrence of the
secondary record.Occurrence to Item The value of an item on the secondary record is a pointer to the occurrence of the
primary record.Item to Item The value of an item on the primary record is compared to the value of an item on the
secondary record. If the values are equal, the records are linked.
Relations can be used in for statements in batch programs and in the Export Data tool.
See also: Relation Properties, Relation Statement
Relation PropertiesProperty MeaningRelation Name The name of this item for use in for statements in the CSPro language.Primary This is the name of multiply occurring record or item. Items in the secondary are linked to items in
the primary.Primary Link This is either (occ) or the name of an item. If the primary is a record, then this is the name of an
item within the primary record. If the primary is an item, then this is a the name of a subitem withinthe primary item.
Secondary This is the name of multiply occurring record or item. Items within the secondary are linked to itemin the primary. The secondary cannot be the same as the primary.
Secondary Link This is either (occ) or the name of an item. If the secondary is a record, then this is the name of anitem within the secondary record. If the secondary is an item, then this is a the name of a subitemwithin the secondary item.
See also: Relation Description
Pa ge 81 of 684 Re l a ons

Data Dictionary ApplicationCreating a Dictionary for a New File To create a data dictionary application do the following:
• Click on the toolbar, or from the File menu, select New; or press Ctrl+N
• In the Object window select Data Dictionary • Provide a name for the new dictionary (you need not provide the dictionary extension (.dcf); it will be automatically
appended to the name). • Select the folder where the dictionary (object) is to be stored. You can press the "Browse" button to locate an existing
folder. If the dictionary file already exists, it will be used. If the dictionary file does not exist, it will be created. • Press "Next" to advance to the Summary Screen and review your choices. • If everything looks correct, press Finish to complete the operation. If you are creating a dictionary to describe an existing data file, you may want to use absolute mode, in the event thereare any "holes" in the data file(s). Or, if you want to use only a subset of the data file's information, using absolutepositioning allows you to define only those data items of interest to you. If you are defining a dictionary for a new datafile, you should be in relative mode, as this does not allow "holes" in your data. If you have a long questionnaire, you can split the job and have several persons create data dictionaries for differentsections. Later, you can copy and paste the items into one dictionary, making sure that the record type identification isunique.
Creating a Dictionary for an Existing File To create a dictionary from an existing file you will need written documentation concerning the organization of the data onthe file. This is usually presented as a set of record descriptions. These record descriptions identify the different kinds of
Pa ge 82 of 684 Da ta Di c ona ry Appl i ca on

records, the items on each record, the starting position and length of each item, type of data contained in each item, thevalues that can appear in each item and the significance of those values. Further, if you only want to use a subset ofinformation in the data file, using absolute positioning allows you to define only those data items of interest to you. Once you have the record descriptions for the data file you are ready to create the dictionary. • With CSPro create a new Data Dictionary file. • In the Turn Options menu, uncheck the option for "Relative Positioning" so that you can position each data item
according to the written specification. • In the new data dictionary, define the records, items, and values from the record description. See also: Select Relative or Absolute Positioning
Data Dictionary Screen Layout When finished creating the data dictionary application, you will see the screen divided into two windows. The screen onthe left displays the dictionary tree:
CSPro created a dictionary ("Poverty") with one level ("Poverty questionnaire"), and that level contains a set of ID Items ("(Id Items)") and one record ("Poverty record"). The screen on the right displays detailed information for the highlighted object in the left-hand screen. For example, if inthe left-hand screen the focus [cursor or highlight] is on the first line ( ), the right-hand screen will display informationabout the dictionary [file] as a whole. If the focus in the left-hand screen is moved to the second line ( ) questionnaireor case level, the right-hand screen will display information about the questionnaire [case], which is the basic element ofthe file. As the focus is moved down the dictionary tree, the right-hand screen changes to reflect the different items ofinterest at each successive level. The tabs at the bottom of the right-hand display are marked "Files" and "Dicts". Clicking on either of these tabs will bring
Pa ge 83 of 684 Da ta Di c ona ry Appl i ca on
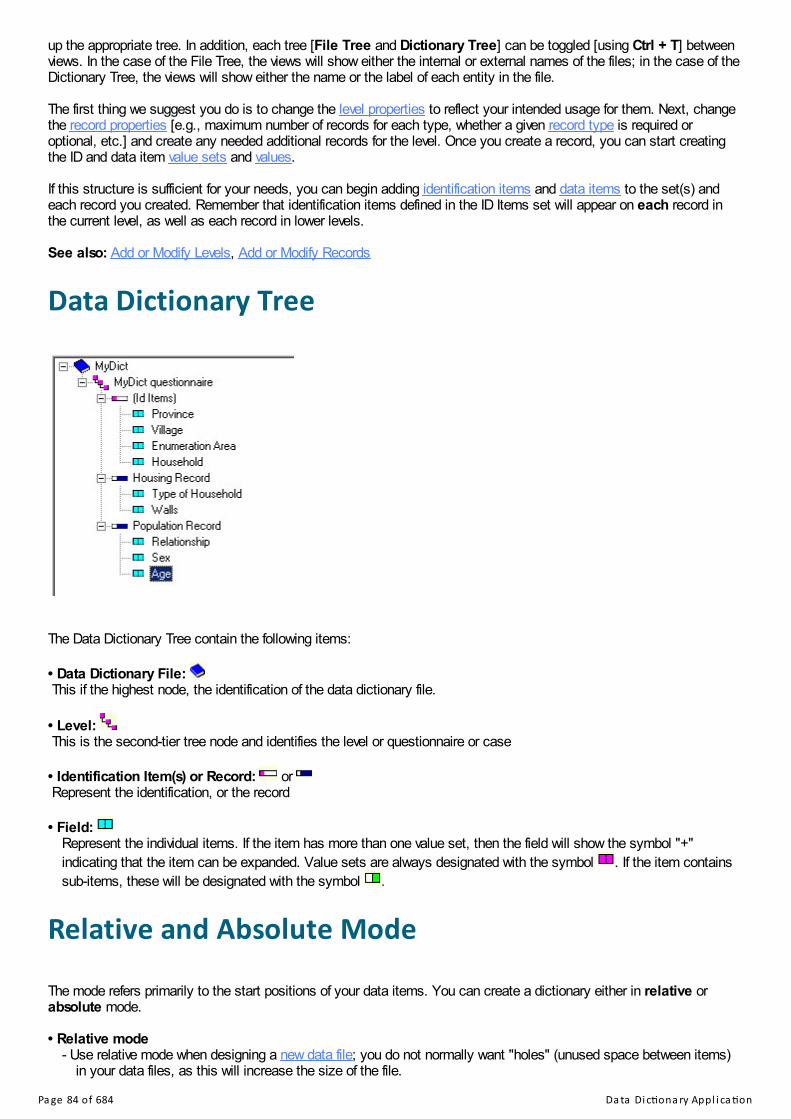
up the appropriate tree. In addition, each tree [File Tree and Dictionary Tree] can be toggled [using Ctrl + T] betweenviews. In the case of the File Tree, the views will show either the internal or external names of the files; in the case of theDictionary Tree, the views will show either the name or the label of each entity in the file. The first thing we suggest you do is to change the level properties to reflect your intended usage for them. Next, changethe record properties [e.g., maximum number of records for each type, whether a given record type is required oroptional, etc.] and create any needed additional records for the level. Once you create a record, you can start creatingthe ID and data item value sets and values. If this structure is sufficient for your needs, you can begin adding identification items and data items to the set(s) andeach record you created. Remember that identification items defined in the ID Items set will appear on each record inthe current level, as well as each record in lower levels. See also: Add or Modify Levels, Add or Modify Records
Data Dictionary Tree
The Data Dictionary Tree contain the following items: • Data Dictionary File: This if the highest node, the identification of the data dictionary file. • Level: This is the second-tier tree node and identifies the level or questionnaire or case • Identification Item(s) or Record: or Represent the identification, or the record • Field:
Represent the individual items. If the item has more than one value set, then the field will show the symbol "+"indicating that the item can be expanded. Value sets are always designated with the symbol . If the item containssub-items, these will be designated with the symbol .
Relative and Absolute Mode The mode refers primarily to the start positions of your data items. You can create a dictionary either in relative orabsolute mode. • Relative mode
- Use relative mode when designing a new data file; you do not normally want "holes" (unused space between items)in your data files, as this will increase the size of the file.
Pa ge 84 of 684 Da ta Di c ona ry Appl i ca on

- The record type, if present, is always the first item in every record.
- ID items, if any, are always located after the record type (and other ID Items defined at a higher level).
- Each data item will be placed after all defined ID items (even those defined at a higher level than the record) in the
record.
- There are no gaps or "holes" between items. - As items are added, inserted, modified, or deleted, other items are automatically moved as needed to maintain the
above arrangement.
- Changing the starting position of an item will move it and any following items to give the implied relative arrangement. • Absolute mode
- Use absolute mode to create a dictionary from an existing data file.
- The record type, ID items and data items can be positioned at any location in a record.
- All items will remain in their assigned locations, unless specifically moved by the user.
- When inserting or adding an item, there must be room (i.e., a "gap") for the item at the specified location.
- When items are deleted, gaps may be created.
- When an item's starting position or length is changed, room for the item must exist.
Dictionary TypesEvery dictionary associated with an application has a type value that indicates how it is being used. For the primarydictionary (i.e., the one upon which your application was created), this will be your main dictionary. Other dictionaries(ones that are inserted either directly or secondarily via a forms file) can have additional properties, as explained below.
To see your dictionary's type, go to the Files tab, right-click on the dictionary in question, and select Dictionary Type.You will then see the following four choices (which may or may not be active, depending on their use):
Type DescriptionMain This is the principal dictionary upon which the application was built. You cannot give the dictionary
another status as it will always be the primary dictionary for the application.External When you add a dictionary to an application, its type can either be "external" or "working." If it is an
external dictionary, it must have an associated data file. When external dictionary variables areused in an application, their default values will be Not Applicable (Notappl).
Working When you add a dictionary to an application, its type can either be "external" or "working." If it is aworking dictionary, it does not need an associated data file. When working dictionary variables areused in an application, their default values will be blank (if the variable type is alphanumeric) or zero(if the variable type is numeric).
Special Output This option is provided for backward compatibility with ISSA Batch Edit Applications. Only non-primary dictionaries used in Batch Edit Applications can have a "special output" type. Refer to theISSA Manual for further instruction.
Reconciling Dictionary ChangesWhenever you make changes to a data dictionary, CSPro must reconcile the changes in applications that use thedictionary. If the application is open when you make the change, CSPro automatically makes the change in yourapplication. If the application is not open, CSPro will attempt to make any changes the next time you open theapplication.
Pa ge 85 of 684 Da ta Di c ona ry Appl i ca on

Under some circumstances CSPro will ask you to assist in the reconciliation process. You may asked whether you wantto delete item from a form or rename the item, that is, use an item with a different dictionary name.
To rename the item, select "Rename" and then choose the new item name from the list presented. To delete the item,select "Delete."
Pa ge 86 of 684 Da ta Di c ona ry Appl i ca on

How to ...Open an Existing Dictionary ApplicationClick on the toolbar, from the File menu select Open, or press Ctrl+O. Select from the "Files of type" at the bottomof the dialog box. In CSPro you can open either an application or a file. Select the name of the file you want to open.Each time you open or create an application or file, it is added to the files tree. Any other files belonging to theapplication or file will also be opened and added to the appropriate trees.
You may open a data dictionary and make changes to it, even if it already belongs to an application. Be aware that if youlater open an application to which it belongs, CSPro will automatically make necessary adjustments in other files. Forexample, if you delete or rename a dictionary item, then later open an application that contains the data dictionary, anycorresponding fields on forms will be deleted.
You may open a forms file and make changes to it, even if it already belongs to an application. However, you will nothave access to the associated Logic file and you will not be able to run it.
Any changes you make to applications and files are not made permanent until you save the file or application that youmodified.
Move Around a Dictionary Press To Up Arrow Move up one line Down Arrow Move down one line Page Up Scroll up one screen (if possible) Page Down Scroll down one screen (if possible) Ctrl+Home Jump to first record, item, or value (from the view only) Ctrl+End Jump to last record, item, or value (from the view only) Ctrl+Left Arrow Scrolls left (if possible, and from the tree only) Ctrl+Right Arrow Scrolls right (if possible, and from the tree only) Ctrl+Up Arrow Multi-selects rows (from the view) Scrolls up (if possible, and from the tree only) Ctrl+Down Arrow Multi-selects rows (from the view) Scrolls down (if possible, and from the tree only) See also: Add, Modify, Delete Dictionary Elements. Toolbar Summary
View the Dictionary Layout
From the toolbar, press , or press Ctrl+L, or select Layout from the View menu. Any of these options will toggle thedisplay of the current layout of the data dictionary. The display will appear in the lower half of the right-hand screen.
Pa ge 87 of 684 How to ...
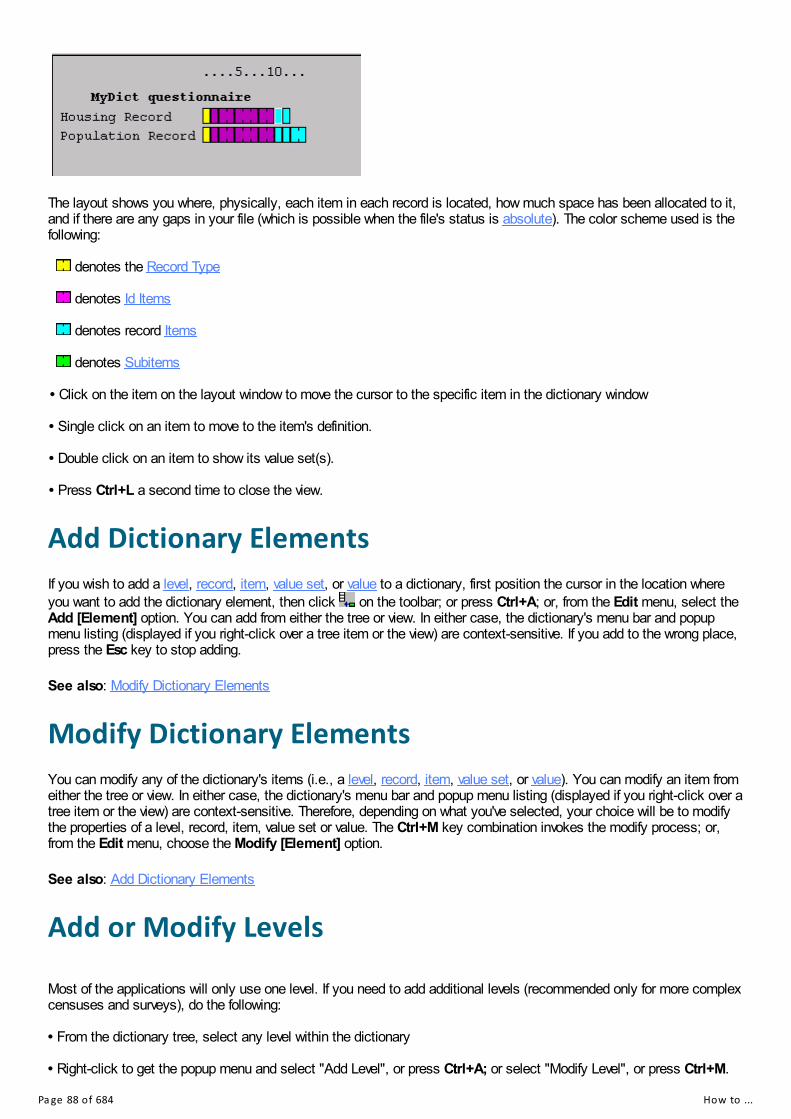
The layout shows you where, physically, each item in each record is located, how much space has been allocated to it,and if there are any gaps in your file (which is possible when the file's status is absolute). The color scheme used is thefollowing: denotes the Record Type denotes Id Items denotes record Items denotes Subitems • Click on the item on the layout window to move the cursor to the specific item in the dictionary window • Single click on an item to move to the item's definition. • Double click on an item to show its value set(s). • Press Ctrl+L a second time to close the view.
Add Dictionary ElementsIf you wish to add a level, record, item, value set, or value to a dictionary, first position the cursor in the location whereyou want to add the dictionary element, then click on the toolbar; or press Ctrl+A; or, from the Edit menu, select theAdd [Element] option. You can add from either the tree or view. In either case, the dictionary's menu bar and popupmenu listing (displayed if you right-click over a tree item or the view) are context-sensitive. If you add to the wrong place,press the Esc key to stop adding.
See also: Modify Dictionary Elements
Modify Dictionary ElementsYou can modify any of the dictionary's items (i.e., a level, record, item, value set, or value). You can modify an item fromeither the tree or view. In either case, the dictionary's menu bar and popup menu listing (displayed if you right-click over atree item or the view) are context-sensitive. Therefore, depending on what you've selected, your choice will be to modifythe properties of a level, record, item, value set or value. The Ctrl+M key combination invokes the modify process; or,from the Edit menu, choose the Modify [Element] option.
See also: Add Dictionary Elements
Add or Modify Levels Most of the applications will only use one level. If you need to add additional levels (recommended only for more complexcensuses and surveys), do the following: • From the dictionary tree, select any level within the dictionary • Right-click to get the popup menu and select "Add Level", or press Ctrl+A; or select "Modify Level", or press Ctrl+M.
Pa ge 88 of 684 How to ...

• Complete the level properties requested • When you are finished entering the level(s) desired and wish to terminate data entry, press the Esc key. After entering the second level, the 'add level' mode will continue for one additional level. To terminate with just two levels,press Esc when you reach the (third) new level entry. Additional levels will have exactly the same structure as the firstone, i.e., an (ID Items) set and a record ('New Record'). You can undo modifications if you decide they were incorrect. If you need additional records for this level, you should create them first. After selecting a level in the tree, you can press
to initiate add mode. The level will always be added at the end of the dictionary. See also: Dictionary Hierarchy, Level Description, Level Properties
Add or Modify Records • From the dictionary tree, select any record (or (Id Items) set) within the level you wish to add or modify. • Right-click to get the popup menu and select "Add Record", or press Ctrl+A; or select "Modify Record", or press
Ctrl+M. • Complete the record properties requested. • When you are finished entering the record(s) desired and wish to stop adding, press the Esc key. If this structure is sufficient for your needs you can begin adding identification items and data items to the record. Theitem will always be added at the end of the record. There is no limit on the number of records within a level. See also: Dictionary Hierarchy, Record Description, Record Properties, Record Type, Required Record, MaximumNumber
Add or Modify Items • From the dictionary tree, select the item within the ID Items or record you wish to add or modify. • Right-click to get the popup menu; select "Add Item", or press Ctrl+A; or select "Modify Item", or press Ctrl+M. • Complete the item properties requested. • When you are finished entering data items and wish to stop adding, press the Esc key. There is no limit on the number of items within a record. The item will always be added at the end of the record. After
selecting an item in the tree, you can press to initiate add mode. If you add to the wrong place, press the Esc key to stop adding. Use undo if you added at the wrong place.
Add or Modify Value Sets • From the dictionary tree, select the item or subitem to which you wish to add a value set. • Right-click to get the popup menu and select "Add Value Set", or press Ctrl+A; or select "Modify Value Set", or press
Ctrl+M.
Pa ge 89 of 684 How to ...

• Provide the Label and Name for the Value Set. • Complete the value set properties requested. • When you are finished entering values and wish to stop adding, press the <Esc> key.
Linked Value SetsThere are times when several items in a dictionary share the same list of possible values. For example in a survey thatasks for the country where someone lives as well as the country where that person was born, the value set for both itemswould be a listing of all countries. A user can enter the possible values for one item and then copy and paste them ontothe second item, but the concept of linked value sets is a better approach to the problem. With linked value sets a userpastes a "value set link" which indicates to CSPro that the two items share the same possible values. Then if the useradds or modifies entries for one item, the values for the linked items are also modified. Users do not have to updatemultiple value sets to make changes.
Create a Value Set Link
Create the value set for one of the items and then copy the value set to the clipboard. Go to the value set window for theitem to which you want to link the value set. Right-click on the window and select Paste Value Set Link.
After pasting the link the value set will turn pink as a way of indicating that the value set is shared across two or moreitems. Modify or add values to the value set as you would for a regular value set.
Remove a Value Set Link
Right-click on the value set name and select Remove Value Set Link. If the value set is linked to more than two items,you can chose to remove the link for only the item that you right-clicked on, or you can remove all the linkages. When alink is removed the value set is no longer colored pink. The values remain but now modifying the value set does not affectthe value sets in the items to which it had previously been linked.
Pa ge 90 of 684 How to ...

Generate Numeric Value Set To generate a value set for a numeric data item:
From the dictionary tree, select the desired item.
Right click on the view on the right, or select the Edit menu.
Select Generate Value Set. The following dialog box will appear.
Value Set Label: A descriptive text label for a collection of categories of an item. Used by the Tabulation module toselect tabulation categories. This cannot be left blank. Value Set Name: The name of this value for use in the CSPro language procedures. From: The smallest value in the value set.To: The largest value in the value set.Interval: The size of the interval in each value range generated. For example, if 5 year age groups are desired, then theinterval is 5. The interval must be greater than 0. If the interval is the smallest positive number that can be contained inthe data item, then single values are produced. Value Label Template: A model for descriptive text of each value or value range that is generated. The characters %sin the template are replaced by the from and to values for each value range. All other characters are output as entered.
Add or Modify Values • From the dictionary tree, select the desired value set. • Select one of the value set's values in the view on the right. • Press Ctrl+A to begin adding a value. • Complete the Value Properties requested. • When you are finished entering values and wish to stop adding, press the Esc key.
Pa ge 91 of 684 How to ...

A single value set can contain one or more values. The value will always be added to the end of the value set listings. Ifyou add to the wrong place, press the Esc key to stop the add. Use undo if you added at the wrong place.
Undo and Redo ChangesCSPro keeps track (in an "undo stack") of the 12 most recent changes you have made to your application. Please beaware that not all changes can be undone.
If you have made a mistake and want to undo it, press on the toolbar; or from the Edit menu, select Undo; or pressCtrl+Z. CSPro will try to restore your forms to the state previous to last change you made. To undo the next-to-lastchange, press the Undo button again.
Sometimes you may undo several changes and realize you have gone too far back. Press on the toolbar; or from theEdit menu, select Redo; or press Ctrl+Y. Redo is an "undo" of an undo.
Select Several Dictionary ElementsYou can select several dictionary elements of the same type from the dictionary window.
Using the Mouse
1. Click on the line where you want to start selecting.
2. Hold the left mouse button down and drag the mouse up or down until your desired selection is highlighted. Notethat the window will automatically scroll if necessary.
3. Release the mouse button.
Using the Keyboard
1. Using the cursor keys, move to the start of your desired selection, so that the blue highlight bar is on that line.
2. Press and hold the Shift key.
3. Use the Up and Down arrows to expand your selection. PgUp and PgDn will expand the selected lines a page ata time.
You can use cut and copy to move/copy your selection elsewhere within the dictionary, or to use in another opendictionary. You can delete multiple records, items, or values at the same time. Undo can be a useful feature whendealing with block operations.
Insert Dictionary Elements If you wish to insert a level, record, item, value set, or value to a dictionary, first position the cursor in the location where
you want to insert the dictionary element, then do one of the following: click on the toolbar; or press the Insert (Ins)key; or, from the Edit menu, select the "Insert [element]" option. You can insert from either the tree or view — in eithercase, the dictionary's menu bar and popup menu listing (displayed if you right-click over a tree item or the view) arecontext-sensitive. If you insert to the wrong place, press the Esc key to stop inserting. Use undo if you completed theinsert to the wrong place.
Delete Dictionary ElementsIf you wish to delete a level, record, item, value set, or value from the dictionary, first position the cursor in the locationwhere you want to delete the dictionary element, then do one of the following: click on the toolbar; or pressDelete/Del, or select Delete from the Edit menu.
Pa ge 92 of 684 How to ...

If you delete the wrong object, click on the toolbar to undo the operation and recover the deleted material. You canselect multiple lines by dragging the mouse over the desired lines or pressing down on the Shift key while you use theup or down arrow to adjust the selection.
Move Dictionary Elements To move things in the Dictionary around use "cut," "copy," and "paste." "Cut" will delete the material from the dictionaryand place it on the clipboard. "Copy" will simply place a copy of the selected material on the clipboard. "Paste" will placea copy of the material on the clipboard into the dictionary. You can paste cut or copied material to more than onelocation. You can also copy/cut dictionary elements from one dictionary and paste into another. • To cut things …
Select the material you want to cut, then click on the toolbar; or from the Edit menu, select Cut; or press Ctrl+X. • To copy things …
Select the material you want to copy, then click on the toolbar; or from the Edit menu, select Copy; or pressCtrl+C.
• To paste things …
Select the place where you want the records, items, or values to be pasted then click on the toolbar; or from theEdit menu, select Paste; or press Ctrl+V.
Find Dictionary ElementsPress on the toolbar, or press Ctrl+F; or select Find from the Edit menu to open the Find dialog box. Names andlabels of all dictionary entities (for example, levels, record, items, value sets) will be searched. The following optionsallow you to search for text:
Find What
Enter all or part of the text string to search for. Text used in previous searches is available by clicking on the down arrowand selecting from the dropdown list.
Next
Find the next occurrence of the text string, starting from the last one found. If it finds the item, it will be brought intofocus in the view; otherwise you will receive a notification that it could not be found.
Prev
Find the previous text string starting from the last one found.
Match Case
If this option is checked, the string will match only if the letters are the same case (upper or lower) as in the string youentered as the search key. If this option is not checked, the search will ignore case.
Close
Close the Find dialog box.
Document Dictionary ElementsPa ge 93 of 684 How to ...

In the view screen on the right, select the element you want to document or for which you want to modify thedocumentation. Click on the toolbar; or from the Edit menu select Notes; or press Ctrl+D. You can also press thebutton at the beginning of the line of the selected element, or right-click and select Notes. You can use the Enter key toend a paragraph and begin a new one within the note. You can use Ctrl+X, Ctrl+C, and Ctrl+V to cut, copy, and pastetext in the note.
Convert Items to SubitemsSelect the items you want to convert to subitems. From the Edit menu, select Convert to Subitems or right-click on theitem list in the view and select Convert to Subitems from the popup menu. Enter information about the item that willinclude these subitem(s).
To convert subitems back to items, delete the item. When asked if you wish to "Delete subitems too?" answer No.
Select Relative or Absolute PositioningTo toggle between Relative and Absolute positioning, select Options from the menu bar, then select Relative Positions.A checkmark indicates your file is in Relative Positioning; the absence of a checkmark indicates the file is usingAbsolute Positioning.
Create Dictionary with No Record TypesIf your dictionary has only one type of record, there is no need for a Record Type item in the record. In order to removethe Record Type item, set its starting position to 0 and it length to 0.
Occurrence LabelsOccurrence labels can be attached to a repeating item or a repeating roster by right-clicking on the dictionary elementand selecting Occurrence Labels. Alternatively, that option can be found on the Edit menu. To edit an occurrence label,simply click on the appropriate row and add the label.
Pa ge 94 of 684 How to ...

Occurrence labels can be used as row labels in a roster, in programmed logic, or as replacement text in the CAPI textwindow.
Add or Modify Relations
From the Edit menu, select Relations.
Press the Add button to add a relation at the end of the list or press the Insert button to insert a relation at thecurrent highlighted line.
Enter the Relation Properties across the line.
Press the Delete button to delete the highlighted line.
Press OK button when you have completed your edits.
Print the Dictionary File
Click on the toolbar; or from the File menu, select Print; or press Ctrl+P to open the Print dialog box and selectamong the following options: • Where You can send your output directly to a printer, or save it in a file. • Detail You can select Complete to print the data dictionary with the value sets and notes; or Brief to obtain a listing of the
items only. • Order This option allows the user to place either the item name or the item label in the first column of the listing. You can also print part of a document by selecting the desired text and then pressing Ctrl+P. To preview the printing
click on the tool bar; or from the File menu, select Print Preview.
Save Dictionary as New FileTo save a dictionary under a new name:
1. Open the dictionary alone (that is, not as part of an application).
2. From the File menu, select Save As.
3. Enter the file name for the new dictionary in the file open dialog box.
When the Save As is complete you will be editing the new dictionary.
See also: Save an Application with a New Name
Multiple Language DictionariesIt is possible to specify your dictionary's labels in more than one language. To do this, while editing your dictionary, fromthe Edit menu, select Languages. You can add a language the same way that you define CAPI languages. Once yourapplication has more than one language, a toolbar will appear showing the names of the languages:
Pa ge 95 of 684 How to ...

Each language has its own set of labels for all of the dictionary elements (record labels, item labels, value labels,occurrence labels, etc.). If a label is not defined for a given language, the label will default to the label for the firstlanguage. To simplify the editing of labels, you can press the keyboard shortcut Control+Alt+L to change between thelanguages.
When adding items to your data entry forms, you can specify that the field labels should be directly linked to thedictionary label. This default setting ensures that the field labels change when the user changes the language during dataentry.
For your application to fully take advantage of multiple language dictionaries, you must define the languages that youwould like to use in the CAPI language section. When running your data entry program, CSEntry will only list languagesdefined in the CAPI section. In this way, changing a language will change both the CAPI language text as well as thedictionary labels used.
Dictionary MacrosThere are several specialized tasks that you can perform on a dictionary using the dictionary macros functionality. Toaccess the options, either right-click on a dictionary in the tree and select Dictionary Macros or, with the dictionaryeditor active, select Dictionary Macros from the Edit menu. A dialog box will appear with the following options:
Dictionary Names and Labels
You can Copy All the names and labels to the clipboard for all attributes in your dictionary (levels, records, items, andvalue sets). If your dictionary has multiple languages, the All Languages option allows you to copy all of the labels,instead of just the primary label, to the clipboard. The Item Lengths option allows you to copy, in addition to the namesand labels, the length of each item to the clipboard.
This can be useful if you want to edit the names, labels, and lengths in a different software tool, such as Microsoft Excel.The information is copied in a tab-delimited format.
If you edit the data in an outside program and want to bring the changes back to CSPro, you can use the Paste Allfunctionality. CSPro will check that what is in the clipboard matches the contents of the dictionary, so you cannot add ordelete items outside of CSPro.
You may find it useful to setup your dictionary parameters in CSPro and then have a subject matter specialist or clerkenter the labels in another software, particularly if working in multiple languages.
Value Sets
You can Copy All the names and labels to the clipboard for all value sets in your dictionary. As with dictionary namesand labels, you can use this feature to edit the value sets in a different software tool. If your dictionary has multiplelanguages, the All Languages option allows you to copy all of the labels, instead of just the primary label, to theclipboard. If you select Value Set Images, the file names of value set images will also be copied.
After modifying the value set labels in an outside program, you can use the Paste functionality to bring the changes backto CSPro. You do not need to paste all value sets, so you can make changes to only the value sets that you want tomodify. You can add and remove value set labels in the outside program, but you cannot change value set names.
If you want to remove all the value sets from your program, which can be useful if testing a data entry application thatsomeone else designed (and for which you do not know the proper values), you can use the Delete All functionality. Thechange is permanent, however, so you may want to make a copy of your dictionary prior to removing all value sets.
Add Items to Records
Pa ge 96 of 684 How to ...

This macro allows you to bulk add items to a record. This can be useful if you want to add many items to yourdictionary, whose names and labels you will modify in a different software tool. Specify the Number of Items to add, andthen select to which Record you want to add the items. The items will come with names such asRECORD_NAME_ITEM001, RECORD_NAME_ITEM002, etc.
Records
In a dictionary with many records, it may be useful to modify all records to make all required (Set All to Required) or tomake none required (Set All to Not Required).
Generate Random Data File
Sometimes, particularly when testing a data entry or batch edit application, you may want to create a data file with someNumber of Cases in it. If you do not have any preexisting data for your dictionary, this is a way to easily generate datawithout having to enter it manually. The output file will consist of cases with data based on your dictionary'sspecifications. For items with value sets, only valid values will be output.
If you want some number of blank values in your output file, you can modify the Percent Not Applicable. If you wantsome items to have values that are not in their value sets, than you can modify the Percent Invalid. When testing batchedit applications, this can be useful as a way to detect if your edits properly handle blank and out-of-range values.
Sample Data File
This macro provides an easy way to create a sample from an existing data file. For example, it is a common task tocreate a 1%, 5%, or 10% sample census data file, particularly when testing batch edit applications. Based on theprovided Percent, you can create a Random or Sequential sample data file.
Suppose your file has 100 cases and you want to create a 10% sample. Creating a random sample means that all 100cases have a 10% change of being selected for the sample. Based on randomness, that means that generally yoursample file will have 10 output cases, but it could have fewer or more. You might also get some clumping of cases. Onthe other hand, a sequential sample means that the output file will consist of the 1st, 11th, 21st, ... cases. The outputfile will always have 10 cases. By modifying the Start Position, you can control which case is output first. For example,if that value was 3, then your output file would consist of the 3rd, 13th, 23rd, ... cases.
Data File Tasks
There are three options in this area:
Compact Data: When working with text data sources as external dictionaries to a program, you can end up witha lot of deleted records. Deleted records appear in the file with a tilde (~) at the beginning of the line. This optionwill remove all deleted records from a file, reducing its size.
Sort Data in ID Order: This will run the Sort Data tool to automatically sort a data file in ID order. Particularlyafter concatenating multiple data files, you may want to sort the data in some order, generally based ongeographic ID items.
Create Notes Dictionary: This will create a new dictionary, based on your current one, that can be used to readthe .csnot notes file generated by a data entry application. If you want to export your data entry notes, you canuse this macro and then open the newly created dictionary in the Export Data tool.
See also: Dictionary Analysis, Question Text Macros
Dictionary AnalysisWhile editing or viewing a data dictionary, you can generate several reports that analyze the contents of the dictionary byselecting an option from the Dictionary Analysis submenu off the View menu. The options include:
Items Without Value Sets: Determine which items have no value sets.
Pa ge 97 of 684 How to ...

Numeric Items Without Value Sets: Determine which numeric items have no value sets.
Numeric Items With Overlapping Value Sets: Determine which numeric value sets have discrete or range values thatoverlap.
Numeric Items With Mismatched ZeroFill or DecChar Options: Determine which numeric items have a zero fill ordecimal character option that differs from the dictionary's default options. You generally want every item in the dictionaryto use the same options.
See also: Dictionary Macros
Dictionary Security OptionsSeveral security options can be defined on a per-dictionary basis. To change these options, select Security Optionsfrom the Edit menu. A dialog box will appear with the following options:
When checked, the first option, Allow the use of Data Viewer to modify data, means that a user can use DataViewer to delete and modify cases.
When checked, the second option, Allow exporting data to other formats, allows a user to use Data Viewer, theExport Data tool, or the export statement to output data to another format.
Encryption Options
Encryption options control whether or not passwords can be stored for data sources using that dictionary. These optionsonly apply when using the dictionary to access encrypted data using the Encrypted CSPro DB data source. By default,passwords used to open such files are not cached on the machine, meaning that the password must be specified everytime the file is opened (unless the password is specified in a connection string). If you want to allow the storage ofpasswords, specify the number of minutes that the stored password can be used to open the data file.
The password itself will not be stored on the device; instead, a key that can be used to open the data file will be stored.A clever hacker who accesses this key may be able to open the data but will have a hard time reverse engineering thekey to get the original password itself. The key is stored in secure storage on the device. You can use the CSProSettings dialog to clear any cached passwords.
See also: Encrypted Data
Pa ge 98 of 684 How to ...

The CSPro LanguageIntroduction to CSPro LanguageThe CSPro language lets you write programming logic for your data entry and batch edit applications. In data entryapplications you can write logic to control and check the keying or CAPI operation as it progresses. In batch editapplications you can write logic to identify and correct errors after data capture is complete.
This section contains the following information:
Program Structure
Declaration Section
Procedural Sections
Logic
Language Elements
For a list of commands, see the CSPro Statements and Functions section.
Data RequirementsData files appear in many different formats and structures. CSPro can work with several type data sources, but mostpeople work with text files. If you are using data files created by another software package, you must save the data in aseparate text file before you can use it with CSPro. Data files are limited to 2 gigabytes in overall size; the maximumlength of any record in the file is 32,000 characters. CSPro encodes data files using UTF-8. Read more about Unicodetext files at the Unicode Primer.
CSPro processes one case at a time. Each record must contain a unique questionnaire identification code in the sameposition in each record. This number must be the same for all records of the same case. If the file is a "flat" file, meaningthat each questionnaire contains only one record, the questionnaire identification becomes irrelevant. In this case, anydata item can be used as the questionnaire identification, but it should be unique for each record. CSPro uses the caseidentification values to determine where one case ends, and the next one begins. Records belonging to the same casemust be contiguous within the data file, but there is no requirement that the data file be sorted by case identifier.
CSPro can handle a data file with multiple record types—for example, housing and population—but a record type codemust identify the type of record. This code must be in the same position in each record. Within the same record type,each data field must be in the same position.
CSPro can process one input data file at a time, but it can access one or more external files. These files must also bedescribed by a data dictionary.
In some survey data, especially where the total number of data items is great but only a few responses are expected, theuser may choose a format in which each data field is preceded by a "source code" relating it back to the originaldocument. By using this scheme, non-response fields (empty responses) need not be entered. With this type of format,each data field is not in a pre-defined location on the record. Before a file like this can be processed by CSPro, it mustbe reformatted so that the data fields are in fixed positions. Items in data files must be fixed format, that is, items musthave the same starting position and length in every record where they occur.
See also: Data File Type Structure
CSPro Program Structure
Pa ge 99 of 684 The CSPro La ngua ge

CSPro logic consists of a collection of events defined as procedures. Each procedure performs the operations youspecify using CSPro statements and functions written in the CSPro language. A CSPro program includes a declarationsection and one or more procedural sections.
Declaration Section (PROC GLOBAL)
Declarations and definitions are defined in the global procedure. In this section you declare global variables, arrays, filehandlers, and user-defined functions. The global procedure always appears at the beginning of the logic file and beginswith the line "PROC GLOBAL." Except for within user-defined functions, there are no executable statements in this section.You can edit the PROC GLOBAL section by clicking on the topmost entry of the data entry edits tree or batch edits tree.
Example
PROC GLOBAL
// variablesnumeric MinAgeDifferenceParent = 12, MaxAgeDifferenceMother = 55;
string personName;array validRelationships(5);
// user-defined functionfunction numeric IsMotherValidByAge(numeric motherAge, numeric childAge) IsMotherValidByAge = ( ( motherAge - childAge ) inMinAgeDifferenceParent:MaxAgeDifferenceMother );end;
Procedural Section
This section contains executable and assignment statements that can be written before (preproc) or after (postproc) anevent. Events always fall under the PROC section, which is followed by the name of the forms file, level, form, roster, orfield. Statements are assumed to be in the postproc unless it is explicitly stated that they are in another procedure.
Data entry applications also have a forms file procedure. The form file preproc is executed before a data entry sessionbegins. There are three other procedure types that may be useful in data entry applications: onfocus, killfocus, andonoccchange.
Example
Pa ge 100 of 684 The CSPro La ngua ge

PROC MYDICT_FF // form file procedure
preproc
// statements
PROC MYDICT_QUEST // level procedure
preproc
// statements
postproc
// statements
PROC HOUSING_FORM // form procedure
postproc
// statements
PROC INCOME // field procedure
// statements (implicitly in the postproc)
See also: Proc Statement, PreProc Statement, OnFocus Statement, OnOccChange Statement, KillFocus Statement,PostProc Statement, Order of Executing Data Entry Events, Order of Executing Batch Edit Events
Programming StandardsIt is a good idea to create a set of programming standards when writing CSPro code. If you work in an organization, youwill want to discuss these standards with the other programmers in your organization. Code is more readable whenmultiple people use the same coding guidelines.
This is an example of a set of programming standards adopted by an organization. Your standards may differ, but thepoint is to at least have a set of standards.
1. Backup your code, and all components of the application, frequently. Create a system of version control (such asby using Git).
2. Compile code frequently while working on it as this will help you identify syntax errors early.
3. Use the help system (by pressing F1) and the reference window while writing logic.
4. Use // for line comments and { } for multiline comments. Comment the code while writing it, not afterwards, asit will probably never get done in that case. Remember that it is likely that you will not be the only person wholooks at your code.
5. Maintain indentations for code within conditional statements (if), loops (do/for), and functions.
6. Write CSPro statements in lowercase.
7. Write variable names from the dictionary in UPPERCASE.
8. Write globally declared variable names in mixed case, starting with a lowercase word (this is called camelCase).Make all global variables at least three characters long.
9. Declare all constants in PROC GLOBAL, not in the application-level preproc.
10. Use locally declared variables for loop counters and when only one procedure or function uses the value of thevariable. Remember that the value of the local variable will be reset (to 0) each time the procedure is executed.
11. Use functions when an operation is generalizable or if the same operation will be called repeatedly from differentprocedures.
12. Use standard prefixes for variable names. For example:
Pa ge 101 of 684 The CSPro La ngua ge

cnt: counts of an item (such as cntPersons and cntHouseholds)
ptr: pointer to a record (for instance ptrEldest is the occurrence number of the eldest resident)
13. For batch applications, maintain an error message numbering scheme so that both subject matter specialists andprogrammers can understand where error messages occur. For example:
(1 digit) record type number
(2 digits) question number of the primary variable
(2 digits) error number for this variable
14. Do not use deprecated features as they may not be supported in a future version of CSPro.
15. Take advantage of free support from the U.S. Census Bureau at: [email protected]
See also: Define Coding Standards
Debugging CSPro ApplicationsThere is no structured debugger that works with CSPro. However, there are several techniques that can be used to findproblems and solve them. One technique is to "comment out" code. By enclosing specific code between braces { },you can isolate specific areas of code that may be the cause of your problem.
Another technique is to use error messages with the errmsg function. The generation of an error message tells you thatprogram control has passed to that point in your application. The error message can also include variable values toindicate the status of those variables at that point.
It may sound obvious, but it is good programming technique to indent your code. This will help you find problemscaused by unterminated if or do statements, for example. If you consistently indent (or tab) the content within anycontrol structure, finding a lost endif or enddo will be much easier.
You can also use the trace function to determine problems in your application by outputting messages to a separatewindow or file rather than have them appear onscreen as they would with error messages.
Pa ge 102 of 684 The CSPro La ngua ge

Declaration SectionCompiler ModeThe CSPro compiler operates with the requirement that variables are declared explicitly. You must declare all variablesnot defined in your dictionary; otherwise, the variables will be flagged as errors by the compiler. The advantage of this isthat you do not have to worry about misspelled names.
Prior to CSPro 7.2, there was a compilation mode called implicit that allowed for on-the-fly variable declarations. Thiswas removed because it could easily lead to mistakes based on programmers mistyping variable names. There weresome purposes where implicit declaration mode could be useful, which can now be achieved by using the ensurestatement.
VariablesIn CSPro you can declare numeric or string variables. Variable names must contain only letters, numbers, or theunderscore (_) character, and must begin with a letter. Names are case insensitive, that is, uppercase and lowercaseletters are considered the same. (For example, myvar, MYVAR, and MyVar are all equivalent.) Variables of all types followthe same rules for names.
Numeric Variables
In CSPro, numeric variables are stored internally in floating point format. They can accommodate numbers of extremelysmall or large size, positive or negative. Numeric variables can be global in scope, meaning that you can assign or getthe value of a variable from any other event, or local in scope, meaning that you can only access the value from within asingle event. A numeric variable may be up to 15 digits in size. It is equivalent to a float or double variable.
String Variables
String variables in CSPro store alphanumeric data. You must declare a string variable using either the alpha or stringstatements. As with numeric variables, string variables can be either global or local in scope.
See also: Array Object, Text Strings, Logic Objects and Dot Notation
Alias StatementFormat
alias aliased_name : original_name;
Description
The alias statement allows for the creation of new names to alias, or to provide an alternative reference to, names in aprogram. This can be used to shorten, or lengthen, variable names, or to match names in a dictionary with preexistingcode using a certain naming convention.
Example 1: Shortening Dictionary Names to Quicken the Typing of Variables
alias P14 : P14_AGE, P15 : P15_RELATIONSHIP, P16 : P16_SEX;
Pa ge 103 of 684 De cl a ra on Se c on

Example 2: Using Aliases to Standardize Variable Names so that Logic Can be ReusedAcross Programs
alias AGE : P14_AGE, RELATIONSHIP : P15_RELATIONSHIP, SEX : P16_SEX;
In both examples, P14_AGE, P15_RELATIONSHIP, and P16_SEX are the names of items declared in a dictionary. Once thealias statement has been specified (in PROC GLOBAL), the names P14 and P14_AGE can be used interchangeably. Forexample, these two statements are identical:
if P14_AGE < 18 and P16_SEX = 2 then
if AGE < 18 and SEX = 2 then
Ensure StatementFormat
ensure numeric variable_name1『『, ... , variable_nameN』』;
Description
The ensure statement allows for the conditional creation of numeric variables in the PROC GLOBAL section of logic. Oneor more variable names are specified, and if the name of the variable exists (because of being declared previously inlogic, or defined in a dictionary), then it will not be created. If it does not exist, a temporary variable is created just as if itwere a declared numeric variables. The initial value of the variable is 0.
This statement is useful when working with applications that reuse blocks of logic with different dictionaries. If a certainroutine depends on a dictionary variable, you can use this statement to ensure that the logic compiles without issue. It isimportant to make sure that your logic works regardless of whether the variable is defined in a dictionary or from theensure statement.
In versions of CSPro prior to 7.2, you could simulate the behavior of ensure by using set implicit mode.
Example
PROC GLOBAL
ensure numeric SUPERVISOR_CODE;
PROC DATA_TRANSMISSION
// assuming that 0 is never a valid value for SUPERVISOR_CODE, then // you could have two synchronization routines in your code, one for // surveys where there are supervisors (and SUPERVISOR_CODE is defined // in a dictionary), and another for surveys where interviewers directly // send data to headquarters
if SUPERVISOR_CODE = 0 then SyncWithHeadquarters();
else SyncWithSupervisor();
endif;
See also: Numeric Statement
Pa ge 104 of 684 De cl a ra on Se c on

User-Defined FunctionsUser-defined functions are coded in the declaration portion (PROC GLOBAL) of an application. Once defined, they can beused anywhere in an application. Functions are used to perform operations that are used in several different places in anapplication.
Functions are of the form:
return_value = function_name(argument_list);
Functions may include an argument list, which can vary depending on the function call's requirements. This list may beempty (that is, it contains no arguments between the opening and closing parentheses) or it may contain one or morearguments. Each argument specifies a variable, array, list, or file handler that is used by the statements within thefunction.
Numeric, string, and alphanumeric variables are local to the function. That is, if a variable is passed as an argument, itsvalue in the rest of the application will not be changed by actions within the function (this is called "pass by value"). Onthe other hand, objects (such as arrays and file handlers) passed as arguments refer to the source variable andinteractions on the variable affect the source variable (this is called "pass by reference"). If you want to pass a numeric orstring variable by reference, you can use the ref keyword to signify that changes made in the function should affect thesource variable.
A user-defined function:
Returns a single value, either numeric or alphanumeric.
Can contain CSPro statements and functions, as well as other user-defined functions. If no return value isassigned to the function, the value default (or a blank string) is returned.
The function statement allows the creation of a user-defined function.
Array ObjectIn logic, an array is an object that contains a collection of elements of the same type, either numeric, alphanumeric, orstring. An array can be of many dimensions, though each of these dimensions is of a fixed size. Arrays can be used invarious processing operations, including defining a list of constant values (like month names) or working with hotdecksand DeckArrays.
Whenever an array variable is used in the application, a value or numeric expression for each dimension must be given.The initial array contents are zero (if numeric) and blank (if alphanumeric or string) until a value for each dimension isassigned. If using a numeric saved array, the initial array contents are default.
If you want the behavior of an array but without fixed dimensions, you can use the hashmap object, which is anassociative array.
Functionality
An array is a CSPro logic object and the following functions can be called via dot notation:
Function Descriptionclear Resets all array values to the default value.length Returns the size of an array dimension.
See also: HashMap Object, List Object
Audio ObjectPa ge 105 of 684 De cl a ra on Se c on

In logic, an audio object represents an audio recording. Audio recordings may be loaded from audio files, saved to audiofiles, played back or recorded. Audio objects are typically used to record portions of an interview either interactively or inthe background. With interactive recording an audio recorder is displayed to the user who then controls when therecording is started and stopped. The user must complete the audio recording before moving to the next survey question.With background recording, the audio recorder is started and stopped using CSPro logic and the user can continue withthe survey while the audio is recorded.
Audio recording is typically implemented by declaring a variable of type audio, calling either the record orrecordInteractive function, and then calling the save function to save the audio to a file.
Audio recording and playback are currently only supported on Android.
Functionality
An audio object is a CSPro logic object and the following functions can be called via dot notation:
Function Descriptionclear Erases the audio recording currently stored in the audio object.concat Appends an audio recording to the recording stored in the audio object.length Returns the length, in seconds, of the recording in the audio object.load Reads an audio file and places the contents in the audio object.play Launches an audio player to play back the contents of the audio object.record Starts recording audio in the background.recordInteractive Starts interactive audio recording.save Writes the audio recording to a file.stop Stops the current background recording.
In addition to these object functions, audio objects can be used as arguments to the filename function.
Audio objects can be assigned to other audio objects, which will replace the recorded audio with the recording from theassigned audio object.
audio_name = another_audio_name;
Example
Pa ge 106 of 684 De cl a ra on Se c on

PROC AUDIO_QUESTION
onfocus
// Variable to store the recordingaudio recording;
// Save recording to a file that includes case id-items to differentiate it from// audio saved in other casesstring nameOfAudioFile = maketext("%v%v%vAUDIO_QUESTION.m4a", PROVINCE, DISTRICT, EA);
// If no audio is recorded for this question then the only option is to record,// otherwise allow user to re-record, play or clear recording before continuingvalueset vs;if fileexist(nameOfAudioFile) and recording.load(nameOfAudioFile) then vs.add("Re-record", 1); vs.add("Play recording", 2); vs.add("Clear recording", 3); vs.add("Next question", 4);else vs.add("Record", 1);endif;setvalueset($, vs);
postproc
if $ = 1 then // Record/re-record recording.clear(); string message = "Record the respondents answer to this question"; numeric seconds = recording.recordinteractive(message); if seconds > 0 then recording.save(nameOfAudioFile); else errmsg("No audio recorded. Please try again"); endif; reenter;elseif $ = 2 then // Play back recording recording.play(); reenter;elseif $ = 3 then // Clear the recording filedelete(nameOfAudioFile); reenter;elseif $ = 4 then // Continue to next questionendif;
See also: Multimedia Features
File ObjectMost files in CSPro are data files, whose structure is defined by a data dictionary are are used in logic by referring totheir dictionary names. However, it is also possible to write to text files without an associated data dictionary. Lines oftext can be written to a file or read from a file, and these files can also be used in export statements.
The physical name of the file can be specified in the Define File Associations dialog when the application is run, in a PFFfile, or by using the open or setfile functions.
Functionality
A file is a CSPro logic object and the following functions can be called via dot notation:
Pa ge 107 of 684 De cl a ra on Se c on

Function Descriptionopen Associates the file object with an existing or a new file on the disk (equivalent to setfile).close Closes the open file (equivalent to close).read Reads one or more lines of text from the file (equivalent to fileread).write Writes one or more lines of text to a file (equivalent to filewrite).
In addition to these object functions, files can be used as arguments to functions such as filecopy, filedelete,fileempty, fileexist, filename, filerename, filesize, open, and pathname.
Example
file login_times_file;login_times_file.open("Login Times.csv", append);login_times_file.write("%s, %s, %d", getdeviceid(), getoperatorid(), timestamp());login_times_file.close();
HashMap ObjectIn logic, a hashmap is similar to an array but has dimensions that can be either non-consecutive numbers or strings. Ahashmap is an associative array that can be used to store numbers or strings and can dynamically grow or shrink insize.
Functionality
A hashmap is a CSPro logic object and the following functions can be called via dot notation:
Function Descriptionclear Removes all values from the hashmap.contains Returns whether a specified key exists.getKeys Fills a list with the hashmap's keys.length Returns the number of keys.remove Removes a key.
Hashmaps can be assigned to other hashmaps, which will replace the initial hashmap with the values of the assignedhashmap:
hashmap_name = another_hashmap_name;
When assigning a hashmap to another hashmap, both must have the same value types, and the dimension types mustbe compatible.
Individual elements of hashmaps can be retrieved or set by using an index to specify the dimension keys:
hashmap_name(key_value1『『, key_value2, ...』』) = value_to_set_or_modify;
value_to_retrieve = hashmap_name(key_value1『『, key_value2, ...』』);
Example
Pa ge 108 of 684 De cl a ra on Se c on

PROC GLOBAL
hashmap invalidValuesByPerson default(0);
PROC CENSUS_LEVEL
list string person_list;
invalidValuesByPerson.getKeys(person_list);
do numeric counter = 1 while counter <= person_list.length() errmsg("%s had %d invalid values", strip(person_list(counter)), invalidValuesByPerson(person_list(counter))); enddo;
invalidValuesByPerson.clear();
PROC SEX
if not invalueset(SEX) then inc(invalidValuesByPerson(PERSON_NAME)); endif;
PROC AGE
if not invalueset(AGE) then inc(invalidValuesByPerson(PERSON_NAME)); endif;
See also: Array Object, List Object
List ObjectIn logic, a list is similar to an one-dimensional array but without a defined size. That is, a list is a collection of values,either numeric or string, that can grow or shrink in size.
Functionality
A list is a CSPro logic object and the following functions can be called via dot notation:
Function Descriptionadd Adds a single value, or a list of values, to the end of a list.clear Removes all values from the list.insert Inserts a single value, or a list of values, at a given position in the list.length Returns the size of the list.remove Removes the value at a given position from the list.removeDuplicates Removes duplicate values from the list.removeIn Removes values from the list that are specified in an in list.seek Returns the index of a specified value.show Displays the list's values (similarly to accept) and returns the index of the operator's
selection.sort Sorts the list's values in ascending or descending order.
In addition to these object functions, lists can be filled when used as arguments to functions such as dirlist, keylist,and hashmap.getKeys.
Lists can be assigned to other lists, which will replace the initial list with the values of the assigned list:
list_name = another_list_name;
Pa ge 109 of 684 De cl a ra on Se c on

Individual elements of lists can also be modified or added by using a one-based index:
list_name(index) = modify_value;list_name(list_name.length() + 1) = add_value;
Example
list string respondent_query;
do numeric counter = 1 while counter <= count(NAME) respondent_query.add(NAME(counter));enddo;
numeric respondent_index = respondent_query.show("Who in the household is responding toquestions?");
See also: Array Object, HashMap Object, ValueSet Object
Map ObjectIn logic, a map is an object that can be used to display and control an interactive map. The map may be panned andzoomed with touch controls and may optionally show the user's current location. Using map functions you can addmarkers at geographic positions on the map, add custom buttons, and set the geographical area displayed. You canalso specify user-defined functions in your logic to be called when the user taps on markers, buttons, and on the mapitself. Together, these functions allow for rich map-based interactions such as showing households on a map andlaunching an interview when the user taps a household.
Note that maps are currently only supported on Android. The map functions will do nothing when run on Windows.
To display a map, call the show function. The map will be displayed allowing the user to interact with it until the user tapsthe back button or the hide function is called from program logic.
You can call map functions to add markers, buttons, set the base map, and pan/zoom before showing the map. This willbe more efficient than adding them afterwards, especially when adding large numbers of markers. You can also call themap functions after showing the map from within any of the user-defined callback functions for map, marker, and buttonclicks and drags.
Pa ge 110 of 684 De cl a ra on Se c on

You can add markers to the map using the addMarker function. You can replace the default marker icon with a customimage by calling setMarkerImage or with a text icon using setMarkerText.
By default, the map contains a button to zoom to the users current location. You can add additional buttons to the mapby calling addImageButton or addTextButton.
By default, the map will display a base map from Google Maps, which requires an Internet connection. With no Internetconnection the base map will be empty. To display a map without an Internet connection you can copy an an offline mapfile to your device and pass the file to the setBaseMap function.
Functionality
A map is a CSPro logic object and the following functions can be called via dot notation:
Function Descriptionshow Display the map and allow the user to interact with it.hide End displaying the map if it is currently showing.addMarker Place a marker on the map at specified latitude and longitude.removeMarker Delete a marker from the map.clearMarkers Delete all markers from the map.setMarkerImage Set the icon displayed on the map for a marker.setMarkerText Set text displayed on the map for a marker.setMarkerDescription Set text displayed in a popup window when a marker is tapped, and in the marker list.setMarkerOnClick Set the user-defined function that is called when the user taps a marker.setMarkerOnClickInfoWindow Set the user-defined function that is called when the user taps on a marker's popup
info.
Pa ge 111 of 684 De cl a ra on Se c on

setMarkerOnDrag Set the user-defined function that is called when the user a drags a marker on themap.
setMarkerLocation Move an existing marker to a new position on the map.getLastClickLatitude Retrieve the latitude of the last point on the map the user tapped.getLastClickLongitude Retrieve the longitude of the last point on the map the user tapped.getMarkerLatitude Retrieve the latitude of a marker on the map.getMarkerLongitude Retrieve the longitude of a marker on the map.setOnClick Set the user-defined function that is called when the user taps on the map.setTitle Set the title of the map.addTextButton Create a button with a text label on the map.addImageButton Create a button with an icon on the map.removeButton Delete a button on the map.clearButtons Delete all buttons from the map.setBaseMap Change the map source to an online or offline base map.showCurrentLocation Display the current location (as retrieved from the GPS) on the map.zoomTo Pan/zoom the map.
Example
// Declare a mapmap mymap;
// Add a marker to the map at latitude 38.84839, longitude -76.931098mymap.addMarker(38.84839, -76.931098);
// Display the mapmymap.show();
See also: Display the Case Listing on a Map
Pff ObjectIn logic, a pff is an object that contains information about a CSPro Program Information File (.pff). PFF files are used torun CSPro applications or tools in production mode. Using the pff object in logic, it is possible to dynamically modify theproperties used when running an application or tool.
Functionality
A pff is a CSPro logic object and the following functions can be called via dot notation:
Function Descriptionload Loads the contents a PFF file from the disk.save Saves a PFF file to the disk.getproperty Gets the value associated with a PFF property.setproperty Sets the value associated with a PFF property.exec Executes the application or tool associated with the PFF.
Example
Pa ge 112 of 684 De cl a ra on Se c on
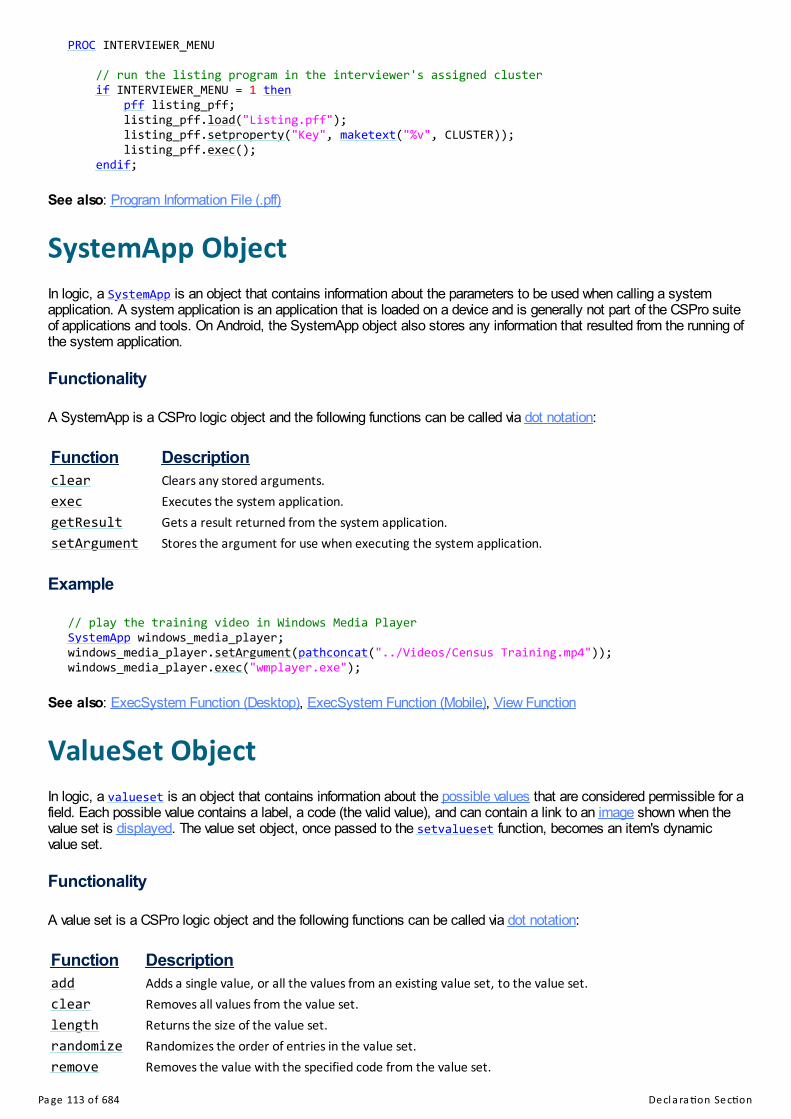
PROC INTERVIEWER_MENU
// run the listing program in the interviewer's assigned cluster if INTERVIEWER_MENU = 1 then pff listing_pff; listing_pff.load("Listing.pff"); listing_pff.setproperty("Key", maketext("%v", CLUSTER)); listing_pff.exec(); endif;
See also: Program Information File (.pff)
SystemApp ObjectIn logic, a SystemApp is an object that contains information about the parameters to be used when calling a systemapplication. A system application is an application that is loaded on a device and is generally not part of the CSPro suiteof applications and tools. On Android, the SystemApp object also stores any information that resulted from the running ofthe system application.
Functionality
A SystemApp is a CSPro logic object and the following functions can be called via dot notation:
Function Descriptionclear Clears any stored arguments.exec Executes the system application.getResult Gets a result returned from the system application.setArgument Stores the argument for use when executing the system application.
Example
// play the training video in Windows Media PlayerSystemApp windows_media_player;windows_media_player.setArgument(pathconcat("../Videos/Census Training.mp4"));windows_media_player.exec("wmplayer.exe");
See also: ExecSystem Function (Desktop), ExecSystem Function (Mobile), View Function
ValueSet ObjectIn logic, a valueset is an object that contains information about the possible values that are considered permissible for afield. Each possible value contains a label, a code (the valid value), and can contain a link to an image shown when thevalue set is displayed. The value set object, once passed to the setvalueset function, becomes an item's dynamicvalue set.
Functionality
A value set is a CSPro logic object and the following functions can be called via dot notation:
Function Descriptionadd Adds a single value, or all the values from an existing value set, to the value set.clear Removes all values from the value set.length Returns the size of the value set.randomize Randomizes the order of entries in the value set.remove Removes the value with the specified code from the value set.
Pa ge 113 of 684 De cl a ra on Se c on

show Displays the value set's labels (similarly to accept) and returns the code of the operator's selection.sort Sorts the order of entries in the value set by either label or code.
In addition to these object functions, value sets contain two built-in list objects: valueset_name.codes andvalueset_name.labels, which contain the codes and labels for the value set. These are read-only lists and can be usedin most ways that list objects can be used.
Several functions accept value sets as arguments, including: getimage, getlabel, invalueset, maxvalue, minvalue,randomin, randomizevs, and setvalueset. Value sets can also be used with the in operator.
Value sets can be assigned to other value sets, which will replace the initial value set with the values of the assignedvalue set:
valueset_name = another_valueset_name;
Example
PROC RESPONDENT
preproc
valueset respondent_valueset;
do numeric counter = 1 while counter <= count(PERSON_REC) if AGE(counter) >= 15 and USUAL_MEMBER(counter) = 1 then respondent_valueset.add(NAME(counter), counter); endif; enddo;
setvalueset(RESPONDENT, respondent_valueset);
See also: Array Object, List Object
Pa ge 114 of 684 De cl a ra on Se c on

Procedural SectionsStatementsA procedure contains a series of statements. Each statement is a complete instruction to the computer.
Executable Statements
Executable statements begin with a command and end with a semicolon (;). They are made up of a combination ofcommands, keywords, expressions, and functions. For example:
skip to Q103;
skip is a command, to is a keyword, and Q103 is the name of a data entry field.
Assignment Statements
Assignment statements set a variable equal to the value of an expression and do not contain commands. If theexpression is a string expression, then the variable must be alphanumeric. If the expression is numeric or conditional,then the variable must be numeric. For example:
AGE = 10;Q102 = previousAge;Y = sqrt(X);NAME = "John Doe";SEX_RATIO = MALES / FEMALES;
Proc StatementFormat
PROC PROCEDURE_NAME
Description
The PROC statement declares the beginning of the procedures for a data entry or batch processing element. ThePROCEDURE_NAME must always be the name of an object in the forms or edit tree. If you are in the logic view andselect a processing element from the tree, the logic view will automatically generate the "PROC PROCEDURE_NAME"heading.
If you plan to write logic for more than one procedure, the order of procedures must be as follows:
Pa ge 115 of 684 Proce dura l Se c ons

PROC ITEM_NAME
preproc
// statements
onfocus
// statements
onoccchange
// statements (only valid for rosters and multiply-occurring forms)
killfocus
// statements
postproc
// statements
See also: PreProc Statement, OnFocus Statement, OnOccChange Statement, KillFocus Statement, PostProcStatement, Order of Executing Data Entry Events, Order of Executing Batch Edit Events
PreProc StatementFormat
preproc
Description
The preproc statement declares that the statements following it are executed at the beginning of a run, case, level,record, form, roster, or field.
In data entry applications, statements in a preproc procedure are executed when you move forward onto an object.Moving forward occurs when the execution flow moves the cursor onto the object, or when the user goes forward to theobject by any means (mouse-click, tab key, arrow keys, etc.). If you move backward onto an object, preprocstatements are not executed. Moving backward occurs if a keyer reenters a value, goes backward with a mouse click, oruses the Shift+tab or arrow keys to move backward. If you want to execute the statements when you move both forwardand backward onto a field, code them in the onfocus procedure.
In batch edit applications, a preproc is used to execute logic at the beginning of a run, case, level, or record. For anitem there is no difference between placing your logic in a preproc or postproc.
Remember, if you don't code a preproc or postproc in a PROC, all instructions are considered postproc statements bydefault.
Example
PROC INTERVIEW_DATE
preproc
INTERVIEW_DATE = sysdate("YYYYMMDD");
See also: Proc Statement, OnFocus Statement, OnOccChange Statement, KillFocus Statement, PostProc Statement,Order of Executing Data Entry Events, Order of Executing Batch Edit Events
Pa ge 116 of 684 Proce dura l Se c ons
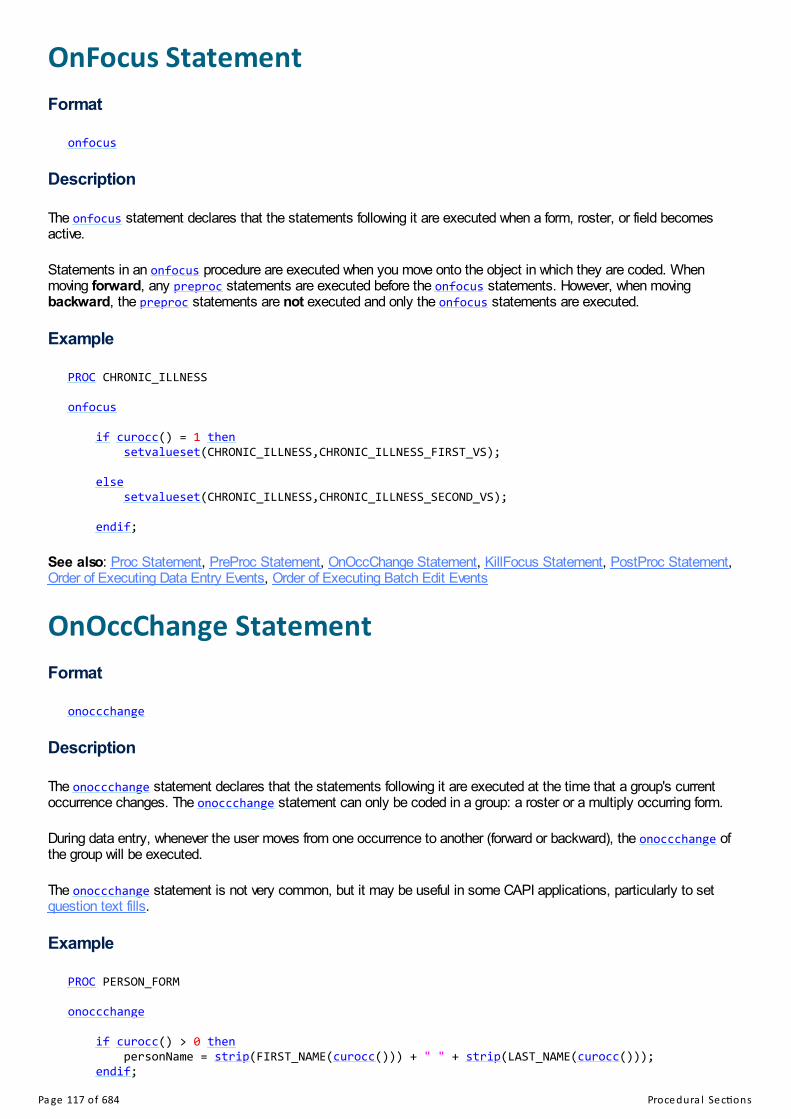
OnFocus StatementFormat
onfocus
Description
The onfocus statement declares that the statements following it are executed when a form, roster, or field becomesactive.
Statements in an onfocus procedure are executed when you move onto the object in which they are coded. Whenmoving forward, any preproc statements are executed before the onfocus statements. However, when movingbackward, the preproc statements are not executed and only the onfocus statements are executed.
Example
PROC CHRONIC_ILLNESS
onfocus
if curocc() = 1 then setvalueset(CHRONIC_ILLNESS,CHRONIC_ILLNESS_FIRST_VS);
else setvalueset(CHRONIC_ILLNESS,CHRONIC_ILLNESS_SECOND_VS);
endif;
See also: Proc Statement, PreProc Statement, OnOccChange Statement, KillFocus Statement, PostProc Statement,Order of Executing Data Entry Events, Order of Executing Batch Edit Events
OnOccChange StatementFormat
onoccchange
Description
The onoccchange statement declares that the statements following it are executed at the time that a group's currentoccurrence changes. The onoccchange statement can only be coded in a group: a roster or a multiply occurring form.
During data entry, whenever the user moves from one occurrence to another (forward or backward), the onoccchange ofthe group will be executed.
The onoccchange statement is not very common, but it may be useful in some CAPI applications, particularly to setquestion text fills.
Example
PROC PERSON_FORM
onoccchange
if curocc() > 0 then personName = strip(FIRST_NAME(curocc())) + " " + strip(LAST_NAME(curocc())); endif;
Pa ge 117 of 684 Proce dura l Se c ons

See also: Proc Statement, PreProc Statement, OnFocus Statement, KillFocus Statement, PostProc Statement, Orderof Executing Data Entry Events, Order of Executing Batch Edit Events
KillFocus StatementFormat
killfocus
Description
The killfocus statement declares that the statements following it are executed when a form, roster, or field stops beingactive.
Statements in an killfocus procedure are executed when you move off the object in which they are coded. Whenmoving forward, any killfocus statements are executed before any postproc statements. However, when movingbackward, the postproc statements are not executed and only the killfocus statements are executed.
The killfocus statement is not very common as most logic operations and checks only occur when moving forward inthe application, in which case they can be coded in a postproc.
Example
PROC CEB_MALE
killfocus
CEB_TOTAL = visualvalue(CEB_MALE) + visualvalue(CEB_FEMALE);
See also: Proc Statement, PreProc Statement, OnFocus Statement, OnOccChange Statement, PostProc Statement,Order of Executing Data Entry Events, Order of Executing Batch Edit Events
PostProc StatementFormat
postproc
Description
The postproc statement declares that the statements following it are executed at the end of a run, case, level, record,form, roster, or field.
In data entry applications, statements in a postproc procedure are executed when you complete an object; that is, flowoff of it. When you click off a field, manually skip from a field, or move backward, the postproc statements are notexecuted. If you want to execute the statements in these situations, code them in the killfocus procedure.
In batch edit applications, a postproc is used to execute logic at the end of a run, case, level, or record. For an itemthere is no difference between placing your logic in a preproc or postproc.
If you don't code a preproc or postproc in a PROC, all instructions are considered postproc statements by default.
Example
Pa ge 118 of 684 Proce dura l Se c ons

PROC MARITAL_STATUS
postproc
if MARITAL_STATUS <> 1 and AGE < 12 then errmsg("People aged less than 12 cannot be married."); reenter;endif;
See also: Proc Statement, PreProc Statement, OnFocus Statement, OnOccChange Statement, KillFocus Statement,Order of Executing Data Entry Events, Order of Executing Batch Edit Events
Pa ge 119 of 684 Proce dura l Se c ons

LogicView Logic
To view the logic in a data entry application you can press icon; or in the View menu select "Logic"; or press
Ctrl+L. To go back to the forms press ; or in the View menu select "Form"; or press Ctrl+M. From the LogicWindow you can create or modify procedures that add logic to your application. The view is divided into two areas:
• Top: Text editor, where you write the logic statements • Bottom: Message tab, where you create messages to be displayed during, or at the completion of, the execution of
your application. This area is also used to display the results of the compiler after you compile a program. If you haveerrors in the logic, the compiler will display the error messages; otherwise it will display "Compile Successful".
Click on any element of the data entry or batch edit tree to see the logic which corresponds to that symbol. Forexample, if you click on a field, you see the logic for only that field. A group or level can also have logic associated withit. Click on the forms file node (usually the topmost node on form tree) to see the logic for the whole application. This isthe way to see and enter logic for the global procedures. See also: Create and Edit Logic, Order of Executing Data Entry Events, Order of Executing Batch Edit Events
Create and Edit LogicYou can use the CSPro language to write logic for virtually any part of your data entry or batch edit application: a level,roster, form, or field. In a data entry application you must make sure the screen has the logic view on the right and thedata entry tree on the left, so you can click on the item for which you want to write logic. You can see the logic for thewhole application by clicking on the forms file (usually the topmost node) on the data entry or batch edit tree.
Example: Programming a Message for the Keyer
Give a message for the keyer if there are married (or previously married) people under the age of 12. Click on the "MaritalStatus" field on the forms tree, P06_MARITAL_STATUS in our example. In the text editor, at the top of the logic view, youwill see:
PROC P06_MARITAL_STATUS
Now enter the following:
if P06_MARITAL_STATUS <> 1 and P05_AGE < 12 then errmsg("Not 'never married' but less than 12 years old");endif;
Pa ge 120 of 684 Logi c

Note that this particular verification can be done only after data has been entered in both fields. If for some reason AGE iscaptured after P06_MARITAL_STATUS, then these instructions would be placed in the AGE field's logic.
Example: Programming a Skip
Program a skip after the marital status question to skip over "Age at First Marriage" if the person is never married. Clickon the "Marital Status" field on the forms tree, P06_MARITAL_STATUS in our example. In the text editor, at the top of thelogic view, enter:
PROC P06_MARITAL_STATUS
if P06_MARITAL_STATUS = 1 then skip to P08_WORK_STATUS; endif;
Find and Replace LogicFind
Press on the toolbar, or press Ctrl+F; or select Find from the Edit menu to open the Find dialog box. You cansimply search for a text string by typing it in the dialog box and pressing Enter. You can then press the F3 key to findthe next occurrence of the text string. If you use the Mark All button, CSPro will show you each line that contains thetext string by putting a yellow circle to the left of it.
Replace
Press Ctrl+H; or select Replace for the Edit menu to open the Replace dialog box. This is the standard Windows dialogbox that allows you to replace one text string with another text string, either one at a time or all at once.
Compile LogicWhen CSPro compiles your logic, it checks the logic you have written to see if there are any errors or warnings. Typicalerrors including spelling a command incorrectly, not using proper command syntax, and putting logic in the wrong place.Error messages appear in the panel at the bottom of the screen and a red dot appears to the left of the line that containsthe error. Typical warning usually involve using commands in questionable ways. Warning messages also appear in thepanel at the bottom of the screen and a yellow dot appears to the left of the line that contains the warning.
You can choose to compile code for a specific item, or for the entire application. To compile code for a specific item,simply select that item from the tree on the left side of the screen. The associated logic for that item will be displayed inthe Logic View. Press on the toolbar; or from the File menu, select Compile; or press Ctrl+K. The results of yourcompile will be displayed in the Compiler Output area at the bottom of the screen. When you are ready to compile theentire application, select the topmost entry of the data entry tree or batch edits tree. This will display all logic written forthe application in the Logic View. You can then press the compile button or press Ctrl+K.
CSPro always compiles your application when you run the data entry or batch edit application. If there are errors, youcannot proceed until the errors are corrected.
Pa ge 121 of 684 Logi c

Language ElementsDelimitersDelimiters separate elements in the CSPro language.
Delimiter Symbol UsageBlank Separate any language symbol.Comma , Separate arguments within functions.Quotation mark " " Specify the beginning and end of strings.Apostrophe ' ' Specify the beginning and end of strings.Semicolon ; Specify the end of statements.Colon : Separate the beginning and end of substrings.Parentheses ( ) Specify the beginning and end of function arguments.Brackets [ ] Specify substrings.
CommentsComments make applications easier to understand. They are used to explain the purpose of specific statements or totemporarily disable statements to help find errors. Any text enclosed by braces { } is a comment. The text within thebrackets will be green. Comments can be placed anywhere in an application and are not checked for syntax errors.Comments can be nested, that is, comments within comments are allowed. Any text following double slashes // untilthe end of the line is also a comment.
The third line in the example below is a comment; a comment is also appended to the code in line five. It is highlyrecommended that the user document CSPro applications through the liberal use of comments.
Example
PROC HHDAY
{ Do not allow June to have more than 30 days } if HHMONTH = 6 and HHDAY > 30 then errmsg(1,"June",30,HHDAY); // if error, then display message reenter; endif;
Logic PreprocessorFormat
#if condition#elseif condition#else#endif
Description
Before CSPro logic is compiled, it passes through a preprocessor that allows you to conditionally compile your codebased on certain conditions. This is an advanced feature and is primarily useful when using external logic files where
Pa ge 122 of 684 La ngua ge El e me nts

certain functionality may only successfully compile based on characteristics of the application.
The preprocessor uses the language's familiar if/elseif/else/endif keywords but with four differences:
1. The keyword must be preceded by a # character.
2. The # must be the first non-whitespace character on the line.
3. The whole condition must be specified on a single line.
4. A condition should not end with a then keyword.
An #if and #endif pair must exist, and optionally #elseif and #else can be included as part of a preprocessor block.
The preprocessor is activated before the rest of logic is compiled and thus has limited functionality. Simple mathexpressions and conditional checks are possible, and there are two functions that can be called:
AppType(app_type)
This function returns true if your application is of the type specified by app_type. Supported types are Entry, Batch, andTabulation.
exists(symbol_name)
This function returns true if a symbol exists at compile-time. The function checks for symbols that exist as part of anapplication (dictionary names, form names, etc.), and not symbols that are created during compilation (user-definedfunctions, objects, etc.).
Example 1
function string GetEAName(numeric province, numeric district, numeric ea)
string ea_name = maketext("EA %04d-%02d-%03d", province, district, ea);
// if we have access to the geocodes dictionary, add the EA description to the name#if exists(GEOCODES_DICT)
GEOCODES_PROVINCE = province; GEOCODES_DISTRICT = district; GEOCODES_EA = ea;
if loadcase(GEOCODES_DICT, GEOCODES_PROVINCE, GEOCODES_DISTRICT, GEOCODES_EA) then ea_name = ea_name + " / " + strip(EA_DESCRIPTION)); endif;
#endif
exit ea_name;
end;
Example 2
Pa ge 123 of 684 La ngua ge El e me nts

function ValidateLiteracy()
if HH_EDUCATION in 3:6 and HH_LITERACY <> 1 then
#if AppType(Entry) errmsg("Person with education level %d should be literate. Please correct.",HH_EDUCATION); reenter;
#elseif AppType(Batch) errmsg("Person with education level %d should be literate. Literacy imputed to 1(literate).", HH_EDUCATION); impute(HH_LITERACY, 1);
#endif
endif;
end;
Pa ge 124 of 684 La ngua ge El e me nts
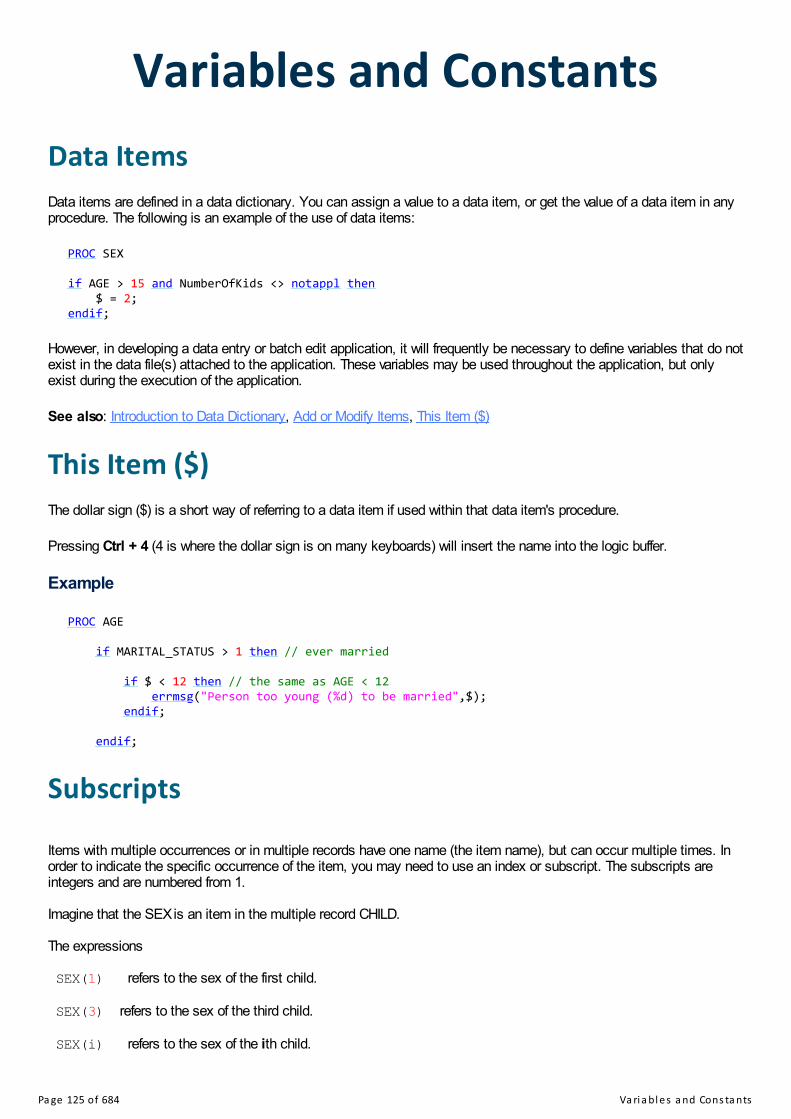
Variables and ConstantsData ItemsData items are defined in a data dictionary. You can assign a value to a data item, or get the value of a data item in anyprocedure. The following is an example of the use of data items:
PROC SEX
if AGE > 15 and NumberOfKids <> notappl then $ = 2;endif;
However, in developing a data entry or batch edit application, it will frequently be necessary to define variables that do notexist in the data file(s) attached to the application. These variables may be used throughout the application, but onlyexist during the execution of the application.
See also: Introduction to Data Dictionary, Add or Modify Items, This Item ($)
This Item ($)The dollar sign ($) is a short way of referring to a data item if used within that data item's procedure.
Pressing Ctrl + 4 (4 is where the dollar sign is on many keyboards) will insert the name into the logic buffer.
Example
PROC AGE
if MARITAL_STATUS > 1 then // ever married
if $ < 12 then // the same as AGE < 12 errmsg("Person too young (%d) to be married",$); endif;
endif;
Subscripts Items with multiple occurrences or in multiple records have one name (the item name), but can occur multiple times. Inorder to indicate the specific occurrence of the item, you may need to use an index or subscript. The subscripts areintegers and are numbered from 1. Imagine that the SEX is an item in the multiple record CHILD. The expressions SEX(1) refers to the sex of the first child. SEX(3) refers to the sex of the third child. SEX(i) refers to the sex of the ith child.
Pa ge 125 of 684 Va ri a bl e s a nd Cons ta nts

Subscripts can be numeric expressions as well as numeric constants. For example, the expression SEX(curocc(CHILD)); refers to the current occurrence of CHILD. (curocc is a function that returns the current occurrence of a multiple record).When referring to multiply-occurring items within the scope of their repetition, you do not need to use subscripts, as thecurrent occurrence will be assumed. For example, suppose you have a population record that has multiply occurrences,and belonging to that record are the three variables SEX, AGE, and FERTILITY. If your code is contained within any ofthese variables' procedures, you do not need to use subscripts. To illustrate: Example 1:{this will check the sex and fertility values for each person in the household} PROC SEX if $ = 1 then if fertility <> notappl then errmsg ("male found with fertility"); endif; elseif $ = 2 then if age < 10 and fertility <> notappl then errmsg ("underage female found with fertility data"); endif; else errmsg ("invalid sex code (sex=%d)", $); endif; However, if you were to place the exact same logic elsewhere in your program, you would have to programmaticallymimic the looping mechanism, and use subscripts. For example, if the above code were placed in the QUESTprocedure, it would need to be adjusted as follows: Example 2: PROC QUEST NumPeople=count (POP_RECS); do varying i=1 while i <= NumPeople if sex(i) = 1 then if fertility(i) <> notappl then errmsg ("male found with fertility"); endif; elseif sex(i) = 2 then if age(i) < 10 and fertility(i) <> notappl then errmsg ("underage female found with fertility data"); endif; else errmsg ("invalid sex code (sex=%d)", sex(i)); endif; enddo;
NumbersNumbers may be any positive or negative integer or decimal value. Negative numbers have a leading minus (-) sign.Positive numbers have no sign, but can have an optional leading plus (+) sign. Numbers can have up to 15 significantdigits. Numbers must not have thousands separators. Decimal points can be either period (.) or comma (,) depending onthe "Regional Options" setting of the computer.
Text StringsA text string is any set of characters in the computer's character set enclosed between a pair of quotation marks (") orapostrophes ('). Any spaces enclosed within the quotation marks or apostrophes are considered part of the text string.Upper- and lower-case letters may be used. However, a text string 'a' is different from a text string 'A.' If you wish to haveapostrophes (') embedded within your string, you must use the quotation marks (") to enclose it, and vice-versa. Forexample:
Pa ge 126 of 684 Va ri a bl e s a nd Cons ta nts

MyString = 'That's great!';
This would set MyString to "that" and the trailing "s great!" would be considered outside the string, and would thereforeprovoke a compiler error. Thus, if you wanted to accomplish the above, you must write:
MyString = "That's great!";
Similarly, if you wanted to embed quotation marks within your string, you must write the string as follows:
MyString = 'The chair is 23" high';
Strings that are surrounded by quotation marks will appear in magenta. Strings that are surrounded by apostrophes willappear in black. We recommend using quotation marks ("), and if the text of the string does not turn magenta when youthink you have completed entering it, it will be quickly apparent that you have not terminated your string properly.
Pa ge 127 of 684 Va ri a bl e s a nd Cons ta nts

ExpressionsExpressions An expression is a combination of operators and operands. Operands can be constants, items, variables, functions, orsome combination thereof. Operators can be arithmetic (+, -, *, /), relational (=, <>, >, <, >=, <=) or logical (and, or, not).Every expression evaluates to a value and can therefore be used as a sub-expression of other expressions. There arethree types of expressions: numeric, string, and logical. • Numeric They evaluate to numbers. The following are numeric expressions:
44 + 5A / BA*(B+C/D)A + sqrt(B)
• String They evaluate to strings. The following are string expressions:
answer="Yes";concat(FIRST_NAME, " ", LAST_NAME);edit("ZZZZ9", A + B);
• Logical
Logical expressions (conditions) evaluate to true (1) or false (0). The following are logical conditions: KIDS > 5SEX = 2 and AGE > 12
Substring ExpressionsFormat
string_variable[start_index:string_length]
Description
A substring expression lets you extract a part (substring) of a string. The start_index gives the starting characterposition of the substring within the string, and string_length gives the number of characters to include in the substring,including the starting character. If string_length is not given, then it is assumed to be to the end of the originating string.A negative start_index leads to the basing of the substring from the end of the string.
Example 1
Suppose the variable STR has the value "ABCDEF":
Pa ge 128 of 684 Expre s s i ons

STR[1] "ABCDEF"STR[3:1] "C"STR[3] "CDEF"STR[2:3] "BCD"STR[5] "EF"STR[4:7] "DEF"STR[-2] "EF"STR[-4:2] "CD"
Both start_index and string_length can be numeric expressions as well as constants. For example, to obtain the last 3characters of STR you could use the expression:
STR[length(STR) - 2:3]
In this example, if STR is not at least two characters long, you may get unexpected results. You could also write theabove as:
STR[-3]
Example 2
Likewise, substring expressions can be performed on string arrays. Suppose the string array crop had the followingdefinition:
PROC GLOBAL
array string crop(5); // 5 crop names
PROC MY_PROGRAM
preproc
crop(1) = "maize"; crop(2) = "wheat"; crop(3) = "rice"; crop(4) = "potatoes"; crop(5) = "legumes";
The following substring expressions would yield the results as shown:
crop(1)[2] "aize"crop(1)[3:1] "i"crop(2)[3] "eat"crop(3)[2] "ice"crop(4)[5] "toes"crop(5)[1:3] "leg"
Boolean ValuesThere are two numeric values in the CSPro language that translate to boolean values as used in other programminglanguages. The value true is equivalent to 1 and the value false is equivalent to 0. Note that you need to be cautiouswhen using true in conditional expressions, as a conditional expression is true if it is neither zero nor special, butcomparing something with true is true only if the compared value is 1. That is:
numeric value = 2;
if value then errmsg("This will be displayed");endif;
if value = true then errmsg("This will not be displayed");endif;
Pa ge 129 of 684 Expre s s i ons

See also: Special Values
Special ValuesThere are four special values in the CSPro language: missing, refused, notappl, and default. A particular value of adata item can be mapped to one of these special values in the data dictionary. They have the following meaning anduses:
Missing
The value missing indicates that a data item was supposed to have a response and no response was given. Other termsfor this are "not stated" and "non-response." To properly utilize this special value, you must create a value set for thisitem in the dictionary, setting one of the value set entries to the special value "Missing." For example, you could set 8 (or88, 888, etc.) or 9 (or 99, 999, etc.) to missing. Finally, although you must associate a number with the special valuemissing, you can only use the = or <> comparison operators against the special value missing; i.e., you cannot refer tothe numeric value you assigned it to in your dictionary value set.
Refused
The value refused is similar to missing but has several special attributes regarding how it is handled during datacollection. The value indicates that a data item was supposed to have a response but the respondent refused to providean answer. To properly utilize this special value, you must create a value set for this item in the dictionary, setting one ofthe value set entries to the special value "Refused."
Notappl
The value notappl indicates that a data item is blank. The item did not have a response because the question did notapply to this respondent. Fields that are skipped during data entry are assigned the value notappl. You can map thisvalue to a number or blanks in the dictionary using the special value "NotAppl," but generally it is best to keep this valuedefined as blanks.
Default
The value default indicates that a data item or variable has an undefined value. This can result from variouscircumstances. For example, an invalid calculation in logic (such as a divide-by-zero error) will return the result default.Reading the value of a variable from a data file when the data type specified in the dictionary for the variable is numericand the value in the data file contains non-numeric characters will cause the variable to become default. The sameresult occurs if the dictionary does not specify a decimal character for the variable being read but the value in the data filecontains one. Additionally, if a numeric variable has numeric subitems, some of which are notappl (blank) then the valueof the variable will sometimes be default. For example if the numeric variable DATE has 3 subitems DAY=1,MONTH=notappl, and YEAR=2020, then the value of DATE will be default. The value default can also be written to thedata file when the value of the variable being written overflows the length specified for that variable in the dictionary (forexample if the value of the variable is 999 but the dictionary specifies a length of 2 for the variable). You can map thisvalue to a number in the dictionary using the special value "Default," but this should generally be avoided.
See also: Special Function, Refused Value, Boolean Values
Refused ValueThe value refused is a special value that has been defined in the value set and is treated in several special ways byCSPro and CSEntry.
Displaying Refused Values in Response Lists
During data collection, CSEntry will show refused values in extended controls by default, just as it displays other valuesdefined in a value set. However, to make it harder for an operator to select a refused value, it is possible to turn off thedefault displaying of refusals. If turned off, the operator must select CSEntry's Show Refusal Options menu option to see
Pa ge 130 of 684 Expre s s i ons

any defined refused values.
Using Refused in Logic
As with other special values, the number defined as refused cannot be used in logic comparisons. For example, if TRIBEhas the value -99 defined as refused, then in logic:
if TRIBE = -99 then // does not work
if TRIBE = refused then // works
Overriding the Selection of Refusals
Advanced users may want to have more control over when a refused value can be entered. If a function is defined in logicwith the name OnRefused, CSEntry will call this function every time a refused value is selected. If the function returns 0(false), then the function will prevent the entry of that refusal. For example:
function OnRefused()
string probe_text = maketext("Are you sure that you want to select Refused for %s? " "Remember the approaches discussed in training about " "trying to get answers for all questions.", getlabel());
when warning("%s", probe_text) select("Yes", continue, "No", continue) default(1); 1 -> exit true; -> exit false; endwhen;
end;
See also: Special Values
Pa ge 131 of 684 Expre s s i ons

OperatorsOperatorsCSPro logic has a variety of arithmetic, relational, and logical operators. When more than one operator exists in anexpression, the order in which the operators are evaluated is determined by their precedence.
Arithmetic Operators
Operation SymbolAddition +Subtraction -Multiplication *Division /Modulo (remainder) %Exponentiation ^
The arithmetic operators work on numeric expressions, though the addition operator can also be used to perform stringconcatenation.
Relational Operators
Operation SymbolEqual to =Not equal to <>Less than <Less than or equal to <=Greater than >Greater than or equal to >=In range inHas range (for repeating items) has
The relational operators work on numeric and string expressions.
Logical Operators
Operation Symbol KeywordNegation ! notConjunction & andDisjunction | orIf and only if <=>
With logical operators, either the symbol or the keyword can be used.
See also: Operator Precedence, And/Or Truth Table
In OperatorPa ge 132 of 684 Ope ra tors

Description
The in operator is used in logical expressions to test whether an item or variable is within a set of values or ranges. Theitem or variable can be a number or a string. A range of values is separated by a colon, for example 1:5. Elements of alist of values or ranges are separated by commas, for example 1,3:5,7. You can also use special to mean all specialvalues (as in the special function). The in operator can also be used to test whether a value is in several CSProobjects:
A list can be used to determine if the value is located in the list's values (as in the list.seek function).
A value set can also be used to test whether a value is in the value set's codes (as in the invalueset function).
Example 1
if RELATIONSHIP in 1:5 then// is the same as...if RELATIONSHIP >= 1 and RELATIONSHIP <= 5 then
Example 2
if WORK in 1, 3, 5 then// is the same as...if WORK = 1 or WORK = 3 or WORK = 5 then
Example 3
if X in 1:4, missing, refused then// is the same as...if ( X >= 1 and X <= 4 ) or X = missing or X = refused then
Example 4
if NAME in "A":"MZZ" then// is the same as...if NAME >= "A" and NAME <= "MZZ" then
Example 5
if AGE in AGE_TEENAGE_VS, special then// is the same as...if invalueset(AGE, AGE_TEENAGE_VS) or special(AGE) then
See also: Has Operator
Has OperatorDescription
The has operator is used in logical expressions to test whether a repeating item is within a set of values or ranges. Theitem can be numeric or alphanumeric. A range of values is separated by a colon, for example 1:5. Elements of a list ofvalues or ranges are separated by commas, for example 1, 3:5, 7.
This function is similar to the in operator except that it works on repeating items. It thus tests whether a group of itemscontains certain values.
Example
Pa ge 133 of 684 Ope ra tors

// assuming that there are five people listed on a record...
if SEX has 2 then // means: are any of the five people women?
if AGE has 0:17 then // means: are any of the five people under the age of 18?
See also: In Operator, Count Function, Seek Function
If and Only If OperatorThis operator has the following truth table:
if and only if (X <=> Y)
YX true false
true true falsefalse false true
The following two sets of code give the same result:
if ( SEX = 2 and AGE >= 10 ) <=> ( CHILDREN_BORN <> notappl ) then errmsg("Children ever born incorrect");endif;
and:
if SEX = 2 and AGE >= 10 then
if CHILDREN_BORN = notappl then errmsg("Children ever born incorrect"); endif;
else if CHILDREN_BORN <> notappl then errmsg("Children ever born incorrect"); endif;
endif;
See also: Operators, Operator Precedence
Operator PrecedenceThe table below shows the order of precedence for operators. When operators of the same precedence are in anexpression, they are evaluated from left to right. The order of precedence can be changed using parentheses. Operatorsin parentheses are evaluated first.
Order Operators1 ^2 * / %3 + -4 = < > <= >= <> has in5 not !6 and &7 or |
Pa ge 134 of 684 Ope ra tors

8 <=>
And/Or Truth TableThe truth table summarizes all possible evaluations when two expressions (X and Y) joined by an operator (and or or) aretrue, false.
and (X and Y)
YX true false
true true falsefalse false false
or (X or Y)
YX true false
true true truefalse true false
Pa ge 135 of 684 Ope ra tors

FilesExternal Files An external file is a text file other than the primary data file that you can use in a data entry or batch application. Youcan read and/or write to external files, using CSPro logic. You must create a data dictionary that describes the format ofany external file you want to use. An external file dictionary can contain only one level. You can share external files across a network. If an external file is accessed only by read functions (loadcase, locate,find, key, retrieve), no special programming actions need to be taken to share the file. Multiple users can read the file atany time. However, if an external file is accessed by any write functions (writecase or delcase) only one user at a time may usethe file. For write functions, the external file is like a file in a filing cabinet. When one person has taken out the file foruse, no one else can use the file until the person has returned it. You can control when the file is in use by coding open and close functions. The file is in use between the execution ofthe open and the close function. This gives you complete control over when the file is in use. You should try to minimizethe time the file is in use in order to allow other users to access the file.
If open and close functions are not coded for an external file used for writing, the following "open" and "close" rulesapply: • In batch processing, the file is opened at the beginning of the run and closed at the end. • In data entry processing, the file is opened just before any external file function is executed and is closed immediately
following the function, unless one of the following functions is used on the file: - loadcase without a var-list - retrieve - key When any of the above functions is used, the file is opened just before the first file function is executed, but is left openafter the function is completed. These functions depend on remembering the current position of the file. If the file isclosed, the current position is lost. See also: Insert or Drop a File from an Application, Lookup Files
Lookup Files A lookup file (external file) is a text file that can be used in a data entry or batch application from which you retrieve datato display on a form or to use in a calculation. It requires a CSPro data dictionary. Possibilities include: • Geographic codes and names. Your application could show the name corresponding to the code the user keyed. • Industry and occupation codes. Your application could ensure the user keys a valid code. • Last year's data. Your application could look up a corresponding field from last year's data and calculate a percentage
change. • Generalized menu choices. Your application could read a lookup file and show the contents on the screen as a menu,
then convert the user's choice to a code. To use a lookup file (external file) in your application, do the following:
Pa ge 136 of 684 Fi l e s

• Create the lookup file and its data dictionary • Close the lookup file's data dictionary • Create a data entry or batch edit application with a standard forms file and data dictionary. • Insert the lookup file's data dictionary into the application. • Add logic to the application to manipulate the lookup file. The Loadcase and Selcase functions are particularly useful Note: The CSPro examples include an application that demonstrates the use of a lookup file. This is normally installed ina subfolder of the Documents folder, "CSPro\Examples 7.5."
Working Storage File"Working storage" contains alphanumeric variables and data items used in an application and which are not part of anydata file. Definitions of working storage variables and data items are contained in a data dictionary which is notconnected to any data file. This dictionary can have any number of records but can have only one level.
See also: Add Files to an Application
Pa ge 137 of 684 Fi l e s

Data Entry ModuleIntroduction to Data Entry The Data Entry module allows you to create, using a single dictionary, one or more forms [screens] for data entry. Youmay also specify the data entry behavior and incorporate logic in a program to check for consistency between variablesand to set up skip patterns. After you have developed the forms and the program to your satisfaction, use CSEntry toinput the data. You may enter the data in the office after the information is collected or you might want to use the Computer AssistedPersonal Interviewing (CAPI) feature, in which the interviewer uses a laptop computer to enter responses in the field asthey occur.This section contains the following information:
General Data Entry ConceptsCSPro Data Entry ConceptsCreate a Data Entry ApplicationChange Data Entry Characteristics
Pa ge 138 of 684 Da ta Entry Modul e

Data Entry Application
General Data Entry ConceptsData Entry PhilosophiesThere are two different approaches to data keying:
Heads-Down Keying
This approach is most commonly used for keying of census forms because of the large volumes of data involved. Whileentering data, the operator generally does not look at the computer screen, but rather, looks down at the questionnaireon the table or work surface. The objective of heads-down keying is to transcribe to the computer, as quickly andaccurately as possible, the data as they appear on the questionnaire. On-line checking is generally kept to a minimumand consistency errors are resolved in a later phase, generally through computer edit programs. Operators do not needto be familiar with the subject matter of the questionnaire. They make very few decisions to resolve data errors. The mostimportant skill is speed and accuracy. CSPro provides operator statistics to help measure operator speed and accuracy.
Heads-Up Keying
This approach is most commonly used for entering data from surveys, due to the smaller number and greater complexityof the questionnaires (as compared with a census). While entering data, the operator often refers to the computer screenas well as to the questionnaire. The objective of heads-up keying is to catch and correct as many errors as possible asthe data are being entered. As a result, there is generally more on-line checking programmed into the application.Operators need to be very familiar with the subject matter of the questionnaire. They will make decisions to resolve dataerrors, and must be properly trained to do so.
Skip IssuesTo Skip or Not to Skip?
Skipping—causing the cursor to jump over one or more fields during the data entry operation—is an issue that provokesdiscussion both pro and con. The decision of the application designer to use (or not use) skips will depend entirely onthe type of application and the data entry staff.
When the data capture operation is expected to be heads-down, as it would be for a census or similar high-volumeapplication, it will cause less confusion to the keyer if all skips are controlled by the operator rather than the application.There will then be no "surprises" for the keyer when the application logic forces the cursor to one field when the keyer,looking not at the screen but at the form, expects the cursor to be in a different field altogether. Thus, instead ofspeeding up the entry operation by anticipating probable cursor movement, this tactic eventually slows down theoperation when there are inconsis tencies in the data or, simply, keying errors.
When the data capture operation is of smaller volume, or with a more complex questionnaire or forms, it may makesense to use application-controlled skipping. The operator will be more likely to be aware of the cursor movement andless likely to be surprised by unexpected interruptions in the normal sequence. Of course, a combination of operator-controlled and application-controlled skipping may be used in any given application; the designer will have to weigh thekeying environment and the forms to be entered to make the appropriate decision.
Manual Skips
Pa ge 139 of 684 Da ta Entry Appl i ca on

During data entry, there may be times when you want the operator to be able to skip over certain fields that do not applyto the current case. For example, in a Population record, the fertility fields do not apply to males or to underage females,nor do questions on economic activity apply to children under a certain age. In CSEntry, the '+' key on the numerickeypad is always active as a "skip" key. Every field has a skip field value associated with it. The default value is "next,"meaning that when the cursor is on that field and the skip key is pressed the cursor will move to the next field insequence. CSEntry allows you to change this value to any later field in the sequence, or to the end of the screen or form.This approach corresponds to the operator-controlled option in CSPro.
Automatic Skips
Automatic, or application-controlled, skips depend on information already keyed to direct the cursor movement. Forexample, in a household survey, if a female respondent states that she has at least one child living with her, the cursorcan skip automatically to the form for capturing information about that child (and any others). Conversely, if the femaleindicates that no children are present, the cursor can be directed to skip over the information about children. It is clearthat such skips depend entirely on the accuracy of the data keyed prior to the skip; if a "Yes" response is mistakenlyentered as a "No," the cursor will be misdirected and the operator will find that the screen(s) presented for keying do notcorrespond to the information in the paper forms. This will cause loss of time as the operator seeks to uncover the error.Automatic skips, when used, must be well-documented so that the keyer is aware of the possibilities of non-sequentialcursor movement. This approach corresponds to the system-controlled option in CSPro.
Errors at Data EntryErrors are introduced into the data through miskeying. Verification (rekeying or double keying) can reduce these errors. Asystem called intelligent data entry may be used to prevent invalid entries from ever getting into the system. Anintelligent data entry system ensures that the value for each field or data item is within the permissible range of values forthat item. Such a system increases the chance that the data entry operator will key in reasonable data and relievessome of the burden on later stages of the data preparation process.
At data entry time, CSEntry shows a message every time the keyer enters a value that is out of range according to thedata dictionary. You may set the attribute to override the message and force the out-of-range value into the data file. Ifthis attribute is not selected, the keyer cannot proceed until a valid value is entered.
See also: Data Entry Philosophies
Adding LogicIn most surveys, consistency errors are corrected manually as opposed to automatically. The correction process, asdone traditionally, is often very lengthy, time-consuming and painful. In surveys of small volume and high complexity,such as Household Surveys or Income and Expenditures Surveys, it is often desirable to apply the edit specificationsrules at data entry time and resolve any errors immediately while the questionnaire is still at hand. This approach is notrecommended for a census.
You can use the CSPro language to write consistency checks for virtually any part of your data entry application's level,form, roster, or field. The logic is executed as the data is being keyed. Any error messages are reported back on thescreen, and the operator then has access to both the error messages and the questionnaire itself on the screen. Thesame logic can be run against the data after they are entered in either batch or interactive mode.
Pa ge 140 of 684 Da ta Entry Appl i ca on

CSPro Data Entry ConceptsOperator vs. System ControlledCSPro offers two distinct types of data entry applications. Your choice will determine certain behaviors at data entrytime. Some special data entry keys will behave differently. For more detail about special data entry key behavior, pleaserefer to the Data Entry User's Guide.
Operator Controlled
This is the default type of data entry application. This type generally allows more flexibility for the keyer during dataentry. It is recommended for simple ad-hoc applications and for census applications. Operator-controlled applicationshave the following features:
Some special data entry keys are active during data entry.
CSEntry will not keep track of the path.
"Not applicable" values will be allowed.
More appropriate to the heads-down methodology.
Operator can bypass logic in the application using special keys.
System Controlled
These applications generally place more restrictions on the data entry operator. This type is sometimes used forcomplex survey applications. The behavior of these applications at data entry time is essentially the same as in ISSA.System controlled applications have the following features:
Some special data entry keys are not active during data entry.
CSEntry will keep track of the path.
"Not applicable" values will not be allowed unless defined in a value set.
More appropriate to the heads-up and CAPI methodologies.
Logic in the application is strictly enforced; operator cannot bypass or override.
You set the application type in the Change Data Entry Options dialog box (Options -> Data Entry from the main menutoolbar).
Data Entry PathCSPro supports a powerful feature called data entry path. The path can either be "turned on" or "turned off," dependingon the data entry application type selected on the Data Entry Options dialog box. Operator controlled applicationsalways have path turned off, while system controlled applications always have path turned on.
Path On
CSEntry will keep track of the order in which the data entry operator entered all fields. If the operator goes backward, thecursor will go to the fields in the reverse order in which they were entered. For example, if the logic causes the cursor toskip over a set of fields, the cursor will also skip over these fields when the operator goes backwards. Fields that wereskipped can never be entered, unless the operator goes backwards and chooses different values to avoid the skip. Thishelps ensure the integrity of the data file.
Pa ge 141 of 684 CSPro Da ta Entry Conce pts

Path Off
CSEntry will not keep track of the order in which the data entry operator entered the fields. If the operator goesbackward, the cursor will go to the preceding field even if it had originally been skipped.
Data Entry Elements • Forms
A form is a collection of fields, text and/or rosters which appears on the screen at the same time during data entry. Aform may be larger than the actual screen. When this is the case, the form will scroll as necessary during data entryso that the current point of entry is always visible to the keyer. A form may repeat if it contains fields from a dictionaryrecord which has more than one occurrence.
• Rosters
A roster is a grid that shows multiple occurrences of a group at the same time. Many questionnaires have rostersprinted on them. A typical example would show each person as a row and each column as a variable, as shownbelow. Rosters can also have a vertical orientation, in which case the rows and columns would be reversed.
In CSPro, you can show repeating groups as a roster on a single form or as individual fields on a form that repeats. The darker gray area at the top of each column is called a column heading. In the example above, the columnheadings contain the text "Line number", "Relationship", "Sex", and "Age". The text in the darker gray area to the leftof each row is called the "occurrence label." In the example above, the occurrence labels are "1", "2", "3". These arethe default values. In rosters with vertical orientation, column headings and occurrence labels are reversed.
• Fields
Fields are areas of a data entry form that may be keyed or may show values. Fields may be placed directly on theform or may be part of a roster on the form. Fields are always associated with dictionary items. Some properties offields, such as length and type (numeric or alphanumeric), are defined in the data dictionary. Other properties aredefined in the forms designer. In this example we have two fields:
Pa ge 142 of 684 CSPro Da ta Entry Conce pts

See also: Add a Form, Add a Roster to a Form, Add Fields to a Form
BlocksOverview
Blocks are a way to group several fields into a related unit. In summary:
Blocks contain some number of fields that come from the same group.
On mobile devices, a block's fields can be displayed on the same screen and the operator can enter values intothese fields in any order.
Blocks can have question text. When running a data entry application, this question text will appear above thequestion text for each field in the block.
Logic can be defined for the block.
Blocks are primarily useful for two reasons. Firstly, they provide the mechanism for CSEntry to display multiple fields ona screen. Secondly, they allow you to write logic checks in one place that apply to a number of fields.
The use of blocks is entirely optional. Examples of potential uses of blocks include date fields (day, month, year) orconsumption fields (quantity, unit). Alternatively, you can lump together related questions in one block for easy viewingon one screen (e.g., fertility counts of children).
Creating Blocks
To create a new block, select multiple fields in the Forms Tree by holding down the Ctrl key while selecting fields. Oncethe fields are selected, right-click and select Add Block. A dialog box allows you to specify the block's label, name, andwhether or not the fields of the block should appear together on the same screen on mobile devices.
Blocks are shown in the Forms Tree with a red icon.
Only fields can be added to blocks. Blocks can be created from fields on a form or from fields on a roster. To add a fieldto an existing block, drag the field onto the block. To remove a field from a block, drag it outside of the block. A blockcan contain no fields, but once it contains one field, it can only contain other items from the same group. For example, ifa block contains an item from the population record, then only other items from the population record can be part of thegroup.
Using Blocks
You can define question text for a block. When running a data entry application on a mobile device, the block's questiontext appears at the top of the screen, and then each field's individual question text appears underneath. This allows youto have some general text ("What is your date of birth?") and then specific text ("What is your year of birth?"). OnWindows desktop, the block and field question text appears in the same window.
You can write logic that will run when the block is entered or exited. For example, if you have a block with two fields,FIELD1 and FIELD2, then logic will be executed in the following order if moving forward in your program:
Pa ge 143 of 684 CSPro Da ta Entry Conce pts

BLOCK (preproc, onfocus)FIELD1 (preproc, onfocus, killfocus, postproc)FIELD2 (preproc, onfocus, killfocus, postproc)BLOCK (killfocus, postproc)
Instead of putting logic in the field procedures, you will generally place all logic related to the fields of the block in theblock's procedures.
You can refer to blocks in logic in the movement statements (advance, ask, move, reenter, skip) and you can use theblocks in occurrence-related functions (count, curocc, maxocc, noccurs, and totocc).
Just as you will generally want to put logic in the block procedures, you will likely want to use the block name inmovement statements rather than a field name. One advantage of this is that you can modify or reorder the fields in theblock without having to modify movement logic. When using ask on a block, if the condition fails, then all of the fields inthe block will be skipped.
"No Field" Blocks
A block can exist without any fields added to it. The logic procedures associated with such a block are still executedbased on where the block is in the Forms Tree. These blocks can be useful as "control fields," serving as an anchorupon which you can orient your skips.
Example
Thinking about the example in the above image, date of birth (day, month, year), one disadvantage of the one-question-per-screen approach on mobile devices is that it splits related fields onto multiple screens, and, depending on wherelogic checks are executed, results in a reenter potentially not going to the most relevant field. With blocks, all relatedfields appear on the screen at the same time, allowing the enumerator to enter the values in any order.
Only after the enumerator has filled all applicable values will they move past the block. Logic checks for date of birthwould thus appear in the block's procedure:
Pa ge 144 of 684 CSPro Da ta Entry Conce pts

PROC DOB_BLOCK
preproc
// only ask date of birth in conventional households ask if HH_TYPE = 1;
postproc
// if the month or day is missing, then assume 1 for these checks numeric dob_mm = DOB_MONTH;
if dob_mm = missing then dob_mm = 1; endif;
numeric dob_dd = DOB_DAY;
if dob_dd = missing then dob_dd = 1; endif;
numeric dob_yyyymmdd = DOB_YEAR * 10000 + dob_mm * 100 + dob_dd;
if not datevalid(dob_yyyymmdd) then errmsg("The date of birth is not valid"); reenter;
elseif dob_yyyymmdd > sysdate("YYYYMMDD") then errmsg("The date of birth cannot be in the future"); reenter;
endif;
See also: Change Block Properties
Issues to Consider When Designing a Form If you plan to key data from paper questionnaires you generally try to make the forms [screens] match the pages in thequestionnaire. CSPro provides flexibility in the way you define forms, the number of forms to use, and the choice of fieldsto go on each form. There are, of course, limitations imposed by the structure of the data dictionary, some of which haveto do with whether records and items are "multiple": • A record is considered multiple if it is defined as "Max > 1" in the data dictionary. • An item is considered multiple if it is defined as "Occ > 1" in the data dictionary. • A sub-item is considered multiple if it has been defined as "Occ > 1" in the data dictionary or if the item it belongs to is
defined as "Occ > 1". Keep in mind the following rules when you design your data entry forms: • You can mix items from different single records on the same form. • You can mix ID items with items from single records on the same form. • You can split items from the same record onto different forms. • You can make more than one roster from a multiple record. The rosters can be on the same form or on different forms. • You can mix items from a single and a multiple record on the same form, but the latter must be in a roster. • You cannot mix items from different multiple records on the same form.
Pa ge 145 of 684 CSPro Da ta Entry Conce pts

• You cannot mix items from different levels on the same form (applies to complex data dictionaries only) If you have any multiple records, items, or sub-items in the data dictionary, you must decide whether you want to makethem into a roster or use a form that repeats. You must take this into account when deciding which items to place oneach form. Cases and LevelsA case is the primary unit of data in the data file. A case usually corresponds to a questionnaire, although somecomplex applications may have a hierarchical set of questionnaires that comprise a single case. For example, the mainquestionnaire may consist of a household roster and other household information, and there may also be a separatequestionnaire for each woman in the household. The data entry application may then contain two levels —one for the household and one for each woman in thehousehold. The set of forms corresponding to the household make up level one. The set of forms corresponding to eachwoman make up level two. Each case would consist of a level one and a variable number of level occurrences for leveltwo. Most applications consist of a single level.
Tips on Reviewing Data Entry ApplicationsHere are some tips on reviewing a data entry application, including advice on best practices and warnings about commonmistakes that people make when creating data entry applications.
Data Dictionary
1. All dictionaries that make up your application should use the same zero fill and decimal character settings. Youcan check this using Dictionary Analysis.
2. Every numeric item should have a value set defining the range of values that can be entered into the field. Acommon mistake is to not declare a value set for a two-digit age field, but without a value set, ages like -5 can beentered. Although protected fields do not need value sets (because the operator will not enter a value into thefield), it is still a good idea to add a value set so that this information about possible values is available to otherusers of the dictionary. You can use Dictionary Analysis to identify items without a value set.
3. For items with multiple value sets, make sure that the primary value set (the first one showing in the dictionaryeditor) is the value set with the complete list of codes. This value set is used to show labels in the case tree. If theitem's value set is defined by cascading options, consider adding a generic value set as the primary value setrather than having one that potentially leads to incorrect labels based on the cascading conditions.
Form Design
1. Ensure that every field's capture type is set to match the way that you want an operator to enter data for the field.As much as possible, prevent an operator from having to enter codes. For numeric fields, text boxes shouldgenerally only be used for values like age or currencies; you can use combo boxes for instances when anoperator typically will type a value but can occasionally select a discrete code.
2. Check for the consistency of field properties. For example, if the upper case setting is used for some fields, itshould generally be used for all fields. Field properties can be standardized using the Field Properties (for MultipleFields) dialog.
3. All protected fields must be prefilled with a valid value; if not, CSEntry will terminate data collection. Make surethat all protected fields are filled in via logic or by using PFF parameters.
4. If an operator is never going to collect data directly for a given field, consider leaving it off the form. Items in adictionary can be filled in using logic without needing to exist on a form. Alternatively, you can hide such fieldsfrom an operator using the Hide in Case Tree field property.
Question Text
1. Make sure that every question has defined question text. Even for protected fields, it is a good idea, forcompleteness, to define question text.
2. For multiply occurring questions, ensure that the minimum and maximum occurrences defined for a field'squestion text cover the whole range of occurrences. You can use the Harmonize Occurrences functionality to
Pa ge 146 of 684 CSPro Da ta Entry Conce pts

ensure that the maximum occurrence values match the current dictionary settings.
Logic
1. Ensure that there is logic to check for acceptable values for fields without value sets. For example, you may wantto ensure that operators enter proper alphanumeric responses for fields such as names and other/specifies.
2. For alphanumeric text box and checkbox fields, you may want to ensure that a certain number of characters isentered or choices are selected.
3. Review all hard checks and soft checks and think about what data respondents will be able to provide. You do notwant operators to enter invalid data to bypass a hard check, so use soft checks for questions where someflexibility is allowable.
4. When working with dynamic value sets or question text fills that are set via logic, make sure that any logic that isexecuted for such tasks on a multiply occurring field is in an onfocus, not preproc, event. If the logic is in thepreproc, an error can occur as an operator moves backwards to a previous occurrence because the value set andquestion text will not be updated (because preproc events only occur as an operator moves forwards).
5. Verify that fields that should have values are not skipped over. When using system-controlled mode, the values inskipped fields are deleted when a case is finalized. A common mistake is to prefill a field and then skip over it,which results in the data being lost when the case is finalized. In such instances, the field should be prefilled andthen protected, which will prevent the operator from modifying the value but ensuring that the data is maintained.
6. A best practice is to minimize the use of unnamed constants throughout the application. For example, instead ofcoding 2020 as a year, declare numeric CensusYear = 2020; and then use CensusYear throughout theapplication. This makes the code clearer and also makes it easier to change your application whencircumstances change.
See also: Programming Standards
Pa ge 147 of 684 CSPro Da ta Entry Conce pts

Create a Data Entry ApplicationCreate a New Data Entry Application To create a new data entry application:
• Click on the toolbar, or from the File menu, select New. The following dialog box will appear.
• Select Data Entry Application or CAPI Data Entry Application and press OK. Both of these options create data
entry applications, but selecting CAPI sets some options that will be more convenient for creating CAPI applications.(These options include: turning on CAPI mode, running in system controlled mode, and not asking for the operator ID.)
• A file dialog box will appear. Enter the name of the application file. Make sure you are located in the folder where you
want to place the application files. Then press Create. The following dialog box will appear.
• A default name of the data dictionary describing the data enter file is given. You can use this name or change it. If you
give the name of a dictionary file that already exists, that data dictionary will be used by the application. If you give thename of a dictionary that does not exist, a new data dictionary will be created.
Pa ge 148 of 684 Cre a te a Da ta Entry Appl i ca on

• If you are using an existing CSPro data dictionary, then the system displays the question: "Would you like CSPro tocreate a set of forms for you, based on the input dictionary? If you answer "Yes" CSPro will automatically generatedefault data entry forms and will display the the drag option menu. If you answer "No" you may begin creating dataentry forms.
• If you are creating a new CSPro data dictionary, you will need to enter information into the dictionary about records,
items, and values before you can create forms. Data entry applications consist of the following files:
• Data Entry Application File (.ent)
This specifies all other files contained in the application and includes other application information. • Form File (.fmf)
There is usually one forms file per application, but there may be multiple forms files. Each forms file contains one DataDictionary file (.dcf) which represents the primary data file that is being created or modified.
• Logic File (.apc)
Contains CSPro language statements. • Message File (.mgf)
Optional file, it contains text for messages displayed during data entry. • Question File (.qsf)
Optional, contains text for CAPI text and help screens displayed during data entry. • Other Data Dictionary Files (.dcf)
Optional, it represents secondary data files (such as lookup files) that are read and/or written to during data entry.
Generate Default Data Entry FormsCSPro can automatically generate data entry forms that places all dictionary items onto forms. This can save time as itquickly builds up your form(s), allowing you to easily customize them to your specific needs. One form will be created foreach dictionary record (identification items get their own form as well). Thus, for a one-level dictionary that contains atleast one level ID and three other records, you will end up with four forms.
To generate new data entry forms, either press Ctrl+G; or, from the Edit menu select Generate Forms; or from thedictionary tab on the left side of your screen, drag the dictionary onto a form. As this action will destroy all existingforms, a warning message will appear, asking you to confirm that you wish to proceed.
If you choose to proceed, the Drag Option dialog will appear. At this point you have the opportunity to decide textplacement with respect to the data entry boxes; whether you want to roster items (when possible); whether you wantsubitems dropped instead of the item, etc.
Drag Option MenuWhenever you automatically generate data entry forms, drag an entire dictionary , or drag a dictionary record ontoa form, this dialog box will appear. When you drag an individual dictionary item to a form, this dialog will not appear, butthe settings in effect will be used. To access this dialog box without dragging, select Drag from the Options menu.
Pa ge 149 of 684 Cre a te a Da ta Entry Appl i ca on

The following choices are available to customize your drag-and-drop operation:
Field Label Options
When fields are dragged onto a form from the dictionary, the dictionary text associated with the item is usually alsoincluded. You can select whether the item's label or the item's name is dragged onto the form.
You can also select whether the text is placed to the left or to the right of the data entry box. (This setting has no effect ifthe item is rostered.)
If you select to use the item labels, you can link the field label to the item. That means that if you change the item's labelin the dictionary, then the label on the form will automatically adjust.
Roster Options
This affects dictionary records and items with more than one occurrence. To enter this type of data, you either need aform that repeats (to allow for the multiple occurrences of the data), or you need a roster.
If you choose Horizontal, CSPro will make rosters in which the occurrences are the rows and the fields are thecolumns. In CSEntry the cursor will move from left to right by default.
If you choose Vertical, CSPro will make rosters in which the occurrences are the columns and the fields are the rows. InCSEntry the cursor will move from top to bottom.
If you choose Don't Roster, CSPro will make forms that repeat.
If you select Use occurrence lLabels in roster, the roster's rows, instead of being labeled 1, 2, 3, etc., will use theoccurrence labels defined for the item or record in the dictionary.
Require Enter Key on Entry
Pa ge 150 of 684 Cre a te a Da ta Entry Appl i ca on

This option determines whether the Enter key must be pressed to advance an operator to the next data entry field.
If left unchecked, the cursor will automatically advance to the next field as soon as the maximum number of charactersare entered for the field (that is, if the field length is two, then after entering two characters the cursor will advance to thenext field). An operator can always hit the Enter key to complete a field without having entered the full complement ofdigits.
If this option is checked, the operator must always press the Enter key to advance to the next field.
Use Subitems When Present
If you have items with subitems, you may check this box to place the subitems, instead of the item, on the form. Forexample, if you have a DATE item that contained the three subitems DAY, MONTH, and YEAR, the subitems, rather than theitem DATE, would be placed on the form. However, if any of the subitems overlap, the item will be used instead. (Thissetting has no effect if no subitems are present.)
If this box is left unchecked, items will always be used.
Use Extended Controls
If the item has a valid value set that can be can be represented by an extended control, the item will be added to the formwith a preselected extended control. The control type selected depends on the type and length of the item but can bechanged once the item is on the form.
If this box is left unchecked, the control type will default to a text box (keyed entry).
Data Entry Forms Screen Layout The CSPro window is split in half. The left side contains the data entry tree and three tabs at the bottom. The two tabs ofinterest when designing forms are the Dict [Dictionary] and Form tabs at the bottom. By pressing either one you will beable to view the dictionary tree or the data entry tree on the left side. If you generated the screens by default, then the system will display the data entry tree and the Form tab on the left, andthe first form created on the right window.
Pa ge 151 of 684 Cre a te a Da ta Entry Appl i ca on

If you opted for creating the forms yourself then the system will display the data dictionary tree and the Dict tab on theleft, and a blank form on the right. You are now ready to start dragging items and/or records from the dictionary to theform(s). If you did not have a data dictionary, then the system will display the data dictionary tree and the Dict tab on the left, andthe dictionary window on the right. Use the Window menu to display a list of currently open files at the bottom of the Window menu. A check markappears in front of the name of the file in the active window. Activate a window by choosing the name of its file from thislist.
You can also switch between the forms and dictionary window by pressing either or in the Toolbar.
Data Entry Tree If you generate default data entry screens, the system will create one screen for the identification items and a separatescreen for each record type as defined in the dictionary. Press the "Forms" tab on the bottom left of the screen to seethe data entry tree. The data entry tree will be identical to the dictionary tree; that is, the items will be listed as namedand ordered in the dictionary.
Pa ge 152 of 684 Cre a te a Da ta Entry Appl i ca on

However, if you design the forms yourself, you might decide to include more than one record in one screen or combinefields from different records in one screen. In that case the data entry tree will not be identical to the dictionary tree. Inany case, the data entry tree has the following items:
• Forms File:
This is the highest level node, i.e., the root node. It is the owner of all code, which is to say [1] level-, record-, anditem-related code, [2] user-defined functions, and the [3] global routine.
• Level: This is the second-tier tree node, just below the root. It has a 1-to-1 correspondence with the same-named dictionary
level.
• Form: This is the third-tier tree node, just below its level. It represents the form and all the items in that form. • Roster: It represents the roster and all the items included in the roster.
• Field:
This is the terminal or "leaf"-node; i.e., the lowest accessible level. It has a 1-to-1 correspondence with a dictionary item. You are free to rename any of the above the unique names via the properties dialog box, but it is recommended that youretain the original name, so that it is easier for you to see which dictionary entity is being referenced. The data entry treerepresents the order in which the data entry is keyed. You can change the order of entry by reorganizing the forms or items within the forms by dragging them within the DataEntry tree view. When the operator enters the data, the cursor will follow the order in the tree not the order in the form.When selecting a new edit item, the contents of the logic view will change to display the logic for the selected entity. Pressing Ctrl+T in the data entry tree will allow you to switch between the labels and the names of the items.
Run a Data Entry ApplicationAfter you have created your forms, you can run the application to start entering data in CSEntry.
Press ; or press Ctrl+R; or select Run from the File menu to launch CSEntry. You will see a screen that looks likethis:
Pa ge 153 of 684 Cre a te a Da ta Entry Appl i ca on
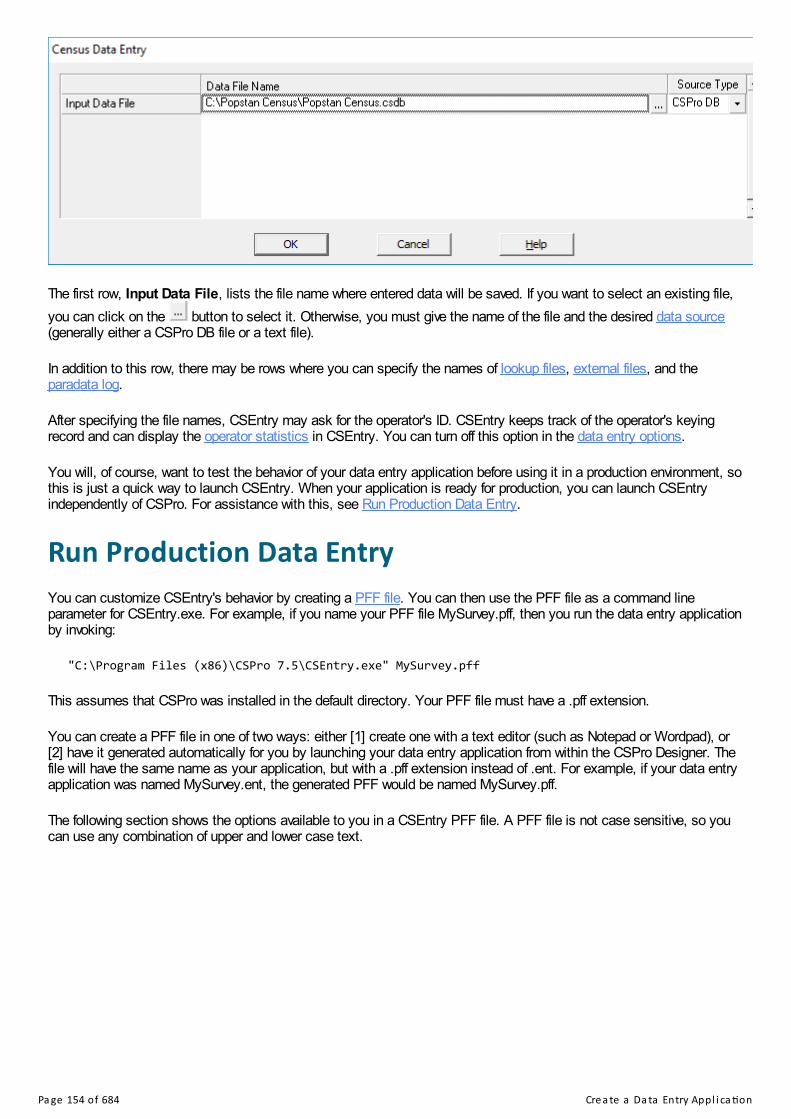
The first row, Input Data File, lists the file name where entered data will be saved. If you want to select an existing file,you can click on the button to select it. Otherwise, you must give the name of the file and the desired data source(generally either a CSPro DB file or a text file).
In addition to this row, there may be rows where you can specify the names of lookup files, external files, and theparadata log.
After specifying the file names, CSEntry may ask for the operator's ID. CSEntry keeps track of the operator's keyingrecord and can display the operator statistics in CSEntry. You can turn off this option in the data entry options.
You will, of course, want to test the behavior of your data entry application before using it in a production environment, sothis is just a quick way to launch CSEntry. When your application is ready for production, you can launch CSEntryindependently of CSPro. For assistance with this, see Run Production Data Entry.
Run Production Data EntryYou can customize CSEntry's behavior by creating a PFF file. You can then use the PFF file as a command lineparameter for CSEntry.exe. For example, if you name your PFF file MySurvey.pff, then you run the data entry applicationby invoking:
"C:\Program Files (x86)\CSPro 7.5\CSEntry.exe" MySurvey.pff
This assumes that CSPro was installed in the default directory. Your PFF file must have a .pff extension.
You can create a PFF file in one of two ways: either [1] create one with a text editor (such as Notepad or Wordpad), or[2] have it generated automatically for you by launching your data entry application from within the CSPro Designer. Thefile will have the same name as your application, but with a .pff extension instead of .ent. For example, if your data entryapplication was named MySurvey.ent, the generated PFF would be named MySurvey.pff.
The following section shows the options available to you in a CSEntry PFF file. A PFF file is not case sensitive, so youcan use any combination of upper and lower case text.
Pa ge 154 of 684 Cre a te a Da ta Entry Appl i ca on

[Run Information]Version=CSPro 7.5AppType=EntryDescription=My Survey
[DataEntryInit]OperatorID=JohnKey=1250StartMode=AddAutoAdd=YesFullScreen=NoNoFileOpen=NoLock=Verify,StatsInteractive=AskCaseListingFilter=12ShowInApplicationListing=Always
[Files]Application=.\MySurvey.entInputData=.\MyData.csdbParadata=.\MyParadataLog.cslogCommonStore=.\MySettings.dbBaseMap=.\MyMap.mbtiles
[ExternalFiles]LOOKUP_DICT=.\LookupFile.dat
[Parameters]Parameter=your choiceLanguage=LINGALAOnExit=.\Menu.pff
[DataEntryIDs]PROVINCE=12DISTRICT=05
[Run Information]
The [Run Information] block is required. The Version and AppType and must appear exactly as shown in the exampleabove. The Description is optional. If included, it will be used instead of the name of the file in the list of applications(mobile only) and in the window title during data entry (all platforms).
[DataEntryInit]
The [DataEntryInit] block is optional. It gives you the opportunity to customize the following runtime characteristics:
OperatorID=specifies the operator ID for the purposes of logging operator statistics. If this line is not present butyour data entry application has been set to ask for this, CSEntry will prompt the operator for one at runtime.
StartMode=determines the mode in which CSEntry starts. The possible options are: Add, Modify, and Verify. Ifthis line is not present, one of two things will occur: if the data file does not exist, then the program will start inAdd mode; if the data file does exist, then CSEntry will wait for the operator to choose their desired mode. Theoperator's choices may be constrained due to options indicated in the Lock feature.
You can also specify the case upon which to act by adding a semicolon and the case IDs of an existing case (forexample: StartMode=Modify;010502). This will open CSEntry in Modify mode and open the case indicated bythe ID. If the StartMode conflicts with the Lock parameter settings, then the StartMode parameter will takeprecedence.
Key= specifies the case ID to automatically open. If a key is provided that exists in the data file, CSEntry willopen that case and then close once the case has been entered. If the case does not exist, a new case is createdand the IDs automatically filled from the values specified. If only a partial key is provided, then only the valuesspecified are prefilled. (For example, if the IDs are cluster and household number and the key only specifies thecluster, then the cluster will be automatically filled but the interviewer will have to specify the household number.)The StartMode attribute takes precedence over the Key attribute. You generally will use only one, if any, in yourdesign. This attribute is typically used in menu programs, often with the output of the key logic function.
Pa ge 155 of 684 Cre a te a Da ta Entry Appl i ca on

AutoAdd=indicates whether, while in Add mode, CSEntry should continuously add cases, meaning that after acase is added, CSEntry will begin adding another case. The possible options are: Yes (default) and No.
FullScreen=determines whether CSEntry will open the application in full screen mode, with no case tree on theleft. The possible options are: Yes, No (default), and NoMenus. The parameter NoMenus will open CSEntry in atablet-friendly mode whereby the case tree and the CSEntry menus and title bar are not shown.
NoFileOpen=determines whether CSEntry will permit the operator to open another data file while running a dataentry application. The possible options are: Yes (default) and No.
Lock=indicates what CSEntry modes the operator cannot access. The possible options are:
Add: The operator cannot add new cases.
Modify: The operator cannot modify existing cases.
Verify: The operator cannot verify existing cases.
Stats: The operator cannot view operator statistics.
Delete: The operator cannot delete cases.
CaseListing: On mobile CSEntry, the Case Listing screen will be bypassed.
Multiple modes can be specified by listing each mode, separated by a comma.
Interactive=specifies the default way that CSEntry runs in Interactive Edit mode. The possible options are:
Ask: The default option, CSEntry will ask the operator how to run Interactive Edit.
Both: CSEntry will display both out-of-range messages and errors generated from the errmsg function.
ErrMsg: CSEntry will only display errors generated from the errmsg function.
Range: CSEntry will only display out-of-range message.
Off: Interative Edit mode will be disabled.
If the mode is followed by a comma and Lock, then the mode cannot be changed by the operator. Otherwise,unless the option is Off, the operator can change the mode from within CSEntry.
CaseListingFilter=filters the cases in the data file shown to the operator. The filter string can use regularexpressions. If you have multiple operators entering data to the same data file, this can be a way to preventoperators from interacting with data entered by other operators. The filter is matched against the IDs of each case.
ShowInApplicationListing=determines whether the application associated with this PFF is displayed on the mobileEntry Applications screen. The possible options are: Always (default), Never, and Hidden. Operators mustmanually elect to show hidden applications, whereas PFFs with the Never option will never be shown.
[Files]
The [Files] block is required. A description of the files, not all of which have to be specified, is as follows:
Application=the name of the data entry application that you created.
InputData=the data file that an operator will be creating, modifying, or verifying with this data entry application.
Paradata=the name of a file where events logged during the application's run are saved.
CommonStore=if you use the loadsetting or savesetting functions in your program, this file overrides thedefault location where these settings are saved.
BaseMap=if you use the map-based case listing this file provides an offline map that will be used as the basemap instead of an online Google Map. MBTiles and ArcGIS Tile Package format files are supported. See OfflineMaps for details.
[ExternalFiles]
If the [ExternalFiles] block is present, it means that a second (or more) dictionary was linked to the data entryapplication. In the example above, LOOKUP_DICT is the dictionary name, and LookupFile.dat is the name of the data filethat contains the lookup codes.
Pa ge 156 of 684 Cre a te a Da ta Entry Appl i ca on
[Parameters]
The [Parameters] block is optional. This section defines parameters for the data entry run.
Parameter=allows you to pass in a string to your program. The parameter can be any length, although the stringthat retrieves the value in your program (via the sysparm function) must be large enough to accommodate it. Oncethe parameter is retrieved, it can be parsed by your program for further usage.
Language=specifies the initial language of the program. The parameter must match the name of a languagespecified in the question text, dictionary, or message file.
OnExit=specifies a PFF file to run after the data entry program closes. This can be useful, for example, if youwant to relaunch a menu program after collecting data.
When starting a new case, if the name of a parameter matches the name of a dictionary item, the value of that item willbe set to the value specified in the PFF. This is similar to how the persistent fields are processed (see below), but thisworks for non-persistent fields.
[DataEntryIDs]
The [DataEntryIDs] block is for use with any persistent IDs that you have defined. CSEntry will assign the specifiedvalues to the indicated persistent fields when a new data file is created. This feature allows automatic definition ofpersistent fields, such as geographic IDs. If you provide values and run this on an existing data file, and the PFF filevalues do not match the values in the data file, then the PFF values will be ignored. The syntax is as follows:
id_item_name=initial_value
Generate Binary Data Entry ApplicationBinary data entry applications provide security during a production data entry operation. A binary data entry applicationconsists of one single file with extension .pen, which includes the same information as the set of text files that normallymake up a data entry application.
This generated file cannot be changed in any way. It cannot be opened by the CSPro designer and it cannot be read in atext editor. If you make changes to the data entry application, you must generate the binary application again.
The binary application will run identically in CSEntry to a normal (text) application. An operator will not see any differencein behavior.
To generate a binary application, open the application in the normal way, then from the File menu select Publish EntryApplication (.pen).
Before CSPro 6.0, binary data entry applications had the extension .enc. The 'P' in the new extension stands for"portable," which indicates that the file can be run not only on desktop CSEntry, but also on mobile devices. CSPro canno longer read .enc files and if you would like to run an application with such a format, you will have to use an olderversion of CSPro.
Pa ge 157 of 684 Cre a te a Da ta Entry Appl i ca on
Change Data EntryCharacteristics
Change the Order of EntryDuring data entry, the forms will be shown to the keyer in the order in which they appear in the forms tree. Within a form,the cursor will move among the fields in the order in which they appear in the forms tree.
To change the form order, simply drag and drop on the form tree. For example, suppose you currently have Form A,Form C, Form D and Form B in your level. The forms tree will now show the following:
1. Form A
2. Form C
3. Form D
4. Form B
If you drag the form icon for Form B and drop it on top of Form C, the forms tree will now show:
1. Form A
2. Form B
3. Form C
4. Form D
Similarly, to change the order of fields within a form, use drag and drop on the forms tree.
To change the order of fields in a roster you must drag and drop within the roster rather than on the tree. You can changethe default order in which the forms and fields will be keyed by using logic in the application.
Change Data Entry OptionsSelect Data Entry from the Options menu to change any of the following:
Pa ge 158 of 684 Cha nge Da ta Entry Cha ra cte ri s cs

Path Type
This choice is very important and will have a large effect at data entry time. See Operator vs. System Controlled for moreinformation.
Application Options
Ask for operator ID: If this box is checked, CSEntry will prompt the operator to enter an operator ID.
Confirm end-of-case: If this box is checked, CSEntry will prompt the operator to accept the case at the end ofeach case entered.
Allow partial save: If this box is checked, CSEntry will allow the operator, when in add, modify, or verify mode,to save a case which has not been completed. You can also have CSEntry automatically partially save cases.
Show case tree: There are four options for the case tree selection. There are options to never show a case tree,to show it only on mobile devices (Android), to show it only on desktop devices, and to show it on all devices. Ifshown, CSEntry will display a tree on the left showing each item in the case currently being added, modified, orverified and its value. The tree can also be used to navigate between parts of the questionnaire.
CAPI mode: If this box is checked, CSEntry will display the Computer-Assisted Personal Interviewing (CAPI)window. The top part is for question text (to be read during the interview). The bottom is for the normal formcontent.
Always show refusals: If this box is checked, refused values defined in a value set will always be shown to theoperator. If unchecked, the operator can view refused values by selecting the Show Refusal Options menu option.
Center forms on screen: If this box is checked, CSEntry will center forms horizontally in the display window.
Decimal mark is a comma: If this box is checked, CSEntry will use a comma instead of a period when showingnumeric fields with a decimal component. The keyer must also type a comma instead of a period to enter thevalues after the decimal mark.
Right-to-left entry: If this box is checked, CSEntry will orient rosters in a right-to-left manner, which is useful forlanguages like Arabic. The first column of a roster will be the furthest right in the roster and the roster will scrollfrom right to left..
Mobile Options
If you are running CSEntry on a mobile device, there are some options to consider:
Automatically advance on selection: When clicking on a response (when displayed as a radio button),CSEntry will automatically advance to the next field, rather than requiring the interviewer to swipe or press thenext button.
Show field labels above question text: Each field's label will be displayed on the screen above the field's
Pa ge 159 of 684 Cha nge Da ta Entry Cha ra cte ri s cs

associated question text. If unchecked, field labels will not be shown at all.
Display error message numbers: When displaying an error message (from a errmsg call), the message number(either a number from the message file or the line number) will be displayed along with the message.
Display value set codes alongside labels: When displaying a field using a control other than a text box, inaddition to showing the labels, the codes will also appear.
Show only discrete values in combo boxes: When displaying the values in a combo box, only the discretevalues, not the range values, from the value set are shown.
Verify Every Nth Case
During verification, you may choose to verify only a subset of the cases in the data file, instead of verifying all the cases.
Frequency: This is the interval between cases that CSEntry will use for verification. For example, if this value is10, every 10th case will be verified.
Start: This is the number of the first case in the data file to verify. For example, if this value is 5, and thefrequency is 10, cases number 5, 15, 25, etc. will be verified. The case number is determined by the physicalorder of the cases in the data file. The start value must be less than or equal to the frequency value.
Random Start: You may check this box instead of specifying a start value. CSEntry will then choose a randomnumber for the start value. The random number will be between 1 and the frequency value.
Data Source OptionsWith a data entry application, you can select Data Sources from the Options menu to change any of the following:
General Options
Automatic partial saves: You can specify the number of minutes after which a case will automatically bepartially saved.
Additional Metadata Files
Listing file: If checked, a listing file will be created for the main input file.
Operator statistics log file: If checked, an operator statistics file, with the extension .log, will be created for themain input file. This file is only created by desktop CSEntry and not on mobile devices.
It may be useful to uncheck both options if creating a menu or CAPI program, as these files are mostly useful in key-from-paper operations.
Multiple Operator Notes
Delete other operators' notes: If checked, any operator can delete the field notes left by other operators. Ifunchecked, an operator can only delete notes that they personally have left.
Edit other operators' notes: If checked, any operator can edit the field notes left by other operators. Ifunchecked, an operator can only edit notes that they have personally left.
See also: GetNote Function, PutNote Function, GetOperatorId Function
Paradata OptionsTo view options related to paradata collection, select Paradata from the Options menu in a data entry or batch editapplication.
Event Collection OptionsPa ge 160 of 684 Cha nge Da ta Entry Cha ra cte ri s cs

A paradata event contains information about some aspect of the data collection or editing process. The dropdown listcontains three options:
No: This disables paradata collection.
Yes: Some Events: This enables paradata collection for some events. You can select the events that you wouldlike to collect by checking or unchecking the checkbox next to the name of each event. You may want to disablesome events to reduce the size of the paradata log or if you are concerned about collecting sensitive information.
Yes: All Events: This enables paradata collection for all events.
The following is a summary of each kind of event that CSPro can collect:
Data Source: Information about interactions with CSPro data files, including what files were used, what caseswere loaded and saved, etc.
Device State: Details about the data collection device, including indicators about whether GPS, Bluetooth, andWi-Fi were enabled; what mobile network the device was using; etc.
External Application: Information about external applications (or CSPro data entry applications) launched fromCSPro.
Field Entry: Details about each field entered, including how long the interviewer spent answering the question,how the program reached that field, etc.
Field Movement: Information about each field movement, including how the program reached and exited eachfield.
Field Validation: Details about CSPro's validation of each entered field, including information on which value setwas used and whether or not the field was successfully validated.
GPS: Information about GPS collection, including the duration to take fresh GPS readings.
Impute: Details about which items were imputed, including the initial and imputed values.
Language Change: Information about which language was initially used and records of language changes duringthe course of data collection.
Message: Details about any error message triggered during data collection.
Note: Information about notes left by interviewers (or via logic) during the execution of the program.
Operator Selection: Details about selections made by the operator as a result of requests coming fromfunctions such as accept or the userbar.
Property: Information about what CSPro settings were used, or changed, during the program's run.
You can explore these events in more detail using the Paradata Viewer's Table Metadata feature.
For advanced users writing SQL queries on the paradata tables, note that the base "event" table links to each of theseevent tables, and that some of these events link to other tables with names that end in "_info" or "_instance."
Partial Collection Options
Some of the events listed above can store sensitive information in the paradata log, which is why you can disable thecollection of this information while still storing the non-sensitive portions of the event:
Field values: The Field Validation event can store each value entered into a field. This can be useful if you wantto look at the frequency of valid and invalid values, but if you do not want such data stored in the paradata log, youshould disable this. The Note event also uses this option to determine if note text should be stored in the paradatalog.
GPS coordinates: The GPS event can store the coordinates of the interviewers. If you do not want this datastored in the paradata log, you should disable the collection of the latitude and longitude coordinates, thoughother information (altitude, accuracy, etc.) will still be stored.
Cases loaded via logic loops: This is not an option related to sensitive information, but if your application loopsthrough external data files in logic (using forcase or loadcase), the paradata log will become very large quicklydue to a preponderance of Data Source events. You can disable this information if you do not plan to analyze it.
Pa ge 161 of 684 Cha nge Da ta Entry Cha ra cte ri s cs

Initial property values: If this option is enabled, the initial property settings will be stored as Property events inthe paradata log when your application begins. This can lead to a large amount of paradata that is potentially notuseful. If disabled, only information about changes to properties will be stored.
The default setting is for all of these options to be disabled.
Background Events
Most events are triggered by some action (e.g., an error message appearing), but two events can occur in thebackground, even if the interviewer is not doing anything. These background events only occur in data entry applications:
Device state: Information about the device as described above in the Device State event.
GPS location: Unless a GPS reading is in progress, the device's GPS unit will be turned on and CSEntry willattempt to take a GPS reading. Once a GPS reading with accuracy 10 meters or less is taken, or once twominutes have elapsed, the GPS unit will be turned off.
The value listed indicates the number of minutes between events occurring, or 0 if the event should be disabled. Forexample, a value of 30 for GPS location means that CSEntry will attempt to store the GPS coordinates of the interviewerevery half hour.
See also: Paradata
Simple SynchronizationsSetting the Synchronization Options
For basic synchronization scenarios, you can configure your data entry application for synchronization by selectingSynchronization from the Options menu:
To add support for data synchronization to your application, check the Enable synchronization box.
The following Server options can be specified:
CSWeb: Synchronize with a CSWeb server. This requires a properly configured CSWeb server. The datadictionary for the application must be uploaded to the CSWeb server. For more information about CSWeb servers,see the CSWeb help documentation.
Dropbox: Synchronize using the online file sharing service Dropbox. This requires an account with Dropbox.
FTP: Synchronize using an FTP server. This option requires that you have an account configured on an FTPserver.
Pa ge 162 of 684 Cha nge Da ta Entry Cha ra cte ri s cs

URL: Specify the URL of the CSWeb server or the URL of the FTP server. For CSWeb servers the URL shouldstart with http:// or https://. For FTP servers the URL should start with ftp://, ftps:// or ftpes://. The URL is not usedfor Dropbox.
Test connection: Click this button to attempt to connect to the server to verify that the URL and settings arecorrect.
The following Sync options can be specified:
Synchronize main data file: This setting determines how the main data file is synchronized. There are threeoptions:
Upload changes to server: Only data that is modified on the device will be sent to the server. No data willbe downloaded from the server. This is the most common option for interviewers when all interviewers willwork on unique assignments.
Download changes from server: Only receive modified data from the server. Do not upload localchanges. This might be used for a supervisor who wants to see what changes interviewers have made butdoes not want to make changes themselves.
Sync local and remote changes: Send local changes to the server and download changes from theserver. This option can be used when multiple interviewers need to work on the same assignments. Notethat if both interviewers modify a case at the same time, one will overwrite the changes made by the other.
Simple synchronizations do not support synchronization of external dictionaries or files other than the .pen and .pff files.To implement these advanced synchronization scenarios, you can create your own synchronization routines using logicfunctions.
The synchronization options are used to synchronize data with a server but are not meant for deploying and updating theapplication itself. To download an application to a mobile device or update the application files of an existing applicationon a mobile device use the Deploy Application tool to package and upload an application to a server. Interviewers canthen download the application to their mobile device using Add Application from the Entry Applications screen ofCSEntry. Interviewers can also download to an application using Update Installed Applications from the EntryApplications screen of CSEntry.
Running Synchronizations
If the synchronization options have been configured, then the operator can launch the synchronization when running thedata entry application. Synchronization may not be run while entering case data.
On mobile devices, the synchronization may be launched from the case listing view by choosing Synchronize from themenu or tapping the following icon:
On desktop devices, select the Synchronize option off of the File menu.
Downloading Data
In order to download the data that has been uploaded to the server, use the Data Viewer's download function. This willdownload all the data on the server into a single CSPro data file that can be used by other CSPro applications and tools.
See also: Synchronization Overview
Display the Case Listing on a MapPa ge 163 of 684 Cha nge Da ta Entry Cha ra cte ri s cs

In addition to showing the already captured cases in a scrolling list on the case listing screen, it is possible to show thecases on a map based on latitude and longitude variables in each case. For example, if the data entry applicationcaptures GPS coordinates for each household, the application could automatically display all of the interviewedhouseholds on a map based on their captured locations.
To enable the map based case listing screen, select Mapping from the Options menu:
In the Mapping Options dialog, check the Show case listing on map option and choose the variables in your datadictionary where the coordinates (latitude and longitude) of the cases are stored. These must be numeric variables fromthe main data dictionary with at least one decimal place.
For each case in the data file, CSEntry displays a marker on the map at the location specified by the values of theselected latitude and longitude variables. Completed cases are represented by blue markers and partially completedcases are represented by red markers. Tapping on a marker displays a popup window on the map containing the caselabel or case ID for the case along with any case notes. Tapping on the popup window launches data entry for theselected case. You can use the setcaselabel and putnote functions to customize the case label and case notedisplayed in the marker popup window. Both the case label and case note support a limited subset of HTML tags forformatting including <b> (bold), <i> (italic) and <font> (font, size and color).
Any cases that have blank values for the latitude or longitude variable will not be displayed on the map. This means, forexample, that a partially saved case where the GPS coordinates have not yet been captured will not be displayed on themap.
Mapping is currently only supported on Android. No maps are displayed in the case listing when running your applicationon Windows.
By default, the cases will be displayed with a Google Maps base map, which requires that the Android device beconnected to the Internet. In cases where no Internet connection is available, you can specify an offline map file to use inthe PFF file.
See also: Mapping, Offline Maps
Change Default Text FontThe default text font is what CSPro will use whenever you add new text to any form. From the Options menu, selectDefault Text Font.
Pa ge 164 of 684 Cha nge Da ta Entry Cha ra cte ri s cs

You can change this by using the Font radio buttons. If you select Choose new default text font, you can then clickon the Choose font button to customize your own font.
If you want to change the font for all text that is already on forms, you must press the Apply to all items button.
See also: Change Field Font, Change Text Properties
Change Field ColorsFrom the Options menu, select Field Colors. By clicking on any of the four colored boxes, you can change the colorthat CSEntry uses to display fields of the type listed. These changes are made on a per-application basis. Changing thefield colors does not change any of the behavior of the program, including values returned from the highlighted function, itis simply for aesthetic purposes. You can change the colors of:
Fields that have not yet been visited (white by default).
The current field (white by default).
Fields that have been visited (green by default).
Fields that have been skipped (yellow by default in operator controlled mode; gray by default in system controlledmode).
See also: Change Field Font, Highlighted Function, Color of Fields in Data Entry User's Guide
Change Field FontFrom the Options menu, select Field Font. If you change the field font you may want to also change the default textfont and apply it to all items.
Pa ge 165 of 684 Cha nge Da ta Entry Cha ra cte ri s cs

Press the Font button to change the font in all the field boxes on all the forms. Changing the size of the font will changethe size of the field boxes. You can change the appearance of the characters by choosing a different script in the fontdialog box.
Press the Reset button to reset the font in all the field boxes on all the forms to the system default.
See also: Change Text Properties, Change Field Colors
Change Error SoundWhen an error occurs during data entry, an error box is shown of the screen and sound (beep, tone or other sound) isgenerated. In order for the sound to be heard:
The computer must have a sound card, with a speaker connected and turned on.
The volume on the sound system must be turned on and sufficiently loud to be heard.
There must be a sound file associated with the Default Sound(Beep) under Control Panel/Sound.
To change the sound, go to Control Panel/Sound and change Default Sound(Beep) to a different sound file.
Pa ge 166 of 684 Cha nge Da ta Entry Cha ra cte ri s cs

Forms DesignerIntroduction to Forms DesignThe previous topics show you how to create a data entry application using the forms generated by default. However,CSPro allows you to create, using a single dictionary, one or more forms (screens) for data entry.
This is the design stage of the data entry process. This tool allows you to create new forms, add or modify text, enterlines and/or boxes, add color to the forms or text. If you have a printed questionnaire you will probably want to use it as aguide when deciding text and field placement, as well as the order of entry for the items.
After you have developed forms to your satisfaction, use CSEntry to input the data.
This section contains the following information:
Add Things to a Form
Modify Things in a Form
Change Form Properties
Pa ge 167 of 684 Forms De s i gne r

Add Things to a FormAdd a Form There are three basic ways to add a new (blank) form. Each method will present you with the "Form Properties" dialogbox. • From the Form Designer Tree tab
Right-click over any of the tree entries (i.e., a Form File, Level, Form, or Item). A popup dialog box will appear. Selectthe Add Form option.
• From the Form Designer's Menubar
Select Edit, then the Add Form option. • From the Form itself
Right-click anywhere over a form. A popup dialog box will appear. Select the "Add Form" option. After you have pressed OK on the "Form Property" dialog box, you will notice on the form tree that the form was placedlast in the current level. You can change the order of the forms by dragging forms on the tree.
Add Fields to a Form • Drag a Dictionary Item to your Form
Expand the dictionary tree so that the desired item is visible. Holding down the left mouse button, select the item ( ) and drag it to the form, releasing the mouse button when the cursor is at the desired location on the form. Dependingon the drag option settings, either your item or existing sub-items ( ) will be dropped onto the form. For example, ifyou have dragged an item from a record with multiple occurrences and you have chosen (in the "Drag Options"dialog) to roster items when possible, the item will appear as a one-column roster. Dragging additional items from thisrecord and dropping them onto the roster will append the items to the roster.
• Drag a Dictionary Record to your Form
Expand the dictionary tree so that the desired record is visible. Holding down the left mouse button, select the record ( ) and drag it to the form, releasing the mouse button when the cursor is at the desired location. Depending on the
record's properties and the Drag option settings, the item(s) within your record will either be dropped as individual fieldsor as a roster.
See also: Change Field Properties
Add a Roster to a Form CSPro automatically creates a roster, under appropriate conditions, when you drag a dictionary item onto a form. In mostcases where a roster is possible, CSPro obeys the Roster Options on the drag options dialog box. Make sure thisoption is Horizontal or Vertical before you begin. In some drag and drop operations a roster is not possible and will not becreated. In other drag and drop operations a roster is the only alternative. Common ways to create a roster include: • Drag a multiple record ( ) from the data dictionary to a blank form. This will generate a roster containing all the
items in the record. • Drag one item ( ) from a multiple record in the data dictionary to a blank form. This will generate a roster containing
only that item. You can then add more items to the roster one at a time.
Pa ge 168 of 684 Add Thi ngs to a Form

• Drag an item from a multiple record, or the record itself, to a form that contains only items from another single record
or ID items. • Drag a multiple item or sub-item ( ) to a form. If you have a multiple item that has sub-items, and you want to create
a roster of the sub-items, make sure you have the "Use sub-items if present" box checked in the Drag Optionsdialog box.
See also: Add Things to a Roster, Change Roster Properties
Add Things to a Roster • Add Items
Rosters can only include items from the same multiple record, or sub-items from the same multiple item. If youcreated the roster by dragging the entire multiple record or item onto the form (or by generating a set of forms), thereare no more fields that can be added to the roster. Otherwise, you can drag an appropriate field from the data dictionary and drop it on the roster. CSPro will add acolumn to the end of the roster. If you don't want the field's column to be at the end, you can reposition the columnafter you add it by dragging and dropping the field in the desired position on the form, or in the list of fields on the Formtree. Be sure to drop the data dictionary item on top of the roster; otherwise, you will create a new roster.
• Add Text
Right click on the light gray space in the desired column of the roster and select "Add Text". You will see the GridText Properties window. Note that you can choose the text placement and select whether the text will go only in thecell in which you clicked, or if it will go at the same position in every cell in the column. You can change this attributelater if you want.
• Add Boxes
Right click on the gray space in the roster and select "Add Boxes". Note that you can choose whether the boxes willgo only in the cell in which you clicked, or if they will go at the same position in every cell in the column. Drawingboxes in a roster is essentially the same as drawing boxes on a form.
Add Text to a FormWhen you add a field to a form by dragging it from the dictionary tree, the dictionary item's label is automatically placedon the form. You may also add other text to the form (a heading across the top, for example) by doing the following:
Pa ge 169 of 684 Add Thi ngs to a Form

1. Right-click on the form at the point where you want the text to start.
2. Select Add Text from the popup menu.
3. Type in the text, and press Enter.
See also: Change Text Properties
Add Lines or Boxes to a FormCSPro also allows the user to draw boxes, as a means to both help visually organize your data and make the layout ofyour form look more professional. For example, if you wish to place fertility data on one portion of your form and thenindicate to the viewer that these data are related, you could draw a box around the related items.
When you select multiple items with the mouse, you'll notice during the selection process a box that drags with you toshow what you're including. To draw a box on a form, it seemed logical to have that same mechanism at work, so we'veintroduced the Select Items/Boxes button. Click on to toggle between the two states. When you first click on thisbutton it will appear depressed, and a floating toolbar will appear with the following buttons:
Click ToToggle states between selecting items and drawing boxes without having to close down the toolbar.Draw a box with an etched edge.Draw a box with a raised edge.Draw a box with a thin edge.Draw a box with a thick edge.
When you have finished drawing boxes and no longer need the Box-Draw toolbar, close it down by either toggling the button, or close the Box-Draw toolbar.
Pa ge 170 of 684 Add Thi ngs to a Form

Modify Things in a FormSelecting ItemsWhen the forms designer first opens, the mouse is in selection mode. That is, if you click on a field, roster, or text item,the item becomes selected. Similarly, if you press the left mouse button and hold it down while dragging over a group offields, rosters, and/or text items, all of those items will be selected. You can then choose to do operations on theselected item(s), such as moving or deleting them. If one item is selected, you can also review its individual(field/roster/text) properties. You can also hold down the Ctrl key while individually clicking on each item to be selectedwith your left mouse button.
To quickly select several fields in their entirety, just grab their data entry boxes. This will cause automatic selection ofany accompanying text, as well. To quickly select just the text portion of several fields, be sure that the selection fieldvisible on the screen does not touch any of the data entry boxes.
There are several methods of selection:
To select several items, hold down the left mouse button while dragging a selection box around the desired items.Or you can also hold down the Ctrl key while individually clicking on each item (box or text) to be selected withyour left mouse button.
To select both a data entry box and its associated description text, hold down the Shift key while clicking oneither the entry box or its associated text.
To select several data entry boxes and their associated descriptions, hold down both the Shift and Ctrl keyswhile individually clicking on either the edit box or its text for each different field.
Move Things When you drag a dictionary item onto a form, it will be placed on the form at the point where you released the mousebutton. The dictionary label will be used as identifying text for the field, and it will be placed on the form according to theDrag Options in effect, which may mean the item becomes rostered. Once the field is on a form, you can fine-tune itsplacement. • Move a Field
To move a field, select the box and drag it to the desired location. Each field has a text item associated with it. Youcan see the text by holding down the Shift key and clicking on the field. This will select both the field and its text. Youcan now move both of them together by dragging and dropping. You can move a field's associated text separately bysimply dragging and dropping only the selected text.
• Move a Roster
To move a roster, select it by clicking on the gray space in any cell or in the small box in the top left corner of theroster. Drag it to the desired location. You can also resize a roster.
• Move Text
To move any text, simply select and drag it to the desired location. • Move a Block of Items
First select a block of items. Then, move the mouse over one of the tracker regions selected. When you see the
mouse cursor change from to , you are ready to move the block. Press down with the left mouse button anddrag it to its new location. A tracker (or tracker region) refers to the item(s) that has(have) been selected with the mouse. Visually, you will see aheavy dashed line drawn around the item(s).
Pa ge 171 of 684 Modi fy Thi ngs i n a Form

Align ThingsIf you have developed your form by dragging individual items from the dictionary to the form, it is probable that the fieldsare not precisely aligned to the left and/or right margins of the form. To correct this problem, you need only select theitems you wish to align, and choose one of the alignment schemes below.
Left
This will take the left-most item (whether the text of a field, the data entry box of a field, a roster, etc.) and use it asthe basis for aligning all other selected elements. This alignment method works best for fields that have been placedon the form in a top-to-bottom manner, with text either to the left or right of the respective data entry box.
Center
This will take the [horizontal] mid-point between the left-most and right-most items (whether the text of a field, thedata entry box of a field, a roster, etc.) and use it as the basis for centering all the selected elements. This alignmentmethod works best to center text items that have been placed in a top-to-bottom manner, or to center the text of afield over the data entry box.
Right
This will take the right-most item (whether the text of a field, the data entry box of a field, a roster, etc.) and use it asthe basis for aligning all other selected elements. This alignment method works best for fields that have been placedon the form in a top-to-bottom manner, with text either to the left or right of the respective data entry box.
Top
This will take the top-most item (whether the text of a field, the data entry box of a field, a roster, etc.) and use it asthe basis for aligning all other selected elements. This alignment method works best for fields that are spread outacross the form in a left-to-right manner, with text either above or below the respective data entry box.
Mid
This will take the [vertical] mid-point between the top-most and bottom-most items (whether the text of a field, thedata entry box of a field, a roster, etc.) and use it as the basis for aligning all the selected elements on the mid-point.This alignment method works best to center text items that have been placed in a left-to-right manner, or to centerthe text of a field next to the data entry box.
Bottom
This will take the bottom-most item (whether the text of a field, the data entry box of a field, a roster, etc.) and use itas a basis for aligning all other selected elements. This alignment method works best for fields that are spread outacross the form in a left-to-right manner, with text either above or below the respective data entry box.
Evenly Horizontal
This will evenly space three or more items (whether the text of a field, the data entry box of a field, a roster, etc.)horizontally. The left-most and right-most items will not move. This alignment works best to evenly space data entryboxes across the screen.
Evenly Vertical
This will evenly space three or more items (whether the text of a field, the data entry box of a field, a roster, etc.)vertically. The top-most and bottom-most items will not move. This alignment works best to evenly space data entryboxes one above the other.
Please note that aligning items could have unintended results. For example, if your fields are spread across the form
Pa ge 172 of 684 Modi fy Thi ngs i n a Form

from left to right and you choose to left- or right-align them, they will end up superimposed, one field on top of another.Similarly, if your fields are displayed in a list-type fashion down the page and you choose to top or bottom align them,they will again end up superimposed, one field on another. If this happens, you should press Ctrl+Z to undo the changeand restore your previous layout.
Cut, Copy, or Paste Things To move things around in the Dictionary use cut, copy, and paste. Cut will delete the material from the dictionary andplace it on the clipboard. Copy will just place a copy of the material on the clipboard. Paste will place a copy of thematerial on the clipboard into the dictionary. • To cut things
Select the material you want to cut, then click on the toolbar; or from the Edit menu, select Cut; or press Ctrl+X. • To copy things
Select the material you want to copy, then click on the toolbar; or from the Edit menu, select Copy; or pressCtrl+C.
• To paste things
Select the place where you want the records, items, or values to be pasted, then click on the toolbar; or from theEdit menu, select Paste; or press Ctrl+V.You can paste cut or copied material to more than one location. Use undo if you paste to the wrong place.
See also: Undo
Resize and Reposition Things in a RosterChanging the Roster Size
Select the roster by clicking on the gray space in any cell. You will see eight small black squares (the resize handles)around the edges at the corners and sides of the roster. Move the mouse pointer on top of any resize handle until themouse pointer changes to a double-headed arrow. Click and drag to the desired size. CSPro will automatically create orremove scrollbars as needed.
Changing the Column Width
Move the mouse pointer over the right edge of the column you wish to resize until the mouse cursor changes to a double-headed arrow. Click and drag to the desired width.
Changing the Row Height
Move the mouse pointer over the bottom edge of the row you wish to resize until the mouse cursor changes to a double-headed arrow. Click and drag to the desired height.
Changing the Order of Columns
At data entry time, fields are keyed in the same order in which they appear in the roster columns, left to right (or top tobottom if the roster orientation is vertical). To change the order of columns, click on the column heading and drag to thedesired position. A gray separator line will tell you where you are about to drop the selected column.
Moving Fields, Text, or Boxes
Select the object by clicking on it. Move the mouse pointer over the object until the mouse pointer changes to a four-headed arrow. Click and drag to the desired position.
Pa ge 173 of 684 Modi fy Thi ngs i n a Form

Join and Split Roster ColumnsBy default, CSPro puts one field in each column. You can put two or more fields in a column by using the Join facility.
Joining Two or More Columns
Select two or more adjacent columns. You can do this by holding down the Ctrl key and clicking on each column. Right-click and choose Join and type in the text for the joined column.
Splitting a Column
Click on the column heading to select it, then right-click and choose Split. If a column already has more than one field init (from a previous join), you can Split the column so that there is one column for each field.
Delete Form ElementsDeleting a Field From a Form
Click on the field on the form, or on the forms tree, then press Delete, or right-click and choose Delete.
To Delete a Form
Click on the form on the forms tree and press Delete, then choose Delete Form from the main menu at the top.
Matching the Application to the Data DictionaryWhenever an existing application is specified, the system automatically checks to make sure the application matchesthe data dictionary. This is to alert you in case a change was made to the data dictionary after the application was lastsaved, or in case you typed in the wrong data dictionary name.
If the application does not match, the system will indicate that discrepancies exist and will ask you to permit theupdating of the application. If you prefer not to accept the update or if you wish to first investigate the cause of thediscrepancy, you may answer No and the system will not open or update the application. You can then verify that youhave the correct dictionary and review any changes that might have been made since the last time the application wasopened.
Pa ge 174 of 684 Modi fy Thi ngs i n a Form

Change Form PropertiesChange Forms File Properties Right click on the form file ( ) on the tree (top most entry) and choose Properties.
• Label
This is descriptive text that helps you identify the current forms file. It may contain any characters (including blanks)and be up to 120 characters long.
• Name
This is the name of the forms file which you would use when writing programming logic. It must consist of letters,digits and the underscore ('_') character. It must not begin or end with underscore. You can see either labels or names on the forms tree. Press Ctrl+T to switch back and forth between them.
Change Level Properties Right click on the level ( ) on the tree and choose "Properties."
• Label
This is descriptive text that helps you identify the current level. It may contain any characters (including blanks) and beup to 120 characters long.
• NameThis is the name of the level which you would use when writing programming logic. It must consist of letters, digits andthe underscore ('_') character. It must not begin or end with underscore. You can see either labels or names on the forms tree. Press Ctrl+T to switch back and forth between them.
Change Form PropertiesRight-click on the form button on the tree and choose Properties, or right click on empty space on the form itself and
Pa ge 175 of 684 Cha nge Form Prope r e s

choose Form Properties.
Label
This is descriptive text that helps you identify the current form. It may contain any characters (including blanks) and beup to 120 characters long.
Name
This is the name of the form which you would use when writing programming logic. It must consist of letters, digits, andthe underscore ('_') character. It must not begin or end with underscore.
You can see either labels or names on the forms tree. Press Ctrl+T to switch back and forth between them.
Color
The button shows the color of the form. To change the form color, click on this button, select a new color and click OK.You can change the form color back to what it was originally (usually gray) by clicking on the Reset Default Colorbutton. You can make all forms the same color by clicking on the Apply to All button.
Extended Controls Popup Position
If your program uses extended controls, you can specify where on the form you want the popup boxes to appear. Enablethis option by clicking on the Use Custom Settings checkbox and then specify the X (horizontal) and Y (vertical)coordinates for the boxes. The (0,0) origin point of the form is located at the form's top left corner. When editing a form,the status bar will show the X and Y coordinates of your cursor, which is one way to determine your desired coordinates.Clicking Apply to All will set the capture position for all forms. Clicking Disable on All will turn off this functionality forall forms and the popup windows will appear in their default positions, as close to the field as possible. The captureposition can also be set in logic using the setcapturepos function.
Change Block PropertiesTo bring up the Block Properties dialog, right-click on a block in the tree and select Properties.
Pa ge 176 of 684 Cha nge Form Prope r e s

Label
This is descriptive text that helps you identify the block. It may contain any characters (including blanks) and be up to120 characters long.
Name
This is the name of the block, which you use when writing programming logic. It must consist of letters, digits, and theunderscore ('_') character. The name must begin with a letter and cannot begin or end with an underscore.
Show on same screen on mobile
When this option is selected, all the fields in the block are shown on the same screen during mobile data entry. Theoperator can fill in these fields' values in any order before continuing with data entry. If the option is not selected, eachfield will be displayed separately, as is the case for fields that are not part of blocks.
See also: Blocks
Change Field PropertiesRight click on the field in the tree or on the form and select Properties. You can also press Alt+Enter to bring up theproperties window.
Field Name
Pa ge 177 of 684 Cha nge Form Prope r e s

This is the name of the dictionary item associated with this field. It is the name you use to refer to this field when writinglogic. Mirror fields will show the dictionary name with three digits appended to it. You cannot change this property.
Screen Text
This is the text that is associated with the data entry box on the form. It is also the text that is displayed on the mobilecase tree for the field. If Linked to dictionary item is checked, then the screen text is synced to the label of theassociated dictionary item. That is, if the dictionary item's label changes, then the screen text will change automatically.
Skip to
This is the name of the field that will be skipped to if the operator presses the plus (+) key on the numeric keypad. If the"skip to" field it is blank and the plus key is pressed, CSPro skips to the next field in sequence. "Skip to" is availableonly in operator-controlled data entry mode.
Capture Type
This attribute allows you to specify an extended control (a popup window that shows entries in the value set) for the field,or to change the appearance of an alpha field.
Validation Method
This attribute allows you to specify how CSEntry validates the value entered in the field. The default option Use value setand capture type means that CSEntry will ensure that a value is part of the field's value set (if applicable), and also, fordate and check box capture types, that the value is valid (beyond simply the value set checks). The option Allow out ofrange with confirmation means that, if the value is not in the value set or invalid based on the capture type, theoperator will be presented with a confirmation message and the operator can accept the invalid value. The option Allowout of range without confirmation allows the entry of any value into the field. More information about validation can befound on the extended controls page.
Keyboard Input
This attribute allows you to choose a keyboard ID that specifies what keyboard input to use for the field, which may beuseful in multiple language environments.
Persistent
Check this box to make a field persistent. Persistent fields are ID fields that take the value from the previous case in thedata file as their default. Persistent fields are typically used for geographic IDs that change very rarely from one case toanother. These fields are shown as light gray boxes on the form. In CSEntry, the operator must press a special key (F7)to change the value of a persistent field. You can make any ID field (except for mirror fields) persistent.
Auto Increment
Check this box to make a field auto increment. Auto increment fields are ID fields that receive an automatic value basedon a calculation using the other cases in a data file. For the first case in the data file, the ID field is set to 1. Forsubsequent cases, the field takes the value of the highest value in the data file plus 1. Auto increment fields are similarto sequential fields except that they work on ID fields across multiple cases, whereas sequential fields work across arepeating group in a single case.
Sequential
Check this box to make a field sequential. Sequential fields automatically increment at data entry time. They arecommonly used as occurrence-number fields in multiple groups. A sequential field takes the value 1 on the firstoccurrence. For subsequent occurrences, CSEntry will use the value of the previous occurrence and add 1. If the field isnot also marked as protected, the operator may change the sequence at any time by simply keying a new value, andfrom that point, CSEntry will use this new value to continue the sequential incrementation. You can make any field(except for mirror fields) sequential. You can define your own kinds of sequential behavior for fields by writing pre-processing logic. In this case, do not use the sequential field attribute.
Pa ge 178 of 684 Cha nge Form Prope r e s

Protected
Check this box to make a field protected. Protected fields are not keyed during data entry. Protected fields arecommonly used to display a value that is calculated elsewhere (for example, the sum of other keyed fields). You mustwrite logic to set the value of a protected field. You can make any field protected.
Mirror
Mirror fields show the value of a previously entered field on the screen. The cursor never goes to a mirror field during dataentry. Mirror fields are useful to display values from one screen on another screen. Any singly occurring item can be amirror field. A common use of mirror fields is to show the geographic IDs on all screens. The first form might contain thegeographic ID fields which the operator keys in, and subsequent forms might contain the geographic ID mirror fields,which will show the operator the ID values even when the ID form is not on screen. The first time you drag a dictionaryitem onto a form you create the normal entry field. On each subsequent occasion that you drag the same dictionary itemonto a form, you create a mirror field.
Upper Case
Check this box to make a field upper case. Alphanumeric fields can be upper case. This means that every alphabeticcharacter that is keyed will be forced to upper case.
Use Enter Key
Check this box if you want to force the data entry operator to press the Enter key to advance to the next field. If leftunchecked, the cursor automatically advances to the next field (after the maximum number of characters have beenentered).
Verify
Check this box if you want to verify the field when the operator is in verification mode. If left unchecked, verification isskipped. If checked, verification will occur as follows: after each field is keyed, the value entered is compared with thevalue currently in the data file. If there is a difference, an error message is displayed, and the field must be reentered.
Hide in Case Tree
Check this box if you do not want the field to appear in the mobile case tree. You might, for example, have some controlfields that the interviewer does not need to see when conducting the interview.
See also: Change Field Properties for Multiple Fields
Change Field Properties for Multiple FieldsIt is possible to change the properties for many fields at one time. To change the properties for all fields in yourapplication, select Field Properties from the Options menu. Alternatively, select multiple fields on a form and thenright-click on a field and select Properties, or press Alt+Enter.
Pa ge 179 of 684 Cha nge Form Prope r e s

The selected attributes will only apply to fields that support the options. For example, if Upper Case is selected, thatoption will be ignored for numeric fields and will be applied only to alpha fields. Selecting <no change> means that thatsetting will be ignored when applying the new properties.
The Data Capture Type options allow you to change the type of extended control used for the field. It will list the unionof valid possibilities for the selected fields, but if a change is requested it will apply the change only to fields that cansupport the specified type. For example, selecting Check Box will only apply that option to alphanumeric fields that cansupport checkboxes. The capture type of fields that do not support the selected type will remain unchanged. If you wouldlike to set the capture type to the default based on the field's item and value set properties, select <default for field>.
If you selected multiple fields on a form to bring up this dialog but would like to apply the changes to all the fields in yourapplication, select the Apply to all fields option.
See also: Change Field Properties
Change Keyboard InputTo manually change the keyboard input for a field, view the field's properties and select Keyboard Input -> Change.
You can specify a specific keyboard input method for a field if you would like to avoid making keyers change inputmethods manually. The list is populated by currently activate input methods. If an input method is not listed, activate itfirst, typically by modifying the Regional and Language Options in the Control Panel.
The keyboard input method will only apply to the selected field. After the keyer moves away from the field, the input
Pa ge 180 of 684 Cha nge Form Prope r e s

method will return to the default keyboard setting. For example, suppose that there are four fields:
Field Name Keyboard IDField1 0Field2 0Field3 1067Field4 0
In the above scenario, the keyboard input method will only be modified for Field3, which will be entered in Armenian.However, suppose that the keyer manually changes the keyboard from the default keyboard to Arabic while on theField2. In that case, Field3 will be entered in Armenian, and then the input method will be changed back to Arabic forField4. In other words, the Default Keyboard input method resets the keyboard back to whatever input method was lastactive on another field with a keyboard ID of 0.
When CSEntry loads the data entry program, it also loads any keyboard input methods that are not currently active onthe machine. The input methods will be unloaded when CSEntry terminates. However, some input methods requireadditional files that do not come in a standard Windows installation. CSEntry can only use input methods that contain allthe required files. If the files do not exist, the Default Keyboard will be used for those fields. Before deploying yourapplication you will want to ensure that the required input methods are installed on each keyer's machine.
See also: ChangeKeyboard Function, Change Field Properties for Multiple Fields
Change Roster PropertiesRight click on the gray space in any roster cell and choose Properties.
Roster Label
This is descriptive text that helps you identify the current roster. It may contain any characters (including blanks) and beup to 120 characters long.
Roster Name
This is the name of the roster which you would use when writing programming logic. It must consist of letters, digits andthe underscore (_) character. It must not begin or end with underscore.
Pa ge 181 of 684 Cha nge Form Prope r e s

Occurrence Control Field Name
If set to a singly-occuring field on the form, entry in the roster will stop after the keyer has entered the number of rowsdetermined by the occurrence control field name's value.
Orientation
This defines whether the cursor will move from left to right or from top to bottom during data entry.
Free Movement
This defines the order in which to enter a record with multiple occurrences: all the items in a record n times or each itemn times before continuing with the next item
You can see either labels or names on the forms tree. Press Ctrl+T to switch back and forth between them.
Change Column Heading Properties Right click on a column heading and choose Properties.
• Column Heading
This is the text that shows in the heading. CSEntry may automatically wrap text to make two or more lines, if thecolumn width is small. You can force your own multi-line text by using Ctrl+Enter at the end of each line. For exampleif you type "Age of", then Ctrl+Enter, then "Mother", you will have two lines of text no matter how wide the column is.
• Horizontal alignment
This allows you to force the text to be left-aligned, right-aligned, or centered within the column heading area. • Vertical alignment
This allows you to force the text to be aligned at the top, middle, or bottom of the column heading area. • Font
To change the font of the column heading text, choose the "Use custom font for text" radio button then click on the"Choose font" button.
• Text Color
The button shows the color of the selected text. To change the text color, click on this button, select a new color and
Pa ge 182 of 684 Cha nge Form Prope r e s

click "OK." You can change the text color back to what it was originally (usually black) by clicking on the "ResetDefaut Color" button. You can make all text on all forms the same color by clicking on the "Apply to All" button.
See also: Change Row Heading Properties
Change Row Heading Properties Right click on a row heading (occurrence label) and choose "Properties."
• Row Heading
This is the text that shows next to the row. CSEntry may automatically wrap text to make two or more lines, if thewidth of the occurrence label area is small. You can force your own multi-line text by using Ctrl+Enter at the end ofeach line. For example if you type "College or", then Ctrl+Enter, then "University", you will have two lines of text nomatter how wide the occurrence label area is.
See "Change Column Heading Properties" for a description of the rest of the properties.
Change Text PropertiesSelect any text item to change the text itself. Select any text item or group of text items to change their font. Onceselected, right-click and choose Properties. You can change the font for all text fields on all forms by choosing Option -> Default Text Font from the main menu.
Pa ge 183 of 684 Cha nge Form Prope r e s

TextEnter the new text here. It may contain any characters (including blanks) and be up to 120 characters long.
Font
This shows what font is in effect for the selected text. To change the font, select the Use custom font radio button thenclick on the Choose font button.
Text Color
The button shows the color of the selected text. To change the text color, click on this button, select a new color andclick OK. You can change the text color back to what it was originally (usually black) by clicking on the Reset DefaultColor button. You can make all text on all forms the same color by clicking on the Apply to All button.
Pa ge 184 of 684 Cha nge Form Prope r e s

Data Entry EditingIntroduction to Data Entry Editing As we saw in previous chapters, a data entry application contains a set of forms (screens) which a data entry operatoruses to key data to a disk file. Data entry applications can be used to add new data to a file and to modify existing data.You can also include logic to perform consistency checks, generate complex skip patterns, look up information in one ormore external files, and display messages after any field is entered. A number of statements and functions in the CSProlanguage set may be used only within data entry applications. They are generally related to the creation and/ormodification of a case, and may require operator interaction. You use the Forms Designer module of CSPro to develop the data entry application. You use CSEntry to run the dataentry application, and use the CSPro language to develop validation procedures to be carried out at data entry time. This section contains the following information: Editing Concepts Writing Logic
Pa ge 185 of 684 Da ta Entry Edi ng

Editing ConceptsType of Edits in Data EntryValidate Individual Data Items
These checks are designed to determine whether a response has a value that is inside or outside the valid limits for thatresponse as defined in the dictionary. The data entry application can be designed to allow forcing out-of-range values, toforce the operator to reenter a valid value, or not to allow any input on the item.
Perform Structure or Consistency Edits
You can write code to check the structure of the case or test the consistency within related items. These instructionscan be written for any object such as a case, level, form, record, roster, or field. The instructions can be executed beforethe cursor moves into the object (onfocus); at the beginning of an object (preproc); after cursor moves off the object(killfocus); or at the end of the object (postproc). You can also perform Interactive Editing after you finish entering acase.
Display Error Messages
The system displays automatic error messages if the item is out-of-range, but you can also use the errmsg function towrite customized messages to be displayed in the screen during data entry.
Control the Data Entry Flow
You can use skip or advance statements to control the data entry flow in a case or end data entry at any time if aparticular condition occurs. Also see the endgroup and endlevel statements.
Control Stopping Data Entry
The OnStop function can be used to keep the operator from stopping data entry or to allow stopping only under certainconditions. You can also stop the application for the current case or terminate the operation. You can stop theapplication at any time and the system will save the partial case. Also see the ispartial function.
Write Notes
You can add notes to a field, which can be viewed by the operator and/or edited. These notes can be used to displayinstructions to the keyer or to elaborate on a particular value. See the putnote, getnote, and editnote functions.
Generate Reports
You can write customized reports to a file. For example, you could create a report to summarize the demographiccharacteristics in the household.
Use Secondary Forms
You can use a secondary form to enter data under certain conditions.
Display Option Menus
The system displays a window with the valid values and the operator may select the correct one. See the accept orshowarray functions.
Pa ge 186 of 684 Edi ng Conce pts

Use External Files
The most common functions are loadcase and retrieve. The selcase Function can only be used in data entryapplications.
Examine Content of Item
You can examine the content of a numeric item with the visualvalue function or alphanumeric item with thehighlighted function before the item has been keyed.
Structure EditsStructure edits can be used to check coverage and to establish that each case has the correct number and type ofrecords. The tests that make up a structure edit ensure that the questionnaires are complete before beginning theconsistency edit. In a typical Housing and Population census, the structure edits will check that:
For all collective and conventional households within an enumeration area, all required records are present and arein the proper order.
Each enumeration area (EA) batch has the correct geographic codes.
Where required, each household has one and only one housing record.
Each occupied housing unit has at least one person record, and vacant housing units (where permitted) have noperson records.
Within a household (conventional or collective), there must be one and only one person record for each member ofthe household (i.e., no duplicate or missing records) such that the total number of person records is equal to therecorded count of persons in the household.
Within each conventional household, there is one and only one qualified head of household; within each collectivehousehold, there is no head of household.
Consistency EditsConsistency edits look at the individual data items within a questionnaire or case, and examine the validity of each itemand the consistency of each item with respect to other related items. For example, the degree of educational attainmentof an individual should have some predictable relationship with the person's age. This means that it is not expected that a9-year-old child will have progressed much beyond the fourth or fifth year of elementary school, depending on localstandards. If, in the unedited census data, a 9-year-old indicates educational attainment above that level, it is probablethat either the age or the educational level have been incorrectly recorded. Whether the age or the educational level ismodified to produce data consistency is a decision left to the subject-matter specialists, who should know whether agedata or education data are more correctly reported. It is also important to take into account the method of data capture;some, like scanning, are prone to systemic error (that is, where a "0" is consistently read as a "9," for example). If sucherror is not recognized and taken into consideration when assessing the reliability of reported information, it can lead toeven greater error in the final data.
At a minimum, consistency checks should seek to resolve all errors which might eventually lead to doubts about thequality of the data. That is, the subject-matter specialists must consider the types of tabulations to be produced and theuses to which the data may be put in the future. For example, if the plan includes tabulations of educational achievementby age and sex, the edit specifications must include a means of detecting and correcting the data for individuals whosedeclared educational achievement is not in line with their declared age (as in the example of the preceding paragraph). Ifa published table shows even one 9-year-old having completed secondary school, the quality of the data will be calledinto question, simply because (in that particular culture) it is not the norm that a child so young could be so advancededucationally. It makes no difference if, in fact, the child is a prodigy and did indeed complete secondary school; when itis a case of one or two "outliers" and the weight of probability is against them, the values must be changed and broughtin line with reasonable expectations. It is not recommended that such changes be made only in the logic whichgenerates the tables; if the data (even a subset) are to be given out to researchers or other users outside the statisticaloffice, they must be clean and consistent throughout before distribution.
Pa ge 187 of 684 Edi ng Conce pts

Checking Errors You can check for errors at the time you enter the data or perform interactive editing after the data have already beenentered. You can use the same programmed logic that was in effect during data entry to find problems that were left unresolvedby the original keyer, or you can use different logic to check for other conditions. Improperly identifying errors can waste precious personnel resources, so a precise set of rules should be developed withinput from subject-matter specialists. During data entry the system automatically displays a message if value for item is out-of-range. However, you might wantto write your own message for missing or out-of-range values. For example, if enumerators had been instructed to recordall persons older than 110 years of age as '110,' the first-pass check for errors might include the following code: PROC AGEif AGE in 0:110 then exit; { the age range is OK, nothing else to do }elseerrmsg ("Person %d, has incorrect age: %d", $);
endif; So what does this code do? If a person's age is in the range from 0 to 110 ('0' is for infants born less than 12 monthsbefore the Census reference date), then the value is accepted as valid and program flow exits the procedure. If not, thenthe value is either outside this range or missing, in which case the subsequent errmsg statement will be executed,showing the reported age for Person N. More involved edits may be needed for other variables. For example, fertility information is only asked of a female of acertain age. So if fertility information is present, you may wish to confirm the values of other variables. A possible testcould be as follows: PROC FERTILITYif FERTILITY in 0:20 then { there are 0-20 children } if sex = 1 then {if sex = male} errmsg ("male has fertility info present"); {message displayed} reenter; {operator must enter valid value} else {sex is not male} if sex = 2 then {if sex = female, check woman's age } if age < 15 then { 15 = minimum age for fertility } errmsg ("woman is too young (%d) to have children", age); endif; endif; endif;else { Fertility is blank } if sex = 2 then { a problem if the woman is "of age" } if age >= 15 then errmsg ("woman aged %d should have fertility info", age); endif; endif;endif;
As you see, the complexity of the logic used to find (and soon, correct!) errors will depend on the specificationsprovided. In the case where specifications are minimal, it is important that the programmer consider allsituations/paths in developing the logic.
Pa ge 188 of 684 Edi ng Conce pts

Writing LogicData Entry Logic Screen Layout Logic for data entry screens is written when developing the application. Forms Designer permits viewing either the formsor the logic associated with the application on the right-hand side of the split screen. To initiate the process of creating
logic for an application, click on ; or from the View menu select "Logic"; or press Ctrl+L. To go back to the forms,
click on ; or from the View menu select "Form"; or press Ctrl+M.
The screen is divided into three main work areas: the Tree View, the Logic View and the Message View. • Tree View
The window on the left half of the screen displays the data entry tree with the first form ( ) selected. • Logic View
This is the window block in the upper portion of the right half of the screen. It is the programmer's "clean slate, towhich may be added logic for any part of the data file: any item, any section, any record, even the file as a whole. It isup to the programmer to determine the correct placement and sequence of execution for each logical element. Theinitial screen (PROC IDSO_FORM) represents the Identification form or initial form. If you move to the top of the tree (
), then the logic view will display:
{Application 'MYDATAENTRY' logic file generated by CSPro }PROC MYDICT_FF
Pa ge 189 of 684 Wri ng Logi c

PROC GLOBAL
This is the beginning of your program. This two lines of code will always be in your application file. You write thedeclaration statements under PROC GLOBAL, then the procedures for the event. If code has been written for a given edit level, form, roster, or field, a check mark will appear superimposed on the iconfor that entity. This is how, at a quick glance, you can see where you have placed programming logic. Once one line ofcode has been written anywhere in the program, a check mark will appear on the Forms File icon.
• Message View
This is the window block in the lower portion of the right half of the screen. It is devoted to messages (user-created andsystem-generated). As with the Tree View, tabs are available to the programmer; clicking on one of them will make thecontents of that view active. The Compiler Output tab displays errors found during compilation of your program; if thecode compiled successfully, it will state "Compile Successful." The Message tab is used to type in error messagesthat will be used in the execution of the program.
If you wish to modify the size of any of these three work areas, just place the mouse over one of the separating bars,grab it, and drag to resize.
Moving Around a Logic ApplicationTo move around your edit application, select individual items from the Forms (in a data entry application) or Edits (in abatch application) tree tab. The logic view will update to display the programming logic (if any) for that item. If you selectthe root of the tree, all logic written for the entire edit application is displayed.
For example, suppose you select AGE from the tree and there is no associated programming logic, you will see in thelogic view:
PROC AGE
Since there is no logic, PROC AGE is generated "on-the-fly" and will not be saved in the logic file. If there was associatedlogic, you might see something like this:
PROC AGE
if not ( AGE in 0:99 ) then errmsg("Invalid age found"); endif;
Order of Executing Data Entry EventsAn "event" is a unit of logic associated with an element of the edit tree, such as a form, a field, etc. The order in whichevents are executed during data entry is dependent on two factors:
1. The inherent order imposed by the CSPro software design, and
2. The order in which data items are entered, which is determined by the designer of the application
CSPro is based on the concept of a "case" containing one or more types of "collections of information." The "case" willusually correspond to the questionnaire used in the survey or census, and the "collections of information" [or groups ofdata items] will usually correspond to one or more record types that make up the case/questionnaire. These elementsconstitute a hierarchy, and in applying logic, CSPro follows this hierarchy; that is, it begins with any logic that pertains tothe file itself, and works "down the tree" through the various levels. CSPro executes application events one case at atime. During data entry, preproc, onfocus, onoccchange, killfocus and postproc statements are executed in theorder in which they are encountered.
The following diagram illustrates the default order of events for a two-level data entry application that has no skip oradvance statements that might otherwise alter the program's natural flow. Level 1 has two forms (1 and 2) and level 2 hasone form (3). This description applies to both system- and operator-controlled applications.
Pa ge 190 of 684 Wri ng Logi c

Form File preproc Level 1 preproc Form 1 preproc Form 1 onfocus Field 11 preproc Field 11 onfocus (entry of Field 11) Field 11 killfocus Field 11 postproc ... Field 19 preproc Field 19 onfocus (entry of Field 19) Field 19 killfocus Field 19 postproc Form 1 killfocus Form 1 postproc Form 2 preproc Form 2 onfocus Field 21 preproc Field 21 onfocus (entry of Field 21) Field 21 killfocus Field 21 postproc ... Field 29 preproc Field 29 onfocus (entry of Field 29) Field 29 killfocus Field 29 postproc Form 2 killfocus Form 2 postproc Level 2 preproc Form 3 preproc Form 3 onfocus Field 31 preproc Field 31 onfocus (entry of Field 31) Field 31 killfocus Field 31 postproc ... Field 39 preproc Field 39 onfocus (entry of Field 39) Field 39 killfocus Field 39 postproc Form 3 killfocus Form 3 postproc Level 2 postproc (repeat level 2 procedures for other level 2 nodes) Level 1 postprocForm File postproc
Note that the natural flow through the fields can also be altered by the use of the cursor or mouse. For example:
Scenario 1
Given: Three fields (A, B, and C). From Field A, click on Field C. Assume all fields have preproc, onfocus,killfocus, and postproc events.
Result: Field A's killfocus would execute, but its postproc would not. Nothing would execute for Field B. Finally,Field C's preproc and onfocus would execute.
Scenario 2
Pa ge 191 of 684 Wri ng Logi c
Given: Form 1, which contains one field, Field 1. Form 2, which also contains one field, Field 2. After keying Field 1,you are automatically advanced to Form 2, Field 2. You then decide to use the up/left arrow to move back to Form 1.Assume both forms and both fields have preproc, onfocus, killfocus, and postproc events.
Result: Field 2's killfocus would execute, but its postproc would not. Next, Form 1's onfocus would execute.Finally, Field 1's onfocus would execute (but its preproc would not). Note that it does not matter how many fieldsare on Form 1; the onfocus for Form 1 would always execute.
Essentially, if the programmer uses logic, or if the data entry operator moves backwards or forwards with the mouse orarrow keys, the natural flow of the program will be altered. If exiting a form, field, or roster prematurely, the killfocusevent will execute but the postproc event will not. Similarly, if entering a form, field, or roster by backing up into it, theonfocus event will execute but the preproc event for it will not.
See also: CSPro Program Structure, Order of Executing Batch Edit Events
Sequence Dictated by DesignerIn the course of creating the application, the designer may choose to modify cursor movement under certain conditions.In the example of a population census, if data are being captured for a male, or for a female under the age of 15, theapplication designer may wish to skip over the items relating to fertility because they are not applicable to thesepopulation subgroups. If the skip occurs (whether programmed or through operator control), the edit sequence will bemodified accordingly. In addition, if the operator moves backward and forward through the forms, the edit sequence mayalso be affected, depending on the type of control (operator or system).
Compile an ApplicationWhen CSPro compiles your application, it checks the logic you have written to see if there are any errors or warnings.Errors typically include spelling a command incorrectly, not using proper command syntax, and putting logic in thewrong place. Error messages appear in the panel at the bottom of the right-hand screen and a red dot appears to the leftof the line that contains the error. Warnings usually involve using commands in questionable ways. Warning messagesalso appear in the panel at the bottom of the right-hand screen and a yellow dot appears to the left of the line thatcontains the warning.
You can choose to compile code for a specific item, or for the entire application. To compile code for a specific item,simply select that item from the edit tree. The associated logic for that item will be displayed in the Logic View. Press
on the toolbar; or from the File menu, select Compile; or press Ctrl+K. The results of your compile will be displayedin the Compiler Output area at the bottom of the right-hand screen. When you are ready to compile the entireapplication, select the root node from the data entry or batch edit tree. This will display all logic written for the applicationin the Logic View. You can then press the Compile button or press Ctrl+K.
CSPro always compiles your application when you run the application. If there are errors, you cannot proceed until theerrors are corrected. During code development, you should compile only the logic for an individual data entry or batch editentity. This saves time, because the system does not have to recompile the entire logic module. Furthermore, your entirefile may not be ready for compilation (i.e., there are unfinished parts awaiting someone's input), so it will be more efficientto compile only untested code.
If your logic compiles with no problem the system will display "Compile Successful" in the Message View. Now you areready to run the data entry or batch edit application.
OnKey Character MapWith the logic view active, select View -> OnKey Character Map.
Pa ge 192 of 684 Wri ng Logi c
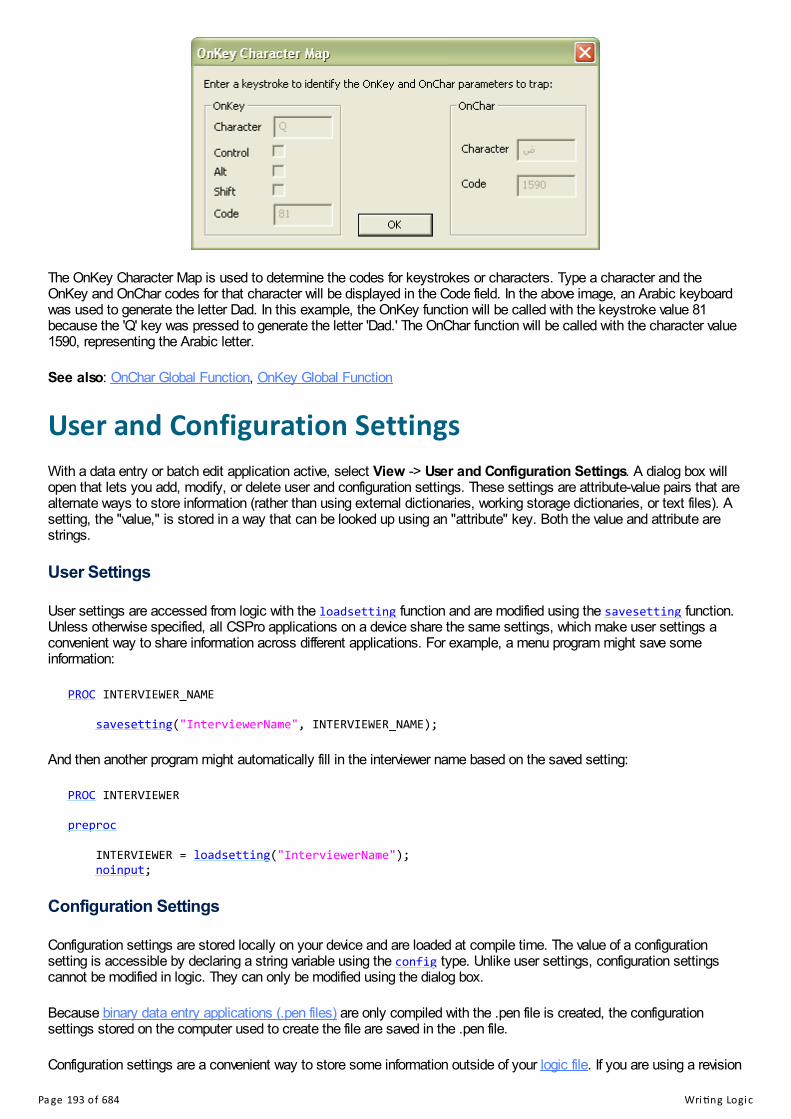
The OnKey Character Map is used to determine the codes for keystrokes or characters. Type a character and theOnKey and OnChar codes for that character will be displayed in the Code field. In the above image, an Arabic keyboardwas used to generate the letter Dad. In this example, the OnKey function will be called with the keystroke value 81because the 'Q' key was pressed to generate the letter 'Dad.' The OnChar function will be called with the character value1590, representing the Arabic letter.
See also: OnChar Global Function, OnKey Global Function
User and Configuration SettingsWith a data entry or batch edit application active, select View -> User and Configuration Settings. A dialog box willopen that lets you add, modify, or delete user and configuration settings. These settings are attribute-value pairs that arealternate ways to store information (rather than using external dictionaries, working storage dictionaries, or text files). Asetting, the "value," is stored in a way that can be looked up using an "attribute" key. Both the value and attribute arestrings.
User Settings
User settings are accessed from logic with the loadsetting function and are modified using the savesetting function.Unless otherwise specified, all CSPro applications on a device share the same settings, which make user settings aconvenient way to share information across different applications. For example, a menu program might save someinformation:
PROC INTERVIEWER_NAME
savesetting("InterviewerName", INTERVIEWER_NAME);
And then another program might automatically fill in the interviewer name based on the saved setting:
PROC INTERVIEWER
preproc
INTERVIEWER = loadsetting("InterviewerName"); noinput;
Configuration Settings
Configuration settings are stored locally on your device and are loaded at compile time. The value of a configurationsetting is accessible by declaring a string variable using the config type. Unlike user settings, configuration settingscannot be modified in logic. They can only be modified using the dialog box.
Because binary data entry applications (.pen files) are only compiled with the .pen file is created, the configurationsettings stored on the computer used to create the file are saved in the .pen file.
Configuration settings are a convenient way to store some information outside of your logic file. If you are using a revision
Pa ge 193 of 684 Wri ng Logi c
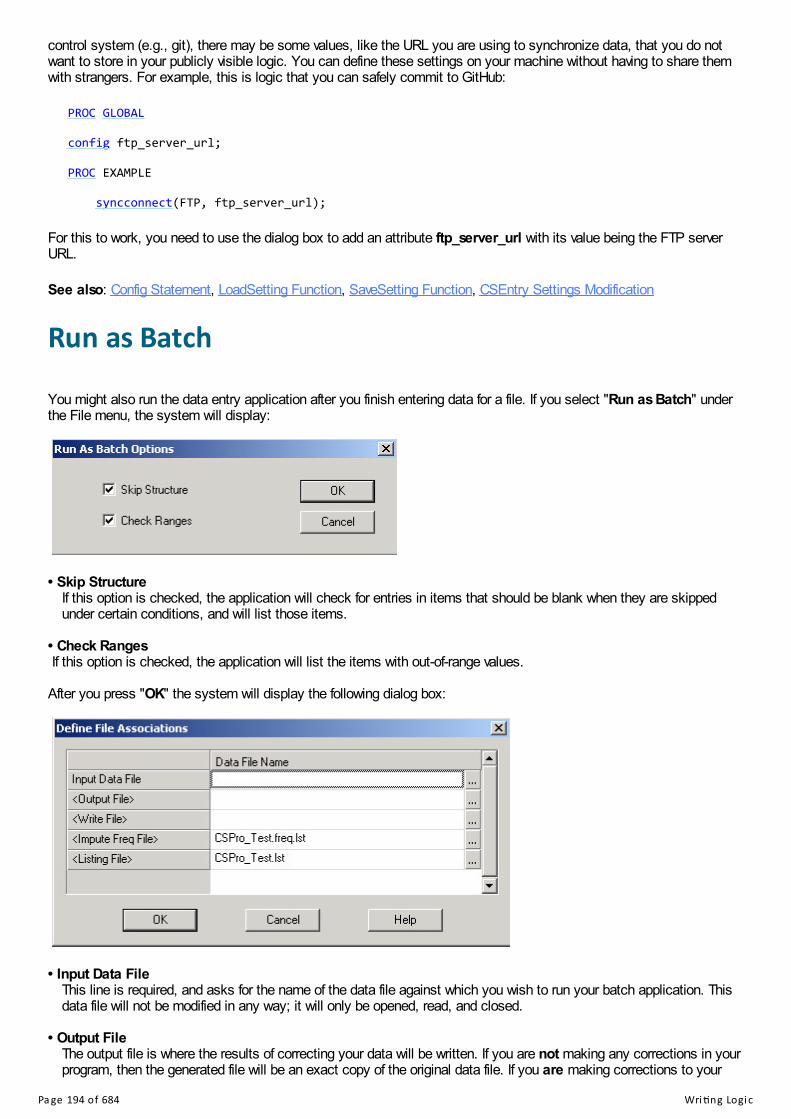
control system (e.g., git), there may be some values, like the URL you are using to synchronize data, that you do notwant to store in your publicly visible logic. You can define these settings on your machine without having to share themwith strangers. For example, this is logic that you can safely commit to GitHub:
PROC GLOBAL
config ftp_server_url;
PROC EXAMPLE
syncconnect(FTP, ftp_server_url);
For this to work, you need to use the dialog box to add an attribute ftp_server_url with its value being the FTP serverURL.
See also: Config Statement, LoadSetting Function, SaveSetting Function, CSEntry Settings Modification
Run as Batch You might also run the data entry application after you finish entering data for a file. If you select "Run as Batch" underthe File menu, the system will display:
• Skip Structure
If this option is checked, the application will check for entries in items that should be blank when they are skippedunder certain conditions, and will list those items.
• Check Ranges If this option is checked, the application will list the items with out-of-range values. After you press "OK" the system will display the following dialog box:
• Input Data File
This line is required, and asks for the name of the data file against which you wish to run your batch application. Thisdata file will not be modified in any way; it will only be opened, read, and closed.
• Output File
The output file is where the results of correcting your data will be written. If you are not making any corrections in yourprogram, then the generated file will be an exact copy of the original data file. If you are making corrections to your
Pa ge 194 of 684 Wri ng Logi c

data file, then this will be the corrected data file. The default file extension is .out, but you can use whatever you'd like.This field is optional; therefore, if you are making corrections to your data, but forget to specify an output file, nocorrected file will be generated.
• Write File
If you have any write functions in your program, they will write information to this file. The default file extension is .wrt,but you can use whatever you'd like. This field is optional; therefore, if your program contains write statements, but youforget to specify a write file, no file will be generated. Similarly, if you indicate a write file but your program does notcontain any write statements, no file will be generated.
• Impute Freq File
If your program contains any impute statements, the results of this command will be written to this file. The default fileextension is .frq, but you can use whatever you'd like. This field is optional; therefore, if your program contains imputecommands, but you forget to specify a frequency file, no file will be generated. Similarly, if you indicate a frequency filebut your program does not contain any impute commands, no file will be generated.
• Listing File
This line is required, and asks for the name of the file to which you want to write the results of the run. Results fromerrmsg functions will be written here. This file will always be generated, regardless of whether or not your programincludes errmsg commands.
Pa ge 195 of 684 Wri ng Logi c

CAPI Data EntryIntroduction to CAPICSPro supports Computer-Assisted Personal Interviewing (CAPI) data entry. In CAPI the interviewer uses a laptop,tablet, or mobile device to enter responses as they occur. The interview is conducted face-to-face, and the entryapplication (sometimes called the "instrument") determines the question order, and also performs editing of responses.
CAPI offers a flexible approach to collecting data, and can result in improved data quality and more efficient interviewingand processing. Creating good instruments, however, requires training and experience on the same level as creatinggood batch edit programs.
CATI (computer-assisted telephone interviewing) is similar to CAPI, but interviews are conducted over the phone insteadof in person.
This section contains the following information:
CAPI Features
Extended Controls
CAPI Strategies
Multimedia Features
How to ...
CAPI FeaturesA CAPI application is similar to a regular data entry application, but involves making use of some additional features.CSPro offers the following features suited to implementing CAPI surveys:
Feature DescriptionQuestion text Customized text for each question can be displayed at the top of the entry form.Help text A help shortcut (F2) can bring up customized help information for each field.Multiple languages The CAPI entry application can be developed with question and help text in several
languages; the interviewer can switch among languages as needed.Response boxes During entry, a response list of valid values for each question can be optionally displayed;
these can make the interview go more smoothly.Notes Interviewers can enter field notes when needed.Support for partial save CAPI applications can be developed so that they support partial save. This lets the
interviewer save an incomplete case, then return later to complete it.Customized branching The entry application can determine on the fly which forms or questions to present based on
the user's previous responses. This is accomplished through program logic.Immediate editing Responses can be edited, and errors or possible mistakes signaled to the interviewer. This
can help improve data quality.
See also: Multimedia Features
Extended ControlsOccasionally it may be useful to display to an enumerator or keyer the possible values for a given field in a data entry
Pa ge 196 of 684 CAPI Da ta Entry

application. For example, if a survey is being conducting on a tablet computer, it may be easier for an enumerator to usea finger or stylus to select a value rather than to key the value using the screen's touch keyboard. CSPro's extendedcontrols allow for such flexibility by allowing the program to specify the capture type associated with a field.
Selecting Extended Controls
You can indicate that you want to automatically use extended controls by selecting the Use Extended Controls option inDrag Options. If this option is selected, CSPro will automatically choose a capture type for the field based on the field'sfirst value set.
You can manually change the capture type for a field by editing the field's properties. CSPro allows you to select acapture type that is suitable for the item's first value set. A warning will appear if the value set is not suitable. In thiscase, if the value set is compatible at the time of data entry (because the value set was changed dynamically using thesetvalueset function), it will be used; if not compatible, the field will appear as a Text Box. For more programmaticcontrol, see the setcapturetype function.
The CSPro Designer shows the fields that use extended controls by coloring the border of the field in blue. The blueborder does not exist when the data entry application is run in CSEntry. The field border will be a lighter blue color whenthe Number Pad capture type is selected.
Text Box
The Text Box attribute is the default option for a field and indicates that no extended control will be displayed. OnWindows, tickmarks divide each character.
Text Box (No Tickmarks)
The Text Box (No Tickmarks) option is only available for alphanumeric fields. On Windows, CSEntry will not display anytickmarks and characters will be displayed with any connecting features. This is useful for some scripts, like Arabic,which have elements that connect, or for other languages that require multiple characters to create a compositecharacter. In the CSPro Designer you can click on the field and resize it horizontally to set an appropriate size.
Text Box (Multiline)
The Text Box (Multiline) control provides a convenient way to collect multiple lines of information in one alphanumericfield. This may be useful for information like an address or a memo field. In the CSPro Designer you can click on the fieldand resize it horizontally and vertically to set an appropriate size. In CSEntry on Windows, the data entry operator canmove up and down in the field using the arrow keys, but as with other fields, pressing Enter will move to the next field. Toadd a line break, the operator must hold down the Control key before pressing Enter.
Pa ge 197 of 684 CAPI Da ta Entry
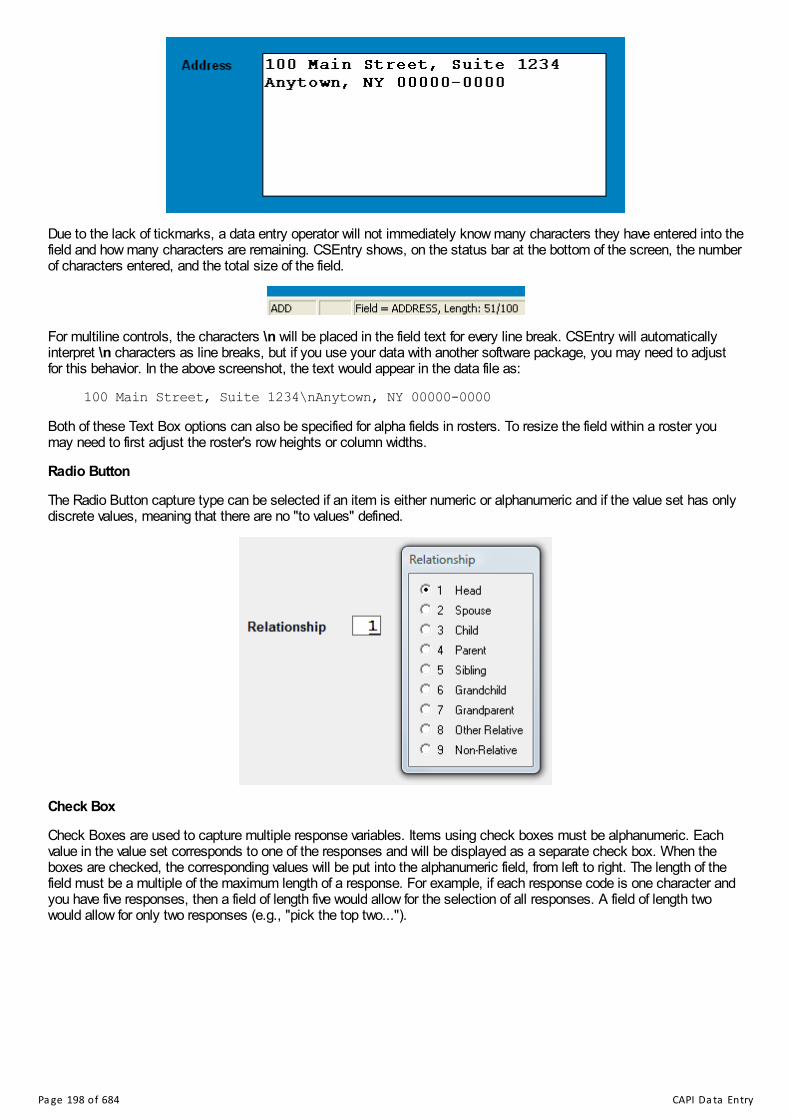
Due to the lack of tickmarks, a data entry operator will not immediately know many characters they have entered into thefield and how many characters are remaining. CSEntry shows, on the status bar at the bottom of the screen, the numberof characters entered, and the total size of the field.
For multiline controls, the characters \n will be placed in the field text for every line break. CSEntry will automaticallyinterpret \n characters as line breaks, but if you use your data with another software package, you may need to adjustfor this behavior. In the above screenshot, the text would appear in the data file as:
100 Main Street, Suite 1234\nAnytown, NY 00000-0000Both of these Text Box options can also be specified for alpha fields in rosters. To resize the field within a roster youmay need to first adjust the roster's row heights or column widths.
Radio Button
The Radio Button capture type can be selected if an item is either numeric or alphanumeric and if the value set has onlydiscrete values, meaning that there are no "to values" defined.
Check Box
Check Boxes are used to capture multiple response variables. Items using check boxes must be alphanumeric. Eachvalue in the value set corresponds to one of the responses and will be displayed as a separate check box. When theboxes are checked, the corresponding values will be put into the alphanumeric field, from left to right. The length of thefield must be a multiple of the maximum length of a response. For example, if each response code is one character andyou have five responses, then a field of length five would allow for the selection of all responses. A field of length twowould allow for only two responses (e.g., "pick the top two...").
Pa ge 198 of 684 CAPI Da ta Entry
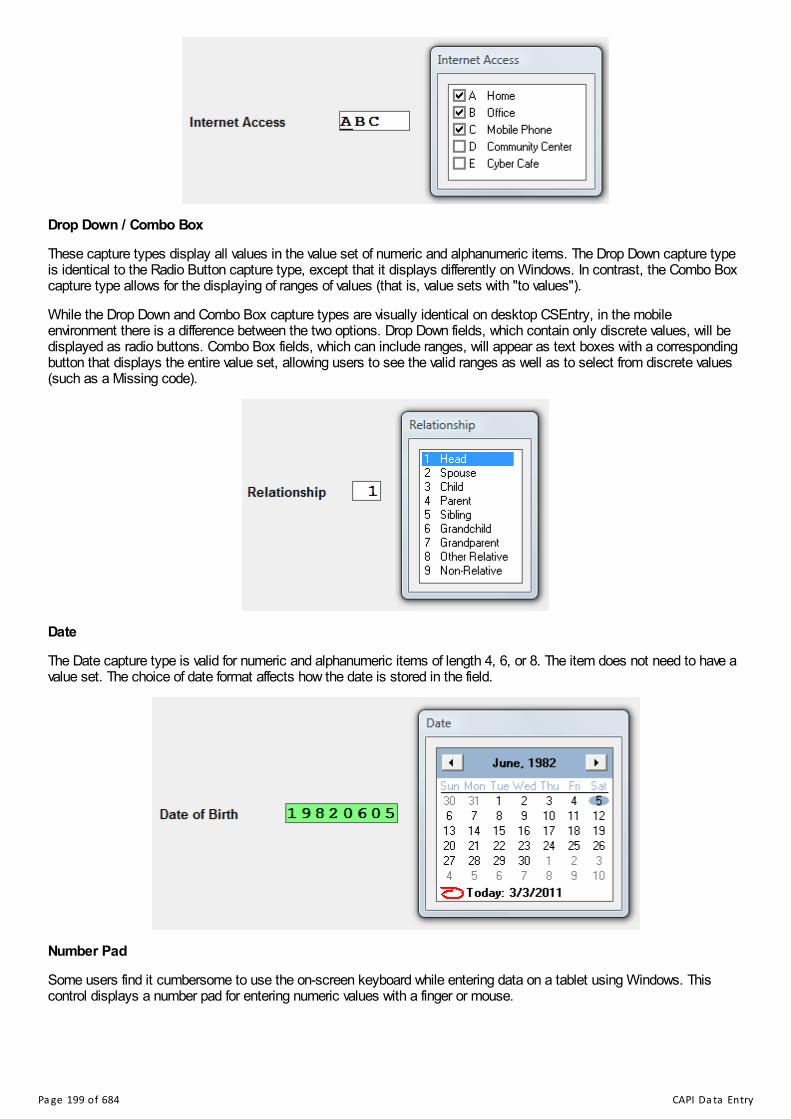
Drop Down / Combo Box
These capture types display all values in the value set of numeric and alphanumeric items. The Drop Down capture typeis identical to the Radio Button capture type, except that it displays differently on Windows. In contrast, the Combo Boxcapture type allows for the displaying of ranges of values (that is, value sets with "to values").
While the Drop Down and Combo Box capture types are visually identical on desktop CSEntry, in the mobileenvironment there is a difference between the two options. Drop Down fields, which contain only discrete values, will bedisplayed as radio buttons. Combo Box fields, which can include ranges, will appear as text boxes with a correspondingbutton that displays the entire value set, allowing users to see the valid ranges as well as to select from discrete values(such as a Missing code).
Date
The Date capture type is valid for numeric and alphanumeric items of length 4, 6, or 8. The item does not need to have avalue set. The choice of date format affects how the date is stored in the field.
Number Pad
Some users find it cumbersome to use the on-screen keyboard while entering data on a tablet using Windows. Thiscontrol displays a number pad for entering numeric values with a finger or mouse.
Pa ge 199 of 684 CAPI Da ta Entry

Hiding the Title of an Extended Control Window
By default CSEntry displays the label of the value set in the window of the extended control, but this title can be turnedoff using programmatic logic:
set attributes(dictionary-symbol) assisted off(variable(title));
Validation Method
When a capture type is used as part of the validation method, acceptance of a value is as follows:
Capture Type Numeric Field Alphanumeric FieldText Box / Number Pad In value set In value set (only for fields of length 1)Radio Button / Drop Down In value set In value setCombo Box In value set In value set (only for fields of length 1)Check Box — Comprised of values in the value setDate In value set and a valid date In value set and a valid date
See also: GetCaptureType Function, SetCaptureType Function, SetCapturePos Function
Multimedia FeaturesWhen collecting data, especially when conducting a CAPI census or survey, you can take advantage of severalmultimedia features available in CSPro. The following features are available when running CSEntry on Android devices:
Feature DescriptionAudio Record audio in the background or in an interactive mode controlled by an enumerator.Barcode Scan a barcode or QR code.Photo Take a photo and save it as a .jpg or .png file.Signature Capture a signature and save it as a .jpg or .png file.
Pa ge 200 of 684 CAPI Da ta Entry

CAPI StrategiesFormsForm layout should be easy for the interviewer to see and understand. For this reason, it's usually best to place feweritems on each form that you might with a non-CAPI application. Also, remember that screen real estate is limited in aCAPI application, since question text will occupy a large portion (sometimes up to half) of the top of the entry window.
Consider breaking your application into a series of sections, each of which deals with a topic (earnings, fertility, etc.).One or more forms are then used for each section's questions.
Avoid scrolling in CAPI applications, since this prevents the interviewer from seeing the entire form (or roster). Also, theinterview environment—laptop, maybe no mouse, possibly poor lighting—often makes scrolling cumbersome.
Also, it is good practice to gather the names of all household members at the start of the interview. Then the interviewcan cycle through each member. Doing this minimizes the risk of accidentally omitting household members.
Try to limit the size of your forms so that the interviewer won't have to scroll them. When developing your application, besure to test your application using the screen resolution that will be on the laptops used in the field.
FieldsIn CAPI data entry, consideration needs to be given to the properties of fields used in the application. The following tablelists certain field properties and how they might be used:
Use enter key This is usually selected, because otherwise the application will automatically advance to the nextfield, which might be confusing for the interviewer.
Mirror fields These are very useful in CAPI applications, as they show the contents of fields in other forms. Thiscan assist the interviewer.
Protected fields CAPI applications use protected fields to show calculated or derived values. These provide usefulfeedback to the interviewer.
Force out-of-range This is almost always turned off, since the interviewer should only be allowed to enter validresponses. However, you should consider including "not applicable", "don't know," and "refused"response categories.
CAPI applications frequently make greater use of alphanumeric responses than do traditional key-from-paper systems.This is because of the interactive nature of CAPI, and it also makes the interview more interactive (by capturing names,for example).
QuestionsCSPro shows customized question text in the top part of the entry window. To help the interviewer distinguish betweentext for the interviewer and the respondent, consider using different color fonts. For example, things the interviewer shouldsay to the respondent (for example, "How many children do you have?") might be shown in black. Instructions to theinterviewer (for example, "Ask of each household member") might be shown in blue. CSPro includes two user definedfonts, CAPI Font #1 and CAPI Font #2, which can facilitate this.
Question text can be customized using fills, or text substitutions. These fills reference the contents of variables,dictionary items, or user-defined functions. They are identified by the name of the object surrounded by percentcharacters (%). During the interview, the value of the variable or data item is substituted into the question text. Forexample, "How old was %FIRST_NAME% on January 1?" might be transformed into "How old was Edward on January1?" Fills help customize the question text and frame it for specific respondents.
Pa ge 201 of 684 CAPI Stra te gi e s

Your CAPI application can also present different sets of question text based on conditions. For example, the text forcertain questions might differ based on the number of persons in the household. Conditions can also let your applicationsupport multiple kinds of questions, depending on criteria you decide.
ValuesA CAPI application can optionally show a popup box containing an item's valid values. This makes it easier for theinterviewer to read and select response categories. The popup box appears to the side of the item, so a response couldalso be typed in. The list of responses that appears comes from the item's first value set.
If you decide to use this feature, be sure to create descriptive value sets for your questions, since these will be displayedas during the interview.
Organization of the InstrumentCAPI entry applications are almost always created in system controlled mode. because they take advantage of CSPro'sability to use logic to determine the question order.
To get started, it is a good idea to define sections containing sets of questions related to one topic. The number ofsections will vary from survey to survey. You might need a section to begin the interview and a section to end theinterview. You also might need some help sections with FAQ or roster of persons in household.
Next you need to develop an order of the sections, that is the order of the interview. Some sections like FAQ or personroster may be independent of the interview sequence, and may best be placed after the last subject matter section orafter the end of the interview section.
Now with a section you need to define the order of questions. Place one item or several items which are related to oneanother on separate forms. The forms will be in the sequence the questions are asked.
Using Multiple LanguagesCAPI respondents often speak different languages. In fact, it is not uncommon to find several languages spoken amongthe households included in a survey. It is advantageous for your entry application to accommodate the differentlanguages that respondents might speak, since doing so will improve data quality and response rates.
CSPro supports multiple languages, and lets you add languages and define question text for each. By default, just onelanguage (marked as English) is available. You can define additional languages and then enter question text for each asneeded.
During the interview, the interviewer can switch among the application's languages on-the-fly. Each question's text will bedisplayed at the top of the screen, in the chosen language. So, if an interviewer arrives at a household and finds that therespondents prefer to conduct the interview in another language, this can be easily done.
When you develop a multi-language application, it is probably easiest to finalize and test all the question texts in onelanguage. Then, once this is done, language specialists can translate them into the other languages your application willsupport. This is easy to do, since the question text editor can display question text for two languages at the same time.The translator can copy and paste text or bitmaps, if needed. Finalizing all the question text in one language first alsohelps avoid version control problems that might arise if things were translated then later modified.
Breaking Off the InterviewSometimes an interview cannot be completed in one session. CSPro gives the developer control over how an interviewcan be terminated. You might want to include a form that asks when the respondent would prefer to do the follow-up visit.
CSPro fully supports partial save, which causes a case to be saved to disk even if it is not yet complete. The case can
Pa ge 202 of 684 CAPI Stra te gi e s

be continued at a later time. Partial save is a very useful feature in CAPI applications, and should be used if any of theinterviews might not be completed in a single sitting. Very small applications, like listing operations or a short-formcensus, probably would not require partial save ability. To enable partial save, select the box in the data entry optionsdialog.
The user function OnStop can be used to trap the stop button ( ) or attempts to exit the interview (for example, bypressing Alt+F4). The developer might want to include a form that manages the exit process and saves the partial caseto disk.
You could also use OnStop() to intervene and prevent an interview from stopping, or to jump to a callback form beforeexiting. Your application also could store the field being entered, so that it could jump to that section when the interviewis later continued.
If it is necessary to return later to finish a CAPI interview, you might want to include a form that asks when therespondent would prefer to do the follow-up visit. In a production CAPI system, a separate case management systemcould take advantage of this information and assist the interviewer in tracking and scheduling appointments.
Coming Back LaterYou need to think about what behavior will be needed if an interview is continued at a later time. That is, should they startagain from the beginning of the instrument, the place where the last interview left off, or something else. Sometimesinstruments will always go through a front section to confirm household member names and other vital information andthen jump to the section where the earlier interview ended.
Prefilling ValuesIn a data entry application, it is possible to prefill fields using several approaches:
1. Make an ID field persistent, which uses the value entered for a previous case to prefill the value for a new case.The initial values of persistent fields can be specified in a PFF.
2. Make an ID field auto increment, which takes the value entered for a previous case and increments it by one toprefill the value for a new case. If no previous case has been entered, the value starts at 1.
3. Use the Key attribute of a PFF to specify the initial value of the case's ID items.
4. Use the Parameters section of a PFF to specify the initial values for non-repeating, non-persistent items.
5. Make a repeating field sequential, which automatically increments a field on a roster, incrementing it by one oneach added occurrence.
6. Specify a value in the preproc of the field; for example:
PROC INTERVIEW_END_TIME
preproc
INTERVIEW_END_TIME = timestamp();
Pa ge 203 of 684 CAPI Stra te gi e s

How to ...Create a New CAPI Application
1. Create a New Data Entry Application
2. Don't generate forms
3. From the options menu, select Data Entry Options.
4. Check the box "CAPI Mode"
5. Check the box "Partial Save", if you want to use partial save.
Notes:
After enabling CAPI mode, the forms screen will be divided horizontally. The top part is for question text (to beread during the interview), the bottom is for the normal form contents.
Define LanguagesA CAPI application can contain question text in multiple languages. The interviewer can switch among availablelanguages as needed.
1. From the CAPI Options menu, select Change CAPI Languages. The CAPI Languages dialog box will be
Pa ge 204 of 684 How to ...

displayed, showing the languages currently defined for the application.
2. You can add, remove, or modify the your application's CAPI languages.
3. You can also define multiple languages for your dictionary and message file.
Notes
Language names follow the same rules as names; that is, they must be unique and cannot contain spaces. Tryusing abbreviations like EN (English), ES (Spanish), FR (French), or PT (Portuguese).
Language labels can contain any text to describe the language.
During data entry, the interviewer can easily switch among languages.
See also: Create Helps for Fields
Organize FormsDivide your CAPI questionnaire into sections, one for each topic area. Add any special sections, such a begin and endsection or global help sections, like an FAQ. These sections organizing units for defining forms and movement within theapplication.
Break up the questions within a section into forms containing one or several responses. Remember, you only have abouthalf of the screen at the bottom to use for a form, because the question text may take up the top half of the screen.
If the form contains a roster, you should make sure that only the roster scrolls, not the form. Scrolling forms can beconfusing to interviewers.
Enter Question TextCAPI applications include a question text window (at the top of the form). You can customize the text that appears inthis window for each question in the application.
1. From the View menu, press CAPI Questions (or press Ctrl+Q). The question editor will be displayed.
2. Select an item from the tree on the left. Any text already defined for this item will be displayed in the editingwindow on the right.
3. Enter text into the editing window. You can format the text using the toolbar, or use the formatting choices shownin the CAPI Options menu.
4. When you have finished entering the question's text, you can select a different item or switch to the form view orlogic view.
The question text editor supports copy and paste operations, including pasting bitmap images.
Create Fills In QuestionsFills are used to customize question text based on respondents' specific characteristics. This is done by embeddingdictionary items, variables, occurrence labels, or user-defined functions into the text and surrounding them with percentcharacters (%).
Fills with Dictionary Items or Variables
Enter some question text that needs to be customized. For words or phrases that need to be filled, enter a dictionaryitem or variable with % characters before and after. For example:
Can I speak with %FIRST_NAME% now?
Pa ge 205 of 684 How to ...

When the entry system comes to this text, it will insert the person's FIRST_NAME value into the question text:
Can I speak with Marjorie now?Can I speak with Allyson now?
When used with numeric values, the fill uses the value code. For example, %SEX% might be 1 or 2. If you want to usethe value label, you can use the getvaluelabel function:
How old was %FIRST_NAME% when they completed %getvaluelabel(HIGHEST_GRADE_COMPLETED)%?
Fills with Occurrence Labels
You can customize the question text by inserting an item or group's occurrence labels into the text. For example:
How much did you spend on %getocclabel% in the last month?
Fills with User-Defined Functions
You can insert the return value of a user-defined function into the question text. The function can return either numeric orstring values. For example:
Thinking now about %FIRST_NAME%, what is %SexPronoun% age?
In logic, a user-defined function must be declared, as in:
function string SexPronoun()
recode SEX -> SexPronoun; 1 -> "his"; -> "her"; endrecode;
end;
The user-defined function must have no parameters or only optional parameters.
Fills with Line Breaks
You can insert a line break (newline) into a fill by inserting <br> into the value of the fill variable or function result. Forexample:
householdMembers = "Bouba<br>Frank<br>Chen";
Which will result in:
BoubaFrankChen
Or more realistically:
householdMembers = "";
do numeric ctr = 1 while ctr <= totocc(PERSON_REC) householdMembers = householdMembers + strip(NAME(ctr)) + "<br>";enddo;
Create Standard FormsPa ge 206 of 684 How to ...
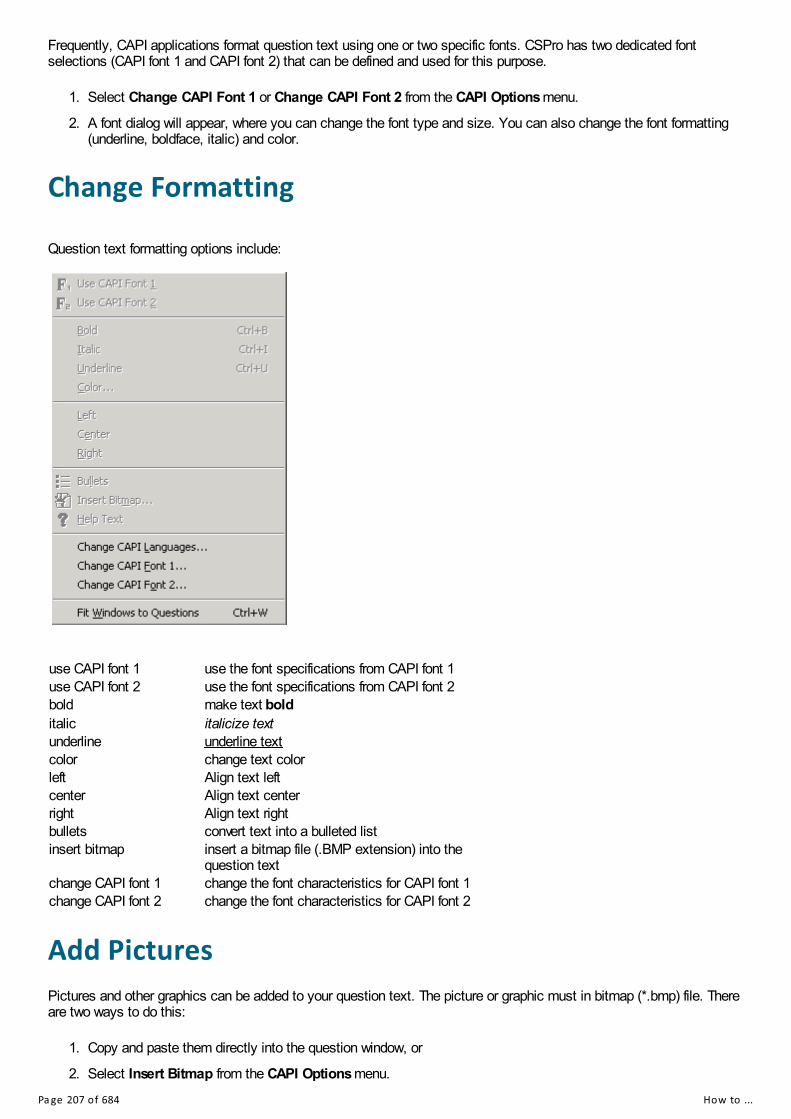
Frequently, CAPI applications format question text using one or two specific fonts. CSPro has two dedicated fontselections (CAPI font 1 and CAPI font 2) that can be defined and used for this purpose.
1. Select Change CAPI Font 1 or Change CAPI Font 2 from the CAPI Options menu.
2. A font dialog will appear, where you can change the font type and size. You can also change the font formatting(underline, boldface, italic) and color.
Change Formatting Question text formatting options include:
use CAPI font 1 use the font specifications from CAPI font 1use CAPI font 2 use the font specifications from CAPI font 2bold make text bolditalic italicize textunderline underline textcolor change text colorleft Align text leftcenter Align text centerright Align text rightbullets convert text into a bulleted listinsert bitmap insert a bitmap file (.BMP extension) into the
question textchange CAPI font 1 change the font characteristics for CAPI font 1change CAPI font 2 change the font characteristics for CAPI font 2
Add PicturesPictures and other graphics can be added to your question text. The picture or graphic must in bitmap (*.bmp) file. Thereare two ways to do this:
1. Copy and paste them directly into the question window, or
2. Select Insert Bitmap from the CAPI Options menu.
Pa ge 207 of 684 How to ...

Pictures are limited to 512K bytes in size. You can determine a picture's size by right-clicking on it in the WindowsExplorer and selecting Properties. The size, in bytes, will be displayed in the properties window. Bitmaps with 24 bitformat take up the most space. Bitmaps with only 16 colors take up the least space.
You can also add bitmaps by right-clicking inside the question window, and choosing the Insert Bitmap option.
Question Text MacrosThere are a few tasks that you can perform on a data entry application's question text using the question text macrosfunctionality. To access these tasks, either right-click on a form file in the tree and select Question Text Macros or,with the form active, select Question Text Macros from the CAPI Options menu. A dialog box will appear with thefollowing options:
Audit Undefined Text: This creates a list of fields and blocks that do not have any question text. For most applications,you will want to define question text for all fields and blocks that an enumerator will visit. This option shows you whichentities may require question text.
Remove Unused Text: If you define question text for a field or block but then remove that entity from a form, itsquestion text may remain in the .qsf file. This option will remove any unused—not connected to a form entity—questiontext from that file.
Harmonize Occurrences: Increases the maximum occurrence number of a field or block's question text to match thatof the controlling record in the dictionary. This is useful if you increase the number of record occurrences; rather thanhaving to manually increase each question's occurrences values, you can use this option.
Initialize as Dictionary Label: For any field that does not have question text defined, the question text will be set tothe field's item dictionary label.
Paste from Clipboard: Using one of the formats specified, a field or block's question text will be set to the textspecified on the clipboard.
See also: Dictionary Macros
Resource FoldersThere may be times, when deploying an application, especially to a mobile device, that you will want to include someauxiliary files that the application uses. Such files might include lookup files or value set images. To simplify thedeployment of such an application, these files can be packaged in with the data entry .pen file. The files will becompressed in the .pen file and then decompressed when the user opens the application. CSEntry will recreate thefolder structure and files contained in the resource folders. Files that already exist on the device will be overwritten only ifthe timestamp of the .pen file is newer than the timestamp of the file on the device.
To specify a resource folder, select File -> Add Files and then select a resource folder. Your application may have morethan one resource folder. All files in the resource folder, and its subfolders, will be included in the .pen file, so it isimportant to think about how to structure your data entry application so that only relevant files are bundled together in the.pen file. You might, for example, have an Images folder where you put all the value set images that your applicationuses. When decompressing data on mobile devices, files will only be saved in the csentry folder or in any of itssubfolders.
If you no longer want to mark a folder as a resource folder, select File -> Drop Files and select the folder that you nolonger want to use.
See also: Lookup Files, Value Set Images
Use Multiple LanguagesIf your application supports multiple languages, then two CAPI question text windows will be shown. Use the drop down
Pa ge 208 of 684 How to ...

list in the toolbar above each question text window to select a language. Each question can have text for each language,although this is not required.
If your CAPI application supports multiple languages, consider starting by entering text for all the questions in the firstlanguage. Then use can translate each text into the other languages by putting the first language in the top questionwindow, and translating in the bottom question window. You can also copy and paste between question text windows.
Create Conditional Questions The bottom window of the question editor is used to add conditions.
1. Select an item for which you want to add a condition (from the left-hand tree).
2. If the item's record type is multiply occurring, then columns for "Min Occ" and "Max Occ" (minimum occurrencesand maximum occurrences) will be shown in the condition editor window. A "condition" column is also shown.
3. Right-click on the blue highlight bar in the condition window
4. Choose Add Condition
5. Enter a condition.
6. Enter text for this question in the window above.
7. Add more conditions, and then question text for each.
When the entry application comes to this question, it will evaluate the first condition. If it is true, then the question textfor that condition will be shown to the user. If not, the next condition will be checked, and so on. If no conditions aresatisfied (i.e., they are all false), then no question text will be displayed. It is not necessary to add an actual condition; ablank condition will always evaluate true. The "Min Occ" and "Max Occ" let you easily base conditions on the number of occurrences of the record type. Forexample, you might have an item AGE in a person record, with conditions: Min Occ Max Occ Condition Effect1 1 this question text will be shown if there is 1 person record in the case2 5 this question text will be shown if there are 2-5 person records6 15 this question text will be shown if there are 6-15 person records this question text will be shown if the three previous conditions are all false
(that is, if there are 16+ person records) Note: Conditions can include dictionary items or variables, and can even call functions. Conditions may not includeboolean operators such as "and" and "or".
Display Questions Without ScrollingCSPro can resize all the question text windows in your CAPI application so that they will not scroll. The horizontalseparator bar will be positioned appropriately during entry.
1. Select Resize Question Windows from the CAPI Options menu; or press Ctrl+W.
2. Note that all of the application's forms' question texts are now sized so that they can be seen without scrolling.
Structure MovementDecide what movements within the case, an interviewer will be allowed to make. For example, will the interviewer only beallowed to move backwards or forward through the interview questions or will they be allowed to jump around. If they canjump around, what jumping movements will they be allowed to make. Are there sections that must be completed first?Are there optional sections that don't have to be filled in? Are there sections that can be completed in any order?
Pa ge 209 of 684 How to ...
Decide what happened when the interviewer tries to stop the interview before it is completed? Will this be allowed? If it is,how will the interview be ended? Through an end section, which may collect when the respondent will be free to continuethe interview and where interview notes may be inspected? Or by just remembering the current question being asked?
If an interview can be continued at a later time, how will the interview be restarted? By just advancing to the last questioncompleted? Or by having the interviewer ask a few questions to reorient the interviewer and respondent.
Create Helps for FieldsIn addition to question text, a CAPI application can have help information for each question. During entry, the F2 key isused to display a question's help text.
1. From the View menu, press CAPI Questions (or press Ctrl+Q). The question editor will be displayed.
2. Select an item from the tree on the left. Any text already defined for this item will be displayed in the editingwindow on the right.
3. Switch from editing questions to editing helps by pressing the button, or by choosing Help Text from theCAPI Options menu.
4. Enter help text into the editing window. You can format the text using the toolbar, or use the formatting choicesshown in the CAPI Options menu.
When you have finished entering the question's text, you can select a different item or switch to the form view or logicview.
Show Values for SelectionYou can display a list of response values for a field, so that the interviewer can select a response. The list of responsevalues comes from the first value set of the field in the data dictionary.
To turn on the display of values for selection during the interview, use the following statement:
set attributes(field-1[, field-2, ...]) assisted on;
The interviewer can turn the responses on or off during the interview by pressing Ctrl+C or going to the options menu andselecting Show Responses (This Field).
Handle Multiple AnswersSome questions allow for multiple responses. For example a question such as "Which of the following items do you havein your household?" allows for multiple responses.
There are three methods that could be used to collect this data in a CAPI application. Two involve defining in thedictionary a data item with multiple occurrences. For example if there are 10 possible responses, then the item, usuallya single character, would occur 10 items. On the data entry form, the item would be displayed as a roster with 10occurrences. Response labels can be given on the form by changing the occurrence labels from numbers from 1 to 10 tothe text of the responses, so the enumerator will know, and can read the possible responses.
One way to collect the responses is to create a roster with free movement, or spreadsheet like behavior, so thatenumerator can move the cursor between occurrences to mark the ones to which the respondent gives positive answers.
Another way to collect the data is to protect the roster and have a separate data item to collect the number of theresponse. When the number is entered, the corresponding occurrence of the item is marked. If the number is enteredagain the corresponding occurrence is unmarked.
A final way to collect the data is to set the item as an alpha item and use a checkbox to collect data for the item.
Pa ge 210 of 684 How to ...

Choose Topic SectionsOften in a CAPI questionnaire, the enumerator needs to be able to move from one section of the questionnaire toanother.
To make this happen, a global navigation key needs to be established and handled by the onkey function. The acceptfunction can be used to collect the enumerators choice of what section to move to and define the first field in the sectionto move to. Movement, however, must be made from a location, a field, before any of the sections are encountered inorder maintain the path structure. This field is protected so that no data need to be entered into it.
Below is code for the onkey function to support using F9 to move to another section in the application. The NAVIGATEdata item provides the location of movement.
function numeric OnKey(numeric keystroke)
if keystroke = 120 then // F9 to navigate among sections
numeric selection = accept( "What Section?", "Section A", "Section B", "Section C", "Section D", "Section E");
if selection = 1 then // Section A JumpField = "Q_A1"; elseif selection = 2 then // Section B JumpField = "Q_B1"; elseif selection = 3 then // Section C JumpField = "Q_C1"; elseif selection = 4 then // Section D JumpField = "Q_D1"; elseif selection = 5 then // Section E JumpField = "Q_E1"; else // Escape OnKey = 0; exit; endif;
JumpFlag = 1; move to NAVIGATE;
else OnKey = keystroke;
endif;
end;
PROC NAVIGATE
onfocus
$ = "Z"; // need to have a value in the field
postproc
if JumpFlag = 1 then JumpFlag = 0; move to JumpField; endif;
Create General HelpsPa ge 211 of 684 How to ...

Often a specialized general help is needed for a CAPI application. Such a help can be established in the followingmanner.
1. Put a form with one alpha item at the end of all forms.
2. Make question text for the item be the help text.
3. Code in the OnKey function a key that will jump to the help form.
4. Code the alpha item on the help form that will be used to jump back.
In the code below, Ctrl+H is used to jump to the general help. The data item X_HELP is on the form with the help text.
PROC GLOBAL
string lastField;
function numeric OnKey(numeric keystroke)
string thisField = getsymbol(); // current field location
if keystroke = 2072 and thisField <> "X_HELP" then // Ctrl+H lastField = thisField; move to X_HELP; endif;
OnKey = keystroke;
end;
PROC X_HELP
reenter lastField;
Test ApplicationCAPI applications require even more testing than data entry applications from paper forms because of the enumerator'sneed to be able to move easily and quickly around the questionnaire.
Here are some suggestions on how to test an application.
Go through the case in intended sequence to test skip patterns, range checks, and edit checks.
If breaking off and restarting the interview are allowed, try doing that from different locations. Can you get back towhere you left off easily?
Test moving around within the application, moving backward and forward.
Test moving between sections, if that is allowed.
Test field helps and general helps.
Pa ge 212 of 684 How to ...

Network Data EntryNetwork Data EntryWhen keying large numbers of questionnaires using a team, it is possible to take advantage of a local area network(LAN) to make it easier to manage data files. There are multiple options for using a LAN to facilitate data entry. In allcases, CSPro must be installed on each of the computers that will be used for keying.
Using a Shared Data File on a Network Drive
It is possible to have multiple keyers, each using their own computer, key to a single data file that is located on a sharednetwork folder. When launching the data entry application, enter or browse to the path on the network drive where youwant to save the data. After having done this once, the path to the data file will be saved in a PFF file. You can thenplace a copy of the data entry application and the PFF file on each computer and have the keyers run the PFF file tostart data entry. All keyers will enter data into the same shared data file.
Sharing a single file between multiple simultaneous users is only possible when using non-text files such as CSPro DBfiles. Data files in text format cannot be shared.
By default, each keyer will be able to view, modify, and verify cases in the shared data file entered by other keyers. Thiscan be restricted by setting the CaseListingFilter in the PFF filter. See Run Production Data Entry for more information.
Using Data Synchronization on the Local Network
CSPro supports the transfer of data files between computers using the synchronization feature. This can be used totransfer data between the keyers' computers and a server. Normally synchronization is used to transfer data over theInternet to a central server, but it can also be used with a server that is connected only to the local network.
When using synchronization, each keyer enters data to a separate data file on their computer. After entering data, theyuse CSEntry's synchronize functionality to transfer the data that they keyed over the network to a server. The combineddata from all keyers can then be downloaded from the server.
Pa ge 213 of 684 Ne twork Da ta Entry

CSPro synchronization supports three types of servers: CSWeb, Dropbox, and FTP, any of which can be used fornetwork data entry. CSWeb is a web server based on Apache, PHP, and MySQL. It can be run on any PC runningWindows or Linux. For information on how to set up and configure CSWeb, see the see the CSWeb help documentation.If you are not familiar with setting up and managing web servers, then it may be easier to use Dropbox or FTP instead.Dropbox does not require a server at all. It simply requires a free account on Dropbox. However, it does require a reliableInternet connection since files are stored on servers in the cloud. There are various free FTP server programs that youcan use to set up an FTP server on your local network, including FileZilla Server and Microsoft IIS FTP Server. Moreinformation about these options can be found online. Note that for network data entry, neither CSWeb nor FTP require apowerful server nor do they need to be connected to the Internet. They can both be run on a standard computerconnected to the local network.
To enable synchronization in your data entry application, use the Simple Synchronizations documentation. After enteringdata, keyers select Synchronize from the File menu in CSEntry to send data to the server. To download data from theserver, use the Download function of the Data Viewer tool. This will automatically combine the data from all the keyersinto a single data file that can be used for further processing.
Data synchronization is only possible when using the CSPro DB and Encrypted CSPro DB file formats. Data files in textformat cannot be synchronized.
Copying Data Files between Computers and Network Drives
In older versions of CSPro that did not support data synchronization or sharing files over a network, it was common tohave each keyer enter data into a file on their computer and then use either a CSPro program or a DOS batch script tocopy files from the keyers' machines to a shared network folder. Following that copying, the Concatenate Data tool wasused to combine the keyers' files into a single data file for further processing. While this is still possible, it is morecomplex and error prone than the above options.
Pa ge 214 of 684 Ne twork Da ta Entry

Android Data EntryAndroid DevelopmentOverview
CSEntry, CSPro's data collection tool, is available as an Android application from the Google Play store. This applicationcan be used to run data entry applications on devices such as phones or tablets running Android version 4.0 (Ice CreamSandwich) or higher. CSPro data entry applications can be designed on Windows machines and then run on eitherWindows or Android devices. This is a "build once, deploy many" system, whereby the running behavior across the twooperating systems is very similar, so you have the freedom to decide what device you want to use to conduct CAPIsurveys using CSEntry.
In the Android environment you will only be able to run binary data entry applications (.pen files). You will not be able toexecute .ent files or any other kind of CSPro application (concatenation, batch processing, etc.). This .pen file, alongwith the .pff runtime script, constitute the two files needed to run a data entry application on an Android device.
All applications on the Android device must be stored in the csentry folder on your device. Connect your Android deviceto your computer and, via USB transfer, copy your .pen and .pff files to the Android device. Generally the device'sexternal storage is its SD card. The first time you run the CSEntry application, the csentry folder will be automaticallycreated for you. The application searches subdirectories located in the csentry folder, so it is possible to add multipleapplications while maintaining a clean directory structure.
Starting with CSPro version 7.5, the csentry directory is located at <externalstorage>/Android/data/gov.census.cspro.csentry/files/csentry. In earlier versions it was located at <externalstorage>/csentry. If you previously had an older version of CSPro on your Android device, the csentry will not be movedwhen you upgrade.
You can also transfer applications to your device by using the Deploy Application tool.
Data Security
As in the Windows environment, the Android application does not encrypt data files by default. Fortunately, it is easy toencrypt an Android device so that all files stored on it are encrypted. On your Android device:
1. Go to Settings.
2. Under the Personal group of options, select Security.
3. Select the Encrypt Phone option and follow the subsequent instructions.
Encrypting the phone will require that you supply a PIN or password to protect the data on the phone.
Differences Between Windows and Android
The Android application only displays one question per screen (unless using blocks). A future release may allow thedisplaying of rosters and multiple fields on a single screen. In addition, though most functions operate identically on theWindows and Android platforms, there are a few functions that behave differently, such as execsystem. Notes aboutdiffering functionality are noted in the help documents about each function.
See also: Multimedia Features
Android Navigation
Pa ge 215 of 684 Androi d Da ta Entry

Overview
The CSEntry for Android application is designed to be straightforward to use, with features and options that interviewerscan easily control.
Entry Applications Screen
Upon opening CSEntry, all data entry applications on the device aredisplayed. Click on an application to open it.
Case Listing Screen
The case listing displays all cases that have already been added to the datafile. Clicking on a case will open it for modification. Clicking on the add icon(green circle with a plus), will add a new case. To delete a case, hard-presson the case until a deletion menu appears. The menu on this screen hasoptions to sort the cases alphabetically, or to display only incomplete cases.
Screen Elements
This illustration showcases the features of the data entry screen.
1. Clicking on the menu icon displays the case tree.
2. This is the name of the survey.
Pa ge 216 of 684 Androi d Da ta Entry

3. Clicking on the pencil and paper icon allows field-specific notes to betaken.
4. Clicking on the search icon and typing in a query allows you to filterthe response listing.
5. Clicking on the more options icon displays a menu with additionaloptions.
6. The field label is a short description of the field that you are currentlyentering.
7. This is the question text for the field that you are currently entering.This will be more descriptive than the field label.
8. These are the response labels. CSEntry can display text boxes, radiobuttons, check boxes, combo boxes, or date selectors.
9. These are the left and right navigation buttons, which correspond tomoving backwards or forwards in the data entry application.Alternatively, swipe left or right to move backwards or forwards.Clicking on the Android back button will close out of adding ormodifying a case.
User Inputs: Text Box
To enter data in a text box field, simply type the response using thekeyboard. If a keyboard does not appear automatically, click on the field anda keyboard will appear. If your keyboard has a Next key, you can click on itto move to the next field.
User Inputs: Radio Buttons
When presented with a list of radio buttons, you must select one, and onlyone, response. Click on the response label, or the corresponding radiobutton, to make your selection.
Pa ge 217 of 684 Androi d Da ta Entry

User Inputs: Check Boxes
When shown checkboxes, you can select none, one, or multiple responses.Click on the response label, or the corresponding checkbox, to make aselection. Once you are finished making all selections, you can proceed tothe next field.
User Inputs: Combo Box
With a combo box, you can either enter a value within the defined range (asin a text box field), or choose a discrete value (as with radio buttons). Tobring up the discrete values, click on the button to the right of the text field.
Pa ge 218 of 684 Androi d Da ta Entry

Search Filter
After clicking on the search icon, a field will appear where you can type asearch query. The list of responses will automatically filter based on yoursearch query. The full text of each response is searched, not necessarilystarting from the first letter of the response.
Field Notes
After clicking on the pencil and paper icon, you will have the opportunity totype a field-specific note. Click the icon again to close the note.
Pa ge 219 of 684 Androi d Da ta Entry

Case Tree
Clicking on the menu icon brings up the case tree. The case tree displays allfields that have been entered in the data entry application, showing thefield label as well as the field response. If you click on a field, you will betaken to that field. This allows you to quickly move from one part of thequestionnaire to another.
To insert or delete a repeating occurrence, hard-press on the occurrencelabel until you are presented with a menu that allows for insertions anddeletions. You can dismiss the case tree by using the Android back button.
CSEntry Settings ModificationIt is possible to customize the menus presented to the user when running CSEntry on an Android device. By using thesavesetting function to save a setting, you can override the default behavior of a menu option. You must execute thisfunction call in logic before the menu setting takes effect, so if you are interested in immediately applying yourcustomized settings, you can distribute your application with the PFF's CommonStore attribute set to a settings file withyour predefined settings.
Settings List and Description{ General Options }"CSEntry.Setting.HelpUrl"A website URL or filename that is opened when the operator clicks on the "Help" menu. "CSEntry.Menu.Help"
Pa ge 220 of 684 Androi d Da ta Entry

Whether to show the "Help" menu option. Values: "Yes" (show) or "No" (hide) { Application Listing Options }"CSEntry.Setting.LaunchSingleApplicationAutomatically"Whether CSEntry should automatically open an application if there is only one PFF on the device. Values: "Yes" (open)or "No" (do not open) "CSEntry.Menu.AddApplication"Whether to show the "Add Application" menu option. Values: "Yes" (show) or "No" (hide) "CSEntry.Menu.Settings"Whether to show the "Settings" menu option. Values: "Yes" (show) or "No" (hide) { Settings Options }"CSEntry.Menu.ShowHiddenApplications"Whether to show the "Show Hidden Applications" option in the settings. Values: "Yes" (show) or "No" (hide) { Data Entry Options }"CSEntry.Menu.AdvanceToEnd"Whether to show the "Advance to End" menu option. Values: "Yes" (show) or "No" (hide) "CSEntry.Menu.ReviewAllNotes"Whether to show the "Review All Notes" menu option. Values: "Yes" (show) or "No" (hide) "CSEntry.Menu.ShowCaseTree"Whether to show the "Show Case Tree" menu option on tablets. Values: "Yes" (show) or "No" (hide) "CSEntry.Menu.ShowRefusals"Whether to show the "Show Refusal Options" menu option. Values: "Yes" (show) or "No" (hide) "CSEntry.Setting.ShowNavigationControls"Whether to display the navigation controls. If this value is set, then the "Show/Hide Navigation Controls" menu option ishidden. Values: "Yes" (show) or "No" (hide) { Case Tree Options }"CSEntry.Menu.AddInsertOccurrence"Whether to show the "Add Occurrence" and "Insert Occurrence" menu options when clicking on a group. Values:"Yes" (show) or "No" (hide) "CSEntry.Menu.DeleteOccurrence"Whether to show the "Delete Occurrence" menu option when clicking on a group. Values: "Yes" (show) or "No"(hide) "Setting.ShowCaseTreeInOverlay"Whether to always show the case tree (as opposed to it being displayed only on user demand). Values:"BasedOnScreenSize" (generally yes for tablets, no for phones), "Yes" (always), or "No" (hidden until userdemand)
Examples
// prevent the user from adding new applicationssavesetting("CSEntry.Menu.AddApplication", "No");
// override the help menu so that it opens the survey documentationsavesetting("CSEntry.Setting.HelpUrl", pathname(Application) + "Enumerator Manual.pdf");
Pa ge 221 of 684 Androi d Da ta Entry

See also: LoadSetting Function, SaveSetting Function, User and Configuration Settings
Pa ge 222 of 684 Ba tch Edi ng Appl i ca ons

Batch Editing ApplicationsIntroduction to Batch EditingOver the years, the questions of whether or not to edit data, and if so, how, have generated a great deal of discussionand even controversy. Today, it is generally recognized that data from any survey or census will require at least minimalediting (and correction) in order to be usable. The following sections present a more detailed discussion of thesequestions, and the tools available in CSPro to carry out these tasks.
The Batch Edit Designer module allows you to create and modify batch edit applications. A batch edit application isused to clean (via editing and imputation) your data files.
For examples and methodology on how to develop your edit routines, refer to the United Nations Handbook on Populationand Housing Census Edits.
This section contains the following information:
Create a New Batch Edit Application
Order of Executing Batch Edit Events
Methods of Correcting Data
Manipulate Automatic Reports
General Batch Editing Issues
Pa ge 223 of 684 Cre a te a Ba tch Edi t Appl i ca on

Create a Batch Edit ApplicationCreate a New Batch Edit Application To perform batch editing, you will need a data dictionary to describe the data file you are editing. If you already have adata dictionary for the file, you can specify this dictionary when you create a new batch edit application. To create a new batch edit application:
• Click on the toolbar, or from the File menu, select New. The following dialog box will appear.
• Select Batch Edit Application and press OK. • A file dialog box will appear. Enter the name of the application file. Make sure you are located in the folder where you
want to place the application files. Then press Create. The following dialog box will appear.
• A default name of the data dictionary describing the data file is given. You can use this name or change it. If you give
the name of a dictionary file that already exists, that data dictionary will be used by the application. If you give thename of a dictionary that does not exist, a new data dictionary will be created.
Pa ge 224 of 684 Cre a te a Ba tch Edi t Appl i ca on

If you are using an existing CSPro data dictionary, you may begin creating batch edit procedures. If you are creating anew CSPro data dictionary, you will need to enter information into the dictionary about records, items, and values beforeyou can create edits. Batch edit applications consist of the following files:
• Batch Edit Application File (.bch)
Specifies all other files contained in the application and includes other application information. • Edit Order File (.ord)
Specifies the order in which logic in the application is executed. There is usually one order file per application, butthere may be multiple order files. Each order file contains one Data Dictionary file (.dcf) that represents the primarydata file that is being read and/or written.
• Logic File (.apc)
Contains CSPro language statements • Message file (.mgf)
Optional file, it contains text for messages displayed on the output listing • Other Data Dictionary Files (.dcf)
Optional, it represents secondary data files (such as lookup files) that are read and/or written to during the batch run.
Batch Application Screen Layout
Pa ge 225 of 684 Cre a te a Ba tch Edi t Appl i ca on

The screen is divided into three main work areas: the Tree View, the Logic View and the Message View. • Tree View
The window on the left half of the screen displays the batch edit tree with the root node ( ) selected. • Logic View
This is the window block in the upper portion of the right half of the screen. It is the programmer's "clean slate, towhich may be added logic for any part of the data file: any item, any section, any record, even the file as a whole. It isup to the programmer to determine the correct placement and sequence of execution for each logical element. Theinitial screen will display:
{Application 'MYBATCHEDIT' logic file generated by CSPro }PROC GLOBAL
PROC MYDICT_FF
These two lines of code will always be in your application file. You can delete them, but they will always beregenerated and placed in your file on open, save, or exit. This is the beginning of your program. You write thedeclaration statements under PROC GLOBAL, then the procedures for the event.
• Message View
This is the window block in the lower portion of the right half of the screen. It is devoted to messages (user-created andsystem-generated). As with the Tree View, tabs are available to the programmer; clicking on one of them will make thecontents of that view active. The Compiler Output tab displays errors found during compilation of your program; if thecode compiled successfully, it will state "Compile Successful." The Message tab is used to type in error messagesthat will be used in the execution of the program.
If you wish to modify the size of any of these three work areas, just place the mouse over one of the separating bars,grab it, and drag to resize. See also: Moving Around a Logic Application
Pa ge 226 of 684 Cre a te a Ba tch Edi t Appl i ca on

Batch Edit Tree When you create a batch edit application, the edit tree will be identical to the dictionary tree; that is, edit items will belisted as named and ordered in the dictionary. However, there are a few distinctions to make, as follows:
• BatchEdit File:
This is the highest level node, i.e., the root node. It is the owner of all code, which is to say [1] level-, record-, anditem-related code, [2] user-defined functions, and the [3] global routine.
• BatchEdit Level: This is the second-tier tree node, just below the root. It has a 1-to-1 correspondence with the same-named dictionary
level.
• BatchEdit Record: This is the third-tier tree node, just below its level. It has a 1-to-1 correspondence with the same-named dictionary record.
• BatchEdit Item: This is the terminal or "leaf"-node; i.e., the lowest accessible level. It has a 1-to-1 correspondence with a dictionary item.
You are free to rename any of the above the unique names via the properties dialog box, but it is recommended that youretain the original name, so that it is easier for you to see which dictionary entity is being referenced. The batch edit treerepresents the order in which the logic associated with each edit item is executed. If code has been written for a given edit level, record, or item, a check mark will appear superimposed on the icon for thatentity. This is how, at a quick glance, you can see where you have placed programming logic. Once one line of code hasbeen written anywhere in the program, a check mark will appear on the root node. You can never delete edit levels, records, or items (i.e., the entries shown on the edit tab). However, you can change theorder of the logic execution by dragging the items within the Batch Edit tree view. When selecting a new edit item, thecontents of the logic view will change to display the logic for the selected entity. Pressing Ctrl+T in the batch edit tree will allow you to switch between the labels and the names of the items.
Run a Batch Edit ApplicationPress ; or press Ctrl+R; or select Run from the File menu to run a batch application. If you've made changes sinceyou last compiled, CSPro will first compile your application. If your program compiles successfully, you will see a screenthat looks similar to this:
Pa ge 227 of 684 Cre a te a Ba tch Edi t Appl i ca on

The following rows are required:
Input Data File: This asks for the name of the data file against which you wish to run your batch application. Thisdata file will not be modified in any way; it will only be opened, read, and closed.
Output File: The output file is where the results of correcting your data will be written. If you are not making anycorrections in your program, then the generated file will be an exact copy of the original data file. If you are makingcorrections to your data file, then this will be the corrected data file. If you do not need a corrected data file, andare simplying running the program to generate a report, you can select a none data source as the output.
Listing File: This asks for the name of the file to which you want to write the results of the run. Results fromerrmsg functions will be written here. This file will always be generated, regardless of whether or not your programincludes errmsg commands. Listing files generally have the extension .lst.
The following rows are optional, based on the logic in your application:
Impute Freq File: If your program contains any impute statements, the results of this command will be writtento this file. The default file extension is .freq.lst, but you can use whatever you'd like. This field is optional;therefore, if your program contains impute commands, but you forget to specify a frequency file, no file will begenerated. Similarly, if you indicate a frequency file but your program does not contain any impute commands, nofile will be generated.
Write File: If you have any write function calls in your program, the results will be saved to this file. This field isoptional. If no write file is specified, the write function's output is saved to the listing file.
In addition to these rows, there may be rows where you can specify the names of lookup files, external files, and theparadata log.
Pa ge 228 of 684 Orde r of Edi ng

Order of EditingOrder of Executing Batch Edit EventsCSPro executes the procedures in an application one case at a time. There are two main procedures for each element: apreproc and a postproc. If the type of procedure is not named, postproc is assumed. (There are three additionalprocedures that are not common in batch applications: onfocus, killfocus, and onoccchange.)
The following diagram illustrates the order of operations for a two-level batch edit application. Level 1 has two records (1and 2) and level 2 has one record (3).
Application File preproc Level 1 (case) preproc Record 1 preproc Item 11 preproc Item 11 postproc ... Item 19 preproc Item 19 postproc Record 1 postproc Record 2 preproc Item 21 preproc Item 21 postproc ... Item 29 preproc Item 29 postproc Record 2 postproc Level 2 preproc Record 3 preproc Item 31 preproc Item 31 postproc ... Item 39 preproc Item 39 postproc Record 3 postproc Level 2 postproc (repeat level 2 procedures for other level 2 nodes) Level 1 (case) postprocApplication File postproc
See also: Batch Edit Order, CSPro Program Structure, Order of Executing Data Entry Events
Batch Edit Order Eventually you'll reach the point where you have written edits for many variables and you will begin to wonder, just howdo you control the order of execution? It's in the batch edit tree. The order of the items listed in the BatchEdits tree tabshows you the order of logic execution. (If there is no associated logic for an edit item, then the order is of course notimportant.) What if you don't like the order that's given? Change it. As mentioned above in "The Batch Edit Tree" you can re-orderitems and records (but not levels) on the batch edit tree. When developing edit specifications, the edit of one variablemight depend on another edit having already been completed (say, relationship before sex). If the dictionary wasn'tdesigned in the order you need, then when a batch edit application is generated, the order will be incorrect. Having said all this, there are a few nuances to the editing process that you may wish to note, specifically with regard tothe execution of preprocs and postprocs execution:
Pa ge 229 of 684 Orde r of Edi ng

• For BatchEdit items, there is no benefit to writing and maintaining preproc and postproc code blocks. Because aBatchEdit item is at the lowest level in the order tree, no other code would be executed in the interval between apreproc and postproc code block. Therefore it is suggested that only one code block exist for each item. If you donot preface the instructions with either "preproc" or "postproc", the code by default will be in the postproc block.This is the recommended approach; that is, accept the default.
• If a BatchEdit item is within a record that repeats, the logic will be repeated for each occurrence of the record. For
example, if you have a population record that allows 30 occurrences, the logic for each of its member items can repeatup to 30 times, depending on the actual number of persons in the household. Suppose you have a household withthree members: the head, the spouse, and a child. The logic for each data item (such as "relationship," "sex," and"age") will be executed three times.
• If a record repeats, the associated logic for that record will NOT repeat; instead, it will be executed once and only once
for questionnaire. For example, take that population record again that allows 30 occurrences. Whether there are 1 or 5or 30 people in the household, the associated logic for the BatchEdit record will execute only once. Therefore, if youhave logic that must occur for each person in the household, we suggest you place that code under the first BatchEdititem in the record.
• Logic written for Level 1 will only execute once for a questionnaire/case. Logic written for Levels 2 or 3 will execute for
each node, i.e., for each set of records contained in that level. • Finally, logic written at the BatchEdit File node will execute only once for a data file. Therefore, if you have global
variables that you need to initialize, etc., this is the place where that should take place.
Change Edit OrderBy default, a new batch edit application fixes the order of editing to the order of items in the dictionary. If new items areadded to or rearranged in the dictionary, the editing order is determined by the new dictionary arrangement.
To make your own custom order of the editing items within records, you need to do two things: from the Options menu,select "Custom Order"; then drag and drop items in the batch edit tree into the order you wish the edits to be performed.If you rearrange items within a record in the dictionary, the custom order will not change. If you add new items to arecord, the new items will be placed at the end of the record for purposes of editing. If you unselect "Custom Order," theedit order will return to the order of items in the dictionary.
See also: Batch Edit Order
Pa ge 230 of 684 Corre c ng Errors

Correcting ErrorsMethods of Correcting DataBefore you can correct your errors, you need to know what kind of errors you have. You have two methods of findingthese errors: manually or automatically. Manually checking large quantities of data is an extremely time-consuming anderror-prone task and not recommended. By contrast, automated searches for your errors is quick and, if done properly, areliable method to use. If you wish to use CSPro to automate the search for errors, you must create a Batch Editapplication.
Using a Batch Edit application to identify errors is a relatively easy task, though care must be taken to do so correctly.Improperly identifying errors can waste precious personnel resources, so a precise set of rules should be developed withinput from subject-matter specialists.
Just as you have two methods available to you when searching for errors, you have two methods available to you forcorrecting errors: manually or automatically.
Manual Correction
Manual correction of a census could take years, and the possibility of human error is great. When large volumes ofdata are collected in censuses and surveys, it is not always practical to refer to the original document in order tocorrect an error. Often the data recorded on the original questionnaires are wrong or inconsistent.
Automatic Correction
With computer editing, both time and the possibility of human error is reduced significantly (just how much dependson how well your logic is written!). The high degree of accuracy and uniformity in computer editing cannot be obtainedin manual editing. In computer editing, range checks and within-record consistency checks can easily be made,between-record edits can be done, and unknown information can be allocated (imputed) automatically. If an allocationmethod is used, you should strive to retain as much of the original information as possible. With a computer editingand imputation system like CSBatch, erroneous data can be corrected immediately and reports can be generated ofall errors found and all changes made.
The programmer should plan and design computer edits to inspect the data and have the computer correct themaccording to specifications supplied by a subject-matter specialist. It would most likely be an extension of the originalprogram written to find the errors—when you reach the point where there is an error, instead of (or in addition to)printing out an error message, you should now correct it with an appropriate value.
Actual methods of making corrections vary depending upon the item. In most instances, data items can be assignedvalid codes with reasonable assurance that they are correct by using responses for other data items within the record, orin other records in the questionnaire. When recorded responses are missing, impossible, inconsistent, or unreasonableand cannot be determined from other responses in the same questionnaire, the hot deck technique can be used toassign entries.
Guidelines for Correcting DataThe purpose of editing is to make the data as representative of the real life situation as possible; do this by eliminatingomissions and invalid entries, and by changing inconsistent entries. Below are some important principles that should befollowed:
The fewest number of changes should be made to the originally recorded data. You are only trying to make arecord or questionnaire acceptable, not make it conform to what you think should be acceptable.
If you must change a data value, do so only once. If you change a person's age, then later find this age doesn'twork for another edit, then you didn't write the original edit correctly. Go back and review the first edit.
Pa ge 231 of 684 Corre c ng Errors

For certain items it may be acceptable to have a "not reported [NR]" or not stated [NS]" category. Thus, in caseof an omission or an inconsistent, impossible, or unreasonable entry, a code for "NR" or "NS" can be assigned.
Obvious inconsistencies among the entries should be eliminated.
Providing corrected values for erroneous or missing items should be supplied by using other values as a guide; (forexample, entries for the housing unit, person, or other persons in the household or comparable group), and alwaysin accordance with specified procedures.
Specifications for editing the questionnaire data should be developed at the same time as the questionnaire itself.Information to the computer programmer concerning what checks and imputations should be made in the data areprovided through editing instructions or specifications. A subject-matter specialist, in collaboration with thecomputer specialist, should write editing instructions. The instructions describe the action to be taken on eachdata item. The editing instructions should be clear, concise, and unambiguous, since they serve as the basis forthe CSPro editing program. Specifications for machine editing may be written instructions, decision tables,flowcharts, or pseudo-code. Pseudo-code (IF/ELSE logic) is recommended because it can be easily translated toCSPro code. Pseudo-code can be prepared using basic word-processing or text-editing software and can beeasily modified.
If the hot deck method of imputation is used, it is important that the edit specifications indicate where, during theprocessing, hot decks are to be updated, that is, at which points in the logic the data items can be considered valid.
ImputationImputation refers to the process of providing values for missing, erroneous, or inconsistent responses. For example, if aperson's sex code is invalid (i.e., out of range or otherwise unacceptable) or missing; then an appropriate responseshould be substituted.
You may decide that for missing data, you'd rather just keep it "missing" and publish your tables with an extra column(or row) for unknown values. This is a very cumbersome method, however, as the number of missing values will vary foreach data item, and so the number of missing entries will vary from table to table, making the data difficult to analyze.
Inconsistent responses occur when a response yields an impossible situation with respect to another response. Forexample, if a 5-year-old female reports having children, either her age is wrong, or her fertility data are wrong (i.e., thatsection should be blank). This type of error must be corrected, as your users will place very little faith in the quality ofyour data if this type of condition becomes evident in the tabulations. Many users also do not look kindly on "missing" orunreported data. Of course, nothing can correct for bad data, and if you find that a significant amount of your data arebad (poorly designed questionnaire, inadequate field procedures, inattentive coders and keyers, etc), you may want toreconsider whether the data should be released at all.
Procedures have been developed to provide the missing information, thereby avoiding discrepancies and the need todetermine percentages twice (with and without unknowns). For a detailed discussion on using imputation and themethods available to you, please refer to the United Nations Handbook on Population and Housing Census Edits.
Essentially, two methods of imputation are available: static and dynamic.
Static ImputationStatic imputation means providing a value from a predetermined set of values. Suppose a person's sex is missing orinvalid (out of range). If we decide to change the response using static imputation, there are two basic methods to use:hard coded or from a "cold deck."
Hard Coded
Using our example above, we would programmatically set SEX to the value we think it should be. For example:
Pa ge 232 of 684 Corre c ng Errors

PROC GLOBAL
numeric sexToggle = 1;
PROC SEX
if not SEX in 1:2 then SEX = sexToggle; sexToggle = 3 - sexToggle; endif;
What we've done above is a very primitive form of imputation. Essentially, when we encounter a bad value for sex, 50% ofthe time the variable SEX will be assigned the value "male," and 50% of the time the value "female." Note that noaccommodation was made for other responses; for example, if fertility data were present, you might not wish to makethis person "male." Or if this were an enumeration of a prison where the entire population is male, you would probably notwant to be adding females to this group! So while this method can be used, you need to take into account otherresponses. We attempt to do this in our next method of static imputation, where we use a cold deck.
Cold Deck
With the cold deck approach, known information about individuals with similar characteristics (sex, age, relationship tohousehold head, economic status, etc.) is used to determine the "most appropriate" response to be used when somepiece (or pieces) of related information is invalid.
For example, suppose a person's age is missing or invalid. We might have a table as follows, where the row indicesrepresent the person's sex (1 = male, 2 = female), and the column indices refers to the person's relationship codes (1-5)(this table assumes that the relationship and sex codes have already been corrected):
Head (1) Spouse (2) Child (3) Other Relative (4) Non-Relative (5)Male (1) 35 50 10 41 65
Female (2) 32 48 10 37 68
In the event that a female child was found to have a missing age, she would be given the age of 10. If a female head ofthe household had a missing age, then her age would be given as 32. This method is acceptable if you do not need touse it often; that is, if very little of your data is missing or invalid. Also, if your population is fairly homogeneous (forexample if you were correcting for religion and 90% of the population is Muslim), then this will not result in an unrealisticportrayal of your country.
However, if you find yourself referring to this table often, or you have a very diverse population where a few static valuesdo not give an accurate portrayal, then your data will end up skewed. For these reasons (and others), dynamicimputation is the preferred method.
Dynamic Imputation (Hot Deck)Dynamic imputation refers to the concept of using constantly changing values for your allocation routines. It is similar tostatic (cold deck) imputation, except that instead of creating a table and assigning allocation values that remain fixed,the tables are continually updated with valid and consistent values taken from the population being edited.
For example, assume, for a given person, that the age, relationship, and sex codes appear correct and that consistencychecks validate these items. You can use the values from this person to update your "cold deck," thus making it a "hotdeck." Below is the table given in the cold deck example:
Head (1) Spouse (2) Child (3) Other Relative (4) Non-Relative (5)Male (1) 35 50 10 41 65
Female (2) 32 48 10 37 68
If the person in question is a male 6-year-old child, the table can be updated with new information, giving the following:
Pa ge 233 of 684 Corre c ng Errors

Head (1) Spouse (2) Child (3) Other Relative (4) Non-Relative (5)Male (1) 35 50 6 41 65
Female (2) 32 48 10 37 68
You would proceed in this way for every person in the household who had correct age, sex, and relationship values.Then, when you encounter a person with an invalid or missing age, you can extract from the table, using the sex andrelationship of the person, a value for age. This value is more likely to be appropriate for the person than would be apurely random value. (The preceding example is clearly a simplification of the hot deck technique, which requires greatcare in constructing and updating the tables used for allocation.)
See also: Use Hot Decks
DeckArraysUsing "DeckArrays" in CSPro is a simplified way of working with hotdecks. It is important to understand the hotdeckprocess well before using DeckArrays because the functions getdeck and putdeck automatically handle recodes andthus hide much of the behavior of hotdecks from the programmer. DeckArrays eliminate the need for the programmer torecode variables to fit within the boundaries of an array as the recodes are processed automatically based on the valuesin a value set.
If using DeckArrays it is very easy to change the parameters of a hotdeck. For instance, if a subject matter specialistdecides that a variable should be hotdecked based on five-year intervals of age but later changes the specification to beten-year intervals, programming such a change is very quick if using DeckArrays, whereas with standard hotdecksreprogramming the recodes may be time-consuming.
Declaring a DeckArray
Declare a DeckArray in PROC GLOBAL as you would a normal array but instead of using numeric dimensions, specifythe name of a value set. The size of the dimension will match the size of the value set. If you make changes to the valueset, the size of the array will automatically reflect the changes.
array Age_HD_from_Sex(SEX_VS); // same as array Age_HD_From_Sex(2);array Age_HD_from_Sex_Relationship(SEX_VS,RELATIONSHIP_VS);To create a DeckArray, at least one of the dimensions must be a value set, but it is permissible that the otherdimensions are declared with a numeric size. Because the program can only recode values for the dimensions based onvalue sets, it is necessary to specify the indices of any numeric dimensions when calling getdeck or putdeck.
array Age_HD_from_EA_Sex(200,SEX_VS); // same as array Age_HD_From_EA_Sex(200,2);Accounting for "Else" Values
Occasionally a programmer wants to create a hotdeck with a "leftover" row for any values not contained in the value set.Sometimes these are invalid values, other times the value set can be created so that this leftover, or "else," row consistsof values valid for the census or survey. For instance, if a user wants to hotdeck a variable based on Christian sects, theprogrammer would create a value set with all the Christian sects, and then would create a DeckArray with a leftover rowfor all people who do not belong to the Christian sects identified. This is indicated by adding a (+) after the value setname.
array CEB_HD_Religion(RELIGION_CHRISTIAN_SECTS_VS(+));Example 1
Simplified edit specification: If the head of household's age is missing or invalid, the value should be imputed with ahotdeck based on the head's sex and the spouse's age. If there is no spouse or no valid age for the spouse, hotdeckbased on the head's sex and the household size, which will be assumed to have a maximum value of 10+.
PROC GLOBAL
array ageFromSpouseHotdeck(SEX_VS,AGE_VS);
numeric maxHHSize = 10;
array ageFromHHSizeHotdeck(10,SEX_VS); // household size is from 1 - 10+
Pa ge 234 of 684 Corre c ng Errors

PROC AGE
universe RELATIONSHIP = 1; // we're only editing head of households here
// assumption: by now RELATIONSHIP and SEX have been edited for the head ofhousehold
numeric ptrSpouse = seek(RELATIONSHIP = 2); numeric minSpouseAge = 12;
if SEX = 2 then minSpouseAge = 15; // males cannot marry until 15 endif;
if AGE in 15:95 then // the head of household has a valid age
if ptrSpouse <> 0 and AGE(ptrSpouse) in minSpouseAge:95 then // the spouse hasa valid age
putdeck(ageFromSpouseHotdeck,AGE,SEX,AGE(ptrSpouse)); // update the hotdeck
// because SEX belongs to the current record being examined (the head ofhousehold) // it can be left blank and CSPro will pick the correct SEX; the age of thespouse must always // be passed because we are updating the hotdeck based on the age of thespouse, not the age // of the head (the age of the head is invalid after all)
putdeck(ageFromSpouseHotdeck,AGE, ,AGE(ptrSpouse)); // this is the same asabove
endif;
putdeck(ageFromHHSizeHotdeck,AGE,low(totocc(),maxHHSize),SEX); // update thehotdeck based on HH size putdeck(ageFromHHSizeHotdeck,AGE,low(totocc(),maxHHSize)); // this is the sameas above
else // the head of household's age is invalid so we must impute it
if ptrSpouse <> 0 and AGE(ptrSpouse) in minSpouseAge:95 then // the spouse hasa valid age impute(AGE,getdeck(ageFromSpouseHotdeck, ,AGE(ptrSpouse)));
else impute(AGE,getdeck(ageFromHHSizeHotdeck,low(totocc(),maxHHSize)));
endif;
endif;
Example 2
VS_SEX has two values: 1 (Male) and 2 (Female). VS_EDUC has three levels: 1 (No schooling), 2 (Primary schooling), 3(Secondary schooling).
// Command: // The hotdeck looks like // this after the command:
Pa ge 235 of 684 Corre c ng Errors

array ageHotdeck(VS_SEX,VS_EDUC(+)); // 00 00 00 00 // 00 00 00 00
SEX = 1; EDUC = 1; AGE = 20; // 20 00 00 00putdeck(ageHotdeck,AGE); // 00 00 00 00
SEX = 2; EDUC = 3; AGE = 50; // 20 00 00 00putdeck(ageHotdeck,AGE); // 00 00 50 00
SEX = 1; EDUC = 8; AGE = 64; // 20 00 00 64putdeck(ageHotdeck,AGE); // 00 00 50 00
SEX = 2; EDUC = 3; AGE = notappl; // 20 00 00 64AGE = getdeck(ageHotdeck); // AGE = 50 // 00 00 50 00
SEX = 2; EDUC = 0; AGE = 10; // 20 00 00 64putdeck(ageHotdeck,AGE,,); // 00 00 50 10
SEX = 2; EDUC = 0; AGE = 11; // 20 00 00 64putdeck(ageHotdeck,AGE,SEX,); // 00 00 50 11
SEX = 2; EDUC = 0; AGE = 12; // 20 00 00 64putdeck(ageHotdeck,AGE,SEX); // 00 00 50 12
SEX = 2; EDUC = 0; AGE = 13; // 20 00 00 64putdeck(ageHotdeck,AGE,,EDUC); // 00 00 50 13
SEX = 2; EDUC = 0; AGE = 14; // 20 00 00 64putdeck(ageHotdeck,AGE,SEX,EDUC); // 00 00 50 14
// 20 00 28 64putdeck(ageHotdeck,28,1,3); // 00 00 50 14
putdeck(ageHotdeck,28,0,3); // returns // 20 00 28 64// DEFAULT because 0 is not in VS_SEX // 00 00 50 14// and no (+) specified // 20 00 28 64AGE = getdeck(ageHotdeck,2,300); // AGE = 14 // 00 00 50 14See also: Getdeck Function, Putdeck Function, DeckArray Leftover Rows
DeckArray Leftover RowsWhen using unedited variables as parameters of your DeckArray, it may be useful to include a "leftover" (spillover) row forcases in which the variable is not valid. This functionality allows the user to simulate the use of many hotdecks using asingle array. An example will best explain this functionality.
This following is a hotdeck for housing type, based on the source of drinking water (H8), the type of toilet (H9), andwhether or not the household has electricity (H10).
array housingTypeHD(H8_VS1(+),H9_VS1(+),H10_VS1(+)) save;At the point that housing type, H6, is edited, none of the dependent variables in the hotdeck have been edited, so thevalues can be blank or invalid. That is why, in the array definition, a (+) has been added after the value set names. The(+) gives an extra row for any value that is not in the value set.
When updating the hotdeck in cases where the housing type value is valid, adding a (+) after the DeckArray name willupdate the "leftover" rows.
putdeck(housingTypeHD(+),H6);This means that when the hotdeck is called upon for an edit or imputation, having valid values for H8, H9, or H10 is notnecessary to return a valid H6 value. This fundamentally makes the housing type DeckArray eight hotdecks combinedinto one. The table below explains what happens when executing a getdeck function call:
Pa ge 236 of 684 Corre c ng Errors

impute(H6,getdeck(housingTypeHD)); H8 H9 H10 Take the H6 value from the nearest neighbor with the same values for...
Valid Valid Valid H8, H9, and H10Valid Valid Invalid H8 and H9Valid Invalid Valid H8 and H10Valid Invalid Invalid H8 onlyInvalid Valid Valid H9 and H10Invalid Valid Invalid H9 onlyInvalid Invalid Valid H10 onlyInvalid Invalid Invalid The previous valid household's value
Or in words:
If electricity is blank, use a hotdeck based on water and toilet.
If electricity and water are blank, use a hotdeck based on toilet.
If water is blank, use a hotdeck based on electricity and toilet.
If all three are blank, use a hotdeck based on the previous valid household.
Etc.
See also: DeckArrays, Getdeck Function, Putdeck Function
Types of Edits in Batch EditingOverview
Errors in data can be (roughly) categorized as problems in either structure or consistency. Problems with structure mayrequire a different approach to correction than will problems with validity or consistency. For this reason, many userschoose to implement a two-stage edit, where the data are first rendered structurally correct, and then passed through asecond edit to ensure that all items are valid and consistent. However, it is expected that while the subject-matterspecialists will have established rules for validity and consistency, the computer specialist may have equally importantinput into the definition of structural validity.
After keying or scanning your data, there will be errors in the data file. This is unavoidable, and will be a combination ofhuman and computer error. It will therefore be necessary to correct the data by writing a series of edit routines(procedures) to systematically and consistently clean your data files.
The Batch Edit Designer module allows you to create and modify batch edit applications. A batch editing applicationcontains logic which you can apply against one set of files to produce another set of files and reports. Batch editingapplications can be used to gather information about a data file.
To create these edit routines, you will use CSPro to develop the batch editing application based on the dictionary thatdescribes your data files. If you received this data file from someone else and do not have a dictionary that describes it,you will need to create a dictionary before you are ready to develop programming logic for it. You use CSBatch to run theapplication. For small surveys and for testing applications, you can run CSBatch directly from CSPro, on the samecomputer. For large surveys and censuses, which require a production environment, you can transfer the application filesto other computers and run CSBatch on them.
You can have the following runtime features in your batch editing application:
Check Case/Questionnaire Structure
These checks ascertain that all records that should be present for a particular questionnaire (case) are supplied and thatno extra records are included.
Validate Individual Data Items
Pa ge 237 of 684 Corre c ng Errors

These checks are designed to determine whether a response has a value that is inside or outside the valid limits for thatresponse. Although these checks are normally performed during data entry, you can also perform them with CSBatch.
Test Consistency Between Items
In these checks, two or more responses in a questionnaire are compared for consistency. For example a male personreporting having any children is an inconsistency between the response to sex and the response to children born.(Only females report children born.) The responses being compared may be in the same record or in different recordswithin a questionnaire.
Automatic Modification
When a census or other large survey is being processed, it would be unduly cumbersome to make most data correctionsby visually examining the errors. CSPro provides the facility for not only finding incorrect or inconsistent data, but alsomaking modification to the data. Needless to say, modifications are not always corrections. Moreover, any modificationsto data that have been collected must be carefully thought out and monitored through CSPro's edit statistics reports.
Generate Edit Reports Automatically
CSPro generates comprehensive statistics about the edit tests carried out and the number of changes made to the data.The user may also create a customized report including or excluding any of the information generated by CSPro duringthe editing process.
Generate Reports
You can write customize reports to a file.
Match Files
CSPro allow for matching two files and gathering information from both. The feature is useful, for example, when a filemust be created which has a combination of data from two other files.
Modify Data Value
During the editing process, values that are invalid, inconsistent, or otherwise unacceptable will need to be replaced withcorrect values.
Use Arrays for Imputations
Whether you choose to correct data using hotdeck or cold-deck methodology, the arrays are easily defined, accessed,and updated.
Generate Imputation Statistics
CSBatch will automatically keep track of changes, but users my choose to format reports to their specifications. Byspecifying a denominator variable, users may obtain rates of imputation, including rates for individual values (e.g., maleor female when imputing the variable Sex).
Create Additional Variables
Recoded or composite variables may be created during the editing process. The only requirement is that space beallocated (via the dictionary for the file) in the output record. The updated output file is automatically created when a filename is specified at the time of execution.
Reference Multiple Lookup Files
An essentially unlimited number of secondary or auxiliary files may be attached to an application and used as reference
Pa ge 238 of 684 Corre c ng Errors

or lookup files. The application may read from and write to any of these files.
Pa ge 239 of 684 How to ...

How to ...Manipulate Automatic ReportsDuring the testing and debugging stages of developing your application, you'll want to write out a lot of error messages tohelp find problem areas, and keep statistics on the number of times certain code blocks are being executed (or valuesare being imputed). You may begin to notice that you're using the same error message in several places. Rather thanwrite out the message every time it's needed, you can define it once and refer to it whenever needed. For example,suppose you have the following error message scattered throughout your code:
errmsg("Current age after imputation is %d",AGE);
Why bother retyping it each time? You can simply define it once and reference it over and over. To do so, select theMessage tab in the Message View. You will see one line that has been generated for you; it reads: {Message codefile generated by CSPro}. Beneath this simply add your error message (we'll give it number 100001):
100001 Current age after imputation is %d
Then, whenever you want to use this message in your code, simply use the message number:
errmsg(100001,AGE);
Besides simplifying your work, after you run your program, a convenient summary statistic will be generated for eachuser-defined error message, indicating how often it was used. A sample listing is shown below:
Number Freq Pct. Message text Denom ------ ---- ---- ------------ ----- 100001 1 - Current age after imputation is %d -
See the errmsg function for a detailed explanation of all the options available to you.
Create a Specialized Report Manipulate Automatic Reports showed how to add messages to the default report which is automatically generated aftera run. This type of report may be useful for debugging, but in general, the subject-matter staff responsible for edit reviewwill usually prefer a more "user-friendly" report - that is, one that presents the information in a format dictated by theusers. Such a "custom" report can be generated by using the write function. This command will put the information you wantwhere you want it in your report. For example, for each questionnaire, you'll want to know the identifying ID values. If thiswere a population census, the case ID would likely be composed of levels of geography [Province, District, Village, EA,etc.] attached to a household identification. The "errmsg " command could display the Ids as follows: Case [010117100110870031] has 12 messages (0 E / 0 W / 12U) As you can see, this may be difficult for the non-programmer to decipher. But by using the write command, you canmore clearly display this. One way would be to put the following write statements in the preproc of the first level (in thisway it would only get written out once per questionnaire): PROC QUESTpreprocwrite ("***************");write (" Province: %3d", PROVINCE);write (" District: %3d", DISTRICT);
Pa ge 240 of 684 How to ...
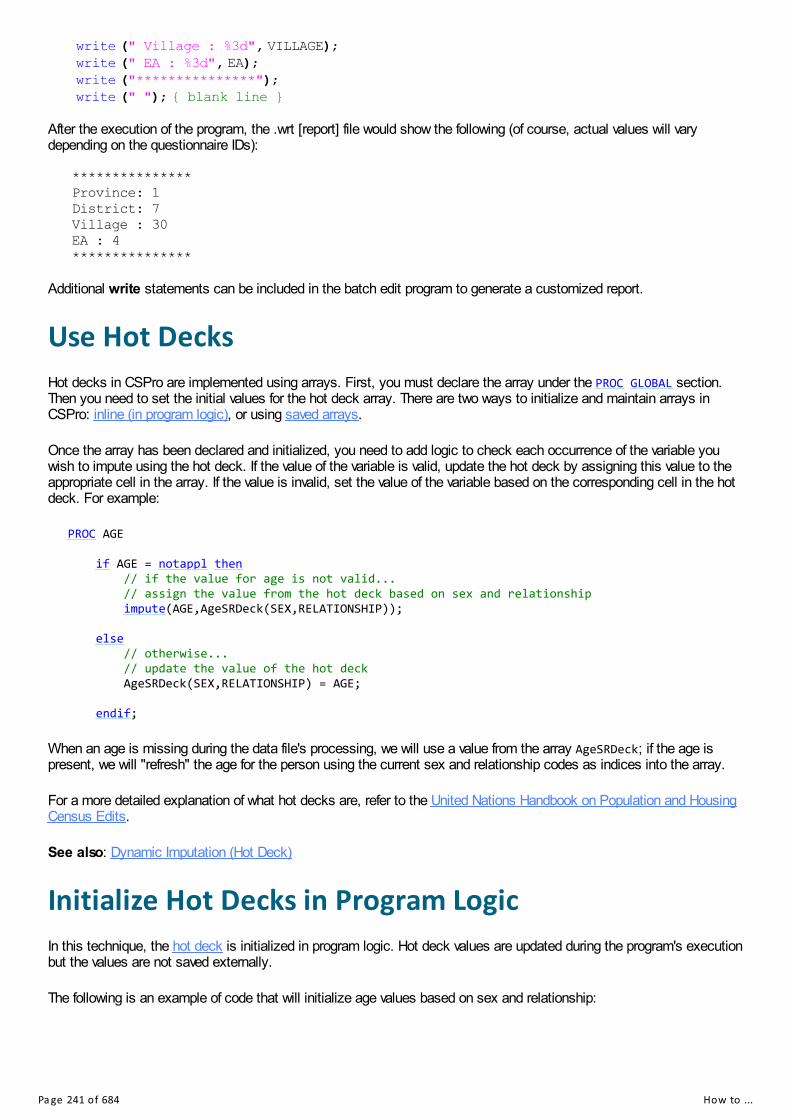
write (" Village : %3d", VILLAGE);write (" EA : %3d", EA);write ("***************");write (" "); { blank line }
After the execution of the program, the .wrt [report] file would show the following (of course, actual values will varydepending on the questionnaire IDs):
***************Province: 1District: 7Village : 30EA : 4***************
Additional write statements can be included in the batch edit program to generate a customized report.
Use Hot DecksHot decks in CSPro are implemented using arrays. First, you must declare the array under the PROC GLOBAL section.Then you need to set the initial values for the hot deck array. There are two ways to initialize and maintain arrays inCSPro: inline (in program logic), or using saved arrays.
Once the array has been declared and initialized, you need to add logic to check each occurrence of the variable youwish to impute using the hot deck. If the value of the variable is valid, update the hot deck by assigning this value to theappropriate cell in the array. If the value is invalid, set the value of the variable based on the corresponding cell in the hotdeck. For example:
PROC AGE
if AGE = notappl then // if the value for age is not valid... // assign the value from the hot deck based on sex and relationship impute(AGE,AgeSRDeck(SEX,RELATIONSHIP));
else // otherwise... // update the value of the hot deck AgeSRDeck(SEX,RELATIONSHIP) = AGE;
endif;
When an age is missing during the data file's processing, we will use a value from the array AgeSRDeck; if the age ispresent, we will "refresh" the age for the person using the current sex and relationship codes as indices into the array.
For a more detailed explanation of what hot decks are, refer to the United Nations Handbook on Population and HousingCensus Edits.
See also: Dynamic Imputation (Hot Deck)
Initialize Hot Decks in Program LogicIn this technique, the hot deck is initialized in program logic. Hot deck values are updated during the program's executionbut the values are not saved externally.
The following is an example of code that will initialize age values based on sex and relationship:
Pa ge 241 of 684 How to ...

PROC GLOBAL
// declare an array and set the initial valuesarray AgeSRDeck(2,6) = 27, // male head of HH 30, // male spouse of head 6, // male child of head 58, // father of head 11, // male other relative of head 24, // male non-relative of head 32, // female head of HH 25, // female spouse of head 8, // female child of head 60, // mother of head 10, // female other relative of head 27; // female non-relative of head
PROC AGE
if AGE = notappl then // if the value for age is not valid... // assign the value from the hot deck based on sex and relationship impute(AGE,AgeSRDeck(SEX,RELATIONSHIP));
else // otherwise... // update the value of the hot deck AgeSRDeck(SEX,RELATIONSHIP) = AGE;
endif;
See also: Dynamic Imputation (Hot Deck), Use Hot Decks, Initialize Hot Decks Using Saved Arrays
Initialize Hot Decks Using Saved ArraysIn this technique, the hot deck is initialized by running the program twice and using the results of the first run to initializethe hot deck for the second run. The array is declared using the save keyword. No initialization of the array is done in theprogram logic. The program is run twice. During the first run of the program, the array has not been initialized so it islikely that some imputations from the hot deck will use these uninitialized values. The results (the output file) from thefirst run of the program are therefore discarded. However, during the first run of the program, the hot deck is filled withvalid values. Since the array has been declared as a saved array, these values are written to the saved arrays file. Whenthe program is run a second time, these values are read from the saved array file and used as initial values from thearray. The advantage of this approach over initializing the array in the program logic is that all values used in the hot deckare taken from the data file.
The following example uses a saved array to initialize a hot deck:
PROC GLOBAL
// declare an array initialized from the saved array filearray AgeSRDeck(2,6) save;
PROC AGE
if AGE = notappl then // if the value for age is not valid... // assign the value from the hot deck based on sex and relationship impute(AGE,AgeSRDeck(SEX,RELATIONSHIP));
else // otherwise... // update the value of the hot deck AgeSRDeck(SEX,RELATIONSHIP) = AGE;
endif;
Pa ge 242 of 684 How to ...

See also: Dynamic Imputation (Hot Deck), Use Hot Decks, Initialize Hot Decks in Program Logic
Interpret Reports After specifying your file(s), a progress dialog bar will be displayed as CSBatch works its way through your data file, thenTextViewer is launched and generate the following listing report:
The "CSPro Process Summary" gives you information about the records and cases. In this example: • 29143 records were read from the input file, which represent 100 % of the input file • "Ignored" is the sum of "Unknown" and "Erased" cases. • "Unknown" represents number of cases with invalid record type code. • "Erased" represents number of records with a "~" character • The list report contains 47063 messages of which: 36 messages were defined by the user; 9004 are warning messages
generated by the system; and 38023 are error messages generated by the system • "Level 1" indicates that the following statistics are for Level 1 only. If the application had more than one level, the
statistics will be displayed for each level. • The input data file included 4872 cases (questionnaires) of which: there were "0" case with bad structure, meaning that
no required records were missing; and 4872 cases were written to the output file ("Level Post").
Pa ge 243 of 684 How to ...

The "Process Messages" gives you information on each case: • *** Case (010705802820460191) has 12 messages (8 E/ 2 W/ 2 U) Indicates that questionnaire 010705802820460191 (codes correspond to the ID items in the Dictionary) has 12
messages: 8 error messages generated by the system; 2 warning messages generated by the system; and 2 errormessages defined by the user.
• W 88870 Value '01' out of range – check P16_IND(1) Indicates that field P16_IND in first person (1) has a value "01" which is out of range because it has not been declared in
the Dictionary. This is Warning 88870, generated by the system. • U -69 Household tenure is vacant, but there are 5 person records. Message defined by the user in line 69 of the program • E 88212 … H07_RENT should be blank (currently '000') Indicates that field H07_RENT has a value '000' but it should be blank. (This is a vacant unit) This is Error 88212, generated by the system. If a write (.wrt) or frequency (.frq) file was generated, then they will also be loaded into TextViewer for display; to rotatebetween the various files, select the "Window" option from TextViewer, and choose from among the files listed at thebottom. If TextViewer was already running when you launched your application, it will be refreshed with the latest runresults. See the explanation given under Run an Application
Run Production Batch EditsYou can customize CSBatch's behavior by creating a PFF file. You can then use the PFF file as a command lineparameter for CSBatch.exe. For example, if you name your PFF file MyEdits.pff, then you run the batch edit applicationby invoking:
"C:\Program Files (x86)\CSPro 7.5\CSBatch.exe" MyEdits.pff
This assumes that CSPro was installed in the default directory. Your PFF file must have a .pff extension.
You can create a PFF file in one of two ways: either [1] create one with a text editor (such as Notepad or Wordpad), or[2] have it generated automatically for you by launching your batch application from within the CSPro Designer. The filewill have the same name as your application, but with a .pff extension instead of .bch. For example, if your batchapplication was named MyEdits.bch, the generated PFF would be named MyEdits.pff. You can also manipulate PFFfiles in logic by using the pff object.
The following section shows the options available to you in a CSBatch PFF file. A PFF file is not case sensitive, so youcan use any combination of upper and lower case text.
Pa ge 244 of 684 How to ...

[Run Information]Version=CSPro 7.5AppType=Batch
[Files]Application=.\MyEdits.bchInputData=.\MyInputData.datOutputData=.\MyOutputData.datParadata=.\MyParadataLog.cslogListing=.\MyEdits.lstImputeFreqs=.\MyEdits.freq.lstWriteData=.\WriteMessages.txtCommonStore=.\MySettings.db
[ExternalFiles]LOOKUP_DICT=.\LookupFile.dat
[Parameters]ViewListing=AlwaysViewResults=YesListingWidth=120MessageWrap=NoErrmsgOverride=NoInputOrder=SequentialParameter=your choiceLanguage=LNOnExit=.\Menu.pff
[Run Information]
The [Run Information] block is required and must appear exactly as shown in the example above.
[Files]
The [Files] block is required. A description of the files, not all of which have to be specified, is as follows:
Application=the name of the batch edit application that you created.
InputData=the data file against which the batch edit program will run. This file will not be modified during the run.
OutputData=the revised/corrected input data will be saved as this file.
Paradata=the name of a file where events logged during the application's run are saved.
Listing=a report of the batch operation.
ImputeFreqs=if you have any impute function calls in your program, the results of these statements will be writtento this file.
WriteData=if there are one or more write function calls in your program, the text of these statements will bewritten to this file.
CommonStore=if you use the loadsetting or savesetting functions in your program, this file overrides thedefault location where these settings are saved.
[ExternalFiles]
If the [ExternalFiles] block is present, it means that a second (or more) dictionary was linked to the batch application.In the example above, LOOKUP_DICT is the dictionary name, and LookupFile.dat is the name of the data file thatcontains the lookup codes.
[Parameters]
The [Parameters] block is optional. This section defines parameters for the batch run.
ViewListing=determines whether you see the batch run report. If this entry is missing or set to Always, then you
Pa ge 245 of 684 How to ...

will see the generated report. Other available options are OnError, in which case you will see the listing reportonly if an error occurred during the run, or Never, in which case you will never be shown the generated report.
ViewResults=determines whether or not the impute and/or write file are displayed in Text Viewer at the end of therun. The available choices are Yes or No. If the entry is missing, the resultant file(s) will be displayed by default.For more information on these files, see Run a Batch Edit Application.
ListingWidth=allows you to control the number of characters outputted to the listing file before forcing the start ofa new line. This is set to 120 characters by default. If your screen resolution and/or printer permits, it may beuseful to increase the width of the listing file. This only applies to text listing files.
MessageWrap=determines whether or not summary messages displayed at the end of a listing file will beoutputted on several lines when they are too long to fit on one line. The default option is No, in which case themessages are truncated so that they fit on one line. This only applies to text listing files.
ErrmsgOverride=allows you to override the default behavior of the errmsg function. The override only affectserrmsg functions used in the code without a case or summary specifier. The option No maintains the defaultbehavior (displaying the messages for each case, as well as in the summary). The option Summary onlydisplays the message in the summary. The option Case displays the message for each case but not in thesummary.
InputOrder=allows you to override the default order in which cases are processed in a data file. The default option,Sequential, means that cases will be processed from the first case to the last case, in file order. The optionIndexed overrides this order and cases will be processed in alphabetical order of the case IDs. Text data filescan contain duplicates case IDs if processed in sequential order, but not in indexed order.
Parameter=allows you to pass in a string to your program. The parameter can be any length, although the stringthat retrieves the value in your program (via the sysparm function) must be large enough to accommodate it. Oncethe parameter is retrieved, it can be parsed by your program for further usage.
Language=specifies the initial language of the program. The parameter must match the name of a languagespecified in the dictionary or message file.
OnExit=specifies a PFF file to run after the application closes. This can be useful, for example, if you want torelaunch a menu program after processing data.
Pa ge 246 of 684 Ste ps i n De ve l opi ng a Ba tch Edi ng Progra m

Steps in Developing a BatchEditing Program
General Batch Editing IssuesThis guide has described the CSPro language and has presented examples of various types of edits. However, the job ofwriting and testing a CSPro program to perform many edits is still a large one. Because of the structure of the CSProlanguage, this job can be distributed among several people if it is well coordinated.
Before coding begins, a complete set of edit specifications and a formatted listing of the data diction ary should beavailable. A team leader should be appointed; this person should have a thorough understanding of the CSPro language.The leader should develop the naming conventions and standards that are to be followed by other members of the team.During the course of program development, questions will arise about the edit specifications, and it is important to involvesubject-matter specialists to resolve these issues.
This section outlines a step-by-step approach to developing a CSPro program. It assumes that a data dictionary hasbeen developed. If this is not the case, then the first step is to build the data dictionary using the Data Dictionary moduleand to check the dictionary carefully against original specifications.
An editing system may contain more than one CSPro program. It is not unusual to have at least two CSPro programs inthe edit system: the first is used to find and report structure errors which must be resolved before the data moves on tothe next stage. These include missing records, duplicate records, or other incompatibilities with requirements which areconsidered essential to the processing. The second program is the more traditional value-validation and consistencyedits.
Review Edit SpecificationsIn order to determine the total editing task, the user should understand what edits are to be performed. Are the editsfairly simple or mostly complex? Are the edits merely to find and report errors in the data file, or will the program correctthe errors as well? Is a non-response value being allowed for any or all data items? Is a look-up file going to be needed?Are there any auxiliary files to be produced? What types of reports will be needed and how will they be organized?
The three types of edit statistics reports are:
Case: Output listing shows case by case.
Summary: Output listing shows (1) a summary of the number of times each error message was generated, and(2) the number or errors as a percentage of total cases in which the edit test was invoked.
Frequency: This report is generated when at least one impute statement is coded in the program. It assigns avalue to a data item and logs the frequency of assignments.
Typically, during the testing phase, the report by case is very useful, because it permits detailed examination of theeffects of the logic coded. After testing, it is usually not used because of the volume of reports generated.
Define Coding StandardsWithout a good set of coding standards, it will be difficult to incorporate the various subroutines into one program.Consistent naming standards and coding techniques must be considered; specific suggestions include the following:
Names for variables to be defined in the program should have unique prefixes. The standard could be that variables
Pa ge 247 of 684 Ste ps i n De ve l opi ng a Ba tch Edi ng Progra m

needed for editing LINE_NUMBER be N01 through N10; those needed for editing AGE would be N11 through N20,and so forth.
Names for hot-deck arrays should also be standardized. For example, an array for hot decking age by maritalstatus, relationship, and sex would be defined as HD_AGE_MAR_REL_SEX. The variable whose values are in thearray (in this case, age) should be named immediately after the prefix (in this case, HD).
It may be necessary for a procedure to call a function, and standards should be defined for naming them.
Standards for coding impute statements should be set. If it is desirable to relate an imputation to the original editspecifications (and this is usually helpful), then case numbers should be assigned to every imputation case in theedit specifications document.
Standards for code indentation should be established so the program is easily readable. All the examples in thismanual are indented consistently and can be used as guides for establishing a standard.
File naming conventions also should be established.
See also: Programming Standards
Code Edits of Individual Data ItemsEdit specifications need not be assigned to team members in any specific order. It is recommended that the simpleredits be coded first, especially if the coding is being done by inexperienced program mers. In this manner, they will gainexperience and will later be able to handle more complex edits.
Team members should code the edit specifications and review the code with the team leader. The team leader shouldthen incorporate the new code into the CSPro program. All syntax errors should be corrected before more code is addedto the main program. It is important to maintain earlier versions of the program as insurance against problems that maycreep in.
Develop Comprehensive Test FileA comprehensive test file should be created; it can be made at any time after the edit specifications are finalized, and itcan be done by anyone familiar with the data file. Each member of the team should create records to test all paths ofhis/her subroutines. These records can be combined into one test file in a logical sequence.
Test CSPro ProgramThe CSPro program should be thoroughly tested using the file with "invented" data. Earlier in this guide is a discussion ofthe errmsg statement and a technique for listing records before and after imputation. This technique (or a similar one)should be used to verify that imputations are being done properly and under the right circumstances. Each record thatcontains imputed items should be examined closely. Records containing no imputed items also should be checked toensure that no imputations were needed.
When hotdeck imputations are used to correct invalid or inconsistent items, it is particularly important to ensure that thehotdeck arrays are being updated under the appropriate circumstances and with valid values. This is the most commonerror in program construction, and one way to avoid it is by requiring that the edit specifications explicitly indicate where,in the sequence of actions, hot decks should be updated.
The output file produced by the Run program step should be "clean," assuming imputations were performed to correct allinvalid and inconsistent data. To verify that the CSPro program does not contain contradictory logic, that it correctserrors properly, and that it does not introduce any new errors, the Run program step should be rerun with the "clean"(output) data file as input. In this rerun, no errors should be found and the edit statistics should reflect this. If errors arefound, then the logic of the CSPro program must be corrected.
Re-Test with Live Data
Pa ge 248 of 684 Ste ps i n De ve l opi ng a Ba tch Edi ng Progra m

The CSPro program should be tested using real data with perhaps 2,000 to 3,000 records. The edit statistics should beexamined closely. The number of imputations should be a very small percentage of records. If a large number ofimputations are being done for any particular edit test, the code should be examined, and the imputations accounted forbefore proceeding. The edit statistics should be examined by subject-matter specialists also, so they can determinewhether or not the rate of imputation is too high. If appropriate coding techniques are used with the impute statements,the imputations can easily be related back to the edit specification document.
Remember: Just because the CSPro program is free of syntax and logic errors is no guarantee that all the requiredediting is being done and is being done correctly! An error-free CSPro program cannot compensate for incomplete editspecifications. Among the test most commonly omitted tests when creating edit specifications are: making sure there isone and only one head of household, and making sure the head of household is of an acceptable age.
Begin Production EditingIf no changes to the CSPro program are needed, only the Run program step needs to be executed for each batch of datato be edited. If the data dictionary is changed, then you must re-compile the program before running it again. Duringproduction processing, edit statistics for each run should be checked to ensure that the number of errors andimputations are within the normal range.
As soon as enough batches have been edited to form a larger geographic area (perhaps all enumeration areas within adistrict), tabulations should be run at the higher geographic level (in this case, district) to see if any inconsistencies areapparent. If so, it will be necessary to pause and discover the reason for the inconsistencies. This may involve modifyingand re-testing the CSPro program until the data are producing satisfactory results. Each time the CSPro program ismodified, all previously-edited batches must be re-edited (always starting with the same original data files!) so that finaldata will all have been edited and corrected following the same logic.
Pa ge 249 of 684 Ta bul a on Appl i ca ons

Tabulation ApplicationsIntroduction to Tabulation Tabulation applications in CSPro allow you to tabulate data quickly and easily, producing basic frequency distributionsand complex cross-tabulations from one or more data files. The only requirements are that: • The data to be tabulated is in text format, with all items in fixed positions • All the data files to be used in a single run share the same format • There be a data dictionary describing the data file. Each of these requirements is easily met: if the data are currently in a proprietary format (that is, within a database,spreadsheet, or other package), they must be exported to a text format (sometimes called "printer" format); if the datadictionary does not yet exist, CSPro will ask you to create the dictionary while you are creating the tabulationapplication. When you create your application, you can use an existing data dictionary or you may create one as you create theapplication. You can produce most tables by way of the menu-driven, point-and-click, drag-and-drop interface, i.e. withoutusing the CSPro programming language. The procedural language is available for the most complex kinds of tables. This section contains the following information: Parts of a TableCommon Uses of TabulationCapabilities of TabulationCreating TablesFormatting TablesCreating Tables by Geographic AreaPrinting TablesTabulation PreferencesSaving and Copying Table DataTable Post CalculationRun Production TablulationsAdvanced Table TopicsTable Tips and Tricks
Parts of a Table Shown below are the terms used by the CSPro software to reference the parts of a table.
Pa ge 250 of 684 Ta bul a on Appl i ca ons

Design/Data View Contents
Title: Top line of table that usually describes its contents.
Subtitle: An optional informational title below the (main) title.
Spanner: An informational text box 'spanning' several columns.
Column Head: Text box describing the contents of a column of data.
Stub Head: Text box describing the general contents of the stubs (rows).
Stub: Text line describing the contents of a row of data.
Caption: Text lines interspersed with Stub lines but which do not have data associated with them.
Page Note: A text line that appears at the bottom of each page of the table [a footnote on each page]
Pa ge 251 of 684 Ta bul a on Appl i ca ons

End Note: A text line that appears at the bottom of the LAST page of a table [a footnote at end of table].
Area Caption [Not shown]: When the area option is used for tabulations, this is a caption line that will bereplaced by the text in the 'area name file'.
Boxhead: This is the union of the Stub Heads, the Spanners, and the Column Heads
Additional Contents for Print View
Left, Center, Right Header: Optional text printed at the top left, center, and/or right of each printed page (abovethe title).
Left, Center, Right Footer: Optional text printed at the bottom left, center, and/or right of each printed page(below any footnotes).
Secondary Stub Head [Not shown]: When stub text is displayed on both sides [left and right] of the printtable, this text is displayed.
Additional Table Terms
Tally: Characteristics associated with the numbers that appear in a table. These include percents, averages,medians, etc.
Subtable: When more than one set of categories is crossed with another characteristic, then each isconsidered a subtable. A table with only one set of stubs and column headings can also be considered as asubtable. (See below: a comma in the table title separates subtable item labels.). A subtable is a portion of alarger table that can have its own settings for universe, weights, value tallied and unit of tabulation different fromother subtables in the same table. When hidden parts in the view menu is enabled, a colored box will be drawnaround each subtable.
Common Uses of TabulationTabulation applications may be used for a number of different purposes. The statistical organization may generate tablesfor dissemination to outside users of the data, and the same organization may also generate tables to be used internally,as a tool for control and analysis of the data themselves. Some other common uses of tabulation applications are:
Pa ge 252 of 684 Ta bul a on Appl i ca ons

Design Table Stub Groups
In the initial stages of designing the tabulations that will eventually be generated from the final edited data, it is importantto optimize the category breakdowns. Certain variables present few problems in this respect, either because the numberof categories is inherently limited (e.g., sex) or the number of categories is limited to those pre-coded on thequestionnaire (e.g., relationship). Other items, how ever, may require that a choice be made (e.g, age, occupation,educational levels, etc.) in grouping the available values. Tabulation applications may be used to examine the effects ofvarious groupings before the final design is approved.
Examine Quality of Data and Design Edits
The design of proper consistency and validity edits is a difficult task, but the use of tabulation applications can help indetermining the accuracy and completeness of the edit program. In fact, effective quality control requires that users verifyand document the results of the edits. By using tabulation applications to generate the same tables from the pre- andpost-edit data, the user can compare the cell values to ensure that all anomalies have been corrected and that the editshave not distorted the distribution of data values across categories.
Test Edits
Although CSBatch automatically produces edit statistics which report the extent of the editing it performed on a file, thesubject-matter specialist and/or computer programmer has the option of using tabulation applications to analyze a datafile before and after editing to examine the extent of the changes to a file, and to review relationships between data itemsin the edited file. Tabulation applications can be used to determine whether the edits did the job they were intended todo.
Test Tables
Tabulations that are destined for publication and for distribution to outside users must be carefully verified to ensure thatthe values presented are without error. Tabulation applications are currently designed for use as a custom tabulationpackage but it can also be useful as a means of comparing the results produced by other tabulation software. In thiscase, the relative rigidity and transparency of tabulation specifications means that there will be virtually no errorsattributable to programming faults; if differences are encountered between the tables produced by CSPro and tablesproduced by other software, the tables produced by CSPro are likely to be closer to the "true" counts. In any case,tabulation applications can be an effective tool to create publication-quality tabulations or for cross-checking numbersproduced by other software.
Pa ge 253 of 684 Ca pa bi l i e s of Ta bul a on

Capabilities of TabulationCross Tabulations Cross tabulations can display relationships between two or more data items. You may have both dependent andindependent variables in each dimension [row and column].
For example, this table has Urban/Rural and Mother Alive as independent variables; Sex and Literacy as dependentvariables. In addition, this table could be produced by 'area'; usually this is a geographic item but it could be any itemthat meets certain conditions. The 'area' item is basically an extra tabulation variable.
The user can elect to display tabulations in terms of actual counts or as percentages of the total, and has the option ofcounting special and/or undefined values. The counts in tabulations may be unweighted or weighted. Users can producea table on a subset of a file using the universe option, or select an item or numeric value to be used as a weighting factorduring tabulation. The selection of an item as a row or column variable will affect the table layout. See also: Create a Table
Tabulate Counts or Percents In addition to the quantitative numbers generated in your tabulations, you can choose to show the distribution of valuesfor an item as a percentage of either row or column totals, or as a percentage of the table total. You can also choose to
Pa ge 254 of 684 Ca pa bi l i e s of Ta bul a on

show values only as percentages and suppress the actual numbers. This is useful when you have a small data set andprefer not to display values which might identify individual cases. See also: Include Percents
Tabulate Values and/or Weights Tabulation allows the use of a data item or a constant value as a weighting factor during tabulation. This is particularlyuseful in the case of a survey, where the weight assigned to each case or observation in the sample must be taken intoaccount in order to produce numbers representative of the whole. If no weight value is specified, weight is assumed to be"1". In the same fashion, values (rather than counts) may be tabulated; like weights, values are numeric data items orconstants with or without decimal positions. When a value is specified for tabulation, the effect is that of cumulativeaddition of the specified value into the cell at the intersection of the row and column coordinates. If you leave the valueitem blank, a value of 1 will be added into the appropriate cell during tabulation. Tabulating values can be used, forexample, when a variable such as "number of children born" has been collected for each woman in the population andyou wish to tally the total number of children born rather than tallying the number of women with a particular number ofchildren. In this case you would use the "number of children" variable as the value to tally so that for each woman, thenumber of children born to that woman would be added to the appropriate cell. If both value and weight are specified for a given table, the specified value is first multiplied by the specified weight andthe product of this multiplication is then added to the cell in question. This feature is useful in the case where the unit ofobservation has a weight, and one of the data items to be tabulated is a quantitative value. An example might be afertility survey, where each female of child-bearing age carries a sampling weight, and where some of the data itemsmight be "Number of children ever born," "Number of children surviving," etc. Tabulation applications easily permits theaccumulation of weighted values to provide the total number of children ever born for all females in the sample. If the weight or value includes decimals, the decimal may be explicit or implicit, but the dictionary definition should reflectthe correct situation. The weight may be assigned to just the current subtable, the entire table or all the tables currentlydefined in the application.
See also: Add Weights to a Table, Tabulate Values Instead of Frequencies
Produce Summary Statistics Tabulation applications allow the inclusion of summary statistics in the tables. Available statistics include Mean, Mode,Median, Minimum value, Maximum value, Standard Deviation, and Variance, as well as Percentiles (N-tiles). Most ofthese give information about the distribution of values for the data item. These do not make sense for some items so youshould only use them if you have some understanding of their meaning and purpose. For example, none of thesemeasures have any meaning for an item such as sex. Mean, Mode and Median are measures of central tendency. These are measures of the location of the middle or thecenter of a distribution. The definition of "middle" or "center" is purposely left somewhat vague so that the term "centraltendency" can refer to a wide variety of measures. The mean is the most commonly used measure of central tendency.Mean is the average value of the item, mode is the most common value occurring in the data, and median is the middle
value (half of the values occur above this value and half below, e.g., 50th percentile). Minimum and Maximum are the lowest values and highest values, respectively, found for the data item. Standard deviation is a statistic that tells you how tightly all the various values are clustered around the mean in a setof data. This measure is the square root of the variance. Variance is a measure of how spread out a distribution is. It is computed as the average squared deviation of eachnumber from its mean. N-tiles are values that divide the data values into N groups, each of which contain 1/N of the values. If N is two, then thismeasure is equivalent to a median.
Pa ge 255 of 684 Ca pa bi l i e s of Ta bul a on

See Also: Tally Attributes for a Variable
Restrict a UniverseWhen you define a universe, CSPro will only tabulate data records in the questionnaires that meet the conditionsstipulated by you. The universe specification acts as a filter, as the tables produced use only a subset of the data file'srecords. Therefore, values in the table may be lower than they would be with no universe specified, since the universerestricts the data available for tabulation. Note that each table has its own universe definition, but that a given universespecification may be extended to all tables in an application.
See also: Define a Universe for a Table
Format Tables for Printing The layout and presentation of the text and numbers in a table is generally referred to as the "Table Format". CSPro,through various menus, gives the user almost complete control over all aspects of the Table Format. These include thetext font, its colors, its indentation, its alignment, its borders and the text itself. Other formats control the presentation ofnumbers, headers and footers on the printed page, and margins. See Also: Formats for Parts of a Table, Formatting Row, Column, or Cell Data, Formats for a Table, Formats for aTabulation Application, Formats for Printing
Load and Save Formatting PreferencesCSPro has a predefined set of formatting standards built into the system; these would be considered "Defaults." Theseinclude the text font, its colors, its indentation, its alignment, etc. Users have the option of creating their own defaultscalled "Preferences." These Preferences can be saved and reused for other applications. They may also be sharedamong multiple users working on the same publications in order to keep consistent formatting for all tables produced bythat team.
See also: Preferences and Default Formats, Modifying Preferences, Load and Save Formatting Preferences
Produce Tables by Area The "Area Processing" feature groups table data according to areas that you define. For example, if you are producingtables for industries, you may want to output the data according to industry type (Agriculture, Mining, Fishing, etc.). One of the most common uses of area processing is for geography. Whatever items you choose to use for your area,they must be part of the questionnaire identification or items on a singly- occurring record. Area processing is in additionto any row/column items selected. To use this feature, you must first create an area names file, which defines the levels of the area and assigns text namesto the numeric code. The Area Processing applies to all tables in your application. See also: Area Processing, Create an Area Names File, Area IDs Dialog Box, Area Names File
Save Tabulations in Different FormatsCSPro lets you select an entire table or parts of a table. The tables can be saved in several formats:
CSPro Tables (.tbw): Lets you save tables so they can be used later by the CSPro Table Viewer.
Rich Text Format (.rtf): Lets you save your tables so they can be used later by word processors such as Word.
Pa ge 256 of 684 Ca pa bi l i e s of Ta bul a on

You can open the (*.rtf) in your word processor, and the table will appear in the word processor's table format.
HTML files (.htm): Lets you save your tables so they can be later incorporated into Internet applications in tableformat.
Tab-delimited (.other): Lets you save your tables so they can be used later by a spreadsheet such as Excel.You can open the file in your spreadsheet, and the table will appear as a matrix of cells with columns lined up asyou would expect.
See also: Save Tables for the Table Viewer, Copy Table to Other Formats
Copy Table to Other FormatsIn addition to saving a table file in a particular format (as described in the preceding section), the user can use standardWindows copy and paste functions to copy all or part of a table directly into a word processor or spreadsheet. If only aportion of a table (i.e, not all rows and/or columns) is highlighted, CSPro will automatically include stub and columnheader text for only the affected rows/columns.
See also: Save Tabulations in Different Formats, Select and Copy Table Data to Other Applications
Copy and Paste Table SpecificationCSPro lets you copy the entire table specification (before you run it against a data file) to the clipboard. The tablespecification includes the variables in the table, tally attributes and formatting information. You can then paste the tableinto the current tabulation application or into a different tabulation application.
This feature is very useful for moving tables from one application to another. If you have many tables to produce, you candivide them into several applications each with a small number of tables, then use copy and paste table specification toassemble them into a single application at the end. If you do this, you must be careful to use the same data dictionary ineach application.
This feature is also useful if you need to add a table in the same application which is very similar to an existing table.
To copy or paste a table specification:
From the Tabulation Tree tab, right-click over any of the tree entries. A popup dialog box will appear. Select CopyTable Spec or Paste Table Spec.
From the Tabulation menu, select Edit, then Copy Table Spec or Paste Table Spec.
From the table itself, right-click anywhere over the cells of a table. A popup dialog box will appear. Select CopyTable Spec or Paste Table Spec.
Create Multiple Subtables Subtables are themselves tabulations nested within a larger tabulation -- hence the prefix 'sub', meaning part of a largerobject. Each subtable can be made up of one to four variables (two for row and two for column). Each subtable has oneindependent variable in the rows and one independent variable in the columns. It may optionally have one dependentvariable in the rows and one dependent variable in the columns. In the first example, each subtable has only twovariables, one row and one column.
Pa ge 257 of 684 Ca pa bi l i e s of Ta bul a on

In the second example, there are three variables in each subtable, one row variable plus two column variables (theindependent variable Urban/Rural and the dependent variable Sex).
Subtables are created automatically as the user builds the table. Every time an independent variable is dropped onto therows or columns of the table, new subtables are created as appropriate. Subtables are designated as part of the larger tabulation using colored outlines when viewing hidden parts. Eachsubtable has the same properties available to the entire tabulation, i.e., universe, weight, value tallied and unit oftabulation. These properties may be set differently for each subtable within a table. See Also: Add a Variable to a Tabulation, Using Subtables
Change Unit of TabulationFor most tabulations the unit of tabulation is easily determined. For example, the unit of tabulation for a table of Ageby Sex would be the Person record. A table of Householder Tenure and Number of Rooms would be tallied for eachHouse record. In cases where all items in the table are contained on the same type of record, the unit of tabulation couldonly be that record itself. At times, tables require inputs from two different record types (or two different groups of data).The choice of the unit of tabulation will affect the numbers in the table. CSPro allows this selection if there is any "cross-group" tallying in the table.
Pa ge 258 of 684 Ca pa bi l i e s of Ta bul a on

See also: Tally Attributes for a Table, Changing the Unit of Tabulation
Tally Items from Related RecordsData items on different records are often linked or related via codes on each of the records. For example, in a labor forcesurvey there may be an initial roster of information about each household member followed by an additional set ofquestions for persons 15 years old and over. If a table involves age and sex from the initial roster and an economicallyactive recode from the supplemental form, the data must be somehow linked so that the tally is done correctly. CSProallows the definition of relations in the data dictionary, which will link these two related records for the purpose of creatingcross tabulations.
See also: Relation Description, Tabulations Using Relations
Pa ge 259 of 684 Cre a ng Ta bl e s

Creating TablesCreate a New Tabulation Application To perform tabulations, you will need a data file, and a data dictionary to describe the file. If you do not have a datadictionary, you will need a written description of the data file structure and organization. You can create the CSPro datadictionary as you create the new Tabulation application.
• Click on the toolbar, or from the File menu, select New. The following dialog box will appear.
• Select Tabulation Application and press OK. • A file dialog box will appear. Enter the name of the application file. Make sure you are located in the folder where you
want to place the application files. Then press Create. The following dialog box will appear.
• A default name of the data dictionary describing the data file is given. You can use this name or change it. If you give
the name of a dictionary file that already exists, that data dictionary will be used by the application. If you give thename of a dictionary that does not exist, a new data dictionary will be created.
Pa ge 260 of 684 Cre a ng Ta bl e s

• If you are using an existing CSPro data dictionary, you may now start creating tables. If you are creating a new CSProdata dictionary, you will need to enter information into the dictionary about records, items, and values before you cancreate tables.
Tabulation applications consist of the following files:
• Tabulation Application file (.XTB)
Specifies all other files contained in the application and includes other application information.
• Table Specifications file (.XTS)Contains variable names and other parameters which define the tables in the application.
• Data dictionary file (.DCF)
Contains the physical format of the data file(s) to tabulate.
See also: CSPro Initial Screen Layout, Introduction to Data Dictionary
Create a Table To create a table, do the following:
Select the Dictionary [Dicts] tab to make the dictionary file structure visible.
Expand the tree until the item(s) you wish to use for row or column variable(s) appears on the tree.
Drag the desired dictionary item and drop it in the table window. Where you drop it on the table will determinewhether it is used as a row or column variable. For a row item drop it on the left side below the generated "Tablenn". For a column drop it on the top but a little below the generated "Table nn". If you imagine a diagonal lineconnecting the top-left corner of the table window to the bottom-right corner, dictionary items dropped below andto the left of the line will become row variables and items dropped above and to the right of the line will becomerow variables.
This can be repeated with additional items. The key to placement for additional items is whether they are droppednext to or on top of existing items. This is indicated by the "+" or "x" displayed with the item while it is beingdragged.
An item dropped next to an existing item is indicated by the "+" while dragging.
Pa ge 261 of 684 Cre a ng Ta bl e s

The dropped item will be appended to the existing item, e.g., Total, Male, Female followed by Total, Literate, Illiterate.
An item dropped on top of an existing item is indicated by the "x" while dragging.
The dropped item will be crossed with the existing item to make sub-groupings, e.g., Total, Literate, Illiterate under Total,Male and Female.
To delete a row/column variable, left-click on one of its value names, then drag and drop it back on the dictionarytree. In the 'x' example above, if "Sex" is deleted, then "Literacy" will also be deleted. However, "Literacy" can bedeleted without affecting "Sex".
The rows/columns that are created when you add an item to a table come directly from the value set defined in thedictionary for that item. If you would like to have different rows/columns created for a particular item, you can eithermodify the value set in the dictionary or create an additional value set for the item and use the new value set instead. Touse a different value set, rather than dragging the item itself onto the table, drag the value set instead. For items withmore than one value set, the value sets appear underneath the item in the dictionary tree. For more information seeImplications of Data Dictionary Value Sets. Optional Definitions • Define the universe for the table. • Define the area for the table. • Select the value Item or constant you want to tabulate. • Select the weight Item or constant • Add percentages. When two variables are selected for the same dimension (row or column), the first one selected becomes theindependent variable and the second one becomes the dependent variable. (See the discussion on row/column variablesfor more details.) See also: Tabulations, Add a Variable to a Tabulation, Remove a Variable from a Tabulation
Pa ge 262 of 684 Cre a ng Ta bl e s

Create Tables with Multiple Variables Row variables are those dictionary items or value sets which appear in the rows of the table. Column variables are thosedictionary items or value sets which appear in the columns of the table. Every table must have at least one row orcolumn variable specified; any given subtable can have a maximum of two row variables and two column variables. Thenumber and disposition of row and column variables will affect the type of table generated. • 1 Row/0 Column Variables
If a table consists of one row variable and no column variables, the system will produce a table with the variable'scategories as rows and frequency counts as the only column.
• 0 Row/1 Column Variable
If a table consists of no row variables and one column variable, the system will produce a table with the tabulationcategories in the columns and totals in the single row of the table.
• 1 Row/1 Column Variable
If a table or subtable consists of one row variable and one column variable, the system will produce a normal cross-tabulation, with the tabulation categories of each variable in row or column, as appropriate. By default, totals willappear in the left-most column and in the top-most row (it is possible, however, to change the position of the total).
• 2 Row/Column Variables
When a table or subtable is designed with two variables or value sets in the row and/or column, one of each pair isconsidered to be the independent [major] variable, and the other is considered to be the dependent [minor] variable.The tabulation categories of the dependent variable appear nested within the categories of the independent variable.Totals for a dependent variable appear as the topmost row or left-most column within each tabulation category of itsindependent variable.
Because there are effectively no limits on the number of rows and columns in a table, the combination of twovariables/value sets can produce tabulations which will be extremely difficult to view and to understand. Users should givecareful thought to the placement of variables and value sets in rows and columns, particularly when one or more of theitems has a large number of tabulation categories. It is almost always easier to manipulate tables with large numbers ofrows than those with the same number of columns. Whenever the area processing function is invoked for a table set, the area levels are included as additional rowcategories within which the other row variables are displayed. Subtables are created by adding variables to the bottom of the existing rows or to the right of the existing columns.When a subtable is created it is usually outlined in color to designate this fact. This is an example.
Notice these are like two separate tables side-by-side; 1) Marital Status by Sex and 2) Marital Status by Literacy. Thereis a total of 6 columns (3 for Sex plus 3 for Literacy). Note also the wording in the generated title. Compare the above to the following:
Pa ge 263 of 684 Cre a ng Ta bl e s

This is a single table (1 row variable and two column variables) with a total of 9 columns (3 for Sex times 3 for Literacy).Note the wording in the generated title.
Implications of Data Dictionary Value Sets Within the data dictionary, the user can define multiple value sets for each data item. For use in Tabulation applications,these sets may have value names for both individual values and value ranges. If one table requires five-year age groupsbut another uses single years of age, both requirements can be met by having two value set definitions for age. If an item in the dictionary has more than one value set, you can choose which of the value sets to use when adding thatitem to a table. If you drag the item itself from the dictionary, CSPro will add the first value set for that item to the table.However, if you drag one of the value sets underneath the item in the dictionary tree window, CSPro will use the value setthat you dragged.When creating a value set, you should take into account the following:
Value labels must be given for the value set since these appear as text (row or column) in the tables. If no label isgiven, the corresponding row/column label will be blank.
Counts associated with the value labels are based on the item values defined for the label. This might be a singlevalue, e.g., Male (sex=1); a range of values, e.g., Under 5 years old (age from 0 to 4); disjoint values, e.g.,Teacher (occupation=23, 42, or 67); or some combination of these. That is, each value in the data file that fallsinto a particular range/value in the value set will cause the count to be incremented for the corresponding cell inthe table.
Counts are ONLY made in the table for item values defined in the value set. Values in the data file that are notdefined in the value set are not counted. In the example below, the 'Marital Status' value set is missing codes 2and 3 from its value set and the total reflects only the values listed in the value set. The exception to this rule iswhen Special Values are included in the Tally Attributes for the table or subtable.
Pa ge 264 of 684 Cre a ng Ta bl e s

In the current version of the software, alphanumeric items CANNOT be tallied.
By default, certain summary statistics (median, n-tiles and mode) are calculated using the counts in thevalues/ranges in the value set. The accuracy of these summary statistics is highly dependent on the number andsize of values/ranges in the value set. If the range for a particular variable is large and there are a small number ofcategories in the value set, these statistics will be inaccurate. For best results, when calculating median, modeand n-tiles, use either single values for discrete variables or small, uniformly sized ranges for continuous variables.Note that by setting the appropriate options for n-tiles and median, you can use different categories for the n-tile/median calculation than those in the value set. See Tally Attributes for a Variable for details.
See Also: Include/Exclude Special Values in a Variable, Tally Attributes for a Table, Value Sets Description, Create aTable, Add Summary Statistics to a Table, Tabulate categories with disjoint values, Debug Table Totals
Tabulate Items with Multiple Occurrences If an item used as a row or column variable is defined as having two or more occurrences, the following conditions apply: • If the parent item [i.e., the one described as occurring n times] is dragged to the table as a row or column variable, the
variable name will be shown without parentheses. • If one of the occurrences of an item is dragged to the table as a row or column variable, the variable name will be shown
with a number in parentheses. For example, MyItem contains two occurrences, MyItem(1) and MyItem(2). If MyItem (the parent item) is draggedfrom the dictionary tree to the table as a row or column variable, no parentheses will appear with the name MyItem inthe table heading because no specific occurrence of MyItem was requested. However, if MyItem(1) is dragged fromthe dictionary tree to the table, then the item name MyItem will be shown with the identifying number in parentheses—MyItem(1)—because the user selected a specific instance [occurrence] of the variable. If you choose an item with occurrences as a row or column variable, all occurrences of that item will be tabulated acrossall corresponding records in the data file. For example, if you choose MyItem, both MyItem(1) and MyItem(2) wouldbe tabulated across all records. If you choose a specific occurrence of an item as a row or column variable (e.g., MyItem(2)), only that occurrence willbe tabulated across all corresponding records. You may also use items with occurrences as the value or weight item. Note that when the unit of tabulation is not the
Pa ge 265 of 684 Cre a ng Ta bl e s
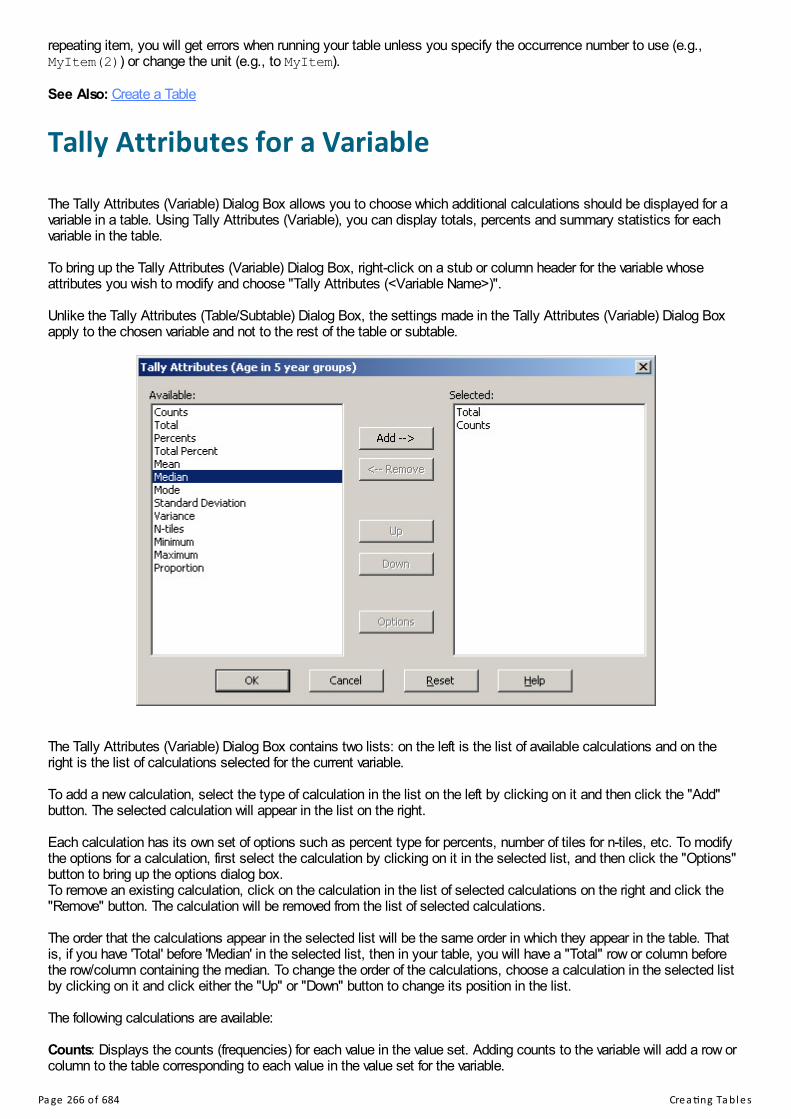
repeating item, you will get errors when running your table unless you specify the occurrence number to use (e.g.,MyItem(2)) or change the unit (e.g., to MyItem). See Also: Create a Table
Tally Attributes for a Variable The Tally Attributes (Variable) Dialog Box allows you to choose which additional calculations should be displayed for avariable in a table. Using Tally Attributes (Variable), you can display totals, percents and summary statistics for eachvariable in the table. To bring up the Tally Attributes (Variable) Dialog Box, right-click on a stub or column header for the variable whoseattributes you wish to modify and choose "Tally Attributes (<Variable Name>)". Unlike the Tally Attributes (Table/Subtable) Dialog Box, the settings made in the Tally Attributes (Variable) Dialog Boxapply to the chosen variable and not to the rest of the table or subtable.
The Tally Attributes (Variable) Dialog Box contains two lists: on the left is the list of available calculations and on theright is the list of calculations selected for the current variable. To add a new calculation, select the type of calculation in the list on the left by clicking on it and then click the "Add"button. The selected calculation will appear in the list on the right. Each calculation has its own set of options such as percent type for percents, number of tiles for n-tiles, etc. To modifythe options for a calculation, first select the calculation by clicking on it in the selected list, and then click the "Options"button to bring up the options dialog box.To remove an existing calculation, click on the calculation in the list of selected calculations on the right and click the"Remove" button. The calculation will be removed from the list of selected calculations. The order that the calculations appear in the selected list will be the same order in which they appear in the table. Thatis, if you have 'Total' before 'Median' in the selected list, then in your table, you will have a "Total" row or column beforethe row/column containing the median. To change the order of the calculations, choose a calculation in the selected listby clicking on it and click either the "Up" or "Down" button to change its position in the list. The following calculations are available: Counts: Displays the counts (frequencies) for each value in the value set. Adding counts to the variable will add a row orcolumn to the table corresponding to each value in the value set for the variable.
Pa ge 266 of 684 Cre a ng Ta bl e s
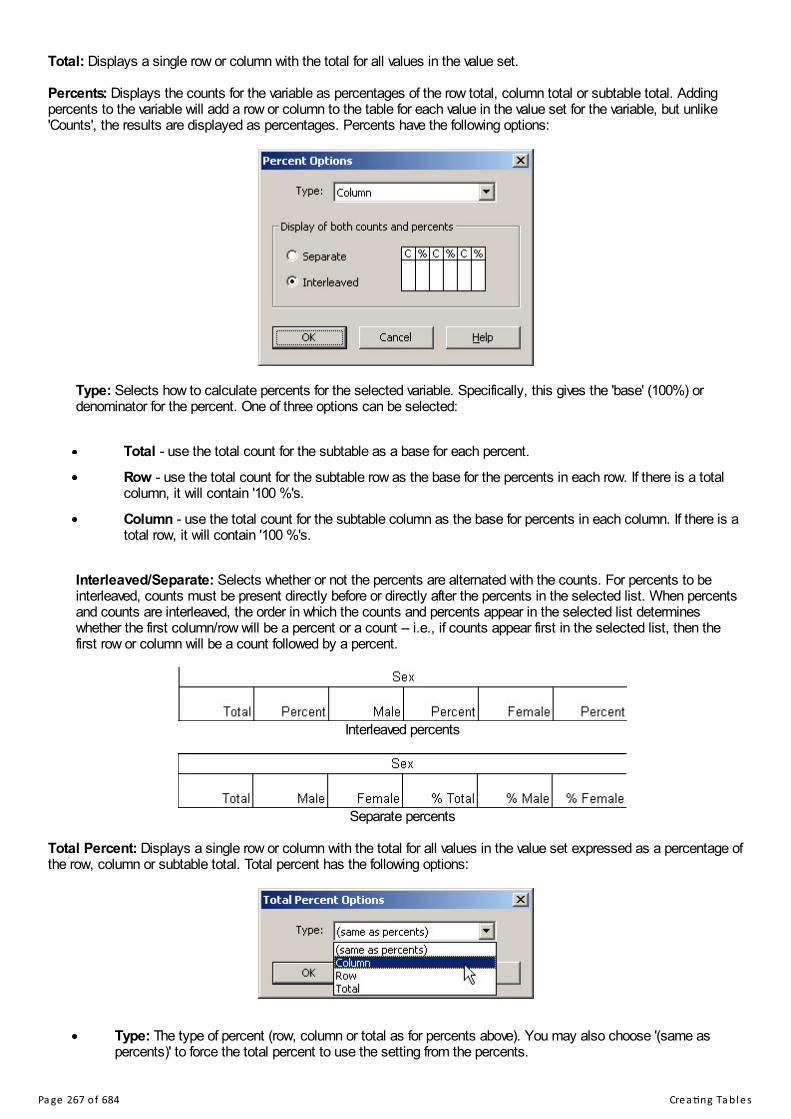
Total: Displays a single row or column with the total for all values in the value set. Percents: Displays the counts for the variable as percentages of the row total, column total or subtable total. Addingpercents to the variable will add a row or column to the table for each value in the value set for the variable, but unlike'Counts', the results are displayed as percentages. Percents have the following options:
Type: Selects how to calculate percents for the selected variable. Specifically, this gives the 'base' (100%) ordenominator for the percent. One of three options can be selected:
Total - use the total count for the subtable as a base for each percent.
Row - use the total count for the subtable row as the base for the percents in each row. If there is a totalcolumn, it will contain '100 %'s.
Column - use the total count for the subtable column as the base for percents in each column. If there is atotal row, it will contain '100 %'s.
Interleaved/Separate: Selects whether or not the percents are alternated with the counts. For percents to beinterleaved, counts must be present directly before or directly after the percents in the selected list. When percentsand counts are interleaved, the order in which the counts and percents appear in the selected list determineswhether the first column/row will be a percent or a count -- i.e., if counts appear first in the selected list, then thefirst row or column will be a count followed by a percent.
Interleaved percents
Separate percents
Total Percent: Displays a single row or column with the total for all values in the value set expressed as a percentage ofthe row, column or subtable total. Total percent has the following options:
Type: The type of percent (row, column or total as for percents above). You may also choose '(same aspercents)' to force the total percent to use the setting from the percents.
Pa ge 267 of 684 Cre a ng Ta bl e s

Mean: Displays the arithmetic mean (average) for each row or column. Median: Displays the median for each row or column. Median has the following options:
Type: Specifies the type of variable – either discrete or continuous. This should be set to "Discrete" fordiscrete variables (such as number of rooms) and to "Continuous" for continuous variables (such as age orincome). The median is approximated using linear interpolation based on a frequency distribution for thevariable. For discrete variables, 0.5 is subtracted from the result to reflect the fact that values in a categoryare all equal to the lower limit of the category whereas for continuous variables values in a category are inbetween the lower and upper limits of the category.
Calculation ranges: Controls which frequency distribution is used to calculate the median. If "Use value setranges for calculation" is checked, then the median will be approximated using a frequency distribution forthe value set that was dropped onto the table. Otherwise, you can specify the ranges to use for thedistribution by entering the min, max and interval. CSPro will generate ranges of width 'interval' starting at'min' and going up to 'max'. For example, a "min" of 0, "max" of 20 and "interval" of 5 will generate thefollowing four ranges:
0 up to but not including 55 up to but not including 1010 up to but not including 1515 up to but not including 20
If the value set you use does not have very many ranges, it is better to generate your own ranges in order toget a closer approximation of the median. For example, using a value set with only three categories for agesuch as 0-14, 15-49 and 49+ will generally result in a very poor approximation of the median, while using 5-year groupings will generally result in a good approximation. For an even better approximation, turn off "Usevalue set ranges for calculation" and specify a min of 0, a max of the largest age in the population and aninterval of 1. For variables such as "income" or "price of a house", you may need to experiment with differentsets of ranges to come up with a good approximation for the median.
Mode: Displays the mode (value with the greatest number of occurrences in the data set) for each row or column. Standard deviation: Displays the standard deviation for each row or column. Variance: Displays the variance for each row or column. N-tiles: Displays percentiles for each row or column. N-tiles has the following options:
Pa ge 268 of 684 Cre a ng Ta bl e s

Number: Sets the percentiles to show. Set it to 4 for quartiles, 5 for quintiles, etc.
Calculation ranges: Controls which frequency distribution is used to calculate the n-tiles. If "Use value setranges for calculation" is checked, then the n-tiles will be approximated using a frequency distribution for thevalue set that was dropped onto the table. Otherwise, you can specify the ranges to use for the distributionby entering the min, max and interval. CSPro will generate ranges of width "interval" starting at "min" andgoing up to "max". For example, a "min" of 0, "max" of 20 and "interval" of 5 will generate the following fourranges:
0 up to but not including 55 up to but not including 1010 up to but not including 1515 up to but not including 20
If the value set you use does not have very many ranges, it is better to generate your own ranges in order toget a closer approximation of the n-tiles. For example, using a value set with only three categories for agesuch as 0-14, 15-49 and 49+ will generally result in a very poor approximation, while using 5-year groupingswill generally result in a good approximation. For an even better approximation, turn off "Use value setranges for calculation" and specify a min of 0, a max of the largest age in the population, and an interval of1. For variables such as 'income' or 'price of a house', you may need to experiment with different sets ofranges to come up with a good approximation for the n-tiles.
Minimum: Displays the minimum value for each row or column.Maximum: Displays the maximum value for each row or column. Proportion: Displays the proportion of a specified subset of the counts for the variable as a percent or ratio of the totalfor the variable. You could also use proportion, for example, on the age variable, to display the percentage or fraction ofthe population with age between 15 and 49. You could also proportion on a yes/no variable such as 'owns a television' toshow the percentage or fraction of the population that owns a television. The proportion is calculated by taking a subsetof the values in the value set for a variable, computing the total for that subset and then dividing that total by the total forall values in the value set. The result may be displayed as a percent or as a ratio. The numerator used to calculate theproportion is the total number of values that match the specified subset of the value set and the denominator is the totalnumber of counts for all values in the value set. For example, in the case of the proportion of people between 15 and 49,the numerator would be the total number of people between 15 and 49 and the denominator would be the total number ofpeople of any age. Proportion has the following options:
Pa ge 269 of 684 Cre a ng Ta bl e s

Type: The type of proportion to display. It may be one of the following values:
Percent: Adds a single row or column to the table showing the counts for the values selectedin the range as a percentage of the total.
Percent & Total: Adds two rows/columns to the total: the first showing the percent as aboveand the second showing the total number of counts for the values selected in the range (i.e.,the numerator used to calculate the percent).
Ratio: Adds a single row or column to the table showing the counts for the values selected inthe range as a fraction of the total.
Ratio & Total: Adds two rows/columns to the total: the first showing the ratio as above and thesecond showing the total number of counts for the values selected in the range (i.e., thenumerator used to calculate the fraction).
Range: Specifies the set of values whose counts will be used in the numerator of the percent or ratio and asthe total. Range can be a single value (e.g., 3), multiple values separated by commas (e.g., 1, 2, 5, 17) and itmay also include value ranges using colons (e.g., 1, 2, 5:10, 25:30).
To show the percentage of the population between 15 and 49 you would add "proportion" to the age variable, set the typeto "Percent" and set the range to 15:49. To show the fraction of the population that owns a television, add "proportion" tothe variable "owns a television", set the type to "Ratio" and the range to 1 (assuming 1 means "yes"). Note that the values calculated for median, mode and n-tiles are dependent on the value set used. For more informationsee Implications of Data Dictionary Value Sets. See Also: Hide or Change the Position of the Total, Add Percents to a Table, Add Summary Statistics to a Table
Tally Attributes for a Table
Click on in the toolbar or right-click on a table or subtable and choose Tally Attributes (Table) or Tally Attributes(Subtable) to bring up the Tally Attributes (Table/Subtable) Dialog Box. This dialog allows you to change the results ofthe tabulation of a table or subtable by adding weights, restricting the universe of values, changing the values tallied,changing the unit of computation and changing the way special values and areas are considered. By default, CSPro counts or tallies once each time it finds an occurrence of a variable in your data set. That is, eachtime an occurrence of a variable is found, it looks at the value of the variable found, determines which cell of the table thisoccurrence falls in and increments the value in that cell by one. By changing the tally attributes, you can have CSProchange the amount that it increments the cell by (using value tallied or weight). You can also make CSPro ignore certainoccurrences of a variable and not count them (using unit tallied or universe).
Pa ge 270 of 684 Cre a ng Ta bl e s

The Tally Attributes (Table/Subtable) Dialog Box contains the following settings: Table (Subtables): Allows you to choose to modify the tally attributes of either the entire table or one of the subtables.Any changes made to Unit Tallied, Value Tallied, Weight, Universe, and Tab Logic will only apply to the selected table orsubtable. Changes made to Special Values, PostCalc and Lowest Break Level always apply to the entire table. Each subtable may have its own unique settings for Unit Tallied, Value Tallied, Weight, Tab Logic and Universe.
If a weight or value tallied is specified for both the entire table, and for a subtable, then the two weights or values(table and subtable) will be multiplied together to compute the final weight or value for the subtable.
If a universe is specified for both a subtable and for the entire table, then the two universes will be combined(using the and operator) to compute the final universe for the subtable.
If a table has more than one subtable, then you cannot set the unit tallied for the entire table. In this case, thereis no unit for the entire table. You must set the unit for each subtable. However, you can set the unit for allsubtables in one step by clicking on the Modify All Subtables button. Note that Modify All Subtables onlychanges the unit for existing subtables. Newly-added subtables will be given the default unit unless you modifythem explicitly after they are created.
If Tab Logic is specified for both a subtable and for the entire table, the logic for the entire table will be executedfor each subtable in addition to any logic for the subtable. The logic for the entire table will be executed beforethe logic for the subtable.
Note that if you choose Tally Attributes (Subtable), the subtable that you clicked on will automatically be selected in thislist.
Pa ge 271 of 684 Cre a ng Ta bl e s

Unit Tallied: Allows you to change the unit of computation for the selected subtable. The unit of computation is thelevel, record or item in the dictionary that is counted for the tally. For example, when tallying the rent variable of thehousing record, by default, the unit would be the housing record so each household would be counted once. However,you could tally the rent variable on a per person basis by setting the unit to the person record. This would count thenumber of people paying a given rent rather than counting the number of households paying a given rent. In most cases,the unit is left as the default. You can modify the unit for all subtables in a table at once by clicking on the "Modify All Subtables" button. This bringsup the following dialog box:
This dialog displays all units that can be applied to all of the subtables. Choose the unit from the drop down and click"OK". Potential units will not be included if they cannot legitimately be applied to one or more of the subtables. Forexample, if one subtable contains an item from a multiple record (e.g., "sex" on the person record), then only themultiply occurring record, and multiply occurring items on that record, are considered legitimate units to be applied to allsubtables. Value Tallied: Optional name of a numeric item in the dictionary whose value would be tallied into the data cells insteadof the unit (one) tally. For example, setting the value tallied to 'children ever born' would count the actual number ofchildren instead of counting the number of cases with a given number of children. This can also be a numeric constant. Weight: Optional name of a numeric item in the dictionary that contains the inflation factor (weight) for a survey case.For each tally, this value will be tallied instead of the unit (one) tally. This can also be a numeric constant. Universe: An expression that restricts the data used for tabulation. When you define a universe, CSPro will tabulate onlythose data records in the questionnaires that meet the conditions stipulated by you. The "universe" specification acts asa filter, as the tables produced use only a subset of the data file's records. Therefore, values in the table may be lowerthan they would be with no universe specified, since the universe restricts the data available for tabulation. Tab Logic: Optional CSPro logic statements that may be used to modify the values of variables in the case duringtabulation. This is used mainly for recodes of existing main dictionary variables into new variables used in the table. Forinformation see Table Logic (tablogic). Logic may be entered directly in the associated edit box or you can click on theEdit button to bring up a larger window in which to modify the logic. PostCalc: Optional CSPro logic statements that may be used to modify values in the table after the tabulation iscomplete. This logic can be used to add values to the table calculated from the tabulated data such as ratios. For moreinformation see Introduction to Table Post Calculation. Logic may be entered directly in the associated edit box or youcan click on the Edit button to bring up a larger window in which to modify the logic. Special Values: Allows you to customize which special values are counted in the selected table. By default, onlyspecial values included in the value sets being tallied are considered. By checking "use custom special values" you canspecify which, if any special values to include in the tabulation regardless of the special values contained in the valuesets. For example, if the value set used in a subtable contains the special values notappl and missing, by defaultundefined and default values will not be included in the tabulation. Enabling custom special values and checking notapplwhile leaving the others unchecked will cause only notappl values to be included in the tabulation. Lowest Break Level: Allows you to limit the geographical areas used for area processing for just the selected table.The lowest break level is the lowest geographical area that will be used in the table. For example, if your file includesdata at the province, district and village level but you set the lowest break level to district, then only province and districtwill appear in the selected table while all three levels will appear in other tables in the file. See Also: Create Multiple Subtables, Define a Universe for a Table, Add Weights to a Table, Tabulate Values Instead ofFrequencies, Include/Exclude Special Values in a Variable
Add, Insert, and Delete TablesPa ge 272 of 684 Cre a ng Ta bl e s

Add Table Any table added to an existing set of tables will always be placed after the last existing table. If you want a new table toappear in any other position in the table set, you must insert the table.
To add a new table simply press the Add button on the toolbar. You'll notice a new table is created with the name"Table #" (where # represents the number of the table—if this is the 5th table in your table set, it will initially benamed "Table 5"). Finish the definition of the added table by adding dictionary items and specifying any universedefinitions or other tabulation parameters desired. You can also add a table by right-clicking anywhere in a table and selecting Add Table from the popup menu.Alternatively, you can add a table from the Edit menu: select Add Table. Insert Table You can insert a table before another table by right-clicking anywhere in a table or on the table name in the table tree,
then selecting Insert Table from the popup menu. Alternately, you can insert a table by clicking on the icon, orselecting Insert Table from the Edit menu. Any table inserted into the existing table set will always be placed before the currently displayed table, which we will call"Table N". You'll notice a new tab is created with the name "Table #A" (where # is N-1). If you insert another table beforethis one, it will be created as "Table #AA". If you insert another table before "Table N", it will be created as "Table #B". Inboth cases # is N-1. Once created, finish the definition of the inserted table by adding dictionary items and specifyingany universe definitions or other tabulation parameters desired. Delete Table The table that is currently on view in the table window is always the one affected when you choose to delete. So if thetable you want to delete is not displayed in the table window, you must first make it visible. Either select it from the tabletree on the left or by using the table paging arrows in the Tabulation toolbar. You can then delete the table by right-clicking anywhere in the table or on the table name in the table tree, then
selecting Delete Table from the popup menu. Alternately you can use the icon on the toolbar or select DeleteTable from Edit menu. You will need to confirm that you actually want to delete the table.
Move Between Tables
To move through the tables press the or buttons on the toolbar. To go to a specific table select the table title from the Table Tree on the left. If the Table Tree is not showing in the leftpanel, click on the Tables tab at the bottom of the panel.
Run a Tabulation Application Once you have finished defining your table(s), you are ready to run them against your data files to produce the tables.
Press the Run Tabulation button or press Ctrl+R. If the application has been modified, you will need to save thechanges in order to run. The run will request the following files as appropriate:Input Data: The data file(s) being tabulated. There is NO required extension for CSPro data files. Multiple input data filescan be selected using the browse button. Area Names: Only used for applications with area processing. An Area Names File is used to associate the area codes
Pa ge 273 of 684 Cre a ng Ta bl e s

in the data file(s) with their descriptive text. The .ANM extension is required. Output TBW: The Table Viewer file created by the run. The .TBW extension is required, but does not to be specified bythe user. During the run, a bar will be displayed showing progress in processing the data file (See below).
Note that you can also stop the processing by using the "Cancel" button. If there are no warnings or errors, the application will display the resulting tables. If your application has generatedmessages, these will be displayed via a listing in Text Viewer but the results will still be shown in your tables.
Renaming Tables and Table Applications CSPro automatically assigns a name to each table in the application, such as TABLE1, TABLE2, etc. These names aredisplayed in the table tree (when "names in tree" is checked on the view menu), shown in certain error messages, andused in table post calculation.
You can change the name of a table using the table properties dialog. Right-click on the table in the "Tables" tree andchoose "Properties". Edit the name of the table and click "OK". Note that the system will not allow you to have twotables with the same name.
You can also change the name and label of the table application by right-clicking on the table application in the "Tables"tree and choosing "Properties". The tables application is always located at the top of the tree. Edit the name and label ofthe application and click "OK."
Pa ge 274 of 684 Cre a ng Ta bl e s

Pa ge 275 of 684 How To ...

How To ...Add a Variable to a Tabulation A table (or subtable) is created by selecting an item OR value set [if multiple value sets are available] from the datadictionary and then drag and dropping it into the table window on the right. Dropped in the upper right it becomes acolumn and in the lower left it becomes a row. Here is an example of dropping a row.
In order to create subgroupings of categories already defined in the table, e.g., by sex, drag and drop the subgroup item(sex) anywhere on the existing value set. (See 'Sex' in column below)
In order to create an additional set of row/column categories, drag and drop the item or value set below the existing rows[for additional set of rows] or to the right of the existing columns [for additional set of columns]. (See Place of Birth andMartial Status below)
The resulting table would be as follows:
Pa ge 276 of 684 How To ...

The title of the table is generated by combining the LABELS from the dropped items/values. The word "and" indicatesthat the second is dependent on the first. The word "by" separates the row labels from the column labels. A commaseparates the subtable items in a row or column. In example above: "Marital Status" and "Place of Birth" are two row items (separated by a ","). These two row items areseparated from the column items using the word "by". The column item, "Urban/Rural", is subdivided by "Sex" (asindicated with "and").
Remove a Variable from a Tabulation To remove a value set from a table, left-click on any of its value labels, then drag and drop it back in the tree panel. Seebelow.
If an independent item is removed then the associated dependent item will also be removed.
Define a Universe for a Table
Pa ge 277 of 684 How To ...

The definition of a universe is available from the Tally Attributes for a Table dialog box. Universes are available for theentire table and/or individual subtables. Experienced users, always remembering to use item names, can type the universe conditional directly in the boxprovided by the Tally Attributes menu. Use the Apply All button to the right of the box if the universe is for the entire table and you want to propagate it to alltables currently defined. It will replace any existing Universe in other tables. Less experienced users can access the universe "wizard" from the "Edit" button to the right of the universe box. Thisbrings up the following:
You can type a universe condition statement, as CSPro logic, in the Universe box. Or, you can double click on an itemname, press a relation button, and double click on a value.
Double click on the item in the left-hand box that you want to use in the universe condition. The item name willappear appended to the text in the universe condition below.
Click a relationship button ( =, <>, >, >=, <, <= ). The relation will appear appended to the text in the universecondition below.
Double click on a value in the right-hand box. The value, not the text label, will appear appended to the text in theuniverse condition below.
You may enter several conditions using the and / or. You can also add parentheses to modify the order ofevaluation of the conditions.
To delete the universe simply erase the contents of the universe condition.
Press OK when you have completed the universe condition.
You can apply a universe to all the tables, by pressing the Apply All button to the right of the Universe box in theTally Attributes dialog box
Examples:
To restrict your table to females of reproductive age, you might state:
P03_SEX = 2 and P04_AGE in 12:49To restrict your table to heads of households who are economically active, you might state:
P02_RELATION = 1 and ECON_ACTIVE = 1
Pa ge 278 of 684 How To ...

Notes:If there is a universe condition for the entire table and another for a subtable, the two conditionals will be combined by"and" to determine tallies for the subtable. If there is some type of error either in the typed or generated conditional, the system will display an "Invalid UniverseSyntax" message and the problem must be corrected before the universe can be accepted. (In the example below, "Sex"is not the CSPro name of a variable.)
See also: Restrict a Universe, Tally Attributes for a Table
Add Weights to a Table The declaration of weights is available from the Tally Attributes for a Table dialog box. Weights are available for the entiretable and/or individual subtables. Weights can be a data item name, a numeric constant, or any arithmetic expression. To add a weight to a table or subtable, simply type the expression the item name, numeric constant or expressiondirectly into the box provided for weight.
Use the Apply All button to the right of the box if the weight is for the entire table and you want to propagate it to alltables currently defined. It will replace any existing weight in other tables. Notes:If the value of the weight data item or expression is not numeric when a tally is to be made, the tally is NOT done. This isequivalent to a tally of zero. If the weight expression is not valid it must be corrected before the Tally Attributes dialog box can be closed.
See also: Tabulate Values and/or Weights, Tally Attributes for a Table
Tabulate Values Instead of Frequencies The declaration of values to be tallied is available from the Tally Attributes for a Table dialog box. Tally values areavailable for the entire table and/or individual subtables.
Pa ge 279 of 684 How To ...
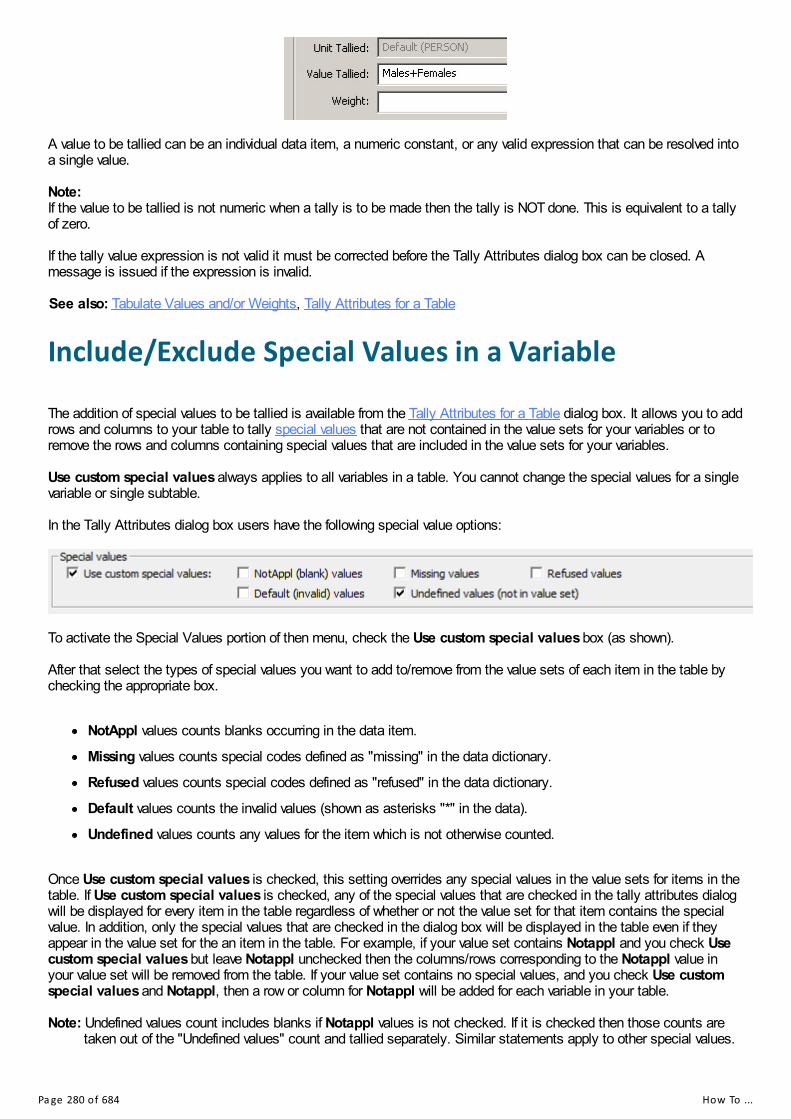
A value to be tallied can be an individual data item, a numeric constant, or any valid expression that can be resolved intoa single value. Note:If the value to be tallied is not numeric when a tally is to be made then the tally is NOT done. This is equivalent to a tallyof zero. If the tally value expression is not valid it must be corrected before the Tally Attributes dialog box can be closed. Amessage is issued if the expression is invalid. See also: Tabulate Values and/or Weights, Tally Attributes for a Table
Include/Exclude Special Values in a Variable The addition of special values to be tallied is available from the Tally Attributes for a Table dialog box. It allows you to addrows and columns to your table to tally special values that are not contained in the value sets for your variables or toremove the rows and columns containing special values that are included in the value sets for your variables. Use custom special values always applies to all variables in a table. You cannot change the special values for a singlevariable or single subtable. In the Tally Attributes dialog box users have the following special value options:
To activate the Special Values portion of then menu, check the Use custom special values box (as shown). After that select the types of special values you want to add to/remove from the value sets of each item in the table bychecking the appropriate box.
NotAppl values counts blanks occurring in the data item.
Missing values counts special codes defined as "missing" in the data dictionary.
Refused values counts special codes defined as "refused" in the data dictionary.
Default values counts the invalid values (shown as asterisks "*" in the data).
Undefined values counts any values for the item which is not otherwise counted.
Once Use custom special values is checked, this setting overrides any special values in the value sets for items in thetable. If Use custom special values is checked, any of the special values that are checked in the tally attributes dialogwill be displayed for every item in the table regardless of whether or not the value set for that item contains the specialvalue. In addition, only the special values that are checked in the dialog box will be displayed in the table even if theyappear in the value set for the an item in the table. For example, if your value set contains Notappl and you check Usecustom special values but leave Notappl unchecked then the columns/rows corresponding to the Notappl value inyour value set will be removed from the table. If your value set contains no special values, and you check Use customspecial values and Notappl, then a row or column for Notappl will be added for each variable in your table. Note: Undefined values count includes blanks if Notappl values is not checked. If it is checked then those counts are
taken out of the "Undefined values" count and tallied separately. Similar statements apply to other special values.
Pa ge 280 of 684 How To ...

Hide or Change the Position of the TotalBy default, a total count is automatically associated with each value set placed in a table. The usual placement for rowsis the top of the value labels; for columns it is to the left of the value labels. To modify this use the Tally Attributes for aVariable dialog.
To remove the total row or column, select the total by clicking on it in the list of selected calculations on the right handside of the dialog, and then click on the Remove button to delete the total.
To move the total after the counts, select the total by clicking on it in the list of selected calculations on the right handside of the dialog, and then click on the Down button to move it until it is after the counts.
The default options are set in the Preferences and Default Formats dialog.
See also: Hide or Show a Row or Column
Add Percents to a Table There are optional percentages available for each value set in a table. To create percentages, use the Tally Attributes fora Variable dialog. To bring up the Tally Attributes for a Variable Dialog, right-click on the variable in the table and choose Tally Attributes(<variable>). To add percents to the variable, select "Percents" in the list of available calculations on the left-hand side of the dialogand click the "Add" button. There are two options for "Percents" which can be set by clicking the "Options" button while the "Percents" are selected:
Type
Total – Percents are based on total cell for the table (% cell = (associated cell value * 100) / total of all the cellsin the table).
Row – Percents are based on total for the row (%cell = (associated cell value * 100) / total of all the cells in therow).
Column – Percents are based on total for the column (%cell = (associated cell value * 100) / total of all the cellsin column).
Interleaved/SeparateBy default, percents and counts are interleaved; that is, for each value in the value set, the frequency for that value islisted in the column/row directly preceding or following the percent for that value. Percents may also be separate, inwhich case all the frequencies are grouped together and all the percents are grouped together.
Pa ge 281 of 684 How To ...

Interleaved Percents
Separate Percents For percents to be interleaved, the percents must directly follow or directly precede the counts in the list of selectedcalculations in the tally attributes dialog. You can change the position of the percents relative to the other selected calculations (including the counts) by selectingthe percents in the list on the right-hand side of the dialog and clicking the "Up" or "Down" buttons. To show percents only (percents without counts), add the percents as described above and set the options to"Separate". Then select the counts in the list of selected calculations on the right-hand side of the dialog and click the"Remove" button to delete the counts. Finally, do the same to remove the "Total". To show percents only with a number row, add the percents and remove the counts as above, but do not remove the"Total". The Defaults are set in the Preferences and Default Formats. By default, data in rows and columns containing percents will be displayed with one decimal place (e.g., 12.3). Tochange the number of decimal places see Change the Number of Decimal Places Displayed. You can also show the percentage of the counts for a subset of the values in a value set (e.g., percent of people with agebetween 15 and 49) using proportions. See the section on proportions under Tally Attributes for Variable for moreinformation.
Add Summary Statistics to a Table There are optional summary statistics available for each value set in a table. To add summary statistics to a table usethe Tally Attributes for a Variable dialog. The choices for statistical measures are:
Mean – average value of observations.
Median - middle value (half of the observations are above this value and half below).
Mode – for categorical (discrete) variables this is the most frequently observed value. For grouped variables, thisis the lower limit of the modal class or the range in the value set in which the most observations lie.
Std Deviation – Standard Deviation, a measure of how clustered the observations are around the mean (squareroot of the variance).
Variance – another measure of dispersion.
N-tiles - values that divide the values into N groups each of which contain 1/N of the total observations (N = 2 isequivalent to median).
Minimum – smallest value found in all observations.
Maximum – largest value found in all observations.
Proportion – show counts for certain values in the value set as a fraction or percentage of the total for thevariable.
It is assumed that users know the meaning and relevance of any statistics that are selected. They are only meaningfulfor data that represents a true numeric value, e.g., age, income, hectares, etc.).
Pa ge 282 of 684 How To ...

Many of the statistics above have additional parameters that can set by selecting them and clicking on the "Options"button. These options are documented in Tally Attributes for a Variable. Note that in the case of grouped or continuous variables, the median, n-tiles and mode depend highly on the value setused. This is because these statistics are calculated using the frequency distribution for the value set rather than on theraw data itself. The mode will be the category in the value set that contains the most observations. The median iscalculated by interpolation using the limits of the category in the value set within which the cumulative frequency reaches50%. This means that the mean, mode and n-tiles will be more accurate for value sets with more smaller categoriesrather than fewer large categories. For best results, use value sets with a large number of uniform categories whencalculating median, mode and n-tiles. For example, using single year of age or 5 year age groups rather than 15 or 20year age groups will result in a more accurate median age. Using a single grouping for age (for example one categoryfor 0-115 years) will result in a highly inaccurate result. Note that for median and n-tiles, it is possible to set groupingsfor the median/n-tile calculation which are different from the categories in the value set in order to get a more accurateresult. See Tally Attributes for a Variable for details. See Also: Implications of Data Dictionary Value Sets
Include/Exclude Tables from RunBy default, all the tables you define in a tabulation application will be produced when you run the application. However,there are times when you may not want all the tables to be produced. For example, if you already have fully tested manytables and you add another table that you wish to test, you may want to run only that table in order to save time. In thiscase you would exclude all the other tables from the run.
To exclude a table from the run, first make sure the table is selected and appears on the screen. From the Edit menu,select Exclude Table from Run, or right-click on the table name on the table tree on the left and select Exclude fromRun. The icon next to the table in the tree on the left will show a red X when the table is excluded.
If a table is already excluded, follow the same steps to change the setting back to included in the run. The red X willdisappear.
To exclude all the tables but the one currently selected, select the Exclude All But This option. This is a useful duringtesting when you want to run only one table at a time. To undo any exclusions, select the Include All Tables option.
Debug Table Totals At times, the totals in a table may differ from totals calculated using other methods. There are some easy ways to figureout the cause of such discrepancies. Some values that exist in your data file may not be in the value set and thus these values will not be counted in thetotals. For example, a value set might include the numbers 1 through 6. The data file might have a value of 7 or 8 for thevariable or in some cases might contain blank (notappl) values for the variable. To see if this is the case, try includingcustom special values in your table. Make sure to check the boxes for the special values notappl, undefined, anddefault. Run the table again and check to see if any of the rows/columns for special values have counts in them.
Pa ge 283 of 684 How To ...

If you have counts for the special value undefined then there are values in your data file that are not in the value set thatyou are tabulating. You may either edit the data file to eliminate such values or change your value set to include them.To find the actual values that are not in the value set, use the Tabulate Frequencies tool with the Each value foundoption. If you have counts for the special value notappl then there are blanks in your data file for the variable in question. Youwill either need to impute the blanks or add an entry for notappl to your value set. If you have counts for the special value default then there are values in your data file that cannot be read by CSPro. Thiscan be because the properties of the variable in the dictionary do not match the data in the file. For example if the datatype in the dictionary is numeric but the value in the data file contains non-numeric characters or if there is a decimalcharacter in the data file but none specified for the item in the dictionary. It can also be because when the data file waswritten the value of the variable overflowed the length specified for the variable in the dictionary. You should examine the data file and the dictionary file for discrepancies and also check any programs that have writtento the data file to see if they could be writing default values. There may be some values in your value set that are repeated and are being counted in more than one row or column ofthe table. For example, in the following value set, age 5 is in both the 0-5 and the 5-10 ranges and therefore each personwith and age of 5 will be counted twice: once in the 0-5 category and once in the 5-10 category. The total will be thecorrect count of the number of persons, however, the sum of the age categories will not match the total.
Check your value set to make sure that no single value is repeated and that no ranges overlap. Of course, in somecases, you may want to have overlapping ranges in your value set, for example if you want to show subtotals. See Also: Implications of Data Dictionary Value Sets, Special Values
Pa ge 284 of 684 Forma ng Ta bl e s

Formatting TablesFormats for a Part of a Table The Format (Table Element) Dialog Box allows you to change the appearance of individual elements of a table such asstubs, column heads, data cells, etc. To bring up the Format (Table Element) Dialog Box, right-click on the element in the table that you wish to modify andchoose Format (<element name>) where <element name> is the type of table element that you clicked on (title, stub,column head, etc…).
The Format (Table Element) Dialog Box has the following settings: Hide: When checked, the selected element will not be displayed in the table. If a column head or row stub is selected,then the associated column or row will also be hidden. Note that stub heads, titles, and data cells may not be hidden. Hide when All Cells in Row are Zero: Available only for stubs. When checked, if all cells in the row contain the valuezero, then the row will be hidden. Custom Text: When checked, the default text generated by CSPro for the selected element will not be displayed. Youmay add your own text for the selected element by double-clicking on the element and typing in the new text. Note that ifyou double-click on a table element and add your own text without first checking the custom text box, CSPro willautomatically check it for you. You can uncheck this box to replace your new text with the default CSPro-generated text. Font: Displays the current font and font size for the selected element. You may switch to a different font and/or font sizeby clicking on the change button. Text Color: Shows the current color used to display the text of the selected element. To change the text color, click onthe square displaying the current color. Fill Color: Shows the current color used to display the cell background of the selected element. To change the fill color,click on the square displaying the current color. Indent: Allows you to set the indentation of the selected element from the right and left edges of the cell. To set the
Pa ge 285 of 684 Forma ng Ta bl e s

indentation for the selected element, first uncheck "use default indentation" and then modify the numbers for "Left" and"Right" indentation appropriately. Note that columns in the table will automatically be made wider to accommodateindentation. Alignment: Allows you to set the horizontal and vertical justification of the selected element within its cell. Using thehorizontal alignment control, elements can be right-justified, left-justified or centered. Using the vertical alignment control,elements can be top-justified, bottom-justified or centered (middle). Lines: Allows you to set the borders on the top, left, bottom and right sides of the selected element. Each side of theelement may have no border, a thick border or a thin border. Note that lines may not be modified for an individual datacell. Instead you should set the lines for a whole row or column by setting the lines for the associated stub or columnhead and checking the "extend lines into cells" checkbox (see below). Extend Font into Cells: When this is checked for a column head or stub, the font and font size for the selected elementare applied to all cells in the associated column or row. For a stub, all cells in the row of the stub will share the font ofthe stub. For a column head, all cells in the column underneath the head will share the font of the column head. Extend Lines into Cells: When this is checked for a column head, spanner, stub or caption, the lines (borders) for theselected element are applied to all cells in the associated column(s) or row. For a stub or caption, all cells in the row ofthe stub or caption will share the top and bottom line settings of the caption. For a column head, all cells in the columnwill share the left and right line settings of the column head. For a spanner, the cells in the rightmost column underneaththe spanner will share the right line setting of the spanner and the cells in the leftmost column underneath the spannerwill share the left line setting of the spanner.
(Thick lines extended into cells from a stub ('30 to 39 years') and a column head ('Separated')) Note that the lines between rows and columns are shared between multiple elements. For example, the vertical linebetween two columns is both the left edge of one column and the right edge of the other column. It may also be the edgeof one or more spanners. At times, you may need to change the line setting in more than one of these elements in orderto change a line. For example, in order to make the vertical line between two columns disappear, you may have to setthe left line of one column to 'none' and the right line of the other column to 'none'. You may also have to set the left orright line of one or more spanners to 'none'.
Extend Text Color into Cells: When this is checked for a column head or stub, the text color for the selected elementis applied to all cells in the associated column or row. For a stub, all cells in the row of the stub will share the text colorof the stub. For a column head, all cells in the column underneath the head will share the text color of the column head. Extend Fill Color into Cells: When this is checked for a column head or stub, the background color for the selectedelement is applied to all cells in the associated column or row. For a stub, all cells in the row of the stub will share the fillcolor of the stub. For a column head, all cells in the column underneath the head will share the fill color of the columnhead. Extend Indentation into Cells: When this is checked for a column head or stub, the indentation setting of the selectedelement is applied to all cells in the associated column or row. For a stub, all cells in the row of the stub will share theindentation of the stub. For a column head, all cells in the column underneath the head will share the indentation of thecolumn head. Span Cells: This setting applies only to captions. When this is checked for a caption, the caption spans the entire row.By default, captions are placed in the first column of the table along with the stubs, and the cells containing them are thesame size as the cells containing the stubs. This means that there are empty cells in all other columns of the captionrow. When "span cells" is checked, the empty cells in the caption row are removed and the caption is placed in onelarge cell that spans the entire row. This allows you, for example, to center or right-justify the caption in the entire row
Pa ge 286 of 684 Forma ng Ta bl e s

(by setting the alignment). Decimal Places: Sets the number of decimal places used to display numeric values for the selected element. If appliedto a data cell, this sets the number of decimal places used for that individual cell. If applied to a column head or stub itsets the number of decimal places for the entire row or column. This may only be applied to data cells, column headsand stubs.
Formatting Row, Column, or Cell Data Rows, columns and data cells are formatted in the same way as other parts of a table. Many formats, such as fonts,colors, indentation and lines, can be applied either to individual data cells or to entire rows or columns. To format anentire row, right-click on the corresponding stub and choose "Format (Stub)". To format an entire column, select thecorresponding column head and choose "Format (Column Head)". Once you have changed the formats, make sure that"extend into cells" is checked in the Format (Table Element) dialog for the formats that you have modified. For example,if you wish to change the font for an entire row, make sure that "Extend font into cells" is checked for the stub, otherwisethe font change will only apply to the stub itself and not to the rest of the row. See Formats for a Part of a Table fordetails on the Format (Table Element) dialog. You can select multiple rows (stubs) or columns (column heads) to format. This is very useful to modify decimal places,indentation or specific attributes of specific groups of rows or columns; for example, to make 'total' rows bold. Multiple selection is done in the usual Windows manner by left-clicking the mouse while using the Shift or Ctrl key.Using the Ctrl key adds each cell in the table that is clicked on to the selection. Using the shift key adds all the cells inbetween the two cells clicked on to the selection. Although you may select different types of cells at the same time(data cells, stubs, column heads), you can only format selected groups when all selected items are of the same type (forexample, all selected items are stubs). In this example multiple stubs have been selected but 'Total' is not.
Use the right-click to access the Format (Stub) menu. Change the indentation to .5 in. then select OK. The result isbelow.
Similar actions can be performed on columns by selecting multiple column heads. You can also select multiple captionsor spanners.
Pa ge 287 of 684 Forma ng Ta bl e s

Although the formatting option is available for each data cell, it should only be used in the rarest of cases. When working with sub-groupings (one variable dropped on top of another), any formatting applied to one row or columnin a sub-grouping will automatically be applied to the corresponding row or column in all of the other sub groupings. In theexample below, changing the font for the column "Male" under the spanner "Total" also changes the font for the "Male"column under the "Urban" and "Rural" spanners.
You cannot change the format for one row or column in only one sub-grouping but not the others. You can, however,achieve the same result using multiple subtables with universes. See also: Change the Way Numbers are Displayed
Formats for a Table The Format (Table) Dialog Box allows you to control the overall appearance of a table. To bring up the Format (Table) Dialog Box, right-click anywhere on the table and choose "Format (Table)", or choose"Format (Table)" from the Edit menu. Any changes made will apply only to the current table.
The Format (Table) Dialog Box has the following settings: Include Subtitle: When checked, an additional row below the title row is added to the table. You may enter a subtitle tothe table by double-clicking on the new row and typing in the text for the subtitle. Include Pagenote: When checked, an additional row is added at the end of the table. You may enter a pagenote foryour table by double-clicking on the new row and typing in the text for the pagenote. Pagenotes are displayed at thebottom of each page of the table. Include Endnote: When checked, an additional row is added at the end of the table. You may enter an endnote for yourtable by double-clicking on the new row and typing in the text for the endnote. Endnotes are displayed only once pertable, at the bottom of the last page of the table. Stub Reader Breaks: Sets the frequency of reader breaks in the rows of the table. Reader breaks are blank rows usedto break up the table. By default there are no reader breaks. The frequency of reader breaks may be set anywhere from 1
Pa ge 288 of 684 Forma ng Ta bl e s
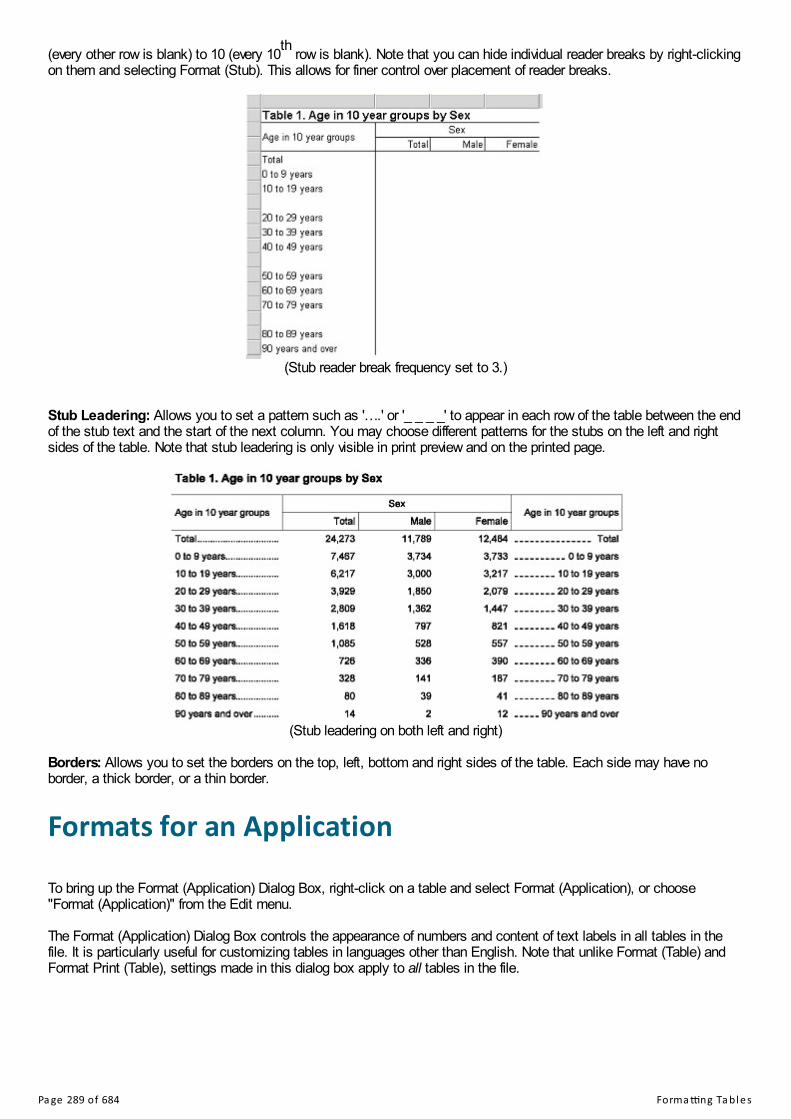
(every other row is blank) to 10 (every 10th row is blank). Note that you can hide individual reader breaks by right-clickingon them and selecting Format (Stub). This allows for finer control over placement of reader breaks.
(Stub reader break frequency set to 3.) Stub Leadering: Allows you to set a pattern such as '….' or '_ _ _ _' to appear in each row of the table between the endof the stub text and the start of the next column. You may choose different patterns for the stubs on the left and rightsides of the table. Note that stub leadering is only visible in print preview and on the printed page.
(Stub leadering on both left and right) Borders: Allows you to set the borders on the top, left, bottom and right sides of the table. Each side may have noborder, a thick border, or a thin border.
Formats for an Application To bring up the Format (Application) Dialog Box, right-click on a table and select Format (Application), or choose"Format (Application)" from the Edit menu. The Format (Application) Dialog Box controls the appearance of numbers and content of text labels in all tables in thefile. It is particularly useful for customizing tables in languages other than English. Note that unlike Format (Table) andFormat Print (Table), settings made in this dialog box apply to all tables in the file.
Pa ge 289 of 684 Forma ng Ta bl e s

The following settings are available: Decimal Symbol: Sets the symbol used to separate the whole and fractional parts of numbers in data cells. By defaultthis is set to period; however, it may be set to comma or any other symbol. For example, changing the symbol fromperiod to comma would change the display of a number from 3.14 to 3,14 Digit Grouping Symbol: Sets the symbol used to separate groups of digits in large numbers in data cells. By defaultthis is set to comma so that numbers are displayed as 123,456,789 but it can be changed; for example, to a period sothat numbers are displayed as 123.456.789 Digit Grouping: Controls how digits are grouped together to be separated by the digit grouping symbol. There are threeoptions:
123,456,789 (default) – place the digit grouping symbol between each group of three digits.
123456789 – do not use the digit grouping symbol.
12,34,56,789 – place the digit grouping symbol between each group of two digits with one group of three digits atthe right.
Display Leading Zeros: Controls whether or not zero should be displayed before the decimal point of a decimal numberbetween zero and one. Leading zeros are displayed by default. Measurement System: Allows you to switch between US (inches) and metric (centimeters) measurements for pagemargins. The measurement is used when specifying margins in the Format Print (Table) dialog as well as indentation inthe Format (Table Element) dialog. The measurement system is set to US by default. Zero Mask: Allows you to change the text that is displayed for data cells that contain a value of exactly zero. By defaultthe zero mask is "-", so any data cell containing a value of zero is displayed as "-" rather than "0". If you want zero to bedisplayed, remove the zero mask text. Rounded to Zero Mask: Allows you to change the text that is displayed for data cells that contain a value which isrounded off to zero because it cannot be displayed using the number of decimal places for that data cell. For example, ifthe value in a data cell is calculated to be 0.002 but the number of decimal places for that cell is set to 2, the rounded tozero mask will be displayed in that cell. Having the zero mask and rounded to zero masks be different makes it clearwhich values are exactly zero and which ones are rounded off. By default the rounded to zero mask is "*". If you wantzero to be displayed, remove the rounded to zero mask text. Note that you can change the number of decimal places for
Pa ge 290 of 684 Forma ng Ta bl e s

a row, column or data cell by using the Format (Table Element) Dialog Box. Title Template: Sets the text used to automatically generate the first portion of default table titles. When you create anew table, CSPro automatically gives the new table a title. By default, this title begins with "Table %s." where the tablenumber replaces %s. You can change this by entering your own text in this edit box. If you put "%s" in your new titletemplate, it will automatically be replaced with the table number when the table title is generated. As an example, if youput "Tableau %1" in the edit box, your table titles will begin with "Tableau 1", "Tableau 2", … Continuation Text: Sets the text added to the end of the table title on the printed page and in print preview to indicatethat the current page is not the first page of the table. By default this text is "(continued)", so that on all but the firstprinted page of a table, the title would be, for example, "Table 1: Age by Sex (continued)". Generated Text: Sets other text (besides title template and continuation text) used by CSPro to generate default text intable titles, column heads, and stubs. To change a particular text string, first select the default string under "DefaultText" and then enter the new string under "Alternate Text". For example, to replace the string "Percent" used in stubsand column heads with "%", first select "Percent" from "Default Text" and then type "%" into "Alternate Text". Now anyrows or columns with percents in them will have "%" in the stub or column head.
Formats for Printing To bring up the Format Print (Table) Dialog Box, either choose Page Setup from the File menu or right-click anywhere onthe table and choose Format Print (Table) or choose "Format Print (Table)" from the Edit menu. The Format Print (Table) Dialog Box allows you to change the appearance of the selected table on the printed page. Notethat changes made in this dialog will only be visible when the file is printed or viewed in print preview. Changes madeusing Format Print (Table) only apply to the current table. To change the printed appearance of all tables in the file, usethe Preferences Dialog Box available from the Edit menu.
The Format Print (Table) Dialog Box has the following settings: Stubs: Controls where stubs will be placed on the printed page. There are four options:
Left side, standard (default): place stubs along the left side of every page. If the table is wide enough so thatsome of the columns go onto a second page, stubs will be placed on the left sides of both pages.
Pa ge 291 of 684 Forma ng Ta bl e s
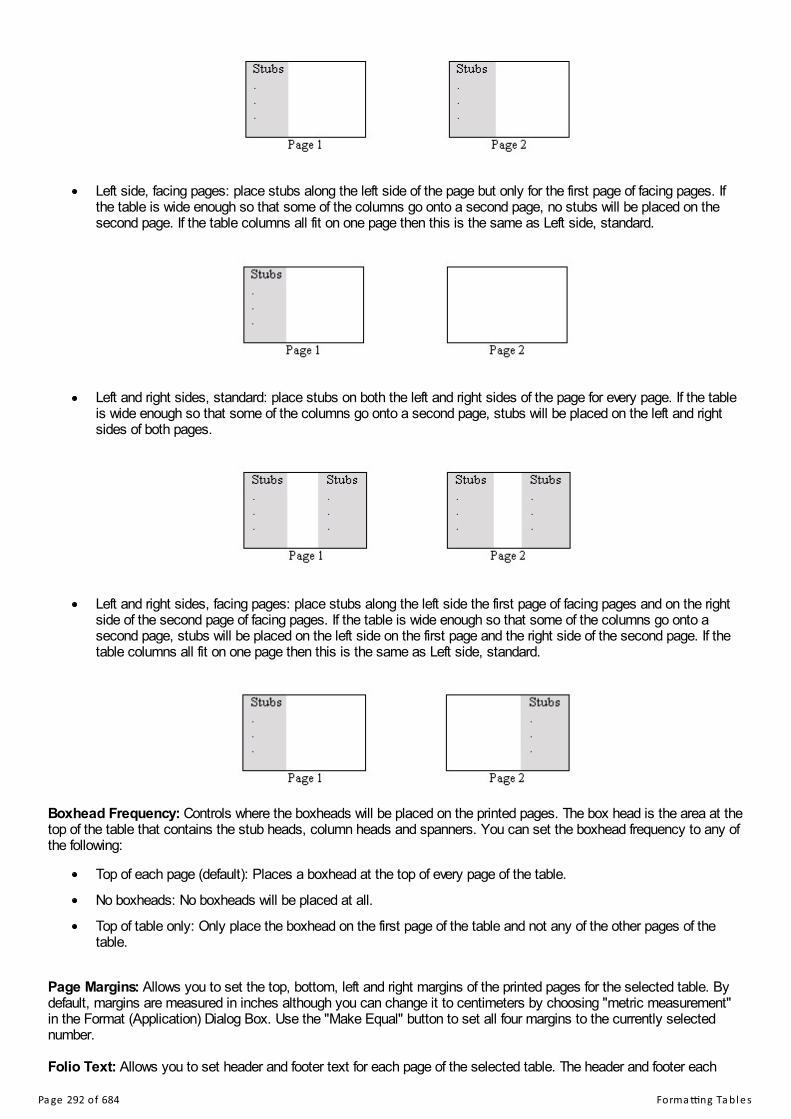
Left side, facing pages: place stubs along the left side of the page but only for the first page of facing pages. Ifthe table is wide enough so that some of the columns go onto a second page, no stubs will be placed on thesecond page. If the table columns all fit on one page then this is the same as Left side, standard.
Left and right sides, standard: place stubs on both the left and right sides of the page for every page. If the tableis wide enough so that some of the columns go onto a second page, stubs will be placed on the left and rightsides of both pages.
Left and right sides, facing pages: place stubs along the left side the first page of facing pages and on the rightside of the second page of facing pages. If the table is wide enough so that some of the columns go onto asecond page, stubs will be placed on the left side on the first page and the right side of the second page. If thetable columns all fit on one page then this is the same as Left side, standard.
Boxhead Frequency: Controls where the boxheads will be placed on the printed pages. The box head is the area at thetop of the table that contains the stub heads, column heads and spanners. You can set the boxhead frequency to any ofthe following:
Top of each page (default): Places a boxhead at the top of every page of the table.
No boxheads: No boxheads will be placed at all.
Top of table only: Only place the boxhead on the first page of the table and not any of the other pages of thetable.
Page Margins: Allows you to set the top, bottom, left and right margins of the printed pages for the selected table. Bydefault, margins are measured in inches although you can change it to centimeters by choosing "metric measurement"in the Format (Application) Dialog Box. Use the "Make Equal" button to set all four margins to the currently selectednumber. Folio Text: Allows you to set header and footer text for each page of the selected table. The header and footer each
Pa ge 292 of 684 Forma ng Ta bl e s

contain left, center and right portions that can be set separately by entering the desired text in the corresponding editbox.
You can modify the fonts used for the header and footer by clicking the Font buttons. The top Font button applies to theheader and the bottom button applies to the footer. You can place the current date, current time, page number and file name(s) in any of the header or footer sections byclicking on the appropriate buttons below the header and footer edit boxes or by adding the following text into theappropriate header/footer edit box:
Text in header/footer edit box Replaced with on printed page&D Current date&T Current time&P Page number&F Name of table file&I Name of data input file(s)
By default, CSPro places the filename in the left header, the date in the right header and the page number in the centerfooter. Start Page: Sets the page number to use on the first page for page numbering. If this is set to 1, then the first page ofthe table will be page 1; the second page will be page 2, etc… If it is set to default then the first page of the selectedtable will be one greater than the last page of the previous table in the file so that the numbers continue from one table tothe next with no gaps. For the first table in the file, if the start page is set to default, then the page numbering for thattable will start at page 1.
Views of Tables Beside Print Preview, there are two views of every table. However, unless the table has hidden rows or columns, ormultiple subtables, the two views are basically the same. One view, called the "Design view" shows the hidden rows orcolumns, and the other view, called the "Display" or "Data" view, does not. Users can switch between the two views byusing Ctrl+D or checking/unchecking "Hidden parts" under the View menu. Most often, users will see the Design view of the table. This is the one that shows hidden stubs or columns. Such stubsor columns are shaded in gray. In example the "Total" stub is hidden.
Pa ge 293 of 684 Forma ng Ta bl e s

This is the Display view of the same stub group.
When a table is first created, you see the design view of the table. When a table is run, the display view is automaticallyshown and hidden parts of the table are no longer visible. In order to switch back the design view (for example, so thatyou can select and unhide a part of the table that is hidden), use Ctrl+D or check "Hidden Parts" on the view menu. In addition to showing hidden parts, the design view also marks subtables with a colored outline while the display viewdoes not. It is often useful to switch to the design view in order to be able to more easily set the tally attributes for asubtable. When the colored outline of subtables is displayed, you may right-click inside the outline and choose TallyAttributes (Subtable). See Also: Using Print Preview, Hide or Show a Row or Column
Pa ge 294 of 684 How To ...

How To ...Customize Table Text To customize the text in any table element (title, spanner, column head, stub, etc.) double click on the text you want tochange. In the example below the table title has been selected.
You can now change the text of the table title. If you want a second line of text, press Ctlr+Enter to create a new line oftext.
To go back to the original default text, right click on the text you want to change, select Format (table part), uncheckthe Custom Text check box, then press OK.
Note that if you customize the text of a stub or column header in a sub grouping, the text will be changed for allcorresponding rows or columns in the sub grouping. In the example below, the text for the column header Male has beenchanged in one column and the change is reflected in the other sub groupings.
If you wish to change the text in only one sub grouping, you will have to use to multiple subtables with universes. See Also: Change the Automatically Generated Text
Hide or Show a Row or Column To hide a row, right-click on the stub for the row you wish to hide, select "Format (Stub)"
Pa ge 295 of 684 How To ...

and check the "Hide" box.
Similarly, to hide a column, right-click on the column head for the column you wish to hide, select "Format (ColumnHead)"
and check the "Hide" box. You can hide multiple rows or multiple columns at the same time by first selecting the rows or columns to hide and thenright-clicking and choosing "Format (Stub)" or "Format (Column Head)" as above. Multiple selection is done in the usualWindows manner by left-clicking the mouse while using the Shift or Ctrl key. Using the Ctrl key adds each cell in thetable that is clicked on to the selection. Using the shift key adds all the cells in between the two cells clicked on to theselection. Hidden rows and columns will be shown with a grey background in the design view and will not be shown at all in thedisplay or print views or on the printed page. To show a hidden row or column, right-click on the stub or column head,choose "Format (Stub)" or "Format (Column Head)" and uncheck the "Hide" box. If you are not in the design view, youmay need to first switch to the design view in order to see the row or column that you wish to unhide. To switch to thedesign view, use Ctrl-D or select "Hidden Parts" from the View menu. When working with sub-groupings (one variable dropped on top of another), hiding or showing a row or column in one sub-grouping will automatically hide or show the corresponding row or column in all of the sub groupings. In the examplebelow, hiding the column "Male" under the spanner "Total", also hides the "Male" column under the "Urban" and "Rural"spanners.
Pa ge 296 of 684 How To ...

You cannot hide a row or column in only one sub-grouping but not the others. You can, however, achieve the same resultusing multiple subtables with universes. To automatically hide rows when all data in the row is zero see Hide Rows Containing All Zeros. See Also: Formats for a Part of a Table, Formatting Row, Column, or Cell Data, Hide or Change the Position of the Total
Hide Rows Containing All ZerosIt is possible to have CSPro automatically hide rows when all the cells in the row contain the value zero. This is usefulwhen many rows in a table will have only zeros and you wish to view only the rows that have non-zero data.
To have CSPro automatically hide a row if all values in the row are zero, right-click on the stub for the row and choose"Format (stub)". In the "Format (stub)" dialog, check the box "Hide when All Cells in Row are Zero". When you run thetable, the row will be hidden if all cells are zero. To view the row again, in order to able to select it, switch to the designview. To switch to the design view, use Ctrl-D or select "Hidden Parts" from the View menu. You can hide multiple rows if they contain all zeros at the same time by first selecting the rows and then right-clickingand choosing "Format (Stub)" as above. Multiple selection is done in the usual Windows manner by left-clicking themouse while using the Shift or Ctrl key. Using the Ctrl key adds each cell in the table that is clicked on to the selection.Using the shift key adds all the cells in between the two cells clicked on to the selection.
Change the Number of Decimal Places Displayed You can change the number of decimal places displayed in an individual data cell or for all cells in a row or column. Tochange the number of decimal places in a data cell, right click on the cell and choose Format (Data Cell). For rows, rightclick on the Stub and choose Format (Stub). For columns, right click on the column head and choose Format (ColumnHead). In all cases, this brings up the Format (table part) dialog. Simply select the number of decimal places for the associatedcells, i.e., the row, the column, or the data cell and click OK.
Rows or columns containing percentages are automatically designated as having one decimal place. If you change the number of decimal places in a data cell to a number other than the default setting (indicated by theword "Default" in the pulldown), then the setting for the data cell will override any settings made for rows or columns
Pa ge 297 of 684 How To ...

containing that data cell. For example, if the data cell is set to one decimal place, and you change the row to have twodecimal places, the data cell will still have one decimal place although other cells in the row will change. In order tomake the number of decimal places in the data cell follow the number of decimal places set in the row or column,change the setting in the data cell to the default. You can change the default number of decimal places for data cells in the preferences.
Add a Footnote (Pagenote or Footnote) To add footnote to a table, right-click anywhere on the table and choose Format (Table) or choose Format (Table) fromthe Edit menu to launch the Format (Table) dialog.
Click to add a check mark to either the pagenote or endnote and then click OK. This will add a new row at the bottom ofthe table. Double click on this new row and type in the text for your footnote. A pagenote will be displayed at the bottom of every page when the table is printed while an endnote will only bedisplayed on the last page of the printed table. To remove a pagenote or endnote, uncheck the corresponding box in Format (Table). Format (Table) allows you add a pagenote or endnote to an individual table. To add an endnote or pagenote for all tablesin a file, use the preferences. See also: Add Header/Footer Text to a Table
Add Header/Footer Text to a Table To add header or footer text to a table, right click anywhere on the table and choose Format Print (Table) or chooseFormat (Table) from the Edit menu to launch the Format Print (Table) dialog. This dialog has text boxes to enter left, right and center text for both the header and footer. "Header" refers to commontext at the top of every printed page. "Footer" refers to common text at the bottom of every printed page. Left, Center,and Right refer to areas of the printed page.
The above options produce the following header:
Pa ge 298 of 684 How To ...

The six text boxes can be filled with any text that you type. In addition, you can choose to display any combination ofdate, time, page number and file name in the header and/or footer by adding one of the following predefined text strings:
Text in header/footer edit box Replaced with on printed page&D Date on which the tables were run&T Time at which the tables were run&P Page number relative to start page&F File name of the table file&I File name of the data input file(s)
To place predefined text in a text box, you can either type it directly or click in the text box where it should go and thenclick the button corresponding to the desired item. Predefined text strings may be mixed with other text, as in the rightheader of the example above. To delete text in the header or footer, delete it from the corresponding edit box. Separate fonts are available for headers and footers. You can set these fonts using the font button to right of the textboxes. If page numbering is used you may set the starting page number, the number to use for the first page of the table, in the"Start Page" text box. By default, the starting page number will be 1 for the first table in the file and for all subsequenttables in the file it will be one greater than the last page of the preceding table. Using the Format Print (Table) dialog will set the header and footer text for the current table. You may set the header andfooter text for all tables in the file using the preferences. Note: Headers and Footers are visible only in Print Preview and on the printed page. See also: Add a Footnote (Pagenote or Endnote)
Add a Subtitle To add a subtitle to a table, right-click anywhere on the table and choose Format (Table) or choose Format (Table) fromthe Edit menu to launch the Format (Table) dialog.
Click to add a check mark next to "Subtitle" then click OK. This will add a new row in the table directly underneath thetitle. Double click on this new row and type in the text for your subtitle. You can then change the format (font, color,alignment, etc…) of your subtitle by right-clicking on it and choosing Format (Subtitle). To remove the subtitle row, uncheck the corresponding box in Format (Table).
Add Stub LeaderingPa ge 299 of 684 How To ...

Stub leadering refers to text patterns such as "….." or "-----" that are placed between the text of a stub and the firstcolumn of the table.
By default, no stub leadering is displayed. To add stub leadering to a table, right-click anywhere on the table and chooseFormat (Table) or choose Format (Table) from the Edit menu to launch the Format (Table) dialog.
Choose the desired pattern from the Stub leadering pulldown menu. If you have chosen to display both left and rightstubs, you can set different leadering patterns for each one. Note: Stub leadering is only visible in Print Preview and on the printed page. Using the Format Print (Table) dialog will stub leadering for the current table. You may set stub leadering for all tables inthe file using the preferences.
Add Borders To add borders to a table, right-click anywhere on the table and choose Format (Table) or choose Format (Table) fromthe Edit menu. This will launch the Format (Table) dialog.
Borders outline the table on the printed page. Different borders are available for each side of the table.
Pa ge 300 of 684 How To ...

The options are:None – no border on this side.Thin – a normal line border on this side.Thick – a "double" line border on this side.
Using Format (Table) will set the borders for the current table. To set the borders for all tables in the file, use preferences. See Also: Add Borders to Cells
Add Reader Breaks Reader breaks separate rows of data into readable groupings. This is done by inserting blank rows in the table at thespecified intervals. To add reader breaks to a table, right-click anywhere on the table and choose Format (Table). This will launch the Format(Table) dialog.
Select the number of lines (intervals) for each group.
(Stub reader break frequency set to 3.)
The frequency of reader breaks may be set anywhere from 1 (every other row is blank) to 10 (every 10th row is blank).Note that you can hide individual reader breaks by right clicking on them and selecting Format (Stub). This allows forfiner control over placement of reader breaks. Note: Reader breaks apply to the entire table. Users may need to do additional spacing in the table rows to gain the
desired result.
Change the Way Numbers are DisplayedPa ge 301 of 684 How To ...

If you want to modify the display of a single data cell or a group of unassociated data cells this is done by selecting theindividual cells, right clicking, and using Format (Data Cell).
Individual Data cells cannot be hidden but you can replace their contents with Custom Text. Of course, the number ofdecimal places, fonts, alignment, and indentation can be changed using the options in the Format (Data Cell) dialogabove. You can hide or otherwise modify entire rows or columns of numbers. Select the rows or columns to be modified(multiple selection is done using Shift and/or Ctrl keys), right click and use Format (Stub) for rows or Format (ColumnHead) for columns.
The settings that have an effect on the numbers in the rows or columns associated with the stub or column head are inthe "Associated Cells" section. These check boxes allow you to extend the format of the stub/column head into all thecells in the corresponding row/column. Of course, the number of decimal places affects only the data cells themselvesand not the column head or stub. See Also: Formatting Row, Column, or Cell Data, Hide or Show a Row or Column
Change the Automatically Generated TextPa ge 302 of 684 How To ...

Most text in tables comes from value labels in the value sets for the variables that you drop onto the table. Someadditional text, such as "Total", "Percent" and "by", is generated by the software. You can customize the text that thesoftware will use for all of these terms. This option is controlled through the Format (Application) dialog. Choose Format (Application) from the edit menu orright-click anywhere on the table and choose Format (Application). Find a list of the words used in the generated text at the bottom of the menu. Select the "default text" which is to bereplaced and enter the "alternate text" or replacement text.
Every occurrence of the default text will be replaced by the alternate text. In the example, every "total" text in every tablewill be replaced by "All persons".
If the text is not appropriate in certain places it can be replaced by "custom text ". Note: Any text can always be replaced by custom text. Changing the automatically generated text is particularly useful when generating tables in languages other than English.You can translate all of the automatically generated text into your language in the Format (Application) dialog and will beupdated in all tables in your file.
Change Fonts or Colors There is no "global" way to change fonts or colors in a table. The formats of the individual elements, e.g., Title, Spanner,Caption, etc., must be individually modified to replace the 'default' fonts and colors. To do so, right-click on the elementand choose Format (<name of table part>) from the menu to bring up the Format (Table Part) dialog. There is also the option to change the default formats for each of these elements. The modifications will take effectimmediately in ALL the tables. See Preferences and Default Formats for more information. In both circumstances, specific or default formats, the font and color are changed in the 'Font and Color' section of theformat (Table Element) dialog.
To change the font, click on the 'Change' button and select the font characteristics from the available list.
Pa ge 303 of 684 How To ...
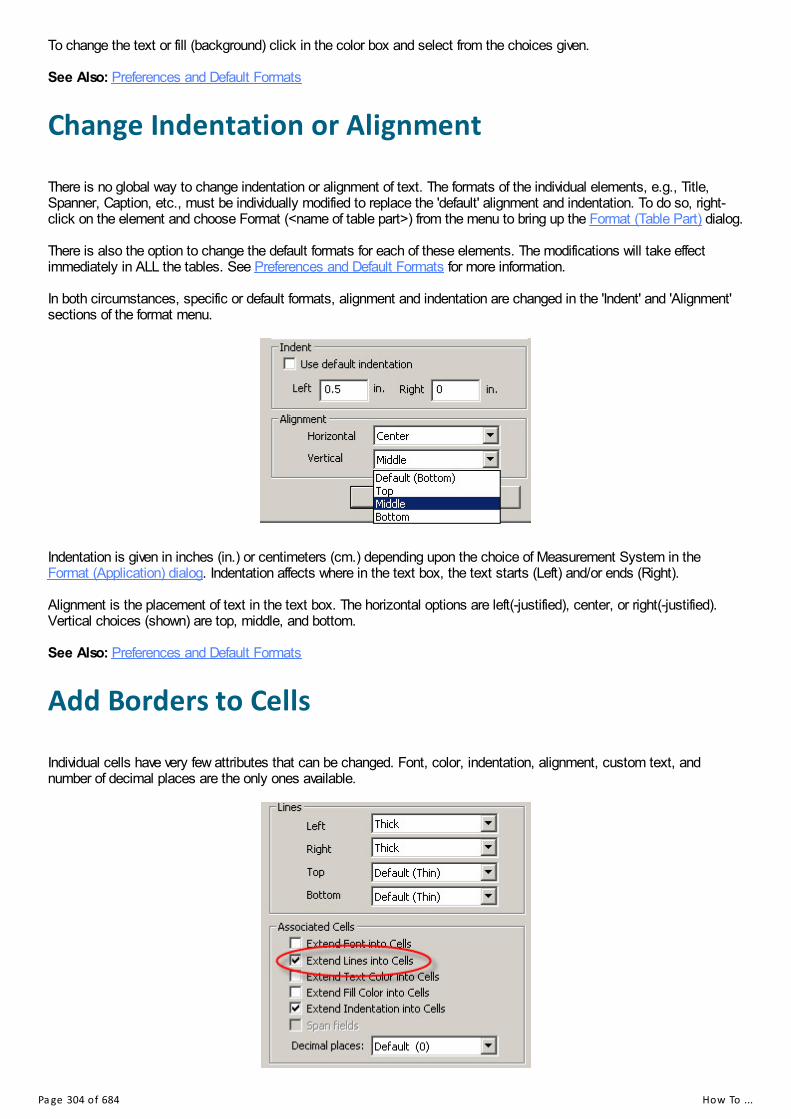
To change the text or fill (background) click in the color box and select from the choices given. See Also: Preferences and Default Formats
Change Indentation or Alignment There is no global way to change indentation or alignment of text. The formats of the individual elements, e.g., Title,Spanner, Caption, etc., must be individually modified to replace the 'default' alignment and indentation. To do so, right-click on the element and choose Format (<name of table part>) from the menu to bring up the Format (Table Part) dialog. There is also the option to change the default formats for each of these elements. The modifications will take effectimmediately in ALL the tables. See Preferences and Default Formats for more information. In both circumstances, specific or default formats, alignment and indentation are changed in the 'Indent' and 'Alignment'sections of the format menu.
Indentation is given in inches (in.) or centimeters (cm.) depending upon the choice of Measurement System in theFormat (Application) dialog. Indentation affects where in the text box, the text starts (Left) and/or ends (Right). Alignment is the placement of text in the text box. The horizontal options are left(-justified), center, or right(-justified).Vertical choices (shown) are top, middle, and bottom. See Also: Preferences and Default Formats
Add Borders to Cells Individual cells have very few attributes that can be changed. Font, color, indentation, alignment, custom text, andnumber of decimal places are the only ones available.
Pa ge 304 of 684 How To ...

Borders can only be created for cells by setting the borders on the rows and columns that contain the cell. To do this,right-click on the associated stub, caption or column head and choose Format (Stub), Format (Caption) or Format(Column Head) to bring up the Format (Table Part) dialog. For columns, set the left and right lines and for rows set thetop and bottom lines. To ensure that line settings are applied to the entire row or column, make sure that Extend Linesinto Cells is checked.
The column header "No" has thick lines set for left and rightand extend into cells is checked
You can also set the left and right borders of a spanner and have them extend into the leftmost and rightmost columnsunder the spanner. This is done the same way it is done for individual columns. Right-click on the spanner, chooseFormat (Spanner), set the left and right lines and ensure that Extend Lines into Cells is checked.
By default, stubs and columns have no borders, but spanners have thin lines on the left. This means that cells in theleftmost columns under a spanner will have left borders. You can change these default settings by using thePreferences. See Also: Formatting Row, Column, or Cell Data, Add Borders to a Table
Make Captions Span Data Cells This option is controlled through the Format (Caption) menu. Captions are rows without data. Normally the value set label is used as a caption before the stub group and the captiontext box is restricted to the same size as the other stub text. However the caption text box can be widened to the widthof the table by using its Span fields option. Right-click on the caption, choose Format (Caption) to bring up the Format(Table Part) dialog and check "Span fields".An example:
Pa ge 305 of 684 How To ...

Select the "Span fields" option from the Format (Caption) menu.
The result:
Note: The horizontal alignment of the caption was also changed to "center" to demonstrate the size of the associated
text box. By default, captions do not span fields. You can make all captions in all tables in the file span fields using Preferencesand Default Formats.
Reset Format of Table Item to Default All the format attributes of every element in a table have a "default" setting. These are established using the Preferencesand Default Formats. Each attribute can be changed through certain entries in the Format (Table Part) dialog. To returnany element to its "default" state, i.e., return to all the default settings in the dialog, just click on the Reset button at thebottom of the dialog.
Note: There is NO "undo" for this operation. All custom entries are lost.
Change the Repeating of Boxheads The boxhead refers to the area of the table containing the stub heads, column headers and spanners. You can controlhow the boxhead is displayed when the table is printed using the Format Print (Table) dialog. To bring up this dialog,choose Format Print (Table) from the Edit menu or right-click anywhere on the table and choose Format Print (Table). The boxhead setting is found in the "Layout" section of the dialog. It only has meaning for a table that spans many pagesand it only has an effect in the print preview and, of course, the printed table.
Pa ge 306 of 684 How To ...

The options are:
No boxheads – Only the table title is printed on each page.Top of table only - Table title and box head only appear on the first page of table.Top of each page – Table title and box head appear on each page of the table.
Use the Format Print (Table) dialog to set the boxhead frequency for a single table. Use Preferences and DefaultFormats to set the default boxhead frequency for all tables in the file.
Change Stub Column Position Stubs are the text associated with each row of the table. By default the stubs appear to the left of the first data column.You can place the stubs for a table on the right, or on both the left and right as well as placing them on the left and rightacross a two-page spread when the table is printed. To bring up this dialog, choose Format Print (Table) from the Editmenu or right-click anywhere on the table and choose Format Print (Table). Stub position is found in the "Layout" section of the dialog. It only has an effect on the print preview and, of course, theprinted table.
There are four options:
Left side, standard (default): place stubs along the left side of every page. If the table is wide enough so thatsome of the columns go onto a second page, stubs will be placed on the left sides of both pages.
Left side, facing pages: place stubs along the left side of the page but only for the first page of facing pages. Ifthe table is wide enough so that some of the columns go onto a second page, no stubs will be placed on thesecond page. If the table columns all fit on one page then this is the same as Left side, standard.
Pa ge 307 of 684 How To ...

Left and right sides, standard: place stubs on both the left and right sides of the page for every page. If the tableis wide enough so that some of the columns go onto a second page, stubs will be placed on the left and rightsides of both pages.
Left and right sides, facing pages: place stubs along the left side the first page of facing pages and on the rightside of the second page of facing pages. If the table is wide enough so that some of the columns go onto asecond page, stubs will be placed on the left side on the first page and the right side of the second page. If thetable columns all fit on one page then this is the same as Left side, standard.
Use the Format Print (Table) dialog to set the boxhead frequency for a single table. Use Preferences and DefaultFormats to set the default boxhead frequency for all tables in the file. See Also: Viewing Multiple and Facing Pages
Pa ge 308 of 684 Cre a ng Ta bl e s by Ge ogra phi c Are a

Creating Tables by GeographicArea
Area Processing Area Processing is the generation of tables by a defined hierarchical structure of area codes. If the geographic hierarchyof a hypothetical country is region, province, locality (major-to-minor order), it may be necessary to produce tables foreach of these sub-divisions. To use area processing you must have done the following: • Created an area names file (.anm) • Selected one or more Area IDs from the area IDs dialog box For example, suppose we wish to perform geographic area processing for our top-most units of geography, which areProvince and District (choose them in the Area IDs dialog box). Each tabulation will be repeated for each Province andDistrict in the data file. In addition, a summary entry [Total] will be shown for the entire data file. The tabulation will bedisplayed in the following order:
TotalProvince 1
District 1 (of Province 1)District 2 (of Province 1)District 3 (of Province 1)
Province 2District 1 (of Province 2)District 2 (of Province 2)District 3 (of Province 2)
::
Area Processing will apply to all tables in your application. No File Processing: It is also possible to produce tables without creating an area names file. Select the levels ofgeography desired but after clicking on the Traffic Light button in CSPro to run your tables, leave the <Area Names> fieldblank. CSPro will use codes from the data file instead of names for each level of geography. For example, if provinceGluten's code is 20, the tables will show code 20 instead of the name Gluten. This can be useful for generating a list ofevery geographic code found in a data file. See also: Area Names File,
Create an Area Names FileThe Area Names file (.anm) is a text file that you can create using any text editor. Be sure you save this file with theextension .anm. This file defines the levels of geography and assigns text names to the numeric codes for eachgeographic unit.
File Format
The following is an excerpt from the area names file for Popstan, which you can find in the Examples folder. The firstsection identifier, [Area Names], indicates the type of file, followed by the CSPro version number.
Pa ge 309 of 684 Cre a ng Ta bl e s by Ge ogra phi c Are a

Next, the [Levels] section provides the names of the geographic hierarchy (levels) in major-to-minor order.
Finally, the [Areas] section gives the correspondence of the geographic codes (major-to-minor order) found in the datawith a name for the geographic area. More detail follows the listing of the area name file.
Area code values can be positive, negative or zero.
If the data file contains area codes that do not have corresponding names in the area names file then the unmatchedarea codes will be displayed as a text string in place of the missing name.
[Area Names]Version=CSPro 7.5
[Levels]Name=ProvinceName=District
[Areas]X X = Popstan
1 X = Artesia1 1 = Dongo1 2 = Idfu⋮
2 X = Copal2 1 = Baja2 2 = Bassac⋮
3 X = Dari3 1 = Argentina3 2 = Benlata3 3 = Bristol⋮
The line following the [Areas] section contains the codes and name of the "total" area ("country" in our case). It isconsidered the "Grand Total" level and denoted by 'X' values for each level of the area hierarchy. In the example, the first'X' represents the Province code and the second 'X' represents the District code. Basically, an 'X' value is similar to a"wildcard" match, so any value in this field is acceptable (and thus part of the area).
Following the total area name is the set of codes and names for the lowest valued major level, "province" in our example.The lowest code for a province is the '1' associated with Artesia. Again, an 'X' value is given for the District code sinceany code here is acceptable. Next, we must give codes and name for all districts in Artesia starting with the lowest codevalue.
Note that each line for this province begins with '1' since the province code must be combined with the district code touniquely distinguish this district. Dongo is district '1' of Artesia (province '1'). Data for a questionnaire with Province code= 1 and District code = 1 will be tallied for Dongo District.
When districts for Artesia are all listed (codes and names), start with the next lowest province code followed by itsdistricts. The process is repeated for each province.
Area codes must be listed in ascending sort order from major to minor.
If the area name file has only one level, e.g., province, then only one code would be given. If three levels were needed,e.g., province, district, village, then three codes would be required. As always, 'X' represents the wildcard match.
The indentation associated with the names above is for illustrative purposes only. Area names shown in tables will not beindented, but indenting the file can make it easier to read.
Also, codes within the [Areas] section can be separated by commas, spaces, or a combination of both. Any of thefollowing are acceptable to define an item at the district level:
Pa ge 310 of 684 Cre a ng Ta bl e s by Ge ogra phi c Are a

3 15 = Sharif3, 15 = Sharif3,15 = Sharif
Hiding Tables
To hide tables for certain level of geographies, preface the area name label with a tilde (~). For areas with this label, atable will still be created (and stored in the .tbw table file), but it will not be displayed and will thus be hidden. Forexample, if a table shows states (provinces) and counties (districts) but some states only contain one county, it may bedesirable to suppress the repetition of the data at both the state and county level. For example:
X X = United States
1 X = Maryland1 1 = Montgomery Country1 2 = Prince George's County
2 X = District of Columbia2 1 = ~ District of Columbia
3 X = Virginia3 1 = Arlington County3 2 = Fairfax County
Without the tilde, a table would be displayed for District of Columbia as both a state and a county. Adding the tilde leadsto the desirable behavior of only displaying one table for that level of geography.
Area Dialog Box This dialog box allows you to select the Questionnaire ID items to be used for area processing.
Area Structure Section
Codes for these items are used to 'tally' in the specific areas. Area items can come from the questionnaire ID items oritems on singly occurring records. Available single record names will be available in the 'Include Items from Record'
Pa ge 311 of 684 Cre a ng Ta bl e s by Ge ogra phi c Are a
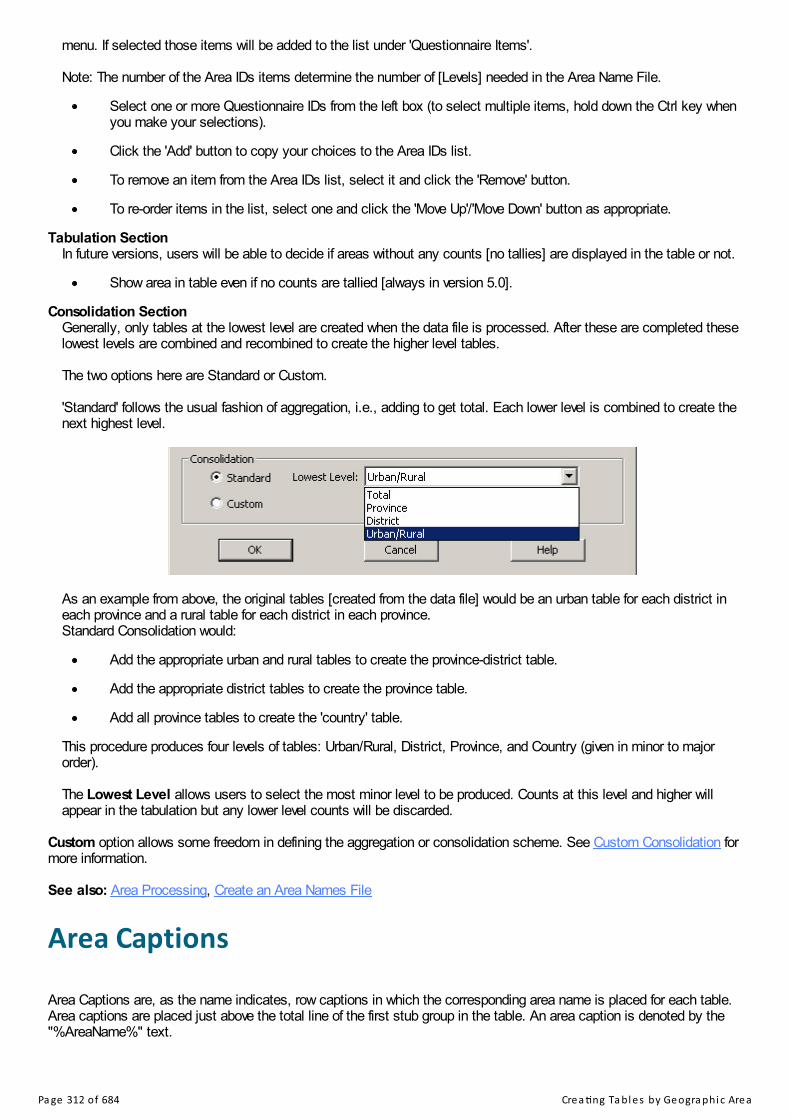
menu. If selected those items will be added to the list under 'Questionnaire Items'. Note: The number of the Area IDs items determine the number of [Levels] needed in the Area Name File.
Select one or more Questionnaire IDs from the left box (to select multiple items, hold down the Ctrl key whenyou make your selections).
Click the 'Add' button to copy your choices to the Area IDs list.
To remove an item from the Area IDs list, select it and click the 'Remove' button.
To re-order items in the list, select one and click the 'Move Up'/'Move Down' button as appropriate.
Tabulation SectionIn future versions, users will be able to decide if areas without any counts [no tallies] are displayed in the table or not.
Show area in table even if no counts are tallied [always in version 5.0].
Consolidation SectionGenerally, only tables at the lowest level are created when the data file is processed. After these are completed theselowest levels are combined and recombined to create the higher level tables. The two options here are Standard or Custom. 'Standard' follows the usual fashion of aggregation, i.e., adding to get total. Each lower level is combined to create thenext highest level.
As an example from above, the original tables [created from the data file] would be an urban table for each district ineach province and a rural table for each district in each province.Standard Consolidation would:
Add the appropriate urban and rural tables to create the province-district table.
Add the appropriate district tables to create the province table.
Add all province tables to create the 'country' table.
This procedure produces four levels of tables: Urban/Rural, District, Province, and Country (given in minor to majororder). The Lowest Level allows users to select the most minor level to be produced. Counts at this level and higher willappear in the tabulation but any lower level counts will be discarded.
Custom option allows some freedom in defining the aggregation or consolidation scheme. See Custom Consolidation formore information. See also: Area Processing, Create an Area Names File
Area Captions Area Captions are, as the name indicates, row captions in which the corresponding area name is placed for each table.Area captions are placed just above the total line of the first stub group in the table. An area caption is denoted by the"%AreaName%" text.
Pa ge 312 of 684 Cre a ng Ta bl e s by Ge ogra phi c Are a
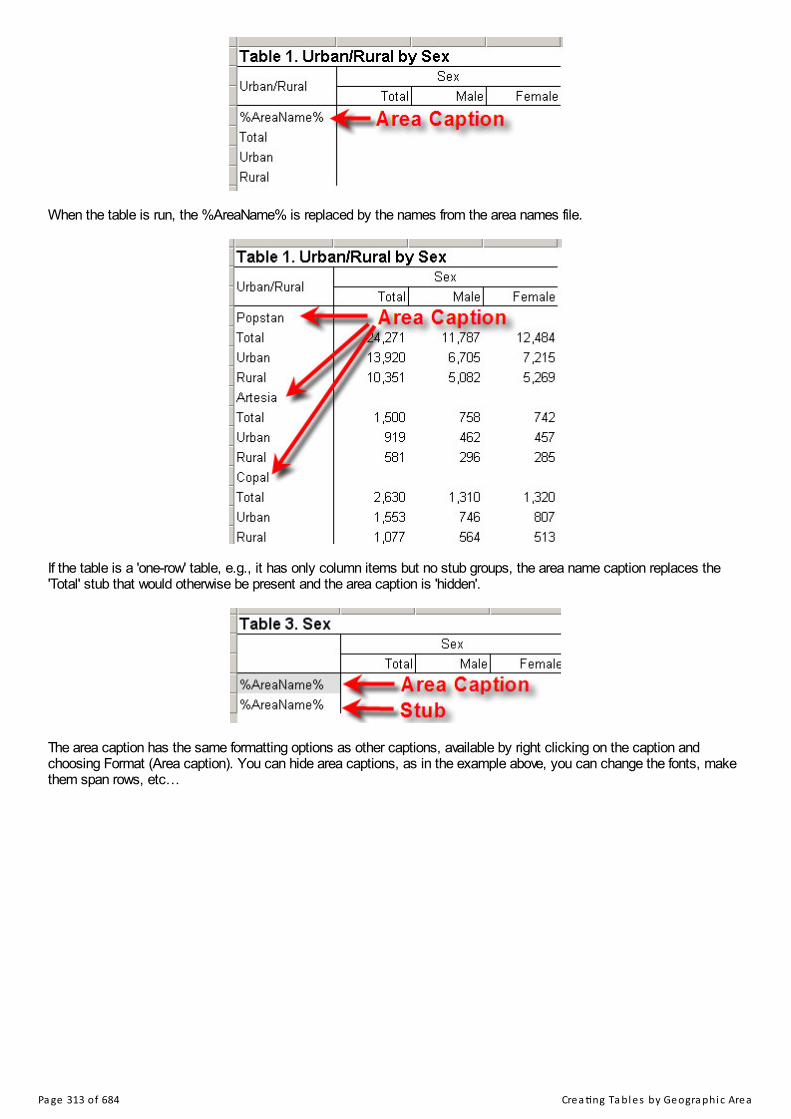
When the table is run, the %AreaName% is replaced by the names from the area names file.
If the table is a 'one-row' table, e.g., it has only column items but no stub groups, the area name caption replaces the'Total' stub that would otherwise be present and the area caption is 'hidden'.
The area caption has the same formatting options as other captions, available by right clicking on the caption andchoosing Format (Area caption). You can hide area captions, as in the example above, you can change the fonts, makethem span rows, etc…
Pa ge 313 of 684 Cre a ng Ta bl e s by Ge ogra phi c Are a

You can also set the default formats for all area captions in all tables in your file using Preferences and Default Formats. See Also: Formats for a Part of a Table
Custom Consolidation Custom Consolidation allows the aggregation of lowest level tables to create almost any reasonable higher level. Usersdefine the consolidation scheme starting from the Standard consolidation, shown below.
Standard Consolidation would:
Retain each Urban and Rural (UR) table for each district in each province.
Add each group of UR tables to create a table for each district in each province.
Add each group of district tables to create a table for each province.
Add all province tables to create a single 'country' table.
The result of the consolidation is:
One Country table
A Province table for each province
A District table for each district in each province
One urban table and one rural table for each district in each province.
Each higher level is the aggregation of the levels below with the corresponding area code.
Pa ge 314 of 684 Cre a ng Ta bl e s by Ge ogra phi c Are a

Using custom consolidation, you can produce tables at only the levels you wish. For example, if you did not want toproduce tables at the district level but wanted to continue producing them for province, urban/rural and entire country; youwould simply remove the district row:
Using Custom Consolidation you can also create user-defined schemes for combining the lowest level tables by addingnew rows to the consolidation scheme:
Each row of the scheme must have a CSPro 'name' for the set of tables to be created, listed under Area Level Nameabove. In the example above, the following tables would be created:
One Country table
One urban table and one rural table for the entire country
A Province table for each province
One urban table and one rural table for each province
A District table for each district in each province
One urban table and one rural table for each district in each province.
In addition, you may place conditions in the cells of the consolidation scheme grid. These conditions are used to modifyhow the tables replaced for a given level (the column) are consolidated for a particular consolidation scheme (row). The options are:
Blank – Any code in this position is included.
Each – Each different code in this position creates a separate table.
Single value – One table created for this value of the area level
Replacement formula – One 'summary' is table created for all areas that the meet the condition and thereplacement code is substituted for the area code for the summary table. [start:end = replacement]
The last two options are illustrated by the following example:
The TOT_URB table will include all tallies that had a value of '1' for the UR area level. The area codes on this table will be
Pa ge 315 of 684 Cre a ng Ta bl e s by Ge ogra phi c Are a

Province=X, District=X, UR= 1. The PROV_1_4 table will include all tallies that had Province codes of 1 through 4. The area codes for this table will beProvince=99, District=X, UR= X. Since other province codes are 1 to 15, the table associated with '99' would bedisplayed after any for those coded. (In the example above NO province tables were created hence they are notdisplayed) In order to use these codes – a corresponding name should be in the area name file.
Note: When custom consolidation is used it is the user's responsibility to make sure the consolidation scheme is
reasonable and that it works in the desired manner. As usual, every aspect of a data processing system shouldbe tested for correctness.
Pa ge 316 of 684 How To ...

How To ...Display Results for One Geographic Area When a Tabulation Application uses the Area Processing option, the table usually displays the counts for each 'area'concatenated one after the other sorted by increasing area code values. If you want to display the counts for a certain geographic then select it from the drop down menu available in Displayview. Note: Ctrl+D switches between Display (hidden parts not shown) and Design (hidden parts shown) views.
The 'All' selection represents the usual display. If area codes are found in the data file that are not defined in the AreaName File then those codes will be listed. The areas are listed in sort order, i.e., the same order that they are defined inthe area names file. Note that this only changes which area is currently displayed. Tables are still produced for all areas originally specifiedand all of these areas will still appear when the tables are printed or saved. To only produce tables for certaingeographies either set the lowest break level for a table, or use custom consolidation.
Tabulate only Certain Levels of Geography When the area structure is defined in the Area Dialog Box it defines the levels at which all the tables in the Tabulationapplication will be tallied. This can be modified for individual tables using the Tally Attributes for a Table. The last section in the menu allows the selection of a lowest area break level for this table only. By default it will be setto the lowest area level available.
Pa ge 317 of 684 How To ...

In the example above, if a certain table is to be produced only at the province level then that item would be selected asthe Lowest Break Level instead of district.
Pa ge 318 of 684 Pri n ng Ta bl e s

Printing TablesUsing Print Preview Print Preview is a view of the tables as they are display on the printed page, i.e., what they will look like when they are
printed on the default printer. To view Print Preview, press the button on the toolbar or under File menu, select PrintPreview. Note: No Print Preview is available if there is no printer installed! This is just one of three views available for a Tabulation Application. To return to Display or Design View use the "Close"button or just click the Print View icon [the icon is depressed when active and "undepressed" when not active], both arein the tool bar. All the formatting done through the various format menus of a table are carried over to print preview. For example all thesettings used in the following would be applied in this view.
The spacing or sizing of rows or columns in Display view is NOT carried over to Print Preview.
Navigating Between Pages, Tables, and Areas The easiest ways to move between tables are
Use the "Next Table" or "Previous Table" icons on the toolbar [see below].
Select the table from the table tree on the left part of the screen [see below].
Pa ge 319 of 684 Pri n ng Ta bl e s

The easiest ways to move between pages of a table are:
Use Home, End, Page Up or Page Down keys.
Use navigation buttons at bottom of preview window (see below).
Use the mouse "wheel" (if available and activated). One "click" (of the wheel) toward the user goes to the nextpage, one "click" away from the user goes to the previous page.
(Note: this behavior is only available in the page view (100%))
See the View menu for other combinations of keys that will allow you to move between tables. There is also a "Goto ..." option available from the Edit menu and from the right-click menu which allows you to godirectly to a particular page, table or area within a table. See Also: Print Preview Options
Viewing Multiple and Facing Pages The view presented when Print Preview is activated is that of the first page of the first table. Users can move betweenpages of the tables (see Navigating Between Pages, Tables, and Areas. Users can change magnification level [zoom inor zoom out] by using the drop down menu available at the top of the window or by clicking on the zoom in and zoom outbuttons on the toolbar.
Pa ge 320 of 684 Pri n ng Ta bl e s

The "100%" setting is the full page and default setting. A value less than 100% shows multiple pages in the window[zoom out]. A value more than 100% shows less than one page in the window [zoom in]. If the current view is 100% or less -
A single wheel "click" toward the user will display the next page. A "click" away from the user will display to theprevious page. This is true even if more than one page is displayed in the window. Of course, when an additional pageis displayed one of the other pages is no longer in the window.
If the current view is greater than 100% -
The wheel activates the vertical scroll bar of the table. If the Ctrl key is held down and the wheel used –
A single wheel "click" toward the user will display the next "zoom in" option. A "click" away from the user will displaythe next "zoom out" option. Note that these wheel "click"s are executed one at a time so in the case of multiple clicksit may take time for the display to adjust.
You can activate facing pages mode by choosing it from the View menu. This mode simulates what the printed tableswould look like if they were bound together in a book. The two pages that would face each other in the book are showntogether. When in facing pages, the next page and previous page buttons will move to the next two pages that face eachother rather than moving one page at a time. If you change the zoom level while in facing pages mode, facing pages isturned off.
Modifying Row and Column Spacing for Printing The width of columns and the height of rows can be modified in Print Preview. Sizing is also available in Design andDisplay views but it does NOT carry over into Print Preview. To modify the width of a column, place the cursor on the "vertical bar" in the box head that you want to move. The cursorwill change to a horizontal double-sided arrow, left click the mouse and drag the vertical bar to the new position.
To modify the height of a row place the cursor below the row text until it changes to a vertical double-sided arrow, leftmouse click and drag the (usually invisible) horizontal bar to the new position.
Pa ge 321 of 684 Pri n ng Ta bl e s

Modifications to row height and column width work in conjunction with the "Apply changes across panels" and"automatically Fit columns across each page" options. See Print Preview Options for more information. Any changes made can be undone using the undo command. To reset the column and rows spacing back to its originalsettings, use Restore Default Table Layout. Both of these commands are available by right-clicking on the table whilein the Print Preview. See Also: Print Preview Options
Print Preview Options You can make some modifications to the table in Print Preview. Most notably the rows and columns can be "sized"similar to the way it is done in spreadsheet software. There is also a "right-click" menu with additional options.
Briefly these options are: Apply changes across panels
If unchecked this means that changes to row height or column width will be applied to only the selected row orcolumn. If checked any sizing changes made to a row or column in a panel will be reflected in the corresponding rowor column of each panel. For example below are three panels for columns:
If this option is checked and a change is made to the width of the "Male" column in any of the three panels then thewidth of all three will be modified. If the option is unchecked then only the specific column selected will have its widthmodified.
Automatically Fit columns across each page
If checked this option will "spread" the table columns for all tables across the entire printed page. If unchecked, thecolumns for all tables will be displayed in the minimal width possible given text, font, etc.
Pa ge 322 of 684 Pri n ng Ta bl e s
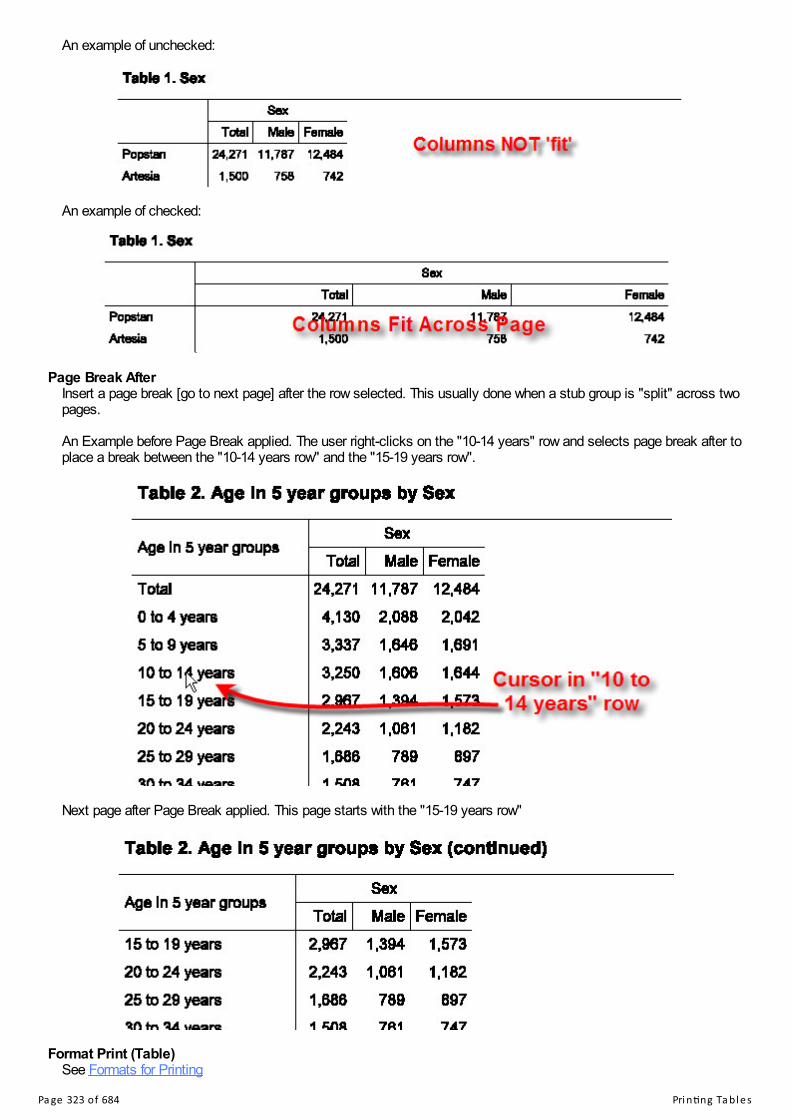
An example of unchecked:
An example of checked:
Page Break After
Insert a page break [go to next page] after the row selected. This usually done when a stub group is "split" across twopages. An Example before Page Break applied. The user right-clicks on the "10-14 years" row and selects page break after toplace a break between the "10-14 years row" and the "15-19 years row".
Next page after Page Break applied. This page starts with the "15-19 years row"
Format Print (Table)
See Formats for Printing
Pa ge 323 of 684 Pri n ng Ta bl e s

Restore default table layout
The default layout of a table is the layout produced for it when the table is first created. Any changes made to the printview of the table will be "undone". There is also an "undo" of a single previous action in Print Preview but this is an"undo" of ALL previous actions for this table.
Undo
Revert to view of table before the last action was taken. Ctrl+Z will also "Undo". Redo
If an "Undo" was the last action then "Redo" is available. Goto…
Allows you to move to a particular page, table or area within a table. This option activates the following menu:
Page option – enter the page number to display.Table option – choose the table (by name) to display.Area option – choose the table and the area within that table to display. This option is only available if areaprocessing is used.
Print Setup This is the usual dialog box for Print Setup. It should be something like the following:
What is important is that this information is used to create the Print Preview of your tables. Changes made here will
Pa ge 324 of 684 Pri n ng Ta bl e s

affect the "preview'' of your tables, particulary changes to the paper size and layout. If changes impact the print previewthe following message will appear:
Sending Tables to the Printer • To preview the printing of tables
Click on the tool bar; or from the File menu, select Print Preview. • To print entire tables
Click on the toolbar; or from the File menu, select Print; or press Ctrl+P.
When the printer menu is displayed the important part is the Print Range section that determines what is to beprinted.
The selection here affects what is printed. The options:
All – All pages of all tables.
Current Page – Page currently displayed in window.
Current Table – Table containing the currently displayed page.
Pages – Range of page numbers for printing.
Selected Tables – for this option click the "Select …" button to its right. A secondary menu is presented fortable selection.
Pa ge 325 of 684 Pri n ng Ta bl e s

Other options will be included in the Print menu such as the number of copies to be printed. These options affect howthe tables will be printed but not what will be printed.
Pa ge 326 of 684 How To ...

How To ...Undo or Reset Changes in Print Preview Most formatting of tables is done using the various format menus available in the Display or Design View but not availablein Print Preview. The major formatting tools in Print Preview are
Sizing of Columns or Rows [changing width or height]
Add Page Breaks
If an action is taken and you want to "undo" it then right click in the Print Preview window. This gives the following menu:
Select "Undo" to reverse a single action. If you just want to restore the table to its system default format then select "Restore default table layout". See Also: Print Preview Options
Print Only Selected Tables or Pages See Sending Tables to the Printer
Pa ge 327 of 684 Ta bul a on Pre fe re nce s

Tabulation PreferencesPreferences and Default Formats The "Default" settings used in all of the format menus (table element, table, table print, and application) can be set forthe entire application. These "Default" settings are then accepted or changed for individual tables. Changing the defaultsetting is the easiest way to change the formatting of all of your tables at once. It allows you to customize the look of allof your all tables. The "Default" Options menu is available under the Edit drop down menu and listed as "Preferences".
Notice the alignment section in the above menu for Spanner. Here is the alignment section in the Format (Spanner) menu for a specific table:
See Also: Modifying Preferences
Pa ge 328 of 684 Ta bul a on Pre fe re nce s

Modifying Preferences The option is available under the Edit drop down menu and listed as 'Preferences'. This brings up the Preferences Window:
Each "Object Format" on the left has a corresponding menu. Select the object in the tree then you can set the 'default'settings for each of the available options. The only difference is that 'Use Default ' check box may be missing since thisis the menu that sets those defaults. It is important to note that if a setting is changed here it will be applied to all tablesthat use the default settings even the tables that have already been defined. For example: If you select blue as "Text Color" for Spanner then all spanners that exist in tables already defined (anduse the default setting) will now be displayed in blue as well as spanners in tables yet to be created. For the meanings of the various options in each menu see the related topic. See Also: Tally Attributes for a Variable, Formats for a Part of a Table, Formats for a Table, Formatting Row, Column, or
Cell Data , Formats for an Application , Formats for Printing
Loading and Saving PreferencesEvery tabulation application starts with the "default preferences" set by CSPro. Users can easily modify thesepreferences to reflect their own choices of defaults. If you have a standard set of preferences that you want to use foryour Tabulation applications, you do not need to make these same changes for each new application. Your settings canbe saved after they are modified and then loaded into other applications.
Pa ge 329 of 684 Ta bul a on Pre fe re nce s

Under the File menu are the two options: Load Preferences and Save Preferences. Use the Save option to create afile that contains your selections. For this option, the user will supply a name for the CSPro Table Format (.tft) file to becreated. This file will contain all the "default" settings currently active for this tabulation application.
The Load option is used to change preferences to those in your CSPro Table Format (.tft) file. For this option, enter thename of the .tft file or browse to find it. Once the file is loaded the revised preferences will be in force.
See also: Modifying Preferences
Pa ge 330 of 684 How To ...

How To ...Share the Same Format on Multiple Computers In most applications the various options in the Format menus use the "Default" settings.
These "Default" settings are contained in Preferences and Default Formats. In any Tabulation application the initial set ofPreferences is established by CSPro. They can be reset to other settings through "Load Preferences…" under the Filemenu. Sets of user-defined preferences are contained in CSPro Table Format (.tft) files. Once the file has been created by the"Save Preferences…" option under the File menu, it can made available to other users in the same manner that anyother file is shared. See Also: Loading and Saving Preferences
Pa ge 331 of 684 Sa vi ng a nd Copyi ng Ta bl e Da ta

Saving and Copying Table DataSave Tables for the Table Viewer
Click on the toolbar; or from the File menu select Save Tables. If there is only one table in the Tabulation application, you will go directly to the Save As dialog. If your Tabulation application has multiple tables defined within it, a Select tables to save dialog box listing the tables isdisplayed.
Use the Select All button if all tables are needed. Otherwise, select the individual table(s) that you would like to save ina single Table Viewer file. (Multiple tables are selected in the usual manner with the Shift and/or Ctrl keys.) After selection press OK. In the Save As dialog box enter the name of the Table Viewer file to be created or browse to select the file to bereplaced. Table Viewer files must have the .tbw extension. See Also: Saving Tables as Text, HTML and Rich Text Format
Saving Tables as Text, HTML or Rich Text
Click on the toolbar; or from the File menu select Save Tables. If there is only one table in the Tabulation application, you will go directly to the Save As dialog. If your Tabulation application has multiple tables defined within it, a Select tables to save dialog box listing the tables isdisplayed.
Pa ge 332 of 684 Sa vi ng a nd Copyi ng Ta bl e Da ta

Use the Select All button if all tables are needed. Otherwise, select the individual table(s) that you would like to save ina single Table Viewer file. (Multiple tables are selected in the usual manner with the Shift and/or Ctrl keys.) After selection press OK. In the "Save As" dialog box use the drop down "Save as type" menu to select the type of file other than .tbw.
Enter the name of the file to be created or browse to select the name of the file to be replaced. Note: ONLY ONE table at a time can be in Rich Text (.rtf) or HTML (.htm) format. Tab delimited format supports saving
multiple tables in a single text file.
Select and Copy Table Data to Other Applications If you want to copy a table or selected cells (with or without associated text) of a table it must be done in the Display orDesign View. There is no selection possible in the Print Preview. • To select table cells - Move the mouse pointer to the upper left-hand corner of the cells you wish to select.
- Press the left mouse button and hold it down while you drag the mouse across the cells you want to select. Thecells will change color to indicate that they have been selected. If you drag the mouse outside the cell area (top orbottom, left or right), the table will automatically scroll and continue to select.
- Release the mouse button. The selected cells are highlighted.
- To select additional cells hold the Ctrl Key down and follow the same technique.
• To select ALL cells from a row or column
- Entire Rows or columns of cells can be selected by clicking in the appropriate part of the grid.
Pa ge 333 of 684 Sa vi ng a nd Copyi ng Ta bl e Da ta

- Hold the Ctrl key down and click to select non-contiguous rows/column (shown above). To select contiguous rows or
columns use the Shift key and select the row or column for the other end of the range. • To select ALL cells in a Table
Choose Select All from the Edit menu; or press Ctrl+A. • To deselect cells Press the Esc key; or from the Edit menu, select "Cancel Selection". Now that cells have been selected for copying you have the choice of copying the text associated with the selected cells(table title, stubs, column headers,…) or just copying the data in the selected cells.
To copy cell values and associated text
- Click on the toolbar; or from the Edit menu, select Copy; or press Ctrl+C.
To copy cell values only
- Select Copy Cells Only from the Edit menu.
Once the cells are copied to the clipboard they can be pasted into a word processor, spreadsheet or any software thataccepts tabular or text format. See also: Saving Tables as Text, HTML or Rich Text
Pa ge 334 of 684 How To ...

How To ...Distribute Finished Tables to Other UsersThe tables from a tabulation application can be saved in several different file formats. The format you choose depends onwhat you wish to do with the tables. To include tables in a word processing document, use the rich text format (.rtf). Tobring the table data into a spreadsheet so that users can do calculations on it, use the tab-delimited format. To posttables to the web, use the HTML format. If you want your users to be able to use your tables in all of these ways, youcan distribute them in the CSPro Table Viewer format (.tbw). Users can then view your tables in the Table Viewer tooland from there they can copy and paste or save tables in any of the formats supported by CSPro. Table Viewer will alsoallow them to print, and change the formatting of your tables, but it will not allow them to modify the table data.
If the tabulations use area processing, the table viewer files can also be imported into a CSPro Table Retrieval System(TRS). This is a much more structured way to distribute tables, especially for large numbers of tables (or documents, forthat matter).
See also: Save Tables for the Table Viewer, Saving Tables as Text, HTML or Rich Text, Introduction to Table Viewer,Introduction to Table Retrieval Setup
Copy Table Data to a Spreadsheet or Word ProcessorCSPro allows you to transfer either part of a table, an entire table or multiple tables at once to a word processor orspreadsheet application.
To copy and paste a single table or part of a table follow the procedure outlined in Select and Copy Table Data to OtherApplications.
To copy multiple tables, use the one of the file format options given for "Save Tables" (Tab Delimited Text, HTML, or RichText). These options are available for single tables or multiple tables. In some cases, you may need to save single tablesin individual files to achieve the desired results.
See also: Select and Copy Table Data to Other Applications, Saving Tables as Text, HTML or Rich Text
Prepare Tables for Posting to the Web In most cases this means saving the tables as HTML files. HTML tables can only created one at a time. So the processmust be repeated for each table to be saved in HTML format. In Design or Display View (not Print Preview) select the Save Tables icon (or equivalent under File menu).
If only one table is in the set then you will go directly to the Save As menu. If there is more than one table thenthe "Select tables to save" dialog box is displayed. Select only one from this menu.
Click OK after selection.
Select HTML Files (.htm) as Save as type.
Enter the name of the file to be created or browse to select the name of an existing HTML file to be replaced.
Click Save button. If file already exists you will be asked if you want to replace it.
These files can be viewed in a browser, e.g., Internet Explorer See Also: Saving Tables as Text, HTML or Rich Text
Pa ge 335 of 684 Ta bl e Pos t Ca l cul a on

Table Post CalculationIntroduction to Table Post Calculation In some cases you may need to do additional processing on tables after all of the tabulation is completed. For example,you may need to calculate ratios or sums using the tabulated data. CSPro allows you to do this by adding program logicin the Postcalc section of the Tally Attributes (Table) dialog. You use program logic, as you would in a batch or dataentry application, to access and modify the cells in a table. Tables are treated as two dimensional arrays or matrices.You can use the full range of CSPro arithmetic operations on individual cells, as well as on rows, columns and cellranges of tables. This section contains the following information: Adding Rows and Columns For Post CalculationPost Calculation For Individual CellsPost Calculation For Rows, Columns and RangesRow and Column Indexing for Post Calculation
Adding Rows and Columns For Post Calculation In order to use table post calculations to add additional calculations to the tabulated data, you first need a place in thetable to put these calculations. This section describes how to add additional rows or columns to a table. As an example, take adding a third column to the following table in which we will place the male to female ratio.
There are two ways to add a new column. We can add a new value to the existing value set for the existing variable or wecan drag a new variable onto the table next to the existing one. Adding a new value to the value set creates a newcolumn under the existing spanner while adding a new variable creates a new column under a new spanner.
Male/Female Ratio column added as new value to value set for the variable Sex. The new column is under the Sex spanner.
Male/Female Ratio column added by dragging a new variable onto the table. The new column is under a separate spanner.
Pa ge 336 of 684 Ta bl e Pos t Ca l cul a on

If you add a new value to the value set, make sure to set the value for the new value set entry to a number that does notexist in your data file, otherwise your totals will be incorrect. In the case of Sex, you can use 3, which should not appearin the edited data. If you would rather add a new variable to the table to create the additional column, you can add any variable in thedictionary since the numbers in the new column will be overwritten by the postcalc logic. You can either add a new valueset to the variable which uses the text you want for the column header (for example "Male/Female Ratio") or you can usean existing value set and customize the column header text once you have placed the variable on the table. New rows can be added in the same ways, adding a new value to the value set of a variable on the rows or dragging anew variable onto the rows of the table. See also: Add a Variable to a Tabulation, Implications of Data Dictionary Value Sets
Post Calculation For Individual Cells CSPro supports modifying individual cells in a table through postcalc logic. As an example, take adding a third cell to the following table in which we will place the male to female ratio. The male tofemale ratio is simply the number of males divided by the number of females. We need add a new column to the tableand then add postcalc logic to divide the number of males by the number of females and put the result in the new cell.
First, we must add the new column to the table as described in Adding Rows and Columns For Post Calculation. Once the new column has been created, all that is left is to add the postcalc logic. Postcalc logic in CSPro tabulationapplications is similar to working with arrays in a CSPro batch edit or data entry application. To access an individual cellin a table, use the table name followed by the indices of the row and column in parentheses: <table name>(<row>, <column>) where: <table name> is the name of the table.
To see the names of the tables, click on the Tables tab in the bottom left of the CSPro window to show theTables Tree and then select "Names in Trees" from the View menu or press Ctrl+T. This toggles betweenshowing the table titles and the table names in the Tables Tree.
<row> is the row number in the table.
Pa ge 337 of 684 Ta bl e Pos t Ca l cul a on

<column> is the column number in the table. Row and column numbering starts at zero. In this example, the following logic divides the number of males (row 0, column 1) by the number of females (row 0,column 2) and puts the result in male/female ratio (row 0, column 3):
TABLE1(0,3) = TABLE1(0,1) / TABLE1(0,2); Note that column and row numbers start at zero, so the first column is column zero, the second column is column iscolumn 1, etc…
To enter postcalc logic for a table, open the Tally Attributes (Table) dialog. You can then either type postcalc logicdirectly into the postcalc area or click on the "Edit" button next to the postcalc area to bring up a larger window to typein.
Pa ge 338 of 684 Ta bl e Pos t Ca l cul a on

Once you have typed in the logic, press OK to dismiss the dialog and then run the table. You may need to change thenumber of the decimal places in the row, column or cell containing the calculated values.
Postcalc logic can contain numeric constants as well as table values. For example if you wanted men per 100 womenrather than male to female ratio, you could use the following logic:
TABLE1(0,3) = 100 * TABLE1(0,1) / TABLE1(0,2); This multiplies the result of the division by 100 to give the number of men per 100 women.
Pa ge 339 of 684 Ta bl e Pos t Ca l cul a on

Multiple statements may be entered in postcalc, provided that each one is terminated by a semicolon. For example, ifyou wanted to calculate male to female ratio in column 3 and males per 100 females in column 4 you would write:
TABLE1(0,3) = TABLE1(0,1) / TABLE1(0,2);TABLE1(0,4) = 100 * TABLE1(0,1) / TABLE1(0,2);
In fact, postcalc logic can contain nearly any of the statements and functions available in program logic in batch edit anddata entry applications. See also: Post Calculation For Rows, Columns and Ranges, Row and Column Indexing for Post Calculation
Post Calculation For Rows, Columns and Ranges In addition to performing operations on individual cells, you can perform operations on cell ranges, rows and columns. Asan example, take the following table, in which an additional column is added to calculate the male to female ratio foreach group.
For information on how to add the additional column, see the previous section Adding Rows and Columns For PostCalculation. The postcalc logic for assigning rows and columns is similar to that of individual cells, however there is a simplified
Pa ge 340 of 684 Ta bl e Pos t Ca l cul a on
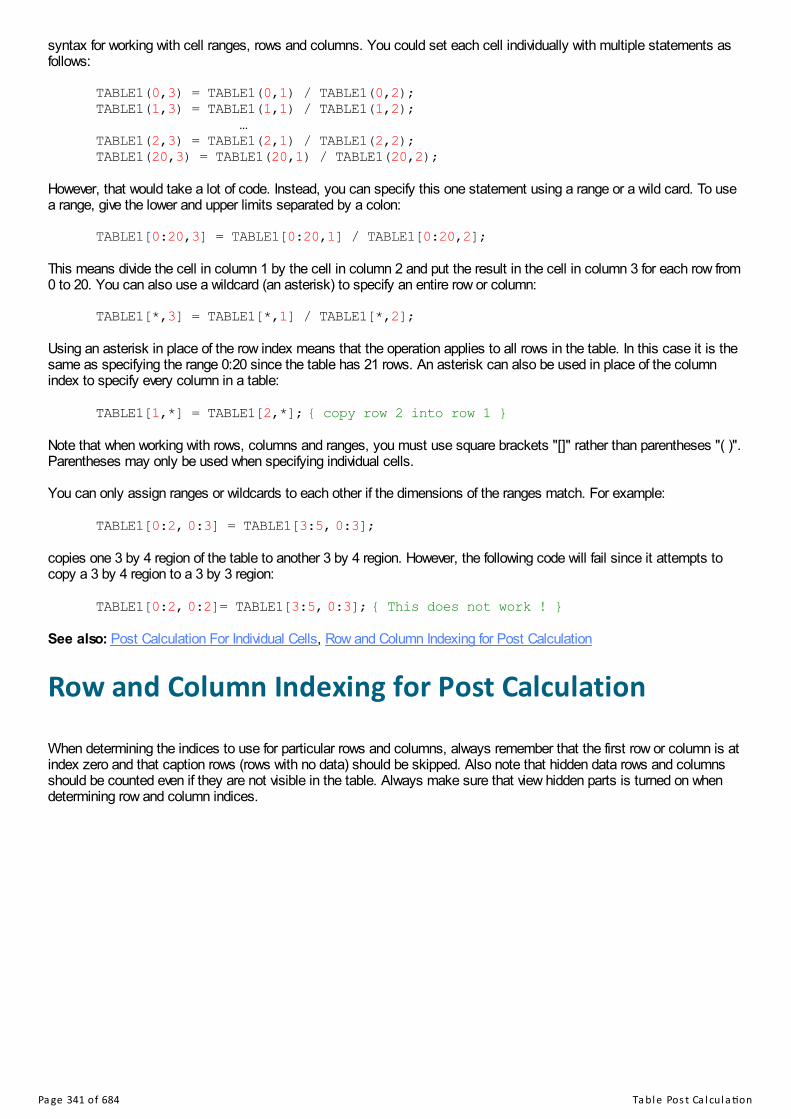
syntax for working with cell ranges, rows and columns. You could set each cell individually with multiple statements asfollows:
TABLE1(0,3) = TABLE1(0,1) / TABLE1(0,2);TABLE1(1,3) = TABLE1(1,1) / TABLE1(1,2);
…TABLE1(2,3) = TABLE1(2,1) / TABLE1(2,2);TABLE1(20,3) = TABLE1(20,1) / TABLE1(20,2);
However, that would take a lot of code. Instead, you can specify this one statement using a range or a wild card. To usea range, give the lower and upper limits separated by a colon:
TABLE1[0:20,3] = TABLE1[0:20,1] / TABLE1[0:20,2]; This means divide the cell in column 1 by the cell in column 2 and put the result in the cell in column 3 for each row from0 to 20. You can also use a wildcard (an asterisk) to specify an entire row or column:
TABLE1[*,3] = TABLE1[*,1] / TABLE1[*,2]; Using an asterisk in place of the row index means that the operation applies to all rows in the table. In this case it is thesame as specifying the range 0:20 since the table has 21 rows. An asterisk can also be used in place of the columnindex to specify every column in a table:
TABLE1[1,*] = TABLE1[2,*]; { copy row 2 into row 1 } Note that when working with rows, columns and ranges, you must use square brackets "[]" rather than parentheses "( )".Parentheses may only be used when specifying individual cells. You can only assign ranges or wildcards to each other if the dimensions of the ranges match. For example:
TABLE1[0:2, 0:3] = TABLE1[3:5, 0:3]; copies one 3 by 4 region of the table to another 3 by 4 region. However, the following code will fail since it attempts tocopy a 3 by 4 region to a 3 by 3 region:
TABLE1[0:2, 0:2]= TABLE1[3:5, 0:3]; { This does not work ! } See also: Post Calculation For Individual Cells, Row and Column Indexing for Post Calculation
Row and Column Indexing for Post Calculation When determining the indices to use for particular rows and columns, always remember that the first row or column is atindex zero and that caption rows (rows with no data) should be skipped. Also note that hidden data rows and columnsshould be counted even if they are not visible in the table. Always make sure that view hidden parts is turned on whendetermining row and column indices.
Pa ge 341 of 684 Ta bl e Pos t Ca l cul a on

For example, in the table above, in order to calculate the percentage of people in each sex category (Male, Female,Total), we set the values in rows 3, 7 and 9. The caption rows, "Sex", "Total", "Literacy", "Male", and "Female" are notcounted, but the hidden rows, the three "Illiterate" rows, are counted. The postcalc logic follows:
TABLE2[3,*] = 100 * TABLE2[1,*]/TABLE2[0,*]; {% literate Total }TABLE2[7,*] = 100 * TABLE2[5,*]/TABLE2[4,*]; {% literate Male }TABLE2[11,*] = 100 * TABLE2[9,*]/TABLE2[8,*]; {% literate Female}
When a table includes percents, the row and column indices are a bit more complicated. Although the percentrows/columns are interleaved with the rows/columns for the counts, the percent rows/columns are numbered after thecounts. In other words the index for the first percent row or column in a subtable always starts after the last count row orcolumn. For example, in the table below, the rows for the values of marital status under the male caption are countedone after another as indices 0 through 4 and are then followed by the percent rows for marital status as indices 5 through9. The first percent row is at index 5 which follows the last count row (Never Married) at index 4.
Pa ge 342 of 684 Ta bl e Pos t Ca l cul a on

In this example, to calculate the ratio of unmarried men per 100 unmarried women, we need to divide the number ofunmarried men (divorced men + separated men + widowed men + never married men) by the number of unmarriedwomen (divorced women + separated women + widowed women + never married women) and multiply the result by 100.The postcalc logic is therefore:
TABLE3[20,*] =100 *(TABLE3[1,*] + TABLE3[2,*] + TABLE3[3,*] + TABLE3[4,*])/(TABLE3[11,*] + TABLE3[12,*] + TABLE3[13,*] + TABLE3[14,*]);
See also: Post Calculation For Individual Cells, Post Calculation For Rows, Columns and Ranges
Pa ge 343 of 684 Run Produc on Ta bul a ons

Run Production TabulationsIntroduction to Production Tabulations Production applications can be run either interactively from CSPro or using batch (*.BAT) files to execute one CSProprogram after another. For small surveys all the tabulation work can usually be done within CSPro. For a populationcensus or large survey, you may want to create batch files to perform processing. When you run tabulation from CSPro, you can produce the entire tabulation in one run or you can tabulate in parts, thatis one step, or process, at a time. The entire tabulation process consists of three processes: Tabulate – One or more data files are processed to produce table matrices, row and columns of tabulated numbers. Consolidate – Tables matrices are added together for different lower geographic areas, say districts, to produce tables
for higher geographic areas such as provinces and country. This process is performed only when area specificationsare given.
Format – Table matrices are surrounded with titles, headings, and stubs to be displayed or printed for the end user. You can have CSPro Run in Parts to perform each of these processes one at a time.
Run All in BatchYou can run a complete tabulation from a batch program by executing CSTab.exe and using a PFF file as thecommand line parameter. For example, if your PFF file name is "MyTabs.pff", you can launch CSTab by: Start /wait "C:\Program Files (x86)\CSPro 7.5\CSTab.exe" MyTabs.pff This launches the program CSTab.exe to run with the parameters specified in the PFF file MyTabs.pff. Note that usingStart /wait is not strictly necessary; it simply ensures that the command does not terminate until CSTab.exe hasfinished processing. This is useful when there are other commands that follow which depend on CSTab completing beforethey can be executed. You can create a PFF file in two ways:
Run the tabulation from CSPro. It will save the *.PFF file it generates in the same folder with your tabulationapplication. The *.PFF will have the same name as the application with .PFF appended. Rename and modify thisfile with a text editor (such as Notepad or Wordpad).
Create a new *.PFF file using a text editor.
The following shows an example of a tabulation PFF file. Note that a PFF file is not case sensitive. You can use anycombination of upper and lower case text. [Run Information]Version=CSPro 7.5AppType=TabulationOperation=All [Files]Application=.\MyTabs.xtbInputData=.\MyData.datListing=.\MyTabs.xtb.lstAreaNames=.\MyAreaNames.anmOutputTBW=.\MyTables.xtb.tbw [Parameters]
Pa ge 344 of 684 Run Produc on Ta bul a ons

ViewListing=OnErrorViewResults=Yes The [Run Information] block is required and must appear exactly as shown in the example above. The [Files] block is required and defines all files used in the tabulation run. A description of the files is as follows:
Application = the tabulation edit application you created
InputData = the data file to be tabulated -- If there is more than one input data file, insert multiple InputDatalines.
Listing = a report of the tabulation processing
AreaNames = the areanames file used only if there is area processing
OutputTBW = the output formatted tables
If any required files are not coded or are missing, the file association dialog box will be displayed allowing you to fill in orchange the missing file names. The [Parameters] block is optional. If allows to specify additional aspects of the tabulation run.
ViewListing = specifies how the tabulation run listing is displayed. If ViewListing is missing, Always isassumed.
Always - the listing is always displayedOnError - the listing is displayed only when an error or an invalid subscript warning occurredNever - the listing is never displayed
ViewResults = specifies whether or not the formatted tables file (*.TBW) is displayed in TableViewer at the endof the run. If ViewResults is missing, Yes is assumed.
Yes - the tables are displayedNo - the tables are not displayed
Pa ge 345 of 684 Run i n Pa rts
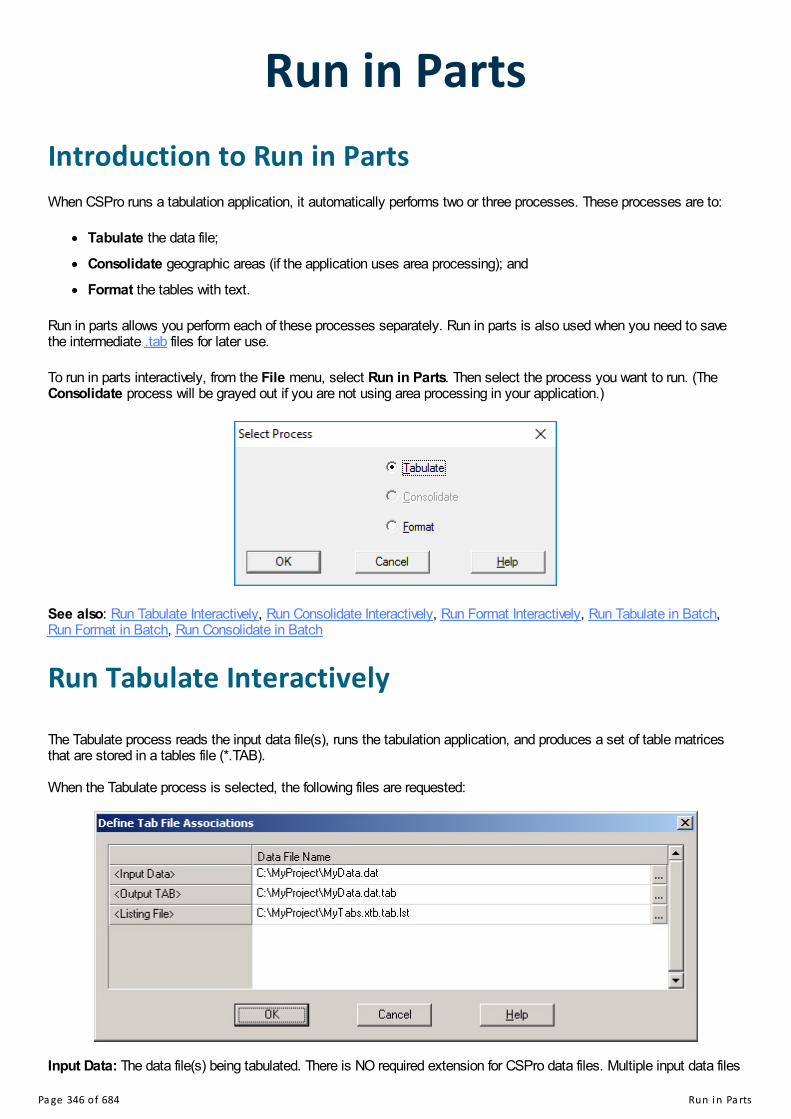
Run in PartsIntroduction to Run in PartsWhen CSPro runs a tabulation application, it automatically performs two or three processes. These processes are to:
Tabulate the data file;
Consolidate geographic areas (if the application uses area processing); and
Format the tables with text.
Run in parts allows you perform each of these processes separately. Run in parts is also used when you need to savethe intermediate .tab files for later use.
To run in parts interactively, from the File menu, select Run in Parts. Then select the process you want to run. (TheConsolidate process will be grayed out if you are not using area processing in your application.)
See also: Run Tabulate Interactively, Run Consolidate Interactively, Run Format Interactively, Run Tabulate in Batch,Run Format in Batch, Run Consolidate in Batch
Run Tabulate Interactively The Tabulate process reads the input data file(s), runs the tabulation application, and produces a set of table matricesthat are stored in a tables file (*.TAB). When the Tabulate process is selected, the following files are requested:
Input Data: The data file(s) being tabulated. There is NO required extension for CSPro data files. Multiple input data files
Pa ge 346 of 684 Run i n Pa rts

can be selected using the browse button. Output TAB: The table matrix file created during tabulation. The *.TAB extension is required. The name should beassociated with the corresponding data file especially if multiple data files are tabulated using the same application. Listing File: The diary-type report generated by the tabulation run showing record and case counts and any problemsencountered. This is a sample of a listing file where no problems were encountered during tabulation: CSPRO Process Summary+-----------------------------------------------------+| 29143 Records Read ( 100% of input file) || 0 Ignored ( 0 unknown, 0 erased) || 0 Messages ( 0 U, 0 W, 0 E) |+---------+--------------+--------------+-------------+| Level | Input Case | Bad Struct | Level Post |+---------+--------------+--------------+-------------+| 1 | 4872 | 0 | 4872 |+---------+--------------+--------------+-------------+ Process Messages CSPRO Executor Normal End----------------------------------------------------- See also: Run Consolidate Interactively, Run Format Interactively
Run Tabulate in Batch You can run the tabulate process from a batch program by executing CSTab.exe and using a PFF file as the commandline parameter. For example, if your PFF file name is "MyTabs.pff", you can launch CSTab by: Start /wait "C:\Program Files (x86)\CSPro 7.5\CSTab.exe" MyTabs.tab.pff This launches the program CSTab.exe to run with the parameters specified in the PFF file MyTabs.pff. Note that usingStart /wait is not strictly necessary; it simply ensures that the command does not terminate until CSTab.exe hasfinished processing. This is useful when there are other commands that follow which depend on CSTab completing beforethey can be executed. You can create a PFF file in two ways:
Run the tabulation from CSPro. It will save the *.PFF file it generates in the same folder with your tabulationapplication. The *.PFF will have the same name as the application with .PFF appended. Rename and modify thisfile with a text editor (such as Notepad or Wordpad).
Create a new *.PFF file using a text editor.
The following shows an example a PFF file for the tabulation process. Note that a PFF file is not case sensitive. You canuse any combination of upper and lower case text. [Run Information]Version=CSPro 7.5AppType=TabulationOperation=Tab [Files]Application=.\MyTabs.xtbInputData=.\MyData.datListing=.\MyTabs.xtb.tab.lstTabOutputTAB=.\MyData.dat.tab
Pa ge 347 of 684 Run i n Pa rts

[Parameters]ViewListing=OnError The [Run Information] block is required and must appear exactly as shown in the example above. The [Files] block is required and defines all files used in the tabulation run. A description of the files is as follows:
Application = the tabulation application you created
InputData = the data file to be tabulated -- If there is more than one input data file, insert multiple InputDatalines.
Listing = a report of the tabulate process
TabOutputTAB = the output table matrices file
If any required files are not coded or are missing, the file association dialog box will be displayed allowing you to fill in orchange the missing file names. The [Parameters] block is optional. If allows to specify additional aspects of the tabulation run.
ViewListing = specifies how the tabulation run listing is displayed. If ViewListing is missing, Always isassumed.
Always - the listing is always displayedOnError - the listing is displayed only when an error or an invalid subscript warning occurredNever - the listing is never displayed
See also: Run Consolidate in Batch, Run Format in Batch
Run Consolidate Interactively The Consolidation process reads the table matrix file(s) output from Tabulate process, and produces another table matrixfile (*.TAB) based on consolidation specifications given in the tabulation application. When the Consolidate process is selected, the following files are requested:
Input TAB: The tabulated table matrices file(s) to be consolidated. Multiple input *.TAB files can be selected using thebrowse button. The *.TAB extension is required. Output TAB: The consolidated table matrices file created [or replaced] from the input TAB file(s). This TAB name mustbe different from the input name and the extension is required. Listing File: The report generated for the run showing area codes found in the data and tables available for those codes.Blank 'codes' indicate summary levels. The .LST extension is not required. This is a sample of a listing file for a Consolidation process:
Pa ge 348 of 684 Run i n Pa rts

CSPro Process Summary+----------------------------------------------+| 1568 Slices Read ( 100% of Input file) |+----------------------------------------------+ Process Messages PROVINCE DISTRICT Table Names-------- -------- -----------TABLE1 TABLE2 TABLE3 TABLE41 TABLE1 TABLE2 TABLE3 TABLE41 1 TABLE1 TABLE2 TABLE3 TABLE41 2 TABLE1 TABLE2 TABLE3 TABLE41 3 TABLE1 TABLE2 TABLE3 TABLE41 4 TABLE1 TABLE2 TABLE3 TABLE41 5 TABLE1 TABLE2 TABLE3 TABLE4 . . . Tables 1, 2, 3 and 4 are available for the following geographies: Total [Country] indicated by Province and District = blankProvince 1 indicated by Province = 1 and District = blankProvince 1 and District 1 indicated by Province = 1 and District = 1Etc. See also: Run Tabulate Interactively, Run Format Interactively
Run Consolidate in Batch You can run the consolidation process from a batch program by executing CSTab.exe and using a PFF file as thecommand line parameter. For example, if your PFF file name is "MyTabs.pff", you can launch CSTab by: Start /wait "C:\Program Files (x86)\CSPro 7.5\CSTab.exe" MyTabs.con.pff This launches the program CSTab.exe to run with the parameters specified in the PFF file MyTabs.pff. Note that usingStart /wait is not strictly necessary; it simply ensures that the command does not terminate until CSTab.exe hasfinished processing. This is useful when there are other commands that follow which depend on CSTab completing beforethey can be executed. You can create a PFF file in two ways:
Run the tabulation from CSPro. It will save the *.PFF file it generates in the same folder with your tabulationapplication. The *.PFF will have the same name as the application with .PFF appended. Rename and modify thisfile with a text editor (such as Notepad or Wordpad).
Create a new *.PFF file using a text editor.
The following shows an example of a PFF file for the consolidation process. Note that a PFF file is not case sensitive.You can use any combination of upper and lower case text. [Run Information]Version=CSPro 7.5AppType=TabulationOperation=Con [Files]Application=.\MyTabs.xtbConInputTAB=.\MyData.dat.tabListing=.\MyTabs.xtb.con.lstConOutputTAB=.\MyData.dat.con.tab
Pa ge 349 of 684 Run i n Pa rts

[Parameters]ViewListing=OnError The [Run Information] block is required and must appear exactly as shown in the example above. The [Files] block is required and defines all files used in the tabulation run. A description of the files is as follows:
Application = the tabulation application you created
ConInputTAB = the input table matrices file – These are the output from the tabulate process. If there aremultiple input table matrices files, insert multiple ConInputTab lines.
ConOutputTAB = the output table matrices file
Listing = a report of the consolidate process
If any required files are not coded or are missing, the file association dialog box will be displayed allowing you to fill in orchange the missing file names. The [Parameters] block is optional. If allows to specify additional aspects of the tabulation run.
ViewListing = specifies how the tabulation run listing is displayed. If ViewListing is missing, Always isassumed.
Always - the listing is always displayedOnError - the listing is displayed only when an error occurredNever - the listing is never displayed
See also: Run Tabulate in Batch, Run Format in Batch
Run Format Interactively The Format process reads the table matrix file(s) output from Tabulate or Consolidations process, and produces tablesfiles (*.TBW) based on format specifications given in the tabulation application. When the Format process is selected, the following files are requested:
Input TAB: The tabulated or consolidated matrices file. If application does not have area processing, it was created inthe Tabulate process, if it has area processing was performed, it was created in the Consolidate process. The .TABextension is required. Area Names: Only used for applications with area processing. An Area Names File is used to associate the areascodes in the TAB file with their descriptive text. The .ANM extension is required. Output TBW: The CSPro Table Viewer file created by merging the matrices from the input TAB file, the table formatspecifications from the tabulations application, and the optional area names. The .TBW extension is required.
Pa ge 350 of 684 Run i n Pa rts

Listing File: The report of the Format process. This is a sample of a listing file for a Format process: CSPRO Process Summary+-----------------------------------------------------+| 8 Slices Read ( 100% of input file) || 0 Ignored ( 0 unknown, 0 erased) || 0 Messages ( 0 U, 0 W, 0 E) |+-----------------------------------------------------+ Process Messages CSPRO Executor Normal End-------------------------------------------------------------------- See also: Run Tabulate Interactively, Run Consolidate Interactively, Introduction To Table Viewer
Run Format in Batch You can run the format process from a batch program by executing CSTab.exe and using a PFF file as the commandline parameter. For example, if your PFF file name is "MyTabs.pff", you can launch CSTab by: Start /wait "C:\Program Files (x86)\CSPro 7.5\CSTab.exe" MyTabs.fmt.pff This launches the program CSTab.exe to run with the parameters specified in the PFF file MyTabs.pff. Note that usingStart /wait is not strictly necessary; it simply ensures that the command does not terminate until CSTab.exe hasfinished processing. This is useful when there are other commands that follow which depend on CSTab completing beforethey can be executed. You can create a PFF file in two ways:
Run the tabulation from CSPro. It will save the *.PFF file it generates in the same folder with your tabulationapplication. The *.PFF will have the same name as the application with .PFF appended. Rename and modify thisfile with a text editor (such as Notepad or Wordpad).
Create a new *.PFF file using a text editor.
The following shows an example a PFF file for the format process. Note that a PFF file is not case sensitive. You canuse any combination of upper and lower case text. [Run Information]Version=CSPro 7.5AppType=TabulationOperation=Format [Files]Application=.\MyTabs.xtbFormatInputTAB=.\MyData.dat.con.tabAreaNames=.\MyAreaNames.anmListing=.\MyTabs.xtb.fmt.lstOutputTBW=.\MyTables.xtb.tbw [Parameters]ViewListing=OnErrorViewResults=No The [Run Information] block is required and must appear exactly as shown in the example above. The [Files] block is required and defines all files used in the tabulation run. A description of the files is as follows:
Application = the tabulation application you created
Pa ge 351 of 684 Run i n Pa rts

FormatInputTAB = the input table matrices file – This is output from the tabulate or consolidate process.
Listing = a report of the tabulation processing
AreaNames = the area names file, only if there is area processing
OutputTBW = the output formatted tables
If any required files are not coded or are missing, the file association dialog box will be displayed allowing you to fill in orchange the missing file names. The [Parameters] block is optional. If allows to specify additional aspects of the tabulation run.
ViewListing = specifies how the tabulation run listing is displayed. If ViewListing is missing, Always isassumed.
Always - the listing is always displayedOnError - the listing is displayed only when an error occurredNever - the listing is never displayed
ViewResults = specifies whether or not the formatted tables file (*.TBW) is displayed in TableViewer at the endof the run. If ViewResults is missing, Yes is assumed.
Yes - the tables are displayedNo - the tables are not displayed
See also: Run Tabulate in Batch, Run Consolidate in Batch
Pa ge 352 of 684 Adva nce d Ta bl e Topi cs

Advanced Table TopicsUsing Subtables Subtables are separate and individual tabulations ("sub") contained within the definition of a single table. Subtables canbe thought of as merged or concatenated to create the whole table. Each subtable, being independent, has its own set of Tally Attributes as well as the Tally Attributes for the "EntireTable". To access the attributes of a subtable either right click while the cursor is in the area of the subtable and thenselect Tally Attributes (Subtable) or right click anywhere in the table, select Tally Attributes (Table), and then select thedesired subtable from the drop down menu as shown below.
In the menu subtables are listed as they appear in the "big" table, from left to right then from top to bottom. The "Names"of the subtables are created from the value sets present. If an item has only one value set then the name of the itemitself appears, e.g., P03_SEX in example. If an item has more than one value set then the name of the value set appears,e.g., P04_AGE_VS2 in the example. Any attributes entered in the "Entire Table" menu except "Unit Tallied" are also incorporated into the subtables. Entriesin this menu apply to all subtables in the table. In the Tally Attributes (Table)
If an item or value is given for "Value Tallied" or "Weight" it is also MULTIPLIED by any corresponding value givein any subtable.
Any entry in the "Universe" box is combined with any universe in a subtable using "and". In other words, bothuniverse criteria must be met in order for a tally to be made.
Of course, any checked "Special values" or "Lowest Break Level" (applicable only for area processing) alwaysrefer to the entire table including any subtables.
With the exception of attributes applying to entire table, individual subtables can each be assigned different weights,universes, etc. See Also: Create Tabulations with Multiple Variables, Tally Attributes for a Table
Pa ge 353 of 684 Adva nce d Ta bl e Topi cs
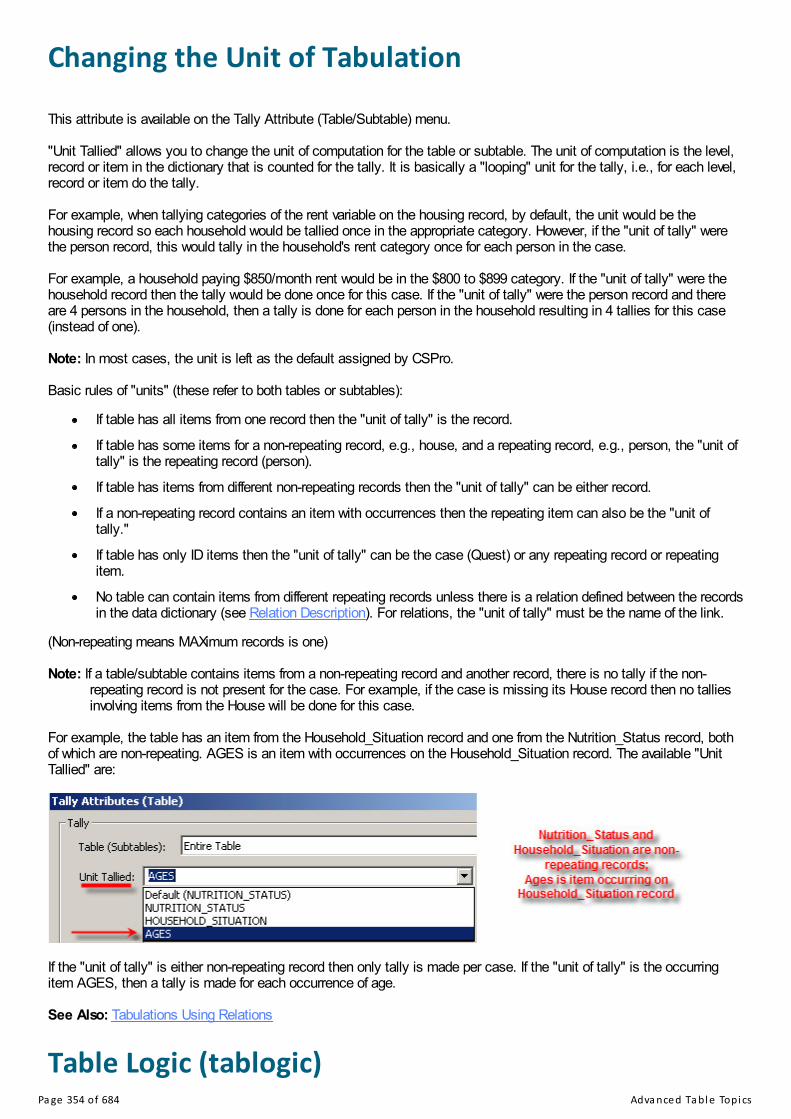
Changing the Unit of Tabulation This attribute is available on the Tally Attribute (Table/Subtable) menu. "Unit Tallied" allows you to change the unit of computation for the table or subtable. The unit of computation is the level,record or item in the dictionary that is counted for the tally. It is basically a "looping" unit for the tally, i.e., for each level,record or item do the tally. For example, when tallying categories of the rent variable on the housing record, by default, the unit would be thehousing record so each household would be tallied once in the appropriate category. However, if the "unit of tally" werethe person record, this would tally in the household's rent category once for each person in the case. For example, a household paying $850/month rent would be in the $800 to $899 category. If the "unit of tally" were thehousehold record then the tally would be done once for this case. If the "unit of tally" were the person record and thereare 4 persons in the household, then a tally is done for each person in the household resulting in 4 tallies for this case(instead of one). Note: In most cases, the unit is left as the default assigned by CSPro. Basic rules of "units" (these refer to both tables or subtables):
If table has all items from one record then the "unit of tally" is the record.
If table has some items for a non-repeating record, e.g., house, and a repeating record, e.g., person, the "unit oftally" is the repeating record (person).
If table has items from different non-repeating records then the "unit of tally" can be either record.
If a non-repeating record contains an item with occurrences then the repeating item can also be the "unit oftally."
If table has only ID items then the "unit of tally" can be the case (Quest) or any repeating record or repeatingitem.
No table can contain items from different repeating records unless there is a relation defined between the recordsin the data dictionary (see Relation Description). For relations, the "unit of tally" must be the name of the link.
(Non-repeating means MAXimum records is one) Note: If a table/subtable contains items from a non-repeating record and another record, there is no tally if the non-
repeating record is not present for the case. For example, if the case is missing its House record then no talliesinvolving items from the House will be done for this case.
For example, the table has an item from the Household_Situation record and one from the Nutrition_Status record, bothof which are non-repeating. AGES is an item with occurrences on the Household_Situation record. The available "UnitTallied" are:
If the "unit of tally" is either non-repeating record then only tally is made per case. If the "unit of tally" is the occurringitem AGES, then a tally is made for each occurrence of age. See Also: Tabulations Using Relations
Table Logic (tablogic)Pa ge 354 of 684 Adva nce d Ta bl e Topi cs

Table logic (or tablogic) allows you to add CSPro logic that is executed during tabulation. This is mainly used to add yourown "recoded" variables to tables instead of using existing variables from your dictionary. This is useful when thecategories you want in your table must be tallied based on the values of more than one variable from the dictionary, inother words, when the categories you want must be computed based on the values of multiple variables. In such a case,you can create a new variable with the categories you want and write logic to set its value based on the values of existingvariables. For example, if you want to tabulate houses that have "complete plumbing," meaning that they have piped water, bathingfacilities and a toilet inside the housing unit. The categories for "complete plumbing" are:
Complete – piped water inside the unit, and a private toilet inside the unit and bathing facilities inside the unit.
Some but not all –one or more of the three conditions above, but not all three.
None – none of the above conditions.
The variable "complete plumbing" does not exist in the main dictionary. It can be however, be determined based on thevalues of the following three variables that are in the dictionary:
Rather than adding new variables to your existing dictionary, you can add new variables to the working storagedictionary. The working storage dictionary is a second dictionary that is created automatically when you create atabulation application. This dictionary is similar to other dictionaries, however there is no data file associated with it. Thevariables in the working storage dictionary must be set by program logic. In this example, we will add the new "complete plumbing variable" to the working storage dictionary. The working storagedictionary appears just below the main dictionary in the dictionary tree. Adding a new variable to the working storagedictionary is the same as adding a variable to any dictionary. Right-click on the "Working Storage Record" under theworking storage dictionary in the dictionary tree and choose "Add Item".
Pa ge 355 of 684 Adva nce d Ta bl e Topi cs
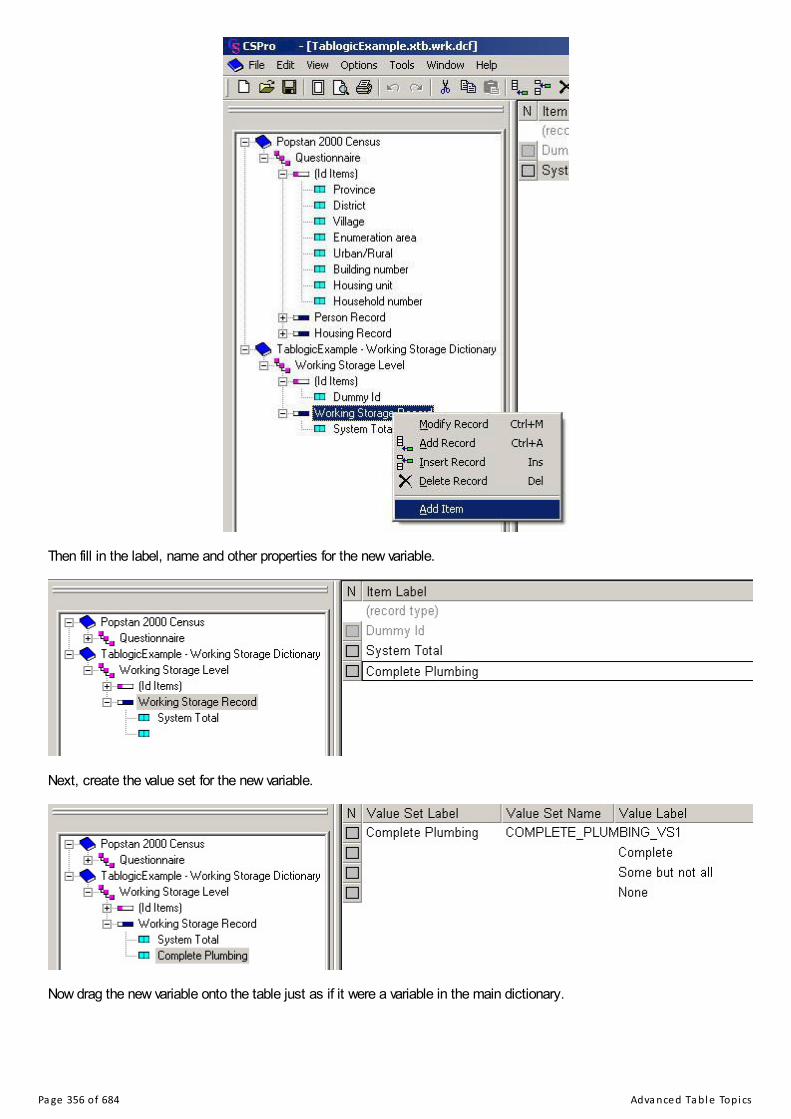
Then fill in the label, name and other properties for the new variable.
Next, create the value set for the new variable.
Now drag the new variable onto the table just as if it were a variable in the main dictionary.
Pa ge 356 of 684 Adva nce d Ta bl e Topi cs

Finally add the tablogic to set the value of complete plumbing based on the values of source of water, toilet facilities andbathing facilities. Bring up the Tally Attributes (Table) dialog and enter the following code in the tab logic edit box:
The above logic will be executed once for each housing record to set the value of complete plumbing for that household.This will result in the following table:
Pa ge 357 of 684 Adva nce d Ta bl e Topi cs

When using variables from the working storage dictionary, it is important to pay attention to the unit of tabulation. Whenusing variables from the main dictionary, CSPro can determine the unit of tabulation based on the variables used. If youchoose variables from the Person record, such as sex, the unit will be set to the person record. If you choose variablesfrom the housing record, the unit will be set to the housing record. However, when you drag variables from the workingstorage dictionary onto the table, CSPro does not know which record or records the recodes for these variables will comefrom. It always sets the unit of tabulation to the first level (questionnaire). In the above example, this does not cause anyproblems because there is exactly one housing record per questionnaire. However, had we created a recode of variablesfrom the person record, we would need to set the unit to the person record, otherwise we could get errors duringtabulation. For more information see Changing the Unit of Tabulation. Note that often it is preferable to create recoded variables in a batch edit program rather than during tabulation. Thisrecode could have been accomplished by adding a new variable to the main dictionary for complete plumbing and writinga batch edit program to set the value of this variable for each case. Then the new complete plumbing variable could bedropped on the table directly, rather than using a working storage variable. The advantage of using batch edit is that thelogic to set the value of the new variable is done once in a batch edit program rather than done as tablogic in each tablein which the variable is used. Another alternative is to use multiple subtables and value sets to simulate a recoded variable. This can be easier forsimple variables, although for recoded variables with more than a few categories, it is generally simpler to use tablogic orbatch edit. For more information see Recodes in Tables Using Value Sets and Subtables.
Tabulations Using Relations Relations provide a way of linking one multiple record or item to one or more multiple records or items. Once the itemson different records are linked through a relation, tallies are done just as if all the items belonged to one record. For example: LFS_LINK is a relation linking a labor force record (LFS) with a person record (PERSON). Both of theserecords are repeating records. The value that links two records is a number on each record (LFS_NUMBER andSERIAL_NUMBER) which identifies a single person, i.e., is the same on both records. Here is the definition of the Link.--------------------------------------------------------------------------------------------------------------Relation Name Primary Linked by Secondary Linked by--------------------------------------------------------------------------------------------------------------LFS_LINK LFS LFS_NUMBER PERSON SERIAL_NUMBER Here is table that tallies an item from both records:
Pa ge 358 of 684 Adva nce d Ta bl e Topi cs

If items from different multiply occurring records are used in the same subtable, CSPro will automatically choose therelation between them as the unit of tabulation if such a relation exists. See Also: Relation Description
Pa ge 359 of 684 How To ...

How To ...Tabulate Items in Relations A "relation" is created in the data dictionary. It links two record types through values on each record or occurrencenumber. If the two items have the same value then the records are linked, i.e., the items on the two record types aremerged so all items "appear" to be on one big record. A table or subtable using items from two record types linked through a relation is created in the same manner as anyother table, i.e., drag and drop the items from each record. CSPro will automatically set the unit of tabulation to therelation between the two items. When the table is run, the tallies will be made from the linked records only. Example:In a Labor Force Survey, the record with labor force information is related to the record with person information throughsequence numbers. Here is the definition of the Link.--------------------------------------------------------------------------------------------------------------Relation Name Primary Linked by Secondary Linked by--------------------------------------------------------------------------------------------------------------LFS_LINK LFS LFS_NUMBER PERSON SERIAL_NUMBER And how it is displayed in the data dictionary:
If "Age" value set is dropped for the Person record and the "Work last week?" value set is dropped from the LFS recordthen the following table is created.
Since the LFS record is the primary link, the tallies will be done for each occurrence of the LFS record. (This assumesthat every LFS record in the case can be linked to a Person record in the case and that no "universe" has beenspecified.) Note: The "Unit Tallied" must be the relation defined in the data dictionary. CSPro will automatically set the default to therelation if such a relation exists.
Pa ge 360 of 684 How To ...

See Also: Relation Description
Pa ge 361 of 684 Ta bl e Ti ps a nd Tri cks

Table Tips and TricksAdd Subtotals to a Table
You can add subtotals to a table using overlapping value sets. In your value set, add an item for each subtotal in additionto the existing items. For example, if you have a value set with single years of age and you wanted to add subtotals foreach 5-year age group, you would insert additional items in the value set for each of the 5-year groups:
Then drag the modified value set onto the table. For additional clarity you can format the stubs corresponding to thesubtotals to make them standout. In the table below, the font for the subtotal stubs is set to bold.
Pa ge 362 of 684 Ta bl e Ti ps a nd Tri cks

Tabulate Categories With Disjoint ValuesAt times it is useful to create categories in a tabulation that contain disjoint values. For example, if you have the followingvalue set for marital status where divorced is code 2 and you wish to create a table with only two categories: "divorced"and "not divorced".
To create such a table, we need a value set that contains only the two categories divorced and not divorced. Creating thecategory for "divorced" is simple, it includes only the value 2. The "not divorced" category, however, needs to contain thevalue 1 (Married) plus the values 3, 4 and 5 (Separated, Widowed, Never Married). These values do not make up a singlerange. In order to create the category you must create two entries in the value set, one that contains the value 1 and thesecond that contains the values 3 through 5. The first entry must contain the label for the category and the label for thesecond entry must be a single space character. CSPro recognizes the single space as a continuation of the previouscategory rather than a separate category. In this case it will merge the value range in the second entry with that of thefirst entry, creating a single category that includes the value 1 and the values 3 through 5.
Pa ge 363 of 684 Ta bl e Ti ps a nd Tri cks

It is important that you use a space rather than no text at all since CSPro will treat an empty label all as a new categoryin the value set. You can tell when CSPro has combined the entries by the absence of the notes box in the secondentry. You can combine any number of entries in the value set into a single category. See also: Implications of Data Dictionary Value Sets
Hiding Rows and Columns in Subgroupings When you have a table that uses subgroupings (one variable that was dropped onto another), there are often problemswhen trying to hide rows or columns in those subgroupings. When you hide or format a row or column in a subgrouping,the corresponding rows/columns in the other sub-groupings are also hidden. This makes it difficult to hide or format a rowor column in one subgrouping but not the others. In addition, it is not possible to hide an entire subgrouping by hiding theassociated caption or spanner. Fortunately, using value sets and multiple subtables, there are workarounds for theserestrictions. Hiding Subgroupings There are two ways to hide an entire subgrouping. One way is to modify the value set used and the other is to usemultiple subtables rather than subgroupings. Take the example of a table with Sex and Literacy as subgroupings on therow where you want to only show the sub-groupings for Total and Female. In other words, you would like to hide thesubgrouping for Male.
Pa ge 364 of 684 Ta bl e Ti ps a nd Tri cks

If you try to hide the rows for the Male subgrouping using hide in the Format (Stub) dialog, it will not work. Hiding theLiterate and Illiterate rows under Male will also hide those rows under Total and Female. Hide is not available in theFormat (Caption) dialog if you right-click on the Male caption.
One way to work around this is to modify the value set for Sex to remove the Male category. Note that removing the Malecategory will also affect the Total (since males will no longer be counted). To fix this, add your own category to the Sexvalue set called Total, which includes the values for Male and Female. Finally hide the system generated total in thetable (see Hide or Change the Position of the Total). The result is the following table:
A second approach is to use multiple subtables rather subgrouping. In our example you would drop the Literacy variabletwice onto the rows to make two separate subtables. This would create the following table:
Pa ge 365 of 684 Ta bl e Ti ps a nd Tri cks
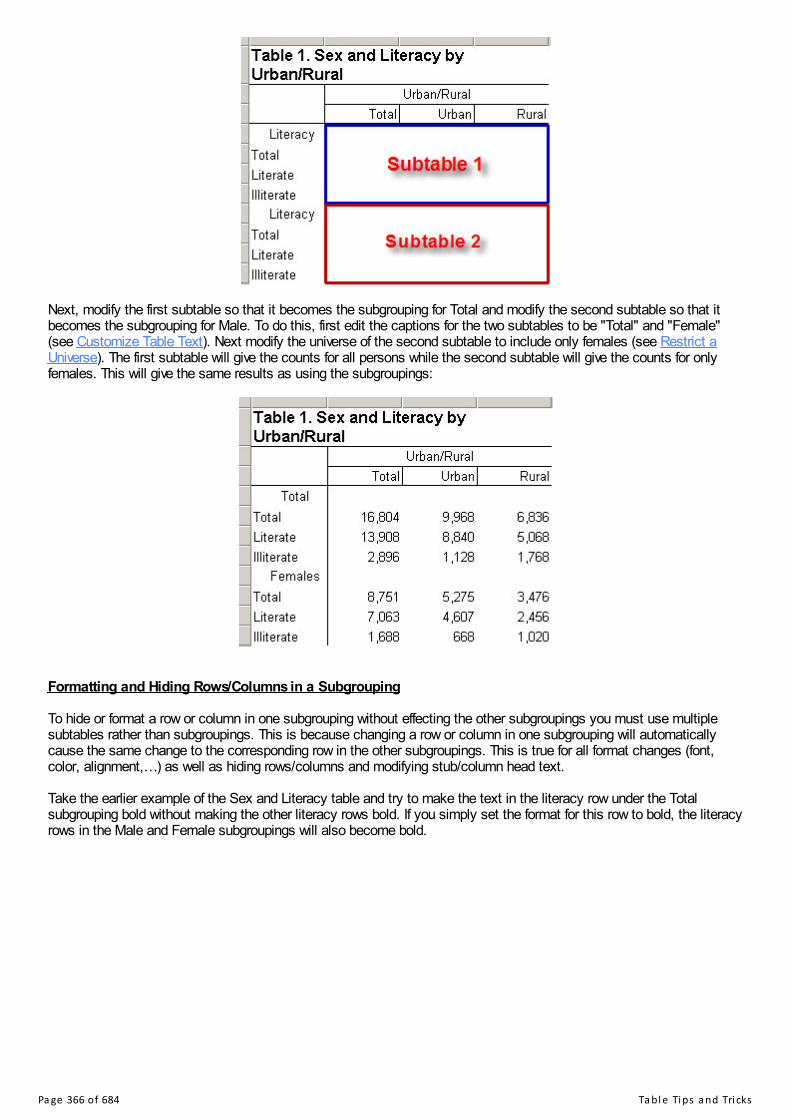
Next, modify the first subtable so that it becomes the subgrouping for Total and modify the second subtable so that itbecomes the subgrouping for Male. To do this, first edit the captions for the two subtables to be "Total" and "Female"(see Customize Table Text). Next modify the universe of the second subtable to include only females (see Restrict aUniverse). The first subtable will give the counts for all persons while the second subtable will give the counts for onlyfemales. This will give the same results as using the subgroupings:
Formatting and Hiding Rows/Columns in a Subgrouping To hide or format a row or column in one subgrouping without effecting the other subgroupings you must use multiplesubtables rather than subgroupings. This is because changing a row or column in one subgrouping will automaticallycause the same change to the corresponding row in the other subgroupings. This is true for all format changes (font,color, alignment,…) as well as hiding rows/columns and modifying stub/column head text. Take the earlier example of the Sex and Literacy table and try to make the text in the literacy row under the Totalsubgrouping bold without making the other literacy rows bold. If you simply set the format for this row to bold, the literacyrows in the Male and Female subgroupings will also become bold.
Pa ge 366 of 684 Ta bl e Ti ps a nd Tri cks

Instead of using subgroupings, drag the variable Literacy onto the rows three times to create separate subtables for theTotal, Male and Female subgroupings.
Then edit the universe for the second subtable to only include males (see Restrict a Universe). In this case set theuniverse to SEX=1. Next edit the universe for the third subtable to include only females (SEX=2). Note that you do notneed to edit the universe for the first subtable since you want to include both males and females (the entire population)which is the default universe. Next, edit the captions of the subtables to be "Total", "Male" and "Female" (see CustomizeTable Text). Finally right-click on the Literacy stub in the first (Total) subtable and set the font to bold. This results in thefollowing table:
Pa ge 367 of 684 Ta bl e Ti ps a nd Tri cks

The same procedure works for hiding or modifying the stub text of an item in a subgrouping, only the last step changes.Rather than setting the font to bold, you would hide the row or modify the stub/column head text. See also: Hide or Show a Row or Column, Hide or Change the Position of the Total, Formats for a Part of a Table,Implications of Data Dictionary Value Sets, Using Subtables
Recodes in Tables Using Value Sets and Subtables Often the variables in your dictionary do not map exactly to the categories desired in your tables and you need to"recode" one or more variables to map it to the groupings you want in the rows and columns of your table. Recodesinvolving a single variable can be accomplished by creating additional value sets while recodes of multiple variables canbe accomplished using multiple subtables. Single variable recodes To recode a single variable, simply create an additional value set for that variable in your dictionary, which regroups thevalues as desired. Then drag this new value set onto the table. For example if you have the following value set for marital status but would like to count only two categories, Married andUnmarried, in your table.
Create a new value set that regroups the original values for marital status into these new categories.
Now drag the new value set onto your table.
Pa ge 368 of 684 Ta bl e Ti ps a nd Tri cks

Value sets may have disjoint values, one category which contains values from different ranges, for example, onecategory for values 23, 45, and 67-71 (see Tabulate categories with disjoint values). Multiple variable recodes To do a recode using multiple variables, create multiple subtables by dragging the variables onto the table multiple timesand set universes on these subtables. For example, if you want to tabulate houses that have "complete plumbing",meaning that they have piped water, bathing facilities and a toilet inside the housing unit. This involves the following threevariables:
The "recoded" variable, "complete plumbing", has three categories:
Complete – piped water inside the unit (source of water = 1), and a private toilet inside the unit (type of toilet = 1)and bathing facilities inside the unit (type of bathing = 1).
Some but not all – any one of the three variables (piped water, flush toilet, bathing facilities) inside the unit butnot all three.
None – all other cases.
To create the table for complete plumbing, use 3 subtables, one for each of the 3 possible values of the recoded variable(complete, some but not all, none). Each of these subtables should have only one row. The easiest way to create a
Pa ge 369 of 684 Ta bl e Ti ps a nd Tri cks
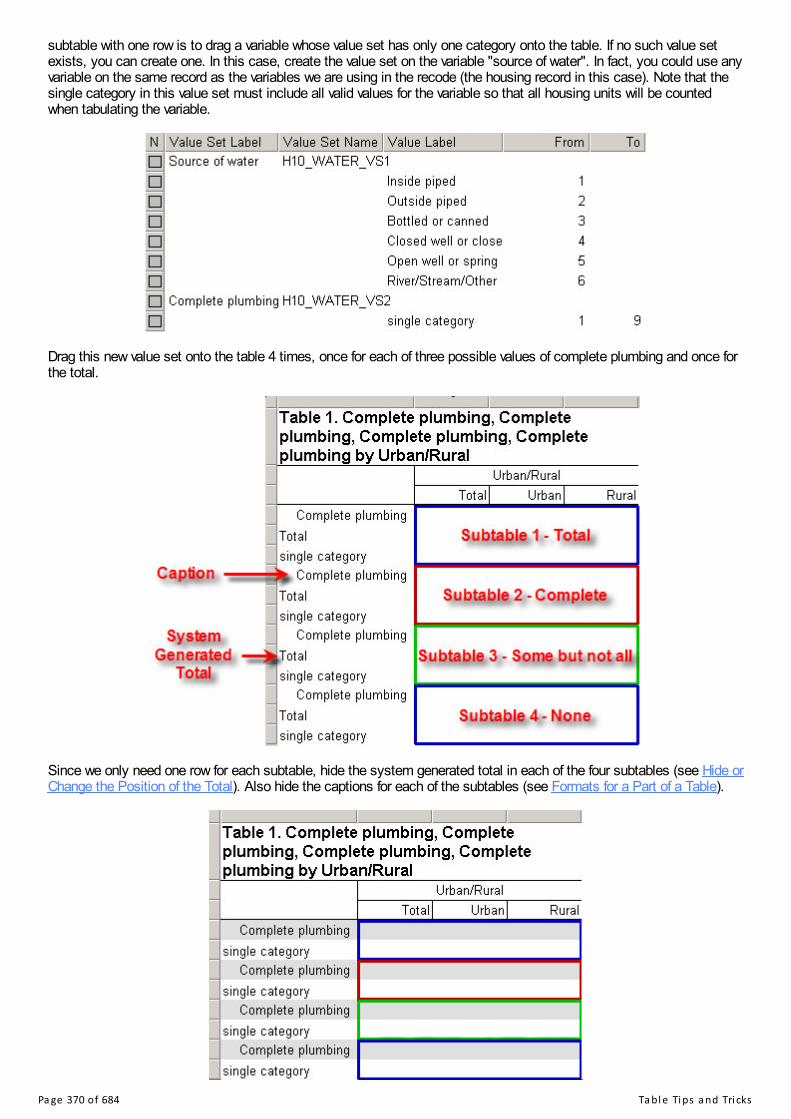
subtable with one row is to drag a variable whose value set has only one category onto the table. If no such value setexists, you can create one. In this case, create the value set on the variable "source of water". In fact, you could use anyvariable on the same record as the variables we are using in the recode (the housing record in this case). Note that thesingle category in this value set must include all valid values for the variable so that all housing units will be countedwhen tabulating the variable.
Drag this new value set onto the table 4 times, once for each of three possible values of complete plumbing and once forthe total.
Since we only need one row for each subtable, hide the system generated total in each of the four subtables (see Hide orChange the Position of the Total). Also hide the captions for each of the subtables (see Formats for a Part of a Table).
Pa ge 370 of 684 Ta bl e Ti ps a nd Tri cks

Next customize the text in the stubs to match the categories for the recode (Total, Complete, Some but not all, None).Also edit the title of the table and put the name of the variable in the Stub Head. See Customize Table Text for how toedit text in the table.
Now set the universes for the subtables to correspond to the appropriate values of the complete plumbing recode. Thefirst subtable will be the total so it should use the default universe, which includes all cases. The second subtablerepresents "complete plumbing" and must include only those cases where piped water, flush toilet AND bathing facilitiesall equal 1. The third subtable represents "some but not all" and must include the cases where one or two of thevariables are equal to 1 but not all of them. The fourth subtable represents "none" and must include all cases where noneof the variables are equal to 1. For more information on setting the universe on a subtable see Restrict a Universe. Thisproduces the following table:
Note that often it is preferable to create recoded variables in a batch edit program rather than during tabulation. Thisrecode could have been accomplished by adding a new variable to the dictionary for complete plumbing and writing abatch edit program to set the value of this variable for each case. Then the new complete plumbing variable could bedropped on the table directly rather than creating multiple subtables with universes. This makes the creation of the tablemuch simpler although it involves creating a batch edit application and writing a small amount of logic. Using batch editis best when the recoded variable will be used in multiple tables. Another alternative would be to create the recoded variable in the working storage dictionary and use tablogic to set itsvalue to each case. See Table Logic (tablogic) for more information.
Use Expressions in Universe and Value TalliedYou can enter any valid CSPro expression as a universe, weight or value tallied. This includes not only variables,constants, logical operators (and, or, not), and mathematical operators (+, -, *, /, ...) but also CSPro functions (count,sum, max, special, ...). Making full use of these expressions allows you to create complex tables very easily. Here aresome examples:
Universe
Tabulate only households where at least one child was born last year with the following universe (assuming thatCHILDREN_BORN_LAST_YEAR is a variable on the person record):
count(CHILDREN_BORN_LAST_YEAR) > 0
Pa ge 371 of 684 Ta bl e Ti ps a nd Tri cks

Count only households with "married couple families," i.e. a household with both a head of household and a spousepresent, with the following universe:
count(PERSON where RELATIONSHIP = 1) > 0 and count(PERSON where RELATIONSHIP = 2) > 0
Restrict a table to only households with total household income of greater than $20,000 by using the following universe:
sum(PERSONAL_INCOME) > 20000
This assumes that PERSONAL_INCOME is a variable on the person record. The sum of the incomes of each person inthe household is the total income for the entire household.
Restrict a table to only households where the head of household is female with the following universe:
SEX(1) = 2
This assumes that the head of the household is always the first person record (occurrence 1). This will only be true ifyour data entry program and/or edit program ensure this. If this is not true, then you would need a more complicatedexpression such as:
count(PERSON where RELATIONSHIP = 1 and SEX = 2) = 1
This will be true only if there is a person in the household who is the head of household and is female. This assumes thatthere is only one head of household in the household, which should be the case for properly edited data.
Value Tallied
Often fertility information is captured separately for male and female children and you wish to tabulate it for both sexes.For example, you have variables for MALE_CHILDREN_BORN and FEMALE_CHILDREN_BORN but no variable for total childrenborn and you want to count the total number of children born. You can use the sum of the two variables in the valuetallied:
MALE_CHILDREN_BORN + FEMALE_CHILDREN_BORN
Note that if one or more of the variables is a special value, the counts will not be correct. This is because the sum of aspecial value and a number is a special value.
See also: Restrict a Universe, Tabulate Values Instead of Frequencies, Tally Attributes for a Table
Pa ge 372 of 684 CSPro Sta te me nts a nd Func ons
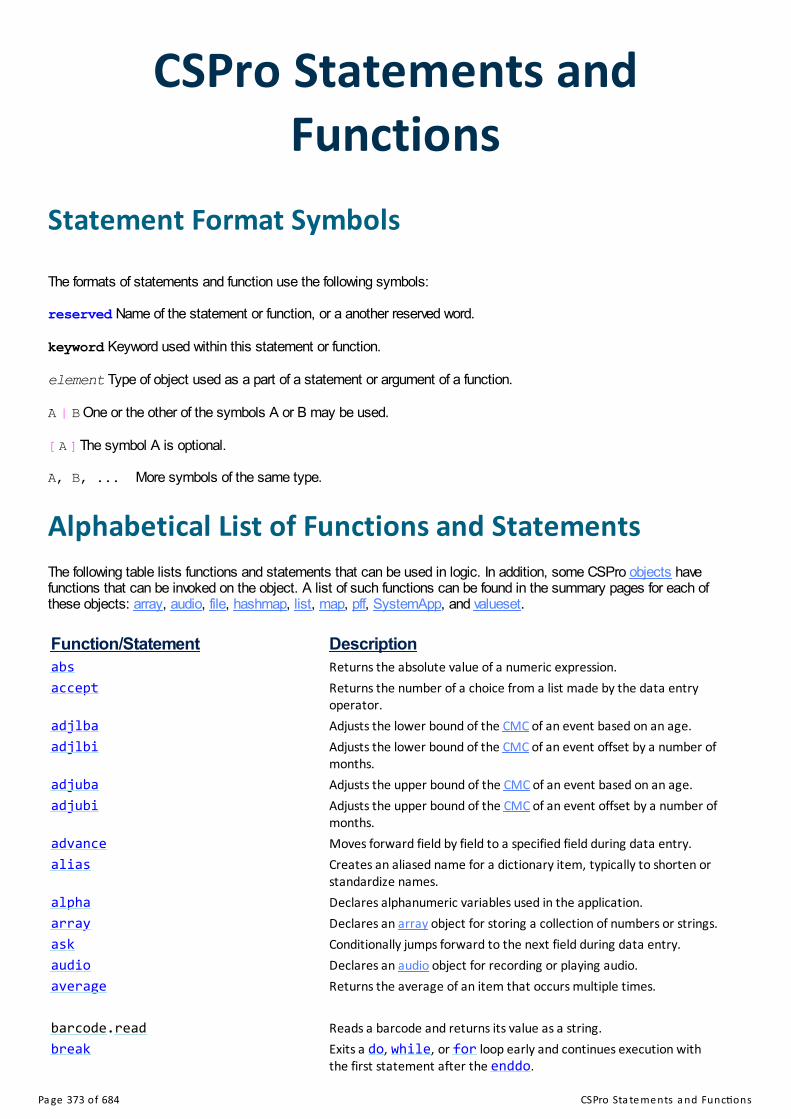
CSPro Statements andFunctions
Statement Format Symbols The formats of statements and function use the following symbols: reserved Name of the statement or function, or a another reserved word. keyword Keyword used within this statement or function. element Type of object used as a part of a statement or argument of a function. A | B One or the other of the symbols A or B may be used. [ A ] The symbol A is optional. A, B, ... More symbols of the same type.
Alphabetical List of Functions and StatementsThe following table lists functions and statements that can be used in logic. In addition, some CSPro objects havefunctions that can be invoked on the object. A list of such functions can be found in the summary pages for each ofthese objects: array, audio, file, hashmap, list, map, pff, SystemApp, and valueset.
Function/Statement Descriptionabs Returns the absolute value of a numeric expression.accept Returns the number of a choice from a list made by the data entry
operator.adjlba Adjusts the lower bound of the CMC of an event based on an age.adjlbi Adjusts the lower bound of the CMC of an event offset by a number of
months.adjuba Adjusts the upper bound of the CMC of an event based on an age.adjubi Adjusts the upper bound of the CMC of an event offset by a number of
months.advance Moves forward field by field to a specified field during data entry.alias Creates an aliased name for a dictionary item, typically to shorten or
standardize names.alpha Declares alphanumeric variables used in the application.array Declares an array object for storing a collection of numbers or strings.ask Conditionally jumps forward to the next field during data entry.audio Declares an audio object for recording or playing audio.average Returns the average of an item that occurs multiple times. barcode.read Reads a barcode and returns its value as a string.break Exits a do, while, or for loop early and continues execution with
the first statement after the enddo.
Pa ge 373 of 684 CSPro Sta te me nts a nd Func ons

changekeyboard Modifies the keyboard input associated with certain fields.clear Initializes the memory values of data items defined in external files to
zero or blank.close Closes a previously opened file.cmcode Returns the number of months since the year 1900 given a month and
year.compare Returns the alphabetical order (i.e., collating sequence) of the two
strings.compress Compresses some number of files into a single .zip file.concat Joins two or more strings into one string.config Declares string variables prefilled with values defined in the
configuration settings.connection Determines whether the device has access to the Internet.count Returns the number of occurrences for a repeating form or roster.countcases Returns the number of cases in an external file that meet a certain
criterion.countnonspecial Returns the number of non-special values in a group of data items.curocc Returns the current occurrence number for a repeating form, roster,
or record. dateadd Calculates a new date from a starting date and a period of elapsed
time.datediff Calculates the difference between two dates.datevalid Determines whether a date in the format YYYYMMDD is valid.decompress Decompresses a .zip file, extracting some number of files.delcase Marks a case for deletion in an external file based on a key.delete Removes a record or item occurrence from the current case.demode Returns the current data entry mode.diagnostics Returns troubleshooting information about CSPro.dircreate Creates a new directory with the given directory name.dirdelete Deletes an empty directory or group of empty directories.direxist Determines whether a directory exists.dirlist Returns a list containing the file and directory listing of the specified
directory.display Displays a message (this function has been superceded by errmsg).do Executes one or more statements repeatedly while a logical condition
remains true or until a logical condition is no longer true. edit Converts a number to a string.editnote Displays the data entry note box for adding or changing.encode Encodes special characters to facilitate writing to HTML or CSV files
and writing to other formats.endcase Ends batch editing for the current case (but outputs the case to file).endgroup Ends data entry for the current record or group/roster.endlevel Ends data entry for the current level.enter Enters data from a secondary form file.errmsg Displays or writes a message.ensure Conditionally declares numeric variables used in the application.execpff Starts another CSPro application.execsystem Starts another application or process.
Pa ge 374 of 684 CSPro Sta te me nts a nd Func ons

exit Ends a procedure before normal processing is expected to end.exp Returns the value of e raised to a given power.export Writes a record to an export file. file Declares one or more files used in the application.fileconcat Concatenates a list of files or a set of files described by a wildcard
specification.filecopy Copies a file to another file.filecreate Creates a new file with the given file name.filedelete Deletes a file or group of files.fileempty Determines whether a file exists but is empty.fileexist Determines whether a file exists.filename Returns the file name currently associated with a dictionary or a
file.fileread Reads a text line from a file into an item or variable.filerename Changes the name of a file.filesize Returns the size of a file in bytes.filetime Returns the last modification date/time of a file or a directory.filewrite Writes a line of text to a file.find Determines the existence of a case in a data file that matches a
condition.for Loops through multiple records or items.for (dictionary) Loops through the cases selected during a selcase operation.forcase Loops through the cases in an external file.function Declares a user-defined function. getbluetoothname Returns the name of the device as broadcast to other Bluetooth
devices.getbuffer Returns a string containing the contents of a data item.getcapturetype Returns the capture type associated with a field.getcaselabel Returns a string containing a case's label (the text that appears in a
case listing).getdeck Retrieves a value from a DeckArray used for editing data.getdeviceid Returns a string that contains a unique value that identifies the
device.getimage Returns the filename of a value set image.getlabel Returns the label of a dictionary symbol or text associated to symbol's
value.getlanguage Returns the current language being used while in data entry mode.getnote Returns a field or case note.getocclabel Returns an occurrence label associated with a repeating dictionary
item or a roster.getoperatorid Returns the text entered in the operator ID.getorientation Returns the display orientation.getos Returns information about the operating system, including whether it
is running Android or Windows.getproperty Returns information about an application or field property.getrecord Returns the name of the record containing a particular item.getsymbol Returns the name of the current procedure being executed.getusername Returns the name of the user logged into Windows or the Android
device account.getvalue Returns the value of a numeric variable whose identity is only known
Pa ge 375 of 684 CSPro Sta te me nts a nd Func ons

at runtime.getvaluealpha Returns the value of a alpha variable whose identity is only known atruntime.
getvaluenumeric Returns the value of a numeric variable whose identity is only knownat runtime.
gps Controls and returns values from a GPS receiver. has Determines whether any of a group of repeating items is within a
range of values.hash Calculates the hash value of a string.hashmap Declares a hashmap object for storing a collection of numbers or
strings in an associative array.hideocc Visually hides an occurrence row in a roster.high Returns the maximum value in a group of numeric expressions.highlighted Returns whether a field is on path or reached during data entry. if Executes statements conditionally.impute Assigns a value to a data item and logs the frequency of assignments.in Determines whether a variable is within a range of values.inc Increments a numeric item.insert Creates a record or item occurrence in the current case.int Returns the integer portion of a numeric expression.invalueset Determines whether a data item's value is within the item's value set.ischecked Returns whether a code is checked as part of a check box field's
selections.ispartial Determines whether a case was opened from a partial case or not.isverified Determines whether a case was verified by double-keying. key Returns the key (ID string) of the currently loaded case.keylist Returns a list containing the keys (ID strings) of cases in a file.killfocus Declares that the following statements are executed after the object
stops being active. length Returns the length of a dictionary item or a string.list Declares a list object for storing a collection of numbers or strings.loadcase Reads a case from an external file into memory (usually based on a
key).loadsetting Returns a string containing a setting saved using the savesetting
function.locate Finds but does not load a case in an external file that matches a
condition.log Returns the base-10 logarithm of a numeric expression.logtext Writes a user-defined message to the paradata log file.low Returns the minimum value in a group of numeric expressions. maketext Returns a formatted string with inserted values.map Declare a map variable that can be used to display interactive maps.max Returns the maximum value of an item that occurs multiple times.maxocc Returns the maximum number of occurrences of a multiply occurring
object.maxvalue Returns the maximum value in an item's range of acceptable values.min Returns the minimum value of an item that occurs multiple times.
Pa ge 376 of 684 CSPro Sta te me nts a nd Func ons

minvalue Returns the minimum value in an item's range of acceptable values.
move Moves backwards or forwards to a specified field during data entry. next Ends a do, while, or for loop early and continues execution with
the next iteration of the loop.nmembers Returns the number of cases selected during a selcase operation.noccurs Returns the number of occurrences for a repeating form or roster.noinput Prevents input for the current field during data entry.numeric Declares numeric variables used in the application. OnChangeLanguage Provides control over actions to occur after a user has changed the
language.OnChar Allows users to trap characters in order to perform special actions or
to change the action of the character.onfocus Declares that the following statements are executed just before an
object becomes active.OnKey Allows users to trap keystrokes in order to perform special actions or
to change the action of the key.OnRefused Provides a way to override the selection of a refused value.onoccchange Declares that the following statements are executed when the
group's current occurrence changes.OnStop Provides control over stopping or exiting data entry.OnSyncMessage Allows users to respond to a message sent by a Bluetooth client using
syncmessage.OnSystemMessage Provides a way to override the displaying of system error messages.open Opens a dictionary or external file. paradata Performs an action on the paradata log.path.concat Combines multiple strings into one string representing a file path.path.getDirectoryName Extracts the directory name from a file path.path.getExtension Extracts the file extension from a file path.path.getFileName Extracts the file name from a file path.path.getFileNameWithoutExtension Extracts the file name without its extension from a file path.pathconcat Combines multiple strings into one string representing a file path.pathname Returns the path of various special directories.pff Declare a pff variable that can be used to dynamically modify the way
other CSPro applications are executed.pos Returns the position of a string within another string.poschar Returns the position of any of a series of characters within another
string.preproc Declares that the following statements are executed at the beginning
of a block.proc Declares the beginning of a new procedure.prompt Prompts the operator to enter an alphanumeric string, also
supporting a password masking option.protect Modifies the protected property of a field.postproc Declares that the following statements are executed at the end of a
block.publishdate Returns the date and time that the code was compiled (which can be
used to determine when a .pen file was created).putdeck Puts a value in a DeckArray used for editing data.putnote Puts the contents of string to a field or case note.
Pa ge 377 of 684 CSPro Sta te me nts a nd Func ons

random Returns a pseudo-random integer in a given range.randomin Returns a pseudo-random integer in a non-continuous range, or using
a value set.randomizevs Randomizes the order of a value set.recode Assigns a value to a variable based on the value of one or more other
variables.reenter Forces the data entry operator to reenter a previous entered field.regexmatch Returns whether a string matches the regular expression.relation Defines a relation between multiple records or items.replace Returns a string with one of more instances of a substring replaced
with new text.report Generates a templated report.retrieve Loads a case from the current position of an external file.round Returns a value rounded to the nearest integer. savepartial Saves the current case as a partially added, modified, or verified case.savesetting Saves, using an attribute-value pair, a setting retrievable with the
loadsetting function.seed Initializes the random number generator to a particular starting
place.seek Searches a multiply occurring item for an item that meets a condition.seekmax Searches a multiply occurring item for an item with the highest value
that meets a condition.seekmin Searches a multiply occurring item for an item with the lowest value
that meets a condition.selcase Allows a data entry operator to select and load a case from an
external file.set Sets the values of various system parameters.set access Sets the order in which cases in a data file are processed.set attributes Modifies the field properties in a data entry application.set behavior Modifies parameters related to field validation or sets export
parameters.set first Positions the first case in a data file as the next case to be processed.set errmsg Modifies the way that error messages are displayed on desktop
CSEntry.set last Positions the last case in a data file as the next case to be processed.setcapturepos Allows the manual declaration of the window coordinates of extended
controls.setcapturetype Sets the capture type associated with a field.setcaselabel Sets a case's label (the text that appears in a case listing).setfile Assigns a new physical file to a dictionary or declared file.setfont Changes the default display font in data entry applications.setlanguage Modifies the current language being used while in data entry mode.setlb Returns the lower bound of the CMC of an event.setocclabel Sets the occurrence label associated with a repeating dictionary item
or a roster.setoperatorid Changes the operator ID associated with the data entry session.setorientation Modifies the display orientation, allowing dynamic rotation of the
display.setoutput Changes the output file where cases are saved in a batch application.setproperty Modifies an application or field property.
Pa ge 378 of 684 CSPro Sta te me nts a nd Func ons
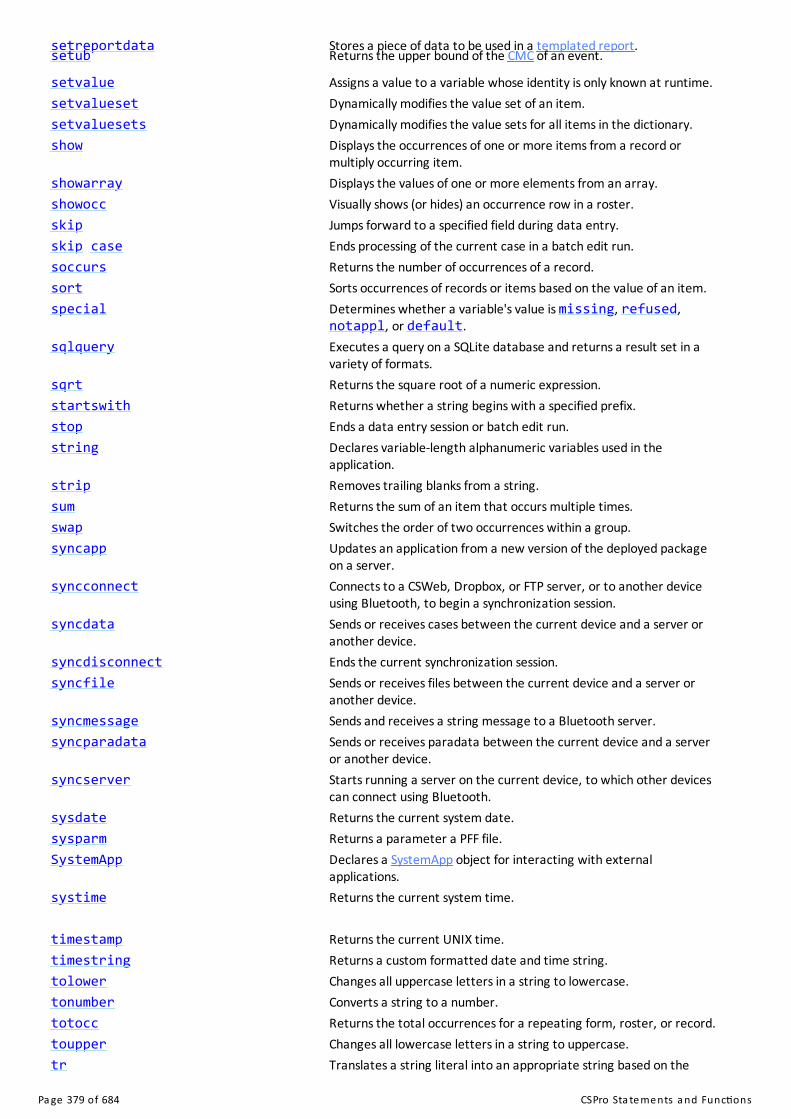
setreportdata Stores a piece of data to be used in a templated report.setub Returns the upper bound of the CMC of an event.
setvalue Assigns a value to a variable whose identity is only known at runtime.setvalueset Dynamically modifies the value set of an item.setvaluesets Dynamically modifies the value sets for all items in the dictionary.show Displays the occurrences of one or more items from a record or
multiply occurring item.showarray Displays the values of one or more elements from an array.showocc Visually shows (or hides) an occurrence row in a roster.skip Jumps forward to a specified field during data entry.skip case Ends processing of the current case in a batch edit run.soccurs Returns the number of occurrences of a record.sort Sorts occurrences of records or items based on the value of an item.special Determines whether a variable's value is missing, refused,
notappl, or default.sqlquery Executes a query on a SQLite database and returns a result set in a
variety of formats.sqrt Returns the square root of a numeric expression.startswith Returns whether a string begins with a specified prefix.stop Ends a data entry session or batch edit run.string Declares variable-length alphanumeric variables used in the
application.strip Removes trailing blanks from a string.sum Returns the sum of an item that occurs multiple times.swap Switches the order of two occurrences within a group.syncapp Updates an application from a new version of the deployed package
on a server.syncconnect Connects to a CSWeb, Dropbox, or FTP server, or to another device
using Bluetooth, to begin a synchronization session.syncdata Sends or receives cases between the current device and a server or
another device.syncdisconnect Ends the current synchronization session.syncfile Sends or receives files between the current device and a server or
another device.syncmessage Sends and receives a string message to a Bluetooth server.syncparadata Sends or receives paradata between the current device and a server
or another device.syncserver Starts running a server on the current device, to which other devices
can connect using Bluetooth.sysdate Returns the current system date.sysparm Returns a parameter a PFF file.SystemApp Declares a SystemApp object for interacting with external
applications.systime Returns the current system time. timestamp Returns the current UNIX time.timestring Returns a custom formatted date and time string.tolower Changes all uppercase letters in a string to lowercase.tonumber Converts a string to a number.totocc Returns the total occurrences for a repeating form, roster, or record.toupper Changes all lowercase letters in a string to uppercase.tr Translates a string literal into an appropriate string based on the
Pa ge 379 of 684 CSPro Sta te me nts a nd Func ons

application's current language.trace Controls a window or file that can contain debugging information.
universe Specifies a condition that must be true for execution of a procedure or
function to continue.userbar Controls the optional display bar in a data entry application.uuid Returns a human-readable string containing a universally unique
identifier. valueset Declares a valueset object for storing the contents of a dynamic value
set.view Launches the system's default viewer to display a file or website.visualvalue Returns the value of a data item prior to its input. warning Displays a "soft check" message only when the operator is not
advancing in the case.when Executes a statement based on the value of one or more other
variables.while Executes one or more statements repeatedly while a logical condition
remains true.write Write to a text file.writecase Writes a case from memory to an external file.
See also: List of Reserved Words
List of Reserved WordsCSPro does not allow certain names to be used as dictionary unique names, or as variables in the programming logic,as they are part of CSPro's procedural language. During compilation, the system will notify you if you have used areserved word.
In addition to the list of reserved words below, there are a few reserved words used internally by CSPro. When you arewriting logic, reserved words are shown in blue, so if you attempt to create a variable using one of these reserved words,you will know this name is not available when it turns blue.
In the table below, reserved words have been linked to the function of the same name, if one exists. If no link exists for aword, it is either because there was more than one association for the word or the word is for internal usage only.
abs exp map setubaccept export max setvalueadd false maxocc setvaluesetadjlba file maxvalue setvaluesetsadjlbi file_revisions mean showadjuba fileconcat meta showarrayadjubi filecopy min showoccadvance filecreate minvalue skipalias filedelete missing smeanall fileempty modify soccursalpha fileexist move sortand filename multiple specialarray fileread next specialvaluesascending filerename nmembers specificask filesize noauto sql
Pa ge 380 of 684 CSPro Sta te me nts a nd Func ons

audio filetime nobreak sqlqueryaverage filewrite noccurs sqrtbarcode find noconfirm stablebox for nofreq startswithbreak forcase noinput statby freq noprint statisticscase frequency not stopcase_id function notappl stringcases getbluetoothname notes stripcell getbuffer numeric stubchangekeyboard getcapturetype occ subtableclear getcaselabel onfocus sumclose getdeck onoccchange summarycmcode getdeviceid open swapcolumn getimage optional synccompare getlabel or sync_historycompress getlanguage outofrange syncappconcat getnote page syncconnectconfig getocclabel paradata syncdataconfirm getoperatorid path syncdisconnectconnection getorientation pathconcat syncfilecontinue getos pathname syncmessagecount getproperty pff syncparadatacountcases getrecord pos syncservercountnonspecial getsymbol poschar sysdatecountvalid getusername postcalc sysparmcrosstab getvalue postproc systemappcurocc getvaluealpha preproc systimedateadd getvaluelabel proc tabledatediff getvaluenumeric prompt tablogicdatevalid global protect tallydecompress gps publishdate tblcoldefault group putdeck tbllaydelcase has putnote tblmeddelete hash random tblrowdemenu hashmap randomin tblsumdemode hideocc randomizevs thendenom high rec_name timestampdescending highest rec_type timestringdiagnostics highlighted recode titledircreate hotdeck reenter todirdelete if ref tolowerdirexist impute refused tonumberdirlist in regexmatch totoccdisjoint inc relation toupperdisplay include replace trdo insert report traceedit int retrieve trueeditnote intervals round unitelse invalueset row universeelseif ioerror save untilencode ischecked savepartial update
Pa ge 381 of 684 CSPro Sta te me nts a nd Func ons

end ispartial savesetting userbar
endbox issa seed usingendcase isverified seek uuidenddo item seekmax valuesetendfor itemlist seekmin varyingendgroup key selcase vector_clockendif keylist select verifyendlevel killfocus set viewendlogic layer setcapturepos visualvalueendrecode length setcapturetype vsetendsect level setcaselabel warningendunit linked setfile weightedendwhen list setfont whenensure loadcase setlanguage whereenter loadsetting setlb whileerrmsg locate setocclabel writeexclude log setoperatorid writecaseexec logtext setorientation xtabexecpff low setoutputexecsystem lowers setpropertyexit maketext setreportdata
See also: Alphabetical List of Functions and Statements
Deprecated FeaturesAs part of a process to simplify and make the CSPro programming language more efficient, some features are going tobe deprecated. In future versions, these features may no longer be supported and in fact may be removed from CSProaltogether. When compiling code, you will see deprecation warnings if you are using these features. To turn off thesewarnings, use the Deprecation Warnings choices on the Options menu.
Feature Version Removed Resolutionalpha Use string variables.box Use recode.changekeyboard Use the setproperty function with the argument "Keyboard"demenu *display Use errmsg with the case keyword.endsect Use endgroup.exec CSPro 7.0 Use the file... series of functions, or the loadsetting and getcapturetype Use the getproperty function with the argument "CaptureType"ioerror CSPro 7.0 Check the return value of the setfile function.set attributes assisted Set the field's capture type using the Field Properties dialog or with the set attributes protect/native Use the protect function.set attributes refresh CSPro 7.1 *set attributes return/autoskip Use the setproperty function with the argument "UseEnterKey"set behavior canenter Use the setproperty function with the argument "CanEnterNotAppl"set behavior specialvalueszero Use the setproperty function with the argument "SpecialValuesZero"set file CSPro 7.3 Use the setfile function.set format CSPro 7.2 *set implicit CSPro 7.2 Use the ensure statement to conditionally declare variables.set language CSPro 7.3 Use the setlanguage function.set path CSPro 7.3 Use the Data Entry Options dialog to choose operator or system controlled mode.
Pa ge 382 of 684 CSPro Sta te me nts a nd Func ons

setcapturepos Use the setproperty function with the argument "CapturePosX"setcapturetype Use the setproperty function with the argument "CaptureType"setvalueset with arrays Use the valueset object to construct dynamic value sets.sync Use the syncconnect, syncfile, and syncdisconnectwriteform CSPro 7.3 Consider writing out the contents of the form to a HTML file.
* These features do not have workarounds. If you think that you need this functionality, email [email protected] describe why this feature should not be deprecated.
Pa ge 383 of 684 De cl a ra on Sta te me nts

Declaration StatementsNumeric Statement Format:numeric var1[, var2[..., var-n]]; Description:
The numeric statement declares temporary numeric variables used only in this application. They will not be saved toa data file defined by a dictionary. A numeric variable is an integer or decimal number significant to 15 digits. Local variables, with a limited scope, can also be declared in functions and PROCs. The variable will only exist andbe accessible from within the function or PROC where it is declared. (In the case of a PROC, it is available in allevents after it is declared. For example, a numeric declared in the preproc will still be accessible in the postproc.) Alocal variable cannot have the same name as a globally declared variable.
Example:PROC GLOBAL numeric NumOfKids; PROC CHILDREN NumOfKids = NumOfKids + 1;
See also: Array Statement, Alpha Statement, String Statement, Ensure Statement
String Statement Format: string var-1[, var-2[..., var-n]]; Description:
The string statement is used to define alphanumeric variables temporarily used in the application. It is similar to thealpha statement but, unlike variables created with that statement, variables created as strings have no fixed length.Strings can be used anywhere an alpha variable can be used. (Strings were only introduced starting in CSPro 6.0 somuch of the documentation refers to alpha variables.) Strings start out with a length of 0 and then automatically resizeto match whatever is assigned to it. This feature make strings the preferred text variable to use, unless the length ofthe string is needed for formatting and calculation purposes.
Examples: PROC GLOBAL
alpha (10) myAlpha;string myString;
PROC EXAMPLE
// myString starts out empty, with length 0
myString = "This is a test." // myString's length is now 15
myAlpha = "Hello"; myString = myAlpha; // myString's length is now 10: "Hello "
myString = "Hello"; // myString's length is now 5: "Hello"
Pa ge 384 of 684 De cl a ra on Sta te me nts

See also: Alpha Statement, Array Statement, Numeric Statement
Config StatementFormat
config variable1『『,...,variableN』』;
Description
The config statement declares a string variable. When the application begins, the variable's value is automatically setto a value defined in the configuration settings. If there is no value defined, the compiler will issue a warning message andthe string variable will be blank. The statement must be coded in the PROC GLOBAL section of the application.
You can use a config variable anywhere in logic as you would a string variable.
Example
PROC GLOBAL
config serverUrl;
PROC EXAMPLE
syncconnect(CSWeb,serverUrl);
See also: User and Configuration Settings, String Statement
Alpha Statement Feature Upgrade: Since CSPro 6.0, you can now use variable-length strings. You are encouraged to use strings insteadof fixed-width alpha variables whenever possible. Format: alpha [(len)] var-1[, var-2[..., var-n]]; Description:
The alpha statement is used to define alphanumeric variables used in the application. The len is the number ofcharacters in the variable. The len applies to all variables which follow in the same statement. If no len is given, 16 isassumed. The maximum string length that can be declared is 8,192. If you attempt to assign to an alpha variable astring that is longer than the variable's size, the string will be truncated from the right. Conversely, it you assign astring that is shorter than the variable's size, the trailing character positions will be blank-filled. The following two examples, using the declaration of x below, should clarify this point:
Example 1:PROC GLOBAL alpha(10) x,y; PROC A1x = "hi mom";
x will now equal "hi mom " 1234567890
x = "good night, mom";
Pa ge 385 of 684 De cl a ra on Sta te me nts

x will now equal "good night"
1234567890 Example 2:PROC GLOBALalpha (3) reply;alpha flag;
PROC Q5if q5 = 1 then reply = "Yes"; flag = "Y";endif;
If the user attempts to assign the string "Not reported" to the variable "reply," CSPro would place the letters "Not" inthe variable and drop the remaining characters of the string.
See also: String Statement, Array Statement, Numeric Statement,
Relation Statement Format:relation relation-name primary to secondary-1 method[to secondary-2 method] ... [to secondary-n method];
where method is parallel | linked by arith-exp | where condition Description:
The relation statement allows you define additional relations beyond those defined in the data dictionary. The relation-name is a unique CSPro name which contains only letters, numbers, or the underscore ('_') character. Itmust begin with a letter. The primary is the name of a multiply occurring record or item. Items defined as secondary are linked to the primaryby the method specified. The secondary is the name of a multiply occurring record or item which is linked to the primary. The method type is specified by one of the keywords parallel, linked by, or where.
In the parallel method corresponding occurrences of the primary record or item and secondary record or item arelinked, that is first occurrences are linked, second occurrences are linked and so on. In the linked by method the value of the arithmetic expression containing values from one record item is a pointer tothe occurrence in the other record or item. In the where method the value of an item on the primary record is compared to the value of an item on the secondaryrecord. If the values are equal, the records are linked.
Example 1:PROC GLOBAL relation PERSON POP1 to POP2 parallel to POP3 parallel;
Example 2:PROC GLOBAL relation MOTHER-CHILD CHILD to MOTHER linked by MOTHER_LINE;
Pa ge 386 of 684 De cl a ra on Sta te me nts

Example 3:PROC GLOBAL relation MOTHER-ALL PERSON to MOTHER where PERSON_LINE = MOTHER_LINE;
Function StatementFormat
function 『『return_type』』 function_name(『『parameter1_type parameter1_name, ..., parameterN_typeparameterN_name』』)
// statements
『『function_name = return_value;』』
end;
Description
The function statement defines a user-defined function with the name function_name. Once defined, the function canbe called in other user-defined functions or in procedures throughout your application.
Numeric expressions, string expressions, objects (such as arrays and file handlers), and function pointers can bepassed to a user-defined function as arguments. These parameters are defined by specifying the variable type (e.g.,parameter1_type) and the name of the variable (e.g., parameter1_name). If no type is specified, the variable will beconsidered numeric. Preceding the parameter type with the optional keyword marks the parameter as an optionalparameter for which a caller does not need to supply a corresponding argument.
The names used in the parameter list of a function are local to the function. They may not be the same as names thatare defined in any dictionary or in PROC GLOBAL, but the names can be reused in other functions or procedures.
Numeric, string, and alphanumeric variables are local to the function. That is, if a variable is passed as an argument, itsvalue in the rest of the application will not be changed by actions within the function (this is called "pass by value"). Onthe other hand, objects (such as arrays and file handlers) passed as arguments refer to the source variable andinteractions on the variable affect the source variable (this is called "pass by reference"). If you want to pass a numeric orstring variable by reference, you can use the ref keyword to signify that changes made in the function should affect thesource variable.
Other than arrays, parameters are defined the same way you would in other parts of logic. However, with arrays, you donot define the size of the array because the array will match the size of the array passed as an argument. By default, anarray is one-dimensional. To specify more than one dimension, use parentheses with the number of dimensions specifiedusing commas. For example, a three-dimensional array must include (,,) after the parameter name. Within thefunction, the function length returns the dimension sizes of the passed array.
Functions always return a value, either a numeric, alphanumeric, or string value. If return_type is not specified, thefunction will by default return a numeric value. To assign the function's return value, assign a value to function_name. Ifno return value is specified, the value default or a blank string is returned, depending on the return type. The returnvalue can also be specified using the exit statement.
Example 1
Pa ge 387 of 684 De cl a ra on Sta te me nts

PROC GLOBAL
function CompareValues(numeric value1, numeric value2)
if value1 <> value2 then errmsg("The values entered, %d and %d, are not equal.", value1, value2); reenter; endif;
end;
PROC BIRTH_DATE
CompareValues(BIRTH_DATE, BIRTH_DATE_FROM_PREVIOUS_ROUND);
Example 2
PROC GLOBAL
function string GetNameOfFirstFemale()
numeric female_index = seek(SEX = 2);
if female_index > 0 then GetNameOfFirstFemale = NAME(female_index); endif;
end;
Example 3
PROC GLOBAL
function numeric SumList(list numeric numeric_list)
numeric summed_value = 0;
do numeric counter = 1 while counter <= length(numeric_list) inc(summed_value, numeric_list(counter)); enddo;
SumList = summed_value;
end;
Example 4
PROC GLOBAL
function string CapitalizeFirstLetters(string text)
do numeric counter = 1 while counter <= length(text)
if counter = 1 or text[( counter - 1 ):1] = " " then text[counter:1] = toupper(text[counter:1]); endif;
enddo;
CapitalizeFirstLetters = text;
end;
See also: User-Defined Functions, Optional Function Parameters, Passing Function Arguments by Reference,Additional Examples of User-Defined Functions, Exit Statement
Pa ge 388 of 684 De cl a ra on Sta te me nts

Optional Function ParametersFormat
function FunctionName(optional numeric parameter1, optional string parameter2)
function FunctionName(numeric parameter1 = default_number, string parameter2 = "default string")
Description
User-defined functions can have optional parameters, which you can specify in two ways. The first way is to use theoptional keyword before the parameter type. This works with all variable types (numerics, strings, and objects) exceptfor arrays, which cannot be used as optional parameters. The second way is by using an = sign when specifying theparameter. This works for numeric and string parameters only.
Using the Optional Keyword
function MyFunction(optional numeric numeric_value, optional string string_value)
When you call the function, you do not need to supply arguments for optional parameters. If not otherwise defined withthe = sign, a number will be set to notappl and a string will be set to a blank string. Any object (such as a hashmap,list, etc.) will be set to its default state (an empty hashmap, a blank list, etc.). Once you specify that a parameter isoptional, then all parameters after it must also be optional.
You can call the function like this:
// both arguments specifiedMyFunction(3, "ABC");
// one argument specified (string_value set to "")MyFunction(3);
// no arguments specified (numeric_value set to notappl, string_value set to "")MyFunction();
Using an = Sign
Using an = sign is for numeric and string parameters only and cannot be used for objects. It is useful for assigning anumeric constant or string literal as the default value:
function MyFunction(optional numeric numeric_value = 30, optional string string_value = "Hello")
When using the = sign, you do not need to use the optional keyword, but you can specify it if you want.
Example 1
Pa ge 389 of 684 De cl a ra on Sta te me nts

PROC GLOBAL
function string GetName(optional numeric person_occurrence)
// if the argument for the occurrence number (person_occurrence) is not passed // to the function, person_occurrence will be notappl and the function will // return the name from the current record; otherwise, person_occurrence will // be defined and the function will return the name for the specified record
if person_occurrence = notappl then person_occurrence = curocc(POPULATION_RECORD); endif;
exit strip(PERSON_NAME(person_occurrence));
end;
PROC AGE
errmsg("%s is %d years younger than the head of household (%s)", GetName(), AGE(1) - AGE, GetName(1));
Example 2
PROC GLOBAL
// This function calculates the age based on the birth date and the enumeration date.// If the birth date is not passed to the function or is not set, the function returns// a calculated age of 998 which is used to indicate that the age could not be calculated.// If the enumeration date is not passed to the function, the function calculates the// date based on the default date of March 11, 2020; otherwise it uses the date passed// as a function argument.
function numeric CalculateAge(optional numeric birth_date, optional numeric enumeration_date =20200311)
if special(birth_date) then exit 998; else exit datediff(birth_date, enumeration_date, "y"); endif;
end;
// ...
DOB = 19520218;ACTUAL_ENUMERATION_DATE = 20200401;
errmsg("%d", CalculateAge(DOB, ACTUAL_ENUMERATION_DATE)); // 68errmsg("%d", CalculateAge(DOB)); // 67errmsg("%d", CalculateAge()); // 998
See also: User-Defined Functions, Function Statement
Passing Function Arguments by ReferenceFormat
Pa ge 390 of 684 De cl a ra on Sta te me nts

function FunctionName(numeric function_variable) function_variable = 500;end;
// using ref, any changes made to function_variable// in the function will be assigned to MY_VALUEFunctionName(ref MY_VALUE);
Description
By default, numeric and string variables that are passed as an argument to a function are not changed by actions withinthe function. This is called "pass by value." On the other hand, objects (such as arrays and file handlers) passed asarguments refer to the source variable and interactions on the variable within the function affect the source variable. Thisis called "pass by reference."
If you want to pass a numeric or string variable by reference, you can use the ref keyword to signify that changes madein the function should affect the source variable. You cannot use ref with expressions, only with numeric and stringvariables (such as dictionary items, array cells, list cells, etc.).
Example 1
function MyFunc(numeric numeric_value) numeric_value = 999;end;
// ...
numeric test_value = 100;
// the value of test_value (100) is passed (copied) to the function// and the function has no effect on the contents of test_valueMyFunc(test_value);errmsg("%d", test_value); // pass by value, prints 100
// by reference (ref) indicates the variable location itself is passed// to the function; performing any operation on the variable inside the// function is the same as performing that operation outside of the functionMyFunc(ref test_value);errmsg("%d", test_value); // pass by reference, prints 999
Example 2
Pa ge 391 of 684 De cl a ra on Sta te me nts

function numeric ReadGPS(optional numeric latitude, optional numeric longitude)
numeric successful_reading = false;
if gps(open) then
// attempt to read the GPS for up to two minutes if gps(read, 120) then successful_reading = true; latitude = gps(latitude); longitude = gps(longitude); endif;
gps(close);
endif;
exit successful_reading;
end;
// ...
// because HH_LATITUDE and HH_LONGITUDE are passed by reference (ref),// they will contain the values as updated in the functionif not ReadGps(ref HH_LATITUDE, ref HH_LONGITUDE) then errmsg("GPS reading error");endif;
See also: User-Defined Functions, Function Statement
Additional Examples of User-Defined FunctionsThese are examples of more advanced ways to work with user-defined functions in CSPro.
Recursive Functions
function numeric NumberDescendantsInHH(numeric ptrPerson)
numeric cntDescendants;
do numeric hhCtr = 1 while hhCtr <= totocc(PERSON_REC)
if LN_FATHER(hhCtr) = ptrPerson or LN_MOTHER(hhCtr) = ptrPerson then inc(cntDescendants,NumberDescendantsInHH(hhCtr)); endif;
enddo;
NumberDescendantsInHH = cntDescendants;
end;
Function Pointers
Pa ge 392 of 684 De cl a ra on Sta te me nts

function numeric FilteredCountInHH(function filter(numeric))
numeric cnt;
do numeric hhCtr = 1 while hhCtr <= totocc(PERSON_REC)
if filter(hhCtr) then inc(cnt); endif;
enddo;
FilteredCountInHH = cnt;
end;
function numeric IsTeenager(numeric ptrPerson) IsTeenager = ( AGE(ptrPerson) in 13:19 );end;
function numeric IsFertileWoman(numeric ptrPerson) IsFertileWoman = ( SEX(ptrPerson) = 2 and AGE(ptrPerson) in 15:49 );end;
PROC ANALYSIS
numeric cntTeenagers = FilteredCountInHH(IsTeenager); numeric cntFertileWomen = FilteredCountInHH(IsFertileWoman);
See also: Function Statement, Optional Function Parameters, Passing Function Arguments by Reference
Logic Objects and Dot NotationA CSPro logic object is a variable that is similar to the objects that exist in other programming languages that are"object-oriented." CSPro logic is not fully object-oriented, but some variables have functions (sometimes called"methods") that can be called by using both the variable name as well as the function name.
variable_name.function_name();
The following objects have functions that can be called on the object: array, audio, file, hashmap, list, map, pff,SystemApp, and valueset. A list of available functions can be found in each of those summary pages.
One way to understand dot notation is to think of it as a shorthand way to specify what variable should be used whenperforming an operation. For example, here are two ways to work through the elements of a list:
list string household_members;
// CSPro 7.2 and earlier:do numeric counter = 1 while counter <= length(household_members)
// CSPro 7.3 and later:do numeric counter = 1 while counter <= household_members.length()
Unlike other CSPro functions, the functions that are associated with an object will not show as blue and they are notreserved words.
Using a dot specifies that you are accessing a function or variable (property) of the object. For example, a value setobject contains two internal variables, codes and labels, both of which are lists, that can be accessed as in:
list string province_labels = PROVINCE_VS.labels;numeric selected_province = province_labels.show("Select a province");
Pa ge 393 of 684 De cl a ra on Sta te me nts

This could also be written using multiple dots:
numeric selected_province = PROVINCE_VS.labels.show("Select a province");
See also: Variables
Pa ge 394 of 684 Arra y Obje ct

Array ObjectArray StatementFormat
array 『『array_type』』 array_name(dimension1『『, ..., dimensionN』』) 『『save』』;
Description
The array statement creates an array with the name array_name. Only one array at a time can be declared with thearray statement. The array name must be unique and must contain only letters, numbers, or the underscore character.The name must begin with a letter. You can declare arrays in PROC GLOBAL or locally in functions or procedures.
Arrays can be numeric, alphanumeric or string. By default an array is numeric, but the type can be modified byspecifying the array_type. If creating an alphanumeric array, the length of each array element can be specified bydefinining the array_type as follows:
alpha 『『(array_length)』』
If array_length is not specified, each element will be 16 characters.
The size of each dimension is specified by supplying a constant positive numeric value, dimension1 to dimensionN. Anarray must have at least one dimension. CSPro supports arrays of an unlimited number of dimensions. A previouslydefined numeric value can also be used to specify the dimension size. The length function can be used to query thesize of a dimension.
The initial values of the elements of an array can be set when declaring the array by listing each value, separated by acomma. If some values are defined and then followed by ..., that set of values will be used over and over until the entirearray has been initialized.
With a numeric array, each element starts with the value 0. For alphanumeric and string arrays, each element starts asa blank string. If using a numeric saved array, the initial array contents are default.
The optional keyword save indicates that the array values should be saved to a file and loaded from that file when theprogram is run again. This allows you to maintain the values of the arrays across multiple runs of the same program.When one or more arrays in the program are marked with save, the first time the application is run, a saved array file iscreated and the values of the arrays are written to the file at the end of program execution. On consecutive runs of theprogram, the initial values of the arrays are read in from the file. This is particularly useful for setting the initial values ofhot decks. In this scenario, the program is run twice. The first run fills the hot deck and saves the hot deck array to thefile. The second run loads the values saved from the first run and uses them as the initial values for the hot deck forimputation. See Initialize Hot Decks in Program Logic for more information.
All arrays marked with save in the application are written to the same file. This file has the same name as the applicationbut with a .sva file extension appended to it (for example, MyApplication.bch.sva). Saved arrays are not supported in dataentry applications.
Example 1 (Numeric)
Pa ge 395 of 684 Arra y Obje ct

PROC GLOBAL
array numeric MinimumAgeMarriage(2) = 15, // male 12; // female
PROC MARRIAGE_AGE
if MARRIAGE_AGE < MinimumAgeMarriage(SEX) then errmsg("The minimum age of marriage is %d", MinimumAgeMarriage(SEX)); reenter; endif;
Example 2 (String)
PROC GLOBAL
array string Months(12) = "Jan", "Feb", "Mar", "Apr", "May", "Jun", "Jul", "Aug", "Sep", "Oct", "Nov", "Dec";
function string FormatDate() FormatDate = maketext("%d %s %d", sysdate("DD"), Months(sysdate("MM")), sysdate("YYYY"));end;
Example 3 (Assignment)
numeric NumberProvinces = 12;array numeric SexCountsByProvince(NumberProvinces, 2); // province by sex
PROC SEX
inc(SexCountsByProvince(PROVINCE, SEX));
PROC DISPLAY_COUNTS
do numeric counter = 1 while counter <= SexCountsByProvince.length(1) errmsg("Province %d has %d males and %d females", counter, SexCountsByProvince(counter, 1), SexCountsByProvince(counter, 2)); enddo;
See also: Array Object, HashMap Object, List Object, Numeric Statement, Alpha Statement, String Statement, SavedArrays File (.sva)
Array.Length FunctionFormat
i = array_name.length(『『dimension』』);
Description
The array.length function returns the size of an array dimension. When applied to a one-dimensional array, thedimension does not need to be specified.
Return Value
The function returns the length of the array dimension.
Example
Pa ge 396 of 684 Arra y Obje ct

array string usmca_countries(3) = "Canada", "Mexico", "United States";usmca_countries.length(); // returns 3;
// ...
array AgeSexDeckArray(AGE_VS, SEX_VS);
do numeric age_counter = 1 while age_counter <= AgeSexDeckArray.length(1) do numeric sex_counter = 1 while sex_counter <= AgeSexDeckArray.length(2) // ... enddo;enddo;
See also: Array Object, Length Function
Array.Clear FunctionFormat
b = array_name.clear();
Description
The array.clear function resets all values of an array to their default value. For numeric arrays, this is 0, unless thearray is a saved array, in which case the value is default. For alphanumeric and string arrays, the default value is ablank string.
Return Value
The function returns a logical value of 1 (true).
Example
array string HouseholdMemberNames(100);
// clear the array of household member names so that// any previously stored names are removedHouseholdMemberNames.clear();
do numeric counter = 1 while counter <= count(NAME) HouseholdMemberNames(counter) = NAME(counter);enddo;
numeric selection = showarray(HouseholdMemberNames, title("Select a Household Member"));
See also: Array Object
Pa ge 397 of 684 Audi o Obje ct

Audio ObjectAudio StatementFormat
audio audio_name;
Description
The audio statement creates an audio object with the name audio_name. The audio name must be unique and mustcontain only letters, numbers, or the underscore character. The name must begin with a letter. You can declare audioobjects globally in PROC GLOBAL or locally in functions or procedures.
Audio recording and playback are currently only supported on Android.
Example
Pa ge 398 of 684 Audi o Obje ct

PROC AUDIO_QUESTION
onfocus
// Variable to store the recordingaudio recording;
// Save recording to a file that includes case id-items to differentiate it from// audio saved in other casesstring nameOfAudioFile = maketext("%v%v%vAUDIO_QUESTION.m4a", PROVINCE, DISTRICT, EA);
// If no audio is recorded for this question then the only option is to record,// otherwise allow user to re-record, play or clear recording before continuingvalueset vs;if fileexist(nameOfAudioFile) and recording.load(nameOfAudioFile) then vs.add("Re-record", 1); vs.add("Play recording", 2); vs.add("Clear recording", 3); vs.add("Next question", 4);else vs.add("Record", 1);endif;setvalueset($, vs);
postproc
if $ = 1 then // Record/re-record recording.clear(); string message = "Record the respondents answer to this question"; numeric seconds = recording.recordinteractive(message); if seconds > 0 then recording.save(nameOfAudioFile); else errmsg("No audio recorded. Please try again"); endif; reenter;elseif $ = 2 then // Play back recording recording.play(); reenter;elseif $ = 3 then // Clear the recording filedelete(nameOfAudioFile); reenter;elseif $ = 4 then // Continue to next questionendif;
See also: Audio Object
Audio.Load FunctionFormat
b = audio_name.load(audio_filename);
Description
The audio.load function reads the audio file named audio_filename and stores the audio data contained in the file inan audio object. The loaded audio can then be played back using audio.play or combined with other audio usingaudio.concat.
CSPro can load and play most audio files in any of the following formats: m4a, mp4, mp3, wav, 3gp, flac, ogg, mkv.
Pa ge 399 of 684 Audi o Obje ct

However, only m4a files (AAC encoded audio in an MPEG-4 container) can be used with the functions audio.concat,audio.length, audio.record, and audio.recordInteractive.
Return Value
The function returns a logical value of 1 (true) if the file was loaded and 0 (false) if the file could not be loaded.
Example
audio recording;if recording.load("myrecording.m4a") then recording.play();endif;
See also: Audio Object, Audio.Save Function, Audio.Play Function
Audio.Save FunctionFormat
b = audio_name.save(audio_filename);
Description
The audio.save function saves the audio recording in an audio object to the file specified by audio_filename.
Audio recorded using the functions audio.record and audio.recordInteractive is stored in m4a format (AACencoded in an MPEG-4 container). Audio in this format should be saved with the extension .m4a so that it will berecognized by media players.
Return Value
The function returns a logical value of 1 (true) if the file was successfully saved or 0 (false) otherwise.
Example
PROC GLOBALaudio recordingQ1;
PROC Q1preprocrecordingQ1.record();
postprocrecordingQ1.stop();string audioFilename = maketext("recording%v.m4a", HOUSEHOLD_ID);recordingQ1.save(audioFilename);
See also: Audio Object, Audio.Load Function
Audio.Play FunctionFormat
b = audio_name.play(『『message』』);
Pa ge 400 of 684 Audi o Obje ct

Description
The audio.play function launches an audio player to play the audio in an audio object. Before calling this function, theaudio object must contain audio data recorded using audio.recordInteractive, audio.record, or loaded usingaudio.load. If the optional argument message is provided, the message text is displayed over the audio player.
CSPro can load and play most audio files in any of the following formats: m4a, mp4, mp3, wav, 3gp, flac, ogg, mkv.However, only m4a files (AAC encoded audio in an MPEG-4 container) can be used with the functions audio.concat,audio.length, audio.record, and audio.recordInteractive.
Return Value
The function returns a logical value of 1 (true) if the audio can be played and a logical value of 0 (false) otherwise.
Example
audio recording;if recording.load("myrecording.m4a") then recording.play();endif;
See also: Audio Object, Audio.Load Function, Audio.Record Function, Audio.RecordInteractive Function
Audio.RecordInteractive FunctionFormat
d = audio_name.recordInteractive(『『message』』);
Description
The audio.recordInteractive function launches an interactive audio recorder that stores a recording to an audioobject. When the function is called, the audio recorder screen is displayed. It contains record, save, and clear buttonsthat control the audio recording. If the optional string argument message is specified, the message will be displayed atthe top of the recorder screen. The audio.recordInteractive function does not return until the user has finishedrecording and taps the save button. This is useful for synchronous recording, for example to have the interviewer recordthe response to a single question. To record the audio in the background while the user continues to interact with thesurvey, use the function audio.record.
The recorded audio is stored in the audio object and can be played back using audio.play or saved to a file usingaudio.save. If the audio object already contains an audio recording, the recorded audio will be appended to the existingrecording. To replace the existing recording rather than adding to it, call the audio.clear function before callingaudio.recordInteractive.
Recorded audio is stored in m4a format (AAC encoded in an MPEG-4 container). Files should be saved with theextension .m4a so that they will be recognized by media players.
Audio recording is only supported on Android. This function will do nothing on Windows.
Return Value
The function returns the length of the recorded audio in seconds (and fractional seconds) or default if there was an errorduring recording.
Example
Pa ge 401 of 684 Audi o Obje ct

PROC AUDIO_QUESTION
onfocus
// Variable to store the recordingaudio recording;
// Save recording to a file that includes case id-items to differentiate it from// audio saved in other casesstring nameOfAudioFile = maketext("%v%v%vAUDIO_QUESTION.m4a", PROVINCE, DISTRICT, EA);
// If no audio is recorded for this question then the only option is to record,// otherwise allow user to re-record, play or clear recording before continuingvalueset vs;if fileexist(nameOfAudioFile) and recording.load(nameOfAudioFile) then vs.add("Re-record", 1); vs.add("Play recording", 2); vs.add("Clear recording", 3); vs.add("Next question", 4);else vs.add("Record", 1);endif;setvalueset($, vs);
postproc
if $ = 1 then // Record/re-record recording.clear(); string message = "Record the respondents answer to this question"; numeric seconds = recording.recordinteractive(message); if seconds > 0 then recording.save(nameOfAudioFile); else errmsg("No audio recorded. Please try again"); endif; reenter;elseif $ = 2 then // Play back recording recording.play(); reenter;elseif $ = 3 then // Clear the recording filedelete(nameOfAudioFile); reenter;elseif $ = 4 then // Continue to next questionendif;
See also: Audio Object, Audio.Record Function
Audio.Record FunctionFormat
b = audio_name.record(『『seconds』』);
Description
The audio.record function starts recording audio in the background and stores the recorded audio in an audio object.The call to record begins audio recording and returns immediately. Recording continues until the audio.stop function iscalled. If the optional parameter seconds is specified, recording will stop after the specified number of seconds haveelapsed—or audio.stop—is called, whichever action comes first.
Pa ge 402 of 684 Audi o Obje ct

While the audio is recording, CSPro continues to run and the user is able to enter responses and move around thequestionnaire as usual. This is useful if you wish to record portions of the interview for audit purposes. If instead you wishto record audio synchronously, for example to record the response to a single question, use theaudio.recordInteractive function instead.
The recorded audio is stored in the audio object and can be played back using audio.play or saved to a file usingaudio.save. If the audio object already contains an audio recording, the recorded audio will be appended to the existingrecording. To replace the existing recording rather than adding to it, call the audio.clear function before callingaudio.record.
Recorded audio is stored in m4a format (AAC encoded in an MPEG-4 container). Files should be saved with theextension .m4a so that they will be recognized by media players.
Audio recording is only supported on Android. This function will do nothing on Windows.
Return Value
The function returns a logical value of 1 (true) if the recording is started successfully and 0 (false) otherwise.
Example
logic>PROC GLOBALaudio recordingQ1;
PROC Q1preprocrecordingQ1.record();
postprocrecordingQ1.stop();string audioFilename = maketext("recording%v.m4a", HOUSEHOLD_ID);recordingQ1.save(audioFilename);
See also: Audio Object, Audio.Stop Function, Audio.RecordInteractive Function, Audio.Clear Function
Audio.Stop FunctionFormat
d = audio_name.stop();
Description
The audio.stop function ends the background recording session for an audio object. Background recording is startedwith the function audio.record. The call to audio.stop should be made to finish the recording session started withaudio.record. This function is not used for interactive recording with audio.recordInteractive.
Return Value
The function returns the duration of the recorded audio in seconds (and fractional seconds) or default if the audio failedto record.
Example
Pa ge 403 of 684 Audi o Obje ct

PROC GLOBALaudio recordingQ1;
PROC Q1preprocrecordingQ1.record();
postprocrecordingQ1.stop();string audioFilename = maketext("recording%v.m4a", HOUSEHOLD_ID);recordingQ1.save(audioFilename);
See also: Audio Object, Audio.Record Function
Audio.Concat FunctionFormat
b = audio_name.concat(audio_filename ‖ audio_object);
Description
The audio.concat function appends an audio recording stored in a file specified by the argument audio_filename or anaudio object specified by the argument audio_object to the current recording in an audio object. The result is a newrecording that combines both recordings and is stored in the initial audio object.
The audio.concat function only works with audio files stored in m4a format (AAC encoded audio stored in an MPEG-4container). This is the format of files recorded in CSPro using the audio.record and audio.recordInteractivefunctions. Audio files that come from sources other than CSPro will most likely not work with audio.concat.
Return Value
The function returns a logical value of 1 (true) if the recordings were concatenated successfully and a logical value of 0(false) if there was an error combining the recordings.
Example 1
audio recording;
recording.load("recording1.m4a");recording.concat("recording2.m4a");recording.save("combined.m4a");
Example 2
Pa ge 404 of 684 Audi o Obje ct

PROC GLOBALaudio recordingQ1;audio recordingQ2;
PROC SURVEY_FF
PROC SURVEY_LEVEL
// at end of questionnaire combine audio recordings from Q1 and Q2 and saveaudio combined;combined = recordingQ1;combined.concat(recordingQ2);string audioFilename = maketext("recording%v.m4a", HOUSEHOLD_ID);combined.save(audioFilename);
PROC Q1preprocrecordingQ1.record();
postprocrecordingQ1.stop();
PROC Q2preprocrecordingQ2.record();
postprocrecordingQ2.stop();
See also: Audio Object
Audio.Length FunctionFormat
d = audio_name.length();
Description
The audio.length function returns the length in seconds of the recording in an audio object.
The audio.length function only supports audio recorded as AAC encoded audio in an mp4 container (.m4a). This is theformat used for audio recorded by CSPro so it will work correctly for audio recorded using the audio.record oraudio.recordInteractive. The length function will return default for audio files recorded by other tools that use adifferent format such as mp3 or wav.
Return Value
The function returns the duration in seconds (and fractional seconds) of the audio recording or default if the durationcannot be computed.
Example
audio recording;numeric seconds = recording.recordinteractive();if seconds > 0 then recording.save("recording.m4a");else errmsg("No audio recorded. Please try again"); reenter;endif;
Pa ge 405 of 684 Audi o Obje ct

See also: Audio Object
Audio.Clear FunctionFormat
b = audio_name.clear();
Description
The audio.clear function removes the current recording from an audio object making it empty.
Return Value
The function returns a logical value of 1 (true).
Example
Pa ge 406 of 684 Audi o Obje ct

PROC AUDIO_QUESTION
onfocus
// Variable to store the recordingaudio recording;
// Save recording to a file that includes case id-items to differentiate it from// audio saved in other casesstring nameOfAudioFile = maketext("%v%v%vAUDIO_QUESTION.m4a", PROVINCE, DISTRICT, EA);
// If no audio is recorded for this question then the only option is to record,// otherwise allow user to re-record, play or clear recording before continuingvalueset vs;if fileexist(nameOfAudioFile) and recording.load(nameOfAudioFile) then vs.add("Re-record", 1); vs.add("Play recording", 2); vs.add("Clear recording", 3); vs.add("Next question", 4);else vs.add("Record", 1);endif;setvalueset($, vs);
postproc
if $ = 1 then // Record/re-record recording.clear(); string message = "Record the respondents answer to this question"; numeric seconds = recording.recordinteractive(message); if seconds > 0 then recording.save(nameOfAudioFile); else errmsg("No audio recorded. Please try again"); endif; reenter;elseif $ = 2 then // Play back recording recording.play(); reenter;elseif $ = 3 then // Clear the recording filedelete(nameOfAudioFile); reenter;elseif $ = 4 then // Continue to next questionendif;
See also: Audio Object
Pa ge 407 of 684 Ba rcode

BarcodeBarcode NamespaceWhen running a data entry application on an Android device, you can use the device's camera to read a barcode inseveral formats, including QR codes.
Functionality
Function Descriptionbarcode.read Reads a barcode and returns its value as a string.
In addition to barcode functions accessible using logic, you can generate a QR code that can be used to installapplications on mobile devices.
Example
PROC BLOOD_SAMPLE
preproc
if BLOOD_SAMPLE = "" then BLOOD_SAMPLE = barcode.read("Scan the blood sample barcode"); endif;
See also: Multimedia Features
Barcode.Read FunctionFormat
s = barcode.read(『『message』』);
Description
The barcode.read function starts an Android device's camera and allows the operator to scan a barcode. The barcodecan be in several formats, including QR codes. An optional string expression, message, is displayed on top of thecamera view and can be used to display instructions to the operator.
This function only works on Android devices and returns a blank string if used on another device.
Return Value
The function returns a string value containing the barcode's value. If the operator canceled before a barcode could besuccessfully read, the function returns a blank string.
Example
Pa ge 408 of 684 Ba rcode

PROC BLOOD_SAMPLE
preproc
if BLOOD_SAMPLE = "" then BLOOD_SAMPLE = barcode.read("Scan the blood sample barcode"); endif;
See also: Barcode Namespace
Pa ge 409 of 684 Fi l e Obje ct

File ObjectFile StatementFormat
file file_handler1『『, ..., file_handlerN』』;
Description
The file statement creates a file handler that is used to read from and write to text files that are not not associated withdata dictionaries. file_handler1 to file_handlerN are CSPro names that must be unique and must contain only letters,numbers, or the underscore character. The names must begin with a letter. You can declare files globally in PROCGLOBAL or locally in functions or procedures.
If declared globally, the physical name of the file can be specified in the Define File Associations dialog when theapplication is run. The name can also be specified in a PFF file or at runtime by using the open or setfile functions.
Example
PROC GLOBAL
file VacantHouseholdsReportFile;
See also: File Object
File.Open FunctionFormat
b = file_handler.open(file_name『『, update ‖ append ‖ create』』);
Description
The open function associates the file file_handler to a text file on the disk. The file_name argument is a stringexpression containing the file name of the file to be associated with the file. This function is equivalent to the setfilefunction.
Using the keyword update, append or create is optional. If no keyword is used, the file is opened in update mode.
If update is used, you are positioned at the beginning of the file. If append is used, the file's contents are not changedand you are positioned at the end of the file. If create is used, all previous content in the file is removed and you arepositioned at the beginning of the file.
If create or append is used and the file does not already exist, a new empty file will be created. If update is used andthe file does not already exist, the function will fail and return 0.
Return Value
The function returns a logical value of 1 (true) if the new file is successfully assigned and 0 (false) otherwise.
File Example
Pa ge 410 of 684 Fi l e Obje ct

file household_report_file;
household_report_file.open("Household Report.txt", create);
See also: File Object, File.Close Function, SetFile Function
File.Close FunctionFormat
b = file_handler.close();
Description
The file.close function closes the text file associated with file_handler. You must close a file before using it in anyother application. If you do not close the file explicitly, it will be closed when the CSPro application terminates. Thisfunction is equivalent to the close function.
Return Value
The function returns a logical value of 1 (true) if successful and 0 (false) otherwise.
Example
file report_file;
// ...
report_file.close();
view(filename(report_file));
See also: File Object, File.Open Function, Close Function
File.Read FunctionFormat
b = file_handler.read(string_variable ‖ string_list);
Description
The file.read function reads one or more lines of text from the file associated with file_handler. After the read the filepointer is positioned to the next line in the file. This function reads lines sequentially. This function is equivalent to thefileread function.
If a string_variable is provided as a argument, a single line of text is read and placed in the variable, which is either atemporary string variable or an alphanumeric dictionary item. If the dictionary item is longer than the line of text, blankswill be added at the end. If the item is shorter, the line of text will be truncated.
Alternatively, a string list can be used as an argument. In this case, all remaining lines in the file are read and stored instring_list.
Return Value
The function returns a logical value of 1 (true) if successful and 0 (false) otherwise.
Pa ge 411 of 684 Fi l e Obje ct

Example
file occupation_codes_file;
occupation_codes_file.open("Occupation Codes.txt");
// approach 1string code;
while occupation_codes_file.read(code) do // do something with the single codeenddo;
// approach 2list string all_codes;
occupation_codes_file.read(all_codes);// do something with all of the codes
occupation_codes_file.close();
See also: File Object, File.Write Function, FileRead Function
File.Write FunctionFormat
b = file_handler.write(message『『, argument1, ..., argumentN』』);
Description
The file.write function writes one or more lines of text to the file associated with file_handler. This function isequivalent to the filewrite function.
The message is either a string expression or a numeric message number that contains the text that is written to the file.If the text contains any message formatters, the optional arguments argument1 to argumentN will be inserted into thetext. There are some additional options for file output:
If you want to break a line of text into two lines, place \n where you want the line divided.
If you want a text line to begin on a new page, place \f at the beginning of the text string.
To output \n or \f as text instead of a new line or a new page, use a double backslash (e.g., \\n).
Alternatively, the message can be a string list. If a list is provided, then each string contained in the list is written to thefile, allowing for the output of multiple lines of text with one function call.
Return Value
The function returns a logical value of 1 (true) if successful and 0 (false) otherwise.
Example
Pa ge 412 of 684 Fi l e Obje ct

file data_file_report;
data_file_report.open("Data File Report.txt", create);
list string data_file_listing;dirlist(data_file_listing, "Data", "*.csdb");
data_file_report.write("There are %d files in the data directory:", data_file_listing.length());data_file_report.write("");data_file_report.write(data_file_listing);
data_file_report.close();
view(filename(data_file_report));
See also: File Object, File.Read Function, FileWrite Function, Message Formatting Options, Encode Function
Pa ge 413 of 684 Ha s hMa p Obje ct
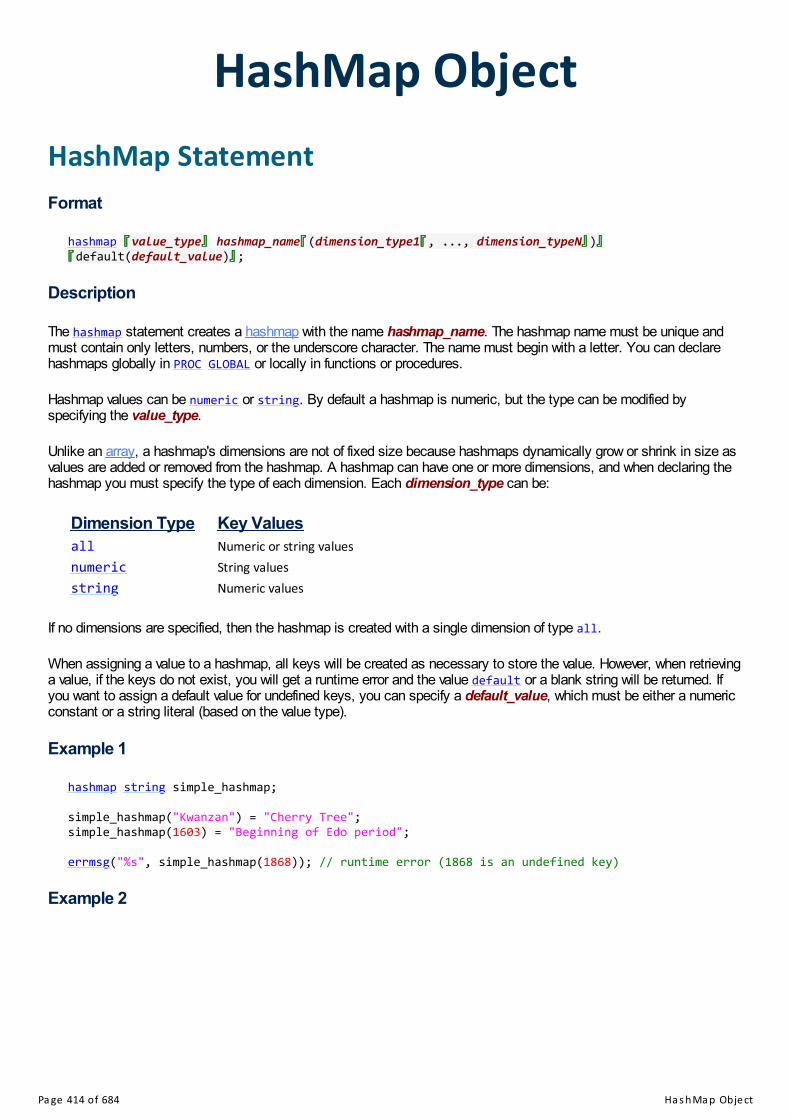
HashMap ObjectHashMap StatementFormat
hashmap 『『value_type』』 hashmap_name『『(dimension_type1『『, ..., dimension_typeN』』)』』『『default(default_value)』』;
Description
The hashmap statement creates a hashmap with the name hashmap_name. The hashmap name must be unique andmust contain only letters, numbers, or the underscore character. The name must begin with a letter. You can declarehashmaps globally in PROC GLOBAL or locally in functions or procedures.
Hashmap values can be numeric or string. By default a hashmap is numeric, but the type can be modified byspecifying the value_type.
Unlike an array, a hashmap's dimensions are not of fixed size because hashmaps dynamically grow or shrink in size asvalues are added or removed from the hashmap. A hashmap can have one or more dimensions, and when declaring thehashmap you must specify the type of each dimension. Each dimension_type can be:
Dimension Type Key Valuesall Numeric or string valuesnumeric String valuesstring Numeric values
If no dimensions are specified, then the hashmap is created with a single dimension of type all.
When assigning a value to a hashmap, all keys will be created as necessary to store the value. However, when retrievinga value, if the keys do not exist, you will get a runtime error and the value default or a blank string will be returned. Ifyou want to assign a default value for undefined keys, you can specify a default_value, which must be either a numericconstant or a string literal (based on the value type).
Example 1
hashmap string simple_hashmap;
simple_hashmap("Kwanzan") = "Cherry Tree";simple_hashmap(1603) = "Beginning of Edo period";
errmsg("%s", simple_hashmap(1868)); // runtime error (1868 is an undefined key)
Example 2
Pa ge 414 of 684 Ha s hMa p Obje ct

hashmap three_dimensional_hashmap(all, numeric, string) default(0);
// proper access:three_dimensional_hashmap(1, 2, "Z");three_dimensional_hashmap("A", 2, "Z");
// compile-time errors:three_dimensional_hashmap("A", "M", "Z"); // the second key must be a numberthree_dimensional_hashmap(1, 2, 3); // the third key must be a string
// with a default value defined, accessing this undefined key results in the displaying of 0errmsg("%d", three_dimensional_hashmap(99, 88, "YY"));
See also: HashMap Object, Array Object, List Object
HashMap.GetKeys FunctionFormat
i = hashmap_name.getKeys(list_name 『『, key_value1, ..., key_valueN』』);
Description
The hashmap.getKeys function fills a list with the keys at a specific location in the hashmap. Each key_value argumentmust be a numeric or string expression matching the type specified when declaring the hashmap. If no arguments areprovided, the first-dimension keys are returned; if one argument is provided, the second-dimension keys are returned; andso on.
The argument list_name is a numeric or string list whose contents will be cleared and then filled with the hashmap'skeys. The type of the list must correspond to the type of keys at the specified location. If the dimension type is numeric,then the list must be a numeric list. If the dimension type is string or all, then the list must be a string list. In the caseof all, any numeric values added as keys to the hashmap will be converted to strings before being inserted in the stringlist.
Return Value
The function returns the number of keys added to the list.
Example
Pa ge 415 of 684 Ha s hMa p Obje ct

PROC GLOBAL
hashmap invalidValuesByPerson default(0);
PROC CENSUS_LEVEL
list string person_list;
invalidValuesByPerson.getKeys(person_list);
do numeric counter = 1 while counter <= person_list.length() errmsg("%s had %d invalid values", strip(person_list(counter)), invalidValuesByPerson(person_list(counter))); enddo;
invalidValuesByPerson.clear();
PROC SEX
if not invalueset(SEX) then inc(invalidValuesByPerson(PERSON_NAME)); endif;
PROC AGE
if not invalueset(AGE) then inc(invalidValuesByPerson(PERSON_NAME)); endif;
See also: HashMap Object, HashMap.Contains Function, HashMap.Length Function
HashMap.Contains FunctionFormat
b = hashmap_name.contains(key_value1『『, ..., key_valueN』』);
Description
The hashmap.contains function returns whether or not a specific key exists in a hashmap. Each key_value argumentmust be a numeric or string expression matching the type specified when declaring the hashmap.
Return Value
The function returns a logical value of 1 (true) if the hashmap contains the key, and 0 (false) otherwise.
Example
Pa ge 416 of 684 Ha s hMa p Obje ct

PROC GLOBAL
hashmap casesToOutput;
PROC CENSUS_FF
preproc
// get a list of special cases to output from the external file forcase SPECIAL_CASES_DICT do casesToOutput(SPECIAL_CASE_KEY) = true; endfor;
PROC CENSUS_LEVEL
preproc
// do not output this case if it was not in the list of special cases if not casesToOutput.contains(key(CENSUS_DICT)) then skip case; endif;
See also: HashMap Object, HashMap.GetKeys Function
HashMap.Length FunctionFormat
i = hashmap_name.length(『『key_value1, ..., key_valueN』』);
Description
The hashmap.length function returns the number of keys at a specific location in the hashmap. Each key_valueargument must be a numeric or string expression matching the type specified when declaring the hashmap. If noarguments are provided, the number of first-dimension keys is returned; if one argument is provided, the number ofsecond-dimension keys is returned; and so on.
Return Value
The function returns the number of keys or 0 if no keys exist at the specified location.
Example
Pa ge 417 of 684 Ha s hMa p Obje ct

hashmap two_dimensional_hashmap(all, numeric);
two_dimensional_hashmap("A", 9) = 1;two_dimensional_hashmap("A", 8) = 1;two_dimensional_hashmap("A", 7) = 1;two_dimensional_hashmap(100, 6) = 1;
errmsg("%d", two_dimensional_hashmap.length()); // 2 (keys "A" and 100)errmsg("%d", two_dimensional_hashmap.length("A")); // 3 (keys 9, 8, and 7)errmsg("%d", two_dimensional_hashmap.length(100)); // 1 (key 6)
two_dimensional_hashmap.remove("A", 9);
errmsg("%d", two_dimensional_hashmap.length()); // 2 (keys "A" and 100)errmsg("%d", two_dimensional_hashmap.length("A")); // 2 (keys 8 and 7)errmsg("%d", two_dimensional_hashmap.length(100)); // 1 (key 6)
two_dimensional_hashmap.remove("A");
errmsg("%d", two_dimensional_hashmap.length()); // 1 (key 100)errmsg("%d", two_dimensional_hashmap.length("A")); // 0 (no keys)errmsg("%d", two_dimensional_hashmap.length(100)); // 1 (key 6)
See also: HashMap Object, HashMap.Contains Function, HashMap.GetKeys Function
HashMap.Remove FunctionFormat
b = hashmap_name.remove(key_value1『『, ..., key_valueN』』);
Description
The hashmap.remove function removes a specific key from a hashmap. Each key_value argument must be a numeric orstring expression matching the type specified when declaring the hashmap.
Return Value
The function returns a logical value of 1 (true) if the hashmap contained the key and it was removed, and 0 (false) if thekey did not exist.
Example
Pa ge 418 of 684 Ha s hMa p Obje ct

hashmap two_dimensional_hashmap(all, numeric);
two_dimensional_hashmap("A", 9) = 1;two_dimensional_hashmap("A", 8) = 1;two_dimensional_hashmap("A", 7) = 1;two_dimensional_hashmap(100, 6) = 1;
errmsg("%d", two_dimensional_hashmap.length()); // 2 (keys "A" and 100)errmsg("%d", two_dimensional_hashmap.length("A")); // 3 (keys 9, 8, and 7)errmsg("%d", two_dimensional_hashmap.length(100)); // 1 (key 6)
two_dimensional_hashmap.remove("A", 9);
errmsg("%d", two_dimensional_hashmap.length()); // 2 (keys "A" and 100)errmsg("%d", two_dimensional_hashmap.length("A")); // 2 (keys 8 and 7)errmsg("%d", two_dimensional_hashmap.length(100)); // 1 (key 6)
two_dimensional_hashmap.remove("A");
errmsg("%d", two_dimensional_hashmap.length()); // 1 (key 100)errmsg("%d", two_dimensional_hashmap.length("A")); // 0 (no keys)errmsg("%d", two_dimensional_hashmap.length(100)); // 1 (key 6)
See also: HashMap Object, HashMap.Clear Function
HashMap.Clear FunctionFormat
b = hashmap_name.clear();
Description
The hashmap.clear function removes all values from a hashmap.
Return Value
The function returns a logical value of 1 (true).
Example
Pa ge 419 of 684 Ha s hMa p Obje ct

PROC GLOBAL
hashmap invalidValuesByPerson default(0);
PROC CENSUS_LEVEL
list string person_list;
invalidValuesByPerson.getKeys(person_list);
do numeric counter = 1 while counter <= person_list.length() errmsg("%s had %d invalid values", strip(person_list(counter)), invalidValuesByPerson(person_list(counter))); enddo;
invalidValuesByPerson.clear();
PROC SEX
if not invalueset(SEX) then inc(invalidValuesByPerson(PERSON_NAME)); endif;
PROC AGE
if not invalueset(AGE) then inc(invalidValuesByPerson(PERSON_NAME)); endif;
See also: HashMap Object, HashMap.Remove Function
Pa ge 420 of 684 Li s t Obje ct

List ObjectList StatementFormat
list 『『list_type』』 list_name;
Description
The list statement creates a list with the name list_name. The list name must be unique and must contain only letters,numbers, or the underscore character. The name must begin with a letter. You can declare lists globally in PROC GLOBALor locally in functions or procedures.
Lists can be numeric or string. By default a list is numeric, but the type can be modified by specifying the list_type.
The initial elements of a list can be set on definition by listing each value, separated by a comma. A list can also beinitialized to the values of another list.
Example
// numeric listslist DaysPerMonthTypical = 31, 28, 31, 30, 31, 30, 31, 31, 30, 31, 30, 31;
list numeric DaysPerMonthLeapYears = DaysPerMonthTypical;DaysPerMonthLeapYears(2) = 29;
// string listslist string MonthNames = "Jan", "Feb", "Mar", "Apr", "May", "Jun", "Jul", "Aug", "Sep", "Oct", "Nov", "Dec";
See also: List Object, Array Object, HashMap Object, ValueSet Object
List.Add FunctionFormat
i = list_name.add(value ‖ list_name);
Description
The list.add function adds a single value (the numeric or string expression value) or a list of values (list_name) to theend of a list. The type of the added value or list must match the type of the receiving list.
Return Value
The function returns the number of the values added to the list. If the list is read-only, the function returns default.
Example
Pa ge 421 of 684 Li s t Obje ct

list string eligible_head_names;
do numeric counter = 1 while counter <= count(PERSON_REC) if AGE(counter) >= 15 and USUAL_MEMBER(counter) = 1 then eligible_head_names.add(NAME(counter)); endif;enddo;
See also: List Object, List.Insert Function
List.Insert FunctionFormat
i = list_name.insert(index, value ‖ list_name);
Description
The list.insert function inserts a single value (the numeric or string expression value) or a list of values (list_name)at the position in the list referenced by the numeric expression index. The type of the inserted value or list must matchthe type of the receiving list. List index values are one-based, so the index must be between 1 and one past the length ofthe list. If the index is 1, the values are inserted at the beginning of the list. If the value is list_name.length() + 1, thevalues are inserted at the end of the list (as would happen with the list.add function).
Return Value
The function returns the number of the values inserted into the list. The function returns 0 if the index is not valid. If thelist is read-only, the function returns default.
Example
list string eligible_head_names;
do numeric counter = 1 while counter <= count(PERSON_REC)
if AGE(counter) >= 15 and USUAL_MEMBER(counter) = 1 then
// insert the names in sorted order numeric insert_index;
do insert_index = 1 while insert_index <= eligible_head_names.length() and eligible_head_names(insert_index) <= NAME(counter) enddo;
eligible_head_names.insert(insert_index, NAME(counter));
endif;
enddo;
See also: List Object, List.Add Function
List.Seek FunctionFormat
i = list_name.seek(value, 『『starting_index ‖ @nth_occurrence』』);
DescriptionPa ge 422 of 684 Li s t Obje ct

The list.seek function returns the one-based index of the first occurrence in the list of value. The type of the valuemust match the type of the list. If the numeric expression starting_index is provided, then the function starts searchingthe for value starting at the index provided. Alternatively, if the @ symbol precedes the numeric expressionnth_occurrence, the function searches for the nth occurrence of the value.
Return Value
The function returns the one-based index of the value, if found, and 0 if no such value is in the list.
Example
list string keys_to_process;
// ...
if keys_to_process.seek(key(DICT_NAME)) = 0 then skip case;endif;
See also: List Object, Seek Function
List.Remove FunctionFormat
b = list_name.remove(index);
Description
The list.remove function removes the value at the position in the list referenced by the numeric expression index. Listindex values are one-based, so the index must be between 1 and the length of the list.
Return Value
The function returns a logical value of 1 (true) if the value is successfully removed, and 0 (false) otherwise, whichindicates that the index is not valid. If the list is read-only, the function returns default.
Example
list string eligible_heads;
// ...
numeric eligible_head_index = eligible_heads.show("Select the head");
if eligible_head_index <> 0 and eligible_heads.length() > 1 then
eligible_heads.remove(eligible_head_index);
numeric secondary_head_index = eligible_heads.show("Select someone who could also be ahead");
endif;
See also: List Object, List.Clear Function, List.RemoveDuplicates Function, List.RemoveIn Function
List.RemoveDuplicates FunctionPa ge 423 of 684 Li s t Obje ct

Format
i = list_name.removeDuplicates();
Description
The list.removeDuplicates function removes duplicate values from a list, leaving the first instance of any duplicate inthe list.
Return Value
The function returns the number of duplicates removed from the list. If the list is read-only, the function returns default.
Example
list string women_names;
for POPULATION_RECORD where HH_SEX = 2 and HH_AGE in 12:95 do women_names.add(HH_NAME);enddo;
women_names.show("Women in Household");// possible results: Maria, Maria, Linda, Maria, Pamela, Linda, Maria
numeric duplicates_removed = women_names.removeDuplicates();women_names.show(maketext("Women in Household (%d duplicates removed)", duplicates_removed));// possible results (4 duplicates removed): Maria, Linda, Pamela
See also: List Object, List.Clear Function, List.Remove Function, List.RemoveIn Function
List.RemoveIn FunctionFormat
i = list_name.removeIn(in_list);
Description
The list.removeIn function removes from a list any values that are specified in an in list. The values in in_list must benumeric for a numeric list and string for a string list. Note that the in operator is case sensitive, so when using a stringlist, specifying "Cindy" will not remove "cindy".
Return Value
The function returns the number of values removed from the list. If the list is read-only, the function returns default.
Example 1
list household_ages;// ...// values: 69, 57, 55, 33, 22, 44, 34, 5
household_ages.removeIn(0:15, 50:99);// result: 33, 22, 44, 34
Example 2
Pa ge 424 of 684 Li s t Obje ct

list string all_case_keys;keylist(CENSUS_DICT(CaseStatus.All), all_case_keys);
list string not_deleted_case_keys;keylist(CENSUS_DICT(CaseStatus.NotDeleted), not_deleted_case_keys);
list string deleted_case_keys = all_case_keys;deleted_case_keys.removeIn(not_deleted_case_keys);
See also: List Object, List.Clear Function, List.Remove Function, List.RemoveDuplicates Function
List.Clear FunctionFormat
b = list_name.clear();
Description
The list.clear function removes all values from a list, setting the length to 0.
Return Value
The function returns a logical value of 1 (true). If the list is read-only, the function returns default.
Example
PROC GLOBAL
list possible_ages;
PROC AGE
possible_ages.clear();
do numeric counter = 1 while counter <= curocc() possible_ages.add(AGE); enddo;
See also: List Object, List.Remove Function, List.RemoveDuplicates Function, List.RemoveIn Function
List.Length FunctionFormat
i = list_name.length();
Description
The list.length function returns the size of a list, indicating the number of values contained by the list.
Return Value
The function returns the length of the list.
Example
Pa ge 425 of 684 Li s t Obje ct

list string file_listing;
dirlist(file_listing, pathname(InputFile), "*.csdb");
if file_listing.length() > 0 then skip to DATA_ALREADY_ENTERED;endif;
See also: List Object, Length Function
List.Show FunctionFormat
i = list_name.show(『『heading』』);
Description
The list.show function displays the values from a list and returns the index of the operator's selection. An optionalstring expression, heading, specifies the title of the window that displays the values. The function is similar to theaccept function but with the options taken from the list's values.
Return Value
The function returns the index of the item selected: 1 for the first value, 2 for the second value, etc. The value 0 isreturned if the escape key (or back button) is pressed and none of the values is chosen.
Example
list string drink_options = "Water", "Milk", "Soda", "Coffee", "Tea";
numeric favorite_drink_index = drink_options.show("What is your favorite drink?");
if favorite_drink_index <> 0 then errmsg("You like %s the most!", drink_options(favorite_drink_index));endif;
See also: List Object, List.Sort Function, Accept Function, Show Function, ShowArray Function, ValueSet.ShowFunction
List.Sort FunctionFormat
b = list_name.sort(『『 ascending ‖ descending 』』);
Description
The list.sort function sorts the values within a list. An optional argument, ascending or descending, allows for thespecification of the sort order. If not specified, the default sort order is ascending. String values are sorted in casesensitive order, so "c" is recognized as different from "C".
Return Value
The function returns a logical value of 1 (true). If the list is read-only, the function returns default.
ExamplePa ge 426 of 684 Li s t Obje ct

list string children_names;
for POPULATION_RECORD where HH_RELATIONSHIP = 3 do children_names.add(HH_NAME);enddo;
children_names.show("Children in Household (before sort)");// possible results: Betty, Ellen, Charlene, Donna, Danny, Donnie, Cindy, Elaine
children_names.sort();children_names.show("Children in Household (after ascending sort)");// possible results: Betty, Charlene, Cindy, Danny, Donna, Donnie, Elaine, Ellen
children_names.sort(descending);children_names.show("Children in Household (after descending sort)");// possible results: Ellen, Elaine, Donnie, Donna, Danny, Cindy, Charlene, Betty
See also: List Object, List.Show Function
Pa ge 427 of 684 Ma p Obje ct

Map ObjectMap StatementFormat
map map_name;
Description
The map statement creates a map with the name map_name. The map name must be unique and must contain onlyletters, numbers, or the underscore character. The name must begin with a letter. You can declare maps globally in PROCGLOBAL or locally in functions or procedures.
Example
// Declare a mapmap mymap;
// Add a marker to the map at latitude 38.84839, longitude -76.931098mymap.addMarker(38.84839, -76.931098);
// Display the mapmymap.show();
See also: Map Object
Map.Show FunctionFormat
b = map_name.show();
Description
The map.show function displays the map named map_name. The map replaces the current question(s) on the screen. Themap will continue to be displayed until the user taps on the back button or the map.hide function is called from within acallback function. The map.show function will not return until the user has finished interacting with the map. For thisreason you should always do the initial map setup (markers, buttons, base map, etc.) before calling map.show. If you callany of the map functions directly after the call to map.show they will not be executed until after the map has been hidden.You can, however, make modifications to the map while it is showing from logic in a callback function supplied to one ofthe map functions such as setOnClick, addTextButton, addImageButton, setMarkerOnClick,setMarkerOnClickInfoWindow, or setMarkerOnDrag.
Return Value
The function returns a logical value of 1 (true) if the map is shown successfully and 0 (false) if there is an error.
Example
Pa ge 428 of 684 Ma p Obje ct

PROC GLOBAL
// User function that will be called on button click// to close the mapfunction closeMap(map m) m.hide();end;
PROC SOMEITEM
// Declare a mapmap mymap;
// Add a button to the map that closes the map when it is clickedmymap.addTextButton("close", closeMap(myMap));
// Show the map; this function will keep running until the user clicks// the close button or uses the back button to exit the mapmymap.show();
// This logic is only run AFTER the call to hideerrmsg("Done showing map");
See also: Map Object, Map.Hide Function
Map.Hide FunctionFormat
b = map_name.hide();
Description
The map.hide function hides the map named map_name and returns to data entry. The hide function should be used in acallback function supplied to one of the map functions such as setOnClick, addTextButton, addImageButton,setMarkerOnClick, setMarkerOnClickInfoWindow, or setMarkerOnDrag. Calling hide will cause the earlier call tomap.show to complete and return control to the statement following the call to map.show.
Return Value
The function returns a logical value of 1 (true).
Example
Pa ge 429 of 684 Ma p Obje ct
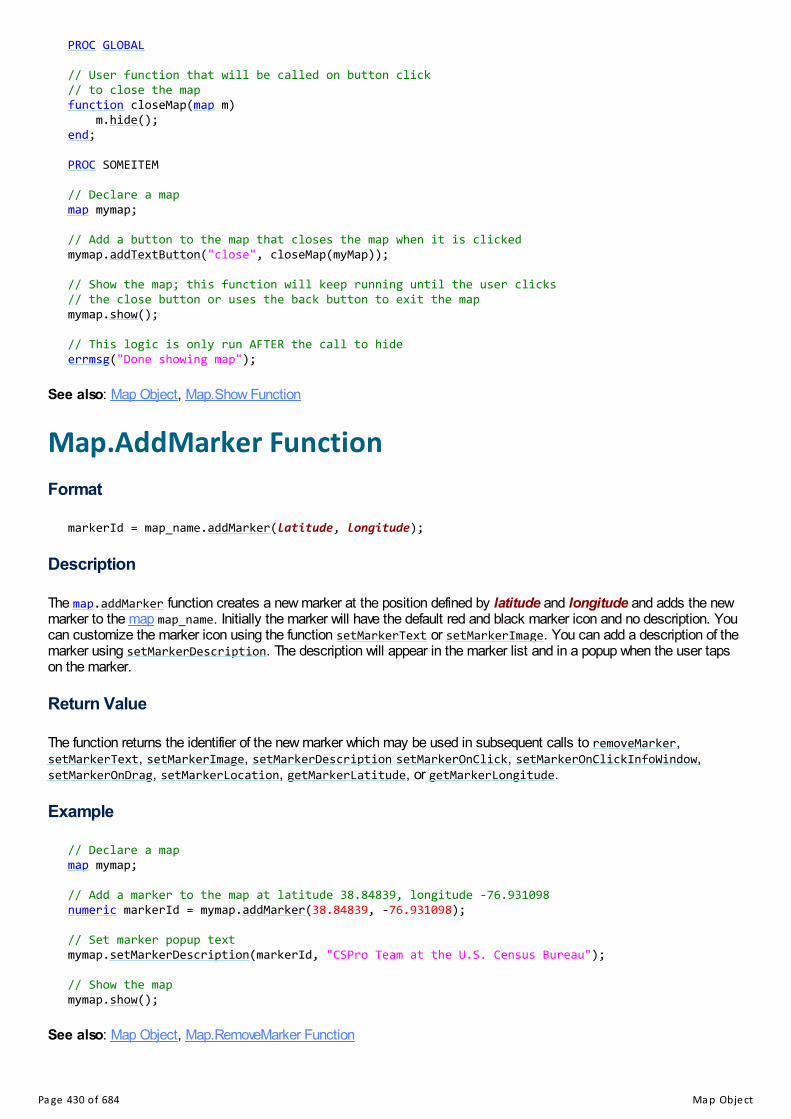
PROC GLOBAL
// User function that will be called on button click// to close the mapfunction closeMap(map m) m.hide();end;
PROC SOMEITEM
// Declare a mapmap mymap;
// Add a button to the map that closes the map when it is clickedmymap.addTextButton("close", closeMap(myMap));
// Show the map; this function will keep running until the user clicks// the close button or uses the back button to exit the mapmymap.show();
// This logic is only run AFTER the call to hideerrmsg("Done showing map");
See also: Map Object, Map.Show Function
Map.AddMarker FunctionFormat
markerId = map_name.addMarker(latitude, longitude);
Description
The map.addMarker function creates a new marker at the position defined by latitude and longitude and adds the newmarker to the map map_name. Initially the marker will have the default red and black marker icon and no description. Youcan customize the marker icon using the function setMarkerText or setMarkerImage. You can add a description of themarker using setMarkerDescription. The description will appear in the marker list and in a popup when the user tapson the marker.
Return Value
The function returns the identifier of the new marker which may be used in subsequent calls to removeMarker,setMarkerText, setMarkerImage, setMarkerDescription setMarkerOnClick, setMarkerOnClickInfoWindow,setMarkerOnDrag, setMarkerLocation, getMarkerLatitude, or getMarkerLongitude.
Example
// Declare a mapmap mymap;
// Add a marker to the map at latitude 38.84839, longitude -76.931098numeric markerId = mymap.addMarker(38.84839, -76.931098);
// Set marker popup textmymap.setMarkerDescription(markerId, "CSPro Team at the U.S. Census Bureau");
// Show the mapmymap.show();
See also: Map Object, Map.RemoveMarker Function
Pa ge 430 of 684 Ma p Obje ct

Map.RemoveMarker FunctionFormat
b = map_name.removeMarker(markerId);
Description
The map.removeMarker function removes a marker from the map map_name. markerId should be the id returned bymap.addMarker when the marker was added to the map.
Return Value
The function returns a logical value of 1 (true) if the marker was found and was successfully removed and 0 (false) if thereis an error.
Example
PROC GLOBAL
// Function to allow to modify the marker text, marker description or remove the markerfunction editMarker(map m, numeric markerId)
numeric sel = accept("Edit marker", "Text", "Description", "Remove"); if sel = 1 then string newText = prompt("Enter new icon text"); if newText <> "" then m.setMarkerText(markerId, newText); endif; elseif sel = 2 then string newDescription = prompt("Enter new icon description"); if newDescription <> "" then m.setMarkerDescription(markerId, newDescription); endif; elseif sel = 3 then m.removeMarker(markerId); endif;end;
PROC SHOW_MAPpreproc
// Declare a mapmap mymap;
// Add a marker to the map at latitude 38.84839, longitude -76.931098numeric markerId = mymap.addMarker(38.84839, -76.931098);mymap.setMarkerDescription(markerId, "US Census Bureau");
// Call edit marker when user taps on popup info windowmymap.setMarkerOnClickInfoWindow(markerId, editMarker(mymap, markerId));
// Display the mapmymap.show();
See also: Map Object, Map.AddMarker Function
Map.ClearMarkers FunctionFormat
Pa ge 431 of 684 Ma p Obje ct

b = map_name.clearMarkers();
Description
The map.clearMarkers function removes all the markers currently on the map named map_name.
Return Value
The function returns a logical value of 1 (true).
Example
// User function that will be called on button click// to filter households by statusfunction filterMapHouseholds(map myMap)
numeric choice = accept("Choose status to show", "Not started", "Partial", "Complete"); if choice > 0 then
// Clear current markers myMap.clearMarkers();
// Add markers for households matching status chosen forcase HOUSEHOLD_DICT WHERE HOUSEHOLD_STATUS = choice do numeric marker = myMap.addMarker(HOUSEHOLD_LATITUDE, HOUSEHOLD_LONGITUDE); myMap.setMarkerDescription(marker, maketext("%l - %s", HOUSEHOLD_NUMBER,HOUSEHOLD_HEAD_NAME)); endfor; endif;end;
See also: Map Object, Map.AddMarker Function, Map.ClearButtons Function
Map.SetMarkerDescription FunctionFormat
b = map_name.setMarkerDescription(markerId, description);
Description
The map.setMarkerDescription function sets the text shown in the popup info window when the marker is tapped. Thedescription is also shown in the list of markers displayed below or to the left of the map.
The description may contain the following HTML tags:
<b> - bold
<i> - italic
<ul> - underline
<strike> or <s> - strikethrough
<sup> - superscript
<sub> - subscript
<font> - font (including color)
<br/> - line break
Pa ge 432 of 684 Ma p Obje ct

Return Value
The function returns a logical value of 1 (true) if the marker was found and the description was set successfully and 0(false) if there is an error.
Example
// Declare a mapmap mymap;
// Add a marker to the map at latitude 38.84839, longitude -76.931098numeric markerId = mymap.addMarker(38.84839, -76.931098);
// Set the popup text when marker is tapped to// display name of head of household and number of household// membersstring popupText = maketext("Head: %s %s Males: %d Females %d", strip(HEAD_FIRST_NAME), strip(HEAD_LAST_NAME), MALE_MEMBERS, FEMALE_MEMBERS);mymap.setMarkerDescription(markerId, popupText);
// Display the mapmymap.show();
See also: Map Object, Map.AddMarker Function, Map.SetMarkerText Function
Map.SetMarkerImage FunctionFormat
b = map_name.setMarkerImage(markerId, pathToImage);
Description
The map.setMarkerImage sets the icon for the marker with id markerId on map map_name. markerId is the id that wasreturned by map.addMarker when the marker was added to the map. pathToImage is the path to a file containing theimage to display as the marker icon. Standard image files (PNG, JPEG, BMP) are supported.
If the marker icon was previously set with map.setMarkerText, calling map.setMarkerImage will replace the marker textwith the image.
Return Value
The function returns a logical value of 1 (true) if the marker was found and the image was set successfully and 0 (false) ifthere is an error.
Example
// Declare a mapmap mymap;
// Add a marker to the map at latitude 38.84839, longitude -76.931098numeric markerId = mymap.addMarker(38.84839, -76.931098);
// Set the iconmymap.setMarkerImage(markerId, "resources/marker_icon.png");
// Display the mapmymap.show();
Pa ge 433 of 684 Ma p Obje ct

See also: Map Object, Map.AddMarker Function
Map.GetMarkerLatitude FunctionFormat
lat = map_name.getMarkerLatitude(markerId);
Description
The map.getMarkerLatitude function retrieves the latitude of the marker identified by markerId.
Return Value
The function returns the latitude of the marker in degrees if the marker was found and returns default if the marker id isinvalid.
Example
PROC GLOBAL
function onDragMarker(map dragMap, numeric markerId) numeric lat = dragMap.getMarkerLatitude(markerId); numeric lon = dragMap.getMarkerLongitude(markerId); errmsg("Marker was moved to: %f, %f", lat, lon);end;
PROC SHOW_MAPpreproc
// Declare a mapmap dragMap;
// Add a marker to the map at latitude 38.84839, longitude -76.931098numeric markerId = dragMap.addMarker(38.84839, -76.931098);
// Set function that is called on marker dragdragMap.setMarkerOnDrag(markerId, onDragMarker(dragMap, markerId));
// Display the mapdragMap.show();
See also: Map Object, Map.GetMarkerLongitude Function, Map.SetMarkerLocation Function, Map.SetMarkerOnDragFunction
Map.GetMarkerLongitude FunctionFormat
long = map_name.getMarkerLongitude(markerId);
Description
The map.getMarkerLongitude function retrieves the longitude of the marker identified by markerId.
Return Value
The function returns the longitude of the marker in degrees if the marker was found and returns default if the marker id
Pa ge 434 of 684 Ma p Obje ct
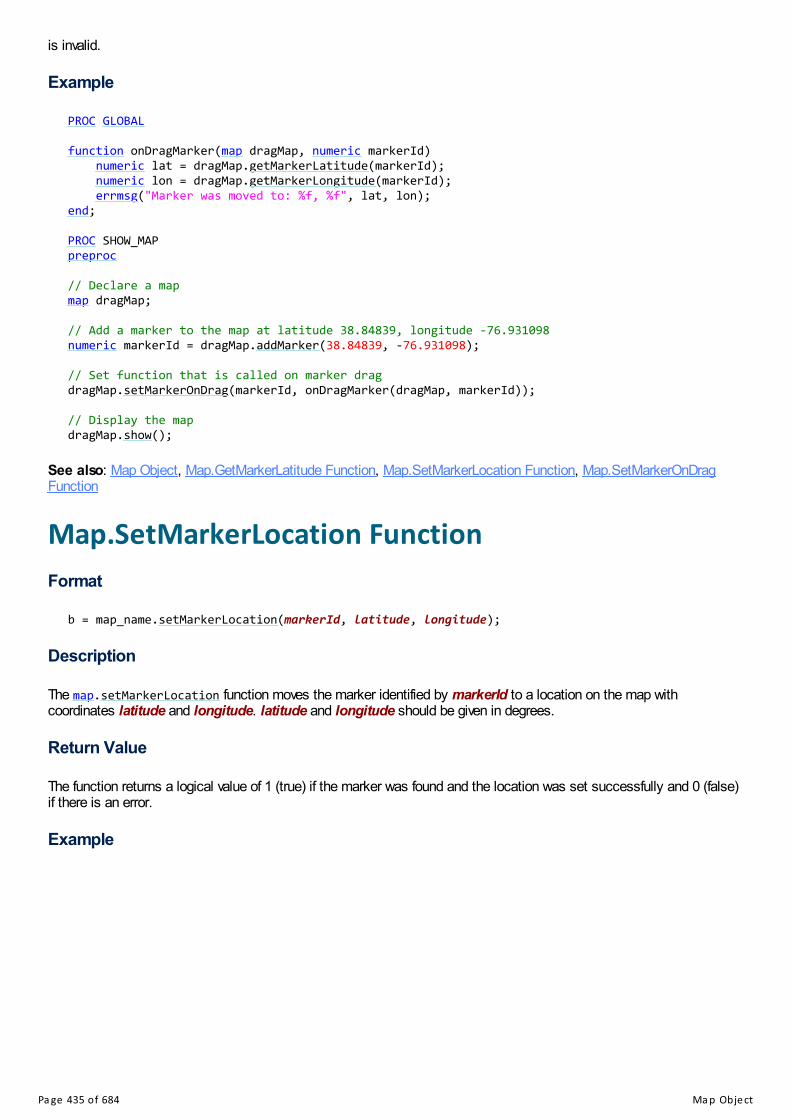
is invalid.
Example
PROC GLOBAL
function onDragMarker(map dragMap, numeric markerId) numeric lat = dragMap.getMarkerLatitude(markerId); numeric lon = dragMap.getMarkerLongitude(markerId); errmsg("Marker was moved to: %f, %f", lat, lon);end;
PROC SHOW_MAPpreproc
// Declare a mapmap dragMap;
// Add a marker to the map at latitude 38.84839, longitude -76.931098numeric markerId = dragMap.addMarker(38.84839, -76.931098);
// Set function that is called on marker dragdragMap.setMarkerOnDrag(markerId, onDragMarker(dragMap, markerId));
// Display the mapdragMap.show();
See also: Map Object, Map.GetMarkerLatitude Function, Map.SetMarkerLocation Function, Map.SetMarkerOnDragFunction
Map.SetMarkerLocation FunctionFormat
b = map_name.setMarkerLocation(markerId, latitude, longitude);
Description
The map.setMarkerLocation function moves the marker identified by markerId to a location on the map withcoordinates latitude and longitude. latitude and longitude should be given in degrees.
Return Value
The function returns a logical value of 1 (true) if the marker was found and the location was set successfully and 0 (false)if there is an error.
Example
Pa ge 435 of 684 Ma p Obje ct

PROC GLOBAL
// Declare a mapmap mymap;
// Declare id for map markernumeric markerId;
// This function is called when the user taps on the map.// It moves the marker to the location that the user tapped.function mapClicked() mymap.setMarkerLocation(markerId, mymap.getLastClickLatitude(),mymap.getLastClickLongitude());end;
PROC SHOW_MAPpreproc
// Add a marker to the map at latitude 38.84839, longitude -76.931098markerId = mymap.addMarker(38.84839, -76.931098);
// Set function that is called when the user taps on the map to move the marker// to the new positionmymap.setOnClick(mapClicked());
// Display the mapmymap.show();
See also: Map Object, Map.SetMarkerOnClick Function, Map.GetMarkerLatitude Function, Map.GetMarkerLatitudeFunction
Map.SetMarkerOnClick FunctionFormat
b = map_name.setMarkerOnClick(markerId, callbackFunction);
Description
The map.setMarkerOnClick function sets the function that is called when the user taps on the marker identified bymarkerId. When the user taps on the marker the user-defined function callbackFunction will be called.
The callbackFunction is the name of a user function defined in the global procedure. The function name may optionallybe followed by function arguments which will be passed to the function when it is run. These arguments are evaluated atthe time that map.setMarkerOnClick is called rather than at the time the callback is run. This allows you to reuse thesame callback function for multiple markers and to customize the behavior of the callback by passing different argumentsto the callback function for each marker.
If no on-click function is set for a marker then when the marker is clicked, the default behavior is to center the view on themarker and to display the marker's info window. After setting an on-click function with map.setMarkerOnClick function,the popup info window is not shown when the marker is clicked. If you wish to still display the popup window and alsohandle taps on the marker you can use the function map.setMarkerOnClickInfoWindow().
Return Value
The function returns a logical value of 1 (true) if the marker was found and the callback function was set successfully and0 (false) if there is an error.
Example 1
Pa ge 436 of 684 Ma p Obje ct

PROC GLOBAL
function clickedOnMarker() errmsg("You clicked on a marker");end;
PROC SOMEITEM
// Declare a mapmap mymap;
// Add a marker to the map at latitude 38.84839, longitude -76.931098numeric markerId = mymap.addMarker(38.84839, -76.931098);
// Set function that is called on marker clickmymap.setMarkerOnClick(markerId, clickedOnMarker());
// Display the mapmymap.show();
Example 2
PROC GLOBAL
function launchHouseholdQuestionnaire(string caseid)
pff household_pff;
household_pff.setproperty("AppType", "Entry");
household_pff.setproperty("Key", caseid);
household_pff.setproperty("Application", "Household.ent"); household_pff.setproperty("InputData", "Household.csdb");
household_pff.setproperty("OnExit", "Menu.pff");
household_pff.exec();
end;
PROC SHOW_HOUSEHOLDS_ON_MAPpreproc
// Declare a mapmap mymap;
// Loop through all households in the listing dictionaryforcase LIST_DICT do
// Create a marker for household at latitude and longitude from listing file numeric markerId = mymap.addMarker(LI_LATITUDE, LI_LONGITUDE);
// Set the marker text to the household number mymap.setMarkerText(markerId, maketext("%v", LI_HOUSEHOLD_NUMBER));
// When marker is clicked launch household questionnaire application // and prefill the ID items string householdCode = key(LIST_DICT); mymap.setMarkerOnClick(markerId, launchHouseholdQuestionnaire(householdCode));
endfor;
// Show the mapmymap.show();
See also: Map Object, Map.AddMarker Function, Map.SetMarkerOnClickInfoWindow Function
Pa ge 437 of 684 Ma p Obje ct

Map.GetLastClickLatitude FunctionFormat
lat = map_name.getLastClickLongitude();
Description
The map.getLastClickLatitude function retrieves the latitude of the last point on the map that the user tapped. This isoften used in the callback function passed to map.setOnClick to get the coordinates of the point that was just tapped.The tapped latitude is only recorded if a user taps on the map itself rather than on a marker.
Return Value
The function returns the latitude of the tapped point in degrees or notappl if the user has not tapped a point on the map.
Example
PROC GLOBAL
// Declare a mapmap mymap;
// Declare id for map markernumeric markerId;
// This function is called when user taps on map.// It moves the marker to the location that the user tapped.function mapClicked() numeric lat = mymap.getLastClickLatitude(); numeric lon = mymap.getLastClickLongitude(); mymap.setMarkerLocation(markerId, lat, lon);end;
PROC SHOW_MAPpreproc
// Add a marker to the map at latitude 38.84839, longitude -76.931098markerId = mymap.addMarker(38.84839, -76.931098);
// Set function that is called when the user taps on the map to move the marker// to the new positionmymap.setOnClick(mapClicked());
// Display the mapmymap.show();
See also: Map Object, Map.GetLastClickLongitude Function, Map.GetMarkerLatitude Function, Map.SetMarkerLocationFunction, Map.SetMarkerOnDrag Function
Map.GetLastClickLongitude FunctionFormat
long = map_name.getLastClickLongitude();
Description
The map.getLastClickLongitude function retrieves the longitude of the last point on the map that the user tapped. This
Pa ge 438 of 684 Ma p Obje ct

is often used in the callback function passed to map.setOnClick to get the coordinates of the point that was just tapped.The tapped longitude is only recorded if a user taps on the map itself rather than on a marker.
Return Value
The function returns the longitude of the tapped point in degrees or notappl if the user has not tapped a point on themap.
Example
PROC GLOBAL
// Declare a mapmap mymap;
// Declare id for map markernumeric markerId;
// This function is called when user taps on map.// It moves the marker to the location that the user tapped.function mapClicked() numeric lat = mymap.getLastClickLatitude(); numeric lon = mymap.getLastClickLongitude(); mymap.setMarkerLocation(markerId, lat, lon);end;
PROC SHOW_MAPpreproc
// Add a marker to the map at latitude 38.84839, longitude -76.931098markerId = mymap.addMarker(38.84839, -76.931098);
// Set function that is called when the user taps on the map to move the marker// to the new positionmymap.setOnClick(mapClicked());
// Display the mapmymap.show();
See also: Map Object, Map.GetLastClickLatitude Function, Map.GetMarkerLatitude Function, Map.SetMarkerLocationFunction, Map.SetMarkerOnDrag Function
Map.SetMarkerOnClickInfoWindow FunctionFormat
b = map_name.setMarkerOnClickInfoWindow(markerId, callbackFunction);
Description
The map.setMarkerOnClick function sets the function that is called when the user taps on the popup info window for themarker identified by markerId. The popup info window is shown when the user taps on the marker and it displays themarker description set by calling map.setMarkerDescription. After tapping on the marker to display the info window,when the user then taps on the popup, the user-defined function callbackFunction will be called.
The callbackFunction is the name of a user function defined in the global procedure. The function name may optionallybe followed by function arguments which will be passed to the function when it is run. These arguments are evaluated atthe time that map.setMarkerOnClickInfoWindow is called rather than at the time the callback is run. This allows you toreuse the same callback function for multiple markers and to customize the behavior of the callback by passing differentarguments to the callback function for each marker.
Pa ge 439 of 684 Ma p Obje ct

Return Value
The function returns a logical value of 1 (true) if the marker was found and the callback function was set successfully and0 (false) if there is an error.
Example 1
PROC GLOBAL
function clickedOnMarkerInfoWindow() errmsg("You clicked on a marker popup");end;
PROC SOMEITEM
// Declare a mapmap mymap;
// Add a marker to the map at latitude 38.84839, longitude -76.931098numeric markerId = mymap.addMarker(38.84839, -76.931098);
// Set function that is called on marker info window clickmymap.setMarkerOnClick(markerId, clickedOnMarkerInfoWindow());
// Display the mapmymap.show();
Example 2
Pa ge 440 of 684 Ma p Obje ct

PROC GLOBAL
function launchHouseholdQuestionnaire(string caseid)
pff household_pff;
household_pff.setproperty("AppType", "Entry");
household_pff.setproperty("Key", caseid);
household_pff.setproperty("Application", "Household.ent"); household_pff.setproperty("InputData", "Household.csdb");
household_pff.setproperty("OnExit", "Menu.pff");
household_pff.exec();
end;
PROC SHOW_HOUSEHOLDS_ON_MAPpreproc
// Declare a mapmap mymap;
// Loop through all households in the listing dictionaryforcase LIST_DICT do
// Create a marker for household at latitude and longitude from listing file numeric markerId = mymap.addMarker(LI_LATITUDE, LI_LONGITUDE);
// Set the marker description to the household head name. // This will be displayed in the popup info window when the user taps the marker mymap.setMarkerDescription(markerId, strip(LI_HOUSEHOLD_HEAD_NAME));
// When the info window is clicked launch household questionnaire application // and prefill the ID items string householdCode = key(LIST_DICT); mymap.setMarkerOnClickInfoWindow(markerId, launchHouseholdQuestionnaire(householdCode));
endfor;
See also: Map Object, Map.AddMarker Function, Map.SetMarkerOnClick Function, Map.SetMarkerDescription Function
Map.SetMarkerOnDrag FunctionFormat
b = map_name.setMarkerOnDrag(markerId, callbackFunction);
Description
The map.setMarkerOnDrag function sets the function that is called when the user drags the marker on the map markeridentified by markerId. Markers may be dragged by first long pressing on them and then sliding them to a new position.The callbackFunction is called at the end of the drag when the user lifts up their finger to release the marker.
The callbackFunction is the name of a user function defined in the global procedure. The function name may optionallybe followed by function arguments which will be passed to the function when it is run. These arguments are evaluated atthe time that map.setMarkerOnDrag is called rather than at the time the callback is run. This allows you to reuse thesame callback function for multiple markers and to customize the behavior of the callback by passing different argumentsto the callback function for each marker.
Return Value
Pa ge 441 of 684 Ma p Obje ct

The function returns a logical value of 1 (true) if the marker was found and the callback function was set successfully and0 (false) if there is an error.
Example
PROC GLOBAL
function onDragMarker(map dragMap, numeric markerId) numeric lat = dragMap.getMarkerLatitude(markerId); numeric lon = dragMap.getMarkerLongitude(markerId); errmsg("Marker was moved to: %f, %f", lat, lon);end;
PROC SHOW_MAPpreproc
// Declare a mapmap dragMap;
// Add a marker to the map at latitude 38.84839, longitude -76.931098numeric markerId = dragMap.addMarker(38.84839, -76.931098);
// Set function that is called on marker dragdragMap.setMarkerOnDrag(markerId, onDragMarker(dragMap, markerId));
// Display the mapdragMap.show();
See also: Map Object, Map.AddMarker Function, Map.SetMarkerOnClick Function, Map.GetMarkerLatitude Function,Map.GetMarkerLongitude Function
Map.SetMarkerText FunctionFormat
b = map_name.setMarkerText(markerId, text『『, backgroundColor, textColor』』]);
Description
The map.setMarkerText sets the icon for the marker with id markerId on map map_name to an icon with the specifiedtext and color. The icon will contain the text surrounded by a small outline. markerId is the id that was returned bymap.addMarker when the marker was added to the map. text is the phrase to display as the marker icon. You canoptionally set the color of the text and the background color of the icon by specifying the backgroundColor andtextColor. Colors can be given by the names of common colors ("blue", "red", etc.) or using an HTML RGB colorspecification that starts with "#" such as "#404040". If no colors are specified the text will be black on a whitebackground.
map.setMarkerText sets the text used in the marker icon. The icon text should be kept short to avoid making the mapcrowded. To associate a longer description with a marker use map.setMarkerDescription instead to display additionaltext in the marker list and in a popup on the map when the user taps the marker.
The text may contain the following HTML tags:
<b> - bold
<i> - italic
<ul> - underline
<strike> or <s> - strikethrough
<sup> - superscript
<sub> - subscript
Pa ge 442 of 684 Ma p Obje ct

<font> - font (including color)
<br/> - line break
If the marker icon was previously set with map.setMarkerImage, calling map.setMarkerText will replace the markerimage with the new text.
Return Value
The function returns a logical value of 1 (true) if the marker was found and the text was set successfully and 0 (false) ifthere is an error.
Example
// Declare a mapmap mymap;
// Add a marker to the map at latitude 38.84839, longitude -76.931098numeric markerId = mymap.addMarker(38.84839, -76.931098);
// Set the iconmymap.setMarkerText(markerId, maketext("%v", HH_NUMBER), "white", "black");
// Display the mapmymap.show();
See also: Map Object, Map.AddMarker Function, Map.SetMarkerImage Function
Map.SetOnClick FunctionFormat
b = map_name.setOnClick(markerId, callbackFunction);
Description
The map.setOnClick function sets the function that is called when the user taps on the base map away from anymarkers. The callbackFunction is the name of a user function defined in the global procedure that will be called whenthe user taps on the map. The function name may optionally be followed by function arguments which will be passed tothe function when it is run. These arguments are evaluated at the time that map.setOnClick is called rather than at thetime the callback is run.
To retreive the coordinates of the map location that was tapped use the functions map.getLastClickLatitude andmap.getLastClickLongitude.
If the user taps on a marker rather than on the map itself, callbackFunction is not called. To capture taps on markersuse the map.setMarkerOnClick function.
Return Value
The function returns a logical value of 1 (true).
Example
Pa ge 443 of 684 Ma p Obje ct

PROC GLOBAL
// Declare a mapmap mymap;
// Declare id for map markernumeric markerId;
// This function is called when user taps on map.// It moves the marker to the location that the user tapped.function mapClicked() numeric lat = mymap.lastClickLatitude(); numeric lon = mymap.lastClickLongitude(); mymap.setMarkerLocation(markerId, lat, lon);end;
PROC SHOW_MAPpreproc
// Add a marker to the map at latitude 38.84839, longitude -76.931098markerId = mymap.addMarker(38.84839, -76.931098);
// Set function that is called when the user taps on the map to move the marker// to the new positionmymap.setOnClick(mapClicked());
// Display the mapmymap.show();
See also: Map Object, Map.SetMarkerLocation Function, Map.SetMarkerOnClick Function, Map.GetMarkerLatitudeFunction, Map.GetMarkerLongitude Function
Map.AddImageButton FunctionFormat
buttonId = map_name.addImageButton(pathToImage, callbackFunction);
Description
The map.addImageButton function adds a new button to the map with the icon from the image file pathToImage.pathToImage is the path to a file containing the image to display on the button. Standard image files (PNG, JPEG,BMP) are supported. Map buttons are displayed on the right hand-side of the map. The new button will be added belowany existing buttons. When the user taps on the button, the user-defined function callbackFunction will be called.
The callbackFunction is the name of a user function defined in the global procedure. The function name may optionallybe followed by function arguments which will be passed to the function when it is run. These arguments are evaluated atthe time that map.addTextButton is called rather than at the time the callback is run. This allows you to reuse the samecallback function for multiple buttons and to customize the behavior of the callback by passing different arguments to thecallback function for each button.
Return Value
The function returns the identifier of the new button which may be used in subsequent calls to removeButton.
Example
Pa ge 444 of 684 Ma p Obje ct

PROC GLOBAL
// User function that will be called on button click// to close the mapfunction closeMap(map m) m.hide();end;
PROC SOMEITEM
// Declare a mapmap mymap;
// Add a button to the map that closes the map when it is clickedmymap.addImageButton("resources/button_close.png", closeMap(mymap));
// Show the map; this function will keep running until the user clicks// the close button or uses the back button to exit the mapmymap.show();
See also: Map Object, Map.RemoveButton Function, Map.AddTextButton Function
Map.AddTextButton FunctionFormat
buttonId = map_name.addTextButton(text, callbackFunction);
Description
The map.addTextButton function adds a new button to the map with the label text. Map buttons are displayed on theright-hand side of the map. The new button will be added below any existing buttons. When the user taps on the buttonthe user-defined function callbackFunction will be called.
The callbackFunction is the name of a user function defined in the global procedure. The function name may optionallybe followed by function arguments which will be passed to the function when it is run. These arguments are evaluated atthe time that map.addTextButton is called rather than at the time the callback is run. This allows you to reuse the samecallback function for multiple buttons and to customize the behavior of the callback by passing different arguments to thecallback function for each button.
Return Value
The function returns the identifier of the new button which may be used in subsequent calls to removeButton.
Example
Pa ge 445 of 684 Ma p Obje ct

PROC GLOBAL
// User function that will be called on button click// to close the mapfunction closeMap(map m) m.hide();end;
PROC SOMEITEMpreproc
// Declare a mapmap mymap;
// Add a button to the map that closes the map when it is clickedmymap.addTextButton("close", closeMap(mymap));
// Show the map; this function will keep running until the user clicks// the close button or uses the back button to exit the mapmymap.show();
See also: Map Object, Map.RemoveButton Function, Map.AddImageButton Function
Map.RemoveButton FunctionFormat
b = map_name.removeButton(buttonId);
Description
The map.removeMarker function removes a marker from the map map_name. buttonId should be the id returned bymap.addTextButton or map.addImageButton when the button was added to the map.
Return Value
The function returns a logical value of 1 (true) if the button was found and was successfully removed and 0 (false) if thereis an error.
Example
PROC GLOBAL
// Declare a mapmap mymap;
// Id of button that will be shown on mapnumeric buttonId;
// Function to remove a button from a mapfunction removeButton() mymap.removeButton(buttonId);end;
PROC SHOW_MAPpreproc
// Add a button that removes itself when it is clickedbuttonId = mymap.addTextButton("remove me", removeButton());
// Display the mapmymap.show();
Pa ge 446 of 684 Ma p Obje ct

See also: Map Object, Map.AddImageButton Function, Map.AddTextButton Function
Map.ClearButtons FunctionFormat
b = map_name.clearButtons();
Description
The map.clearButtons function removes all the buttons currently on the map named map_name.
Return Value
The function returns a logical value of 1 (true).
Example
PROC GLOBALnumeric showAddHousehold = true;numeric showFilter = true;
// User function that will be called on button click// to update the buttonsfunction updateButtons(map myMap)
// Clear existing buttons myMap.clearButtons();
if showAddHousehold then myMap.addTextButton("Add", addHousehold(myMap)); endif;
if showFilterButton then myMap.addTextButton("Filter", filterHouseholds(myMap)); endif;
myMap.addTextButton("Done", closeMap(myMap));end;
See also: Map Object, Map.AddTextButton Function, Map.AddImageButton Function, Map.ClearMarkers Function
Map.SetBaseMap FunctionFormat
b = map_name.setBaseMap(mapType ‖ pathToOfflineMap);
Description
The map.setBaseMap function changes the base map that is displayed for the map map_name. Maps can use eitheronline base maps, which requires an Internet connection to load maps, or can use offline base maps, which requires amap file stored on the device.
The first form of the function sets the base map to one of the online map types based on the value of mapType:
Normal Standard road map showing streets and outlines of some buildings.
Pa ge 447 of 684 Ma p Obje ct

Satellite Satellite imagery.Hybrid Features from the street map overlaid on satellite imagery.Terrain Physical map based on terrain information.None Empty base map. Only markers and buttons are shown.
The second form uses an offline map in a file named named pathToOfflineMap stored on the device. For details onsupported file types for offline maps see offline maps.
By default the map type is Normal.
Return Value
The function returns a logical value of 1 (true) if the base map was changed successfully and 0 (false) otherwise (forexample, if the offline map is missing or invalid).
Example 1 (online map)
// Declare a mapmap mymap;
// Change the base map to satellite imagerymymap.setBaseMap(satellite);
// Display the mapmymap.show();
Example 2 (offline map)
// Declare a mapmap mymap;
// Change the base map to offline map filemymap.setBaseMap("maps/suitland_imagery.mbtiles");
// Display the mapmymap.show();
See also: Map Object, Offline Maps
Map.SetTitle FunctionFormat
b = map_name.setTitle(title);
Description
The map.setTitle function sets the text that is displayed directly above the map to the value of the string expressiontitle. This can be used to display an instruction to the user such as "Tap on the map at the location of the household."By default the instruction is empty and is not shown. To remove the title call map.setTitle("") function with an emptystring.
Return Value
The function returns a logical value of 1 (true).
Example
Pa ge 448 of 684 Ma p Obje ct

// Declare a mapmap mymap;
// Set the title text above the mapmymap.setTitle("Tap on the map to place a household");
mymap.setOnClick(placeHousehold);
// Display the mapmymap.show();
See also: Map Object
Map.ShowCurrentLocation FunctionFormat
b = map_name.showCurrentLocation(show_condition);
Description
The map.showCurrentLocation function enables or disables display of the device's current location on the mapmap_name. If show_condition is non-zero, the current location is displayed on the map as a blue dot. As the user movesaround, the blue dot also moves to follow the user's position. In addition, there is a button in the top left corner of mapthat zooms the map to the user's current location. If show_location is zero, both the blue dot and associated button arehidden. Display of the current location is enabled by default.
Return Value
The function returns a logical value of 1 (true).
Example
// Declare a mapmap mymap;
// Disable display of current locationmymap.showCurrentLocation(0);
// Display the mapmymap.show();
See also: Map Object
Map.ZoomTo FunctionFormat (Point)
b = map_name.zoomTo(latitude, longitude『『, zoom_level』』);
Format (Rectangle)
b = map_name.zoomTo(min_latitude, min_longitude, max_latitude, max_longitude『『, padding』』);
Description
Pa ge 449 of 684 Ma p Obje ct

The map.zoomTo function pans and zooms a map to center the map on a given point or to fit a rectangular region of themap to the screen. The map.zoomTo function may be used before the map is shown to set the initial view or it may beused in a callback function to change the view while the map is showing.
The first form moves the map so that the point with coordinates (latitude, longitude) is at the center of the screen. If theoptional zoom_level is specified, the map is also zoomed to the specified zoom level. zoom_level is a numberrepresenting the level of detail to show. Zoom level one fits the entire world on the screen and each consecutive zoomlevel is twice as detailed as the preceding level. Zoom level 15 shows streets and zoom level 20 shows individualbuildings. The minimum and maximum zoom levels supported will depend on the base map being used. If no zoom levelis specified, the current zoom level is maintained.
The second form pans and zooms the map to fit the rectangular region of the map with corners at (min_latitude,min_longitude) and (max_latitude, max_longitude). If the optional padding is specified, the map will be zoomed lessso that the rectangular region will fit onto the screen with extra padding on each side. This can be used so that theedges of the rectangle do not line up exactly with the edge of the screen. The padding is specified as a percentage ofthe width of the screen. A padding of 5 would add padding equal to 5% of the device screen width.
If no initial view is set by calling map.zoomTo before the map is shown, then the initial view is determined as follows:
If there are any markers, the view is set to fit all of the markers onto the screen.
Otherwise, if an offline map file that specifies an extent is used as a base map, the view is set to the extent of theoffline map file.
Otherwise, the initial view is the entire world.
Return Value
The function returns a logical value of 1 (true) if the map is zoomed/panned and 0 (false) if there is an error (for example ifthe rectangle is invalid).
Example 1
// Declare a mapmap mymap;
// Set initial view to center on the point 38.84839,-76.931098 at street levelmymap.zoomTo(-15.430227, 28.308464, 15);
// Display the mapmymap.show();
Example 2
// Declare a mapmap mymap;
// Set initial view to fit a rectangular region with 15% paddingmymap.zoomTo(38.841546, -76.937428, 38.853679, -76.911550, 15);
// Display the mapmymap.show();
See also: Map Object
Offline MapsThe default base map shown is the Google Maps road map which requires an Internet connection. You can instead usean offline map from a file stored on your device. Offline map files store map tiles which are images of pieces of a map atvarious levels of detail. Rather than downloading map images from Google Maps, CSPro will read the images directlyfrom an offline map file.
Pa ge 450 of 684 Ma p Obje ct
Supported Files
CSPro supports the following formats for offline map files:
MBTiles An open format orginally developed by Mapbox but now widely used by many other systems.MBTiles can be exported from QGIS. You can also download MBTiles files created from OpenStreet Map data from the Humanitarian Open Street Maps project athttps://www.hotosm.org. Only MBTiles containing image tiles (PNG or JPG) are supported.Vector tiles are not supported.
ArcGIS Tile Package Tile packages exported from ArcGIS. See the ArcGIS Help for details. Tile packages must becreated using the ArcGIS Online/Bing Maps/Google Maps tiling scheme to be compatible withCSPro.
Putting Maps on Devices
Once you have a map file you can copy it to your device via a USB connection. You can also download map files to thedevice using the syncfile command in your logic although since map files tend to be large this may be slow. Map filescan be placed anywhere on the device although it is most common to place them in a subfolder of your application.
Specifying the Map to Use in the Case Listing
Use the BaseMap attribute in the [Files] section of the PFF file to provide the path to the offline map file on your deviceto use when displaying the case listing on a map.
Specifying the Map to Use With the Map Object
When using the map object in logic, use the map.setBaseMap function to set the offline map.
File Size
Since offline map files may contain hundreds or thousands of images, they can become very large. The size of the filewill depend on the extents of the map and the level of detail. It is not possible to store a map of the entire world, or evenof an entire country at a high level of detail on most devices. When creating your map files you will need to adjust theextents and level of detail to ensure that the map files will not exceed the available storage space on your device. If yoursurvey will be done over a large geographic area you may need to use separate maps for each interviewer or each teamthat cover only their assigned area.
The level of detail of an offline map is a big component of the file size. Levels of detail in offline maps start at zero wherethe entire world is covered by a single image tile. Each successive level contains four times the number of images as theprevious level so level one contains four tiles, level two contains 16 tiles, level 3 contains 64 tiles, etc. Level 20 is detailedenough to see individual buildings. At level 20 the entire world requires over a trillion tiles. By removing the last level ofdetail of your map you reduce the size of the file by close to two-thirds.
See also: Map Object, Run Production Data Entry
Pa ge 451 of 684 Pa th

PathPath NamespaceThe path namespace is a set of functions used to perform operations on a path or to get information from a pathspecification.
Functionality
Function Descriptionpath.concat Combines multiple strings into one string representing a file path.path.getDirectoryName Extracts the directory name from a file path.path.getExtension Extracts the file extension from a file path.path.getFileName Extracts the file name from a file path.path.getFileNameWithoutExtension Extracts the file name without its extension from a file path.
Example
string data_path = "C:\CSPro Data Files\Region 1\COVID-19 Survey.csdb";
string data_directory = path.getDirectoryName(data_path);// result: C:\CSPro Data Files\Region 1\
string data_filename = path.getFilename(data_path);// result: COVID-19 Survey.csdb
string data_extension = path.getExtension(data_path);// result: .csdb
string data_filename_without_extension = path.getFilenameWithoutExtension(data_path);// result: COVID-19 Survey
See also: PathName Function
Path.Concat FunctionFormat
s = path.concat(path_string1『『, ..., path_stringN』』);
Description
The path.concat function concatenates the values of multiple string expressions (path_string1 + ... + path_stringN)into one string representing a file path. The first argument can be either a string expression or one of the arguments usedin the pathname function. The combined paths are returned as an absolute, not relative, path.
Return Value
The function returns the concatenated path string.
Example
Pa ge 452 of 684 Pa th

string image_filename = path.concat(Application, "../Images", maketext("%v%v.jpg", CLUSTER,HHNO));
See also: Path Namespace, PathName Function, Concat Function
Path.GetDirectoryName FunctionFormat
s = path.getDirectoryName(path_string);
Description
The path.getDirectoryName function returns the directory name for the path specified in the string expressionpath_string.
Return Value
The function returns a string with the directory name extracted from the full path.
Example
string data_path = "C:\CSPro Data Files\Region 1\COVID-19 Survey.csdb";
string data_directory = path.getDirectoryName(data_path);// result: C:\CSPro Data Files\Region 1\
string data_filename = path.getFilename(data_path);// result: COVID-19 Survey.csdb
string data_extension = path.getExtension(data_path);// result: .csdb
string data_filename_without_extension = path.getFilenameWithoutExtension(data_path);// result: COVID-19 Survey
See also: Path Namespace, Path.GetFileName Function
Path.GetExtension FunctionFormat
s = path.getExtension(path_string);
Description
The path.getExtension function returns the file extension for the path specified in the string expression path_string.The extension will begin with a ".". If the file does not have an extension, a blank string is returned.
Return Value
The function returns the extension extracted from the full path.
Example
Pa ge 453 of 684 Pa th

string data_path = "C:\CSPro Data Files\Region 1\COVID-19 Survey.csdb";
string data_directory = path.getDirectoryName(data_path);// result: C:\CSPro Data Files\Region 1\
string data_filename = path.getFilename(data_path);// result: COVID-19 Survey.csdb
string data_extension = path.getExtension(data_path);// result: .csdb
string data_filename_without_extension = path.getFilenameWithoutExtension(data_path);// result: COVID-19 Survey
See also: Path Namespace, Path.GetFileName Function, Path.GetFileNameWithoutExtension Function
Path.GetFileName FunctionFormat
s = path.getFileName(path_string);
Description
The path.getFileName function returns the file name for the path specified in the string expression path_string. The filename will include the extension of the file; to get the file name without the extension, use thepath.getFileNameWithoutExtension function.
Return Value
The function returns a string with the directory name removed from the full path.
Example
string data_path = "C:\CSPro Data Files\Region 1\COVID-19 Survey.csdb";
string data_directory = path.getDirectoryName(data_path);// result: C:\CSPro Data Files\Region 1\
string data_filename = path.getFilename(data_path);// result: COVID-19 Survey.csdb
string data_extension = path.getExtension(data_path);// result: .csdb
string data_filename_without_extension = path.getFilenameWithoutExtension(data_path);// result: COVID-19 Survey
See also: Path Namespace, Path.GetDirectoryName Function, Path.GetExtension Function,Path.GetFileNameWithoutExtension Function
Path.GetFileNameWithoutExtension FunctionFormat
s = path.getFileNameWithoutExtension(path_string);
Description
Pa ge 454 of 684 Pa th

The path.getFileNameWithoutExtension function returns the file name for the path specified in the string expressionpath_string. The file name will not include the extension of the file; to get the file name with the extension, use thepath.getFileName function.
Return Value
The function returns a string with the directory name and extension removed from the full path.
Example
string data_path = "C:\CSPro Data Files\Region 1\COVID-19 Survey.csdb";
string data_directory = path.getDirectoryName(data_path);// result: C:\CSPro Data Files\Region 1\
string data_filename = path.getFilename(data_path);// result: COVID-19 Survey.csdb
string data_extension = path.getExtension(data_path);// result: .csdb
string data_filename_without_extension = path.getFilenameWithoutExtension(data_path);// result: COVID-19 Survey
See also: Path Namespace, Path.GetFileName Function, Path.GetExtension Function
Pa ge 455 of 684 Pff Obje ct

Pff ObjectPff StatementFormat
pff pff_name;
Description
The pff statement creates a dynamic pff with the name pff_name. The pff name must be unique and must contain onlyletters, numbers, or the underscore character. The name must begin with a letter. You can declare pffs globally in PROCGLOBAL or locally in functions or procedures.
Example
PROC INTERVIEWER_MENU
// run the listing program in the interviewer's assigned cluster if INTERVIEWER_MENU = 1 then pff listing_pff; listing_pff.load("Listing.pff"); listing_pff.setproperty("Key", maketext("%v", CLUSTER)); listing_pff.exec(); endif;
See also: Pff Object
Pff.Load FunctionFormat
b = pff_name.load(pff_filename ‖ application_name);
Description
The pff.load function loads the contents from an existing PFF file into a pff. If supplying a string expression,pff_filename, the properties from that PFF will be loaded. If supplying an application_name (the name of yourapplication, which generally ends with _FF), then the PFF used to run the current application will be loaded.
Return Value
The function returns a logical value of 1 (true) if the PFF file exists and was successfully loaded and 0 (false) otherwise.
Example 1
// run the household data entry application but change the name// of the data file to the current clusterpff household_pff;household_pff.load("Household.pff");household_pff.setproperty("InputData", maketext("%v.csdb", CLUSTER));household_pff.exec();
Pa ge 456 of 684 Pff Obje ct

Example 2
function DisplayMinorMessage(string message_text)
// do not display minor messages when running this batch // application and only showing summary messages pff this_application_pff; this_application_pff.load(CENSUS_FF);
if this_application_pff.getproperty("ErrmsgOverride") <> "Summary" then errmsg("%s", message_text); endif;
end;
See also: Pff Object, Pff.Save Function
Pff.Save FunctionFormat
b = pff_name.save(pff_filename);
Description
The pff.save function saves the contents of the pff object to the disk to a PFF file with the name supplied by the stringexpression pff_filename. Because pff objects can be executed without saving them, this function is not necessary, butmay be useful if you want a copy of your PFF file on the disk.
Return Value
The function returns a logical value of 1 (true) if the PFF was successfully saved and 0 (false) otherwise.
Example
// create PFFs for running the listing application for each provincepff listing_pff;listing_pff.load("Listing.pff");
do numeric counter = 1 while counter <= PROVINCE_VS.length()
listing_pff.setproperty("Description", maketext("List in %s", PROVINCE_VS.labels(counter))); listing_pff.setproperty("Key", maketext("%02d", PROVINCE_VS.codes(counter)));
string new_pff_filename = maketext("Listing%02d.pff", PROVINCE_VS.codes(counter)); listing_pff.save(new_pff_filename);
enddo;
See also: Pff Object, Pff.Load Function
Pff.GetProperty FunctionFormat
s = pff_name.getproperty(property_name『『, string_list』』);
Description
Pa ge 457 of 684 Pff Obje ct
The pff.getproperty function returns a string containing the current value associated with the pff's property specifiedby the string expression property_name. PFF properties all have default values, so even if a property was not explicitlydefined in the PFF file, it may have a default value. Some properties, such as input data filenames for batch applications,can have multiple values, and if you want to retrieve all of these values, you must supply a string_list, which will containzero, one, or more strings with the values.
Properties names can be prefixed with the section name, as explained in pff.setproperty, but it is generally notnecessary to do so when using this function.
The function can be used similarly to sysparm to retrieve properties defined in a PFF's [Parameters] section.
Return Value
The function returns a string with the property information. If the property is invalid, a blank string is returned.
Example
// show our custom report unless the PFF specifies ViewListing=Neverpff this_application_pff;this_application_pff.load(CENSUS_FF);
if this_application_pff.getproperty("ViewListing") <> "Never" then view("Disability Statistics.csv");endif;
See also: Pff Object, Pff.SetProperty Function, SysParm Function
Pff.SetProperty FunctionFormat
b = pff_name.setproperty(property_name, property_value ‖ string_list);
Description
The pff.setproperty function modifies the value associated with the pff's property specified by the string expressionproperty_name. The property will be modified to the value given in the string expression property_value. If theproperty_value is blank, the property will be reset to its default value. Alternatively, a string_list can be suppliedcontaining values for properties that have multiple values (such as input data filenames).
Properties names can be prefixed with the section name. For example, if you load an existing PFF that has a persistentID value defined for the item PROVINCE, you can code:
pff_name.setproperty("PROVINCE", "50");
However, if no such property was defined in the PFF, the pff.setproperty function will not know whether you aremodifying a value in the [DataEntryIds] section, the [ExternalFiles] section, or another section. To avoid this ambiguity,when setting new custom properties, you can specify the section name when setting the property:
pff_name.setproperty("DataEntryIds.PROVINCE", "50");
Return Value
The function returns a logical value of 1 (true) because it will always successfully set a property. If the property name isunknown, then the value is assigned to a new parameter (defined in a PFF's [Parameters] section).
Example 1
Pa ge 458 of 684 Pff Obje ct

PROC INTERVIEWER_MENU
// run the listing program in the interviewer's assigned cluster if INTERVIEWER_MENU = 1 then pff listing_pff; listing_pff.load("Listing.pff"); listing_pff.setproperty("Key", maketext("%v", CLUSTER)); listing_pff.exec(); endif;
Example 2
PROC REPORT_SELECTION
// run the batch application to generate a report on... pff report_pff; report_pff.load("..\Report\Report.pff");
// ...the data file for the selected province and region if REPORT_SELECTION = 1 then report_pff.setproperty("InputData", maketext("..\Data\%v%v.csdb", PROVINCE, REGION));
// ...the data files for all the regions in the selected province elseif REPORT_SELECTION = 2 then report_pff.setproperty("InputData", maketext("..\Data\%v*.csdb", PROVINCE));
// ...the data files for the entire country else list string data_files_listing; dirlist(data_files_listing, "..\Data", "*.csdb", recursive); report_pff.setproperty("InputData", data_files_listing);
endif;
report_pff.exec();
See also: Pff Object, Pff.GetProperty Function
Pff.Exec FunctionFormat
b = pff_name.exec();
Description
The pff.exec function starts another CSPro application using the properties defined in the pff object. If you modified anyof the pff object's properties, it is not necessary to save the file to disk when running it, as this function will save atemporary file to the disk with the defined properties.
For data entry PFFs, the function executes the application and immediately closes the current application (withoutsaving any data). This is the same as running execpff with the stop argument. For other PFFs, the function executesthe application using the wait argument. That is, this function is equivalent to:
pff my_pff;// ...
if my_pff.getproperty("AppType") = "Entry" then execpff(filename(my_pff), stop);else execpff(filename(my_pff), wait);endif;
Pa ge 459 of 684 Pff Obje ct
If you want to execute a data entry PFF without closing the current application, you can code:
execpff(filename(my_pff), wait);
Return Value
The function returns a logical value of 1 (true) if the new application was started successfully and 0 (false) otherwise.
Example
PROC INTERVIEW_SELECTION_MENU
pff application_pff;
// conduct the main household interview if INTERVIEW_SELECTION_MENU = 1 then application_pff.load("..\Household\Household.pff");
// conduct the agriculture interview else application_pff.load("..\Agriculture\Agriculture.pff");
endif;
// set the key to the household the user selected application_pff.setproperty("Key", SELECTED_HOUSEHOLD_KEY);
// run the program application_pff.exec();
See also: Pff Object, ExecPFF Function
Pa ge 460 of 684 Sys te mApp Obje ct

SystemApp ObjectSystemApp StatementFormat
SystemApp system_app_name;
Description
The SystemApp statement creates a SystemApp object with the name system_app_name. The SystemApp name mustbe unique and must contain only letters, numbers, or the underscore character. The name must begin with a letter. Youcan declare SystemApp objects globally in PROC GLOBAL or locally in functions or procedures.
Example
// play the training video in Windows Media PlayerSystemApp windows_media_player;windows_media_player.setArgument(pathconcat("../Videos/Census Training.mp4"));windows_media_player.exec("wmplayer.exe");
See also: SystemApp Object
SystemApp.SetArgument FunctionFormat
b = system_app_name.setArgument(argument『『, value』』);
Description
The SystemApp.setArgument function adds an argument to a SystemApp object. The argument will later be used whenthe system application is executed. The string expression argument and the optional string or numeric expressionvalue are processed differently on Android and Windows platforms.
Return Value
The function returns a logical value of 1 (true).
Android Example
On Android, a system application is typically an Android activity. Each argument will be part of the "extras" passed inthe Intent Bundle that opens the activity. If value is a string expression, it will be put as a String extra associated withthe name argument. If value is a numeric expression, it will be put as a double extra associated with the nameargument. If value is not specified, a null String extra will be used. There is special processing for three argumenttypes:
"action": The value is used as the action when calling Intent.setAction.
"data": The value (which should be URI-encoded) is used as the data when calling Intent.setData.
"type": The value is used as the MIME data type when calling Intent.setType.
Pa ge 461 of 684 Sys te mApp Obje ct

// get directions to the U.S. Census Bureau using Google MapsSystemApp google_maps_navigation;google_maps_navigation.setArgument("action", "android.intent.action.VIEW");google_maps_navigation.setArgument("data", "google.navigation:q=U.S.+Census+Bureau");google_maps_navigation.exec("com.google.android.apps.maps");
Windows Example
On Windows, a system application is an executable program. On Windows, every argument is turned into a commandline argument passed to the executable. If an argument is provided without a corresponding value and the argumentcontains spaces and is not wrapped in quotes, the argument will be surrounded by quotes so that it is processed as asingle argument by the executable. If a value is provided, then the argument and value are concatenated and will not besurrounded by quotes. If value is numeric, it will be converted to a string.
// plays the song in Windows Media Player, becoming:// wmplayer.exe "Quick Escape.mp3"SystemApp windows_media_player;windows_media_player.setArgument("Quick Escape.mp3");windows_media_player.exec("wmplayer.exe");
// opens the Census Bureau website in Chrome's Incognito mode, becoming:// chrome.exe --args --incognito https://www.census.govSystemApp chrome;chrome.setArgument("", "--args --incognito");chrome.setArgument("https://www.census.gov");chrome.exec("chrome.exe");
See also: SystemApp Object, SystemApp.Exec Function
SystemApp.Exec FunctionFormat
// Android formatb = system_app_name.exec(『『package_name『『, activity_name』』 』』);
// Windows formatb = system_app_name.exec(executable_name);
Description
The SystemApp.exec function executes a system application associated with the SystemApp object. Any argumentsset using the SystemApp.setArgument function are passed to the system application. On Android, a system applicationcan return results which can be queried with the SystemApp.getResult function.
Return Value
The function returns a logical value of 1 (true) if the system application is started successfully and 0 (false) otherwise.
Android Example
On Android, the optional string expression package_name specifies the name of the Android application (package) thatwill be executed. An optional string expression activity_name specifies the name of the activity within the package thatshould be opened. If no arguments are provided, then the arguments specified using SystemApp.setArgument will beprocessed by the Android operating system and, if there is a way to handle these arguments, then an appropriateapplication will be opened.
Pa ge 462 of 684 Sys te mApp Obje ct

// get directions to the U.S. Census Bureau using Google MapsSystemApp google_maps_navigation;google_maps_navigation.setArgument("action", "android.intent.action.VIEW");google_maps_navigation.setArgument("data", "google.navigation:q=U.S.+Census+Bureau");google_maps_navigation.exec("com.google.android.apps.maps");
Windows Example
On Windows, a system application is an executable specified by the string expression executable_name. Typically thename is the full path of the executable, but for applications that have registered their name in the Windows Registry, youonly need to provide the executable file name.
// play the training video in Windows Media PlayerSystemApp windows_media_player;windows_media_player.setArgument(pathconcat("../Videos/Census Training.mp4"));windows_media_player.exec("wmplayer.exe");
See also: SystemApp Object, SystemApp.SetArgument Function, SystemApp.GetResult Function
SystemApp.GetResult FunctionFormat
s = system_app_name.getResult(argument);
Description
The SystemApp.getResult function returns a result from the system application that was executed using theSystemApp object. The function only works for system applications executed on Android devices.
Return Value
The function returns a string value with the result associated with the string expression argument. If no result exists,then the function returns a blank string.
Android Example
SystemApp fingerprint_reader;fingerprint_reader.setArgument("prompt", maketext("Please take the fingerprints for %s",strip(NAME)));fingerprint_reader.exec("com.example.entry_add_ons","com.example.entry_add_ons.FingerPrintReaderActivity");FINGERPRINT_FILENAME = fingerprint_reader.getResult("filename");
See also: SystemApp Object, SystemApp.Exec Function
SystemApp.Clear FunctionFormat
b = system_app_name.clear();
Description
The SystemApp.clear function clears any stored arguments and results associated with a SystemApp object.
Pa ge 463 of 684 Sys te mApp Obje ct

Return Value
The function returns a logical value of 1 (true).
Example
PROC GLOBAL
SystemApp google_maps;
PROC LOCATION
// clear any previously used arguments google_maps.clear();
// show barber shops near the location google_maps.setArgument("action", "android.intent.action.VIEW"); google_maps.setArgument("data", maketext("geo:%f,%f?q=barber+shop", LATITUDE, LONGITUDE)); google_maps.exec("com.google.android.apps.maps");
See also: SystemApp Object
Pa ge 464 of 684 Va l ue Se t Obje ct

ValueSet ObjectValueSet StatementFormat
valueset 『『valueset_type』』 valueset_name;
Description
The valueset statement creates a dynamic value set with the name valueset_name. The value set name must beunique and must contain only letters, numbers, or the underscore character. The name must begin with a letter. You candeclare value sets globally in PROC GLOBAL or locally in functions or procedures.
Value sets can be numeric or string. By default a value set is numeric, but the type can be modified by specifying thevalueset_type. When associating a value set with an item using setvalueset, the type must match the item type(numeric for numeric items, and string for alphanumeric items).
Example
PROC MENU
onfocus
valueset menu_valueset;
// interviewer options if USER_ROLE = 1 then menu_valueset.add("Add New Household", 1); menu_valueset.add("View Existing Households", 2);
// supervisor options else menu_valueset.add("View Household Report", 3);
endif;
menu_valueset.add("Quit", 99);
setvalueset(MENU, menu_valueset);
See also: ValueSet Object, List Object
ValueSet.Add FunctionFormat
i = valueset_name.add(label『『, image_filename』』, from_code『『, to_code ‖ special_value』』);
i = valueset_name.add(valueset_name『『, from_code』』 『『, to_code』』);
Description
The valueset.add function adds one or more values to the end of a value set. The type of the added code or value setmust match the type of the receiving value set.
Pa ge 465 of 684 Va l ue Se t Obje ct

In the first version, you provide a string expression label and either a numeric or string expression from_code, whichmust match the type of the value set. An optional string expression, image_filename, provides the filename of an imageto be shown as a value set image. For numeric value sets, it is possible to specify a numeric expression to_code, whichcreates a range, or a special_value, which is then associated with the from_code.
In the second version, you provide a valueset_name. This adds all of the values from that value set to the receiving valueset. If you specify a from_code or to_code, then only the values in that range will be added to the receiving value set.
Return Value
The function returns the number of the values added to the value set. If the value set is read-only, the function returnsdefault.
Example 1
PROC SUPERVISOR_MENU
onfocus
valueset string menu_valueset = SUPERVISOR_MENU_VS;
if CAN_SYNC = 1 then menu_valueset.add(SYNC_MENU_VS); endif;
forcase HOUSEHOLD_DICT do menu_valueset.add("Review " + getcaselabel(HOUSEHOLD_DICT), key(HOUSEHOLD_DICT)); endfor;
setvalueset(SUPERVISOR_MENU, menu_valueset);
Example 2
PROC OCCUPATION_MINOR
onfocus
numeric first_occupation_code = OCCUPATION_MAJOR * 100; numeric last_occupation_code = first_occupation_code + 99;
valueset occupation_minor_valueset; occupation_minor_valueset.add(OCCUPATION_MINOR_VS1, first_occupation_code,last_occupation_code); setvalueset(OCCUPATION_MINOR, occupation_minor_valueset);
See also: ValueSet Object
ValueSet.Remove FunctionFormat
i = valueset_remove.remove(code);
Description
The valueset.remove function removes all values from a value set that have a code matching the specified numeric orstring expression code. The type of the code must match the type of the value set.
When using a numeric value set with ranges—both from and to codes are defined—or defined special values, thefunction will remove a value only if it is the from value or if it is the special value.
Pa ge 466 of 684 Va l ue Se t Obje ct

Return Value
The function returns the number of values with the matching code that were removed from the value set. If the value set isread-only, the function returns default.
Example
PROC SECOND_FAVORITE_DRINK
preproc
valueset drink_valueset = FAVORITE_DRINK_VS;
drink_valueset.remove(FAVORITE_DRINK);
setvalueset(SECOND_FAVORITE_DRINK, drink_valueset);
See also: ValueSet Object, ValueSet.Clear Function
ValueSet.Clear FunctionFormat
b = valueset_name.clear();
Description
The valueset.clear function removes all values from a value set.
Return Value
The function returns a logical value of 1 (true). If the value set is read-only, the function returns default.
Example
PROC GLOBAL
valueset name_valueset;
PROC LINE_NUMBER_OF_MOTHER
onfocus
name_valueset.clear();
// construct value set...
See also: ValueSet Object, ValueSet.Remove Function
ValueSet.Length FunctionFormat
i = valueset_name.length();
Description
Pa ge 467 of 684 Va l ue Se t Obje ct

The valueset.length function removes the number of values defined in the value set. When multiple values codes arelinked to a single label, each multiple set counts as a single value.
Return Value
The function returns the length of the value set.
Example
PROC HOUSEHOLD_SELECTION
onfocus
valueset households_vs;
// ...
if households_vs.length() = 0 then errmsg("There are no households to select"); reenter MAIN_MENU; endif;
See also: ValueSet Object
ValueSet.Randomize FunctionFormat
b = valueset_name.randomize(『『exclude(exclude_code1, ..., exclude_codeN)』』);
Description
The valueset.randomize function scrambles the order of values in the value set. The function is useful when usingextended controls in a data entry application. Some survey applications choose to display the possible responsecategories in a randomized way so as to minimize an enumerator or respondent's selection bias.
An optional exclusion list, exclude_code1, ..., exclude_codeN, allows you to prevent certain values from being given arandom order. This is useful for variables like Don't Know, which, after the randomization, would remain at the originallocation in the list of values.
You can use the seed function to initialize the random number generation.
Return Value
The function returns a logical value of 1 (true).
Example
FAVORITE_FOOD_GROUP_VS1.randomize(exclude(5));
Pa ge 468 of 684 Va l ue Se t Obje ct

becomes
See also: ValueSet Object, Random Function, RandomIn Function, Seed Function, ValueSet.Sort Function
ValueSet.Show FunctionFormat
d = valueset_name.show(『『heading』』);
Description
The valueset.show function displays the labels from a value set and returns the code (or index) of the operator'sselection. An optional string expression, heading, specifies the title of the window that displays the values. The functionis similar to the accept function but with the options taken from the value set's labels. For numeric value sets, thereturned value corresponds with the selected label's code. For a string value set, the returned value is the index of theselected label.
Return Value
The function returns the code (or index) of the item selected. If the selected value contains a special value, then thatvalue is returned. The value 0 is returned if the escape key (or back button) is pressed and none of the values is chosen.
Example
valueset respondent_query;
do numeric counter = 1 while counter <= count(NAME) respondent_query.add(NAME(counter), LINE_NUMBER(counter));enddo;
numeric respondent_line_number = respondent_query.show("Who in the household is responding toquestions?");
See also: ValueSet Object, Accept Function, Show Function, ShowArray Function, List.Show Function
ValueSet.Sort FunctionFormat
b = valueset_name.sort(『『 ascending ‖ descending 』』 『『 by code ‖ label 』』);
Description
The valueset.sort function sorts the order of entries in the value set by either label or code. An optional argument,ascending or descending, allows for the specification of the sort order. Another optional argument, by code or bylabel allows you to specify whether to sort the value set's entries by code or label. By default the value set will be
Pa ge 469 of 684 Va l ue Se t Obje ct

sorted in ascending order by label.
Labels are sorted in case insensitive order, so "c" is considered the same as "C". On the other hand, codes foralphanumeric value sets are sorted in case sensitive order, so "c" is recognized as different from "C".
Return Value
The function returns a logical value of 1 (true).
Example
valueset enumerators_vs;
forcase STAFF_DICT where STAFF_ROLE = 1 do enumerators_vs.add(STAFF_NAME, STAFF_CODE);endfor;
enumerators_vs.sort();
setvalueset(ENUMERATOR_LOGIN, enumerators_vs);
See also: ValueSet Object, ValueSet.Randomize Function
Pa ge 470 of 684 Progra m Control Sta te me nts

Program Control StatementsBreak StatementFormat
break;
Description
The break statement exits a do, while, for, or forcase loop early and continues execution with the first statement afterthe enddo.
Example
// find the spousenumeric ptrSpouse,ctr;
for ctr in PERSON do
if P02_REL = 2 then ptrSpouse = ctr; break; endif;
enddo;
See also: Next Statement, Exit Statement
Do Statement Format:do [[varying] var = expression] while/until condition [by expression] statements;enddo; [ ] indicates that this part is optional. Description:
The do statement executes one or more statements repeatedly, in a loop, either while a logical condition is true, oruntil a logical condition is no longer true. The do and enddo keywords are required. You must use a while or untilphrase to terminate the loop. The condition is evaluated on each repetition of the loop before any of the statementswithin the loop are executed. When the while option is used, it means the statements within the loop (between do and enddo) are executedwhile the condition remains true. That is, if the condition is true, the statements are executed. If the conditionbecomes false, execution moves to the first statement following the enddo keyword. When the until option is used, the statements within the do are executed until the condition becomes true. That is, ifthe condition is false the statements are executed. If the condition becomes true, execution moves to the firststatement following the enddo keyword. The by phase adds the indicated number or numeric expression (expression) to the variable after each repetition of theloop. If the by phrase is present, at the end of each repetition of the loop, the expression is evaluated. The result ofthe expression is added to the numeric variable in the varying clause. If the by phrase is omitted, 1 is added to the
Pa ge 471 of 684 Progra m Control Sta te me nts

variable at the end of each repetition of the loop. For example, if you wanted to process only odd-numbered records,you could increment your loop by 2. In the varying clause, the variable must be a numeric variable. The variable assignment is performed once, before thefirst repetition of the loop. The varying keyword has no effect on the command, and so may be omitted. It is possibleto declare a numeric variable after the varying keyword, in which case the numeric variable's scope is the duration ofthe do loop.
Example:HEAD = 0;do varying i = 1 until HEAD > 0 or i > totocc(PERSON) if RELATIONSHIP(i) = 1 then HEAD = i; endif;enddo; This same example could be rewritten using the while condition as follows: HEAD = 0;do varying i = 1 while HEAD = 0 and i <= totocc(PERSON) if RELATIONSHIP(i) = 1 then HEAD = i; endif;enddo; It is purely a matter of preference as to which method should be used. See also: For Statement, While Statement , If Statement
Exit StatementFormat
exit 『『return_value』』;
Description
The exit statement terminates a procedure or user-defined function before normal processing is expected to end. Whenthe statement is executed, processing stops for the current procedure or function, and control is passed to the nextprocedure or function.
When utilized in a user-defined function, an optional argument, return_value, sets the function's return value beforeexiting the function. The type of the argument, either a numeric or string expression, must match the function's returntype.
Example 1
function numeric FirstWoman()
do numeric ctr = 1 while ctr <= HH_MEMBERS
if SEX(ctr) = 2 then FirstWoman = ctr; exit; // exit the function, we've found our first woman! endif;
enddo;
FirstWoman = 0; // no woman was found
end;
Pa ge 472 of 684 Progra m Control Sta te me nts

Example 2
function string QueryForString(string message)
while 1 do
string response = prompt(message);
if response = "" then errmsg("You cannot enter a blank value");
else exit response;
endif;
enddo;
end;
// ...
errmsg("The non-blank value is %s", QueryForString("Enter a non-blank value"));
See also: Universe Statement, Skip Case Statement, Stop Function, EndCase Statement
For StatementFormat
for 『『counter in』』 multiple_occurring_group 『『where condition』』 do // statementsendfor;
Description
The for statement executes one or more statements repeatedly within a loop for each occurrence of a multiply occurringgroup. The multiple_occurring_group can be a form, roster, record, item, relation, or even a dictionary (following aselcase function call). The multiply occurring group controls how many times the for loop is executed. An optionallogical condition, referencing items in the group, can be supplied to restrict the cases processed by the loop.
The numeric variable counter contains the number of the current occurrence being examined. It cannot be changedinside the loop, but it can be referenced. Its starting value is 1 and its ending value is determined by the number ofoccurrences of the group. It is possible to declare a variable local to the loop by adding numeric before the countervariable.
If the group name is a record, item, or relation, then the appropriate keyword record, item, or relation can be usedbefore the name.
The for statement should be coded outside of the group it references. In the example below, note that the code isexecuted in PROC QUEST. It should not be located in PROC PERSON_REC_EDT or in a procedure for any of the data itemswithin the person record.
Example
Pa ge 473 of 684 Progra m Control Sta te me nts

PROC QUEST
numeric pointer_spouse; numeric pointer_oldest_child;
for numeric occurrence_number in PERSON_REC_EDT do
if RELATIONSHIP = 2 then pointer_spouse = occurrence_number;
elseif RELATIONSHIP = 3 then if pointer_oldest_child = 0 or AGE > AGE(pointer_oldest_child) then pointer_oldest_child = occurrence_number; endif;
endif;
endfor;
See also: ForCase Statement, For (Dictionary) Statement, Do Statement, While Statement
ForCase StatementFormat
forcase dictionary_name 『『where condition』』 do // statementsendfor;
Description
The forcase statement executes one or more statements repeatedly within a loop for each case in a file opened asexternal dictionary dictionary_name. An optional logical condition, referencing items in the external dictionary, can besupplied to restrict the cases processed by the loop.
It is possible, by specifying dictionary access parameters after the dictionary name, to limit the cases that the forcaseloop processes.
Example
numeric incomplete_households;
forcase CENSUS_DICT where INTERVIEW_STATUS = 3 do inc(incomplete_households);endfor;
See also: For Statement, For (Dictionary) Statement, CountCases Function, LoadCase Function
For (Dictionary) StatementFormat
for dictionary_name『『(mark_type)』』 do // statementsendfor;
Description
The for (dictionary) statement executes one or more statements repeatedly within a loop for each selection made during
Pa ge 474 of 684 Progra m Control Sta te me nts

a selcase function call. This allows an operator to select some number of cases and then allows you to load each caseand perform some analysis on the selected cases. Unlike the forcase loop, which operates on all cases in a data file,this loop only operates on selected cases.
The dictionary_name must be supplied and refers to an external dictionary associated with your application. An optionalargument, mark_type, indicates what kinds of cases to process, and can be one of the following values:
mark_type Descriptionmarked Process only the cases selected by the operator during the selcase function call.unmarked Process the cases not selected by the operator.all Process all of the cases that could have been selected by the operator.
If not specified, the mark_type defaults to marked.
Example
selcase(OCCUPATION_DICT,"Plantation") multiple;
numeric maxEducation;
for OCCUPATION_DICT do maxEducation = high(maxEducation,MAXIMUM_EDUCATION);endfor;
See also: For Statement, ForCase Statement, NMembers Function
If Statement Format:if condition then [ ] indicates that this part is optional. statements;[elseif condition then statements;][else statements;]endif;
Description:
The if statement executes different statements based on the value of "condition". The condition following the ifcommand is evaluated. If the condition is true, then the statements following it are executed and execution moves tothe first statement after the endif keyword. If the condition is false, execution moves to the first elseif keyword or theelse keyword (if there are no elseif keywords). The elseif blocks are evaluated in the same way as the first if block. When CSPro finds a condition that is true itexecutes the statements following it and moves to the first statement after the endif keyword. If all the conditions arefalse, the statements following the else keyword are executed. If none of the conditions are true and there is no elsekeyword, execution moves to the first statement after the endif keyword without the execution of any statementswithin the if statement. Every if statement must contain an endif keyword. However, if multiple elseif keywords are nested within an if block,they may be terminated with a single endif keyword. The statements within the if statement can be any number ofCSPro statements. If a condition contains an inequality (e.g., >, <, >=, <=) and one of the values tested in theinequality is a special value (e.g., MISSING, REFUSED, NOTAPPL, or DEFAULT), the result of the condition is falseand execution skips to the statement following the else.
Example:if X = 3 then z = 6;elseif x in 4:5 or y in 7:9,12 then
Pa ge 475 of 684 Progra m Control Sta te me nts

z = 7;else z = 8;endif;
See also: When Statement, Recode Statement
Next StatementFormat
next;
Description
The next statement ends a do, while, for, or forcase loop early and continues execution with the next iteration of theloop. If the next iteration results in the termination of the loop, then execution will begin with the first statement after theenddo.
Example
// fill an array with the occurrence numbers of all spousesspouseNumber = 0;
for ctr in PERSON do
if P02_REL <> 2 then next; endif;
inc(spouseNumber); spouseIndices(spouseNumber) = ctr;
enddo;
See also: Break Statement, Exit Statement
Universe StatementFormat
universe condition 『『case』』;
Description
The universe statement determines whether to allow normal execution of a procedure or function based on the value ofcondition. The condition following the universe command is evaluated. If the condition is true, then the statementsfollowing it are executed. If the condition is false, processing stops for the current procedure or user-defined function, andcontrol is passed to the next procedure or user-defined function.
In batch editing mode, if the optional case keyword is specified and the condition is false, the program will stopprocessing the case but will still write it to the output file.
Example 1
Pa ge 476 of 684 Progra m Control Sta te me nts

PROC FERTILITY
universe SEX = 2 and AGE in 12:49;
Example 2
PROC ROOF_TYPE
universe HHTYPE = 1 case;
// the universe is equivalent to: if not HHTYPE = 1 then endcase; endif;
See also: Exit Statement, EndCase Statement, If Statement
When StatementFormat
when expression1 『『:: expression2 :: expressionN』』; 『『value1』』 『『:: value2 :: valueN』』 -> statement; 『『-> else_statement;』』endwhen;
Description
The when program control statement executes a statement based on the value of one or more other variables, combiningif statements with the power of recode. The statement is similar to statements in other programming languages (likeswitch in C or when in Kotlin).
One or more expressions, expression1 to expressionN, are given, with each expression separated by two colons ::.These expressions must evaluate to either a number or string. Based on the values of each expression, CSPro evaluateseach line between the when and endwhen, trying to match a line's values, value1 to valueN, with the evaluatedexpressions. Once a line matches, a statement, which is given after the arrow ->, is executed and program controlmoves to statements following the endwhen. Only a single statement can be provided per line.
Each value provided must evaluate to the same type (number or string) as its respective expression. A value omitted isconsidered a match, and if no values are provided, then the optional else_statement is executed (assuming no precedingline matched).
Values can be provided in the following ways:
An individual value. For example: 50
Using the syntax of in lists, meaning that multiple values can be separated with commas and ranges beseparated by colons. For example: 1,3,5:9
An individual value preceded by one of the following operators: <, <=, >, >=, =, <>. If such an operator is used,the expression's value is compared with the value using the operator. For example: >= 65
Example 1
Pa ge 477 of 684 Progra m Control Sta te me nts
function SimpleWhenExample(numeric sex, numeric age)
when sex :: age; 1 :: -> errmsg("Male"); 2 :: 0: 11 -> errmsg("Young female"); 2 :: 12: 49 -> errmsg("Fertile female"); 2 :: 50:120 -> errmsg("Older female"); -> errmsg("Invalid sex or age"); endwhen;
end;
SimpleWhenExample(2, 10); // Young femaleSimpleWhenExample(2, 38); // Fertile femaleSimpleWhenExample(1, 150); // MaleSimpleWhenExample(2, 150); // Invalid sex or age
Example 2
PROC EMPLOYMENT_STATUS
when EMPLOYMENT_STATUS; 1:2 -> skip to UNEMPLOYMENT; <= 6 -> skip to INFORMAL_EMPLOYMENT >= 7 -> skip to FORMAL_EMPLOYMENT; endwhen;
See also: If Statement, Recode Statement
While StatementFormat
while condition do // statementsenddo;
Description
The while statement executes one or more statements repeatedly, in a loop, while the logical condition is true. Unlikea do loop, a counter is not automatically incremented, so you must ensure the termination of the loop. The condition isevaluated on each repetition of the loop before any of the statements are executed.
Example
setfile(inputFile,"Countries.txt");
string countriesLine;
while fileread(inputFile,countriesLine) do // ...enddo;
See also: Do Statement, For Statement
Pa ge 478 of 684 As s i gnme nt Sta te me nts

Assignment StatementsAssignment StatementFormat
numeric_variable = numeric_expression;
string_variable = string_expression;
Description
The assignment statement sets a variable equal to the value of an expression. If the expression is numeric or conditional,then the variable must be numeric. If the expression is a string expression, then the variable must be alphanumeric.
Examples
AGE = 10;Q102 = PREV_AGE;Y = sqrt(X);
NAME = "John Doe";NAME = "John " + toupper("Doe");
See also: SetValue Function
Recode Statement(Prior to CSPro 7.4, a different version of the recode/box command function existed. That version should no longer beused as it will be removed in a future release.)
Format
recode expression1 『『:: expressionN』』 -> destination_variable1 『『:: destination_variableN』』; value1 『『:: valueN』』 -> result1 『『:: resultN』』; 『『-> else_result1 『『:: else_resultN』』;』』endrecode;
Description
The recode statement assigns a value to one or more output variables based on the value of one or more other inputvariables. It can be used to rescale variables, to assign values to variables, or to create a composite variable fromexisting variables. In many instances it is easier to use than writing multiple if statements.
One or more expressions, expression1 to expressionN, are given, with each expression separated by two colons ::.These expressions must evaluate to either a number or string. Based on the values of each expression, CSPro evaluateseach line between the recode and endrecode, trying to match a line's values, value1 to valueN, with the evaluatedexpressions. Once a line matches, one or more results, result1 to resultN, which are given after the arrow ->, areassigned to destination_variable1 to destination_variableN, which can be dictionary items, working variables, arrayvalues, list values, or the return values of a user-defined function. A destination variable can also be included among theexpressions. It is possible to declare a new numeric, alpha, or string destination variable as part of the recodestatement (see Example 2 below).
Each value provided must evaluate to the same type (number or string) as its respective expression, and each result
Pa ge 479 of 684 As s i gnme nt Sta te me nts
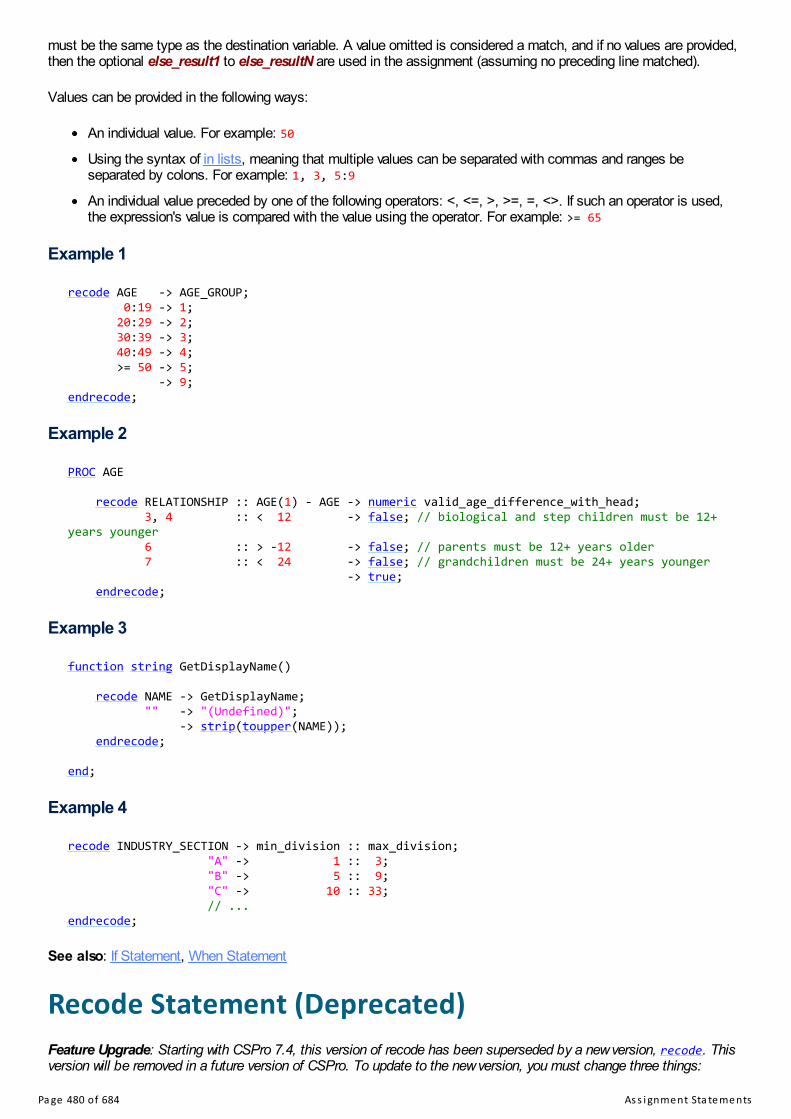
must be the same type as the destination variable. A value omitted is considered a match, and if no values are provided,then the optional else_result1 to else_resultN are used in the assignment (assuming no preceding line matched).
Values can be provided in the following ways:
An individual value. For example: 50
Using the syntax of in lists, meaning that multiple values can be separated with commas and ranges beseparated by colons. For example: 1, 3, 5:9
An individual value preceded by one of the following operators: <, <=, >, >=, =, <>. If such an operator is used,the expression's value is compared with the value using the operator. For example: >= 65
Example 1
recode AGE -> AGE_GROUP; 0:19 -> 1; 20:29 -> 2; 30:39 -> 3; 40:49 -> 4; >= 50 -> 5; -> 9;endrecode;
Example 2
PROC AGE
recode RELATIONSHIP :: AGE(1) - AGE -> numeric valid_age_difference_with_head; 3, 4 :: < 12 -> false; // biological and step children must be 12+years younger 6 :: > -12 -> false; // parents must be 12+ years older 7 :: < 24 -> false; // grandchildren must be 24+ years younger -> true; endrecode;
Example 3
function string GetDisplayName()
recode NAME -> GetDisplayName; "" -> "(Undefined)"; -> strip(toupper(NAME)); endrecode;
end;
Example 4
recode INDUSTRY_SECTION -> min_division :: max_division; "A" -> 1 :: 3; "B" -> 5 :: 9; "C" -> 10 :: 33; // ...endrecode;
See also: If Statement, When Statement
Recode Statement (Deprecated)Feature Upgrade: Starting with CSPro 7.4, this version of recode has been superseded by a new version, recode. Thisversion will be removed in a future version of CSPro. To update to the new version, you must change three things:
Pa ge 480 of 684 As s i gnme nt Sta te me nts

1. Replace => with ->
2. When using multiple variables, replace : with ::
3. Modify ranges from using - to using : (as with in lists)
For example, this shows the differences between using recode prior to CSPro 7.4 and using it starting with CSPro 7.4:
// prior to CSPro 7.4recode SEX : AGE => ASK_FERTILITY; 2 : 12-49 => 1; : => 0;endrecode;
// CSPro 7.4+recode SEX :: AGE -> ASK_FERTILITY; 2 :: 12:49 -> 1; -> 0;endrecode;
The following documentation is for the old recode statement.
Format:recode var-1 [:var-2 [:var-n]] => var-out;
[range-1] [:range-2 [:range-n]] => exp;[range-1] [:range-2 [:range-n]] => exp;
: : :[: [:]] => other-exp;
endrecode;
[ ] indicates that this part is optional. Description:
The recode statement assigns a value to a variable based on the value of one or more other variables. It is used torescale variables, to assign values to variables, and to create new variables from existing ones. It works like a multipleif statement but is easier to use. The recode statement evaluates each line within it sequentially, beginning with thefirst line.
If the values of variables "var-1" to "var-n" lie within the ranges "range-1" to "range-n", respectively, then "var-out" isassigned the value given by the expression on the first line and the recode statement is ended. If the values of thevariables "var-1" to "var-n" do not all lie within their specified ranges, then the next line of the recode statement isevaluated. This process continues until either a value is assigned to "var-out" or the end of the recode statement isreached.
A variable in a multiple record or group cannot be used in the recode statement except in data entry applications(where it may be specified without an index and the current occurrence of a variable is assumed). Use workingvariables to refer to or to assign values to variables in multiple sections or groups.
Variables "var-1" through "var-n" are referred to as independent variables and must be separated by colons [:]. "Var-out", the variable whose value is assigned by the recode statement, is referred to as the dependent variable. A recodestatement can have any number of independent variables, but only one dependent variable. The dependent variable canalso be included among the independent variables. The dependent variable is separated from the independent variablesby =>.
The ranges specified in the recode statement (i.e., "range-1" through "range-n") can take the following formats: • A range between two values, e.g., 12-15• An individual value, e.g., 9• A comparison with another value, using >, <, >=, <=, or <>, e.g., < 5• A special value , e.g., NOTAPPL• Some combination of these formats separated by a comma, e.g., < 5, 9, 12-15, missing A blank range for an independent variable includes all values. A blank range for all independent variables on the last
Pa ge 481 of 684 As s i gnme nt Sta te me nts

line of a recode statement acts as a catch-all condition. It ensures that a value is always assigned to "var-out" by therecode statement. If a value is not assigned by the recode statement, the value of "var-out" will not change. Thenumber of ranges on each line must equal the number of independent variables.
The expression for the dependent variable must result in a numeric value (if "var-out" is a numeric variable) or a string(if "var-out" is an alphanumeric variable).
(Note to ISSA users: The Recode and Box statements are identical.)
Example 1:recode AGE => AGE_GROUP; 0-19 => 1; 20-29 => 2; 30-39 => 3; 40-49 => 4; >= 50 => 5; => 9;endrecode; is equivalent to the following if statements: if AGE in 0:19 then AGE_GROUP = 1;elseif AGE in 20:29 then AGE_GROUP = 2;elseif AGE in 30:39 then AGE_GROUP = 3;elseif AGE in 40:49 then AGE_GROUP = 4;elseif AGE >= 50 then AGE_GROUP = 5;else AGE_GROUP = 9;endif;
Example 2:recode ATTEND : ED_LEVEL => EDUC; 2,notappl : => 1; 1 : 1 => 2; 1 : 2,3 => 3; : => 9;endrecode; is equivalent to the following if statements: if (ATTEND = 2 or ATTEND = notappl) then EDUC = 1;elseif ATTEND = 1 then if ED_LEVEL = 1 then EDUC = 2; elseif ED_LEVEL in 2:3 then EDUC = 3; endif;else EDUC = 9;endif;
Example 3:recode UNITS : NUMBER => DAYS; : notappl => notappl; : missing => missing; 1 : => NUMBER; 2 : => NUMBER*7;
Pa ge 482 of 684 As s i gnme nt Sta te me nts

3 : => NUMBER*30; 4 : => NUMBER*365; : => missing;endrecode; is equivalent to the following if statements: if NUMBER = notappl then DAYS = notappl;elseif NUMBER = missing then DAYS = missing;elseif UNITS = 1 then DAYS = NUMBER;elseif UNITS = 2 then DAYS = NUMBER*7;elseif UNITS = 3 then DAYS = NUMBER*30;elseif UNITS = 4 then DAYS = NUMBER*365;else DAYS = missing;endif;
See also: If Statement
Impute Function Format:impute (item-name, expression) [stat (item-name1, item-name2,....,item-nameN)] [title (alpha-expression)] [vset (vset-number)] [specific]; [ ] indicates that this part is optional. Description:
The impute statement assigns a value to a data item and logs the frequency of assignments. The arguments are: • item_name:
The dictionary data item to impute. The item must be numeric, with or without decimals, and can be single ormultiple. If the item is multiple and is being used inside its PROC, the current occurrence is assumed. If the item ismultiple and is being referenced outside its PROC, an occurrence must be specified. Occurrence numbers are 1-based.
• expression:
Is a variable name, a number, or an arithmetic expression; for example, 'TEMPAGE', '5', or '2+3'.
The options are: • STAT (item_name1[, item_name2]):
Tells the system to generate the secondary .dcf and .dat files. These files contain references to the data items thatwere changed; i.e., identifying ID values, the data item being imputed, and each subsequent data item named in thestat argument list.
• TITLE (alpha_expr):
Under the "IMPUTE STATISTICS" heading at the top of each page, this line will replace the default line that isgenerated ("IMPUTED Item (<unique name of data item>): <label name of data item>").
• VSET (vset_number):
Is the 1-based value set number of the item being imputed (i.e., impute_item_name), and corresponds to the orderof listing in the data dictionary (i.e., the first value set of an item will be number 1, the second value set will benumber 2, etc). This may yield a different number of frequencies than what occurred when not using this option. Forexample, if you are imputing "age", and do not use the VSET option, your report will show the total number ofimputations that occurred. However, if you use the VSET option, and the value set you choose does not list allpossible values, then the total number of imputations listed in the frequency report will most likely be less than thatgiven if you did not use this option.
Pa ge 483 of 684 As s i gnme nt Sta te me nts

• SPECIFIC:Indicates if the frequency will be generated alone or not. You can have multiple impute statements for a single dataitem. If you do this, you may want to have frequency reports separated for each impute. If specific is not used, allimputations for a given data item will be lumped together in the frequency report.
The impute command can generate up to three files:
<xxx>.frq
<xxx>.dat (only generated if the STAT option is used) <xxx>.dcf (only generated if the STAT option is used)
where XXX corresponds to the name of the data file used in the run. These files will be placed in the directory wherethe .bch application is located.
The format of the report contained in the .frq file is divided up into five columns as follows:
Category Freq CumFreq Percent CumPct
1 3432 3432.0 14.8 14.82 193 3625.0 0.8 15.7:
Column one: lists the values that were assigned during the imputations (1, 2, etc)
Column two: shows the frequency (that is, the total number of times) each value wasassigned (i.e., number '2' was assigned 193 times)
Column three: displays cumulative totals of the "Freq" column
Column four: indicates what percentage each imputation represents from the total number ofimputations made (i.e., number '2' was imputed 193 times, representing barelyone percent (0.8) of the total number of imputations made)
Column five: lists the cumulative totals of the "Percent" column
Example:impute(P04_AGE, TEMPAGE) title("Age updated via TempAge") vset(2);
Code Example:
A code example of this statement can be found in the Examples/Impute folder in the CSPro software folder.
SetValue FunctionFormat
b = setvalue(variable_name, value『『, occurrence1, ..., occurrence3』』);
Description
The setvalue function executes an assignment when the name of the variable to be assigned to is not known atcompilation time (when writing the application). The function searches for a variable with a name stored in the stringexpression variable_name, and if such a variable is found, the function assigns to it the value stored in value. If thevariable is numeric, then value should be a numeric expression, and if the variable is alphanumeric, then it should be astring expression. Optional arguments, occurrence1 to occurrence3, allow you to pass occurrence numbers to thefunction. This function is especially useful when combined with a userbar button or an OnKey character sequence.
Return ValuePa ge 484 of 684 As s i gnme nt Sta te me nts

The function returns a logical value of 1 (true) if the variable name was found and the value was successfully changed.The function returns 0 (false) if the variable was not found, if a string expression was assigned to a numeric variable, or ifa numeric expression was assigned to an alphanumeric variable.
Examples
// the following statements are equivalent but you would not use setvalue// because the left-hand side of the assignment is already known
setvalue("NAME", "Amelia");NAME = "Amelia";
setvalue("AGE", 20);AGE = 20;
// below, the left-hand side of the assignment is not known at compilation time
setvalue(getsymbol(), missing); // set the current field to missing
setvalue(getsymbol(), "DK", 3); // set the third occurrence of the current field to "DK"
See also: GetValue Function, Assignment Statement
GetValue FunctionFormats
d = getvalue(variable_name『『, occurrence1, ..., occurrence3』』);
d = getvaluenumeric(variable_name『『, occurrence1, ..., occurrence3』』);
s = getvaluealpha(variable_name『『, occurrence1, ..., occurrence3』』);
Description
The getvalue function returns the value of a variable when the variable name is not known at compilation time (whenwriting the application). The function searches for a variable with a name stored in the string expression variable_name,and if such a variable is found, the function returns the value of that variable.
The functions getvalue and getvaluenumeric return the value of numeric variables. The function getvaluealphareturns the value of an alphanumeric variable. Optional arguments, occurrence1 to occurrence3, allow you to passoccurrence numbers to the function.
Return Value
The function returns the variable's value if the variable name was found. If a numeric variable was not found, the functionsgetvalue and getvaluenumeric return default. If an alphanumeric variable was not found, getvaluealpha returns ablank string.
Example
errmsg("The current field's value is %d", getvalue(getsymbol()));
See also: SetValue Function
Pa ge 485 of 684 Da ta Entry Sta te me nts a nd Func ons

Data Entry Statements andFunctions
Accept Function Format 1:i = accept(heading, opt-1, opt-2[,...opt-n]);
Format 2:i = accept(heading, alpha-array | string-list);
Description:The accept function displays a menu with the heading and list of choices ("opt-1", "opt-2", etc.). The operator canmove the down- or up-arrow keys to select the desired options and press Enter. The operator can also use the mouseto click on the desired option. The number of options will be calculated dynamically if an alpha array is passed to the accept function. Each elementof the array will be displayed until a blank string is found in the array. A string list can also be used for the options.
Return value:
The function returns the number of the option selected: 1 for the first option, 2 for the second option, etc. The value 0is returned if the Esc key is pressed and none of the options is chosen.
Example 1: PROC UR preproc I = 0; do until I in 1:2 I = accept("Area Designation?", "Urban", "Rural"); enddo; $ = I; noinput;
Example 2:PROC GLOBAL array string acceptOptions(20); PROC ACTION
preproc
numeric ctr; do ctr = 1 while ctr <= count(NAME) acceptOptions(ctr) = NAME(ctr); enddo; acceptOptions(ctr) = ""; // mark the end of the array
ACTION = accept("Select a Person to Interview",acceptOptions); See also: Do Statement, Noinput Statement, Prompt Function
Pa ge 486 of 684 Da ta Entry Sta te me nts a nd Func ons

Advance StatementFormat
advance 『『to』』 『『field_name』』;
Description
The advance statement moves forward, field by field, to the specified field, executing logic in fields' preproc andpostproc events as it proceeds. It acts as though the Enter key were pressed repeatedly until either the specified fieldappears or one of the procedures executed during the advance goes to a different field.
The optional field_name is either the name of a field or is a string variable specifying the name of the field. If thefield_name is not specified, the program attempts to advance to the end of the level.
The target field can be located in any record at the same level as the current field, but it cannot be located at a differentlevel. The field must be later on the path than the current field, meaning that it is a field that has not yet been entered. Ifthe field has already been entered, an error message will be displayed during data entry. If you do not know whether thefield is earlier in the data path, use the move statement.
Note that the advance statement behaves differently from the skip statement, moving over some number of fields, ratherthan skipping past the fields.
Example
PROC CEB
preproc
// for girls aged less than 15, prefill in 0 for children ever born, but // keep the information on path in case the keyer wants to change it if AGE < 15 then CEB = 0; CEB_M = 0; CEM_F = 0; advance to MARITAL_AGE; endif;
See also: Ask Statement, Move Statement, NoInput Statement, Reenter Statement, Skip Statement
Ask StatementFormat
ask if condition;
Description
The ask statement determines whether a field, roster, or form is eligible for data entry. The statement must be coded in apreproc. The condition is evaluated, and if true, any additional logic is executed until the appropriate field is reachedand entered. If the condition is false, then control moves to the next field, roster, or form.
The ask statement is an inversion of the skip statement and can be written as:
if not condition then skip to next_field;endif;
Pa ge 487 of 684 Da ta Entry Sta te me nts a nd Func ons

Example
PROC MARRIAGE_AGE
preproc
ask if MARITAL_STATUS in 2:5;
See also: Advance Statement, Move Statement, Reenter Statement, Skip Statement
ChangeKeyboard FunctionFeature Upgrade: Starting with CSPro 7.1, you should no longer use this function as it may soon be removed fromCSPro. To replicate the behavior of the function, you can use the setproperty function with the argument "Keyboard".
Format
i = changekeyboard(dictionary_symbol『『,keyboard_id』』);
Description
The changekeyboard function modifies the keyboard input associated with a field on a form. The valuedictionary_symbol may be an item, group, form, or an entire dictionary. The numeric expression keyboard_id refers toa keyboard ID (which can be determined using the Change Keyboard Input dialog box). A keyboard ID of 0 will reset thefield to the default keyboard for the application.
Calls to this function are ignored when executed on mobile devices.
Return Value
The function returns the number of items whose capture positions were successfully changed. If a keyboard ID is notspecified, the function will instead return the current keyboard ID associated with a given field.
Example
PROC NAME
onfocus
// use the Dvorak keyboard to key in the name changekeyboard(NAME,66569);
See also: Change Keyboard Input
Connection FunctionFormat
b = connection(『『WiFi ‖ Mobile』』);
Description
The connection function determines whether a device has access to the Internet. If called with no arguments, then thefunction determines whether the device can connect to the Internet via Wi-Fi or via a mobile network like 3G, 4G, orGPRS. Optional arguments (WiFi and Mobile) allow you to determine if a given connection is valid on mobile CSEntry.On desktop CSEntry, the optional arguments are ignored and the function returns whether a connection can be made viaa LAN, a Wi-Fi connection, or a mobile network connection.
Pa ge 488 of 684 Da ta Entry Sta te me nts a nd Func ons

Return Value
The function returns a logical value of 1 (true) if a connection exists and 0 (false) otherwise. The presence of a connectiondoes not guarantee access to the Internet, however. For example, a device could be connected to a Wi-Fi router thatdoes not have an Internet connection. The function would still return 1 in that case.
Example
// only sync when connected on Wi-Fiif connection(WiFi) then if syncconnect(Dropbox) then syncdata(PUT, HOUSEHOLDQUESTIONNAIRE_DICT); syncdisconnect(); endif;endif;
DeMode FunctionFormat
i = demode();
Description
The demode function returns the data entry mode and is often used to limit the execution of certain statements to aspecific mode. For example, a variable may need initialization when the operator invokes add or verify mode, but can beleft unaltered for modify mode.
Return Value
The function returns an integer but there are also aliased values for the modes. There are three data entry operatormodes:
Return Value Mode1 add (entering new cases)2 modify (modifying cases that have already been entered)3 verify (reentering cases as a check for differences between the first and second entry)
Example
if demode() = add then INTERVIEW_START_DATE = sysdate("YYYYMMDD");endif;
Display OrientationDisplay Orientation In a data entry application that uses a rich visual interface, you may want to exert programmatic control over theorientation of the screen, e.g., whether the display is horizontal or vertical. For computers with video cards that supportchanging the display orientation, which includes most new computers as well as tablet PCs, two functions can be usedto control the orientation. Calls to these functions are ignored when executed on mobile devices. Format:
Pa ge 489 of 684 Da ta Entry Sta te me nts a nd Func ons

b = getorientation(); Description:
The getorientation function returns the current display orientation. The function will return one of four values:
0: The natural orientation of the display device
90: The display orientation is rotated 90 degrees from the natural orientation
180: The display orientation is rotated 180 degrees from the natural orientation
270: The display orientation is rotated 270 degrees from the natural orientation
SetOrientation Function Format:b = setorientation(numeric-expression);
Description:
The setorientation function changes the orientation of the display. The numeric expression must be one of the fourvalues listed above. The function returns 1 if the display orientation was successfully changed, 0 otherwise.
Example: function rotateScreen()
numeric nextOrientation = getorientation() + 90; if nextOrientation = 360 then nextOrientation = 0; endif; setorientation(nextOrientation);
end;
EditNote FunctionFormat
s = editnote(『『dictionary_symbol』』 『『,operator_id』』);
Description
The editnote function displays the note entry dialog box for adding or changing the note for a field or other dictionarysymbol. You can use this function to force the collection of note text. The operator can always create or edit a notemanually by pressing Ctrl+N (on desktop CSEntry) or by clicking on the Notes button on mobile CSEntry.
If no arguments are supplied, the note for the current field is displayed for editing. The optional argumentdictionary_symbol allows you to edit the note for a dictionary item, record, or level. If using the dictionary name, thecase note is edited. Another optional string argument, operator_id, allows you to edit the note for a particular operator. Ifno operator ID is supplied, then the note for the current operator will be edited.
Return Value
The function returns a string containing the note text. If there is no note, the length of the string will be 0.
Example
Pa ge 490 of 684 Da ta Entry Sta te me nts a nd Func ons

PROC COOKING
if COOKING = 9 then COOKING_OTHER = editnote(); endif;
See also: GetNote Function, PutNote Function
EndLevel StatementFormat
endlevel;
Description
The endlevel statement ends data entry for the current level of the current questionnaire. The effect of this statementdepends on where it is used. If it is used in a field, roster, or form procedure, all remaining procedures within that levelare skipped and control passes to the level postproc.
If the statement is executed in a level preproc or postproc, control passes to the postproc of the next-highest level. If itis used in the highest-level postproc, control passes to the form file's postproc (if there is one), and then data entry isterminated for the current case.
In system-controlled applications, CSPro will continue to add cases at the lowest level of a multiple-level dictionary untilit is told to stop by endlevel. Therefore, the statement should be used in the postproc of the lowest level to end dataentry at that level.
Example
if MORE_WOMEN = 0 then endlevel;endif;
See also: EndGroup Statement
EndGroup StatementFormat
endgroup;
Description
The endgroup statement finishes data entry for the current group (roster or multiply-occurring form) in a data entryapplication. It can not be used in a batch application. If the statement is used in an item procedure, it causes anautomatic skip to the postproc of the current group/record. If the statement is executed in the preproc of thegroup/record, the entire group/record is skipped and control passes to the group/record's postproc.
This function has superseded the endsect statement. Where endsect exists in an application, it will continue to work,but users creating new applications should adopt the endgroup instruction.
Example
if KIDSBORN = 0 then endgroup;endif;
Pa ge 491 of 684 Da ta Entry Sta te me nts a nd Func ons

See also: EndLevel Statement
Enter StatementFormat
enter form_file_name;
Description
The enter statement allows the use of a secondary form file to capture data in a secondary data file.
The form_file_name is the name of the secondary form file that you want to use. The secondary form file must be part ofyour data entry application.
The enter statement cannot be used inside a user-defined function.
Example
if V108 = 6 then enter OTHERS_FF;endif;
GetCaptureType FunctionFeature Upgrade: Starting with CSPro 7.1, you should no longer use this function as it may soon be removed fromCSPro. To replicate the behavior of the function, you can use the getproperty function with the argument"CaptureType".
Format
i = getcapturetype(field_name);
Description
The getcapturetype function returns the capture type currently associated with a field on a form. The field_name mustbe located on one of the application's forms.
Return Value
The function returns the capture type, which is one of the following values:
Code Capture Type0 Textbox1 Radio Button2 Checkbox3 Drop Down Box4 Combo Box5 Date Picker6 Number Pad (desktop CSEntry only)
Example
Pa ge 492 of 684 Da ta Entry Sta te me nts a nd Func ons

PROC SEX
onfocus
// change SEX from a radio button to a drop down box if getcapturetype(SEX) = 1 then setcapturetype(SEX,3); endif;
See also: SetCaptureType Function
GetCaseLabel FunctionFormat
s = getcaselabel(dictionary_name);
Description
The getcaselabel function returns the label for the case currently associated with the dictionary dictionary_name. Thedictionary can be either the main input dictionary of a data entry application or an external dictionary.
Return Value
The function returns the label if one has been set, or a blank string if there is no label for the case.
Example
PROC LAST_FIELD
string end_query = maketext("Are you finished entering '%s'?", getcaselabel(CENSUS_DICT));
if accept(end_query, "Yes", "No") <> 1 then reenter; endif;
See also: SetCaseLabel Function, Key Function
GetDeviceID FunctionFormat
s = getdeviceid();
Description
The getdeviceid function returns a string that can be used to uniquely identify a device. As programmed now, it returnsa MAC address on Windows and an ANDROID_ID on Android, but this may change in the future. It is theoreticallypossible that this ID is not unique, but the chance of this happening without deliberate user invention is virtuallyimpossible.
Return Value
The function returns a string with the unique ID.
Example
Pa ge 493 of 684 Da ta Entry Sta te me nts a nd Func ons

PROC USER_NAME
if not loadcase(USER_PERMISSIONS_DICT,USER_NAME) then errmsg("The entered user name is not in the database of users."); reenter;
elseif USER_ALLOWED_DEVICE <> getdeviceid() then errmsg("You, %s, do not have permission to use device%s.",strip(USER_NAME),getdeviceid()); reenter;
endif;
See also: GetOperatorId Function, GetUserName Function, GetBluetoothName Function
GetImage FunctionFormat
s = getimage(item_name ‖ value_set_name, value);
Description
The getimage function returns the filename of a value set image. Based on the provided item or value set, the imagefilename associated with the value will be returned. The value is either a numeric or string expression, based on thetype of the item. If an item_name is used instead of a value_set_name, then the function will search for the relevantimage in the item's current value set.
Return Value
The function returns a string containing the image filename, or a blank string if there is no value set image for theprovided value or if the provided value does not exist in the value set.
Example
PROC IMAGE_SELECTOR
string imageFilename = getimage(IMAGE_SELECTOR_VS1, IMAGE_SELECTOR);
view(imageFilename);
See also: GetLabel Function, SetValueSet Function
GetNote FunctionFormat
s = getnote(『『dictionary_symbol』』 『『,operator_id』』);
Description
The getnote function returns a string containing the note for a field or other dictionary symbol. If no arguments aresupplied, the note for the current field is returned. The optional argument dictionary_symbol allows you to query thenote for a dictionary item, record, or level. If using the dictionary name, the case note is returned. Another optional stringargument, operator_id, allows you to query the note for a particular operator. If no operator ID is supplied, then the notefor the current operator will be returned.
Pa ge 494 of 684 Da ta Entry Sta te me nts a nd Func ons
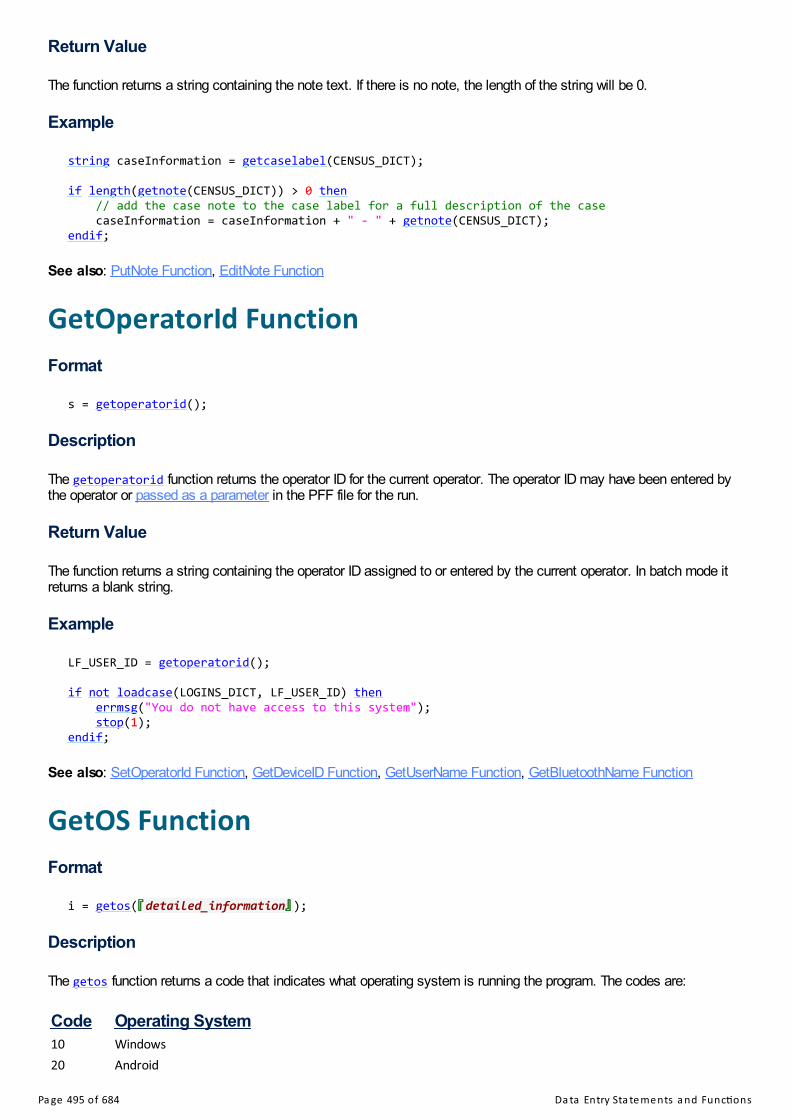
Return Value
The function returns a string containing the note text. If there is no note, the length of the string will be 0.
Example
string caseInformation = getcaselabel(CENSUS_DICT);
if length(getnote(CENSUS_DICT)) > 0 then // add the case note to the case label for a full description of the case caseInformation = caseInformation + " - " + getnote(CENSUS_DICT);endif;
See also: PutNote Function, EditNote Function
GetOperatorId FunctionFormat
s = getoperatorid();
Description
The getoperatorid function returns the operator ID for the current operator. The operator ID may have been entered bythe operator or passed as a parameter in the PFF file for the run.
Return Value
The function returns a string containing the operator ID assigned to or entered by the current operator. In batch mode itreturns a blank string.
Example
LF_USER_ID = getoperatorid();
if not loadcase(LOGINS_DICT, LF_USER_ID) then errmsg("You do not have access to this system"); stop(1);endif;
See also: SetOperatorId Function, GetDeviceID Function, GetUserName Function, GetBluetoothName Function
GetOS FunctionFormat
i = getos(『『detailed_information』』);
Description
The getos function returns a code that indicates what operating system is running the program. The codes are:
Code Operating System10 Windows20 Android
Pa ge 495 of 684 Da ta Entry Sta te me nts a nd Func ons

An optional alphanumeric variable detailed_information can be passed to the function that will give detailed informationon the operating system, including the operating system name and the version number. Note, however, that Windowsversion numbers do not necessarily match the official release numbers. For example, Windows 8.1 has a version numberof 6.3.
Return Value
The function returns the operating system code or, optionally, a text description of the operating system.
Example
string operating_system_name;getos(operating_system_name);
errmsg("Code = %d, Text = %s", getos(), operating_system_name);
// the above code might display, for example:// Code = 10, Text = Windows;6.1// Code = 20, Text = Android;4.2.2
See also: GetOperatorId Function, GetUserName Function, GetBluetoothName Function
GetRecord FunctionFormat
s = getrecord(item_name_string);
Description
The getrecord function returns the name of the record that contains the item identified by the string expressionitem_name_string.
Return Value
The function returns a string with the name of the record. If the item does not exist, the function returns a blank string.
Example
errmsg("SEX belongs to %s",getrecord("SEX")); // SEX belongs to POPULATIONerrmsg("WATERSOURCE belongs to %s",getrecord("WATERSOURCE")); // WATERSOURCE belongs toHOUSING
See also: GetSymbol Function
GetUserName FunctionFormat
s = getusername();
Description
This getusername function returns the login of the current user. On Windows this is the name of the user currentlylogged in, whereas on Android this is the first account registered on the device.
Pa ge 496 of 684 Da ta Entry Sta te me nts a nd Func ons

Return Value
The function returns a string containing the user name.
Example
PROC USER_NAME
preproc
USER_NAME = getusername(); noinput;
See also: GetDeviceID Function, GetOperatorId Function, GetOS Function, GetBluetoothName Function
GPS FunctionIt is possible to take advantage of the functionality of a Global Positioning System (GPS) receiver when designing anapplication for use on either a laptop or tablet with a GPS receiver or using either Android or Windows Mobile operatingsystems. Manipulating the GPS receiver is done from within the program's logic.
Basic Example
gps(open); // on Androidgps(open,3,4800); // on a laptop or Windows tablet; COM3, 4800 baud
if gps(read,5) then // a successful attempt at a read, for up to five seconds errmsg("Latitude is %f, longitude is %f",gps(latitude),gps(longitude));
else errmsg("GPS signal could not be acquired");
endif;
gps(close);Opening and Closing the GPS Receiver
b = gps(open | close);Before using the device's GPS receiver, it is necessary to open a connection to the GPS unit. After making all necessaryGPS readings, close the connection. The function returns 1 if successful, 0 otherwise. If using CSPro on a Windowslaptop or tablet, it is necessary to specify the hardware settings of the GPS unit, specifically the number of the COM portand the baud rate (see the above example).
Obtaining the Last Successful GPS Reading
b = gps(readlast);The readlast command obtains the last successful GPS reading, a reading that might be very old. If the GPS unit hasbeen turned on for some time and the device is being used outdoors, it is likely that the reading is very fresh (recent), butif, for example, an enumerator walks inside a building to conduct an interview, the reading may be minutes or hours old,from the last time that the enumerator was outside. The function returns 1 if there was a successful previous reading, 0otherwise.
Obtaining a New GPS Reading
b = gps(read);b = gps(read,numeric-expression);i = gps(read,numeric-expression,alpha-expression);
The read command obtains a new GPS reading in a specified time period (in seconds). If no time period is specified, theprogram will pause for up to three seconds to obtain a reading. A reading time of up to ten minutes (600 seconds) maybe specified. An optional third argument displays a message while the program attempts to obtain a GPS reading. The
Pa ge 497 of 684 Da ta Entry Sta te me nts a nd Func ons

message box has a cancel button and if the user cancels the operation, the function returns -1. Otherwise the functionreturns 1 if a reading was successful, 0 otherwise. Unlike the readlast command, a successful function call with readguarantees a fresh GPS reading.
It is possible on Android devices to specify a desired level of accuracy for the reading. When specified, the function willcontinue to take GPS readings until a reading at or below the level of accuracy is achieved. The function will still return 1if, though timing out, a successful reading at an accuracy level greater than specified was achieved during the allottedtime period. This ensures that a GPS reading will be as accurate as possible, but with the assumption that any readingis better than no reading. Use a second numeric expression to specify the level of the accuracy.
b = gps(read,time-period,accuracy-level);i = gps(read,time-period,accuracy-level,alpha-expression);
Querying a Successful GPS Read
If the readlast or read commands returned successfully, the GPS system has valid values for latitude and longitude.Further attributes of the reading can be queried though they are not guaranteed to be valid.
f = gps(latitude);f = gps(longitude);f = gps(altitude);f = gps(satellites);f = gps(accuracy);f = gps(readtime);
Latitude and longitude return coordinates in degrees. Altitude returns the number of meters above sea level of thereading. Satellites returns the number of satellites used to calculate the values in the last reading. Generally, the greaternumber of satellites, the better the quality of the reading. Accuracy is a calculation of the precision of the last reading.On Windows devices, an accuracy value of 1 is the most accurate and 50 is the least accurate reading. On Androiddevices, the value signifies the accuracy of the reading, measured in meters. Readtime returns, in local time, the time ofthe last successful reading. If the queried value (other than latitude and longitude) is not available, or if the last GPS readwas unsuccessful, the function will return DEFAULT.
Calculating Distances
The gps function can also calculate great-circle distances between two sets of GPS coordinates. Great-circlecalculations give a rough approximation of the distance between two points. The function returns the distance asmeasured in meters.
f = gps(distance,numeric-expression,numeric-expression,numeric-expression,numeric-expression);
numeric kilometersToCensusBureau =gps(distance,38.846261,-76.929445,gps(latitude),gps(longitude)) / 1000;
HideOcc FunctionFormat
b = hideocc(roster_name ‖ form_name『『(occurrence_number)』』);
Description
The hideocc function hides an occurrence of a roster or form from showing in the mobile CSEntry case tree. It will alsohide the row from appearing on a roster on desktop CSEntry. If no numeric occurrence_number is supplied, then thecurrent occurrence for the roster or form will be hidden.
Return Value
The function returns a logical value 1 (true) if successful and 0 (false) otherwise.
Example
Pa ge 498 of 684 Da ta Entry Sta te me nts a nd Func ons

PROC KEEP_PERSON
if KEEP_PERSON = 0 then hideocc(PERSON000); endif;
See also: ShowOcc Function, SetOccLabel Function, Occurrence Labels
Highlighted FunctionFormat
b = highlighted(field_name);
Description
The highlighted function is used to determine whether a field, field_name, is on the path (green) in system-controlledmode, or has been passed through (green or yellow) either directly or by skips in operator-controlled mode. This can beused to determine whether an item has been entered or skipped because of logic in system-controlled mode, or whetherit is before or after the high water mark in operator-controlled mode.
Return Value
The function returns 1 (true) if the field has been passed (green or yellow) and 0 (false) if the field is yet to be entered(white).
Example
if highlighted(HOURS_WORKED) then errmsg("Hours Worked = %d",HOURS_WORKED);else errmsg("Skipped or not entered yet!");endif;
See also: VisualValue Function, Operator vs. System Controlled, Color of Fields in Data Entry User's Guide
IsPartial FunctionFormat
b = ispartial(『『dictionary_name』』);
Description
The ispartial function determines, for data entry input dictionaries whether a case was opened from a partial case, andfor external dictionaries where the case is currently marked as a partial save. By default the function looks at the caseloaded by the main data entry input dictionary, but an optional argument, dictionary_name, allows you to determine thepartial save status of cases in external dictionaries.
Return Value
The function returns a logical value of 1 (true) if the case was opened from a partial case or if it has been partially savedduring the data entry session and 0 (false) otherwise.
Example
Pa ge 499 of 684 Da ta Entry Sta te me nts a nd Func ons

if ispartial() then errmsg("Entering a partially saved case");endif;
See also: SavePartial Function, OnStop Global Function, IsVerified Function
IsVerified FunctionFormat
b = isverified(dictionary_name);
Description
The isverified function determines whether a case has been verified by double-keying. The function, with argumentdictionary_name, can look at cases in external dictionaries or in batch edit input dictionaries.
Return Value
The function returns a logical value of 1 (true) if the case was verified and 0 (false) otherwise.
Example
PROC CASE_MENU
if CASE_MENU = 1 then // verify case
if isverified(SURVEY_DICT) then errmsg("The case has already been verified."); reenter;
else // ...
endif;
endif;
See also: IsPartial Function
Move StatementFormat
move 『『to』』 field_name 『『advance ‖ skip』』;
Description
The move statement allows movement to a field without regard to whether it is before or after the current field. This isparticularly useful in an OnKey or userbar function because you may not know at what point the function will be called.The field_name is either the name of a field or is a string variable specifying the name of the field.
Movement to a field before the current field acts exactly like a reenter statement. The action of move to a field after thecurrent field depends on the optional keywords advance or skip. If no keyword is specified, or if skip is coded, thenforward movement acts exactly like a skip statement, skipping past fields. If advance is coded, then forward movementacts exactly like an advance statement, moving over fields.
Pa ge 500 of 684 Da ta Entry Sta te me nts a nd Func ons

Example
function numeric OnKey(numeric keystroke)
if keystroke = 2070 then // Ctrl+F // move to the first person move to NAME(1) advance;
elseif keystroke = 2076 then // Ctrl+L // move to the last person move to NAME(totocc(PERSON_REC000)) advance;
else OnKey = keystroke;
endif;
end;
See also: Advance Statement, Ask Statement, Reenter Statement, Skip Statement
NoInput StatementFormat
noinput;
Description
The noinput statement prevents input of a field during data entry. This command can be coded only in a preproc oronfocus procedures.
When the statement is executed in a preproc, control passes directly from the field's preproc to the field's postproc,executing the onfocus and killfocus procedures (if present) and performing the item range check, but not permittinginput of the field.
When the statement is executed in an onfocus, control passes directly from the field's onfocus to the field's postproc,executing the killfocus procedure if present and performing the item range check, but not permitting input of the field.The field is on the data entry path even though entry is prevented.
The effect of the noinput statement is similar, but not identical, to that of a protected field. If a noinput statement isused, it is possible to back-tab to the field. It is not possible to back-tab to a field that is protected.
Example
PROC MARITAL_STATUS
preproc
if AGE < 12 then MARITAL_STATUS = 1; noinput; endif;
See also: Advance Statement
OnChangeLanguage Global Function
Pa ge 501 of 684 Da ta Entry Sta te me nts a nd Func ons

Format:function OnChangeLanguage();
Description:
The onchangelanguage global function allows you to execute certain code after the user has changed the CAPIlanguage via the CSEntry Options menu. This function must be placed in the Global Procedure.
Returned value:The return value of the function is ignored.
Example: function OnChangeLanguage() setvaluesets(concat("_",getlanguage()));end; See also: Global Procedure, User Defined Functions
OnChar Global Function Format:function OnChar(key-value);
Description:
The onchar global function allows you to trap characters in order to perform special actions or to change the action ofthe character. It can also be used to disable or remap characters. This function must be placed in the GlobalProcedure. If an onchar global function is coded, every character the operator types is sent to the onchar function for processing. Ifthe onchar function returns a value, then the return value is processed by the field as the character. If a statement inthe onchar function causes movement to another field within the case, then the movement is executed. If no oncharfunction is coded, then characters are unmodified.
The key value is a number code identifying what character was typed using the keyboard. Its value can be usedwithin the function. You can use the OnKey Character Map to determine the value of characters. Calls to this function are ignored when executed on mobile devices.
Differences between onkey and onchar:The onchar function differs from the onkey function. A keystroke contains information about the key pressed on thekeyboard, regardless of what this keystroke eventually maps to. A character refers to the final representation of one ormore keystrokes. This is important when using non-Latin languages that require multiple keystrokes to create onecharacter. For example, creating the Chinese character '马' using a Pinyin input system requires two keystrokes: 'm'and 'a.' The code for this character is 39532. If typing such a keystroke, onkey will be called several times beforeonchar is called. If both onkey and onchar functions exist, onkey will always be called before onchar is called. The onchar function also returns values different from the onkey function for some Latin keystrokes. For example, withCaps Lock off, if a keyer holds down Shift and types 'M,' onkey will return 1077 (1000 for the shift, 77 for 'm'). Onchar,on the other hand, will return 77, the character code for 'M.' For a lowercase 'm,' onkey returns 77 and onchar returns109, the character code for 'm.' The onchar function does not return any information about whether any of the Shift, Ctrl, or Alt keys were held downwhen the character was typed.
Returned value:
Like any global function, the onchar global function returns an integer value. The value should be either the value of thecharacter pressed (the same as the value passed to the function), a substituted character value (remapping thecharacter), or zero (0) to indicate that the character is to be ignored.
Example:
Pa ge 502 of 684 Da ta Entry Sta te me nts a nd Func ons

function OnChar(numeric keystroke)
if keystroke = 24110 then // 帮 (bang) move to HELP_FORM; else OnChar = keystroke; endif; end; See also: Global Procedure, User Defined Functions, OnKey Character Map, Onkey Global Function
OnKey Global Function Format:function OnKey(key-value);
Description:
The onkey global function allows you to trap keystrokes in order to perform special actions or to change the action ofthe key. It also can be used to disable or remap keys. This function must be placed in the Global Procedure.
If an onkey global function is coded, every keystroke the operator types is sent to the onkey function for processing. Ifthe onkey function returns a value, then the return value is processed by the field as the keystroke. If a statement inthe onkey function causes movement to another field within the case, then the movement is executed. If no onkeyfunction is coded, then keystrokes are unmodified.
The key value is a number code identifying what key was pressed on the keyboard. Its value can be used within thefunction. See detailed description below. You can use the OnKey Character Map to determine the value of characters. Calls to this function are ignored when executed on mobile devices.
Returned value:
Like any global function, the onkey global function returns an integer value. The value should be either the value of thekey pressed (the same as the value passed to the function), a substituted key value (remapping the key), or zero (0)to indicate that the key is to be ignored.
Example:function OnKey(numeric x) if x in 114:116 then { F3, F4, F5 } { don't allow these keys to work, eat the key } OnKey = 0; elseif x = 2069 then { Ctrl+E go to END_FIELD } move to END_FIELD; else OnKey = x; { return rest of keys } endif;end;
Keyboard Key Values The key values passed into and out of the onkey function are given below. Single key values are given below. When Shift, Ctrl, and/or Alt are held down while pressing another key, the followingvalues are added to the code of the other key.
Keys AddShift 1000
Pa ge 503 of 684 Da ta Entry Sta te me nts a nd Func ons

Shift 1000Ctrl 2000Shift+Ctrl 3000Alt 4000Alt+Shift 5000Alt+Ctrl 6000Alt+Shift+Ctrl 7000
For example, if Shift, Ctrl, and/or Alt are held down when A is pressed
Keys CodeA 65Shift+A 1065Ctrl+A 2065Shift+Ctrl+A 3065Alt+A 4065Alt+Shift+A 5065Alt+Ctrl+A 6065Alt+Shift+Ctrl+A 7065
Numbers
For the number keys across the top of the keyboard, or on the numeric keypad when the "NumLock" button isdepressed, the following keyboard key value will be returned: Key Code
0 481 492 503 514 525 536 547 558 569 57
LettersFor the letters a-z and A-Z, the following keyboard key values will be returned. Please note that the status of theCapsLock key does not effect the code. However, if the Ctrl, Shift, and/or Alt keys are being held down, they willchange the code returned. See above.
Key Code
a 65b 66c 67d 68e 69f 70g 71h 72i 73j 74k 75l 76
m 77n 78o 79p 80q 81r 82s 83
t 84
Pa ge 504 of 684 Da ta Entry Sta te me nts a nd Func ons

t 84u 85v 86w 87x 88y 89z 90
Function Keys
Key CodeF1 112F2 113F3 114F4 115 F5 116F6 117F7 118F8 119 F9 120F10 121F11 122F12 123
Non-numeric Numpad Keys:
Key CodeNumLock
144
/ 111 (with or without numlock)
* 106 (with or without numlock)
- 109 (with or without numlock)
+ 107 (with or without numlock)
. 110 (with num lock—46without)
Miscellaneous Keys:
Key CodeSysReq no code returned
Bksp 8Tab 9
Enter 13 (with or withoutnum lock)
Break 19Caps 20
Escape 27Space 32
Page Up 33Page Down 34
End 35Home 36
Left Arrow 37Up Arrow 38
RightArrow
39
DownArrow
40
Pa ge 505 of 684 Da ta Entry Sta te me nts a nd Func ons

Insert 45Delete 46Wnd 91 (flying window)
Scrol l Lock 145; 186= 187, 188 (comma)- 189. 190 (period)/ 191` 192 (accent)[ 219] 221\ 220' 222
Control Keys:
Key CodeShift 1016Ctrl 2017Alt 4018
See also: Global Procedure, User Defined Functions, OnKey Character Map, OnKey Character Map
OnStop Global FunctionFormat
function OnStop();
Description
OnStop is a special global function. It has no return value and must be placed in the PROC GLOBAL section just like anyother user-defined functions.
When defined, it provides control over what happens when the data entry operator tries to stop data entry using the ESCkey, the Stop button, pressing Ctrl+S, or attempting to exit data entry. When any of the above events occur, theOnStop function is executed and no stop dialog (discard, save, cancel) occurs.
If an OnStop function has been coded in a data entry application, then when resuming a partial case, no resume dialog("Do you want to go to last...") occurs. If special actions are required when entering a partial case, check whether apartial case has been entered using the ispartial function and program the appropriate action. You can retrieve thename and occurrence number of the last field entered (on a one-level application) by calling getsymbol(savepartial).
The OnStop function is not executed when the stop function is executed.
The OnStop function can be used to keep the operator from stopping data entry (see Example 1 below) or to allowstopping only under certain conditions (see Example 2 below).
Example 1
PROC GLOBAL
function OnStop() reenter;end;
Example 2Pa ge 506 of 684 Da ta Entry Sta te me nts a nd Func ons

PROC GLOBAL
function OnStop() if getsymbol() in "FIRST_NAME", "LAST_NAME" then reenter; else savepartial(); stop(1); endif;end;
See also: User-Defined Functions, Function Statement, Stop Function, SavePartial Function, IsPartial Function,EndLevel Statement
OnSystemMessage Global FunctionFormat
function numeric OnSystemMessage(『『numeric message_number』』 『『, numeric message_type』』 『『, stringmessage_text』』);
Description
OnSystemMessage is a special global function. It is a function that gets called when a system message is issued. This issimilar to the OnKey or OnStop functions, which get called automatically by the running CSPro application, not becauseof a call to the function in your logic. A system message is a message such as "Invalid subscript," not a user messagethat comes from an errmsg statement.
The function must return a numeric value and you can provide from one to three parameters. If one numeric parameter isprovided, then it will receive the message number. If two numeric parameters are provided, the second numeric parameterwill get the message type (1 = error, 2 = warning). If a string parameter is provided, then it will receive the message text.
Return Value
Return 0 (false) to suppress the message. Returning anything other than 0 means that the message will be issued(displayed to the enumerator in a data entry application or written to the listing file in a batch application).
Example 1
function OnSystemMessage(numeric message_number, numeric message_type)
// suppress all warning messages recode message_type -> OnSystemMessage; 1 -> true; 2 -> false; endrecode;
end;
Example 2
Pa ge 507 of 684 Da ta Entry Sta te me nts a nd Func ons

function OnSystemMessage(numeric message_number, string message_text)
// modify the displayed message for invalid subscript errors if message_number = 1008 then errmsg("Subscript Error (%d). Most likely cause is no children in household. %s",message_number, message_text);
// suppress the system message exit false;
endif;
// issue the message in all other cases exit true;
end;
See also: User-Defined Functions, Function Statement
Prompt FunctionFormat
s = prompt(message『『, initial_value』』 『『, prompt_type』』);
Description
The prompt function displays a dialog box showing the string expression message and provides a text box for anoperator to enter a string value. An optional string expression initial_value determines the starting value displayed to theoperator. Another optional argument, prompt_type, provides a way to customize the kind of entry permitted. Typesinclude:
Password: The entered characters will be masked with asterisks.
UpperCase: Alphabetical characters will automatically be converted to their uppercase equivalents.
Numeric: Only numeric characters can be entered.
Multiline: The text box will support multiple lines of data entry and the Enter key on the keyboard will insertcarriage returns, which will be converted to "\n" in the returned value.
Return Value
The function returns a string value containing the entered value. If the operator canceled without entering a string, thefunction returns a blank string (even if an initial value was provided).
Example 1
string surveyPassword = prompt("Enter your password:",password);
Example 2
if ROOF_TYPE = 9 then // other (specify) ROOF_TYPE_OTHER = prompt("Specify the kind of roof on the dwelling unit:", ROOF_TYPE_OTHER,multiline);endif;
See also: Accept Function
Protect FunctionPa ge 508 of 684 Da ta Entry Sta te me nts a nd Func ons

Format
i = protect(symbol, protect_property);
Description
The protect function modifies the protected property of the field symbol. If symbol is a block, group, form, or dictionary,the function will try to apply the protected property to all fields belonging to that symbol. The numeric expressionprotect_property turns the protected property off (if zero) or on (if nonzero).
Return Value
The function returns the number of items whose protected property was successfully changed.
Example
PROC RELATIONSHIP
onfocus
// automatically set the first person to be the head of the household // and protect the field so that it is not shown to the enumerator if curocc() = 1 then RELATIONSHIP = 1; protect(RELATIONSHIP, true); else protect(RELATIONSHIP, false); endif;
See also: SetProperty Function
PutNote FunctionFormat
b = putnote(note_text『『,dictionary_symbol』』 『『,operator_id』』);
Description
The putnote function sets the note for a field or other dictionary symbol, replacing the note with the text found in thestring expression note_text. If the note text is an empty string, the note will be removed. The optional argumentdictionary_symbol allows you to set the note for a dictionary item, record, or level. If using the dictionary name, thecase note is set. Another optional string argument, operator_id, allows you to set the note for a particular operator. If nooperator ID is supplied, then the note for the current operator will be set.
Return Value
The function returns a logical value of 1 (true) if successful and 0 (false) otherwise.
Example
PROC STATUS
// set the case note to a description of the interview status putnote("Interview Status: " + getlabel(STATUS,STATUS),CENSUS_DICT);
See also: GetNote Function, EditNote Function
Pa ge 509 of 684 Da ta Entry Sta te me nts a nd Func ons

RandomizeVS FunctionFeature Upgrade: Starting with CSPro 7.5, you are encouraged to use the valueset.randomize function.
Format
i = randomizevs(dictionary_symbol『『, exclude(exclude_code1, ..., exclude_codeN)』』);
Description
The randomizevs function scrambles the order of values in a value set. The function is useful when using extendedcontrols in a data entry application. Some survey applications choose to display the possible response categories in arandomized way so as to minimize an enumerator or respondent's selection bias.
The dictionary_symbol may be the name of a value set, item, group, form, or an entire dictionary. If randomizing thevalue set for an item, an optional exclusion list, exclude_code1, ..., exclude_codeN, allows you to prevent certainvalues from being given a random order. This is useful for variables like Don't Know, which, after the randomization, wouldremain at the bottom of the list of values.
Return Value
The function returns the number of items for which the value sets were successfully randomized.
Example
randomizevs(FAVORITE_FOOD_GROUP, exclude(5));
becomes
See also: Random Function, RandomIn Function, Seed Function, ValueSet.Randomize Function
Reenter StatementFormat
reenter 『『field_name』』;
Description
The reenter statement is used to force the entry operator to reenter the contents of the current field or of a field that wasentered earlier. The optional field_name is either the name of a field or is a string variable specifying the name of thefield. If the field_name is not specified, the current field is reentered. The field to be reentered must be earlier on the datapath than the current variable. If it is not, an error message will be displayed during data entry. If you do not knowwhether the field is earlier in the data path, use the move statement.
When a reenter statement is executed, the preproc of the reentered field will not be executed. The postproc of the
Pa ge 510 of 684 Da ta Entry Sta te me nts a nd Func ons

field will be executed normally after the field has been reentered. If the field is on a different form than the current field,that form will be displayed automatically.
Example 1
PROC RELATIONSHIP
if curocc() = 1 and RELATIONSHIP <> 1 then errmsg("The head of household must be entered on the first row."); reenter; endif;
Example 2
PROC DOB_YEAR
if DOB_YEAR = CensusYear and DOB_MONTH > CensusMonth then errmsg("The date of birth cannot be after the census date. Reenter the month andyear."); reenter DOB_MONTH; endif;
See also: Advance Statement, Ask Statement, Move Statement, Skip Statement
SavePartial FunctionFormat
b = savepartial(『『clear』』);
Description
The savepartial function saves the current case as a partially added, modified or verified case. It is useful in a largedata entry application to perform intermediate backups. It can also be used to automatically perform a partial save whenthe keyer stops the case before completing it. You can also have CSEntry automatically partially save cases.
The function can be coded only in the preproc or postproc of a field. The function cannot be used before all ID values forthe case have been entered. You can get the field name where the last partial save occurred by codinggetsymbol(savepartial).
An optional argument, clear, results in the removal of visual values before the data is saved. This behavior is the sameas would happen if the case was completed in a system controlled application. Generally you will want to maintainskipped-over fields in case an interviewer decides to make changes to the case at a later point, so it is rare that youwould use this argument.
Return Value
The function returns a logical value of 1 (true) if the case was successfully saved as a partial case and 0 (false)otherwise.
Example
PROC LINE_NUMBER
preproc
savepartial();
See also: IsPartial Function, Stop Function
Pa ge 511 of 684 Da ta Entry Sta te me nts a nd Func ons

SelCase Function Format:b = selcase([heading,]ext-dict-name,alphanumeric-expression[,offset])
[include(dictionary-item])] [where logical-expression]; [ ] indicates that this part is optional. Description:
The selcase function allows a data entry operator to select and load a case from an external file. This function canonly be used in data entry applications. It searches the index of the external file named by "ext-dict-name" for allcases whose keys match the criterion specified by "alphanumeric-expression." If two or more matching keys arefound, they will be presented to the entry operator in a display box. Using a highlight bar, the operator can select oneof the keys. The case identified by that key is then read into memory.
The "offset" tells CSPro the number of characters, beginning with the first character of the ID items for the externalfile, that should be suppressed if multiple matches are found. • alphanumeric-expression: can be a literal or a CSPro expression. The matching is case sensitive. If an empty stringis passed, all cases in the external file are returned. • include: tells CSPro to list additional items from the specified dictionary in the display box. • where: applies the logical expression to all cases returned by the selcase statement. The resulting display box willonly show cases in which the logical expression evaluated to true (returning a nonzero value).
It is possible, by specifying dictionary access parameters after the dictionary name, to limit the cases that the selcasefunction processes.
Return value:The function returns a logical value of true (1) if a case is found or selected by the entry operator and false (0)otherwise.
Example 1:OK = selcase(LOOKUP,concat(PROV, DIST));
Example 2:OK = selcase(OCCUPATION_DICT, "Plantation"); will return cases whose key begins with "Plantation."
Example 3:OK = selcase(OCCUPATION_DICT, "Plantation")
include(OCCUPATION_CODE, OCCUPATION_SUMMARY_LEVEL);
Pa ge 512 of 684 Da ta Entry Sta te me nts a nd Func ons

Example 4:OK = selcase(OCCUPATION_DICT, "")
include(OCCUPATION_CODE, OCCUPATION_SUMMARY_LEVEL)where OCCUPATION_CODE >= 631 and OCCUPATION_CODE <= 633;
will result in the same screen as appeared in Example 3.
Set Attributes StatementFeature Upgrade: Starting with CSPro 7.1, you should no longer use these functions as they may soon be removedfrom CSPro. To replicate the behavior of the functions, you can use the setproperty function with one of the followingarguments: "CaptureType", "Protected", or "UseEnterKey".
Format 1:set attributes (field-1[, field-2, ..., field-N]) display | visible | autoskip | return | protect | hidden | native;
Format 2:set attributes(field-1[, field-2, ..., field-N]) assisted on|off [(question, responses)];
[ ] indicates that this part is optional| indicates that one of the attributes may be selected
Description of Format 1:
This set attributes statement switches the values of various field properties. Field properties can be set statically, viathe field properties dialog box, or dynamically at run time via the set attributes command. A dynamically set fieldproperty will override any statically set property. Field properties can be set dynamically anywhere in the programexcept in the PROC GLOBAL section.
One or more dictionary items can be named in the field list. If the dictionary name is used, all the fields in thedictionary are affected. If a form name is used, all the fields on the form are affected. In Format 1, only one attribute setting can be used in any single set attributes statement. The options are as follows: visible If a field is hidden, its value will now be visible; if it was already visible, the setting
has no effect
autoskip This is equivalent to leaving the statically-set field property "Use Enter Key"unchecked. If this option is used, the cursor automatically advances to the next field,after the maximum number of characters have been entered. This option will overrideany statically-set field property settings.
return This is equivalent to checking the statically-set field property "Use Enter Key." If thisoption is used, the operator must press the <Enter> key to advance from the listedfield(s). This option will override any statically-set field property settings.
protect This is identical to the statically-set field property "protected." If a field is set to'protect', the operator will not be able to enter it. If the field was already statically set
Pa ge 513 of 684 Da ta Entry Sta te me nts a nd Func ons

to "protected," the setting has no effect.
hidden If a field is visible, its value will now be hidden from view; if it was already hidden, thesetting has no effect.
native Regardless of what settings have been made dynamically in the program, if a field isset to native, all field settings will revert to their initial, statically-set properties.
Example of Format 1:set attributes (total_HH_income) protect;
Description of Format 2:
The set attributes statement with the assisted keyword switches on or off a popup responses box during data entry.The values in the responses box come from the first value set in the data dictionary for that field. The user can eitherselect a response or type a response. This behavior is true in any CSPro data entry application. One or more dictionary items can be named in the field list. If the dictionary name is used, all the fields in thedictionary are affected. If a form name is used, all the fields on the form are affected. By default, the responses are taken from the first value set of the item. You can modify the values and responsesusing the function setvalueset.
Description of Format 2 in CAPI applicationsThis statement has further meaning in CAPI data entry applications. Note that when you create a CAPI data entryapplication, the question text for each item is automatically shown during data entry, but NOT the responses box. There are two ways to make the responses box appear (or disappear): 1. Use this statement in the application's logic. For example:
set attributes(MYDICT) assisted on;set attributes(MYDICT) assisted off;set attributes(REL, SEX, EDUC) assisted on;
2. Have the operator turn the response box on and off:
To show or hide responses for this field, press Ctrl+C or from the Options menu, select Show Responses (This Field). To show or hide responses for all fields, press Ctrl+K or from the Options menu, select Show Responses (All Fields). The operator can also move the response box around on the screen using the mouse.
Use the following forms of this command to get the desired behavior in your program logic for CAPI applications:
// show both questions and responsesset attributes(MYDICT) assisted on;set attributes(MYDICT) assisted on (question, responses); // show question text but not responsesset attributes(MYDICT) assisted on (question);< no set attributes command > // show responses but not question textset attributes(MYDICT) assisted on (responses);
See also: Change Field Properties, Change Data Entry Options, Introduction to CAPI
Set Behavior CanEnter StatementFeature Upgrade: Starting with CSPro 7.1, you should no longer use this function as it may soon be removed fromCSPro. To replicate the behavior of the function, you can use the setproperty function with the argument"CanEnterNotAppl" or "CanEnterOutOfRange".
Pa ge 514 of 684 Da ta Entry Sta te me nts a nd Func ons

Format 1:set behavior([field-1, ..., field-N]) canenter(notappl|outofrange) on(confirm|noconfirm); Format 2:set behavior([field-2, ..., field-N]) canenter(notappl|outofrange) off; Description:
The set behavior canenter statement allows the entry of blanks (notappl) for numeric data items during data entry orto bypass the system 'Out of Range' message during data entry. You may wish to enter blanks when answers aremissing from the form. You may wish to bypass the system 'Out of Range' message in order to code your ownmessage. If no arguments are specified, then the set behavior statement affects all data items from the point where it is executedonward. To limit its scope, it must be turned on and off at appropriate times. It is possible, however, to specify thename of a field, group, record, form, or dictionary to narrow the scope of the behavior to only fields that fall within thespecified object.
In operator-controlled applications, notappl defined as a value in the value set for the item usually allows blank to beaccepted. In system-controlled applications the set behavior function must be used to allow blanks even if notappl is inthe value set.
The keywords confirm or noconfirm must be coded when on is used. Confirm means that a message box isdisplayed asking if it OK to enter this value. Noconfirm means that no message box is displayed.
Example 1:set behavior() canenter(notappl) on (noconfirm);
Example 2:set behavior(AGE,AGE_FIRST_MARRIAGE) canenter(outofrange) on (noconfirm);set behavior(RELIGION) canenter(notappl) on (noconfirm);
See also: Special Values, Invalueset
SetCapturePos FunctionFeature Upgrade: Starting with CSPro 7.1, you should no longer use this function as it may soon be removed fromCSPro. To replicate the behavior of the function, you can use the setproperty function with the argument"CapturePosX" or "CapturePosY".
Format
i = setcapturepos(symbol, x_coord, y_coord);
Description
The setcapturepos function modifies the capture position for the extended control associated with a field on a form. Thesymbol_name may refer to a field, group, form, or an entire dictionary. The two numeric expressions x_coord andy_coord refer to the x (horizontal) and y (vertical) positions of the top-left corner of the extended control window. Thisposition is relative to the form window, not the whole CSEntry window, with (0,0) referring to the top-left corner of theform. If the position given for a field is greater than the size of the form, CSEntry will ignore the argument when displayingthe extended control window. This function is useful for CAPI applications in which a part of the screen is left blankspecifically for extended control windows. Calls to this function are ignored when executed on mobile devices.
Return Value
The function returns the number of items whose capture positions were successfully changed.
Example
Pa ge 515 of 684 Da ta Entry Sta te me nts a nd Func ons

setcapturepos(CAPI_DICT, 700, 20); // draw all windows on the right side of the form
See also: SetCaptureType Function, Change Form Properties
SetCaptureType FunctionFeature Upgrade: Starting with CSPro 7.1, you should no longer use this function as it may soon be removed fromCSPro. To replicate the behavior of the function, you can use the setproperty function with the argument"CaptureType" or "CaptureDateFormat".
Format
i = setcapturetype(symbol_name, capture_type『『, date_format』』);
Description
The setcapturetype function modifies the capture type currently associated with a field on a form. The symbol_namemay refer to a field, group, form, or an entire dictionary. The numeric expression capture_type refers to a capture typecode, listed in the table below. If specifying a date, the format can be specified with the optional string expressiondate_format.
Code Capture Type0 Textbox1 Radio Button2 Checkbox3 Drop Down Box4 Combo Box5 Date Picker6 Number Pad (desktop CSEntry only)
Return Value
The function returns the number of items that were successfully changed to the specified capture type. An item's capturetype can be successfully changed if the current value set associated with the item supports the requested capture type.For instance, if an item's value set contains ranges, the capture type cannot be changed to a radio button. The successof changing a field to a date picker does not depend on the date format, so if the date format is not valid for the field thecapture type will be changed to the default date format for the item.
Example
setcapturetype(DATE_OF_BIRTH, 5, "YYYYMMDD");
errmsg("%d fields changed to radio buttons on the housing form",setcapturetype(HOUSING_FORM,1));
See also: GetCaptureType Function, SetCapturePos Function
SetCaseLabel FunctionFormat
b = setcaselabel(dictionary_name, case_label);
Description
Pa ge 516 of 684 Da ta Entry Sta te me nts a nd Func ons

The setcaselabel function sets the label to case_label for the case currently associated with the dictionarydictionary_name. The dictionary can be either the main input dictionary of a data entry application or an externaldictionary. By default, CSEntry will show the case label instead of the ID items when listing the cases in a data source.(A menu option allows CSEntry to show the case IDs instead.)
Return Value
The function returns 1 (true) if successful or 0 (false) if the function failed.
Example
PROC HEAD_HH_NAME
setcaselabel(CENSUS_DICT, maketext("Household %d headed by %s", HH_NUMBER,strip(HEAD_HH_NAME)));
See also: GetCaseLabel Function
Set ErrMsg StatementFormat
set errmsg(message_style『『,close_message』』 『『,close_keystroke』』);
Description
CSPro data entry applications have two operating modes: operator- and system-controlled modes. Each mode has adifferent style error message box. System-controlled mode uses a standard Windows dialog box whereas operator-controlled mode uses a customized yellow box. The set errmsg statement allows the user to choose which kind of boxto use. The first argument, message_style, is one of the following:
default: Reset the box to the default style for the data entry mode.
operator: Use the operator-controlled box.
system: Use the system-controlled box.
For operator-controlled message boxes, the optional string expression close_message allows you to modify the text thatappears beneath the error message, which by default is "Press F8 to clear." Another optional argument, the numericexpression close_keystroke, modifies the keystroke required to close the box.
Calls to this function are ignored when executed on mobile devices.
Examples
set errmsg(system); // use the system-controlled styleset errmsg(operator); // use the operator-controlled styleset errmsg(default); // use the default style for the data entry mode
// defines the error message and defaults to F8 to close the boxset errmsg(operator,"Appuyez sur F8 pour fermer");
// 67 (C) is the key that will close the boxset errmsg(operator,"Appuyez sur C pour fermer",67);
// 67 (C) is the key that will close the box// but the default error message text is usedset errmsg(operator,67);
See also: SetFont Function
Pa ge 517 of 684 Da ta Entry Sta te me nts a nd Func ons

SetFont FunctionSetting Format
b = setfont(ErrMsg ‖ ValueSets ‖ NumberPad ‖ UserBar ‖ Notes ‖ All, font_name, font_size『『, bold,italics』』);
Resetting Format
b = setfont(ErrMsg ‖ ValueSets ‖ NumberPad UserBar ‖ Notes ‖ All, default);
Description
In a data entry application, the setfont function allows you to modify the font that CSPro uses to display text in:
ErrMsg: The font that appears in boxes generated by the errmsg function.
ValueSets: The font that appears in extended controls (other than the number pad).
NumberPad: The font that is used by the number pad.
UserBar: The font that appears in buttons and text strings on the userbar.
Notes: The font that appears when a user edits a field note.
All: The font is changed for all of the four above entities.
The font is changed to the font indicated by the string expression font_name and the numeric expression font_size, or ifthe resetting format is used, the font is restored to CSPro's default font selection. The user must ensure that the desiredfont is installed on the machine that will run the data entry application. Optional bold and italics markers may beindicated. Calls to this function are ignored when executed on mobile devices.
Return Value
The function returns 1 (true) if the font(s) were changed successfully, and 0 (false) otherwise.
Example
Pa ge 518 of 684 Da ta Entry Sta te me nts a nd Func ons

function majorError(string message)
setfont(ErrMsg, "Arial", 24, bold, italics); errmsg("%s", message);
end;
function minorError(string message)
setfont(ErrMsg, "Arial", 12, bold); errmsg("%s", message);
end;
function minorWarning(string message)
setfont(ErrMsg, "Arial", 12, italics); errmsg("%s", message);
end;
PROC AGE
if AGE > 95 then minorWarning(maketext("Age (%d) is over 95, set to 95", AGE)); AGE = 95;
elseif not AGE in 12:95 then minorError(maketext("Age (%d) is invalid for this survey, reenter", AGE)); reenter;
endif;
See also: Set ErrMsg Statement, SetValueSets Function
SetOperatorId FunctionFormat
b = setoperatorid(operator_id);
Description
The setoperatorid function sets the operator ID to the string expression operator_id for the current data entry session.The operator ID is generally entered by the operator or passed as a parameter in the PFF file, but for some programs,such as menu systems, it may be useful to set the operator ID in logic.
Return Value
The function returns 1 (true) if successful or 0 (false) if the function failed or was executed in batch mode.
Example
Pa ge 519 of 684 Da ta Entry Sta te me nts a nd Func ons

PROC USER_ID
LF_USER_ID = USER_ID;
if not loadcase(LOGINS_DICT, LF_USER_ID) then errmsg("Invalid login."); reenter; endif;
setoperatorid(strip(LF_USER_NAME));
See also: GetOperatorId Function
Show FunctionFormat
i = show(『『heading,』』group_name,item_list『『,where condition』』 『『,title(text_list)』』);
Description
The show function displays items from a roster in the form of a menu that looks like a roster. The group_name specifieswhich group contains the items to be displayed, one or more of which are specified in the item_list. This function issimilar to the show and accept functions, and is useful as a menu or simply as a way to show roster values in anotherpart of the questionnaire. An optional string expression, heading, defines the title of the grid. An optional where clause,with a specified condition, allows you to only specify that only some occurrences of the roster should be displayed. Ifyou want to override the column headings, you can specify them with string expressions in text_title.
Return Value
The function returns the number of the item selected: 1 for the first item, 2 for the second item, etc. This is the number ofthe item on the display, not in the roster. The value 0 is returned if the escape key (or back button) is pressed and noneof the options is chosen.
Example 1
if RELATIONSHIP = 2 and SEX = SEX(ptrHead) then show("Sex of spouse is the same as the sex of head!",PERSON_REC,NAME,RELATIONSHIP,SEX,AGE, title("Name","Rel","Sex","Age"));endif;
Example 2
if ctrHead > 1 then // more than 1 head in the household errmsg("More than 1 head of household (count=%d)",ctrHead); numeric headToDelete = show(PERSON_REC,NAME,RELATIONSHIP,SEX,AGE,WHERE RELATIONSHIP = 1); // ...endif;
Pa ge 520 of 684 Da ta Entry Sta te me nts a nd Func ons
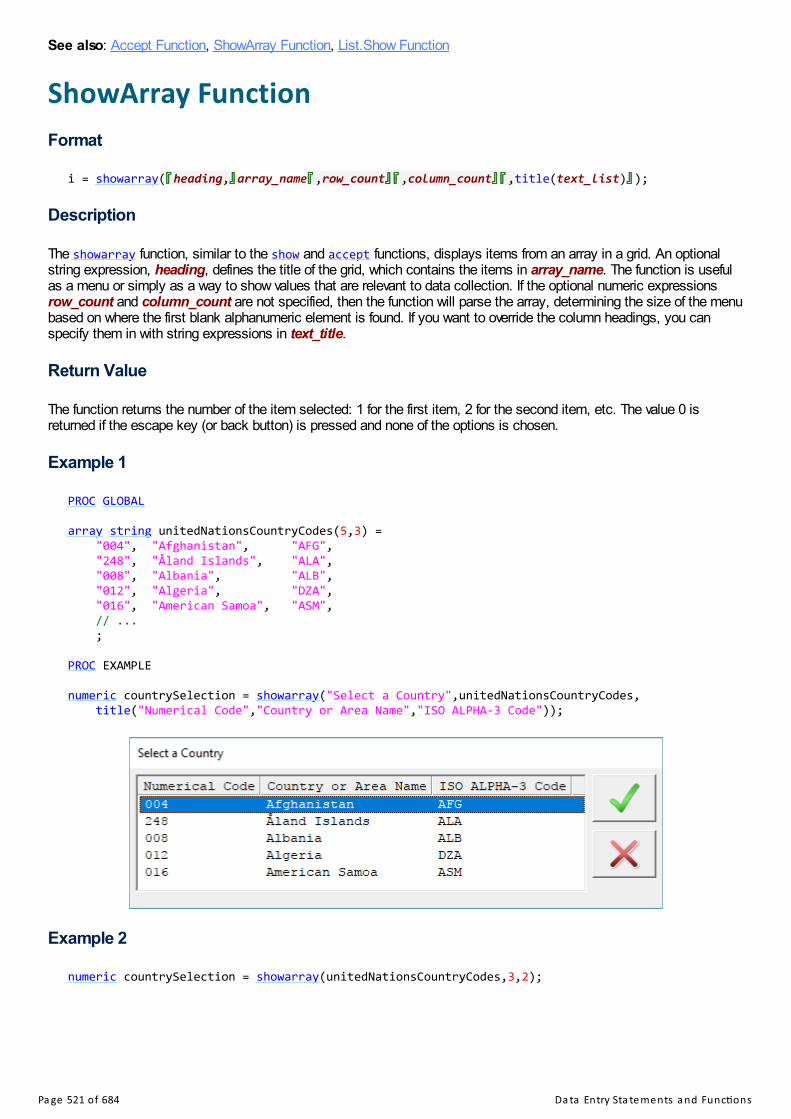
See also: Accept Function, ShowArray Function, List.Show Function
ShowArray FunctionFormat
i = showarray(『『heading,』』array_name『『,row_count』』 『『,column_count』』 『『,title(text_list)』』);
Description
The showarray function, similar to the show and accept functions, displays items from an array in a grid. An optionalstring expression, heading, defines the title of the grid, which contains the items in array_name. The function is usefulas a menu or simply as a way to show values that are relevant to data collection. If the optional numeric expressionsrow_count and column_count are not specified, then the function will parse the array, determining the size of the menubased on where the first blank alphanumeric element is found. If you want to override the column headings, you canspecify them in with string expressions in text_title.
Return Value
The function returns the number of the item selected: 1 for the first item, 2 for the second item, etc. The value 0 isreturned if the escape key (or back button) is pressed and none of the options is chosen.
Example 1
PROC GLOBAL
array string unitedNationsCountryCodes(5,3) = "004", "Afghanistan", "AFG", "248", "Åland Islands", "ALA", "008", "Albania", "ALB", "012", "Algeria", "DZA", "016", "American Samoa", "ASM", // ... ;
PROC EXAMPLE
numeric countrySelection = showarray("Select a Country",unitedNationsCountryCodes, title("Numerical Code","Country or Area Name","ISO ALPHA-3 Code"));
Example 2
numeric countrySelection = showarray(unitedNationsCountryCodes,3,2);
Pa ge 521 of 684 Da ta Entry Sta te me nts a nd Func ons

See also: Accept Function, Show Function, List.Show Function
ShowOcc FunctionFormat
b = showocc(roster_name ‖ form_name『『(occurrence_number)』』 『『,show_condition』』);
Description
The showocc function shows an occurrence of a roster or form in the mobile CSEntry case tree. It will also show the rowon a roster on desktop CSEntry. If no numeric occurrence_number is supplied, then the current occurrence for theroster or form will be shown.
By default, all occurrences of a roster and form are shown by CSEntry, but occurrences may be hidden with the hideoccfunction. Alternatively, an optional numeric argument show_condition, allows the showocc function to conditionally hideoccurrences, based on whether the condition is true. The occurrence will be hidden if show_condition is 0; theoccurrence will be shown for any other value.
Return Value
The function returns a logical value 1 (true) if successful and 0 (false) otherwise.
Example
PROC MYSURVEY_QUEST
preproc
// fill in and potentially hide occurrence labels for the household roster do numeric ctr = 1 while ctr <= totocc(PERSON_ROSTER) showocc(PERSON_ROSTER(ctr),KEEP_PERSON(ctr)); setocclabel(PERSON_ROSTER(ctr),strip(NAME(ctr))); enddo;
See also: HideOcc Function, SetOccLabel Function, Occurrence Labels
Skip StatementFormats
skip 『『to』』 field_name;
skip 『『to』』 next 『『multiply_occurring_field_name』』;
skip;
Pa ge 522 of 684 Da ta Entry Sta te me nts a nd Func ons

Description
The skip statement skips to the a field located after the current field. The argument field_name is either the name of afield or is a string variable specifying the name of the field. If the field has multiple occurrences, and if skipping from afield not on the same repeating form or roster, the target occurrence number must be specified to skip to the correctoccurrence.
The next keyword skips to the next occurrence of multiply_occurring_field_name. If the target field is on the samerepeating form or roster as the current field, control will move to the next occurrence of the target field. If not, control willmove to the first occurrence of the target field. Occurrence numbers cannot be used with the next keyword.
When using the next keyword without the optional target field, control passes to the next occurrence of the currentrepeating form or roster, with the target field as the first field in that form or roster. This is a useful way to skip to thebeginning of the next occurrence.
If using skip without specifying a target field, then control passes to the next field in the application. This targetless skipcan only occur in the preproc of a field, roster, form, or user-defined function. CSPro will automatically figure out whatthe target field should be, as it does with an ask statement.
The target field can be located in any record at the same level as the current field, but it cannot be located at a differentlevel. The field must be later on the path than the current field, meaning that it is a field that has not yet been entered. Ifthe field has already been entered, an error message will be displayed during data entry. If you do not know whether thefield is earlier in the data path, use the move statement.
When a skip statement is executed, the preproc of the target field will be executed but none of the statements betweenthe skip statement and the preproc of the target field will be executed. Skipped fields are assigned the special value ofnotappl.
Note that the skip statement behaves differently from the advance statement, skipping past some number of fields,rather than moving over the fields.
Example 1
PROC ATTENDED_SCHOOL_YN
if ATTENDED_SCHOOL_YN = 2 then skip to REASON_NEVER_ATTEND; endif;
Example 2
PROC CHILDREN_EVER_BORN
preproc
if SEX = 1 or AGE < 12 then skip to next; endif;
Example 3
PROC MARRIAGE_AGE
preproc
if MARITAL_STATUS = 1 then skip; endif;
See also: Advance Statement, Ask Statement, Move Statement, Reenter Statement
Pa ge 523 of 684 Da ta Entry Sta te me nts a nd Func ons

Userbar FunctionIt is possible to add a bar at the top of a data entry application to facilitate certain kinds of communication between auser and the intentions of the application programmer. For instance, a button can be added that allows the user to jumpto a certain section of a questionnaire, or the bar can display reference text useful for the user. This "userbar" candisplay text, buttons, and text fields.
General Userbar Commands
b = userbar(show | hide | clear);Show adds a userbar to the application, or if one has been added and is hidden, the show command displays it again.The hide command removes the userbar from the data entry window but keeps the userbar's contents in case it isshown again later. The clear command removes the userbar from the data entry window and deletes the contents of theuserbar. The function returns 1 if successful, 0 otherwise. If the first command to a userbar is an add command, theuserbar will be automatically displayed. If you want to add items to the userbar without displaying it, call hide or clearbefore adding the items.
Adding Items to the Userbar
i = userbar(add text | button | field | spacing,[...]);All of the add commands, detailed below, return a resource identifier, an integer that uniquely points to the added object.If you plan to modify or remove objects added to the userbar, it is necessary to maintain this resource identifier as a wayto identify on what object the modify or remove command should work. Objects are added to the userbar in left-to-rightformat. There is no way to add an item in between two existing items.
Adding Text to the Userbar
i = userbar(add text,alpha-expression);The alpha-expression is a string of text that will be displayed on the userbar. The color of the text can be modified usingthe set color command.
Adding Buttons to the Userbar
i = userbar(add button,alpha-expression[,function-name]);The button text comes from the alpha-expression. An optional argument specifies a function that is to be called when thebutton is pressed. If the function has parameters, it is necessary to specify the values of the arguments. The values ofthese arguments are evaluated when the button is activated by a user, not at the point that the button is added to theuserbar. Several existing functions (mimicking options available on the CSEntry menu) can be specified using the docommand:
i = userbar(add button,alpha-expression,do(alpha-expression));The alpha-expression within the do command can be one of the following values:
"NextField", "PreviousField", "AdvanceToEnd", "EditNote", "ChangeLanguage", "PartialSave", "FieldHelp","InsertLevelOcc", "AddLevelOcc", "DeleteLevelOcc", "InsertGroupOcc", "InsertGroupOccAfter", "DeleteGroupOcc","SortGroupOcc", "PreviousScreen", "NextScreen", "EndGroupOcc", "EndGroup", "EndLevelOcc", "EndLevel","FullScreen", "ToggleResponses", or "ToggleAllResponses"
Adding Fields to the Userbar
i = userbar(add field,alpha-expression[,function-name]);The field's initial text comes from the alpha-expression. As with adding buttons, an optional argument specifies a functionthat is called when the user presses enter while typing text in the field. The width of the field depends on the initial text,so if you want a large field that starts with a blank value, use a long but blank string to initialize the field. Modifying thetext of the field will not affect its size.
Adding Spacing to the Userbar
i = userbar(add spacing,numeric-expression);If you want to space out the items on the userbar, specify in numeric-expression the number of pixels to leave blank
Pa ge 524 of 684 Da ta Entry Sta te me nts a nd Func ons

between the last-to-be and next-to-be added items.
Modifying Items on the Userbar
b = userbar(modify,resource-identifier,alpha-expression); // for text, buttons, andfieldsb = userbar(modify,resource-identifier,function-name); // for buttons and fieldsb = userbar(modify,resource-identifier,alpha-expression,function-name); // for buttonsand fieldsb = userbar(modify,resource-identifier,numeric-expression); // for spacingTo modify an item on the userbar, use the resource identifier that the function returned when the item was added to theuserbar and specify the changes to the item. For buttons and fields, the text of the item and/or the function can bemodified. The function returns 1 if successful, 0 otherwise.
Removing Items from the Userbar
b = userbar(remove,resource-identifier);The remove command takes the item pointed to by the resource identifier off the userbar. The function returns 1 ifsuccessful, 0 otherwise.
Changing the Color of Items
b = userbar(set color[,resource-identifier],red-value,green-value,blue-value);The background color of the userbar is changed by specifying the RGB (0 to 255) values of the desired color.Alternatively, if a resource identifier of a text item is passed, the color of the text item is changed. The function returns 1if successful, 0 otherwise.
Identifying the Source of an Action
i = userbar(get);The get command returns the resource identifier of the last clicked button or the last userbar field in which data wasentered. If no event has occurred, the function returns 0.
Obtaining the Contents of a Field
b = userbar(get,resource-identifier,alpha-variable);In this format, the get command returns the contents of a userbar field identified by the resource identifier. Alpha-variablemust be an alphanumeric variable declared in the PROC GLOBAL section of the code. The function returns 1 ifsuccessful, 0 otherwise.
Userbar on Mobile Devices
The userbar shows up as an icon to the left of the field note icon. Only buttons are displayed on the userbar so any colorchanges or additions of fields or spacing will be ignored. Options that mimic the CSEntry menu, added via the do(...)command, will also be ignored.
Example
PROC GLOBAL
numeric ADD_OP = 1, SUBTRACT_OP = 2, MULT_OP = 3, DIVIDE_OP = 4, MOD_OP = 5, EXP_OP =6;
numeric leftOperatorRID,rightOperatorRID,resultsRID;
alpha (30) leftOperator,rightOperator;alpha (1) operatorTypeString;
function performMathOperation(numeric operationType)
userbar(get,leftOperatorRID,leftOperator); userbar(get,rightOperatorRID,rightOperator);
Pa ge 525 of 684 Da ta Entry Sta te me nts a nd Func ons

numeric leftNumber = tonumber(leftOperator); numeric rightNumber = tonumber(rightOperator);
if countnonspecial(leftNumber,rightNumber) <> 2 or leftOperator = "" orrightOperator = "" then userbar(modify,resultsRID,"The supplied values are invalid!"); userbar(set color,255,0,0); elseif rightNumber = 0 and operationType in DIVIDE_OP,MOD_OP then userbar(modify,resultsRID,"0 cannot be a denominator in a divide or moduloexpression!"); userbar(set color,255,0,0); else numeric result; if operationType = ADD_OP then result = leftNumber + rightNumber;operatorTypeString = '+'; elseif operationType = SUBTRACT_OP then result = leftNumber - rightNumber;operatorTypeString = '-'; elseif operationType = MULT_OP then result = leftNumber * rightNumber;operatorTypeString = '*'; elseif operationType = DIVIDE_OP then result = leftNumber / rightNumber;operatorTypeString = '/'; elseif operationType = MOD_OP then result = leftNumber % rightNumber;operatorTypeString = '%'; elseif operationType = EXP_OP then result = leftNumber ^ rightNumber;operatorTypeString = '^'; endif; userbar(modify,resultsRID,maketext("%0.2f %s %0.2f =%0.2f",leftNumber,operatorTypeString,rightNumber,result)); userbar(set color,0,255,0); endif;
end;
PROC USERBAR_FF
preproc
userbar(clear); userbar(add text,"Enter two values and select an operation:"); leftOperatorRID = userbar(add field," "); rightOperatorRID = userbar(add field," "); userbar(add button,"Addition",performMathOperation(ADD_OP)); userbar(add button,"Subtraction",performMathOperation(SUBTRACT_OP)); userbar(add button,"Multiplication",performMathOperation(MULT_OP)); userbar(add button,"Division",performMathOperation(DIVIDE_OP)); userbar(add button,"Modulo",performMathOperation(MOD_OP)); userbar(add button,"Exponentiation",performMathOperation(EXP_OP)); userbar(add spacing,50); resultsRID = userbar(add text," "); userbar(show);
Pa ge 526 of 684 Da ta Entry Sta te me nts a nd Func ons

See also: Extended Controls
VisualValue FunctionFormat
d = visualvalue(field_name);
Description
The visualvalue function is used to access the contents of a data item before the data item has been entered. Whenan item is on a form as a field, CSPro will give its value in logic as notappl until the item has been entered. If you knowthat the field has been previously filled, perhaps because the operator is in modify mode or is resuming from a partialsave, you can use this function to get the value stored in the item that is on the form and represented as field_name.
This function is for use only with numeric fields. Refering to alphanumeric fields will always result in the evaluation of thefield's visual value.
Return Value
The function returns the numeric value of the field.
Example
PROC INTERVIEW_START_DATE
preproc
// do not overwrite the start date if modifying the case if visualvalue(INTERVIEW_START_DATE) = notappl then INTERVIEW_START_DATE = sysdate("YYYYMMDD"); endif;
See also: Highlighted Function
Pa ge 527 of 684 Ba tch Edi t Sta te me nts
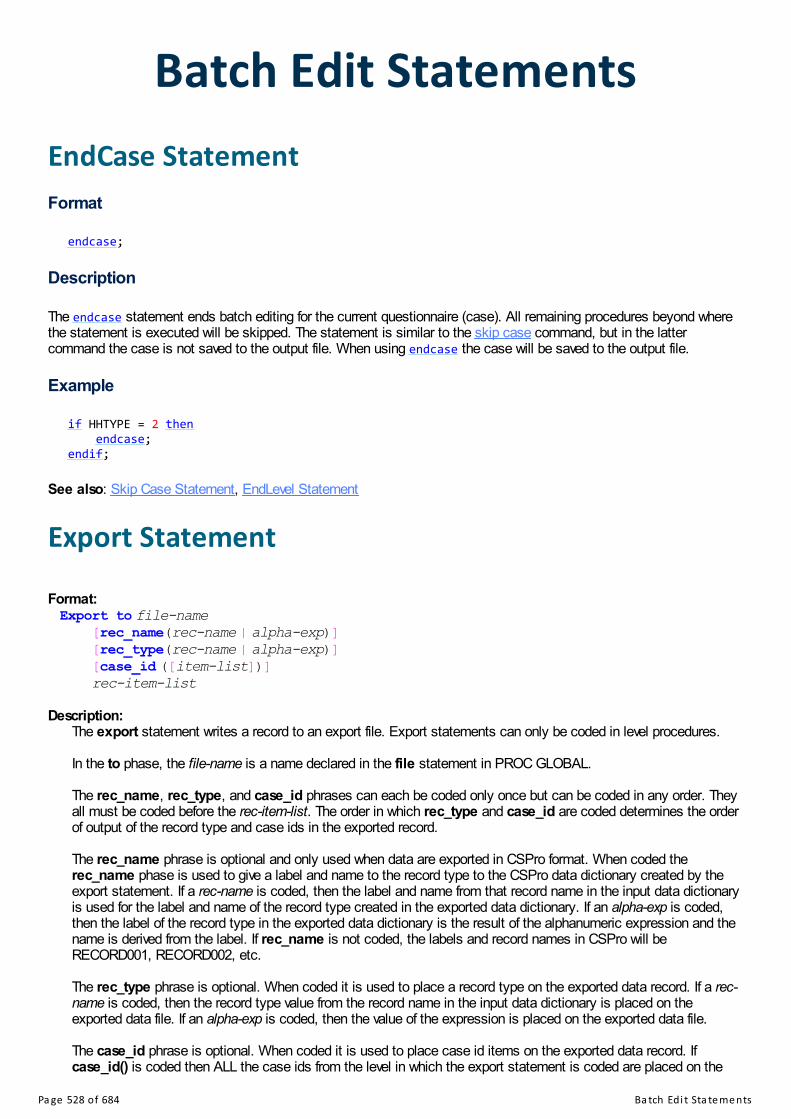
Batch Edit StatementsEndCase StatementFormat
endcase;
Description
The endcase statement ends batch editing for the current questionnaire (case). All remaining procedures beyond wherethe statement is executed will be skipped. The statement is similar to the skip case command, but in the lattercommand the case is not saved to the output file. When using endcase the case will be saved to the output file.
Example
if HHTYPE = 2 then endcase;endif;
See also: Skip Case Statement, EndLevel Statement
Export Statement Format:Export to file-name [rec_name(rec-name | alpha-exp)] [rec_type(rec-name | alpha-exp)] [case_id ([item-list])] rec-item-list
Description:
The export statement writes a record to an export file. Export statements can only be coded in level procedures. In the to phase, the file-name is a name declared in the file statement in PROC GLOBAL. The rec_name, rec_type, and case_id phrases can each be coded only once but can be coded in any order. Theyall must be coded before the rec-item-list. The order in which rec_type and case_id are coded determines the orderof output of the record type and case ids in the exported record. The rec_name phrase is optional and only used when data are exported in CSPro format. When coded therec_name phase is used to give a label and name to the record type to the CSPro data dictionary created by theexport statement. If a rec-name is coded, then the label and name from that record name in the input data dictionaryis used for the label and name of the record type created in the exported data dictionary. If an alpha-exp is coded,then the label of the record type in the exported data dictionary is the result of the alphanumeric expression and thename is derived from the label. If rec_name is not coded, the labels and record names in CSPro will beRECORD001, RECORD002, etc. The rec_type phrase is optional. When coded it is used to place a record type on the exported data record. If a rec-name is coded, then the record type value from the record name in the input data dictionary is placed on theexported data file. If an alpha-exp is coded, then the value of the expression is placed on the exported data file. The case_id phrase is optional. When coded it is used to place case id items on the exported data record. Ifcase_id() is coded then ALL the case ids from the level in which the export statement is coded are placed on the
Pa ge 528 of 684 Ba tch Edi t Sta te me nts

exported data record. If no case_id phrase is coded and export format is CSPro, the ALL case ids from ALL levelswill be output. The rec-item-list specifies the contents of the exported data record. This can be any combination of record names oritem names. Where possible users are encouraged to use the Export Data tool instead of the export statement.
Example:{Export fertility data for women 15 to 54 years old}PROC GLOBALnumeric i;file SPSS_EXPORT; PROC CENSUS_2000_DICTIONARY_FF PROC QUEST {export done at LEVEL procedure} set behavior() export ( SPSS , ItemOnly ); do I = 1 until I > totocc(PERSON) if P03_SEX (i) = 2 and P04_AGE(i) in 15:54 then export to SPSS_EXPORT case_id (PROVINCE,DISTRICT,EA,HU,HH) LINE(i), P18_BORN(i), P19_LIVING(i), P20_BORN12(i); errmsg ("Record exported for female, 15 to 54") summary; endif; enddo;
See also: Set Behavior Export Statement, File Statement, SetFile Function, Export Data Tool
GetDeck FunctionFormat:f = getdeck(array-name[,override-dim1,override-dim2,override-dim3]);
Description:
The getdeck function returns the value in the DeckArray hotdeck using the current values in the items identified by thevalue sets used in the declaration of the DeckArray. The function automatically recodes the values and accesses theproper cell in the hotdeck. If any of the dimensions of the DeckArray are not value set dimensions, you must specifythe numeric index when calling the function.
Return value:
The function returns the value in the hotdeck or DEFAULT in the case that the values supplied are not valid entries inthe value sets and thus could not be recoded to a proper cell in the hotdeck.
Example:array education_HD_SexAge(SEX_VS,AGE_FOR_EDUCATION_HD_VS) save;
...
PROC EDUCATION
EDUCATION = getdeck(education_HD_SexAge); // use current values for sex and age EDUCATION = getdeck(education_HD_SexAge,1); // override sex only EDUCATION = getdeck(education_HD_SexAge,,28); // override age only EDUCATION = getdeck(education_HD_SexAge,1,28); // override both value and age
See also: DeckArrays, DeckArray Leftover Rows, Putdeck Function
PutDeck FunctionFormat:
Pa ge 529 of 684 Ba tch Edi t Sta te me nts

f = putdeck(array-name,numeric-expression[,override-dim1,override-dim2,override-dim3]);
Description:
The putdeck function updates the value in the DeckArray hotdeck using the current values in the items identified bythe value sets used in the declaration of the DeckArray. The function automatically recodes the values and accessesthe proper cell in the hotdeck, where it places the value of the numeric-expression. If any of the dimensions of theDeckArray are not value set dimensions, you must specify the numeric index when calling the function. If a (+) is specified after the array-name, the "leftover" rows for the hotdeck will also be updated with the value. See theleftover rows page for more information.
Return value:
The function returns 1 if successful or DEFAULT in the case that the values supplied are not valid entries in the valuesets and thus could not be recoded to a proper cell in the hotdeck.
Example:array education_HD_SexAge(SEX_VS,AGE_FOR_EDUCATION_HD_VS) save;
...
PROC EDUCATION
putdeck(education_HD_SexAge,EDUCATION); // use current values for sex and age putdeck(education_HD_SexAge,EDUCATION,1); // override sex only putdeck(education_HD_SexAge,EDUCATION,,28); // override age only putdeck(education_HD_SexAge,EDUCATION,1,28); // override both value and age
See also: DeckArrays, DeckArray Leftover Rows, Getdeck Function
Set Behavior Export Statement Format:
set behavior() export (model[, item-type, text-encoding, decimal-mark]); Description:
The set behavior export statement is coded before the first export statement. The model is required. It is one of the keywords SPSS, SAS, Stata, R, All, CSPro, TabDelim, CommaDelim, orSemiColonDelim, indicating the type of file being exported. Item-type is optional. It is one of the keywords ItemOnly, SubitemOnly, or ItemSubitem, indicating how subitemsand their parent item are handled when entire records are exported. If not coded, SubitemOnly is assumed. Text-encoding is optional. It is either ANSI or Unicode, and specifies the text encoding of the exported data file andany description or script files. If not coded, ANSI is assumed. The Unicode option will output UTF-8 files. Decimal-mark is optional. If specified with the keyword CommaDecimal, decimal marks will use commas instead ofperiods in the exported data file.
See also: Export Statement
SetOutput Function Format:b = setoutput(alpha-exp);
Description:
The setoutput function redirects the output cases of a batch application to the data file specified in the alpha-exp. All
Pa ge 530 of 684 Ba tch Edi t Sta te me nts

data will be appended to (added to the end of) the file. If the file exists prior to the application run, you may, dependingon the circumstances, want to use the filedelete function to remove the file. This function can not be used in dataentry applications. Alpha-exp is an alphanumeric expression containing the folder and file name of the file to be attached to the batchoutput.
Return value:
The function returns a logical value of 1 (true) if the physical file is successfully assigned and 0 (false) otherwise. If thenew file cannot be created or opened, the batch application will terminate.
Example:PROC PROVINCE
// this will split the contents of the input data file into // one file for each province code setoutput(maketext(".\split\%02d.dat",PROVINCE)); See also: Setfile Function, Skip Case Statement
Skip Case StatementFormat
skip case;
Description
The skip case statement ends batch edit processing of the current case and skips to the next case in the input file. Ifan output file is specified, the skipped case is not saved in the output file.
Example
// remove any vacant householdsif totocc(PERSON_REC) = 0 then skip case;endif;
See also: EndCase Statement, Stop Function
Pa ge 531 of 684 Nume ri c Func ons
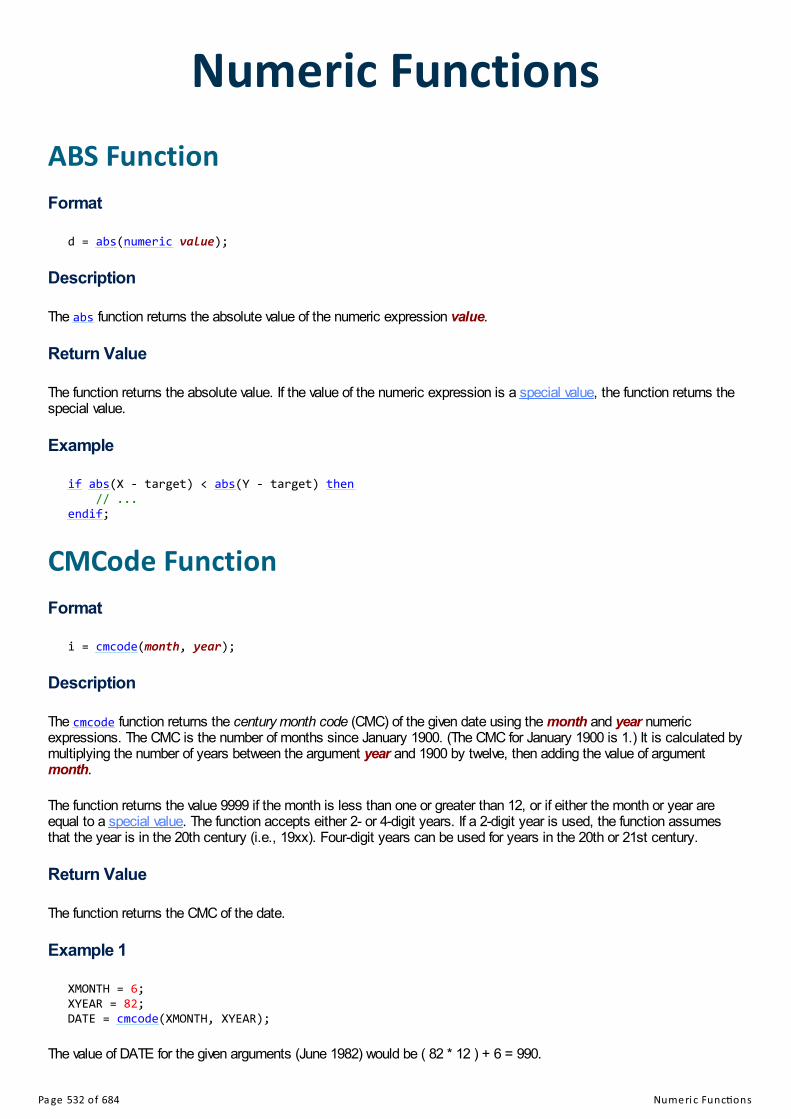
Numeric FunctionsABS FunctionFormat
d = abs(numeric value);
Description
The abs function returns the absolute value of the numeric expression value.
Return Value
The function returns the absolute value. If the value of the numeric expression is a special value, the function returns thespecial value.
Example
if abs(X - target) < abs(Y - target) then // ...endif;
CMCode FunctionFormat
i = cmcode(month, year);
Description
The cmcode function returns the century month code (CMC) of the given date using the month and year numericexpressions. The CMC is the number of months since January 1900. (The CMC for January 1900 is 1.) It is calculated bymultiplying the number of years between the argument year and 1900 by twelve, then adding the value of argumentmonth.
The function returns the value 9999 if the month is less than one or greater than 12, or if either the month or year areequal to a special value. The function accepts either 2- or 4-digit years. If a 2-digit year is used, the function assumesthat the year is in the 20th century (i.e., 19xx). Four-digit years can be used for years in the 20th or 21st century.
Return Value
The function returns the CMC of the date.
Example 1
XMONTH = 6;XYEAR = 82;DATE = cmcode(XMONTH, XYEAR);
The value of DATE for the given arguments (June 1982) would be ( 82 * 12 ) + 6 = 990.
Pa ge 532 of 684 Nume ri c Func ons
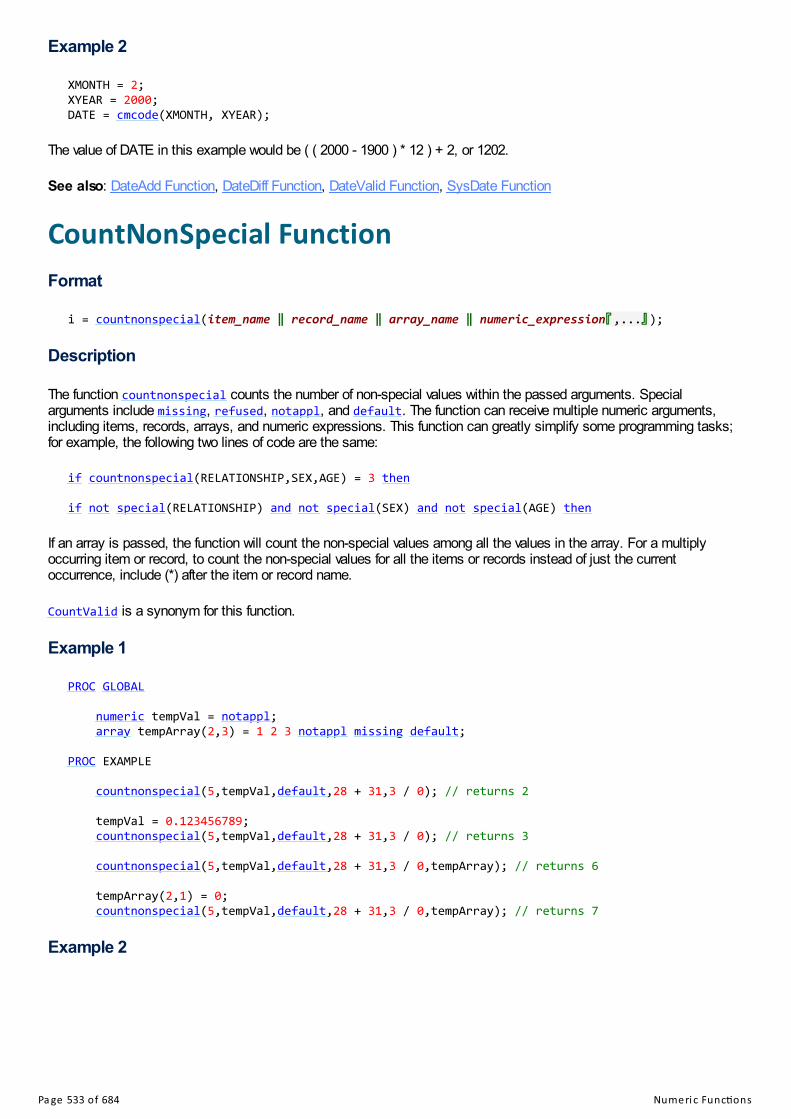
Example 2
XMONTH = 2;XYEAR = 2000;DATE = cmcode(XMONTH, XYEAR);
The value of DATE in this example would be ( ( 2000 - 1900 ) * 12 ) + 2, or 1202.
See also: DateAdd Function, DateDiff Function, DateValid Function, SysDate Function
CountNonSpecial FunctionFormat
i = countnonspecial(item_name ‖ record_name ‖ array_name ‖ numeric_expression『『,...』』);
Description
The function countnonspecial counts the number of non-special values within the passed arguments. Specialarguments include missing, refused, notappl, and default. The function can receive multiple numeric arguments,including items, records, arrays, and numeric expressions. This function can greatly simplify some programming tasks;for example, the following two lines of code are the same:
if countnonspecial(RELATIONSHIP,SEX,AGE) = 3 then
if not special(RELATIONSHIP) and not special(SEX) and not special(AGE) then
If an array is passed, the function will count the non-special values among all the values in the array. For a multiplyoccurring item or record, to count the non-special values for all the items or records instead of just the currentoccurrence, include (*) after the item or record name.
CountValid is a synonym for this function.
Example 1
PROC GLOBAL
numeric tempVal = notappl; array tempArray(2,3) = 1 2 3 notappl missing default;
PROC EXAMPLE
countnonspecial(5,tempVal,default,28 + 31,3 / 0); // returns 2
tempVal = 0.123456789; countnonspecial(5,tempVal,default,28 + 31,3 / 0); // returns 3
countnonspecial(5,tempVal,default,28 + 31,3 / 0,tempArray); // returns 6
tempArray(2,1) = 0; countnonspecial(5,tempVal,default,28 + 31,3 / 0,tempArray); // returns 7
Example 2
Pa ge 533 of 684 Nume ri c Func ons

// in this example SEX is not on the FERTILITY recordPROC SEX
if SEX <> 2 and countnonspecial(FERTILITY(curocc())) > 3 then errmsg("Sex (%d) is not female but 4+ fertility entries defined so sex changed tofemale",SEX); impute(SEX,2);endif;
Example 3
numeric numDefinedValues = countnonspecial(SEX(*),AGE(*));numeric numPossibleValues = 2 * totocc(POPULATION);
errmsg("%d% of sex and age values are missing",100 * ( 1 - ( numDefinedValues /numPossibleValues ) ));
See also: Special Function, Special Values
Exp FunctionFormat
d = exp(numeric_expression);
Description
The exp function raises the value of e (2.7182818...) to the power given by numeric_expression. This value e is calledNapier's constant or Euler's number and is the basis of natural logarithms.
Return Value
The function returns a decimal number. If the value of numeric_expression is a special value, the function returns thatvalue.
Example
X = exp(Y);
High FunctionFormat
d = high(number1『『,number2...numberN』』);
Description
The high function returns the maximum (highest) value in a group of numbers represented by numeric expressionsnumber1 ... numberN. The function ignores special values.
Return Value
The function returns the highest value, or default in the case that no valid values were passed.
Example
Pa ge 534 of 684 Nume ri c Func ons

errmsg("Lowest value is %f",low(50,-123.45,1982.0605,20)); // displays -123.45errmsg("Highest value is %f",high(50,-123.45,1982.0605,20)); // displays 1982.0605
See also: Low Function, MaxValue Function
Inc FunctionFormat
i = inc(numeric_item『『,increment_value』』);
Description
The inc function increments numeric_item, which is either a dictionary item or a numeric variable. If the optionalnumeric expression increment_value is present, then the value of that expression is added to numeric_item. If noexpression is present, 1 is added to numeric_item. The increment value can be negative or nonnegative. inc(X) isessentially shorthand for X = X + 1;
Return Value
The function returns the sum of the numeric item and the increment value.
Example
X = 5;
inc(X);// X is 6 after X = X + 1;
inc(X,4);// X is 10 after X = X + 4;
inc(X,-5);// X is 5 after X = X + (-5);
X = 5 + inc(X,inc(X));// X is 17 after X = X + 1; X = X + X; X = 5 + X;
Int FunctionFormat
i = int(numeric_expression);
Description
The int function returns the integer portion of the decimal value numeric_expression.
Return Value
The function returns an integer value. If the value of numeric_expression is a special value, the function returns thatvalue.
Example
X = int(5 / 3); // X will be 1
Pa ge 535 of 684 Nume ri c Func ons

See also: Round Function
Log FunctionFormat
d = log(numeric_expression);
Description
The log function calculates the base-10 logarithm of numeric_expression. The number numeric_expression should bea positive value.
Return Value
The function returns a decimal number logarithm. If the value of the number is a special value, the function returns thespecial value given. If the value of the number is negative, the function returns default.
Example
numeric incomeLog = log(INCOME);
Low FunctionFormat
d = low(number1『『,number2...numberN』』);
Description
The low function returns the minimum (lowest) value in a group of numbers represented by numeric expressionsnumber1 ... numberN. The function ignores special values.
Return Value
The function returns the lowest value, or default in the case that no valid values were passed.
Example
errmsg("Lowest value is %f",low(50,-123.45,1982.0605,20)); // displays -123.45errmsg("Highest value is %f",high(50,-123.45,1982.0605,20)); // displays 1982.0605
See also: High Function, MinValue Function
Random FunctionFormat
i = random(min_value, max_value);
Description
The random function returns a uniformly distributed random number between the number expressions min_value and
Pa ge 536 of 684 Nume ri c Func ons
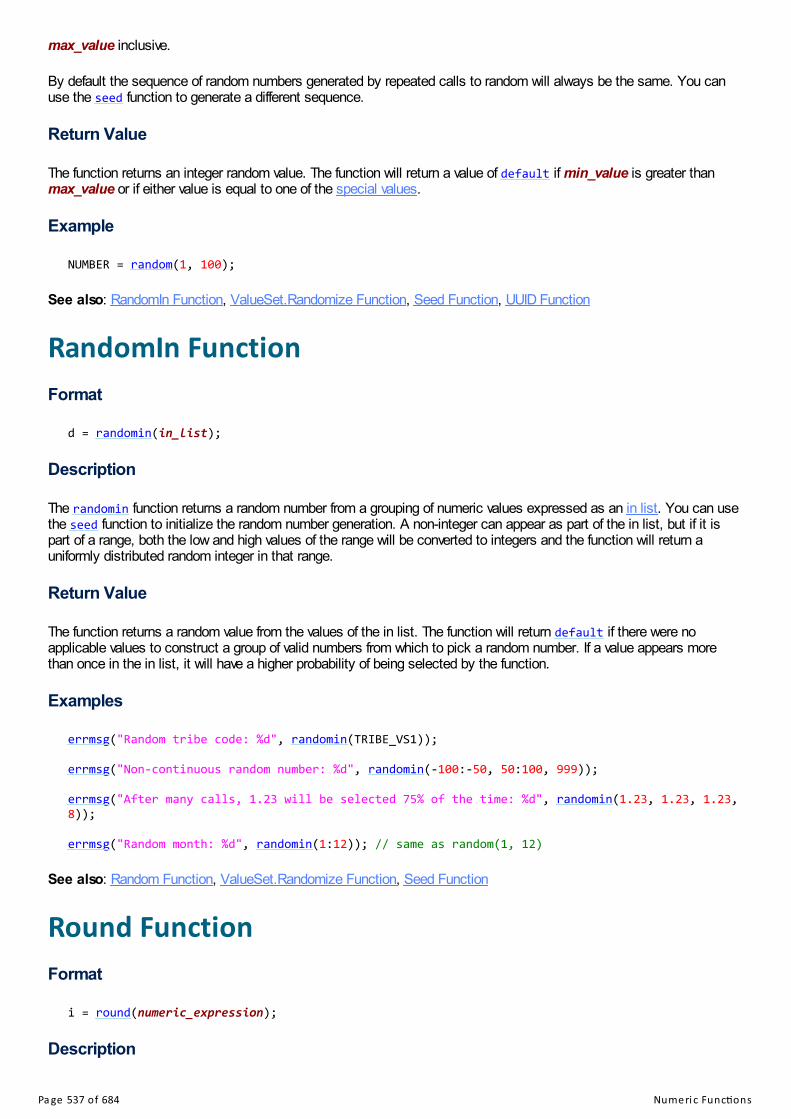
max_value inclusive.
By default the sequence of random numbers generated by repeated calls to random will always be the same. You canuse the seed function to generate a different sequence.
Return Value
The function returns an integer random value. The function will return a value of default if min_value is greater thanmax_value or if either value is equal to one of the special values.
Example
NUMBER = random(1, 100);
See also: RandomIn Function, ValueSet.Randomize Function, Seed Function, UUID Function
RandomIn FunctionFormat
d = randomin(in_list);
Description
The randomin function returns a random number from a grouping of numeric values expressed as an in list. You can usethe seed function to initialize the random number generation. A non-integer can appear as part of the in list, but if it ispart of a range, both the low and high values of the range will be converted to integers and the function will return auniformly distributed random integer in that range.
Return Value
The function returns a random value from the values of the in list. The function will return default if there were noapplicable values to construct a group of valid numbers from which to pick a random number. If a value appears morethan once in the in list, it will have a higher probability of being selected by the function.
Examples
errmsg("Random tribe code: %d", randomin(TRIBE_VS1));
errmsg("Non-continuous random number: %d", randomin(-100:-50, 50:100, 999));
errmsg("After many calls, 1.23 will be selected 75% of the time: %d", randomin(1.23, 1.23, 1.23,8));
errmsg("Random month: %d", randomin(1:12)); // same as random(1, 12)
See also: Random Function, ValueSet.Randomize Function, Seed Function
Round FunctionFormat
i = round(numeric_expression);
Description
Pa ge 537 of 684 Nume ri c Func ons
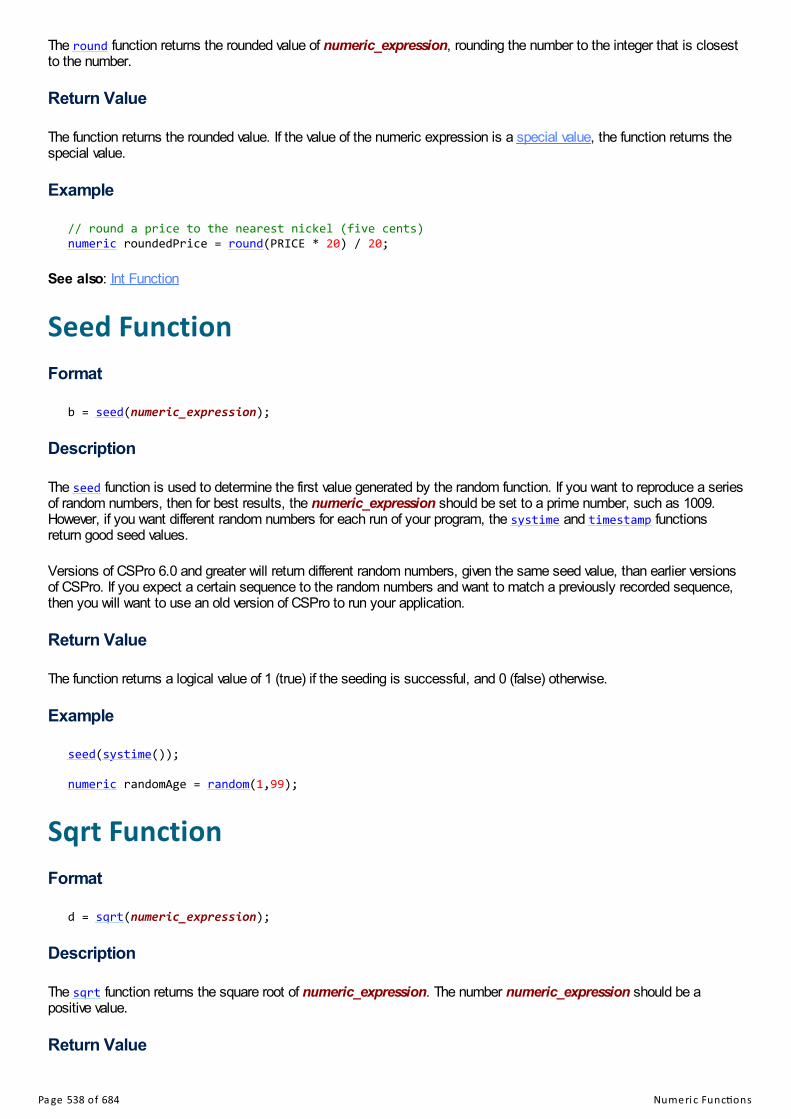
The round function returns the rounded value of numeric_expression, rounding the number to the integer that is closestto the number.
Return Value
The function returns the rounded value. If the value of the numeric expression is a special value, the function returns thespecial value.
Example
// round a price to the nearest nickel (five cents)numeric roundedPrice = round(PRICE * 20) / 20;
See also: Int Function
Seed FunctionFormat
b = seed(numeric_expression);
Description
The seed function is used to determine the first value generated by the random function. If you want to reproduce a seriesof random numbers, then for best results, the numeric_expression should be set to a prime number, such as 1009.However, if you want different random numbers for each run of your program, the systime and timestamp functionsreturn good seed values.
Versions of CSPro 6.0 and greater will return different random numbers, given the same seed value, than earlier versionsof CSPro. If you expect a certain sequence to the random numbers and want to match a previously recorded sequence,then you will want to use an old version of CSPro to run your application.
Return Value
The function returns a logical value of 1 (true) if the seeding is successful, and 0 (false) otherwise.
Example
seed(systime());
numeric randomAge = random(1,99);
Sqrt FunctionFormat
d = sqrt(numeric_expression);
Description
The sqrt function returns the square root of numeric_expression. The number numeric_expression should be apositive value.
Return Value
Pa ge 538 of 684 Nume ri c Func ons

The function returns a decimal value of the square root of the expression. If the value of the number is a special value, thefunction returns the special value given. If the value of the number is negative, the function returns default.
Example
numeric incomeSqrt = sqrt(INCOME);
Set Behavior SpecialValues StatementFeature Upgrade: Starting with CSPro 7.1, you should no longer use this function as it may soon be removed fromCSPro. To replicate the behavior of the function, you can use the setproperty function with the argument"SpecialValuesZero".
Format:set behavior() specialvalues(zero) on | off;
Description:
The set behavior specialvalues statement allows special values to be treated as zero (0) values during arithmeticoperations, including addition, subtraction, multiplication, division, and modulo. By default this behavior is disabled.The set behavior statement affects all numeric data items from the point where it is executed onward. To limit itsscope, it must be turned on and off at appropriate times.
Example:
PROC GLOBAL
numeric var1,var2,var3;numeric result;
PROC SUMMATION
var1 = 5;var2 = 10;var3 = default; set behavior() specialvalues(zero) on;result = var1 + var2 + var3; { result will be 15 } set behavior() specialvalues(zero) off;result = var1 + var2 + var3; { result will be DEFAULT }
See also: Special Values
Pa ge 539 of 684 Stri ng Func ons

String FunctionsCompare FunctionFormat
i = compare(string1,string2);
Description
The compare function compares the two strings expressions string1 and string2 character by character to determine thealphabetical (collating sequence) order of the strings. If string1 and string2 are of different lengths, the function will padthe shorter string with blanks to carry out the comparison.
Return Value
The function returns an integer value of:
-1 if string1 would be listed alphabetically before string2.0 if the strings are identical.1 if string1 would be listed alphabetically after string2.
Example
if compare(thisCaseKey,previousCaseKey) = -1 then // ...endif;
Direct string comparisons can also be made. For example, the following code is permissible:
if thisCaseKey < previousCaseKey then // ...endif;
Concat FunctionFormat
s = concat(string1, string2『『, ..., stringN』』);
Description
The concat function concatenates the values of two or more string expressions (string1 + string2 + ... + stringN). Thestrings can be alphanumeric items, text strings, or functions that return strings. You can also use the + operator toconcatenate strings.
Return Value
The function returns the concatenated string.
ExamplePa ge 540 of 684 Stri ng Func ons

FIRST_NAME = "John";LAST_NAME = "Henry";
string full_name = concat(FIRST_NAME, " ", LAST_NAME); // full_name is: John Henry
See also: String Concatenation Operator, PathConcat Function
String Concatenation OperatorIn addition to serving as the addition operator for numeric values, the + operator can be used to concatenate strings,similar to the concat function. For example, both lines of code below will give the same result:
string text1 = "Hello", text2 = "World!";
string messagePlus = text1 + ", " + text2;
string messageConcat = concat(text1,", ",text2);
The + operator is a convenient way to build strings and can be used along with other functions that return alphanumericvalues.
Example
string message;
do numeric counter = 1 while counter <= 13 by 2 message = message + edit("99 ",counter);enddo;
// message is now: "01 03 05 07 09 11 13"
Edit Function Format:s = edit(edit-pattern,numeric-expression);
Description:
The edit function converts a number to a character string defined by the given "edit pattern". The "edit pattern" is astring containing "Z"s or "9"s (i.e., "9999" or "ZZ9.99"). Both "9" and "Z" represent a digit. 9 display a digit Z display a digit, but if it is a leading zero, display a blank . display the decimal character , display the thousands separator character Any other character will be displayed as itself.
Return value:The function returns a string derived from the "numeric-expression" argument.
Example 1:X = 87;A1 = edit("ZZZ9",X); yields A1 = " 87"A2 = edit("9999",X); yields A2 = "0087"A3 = edit("Z999",X); yields A3 = " 087"
Example 2:Y = 0;
Pa ge 541 of 684 Stri ng Func ons

A4 = edit("ZZ9",Y); yields A4 = " 0"A5 = edit("999",Y); yields A5 = "000"A6 = edit("ZZZ",Y); yields A6 = " "
Example 3:A = edit("99:99:99",sysdate());
Example 4:A = edit("99/99/99",sysdate("DDMMYY"));
Example 5:A = edit("ZZZ,ZZZ,ZZ9",INCOME);
See also: Tonumber Function , Sysdate Function
GetBuffer FunctionFormat
s = getbuffer(item_name);
Description
The getbuffer function returns a string containing a data item's contents. The item_name can refer to either a numericor alphanumeric item.
The function is especially useful when a numeric data item in a data file contains a non-numeric value, such as "*", "-", or"a". You cannot test the contents of the numeric data item for alphanumeric values because CSPro stores default asthe value of any numeric data item which contains non-numeric values. Therefore, to find out what non-numeric value(s)exist in a data item, you would use this function to return its contents in the form of a string.
Return Value
The function returns a string containing the item's contents.
Example
if special(AGE) then errmsg("Person's age is invalid, AGE = %s",getbuffer(AGE));endif;
Length FunctionFormat
i = length(string_expression);
Description
The function length calculates the length of an alphanumeric string_expression. If the string is a dictionary item, thevalue returned is the length of the item. If it the string is the result of a function, the value returned is the length of thestring returned by the function.
Return Value
The function returns the length of the string as an integer value. If using an alpha variable or a dictionary item, you may
Pa ge 542 of 684 Stri ng Func ons

want to strip the string before calculating its length.
Example
alpha (30) NAME = "John Henry";length(NAME); // returns 30length(strip(NAME)); // returns 10
Uses on Lists and Arrays
The length function also operates on lists and arrays. When applied to a list, it returns the number of elements in thelist. When applied on an array, it returns the size of an array dimension.
Format
i = length(list_name);i = length(array_name『『, dimension』』);
Examples
array string usmca_countries(3) = "Canada", "Mexico", "United States";length(usmca_countries); // returns 3;
// ...
array AgeSexDeckArray(AGE_VS, SEX_VS);
do numeric age_counter = 1 while age_counter <= length(AgeSexDeckArray, 1) do numeric sex_counter = 1 while sex_counter <= length(AgeSexDeckArray, 2) // ... enddo;enddo;
See also: Array.Length Function
MakeText Function Format:s = maketext(string-exp[,p1[,p2[,...,pn]]]);
[ ] indicates that this part is optional. Description:
The maketext function formats a text string with inserted values. Each argument (e.g., "p1") is sequentially insertedinto the text string. Arguments can be numeric or alphanumeric expressions, but the type of the argument mustmatch the type of the receiving field in the string expression. In the "string expression",
%[n]d = Insert a number and display it as an integer%[n.d]f = Insert a number and display it as a decimal value%[n.d]s = Insert a text string
where "n" is the size of the field and "d" is the number of decimal places to show for a number. Numbers are never truncated. Text strings are truncated only if ".d" is used. If "n" is positive, the insert is rightjustified in the size of the field. If "n" is negative, the insert is left-justified in the size of the field. If "n" is a positivenumber with a leading zero, the insert is right-justified in the size of the field and zero-filled to the left. When inserting anumber, if "n" is preceded by a "+", the sign of the number is always displayed.
Pa ge 543 of 684 Stri ng Func ons
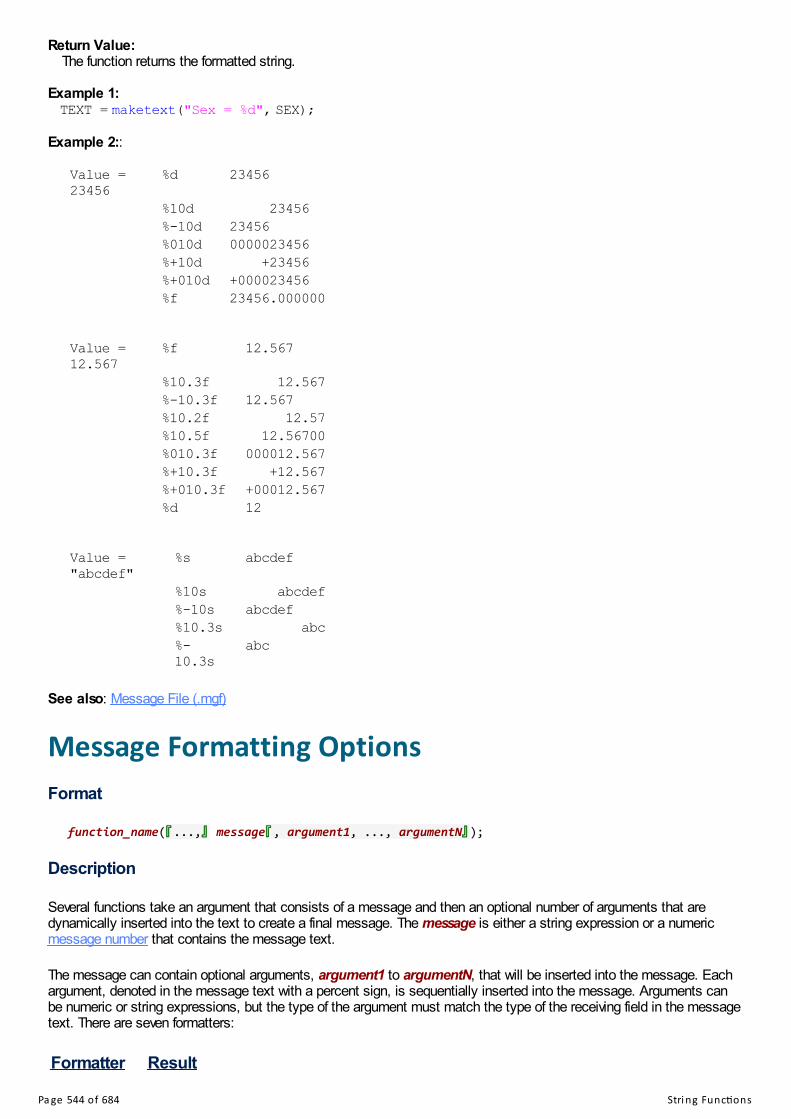
Return Value:The function returns the formatted string.
Example 1:TEXT = maketext("Sex = %d", SEX);
Example 2:: Value =23456
%d 23456
%10d 23456 %-10d 23456 %010d 0000023456 %+10d +23456 %+010d +000023456 %f 23456.000000
Value =12.567
%f 12.567
%10.3f 12.567 %-10.3f 12.567 %10.2f 12.57 %10.5f 12.56700 %010.3f 000012.567 %+10.3f +12.567 %+010.3f +00012.567 %d 12
Value ="abcdef"
%s abcdef
%10s abcdef %-10s abcdef %10.3s abc %-
10.3sabc
See also: Message File (.mgf)
Message Formatting OptionsFormat
function_name(『『...,』』 message『『, argument1, ..., argumentN』』);
Description
Several functions take an argument that consists of a message and then an optional number of arguments that aredynamically inserted into the text to create a final message. The message is either a string expression or a numericmessage number that contains the message text.
The message can contain optional arguments, argument1 to argumentN, that will be inserted into the message. Eachargument, denoted in the message text with a percent sign, is sequentially inserted into the message. Arguments canbe numeric or string expressions, but the type of the argument must match the type of the receiving field in the messagetext. There are seven formatters:
Formatter Result
Pa ge 544 of 684 Stri ng Func ons

"%d" Inserts a number that is displayed as an integer."%f" Inserts a number that is displayed as a decimal value (with six decimal places shown by default)."%s" Inserts a text string."%v" Inserts a variable formatted intelligently (see below)."%l" Inserts a variable's value label (see below)."%p" Inserts the name of the current procedure, which can be useful for debugging. No argument should be
supplied if using this option."%c" Inserts the first character of a text string, or no characters if the string is blank.
Variable Intelligent Formatting
The "%v" formatter works with either numeric or string variables, whether a dictionary item or a temporary variable. If theformatter is used on an alphanumeric dictionary item or a string variable, then it displays it in the same way as would"%s". However, if a numeric dictionary item is used, then it formats the number in the way that it would be saved,obeying the length, zero fill, and decimal attributes of the field. If a numeric temporary variable is used, then the numberis displayed as an integer ("%d") if applicable, or as a decimal value ("%f") with up to six decimal places otherwise.
The "%l" formatter looks up the value set label associated with the variable's current value. If found, it displays that label(in the same way that the getvaluelabel function does). If no value set label is associated with the value, then the "%l"formatter behaves as if it were the "%v" formatter.
Additional Formatting Options
Numeric and string arguments have a couple additional options that can be specified after the percent sign: "%[n]d", "%[n.d]f", and "%[n.d]s". In these cases, "n" controls the length of the replacement text and "d" controls either thenumber of decimal places shown or the length of the string. There are some rules:
If the number is positive, as in "%+5d", the text is right justified to the size of the field (e.g., " 9").
If the number is negative, as in "%-5d", the text is left justified to the size of the field (e.g., "9 ").
For numbers, if a leading zero proceeds the number, as in "%05d", the text is right justified to the size of the fieldbut instead of being padded with spaces, it is padded with zeros (e.g., "00009").
For numbers, if the number is preceded by a plus sign, as in "%+d", the sign of the number is always displayed(e.g., "+9").
Numbers are never truncated. Text strings are not truncated unless used as in "%0.5s", where the second part,".5", indicates the maximum number of characters.
Example
Pa ge 545 of 684 Stri ng Func ons

numeric integerValue = 23456;
errmsg( "%d" , integerValue); // 23456errmsg( "%10d" , integerValue); // 23456errmsg( "%-10d" , integerValue); // 23456errmsg( "%010d" , integerValue); // 0000023456errmsg( "%+10d" , integerValue); // +23456errmsg( "%+010d" , integerValue); // +000023456errmsg( "%f" , integerValue); // 23456.000000
numeric decimalValue = 12.567;
errmsg( "%f" , decimalValue); // 12.567000errmsg( "%10.3f" , decimalValue); // 12.567errmsg( "%-10.3f" , decimalValue); // 12.567errmsg( "%10.2f" , decimalValue); // 12.57errmsg( "%10.5f" , decimalValue); // 12.56700errmsg( "%010.3f" , decimalValue); // 000012.567errmsg( "%+10.3f" , decimalValue); // +12.567errmsg( "%+010.3f" , decimalValue); // +00012.567errmsg( "%d" , decimalValue); // 12
string stringValue = "abcdef";
errmsg( "%s" , stringValue); // abcdeferrmsg( "%10s" , stringValue); // abcdeferrmsg( "%-10s" , stringValue); // abcdeferrmsg( "%10.3s" , stringValue); // abcerrmsg( "%-10.3s" , stringValue); // abc
See also: ErrMsg Function, FileWrite Function, File.Write Function, LogText Function, MakeText Function, TraceFunction, Warning Function, Write Function
Pos FunctionFormat
i = pos(substring, source_string);
Description
The pos function searches for a grouping of characters, represented in a substring, within a source_string. The functionreturns the beginning position of the first occurrence of the substring. Both arguments are string expressions, and theyare case sensitive, meaning that "children" is recognized as different from "CHILDREN".
If using an alpha string or dictionary item, be aware that searching for a space character can lead to the function findingone at the end of your string. You may want to strip alphanumeric variables before searching for spaces.
Return Value
The function returns the position of the first occurrence of the substring, or if the substring is not found, the functionreturns 0.
Examples
Pa ge 546 of 684 Stri ng Func ons

VALUE = pos("L", "FOR THE CHILDREN"); // VALUE will be 12; this is where the // substring (the letter "L") occurs in the // source string ("FOR THE CHILDREN")
VALUE = pos("DRE", "CHILDREN"); // VALUE will be 5; this is where the // substring ("DRE") occurs in the source string
VALUE = pos("DCN", "CHILDREN"); // VALUE will be 0; the substring ("DCN") does // not occur in the source string
See also: PosChar Function, StartsWith Function, Replace Function, IsChecked Function
PosChar FunctionFormat
i = poschar(pattern_string, source_string);
Description
The poschar function searches for a collection of characters, represented in a pattern_string, within a source_string.The function returns the beginning position of the first occurrence of the pattern string in the source string. Botharguments are string expressions, and they are case sensitive, meaning that "c" is recognized as different from "C".
Return Value
The function returns the position of the first occurrence of the pattern string, or if no characters from the pattern string arefound, the function returns 0.
Examples
VALUE = poschar("L", "CHILDREN"); // VALUE will be 4; this is where the // pattern string (the letter "L") // occurs in the source string ("CHILDREN")
VALUE = poschar("LCN", "CHILDREN"); // VALUE will be 1; of the characters in the // pattern string, "C" is the first character // encountered in the source string, and it is // found at position 1
See also: Pos Function, StartsWith Function, Replace Function, IsChecked Function
RegExMatch FunctionFormat
i = regexmatch(target_string,regex_string);
Description
The regexmatch function tests whether the target_string matches the regex_string.
Return Value
The function returns an integer value of:
1 if target_string matches regex_string.
Pa ge 547 of 684 Stri ng Func ons

0 if target_string does not match regex_string.
Writing and Testing Regular Expressions
Regular expressions have their own syntax separate from CSPro logic. Therefore, it is recommended to write and testyour regular expressions in a regular expression editor. Use any regular expression editor that supports ECMAScript(JavaScript) engine (or flavor). One such editor is regex101, just make sure you change the flavor to ECMAScript.
Example
// Matches format xxx-xxx-xxxxif regexmatch(TELEPHONE_NUMBER, "^([0-9]{3}-){2}[0-9]{4}$") then // ...endif;
// Basic validation for emailif regexmatch(EMAIL, "^[^@\s]+@[^@\s]+\.[^@\s]+$") then // ...endif;
Replace FunctionFormat
s = replace(source_text, old_text, new_text);
Description
The replace function looks at source_text and replaces one or more instances of the substring old_text with the valuein new_text. All arguments are string expressions and the replacement is case sensitive, meaning that "c" isrecognized as different from "C".
Return Value
The function returns a new string with the replaced text.
Example 1
string example = "Robert Smith's son's name is Robert, Jr.";
example = replace(example, "Robert", "Bob");
// result: Bob Smith's son's name is Bob, Jr.
Example 2
Pa ge 548 of 684 Stri ng Func ons
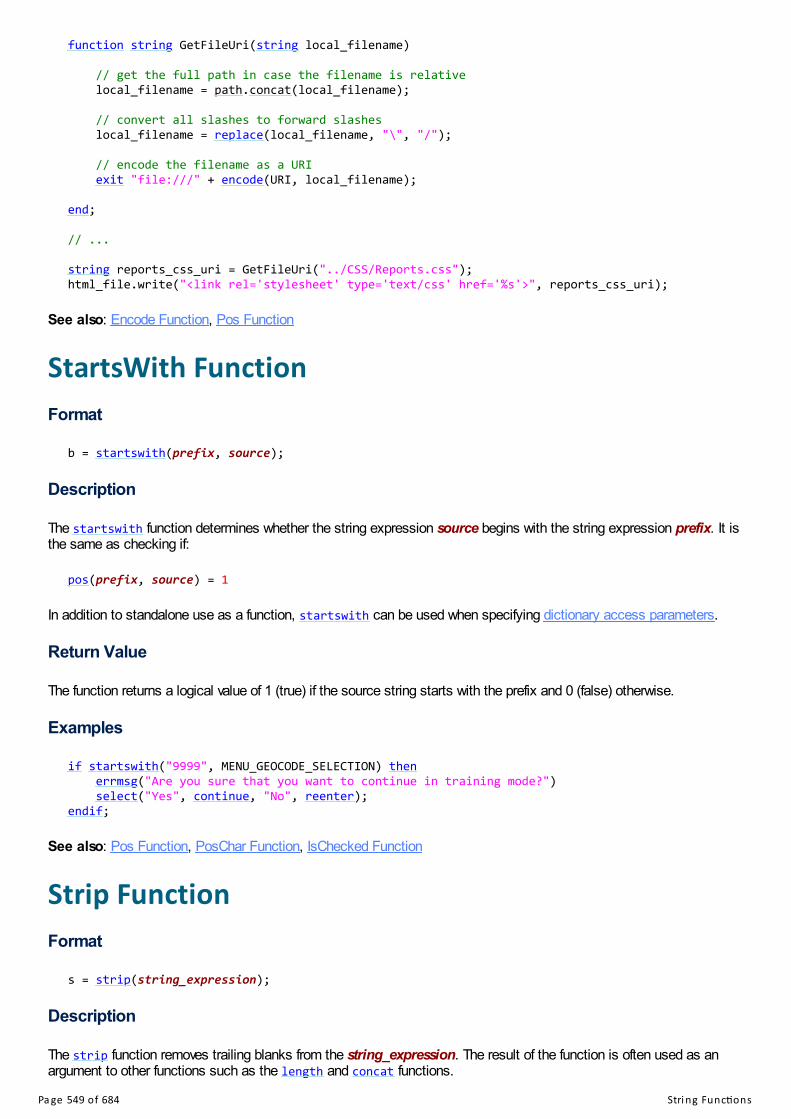
function string GetFileUri(string local_filename)
// get the full path in case the filename is relative local_filename = path.concat(local_filename);
// convert all slashes to forward slashes local_filename = replace(local_filename, "\", "/");
// encode the filename as a URI exit "file:///" + encode(URI, local_filename);
end;
// ...
string reports_css_uri = GetFileUri("../CSS/Reports.css");html_file.write("<link rel='stylesheet' type='text/css' href='%s'>", reports_css_uri);
See also: Encode Function, Pos Function
StartsWith FunctionFormat
b = startswith(prefix, source);
Description
The startswith function determines whether the string expression source begins with the string expression prefix. It isthe same as checking if:
pos(prefix, source) = 1
In addition to standalone use as a function, startswith can be used when specifying dictionary access parameters.
Return Value
The function returns a logical value of 1 (true) if the source string starts with the prefix and 0 (false) otherwise.
Examples
if startswith("9999", MENU_GEOCODE_SELECTION) then errmsg("Are you sure that you want to continue in training mode?") select("Yes", continue, "No", reenter);endif;
See also: Pos Function, PosChar Function, IsChecked Function
Strip FunctionFormat
s = strip(string_expression);
Description
The strip function removes trailing blanks from the string_expression. The result of the function is often used as anargument to other functions such as the length and concat functions.
Pa ge 549 of 684 Stri ng Func ons
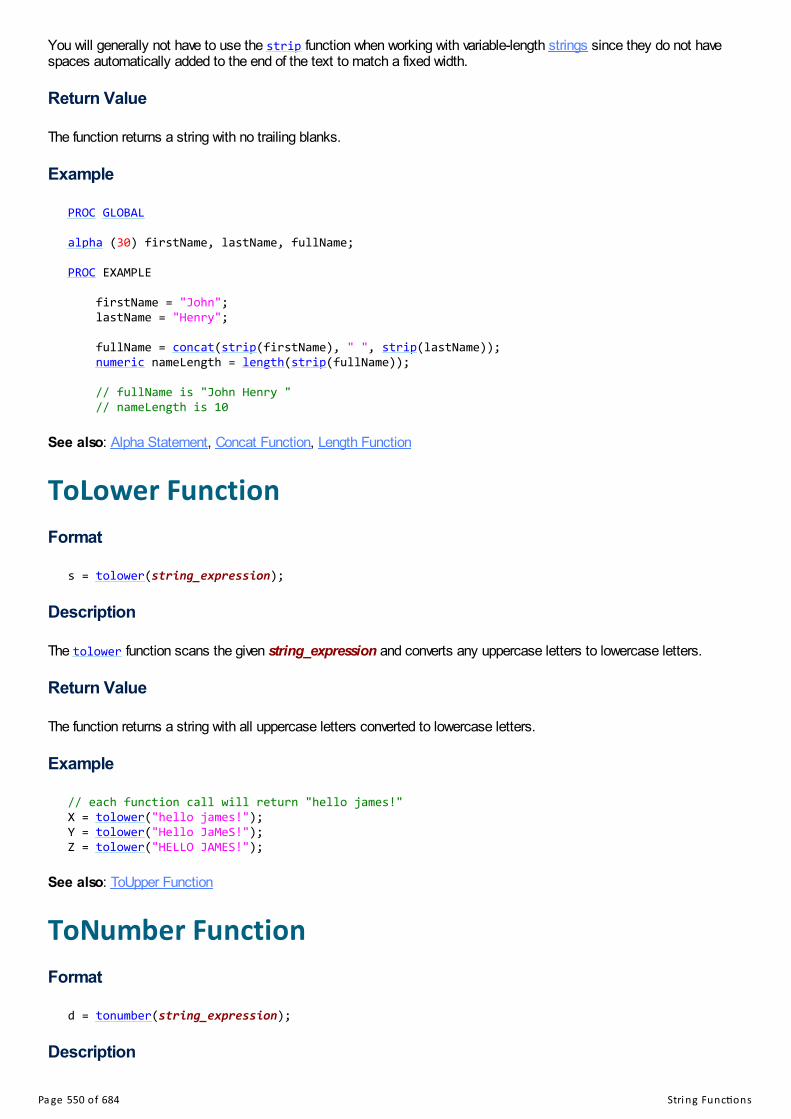
You will generally not have to use the strip function when working with variable-length strings since they do not havespaces automatically added to the end of the text to match a fixed width.
Return Value
The function returns a string with no trailing blanks.
Example
PROC GLOBAL
alpha (30) firstName, lastName, fullName;
PROC EXAMPLE
firstName = "John"; lastName = "Henry";
fullName = concat(strip(firstName), " ", strip(lastName)); numeric nameLength = length(strip(fullName));
// fullName is "John Henry " // nameLength is 10
See also: Alpha Statement, Concat Function, Length Function
ToLower FunctionFormat
s = tolower(string_expression);
Description
The tolower function scans the given string_expression and converts any uppercase letters to lowercase letters.
Return Value
The function returns a string with all uppercase letters converted to lowercase letters.
Example
// each function call will return "hello james!"X = tolower("hello james!");Y = tolower("Hello JaMeS!");Z = tolower("HELLO JAMES!");
See also: ToUpper Function
ToNumber FunctionFormat
d = tonumber(string_expression);
Description
Pa ge 550 of 684 Stri ng Func ons

The tonumber function converts a string_expression into a number. Leading blanks in the string are ignored. Theconversion stops at the first non-numeric character encountered.
Return Value
The function returns a decimal number. If the string begins with a non-numeric character (other than a blank), the functionreturns default.
Example
numeric districtParameter = tonumber(sysparm("DISTRICT"));
See also: Edit Function
ToUpper FunctionFormat
s = toupper(string_expression);
Description
The toupper function scans the given string_expression and converts any lowercase letters to uppercase letters.
Return Value
The function returns a string with all lowercase letters converted to uppercase letters.
Example
// each function call will return "HELLO JAMES!"X = toupper("hello james!");Y = toupper("Hello JaMeS!");Z = toupper("HELLO JAMES!");
See also: ToLower Function
Pa ge 551 of 684 Mul pl e Occurre nce Func ons

Multiple Occurrence FunctionsAverage FunctionFormat
d = average(multiple_item 『『where condition』』);
Description
The average function returns the average of multiple_item, an item that occurs multiple times. During data entry, theresult of the average calculation depends on where the statement is located. If the function is executed prior to the formor roster containing the item, it returns default. If it is executed within the form or roster containing the item, it returnsthe average up to the current occurrence number. If it is executed after the form or roster containing the item, it returnsthe average for all occurrences of the item.
During batch editing, the function returns the average value for all occurrences of the item, regardless of the statement'splacement in the program.
If a where condition is included, the function returns the average of the occurrences for which condition is true.
If the value of an occurrence of the item is a special value, the occurrence will not be included in the calculation. If noneof the occurrences have values other than special values, default is returned.
Return Value
The function returns the decimal value of the average.
Examples
AVG_INCOME = average(INCOME);
AVG_FEMALE_INCOME = average(INCOME where SEX = 2);
Count Function Format:i = count(multiple-item [where condition]);
Description:
The count function returns the number of occurrences for a repeating form or roster. During data entry, the occurrencevalue is updated after the postproc of the first field within a repeating form or roster is executed. If the count function isexecuted prior to the form or roster, it returns 0. If it is executed from a field within the form or roster, it returns thecurrent occurrence number. If it is executed after the form or roster, it returns the total number of occurrences in theform or roster. During batch editing, count always returns the total number of occurrences in the multiply-repeating item/record. If a where condition is included, the function returns the number of occurrences for which the condition is true. If thewhere condition is not included, the count function and the noccurs function return the same result.
Return value:The function returns an integer count value.
Pa ge 552 of 684 Mul pl e Occurre nce Func ons

Examples:TOTAL_PERSONS = count(PERSONS);NUM_CHILDREN = count(PERSONS where RELATIONSHIP = 3);
See also: Noccurs Function, Soccurs Function, Totocc Function, Curocc Function, Seek Function, Has Operator
CurOcc Function Format:i = curocc([group]);
Description:The curocc function returns the current occurrence number for a roster, form, or record.During data entry, you may determine the current occurrence of a roster or form. If the form does not repeat, curoccwill return 1 (a roster must always repeat). The current occurrence can be determined by calling the curocc functionfrom any field contained within the roster or form. If it is executed prior to the roster or repeating form it names, itreturns 0. If it is invoked after entry of the roster or form has completed, it returns the total number of occurrenceskeyed.
During batch editing, you may determine the current occurrence of a record or repeating item. If the curocc function isused in a procedure not associated with an item on a record then curocc will return the total number of occurrencesfound. If the curocc function is used in a procedure associated with an item on the record, it will return the sequencenumber of the record in the case. The curocc of a repeating item will be its sequence number within the group.
Return value:
The function returns the occurrence number as an integer. Examples 1:PROC RELATION if curocc(PERSON_REC) = 1 then if (RELATION <> 1) then errmsg("First person must be head of household."); endif; endif;
See also: Maxocc Function, Totocc Function, Noccurs Function, Soccurs Function, Count Function , If Statement,Errmsg Function
Delete FunctionFormat
b = delete(group_name『『(occurrence)』』);
b = delete(group_name, first_occurrence)『『, last_occurrence』』);
Description
The delete function removes incomplete, or otherwise unneeded, records or item occurrences from the current case. Itcan be used to remove singly- or multiply-occurring records, although if the record is non-repeating (such as the housingrecord in a typical census application), then it must be defined as "Required=No" in the dictionary. This function isprimarily intended for batch applications. It should be used with extreme caution in data entry applications because ofpossible conflicts between the operator's actions and the program logic.
The first syntax deletes a single occurrence of the record. When deleting a singly-occurring record, it is not necessary tospecify the occurrence. The second syntax deletes one or more occurrences of a record, starting with thelast_occurrence and deleting up to the first_occurrence. This allows for the mass deletion of record occurrences.
Pa ge 553 of 684 Mul pl e Occurre nce Func ons

Return Value
The function returns a logical value of 1 (true) if successful and 0 (false) otherwise.
Example 1 (Multiply-Occurring Records)
// remove "blank" person recordsdo numeric i = totocc(PERSON_REC) while i >= 1 by -1
if RELATIONSHIP(i) = notappl and SEX(i) = notappl and AGE(i) = notappl then delete(PERSON_REC(i)); endif;
enddo;
In this example blank person records are deleted from the case. Records following any deleted record are "shifted up" tocover the vacated area. For example, if you delete the second of four records, the third record shifts to the secondposition and the fourth record shifts to the third position.
It is best to delete the records starting with the last record and moving toward the first. Use a subscript that starts at thelast occurrence then is decremented (decreased by 1). In this way you will not need to worry about the records that areshifting positions.
Example 2 (Singly-Occurring Records)
// if person is homeless, delete the recordif H01_TYPE = 6 then delete(HOUSING_REC); // note the absence of a subscriptendif;
See also: Insert Function
GetOccLabel FunctionFormat
s = getocclabel(『『item_name ‖ group_name』』);
Description
The getocclabel function returns the occurrence label for a repeating item or group (i.e., the row label of a roster). If noitem_name or group_name is given, the function returns the occurrence label of the current field, as calculated asfollows:
s = getocclabel($(curocc($)));
In addition to uses in logic, the function can be used as a fill in question text.
Return Value
The function returns a string containing the occurrence label. If an occurrence label for the item or group does not exist,the function returns a blank string.
Example
Pa ge 554 of 684 Mul pl e Occurre nce Func ons

if EXPENSES > SALES then errmsg("You could not have made a profit on %s if expenses were greater thansales.",getocclabel()); reenter;endif;
See also: SetOccLabel Function, Occurrence Labels, Create Fills In Questions
Insert FunctionFormat
b = insert(group_name『『(occurrence)』』);
b = insert(group_name, first_occurrence)『『, last_occurrence』』);
Description
The insert function inserts missing or otherwise needed data records or item occurrences in the current case. It isprimarily intended for use in batch applications. It should be used with extreme caution in data entry applicationsbecause of possible conflicts between the operator's actions and the program logic.
The first syntax inserts a single occurrence of the record. When inserting a singly-occurring record, it is not necessary tospecify the occurrence. The second syntax inserts one or more occurrences of a record, starting with thefirst_occurrence and inserting up to the last_occurrence. This allows for the mass inserts of record occurrences.
Return Value
The function returns a logical value of 1 (true) if successful and 0 (false) otherwise.
Example 1 (Multiply-Occurring Records)
In the following example there is a data item in the housing record called H13_PERSONS, which contains the total numberof people living in the household. We have decided that if the number of population records found in the household is lessthan this variable, we will insert the missing number of population record(s).
do numeric i = count(PERSON_REC) + 1 while i <= H13_PERSONS insert(PERSON_REC(i));enddo;
It makes no difference if the population record has been defined in the dictionary as required or not. What is important isthat it was defined as a multiply-occurring record.
Example 2 (Singly-Occurring Records)
For this example, we are processing data that did not require housing records to be present. However, now we want toforce the existence of housing records. We could implement this as follows:
if totocc(HOUSING_REC) = 0 then insert(HOUSING_REC); // note the absence of a subscriptendif;
To accomplish this, the housing record must be set to "Required=No" in the dictionary. You cannot use this function fora singly-occurring record when the record is required.
See also: Delete Function
Pa ge 555 of 684 Mul pl e Occurre nce Func ons

Max Function Format:d = max(multiple-item [where condition]);
Description:The max function returns the maximum value of an item that occurs multiple times. During batch editing, if the valuesof the items are not changed, the result of the maximum calculation is the same, no matter where the function islocated.
During data entry, the result of the maximum calculation depends on where the statement is located. If the maxfunction is executed prior to the form or roster containing the item, it returns DEFAULT. If it is executed within the formor roster containing the item, it returns the maximum value up to the current occurrence number. If it is executed afterthe form or roster containing the item, it returns the maximum value for all occurrences of the item.
During batch editing, max always returns the maximum value for all occurrences of the item.
If a where condition is included, the function returns the maximum value of the occurrences for which the condition istrue.
If the value of an occurrence of the item is a special value (DEFAULT, MISSING, REFUSED, or NOTAPPL), theoccurrence will not be included in the calculation. If none of the occurrences have values other than special values,DEFAULT is returned.
Return value:
The function returns a decimal value. Examples:MAX_INCOME = max(INCOME);MAX_FEMALE_INCOME = max(INCOME where SEX = 2);
See also: Min Function
MaxOcc Function Format:i = maxocc([group]);
Description:
The maxocc function returns the maximum number of multiply occurring records or the maximum number of multiply-occurring items defined for a group in the dictionary. This value remains the same throughout the application run.
Return value:
The function returns an integer value of the maximum number of occurrences. Example 1:PROC HOUSING errmsg("Maximum number of persons is %d", maxocc(PERSON));
Example 2:PROC PERSON errmsg("Maximum number of persons is %d", maxocc());
See also: Curocc Function, Totocc Function, Soccurs Function, Noccurs Function
Pa ge 556 of 684 Mul pl e Occurre nce Func ons

Min Function Format:d = min(multiple-item [where condition]);
Description:
The min function returns the minimum value of an item that occurs multiple times. During batch editing, if the values ofthe items are not changed, the result of the minimum calculation is the same, no matter where the function is located.
During data entry, the result of the minimum calculation depends on where the statement is located. If the minfunction is executed prior to the form or roster containing the item, it returns DEFAULT. If it is executed within the formor roster containing the item, it returns the minimum value up to the current occurrence number. If it is executed afterthe form or roster containing the item, it returns the minimum value for all occurrences of the item.
During batch editing, min always returns the minimum value for all occurrences of the item.
If a where condition is included, the function returns the minimum value of the occurrences for which the condition istrue.
If the value of an occurrence of the item is a special value (DEFAULT, MISSING, REFUSED, or NOTAPPL) theoccurrence will not be included in the calculation. If none of the occurrences have values other than special values,DEFAULT is returned.
Return value:
The function return a decimal value. Examples:MIN_INCOME = min(INCOME);MIN_MALE_INCOME = min(INCOME where SEX = 1);
See also: Max Function
NOccurs Function Format:i = noccurs(group);
Description:
The noccurs function returns the number of occurrences of a roster, form, or record. It is equivalent to the countfunction without the where phrase.
During data entry, you may determine the current occurrence of a roster or form. The occurrence value is updated afterthe first entry into the first field. If the noccurs function is executed prior to the roster or form it specifies then it returns0. If it is executed from a field within the roster or form, it returns the current occurrence number after the first field ison the path. For example, its value in the PREPROC of the first occurrence of the first item entered in a form or rosteris zero (0), i.e., before entry. After entry its value will always be one (1). This is true for each occurrence keyed, thenoccurs function is not incremented until the cursor is in or has passed through the first field on the roster or form. If itis executed after the form or roster, it returns the total number of occurrences in the form or roster. If the form does notrepeat, noccurs will return 1 (a roster must always repeat). When used in Data entry noccurs and soccurs functionsare the same.
During batch editing, noccurs always returns the total number of occurrences in the group.
Return value:The function returns the number of occurrences as an integer value.
Example:TOTAL_PERSONS = noccurs(PERSON);
Pa ge 557 of 684 Mul pl e Occurre nce Func ons
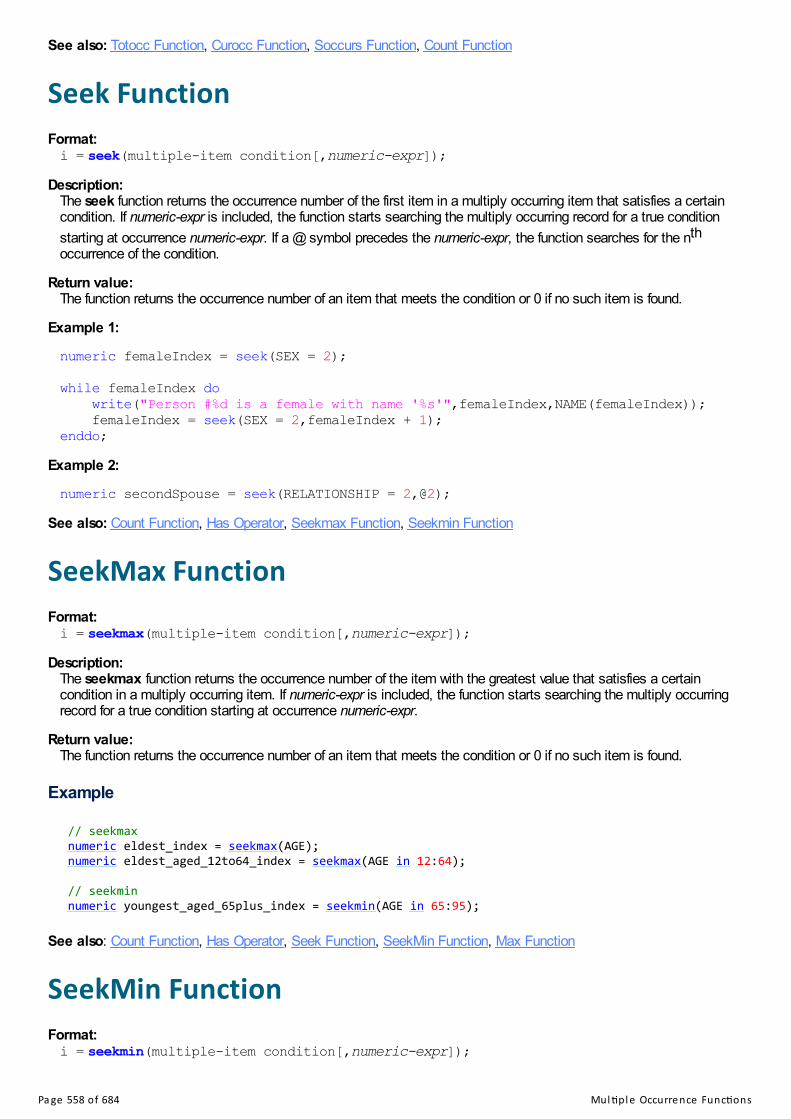
See also: Totocc Function, Curocc Function, Soccurs Function, Count Function
Seek FunctionFormat:i = seek(multiple-item condition[,numeric-expr]);
Description:The seek function returns the occurrence number of the first item in a multiply occurring item that satisfies a certaincondition. If numeric-expr is included, the function starts searching the multiply occurring record for a true conditionstarting at occurrence numeric-expr. If a @ symbol precedes the numeric-expr, the function searches for the nthoccurrence of the condition.
Return value:The function returns the occurrence number of an item that meets the condition or 0 if no such item is found.
Example 1:
numeric femaleIndex = seek(SEX = 2);
while femaleIndex do write("Person #%d is a female with name '%s'",femaleIndex,NAME(femaleIndex)); femaleIndex = seek(SEX = 2,femaleIndex + 1);enddo;
Example 2:
numeric secondSpouse = seek(RELATIONSHIP = 2,@2);See also: Count Function, Has Operator, Seekmax Function, Seekmin Function
SeekMax FunctionFormat:i = seekmax(multiple-item condition[,numeric-expr]);
Description:The seekmax function returns the occurrence number of the item with the greatest value that satisfies a certaincondition in a multiply occurring item. If numeric-expr is included, the function starts searching the multiply occurringrecord for a true condition starting at occurrence numeric-expr.
Return value:The function returns the occurrence number of an item that meets the condition or 0 if no such item is found.
Example
// seekmaxnumeric eldest_index = seekmax(AGE);numeric eldest_aged_12to64_index = seekmax(AGE in 12:64);
// seekminnumeric youngest_aged_65plus_index = seekmin(AGE in 65:95);
See also: Count Function, Has Operator, Seek Function, SeekMin Function, Max Function
SeekMin FunctionFormat:i = seekmin(multiple-item condition[,numeric-expr]);
Pa ge 558 of 684 Mul pl e Occurre nce Func ons

Description:The seekmin function returns the occurrence number of the item with the lowest value that satisfies a certain conditionin a multiply occurring item. If numeric-expr is included, the function starts searching the multiply occurring record for atrue condition starting at occurrence numeric-expr.
Return value:The function returns the occurrence number of an item that meets the condition or 0 if no such item is found.
Example
// seekmaxnumeric eldest_index = seekmax(AGE);numeric eldest_aged_12to64_index = seekmax(AGE in 12:64);
// seekminnumeric youngest_aged_65plus_index = seekmin(AGE in 65:95);
See also: Count Function, Has Operator, Seek Function, SeekMax Function, Min Function
SetOccLabel FunctionFormat
b = setocclabel(『『item_name ‖ group_name,』』occurrence_label);
Description
The setocclabel function sets the occurrence label for a repeating item or group (i.e., the row label of a roster). This isespecially useful when designing applications for mobile devices, as it allows you to specify the label that is displayed inthe navigational case tree. If no item_name or group_name is given, the function sets the occurrence label of thecurrent field. The occurrence label is set to the string expression occurrence_label.
Return Value
The function returns a logical value of 1 (true) if the label was set successfully and 0 (false) if the occurrence for the itemor group item does not exist.
Example 1
PROC PERSON_NAME
setocclabel(PERSON_ROSTER,strip(PERSON_NAME));
Example 2
PROC MYSURVEY_QUEST
preproc
// fill in occurrence labels for the household roster do numeric ctr = 1 while ctr <= totocc(PERSON_ROSTER) setocclabel(PERSON_ROSTER(ctr),strip(NAME(ctr))); enddo;
See also: GetOccLabel Function, Occurrence Labels, ShowOcc Function
SOccurs FunctionPa ge 559 of 684 Mul pl e Occurre nce Func ons

Format:i = soccurs(record-name);
Description:
The soccurs function returns the total number of occurrences of a record.
During data entry, you may determine the current occurrence of a record. The occurrence value is updated after thefirst entry into the first field. If the soccurs function is executed prior to the roster or form it specifies then it returns 0. Ifit is executed from a field within the roster or form, it returns the current occurrence number after the first field is on thepath. For example, its value in the PREPROC of the first occurrence of the first item entered in a form or roster is zero(0), i.e., before entry. After entry its value will always be one (1). This is true for each occurrence keyed, the soccursfunction is not incremented until the cursor is in or has passed through the first field on the record. If it is executedafter the form or roster, it returns the total number of occurrences in the form or roster. If the form does not repeat,noccurs will return 1 (a roster must always repeat). When used in Data entry noccurs and soccurs functions are thesame. During batch editing, soccurs always returns the total number of record occurrences found.
Return value:The function returns the number of occurrences as an integer value.
Example:NUM_HH_MEMBERS = soccurs(PERSON_REC);
See also: Totocc Function, Curocc Function, Noccurs Function, Count Function
Sort FunctionFormat
b = sort(group_name using 『『-』』item_name1 『『,『『-』』item_name2, ...』』 『『where where_condition』』);
Description
The sort function sorts occurrences of records or items based on the value of an item or multiple items. It orders themultiple records or items in the specified group in ascending sequence using the specified data item as the sort key. Thesort key item must be contained within the record or item sorted. If a negative sign is included before the item name, thesort will be in descending order. If a where_condition is included, the function sorts only the occurrences for which thecondition is true. When multiple sort keys are provided, the second, third, ... key is only evaluated when the values of theprevious keys are identical.
Sort is primarily intended for use in batch applications. It should be used with extreme caution in data entry applicationsbecause of possible conflicts between the operator's actions and the program logic.
Return Value
The function returns a logical value 1 (true) if successful and 0 (false) otherwise.
Examples
// sort the people using the line numbersort(PERSON_EDT using LINE_NUM);
// sort the children by age from oldest to youngestsort(PERSON_EDT using -AGE where RELATIONSHIP = 3);
// sort the people first by relationship code (ascending) and then by age (descending)sort(PERSON_EDT using RELATIONSHIP, -AGE);
Pa ge 560 of 684 Mul pl e Occurre nce Func ons

See also: Swap Function, ValueSet.Sort Function
Sum Function Format:d = sum(multiple-item [where condition]);
Description:
The sum function returns the sum of an item that occurs multiple times. If a where condition is included, the functionreturns the sum of the occurrences for which the condition is true.
During data entry, the result of the sum calculation depends on where the statement is located. If the sum function isexecuted prior to the form or roster containing the item, it returns DEFAULT. If it is executed within the form or rostercontaining the item, it returns the sum up to the current occurrence number. If it is executed after the form or rostercontaining the item, it returns the sum for all occurrences of the item.
During batch editing, sum always returns the sum for all occurrences of the item.
If the value of an occurrence of the item is a special value (DEFAULT, MISSING, REFUSED, or NOTAPPL) theoccurrence will not be included in the calculation. If none of the occurrences have values other than special values,DEFAULT is returned.
Return value:The function returns a decimal value of the sum.
Example:TOTAL_INCOME = sum(INCOME);TOTAL_FEMALE_INCOME = sum(INCOME where SEX = 2);
Swap Function Format:b = swap(group-name,record-number,record-number);
Description:
The swap function reorders the sequence of occurrences of records or items. It is useful for reorganizing the position(occurrence number) of items in a roster, for instance if you want to ensure that the head of household is the firstperson on the roster.
Swap is primarily intended for use in batch applications. It should be used with extreme caution in data entryapplications because of possible conflicts between the operator's actions and the program logic.
Return value:The function returns a logical value 1 (true) if successful and 0 (false) otherwise.
Example:swap(PERSON,1,ptrHead);
See also: Sort Function
TotOcc Function Format:i = totocc([group]);
Description:
Pa ge 561 of 684 Mul pl e Occurre nce Func ons

The totocc function returns the total number of multiply occurring records or the total number of multiply-occurringitems that a group currently contains.
During data entry, the occurrence value is updated in the preproc of the first field within a repeating form, record orroster. If the totocc function is executed prior to the entry of form or roster, it returns 0. If it is executed from a group orfield within the form or roster, it returns the total number of occurrences currently entered. If it is executed after theform or roster, it returns the total number of occurrences in the form or roster.
During batch editing, totocc always returns the total number of occurrences in the group.
Return value:The function returns an integer value of the number of occurrences.
Example 1:if totocc(HOUSING) > 1 then errmsg("More than 1 housing record");endif;
Example 2:PROC HOUSINGif totocc() > 1 then errmsg("More than 1 housing record");endif;
See also: Curocc Function, Maxocc Function, Count Function, Soccurs Function, Noccurs Function
Pa ge 562 of 684 Ge ne ra l Func ons

General FunctionsCompress FunctionFormat
i = compress(zip_file_name, input_file_list ‖ input_file_name);
Description
The compress function compresses one or more files and saves the compressed files in a single .zip file. That file can bedecompressed with the decompress function or with other popular tools. Compressing data, in addition to saving size, isa convenient way to bundle several files into a single file.
The argument zip_file_name is a string expression containing the file name of the output .zip file. If an existing .zip fileexists with that name, it will be overwritten. The list of input files can come from a string list, input_file_list, that couldbe returned from a dirlist function call. Alternatively, the list of input files can come from a string expressioninput_file_name. If using a string expression, you can use the wildcard characters "*" and "?" to specify a group of files.
Return Value
The function returns the number of files (but not folders) added to the compressed .zip file. If there was an error creatingthe compressed file, the function returns default.
Example 1
compress("CollectedData.zip", "*.csdb");
Example 2
list string imageFilesListing;
dirlist(imageFilesListing, pathname(InputFile), "*.jpg", recursive);
compress("Images.zip", imageFilesListing);
See also: Decompress Function
Decompress FunctionFormat
i = decompress(zip_file_name『『,directory_name』』);
Description
The decompress function decompresses the compressed files contained in a .zip file. Compressed .zip files can becreated using the compress function or with other popular tools.
The argument zip_file_name is a string expression containing the file name of the .zip file. An optional string expressiondirectory_name indicates the folder to which the files should be decompressed. If no directory name is specified, thefiles are decompressed to the current application directory.
Pa ge 563 of 684 Ge ne ra l Func ons
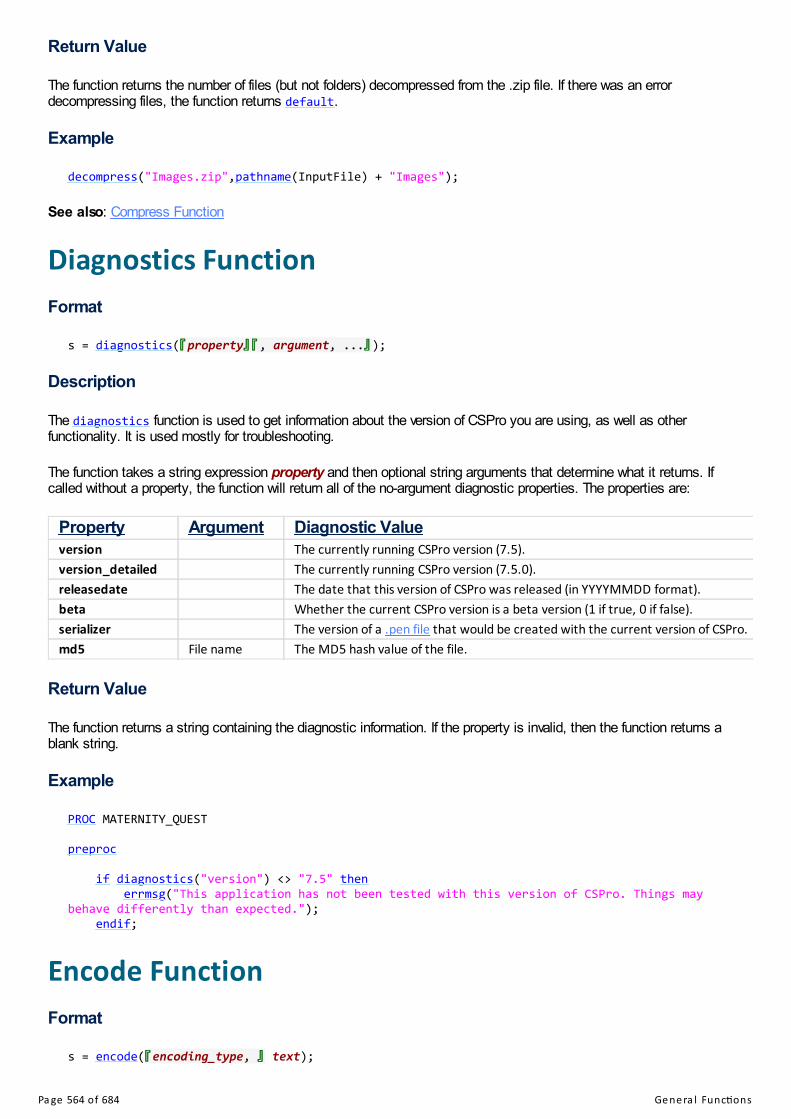
Return Value
The function returns the number of files (but not folders) decompressed from the .zip file. If there was an errordecompressing files, the function returns default.
Example
decompress("Images.zip",pathname(InputFile) + "Images");
See also: Compress Function
Diagnostics FunctionFormat
s = diagnostics(『『property』』 『『, argument, ...』』);
Description
The diagnostics function is used to get information about the version of CSPro you are using, as well as otherfunctionality. It is used mostly for troubleshooting.
The function takes a string expression property and then optional string arguments that determine what it returns. Ifcalled without a property, the function will return all of the no-argument diagnostic properties. The properties are:
Property Argument Diagnostic Valueversion The currently running CSPro version (7.5).version_detailed The currently running CSPro version (7.5.0).releasedate The date that this version of CSPro was released (in YYYYMMDD format).beta Whether the current CSPro version is a beta version (1 if true, 0 if false).serializer The version of a .pen file that would be created with the current version of CSPro.md5 File name The MD5 hash value of the file.
Return Value
The function returns a string containing the diagnostic information. If the property is invalid, then the function returns ablank string.
Example
PROC MATERNITY_QUEST
preproc
if diagnostics("version") <> "7.5" then errmsg("This application has not been tested with this version of CSPro. Things maybehave differently than expected."); endif;
Encode FunctionFormat
s = encode(『『encoding_type, 』』 text);
Pa ge 564 of 684 Ge ne ra l Func ons

Description
The encode function escapes special characters to facilitate writing to HTML or CSV files, or encodes characters whenwriting out URIs or URI components.
The optional argument encoding_type specifies the format for encoding. The text argument is a string expression thatspecifies the text to encode. If an encoding type is provided with no text, then the default encoding type for theapplication is modified. (An application starts with the default encoding type set to HTML.) The encoding types are:
Encoding Type DescriptionHTML Encodes the characters < > & and newlines for writing to HTML files.CSV Encodes the characters , " and newlines for writing to comma-separated values files.URI Encodes a group of characters for writing uniform resource identifiers (URIs).URIComponent Encodes a group of characters for writing the components of URIs.PercentEncoding Encodes a group of characters for writing to formats such as connection strings.
Return Value
The function returns a string with the appropriate characters encoded. If the default encoding type is changed, thefunction returns a blank string.
Example
// write to a HTML filefile html_file;
html_file.write("<p>Enumerator name: %s</p>", encode(strip(ENUMERATOR_NAME)));
string house_image_filename = pathconcat("../House Images", key(HOUSING_DICT) + ".jpg");html_file.write("<p><img src='file:///%s' alt='House' /></p>", encode(URI,house_image_filename));
// write to a CSV filefile csv_file;
encode(CSV);csv_file.write("Address,Head of Household");csv_file.write("%s,%s", encode(strip(ADDRESS)), encode(strip(HEAD_NAME)));
See also: File.Write Function, Replace Function
ErrMsg Function Format 1:[b =] errmsg(alpha-exp[,p1[,p2[,...,pn]]]) [select(caption-1, field-name-1, ..., caption-n, field-name-n)] [denom=var] [case|summary]);
Format 2:[b =] errmsg(msg-num[,p1[,p2[,...,pn]]]) [select(caption-1, field-name-1, ..., caption-n, field-name-n)] [denom=var] [case|summary];
Description:
The errmsg function displays a message on the data entry screen (when used in a Data Entry application) or writes amessage to the batch edit report (when used in a Batch Edit application). If messages are defined via the messagenumber msg-num, then those messages will be stored in a message file [.mgf].
Pa ge 565 of 684 Ge ne ra l Func ons

msg-num can be a number or numeric expression Note to ISSA users: Use the errmsg function with the case keyword to replace the "display" function. Each argument (e.g., "p1") is sequentially inserted into the error message. Arguments can be numeric oralphanumeric expressions, but the type of the argument must match the type of the receiving field in the messagetext. The maximum number of arguments in an errmsg function is 20. In the message text
%[n]d = Insert a number and display it as an integer%[n.d]f = Insert a number and display it as a decimal value%[n.d]s = Insert a text string
"n" is the size of the field and "d" is the number of decimal places to show for a number. Numbers are never truncated. Text strings are truncated only if ".d" is used.
If "n" is positive, the insert is right justified in the size of the field. If "n" is negative, the insert is left justified in the sizeof the field. If "n" is a positive number with a leading zero, the insert is right justified in the size of the field and zerofilled to the left. When inserting a number, if "n" is preceded by a +, the sign of the number is always displayed.
Examples: Value = 23456 %d 23456 %10d 23456 %-10d 23456 %010d 0000023456 %+10d +23456 %+010d +000023456 %f 23456.000000
Value = 12.567 %f 12.567000 %10.3f 12.567 %-10.3f 12.567 %10.2f 12.57 %10.5f 12.56700 %010.3f 000012.567 %+10.3f +12.567 %+010.3f +00012.567 %d 12
Value = "abcdef" %s abcdef %10s abcdef %-10s abcdef %10.3s abc %-10.3s abc
The denom keyword allows you to specify a denominator, so that you can show percentages in the summary portionof the output listing. This is very useful for showing edit failure rates. In Example 2 below, the output listing will showthe number of times there was more than one head of household divided by the number of households processedduring the run. Note that it is the responsibility of the application designer to write logic to put the proper values intothe denominator variable. The case and summary keywords give you some control over the output listing. By default, the output listing showsyou messages case by case, and also shows you a summary of the number of times the message was triggered (withan optional denominator, described above). You can limit the output listing to only case-by-case reporting, or onlysummary reporting by using these keywords.
Pa ge 566 of 684 Ge ne ra l Func ons

The select keyword is used to give the option of specifying the field to go to in response to the error message. Abutton is placed on the error message window for each caption and field-name specified as a select argument. Thecaption is what is displayed on the button. When the button is clicked, the system goes to the field specified as field-name. If continue is used as the field name, the system continues executing the code following the errmsg function.
Return Value:
The function returns a logical value 1 (true) if successful and 0 (false) otherwise. When the select keyword is used, thefunction returns the number of the button that was pressed, with the first button having the value 1.
Format 1 Examples: Example 1: errmsg("Head of household is %d years old.", AGE);
Example 2: errmsg("More than 1 head of household") denom = PERSON_COUNT summary;
Example 3: errmsg("Head of household is %d years old. Age must be >= 12", AGE) select("Go to RELATIONSHIP", RELATIONSHIP,"Go To AGE", AGE) denom = PERSON_COUNT;
Format 2 Example: OK = errmsg (1,"June",30,31);
where the message file contains the following text: 1 %s has only %d days. You entered %d! Note the errmsg call could have also been invoked as follows:
i = 1;
OK = errmsg (i,"June",30,31);
See also: Message File (.mgf)
ExecSystem Function (Desktop)Format
b = execsystem(action『『, flags』』);
Description
The execsystem function, on a desktop, starts another Windows application or process. There is a related version forapplications running on mobile devices.
The string expression action is the name of the application or process to be started. Command line parameters may beincluded in this expression. If folder or file names contain blanks, then quotation marks (") must surround the names. Inthis case CSPro text strings can be surrounded by apostrophes (').
An optional set of three flags controls the way that the application is opened, and includes the following options:
Category Flag DescriptionProgram Control nowait The application is opened alongside CSPro. This is the default option.
wait The application is opened and CSPro waits until it closes to resume program control.stop CSPro immediately closes and then opens the application. This is similar to what
would occur if using the stop function with an argument of 1.
Pa ge 567 of 684 Ge ne ra l Func ons

Window Size normal The application's window is opened in its normal state. This is the default option.maximized The application's window is opened in its maximized state.minimized The application's window is opened in its minimized state.
Window Focus focus The application is opened and immediately has focus (is "active"). This is the default
option.nofocus The application is opened without focus.
A combination of flags can be used, with each set separated by a comma.
Return Value
The function returns a logical value of 1 (true) if the new application is started successfully and 0 (false) otherwise.
Examples
// opens the Windows calculatorexecsystem("calc.exe");
// opens documentation in Text Viewerexecsystem(maketext('"%sTextView.exe" "C:\Survey\Helps.txt"', pathname(CSPro)), maximized,wait);
// open a website in Internet Explorerexecsystem(maketext('"%sInternet Explorer\iexplore.exe" "https://www.csprousers.org/forum"',pathname(ProgramFiles32)));
See also: SystemApp Object, ExecSystem Function (Mobile), ExecPFF Function, View Function
ExecSystem Function (Mobile)Format
b = execsystem(action『『, stop』』);
Description
The execsystem function, on mobile devices (Android), starts another application or executes a task. There is a relatedversion for applications running on desktop CSEntry.
If stop is coded, the application will immediately close after launching the application, in the same way that would occurif using the stop function with an argument of 1.
The string expression action must begin with one of the following commands:
Command Descriptionapp Open another application on the device. (You can get more control using SystemApp instead.)browse View a website in the Internet browser.call Place a phone call.camera Take a photo in .jpg or .png format.gps View a latitude/longitude point using an installed mapping engine (e.g., Google Maps).html View a website from within CSEntry (equivalent to using the view function).signature Bring up a screen where someone can sign the mobile device, an image of which can be saved in .jpg
or .png format.sms Send a text message.
Pa ge 568 of 684 Ge ne ra l Func ons
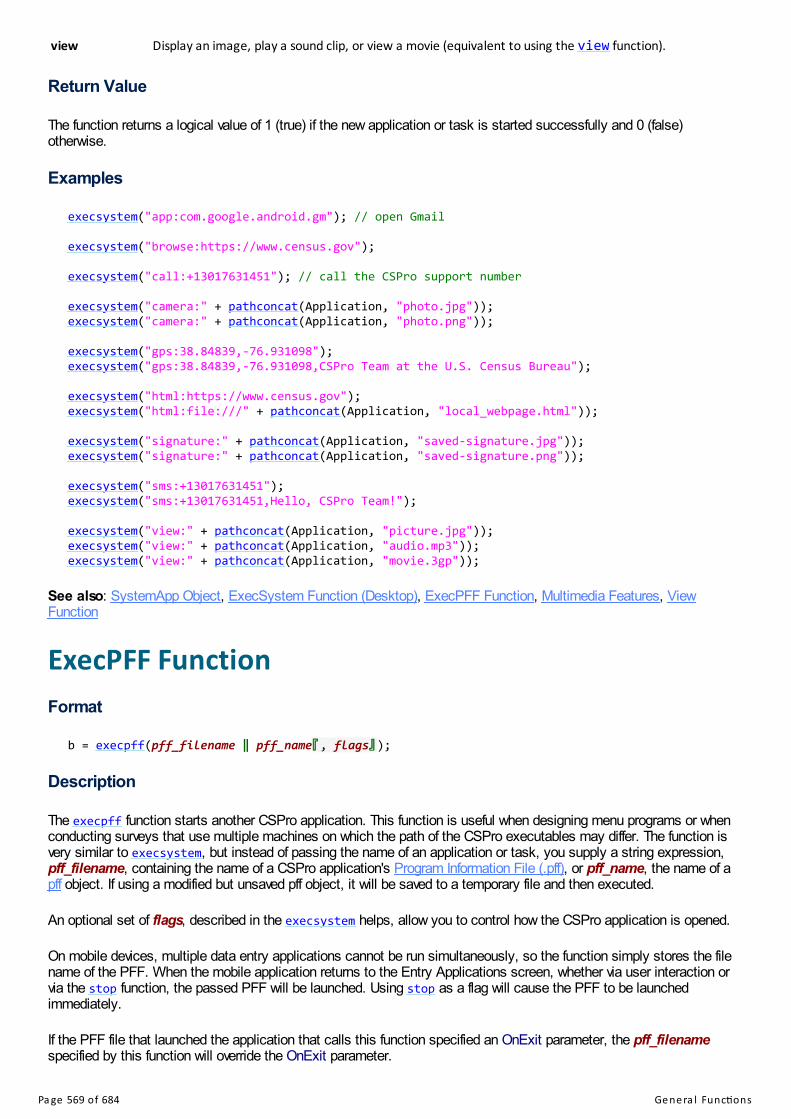
view Display an image, play a sound clip, or view a movie (equivalent to using the view function).
Return Value
The function returns a logical value of 1 (true) if the new application or task is started successfully and 0 (false)otherwise.
Examples
execsystem("app:com.google.android.gm"); // open Gmail
execsystem("browse:https://www.census.gov");
execsystem("call:+13017631451"); // call the CSPro support number
execsystem("camera:" + pathconcat(Application, "photo.jpg"));execsystem("camera:" + pathconcat(Application, "photo.png"));
execsystem("gps:38.84839,-76.931098");execsystem("gps:38.84839,-76.931098,CSPro Team at the U.S. Census Bureau");
execsystem("html:https://www.census.gov");execsystem("html:file:///" + pathconcat(Application, "local_webpage.html"));
execsystem("signature:" + pathconcat(Application, "saved-signature.jpg"));execsystem("signature:" + pathconcat(Application, "saved-signature.png"));
execsystem("sms:+13017631451");execsystem("sms:+13017631451,Hello, CSPro Team!");
execsystem("view:" + pathconcat(Application, "picture.jpg"));execsystem("view:" + pathconcat(Application, "audio.mp3"));execsystem("view:" + pathconcat(Application, "movie.3gp"));
See also: SystemApp Object, ExecSystem Function (Desktop), ExecPFF Function, Multimedia Features, ViewFunction
ExecPFF FunctionFormat
b = execpff(pff_filename ‖ pff_name『『, flags』』);
Description
The execpff function starts another CSPro application. This function is useful when designing menu programs or whenconducting surveys that use multiple machines on which the path of the CSPro executables may differ. The function isvery similar to execsystem, but instead of passing the name of an application or task, you supply a string expression,pff_filename, containing the name of a CSPro application's Program Information File (.pff), or pff_name, the name of apff object. If using a modified but unsaved pff object, it will be saved to a temporary file and then executed.
An optional set of flags, described in the execsystem helps, allow you to control how the CSPro application is opened.
On mobile devices, multiple data entry applications cannot be run simultaneously, so the function simply stores the filename of the PFF. When the mobile application returns to the Entry Applications screen, whether via user interaction orvia the stop function, the passed PFF will be launched. Using stop as a flag will cause the PFF to be launchedimmediately.
If the PFF file that launched the application that calls this function specified an OnExit parameter, the pff_filenamespecified by this function will override the OnExit parameter.
Pa ge 569 of 684 Ge ne ra l Func ons
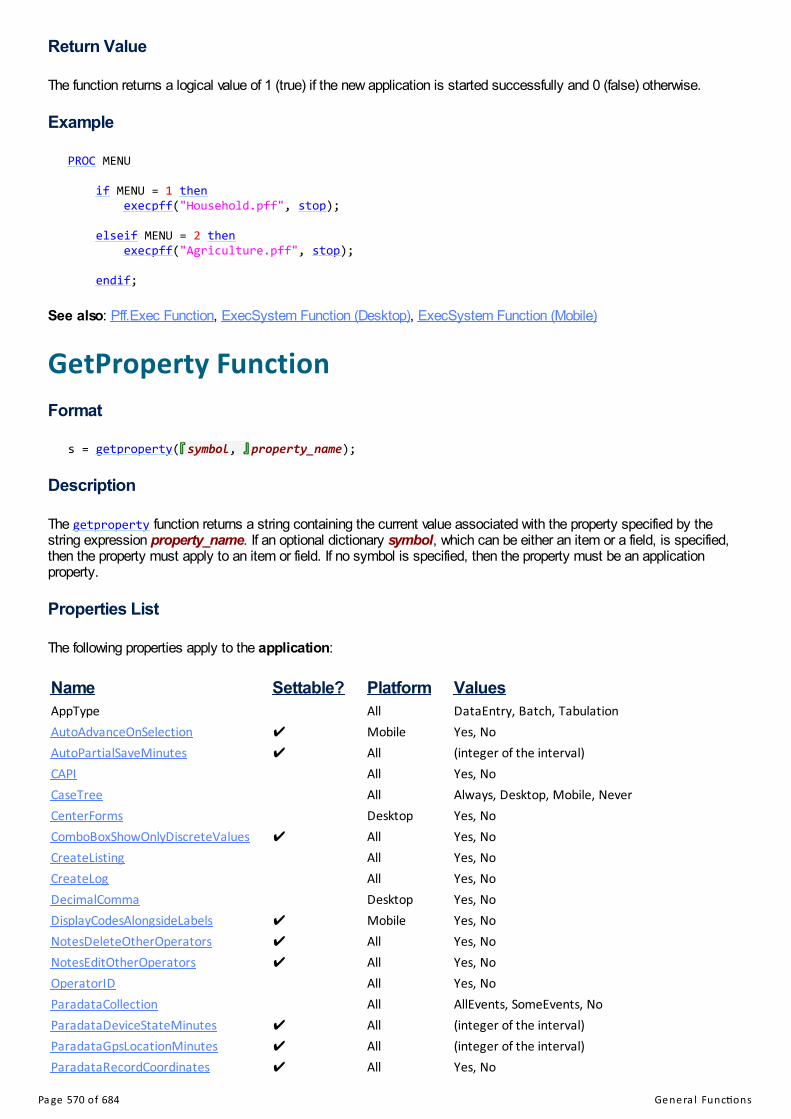
Return Value
The function returns a logical value of 1 (true) if the new application is started successfully and 0 (false) otherwise.
Example
PROC MENU
if MENU = 1 then execpff("Household.pff", stop);
elseif MENU = 2 then execpff("Agriculture.pff", stop);
endif;
See also: Pff.Exec Function, ExecSystem Function (Desktop), ExecSystem Function (Mobile)
GetProperty FunctionFormat
s = getproperty(『『symbol, 』』property_name);
Description
The getproperty function returns a string containing the current value associated with the property specified by thestring expression property_name. If an optional dictionary symbol, which can be either an item or a field, is specified,then the property must apply to an item or field. If no symbol is specified, then the property must be an applicationproperty.
Properties List
The following properties apply to the application:
Name Settable? Platform ValuesAppType All DataEntry, Batch, TabulationAutoAdvanceOnSelection ✔ Mobile Yes, NoAutoPartialSaveMinutes ✔ All (integer of the interval)CAPI All Yes, NoCaseTree All Always, Desktop, Mobile, NeverCenterForms Desktop Yes, NoComboBoxShowOnlyDiscreteValues ✔ All Yes, NoCreateListing All Yes, NoCreateLog All Yes, NoDecimalComma Desktop Yes, NoDisplayCodesAlongsideLabels ✔ Mobile Yes, NoNotesDeleteOtherOperators ✔ All Yes, NoNotesEditOtherOperators ✔ All Yes, NoOperatorID All Yes, NoParadataCollection All AllEvents, SomeEvents, NoParadataDeviceStateMinutes ✔ All (integer of the interval)ParadataGpsLocationMinutes ✔ All (integer of the interval)ParadataRecordCoordinates ✔ All Yes, No
Pa ge 570 of 684 Ge ne ra l Func ons

ParadataRecordIteratorLoadCases ✔ All Yes, NoParadataRecordValues ✔ All Yes, NoPartialSave ✔ All Yes, NoPath All Yes (system controlled), No (operator
controlled)ShowEndCaseDialog ✔ All Yes, NoShowErrorMessageNumbers ✔ Mobile Yes, NoShowFieldLabels Mobile Yes, NoShowLabelsInCaseTree ✔ Mobile Yes, NoShowNavigationControls ✔ Mobile Yes, NoShowRefusals ✔ All Yes, NoShowSkippedFields ✔ Mobile Yes, NoSpecialValuesZero ✔ All Yes, NoUpdateSaveArrayFile ✔ All Yes, NoValidateAlphaFields ✔ All Yes, NoWindowTitle ✔ All (string of the window title)
The following properties apply to items, none of which are settable:
Name ValuesDataType Alpha, NumericDecimal (integer)DecimalChar Yes, NoLen (integer)ZeroFill Yes, No
The following properties apply to fields:
Name Settable? ValuesAllowMultiLine Yes, NoAutoIncrement Yes, NoCanEnterNotAppl ✔ No, Confirm, NoConfirmCanEnterOutOfRange ✔ No, Confirm, NoConfirmCapturePosX ✔ (integer of the X position)CapturePosY ✔ (integer of the Y position)CaptureType ✔ TextBox, RadioButton, CheckBox, DropDown, ComboBox, Date,
NumberPadCaptureTypeDateFormat ✔ (string of the date format, e.g., YYYYMMDD)ForceOutOfRange ✔ Yes, NoHideInCaseTree ✔ Yes, NoKeyboard ✔ (integer of the keyboard ID)Persistent Yes, NoProtected ✔ Yes, NoSequential Yes, NoSkipTo (string of the field name)UpperCase ✔ Yes, NoUseEnterKey ✔ Yes, NoUseUnicodeTextBox Yes, NoValidationMethod ✔ Default, Confirm, NoConfirm, CustomVerify Yes, No
Pa ge 571 of 684 Ge ne ra l Func ons

Return Value
The function returns a string with the property information. If the property is invalid, a blank string is returned.
Example
PROC APPLICATION_FF
preproc
if getproperty("OperatorID") = "No" then setoperatorid(getusername()); endif;
See also: SetProperty Function
GetLabel FunctionFormat
s = getlabel(dictionary_symbol 『『, value』』);
Description
The getlabel function returns the label of a dictionary_symbol or the text associated with a particular value of thesymbol as defined in a value set. If the value argument is not specified, then the dictionary symbol's label is returned.The symbol can be the name of a dictionary, level, record, item, or value set.
The value argument can only be used if the dictionary symbol is an item or a value set. The value is either a numeric orstring expression, based on the type of the item. If the argument is used, the label associated with the specified value isreturned. If the symbol is an item name, then the value labels from the current value set are returned. If the symbol is avalue set, then the value labels from that value set are returned. If no label is associated with the value, then an emptystring is returned. This behavior can also be achieved with the getvaluelabel function.
When using the value argument, a value's code can be returned rather than the value label by using the optional bylabel (as opposed to the default by code behavior).
Return Value
The function returns a string containing the label.
Example
PROC EXAMPLE
write("%s", getlabel(SEX)); // Sex write("Crop Type = %s", getlabel(CROP_VS2, 23)); // Crop Type = Maize
PROC RELATIONSHIP
write("%s = %s", getlabel($), getlabel($, $)); // Relationship = Head, // Relationship = Child, etc.
PROC BY_EXAMPLE
write("%s", getlabel(SEX by code, 1)); // Male write("%s", getlabel(SEX by label, "Male")); // 1
See also: GetValueLabel Function, GetSymbol Function, GetImage Function
Pa ge 572 of 684 Ge ne ra l Func ons

GetLanguage FunctionFormat
s = getlanguage();
Return Value
The getlanguage function returns a string with the name of the language currently being used by the application.
Example
if getlanguage() = "EN" then errmsg("Hello");elseif getlanguage() = "FR" then errmsg("Bonjour");endif;
See also: SetLanguage Function, OnChangeLanguage Global Function, Multiple Language Applications
GetSymbol FunctionFormat
s = getsymbol();
Description
The getsymbol function returns the name of the current procedure being executed.
An optional syntax, getsymbol(savepartial), returns the field name and occurrence information (for multiply-occurringitems) of the location of the last partial save.
Return Value
The function returns a string with the procedure's name.
Example
function OnStop()
if getsymbol() = "ACTION" then stop(1);
else reenter ACTION;
endif;
end;
See also: GetLabel Function, GetRecord Function
GetValueLabel Function
Pa ge 573 of 684 Ge ne ra l Func ons

Format
s = getvaluelabel(item_name);
Description
The getvaluelabel function returns the value label associated with the current value of item_name. The label isdetermined in the following order, with the first valid label returned:
1. The label for the value in the item's current value set.
2. The label for the value in the item's primary value set.
3. The value itself, formatted for displaying.
The function returns a value similar to calling:
s = getlabel(ITEM_NAME, ITEM_NAME);
In addition to uses in logic, the function can be used as a fill in question text.
Return Value
The function returns a string containing the label.
Example
PROC GRADE_ATTENDING
if GRADE_ATTENDING > 3 and AGE < 15 then errmsg("Someone aged under 15 cannot attend %s.", getvaluelabel(GRADE_ATTENDING)); reenter; endif;
// using the "%l" message formatter, the above error message can also written as: errmsg("Someone aged under 15 cannot attend %l.", GRADE_ATTENDING);
See also: GetLabel Function, Message Formatting Options
Hash FunctionFormat
s = hash(value 『『, length『『, salt』』 』』);
Description
The hash function generates a hash value for the string or numeric expression value. This hash value is a fixed-lengthrepresentation of the value and can be used for purposes such as storing passwords without storing the actual plaintextpassword. The hash value of the same text string will always be the same, but it is nontrivial (impossible for CSPropurposes) to work backwards to calculate the original text from the hash value.
The hash value is calculated using a SHA-256 key derivation algorithm. This results in a 32-byte value, which is returnedas a hexadecimal string with each byte represented as two characters, thus resulting in a string of a length 64.
Optionally, you can specify a numeric expression length, which specifies the length of the hash value in bytes. Thestring returned will always be twice the value of length. The maximum value for length is 500.
You can also specify a string expression, salt, which is an additional input in generating the hash value. You must store
Pa ge 574 of 684 Ge ne ra l Func ons

this salt value somewhere to be able to use this hash function to perform any checks. More information on hash values,key derivation algorithms, and salt values is readily available online.
Return Value
The function returns a hash value represented as a hexadecimal string.
Example
string user_password = prompt("Enter your password", password);
if hash(user_password) <> USER_PASSWORD_HASH then errmsg("Invalid password. You cannot access this system."); stop(1);endif;
See also: HashMap Object
InValueSet FunctionFormat
b = invalueset(item_name『『, value_set_name』』);
Description
The invalueset function determines whether an item's current value is within the permissible ranges of a value set. Inaddition to specifying the item_name, an optional argument, value_set_name, allows you to specify in which value setto check if the item's value is within the permissible ranges. If no value set is specified, the item's current value set isused.
Return Value
The function returns a logical value of 1 (true) if the item's value is within the value set's ranges and 0 (false) otherwise. Ifthe item has no value set, the function return 1 (true).
Example 1
if not invalueset(P08_MARITAL_STATUS) then errmsg("Marital status is out of range. Value is %d", P08_MARITAL_STATUS);endif;
Example 2
if D02_SEX = 1 and not invalueset(D05_CAUSE_DEATH, D05_CAUSE_DEATH_MALE_VS) then errmsg("A man cannot die of %l", D05_CAUSE_DEATH); reenter;endif;
See also: In Operator, SetValueSet Function
IsChecked FunctionFormat
b = ischecked(code, check_box_field_name);
Pa ge 575 of 684 Ge ne ra l Func ons

Description
The ischecked function returns whether a code is checked as part of a check box field's selections. Thecheck_box_field_name is the name of an alphanumeric field that is represented on a form as a check box. The code isa string expression containing the code to be checked.
The codes of CSPro check boxes are placed at uniformly spaced offsets based on the size of the code. For example, ifthe check box field has a length of 20 and each code has a length of 2, then the function checks positions 1-2 for thecode, then positions 3-4, and so on until positions 19-20.
Return Value
The function returns a logical value of 1 (true) if the code was found (at the correct offset) in the check box field and 0(false) otherwise.
Example
PROC LANGUAGES_SPOKEN_OTHER
preproc
ask if ischecked("Z", LANGUAGES_SPOKEN);
See also: Pos Function, StartsWith Function
LoadSetting FunctionFormat
s = loadsetting(attribute 『『,default_setting』』);
Description
The loadsetting function, using the string expression attribute, retrieves a setting from an attribute-value pair, a settingthat has been previously saved using the savesetting function. An optional string or numeric expressiondefault_setting can be provided and will be returned if no value has been saved for the given attribute.
The file from which settings are retrieved can be modified by altering the CommonStore attribute of a PFF file. If anattribute does not exist in the specified file but does exist in the global settings database (shared by all CSProapplications), then that global attribute-value pair is used.
Return Value
The function returns a string containing the value associated with the attribute. If no value is associated with the attribute,then the function returns a blank string unless a default setting has been provided, in which case it returns the defaultsetting.
Example
Pa ge 576 of 684 Ge ne ra l Func ons
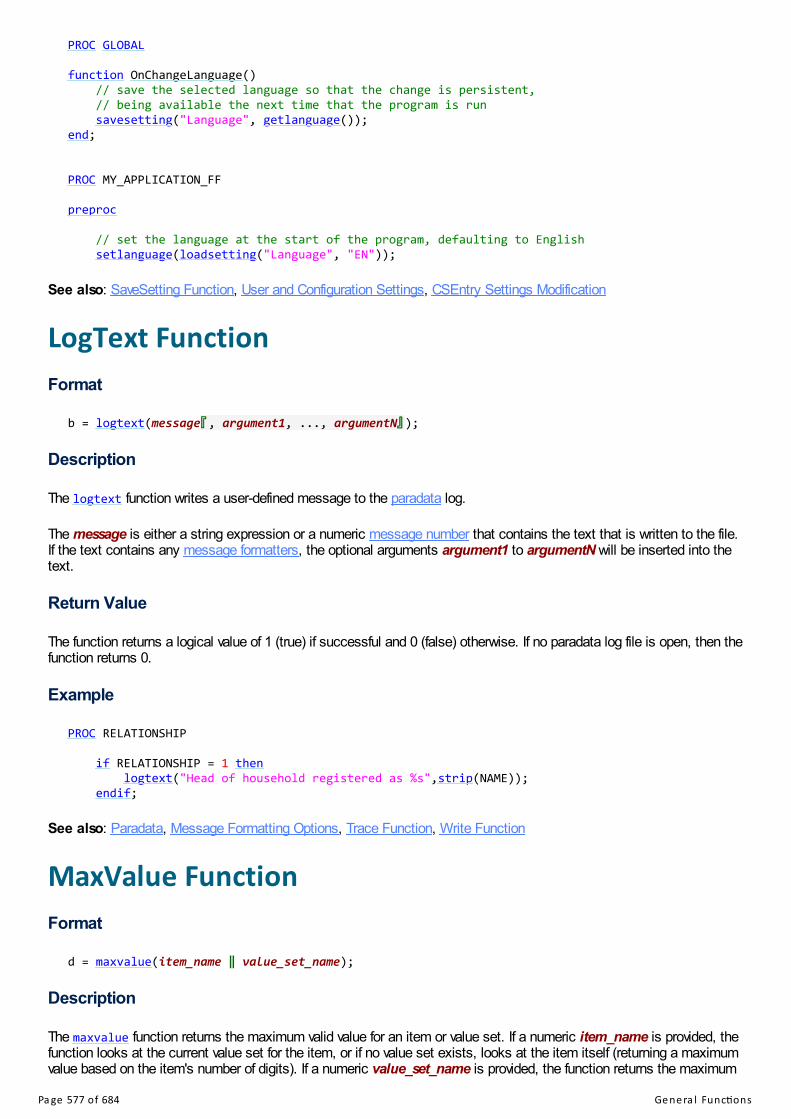
PROC GLOBAL
function OnChangeLanguage() // save the selected language so that the change is persistent, // being available the next time that the program is run savesetting("Language", getlanguage());end;
PROC MY_APPLICATION_FF
preproc
// set the language at the start of the program, defaulting to English setlanguage(loadsetting("Language", "EN"));
See also: SaveSetting Function, User and Configuration Settings, CSEntry Settings Modification
LogText FunctionFormat
b = logtext(message『『, argument1, ..., argumentN』』);
Description
The logtext function writes a user-defined message to the paradata log.
The message is either a string expression or a numeric message number that contains the text that is written to the file.If the text contains any message formatters, the optional arguments argument1 to argumentN will be inserted into thetext.
Return Value
The function returns a logical value of 1 (true) if successful and 0 (false) otherwise. If no paradata log file is open, then thefunction returns 0.
Example
PROC RELATIONSHIP
if RELATIONSHIP = 1 then logtext("Head of household registered as %s",strip(NAME)); endif;
See also: Paradata, Message Formatting Options, Trace Function, Write Function
MaxValue FunctionFormat
d = maxvalue(item_name ‖ value_set_name);
Description
The maxvalue function returns the maximum valid value for an item or value set. If a numeric item_name is provided, thefunction looks at the current value set for the item, or if no value set exists, looks at the item itself (returning a maximumvalue based on the item's number of digits). If a numeric value_set_name is provided, the function returns the maximum
Pa ge 577 of 684 Ge ne ra l Func ons

range or discrete value in the value set.
Return Value
The function returns the maximum valid value for an item or value set.
Example
PROC EDUCATION_CURRENT
if EDUCATION_CURRENT = 1 and AGE > maxvalue(EDUCATION_CURRENT_PRESCHOOL_VS) then errmsg("Someone aged %d cannot be currently attending preschool.", AGE); reenter; endif;
See also: MinValue Function, High Function, GetLabel Function
MinValue FunctionFormat
d = minvalue(item_name ‖ value_set_name);
Description
The minvalue function returns the minimum valid value for an item or value set. If a numeric item_name is provided, thefunction looks at the current value set for the item, or if no value set exists, looks at the item itself (returning a minimumvalue based on the item's number of digits). If a numeric value_set_name is provided, the function returns the minimumrange or discrete value in the value set.
Return Value
The function returns the minimum valid value for an item or value set.
Example
PROC AGE
if RELATIONSHIP = 1 and AGE < minvalue(AGE_HEAD_VS) then errmsg("The head of household must be at least %d-years-old.", minvalue(AGE_HEAD_VS)); reenter; endif;
See also: MaxValue Function, Low Function, GetLabel Function
Paradata FunctionFormat
d = paradata(action_type『『, argument1, ..., argumentN』』);
Description
The paradata function performs an action related to the paradata log. The first argument, action_type, must be one ofthe following:
Pa ge 578 of 684 Ge ne ra l Func ons

action_type Descriptionconcat Concatenates several paradata logs into a single log. The first argument is the file name of the output
log. The subsequent arguments are the file names (as string expressions or string lists) of input logs. Youcan concatenate into the currently open paradata log, but in that case you must also include thecurrently open paradata log as an input.
query Executes a query on the paradata log. This is the same as:sqlquery(filename(paradata),...).
open Opens a paradata log to start logging events. Specify the file name as a string expression as the soleargument.
close Closes the currently open paradata log.flush Writes all cached paradata events to the log. This is rarely needed, and may only be necessary if you
want to query the paradata log from an external application.
It is not recommended that you open or close paradata logs via logic, as the log will not contain all of the initializingfeatures that exist when specifying the paradata log when the application begins (and via the PFF file).
Return Value
For the open, close, and flush actions, the function returns a logical value of 1 (true) if successful and 0 (false)otherwise. For the concat action, the function returns the number of paradata logs concatenated, or default upon error.Look at the documentation for the sqlquery function to see the return values for the query action.
Example - Concat
list string logs_list;
dirlist(logs_list, "C:\Survey\Paradata", "*.cslog");
// add the paradata logs into the currently open logparadata(concat, filename(paradata), filename(paradata), logs_list);
Example - Query
string message_events_query = maketext( "SELECT COUNT(*) " "FROM message_event " "JOIN event ON message_event.id = event.id " "JOIN case_instance ON event.case_instance = case_instance.id " "JOIN case_info ON case_instance.case_info = case_info.id " "WHERE case_info.uuid = '%s';", uuid(DICT_NAME));
numeric message_events_for_this_case = paradata(query, message_events_query);
See also: Paradata, SqlQuery Function, SyncParadata Function
PathConcat FunctionFeature Upgrade: Starting with CSPro 7.5, you are encouraged to use the path.concat function.
Format
s = pathconcat(path1『『, ..., pathN』』);
Description
The pathconcat function concatenates the values of multiple string expressions (path1 + ... + pathN) into one stringrepresenting a file path. The first argument can be either a string expression or one of the arguments used in the
Pa ge 579 of 684 Ge ne ra l Func ons

pathname function. The combined paths are returned as an absolute, not relative, path.
Return Value
The function returns the concatenated path string.
Example
string image_filename = pathconcat(Application, "../Images", maketext("%v%v.jpg", CLUSTER,HHNO));
See also: Path.Concat Function, PathName Function, Concat Function
PathName FunctionFormat
s = pathname(path_type ‖ dictionary_name ‖ file_handler);
Description
The following path_type arguments return the folder name associated with a special directory on your device:
path_type DescriptionApplication The folder where the application file (.ent or .bch) is located.CSPro The folder where the CSPro executable files are located.InputFile The folder where the main data file (associated with the primary dictionary) is located.Temp The operating system's temporary directory.
There are some options specific to Windows:
path_type DescriptionDocuments The current user's Documents folder.Desktop The current user's Desktop folder.ProgramFiles32 The folder containing installed 32-bit applications.ProgramFiles64 The folder containing installed 64-bit applications. If the computer has only a 32-bit processor,
this returns the same value as ProgramFiles32.Windows The folder contains the Windows operating system.
There are some options specific to mobile devices:
path_type DescriptionCSEntry The folder from which CSPro applications are run.CSEntryExternal On devices with removable storage (e.g., an SD card), the folder on removable storage to
which CSPro applications can write.
If supplying a dictionary_name, the function returns the folder name of the dictionary file (.dcf) itself, not of the data fileassociated with the dictionary. On mobile devices, the function returns the folder name of the .pen file because dictionaryfiles (.dcf) are not used directly when running .pen applications.
If providing a file_handler (declared in a file statement in PROC GLOBAL), the function returns the folder namecontaining the text file associated with the file handler.
Pa ge 580 of 684 Ge ne ra l Func ons

Return Value
The function returns a string containing the fully qualified folder name.
Example
setfile(log_file, pathname(Desktop) + "Census Daily Report.txt", create);
See also: Path Namespace, FileName Function
Report FunctionFormat
b = report(template_file_name『『,output_file_name』』);
Description
The report function generates a templated report. The function reads the template specified in the string expressiontemplate_file_name and analyzes the template for any queries that need to be executed. After running the queries, andpassing to the template any data created using the setreportdata function, a report is created based off the template.
The optional string expression output_file_name specifies the name for the created report. If this argument is notspecified, the report will be saved to a temporary file and it will be displayed in a web browser. These temporary reportsare deleted when the application closes.
Return Value
The function returns a logical value of 1 (true) if the report was generated correctly, and 0 (false) otherwise. Any errorsencountered when creating the report are displayed, which will help you diagnose any problems with the template.
Example
// create and view the reportreport("interviewer_report_template.html");
// alternatively, save the reportreport("interviewer_report_template.html","interviewer_report." + getoperatorid() + ".html");
See also: SetReportData Function, Templated Reports
SaveSetting FunctionFormat
b = savesetting(attribute, value);
Description
The savesetting function saves a setting as an attribute-value pair using the string expression attribute and the stringor numeric expression value. You can save multiple settings using different attribute strings and can retrieve the settingsusing the loadsetting function. These settings are stored locally on the device and can be accessed by other programsusing the attribute string. Using settings is a way to share data between different CSPro applications on the samedevice.
Pa ge 581 of 684 Ge ne ra l Func ons

The file from which settings are retrieved can be modified by altering the CommonStore attribute of a PFF file.
All settings can be cleared using the following command: savesetting(clear);
Return Value
The function returns 1 (true) if successful or 0 (false) if the function failed.
Example
PROC INTERVIEWER_NAME
preproc
string InterviewerNameKey = "InterviewerName";
INTERVIEWER_NAME = loadsetting(InterviewerNameKey);
postproc
if INTERVIEWER_NAME = "" then errmsg("You must enter the interviewer's name."); reenter; endif;
savesetting(InterviewerNameKey, INTERVIEWER_NAME);
See also: LoadSetting Function, User and Configuration Settings, CSEntry Settings Modification
SetLanguage FunctionFormat
b = setlanguage(language_name);
Description
The setlanguage function changes the language being used by an application. Pass a string expression,language_name, with the name, not the label, of the language to which you want to change.
Return Value
The function returns 1 (true) if the language exists and the language was successfully changed. Otherwise it returns 0(false).
Example
PROC INTERVIEW_LANGUAGE
if INTERVIEW_LANGUAGE = 1 then setlanguage("EN"); elseif INTERVIEW_LANGUAGE = 2 then setlanguage("FR"); else setlanguage("ZH"); endif;
See also: GetLanguage Function, OnChangeLanguage Global Function, Multiple Language Applications
Pa ge 582 of 684 Ge ne ra l Func ons

SetProperty FunctionFormat
i = setproperty(『『symbol,』』property_name,property_value);
Description
The setproperty function modifies the current property, specified by the string expression property_name, associatedwith an application or a field. If an optional dictionary symbol is specified, then the property must apply to a field. If thesymbol is not a field but is intead a block, group, form, or dictionary, then the function will try to apply the property to allfields belonging to that symbol. If no symbol is specified, then the property must be an application property. The propertywill be modified to the value given in the string expression property_value.
Properties List
The following properties apply to the application:
Name Settable? Platform ValuesAppType All DataEntry, Batch, TabulationAutoAdvanceOnSelection ✔ Mobile Yes, NoAutoPartialSaveMinutes ✔ All (integer of the interval)CAPI All Yes, NoCaseTree All Always, Desktop, Mobile, NeverCenterForms Desktop Yes, NoComboBoxShowOnlyDiscreteValues ✔ All Yes, NoCreateListing All Yes, NoCreateLog All Yes, NoDecimalComma Desktop Yes, NoDisplayCodesAlongsideLabels ✔ Mobile Yes, NoNotesDeleteOtherOperators ✔ All Yes, NoNotesEditOtherOperators ✔ All Yes, NoOperatorID All Yes, NoParadataCollection All AllEvents, SomeEvents, NoParadataDeviceStateMinutes ✔ All (integer of the interval)ParadataGpsLocationMinutes ✔ All (integer of the interval)ParadataRecordCoordinates ✔ All Yes, NoParadataRecordIteratorLoadCases ✔ All Yes, NoParadataRecordValues ✔ All Yes, NoPartialSave ✔ All Yes, NoPath All Yes (system controlled), No (operator
controlled)ShowEndCaseDialog ✔ All Yes, NoShowErrorMessageNumbers ✔ Mobile Yes, NoShowFieldLabels Mobile Yes, NoShowLabelsInCaseTree ✔ Mobile Yes, NoShowNavigationControls ✔ Mobile Yes, NoShowRefusals ✔ All Yes, NoShowSkippedFields ✔ Mobile Yes, NoSpecialValuesZero ✔ All Yes, NoUpdateSaveArrayFile ✔ All Yes, No
Pa ge 583 of 684 Ge ne ra l Func ons

ValidateAlphaFields ✔ All Yes, NoWindowTitle ✔ All (string of the window title)
The following properties apply to items, none of which are settable:
Name ValuesDataType Alpha, NumericDecimal (integer)DecimalChar Yes, NoLen (integer)ZeroFill Yes, No
The following properties apply to fields:
Name Settable? ValuesAllowMultiLine Yes, NoAutoIncrement Yes, NoCanEnterNotAppl ✔ No, Confirm, NoConfirmCanEnterOutOfRange ✔ No, Confirm, NoConfirmCapturePosX ✔ (integer of the X position)CapturePosY ✔ (integer of the Y position)CaptureType ✔ TextBox, RadioButton, CheckBox, DropDown, ComboBox, Date,
NumberPadCaptureTypeDateFormat ✔ (string of the date format, e.g., YYYYMMDD)ForceOutOfRange ✔ Yes, NoHideInCaseTree ✔ Yes, NoKeyboard ✔ (integer of the keyboard ID)Persistent Yes, NoProtected ✔ Yes, NoSequential Yes, NoSkipTo (string of the field name)UpperCase ✔ Yes, NoUseEnterKey ✔ Yes, NoUseUnicodeTextBox Yes, NoValidationMethod ✔ Default, Confirm, NoConfirm, CustomVerify Yes, No
Return Value
The function returns the number of items whose property was successfully changed. If either the property name or valueis invalid, then the function returns default.
Example
Pa ge 584 of 684 Ge ne ra l Func ons

PROC CENSUS_QUEST
preproc
if STAFF_ROLE = 1 then // interviewer setproperty("DisplayCodesAlongsideLabels","No"); setproperty(CENSUS_DICT,"CanEnterNotAppl","No"); setproperty(CENSUS_DICT,"CanEnterOutOfRange","No");
else // supervisor setproperty("DisplayCodesAlongsideLabels","Yes"); setproperty(CENSUS_DICT,"CanEnterNotAppl","NoConfirm"); setproperty(CENSUS_DICT,"CanEnterOutOfRange","NoConfirm");
endif;
See also: GetProperty Function, Protect Function
SetReportData FunctionFormat
b = setreportdata(『『attribute,』』 data_source);
Description
The setreportdata function stores in memory a piece of data that will later be used by the report function to generatea templated report. The string expression attribute specifies the key, or tag, that uniquely identifies the piece of data.The attribute is case sensitive. In the report template, you will use this attribute to refer to this data.
The data_source must be one of the following:
data_source Descriptionvalue A string expression containing some text.record_name The contents of a record, including multiply occurring records. In a data entry application, only
information up to the number of entered occurrences will be stored.list_name The contents of a list.array_name The contents of a one- or multiple-dimensional array.sqlquery The result set of a query executed by the sqlquery function. Do not specify that function's optional
result_set argument, as the result set is stored in memory when called by setreportdata.
It is not necessary to specify the attribute when working with a record_name, list_name, or array_name. If noattribute is specified, then it will default to the name of the record, list, or array.
You can clear all stored data by executing: setreportdata(clear).
Return Value
The function returns a logical value of 1 (true) if the data was stored successfully, and 0 (false) otherwise (for example ifthe sqlquery function encountered a problem).
Example - Text and Record
setreportdata("title", "Demographic Report");setreportdata(PERSON_REC);
Example - SqlQuery
Pa ge 585 of 684 Ge ne ra l Func ons

string DeviceQuery = "SELECT device_model, COUNT(*) AS device_count " "FROM device_info " "GROUP BY device_model;";
setreportdata("device_info", sqlquery(paradata, DeviceQuery));
See also: Report Function, SqlQuery Function, Templated Reports
SetValueSet FunctionFormat
b = setvalueset(item_name, value_set_name);
Description
The setvalueset function allows you to dynamically change an item's current value set. An item's current value set isused to determine whether or not entered values are out of range. The current value set is also used to provide the valuechoices displayed in extended controls. The changing of a value set is not permanent; it remains in effect only during theprocessing of the current case or until the next call to setvalueset.
The item_name is the name of the item in the data dictionary whose value set is to be changed. The argument is usuallyan item name but, preceded by the @ symbol, it can also be a string expression that evaluates to the name of an item;for example:
setvalueset(@getsymbol(), MY_VALUESET_VS1);
The argument value_set_name is the name of an existing value set in the dictionary for the specified item. The functionwill replace the values of the current value set for the item with the values from the value set specified byvalue_set_name, which is either the name of a value set or a string expression that evaluates to a value set name. Thevalue_set_name can also be the name of a dynamic value set.
The setvalueset function can also create dynamic value sets from array arguments.
Return Value
When using a value set specified in the dictionary, the function returns a logical value of 1 (true) if the value set waschanged successfully and 0 (false) otherwise (for example, if the value set name is invalid). With dynamic value sets, thefunction returns the number of codes in the newly created value set.
Example 1
PROC D05_CAUSE_DEATH
onfocus
if D02_SEX = 1 then setvalueset(SEX, D05_CAUSE_DEATH_MALE_VS);
else setvalueset(SEX, D05_CAUSE_DEATH_FEMALE_VS);
endif;
Example 2
Pa ge 586 of 684 Ge ne ra l Func ons

PROC DISTRICT
preproc
setvalueset(DISTRICT, maketext("DISTRICT_VS%v", PROVINCE));
Example (Dynamic Value Set)
PROC SECOND_FAVORITE_DRINK
preproc
valueset drink_valueset = FAVORITE_DRINK_VS;
drink_valueset.remove(FAVORITE_DRINK);
setvalueset(SECOND_FAVORITE_DRINK, drink_valueset);
See also: SetValueSets Function, InValueSet Function
SetValueSet Function With ArraysFeature Upgrade: Starting with CSPro 7.3, you should no longer use this function as it may soon be removed fromCSPro. To replicate the behavior of the function, you can use the setvalueset function with dynamic value sets.
Format
i = setvalueset(item_name, codes_array, labels_array『『, images_array』』);
Description
The setvalueset function allows you to dynamically change an item's current value set. An item's current value set isused to determine whether or not entered values are out of range. The current value set is also used to provide the valuechoices displayed in extended controls. The changing of a value set is not permanent; it remains in effect only during theprocessing of the current case or until the next call to setvalueset.
The item_name is the name of the item in the data dictionary whose value set is to be changed. The second argument,codes_array, is an array of codes to use in the new value set and the third argument, labels_array, is an array of labelsthat correspond to the values in the codes array (the nth element of the labels array is the label for the nth element in thecodes array). If the item is numeric, codes_array must be a numeric array. If the item is alphanumeric, codes_arraymust be a string array. The labels_array must always be a string array. The optional fourth argument, images_array, isa string array pointing to image filenames to be used as value set images.
When working with the codes_array, to indicate the end of a numeric array, assign the special value notappl to theposition after the last valid code. To indicate the end of a string array, assign a blank value. This indicates when to stoploading values from the array.
In versions of CSPro earlier than 6.0, the value set labels and codes array needed to start at index position 0. Zero-basedarrays are still permitted, but if a one-based array is passed to the function (and the zeroth element has never beenassigned to), then CSPro will start processing the dynamic value set at array position 1.
Return Value
The function returns the number of codes in the newly created value set.
Example
Pa ge 587 of 684 Ge ne ra l Func ons

PROC GLOBAL
array vsCodes(100);array string vsLabels(100);
PROC DISTRICT
preproc
vsCodes(1) = 1; vsLabels(1) = "District 1";
vsCodes(2) = 2; vsLabels(2) = "District 2";
vsCodes(3) = 3; vsLabels(3) = "District 3";
vsCodes(4) = notappl; // mark the end of the array
setvalueset(DISTRICT, vsCodes, vsLabels);
See also: SetValueSet Function
SetValueSets FunctionFormat
i = setvaluesets(value_sets_search_query);
Description
The setvaluesets function allows you to dynamically change the value sets associated with multiple items. Unlike thesetvalueset function, which only operates on one item, the setvaluesets function traverses every item in the primarydictionary and searches each item's value sets to see if they have a name that contains the text found in the stringexpression value_sets_search_query. If the text is found, the first value set with the name containing the expression isthe value set used for the item. Otherwise the currently used value set is maintained.
Before multiple language dictionary labels were added in CSPro 6.2, this function was useful for changing the language ofvalue sets in a multi-language application.
Return Value
The function returns the number of items whose value sets were changed.
Example
function ResetLanguage(language)
if language = 1 then // English setvaluesets("_ENG");
elseif language = 2 then // Russian setvaluesets("_RUS");
else // Tajik setvaluesets("_TAJ");
endif;
end;
Pa ge 588 of 684 Ge ne ra l Func ons

See also: SetValueSet Function
Special FunctionFormat
b = special(numeric_expression);
Description
The special function determines whether the value of numeric_expression is one of the four special values: missing,refused, notappl, or default.
Return Value
The function returns a logical value of 1 (true) if the variable is a special value and 0 (false) otherwise.
Example
if special(CHILDREN_EVER_BORN) then CHILDREN_EVER_BORN = 0;endif;
See also: CountNonSpecial Function, In Operator
SqlQuery FunctionFormat
d = sqlquery(sqlite_database『『, result_set』』, sql_query);
Description
The sqlquery function executes a query on a SQLite database and returns a result set in a variety of formats. Thisfunction is intended for advanced users who are familiar with writing SQL expressions. While many files used by CSProapplications are text files, there are some files that are stored as SQLite databases, including CSPro DB data files andparadata logs. You can query these files with this function.
The first argument, sqlite_database, must be one of the following:
sqlite_database Descriptionparadata The query will be executed on the currently open paradata log. This is the same as:
paradata(query,...).dictionary_name The data source pointed to by dictionary_name must be of type CSPro DB, Encrypted CSPro DB, or
text. The query will be executed on the file associated with this data source. If working with textfiles, you can query the file's index.
file_name The string expression file_name gives the file name of a SQLite database. The database will beopened, the query executed, and then the database will be closed. This allows you to work withdatabases maintained outside of CSPro.
The optional second argument, result_set, indicates the destination for the result set generated following the execution ofthe query. If you do not provide a result set for your query, the query must be a scalar query (one that returns a singleresult such as "SELECT COUNT(*) FROM ..."). The result set must be one of the following:
Pa ge 589 of 684 Ge ne ra l Func ons

result_set Descriptionrecord_name The results of a query can fill a CSPro dictionary's record. The record_name must point to a record in a
working storage dictionary. The function will look at the column names of the result set to determinewhich columns of the results get stored in which items of the record. The results cannot be stored insubitems or multiply occurring items.
list_name Because lists are only one-dimensional, only the first column of results will be stored in list_name,which can be of type numeric or string. Because the size of a list is dynamic, the length of the listwill be equal to the number of rows in the result set (up to a maximum of 10,000 rows).
array_name You can use one- or two-dimensional arrays of type numeric or string. When using a one-dimensional array, only the first column of results will be stored in array_name. When using a two-dimensional array, each column of results will be stored in a separate column of array_name.
Using a working storage record for the results is advantageous because the results are stored in their proper type.Because lists and arrays are all of one type (numeric or string), some results may be converted to a invalid type (forexample, a string value may be stored in a numeric array).
The final argument, sql_query, is a string expression containing the SQL query.
Return Value
If executing a scalar query, the function returns the queried value. Otherwise, the function returns the number of rowsstored in the result set. If there was an error executing the query, then the function returns default.
Example - Scalar Query on CSPro DB File
numeric numberVerifiedCases = sqlquery(SURVEY_DICT, "SELECT COUNT(*) FROM cases WHEREcases.verified != 0;");errmsg("%d cases have been verified", numberVerifiedCases);
Example - Query on CSPro DB File, Storing Results in List
list string verifiedCaseKeys;
sqlquery(DICT_NAME, verifiedCaseKeys, "SELECT cases.key FROM cases WHERE cases.verified != 0;");
do numeric ctr = 1 while ctr <= verifiedCaseKeys.length() errmsg("Verified case key: %s", verifiedCaseKeys(ctr));enddo;
Example - Query on Paradata Log, Storing Results in Array
Pa ge 590 of 684 Ge ne ra l Func ons
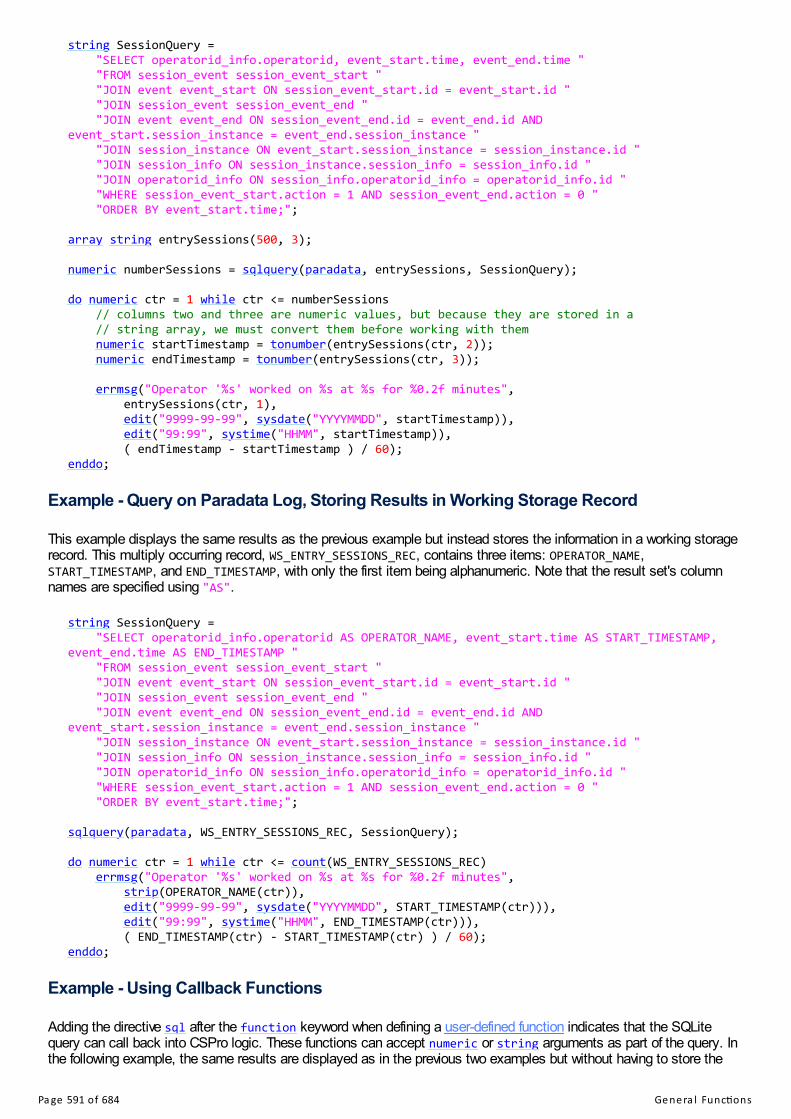
string SessionQuery = "SELECT operatorid_info.operatorid, event_start.time, event_end.time " "FROM session_event session_event_start " "JOIN event event_start ON session_event_start.id = event_start.id " "JOIN session_event session_event_end " "JOIN event event_end ON session_event_end.id = event_end.id ANDevent_start.session_instance = event_end.session_instance " "JOIN session_instance ON event_start.session_instance = session_instance.id " "JOIN session_info ON session_instance.session_info = session_info.id " "JOIN operatorid_info ON session_info.operatorid_info = operatorid_info.id " "WHERE session_event_start.action = 1 AND session_event_end.action = 0 " "ORDER BY event_start.time;";
array string entrySessions(500, 3);
numeric numberSessions = sqlquery(paradata, entrySessions, SessionQuery);
do numeric ctr = 1 while ctr <= numberSessions // columns two and three are numeric values, but because they are stored in a // string array, we must convert them before working with them numeric startTimestamp = tonumber(entrySessions(ctr, 2)); numeric endTimestamp = tonumber(entrySessions(ctr, 3));
errmsg("Operator '%s' worked on %s at %s for %0.2f minutes", entrySessions(ctr, 1), edit("9999-99-99", sysdate("YYYYMMDD", startTimestamp)), edit("99:99", systime("HHMM", startTimestamp)), ( endTimestamp - startTimestamp ) / 60);enddo;
Example - Query on Paradata Log, Storing Results in Working Storage Record
This example displays the same results as the previous example but instead stores the information in a working storagerecord. This multiply occurring record, WS_ENTRY_SESSIONS_REC, contains three items: OPERATOR_NAME,START_TIMESTAMP, and END_TIMESTAMP, with only the first item being alphanumeric. Note that the result set's columnnames are specified using "AS".
string SessionQuery = "SELECT operatorid_info.operatorid AS OPERATOR_NAME, event_start.time AS START_TIMESTAMP,event_end.time AS END_TIMESTAMP " "FROM session_event session_event_start " "JOIN event event_start ON session_event_start.id = event_start.id " "JOIN session_event session_event_end " "JOIN event event_end ON session_event_end.id = event_end.id ANDevent_start.session_instance = event_end.session_instance " "JOIN session_instance ON event_start.session_instance = session_instance.id " "JOIN session_info ON session_instance.session_info = session_info.id " "JOIN operatorid_info ON session_info.operatorid_info = operatorid_info.id " "WHERE session_event_start.action = 1 AND session_event_end.action = 0 " "ORDER BY event_start.time;";
sqlquery(paradata, WS_ENTRY_SESSIONS_REC, SessionQuery);
do numeric ctr = 1 while ctr <= count(WS_ENTRY_SESSIONS_REC) errmsg("Operator '%s' worked on %s at %s for %0.2f minutes", strip(OPERATOR_NAME(ctr)), edit("9999-99-99", sysdate("YYYYMMDD", START_TIMESTAMP(ctr))), edit("99:99", systime("HHMM", END_TIMESTAMP(ctr))), ( END_TIMESTAMP(ctr) - START_TIMESTAMP(ctr) ) / 60);enddo;
Example - Using Callback Functions
Adding the directive sql after the function keyword when defining a user-defined function indicates that the SQLitequery can call back into CSPro logic. These functions can accept numeric or string arguments as part of the query. Inthe following example, the same results are displayed as in the previous two examples but without having to store the
Pa ge 591 of 684 Ge ne ra l Func ons

result set.
PROC GLOBAL
function sql DisplayEntrySession(string operatorName, numeric startTime, numeric endTime) errmsg("Operator '%s' worked on %s at %s for %0.2f minutes", operatorName, edit("9999-99-99", sysdate("YYYYMMDD",startTime)), edit("99:99", systime("HHMM",endTime)), ( endTime - startTime ) / 60);end;
PROC EXAMPLE
string SessionQuery = "SELECT DisplayEntrySession(operatorid_info.operatorid, event_start.time,event_end.time) " "FROM session_event session_event_start " "JOIN event event_start ON session_event_start.id = event_start.id " "JOIN session_event session_event_end " "JOIN event event_end ON session_event_end.id = event_end.id ANDevent_start.session_instance = event_end.session_instance " "JOIN session_instance ON event_start.session_instance = session_instance.id " "JOIN session_info ON session_instance.session_info = session_info.id " "JOIN operatorid_info ON session_info.operatorid_info = operatorid_info.id " "WHERE session_event_start.action = 1 AND session_event_end.action = 0 " "ORDER BY event_start.time;";
sqlquery(paradata, SessionQuery);
See also: CSPro DB File Format, Paradata Function, SetReportData Function
Stop FunctionFormat
b = stop(『『stop_code』』);
Description
The stop function prematurely ends a CSPro application. If the function is used in a data entry application, the optionalnumeric expression stop_code determines whether data entry is stopped just for the current case or whether the entiredata entry application is closed. If stop_code is not specified or is 0, entry of the current case is stopped (the same apressing the stop button), but CSEntry remains active. If stop_code is 1, entry of the current case is stopped andCSEntry terminates.
In a data entry application, if the function is executed in the postproc of the first (highest) level then the data for the caseis saved. Otherwise, any data entered for the current case is lost. If you want to avoid losing data, you can callsavepartial just before the stop function.
If the function is used in a batch edit application, the stop_code has no effect. The run is always terminated. If an outputfile was specified in the batch run, neither the current case nor subsequent cases will be saved to the output file.
Return Value
The function returns a logical value of 0 (false) if the program cannot be stopped (for example, if the function is calledfrom an external form).
Data Entry Example
Pa ge 592 of 684 Ge ne ra l Func ons

if VALUE = 99 then savepartial(); stop(1);endif;
Batch Edit Example
if cntTotalErrors > 100 then stop();endif;
See also: EndCase Statement, Skip Case Statement
SysParm FunctionFormat
s = sysparm(『『parameter_name』』);
Description
The sysparm function returns the value of a parameter provided in a data entry or batch edit PFF file. The function returnsthe parameter as a left-justified string. If no parameter was given in the PFF file, the function returns a blank string.
If a string expression parameter_name is provided, the function looks to see if there is a parameter with the given namespecified in the [Parameters] section of the PFF file. If such a parameter exists, it is returned as a string. Using thisfunctionality, you can pass several parameters to your programs.
On Windows, it is possible to check for the presence of a command line argument using this function. Ifparameter_name is not in the PFF file, the function will check if that string is specified in the command line and if so,will return a non-blank string.
Return Value
The function returns a string containing the parameter.
Example PFF
[Parameters]Parameter=OtterState=20County=5
Example Logic
errmsg("%s",sysparm()); // displays OtterSTATE = tonumber(sysparm("State")); // sets STATE to 20COUNTY = tonumber(sysparm("County")); // sets COUNTY to 5
See also: Pff.GetProperty Function
Tr FunctionFormat
s = tr(string_expression ‖ message_number);
Pa ge 593 of 684 Ge ne ra l Func ons
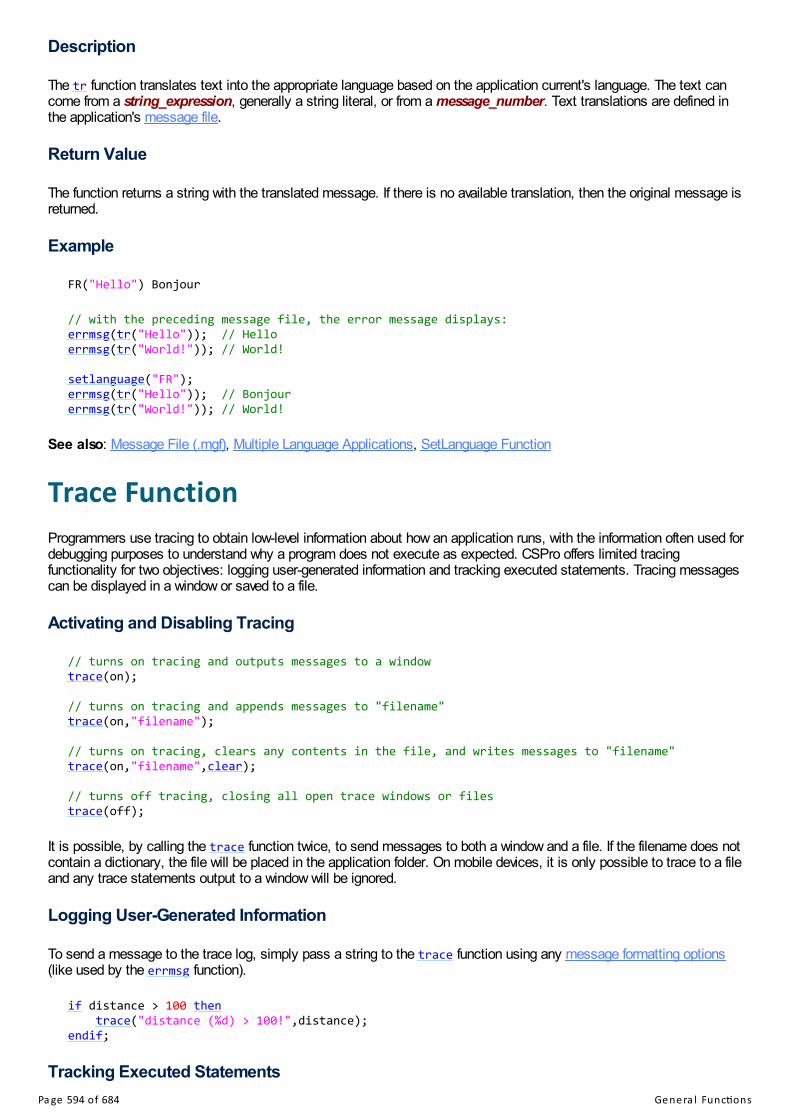
Description
The tr function translates text into the appropriate language based on the application current's language. The text cancome from a string_expression, generally a string literal, or from a message_number. Text translations are defined inthe application's message file.
Return Value
The function returns a string with the translated message. If there is no available translation, then the original message isreturned.
Example
FR("Hello") Bonjour
// with the preceding message file, the error message displays:errmsg(tr("Hello")); // Helloerrmsg(tr("World!")); // World!
setlanguage("FR");errmsg(tr("Hello")); // Bonjourerrmsg(tr("World!")); // World!
See also: Message File (.mgf), Multiple Language Applications, SetLanguage Function
Trace FunctionProgrammers use tracing to obtain low-level information about how an application runs, with the information often used fordebugging purposes to understand why a program does not execute as expected. CSPro offers limited tracingfunctionality for two objectives: logging user-generated information and tracking executed statements. Tracing messagescan be displayed in a window or saved to a file.
Activating and Disabling Tracing
// turns on tracing and outputs messages to a windowtrace(on);
// turns on tracing and appends messages to "filename"trace(on,"filename");
// turns on tracing, clears any contents in the file, and writes messages to "filename"trace(on,"filename",clear);
// turns off tracing, closing all open trace windows or filestrace(off);
It is possible, by calling the trace function twice, to send messages to both a window and a file. If the filename does notcontain a dictionary, the file will be placed in the application folder. On mobile devices, it is only possible to trace to a fileand any trace statements output to a window will be ignored.
Logging User-Generated Information
To send a message to the trace log, simply pass a string to the trace function using any message formatting options(like used by the errmsg function).
if distance > 100 then trace("distance (%d) > 100!",distance);endif;
Tracking Executed StatementsPa ge 594 of 684 Ge ne ra l Func ons
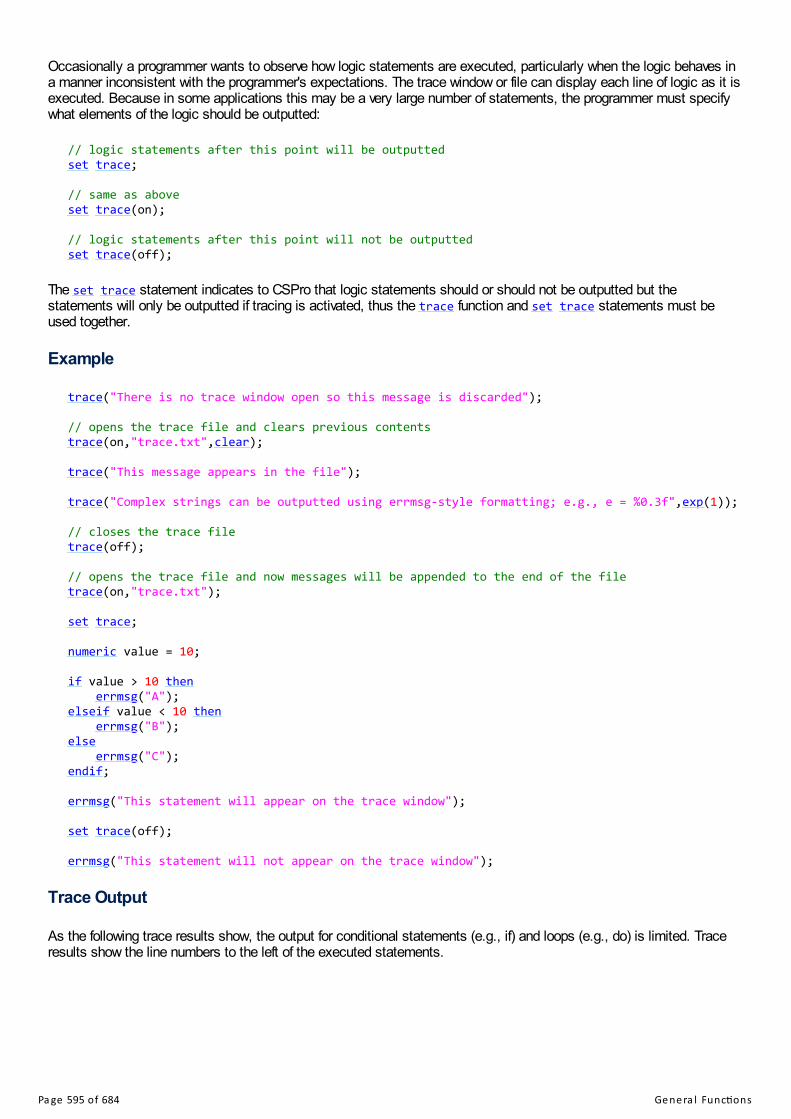
Occasionally a programmer wants to observe how logic statements are executed, particularly when the logic behaves ina manner inconsistent with the programmer's expectations. The trace window or file can display each line of logic as it isexecuted. Because in some applications this may be a very large number of statements, the programmer must specifywhat elements of the logic should be outputted:
// logic statements after this point will be outputtedset trace;
// same as aboveset trace(on);
// logic statements after this point will not be outputtedset trace(off);
The set trace statement indicates to CSPro that logic statements should or should not be outputted but thestatements will only be outputted if tracing is activated, thus the trace function and set trace statements must beused together.
Example
trace("There is no trace window open so this message is discarded");
// opens the trace file and clears previous contentstrace(on,"trace.txt",clear);
trace("This message appears in the file");
trace("Complex strings can be outputted using errmsg-style formatting; e.g., e = %0.3f",exp(1));
// closes the trace filetrace(off);
// opens the trace file and now messages will be appended to the end of the filetrace(on,"trace.txt");
set trace;
numeric value = 10;
if value > 10 then errmsg("A");elseif value < 10 then errmsg("B");else errmsg("C");endif;
errmsg("This statement will appear on the trace window");
set trace(off);
errmsg("This statement will not appear on the trace window");
Trace Output
As the following trace results show, the output for conditional statements (e.g., if) and loops (e.g., do) is limited. Traceresults show the line numbers to the left of the executed statements.
Pa ge 595 of 684 Ge ne ra l Func ons

Trace started at 02/03/11 20:28:35
TRACE This message appears in the fileTRACE Complex strings can be outputted using errmsg-style formatting; e.g., e = 2.718
Trace stopped at 02/03/11 20:28:35Trace started at 02/03/11 20:28:35
31 : numeric value = 10;33 : if value > 10 then38 : errmsg("C");41 : errmsg("This statement will appear on the trace window");43 : set trace(off);
Trace stopped at 02/03/11 20:28:35
See also: LogText Function
UUID FunctionFormat
s = uuid(『『dictionary_name』』);
Description
This uuid function returns a human-readable string containing a universally unique identifier (UUID), also referred to as aglobally unique identifier (GUID). This is a 36-character string that will be formatted in groups of 8, 4, 4, 4, and 12characters, separated by hyphens. For example:
e459e2b6-1fec-4d71-86c1-078cc2fe7433
This is a string representation of a 128-bit number that can essentially be considered globally unique. The probability ofgenerating the same UUID twice is near zero. You will receive a different string every time you call the function.
If an optional dictionary_name is specified, the function returns the UUID (internal key) associated with the currentlyloaded case. This may be useful when working with paradata queries.
Return Value
The function returns a string containing the human-readable representation of the identifier.
Example
PROC UNIQUE_ID
preproc
if UNIQUE_ID = "" then UNIQUE_ID = uuid();endif;
See also: Random Function
View Functionb = view(filename ‖ website_address』』);
Pa ge 596 of 684 Ge ne ra l Func ons

Description
The view function launches an external application to view a file or website. The function expects a string expressionrepresenting a file (filename) or a website URL (website_address). If a file is provided, it is opened in the system'sdefault viewer for that file type. If a website URL is provided, it is opened in an embedded window using the system'sdefault web browser.
Return Value
The function returns a logical value of 1 (true) if the file exists and the external application could be launched successfullyand 0 (false) otherwise.
Examples
view("https://www.census.gov/data/software/cspro.html");
view("../Old Images/carn03.jpg");
See also: ExecSystem Function (Desktop), ExecSystem Function (Mobile)
Warning FunctionFormat
i = warning(message『『, argument1, ..., argumentN』』);
Format with Additional Options
i = warning(message『『, argument1, ..., argumentN』』) 『『select(caption1, field1, ..., captionN, fieldN』』) 『『default(default_option)』』 』』 『『case ‖ summary』』 『『denom = numeric_denom』』;
Description
The warning function is similar to the errmsg function and the arguments and return value are described in the helpdocumentation for that function. The function only has special behavior in a data entry application. If used in a batch ortabulation application, it behaves identically to errmsg.
The function differs from errmsg in that it can be used for "soft check" error messages. These messages will not bedisplayed to the operator when advancing in the case (such as when resuming from a partial save). This can also beuseful for information that you want to display to the operator only when they have just filled a field, rather than whenmoving from one section to another section.
If using the select option, then one of the field arguments must be continue or you must specify the default_option.When advancing past this function, a message will not display and then the default_option or continue will beevaluated.
Example
PROC RELATIONSHIP
if RELATIONSHIP = 1 then warning("Please confirm that %s is the head of household.", strip(NAME)) select("Correct", continue, "Incorrect: Change Relationship", RELATIONSHIP); endif;
Pa ge 597 of 684 Ge ne ra l Func ons

See also: Message Formatting Options, ErrMsg Function
Pa ge 598 of 684 Da te a nd Ti me Func ons

Date and Time FunctionsAdjLBA FunctionFormat
i = adjlba(lower_cmc1,upper_cmc1,lower_cmc2,upper_cmc2,age);
Description
The adjlba function adjusts the lower bound of the century month code (CMC) of an event based on an age. It isgenerally used to calculate the minimum date of birth based on the date of an interview.
The lower_cmc1 and upper_cmc1 arguments are numeric expressions generally representing the date of birth CMCrange. The lower_cmc2 argument is a numeric expression of the CMC of an event, generally the date of an interview.The upper_cmc2 argument is not used (but is used by adjuba). The age argument is a numeric expression expressingthe age of the person in complete years.
Return Value
The function returns the adjusted lower bound of the CMC of an event based on the age. If the adjusted lower bound isgreater than upper_cmc1, the function returns the error code of -1.
Example
t = adjlba(ldob,udob,di,di,HL6);
See also: AdjUBA Function, AdjLBI Function, AdjUBI Function, CMCode Function, SetLB Function, SetUB Function
AdjLBI FunctionFormat
i = adjlbi(lower_cmc1,upper_cmc1,lower_cmc2,upper_cmc2,interval);
Description
The adjlbi function adjusts the lower bound of the century month code (CMC) of an event based on an interval. It isgenerally used to calculate the minimum next date of birth based on a date of birth and a minimum number of monthsallowed between births.
The lower_cmc1 argument is a numeric expression generally representing the date of birth CMC of a child. Theupper_cmc1 argument is not used (but is used by adjubi). The lower_cmc2 and upper_cmc2 arguments are numericexpressions generally representing the date of birth CMC range of the child that was born after the child represented inlower_cmc1. The interval argument is a numeric expression expressing the minimum number of months betweenevents, which is generally the minimum number of months allowed to pass between a woman's successive childbirths.
Return Value
The function returns the adjusted lower bound of the CMC of an event based on the number of months represented by theinterval. If the adjusted lower bound is greater than upper_cmc2, the function returns the error code of -1. It the adjustedlower bound is otherwise valid, the function returns either the adjusted lower bound or lower_cmc2, whichever is greater.
Pa ge 599 of 684 Da te a nd Ti me Func ons

Example
t = adjlbi(ldc(i),udc(i),ldc(j),udc(j),7);
See also: AdjUBI Function, AdjLBA Function, AdjUBA Function, CMCode Function, SetLB Function, SetUB Function
AdjUBA FunctionFormat
i = adjuba(lower_cmc1,upper_cmc1,lower_cmc2,upper_cmc2,age);
Description
The adjuba function adjusts the upper bound of the century month code (CMC) of an event based on an age. It isgenerally used to calculate the maximum date of birth based on the date of an interview.
The lower_cmc1 and upper_cmc1 arguments are numeric expressions generally representing the date of birth CMCrange. The lower_cmc2 argument is not used (but is used by adjlba). The upper_cmc2 argument is a numericexpression of the CMC of an event, generally the date of an interview. The age argument is a numeric expressionexpressing the age of the person in complete years.
Return Value
The function returns the adjusted upper bound of the CMC of an event based on the age. If the adjusted upper bound isless than upper_cmc1, the function returns the error code of -1.
Example
t = adjuba(ldob,udob,di,di,HL6);
See also: AdjLBA Function, AdjLBI Function, AdjUBI Function, CMCode Function, SetLB Function, SetUB Function
AdjUBI FunctionFormat
i = adjubi(lower_cmc1,upper_cmc1,lower_cmc2,upper_cmc2,interval);
Description
The adjubi function adjusts the upper bound of the century month code (CMC) of an event based on an interval. It isgenerally used to calculate the maximum previous date of birth based on a date of birth and a minimum number ofmonths allowed between births.
The lower_cmc1 and upper_cmc1 arguments are numeric expressions generally representing the date of birth CMCrange of the child that was born prior to the child represented in upper_cmc2. The lower_cmc2 argument is not used(but is used by adjlbi). The upper_cmc2 argument is a numeric expression generally representing the date of birth CMCof a child. The interval argument is a numeric expression expressing the minimum number of months between events,which is generally the minimum number of months allowed to pass between a woman's successive childbirths.
Return Value
The function returns the adjusted upper bound of the CMC of an event based on the number of months represented bythe interval. If the adjusted upper bound is less than lower_cmc1, the function returns the error code of -1. It the adjusted
Pa ge 600 of 684 Da te a nd Ti me Func ons
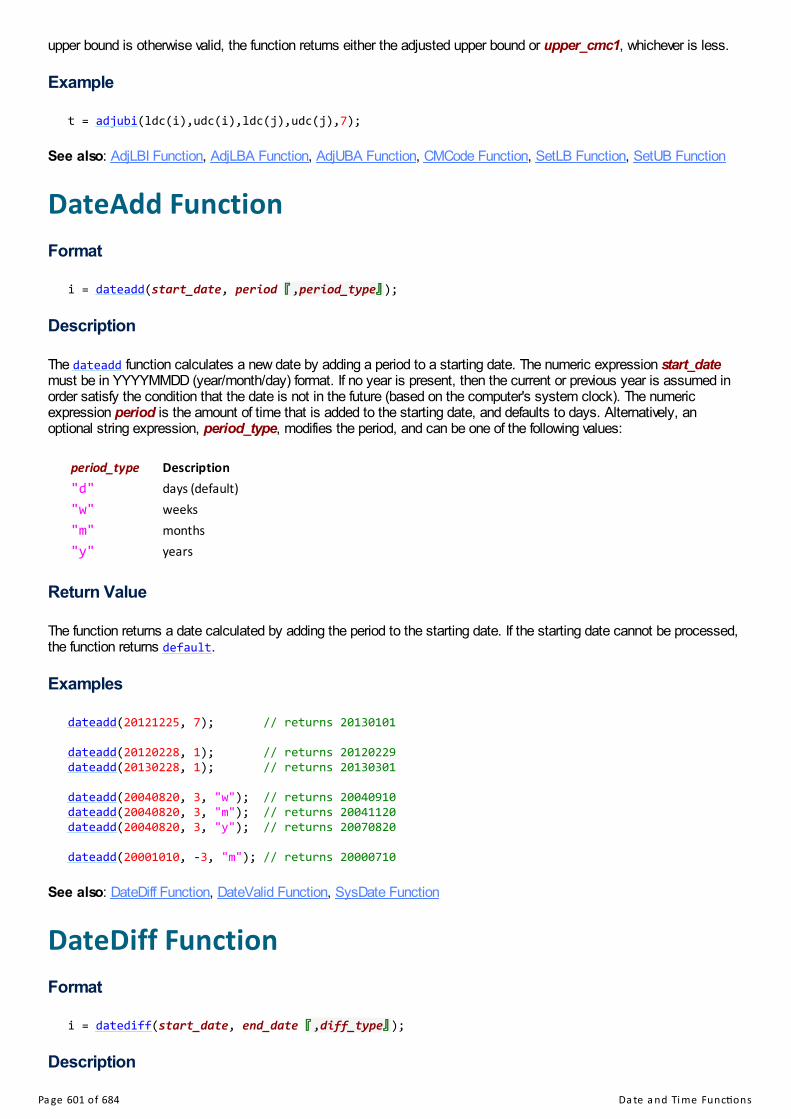
upper bound is otherwise valid, the function returns either the adjusted upper bound or upper_cmc1, whichever is less.
Example
t = adjubi(ldc(i),udc(i),ldc(j),udc(j),7);
See also: AdjLBI Function, AdjLBA Function, AdjUBA Function, CMCode Function, SetLB Function, SetUB Function
DateAdd FunctionFormat
i = dateadd(start_date, period 『『,period_type』』);
Description
The dateadd function calculates a new date by adding a period to a starting date. The numeric expression start_datemust be in YYYYMMDD (year/month/day) format. If no year is present, then the current or previous year is assumed inorder satisfy the condition that the date is not in the future (based on the computer's system clock). The numericexpression period is the amount of time that is added to the starting date, and defaults to days. Alternatively, anoptional string expression, period_type, modifies the period, and can be one of the following values:
period_type Description"d" days (default)"w" weeks"m" months"y" years
Return Value
The function returns a date calculated by adding the period to the starting date. If the starting date cannot be processed,the function returns default.
Examples
dateadd(20121225, 7); // returns 20130101
dateadd(20120228, 1); // returns 20120229dateadd(20130228, 1); // returns 20130301
dateadd(20040820, 3, "w"); // returns 20040910dateadd(20040820, 3, "m"); // returns 20041120dateadd(20040820, 3, "y"); // returns 20070820
dateadd(20001010, -3, "m"); // returns 20000710
See also: DateDiff Function, DateValid Function, SysDate Function
DateDiff FunctionFormat
i = datediff(start_date, end_date 『『,diff_type』』);
Description
Pa ge 601 of 684 Da te a nd Ti me Func ons

The datediff function returns the difference between two dates as a number, defaulting to the number of days betweenthe dates. This function acts similarly to Microsoft Excel's datedif function. The numeric expressions start_date andend_date must be in YYYYMMDD (year/month/day) format. If no year is present then the current or next year isassumed in order to satisfy the condition that the start date is earlier than the end date. If years are present, it ispossible for the start date to be later than the end date, in which case the function returns a negative difference. Anoptional string expression, diff_type, indicates the type of date difference requested, and can be one of the followingvalues:
diff_type Description"d" days between the start and end dates (default)"w" weeks between the start and end dates"m" months between the start and end dates"y" years between the start and end dates"md" days between the start and end dates ignoring both the years and months of the dates"ym" months between the start and end dates ignoring the years of the dates"yd" days between the start and end dates ignoring the years of the dates
Return Value
The function returns the requested difference in dates, defaulting to the number of days between the dates. If the datescannot be processed, the function returns default. The function returns values equal to Excel's function for mostarguments, but due to processing differences involving leap years, sometimes CSPro's function will return a valuedifferent from Excel's.
Example 1
datediff(19790404, 19820605); // returns 1158datediff(19790404, 19820605, "d"); // returns 1158datediff(19790404, 19820605, "w"); // returns 165datediff(19790404, 19820605, "m"); // returns 38datediff(19790404, 19820605, "y"); // returns 3datediff(19790404, 19820605, "md"); // returns 1datediff(19790404, 19820605, "ym"); // returns 2datediff(19790404, 19820605, "yd"); // returns 62
Example 2
numeric date1 = 20090120;numeric date2 = 20121106;
string outputText = "The difference between January 20, 2009 and November 6, 2012 is %d years,%d months, and %d days";
errmsg(outputText, datediff(date1, date2, "y"), datediff(date1, date2, "ym"), datediff(date1,date2, "md"));
// returns ... 3 years, 9 months, and 17 days
See also: DateAdd Function, DateValid Function, SysDate Function
DateValid FunctionFormat
b = datevalid(date);
Description
Pa ge 602 of 684 Da te a nd Ti me Func ons

The datevalid function determines whether a date is valid. The numeric expression date must be in YYYYMMDD(year/month/day) format.
Return Value
The function returns 1 (true) if the date is valid and 0 (false) otherwise.
Example
datevalid(20120229); // returns 1datevalid(20130229); // returns 0
See also: DateAdd Function, DateDiff Function, SysDate Function
PublishDate FunctionFormat
i = publishdate();
Description
The publishdate function returns the date and time that the code was compiled. Generally, this is not particularlymeaningful because the code is compiled right before it is executed. The exception to this is when you create compiledbinary data entry applications. These files, with the extension .pen, are used to run applications on mobile devices. In thecase of a .pen file, the value returned by the function will be the date and time that the .pen file was created.
Return Value
The function returns a number in the form YYYYMMddHHmmss , where YYYY is the year, MM is the month, dd is theday, HH is the hour, mm is the minute, and ss are the seconds.
Example
numeric publishDay = int(publishdate() / 1000000); // ignore the time
if datediff(publishDay,sysdate("YYYYMMDD")) > 20 then errmsg("This program expires after 20 days. Sync to get a new program."); stop(1);endif;
See also: DateAdd Function, DateDiff Function, SysDate Function, SysTime Function
SetLB FunctionFormat
i = setlb(month, year, minimum_cmc);
Description
The setlb function returns the lower bound of the century month code (CMC) of an event. The arguments month, year,and minimum_cmc are all numeric expressions.
If the month and year are both valid, the function returns the CMC of that date, as if calling:
Pa ge 603 of 684 Da te a nd Ti me Func ons

i = cmcode(month, year);
If the month is invalid but the year is valid, the function returns the CMC of January in the valid year, as if calling:
i = cmcode(1, year);
If both the month and year are invalid, the function returns the lower bound represented as minimum_cmc.
Return Value
The function returns the lower bound of the CMC of an event.
Example
if CM12Y < 9997 then ldoblc = setlb(CM12M, CM12Y, 0); udoblc = setub(CM12M, CM12Y, 9999);endif;
See also: SetUB Function, CMCode Function, AdjLBA Function, AdjLBI Function, AdjUBA Function, AdjUBI Function
SetUB FunctionFormat
i = setub(month, year, maximum_cmc);
Description
The setlb function returns the upper bound of the century month code (CMC) of an event. The arguments month, year,and maximum_cmc are all numeric expressions.
If the month and year are both valid, the function returns the CMC of that date, as if calling:
i = cmcode(month, year);
If the month is invalid but the year is valid, the function returns the CMC of December in the valid year, as if calling:
i = cmcode(12, year);
If both the month and year are invalid, the function returns the upper bound represented as maximum_cmc.
Return Value
The function returns the upper bound of the CMC of an event.
Example
if CM12Y < 9997 then ldoblc = setlb(CM12M, CM12Y, 0); udoblc = setub(CM12M, CM12Y, 9999);endif;
See also: SetLB Function, CMCode Function, AdjLBA Function, AdjLBI Function, AdjUBA Function, AdjUBI Function
SysDate FunctionPa ge 604 of 684 Da te a nd Ti me Func ons

Format
i = sysdate(『『date_format『『,timestamp_value』』 』』);
Description
The sysdate function returns the current system date as an integer. The optional string expression date_format iscomposed of a combination of DD (days), MM (months), and/or YY or YYYY (years). YY returns the current year in twodigits, while YYYY returns it in four digits. The strings DD, MM and YY or YYYY can be put together in any order tomake up a customized format. If no date format is specified, the function returns the date in the format YYMMDD.
Passing an optional numeric expression, timestamp_value, means that instead of using the system date, the functionwill use the date, in the local machine's time zone, of a date/time value that came from timestamp function.
The current date can be returned as a string using the edit function as follows:
edit("9999-99-99",sysdate("YYYYDDMM"));
Return Value
The function returns the system date as an integer. If the date format is invalid, the function returns 0.
Example
// if the current date is December 17, 1999...x = sysdate("DDMMYYYY"); // returns 17121999x = sysdate("MMYYYY"); // returns 121999x = sysdate("DD"); // returns 17x = sysdate(); // returns 991217
// if the current date is March 8, 2000...x = sysdate("DDMMYYYY"); // returns 8032000x = sysdate("MMYYYY"); // returns 32000x = sysdate("MMYY"); // returns 300x = sysdate("DD"); // returns 8x = sysdate(); // returns 308
See also: DateAdd Function, DateDiff Function, DateValid Function, PublishDate Function, SysTime Function,Timestamp Function
SysTime FunctionFormat
i = systime(『『time_format『『,timestamp_value』』 』』);
Description
The systime function returns the current system time as a six-digit integer in the form HHMMSS, where HH is the hour,MM are the minutes, and SS are the seconds.
Optionally, a string expression time_format can be supplied, using a combination of HH, MM, and SS, to extract onlypart of the current system time.
Passing an optional numeric expression, timestamp_value, means that instead of using the system time, the functionwill use the time, in the local machine's time zone, of a date/time value that came from timestamp function.
The current time can be returned as a string using the edit function as follows:
Pa ge 605 of 684 Da te a nd Ti me Func ons

edit("99:99:99",systime());
Return Value
The function returns the system time as an integer.
Example
SURVEY_START_HOUR = systime("HH");SURVEY_START_MINUTE = systime("MM");
See also: SysDate Function, Timestamp Function, Edit Function
Timestamp FunctionFormat
d = timestamp();
Description
The timestamp function returns the UNIX time, which is, in Coordinated Universal Time (UTC), the number of secondsthat have elapsed since January 1, 1970. This value is used by many computer programs and is thus useful for storingtimes as well as calculating timespans. Because the time is in UTC, it eliminates the need to worry about time zoneswhen working with times.
Return Value
The function returns the UNIX time as a decimal value. The integer part of this value is the number of elapsed seconds,while the decimal part contains the milliseconds.
Example
PROC GLOBAL
numeric surveyStartTime;
PROC CROPS_QUEST
preproc
surveyStartTime = timestamp();
postproc
SURVEY_DURATION = timestamp() - surveyStartTime;
See also: TimeString Function, SysTime Function, SysDate Function, FileTime Function
TimeString FunctionFormat
s = timestring(『『timestamp_format』』 『『,timestamp_value』』);
Description
Pa ge 606 of 684 Da te a nd Ti me Func ons

The timestring function returns a formatted string representing the date and time represented by a UNIX time in thelocal machine's time zone.
The optional string expression timestamp_format contains date and time formatters. You can view a list of theseformatters on a webpage about the C function strftime. If no formatter is supplied, the function returns an expressionbased on the machine's local settings (using the formatter "%c").
The optional numeric expression timestamp_value allows you to use a date/time value that came from timestampfunction. If not supplied, the function uses the current date/time.
If querying a SQL database via the sqlquery function, you can call this function with the name cspro_timestring.
Return Value
The function returns the custom formatted date and time string.
Example
numeric csproFirstReleaseTimestamp = 957528000;
// displays a string similar to: Fri May 5 08:00:00 2000errmsg("%s",timestring(csproFirstReleaseTimestamp));
// displays a string similar to: Friday, May 5, 2000errmsg("%s",timestring("%A, %B %e, %Y",csproFirstReleaseTimestamp));
See also: Timestamp Function, SysTime Function, SysDate Function
Pa ge 607 of 684 Exte rna l Fi l e Func ons

External File FunctionsClear FunctionFormat
b = clear(dictionary_name);
Description
The clear function initializes the memory values of data items defined for the external or working storage dictionarydictionary_name. Numeric items are initialized to notappl (blank) for external dictionaries and 0 for working storagedictionaries. Alphanumeric items are initialized to blank. The function will also set the number of occurrences of recordsand items to 0.
Return Value
The function returns a logical value 1 (true) if successful and 0 (false) otherwise.
Example
clear(OTHERS_DICT);enter OTHERS_FF;
See also: Array.Clear Function
Close FunctionFormat
b = close(dictionary_name ‖ file_handler);
Description
The close function closes a file, whether opened as a dictionary or via a file statement. The function closes either adictionary named dictionary_name or a text file associated with file_handler.
If closing a dictionary, the dictionary will be set to a none data source and will remain set to that source until the previousfile is reopened using the open function or if a new file is associated with the dictionary using the setfile function.
Return Value
The function returns a logical value of 1 (true) if successful and 0 (false) otherwise.
Example
Pa ge 608 of 684 Exte rna l Fi l e Func ons

file report_file;
// ...
close(report_file);
view(filename(report_file));
See also: Open Function, SetFile Function, File.Close Function
CountCases FunctionFormat
i = countcases(dictionary_name 『『where condition』』);
Description
The countcases function counts the number of cases in a file referenced by dictionary_name. The dictionary can beeither the main input dictionary or an external dictionary. An optional logical condition, referencing items in a dictionary,can be supplied to count the number of cases in the file that meet a certain criterion. When using this condition, thedictionary must be an external dictionary.
It is possible, by specifying dictionary access parameters after the dictionary name, to limit the cases that thecountcases function processes.
Return Value
The function returns the number of cases in the file, or if a condition is given, the number of cases that meet thatcondition. If there is an error processing the file, the function returns default.
Example
PROC NEW_INTERVIEWER_NAME
if countcases(STAFF_DICT where STAFF_NAME = NEW_INTERVIEWER_NAME) >= 1 then errmsg("You must give the interviewer a unique name."); reenter; endif;
See also: ForCase Statement, Find Function
DelCase FunctionFormat
b = delcase(dictionary_name『『, id1, ..., idN』』);
Description
The delcase function marks a case for deletion in an external file.
The dictionary_name must be supplied and refers to an external dictionary associated with your application.
The optional list of ID variables, id1 ... idN, specifies the list of variables that will identify the case to delete from theexternal file. Generally, each of the variables in the list is defined in a dictionary. The combined length of the variables inthe list must equal the length of the case IDs defined for the external dictionary. The function concatenates the variables
Pa ge 609 of 684 Exte rna l Fi l e Func ons

in the ID list to form a string. Alternatively, you can pass, as a string, the full key of the case to delete. The function thendeletes from the external file the case whose case identifier matches the string constructed from the list.
If no ID list is provided, the current values of the ID items for the external dictionary are used.
Return Value
The function returns a logical value of 1 (true) if the case existed and was successfully marked for deletion and 0 (false)otherwise.
Example
delcase(ASSIGNMENT_DICT, CLUSTER, HH);
See also: LoadCase Function, WriteCase Function
DirCreate FunctionFormat
b = dircreate(directory_name);
Description
The dircreate function creates a new directory whose name comes from the string expression directory_name. Ifnecessary, parent directories will be added to support the creation of the directory.
Return Value
The function returns a logical value of 1 (true) if successful and 0 (false) otherwise. If the directory already exists, thefunction returns 1.
Example
string backupDirectoryName = pathname(InputFile) + "Backups";dircreate(backupDirectoryName);
See also: DirExist Function, FileCreate Function
DirDelete FunctionFormat
i = dirdelete(directory_name);
Description
The dirdelete function deletes an empty directory or group of empty directories. The argument directory_name is astring expression giving a directory name.
You can use the wildcard characters "*" and "?" to specify a group of directories to delete.
Return Value
Pa ge 610 of 684 Exte rna l Fi l e Func ons

The function returns the number of directories deleted. If there was an error deleting directories, the function returnsdefault.
Example
// delete directory "Backups" from the application folderdirdelete(pathname(Application) + "Backups");
// delete all directories that begin with "Backup" from the application folderdirdelete(pathname(Application) + "Backup*");
See also: DirCreate Function, DirExist Function, DirList Function, FileDelete Function
DirExist FunctionFormat
b = direxist(directory_name);
Description
The direxist function determines whether a directory exists. directory_name is a string expression.
Return Value
The function returns a logical value of 1 (true) if the directory exists and 0 (false) otherwise.
Example
if direxist("C:\Backups") then // process backupsendif;
See also: DirCreate Function, FileExist Function
DirList FunctionFormat
b = dirlist(directory_listing,directory_name『『,wildcard_filter』』 『『,recursive』』);
Description
The dirlist function fills directory_listing, a string list, with the paths of files and directories located in a directoryspecified by the string expression directory_name. A wildcard filter can be passed as an optional third stringexpression, wildcard_filter. An optional fourth argument, recursive, instructs the function to create a listing of thespecified directory as well as any subdirectories. All file and directory names will be fully-qualified; i.e., they will beabsolute, not relative, path names.
Return Value
The function returns a logical value of 1 (true) if successful and 0 (false) if the directory does not exist or cannot beaccessed.
Example
Pa ge 611 of 684 Exte rna l Fi l e Func ons

write("Shape files in folder and subfolders:");
list string fileListing;
dirlist(fileListing, "C:\Survey\Maps", "*.shp", recursive);
do numeric ctr = 1 while ctr <= fileListing.length() write("Shape filename: %s", fileListing(ctr));enddo;
See also: DirCreate Function, DirExist Function
FileConcat FunctionFormat
b = fileconcat(『『dictionary_name,』』 output_file_name, file_name1『『, ..., file_nameN』』);
Description
The fileconcat function concatenates a number of files into a single file. The files to concatenate can be eitherindividual file names or wildcard file specifications. The function supports two different methods of concatenation:
Concatenate cases: Reads cases from each input file and writes them to the output file, skipping invalid andduplicate cases. This mode requires a data dictionary that describes the format of the input and output data filesso that cases may be validated and duplicates may be identified. Concatenate cases mode may be used with alltypes of CSPro data files.
Concatenate file contents: Simply appends one file to the end of another regardless of the file contents. Thismode will not work for CSPro data files that are not text files (such as CSPro DB files).
To peform a case concatenation, you must specify a dictionary_name that specifies the layout of the data files beingconcatenated. When the dictionary is specified, the files are combined by reading each case from each of the input filesand writing them to the output file. In this mode, invalid cases and duplicate cases are automatically removed from theoutput file.
To perform content concatenation, do not specify a dictionary. In this case, the input files are appended together withoutexamining their contents. This will be faster but will not eliminate duplicates or invalid cases.
The output_file_name is a string expression giving the name of the output file that will contain the concatenated data.The arguments file_name1 to file_nameN are either string expressions or string lists that contain the names of specificfiles or a wildcard specification of a group of files.
Return Value
The function returns a logical value of 1 (true) if successful and 0 (false) otherwise.
Example 1
fileconcat("DMV.txt", "District of Columbia.txt", "Maryland.txt", "Virginia.txt");
Example 2
fileconcat(CENSUS_DICT, "14combined.csdb", "../Data/14*.csdb");
See also: FileCopy Function
FileCopy FunctionPa ge 612 of 684 Exte rna l Fi l e Func ons
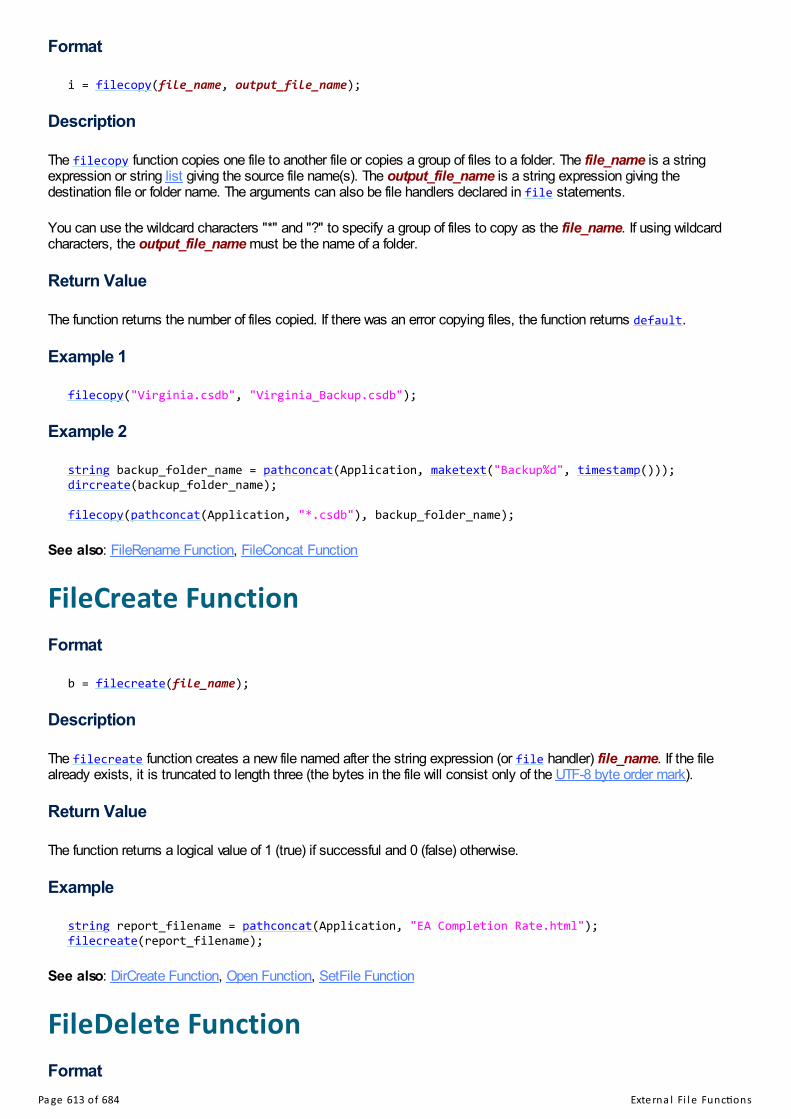
Format
i = filecopy(file_name, output_file_name);
Description
The filecopy function copies one file to another file or copies a group of files to a folder. The file_name is a stringexpression or string list giving the source file name(s). The output_file_name is a string expression giving thedestination file or folder name. The arguments can also be file handlers declared in file statements.
You can use the wildcard characters "*" and "?" to specify a group of files to copy as the file_name. If using wildcardcharacters, the output_file_name must be the name of a folder.
Return Value
The function returns the number of files copied. If there was an error copying files, the function returns default.
Example 1
filecopy("Virginia.csdb", "Virginia_Backup.csdb");
Example 2
string backup_folder_name = pathconcat(Application, maketext("Backup%d", timestamp()));dircreate(backup_folder_name);
filecopy(pathconcat(Application, "*.csdb"), backup_folder_name);
See also: FileRename Function, FileConcat Function
FileCreate FunctionFormat
b = filecreate(file_name);
Description
The filecreate function creates a new file named after the string expression (or file handler) file_name. If the filealready exists, it is truncated to length three (the bytes in the file will consist only of the UTF-8 byte order mark).
Return Value
The function returns a logical value of 1 (true) if successful and 0 (false) otherwise.
Example
string report_filename = pathconcat(Application, "EA Completion Rate.html");filecreate(report_filename);
See also: DirCreate Function, Open Function, SetFile Function
FileDelete FunctionFormat
Pa ge 613 of 684 Exte rna l Fi l e Func ons

i = filedelete(file_name);
Description
The filedelete function deletes a file or group of files. The argument file_name is either a string expression or stringlist giving a file name or names, or is a file handler declared in a file statement.
You can use the wildcard characters "*" and "?" to specify a group of files to delete.
Return Value
The function returns the number of files deleted. If there was an error deleting files, the function returns default.
Example
// delete file "Household.csdb" from the backups folderfiledelete(pathconcat(Application, "Backups/Household.csdb"));
// delete all data from the backups folderfiledelete(pathconcat(Application, "Backups/*.csdb"));
See also: FileCopy Function, FileRename Function, DirDelete Function
FileEmpty FunctionFormat
b = fileempty(file_name);
Description
The fileempty function determines whether or not a file is empty and has no content. This function is useful forchecking the status of files without needing to know the text encoding. An empty ANSI file is 0 bytes but an empty UTF-8 file is 3 bytes. The argument file_name is either a string expression giving a file name or is a file handler declared in afile statement in PROC GLOBAL.
Return Value
The function returns a logical value of 1 (true) if the file exists and is empty and 0 (false) if the file is not empty. If the filedoes not exist, the function returns default.
Example
if fileempty(customReportFile) then // print the header filewrite(customReportFile,"SECONDS,KEYSTROKES");endif;
See also: FileExist Function, FileSize Function
FileExist FunctionFormat
b = fileexist(file_name);
Pa ge 614 of 684 Exte rna l Fi l e Func ons

Description
The fileexist function determines whether a file exists. file_name is either a string expression giving a file name or isa file handler declared in a file statement in PROC GLOBAL.
You can use the wildcard characters "*" and "?" in the file_name. In that case the function will determine whether anyfile matching the specification exists.
Prior to CSPro 6.2, the function determined whether either a file or a directory existed. The direxist function must nowbe used to check for the existence of a directory.
Return Value
The function returns a logical value of 1 (true) if the file exists and 0 (false) otherwise.
Example
if fileexist(householdPffFilename) then filedelete(householdPffFilename);endif;
See also: FileEmpty Function, FileSize Function, DirExist Function
FileName FunctionFormat
s = filename(dictionary_name ‖ file_handler ‖ pff_name ‖ audio_name);
Description
The filename function returns the fully qualified name of a file. If supplying a dictionary_name, the function returns thename of the data file associated with a data dictionary. If providing a file_handler (declared in a file statement), thefunction returns the name of the text file associated with the file handler.
If providing a pff_name (declared in a pff statement), the function returns the name of an existing PFF file, or the nameof a temporarily created PFF file. If a PFF file was loaded (via pff.load) and not modified, the name of that PFF file isreturned. If the PFF has been modified and not saved, then calling filename will save the PFF to a temporary file and thename of that file is returned.
If providing an audio_name (declared in an audio statement), the function returns the name of the audio file associatedwith the audio object.
The function can also take paradata as its argument, in which case it returns the file name of the currently openparadata log.
Return Value
The function returns a string containing the folder and file name.
Example
filewrite(report_file, "Report file: %s", filename(report_file));filewrite(report_file, "Census file: %s", filename(CENSUS_DICT));
See also: Path Namespace, PathName Function, FileExist Function, FileSize Function
Pa ge 615 of 684 Exte rna l Fi l e Func ons
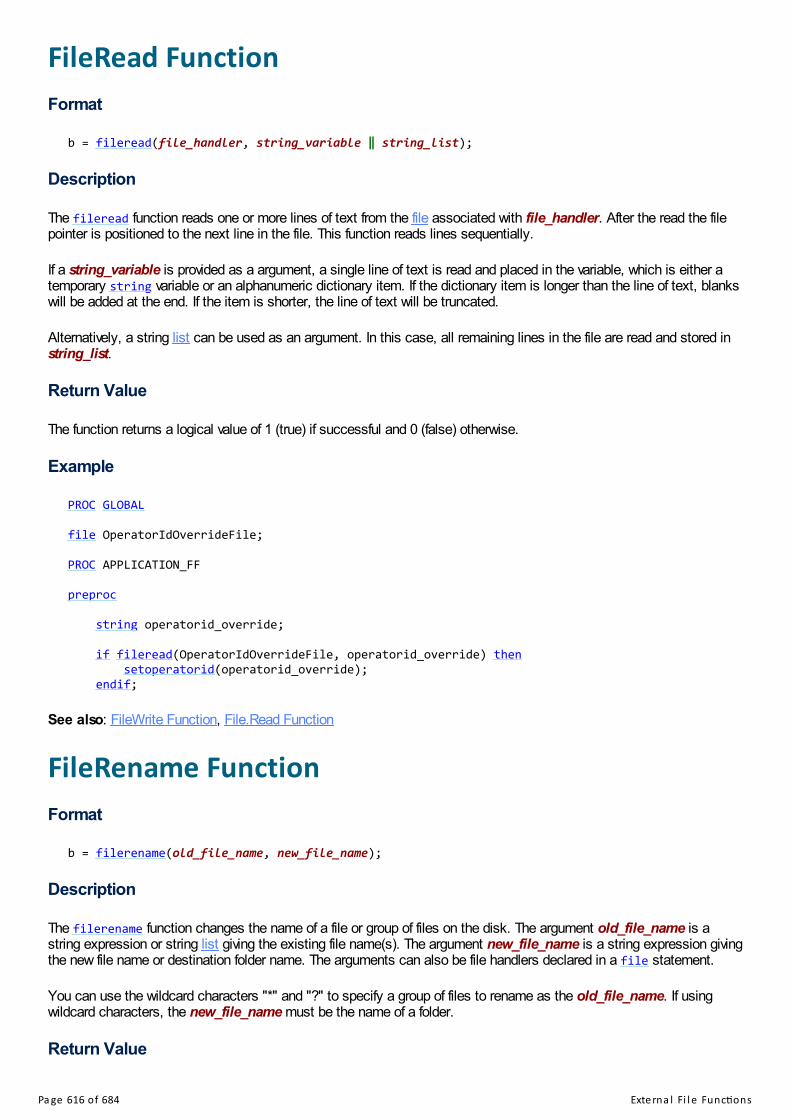
FileRead FunctionFormat
b = fileread(file_handler, string_variable ‖ string_list);
Description
The fileread function reads one or more lines of text from the file associated with file_handler. After the read the filepointer is positioned to the next line in the file. This function reads lines sequentially.
If a string_variable is provided as a argument, a single line of text is read and placed in the variable, which is either atemporary string variable or an alphanumeric dictionary item. If the dictionary item is longer than the line of text, blankswill be added at the end. If the item is shorter, the line of text will be truncated.
Alternatively, a string list can be used as an argument. In this case, all remaining lines in the file are read and stored instring_list.
Return Value
The function returns a logical value of 1 (true) if successful and 0 (false) otherwise.
Example
PROC GLOBAL
file OperatorIdOverrideFile;
PROC APPLICATION_FF
preproc
string operatorid_override;
if fileread(OperatorIdOverrideFile, operatorid_override) then setoperatorid(operatorid_override); endif;
See also: FileWrite Function, File.Read Function
FileRename FunctionFormat
b = filerename(old_file_name, new_file_name);
Description
The filerename function changes the name of a file or group of files on the disk. The argument old_file_name is astring expression or string list giving the existing file name(s). The argument new_file_name is a string expression givingthe new file name or destination folder name. The arguments can also be file handlers declared in a file statement.
You can use the wildcard characters "*" and "?" to specify a group of files to rename as the old_file_name. If usingwildcard characters, the new_file_name must be the name of a folder.
Return Value
Pa ge 616 of 684 Exte rna l Fi l e Func ons

The function returns the number of files renamed. If there was an error renaming files, the function returns default.
Example
filerename("data.csdb", maketext("old_data%d.csdb",timestamp()));
See also: FileCopy Function, FileDelete Function
FileSize FunctionFormat
i = filesize(file_name);
Description
The filesize function returns the size of a file in bytes. The argument file_name is either a string expression giving afile name or is a file handler declared in a file statement in PROC GLOBAL.
Return Value
If the file exists, the function returns the size of the file in bytes. If the file does not exist, the function returns default.
Example 1
if filesize("report.txt") > 0 then errmsg("The report already exists!");endif;
Example 2
PROC GLOBAL
file reportFile;
PROC EXAMPLE
numeric reportSize = filesize(reportFile);
See also: FileEmpty Function, FileExist Function
FileTime FunctionFormat
d = filetime(file_name);
Description
The filetime function returns the last modified date and time of a file or a directory. The argument file_name is either astring expression giving a file or directory name or is a file handler declared in a file statement in PROC GLOBAL.
Return Value
If the file or directory exists, the function returns a timestamp value indicating the last modified date and time. If the file or
Pa ge 617 of 684 Exte rna l Fi l e Func ons

directory does not exist, the function returns default.
Example
list string photos_list;dirlist(photos_list, "../Photos", "*.jpg");
do numeric counter = 1 while counter <= photos_list.length()
// only sync photos that weren't previously synced if filetime(photos_list(counter)) > last_sync_timestamp then syncfile(PUT, photos_list(counter), "/Photos/"); endif;
enddo;
See also: Timestamp Function, TimeString Function
FileWrite FunctionFormat
b = filewrite(file_handler, message『『, argument1, ..., argumentN』』);
Description
The filewrite function writes one or more lines of text to the file associated with file_handler.
The message is either a string expression or a numeric message number that contains the text that is written to the file.If the text contains any message formatters, the optional arguments argument1 to argumentN will be inserted into thetext. There are some additional options for file output:
If you want to break a line of text into two lines, place \n where you want the line divided.
If you want a text line to begin on a new page, place \f at the beginning of the text string.
To output \n or \f as text instead of a new line or a new page, use a double backslash (e.g., \\n).
Alternatively, the message can be a string list. If a list is provided, then each string contained in the list is written to thefile, allowing for the output of multiple lines of text with one function call.
Return Value
The function returns a logical value of 1 (true) if successful and 0 (false) otherwise.
Example
PROC GLOBAL
file CsvFile;
PROC EXAMPLE
filewrite(CsvFile, "Name,Sex,Age");
do numeric counter = 1 while counter <= totocc(PERSON_REC) filewrite(CsvFile, "%s,%d,%d", encode(CSV, NAME(counter)), SEX(counter), AGE(counter)); enddo;
See also: FileRead Function, File.Write Function, Write Function, Message Formatting Options, Encode Function
Pa ge 618 of 684 Exte rna l Fi l e Func ons
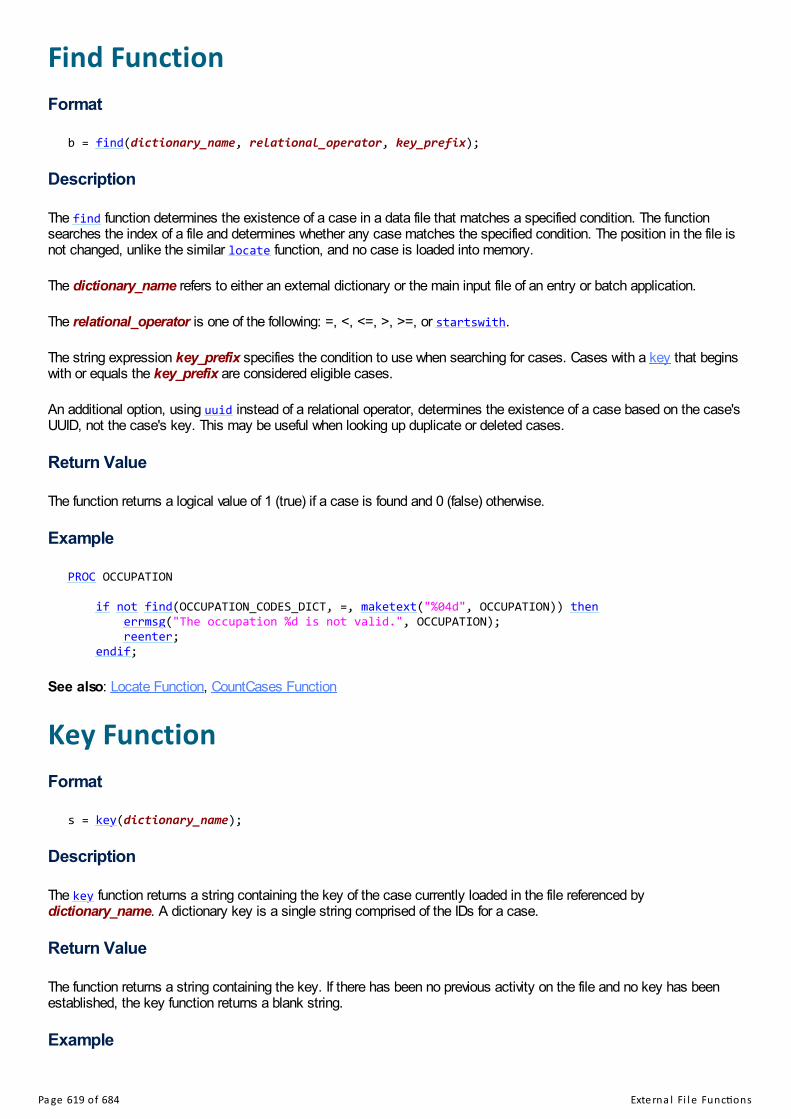
Find FunctionFormat
b = find(dictionary_name, relational_operator, key_prefix);
Description
The find function determines the existence of a case in a data file that matches a specified condition. The functionsearches the index of a file and determines whether any case matches the specified condition. The position in the file isnot changed, unlike the similar locate function, and no case is loaded into memory.
The dictionary_name refers to either an external dictionary or the main input file of an entry or batch application.
The relational_operator is one of the following: =, <, <=, >, >=, or startswith.
The string expression key_prefix specifies the condition to use when searching for cases. Cases with a key that beginswith or equals the key_prefix are considered eligible cases.
An additional option, using uuid instead of a relational operator, determines the existence of a case based on the case'sUUID, not the case's key. This may be useful when looking up duplicate or deleted cases.
Return Value
The function returns a logical value of 1 (true) if a case is found and 0 (false) otherwise.
Example
PROC OCCUPATION
if not find(OCCUPATION_CODES_DICT, =, maketext("%04d", OCCUPATION)) then errmsg("The occupation %d is not valid.", OCCUPATION); reenter; endif;
See also: Locate Function, CountCases Function
Key FunctionFormat
s = key(dictionary_name);
Description
The key function returns a string containing the key of the case currently loaded in the file referenced bydictionary_name. A dictionary key is a single string comprised of the IDs for a case.
Return Value
The function returns a string containing the key. If there has been no previous activity on the file and no key has beenestablished, the key function returns a blank string.
Example
Pa ge 619 of 684 Exte rna l Fi l e Func ons

if key(CENSUS_DICT)[1:2] = "04" then // do not output any cases with IDs starting with 04 skip case;endif;
See also: KeyList Function, Key PFF Attribute, GetCaseLabel Function
KeyList FunctionFormat
i = keylist(dictionary_name『『, key_listing』』);
Description
The keylist function fills key_listing, an optional string list, with the keys in the file referenced by dictionary_name.The dictionary can be either the main input dictionary or an external dictionary. A dictionary key is a single stringcomprised of the IDs for a case.
It is possible, by specifying dictionary access parameters after the dictionary name, to limit the keys that the keylistfunction returns.
Return Value
The function returns the number of cases in file.
Example 1
PROC ACTION
if ACTION in 1,3,6 and keylist(CENSUS_DICT) = 0 then // actions that require cases errmsg("No cases have been entered yet."); reenter; endif;
Example 2
PROC HOUSEHOLD_NUMBER
list string enteredKeys;
keylist(CENSUS_DICT, enteredKeys);
do numeric keyCtr = 1 while keyCtr <= enteredKeys.length()
if HOUSEHOLD_NUMBER = tonumber(enteredKeys(keyCtr)[9:2]) then errmsg("The household number %d has already been entered.", HOUSEHOLD_NUMBER); reenter; endif;
enddo;
See also: Key Function
LoadCase FunctionFormat
b = loadcase(dictionary_name『『, id1, ..., idN』』);
Pa ge 620 of 684 Exte rna l Fi l e Func ons

Description
The loadcase function reads a specified case from an external file into memory. Once the case is loaded, all variablesdefined in the corresponding dictionary are available for use.
The dictionary_name must be supplied and refers to an external dictionary associated with your application.
The optional list of ID variables, id1 ... idN, specifies the list of variables that will identify the case to load from theexternal file. This process is similar to matching files on the basis of key variables in statistical and database softwarepackages. Generally, each of the variables in the list is defined in a dictionary. The combined length of the variables inthe list must equal the length of the case IDs defined for the external dictionary. The function concatenates the variablesin the ID list to form a string. Alternatively, you can pass, as a string, the full key of the case to load. The function thenloads from the external file the case whose case identifier matches the string constructed from the list.
If no ID list is provided, the next logical case in the external file will be loaded. The determination of what is "next" isbased on the dictionary's access parameters.
(In versions of CSPro prior to 7.0, calling this function would automatically open an external file. The function no longerdoes this, so if you call close on an external dictionary, you must open it manually before calling this function.)
Return Value
The function returns a logical value of 1 (true) if the case was loaded successfully and 0 (false) otherwise.
Example
if loadcase(SAMPLE_DICT, CLUSTER, HH) then WEIGHT = SAMPLE_WEIGHT;endif;
See also: Retrieve Function, WriteCase Function
Locate FunctionFormat
b = locate(dictionary_name, relational_operator, key_prefix);
Description
The locate function finds, but does not load, a case in a data file that matches a specified condition. The functionsearches the index of a file and finds the first case that matches the specified condition. The case pointer is positionedto the case's location, but the case is not loaded into memory. To load the case into memory, use the retrieve functionor the loadcase function without arguments.
The dictionary_name refers to either an external dictionary or the main input file of a batch application.
The relational_operator is one of the following: =, <, <=, >, >=, or startswith.
The string expression key_prefix specifies the condition to use when searching for cases. Cases with a key that beginswith or equals the key_prefix are considered eligible cases. If the relational operators are < or <=, then the file ispositioned at the case with the largest key which satisfies the condition. If the relational operators are > or >=, then thefile is positioned at the case with the smallest key which satisfies the condition. If startswith is used, the file ispositioned at the first case whose key starts with the key_prefix.
An additional option, using uuid instead of a relational operator, determines the existence of a case based on the case'sUUID, not the case's key. This may be useful when looking up duplicate or deleted cases.
Pa ge 621 of 684 Exte rna l Fi l e Func ons

Return Value
The function returns a logical value of 1 (true) if a case is found and 0 (false) otherwise.
Example
if locate(SURVEY_DICT, >=, "55") then
do while loadcase(SURVEY_DICT) and PROVINCE = 55 // process all cases in province 55 enddo;
endif;
See also: Find Function, Set First Statement, Set Last Statement, Retrieve Function, LoadCase Function
NMembers FunctionFormat
i = nmembers(dictionary_name 『『mark_type』』);
Description
The nmembers function returns the number of cases selected by an operator during a selcase function call.
The dictionary_name must be supplied and refers to an external dictionary associated with your application. An optionalargument, mark_type, indicates what kinds of cases to process, and can be one of the following values:
mark_type Descriptionmarked Process only the cases selected by the operator during the selcase function call.unmarked Process the cases not selected by the operator.all Process all of the cases that could have been selected by the operator.
If not specified, the mark_type defaults to marked.
Return Value
The function returns the number of cases that are described by the mark_type query.
Example
while 1 do
selcase(OCCUPATION_DICT,"Plantation") multiple;
if nmembers(OCCUPATION_DICT) < 3 then errmsg("You must select at least three options.");
else break;
endif;
enddo;
See also: SelCase Function, For (Dictionary) Statement
Pa ge 622 of 684 Exte rna l Fi l e Func ons

Open Function Format:b = open(ext-dict-name | file-name[, update | append | create]);
Description:
The open function opens and keeps open an external file or file declared in a file statement. Under most circumstances, neither an open nor a close function is necessary to manipulate the file. In data entryapplications, by default, the file is opened when it is operated on with a file function, such as loadcase, writecase,readfile, or writefile and closed immediately afterward. In batch applications, by default, the file is opened at thebeginning of the run and closed at the end.
If you want to control the opening and closing of the file, you can use the open and close functions to do this. If youcode an open function anywhere is the application logic, then you must control all opening and closing of the file
The ext-dict-name or file-name must be supplied. Ext-dict-name is the name of a data dictionary defining an externaldata file. File-name is the name of a file declared in a file statement. The keywords update, append or create are optional. If no keyword is coded, the file is opened in update mode. When an ext-dict-name is used, if update or append is used, the file is opened, its contents are not changed, andthe file is ready to update cases. If create is coded, the file is opened, all previous records are removed and the file isready to add cases. When a file-name is used, if update is used, the file is opened and you are positioned at the beginning of the file. Ifappend is coded, the file is opened, its contents are not changed, and you are positioned at the end of the file. Ifcreate is coded, the file is opened, all previous records are removed and you are positioned at the beginning of thefile.
Return value:The function returns a logical value of 1 (true) if file is opened and 0 (false) otherwise.
Example 1:OK = open(LOOKUP);
Example 2:OK = open(REPORT, append);
Retrieve FunctionFormat
b = retrieve(dictionary_name);
Description
The retrieve function reads a case into memory from the current position of an external file. It is intended for use onlyafter a successful execution of the locate function. The dictionary_name must refer to an external dictionary.
Return Value
The function returns a logical value of 1 (true) if a case is retrieved and 0 (false) otherwise.
Example
Pa ge 623 of 684 Exte rna l Fi l e Func ons
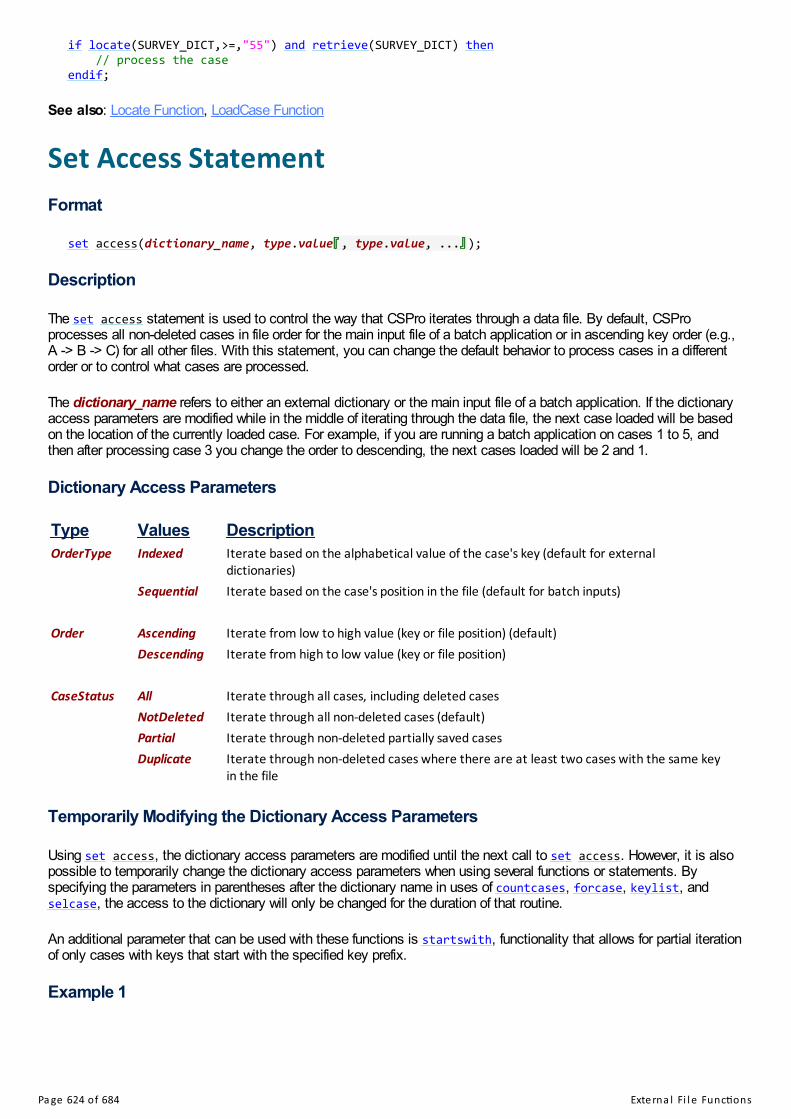
if locate(SURVEY_DICT,>=,"55") and retrieve(SURVEY_DICT) then // process the caseendif;
See also: Locate Function, LoadCase Function
Set Access StatementFormat
set access(dictionary_name, type.value『『, type.value, ...』』);
Description
The set access statement is used to control the way that CSPro iterates through a data file. By default, CSProprocesses all non-deleted cases in file order for the main input file of a batch application or in ascending key order (e.g.,A -> B -> C) for all other files. With this statement, you can change the default behavior to process cases in a differentorder or to control what cases are processed.
The dictionary_name refers to either an external dictionary or the main input file of a batch application. If the dictionaryaccess parameters are modified while in the middle of iterating through the data file, the next case loaded will be basedon the location of the currently loaded case. For example, if you are running a batch application on cases 1 to 5, andthen after processing case 3 you change the order to descending, the next cases loaded will be 2 and 1.
Dictionary Access Parameters
Type Values DescriptionOrderType Indexed Iterate based on the alphabetical value of the case's key (default for external
dictionaries)Sequential Iterate based on the case's position in the file (default for batch inputs)
Order Ascending Iterate from low to high value (key or file position) (default)
Descending Iterate from high to low value (key or file position) CaseStatus All Iterate through all cases, including deleted cases
NotDeleted Iterate through all non-deleted cases (default)Partial Iterate through non-deleted partially saved casesDuplicate Iterate through non-deleted cases where there are at least two cases with the same key
in the file
Temporarily Modifying the Dictionary Access Parameters
Using set access, the dictionary access parameters are modified until the next call to set access. However, it is alsopossible to temporarily change the dictionary access parameters when using several functions or statements. Byspecifying the parameters in parentheses after the dictionary name in uses of countcases, forcase, keylist, andselcase, the access to the dictionary will only be changed for the duration of that routine.
An additional parameter that can be used with these functions is startswith, functionality that allows for partial iterationof only cases with keys that start with the specified key prefix.
Example 1
Pa ge 624 of 684 Exte rna l Fi l e Func ons

PROC CENSUS_FF
preproc
// process the batch input in order from the last province to the first set access(CENSUS_DICT, OrderType.Indexed, Order.Descending);
Example 2
forcase CENSUS_DICT(CaseStatus.Partial) do interview_vs.add("Continue interview: " + getcaselabel(CENSUS_DICT), key(CENSUS_DICT));endfor;
Example 3
// only process assignments in the area where the supervisor is workingforcase GEOCODES_DICT(startswith, strip(MENU_GEOCODE_SELECTION)) do // ...endfor;
See also: Set First Statement, Set Last Statement, Locate Function
SetFile FunctionFormat
b = setfile(dictionary_name ‖ file_handler, file_name『『, update ‖ append ‖ create』』);
Description
The setfile function assigns a data file to the dictionary associated with dictionary_name or associates the filefile_handler to a text file on the disk. The file_name argument is a string expression containing the file name of the fileto be associated with the dictionary or file. With dictionaries, the file_name can also be a connection string.
Using the keyword update, append or create is optional. If no keyword is used, the file is opened in update mode.
Dictionary behavior: If update or append is used, the data file's contents are not changed and the file is ready toupdate cases. If create is used, all previous cases are removed and the file is ready to add cases.
File behavior: If update is used, you are positioned at the beginning of the file. If append is used, the file's contents arenot changed and you are positioned at the end of the file. If create is used, all previous content in the file is removed andyou are positioned at the beginning of the file.
For both dictionaries and files, if create or append is used and the file does not already exist, a new empty file will becreated. If update is used and the file does not already exist, the function will fail and return 0.
Return Value
The function returns a logical value of 1 (true) if the new file is successfully assigned and 0 (false) otherwise.
Dictionary Example
if REGION = 1 then setfile(GEOCODES_DICT, "Eastern.csdb");else setfile(GEOCODES_DICT, "Western.csdb");endif;
Pa ge 625 of 684 Exte rna l Fi l e Func ons

File Example
file household_report_file;
setfile(household_report_file, "Household Report.txt", create);
See also: File Statement, FileName Function, SetOutput Function, File.Open Function
Set First StatementFormat
set first(dictionary_name);
Description
The set first statement is used, like the locate function, to find a specific case in a data file. The case pointer ispositioned to the first case. Based on the dictionary access parameters, the case is either the first case by indexed(key) order or by sequential (file) order. To load the case into memory, use the retrieve function or the loadcasefunction without arguments.
The dictionary_name refers to either an external dictionary or the main input file of a batch application. Using thisstatement with the main input file of a batch application allows you to pass through the same data file more than once ina single run of a batch application.
Example
PROC MENU
set first(SURVEY_DICT);
do while loadcase(SURVEY_DICT) // process the cases in ascending key order enddo;
See also: Set Last Statement, Locate Function, Set Access Statement
Set Last StatementFormat
set last(dictionary_name);
Description
The set last statement is used, like the locate function, to find a specific case in a data file. The case pointer ispositioned to the last case. Based on the dictionary access parameters, the case is either the last case by indexed(key) order or by sequential (file) order. To load the case into memory, use the retrieve function or the loadcasefunction without arguments.
The dictionary_name refers to either an external dictionary or the main input file of a batch application.
Example
Pa ge 626 of 684 Exte rna l Fi l e Func ons

PROC MENU
set access(SURVEY_DICT, Order.Descending);
set last(SURVEY_DICT);
do while loadcase(SURVEY_DICT) // process the cases in descending key order enddo;
See also: Set First Statement, Locate Function, Set Access Statement
Write Function Format:[b =] write(alpha-exp[,p1[,p2[,...,pn]]]);
Description:
The write function writes text to a write file that can be used as a report. Each argument (e.g., "p1") is sequentiallyinserted into the write string. Arguments can be numeric or alphanumeric expressions, but the type of the argumentmust match the type of the receiving field in the message text. If no write file is specified at run time, the write file linesare placed in the default data entry or batch error report.
In the string expression
%[n]d = Insert a number and display it as an integer%[n.d]f = Insert a number and display it as a decimal value%[n.d]s = Insert a text string
"n" is the size of the field and "d" is the number of decimal places to show for a number.
Numbers are never truncated. Text strings are truncated only if ".d" is used.
If "n" is positive, the insert is right-justified in the size of the field. If "n" is negative, the insert is left-justified in the sizeof the field. If "n" is a positive number with a leading zero, the insert is right-justified in the size of the field and zero-filled to the left. When inserting a number, if "n" is preceded by a "+", the sign of the number is always displayed. Examples: Value =23456
%d 23456
%10d 23456 %-10d 23456 %010d 0000023456 %+10d +23456 %+010d +000023456 %f 23456.000000
Value =12.567
%f 12.567
%10.3f 12.567 %-10.3f 12.567 %10.2f 12.57 %10.5f 12.56700 %010.3f 000012.567 %+10.3f +12.567 %+010.3f +00012.567 %d 12
Value = %s abcdef
Pa ge 627 of 684 Exte rna l Fi l e Func ons

Value ="abcdef"
%s abcdef
%10s abcdef %-10s abcdef %10.3s abc %-
10.3sabc
Return Value:
The function returns a logical value 1 (true) if successful and 0 (false) otherwise. Example:write("Sex = %d", SEX);
See also: Filewrite Function
WriteCase FunctionFormat
b = writecase(dictionary_name);
Description
The writecase function writes a case from memory to an external data file. It can be used to update existing cases or towrite new ones.
The dictionary_name must be supplied and refers to an external dictionary associated with your application.
After a case is written to an external file, the dictionary variables for that case remain in memory. If the application doesnot assign new values to all variables in the external dictionary before the next writecase function is executed, then thevalues from the previous case will be written to the external data file. Use the clear function to reset the values of thesevariables.
No Index Mode
In a batch application it is possible to have the function output cases without updating the file's index. This allows theexternal data file to have duplicate cases, i.e., cases sharing the same set of IDs. This may be useful if the batchapplication is a tool to reformat large sets of data, a situation in which maintaining the file's index is very timeconsuming. Since no check is done for duplicates you should be certain that duplicates cannot be generated, or that youwant duplicates in the data file. You cannot use other external file functions like loadcase or retrieve if using no indexmode. To use this special mode, in the function arguments write (noindex) after the dictionary name.
b = writecase(dictionary_name(noindex));
Return Value
The function returns a logical value of 1 (true) if the write is successful and 0 (false) otherwise.
Example
WORK_RECORD_ID = HOUSEHOLD_ID;LAST_WORK_TIME = timestamp();
writecase(WORK_RECORD_DICT);
See also: LoadCase Function, DelCase Function
Pa ge 628 of 684 Synchroni za on Func ons

Synchronization FunctionsSyncConnect FunctionFormat
b = syncconnect(differing_arguments);
Description
The syncconnect function opens a connection to a server to start a synchronization session. The function has four formsbased on the type of connection, with each form described on a separate page:
CSWeb
Bluetooth
Dropbox
FTP
LocalDropbox
LocalFiles
After a successful connection, call syncdata and syncfile to synchronize data and files between the device and theserver. When finished transferring data, call syncdisconnect to close the connection.
Return Value
The function returns a logical value of 1 (true) if the connection was successful and 0 (false) otherwise.
See also: Synchronization Overview, SyncDisconnect Function, SyncServer Function, SyncData Function, SyncFileFunction, SyncParadata Function
SyncConnect Function (CSWeb)This page describes the syncconnect function when connecting to a CSWeb server. For generalized information on thefunction, see the documentation for the syncconnect function.
Format
b = syncconnect(CSWeb,csweb_url『『,username『『,password』』 』』);
Description
The syncconnect function opens a connection to a CSWeb server to synchronize data and files over the Internet. Thefirst argument must be the keyword CSWeb. The second argument, csweb_url, is a string expression of the full URL ofthe CSWeb server. The third and fourth arguments, username and password are optional string arguments of thecredentials used to login to the server. If the username and password are not specified, the user will be prompted to enterthem the first time the synchronization is run. After the credentials have been entered the first time, they are saved insecure storage on the device and do not need to be entered again. You can use the CSPro Settings dialog to clear anycached credentials.
For more information about CSWeb servers, see the Synchronization Overview and the CSWeb help documentation.
Pa ge 629 of 684 Synchroni za on Func ons

Example
string cswebServerUrl = "https://www.myserver.org/api";
// connect to the CSWeb serverif syncconnect(CSWeb,cswebServerUrl) then
// send the latest cases to the CSWeb server syncdata(PUT,SURVEY_DICT);
syncdisconnect();
endif;
See also: Synchronization Overview, SyncConnect Function, SyncConnect Function (Bluetooth), SyncConnect Function(Dropbox), SyncConnect Function (FTP), SyncConnect Function (LocalDropbox), SyncConnect Function (LocalFiles)
SyncConnect Function (Bluetooth)This page describes the syncconnect function when connecting, via Bluetooth, to another device running a CSProapplication. For generalized information on the function, see the documentation for the syncconnect function.
Format
b = syncconnect(Bluetooth『『,server_device_name』』);
Description
The syncconnect function opens a connection, via Bluetooth, to another device (a computer, laptop, tablet, or phone)running a local server. The first argument must be the keyword Bluetooth. The second argument, server_device_name,is an optional string expression of the name of the device to which you want to connect. For Android devices, the devicename can be found in Bluetooth settings on the device running the server. For Windows devices, this is the PC namethat can be found in Windows settings. The getbluetoothname function can be used on the other device to find thedevice name. If no server device name is specified, a list of nearby devices is displayed and the operator may choosewhich one to connect to.
In order for the two devices to connect successfully, the device running the server must call the function syncserver atroughly the same time as the call to syncconnect is made by the client device.
When connecting over Bluetooth, no Internet connection is required, however the two devices must be in close physicalproximity. This is useful when transferring data in areas where no Internet connection is available.
Example
string server_name = "supervisor21";
// connect to the supervisor's device using Bluetoothif syncconnect(Bluetooth, server_name) then
// send the latest cases to the supervisor's device syncdata(PUT, SURVEY_DICT);
syncdisconnect();
endif;
See also: SyncConnect Function, SyncConnect Function (CSWeb), SyncConnect Function (Dropbox), SyncConnectFunction (FTP), SyncConnect Function (LocalDropbox), SyncConnect Function (LocalFiles), SyncMessage Function,GetBluetoothName Function
Pa ge 630 of 684 Synchroni za on Func ons

SyncConnect Function (Dropbox)This page describes the syncconnect function when connecting to Dropbox. For generalized information on the function,see the documentation for the syncconnect function.
Format
b = syncconnect(Dropbox);
Description
The syncconnect function opens a connection to Dropbox to synchronize data and files over the Internet. The first andonly argument must be the keyword Dropbox. This requires an account with the online file sharing service Dropbox. Itdoes NOT require that the Dropbox client software be installed on the device. The first time the connection is made, theuser will see a prompt to enter the Dropbox username and password and these settings will be saved in secure storagefor future synchronizations. You can use the CSPro Settings dialog to clear any cached settings.
Example
// connect to Dropboxif syncconnect(Dropbox) then
// send the latest cases to Dropbox syncdata(PUT,SURVEY_DICT);
syncdisconnect();
endif;
See also: Synchronization Overview, SyncConnect Function, SyncConnect Function (CSWeb), SyncConnect Function(Bluetooth), SyncConnect Function (FTP), SyncConnect Function (LocalDropbox), SyncConnect Function (LocalFiles)
SyncConnect Function (LocalDropbox)This page describes the syncconnect function when connecting to a Dropbox folder on the local computer. Forgeneralized information on the function, see the documentation for the syncconnect function.
Format
b = syncconnect(LocalDropbox);
Description
The syncconnect function opens a connection to Dropbox to synchronize data and files using the Dropbox folder on thelocal computer. The first and only argument must be the keyword LocalDropbox. This requires that the Dropbox clientsoftware be installed on the computer. Rather than synchronize files over the Internet this connection relies on theDropbox client software to do file synchronization. CSPro simply copies files and data to/from the Dropbox folder. This ismainly useful when downloading large quantities of data which would take a long time to do using the online Dropboxconnection. The LocalDropbox connection is only supported on Windows.
Example
Pa ge 631 of 684 Synchroni za on Func ons

// connect to local Dropbox folderif syncconnect(LocalDropbox) then
// Download the latest cases from Dropbox syncdata(GET, SURVEY_DICT);
syncdisconnect();
endif;
See also: Synchronization Overview, SyncConnect Function, SyncConnect Function (Dropbox), SyncConnect Function(LocalFiles), SyncConnect Function (CSWeb), SyncConnect Function (Bluetooth), SyncConnect Function (FTP)
SyncConnect Function (LocalFiles)This page describes the syncconnect function when connecting to a folder on the local computer such as the homedirectory of an FTP server. For generalized information on the function, see the documentation for the syncconnectfunction.
Format
b = syncconnect(LocalFiles, local_path);
Description
The syncconnect function opens a connection to synchronize data and files using the a folder on the local computer.The first argument must be the keyword LocalFiles and the second argument, the string expression local_path, mustbe the path to a local folder on the computer. Rather than synchronize files over the Internet this connection assumesthat some other service, such as an FTP server, will handle file transfers. CSPro simply copies files and data to/from thelocal folder. This is mainly useful when downloading large quantities of data which would take a long time to do using anetwork connection.
Example
// connect to local folderif syncconnect(LocalFiles, "C:/FTPDirectory/") then
// download the latest cases syncdata(GET, SURVEY_DICT);
syncdisconnect();
endif;
See also: Synchronization Overview, SyncConnect Function, SyncConnect Function (CSWeb), SyncConnect Function(Bluetooth), SyncConnect Function (FTP)
SyncConnect Function (FTP)This page describes the syncconnect function when connecting to an FTP server. For generalized information on thefunction, see the documentation for the syncconnect function.
Format
b = syncconnect(FTP,ftp_url『『,username『『,password』』 』』);
Description
Pa ge 632 of 684 Synchroni za on Func ons

The syncconnect function opens a connection to an FTP server to synchronize data and files over the Internet. The firstargument must be the keyword FTP. The second argument, ftp_url, is a string expression of the full URL of the FTPserver. The third and fourth arguments, username and password are optional string arguments of the credentials used tologin to the server. If the username and password are not specified, the user will be prompted to enter them the first timethe synchronization is run. After the credentials have been entered the first time, they are saved in secure storage on thedevice and do not need to be entered again. You can use the CSPro Settings dialog to clear any cached credentials.
CSPro synchronization can work with FTP servers using encrypted transmission via TLS/SSL. There are two modes thatCSPro supports for encrypted FTP: explicit and implicit. To use explicit TLS/SSL, provide a URL for the server that startswith "ftpes://". To use implicit TLS/SSL, provide a URL for the server that starts with "ftps://". For servers that donot support TLS/SSL, use a URL that starts with "ftp://". FTP over SSH (SFTP) is not supported.
You can optionally specify a port number by adding it to the end of the URL, separated by a colon. For example, theURL "ftp://myserver.com:27" tells CSPro to connect to port 27. If no port is specified, the standard FTP port will beused (port 21 for FTP or port 990 for FTPS).
Example
string ftpServerUrl = "ftpes://myserver.org";
// connect to the FTP serverif syncconnect(FTP,ftpServerUrl) then
// send the latest cases to the FTP server syncdata(PUT,SURVEY_DICT);
syncdisconnect();
endif;
See also: Synchronization Overview, SyncConnect Function, SyncConnect Function (CSWeb), SyncConnect Function(Bluetooth), SyncConnect Function (Dropbox), SyncConnect Function (LocalDropbox), SyncConnect Function(LocalFiles)
SyncServer FunctionFormat
b = syncserver(Bluetooth『『,file_root_path』』);
Description
The syncserver function runs a local server that allows peer-to-peer synchronization between two devices via Bluetooth,without needing an Internet connection. The function waits for a connection from another device (a client) made when theclient calls syncconnect to start a Bluetooth synchronization. Once the two devices are connected, the client devicecalls syncdata and syncfile to copy data and/or files to and from the server. Finally, the client device callssyncdisconnect to end the session.
The server in a peer-to-peer synchronization is passive. It does not call syncdata or syncfile. It simply responds torequests initiated from the client. The Bluetooth server runs until either the client successfully connects and disconnectsor the operator cancels the synchronization.
The syncserver function displays a dialog to the operator indicating that it is waiting for a client device to connect.During this time, no other logic on the server is executed. Once a connection is made, the dialog displays the progressof the synchronization. When the client disconnects by calling syncdisconnect, the dialog is removed and syncserverreturns. If no connection is made, the operator can use the cancel button on the dialog to cause syncserver to returnand continue executing any logic that follows. The server only allows connections while the syncserver function isrunning, so the server must call syncserver before the client device calls syncconnect.
The first argument must be the keyword Bluetooth. The second argument, file_root_path, is an optional string
Pa ge 633 of 684 Synchroni za on Func ons

expression of the path to use as the base directory from which to transfer files when the client calls syncfile. Theremote path specified in the call to syncfile is appended to this base directory to determine the full path of files on theserver. In other words, "/" in a syncfile call from the client refers to the file_root_path directory on the server. Forexample, if file_root_path is "C:\MyApp\MyFiles" and the client calls syncfile(GET,"/Images/image.jpg"), thenthe file image.jpg will be read from the directory C:\MyApp\MyFiles\Images\ on the server. If no file_root_path isspecified, the application directory is used. The rules that dictate which files can be synced on the server differdepending on the operating system. On Android files inside the csentry directory can be synced by default. To syncoutside the csentry directory use file_root_path to specify a path outside the csentry directory. On Windows any filecan be synced.
When connecting over Bluetooth, no Internet connection is required, but the two devices must be in close physicalproximity.
Return Value
The function returns a logical value of 1 (true) if the synchronization was successful and 0 (false) otherwise.
Example 1
// start a peer-to-peer Bluetooth server with the application directory as the file root pathsyncserver(Bluetooth);
Example 2
// start a peer-to-peer Bluetooth server with the application parent directory as the file rootpathsyncserver(Bluetooth, "..");
See also: Synchronization Overview, SyncConnect Function, SyncData Function, SyncDisconnect Function, SyncFileFunction, SyncMessage Function
SyncDisconnect FunctionFormat
b = syncdisconnect();
Description
The syncdisconnect function ends a synchronization session previously started by calling syncconnect.
Return Value
The function returns a logical value of 1 (true) if successful and 0 (false) otherwise.
Example
if syncconnect(Dropbox) then
// perform synchronization actions
syncdisconnect();
endif;
See also: Synchronization Overview, SyncConnect Function, SyncData Function, SyncFile Function, SyncParadataFunction, SyncServer Function
Pa ge 634 of 684 Synchroni za on Func ons

SyncData FunctionFormat
b = syncdata(direction, dictionary_name『『, sync_universe』』);
Description
The syncdata function transfers cases in a CSPro data file between a device and a synchronization server. Before callingsyncdata, you must first connect to the server by calling syncconnect.
The function can upload cases from the local device (client) to the server as well as download cases from the server. Thedirection argument determines which of these operations is performed. It must be one of the following values:
GET: Download any cases that were modified on the server since the last sync and update or add them to thelocal data file.
PUT: Upload to the server any cases that were modified in the local data file since the last sync.
BOTH: Sync cases in the local data file with the server in both directions (i.e., perform both a GET and a PUT).
The dictionary_name argument must be the name of a data dictionary corresponding to the data file to synchronize.This can be either the dictionary for the main data file or an external dictionary. CSPro uses the data file that is currentlyassociated with this dictionary, either because it was specified when the application was started or via a call to setfilefrom application logic.
For synchronization with a CSWeb server, the dictionary must first be uploaded to the server. (See the CSWeb helpdocumentation for more information.)
For peer-to-peer synchronization, the data is written to the file associated with the dictionary of the same name on thedevice running the server. This means that both devices must have this dictionary added to the currently running CSProapplication, either as the main dictionary or as an external dictionary.
By providing an optional string expression for the sync_universe argument, you can limit the cases that are transferred.The universe is matched against the ID items of each of the cases. Only cases whose ID items concatenated togethermatch the universe will be transferred. For example, if the universe is "123" then cases with IDs "1234" and "1235"would be synced but a case with IDs "2345" would not.
The syncdata function keeps track of which cases are transferred each time the client and server are synchronized anduses this information to only transfer cases that have been modified since the last synchronization. This significantlyreduces the amount of data transferred and therefore reduces bandwidth and the cost of air time. It also reduces thechance that two interviewers overwrite each other's work by both syncing to the same data file on the server. As long asthe two interviewers do not modify the same case at the same time, they may both synchronize to the same serverwithout overwriting each other's data.
The syncdata function is only supported on data files in CSPro DB or Encrypted CSPro DB formats. Data files in thelegacy text format may not be synchronized using syncdata but instead can be transferred using the syncfile function.That function always transfers the entire file, however, increasing the amount of data transferred and allowing for oneinterviewer to overwrite the changes of another.
Return Value
The function returns a logical value of 1 (true) if the transfer was successful and 0 (false) otherwise.
Example 1
Pa ge 635 of 684 Synchroni za on Func ons

if syncconnect(CSWeb, "https://www.myserver.org/api") then
// send the latest survey data to the server syncdata(PUT, SURVEY_DICT);
// get the latest assignments lookup file from the server syncdata(GET, ASSIGNMENTS_DICT);
syncdisconnect();
endif;
Example 2
if syncconnect(Bluetooth) then
// sync data for only the province and district assigned to the interviewer string assignmentUniverse = maketext("%v%v", ASSIGNED_PROVINCE, ASSIGNED_DISTRICT); syncdata(BOTH, CENSUS_DICT, assignmentUniverse);
syncdisconnect();
endif;
See also: Synchronization Overview, SyncConnect Function, SyncFile Function, SyncParadata Function,SyncDisconnect Function, SyncServer Function
SyncFile FunctionFormat
b = syncfile(direction, from_path『『, to_path』』);
Description
The syncfile function transfers files between a device and a synchronization server. Files may be of any type:application files, images, text files, etc. However, for transferring CSPro data files it is more efficient to use the functionsyncdata. Before calling syncfile, you must first connect to a server by calling syncconnect.
The syncfile function uploads or downloads one or more files from the server. Unlike syncdata, this sends or retrievesan entire file, not individual cases. It is therefore useful for transferring files that are not data files such as images or newversions of an application.
The function can upload files from the local device (client) to the server as well as download files from the server. Thedirection argument determines which of these operations is performed. It must be one of the following values:
GET: Download files from the server and save them on the client.
PUT: Upload files from the client to the server.
The from_path argument is a string expression that specifies the path of the file to transfer. If the direction is GET thenthis is the path of the file on the server to download. If the direction is PUT then this is the full path to the file name on theclient to upload.
The optional to_path argument is a string expression that specifies the destination path for the file. If the direction isGET then this is the full path of the destination file name on the client device. If the direction is PUT then this is the pathof the destination file or folder on the server. If to_path is not specified, then the file will have the same name as the file inthe from_path and will be saved to the application directory on the client (for GET) or the server root directory (for PUT).
The from_path argument may contain the wildcard characters "*" and "?" to specify a group of files to transfer. In thiscase, the to_path argument should be the name of a folder to copy all files that match the wildcard pattern into.
Pa ge 636 of 684 Synchroni za on Func ons

When downloading files using GET, syncfile first looks to see if the file already exists on the client device. If it does, itonly downloads the file if the server has a different version. It uses the file signature (MD5) to determine if the version ofthe file on the server is different. This reduces the bandwidth used when downloading large files.
Return Value
The function returns a logical value of 1 (true) if the transfer was successful and 0 (false) otherwise.
Example
if syncconnect(CSWeb, "https://www.myserver.org/api") then
// upload all images in images directory to the images directory on the server syncfile(PUT, "Images/*.jpg", "/Images/");
syncdisconnect();
endif;
See also: Synchronization Overview, SyncConnect Function, SyncData Function, SyncParadata Function, SyncAppFunction, SyncDisconnect Function, SyncServer Function
SyncMessage FunctionFormat
// Bluetooth clients = syncmessage(message_name『『, message_value』』);
// Bluetooth serverfunction string OnSyncMessage(string message_name, string message_value) exit message_response;end;
Description
The syncmessage function sends a string message from one device to another device that is acting as a Bluetoothserver. The string expression message_name identifies the message, and an optional string expression message_valuedefines a value associated with the message. The client device sends this message to a Bluetooth server.
The application running on the Bluetooth server must have a user-defined function with the name OnSyncMessage thathas two string parameters and returns a string. While the syncserver function is running, the OnSyncMessage function iscalled anytime a message is received and the return value of that function is returned to the Bluetooth client.
Return Value
The function returns the message returned by the OnSyncMessage function running on the Bluetooth server. If nomessage is returned, a blank string is returned.
Example
Pa ge 637 of 684 Synchroni za on Func ons

// on the client...syncmessage("STAFF_CODE", STAFF_CODE);
if syncmessage("TRAINING_MODE") <> maketext("%d", TRAINING_MODE) then errmsg("You cannot sync with a device that is not in the same training mode as yourdevice"); syncdisconnect();endif;
// on the serverPROC GLOBAL
function string OnSyncMessage(string message_name, string message_value)
// store information about the sync in the paradata log if message_name = "STAFF_CODE" then logtext("Syncing with %s at %s", message_value, timestring());
// return the training mode elseif message_name = "TRAINING_MODE" then exit maketext("%d", TRAINING_MODE);
endif;
end;
See also: Synchronization Overview, SyncConnect Function (Bluetooth), SyncServer Function
SyncParadata FunctionFormat
b = syncparadata(direction);
Description
The syncparadata function transfers paradata between a device and a synchronization server. Before callingsyncparadata, you must first connect to the server by calling syncconnect.
The function can upload paradata from the local device (client) to the server as well as download paradata from theserver. The direction argument determines which of these operations is performed. It must be one of the followingvalues:
GET: Download any paradata that was sent to the server since the last sync and add it to the currently openparadata log.
PUT: Upload to the server any paradata that was collected since the last sync.
BOTH: Sync paradata in the currently open paradata log with the server in both directions (i.e., perform both aGET and a PUT).
The syncparadata function keeps track of what paradata has been transferred each time the client and server aresynchronized and uses this information to only transfer paradata that has been collected since the last synchronization.This significantly reduces the amount of data transferred and therefore reduces bandwidth and the cost of air time.
Paradata logs can be very large so be careful about adding paradata synchronizations to your applications. If you areinterested in syncing paradata, a general suggestion is to use BOTH when syncing between devices using Bluetooth,and to use PUT to a CSWeb, Dropbox, or FTP server.
Return Value
Pa ge 638 of 684 Synchroni za on Func ons

The function returns a logical value of 1 (true) if the transfer was successful and 0 (false) otherwise.
Example
if syncconnect(Bluetooth) then
// other sync actions...
syncparadata(BOTH);
syncdisconnect();
endif;
See also: Synchronization Overview, SyncData Function, SyncFile Function, Paradata, Paradata Function
SyncApp FunctionFormat
b = syncapp();
Description
The syncapp function updates application files, such as a .pen and .pff, from a new version of the application package ona server. This function is used to make updates, such as bug fixes and other modifications, to an application alreadydeployed on mobile devices in the field.
The function checks for an updated version of the application on the server that the program is currently connected tofrom a previous call to syncconnect. If the version of the application on the server is newer than the currently runningversion, then the new package is downloaded from the server and the application on the device is updated.
This function only works on Android. It is not supported on Windows. It may be used with CSWeb, Dropbox and FTPservers as well as with peer to peer synchronization via Bluetooth.
Using syncapp is typically only for advanced scenarios, such as when you want to update an application over Bluetoothor when you want to initiate an update from within a menu program. In most cases it is simpler to use Update InstalledApplications from the menu in the Entry Applications screen of CSEntry as it does the same update as syncapp withoutrequiring any custom logic.
Before calling syncapp, you must first connect to a server by calling syncconnect.
To use the syncapp function, you must first upload the application package to a server using the Deploy Application tool.The syncapp function looks for a package on the server with the same package name as the currently runningapplication. If no package matching the current package name has been deployed to the server, the function will displayan error. Note that the application package is not necessarily the same as the name of the .pen file. The package nameis the name that was entered in the Deploy Application tool when the package was deployed to the server. It is importanttherefore to always use the same package name whenever deploying updates to an application.
The syncapp function only downloads the application if the version of the application on the server is more recent thanthe version on the mobile device. This is accomplished by storing the date and time the package was uploaded to theserver by the Deploy Application tool. This date and time is stored in the application package and is used to determine ifthe package on the server is newer than the package on the mobile device.
Furthermore, if you are using a CSWeb server or Bluetooth, in order to keep data usage to a minimum, only files that aredifferent in the version of the package on the server from those in the version on the mobile device are downloaded. Thisway if you have large files in your application package that do not change as part of the update, they will not slow downthe update. This optimization is not done for Dropbox or FTP servers.
Pa ge 639 of 684 Synchroni za on Func ons
Files in the downloaded package overwrite the corresponding files on the mobile device. To avoid generating multiplecopies of the same file, use the same directory layout, file and folder names in the updated package as were used in theoriginal package.
Files that are marked Only on first install in the deployment package that already exist on the mobile device will beignored by syncapp and are not updated even if a newer version is included in the updated package.
Be careful when including data files in an application package that is used with syncapp since any data files that are inuse by the current application will be locked which will result in errors when syncapp attempts to overwrite them. Eitherclose any files that may be updated prior to calling syncapp or mark the data files as Only on first install in the DeployApplications tool and use syncdata to update them instead.
Note that if as part of the application update the currently running .pen file is updated to a newer version, syncapp willrestart the application in order to run the updated version. This means that any logic that follows the call to syncapp willnot be executed. To avoid problems, make sure that the call to syncapp is the last call in the procedure. For example, tocombine the application update with calls to syncdata to update data files, place the calls to syncdata before the call tosyncapp.
Return Value
The function returns a logical value of 1 (true) if the update was successful and 0 (false) otherwise.
Example
if syncconnect(CSWeb,"https://www.myserver.org/api") then
// get the latest versions of the application files from the server syncapp();
syncdisconnect();
endif;
See also: Synchronization Overview, SyncConnect Function, SyncData Function, SyncDisconnect Function,SyncServer Function
GetBluetoothName FunctionFormat
s = getbluetoothname();
Description
The getbluetoothname function returns the name of the device as broadcast to other Bluetooth devices. When otherBluetooth enabled devices scan for nearby devices to connect to, this is the name that they will see.
When using Bluetooth for synchronization between two devices the Bluetooth name of the device is what is shown in thescreen asking the user which device to connect to. In addition the Bluetooth name of one device may be passed as anargument to the syncconnect function on the other device in order to connect directly to that device bypassing thescreen asking the user which device to connect to.
Because it is possible to change the Bluetooth device name in the settings on Android and in the Device Manager onWindows, the Bluetooth name can be used as a way to name devices for management and audit purposes. The devicecan be assigned a unique identifer or serial number which is used as the Bluetooth device name. Usinggetbluetoothname, this identifier can be written to an item in the data file for audit purposes, supplied as a username forsynchronization or used as a key in lookup file as part of a survey management system.
Return Value
Pa ge 640 of 684 Synchroni za on Func ons

The function returns a string containing the name of the device.
Example
PROC DEVICE_NAME
preproc
DEVICE_NAME = getbluetoothname(); noinput;
See also: GetDeviceID Function, GetOperatorId Function, GetOS Function, GetUserName Function, SyncConnectFunction (Bluetooth)
Pa ge 641 of 684 Te mpl a te d Re por ng Sys te m

Templated Reporting SystemTemplated ReportsOverview
CSPro can create HTML reports using case data as well as results from queries into paradata and other data sets. Byspecifying tags in your report template, you indicate to a templating engine what areas of your report are dynamic, andthen via the setreportdata function, CSPro creates an object that the templating engine uses to render a dynamicreport. The reporting system also supports the ability to automatically run queries on data sets based on queriesspecified in the report template.
Basic Functionality
This example will demonstrate how to create a simple report using Mustache, the default templating engine. The basicreport template is a standard HTML file to which you add two components. First, you add a div block with the idcspro_report. This is the placeholder block where the template engine will place the results of its templating.
<div id="cspro_report"></div>
Second, you specify the text that you want to pass to the templating engine. Using the script element, you specify thetype, application/vnd.cspro.report-template, as well as the id, cspro_report_template. In between the script tags,you specify the HTML. Using Mustache, replacement parameters are defined in between double brackets {{ ... }}, and #and / are used to start and end processing on elements of an array.
<script type="application/vnd.cspro.report-template" id="cspro_report_template"> <h2>{{title}}</h2> <table> <tr><th>Name</th><th>Sex</th><th>Age</th></tr> {{#PERSON_REC}} <tr><td>{{NAME}}</td><td>{{SEX}}</td><td>{{AGE}}</td></tr> {{/PERSON_REC}} </table></script>
When CSPro passes this template to Mustache, the templating engine will look to replace {{title}}, and then for eachoccurrence (array element) of PERSON_REC, it will replace {{NAME}}, {{SEX}}, and {{AGE}}. Once it has done this, itwill replace the cspro_report block with the dynamic contents.
Within CSPro, we must pass these parameters to the reporting system. Assuming that our template is saved to a filenamed simple_report.html, then our code might be as follows:
setreportdata("title","Demographic Report");setreportdata(PERSON_REC);report("simple_report.html");
The calls to setreportdata set the data for the title and copy the information on the person record to an array that canbe accessed in the template. The call to report specifies the name of the template. CSPro will read the template, passin the title and person record data, and display the report in a web browser.
Details for Advanced Users
There are a few components that make up the reporting system, each described in detail below.
Pa ge 642 of 684 Te mpl a te d Re por ng Sys te m
Data
The first component is the data itself. Via calls to setreportdata, CSPro creates a JSON object and embeds it as ascript with the id cspro_report_data. If your template has such an id defined, it will be overwritten; otherwise, it will beinserted in the output. If you want to define your own templating engine, it must be able to work with this JSON object.
Report Template
As described above, the report template contains the HTML text that will be passed to the templating engine. That, alongwith the JSON data, is what turns the template into a dynamic report. The template has a few parameters:
<script type="application/vnd.cspro.report-template" id="..." data-template-engines="..." data-queries="..."> <!-- HTML report --></script>
The type must always be application/vnd.cspro.report-template.
The id uniquely identifies the script block. There are no restrictions on its name, but if you want to use the basic reportfunctionality, then the id must be cspro_report_template and there must be a div block with the id cspro_report.
The optional data-template-engines specifies the names of the templating engines that are required to create the report.Separate multiple names with whitespace. If not specified, and if the id is cspro_report_template, Mustache will beused, as that engine comes installed with CSPro. If you specify a templating engine that CSPro cannot locate, the reportgeneration will result in an error.
The optional data-queries specifies the names of any queries whose execution is required to create the report. Separatemultiple names with whitespace. CSPro will check if data with the query name has been set via setreportdata. If not, itwill search for a query with the proper name, and if found, execute it. If no suitable query can be found, the reportgeneration will result in an error.
Query
Any queries defined in your template will be executed prior to CSPro generating the report. Queries will be passedthrough the setreportdata/sqlquery functions with the result set stored under the attribute defined by data-query-name. The query has a few parameters:
<script type="application/vnd.cspro.query" data-query-name="..." data-description="..." data-source="..."> <!-- SQL query --></script>
The type must always be application/vnd.cspro.query.
The data-query-name is the name that CSPro uses to refer to the query. You do not need to specify an id, as CSProuses this name instead. This is the name that corresponds to entries in a report template's data-queries.
The data-description is optional text that may be used to give a more complete description of the query.
The data-source identifies the source of the query. The reporting system must know on which database to execute thequery. The options are either paradata, to execute a query on the currently open paradata log, or a dictionary name, inwhich case the query is executed on the currently open CSPro data source associated with that dictionary.
Template Engine
Pa ge 643 of 684 Te mpl a te d Re por ng Sys te m

Most users will not have a reason to add a new templating engine, as Mustache is sufficient for most reports, but someadvanced users may want to define their own engine. The engine has a few parameters:
<script type="application/vnd.cspro.template-engine" data-template-engine-name="..." data-script-type="..." data-include-src="..." data-include-type="..."> <!-- script code --></script>
The type must always be application/vnd.cspro.template-engine.
The data-template-engine-name is the name that CSPro uses to refer to the template engine. You do not need to specifyan id, as CSPro uses this name instead. This is the name that corresponds to entries in a report template's data-template-engines.
The optional data-script-type specifies the type of code located in the script block. If not specified, it defaults toapplication/javascript.
The optional data-include-src identifies the file, generally a JavaScript file, that contains the source for the templatingengine.
The optional data-include-type specifies the type of code found in the file identified by data-include-src. If not specified, itdefaults to application/javascript.
CSPro will include in the HTML report the script block of any templating engine necessary to generate the report, as wellas links to any (JavaScript) files required to run the template.
Evaluating Queries and Template Engines
CSPro first reads in any report templates and determines what queries and template engines are required to create thereport. It checks any data set via setreportdata, and if that data has an attribute with the same name as a query, thenit is assumed that that data overrides the query and the query required by the template is assumed to be handled and isignored. CSPro then looks in the report template for the definition of any queries and template engines. If they are found,then they are processed.
However, if CSPro cannot find the definition of a query or template engine in the report template, it looks in two places forthese definitions, which can be included in report script definition files, which have the extension .csrs. These filesconsist of script blocks defining queries and template engines. First, CSPro looks in the directory where the report isbeing created and loads any .csrs files in that directory. If CSPro cannot find the definition of a query or template enginein those files, it then loads the .csrs files that come with default CSPro installation. If it cannot find them in either ofthese locations, the report generation will result in an error.
To see an example of how this works, create a basic report, using the Mustache engine, and the output of the report willuse the engine as it is defined in "C:\Program Files (x86)\CSPro 7.5\Reports\CSPro Reports.csrs." You could overridethe default Mustache behavior by adding a template engine with the name "mustache" to your report template or to a.csrs file in the directory where your report will be created.
See also: Report Function, SetReportData Function, SqlQuery Function
Mustache Templated ReportsMustache is an open-source templating engine that comes installed with CSPro. You can use Mustache to createsimple reports templated reports. More information on Mustache is available on the project's website, and there are manyonline examples of using Mustache.
Below are some examples of how to use Mustache with data from CSPro:
Pa ge 644 of 684 Te mpl a te d Re por ng Sys te m

Example - Text
setreportdata("operator_name");
<h2>Report for {{operator_name}}</h2>
Example - Records
// each record occurrence is output as an array, with the items// for each occurrence of the record output within that arraysetreportdata(PERSON_REC);
{{#PERSON_REC}} <p><b>{{NAME}}</b> is aged {{AGE}}.</p>{{/PERSON_REC}}
Example - SqlQuery
string DeviceQuery = "SELECT device_model, COUNT(*) AS device_count " "FROM device_info " "GROUP BY device_model;";
setreportdata("device_info",sqlquery(paradata,DeviceQuery));
{{#device_info}} <p>{{device_count}} interviewers used {{device_model}}.</p>{{/device_info}}
See also: Templated Reports
Pa ge 645 of 684 Appe ndi x

Appendix
Appendix A - InstallationHardware and Software RequirementsThe minimal configuration for CSPro is:
Pentium processor
512MB of RAM
SVGA monitor
Mouse
100MB of free hard drive space
Microsoft Windows Vista, 7, 8, or 10
Installing CSProThe CSPro installer has the file name cspro75.exe. To install CSPro:
1. Double-click on the file.
2. Read and accept the U.S. Census Bureau's license agreement
3. Select the components that you want to install. You will generally want to install all of the components.
4. Select the folder where you want to install CSPro. You will generally want to install CSPro in the suggesteddirectory.
After CSPro has been installed on your computer, you will have the option to run the program and/or view the releasenotes.
You will find a CSPro 7.5 icon on your desktop that you can double-click on when you want to run CSPro in the future.
Installing a Newer VersionUpgrading to CSPro 7.5 From CSPro 7.4 or Earlier
If you have an old version of CSPro installed on your computer, you can install CSPro 7.5 without affecting the previousversion. When you have finished your conversion of applications to CSPro 7.0, you can then uninstall the previousversion.
Due to internal changes within CSPro 7.5, once files have been loaded in CSPro 7.5, you may no longer be able to loadthem in previous versions of CSPro.
Updating a Previous Version of CSPro 7.5
If you are updating a previous version of CSPro 7.5, the installer will remove the previous version and replace it with the
Pa ge 646 of 684 Appe ndi x

new version. It will not change any applications or other files that you have created.
Uninstalling CSProThere are two ways to uninstall CSPro. The uninstaller will remove all registry entries and CSPro system files. It will notremove any applications or other files that you have created.
You can uninstall the program using the Windows Control Panel:
1. Using the Windows search functionality (Windows Key+S), type Add or remove programs.
2. Select CSPro from the list of programs.
3. Follow the prompts to uninstall the program.
Alternatively, you can:
1. Use Windows Explorer to browse to the CSPro application folder, which will likely be: C:\Program Files(x86)\CSPro 7.5.
2. Run the program uninstall.exe.
3. Follow the prompts to uninstall the program.
Installing Data Entry ApplicationsInstall CSPro
Run the CSPro installation program on each computer. The installation setup can be run from removable media such asa CD or USB (flash) drive, or it can be placed on a networked drive.
Install the CSPro Data Entry Application
Once the data entry application has been tested and finalized, use the Pack Application tool to create a single file thatcontains all the essential application files. This file can be placed in a folder either on a network drive for multiple users oron each data entry operator's local hard drive. The application files then need to be extracted (unzipped) from the packedfile.
If the application is on a network drive, multiple users can access it at the same time. Normally, only one person hasaccess to an application on a local hard drive. The data file for an application can also be placed on a network drive orthe operator's local hard drive, though two or more data entry operators cannot access the same data (or lookup) file atthe same time.
Another way to distribute a data entry application is to compile it into a single combined file that contains all elements ofthe program. This file cannot be edited and provides security during the data entry operation. For this approach, readabout binary data entry applications.
For information about data entry applications in general, see the Data Entry User's Guide.
Pa ge 647 of 684 Appe ndi x B - Ke ys Summa ry

Appendix B - Keys SummaryData Dictionary KeysShortcuts Common Throughout CSPro
Shortcut Key DescriptionCtrl + R Run the application.Ctrl Shift + R Run the application without prompting for file associations.Ctrl + J Hide the tree (view full screen).Ctrl + T Show names instead of labels in tree.Ctrl + Shift + T Cycle between tabbed views in the tree.
Shortcuts Specific to the Dictionary Editor
Shortcut Key DescriptionCtrl + A Add a new level, record, item, value set, or value.Ctrl + I Insert a new object above the selected object.Ins Insert a new object above the selected object.Del Delete the selected object.Esc Cancel edits for the object (if in editing mode).Ctrl + Enter Finish edits for the object and move on to the next object.Ctrl + M Modify the selected object.Ctrl + D Add notes about the selected object.Ctrl + G Generate a value set for an item.Ctrl + L Show or hide the data file layout view.
Shortcuts Common Throughout Windows
Shortcut Key DescriptionF1 Launch the help system.Ctrl + N Create a new document.Ctrl + O Open an existing document.Ctrl + S Save the active document.Ctrl + C Copy the selected object or text to the clipboard.Ctrl + X Cut the selected object or text to the clipboard.Ctrl + V Paste into the document the object or text on the clipboard.Ctrl + Z Undo the last action.Ctrl + Y Redo the previously undone action.Ctrl + F4 Close the active document.Alt + F4 Exit the application.Ctrl + Tab Change focus to the next window.Alt + F6 Change focus to the next window.Shift + Alt + F6 Change focus to the previous window.
See also: Data Entry Keys, Batch Edit Keys, Tabulation Keys
Pa ge 648 of 684 Appe ndi x B - Ke ys Summa ry

Data Entry KeysShortcuts Common Throughout CSPro
Shortcut Key DescriptionCtrl + R Run the application.Ctrl Shift + R Run the application without prompting for file associations.Ctrl + J Hide the tree (view full screen).Ctrl + T Show names instead of labels in tree.Ctrl + Shift + T Cycle between tabbed views in the tree.
Shortcuts Specific to the Forms Designer
Shortcut Key DescriptionCtrl + L View the logic for the currently selected item.Ctrl + M View the form for the currently selected item.Ctrl + Q View the CAPI question text for the currently selected item.Ctrl + G Generate a set of forms based on the dictionary.Ctrl + A Add a form to the current level.Ctrl + W Size the CAPI question text window.Alt + Enter Modify the field properties for the currently selected items.Arrow Key Move items on a form.Ctrl + Arrow Key Move items on a form at a faster rate.Del Delete currently selected items.Ctrl + Del Delete the currently displayed form.
Shortcuts Specific to the Logic Editor
ShortcutKey
Description
Ctrl + K Compile the currently selected item's logic.Ctrl + Space Display autocomplete suggestions for a partially entered word.Ctrl + 4 Insert the name of the procedure or function that is currently being edited. 4 is the key for this item
($) on many keyboards.Ctrl + G Go to a specific line number.Ctrl + F Find the specified text.F3 Find the next occurrence of the specified text.Shift + F3 Find the previous occurrence of the specified text.Ctrl + H Replace the specified text with different text.Ctrl + A Select all text.Ctrl + Shift + L View the PROC GLOBAL logic.Ctrl + / Comment or uncomment the current line or block of logic.Ctrl + D Duplicate the current line or block of logic.Ctrl + L Delete the current line.Ctrl + Del Delete the current word.Ctrl + Shift + F Copy the selected logic in a format for using on the CSPro Users Forum.Alt + F12 Display the reference window with information on the selected word.Ctrl + Alt +Click
Display the reference window with information on the selected word.
Pa ge 649 of 684 Appe ndi x B - Ke ys Summa ry

F12 Go to the declaration of the selected word.Ctrl + Click Go to the declaration of the selected word.Ctrl + Plus (+) Increase the text font size.Ctrl + Minus(-)
Decrease the text font size.
Shortcuts Specific to the CAPI Question Text Editor
Shortcut Key DescriptionCtrl + B Bold text.Ctrl + I Italicize text.Ctrl + U Underline text.
Shortcuts Common Throughout Windows
Shortcut Key DescriptionF1 Launch the help system.Ctrl + N Create a new document.Ctrl + O Open an existing document.Ctrl + S Save the active document.Ctrl + C Copy the selected object or text to the clipboard.Ctrl + X Cut the selected object or text to the clipboard.Ctrl + V Paste into the document the object or text on the clipboard.Ctrl + Z Undo the last action.Ctrl + Y Redo the previously undone action.Ctrl + F4 Close the active document.Alt + F4 Exit the application.Ctrl + Tab Change focus to the next window.Alt + F6 Change focus to the next window.Shift + Alt + F6 Change focus to the previous window.
See also: Data Dictionary Keys, Batch Edit Keys, Tabulation Keys
Batch Edit KeysShortcuts Common Throughout CSPro
Shortcut Key DescriptionCtrl + R Run the application.Ctrl Shift + R Run the application without prompting for file associations.Ctrl + J Hide the tree (view full screen).Ctrl + T Show names instead of labels in tree.Ctrl + Shift + T Cycle between tabbed views in the tree.
Shortcuts Specific to the Logic Editor
ShortcutKey
Description
Ctrl + K Compile the currently selected item's logic.
Pa ge 650 of 684 Appe ndi x B - Ke ys Summa ry

Ctrl + Space Display autocomplete suggestions for a partially entered word.Ctrl + 4 Insert the name of the procedure or function that is currently being edited. 4 is the key for this item
($) on many keyboards.Ctrl + G Go to a specific line number.Ctrl + F Find the specified text.F3 Find the next occurrence of the specified text.Shift + F3 Find the previous occurrence of the specified text.Ctrl + H Replace the specified text with different text.Ctrl + A Select all text.Ctrl + Shift + L View the PROC GLOBAL logic.Ctrl + / Comment or uncomment the current line or block of logic.Ctrl + D Duplicate the current line or block of logic.Ctrl + L Delete the current line.Ctrl + Del Delete the current word.Ctrl + Shift + F Copy the selected logic in a format for using on the CSPro Users Forum.Alt + F12 Display the reference window with information on the selected word.Ctrl + Alt +Click
Display the reference window with information on the selected word.
F12 Go to the declaration of the selected word.Ctrl + Click Go to the declaration of the selected word.Ctrl + Plus (+) Increase the text font size.Ctrl + Minus(-)
Decrease the text font size.
Shortcuts Common Throughout Windows
Shortcut Key DescriptionF1 Launch the help system.Ctrl + N Create a new document.Ctrl + O Open an existing document.Ctrl + S Save the active document.Ctrl + C Copy the selected object or text to the clipboard.Ctrl + X Cut the selected object or text to the clipboard.Ctrl + V Paste into the document the object or text on the clipboard.Ctrl + Z Undo the last action.Ctrl + Y Redo the previously undone action.Ctrl + F4 Close the active document.Alt + F4 Exit the application.Ctrl + Tab Change focus to the next window.Alt + F6 Change focus to the next window.Shift + Alt + F6 Change focus to the previous window.
See also: Data Dictionary Keys, Data Entry Keys, Tabulation Keys
Tabulation KeysShortcuts Common Throughout CSPro
Shortcut Key Description
Pa ge 651 of 684 Appe ndi x B - Ke ys Summa ry

Ctrl + R Run the application.Ctrl Shift + R Run the application without prompting for file associations.Ctrl + J Hide the tree (view full screen).Ctrl + T Show names instead of labels in tree.Ctrl + Shift + T Cycle between tabbed views in the tree.
Shortcuts Specific to the Table Designer
Shortcut Key DescriptionCtrl + B View the table’s tally attributes.Ctrl + D Show or hide the table's hidden parts.Alt + A Edit the area name options.Ctrl + A Select all cells.Ctrl + Shift + C Fast copy a populated table (for Excel).Alt + Shift + Left Go to the previous table.Alt + Shift + Right Go to the next table.Ctrl + L View the logic for the tables.Ctrl + M View the tables (from logic view).
Shortcuts Specific to the Table Print View
Shortcut Key DescriptionCtrl + G Go to a specific page or table.Ctrl + Plus (+) Zoom in.Ctrl + Minus (-) Zoom out.Alt + Home Go to the first page of the first table.Alt + Left Go to the previous page.Alt + Right Go to the next page.Alt + End Go to the last page of the last table.
Shortcuts Specific to the Logic Editor
ShortcutKey
Description
Ctrl + K Compile the currently selected item's logic.Ctrl + Space Display autocomplete suggestions for a partially entered word.Ctrl + 4 Insert the name of the procedure or function that is currently being edited. 4 is the key for this item
($) on many keyboards.Ctrl + G Go to a specific line number.Ctrl + F Find the specified text.F3 Find the next occurrence of the specified text.Shift + F3 Find the previous occurrence of the specified text.Ctrl + H Replace the specified text with different text.Ctrl + A Select all text.Ctrl + Shift + L View the PROC GLOBAL logic.Ctrl + / Comment or uncomment the current line or block of logic.Ctrl + D Duplicate the current line or block of logic.Ctrl + L Delete the current line.Ctrl + Del Delete the current word.Ctrl + Shift + F Copy the selected logic in a format for using on the CSPro Users Forum.
Pa ge 652 of 684 Appe ndi x B - Ke ys Summa ry

Alt + F12 Display the reference window with information on the selected word.Ctrl + Alt +Click
Display the reference window with information on the selected word.
F12 Go to the declaration of the selected word.Ctrl + Click Go to the declaration of the selected word.Ctrl + Plus (+) Increase the text font size.Ctrl + Minus(-)
Decrease the text font size.
Shortcuts Common Throughout Windows
Shortcut Key DescriptionF1 Launch the help system.Ctrl + N Create a new document.Ctrl + O Open an existing document.Ctrl + S Save the active document.Ctrl + C Copy the selected object or text to the clipboard.Ctrl + X Cut the selected object or text to the clipboard.Ctrl + V Paste into the document the object or text on the clipboard.Ctrl + Z Undo the last action.Ctrl + Y Redo the previously undone action.Ctrl + F4 Close the active document.Alt + F4 Exit the application.Ctrl + Tab Change focus to the next window.Alt + F6 Change focus to the next window.Shift + Alt + F6 Change focus to the previous window.
See also: Data Dictionary Keys, Data Entry Keys, Batch Edit Keys
Pa ge 653 of 684 Appe ndi x C - Me nu Summa ry

Appendix C - Menu SummaryCSPro MenuThe following is a summary of the menu options available throughout CSPro:
FileNew Create a new application.Open Open an existing application.
ToolsData Viewer View data files.Text Viewer View text or data files.Table Viewer View CSPro tables.Table Retrieval Retrieve tables from a data set.Tabulate Frequencies Tabulate frequency distributions for file contents.Sort Data Sort cases or records.Export Data Export data in various formats.Reformat Data Reformat data using two dictionaries.Compare Data Compare contents of two similar data files.Concatenate Data Join text or data files one after the other.Table Retrieval Setup Setup table retrieval database.Pack Application Pack entire CSPro application into a ZIP file.Index Data Identifies duplicate cases in a data file.Excel to CSPro Convert data from Excel to CSPro.PFF Editor Edit a PFF file in an interactive environment.Production Runner Automate the running of multiple CSPro applications.Operator Statistics Viewer View operator statistics files.Save Array Viewer View and modify saved arrays.Font Preferences Change the font preferences for the CSPro Designer.
WindowCascade Arrange windows in an overlapping fashion.Tile Top to Bottom Arrange windows one above the other.Tile Side by Side Arrange windows one beside the other.
HelpHelp Topics Get help on current application.Examples Folder Open the folder containing some CSPro examples.Mailing List Signup Sign up to the mailing list to receive CSPro news updates.Technical Support Get information about receiving technical support.Android CSEntry Application Open Google Play to download the Android application.About Get information about the software.
Data Dictionary MenuPa ge 654 of 684 Appe ndi x C - Me nu Summa ry

The following is a summary of the menu options available while editing dictionaries:
FileNew Create a new application.Open Open an existing application.Close Close an application.Save Save an application.Save As Save the current dictionary to a new file name.Add Files Insert a file in an existing application.Drop Files Drop a file from an existing application.Page Setup Change headers, footers, and margins for printed pages.Print Setup Change orientation and paper size for printed pages.Print Preview Preview the printed pages.Print Print all or part of a document.
EditUndo Undo dictionary changes.Redo Redo dictionary changes.Cut Copy selected dictionary element to clipboard and delete it.Copy Copy selected dictionary element to clipboard.Paste Paste dictionary element on clipboard to selected location.Modify Edit the selected dictionary element.Add Add a dictionary element at the end of the list.Insert Insert a dictionary element at the selected location.Delete Delete selected dictionary element.Languages Define the set of languages used in the dictionary.Relations Define relations between items and records.Notes Edit notes for selected dictionary element.Find Find a label or name with the specified text.Convert to Subitems Convert selected items to subitems and insert the item that contains them.Flatten Occurrences Convert a multiply occurring item to many singly occurring items.Occurrence Labels Edit the occurrence labels of a multiply occurring record or item.Generate Value Set Generate a value set of intervals of a numeric data item.Dictionary Macros Access special functionality for the dictionary.
ViewNames in Trees Show names instead of labels in trees.Append Labels to Names inTree
Show both labels and names in trees.
Full Screen Hide the trees and show full screen view.Layout Show record layout of file in the window.
OptionsRelative Positions Select whether items stay next to each other with no gaps.ZeroFill Default 'Yes' Select whether numeric data items will have leading zeros.DecChar Default 'Yes' Specifies whether the item should be stored in the data file with an explicit decimal
character.
See also: CSPro Menu
Pa ge 655 of 684 Appe ndi x C - Me nu Summa ry

Data Entry MenuThe following is a summary of the menu options available while editing data entry applications:
FileNew Create a new application.Open Open an existing application.Close Close an application.Save Save an application.Save As Save the active application with a new name.Add Files Add a dictionary or form to an existing application.Drop Files Drop a dictionary or form from an existing application.Compile Compile the logic in the application.Run Run the application.Run as Batch Run the application after finishing keying data for a file.Publish Entry Application Generate a binary (compiled) version of the application.
EditUndo Undo the most recent change.Redo Redo the last undo.Cut Copy selected element to clipboard and delete it.Copy Copy selected element to clipboard.Paste Paste element on clipboard to selected location.Add Form Add a form to the application.Delete Form Delete a form from the application.Generate Forms Generate forms using the dictionary.Delete Delete selected objects.Find Find text in the procedures.Find Next Find the next occurrence of text in the procedures.Replace Replace text with new text in the procedures.Format Logic Format the logic using the default CSPro code formatting style.
ViewBox Toolbar Show or hide the box drawing toolbar.Names in Trees Show names instead of labels in trees.Append Labels to Names inTree
Show both labels and names in trees.
Full Screen Hide the trees and show full screen view.Form Show forms in the right-hand window.Logic Show logic procedures in the right-hand window.CAPI Questions Show the screen to enter question text.OnKey Character Map Calculate OnKey and OnChar codes.User and Configuration Settings Open a dialog that allows you to edit the user and configuration settings.
OptionsData Entry Change the data entry options.Drag Change the drag options.Data Sources Change the data source options.
Pa ge 656 of 684 Appe ndi x C - Me nu Summa ry

Synchronization Set the simple synchronization parameters.Default Text Font Change the default text font settings.Field Font Change the field font settings.Deprecation Warnings Modify the setting for the kind of deprecation warnings to display during
compilation.
AlignLeft Position to left-most item.Center Center items as a group.Right Position to right-most item.Top Position to top-most item.Mid Align mid-points of items as a group.Bottom Position to bottom-most item.Evenly Horizontal Space evenly left to right.Evenly Vertical Space evenly top to bottom.
CAPI OptionsUse CAPI Font 1 For CAPI text use first default font.Use CAPI Font 2 For CAPI text use second default font.Bold Switch between bold and non-bold text.Italic Switch between italic and non-italic text.Underline Switch between underlined and non-underlined text.Color Change color of text.Left Align selected text to left of question window.Center Align selected text to center of question window.Right Align selected text to right of question window.Bullets Add bullets to selected or new text.Insert Bitmap Insert bitmap (BMP file) image in question window.Help Text Switch display between question text and help text.Define CAPI Languages Define the set of CAPI languages used in application.Change CAPI Font 1 Select the first default font for a CAPI language.Change CAPI Font 2 Select the second default font for a CAPI language.Fit Windows to Questions Adjust question windows to display their entire text.
See also: CSPro Menu, Data Dictionary Menu
Batch Editing MenuThe following is a summary of the menu options available while editing batch edit applications:
FileNew Create a new application.Open Open an existing application.Close Close an application.Save Save an application.Save As Save the active application with a new name.Add Files Add a dictionary to an existing application.Drop Files Drop a dictionary from an existing application.Compile Compile the logic in the application.
Pa ge 657 of 684 Appe ndi x C - Me nu Summa ry

Run Run the application.
EditUndo Undo latest cut/copy/paste operations.Redo Redo the latest undo operations.Cut Cut logic and place it on the clipboard.Copy Copy logic and place it on the clipboard.Paste Paste logic from the clipboard.Find Find text in the logic.Find Next Find the next occurrence of text in the logic.Replace Replace text with new text in the logic.Format Logic Format the logic using the default CSPro code formatting style.
ViewNames in Trees Show names instead of labels in trees.Append Labels to Names inTree
Show both labels and names in trees.
Full Screen Hide the trees and show full screen view.User and Configuration Settings Open a dialog that allows you to edit the user and configuration settings.
OptionsCustom Order Allow user defined order of editing.Deprecation Warnings Modify the setting for the kind of deprecation warnings to display during
compilation.
See also: CSPro Menu, Data Dictionary Menu
Tabulation MenuThe following is a summary of the menu options available while editing tabulation applications:
FileNew Create a new application.Open Open an existing application.Close Close an application.Save Save an application.Save As Save the active application with a new name.Save Tables Save current table results in a file.Add Files Add a dictionary to an existing application.Drop Files Drop a dictionary from an existing application.Load Preferences Load stored table formatting preferences.Save Preferences Save table formatting preferences.Run Run the application.Run in Parts Run Tabulate, Consolidate, or Format process.Page Setup Change headers, footers, and margins for printed pages.Print Setup Change orientation and paper size for printed pages.Print Preview Preview the printed pages.Print Print all or part of a document.
Pa ge 658 of 684 Appe ndi x C - Me nu Summa ry

EditAdd Table Add a table at the end.Insert Table Insert a table at the current location.Delete Table Delete the current table.Tally Attributes Table Edit the universe or filter of tabulation.Area Enable or change tabulation by geographic area.Format Table Edit formats that apply to the entire table.Format Application Edit formats that apply to the entire application.Format Print Table Edit formats for the printed tables.Go To Go to a particular page, table, or area.Copy Copy selected tables cells and headings to the clipboard.Copy Cells Only Copy only the selected table cells to the clipboard.Copy Table Spec Copy table specification to the clipboard.Paste Table Spec Paste table specification into application.Select All Select the entire table.Cancel Selection Cancel the currently selected cells.Exclude Table from Run Exclude the selected table from the run.Exclude All But This Exclude all tables but the selected table from the run.Include All Tables Include all tables in the run.Preferences Change application format and tally preference.
ViewNames in Trees Show names instead of labels in trees.Append Labels to Names in Tree Show both labels and names in trees.Full Screen Hide the trees and show full screen view.Hidden Parts Show or hide hidden parts of a table.Previous Table Show the previous table.Next Table Show the next table.Zoom In Zoom in on a print preview.Zoom Out Zoom out on a print preview.Facing Pages Show facing pages (two) on a print preview.Multiple Pages Show selected number of pages in print preview.First Page Show first print page of first table.Previous page Show previous print page.Next page Show next print page.Last page Show last print page of last table.
See also: CSPro Menu, Data Dictionary Menu
Pa ge 659 of 684 Appe ndi x D - Tool ba r Summa ry

Appendix D - Toolbar SummaryCSPro Toolbar The CSPro toolbar is displayed across the top of the window, below the menu bar. It provides quick mouse access tomany features used in CSPro. Click To
Create a new application.
Open an existing application
Get help. The CSPro toolbar only appears when CSPro is opened without specifying an application or file. When applications orfiles are open, the toolbar corresponding to the contents of the right-hand screen appears.
Data Dictionary Toolbar The Data Dictionary toolbar is displayed across the top of the window, below the menu bar. It provides quick mouseaccess to many features used in the Data Dictionary. It is available whenever the right-hand screen is displayingdictionary items Click To
Create a new dictionary.
Open a dictionary.
Save a dictionary.
Set up page margins and headings for printing.
Preview contents of the dictionary.
Print contents of the dictionary.
Undo the last change to dictionary.
Redo last undo.
Cut the selected records, items, or values to the clipboard.
Copy the selected records, items, or values to the clipboard.
Paste the contents of the clipboard to the current position.
Add levels, records, items, values sets, or values.
Insert levels, records, items, values sets, or values.
Delete levels, records, items, value sets, or values.
Edit Notes for dictionary, level, record, item, value set, or value.
Find a label or a name in the dictionary.
Pa ge 660 of 684 Appe ndi x D - Tool ba r Summa ry

Show the Layout window.
Show last Dictionary window.
Show last Forms window.
Show last Batch Edit window.
Show last Tabulation window.
Get Help.
Data Entry Toolbar The Forms Designer toolbar is displayed across the top of the window, immediately below the menu bar. The toolbarprovides quick mouse access to many of the often-used features found in the Forms Designer. Click To
Create a New application.
Open an application.
Save an application.
Compile the logic (code) of your data entry application.
Run the current data entry application (i.e., start up CSEntry).
Undo the latest changes.
Redo the latest changes.
Cut the selected elements to the clipboard.
Copy the selected elements to clipboard.
Paste the contents of the clipboard to the form.
Delete the currently selected item(s).
Find text in logic.
Toggle between selecting item(s) or drawing boxes .
View the forms
View the logic
View the CAPI question
Show last Dictionary window.
Show last Forms window.
Show last Batch Edit window.
Show last Tabulation window.
Get Help.
Pa ge 661 of 684 Appe ndi x D - Tool ba r Summa ry

Batch Editing Toolbar The Edit Designer toolbar is displayed across the top of the window, immediately below the menu bar. The toolbarprovides quick mouse access to many of the often-used features found in the Edit Designer. Click To
Create a New application
Open an application
Save an application
Compile the logic (code) of your application
Run the current batch edit application
Undo the latest text changes.
Redo the latest text changes.
Cut the selected logic to the clipboard.
Copy the selected logic to clipboard.
Paste the contents of the clipboard to the logic.
Find text in the logic
Launch Text Viewer
Show last Dictionary window.
Show last Forms window.
Show last Batch Edit window.
Show last Tabulation window.
Get Help.
Tabulation Toolbar The Tabulation toolbar is displayed across the top of the window, immediately below the menu bar. The toolbar providesquick mouse access to many of the more frequently-used features found in Tabulation. Click To
Create a New application.
Open an existing application.
Save an application.
Save tables.
Setup page margins and headings for printing.
Preview printing of tables.
Pa ge 662 of 684 Appe ndi x D - Tool ba r Summa ry

Print tables.
Run a tabulation.
Add a table.
Insert a table.
Delete the current table.
Specify Tally Attributes for the table.
Define Area Processing variables.
Copy a selection from a table.
Show Previous Table.
Show Next Table.
Show last Dictionary window.
Show last Forms window.
Show last Batch Edit window.
Show last Tabulation window.
Get Help.
Pa ge 663 of 684 Appe ndi x E - Conve r ng Wi thi n IMPS or ISSA

Appendix E - Converting WithinIMPS or ISSA
Converting a Data DictionaryCSPro will convert your existing IMPS 3.1, IMPS 4.1, or ISSA dictionary (any version) to the CSPro dictionary format.You can also save your CSPro dictionary file out as an IMPS 3.1 or ISSA dictionary. Either way, just do the following:
1. Click the Tools menu, and then click Convert Dictionary.
2. Choose whether you are converting between CSPro and IMPS, or CSPro and ISSA, then press Next.
3. Choose the type conversion you are performing and press Next.
4. Choose the file name of the dictionary you are converting.
5. Specify the file name of the dictionary you are generating.
6. Press Finish when ready.
Note: The Convert Dictionary tool is no longer distributed with CSPro but is instead available onwww.csprousers.org.
Converting within IMPSConvert an IMPS 3.1 (DOS) data dictionary to CSPro
Hypens (dashes) within record and item names are changed to underlines.
All common items in IMPS are changed to ID items in CSPro.
As CSPro does not allow the use of subitems in the ID section, any subitems found in the IMPS common sectionwill be converted to ID items. This could increase the length of the ID section. Therefore we advise you to checkyour CSPro dictionary after conversion if you receive a message about "subitems found in common, promoted toID items". Similarly, if you receive any error messages during the conversion about overlapping items, this is mostlikely due to the use of subitems in the common block of IMPS.
If you have used "NR" as a value name in your IMPS dictionary, it will be converted to the special value missing.
If you have used "NA" as a value name in your IMPS dictionary, it will be converted to the special value notappl.
Convert an IMPS 4.1 (Windows) data dictionary to CSPro
All hierarchy information is lost.
All other comments as listed under IMPS 3.1 to CSPro apply.
Convert a CSPro data dictionary to IMPS 3.1 (DOS)
Underlines within record and item names are changed to hyphens (dashes).
All level record, item, and value set labels are lost.
All value labels are truncated to 16 characters.
Value sets, after the first, are converted to subitems.
Pa ge 664 of 684 Appe ndi x E - Conve r ng Wi thi n IMPS or ISSA

All notes are lost.
All level information is lost.
All special values (missing, refused, notappl, and default) are lost.
CSPro allows the use of long names even though IMPS only allows 16 characters. Therefore, if any of your uniquenames are longer than 16 characters, you will receive a message for each variable that its name will be truncated to 16.
CSPro does not support the use of short names, as described in IMPS. Therefore, if the first 8 characters of any itemname in CSPro are not unique, the converted IMPS dictionary will have duplicate shorts names. You should check theconverted IMPS dictionary to ensure that there are no duplicate short names.
Converting within ISSAIn an ISSA data entry application, a dictionary file contains both descriptive information about each data item (item type,item length, etc), as well as information about the form layout. However, in CSPro, we break this information into twoseparate files. Therefore, if you:
Convert an ISSA data dictionary to CSPro data dictionary only, you will receive a CSPro dictionary (.dcf) only.You can choose to convert either a regular data dictionary (.dic) or a working storage dictionary (.wst).
Convert an ISSA data dictionary to CSPro form and data dictionary, you will receive both a CSPro dictionary (.dcf)and a CSPro form file (.fmf). You can choose to convert either a regular data dictionary (.dic) or a working storagedictionary (.wst).
Converting an IMPS Data Entry ApplicationCSPro provides a utility to convert existing IMPS data dictionaries to CSPro. However, there is no automated tool toconvert CENTRY application files. You must create the forms again in CSPro.
At any time in CSPro, you can go to the Tools menu option. Select Convert Dictionary from the menu, then choose toconvert Between CSPro and IMPS in the opening dialog box.
CSPro is much less constrained than CENTRY in the relationship between dictionary records and data entry forms. InCSPro you can mix dictionary items from different records on the same form. See Issues to Consider When Designing aForm for more details.
In CSPro you can make the equivalent of the CENTRY "Batch," "Questionnaire," and "Record" screens. If you use thisapproach, you must be sure to make all the fields on the "Batch" screen persistent.
Note: The Convert Dictionary tool is no longer distributed with CSPro but is instead available onwww.csprousers.org.
Converting an ISSA Data Entry ApplicationIf you have an existing ISSA Dictionary that contains forms, CSPro provides a utility to convert it to a CSPro form file (adictionary will be generated as well).
At any time in CSPro, you can go to the Tools menu option. Select Convert Dictionary from the menu, then choose toconvert Between CSPro and ISSA in the opening dialog box.
Next, state that you'd like to convert from ISSA to a CSPro Forms and Data Dictionary. Provide the name of theoriginal ISSA dictionary file, and the name you would like to call the CSPro form file to be generated (a CSPro dictionaryfile will also be created, and its name will be based on the form file name). Press OK when ready and the files will becreated for you. You are then ready to fine-tune the layout of the forms as desired.
Note that this creates a stand-alone dictionary and form file; it does not create a data entry application. Until there exists
Pa ge 665 of 684 Appe ndi x E - Conve r ng Wi thi n IMPS or ISSA

a data entry application, you cannot write logic for the form variables, nor can you enter data based on this form file. Ifyou would like to generate a data entry application, proceed as you would for creating a new data entry application.When you are asked to provide the name of the form file, simply use the same form file name that was used during theconversion, and CSPro will complete the task.
Note: The Convert Dictionary tool is no longer distributed with CSPro but is instead available onwww.csprousers.org.
Pa ge 666 of 684 Appe ndi x F - Errors i n Ce ns us e s a nd Surve ys

Appendix F - Errors in Censusesand Surveys
Nature of Census and Survey DataA census is a complete count of a given entity, whether population, housing, agricultural holdings, businesses, or other,in a given geographic area at a given time. Because of financial and time constraints, the information collected in acensus is usually basic and limited. A survey is admin istered to a subset of a population to obtain detailed informationabout certain groups, such as school-age children or mothers, or to obtain other information, on a sample basis, aboutthe entity in question (households, businesses, agricultural establishments, etc.).
A survey can provide valuable infor ma tion about the population being studied, but because of the limitations of samples,the results can be generalized only for relatively high-level geographic areas, such as the country as a whole, or(depending on the way in which the sample was selected) for specific regions or areas of the country (e.g., urban vs.rural). A census, however, attempts to cover the entire geographic area of the subject population, so it can providereliable information at very low levels of geography. In addition to counts (e.g., number of people, number of housingunits, number of farms, number of businesses, etc.), a census usually provides a profile of additional relatedcharacteristics such as fertility, housing quality, acreage, number of employees, and so on.
Census and survey data are used to plan for education, health facilities, administration, and other needs. In order toimplement programs and activities, statistics are needed by government administrators and by private users, includingbusinesses, industries, research organizations, and the general public. These statistics also may serve as measures ofexisting conditions for small areas, providing a basis for planning development programs, and perhaps establishing abasis for action.
In order to obtain an accurate census or survey, the data must be as free as possible from errors and inconsistencies.Statistics derived from 'dirty data' (that is, data which still contain errors) may produce an inaccurate profile of the countryor geographic area. Therefore, before any tabulation programs are run, the data should be checked for errors andchanged so that important data items are valid and consistent. This is not to say that correction of data after they arecollected can compensate for poorly collected data. It is not practical (if not impossible) to produce a data file which is100 percent error free. Every effort at accuracy should be made in all stages of the census or survey.
Errors in Censuses and SurveysType of Errors
Editing is the process of maximizing the quality of data, in the shortest time possible, while minimizing the introductionof new errors. The process involves a number of sequential, interrelated activities as shown below. During each activityerrors may occur.
Activity Possible ErrorsEnumeration Respondent Errors, Enumerator ErrorsField Editing Field Checking, Office CheckingOffice Coding MiscodesData Capture Miskeys, Incorrectly ScannedComputer Editing Logic Errors, Misallocation, MiscorrectionTabulation Distribution of UnknownsPublication Misprints
Errors in EnumerationPa ge 667 of 684 Appe ndi x F - Errors i n Ce ns us e s a nd Surve ys

Two types of errors occur at the enumeration stage: the respondent sometimes errs when giving information to theenumerator either by offering what the respondent believes to be the "proper response" (as opposed to a truthfulresponse) to the questions; or by misunderstanding the question; and the enumerator, in asking the questions, recordingthe responses, and reviewing entries at the conclusion of the interview, also may add errors to the data.
Little can be done to improve the quality of responses from individuals, except through publicity for the census and well-trained enumerators who explain the purpose of the census and reasons for asking the various questions. The quality ofenumerators and enumerator training often can be the crucial factors in census processing. Enumerators must beproperly trained in all relevant aspects of census procedures and made to understand why their part of the census isimportant, and how the enumeration fits in with the other stages of the census. Pretesting should be used to eliminateproblems in the questionnaires and materials, and to help enumerators obtain the data and complete the enumeration inthe allotted time. Also, since enumerators come from many different backgrounds and have varying levels of educationand training, training must be developed to make certain the enumerators know how to ask the questions to obtain anunbiased response.
Errors in Field Editing
A general rule for editing could be: the closer that corrections are made to the source of the data the higher the quality ofthe final statistics. Field editing is, therefore, perhaps the most important stage in the census processing. Supervisors, inaddition to training enumerators, must also be able to collect the data themselves and to correct enumerator errors whilethe forms, the respondents, and the enumerators are still available. Questions that arise can then be answered beforethe questionnaires are sent to the central census office.
Once the forms leave the enumeration areas, changes can no longer easily be made with the knowledge and help of therespondents and enumerators, so other procedures must be used to cope with inaccurate, incomplete, or inconsistentdata. During preliminary census office editing, checks of crucial entries must be carried out quickly to determinecompleteness and consistency in the collected data. Highly-aberrant forms may be sent back to the field, if time andmoney permit. Place codes must be checked for validity, and relationships between numbers of expected individuals asrecorded on the household form, and the actual numbers of individual forms (if individual forms are used) must agree.
Errors in Coding
Precise, detailed instructions for coding in preparation for manual and computer editing must be determined after thetabulation plans are developed, but before the enumeration is actually undertaken. Back in the census office, it is nolonger possible to make corrections while in contact with the respondents, so editing must be determined on the basis ofassumptions about what the most probable response would be. If computer editing is possible, manual office editingshould be minimized to checking for completeness.
If census data are collected on precoded questionnaires (coded either by respondents or enumerators), and machinesare used to convert the information to computer-readable data, then except for the introduction of errors due to straymarks or physical problems with the questionnaires, the errors found should be minimal.
Errors may occur when the data are coded, since the coder may miscode some piece of information. If the miscode isinvalid, it should be caught during the computer editing; if the code is valid but incorrect (for example, if two digits arereversed for the entry for birthplace), the computer will not note the errors, and the information will remain incorrect for thetabulations. Coders must be trained to edit according to the edit specifications, and efforts must be made to obtain andmaintain quality of coders, 'weeding out' inefficient inaccurate coders. Spot checks and verification of samples from eachcoder can help to identify persistent coding errors.
Errors in Data Capture
Data capture is the process of converting data to a form which the computer can use. The most common method used toconvert the data is keying; scanning technologies like optical character readers (OCR) and optical mark readers (OMR)are increasingly used, and while these methodologies appear to offer lower costs and reduced time when compared withoperator-based entry, in fact each presents a separate set of difficulties, different from those associated with manualkeying, that must be overcome, and which can nullify any perceived gains.
With keyer-based entry, errors are introduced into the data through miskeying. Verification (rekeying or double-keying)can reduce these errors. A system called "intelligent data entry" (IDE) may be used to prevent invalid entries from evergetting into the system. An IDE system ensures that the value for each field or data item is within the permissible range
Pa ge 668 of 684 Appe ndi x F - Errors i n Ce ns us e s a nd Surve ys

of values for that item. Such a system increases the chance that the data entry operator will key in reasonable data andrelieves some of the burden on later stages of the data preparation process.
With scanning technologies, errors can be more insidious, and proper verification is more time-consuming, because itwill require either manual comparison between the information captured by the scanner and the forms, or theestablishment of a separate keying operation so that keyed output can be compared with scanned output. It is extremelyimportant not to assume that the use of "advanced" technology reduces or eliminates the need for verification; errors canand will occur, so they must be caught early in the cycle of capture so that corrective measures (technological ormanual) may be applied. If this is not done, systemic error can corrupt the data beyond repair.
Errors in Computer Editing
The high degree of accuracy and uniformity obtainable with computer editing cannot be achieved through manual editing.In computer editing, range checks and within-record consistency checks can easily be made; between-record edits canalso be done if the computer programs have this capability; and unknown information can be allocated automatically. Ifan allocation method is used, as much of the original information as possible must be retained.
Computer edit checks have been used in almost all censuses carried out since the 1980 round. For properimplementation of this tool, there must be good communication between the subject-matter specialists and theprogrammers. Subject-matter specialists should write complete and clear edit specifications. Programmers should reviewthese specifications and work closely with subject-matter specialists to resolve questions or difficulties in implementingthe specifications. Programmers also should make sure that subject-matter specialists are involved in testing the editprograms, that is, in providing test data and reviewing the outputs to insure that all the necessary edits were included inthe specifications. It is the programmers' responsibility to produce an edit program free of errors. If these programs areinadequately thought out or not completely tested, existing errors in the data may not be corrected and even more errorsmay be introduced.
Errors in Tabulation
Errors can occur at the tabulation stage due to improper programming or use of unknown information. Errors at this stageare difficult to correct without introducing new errors.
Errors in Publication
Errors can occur at the publication stage through lack of inter-tabulation checking, or through printing errors. If errors arecarried through all stages of the process to publication, they will be apparent and the results will be of questionablevalue. Most importantly, obvious errors at this stage diminish the credibility of the organization presenting the data.Finally, it is very important that error analysis be done to help in interpreting the extent and kind of errors in the censusand to aid in preparing for future censuses and surveys.
Pa ge 669 of 684 Appe ndi x G - Fi l e Type s

Appendix G - File TypesFile TypesIt is highly recommended that you enable the viewing of file extensions in Windows when using CSPro. By default,Windows hides the extensions of known types, and this can be confusing when working with CSPro files. To view theextensions, open Explorer, select the View tab and then the Options button. On the View tab, uncheck Hideextensions for known file types.
Dictionary.dcf Data dictionary
Program Information.pff Parameters describing how to run any CSPro application.pffRunner Compilation of PFF files used by the Production Runner
Data Entry Application.ent Data entry application.dcf Data dictionary.fmf Forms.ent.apc Logic code.ent.mgf User-defined messages.ent.qsf CAPI question text .pen Compiled data entry application to run on mobile devices
Data File.csdb CSPro DB data file.csdbe Encrypted CSPro DB data file .??? Text data file.csidx Index for text data files (in binary format).csnot Notes (entered by the operator) for text data files.sts Status file, listing information about what cases have been verified or partially entered, for text
data files .log Operator statistics.lst Listing of data entry activity
Batch Edit Application.bch Batch edit application.dcf Data dictionary.ord Order of edits.bch.apc Logic code.bch.mgf User-defined messages
Pa ge 670 of 684 Appe ndi x G - Fi l e Type s

.lst Listing of batch edit results
.freq.lst Imputation frequencies
.sva Contents of saved arrays
Tabulation Application.xtb Tabulation application.dcf Data dictionary.xts Table specifications.xtb.apc Logic code.xtb.mgf User-defined messages .anm Area names.lst Listing of tabulation results.tbw Output tables for the Table Viewer .tab Table matrices file.tabidx Table matrices index file
Other.cmp Comparison specifications for the Sort Data tool.csds Deployment specifications for the Deploy Application tool.cslog Log with paradata events stored during an application's run.csrs Report script for templated reports.exf Export specifications for the Export Data tool.fqf Frequency specifications for the Tabulate Frequencies tool.m4a Recorded audio files (AAC audio in an MPEG-4 container).ssf Sort specifications for the Sort Data tool.trs Table retrieval file.xl2cs Conversion specifications for the Excel to CSPro tool Some of the file extensions were different in previous versions of CSPro: PreviousExtension
Current Extension
.app .apc
.enc .pen
.idx .csidx
.not .csnot
.tai .tabidx
Importing Data to CSPro FormatThere are occasions, such as when using lookup files, when you will want to convert data created in another applicationto a format that CSPro can read. This is a two-step process:
1. Convert the data to a flat file with one record per line and all records for a case organized together. (Read moreabout data requirements or CSPro's file structure.)
2. Create a CSPro dictionary that describes this data file.
There are many formats from which data can be converted, but converting data to CSPro format from Microsoft Excel is
Pa ge 671 of 684 Appe ndi x G - Fi l e Type s

the most common task. There is a tool, Excel to CSPro, that can do this automatically for you. It is the preferred way ofconverting data. It is also possible to create a flat file yourself from within Excel. To convert data to CSPro format:
1. Open a file in Excel. We will demonstrate this conversion using the following file:
2. Remove any header information in the file. CSPro data files should contain only data and thus any metadata (e.g.,column headings) should be removed:
3. All fields must be right-justified:
4. Remove any specialized formatting attached to cells (unless that formatting is desired in the final output):
5. Set the column widths to appropriate values. When this information is finally saved, the width of each columndetermines the length of each item in your CSPro dictionary.
6. Save As, choosing "Formatted Text (Space delimited) (*.prn)" as the output format:
Pa ge 672 of 684 Appe ndi x G - Fi l e Type s

Using the above example, the resulting file looks like this:
11/10/2009 Hotel Intercontinental 1500.00 0.013387 20.0811/12/2009China Anhui Huaren Restaurant 1000.00 0.013387 13.3911/13/2009 Alliance Française 100.00 0.013387 1.3411/15/2009 Kenya Forest Service 150.00 0.013387 2.0111/19/2009 Waamo Pizza & Fries 750.00 0.013388 10.04
7. Create a CSPro dictionary that describes this data. The length of each item is determined by the column widthspecified in Excel. Other options, such as whether a decimal character should exist, or whether numeric valuesshould be zero-filled, can also be specified in Excel.
It is a good idea to run frequencies on each item to make sure that the dictionary you created properly describes the .prnfile.
The above example is a rather simple one, but more complex imports, including importing cases with multiple records(and thus a record type), are also possible.
Locking Application FilesIf distributing a CSPro application to users, one simple, though not rigorous, way of preventing the users from modifyingthe applications is to add the command [NoEdit] at the top of either of these files:
.ent
.bch
.xtb
.dcf
.fmf
For instance:
[NoEdit][CSPro Application]Version=CSPro 7.5
When the user tries to open any such data file, the CSPro Designer will give an error message. However, the user canopen the files in the context of running an application, whether that is running a batch program or exporting data. Thissetting only affects the CSPro Designer. It is not particularly robust protection, as a knowledgeable user can remove[NoEdit] from the file, but it will protect against most users modifying application files. With data entry applications, .penfiles can be distributed for more protection against editing.
Temporary Data FileMost CSPro applications sensibly require data files to operate but there may be times when the contents of a data fileare unimportant. Examples of this include a menu program that launches another program based on a user's selection.Such a program generally has no output and thus the contents of the file are meaningless. For batch programs it may bethe case that you want to use CSPro functions to perform some task, such as creating content using the writestatement.
Pa ge 673 of 684 Appe ndi x G - Fi l e Type s

Before CSPro 7.0, it was possible to write "<none>" in the Define File Associations dialog to have CSPro create atemporary data file. Now you can use a none data source.
Data entry applications run as they would with a file specified. Batch applications, however, do not run any logicassociated with elements of the dictionary. Instead only the application preproc and postproc are executed.
PROC GLOBAL
// this function concatenates all the .dat files in a directory by order of datefunction ConcatenateDatFiles()
string file_listing_filename = "file_listing.txt"; string output_filename = "Output/CombinedFiles.dat";
// use the DOS dir command to create a file with the list of all .dat files string listing_call = maketext('cmd /c "dir /b /od *.dat > %s"', file_listing_filename); execsystem(listing_call, wait);
// open that file and read all of the contents file file_listing_file; list string file_list;
file_listing_file.open(file_listing_filename); file_listing_file.read(file_list); file_listing_file.close();
filedelete(file_listing_filename);
// create and run a pff to concatenate these files pff concat_pff;
concat_pff.setproperty("AppType", "Concatenate"); concat_pff.setproperty("InputData", file_list); concat_pff.setproperty("OutputData", output_filename); concat_pff.setproperty("Listing", "ConcatenateDatFiles.lst"); concat_pff.setproperty("ViewListing", "OnError"); concat_pff.setproperty("ViewResults", "No");
concat_pff.exec();
end;
PROC CONCATENATE_FF
ConcatenateDatFiles();
CSPro DB File FormatCSPro DB files are SQLite database files. SQLite is a file-based relational database which means that it is possible touse SQL commands to query the CSPro data. SQL queries can be run from a CSPro program using the sqlqueryfunction. In addition, there are also many free viewers for SQLite that allow you to access the data outside of CSPro.
Note that this information applies only to CSPro DB files created in version 7.4 or later. Data files created in earlierversions store all the data from a case in a single database column so it is not possible to access individual items usingSQL.
Structure of the Database
The structure of the database is based on the data dictionary. Each record in the data dictionary corresponds to a tablein the database. The database tables have the same name as the record in the dictionary. Each item in the recordcorresponds to a column in the table with the same name as the dictionary item. The ID items from the dictionary arestored in a table named level-1 (two level dictionaries will have a second table named level-2 for the second level id-items). The tables for each record are linked to the table for the level by the primary key of the level table which is namedlevel 1-id.
Pa ge 674 of 684 Appe ndi x G - Fi l e Type s

In the example above, the dictionary has three records: PERSON_REC, HOUSING_REC and DEATHS_REC. Thedatabase therefore has the corresponding records person_rec, housing_rec and deaths_rec. The dictionary ID itemsare in the table level-1 which is linked to the record tables by the column level-1-id.
Each record table has an auto-increment integer primary key column named <record name>-id. This column does notcorrespond to any dictionary item and its value is set automatically by SQLite.
Records with multiple occurrences have an additional column named occ which represents the occurrence number. If acase in the data file has, for example, three occurrences of a particular record then the values of the occ column for therows in the record table for that case will be 1, 2 and 3.
All CSPro DB files also have a table named cases that contains additional information about each case in the data filesuch as the case label, whether or not the case was deleted, and whether or not it was partially saved. The ID column ofthe cases table is a UUID stored as a string. The database table for the first level in the dictionary is linked to the casestable by this ID column.
CSPro DB files also contain additional tables that store field notes as well as information required for datasynchronization.
Querying the Database
To find the rows in the record tables that correspond to a particular case in the data file, join the record table with the
Pa ge 675 of 684 Appe ndi x G - Fi l e Type s

level table using the linking column and filter on the ID items. For example, the following query on the example databaseabove lists all the individuals in province 1, district 1, enumeration area 3, household 1:
SELECT * FROM person_recJOIN `level-1` ON `level-1`.`level-1-id` = person_rec.`level-1-id`WHERE province = 1 AND district = 1 AND enumeration_area = 3 AND household_number = 1
Note the use of ̀around level-1-id. This is required so that SQLite does not treat the "-" character in the name as aminus sign which would cause a syntax error.
The query above could potentially include data from deleted cases. To exclude deleted cases, join with the cases tableand filter on the deleted column:
SELECT * FROM person_recJOIN `level-1` ON `level-1`.`level-1-id` = person_rec.`level-1-id`JOIN cases ON cases.id = `level-1`.`case-id`WHERE deleted = 0 AND province = 1 AND district = 1 AND enumeration_area = 3 AND household_number
Using GROUP BY, the following query gets the number of households by enumeration area:
SELECT province, district, enumeration_area, COUNT(*) AS `number of households`FROM `level-1`JOIN cases ON cases.id = `level-1`.`case-id`WHERE deleted = 0GROUP BY province, district, enumeration_area
Modifying the Data
Modifying a CSPro DB file using SQL commands is strongly discouraged. Editing the schema or using update and insertqueries to modify the data in a CSPro DB file can leave the file in a state where it can no longer be read by CSPro. Inaddition, any modifications to cases in the data file that do not correctly update the file_revisions and vector_clocktables will leave the file in a state where data synchronization will no longer work correctly. All modifications to theCSPro DB file should be done using CSPro data entry or batch edit applications or CSPro tools.
See also: SqlQuery Function, Data Sources
Pa ge 676 of 684 Fi l e s De s cri p on

Files DescriptionData Dictionary File (.dcf)Each data file manipulated by CSPro must be described by a data dictionary. The data dictionary file containsinformation defining the layout of a data file, including levels, records, items, value sets and values.
CSPro allows you to explicitly open, close and save data dictionary files independently of other application files. Youmust be careful when you do so if more than one application uses the data dictionary.
CSPro applications may optionally contain data dictionaries which represent secondary files, such as lookup files, whichare opened during data entry.
The data dictionary file is a text file which may be viewed with any text editor, such as Text Viewer or Notepad. It is notrecommended to make changes to this file outside the CSPro environment.
Data Entry Application File (.ent)The data entry application file is the master file for data entry application. This file specifies all other files contained in theapplication, along with other information. CSPro allows you to open, close and save data entry application files. Whenyou do so, all other files associated with the application are also opened, closed or saved.
The data entry application file is a text file which may be viewed with any text editor, such as Text Viewer or Notepad. Itis not recommended to make changes to this file outside the CSPro environment. Advanced users might do so, however,to change the names of associated files from the CSPro assigned defaults.
Forms File (.fmf)The forms file contains information about forms, their fields, text and rosters. The forms file also contains the name of theassociated data dictionary file. Fields and rosters have links into the data dictionary. The flow during data entry, that is,the order in which forms and fields are entered, is defined in the forms file, not in the data dictionary.
CSPro allows you to explicitly open, close and save forms files independently of the application file. When you do so, theassociated data dictionary file is also opened, closed or saved. Note that if you open a forms file you will not haveaccess to its application's logic. Generally, only advanced users open forms files explicitly.
The forms file is a text file which may be viewed with any text editor, such as Text Viewer or Notepad. It is notrecommended to make changes to this file outside the CSPro environment. Advanced users might do so, however, forexample to change the name of the associated data dictionary file.
Logic File (.apc)The logic file contains all the CSPro language statements which control the application. There is a logic file associatedwith each application. CSPro does not allow you to explicitly open the logic file. It is opened only when you open itsassociated application.
By default, the logic file has the same name as the application file, but with a different extension, .apc. This is not arequirement, however. Advanced users who change the name of this file must also remember to change thecorresponding name in the application file.
You can associate multiple logic files with an application, which can be useful if you have a library of functions that youwould like to share across several applications. To do this, select File -> Add Files and then choose the external logic
Pa ge 677 of 684 Fi l e s De s cri p on

file to add to the application. The names of any variables or functions defined in that logic file cannot clash with thenames used in the application's primary logic file. If you no longer want to use the external logic file, you can remove itby selecting File -> Drop Files.
The logic file is a text file which may be viewed with any text editor, such as Text Viewer or Notepad. While you maymake changes to this file outside the CSPro environment, CSPro provides a powerful text editor which is integrated withthe CSPro compiler.
Prior to CSPro 6.0, logic files had the extension .app. Although the default extension has changed, CSPro can still readapplications that have logic files with the .app extension.
Message File (.mgf)The message file for a data entry application stores the error message text that is displayed during data entry. Themessage file for a batch application stores the error message text that will be included in the execution report. Themessage file has the extension .mgf. While creating your application, you can view the message text in a window at thebottom of the logic screen.
You can associate multiple message files with an application, which can be useful if you have messages defined inmultiple languages. To do this, select File -> Add Files and then choose the external message file to add to theapplication. If you no longer want to use the external message file, you can remove it by selecting File -> Drop Files. Ifthe name of the external message file begins with CSProRuntime, then the messages in that file will override the CSProsystem messages.
Basic Messages
Each line in the message file contains one message. A message consists of a message number followed by text. Themessage text can be up to 240 characters long. It is displayed on the entry screen when an errmsg function with themessage number is executed in a data entry application. It is written to the execution report when errmsg function withthe message number is executed in a batch application. The messages can also be accessed with other functions(including maketext).
For example, suppose a message file contains the following lines:
1 This is the first message2 This is the second message
When an errmsg(1) function is executed in a data entry application, the message "This is the first message" isdisplayed on screen. When an errmsg(2) function is executed, the message "This is the second message" isdisplayed.
Messages with Arguments
Arguments can be specified in the errmsg function. These arguments can be numeric expressions or string expressions.String arguments in the error message text are indicated by %s. Integer numeric arguments are indicated with %d.Decimal numeric arguments are indicated with %f. For example, a message file might contain the following:
1 The month of %s has only %d days. You entered %d!
The application could use this as follows:
errmsg(1, "June", 30, 31);
When the function is executed, it knows to use error message 1 and substitute the word "June" for %s in the messagetext, the number 30 for the first %d, and the number 31 for the second %d. The message "The month of June has only 30days. You entered 31!" will be displayed on the screen.
The more general the arguments of the message, the more flexible the message. In the example below, the value of thevariable HHDAY is used as a argument. The error message will use the value of HHDAY if the errmsg function is
Pa ge 678 of 684 Fi l e s De s cri p on

executed.
PROC HHDAY
if HHMONTH = 6 and HHDAY > 30 then errmsg(1, "June", 30, HHDAY); reenter; endif;
Messages in Multiple Languages
When designing an application that will be used in multiple languages, you can define multiple messages for a givenmessage number. Use the language name, followed by the message number in parentheses, as shown in this example:
101 HelloZH(101) 你好FR(101) Bonjour
CSPro will automatically display the correct message based on the current language. If no translated message exists forthe current language, the default message is shown.
Using the Language directive declares that all subsequent error messages are in a given language. For example, theprevious example could be rewritten as:
Language=EN101 Hello
Language=ZH101 你好
Language=FR101 Bonjour
If you would like to define messages for multiple languages at the same time, separate the name of each language with acomma:
Language=HI, PA101 नम ते
You can also use the message file to translate string literals that are used along with the tr function. For example:
ZH("Hello") 你好FR("Hello") Bonjour
Calling tr("Hello") in logic will display the correct string based on the current language.
See also: Multiple Language Applications, Tr Function
Question File (.qsf)The question file contains information related to CAPI (Computer-Assisted Personal Interviewing) data entry applications.Such information includes question text to appear on the screen with each field and help screens to appear when theoperator presses the help (F2) key.
Program Information File (.pff)Program Information Files (.pff) are used to run CSPro applications or tools in production mode. A PFF file stores thename of the application or tool, the data file(s) to be used, and any runtime parameters specific to the program. You canuse a PFF file as a command line parameter for most CSPro applications and tools. PFF files can be edited with a text
Pa ge 679 of 684 Fi l e s De s cri p on

editor, with the PFF Editor, or can be manipulated in logic with the pff object.
Application-specific PFF information can be viewed in the following help topics:
Batch Edits
Compares
Concatenates
Deployments
Data Entry
Excel to CSPro Conversions
Exports
Frequencies
Indexing
Packs
Paradata Concatenates
Reformats
Sorts
Synchronizations
Tabulations
See also: Pff Object
Binary Data Entry Application File (.pen)A binary data entry application file is an alternative to the normal set of text data entry application files. It is onefile that contains the same information as the set of text files, including the data dictionaries, forms, logic andCAPI question text. It cannot be viewed with any text editor.
This file can be generated in the CSPro designer and opened by CSEntry, on desktop and mobile devices. Itcannot be opened by the CSPro designer.
Binary data entry application files provide security during a data entry operation. If you distribute this file to thedata entry workstations, the operators cannot change the application, even if they have the full CSPro installed ontheir machines.
Binary data entry applications created in versions of CSPro prior to 6.0 had the extension .enc, not .pen. Thesefiles cannot be read by this version of CSPro.
Index File (.csidx)The index file stores the case IDs and their physical location in the data file. This helps CSPro applications manipulatethe data file more quickly. The file is a binary file and should not be modified file outside of CSPro.
CSPro automatically generates an index file when creating a new data file. CSPro then coordinates between both files ascases are added, modified, or deleted.
When CSPro opens a data file, it looks for the corresponding index file. If it does not find one, CSPro automaticallygenerates a new one. If you suspect, for any reason, that the index file has been corrupted, or does not match the datafile, simply delete the index file and let CSPro generate a new one.
An index is only created for text files. Prior to CSPro 7.0, the data file index had the extension .idx.
Pa ge 680 of 684 Fi l e s De s cri p on

Notes File (.csnot)The notes file is a text file that contains all notes processed by a data entry application. The file contains the case IDs,the name of the data item to which each note belongs, the name of the operator, the time the note was left, and the notetext. There may be multiple note records for a particular field.
The format of each note record is as follows:
The first N characters are the case IDs.
The next 32 characters are the field name as given in the dictionary (left justified). If you use field names longerthan 32 characters, the field name will be encoded in a way so that it fits in 32 characters. You can use theNOTES_FIELD_VS value set of the notes dictionary to figure out which note is which.
The next 32 characters are the name of the operator ID (left justified).
The next 8 characters are the date the note was last modified (YYYYMMDD).
The next 6 characters are the time the note was last modified (HHMMSS).
The next 5 characters are the record occurrence number if applicable (right justified).
The next 5 characters are the item occurrence number if applicable (right justified).
The next 5 characters are the subitem occurrence number if applicable (right justified).
The remaining characters are the note text.
Note text can contain "\n" characters, which indicate a newline (Enter key) character. If the note text is automaticallywrapped in the note text box, there will be no newline characters.
The .csnot file can be processed by another CSPro application by creating a data dictionary for it. You can use theDictionary Macros function to automatically create this dictionary.
Notes can be created, edited, and deleted using the getnote, putnote, and editnote functions.
Notes for non-text files (such as CSPro DB files) are stored within the file itself and not in a .csnot file. Prior to CSPro7.0, the notes file had the extension .not.
Status File (.sts)The status file stores information about which cases are partially entered and the last field entered. It also keeps track ofthe cases that have been verified. CSEntry uses this information to:
Show which cases in the data file are partially entered.
Restart partially entered cases at the last field location entered.
Show the number and percent of verified cases in the operator statistics.
The .sts file is a text file and you can view this file in Text Viewer.
If necessary, you can modify this file in a text editor. However, you should manipulate this file with extreme caution. Ifyou modify it incorrectly, you can lose information about partially entered cases or which cases have been verified.
Status information for non-text files (such as CSPro DB files) is stored within the file itself and not in a .sts file.
Paradata Log File (.cslog)Paradata log files contain information about paradata events stored during an application's run. Files created using thistype have the extension .cslog and are not text files so they cannot be viewed in Text Viewer.
Pa ge 681 of 684 Fi l e s De s cri p on

You can use the Paradata Viewer to view the contents of the file. Advanced users can also query paradata logs by usingthe paradata logic function or by generating a templated report. Paradata can be synchronized between devices orservers by using the syncparadata function.
You can combine multiple paradata logs into a single log by using the Paradata Concatenator tool.
Operator Statistics File (.log)The log file stores operator statistics generated by CSEntry for a corresponding data file. CSEntry creates a log file whenit creates a new data file. The log file is a comma-delimited text file with a fixed format. It is designed to be easilyimported into other software packages for custom processing. The log file can also be processed by CSPro applicationwith the appropriate data dictionary.
Each record in the log file represents one data entry session. The record layout is as follows:
Position Contents1 - 3 Mode (ADD, MOD, or VER)4 comma5 - 36 Operator ID (as entered)37 comma38 - 47 Start date (mm/dd/yyyy)48 comma49 - 56 Start time (hh:mm:ss)57 comma58 - 65 End time (hh:mm:ss)66 comma67 - 74 Total time (End time - Start time) (seconds)75 comma76 - 83 Pause time (seconds)84 comma85 - 92 Number of cases written93 comma94 - 101 Number of records written102 comma103 - 110 Number of keystrokes111 comma112 - 119 Number of bad keystrokes120 comma121 - 128 Number of fields with errors attributed to keyer129 comma130 - 137 Number of fields with errors attributed to verifyer138 comma139 - 146 Total number of fields verified
Listing FileThe listing file contains information about how an application was run and contains the results of the program'soperations. It gives the following information:
The names of the files used.
The start and end time of the run.
Pa ge 682 of 684 Fi l e s De s cri p on

Any error messages, both user and system messages, which occurred during the run.
The listing file associated with a batch edit application is often the primary output of the application. For most otherapplications and tools, the listing file is a secondary output. For data entry applications, this file can be useful formonitoring the work of keyers in training and identifying problem keyers.
Listing File Formats
The traditional CSPro listing file is a text file with the extension .lst. However, you may find it useful to change the listingfile output based on the kind of analysis you are conducting. There are three listing file formats. CSPro will output to aformat based on the extension of the listing file name.
Format Extension Results ViewerText .lst Text ViewerCSV .csv Application associated with.csv files (often Microsoft Excel)CSPro Data .csdb / .dat Data Viewer
Using any extension not in the table above will result in a text listing file.
The CSV (comma-separated values) and CSPro Data listing files can only be used with applications that contain an inputdictionary so they are not suitable for some tabulation applications.
Whereas the text listing file displays keys of cases that had errors in text format, the CSV and CSPro Data listing filesoutput these keys as separate columns/items (e.g., "0901" vs. PROVINCE: 9 / DISTRICT: 1).
Error messages that occur outside of a case (for example during the application procedure) are written to all listing fileformats except for CSPro Data, which only contains information about case-related errors. When using the CSPro Datalisting file, a dictionary that describes the data file will be output using the name of the listing file with the addedextension .dcf.
Batch Edit Application File (.bch)The batch edit application file is the master file for a batch edit application. This file specifies all other files contained inthe application, along with other information. CSPro allows you to open, close and save batch edit application files.When you do so, all other files associated with the application are also opened, closed or saved.
The batch edit application file is a text file that may be viewed with any text editor, such as Text Viewer or Notepad. It isnot recommended to make changes to this file outside the CSPro environment. Advanced users might do so, however, tochange the names of associated files from the CSPro assigned defaults.
Edit Order File (.ord)The Edit Order File is a text file that contains information about the sequence in which fields defined in the associateddata dictionary are edited during batch editing. Each item in the associated CSPro dictionary is listed in the Edit OrderFile in the sequence in which the procedures for that item will be executed.
Saved Arrays File (.sva)The saved arrays file stores values from arrays in a batch edit application marked with the save keyword. At the end ofprogram execution, the current values of any saved arrays are written to the file. When the program is run, the savedarray file is read and the array is initialized with the values from the saved array file.
CSPro creates the saved arrays file automatically when one or more arrays in a batch edit application are marked as asaved array. The name of the saved arrays file is always the same as that of the application with the additional .sva fileextension added (e.g., application_name.bch.sva).
Pa ge 683 of 684 Fi l e s De s cri p on

The saved arrays file is a text file that may be viewed with any text editor, such as Text Viewer or Notepad. It is notrecommended to make changes to this file outside the CSPro environment. Advanced users might do so, however, to setinitial values for arrays.
If you want to prevent the file from being updated after a run, which may be desirable if you want to produce the sameresults from run to run, you can disable the update via logic:
setproperty("UpdateSaveArrayFile", "No");
Tabulation Application File (.xtb)The tabulation application file is the master file for a tabulation application. This file specifies all other files contained inthe application, along with other information.
CSPro allows you to open, close and save tabulation application files. When you do so, all other files associated with theapplication are also opened, closed or saved.
The tabulation application file is a text file which may be viewed with any text editor, such as Text Viewer or Notepad. Itis not recommended to make changes to this file outside the CSPro environment. Advanced users might do so, however,to change the names of associated files from the CSPro assigned defaults.
Table Specifications File (.xts)The tabulation specifications file contains tables, dictionary items/value sets and other information which defines a set oftables. The file also contains the name of the associated data dictionary file. Items and value sets have links into thedata dictionary.
The tabulation specifications file is a text file that may be viewed with any text editor, such as Text Viewer or Notepad. Itis not recommended to make changes to this file outside the CSPro environment.
Tables File (.tbw)The tables file (.tbw) is a text file that contains information about a table layout such as stubs, the headers, column size,etc. It also contains the table data. This file is read by the Table Viewer to produce a "published" table.
See also: Save Tables for the Table Viewer
Area Names File (.anm)The Area Names file (.anm) is a text file that you can create using any text editor. Be sure that you save this file with theextension .anm.
The Area Names file defines the hierarchical levels of geography and assigns text names to the numeric codes for eachgeographic unit. The items must be defined in the common part of the data dictionary and should be listed in order frommajor to minor division.
See also: Create an Area Names File
Table Matrices File (.tab)A table matrices file (.tab) contains the output of tabulated numbers from CSPro's tabulation engine. They are row andcolumn contents of the tabulated tables, without any surrounding text.
Pa ge 684 of 684 Fi l e s De s cri p on

A table matrices file may also contain the output of the Consolidate process of CSPro, where table matrices for onegeographic level are added together to produce table matrices for a higher geographic level.
These files are used as output and input when tabulations are run in parts.
See also: Table Matrices Index File (.tabidx), Introduction to Run in Parts
Table Matrices Index File (.tabidx)A table matrices index file (.tabidx) contains indices for a table matrices file with the same name. While it is notnecessary to save these files, because they can be recreated, having them around makes tabulation processing gofaster.
See also: Table Matrices File (.tab), Introduction to Run in Parts
Frequency Specification File (.fqf)Tabulate Frequencies is a CSPro tool that allows you to display a frequency distribution of a dictionary variable(s) basedon its value set(s). For example, you could have defined several value sets such as "age in 5 year groups," "level ofeducation," or "type of occupation." Tabulate Frequencies gives you both the numeric count and percentage distributionfor the selected variables. It also gives the cumulative distributions.
Pa ge 685 of 684 Fi l e s De s cri p on