Credit Card Setup Guide — Multiple Formats
136
Oracle® Hospitality Cruise Shipboard Property Management System Credit Card Setup Guide — Multiple Formats Release 20.2 F44435–02 March 2022
-
Upload
khangminh22 -
Category
Documents
-
view
4 -
download
0
Transcript of Credit Card Setup Guide — Multiple Formats

Oracle® Hospitality Cruise ShipboardProperty Management SystemCredit Card Setup Guide — Multiple Formats
Release 20.2F44435–02March 2022

Oracle Hospitality Cruise Shipboard Property Management System Credit Card Setup Guide — MultipleFormats, Release 20.2
F44435–02
Copyright © 2015, 2022, Oracle and/or its affiliates.
This software and related documentation are provided under a license agreement containing restrictions onuse and disclosure and are protected by intellectual property laws. Except as expressly permitted in yourlicense agreement or allowed by law, you may not use, copy, reproduce, translate, broadcast, modify, license,transmit, distribute, exhibit, perform, publish, or display any part, in any form, or by any means. Reverseengineering, disassembly, or decompilation of this software, unless required by law for interoperability, isprohibited.
The information contained herein is subject to change without notice and is not warranted to be error-free. Ifyou find any errors, please report them to us in writing.
If this is software or related documentation that is delivered to the U.S. Government or anyone licensing it onbehalf of the U.S. Government, then the following notice is applicable:
U.S. GOVERNMENT END USERS: Oracle programs (including any operating system, integrated software,any programs embedded, installed or activated on delivered hardware, and modifications of such programs)and Oracle computer documentation or other Oracle data delivered to or accessed by U.S. Government endusers are "commercial computer software" or "commercial computer software documentation" pursuant to theapplicable Federal Acquisition Regulation and agency-specific supplemental regulations. As such, the use,reproduction, duplication, release, display, disclosure, modification, preparation of derivative works, and/oradaptation of i) Oracle programs (including any operating system, integrated software, any programsembedded, installed or activated on delivered hardware, and modifications of such programs), ii) Oraclecomputer documentation and/or iii) other Oracle data, is subject to the rights and limitations specified in thelicense contained in the applicable contract. The terms governing the U.S. Government’s use of Oracle cloudservices are defined by the applicable contract for such services. No other rights are granted to the U.S.Government.
This software or hardware is developed for general use in a variety of information management applications.It is not developed or intended for use in any inherently dangerous applications, including applications thatmay create a risk of personal injury. If you use this software or hardware in dangerous applications, then youshall be responsible to take all appropriate fail-safe, backup, redundancy, and other measures to ensure itssafe use. Oracle Corporation and its affiliates disclaim any liability for any damages caused by use of thissoftware or hardware in dangerous applications.
Oracle, Java, and MySQL are registered trademarks of Oracle and/or its affiliates. Other names may betrademarks of their respective owners.
Intel and Intel Inside are trademarks or registered trademarks of Intel Corporation. All SPARC trademarks areused under license and are trademarks or registered trademarks of SPARC International, Inc. AMD, Epyc,and the AMD logo are trademarks or registered trademarks of Advanced Micro Devices. UNIX is a registeredtrademark of The Open Group.
This software or hardware and documentation may provide access to or information about content, products,and services from third parties. Oracle Corporation and its affiliates are not responsible for and expresslydisclaim all warranties of any kind with respect to third-party content, products, and services unless otherwiseset forth in an applicable agreement between you and Oracle. Oracle Corporation and its affiliates will not beresponsible for any loss, costs, or damages incurred due to your access to or use of third-party content,products, or services, except as set forth in an applicable agreement between you and Oracle.

Contents
Preface
1 Papagena Format
Prerequisites, Supported Systems, and Compatibility 1-1
SPMS Parameters 1-1
System Configuration 1-3
Registration of Credit Card 1-3
Registering Credit Card in Advance Quick Check-In (AQCI) 1-5
Credit Card Transfer Interface 1-6
Troubleshooting 1-11
2 Generic Credit Card
SPMS Parameters 2-1
System Configuration 2-3
Department Setup 2-3
Receipt Setup 2-5
Transaction Services Installation 2-5
Registering a Credit Card 2-5
Creating Incremental / Top up Authorization File 2-7
Reading Authorization File 2-9
Obtaining Manual Authorization 2-10
Creating Settlement File 2-11
Report 2-12
Troubleshooting Section 2-13
Generic Credit Card Mapping Fields 2-15
Sample BIN Range 2-20
3 Ingenico Format
Prerequisite, Supported Systems, and Compatibility 3-1
SPMS Parameters Ingenico 3-1
iii

System Configuration Ingenico 3-3
Merchant Setup 3-5
Merchant Credentials 3-5
Ingenico OHC Ship Transfer 3-7
Checking Amount Authorized in Management module 3-8
Processing Credit Card Batch 3-9
Generating Batch Authorization 3-9
Generating Batch Settlement 3-12
Setting up a Report 3-15
Troubleshooting Ingenico 3-16
Appendices 3-19
Sample BIN Ranges Ingenico 3-20
4 Servebase Format
Prerequisite, Supported Systems, and Compatibility 4-1
SPMS Parameters Servebase 4-1
System Configuration Servebase 4-3
Setting up Merchant Details 4-5
Servebase Web Services Installation 4-7
Store Forward Handling 4-8
Setting up Device 4-8
OHC Ship Transfer Setup 4-10
Configuring OHC Ship Transfer 4-11
Registering a Credit Card Servebase 4-12
Settling a Credit Card Batch 4-12
Performing a Credit Card Refund 4-13
Registering Credit Card in Advanced Quick Check In (AQCI) 4-14
Sample Response File in Ship Transfer 4-15
Synopsis 4-17
Troubleshooting Servebase 4-30
5 PAYPOINT
SPMS Parameters Paypoint 5-1
System Configuration Paypoint 5-3
OHC Transfer Setup 5-5
Paypoint Workflow 5-6
PAYPOINT Handling 5-7
Setting up Device in Advance Quick Check-In module 5-8
Viewing Authorization Amount in Management module 5-9
iv

OHC Ship Transfer (Sample Response Message) 5-10
Troubleshooting PAYPOINT 5-11
6 NCL DCC
SPMS Parameters NCL DCC 6-1
Configuring SPMS 6-2
Hardware Setup 6-3
System Configuration NCL DCC 6-4
Setting up Receipt 6-4
Importing Credit Card BIN 6-4
Loading the BIN File 6-5
Setting up PGP Encryption 6-5
Using the Verifone Card Device 6-6
OHC Advanced Quick Check In 6-9
OHC Credit Card Transfer 6-11
Batch File Processes 6-12
Reading an Authorization 6-14
Generating an Incremental File 6-16
Generating Incremental File with Authorization Template 6-17
Generating Settlement File 6-19
Recreating a Settlement File 6-20
Mapping Fields 6-21
v

Preface
This document explains how to set up the credit card interfaces to communicate withthe shore-side Credit Card Service Providers to obtain card authorizations andsettlements. Included in this guide are the credit card interfaces for:
• Papagena Format
• Generic Credit Card Format
• Ingenico Handling
• Servebase Handling
• Paypoint Handling
• NCL DCC Handling
Audience
This document is intended for installers, programmers, technical support teams,product specialists and others who are responsible for setting up Oracle HospitalityCruise Shipboard Property Management System (SPMS) version 20.2.
Customer Support
To contact Oracle Customer Support, access My Oracle Support at the following URL:
https://support.oracle.com
When contacting Customer Support, please provide the following:
• Product version and program/module name
• Functional and technical description of the problem (include business impact)
• Detailed step-by-step instructions to re-create
• Exact error message received and any associated log files
• Screen shots of each step you take
Documentation
Oracle Hospitality product documentation is available on the Oracle Help Center at http://docs.oracle.com/en/industries/hospitality/cruise.html.
Revision History
Table 1 Revision History
Date Description of Change
September 2021 Initial publication.
Preface
vi

Table 1 (Cont.) Revision History
Date Description of Change
March 2022 Made minor grammatical changes.
Preface
vii

1Papagena Format
The following section describes the setup and usage of Credit Card Transfer for PAPAGENAHandling.
Prerequisites, Supported Systems, and CompatibilityCompatibility
SPMS version 20.2 or later. For customer operating on version below 20.2, databaseupgrade to the recommended or latest version is required.
Prerequisites, Supported Systems, and Compatibility
This section describes the minimum requirements for PAPAGENA Credit Card handling andsupported peripherals.
Prerequisites
• Credit Card Transfer.exe
• Tools.exe
• SPMS parameters
• SPMS DLL
– MTIPADLIB.dll
– IPADLIB.dll
SPMS ParametersThis section describes the parameters available to the Credit Card Transfer module which areaccessible from Administration module, System Setup, Parameter function.
Table 1-1 PAR _GROUP General
PAR Name PAR Value Description
Enable Signature Capture forCredit Card
0 or 1 Prevent the credit cardregistration without asignature when enabled.0 - Disable Signature Capturefor Credit Card.1 - Enable Signature Capturefor Credit Card.
1-1

Table 1-1 (Cont.) PAR _GROUP General
PAR Name PAR Value Description
Disable C/Card and Postingwhen auth is decline
0 or 1 0 - No credit card deactivationand no posting disable.1 - Deactivate the credit cardfollowed by the posting ifthere are no other activecredit cards.2 - Deactivate the credit card.Posting remains enabled.
Top Up Percentage <value> Specify top up percentage tobe calculated with the totalauthorized amount.For example, Total AuthAmount=1000 * 15% = 1150 asNew Auth Amount.
Test Auth Amount <value> Specify PAPAGENA testauthorization amount for bothonline and offline mode.
Card Track Data not Stored <BLANK> List of card types that shouldnot store or track data in thedatabase. Format (‘Card Type1’,’Card Type 2’).For example, ('DS','DI','JC','DC').
Allow Manual Card Entry forPapagena
0 or 1 0 - Do not allow manual entrywhen card swipe fail.1 – Allow Manual Entry whencard swipe fails.
Table 1-2 PAR_GROUP Interfaces
PAR Name PAR Value Description
Batch CCard ProcessingFormat PAPAGENA
Specify the message formatto be generated by CreditCard Transfer program.
Merchant ID <character> Defines the Merchant ID forthe authorization file.
CC Auth/Settlement Folder Folder path Repository location forauthorization/settlementfiles generated by OHCCredit Card Interface.Note: To avoid adverseimpact on your system,please abstain from usingthe following folder path:• System Directory• “\Users\Public\Documen
ts\Oracle HospitalityCruise”
Chapter 1SPMS Parameters
1-2

System ConfigurationThis section describes the setup of various system codes required by PAPAGENA handling.These codes are set up in Administration module, Financial Setup, Department.
Department Setup
For charging and posting, a debit and credit department code for each credit card typeaccepted by the ship must be configured in SPMS.
Credit/Debit Card Department Code Setup
1. Log in to the Administration module and select Financial Setup, Department Setupfrom the drop-down list.
2. Click New to create a Sub-Department code.
3. Under the Main Department section, enter the credit/debit card information such asPayment Type, Department Code, and Description.
4. In the Payment Type Details section,
a. Enter the first two digits of the first set of credit card number in the Credit Card digits.
b. Enter the Credit Card ID. For example, MC - MasterCard, VI - Visa, and others.
c. Select the corresponding Credit Card Internal ID from the drop-down box.
d. Enter the Credit Card Merchant Number provided by the Service Provider.
e. Set the Minimum Authorized Value to 0.
f. Select the Commission Department from the drop-down list and update theCommission Rate in percentage.
g. Check the Debit Card No Commission charge if the commission is not applicable todebit card.
5. In the Department Security access, select the appropriate security level from the drop-down box.
6. Select the Payment Type in Payment Department Type. Options are: Both Credit andDebit card, Credit card, or Debit card.
7. Click OK to save.
Receipt Setup
You can generate a receipt upon payment, which requires setting up a report template. AStandard Credit Card receipt template is available in Administration module, SystemSetup, Report Setup, Receipts Group. Contact Oracle Hospitality Cruise Support if youwould like to configure a customized receipt format.
Registration of Credit CardThe SPMS program does not allow credit card registration without a signature if the EnableSignature Capture for Credit Card parameter is enabled, and a signature device isconfigured in the hardware option setup.
Registering Credit Card in Management module
1. Log in to the Management module and select Guest from the Cashier Menu.
Chapter 1System Configuration
1-3

2. Select a checked-in guest and click the Get Credit Card button.
3. The system prompts to swipe a card through a reader.
4. After you swipe the credit card, the credit card details, validity and status of thecard populates onto the Guest Handling, Credit Card Entry screen. If the card isvalid, the card status shows Credit Card Accepted.
Figure 1-1 Credit Card Entry Screen
5. Click OK to proceed with payment card registration or click Cancel to terminatethe payment card registration process.
6. When you click OK, the system prompts a signature screen for the card holder tosign and activates when the Enable Signature Capture for Credit Cardparameter is enabled and a Signotec LCD Signature Pad Omega is installed.
7. Allow the cardholder to place the signature on the Signotec Signature pad andpress the green check mark to complete the credit card registration. To capture anew signature, press the Refresh icon to clear the screen.
8. After the registration is successful, this set offs a confirmation prompt. Click OK toconfirm. If the ‘X’ is clicked, this cancels the token request.
Figure 1-2 Credit Card Screen — Credit Card Registration is Complete
Chapter 1Registration of Credit Card
1-4

Figure 1-3 Signature Screen — User Cancel Signature Action
9. The credit card information and signature captured are stored in the Guest HandlingCredit Card tab.
Registering Credit Card in Advance Quick Check-In (AQCI)1. Start the AQCI program and select a checked-in passenger.
2. Click the Get Credit Card button at the ribbon bar. Both devices prompt ‘Please Swipecard’. At the Request Token prompt, swipe the credit card through a card reader device.
3. The detailed from the swiped credit card populate under Credit Card Details field. ClickSave at the ribbon bar to save the information and this activates the signature screen onthe Signotec Signature pad if the device is installed.
Figure 1-4 Advance QCI Credit Card Section
Chapter 1Registering Credit Card in Advance Quick Check-In (AQCI)
1-5

4. Click Save to proceed with the registration process. The signature screen promptswhen the Enable Signature Capture for Credit Card parameter is enabled andthe Signotec Signature Pad is installed.
5. The registered credit card details are stored in the Guest Handling, Credit Cardtab.
Credit Card Transfer InterfaceThe Credit Card Interface has several functions enabled for PAPAGENA handlingthrough the Credit Card Batch Authorization. Refer to the following table:
Table 1-3 Credit Card Transfer Interface Functions
Authorization Settlement
• Test File• New Authorization File• Read Authorization File• Manual Authorization File
• New Settlement File• Read Settlement File
Creating Test Authorization File
1. Start the Credit Card Transfer Interface and select the Authorization menu.
2. Select the Test File option from the drop-down menu.
3. All payment cards requiring authorization are listed in the Test Authorizationscreen, with the exception of credit card registered with a token.
Figure 1-5 Credit Card Transfer — Test Authorization Screen
4. Click Process to generate the Test Authorization. The amount shown in the TestAuthorization is the value set within the Test Auth Amount parameter.
Creating Initial Authorization File
1. Repeat step 1 of Creating Test Authorization File and then select NewAuthorization File from the drop-down menu.
2. All payment cards requiring an incremental authorization are listed in thePAPAGENA Credit Card Authorization Write screen.
Chapter 1Credit Card Transfer Interface
1-6

Figure 1-6 Credit Card Transfer — New Authorization Screen
3. The initial authorization can be generated only when the Test Authorization is approved.Following are the validation prompts during the Test Authorization when generating aninitial authorization:
a. Credit Card registered without Test Authorization or No Test Authorization - Thesystem prompts ‘There is Test Authorization not created yet’.
b. Credit Card registered with Test Authorization has status Outstanding or Declined -The system prompts ‘‘There is Test Authorization without response or declinedresponse’
4. Click the Process button to generate the Initial Authorization file. After the incrementalauthorization file is created, the screen displays the location of the saved file. A sample ofthe incremental file is illustrated in Figure 1‑10 - Sample Authorization File
Figure 1-7 Sample Authorization File
5. The authorization status of the card appears as Outstanding in the Managementmodule, Guest Handling, Credit Card tab, View Authorization function.
Reading Authorization File
After the authorization request is processed by the Merchant/Service Provider, a response filewith authorization codes is returned. These authorization codes are updated in the guestaccount using the Read Authorization function.
1. Repeat step 1 of Creating Test Authorization File and select Read Authorization Filefrom the drop-down menu.
Chapter 1Credit Card Transfer Interface
1-7

2. On the PAPAGENA Credit Card Authorization Read screen, select Open to locatethe response file returned by the merchant.
3. Click the Process button to process the information on file. The screen displays aprogress status.
Figure 1-8 Credit Card Transfer — PAPAGENA Credit Card AuthorizationRead
4. At the end of the process, the system updates the payment card status toAuthorized. You can verify the status by logging into the Management module,Guest Handling, Credit Card tab, View Authorization function.
Figure 1-9 Management - Authorization Screen
The above process also updates the CRD_TOKEN field followed by CCT_TOKEN fieldin the database, if the settlement record is created before running the ReadAuthorization.
Creating Incremental File
When an account balance exceeds the initial authorization amount, you must obtainan additional authorization value to allow postings to flow through the account.
The process for obtaining additional authorization is the same as the steps in CreatingInitial Authorization File and Reading Authorization File.
Obtaining Manual Authorization
Chapter 1Credit Card Transfer Interface
1-8

A manual authorization is obtain-able on an ad hoc basis and is performed within the guestaccount.
1. In the Management module,Guest Handling function, select the guest account.
2. Navigate to the Credit Card tab and click View Authorization.
3. In the Authorization screen, select Add Authorization.
4. Enter the value including the initial authorized value in the Credit Card Authorizationscreen when prompted and click OK to save.
Figure 1-10 Management — Add Authorization Screen
5. An additional authorization is added to the Authorization grid with its status shown asOutstanding. Select the line item from the grid, enter the code and value obtained, andthen click Authorized. This process overwrites the existing value and changes theauthorization status to Forced, and writes the authorization code into the Settlement fileas the last authorization code.
Figure 1-11 Management — Manual Authorization
Creating Settlement File
Chapter 1Credit Card Transfer Interface
1-9

At the end of an invoice settlement, the system writes the settlement to the Settlementfile to be processed in a batch.
1. At the Credit Card Transfer Interface, select the Settlement menu, and select NewSettlement File from the drop-down menu.
2. The settlement file can only be generated when the Test Authorization isapproved. Below is the validation prompt during the Test Authorization whengenerating an initial authorization for:
a. Credit Card registered without Test Authorization or No Test Authorization - thesystem prompts: “There is Test Authorization not created yet”.
b. Credit Card registered with Test Authorization has status as Outstanding orDeclined. The system prompts the following message: “There is TestAuthorization without response or declined response.”
If the Settlement has Test Authorization as Outstanding or Declined, thissettlement only shows in the Settlement Write screen and it does not write intothe Settlement File.
If the Settlement does not have an authorization and CCT_TOKEN the settlementis then written into the Settlement File with CC|ORDER
3. Click the Processbutton to generate the Settlement File. After the Settlement fileis created, the location of the saved file is displayed on the screen.
Figure 1-12 Credit Card Transfer — Settlement Write Screen
Reading Settlement File
A response file is sent back by the merchant or service provider after the settlement isprocessed at their end. You must upload the file and update the Settlementtransactions status.
1. From the Settlement drop-down menu, select Read Settlement File.
2. On the PAPAGENA Credit Card Settlement Read screen, click the Open Filebutton to locate the Settlement Response file.
3. The status of the process is displayed on the Settlement Read screen. Click theProcess button to read and update the Settlement record.
Chapter 1Credit Card Transfer Interface
1-10

Figure 1-13 Credit Card Transfer — Settlement Read Screen (Ready to Process)
TroubleshootingThis section describes the troubleshooting steps for resolving some known issuesencountered in PAPAGENA Handling across various modules.
Tools
Table 1-4 Tool Known Issue and Solution
Known Issue Solution
Error — ‘Key unable to upload’ Register PGPBBox7.dll with regsvr32.exeagain.
Error — ‘License Key has not been set’ Register PGPBBox7.dll with regsvr32.exeagain.
Credit Card Transfer Interface
Table 1-5 Credit Card Transfer Interface Known Issue and Solution
Known Issue Solution
Credit Card Transfer does not reflect correctdesired credit card format
Check the credit card format setup inAdministration module, System Setup,Database Parameter, ‘Interfaces’, ’Batch CCardProcessing Format’.
PAPAGENA Mapping Fields
This section describes the mapping fields used in PAPAGENA Credit Card format.
File name format
The file naming format for PAPAGENA is explained in the following table, for example:GuestTransfer071020161138.pci
Chapter 1Troubleshooting
1-11

Table 1-6 PAPAGENA File Format
Name Description
Guest The first word of the file name representsthe Account Type base on the filter used togenerate the authorization file.Guest - GuestTransfer#######.pciCrew - CrewTransfer#######.pciGroup - GroupTransfer#######.pciStaff - StaffTransfer#######.pciAll filter - <Blank>Transfer#######.pci
Transfer The second word of the file namerepresents the type of transfer.TestTransfer = test authorization fileTransfer = Authorization transaction fileSettle = Settlement transaction file
071020161138 The date/time format of the authorizationfile:DDMMYYYYHHMM
pci or pcr The file format extension of theauthorization filepci = request filepcr = response file
Request File Format
The following tables describes the field definitions for a Request File for Authorizationand Settlement.
Table 1-7 Request File Format
Field Type Size Definition
Header
Head Varchar 4 Fixed value: “HEAD”
data-source Varchar 30 File sender name,example “MV SHIP”
Date Int 12 Format:YYMMDDHHMMSS,111019130712
file-number Int 12 Counter for the file,example 42
Version Varchar 4 The version string ofour batch file,example 1.0
Batch RecordMerchantID Varchar 20 Merchant ID. For
example HOTEL
Chapter 1Troubleshooting
1-12

Table 1-7 (Cont.) Request File Format
Field Type Size Definition
Paytype Varchar 10 “CC” - for VI, MC“EDD” - for EC“TO” - for if tokenwith value
Trxtype Varchar 12 |tstauth|incauth|capture|refundtstauth: Testauthorization, it is amandatoryauthorization priorto generating aninitial authorization.incauth: Incrementalauthorizationincreases amount ofan existingauthorization. Inputhas to be the totalamount(initial+additionalamount).capture: Book a pre-authorization.Capture amount hasto be less than orequal to theauthorized amount.refund: Refund anamount only validfor an existing order.
TransID Varchar 50 Unique transactionidentificationnumber in ASCII.Does not supportspecial characters.
TransID reference Varchar 50 Reference to theoriginal uniquetransaction wherenecessary. Forexample, capture,refund, incauth foran already existingtransaction.
Amount Int 9 Always in thesmallest currencyunit (in cent for Euroand so on, example100 for 1 Euro),empty ifTrxtype=register
Chapter 1Troubleshooting
1-13

Table 1-7 (Cont.) Request File Format
Field Type Size Definition
Currency Varchar 3 Currency codeaccording to ISO4217 for thistransaction, forexample, EUR,USD,or follow the Ship’scurrency.
Description Varchar 27 Note to Payee in textfor EmploymentDevelopmentDepartment (EDD)Debit Card or otherPayment Method.
AppCodeTel Int 6 Specialauthorization codeobtained manuallythrough telephonefor an authorizationfrom an acquirer.
Customer Varchar 27 Customer name.
CD_customerid Varchar 16 Customer ID inCustomerRelationshipManagementSystem.
CD_customertype Varchar 12 Type of customer,for example crew,passenger, staff, andothers.
CD_orderid Varchar 16 Unique order-id.
CD_paxid Varchar 16 Customer unique id.
CD_cruiseid Varchar 10 Travel number.
CD_accountid Varchar 12 On-board accountnumber.
CD_roomid Varchar 6 Cabin number.
CD_invoiceid Varchar 12 Account number.
Reference Varchar 30 Additional reference.
Token Varchar 30-40 UUID, ex.ed4bdf30-4ac4-102f-991a-000bcd838e00.Reference for apayment account,either from pre-registration(manifest) or earlierbatch reply. Tokenusage is mandatory.
Chapter 1Troubleshooting
1-14

Table 1-7 (Cont.) Request File Format
Field Type Size Definition
CC_brand Varchar Varchar 10 Credit card brandMasterCard, VISA,AMEX, DC, JCB.
CC_cardowner Varchar 27 Card owner.
EDD_accountowner Varchar 27 Bank account owner.
Track1enc Varchar 256 For future use.
Track2enc Varchar 256 For future use.
Track3enc Varchar 256 For future use.
KSN Varchar 32 For future use.
TransID reference Varchar 50
Reference to theoriginal uniquetransaction wherenecessary. Forexample, capture,refund, incauth foran already existingtransaction.
Amount Int 9 Always in thesmallest currencyunit (in cent for Euroand so on, example100 for 1 Euro),empty ifTrxtype=register
Currency Varchar 3 Currency codeaccording to ISO4217 for thistransaction, forexample, EUR,USD,or follow the Ship’scurrency.
Description Varchar 27 Note to Payee in textfor EmploymentDevelopmentDepartment (EDD)Debit Card or otherPayment Method.
AppCodeTel Int 6 Specialauthorization codeobtained manuallythrough telephonefor an authorizationfrom an acquirer.
Customer Varchar 27 Customer name.
CD_customerid Varchar 16 Customer ID inCustomerRelationshipManagementSystem.
Chapter 1Troubleshooting
1-15

Table 1-7 (Cont.) Request File Format
Field Type Size Definition
CD_customertype Varchar 12 Type of customer,for example crew,passenger, staff, andothers.
CD_orderid Varchar 16 Unique order-id
CD_paxid Varchar 16 Customer unique id
CD_cruiseid Varchar 10 Travel number.
CD_accountid Varchar 12 On-board accountnumber.
CD_roomid Varchar 6 Cabin number.
CD_invoiceid Varchar 12 Account number
Reference Varchar 30 Additional reference.
Token Varchar 30-40 UUID, ex.ed4bdf30-4ac4-102f-991a-000bcd838e00.Reference for apayment account,either from pre-registration(manifest) or earlierbatch reply. Tokenusage is mandatory.
CC_brand Varchar Varchar 10 Credit card brandMasterCard, VISA,AMEX, DC, JCB.
CC_cardowner Varchar 27 Card owner.
EDD_accountowner Varchar 27 Bank account owner.
Track1enc Varchar 256 For future use.
Track2enc Varchar 256 For future use.
Track3enc Varchar 256 For future use.
KSN Varchar 32 For future use.
Response File Format
The following table describes the field definition for a Response File for Authorizationand Settlement.
Table 1-8 Response File Format
Field Type Size Definition
Head Varchar 4 Fixed value: “HEAD”.
data-source Varchar 30 File sender name,example “MV SHIP”.
Chapter 1Troubleshooting
1-16

Table 1-8 (Cont.) Response File Format
Field Type Size Definition
Date Int 12 Format:YYMMDDHHMMSS,111019130712.
file-number Int 12 Counter for the file,for example 42.
Version Varchar 4 The version string ofour batch file,example 1.0 .
Response Record
TransID Varchar 50 unique transactionid.
Token Varchar 40 Token, UUID for thispayment account.Only if the paymentaccount (credit cardor EDD) is valid.
Return-code Varchar 10 00000000 (8 zeros forOK)NNNNNN (for Error.For example.23055310).
Status Varchar 10 The textualrepresentation ofreturn code, “OK“,“Error“.
Description Varchar 255 Description forStatus.
Reference Varchar 30 Additional reference(same as inputparameter).
CD_customerid Varchar 16 Customer numberfrom CRM.
Approvalcode Int 6 Approval-code forthis transaction.
EPAref Int 9 EPA-Reference forthis transaction, onlyused for Accounting.
auth_time Varchar 20 Server time stampfor the singletransaction,format YYYY-MM-DDTHH:MM:SS asUTC Time.
Footer
Foot Varchar 4 Fixed value: “FOOT“.
Counter Int 9 Total number ofrecords.
Chapter 1Troubleshooting
1-17

2Generic Credit Card
The Credit Card Transfer is an interface that communicates with the shore-side Credit CardService provider to obtain the card authorization and settlement through batch transfers.
Prerequisite, Supported Systems, and Compatibility
This section describes the minimum requirements to operate the supported credit card devicefor Generic Credit Card Handling.
Prerequisite
Credit Card Transfer.exe
Tools.exe
SPMS Parameters
Compatibility
SPMS version 20.1 or later. For customer operating on version below 20.1, databaseupgrade to the recommended or latest version is required.
SPMS ParametersThis section describes the parameters available to the Credit Card Transfer module. They areaccessible in Administration module, System Setup, Parameter function.
PAR_GROUP General
Table 2-1 PAR Group General
PAR Name PAR Value Description
Enable Signature Capture forCredit Card
0 or 1 0 - Disables Signature Capturefor Credit Card.1 - Enables Signature Capturefor Credit Card.
Number of day beforedebarkation
2 Specifies the number of daysbefore guest debarkation dateto swipe the exact amount fordebit/credit card in onlinemode.
Disable C/Card and Postingwhen auth is decline
0 or 1 or 2 0 - No credit card deactivationand no posting is disable.1 - We will deactivate thecredit card first. If there is nomore active credit card, theguest posting will be disable.2 - Deactivates the credit cardbut posting is still enable.
2-1

Table 2-1 (Cont.) PAR Group General
PAR Name PAR Value Description
Online Initial Auth Amount <Amount> Specifies the initialauthorization amount for allcard types when card isswiped at the terminal inOnline mode.
Online Debit Initial AuthAmount
10, 20, 30, 40 Specifies four amounts for thedebit card initial authorizationamount.
Top Up Percentage <value> Specifies the top uppercentage to be calculatedwith the total authorizedamount. For example: TotalAuth Amount=1000 * 15% =1150.
Number of Credit Card FrontDigit to Display
<Value> Only value 0 - 6 is allowed inthis parameter.The value define in thisparameter is to reflect thefront digit of the credit cardnumber in the report.
Card Track Data not Stored <BLANK> List of card types that shouldnot store track data in thedatabase. Format (‘Card Type1’,’Card Type 2’).For example: ('DS','DI','JC','DC')
PAR_GROUP Interfaces
Table 2-2 PAR Group Interfaces
PAR Name PAR Value Description
Batch CCard ProcessingFormat OHCCreditCard
Specifies the messageformat to be generated byCredit Card Transfer.
Merchant ID <character> Defines the Merchant ID forthe authorization file.
CC Auth/Settlement Folder Folder path Repository location forauthorization/settlementfiles generated by OHCCredit Card Interface.Note: To avoid adverseimpact on your system,please abstain from usingthe following folder path:SystemDirectory“\Users\Public\Documents\OracleHospitality Cruise”
Chapter 2SPMS Parameters
2-2

PAR_GROUP Not Specified
Table 2-3 PAR_GROUP Not Specified
PAR Name PAR Value Description
CC Transfer Format OHCCreditCard Specifies the message formatto be generated by Credit CardTransfer.
System ConfigurationThis section describes the setup of various system codes required by the Generic CreditCard handling and these codes are setup in Administration module, Financial Setup,Department Setup.
Department SetupDepartment Setup
A debit and credit department code for each credit card type accepted by the ship must beconfigured for charging and posting to take place.
Credit/Debit Card Department Code Setup
1. Log in to the Aministration module and select Financial Setup, Department Setupfrom the drop-down list.
2. Click New to create a Sub-Department code.
Chapter 2System Configuration
2-3

Figure 2-1 Department Code Setup
3. Under the Main Department section, enter the credit/debit card information suchas payment type, department code, and description.
4. In the Payment Type Details section,
a. Enter the first two digits of the first set of the credit card number in Credit Carddigit.
b. Enter the Credit Card ID, for example MC — MasterCard, VI — Visa, andothers.
c. Select the corresponding Credit Card Internal ID from the drop-down box.
d. Enter the Credit Card Merchant Numberprovided by the service provider.
e. Set the Minimum Authorized Value to 0.
f. Select the Commission department from the drop-down list and update thecommission rate in percentage.
g. Select the Debit Card No Commission chargecheck box if a commission isnot applicable to the debit card.
5. In the Department Security access, select the appropriate security level from thedrop-down box.
6. Select the Payment Type under the Payment Department Type, either Both Creditand Debit card, Credit card or Debit card.
Chapter 2Department Setup
2-4

7. Click OK to save.
Receipt SetupA receipt can be generated upon payment and this requires a report template to be set up. AStandard Credit Card receipt template is available in Administration module, SystemSetup, Report Setup, Receipts Group. Please contact Oracle Hospitality Cruise Support ifyou would like to configure a customized receipt format.
Transaction Services InstallationIn order to have the program to work seamlessly and as a standard installation, a WebServices installation is required. Download the latest Installation Guide from the Oracle HelpCenter and follow the steps to install.
Registering a Credit CardThe Generic Credit Card handling has two operating modes:Attended and Unattended. TheUnattended Mode offers user a payment solution in an un-managed environment such askiosk, self-service outlets. The Attended Mode requires user intervention. Registration ofcredit cards in both modes is performed through a Web Service function.
Registering Credit Card in Attended Mode
The Attended Mode is a direct sales mode that registers a card, performs the saletransaction, and deactivates the card after the sale transaction is complete and at the sametime, inserts the card details into the account as Inactive. A board card or cruise card isrequired in order to process the sales transaction and a re-registration of the card if the guestdecides to use the same card for settlement at a later time.
Viewing an Authorization Amount in Management module for Attended mode
1. Log in to the Management module and navigate to the Guest Handling screen.
2. In the Search Panel, browse for the guest account and navigate to the Credit Card tabin the guest account. The registered card should be in an Inactive mode.
3. To display the initial authorization, select the credit card and click CView Authorizationin the middle section of the screen.
4. Navigate to the Invoice tab to view the sale transaction of the credit card. The amount iscredited automatically onto the invoice if the card is a Debit Card.
Figure 2-2 Authorization Display on Invoice — Credit Card
Chapter 2Receipt Setup
2-5

Figure 2-3 Management Authorization Display on Invoice — Debit Card
Registering Credit Card in Unattended Mode
The Unattended mode registers the card as Active in the guest account and post sacredit if the registered card is a debit card. A board card or cruise card is required forpayment card registration.
Viewing an Authorization Amount in Management module for Unattended Mode.
1. Log in to the Management module and navigate to the Guest Handling screen.
2. In the Search Panel, browse for the guest account and navigate to the Creditcard tab in the Guest account.
Figure 2-4 Management Authorization View
3. Select the registered credit/debit card and click View Authorizations to displaythe Initial Authorization.
Chapter 2Registering a Credit Card
2-6

Figure 2-5 Management Initial Authorization View
Credit Card Transfer Interface
The Credit Card Interface has several functions enabled for Generic Card Transfer handlingthrough the Credit Card Batch Authorization. Refer to the following table:
Table 2-4 Credit Card Transfer Interface Functions
Authorization Settlement
• Test File• New Authorization File• Read Authorization File• Manual Authorization File
• New Settlement File• Read Settlement File
Creating Incremental / Top up Authorization File1. Start the Credit Card Transfer Interface, select the Authorization menu, and select the
New Authorization File from the drop-down menu.
Chapter 2Creating Incremental / Top up Authorization File
2-7

Figure 2-6 Credit Card Transfer — Authorization Tab
2. In the Cruise Credit Card Authorization Write screen, a list of credit cards requiringincremental authorization appear in the grid. Use the Selection Criteria to filter thedesired information.
Figure 2-7 New Authorization Screen
3. Click the Process button to generate the Authorization file. After the filegeneration completes, the location of the saved file is indicated on the screen.
Figure 2-8 Authorization File Location
4. In the Management module, Guest Handling function, select the guest accountand navigate to the Credit Card tab. Click View Authorization to open the
Chapter 2Creating Incremental / Top up Authorization File
2-8

Authorization screen. The status of the transaction pending authorization is reflected as:Outstanding.
Figure 2-9 Management — Authorization Screen Manual
Reading Authorization FileAfter the Merchant/Service Provider processes the authorization request, a response file withauthorization codes is returned. You must update the authorization codes into the guestaccount using the Read Authorization function.
1. Repeat step 1 of Creating Incremental/Top Up Authorization File and select ReadAuthorization File from the drop-down menu.
2. At the Cruise Credit Card Authorization Read screen, click Open Fileand search for theresponse file provided by the merchant, for example, the file name is XXXXXX.pcr
3. Click Process to process the response transactions. A progress status is shown on thescreen.
4. Navigate to the Management module, Guest Handling function, locate the guestaccount, and navigate to Credit Card tab.
5. Click the View Authorization button to view. The authorized transaction status‘Authorized’.
Chapter 2Reading Authorization File
2-9

Figure 2-10 Management — Authorization Screen Manual
Obtaining Manual AuthorizationA manual authorization is available on an ad hoc basis and is performed within theguest account.
1. In the Management module, Guest Handling function, select the guest account.
2. Navigate to the Credit Card tab and click View Authorization.
3. In the Authorization screen, select Add Authorization.
4. Enter the value and the authorization code in the Credit Card Authorization screenwhen prompted, and click OK to save. This sets the status to ‘Authorized’ in theManual Authorization screen.
Figure 2-11 Management — Add Authorization Screen — Credit CardAuthorization
5. The Authorized code and value is shown at Authorization section when selectingthe manual authorized transaction.
Chapter 2Obtaining Manual Authorization
2-10

Figure 2-12 Manual Authorization Screen, Forced Status
Creating Settlement FileAt the end of an invoice settlement, the system writes the settlement into the Settlement file,to be processed in a batch.
1. In the Credit Card Transfer Interface program, select from the drop-down menuSettlement, then New Settlement File.
2. Click the Process button to generate the Settlement File. After the Settlement file iscreated, the location of the saved file is shown on the screen.
Figure 2-13 Settlement Write Screen
Reading Settlement File
After the Merchant or Service Provider returns a Response File, you must upload the file andupdate the Settlement transactions status.
Chapter 2Creating Settlement File
2-11

1. From the Settlement drop-down menu, select Read Settlement File.
2. On the Cruise Credit Card Settlement Read screen, click the Open File button andlocate the Settlement Response file.
3. The status of the process is on the Settlement Read screen. Click the Processbutton to read and update the Settlement record.
Figure 2-14 Settlement Read Screen
ReportThe credit card digits to print on reports depends on the setting defined in the Numberof Credit Card Front Digit to Display parameter. This parameter only supports valuefrom 0 - 6.
Below are the examples of the number of front digit to show on the report based on thevalue defined.
Figure 2-15 Reporting — Number of Front Digit to Appear in Report
Chapter 2Report
2-12

Troubleshooting SectionThis section describes the troubleshooting steps for resolving some known issuesencountered in Generic Credit Card handling.
Table 2-5 Tools Known Issue and Solution
Known Issue Solution
Error — ‘Key unable to upload’ Register PGPBBox7.dll with regsvr32.exeagain.
Error — ‘License Key has not been set’ Register PGPBBox7.dll with regsvr32.exeagain.
Credit Card Transfer Interface
Table 2-6 Credit Card Transfer Interface Known Issue and Solution
Known Issue Solution
Credit Card Transfer does not reflect thecorrect desired credit card format
Check the credit card format setup inAdministration module, System Setup,Database Parameter, Interfaces, Batch CCardProcessing Format.
Table 2-7 Web Services Log
Parameter Description
<GuestSearch> The program searches the guest details fromthe information obtained from the Credit Carddevice; all guests in the same cabin are alsoshown on the Credit Card device.
<GetAmount> Credit Card device prompts to insert/swipepayment card and SPMS will determine thepre-authorization amount based on cardinformation retrieved from Credit Card device.The Credit Card pre-authorization amount isbased on the Online Initial Auth Amountparameter, and the debit card pre-authorization amount is based on the OnlineDebit Initial Auth Amount parameter.
<UpdateCardInfo> The SPMS obtain information provided by themerchant or service provider through the carddevice and inserts the token, status andmodification date from the response into thecard record and authorization record forApproved and Declined cards.
<AddRouting> If the transaction is approved, the Credit Carddevice displays the other guest names of thesame cabin for routing processing. SPMSupdates the RES_QROUTE_ACC if routing isassigned through the device.
Chapter 2Troubleshooting Section
2-13

Table 2-7 (Cont.) Web Services Log
Parameter Description
<TmlTweet> The function maintains the Credit Card deviceKeep Alive status. Additional informationupdates such as cruise currency, pendingtransaction depend on this function.
<gbCardRegistration> This parameter identifies whether the guest/crew/system account is allowed to performpayment card registration or not. The value forthe parameter is either true or false.
<gbRouting> This parameter identifies whether the guest/crew/system account is allowed or not toperform payment routing.The value for the parameter is either true orfalse.
<GuestSearch>
The program searches the guest details fromthe information obtained from the Credit Carddevice; all guests in the same cabin are alsoshown on the Credit Card device.
<GetAmount> The Credit Card device prompts to insert/swipepayment card, and SPMS determines the pre-authorization amount based on cardinformation retrieve from Credit Card device.The Credit card pre-authorization amount isbased on the Online Initial Auth Amountparameter, and the debit card pre-authorization amount is based on the OnlineDebit Initial Auth Amount parameter.
<UpdateCardInfo> The SPMS obtain information provided by themerchant or service provider through the carddevice and inserts the token, status andmodification date from the response into thecard record and authorization record forApproved and Declined cards.
<AddRouting> If the transaction is approved, the Credit Carddevice displays the other guest names of thesame cabin for the routing process. SPMSupdates the RES_QROUTE_ACC if routing isassigned through the device.
<TmlTweet> The function maintains the Credit Card device‘Keep Alive’ status. Additional informationupdate such as cruise currency, pendingtransaction depends on this function.
<gbCardRegistration> This parameter identifies whether the guest/crew/system account is allowed to performpayment card registration. The value for theparameter is either true or false.
Chapter 2Troubleshooting Section
2-14

Table 2-7 (Cont.) Web Services Log
Parameter Description
<gbLastDay>
This parameter identifies the guest/crew/system account’s last day of the cruise. Theparameter is controlled by the ‘General’,‘Number of Before Disembarkation Days’parameter, and the value of the parameter iseither true or false,for example:If [Disembarkation date] - [Number of BeforeDisembarkation Days] = [System Date], then<gbLastDay> = true, else <gbLastDay> = false.
<gbDebitRefund> This parameter identifies whether the guest/crew/system account is allowed to receive arefund the balance from their invoice account.The value for the parameter is either true orfalse.
Generic Credit Card Mapping FieldsThis section describes the field definition supported by the Generic Credit Card(OHCCreditCard) format.
File Name Format
The file naming format for Generic Credit Card is explained in in the following table, forexample: GuestTransfer#######.pci.
Table 2-8 Generic Credit Card File Format
Name Description
Guest The first word of the file name is arepresentation of the Account Type based onthe filter used to generate the authorizationfile.Guest - GuestTransfer#######.pciCrew - CrewTransfer#######.pciGroup - GroupTransfer#######.pciStaff - StaffTransfer#######.pciAll filter - <Blank>Transfer#######.pci
Transfer The second word of the file name representsthe type of transfer.TestTransfer = test authorization file.Transfer = Authorization transaction file.Settle = Settlement transaction file.
071020161138 The date/time format of the authorization fileisDDMMYYYYHHMM.
Chapter 2Generic Credit Card Mapping Fields
2-15

Table 2-8 (Cont.) Generic Credit Card File Format
Name Description
PCI or PCR The file format extension of the authorizationfile:pci = request filepcr = response file
Request File Format
The following table describes the field definitions for a Request File for Authorizationand Settlement.
Table 2-9 Request File Format
Field Type Size Definition
Header
Head Varchar 4 Fixed value: “HEAD”.
data-source Varchar 30 File sender name,example “MV SHIP”.
Date Int 12 Format:YYMMDDHHMMSS,111019130712.
file-number Int 12 Counter for the file.
Version Varchar 4 Version string of ourbatch file, example1.0.
Batch Record
MerchantID Varchar 20 Merchant ID. Forexample: HOTEL.
Paytype Varchar 10 “CC” - for VI, MC.“EDD” - for EC.“TO” - for if tokenwith value.
Chapter 2Generic Credit Card Mapping Fields
2-16

Table 2-9 (Cont.) Request File Format
Field Type Size Definition
Trxtype Varchar 12 |tstauth|incauth|capture|refundtstauth: Testauthorization, it is amandatoryauthorization priorto generating aninitial authorization.incauth: Incrementalauthorizationincreases amount ofan existingauthorization. Inputhas to be the totalamount(initial+additionalamount).capture: Book a pre-authorization.Capture amount hasto be less than orequal to theauthorized amount.refund: Refund anamount only validfor an existing order.
TransID Varchar 50 Unique transactionidentificationnumber in ASCII.Does not supportspecial characters.
TransID reference Varchar 50 Reference to theoriginal uniquetransaction wherenecessary. Forexample: capture,refund, incauth foran already existingtransaction.
Amount Int 9 Always in thesmallest currencyunit in cent for Euroand so on. Forexample 100 for 1Euro.b Empty ifTrxtype=register.
Chapter 2Generic Credit Card Mapping Fields
2-17

Table 2-9 (Cont.) Request File Format
Field Type Size Definition
Currency Varchar 3 Currency codeaccording to ISO4217 for thistransaction. Forexample; EUR, USD,or follow the Ship’scurrency.
Description Varchar 27 Note to payee in textfor EDD Debit Cardor other PaymentMethod.
AppCodeTel Int 6 Specialauthorization codeobtained manuallythrough telephonefor an authorizationfrom an acquirer.
Customer Varchar 27 Customer name.
CD_customerid Varchar 16
Customer ID inCustomerRelationshipManagement System(CRM).
CD_customertype Varchar 12 Type of customer,For example: crew,passenger, staff andothers.
CD_orderid Varchar 16 Unique order-id.
CD_paxid Varchar 16 Customer unique ID.
CD_cruiseid Varchar 10 Travel number.
CD_accountid Varchar 12 On-board accountnumber.
CD_roomid Varchar 6 Cabin number
CD_invoiceid Varchar 12 Account number
Reference Varchar 30 Additional reference.
Token Varchar 30-40 Universally uniqueidentifier (UUID). Forexample:ed4bdf30-4ac4-102f-991a-000bcd838e00.Reference for apayment account,either from pre-registration(manifest) or fromearlier batch reply.Token usage ismandatory.
Chapter 2Generic Credit Card Mapping Fields
2-18

Table 2-9 (Cont.) Request File Format
Field Type Size Definition
CC_brand Varchar Varchar 10 Credit card brandMasterCard, VISA,AMEX, DC, JCB.
CC_cardowner Varchar 27 Card owner.
EDD_accountowner Varchar 27 Bank account owner.
Track1enc Varchar 256 For future use.
Track2enc Varchar 256 For future use.
Track3enc Varchar 256 For future use.
KSN Varchar 32 For future use.
Device Varchar 32 For future use.
Batch Footer
Foot Varchar 4 Fixed value: “FOOT”.
Counter Int 9 Total number ofrecords.
Table 2-10 Response File Format
Field Type Size Definition
Head Varchar 4 Fixed value: “HEAD”.
data-source Varchar 30 File sender name,example “MV SHIP”.
Date Int 12 Format:YYMMDDHHMMSS,111019130712.
file-number Int 12 Counter for the file.
Version Varchar 4 Version string of ourbatch file, example 1.0.
Response Record
TransID Varchar 50 Unique transaction ID.
Token Varchar 40 UUID for this paymentaccount. Only if thepayment account(credit card or EDD) isvalid.
Return-code Varchar 10 00000000 (8 zeros forOK)NNNNNN (for Error,ex. 23055310).
Status Varchar 10 Textual representationof return code, “OK”,“Error”.
Description Varchar 255 Description for Status.
Chapter 2Generic Credit Card Mapping Fields
2-19

Table 2-10 (Cont.) Response File Format
Field Type Size Definition
Reference Varchar 30 Additional reference.Same as inputparameter.
CD_customerid Varchar 16 Customer numberfrom CRM.
Approvalcode Int 6 Approval-code for thistransaction.
EPAref Int 9 EPA-Reference for thistransaction, only usedfor Accounting.
auth_time Varchar 20 Server time stamp forthe single transaction,format YYYY-MM-DDTHH:MM:SS as UTCTime.
Footer
Foot Varchar 4 Fixed value: “FOOT”.
Counter Int 9 Total number ofrecords.
Sample BIN RangeBelow are the sample eligible BIN range for Generic Credit Card.
400626,400626,DEL,Visa Debit,16 480240,480240,DEL,Visa Debit,16
407704,407705,DEL,Visa Debit,16 407704,407705,DEL,Visa Debit,16
408367,408367,DEL,Visa Debit,16 484412,484412,DEL,Visa Debit,16
409400,409402,DEL,Visa Debit,16 484415,484417,DEL,Visa Debit,16
412285,412286,DEL,Visa Debit,16 484427,484427,DEL,Visa Debit,16
413733,413737,DEL,Visa Debit,16 490960,490979,DEL,Visa Debit,16
413787,413788,DEL,Visa Debit,16 492181,492182,DEL,Visa Debit,16
418760,418760,DEL,Visa Debit,16 495065,495065,DEL,Visa Debit,16
419176,419179,DEL,Visa Debit,16 495090,495094,DEL,Visa Debit,16
419772,419772,DEL,Visa Debit,16 498824,498824,DEL,Visa Debit,16
420672,420672,DEL,Visa Debit,16 499844,499846,DEL,Visa Debit,16
446213,446254,DEL,Visa Debit,16 499902,499902,DEL,Visa Debit,16
446257,446272,DEL,Visa Debit,16 400115,400115,ELC,Visa Electron,16
446274,446283,DEL,Visa Debit,16 400837,400839,ELC,Visa Electron,16
446286,446286,DEL,Visa Debit,16 412921,412923,ELC,Visa Electron,16
Chapter 2Sample BIN Range
2-20

450875,450875,DEL,Visa Debit,16 424962,424963,ELC,Visa Electron,16
453978,453979,DEL,Visa Debit,16 444000,444000,ELC,Visa Electron,16
454313,454313,DEL,Visa Debit,16 484406,484408,ELC,Visa Electron,16
456705,456706,DEL,Visa Debit,16 484411,484411,ELC,Visa Electron,16
456725,456745,DEL,Visa Debit,16 484418,484426,ELC,Visa Electron,16
458046,458046,DEL,Visa Debit,16 484428,484455,ELC,Visa Electron,16
460024,460024,DEL,Visa Debit,16 491730,491759,ELC,Visa Electron,16
465830,465879,DEL,Visa Debit,16 499806,499806,ELC,Visa Electron,16
465901,465950,DEL,Visa Debit,16 512499,512499,MCD,MasterCard Debit,16
474503,474503,DEL,Visa Debit,16 512746,512746,MCD,MasterCard Debit,16
474551,474551,DEL,Visa Debit,16 516001,516001,MCD,MasterCard Debit,16
475110,475159,DEL,Visa Debit,16 535420,535819,MCD,MasterCard Debit,16
475183,475183,DEL,Visa Debit,16 537210,537609,MCD,MasterCard Debit,16
476220,476269,DEL,Visa Debit,16 557347,557496,MCD,MasterCard Debit,16
476340,476389,DEL,Visa Debit,16 545721,545723,MCD,MasterCard Debit,16
Chapter 2Sample BIN Range
2-21

3Ingenico Format
The following sections describe the setup and usage of Online Credit Card Transfer for theINGENICO handling.
Prerequisite, Supported Systems, and CompatibilityThis section describes the minimum requirements for using the Ingenico handling.
Prerequisite
• OHC Ship Transf.exe
• OHC Tools.exe version
• Wrapper.dll version
• SPMS Parameters
• Web Services Installation
• CRUFLFC.dll version
Supported Credit Card Device
Please contact your local provider on the device supported and the installation instructions.
Compatibility
SPMS version 20.2 or later. For customer operating on version below 20.2, a databaseupgrade to the recommended or latest version is required.
SPMS Parameters IngenicoThis section describes the parameters available to INGENICO Online Credit Card module.They are accessible from the Administration module, System Setup, Parameter function.
PAR_GROUP General
Table 3-1 PAR Group General
PAR Name PAR Value Description
Enable Signature Capturefor Credit Card 0 or 1
0 - Disables Signature Capture for Credit Card.1 - Enables Signature Capture for Credit Card.
Number of day beforedebarkation
2 Specifies the number of days before guestdisembarkation date to swipe the exact amount fordebit/credit card in online mode.
3-1

Table 3-1 (Cont.) PAR Group General
PAR Name PAR Value Description
Allow payment forDeclined Authorization
1 0 - Does not allow payment if authorization isdeclined but allow when offline.1 - Allows payment if authorization is decline oroffline.2 - Does not allow payment if authorization isdecline or offline.
Allow posting for declinedauthorization
1 0 - Does not allow posting if credit cardauthorization is declined.1 - Allows posting.
Online Initial AuthAmount
<Amount> Defines the initial authorization amount for allcard types when card is swiped at the terminal inonline mode.
Online Debit Initial AuthAmount
10,20,30,40 Defines four amounts for the debit card initialauthorization amount.
Allow Settlement Voiding 1 0 - Allows voiding, no message will be prompted.1 - Allows voiding, message will be prompted.2 - Does not allow voiding.
Number of hour afterembark date to block card
<hours> Defines the number of hours after embarkationdate to block cruise card/disable posting.
Number of Credit CardFront Digit to Display
<Value> Defines the number of credit card front digitvisible in the credit card report. Value 0 to 6.
PAR_GROUP Ingenico
Table 3-2 PAR Group Ingenico
PAR Name PAR Value Description
Enable Change PaymentDepartment 0
0 - Disables the change of payment departmentafter card is deactivated.1 - Enables a change of payment departmentafter card is deactivated.
Amount for Online topup
<Amount> Defines the top up amount to define to send inonline/offline mode.
Fixed Amount to add totop up amount
<Amount> Defines the fixed amount to add to the top upvalue.
Posting amount to rejectif auth declined/offline
<Amount> Does not allow posting if posting amount aremore than parameter defined amount ANDauthorization is decline or offline.
Credit Amount NotAllowed to Exceed
<Amount> Specifies the credit posting amount not allowedto add if credit is greater than debit value andcredit greater than new parameter value.Default value = 0.
PAR_GROUP Not Specified
Chapter 3SPMS Parameters Ingenico
3-2

Table 3-3 PAR_GROUP Not Specified
PAR Name PAR Value Description
CC Transfer Format OHCCreditCard Specifies the message formatto be generated by Credit CardTransfer.
CCard Interface Name <Workstation IP/Name> Workstation IP address/namethat runs OHC Ship Transfer.
System Configuration IngenicoThis section describes the various system code setups used by Ingenico Handling. Thefunction is available in the Administration module.
Department Setup
You must configure a debit and credit department code for each credit card type accepted bythe ship in order for charging and posting to take place.
Credit/Debit Card Department Code Setup
1. Log in to the Administration module and select Financial Setup, Department setupfrom the drop-down list.
2. Click the New button to create a Sub-Department code.
Chapter 3System Configuration Ingenico
3-3

Figure 3-1 Department Code Setup
3. Under the Main Department section, enter the credit/debit card information suchas Payment Type, Department Code, and Description.
4. In the Payment Type Details section:
• Enter the first two digits of the first set of the credit card number in the CreditCard digits field.
• Enter the Credit Card ID, for example, MC — MasterCard, VI — Visa, andothers.
• Select the corresponding Credit Card Internal ID from the drop-down list.
• Enter the Credit Card Merchant Number provided by the Service Provider.
• Select the Commission department from the drop-down list and update thecommission rate in percentage.
• Select the Debit Card No Commission charge if the commission is notapplicable to debit card.
5. In the Department Security access section, select the appropriate security levelfrom the drop-down list.
Chapter 3System Configuration Ingenico
3-4

6. Select the Payment Type under Payment Department Type, either Both Credit and Debitcard, Credit card or Debit card. This field determines whether the payment type is aCredit Card or Debit Card.
7. Click OK to save.
Merchant SetupA merchant credential is required for credit card authorizations and payments to be handledefficiently. Prior to setting up the Merchant’s credentials, the following information must beready:
• Pre-configured Credit Card type
• Currency code exist in currency table
• Merchant information from service provider
Merchant Credentials1. Log in to the Administration module and select Financial Setup, Credit Card Merchant
Setup from the drop-down list.
2. Right-click and select Add New to open a new screen.
Figure 3-2 Merchant Setup
3. Fill in the following fields correctly:
Chapter 3Merchant Setup
3-5

a. Credit Card type
b. Currency
c. Terminal IF
d. Decimal
e. IP port
f. Merchant Logon ID
g. Merchant Password
4. Click OK to save.
5. Repeat steps 1 to 5 for other credit card types accepted by the Merchant.
Receipt Setup
A receipt can be generated upon payment and this requires setting up a reporttemplate. A Standard Credit Card receipt template is available in Administrationmodule, System Setup, Report setup, Receipts group. Contact Oracle HospitalityCruise Support if you want to configure a customized receipt format.
Credit Card BIN Import
In order for the program to recognize the correct card type (Credit/Debit) and itshandling, you must import a Credit Card Bank Identification Number (BIN) file providedby ELAVON to SPMS periodically. This file contains the complete set of eligible BINsand information from the previously loaded BIN file is overwritten during the reloadprocess.
BIN file loading
1. Log in to the Administration module and select Financial Setup, Import CreditCard Bin file.
2. Locate and select the latest BIN file from the folder, and click Open. For moreinformation about the BIN format, see Sample BIN Ranges.
3. The BIN file Information populates in the Credit Card BIN Import screen. Click theImport to save the BIN ranges into the BIN table. Table 3–4 — Card TypeCategory in BIN Table describes the card categories in the BIN file:
Table 3-4 Card Type Category in BIN Table
BIN-ISDEBIT Description
0 Credit Card
1 Debit Card
2 Combo Card
4. Click Close to exit.
Transaction Services Installation
As a standard installation, a Transaction Services installation is required. To install theTransactionsServices, consult the SPMS Installation Guide.
Chapter 3Merchant Credentials
3-6

Ingenico OHC Ship TransferThe OHC Ship Transfer is an interface program that sends the batch authorization fromSPMS to the Ingenico Payment Gateway at a scheduled time for credit card payments to beauthorized.
Setting up OHC Ship Transfer
1. Start OHC Ship Transf.exe and navigate to Settings tab.
2. Under the Remote Server section, insert the following URLs obtained from therespective payment gateway provider in the respective field:
• Payment gateway URL / Web service URL
• Batch Payment gateway URL / Batch Web service URL
3. To set an Auto Scheduler for batch authorizations to be sent daily at a scheduled time,select the Auto Scheduler and set the desire time.
Figure 3-3 OHC Ship Transfer Scheduler
4. This function is only applicable to the Ingenico Online Credit Card format batchauthorization. For Batch Settlement, these are performed in Management/Crew, CreditCard Batch Settlement function.
5. The above settings are saved in OHCSettings.Par under the following tag:
Chapter 3Ingenico OHC Ship Transfer
3-7

Table 3-5 OHCSettings.Par
Field Name Description
[#ShipTransf.Connection.AutoScheduler=1#]
Indicates whether the Auto Scheduler isturn on/off (1 = on, 0 = Off).
[#ShipTransf.Connection.AutoSchedulerTime=23:30#]
Indicates the time set in Auto Scheduler.
[#ShipTransf.Connection.last Date AutoAuthorization=20150307000000#]
Indicates the last sent date/time of thebatch top up. The saved date/time formatis YYYMMDDHHMMSS
Checking Amount Authorized in Management module1. Log in to the Management module and navigate to the Guest Handling screen.
2. In the Search Panel, browse for the guest account.
3. Navigate to the Credit Cards tab in the Guest account.
Figure 3-4 Management Authorization View Screen
4. Select the registered credit/debit card and click View Authorizations to displayInitial Authorization.
Chapter 3Checking Amount Authorized in Management module
3-8

Figure 3-5 Management Initial Authorization View Screen
Processing Credit Card BatchThe batch function sends authorization requests and settlement by batch to Ingenico forprocessing. This function requires parameters, Not Specified, CC Transfer Format set as“INGENICO”. These functions are only permissible to users with assigned security rights.See User Security Group for access rights for details. Both functions are available in theManagement and the Crew module.
• Management, Cashier, Credit Card Batch Authorization/ Credit Card Batch Settlement.
• Crew, Quick Functions, Credit.
Generating Batch AuthorizationThe Credit Card Batch Authorization function sends authorization requests of credit/debitcards marked with ‘Online top up amount’ by batch to Ingenico through the Ship Transferinterface.
1. Log in to the Management module.
2. Select Credit Card Batch Authorization from the menu-item to open the BatchAuthorization Handling screen. The Batch Authorization Handling screen includes fourtabs.
Table 3-6 Batch Authorization Screen
Tab Name Description
Outstanding Authorizations Authorizations request yet to be process.
Pending Authorizations Authorizations request pending approvalfrom service provider.
Declined Authorizations Authorizations request declined by serviceprovider.
Chapter 3Processing Credit Card Batch
3-9

Table 3-6 (Cont.) Batch Authorization Screen
Tab Name Description
Approved Authorizations Authorization request approved by serviceprovider.
3. To process the batch, select the desire tab and click Process. A progress bar isshown on the screen indicating the batch progress.
Figure 3-6 Management, Batch Authorization — Outstanding AuthorizationTab
Figure 3-7 Management, Batch Authorization — Outstanding AuthorizationTab
Chapter 3Generating Batch Authorization
3-10

Figure 3-8 Management, Batch Authorization — Declined Authorization Tab
Figure 3-9 Management, Batch Authorization — Approved Authorization Tab
4. Information is passed to the OHC Ship Transfer to request authorization from Ingenico.The status of the batch authorization is reflected in the OHC Ship Transfer Message tabin the following example:
Chapter 3Generating Batch Authorization
3-11

Figure 3-10 OHC Ship Transfer Messages
Table 3-7 OHC Ship Transfer Message Description
Message Line Authorization Status
Line 1 Batch authorization requested to serviceprovider.
Line 2 Batch authorization request is successful,can start sending batch authorization data.
Line 3 Batch authorization data sent successfullyto service provider.
Line 4 Batch authorization data send completed,and now awaiting response from serviceprovider.
Line 5 Batch authorization response from serviceprovider.
Generating Batch SettlementThe Batch Settlement Handling screen includes four tabs as follows:
• Outstanding Settlements: Settlement request yet to be process.
• Pending Settlements: Settlement request pending approval from servicesprovider.
• Declined Settlements: Settlement request declined by service provider.
• Approved Settlements: Settlement request approved by service provider.
To generate a batch settlement,
Chapter 3Generating Batch Settlement
3-12

1. From the menu-item, select Credit Card Batch Settlement to open the BatchSettlement Handling screen.
2. Select the desire tab and click Progress. A progress bar appears on the screenindicating the batch progress.
Figure 3-11 Management, Batch Settlement — Outstanding Settlement Tab
3. In the Declined tab, declined settlement transactions are listed. Click the Retry button toresubmit the declined settlement transaction for approval.
Chapter 3Generating Batch Settlement
3-13

Figure 3-12 Management, Batch Settlement — Declined Settlement Tab
Figure 3-13 Management, Batch Settlement — Approved Settlement Tab/Progress Bar
4. Information is passed to Ship Transfer to request a settlement process fromIngenico. The status of the batch settlements is reflected in the Ship Transfer’sMessage tab and illustrated in the following examples:
Chapter 3Generating Batch Settlement
3-14

Figure 3-14 OHC Ship Transfer Message
Table 3-8 OHC Ship Transfer Message Description
Message Line Authorization Status
Line ABatch Settlement Request sent (Positive /Negative/Refund amount).
Line B Batch Settlement sent successfully.
Line C Await response from service provider.
Line D Response from service provider (Positive /Negative/Refund amount).
Line E Response updates statuses.0 - Not Processed; 1 - Processing; 2 - Processed;3 - Error.
Setting up a ReportIn order to meet Payment Application Data Security Standard (PA-DSS) requirements, allcredit card numbers printed must be masked. This is accomplished using Number of CreditCard Front Digit to Display parameter to handle the number of digits to be displayed on thereport. You can only enter a value ranging from zero to six in this parameter. Any valueoutside this range will receive an error.
The total front digit of the card number to display in the report is subject to the value definedin theNumber of Credit Card Front Digit to Display parameter. See the following examples:
Chapter 3Setting up a Report
3-15

Figure 3-15 Number of Credit Card Front Digit to Display
Troubleshooting IngenicoThis section describes the troubleshooting steps that will assist you in resolving theknown errors with Ingenico handling.
Table 3-9 Ship Transfer Interface Known Issue and Solution
Known Issue Solution
OHC Ship Transfer program opens/closesitself
Ensure you are using latest wrapper.dll.Version 5.0.0.001 or later.
MsgErr <HT> Logon ID is Missing Register the Wrapper.dll with regasm.exe
MsgErr <HT> Logon ID is Missing Ensure the Logon and Password isconfigured in the merchant setup.
Chapter 3Troubleshooting Ingenico
3-16

Table 3-10 Ingenico ISC480 Device Known Issue and Solution
Known Issue Solution
Error code : [1001] Ensure the App_code.dll or OHCSPMSData.dll,OHCSPMSBusiness.dll, OHCSPMSMobile.dll,OHCSPMSUI.dll is of the same version incurrent SPMS Web Server in OHCWebservices,Bin folder.
Error code : [1003] Ensure the Webserver IP address, port numberis configured correctly in the device.
Error code : [3103] Ensure the Web Server is connected todatabase defined in web.config file.To check the connection between webserverand database.Browsehttp://<web server hostname>/OHCWebServices/IngenicoService.asmx?op=GuestSearchKey in the Terminal ID.Key in guest’s board card string.Click Invoke.Guest information populates if the connectionbetween webserver and database is active.
Table 3-11 Web Services Log
Parameter Description
<GuestSearch>
Ingenico device will prompt to swipe boardcard screen.SPMS will search guest details from theinformation retrieved (board card swipedthrough Ingenico device) from Ingenicodevice; all guests in same cabin will display inIngenico device as well.
<GetAmount> Ingenico device will prompt to insert/swipepayment card.SPMS will determine the card informationretrieve from Ingenico device for the pre-authorization amount.Credit card pre-authorization amount is basedon parameter > ‘Online Initial Auth Amount’.Debit card pre-authorization amount is basedon parameter > ‘Online Debit Initial AuthAmount’.
<UpdateCardInfo> Ingenico device will get the transaction statusfrom the merchant/service provider andresponse to SPMS.SPMS will insert the response into databaseand Authorization the status retrieves fromresponse file (Approved/Declined).
Chapter 3Troubleshooting Ingenico
3-17

Table 3-11 (Cont.) Web Services Log
Parameter Description
<AddRouting> If the transaction is approved, Ingenico devicewill display the other guest names of the samecabin for routing process.SPMS will update the RES_QROUTE_ACC ifrouting assign in the device.
<TmlTweet> This parameter is to keep the Ingenico deviceconnection alive.Additional information like cruise currency,pending transaction will be determined by thisfunction.
<gbCardRegistration> This parameter identifies the guest/crew/system account allowed to perform paymentcard registration or not.The value for the parameter is true or false.
<gbRounting> This parameter identifies the guest/crew/system account allowed to perform paymentrouting or not.The value for the parameter is true or false.
<gbLastDay> This parameter identifies the guest/crew/system account’s last day of the cruise.This parameter is controlled by systemparameter [Parameter > General > ‘Number ofBefore Disembarkation Days’]The value for the parameter is true or false.For exampleIf [Disembarkation date] - [Number of BeforeDisembarkation Days] = [System Date], then<gbLastDay> = true, else <gbLastDay> = false
<gbDebitRefund> This parameter identifies the guest/crew/system account allowed to refund the balancefrom their invoice account.The value for the parameter is true or false
Table 3-12 Transaction Status
Status Description
Initial Authorization
CCA_OPERATION 1
CCA_MTYPE 0 (Online initial auth), 1 (Offline initialauth).
CCA_PREVIOUS Original pre-authorization reference ID,value retrieve from parameter ‘CC Ship’ at(CCA_GROUP= ‘Not Specified’ + sequenceCNT_POS_RES).
CCA_STATUS 0 (outstanding/pending), 1 (approved), 2(declined).
Chapter 3Troubleshooting Ingenico
3-18

Table 3-12 (Cont.) Transaction Status
Status Description
CCA_QSTATUS 0 (pending), 8 (completed).
CCA_STATUS = 0CCA_QSTATUS = 8
It means pseudo/temporary token isreceived and waiting for real token afterconnection with merchant/service provideris resume.
Incremental Authorization
CCA_OPERATION 2
CCA_MTYPE 4 (Online incremental auth), 5 (offlineincremental auth)If CCA_MTYPE = 5• When parameter ‘Allow Posting For
Declined Authorization’ is set to 0. Forincremental authorization createdduring system cruise change.
• When parameter ‘Allow Payment ForDeclined Authorization’ is set to 0 or 2.For incremental authorization createdduring pay invoice/quick billing.
CCA_FILENO File number being assigned when createbatch authorization.
CCA_FSTATUS Batch file processing status0 (pending), 1 (processing and waiting forresponse), 2 (processed done), 3 (error).
Settlement
CCT_STATUS 0 (outstanding), 1 (approved), 2 (declined)
CCT_QSTATUS 0 (pending), 2 (when ‘Process’ is clicked onOHC Management > Credit Card BatchSettlement), 8 (Completed)
CCT_FILENO File number being assigned when createbatch settlement
CCT_FSTATUS Batch file processing status0 (pending), 1 (processing and waiting forresponse), 2 (completed), 3 (error)
Direct Payment
CCA_MTYPE 6
CCA_STATUS 1 (approved), 2 (declined).
No Settlement created
AppendicesUser Security Group
The following User Access Rights must be granted to users performing Batch Authorization/Settlements.
Chapter 3Appendices
3-19

Table 3-13 User Security Group
User Group No Security Reference No Description
Management\Menu\Cashier 4596Credit Card BatchAuthorization.
Management\Menu\Cashier 4511 Credit Card BatchSettlement.
Crew\Menu\Quick Functions 4598 Credit Card BatchAuthorization.
Crew\Menu\Quick Functions 4597 Credit Card BatchSettlement.
Sample BIN Ranges IngenicoThe following are sample eligible BIN ranges for Ingenico:
400626,400626,DEL,Visa Debit,16 480240,480240,DEL,Visa Debit,16
407704,407705,DEL,Visa Debit,16 484409,484410,DEL,Visa Debit,16
408367,408367,DEL,Visa Debit,16 495067,495067,DEL,Visa Debit,16
419772,419772,DEL,Visa Debit,16 495090,495094,DEL,Visa Debit,16
420672,420672,DEL,Visa Debit,16 419773,419776,ELC,Visa Electron,16
445190,445192,DEL,Visa Debit,16 424519,424519,ELC,Visa Electron,16
446200,446211,DEL,Visa Debit,16 424962,424963,ELC,Visa Electron,16
446213,446254,DEL,Visa Debit,16 444000,444000,ELC,Visa Electron,16
446257,446272,DEL,Visa Debit,16 484406,484408,ELC,Visa Electron,16
446274,446283,DEL,Visa Debit,16 484428,484455,ELC,Visa Electron,16
446286,446286,DEL,Visa Debit,16 491730,491759,ELC,Visa Electron,16
460024,460024,DEL,Visa Debit,16 499806,499806,ELC,Visa Electron,16
465830,465879,DEL,Visa Debit,16 512499,512499,MCD,MasterCard Debit,16
465901,465950,DEL,Visa Debit,16 512746,512746,MCD,MasterCard Debit,16
474503,474503,DEL,Visa Debit,16 516001,516001,MCD,MasterCard Debit,16
474551,474551,DEL,Visa Debit,16 516730,516979,MCD,MasterCard Debit,16
475110,475159,DEL,Visa Debit,16 527591,527591,MCD,MasterCard Debit,16
475183,475183,DEL,Visa Debit,16 535110,535309,MCD,MasterCard Debit,16
476220,476269,DEL,Visa Debit,16 557347,557496,MCD,MasterCard Debit,16
476340,476389,DEL,Visa Debit,16 545721,545723,MCD,MasterCard Debit,16
Chapter 3Sample BIN Ranges Ingenico
3-20

4Servebase Format
The following section describes the setup and use of Online Credit Card Transfer forServebase Handling.
Prerequisite, Supported Systems, and CompatibilityPrerequisite, Supported Systems, and Compatibility
This section describes the minimum requirements to use the Online Credit Card TransferServebase Handling.
Prerequisite
• OHC Ship Transf.exe
• OHC Tools.exe
• Wrapper.dll
• SPMS Parameters
• Servebase Web Services Installation
• CRUFLFC.dll
Compatibility
SPMS version 20.2 or later. For customer operating on version below 20.2, databaseupgrade to the recommended or latest version is required.
SPMS Parameters ServebaseThis section describes the Parameters available to Servebase Handling and they areaccessible in the Administration module, System Setup parameter.
Table 4-1 PAR_GROUP General
PAR Name PAR Value Description
Enable Signature Capture forCredit Card
0 or 1 0 - Disable Signature Capturefor Credit Card.1 - Enable Signature Capturefor Credit Card.
CC Type not Supported <Value> Specifies unsupported CreditCard type, for example,(‘AX’,’DS’,’VI’,’MC’,’DI’,’DC’,’JC’,’EC’)
4-1

Table 4-1 (Cont.) PAR_GROUP General
PAR Name PAR Value Description
CC Partial Reversal <Value> Specifies the Credit Card typewhich does not support partialreversal, for example:(‘AX’,’DS’,’VI’,’MC’,’DI’,’DC’,’JC’,’EC’)
CC Type Reversal NotSupported
<Value> Specifies the Credit Card typesfor reversal. authorization notsupported for online creditcard system, for example:(‘AX’,’DS’,’VI’,’MC’,’DI’,’DC’,’JC’,’EC’)
Online Initial Auth Amount <Amount> Specifies the initialauthorization amount for allcard types when the card isswiped at the terminal withonline mode.
Show Void Settlement 0 or 1 0 - To hide the voidedsettlement.1 - To show the voidedsettlement.
Table 4-2 PAR Group Interfaces
PAR Name PAR Value Description
Auto Incremental AuthAmount
<Amount> Specifies the incrementalauthorization amount.
Enable Auto IncrementalAuth
0 or 1 0 - Disallows the autoincremental authorization.1 - Allows the autoincremental authorization.
Get Last Approval Code 0 or 1 0 - Does not assign the lastapproval code forsettlement.1 - Assigns the last approvalcode for settlement.
Online CC Remote Port 16107 The remote port whereinterface communicationwith.
Online CCard Timeout 120 Duration to wait (inseconds) for a responsefrom Online Credit CardInterface.
Chapter 4SPMS Parameters Servebase
4-2
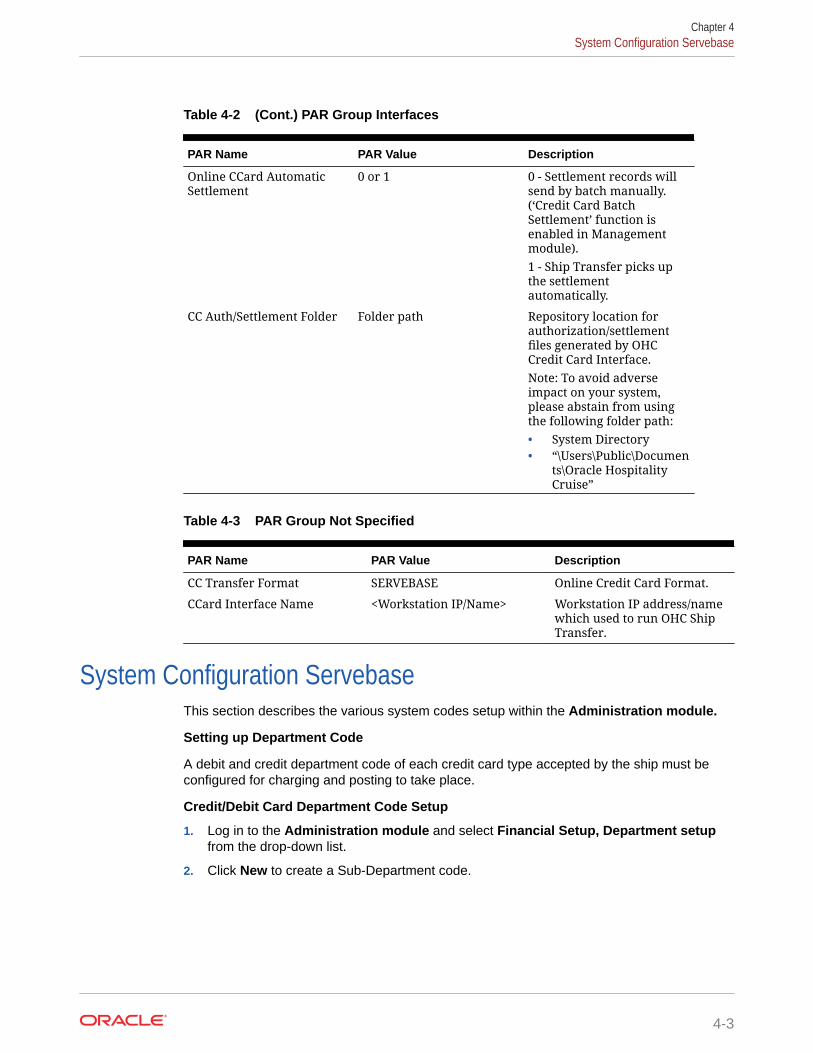
Table 4-2 (Cont.) PAR Group Interfaces
PAR Name PAR Value Description
Online CCard AutomaticSettlement
0 or 1 0 - Settlement records willsend by batch manually.(‘Credit Card BatchSettlement’ function isenabled in Managementmodule).1 - Ship Transfer picks upthe settlementautomatically.
CC Auth/Settlement Folder Folder path Repository location forauthorization/settlementfiles generated by OHCCredit Card Interface.Note: To avoid adverseimpact on your system,please abstain from usingthe following folder path:• System Directory• “\Users\Public\Documen
ts\Oracle HospitalityCruise”
Table 4-3 PAR Group Not Specified
PAR Name PAR Value Description
CC Transfer Format SERVEBASE Online Credit Card Format.
CCard Interface Name <Workstation IP/Name> Workstation IP address/namewhich used to run OHC ShipTransfer.
System Configuration ServebaseThis section describes the various system codes setup within the Administration module.
Setting up Department Code
A debit and credit department code of each credit card type accepted by the ship must beconfigured for charging and posting to take place.
Credit/Debit Card Department Code Setup
1. Log in to the Administration module and select Financial Setup, Department setupfrom the drop-down list.
2. Click New to create a Sub-Department code.
Chapter 4System Configuration Servebase
4-3

Figure 4-1 Department Code Setup
3. Under the Main Department section, enter the credit/debit card information suchas payment type, department code and description.
4. In the Payment Type Details section,
a. Enter the first two digits of the first set of the credit card number in Credit Carddigit.
b. Enter the Credit Card ID, for example MC — MasterCard, VI — Visa, andothers.
c. Select the corresponding Credit Card Internal ID from the drop-down box.
d. Enter the Credit Card Merchant Number provided by the Service Provider.
e. Set the Minimum Authorized Value to 0.
f. Select the Commission department from the drop-down list and update thecommission rate in percentages.
g. Check the Debit Card No Commission Charge if the commission is notapplicable to debit card.
5. In the Department Security access, select the appropriate security level from thedrop-down box.
Chapter 4System Configuration Servebase
4-4

6. Select the Payment Type under the Payment Department Type, either Both Credit andDebit card, Credit card or Debit card.
7. Click OK to save.
Setting up Merchant DetailsSetting up Merchant Details
A Merchant credential is required for credit card authorizations and payment to be handledefficiently. Before you set up the Merchant’s credential, you must have the followinginformation ready:
• Pre-configured Credit Card type
• Currency code exist in currency table
• Merchant information from service provider
To setup the merchant,
1. From the Financial Setup, select Credit Card Merchant setup from the drop-down list.
2. Right-click and select Add New.
Figure 4-2 Merchant Details Setup
3. Fill in the following fields correctly:
a. Credit Card type
Chapter 4Setting up Merchant Details
4-5

b. Currency
c. Terminal ID — The Terminal ID must match the PIN pad Terminal ID.
d. Decimal
e. IP port
f. Merchant Logon ID
g. Merchant Password
4. Click OK to save.
5. Repeat steps 1 to 4 for other credit card types accepted by the Merchant.
Below are the sample Merchant Information used for testing purpose only.
Table 4-4 Sample Merchant Information (Only for Reference)
Merchant Info User Account 1 User Account 2 User Account 3
Credit Card Type MC - Master Card MC - Master Card MC - Master Card
Currency GBP GBP GBP
Terminal ID 001 002 003
Bank ID FID FID FID
Merchant ID 21249872 21249872 21249872
Decimal 2 2 2
IP Port 30003 30003 30003
Merchant Logon ID FIDxx0000001 FIDxx00002 FIDxx00003
Site FID000000001 FID000000001 FID000000001
Culture en en en
Setting up a Receipt
Receipts are generated upon payment and this requires a report template to be set up.A Standard Credit Card receipt template is available in Administration Module,System Setup, Report Setup, Receipts group. Please contact Oracle HospitalityCruise Support if you would like to configure a customized receipt format.
Setting up the PIN Pad Terminal
In order for the program to determine the connection availability of the PIN Pad device,an IP address is assigned to the Credit Card device connecting to the PIN PadTerminal program.
Adding PIN Pad Device
1. From the Administration drop-down menu, select Pinpad Terminal Setup.
2. In the Pinpad Terminal Setup screen, right-click and select Add New.
3. Enter the credit card device by the IP address assigned.
4. The Enabled check box is selected by default. To disable the device, deselect thecheck box.
5. Click OK to save.
Chapter 4Setting up Merchant Details
4-6

Servebase Web Services InstallationThe PED Framework Service (PC-EFT POS) is a Web Service that provides communicationbetween SPMS applications and the Servebase Gateway. You are to obtain the installationfile from the bank/PXP provider and follow the deployment instructions.
1. After the installation is complete, open
Servebase.Pceft.Ped.Service.Server.exe.config in C:\Program Files (x64)\PXP Solutionsfolder and change the highlighted text value per below.
<diagnosticConfiguration keepLogFilesFor="10" logFilePath="c:\work\" />
<endpointSettings port="####" messageFormat="Native" endpointProtocol="Ip"supportDeviceIsDisplaying="true" supportCustomerInteraction="true"supportAcknowledgements="true" supportNetworkStatus="true"monoCertificatePolicy="false" />
<externalServices base="<servebaseURL>" requestTimeout="30000">
<endpointAddress type="Request">
<serialPort comPort="COM1" />
<tcp hostName="IP ADDRESS" />
<failoverService processTimePollIntervalInSeconds="300" atOnceTransactionLimit="15"ignoreProcessorTime="false" path="c:\dir\"
storeFailoverResponses="true" failedResponseListeningAvailable="true"socketIdleTime="10"/>
2. At the root of C:\, create and name the folder as Work. This is used to save thetransaction log between SPMS applications and the Servebase gateway
3. Copy the Credential.xml from C:\Programs Files (x64)\PXP Solution folder into C:\Workfolder.
<CustomerCode></CustomerCode>
<IpAddress></IpAddress>
<Merchant></Merchant>
<Password></Password>
<Site></Site>
<Terminal1><Terminal1/>
<Username></Username>
<WorkStation></WorkStation>
4. At the Windows desktop, click Start and click Run.
5. In the Run dialog box, type Services.msc, and click OK.
6. In the Services screen, locate and start the PEDFrameworkService. The Password inCredential.xml will encrypt after PEDFrameworkServices starts.
Chapter 4Servebase Web Services Installation
4-7

Store Forward HandlingThe Store Forwarding handling sends the pre-authorization through ‘AuthorizationConnection Type = ForcedFailOver’ and receives the response from the listener port,whereas the normal handling sends the pre-authorization through ‘AuthorizationConnection Type = OnlineAuthorization’ and receive the response from current port.
To use the Store Forward handling, the Interfaces, Store Forward Handlingparameter must be enabled and configured per the following:
1. Open Servebase.Pceft.Ped.Service.Server.exe.config in C:\Program Files(x64)\PXP Solutions folder and change the highlighted value per the following:
<failoverService processTimePollIntervalInSeconds="300"atOnceTransactionLimit="15" ignoreProcessorTime="false" path="c:\dir\"
storeFailoverResponses="true" failedResponseListeningAvailable="true"socketIdleTime="10"/>
2. The default resend interval is set to 60 seconds. Change if necessary.
3. When registering the credit card, the Ship Transfer will not pick up the registrationand send the authorization immediately. Hence, the authorization status is‘Outstanding’ and the following message is shown in the Ship Transfer log.
<AuthorizationConnectionType>ForcedFailOver</AuthorizationConnectionType>
4. The Ship Transfer resumes sending the failed transactions to the PXP Servicesprovider after a few minutes.
Setting up Device1. Run the Management module and navigate to the Option menu and Hardware
tab.
2. Enter the device IP Address in the Pin Entry Device Initialization section andclick Save PED IP.
Chapter 4Store Forward Handling
4-8

Figure 4-3 Management — Options — Hardware — Pin Entry Device Initialization
3. At the Pin Entry Device confirmation message, the Workstation name is visible. On thedevice screen, the ‘PED [IP Address] Initialization on PC [workstation name]’ is shown.Verify the device is connected to the correct workstation.
4. The response message from PED Framework Service is shown in the Ship TransferMessage tab when the device is successfully configured in the Management module.
Figure 4-4 Ship Transfer — Device Initialization
Chapter 4Setting up Device
4-9

5. Click the Yes button on the device defined for the workstation. After the device isidentified, a dialog box prompting ‘Device Identification:OK’ appears in SPMS.Click OK to confirm and close.
OHC Ship Transfer SetupThe Ship Transfer Interface is an interface that sends the credit card payments forauthorization from SPMS to SERVEBASE Payment Gateway by batch.
Figure 4-5 OHC Ship Transfer Setup
Table 4-5 Ship Transfer Application Parameter
Settings Value Description
Acknowledge Timeout (sec) <value> Defines the duration to waitfor a response from otherparties, such as third partyprovide, bank providerbefore timing out theauthorization.
Shore Remote Host <IP address/host name> IP address of theworkstation/PC whereServebase PED FrameworkServices is running.
IP Shore Connection Port 5000 TCP Port number of anotherparty interface to connect.
Remote listener Port 30002 Listener port for third partyinterface.
Chapter 4OHC Ship Transfer Setup
4-10

Table 4-5 (Cont.) Ship Transfer Application Parameter
Settings Value Description
Workstation ID <workstation id> Workstation ID maintainedin Credit Card MerchantSetup (CCM) but not in PinPad Terminal Setup(TYP_PIN).The workstation ID is savedin internal systemparameter.
Resend Interval <value> Define the value in minutesto resend the outstandingauthorizations andsettlements after X minutes.
Configuring OHC Ship Transfer1. Start OHC Ship Transf.exe and navigate to the Settings tab.
2. In the Shore Communication section, update the value of the respective parameter.
3. Click Apply to save the setting.
4. Navigate to the Message tab and verify the connection to Servebase Services (PEDFramework Service is connected successfully.
Figure 4-6 OHC Ship Transfer Connection to PED Framework Services
5. To ensure the PED Framework Service is running, see step 6 of Servebase WebServices Installation.
6. The above settings are saved in OHCSettings.par under the following tag.
Table 4-6 OHCSettings.par
Setting Name Description
[#ShipTransf.Connection.Connection=TCP/IP#] Indicates the OHC Ship Transfer is in Activemode.
[#ShipTransf.Connection.RemoteHost=HOSTNAME
Indicates the remote host IP Address wherePED Framework Services running.
Chapter 4Configuring OHC Ship Transfer
4-11

Table 4-6 (Cont.) OHCSettings.par
Setting Name Description
[#ShipTransf.Connection.Remote Port=5000#] Indicates the TCP Port number of other partythe interface connects to.
[#ShipTransf.Connection.Remote Timeout=5#] Indicate the duration to wait for a responsefrom other party before timing out theauthorization.
[#ShipTransf.Connection.Remote ListenPort=30002#]
Indicates the listener port of the third partysuch as PXP Web Service port.
[#ShipTransf.PARAM.Restart Interval=24#] Indicates the interval hours before systemrestarts the Ship Transfer program.
[#ShipTransf.PARAM.Resend Interval=1#] Indicates the last sent date/time of the batchtop up. The saved date/time format isYYYMMDDHHMMSS.
Registering a Credit Card ServebaseThis section describes the steps taken to register a credit card in SPMS.
Registering Credit Card in Management Mode
1. Log in to the Management module and select Guest from the Cashier Menu.
2. Select a checked-in guest and click the Get Credit Card button.
3. The system prompts for a card to be swiped. Swipe the credit card through thecard device.
4. After the guest enters the credit card pin, the Servebase service checks andauthenticates the initial authorization at the same time, and stores the cardinformation in the Guest Handling, Credit Card tab.
5. If the initial authorization is approved or outstanding, the credit card status will bein active mode.
6. If the initial authorization is declined, the credit card status is in deactivate mode.
Figure 4-7 Guest Handling Credit Card
Settling a Credit Card BatchThe Servebase Handling supports both online and offline batch settlements and thesettlement function is accessible from Management module, Cashier Menu. Thisfunction is mainly used by financial officers to review all the settlements created priorto sending the settlements to the Servebase service provider.
Chapter 4Registering a Credit Card Servebase
4-12

This function is enabled when the Interface, Online CCard Automatic Settlementparameter is disabled. Else, OHC Ship Transfer will pick up the settlement transaction andsend it to the Servebase service provider automatically as shown in the figure below.
Figure 4-8 Management, Cashier — Credit Card Batch Settlement
The voided settlement transaction is highlighted in red and appears when theGeneral, ShowVoided Settlement parameter is enabled.
Figure 4-9 Management, Cashier — Batch Settlement with Voided Transaction
Please note that the program only processes the settlement with CCT_QSTATUS = 0. If theoriginal settlement is still residing in the ‘pending send’ queue, the voided settlement will notbe sent for processing. Both the original settlement and voided settlement record will behighlight if the color defined in the Management module, Option, Color, NoPrint section.
Performing a Credit Card RefundThe credit card Refund function is available to Serverbase Handling only. The refund button isenabled automatically when a negative amount is entered.
Chapter 4Performing a Credit Card Refund
4-13

Figure 4-10 Management, Pay Invoice Refund
1. In the Guest Handling screen, clicking the Refund button will prompt a 'RequestToken’ screen. Insert or swipe the card through the device.
2. After the refund process completes successfully, the authorization code isCCA_MTYPE = 6 and POS transaction is created.
3. If the guest account has a pre-registered credit card and a negative amount isentered followed by clicking the Pay button in Pay Invoice screen, you will receivea message box prompting you to perform a Refund instead.
Registering Credit Card in Advanced Quick Check In (AQCI)Below are the steps to register a credit card in Advance Quick Check-in module.
1. Log in to the AQCI program and search for an account using the Account Searchfunction.
2. Click the Get Credit Card button and swipe or insert the card into the card readerdevice when prompted.
3. After the guest enters the pin, the Servebase service checks and authenticates theinitial authorization. Details of the card are stored in Guest Handling, Credit cardtab.
• If initial authorization is approved or outstanding, the credit card status will bein active mode.
• If initial authorization is declined, the credit card status is in deactivate mode.
Chapter 4Registering Credit Card in Advanced Quick Check In (AQCI)
4-14

Figure 4-11 Guest Handling Screen —Credit Card Tab
Sample Response File in Ship TransferThe sections below describe the samples of the response messages as shown in the ShipTransfer program.
Figure 4-12 Response Message of Register Credit Card
Chapter 4Sample Response File in Ship Transfer
4-15

Figure 4-13 Response Message of Register Credit Card in Debug Details
Figure 4-14 Response Message of Send Authorization
Figure 4-15 Response Message of Send Authorization in Debug Details
Figure 4-16 Response Message for Send Settlement
Chapter 4Sample Response File in Ship Transfer
4-16

Figure 4-17 Response Message for Send Settlement in Debug Details
Figure 4-18 Response Message for Send Refund
Figure 4-19 Response Message for Send Refund in Debug Details
SynopsisThe following sections describe the synopsis of Servebase Handling.
Register Credit Card and Send Initial Authorization
Chapter 4Synopsis
4-17

Table 4-7 Register Credit Card and Send Initial Authorization Process andExpected
No Process Expected Result Remarks
1 Use the Insertmethod to registerthe credit cardwhere invoicebalance = 0
Initial authorizationamount = ‘OnlineInitial Auth Amount’
CRD_MANUAL = I
2 Use the Insertmethod to registercredit card whereinvoice balance >‘Online Initial AuthAmount’
Initial authorizationamount = ‘OnlineInitial Auth Amount’
CRD_MANUAL = I
3 Use the Swipemethod to registercredit card whereinvoice balance = 0
Initial authorizationamount = ‘OnlineInitial Auth Amount’
CRD_MANUAL = A
4 Register Credit Cardwith the SignatureCapture functionenabled.
Prompt forsignature. Able toregister credit cardafter acceptingsignature capture.
5 Clicking the Cancelbutton on SignaturePad after Credit Cardaccepted by bankissuer atManagementmodule.
• Message ‘UserCancel SignatureAction’ prompt.
• Does not allowto register acredit card.
6 Register same creditcard where theprevious registeredcredit card isdeactivated aftersettlement.
Same credit card willbe reactivated andnew initialauthorization is sent.
7 Register the samecredit card whereprevious registeredcredit card isdeactivatedmanually.
Message ‘The CreditCard is alreadyregistered in thesystem’. You need toclick ‘Activate’button to activatethe card manually.
8 Register first creditcard during Online.Swipe the samecredit card duringOffline.
The Second creditcard will be createddue to the real tokendoes not reply to theactual credit cardnumber.
Chapter 4Synopsis
4-18

Table 4-8 Add Posting and Send Incremental Authorization
No Process Expected Result Remarks
1 Total posting is lessthan the initialauthorization.
• No incrementalauthorizationsends.
2 Total posting is morethan initialauthorization, but lessthen ‘AutoIncremental Amount’.
• IncrementalAmount = ‘AutoIncrementalAmount’.
3 Total posting is morethan initialauthorization, andmore than ‘AutoIncremental Amount’.
• IncrementalAmount = [TotalPosting Amount] -[TotalAuthorizationAmount]
Table 4-9 Pay Invoice and Send Settlement Authorization
No Process Expected Result Remarks
1 Payment amount ismore than TotalAuthorizationAmount. Theincrementalauthorization isApproved / Declined /Outstanding.
• Send additionalincrementalauthorization.
• Message‘Settlement isdone. The card iscurrentlydeactivated’prompt.
• Payment type ischanged to defaultpayment type.
2 Payment amount isless than totalauthorization amount.
• No reversal issent.
• Message‘Settlement isdone. The card iscurrentlydeactivated’prompt.
• Payment type ischanged to thedefault paymenttype.
Chapter 4Synopsis
4-19

Table 4-9 (Cont.) Pay Invoice and Send Settlement Authorization
No Process Expected Result Remarks
3 Payment amount issame with totalauthorization amount.Where, incrementalauthorization isapproved.
• Message‘Settlement isdone. The card iscurrentlydeactivated.’prompt.
• Payment type ischanged to thedefault paymenttype.
4 Pay Invoice again afterpayment is voided.
• Message‘Settlement isdone. The card iscurrentlydeactivated’prompt.
• Payment type ischanged to thedefault paymenttype.
5 Pay Invoice whileauthorization still in‘Outstanding’ status
• The program isnot able to getCCT_CCA_ID and itcaused theCRD_ACTIVATION_LOCK still is 0.
Direct Sales
Direct sales function is available when a guest does not have a pre-registered creditcard. The ‘Pay Direct Sale’ is visible in the Pay Invoice screen.
Table 4-10 Direct Sales Process and Expected Result
No Process Expected Result Remarks
1 Do payment withoutpre-registered creditcard
Authorizationcreated withCCA_MTYPE = 6
Table 4-11 Void Payment and Send Refund
No Process Expected Result
1 Use Void button; If originalsettlement CCT_QSTATUS = 0
Credit Card is reactivatedautomatically without initialauthorizationOriginal settlement andrefund will not be sent outPayment type changed toCredit Card
Chapter 4Synopsis
4-20

Table 4-11 (Cont.) Void Payment and Send Refund
No Process Expected Result
2 Use Void button; If originalsettlement CCT_QSTATUS > 0
The message ‘By voiding thepayment, you need to swipecredit card again or changeto another payment type.Are you sure you want tovoid the payment?’Send refundGuest payment type remainas Cash
3 Pay amount $80 with creditcard, but invoice balance = 0
Initial authorization = $20Incremental authorization= $60 send outInvoice balance = -$80Pay -$80 will send as refund
4 Invoice balance = $150, payinvoice = $200
Settlement created withCCT_AMOUNT = $200Invoice balance = -$50Pay -$50 will send as refund
5 Pay -$120 on invoicebalance=0
Servebase does not supporta negative amountThe message ‘Unable torefund a transaction until ithas been settled’ prompt
Table 4-12 Pay Negative Amount and Send Refund
No Process Expected Result
1 A pre-registered credit card isdeactivated. Payment type isCash. Enter the negativeamount and click on Refundbutton.
• Refund sent successfully.• Authorization created
with CCA_MTYPE = 6.2 A pre-registered credit card is
activated. Payment type is aCredit card. Enter the negativeamount and click on Refundbutton.
• Refund sent successfully.• Authorization created
with CCA_MTYPE = 6.• The credit card is
deactivated automaticallyand not able to bereactivated.
3 A pre-registered credit card isactivated. Payment type isCredit card. Enter the negativeamount and click on Refundbutton with swipe differentcredit card.
• Refund sent successfully.• Authorization created
with CCA_MTYPE = 6.• The pre-registered credit
card remains active.
Chapter 4Synopsis
4-21

Table 4-12 (Cont.) Pay Negative Amount and Send Refund
No Process Expected Result
4 No pre-register credit card.Payment type is Cash. Enterthe negative amount and clickon Refund button with swipedifferent credit card
• Refund send successfully.• Authorization created
with CCA_MTYPE = 6• Card record created and
deactivated.5 Do refund while no internet
connection• Refund failed due to
transaction beingapproved offline.
Multiple Credit Card
The message ‘This Credit Card is already registered in the system’ will always prompteven when the Check Credit Card Registration parameter is disabled.
Table 4-13 Multiple Credit Card Process and Expected Result
No Process Expected Result
1 Register same credit cardfor the same guest where afirst registered credit card isin active mode.Guest A Register Card AGuest A Register Card Aagain
Message as above prompt.No Card record andAuthorization create forsecond registration.
2 Register same credit cardfor the same guest where afirst registered credit card isdeactivated manually.Guest A Register Card A anddeactivated manuallyGuest A Register Card Aagain
Message as above prompt.You have to re-activate thecredit card manuallythrough Activate button.No Card record andAuthorization create forsecond registration.
3 Register same credit cardfor the same guest wherethe first registered creditcard is deactivated aftersettlement.Guest A Register Card A, anddo settlement.Guest A Register Card Aagain
No message prompts.The card is reactivatedautomatically.Initial authorization sendsagain.
4 Register same credit cardfor different guest where afirst registered credit card isin active mode.Guest A Register Card AGuest B Register Card B
No message prompts.The credit card registerssuccessfully.
Chapter 4Synopsis
4-22

Table 4-13 (Cont.) Multiple Credit Card Process and Expected Result
No Process Expected Result
5 Register same credit cardfor different guest wherethe first registered creditcard is deactivatedmanually.Guest A Register Card A, anddeactivate manuallyGuest B Register Card A
No message prompts.The credit card registerssuccessfully.
6 Register same credit cardfor different guest wherethe first registered creditcard is deactivated aftersettlement.Guest A Register Card A, anddo Settlement.Guest B Register Card A
No message prompts.The credit card registerssuccessfully.
Multiple Pin Pad Terminal Run Simultaneously
Table 4-14 Multiple Pin Pad Terminal Run Simultaneously Process and ExpectedResult
No Process Expected Result
1 Run the same application ondifferent PC. Each PC connectto the different pin pad
Able to register credit cardaccordingly.
2 Run a different application ondifferent PC. Each PC connectto the same pin pad
The message ‘The Pin EntryDevice IP xxx is in used byOHC XX on workstation XX’shall prompt.
Activate/Deactivate Credit Card
Table 4-15 Activate/Deactivate Credit Card Process and Expected Result
No Process Expected Result
1 The Card is deactivated afterperforming the settlement
• Message prompt‘Settlement or reversal isdone for this card, pleaseget credit card again.’
• Credit card remainsdeactivated.
• Found theCRD_LOCK_ACTIVATION =1
2 Use Deactivate Card button todeactivate the card
• Credit card is able to beactivated.
Chapter 4Synopsis
4-23

Table 4-15 (Cont.) Activate/Deactivate Credit Card Process and Expected Result
No Process Expected Result
3 Card is deactivated afterDirect Sales
• Message prompt‘Activation not allowed forDirect Sale Credit / DebitCard’.
• Found theCRD_LOCK_ACTIVATION =2
4 Card is deactivated afterupgrade from an old format toSERVEBASE format
• Message prompt ‘This cardis not allowed to activateas the credit card formatis not supported’.
• Found the CRD_TOKEN isnull.
Table 4-16 Manually Add Authorization
No Process Expected Result
1 Click Add Authorizationbutton on ViewAuthorization screen
Authorization Value screenpops up.Incremental Authorizationwith CCA_STATUS= 0 iscreated.OHC Ship Transfer will sendthe authorization forapproval.
Offline Handling
Chapter 4Synopsis
4-24

Table 4-17 Offline Handling Process and Expected Result
No Process Expected Result
1 No internet connection whilegetting credit card
• Credit card is still able toregister and saved into thedatabase withCCA_STATUS=0,CCA_QSTATUS = 8
• OHC Ship Transfer keeptrying and show‘QueryForFailover…’
• Restart PED FrameworkService, the Authorizationrecord is resent forauthorization.
• Proceed to add posting,the Top Up authorizationwill not send until theinitial authorization getapproved.
2 Initial authorization of theoffline credit card registrationreturn declined
• All the authorization (topup, settlement) belongs tothe credit card will updateto declined automatically
• Proceed to add posting,the offline initial authcreated (CCA_MTYPE = 1)
Chapter 4Synopsis
4-25

Table 4-17 (Cont.) Offline Handling Process and Expected Result
No Process Expected Result
3 Multiple Offline Tokenhandling - InitialAuthorization is ‘pending’status
• Register credit card A.• Interface sends the pre-
authorization but noresponse. Initialauthorization inoutstanding status.
• Register credit card B.• Interface sends the pre-
authorization and getapproved response. Initialauthorization in approvedstatus.
• Add posting to credit cardA.
• Interface does not sendthe top up request.Incremental authorizationin outstanding status.
• Add posting to credit cardB.
• Interface sends the top uprequest and get approvedresponse. Incrementalauthorization in approvedstatus.
• Perform settlement forcredit card A.
• Interface does not sendSettlement request forcredit card A. (This is dueto initial authorization isstill pending for approval).The settlement inoutstanding status.
• Perform settlement forcredit card B.
• Interface sends settlementrequest and get approvedresponse. Settlement inapproved status.
Chapter 4Synopsis
4-26

Table 4-17 (Cont.) Offline Handling Process and Expected Result
No Process Expected Result
4 Multiple Offline Tokenhandling - InitialAuthorization is ‘declined’status
• Register credit card A.• Interface sends the pre-
authorization but noresponse. Initialauthorization inoutstanding status.
• Register credit card B.• Interface sends the pre-
authorization and getapproved response. Initialauthorization in approvedstatus.
• Interface receives declineresponse for credit card Ato pre-authorization.
• Initial authorization forcredit card A in declinedstatus. Credit card A isdeactivated automatically.
• Continue to add postingfor credit card B, C.
• Interface does not send allthe pre-authorization, topup request.
• Perform the settlement forcredit card B, C.
• Interface does not sendthe Settlement request.Settlement in outstandingstatus.
• Interface sends all the pre-authorization, top uprequest if all theauthorization belongs tocredit card A is declined /or credit card A had newinitial authorization.
Interface sends all thesettlement if all the settlementbelongs to credit card A isdeclined.
Declining Offline Token
Credit Card Data:
• Date: Credit Card A + Credit Card B
• Initial authorization is outstanding
• Incremental authorization is outstanding
• Settlement is Outstanding
Chapter 4Synopsis
4-27

Table 4-18 Credit Card Process and Expected Result
No Process Expected Result
Parameter ‘Disable C/Card and Posting when auth is decline’ = 0
1 Initial authorizationresponse ‘decline’
• All Authorization andSettlement for creditcard A is updated todecline.
• UpdateCRD_LOCK_ACTIVATION= 1 for credit card A.
• Credit card isdeactivated andpayment departmentdefault to Cash.
• If multiple credit card,all invoices are routedto credit card B.payment departmentdefault to credit B.
• Posting status is enable.2 One of the incremental
authorization responsesback ‘decline’
• Only that Authorizationis updated to decline.
• Credit card activationstatus remains active.
Parameter ‘Disable C/Card and Posting when auth is decline’ = 1
1 Initial authorizationresponse ‘decline’
• All Authorization andSettlement for creditcard A is updated todecline.
• UpdateCRD_LOCK_ACTIVATION= 1 for credit card A.Credit Card A isdeactivated andpayment departmentdefault to Cash.
• Posting is disabled.• If multiple credit card,
all invoices are routedto credit card B.payment departmentdefault to credit B.Posting status remainsenabled.
Chapter 4Synopsis
4-28

Table 4-18 (Cont.) Credit Card Process and Expected Result
2 One of the incrementalauthorization responsesback ‘decline’
• Only that Authorizationis updated to decline.
• Credit card status isdeactivated andpayment department isupdated to Cash.
• CRD_LOCK_ACTIVATION= 0
• Posting status updatesto disable.
• If multiple credit card,all invoices are routedto credit card B.payment departmentdefault to credit B.Posting status remainsenable.
Parameter ‘Disable C/Card and Posting when auth is decline’ = 2
1 Initial authorizationresponse ‘decline’
• All Authorization andSettlement for creditcard A is updated todecline.
• UpdateCRD_LOCK_ACTIVATION= 1 for credit card A.
• Credit Card A isdeactivated andpayment departmentdefault to Cash.
• Posting is enabled.• If multiple credit card,
all invoices are routedto credit card B.payment departmentdefault to credit B.Posting status remainsenable.
2 One of the incrementalauthorization responsesback ‘decline’
• Only that Authorizationis updated to decline.
• Credit card status isDeactivate and paymentdepartment is updatedto Cash.
• CRD_LOCK_ACTIVATION= 0
• Posting status remainsenable.
If multiple credit card, allinvoices are routed to creditcard B. payment departmentdefault to credit B. Postingstatus remains enable.
Chapter 4Synopsis
4-29

Troubleshooting ServebaseThis section describes the troubleshooting steps that assist you in resolving thecommonly known errors with Servebase Handling.
Table 4-19 OHC Ship Transfer Interface
Known Issue Solution
OHC Ship Transfer program opens/closesby itself
• Ensure you are using the latestwrapper.dll.
• Register the wrapper.dll withregasm.exe.
Authorization/Settlement in pending status,and not send to Ship Transfer Interface
This is due to initial authorizationreferences is missing for the authorization/settlement.The recommended workaround is:• Locate the authorization/settlement
with missing initial authorization(CCA_PREVIOUS).
• From the Authorization record,determine the transaction date andapproval code from the record. Obtainthe corresponding Ship Transfer logfile and locate the initial authorizationreference tag <TransactionReference>used in the authorization code underthe <AuthorityCode> tag.
• To update the initial authorizationreference value to CCA_PREVIOUScolumn for the affected Authorizationrecord, please contact your consultant/support to help you regarding an SQLstatement that you need to apply whenthis issue occurs.
CRD_ACTIVATION_LOCK not updated to 1after performing the payment.
Ensure CCT_CCA_ID value is valid.
Initial authorization getting ‘Outstanding’status
Check the Pin Pad Terminal Setup. Ensurethe Pin Pad IP matches the device that isused to register a credit card.
Message ‘Socket is not connected’, whentrying to save the PED IP or Message ‘Errorin connection with this Pin Entry Device’
Verify and ensure:• The PED Framework Service is
running.• The connection information is correct.• The Pin Pad device is connected.• Window firewall is turn off.
To find the outstanding CCA causing otherCCT not able to process
Please contact your consultant/support tohelp you regarding an SQL statement thatyou need to apply when this issue occurs.
Management module
Chapter 4Troubleshooting Servebase
4-30

Table 4-20 Management module Known Issue and Solution
Known Issue Solution
Showing ‘Please Wait….’, and did not promptfor ‘Insert/Swipe Card’ to notify user.
Check and ensure the PED FrameworkServices is running.Ensure the Configuration file settings is thesame as below:<endpointSettingsport="5000"messageFormat="Native"endpointProtocol="Ip"supportDeviceIsDisplaying="true"supportCustomerInteraction="true"supportAcknowledgements="true"supportNetworkStatus="true"monoCertificatePolicy="false" />
Request Token prompts ‘Precondition failed: !string.IsnullOrEmpty(item.Credentials.CustomerCode)
Ensure Merchant Setting is correct (CCM).
Message ‘Invalid Credentials. No user recordsthat match the supplied credentials’ when tryto register credit card
Ensure User account setup in Servebaseconfiguration file / CCM entry is valid.
Message ‘Client found response content type of'text/html; charset=utf-8', but expected 'text/xml' when trying to register credit card.
Ensure the correct credential file is located.And, the ship currency and match with CCM.
Windows Services
Table 4-21 Windows Services Known Issue and Solution
Known Issue Solution
The PED Framework Service on LocalComputer started and stopped. Some servicesstop automatically if they are not in use byother services or programs,
Ensure the C:\Work folder exists.
Transaction Status
Table 4-22 Transaction Status
Status Description
Initial Authorization
CCA_OPERATION 1
CCA_MTYPE 0 (Online initial auth), 1 (Offline initial auth).
CCA_PREVIOUS Original pre-authorization reference ID, valuegenerated from sequence CNT_POS_RES)
CCA_STATUS 0 (outstanding/pending), 1 (approved), 2(declined).
Chapter 4Troubleshooting Servebase
4-31

Table 4-22 (Cont.) Transaction Status
Status Description
CCA_QSTATUS 0 (pending), 2 (Transaction sent out from OHCShip Transfer), 3 (Acknowledgement receivedfrom Credit Card provider), 8 (completed).
CCA_STATUS = 0CCA_QSTATUS = 8
It means pseudo/temporary token is receivedand waiting for real token after the connectionwith merchant/service provider is resume.
Incremental Authorization
CCA_OPERATION 2
CCA_MTYPE 4 (Online incremental auth), 5 (offlineincremental auth)If CCA_MTYPE = 5• When parameter ‘Allow Posting For
Declined Authorization’ is set to 0. Forincremental authorization created duringsystem cruise change.
• When parameter ‘Allow Payment ForDeclined Authorization’ is set to 0 or 2. Forincremental authorization created duringpay invoice/quick billing.
Settlement
CCT_STATUS 0 (outstanding), 1 (approved), 2 (declined)
CCT_QSTATUS 0 (pending), 2 (Transaction sent out from OHCShip Transfer), 3 (Acknowledgement receivedfrom Credit card provider), 8 (Completed).
Direct Payment
CCA_MTYPE 6
CCA_STATUS 1 (approved), 2 (declined).
No Settlement create
Chapter 4Troubleshooting Servebase
4-32

5PAYPOINT
The following sections describe the setup, usage of Online Credit Card Transfer forPAYPOINT Handling.
Prerequisite, Supported Systems, and Compatibility
This section describes the minimum requirements to operate the Paypoint credit card device.
Prerequisite
• OHC Ship Transf.exe
• OHC Tools.exe
• Wrapper.dll
• SPMS Parameters
• CRUFLFC.dll version
• PaypointAPI.dlli9
• Interop.PAYPOINTAPILib.dll
• Paypoint.dll
Compatibility
SPMS version 20.1 or later. For customer operating on version below 20.1, databaseupgrade to the recommended or latest version is required.
SPMS Parameters PaypointThis section describes the parameters available to the Paypoint Online Credit Card module,which are accessible in the Administration module, System Setup, Parameter.
Table 5-1 PAR_GROUP General
PAR Name PAR Value Description
Enable Signature Capture forCredit Card
0 or 1 0 — Disables SignatureCapture for Credit Card.1 — Enables Signature Capturefor Credit Card.
5-1

Table 5-1 (Cont.) PAR_GROUP General
PAR Name PAR Value Description
Allow payment for declinedauthorization
0 or 1 or 2 0 — Does not allow payment ifauthorization is declined byallow when offline.1 — Allows payment ifauthorization is declined oroffline.2 — Does not allow payment ifauthorization is decline oroffline.
Allow posting for declinedauthorization
0 or 1 0 — Does not allow posting ifcredit card authorization isdeclined.1 — Allows posting.
Online Initial Auth Amount <Amount> Specifies intial authorizationamount for all cad types whenthe card is swiped at theterminal with online mode.
CC Type Not Supported <Blank> Does not include supportedcredit card.
Auto Incremental AuthAmount
<Amount> Minimum IncrementalAmount.
Specify Decline Error to AllowPayment
('FEIL VEDKOMMUNIKASJON','TIMEOUT')
This parameter is work with‘'Allow Payment for DeclinedAuthorization’.If payment does not allow dueauthorization is offline ordecline, but with decline errorspecified in parameter, theprogram will still allowpayment to be performed.
Table 5-2 PAR_GROUP Interfaces
PAR Name PAR Value Description
Specify Decline Error forResend
('FEIL VEDKOMMUNIKASJON','TERM.ER OPPTATT','MISTETFORBINDELSE','TIDSAVBRUDD')
This parameter allows theidentified transaction to beresent. If the Paypointreturns a response with anerror message, OHC ShipTransfer will update theCCT_STATUS = 0,CCT_QSTATUS = 8 andremove theCCT_NONAPPROVALTEXTfor resent purpose.
Chapter 5SPMS Parameters Paypoint
5-2

Table 5-2 (Cont.) PAR_GROUP Interfaces
PAR Name PAR Value Description
Enable Auto IncrementalAuth
0 or 1 This is used for OCC. Whenenabled, the system checksfor each debit postingamount if it is within thelast approved auth amount.If not, an auth is sent withthe amount specified in theparameter Auto IncrementalAmount.0 - Disable the automaticincremental authorization.1 - Enable the automaticincremental authorization.
CC Auth/Settlement Folder Folder path Repository location forauthorization/settlementfiles generated by OHCCredit Card InterfaceNote: To avoid adverseimpact on your system,please abstain from usingthe following folder path:• System Directory• “\Users\Public\Documen
ts\Oracle HospitalityCruise”
Table 5-3 PAR Group Not Specified
PAR Name PAR Value Description
CC Transfer Format PAYPOINT Online Credit Card Format.
CCard Interface Name <Workstation IP/Name> Workstation IP address/namewhich used to run OHC ShipTransfer.
System Configuration PaypointThis section describes the various system codes setup within the Administration module.
Department Setup
A debit/credit department code of a credit card type is required for charge/posting and this issetup up in Administration module, Financial Setup, Department setup.
Credit/Debit Card Department Code Setup
1. Log in to Administration module and select Financial Setup, Department setup fromthe drop-down list.
2. Click New to create a Sub-Department code.
Chapter 5System Configuration Paypoint
5-3

Figure 5-1 Department Code Setup
3. At the Main Department section, enter the credit/debit card information such asPayment type, department code and description.
a. Enter the two digits of the first set of the credit card number of the Credit Cardtype.
b. Enter the Credit Card ID. For example, MC for MasterCard, VI for Visa, andothers.
c. Select the corresponding Credit Card Internal ID from the drop-down list.
d. Enter the Credit Card Merchant Number provided by the Service Provider.
e. Select the Commission Department from the drop-down list and update thecommission rate in percentage.
f. Check the Debit Card No Commission charge if the commission is notapplicable to debit card.
4. At the Department Security access, select the relevant security level from thedrop-down list.
5. Select the relevant Payment Type under Payment Department Type, either BothCredit and Debit card, Credit card or Debit card. This field determines whetherthe payment type is a Credit Card or Debit Card.
Chapter 5System Configuration Paypoint
5-4

6. Click OK to save.
Setting up Receipt
To generate a receipt upon payment, it requires a report template to be set up. A StandardCredit Card receipt template is available in Administration module, System Setup, Reportsetup, _Receipts group.
Please contact Oracle Hospitality Cruise Support if you would like to configure a customizedreceipt format.
OHC Transfer SetupThe OHC Ship Transfer Interface is an interface that sends credit card payments from SPMSto Paypoint Payment Gateway for credit card payments to be authorized using interfaceprogram OHC Ship Transf.exeConfigure OHC Ship Transfer
1. Start OHC Ship Transf.exe and navigate to the Settings tab.
2. Enter the Shore Remote Host IP address. The shore remote host is the PaypointTerminal IP address.
Figure 5-2 OHC Ship Transfer — Setting Screen
3. The connection is shown in Message tab per below figure.
Chapter 5OHC Transfer Setup
5-5

Figure 5-3 OHC Ship Transfer — Message Screen
Paypoint WorkflowThe SPMS application communicates with Paypoint device through a TCP/IP protocoland the device handles the communication with the host through its own network card.The IP address is stored in the Paypoint device itself.
Send Initial Authorization
Authorization requests performed at Management module, Get Credit Card orAdvance Quick Check-in module, Get Credit Card/Direct Salesare sent to thePaypoint device before passing them to the Paypoint Payment Gateway.
Send Incremental/Settlement Authorization
An Incremental/Settlement request performed at Management module, AddPosting / Pay invoice function is sent to OHC Ship Transfer module before beingpassed to Paypoint payment gateway.
Figure 5-4 Paypoint Credit Card Handling Workflow
Chapter 5Paypoint Workflow
5-6

PAYPOINT HandlingThis section describes the device set up for Paypoint credit card handling.Setting up Device in Management module
1. Navigate to Options, Hardware tab from the menu bar.
2. Enter the device IP address into the Pin Entry Device Initialization field and click SavePED IP.
Figure 5-5 Hardware Options — Pin Entry Device IP
3. After the Save PED IP button is clicked, a Test Communication between theManagement module and the device shall commence.
Figure 5-6 Management — Test Communication — In Progress
Figure 5-7 Management — Get Credit Card
4. When you click the Get Credit Card button at Guest Handling, the programcommunicates with the device and prompts to insert/swipe a credit card.
Chapter 5PAYPOINT Handling
5-7

Setting up Device in Advance Quick Check-In module1. At the start up the AQCI module and if the module has never been connected/
configured with a card device, the Pin Entry Device screen without an IP addressprompts ‘Enter the device’s IP address’ and click OK.
Figure 5-8 Advance QCI — Pin Entry Device
2. If AQCI has been connected to the card device before, the previous IP address isstored in Pin Entry Device. Click the PED Overwrite button to change the IPaddress if the device’s IP is different.
Figure 5-9 Advance QCI — Pin Entry Device — with IP address
3. The AQCI program will run the Test Communication between AQCI and the carddevice when the OK button is clicked and you will receive a notification when thetesting is OK.
4. To change or re-test the connection, navigate to the Setup tab, click the CreditCard PED IP setup at the ribbon bar and the Pin Entry Device IP screen shallprompt. Click the PED Overwrite button and enter the new IP address.
Chapter 5Setting up Device in Advance Quick Check-In module
5-8

Figure 5-10 Advance QCI — Credit Card PED IP Setup
Viewing Authorization Amount in Management module1. Log in to Management module and navigate to Guest Handling screen.
2. At the Search Panel, browse the guest account.
3. Navigate to the Credit Card tab of the guest account. The registered card status shouldbe in Inactive mode.
Figure 5-11 Management Credit Card
4. To display the initial authorization, select the credit card and click View Authorization.
5. The Authorized Value shown in View Authorization is the last authorization amount,excluding the amount from Direct Sales.
Chapter 5Viewing Authorization Amount in Management module
5-9

Figure 5-12 Management View Authorization
6. To view the earlier settlement of the credit card, navigate to the Invoice tab.
7. If the card is a debit card, the amount is credited onto the invoice automatically.
Figure 5-13 Management Authorization Display on Invoice — Debit CardDetails
OHC Ship Transfer (Sample Response Message)Below are the samples response message in OHC Ship Transfer.
Send Authorization
Figure 5-14 OHC Ship Transfer — Send Request Message — SendAuthorization
Chapter 5OHC Ship Transfer (Sample Response Message)
5-10

Send Settlement
Figure 5-15 OHC Ship Transfer — Send Request Message — Send Settlement
Send Refund
Figure 5-16 OHC Ship Transfer — Send Request Message — Send Refund
Troubleshooting PAYPOINTThis section describes the troubleshooting steps that will assist you in resolving the knownerrors with PAYPOINT Credit Card Handling.
General
Table 5-4 General Known Issue and Solution
Known Issue Solution
To trace the Paypoint error log The log file is saved in Oracle HospitalityCruise folder.\DIR\DIR\Paypoint.log or Paypointtrans.log
Management module
Chapter 5Troubleshooting PAYPOINT
5-11

Table 5-5 module
Known Issue Solution
Error ‘No contact with term’ Restart the program or device. This is dueto no connection between the program andthe device.
Error ‘No contact with card issuer’ Try another credit card. This card may beblocked by Paypoint payment gateway.
Error ‘Error in sending pre-authorization’ Restart the program and reset the networkconnection.
Error ‘Invalid Service for this card’ This is due to the credit card type notdefined in parameter ‘CCard NotSupported’.
Transaction Status
Table 5-6 Transaction Status Detail
Status Description/Transaction Type
Initial Authorization
CCA_OPERATION 1
CCA_MTYPE 0 = Online initial auth, 1 = Offline initialauth
CCA_STATUS 0 = outstanding/pending, 1 = approved, 2 =declined
CCA_QSTATUS 0 = pending, 8 = completed
Incremental Authorization
CCA_OPERATION 2
CCA_MTYPE 4 = Online incremental auth, 5 =offlineincremental authIf CCA_MTYPE = 5When parameter Allow Posting ForDeclined Authorization is set to 0, theincremental authorization is createdduring system cruise change.When parameter Allow Payment ForDeclined Authorization is set to 0 or 2,then the incremental authorization iscreated during pay invoice/quick billing.
Settlement
CCT_STATUS 0 = outstanding, 1 = approved, 2 = declined
CCT_QSTATUS 0 = pending, 2 = “Process” button pressed atManagement module, Credit Card BatchSettlement, 8 = Completed
Direct Payment
CCA_MTYPE 6
CCA_STATUS 1=approved, 2=declined
Chapter 5Troubleshooting PAYPOINT
5-12

Ship Transfer Interface module
Table 5-7 Ship Transfer Interface module Known Issue and Solution
Known Issue Solution
Error ‘Duplicate reject trans’ Turn off the checking on XENTA device fromMenu, Administer, Change Params, GeneralUse, Duplicate.
Error ‘Automation Error. The Specificationmodule could not be found’
The PAYPOINTAPI.dll is missing or corrupted.Replace the new PAYPOINTAPI.dll into OracleHospitality Cruise folder.
Error ‘paypoint.dll open failed’ The remote shore host does not match thePaypoint terminal IP address.
Do not pick up the settlement transaction toprocess
• Possible due to initial authorization ismissing, or status is outstanding.
• Check on CCA_PREVIOUS and CCT_CCA_IDfor further investigation.
• Check the Paypoint.log for furtherinvestigation.
Do not pick up the authorization transaction • Check the Paypoint.log• CCA_QSTATUS must less than 3.• CCA_STATUS have to be 0.• Authorization not able to process due to
invalid characters found in the transactionstring, for example “ñøôñ÷à ï÷éøîà’
2015-05-07 05:12:34.373 ERROR Illegaladditional transaction data2015-05-07 05:14:34.511 DEBUG TransData(type 49):300000;4;ñøôñ÷àï÷éøîà;A000000025010402;526542;;;;;;2015-05-07 05:14:34.511 DEBUG TransData(type 50): 1164347• The characters highlighted in yellow are
the invalid characters returned byPaypoint service.
• The characters highlighted in green refersto CCA_ACC_ID.
• Open Oracle SQL Developer, and filter theCCA_ACC_ID transaction.
• Locate the initial authorization(CCA_OPERATION = 1), then identify thecolumn CCA_LOCALMODEDATA where thetransaction data will be saved in thiscolumn.
• Edit and remove the invalid character,commit the changes.
• Go to Ship Transfer interfaces and clickApplyto initial the authorization processagain.
Chapter 5Troubleshooting PAYPOINT
5-13

6NCL DCC
This document contains the setup and usage of Credit Card Transfer for NCL DCC (DynamicCurrency Conversion) Handling.
Prerequisite, Supported Systems, and Compatibility
This section describes the minimum requirements to use the NCL DCC Handling.
Prerequisite
• OHC Credit Card Transfer.exe
• OHC Tools.exe
• SPMS Parameters
Compatibility
SPMS version 20.1 or later. For customer operating on version below 20.1, databaseupgrade to the recommended or latest version is required.
SPMS Parameters NCL DCCThis section describes the parameters available to Credit Card Transfer module and they areaccessible in the Administration module, System Setup, Parameter.
Table 6-1 PAR_GROUP General
PAR Name PAR Value Description
Enable Signature Capture forCredit Card
0 or 1 0 - Disables Signature Capturefor Credit Card.1 - Enables Signature Capturefor Credit Card.
Credit Card DCC ConfirmMessage
0 or 1 0 - Disables Credit Card DCC(Dynamic CurrencyConversion).1 - Enables Credit Card DCC(Dynamic CurrencyConversion).
Credit Card DCC Message &Guest Currency Choice&&Your Card Billing Currency:<xxx> &&Current Rate ofExchange: <yyy> &Rateincludes 3% margin &&Selectthe currency your charges willbe finalized in.
6-1

Table 6-1 (Cont.) PAR_GROUP General
PAR Name PAR Value Description
Credit Card DCC RouteMessage
&The guest named below:&Name as it appears on thecard: &<CNAME> &&CreditCard No. : & XXXX XXXX XXXX<NO> &will pay for all chargesmade by the & Followingguest(s) during their onboardvacation: &&Cabin : GuestName : &
DCC Base Country Leaves as blank.
Enable Credit Card DCC 0 or 1 0 - Enables Credit Card DCC.1 - Disables Credit Card DCC.
Table 6-2 PAR_GROUP Interfaces
PAR Name PAR Value Description
Enable Add-on DCC NOVATE CC Provider that supports Add-on DCC. For example: Novate.
Batch CCard ProcessingFormat
NCL Specifies the message format tobe generated by OHC CreditCard Transfer.
CC Auth/Settlement Folder Folder path Repository location forauthorization/settlement filesgenerated by OHC Credit CardInterface .Note: To avoid adverse impacton your system, please abstainfrom using the following folderpath:• System Directory• “\Users\Public\Documents\O
racle Hospitality Cruise”
Configuring SPMSThis section describes the program setup within the Administration module andManagement module.
Prerequisite for Program Setup
The Verifone card device requires the vFormAgent.dll and Interop.vFormAgent.dll.These files are downloaded automatically from XAPP into Oracle Hospitality Cruisefolder after you run the OHC Launch Panel.
You have to run the OHC Database Installer to ensure you have the latest programfiles. The device also requires below forms and you can obtain these from OracleSupport.
Chapter 6Configuring SPMS
6-2

• DCCLBL.frm
• DCCCONFIRMLBL.frm
• SIGNATURE.frm
• 925_SWIPE_CARDONLY.frm
• WELCOME.frm
• ROUTING.frm
Hardware SetupBefore you begin using the Verifone device, you must configure the device connection in theManagement module.
1. Start the Management module and select the Options menu.
2. Navigate to the Hardware tab of the Options screen.
3. At the Card Reader/Encoder #1 section, select the Card Reader Type as VerifoneMX925. The port details are shared with Signature Capture, defined in the next step.
4. The port details need to be defined as per below setting, similar to Port propertiesconfigured in My Computer, Device Manager.
a. Speed: 115200
b. Data bits: 8
c. Parity: None
d. Stop Bits: 1
5. Click Apply and close the Hardware Option screen. The Verifone device downloads therequired pre-loaded forms and prompt ‘File successfully downloaded’ upon completion.
6. Re-open the Hardware tab and verify that the port number no longer appears in the PortNumber column.
7. If a Signature Capture device is used during the credit card registration, assign the deviceat the Hardware Option under Signature Device. Both the Verifone MX925 CardReader Type and Signature Capture share the same Port setting.
8. Close the Hardware Optionscreen and restart OHC Management. The devicedownloads and installs the required forms upon the program startup. Below are theindicators for the process.
• Signal is caught screen: This mean the Verifone device is detected.
• Form Agent screen: Forms are being loaded from the device.
• System Information screen: Displays the configuration information.
9. If the port number is wrongly assigned or the device is not properly connected, amessage box prompts during program startup. Check if the device is connected and theDLL are properly registered.
vFormAgent.dll & interop.vFormAgent.dll is not updated.vFormAgent.dll &interop.vFormAgent.dll is not registered properly.
Chapter 6Hardware Setup
6-3

System Configuration NCL DCCThis section describes the various system codes setup within the Administrationmodule.
Department Setup
A debit/credit department code of a credit card type is required for charge/posting,which is set up in the Administration module, Financial Setup, Department setup.
Credit/Debit Card Department Code Setup
1. Log in to the Administration module and select Financial Setup, Departmentsetup from the drop-down list.
2. Click the New button to create a Sub-Department code.
3. At the Main Department section, enter the credit/debit card information such asPayment type, Department Code, and Description.
4. At the Payment Type details section,
a. Enter the two digits of the first set of the credit card number in Credit Carddigit.
b. Enter the Credit Card ID, for example, MC - MasterCard, VI - Visa, etc.
c. Select the corresponding Credit Card Internal ID from the drop-down box.
d. Enter the Credit Card Merchant Number provided by the Service Provider.
e. Select the Commission department from the drop-down list and update thecommission rate in percentage.
f. Check the Debit Card No Commission charge if the commission is notapplicable to debit card.
5. At the Department Security access, select the relevant security level from thedrop-down box.
6. At the Department Security access, select the relevant security level from thedrop-down box.
7. Click OK to save.
Setting up ReceiptA receipt can be generated upon payment, which requires a report template to be setup. A Standard Credit Card receipt template is available in the Administrationmodule, System Setup, Report setup, _Receipts group. Please contact OracleHospitality Cruise Support if you would like to configure a customized receipt format.
Importing Credit Card BINIn order for the program to determine the correct card type (Credit/Debit) and itshandling, you must mport a Credit Card Bank Identification Numbers (BIN) in the fileinto SPMS. This file contains the complete set of eligible BIN range and is providedperiodically by ELAVON. When the BIN file reloads, all previously loaded information isoverwritten during the process.
Chapter 6System Configuration NCL DCC
6-4

Loading the BIN File1. to the Administration module and select Financial SLoginetup, Import Credit Card
Bin file.
2. Locate and select the latest BIN File from the folder. For example, see section SampleBIN file.
Figure 6-1 Credit Card BIN Import Screen
3. The BIN file information populates in the Credit Card BIN Import screen. Click Import tosave the BIN ranges into the BIN table and Close to exit.
Setting up PGP EncryptionThe PGP Encryption is a Payment Application Data Security Standard (PA-DSS) Compliantrequirements. Its aims to prevent any third parties from storing prohibited secure dataincluding credit card track data, card validation codes or pin block data, therefore minimizethe potential security breaches leading to compromising the full magnetic stripe data, cardvalidation codes or pin block data. The encryption is performed using OHC Tools by way ofuploading a PGP key pair, which is then used to encrypt and decrypt the authorization file inOHC Credit Card Transfer.
1. Run OHC Tools and select Upload PGP Key to upload PGP key pair for DCC handling.
Chapter 6Loading the BIN File
6-5

Figure 6-2 OHC Tools Menu
2. At the PGP Key Uploaded screen, navigate to the DCC handling tab.
3. Browse for the bank public key (file format is .pkr) under Public Key column.
4. Browse for the secret key (file format is .skr) under Private Key column.
5. Enter a Key Passphrase if the key pair is generated with a passphrase.
6. Enter Ship’s database username and password.
Figure 6-3 PGP Key Uploader — DCC Handling Tab
7. Click the Upload button to begin the key upload for DCC Handling.
8. Upon successful upload, the system prompts a message box. Click OK to closeand exit.
Figure 6-4 Successful PGP Key Upload Prompt
Using the Verifone Card DeviceThis section describes the usage of the Verifone device in AQCI, Managementmodule, and Credit Card Transfer Program.
OHC Management
To register a credit card using a Verifone device in the Management module, follow thesteps below:
Chapter 6Using the Verifone Card Device
6-6

1. Start the Management module.
2. From the main menu, select Cashier then Guests.
3. Select a checked-in guest and click Get Credit Card button in the Guest Handlingscreen.
4. The system will prompt a message requesting the card to be swiped. Swipe the cardthrough the card slot of the card device.
5. After the card is swiped, the credit card information and its status are reflected on thecredit card entry. If the credit card is valid, the credit card accepted status is shown onthe screen.
Figure 6-5 Credit Card Entry Details
6. The processing screen displays during the credit card registration in the Credit CardEntry screen.
Note:
The Currency Exchange rate used refers to the DCC table and exchange rateimported from the authorization response file.
If the credit card is eligible for Dynamic Currency Conversion (DCC) and iswithin the DCC BIN range, the program prompts the DCC handling messagebox, followed by the currency selection screen
.
7. Select the available Card Billing Currency for the credit card to enroll into the DCChandling prompt for acknowledgement of the DCC’s Term and Conditions clause on thecard device.
8. Click the Decline prompt on the device to terminate the credit card enrollment and savethe credit card data into the database. Before saving the credit card data, it will prompt forsignature if the Enable Signature Capture for Credit Card parameter is enabled.
Chapter 6Using the Verifone Card Device
6-7

9. Click Acceptto enroll the credit card in DCC Handling. The system prompts aconfirmation to save the credit card data. Click Yes to proceed.
Figure 6-6 Message box — DCC Confirmation
10. If the Credit Card DCC Route Message parameter is enabled, a routing messageappears on the device.
11. Click the Accept button to accept the routing for the other guest or Decline if thereis no routing for this guest.
12. To use the Signature Capture feature, the Enable Signature Capture for CreditCard parameter and the Signature screen will prompt when the card is registeredat both the Management module and the device.
Figure 6-7 Signature Screen at Module
13. After the guest places their signature on the device, click Enter to complete thecredit card registration process. If Cancel is pressed, you will receive a NoSignature Received promptly in Guest Handling screen.
14. A Transaction Completed screen appears on the device when the registrationcompletes or Transaction Cancelled appears when the Cancel button is pressed.
15. The signature captured is shown on the signature screen. Clicking the ClearSignature button resets the signature and allows the guest to place a freshsignature.
Chapter 6Using the Verifone Card Device
6-8

16. Click the Capture Signature button to complete the credit card registration on the guestaccount.
17. Click OK at the registration complete prompt to return to the previous screen.
18. The registered credit card details are stored in the Credit Card tab of Guest handlingscreen, with the DCC column flagged with ‘Y’ when the card is enrolled with DCC. At theSignature Captured column, the signature captured during the credit card registration isshown. The program does not allow credit card registration without a signature whenEnable Signature Capture for Credit Card parameter is enabled.
Figure 6-8 Guest Handling Credit Card Screen
19. For DCC handling, the folowing message box will prompt when the ‘Card Reader Type’ isassigned to a magnetic swipe device. This shows that the credit card is eligible for DCCenrollment.
Figure 6-9 DCC Enable Screen — Manual Card Swipe
20. Click Yes to enroll the DCC handling or No to register the credit card without DCChandling.
OHC Advanced Quick Check In1. Run OHC Advanced Quick Check In (AQCI).
2. At the ribbon bar, select the Setup tab, General Setup, Hardware tab.
Chapter 6OHC Advanced Quick Check In
6-9

3. At the Hardware tab, Card Reader #1 section, a port number is assigned. The portnumber in AQCI always shows the assigned port number that is different fromOHC Management.
4. Select the device from the drop-down list. The Get Credit Card button is enabledat the ribbon bar after you assigned the device.
5. Clicking the Get Credit Card button after selecting a checked-in passenger willprompt a Please Swipe Card notification on AQCI screen.
6. After the card is swiped, the credit card details populate in the respective field ofCredit Card Details section.
Figure 6-10 AQCI Credit Card Section
7. Click Save to proceed with the registration. If the credit card is eligible for DCC(Dynamic Currency Conversion) enrolment, the system prompts the DCC handlingmessage, requesting you to select the currency on the device.
Note:
The Currency exchange rate used refers to the rate in DCC table, anexchange rate imported from the authorization response file.
If the credit card is eligible for Dynamic Currency Conversion (DCC) andis within the DCC BIN range, the program prompts the DCC handlingmessage box, followed by the currency selection screen.
8. Select the available Credit Card Billing Currency to enroll the card in DCChandling. At the DCC Term and Conditions notification prompt, have the guestread and Accept the Terms & Condition on the device. Pressing Declineterminates the card enrollment and saves the credit details into the database. Youare prompted to place a signature on the device if Enable Signature Capture forCredit Card parameter is enabled.
9. At the AQCI screen, select Yes at the confirmation to write the card details into thedatabase.
Chapter 6OHC Advanced Quick Check In
6-10

10. If the Credit Card DCC Route Message parameter is enabled, a routing messagedisplays on the device. Click Accept to route to another guest or Decline if no routing isrequired.
11. Have the guest place the signature on the device signature screen and press Enter tocomplete the card registration. The guest signature is captured and shown on AQCIscreen. Click the Capture Signature to save and complete the registration.
12. Clicking the Clear Signature button erases the signature, allowing the guest to replacethe signature. This prompts a No Signature Received on AQCI screen and TransactionCancelled on the device.
13. The registered credit card details are stored in the Credit Card tab of Guest handlingscreen, with the DCC column flagged with ‘Y’ when the card is enrolled with DCC. At theSignature Captured column, the signature captured during the credit card registration isshown. The program does not allow credit card registration without a signature whenEnable Signature Capture for Credit Card parameter is enabled and you are requiredto configure the device in hardware option setup.
14. For DCC handling, when the ‘Card Reader Type’ is assigned to magnetic swipe (notVerifone device), the system prompts a message if you would like to settle the invoice inxxx currency. This shows that the credit card is eligible for DCC enrolment.
15. Click Yes to enroll the DCC handling or No to register credit card without DCC handling.
OHC Credit Card TransferAn Authorization file can be generated using one of this option:
• DCC New Incremental File: For credit card enrolled with DCC Handling.
• New Incremental File: For normal credit card registration that is not enrolled with DCCHandling.
Figure 6-11 OHC Credit Card Transfer — Authorization Menu
When the PGP Key Pair does not exist in the database, and the Process button is clicked, amessage box per the following figure will prompt prohibiting you from generating anauthorization file.
Chapter 6OHC Credit Card Transfer
6-11

Figure 6-12 PGP Does Not Exist Message Prompt
Batch File ProcessesGenerating an Initial Authorization
1. At the Authorization menu, click the DCC New Incremental File to list all thecredit cards requiring authorization that are flagged with DCC= “Y” on the DCCCredit Card Authorization Write screen.
Figure 6-13 DCC Credit Card Authorization Write Screen
Chapter 6Batch File Processes
6-12

Note:
The initial authorization amount refers to Minimum Authorization in Credit CardFinancial Setup.
2. After you click the Process button, an Authorization file is generated and encrypted witha PGP key.
Figure 6-14 Sample PGP Encrypted Authorization File
3. Status for the pending approval authorization transaction is Outstanding, and thetransaction can be traced in Management module, Guest handling, Credit Card tab,View Authorization.
Chapter 6Batch File Processes
6-13

Figure 6-15 Credit Card Authorization in Management module
Reading an Authorization1. After you have obtained the response file from the merchant, at the Authorization
menu, select DCC Read Increment File.
2. Click the Open File button and locate the response file from the merchant.
3. If the response file is not encrypted, an alert message box will prompt. Select theappropriate response.
Figure 6-16 Non-encrypted Response File
4. You will receive a batch with currency exchange rate provided by the merchant.See the figure below for sample.
Chapter 6Reading an Authorization
6-14

Figure 6-17 Sample Response File with Currency Exchange Rate
5. Click the Process button to continue and this populates the authorization transactionsonto the grid.
Figure 6-18 DCC Credit Card Authorization Read Screen with Data
6. Click the Process button again to begin the process. The progress status appears onDCC Credit Card Authorization Read screen.
7. After the authorization completes, the authorization status in Guest Handling, CreditCard tab, View Authorization is updated to Authorized, with the exchange rateprovided in the response file. The exchange rate is also stored in the DCC table.
Chapter 6Reading an Authorization
6-15

Figure 6-19 OHC Management — Credit Card Tab
Generating an Incremental FileWhen the total posting amount is more than the initial authorization, an incrementalauthorization is required. For example, additional posting is at $370 and the initialauthorization is $300. The incremental authorization will be $70.
1. At the DCC Credit Card Authorization Write screen, a converted (OnboardAuthorization * Currency Exchange Rate) pending authorization transaction islisted. Click the Process button to write the authorization transactions into the file.
Figure 6-20 DCC Credit Card Authorization Write
2. In the Guest Handling, Credit Card, View Authorization screen, the status ofthe unconverted incremental authorization amount is listed as Outstanding status.
3. To change the status to Authorize, see Reading an Authorization.
Chapter 6Generating an Incremental File
6-16

Figure 6-21 View Authorization with Incremental Authorization — PendingApproval
Generating Incremental File with Authorization TemplateAn Authorization Template is used to obtain additional authorization amounts. The templateonly applies to Incremental Authorization. Use the following steps to set up the AuthorizationTemplate.
1. At the Authorization menu, select Level Criteria Setupfrom the drop-down list.
Figure 6-22 OHC Credit Card Transfer — Authorization
2. Configure the Authorization template in value amount. For example, see Figure 6–22 —Sample Level Criteria Setup in Value.
Chapter 6Generating Incremental File with Authorization Template
6-17

• Define the credit card type (VI Visa).
• Define the Level ID (02)
• Define the Account Balance (999999)
• Define the Value/Percentage (100)
Figure 6-23 Sample Level Criteria Setup in Value
3. Configure the Authorization template in percentage. For example, see Figure 6–23— Sample Level Criteria Setup in Percentage.
• Define the credit card type (VI Visa)
• Define the Level ID ( 05)
• Define the Account Balance (999999)
• Define the Value/Percentage (15%)
Figure 6-24 Sample Level Criteria Setup in Percentage
4. The following are formulas used in Authorization Template calculations:
• For Value Amount
– If current balance > 0 = (Total Posting - Total Approved AuthorizationAmount) + Level Amount
Chapter 6Generating Incremental File with Authorization Template
6-18

– If current balance < 0 = (Level Amount - Open balance)
• For Percentage
– (Total posting - Total approved authorization) + (current balance + percentage%)
In the following scenario,
• Current Balance = -10
• Total Approved Authorization Amount = 50
Authorization Template: Value Amount
• Template: Additional Authorization $100
• Result : (-10 + 100) - 50 = 40
• **Authorization amount converted with exchange rate = 40 * 0.6153 = 24.61
Figure 6-25 DCC Credit Card Authorization Write with Authorization Template
Authorization Template: Percentage
• Template : Additional Authorization 15%
• Result : (-10 - 50) + (-10 * 15%) = -61.50
• Negative Authorization amount/value will not be process
Generating Settlement File1. After a settlement is performed on a guest account, the settlement transaction requiring
approval becomes listed under DCC New Settlement file.
Figure 6-26 OHC Credit Card Transfer — Settlement Menu
Chapter 6Generating Settlement File
6-19

2. At the Settlement Menu, DCC New Settlement screen, the settlementtransaction is flagged with DCC, and the amount shown is converted using theexchange rate from the DCC table. (Onboard Settlement * Currency ExchangeRate).
Figure 6-27 DCC Credit Card Settlement Write Screen (With SettlementTransaction)
3. Click the Process button to write the settlement transaction into the settlement file.
Note:
The NCL Credit Card format does not read the settlement response file.Hence the CCT_STATUS is updated to ‘1’ upon generation of the settlementfile.
Recreating a Settlement FileThis function allows you to recreate the settlement file.
1. Click the Recreate Settlement from the Settlement menu.
Figure 6-28 Settlement Menu — Recreate Settlement
Chapter 6Recreating a Settlement File
6-20

2. At the Restore Settlement Data screen, select a Transfer Date to recreate and clickProcess.
Figure 6-29 OHC Credit Card Transfer — Recreate Settlement Screen
3. At the DCC Credit Card Settlement Write screen, select the Recreate Settlementcheck box to list the transaction.
Figure 6-30 DCC Credit Card Settlement Write Screen — Recreate SettlementCheckbox
Mapping FieldsThis section lists the mapping format used in NCL DCC Credit Card.
Request File FormatTransfer161108006.pgp
Transfer<DATE><SEQ#>.pgp
Table 6-3 Request File Format Detail
Name Description
TransferTransfer - Authorization file.Settle - Settlement file.
Chapter 6Mapping Fields
6-21

Table 6-3 (Cont.) Request File Format Detail
Name Description
161108 Creation date.
006 Sequence number of authorization/settlementfile.
.pgp File name extension.
Table 6-4 Transaction Record Detail
Field Start End Size Comment
Account No 1 7 7
Generated whenauthorization orsettlement file iscreated by OHCCredit CardTransfer.(CCA_ID,CCT_ID)
Trans. Type 8 10 3 Hardcoded -OBC
Method of Pmt. 11 12 2 Hardcoded - AX-Amex, MV-Visa/Master, D-Discover
Credit Card No. 13 28 16 CRD_NO
Blank 29 29 1 Blank
Crdt Card Seqno
30 33 4 Hardcoded -0001
Company 34 35 2 Hardcoded - 01
Blank 36 36 1 Blank
Ship No. 37 38 2 Parameter >DCC Ship ID
Reply Code 39 39 1 A-Approved, H-Refund, S-Settled, D-Denied, W-Wait,E-Error, C-Callback, X-Deleted,‘ ‘-None, R-Reject(CCA_CRED_SOURCE /CCA_CRED_RESPONSE)
Response Code 40 45 6 Authorizationnumberprovided inauthorizationresponse file(CCA_AUTH_REFERENCE)
Chapter 6Mapping Fields
6-22

Table 6-4 (Cont.) Transaction Record Detail
Reservation no. 46 54 9 RES_V_GUESTID
Group No 55 60 6 Space
Cruise no 61 68 8 Read shipnumber fromparameter (DCCShip Id) +SCR_A_DATE
Cruise Segment 69 70 2 Space
Blank 71 71 1 Blank
Sailing date 72 77 6 Format :YYMMDD(SCR_A_DATE)
Blank 78 78 1 Blank
Amount 79 88 10 CCA_AMOUNT -AuthorizationamountCCT_AMOUNT -SettlementamountCCA_CUR_AMOUNT - to trackvalue written toauthorization /settlement file
Blank 89 89 1 Blank
Cdt Card Expiry 90 93 4 Credit cardexpiry date(Format :MMYY)
Last Name 94 108 15 UXP_A_NAME
First Name 109 118 10 UXP_A_FSTN
AuthenticationCode
119 127 9 Blank
AuthenticationSource
128 128 1 5-Approval, D-Referral, E-OfflineApproval.(CCA_CRED_RESPONSE /CCA_CRED_SOURCE)
Interface Cmd 129 133 5 CAUTH -AuthorizationCSETL -Settlement
Card track 1 134 212 79 Blank
Card track 2 213 252 40 Blank
Chapter 6Mapping Fields
6-23

Table 6-4 (Cont.) Transaction Record Detail
Message 253 282 30 Use only whendeclined -CCA_NONAPPROVAL_TEXT
Auth ACI Code 283 284 2 Blank
Tran ID 285 299 15 CCA_REPLY017TO122
Validation Code 300 303 4 CCA_REASON
Transmit Status 304 304 1 Blank
Request Type 305 305 1 A-Authorization,I-Incremental, I-Settlement
Blank 306 306 1 Blank
CTD AuthAmount
307 316 10 Hardcoded - 0
Blank 317 317 1 Blank
Initial AuthAmount
318 326 10 CCA_AMOUNT
Blank 327 328 2 Blank
Init Auth Date 329 334 6 CCA_BDATE
Blank 335 335 1 Blank
Init. Auth. Time 336 341 6 CCA_BDATE
DCC Opt In 342 342 1 1 - DCC, 0 - NotDCC (CRD_DCC)
DCC CurrencyInd.
343 345 3 CRD_CUR
DCC ExchangeRate
346 356 11 CCA_RATE
DCC ControlNumber
357 396 40 CCA_CTLNO
Table 6-5 Exchange Rate Record Detail
Field Start End Size Comment
Base currencycode 1 3 3
Currency code isin ISO 4217format.(DCC_BASE)
Foreigncurrency code
4 6 3 Currency code isin ISO 4217format.(DCC_CUR)
Exchange rate 7 19 13 DCC_EXRATE
Rate issue date 20 33 14 DCC_DATE
Rate expiry date 34 47 14 DCC_EXP_DATE
Chapter 6Mapping Fields
6-24

Table 6-5 (Cont.) Exchange Rate Record Detail
Field Start End Size Comment
Exchange ratesource name
48 79 32 Specifies thesource of theexchange rate
Commissionpercentage
80 86 7 Reserved for thepurpose ofmeetingregulatoryrequirementswhereapplicable.Space if notpresent.
Exchange ratesourcetimestamp
87 100 14 Formatyyyymmddhhmmss.
Sample BIN file
Below are the BIN range samples provided periodically by the bank.
VOL120110427162858 4000790643RUB 4001020986BRL 4001030032ARS
4001040032ARS 4001150826GBP 4001210978EUR 4001310978EUR
4001360986BRL 4001450937VEF 4001540710ZAR 4001590376ILS
4001620986BRL 4001630986BRL 4001680986BRL 4001700986BRL
4001740986BRL 4001760986BRL 4001780986BRL 4001820986BRL
4001840986BRL 4001850986BRL 4001870986BRL 4001880978EUR
4001900978EUR 4001910986BRL 4001920578NOK 4001990986BRL
4002010901TWD 4002110901TWD 4002160578NOK 4002170986BRL
4002230410KRW 4002250986BRL 4002270985PLN 4002340986BRL
4002350986BRL 4002360986BRL 4002370986BRL 4002380986BRL
4002390986BRL 4002420986BRL 4002430986BRL 4002450986BRL
4002470986BRL 4002480986BRL 4002490986BRL 4002520986BRL
4002530986BRL 4002540986BRL 4002580214DOP 4002670214DOP
4002680986BRL 4002710978EUR 4002720978EUR 4002760032ARS
4002770578NOK 4002800978EUR 4002810978EUR 4002870643RUB
4002880578NOK 4002910784AED 4002930978EUR 4003020978EUR
4003080214DOP 4003090214DOP 4003110978EUR 4003120978EUR
4003140978EUR 4003150978EUR 4003160978EUR 4003170978EUR
4003320978EUR 4003330978EUR 4003340978EUR 4003350978EUR
Chapter 6Mapping Fields
6-25

4003400780TTD 4003530901TWD 4003550901TWD 4003560901TWD
4003570901TWD 4003580344HKD 4003590901TWD 4003610901TWD
4003890344HKD 4003990682SAR 4005240203CZK 4006010414KWD
4006050484MXN 4006080170COP 4006090036AUD 4006120344HKD
4006150032ARS 4006250986BRL 4006260826GBP 4006270643RUB
4006280643RUB 4006310780TTD 4006340986BRL 4006350986BRL
4006360986BRL 4006370986BRL 4006380986BRL 4006420986BRL
4006430986BRL 4006450986BRL 4006460986BRL 4006470986BRL
Table 6-6 OHC Tools Known Issue and Solution
Known Issue Solution
Error - ‘Key unable to upload’ Register PGPBBox7.dll with regsvr32.exeagain.
Error - ‘License Key has not been set’ Register PGPBBox7.dll with regsvr32.exeagain.
Table 6-7 OHC Credit Card Transfer Known Issue and Solution
Known Issue Solution
OHC Credit Card Transfer doesn’t reflectthe correct credit card format.
Check the credit card format in SystemParameter in Administration moduleunder System Setup, Database Parameter,Interfaces, Batch CCard Processing Format.
Table 6-8 OHC Management Known Issue and Solution
Known Issue Solution
Error - ‘Please check if Verifone device dllis registered or device is connected’.
Ensure the Verifone device is connectedwith the workstation.
Chapter 6Mapping Fields
6-26