Creating Aesthetic Success Through Proper Clinician and ...
14
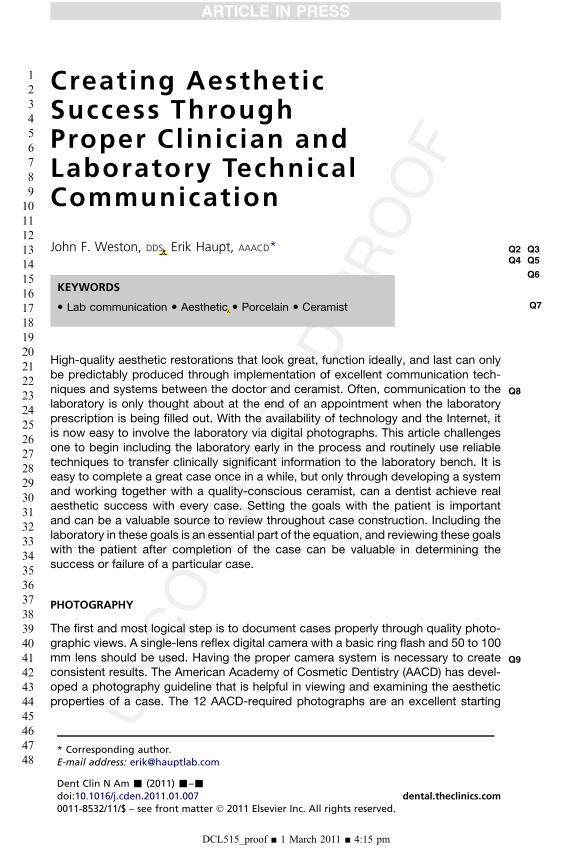
Creating Aesthetic Success Through Proper Clinician and Laboratory Technical Communication John F. Weston, DDS, Erik Haupt, AAACD* Q2 Q3 Q4 Q5 Q6 High-quality aesthetic restorations that look great, function ideally, and last can only be predictably produced through implementation of excellent communication tech- niques and systems between the doctor and ceramist. Q8 Often, communication to the laboratory is only thought about at the end of an appointment when the laboratory prescription is being filled out. With the availability of technology and the Internet, it is now easy to involve the laboratory via digital photographs. This article challenges one to begin including the laboratory early in the process and routinely use reliable techniques to transfer clinically significant information to the laboratory bench. It is easy to complete a great case once in a while, but only through developing a system and working together with a quality-conscious ceramist, can a dentist achieve real aesthetic success with every case. Setting the goals with the patient is important and can be a valuable source to review throughout case construction. Including the laboratory in these goals is an essential part of the equation, and reviewing these goals with the patient after completion of the case can be valuable in determining the success or failure of a particular case. PHOTOGRAPHY The first and most logical step is to document cases properly through quality photo- graphic views. A single-lens reflex digital camera with a basic ring flash and 50 to 100 mm lens should be used. Q9 Having the proper camera system is necessary to create consistent results. The American Academy of Cosmetic Dentistry (AACD) has devel- oped a photography guideline that is helpful in viewing and examining the aesthetic properties of a case. The 12 AACD-required photographs are an excellent starting * Corresponding author. E-mail address: [email protected] KEYWORDS Lab communication Aesthetic Porcelain Ceramist Q7 DCL515_proof ■ 1 March 2011 ■ 4:15 pm Dent Clin N Am - (2011) -–- doi:10.1016/j.cden.2011.01.007 dental.theclinics.com 0011-8532/11/$ – see front matter Ó 2011 Elsevier Inc. All rights reserved. 1 2 3 4 5 6 7 8 9 10 11 12 13 14 15 16 17 18 19 20 21 22 23 24 25 26 27 28 29 30 31 32 33 34 35 36 37 38 39 40 41 42 43 44 45 46 47 48
-
Upload
khangminh22 -
Category
Documents
-
view
1 -
download
0
Transcript of Creating Aesthetic Success Through Proper Clinician and ...
1
234
567
8910
11121314
151617
181920
212223
24252627
282930
313233
34353637
383940
414243
444546
4748
Creating AestheticSuccess ThroughProper Clinician andLaboratory TechnicalCommunication
Q2 Q3
John F. Weston, DDS, Erik Haupt, AAACD* Q4 Q5Q6
Q8
KEYWORDS
� Lab communication � Aesthetic � Porcelain � Ceramist Q7
High-quality aesthetic restorations that look great, function ideally, and last can onlybe predictably produced through implementation of excellent communication tech-niques and systems between the doctor and ceramist. Often, communication to thelaboratory is only thought about at the end of an appointment when the laboratoryprescription is being filled out. With the availability of technology and the Internet, itis now easy to involve the laboratory via digital photographs. This article challengesone to begin including the laboratory early in the process and routinely use reliabletechniques to transfer clinically significant information to the laboratory bench. It iseasy to complete a great case once in a while, but only through developing a systemand working together with a quality-conscious ceramist, can a dentist achieve realaesthetic success with every case. Setting the goals with the patient is importantand can be a valuable source to review throughout case construction. Including thelaboratory in these goals is an essential part of the equation, and reviewing these goalswith the patient after completion of the case can be valuable in determining thesuccess or failure of a particular case.
Q9
PHOTOGRAPHY
The first and most logical step is to document cases properly through quality photo-graphic views. A single-lens reflex digital camera with a basic ring flash and 50 to 100mm lens should be used. Having the proper camera system is necessary to createconsistent results. The American Academy of Cosmetic Dentistry (AACD) has devel-oped a photography guideline that is helpful in viewing and examining the aestheticproperties of a case. The 12 AACD-required photographs are an excellent starting
* Corresponding author.E-mail address: [email protected]
DCL515_proof ■ 1 March 2011 ■ 4:15 pm
Dent Clin N Am - (2011) -–-doi:10.1016/j.cden.2011.01.007 dental.theclinics.com0011-8532/11/$ – see front matter � 2011 Elsevier Inc. All rights reserved.
john
Inserted Text
, FAACD
john
Cross-Out
john
Replacement Text
Aesthetics

Q10
Q11
Q12
print&web4C=FPO
Weston & Haupt2
49
505152
535455
565758
59606162
636465
666768
697071
72737475
767778
798081
82838485
868788
899091
929394
95969798
99
point toward successful communication (Figs. 1–3). Properly exposed and framedphotographs allow the ceramist to see what materials and techniques are necessaryto create the final result. Additional photographs to consider beyond these would beshade reference views of lips in repose or at rest. Theseare valuable views to deter-mine the final length of the central incisors, which is typically 2 to 3 mm should be dis-played beyond the edge of the upper lip (Fig. 4). Lastly, it is important that all thephotographs are taken with the teeth well hydrated. A tooth that is dehydrated willhave a higher value and chroma than a hydrated one. These photographs set the foun-dation for all successful dentist/ceramist teams.
MODELS
It is always valuable to record the detail of shapes and positions of the natural teethbefore providing any treatment via models. Because of the availability of inexpensivePVSmaterials, alginate impressions are no longer the standard of care for opposing orpreoperative models. The laboratory technician will often refer back to the originalteeth many times while building a case to see what features of the patients’ teethneed to be incorporated in the new design. Providing accurate and reproduciblemodels is an important issue. Subtle details in texture, anatomy, and contours keepthe ceramic restorations from looking contrived and can provide the element of“perfect imperfection” that natural teeth exhibit. One should never underestimatethe value of what was working in a patients smile before the case was started. Themost beautiful smiles are created in the laboratory by looking for ways to improvewhat nature provided instead of erasing and rebuilding from scratch.
JAW RELATION RECORDS
There are many theories on the best way to manage restorations with regard to occlu-sion. There is also a great debate about which theory is right. However, there is nodebate about the fact that there should be a consistent method that provides a reliableand repeatable record to mount models and build a case. In the end, the model mustbe able to occlude with function and comfort for sustained periods and not overloadthe muscles, joints, or teeth. Having accurate bite records helps to confidently cross-mount all models from preoperative to prepared to provisional, allowing the laboratorytechnician maximum ability to build an accurate occlusal scheme. Typically, once thereconstruction proceeds beyond the canines, a face bow transfer is indicated. Thisprocess requires the laboratory technician and doctor to have the same articulators.
Fig. 1. An AACD-required photograph, front smile view.
DCL515_proof ■ 1 March 2011 ■ 4:15 pm
john
Cross-Out
john
Replacement Text
Teeth
john
Cross-Out
john
Replacement Text
and joints
john
Cross-Out
john
Replacement Text
and

print&web4C=FPO
Fig. 3. An AACD required photograph, front close-up view.
print&web4C=FPO
Fig. 2. An AACD-required photograph, front retracted view.
print&web4C=FPO
Fig. 4. Properly framed, lips at rest or repose, note proper incisal display.
Q1Clinician and Laboratory Technical Communication
DCL515_proof ■ 1 March 2011 ■ 4:15 pm
3
100
101102103
104105106
107108109
110111112113
114115116
117118119
120121122
123124125126
127128129
130131132
133134135136
137138139
140141142
143144145
146147148149
150
print&web4C=FPO
Fig. 5. Stick bite secured to lower teeth, horizontal to the plane of the earth.
print&web4C=FPO
Weston & Haupt4
151
152153154
155156157
158159160
161162163164
165166167
168169170
171172173
174175176177
178179180
181182183
184185186187
188189190
191192193
194195196
197198199200
201
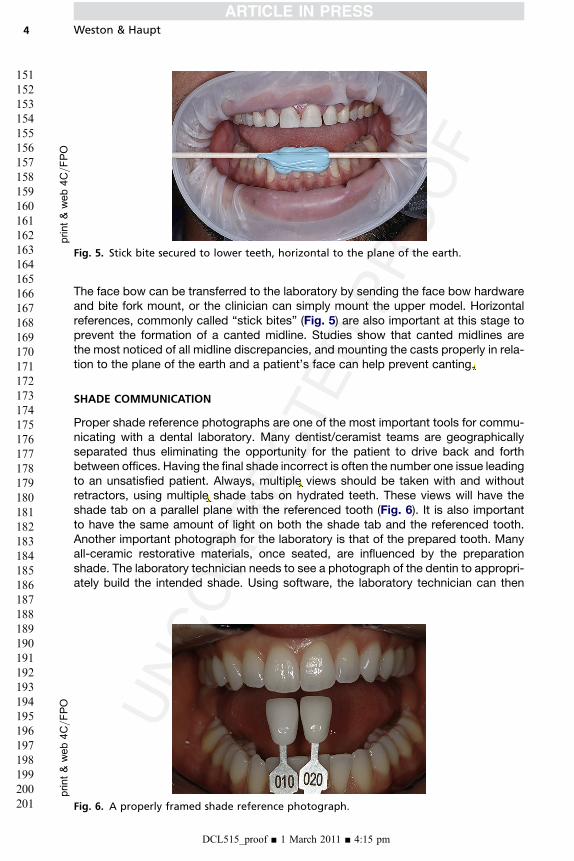
The face bow can be transferred to the laboratory by sending the face bow hardwareand bite fork mount, or the clinician can simply mount the upper model. Horizontalreferences, commonly called “stick bites” (Fig. 5) are also important at this stage toprevent the formation of a canted midline. Studies show that canted midlines arethe most noticed of all midline discrepancies, and mounting the casts properly in rela-tion to the plane of the earth and a patient’s face can help prevent canting.
SHADE COMMUNICATION
Proper shade reference photographs are one of the most important tools for commu-nicating with a dental laboratory. Many dentist/ceramist teams are geographicallyseparated thus eliminating the opportunity for the patient to drive back and forthbetween offices. Having the final shade incorrect is often the number one issue leadingto an unsatisfied patient. Always, multiple views should be taken with and withoutretractors, using multiple shade tabs on hydrated teeth. These views will have theshade tab on a parallel plane with the referenced tooth (Fig. 6). It is also importantto have the same amount of light on both the shade tab and the referenced tooth.Another important photograph for the laboratory is that of the prepared tooth. Manyall-ceramic restorative materials, once seated, are influenced by the preparationshade. The laboratory technician needs to see a photograph of the dentin to appropri-ately build the intended shade. Using software, the laboratory technician can then
Fig. 6. A properly framed shade reference photograph.
DCL515_proof ■ 1 March 2011 ■ 4:15 pm
john
Cross-Out
john
Replacement Text
this problem
john
Cross-Out
john
Replacement Text
a selection of
john
Cross-Out
john
Replacement Text
Multiple
Q13
Q14
Q15
Clinician and Laboratory Technical Communication 5
202
203204205
206207208
209210211
212213214215
216217218
219220221
222223224
225226227228
229230231
232233234
235236237238
239240241
242243244
245246247
248249250251
252
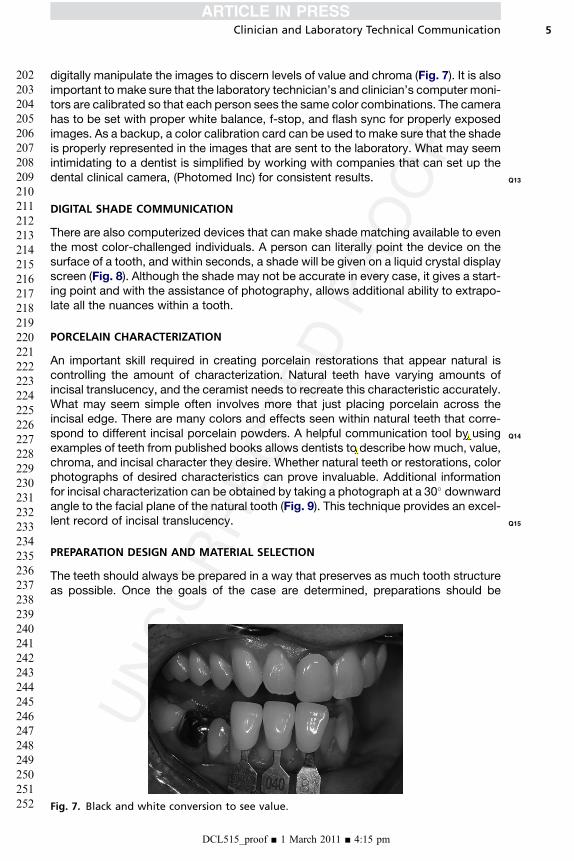
digitally manipulate the images to discern levels of value and chroma (Fig. 7). It is alsoimportant to make sure that the laboratory technician’s and clinician’s computer moni-tors are calibrated so that each person sees the same color combinations. The camerahas to be set with proper white balance, f-stop, and flash sync for properly exposedimages. As a backup, a color calibration card can be used to make sure that the shadeis properly represented in the images that are sent to the laboratory. What may seemintimidating to a dentist is simplified by working with companies that can set up thedental clinical camera, (Photomed Inc) for consistent results.
DIGITAL SHADE COMMUNICATION
There are also computerized devices that can make shade matching available to eventhe most color-challenged individuals. A person can literally point the device on thesurface of a tooth, and within seconds, a shade will be given on a liquid crystal displayscreen (Fig. 8). Although the shade may not be accurate in every case, it gives a start-ing point and with the assistance of photography, allows additional ability to extrapo-late all the nuances within a tooth.
PORCELAIN CHARACTERIZATION
An important skill required in creating porcelain restorations that appear natural iscontrolling the amount of characterization. Natural teeth have varying amounts ofincisal translucency, and the ceramist needs to recreate this characteristic accurately.What may seem simple often involves more that just placing porcelain across theincisal edge. There are many colors and effects seen within natural teeth that corre-spond to different incisal porcelain powders. A helpful communication tool by usingexamples of teeth from published books allows dentists to describe how much, value,chroma, and incisal character they desire. Whether natural teeth or restorations, colorphotographs of desired characteristics can prove invaluable. Additional informationfor incisal characterization can be obtained by taking a photograph at a 30� downwardangle to the facial plane of the natural tooth (Fig. 9). This technique provides an excel-lent record of incisal translucency.
PREPARATION DESIGN AND MATERIAL SELECTION
The teeth should always be prepared in a way that preserves as much tooth structureas possible. Once the goals of the case are determined, preparations should be
Fig. 7. Black and white conversion to see value.
DCL515_proof ■ 1 March 2011 ■ 4:15 pm
john
Cross-Out
john
Cross-Out
john
Replacement Text
By
john
Cross-Out
john
Replacement Text
the dentist can

print&web4C=FPO
print&web4C=FPO
Fig. 8. Easyshade device in use, results are instant (A, B). Q23
Weston & Haupt6
253
254255256
257258259
260261262
263264265266
267268269
270271272
273274275
276277278279
280281282
283284285
286287288289
290291292
293294295
296297298
299300301302
303
decided clinically based on design parameters, shade requirements, and availabletooth structure. Restorative material choices should be finalized in the laboratory tomatch the strength and aesthetic goals required by the case while meeting the prep-aration clearances provided. Blindly preparing teeth just to fit the parameters ofcertain restoratives could be considered inappropriate and, in some cases, malprac-tice. Porcelain veneering was initially introduced as a “no prep” procedure. Whereasbonding strengths were very high because of the large amount of enamel bondingavailable, the feldspathic materials used at the time had strength limitations. Now,because new materials such as lithium disilicate are available at minimal thickness,there is a resurgence of preparationless or minimal preparation options. This resur-gence has created a positive effect on the profession as a whole and serves to reed-ucate the patients and profession to the important philosophy that minimal removal ofexisting tooth structure should always be a top priority.
TEMPORIZATION
One of the key concepts that dentist’s need to understand is that provisionals serve asthe foundation to building a successful case. The 2most commonmethods to creatingprovisionals are using templates from a direct mock-up technique or laboratory wax-up. With a direct mock-up, the restoring dentist uses a flowable composite to adddirectly to the patients existing dentition creating an ideal smile. Once this mock-upis completed, the dentist makes an impression and uses this as a guide for the finaltemporaries. Another option would be to have the laboratory create a wax-up
Fig. 9. Clear incisal character displayed on natural tooth.
DCL515_proof ■ 1 March 2011 ■ 4:15 pm
print&web4C=FPO
Clinician and Laboratory Technical Communication 7
304
305306307
308309310
311312313
314315316317
318319320
321322323
324325326
327328329330
331332333
334335336
337338339340
341342343
344345346
347348349
350351352353
354
idealizing the patients existing tooth form. This wax-up is then used to create a matrixfor provisional fabrication. Although the methods differ in technique, the result is thatpatients have a set of provisionals that they can wear while the final porcelain iscreated. Any functional or aesthetic issues can be worked out with plastic insteadof the final porcelain provisional, thus allowing patients to approve their provisionalsmile before insertion of the final porcelain. Careful planning and attention to provi-sionals are essential for predictable outcomes and satisfied patients.
Q16
Q17
Q18
CASE PRESENTATION
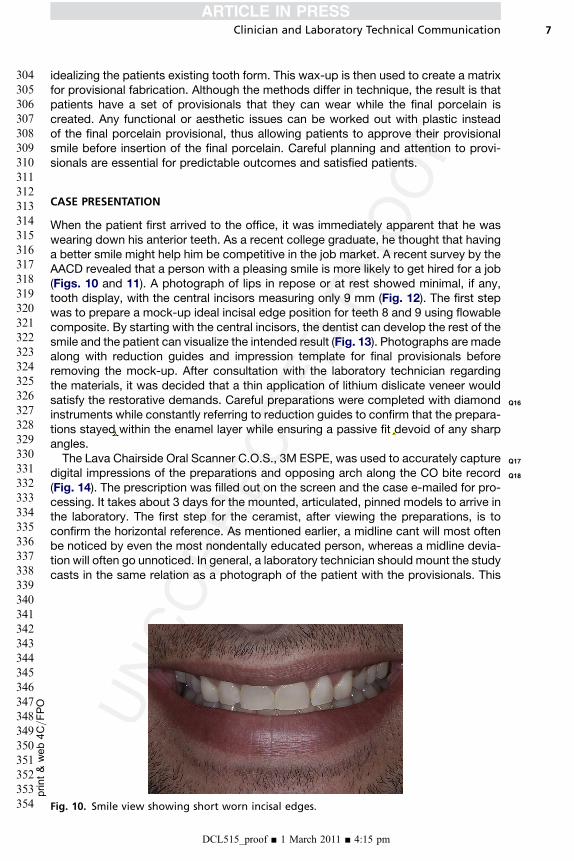
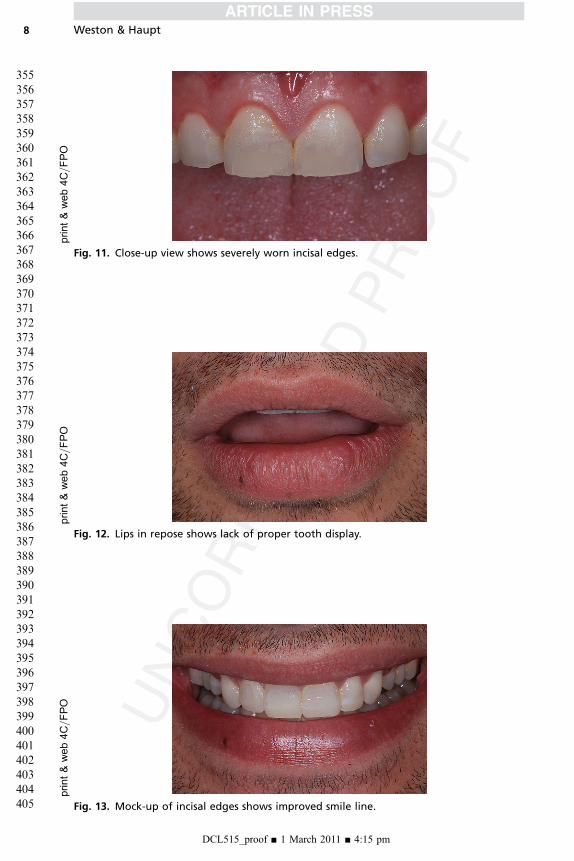
When the patient first arrived to the office, it was immediately apparent that he waswearing down his anterior teeth. As a recent college graduate, he thought that havinga better smile might help him be competitive in the job market. A recent survey by theAACD revealed that a person with a pleasing smile is more likely to get hired for a job(Figs. 10 and 11). A photograph of lips in repose or at rest showed minimal, if any,tooth display, with the central incisors measuring only 9 mm (Fig. 12). The first stepwas to prepare a mock-up ideal incisal edge position for teeth 8 and 9 using flowablecomposite. By starting with the central incisors, the dentist can develop the rest of thesmile and the patient can visualize the intended result (Fig. 13). Photographs are madealong with reduction guides and impression template for final provisionals beforeremoving the mock-up. After consultation with the laboratory technician regardingthe materials, it was decided that a thin application of lithium dislicate veneer wouldsatisfy the restorative demands. Careful preparations were completed with diamondinstruments while constantly referring to reduction guides to confirm that the prepara-tions stayed within the enamel layer while ensuring a passive fit devoid of any sharpangles.The Lava Chairside Oral Scanner C.O.S., 3M ESPE, was used to accurately capture
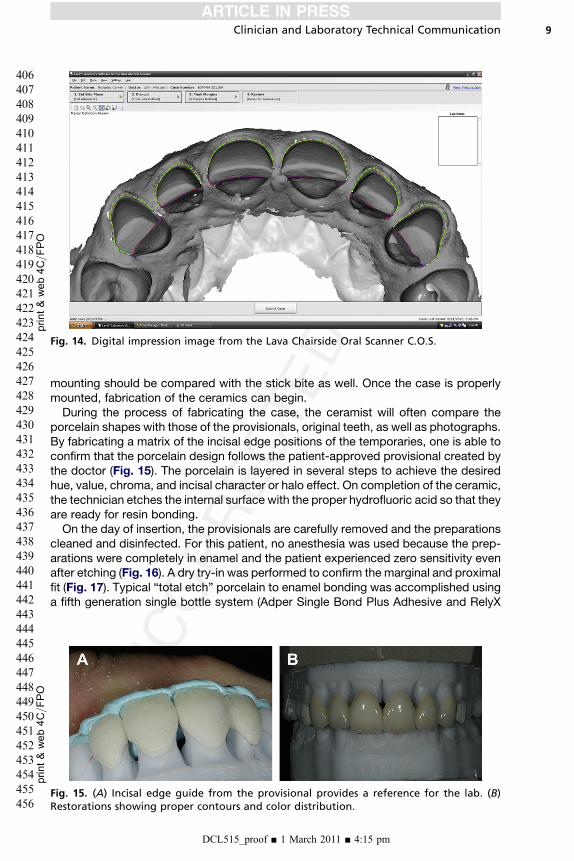
digital impressions of the preparations and opposing arch along the CO bite record(Fig. 14). The prescription was filled out on the screen and the case e-mailed for pro-cessing. It takes about 3 days for the mounted, articulated, pinned models to arrive inthe laboratory. The first step for the ceramist, after viewing the preparations, is toconfirm the horizontal reference. As mentioned earlier, a midline cant will most oftenbe noticed by even the most nondentally educated person, whereas a midline devia-tion will often go unnoticed. In general, a laboratory technician should mount the studycasts in the same relation as a photograph of the patient with the provisionals. This
Fig. 10. Smile view showing short worn incisal edges.
DCL515_proof ■ 1 March 2011 ■ 4:15 pm
john
Cross-Out
john
Replacement Text
stay
john
Inserted Text
that is devoid
john
Cross-Out
print&web4C=FPO
Fig. 11. Close-up view shows severely worn incisal edges.
print&web4C=FPO
Fig. 12. Lips in repose shows lack of proper tooth display.
print&web4C=FPO
Fig. 13. Mock-up of incisal edges shows improved smile line.
Weston & Haupt
DCL515_proof ■ 1 March 2011 ■ 4:15 pm
8
355
356357358
359360361
362363364
365366367368
369370371
372373374
375376377
378379380381
382383384
385386387
388389390391
392393394
395396397
398399400
401402403404
405
print&
web4C=FPO
Fig. 14. Digital impression image from the Lava Chairside Oral Scanner C.O.S.
print&
web4C=FPO
Clinician and Laboratory Technical Communication 9
406
407408409
410411412
413414415
416417418419
420421422
423424425
426427428
429430431432
433434435
436437438
439440441442
443444445
446447448
449450451
452453454455
456
mounting should be compared with the stick bite as well. Once the case is properlymounted, fabrication of the ceramics can begin.During the process of fabricating the case, the ceramist will often compare the
porcelain shapes with those of the provisionals, original teeth, as well as photographs.By fabricating a matrix of the incisal edge positions of the temporaries, one is able toconfirm that the porcelain design follows the patient-approved provisional created bythe doctor (Fig. 15). The porcelain is layered in several steps to achieve the desiredhue, value, chroma, and incisal character or halo effect. On completion of the ceramic,the technician etches the internal surface with the proper hydrofluoric acid so that theyare ready for resin bonding.On the day of insertion, the provisionals are carefully removed and the preparations
cleaned and disinfected. For this patient, no anesthesia was used because the prep-arations were completely in enamel and the patient experienced zero sensitivity evenafter etching (Fig. 16). A dry try-in was performed to confirm the marginal and proximalfit (Fig. 17). Typical “total etch” porcelain to enamel bonding was accomplished usinga fifth generation single bottle system (Adper Single Bond Plus Adhesive and RelyX
Fig. 15. (A) Incisal edge guide from the provisional provides a reference for the lab. (B)Restorations showing proper contours and color distribution.
DCL515_proof ■ 1 March 2011 ■ 4:15 pm

print&web4C=FPO
Fig. 16. Etched preparations showing significant enamel bonding available.
print&web4C=FPO
Fig. 17. Dry try-in used to verify marginal and proximal fit.
print&web4C=FPO
Fig. 18. Immediate postseating.
Weston & Haupt
DCL515_proof ■ 1 March 2011 ■ 4:15 pm
10
457
458459460
461462463
464465466
467468469470
471472473
474475476
477478479
480481482483
484485486
487488489
490491492493
494495496
497498499
500501502
503504505506
507
print&web4C=FPO
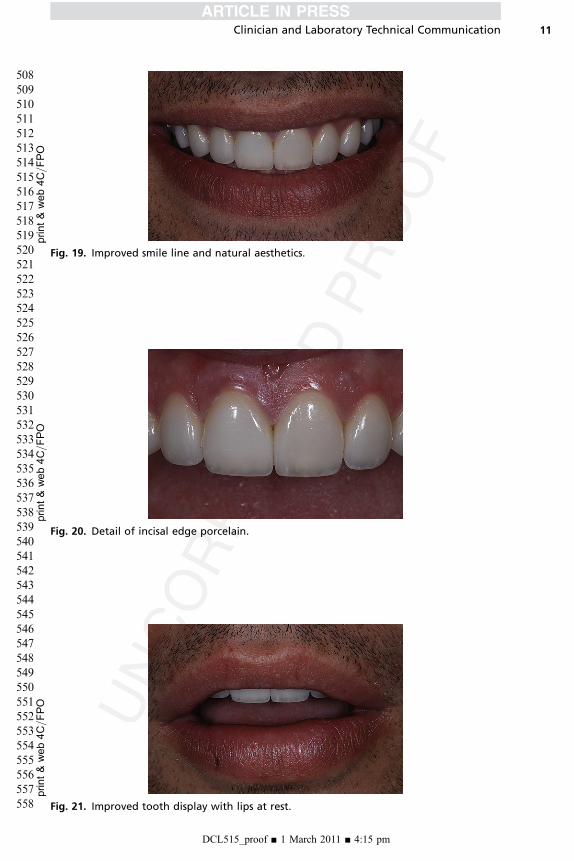
Fig. 19. Improved smile line and natural aesthetics.
print&
web4C=FPO
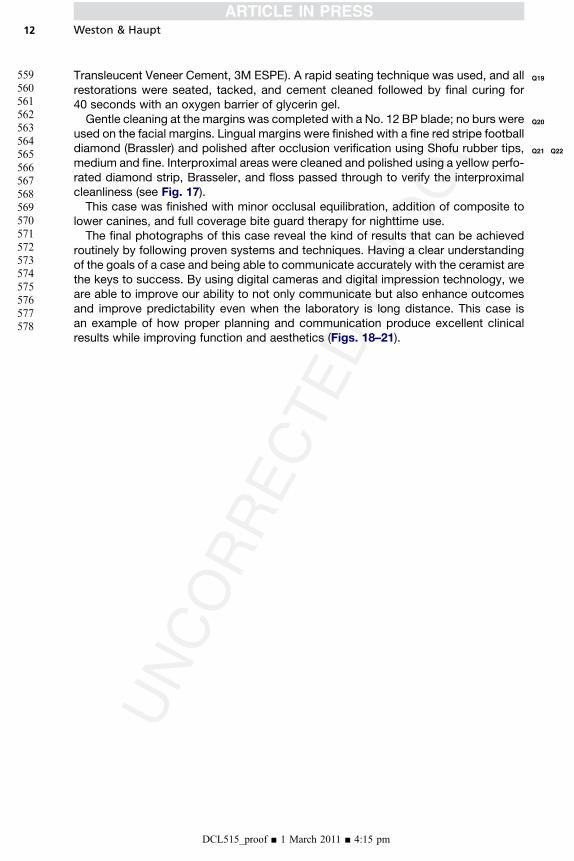
Fig. 20. Detail of incisal edge porcelain.
print&web4C=FPO
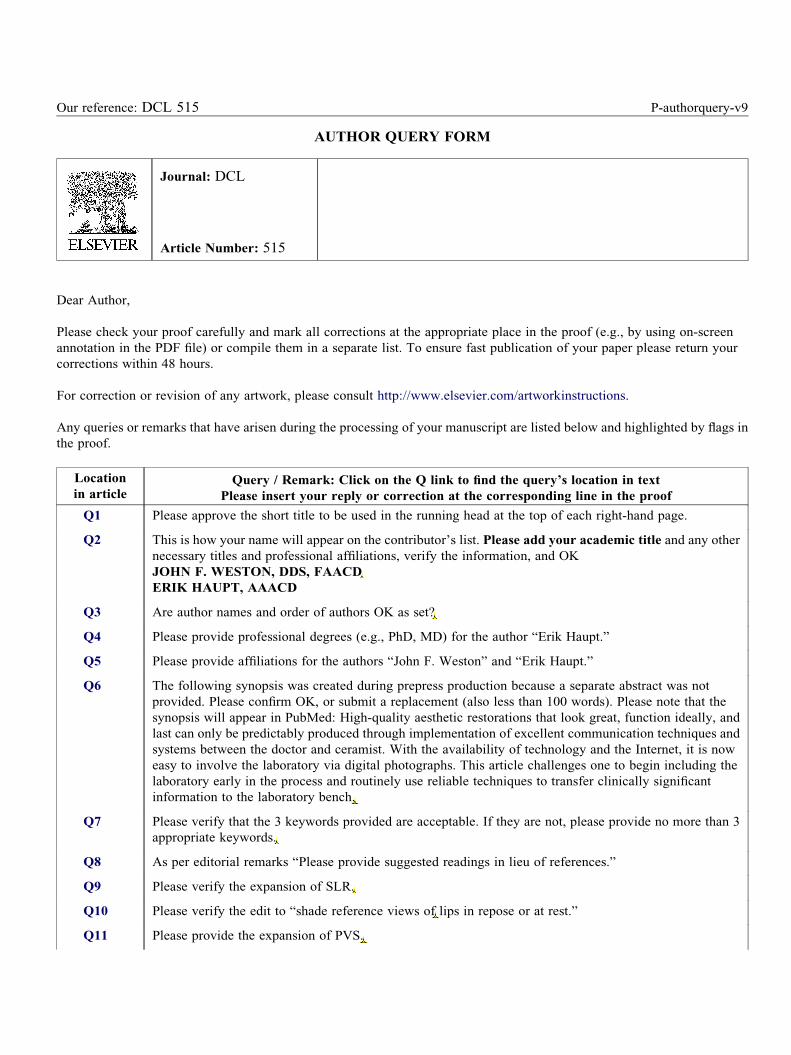
Fig. 21. Improved tooth display with lips at rest.
Clinician and Laboratory Technical Communication
DCL515_proof ■ 1 March 2011 ■ 4:15 pm
11
508
509510511
512513514
515516517
518519520521
522523524
525526527
528529530
531532533534
535536537
538539540
541542543544
545546547
548549550
551552553
554555556557
558
Q19
Q20
Q21 Q22
Weston & Haupt12
559560561562563564565566567568569570571572573574575576577578
Transleucent Veneer Cement, 3M ESPE). A rapid seating technique was used, and allrestorations were seated, tacked, and cement cleaned followed by final curing for40 seconds with an oxygen barrier of glycerin gel.Gentle cleaning at the margins was completed with a No. 12 BP blade; no burs were
used on the facial margins. Lingual margins were finished with a fine red stripe footballdiamond (Brassler) and polished after occlusion verification using Shofu rubber tips,medium and fine. Interproximal areas were cleaned and polished using a yellow perfo-rated diamond strip, Brasseler, and floss passed through to verify the interproximalcleanliness (see Fig. 17).This case was finished with minor occlusal equilibration, addition of composite to
lower canines, and full coverage bite guard therapy for nighttime use.The final photographs of this case reveal the kind of results that can be achieved
routinely by following proven systems and techniques. Having a clear understandingof the goals of a case and being able to communicate accurately with the ceramist arethe keys to success. By using digital cameras and digital impression technology, weare able to improve our ability to not only communicate but also enhance outcomesand improve predictability even when the laboratory is long distance. This case isan example of how proper planning and communication produce excellent clinicalresults while improving function and aesthetics (Figs. 18–21).
DCL515_proof ■ 1 March 2011 ■ 4:15 pm
Our reference: DCL 515 P-authorquery-v9
AUTHOR QUERY FORM
Journal: DCL
Article Number: 515
Dear Author,
Please check your proof carefully and mark all corrections at the appropriate place in the proof (e.g., by using on-screen
annotation in the PDF file) or compile them in a separate list. To ensure fast publication of your paper please return your
corrections within 48 hours.
For correction or revision of any artwork, please consult http://www.elsevier.com/artworkinstructions.
Any queries or remarks that have arisen during the processing of your manuscript are listed below and highlighted by flags in
the proof.
Location
in articleQuery / Remark: Click on the Q link to find the query’s location in text
Please insert your reply or correction at the corresponding line in the proof
Q1 Please approve the short title to be used in the running head at the top of each right-hand page.
Q2 This is how your name will appear on the contributor’s list. Please add your academic title and any other
necessary titles and professional affiliations, verify the information, and OK
JOHN F. WESTON, DDS, FAACD
ERIK HAUPT, AAACD
Q3 Are author names and order of authors OK as set?
Q4 Please provide professional degrees (e.g., PhD, MD) for the author “Erik Haupt.”
Q5 Please provide affiliations for the authors “John F. Weston” and “Erik Haupt.”
Q6 The following synopsis was created during prepress production because a separate abstract was not
provided. Please confirm OK, or submit a replacement (also less than 100 words). Please note that the
synopsis will appear in PubMed: High-quality aesthetic restorations that look great, function ideally, and
last can only be predictably produced through implementation of excellent communication techniques and
systems between the doctor and ceramist. With the availability of technology and the Internet, it is now
easy to involve the laboratory via digital photographs. This article challenges one to begin including the
laboratory early in the process and routinely use reliable techniques to transfer clinically significant
information to the laboratory bench.
Q7 Please verify that the 3 keywords provided are acceptable. If they are not, please provide no more than 3
appropriate keywords.
Q8 As per editorial remarks “Please provide suggested readings in lieu of references.”
Q9 Please verify the expansion of SLR.
Q10 Please verify the edit to “shade reference views of lips in repose or at rest.”
Q11 Please provide the expansion of PVS.
john
Inserted Text
Director Scripps Center for Dental Care Board Member, Amercian Academy of Cosmetic Dentistry, Acredited Fellow American Academy of Cosmetic Dentistry
john
Inserted Text
Yes
john
Inserted Text
OK
john
Inserted Text
OK
john
Inserted Text
OK
john
Cross-Out
john
Replacement Text
and
john
Inserted Text
Polyvinyl Siloxane
Q12 Please verify edit to the sentence “In the end, the model.”
Q13 Please provide the manufacturer location for “Photomed Inc.”
Q14 Please verify edits to the sentence “A helpful communication.”
Q15 Please provide complete details of reference pertaining to the information “JCD Volume 19 Issue #3” in the
reference list and a citation for the same in the text, ensuring sequential order.
Q16 Does edit preserve intent in the sentence “After consultation with the.?”
Q17 Please verify the manufacturer name for “Lava Chairside Oral Scanner C.O.S.” and provide its location.
Q18 Please provide the expansion of “CO.”
Q19 Please verify corrections made to the name of products “Adper Single Bond Plus Adhesive” and “RelyX
Transleucent Veneer Cement” and provide “3M ESPE’s” location.
Q20 Please provide the expansion of BP, if any.
Q21 Please provide the trade names, if any, for “fine red stripe football diamond” and “yellow perforated
diamond strip” and the manufacturer location for Brasseler.
Q22 Please clarify if “Shofu rubber tips” is a product. If so, please provide the manufacturer name and location.
Q23 Please provide the manufacturer name and location of Easyshade device.
Thank you for your assistance.
john
Inserted Text
See correction in document
john
Inserted Text
PhotoMed International14141 Covello StreetBldg 7 Suite CVan Nuys, CA 91405
john
Inserted Text
se text for correction
john
Inserted Text
American Academy of Cosmetic Dentistry [Internet]. Madison (WI): The Academy; c2010 Can a new smile make you appear more successful and intelligent? Available from: http://www.aacd.com/index.php?module=cms&page=75
john
Inserted Text
see text for correction notes
john
Inserted Text
3M Espe3M ESPE Division3M Center, Building 0275-02-SE-03St. Paul, MN 55144-1000 U.S.A.
john
Inserted Text
Centric Occlusion
john
Inserted Text
3M ESPE Division3M Center, Building 0275-02-SE-03St. Paul, MN 55144-1000 U.S.A.
john
Inserted Text
Bard Parker1 Becton DriveFranklin Lakes, NJ USA 07417201.847.6800
john
Inserted Text
Savannah, GA 31419Tel: 1-800-535-6638Fax: 1-912-921-7578
john
Inserted Text
Shofu Dental inc1225 Stone DriveSan Marcos, CA 92078 USAToll Free: 1-800-827-4638 Phone: 760-736-3277
john
Inserted Text
VITA Zahnfabrik H. Rauter GmbH & Co.KGPostfach 1338 · D-79704 Bad Säckingen · GermanyTel. +49(0)7761/562-0 · Fax +49(0)7761/562-299