clinical nursing skills
406
Transcript of clinical nursing skills


Skill Checklists for
Taylor’s ClinicalNursing SkillsA NURSING PROCESS APPROACH
T H I R D E D I T I O N
Pamela Lynn, MSN, RNInstructorSchool of NursingGwynedd-Mercy CollegeGwynedd Valley, Pennsylvania
Marilee LeBon, BAEditor Brigantine, New Jersey
LWBK681-FM_pi-xii.qxd 9/4/10 12:53 AM Page i MCGH146-c01_1-26.qxd

Executive Acquisitions Editor: Carrie BrandonProduct Manager: Helene T. CaprariDesign Coordinator: Holly McLaughlinManufacturing Coordinator: Karin DuffieldPrepress Vendor: Aptara, Inc.
3rd edition
Copyright © 2011 Wolters Kluwer Health | Lippincott Williams & Wilkins.
Copyright © 2008, 2005 Lippincott Williams & Wilkins. All rights reserved. This book is protected bycopyright. No part of this book may be reproduced or transmitted in any form or by any means, includingas photocopies or scanned-in or other electronic copies, or utilized by any information storage and retrievalsystem without written permission from the copyright owner, except for brief quotations embodied incritical articles and reviews. Materials appearing in this book prepared by individuals as part of theirofficial duties as U.S. government employees are not covered by the above-mentioned copyright. Torequest permission, please contact Lippincott Williams & Wilkins at Two Commerce Square, 2001Market Street, Philadelphia, PA 19103, via email at [email protected], or via our website atlww.com (products and services).
9 8 7 6 5 4 3 2 1
Printed in the United States of America.
ISBN: 978-0-7817-9518-0
Care has been taken to confirm the accuracy of the information presented and to describe generallyaccepted practices. However, the authors, editors, and publisher are not responsible for errors or omis-sions or for any consequences from application of the information in this book and make no warranty,expressed or implied, with respect to the currency, completeness, or accuracy of the contents of the pub-lication. Application of this information in a particular situation remains the professional responsibilityof the practitioner; the clinical treatments described and recommended may not be considered absoluteand universal recommendations.
The authors, editors, and publisher have exerted every effort to ensure that drug selection anddosage set forth in this text are in accordance with the current recommendations and practice at thetime of publication. However, in view of ongoing research, changes in government regulations, and theconstant flow of information relating to drug therapy and drug reactions, the reader is urged to checkthe package insert for each drug for any change in indications and dosage and for added warnings andprecautions. This is particularly important when the recommended agent is a new or infrequentlyemployed drug.
Some drugs and medical devices presented in this publication have Food and Drug Administration(FDA) clearance for limited use in restricted research settings. It is the responsibility of the health care provider to ascertain the FDA status of each drug or device planned for use in his or her clinicalpractice.
LWW.com
LWBK681-FM_pi-xii.qxd 9/16/10 2:35 AM Page ii Aptara

iii
Introduction
Developing clinical competency is a major challenge for each fundamentals student. To facilitate the masteryof nursing skills, we are happy to provide Skill Checklists for each skill in Taylor Clinical Nursing Skills: A Nursing Process Approach, 3rd edition. The skill checklists follow each step of the skill to provide acomplete evaluative tool. Students can use the checklists to facilitate self-evaluation, and faculty will find themuseful in measuring and recording student performance. Three-hole punched and perforated, these checklistscan be easily reproduced and brought to the simulation laboratory or clinical area. The checklists are designedto record an evaluation of each step of the skill.
• Checkmark in the “Excellent” column denotes mastering the procedure.• Checkmark in the “Satisfactory” column indicates use of the recommended technique.• Checkmark in the “Needs Practice” column indicates use of some but not all of each recommended
technique.
The Comments section allows you to highlight suggestions that will improve skills. Space is available at the topof each checklist to record a final pass/fail evaluation, date, and the signature of the student and evaluatingfaculty member.
LWBK681-FM_pi-xii.qxd 9/4/10 12:53 AM Page iii MCGH146-c01_1-26.qxd

LWBK681-FM_pi-xii.qxd 9/4/10 12:53 AM Page iv MCGH146-c01_1-26.qxd

List of Skills by Chapter
Chapter 1 Vital SignsSkill 1-1: Assessing Body Temperature 1
Skill 1-2: Monitoring Temperature Using an Overhead Radiant Warmer 5
Skill 1-3: Using a Cooling Blanket 6
Skill 1-4: Assessing a Peripheral Pulse by Palpation 8
Skill 1-5: Assessing the Apical Pulse by Auscultation 9
Skill 1-6: Assessing Respiration 10
Skill 1-7: Assessing Brachial Artery Blood Pressure 11
Chapter 2 Health AssessmentSkill 2-1: Performing a General Survey 14
Skill 2-2: Using a Bed Scale 16
Skill 2-3: Assessing the Skin, Hair, and Nails 18
Skill 2-4: Assessing the Head and Neck 20
Skill 2-5: Assessing the Thorax and Lungs 23
Skill 2-6: Assessing the Cardiovascular System 25
Skill 2-7: Assessing the Abdomen 27
Skill 2-8: Assessing the Neurologic, Musculoskeletal, and Peripheral Vascular Systems 29
Chapter 3 SafetySkill 3-1: Fall Prevention 32
Skill 3-2: Implementing Alternatives to the Use of Restraints 34
Skill 3-3: Applying an Extremity Restraint 36
Skill 3-4: Applying a Waist Restraint 38
Skill 3-5: Applying an Elbow Restraint 40
Skill 3-6: Applying a Mummy Restraint 42
Chapter 4 Asepsis and Infection ControlSkill 4-1: Performing Hand Hygiene Using Soap and Water (Handwashing) 43
Skill 4-2: Performing Hand Hygiene Using an Alcohol-Based Hand Rub 44
Skill 4-3: Preparing a Sterile Field Using a Packaged Sterile Drape 45
Skill 4-4: Preparing a Sterile Field Using a Commercially Prepared Sterile Kit or Tray 46
Skill 4-5: Adding Sterile Items to a Sterile Field 48
Skill 4-6: Putting on Sterile Gloves and Removing Soiled Gloves 50
Skill 4-7: Using Personal Protective Equipment 52
Chapter 5 MedicationsSkill 5-1: Administering Oral Medications 54
Skill 5-2: Administering Medications via a Gastric Tube 57
Skill 5-3: Removing Medication from an Ampule 60
Skill 5-4: Removing Medication from a Vial 62
Skill 5-5: Mixing Medications From Two Vials in One Syringe 64
Skill 5-6: Administering an Intradermal Injection 66
Skill 5-7: Administering a Subcutaneous Injection 69
Skill 5-8: Administering an Intramuscular Injection 72
Skill 5-9: Administering Continuous Subcutaneous Infusion: Applying an Insulin Pump 75
Skill 5-10: Administering Medications by Intravenous Bolus or Push Through an Intravenous Infusion 78
Skill 5-11: Administering a Piggyback Intermittent Intravenous Infusion of Medication 81
v
LWBK681-FM_pi-xii.qxd 9/4/10 12:53 AM Page v MCGH146-c01_1-26.qxd
vi Contents
Skill 5-12: Administering an Intermittent Intravenous Infusion of Medication via a Mini-infusion Pump 84
Skill 5-13: Administering an Intermittent Intravenous Infusion of Medication via a Volume-Control
Administration Set 87
Skill 5-14: Introducing Drugs Through a Medication or Drug-Infusion Lock Using the Saline Flush
(Intermittent Peripheral Venous Access Device) 90
Skill 5-15: Applying a Transdermal Patch 93
Skill 5-16: Instilling Eye Drops 95
Skill 5-17: Administering an Eye Irrigation 98
Skill 5-18: Instilling Ear Drops 100
Skill 5-19: Administering an Ear Irrigation 102
Skill 5-20: Instilling Nose Drops 104
Skill 5-21: Administering a Vaginal Cream 106
Skill 5-22: Administering a Rectal Suppository 109
Skill 5-23: Administering Medication via a Metered-Dose Inhaler (MDI) 111
Skill 5-24: Administering Medication via a Small-Volume Nebulizer 113
Skill 5-25: Administering Medication via a Dry Powder Inhaler 115
Chapter 6 Perioperative NursingSkill 6-1: Providing Preoperative Patient Care: Hospitalized Patient 117
Skill 6-2: Deep Breathing Exercises, Coughing, and Splinting 120
Skill 6-3: Leg Exercises 122
Skill 6-4: Providing Preoperative Patient Care: Hospitalized Patient (Day of Surgery) 123
Skill 6-5: Providing Postoperative Care When Patient Returns to Room 125
Skill 6-6: Applying a Forced-Air Warming Device 128
Chapter 7 HygieneSkill 7-1: Giving a Bed Bath 129
Skill 7-2: Assisting the Patient With Oral Care 132
Skill 7-3: Providing Oral Care for the Dependent Patient 134
Skill 7-4: Providing Denture Care 135
Skill 7-5: Removing Contact Lenses 136
Skill 7-6: Shampooing a Patient’s Hair in Bed 137
Skill 7-7: Assisting the Patient to Shave 139
Skill 7-8: Making an Unoccupied Bed 140
Skill 7-9: Making an Occupied Bed 142
Chapter 8 Skin Integrity and Wound CareSkill 8-1: Cleaning a Wound and Applying a Dry, Sterile Dressing 144
Skill 8-2: Applying a Saline-Moistened Dressing 147
Skill 8-3: Applying a Hydrocolloid Dressing 149
Skill 8-4: Performing Irrigation of a Wound 151
Skill 8-5: Collecting a Wound Culture 153
Skill 8-6: Applying Montgomery Straps 155
Skill 8-7: Caring for a Penrose Drain 157
Skill 8-8: Caring for a T-Tube Drain 159
Skill 8-9: Caring for a Jackson-Pratt Drain 162
Skill 8-10: Caring for a Hemovac Drain 164
Skill 8-11: Applying Negative Pressure Wound Therapy 166
Skill 8-12: Removing Sutures 169
Skill 8-13: Removing Surgical Staples 171
Skill 8-14: Applying an External Heating Pad 173
Skill 8-15: Applying a Warm Compress 175
Skill 8-16: Assisting With a Sitz Bath 177
Skill 8-17: Applying Cold Therapy 178
Chapter 9 ActivitySkill 9-1: Assisting a Patient With Turning in Bed 180
Skill 9-2: Moving a Patient Up in Bed With the Assistance of Another Nurse 182
Skill 9-3: Transferring a Patient From the Bed to a Stretcher 184
LWBK681-FM_pi-xii.qxd 9/4/10 12:53 AM Page vi MCGH146-c01_1-26.qxd
Contents vii
Skill 9-4: Transferring a Patient From the Bed to a Chair 186
Skill 9-5: Transferring a Patient Using a Powered Full-Body Sling Lift 188
Skill 9-6: Providing Range-of-Motion Exercises 190
Skill 9-7: Assisting a Patient With Ambulation 192
Skill 9-8: Assisting a Patient With Ambulation Using a Walker 194
Skill 9-9: Assisting a Patient With Ambulation Using Crutches 196
Skill 9-10: Assisting a Patient With Ambulation Using a Cane 198
Skill 9-11: Applying and Removing Antiembolism Stockings 199
Skill 9-12: Applying Pneumatic Compression Devices 201
Skill 9-13: Applying a Continuous Passive Motion Device 203
Skill 9-14: Applying a Sling 205
Skill 9-15: Applying a Figure-Eight Bandage 206
Skill 9-16: Assisting With Cast Application 208
Skill 9-17: Caring for a Cast 210
Skill 9-18: Applying Skin Traction and Caring for a Patient in Skin Traction 212
Skill 9-19: Caring for a Patient in Skeletal Traction 214
Skill 9-20: Caring for a Patient With an External Fixation Device 216
Chapter 10 ComfortSkill 10-1: Promoting Patient Comfort 218
Skill 10-2: Giving a Back Massage 222
Skill 10-3: Applying and Caring for a Patient Using a TENS Unit 224
Skill 10-4: Caring for a Patient Receiving Patient-Controlled Analgesia 226
Skill 10-5: Caring for a Patient Receiving Epidural Analgesia 228
Skill 10-6: Caring for a Patient Receiving Continuous Wound Perfusion Pain Management 230
Chapter 11 NutritionSkill 11-1: Assisting a Patient With Eating 232
Skill 11-2: Inserting a Nasogastric (NG) Tube 234
Skill 11-3: Administering a Tube Feeding 237
Skill 11-4: Removing a Nasogastric Tube 240
Skill 11-5: Caring for a Gastrostomy Tube 241
Chapter 12 Urinary EliminationSkill 12-1: Assisting With the Use of a Bedpan 243
Skill 12-2: Assisting With the Use of a Urinal 245
Skill 12-3: Assisting With the Use of a Bedside Commode 247
Skill 12-4: Assessing Bladder Volume Using an Ultrasound Bladder Scanner 249
Skill 12-5: Applying an External Condom Catheter 251
Skill 12-6: Catheterizing the Female Urinary Bladder 253
Skill 12-7: Catheterizing the Male Urinary Bladder 256
Skill 12-8: Removing an Indwelling Catheter 259
Skill 12-9: Performing Intermittent Closed Catheter Irrigation 260
Skill 12-10: Administering a Continuous Closed Bladder Irrigation 262
Skill 12-11: Emptying and Changing a Stoma Appliance on an Ileal Conduit 264
Skill 12-12: Caring for a Suprapubic Urinary Catheter 266
Skill 12-13: Caring for a Peritoneal Dialysis Catheter 268
Skill 12-14: Caring for a Hemodialysis Access (Arteriovenous Fistula or Graft) 270
Chapter 13 Bowel EliminationSkill 13-1: Administering a Large-Volume Cleansing Enema 271
Skill 13-2: Administering a Small-Volume Cleansing Enema 273
Skill 13-3: Administering a Retention Enema 275
Skill 13-4: Digital Removal of Stool 277
Skill 13-5: Applying a Fecal Incontinence Pouch 279
Skill 13-6: Changing and Emptying an Ostomy Appliance 280
Skill 13-7: Irrigating a Colostomy 282
Skill 13-8: Irrigating a Nasogastric Tube Connected to Suction 284
LWBK681-FM_pi-xii.qxd 9/4/10 12:53 AM Page vii MCGH146-c01_1-26.qxd
viii Contents
Chapter 14 OxygenationSkill 14-1: Using a Pulse Oximeter 286
Skill 14-2: Teaching Patient to Use an Incentive Spirometer 288
Skill 14-3: Administering Oxygen by Nasal Cannula 290
Skill 14-4: Administering Oxygen by Mask 291
Skill 14-5: Using an Oxygen Tent 292
Skill 14-6: Suctioning the Nasopharyngeal and Oropharyngeal Airways 293
Skill 14-7: Inserting an Oropharyngeal Airway 296
Skill 14-8: Suctioning an Endotracheal Tube: Open System 298
Skill 14-9: Suctioning an Endotracheal Tube: Closed System 301
Skill 14-10: Securing an Endotracheal Tube 304
Skill 14-11: Suctioning the Tracheostomy: Open System 307
Skill 14-12: Providing Tracheostomy Care 310
Skill 14-13: Providing Care of a Chest Drainage System 313
Skill 14-14: Assisting With Removal of a Chest Tube 315
Skill 14-15: Using a Handheld Resuscitation Bag and Mask 316
Chapter 15 Fluid, Electrolyte, and Acid–Base BalanceSkill 15-1: Initiating a Peripheral Venous Access IV Infusion 318
Skill 15-2: Changing an IV Solution Container and Administration Set 322
Skill 15-3: Monitoring an IV Site and Infusion 325
Skill 15-4: Changing a Peripheral Venous Access Dressing 327
Skill 15-5: Capping for Intermittent Use and Flushing a Peripheral Venous Access Device 329
Skill 15-6: Administering a Blood Transfusion 330
Skill 15-7: Changing the Dressing and Flushing Central Venous Access Devices 333
Skill 15-8: Accessing an Implanted Port 335
Skill 15-9: Deaccessing an Implanted Port 337
Skill 15-10: Removing a Peripherally Inserted Central Catheter (PICC) 339
Chapter 16 Cardiovascular CareSkill 16-1: Obtaining an Electrocardiogram (ECG) 340
Skill 16-2: Applying a Cardiac Monitor 343
Skill 16-3: Obtaining an Arterial Blood Sample From an Arterial Line–Stopcock System 345
Skill 16-4: Removing Arterial and Femoral Lines 347
Skill 16-5: Performing Cardiopulmonary Resuscitation (CPR) 349
Skill 16-6: Performing Emergency Automated External Defibrillation 351
Skill 16-7: Performing Emergency Manual External Defibrillation (Asynchronous) 353
Skill 16-8: Using an External (Transcutaneous) Pacemaker 355
Chapter 17 Neurologic CareSkill 17-1: Logrolling a Patient 358
Skill 17-2: Applying a Two-Piece Cervical Collar 360
Skill 17-3: Employing Seizure Precautions and Seizure Management 362
Skill 17-4: Caring for a Patient in Halo Traction 364
Skill 17-5: Caring for a Patient with an External Ventriculostomy (Intraventricular Catheter–Closed
Fluid-Filled System) 366
Skill 17-6: Caring for a Patient With a Fiber Optic Intracranial Catheter 368
Chapter 18 Laboratory Specimen CollectionSkill 18-1: Testing Stool for Occult Blood 369
Skill 18-2: Collecting a Stool Specimen for Culture 371
Skill 18-3: Obtaining a Capillary Blood Sample for Glucose Testing 372
Skill 18-4: Obtaining a Nasal Swab 374
Skill 18-5: Obtaining a Nasopharyngeal Swab 376
Skill 18-6: Collecting a Sputum Specimen for Culture 378
Skill 18-7: Collecting a Urine Specimen (Clean Catch, Midstream) for Urinalysis and Culture 380
Skill 18-8: Obtaining a Urine Specimen From an Indwelling Urinary Catheter 382
Skill 18-9: Using Venipuncture to Collect a Venous Blood Sample for Routine Testing 384
Skill 18-10: Obtaining a Venous Blood Specimen for Culture and Sensitivity 387
Skill 18-11: Obtaining an Arterial Blood Specimen for Blood Gas Analysis 390
LWBK681-FM_pi-xii.qxd 9/4/10 12:53 AM Page viii MCGH146-c01_1-26.qxd

List of Skills in Alphabetical Order
Skill 2-7: Abdomen, Assessing the 27
Skill 9-7: Ambulation, Assisting a Patient With 192
Skill 9-10: Ambulation Using a Cane, Assisting a Patient With 198
Skill 9-9: Ambulation Using Crutches, Assisting a Patient With 212
Skill 9-8: Ambulation Using a Walker, Assisting a Patient With 194
Skill 9-11: Antiembolism Stockings, Applying and Removing 199
Skill 16-4: Arterial and Femoral Lines, Removing 347
Skill 10-2: Back Massage, Giving a 222
Skill 9-1: Bed, Assisting a Patient With Turning in 000
Skill 7-9: Bed, Making an Occupied 142
Skill 7-8: Bed, Making an Unoccupied 140
Skill 12-1: Bedpan, Assisting With the Use of a 243
Skill 12-3: Bedside Commode, Assisting With the Use of a 247
Skill 7-1: Bed Bath, Giving a 129
Skill 2-2: Bed Scale, Using a 16
Skill 12-10: Bladder Irrigation, Administering a Continuous Closed 262
Skill 12-4: Bladder Volume Using an Ultrasound Bladder Scanner, Assessing 249
Skill 1-7: Blood Pressure, Assessing Brachial Artery 11
Skill 18-9: Blood Sample for Routine Testing, Using Venipuncture to Collect a Venous 384
Skill 16-3: Blood Sample From an Arterial Line–Stopcock System, Obtaining an Arterial 345
Skill 18-11: Blood Specimen for Blood Gas Analysis, Obtaining an Arterial 390
Skill 18-10: Blood Specimen for Culture and Sensitivity, Obtaining a Venous 387
Skill 15-6: Blood Transfusion, Administering a 330
Skill 6-2: Breathing Exercises, Deep: Coughing, and Splinting 120
Skill 16-2: Cardiac Monitor, Applying a 343
Skill 16-5: Cardiopulmonary Resuscitation (CPR), Performing 349
Skill 2-6: Cardiovascular System, Assessing the 25
Skill 9-17: Cast, Caring for a 210
Skill 9-16: Cast Application, Assisting With 208
Skill 12-5: Catheter, Applying an External Condom 251
Skill 17-6: Catheter, Caring for a Patient With a Fiber Optic Intracranial 368
Skill 12-13: Catheter, Caring for a Peritoneal Dialysis 247
Skill 12-12: Catheter, Caring for a Suprapubic Urinary 266
Skill 18-8: Catheter, Obtaining a Urine Specimen From an Indwelling Urinary 382
Skill 12-8: Catheter, Removing an Indwelling 259
Skill 12-9: Catheter Irrigation, Performing Intermittent Closed 260
Skill 15-10: Catheter (PICC), Removing a Peripherally Inserted Central 339
Skill 12-6: Catheterizing the Female Urinary Bladder 253
Skill 12-7: Catheterizing the Male Urinary Bladder 256
Skill 15-7: Central Venous Access Devices, Changing the Dressing and Flushing 333
Skill 17-2: Cervical Collar, Applying a Two-Piece 360
Skill 14-13: Chest Drainage System, Providing Care of a 290
Skill 14-14: Chest Tube, Assisting With Removal of a 315
Skill 8-17: Cold Therapy, Applying 178
Skill 13-7: Colostomy, Irrigating a 282
Skill 10-1: Comfort, Promoting Patient 218
Skill 8-15: Compress, Applying a Warm 175
Skill 7-5: Contact Lenses, Removing 136
Skill 1-3: Cooling Blanket, Using a 6
ix
LWBK681-FM_pi-xii.qxd 9/4/10 12:53 AM Page ix MCGH146-c01_1-26.qxd
x Contents
Skill 16-6: Defibrillation, Performing Emergency Automated External 351
Skill 16-7: Defibrillation (Asynchronous), Performing Emergency Manual External 353
Skill 7-4: Denture Care, Providing 135
Skill 8-10: Drain, Caring for a Hemovac 164
Skill 8-9: Drain, Caring for a Jackson-Pratt 162
Skill 8-7: Drain, Caring for a Penrose 157
Skill 8-8: Drain, Caring for a T-Tube 159
Skill 8-3: Dressing, Applying a Hydrocolloid 149
Skill 8-2: Dressing, Applying a Saline-Moistened 147
Skill 5-14: Drug-Infusion Lock (Intermittent Peripheral Venous Access Device) Using the Saline Flush,
Introducing Drugs Through a Medication or 90
Skill 5-25: Dry Powder Inhaler, Administering Medication via a 115
Skill 5-18: Ear Drops, Instilling 100
Skill 5-19: Ear Irrigation, Administering an 102
Skill 11-1: Eating, Assisting a Patient With 232
Skill 16-1: Electrocardiogram (ECG), Obtaining an 340
Skill 14-8: Endotracheal Tube: Open System, Suctioning an 298
Skill 14-9: Endotracheal Tube: Closed System, Suctioning an 301
Skill 14-10: Endotracheal Tube, Securing an 304
Skill 13-1: Enema, Administering a Large-Volume Cleansing 271
Skill 13-3: Enema, Administering a Retention 275
Skill 13-2: Enema, Administering a Small-Volume Cleansing 273
Skill 10-5: Epidural Analgesia, Caring for a Patient Receiving 228
Skill 6-3: Exercises, Leg 122
Skill 9-6: Exercises, Providing Range-of-Motion 190
Skill 9-20: External Fixation Device, Caring for a Patient With an 216
Skill 5-16: Eye Drops, Instilling 95
Skill 5-17: Eye Irrigation, Administering an 98
Skill 3-1: Fall Prevention 32
Skill 13-5: Fecal Incontinence Pouch, Applying a 279
Skill 9-15: Figure-Eight Bandage, Applying a 206
Skill 6-6: Forced-Air Warming Device, Applying a 128
Skill 5-2: Gastric Tube, Administering Medications via a 57
Skill 11-5: Gastrostomy Tube, Caring for a 241
Skill 2-1: General Survey, Performing a 14
Skill 4-6: Gloves, Putting on Sterile Gloves and Removing Soiled 50
Skill 18-3: Glucose Testing, Obtaining a Capillary Blood Sample for 372
Skill 4-2: Hand Hygiene, Performing: Using an Alcohol-Based Hand Rub 44
Skill 4-1: Hand Hygiene, Performing: Using Soap and Water (Handwashing) 43
Skill 2-4: Head and Neck, Assessing the 20
Skill 8-14: Heating Pad, Applying an External 173
Skill 12-14: Hemodialysis Access (Arteriovenous Fistula or Graft), Caring for a 270
Skill 14-2: Incentive Spirometer, Teaching Patient to Use an 288
Skill 5-7: Injection, Administering a Subcutaneous 69
Skill 5-6: Injection, Administering an Intradermal 66
Skill 5-8: Injection, Administering an Intramuscular 72
Skill 5-10: Intravenous Infusion, Administering Medications by Intravenous Bolus or Push Through an 75
Skill 5-11: Intravenous Infusion of Medication, Administering a Piggyback Intermittent 81
Skill 5-12: Intravenous Infusion of Medication via a Mini-Infusion Pump, Administering an Intermittent 84
Skill 5-13: Intravenous Infusion of Medication via a Volume-Control Administration Set, Administering
an Intermittent 87
Skill 5-9: Insulin Pump, Applying an: Administering Continuous Subcutaneous Infusion 75
Skill 15-1: IV Infusion, Initiating a Peripheral Venous Access 318
Skill 15-3: IV Site and Infusion, Monitoring an 325
Skill 15-2: IV Solution Container and Administration Set, Changing an 322
Skill 17-1: Logrolling a Patient 358
Skill 5-3: Medication, Removing From an Ampule 60
Skill 5-4: Medication, Removing From a Vial 62
Skill 5-1: Medications, Administering Oral 54
LWBK681-FM_pi-xii.qxd 9/4/10 12:53 AM Page x MCGH146-c01_1-26.qxd
Contents xi
Skill 5-5: Medications, Mixing From Two Vials in One Syringe 64
Skill 5-23: Metered-Dose Inhaler (MDI), Administering Medication via a 111
Skill 8-6: Montgomery Straps, Applying 155
Skill 9-2: Moving a Patient Up in Bed With the Assistance of Another Nurse 182
Skill 18-4: Nasal Swab, Obtaining a 374
Skill 11-2: Nasogastric (NG) Tube, Inserting a 234
Skill 13-8: Nasogastric Tube Connected to Suction, Irrigating a 284
Skill 11-4: Nasogastric Tube, Removing a 240
Skill 14-6: Nasopharyngeal and Oropharyngeal Airways, Suctioning the 293
Skill 18-5: Nasopharyngeal Swab, Obtaining a 376
Skill 5-24: Nebulizer, Administering Medication via a Small-Volume 113
Skill 2-8: Neurologic, Musculoskeletal, and Peripheral Vascular Systems, Assessing the 29
Skill 5-20: Nose Drops, Instilling 104
Skill 18-1: Occult Blood, Testing Stool for 369
Skill 7-2: Oral Care, Assisting the Patient With 132
Skill 7-3: Oral Care for the Dependent Patient, Providing 134
Skill 14-7: Oropharyngeal Airway, Inserting an 296
Skill 13-6: Ostomy Appliance, Changing and Emptying an 280
Skill 14-4: Oxygen by Mask, Administering 291
Skill 14-3: Oxygen by Nasal Cannula, Administering 290
Skill 14-5: Oxygen Tent, Using an 292
Skill 16-8: Pacemaker, Using an External (Transcutaneous) 355
Skill 9-13: Passive Motion Device, Applying a Continuous 203
Skill 10-4: Patient-Controlled Analgesia, Caring for a Patient Receiving 226
Skill 15-5: Peripheral Venous Access Device, Capping for Intermittent Use and Flushing a 329
Skill 15-4: Peripheral Venous Access Dressing, Changing a 327
Skill 4-7: Personal Protective Equipment, Using 52
Skill 9-12: Pneumatic Compression Devices, Applying 201
Skill 15-8: Port, Accessing an Implanted 335
Skill 15-9: Port, Deaccessing an Implanted 337
Skill 6-5: Postoperative Care When Patient Returns to Room, Providing 125
Skill 6-4: Preoperative Patient Care: Hospitalized Patient (Day of Surgery), Providing 123
Skill 6-1: Preoperative Patient Care: Hospitalized Patient, Providing 117
Skill 1-5: Pulse by Auscultation, Assessing the Apical 9
Skill 1-4: Pulse by Palpation, Assessing a Peripheral 8
Skill 14-1: Pulse Oximeter, Using a 286
Skill 5-22: Rectal Suppository, Administering a 109
Skill 1-6: Respiration, Assessing 10
Skill 3-5: Restraint, Applying an Elbow 40
Skill 3-3: Restraint, Applying an Extremity 36
Skill 3-6: Restraint, Applying a Mummy 42
Skill 3-4: Restraint, Applying a Wrist 42
Skill 3-2: Restraints, Implementing Alternatives to the Use of 34
Skill 14-15: Resuscitation Bag and Mask, Using a Handheld 316
Skill 17-3: Seizure Precautions and Seizure Management, Employing 362
Skill 7-6: Shampooing a Patient’s Hair in Bed 137
Skill 7-7: Shave, Assisting the Patient to 139
Skill 8-16: Sitz Bath, Assisting With a 177
Skill 2-3: Skin, Hair, and Nails; Assessing the 18
Skill 9-14: Sling, Applying a 205
Skill 18-6: Sputum Specimen for Culture, Collecting a 378
Skill 4-5: Sterile Field, Adding Sterile Items to a 48
Skill 4-4: Sterile Field Using a Commercially Prepared Sterile Kit or Tray, Preparing a 46
Skill 4-3: Sterile Field Using a Packaged Sterile Drape, Preparing a 45
Skill 12-11: Stoma Appliance on an Ileal Conduit, Emptying and Changing a 243
Skill 13-4: Stool, Digital Removal of 277
Skill 18-2: Stool Specimen for Culture, Collecting a 371
Skill 8-13: Surgical Staples, Removing 171
Skill 8-12: Sutures, Removing 169
LWBK681-FM_pi-xii.qxd 9/4/10 12:53 AM Page xi MCGH146-c01_1-26.qxd

xii Contents
Skill 1-1: Temperature, Assessing Body 1
Skill 1-2: Temperature, Monitoring Using an Overhead Radiant Warmer, 5
Skill 10-3: TENS Unit, Applying and Caring for a Patient Using a 224
Skill 2-5: Thorax and Lungs, Assessing the 23
Skill 14-12: Tracheostomy Care, Providing 310
Skill 14-11: Tracheostomy: Open System, Suctioning the 307
Skill 9-18: Traction, Applying Skin Traction and Caring for a Patient in Skin 212
Skill 17-4: Traction, Caring for a Patient in Halo 364
Skill 9-19: Traction, Caring for a Patient in Skeletal 214
Skill 5-15: Transdermal Patch, Applying a 93
Skill 9-4: Transferring a Patient From the Bed to a Chair 186
Skill 9-3: Transferring a Patient From the Bed to a Stretcher 184
Skill 9-5: Transferring a Patient Using a Powered Full-Body Sling Lift 188
Skill 11-3: Tube Feeding, Administering a 237
Skill 12-2: Urinal, Assisting With the Use of a 245
Skill 18-7: Urine Specimen (Clean Catch, Midstream) for Urinalysis and Culture, Collecting a 382
Skill 5-21: Vaginal Cream, Administering a 105
Skill 17-5: Ventriculostomy (Intraventricular Catheter-Closed Fluid-Filled System), Caring for a Patient
With an External 366
Skill 8-1: Wound, Cleaning a, and Applying a Dry Sterile Dressing 144
Skill 8-4: Wound, Performing Irrigation of a 151
Skill 10-6: Wound Perfusion Pain Management, Caring for a Patient Receiving Continuous 230
Skill 8-5: Wound Culture, Collecting a 153
Skill 8-11: Wound Therapy, Applying Negative Pressure 166
LWBK681-FM_pi-xii.qxd 9/4/10 12:53 AM Page xii MCGH146-c01_1-26.qxd

1
Skill Checklists for Taylor's Clinical Nursing Skills:
A Nursing Process Approach, 3rd edition
Name Date
Unit Position
Instructor/Evaluator: Position
SKILL 1-1
Assessing Body Temperature
Goal: The patient’s temperature is assessed accurately without
injury and the patient experiences only minimal discomfort. Comments
1. Check medical order or nursing care plan for frequency ofmeasurement and route. More frequent temperature meas-urement may be appropriate based on nursing judgment.Bring necessary equipment to the bedside stand or overbedtable.
2. Perform hand hygiene and put on PPE, if indicated.
3. Identify the patient.
4. Close curtains around bed and close the door to the room,if possible. Discuss the procedure with patient and assessthe patient’s ability to assist with the procedure.
5. Ensure the electronic or digital thermometer is in workingcondition.
6. Put on gloves, if appropriate or indicated.
7. Select the appropriate site based on previous assessmentdata.
8. Follow the steps as outlined below for the appropriate typeof thermometer.
9. When measurement is completed, remove gloves, if worn.Remove additional PPE, if used. Perform hand hygiene.
Measuring a Tympanic Membrane Temperature
10. If necessary, push the “on” button and wait for the“ready” signal on the unit.
11. Slide disposable cover onto the tympanic probe.
12. Insert the probe snugly into the external ear using gentlebut firm pressure, angling the thermometer toward thepatient’s jaw line. Pull pinna up and back to straightenthe ear canal in an adult.
13. Activate the unit by pushing the trigger button. The read-ing is immediate (usually within 2 seconds). Note the reading.
14. Discard the probe cover in an appropriate receptacle bypushing the probe-release button or use rim of cover toremove from probe. Replace the thermometer in itscharger, if necessary.
Copyright © 2011 by Wolters Kluwer Health | Lippincott Williams & Wilkins. Skill Checklists for Taylor's Clinical Nursing Skills:
A Nursing Process Approach, 3rd edition, by Pamela Lynn and Marilee LeBon.
Exce
llent
Satis
fact
ory
Nee
ds P
ract
ice
LWBK681-C01_p01-13.qxd 9/3/10 5:35 PM Page 1 Aptara Inc

2
Copyright © 2011 by Wolters Kluwer Health | Lippincott Williams & Wilkins. Skill Checklists for Taylor's Clinical Nursing Skills:
A Nursing Process Approach, 3rd edition, by Pamela Lynn and Marilee LeBon.
SKILL 1-1
Assessing Body Temperature (Continued)
Comments
Assessing Oral Temperature
10. Remove the electronic unit from the charging unit, andremove the probe from within the recording unit.
11. Cover thermometer probe with disposable probe cover andslide it on until it snaps into place.
12. Place the probe beneath the patient’s tongue in the posteriorsublingual pocket. Ask the patient to close his or her lipsaround the probe.
13. Continue to hold the probe until you hear a beep. Note thetemperature reading.
14. Remove the probe from the patient’s mouth. Dispose ofthe probe cover by holding the probe over an appropriatereceptacle and pressing the probe release button.
15. Return the thermometer probe to the storage place withinthe unit. Return the electronic unit to the charging unit, ifappropriate.
Assessing Rectal Temperature
10. Adjust the bed to a comfortable working height, usuallyelbow height of the care giver (VISN 8 Patient Safety Center, 2009). Put on nonsterile gloves.
11. Assist the patient to a side-lying position. Pull back thecovers sufficiently to expose only the buttocks.
12. Remove the rectal probe from within the recording unit ofthe electronic thermometer. Cover the probe with a dispos-able probe cover and slide it into place until it snaps inplace.
13. Lubricate about 1 inch of the probe with a water-solublelubricant.
14. Reassure the patient. Separate the buttocks until the analsphincter is clearly visible.
15. Insert the thermometer probe into the anus about 1.5 inchesin an adult or 1 inch in a child.
16. Hold the probe in place until you hear a beep, thencarefully remove the probe. Note the temperature readingon the display.
17. Dispose of the probe cover by holding the probe over an appropriate waste receptacle and pressing the releasebutton.
18. Using toilet tissue, wipe the anus of any feces or excesslubricant. Dispose of the toilet tissue. Remove gloves anddiscard them.
Exce
llent
Satis
fact
ory
Nee
ds P
ract
ice
LWBK681-C01_p01-13.qxd 9/3/10 5:35 PM Page 2 Aptara Inc
3
Copyright © 2011 by Wolters Kluwer Health | Lippincott Williams & Wilkins. Skill Checklists for Taylor's Clinical Nursing Skills:
A Nursing Process Approach, 3rd edition, by Pamela Lynn and Marilee LeBon.
SKILL 1-1
Assessing Body Temperature (Continued)
Comments
19. Cover the patient and help him or her to a position ofcomfort.
20. Place the bed in the lowest position; elevate rails as needed.
21. Return the thermometer to the charging unit.
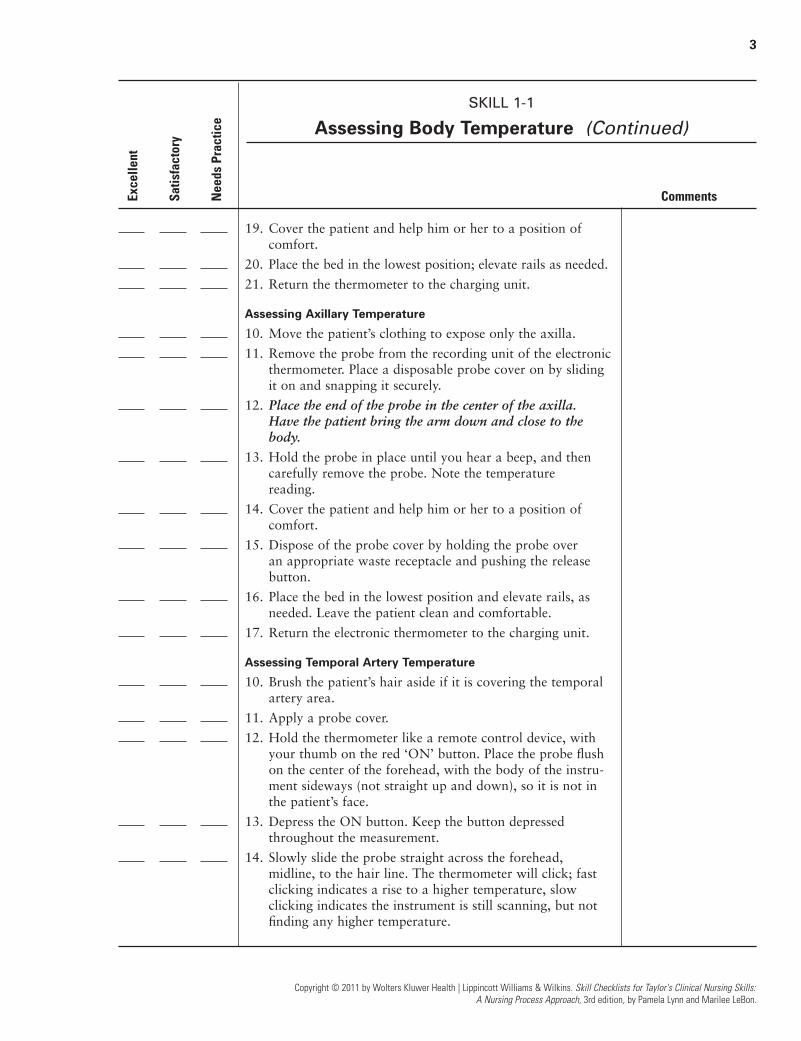
Assessing Axillary Temperature
10. Move the patient’s clothing to expose only the axilla.
11. Remove the probe from the recording unit of the electronicthermometer. Place a disposable probe cover on by slidingit on and snapping it securely.
12. Place the end of the probe in the center of the axilla. Have the patient bring the arm down and close to thebody.
13. Hold the probe in place until you hear a beep, and thencarefully remove the probe. Note the temperature reading.
14. Cover the patient and help him or her to a position ofcomfort.
15. Dispose of the probe cover by holding the probe over an appropriate waste receptacle and pushing the releasebutton.
16. Place the bed in the lowest position and elevate rails, asneeded. Leave the patient clean and comfortable.
17. Return the electronic thermometer to the charging unit.
Assessing Temporal Artery Temperature
10. Brush the patient’s hair aside if it is covering the temporalartery area.
11. Apply a probe cover.
12. Hold the thermometer like a remote control device, withyour thumb on the red ‘ON’ button. Place the probe flushon the center of the forehead, with the body of the instru-ment sideways (not straight up and down), so it is not inthe patient’s face.
13. Depress the ON button. Keep the button depressedthroughout the measurement.
14. Slowly slide the probe straight across the forehead,midline, to the hair line. The thermometer will click; fastclicking indicates a rise to a higher temperature, slowclicking indicates the instrument is still scanning, but notfinding any higher temperature.
Exce
llent
Satis
fact
ory
Nee
ds P
ract
ice
LWBK681-C01_p01-13.qxd 9/3/10 5:35 PM Page 3 Aptara Inc

4
Copyright © 2011 by Wolters Kluwer Health | Lippincott Williams & Wilkins. Skill Checklists for Taylor's Clinical Nursing Skills:
A Nursing Process Approach, 3rd edition, by Pamela Lynn and Marilee LeBon.
SKILL 1-1
Assessing Body Temperature (Continued)
Comments
15. Brush hair aside if it is covering the ear, exposing the areaof the neck under the ear lobe. Lift the probe from theforehead and touch on the neck just behind the ear lobe, in the depression just below the mastoid.
16. Release the button and read the thermometermeasurement.
17. Hold the thermometer over a waste receptacle. Gentlypush the probe cover with your thumb against theproximal edge to dispose of probe cover.
18. Instrument will automatically turn off in 30 seconds, orpress and release the power button.
Exce
llent
Satis
fact
ory
Nee
ds P
ract
ice
LWBK681-C01_p01-13.qxd 9/3/10 5:35 PM Page 4 Aptara Inc
5
Skill Checklists for Taylor's Clinical Nursing Skills:
A Nursing Process Approach, 3rd edition
Name Date
Unit Position
Instructor/Evaluator: Position
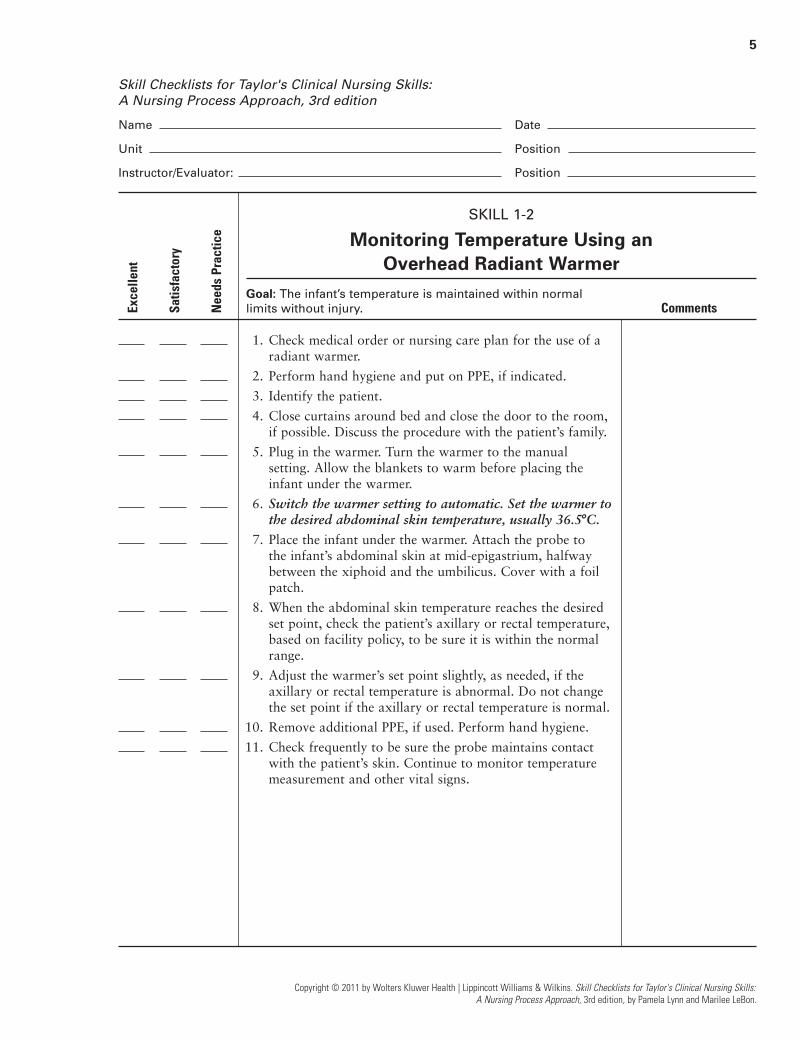
SKILL 1-2
Monitoring Temperature Using an Overhead Radiant Warmer
Goal: The infant’s temperature is maintained within normal
limits without injury. Comments
1. Check medical order or nursing care plan for the use of aradiant warmer.
2. Perform hand hygiene and put on PPE, if indicated.
3. Identify the patient.
4. Close curtains around bed and close the door to the room,if possible. Discuss the procedure with the patient’s family.
5. Plug in the warmer. Turn the warmer to the manualsetting. Allow the blankets to warm before placing theinfant under the warmer.
6. Switch the warmer setting to automatic. Set the warmer tothe desired abdominal skin temperature, usually 36.5�C.
7. Place the infant under the warmer. Attach the probe to the infant’s abdominal skin at mid-epigastrium, halfwaybetween the xiphoid and the umbilicus. Cover with a foilpatch.
8. When the abdominal skin temperature reaches the desiredset point, check the patient’s axillary or rectal temperature,based on facility policy, to be sure it is within the normalrange.
9. Adjust the warmer’s set point slightly, as needed, if theaxillary or rectal temperature is abnormal. Do not changethe set point if the axillary or rectal temperature is normal.
10. Remove additional PPE, if used. Perform hand hygiene.
11. Check frequently to be sure the probe maintains contactwith the patient’s skin. Continue to monitor temperaturemeasurement and other vital signs.
Copyright © 2011 by Wolters Kluwer Health | Lippincott Williams & Wilkins. Skill Checklists for Taylor's Clinical Nursing Skills:
A Nursing Process Approach, 3rd edition, by Pamela Lynn and Marilee LeBon.
Exce
llent
Satis
fact
ory
Nee
ds P
ract
ice
LWBK681-C01_p01-13.qxd 9/3/10 5:35 PM Page 5 Aptara Inc
6
Copyright © 2011 by Wolters Kluwer Health | Lippincott Williams & Wilkins. Skill Checklists for Taylor's Clinical Nursing Skills:
A Nursing Process Approach, 3rd edition, by Pamela Lynn and Marilee LeBon.
Skill Checklists for Taylor's Clinical Nursing Skills:
A Nursing Process Approach, 3rd edition
Name Date
Unit Position
Instructor/Evaluator: Position
SKILL 1-3
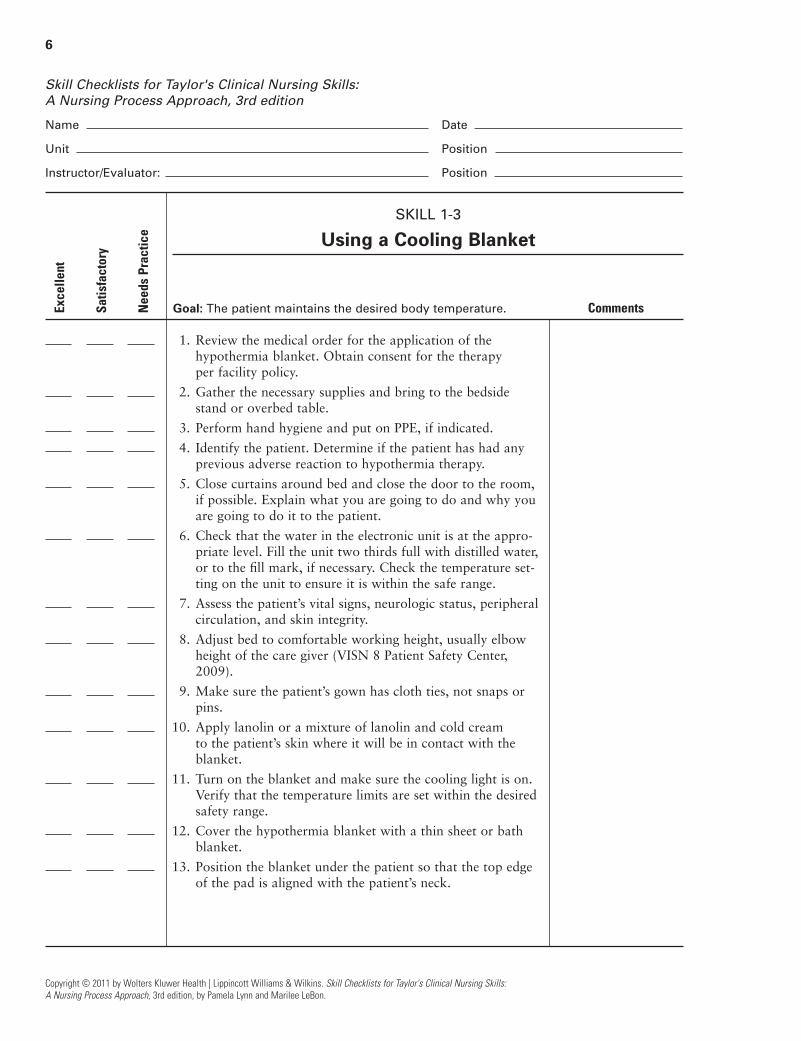
Using a Cooling Blanket
Goal: The patient maintains the desired body temperature. Comments
1. Review the medical order for the application of thehypothermia blanket. Obtain consent for the therapy per facility policy.
2. Gather the necessary supplies and bring to the bedsidestand or overbed table.
3. Perform hand hygiene and put on PPE, if indicated.
4. Identify the patient. Determine if the patient has had anyprevious adverse reaction to hypothermia therapy.
5. Close curtains around bed and close the door to the room,if possible. Explain what you are going to do and why youare going to do it to the patient.
6. Check that the water in the electronic unit is at the appro-priate level. Fill the unit two thirds full with distilled water,or to the fill mark, if necessary. Check the temperature set-ting on the unit to ensure it is within the safe range.
7. Assess the patient’s vital signs, neurologic status, peripheralcirculation, and skin integrity.
8. Adjust bed to comfortable working height, usually elbowheight of the care giver (VISN 8 Patient Safety Center,2009).
9. Make sure the patient’s gown has cloth ties, not snaps orpins.
10. Apply lanolin or a mixture of lanolin and cold cream to the patient’s skin where it will be in contact with theblanket.
11. Turn on the blanket and make sure the cooling light is on.Verify that the temperature limits are set within the desiredsafety range.
12. Cover the hypothermia blanket with a thin sheet or bathblanket.
13. Position the blanket under the patient so that the top edgeof the pad is aligned with the patient’s neck.
Exce
llent
Satis
fact
ory
Nee
ds P
ract
ice
LWBK681-C01_p01-13.qxd 9/3/10 5:35 PM Page 6 Aptara Inc
7
Copyright © 2011 by Wolters Kluwer Health | Lippincott Williams & Wilkins. Skill Checklists for Taylor's Clinical Nursing Skills:
A Nursing Process Approach, 3rd edition, by Pamela Lynn and Marilee LeBon.
SKILL 1-3
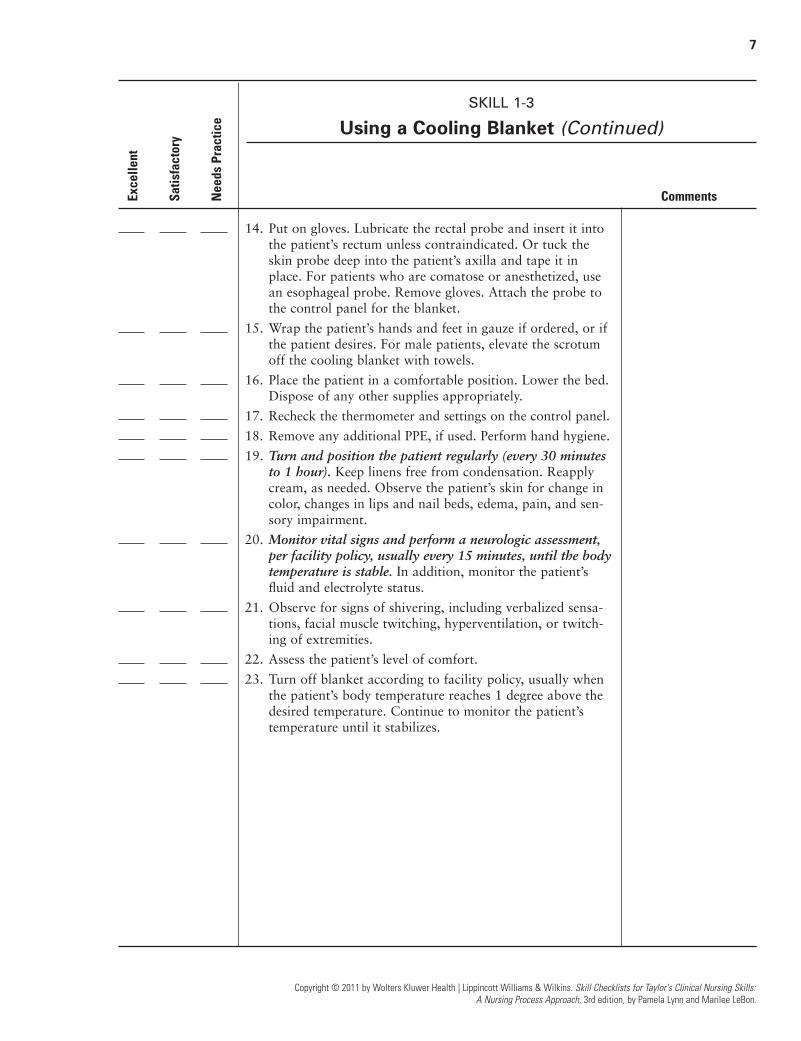
Using a Cooling Blanket (Continued)
Comments
14. Put on gloves. Lubricate the rectal probe and insert it intothe patient’s rectum unless contraindicated. Or tuck theskin probe deep into the patient’s axilla and tape it inplace. For patients who are comatose or anesthetized, usean esophageal probe. Remove gloves. Attach the probe tothe control panel for the blanket.
15. Wrap the patient’s hands and feet in gauze if ordered, or ifthe patient desires. For male patients, elevate the scrotumoff the cooling blanket with towels.
16. Place the patient in a comfortable position. Lower the bed.Dispose of any other supplies appropriately.
17. Recheck the thermometer and settings on the control panel.
18. Remove any additional PPE, if used. Perform hand hygiene.
19. Turn and position the patient regularly (every 30 minutesto 1 hour). Keep linens free from condensation. Reapplycream, as needed. Observe the patient’s skin for change incolor, changes in lips and nail beds, edema, pain, and sen-sory impairment.
20. Monitor vital signs and perform a neurologic assessment,per facility policy, usually every 15 minutes, until the bodytemperature is stable. In addition, monitor the patient’sfluid and electrolyte status.
21. Observe for signs of shivering, including verbalized sensa-tions, facial muscle twitching, hyperventilation, or twitch-ing of extremities.
22. Assess the patient’s level of comfort.
23. Turn off blanket according to facility policy, usually whenthe patient’s body temperature reaches 1 degree above thedesired temperature. Continue to monitor the patient’stemperature until it stabilizes.
Exce
llent
Satis
fact
ory
Nee
ds P
ract
ice
LWBK681-C01_p01-13.qxd 9/3/10 5:35 PM Page 7 Aptara Inc

8
Copyright © 2011 by Wolters Kluwer Health | Lippincott Williams & Wilkins. Skill Checklists for Taylor's Clinical Nursing Skills:
A Nursing Process Approach, 3rd edition, by Pamela Lynn and Marilee LeBon.
Skill Checklists for Taylor's Clinical Nursing Skills:
A Nursing Process Approach, 3rd edition
Name Date
Unit Position
Instructor/Evaluator: Position
SKILL 1-4
Assessing a Peripheral Pulse by Palpation
Goal: The patient’s pulse is assessed accurately without injury
and the patient experiences only minimal discomfort. Comments
1. Check medical order or nursing care plan for frequency ofpulse assessment. More frequent pulse measurement maybe appropriate based on nursing judgment.
2. Perform hand hygiene and put on PPE, if indicated.
3. Identify the patient.
4. Close curtains around bed and close the door to the room,if possible. Discuss the procedure with patient and assessthe patient’s ability to assist with the procedure.
5. Put on gloves, as appropriate.
6. Select the appropriate peripheral site based on assessmentdata.
7. Move the patient’s clothing to expose only the site chosen.
8. Place your first, second, and third fingers over the artery.Lightly compress the artery so pulsations can be felt andcounted.
9. Using a watch with a second hand, count the number ofpulsations felt for 30 seconds. Multiply this number by 2 to calculate the rate for 1 minute. If the rate, rhythm, oramplitude of the pulse is abnormal in any way, palpate and count the pulse for 1 minute.
10. Note the rhythm and amplitude of the pulse.
11. When measurement is completed, remove gloves, if worn.Cover the patient and help him or her to a position ofcomfort.
12. Remove additional PPE, if used. Perform hand hygiene.
Exce
llent
Satis
fact
ory
Nee
ds P
ract
ice
LWBK681-C01_p01-13.qxd 9/3/10 5:35 PM Page 8 Aptara Inc

9
Skill Checklists for Taylor's Clinical Nursing Skills:
A Nursing Process Approach, 3rd edition
Name Date
Unit Position
Instructor/Evaluator: Position
SKILL 1-5
Assessing the Apical Pulse by Auscultation
Goal: The patient’s pulse is assessed accurately without injury
and the patient experiences minimal discomfort. Comments
1. Check medical order or nursing care plan for frequency ofpulse assessment. More frequent pulse measurement maybe appropriate based on nursing judgment. Identify theneed to obtain an apical pulse measurement.
2. Perform hand hygiene and put on PPE, if indicated.
3. Identify the patient.
4. Close curtains around bed and close the door to the room,if possible. Discuss procedure with patient and assesspatient’s ability to assist with the procedure.
5. Put on gloves, as appropriate.
6. Use alcohol swab to clean the diaphragm of the stethoscope.Use another swab to clean the earpieces, if necessary.
7. Assist patient to a sitting or reclining position and exposechest area.
8. Move the patient’s clothing to expose only the apical site.
9. Hold the stethoscope diaphragm against the palm of yourhand for a few seconds.
10. Palpate the space between the fifth and sixth ribs (fifthintercostal space), and move to the left midclavicular line.Place the diaphragm over the apex of the heart.
11. Listen for heart sounds (“lub-dub”). Each “lub-dub” countsas one beat.
12. Using a watch with a second hand, count the heartbeat for1 minute.
13. When measurement is completed, remove gloves, if worn.Cover the patient and help him or her to a position ofcomfort.
14. Clean the diaphragm of the stethoscope with an alcoholswab.
15. Remove additional PPE, if used. Perform hand hygiene.
Copyright © 2011 by Wolters Kluwer Health | Lippincott Williams & Wilkins. Skill Checklists for Taylor's Clinical Nursing Skills:
A Nursing Process Approach, 3rd edition, by Pamela Lynn and Marilee LeBon.
Exce
llent
Satis
fact
ory
Nee
ds P
ract
ice
LWBK681-C01_p01-13.qxd 9/3/10 5:35 PM Page 9 Aptara Inc

10
Copyright © 2011 by Wolters Kluwer Health | Lippincott Williams & Wilkins. Skill Checklists for Taylor's Clinical Nursing Skills:
A Nursing Process Approach, 3rd edition, by Pamela Lynn and Marilee LeBon.
Skill Checklists for Taylor's Clinical Nursing Skills:
A Nursing Process Approach, 3rd edition
Name Date
Unit Position
Instructor/Evaluator: Position
SKILL 1-6
Assessing Respiration
Goal: The patient’s respirations are assessed accurately without
injury and the patient experiences only minimal discomfort. Comments
1. While your fingers are still in place for the pulse measure-ment, after counting the pulse rate, observe the patient’srespirations.
2. Note the rise and fall of the patient’s chest.
3. Using a watch with a second hand, count the number of respirations for 30 seconds. Multiply this number by 2 tocalculate the respiratory rate per minute.
4. If respirations are abnormal in any way, count the respirations for at least 1 full minute.
5. Note the depth and rhythm of the respirations.
6. When measurement is completed, remove gloves, if worn.Cover the patient and help him or her to a position of comfort.
7. Remove additional PPE, if used. Perform hand hygiene.
Exce
llent
Satis
fact
ory
Nee
ds P
ract
ice
LWBK681-C01_p01-13.qxd 9/3/10 5:35 PM Page 10 Aptara Inc

11
Skill Checklists for Taylor's Clinical Nursing Skills:
A Nursing Process Approach, 3rd edition
Name Date
Unit Position
Instructor/Evaluator: Position
SKILL 1-7
Assessing Brachial Artery Blood Pressure
Goal: The patient’s blood pressure is measured accurately
with minimal discomfort to the patient. Comments
1. Check physician’s order or nursing care plan for frequency ofblood pressure measurement. More frequent measurementmay be appropriate based on nursing judgment.
2. Perform hand hygiene and put on PPE, if indicated.
3. Identify the patient.
4. Close curtains around bed and close the door to the room,if possible. Discuss procedure with patient and assesspatient’s ability to assist with the procedure. Validate thatthe patient has relaxed for several minutes.
5. Put on gloves, if appropriate or indicated.
6. Select the appropriate arm for application of the cuff.
7. Have the patient assume a comfortable lying or sittingposition with the forearm supported at the level of the heart and the palm of the hand upward. If themeasurement is taken in the supine position, support thearm with a pillow. In the sitting position, support the armyourself or by using the bedside table. If the patient is sitting, have the patient sit back in the chair so that thechair supports his or her back. In addition, make sure thepatient keeps the legs uncrossed.
8. Expose the brachial artery by removing garments, or movea sleeve, if it is not too tight, above the area where the cuffwill be placed.
9. Palpate the location of the brachial artery. Center thebladder of the cuff over the brachial artery, about midwayon the arm, so that the lower edge of the cuff is about 2.5to 5 cm (1 to 2 inches) above the inner aspect of theelbow. Line the artery marking on the cuff up with thepatient’s brachial artery. The tubing should extend fromthe edge of the cuff nearer the patient’s elbow.
10. Wrap the cuff around the arm smoothly and snugly, andfasten it. Do not allow any clothing to interfere with theproper placement of the cuff.
Copyright © 2011 by Wolters Kluwer Health | Lippincott Williams & Wilkins. Skill Checklists for Taylor's Clinical Nursing Skills:
A Nursing Process Approach, 3rd edition, by Pamela Lynn and Marilee LeBon.
Exce
llent
Satis
fact
ory
Nee
ds P
ract
ice
LWBK681-C01_p01-13.qxd 9/3/10 5:35 PM Page 11 Aptara Inc

12
Copyright © 2011 by Wolters Kluwer Health | Lippincott Williams & Wilkins. Skill Checklists for Taylor's Clinical Nursing Skills:
A Nursing Process Approach, 3rd edition, by Pamela Lynn and Marilee LeBon.
SKILL 1-7
Assessing Brachial Artery Blood Pressure (Continued)
Comments
11. Check that the needle on the aneroid gauge is within thezero mark. If using a mercury manometer, check to seethat the manometer is in the vertical position and that the mercury is within the zero level with the gauge at eyelevel.
Estimating Systolic Pressure
12. Palpate the pulse at the brachial or radial artery by press-ing gently with the fingertips.
13. Tighten the screw valve on the air pump.
14. Inflate the cuff while continuing to palpate the artery.Note the point on the gauge where the pulse disappears.
15. Deflate the cuff and wait 1 minute.
Obtaining Blood Pressure Measurement
16. Assume a position that is no more than 3 feet away fromthe gauge.
17. Place the stethoscope earpieces in your ears. Direct theearpieces forward into the canal and not against the ear itself.
18. Place the bell or diaphragm of the stethoscope firmly butwith as little pressure as possible over the brachial artery.Do not allow the stethoscope to touch clothing or the cuff.
19. Pump the pressure 30 mm Hg above the point at whichthe systolic pressure was palpated and estimated. Open thevalve on the manometer and allow air to escape slowly(allowing the gauge to drop 2 to 3 mm per second).
20. Note the point on the gauge at which the first faint, butclear, sound appears that slowly increases in intensity. Note this number as the systolic pressure. Read thepressure to the closest 2 mm Hg.
21. Do not reinflate the cuff once the air is being released torecheck the systolic pressure reading.
22. Note the point at which the sound completely disappears.
23. Allow the remaining air to escape quickly. Repeat anysuspicious reading, but wait at least 1 minute. Deflatethe cuff completely between attempts to check the bloodpressure.
Exce
llent
Satis
fact
ory
Nee
ds P
ract
ice
LWBK681-C01_p01-13.qxd 9/3/10 5:35 PM Page 12 Aptara Inc
13
Copyright © 2011 by Wolters Kluwer Health | Lippincott Williams & Wilkins. Skill Checklists for Taylor's Clinical Nursing Skills:
A Nursing Process Approach, 3rd edition, by Pamela Lynn and Marilee LeBon.
SKILL 1-7
Assessing Brachial Artery Blood Pressure (Continued)
Comments
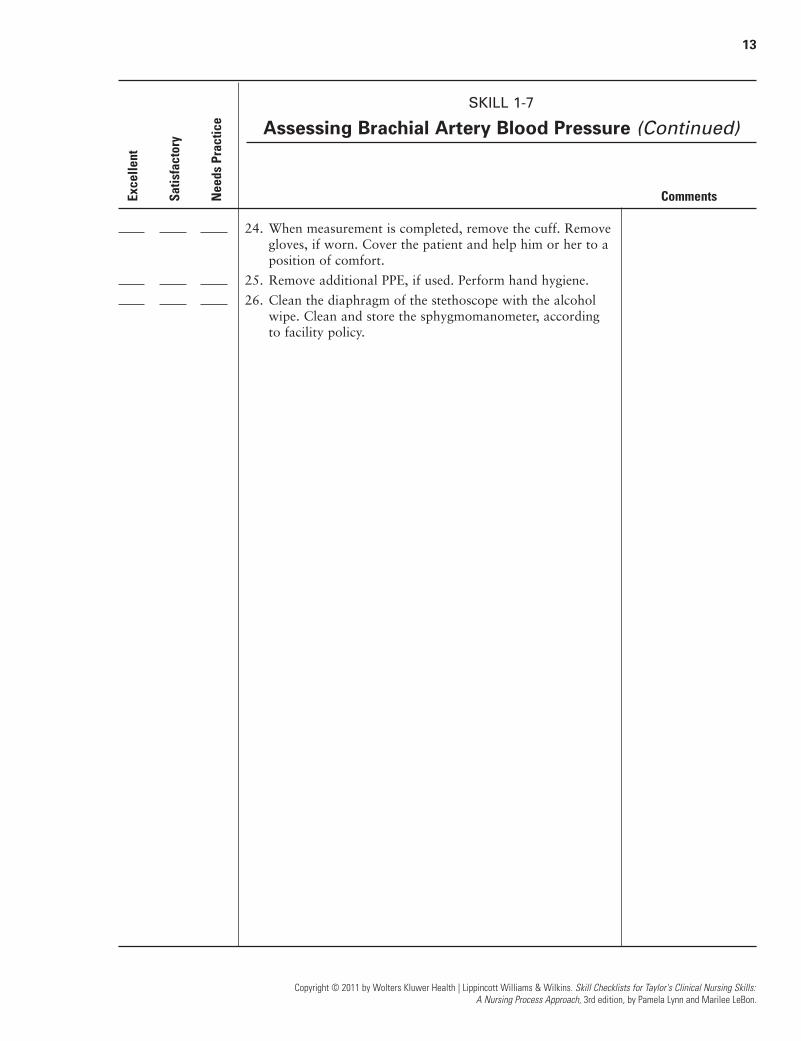
24. When measurement is completed, remove the cuff. Removegloves, if worn. Cover the patient and help him or her to aposition of comfort.
25. Remove additional PPE, if used. Perform hand hygiene.
26. Clean the diaphragm of the stethoscope with the alcoholwipe. Clean and store the sphygmomanometer, accordingto facility policy.
Exce
llent
Satis
fact
ory
Nee
ds P
ract
ice
LWBK681-C01_p01-13.qxd 9/3/10 5:35 PM Page 13 Aptara Inc

14
Copyright © 2011 by Wolters Kluwer Health | Lippincott Williams & Wilkins. Skill Checklists for Taylor's Clinical Nursing Skills:
A Nursing Process Approach, 3rd edition, by Pamela Lynn and Marilee LeBon.
Skill Checklists for Taylor's Clinical Nursing Skills:
A Nursing Process Approach, 3rd edition
Name Date
Unit Position
Instructor/Evaluator: Position
SKILL 2-1
Performing a General SurveyGoal: The assessment is completed without the patient
experiencing anxiety or discomfort, an overall impression of
the patient is formulated, the findings are documented, and
the appropriate referral is made to other healthcare professionals,
as needed for further evaluation. Comments
1. Perform hand hygiene and put on PPE, if indicated.
2. Identify the patient.
3. Close curtains around bed and the door to the room, ifpossible. Explain the purpose of the health examinationand what you are going to do. Answer any questions.
4. Assess the patient’s physical appearance. Observe if thepatient appears his or her stated age. Note the patient’smental status. Is the person alert and oriented, responsiveto questions and responding appropriately? Are the facialfeatures symmetric? Note any signs of acute distress, suchas shortness of breath, pain, or anxiousness.
5. Assess the patient’s body structure. Does the person’sheight appear within normal range for stated age andgenetic heritage? Does the person’s weight appear withinnormal range for height and body build? Note if body fatis evenly distributed. Do body parts appear equalbilaterally and relatively proportionate? Is the patient’sposture erect and appropriate for age?
6. Assess the patient’s mobility. Is the patient’s gait smooth,even, well-balanced, and coordinated? Is joint mobilitysmooth and coordinated with a general full range ofmotion (ROM)? Are involuntary movements evident?
7. Assess the patient’s behavior. Are facial expressions appro-priate for the situation? Does the patient maintain eye con-tact, based on cultural norms? Does the person appearcomfortable and relaxed with you? Is the patient’s speechclear and understandable? Observe the person’s hygieneand grooming. Is the clothing appropriate for climate, fitwell, appear clean, and appropriate for the person’s cultureand age group? Does the person appear clean and wellgroomed, appropriate for age and culture?
8. Assess for pain. (Refer to Chapter 10, Comfort.)
Exce
llent
Satis
fact
ory
Nee
ds P
ract
ice
LWBK681-C02_p14-31.qxd 9/6/10 10:16 PM Page 14 Aptara
15
Copyright © 2011 by Wolters Kluwer Health | Lippincott Williams & Wilkins. Skill Checklists for Taylor's Clinical Nursing Skills:
A Nursing Process Approach, 3rd edition, by Pamela Lynn and Marilee LeBon.
SKILL 2-1
Performing a General Survey (Continued)
Comments
9. Have the patient remove shoes and heavy outer clothing.Weigh the patient using a scale. Compare the measurementwith previous weight measurements and recommendedrange for height.
10. With shoes off, and standing erect, measure the patient’sheight using a wall-mounted measuring device or measur-ing pole. Compare height and weight with recommendedaverage weights on a standardized chart.
11. Use the patient’s weight and height measurements to calcu-late the patient’s BMI.
weight in kilogramsBody mass index �
height in meters2
12. Using the tape measure, measure the patient’s waistcircumference. Place the tape measure snugly around thepatient’s waist at the level of the umbilicus.
13. Measure the patient’s temperature, pulse, respirations,blood pressure, and oxygen saturation. (Refer to Chapter 1,Vital Signs, and Chapter 14, Oxygenation, for specifictechniques.)
14. Remove PPE, if used. Perform hand hygiene. Continuewith assessments of specific body systems as appropriate orindicated. Initiate appropriate referral to other healthcarepractitioners for further evaluation as indicated.
Exce
llent
Satis
fact
ory
Nee
ds P
ract
ice
LWBK681-C02_p14-31.qxd 9/6/10 10:16 PM Page 15 Aptara
16
Copyright © 2011 by Wolters Kluwer Health | Lippincott Williams & Wilkins. Skill Checklists for Taylor's Clinical Nursing Skills:
A Nursing Process Approach, 3rd edition, by Pamela Lynn and Marilee LeBon.
Skill Checklists for Taylor's Clinical Nursing Skills:
A Nursing Process Approach, 3rd edition
Name Date
Unit Position
Instructor/Evaluator: Position
SKILL 2-2
Using a Bed Scale
Goal: The patient’s weight is assessed accurately, without
injury, and the patient experiences minimal discomfort. Comments
1. Check medical order or nursing care plan for frequency ofweight measurement. More frequent pulse measurementmay be appropriate based on nursing judgment. Obtainthe assistance of a second caregiver, based on patient’smobility and ability to cooperate with procedure.
2. Perform hand hygiene and put on PPE, if indicated.
3. Identify the patient.
4. Close curtains around bed and close door to room if possi-ble. Discuss procedure with patient and assess patient’sability to assist with the procedure.
5. Place a cover over the sling of the bed scale.
6. Attach the sling to the bed scale. Lay the sheet or bathblanket in the sling. Turn the scale on. Adjust the dial sothat weight reads 0.0.
7. Adjust bed to comfortable working position, usually elbowheight of the caregiver (VISN 8, 2009). Position one care-giver on each side of the bed, if two caregivers are present.Raise side rail on the opposite side of the bed from wherethe scale is located, if not already in place. Cover thepatient with the sheet or bath blanket. Remove other covers and any pillows.
8. Turn patient onto his or her side facing the side rail, keepinghis or her body covered with the sheet or blanket. Removethe sling from the scale. Roll sling long ways. Place rolledsling under patient, making sure the patient is centered inthe sling.
9. Roll patient back over sling and onto other side. Pull slingthrough, as if placing sheet under patient, unrolling slingas it is pulled through.
10. Roll scale over the bed so that arms of scale are directlyover patient. Spread the base of the scale. Lower arms ofthe scale and place arm hooks into holes on the sling.
Exce
llent
Satis
fact
ory
Nee
ds P
ract
ice
LWBK681-C02_p14-31.qxd 9/6/10 10:16 PM Page 16 Aptara

17
Copyright © 2011 by Wolters Kluwer Health | Lippincott Williams & Wilkins. Skill Checklists for Taylor's Clinical Nursing Skills:
A Nursing Process Approach, 3rd edition, by Pamela Lynn and Marilee LeBon.
SKILL 2-2
Using a Bed Scale (Continued)
Comments
11. Once scale arms are hooked onto the sling, graduallyelevate the sling so that the patient is lifted up off of thebed. Assess all tubes and drains, making sure that nonehave tension placed on them as the scale is lifted. Once the sling is no longer touching the bed, ensure that nothing else is hanging onto the sling (e.g., ventilatortubing, IV tubing). If any tubing is connected to thepatient, raise it up so that it is not adding any weight tothe patient.
12. Note weight reading on the scale. Slowly and gently, lowerpatient back onto the bed. Disconnect scale arms fromsling. Close base of scale and pull it away from the bed.
13. Raise the side rail. Turn patient to the side rail. Roll thesling up against the patient’s backside.
14. Raise the other side rail. Roll patient back over the slingand up facing the other side rail. Remove sling from bed.Remove gloves, if used. Raise remaining side rail.
15. Cover the patient and help him or her to a position ofcomfort. Place the bed in the lowest position.
16. Remove disposable cover from sling and discard in appro-priate receptacle.
17. Remove additional PPE, if used. Perform hand hygiene.
18. Replace scale and sling in appropriate spot. Plug scale intoelectrical outlet.
Exce
llent
Satis
fact
ory
Nee
ds P
ract
ice
LWBK681-C02_p14-31.qxd 9/6/10 10:16 PM Page 17 Aptara
18
Copyright © 2011 by Wolters Kluwer Health | Lippincott Williams & Wilkins. Skill Checklists for Taylor's Clinical Nursing Skills:
A Nursing Process Approach, 3rd edition, by Pamela Lynn and Marilee LeBon.
Skill Checklists for Taylor's Clinical Nursing Skills:
A Nursing Process Approach, 3rd edition
Name Date
Unit Position
Instructor/Evaluator: Position
SKILL 2-3
Assessing the Skin, Hair, and NailsGoal: The assessment is completed without the patient
experiencing anxiety or discomfort, the findings are documented,
and the appropriate referral is made to the other healthcare
professionals, as needed, for further evaluation. Comments
1. Perform hand hygiene and put on PPE, if indicated.
2. Identify the patient.
3. Close curtains around bed and the door to room, if possi-ble. Explain the purpose of the integumentary examinationand what you are going to do. Answer any questions.
4. Ask the patient to remove all clothing and put on anexamination gown (if appropriate). The patient remains inthe sitting position for most of the examination but willneed to stand or lie on the side when the posterior part ofthe body is examined, exposing only the body part beingexamined.
5. Use the bath blanket or drape to cover any exposed areaother than the one being assessed. Inspect the overall skincoloration.
6. Inspect skin for vascularity, bleeding, or bruising.
7. Inspect the skin for lesions. Note bruises, scratches, cuts,insect bites, and wounds (Refer to Wound Assessment[Fundamentals Review 8-3] in Chapter 8, Skin Integrityand Wound Care). If present, note size, shape, color, exu-dates, and distribution/pattern.
8. Palpate skin using the backs of your hands to assesstemperature. Wear gloves when palpating any potentiallyopen area of the skin.
9. Palpate for texture and moisture.
10. Assess for skin turgor by gently pinching the skin underthe clavicle.
11. Palpate for edema, which is characterized by swelling, withtaut and shiny skin over the edematous area.
12. If lesions are present, put on gloves and palpate the lesion.
13. Inspect the nail condition, including the shape and color aswell as the nail angle, noting if any clubbing is present.
14. Palpate nails for texture and capillary refill.
Exce
llent
Satis
fact
ory
Nee
ds P
ract
ice
LWBK681-C02_p14-31.qxd 9/6/10 10:16 PM Page 18 Aptara
19
Copyright © 2011 by Wolters Kluwer Health | Lippincott Williams & Wilkins. Skill Checklists for Taylor's Clinical Nursing Skills:
A Nursing Process Approach, 3rd edition, by Pamela Lynn and Marilee LeBon.
SKILL 2-3
Assessing the Skin, Hair, and Nails (Continued)
Comments
15. Inspect the hair and scalp. Wear gloves for palpation iflesions or infestation is suspected or if hygiene is poor.
16. Remove gloves and any additional PPE, if used. Performhand hygiene. Continue with assessments of specific bodysystems, as appropriate or indicated. Initiate appropriatereferral to other healthcare practitioners for further evalua-tion, as indicated.
Exce
llent
Satis
fact
ory
Nee
ds P
ract
ice
LWBK681-C02_p14-31.qxd 9/6/10 10:16 PM Page 19 Aptara

20
Copyright © 2011 by Wolters Kluwer Health | Lippincott Williams & Wilkins. Skill Checklists for Taylor's Clinical Nursing Skills:
A Nursing Process Approach, 3rd edition, by Pamela Lynn and Marilee LeBon.
Skill Checklists for Taylor's Clinical Nursing Skills:
A Nursing Process Approach, 3rd edition
Name Date
Unit Position
Instructor/Evaluator: Position
SKILL 2-4
Assessing the Head and NeckGoal: The assessment is completed without the patient
experiencing anxiety or discomfort, the findings are documented,
and the appropriate referral is made to the other healthcare
professionals, as needed, for further evaluation. Comments
1. Perform hand hygiene and put on PPE, if indicated.
2. Identify the patient.
3. Close curtains around bed and close the door to the room,if possible. Explain the purpose of the head and neckexamination and what you are going to do. Answer anyquestions.
4. Inspect the head and then the face for color, symmetry,lesions, and distribution of facial hair. Note facial expres-sion. Palpate the skull.
5. Inspect the external eye structures (eyelids, eyelashes, eye-ball, and eyebrows), cornea, conjunctiva, and sclera. Notecolor, edema, symmetry, and alignment.
6. Examine the pupils for equality of size, shape, and reactionto light by darkening the room and using a penlight to shinethe light on each pupil.
7. To test for pupillary accommodation and convergence, askthe patient to focus on an object as you bring it closer tothe nose.
8. Using an ophthalmoscope, check the red reflex.
9. Test the patient’s visual acuity with a Snellen chart. Askthe patient to read the smallest possible line of letters, firstwith both eyes and then with one eye at a time.
10. With the patient about 2 feet away, ask the patient to focuson your finger and move the patient’s eyes through the sixcardinal positions of gaze.
11. Inspect the external ear bilaterally for shape, size, andlesions. Palpate the ear and mastoid process.
12. Perform an otoscopic examination. For an adult, pull theauricle up and back; for a child, pull the auricle down andback. Note cerumen (wax), edema, discharge, or foreignbodies and condition of the tympanic membrane.
13. Use a whispered voice to test hearing. Stand about 1 to 2 feet away from the patient out of the patient’s line ofvision. Ask the patient to cover the ear not being tested.Perform test on each ear.
Exce
llent
Satis
fact
ory
Nee
ds P
ract
ice
LWBK681-C02_p14-31.qxd 9/6/10 10:16 PM Page 20 Aptara
21
Copyright © 2011 by Wolters Kluwer Health | Lippincott Williams & Wilkins. Skill Checklists for Taylor's Clinical Nursing Skills:
A Nursing Process Approach, 3rd edition, by Pamela Lynn and Marilee LeBon.
SKILL 2-4
Assessing the Head and Neck (Continued)
Comments
14. Use a tuning fork to perform Weber’s test and Rinne test if the patient reports diminished hearing in either ear.
15. Put on gloves. Inspect and palpate the external nose.
16. Palpate and lightly percuss over the frontal and maxillarysinuses.
17. Occlude one nostril externally with a finger while patientbreathes through the other; repeat for the other side.
18. Inspect the internal nostrils using an otoscope with a nasalspeculum attachment.
19. Palpate the temporomandibular joint by placing your indexfinger over the front of each ear as you ask the patient toopen and close the mouth.
20. Inspect the lips, oral mucosa, hard and soft palates, gingi-vae, teeth, and salivary gland openings by asking thepatient to open the mouth wide using a tongue blade and penlight.
21. Inspect the tongue. Ask the patient to stick out the tongue.Place a tongue blade at the side of the tongue while patientpushes it to the left and right with the tongue. Inspect theuvula by asking the patient to say “ahh” while sticking outthe tongue. Palpate the tongue for muscle tone and tender-ness. Remove gloves.
22. Palpate from the forehead to the posterior triangle of theneck for the posterior cervical lymph nodes using the fingerpads in a slow, circular motion.
23. Inspect and palpate in front of and behind the ears, underthe chin, and in the anterior triangle for the anterior cervi-cal lymph nodes.
24. Inspect and palpate the left and then the right carotidarteries. Only palpate one carotid artery at a time.Use the bell of the stethoscope to auscultate the arteries.
25. Inspect and palpate for the trachea.
26. Palpate the thyroid gland (illustrate the two techniques).Then, if enlarged, auscultate the thyroid gland using thebell of the stethoscope.
27. Inspect and palpate the supraclavicular area.
Exce
llent
Satis
fact
ory
Nee
ds P
ract
ice
LWBK681-C02_p14-31.qxd 9/6/10 10:16 PM Page 21 Aptara

22
Copyright © 2011 by Wolters Kluwer Health | Lippincott Williams & Wilkins. Skill Checklists for Taylor's Clinical Nursing Skills:
A Nursing Process Approach, 3rd edition, by Pamela Lynn and Marilee LeBon.
SKILL 2-4
Assessing the Head and Neck (Continued)
Comments
28. Inspect the ability of the patient to move the neck. Ask thepatient to touch chin to chest and to each shoulder, eachear to the corresponding shoulder, and then tip the headback as far as possible.
29. Remove any additional PPE, if used. Perform hand hygiene.Continue with assessments of specific body systems, asappropriate or indicated. Initiate appropriate referral toother healthcare practitioners for further evaluation, asindicated.
Exce
llent
Satis
fact
ory
Nee
ds P
ract
ice
LWBK681-C02_p14-31.qxd 9/6/10 10:16 PM Page 22 Aptara

23
Skill Checklists for Taylor's Clinical Nursing Skills:
A Nursing Process Approach, 3rd edition
Name Date
Unit Position
Instructor/Evaluator: Position
SKILL 2-5
Assessing the Thorax and LungsGoal: The assessment is completed without causing the patient
to experience anxiety or discomfort, the findings are documented,
and the appropriate referral is made to other healthcare
professionals, as needed, for further evaluation. Comments
1. Perform hand hygiene and put on PPE, if indicated.
2. Identify the patient.
3. Close curtains around bed and close the door to the room,if possible. Explain the purpose of the thorax and lungexamination and what you are going to do. Answer anyquestions.
4. Help the patient undress, if needed, and provide a patientgown. Assist the patient to a sitting position and exposethe posterior thorax.
5. Use the bath blanket to cover any exposed area other thanthe one being assessed.Inspect the posterior thorax. Examine the skin, bones, andmuscles of the spine, shoulder blades, and back as well assymmetry of expansion and accessory muscle use duringrespirations.
6. Assess the anteroposterior (AP) and lateral diameters ofthe thorax.
7. Palpate over the spine and posterior thorax.
a. Use the palmar surface of the hand to palpate fortemperature, tenderness, muscle development, andmasses.
b. Instruct patient to take a deep breath. Assess for tactilefremitus by using the ball of the hands to palpate over the posterior thorax and while the patient says“ninety-nine”.
8. Assess thoracic expansion by standing behind the patient,placing both thumbs on either side of the patient’s spine at the level of T9 or T10. Ask the patient to take a deepbreath and note movement of your hands.
9. Percuss over the posterior and lateral lung fields for toneusing a zigzag pattern, starting above the scapulae to thebases of the lungs. Note intensity, pitch, duration, andquality of sounds produced. Percuss for diaphragmaticexcursion on each side of the posterior thorax.
Copyright © 2011 by Wolters Kluwer Health | Lippincott Williams & Wilkins. Skill Checklists for Taylor's Clinical Nursing Skills:
A Nursing Process Approach, 3rd edition, by Pamela Lynn and Marilee LeBon.
Exce
llent
Satis
fact
ory
Nee
ds P
ract
ice
LWBK681-C02_p14-31.qxd 9/6/10 10:16 PM Page 23 Aptara
24
Copyright © 2011 by Wolters Kluwer Health | Lippincott Williams & Wilkins. Skill Checklists for Taylor's Clinical Nursing Skills:
A Nursing Process Approach, 3rd edition, by Pamela Lynn and Marilee LeBon.
SKILL 2-5
Assessing the Thorax and Lungs (Continued)
Comments
10. Auscultate the lungs across and down the posterior thoraxto the bases of lungs as the patient breathes slowly anddeeply through the mouth.
11. Examine the anterior thorax. With the patient sitting,rearrange the gown so the anterior chest is exposed. Inspectthe skin, bones, and muscles, as well as symmetry of lungexpansion and accessory muscle use.
12. Palpate the anterior thorax using the proper sequence.Palpate for tactile fremitus (as the patient repeats the word “ninety-nine”).
13. Percuss over the anterior thorax using the proper sequence.
14. Auscultate the lungs through the anterior thorax as thepatient breathes slowly and deeply through the mouth.
15. Inspect the breasts and axillae with the patient’s handsresting on both sides of the body, placed on the hips, andthen raised above the head.
16. Palpate the axillae with the patient’s arms resting againstthe side of the body. Assist the patient into a supineposition. Place a small pillow or towel under the patient’sback. Palpate the breasts and nipples. Wear gloves if thereis any discharge from the nipples or if a lesion is present.
17. Assist the patient in replacing the gown. Remove glovesand any additional PPE, if used. Perform hand hygiene.Continue with assessments of specific body systems, asappropriate or indicated. Initiate appropriate referral toother healthcare practitioners for further evaluation, asindicated.
Exce
llent
Satis
fact
ory
Nee
ds P
ract
ice
LWBK681-C02_p14-31.qxd 9/6/10 10:16 PM Page 24 Aptara
25
Skill Checklists for Taylor's Clinical Nursing Skills:
A Nursing Process Approach, 3rd edition
Name Date
Unit Position
Instructor/Evaluator: Position
SKILL 2-6
Assessing the Cardiovascular SystemGoal: The assessment is completed without causing the patient
to experience anxiety or discomfort, the findings are documented,
and the appropriate referral is made to other healthcare
professionals, as needed, for further evaluation. Comments
1. Perform hand hygiene and put on PPE, if indicated.
2. Identify the patient.
3. Close curtains around bed and close the door to the room,if possible. Explain the purpose of the cardiovascularexamination and what you are going to do. Answer anyquestions.
4. Help the patient undress, if needed, and provide a patientgown. Assist the patient to a supine position with the headelevated about 30 to 45 degrees and expose the anteriorchest. Use the bath blanket to cover any exposed areaother than the one being assessed.
5. Inspect and palpate the left and then the right carotidarteries. Only palpate one carotid artery at a time. Use the bell of the stethoscope to auscultate the arteries.
6. Inspect the neck for jugular vein distention, observing forpulsations.
7. Inspect the precordium for contour, pulsations, and heaves.Observe for the apical impulse at the fourth to fifth inter-costal spaces (ICS).
8. Use the palmar surface with the four fingers held togetherand palpate the precordium gently for pulsations. Remem-ber that hands should be warm. Palpation proceeds in asystematic manner, with assessment of specific cardiac land-marks—the aortic, pulmonic, tricuspid, and mitral areasand Erb’s point. Palpate the apical impulse in the mitralarea. Note size, duration, force, and location in relationshipto the midclavicular line.
9. Use systematic auscultation, beginning at the aortic area,moving to the pulmonic area, then to Erb’s point, then tothe tricuspid area, and finally to the mitral area. Ask thepatient to breathe normally. The stethoscope diaphragm isfirst used to listen to high-pitched sounds, followed by useof the bell to listen to low-pitched sounds. Focus on theoverall rate and rhythm of the heart and the normal heartsounds.
Copyright © 2011 by Wolters Kluwer Health | Lippincott Williams & Wilkins. Skill Checklists for Taylor's Clinical Nursing Skills:
A Nursing Process Approach, 3rd edition, by Pamela Lynn and Marilee LeBon.
Exce
llent
Satis
fact
ory
Nee
ds P
ract
ice
LWBK681-C02_p14-31.qxd 9/6/10 10:16 PM Page 25 Aptara
26
Copyright © 2011 by Wolters Kluwer Health | Lippincott Williams & Wilkins. Skill Checklists for Taylor's Clinical Nursing Skills:
A Nursing Process Approach, 3rd edition, by Pamela Lynn and Marilee LeBon.
SKILL 2-6
Assessing the Cardiovascular System (Continued)
Comments
10. Assist the patient in replacing the gown. Remove PPE, ifused. Perform hand hygiene. Continue with assessments ofspecific body systems as appropriate or indicated. Initiateappropriate referral to other healthcare practitioners forfurther evaluation, as indicated.
Exce
llent
Satis
fact
ory
Nee
ds P
ract
ice
LWBK681-C02_p14-31.qxd 9/6/10 10:16 PM Page 26 Aptara

27
Skill Checklists for Taylor's Clinical Nursing Skills:
A Nursing Process Approach, 3rd edition
Name Date
Unit Position
Instructor/Evaluator: Position
SKILL 2-7
Assessing the AbdomenGoal: The assessments are completed without causing the patient
to experience anxiety or discomfort, the findings are documented,
and the appropriate referral is made to other healthcare
professionals, as needed, for further evaluation. Comments
1. Perform hand hygiene and put on PPE, if indicated.
2. Identify the patient.
3. Close curtains around bed and close the door to theroom, if possible. Explain the purpose of the abdominalexamination and what you are going to do. Answer anyquestions.
4. Help the patient undress, if needed, and provide a patientgown. Assist the patient to a supine position and exposethe abdomen. Use the bath blanket to cover any exposedarea other than the one being assessed.
5. Inspect the abdomen for skin color, contour, pulsations,the umbilicus, and other surface characteristics (rashes,lesions, masses, scars).
6. Auscultate all four quadrants of the abdomen for bowelsounds by using the diaphragm of the stethoscope. Use asystematic method.
7. Auscultate the abdomen for vascular sounds by using thebell of the stethoscope.
8. Percuss the abdomen for tones.
9. Palpate the abdomen lightly in all four quadrants and thenpalpate using deep palpation technique. If the patientcomplains of pain or discomfort in a particular area of the abdomen, palpate that area last.
10. Palpate for the kidneys on each side of the abdomen.Palpate the liver at the right costal border. Palpate forthe spleen at the left costal border.
11. Assess for rebound tenderness last if the patient reportspain by pressing deeply and gently into the abdomen withthe hand and fingers downward and then withdrawingthe hand rapidly.
12. Palpate and then auscultate the femoral pulses in the groin.
Copyright © 2011 by Wolters Kluwer Health | Lippincott Williams & Wilkins. Skill Checklists for Taylor's Clinical Nursing Skills:
A Nursing Process Approach, 3rd edition, by Pamela Lynn and Marilee LeBon.
Exce
llent
Satis
fact
ory
Nee
ds P
ract
ice
LWBK681-C02_p14-31.qxd 9/6/10 10:16 PM Page 27 Aptara

28
Copyright © 2011 by Wolters Kluwer Health | Lippincott Williams & Wilkins. Skill Checklists for Taylor's Clinical Nursing Skills:
A Nursing Process Approach, 3rd edition, by Pamela Lynn and Marilee LeBon.
SKILL 2-7
Assessing the Abdomen (Continued)
Comments
13. Assist the patient in replacing the gown. Remove PPE, ifused. Perform hand hygiene. Continue with assessments ofspecific body systems, as appropriate, or indicated. Initiateappropriate referral to other healthcare practitioners forfurther evaluation, as indicated.
Exce
llent
Satis
fact
ory
Nee
ds P
ract
ice
LWBK681-C02_p14-31.qxd 9/6/10 10:16 PM Page 28 Aptara

29
Skill Checklists for Taylor's Clinical Nursing Skills:
A Nursing Process Approach, 3rd edition
Name Date
Unit Position
Instructor/Evaluator: Position
SKILL 2-8
Assessing the Neurologic, Musculoskeletal, andPeripheral Vascular Systems
Goal: The assessments are completed without causing the
patient to experience anxiety or discomfort, the findings are
documented, and the appropriate referral is made to other
healthcare professionals, as needed, for further evaluation. Comments
1. Perform hand hygiene and put on PPE, if indicated.2. Identify the patient.3. Close curtains around bed and close the door to the room,
if possible. Explain the purpose of the neurologic, muscu-loskeletal, and peripheral vascular examinations and whatyou are going to do. Answer any questions.
4. Help the patient undress, if needed, and provide a patientgown. Assist the patient to a supine position. Use the bathblanket to cover any exposed area other than the onebeing assessed.
5. Begin with a survey of the patient’s overall hygiene andphysical appearance.
6. Assess the patient’s mental status.a. Evaluate the patient’s orientation to person, place, and
time.b. Evaluate level of consciousness. c. Assess memory (immediate recall and past memory).d. Assess abstract reasoning by asking the patient to explain
a proverb, such as “The early bird catches the worm.”e. Evaluate the patient’s ability to understand spoken and
written word.7. Test cranial nerve (CN) function.
a. Ask the patient to close the eyes, occlude one nostril, andthen identify the smell of different substances, such ascoffee, chocolate, or alcohol. Repeat with other nostril.
b. Test visual acuity and pupillary constriction. c. Move the patient’s eyes through the six cardinal
positions of gaze.d. Ask the patient to smile, frown, wrinkle forehead, and
puff out cheeks. e. Test hearing.f. Test the gag reflex by touching the posterior pharynx
with the tongue depressor. Explain to patient that thismay be uncomfortable.
Copyright © 2011 by Wolters Kluwer Health | Lippincott Williams & Wilkins. Skill Checklists for Taylor's Clinical Nursing Skills:
A Nursing Process Approach, 3rd edition, by Pamela Lynn and Marilee LeBon.
Exce
llent
Satis
fact
ory
Nee
ds P
ract
ice
LWBK681-C02_p14-31.qxd 9/6/10 10:16 PM Page 29 Aptara
30
Copyright © 2011 by Wolters Kluwer Health | Lippincott Williams & Wilkins. Skill Checklists for Taylor's Clinical Nursing Skills:
A Nursing Process Approach, 3rd edition, by Pamela Lynn and Marilee LeBon.
SKILL 2-8
Assessing the Neurologic, Musculoskeletal, andPeripheral Vascular Systems (Continued)
Comments
g. Place your hands on the patient’s shoulders while he orshe shrugs against resistance. Then place your hand onthe patient’s left cheek, then the right cheek, and havethe patient push against it.
8. Inspect the ability of the patient to move his or her neck.Ask the patient to touch his or her chin to chest and toeach shoulder, each ear to the corresponding shoulder, andthen tip head back as far as possible.
9. Inspect the upper extremities. Observe for skin color, pres-ence of lesions, rashes, and muscle mass. Palpate for skintemperature, texture, and presence of masses.
10. Ask patient to extend arms forward and then rapidly turnpalms up and down.
11. Ask patient to flex upper arm and to resist examiner’sopposing force.
12. Inspect and palpate the hands, fingers, wrists, and elbowjoints.
13. Palpate the radial and brachial pulses.
14. Have the patient squeeze two of your fingers.
15. Ask the patient to close his or her eyes. Using your fingeror applicator, trace a one-digit number on the patient’spalm and ask him or her to identify the number. Repeat on the other hand with a different number.
16. Ask the patient to close his or her eyes. Place a familiarobject, such as a key, in the patient’s hand and ask him or her to identify the object. Repeat using another objectfor the other hand.
17. Assist the patient to a supine position. Examine the lowerextremities. Inspect the legs and feet for color, lesions, vari-cosities, hair growth, nail growth, edema, and muscle mass.
18. Test for pitting edema in the pretibial area by pressing fin-gers into the skin of the pretibial area. If an indentationremains in the skin after the fingers have been lifted,pitting edema is present.
19. Palpate for pulses and skin temperature at the posteriortibial, dorsalis pedis, and popliteal areas.
20. Have the patient perform the straight leg test with one legat a time.
21. Ask the patient to move one leg laterally with the kneestraight to test abduction and medially to test adduction of the hips.
Exce
llent
Satis
fact
ory
Nee
ds P
ract
ice
LWBK681-C02_p14-31.qxd 9/6/10 10:16 PM Page 30 Aptara

31
Copyright © 2011 by Wolters Kluwer Health | Lippincott Williams & Wilkins. Skill Checklists for Taylor's Clinical Nursing Skills:
A Nursing Process Approach, 3rd edition, by Pamela Lynn and Marilee LeBon.
SKILL 2-8
Assessing the Neurologic, Musculoskeletal, andPeripheral Vascular Systems (Continued)
Comments
22. Ask the patient to raise the thigh against the resistance ofyour hand; next have the patient push outward against theresistance of your hand; then have the patient pullbackward against the resistance of your hand. Repeat onthe opposite side.
23. Assess the patient’s deep tendon reflexes (DTR).
a. Place your fingers above the patient’s wrist and tap witha reflex hammer; repeat on the other arm.
b. Place your fingers at the elbow area with the thumbover the antecubital area and tap with a reflex hammer;repeat on the other side.
c. Place your fingers over the triceps tendon area and tap with a reflex hammer; repeat on the other side.
d. Tap just below the patella with a reflex hammer; repeaton the other side.
e. Tap over the Achilles’ tendon area with reflex hammer;repeat on the other side.
24. Stroke the sole of the patient’s foot with the end of a reflexhammer handle or other hard object such as a key; repeaton the other side.
25. Ask patient to dorsiflex and then plantarflex both feetagainst opposing resistance.
26. As needed, assist the patient to a standing position. Observethe patient as he or she walks with a regular gait, on thetoes, on the heels, and then heel to toe.
27. Perform the Romberg’s test; ask the patient to stand straightwith feet together, both eyes closed with arms at side. Wait20 seconds and observe for patient swaying and ability tomaintain balance. Be alert to prevent patient fall or injuryrelated to losing balance during this assessment.
28. Assist the patient to a comfortable position.
29. Remove PPE, if used. Perform hand hygiene. Continuewith assessments of specific body systems, as appropriate,or indicated. Initiate appropriate referral to other health-care practitioners for further evaluation, as indicated.
Exce
llent
Satis
fact
ory
Nee
ds P
ract
ice
LWBK681-C02_p14-31.qxd 9/6/10 10:16 PM Page 31 Aptara
32
Copyright © 2011 by Wolters Kluwer Health | Lippincott Williams & Wilkins. Skill Checklists for Taylor's Clinical Nursing Skills:
A Nursing Process Approach, 3rd edition, by Pamela Lynn and Marilee LeBon.
Skill Checklists for Taylor's Clinical Nursing Skills:
A Nursing Process Approach, 3rd edition
Name Date
Unit Position
Instructor/Evaluator: Position
SKILL 3-1
Fall Prevention
Goal: The patient does not experience a fall and remains free
of injury. Comments
1. Perform hand hygiene and put on PPE, if indicated.
2. Identify the patient.
3. Explain the rationale for fall prevention interventions tothe patient and family/significant others.
4. Include the patient’s family and/or significant others in theplan of care.
5. Provide adequate lighting. Use a night light during sleepinghours.
6. Remove excess equipment, supplies, furniture, and otherobjects from rooms and walkways. Pay particular attentionto high traffic areas and the route to the bathroom.
7. Orient patient and significant others to new surroundings,including use of the telephone, call signal, patient bed, androom illumination. Indicate the location of the patientbathroom.
8. Provide a ‘low bed’ to replace regular hospital bed.
9. Use floor mats if patient is at risk for serious injury.
10. Provide nonskid footwear and/or walking shoes.
11. Institute a toileting regimen and/or continence program, ifappropriate.
12. Provide a bedside commode and/or urinal/bedpan, ifappropriate. Ensure that it is near the bed at all times.
13. Ensure that the call bell, bedside table, telephone, andother personal items are within the patient’s reach at alltimes.
14. Confer with primary care provider regarding appropriateexercise and physical therapy.
15. Confer with primary care provider regarding appropriatemobility aids, such as a cane or walker.
16. Confer with primary care provider regarding the use ofbone-strengthening medications, such as calcium, vitaminD, and drugs to prevent/treat osteoporosis.
17. Encourage the patient to rise or change position slowlyand sit for several minutes before standing.
Exce
llent
Satis
fact
ory
Nee
ds P
ract
ice
LWBK681-C03_p32-42.qxd 9/6/10 10:18 PM Page 32 Aptara
33
Copyright © 2011 by Wolters Kluwer Health | Lippincott Williams & Wilkins. Skill Checklists for Taylor's Clinical Nursing Skills:
A Nursing Process Approach, 3rd edition, by Pamela Lynn and Marilee LeBon.
SKILL 3-1
Fall Prevention (Continued)
Comments
18. Evaluate the appropriateness of elastic stockings for lowerextremities.
19. Review medications for potential hazards.
20. Keep the bed in the lowest position during use. If elevatedto provide care (to reduce caregiver strain), ensure that it is lowered when care is completed.
21. Make sure locks on the bed or wheelchair are secured atall times.
22. Use bed rails according to facility policy, when appropriate.
23. Anticipate patient needs and provide assistance with activi-ties instead of waiting for the patient to ask.
24. Consider the use of an electronic personal alarm or pressuresensor alarm for the bed or chair.
25. Discuss the possibility of appropriate family member(s)staying with patient.
26. Consider the use of patient attendant or sitter.
27. Increase the frequency of patient observation andsurveillance; 1- or 2-hour nursing rounds, including painassessment, toileting assistance, patient comfort, personalitems in reach, and patient needs.
28. Remove PPE, if used. Perform hand hygiene.
Exce
llent
Satis
fact
ory
Nee
ds P
ract
ice
LWBK681-C03_p32-42.qxd 9/6/10 10:18 PM Page 33 Aptara

34
Copyright © 2011 by Wolters Kluwer Health | Lippincott Williams & Wilkins. Skill Checklists for Taylor's Clinical Nursing Skills:
A Nursing Process Approach, 3rd edition, by Pamela Lynn and Marilee LeBon.
Skill Checklists for Taylor's Clinical Nursing Skills:
A Nursing Process Approach, 3rd edition
Name Date
Unit Position
Instructor/Evaluator: Position
SKILL 3-2
Implementing Alternatives to the Use of Restraints
Goal: The use of restraints is avoided and the patient and others
remain free from harm. Comments
1. Perform hand hygiene and put on PPE, if indicated.
2. Identify the patient.
3. Explain the rationale for interventions to the patient andfamily/significant others.
4. Include the patient’s family and/or significant others in theplan of care.
5. Identify behavior(s) that place the patient at risk forrestraint use. Assess the patient’s status and environment,as outlined above.
6. Identify triggers or contributing factors to patient behav-iors. Evaluate medication usage for medications that cancontribute to cognitive and movement dysfunction andcontribute to increased risk for falls.
7. Assess the patient’s functional, mental, and psychologicalstatus and the environment, as outlined above.
8. Provide adequate lighting. Use a nightlight during sleepinghours.
9. Consult with primary care provider and other appropriatehealthcare providers regarding the continued need fortreatments/therapies and the use of the least invasivemethod to deliver care.
10. Assess the patient for pain and discomfort. Provide appro-priate pharmacologic and nonpharmacologic interventions.(Refer to Chapter 10, Comfort.)
11. Ask a family member or significant other to stay withpatient.
12. Reduce unnecessary environmental stimulation and noise.
13. Provide simple, clear, and direct explanations for treatmentsand care. Repeat to reinforce as needed.
14. Distract and redirect using a calm voice.
15. Increase the frequency of patient observation and surveil-lance; 1- or 2-hour nursing rounds, including pain assess-ment, toileting assistance, patient comfort, personal itemsin reach, and patient needs.
Exce
llent
Satis
fact
ory
Nee
ds P
ract
ice
LWBK681-C03_p32-42.qxd 9/6/10 10:18 PM Page 34 Aptara

35
Copyright © 2011 by Wolters Kluwer Health | Lippincott Williams & Wilkins. Skill Checklists for Taylor's Clinical Nursing Skills:
A Nursing Process Approach, 3rd edition, by Pamela Lynn and Marilee LeBon.
SKILL 3-2
Implementing Alternatives to the Use of Restraints (Continued)
Comments
16. Implement fall precaution interventions. Refer to Skill 3-1.
17. Camouflage tube and other treatment sites with clothing,elastic sleeves, or bandaging.
18. Ensure the use of glasses and hearing aids, if necessary.
19. Consider relocation to a room close to the nursing station.
20. Encourage daily exercise/provide exercise and activities orrelaxation techniques.
21. Make the environment as homelike as possible; providefamiliar objects.
22. Allow restless patient to walk after ensuring that environ-ment is safe. Use a large plant or piece of furniture as abarrier to limit wandering from designated area.
23. Consider the use of patient attendant or sitter.
24. Remove PPE, if used. Perform hand hygiene.
Exce
llent
Satis
fact
ory
Nee
ds P
ract
ice
LWBK681-C03_p32-42.qxd 9/6/10 10:18 PM Page 35 Aptara

36
Copyright © 2011 by Wolters Kluwer Health | Lippincott Williams & Wilkins. Skill Checklists for Taylor's Clinical Nursing Skills:
A Nursing Process Approach, 3rd edition, by Pamela Lynn and Marilee LeBon.
Skill Checklists for Taylor's Clinical Nursing Skills:
A Nursing Process Approach, 3rd edition
Name Date
Unit Position
Instructor/Evaluator: Position
SKILL 3-3
Applying an Extremity Restraint
Goal: The patient is constrained by the restraint, remains
free from injury, and the restraint does not interfere with
therapeutic devices. Comments
1. Determine need for restraints. Assess patient’s physical con-dition, behavior, and mental status. (Refer to FundamentalsReview 3-1, 3-2, 3-3, and 3-4 at the beginning of the chapter.)
2. Confirm agency policy for application of restraints. Securean order from the primary care provider, or validate thatthe order has been obtained within the past 24 hours.
3. Perform hand hygiene and put on PPE, if indicated.
4. Identify the patient.
5. Explain reason for restraint use to patient and family.Clarify how care will be given and how needs will be met. Explain that restraint is a temporary measure.
6. Include the patient’s family and/or significant others in theplan of care.
7. Apply restraint according to manufacturer’s directions:
a. Choose the least restrictive type of device that allowsthe greatest possible degree of mobility.
b. Pad bony prominences.
c. Wrap the restraint around the extremity with the softpart in contact with the skin. If a hand mitt is beingused, pull over the hand with cushion to the palmaraspect of hand. Secure in place with the Velcro straps.
8. Ensure that two fingers can be inserted between therestraint and patient’s wrist or ankle.
9. Maintain restrained extremity in normal anatomic position.Use a quick-release knot to tie the restraint to the bedframe, not side rail. The restraint may also be attached toa chair frame. The site should not be readily accessible to patient.
10. Remove PPE, if used. Perform hand hygiene.
Exce
llent
Satis
fact
ory
Nee
ds P
ract
ice
LWBK681-C03_p32-42.qxd 9/6/10 10:18 PM Page 36 Aptara

37
Copyright © 2011 by Wolters Kluwer Health | Lippincott Williams & Wilkins. Skill Checklists for Taylor's Clinical Nursing Skills:
A Nursing Process Approach, 3rd edition, by Pamela Lynn and Marilee LeBon.
SKILL 3-3
Applying an Extremity Restraint (Continued)
Comments
11. Assess the patient at least every hour or according to facil-ity policy. Assessment should include the placement of therestraint, neurovascular assessment of the affected extrem-ity, and skin integrity. In addition, assess for signs of sen-sory deprivation, such as increased sleeping, daydreaming,anxiety, panic, and hallucinations.
12. Remove restraint at least every 2 hours, or according toagency policy and patient need. Perform range-of-motionexercises.
13. Evaluate patient for continued need of restraint. Reapplyrestraint only if continued need is evident and order is still valid.
14. Reassure patient at regular intervals. Provide continuedexplanation of rationale for interventions, reorientation if necessary, and plan of care. Keep call bell within easyreach.
Exce
llent
Satis
fact
ory
Nee
ds P
ract
ice
LWBK681-C03_p32-42.qxd 9/6/10 10:18 PM Page 37 Aptara

38
Copyright © 2011 by Wolters Kluwer Health | Lippincott Williams & Wilkins. Skill Checklists for Taylor's Clinical Nursing Skills:
A Nursing Process Approach, 3rd edition, by Pamela Lynn and Marilee LeBon.
Skill Checklists for Taylor's Clinical Nursing Skills:
A Nursing Process Approach, 3rd edition
Name Date
Unit Position
Instructor/Evaluator: Position
SKILL 3-4
Applying a Waist Restraint
Goal: The patient is constrained by the restraint, remains
free from injury, and the restraint does not interfere with
therapeutic devices. Comments
1. Determine need for restraints. Assess patient’s physical con-dition, behavior, and mental status. (Refer to FundamentalsReview 3-1, 3-2, 3-3, and 3-4 at the beginning of thechapter.)
2. Confirm agency policy for application of restraints. Securean order from the primary care provider or validate thatthe order has been obtained within the past 24 hours.
3. Perform hand hygiene and put on PPE, if indicated.
4. Identify the patient.
5. Explain reason for use to patient and family. Clarify howcare will be given and how needs will be met. Explain thatrestraint is a temporary measure.
6. Include the patient’s family and/or significant others in theplan of care.
7. Apply restraint according to manufacturer’s directions:
a. Choose the correct size of the least restrictive type of device that allows the greatest possible degree ofmobility.
b. Pad bony prominences that may be affected by the waistrestraint.
c. Assist patient to a sitting position, if not contraindicated.
d. Place waist restraint on patient over gown. Bring tiesthrough slots in restraint. Position slots at patient’s back.
e. Pull the ties secure. Ensure that the restraint is not tootight and there are no wrinkles in it.
f. Insert fist between restraint and patient to ensure thatbreathing is not constricted. Assess respirations afterrestraint is applied.
8. Use a quick-release knot to tie the restraint to the bedframe, not side rail. If patient is in a wheelchair, lock thewheels and place the ties under the arm rests and tiebehind the chair. Site should not be readily accessible tothe patient.
Exce
llent
Satis
fact
ory
Nee
ds P
ract
ice
LWBK681-C03_p32-42.qxd 9/6/10 10:18 PM Page 38 Aptara

39
Copyright © 2011 by Wolters Kluwer Health | Lippincott Williams & Wilkins. Skill Checklists for Taylor's Clinical Nursing Skills:
A Nursing Process Approach, 3rd edition, by Pamela Lynn and Marilee LeBon.
SKILL 3-4
Applying a Waist Restraint (Continued)
Comments
9. Remove PPE, if used. Perform hand hygiene.
10. Assess the patient at least every hour or according to facil-ity policy. An assessment should include the placement ofthe restraint, respiratory assessment, and skin integrity.Assess for signs of sensory deprivation, such as increasedsleeping, daydreaming, anxiety, panic, and hallucinations.
11. Remove restraint at least every 2 hours or according toagency policy and patient need. Perform ROM exercises.
12. Evaluate patient for continued need of restraint. Reapplyrestraint only if continued need is evident and order is stillvalid.
13. Reassure patient at regular intervals. Provide continuedexplanation of rationale for interventions, reorientation if necessary, and plan of care. Keep call bell within easyreach.
14. Perform hand hygiene.
Exce
llent
Satis
fact
ory
Nee
ds P
ract
ice
LWBK681-C03_p32-42.qxd 9/6/10 10:18 PM Page 39 Aptara

40
Copyright © 2011 by Wolters Kluwer Health | Lippincott Williams & Wilkins. Skill Checklists for Taylor's Clinical Nursing Skills:
A Nursing Process Approach, 3rd edition, by Pamela Lynn and Marilee LeBon.
Skill Checklists for Taylor's Clinical Nursing Skills:
A Nursing Process Approach, 3rd edition
Name Date
Unit Position
Instructor/Evaluator: Position
SKILL 3-5
Applying an Elbow Restraint
Goal: The patient is constrained by the restraint, remains
free from injury, and the restraint does not interfere with
therapeutic devices. Comments
1. Determine need for restraints. Assess patient’s physicalcondition, behavior, and mental status. Refer to reviewmaterial in the chapter introduction.
2. Confirm agency policy for application of restraints. Securean order from the primary care provider or validate thatthe order has been obtained within the past 24 hours.
3. Perform hand hygiene and put on PPE, if indicated.
4. Identify the patient.
5. Explain reason for use to patient and family. Clarify howcare will be given and how needs will be met. Explain thatrestraint is a temporary measure.
6. Apply restraint according to manufacturer’s directions:
a. Choose the correct size of the least restrictive type of device that allows the greatest possible degree ofmobility.
b. Pad bony prominences that may be affected by therestraint.
c. Spread elbow restraint out flat. Place middle of elbowrestraint behind patient’s elbow. The restraint should notextend below the wrist or place pressure on the axilla.
d. Wrap restraint snugly around patient’s arm, but makesure that two fingers can easily fit under restraint.
e. Secure Velcro straps around restraint.
f. Apply restraint to opposite arm if patient can move arm.
g. Thread Velcro strap from one elbow restraint across theback and into the loop on the opposite elbow restraint.
7. Assess circulation to fingers and hand.
8. Remove PPE, if used. Perform hand hygiene.
9. Assess the patient at least every hour or according to facil-ity policy. An assessment should include the placement ofthe restraint, neurovascular assessment, and skin integrity.Assess for signs of sensory deprivation, such as increasedsleeping, daydreaming, anxiety, inconsolable crying, andpanic.
Exce
llent
Satis
fact
ory
Nee
ds P
ract
ice
LWBK681-C03_p32-42.qxd 9/6/10 10:18 PM Page 40 Aptara

41
Copyright © 2011 by Wolters Kluwer Health | Lippincott Williams & Wilkins. Skill Checklists for Taylor's Clinical Nursing Skills:
A Nursing Process Approach, 3rd edition, by Pamela Lynn and Marilee LeBon.
SKILL 3-5
Applying an Elbow Restraint (Continued)
Comments
10. Remove restraint at least every 2 hours or according toagency policy and patient need. Remove restraint at leastevery 2 hours for children ages 9 to 17 years and at leastevery 1 hour for children under age 9, or according toagency policy and patient need. Perform ROM exercises.
11. Evaluate patient for continued need of restraint. Reapplyrestraint only if continued need is evident.
12. Reassure patient at regular intervals. Keep call bell withineasy reach.
Exce
llent
Satis
fact
ory
Nee
ds P
ract
ice
LWBK681-C03_p32-42.qxd 9/6/10 10:18 PM Page 41 Aptara

42
Copyright © 2011 by Wolters Kluwer Health | Lippincott Williams & Wilkins. Skill Checklists for Taylor's Clinical Nursing Skills:
A Nursing Process Approach, 3rd edition, by Pamela Lynn and Marilee LeBon.
Skill Checklists for Taylor's Clinical Nursing Skills:
A Nursing Process Approach, 3rd edition
Name Date
Unit Position
Instructor/Evaluator: Position
SKILL 3-6
Applying a Mummy Restraint
Goal: The patient is constrained by the restraint, remains
free from injury, and the restraint does not interfere with
therapeutic devices. Comments
1. Determine need for restraints. Assess patient’s physicalcondition, behavior, and mental status. Refer to reviewmaterial in the chapter introduction.
2. Confirm agency policy for application of restraints. Securean order from the primary care provider or validate thatthe order has been obtained within the past 24 hours.
3. Perform hand hygiene and put on PPE, if indicated.
4. Identify the patient.
5. Explain reason for use to patient and family. Clarify howcare will be given and how needs will be met. Explain thatrestraint is a temporary measure.
6. Open the blanket or sheet. Place the child on the blanket,with edge of blanket at or above neck level.
7. Position the child’s right arm alongside the child’s body.Left arm should not be constrained at this time. Pull theright side of the blanket tightly over the child’s right shoul-der and chest. Secure under the left side of the child’s body.
8. Position the left arm alongside the child’s body. Pull theleft side of the blanket tightly over the child’s left shoulderand chest. Secure under the right side of the child’s body.
9. Fold the lower part of blanket up and pull over the child’sbody. Secure under the child’s body on each side or withsafety pins.
10. Stay with child while mummy wrap is in place. Reassurechild and parents at regular intervals. Once examination ortreatment is completed, unwrap child.
11. Remove PPE, if used. Perform hand hygiene.
Exce
llent
Satis
fact
ory
Nee
ds P
ract
ice
LWBK681-C03_p32-42.qxd 9/6/10 10:18 PM Page 42 Aptara

43
Skill Checklists for Taylor's Clinical Nursing Skills:
A Nursing Process Approach, 3rd edition
Name Date
Unit Position
Instructor/Evaluator: Position
SKILL 4-1
Performing Hand Hygiene Using Soap and Water (Handwashing)
Goal: The hands will be free of visible soiling and transient
microorganisms will be eliminated. Comments
1. Gather the necessary supplies. Stand in front of the sink.Do not allow your clothing to touch the sink during thewashing procedure.
2. Remove jewelry, if possible, and secure in a safe place. A plain wedding band may remain in place.
3. Turn on water and adjust force. Regulate the temperatureuntil the water is warm.
4. Wet the hands and wrist area. Keep hands lower thanelbows to allow water to flow toward fingertips.
5. Use about 1 teaspoon liquid soap from dispenser or rinsebar of soap and lather thoroughly. Cover all areas of handswith the soap product. Rinse soap bar again and return tosoap rack.
6. With firm rubbing and circular motions, wash the palmsand backs of the hands, each finger, the areas between thefingers, and the knuckles, wrists, and forearms. Wash atleast 1 inch above area of contamination. If hands are notvisibly soiled, wash to 1 inch above the wrists.
7. Continue this friction motion for at least 15 seconds.
8. Use fingernails of the opposite hand or a cleanorangewood stick to clean under fingernails.
9. Rinse thoroughly with water flowing toward fingertips.
10. Pat hands dry with a paper towel, beginning with the fin-gers and moving upward toward forearms, and discard itimmediately. Use another clean towel to turn off thefaucet. Discard towel immediately without touching otherclean hand.
11. Use oil-free lotion on hands if desired.
Copyright © 2011 by Wolters Kluwer Health | Lippincott Williams & Wilkins. Skill Checklists for Taylor's Clinical Nursing Skills:
A Nursing Process Approach, 3rd edition, by Pamela Lynn and Marilee LeBon.
Exce
llent
Satis
fact
ory
Nee
ds P
ract
ice
LWBK681-C04_p43-53.qxd 9/6/10 10:19 PM Page 43 Aptara

44
Copyright © 2011 by Wolters Kluwer Health | Lippincott Williams & Wilkins. Skill Checklists for Taylor's Clinical Nursing Skills:
A Nursing Process Approach, 3rd edition, by Pamela Lynn and Marilee LeBon.
Skill Checklists for Taylor's Clinical Nursing Skills:
A Nursing Process Approach, 3rd edition
Name Date
Unit Position
Instructor/Evaluator: Position
SKILL 4-2
Performing Hand Hygiene Using an Alcohol-Based Hand Rub
Goal: Transient microorganisms are eliminated from
the hands. Comments
1. Remove jewelry, if possible, and secure in a safe place. Aplain wedding band may remain in place.
2. Check the product labeling for correct amount of productneeded.
3. Apply the correct amount of product to the palm of onehand. Rub hands together, covering all surfaces of handsand fingers, and between fingers. Also clean the fingertipsand the area beneath the fingernails.
4. Rub hands together until they are dry (at least 15 seconds).
5. Use oil-free lotion on hands if desired.
Exce
llent
Satis
fact
ory
Nee
ds P
ract
ice
LWBK681-C04_p43-53.qxd 9/6/10 10:19 PM Page 44 Aptara

45
Skill Checklists for Taylor's Clinical Nursing Skills:
A Nursing Process Approach, 3rd edition
Name Date
Unit Position
Instructor/Evaluator: Position
SKILL 4-3
Preparing a Sterile Field Using a Packaged Sterile Drape
Goal: The sterile field is created without contamination and
the patient remains free of exposure to potential infection-
causing microorganisms. Comments
1. Perform hand hygiene and put on PPE, if indicated.
2. Identify the patient. Explain the procedure to the patient.
3. Check that packaged sterile drape is dry and unopened.Also note expiration date, making sure that the date is still valid.
4. Select a work area that is waist level or higher.
5. Open the outer covering of the drape. Remove sterile drape,lifting it carefully by its corners. Hold away from body andabove the waist and work surface.
6. Continue to hold only by the corners. Allow the drape tounfold, away from your body and any other surface.
7. Position the drape on the work surface with the moisture-proof side down. This would be the shiny or blue side.Avoid touching any other surface or object with the drape.If any portion of the drape hangs off the work surface, thatpart of the drape is considered contaminated.
8. Place additional sterile items on field as needed. Refer toSkill 4-5. Continue with the procedure as indicated.
9. When procedure is completed, remove PPE, if used. Performhand hygiene.
Copyright © 2011 by Wolters Kluwer Health | Lippincott Williams & Wilkins. Skill Checklists for Taylor's Clinical Nursing Skills:
A Nursing Process Approach, 3rd edition, by Pamela Lynn and Marilee LeBon.
Exce
llent
Satis
fact
ory
Nee
ds P
ract
ice
LWBK681-C04_p43-53.qxd 9/6/10 10:19 PM Page 45 Aptara
46
Copyright © 2011 by Wolters Kluwer Health | Lippincott Williams & Wilkins. Skill Checklists for Taylor's Clinical Nursing Skills:
A Nursing Process Approach, 3rd edition, by Pamela Lynn and Marilee LeBon.
Skill Checklists for Taylor's Clinical Nursing Skills:
A Nursing Process Approach, 3rd edition
Name Date
Unit Position
Instructor/Evaluator: Position
SKILL 4-4
Preparing a Sterile Field Using a Commercially Prepared Sterile Kit or Tray
Goal: A sterile field is created without contamination, the
contents of the package remain sterile, and the patient
remains free of exposure to potential infection-causing
microorganisms. Comments
1. Perform hand hygiene and put on PPE, if indicated.
2. Identify the patient. Explain the procedure to the patient.
3. Check that the packaged kit or tray is dry and unopened.Also note expiration date, making sure that the date is stillvalid.
4. Select a work area that is waist level or higher.
5. Open the outside cover of the package and remove the kitor tray. Place in the center of the work surface, with thetopmost flap positioned on the far side of the package.
6. Reach around the package and grasp the outer surface ofthe end of the topmost flap, holding no more than 1 inchfrom the border of the flap. Pull open away from the body,keeping the arm outstretched and away from the inside ofthe wrapper. Allow the wrapper to lie flat on the work sur-face.
7. Reach around the package and grasp the outer surface ofthe first side flap, holding no more than 1 inch from theborder of the flap. Pull open to the side of the package,keeping the arm outstretched and away from the insideof the wrapper. Allow the wrapper to lie flat on the worksurface.
8. Reach around the package and grasp the outer surface ofthe remaining side flap, holding no more than 1 inch fromthe border of the flap. Pull open to the side of the package,keeping the arm outstretched and away from the inside ofthe wrapper. Allow the wrapper to lie flat on the worksurface.
Exce
llent
Satis
fact
ory
Nee
ds P
ract
ice
LWBK681-C04_p43-53.qxd 9/6/10 10:19 PM Page 46 Aptara
47
Copyright © 2011 by Wolters Kluwer Health | Lippincott Williams & Wilkins. Skill Checklists for Taylor's Clinical Nursing Skills:
A Nursing Process Approach, 3rd edition, by Pamela Lynn and Marilee LeBon.
SKILL 4-4
Preparing a Sterile Field Using a Commercially Prepared Sterile Kit or Tray (Continued)
Comments
9. Stand away from the package and work surface. Grasp theouter surface of the remaining flap closest to the body, hold-ing not more than 1 inch from the border of the flap. Pullthe flap back toward the body, keeping arm outstretchedand away from the inside of the wrapper. Keep this hand inplace. Use other hand to grasp the wrapper on the underside(the side that is down to the work surface). Position thewrapper so that when flat, edges are on the work surface,and do not hang down over sides of work surface. Allowthe wrapper to lie flat on the work surface.
10. The outer wrapper of the package has become a sterilefield with the packaged supplies in the center. Do nottouch or reach over the sterile field. Place additional sterileitems on field as needed. Refer to Skill 4-5. Continue withthe procedure as indicated.
11. When procedure is completed, remove PPE, if used.Perform hand hygiene.
Exce
llent
Satis
fact
ory
Nee
ds P
ract
ice
LWBK681-C04_p43-53.qxd 9/6/10 10:19 PM Page 47 Aptara

48
Copyright © 2011 by Wolters Kluwer Health | Lippincott Williams & Wilkins. Skill Checklists for Taylor's Clinical Nursing Skills:
A Nursing Process Approach, 3rd edition, by Pamela Lynn and Marilee LeBon.
Skill Checklists for Taylor's Clinical Nursing Skills:
A Nursing Process Approach, 3rd edition
Name Date
Unit Position
Instructor/Evaluator: Position
SKILL 4-5
Adding Sterile Items to a Sterile Field
Goal: The sterile field is created without contamination, the
sterile supplies are not contaminated, and the patient remains
free of exposure to potential infection-causing microorganisms. Comments
1. Perform hand hygiene and put on PPE, if indicated.
2. Identify the patient. Explain the procedure to the patient.
3. Check that the sterile, packaged drape and supplies are dryand unopened. Also note expiration date, making sure thatthe date is still valid.
4. Select a work area that is waist level or higher.
5. Prepare sterile field as described in Skill 4-3 or Skill 4-4.
6. Add sterile item:
To Add an Agency-Wrapped and Sterilized Item
a. Hold agency-wrapped item in the dominant hand, with topflap opening away from the body. With other hand, reacharound the package and unfold top flap and both sides.
b. Keep a secure hold on the item through the wrapper with the dominant hand. Grasp the remaining flap of thewrapper closest to the body, taking care not to touch theinner surface of the wrapper or the item. Pull the flap backtoward the wrist, so the wrapper covers the hand and wrist.
c. Grasp all the corners of the wrapper together with thenondominant hand and pull back toward wrist, coveringhand and wrist. Hold in place.
d. Hold the item 6 inches above the surface of the sterile fieldand drop onto the field. Be careful to avoid touching thesurface or other items or dropping onto the 1-inch border.
To Add a Commercially Wrapped and Sterilized Item
a. Hold package in one hand. Pull back top cover withother hand. Alternately, carefully peel the edges apartusing both hands.
b. After top cover or edges are partially separated, hold theitem 6 inches above the surface of the sterile field.Continue opening the package and drop the item ontothe field. Be careful to avoid touching the surface orother items or dropping onto the 1-inch border.
c. Discard wrapper.
Exce
llent
Satis
fact
ory
Nee
ds P
ract
ice
LWBK681-C04_p43-53.qxd 9/6/10 10:19 PM Page 48 Aptara
49
Copyright © 2011 by Wolters Kluwer Health | Lippincott Williams & Wilkins. Skill Checklists for Taylor's Clinical Nursing Skills:
A Nursing Process Approach, 3rd edition, by Pamela Lynn and Marilee LeBon.
SKILL 4-5
Adding Sterile Items to a Sterile Field (Continued)
Comments
To Add a Sterile Solution
a. Obtain appropriate solution and check expiration date.
b. Open solution container according to directions andplace cap on table away from the field with edges up.
c. Hold bottle outside the edge of the sterile field with thelabel side facing the palm of your hand and prepare topour from a height of 4 to 6 inches (10 to 15 cm). Thetip of the bottle should never touch a sterile container orfield.
d. Pour required amount of solution steadily into sterilecontainer previously added to the sterile field andpositioned at side of sterile field or onto dressings. Avoidsplashing any liquid.
e. Touch only the outside of the lid when recapping. Labelsolution with date and time of opening.
7. Continue with procedure as indicated.
8. When procedure is completed, remove PPE, if used. Performhand hygiene.
Exce
llent
Satis
fact
ory
Nee
ds P
ract
ice
LWBK681-C04_p43-53.qxd 9/6/10 10:19 PM Page 49 Aptara

50
Copyright © 2011 by Wolters Kluwer Health | Lippincott Williams & Wilkins. Skill Checklists for Taylor's Clinical Nursing Skills:
A Nursing Process Approach, 3rd edition, by Pamela Lynn and Marilee LeBon.
Skill Checklists for Taylor's Clinical Nursing Skills:
A Nursing Process Approach, 3rd edition
Name Date
Unit Position
Instructor/Evaluator: Position
SKILL 4-6
Putting on Sterile Gloves and Removing Soiled Gloves
Goal: The gloves are applied and removed without
contamination. Comments
1. Perform hand hygiene and put on PPE, if indicated.
2. Identify the patient. Explain the procedure to the patient.
3. Check that the sterile glove package is dry and unopened.Also note expiration date, making sure that the date is stillvalid.
4. Place sterile glove package on clean, dry surface at orabove your waist.
5. Open the outside wrapper by carefully peeling the toplayer back. Remove inner package, handling only the out-side of it.
6. Place the inner package on the work surface with the sidelabeled ‘cuff end’ closest to the body.
7. Carefully open the inner package. Fold open the top flap,then the bottom and sides. Take care not to touch theinner surface of the package or the gloves.
8. With the thumb and forefinger of the nondominant hand,grasp the folded cuff of the glove for the dominant hand,touching only the exposed inside of the glove.
9. Keeping the hands above the waistline, lift and hold theglove up and off the inner package with fingers down. Becareful it does not touch any unsterile object.
10. Carefully insert dominant hand palm up into glove andpull glove on. Leave the cuff folded until the opposite handis gloved.
11. Hold the thumb of the gloved hand outward. Place the fin-gers of the gloved hand inside the cuff of the remainingglove. Lift it from the wrapper, taking care not to touchanything with the gloves or hands.
12. Carefully insert nondominant hand into glove. Pull theglove on, taking care that the skin does not touch any ofthe outer surfaces of the gloves.
13. Slide the fingers of one hand under the cuff of the otherand fully extend the cuff down the arm, touching onlythe sterile outside of the glove. Repeat for the remaininghand.
Exce
llent
Satis
fact
ory
Nee
ds P
ract
ice
LWBK681-C04_p43-53.qxd 9/6/10 10:19 PM Page 50 Aptara

51
Copyright © 2011 by Wolters Kluwer Health | Lippincott Williams & Wilkins. Skill Checklists for Taylor's Clinical Nursing Skills:
A Nursing Process Approach, 3rd edition, by Pamela Lynn and Marilee LeBon.
SKILL 4-6
Putting on Sterile Gloves and Removing Soiled Gloves (Continued)
Comments
14. Adjust gloves on both hands if necessary, touching onlysterile areas with other sterile areas.
15. Continue with procedure as indicated.
Removing Soiled Gloves
16. Use dominant hand to grasp the opposite glove near cuffend on the outside exposed area. Remove it by pulling itoff, inverting it as it is pulled, keeping the contaminatedarea on the inside. Hold the removed glove in the remain-ing gloved hand.
17. Slide fingers of ungloved hand between the remainingglove and the wrist. Take care to avoid touching theoutside surface of the glove. Remove it by pulling it off,inverting it as it is pulled, keeping the contaminated areaon the inside, and securing the first glove inside the second.
18. Discard gloves in appropriate container. Removeadditional PPE, if used. Perform hand hygiene.
Exce
llent
Satis
fact
ory
Nee
ds P
ract
ice
LWBK681-C04_p43-53.qxd 9/6/10 10:19 PM Page 51 Aptara

52
Copyright © 2011 by Wolters Kluwer Health | Lippincott Williams & Wilkins. Skill Checklists for Taylor's Clinical Nursing Skills:
A Nursing Process Approach, 3rd edition, by Pamela Lynn and Marilee LeBon.
Skill Checklists for Taylor's Clinical Nursing Skills:
A Nursing Process Approach, 3rd edition
Name Date
Unit Position
Instructor/Evaluator: Position
SKILL 4-7
Using Personal Protective Equipment
Goal: The transmission of microorganisms is prevented. Comments
1. Check medical record and nursing plan of care for type ofprecautions and review precautions in infection controlmanual.
2. Plan nursing activities before entering patient’s room.
3. Perform hand hygiene.
4. Provide instruction about precautions to patient, familymembers, and visitors.
5. Put on gown, gloves, mask, and protective eyewear, basedon the type of exposure anticipated and category ofisolation precautions.
a. Put on the gown, with the opening in the back. Tie gownsecurely at neck and waist.
b. Put on the mask or respirator over your nose, mouth,and chin. Secure ties or elastic bands at the middle of thehead and neck. If respirator is used, perform a fit check.Inhale; the respirator should collapse. Exhale; air shouldnot leak out.
c. Put on goggles. Place over eyes and adjust to fit.Alternately, a face shield could be used to take the placeof the mask and goggles.
d. Put on clean disposable gloves. Extend gloves to coverthe cuffs of the gown.
6. Identify the patient. Explain the procedure to the patient.Continue with patient care as appropriate.
Remove PPE
7. Remove PPE: Except for respirator, remove PPE at the door-way or in an anteroom. Remove respirator after leaving thepatient room and closing door.
a. If impervious gown has been tied in front of the body atthe waistline, untie waist strings before removing gloves.
b. Grasp the outside of one glove with the opposite glovedhand and peel off, turning the glove inside out as youpull it off. Hold the removed glove in the remaininggloved hand.
Exce
llent
Satis
fact
ory
Nee
ds P
ract
ice
LWBK681-C04_p43-53.qxd 9/6/10 10:19 PM Page 52 Aptara

53
Copyright © 2011 by Wolters Kluwer Health | Lippincott Williams & Wilkins. Skill Checklists for Taylor's Clinical Nursing Skills:
A Nursing Process Approach, 3rd edition, by Pamela Lynn and Marilee LeBon.
SKILL 4-7
Using Personal Protective Equipment (Continued)
Comments
c. Slide fingers of ungloved hand under the remaining gloveat the wrist, taking care not to touch the outer surface ofthe glove.
d. Peel off the glove over the first glove, containing the oneglove inside the other. Discard in appropriate container.
e. To remove the goggles or face shield: Handle by theheadband or ear pieces. Lift away from the face. Place indesignated receptacle for reprocessing or in an appropri-ate waste container.
f. To remove gown: Unfasten ties, if at the neck and back.Allow the gown to fall away from shoulders. Touchingonly the inside of the gown, pull away from the torso.Keeping hands on the inner surface of the gown, pullfrom arms. Turn gown inside out. Fold or roll into a bun-dle and discard.
g. To remove mask or respirator: Grasp the neck ties orelastic, then top ties or elastic and remove. Take care toavoid touching front of mask or respirator. Discard inwaste container. If using a respirator, save for future usein the designated area.
8. Perform hand hygiene immediately after removing all PPE.
Exce
llent
Satis
fact
ory
Nee
ds P
ract
ice
LWBK681-C04_p43-53.qxd 9/6/10 10:19 PM Page 53 Aptara

54
Copyright © 2011 by Wolters Kluwer Health | Lippincott Williams & Wilkins. Skill Checklists for Taylor's Clinical Nursing Skills:
A Nursing Process Approach, 3rd edition, by Pamela Lynn and Marilee LeBon.
Skill Checklists for Taylor's Clinical Nursing Skills:
A Nursing Process Approach, 3rd edition
Name Date
Unit Position
Instructor/Evaluator: Position
SKILL 5-1
Administering Oral Medications
Goal: The patient will swallow the prescribed medication at the
proper time. Comments
1. Gather equipment. Check each medication order againstthe original in the medical record, according to facility policy. Clarify any inconsistencies. Check the patient’schart for allergies.
2. Know the actions, special nursing considerations, safe doseranges, purpose of administration, and adverse effects ofthe medications to be administered. Consider the appropri-ateness of the medication for this patient.
3. Perform hand hygiene.
4. Move the medication cart to the outside of the patient’sroom or prepare for administration in the medication area.
5. Unlock the medication cart or drawer. Enter pass code intothe computer and scan employee identification, if required.
6. Prepare medications for one patient at a time.
7. Read the CMAR/MAR and select the proper medicationfrom the patient’s medication drawer or unit stock.
8. Compare the label with the CMAR/MAR. Checkexpiration dates and perform calculations, if necessary.Scan the bar code on the package, if required.
9. Prepare the required medications:
a. Unit dose packages: Place unit dose-packagedmedications in a disposable cup. Do not open the wrap-per until at the bedside. Keep narcotics andmedications that require special nursing assessments ina separate container.
b. Multidose containers: When removing tablets or capsulesfrom a multidose bottle, pour the necessary number intothe bottle cap and then place the tablets or capsules in amedication cup. Break only scored tablets, if necessary,to obtain the proper dosage. Do not touch tablets orcapsules with hands.
Exce
llent
Satis
fact
ory
Nee
ds P
ract
ice
LWBK681-C05_p054-116.qxd 9/6/10 10:19 PM Page 54 Aptara

55
Copyright © 2011 by Wolters Kluwer Health | Lippincott Williams & Wilkins. Skill Checklists for Taylor's Clinical Nursing Skills:
A Nursing Process Approach, 3rd edition, by Pamela Lynn and Marilee LeBon.
SKILL 5-1
Administering Oral Medications (Continued)
Comments
c. Liquid medication in multidose bottle: When pouringliquid medications out of a multidose bottle, hold thebottle so the label is against the palm. Use the appropri-ate measuring device when pouring liquids, and read theamount of medication at the bottom of the meniscus ateye level. Wipe the lip of the bottle with a paper towel.
10. When all medications for one patient have been prepared,recheck the labels with the CMAR/MAR before taking the medications to the patient. Replace any multidosecontainers in the patient’s drawer or unit stock. Lock the medication cart before leaving it.
11. Transport medications to the patient’s bedside carefully,and keep the medications in sight at all times.
12. Ensure that the patient receives the medications at the correct time.
13. Perform hand hygiene and put on PPE, if indicated.
14. Identify the patient. Usually, the patient should beidentified using two methods. Compare the informationwith the CMAR/MAR.
a. Check the name and identification number on thepatient’s identification band.
b. Ask the patient to state his or her name and birth date,based on facility policy.
c. If the patient cannot identify him- or herself, verify thepatient’s identification with a staff member who knowsthe patient, for the second source.
15. Scan the patient’s bar code on the identification band, ifrequired.
16. Complete necessary assessments before administeringmedications. Check the patient’s allergy bracelet or askthe patient about allergies. Explain the purpose andaction of each medication to the patient.
17. Assist the patient to an upright or lateral position.
18. Administer medications:
a. Offer water or other permitted fluids with pills,capsules, tablets, and some liquid medications.
b. Ask whether the patient prefers to take the medicationsby hand or in a cup.
Exce
llent
Satis
fact
ory
Nee
ds P
ract
ice
LWBK681-C05_p054-116.qxd 9/6/10 10:19 PM Page 55 Aptara
56
Copyright © 2011 by Wolters Kluwer Health | Lippincott Williams & Wilkins. Skill Checklists for Taylor's Clinical Nursing Skills:
A Nursing Process Approach, 3rd edition, by Pamela Lynn and Marilee LeBon.
SKILL 5-1
Administering Oral Medications (Continued)
Comments
19. Remain with the patient until each medication is swallowed.Never leave medication at the patient’s bedside.
20. Assist the patient to a comfortable position. Remove PPE,if used. Perform hand hygiene.
21. Document the administration of the medication immediatelyafter administration.
22. Evaluate the patient’s response to medication withinappropriate time frame.
Exce
llent
Satis
fact
ory
Nee
ds P
ract
ice
LWBK681-C05_p054-116.qxd 9/6/10 10:19 PM Page 56 Aptara

57
Skill Checklists for Taylor's Clinical Nursing Skills:
A Nursing Process Approach, 3rd edition
Name Date
Unit Position
Instructor/Evaluator: Position
SKILL 5-2
Administering Medications via a Gastric Tube
Goal: The patient receives the medication via the tube and
experiences the intended effect of the medication. Comments
1. Gather equipment. Check each medication order againstthe original in the medical record, according to facility pol-icy. Clarify any inconsistencies. Check the patient’s chartfor allergies.
2. Know the actions, special nursing considerations, safe doseranges, purpose of administration, and adverse effects ofthe medications to be administered. Consider the appropri-ateness of the medication for this patient.
3. Perform hand hygiene.
4. Move the medication cart to the outside of the patient’sroom or prepare for administration in the medication area.
5. Unlock the medication cart or drawer. Enter pass code andscan employee identification, if required.
6. Prepare medications for one patient at a time.
7. Read the CMAR/MAR and select the proper medicationfrom the patient’s medication drawer or unit stock.
8. Compare the label with the CMAR/MAR. Checkexpiration dates and perform calculations, if necessary.Scan the bar code on the package, if required.
9. Check to see if medications to be administered come in aliquid form. If pills or capsules are to be given, check withpharmacy or drug reference to verify the ability to crushor open capsules.
10. Prepare medication.
Pills: Using a pill crusher, crush each pill one at a time.Dissolve the powder with water or other recommended liq-uid in a liquid medication cup, keeping each medicationseparate from the others. Keep the package label with themedication cup, for future comparison of information.
Liquid: When pouring liquid medications from a multidosebottle, hold the bottle with the label against the palm. Usethe appropriate measuring device when pouring liquids,and read the amount of medication at the bottom of themeniscus at eye level. Wipe the lip of the bottle with apaper towel.
Copyright © 2011 by Wolters Kluwer Health | Lippincott Williams & Wilkins. Skill Checklists for Taylor's Clinical Nursing Skills:
A Nursing Process Approach, 3rd edition, by Pamela Lynn and Marilee LeBon.
Exce
llent
Satis
fact
ory
Nee
ds P
ract
ice
LWBK681-C05_p054-116.qxd 9/6/10 10:19 PM Page 57 Aptara
58
Copyright © 2011 by Wolters Kluwer Health | Lippincott Williams & Wilkins. Skill Checklists for Taylor's Clinical Nursing Skills:
A Nursing Process Approach, 3rd edition, by Pamela Lynn and Marilee LeBon.
SKILL 5-2
Administering Medications via a Gastric Tube (Continued)
Comments
11. When all medications for one patient have been prepared,recheck the label with the MAR before taking the medica-tions to the patient.
12. Lock the medication cart before leaving it.
13. Transport medications to the patient’s bedside carefully,and keep the medications in sight at all times.
14. Ensure that the patient receives the medications at the correct time.
15. Perform hand hygiene and put on PPE, if indicated.
16. Identify the patient. Usually, the patient should beidentified using two methods. Compare information with the CMAR/MAR.
a. Check the name and identification number on thepatient’s identification band.
b. Ask the patient to state his or her name and birth date,based on facility policy.
c. If the patient cannot identify him- or herself, verify thepatient’s identification with a staff member who knowsthe patient for the second source.
17. Complete necessary assessments before administering med-ications. Check the patient’s allergy bracelet or ask thepatient about allergies. Explain what you are going to do,and the reason for doing it, to the patient.
18. Scan the patient’s bar code on the identification band, ifrequired.
19. Assist the patient to the high Fowler’s position, unless contraindicated.
20. Put on gloves.
21. If patient is receiving continuous tube feedings, pause thetube-feeding pump.
22. Pour the water into the irrigation container. Measure 30 mL of water. Apply clamp on feeding tube, if present.Alternately, pinch gastric tube below port with fingers, or position stopcock to correct direction. Open port ongastric tube delegated to medication administration or dis-connect tubing for feeding from gastric tube and place capon end of feeding tubing.
23. Check placement of tube, depending on type of tube andfacility policy. (Refer to Chapter 11, Nutrition.)
Exce
llent
Satis
fact
ory
Nee
ds P
ract
ice
LWBK681-C05_p054-116.qxd 9/6/10 10:19 PM Page 58 Aptara

59
Copyright © 2011 by Wolters Kluwer Health | Lippincott Williams & Wilkins. Skill Checklists for Taylor's Clinical Nursing Skills:
A Nursing Process Approach, 3rd edition, by Pamela Lynn and Marilee LeBon.
SKILL 5-2
Administering Medications via a Gastric Tube (Continued)
Comments
24. Note the amount of any residual. Refer to Chapter 11,Nutrition. Replace residual back into stomach, based onfacility policy.
25. Apply clamp on feeding tube, if present. Alternately, pinchgastric tube below port with fingers, or position stopcockto correct direction. Remove 60-mL syringe gastric tube.Remove the plunger of the syringe. Reinsert the syringe inthe gastric tube without the plunger. Pour 30 mL of waterinto the syringe. Unclamp the tube and allow the water toenter the stomach via gravity infusion.
26. Administer the first dose of medication by pouring into thesyringe. Follow with a 5- to 10-mL water flush betweenmedication doses. Follow the last dose of medication with30 to 60 mL of water flush.
27. Clamp the tube, remove the syringe, and replace the feed-ing tubing. If stopcock is used, position stopcock to correctdirection. If tube medication port was used, cap port.Unclamp gastric tube and restart tube feeding, if appropri-ate for medications administered.
28. Remove gloves. Assist the patient to a comfortable position.If receiving a tube feeding, the head of the bed must remainelevated at least 30 degrees.
29. Remove additional PPE, if used. Perform hand hygiene.
30. Document the administration of the medication immediatelyafter administration.
31. Evaluate the patient’s response to medication withinappropriate time frame.
Exce
llent
Satis
fact
ory
Nee
ds P
ract
ice
LWBK681-C05_p054-116.qxd 9/6/10 10:19 PM Page 59 Aptara

60
Copyright © 2011 by Wolters Kluwer Health | Lippincott Williams & Wilkins. Skill Checklists for Taylor's Clinical Nursing Skills:
A Nursing Process Approach, 3rd edition, by Pamela Lynn and Marilee LeBon.
Skill Checklists for Taylor's Clinical Nursing Skills:
A Nursing Process Approach, 3rd edition
Name Date
Unit Position
Instructor/Evaluator: Position
SKILL 5-3
Removing Medication from an Ampule
Goal: The proper dose of medication will be removed in a sterile
manner, and will be free from glass shards. Comments
1. Gather equipment. Check the medication order against theoriginal order in the medical record, according to facilitypolicy. Clarify any inconsistencies. Check the patient’schart for allergies.
2. Know the actions, special nursing considerations, safe doseranges, purpose of administration, and adverse effects ofthe medications to be administered. Consider the appropri-ateness of the medication for this patient.
3. Perform hand hygiene.
4. Move the medication cart to the outside of the patient’sroom or prepare for administration in the medication area.
5. Unlock the medication cart or drawer. Enter pass code andscan employee identification, if required.
6. Prepare medications for one patient at a time.
7. Read the CMAR/MAR and select the proper medicationfrom the patient’s medication drawer or unit stock.
8. Compare the label with the CMAR/MAR. Checkexpiration dates and perform calculations, if necessary.Scan the bar code on the package, if required.
9. Tap the stem of the ampule or twist your wrist quicklywhile holding the ampule vertically.
10. Wrap a small gauze pad around the neck of the ampule.
11. Use a snapping motion to break off the top of the ampulealong the scored line at its neck. Always break away fromyour body.
12. Attach filter needle to syringe. Remove the cap from thefilter needle by pulling it straight off.
13. Withdraw medication in the amount ordered plus a smallamount more (approximately 30% more). Do not injectair into the solution. Use either of the following methods.While inserting the filter needle into the ampule, be care-ful not to touch the rim.
a. Insert the tip of the needle into the ampule, which isupright on a flat surface, and withdraw fluid into thesyringe. Touch the plunger at the knob only.
Exce
llent
Satis
fact
ory
Nee
ds P
ract
ice
LWBK681-C05_p054-116.qxd 9/6/10 10:19 PM Page 60 Aptara
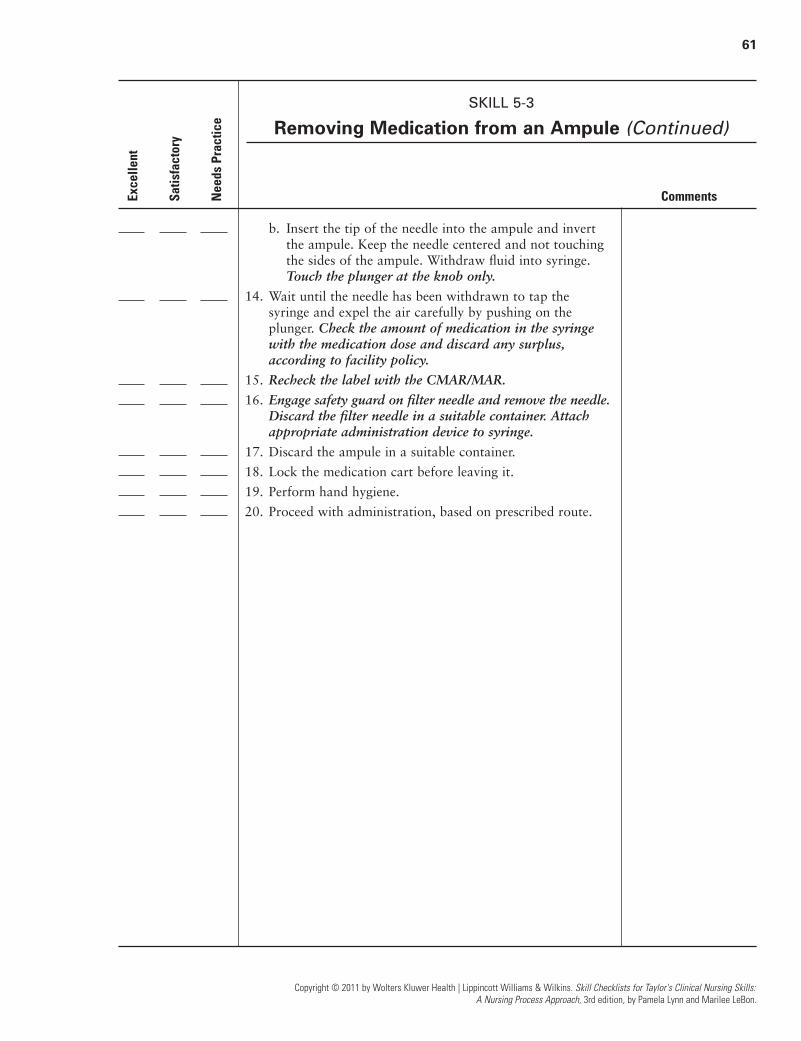
61
Copyright © 2011 by Wolters Kluwer Health | Lippincott Williams & Wilkins. Skill Checklists for Taylor's Clinical Nursing Skills:
A Nursing Process Approach, 3rd edition, by Pamela Lynn and Marilee LeBon.
SKILL 5-3
Removing Medication from an Ampule (Continued)
Comments
b. Insert the tip of the needle into the ampule and invertthe ampule. Keep the needle centered and not touchingthe sides of the ampule. Withdraw fluid into syringe.Touch the plunger at the knob only.
14. Wait until the needle has been withdrawn to tap thesyringe and expel the air carefully by pushing on theplunger. Check the amount of medication in the syringewith the medication dose and discard any surplus,according to facility policy.
15. Recheck the label with the CMAR/MAR.
16. Engage safety guard on filter needle and remove the needle.Discard the filter needle in a suitable container. Attachappropriate administration device to syringe.
17. Discard the ampule in a suitable container.
18. Lock the medication cart before leaving it.
19. Perform hand hygiene.
20. Proceed with administration, based on prescribed route.
Exce
llent
Satis
fact
ory
Nee
ds P
ract
ice
LWBK681-C05_p054-116.qxd 9/6/10 10:19 PM Page 61 Aptara

62
Copyright © 2011 by Wolters Kluwer Health | Lippincott Williams & Wilkins. Skill Checklists for Taylor's Clinical Nursing Skills:
A Nursing Process Approach, 3rd edition, by Pamela Lynn and Marilee LeBon.
Skill Checklists for Taylor's Clinical Nursing Skills:
A Nursing Process Approach, 3rd edition
Name Date
Unit Position
Instructor/Evaluator: Position
SKILL 5-4
Removing Medication from a Vial
Goal: The proper dosage of medication is withdrawn into a
syringe using sterile technique. Comments
1. Gather equipment. Check the medication order against theoriginal order in the medical record, according to facilitypolicy.
2. Know the actions, special nursing considerations, safe doseranges, purpose of administration, and adverse effects ofthe medications to be administered. Consider the appropri-ateness of the medication for this patient.
3. Perform hand hygiene.
4. Move the medication cart to the outside of the patient’sroom or prepare for administration in the medication area.
5. Unlock the medication cart or drawer. Enter pass code andscan employee identification, if required.
6. Prepare medications for one patient at a time.
7. Read the CMAR/MAR and select the proper medicationfrom the patient’s medication drawer or unit stock.
8. Compare the label with the CMAR/MAR. Checkexpiration dates and perform calculations, if necessary.Scan the bar code on the package, if required.
9. Remove the metal or plastic cap on the vial that protectsthe rubber stopper.
10. Swab the rubber top with the antimicrobial swab andallow to dry.
11. Remove the cap from the needle or blunt cannula bypulling it straight off. Touch the plunger at the knob only.Draw back an amount of air into the syringe that is equalto the specific dose of medication to be withdrawn. Somefacilities require use of a filter needle when withdrawingpremixed medication from multidose vials.
12. Hold the vial on a flat surface. Pierce the rubber stopper inthe center with the needle tip and inject the measured airinto the space above the solution. Do not inject air into thesolution.
13. Invert the vial. Keep the tip of the needle or blunt cannulabelow the fluid level.
Exce
llent
Satis
fact
ory
Nee
ds P
ract
ice
LWBK681-C05_p054-116.qxd 9/6/10 10:19 PM Page 62 Aptara

63
Copyright © 2011 by Wolters Kluwer Health | Lippincott Williams & Wilkins. Skill Checklists for Taylor's Clinical Nursing Skills:
A Nursing Process Approach, 3rd edition, by Pamela Lynn and Marilee LeBon.
SKILL 5-4
Removing Medication from a Vial (Continued)
Comments
14. Hold the vial in one hand and use the other to withdrawthe medication. Touch the plunger at the knob only. Drawup the prescribed amount of medication while holding thesyringe vertically and at eye level.
15. If any air bubbles accumulate in the syringe, tap the barrelof the syringe sharply and move the needle past the fluidinto the air space to re-inject the air bubble into the vial.Return the needle tip to the solution and continuewithdrawal of the medication.
16. After the correct dose is withdrawn, remove the needlefrom the vial and carefully replace the cap over the needle.If a filter needle has been used to draw up the medication,remove it and attach the appropriate administration device.Some facilities require changing the needle, if one was usedto withdraw the medication, before administering the medication.
17. Check the amount of medication in the syringe with themedication dose and discard any surplus.
18. Recheck the label with the CMAR/MAR.
19. If a multidose vial is being used, label the vial with thedate and time opened, and store the vial containing theremaining medication according to facility policy.
20. Lock the medication cart before leaving it.
21. Perform hand hygiene.
22. Proceed with administration, based on prescribed route.
Exce
llent
Satis
fact
ory
Nee
ds P
ract
ice
LWBK681-C05_p054-116.qxd 9/6/10 10:19 PM Page 63 Aptara

64
Copyright © 2011 by Wolters Kluwer Health | Lippincott Williams & Wilkins. Skill Checklists for Taylor's Clinical Nursing Skills:
A Nursing Process Approach, 3rd edition, by Pamela Lynn and Marilee LeBon.
Skill Checklists for Taylor's Clinical Nursing Skills:
A Nursing Process Approach, 3rd edition
Name Date
Unit Position
Instructor/Evaluator: Position
SKILL 5-5
Mixing Medications From Two Vials in One Syringe
Goal: The proper dosage of medication is withdrawn into a
syringe using sterile technique. Comments
1. Gather equipment. Check medication order against theoriginal order in the medical record, according to facilitypolicy.
2. Know the actions, special nursing considerations, safe doseranges, purpose of administration, and adverse effects ofthe medications to be administered. Consider the appropri-ateness of the medication for this patient.
3. Perform hand hygiene.
4. Move the medication cart to the outside of the patient’sroom or prepare for administration in the medication area.
5. Unlock the medication cart or drawer. Enter pass code andscan employee identification, if required.
6. Prepare medications for one patient at a time.
7. Read the CMAR/MAR and select the proper medicationsfrom the patient’s medication drawer or unit stock.
8. Compare the labels with the CMAR/MAR. Check expira-tion dates and perform calculations, if necessary. Scan thebar code on the package, if required.
9. If necessary, remove the cap that protects the rubber stop-per on each vial.
10. If medication is a suspension (e.g., NPH insulin), roll andagitate the vial to mix it well.
11. Cleanse the rubber tops with antimicrobial swabs.
12. Remove cap from needle by pulling it straight off. Touchthe plunger at the knob only. Draw back an amount of airinto the syringe that is equal to the dose of modifiedinsulin to be withdrawn.
13. Hold the modified vial on a flat surface. Pierce the rubberstopper in the center with the needle tip and inject themeasured air into the space above the solution. Do notinject air into the solution. Withdraw the needle.
14. Draw back an amount of air into the syringe that is equalto the dose of unmodified insulin to be withdrawn.
Exce
llent
Satis
fact
ory
Nee
ds P
ract
ice
LWBK681-C05_p054-116.qxd 9/6/10 10:19 PM Page 64 Aptara
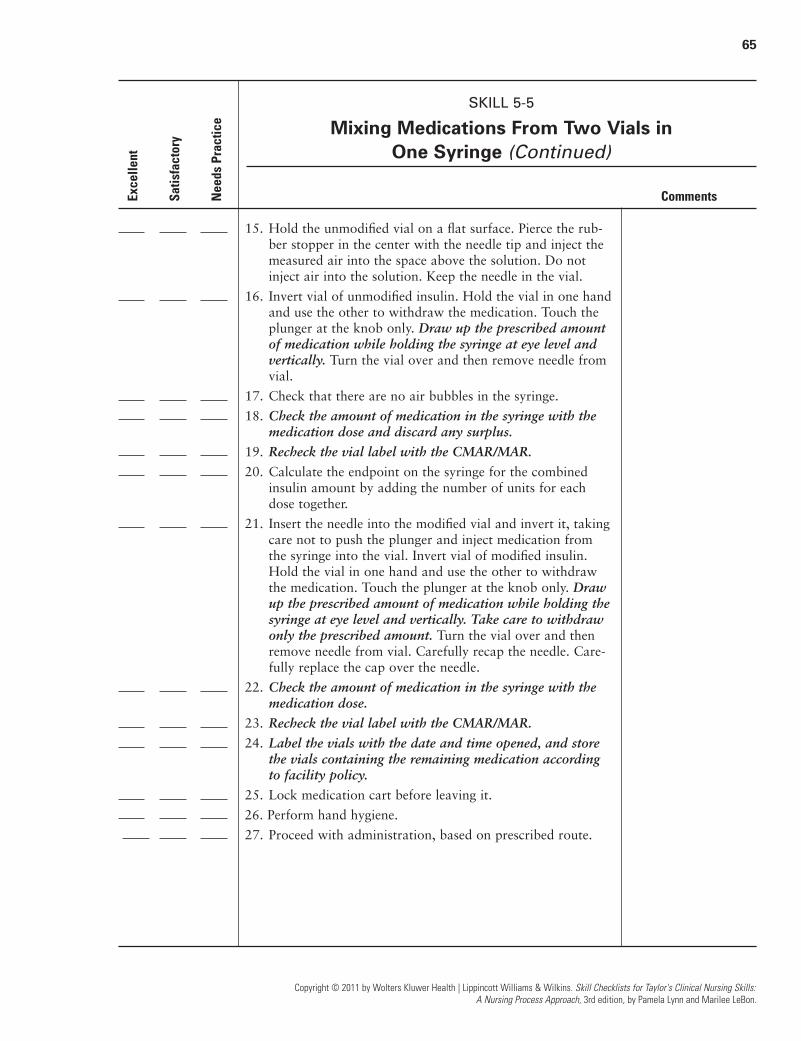
65
Copyright © 2011 by Wolters Kluwer Health | Lippincott Williams & Wilkins. Skill Checklists for Taylor's Clinical Nursing Skills:
A Nursing Process Approach, 3rd edition, by Pamela Lynn and Marilee LeBon.
SKILL 5-5
Mixing Medications From Two Vials in One Syringe (Continued)
Comments
15. Hold the unmodified vial on a flat surface. Pierce the rub-ber stopper in the center with the needle tip and inject themeasured air into the space above the solution. Do notinject air into the solution. Keep the needle in the vial.
16. Invert vial of unmodified insulin. Hold the vial in one handand use the other to withdraw the medication. Touch theplunger at the knob only. Draw up the prescribed amountof medication while holding the syringe at eye level andvertically. Turn the vial over and then remove needle fromvial.
17. Check that there are no air bubbles in the syringe.
18. Check the amount of medication in the syringe with themedication dose and discard any surplus.
19. Recheck the vial label with the CMAR/MAR.
20. Calculate the endpoint on the syringe for the combinedinsulin amount by adding the number of units for eachdose together.
21. Insert the needle into the modified vial and invert it, takingcare not to push the plunger and inject medication fromthe syringe into the vial. Invert vial of modified insulin.Hold the vial in one hand and use the other to withdrawthe medication. Touch the plunger at the knob only. Drawup the prescribed amount of medication while holding thesyringe at eye level and vertically. Take care to withdrawonly the prescribed amount. Turn the vial over and thenremove needle from vial. Carefully recap the needle. Care-fully replace the cap over the needle.
22. Check the amount of medication in the syringe with themedication dose.
23. Recheck the vial label with the CMAR/MAR.
24. Label the vials with the date and time opened, and storethe vials containing the remaining medication accordingto facility policy.
25. Lock medication cart before leaving it.
26. Perform hand hygiene.
27. Proceed with administration, based on prescribed route.
Exce
llent
Satis
fact
ory
Nee
ds P
ract
ice
LWBK681-C05_p054-116.qxd 9/6/10 10:19 PM Page 65 Aptara
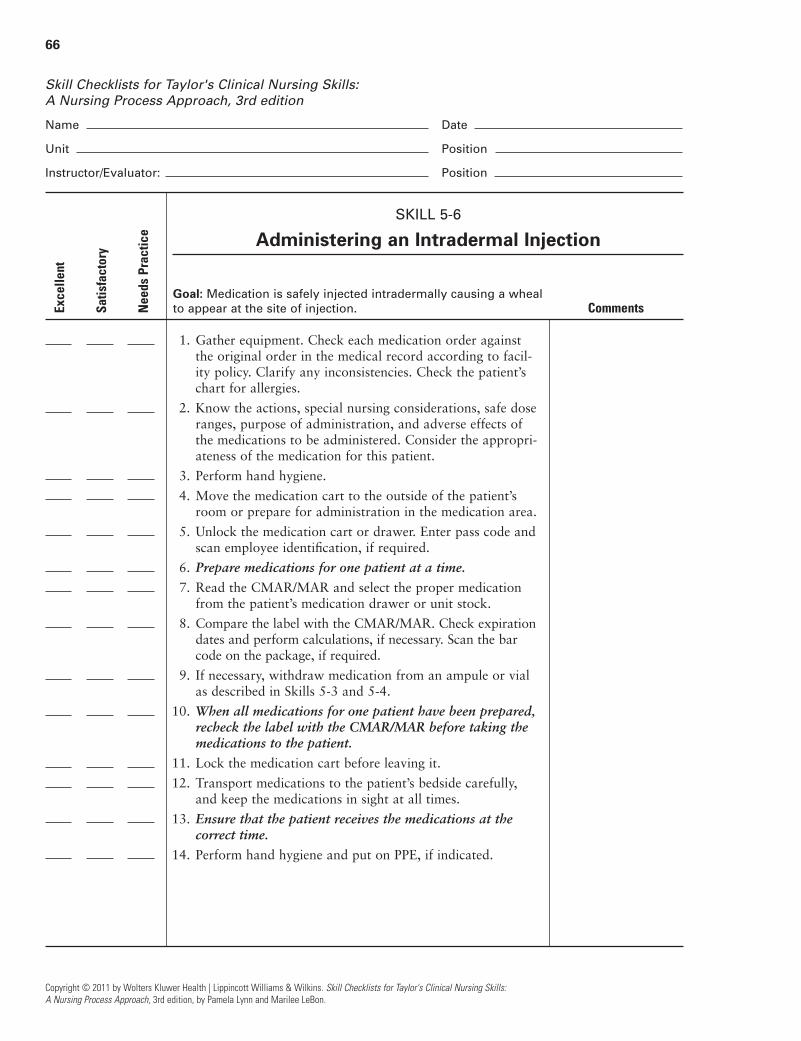
66
Copyright © 2011 by Wolters Kluwer Health | Lippincott Williams & Wilkins. Skill Checklists for Taylor's Clinical Nursing Skills:
A Nursing Process Approach, 3rd edition, by Pamela Lynn and Marilee LeBon.
Skill Checklists for Taylor's Clinical Nursing Skills:
A Nursing Process Approach, 3rd edition
Name Date
Unit Position
Instructor/Evaluator: Position
SKILL 5-6
Administering an Intradermal Injection
Goal: Medication is safely injected intradermally causing a wheal
to appear at the site of injection. Comments
1. Gather equipment. Check each medication order againstthe original order in the medical record according to facil-ity policy. Clarify any inconsistencies. Check the patient’schart for allergies.
2. Know the actions, special nursing considerations, safe doseranges, purpose of administration, and adverse effects ofthe medications to be administered. Consider the appropri-ateness of the medication for this patient.
3. Perform hand hygiene.
4. Move the medication cart to the outside of the patient’sroom or prepare for administration in the medication area.
5. Unlock the medication cart or drawer. Enter pass code andscan employee identification, if required.
6. Prepare medications for one patient at a time.
7. Read the CMAR/MAR and select the proper medicationfrom the patient’s medication drawer or unit stock.
8. Compare the label with the CMAR/MAR. Check expirationdates and perform calculations, if necessary. Scan the barcode on the package, if required.
9. If necessary, withdraw medication from an ampule or vialas described in Skills 5-3 and 5-4.
10. When all medications for one patient have been prepared,recheck the label with the CMAR/MAR before taking themedications to the patient.
11. Lock the medication cart before leaving it.
12. Transport medications to the patient’s bedside carefully,and keep the medications in sight at all times.
13. Ensure that the patient receives the medications at the correct time.
14. Perform hand hygiene and put on PPE, if indicated.
Exce
llent
Satis
fact
ory
Nee
ds P
ract
ice
LWBK681-C05_p054-116.qxd 9/6/10 10:19 PM Page 66 Aptara

67
Copyright © 2011 by Wolters Kluwer Health | Lippincott Williams & Wilkins. Skill Checklists for Taylor's Clinical Nursing Skills:
A Nursing Process Approach, 3rd edition, by Pamela Lynn and Marilee LeBon.
SKILL 5-6
Administering an Intradermal Injection (Continued)
Comments
15. Identify the patient. Usually, the patient should beidentified using two methods. Compare information withthe CMAR/MAR.
a. Check the name and identification number on thepatient’s identification band.
b. Ask the patient to state his or her name and birth date,based on facility policy.
c. If the patient cannot identify him- or herself, verify thepatient’s identification with a staff member who knowsthe patient for the second source.
16. Close the door to the room or pull the bedside curtain.
17. Complete necessary assessments before administering med-ications. Check allergy bracelet or ask the patient aboutallergies. Explain the purpose and action of the medicationto the patient.
18. Scan the patient’s bar code on the identification band, ifrequired.
19. Put on clean gloves.
20. Select an appropriate administration site. Assist the patientto the appropriate position for the site chosen. Drape asneeded to expose only area of site to be used.
21. Cleanse the site with an antimicrobial swab while wipingwith a firm, circular motion and moving outward from theinjection site. Allow the skin to dry.
22. Remove the needle cap with the nondominant hand bypulling it straight off.
23. Use the nondominant hand to spread the skin taut over theinjection site.
24. Hold the syringe in the dominant hand, between thethumb and forefinger with the bevel of the needle up.
25. Hold the syringe at a 5- to 15-degree angle from the site.Place the needle almost flat against the patient’s skin,bevel side up, and insert the needle into the skin. Insertthe needle only about 1⁄8 inch with entire bevel under the skin.
26. Once the needle is in place, steady the lower end of thesyringe. Slide your dominant hand to the end of theplunger.
27. Slowly inject the agent while watching for a small wheal orblister to appear.
Exce
llent
Satis
fact
ory
Nee
ds P
ract
ice
LWBK681-C05_p054-116.qxd 9/6/10 10:19 PM Page 67 Aptara
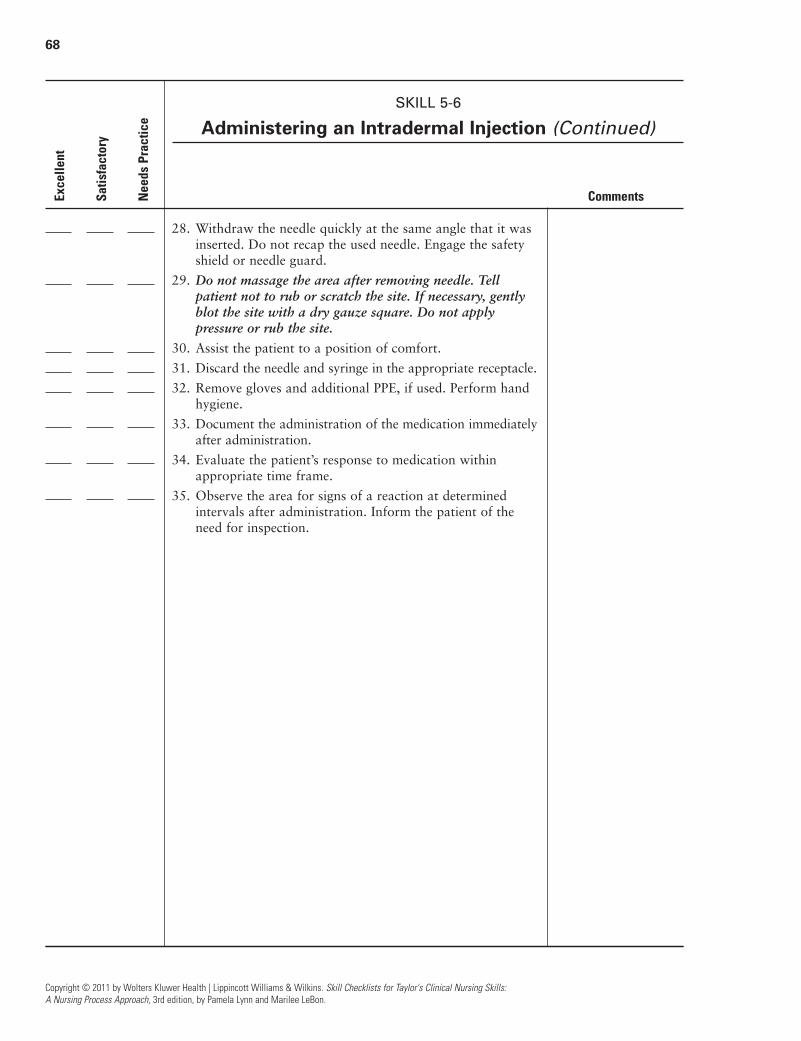
68
Copyright © 2011 by Wolters Kluwer Health | Lippincott Williams & Wilkins. Skill Checklists for Taylor's Clinical Nursing Skills:
A Nursing Process Approach, 3rd edition, by Pamela Lynn and Marilee LeBon.
SKILL 5-6
Administering an Intradermal Injection (Continued)
Comments
28. Withdraw the needle quickly at the same angle that it wasinserted. Do not recap the used needle. Engage the safetyshield or needle guard.
29. Do not massage the area after removing needle. Tellpatient not to rub or scratch the site. If necessary, gentlyblot the site with a dry gauze square. Do not applypressure or rub the site.
30. Assist the patient to a position of comfort.
31. Discard the needle and syringe in the appropriate receptacle.
32. Remove gloves and additional PPE, if used. Perform handhygiene.
33. Document the administration of the medication immediatelyafter administration.
34. Evaluate the patient’s response to medication withinappropriate time frame.
35. Observe the area for signs of a reaction at determinedintervals after administration. Inform the patient of theneed for inspection.
Exce
llent
Satis
fact
ory
Nee
ds P
ract
ice
LWBK681-C05_p054-116.qxd 9/6/10 10:19 PM Page 68 Aptara
69
Skill Checklists for Taylor's Clinical Nursing Skills:
A Nursing Process Approach, 3rd edition
Name Date
Unit Position
Instructor/Evaluator: Position
SKILL 5-7
Administering a Subcutaneous Injection
Goal: The patient safely receives medication via the subcutaneous
route. Comments
1. Gather equipment. Check each medication order againstthe original order in the medical record, according to facil-ity policy. Clarify any inconsistencies. Check the patient’schart for allergies.
2. Know the actions, special nursing considerations, safe doseranges, purpose of administration, and adverse effects ofthe medications to be administered. Consider the appropri-ateness of the medication for this patient.
3. Perform hand hygiene.
4. Move the medication cart to the outside of the patient’sroom or prepare for administration in the medication area.
5. Unlock the medication cart or drawer. Enter pass code andscan employee identification, if required.
6. Prepare medications for one patient at a time.
7. Read the CMAR/MAR and select the proper medicationfrom the patient’s medication drawer or unit stock.
8. Compare the label with the CMAR/MAR. Checkexpiration dates and perform calculations, if necessary.Scan the bar code on the package, if required.
9. If necessary, withdraw medication from an ampule or vialas described in Skills 5-3 and 5-4.
10. When all medications for one patient have been prepared,recheck the label with the MAR before taking medicationsto the patient.
11. Lock the medication cart before leaving it.
12. Transport medications to the patient’s bedside carefully,and keep the medications in sight at all times.
13. Ensure that the patient receives the medications at the correct time.
14. Perform hand hygiene and put on PPE, if indicated.
Copyright © 2011 by Wolters Kluwer Health | Lippincott Williams & Wilkins. Skill Checklists for Taylor's Clinical Nursing Skills:
A Nursing Process Approach, 3rd edition, by Pamela Lynn and Marilee LeBon.
Exce
llent
Satis
fact
ory
Nee
ds P
ract
ice
LWBK681-C05_p054-116.qxd 9/6/10 10:19 PM Page 69 Aptara

70
Copyright © 2011 by Wolters Kluwer Health | Lippincott Williams & Wilkins. Skill Checklists for Taylor's Clinical Nursing Skills:
A Nursing Process Approach, 3rd edition, by Pamela Lynn and Marilee LeBon.
SKILL 5-7
Administering a Subcutaneous Injection (Continued)
Comments
15. Identify the patient. Usually, the patient should beidentified using two methods. Compare information with the CMAR/MAR.
a. Check the name and identification number on thepatient’s identification band.
b. Ask the patient to state his or her name and birth date,based on facility policy.
c. If the patient cannot identify him- or herself, verify thepatient’s identification with a staff member who knowsthe patient for the second source.
16. Close the door to the room or pull the bedside curtain.
17. Complete necessary assessments before administering med-ications. Check the patient’s allergy bracelet or ask thepatient about allergies. Explain the purpose and action ofthe medication to the patient.
18. Scan the patient’s bar code on the identification band, ifrequired.
19. Put on clean gloves.
20. Select an appropriate administration site.
21. Assist the patient to the appropriate position for the sitechosen. Drape, as needed, to expose only area of site to beused.
22. Identify the appropriate landmarks for the site chosen.
23. Cleanse the area around the injection site with an antimi-crobial swab. Use a firm, circular motion while movingoutward from the injection site. Allow area to dry.
24. Remove the needle cap with the nondominant hand,pulling it straight off.
25. Grasp and bunch the area surrounding the injection site orspread the skin taut at the site.
26. Hold the syringe in the dominant hand between the thumb and forefinger. Inject the needle quickly at a 45- to 90-degree angle.
27. After the needle is in place, release the tissue. If you have alarge skin fold pinched up, ensure that the needle stays inplace as the skin is released. Immediately move your non-dominant hand to steady the lower end of the syringe.Slide your dominant hand to the end of the plunger. Avoidmoving the syringe.
28. Inject the medication slowly (at a rate of 10 sec/mL).
Exce
llent
Satis
fact
ory
Nee
ds P
ract
ice
LWBK681-C05_p054-116.qxd 9/6/10 10:19 PM Page 70 Aptara

71
Copyright © 2011 by Wolters Kluwer Health | Lippincott Williams & Wilkins. Skill Checklists for Taylor's Clinical Nursing Skills:
A Nursing Process Approach, 3rd edition, by Pamela Lynn and Marilee LeBon.
SKILL 5-7
Administering a Subcutaneous Injection (Continued)
Comments
29. Withdraw the needle quickly at the same angle at which itwas inserted, while supporting the surrounding tissue withyour nondominant hand.
30. Using a gauze square, apply gentle pressure to the site afterthe needle is withdrawn. Do not massage the site.
31. Do not recap the used needle. Engage the safety shield orneedle guard. Discard the needle and syringe in the appro-priate receptacle.
32. Assist the patient to a position of comfort.
33. Remove gloves and additional PPE, if used. Perform handhygiene.
34. Document the administration of the medication immediatelyafter administration.
35. Evaluate the patient’s response to the medication within anappropriate time frame for the particular medication.
Exce
llent
Satis
fact
ory
Nee
ds P
ract
ice
LWBK681-C05_p054-116.qxd 9/6/10 10:19 PM Page 71 Aptara

72
Copyright © 2011 by Wolters Kluwer Health | Lippincott Williams & Wilkins. Skill Checklists for Taylor's Clinical Nursing Skills:
A Nursing Process Approach, 3rd edition, by Pamela Lynn and Marilee LeBon.
Skill Checklists for Taylor's Clinical Nursing Skills:
A Nursing Process Approach, 3rd edition
Name Date
Unit Position
Instructor/Evaluator: Position
SKILL 5-8
Administering an Intramuscular Injection
Goal: The patient safely receives the medication via the
intramuscular route using a Z-track method. Comments
1. Gather equipment. Check each medication order againstthe original order in the medical record according to facil-ity policy. Clarify any inconsistencies. Check the patient’schart for allergies.
2. Know the actions, special nursing considerations, safe doseranges, purpose of administration, and adverse effects ofthe medications to be administered. Consider the appropri-ateness of the medication for this patient.
3. Perform hand hygiene.
4. Move the medication cart to the outside of the patient’sroom or prepare for administration in the medication area.
5. Unlock the medication cart or drawer. Enter pass code andscan employee identification, if required.
6. Prepare medications for one patient at a time.
7. Read the CMAR/MAR and select the proper medicationfrom the patient’s medication drawer or unit stock.
8. Compare the label with the CMAR/MAR. Checkexpiration dates and perform calculations, if necessary.Scan the bar code on the package, if required.
9. If necessary, withdraw medication from an ampule or vialas described in Skills 5-3 and 5-4.
10. When all medications for one patient have been prepared,recheck the label with the MAR before taking the medica-tions to the patient.
11. Lock the medication cart before leaving it.
12. Transport medications to the patient’s bedside carefully,and keep the medications in sight at all times.
13. Ensure that the patient receives the medications at the correct time.
14. Perform hand hygiene and put on PPE, if indicated.
Exce
llent
Satis
fact
ory
Nee
ds P
ract
ice
LWBK681-C05_p054-116.qxd 9/6/10 10:19 PM Page 72 Aptara

73
Copyright © 2011 by Wolters Kluwer Health | Lippincott Williams & Wilkins. Skill Checklists for Taylor's Clinical Nursing Skills:
A Nursing Process Approach, 3rd edition, by Pamela Lynn and Marilee LeBon.
SKILL 5-8
Administering an Intramuscular Injection (Continued)
Comments
15. Identify the patient. Usually, the patient should be identifiedusing two methods. Compare information with the CMAR/MAR.
a. Check the name and identification number on thepatient’s identification band.
b. Ask the patient to state his or her name and birth date,based on facility policy.
c. If the patient cannot identify him- or herself, verify thepatient’s identification with a staff member who knowsthe patient for the second source.
16. Close the door to the room or pull the bedside curtain.
17. Complete necessary assessments before administering med-ications. Check the patient’s allergy bracelet or ask thepatient about allergies. Explain the purpose and action ofthe medication to the patient.
18. Scan the patient’s bar code on the identification band, ifrequired.
19. Put on clean gloves.
20. Select an appropriate administration site.
21. Assist the patient to the appropriate position for the sitechosen. Drape, as needed, to expose only the area of sitebeing used.
22. Identify the appropriate landmarks for the site chosen.
23. Cleanse the area around the injection site with an antimi-crobial swab. Use a firm, circular motion while movingoutward from the injection site. Allow area to dry.
24. Remove the needle cap by pulling it straight off. Hold thesyringe in your dominant hand between the thumb andforefinger.
25. Displace the skin in a Z-track manner by pulling the skindown or to one side about 1 inch (2.5 cm) with yournondominant hand and hold the skin and tissue in this posi-tion. (See the Skill Variation in your skills book for adminis-tering an intramuscular injection without using the Z-tracktechnique.)
26. Quickly dart the needle into the tissue so that the needle is perpendicular to the patient’s body. This should ensurethat it is given using an angle of injection between 72 and90 degrees.
Exce
llent
Satis
fact
ory
Nee
ds P
ract
ice
LWBK681-C05_p054-116.qxd 9/6/10 10:19 PM Page 73 Aptara
74
Copyright © 2011 by Wolters Kluwer Health | Lippincott Williams & Wilkins. Skill Checklists for Taylor's Clinical Nursing Skills:
A Nursing Process Approach, 3rd edition, by Pamela Lynn and Marilee LeBon.
SKILL 5-8
Administering an Intramuscular Injection (Continued)
Comments
27. As soon as the needle is in place, use the thumb and forefin-ger of your nondominant hand to hold the lower end of thesyringe. Slide your dominant hand to the end of the plunger.Inject the solution slowly (10 sec/mL of medication).
28. Once the medication has been instilled, wait 10 secondsbefore withdrawing the needle.
29. Withdraw the needle smoothly and steadily at the sameangle at which it was inserted, supporting tissue aroundthe injection site with your nondominant hand.
30. Apply gentle pressure at the site with a dry gauze. Do notmassage the site.
31. Do not recap the used needle. Engage the safety shield orneedle guard, if present. Discard the needle and syringe inthe appropriate receptacle.
32. Assist the patient to a position of comfort.
33. Remove gloves and additional PPE, if used. Perform handhygiene.
34. Document the administration of the medication immediatelyafter administration.
35. Evaluate the patient’s response to medication within anappropriate time frame. Assess site, if possible, within 2 to 4 hours after administration.
Exce
llent
Satis
fact
ory
Nee
ds P
ract
ice
LWBK681-C05_p054-116.qxd 9/6/10 10:19 PM Page 74 Aptara
75
Skill Checklists for Taylor's Clinical Nursing Skills:
A Nursing Process Approach, 3rd edition
Name Date
Unit Position
Instructor/Evaluator: Position
SKILL 5-9
Administering Continuous Subcutaneous Infusion:Applying an Insulin Pump
Goal: The device is applied successfully and medication is
administered. Comments
1. Gather equipment. Check each medication order againstthe original order in the medical record, according to facil-ity policy. Clarify any inconsistencies. Check the patient’schart for allergies.
2. Know the actions, special nursing considerations, safe doseranges, purpose of administration, and adverse effects ofthe medications to be administered. Consider the appropri-ateness of the medication for this patient.
3. Perform hand hygiene.
4. Move the medication cart to the outside of the patient’sroom or prepare for administration in the medication area.
5. Unlock the medication cart or drawer. Enter pass code andscan employee identification, if required.
6. Prepare medications for one patient at a time.
7. Read the CMAR/MAR and select the proper medicationfrom the patient’s medication drawer or unit stock.
8. Compare the label with the CMAR/MAR. Check expirationdates and perform calculations, if necessary. Scan the barcode on the package, if required.
9. Attach a blunt-ended needle or a small-gauge needle to asyringe. Follow Skill 5-4 to remove insulin from vial, ifnecessary. Remove enough insulin to last patient 2 to 3 days, plus 30 units for priming tubing. If using prepack-aged insulin syringe or cartridge, remove from packaging.
10. When all medications for one patient have been prepared,recheck the label with the MAR before taking them to thepatient.
11. Lock the medication cart before leaving it.
12. Transport medications to the patient’s bedside carefully,and keep the medications in sight at all times.
13. Ensure that the patient receives the medications at the correct time.
14. Perform hand hygiene and put on PPE, if indicated.
Copyright © 2011 by Wolters Kluwer Health | Lippincott Williams & Wilkins. Skill Checklists for Taylor's Clinical Nursing Skills:
A Nursing Process Approach, 3rd edition, by Pamela Lynn and Marilee LeBon.
Exce
llent
Satis
fact
ory
Nee
ds P
ract
ice
LWBK681-C05_p054-116.qxd 9/6/10 10:19 PM Page 75 Aptara
76
Copyright © 2011 by Wolters Kluwer Health | Lippincott Williams & Wilkins. Skill Checklists for Taylor's Clinical Nursing Skills:
A Nursing Process Approach, 3rd edition, by Pamela Lynn and Marilee LeBon.
SKILL 5-9
Administering Continuous Subcutaneous Infusion:Applying an Insulin Pump (Continued)
Comments
15. Identify the patient. Usually, the patient should be identifiedusing two methods. Compare information with the CMAR/MAR.
a. Check the name and identification number on thepatient’s identification band.
b. Ask the patient to state his or her name and birth date,based on facility policy.
c. If the patient cannot identify him- or herself, verify thepatient’s identification with a staff member who knowsthe patient.
16. Close the door to the room or pull the bedside curtain.
17. Complete necessary assessments before administering med-ications. Check the patient’s allergy bracelet or ask thepatient about allergies. Explain the purpose and action ofthe medication to the patient.
18. Scan the patient’s bar code on the identification band, ifrequired.
19. Perform hand hygiene. Put on gloves.
20. Remove the cap from the syringe or insulin cartridge.Attach sterile tubing to syringe or insulin cartridge. Openthe pump and place the syringe or cartridge in compartmentaccording to manufacturer’s directions. Close the pump.
21. Initiate priming of the tubing, according to manufacturer’sdirections. Program the pump according to manufacturer’srecommendations following primary care provider’s orders.Check for any bubbles in the tubing.
22. Activate the delivery device. Place the needle betweenprongs of the insertion device with the sharp edge facingout. Push insertion set down until a click is heard.
23. Select an appropriate administration site.
24. Assist the patient to the appropriate position for the sitechosen. Drape, as needed, to expose only area of site to be used.
25. Identify the appropriate landmarks for the site chosen.
26. Cleanse area around injection site with antimicrobialswab. Use a firm, circular motion while moving outwardfrom insertion site. Allow antiseptic to dry.
27. Remove paper from adhesive backing. Remove the needleguard. Pinch skin at insertion site, press insertion device onsite, and press release button to insert needle. Remove trig-gering device.
Exce
llent
Satis
fact
ory
Nee
ds P
ract
ice
LWBK681-C05_p054-116.qxd 9/6/10 10:19 PM Page 76 Aptara

77
Copyright © 2011 by Wolters Kluwer Health | Lippincott Williams & Wilkins. Skill Checklists for Taylor's Clinical Nursing Skills:
A Nursing Process Approach, 3rd edition, by Pamela Lynn and Marilee LeBon.
SKILL 5-9
Administering Continuous Subcutaneous Infusion:Applying an Insulin Pump (Continued)
Comments
28. Apply sterile occlusive dressing over insertion site, if notpart of insertion device. Attach the pump to patient’sclothing, as desired.
29. Assist the patient to a position of comfort.
30. Discard the needle and syringe in the appropriate receptacle.
31. Remove gloves and additional PPE, if used. Perform handhygiene.
32. Document the administration of the medication immediatelyafter administration.
33. Evaluate the patient’s response to medication withinappropriate time frame. Monitor the patient’s bloodglucose levels, as appropriate, or as ordered.
Exce
llent
Satis
fact
ory
Nee
ds P
ract
ice
LWBK681-C05_p054-116.qxd 9/6/10 10:19 PM Page 77 Aptara
78
Copyright © 2011 by Wolters Kluwer Health | Lippincott Williams & Wilkins. Skill Checklists for Taylor's Clinical Nursing Skills:
A Nursing Process Approach, 3rd edition, by Pamela Lynn and Marilee LeBon.
Skill Checklists for Taylor's Clinical Nursing Skills:
A Nursing Process Approach, 3rd edition
Name Date
Unit Position
Instructor/Evaluator: Position
SKILL 5-10
Administering Medications by Intravenous Bolus or Push Through an Intravenous Infusion
Goal: The prescribed medication is given to the patient safely via
the intravenous route. Comments
1. Gather equipment. Check medication order against theoriginal order in the medical record, according to facilitypolicy. Clarify any inconsistencies. Check the patient’schart for allergies. Verify the compatibility of the medica-tion and IV fluid. Check a drug resource to clarify whetherthe medication needs to be diluted before administration.Check the infusion rate.
2. Know the actions, special nursing considerations, safe doseranges, purpose of administration, and adverse effects ofthe medications to be administered. Consider the appropri-ateness of the medication for this patient.
3. Perform hand hygiene.
4. Move the medication cart to the outside of the patient’sroom or prepare for administration in the medication area.
5. Unlock the medication cart or drawer. Enter pass code andscan employee identification, if required.
6. Prepare medication for one patient at a time.
7. Read the CMAR/MAR and select the proper medicationfrom the patient’s medication drawer or unit stock.
8. Compare the label with the CMAR/MAR. Checkexpiration dates and perform calculations, if necessary.Scan the bar code on the package, if required.
9. If necessary, withdraw medication from an ampule or vialas described in Skills 5-3 and 5-4.
10. Recheck the label with the MAR before taking it to thepatient.
11. Lock the medication cart before leaving it.
12. Transport medications and equipment to the patient’s bedside carefully, and keep the medications in sight at alltimes.
13. Ensure that the patient receives the medications at the correct time.
14. Perform hand hygiene and put on PPE, if indicated.
Exce
llent
Satis
fact
ory
Nee
ds P
ract
ice
LWBK681-C05_p054-116.qxd 9/6/10 10:19 PM Page 78 Aptara

79
Copyright © 2011 by Wolters Kluwer Health | Lippincott Williams & Wilkins. Skill Checklists for Taylor's Clinical Nursing Skills:
A Nursing Process Approach, 3rd edition, by Pamela Lynn and Marilee LeBon.
SKILL 5-10
Administering Medications by Intravenous Bolus or Push Through an Intravenous Infusion (Continued)
Comments
15. Identify the patient. Usually, the patient should be identifiedusing two methods. Compare information with the CMAR/MAR.
a. Check the name and identification number on thepatient’s identification band.
b. Ask the patient to state his or her name and birth date,based on facility policy.
c. If the patient cannot identify him- or herself, verify thepatient’s identification with a staff member who knowsthe patient for the second source.
16. Close the door to the room or pull the bedside curtain.
17. Complete necessary assessments before administering med-ications. Check the patient’s allergy bracelet or ask thepatient about allergies. Explain the purpose and action ofthe medication to the patient.
18. Scan the patient’s bar code on the identification band, ifrequired.
19. Assess IV site for presence of inflammation or infiltration.
20. If IV infusion is being administered via an infusion pump,pause the pump.
21. Put on clean gloves.
22. Select injection port on tubing that is closest to venipunc-ture site. Clean port with antimicrobial swab.
23. Uncap syringe. Steady port with your nondominant handwhile inserting syringe into center of port.
24. Move your nondominant hand to the section of IV tubingjust above the injection port. Fold the tubing between yourfingers.
25. Pull back slightly on plunger just until blood appears intubing.
26. Inject the medication at the recommended rate.
27. Release the tubing. Remove the syringe. Do not recap theused needle, if used. Engage the safety shield or needleguard, if present. Release the tubing and allow the IV fluidto flow. Discard the needle and syringe in the appropriatereceptacle.
28. Check IV fluid infusion rate. Restart infusion pump, ifappropriate.
Exce
llent
Satis
fact
ory
Nee
ds P
ract
ice
LWBK681-C05_p054-116.qxd 9/6/10 10:19 PM Page 79 Aptara

80
Copyright © 2011 by Wolters Kluwer Health | Lippincott Williams & Wilkins. Skill Checklists for Taylor's Clinical Nursing Skills:
A Nursing Process Approach, 3rd edition, by Pamela Lynn and Marilee LeBon.
SKILL 5-10
Administering Medications by Intravenous Bolus or Push Through an Intravenous Infusion (Continued)
Comments
29. Remove gloves and additional PPE, if used. Perform handhygiene.
30. Document the administration of the medicationimmediately after administration.
31. Evaluate the patient’s response to medication withinappropriate time frame.
Exce
llent
Satis
fact
ory
Nee
ds P
ract
ice
LWBK681-C05_p054-116.qxd 9/6/10 10:19 PM Page 80 Aptara
81
Skill Checklists for Taylor's Clinical Nursing Skills:
A Nursing Process Approach, 3rd edition
Name Date
Unit Position
Instructor/Evaluator: Position
SKILL 5-11
Administering a Piggyback Intermittent Intravenous Infusion of Medication
Goal: The medication is delivered safely to the patient via the
intravenous route using sterile technique. Comments
1. Gather equipment. Check each medication order againstthe original order in the medical record, according to facil-ity policy. Clarify any inconsistencies. Check the patient’schart for allergies.
2. Know the actions, special nursing considerations, safe doseranges, purpose of administration, and adverse effects ofthe medications to be administered. Consider the appropri-ateness of the medication for this patient.
3. Perform hand hygiene.
4. Move the medication cart to the outside of the patient’sroom or prepare for administration in the medication area.
5. Unlock the medication cart or drawer. Enter pass code andscan employee identification, if required.
6. Prepare medications for one patient at a time.
7. Read the CMAR/MAR and select the proper medicationfrom the patient’s medication drawer or unit stock.
8. Compare the label with the CMAR/MAR. Checkexpiration dates. Confirm the prescribed or appropriateinfusion rate. Calculate the drip rate if using gravitysystem. Scan the bar code on the package, if required.
9. When all medications for one patient have been prepared,recheck the label with the MAR before taking them to thepatient.
10. Lock the medication cart before leaving it.
11. Transport medications to the patient’s bedside carefully,and keep the medications in sight at all times.
12. Ensure that the patient receives the medications at thecorrect time.
13. Perform hand hygiene and put on PPE, if indicated.
14. Identify the patient. Usually, the patient should be identifiedusing two methods. Compare information with the CMAR/MAR.
a. Check the name and identification number on thepatient’s identification band.
Copyright © 2011 by Wolters Kluwer Health | Lippincott Williams & Wilkins. Skill Checklists for Taylor's Clinical Nursing Skills:
A Nursing Process Approach, 3rd edition, by Pamela Lynn and Marilee LeBon.
Exce
llent
Satis
fact
ory
Nee
ds P
ract
ice
LWBK681-C05_p054-116.qxd 9/6/10 10:19 PM Page 81 Aptara

82
Copyright © 2011 by Wolters Kluwer Health | Lippincott Williams & Wilkins. Skill Checklists for Taylor's Clinical Nursing Skills:
A Nursing Process Approach, 3rd edition, by Pamela Lynn and Marilee LeBon.
SKILL 5-11
Administering a Piggyback Intermittent Intravenous Infusion of Medication (Continued)
Comments
b. Ask the patient to state his or her name and birth date,based on facility policy.
c. If the patient cannot identify him- or herself, verify thepatient’s identification with a staff member who knowsthe patient for the second source.
15. Close the door to the room or pull the bedside curtain.
16. Complete necessary assessments before administering med-ications. Check the patient’s allergy bracelet or ask thepatient about allergies. Explain the purpose and action ofthe medication to the patient.
17. Scan the patient’s bar code on the identification band, ifrequired.
18. Assess the IV site for the presence of inflammation or infiltration.
19. Close the clamp on the short secondary infusion tubing.Using aseptic technique, remove the cap on the tubingspike and the cap on the port of the medication container,taking care to avoid contaminating either end.
20. Attach infusion tubing to the medication container byinserting the tubing spike into the port with a firm pushand twisting motion, taking care to avoid contaminatingeither end.
21. Hang piggyback container on IV pole, positioning it higherthan primary IV according to manufacturer’s recommenda-tions. Use metal or plastic hook to lower primary IV fluidcontainer. (See the Skill Variation in your skills book forinformation on administering an intermittent IV medicationusing a tandem piggyback setup.)
22. Place label on tubing with appropriate date.
23. Squeeze drip chamber on tubing and release. Fill to the lineor about half full. Open clamp and prime tubing. Closeclamp. Place needleless connector on the end of the tubing,using sterile technique, if required.
24. Use an antimicrobial swab to clean the access port or stop-cock above the roller clamp on the primary IV infusiontubing.
25. Connect piggyback setup to the access port or stopcock. Ifusing, turn the stopcock to the open position.
Exce
llent
Satis
fact
ory
Nee
ds P
ract
ice
LWBK681-C05_p054-116.qxd 9/6/10 10:19 PM Page 82 Aptara
83
Copyright © 2011 by Wolters Kluwer Health | Lippincott Williams & Wilkins. Skill Checklists for Taylor's Clinical Nursing Skills:
A Nursing Process Approach, 3rd edition, by Pamela Lynn and Marilee LeBon.
SKILL 5-11
Administering a Piggyback Intermittent Intravenous Infusion of Medication (Continued)
Comments
26. Open clamp on the secondary tubing. Set rate for second-ary infusion on infusion pump and begin infusion. If usinggravity infusion, use the roller clamp on the primary infu-sion tubing to regulate flow at prescribed delivery rate.Monitor medication infusion at periodic intervals.
27. Clamp tubing on piggyback set when solution is infused.Follow facility policy regarding disposal of equipment.
28. Replace primary IV fluid container to original height.Check primary infusion rate on infusion pump. If usinggravity infusion, readjust flow rate of primary IV.
29. Remove PPE, if used. Perform hand hygiene.
30. Document the administration of the medication immediatelyafter administration.
31. Evaluate the patient’s response to medication within appro-priate time frame. Monitor IV site at periodic intervals.
Exce
llent
Satis
fact
ory
Nee
ds P
ract
ice
LWBK681-C05_p054-116.qxd 9/6/10 10:19 PM Page 83 Aptara

84
Copyright © 2011 by Wolters Kluwer Health | Lippincott Williams & Wilkins. Skill Checklists for Taylor's Clinical Nursing Skills:
A Nursing Process Approach, 3rd edition, by Pamela Lynn and Marilee LeBon.
Skill Checklists for Taylor's Clinical Nursing Skills:
A Nursing Process Approach, 3rd edition
Name Date
Unit Position
Instructor/Evaluator: Position
SKILL 5-12
Administering an Intermittent Intravenous Infusion ofMedication via a Mini-infusion Pump
Goal: The medication is delivered via the intravenous route
using sterile technique. Comments
1. Gather equipment. Check each medication order againstthe original order in the medical record according to facil-ity policy. Clarify any inconsistencies. Check the patient’schart for allergies.
2. Know the actions, special nursing considerations, safe doseranges, purpose of administration, and adverse effects ofthe medications to be administered. Consider the appropri-ateness of the medication for this patient.
3. Perform hand hygiene.
4. Move the medication cart to the outside of the patient’sroom or prepare for administration in the medicationarea.
5. Unlock the medication cart or drawer. Enter pass code andscan employee identification, if required.
6. Prepare medications for one patient at a time.
7. Read the CMAR/MAR and select the proper medicationfrom the patient’s medication drawer or unit stock.
8. Compare the label with the CMAR/MAR. Check expirationdates. Confirm the prescribed or appropriate infusion rate.Scan the bar code on the package, if required.
9. When all medications for one patient have been prepared,recheck the label with the MAR before taking them to thepatient.
10. Lock the medication cart before leaving it.
11. Transport medications to the patient’s bedside carefully,and keep the medications in sight at all times.
12. Ensure that the patient receives the medications at the correct time.
13. Perform hand hygiene and put on PPE, if indicated.
Exce
llent
Satis
fact
ory
Nee
ds P
ract
ice
LWBK681-C05_p054-116.qxd 9/6/10 10:19 PM Page 84 Aptara

85
Copyright © 2011 by Wolters Kluwer Health | Lippincott Williams & Wilkins. Skill Checklists for Taylor's Clinical Nursing Skills:
A Nursing Process Approach, 3rd edition, by Pamela Lynn and Marilee LeBon.
SKILL 5-12
Administering an Intermittent Intravenous Infusion ofMedication via a Mini-infusion Pump (Continued)
Comments
14. Identify the patient. Usually, the patient should be identifiedusing two methods. Compare information with the MAR/CMAR.
a. Check the name and identification number on thepatient’s identification band.
b. Ask the patient to state his or her name and birth date,based on facility policy.
c. If the patient cannot identify him- or herself, verify thepatient’s identification with a staff member who knowsthe patient for the second source.
15. Close the door to the room or pull the bedside curtain.
16. Complete necessary assessments before administering med-ications. Check the patient’s allergy bracelet or ask thepatient about allergies. Explain the purpose and action ofthe medication to the patient.
17. Scan the patient’s bar code on the identification band, ifrequired.
18. Assess the IV site for the presence of inflammation or infiltration.
19. Using aseptic technique, remove the cap on the tubing andthe cap on the syringe, taking care not to contaminateeither end.
20. Attach infusion tubing to the syringe, taking care not tocontaminate either end.
21. Place label on tubing with appropriate date.
22. Fill tubing with medication by applying gentle pressure tosyringe plunger. Place needleless connector on the end ofthe tubing, using sterile technique, if required.
23. Insert syringe into mini-infusion pump according to manu-facturer’s directions.
24. Use antimicrobial swab to clean the access port or stopcockbelow the roller clamp on the primary IV infusion tubing,usually the port closest to the IV insertion site.
25. Connect the secondary infusion to the primary infusion atthe cleansed port.
26. Program pump to the appropriate rate and begin infusion.Set alarm if recommended by manufacturer.
Exce
llent
Satis
fact
ory
Nee
ds P
ract
ice
LWBK681-C05_p054-116.qxd 9/6/10 10:19 PM Page 85 Aptara
86
Copyright © 2011 by Wolters Kluwer Health | Lippincott Williams & Wilkins. Skill Checklists for Taylor's Clinical Nursing Skills:
A Nursing Process Approach, 3rd edition, by Pamela Lynn and Marilee LeBon.
SKILL 5-12
Administering an Intermittent Intravenous Infusion ofMedication via a Mini-infusion Pump (Continued)
Comments
27. Clamp tubing on secondary set when solution is infused.Remove secondary tubing from access port and cap, orreplace connector with a new, capped one, if reusing. Fol-low facility policy regarding disposal of equipment.
28. Check rate of primary infusion.
29. Remove PPE, if used. Perform hand hygiene.
30. Document the administration of the medication immediatelyafter administration.
31. Evaluate the patient’s response to medication within appro-priate time frame. Monitor IV site at periodic intervals.
Exce
llent
Satis
fact
ory
Nee
ds P
ract
ice
LWBK681-C05_p054-116.qxd 9/6/10 10:19 PM Page 86 Aptara
87
Skill Checklists for Taylor's Clinical Nursing Skills:
A Nursing Process Approach, 3rd edition
Name Date
Unit Position
Instructor/Evaluator: Position
SKILL 5-13
Administering an Intermittent Intravenous Infusion of Medication via a Volume-Control
Administration SetGoal: The medication is delivered via the intravenous route
using sterile technique. Comments
1. Gather equipment. Check the medication order against theoriginal order in the medical record according to facilitypolicy. Clarify any inconsistencies. Check the patient’schart for allergies. Verify the compatibility of the medica-tion and IV fluid.
2. Know the actions, special nursing considerations, safe doseranges, purpose of administration, and adverse effects ofthe medications to be administered. Consider the appropri-ateness of the medication for this patient.
3. Perform hand hygiene.
4. Move the medication cart to the outside of the patient’sroom or prepare for administration in the medication area.
5. Unlock the medication cart or drawer. Enter pass code andscan employee identification, if required.
6. Prepare medication for one patient at a time.
7. Read the CMAR/MAR and select the proper medicationfrom the patient’s medication drawer or unit stock.
8. Compare the label with the CMAR/MAR. Check expirationdates and perform calculations, if necessary. Confirm theprescribed or appropriate infusion rate. Calculate the driprate if using gravity system. Scan the bar code on the pack-age, if required. Check the infusion rate.
9. If necessary, withdraw medication from an ampule or vial as described in Skills 5-3 and 5-4. Attach needlelessconnector or blunt needle to end of syringe, if necessary.
10. When all medications for one patient have been prepared,recheck the label with the CMAR/MAR before takingthem to the patient.
11. Prepare medication label including name of medication,dose, total volume, including diluent, and time of adminis-tration.
12. Lock the medication cart before leaving it.
Copyright © 2011 by Wolters Kluwer Health | Lippincott Williams & Wilkins. Skill Checklists for Taylor's Clinical Nursing Skills:
A Nursing Process Approach, 3rd edition, by Pamela Lynn and Marilee LeBon.
Exce
llent
Satis
fact
ory
Nee
ds P
ract
ice
LWBK681-C05_p054-116.qxd 9/6/10 10:19 PM Page 87 Aptara

88
Copyright © 2011 by Wolters Kluwer Health | Lippincott Williams & Wilkins. Skill Checklists for Taylor's Clinical Nursing Skills:
A Nursing Process Approach, 3rd edition, by Pamela Lynn and Marilee LeBon.
SKILL 5-13
Administering an Intermittent Intravenous Infusion of Medication via a Volume-Control
Administration Set (Continued)
Comments
13. Transport medications and equipment to the patient’s bedside carefully, and keep the medications in sight at alltimes.
14. Ensure that the patient receives the medications at the correct time.
15. Perform hand hygiene and put on PPE, if indicated.
16. Identify the patient. Usually, the patient should beidentified using two methods. Compare information withthe CMAR/MAR.
a. Check the name and identification number on thepatient’s identification band.
b. Ask the patient to state his or her name and birth date,based on facility policy.
c. If the patient cannot identify him- or herself, verify thepatient’s identification with a staff member who knowsthe patient for the second source.
17. Close the door to the room or pull the bedside curtain.
18. Complete necessary assessments before administering med-ications. Check the patient’s allergy bracelet or ask thepatient about allergies. Explain the purpose and action ofthe medication to the patient.
19. Scan the patient’s bar code on the identification band, ifrequired.
20. Assess IV site for presence of inflammation or infiltration.
21. Fill the volume-control administration set with the prescribedamount of IV fluid by opening the clamp between IVsolution and the volume-control administration set. Followmanufacturer’s instructions and fill with prescribed amountof IV solution. Close clamp.
22. Check to make sure the air vent on the volume-controladministration set chamber is open.
23. Use antimicrobial swab to clean access port on volume-control administration set chamber.
24. Attach the syringe with a twisting motion into the accessport while holding the syringe steady. Alternately, insertthe needleless device or blunt needle into the port. Injectthe medication into the chamber. Gently rotate the chamber.
25. Attach the medication label to the volume-control device.
Exce
llent
Satis
fact
ory
Nee
ds P
ract
ice
LWBK681-C05_p054-116.qxd 9/6/10 10:19 PM Page 88 Aptara
89
Copyright © 2011 by Wolters Kluwer Health | Lippincott Williams & Wilkins. Skill Checklists for Taylor's Clinical Nursing Skills:
A Nursing Process Approach, 3rd edition, by Pamela Lynn and Marilee LeBon.
SKILL 5-13
Administering an Intermittent Intravenous Infusion of Medication via a Volume-Control
Administration Set (Continued)
Comments
26. Use an antimicrobial swab to clean the access port or stop-cock below the roller clamp on the primary IV infusiontubing, usually the port closest to the IV insertion site.
27. Connect the secondary infusion to the primary infusion atthe cleansed port.
28. The volume-control administration set may be placed onan infusion pump with the appropriate dose programmedinto the pump. Alternately, use the roller clamp on the volume-control administration set tubing to adjust theinfusion to the prescribed rate.
29. Discard the syringe in the appropriate receptacle.
30. Clamp tubing on secondary set when solution is infused.Remove secondary tubing from access port and cap orreplace connector with a new, capped one, if reusing. Follow facility policy regarding disposal of equipment.
31. Check rate of primary infusion.
32. Remove PPE, if used. Perform hand hygiene.
33. Document the administration of the medication immediatelyafter administration.
34. Evaluate the patient’s response to medication withinappropriate time frame. Monitor IV site at periodic intervals.
Exce
llent
Satis
fact
ory
Nee
ds P
ract
ice
LWBK681-C05_p054-116.qxd 9/6/10 10:19 PM Page 89 Aptara

90
Copyright © 2011 by Wolters Kluwer Health | Lippincott Williams & Wilkins. Skill Checklists for Taylor's Clinical Nursing Skills:
A Nursing Process Approach, 3rd edition, by Pamela Lynn and Marilee LeBon.
Skill Checklists for Taylor's Clinical Nursing Skills:
A Nursing Process Approach, 3rd edition
Name Date
Unit Position
Instructor/Evaluator: Position
SKILL 5-14
Introducing Drugs Through a Medication or Drug-Infusion Lock (Intermittent Peripheral Venous Access
Device) Using the Saline FlushGoal: The medication is delivered safely to the patient via the
intravenous route using sterile technique. Comments
1. Gather equipment. Check the medication order against theoriginal order in the medical record, according to agencypolicy. Clarify any inconsistencies. Check the patient’s chartfor allergies. Check a drug resource to clarify whether med-ication needs to be diluted before administration. Verify therecommended infusion rate.
2. Know the actions, special nursing considerations, safe doseranges, purpose of administration, and adverse effects ofthe medications to be administered. Consider the appropri-ateness of the medication for this patient.
3. Perform hand hygiene.
4. Move the medication cart to the outside of the patient’sroom or prepare for administration in the medication area.
5. Unlock the medication cart or drawer. Enter pass code andscan employee identification, if required.
6. Prepare medication for one patient at a time.
7. Read the CMAR/MAR and select the proper medicationfrom the patient’s medication drawer or unit stock.
8. Compare the label with the CMAR/MAR. Check expirationdates and perform calculations, if necessary. Scan the barcode on the package, if required.
9. If necessary, withdraw medication from an ampule or vialas described in Skills 5-3 and 5-4.
10. When all medications for one patient have been prepared,recheck the label with the MAR before taking them to thepatient.
11. Lock the medication cart before leaving it.
12. Transport medications and equipment to the patient’s bedside carefully, and keep the medications in sight at all times.
13. Ensure that the patient receives the medications at the correct time.
Exce
llent
Satis
fact
ory
Nee
ds P
ract
ice
LWBK681-C05_p054-116.qxd 9/6/10 10:19 PM Page 90 Aptara

91
Copyright © 2011 by Wolters Kluwer Health | Lippincott Williams & Wilkins. Skill Checklists for Taylor's Clinical Nursing Skills:
A Nursing Process Approach, 3rd edition, by Pamela Lynn and Marilee LeBon.
SKILL 5-14
Introducing Drugs Through a Medication or Drug-Infusion Lock (Intermittent Peripheral Venous Access
Device) Using the Saline Flush (Continued)
Comments
14. Perform hand hygiene and put on PPE, if indicated.
15. Identify the patient. Usually, the patient should be identifiedusing two methods. Compare information with the MAR/CMAR.
a. Check the name and identification number on thepatient’s identification band.
b. Ask the patient to state his or her name and birth date,based on facility policy.
c. If the patient cannot identify him- or herself, verify thepatient’s identification with a staff member who knowsthe patient for the second source.
16. Close the door to the room or pull the bedside curtain.
17. Complete necessary assessments before administering med-ications. Check the patient’s allergy bracelet or ask thepatient about allergies. Explain the purpose and action ofthe medication to the patient.
18. Scan the patient’s bar code on the identification band, ifrequired.
19. Assess IV site for presence of inflammation or infiltration.
20. Put on clean gloves.
21. Clean the access port of the medication lock withantimicrobial swab.
22. Stabilize the port with your nondominant hand and insertthe syringe, or needleless access device, of normal salineinto the access port.
23. Release the clamp on the extension tubing of the medicationlock. Aspirate gently and check for blood return.
24. Gently flush with normal saline by pushing slowly on thesyringe plunger. Observe the insertion site while insertingthe saline. Remove syringe.
25. Insert syringe, or needleless access device, with medicationinto the port and gently inject medication, using a watchto verify correct administration rate. Do not force theinjection if resistance is felt.
Exce
llent
Satis
fact
ory
Nee
ds P
ract
ice
LWBK681-C05_p054-116.qxd 9/6/10 10:19 PM Page 91 Aptara
92
Copyright © 2011 by Wolters Kluwer Health | Lippincott Williams & Wilkins. Skill Checklists for Taylor's Clinical Nursing Skills:
A Nursing Process Approach, 3rd edition, by Pamela Lynn and Marilee LeBon.
SKILL 5-14
Introducing Drugs Through a Medication or Drug-Infusion Lock (Intermittent Peripheral Venous Access
Device) Using the Saline Flush (Continued)
Comments
26. Remove the medication syringe from the port. Stabilize theport with your nondominant hand and insert the syringe,or needleless access device, of normal saline into the port.Gently flush with normal saline by pushing slowly on thesyringe plunger. If medication lock is capped with positivepressure valve/device, remove syringe, and then clamp theIV tubing. Alternately, to gain positive pressure if positivepressure valve/device is not present, clamp the IV tubing asyou are still flushing the last of the saline into the medica-tion lock. Remove syringe.
27. Discard the syringe in the appropriate receptacle.
28. Remove PPE, if used. Perform hand hygiene.
29. Document the administration of the medication immediatelyafter administration.
30. Evaluate the patient’s response to medication withinappropriate time frame.
31. Check the medication lock site at least every 8 hours oraccording to facility policy.
Exce
llent
Satis
fact
ory
Nee
ds P
ract
ice
LWBK681-C05_p054-116.qxd 9/6/10 10:19 PM Page 92 Aptara

93
Skill Checklists for Taylor's Clinical Nursing Skills:
A Nursing Process Approach, 3rd edition
Name Date
Unit Position
Instructor/Evaluator: Position
SKILL 5-15
Applying a Transdermal Patch
Goal: The medication is delivered via the transdermal route. Comments
1. Gather equipment. Check medication order against theoriginal order in the medical record, according to facilitypolicy. Clarify any inconsistencies. Check the patient’schart for allergies.
2. Know the actions, special nursing considerations, safe doseranges, purpose of administration, and adverse effects ofthe medications to be administered. Consider the appropri-ateness of the medication for this patient.
3. Perform hand hygiene.
4. Move the medication cart to the outside of the patient’sroom or prepare for administration in the medication area.
5. Unlock the medication cart or drawer. Enter pass code andscan employee identification, if required.
6. Prepare medications for one patient at a time.
7. Read the CMAR/MAR and select the proper medicationfrom the patient’s medication drawer or unit stock.
8. Compare the label with the CMAR/MAR. Check expirationdates and perform calculations, if necessary. Scan the barcode on the package, if required.
9. When all medications for one patient have been prepared,recheck the label with the CMAR/MAR before takingthem to the patient.
10. Lock the medication cart before leaving it.
11. Transport medications to the patient’s bedside carefully,and keep the medications in sight at all times.
12. Ensure that the patient receives the medications at the correct time.
13. Perform hand hygiene and put on PPE, if indicated.
14. Identify the patient. Usually, the patient should beidentified using two methods. Compare information withthe CMAR/MAR.
a. Check the name and identification number on thepatient’s identification band.
Copyright © 2011 by Wolters Kluwer Health | Lippincott Williams & Wilkins. Skill Checklists for Taylor's Clinical Nursing Skills:
A Nursing Process Approach, 3rd edition, by Pamela Lynn and Marilee LeBon.
Exce
llent
Satis
fact
ory
Nee
ds P
ract
ice
LWBK681-C05_p054-116.qxd 9/6/10 10:19 PM Page 93 Aptara

94
Copyright © 2011 by Wolters Kluwer Health | Lippincott Williams & Wilkins. Skill Checklists for Taylor's Clinical Nursing Skills:
A Nursing Process Approach, 3rd edition, by Pamela Lynn and Marilee LeBon.
SKILL 5-15
Applying a Transdermal Patch (Continued)
Comments
b. Ask the patient to state his or her name and birth date,based on facility policy.
c. If the patient cannot identify him- or herself, verify thepatient’s identification with a staff member who knowsthe patient for the second source.
15. Complete necessary assessments before administering med-ications. Check the patient’s allergy bracelet or ask thepatient about allergies. Explain the purpose and action ofeach medication to the patient.
16. Scan the patient’s bar code on the identification band, ifrequired.
17. Put on gloves.
18. Assess the patient’s skin where patch is to be placed, look-ing for any signs of irritation or breakdown. Site should beclean, dry, and free of hair. Rotate application sites.
19. Remove any old transdermal patches from the patient’sskin. Fold the old patch in half with the adhesive sidessticking together and discard according to facility policy.Gently wash the area where the old patch was with soapand water.
20. Remove the patch from its protective covering. Initial andwrite the date and time of administration on the label sideof the patch.
21. Remove the covering on the patch without touching themedication surface. Apply the patch to the patient’s skin.Use the palm of your hand to press firmly for about 10 seconds. Do not massage.
22. Remove gloves and additional PPE, if used. Perform handhygiene.
23. Document the administration of the medication immediatelyafter administration.
24. Evaluate the patient’s response to medication within theappropriate time frame.
Exce
llent
Satis
fact
ory
Nee
ds P
ract
ice
LWBK681-C05_p054-116.qxd 9/6/10 10:19 PM Page 94 Aptara

95
Skill Checklists for Taylor's Clinical Nursing Skills:
A Nursing Process Approach, 3rd edition
Name Date
Unit Position
Instructor/Evaluator: Position
SKILL 5-16
Instilling Eye Drops
Goal: The medication is delivered successfully into the eye. Comments
1. Gather equipment. Check medication order against theoriginal order in the medical record, according to facilitypolicy. Clarify any inconsistencies. Check the patient’schart for allergies.
2. Know the actions, special nursing considerations, safe doseranges, purpose of administration, and adverse effects ofthe medications to be administered. Consider the appropri-ateness of the medication for this patient.
3. Perform hand hygiene.
4. Move the medication cart to the outside of the patient’sroom or prepare for administration in the medication area.
5. Unlock the medication cart or drawer. Enter pass code andscan employee identification, if required.
6. Prepare medications for one patient at a time.
7. Read the CMAR/MAR and select the proper medicationfrom the patient’s medication drawer or unit stock.
8. Compare the label with the CMAR/MAR. Check expirationdates and perform calculations, if necessary. Scan the barcode on the package, if required.
9. When all medications for one patient have been prepared,recheck the label with the CMAR/MAR before takingthem to the patient.
10. Lock the medication cart before leaving it.
11. Transport medications to the patient’s bedside carefully,and keep the medications in sight at all times.
12. Ensure that the patient receives the medications at the correct time.
13. Perform hand hygiene and put on PPE, if indicated.
14. Identify the patient. Usually, the patient should beidentified using two methods. Compare information with the CMAR/MAR.
a. Check the name and identification number on thepatient’s identification band.
Copyright © 2011 by Wolters Kluwer Health | Lippincott Williams & Wilkins. Skill Checklists for Taylor's Clinical Nursing Skills:
A Nursing Process Approach, 3rd edition, by Pamela Lynn and Marilee LeBon.
Exce
llent
Satis
fact
ory
Nee
ds P
ract
ice
LWBK681-C05_p054-116.qxd 9/6/10 10:19 PM Page 95 Aptara

96
Copyright © 2011 by Wolters Kluwer Health | Lippincott Williams & Wilkins. Skill Checklists for Taylor's Clinical Nursing Skills:
A Nursing Process Approach, 3rd edition, by Pamela Lynn and Marilee LeBon.
SKILL 5-16
Instilling Eye Drops (Continued)
Comments
b. Ask the patient to state his or her name and birth date,based on facility policy.
c. If the patient cannot identify him- or herself, verify thepatient’s identification with a staff member who knowsthe patient for the second source.
15. Complete necessary assessments before administering med-ications. Check the patient’s allergy bracelet or ask thepatient about allergies. Explain the purpose and action ofeach medication to the patient.
16. Scan the patient’s bar code on the identification band, ifrequired.
17. Put on gloves.
18. Offer tissue to patient.
19. Cleanse the eyelids and eyelashes of any drainage with awashcloth, cotton balls, or gauze squares moistened withnormal saline solution. Use each area of the cleaning surface once, moving from the inner toward the outercanthus.
20. Tilt the patient’s head back slightly if sitting, or place thepatient’s head over a pillow if lying down. The head maybe turned slightly to the affected side to prevent solutionor tears from flowing toward the opposite eye.
21. Remove the cap from the medication bottle, being carefulnot to touch the inner side of the cap. (See the Skill Varia-tion in your skills book for administering ointment.)
22. Invert the monodrip plastic container that is commonlyused to instill eye drops. Have patient look up and focuson something on the ceiling.
23. Place thumb or two fingers near margin of lower eyelidimmediately below eyelashes, and exert pressure downwardover bony prominence of cheek. Lower conjunctival sac isexposed as lower lid is pulled down.
24. Hold dropper close to eye, but avoid touching eyelids orlashes. Squeeze container and allow prescribed number ofdrops to fall in lower conjunctival sac.
25. Release lower lid after eye drops are instilled. Ask patientto close eyes gently.
26. Apply gentle pressure over inner canthus to prevent eyedrops from flowing into tear duct.
27. Instruct patient not to rub affected eye.
Exce
llent
Satis
fact
ory
Nee
ds P
ract
ice
LWBK681-C05_p054-116.qxd 9/6/10 10:19 PM Page 96 Aptara
97
Copyright © 2011 by Wolters Kluwer Health | Lippincott Williams & Wilkins. Skill Checklists for Taylor's Clinical Nursing Skills:
A Nursing Process Approach, 3rd edition, by Pamela Lynn and Marilee LeBon.
SKILL 5-16
Instilling Eye Drops (Continued)
Comments
28. Remove gloves. Assist patient to a comfortable position.
29. Remove additional PPE, if used. Perform hand hygiene.
30. Document the administration of the medicationimmediately after administration.
31. Evaluate the patient’s response to medication withinappropriate time frame.
Exce
llent
Satis
fact
ory
Nee
ds P
ract
ice
LWBK681-C05_p054-116.qxd 9/6/10 10:19 PM Page 97 Aptara

98
Copyright © 2011 by Wolters Kluwer Health | Lippincott Williams & Wilkins. Skill Checklists for Taylor's Clinical Nursing Skills:
A Nursing Process Approach, 3rd edition, by Pamela Lynn and Marilee LeBon.
Skill Checklists for Taylor's Clinical Nursing Skills:
A Nursing Process Approach, 3rd edition
Name Date
Unit Position
Instructor/Evaluator: Position
SKILL 5-17
Administering an Eye Irrigation
Goal: The eye is cleansed successfully. Comments
1. Gather equipment. Check the original order in the medicalrecord for the irrigation according to facility policy. Clarifyany inconsistencies. Check the patient’s chart for allergies.
2. Perform hand hygiene and put on PPE, if indicated.
3. Identify the patient. Usually, the patient should be identifiedusing two methods. Compare information with the CMAR/MAR.
a. Check the name and identification number on thepatient’s identification band.
b. Ask the patient to state his or her name and birth date,based on facility policy.
c. If the patient cannot identify him- or herself, verify thepatient’s identification with a staff member who knowsthe patient for the second source.
4. Explain procedure to patient.
5. Assemble equipment at patient’s bedside.
6. Have patient sit or lie with head tilted toward side ofaffected eye. Protect patient and bed with a waterproofpad.
7. Put on gloves. Clean lids and lashes with washcloth mois-tened with normal saline or the solution ordered for theirrigation. Wipe from inner canthus to outer canthus. Usea different corner of washcloth with each wipe.
8. Place curved basin at cheek on the side of the affected eyeto receive irrigating solution. If patient is able, ask him orher to support the basin.
9. Expose lower conjunctival sac and hold upper lid openwith your nondominant hand.
10. Fill the irrigation syringe with the prescribed fluid. Holdirrigation syringe about 2.5 cm (1 inch) from eye. Directflow of solution from inner to outer canthus alongconjunctival sac.
Exce
llent
Satis
fact
ory
Nee
ds P
ract
ice
LWBK681-C05_p054-116.qxd 9/6/10 10:19 PM Page 98 Aptara

99
Copyright © 2011 by Wolters Kluwer Health | Lippincott Williams & Wilkins. Skill Checklists for Taylor's Clinical Nursing Skills:
A Nursing Process Approach, 3rd edition, by Pamela Lynn and Marilee LeBon.
SKILL 5-17
Administering an Eye Irrigation (Continued)
Comments
11. Irrigate until the solution is clear or all the solution hasbeen used. Use only enough force to remove secretionsgently from the conjunctiva. Avoid touching any part ofthe eye with the irrigating tip.
12. Pause irrigation and have patient close the eye periodicallyduring procedure.
13. Dry periorbital area after irrigation with gauze sponge.Offer a towel to the patient if face and neck are wet.
14. Remove gloves. Assist the patient to a comfortable position.
15. Remove additional PPE, if used. Perform hand hygiene.
16. Evaluate the patient’s response to medication withinappropriate time frame.
Exce
llent
Satis
fact
ory
Nee
ds P
ract
ice
LWBK681-C05_p054-116.qxd 9/6/10 10:19 PM Page 99 Aptara

100
Copyright © 2011 by Wolters Kluwer Health | Lippincott Williams & Wilkins. Skill Checklists for Taylor's Clinical Nursing Skills:
A Nursing Process Approach, 3rd edition, by Pamela Lynn and Marilee LeBon.
Skill Checklists for Taylor's Clinical Nursing Skills:
A Nursing Process Approach, 3rd edition
Name Date
Unit Position
Instructor/Evaluator: Position
SKILL 5-18
Instilling Ear Drops
Goal: Drops are administered successfully. Comments
1. Gather equipment. Check medication order against theoriginal order in the medical record, according to facilitypolicy. Clarify any inconsistencies. Check the patient’schart for allergies.
2. Know the actions, special nursing considerations, safe doseranges, purpose of administration, and adverse effects ofthe medication to be administered. Consider the appropri-ateness of the medication for this patient.
3. Perform hand hygiene.
4. Move the medication cart to the outside of the patient’sroom or prepare for administration in the medication area.
5. Unlock the medication cart or drawer. Enter pass code andscan employee identification, if required.
6. Prepare medications for one patient at a time.
7. Read the CMAR/MAR and select the proper medicationfrom the patient’s medication drawer or unit stock.
8. Compare the label with the CMAR/MAR. Check expirationdates and perform calculations, if necessary. Scan the barcode on the package, if required.
9. When all medications for one patient have been prepared,recheck the label with the CMAR/MAR before takingthem to the patient.
10. Lock the medication cart before leaving it.
11. Transport medications to the patient’s bedside carefully,and keep the medications in sight at all times.
12. Ensure that the patient receives the medications at the correct time.
13. Perform hand hygiene and put on PPE, if indicated.
14. Identify the patient. Usually, the patient should beidentified using two methods. Compare information withthe CMAR/MAR.
a. Check the name and identification number on thepatient’s identification band.
Exce
llent
Satis
fact
ory
Nee
ds P
ract
ice
LWBK681-C05_p054-116.qxd 9/6/10 10:19 PM Page 100 Aptara

101
Copyright © 2011 by Wolters Kluwer Health | Lippincott Williams & Wilkins. Skill Checklists for Taylor's Clinical Nursing Skills:
A Nursing Process Approach, 3rd edition, by Pamela Lynn and Marilee LeBon.
SKILL 5-18
Instilling Ear Drops (Continued)
Comments
b. Ask the patient to state his or her name and birth date,based on facility policy.
c. If the patient cannot identify him- or herself, verify thepatient’s identification with a staff member who knowsthe patient for the second source.
15. Complete necessary assessments before administering med-ications. Check the patient’s allergy bracelet or ask thepatient about allergies. Explain the purpose and action ofeach medication to the patient.
16. Scan the patient’s bar code on the identification band, ifrequired.
17. Put on gloves.
18. Cleanse external ear of any drainage with cotton ball orwashcloth moistened with normal saline.
19. Place patient on his or her unaffected side in bed, or, ifambulatory, have patient sit with head well tilted to theside so that affected ear is uppermost.
20. Draw up the amount of solution needed in the dropper. Donot return excess medication to stock bottle. A prepackaged,monodrip plastic container may also be used.
21. Straighten auditory canal by pulling cartilaginous portionof pinna up and back for an adult.
22. Hold dropper in the ear with its tip above the auditorycanal. Do not touch the dropper to the ear. For an infantor an irrational or confused patient, protect the dropperwith a piece of soft tubing to help prevent injury to the ear.
23. Allow drops to fall on the side of the canal.
24. Release pinna after instilling drops, and have patient main-tain the position to prevent escape of medication.
25. Gently press on the tragus a few times.
26. If ordered, loosely insert a cotton ball into the ear canal.
27. Remove gloves. Assist the patient to a comfortableposition.
28. Remove additional PPE, if used. Perform hand hygiene.
29. Document the administration of the medication immediatelyafter administration.
30. Evaluate the patient’s response to medication withinappropriate time frame.
Exce
llent
Satis
fact
ory
Nee
ds P
ract
ice
LWBK681-C05_p054-116.qxd 9/6/10 10:19 PM Page 101 Aptara
102
Copyright © 2011 by Wolters Kluwer Health | Lippincott Williams & Wilkins. Skill Checklists for Taylor's Clinical Nursing Skills:
A Nursing Process Approach, 3rd edition, by Pamela Lynn and Marilee LeBon.
Skill Checklists for Taylor's Clinical Nursing Skills:
A Nursing Process Approach, 3rd edition
Name Date
Unit Position
Instructor/Evaluator: Position
SKILL 5-19
Administering an Ear Irrigation
Goal: The irrigation is administered successfully. Comments
1. Gather equipment. Check medication order against theoriginal order in the medical record, according to facilitypolicy. Clarify any inconsistencies. Check the patient’schart for allergies.
2. Know the actions, special nursing considerations, safe doseranges, purpose of administration, and adverse effects ofthe medication to be administered. Consider the appropri-ateness of the medication for this patient.
3. Perform hand hygiene.
4. Move the medication cart to the outside of the patient’sroom or prepare for administration in the medication area.
5. Unlock the medication cart or drawer. Enter pass code andscan employee identification, if required.
6. Prepare medications for one patient at a time.
7. Read the CMAR/MAR and select the proper medicationfrom the patient’s medication drawer or unit stock.
8. Compare the label with the CMAR/MAR. Check expirationdates and perform calculations, if necessary. Scan the barcode on the package, if required.
9. When all medications for one patient have been prepared,recheck the label with the CMAR/MAR before takingthem to the patient.
10. Lock the medication cart before leaving it.
11. Transport medications to the patient’s bedside carefully,and keep the medications in sight at all times.
12. Ensure that the patient receives the medications at the correct time.
13. Perform hand hygiene and put on PPE, if indicated.
14. Identify the patient. Usually, the patient should be identifiedusing two methods. Compare information with the CMAR/MAR.
a. Check the name and identification number on thepatient’s identification band.
Exce
llent
Satis
fact
ory
Nee
ds P
ract
ice
LWBK681-C05_p054-116.qxd 9/6/10 10:19 PM Page 102 Aptara
103
Copyright © 2011 by Wolters Kluwer Health | Lippincott Williams & Wilkins. Skill Checklists for Taylor's Clinical Nursing Skills:
A Nursing Process Approach, 3rd edition, by Pamela Lynn and Marilee LeBon.
SKILL 5-19
Administering an Ear Irrigation (Continued)
Comments
b. Ask the patient to state his or her name and birth date,based on facility policy.
c. If the patient cannot identify him- or herself, verify thepatient’s identification with a staff member who knowsthe patient for the second source.
15. Explain procedure to patient.
16. Assemble equipment at patient’s bedside.
17. Put on gloves.
18. Have the patient sit up or lie with head tilted toward sideof the affected ear. Protect the patient and bed with awaterproof pad. Have the patient support basin under theear to receive the irrigating solution.
19. Clean pinna and meatus of auditory canal, as necessary,with moistened cotton-tipped applicators dipped in warmtap water or the irrigating solution.
20. Fill bulb syringe with warm solution. If an irrigating con-tainer is used, prime the tubing.
21. Straighten auditory canal by pulling cartilaginous portionof pinna up and back for an adult.
22. Direct a steady, slow stream of solution against the roof of the auditory canal, using only enough force to removesecretions. Do not occlude the auditory canal with theirrigating nozzle. Allow solution to flow out unimpeded.
23. When irrigation is complete, place a cotton ball loosely inauditory meatus and have patient lie on side of affected earon a towel or absorbent pad.
24. Remove gloves. Assist the patient to a comfortable position.
25. Remove additional PPE, if used. Perform hand hygiene.
26. Document the administration of the medication immediatelyafter administration.
27. Evaluate the patient’s response to the procedure. Return in 10 to 15 minutes and remove cotton ball and assessdrainage. Evaluate the patient’s response to medicationwithin appropriate time frame.
Exce
llent
Satis
fact
ory
Nee
ds P
ract
ice
LWBK681-C05_p054-116.qxd 9/6/10 10:19 PM Page 103 Aptara

104
Copyright © 2011 by Wolters Kluwer Health | Lippincott Williams & Wilkins. Skill Checklists for Taylor's Clinical Nursing Skills:
A Nursing Process Approach, 3rd edition, by Pamela Lynn and Marilee LeBon.
Skill Checklists for Taylor's Clinical Nursing Skills:
A Nursing Process Approach, 3rd edition
Name Date
Unit Position
Instructor/Evaluator: Position
SKILL 5-20
Instilling Nose Drops
Goal: The medication is administered successfully into the nose. Comments
1. Gather equipment. Check medication order against theoriginal order in the medical record, according to facilitypolicy. Clarify any inconsistencies. Check the patient’schart for allergies.
2. Know the actions, special nursing considerations, safe doseranges, purpose of administration, and adverse effects ofthe medication to be administered. Consider the appropri-ateness of the medication for this patient.
3. Perform hand hygiene.
4. Move the medication cart to the outside of the patient’sroom or prepare for administration in the medication area.
5. Unlock the medication cart or drawer. Enter pass code andscan employee identification, if required.
6. Prepare medications for one patient at a time.
7. Read the CMAR/MAR and select the proper medicationfrom the patient’s medication drawer or unit stock.
8. Compare the label with the CMAR/MAR. Check expirationdates and perform calculations, if necessary. Scan the barcode on the package, if required.
9. When all medications for one patient have been prepared,recheck the label with the CMAR/MAR before takingthem to the patient.
10. Lock the medication cart before leaving it.
11. Transport medications to the patient’s bedside carefully,and keep the medications in sight at all times.
12. Ensure that the patient receives the medications at the correct time.
13. Perform hand hygiene and put on PPE, if indicated.
14. Identify the patient. Usually, the patient should be identifiedusing two methods. Compare information with the CMAR/MAR.
a. Check the name and identification number on thepatient’s identification band.
Exce
llent
Satis
fact
ory
Nee
ds P
ract
ice
LWBK681-C05_p054-116.qxd 9/6/10 10:19 PM Page 104 Aptara

105
Copyright © 2011 by Wolters Kluwer Health | Lippincott Williams & Wilkins. Skill Checklists for Taylor's Clinical Nursing Skills:
A Nursing Process Approach, 3rd edition, by Pamela Lynn and Marilee LeBon.
SKILL 5-20
Instilling Nose Drops (Continued)
Comments
b. Ask the patient to state his or her name and birth date,based on facility policy.
c. If the patient cannot identify him- or herself, verify thepatient’s identification with a staff member who knowsthe patient for the second source.
15. Complete necessary assessments before administering med-ications. Check the patient’s allergy bracelet or ask thepatient about allergies. Explain the purpose and action ofeach medication to the patient.
16. Scan the patient’s bar code on the identification band, ifrequired.
17. Put on gloves.
18. Provide patient with paper tissues and ask patient to blowhis or her nose.
19. Have patient sit up with head tilted well back. If patient islying down, tilt head back over a pillow.
20. Draw sufficient solution into dropper for both nares. Donot return excess solution to a stock bottle.
21. Ask the patient to breathe through the mouth. Hold tip ofnose up and place dropper just above naris, about 1⁄3 inch.Instill the prescribed number of drops in one naris andthen into the other. Protect dropper with a piece of softtubing if patient is an infant or young child. Avoid touch-ing naris with dropper.
22. Have patient remain in position with head tilted back for afew minutes.
23. Remove gloves. Assist the patient to a comfortable position.
24. Remove additional PPE, if used. Perform hand hygiene.
25. Document the administration of the medication immediatelyafter administration.
26. Evaluate the patient’s response to the procedure and medication within appropriate time frame.
Exce
llent
Satis
fact
ory
Nee
ds P
ract
ice
LWBK681-C05_p054-116.qxd 9/6/10 10:19 PM Page 105 Aptara

106
Copyright © 2011 by Wolters Kluwer Health | Lippincott Williams & Wilkins. Skill Checklists for Taylor's Clinical Nursing Skills:
A Nursing Process Approach, 3rd edition, by Pamela Lynn and Marilee LeBon.
Skill Checklists for Taylor's Clinical Nursing Skills:
A Nursing Process Approach, 3rd edition
Name Date
Unit Position
Instructor/Evaluator: Position
SKILL 5-21
Administering a Vaginal Cream
Goal: The medication is administered successfully into the vagina. Comments
1. Gather equipment. Check medication order against theoriginal order in the medical record, according to facilitypolicy. Clarify any inconsistencies. Check the patient’schart for allergies.
2. Know the actions, special nursing considerations, safe doseranges, purpose of administration, and adverse effects ofthe medication to be administered. Consider the appropri-ateness of the medication for this patient.
3. Perform hand hygiene.
4. Move the medication cart to the outside of the patient’sroom or prepare for administration in the medication area.
5. Unlock the medication cart or drawer. Enter pass code andscan employee identification, if required.
6. Prepare medications for one patient at a time.
7. Read the CMAR/MAR and select the proper medicationfrom the patient’s medication drawer or unit stock.
8. Compare the label with the CMAR/MAR. Check expirationdates and perform calculations, if necessary. Scan the barcode on the package, if required.
9. When all medications for one patient have been prepared,recheck the label with the MAR before taking them to thepatient.
10. Lock the medication cart before leaving it.
11. Transport medications to the patient’s bedside carefully,and keep the medications in sight at all times.
12. Ensure that the patient receives the medications at the correct time.
13. Perform hand hygiene and put on PPE, if indicated.
14. Identify the patient. Usually, the patient should be identifiedusing two methods. Compare information with the CMAR/MAR.
a. Check the name and identification number on thepatient’s identification band.
Exce
llent
Satis
fact
ory
Nee
ds P
ract
ice
LWBK681-C05_p054-116.qxd 9/6/10 10:19 PM Page 106 Aptara

107
Copyright © 2011 by Wolters Kluwer Health | Lippincott Williams & Wilkins. Skill Checklists for Taylor's Clinical Nursing Skills:
A Nursing Process Approach, 3rd edition, by Pamela Lynn and Marilee LeBon.
SKILL 5-21
Administering a Vaginal Cream (Continued)
Comments
b. Ask the patient to state his or her name and birth date,based on facility policy.
c. If the patient cannot identify herself, verify the patient’sidentification with a staff member who knows the patientfor the second source.
15. Complete necessary assessments before administering med-ications. Check the patient’s allergy bracelet or ask thepatient about allergies. Explain the purpose and action ofeach medication to the patient.
16. Scan the patient’s bar code on the identification band, ifrequired.
17. Put on gloves.
18. Ask the patient to void before inserting the medication.
19. Position the patient so that she is lying on her back withthe knees flexed. Maintain privacy with draping. Provideadequate light to visualize the vaginal opening.
20. Spread labia with fingers, and cleanse area at vaginalorifice with washcloth and warm water, using a differentcorner of the washcloth with each stroke. Wipe fromabove the vaginal orifice downward toward the sacrum(front to back).
21. Remove gloves and put on new gloves.
22. Fill vaginal applicator with prescribed amount of cream.(See the Skill Variation in your skills book for administer-ing a vaginal suppository.)
23. Lubricate applicator with the lubricant, as necessary.
24. Spread the labia with your nondominant hand andintroduce applicator with your dominant hand gently, in a rolling manner, while directing it downward and backward.
25. After applicator is properly positioned, labia may beallowed to fall in place if necessary to free the hand formanipulating the plunger. Push the plunger to its fulllength and then gently remove applicator with plungerdepressed.
26. Ask the patient to remain in the supine position for 5 to10 minutes after insertion. Offer the patient a perineal padto collect drainage.
27. Dispose of applicator in appropriate receptacle or clean,nondisposable applicator according to manufacturer’sdirections.
Exce
llent
Satis
fact
ory
Nee
ds P
ract
ice
LWBK681-C05_p054-116.qxd 9/6/10 10:19 PM Page 107 Aptara

108
Copyright © 2011 by Wolters Kluwer Health | Lippincott Williams & Wilkins. Skill Checklists for Taylor's Clinical Nursing Skills:
A Nursing Process Approach, 3rd edition, by Pamela Lynn and Marilee LeBon.
SKILL 5-21
Administering a Vaginal Cream (Continued)
Comments
28. Remove gloves and additional PPE, if used. Perform handhygiene.
29. Document the administration of the medication immedi-ately after administration.
30. Evaluate the patient’s response to medication withinappropriate time frame.
Exce
llent
Satis
fact
ory
Nee
ds P
ract
ice
LWBK681-C05_p054-116.qxd 9/6/10 10:19 PM Page 108 Aptara
109
Skill Checklists for Taylor's Clinical Nursing Skills:
A Nursing Process Approach, 3rd edition
Name Date
Unit Position
Instructor/Evaluator: Position
SKILL 5-22
Administering a Rectal Suppository
Goal: The medication is administered successfully into
the rectum. Comments
1. Gather equipment. Check medication order against theoriginal order in the medical record, according to facilitypolicy. Clarify any inconsistencies. Check the patient’schart for allergies.
2. Know the actions, special nursing considerations, safe doseranges, purpose of administration, and adverse effects ofthe medication to be administered. Consider the appropri-ateness of the medication for this patient.
3. Perform hand hygiene.
4. Move the medication cart to the outside of the patient’sroom or prepare for administration in the medication area.
5. Unlock the medication cart or drawer. Enter pass code andscan employee identification, if required.
6. Prepare medications for one patient at a time.
7. Read the CMAR/MAR and select the proper medicationfrom the patient’s medication drawer or unit stock.
8. Compare the label with the CMAR/MAR. Check expirationdates and perform calculations, if necessary. Scan the barcode on the package, if required.
9. When all medications for one patient have been prepared,recheck the label with the CMAR/MAR before takingthem to the patient.
10. Lock the medication cart before leaving it.
11. Transport medications to the patient’s bedside carefully,and keep the medications in sight at all times.
12. Ensure that the patient receives the medications at the correct time.
13. Perform hand hygiene and put on PPE, if indicated.
14. Identify the patient. Usually, the patient should be identifiedusing two methods. Compare information with the CMAR/MAR.
a. Check the name and identification number on thepatient’s identification band.
Copyright © 2011 by Wolters Kluwer Health | Lippincott Williams & Wilkins. Skill Checklists for Taylor's Clinical Nursing Skills:
A Nursing Process Approach, 3rd edition, by Pamela Lynn and Marilee LeBon.
Exce
llent
Satis
fact
ory
Nee
ds P
ract
ice
LWBK681-C05_p054-116.qxd 9/6/10 10:19 PM Page 109 Aptara
110
Copyright © 2011 by Wolters Kluwer Health | Lippincott Williams & Wilkins. Skill Checklists for Taylor's Clinical Nursing Skills:
A Nursing Process Approach, 3rd edition, by Pamela Lynn and Marilee LeBon.
SKILL 5-22
Administering a Rectal Suppository (Continued)
Comments
b. Ask the patient to state his or her name and birth date,based on facility policy.
c. If the patient cannot identify him- or herself, verify thepatient’s identification with a staff member who knowsthe patient for the second source.
15. Complete necessary assessments before administering med-ications. Check the patient’s allergy bracelet or ask thepatient about allergies. Explain the purpose and action of each medication to the patient.
16. Scan the patient’s bar code on the identification band, ifrequired.
17. Put on gloves.
18. Assist the patient to his or her left side in a Sims’ position.Drape accordingly to only expose the buttocks.
19. Remove the suppository from its wrapper. Apply lubricantto the rounded end. Lubricate the index finger of yourdominant hand.
20. Separate the buttocks with your nondominant hand andinstruct the patient to breathe slowly and deeply throughhis or her mouth while the suppository is being inserted.
21. Using your index finger, insert the suppository, round endfirst, along the rectal wall. Insert about 3 to 4 inches.
22. Use toilet tissue to clean any stool or lubricant fromaround the anus. Release the buttocks. Encourage thepatient to remain on his or her side for at least 5 minutesand retain the suppository for the appropriate amount oftime for the specific medication.
23. Remove additional PPE, if used. Perform hand hygiene.
24. Document the administration of the medication immediatelyafter administration.
25. Evaluate patient’s response to the medication withinappropriate time frame.
Exce
llent
Satis
fact
ory
Nee
ds P
ract
ice
LWBK681-C05_p054-116.qxd 9/6/10 10:19 PM Page 110 Aptara

111
Skill Checklists for Taylor's Clinical Nursing Skills:
A Nursing Process Approach, 3rd edition
Name Date
Unit Position
Instructor/Evaluator: Position
SKILL 5-23
Administering Medication via a Metered-Dose Inhaler (MDI)
Goal: The patient receives the medication via an inhaler
using the correct technique. Comments
1. Gather equipment. Check each medication order againstthe original order in the medical record, according to facil-ity policy. Clarify any inconsistencies. Check the patient’schart for allergies.
2. Know the actions, special nursing considerations, safe doseranges, purpose of administration, and adverse effects ofthe medications to be administered. Consider the appropri-ateness of the medication for this patient.
3. Perform hand hygiene.
4. Move the medication cart to the outside of the patient’sroom or prepare for administration in the medication area.
5. Unlock the medication cart or drawer. Enter pass code andscan employee identification, if required.
6. Prepare medications for one patient at a time.
7. Read the CMAR/MAR and select the proper medicationfrom the patient’s medication drawer or unit stock.
8. Compare the label with the CMAR/MAR. Check expirationdates and perform calculations, if necessary. Scan the barcode on the package, if required.
9. When all medications for one patient have been prepared,recheck the label with the MAR before taking them to thepatient.
10. Lock the medication cart before leaving it.
11. Transport medications to the patient’s bedside carefully,and keep the medications in sight at all times.
12. Ensure that the patient receives the medications at the correct time.
13. Perform hand hygiene and put on PPE, if indicated.
14. Identify the patient. Usually, the patient should be identifiedusing two methods. Compare information with the CMAR/MAR.
a. Check the name and identification number on thepatient’s identification band.
Copyright © 2011 by Wolters Kluwer Health | Lippincott Williams & Wilkins. Skill Checklists for Taylor's Clinical Nursing Skills:
A Nursing Process Approach, 3rd edition, by Pamela Lynn and Marilee LeBon.
Exce
llent
Satis
fact
ory
Nee
ds P
ract
ice
LWBK681-C05_p054-116.qxd 9/6/10 10:19 PM Page 111 Aptara

112
Copyright © 2011 by Wolters Kluwer Health | Lippincott Williams & Wilkins. Skill Checklists for Taylor's Clinical Nursing Skills:
A Nursing Process Approach, 3rd edition, by Pamela Lynn and Marilee LeBon.
SKILL 5-23
Administering Medication via a Metered-Dose Inhaler (MDI) (Continued)
Comments
b. Ask the patient to state his or her name and birth date,based on facility policy.
c. If the patient cannot identify him- or herself, verify thepatient’s identification with a staff member who knowsthe patient for the second source.
15. Complete necessary assessments before administering med-ications. Check the patient’s allergy bracelet or ask thepatient about allergies. Explain what you are going to doand the reason to the patient.
16. Scan the patient’s bar code on the identification band, ifrequired.
17. Remove the mouthpiece cover from the MDI and the spacer.Attach the MDI to the spacer. (See the Skill Variation inyour skills book for using an MDI without a spacer.)
18. Shake the inhaler and spacer well.
19. Have patient place the spacer’s mouthpiece into mouth,grasping securely with teeth and lips. Have patient breathenormally through the spacer.
20. Patient should depress the canister, releasing one puff into the spacer, then inhale slowly and deeply through themouth.
21. Instruct patient to hold his or her breath for 5 to 10seconds, or as long as possible, and then to exhale slowlythrough pursed lips.
22. Wait 1 to 5 minutes, as prescribed, before administeringthe next puff.
23. After the prescribed amount of puffs has been administered,have patient remove the MDI from the spacer and replacethe caps on both.
24. Have the patient gargle and rinse with tap water afterusing an MDI, as necessary. Clean the MDI according tothe manufacturer’s directions.
25. Remove gloves and additional PPE, if used. Perform handhygiene.
26. Document the administration of the medication immediatelyafter administration.
27. Evaluate the patient’s response to medication within appro-priate time frame. Reassess lung sounds, oxygenation saturation if ordered, and respirations.
Exce
llent
Satis
fact
ory
Nee
ds P
ract
ice
LWBK681-C05_p054-116.qxd 9/6/10 10:19 PM Page 112 Aptara

113
Skill Checklists for Taylor's Clinical Nursing Skills:
A Nursing Process Approach, 3rd edition
Name Date
Unit Position
Instructor/Evaluator: Position
SKILL 5-24
Administering Medication via a Small-Volume Nebulizer
Goal: The patient receives the medication via a small volume
nebulizer using the correct technique. Comments
1. Gather equipment. Check each medication order againstthe original order in the medical record, according to facil-ity policy. Clarify any inconsistencies. Check the patient’schart for allergies.
2. Know the actions, special nursing considerations, safe doseranges, purpose of administration, and adverse effects ofthe medications to be administered. Consider the appropri-ateness of the medication for this patient.
3. Perform hand hygiene.
4. Move the medication cart to the outside of the patient’sroom or prepare for administration in the medication area.
5. Unlock the medication cart or drawer. Enter pass code andscan employee identification, if required.
6. Prepare medications for one patient at a time.
7. Read the CMAR/MAR and select the proper medicationfrom the patient’s medication drawer or unit stock.
8. Compare the label with the CMAR/MAR. Check expirationdates and perform calculations, if necessary. Scan the barcode on the package, if required.
9. When all medications for one patient have been prepared,recheck the label with the CMAR/MAR before takingthem to the patient.
10. Lock the medication cart before leaving it.
11. Transport medications to the patient’s bedside carefully,and keep the medications in sight at all times.
12. Ensure that the patient receives the medications at the correct time.
13. Perform hand hygiene and put on PPE, if indicated.
14. Identify the patient. Usually, the patient should be identifiedusing two methods. Compare information with the MAR/CMAR.
a. Check the name and identification number on thepatient’s identification band.
Copyright © 2011 by Wolters Kluwer Health | Lippincott Williams & Wilkins. Skill Checklists for Taylor's Clinical Nursing Skills:
A Nursing Process Approach, 3rd edition, by Pamela Lynn and Marilee LeBon.
Exce
llent
Satis
fact
ory
Nee
ds P
ract
ice
LWBK681-C05_p054-116.qxd 9/6/10 10:19 PM Page 113 Aptara
114
Copyright © 2011 by Wolters Kluwer Health | Lippincott Williams & Wilkins. Skill Checklists for Taylor's Clinical Nursing Skills:
A Nursing Process Approach, 3rd edition, by Pamela Lynn and Marilee LeBon.
SKILL 5-24
Administering Medication via a Small-Volume Nebulizer (Continued)
Comments
b. Ask the patient to state his or her name and birth date,based on facility policy.
c. If the patient cannot identify him- or herself, verify thepatient’s identification with a staff member who knowsthe patient for the second source.
15. Complete necessary assessments before administering med-ications. Check the patient’s allergy bracelet or ask thepatient about allergies. Explain what you are going to do,and the reason for doing it, to the patient.
16. Scan the patient’s bar code on the identification band, ifrequired.
17. Remove the nebulizer cup from the device and open it.Place premeasured unit-dose medication in the bottom sec-tion of the cup or use a dropper to place a concentrateddose of medication in cup and add prescribed diluent, ifrequired.
18. Screw the top portion of the nebulizer cup back in placeand attach the cup to the nebulizer. Attach one end of tub-ing to the stem on the bottom of the nebulizer cuff and theother end to the air compressor or oxygen source.
19. Turn on the air compressor or oxygen. Check that a finemedication mist is produced by opening the valve. Havepatient place mouthpiece into mouth and grasp securelywith teeth and lips.
20. Instruct patient to inhale slowly and deeply through themouth. A nose clip may be necessary if the patient is alsobreathing through the nose. Hold each breath for a slightpause, before exhaling.
21. Continue this inhalation technique until all medication in the nebulizer cup has been aerosolized (usually about15 minutes). Once the fine mist decreases in amount, gently flick the sides of the nebulizer cup.
22. Have the patient gargle and rinse with tap water afterusing the nebulizer, as necessary. Clean the nebulizeraccording to the manufacturer’s directions.
23. Remove gloves and additional PPE, if used. Perform handhygiene.
24. Document the administration of the medication immediatelyafter administration.
25. Evaluate patient’s response to medication within appropri-ate time frame. Reassess lung sounds, oxygenation satura-tion if ordered, and respirations.
Exce
llent
Satis
fact
ory
Nee
ds P
ract
ice
LWBK681-C05_p054-116.qxd 9/6/10 10:19 PM Page 114 Aptara

115
Skill Checklists for Taylor's Clinical Nursing Skills:
A Nursing Process Approach, 3rd edition
Name Date
Unit Position
Instructor/Evaluator: Position
SKILL 5-25
Administering Medication via a Dry Powder Inhaler
Goal: The patient receives the medication via a dry powder
inhaler using the correct technique. Comments
1. Gather equipment. Check each medication order againstthe original order in the medical record, according to facil-ity policy. Clarify any inconsistencies. Check the patient’schart for allergies.
2. Know the actions, special nursing considerations, safe doseranges, purpose of administration, and adverse effects ofthe medications to be administered. Consider the appropri-ateness of the medication for this patient.
3. Perform hand hygiene.
4. Move the medication cart to the outside of the patient’sroom or prepare for administration in the medication area.
5. Unlock the medication cart or drawer. Enter pass code andscan employee identification, if required.
6. Prepare medications for one patient at a time.
7. Read the CMAR/MAR and select the proper medicationfrom the patient’s medication drawer or unit stock.
8. Compare the label with the CMAR/MAR. Check expirationdates and perform calculations, if necessary. Scan the barcode on the package, if required.
9. When all medications for one patient have been prepared,recheck the label with the CMAR/MAR before takingthem to the patient.
10. Lock the medication cart before leaving it.
11. Transport medications to the patient’s bedside carefully,and keep the medications in sight at all times.
12. Ensure that the patient receives the medications at the correct time.
13. Perform hand hygiene and put on PPE, if indicated.
14. Identify the patient. Usually, the patient should be identifiedusing two methods. Compare information with the CMAR/MAR.
a. Check the name and identification number on thepatient’s identification band.
Copyright © 2011 by Wolters Kluwer Health | Lippincott Williams & Wilkins. Skill Checklists for Taylor's Clinical Nursing Skills:
A Nursing Process Approach, 3rd edition, by Pamela Lynn and Marilee LeBon.
Exce
llent
Satis
fact
ory
Nee
ds P
ract
ice
LWBK681-C05_p054-116.qxd 9/6/10 10:19 PM Page 115 Aptara

116
Copyright © 2011 by Wolters Kluwer Health | Lippincott Williams & Wilkins. Skill Checklists for Taylor's Clinical Nursing Skills:
A Nursing Process Approach, 3rd edition, by Pamela Lynn and Marilee LeBon.
SKILL 5-25
Administering Medication via a Dry Powder Inhaler (Continued)
Comments
b. Ask the patient to state his or her name and birth date,based on facility policy.
c. If the patient cannot identify him- or herself, verify thepatient’s identification with a staff member who knowsthe patient for the second source.
15. Complete necessary assessments before administering med-ications. Check the patient’s allergy bracelet or ask thepatient about allergies. Explain what you are going to do,and the reason for doing it, to the patient.
16. Scan the patient’s bar code on the identification band, ifrequired.
17. Remove the mouthpiece cover or remove from storagecontainer. Load a dose into the device as directed by themanufacturer, if necessary. Alternately, activate the inhaler,if necessary, according to manufacturer’s directions.
18. Have the patient breathe out slowly and completely, with-out breathing into the DPI.
19. Patient should place teeth over, and seal lips around, themouthpiece. Do not block the opening with the tongue orteeth.
20. Breathe in quickly and deeply through the mouth, forlonger than 2 to 3 seconds.
21. Remove inhaler from mouth. Instruct patient to hold thebreath for 5 to 10 seconds, or as long as possible, andthen to exhale slowly through pursed lips.
22. Wait 1 to 5 minutes, as prescribed, before administeringthe next puff.
23. After the prescribed amount of puffs has been administered,have patient replace the cap or storage container.
24. Have the patient gargle and rinse with tap water afterusing DPI, as necessary. Clean the DPI according to themanufacturer’s directions.
25. Remove gloves and additional PPE, if used. Perform handhygiene.
26. Document the administration of the medication immediatelyafter administration.
27. Evaluate patient’s response to medication within appropri-ate time frame. Reassess lung sounds, oxygenation satura-tion if ordered, and respirations.
Exce
llent
Satis
fact
ory
Nee
ds P
ract
ice
LWBK681-C05_p054-116.qxd 9/6/10 10:19 PM Page 116 Aptara

117
Skill Checklists for Taylor's Clinical Nursing Skills:
A Nursing Process Approach, 3rd edition
Name Date
Unit Position
Instructor/Evaluator: Position
SKILL 6-1
Providing Preoperative Patient Care: Hospitalized Patient
Goal: The patient proceeds to surgery physically and
psychologically prepared. Comments
1. Check the patient’s chart for the type of surgery andreview the medical orders. Review the nursing database,history, and physical examination. Check that the baselinedata are recorded; report those that are abnormal.
2. Check that diagnostic testing has been completed andresults are available; identify and report abnormal results.
3. Gather the necessary supplies and bring to the bedsidestand or overbed table.
4. Perform hand hygiene and put on PPE, if indicated.
5. Identify the patient.
6. Close curtains around bed and close the door to the room,if possible. Explain what you are going to do and why youare going to do it to the patient.
7. Explore the psychological needs of the patient related tothe surgery as well as the family.
a. Establish the therapeutic relationship, encouraging thepatient to verbalize concerns or fears.
b. Use active learning skills, answering questions and clari-fying any misinformation.
c. Use touch, as appropriate, to convey genuine empathy.
d. Offer to contact spiritual counselor (priest, minister,rabbi) to meet spiritual needs.
8. Identify learning needs of patient and family. Ensure thatthe informed consent of the patient for the surgery hasbeen signed, witnessed, and dated. Inquire if the patienthas any questions regarding the surgical procedure. Checkthe patient’s record to determine if an advance directivehas been completed. If an advance directive has not beencompleted, discuss with the patient the possibility of com-pleting it, as appropriate. If patient has had surgery before,ask about this experience.
9. Provide teaching about deep breathing exercises. Refer toSkill 6-2.
10. Provide teaching regarding coughing and splinting (provid-ing support to the incision). Refer to Skill 6-2.
Copyright © 2011 by Wolters Kluwer Health | Lippincott Williams & Wilkins. Skill Checklists for Taylor's Clinical Nursing Skills:
A Nursing Process Approach, 3rd edition, by Pamela Lynn and Marilee LeBon.
Exce
llent
Satis
fact
ory
Nee
ds P
ract
ice
LWBK681-C06_p117-128.qxd 9/6/10 10:20 PM Page 117 Aptara
118
Copyright © 2011 by Wolters Kluwer Health | Lippincott Williams & Wilkins. Skill Checklists for Taylor's Clinical Nursing Skills:
A Nursing Process Approach, 3rd edition, by Pamela Lynn and Marilee LeBon.
SKILL 6-1
Providing Preoperative Patient Care: Hospitalized Patient (Continued)
Comments
11. Provide teaching regarding incentive spirometer. (Refer to Skill 14-2, Chapter 14, Oxygenation for specificinformation.)
12. Provide teaching regarding leg exercises, as appropriate.Refer to Skill 6-3.
13. Assist the patient in putting on antiembolism stockings(Refer to Skill 9-11, Chapter 9, Activity, for specific infor-mation) and demonstrate how the pneumatic compressiondevice operates (Refer to Skill 9-12, Chapter 9, Activity,for specific information).
14. Provide teaching regarding turning in the bed.
a. Instruct the patient to use a pillow or bath blanket tosplint where the incision will be. Ask the patient to raisehis or her left knee and reach across to grasp the rightside rail of the bed when turning toward his or her rightside. If patient is turning to his or her left side, he or shewill bend the right knee and grasp the left side rail.
b. When turning the patient onto his or her right side, askthe patient to push with bent left leg and pull on theright side rail. Explain to patient that you will place apillow behind his/her back to provide support, and thatthe call bell will be placed within easy reach.
c. Explain to the patient that position change isrecommended every 2 hours.
15. Provide teaching about pain management.
a. Discuss past experiences with pain and interventionsthat the patient has used to reduce pain.
b. Discuss the availability of analgesic medication postop-eratively.
c. Discuss the use of patient controlled analgesia (PCA), asappropriate. Refer to Skill 10-4, Chapter 10, Comfort.
d. Explore the use of other alternative and nonpharmaco-logic methods to reduce pain, such as position change,massage, relaxation/diversion, guided imagery, andmeditation.
16. Review equipment that may be used.
a. Show the patient various equipment, such as IV pumps,electronic blood pressure cuff, tubes, and surgical drains.
17. Provide skin preparation.
a. Ask the patient to bathe or shower with the antisepticsolution. Remind the patient to clean the surgical site.
Exce
llent
Satis
fact
ory
Nee
ds P
ract
ice
LWBK681-C06_p117-128.qxd 9/6/10 10:20 PM Page 118 Aptara
119
Copyright © 2011 by Wolters Kluwer Health | Lippincott Williams & Wilkins. Skill Checklists for Taylor's Clinical Nursing Skills:
A Nursing Process Approach, 3rd edition, by Pamela Lynn and Marilee LeBon.
SKILL 6-1
Providing Preoperative Patient Care: Hospitalized Patient (Continued)
Comments
18. Provide teaching about and follow dietary/fluid restrictions.
a. Explain to the patient that both food and fluid will berestricted before surgery to ensure that the stomachcontains a minimal amount of gastric secretions. Thisrestriction is important to reduce the risk of aspiration.Emphasize to the patient the importance of avoidingfood and fluids during the prescribed time period,because failure to adhere may necessitate cancellation of the surgery.
19. Provide intestinal preparation, as appropriate. In certainsituations, the bowel will need to be prepared by adminis-tering enemas or laxatives to evacuate the bowel and toreduce the intestinal bacteria.
a. As needed, provide explanation of the purpose of ene-mas or laxatives before surgery. If patient will beadministering an enema, clarify the steps as needed.
20. Check administration of regularly scheduled medications.Review with the patient routine medications, over-the-counter medications, and herbal supplements that aretaken regularly. Check the physician’s orders and reviewwith the patient which medications he or she will bepermitted to take the day of surgery.
21. Remove PPE, if used. Perform hand hygiene.
Exce
llent
Satis
fact
ory
Nee
ds P
ract
ice
LWBK681-C06_p117-128.qxd 9/6/10 10:20 PM Page 119 Aptara
120
Copyright © 2011 by Wolters Kluwer Health | Lippincott Williams & Wilkins. Skill Checklists for Taylor's Clinical Nursing Skills:
A Nursing Process Approach, 3rd edition, by Pamela Lynn and Marilee LeBon.
Skill Checklists for Taylor's Clinical Nursing Skills:
A Nursing Process Approach, 3rd edition
Name Date
Unit Position
Instructor/Evaluator: Position
SKILL 6-2
Deep Breathing Exercises, Coughing, and Splinting
Goal: The patient and/or significant other verbalizes an
understanding of the instructions and is able to demonstrate
the activities. Comments
1. Check the patient’s chart for the type of surgery andreview the medical orders.
2. Gather the necessary supplies and bring to the bedsidestand or overbed table.
3. Perform hand hygiene and put on PPE, if indicated.
4. Identify the patient.
5. Close curtains around bed and close the door to the room,if possible. Explain what you are going to do and why youare going to do it to the patient.
6. Identify the patient’s learning needs. Identify the patient’slevel of knowledge regarding deep breathing exercises,coughing, and splinting of the incision. If the patient hashad surgery before, ask about this experience.
7. Explain the rationale for performing deep breathing exer-cises, coughing, and splinting of the incision.
8. Provide teaching about deep breathing exercises.
a. Assist or ask the patient to sit up (semi- or high-Fowler’sposition) and instruct the patient to place the palms ofboth hands along the lower anterior rib cage.
b. Instruct the patient to exhale gently and completely.
c. Instruct the patient to breathe in through the nose asdeeply as possible and hold breath for 3 seconds.
d. Instruct the patient to exhale through the mouth, purs-ing the lips like when whistling.
e. Have the patient practice the breathing exercise threetimes. Instruct the patient that this exercise should beperformed every 1 to 2 hours for the first 24 hours aftersurgery.
9. Provide teaching regarding coughing and splinting (provid-ing support to the incision).
a. Ask the patient to sit up (semi-Fowler’s position) andapply a folded bath blanket or pillow against the partof the body where the incision will be (e.g., abdomen orchest).
Exce
llent
Satis
fact
ory
Nee
ds P
ract
ice
LWBK681-C06_p117-128.qxd 9/6/10 10:20 PM Page 120 Aptara

121
Copyright © 2011 by Wolters Kluwer Health | Lippincott Williams & Wilkins. Skill Checklists for Taylor's Clinical Nursing Skills:
A Nursing Process Approach, 3rd edition, by Pamela Lynn and Marilee LeBon.
SKILL 6-2
Deep Breathing Exercises, Coughing, and Splinting (Continued)
Comments
b. Instruct the patient to inhale and exhale through thenose three times.
c. Ask the patient to take a deep breath and hold it for 3 seconds and then cough out three short breaths.
d. Ask the patient to take a breath through the mouth andstrongly cough again two times.
e. Instruct the patient that he or she should perform theseactions every 2 hours when awake after surgery.
10. Validate patient’s understanding of information. Ask thepatient to give a return demonstration. Ask the patient ifhe or she has any questions. Encourage the patient to prac-tice the activities and ask questions, if necessary.
11. Remove PPE, if used. Perform hand hygiene.
Exce
llent
Satis
fact
ory
Nee
ds P
ract
ice
LWBK681-C06_p117-128.qxd 9/6/10 10:20 PM Page 121 Aptara

122
Copyright © 2011 by Wolters Kluwer Health | Lippincott Williams & Wilkins. Skill Checklists for Taylor's Clinical Nursing Skills:
A Nursing Process Approach, 3rd edition, by Pamela Lynn and Marilee LeBon.
Skill Checklists for Taylor's Clinical Nursing Skills:
A Nursing Process Approach, 3rd edition
Name Date
Unit Position
Instructor/Evaluator: Position
SKILL 6-3
Leg Exercises
Goal: The patient the patient and/or significant other verbalizes
an understanding of the instructions related to leg exercises
and is able to demonstrate the activities. Comments
1. Check the patient’s chart for the type of surgery andreview the medical orders.
2. Gather the necessary supplies and bring to the bedsidestand or overbed table.
3. Perform hand hygiene and put on PPE, if indicated.
4. Identify the patient.
5. Close curtains around bed and close the door to the room,if possible. Explain what you are going to do and why youare going to do it to the patient.
6. Identify the patient’s learning needs. Identify the patient’slevel of knowledge regarding leg exercises. If the patienthas had surgery before, ask about this experience.
7. Explain the rationale for performing leg exercises.
8. Provide teaching regarding leg exercises.
a. Assist or ask the patient to sit up (semi-Fowler’s position)and explain to the patient that you will first demonstrate,and then coach him/her to exercise one leg at a time.
b. Straighten the patient’s knee, raise the foot, extend thelower leg, and hold this position for a few seconds.Lower the entire leg. Practice this exercise with theother leg.
c. Assist or ask the patient to point the toes of both legstoward the foot of the bed, then relax them. Next, flexor pull the toes toward the chin.
d. Assist or ask the patient to keep legs extended and tomake circles with both ankles, first circling to the leftand then to the right. Instruct the patient to repeatthese exercises three times.
9. Validate the patient’s understanding of information. Askthe patient to give a return demonstration. Ask the patientif he or she has any questions. Encourage the patient topractice the activities and ask questions, if necessary.
10. Remove PPE, if used. Perform hand hygiene.
Exce
llent
Satis
fact
ory
Nee
ds P
ract
ice
LWBK681-C06_p117-128.qxd 9/6/10 10:20 PM Page 122 Aptara
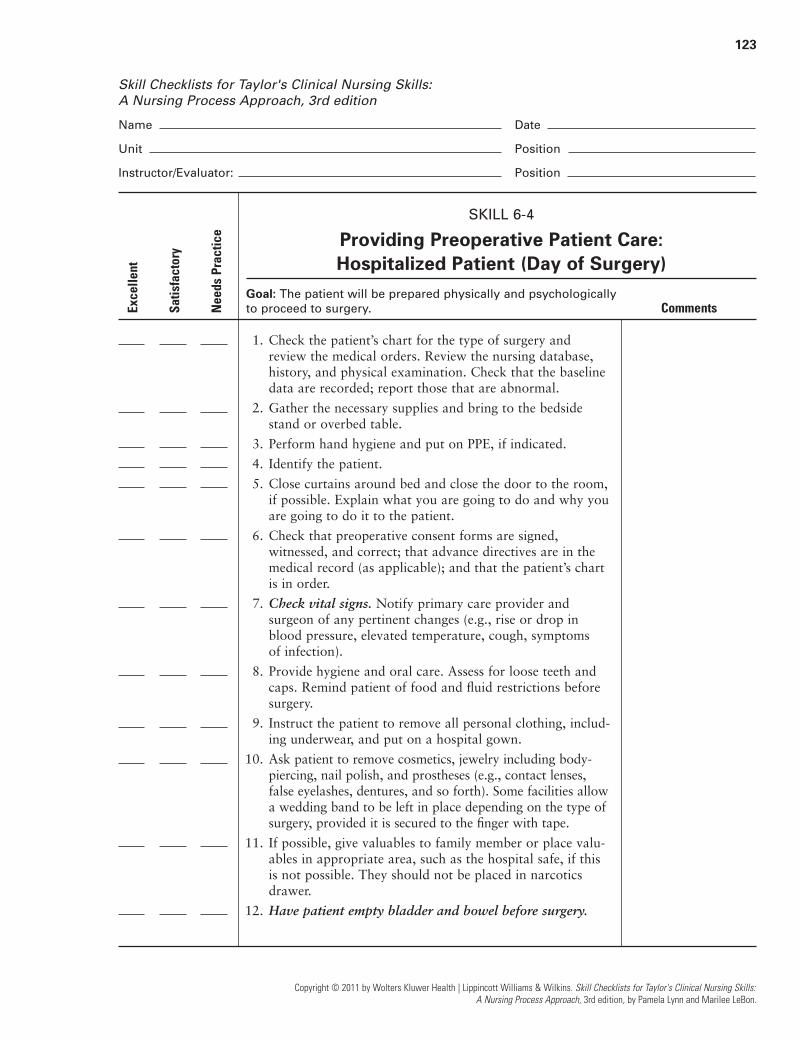
123
Skill Checklists for Taylor's Clinical Nursing Skills:
A Nursing Process Approach, 3rd edition
Name Date
Unit Position
Instructor/Evaluator: Position
SKILL 6-4
Providing Preoperative Patient Care: Hospitalized Patient (Day of Surgery)
Goal: The patient will be prepared physically and psychologically
to proceed to surgery. Comments
1. Check the patient’s chart for the type of surgery andreview the medical orders. Review the nursing database,history, and physical examination. Check that the baselinedata are recorded; report those that are abnormal.
2. Gather the necessary supplies and bring to the bedsidestand or overbed table.
3. Perform hand hygiene and put on PPE, if indicated.
4. Identify the patient.
5. Close curtains around bed and close the door to the room,if possible. Explain what you are going to do and why youare going to do it to the patient.
6. Check that preoperative consent forms are signed,witnessed, and correct; that advance directives are in themedical record (as applicable); and that the patient’s chartis in order.
7. Check vital signs. Notify primary care provider andsurgeon of any pertinent changes (e.g., rise or drop inblood pressure, elevated temperature, cough, symptoms of infection).
8. Provide hygiene and oral care. Assess for loose teeth andcaps. Remind patient of food and fluid restrictions beforesurgery.
9. Instruct the patient to remove all personal clothing, includ-ing underwear, and put on a hospital gown.
10. Ask patient to remove cosmetics, jewelry including body-piercing, nail polish, and prostheses (e.g., contact lenses,false eyelashes, dentures, and so forth). Some facilities allowa wedding band to be left in place depending on the type ofsurgery, provided it is secured to the finger with tape.
11. If possible, give valuables to family member or place valu-ables in appropriate area, such as the hospital safe, if thisis not possible. They should not be placed in narcoticsdrawer.
12. Have patient empty bladder and bowel before surgery.
Copyright © 2011 by Wolters Kluwer Health | Lippincott Williams & Wilkins. Skill Checklists for Taylor's Clinical Nursing Skills:
A Nursing Process Approach, 3rd edition, by Pamela Lynn and Marilee LeBon.
Exce
llent
Satis
fact
ory
Nee
ds P
ract
ice
LWBK681-C06_p117-128.qxd 9/6/10 10:20 PM Page 123 Aptara

124
Copyright © 2011 by Wolters Kluwer Health | Lippincott Williams & Wilkins. Skill Checklists for Taylor's Clinical Nursing Skills:
A Nursing Process Approach, 3rd edition, by Pamela Lynn and Marilee LeBon.
SKILL 6-4
Providing Preoperative Patient Care: Hospitalized Patient (Day of Surgery) (Continued)
Comments
13. Attend to any special preoperative orders, such as startingan IV line.
14. Complete preoperative checklist and record of patient’spreoperative preparation.
15. Question patient regarding the location of the operativesite. Document the location in the medical record accord-ing to facility policy. The actual site will be marked on the patient when the patient arrives in the preoperativeholding area by the licensed independent practitioner whowill be directly involved in the procedure (The Joint Com-mission, 2008).
16. Administer preoperative medication as prescribed by physician/anesthesia provider.
17. Raise side rails of bed; place bed in lowest position.Instruct patient to remain in bed or on stretcher. Ifnecessary, use a safety belt.
18. Help move the patient from the bed to the transportstretcher, if necessary. Reconfirm patient identification and ensure that all preoperative events and measures aredocumented.
19. Tell the patient’s family where the patient will be takenafter surgery and the location of the waiting area wherethe surgeon will come to explain the outcome of thesurgery. If possible, take the family to the waiting area.
20. After the patient leaves for the operating room, prepare theroom and make a postoperative bed for the patient. Antici-pate any necessary equipment based on the type of surgeryand the patient’s history.
21. Remove PPE, if used. Perform hand hygiene.
Exce
llent
Satis
fact
ory
Nee
ds P
ract
ice
LWBK681-C06_p117-128.qxd 9/6/10 10:20 PM Page 124 Aptara
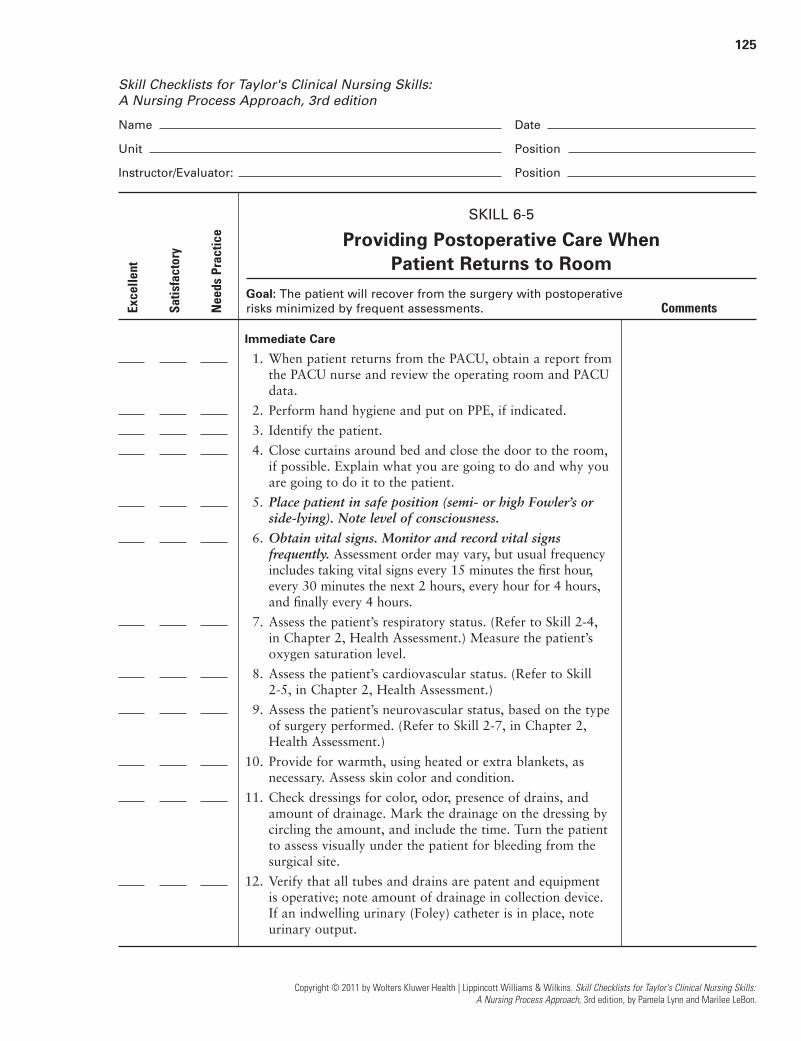
125
Skill Checklists for Taylor's Clinical Nursing Skills:
A Nursing Process Approach, 3rd edition
Name Date
Unit Position
Instructor/Evaluator: Position
SKILL 6-5
Providing Postoperative Care When Patient Returns to Room
Goal: The patient will recover from the surgery with postoperative
risks minimized by frequent assessments. Comments
Immediate Care
1. When patient returns from the PACU, obtain a report fromthe PACU nurse and review the operating room and PACUdata.
2. Perform hand hygiene and put on PPE, if indicated.
3. Identify the patient.
4. Close curtains around bed and close the door to the room,if possible. Explain what you are going to do and why youare going to do it to the patient.
5. Place patient in safe position (semi- or high Fowler’s orside-lying). Note level of consciousness.
6. Obtain vital signs. Monitor and record vital signsfrequently. Assessment order may vary, but usual frequencyincludes taking vital signs every 15 minutes the first hour,every 30 minutes the next 2 hours, every hour for 4 hours,and finally every 4 hours.
7. Assess the patient’s respiratory status. (Refer to Skill 2-4,in Chapter 2, Health Assessment.) Measure the patient’soxygen saturation level.
8. Assess the patient’s cardiovascular status. (Refer to Skill 2-5, in Chapter 2, Health Assessment.)
9. Assess the patient’s neurovascular status, based on the typeof surgery performed. (Refer to Skill 2-7, in Chapter 2,Health Assessment.)
10. Provide for warmth, using heated or extra blankets, asnecessary. Assess skin color and condition.
11. Check dressings for color, odor, presence of drains, andamount of drainage. Mark the drainage on the dressing bycircling the amount, and include the time. Turn the patientto assess visually under the patient for bleeding from thesurgical site.
12. Verify that all tubes and drains are patent and equipmentis operative; note amount of drainage in collection device.If an indwelling urinary (Foley) catheter is in place, noteurinary output.
Copyright © 2011 by Wolters Kluwer Health | Lippincott Williams & Wilkins. Skill Checklists for Taylor's Clinical Nursing Skills:
A Nursing Process Approach, 3rd edition, by Pamela Lynn and Marilee LeBon.
Exce
llent
Satis
fact
ory
Nee
ds P
ract
ice
LWBK681-C06_p117-128.qxd 9/6/10 10:20 PM Page 125 Aptara
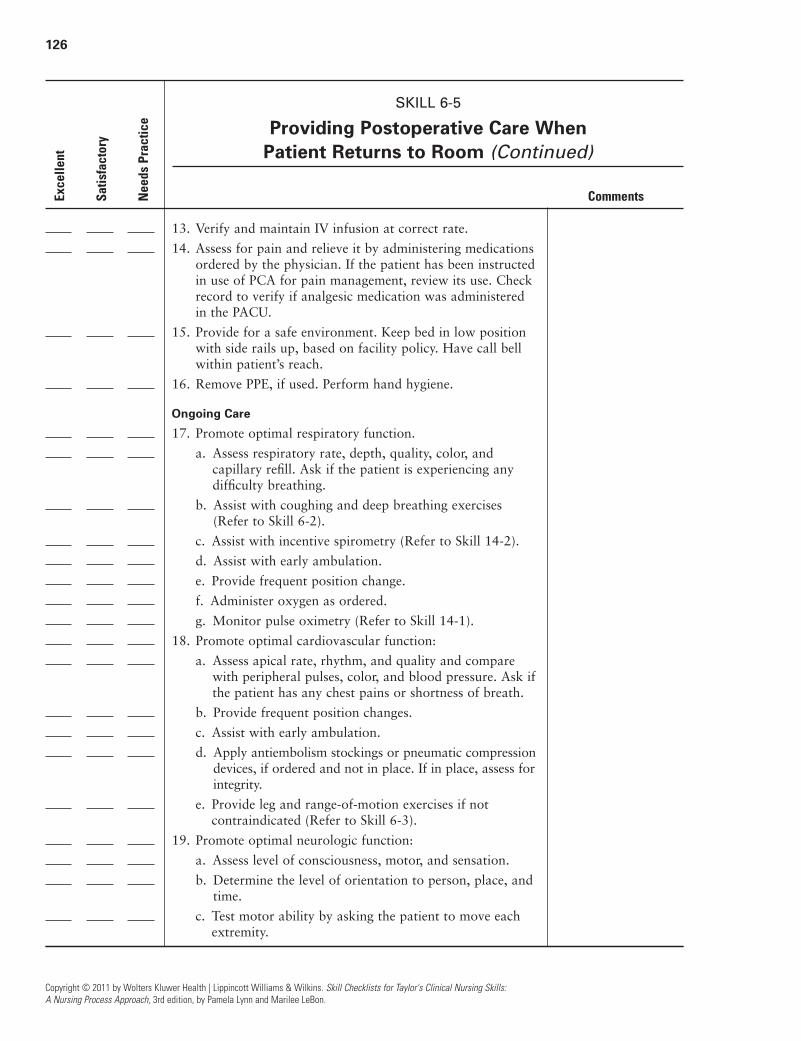
126
Copyright © 2011 by Wolters Kluwer Health | Lippincott Williams & Wilkins. Skill Checklists for Taylor's Clinical Nursing Skills:
A Nursing Process Approach, 3rd edition, by Pamela Lynn and Marilee LeBon.
SKILL 6-5
Providing Postoperative Care When Patient Returns to Room (Continued)
Comments
13. Verify and maintain IV infusion at correct rate.
14. Assess for pain and relieve it by administering medicationsordered by the physician. If the patient has been instructedin use of PCA for pain management, review its use. Checkrecord to verify if analgesic medication was administeredin the PACU.
15. Provide for a safe environment. Keep bed in low positionwith side rails up, based on facility policy. Have call bellwithin patient’s reach.
16. Remove PPE, if used. Perform hand hygiene.
Ongoing Care
17. Promote optimal respiratory function.
a. Assess respiratory rate, depth, quality, color, and capillary refill. Ask if the patient is experiencing any difficulty breathing.
b. Assist with coughing and deep breathing exercises(Refer to Skill 6-2).
c. Assist with incentive spirometry (Refer to Skill 14-2).
d. Assist with early ambulation.
e. Provide frequent position change.
f. Administer oxygen as ordered.
g. Monitor pulse oximetry (Refer to Skill 14-1).
18. Promote optimal cardiovascular function:
a. Assess apical rate, rhythm, and quality and comparewith peripheral pulses, color, and blood pressure. Ask ifthe patient has any chest pains or shortness of breath.
b. Provide frequent position changes.
c. Assist with early ambulation.
d. Apply antiembolism stockings or pneumatic compressiondevices, if ordered and not in place. If in place, assess forintegrity.
e. Provide leg and range-of-motion exercises if notcontraindicated (Refer to Skill 6-3).
19. Promote optimal neurologic function:
a. Assess level of consciousness, motor, and sensation.
b. Determine the level of orientation to person, place, andtime.
c. Test motor ability by asking the patient to move eachextremity.
Exce
llent
Satis
fact
ory
Nee
ds P
ract
ice
LWBK681-C06_p117-128.qxd 9/6/10 10:20 PM Page 126 Aptara

127
Copyright © 2011 by Wolters Kluwer Health | Lippincott Williams & Wilkins. Skill Checklists for Taylor's Clinical Nursing Skills:
A Nursing Process Approach, 3rd edition, by Pamela Lynn and Marilee LeBon.
SKILL 6-5
Providing Postoperative Care When Patient Returns to Room (Continued)
Comments
d. Evaluate sensation by asking the patient if he or she canfeel your touch on an extremity.
20. Promote optimal renal and urinary function and fluid andelectrolyte status. Assess intake and output, evaluate forurinary retention and monitor serum electrolyte levels.
a. Promote voiding by offering bedpan at regular intervals,noting the frequency, amount, and if any burning orurgency symptoms.
b. Monitor urinary catheter drainage if present.
c. Measure intake and output.
21. Promote optimal gastrointestinal function and meet nutri-tional needs:
a. Assess abdomen for distention and firmness. Ask ifpatient feels nauseated, any vomiting, and if passing flatus.
b. Auscultate for bowel sounds.
c. Assist with diet progression; encourage fluid intake;monitor intake.
d. Medicate for nausea and vomiting, as ordered by physician.
22. Promote optimal wound healing.
a. Assess condition of wound for presence of drains andany drainage.
b. Use surgical asepsis for dressing changes.
c. Inspect all skin surfaces for beginning signs of pressureulcer development and use pressure-relieving supportsto minimize potential skin breakdown.
23. Promote optimal comfort and relief from pain.
a. Assess for pain (location and intensity using scale).
b. Provide for rest and comfort; provide extra blankets, asneeded, for warmth.
c. Administer pain medications, as needed, or othernonpharmacologic methods.
24. Promote optimal meeting of psychosocial needs:
a. Provide emotional support to patient and family, asneeded.
b. Explain procedures and offer explanations regardingpostoperative recovery, as needed, to both patient andfamily members.
Exce
llent
Satis
fact
ory
Nee
ds P
ract
ice
LWBK681-C06_p117-128.qxd 9/6/10 10:20 PM Page 127 Aptara

128
Copyright © 2011 by Wolters Kluwer Health | Lippincott Williams & Wilkins. Skill Checklists for Taylor's Clinical Nursing Skills:
A Nursing Process Approach, 3rd edition, by Pamela Lynn and Marilee LeBon.
Skill Checklists for Taylor's Clinical Nursing Skills:
A Nursing Process Approach, 3rd edition
Name Date
Unit Position
Instructor/Evaluator: Position
SKILL 6-6
Applying a Forced-Air Warming Device
Goal: The patient returns to and maintain a temperature
of 97.7�F to 99.5�F (36.5�C to 37.5�C). Comments
1. Check patient’s chart for the medical order for the use of aforced-air warming device.
2. Gather the necessary supplies and bring to the bedsidestand or overbed table.
3. Perform hand hygiene and put on PPE, if indicated.
4. Identify the patient.
5. Close curtains around bed and close the door to the room,if possible. Explain what you are going to do and why youare going to do it to the patient.
6. Assess patient’s temperature.
7. Plug forced-air warming device into electrical outlet. Placeblanket over patient, with plastic side up. Keep air-hoseinlet at foot of bed.
8. Securely insert air hose into inlet. Place a lightweight fabricblanket over forced-air blanket, according to manufacturer’sinstructions. Turn machine on and adjust temperature of airto desired effect.
9. Remove PPE, if used. Perform hand hygiene.
10. Monitor patient’s temperature at least every 30 minuteswhile using the forced-air device. If rewarming a patientwith hypothermia, do not raise temperature more than1�C/hour to prevent a rapid vasodilation effect.
11. Discontinue use of forced-air device once patient’s temper-ature is adequate and patient can maintain the temperaturewithout assistance.
12. Remove device and clean according to agency policy andmanufacturer’s instructions.
Exce
llent
Satis
fact
ory
Nee
ds P
ract
ice
LWBK681-C06_p117-128.qxd 9/6/10 10:20 PM Page 128 Aptara
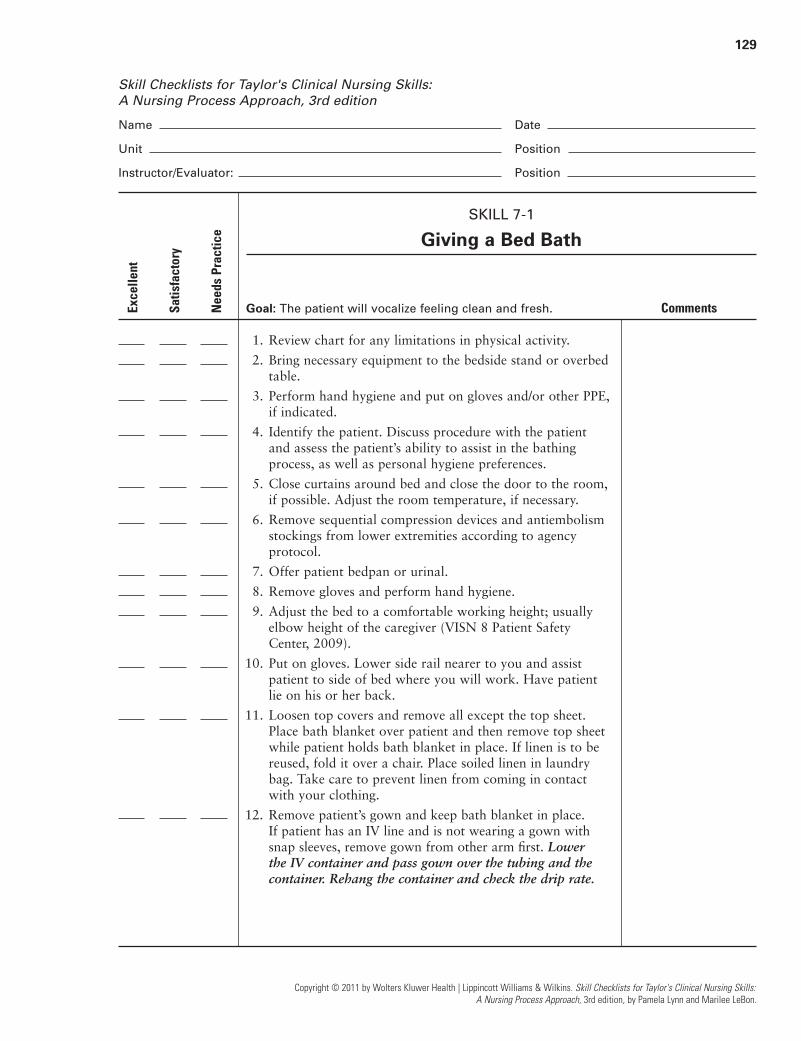
129
Skill Checklists for Taylor's Clinical Nursing Skills:
A Nursing Process Approach, 3rd edition
Name Date
Unit Position
Instructor/Evaluator: Position
SKILL 7-1
Giving a Bed Bath
Goal: The patient will vocalize feeling clean and fresh. Comments
1. Review chart for any limitations in physical activity.
2. Bring necessary equipment to the bedside stand or overbedtable.
3. Perform hand hygiene and put on gloves and/or other PPE,if indicated.
4. Identify the patient. Discuss procedure with the patientand assess the patient’s ability to assist in the bathingprocess, as well as personal hygiene preferences.
5. Close curtains around bed and close the door to the room,if possible. Adjust the room temperature, if necessary.
6. Remove sequential compression devices and antiembolismstockings from lower extremities according to agency protocol.
7. Offer patient bedpan or urinal.
8. Remove gloves and perform hand hygiene.
9. Adjust the bed to a comfortable working height; usuallyelbow height of the caregiver (VISN 8 Patient Safety Center, 2009).
10. Put on gloves. Lower side rail nearer to you and assistpatient to side of bed where you will work. Have patientlie on his or her back.
11. Loosen top covers and remove all except the top sheet.Place bath blanket over patient and then remove top sheetwhile patient holds bath blanket in place. If linen is to bereused, fold it over a chair. Place soiled linen in laundrybag. Take care to prevent linen from coming in contactwith your clothing.
12. Remove patient’s gown and keep bath blanket in place. If patient has an IV line and is not wearing a gown withsnap sleeves, remove gown from other arm first. Lower the IV container and pass gown over the tubing and thecontainer. Rehang the container and check the drip rate.
Copyright © 2011 by Wolters Kluwer Health | Lippincott Williams & Wilkins. Skill Checklists for Taylor's Clinical Nursing Skills:
A Nursing Process Approach, 3rd edition, by Pamela Lynn and Marilee LeBon.
Exce
llent
Satis
fact
ory
Nee
ds P
ract
ice
LWBK681-C07_p129-143.qxd 9/6/10 10:20 PM Page 129 Aptara

130
Copyright © 2011 by Wolters Kluwer Health | Lippincott Williams & Wilkins. Skill Checklists for Taylor's Clinical Nursing Skills:
A Nursing Process Approach, 3rd edition, by Pamela Lynn and Marilee LeBon.
SKILL 7-1
Giving a Bed Bath (Continued)
Comments
13. Raise side rails. Fill basin with a sufficient amount of comfortably warm water (110�F to 115�F). Add the skincleanser, if appropriate, according to manufacturer’s direc-tions. Change as necessary throughout the bath. Lowerside rail closer to you when you return to the bedside tobegin the bath.
14. Put on gloves, if necessary. Fold the washcloth like a mitton your hand so that there are no loose ends.
15. Lay a towel across patient’s chest and on top of bath blanket.
16. With no cleanser on the washcloth, wipe one eye from the inner part of the eye, near the nose, to the outer part.Rinse or turn the cloth before washing the other eye.
17. Bathe patient’s face, neck, and ears. Apply appropriateemollient.
18. Expose patient’s far arm and place towel lengthwise underit. Using firm strokes, wash hand, arm, and axilla, liftingthe arm as necessary to access axillary region. Rinse, ifnecessary, and dry. Apply appropriate emollient.
19. Place a folded towel on the bed next to the patient’s handand put basin on it. Soak the patient’s hand in basin.Wash, rinse if necessary, and dry hand. Apply appropriateemollient.
20. Repeat Actions 18 and 19 for the arm nearer you. Anoption for the shorter nurse or one susceptible to backstrain might be to bathe one side of the patient and moveto the other side of the bed to complete the bath.
21. Spread a towel across patient’s chest. Lower bath blanketto patient’s umbilical area. Wash, rinse, if necessary, anddry chest. Keep chest covered with towel between the washand rinse. Pay special attention to the folds of skin underthe breasts.
22. Lower bath blanket to the perineal area. Place a towel overpatient’s chest.
23. Wash, rinse, if necessary, and dry abdomen. Carefullyinspect and clean umbilical area and any abdominal foldsor creases.
24. Return bath blanket to original position and expose farleg. Place towel under far leg. Using firm strokes, wash,rinse, if necessary, and dry leg from ankle to knee and kneeto groin. Apply appropriate emollient.
Exce
llent
Satis
fact
ory
Nee
ds P
ract
ice
LWBK681-C07_p129-143.qxd 9/6/10 10:20 PM Page 130 Aptara

131
Copyright © 2011 by Wolters Kluwer Health | Lippincott Williams & Wilkins. Skill Checklists for Taylor's Clinical Nursing Skills:
A Nursing Process Approach, 3rd edition, by Pamela Lynn and Marilee LeBon.
SKILL 7-1
Giving a Bed Bath (Continued)
Comments
25. Wash, rinse if necessary, and dry the foot. Pay particularattention to the areas between toes. Apply appropriateemollient.
26. Repeat Actions 21 and 22 for the other leg and foot.
27. Make sure patient is covered with bath blanket. Changewater and washcloth at this point or earlier, if necessary.
28. Assist patient to prone or side-lying position. Put ongloves, if not applied earlier. Position bath blanket andtowel to expose only the back and buttocks.
29. Wash, rinse, if necessary, and dry back and buttocks area.Pay particular attention to cleansing between glutealfolds, and observe for any redness or skin breakdown inthe sacral area.
30. If not contraindicated, give patient a backrub, as describedin Chapter 10. Back massage may be given also after per-ineal care. Apply appropriate emollient and/or skin barrierproduct.
31. Raise the side rail. Refill basin with clean water. Discardwashcloth and towel. Remove gloves and put on cleangloves.
32. Clean perineal area or set patient up so that he or she can complete perineal self-care. If the patient is unable,lower the side rail and complete perineal care, followingguidelines in the accompanying Skill Variation. Apply skinbarrier, as indicated. Raise side rail, remove gloves, andperform hand hygiene.
33. Help patient put on a clean gown and assist with the use ofother personal toiletries, such as deodorant or cosmetics.
34. Protect pillow with towel and groom patient’s hair.
35. When finished, make sure the patient is comfortable, withthe side rails up and the bed in the lowest position.
36. Change bed linens, as described in Skills 7-8 and 7-9. Dis-pose of soiled linens according to agency policy. Removegloves and any other PPE, if used. Perform hand hygiene.
Exce
llent
Satis
fact
ory
Nee
ds P
ract
ice
LWBK681-C07_p129-143.qxd 9/6/10 10:20 PM Page 131 Aptara
132
Copyright © 2011 by Wolters Kluwer Health | Lippincott Williams & Wilkins. Skill Checklists for Taylor's Clinical Nursing Skills:
A Nursing Process Approach, 3rd edition, by Pamela Lynn and Marilee LeBon.
Skill Checklists for Taylor's Clinical Nursing Skills:
A Nursing Process Approach, 3rd edition
Name Date
Unit Position
Instructor/Evaluator: Position
SKILL 7-2
Assisting the Patient With Oral Care
Goal: The patient has a clean mouth and clean teeth,
exhibits a positive body image, and verbalizes the
importance of oral care. Comments
1. Perform hand hygiene and put on gloves if assisting withoral care, and/or other PPE, if indicated.
2. Identify the patient. Explain procedure to the patient.
3. Assemble equipment on overbed table within patient’sreach.
4. Close the room door or curtains. Place the bed at anappropriate and comfortable working height; usuallyelbow height of the caregiver (VISN 8 Patient Safety Center, 2009).
5. Lower side rail and assist patient to sitting position, if permitted, or turn patient onto side. Place towel acrosspatient’s chest. Raise bed to a comfortable workingposition.
6. Encourage patient to brush own teeth, or assist, ifnecessary.
a. Moisten toothbrush and apply toothpaste to bristles.
b. Place brush at a 45-degree angle to gum line and brushfrom gum line to crown of each tooth. Brush outer andinner surfaces. Brush back and forth across bitingsurface of each tooth.
c. Brush tongue gently with toothbrush.
d. Have patient rinse vigorously with water and spit intoemesis basin. Repeat until clear. Suction may be used asan alternative for removal of fluid and secretions frommouth.
7. Assist patient to floss teeth, if appropriate:
a. Remove approximately 6 inches of dental floss fromcontainer or use a plastic floss holder. Wrap the flossaround the index fingers, keeping about 1 to 1.5 inchesof floss taut between the fingers.
b. Insert floss gently between teeth, moving it back andforth downward to the gums.
Exce
llent
Satis
fact
ory
Nee
ds P
ract
ice
LWBK681-C07_p129-143.qxd 9/6/10 10:20 PM Page 132 Aptara
133
Copyright © 2011 by Wolters Kluwer Health | Lippincott Williams & Wilkins. Skill Checklists for Taylor's Clinical Nursing Skills:
A Nursing Process Approach, 3rd edition, by Pamela Lynn and Marilee LeBon.
SKILL 7-2
Assisting the Patient With Oral Care (Continued)
Comments
c. Move the floss up and down, first on one side of a toothand then on the side of the other tooth, until the surfacesare clean. Repeat in the spaces between all teeth.
d. Instruct patient to rinse mouth well with water afterflossing.
8. Offer mouthwash if patient prefers.
9. Offer lip balm or petroleum jelly.
10. Remove equipment. Remove gloves and discard. Raise siderail and lower bed. Assist patient to a position of comfort.
11. Remove any other PPE, if used. Perform hand hygiene.
Exce
llent
Satis
fact
ory
Nee
ds P
ract
ice
LWBK681-C07_p129-143.qxd 9/6/10 10:20 PM Page 133 Aptara
134
Copyright © 2011 by Wolters Kluwer Health | Lippincott Williams & Wilkins. Skill Checklists for Taylor's Clinical Nursing Skills:
A Nursing Process Approach, 3rd edition, by Pamela Lynn and Marilee LeBon.
Skill Checklists for Taylor's Clinical Nursing Skills:
A Nursing Process Approach, 3rd edition
Name Date
Unit Position
Instructor/Evaluator: Position
SKILL 7-3
Providing Oral Care for the Dependent Patient
Goal: The patient has a clean mouth and clean teeth; is free
from impaired oral mucous membranes; demonstrates
improvement in body image; and verbalizes, if able, an
understanding about the importance of oral care. Comments
1. Perform hand hygiene and put on PPE, if indicated.
2. Identify the patient. Explain procedure to patient.
3. Assemble equipment on overbed table within reach.
4. Close the room door or curtains. Place the bed at an appro-priate and comfortable working height, usually elbowheight of the caregiver (VISN 8 Patient Safety Center,2009). Lower one side rail and position patient on the side,with head tilted forward. Place towel across patient’s chestand emesis basin in position under chin. Put on gloves.
5. Gently open the patient’s mouth by applying pressure tolower jaw at the front of the mouth. Remove dentures, ifpresent. (Refer to Skill 7-4.) Brush the teeth and gumscarefully with toothbrush and paste. Lightly brush thetongue.
6. Use toothette dipped in water to rinse the oral cavity. Ifdesired, insert the rubber tip of the irrigating syringe intopatient’s mouth and rinse gently with a small amount ofwater. Position patient’s head to allow for return of wateror use suction apparatus to remove the water from oralcavity.
7. Clean the dentures before replacing. (See Skill 7-4.)
8. Apply lubricant to patient’s lips.
9. Remove equipment and return patient to a position ofcomfort. Remove your gloves. Raise side rail and lowerbed.
10. Remove additional PPE, if used. Perform hand hygiene.
Exce
llent
Satis
fact
ory
Nee
ds P
ract
ice
LWBK681-C07_p129-143.qxd 9/6/10 10:20 PM Page 134 Aptara

135
Skill Checklists for Taylor's Clinical Nursing Skills:
A Nursing Process Approach, 3rd edition
Name Date
Unit Position
Instructor/Evaluator: Position
SKILL 7-4
Providing Denture Care
Goal: The patient will have a clean mouth and clean dentures,
exhibit a positive body image, and verbalize the importance
of oral care. Comments
1. Perform hand hygiene and put on PPE, if indicated.
2. Identify patient. Explain procedure to patient.
3. Assemble equipment on overbed table within reach.
4. Provide privacy for patient.
5. Lower side rail and assist patient to sitting position, if permitted, or turn patient onto side. Place towel acrosspatient’s chest. Raise bed to a comfortable working position,usually elbow height of the caregiver (VISN 8 Patient SafetyCenter, 2009). Put on gloves.
6. Apply gentle pressure with 4 � 4 gauze to grasp upperdenture plate and remove it. Place it immediately indenture cup. Lift lower dentures with gauze, using slightrocking motion. Remove, and place in denture cup.
7. Place paper towels or washcloth in sink while brushing.Using the toothbrush and paste, brush all surfaces gentlybut thoroughly. If patient prefers, add denture cleaner tocup with water and follow directions on preparation.
8. Rinse thoroughly with water. Apply denture adhesive, ifappropriate.
9. Use a toothbrush and paste to gently clean gums, mucousmembranes, and tongue. Offer water and/or mouthwashso patient can rinse mouth before replacing dentures.
10. Insert upper denture in mouth and press firmly. Insertlower denture. Check that the dentures are securely inplace and comfortable.
11. If the patient desires, dentures can be stored in the denturecup in cold water, instead of returning to the mouth. Labelthe cup and place in the patient’s bedside table.
12. Remove equipment and return patient to a position ofcomfort. Remove your gloves. Raise side rail and lowerbed.
13. Remove additional PPE, if used. Perform hand hygiene.
Copyright © 2011 by Wolters Kluwer Health | Lippincott Williams & Wilkins. Skill Checklists for Taylor's Clinical Nursing Skills:
A Nursing Process Approach, 3rd edition, by Pamela Lynn and Marilee LeBon.
Exce
llent
Satis
fact
ory
Nee
ds P
ract
ice
LWBK681-C07_p129-143.qxd 9/6/10 10:20 PM Page 135 Aptara
136
Copyright © 2011 by Wolters Kluwer Health | Lippincott Williams & Wilkins. Skill Checklists for Taylor's Clinical Nursing Skills:
A Nursing Process Approach, 3rd edition, by Pamela Lynn and Marilee LeBon.
Skill Checklists for Taylor's Clinical Nursing Skills:
A Nursing Process Approach, 3rd edition
Name Date
Unit Position
Instructor/Evaluator: Position
SKILL 7-5
Removing Contact Lenses
Goal: The lenses are removed without trauma to the eye and
stored safely. Comments
1. Perform hand hygiene and put on PPE, if indicated.
2. Identify the patient. Explain the procedure to the patient.
3. Assemble equipment on overbed table within reach.
4. Close curtains around bed and close the door to the room,if possible.
5. Assist patient to supine position. Elevate bed. Lower siderail closest to you.
6. If containers are not already labeled, do so now. Place 5 mL of normal saline in each container.
7. Put on gloves. Remove soft contact lens:
a. Have the patient look forward. Retract the lower lidwith one hand. Using the pad of the index finger of theother hand, move the lens down to the sclera.
b. Using the pads of the thumb and index finger, grasp thelens with a gentle pinching motion and remove.
(See the Skill Variation in your skills book for figuresshowing other techniques for removing both hard and soft lenses.)
8. Place the first lens in its designated cup in the storage casebefore removing the second lens.
9. Repeat actions to remove other contact lens.
10. If patient is awake and has glasses at bedside, offer patientglasses.
11. Remove equipment and return patient to a position ofcomfort. Remove your gloves. Raise side rail and lowerbed.
12. Remove additional PPE, if used. Perform hand hygiene.
Exce
llent
Satis
fact
ory
Nee
ds P
ract
ice
LWBK681-C07_p129-143.qxd 9/6/10 10:20 PM Page 136 Aptara
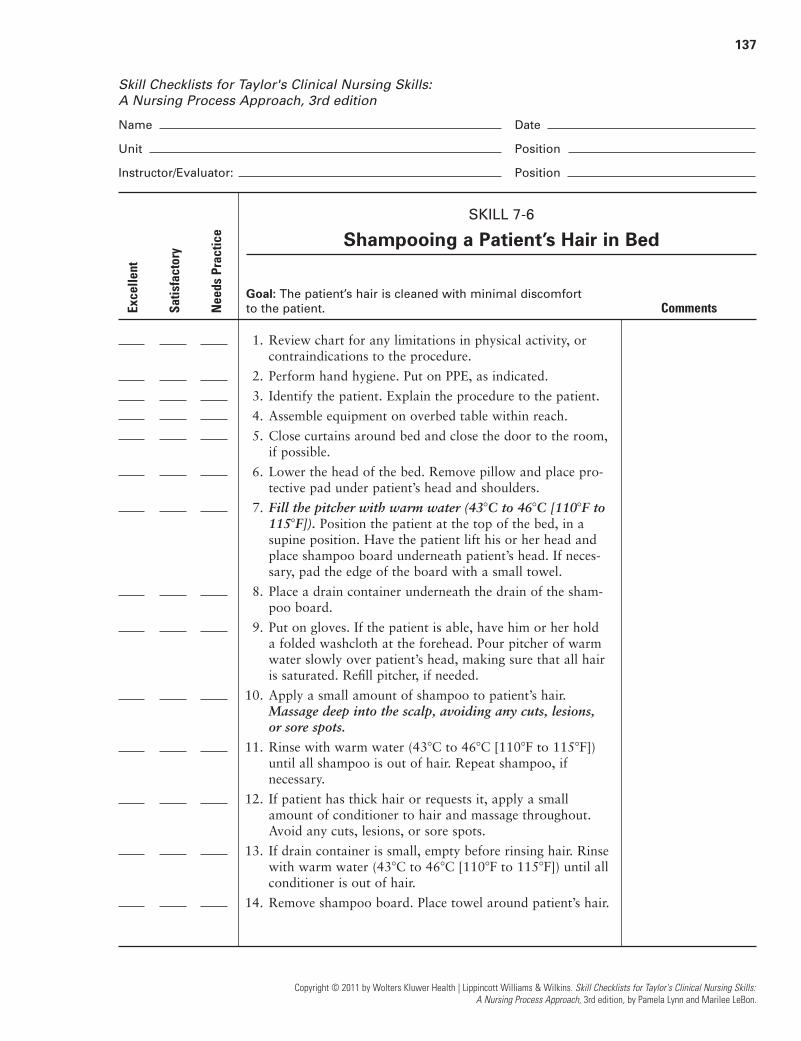
137
Skill Checklists for Taylor's Clinical Nursing Skills:
A Nursing Process Approach, 3rd edition
Name Date
Unit Position
Instructor/Evaluator: Position
SKILL 7-6
Shampooing a Patient’s Hair in Bed
Goal: The patient’s hair is cleaned with minimal discomfort
to the patient. Comments
1. Review chart for any limitations in physical activity, orcontraindications to the procedure.
2. Perform hand hygiene. Put on PPE, as indicated.
3. Identify the patient. Explain the procedure to the patient.
4. Assemble equipment on overbed table within reach.
5. Close curtains around bed and close the door to the room,if possible.
6. Lower the head of the bed. Remove pillow and place pro-tective pad under patient’s head and shoulders.
7. Fill the pitcher with warm water (43�C to 46�C [110�F to115�F]). Position the patient at the top of the bed, in asupine position. Have the patient lift his or her head andplace shampoo board underneath patient’s head. If neces-sary, pad the edge of the board with a small towel.
8. Place a drain container underneath the drain of the sham-poo board.
9. Put on gloves. If the patient is able, have him or her hold a folded washcloth at the forehead. Pour pitcher of warmwater slowly over patient’s head, making sure that all hairis saturated. Refill pitcher, if needed.
10. Apply a small amount of shampoo to patient’s hair.Massage deep into the scalp, avoiding any cuts, lesions, or sore spots.
11. Rinse with warm water (43�C to 46�C [110�F to 115�F])until all shampoo is out of hair. Repeat shampoo, if necessary.
12. If patient has thick hair or requests it, apply a smallamount of conditioner to hair and massage throughout.Avoid any cuts, lesions, or sore spots.
13. If drain container is small, empty before rinsing hair. Rinsewith warm water (43�C to 46�C [110�F to 115�F]) until allconditioner is out of hair.
14. Remove shampoo board. Place towel around patient’s hair.
Copyright © 2011 by Wolters Kluwer Health | Lippincott Williams & Wilkins. Skill Checklists for Taylor's Clinical Nursing Skills:
A Nursing Process Approach, 3rd edition, by Pamela Lynn and Marilee LeBon.
Exce
llent
Satis
fact
ory
Nee
ds P
ract
ice
LWBK681-C07_p129-143.qxd 9/6/10 10:20 PM Page 137 Aptara

138
Copyright © 2011 by Wolters Kluwer Health | Lippincott Williams & Wilkins. Skill Checklists for Taylor's Clinical Nursing Skills:
A Nursing Process Approach, 3rd edition, by Pamela Lynn and Marilee LeBon.
SKILL 7-6
Shampooing a Patient’s Hair in Bed (Continued)
Comments
15. Pat hair dry, avoiding any cuts, lesions, or sore spots.Remove protective padding but keep one dry protectivepad under patient’s hair.
16. Gently brush hair, removing tangles as needed.
17. Blow-dry hair on a cool setting, if allowed and if patientwishes. If not, consider covering the patient’s head with adry towel, until hair is dry.
18. Change patient’s gown and remove protective pad. Replacepillow.
19. Remove equipment and return patient to a position ofcomfort. Remove your gloves. Raise side rail and lowerbed.
20. Remove additional PPE, if used. Perform hand hygiene.
Exce
llent
Satis
fact
ory
Nee
ds P
ract
ice
LWBK681-C07_p129-143.qxd 9/6/10 10:20 PM Page 138 Aptara
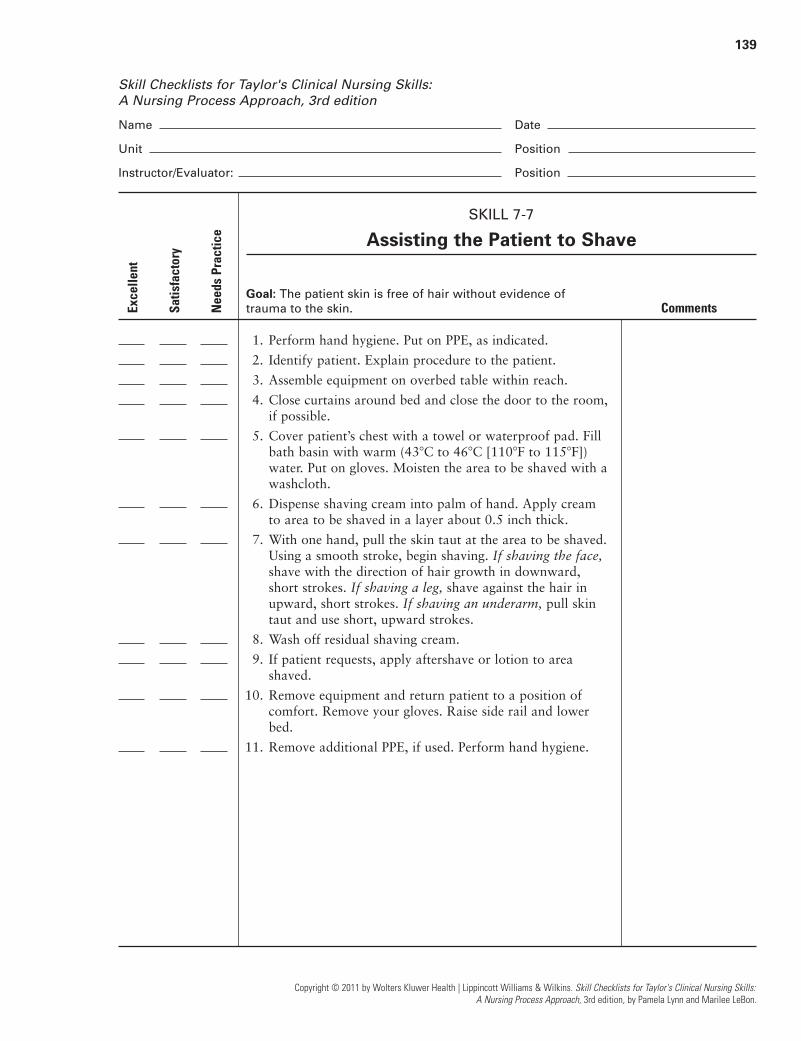
139
Skill Checklists for Taylor's Clinical Nursing Skills:
A Nursing Process Approach, 3rd edition
Name Date
Unit Position
Instructor/Evaluator: Position
SKILL 7-7
Assisting the Patient to Shave
Goal: The patient skin is free of hair without evidence of
trauma to the skin. Comments
1. Perform hand hygiene. Put on PPE, as indicated.
2. Identify patient. Explain procedure to the patient.
3. Assemble equipment on overbed table within reach.
4. Close curtains around bed and close the door to the room,if possible.
5. Cover patient’s chest with a towel or waterproof pad. Fillbath basin with warm (43�C to 46�C [110�F to 115�F])water. Put on gloves. Moisten the area to be shaved with awashcloth.
6. Dispense shaving cream into palm of hand. Apply creamto area to be shaved in a layer about 0.5 inch thick.
7. With one hand, pull the skin taut at the area to be shaved.Using a smooth stroke, begin shaving. If shaving the face,shave with the direction of hair growth in downward,short strokes. If shaving a leg, shave against the hair inupward, short strokes. If shaving an underarm, pull skintaut and use short, upward strokes.
8. Wash off residual shaving cream.
9. If patient requests, apply aftershave or lotion to areashaved.
10. Remove equipment and return patient to a position ofcomfort. Remove your gloves. Raise side rail and lowerbed.
11. Remove additional PPE, if used. Perform hand hygiene.
Copyright © 2011 by Wolters Kluwer Health | Lippincott Williams & Wilkins. Skill Checklists for Taylor's Clinical Nursing Skills:
A Nursing Process Approach, 3rd edition, by Pamela Lynn and Marilee LeBon.
Exce
llent
Satis
fact
ory
Nee
ds P
ract
ice
LWBK681-C07_p129-143.qxd 9/6/10 10:20 PM Page 139 Aptara
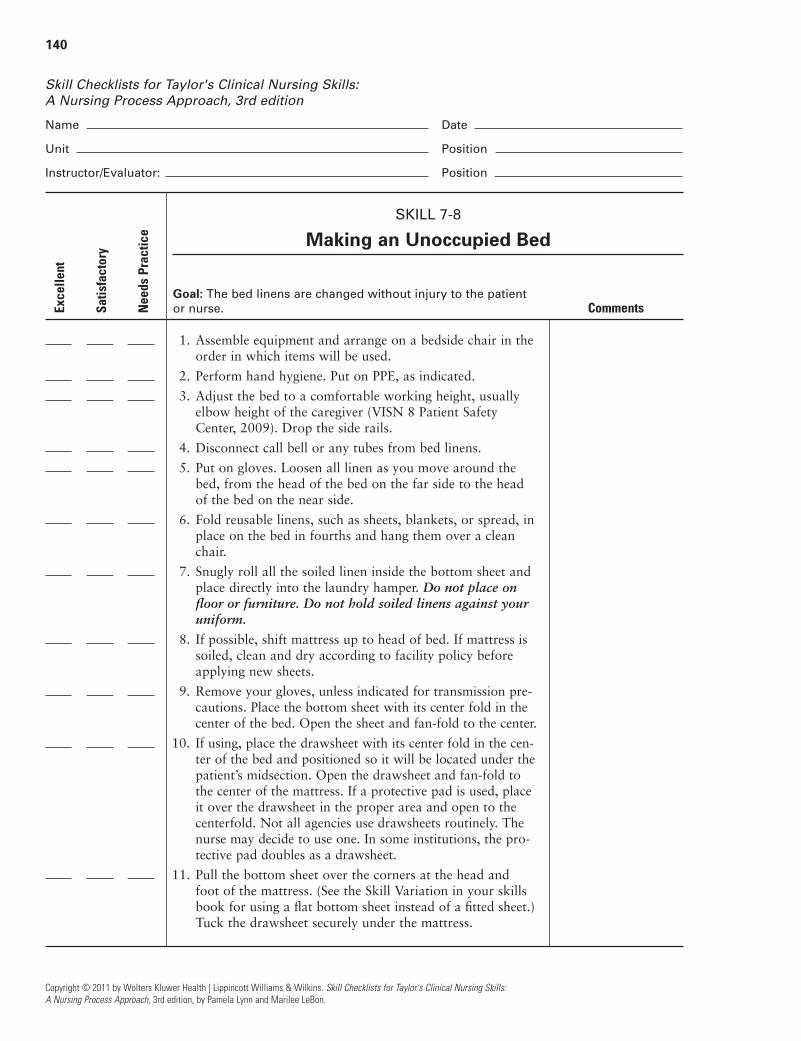
140
Copyright © 2011 by Wolters Kluwer Health | Lippincott Williams & Wilkins. Skill Checklists for Taylor's Clinical Nursing Skills:
A Nursing Process Approach, 3rd edition, by Pamela Lynn and Marilee LeBon.
Skill Checklists for Taylor's Clinical Nursing Skills:
A Nursing Process Approach, 3rd edition
Name Date
Unit Position
Instructor/Evaluator: Position
SKILL 7-8
Making an Unoccupied Bed
Goal: The bed linens are changed without injury to the patient
or nurse. Comments
1. Assemble equipment and arrange on a bedside chair in theorder in which items will be used.
2. Perform hand hygiene. Put on PPE, as indicated.
3. Adjust the bed to a comfortable working height, usuallyelbow height of the caregiver (VISN 8 Patient Safety Center, 2009). Drop the side rails.
4. Disconnect call bell or any tubes from bed linens.
5. Put on gloves. Loosen all linen as you move around thebed, from the head of the bed on the far side to the headof the bed on the near side.
6. Fold reusable linens, such as sheets, blankets, or spread, inplace on the bed in fourths and hang them over a cleanchair.
7. Snugly roll all the soiled linen inside the bottom sheet andplace directly into the laundry hamper. Do not place onfloor or furniture. Do not hold soiled linens against youruniform.
8. If possible, shift mattress up to head of bed. If mattress issoiled, clean and dry according to facility policy beforeapplying new sheets.
9. Remove your gloves, unless indicated for transmission pre-cautions. Place the bottom sheet with its center fold in thecenter of the bed. Open the sheet and fan-fold to the center.
10. If using, place the drawsheet with its center fold in the cen-ter of the bed and positioned so it will be located under thepatient’s midsection. Open the drawsheet and fan-fold tothe center of the mattress. If a protective pad is used, placeit over the drawsheet in the proper area and open to thecenterfold. Not all agencies use drawsheets routinely. Thenurse may decide to use one. In some institutions, the pro-tective pad doubles as a drawsheet.
11. Pull the bottom sheet over the corners at the head and foot of the mattress. (See the Skill Variation in your skills book for using a flat bottom sheet instead of a fitted sheet.)Tuck the drawsheet securely under the mattress.
Exce
llent
Satis
fact
ory
Nee
ds P
ract
ice
LWBK681-C07_p129-143.qxd 9/6/10 10:20 PM Page 140 Aptara

141
Copyright © 2011 by Wolters Kluwer Health | Lippincott Williams & Wilkins. Skill Checklists for Taylor's Clinical Nursing Skills:
A Nursing Process Approach, 3rd edition, by Pamela Lynn and Marilee LeBon.
SKILL 7-8
Making an Unoccupied Bed (Continued)
Comments
12. Move to the other side of the bed to secure bottom linens.Pull the bottom sheet tightly and secure over the corners atthe head and foot of the mattress. Pull the drawsheet tightlyand tuck it securely under the mattress.
13. Place the top sheet on the bed with its center fold in thecenter of the bed and with the hem even with the head ofthe mattress. Unfold the top sheet. Follow same procedurewith top blanket or spread, placing the upper edge about 6 inches below the top of the sheet.
14. Tuck the top sheet and blanket under the foot of the bedon the near side. Miter the corners.
15. Fold the upper 6 inches of the top sheet down over thespread and make a cuff.
16. Move to the other side of the bed and follow the sameprocedure for securing top sheets under the foot of the bed and making a cuff.
17. Place the pillows on the bed. Open each pillowcase in the same manner as you opened other linens. Gather thepillowcase over one hand toward the closed end. Grasp thepillow with the hand inside the pillowcase. Keep a firmhold on the top of the pillow and pull the cover onto thepillow. Place the pillow at the head of the bed.
18. Fan-fold or pie-fold the top linens.
19. Secure the signal device on the bed, according to agencypolicy.
20. Raise side rail and lower bed.
21. Dispose of soiled linen according to agency policy.
22. Remove any other PPE, if used. Perform hand hygiene.
Exce
llent
Satis
fact
ory
Nee
ds P
ract
ice
LWBK681-C07_p129-143.qxd 9/6/10 10:20 PM Page 141 Aptara
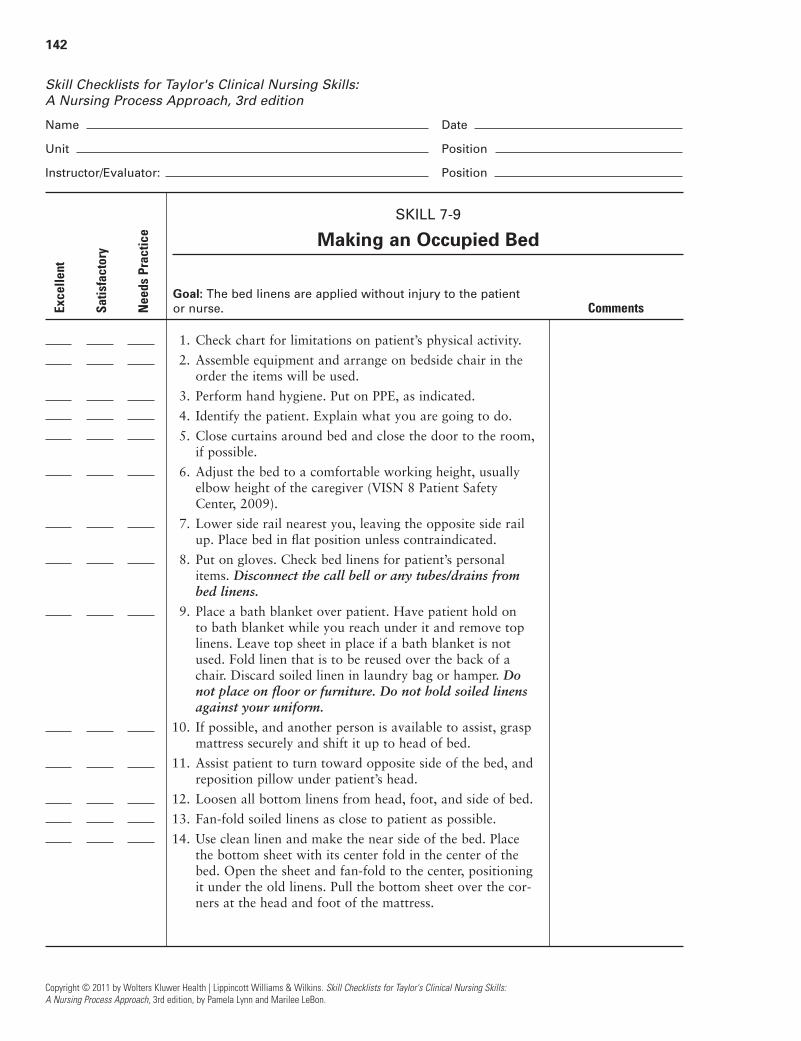
142
Copyright © 2011 by Wolters Kluwer Health | Lippincott Williams & Wilkins. Skill Checklists for Taylor's Clinical Nursing Skills:
A Nursing Process Approach, 3rd edition, by Pamela Lynn and Marilee LeBon.
Skill Checklists for Taylor's Clinical Nursing Skills:
A Nursing Process Approach, 3rd edition
Name Date
Unit Position
Instructor/Evaluator: Position
SKILL 7-9
Making an Occupied Bed
Goal: The bed linens are applied without injury to the patient
or nurse. Comments
1. Check chart for limitations on patient’s physical activity.
2. Assemble equipment and arrange on bedside chair in theorder the items will be used.
3. Perform hand hygiene. Put on PPE, as indicated.
4. Identify the patient. Explain what you are going to do.
5. Close curtains around bed and close the door to the room,if possible.
6. Adjust the bed to a comfortable working height, usuallyelbow height of the caregiver (VISN 8 Patient Safety Center, 2009).
7. Lower side rail nearest you, leaving the opposite side railup. Place bed in flat position unless contraindicated.
8. Put on gloves. Check bed linens for patient’s personalitems. Disconnect the call bell or any tubes/drains frombed linens.
9. Place a bath blanket over patient. Have patient hold on to bath blanket while you reach under it and remove toplinens. Leave top sheet in place if a bath blanket is notused. Fold linen that is to be reused over the back of achair. Discard soiled linen in laundry bag or hamper. Donot place on floor or furniture. Do not hold soiled linensagainst your uniform.
10. If possible, and another person is available to assist, graspmattress securely and shift it up to head of bed.
11. Assist patient to turn toward opposite side of the bed, andreposition pillow under patient’s head.
12. Loosen all bottom linens from head, foot, and side of bed.
13. Fan-fold soiled linens as close to patient as possible.
14. Use clean linen and make the near side of the bed. Placethe bottom sheet with its center fold in the center of thebed. Open the sheet and fan-fold to the center, positioningit under the old linens. Pull the bottom sheet over the cor-ners at the head and foot of the mattress.
Exce
llent
Satis
fact
ory
Nee
ds P
ract
ice
LWBK681-C07_p129-143.qxd 9/6/10 10:20 PM Page 142 Aptara

143
Copyright © 2011 by Wolters Kluwer Health | Lippincott Williams & Wilkins. Skill Checklists for Taylor's Clinical Nursing Skills:
A Nursing Process Approach, 3rd edition, by Pamela Lynn and Marilee LeBon.
SKILL 7-9
Making an Occupied Bed (Continued)
Comments
15. If using, place the drawsheet with its center fold in the cen-ter of the bed and positioned so it will be located underthe patient’s midsection. Open the drawsheet and fan-foldto the center of the mattress. Tuck the drawsheet securelyunder the mattress. If a protective pad is used, place it overthe drawsheet in the proper area and open to the centerfold. Not all agencies use drawsheets routinely. The nursemay decide to use one.
16. Raise side rail. Assist patient to roll over the folded linenin the middle of the bed toward you. Reposition pillowand bath blanket or top sheet. Move to other side of thebed and lower side rail.
17. Loosen and remove all bottom linen. Discard soiled linenin laundry bag or hamper. Do not place on floor or furni-ture. Do not hold soiled linens against your uniform.
18. Ease clean linen from under the patient. Pull the bottomsheet taut and secure at the corners at the head and foot ofthe mattress. Pull the drawsheet tight and smooth. Tuckthe drawsheet securely under the mattress.
19. Assist patient to turn back to the center of bed. Removepillow and change pillowcase. Open each pillowcase in the same manner as you opened other linens. Gather thepillowcase over one hand toward the closed end. Grasp thepillow with the hand inside the pillowcase. Keep a firmhold on the top of the pillow and pull the cover onto thepillow. Place the pillow under the patient’s head.
20. Apply top linen, sheet and blanket, if desired, so that it iscentered. Fold the top linens over at the patient’s shouldersto make a cuff. Have patient hold on to top linen andremove the bath blanket from underneath.
21. Secure top linens under foot of mattress and miter corners.(Refer to Skill Variation in Skill 7-8.) Loosen top linensover patient’s feet by grasping them in the area of the feetand pulling gently toward foot of bed.
22. Return patient to a position of comfort. Remove yourgloves. Raise side rail and lower bed. Reattach call bell.
23. Dispose of soiled linens according to agency policy.
24. Remove any other PPE, if used. Perform hand hygiene.
Exce
llent
Satis
fact
ory
Nee
ds P
ract
ice
LWBK681-C07_p129-143.qxd 9/6/10 10:20 PM Page 143 Aptara

144
Copyright © 2011 by Wolters Kluwer Health | Lippincott Williams & Wilkins. Skill Checklists for Taylor's Clinical Nursing Skills:
A Nursing Process Approach, 3rd edition, by Pamela Lynn and Marilee LeBon.
Skill Checklists for Taylor's Clinical Nursing Skills:
A Nursing Process Approach, 3rd edition
Name Date
Unit Position
Instructor/Evaluator: Position
SKILL 8-1
Cleaning a Wound and Applying a Dry, Sterile Dressing
Goal: The wound is cleaned and protected with a dressing
without contaminating the wound area, without causing
trauma to the wound, and without causing the patient to
experience pain or discomfort. Comments
1. Review the medical orders for wound care or the nursingplan of care related to wound care.
2. Gather the necessary supplies and bring to the bedsidestand or overbed table.
3. Perform hand hygiene and put on PPE, if indicated.
4. Identify the patient.
5. Close curtains around bed and close door to room if possi-ble. Explain what you are going to do and why you aregoing to do it to the patient.
6. Assess the patient for possible need for nonpharmacologicpain-reducing interventions or analgesic medication beforewound care dressing change. Administer appropriate pre-scribed analgesic. Allow enough time for analgesic toachieve its effectiveness.
7. Place a waste receptacle or bag at a convenient location foruse during the procedure.
8. Adjust bed to comfortable working height, usually elbowheight of the caregiver (VISN 8, 2009).
9. Assist the patient to a comfortable position that provideseasy access to the wound area. Use the bath blanket tocover any exposed area other than the wound. Place awaterproof pad under the wound site.
10. Check the position of drains, tubes, or other adjunctsbefore removing the dressing. Put on clean, disposablegloves and loosen tape on the old dressings. If necessary,use an adhesive remover to help get the tape off.
11. Carefully remove the soiled dressings. If there is resistance,use a silicone-based adhesive remover to help remove thetape. If any part of the dressing sticks to the underlyingskin, use small amounts of sterile saline to help loosen andremove.
Exce
llent
Satis
fact
ory
Nee
ds P
ract
ice
LWBK681-C08_p144-179.qxd 9/3/10 5:37 PM Page 144 Aptara Inc
145
Copyright © 2011 by Wolters Kluwer Health | Lippincott Williams & Wilkins. Skill Checklists for Taylor's Clinical Nursing Skills:
A Nursing Process Approach, 3rd edition, by Pamela Lynn and Marilee LeBon.
SKILL 8-1
Cleaning a Wound and Applying a Dry, Sterile Dressing (Continued)
Comments
12. After removing the dressing, note the presence, amount,type, color, and odor of any drainage on the dressings.Place soiled dressings in the appropriate waste receptacle.Remove your gloves and dispose of them in an appropriatewaste receptacle.
13. Inspect the wound site for size, appearance, anddrainage. Assess if any pain is present. Check the statusof sutures, adhesive closure strips, staples, and drains ortubes, if present. Note any problems to include in yourdocumentation.
14. Using sterile technique, prepare a sterile work area andopen the needed supplies.
15. Open the sterile cleaning solution. Depending on theamount of cleaning needed, the solution might be poureddirectly over gauze sponges over a container for smallcleaning jobs, or into a basin for more complex or largercleaning.
16. Put on sterile gloves.
17. Clean the wound. Clean the wound from top to bottomand from the center to the outside. Following this pattern,use new gauze for each wipe, placing the used gauze inthe waste receptacle. Alternately, spray the wound fromtop to bottom with a commercially prepared woundcleanser.
18. Once the wound is cleaned, dry the area using a gauzesponge in the same manner. Apply ointment or performother treatments, as ordered.
19. If a drain is in use at the wound location, clean around thedrain. Refer to Skills 8-7, 8-8, 8-9, and 8-10.
20. Apply a layer of dry, sterile dressing over the wound. Forceps may be used to apply the dressing.
21. Place a second layer of gauze over the wound site.
22. Apply a surgical or abdominal pad (ABD) over the gauzeat the site as the outermost layer of the dressing.
23. Remove and discard gloves. Apply tape, Montgomerystraps or roller gauze to secure the dressings. Alternately,many commercial wound products are self adhesive and donot require additional tape.
Exce
llent
Satis
fact
ory
Nee
ds P
ract
ice
LWBK681-C08_p144-179.qxd 9/3/10 5:37 PM Page 145 Aptara Inc
146
Copyright © 2011 by Wolters Kluwer Health | Lippincott Williams & Wilkins. Skill Checklists for Taylor's Clinical Nursing Skills:
A Nursing Process Approach, 3rd edition, by Pamela Lynn and Marilee LeBon.
SKILL 8-1
Cleaning a Wound and Applying a Dry, Sterile Dressing (Continued)
Comments
24. After securing the dressing, label dressing with date andtime. Remove all remaining equipment; place the patient ina comfortable position, with side rails up and bed in thelowest position.
25. Remove PPE, if used. Perform hand hygiene.
26. Check all wound dressings every shift. More frequentchecks may be needed if the wound is more complex ordressings become saturated quickly.
Exce
llent
Satis
fact
ory
Nee
ds P
ract
ice
LWBK681-C08_p144-179.qxd 9/3/10 5:37 PM Page 146 Aptara Inc
147
Skill Checklists for Taylor's Clinical Nursing Skills:
A Nursing Process Approach, 3rd edition
Name Date
Unit Position
Instructor/Evaluator: Position
SKILL 8-2
Applying a Saline-Moistened Dressing
Goal: The procedure is accomplished without contaminating the
wound area, without causing trauma to the wound, and without
causing the patient to experience pain or discomfort. Comments
1. Review the medical orders for wound care or the nursingplan of care related to wound care.
2. Gather the necessary supplies and bring to the bedsidestand or overbed table.
3. Perform hand hygiene and put on PPE, if indicated.
4. Identify the patient.
5. Close curtains around bed and close door to room if possi-ble. Explain what you are going to do and why you aregoing to do it to the patient.
6. Assess the patient for possible need for nonpharmacologicpain-reducing interventions or analgesic medication beforewound care dressing change. Administer appropriate pre-scribed analgesic. Allow enough time for analgesic toachieve its effectiveness.
7. Place a waste receptacle or bag at a convenient location foruse during the procedure.
8. Adjust bed to comfortable working height, usually elbowheight of the caregiver (VISN 8, 2009).
9. Assist the patient to a comfortable position that provideseasy access to the wound area. Position the patient so thewound cleanser or irrigation solution will flow from theclean end of the wound toward the dirtier end, if beingused (see Skill 8-1 for wound cleansing and Skill 8-4 forirrigation techniques). Use the bath blanket to cover anyexposed area other than the wound. Place a waterproofpad under the wound site.
10. Put on clean gloves. Carefully and gently remove the soileddressings. If there is resistance, use a silicone-based adhesiveremover to help remove the tape. If any part of the dressingsticks to the underlying skin, use small amounts of sterilesaline to help loosen and remove.
11. After removing the dressing, note the presence, amount,type, color, and odor of any drainage on the dressings.Place soiled dressings in the appropriate waste receptacle.
Copyright © 2011 by Wolters Kluwer Health | Lippincott Williams & Wilkins. Skill Checklists for Taylor's Clinical Nursing Skills:
A Nursing Process Approach, 3rd edition, by Pamela Lynn and Marilee LeBon.
Exce
llent
Satis
fact
ory
Nee
ds P
ract
ice
LWBK681-C08_p144-179.qxd 9/3/10 5:37 PM Page 147 Aptara Inc

148
Copyright © 2011 by Wolters Kluwer Health | Lippincott Williams & Wilkins. Skill Checklists for Taylor's Clinical Nursing Skills:
A Nursing Process Approach, 3rd edition, by Pamela Lynn and Marilee LeBon.
SKILL 8-2
Applying a Saline-Moistened Dressing (Continued)
Comments
12. Assess the wound for appearance, stage, the presence ofeschar, granulation tissue, epithelialization, undermining,tunneling, necrosis, sinus tract, and drainage. Assess theappearance of the surrounding tissue. Measure the wound.Refer to Fundamentals Review 8-3.
13. Remove your gloves and put them in the receptacle.
14. Using sterile technique, open the supplies and dressings.Place the fine-mesh gauze into the basin and pour theordered solution over the mesh to saturate it.
15. Put on the sterile gloves. Alternately, clean gloves (cleantechnique) may be used to clean a chronic wound.
16. Clean the wound. Refer to Skill 8-1. Alternately, irrigatethe wound, as ordered or required (see Skill 8-4).
17. Dry the surrounding skin with sterile gauze dressings.
18. Apply a skin protectant to the surrounding skin if needed.
19. If not already on, put on sterile gloves. Squeeze excess fluidfrom the gauze dressing. Unfold and fluff the dressing.
20. Gently press to loosely pack the moistened gauze into thewound. If necessary, use the forceps or cotton-tipped appli-cators to press the gauze into all wound surfaces.
21. Apply several dry, sterile gauze pads over the wet gauze.
22. Place the ABD pad over the gauze.
23. Remove and discard gloves. Apply tape, Montgomerystraps or roller gauze to secure the dressings. Alternately,many commercial wound products are self adhesive and donot require additional tape.
24. After securing the dressing, label dressing with date andtime. Remove all remaining equipment; place the patient ina comfortable position, with side rails up and bed in thelowest position.
25. Remove PPE, if used. Perform hand hygiene.
26. Check all wound dressings every shift. More frequentchecks may be needed if the wound is more complex ordressings become saturated quickly.
Exce
llent
Satis
fact
ory
Nee
ds P
ract
ice
LWBK681-C08_p144-179.qxd 9/3/10 5:37 PM Page 148 Aptara Inc

149
Skill Checklists for Taylor's Clinical Nursing Skills:
A Nursing Process Approach, 3rd edition
Name Date
Unit Position
Instructor/Evaluator: Position
SKILL 8-3
Applying a Hydrocolloid Dressing
Goal: The procedure is accomplished without contaminating
the wound area, without causing trauma to the wound, and
without causing the patient to experience pain or discomfort. Comments
1. Review the medical orders for wound care or the nursingplan of care related to wound care.
2. Gather the necessary supplies and bring to the bedsidestand or overbed table.
3. Perform hand hygiene and put on PPE, if indicated.
4. Identify the patient.
5. Close curtains around bed and close door to room if possi-ble. Explain what you are going to do and why you aregoing to do it to the patient.
6. Assess the patient for possible need for nonpharmacologicpain-reducing interventions or analgesic medication beforewound care dressing change. Administer appropriate pre-scribed analgesic. Allow enough time for analgesic toachieve its effectiveness before beginning procedure.
7. Place a waste receptacle or bag at a convenient location foruse during the procedure.
8. Adjust bed to comfortable working height, usually elbowheight of the caregiver (VISN 8, 2009).
9. Assist the patient to a comfortable position that provideseasy access to the wound area. Position the patient so thewound cleanser or irrigation solution will flow from theclean end of the wound toward the dirtier end, if beingused (See Skill 8-1 for wound cleansing and Skill 8-4 forirrigation techniques). Use the bath blanket to cover anyexposed area other than the wound. Place a waterproofpad under the wound site.
10. Put on clean gloves. Carefully and gently remove the soiled dressings. If there is resistance, use a silicone-basedadhesive remover to help remove the tape. If any part of the dressing sticks to the underlying skin, use smallamounts of sterile saline to help loosen and remove.
11. After removing the dressing, note the presence, amount,type, color, and odor of any drainage on the dressings.Place soiled dressings in the appropriate waste receptacle.
Copyright © 2011 by Wolters Kluwer Health | Lippincott Williams & Wilkins. Skill Checklists for Taylor's Clinical Nursing Skills:
A Nursing Process Approach, 3rd edition, by Pamela Lynn and Marilee LeBon.
Exce
llent
Satis
fact
ory
Nee
ds P
ract
ice
LWBK681-C08_p144-179.qxd 9/3/10 5:37 PM Page 149 Aptara Inc
150
Copyright © 2011 by Wolters Kluwer Health | Lippincott Williams & Wilkins. Skill Checklists for Taylor's Clinical Nursing Skills:
A Nursing Process Approach, 3rd edition, by Pamela Lynn and Marilee LeBon.
SKILL 8-3
Applying a Hydrocolloid Dressing (Continued)
Comments
12. Assess the wound for appearance, stage, the presence ofeschar, granulation tissue, epithelialization, undermining,tunneling, necrosis, sinus tract, and drainage. Assess theappearance of the surrounding tissue. Measure the wound.Refer to Fundamentals Review 8-3.
13. Remove your gloves and put them in the receptacle.
14. Set up a sterile field, if indicated, and wound cleaning sup-plies. Put on sterile gloves. Alternately, clean gloves (cleantechnique) may be used when cleaning a chronic wound.
15. Clean the wound. Refer to Skill 8-1. Alternately, irrigatethe wound, as ordered or required (see Skill 8-4).
16. Dry the surrounding skin with gauze dressings.
17. Apply a skin protectant to the surrounding skin.
18. Cut the dressing to size, if indicated, using sterile scissors.Size the dressing generously, allowing at least a 1� marginof healthy skin around the wound to be covered with thedressing.
19. Remove the release paper from the adherent side of thedressing. Apply the dressing to the wound without stretch-ing the dressing. Smooth wrinkles as the dressing is applied.
20. If necessary, secure the dressing edges with tape. Applyadditional skin barrier to the areas to be covered withtape, if necessary. Dressings that are near the anus need tohave the edges taped. Apply additional skin barrier to theareas to be covered with tape, if necessary.
21. After securing the dressing, label dressing with date andtime. Remove all remaining equipment; place the patient ina comfortable position, with side rails up and bed in thelowest position.
22. Remove PPE, if used. Perform hand hygiene.
23. Check all wound dressings every shift. More frequentchecks may be needed if the wound is more complex ordressings become saturated quickly.
Exce
llent
Satis
fact
ory
Nee
ds P
ract
ice
LWBK681-C08_p144-179.qxd 9/3/10 5:37 PM Page 150 Aptara Inc

151
Skill Checklists for Taylor's Clinical Nursing Skills:
A Nursing Process Approach, 3rd edition
Name Date
Unit Position
Instructor/Evaluator: Position
SKILL 8-4
Performing Irrigation of a Wound
Goal: The wound is cleaned without contamination or trauma
and without causing the patient to experience pain or discomfort. Comments
1. Review the medical orders for wound care or the nursingplan of care related to wound care.
2. Gather the necessary supplies and bring to the bedsidestand or overbed table.
3. Perform hand hygiene and put on PPE, if indicated.
4. Identify the patient.
5. Close curtains around bed and close door to room if possi-ble. Explain what you are going to do and why you aregoing to do it to the patient.
6. Assess the patient for possible need for nonpharmacologicpain-reducing interventions or analgesic medication beforewound care and/or dressing change. Administer appropri-ate prescribed analgesic. Allow enough time for analgesicto achieve its effectiveness before beginning procedure.
7. Place a waste receptacle or bag at a convenient location foruse during the procedure.
8. Adjust bed to comfortable working height, usually elbowheight of the caregiver (VISN 8, 2009).
9. Assist the patient to a comfortable position that provideseasy access to the wound area. Position the patient so theirrigation solution will flow from the clean end of thewound toward the dirtier end. Use the bath blanket tocover any exposed area other than the wound. Place awaterproof pad under the wound site.
10. Put on a gown, mask, and eye protection.
11. Put on clean gloves. Carefully and gently remove the soiled dressings. If there is resistance, use a silicone-basedadhesive remover to help remove the tape. If any part of the dressing sticks to the underlying skin, use smallamounts of sterile saline to help loosen and remove.
12. After removing the dressing, note the presence, amount,type, color, and odor of any drainage on the dressings.Place soiled dressings in the appropriate waste receptacle.
Copyright © 2011 by Wolters Kluwer Health | Lippincott Williams & Wilkins. Skill Checklists for Taylor's Clinical Nursing Skills:
A Nursing Process Approach, 3rd edition, by Pamela Lynn and Marilee LeBon.
Exce
llent
Satis
fact
ory
Nee
ds P
ract
ice
LWBK681-C08_p144-179.qxd 9/3/10 5:37 PM Page 151 Aptara Inc
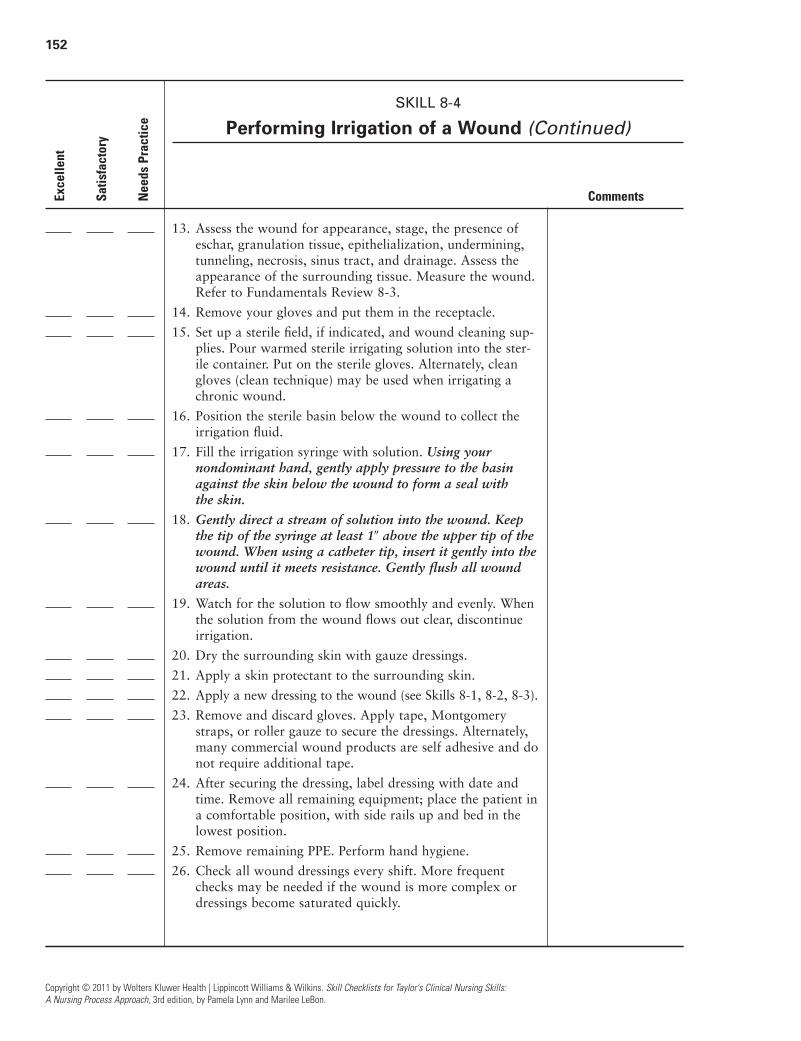
152
Copyright © 2011 by Wolters Kluwer Health | Lippincott Williams & Wilkins. Skill Checklists for Taylor's Clinical Nursing Skills:
A Nursing Process Approach, 3rd edition, by Pamela Lynn and Marilee LeBon.
SKILL 8-4
Performing Irrigation of a Wound (Continued)
Comments
13. Assess the wound for appearance, stage, the presence ofeschar, granulation tissue, epithelialization, undermining,tunneling, necrosis, sinus tract, and drainage. Assess theappearance of the surrounding tissue. Measure the wound.Refer to Fundamentals Review 8-3.
14. Remove your gloves and put them in the receptacle.
15. Set up a sterile field, if indicated, and wound cleaning sup-plies. Pour warmed sterile irrigating solution into the ster-ile container. Put on the sterile gloves. Alternately, cleangloves (clean technique) may be used when irrigating achronic wound.
16. Position the sterile basin below the wound to collect theirrigation fluid.
17. Fill the irrigation syringe with solution. Using yournondominant hand, gently apply pressure to the basinagainst the skin below the wound to form a seal with the skin.
18. Gently direct a stream of solution into the wound. Keepthe tip of the syringe at least 1� above the upper tip of thewound. When using a catheter tip, insert it gently into thewound until it meets resistance. Gently flush all woundareas.
19. Watch for the solution to flow smoothly and evenly. Whenthe solution from the wound flows out clear, discontinueirrigation.
20. Dry the surrounding skin with gauze dressings.
21. Apply a skin protectant to the surrounding skin.
22. Apply a new dressing to the wound (see Skills 8-1, 8-2, 8-3).
23. Remove and discard gloves. Apply tape, Montgomerystraps, or roller gauze to secure the dressings. Alternately,many commercial wound products are self adhesive and donot require additional tape.
24. After securing the dressing, label dressing with date andtime. Remove all remaining equipment; place the patient ina comfortable position, with side rails up and bed in thelowest position.
25. Remove remaining PPE. Perform hand hygiene.
26. Check all wound dressings every shift. More frequentchecks may be needed if the wound is more complex ordressings become saturated quickly.
Exce
llent
Satis
fact
ory
Nee
ds P
ract
ice
LWBK681-C08_p144-179.qxd 9/3/10 5:37 PM Page 152 Aptara Inc

153
Skill Checklists for Taylor's Clinical Nursing Skills:
A Nursing Process Approach, 3rd edition
Name Date
Unit Position
Instructor/Evaluator: Position
SKILL 8-5
Collecting a Wound Culture
Goal: The culture is obtained without evidence of contamination,
without exposing the patient to additional pathogens, and
without causing discomfort for the patient. Comments
1. Review the medical orders for obtaining a wound culture.
2. Gather the necessary supplies and bring to the bedsidestand or overbed table.
3. Perform hand hygiene and put on PPE, if indicated.
4. Identify the patient.
5. Close curtains around bed and close door to room if possi-ble. Explain what you are going to do and why you aregoing to do it to the patient.
6. Assess the patient for possible need for nonpharmacologicpain-reducing interventions or analgesic medication beforeobtaining the wound culture. Administer appropriate pre-scribed analgesic. Allow enough time for analgesic toachieve its effectiveness before beginning procedure.
7. Place an appropriate waste receptacle within easy reach foruse during the procedure.
8. Adjust bed to comfortable working height, usually elbowheight of the caregiver (VISN 8, 2009).
9. Assist the patient to a comfortable position that provideseasy access to the wound. If necessary, drape the patientwith the bath blanket to expose only the wound area.Place a waterproof pad under the wound site. Check theculture label against the patient’s identification bracelet.
10. If there is a dressing in place on the wound, put on cleangloves. Carefully and gently remove the soiled dressings. If there is resistance, use a silicone-based adhesive remover to help remove the tape. If any part of the dressing sticks to the underlying skin, use small amounts of sterilesaline to help loosen and remove.
11. After removing the dressing, note the presence, amount,type, color, and odor of any drainage on the dressings.Place soiled dressings in the appropriate waste receptacle.
Copyright © 2011 by Wolters Kluwer Health | Lippincott Williams & Wilkins. Skill Checklists for Taylor's Clinical Nursing Skills:
A Nursing Process Approach, 3rd edition, by Pamela Lynn and Marilee LeBon.
Exce
llent
Satis
fact
ory
Nee
ds P
ract
ice
LWBK681-C08_p144-179.qxd 9/3/10 5:37 PM Page 153 Aptara Inc

154
Copyright © 2011 by Wolters Kluwer Health | Lippincott Williams & Wilkins. Skill Checklists for Taylor's Clinical Nursing Skills:
A Nursing Process Approach, 3rd edition, by Pamela Lynn and Marilee LeBon.
SKILL 8-5
Collecting a Wound Culture (Continued)
Comments
12. Assess the wound for appearance, stage, the presence ofeschar, granulation tissue, epithelialization, undermining,tunneling, necrosis, sinus tract, and drainage. Assess theappearance of the surrounding tissue. Measure the wound.Refer to Fundamentals Review 8-3.
13. Remove your gloves and put them in the receptacle.
14. Set up a sterile field, if indicated, and wound cleaning sup-plies. Put on the sterile gloves. Alternately, clean gloves(clean technique) may be used when cleaning a chronicwound.
15. Clean the wound. Refer to Skill 8-1. Alternately, irrigatethe wound, as ordered or required (see Skill 8-4).
16. Dry the surrounding skin with gauze dressings. Put onclean gloves.
17. Twist the cap to loosen the swab on the Culturette tube, oropen the separate swab and remove the cap from the culturetube. Keep the swab and inside of the culture tube sterile.
18. If contact with the wound is necessary to separate woundmargins to permit insertion of the swab deep into thewound, put a sterile glove on one hand to manipulate thewound margins. Clean gloves may be appropriate for con-tact with pressure ulcers and chronic wounds.
19. Carefully insert the swab into the wound. Press and rotatethe swab several times over the wound surfaces. Avoidtouching the swab to intact skin at the wound edges. Useanother swab if collecting a specimen from another site.
20. Place the swab back in the culture tube. Do not touch theoutside of the tube with the swab. Secure the cap. Someswab containers have an ampule of medium at the bottomof the tube. It might be necessary to crush this ampule toactivate. Follow the manufacturer’s instructions for use.
21. Remove gloves and discard them accordingly.
22. Put on gloves. Place a dressing on the wound, as appropri-ate, based on medical orders and/or the nursing plan ofcare. Refer to Skills 8-1 through 8-3. Remove gloves.
23. After securing the dressing, label dressing with date andtime. Remove all remaining equipment; place the patient ina comfortable position, with side rails up and bed in thelowest position.
24. Label the specimen according to your institution’s guidelinesand send it to the laboratory in a biohazard bag.
25. Remove PPE, if used. Perform hand hygiene.
Exce
llent
Satis
fact
ory
Nee
ds P
ract
ice
LWBK681-C08_p144-179.qxd 9/3/10 5:37 PM Page 154 Aptara Inc

155
Skill Checklists for Taylor's Clinical Nursing Skills:
A Nursing Process Approach, 3rd edition
Name Date
Unit Position
Instructor/Evaluator: Position
SKILL 8-6
Applying Montgomery Straps
Goal: The patient’s skin is free from irritation and injury. Comments
1. Review the medical orders for wound care or the nursingplan of care related to wound care.
2. Gather the necessary supplies and bring to the bedsidestand or overbed table.
3. Perform hand hygiene and put on PPE, if indicated.
4. Identify the patient.
5. Close curtains around bed and close door to room if possi-ble. Explain what you are going to do and why you aregoing to do it to the patient.
6. Assess the patient for possible need for nonpharmacologicpain-reducing interventions or analgesic medication beforewound care dressing change. Administer appropriate pre-scribed analgesic. Allow enough time for analgesic toachieve its effectiveness before beginning procedure.
7. Place a waste receptacle at a convenient location for useduring the procedure.
8. Adjust bed to comfortable working height, usually elbowheight of the caregiver (VISN 8, 2009).
9. Assist the patient to a comfortable position that provideseasy access to the wound area. Use a bath blanket to coverany exposed area other than the wound. Place a waterproofpad under the wound site.
10. Perform wound care and a dressing change as outlined inSkills 8-1 through 8-4, as ordered.
11. Put on clean gloves. Clean the skin on either side of thewound with the gauze, moistened with normal saline. Dry the skin.
12. Apply a skin protectant to the skin where the straps willbe placed.
13. Remove gloves.
14. Cut the skin barrier to the size of the tape or strap. Applythe skin barrier to the patient’s skin, near the dressing.Apply the sticky side of each tape or strap to the skin bar-rier sheet, so the openings for the strings are at the edge of the dressing. Repeat for the other side.
Copyright © 2011 by Wolters Kluwer Health | Lippincott Williams & Wilkins. Skill Checklists for Taylor's Clinical Nursing Skills:
A Nursing Process Approach, 3rd edition, by Pamela Lynn and Marilee LeBon.
Exce
llent
Satis
fact
ory
Nee
ds P
ract
ice
LWBK681-C08_p144-179.qxd 9/3/10 5:37 PM Page 155 Aptara Inc

156
Copyright © 2011 by Wolters Kluwer Health | Lippincott Williams & Wilkins. Skill Checklists for Taylor's Clinical Nursing Skills:
A Nursing Process Approach, 3rd edition, by Pamela Lynn and Marilee LeBon.
SKILL 8-6
Applying Montgomery Straps (Continued)
Comments
15. Thread a separate string through each pair of holes in thestraps. Tie one end of the string in the hole. Fasten theother end with the opposing tie, like a shoelace. Do notsecure too tightly. Repeat according to the number ofstraps needed. If commercially prepared straps are used, tiestrings like a shoelace. Note date and time of applicationon strap.
16. After securing the dressing, label dressing with date andtime. Remove all remaining equipment; place the patient ina comfortable position, with side rails up and bed in thelowest position.
17. Remove additional PPE, if used. Perform hand hygiene.
18. Check all wound dressings every shift. More frequentchecks may be needed if the wound is more complex ordressings become saturated quickly.
19. Replace the ties and straps whenever they are soiled, orevery 2 to 3 days. Straps can be reapplied onto skin bar-rier. Skin barrier can remain in place up to 7 days. Use asilicone-based adhesive remover to help remove the skinbarrier.
Exce
llent
Satis
fact
ory
Nee
ds P
ract
ice
LWBK681-C08_p144-179.qxd 9/3/10 5:37 PM Page 156 Aptara Inc
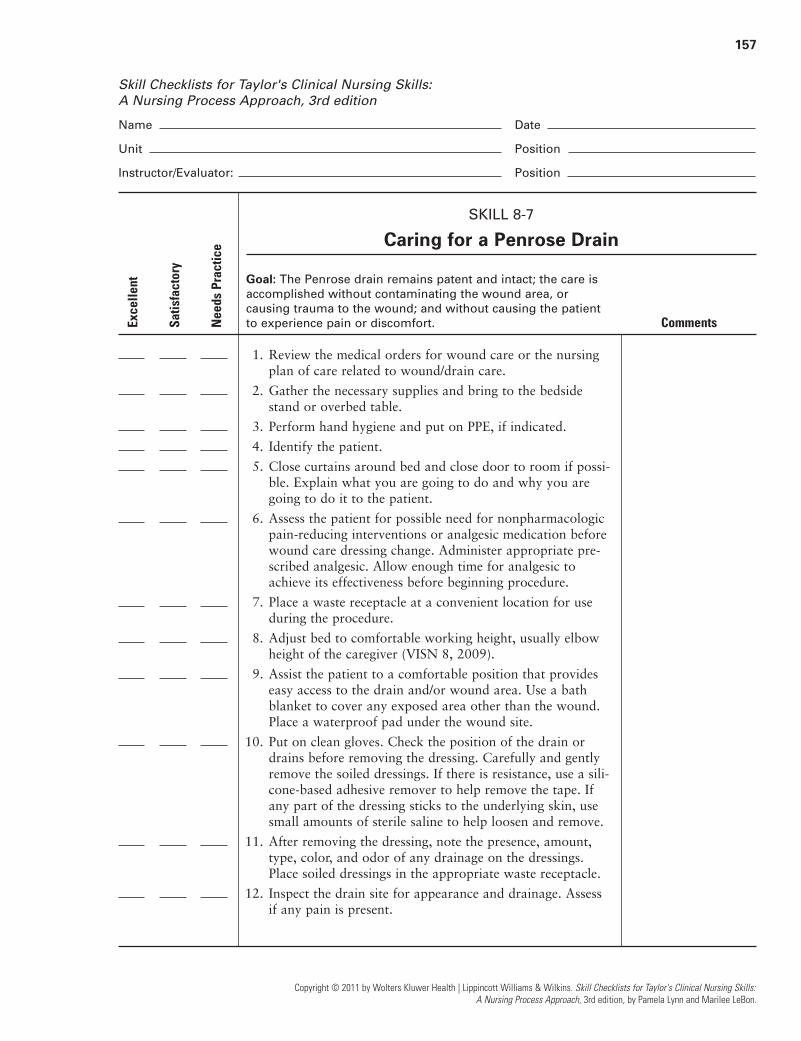
157
Skill Checklists for Taylor's Clinical Nursing Skills:
A Nursing Process Approach, 3rd edition
Name Date
Unit Position
Instructor/Evaluator: Position
SKILL 8-7
Caring for a Penrose Drain
Goal: The Penrose drain remains patent and intact; the care is
accomplished without contaminating the wound area, or
causing trauma to the wound; and without causing the patient
to experience pain or discomfort. Comments
1. Review the medical orders for wound care or the nursingplan of care related to wound/drain care.
2. Gather the necessary supplies and bring to the bedsidestand or overbed table.
3. Perform hand hygiene and put on PPE, if indicated.
4. Identify the patient.
5. Close curtains around bed and close door to room if possi-ble. Explain what you are going to do and why you aregoing to do it to the patient.
6. Assess the patient for possible need for nonpharmacologicpain-reducing interventions or analgesic medication beforewound care dressing change. Administer appropriate pre-scribed analgesic. Allow enough time for analgesic toachieve its effectiveness before beginning procedure.
7. Place a waste receptacle at a convenient location for useduring the procedure.
8. Adjust bed to comfortable working height, usually elbowheight of the caregiver (VISN 8, 2009).
9. Assist the patient to a comfortable position that provideseasy access to the drain and/or wound area. Use a bathblanket to cover any exposed area other than the wound.Place a waterproof pad under the wound site.
10. Put on clean gloves. Check the position of the drain ordrains before removing the dressing. Carefully and gentlyremove the soiled dressings. If there is resistance, use a sili-cone-based adhesive remover to help remove the tape. Ifany part of the dressing sticks to the underlying skin, usesmall amounts of sterile saline to help loosen and remove.
11. After removing the dressing, note the presence, amount,type, color, and odor of any drainage on the dressings.Place soiled dressings in the appropriate waste receptacle.
12. Inspect the drain site for appearance and drainage. Assessif any pain is present.
Copyright © 2011 by Wolters Kluwer Health | Lippincott Williams & Wilkins. Skill Checklists for Taylor's Clinical Nursing Skills:
A Nursing Process Approach, 3rd edition, by Pamela Lynn and Marilee LeBon.
Exce
llent
Satis
fact
ory
Nee
ds P
ract
ice
LWBK681-C08_p144-179.qxd 9/3/10 5:37 PM Page 157 Aptara Inc

158
Copyright © 2011 by Wolters Kluwer Health | Lippincott Williams & Wilkins. Skill Checklists for Taylor's Clinical Nursing Skills:
A Nursing Process Approach, 3rd edition, by Pamela Lynn and Marilee LeBon.
SKILL 8-7
Caring for a Penrose Drain (Continued)
Comments
13. Using sterile technique, prepare a sterile work area andopen the needed supplies.
14. Open the sterile cleaning solution. Pour the cleansing solu-tion into the basin. Add the gauze sponges.
15. Put on sterile gloves.
16. Cleanse the drain site with the cleaning solution. Use theforceps and the moistened gauze or cotton-tipped applica-tors. Start at the drain insertion site, moving in a circularmotion toward the periphery. Use each gauze sponge orapplicator only once. Discard and use new gauze if addi-tional cleansing is needed.
17. Dry the skin with a new gauze pad in the same manner.Apply skin protectant to the skin around the drain; extendout to include the area of skin that will be taped. Place a presplit drain sponge under the drain. Closely observethe safety pin in the drain. If the pin or drain is crusted,replace the pin with a new sterile pin. Take care not to dislodge the drain.
18. Apply gauze pads over the drain. Apply ABD pads overthe gauze.
19. Remove and discard gloves. Apply tape, Montgomerystraps, or roller gauze to secure the dressings.
20. After securing the dressing, label dressing with date andtime. Remove all remaining equipment; place the patient ina comfortable position, with side rails up and bed in thelowest position.
21. Remove additional PPE, if used. Perform hand hygiene.
22. Check all wound dressings every shift. More frequentchecks may be needed if the wound is more complex ordressings become saturated quickly.
Exce
llent
Satis
fact
ory
Nee
ds P
ract
ice
LWBK681-C08_p144-179.qxd 9/3/10 5:37 PM Page 158 Aptara Inc
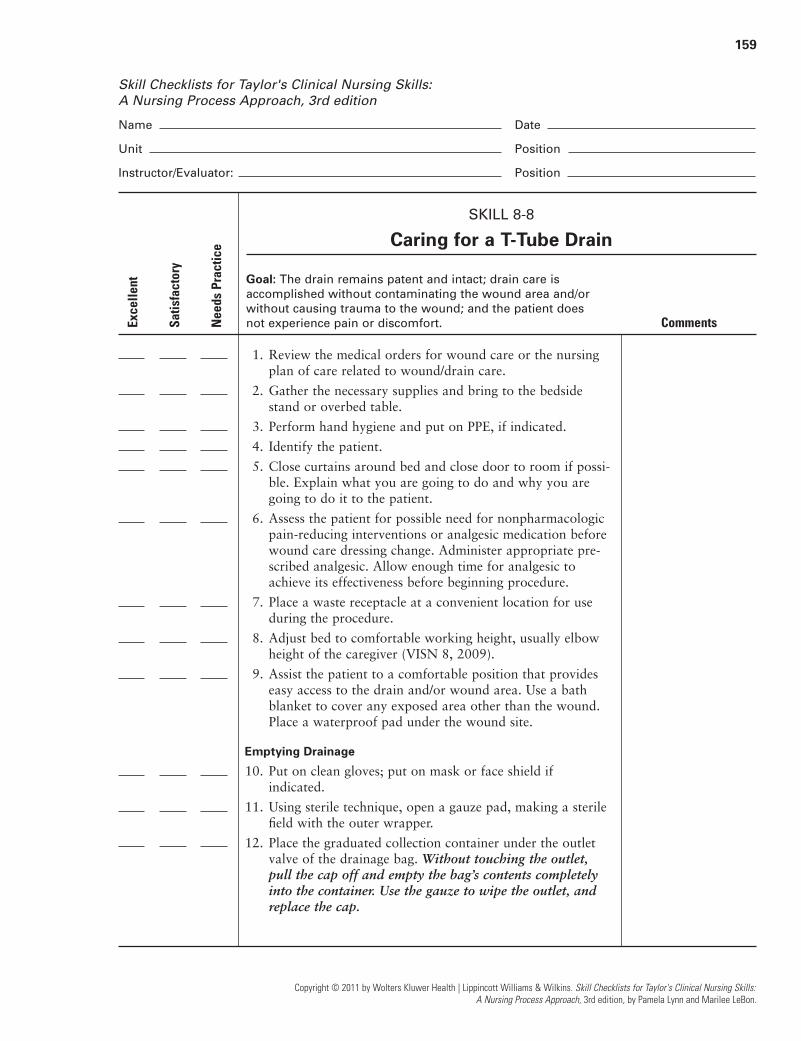
159
Skill Checklists for Taylor's Clinical Nursing Skills:
A Nursing Process Approach, 3rd edition
Name Date
Unit Position
Instructor/Evaluator: Position
SKILL 8-8
Caring for a T-Tube Drain
Goal: The drain remains patent and intact; drain care is
accomplished without contaminating the wound area and/or
without causing trauma to the wound; and the patient does
not experience pain or discomfort. Comments
1. Review the medical orders for wound care or the nursingplan of care related to wound/drain care.
2. Gather the necessary supplies and bring to the bedsidestand or overbed table.
3. Perform hand hygiene and put on PPE, if indicated.
4. Identify the patient.
5. Close curtains around bed and close door to room if possi-ble. Explain what you are going to do and why you aregoing to do it to the patient.
6. Assess the patient for possible need for nonpharmacologicpain-reducing interventions or analgesic medication beforewound care dressing change. Administer appropriate pre-scribed analgesic. Allow enough time for analgesic toachieve its effectiveness before beginning procedure.
7. Place a waste receptacle at a convenient location for useduring the procedure.
8. Adjust bed to comfortable working height, usually elbowheight of the caregiver (VISN 8, 2009).
9. Assist the patient to a comfortable position that provideseasy access to the drain and/or wound area. Use a bathblanket to cover any exposed area other than the wound.Place a waterproof pad under the wound site.
Emptying Drainage
10. Put on clean gloves; put on mask or face shield ifindicated.
11. Using sterile technique, open a gauze pad, making a sterilefield with the outer wrapper.
12. Place the graduated collection container under the outletvalve of the drainage bag. Without touching the outlet,pull the cap off and empty the bag’s contents completelyinto the container. Use the gauze to wipe the outlet, andreplace the cap.
Copyright © 2011 by Wolters Kluwer Health | Lippincott Williams & Wilkins. Skill Checklists for Taylor's Clinical Nursing Skills:
A Nursing Process Approach, 3rd edition, by Pamela Lynn and Marilee LeBon.
Exce
llent
Satis
fact
ory
Nee
ds P
ract
ice
LWBK681-C08_p144-179.qxd 9/3/10 5:37 PM Page 159 Aptara Inc

160
Copyright © 2011 by Wolters Kluwer Health | Lippincott Williams & Wilkins. Skill Checklists for Taylor's Clinical Nursing Skills:
A Nursing Process Approach, 3rd edition, by Pamela Lynn and Marilee LeBon.
SKILL 8-8
Caring for a T-Tube Drain (Continued)
Comments
13. Carefully measure and note the characteristics of thedrainage. Discard the drainage according to facility policy.
14. Remove gloves and perform hand hygiene.
Cleaning the Drain Site
15. Put on clean gloves. Check the position of the drain ordrains before removing the dressing. Carefully and gentlyremove the soiled dressings. If there is resistance, use a sili-cone-based adhesive remover to help remove the tape. Ifany part of the dressing sticks to the underlying skin, usesmall amounts of sterile saline to help loosen and remove.Do not reach over the drain site.
16. After removing the dressing, note the presence, amount,type, color, and odor of any drainage on the dressings.Place soiled dressings in the appropriate waste receptacle.Remove gloves and dispose of in appropriate waste receptacle.
17. Inspect the drain site for appearance and drainage. Assessif any pain is present.
18. Using sterile technique, prepare a sterile work area andopen the needed supplies.
19. Open the sterile cleaning solution. Pour the cleansing solu-tion into the basin. Add the gauze sponges.
20. Put on sterile gloves.
21. Cleanse the drain site with the cleaning solution. Use theforceps and the moistened gauze or cotton-tipped applica-tors. Start at the drain insertion site, moving in a circularmotion toward the periphery. Use each gauze sponge onlyonce. Discard and use new gauze if additional cleansingis needed.
22. Dry with new sterile gauze in the same manner. Apply skinprotectant to the skin around the drain; extend out toinclude the area of skin that will be taped.
23. Place a presplit drain sponge under the drain. Apply gauzepads over the drain. Remove and discard gloves.
24. Secure the dressings with tape as needed. Alternatively,before removing gloves, place a transparent dressing overthe tube and insertion site. Be careful not to kink the tubing.
Exce
llent
Satis
fact
ory
Nee
ds P
ract
ice
LWBK681-C08_p144-179.qxd 9/3/10 5:37 PM Page 160 Aptara Inc

161
Copyright © 2011 by Wolters Kluwer Health | Lippincott Williams & Wilkins. Skill Checklists for Taylor's Clinical Nursing Skills:
A Nursing Process Approach, 3rd edition, by Pamela Lynn and Marilee LeBon.
SKILL 8-8
Caring for a T-Tube Drain (Continued)
Comments
25. After securing the dressing, label dressing with date andtime. Remove all remaining equipment; place the patient ina comfortable position, with side rails up and bed in thelowest position.
26. Remove additional PPE, if used. Perform hand hygiene.
27. Check drain status at least every four hours. Check allwound dressings every shift. More frequent checks may beneeded if the wound is more complex or dressings becomesaturated quickly.
Exce
llent
Satis
fact
ory
Nee
ds P
ract
ice
LWBK681-C08_p144-179.qxd 9/3/10 5:37 PM Page 161 Aptara Inc
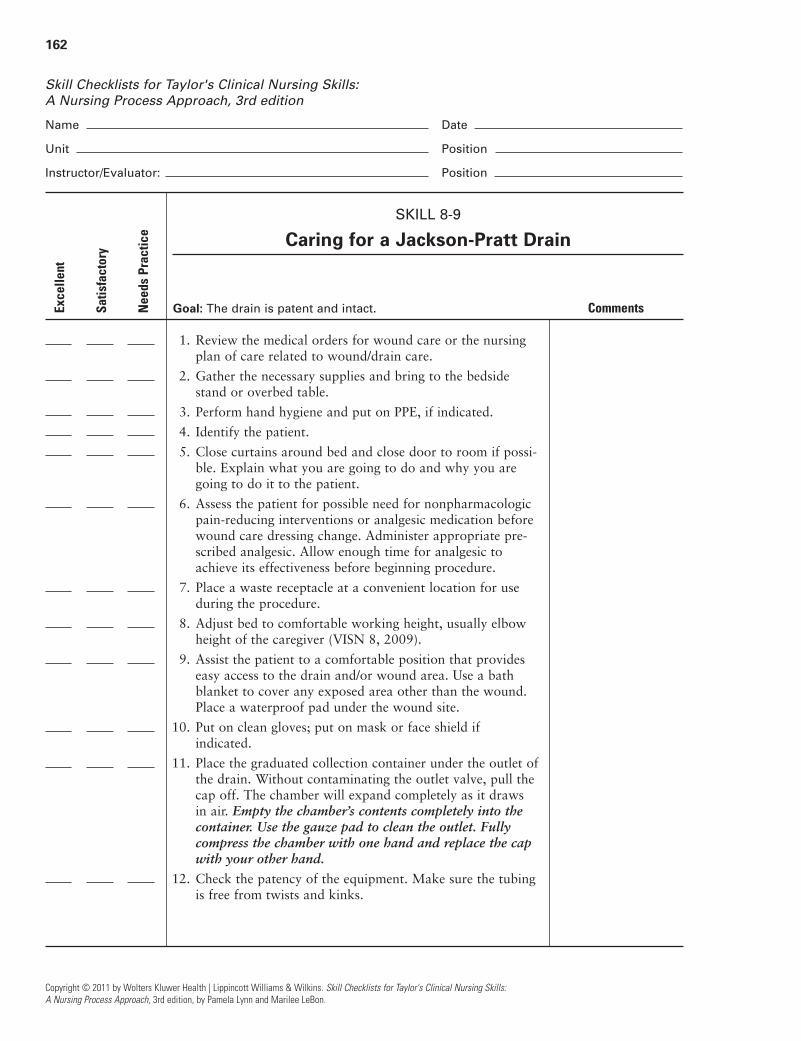
162
Copyright © 2011 by Wolters Kluwer Health | Lippincott Williams & Wilkins. Skill Checklists for Taylor's Clinical Nursing Skills:
A Nursing Process Approach, 3rd edition, by Pamela Lynn and Marilee LeBon.
Skill Checklists for Taylor's Clinical Nursing Skills:
A Nursing Process Approach, 3rd edition
Name Date
Unit Position
Instructor/Evaluator: Position
SKILL 8-9
Caring for a Jackson-Pratt Drain
Goal: The drain is patent and intact. Comments
1. Review the medical orders for wound care or the nursingplan of care related to wound/drain care.
2. Gather the necessary supplies and bring to the bedsidestand or overbed table.
3. Perform hand hygiene and put on PPE, if indicated.
4. Identify the patient.
5. Close curtains around bed and close door to room if possi-ble. Explain what you are going to do and why you aregoing to do it to the patient.
6. Assess the patient for possible need for nonpharmacologicpain-reducing interventions or analgesic medication beforewound care dressing change. Administer appropriate pre-scribed analgesic. Allow enough time for analgesic toachieve its effectiveness before beginning procedure.
7. Place a waste receptacle at a convenient location for useduring the procedure.
8. Adjust bed to comfortable working height, usually elbowheight of the caregiver (VISN 8, 2009).
9. Assist the patient to a comfortable position that provideseasy access to the drain and/or wound area. Use a bathblanket to cover any exposed area other than the wound.Place a waterproof pad under the wound site.
10. Put on clean gloves; put on mask or face shield ifindicated.
11. Place the graduated collection container under the outlet ofthe drain. Without contaminating the outlet valve, pull thecap off. The chamber will expand completely as it drawsin air. Empty the chamber’s contents completely into thecontainer. Use the gauze pad to clean the outlet. Fullycompress the chamber with one hand and replace the capwith your other hand.
12. Check the patency of the equipment. Make sure the tubingis free from twists and kinks.
Exce
llent
Satis
fact
ory
Nee
ds P
ract
ice
LWBK681-C08_p144-179.qxd 9/3/10 5:37 PM Page 162 Aptara Inc

163
Copyright © 2011 by Wolters Kluwer Health | Lippincott Williams & Wilkins. Skill Checklists for Taylor's Clinical Nursing Skills:
A Nursing Process Approach, 3rd edition, by Pamela Lynn and Marilee LeBon.
SKILL 8-9
Caring for a Jackson-Pratt Drain (Continued)
Comments
13. Secure the Jackson-Pratt drain to the patient’s gown belowthe wound with a safety pin, making sure that there is notension on the tubing.
14. Carefully measure and record the character, color, andamount of the drainage. Discard the drainage according to facility policy. Remove gloves.
15. Put on clean gloves. If the drain site has a dressing, re-dress the site as outlined in Skill 8-8. Include cleaning ofthe sutures with the gauze pad moistened with normalsaline. Dry sutures with gauze before applying new dressing.
16. If the drain site is open to air, observe the sutures thatsecure the drain to the skin. Look for signs of pulling, tear-ing, swelling, or infection of the surrounding skin. Gentlyclean the sutures with the gauze pad moistened withnormal saline. Dry with a new gauze pad. Apply skin protectant to the surrounding skin if needed.
17. Remove and discard gloves. Remove all remainingequipment; place the patient in a comfortable position,with side rails up and bed in the lowest position.
18. Remove additional PPE, if used. Perform hand hygiene.
19. Check drain status at least every four hours. Check allwound dressings every shift. More frequent checks may beneeded if the wound is more complex or dressings becomesaturated quickly.
Exce
llent
Satis
fact
ory
Nee
ds P
ract
ice
LWBK681-C08_p144-179.qxd 9/3/10 5:37 PM Page 163 Aptara Inc
164
Copyright © 2011 by Wolters Kluwer Health | Lippincott Williams & Wilkins. Skill Checklists for Taylor's Clinical Nursing Skills:
A Nursing Process Approach, 3rd edition, by Pamela Lynn and Marilee LeBon.
Skill Checklists for Taylor's Clinical Nursing Skills:
A Nursing Process Approach, 3rd edition
Name Date
Unit Position
Instructor/Evaluator: Position
SKILL 8-10
Caring for a Hemovac Drain
Goal: The drain is patent and intact. Comments
1. Review the medical orders for wound care or the nursingplan of care related to wound/drain care.
2. Gather the necessary supplies and bring to the bedsidestand or overbed table.
3. Perform hand hygiene and put on PPE, if indicated.
4. Identify the patient.
5. Close curtains around bed and close door to room if possi-ble. Explain what you are going to do and why you aregoing to do it to the patient.
6. Assess the patient for possible need for nonpharmacologicpain-reducing interventions or analgesic medication beforewound care dressing change. Administer appropriate pre-scribed analgesic. Allow enough time for analgesic toachieve its effectiveness before beginning procedure.
7. Place a waste receptacle at a convenient location for useduring the procedure.
8. Adjust bed to comfortable working height, usually elbowheight of the caregiver (VISN 8, 2009).
9. Assist the patient to a comfortable position that provideseasy access to the drain and/or wound area. Use a bathblanket to cover any exposed area other than the wound.Place a waterproof pad under the wound site.
10. Put on clean gloves; put on mask or face shield ifindicated.
11. Place the graduated collection container under the outlet ofthe drain. Without contaminating the outlet, pull the cap off. The chamber will expand completely as it draws in air.Empty the chamber’s contents completely into the container.Use the gauze pad to clean the outlet. Fully compress thechamber by pushing the top and bottom together with yourhands. Keep the device tightly compressed while you applythe cap.
12. Check the patency of the equipment. Make sure the tubingis free from twists and kinks.
Exce
llent
Satis
fact
ory
Nee
ds P
ract
ice
LWBK681-C08_p144-179.qxd 9/3/10 5:37 PM Page 164 Aptara Inc
165
Copyright © 2011 by Wolters Kluwer Health | Lippincott Williams & Wilkins. Skill Checklists for Taylor's Clinical Nursing Skills:
A Nursing Process Approach, 3rd edition, by Pamela Lynn and Marilee LeBon.
SKILL 8-10
Caring for a Hemovac Drain (Continued)
Comments
13. Secure the Hemovac drain to the patient’s gown below the wound with a safety pin, making sure that there is notension on the tubing.
14. Carefully measure and record the character, color, andamount of the drainage. Discard the drainage according to facility policy.
15. Put on clean gloves. If the drain site has a dressing, re-dressthe site as outlined in Skill 8-8. Include cleaning of thesutures with the gauze pad moistened with normal saline.Dry sutures with gauze before applying new dressing.
16. If the drain site is open to air, observe the sutures thatsecure the drain to the skin. Look for signs of pulling, tear-ing, swelling, or infection of the surrounding skin. Gentlyclean the sutures with the gauze pad moistened withnormal saline. Dry with a new gauze pad. Apply skin protectant to the surrounding skin if needed.
17. Remove and discard gloves. Remove all remainingequipment; place the patient in a comfortable position,with side rails up and bed in the lowest position.
18. Remove additional PPE, if used. Perform hand hygiene.
19. Check drain status at least every four hours. Check allwound dressings every shift. More frequent checks may beneeded if the wound is more complex or dressings becomesaturated quickly.
Exce
llent
Satis
fact
ory
Nee
ds P
ract
ice
LWBK681-C08_p144-179.qxd 9/3/10 5:37 PM Page 165 Aptara Inc

166
Copyright © 2011 by Wolters Kluwer Health | Lippincott Williams & Wilkins. Skill Checklists for Taylor's Clinical Nursing Skills:
A Nursing Process Approach, 3rd edition, by Pamela Lynn and Marilee LeBon.
Skill Checklists for Taylor's Clinical Nursing Skills:
A Nursing Process Approach, 3rd edition
Name Date
Unit Position
Instructor/Evaluator: Position
SKILL 8-11
Applying Negative Pressure Wound Therapy
Goal: The therapy is accomplished without contaminating the
wound area, without causing trauma to the wound, and without
causing the patient to experience pain or discomfort. Comments
1. Review the medical order for the application of NPWTtherapy, including the ordered pressure setting for thedevice.
2. Gather the necessary supplies and bring to the bedsidestand or overbed table.
3. Perform hand hygiene and put on PPE, if indicated.
4. Identify the patient.
5. Close curtains around bed and close door to room if possi-ble. Explain what you are going to do and why you aregoing to do it to the patient.
6. Assess the patient for possible need for nonpharmacologicpain-reducing interventions or analgesic medication beforewound care dressing change. Administer appropriate pre-scribed analgesic. Allow enough time for analgesic toachieve its effectiveness before beginning procedure.
7. Adjust bed to comfortable working height, usually elbowheight of the caregiver (VISN 8, 2009).
8. Assist the patient to a comfortable position that provideseasy access to the wound area. Position the patient so theirrigation solution will flow from the clean end of thewound toward the dirty end. Expose the area and drapethe patient with a bath blanket if needed. Put a waterproofpad under the wound area.
9. Have the disposal bag or waste receptacle within easyreach for use during the procedure.
10. Using sterile technique, prepare a sterile field and add allthe sterile supplies needed for the procedure to the field.Pour warmed, sterile irrigating solution into the sterilecontainer.
11. Put on a gown, mask, and eye protection.
12. Put on clean gloves. Carefully and gently remove the dress-ing. If there is resistance, use a silicone-based adhesiveremover to help remove the drape. Note the number ofpieces of foam removed from the wound. Compare with thedocumented number from the previous dressing change.
Exce
llent
Satis
fact
ory
Nee
ds P
ract
ice
LWBK681-C08_p144-179.qxd 9/3/10 5:37 PM Page 166 Aptara Inc

167
Copyright © 2011 by Wolters Kluwer Health | Lippincott Williams & Wilkins. Skill Checklists for Taylor's Clinical Nursing Skills:
A Nursing Process Approach, 3rd edition, by Pamela Lynn and Marilee LeBon.
SKILL 8-11
Applying Negative Pressure Wound Therapy (Continued)
Comments
13. Discard the dressings in the receptacle. Remove your glovesand put them in the receptacle.
14. Put on sterile gloves. Using sterile technique, irrigate thewound (see Skill 8-4).
15. Clean the area around the skin with normal saline. Dry thesurrounding skin with a sterile gauze sponge.
16. Assess the wound for appearance, stage, the presence ofeschar, granulation tissue, epithelialization, undermining,tunneling, necrosis, sinus tract, and drainage. Assess theappearance of the surrounding tissue. Measure the wound.Refer to Fundamentals Review 8-3.
17. Wipe intact skin around the wound with a skin-protectantwipe and allow it to dry well.
18. Remove gloves if they become contaminated and discardthem into the receptacle.
19. Put on a new pair of sterile gloves, if necessary. Using ster-ile scissors, cut the foam to the shape and measurement ofthe wound. Do not cut foam over the wound. More thanone piece of foam may be necessary if the first piece is cuttoo small. Carefully place the foam in the wound. Ensurefoam-to-foam contact if more than one piece is required.Note the number of pieces of foam placed in the wound.
20. Trim and place the V.A.C. Drape to cover the foam dressingand an additional 3 to 5 cm border of intact periwound tis-sue. V.A.C. Drape may be cut into multiple pieces for easierhandling.
21. Choose an appropriate site to apply the T.R.A.C. Pad.
22. Pinch the Drape and cut a 2-cm hole through the Drape.Apply the T.R.A.C. Pad. Remove V.A.C. Canister frompackage and insert into the V.A.C. Therapy Unit until itlocks into place. Connect T.R.A.C. Pad tubing to canistertubing and check that the clamps on each tube are open.Turn on the power to the V.A.C. Therapy Unit and selectthe prescribed therapy setting.
23. Assess the dressing to ensure seal integrity. The dressingshould be collapsed, shrinking to the foam and skin.
24. Remove and discard gloves. Apply tape, Montgomerystraps or roller gauze to secure the dressings. Alternately,many commercial wound products are self adhesive and donot require additional tape.
Exce
llent
Satis
fact
ory
Nee
ds P
ract
ice
LWBK681-C08_p144-179.qxd 9/3/10 5:37 PM Page 167 Aptara Inc

168
Copyright © 2011 by Wolters Kluwer Health | Lippincott Williams & Wilkins. Skill Checklists for Taylor's Clinical Nursing Skills:
A Nursing Process Approach, 3rd edition, by Pamela Lynn and Marilee LeBon.
SKILL 8-11
Applying Negative Pressure Wound Therapy (Continued)
Comments
25. Label dressing with date and time. Remove all remainingequipment; place the patient in a comfortable position,with side rails up and bed in the lowest position.
26. Remove PPE, if used. Perform hand hygiene.
27. Check all wound dressings every shift. More frequentchecks may be needed if the wound is more complex ordressings become saturated quickly.
Exce
llent
Satis
fact
ory
Nee
ds P
ract
ice
LWBK681-C08_p144-179.qxd 9/3/10 5:37 PM Page 168 Aptara Inc
169
Skill Checklists for Taylor's Clinical Nursing Skills:
A Nursing Process Approach, 3rd edition
Name Date
Unit Position
Instructor/Evaluator: Position
SKILL 8-12
Removing Sutures
Goal: The sutures are removed without contaminating the
incisional area, without causing trauma to the wound, and
without causing the patient to experience pain or discomfort. Comments
1. Review the medical orders for suture removal.
2. Gather the necessary supplies and bring to the bedsidestand or overbed table.
3. Perform hand hygiene and put on PPE, if indicated.
4. Identify the patient.
5. Close curtains around bed and close door to room if possi-ble. Explain what you are going to do and why you aregoing to do it to the patient. Describe the sensation ofsuture removal as a pulling or slightly uncomfortable experience.
6. Assess the patient for possible need for nonpharmacologicpain-reducing interventions or analgesic medication beforebeginning the procedure. Administer appropriate prescribedanalgesic. Allow enough time for analgesic to achieve itseffectiveness before beginning procedure.
7. Place a waste receptacle at a convenient location for useduring the procedure.
8. Adjust bed to comfortable working height, usually elbowheight of the caregiver (VISN 8, 2009).
9. Assist the patient to a comfortable position that provideseasy access to the incision area. Use a bath blanket tocover any exposed area other than the incision. Place awaterproof pad under the incision site.
10. Put on clean gloves. Carefully and gently remove the soileddressings. If there is resistance, use a silicone-based adhesiveremover to help remove the tape. If any part of the dressingsticks to the underlying skin, use small amounts of sterilesaline to help loosen and remove. Inspect the incision area.
11. Clean the incision using the wound cleanser and gauze,according to facility policies and procedures.
12. Using the forceps, grasp the knot of the first suture andgently lift the knot up off the skin.
Copyright © 2011 by Wolters Kluwer Health | Lippincott Williams & Wilkins. Skill Checklists for Taylor's Clinical Nursing Skills:
A Nursing Process Approach, 3rd edition, by Pamela Lynn and Marilee LeBon.
Exce
llent
Satis
fact
ory
Nee
ds P
ract
ice
LWBK681-C08_p144-179.qxd 9/3/10 5:37 PM Page 169 Aptara Inc
170
Copyright © 2011 by Wolters Kluwer Health | Lippincott Williams & Wilkins. Skill Checklists for Taylor's Clinical Nursing Skills:
A Nursing Process Approach, 3rd edition, by Pamela Lynn and Marilee LeBon.
SKILL 8-12
Removing Sutures (Continued)
Comments
13. Using the scissors, cut one side of the suture below theknot, close to the skin. Grasp the knot with the forcepsand pull the cut suture through the skin. Avoid pulling thevisible portion of the suture through the underlying tissue.
14. Remove every other suture to be sure the wound edges arehealed. If they are, remove the remaining sutures asordered. Dispose of sutures according to facility policy.
15. If wound closure strips are to be applied, apply skin protec-tant to skin around incision. Do not apply to incision.Apply adhesive closure strips. Take care to handle the stripsby the paper backing.
16. Reapply the dressing, depending on the medical orders andfacility policy.
17. Remove gloves and discard. Remove all remainingequipment; place the patient in a comfortable position,with side rails up and bed in the lowest position.
18. Remove additional PPE, if used. Perform hand hygiene.
19. Assess all wounds every shift. More frequent checks maybe needed if the wound is more complex.
Exce
llent
Satis
fact
ory
Nee
ds P
ract
ice
LWBK681-C08_p144-179.qxd 9/3/10 5:37 PM Page 170 Aptara Inc

171
Skill Checklists for Taylor's Clinical Nursing Skills:
A Nursing Process Approach, 3rd edition
Name Date
Unit Position
Instructor/Evaluator: Position
SKILL 8-13
Removing Surgical Staples
Goal: The staples are removed without contaminating the
incisional area, without causing trauma to the wound, and
without causing the patient to experience pain or discomfort. Comments
1. Review the medical orders for staple removal.
2. Gather the necessary supplies and bring to the bedsidestand or overbed table.
3. Perform hand hygiene and put on PPE, if indicated.
4. Identify the patient.
5. Close curtains around bed and close door to room if possi-ble. Explain what you are going to do and why you aregoing to do it to the patient. Describe the sensation of staple removal as a pulling experience.
6. Assess the patient for possible need for nonpharmacologicpain-reducing interventions or analgesic medication beforebeginning the procedure. Administer appropriate prescribedanalgesic. Allow enough time for analgesic to achieve itseffectiveness before beginning procedure.
7. Place a waste receptacle at a convenient location for useduring the procedure.
8. Adjust bed to comfortable working height, usually elbowheight of the caregiver (VISN 8).
9. Assist the patient to a comfortable position that provideseasy access to the incision area. Use a bath blanket tocover any exposed area other than the incision. Place awaterproof pad under the incision site.
10. Put on clean gloves. Carefully and gently remove the soileddressings. If there is resistance, use a silicone-based adhesiveremover to help remove the tape. If any part of the dressingsticks to the underlying skin, use small amounts of sterilesaline to help loosen and remove. Inspect the incision area.
11. Clean the incision using the wound cleanser and gauze,according to facility policies and procedures.
12. Grasp the staple remover. Position the staple removerunder the staple to be removed. Firmly close the stapleremover. The staple will bend in the middle and the edgeswill pull up out of the skin.
Copyright © 2011 by Wolters Kluwer Health | Lippincott Williams & Wilkins. Skill Checklists for Taylor's Clinical Nursing Skills:
A Nursing Process Approach, 3rd edition, by Pamela Lynn and Marilee LeBon.
Exce
llent
Satis
fact
ory
Nee
ds P
ract
ice
LWBK681-C08_p144-179.qxd 9/3/10 5:37 PM Page 171 Aptara Inc

172
Copyright © 2011 by Wolters Kluwer Health | Lippincott Williams & Wilkins. Skill Checklists for Taylor's Clinical Nursing Skills:
A Nursing Process Approach, 3rd edition, by Pamela Lynn and Marilee LeBon.
SKILL 8-13
Removing Surgical Staples (Continued)
Comments
13. Remove every other staple to be sure the wound edges arehealed. If they are, remove the remaining staples as ordered.Dispose of staples in the sharps container.
14. If wound closure strips are to be applied, apply skin protec-tant to skin around incision. Do not apply to incision.Apply adhesive closure strips. Take care to handle the stripsby the paper backing.
15. Reapply the dressing, depending on the medical orders andfacility policy.
16. Remove gloves and discard. Remove all remainingequipment; place the patient in a comfortable position,with side rails up and bed in the lowest position.
17. Remove additional PPE, if used. Perform hand hygiene.
18. Assess all wounds every shift. More frequent checks maybe needed if the wound is more complex.
Exce
llent
Satis
fact
ory
Nee
ds P
ract
ice
LWBK681-C08_p144-179.qxd 9/3/10 5:37 PM Page 172 Aptara Inc

173
Skill Checklists for Taylor's Clinical Nursing Skills:
A Nursing Process Approach, 3rd edition
Name Date
Unit Position
Instructor/Evaluator: Position
SKILL 8-14
Applying an External Heating Pad
Goal: Desired outcome depends on the patient’s nursing
diagnosis. Comments
1. Review the medical order for the application of heat ther-apy, including frequency, type of therapy, body area to betreated, and length of time for the application.
2. Gather the necessary supplies and bring to the bedsidestand or overbed table.
3. Perform hand hygiene and put on PPE, if indicated.
4. Identify the patient.
5. Close curtains around bed and close door to room if possi-ble. Explain what you are going to do and why you aregoing to do it to the patient.
6. Adjust bed to comfortable working height, usually elbowheight of the caregiver (VISN 8, 2009).
7. Assist the patient to a comfortable position that provideseasy access to the area where the heat will be applied; usea bath blanket to cover any other exposed area.
8. Assess the condition of the skin where the heat is to beapplied.
9. Check that the water in the electronic unit is at theappropriate level. Fill the unit two-thirds full or to thefill mark, with distilled water, if necessary. Check thetemperature setting on the unit to ensure it is withinthe safe range.
10. Attach pad tubing to electronic unit tubing.
11. Plug in the unit and warm the pad before use. Apply theheating pad to the prescribed area. Secure with gauzebandage or tape.
12. Assess the condition of the skin and the patient’s responseto the heat at frequent intervals, according to facility pol-icy. Do not exceed the prescribed length of time for theapplication of heat.
Copyright © 2011 by Wolters Kluwer Health | Lippincott Williams & Wilkins. Skill Checklists for Taylor's Clinical Nursing Skills:
A Nursing Process Approach, 3rd edition, by Pamela Lynn and Marilee LeBon.
Exce
llent
Satis
fact
ory
Nee
ds P
ract
ice
LWBK681-C08_p144-179.qxd 9/3/10 5:37 PM Page 173 Aptara Inc

174
Copyright © 2011 by Wolters Kluwer Health | Lippincott Williams & Wilkins. Skill Checklists for Taylor's Clinical Nursing Skills:
A Nursing Process Approach, 3rd edition, by Pamela Lynn and Marilee LeBon.
SKILL 8-14
Applying an External Heating Pad (Continued)
Comments
13. Remove gloves and discard. Remove all remainingequipment; place the patient in a comfortable position,with side rails up and bed in the lowest position.
14. Remove additional PPE, if used. Perform hand hygiene.
15. Remove after the prescribed amount of time. Reassess thepatient and area of application, noting the effect and pres-ence of adverse effects.
Exce
llent
Satis
fact
ory
Nee
ds P
ract
ice
LWBK681-C08_p144-179.qxd 9/3/10 5:37 PM Page 174 Aptara Inc

175
Skill Checklists for Taylor's Clinical Nursing Skills:
A Nursing Process Approach, 3rd edition
Name Date
Unit Position
Instructor/Evaluator: Position
SKILL 8-15
Applying a Warm Compress
Goal: The patient displays signs of improvement, such as
decreased inflammation, decreased muscle spasms, or
decreased pain that indicate problems have been relieved. Comments
1. Review the medical order for the application of a moistwarm compress, including frequency, and length of timefor the application.
2. Gather the necessary supplies and bring to the bedsidestand or overbed table.
3. Perform hand hygiene and put on PPE, if indicated.
4. Identify the patient.
5. Assess the patient for possible need for nonpharmacologicpain-reducing interventions or analgesic medication beforebeginning the procedure. Administer appropriate analgesic,consulting physician’s orders, and allow enough time foranalgesic to achieve its effectiveness before beginning procedure.
6. Close curtains around bed and close door to room if possi-ble. Explain what you are going to do and why you aregoing to do it to the patient.
7. If using an electronic heating device, check that the waterin the unit is at the appropriate level. Fill the unit two-thirds full with distilled water, or to the fill mark, if neces-sary. Check the temperature setting on the unit to ensure itis within the safe range (Refer to Skill 8-14).
8. Assist the patient to a comfortable position that provideseasy access to the area. Use a bath blanket to cover anyexposed area other than the intended site. Place awaterproof pad under the site.
9. Place a waste receptacle at a convenient location for useduring the procedure.
10. Pour the warmed solution into the container and drop thegauze for the compress into the solution. Alternately, ifcommercially packaged pre-warmed gauze is used, openpackaging.
11. Put on clean gloves. Assess the application site for inflam-mation, skin color, and ecchymosis.
Copyright © 2011 by Wolters Kluwer Health | Lippincott Williams & Wilkins. Skill Checklists for Taylor's Clinical Nursing Skills:
A Nursing Process Approach, 3rd edition, by Pamela Lynn and Marilee LeBon.
Exce
llent
Satis
fact
ory
Nee
ds P
ract
ice
LWBK681-C08_p144-179.qxd 9/3/10 5:37 PM Page 175 Aptara Inc

176
Copyright © 2011 by Wolters Kluwer Health | Lippincott Williams & Wilkins. Skill Checklists for Taylor's Clinical Nursing Skills:
A Nursing Process Approach, 3rd edition, by Pamela Lynn and Marilee LeBon.
SKILL 8-15
Applying a Warm Compress (Continued)
Comments
12. Retrieve the compress from the warmed solution, squeezingout any excess moisture. Alternately, remove pre-warmedgauze from open package. Apply the compress by gentlyand carefully molding it to the intended area. Ask patientif the application feels too hot.
13. Cover the site with a single layer of gauze and with a cleandry bath towel; secure in place if necessary.
14. Place the Aquathermia or heating device, if used, over thetowel.
15. Remove gloves and discard them appropriately. Performhand hygiene and remove additional PPE, if used.
16. Monitor the time the compress is in place to prevent burnsand skin/tissue damage. Monitor the condition of thepatient’s skin and the patient’s response at frequent intervals.
17. After the prescribed time for the treatment (up to 30 min-utes), remove the external heating device (if used) and puton gloves.
18. Carefully remove the compress while assessing the skincondition around the site and observing the patient’sresponse to the heat application. Note any changes in theapplication area.
19. Remove gloves. Place the patient in a comfortable position.Lower the bed. Dispose of any other suppliesappropriately.
20. Remove additional PPE, if used. Perform hand hygiene.
Exce
llent
Satis
fact
ory
Nee
ds P
ract
ice
LWBK681-C08_p144-179.qxd 9/3/10 5:37 PM Page 176 Aptara Inc

177
Skill Checklists for Taylor's Clinical Nursing Skills:
A Nursing Process Approach, 3rd edition
Name Date
Unit Position
Instructor/Evaluator: Position
SKILL 8-16
Assisting With a Sitz Bath
Goal: The patient states an increase in comfort. Comments
1. Review the medical order for the application of a Sitz bath,including frequency, and length of time for the application.
2. Gather the necessary supplies and bring to the bedsidestand or overbed table.
3. Perform hand hygiene and put on PPE, if indicated.
4. Identify the patient.
5. Close curtains around bed and close door to room if possible.
6. Put on gloves. Assemble equipment; at the bedside if usinga bedside commode or in bathroom.
7. Raise lid of toilet or commode. Place bowl of sitz bath,with drainage ports to rear and infusion port in front, inthe toilet. Fill bowl of sitz bath about halfway full withtepid to warm water (37�–46�C [98�–115�F]).
8. Clamp tubing on bag. Fill bag with same temperaturewater as mentioned above. Hang bag above patient’sshoulder height on the IV pole.
9. Assist patient to sit on toilet or commode and provide anyextra draping if needed. Insert tubing into infusion port ofsitz bath. Slowly unclamp tubing and allow sitz bath to fill.
10. Clamp tubing once sitz bath is full. Instruct patient toopen clamp when water in bowl becomes cool. Ensurethat call bell is within reach. Instruct patient to call if shefeels light-headed or dizzy or has any problems. Instructpatient not to try standing without assistance.
11. Remove gloves and perform hand hygiene.
12. When patient is finished (in about 15–20 minutes, or pre-scribed time), put on clean gloves. Assist the patient tostand and gently pat perineal area dry. Remove gloves.Assist patient to bed or chair. Ensure that call bell is within reach.
13. Put on gloves. Empty and disinfect Sitz bath bowl accord-ing to agency policy.
14. Remove gloves and any additional PPE, if used. Performhand hygiene.
Copyright © 2011 by Wolters Kluwer Health | Lippincott Williams & Wilkins. Skill Checklists for Taylor's Clinical Nursing Skills:
A Nursing Process Approach, 3rd edition, by Pamela Lynn and Marilee LeBon.
Exce
llent
Satis
fact
ory
Nee
ds P
ract
ice
LWBK681-C08_p144-179.qxd 9/3/10 5:37 PM Page 177 Aptara Inc

178
Copyright © 2011 by Wolters Kluwer Health | Lippincott Williams & Wilkins. Skill Checklists for Taylor's Clinical Nursing Skills:
A Nursing Process Approach, 3rd edition, by Pamela Lynn and Marilee LeBon.
Skill Checklists for Taylor's Clinical Nursing Skills:
A Nursing Process Approach, 3rd edition
Name Date
Unit Position
Instructor/Evaluator: Position
SKILL 8-17
Applying Cold Therapy
Goal: The patient reports a relief of pain and increased comfort. Comments
1. Review the medical order or nursing plan of care for theapplication of cold therapy, including frequency, type oftherapy, body area to be treated, and length of time for theapplication.
2. Gather the necessary supplies and bring to the bedsidestand or overbed table.
3. Perform hand hygiene and put on PPE, if indicated.
4. Identify the patient. Determine if the patient has had anyprevious adverse reaction to hypothermia therapy.
5. Close curtains around bed and close door to room if possible. Explain what you are going to do and why youare going to do it to the patient.
6. Assess the condition of the skin where the ice is to beapplied.
7. Assist the patient to a comfortable position that provideseasy access to the area to be treated. Expose the area anddrape the patient with a bath blanket if needed. Put thewaterproof pad under the wound area, if necessary.
8. Prepare device:
Fill the bag, collar, or glove about three-fourths full withice. Remove any excess air from the device. Securely fastenthe end of the bag or collar; tie the glove closed, checkingfor holes and leakage of water.
Prepare commercially prepared ice pack if appropriate.
9. Cover the device with a towel or washcloth. (If the devicehas a cloth exterior, this is not necessary.)
10. Position cooling device on top of designated area andlightly secure in place as needed.
11. Remove the ice and assess the site for redness after 30 seconds. Ask the patient about the presence of burningsensations.
12. Replace the device snugly against the site if no problemsare evident. Secure it in place with gauze wrap, ties, ortape.
Exce
llent
Satis
fact
ory
Nee
ds P
ract
ice
LWBK681-C08_p144-179.qxd 9/3/10 5:37 PM Page 178 Aptara Inc

179
Copyright © 2011 by Wolters Kluwer Health | Lippincott Williams & Wilkins. Skill Checklists for Taylor's Clinical Nursing Skills:
A Nursing Process Approach, 3rd edition, by Pamela Lynn and Marilee LeBon.
SKILL 8-17
Applying Cold Therapy (Continued)
Comments
13. Reassess the treatment area every 5 minutes or accordingto facility policy.
14. After 20 minutes or the prescribed amount of time, removethe ice and dry the skin.
15. Remove PPE, if used. Perform hand hygiene.
Exce
llent
Satis
fact
ory
Nee
ds P
ract
ice
LWBK681-C08_p144-179.qxd 9/3/10 5:37 PM Page 179 Aptara Inc
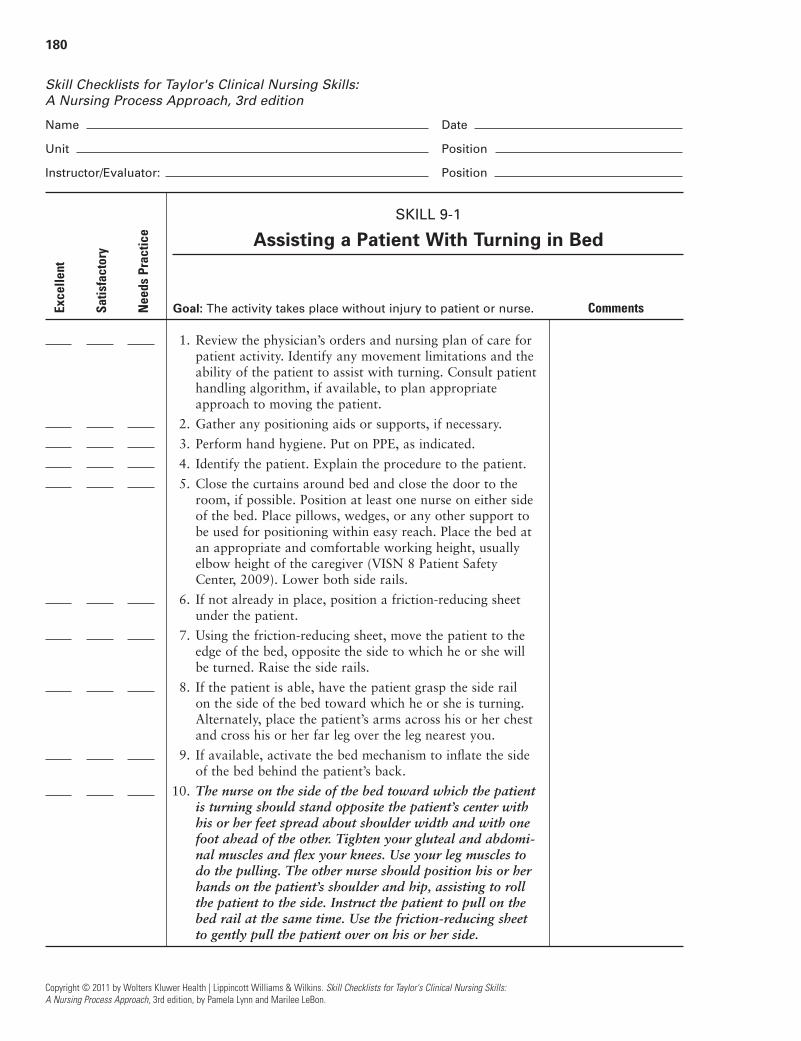
180
Copyright © 2011 by Wolters Kluwer Health | Lippincott Williams & Wilkins. Skill Checklists for Taylor's Clinical Nursing Skills:
A Nursing Process Approach, 3rd edition, by Pamela Lynn and Marilee LeBon.
Skill Checklists for Taylor's Clinical Nursing Skills:
A Nursing Process Approach, 3rd edition
Name Date
Unit Position
Instructor/Evaluator: Position
SKILL 9-1
Assisting a Patient With Turning in Bed
Goal: The activity takes place without injury to patient or nurse. Comments
1. Review the physician’s orders and nursing plan of care forpatient activity. Identify any movement limitations and theability of the patient to assist with turning. Consult patienthandling algorithm, if available, to plan appropriateapproach to moving the patient.
2. Gather any positioning aids or supports, if necessary.
3. Perform hand hygiene. Put on PPE, as indicated.
4. Identify the patient. Explain the procedure to the patient.
5. Close the curtains around bed and close the door to theroom, if possible. Position at least one nurse on either sideof the bed. Place pillows, wedges, or any other support tobe used for positioning within easy reach. Place the bed atan appropriate and comfortable working height, usuallyelbow height of the caregiver (VISN 8 Patient Safety Center, 2009). Lower both side rails.
6. If not already in place, position a friction-reducing sheetunder the patient.
7. Using the friction-reducing sheet, move the patient to theedge of the bed, opposite the side to which he or she willbe turned. Raise the side rails.
8. If the patient is able, have the patient grasp the side rail on the side of the bed toward which he or she is turning.Alternately, place the patient’s arms across his or her chestand cross his or her far leg over the leg nearest you.
9. If available, activate the bed mechanism to inflate the sideof the bed behind the patient’s back.
10. The nurse on the side of the bed toward which the patientis turning should stand opposite the patient’s center withhis or her feet spread about shoulder width and with onefoot ahead of the other. Tighten your gluteal and abdomi-nal muscles and flex your knees. Use your leg muscles todo the pulling. The other nurse should position his or herhands on the patient’s shoulder and hip, assisting to rollthe patient to the side. Instruct the patient to pull on thebed rail at the same time. Use the friction-reducing sheetto gently pull the patient over on his or her side.
Exce
llent
Satis
fact
ory
Nee
ds P
ract
ice
LWBK681-C09_p180-217.qxd 9/6/10 10:21 PM Page 180 Aptara

181
Copyright © 2011 by Wolters Kluwer Health | Lippincott Williams & Wilkins. Skill Checklists for Taylor's Clinical Nursing Skills:
A Nursing Process Approach, 3rd edition, by Pamela Lynn and Marilee LeBon.
SKILL 9-1
Assisting a Patient With Turning in Bed (Continued)
Comments
11. Use a pillow or other support behind the patient’s back.Pull the shoulder blade forward and out from under thepatient.
12. Make the patient comfortable and position in properalignment, using pillows or other supports under the leg and arm, as needed. Readjust the pillow under thepatient’s head. Elevate the head of the bed as needed for comfort.
13. Place the bed in the lowest position, with the side rails up. Make sure the call bell and other necessary items arewithin easy reach.
14. Clean transfer aids, per facility policy, if not indicated forsingle patient use. Remove gloves and other PPE, if used.Perform hand hygiene.
Exce
llent
Satis
fact
ory
Nee
ds P
ract
ice
LWBK681-C09_p180-217.qxd 9/6/10 10:21 PM Page 181 Aptara
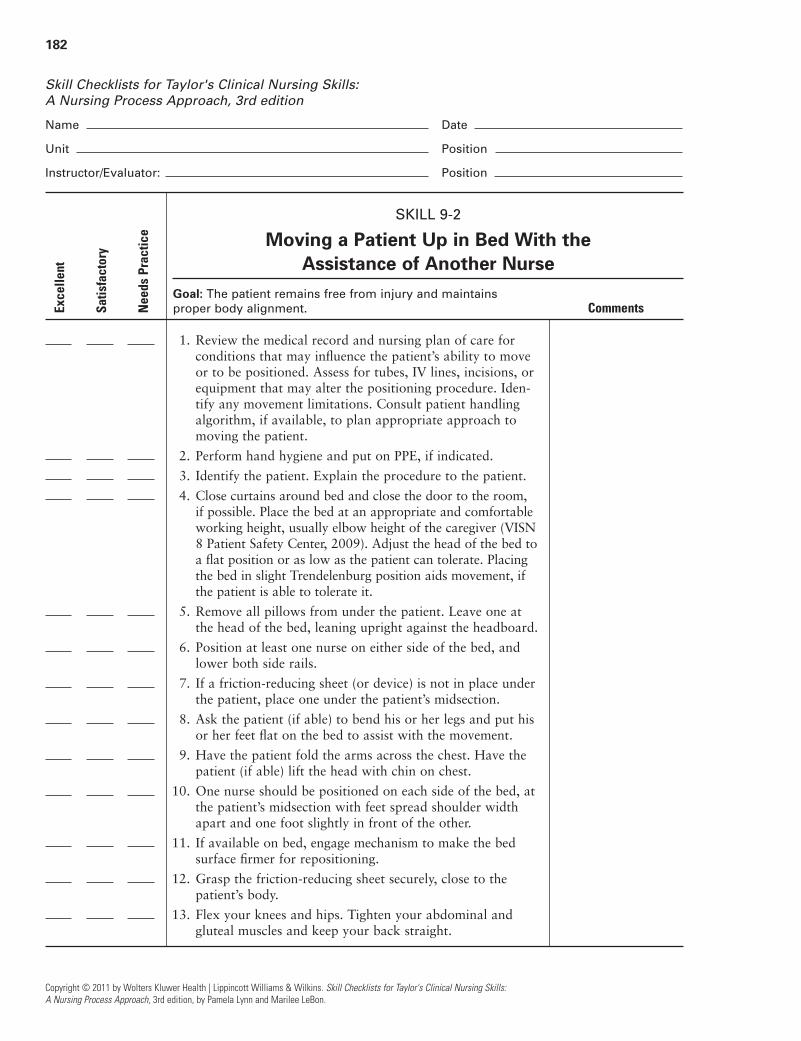
182
Copyright © 2011 by Wolters Kluwer Health | Lippincott Williams & Wilkins. Skill Checklists for Taylor's Clinical Nursing Skills:
A Nursing Process Approach, 3rd edition, by Pamela Lynn and Marilee LeBon.
Skill Checklists for Taylor's Clinical Nursing Skills:
A Nursing Process Approach, 3rd edition
Name Date
Unit Position
Instructor/Evaluator: Position
SKILL 9-2
Moving a Patient Up in Bed With the Assistance of Another Nurse
Goal: The patient remains free from injury and maintains
proper body alignment. Comments
1. Review the medical record and nursing plan of care forconditions that may influence the patient’s ability to moveor to be positioned. Assess for tubes, IV lines, incisions, orequipment that may alter the positioning procedure. Iden-tify any movement limitations. Consult patient handlingalgorithm, if available, to plan appropriate approach tomoving the patient.
2. Perform hand hygiene and put on PPE, if indicated.
3. Identify the patient. Explain the procedure to the patient.
4. Close curtains around bed and close the door to the room,if possible. Place the bed at an appropriate and comfortableworking height, usually elbow height of the caregiver (VISN8 Patient Safety Center, 2009). Adjust the head of the bed toa flat position or as low as the patient can tolerate. Placingthe bed in slight Trendelenburg position aids movement, ifthe patient is able to tolerate it.
5. Remove all pillows from under the patient. Leave one atthe head of the bed, leaning upright against the headboard.
6. Position at least one nurse on either side of the bed, andlower both side rails.
7. If a friction-reducing sheet (or device) is not in place underthe patient, place one under the patient’s midsection.
8. Ask the patient (if able) to bend his or her legs and put hisor her feet flat on the bed to assist with the movement.
9. Have the patient fold the arms across the chest. Have thepatient (if able) lift the head with chin on chest.
10. One nurse should be positioned on each side of the bed, atthe patient’s midsection with feet spread shoulder widthapart and one foot slightly in front of the other.
11. If available on bed, engage mechanism to make the bedsurface firmer for repositioning.
12. Grasp the friction-reducing sheet securely, close to thepatient’s body.
13. Flex your knees and hips. Tighten your abdominal andgluteal muscles and keep your back straight.
Exce
llent
Satis
fact
ory
Nee
ds P
ract
ice
LWBK681-C09_p180-217.qxd 9/6/10 10:21 PM Page 182 Aptara
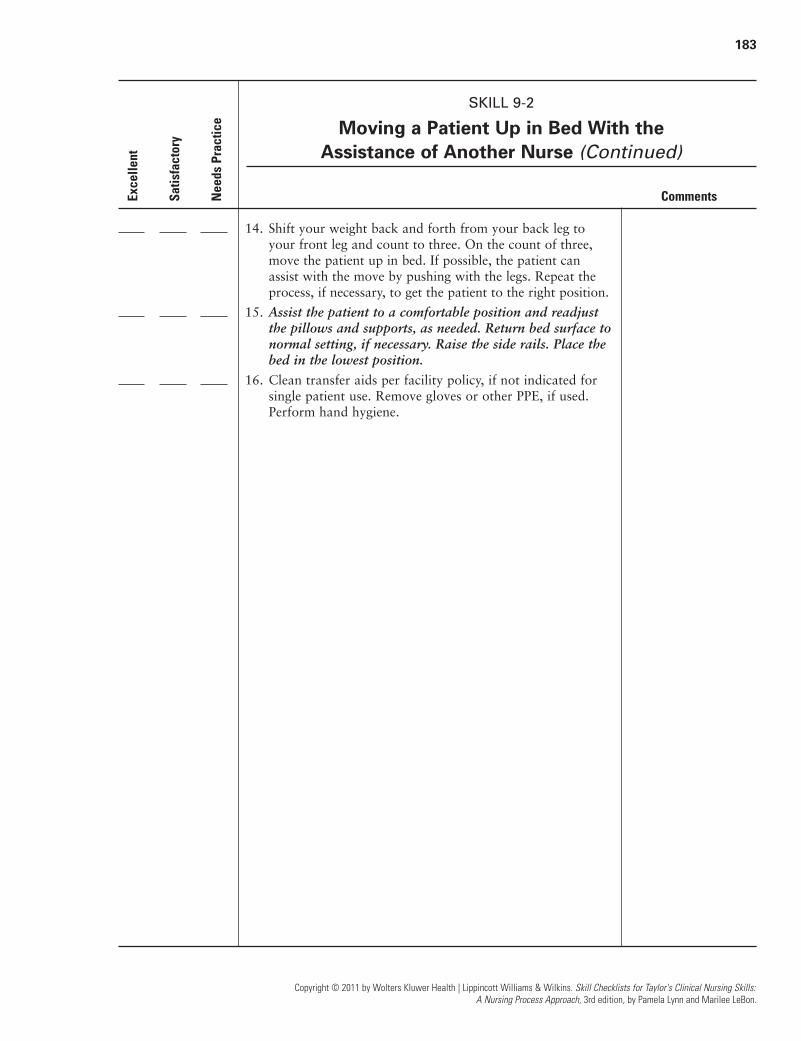
183
Copyright © 2011 by Wolters Kluwer Health | Lippincott Williams & Wilkins. Skill Checklists for Taylor's Clinical Nursing Skills:
A Nursing Process Approach, 3rd edition, by Pamela Lynn and Marilee LeBon.
SKILL 9-2
Moving a Patient Up in Bed With the Assistance of Another Nurse (Continued)
Comments
14. Shift your weight back and forth from your back leg toyour front leg and count to three. On the count of three,move the patient up in bed. If possible, the patient canassist with the move by pushing with the legs. Repeat theprocess, if necessary, to get the patient to the right position.
15. Assist the patient to a comfortable position and readjustthe pillows and supports, as needed. Return bed surface tonormal setting, if necessary. Raise the side rails. Place thebed in the lowest position.
16. Clean transfer aids per facility policy, if not indicated forsingle patient use. Remove gloves or other PPE, if used.Perform hand hygiene.
Exce
llent
Satis
fact
ory
Nee
ds P
ract
ice
LWBK681-C09_p180-217.qxd 9/6/10 10:21 PM Page 183 Aptara

184
Copyright © 2011 by Wolters Kluwer Health | Lippincott Williams & Wilkins. Skill Checklists for Taylor's Clinical Nursing Skills:
A Nursing Process Approach, 3rd edition, by Pamela Lynn and Marilee LeBon.
Skill Checklists for Taylor's Clinical Nursing Skills:
A Nursing Process Approach, 3rd edition
Name Date
Unit Position
Instructor/Evaluator: Position
SKILL 9-3
Transferring a Patient From the Bed to a Stretcher
Goal: The patient is transferred without injury to patient or nurse. Comments
1. Review the medical record and nursing plan of care forconditions that may influence the patient’s ability to moveor to be positioned. Assess for tubes, IV lines, incisions, orequipment that may alter the positioning procedure. Iden-tify any movement limitations. Consult patient handlingalgorithm, if available, to plan appropriate approach tomoving the patient.
2. Perform hand hygiene and put on PPE, if indicated.
3. Identify the patient. Explain the procedure to the patient.
4. Close curtains around bed and close the door to the room,if possible. Adjust the head of the bed to a flat position oras low as the patient can tolerate. Raise the bed to a heightthat is even with the transport stretcher (VISN 8 PatientSafety Center, 2009). Lower the side rails, if in place.
5. Place the bath blanket over the patient and remove the topcovers from underneath.
6. If a friction-reducing transfer sheet is not in place underthe patient, place one under the patient’s midsection. Havepatient fold arms against chest and move chin to chest. Usethe friction-reducing sheet to move the patient to the sideof the bed where the stretcher will be placed. Alternately,place a lateral-assist device under the patient. Follow man-ufacturer’s directions for use.
7. Position the stretcher next to (and parallel) to the bed.Lock the wheels on the stretcher and the bed.
8. Two nurses should stand on the stretcher side of the bed.A third nurse should stand on the side of the bed withoutthe stretcher.
9. Use the friction-reducing sheet to roll the patient awayfrom the stretcher. Place the transfer board across thespace between the stretcher and the bed, partially underthe patient. Roll the patient onto his or her back, so thatthe patient is partially on the transfer board.
Exce
llent
Satis
fact
ory
Nee
ds P
ract
ice
LWBK681-C09_p180-217.qxd 9/6/10 10:21 PM Page 184 Aptara
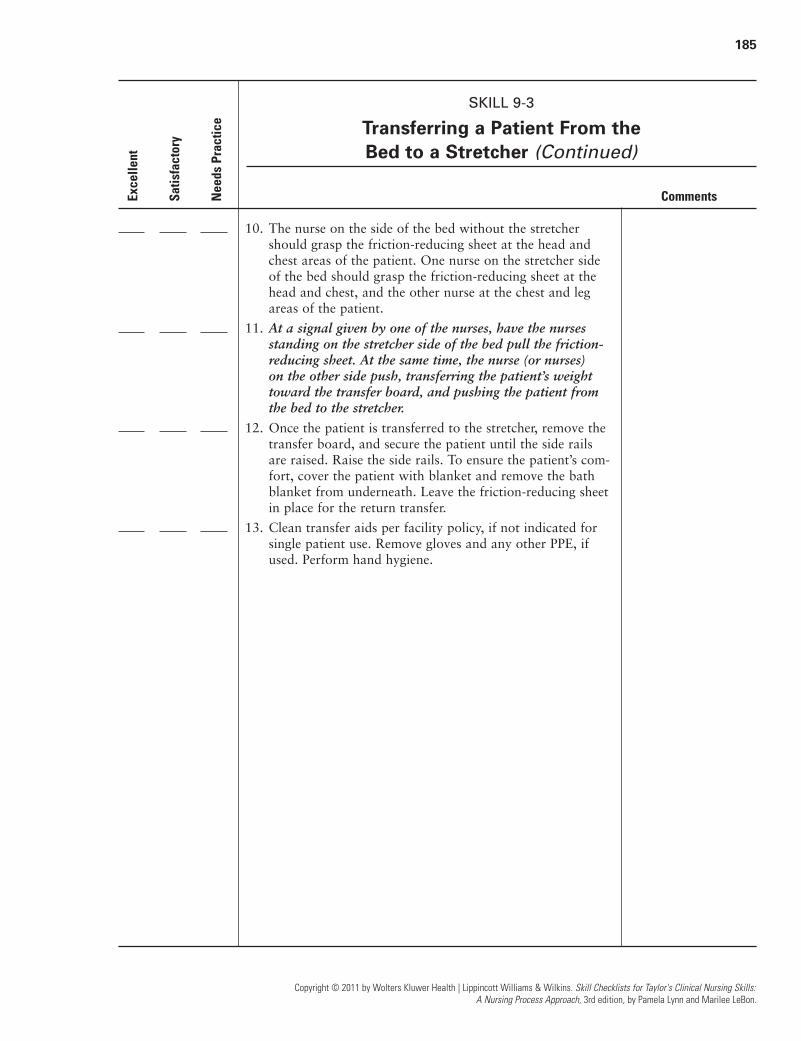
185
Copyright © 2011 by Wolters Kluwer Health | Lippincott Williams & Wilkins. Skill Checklists for Taylor's Clinical Nursing Skills:
A Nursing Process Approach, 3rd edition, by Pamela Lynn and Marilee LeBon.
SKILL 9-3
Transferring a Patient From the Bed to a Stretcher (Continued)
Comments
10. The nurse on the side of the bed without the stretchershould grasp the friction-reducing sheet at the head andchest areas of the patient. One nurse on the stretcher sideof the bed should grasp the friction-reducing sheet at thehead and chest, and the other nurse at the chest and legareas of the patient.
11. At a signal given by one of the nurses, have the nursesstanding on the stretcher side of the bed pull the friction-reducing sheet. At the same time, the nurse (or nurses) on the other side push, transferring the patient’s weighttoward the transfer board, and pushing the patient fromthe bed to the stretcher.
12. Once the patient is transferred to the stretcher, remove thetransfer board, and secure the patient until the side railsare raised. Raise the side rails. To ensure the patient’s com-fort, cover the patient with blanket and remove the bathblanket from underneath. Leave the friction-reducing sheetin place for the return transfer.
13. Clean transfer aids per facility policy, if not indicated forsingle patient use. Remove gloves and any other PPE, ifused. Perform hand hygiene.
Exce
llent
Satis
fact
ory
Nee
ds P
ract
ice
LWBK681-C09_p180-217.qxd 9/6/10 10:21 PM Page 185 Aptara

186
Copyright © 2011 by Wolters Kluwer Health | Lippincott Williams & Wilkins. Skill Checklists for Taylor's Clinical Nursing Skills:
A Nursing Process Approach, 3rd edition, by Pamela Lynn and Marilee LeBon.
Skill Checklists for Taylor's Clinical Nursing Skills:
A Nursing Process Approach, 3rd edition
Name Date
Unit Position
Instructor/Evaluator: Position
SKILL 9-4
Transferring a Patient From the Bed to a Chair
Goal: The transfer is accomplished without injury to patient
or nurse and the patient remains free of any complications
of immobility. Comments
1. Review the medical record and nursing plan of care forconditions that may influence the patient’s ability to moveor to be positioned. Assess for tubes, IV lines, incisions, orequipment that may alter the positioning procedure. Iden-tify any movement limitations. Consult patient-handlingalgorithm, if available, to plan appropriate approach tomoving the patient.
2. Perform hand hygiene and put on PPE, as indicated.
3. Identify the patient. Explain the procedure to the patient.
4. If needed, move equipment to make room for the chair.Close curtains around bed and close the door to the room,if possible.
5. Place the bed in the lowest position. Raise the head of the bed to a sitting position, or as high as the patient cantolerate.
6. Make sure the bed brakes are locked. Put the chair next tothe bed. If available, lock the brakes of the chair. If thechair does not have brakes, brace the chair against asecure object.
7. Encourage the patient to make use of a stand-assist aid,either freestanding or attached to the side of the bed, ifavailable, to move to the side of the bed and to a side-lyingposition, facing the side of the bed on which the patientwill sit.
8. Lower the side rail, if necessary, and stand near thepatient’s hips. Stand with your legs shoulder width apartwith one foot near the head of the bed, slightly in front of the other foot.
9. Encourage the patient to make use of the stand-assistdevice. Assist the patient to sit up on the side of the bed;ask the patient to swing his or her legs over the side of thebed. At the same time, pivot on your back leg to lift thepatient’s trunk and shoulders. Keep your back straight;avoid twisting.
Exce
llent
Satis
fact
ory
Nee
ds P
ract
ice
LWBK681-C09_p180-217.qxd 9/6/10 10:21 PM Page 186 Aptara
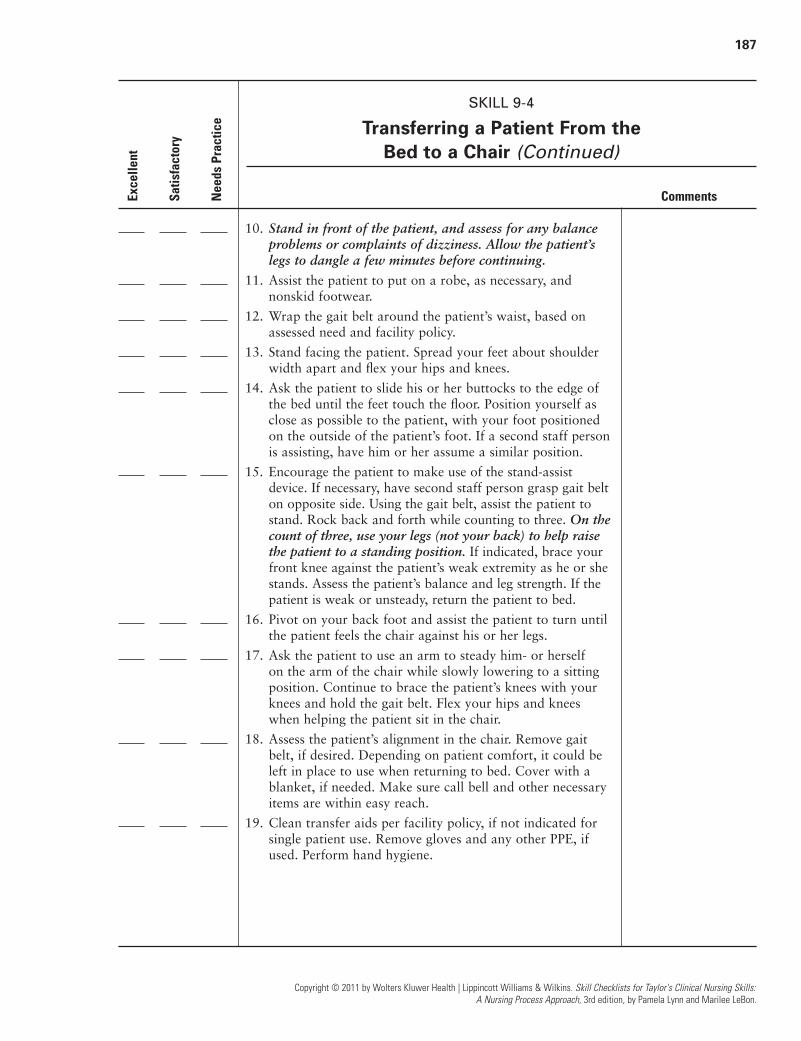
187
Copyright © 2011 by Wolters Kluwer Health | Lippincott Williams & Wilkins. Skill Checklists for Taylor's Clinical Nursing Skills:
A Nursing Process Approach, 3rd edition, by Pamela Lynn and Marilee LeBon.
SKILL 9-4
Transferring a Patient From the Bed to a Chair (Continued)
Comments
10. Stand in front of the patient, and assess for any balanceproblems or complaints of dizziness. Allow the patient’slegs to dangle a few minutes before continuing.
11. Assist the patient to put on a robe, as necessary, and nonskid footwear.
12. Wrap the gait belt around the patient’s waist, based onassessed need and facility policy.
13. Stand facing the patient. Spread your feet about shoulderwidth apart and flex your hips and knees.
14. Ask the patient to slide his or her buttocks to the edge ofthe bed until the feet touch the floor. Position yourself asclose as possible to the patient, with your foot positionedon the outside of the patient’s foot. If a second staff personis assisting, have him or her assume a similar position.
15. Encourage the patient to make use of the stand-assistdevice. If necessary, have second staff person grasp gait belton opposite side. Using the gait belt, assist the patient tostand. Rock back and forth while counting to three. On thecount of three, use your legs (not your back) to help raisethe patient to a standing position. If indicated, brace yourfront knee against the patient’s weak extremity as he or shestands. Assess the patient’s balance and leg strength. If thepatient is weak or unsteady, return the patient to bed.
16. Pivot on your back foot and assist the patient to turn untilthe patient feels the chair against his or her legs.
17. Ask the patient to use an arm to steady him- or herself on the arm of the chair while slowly lowering to a sittingposition. Continue to brace the patient’s knees with yourknees and hold the gait belt. Flex your hips and kneeswhen helping the patient sit in the chair.
18. Assess the patient’s alignment in the chair. Remove gaitbelt, if desired. Depending on patient comfort, it could beleft in place to use when returning to bed. Cover with ablanket, if needed. Make sure call bell and other necessaryitems are within easy reach.
19. Clean transfer aids per facility policy, if not indicated forsingle patient use. Remove gloves and any other PPE, ifused. Perform hand hygiene.
Exce
llent
Satis
fact
ory
Nee
ds P
ract
ice
LWBK681-C09_p180-217.qxd 9/6/10 10:21 PM Page 187 Aptara
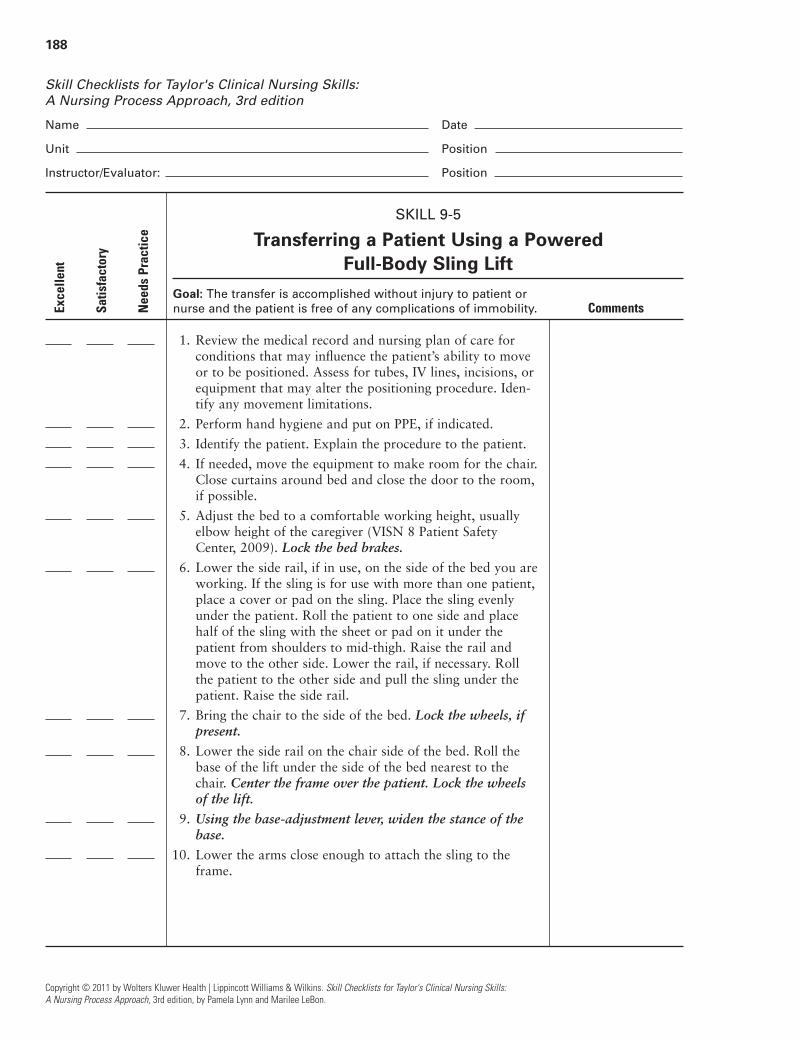
188
Copyright © 2011 by Wolters Kluwer Health | Lippincott Williams & Wilkins. Skill Checklists for Taylor's Clinical Nursing Skills:
A Nursing Process Approach, 3rd edition, by Pamela Lynn and Marilee LeBon.
Skill Checklists for Taylor's Clinical Nursing Skills:
A Nursing Process Approach, 3rd edition
Name Date
Unit Position
Instructor/Evaluator: Position
SKILL 9-5
Transferring a Patient Using a Powered Full-Body Sling Lift
Goal: The transfer is accomplished without injury to patient or
nurse and the patient is free of any complications of immobility. Comments
1. Review the medical record and nursing plan of care forconditions that may influence the patient’s ability to moveor to be positioned. Assess for tubes, IV lines, incisions, orequipment that may alter the positioning procedure. Iden-tify any movement limitations.
2. Perform hand hygiene and put on PPE, if indicated.
3. Identify the patient. Explain the procedure to the patient.
4. If needed, move the equipment to make room for the chair.Close curtains around bed and close the door to the room,if possible.
5. Adjust the bed to a comfortable working height, usuallyelbow height of the caregiver (VISN 8 Patient Safety Center, 2009). Lock the bed brakes.
6. Lower the side rail, if in use, on the side of the bed you areworking. If the sling is for use with more than one patient,place a cover or pad on the sling. Place the sling evenlyunder the patient. Roll the patient to one side and placehalf of the sling with the sheet or pad on it under thepatient from shoulders to mid-thigh. Raise the rail andmove to the other side. Lower the rail, if necessary. Rollthe patient to the other side and pull the sling under thepatient. Raise the side rail.
7. Bring the chair to the side of the bed. Lock the wheels, ifpresent.
8. Lower the side rail on the chair side of the bed. Roll thebase of the lift under the side of the bed nearest to thechair. Center the frame over the patient. Lock the wheelsof the lift.
9. Using the base-adjustment lever, widen the stance of thebase.
10. Lower the arms close enough to attach the sling to theframe.
Exce
llent
Satis
fact
ory
Nee
ds P
ract
ice
LWBK681-C09_p180-217.qxd 9/6/10 10:21 PM Page 188 Aptara

189
Copyright © 2011 by Wolters Kluwer Health | Lippincott Williams & Wilkins. Skill Checklists for Taylor's Clinical Nursing Skills:
A Nursing Process Approach, 3rd edition, by Pamela Lynn and Marilee LeBon.
SKILL 9-5
Transferring a Patient Using a Powered Full-Body Sling Lift (Continued)
Comments
11. Place the strap or chain hooks through the holes of thesling. Short straps attach behind the patient’s back andlong straps attach at the other end of the sling. Check thepatient to make sure the hooks are not pressing into theskin. Some lifts have straps on the sling that attach tohooks on the frame. Check the manufacturer’s instructionsfor each lift.
12. Check all equipment, lines, and drains attached to thepatient so that they are not interfering with the device.Have the patient fold his or her arms across the chest.
13. With a person standing on each side of the lift, tell thepatient that he or she will be lifted from the bed. Supportinjured limbs as necessary. Engage the pump to raise thepatient about 6 inches above the bed.
14. Unlock the wheels of the lift. Carefully wheel the patientstraight back and away from the bed. Support the patient’slimbs, as needed.
15. Position the patient over the chair with the base of the liftstraddling the chair. Lock the wheels of the lift.
16. Gently lower the patient to the chair until the hooks orstraps are slightly loosened from the sling or frame. Guidethe patient into the chair with your hands as the sling lowers.
17. Disconnect the hooks or strap from the frame. Keep thesling in place under the patient.
18. Adjust the patient’s position, using pillows, if necessary.Check the patient’s alignment in the chair. Cover the patientwith a blanket, if necessary. Make sure call bell and othernecessary items are within easy reach. When it is time forthe patient to return to bed, reattach the hooks or strapsand reverse the steps.
19. Clean transfer aids per facility policy, if not indicated forsingle patient use. Remove gloves and any other PPE, ifused. Perform hand hygiene.
Exce
llent
Satis
fact
ory
Nee
ds P
ract
ice
LWBK681-C09_p180-217.qxd 9/6/10 10:21 PM Page 189 Aptara

190
Copyright © 2011 by Wolters Kluwer Health | Lippincott Williams & Wilkins. Skill Checklists for Taylor's Clinical Nursing Skills:
A Nursing Process Approach, 3rd edition, by Pamela Lynn and Marilee LeBon.
Skill Checklists for Taylor's Clinical Nursing Skills:
A Nursing Process Approach, 3rd edition
Name Date
Unit Position
Instructor/Evaluator: Position
SKILL 9-6
Providing Range-of-Motion Exercises
Goal: The patient maintains joint mobility. Comments
1. Review the physician’s orders and nursing plan of care forpatient activity. Identify any movement limitations.
2. Perform hand hygiene and put on PPE, if indicated.
3. Identify the patient. Explain the procedure to the patient.
4. Close curtains around bed and close the door to the room,if possible. Place the bed at an appropriate and comfortableworking height, usually elbow height of the caregiver (VISN8 Patient Safety Center, 2009). Adjust the head of the bed toa flat position or as low as the patient can tolerate.
5. Stand on the side of the bed where the joints are to beexercised. Lower side rail on that side, if in place. Uncoveronly the limb to be used during the exercise.
6. Perform the exercises slowly and gently, providing supportby holding the areas proximal and distal to the joint.Repeat each exercise two to five times, moving each jointin a smooth and rhythmic manner. Stop movement if thepatient complains of pain or if you meet resistance.
7. While performing the exercises, begin at the head andmove down one side of the body at a time. Encourage thepatient to do as many of these exercises by him- or herselfas possible.
8. Move the chin down to rest on the chest. Return the headto a normal upright position. Tilt the head as far as possi-ble toward each shoulder.
9. Move the head from side to side, bringing the chin towardeach shoulder.
10. Start with the arm at the patient’s side and lift the arm for-ward to above the head. Return the arm to the startingposition at the side of the body.
11. With the arm back at the patient’s side, move the arm lat-erally to an upright position above the head, and thenreturn it to the original position. Move the arm across thebody as far as possible.
Exce
llent
Satis
fact
ory
Nee
ds P
ract
ice
LWBK681-C09_p180-217.qxd 9/6/10 10:21 PM Page 190 Aptara
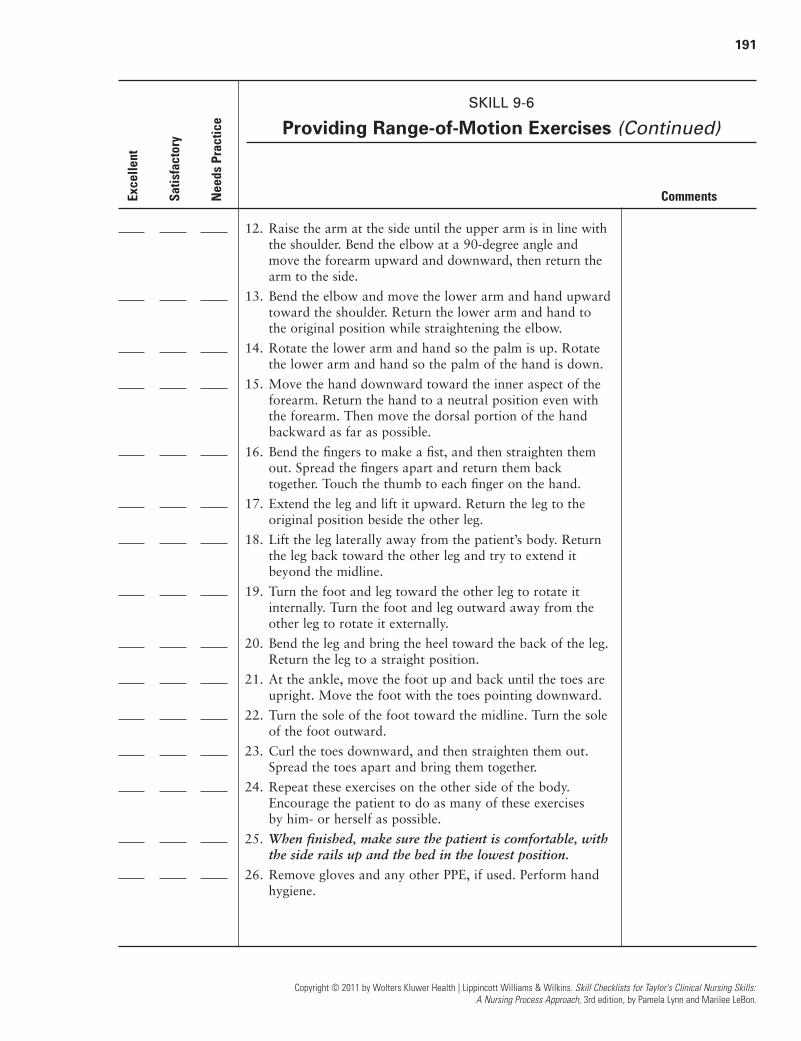
191
Copyright © 2011 by Wolters Kluwer Health | Lippincott Williams & Wilkins. Skill Checklists for Taylor's Clinical Nursing Skills:
A Nursing Process Approach, 3rd edition, by Pamela Lynn and Marilee LeBon.
SKILL 9-6
Providing Range-of-Motion Exercises (Continued)
Comments
12. Raise the arm at the side until the upper arm is in line withthe shoulder. Bend the elbow at a 90-degree angle andmove the forearm upward and downward, then return thearm to the side.
13. Bend the elbow and move the lower arm and hand upwardtoward the shoulder. Return the lower arm and hand tothe original position while straightening the elbow.
14. Rotate the lower arm and hand so the palm is up. Rotatethe lower arm and hand so the palm of the hand is down.
15. Move the hand downward toward the inner aspect of theforearm. Return the hand to a neutral position even withthe forearm. Then move the dorsal portion of the handbackward as far as possible.
16. Bend the fingers to make a fist, and then straighten themout. Spread the fingers apart and return them backtogether. Touch the thumb to each finger on the hand.
17. Extend the leg and lift it upward. Return the leg to theoriginal position beside the other leg.
18. Lift the leg laterally away from the patient’s body. Returnthe leg back toward the other leg and try to extend itbeyond the midline.
19. Turn the foot and leg toward the other leg to rotate itinternally. Turn the foot and leg outward away from theother leg to rotate it externally.
20. Bend the leg and bring the heel toward the back of the leg.Return the leg to a straight position.
21. At the ankle, move the foot up and back until the toes areupright. Move the foot with the toes pointing downward.
22. Turn the sole of the foot toward the midline. Turn the soleof the foot outward.
23. Curl the toes downward, and then straighten them out.Spread the toes apart and bring them together.
24. Repeat these exercises on the other side of the body.Encourage the patient to do as many of these exercises by him- or herself as possible.
25. When finished, make sure the patient is comfortable, withthe side rails up and the bed in the lowest position.
26. Remove gloves and any other PPE, if used. Perform handhygiene.
Exce
llent
Satis
fact
ory
Nee
ds P
ract
ice
LWBK681-C09_p180-217.qxd 9/6/10 10:21 PM Page 191 Aptara

192
Copyright © 2011 by Wolters Kluwer Health | Lippincott Williams & Wilkins. Skill Checklists for Taylor's Clinical Nursing Skills:
A Nursing Process Approach, 3rd edition, by Pamela Lynn and Marilee LeBon.
Skill Checklists for Taylor's Clinical Nursing Skills:
A Nursing Process Approach, 3rd edition
Name Date
Unit Position
Instructor/Evaluator: Position
SKILL 9-7
Assisting a Patient With Ambulation
Goal: The patient ambulates safely, without falls or injury. Comments
1. Review the medical record and nursing plan of care forconditions that may influence the patient’s ability to moveand ambulate. Assess for tubes, IV lines, incisions, orequipment that may alter the procedure for ambulation.Identify any movement limitations.
2. Perform hand hygiene. Put on PPE, as indicated.
3. Identify the patient. Explain the procedure to the patient.Ask the patient to report any feelings of dizziness, weakness,or shortness of breath while walking. Decide how far towalk.
4. Place the bed in the lowest position.
5. Encourage the patient to make use of a stand-assist aid,either freestanding or attached to the side of the bed, if available, to move to the side of the bed. Assist thepatient to the side of the bed, if necessary.
6. Have the patient sit on the side of the bed for several min-utes and assess for dizziness or lightheadedness. Have thepatient stay sitting until he or she feels secure.
7. Assist the patient to put on footwear and a robe, if desired.
8. Wrap the gait belt around the patient’s waist, based onassessed need and facility policy.
9. Encourage the patient to make use of the stand-assistdevice. Assist the patient to stand, using the gait belt, ifnecessary. Assess the patient’s balance and leg strength. Ifthe patient is weak or unsteady, return the patient to thebed or assist to a chair.
Exce
llent
Satis
fact
ory
Nee
ds P
ract
ice
LWBK681-C09_p180-217.qxd 9/6/10 10:21 PM Page 192 Aptara

193
Copyright © 2011 by Wolters Kluwer Health | Lippincott Williams & Wilkins. Skill Checklists for Taylor's Clinical Nursing Skills:
A Nursing Process Approach, 3rd edition, by Pamela Lynn and Marilee LeBon.
SKILL 9-7
Assisting a Patient With Ambulation (Continued)
Comments
10. If you are the only nurse assisting, position yourself to theside and slightly behind the patient. Support the patient bythe waist or transfer belt.
When two nurses assist, position yourself to the side andslightly behind the patient, supporting the patient by thewaist or gait belt. Have the other nurse carry or manageequipment or provide additional support from the otherside.
Alternatively, when two nurses assist, stand at the patient’ssides (one nurse on each side) with near hands grasping thegait belt and far hands holding the patient’s lower arm orhand.
11. Take several steps forward with the patient. Continue toassess the patient’s strength and balance. Remind thepatient to stand erect.
12. Continue with ambulation for the planned distance andtime. Return the patient to the bed or chair based on thepatient’s tolerance and condition.
13. Remove gait belts. Clean transfer aids per facility policy, if not indicated for single patient use. Remove gloves andany other PPE, if used. Perform hand hygiene.
Exce
llent
Satis
fact
ory
Nee
ds P
ract
ice
LWBK681-C09_p180-217.qxd 9/6/10 10:21 PM Page 193 Aptara
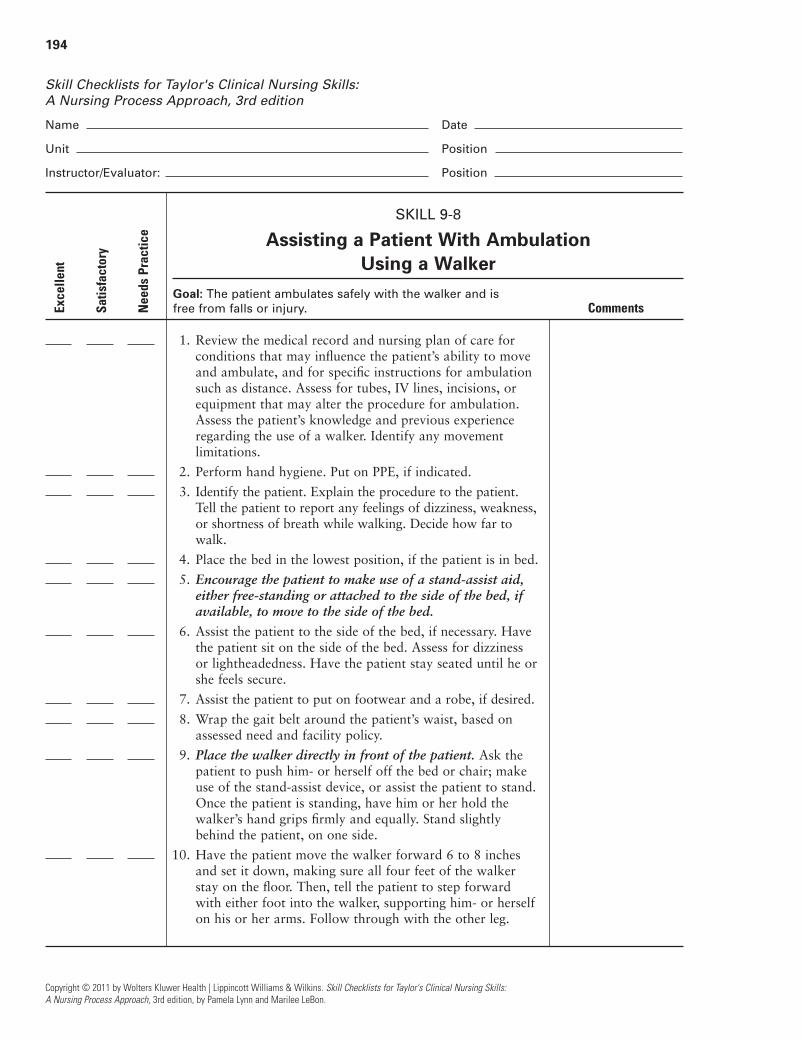
194
Copyright © 2011 by Wolters Kluwer Health | Lippincott Williams & Wilkins. Skill Checklists for Taylor's Clinical Nursing Skills:
A Nursing Process Approach, 3rd edition, by Pamela Lynn and Marilee LeBon.
Skill Checklists for Taylor's Clinical Nursing Skills:
A Nursing Process Approach, 3rd edition
Name Date
Unit Position
Instructor/Evaluator: Position
SKILL 9-8
Assisting a Patient With Ambulation Using a Walker
Goal: The patient ambulates safely with the walker and is
free from falls or injury. Comments
1. Review the medical record and nursing plan of care forconditions that may influence the patient’s ability to moveand ambulate, and for specific instructions for ambulationsuch as distance. Assess for tubes, IV lines, incisions, orequipment that may alter the procedure for ambulation.Assess the patient’s knowledge and previous experienceregarding the use of a walker. Identify any movement limitations.
2. Perform hand hygiene. Put on PPE, if indicated.
3. Identify the patient. Explain the procedure to the patient.Tell the patient to report any feelings of dizziness, weakness,or shortness of breath while walking. Decide how far towalk.
4. Place the bed in the lowest position, if the patient is in bed.
5. Encourage the patient to make use of a stand-assist aid,either free-standing or attached to the side of the bed, ifavailable, to move to the side of the bed.
6. Assist the patient to the side of the bed, if necessary. Havethe patient sit on the side of the bed. Assess for dizzinessor lightheadedness. Have the patient stay seated until he orshe feels secure.
7. Assist the patient to put on footwear and a robe, if desired.
8. Wrap the gait belt around the patient’s waist, based onassessed need and facility policy.
9. Place the walker directly in front of the patient. Ask thepatient to push him- or herself off the bed or chair; makeuse of the stand-assist device, or assist the patient to stand.Once the patient is standing, have him or her hold thewalker’s hand grips firmly and equally. Stand slightlybehind the patient, on one side.
10. Have the patient move the walker forward 6 to 8 inchesand set it down, making sure all four feet of the walkerstay on the floor. Then, tell the patient to step forwardwith either foot into the walker, supporting him- or herselfon his or her arms. Follow through with the other leg.
Exce
llent
Satis
fact
ory
Nee
ds P
ract
ice
LWBK681-C09_p180-217.qxd 9/6/10 10:21 PM Page 194 Aptara

195
Copyright © 2011 by Wolters Kluwer Health | Lippincott Williams & Wilkins. Skill Checklists for Taylor's Clinical Nursing Skills:
A Nursing Process Approach, 3rd edition, by Pamela Lynn and Marilee LeBon.
SKILL 9-8
Assisting a Patient With Ambulation Using a Walker (Continued)
Comments
11. Move the walker forward again, and continue the samepattern. Continue with ambulation for the planneddistance and time. Return the patient to the bed or chairbased on the patient’s tolerance and condition, ensuringthat the patient is comfortable. Make sure call bell andother necessary items are within easy reach.
12. Remove gait belts. Clean transfer aids per facility policy, ifnot indicated for single patient use. Remove gloves andany other PPE, if used. Perform hand hygiene.
Exce
llent
Satis
fact
ory
Nee
ds P
ract
ice
LWBK681-C09_p180-217.qxd 9/6/10 10:21 PM Page 195 Aptara

196
Copyright © 2011 by Wolters Kluwer Health | Lippincott Williams & Wilkins. Skill Checklists for Taylor's Clinical Nursing Skills:
A Nursing Process Approach, 3rd edition, by Pamela Lynn and Marilee LeBon.
Skill Checklists for Taylor's Clinical Nursing Skills:
A Nursing Process Approach, 3rd edition
Name Date
Unit Position
Instructor/Evaluator: Position
SKILL 9-9
Assisting a Patient With Ambulation Using Crutches
Goal: The patient ambulates safely without experiencing falls
or injury. Comments
1. Review the medical record and nursing plan of care for con-ditions that may influence the patient’s ability to move andambulate. Assess for tubes, IV lines, incisions, or equipmentthat may alter the procedure for ambulation. Assess thepatient’s knowledge and previous experience regarding theuse of crutches. Determine that the appropriate size crutchhas been obtained.
2. Perform hand hygiene. Put on PPE, if indicated.
3. Identify the patient. Explain the procedure to the patient.Tell the patient to report any feelings of dizziness, weakness,or shortness of breath while walking. Decide how far towalk.
4. Encourage the patient to make use of the stand-assistdevice, if available. Assist the patient to stand erect, faceforward in the tripod position. This means the patientholds the crutches 12 inches in front of and 12 inches tothe side of each foot.
5. For the four-point gait:
a. Have the patient move the right crutch forward 12 inchesand then move the left foot forward to the level of theright crutch.
b. Then have the patient move the left crutch forward 12 inches and then move the right foot forward to thelevel of the left crutch.
6. For the three-point gait:
a. Have the patient move the affected leg and both crutchesforward about 12 inches.
b. Have the patient move the stronger leg forward to thelevel of the crutches.
7. For the two-point gait:
a. Have the patient move the left crutch and the right footforward about 12 inches at the same time.
b. Have the patient move the right crutch and left leg for-ward to the level of the left crutch at the same time.
Exce
llent
Satis
fact
ory
Nee
ds P
ract
ice
LWBK681-C09_p180-217.qxd 9/6/10 10:21 PM Page 196 Aptara
197
Copyright © 2011 by Wolters Kluwer Health | Lippincott Williams & Wilkins. Skill Checklists for Taylor's Clinical Nursing Skills:
A Nursing Process Approach, 3rd edition, by Pamela Lynn and Marilee LeBon.
SKILL 9-9
Assisting a Patient With Ambulation Using Crutches (Continued)
Comments
8. For the swing-to gait:
a. Have the patient move both crutches forward about 12 inches.
b. Have the patient lift the legs and swing them to thecrutches, supporting his or her body weight on thecrutches.
9. Continue with ambulation for the planned distance andtime. Return the patient to the bed or chair based on thepatient’s tolerance and condition, ensuring that the patientis comfortable. Make sure call bell and other necessaryitems are within easy reach.
10. Remove PPE, if used. Perform hand hygiene.
Exce
llent
Satis
fact
ory
Nee
ds P
ract
ice
LWBK681-C09_p180-217.qxd 9/6/10 10:21 PM Page 197 Aptara
198
Copyright © 2011 by Wolters Kluwer Health | Lippincott Williams & Wilkins. Skill Checklists for Taylor's Clinical Nursing Skills:
A Nursing Process Approach, 3rd edition, by Pamela Lynn and Marilee LeBon.
Skill Checklists for Taylor's Clinical Nursing Skills:
A Nursing Process Approach, 3rd edition
Name Date
Unit Position
Instructor/Evaluator: Position
SKILL 9-10
Assisting a Patient With Ambulation Using a Cane
Goal: The patient ambulates safely without falls or injury. Comments
1. Review the medical record and nursing plan of care forconditions that may influence the patient’s ability to moveand ambulate. Assess for tubes, IV lines, incisions, orequipment that may alter the procedure for ambulation.
2. Perform hand hygiene. Put on PPE, as indicated.
3. Identify the patient. Explain the procedure to the patient.Tell the patient to report any feelings of dizziness, weakness,or shortness of breath while walking. Decide how far towalk.
4. Encourage the patient to make use of a stand-assist aid,either free-standing or attached to the side of the bed, ifavailable, to move to and sit on the side of the bed.
5. Wrap the gait belt around the patient’s waist, based onassessed need and facility policy.
6. Encourage the patient to make use of the stand-assistdevice to stand with weight evenly distributed between the feet and the cane.
7. Have the patient hold the cane on his or her stronger side,close to the body, while the nurse stands to the side andslightly behind the patient.
8. Tell the patient to advance the cane 4 to 12 inches (10 to30 cm) and then, while supporting his or her weight on the stronger leg and the cane, advance the weaker foot forward, parallel with the cane.
9. While supporting his or her weight on the weaker leg andthe cane, have the patient advance the stronger leg forwardahead of the cane (heel slightly beyond the tip of the cane).
10. Tell the patient to move the weaker leg forward until it iseven with the stronger leg, and then advance the cane again.
11. Continue with ambulation for the planned distance and time.Return the patient to the bed or chair based on the patient’stolerance and condition, ensuring the patient’s comfort. Makesure call bell and other necessary items are within easy reach.
12. Clean transfer aids per facility policy, if not indicated for sin-gle patient use. Remove PPE, if used. Perform hand hygiene.
Exce
llent
Satis
fact
ory
Nee
ds P
ract
ice
LWBK681-C09_p180-217.qxd 9/6/10 10:21 PM Page 198 Aptara

199
Skill Checklists for Taylor's Clinical Nursing Skills:
A Nursing Process Approach, 3rd edition
Name Date
Unit Position
Instructor/Evaluator: Position
SKILL 9-11
Applying and Removing Antiembolism Stockings
Goal: The stockings are applied and removed with minimal
discomfort to the patient. Comments
1. Review the medical record and medical orders to determinethe need for antiembolism stockings.
2. Perform hand hygiene. Put on PPE, as indicated.
3. Identify the patient. Explain what you are going to do andthe rationale for use of elastic stockings.
4. Close curtains around bed and close the door to the room,if possible.
5. Adjust the bed to a comfortable working height, usuallyelbow height of the caregiver (VISN 8 Patient Safety Center, 2009).
6. Assist patient to supine position. If patient has been sittingor walking, have him or her lie down with legs and feet wellelevated for at least 15 minutes before applying stockings.
7. Expose legs one at a time. Wash and dry legs, if necessary.Powder the leg lightly unless patient has a breathing prob-lem, dry skin, or sensitivity to the powder. If the skin isdry, a lotion may be used. Powders and lotions are not recommended by some manufacturers; check the packagematerial for manufacturer specifications.
8. Stand at the foot of the bed. Place hand inside stockingand grasp heel area securely. Turn stocking inside-out tothe heel area, leaving the foot inside the stocking leg.
9. With the heel pocket down, ease the stocking foot over thefoot and heel. Check that patient’s heel is centered in heelpocket of stocking.
10. Using your fingers and thumbs, carefully grasp edge ofstocking and pull it up smoothly over ankle and calf,toward the knee. Make sure it is distributed evenly.
11. Pull forward slightly on toe section. If the stocking has atoe window, make sure it is properly positioned. Adjust ifnecessary to ensure material is smooth.
12. If the stockings are knee-length, make sure each stockingtop is 1 to 2 inches below the patella. Make sure the stock-ing does not roll down.
Copyright © 2011 by Wolters Kluwer Health | Lippincott Williams & Wilkins. Skill Checklists for Taylor's Clinical Nursing Skills:
A Nursing Process Approach, 3rd edition, by Pamela Lynn and Marilee LeBon.
Exce
llent
Satis
fact
ory
Nee
ds P
ract
ice
LWBK681-C09_p180-217.qxd 9/6/10 10:21 PM Page 199 Aptara

200
Copyright © 2011 by Wolters Kluwer Health | Lippincott Williams & Wilkins. Skill Checklists for Taylor's Clinical Nursing Skills:
A Nursing Process Approach, 3rd edition, by Pamela Lynn and Marilee LeBon.
SKILL 9-11
Applying and Removing Antiembolism Stockings (Continued)
Comments
13. If applying thigh-length stocking, continue the application.Flex the patient’s leg. Stretch the stocking over the knee.
14. Pull the stocking over the thigh until the top is 1 to 3 inchesbelow the gluteal fold. Adjust the stocking, as necessary, todistribute the fabric evenly. Make sure the stocking does notroll down.
15. Remove equipment and return patient to a position ofcomfort. Remove your gloves. Raise side rail and lowerbed.
16. Remove any other PPE, if used. Perform hand hygiene.
Removing Stockings
17. To remove stocking, grasp top of stocking with yourthumb and fingers and smoothly pull stocking off insideout to heel. Support foot and ease stocking over it.
Exce
llent
Satis
fact
ory
Nee
ds P
ract
ice
LWBK681-C09_p180-217.qxd 9/6/10 10:21 PM Page 200 Aptara

201
Skill Checklists for Taylor's Clinical Nursing Skills:
A Nursing Process Approach, 3rd edition
Name Date
Unit Position
Instructor/Evaluator: Position
SKILL 9-12
Applying Pneumatic Compression Devices
Goal: The patient maintains adequate circulation in extremities
and is free from symptoms of neurovascular compromise. Comments
1. Review the medical record and nursing plan of care forconditions that may contraindicate the use of the PCD.
2. Perform hand hygiene. Put on PPE, as indicated.
3. Identify the patient. Explain the procedure to the patient.
4. Close curtains around bed and close the door to the room,if possible. Place the bed at an appropriate and comfortableworking height, usually elbow height of the caregiver (VISN8 Patient Safety Center, 2009).
5. Hang the compression pump on the foot of the bed andplug it into an electrical outlet. Attach the connecting tubing to the pump.
6. Remove the compression sleeves from the package andunfold them. Lay the unfolded sleeves on the bed with thecotton lining facing up. Note the markings indicating thecorrect placement for the ankle and popliteal areas.
7. Apply antiembolism stockings, if ordered. Place a sleeveunder the patient’s leg with the tubing toward the heel.Each one fits either leg. For total leg sleeves, place thebehind-the-knee opening at the popliteal space to preventpressure there. For knee-high sleeves, make sure the backof the ankle is over the ankle marking.
8. Wrap the sleeve snugly around the patient’s leg so that twofingers fit between the leg and the sleeve. Secure the sleevewith the Velcro fasteners. Repeat for the second leg, ifbilateral therapy is ordered. Connect each sleeve to thetubing, following manufacturer’s recommendations.
9. Set the pump to the prescribed maximal pressure (usually35 to 55 mm Hg). Make sure the tubing is free from kinks.Check that the patient can move about without interrupt-ing the airflow. Turn on the pump. Initiate cooling setting,if available.
10. Observe the patient and the device during the first cycle.Check the audible alarms. Check the sleeves and pump atleast once per shift or per facility policy.
Copyright © 2011 by Wolters Kluwer Health | Lippincott Williams & Wilkins. Skill Checklists for Taylor's Clinical Nursing Skills:
A Nursing Process Approach, 3rd edition, by Pamela Lynn and Marilee LeBon.
Exce
llent
Satis
fact
ory
Nee
ds P
ract
ice
LWBK681-C09_p180-217.qxd 9/6/10 10:21 PM Page 201 Aptara

202
Copyright © 2011 by Wolters Kluwer Health | Lippincott Williams & Wilkins. Skill Checklists for Taylor's Clinical Nursing Skills:
A Nursing Process Approach, 3rd edition, by Pamela Lynn and Marilee LeBon.
SKILL 9-12
Applying Pneumatic Compression Devices (Continued)
Comments
11. Place the bed in the lowest position. Make sure the callbell and other necessary items are within easy reach.
12. Remove PPE, if used. Perform hand hygiene.
13. Assess the extremities for peripheral pulses, edema, changesin sensation, and movement. Remove the sleeves and assessand document skin integrity every 8 hours.
Exce
llent
Satis
fact
ory
Nee
ds P
ract
ice
LWBK681-C09_p180-217.qxd 9/6/10 10:21 PM Page 202 Aptara
203
Skill Checklists for Taylor's Clinical Nursing Skills:
A Nursing Process Approach, 3rd edition
Name Date
Unit Position
Instructor/Evaluator: Position
SKILL 9-13
Applying a Continuous Passive Motion Device
Goal: The patient experiences increased joint mobility. Comments
1. Review the medical record and nursing plan of care for theappropriate degrees of flexion and extension, the cyclerate, and the length of time the CPM is to be used.
2. Obtain equipment. Apply the soft goods to the CPM device.
3. Perform hand hygiene. Put on PPE, as indicated.
4. Identify the patient. Explain the procedure to the patient.
5. Close curtains around bed and close the door to the room,if possible. Place the bed at an appropriate and comfortableworking height, usually elbow height of the caregiver (VISN8 Patient Safety Center, 2009).
6. Using the tape measure, determine the distance betweenthe gluteal crease and the popliteal space.
7. Measure the leg from the knee to 14 inches beyond thebottom of the foot.
8. Position the patient in the middle of the bed. The affectedextremity should be in a slightly abducted position.
9. Support the affected extremity and elevate it, placing it inthe padded CPM device.
10. Make sure the knee is at the hinged joint of the CPMdevice.
11. Adjust the footplate to maintain the patient’s foot in aneutral position. Assess the patient’s position to make sure the leg is not internally or externally rotated.
12. Apply the restraining straps under the CPM device andaround the leg. Check that two fingers fit between thestrap and the leg.
13. Explain the use of the STOP/GO button to the patient. Setthe controls to the prescribed levels of flexion and extensionand cycles per minute. Turn on the power to the CPM.
14. Set the device to ON and start the therapy by pressing theGO button. Observe the patient and the device during thefirst cycle. Determine the angle of flexion when the devicereaches its greatest height using the goniometer. Comparewith prescribed degree.
Copyright © 2011 by Wolters Kluwer Health | Lippincott Williams & Wilkins. Skill Checklists for Taylor's Clinical Nursing Skills:
A Nursing Process Approach, 3rd edition, by Pamela Lynn and Marilee LeBon.
Exce
llent
Satis
fact
ory
Nee
ds P
ract
ice
LWBK681-C09_p180-217.qxd 9/6/10 10:21 PM Page 203 Aptara
204
Copyright © 2011 by Wolters Kluwer Health | Lippincott Williams & Wilkins. Skill Checklists for Taylor's Clinical Nursing Skills:
A Nursing Process Approach, 3rd edition, by Pamela Lynn and Marilee LeBon.
SKILL 9-13
Applying a Continuous Passive Motion Device (Continued)
Comments
15. Check the patient’s level of comfort and perform skin andneurovascular assessments at least every 8 hours or perfacility policy.
16. Place the bed in the lowest position, with the side rails up.Make sure the call bell and other necessary items are withineasy reach.
17. Remove PPE, if used. Perform hand hygiene.
Exce
llent
Satis
fact
ory
Nee
ds P
ract
ice
LWBK681-C09_p180-217.qxd 9/6/10 10:21 PM Page 204 Aptara

205
Skill Checklists for Taylor's Clinical Nursing Skills:
A Nursing Process Approach, 3rd edition
Name Date
Unit Position
Instructor/Evaluator: Position
SKILL 9-14
Applying a Sling
Goal: The arm is immobilized, and the patient maintains muscle
strength and joint range of motion. Comments
1. Review the medical record and nursing plan of care todetermine the need for the use of a sling.
2. Perform hand hygiene. Put on PPE, as indicated.
3. Identify the patient. Explain the procedure to the patient.
4. Close curtains around bed and close the door to the room,if possible. Place the bed at an appropriate and comfortableworking height, if necessary.
5. Assist the patient to a sitting position. Place the patient’sforearm across the chest with the elbow flexed and thepalm against the chest. Measure the sleeve length, ifindicated.
6. Enclose the arm in the sling, making sure the elbow fitsinto the corner of the fabric. Run the strap up the patient’sback and across the shoulder opposite the injury, thendown the chest to the fastener on the end of the sling.
7. Place the ABD pad under the strap, between the strap andthe patient’s neck. Ensure that the sling and forearm areslightly elevated and at a right angle to the body.
8. Place the bed in the lowest position, with the side rails up.Make sure the call bell and other necessary items arewithin easy reach.
9. Remove PPE, if used. Perform hand hygiene.
10. Check the patient’s level of comfort, arm positioning, andneurovascular status of the affected limb every 4 hours oraccording to facility policy. Assess the axillary and cervicalskin frequently for irritation or breakdown.
Copyright © 2011 by Wolters Kluwer Health | Lippincott Williams & Wilkins. Skill Checklists for Taylor's Clinical Nursing Skills:
A Nursing Process Approach, 3rd edition, by Pamela Lynn and Marilee LeBon.
Exce
llent
Satis
fact
ory
Nee
ds P
ract
ice
LWBK681-C09_p180-217.qxd 9/6/10 10:21 PM Page 205 Aptara
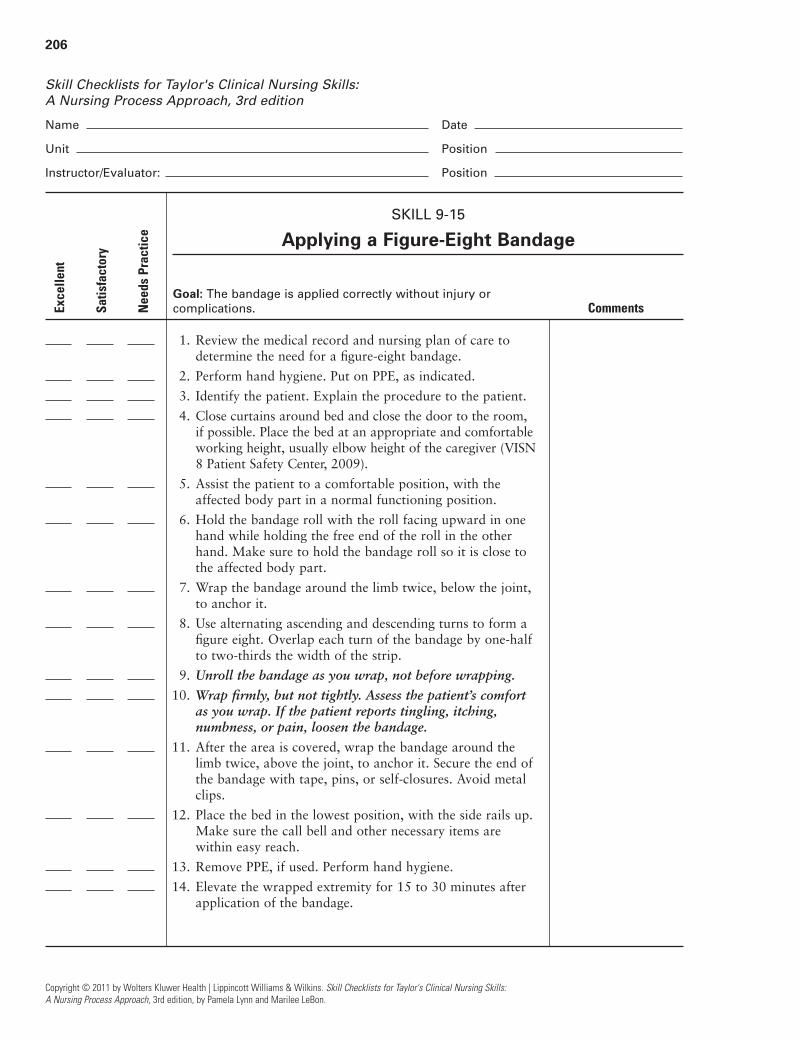
206
Copyright © 2011 by Wolters Kluwer Health | Lippincott Williams & Wilkins. Skill Checklists for Taylor's Clinical Nursing Skills:
A Nursing Process Approach, 3rd edition, by Pamela Lynn and Marilee LeBon.
Skill Checklists for Taylor's Clinical Nursing Skills:
A Nursing Process Approach, 3rd edition
Name Date
Unit Position
Instructor/Evaluator: Position
SKILL 9-15
Applying a Figure-Eight Bandage
Goal: The bandage is applied correctly without injury or
complications. Comments
1. Review the medical record and nursing plan of care todetermine the need for a figure-eight bandage.
2. Perform hand hygiene. Put on PPE, as indicated.
3. Identify the patient. Explain the procedure to the patient.
4. Close curtains around bed and close the door to the room,if possible. Place the bed at an appropriate and comfortableworking height, usually elbow height of the caregiver (VISN8 Patient Safety Center, 2009).
5. Assist the patient to a comfortable position, with theaffected body part in a normal functioning position.
6. Hold the bandage roll with the roll facing upward in onehand while holding the free end of the roll in the otherhand. Make sure to hold the bandage roll so it is close tothe affected body part.
7. Wrap the bandage around the limb twice, below the joint,to anchor it.
8. Use alternating ascending and descending turns to form afigure eight. Overlap each turn of the bandage by one-halfto two-thirds the width of the strip.
9. Unroll the bandage as you wrap, not before wrapping.
10. Wrap firmly, but not tightly. Assess the patient’s comfortas you wrap. If the patient reports tingling, itching,numbness, or pain, loosen the bandage.
11. After the area is covered, wrap the bandage around thelimb twice, above the joint, to anchor it. Secure the end ofthe bandage with tape, pins, or self-closures. Avoid metalclips.
12. Place the bed in the lowest position, with the side rails up.Make sure the call bell and other necessary items arewithin easy reach.
13. Remove PPE, if used. Perform hand hygiene.
14. Elevate the wrapped extremity for 15 to 30 minutes afterapplication of the bandage.
Exce
llent
Satis
fact
ory
Nee
ds P
ract
ice
LWBK681-C09_p180-217.qxd 9/6/10 10:21 PM Page 206 Aptara

207
Copyright © 2011 by Wolters Kluwer Health | Lippincott Williams & Wilkins. Skill Checklists for Taylor's Clinical Nursing Skills:
A Nursing Process Approach, 3rd edition, by Pamela Lynn and Marilee LeBon.
SKILL 9-15
Applying a Figure-Eight Bandage (Continued)
Comments
15. Assess the distal circulation after the bandage is in place.
16. Lift the distal end of the bandage and assess the skin forcolor, temperature, and integrity. Assess for pain and per-form a neurovascular assessment of the affected extremityafter applying the bandage and at least every 4 hours, orper facility policy.
17. Perform hand hygiene.
Exce
llent
Satis
fact
ory
Nee
ds P
ract
ice
LWBK681-C09_p180-217.qxd 9/6/10 10:21 PM Page 207 Aptara
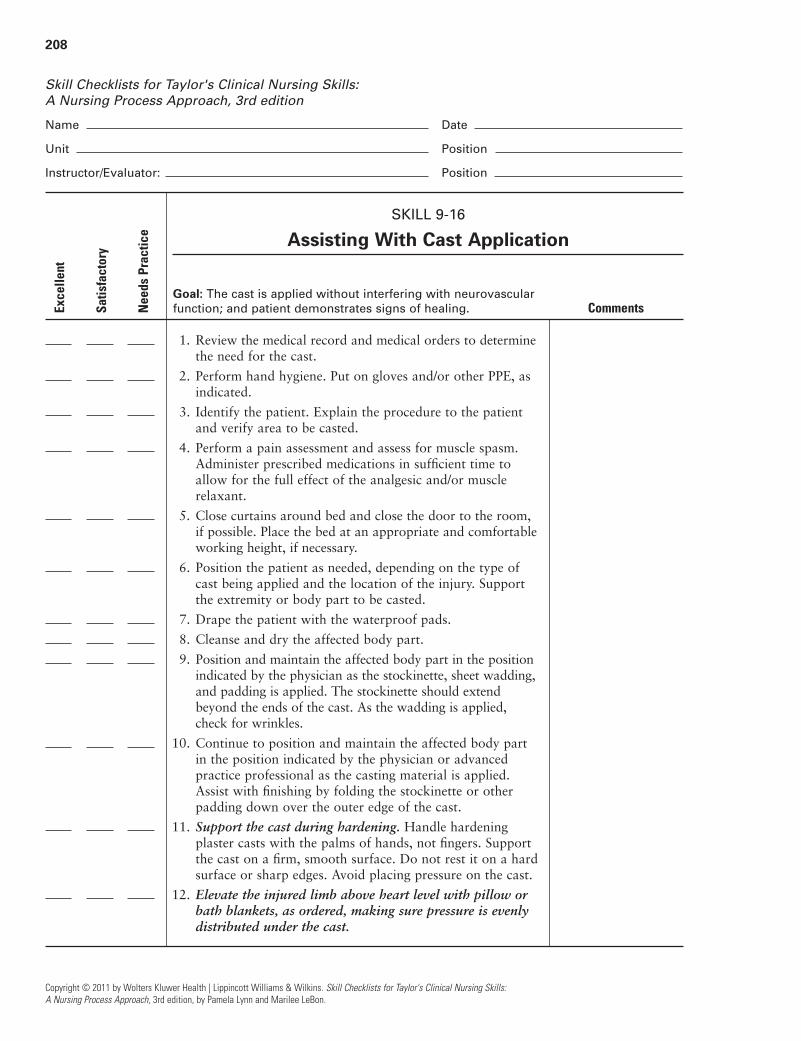
208
Copyright © 2011 by Wolters Kluwer Health | Lippincott Williams & Wilkins. Skill Checklists for Taylor's Clinical Nursing Skills:
A Nursing Process Approach, 3rd edition, by Pamela Lynn and Marilee LeBon.
Skill Checklists for Taylor's Clinical Nursing Skills:
A Nursing Process Approach, 3rd edition
Name Date
Unit Position
Instructor/Evaluator: Position
SKILL 9-16
Assisting With Cast Application
Goal: The cast is applied without interfering with neurovascular
function; and patient demonstrates signs of healing. Comments
1. Review the medical record and medical orders to determinethe need for the cast.
2. Perform hand hygiene. Put on gloves and/or other PPE, asindicated.
3. Identify the patient. Explain the procedure to the patientand verify area to be casted.
4. Perform a pain assessment and assess for muscle spasm.Administer prescribed medications in sufficient time toallow for the full effect of the analgesic and/or musclerelaxant.
5. Close curtains around bed and close the door to the room,if possible. Place the bed at an appropriate and comfortableworking height, if necessary.
6. Position the patient as needed, depending on the type ofcast being applied and the location of the injury. Supportthe extremity or body part to be casted.
7. Drape the patient with the waterproof pads.
8. Cleanse and dry the affected body part.
9. Position and maintain the affected body part in the positionindicated by the physician as the stockinette, sheet wadding,and padding is applied. The stockinette should extendbeyond the ends of the cast. As the wadding is applied,check for wrinkles.
10. Continue to position and maintain the affected body partin the position indicated by the physician or advancedpractice professional as the casting material is applied.Assist with finishing by folding the stockinette or otherpadding down over the outer edge of the cast.
11. Support the cast during hardening. Handle hardeningplaster casts with the palms of hands, not fingers. Supportthe cast on a firm, smooth surface. Do not rest it on a hardsurface or sharp edges. Avoid placing pressure on the cast.
12. Elevate the injured limb above heart level with pillow orbath blankets, as ordered, making sure pressure is evenlydistributed under the cast.
Exce
llent
Satis
fact
ory
Nee
ds P
ract
ice
LWBK681-C09_p180-217.qxd 9/6/10 10:21 PM Page 208 Aptara
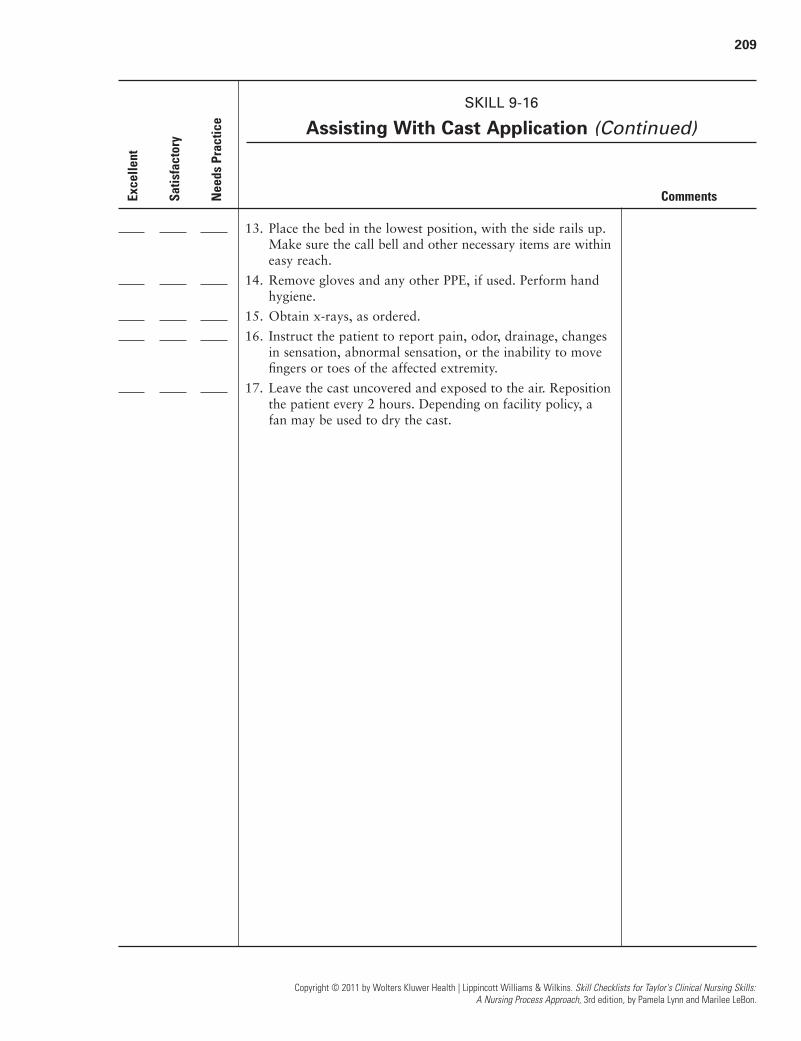
209
Copyright © 2011 by Wolters Kluwer Health | Lippincott Williams & Wilkins. Skill Checklists for Taylor's Clinical Nursing Skills:
A Nursing Process Approach, 3rd edition, by Pamela Lynn and Marilee LeBon.
SKILL 9-16
Assisting With Cast Application (Continued)
Comments
13. Place the bed in the lowest position, with the side rails up.Make sure the call bell and other necessary items are withineasy reach.
14. Remove gloves and any other PPE, if used. Perform handhygiene.
15. Obtain x-rays, as ordered.
16. Instruct the patient to report pain, odor, drainage, changesin sensation, abnormal sensation, or the inability to movefingers or toes of the affected extremity.
17. Leave the cast uncovered and exposed to the air. Repositionthe patient every 2 hours. Depending on facility policy, afan may be used to dry the cast.
Exce
llent
Satis
fact
ory
Nee
ds P
ract
ice
LWBK681-C09_p180-217.qxd 9/6/10 10:21 PM Page 209 Aptara
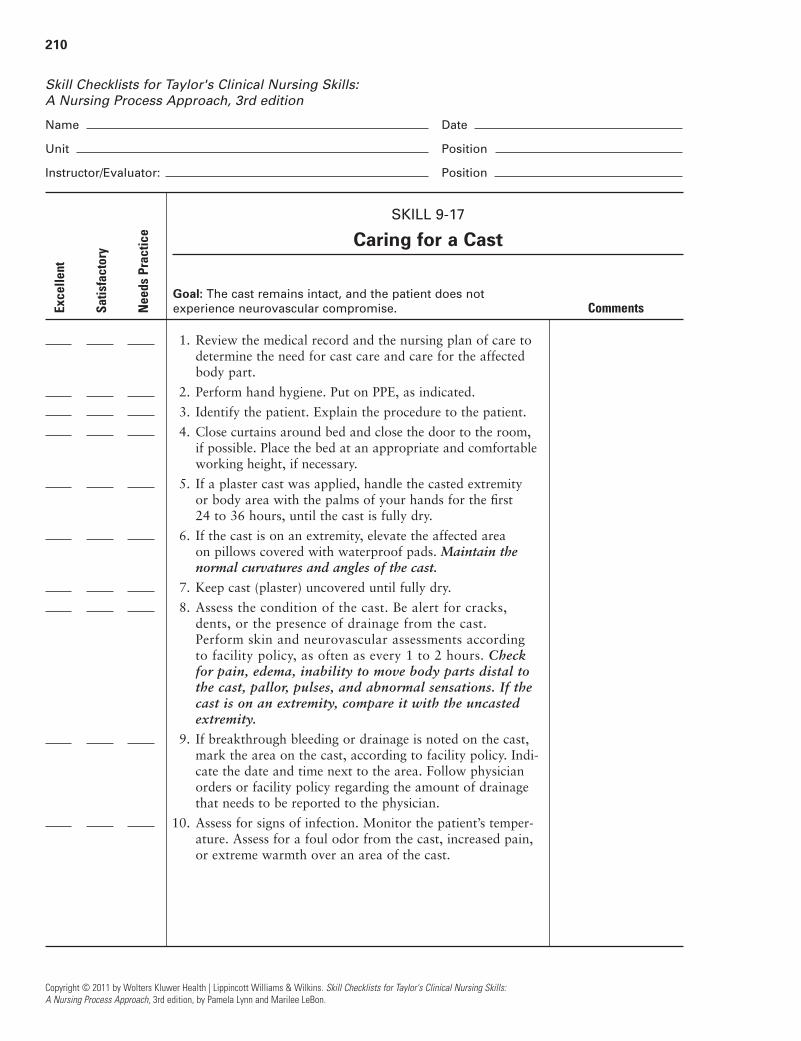
210
Copyright © 2011 by Wolters Kluwer Health | Lippincott Williams & Wilkins. Skill Checklists for Taylor's Clinical Nursing Skills:
A Nursing Process Approach, 3rd edition, by Pamela Lynn and Marilee LeBon.
Skill Checklists for Taylor's Clinical Nursing Skills:
A Nursing Process Approach, 3rd edition
Name Date
Unit Position
Instructor/Evaluator: Position
SKILL 9-17
Caring for a Cast
Goal: The cast remains intact, and the patient does not
experience neurovascular compromise. Comments
1. Review the medical record and the nursing plan of care todetermine the need for cast care and care for the affectedbody part.
2. Perform hand hygiene. Put on PPE, as indicated.
3. Identify the patient. Explain the procedure to the patient.
4. Close curtains around bed and close the door to the room,if possible. Place the bed at an appropriate and comfortableworking height, if necessary.
5. If a plaster cast was applied, handle the casted extremityor body area with the palms of your hands for the first 24 to 36 hours, until the cast is fully dry.
6. If the cast is on an extremity, elevate the affected area on pillows covered with waterproof pads. Maintain thenormal curvatures and angles of the cast.
7. Keep cast (plaster) uncovered until fully dry.
8. Assess the condition of the cast. Be alert for cracks,dents, or the presence of drainage from the cast.Perform skin and neurovascular assessments accordingto facility policy, as often as every 1 to 2 hours. Checkfor pain, edema, inability to move body parts distal tothe cast, pallor, pulses, and abnormal sensations. If thecast is on an extremity, compare it with the uncastedextremity.
9. If breakthrough bleeding or drainage is noted on the cast,mark the area on the cast, according to facility policy. Indi-cate the date and time next to the area. Follow physicianorders or facility policy regarding the amount of drainagethat needs to be reported to the physician.
10. Assess for signs of infection. Monitor the patient’s temper-ature. Assess for a foul odor from the cast, increased pain,or extreme warmth over an area of the cast.
Exce
llent
Satis
fact
ory
Nee
ds P
ract
ice
LWBK681-C09_p180-217.qxd 9/6/10 10:21 PM Page 210 Aptara
211
Copyright © 2011 by Wolters Kluwer Health | Lippincott Williams & Wilkins. Skill Checklists for Taylor's Clinical Nursing Skills:
A Nursing Process Approach, 3rd edition, by Pamela Lynn and Marilee LeBon.
SKILL 9-17
Caring for a Cast (Continued)
Comments
11. Reposition the patient every 2 hours. Provide back andskin care frequently. Encourage range-of-motion exercisesfor unaffected joints. Encourage the patient to cough anddeep breathe.
12. Instruct the patient to report pain, odor, drainage, changesin sensation, abnormal sensation, or the inability to movefingers or toes of the affected extremity.
13. Remove PPE, if used. Place bed in lowest position. Performhand hygiene.
Exce
llent
Satis
fact
ory
Nee
ds P
ract
ice
LWBK681-C09_p180-217.qxd 9/6/10 10:21 PM Page 211 Aptara

212
Copyright © 2011 by Wolters Kluwer Health | Lippincott Williams & Wilkins. Skill Checklists for Taylor's Clinical Nursing Skills:
A Nursing Process Approach, 3rd edition, by Pamela Lynn and Marilee LeBon.
Skill Checklists for Taylor's Clinical Nursing Skills:
A Nursing Process Approach, 3rd edition
Name Date
Unit Position
Instructor/Evaluator: Position
SKILL 9-18
Applying Skin Traction and Caring for a Patient in Skin Traction
Goal: The traction is maintained with the appropriate
counterbalance and the patient is free from complications
of immobility. Comments
1. Review the medical record and the nursing plan of care todetermine the type of traction being used and care for theaffected body part.
2. Perform hand hygiene. Put on PPE, as indicated.
3. Identify the patient. Explain the procedure to the patient,emphasizing the importance of maintaining counterbalance,alignment, and position.
4. Perform a pain assessment and assess for muscle spasm.Administer prescribed medications in sufficient time to allowfor the full effect of the analgesic and/or muscle relaxant.
5. Close curtains around bed and close the door to the room,if possible. Place the bed at an appropriate and comfortableworking height.
Applying Skin Traction
6. Ensure the traction apparatus is attached securely to thebed. Assess the traction setup.
7. Check that the ropes move freely through the pulleys.Check that all knots are tight and are positioned awayfrom the pulleys. Pulleys should be free from the linens.
8. Place the patient in a supine position with the foot of thebed elevated slightly. The patient’s head should be near thehead of the bed and in alignment.
9. Cleanse the affected area. Place the elastic stocking on theaffected limb, as appropriate.
10. Place the traction boot over the patient’s leg. Be sure thepatient’s heel is in the heel of the boot. Secure the bootwith the straps.
11. Attach the traction cord to the footplate of the boot. Pass therope over the pulley fastened at the end of the bed. Attachthe weight to the hook on the rope, usually 5 to 10 poundsfor an adult. Gently let go of the weight. The weight shouldhang freely, not touching the bed or the floor.
12. Check the patient’s alignment with the traction.
Exce
llent
Satis
fact
ory
Nee
ds P
ract
ice
LWBK681-C09_p180-217.qxd 9/6/10 10:21 PM Page 212 Aptara

213
Copyright © 2011 by Wolters Kluwer Health | Lippincott Williams & Wilkins. Skill Checklists for Taylor's Clinical Nursing Skills:
A Nursing Process Approach, 3rd edition, by Pamela Lynn and Marilee LeBon.
SKILL 9-18
Applying Skin Traction and Caring for a Patient in Skin Traction (Continued)
Comments
13. Check the boot for placement and alignment. Make surethe line of pull is parallel to the bed and not angleddownward.
14. Place the bed in the lowest position that still allows theweight to hang freely.
15. Remove PPE, if used. Perform hand hygiene.
Caring for a Patient With Skin Traction
16. Perform a skin-traction assessment per facility policy. Thisassessment includes checking the traction equipment, exam-ining the affected body part, maintaining proper body align-ment, and performing skin and neurovascular assessments.
17. Remove the straps every 4 hours per the physician’s orderor facility policy. Check bony prominences for skin break-down, abrasions, and pressure areas. Remove the boot, perphysician’s order or facility policy, every 8 hours. Put ongloves and wash, rinse, and thoroughly dry the skin.
18. Assess the extremity distal to the traction for edema, andassess peripheral pulses. Assess the temperature, color, andcapillary refill, and compare with the unaffected limb.Check for pain, inability to move body parts distal to thetraction, pallor, and abnormal sensations. Assess for indi-cators of deep-vein thrombosis, including calf tenderness,and swelling.
19. Replace the traction and remove gloves and dispose ofthem appropriately.
20. Check the boot for placement and alignment. Make surethe line of pull is parallel to the bed and not angleddownward.
21. Ensure the patient is positioned in the center of the bed,with the affected leg aligned with the trunk of the patient’sbody.
22. Examine the weights and pulley system. Weights shouldhang freely, off the floor and bed. Knots should be secure.Ropes should move freely through the pulleys. The pulleysshould not be constrained by knots.
23. Perform range-of-motion exercises on all unaffected jointareas, unless contraindicated. Encourage the patient tocough and deep breathe every 2 hours.
24. Raise the side rails. Place the bed in the lowest positionthat still allows the weight to hang freely.
25. Remove PPE, if used. Perform hand hygiene.
Exce
llent
Satis
fact
ory
Nee
ds P
ract
ice
LWBK681-C09_p180-217.qxd 9/6/10 10:21 PM Page 213 Aptara
214
Copyright © 2011 by Wolters Kluwer Health | Lippincott Williams & Wilkins. Skill Checklists for Taylor's Clinical Nursing Skills:
A Nursing Process Approach, 3rd edition, by Pamela Lynn and Marilee LeBon.
Skill Checklists for Taylor's Clinical Nursing Skills:
A Nursing Process Approach, 3rd edition
Name Date
Unit Position
Instructor/Evaluator: Position
SKILL 9-19
Caring for a Patient in Skeletal Traction
Goal: The traction is maintained with the appropriate
counterbalance and the patient is free from complications
of immobility. Comments
1. Review the medical record and the nursing plan of care todetermine the type of traction being used and the prescribedcare.
2. Perform hand hygiene. Put on PPE, as indicated.
3. Identify the patient. Explain the procedure to the patient,emphasizing the importance of maintaining counterbalance,alignment, and position.
4. Perform a pain assessment and assess for muscle spasm.Administer prescribed medications in sufficient time to allowfor the full effect of the analgesic and/or muscle relaxant.
5. Close curtains around bed and close the door to the room,if possible. Place the bed at an appropriate and comfortableworking height.
6. Ensure the traction apparatus is attached securely to thebed. Assess the traction setup, including application of theordered amount of weight. Be sure that the weights hangfreely, not touching the bed or the floor.
7. Check that the ropes move freely through the pulleys.Check that all knots are tight and are positioned awayfrom the pulleys. Pulleys should be free from the linens.
8. Check the alignment of the patient’s body, as prescribed.
9. Perform a skin assessment. Pay attention to pressurepoints, including the ischial tuberosity, popliteal space,Achilles’ tendon, sacrum, and heel.
10. Perform a neurovascular assessment. Assess the extremitydistal to the traction for edema and peripheral pulses. Assessthe temperature and color and compare with the unaffectedlimb. Check for pain, inability to move body parts distal tothe traction, pallor, and abnormal sensations. Assess for indi-cators of deep-vein thrombosis, including calf tenderness,and swelling.
11. Assess the site at and around the pins for redness, edema,and odor. Assess for skin tenting, prolonged or purulentdrainage, elevated body temperature, elevated pin site tem-perature, and bowing or bending of the pins.
Exce
llent
Satis
fact
ory
Nee
ds P
ract
ice
LWBK681-C09_p180-217.qxd 9/6/10 10:21 PM Page 214 Aptara
215
Copyright © 2011 by Wolters Kluwer Health | Lippincott Williams & Wilkins. Skill Checklists for Taylor's Clinical Nursing Skills:
A Nursing Process Approach, 3rd edition, by Pamela Lynn and Marilee LeBon.
SKILL 9-19
Caring for a Patient in Skeletal Traction (Continued)
Comments
12. Provide pin site care.
a. Using sterile technique, open the applicator packageand pour the cleansing agent into the sterile container.
b. Put on the sterile gloves.
c. Place the applicators into the solution.
d. Clean the pin site starting at the insertion area andworking outward, away from the pin site.
e. Use each applicator once. Use a new applicator foreach pin site.
13. Depending on physician order and facility policy, apply theantimicrobial ointment to pin sites and apply a dressing.
14. Remove gloves and any other PPE, if used. Perform handhygiene.
15. Perform range-of-motion exercises on all joint areas, unlesscontraindicated. Encourage the patient to cough and deepbreathe every 2 hours.
Exce
llent
Satis
fact
ory
Nee
ds P
ract
ice
LWBK681-C09_p180-217.qxd 9/6/10 10:21 PM Page 215 Aptara

216
Copyright © 2011 by Wolters Kluwer Health | Lippincott Williams & Wilkins. Skill Checklists for Taylor's Clinical Nursing Skills:
A Nursing Process Approach, 3rd edition, by Pamela Lynn and Marilee LeBon.
Skill Checklists for Taylor's Clinical Nursing Skills:
A Nursing Process Approach, 3rd edition
Name Date
Unit Position
Instructor/Evaluator: Position
SKILL 9-20
Caring for a Patient With an External Fixation Device
Goal: The patient shows no evidence of complication, such as
infection, contractures, venous stasis, thrombus formation, or
skin breakdown. Comments
1. Review the medical record and the nursing plan of care todetermine the type of device being used and prescribedcare.
2. Perform hand hygiene. Put on PPE, as indicated.
3. Identify the patient. Explain the procedure to the patient.Assure the patient that there will be little pain after the fix-ation device is in place. Reinforce that the patient will beable to adjust to the device and will be able to move aboutwith the device, allowing him or her to resume normalactivities more quickly.
4. After the fixation device is in place, apply ice to the surgi-cal site, as ordered or per facility policy. Elevate theaffected body part, if appropriate.
5. Perform a pain assessment and assess for muscle spasm.Administer prescribed medications in sufficient time toallow for the full effect of the analgesic and/or musclerelaxant.
6. Administer analgesics, as ordered, before exercising ormobilizing the affected body part.
7. Perform neurovascular assessments, per facility policy orphysician’s order, usually every 2 to 4 hours for 24 hours,then every 4 to 8 hours. Assess the affected body part forcolor, motion, sensation, edema, capillary refill, and pulses.If appropriate, compare with the unaffected side. Assess forpain not relieved by analgesics, and for burning, tingling,and numbness.
8. Close curtains around bed and close the door to the room,if possible. Place the bed at an appropriate and comfortableworking height, usually elbow height of the caregiver (VISN8 Patient Safety Center, 2009).
9. Assess the pin site for redness, tenting of the skin,prolonged or purulent drainage, swelling, and bowing,bending, or loosening of the pins. Monitor body temperature.
Exce
llent
Satis
fact
ory
Nee
ds P
ract
ice
LWBK681-C09_p180-217.qxd 9/6/10 10:21 PM Page 216 Aptara

217
Copyright © 2011 by Wolters Kluwer Health | Lippincott Williams & Wilkins. Skill Checklists for Taylor's Clinical Nursing Skills:
A Nursing Process Approach, 3rd edition, by Pamela Lynn and Marilee LeBon.
SKILL 9-20
Caring for a Patient With an External Fixation Device (Continued)
Comments
10. Perform pin site care.
a. Using sterile technique, open the applicator packageand pour the cleansing agent into the sterile container.
b. Put on the sterile gloves.
c. Place the applicators into the solution.
d. Clean the pin site starting at the insertion area andworking outward, away from the pin site.
e. Use each applicator once. Use a new applicator foreach pin site.
11. Depending on physician order and facility policy, apply theantimicrobial ointment to pin sites and apply a dressing.
12. Place the bed in the lowest position, with the side rails up.Make sure the call bell and other necessary items are withineasy reach.
13. Remove gloves and any other PPE, if used. Perform handhygiene.
Exce
llent
Satis
fact
ory
Nee
ds P
ract
ice
LWBK681-C09_p180-217.qxd 9/6/10 10:21 PM Page 217 Aptara

218
Copyright © 2011 by Wolters Kluwer Health | Lippincott Williams & Wilkins. Skill Checklists for Taylor's Clinical Nursing Skills:
A Nursing Process Approach, 3rd edition, by Pamela Lynn and Marilee LeBon.
Skill Checklists for Taylor's Clinical Nursing Skills:
A Nursing Process Approach, 3rd edition
Name Date
Unit Position
Instructor/Evaluator: Position
SKILL 10-1
Promoting Patient Comfort
Goal: The patient experiences relief from discomfort and/or
pain without adverse effect. Comments
1. Perform hand hygiene and put on PPE, if indicated.
2. Identify the patient.
3. Discuss pain with the patient, acknowledging that thepatient’s pain exists. Explain how pain medications andother pain management therapies work together to providepain relief. Allow the patient to help choose interventionsfor pain relief.
4. Assess the patient’s pain, using an appropriate assessmenttool and measurement scale (see Fundamentals Review 10-1 through 10-5).
5. Provide pharmacologic interventions, if indicated andordered.
6. Adjust the patient’s environment to promote comfort.
a. Adjust and maintain the room temperature per thepatient’s preference.
b. Reduce harsh lighting, but provide adequate lightingper the patient’s preference.
c. Reduce harsh and unnecessary noise. Avoid having con-versations immediately outside the patient’s room.
d. Close room door and/or curtain whenever possible.
e. Provide good ventilation in the patient’s room. Reduceunpleasant odors by promptly emptying bedpans,urinals, and emesis basins after use. Remove trash and laundry promptly.
7. Prevent unnecessary interruptions and coordinate patientactivities to group activities together. Allow for and planrest periods without disturbance.
8. Assist the patient to change position frequently. Assist thepatient to a comfortable position, maintaining good align-ment and supporting extremities as needed. Raise the headof the bed as appropriate. (See Chapter 9, Activity, formore information on positioning.)
Exce
llent
Satis
fact
ory
Nee
ds P
ract
ice
LWBK681-C10_p218-231.qxd 9/6/10 10:21 PM Page 218 Aptara
219
Copyright © 2011 by Wolters Kluwer Health | Lippincott Williams & Wilkins. Skill Checklists for Taylor's Clinical Nursing Skills:
A Nursing Process Approach, 3rd edition, by Pamela Lynn and Marilee LeBon.
SKILL 10-1
Promoting Patient Comfort (Continued)
Comments
9. Provide oral hygiene as often as necessary to keep themouth and mucous membranes clean and moist, as oftenas every 1 or 2 hours if necessary. This is especially impor-tant for patients who cannot drink or are not permittedfluids by mouth. (See Chapter 7, Hygiene, for additionalinformation about mouth care.)
10. Ensure the availability of appropriate fluids for drinking,unless contraindicated. Make sure the patient’s waterpitcher is filled and within reach. Make other fluids of thepatient’s choice available.
11. Remove physical situations that might cause discomfort.
a. Change soiled and/or wet dressings; replace soiledand/or wet bed linens.
b. Smooth wrinkles in bed linens.
c. Ensure patient is not lying or sitting on tubes, tubing,wires, or other equipment.
12. Assist the patient as necessary with ambulation, and activeor passive range-of-motion exercises, as appropriate. (SeeChapter 9, Activity, for more information about activity.)
13. Assess the patient’s spirituality needs related to the painexperience. Ask the patient if he/she would like a spiritualcounselor to visit.
14. Consider the use of distraction. Distraction requires thepatient to focus on something other than the pain.
a. Have the patient recall a pleasant experience or focusattention on an enjoyable experience.
b. Offer age or developmentally appropriate games, toys,books, audiobooks, access to television, and/or videos,or other items of interest to the patient.
c. Encourage the patient to hold or stroke a loved person,pet, or toy.
d. Offer access to music the patient prefers. Turn on themusic when pain begins, or before anticipated painfulstimuli. The patient can close his or her eyes andconcentrate on listening. Raising or lowering thevolume as pain increases or decreases can be helpful.
15. Consider the use of guided imagery.
a. Help the patient to identify a scene or experience thatthe patient describes as happy, pleasant, or peaceful.
Exce
llent
Satis
fact
ory
Nee
ds P
ract
ice
LWBK681-C10_p218-231.qxd 9/6/10 10:21 PM Page 219 Aptara

220
Copyright © 2011 by Wolters Kluwer Health | Lippincott Williams & Wilkins. Skill Checklists for Taylor's Clinical Nursing Skills:
A Nursing Process Approach, 3rd edition, by Pamela Lynn and Marilee LeBon.
SKILL 10-1
Promoting Patient Comfort (Continued)
Comments
b. Encourage the patient to begin with several minutes offocused breathing, relaxation, or meditation. (Refer tospecific information in steps 15 and 16.)
c. Help the patient concentrate on the peaceful, pleasantimage.
d. If indicated, read a description of the identified scene orexperience, using a soothing, soft voice.
e. Encourage the patient to concentrate on the details ofthe image, such as its sight, sounds, smells, tastes, andtouch.
16. Consider the use of relaxation activities, such as deepbreathing.
a. Have the patient sit or recline comfortably and placehands on stomach. Close the eyes.
b. Ask the patient to mentally count to maintain acomfortable rate and rhythm. Have the patient inhaleslowly and deeply while letting the abdomen expand as much as possible. Have the patient hold his or herbreath for a few seconds.
c. Tell the patient to exhale slowly through mouth, blow-ing through puckered lips. Have the patient continue tocount to maintain comfortable rate and rhythm, concen-trating on the rise and fall of abdomen.
d. When the patient’s abdomen feels empty, have thepatient begin again with a deep inhalation.
e. Encourage patient to practice at least twice a day, for 10 minutes, and then use as needed to assist with painmanagement (Schaffer & Yucha, 2004).
17. Consider the use of relaxation activities, such as progressivemuscle relaxation.
a. Assist the patient to a comfortable position.
b. Direct the patient to focus on a particular muscle group.Start with the muscles of the jaw, then repeat with themuscles of the neck, shoulder, upper and lower arm,hand, abdomin, buttocks, thigh, lower leg, and foot.
c. Ask the patient to tighten the muscle group and notethe sensation that the tightened muscles produce. After5 to 7 seconds, tell the patient to relax the muscles all atonce and concentrate on the sensation of the relaxedstate, noting the difference in feeling in the muscleswhen contracted and relaxed.
Exce
llent
Satis
fact
ory
Nee
ds P
ract
ice
LWBK681-C10_p218-231.qxd 9/6/10 10:21 PM Page 220 Aptara
221
Copyright © 2011 by Wolters Kluwer Health | Lippincott Williams & Wilkins. Skill Checklists for Taylor's Clinical Nursing Skills:
A Nursing Process Approach, 3rd edition, by Pamela Lynn and Marilee LeBon.
SKILL 10-1
Promoting Patient Comfort (Continued)
Comments
d. Have the patient continue to tighten-hold-relax eachmuscle group until the entire body has been covered.
e. Encourage patient to practice at least twice a day, for 10 minutes, and then use as needed to assist with painmanagement (Schaffer & Yucha, 2004).
18. Consider the use of cutaneous stimulation, such as theintermittent application of heat or cold, or both. (SeeChapter 8, Skin Integrity and Wound Care, for additionalinformation on heat and cold therapy.)
19. Consider the use of cutaneous stimulation, such as massage(see Skill 10-2).
20. Discuss the potential for use of cutaneous stimulation,such as TENS, with the patient and primary care provider.(See Skill 10-3.)
21. Remove equipment and return patient to a position ofcomfort. Remove gloves, if used. Raise side rail and lower bed.
22. Remove additional PPE, if used. Perform hand hygiene.
23. Evaluate the patient’s response to interventions. Reassesslevel of discomfort or pain using original assessment tools.Reassess and alter plan of care as appropriate.
Exce
llent
Satis
fact
ory
Nee
ds P
ract
ice
LWBK681-C10_p218-231.qxd 9/6/10 10:21 PM Page 221 Aptara

222
Copyright © 2011 by Wolters Kluwer Health | Lippincott Williams & Wilkins. Skill Checklists for Taylor's Clinical Nursing Skills:
A Nursing Process Approach, 3rd edition, by Pamela Lynn and Marilee LeBon.
Skill Checklists for Taylor's Clinical Nursing Skills:
A Nursing Process Approach, 3rd edition
Name Date
Unit Position
Instructor/Evaluator: Position
SKILL 10-2
Giving a Back Massage
Goal: The patient reports increased comfort and decreased
pain and exhibits a relaxed state. Comments
1. Perform hand hygiene and put on PPE, if indicated.
2. Identify the patient.
3. Offer a back massage to the patient and explain the procedure.
4. Put on gloves, if indicated.
5. Close room door and/or curtain.
6. Assess the patient’s pain, using an appropriate assessmenttool and measurement scale. (See Fundamentals Review10-1 through 10-6.)
7. Raise the bed to a comfortable working position, usuallyelbow height of the caregiver (VISN 8 Patient Safety Center, 2009), and lower the side rail.
8. Assist the patient to a comfortable position, preferably theprone or side-lying position. Remove the covers and movethe patient’s gown just enough to expose the patient’s backfrom the shoulders to sacral area. Drape the patient, asneeded, with the bath blanket.
9. Warm the lubricant or lotion in the palm of your hand, orplace the container in small basin of warm water. Duringmassage, observe the patient’s skin for reddened or openareas. Pay particular attention to the skin over bonyprominences. (See Chapter 8, Skin Integrity and WoundCare, for detailed information regarding skin assessment.)
10. Using light, gliding strokes (effleurage), apply lotion topatient’s shoulders, back, and sacral area.
11. Place your hands beside each other at the base of thepatient’s spine and stroke upward to the shoulders andback downward to the buttocks in slow, continuousstrokes. Continue for several minutes.
12. Massage the patient’s shoulder, entire back, areas over iliac crests, and sacrum with circular stroking motions.Keep your hands in contact with the patient’s skin.Continue for several minutes, applying additional lotion,as necessary.
Exce
llent
Satis
fact
ory
Nee
ds P
ract
ice
LWBK681-C10_p218-231.qxd 9/6/10 10:21 PM Page 222 Aptara

223
Copyright © 2011 by Wolters Kluwer Health | Lippincott Williams & Wilkins. Skill Checklists for Taylor's Clinical Nursing Skills:
A Nursing Process Approach, 3rd edition, by Pamela Lynn and Marilee LeBon.
SKILL 10-2
Giving a Back Massage (Continued)
Comments
13. Knead the patient’s skin by gently alternating grasping andcompression motions (pétrissage).
14. Complete the massage with additional long, strokingmovements that eventually become lighter in pressure.
15. Use the towel to pat the patient dry and to remove excesslotion.
16. Remove gloves, if worn. Reposition patient’s gown andcovers. Raise side rail and lower bed. Assist patient to aposition of comfort.
17. Remove additional PPE, if used. Perform hand hygiene.
18. Evaluate the patient’s response to interventions. Reassesslevel of discomfort or pain using original assessment tools.Reassess and alter plan of care, as appropriate.
Exce
llent
Satis
fact
ory
Nee
ds P
ract
ice
LWBK681-C10_p218-231.qxd 9/6/10 10:21 PM Page 223 Aptara

224
Copyright © 2011 by Wolters Kluwer Health | Lippincott Williams & Wilkins. Skill Checklists for Taylor's Clinical Nursing Skills:
A Nursing Process Approach, 3rd edition, by Pamela Lynn and Marilee LeBon.
Skill Checklists for Taylor's Clinical Nursing Skills:
A Nursing Process Approach, 3rd edition
Name Date
Unit Position
Instructor/Evaluator: Position
SKILL 10-3
Applying and Caring for a Patient Using a TENS Unit
Goal: The patient reports increased comfort and decreased pain;
and is free from injury, skin irritation or breakdown. Comments
1. Perform hand hygiene and put on PPE, if indicated.
2. Identify the patient.
3. Show the patient the device, and explain its function andthe reason for its use.
4. Assess the patient’s pain, using an appropriate assessmenttool and measurement scale. (See Fundamentals Review10-1 through 10-6.)
5. Inspect the area where the electrodes are to be placed.Clean the patient’s skin, using skin cleanser and water. Dry the area thoroughly.
6. Remove the adhesive backing from the electrodes andapply them to the specified location. If the electrodes arenot pregelled, apply a small amount of electrode gel to the bottom of each electrode. If the electrodes are not self-adhering, tape them in place.
7. Check the placement of the electrodes; leave at least a 2�(5 cm) space (about the width of one electrode) betweenthem.
8. Check the controls on the TENS unit to make sure thatthey are off. Connect the wires to the electrodes (if notalready attached) and plug them into the unit.
9. Turn on the unit and adjust the intensity setting to the low-est intensity and determine if the patient can feel a tingling,burning, or buzzing sensation. Then adjust the intensity tothe prescribed amount or the setting most comfortable forthe patient. Secure the unit to the patient.
10. Set the pulse width (duration of the each pulsation) asindicated or recommended.
11. Assess the patient’s pain level during therapy.
a. If intermittent use is ordered, turn the unit off after the specified duration of treatment and remove the electrodes. Provide skin care to the area.
Exce
llent
Satis
fact
ory
Nee
ds P
ract
ice
LWBK681-C10_p218-231.qxd 9/6/10 10:21 PM Page 224 Aptara

225
Copyright © 2011 by Wolters Kluwer Health | Lippincott Williams & Wilkins. Skill Checklists for Taylor's Clinical Nursing Skills:
A Nursing Process Approach, 3rd edition, by Pamela Lynn and Marilee LeBon.
SKILL 10-3
Applying and Caring for a Patient Using a TENS Unit (Continued)
Comments
b. If continuous therapy is ordered, periodically removethe electrodes from the skin (after turning the unit off)to inspect the area and clean the skin, according tofacility policy. Reapply the electrodes and continue ther-apy. Change the electrodes according to manufacturer’sdirections.
12. When therapy is discontinued, turn the unit off andremove the electrodes. Clean the patient’s skin. Clean the unit and replace the batteries.
13. Remove PPE, if used. Perform hand hygiene.
Exce
llent
Satis
fact
ory
Nee
ds P
ract
ice
LWBK681-C10_p218-231.qxd 9/6/10 10:21 PM Page 225 Aptara

226
Copyright © 2011 by Wolters Kluwer Health | Lippincott Williams & Wilkins. Skill Checklists for Taylor's Clinical Nursing Skills:
A Nursing Process Approach, 3rd edition, by Pamela Lynn and Marilee LeBon.
Skill Checklists for Taylor's Clinical Nursing Skills:
A Nursing Process Approach, 3rd edition
Name Date
Unit Position
Instructor/Evaluator: Position
SKILL 10-4
Caring for a Patient Receiving Patient-Controlled Analgesia
Goal: The patient reports increased comfort and decreased pain;
and shows no signs of adverse effects, oversedation, or respiratory
depression. Comments
1. Gather equipment. Check the medication order against theoriginal physician’s order according to agency policy. Clarifyany inconsistencies. Check the patient’s chart for allergies.
2. Know the actions, special nursing considerations, safe doseranges, purpose of administration, and adverse effects ofthe medications to be administered. Consider the appropri-ateness of the medication for this patient.
3. Prepare the medication syringe or other container, basedon facility policy, for administration. (See Chapter 5, Medications, for additional information.)
4. Perform hand hygiene and put on PPE, if indicated.
5. Identify the patient.
6. Show the patient the device, and explain its function andthe reason for use. Explain the purpose and action of themedication to the patient.
7. Plug the PCA device into the electrical outlet, if necessary.Check status of battery power, if appropriate.
8. Close the door to the room or pull the bedside curtain.
9. Complete necessary assessments before administering medication. Check allergy bracelet or ask patient aboutallergies. Assess the patient’s pain, using an appropriateassessment tool and measurement scale. (See FundamentalsReview 10-1 through 10-6.)
10. Check the label on the prefilled drug syringe with themedication record and patient identification. Obtain veri-fication of information from a second nurse, according tofacility policy. If using a barcode administration system,scan the barcode on the medication label, if required.
11. If using a barcode administration system, scan the patient’sbarcode on the identification band, if required.
12. Connect tubing to prefilled syringe and place the syringeinto the PCA device. Prime the tubing.
Exce
llent
Satis
fact
ory
Nee
ds P
ract
ice
LWBK681-C10_p218-231.qxd 9/6/10 10:21 PM Page 226 Aptara
227
Copyright © 2011 by Wolters Kluwer Health | Lippincott Williams & Wilkins. Skill Checklists for Taylor's Clinical Nursing Skills:
A Nursing Process Approach, 3rd edition, by Pamela Lynn and Marilee LeBon.
SKILL 10-4
Caring for a Patient Receiving Patient-Controlled Analgesia (Continued)
Comments
13. Set the PCA device to administer the loading dose, ifordered, and then program the device based on the medicalorder for medication dosage, dose interval, and lockoutinterval. Obtain verification of information from a secondnurse, according to facility policy.
14. Put on gloves. Using antimicrobial swab, clean connectionport on IV infusion line or other site access, based onroute of administration. Connect the PCA tubing to thepatient’s IV infusion line or appropriate access site, basedon the specific site used. Secure the site per facility policyand procedure. Remove gloves. Initiate the therapy by acti-vating the appropriate button on the pump. Lock the PCAdevice, per facility policy.
15. Remind the patient to press the button each time he or sheneeds relief from pain.
16. Assess the patient’s pain at least every 4 hours or moreoften, as needed. Monitor vital signs, especially respiratorystatus, including oxygen saturation at least every 4 hoursor more often as needed.
17. Assess the patient’s sedation score and end-tidal carbondioxide level (capnography) at least every 4 hours or moreoften as needed.
18. Assess the infusion site periodically, according to facilitypolicy and nursing judgment. Assess the patient’s use of themedication, noting number of attempts and number ofdoses delivered. Replace the drug syringe when it is empty.
19. Make sure the patient control (dosing button) is within thepatient’s reach.
20. Remove gloves and additional PPE, if used. Perform handhygiene.
Exce
llent
Satis
fact
ory
Nee
ds P
ract
ice
LWBK681-C10_p218-231.qxd 9/6/10 10:21 PM Page 227 Aptara
228
Copyright © 2011 by Wolters Kluwer Health | Lippincott Williams & Wilkins. Skill Checklists for Taylor's Clinical Nursing Skills:
A Nursing Process Approach, 3rd edition, by Pamela Lynn and Marilee LeBon.
Skill Checklists for Taylor's Clinical Nursing Skills:
A Nursing Process Approach, 3rd edition
Name Date
Unit Position
Instructor/Evaluator: Position
SKILL 10-5
Caring for a Patient Receiving Epidural Analgesia
Goal: The patient reports increased comfort and decreased
pain; and shows no signs of adverse effects, oversedation,
or respiratory depression. Comments
1. Check the medication order against the original medicalorder according to agency policy. Clarify any inconsisten-cies. Check the patient’s chart for allergies.
2. Know the actions, special nursing considerations, safe doseranges, purpose of administration, and adverse effects ofthe medications to be administered. Consider the appropri-ateness of the medication for this patient.
3. Prepare the medication syringe or other container, basedon facility policy, for administration. (See Chapter 5, Medications, for additional information.)
4. Perform hand hygiene and put on PPE, if indicated.
5. Identify the patient.
6. Show the patient the device, and explain the function ofthe device and reason for use. Explain the purpose andaction of the medication to the patient.
7. Close the door to the room or pull the bedside curtain.
8. Complete necessary assessments before administering medication. Check allergy bracelet or ask patient aboutallergies. Assess the patient’s pain, using an appropriateassessment tool and measurement scale. (See FundamentalsReview 10-1 through 10-6.) Put on gloves.
9. Have an ampule of 0.4 mg naloxone (Narcan) and asyringe at the bedside.
10. After the catheter has been inserted and the infusion initi-ated by the anesthesiologist or radiologist, check the labelon the medication container and rate of infusion with themedication record and patient identification. Obtain veri-fication of information from a second nurse, according tofacility policy. If using a barcode administration system,scan the barcode on the medication label, if required.
11. Tape all connection sites. Label the bag, tubing, and pumpapparatus “For Epidural Infusion Only.” Do not adminis-ter any other narcotics or adjuvant drugs without theapproval of the clinician responsible for the epiduralinjection.
Exce
llent
Satis
fact
ory
Nee
ds P
ract
ice
LWBK681-C10_p218-231.qxd 9/6/10 10:21 PM Page 228 Aptara

229
Copyright © 2011 by Wolters Kluwer Health | Lippincott Williams & Wilkins. Skill Checklists for Taylor's Clinical Nursing Skills:
A Nursing Process Approach, 3rd edition, by Pamela Lynn and Marilee LeBon.
SKILL 10-5
Caring for a Patient Receiving Epidural Analgesia (Continued)
Comments
12. Assess the catheter exit site and apply a transparent dress-ing over the catheter insertion site, if not already in place.Remove gloves and additional PPE, if used. Perform handhygiene.
13. Monitor the infusion rate according to facility policy.Assess and record sedation level and respiratory statusevery hour for the first 24 hours, then at 4-hour intervals(or according to agency policy). Notify the physician if thesedation rating is 3 or 4, the respiratory depth decreases,or the respiratory rate falls below 10 breaths per minute.
14. Keep the head of bed elevated 30 degrees unlesscontraindicated.
15. Assess the patient’s level of pain and the effectiveness ofpain relief.
16. Monitor urinary output and assess for bladder distention.
17. Assess motor strength and sensation every 4 hours.
18. Monitor for adverse effects (pruritus, nausea, and vomiting).
19. Assess for signs of infection at the insertion site.
20. Change the dressing over the catheter exit site every 24 to48 hours or as needed per agency policy using aseptic tech-nique. Change the infusion tubing every 48 hours or asspecified by agency policy.
Exce
llent
Satis
fact
ory
Nee
ds P
ract
ice
LWBK681-C10_p218-231.qxd 9/6/10 10:21 PM Page 229 Aptara
230
Copyright © 2011 by Wolters Kluwer Health | Lippincott Williams & Wilkins. Skill Checklists for Taylor's Clinical Nursing Skills:
A Nursing Process Approach, 3rd edition, by Pamela Lynn and Marilee LeBon.
Skill Checklists for Taylor's Clinical Nursing Skills:
A Nursing Process Approach, 3rd edition
Name Date
Unit Position
Instructor/Evaluator: Position
SKILL 10-6
Caring for a Patient Receiving Continuous WoundPerfusion Pain Management
Goal: The patient reports increased comfort and/or decreased
pain, without adverse effects. Comments
1. Check the medication order against the original medicalorder, according to agency policy. Clarify any inconsisten-cies. Check the patient’s chart for allergies.
2. Know the actions, special nursing considerations, safe doseranges, purpose of administration, and adverse effects ofthe medications to be administered. Consider the appropri-ateness of the medication for this patient.
3. Perform hand hygiene and put on PPE, if indicated.
4. Identify the patient.
5. Close the door to the room or pull the bedside curtain.
6. Assess the patient’s pain. Administer postoperativeanalgesic, as ordered.
7. Check the medication label attached to the balloon. Com-pare with the medical order and MAR, per facility policy.Assess the patient for perioral numbness or tingling, numb-ness or tingling of fingers or toes, blurred vision, ringing inthe ears, metallic taste in the mouth, confusion, seizures,drowsiness, nausea and/or vomiting. Assess the patient’svital signs.
8. Put on gloves. Assess the wound perfusion system. Inspecttubing for kinks; check that the white tubing clamps areopen. If tubing appears crimped, massage area on tubingto facilitate flow. Check filter in tubing, which should beunrestricted and free from tape.
9. Check the flow restrictor to ensure it is in contact with thepatient’s skin. Tape in place, as necessary.
10. Check the insertion site dressing. Ensure that it is intact.Assess for leakage and dislodgement. Assess for redness,warmth, swelling, pain at site, and drainage.
11. Review the device with the patient. Review the function ofthe device and reason for use. Reinforce the purpose andaction of the medication to the patient.
Exce
llent
Satis
fact
ory
Nee
ds P
ract
ice
LWBK681-C10_p218-231.qxd 9/6/10 10:21 PM Page 230 Aptara

231
Copyright © 2011 by Wolters Kluwer Health | Lippincott Williams & Wilkins. Skill Checklists for Taylor's Clinical Nursing Skills:
A Nursing Process Approach, 3rd edition, by Pamela Lynn and Marilee LeBon.
SKILL 10-6
Caring for a Patient Receiving Continuous WoundPerfusion Pain Management (Continued)
Comments
To Remove the Catheter
12. Check to ensure that infusion is complete. Infusion is com-plete when the delivery time has passed and the balloon isno longer inflated.
13. Perform hand hygiene. Identify the patient. Put on gloves.Remove the catheter site dressing. Loosen adhesive skinclosure strips at catheter site.
14. Grasp the catheter close to the patient’s skin at the insertionsite. Gently pull catheter to remove. Catheter should beeasy to remove and not painful. Do not tug or quickly pullon the catheter during removal. Check the distal end of thecatheter for the black marking.
15. Cover puncture site with a dry dressing, according to facil-ity policy.
16. Dispose of the balloon, tubing, and catheter according tofacility policy.
17. Remove gloves and additional PPE, if used. Perform handhygiene.
Exce
llent
Satis
fact
ory
Nee
ds P
ract
ice
LWBK681-C10_p218-231.qxd 9/6/10 10:21 PM Page 231 Aptara
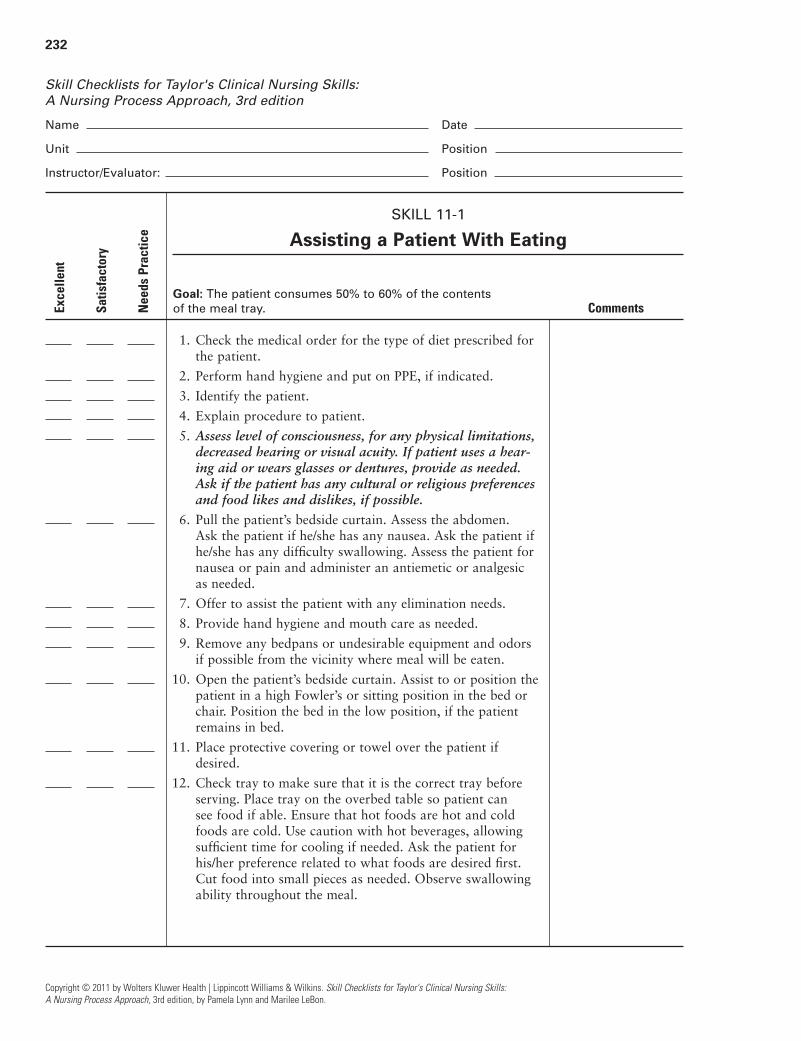
232
Copyright © 2011 by Wolters Kluwer Health | Lippincott Williams & Wilkins. Skill Checklists for Taylor's Clinical Nursing Skills:
A Nursing Process Approach, 3rd edition, by Pamela Lynn and Marilee LeBon.
Skill Checklists for Taylor's Clinical Nursing Skills:
A Nursing Process Approach, 3rd edition
Name Date
Unit Position
Instructor/Evaluator: Position
SKILL 11-1
Assisting a Patient With Eating
Goal: The patient consumes 50% to 60% of the contents
of the meal tray. Comments
1. Check the medical order for the type of diet prescribed forthe patient.
2. Perform hand hygiene and put on PPE, if indicated.
3. Identify the patient.
4. Explain procedure to patient.
5. Assess level of consciousness, for any physical limitations,decreased hearing or visual acuity. If patient uses a hear-ing aid or wears glasses or dentures, provide as needed.Ask if the patient has any cultural or religious preferencesand food likes and dislikes, if possible.
6. Pull the patient’s bedside curtain. Assess the abdomen. Ask the patient if he/she has any nausea. Ask the patient ifhe/she has any difficulty swallowing. Assess the patient fornausea or pain and administer an antiemetic or analgesicas needed.
7. Offer to assist the patient with any elimination needs.
8. Provide hand hygiene and mouth care as needed.
9. Remove any bedpans or undesirable equipment and odorsif possible from the vicinity where meal will be eaten.
10. Open the patient’s bedside curtain. Assist to or position thepatient in a high Fowler’s or sitting position in the bed orchair. Position the bed in the low position, if the patientremains in bed.
11. Place protective covering or towel over the patient ifdesired.
12. Check tray to make sure that it is the correct tray beforeserving. Place tray on the overbed table so patient can see food if able. Ensure that hot foods are hot and coldfoods are cold. Use caution with hot beverages, allowingsufficient time for cooling if needed. Ask the patient forhis/her preference related to what foods are desired first.Cut food into small pieces as needed. Observe swallowingability throughout the meal.
Exce
llent
Satis
fact
ory
Nee
ds P
ract
ice
LWBK681-C11_p232-242.qxd 9/3/10 5:38 PM Page 232 Aptara Inc
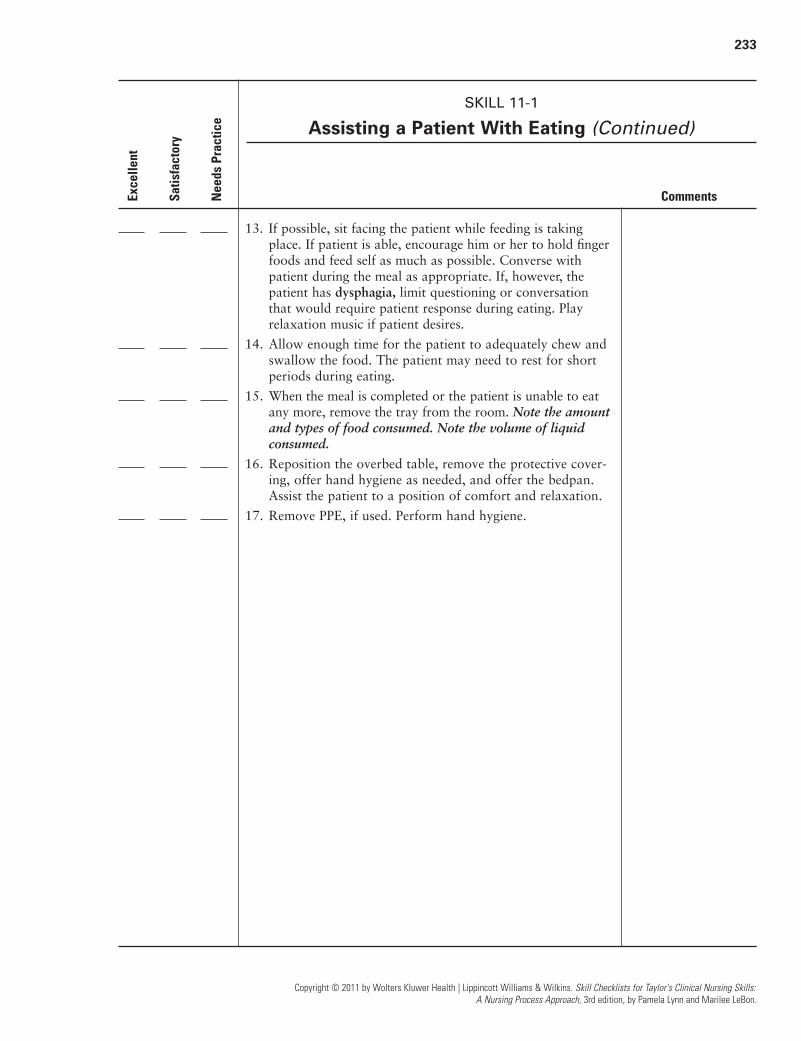
233
Copyright © 2011 by Wolters Kluwer Health | Lippincott Williams & Wilkins. Skill Checklists for Taylor's Clinical Nursing Skills:
A Nursing Process Approach, 3rd edition, by Pamela Lynn and Marilee LeBon.
SKILL 11-1
Assisting a Patient With Eating (Continued)
Comments
13. If possible, sit facing the patient while feeding is takingplace. If patient is able, encourage him or her to hold fingerfoods and feed self as much as possible. Converse withpatient during the meal as appropriate. If, however, thepatient has dysphagia, limit questioning or conversationthat would require patient response during eating. Playrelaxation music if patient desires.
14. Allow enough time for the patient to adequately chew andswallow the food. The patient may need to rest for shortperiods during eating.
15. When the meal is completed or the patient is unable to eatany more, remove the tray from the room. Note the amountand types of food consumed. Note the volume of liquidconsumed.
16. Reposition the overbed table, remove the protective cover-ing, offer hand hygiene as needed, and offer the bedpan.Assist the patient to a position of comfort and relaxation.
17. Remove PPE, if used. Perform hand hygiene.
Exce
llent
Satis
fact
ory
Nee
ds P
ract
ice
LWBK681-C11_p232-242.qxd 9/3/10 5:38 PM Page 233 Aptara Inc
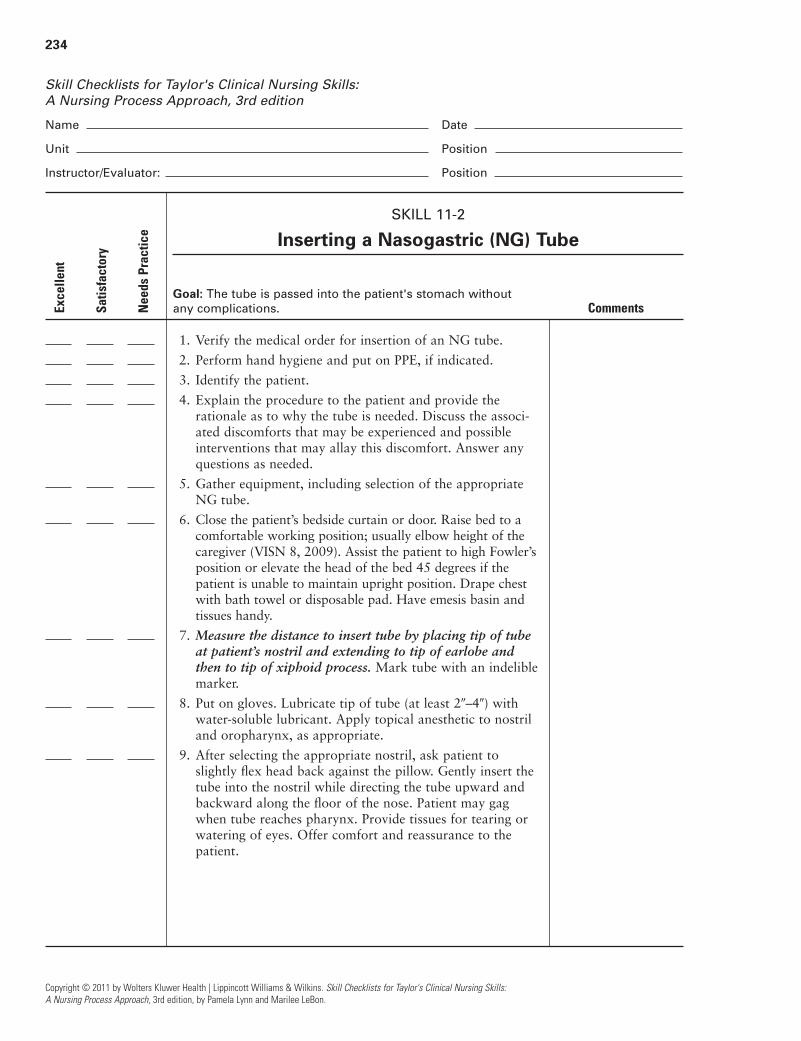
234
Copyright © 2011 by Wolters Kluwer Health | Lippincott Williams & Wilkins. Skill Checklists for Taylor's Clinical Nursing Skills:
A Nursing Process Approach, 3rd edition, by Pamela Lynn and Marilee LeBon.
Skill Checklists for Taylor's Clinical Nursing Skills:
A Nursing Process Approach, 3rd edition
Name Date
Unit Position
Instructor/Evaluator: Position
SKILL 11-2
Inserting a Nasogastric (NG) Tube
Goal: The tube is passed into the patient's stomach without
any complications. Comments
1. Verify the medical order for insertion of an NG tube.
2. Perform hand hygiene and put on PPE, if indicated.
3. Identify the patient.
4. Explain the procedure to the patient and provide therationale as to why the tube is needed. Discuss the associ-ated discomforts that may be experienced and possibleinterventions that may allay this discomfort. Answer anyquestions as needed.
5. Gather equipment, including selection of the appropriateNG tube.
6. Close the patient’s bedside curtain or door. Raise bed to acomfortable working position; usually elbow height of thecaregiver (VISN 8, 2009). Assist the patient to high Fowler’sposition or elevate the head of the bed 45 degrees if thepatient is unable to maintain upright position. Drape chestwith bath towel or disposable pad. Have emesis basin andtissues handy.
7. Measure the distance to insert tube by placing tip of tubeat patient’s nostril and extending to tip of earlobe andthen to tip of xiphoid process. Mark tube with an indeliblemarker.
8. Put on gloves. Lubricate tip of tube (at least 2�–4�) withwater-soluble lubricant. Apply topical anesthetic to nostriland oropharynx, as appropriate.
9. After selecting the appropriate nostril, ask patient toslightly flex head back against the pillow. Gently insert thetube into the nostril while directing the tube upward andbackward along the floor of the nose. Patient may gagwhen tube reaches pharynx. Provide tissues for tearing orwatering of eyes. Offer comfort and reassurance to thepatient.
Exce
llent
Satis
fact
ory
Nee
ds P
ract
ice
LWBK681-C11_p232-242.qxd 9/3/10 5:38 PM Page 234 Aptara Inc

235
Copyright © 2011 by Wolters Kluwer Health | Lippincott Williams & Wilkins. Skill Checklists for Taylor's Clinical Nursing Skills:
A Nursing Process Approach, 3rd edition, by Pamela Lynn and Marilee LeBon.
SKILL 11-2
Inserting a Nasogastric (NG) Tube (Continued)
Comments
10. When pharynx is reached, instruct patient to touch chin tochest. Encourage patient to sip water through a straw orswallow even if no fluids are permitted. Advance tube indownward and backward direction when patient swallows.Stop when patient breathes. If gagging and coughing per-sist, stop advancing the tube and check placement of tube with tongue blade and flashlight. If tube is curled,straighten the tube and attempt to advance again. Keepadvancing tube until pen marking is reached. Do not useforce. Rotate tube if it meets resistance.
11. Discontinue procedure and remove tube if there are signsof distress, such as gasping, coughing, cyanosis, andinability to speak or hum.
12. Secure the tube loosely to the nose or cheek until it isdetermined that the tube is in the patient’s stomach:
a. Attach syringe to end of tube and aspirate a smallamount of stomach contents.
b. Measure the pH of aspirated fluid using pH paper or ameter. Place a drop of gastric secretions onto pH paperor place small amount in plastic cup and dip the pHpaper into it. Within 30 seconds, compare the color onthe paper with the chart supplied by the manufacturer.
c. Visualize aspirated contents, checking for color andconsistency.
d. Obtain radiograph (x-ray) of placement of tube, basedon facility policy (and ordered by physician).
13. Apply skin barrier to tip and end of nose and allow to dry. Remove gloves and secure tube with a commerciallyprepared device (follow manufacturer’s directions) or tapeto patient’s nose. To secure with tape:
a. Cut a 4� piece of tape and split bottom 2� or use pack-aged nose tape for NG tubes.
b. Place unsplit end over bridge of patient’s nose.
c. Wrap split ends under tubing and up and over ontonose. Be careful not to pull tube too tightly againstnose.
14. Put on gloves. Clamp tube and remove the syringe. Cap thetube or attach tube to suction according to the medicalorders (see Chapter 13).
Exce
llent
Satis
fact
ory
Nee
ds P
ract
ice
LWBK681-C11_p232-242.qxd 9/3/10 5:38 PM Page 235 Aptara Inc

236
Copyright © 2011 by Wolters Kluwer Health | Lippincott Williams & Wilkins. Skill Checklists for Taylor's Clinical Nursing Skills:
A Nursing Process Approach, 3rd edition, by Pamela Lynn and Marilee LeBon.
SKILL 11-2
Inserting a Nasogastric (NG) Tube (Continued)
Comments
15. Measure length of exposed tube. Reinforce marking on tubeat nostril with indelible ink. Ask the patient to turn theirhead to the side opposite the nostril the tube is inserted.Secure tube to patient’s gown by using rubber band or tapeand safety pin. For additional support, tube can be tapedonto patient’s cheek using a piece of tape. If a double-lumentube (e.g., Salem sump) is used, secure vent above stomachlevel. Attach at shoulder level.
16. Assist with or provide oral hygiene at 2- to 4-hour intervals.Lubricate the lips generously and clean nares and lubricateas needed. Offer analgesic throat lozenges or anestheticspray for throat irritation if needed.
17. Remove equipment and return patient to a position ofcomfort. Remove gloves. Raise side rail and lower bed.
18. Remove additional PPE, if used. Perform hand hygiene.
Exce
llent
Satis
fact
ory
Nee
ds P
ract
ice
LWBK681-C11_p232-242.qxd 9/3/10 5:38 PM Page 236 Aptara Inc
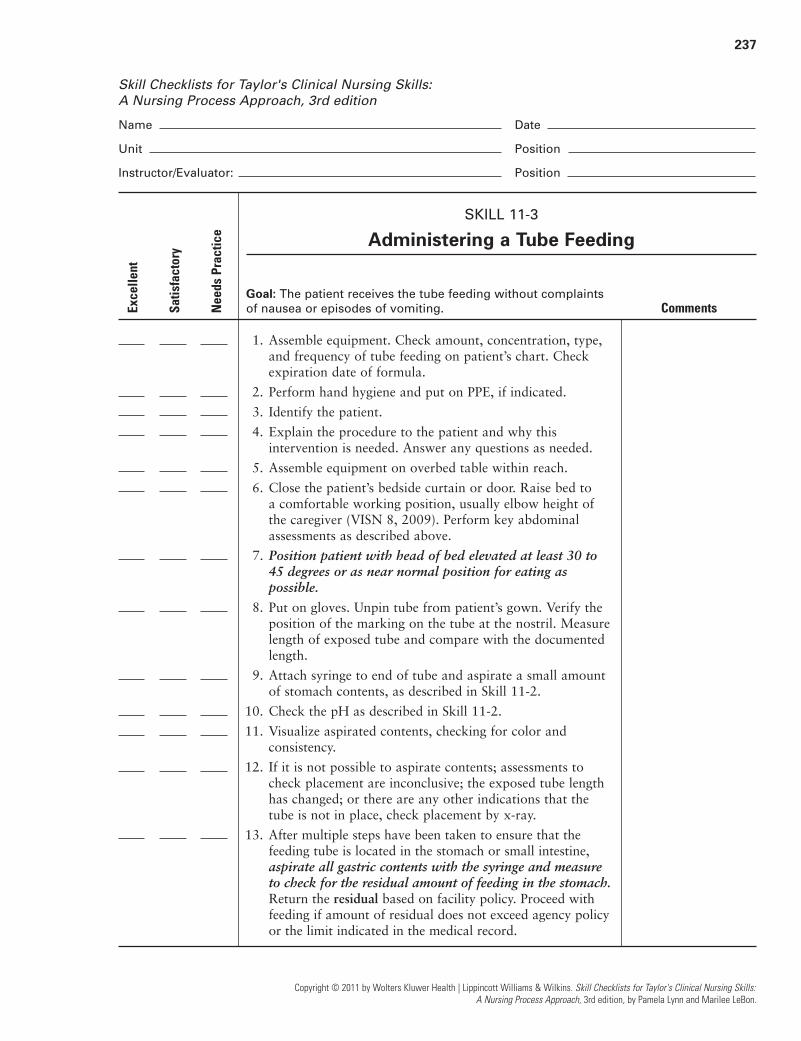
237
Skill Checklists for Taylor's Clinical Nursing Skills:
A Nursing Process Approach, 3rd edition
Name Date
Unit Position
Instructor/Evaluator: Position
SKILL 11-3
Administering a Tube Feeding
Goal: The patient receives the tube feeding without complaints
of nausea or episodes of vomiting. Comments
1. Assemble equipment. Check amount, concentration, type,and frequency of tube feeding on patient’s chart. Checkexpiration date of formula.
2. Perform hand hygiene and put on PPE, if indicated.
3. Identify the patient.
4. Explain the procedure to the patient and why thisintervention is needed. Answer any questions as needed.
5. Assemble equipment on overbed table within reach.
6. Close the patient’s bedside curtain or door. Raise bed to a comfortable working position, usually elbow height ofthe caregiver (VISN 8, 2009). Perform key abdominalassessments as described above.
7. Position patient with head of bed elevated at least 30 to45 degrees or as near normal position for eating as possible.
8. Put on gloves. Unpin tube from patient’s gown. Verify theposition of the marking on the tube at the nostril. Measurelength of exposed tube and compare with the documentedlength.
9. Attach syringe to end of tube and aspirate a small amountof stomach contents, as described in Skill 11-2.
10. Check the pH as described in Skill 11-2.
11. Visualize aspirated contents, checking for color and consistency.
12. If it is not possible to aspirate contents; assessments tocheck placement are inconclusive; the exposed tube lengthhas changed; or there are any other indications that thetube is not in place, check placement by x-ray.
13. After multiple steps have been taken to ensure that thefeeding tube is located in the stomach or small intestine,aspirate all gastric contents with the syringe and measureto check for the residual amount of feeding in the stomach.Return the residual based on facility policy. Proceed withfeeding if amount of residual does not exceed agency policyor the limit indicated in the medical record.
Copyright © 2011 by Wolters Kluwer Health | Lippincott Williams & Wilkins. Skill Checklists for Taylor's Clinical Nursing Skills:
A Nursing Process Approach, 3rd edition, by Pamela Lynn and Marilee LeBon.
Exce
llent
Satis
fact
ory
Nee
ds P
ract
ice
LWBK681-C11_p232-242.qxd 9/3/10 5:38 PM Page 237 Aptara Inc

238
Copyright © 2011 by Wolters Kluwer Health | Lippincott Williams & Wilkins. Skill Checklists for Taylor's Clinical Nursing Skills:
A Nursing Process Approach, 3rd edition, by Pamela Lynn and Marilee LeBon.
SKILL 11-3
Administering a Tube Feeding (Continued)
Comments
14. Flush tube with 30 mL of water for irrigation. Disconnectsyringe from tubing and cap end of tubing while preparingthe formula feeding equipment. Remove gloves.
15. Put on gloves before preparing, assembling and handlingany part of the feeding system.
16. Administer feeding.
When Using a Feeding Bag (Open System)
a. Label bag and/or tubing with date and time. Hang bagon IV pole and adjust to about 12� above the stomach.Clamp tubing.
b. Check the expiration date of the formula. Cleanse topof feeding container with a disinfectant before openingit. Pour formula into feeding bag and allow solution torun through tubing. Close clamp.
c. Attach feeding setup to feeding tube, open clamp, andregulate drip according to the medical order, or allowfeeding to run in over 30 minutes.
d. Add 30 to 60 mL (1–2 oz) of water for irrigation tofeeding bag when feeding is almost completed andallow it to run through the tube.
e. Clamp tubing immediately after water has beeninstilled. Disconnect feeding setup from feeding tube.Clamp tube and cover end with cap.
When Using a Large Syringe (Open System)
a. Remove plunger from 30- or 60-mL syringe.
b. Attach syringe to feeding tube, pour premeasuredamount of tube feeding formula into syringe, openclamp, and allow food to enter tube. Regulate rate, fastor slow, by height of the syringe. Do not push formulawith syringe plunger.
c. Add 30 to 60 mL (1–2 oz) of water for irrigation tosyringe when feeding is almost completed, and allow itto run through the tube.
d. When syringe has emptied, hold syringe high and discon-nect from tube. Clamp tube and cover end with cap.
When Using an Enteral Feeding Pump
a. Close flow-regulator clamp on tubing and fill feedingbag with prescribed formula. Amount used depends onagency policy. Place label on container with patient’sname, date, and time the feeding was hung.
Exce
llent
Satis
fact
ory
Nee
ds P
ract
ice
LWBK681-C11_p232-242.qxd 9/3/10 5:38 PM Page 238 Aptara Inc

239
Copyright © 2011 by Wolters Kluwer Health | Lippincott Williams & Wilkins. Skill Checklists for Taylor's Clinical Nursing Skills:
A Nursing Process Approach, 3rd edition, by Pamela Lynn and Marilee LeBon.
SKILL 11-3
Administering a Tube Feeding (Continued)
Comments
b. Hang feeding container on IV pole. Allow solution toflow through tubing.
c. Connect to feeding pump following manufacturer’sdirections. Set rate. Maintain the patient in the uprightposition throughout the feeding. If the patient needs totemporarily lie flat, the feeding should be paused. Thefeeding may be resumed after the patient’s position hasbeen changed back to at least 30 to 45 degrees.
d. Check placement of tube and gastric residual every 4 to 6 hours.
17. Observe the patient’s response during and after tube feed-ing and assess the abdomen at least once a shift.
18. Have patient remain in upright position for at least 1 hour after feeding.
19. Remove equipment and return patient to a position ofcomfort. Remove gloves. Raise side rail and lower bed.
20. Put on gloves. Wash and clean equipment or replaceaccording to agency policy. Remove gloves.
21. Remove additional PPE, if used. Perform hand hygiene.
Exce
llent
Satis
fact
ory
Nee
ds P
ract
ice
LWBK681-C11_p232-242.qxd 9/3/10 5:38 PM Page 239 Aptara Inc
240
Copyright © 2011 by Wolters Kluwer Health | Lippincott Williams & Wilkins. Skill Checklists for Taylor's Clinical Nursing Skills:
A Nursing Process Approach, 3rd edition, by Pamela Lynn and Marilee LeBon.
Skill Checklists for Taylor's Clinical Nursing Skills:
A Nursing Process Approach, 3rd edition
Name Date
Unit Position
Instructor/Evaluator: Position
SKILL 11-4
Removing a Nasogastric Tube
Goal: The tube is removed with minimal discomfort to the
patient, and the patient maintains an adequate nutritional intake. Comments
1. Check medical order for removal of NG tube.
2. Perform hand hygiene and put on PPE, if indicated.
3. Identify the patient.
4. Explain the procedure to the patient and why this interven-tion is warranted. Describe that it will entail a quick fewmoments of discomfort. Perform key abdominal assessmentsas described above.
5. Pull the patient’s bedside curtain. Raise bed to a comfortableworking position, usually elbow height of the caregiver(VISN 8, 2009). Assist the patient into a 30- to 45-degreeposition. Place towel or disposable pad across patient’schest. Give tissues and emesis basin to patient.
6. Put on gloves. Discontinue suction and separate tube fromsuction. Unpin tube from patient’s gown and carefullyremove adhesive tape from patient’s nose.
7. Check placement (as outlined in Skill 11-2) and attachsyringe and flush with 10 mL of water or normal salinesolution (optional) or clear with 30 to 50 mL of air.
8. Clamp tube with fingers by doubling tube on itself. Instructpatient to take a deep breath and hold it. Quickly andcarefully remove tube while patient holds breath. Coil thetube in the disposable pad as you remove from the patient.
9. Dispose of tube per agency policy. Remove gloves andplace in bag. Perform hand hygiene.
10. Offer mouth care to patient and facial tissue to blow nose.Lower the bed and assist the patient to a position of com-fort as needed.
11. Remove equipment and raise side rail and lower bed.
12. Put on gloves and measure the amount of nasogastricdrainage in the collection device and record on output flowrecord, subtracting irrigant fluids if necessary. Add solidify-ing agent to nasogastric drainage according to hospitalpolicy.
13. Remove additional PPE, if used. Perform hand hygiene.
Exce
llent
Satis
fact
ory
Nee
ds P
ract
ice
LWBK681-C11_p232-242.qxd 9/3/10 5:38 PM Page 240 Aptara Inc

241
Skill Checklists for Taylor's Clinical Nursing Skills:
A Nursing Process Approach, 3rd edition
Name Date
Unit Position
Instructor/Evaluator: Position
SKILL 11-5
Caring for a Gastrostomy Tube
Goal: The patient ingests an adequate diet and exhibits no
signs and symptoms of irritation, excoriation, or infection at
the tube insertion site. Comments
1. Assemble equipment. Verify the medical order or facilitypolicy and procedure regarding site care.
2. Perform hand hygiene and put on PPE, if indicated.
3. Identify the patient.
4. Explain the procedure to the patient and why this interven-tion is needed. Answer any questions as needed.
5. Assess patient for presence of pain at the tube insertion site.If pain is present, offer patient analgesic medication perphysician’s order and wait for medication absorption beforebeginning insertion site care.
6. Pull the patient’s bedside curtain. Raise bed to a comfortableworking position, usually elbow height of the caregiver(VISN 8, 2009).
7. Put on gloves. If gastrostomy tube is new and still hassutures holding it in place, dip cotton-tipped applicatorinto sterile saline solution and gently clean around theinsertion site, removing any crust or drainage. Avoidadjusting or lifting the external disk for the first few daysafter placement except to clean the area. If the gastric tubeinsertion site has healed and the sutures are removed, weta washcloth and apply a small amount of soap onto wash-cloth. Gently cleanse around the insertion, removing anycrust or drainage. Rinse site, removing all soap.
8. Pat skin around insertion site dry.
9. If the sutures have been removed, gently rotate the guardor external bumper 90 degrees at least once a day. Assessthat the guard or external bumper is not digging into thesurrounding skin. Avoid placing any tension on the feed-ing tube.
Copyright © 2011 by Wolters Kluwer Health | Lippincott Williams & Wilkins. Skill Checklists for Taylor's Clinical Nursing Skills:
A Nursing Process Approach, 3rd edition, by Pamela Lynn and Marilee LeBon.
Exce
llent
Satis
fact
ory
Nee
ds P
ract
ice
LWBK681-C11_p232-242.qxd 9/3/10 5:38 PM Page 241 Aptara Inc

242
Copyright © 2011 by Wolters Kluwer Health | Lippincott Williams & Wilkins. Skill Checklists for Taylor's Clinical Nursing Skills:
A Nursing Process Approach, 3rd edition, by Pamela Lynn and Marilee LeBon.
SKILL 11-5
Caring for a Gastrostomy Tube (Continued)
Comments
10. Leave the site open to air unless there is drainage. Ifdrainage is present, place one thickness of precut gauzepad or drain sponge under the external bumper andchange as needed to keep the area dry. Use a skin protec-tant or substance such as zinc oxide to prevent skinbreakdown.
11. Remove gloves. Lower the bed and assist the patient to aposition of comfort as needed.
12. Remove additional PPE, if used. Perform hand hygiene.
Exce
llent
Satis
fact
ory
Nee
ds P
ract
ice
LWBK681-C11_p232-242.qxd 9/3/10 5:38 PM Page 242 Aptara Inc

243
Skill Checklists for Taylor's Clinical Nursing Skills:
A Nursing Process Approach, 3rd edition
Name Date
Unit Position
Instructor/Evaluator: Position
SKILL 12-1
Assisting With the Use of a Bedpan
Goal: The patient is able to void with assistance. Comments
1. Review the patient’s chart for any limitations in physicalactivity. (See Skill Variation: Assisting With Use of aBedpan When the Patient Has Limited Movement.)
2. Bring bedpan and other necessary equipment to the bedsidestand or overbed table.
3. Perform hand hygiene and put on PPE, if indicated.
4. Identify the patient.
5. Close curtains around bed and close the door to the room,if possible. Discuss the procedure with the patient andassess the patient’s ability to assist with the procedure, aswell as personal hygiene preferences.
6. Unless contraindicated, apply powder to the rim of thebedpan. Place bedpan and cover on chair next to bed. Puton gloves.
7. Adjust bed to comfortable working height, usually elbowheight of the caregiver (VISN 8 Patient Safety Center, 2009).Place the patient in a supine position, with the head of thebed elevated about 30 degrees, unless contraindicated.
8. Fold top linen back just enough to allow placement of bedpan. If there is no waterproof pad on the bed and timeallows, consider placing a waterproof pad under patient’sbuttocks before placing bedpan.
9. Ask the patient to bend the knees. Have the patient lift hisor her hips upward. Assist patient, if necessary, by placingyour hand that is closest to the patient palm up, under thelower back, and assist with lifting. Slip the bedpan intoplace with other hand.
10. Ensure that bedpan is in proper position and patient’sbuttocks are resting on the rounded shelf of the regularbedpan or the shallow rim of the fracture bedpan.
11. Raise head of bed as near to sitting position as tolerated,unless contraindicated. Cover the patient with bed linens.
12. Place call bell and toilet tissue within easy reach. Placethe bed in the lowest position. Leave patient if it is safe todo so. Use side rails appropriately.
Copyright © 2011 by Wolters Kluwer Health | Lippincott Williams & Wilkins. Skill Checklists for Taylor's Clinical Nursing Skills:
A Nursing Process Approach, 3rd edition, by Pamela Lynn and Marilee LeBon.
Exce
llent
Satis
fact
ory
Nee
ds P
ract
ice
LWBK681-C12_p243-270.qxd 9/6/10 10:21 PM Page 243 Aptara

244
Copyright © 2011 by Wolters Kluwer Health | Lippincott Williams & Wilkins. Skill Checklists for Taylor's Clinical Nursing Skills:
A Nursing Process Approach, 3rd edition, by Pamela Lynn and Marilee LeBon.
SKILL 12-1
Assisting With the Use of a Bedpan (Continued)
Comments
13. Remove gloves and additional PPE, if used. Perform handhygiene.
Removing the Bedpan
14. Perform hand hygiene and put on gloves and additionalPPE, as indicated. Adjust bed to comfortable workingheight, usually elbow height of the caregiver (VISN 8Patient Safety Center, 2009). Have a receptacle, such asplastic trash bag, handy for discarding tissue.
15. Lower the head of the bed, if necessary, to about 30 degrees.Remove bedpan in the same manner in which it was offered,being careful to hold it steady. Ask the patient to bend theknees and lift the buttocks up from the bedpan. Assistpatient, if necessary, by placing your hand that is closest tothe patient palm up, under the lower back, and assist withlifting. Place the bedpan on the bedside chair and cover it.
16. If patient needs assistance with hygiene, wrap tissuearound the hand several times, and wipe patient clean,using one stroke from the pubic area toward the anal area.Discard tissue, and use more until patient is clean. Placepatient on his or her side and spread buttocks to cleananal area.
17. Do not place toilet tissue in the bedpan if a specimen isrequired or if output is being recorded. Place toilet tissuein appropriate receptacle.
18. Return the patient to a comfortable position. Make surethe linens under the patient are dry. Replace or remove padunder the patient, as necessary. Remove your gloves andensure that the patient is covered.
19. Raise side rail. Lower bed height and adjust head of bed toa comfortable position. Reattach call bell.
20. Offer patient supplies to wash and dry his or her hands,assisting as necessary.
21. Put on clean gloves. Empty and clean the bedpan, measur-ing urine in graduated container, as necessary. Discardtrash receptacle with used toilet paper per facility policy.
22. Remove additional PPE, if used. Perform hand hygiene.
Exce
llent
Satis
fact
ory
Nee
ds P
ract
ice
LWBK681-C12_p243-270.qxd 9/6/10 10:21 PM Page 244 Aptara

245
Skill Checklists for Taylor's Clinical Nursing Skills:
A Nursing Process Approach, 3rd edition
Name Date
Unit Position
Instructor/Evaluator: Position
SKILL 12-2
Assisting With the Use of a Urinal
Goal: The patient is able to void with assistance. Comments
1. Review the patient’s chart for any limitations in physicalactivity.
2. Bring urinal and other necessary equipment to the bedsidestand or overbed table.
3. Perform hand hygiene and put on PPE, if indicated.
4. Identify the patient.
5. Close the curtains around the bed and close the door tothe room, if possible. Discuss procedure with patient andassess the patient’s ability to assist with the procedure, aswell as personal hygiene preferences.
6. Put on gloves.
7. Assist the patient to an appropriate position, as necessary:standing at the bedside, lying on one side or back, sittingin bed with the head elevated, or sitting on the side of thebed.
8. If the patient remains in the bed, fold the linens justenough to allow for proper placement of the urinal.
9. If the patient is not standing, have him spread his legsslightly. Hold the urinal close to the penis and position thepenis completely within the urinal. Keep the bottom of theurinal lower than the penis. If necessary, assist the patientto hold the urinal in place.
10. Cover the patient with the bed linens.
11. Place call bell and toilet tissue within easy reach. Have areceptacle, such as plastic trash bag, handy for discardingtissue. Ensure the bed is in the lowest position. Leavepatient if it is safe to do so. Use side rails appropriately.
12. Remove gloves and additional PPE, if used. Perform handhygiene.
Removing the Urinal
13. Perform hand hygiene. Put on gloves and additional PPE,as indicated.
Copyright © 2011 by Wolters Kluwer Health | Lippincott Williams & Wilkins. Skill Checklists for Taylor's Clinical Nursing Skills:
A Nursing Process Approach, 3rd edition, by Pamela Lynn and Marilee LeBon.
Exce
llent
Satis
fact
ory
Nee
ds P
ract
ice
LWBK681-C12_p243-270.qxd 9/6/10 10:21 PM Page 245 Aptara
246
Copyright © 2011 by Wolters Kluwer Health | Lippincott Williams & Wilkins. Skill Checklists for Taylor's Clinical Nursing Skills:
A Nursing Process Approach, 3rd edition, by Pamela Lynn and Marilee LeBon.
SKILL 12-2
Assisting With the Use of a Urinal (Continued)
Comments
14. Pull back the patient’s bed linens just enough to remove theurinal. Remove the urinal. Cover the open end of the urinal.Place on the bedside chair. If patient needs assistance withhygiene, wrap tissue around the hand several times, andwipe patient clean. Place tissue in receptacle.
15. Return the patient to a comfortable position. Make surethe linens under the patient are dry. Remove your glovesand ensure that the patient is covered.
16. Ensure patient call bell is in reach.
17. Offer patient supplies to wash and dry his hands, assistingas necessary.
18. Put on clean gloves. Empty and clean the urinal, measuringurine in graduated container, as necessary. Discard trashreceptacle with used toilet paper per facility policy.
19. Remove gloves and additional PPE, if used, and performhand hygiene.
Exce
llent
Satis
fact
ory
Nee
ds P
ract
ice
LWBK681-C12_p243-270.qxd 9/6/10 10:21 PM Page 246 Aptara
247
Skill Checklists for Taylor's Clinical Nursing Skills:
A Nursing Process Approach, 3rd edition
Name Date
Unit Position
Instructor/Evaluator: Position
SKILL 12-3
Assisting With the Use of a Bedside Commode
Goal: The patient is able to void with assistance. Comments
1. Review the patient’s chart for any limitations in physicalactivity.
2. Bring the commode and other necessary equipment to the bedside. Obtain assistance for patient transfer fromanother staff member, if necessary.
3. Perform hand hygiene and put on PPE, if indicated.
4. Identify the patient.
5. Close the curtains around the bed and close the door tothe room, if possible. Discuss procedure with the patientand assess the patient’s ability to assist with the procedure,as well as personal hygiene preferences.
6. Place the commode close to, and parallel with, the bed.Raise or remove the seat cover.
7. Assist the patient to a standing position and then help thepatient pivot to the commode. While bracing one commodeleg with your foot, ask the patient to place his or her handsone at a time on the armrests. Assist the patient to lowerhimself/herself slowly onto the commode seat.
8. Cover the patient with a blanket. Place call bell and toilettissue within easy reach. Leave patient if it is safe to do so.
Assisting Patient Off Commode
9. Perform hand hygiene. Put on gloves and additional PPE,as indicated.
10. Assist the patient to a standing position. If patient needsassistance with hygiene, wrap toilet tissue around yourhand several times, and wipe patient clean, using onestroke from the pubic area toward the anal area. Discardtissue in an appropriate receptacle, according to facilitypolicy, and continue with additional tissue until patient isclean.
11. Do not place toilet tissue in the commode if a specimen isrequired or if output is being recorded. Replace or lowerthe seat cover.
Copyright © 2011 by Wolters Kluwer Health | Lippincott Williams & Wilkins. Skill Checklists for Taylor's Clinical Nursing Skills:
A Nursing Process Approach, 3rd edition, by Pamela Lynn and Marilee LeBon.
Exce
llent
Satis
fact
ory
Nee
ds P
ract
ice
LWBK681-C12_p243-270.qxd 9/6/10 10:21 PM Page 247 Aptara
248
Copyright © 2011 by Wolters Kluwer Health | Lippincott Williams & Wilkins. Skill Checklists for Taylor's Clinical Nursing Skills:
A Nursing Process Approach, 3rd edition, by Pamela Lynn and Marilee LeBon.
SKILL 12-3
Assisting With the Use of a Bedside Commode (Continued)
Comments
12. Remove your gloves. Return the patient to the bed orchair. If the patient returns to the bed, raise side rails, asappropriate. Ensure that the patient is covered and call bellis readily within reach.
13. Offer patient supplies to wash and dry his or her hands,assisting as necessary.
14. Put on clean gloves. Empty and clean the commode,measuring urine in graduated container, as necessary.
15. Remove gloves and additional PPE, if used. Perform handhygiene.
Exce
llent
Satis
fact
ory
Nee
ds P
ract
ice
LWBK681-C12_p243-270.qxd 9/6/10 10:21 PM Page 248 Aptara

249
Skill Checklists for Taylor's Clinical Nursing Skills:
A Nursing Process Approach, 3rd edition
Name Date
Unit Position
Instructor/Evaluator: Position
SKILL 12-4
Assessing Bladder Volume Using an Ultrasound Bladder Scanner
Goal: The volume of urine in the bladder is accurately
measured. Comments
1. Review the patient’s chart for any limitations in physicalactivity.
2. Bring the bladder scanner and other necessary equipmentto the bedside.
3. Perform hand hygiene and put on PPE, if indicated.
4. Identify the patient.
5. Close curtains around bed and close the door to the room,if possible. Discuss the procedure with the patient andassess the patient’s ability to assist with the procedure, aswell as personal hygiene preferences.
6. Adjust the bed to a comfortable working height; usuallyelbow height of the caregiver (VISN 8 Patient Safety Cen-ter, 2009). Place the patient in a supine position. Drapepatient. Stand on the patient’s right side if you are right-handed, patient’s left side if you are left-handed.
7. Put on clean gloves.
8. Press the ON button. Wait until the device warms up.Press the SCAN button to turn on the scanning screen.
9. Press the appropriate gender button. The appropriate iconfor male or female will appear on the screen.
10. Clean the scanner head with the appropriate cleaner.
11. Gently palpate the patient’s symphysis pubis. Place a gen-erous amount of ultrasound gel or gel pad midline on thepatient’s abdomen, about 1 to 1.5 inches above the symph-ysis pubis (anterior midline junction of pubic bones).
12. Place the scanner head on the gel or gel pad, with thedirectional icon on the scanner head toward the patient’shead. Aim the scanner head toward the bladder (point thescanner head slightly downward toward the coccyx)(Patraca, 2005). Press and release the scan button.
13. Observe the image on the scanner screen. Adjust the scan-ner head to center the bladder image on the crossbars.
14. Press and hold the DONE button until it beeps. Read thevolume measurement on the screen. Print the results, ifrequired, by pressing PRINT.
Copyright © 2011 by Wolters Kluwer Health | Lippincott Williams & Wilkins. Skill Checklists for Taylor's Clinical Nursing Skills:
A Nursing Process Approach, 3rd edition, by Pamela Lynn and Marilee LeBon.
Exce
llent
Satis
fact
ory
Nee
ds P
ract
ice
LWBK681-C12_p243-270.qxd 9/6/10 10:21 PM Page 249 Aptara

250
Copyright © 2011 by Wolters Kluwer Health | Lippincott Williams & Wilkins. Skill Checklists for Taylor's Clinical Nursing Skills:
A Nursing Process Approach, 3rd edition, by Pamela Lynn and Marilee LeBon.
SKILL 12-4
Assessing Bladder Volume Using an Ultrasound Bladder Scanner (Continued)
Comments
15. Use a washcloth or paper towel to remove remaining gelfrom the patient’s skin. Alternately, gently remove gel padfrom patient’s skin. Return the patient to a comfortableposition. Remove your gloves and ensure that the patientis covered.
16. Lower bed height and adjust head of bed to a comfortableposition. Reattach call bell, if necessary.
17. Remove additional PPE, if used. Perform hand hygiene.
Exce
llent
Satis
fact
ory
Nee
ds P
ract
ice
LWBK681-C12_p243-270.qxd 9/6/10 10:21 PM Page 250 Aptara

251
Skill Checklists for Taylor's Clinical Nursing Skills:
A Nursing Process Approach, 3rd edition
Name Date
Unit Position
Instructor/Evaluator: Position
SKILL 12-5
Applying an External Condom Catheter
Goal: The patient's urinary elimination is maintained, with
a urine output of at least 30 mL/hour, and the bladder is
not distended. Comments
1. Bring necessary equipment to the bedside.
2. Perform hand hygiene and put on PPE, if indicated.
3. Identify the patient.
4. Close curtains around bed and close the door to the room,if possible. Discuss the procedure with patient. Ask thepatient if he has any allergies, especially to latex.
5. Adjust bed to comfortable working height, usually elbowheight of the caregiver (VISN 8 Patient Safety Center,2009). Stand on the patient’s right side if you are right-handed, or on patient’s left side if you are left-handed.
6. Prepare urinary drainage setup or reusable leg bag forattachment to condom sheath.
7. Position patient on his back with thighs slightly apart.Drape patient so that only the area around the penis isexposed. Slide waterproof pad under patient.
8. Put on disposable gloves. Trim any long pubic hair that isin contact with penis.
9. Clean the genital area with washcloth, skin cleanser, andwarm water. If patient is uncircumcised, retract foreskinand clean glans of penis. Replace foreskin. Clean the tip ofthe penis first, moving the washcloth in a circular motionfrom the meatus outward. Wash the shaft of the penisusing downward strokes toward the pubic area. Rinse anddry. Remove gloves. Perform hand hygiene again.
10. Apply skin protectant to penis and allow to dry.
11. Roll condom sheath outward onto itself. Grasp penisfirmly with nondominant hand. Apply condom sheath by rolling it onto penis with dominant hand. Leave 1 to 2 inches (2.5 to 5 cm) of space between tip of penis andend of condom sheath.
12. Apply pressure to sheath at the base of penis for 10 to 15 seconds.
13. Connect condom sheath to drainage setup. Avoid kinkingor twisting drainage tubing.
Copyright © 2011 by Wolters Kluwer Health | Lippincott Williams & Wilkins. Skill Checklists for Taylor's Clinical Nursing Skills:
A Nursing Process Approach, 3rd edition, by Pamela Lynn and Marilee LeBon.
Exce
llent
Satis
fact
ory
Nee
ds P
ract
ice
LWBK681-C12_p243-270.qxd 9/6/10 10:21 PM Page 251 Aptara

252
Copyright © 2011 by Wolters Kluwer Health | Lippincott Williams & Wilkins. Skill Checklists for Taylor's Clinical Nursing Skills:
A Nursing Process Approach, 3rd edition, by Pamela Lynn and Marilee LeBon.
SKILL 12-5
Applying an External Condom Catheter (Continued)
Comments
14. Remove gloves. Secure drainage tubing to the patient’sinner thigh with Velcro leg strap or tape. Leave some slackin tubing for leg movement.
15. Assist the patient to a comfortable position. Cover thepatient with bed linens. Place the bed in the lowestposition.
16. Secure drainage bag below the level of the bladder. Checkthat drainage tubing is not kinked and that movement ofside rails does not interfere with the drainage bag.
17. Remove equipment. Remove gloves and additional PPE, ifused. Perform hand hygiene.
Exce
llent
Satis
fact
ory
Nee
ds P
ract
ice
LWBK681-C12_p243-270.qxd 9/6/10 10:21 PM Page 252 Aptara
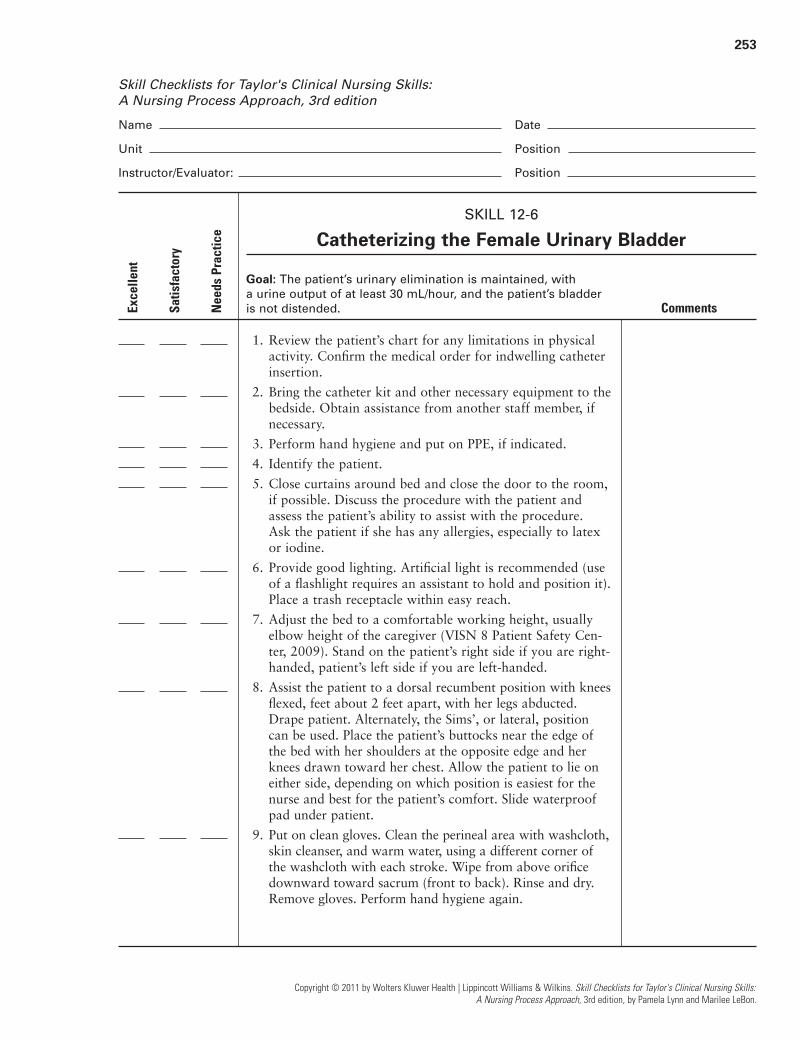
253
Skill Checklists for Taylor's Clinical Nursing Skills:
A Nursing Process Approach, 3rd edition
Name Date
Unit Position
Instructor/Evaluator: Position
SKILL 12-6
Catheterizing the Female Urinary Bladder
Goal: The patient’s urinary elimination is maintained, with
a urine output of at least 30 mL/hour, and the patient’s bladder
is not distended. Comments
1. Review the patient’s chart for any limitations in physicalactivity. Confirm the medical order for indwelling catheterinsertion.
2. Bring the catheter kit and other necessary equipment to thebedside. Obtain assistance from another staff member, ifnecessary.
3. Perform hand hygiene and put on PPE, if indicated.
4. Identify the patient.
5. Close curtains around bed and close the door to the room,if possible. Discuss the procedure with the patient andassess the patient’s ability to assist with the procedure. Ask the patient if she has any allergies, especially to latexor iodine.
6. Provide good lighting. Artificial light is recommended (useof a flashlight requires an assistant to hold and position it).Place a trash receptacle within easy reach.
7. Adjust the bed to a comfortable working height, usuallyelbow height of the caregiver (VISN 8 Patient Safety Cen-ter, 2009). Stand on the patient’s right side if you are right-handed, patient’s left side if you are left-handed.
8. Assist the patient to a dorsal recumbent position with kneesflexed, feet about 2 feet apart, with her legs abducted.Drape patient. Alternately, the Sims’, or lateral, positioncan be used. Place the patient’s buttocks near the edge ofthe bed with her shoulders at the opposite edge and herknees drawn toward her chest. Allow the patient to lie oneither side, depending on which position is easiest for thenurse and best for the patient’s comfort. Slide waterproofpad under patient.
9. Put on clean gloves. Clean the perineal area with washcloth,skin cleanser, and warm water, using a different corner ofthe washcloth with each stroke. Wipe from above orificedownward toward sacrum (front to back). Rinse and dry.Remove gloves. Perform hand hygiene again.
Copyright © 2011 by Wolters Kluwer Health | Lippincott Williams & Wilkins. Skill Checklists for Taylor's Clinical Nursing Skills:
A Nursing Process Approach, 3rd edition, by Pamela Lynn and Marilee LeBon.
Exce
llent
Satis
fact
ory
Nee
ds P
ract
ice
LWBK681-C12_p243-270.qxd 9/6/10 10:21 PM Page 253 Aptara

254
Copyright © 2011 by Wolters Kluwer Health | Lippincott Williams & Wilkins. Skill Checklists for Taylor's Clinical Nursing Skills:
A Nursing Process Approach, 3rd edition, by Pamela Lynn and Marilee LeBon.
SKILL 12-6
Catheterizing the Female Urinary Bladder (Continued)
Comments
10. Prepare urine drainage setup if a separate urine collectionsystem is to be used. Secure to bed frame according tomanufacturer’s directions.
11. Open sterile catheterization tray on a clean overbed tableusing sterile technique.
12. Put on sterile gloves. Grasp upper corners of drape andunfold drape without touching unsterile areas. Fold back acorner on each side to make a cuff over gloved hands. Askpatient to lift her buttocks and slide sterile drape under herwith gloves protected by cuff.
13. Based on facility policy, position the fenestrated steriledrape. Place a fenestrated sterile drape over the perinealarea, exposing the labia.
14. Place sterile tray on drape between patient’s thighs.
15. Open all the supplies. Fluff cotton balls in tray beforepouring antiseptic solution over them. Alternately, openpackage of antiseptic swabs. Open specimen container ifspecimen is to be obtained.
16. Lubricate 1 to 2 inches of catheter tip.
17. With thumb and one finger of nondominant hand, spreadlabia and identify meatus. Be prepared to maintain separa-tion of labia with one hand until catheter is inserted andurine is flowing well and continuously. If the patient is inthe side-lying position, lift the upper buttock and labia toexpose the urinary meatus.
18. Use the dominant hand to pick up a cotton ball or antisep-tic swab. Clean one labial fold, top to bottom (from abovethe meatus down toward the rectum), then discard thecotton ball. Using a new cotton ball/swab for each stroke,continue to clean the other labial fold, then directly overthe meatus.
19. With your uncontaminated, dominant hand, place thedrainage end of the catheter in receptacle. If the catheter ispreattached to sterile tubing and drainage container (closeddrainage system), position catheter and setup within easyreach on sterile field. Ensure that clamp on drainage bag isclosed.
Exce
llent
Satis
fact
ory
Nee
ds P
ract
ice
LWBK681-C12_p243-270.qxd 9/6/10 10:21 PM Page 254 Aptara

255
Copyright © 2011 by Wolters Kluwer Health | Lippincott Williams & Wilkins. Skill Checklists for Taylor's Clinical Nursing Skills:
A Nursing Process Approach, 3rd edition, by Pamela Lynn and Marilee LeBon.
SKILL 12-6
Catheterizing the Female Urinary Bladder (Continued)
Comments
20. Using your dominant hand, hold the catheter 2 to 3 inchesfrom the tip and insert slowly into the urethra. Advancethe catheter until there is a return of urine (approximately2 to 3 inches [4.8 to 7.2 cm]). Once urine drains, advancecatheter another 2 to 3 inches (4.8 to 7.2 cm). Do not forcecatheter through urethra into bladder. Ask patient tobreathe deeply, and rotate catheter gently if slight resistanceis met as catheter reaches external sphincter.
21. Hold the catheter securely at the meatus with your nondom-inant hand. Use your dominant hand to inflate the catheterballoon. Inject entire volume of sterile water supplied in prefilled syringe.
22. Pull gently on catheter after balloon is inflated to feelresistance.
23. Attach catheter to drainage system if not alreadypreattached.
24. Remove equipment and dispose of it according to facilitypolicy. Discard syringe in sharps container. Wash and drythe perineal area, as needed.
25. Remove gloves. Secure catheter tubing to the patient’sinner thigh with Velcro leg strap or tape. Leave some slack in catheter for leg movement.
26. Assist the patient to a comfortable position. Cover thepatient with bed linens. Place the bed in the lowestposition.
27. Secure drainage bag below the level of the bladder. Checkthat drainage tubing is not kinked and that movement ofside rails does not interfere with catheter or drainage bag.
28. Put on clean gloves. Obtain urine specimen immediately, ifneeded, from drainage bag. Label specimen. Send urinespecimen to the laboratory promptly or refrigerate it.
29. Remove gloves and additional PPE, if used. Perform handhygiene.
Exce
llent
Satis
fact
ory
Nee
ds P
ract
ice
LWBK681-C12_p243-270.qxd 9/6/10 10:21 PM Page 255 Aptara

256
Copyright © 2011 by Wolters Kluwer Health | Lippincott Williams & Wilkins. Skill Checklists for Taylor's Clinical Nursing Skills:
A Nursing Process Approach, 3rd edition, by Pamela Lynn and Marilee LeBon.
Skill Checklists for Taylor's Clinical Nursing Skills:
A Nursing Process Approach, 3rd edition
Name Date
Unit Position
Instructor/Evaluator: Position
SKILL 12-7
Catheterizing the Male Urinary Bladder
Goal: The patient’s urinary elimination is maintained, with
a urine output of at least 30 mL/hour, and the patient’s bladder
is not distended. Comments
1. Review chart for any limitations in physical activity. Con-firm the medical order for indwelling catheter insertion.
2. Bring catheter kit and other necessary equipment to thebedside. Obtain assistance from another staff member, ifnecessary.
3. Perform hand hygiene and put on PPE, if indicated.
4. Identify the patient.
5. Close curtains around bed and close the door to the room,if possible. Discuss the procedure with the patient andassess patient’s ability to assist with the procedure. Ask thepatient if he has any allergies, especially to latex or iodine.
6. Provide good lighting. Artificial light is recommended (useof a flashlight requires an assistant to hold and position it).Place a trash receptacle within easy reach.
7. Adjust the bed to a comfortable working height, usuallyelbow height of the caregiver (VISN 8 Patient Safety Cen-ter, 2009). Stand on the patient’s right side if you are right-handed, patient’s left side if you are left-handed.
8. Position the patient on his back with thighs slightly apart.Drape the patient so that only the area around the penis isexposed. Slide waterproof pad under patient.
9. Put on clean gloves. Clean the genital area with washcloth,skin cleanser, and warm water. Clean the tip of the penisfirst, moving the washcloth in a circular motion from themeatus outward. Wash the shaft of the penis using down-ward strokes toward the pubic area. Rinse and dry.Remove gloves. Perform hand hygiene again.
10. Prepare urine drainage setup if a separate urine collectionsystem is to be used. Secure to bed frame according tomanufacturer’s directions.
11. Open sterile catheterization tray on a clean overbed table,using sterile technique.
12. Put on sterile gloves. Open sterile drape and place onpatient’s thighs. Place fenestrated drape with opening over penis.
Exce
llent
Satis
fact
ory
Nee
ds P
ract
ice
LWBK681-C12_p243-270.qxd 9/6/10 10:21 PM Page 256 Aptara

257
Copyright © 2011 by Wolters Kluwer Health | Lippincott Williams & Wilkins. Skill Checklists for Taylor's Clinical Nursing Skills:
A Nursing Process Approach, 3rd edition, by Pamela Lynn and Marilee LeBon.
SKILL 12-7
Catheterizing the Male Urinary Bladder (Continued)
Comments
13. Place catheter set on or next to patient’s legs on steriledrape.
14. Open all the supplies. Fluff cotton balls in tray beforepouring antiseptic solution over them. Alternately, openpackage of antiseptic swabs. Open specimen container ifspecimen is to be obtained. Remove cap from syringe pre-filled with lubricant.
15. Place drainage end of catheter in receptacle. If the catheteris preattached to sterile tubing and drainage container(closed drainage system), position catheter and setupwithin easy reach on sterile field. Ensure that clamp ondrainage bag is closed.
16. Lift penis with nondominant hand. Retract foreskin inuncircumcised patient. Be prepared to keep this hand inthis position until catheter is inserted and urine is flowingwell and continuously. Using the dominant hand and theforceps, pick up a cotton ball or antiseptic swab. Using acircular motion, clean the penis, moving from the meatusdown the glans of the penis. Repeat this cleansing motiontwo more times, using a new cotton ball/swab each time.Discard each cotton ball/swab after one use.
17. Hold penis with slight upward tension and perpendicularto patient’s body. Use the dominant hand to pick up the lubricant syringe. Gently insert tip of syringe withlubricant into urethra and instill the 10 mL of lubricant(Society of Urologic Nurses and Associates, 2005c).
18. Use the dominant hand to pick up the catheter and hold itan inch or two from the tip. Ask the patient to bear downas if voiding. Insert catheter tip into meatus. Ask thepatient to take deep breaths. Advance the catheter to thebifurcation or “Y” level of the ports. Do not use force tointroduce the catheter. If the catheter resists entry, askpatient to breathe deeply and rotate catheter slightly.
19. Hold the catheter securely at the meatus with your nondom-inant hand. Use your dominant hand to inflate the catheterballoon. Inject the entire volume of sterile water supplied in the prefilled syringe. Once the balloon is inflated, thecatheter may be gently pulled back into place. Replace foreskin over catheter. Lower penis.
20. Pull gently on catheter after balloon is inflated to feelresistance.
21. Attach catheter to drainage system, if necessary.
Exce
llent
Satis
fact
ory
Nee
ds P
ract
ice
LWBK681-C12_p243-270.qxd 9/6/10 10:21 PM Page 257 Aptara

258
Copyright © 2011 by Wolters Kluwer Health | Lippincott Williams & Wilkins. Skill Checklists for Taylor's Clinical Nursing Skills:
A Nursing Process Approach, 3rd edition, by Pamela Lynn and Marilee LeBon.
SKILL 12-7
Catheterizing the Male Urinary Bladder (Continued)
Comments
22. Remove equipment and dispose of it according to facilitypolicy. Discard syringe in sharps container. Wash and drythe perineal area as needed.
23. Remove gloves. Secure catheter tubing to the patient’sinner thigh or lower abdomen (with the penis directedtoward the patient’s chest) with Velcro leg strap or tape.Leave some slack in catheter for leg movement.
24. Assist the patient to a comfortable position. Cover thepatient with bed linens. Place the bed in the lowestposition.
25. Secure drainage bag below the level of the bladder. Checkthat drainage tubing is not kinked and that movement ofside rails does not interfere with catheter or drainage bag.
26. Put on clean gloves. Obtain urine specimen immediately, ifneeded, from drainage bag. Label specimen. Send urinespecimen to the laboratory promptly or refrigerate it.
27. Remove gloves and additional PPE, if used. Perform handhygiene.
Exce
llent
Satis
fact
ory
Nee
ds P
ract
ice
LWBK681-C12_p243-270.qxd 9/6/10 10:21 PM Page 258 Aptara

259
Skill Checklists for Taylor's Clinical Nursing Skills:
A Nursing Process Approach, 3rd edition
Name Date
Unit Position
Instructor/Evaluator: Position
SKILL 12-8
Removing an Indwelling Catheter
Goal: The catheter is removed without difficulty and with
minimal patient discomfort. Comments
1. Confirm the order for catheter removal in the medicalrecord.
2. Bring necessary equipment to the bedside.
3. Perform hand hygiene and put on PPE, if indicated.
4. Identify the patient.
5. Close curtains around the bed and close the door to theroom, if possible. Discuss the procedure with the patientand assess the patient’s ability to assist with the procedure.
6. Adjust bed to comfortable working height, usually elbowheight of the caregiver (VISN 8 Patient Safety Center,2009). Stand on the patient’s right side if you are right-handed, patient’s left side if you are left-handed.
7. Position the patient as for catheter insertion. Drape thepatient so that only the area around the catheter is exposed.Slide waterproof pad between the female patient’s legs orover the male patient’s thighs.
8. Remove the leg strap, tape, or other device used to securethe catheter to the patient’s thigh or abdomen.
9. Insert the syringe into the balloon inflation port. Allowwater to come back by gravity (Mercer Smith, 2003). Alter-nately, aspirate the entire amount of sterile water used toinflate the balloon. Refer to manufacturer’s instructions fordeflation. Do not cut the inflation port.
10. Ask the patient to take several slow deep breaths. Slowlyand gently remove the catheter. Place it on the waterproofpad and wrap it in the pad.
11. Wash and dry the perineal area, as needed.
12. Remove gloves. Assist the patient to a comfortableposition. Cover the patient with bed linens. Place the bedin the lowest position.
13. Put on clean gloves. Remove equipment and dispose of it according to facility policy. Note characteristics andamount of urine in drainage bag.
14. Remove gloves and additional PPE, if used. Perform handhygiene.
Copyright © 2011 by Wolters Kluwer Health | Lippincott Williams & Wilkins. Skill Checklists for Taylor's Clinical Nursing Skills:
A Nursing Process Approach, 3rd edition, by Pamela Lynn and Marilee LeBon.
Exce
llent
Satis
fact
ory
Nee
ds P
ract
ice
LWBK681-C12_p243-270.qxd 9/6/10 10:21 PM Page 259 Aptara
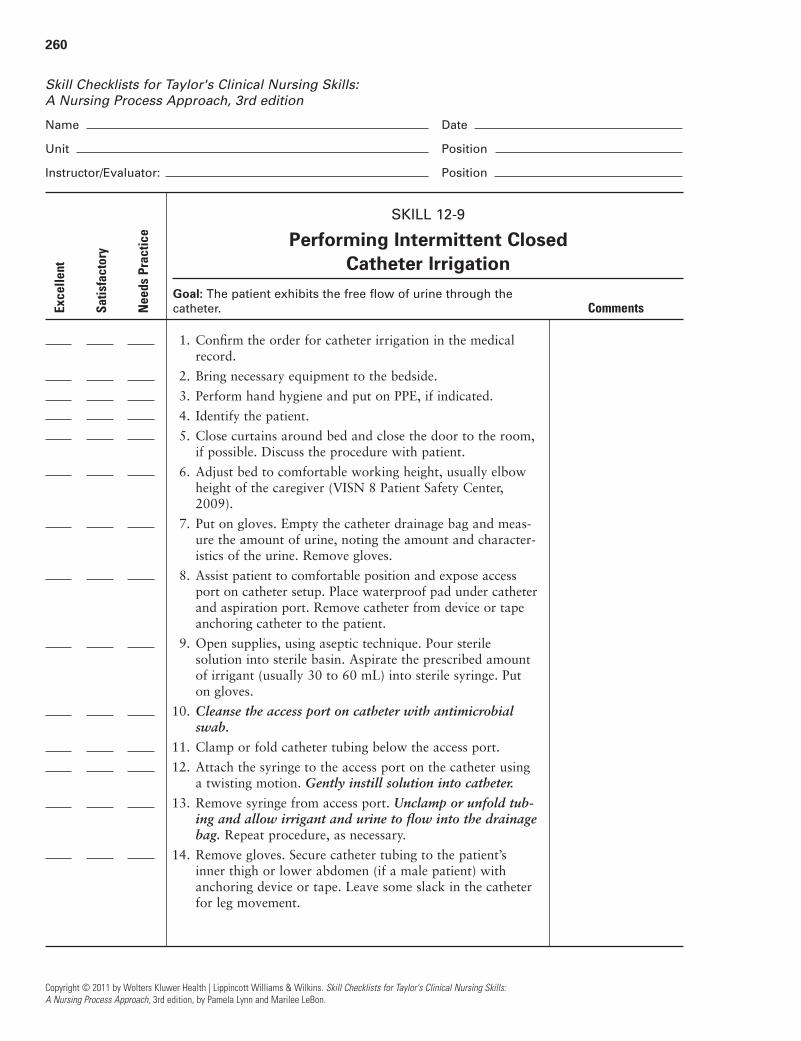
260
Copyright © 2011 by Wolters Kluwer Health | Lippincott Williams & Wilkins. Skill Checklists for Taylor's Clinical Nursing Skills:
A Nursing Process Approach, 3rd edition, by Pamela Lynn and Marilee LeBon.
Skill Checklists for Taylor's Clinical Nursing Skills:
A Nursing Process Approach, 3rd edition
Name Date
Unit Position
Instructor/Evaluator: Position
SKILL 12-9
Performing Intermittent Closed Catheter Irrigation
Goal: The patient exhibits the free flow of urine through the
catheter. Comments
1. Confirm the order for catheter irrigation in the medicalrecord.
2. Bring necessary equipment to the bedside.
3. Perform hand hygiene and put on PPE, if indicated.
4. Identify the patient.
5. Close curtains around bed and close the door to the room,if possible. Discuss the procedure with patient.
6. Adjust bed to comfortable working height, usually elbowheight of the caregiver (VISN 8 Patient Safety Center,2009).
7. Put on gloves. Empty the catheter drainage bag and meas-ure the amount of urine, noting the amount and character-istics of the urine. Remove gloves.
8. Assist patient to comfortable position and expose accessport on catheter setup. Place waterproof pad under catheterand aspiration port. Remove catheter from device or tapeanchoring catheter to the patient.
9. Open supplies, using aseptic technique. Pour sterilesolution into sterile basin. Aspirate the prescribed amountof irrigant (usually 30 to 60 mL) into sterile syringe. Puton gloves.
10. Cleanse the access port on catheter with antimicrobialswab.
11. Clamp or fold catheter tubing below the access port.
12. Attach the syringe to the access port on the catheter usinga twisting motion. Gently instill solution into catheter.
13. Remove syringe from access port. Unclamp or unfold tub-ing and allow irrigant and urine to flow into the drainagebag. Repeat procedure, as necessary.
14. Remove gloves. Secure catheter tubing to the patient’sinner thigh or lower abdomen (if a male patient) withanchoring device or tape. Leave some slack in the catheterfor leg movement.
Exce
llent
Satis
fact
ory
Nee
ds P
ract
ice
LWBK681-C12_p243-270.qxd 9/6/10 10:21 PM Page 260 Aptara

261
Copyright © 2011 by Wolters Kluwer Health | Lippincott Williams & Wilkins. Skill Checklists for Taylor's Clinical Nursing Skills:
A Nursing Process Approach, 3rd edition, by Pamela Lynn and Marilee LeBon.
SKILL 12-9
Performing Intermittent Closed Catheter Irrigation (Continued)
Comments
15. Assist the patient to a comfortable position. Cover thepatient with bed linens. Place the bed in the lowestposition.
16. Secure drainage bag below the level of the bladder. Checkthat drainage tubing is not kinked and that movement ofside rails does not interfere with catheter or drainage bag.
17. Remove equipment and discard syringe in appropriatereceptacle. Remove gloves and additional PPE, if used. Per-form hand hygiene.
18. Assess patient’s response to the procedure and the qualityand amount of drainage after the irrigation.
Exce
llent
Satis
fact
ory
Nee
ds P
ract
ice
LWBK681-C12_p243-270.qxd 9/6/10 10:21 PM Page 261 Aptara

262
Copyright © 2011 by Wolters Kluwer Health | Lippincott Williams & Wilkins. Skill Checklists for Taylor's Clinical Nursing Skills:
A Nursing Process Approach, 3rd edition, by Pamela Lynn and Marilee LeBon.
Skill Checklists for Taylor's Clinical Nursing Skills:
A Nursing Process Approach, 3rd edition
Name Date
Unit Position
Instructor/Evaluator: Position
SKILL 12-10
Administering a Continuous Closed Bladder Irrigation
Goal: The patient exhibits free-flowing urine through the catheter. Comments
1. Confirm the order for catheter irrigation in the medicalrecord. Calculate the drip rate via gravity infusion for theprescribed infusion rate.
2. Bring necessary equipment to the bedside.
3. Perform hand hygiene and put on PPE, if indicated.
4. Identify the patient.
5. Close curtains around the bed and close the door to theroom, if possible. Discuss the procedure with patient.
6. Adjust bed to comfortable working height, usually elbowheight of the caregiver (VISN 8 Patient Safety Center,2009).
7. Empty the catheter drainage bag and measure the amountof urine, noting the amount and characteristics of the urine.
8. Assist patient to comfortable position and expose the irri-gation port on the catheter setup. Place waterproof padunder the catheter and aspiration port.
9. Prepare sterile irrigation bag for use as directed by manu-facturer. Clearly label the solution as ‘Bladder Irrigant.’Include the date and time on the label. Hang bag on IVpole 2.5 to 3 feet above the level of the patient’s bladder.Secure tubing clamp and insert sterile tubing with dripchamber to container using aseptic technique. Releaseclamp and remove protective cover on end of tubing with-out contaminating it. Allow solution to flush tubing andremove air. Clamp tubing and replace end cover.
10. Put on gloves. Cleanse the irrigation port on the catheterwith an alcohol swab. Using aseptic technique, attachirrigation tubing to irrigation port of three-wayindwelling catheter.
11. Check the drainage tubing to make sure clamp, if present,is open.
12. Release clamp on irrigation tubing and regulate flow atdetermined drip rate, according to the ordered rate. If thebladder irrigation is to be done with a medicated solution,use an electronic infusion device to regulate the flow.
Exce
llent
Satis
fact
ory
Nee
ds P
ract
ice
LWBK681-C12_p243-270.qxd 9/6/10 10:21 PM Page 262 Aptara

263
Copyright © 2011 by Wolters Kluwer Health | Lippincott Williams & Wilkins. Skill Checklists for Taylor's Clinical Nursing Skills:
A Nursing Process Approach, 3rd edition, by Pamela Lynn and Marilee LeBon.
SKILL 12-10
Administering a Continuous Closed Bladder Irrigation (Continued)
Comments
13. Remove gloves. Assist the patient to a comfortable position.Cover the patient with bed linens. Place the bed in the low-est position.
14. Assess patient’s response to the procedure, and quality andamount of drainage.
15. Remove equipment. Remove gloves and additional PPE, ifused. Perform hand hygiene.
16. As irrigation fluid container nears empty, clamp the admin-istration tubing. Do not allow drip chamber to empty. Disconnect empty bag and attach a new full irrigationsolution bag.
17. Put on gloves and empty drainage collection bag as eachnew container is hung and recorded.
Exce
llent
Satis
fact
ory
Nee
ds P
ract
ice
LWBK681-C12_p243-270.qxd 9/6/10 10:21 PM Page 263 Aptara
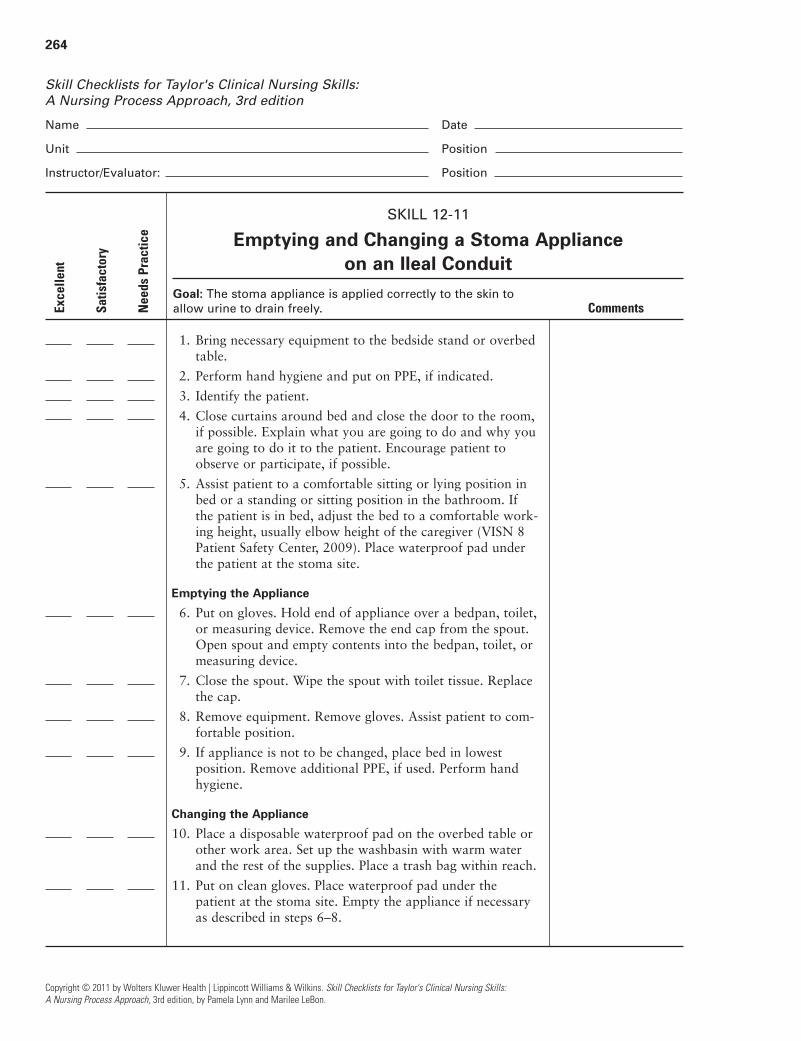
264
Copyright © 2011 by Wolters Kluwer Health | Lippincott Williams & Wilkins. Skill Checklists for Taylor's Clinical Nursing Skills:
A Nursing Process Approach, 3rd edition, by Pamela Lynn and Marilee LeBon.
Skill Checklists for Taylor's Clinical Nursing Skills:
A Nursing Process Approach, 3rd edition
Name Date
Unit Position
Instructor/Evaluator: Position
SKILL 12-11
Emptying and Changing a Stoma Appliance on an Ileal Conduit
Goal: The stoma appliance is applied correctly to the skin to
allow urine to drain freely. Comments
1. Bring necessary equipment to the bedside stand or overbedtable.
2. Perform hand hygiene and put on PPE, if indicated.
3. Identify the patient.
4. Close curtains around bed and close the door to the room,if possible. Explain what you are going to do and why youare going to do it to the patient. Encourage patient toobserve or participate, if possible.
5. Assist patient to a comfortable sitting or lying position inbed or a standing or sitting position in the bathroom. Ifthe patient is in bed, adjust the bed to a comfortable work-ing height, usually elbow height of the caregiver (VISN 8Patient Safety Center, 2009). Place waterproof pad underthe patient at the stoma site.
Emptying the Appliance
6. Put on gloves. Hold end of appliance over a bedpan, toilet,or measuring device. Remove the end cap from the spout.Open spout and empty contents into the bedpan, toilet, ormeasuring device.
7. Close the spout. Wipe the spout with toilet tissue. Replacethe cap.
8. Remove equipment. Remove gloves. Assist patient to com-fortable position.
9. If appliance is not to be changed, place bed in lowest position. Remove additional PPE, if used. Perform handhygiene.
Changing the Appliance
10. Place a disposable waterproof pad on the overbed table orother work area. Set up the washbasin with warm waterand the rest of the supplies. Place a trash bag within reach.
11. Put on clean gloves. Place waterproof pad under thepatient at the stoma site. Empty the appliance if necessaryas described in steps 6–8.
Exce
llent
Satis
fact
ory
Nee
ds P
ract
ice
LWBK681-C12_p243-270.qxd 9/6/10 10:21 PM Page 264 Aptara

265
Copyright © 2011 by Wolters Kluwer Health | Lippincott Williams & Wilkins. Skill Checklists for Taylor's Clinical Nursing Skills:
A Nursing Process Approach, 3rd edition, by Pamela Lynn and Marilee LeBon.
SKILL 12-11
Emptying and Changing a Stoma Appliance on an Ileal Conduit (Continued)
Comments
12. Gently remove appliance faceplate from skin by pushingskin from appliance rather than pulling appliance fromskin. Start at the top of the appliance, while keeping theskin taut. Apply a silicone-based adhesive remover byspraying or wiping with the remover wipe.
13. Place the appliance in the trash bag, if disposable. Ifreusable, set aside to wash in lukewarm soap and waterand allow to air dry after the new appliance is in place.
14. Clean skin around stoma with mild soap and water or acleansing agent and a washcloth. Remove all old adhesivefrom skin; additional adhesive remover may be used. Donot apply lotion to peristomal area.
15. Gently pat area dry. Make sure skin around stoma is thor-oughly dry. Assess stoma and condition of surroundingskin.
16. Place one or two gauze squares over stoma opening.
17. Apply skin protectant to a 2-inch (5-cm) radius around thestoma, and allow it to dry completely, which takes about30 seconds.
18. Lift the gauze squares for a moment and measure thestoma opening, using the measurement guide. Replace thegauze. Trace the same size opening on the back center ofthe appliance. Cut the opening 1/8 inch larger than thestoma size. Check that the spout is closed and the end capis in place.
19. Remove the backing from the appliance. Quickly removethe gauze squares and discard appropriately; ease theappliance over the stoma. Gently press onto the skin whilesmoothing over the surface. Apply gentle pressure to theappliance for a few minutes.
20. Secure optional belt to appliance and around patient.
21. Remove gloves. Assist the patient to a comfortableposition. Cover the patient with bed linens. Place the bed in the lowest position.
22. Put on clean gloves. Remove or discard any remainingequipment and assess patient’s response to procedure.
23. Remove gloves and additional PPE, if used. Perform handhygiene.
Exce
llent
Satis
fact
ory
Nee
ds P
ract
ice
LWBK681-C12_p243-270.qxd 9/6/10 10:21 PM Page 265 Aptara

266
Copyright © 2011 by Wolters Kluwer Health | Lippincott Williams & Wilkins. Skill Checklists for Taylor's Clinical Nursing Skills:
A Nursing Process Approach, 3rd edition, by Pamela Lynn and Marilee LeBon.
Skill Checklists for Taylor's Clinical Nursing Skills:
A Nursing Process Approach, 3rd edition
Name Date
Unit Position
Instructor/Evaluator: Position
SKILL 12-12
Caring for a Suprapubic Urinary Catheter
Goal: The patient's skin remains clean, dry, intact, and without
evidence of irritation or breakdown; and the patient verbalizes
an understanding of the purpose for, and care of the catheter,
as appropriate. Comments
1. Bring necessary equipment to the bedside stand or overbedtable.
2. Perform hand hygiene and put on PPE, if indicated.
3. Identify the patient.
4. Close curtains around bed and close the door to the room,if possible. Explain what you are going to do, and why youare going to do it, to the patient. Encourage the patient toobserve or participate, if possible.
5. Adjust bed to comfortable working height, usually elbowheight of the caregiver (VISN 8 Patient Safety Center, 2009).Assist patient to a supine position. Place waterproof padunder the patient at the stoma site.
6. Put on clean gloves. Gently remove old dressing, if one is inplace. Place dressing in trash bag. Remove gloves. Performhand hygiene.
7. Assess the insertion site and surrounding skin.
8. Wet washcloth with warm water and apply skin cleanser.Gently cleanse around suprapubic exit site. Remove anyencrustations. If this is a new suprapubic catheter, use ster-ile cotton-tipped applicators and sterile saline to clean thesite until the incision has healed. Moisten the applicatorswith the saline and clean in circular motion from theinsertion site outward.
9. Rinse area of all cleanser. Pat dry.
10. If the exit site has been draining, place small drain spongearound the catheter to absorb any drainage. Be preparedto change this sponge throughout the day, depending onthe amount of drainage. Do not cut a 4 � 4 gauze to makea drain sponge.
11. Remove gloves. Form a loop in tubing and anchor the tubing on the patient’s abdomen.
Exce
llent
Satis
fact
ory
Nee
ds P
ract
ice
LWBK681-C12_p243-270.qxd 9/6/10 10:21 PM Page 266 Aptara
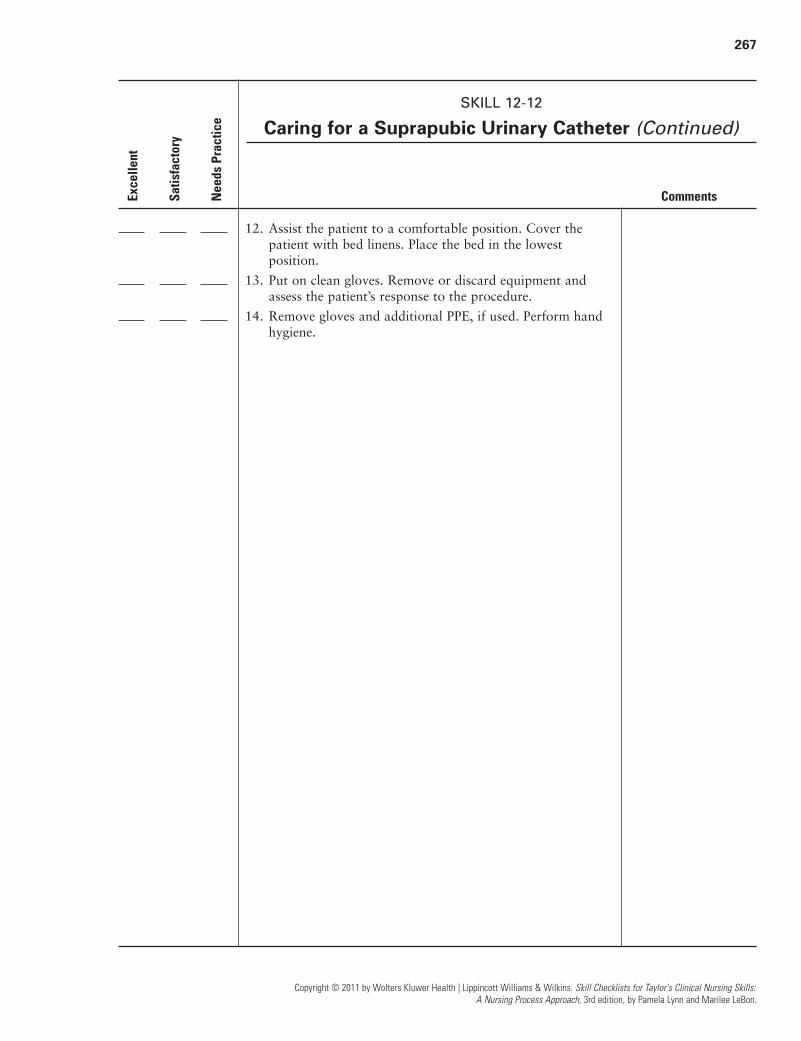
267
Copyright © 2011 by Wolters Kluwer Health | Lippincott Williams & Wilkins. Skill Checklists for Taylor's Clinical Nursing Skills:
A Nursing Process Approach, 3rd edition, by Pamela Lynn and Marilee LeBon.
SKILL 12-12
Caring for a Suprapubic Urinary Catheter (Continued)
Comments
12. Assist the patient to a comfortable position. Cover thepatient with bed linens. Place the bed in the lowestposition.
13. Put on clean gloves. Remove or discard equipment andassess the patient’s response to the procedure.
14. Remove gloves and additional PPE, if used. Perform handhygiene.
Exce
llent
Satis
fact
ory
Nee
ds P
ract
ice
LWBK681-C12_p243-270.qxd 9/6/10 10:21 PM Page 267 Aptara

268
Copyright © 2011 by Wolters Kluwer Health | Lippincott Williams & Wilkins. Skill Checklists for Taylor's Clinical Nursing Skills:
A Nursing Process Approach, 3rd edition, by Pamela Lynn and Marilee LeBon.
Skill Checklists for Taylor's Clinical Nursing Skills:
A Nursing Process Approach, 3rd edition
Name Date
Unit Position
Instructor/Evaluator: Position
SKILL 12-13
Caring for a Peritoneal Dialysis Catheter
Goal: The peritoneal dialysis catheter dressing change is completed
using aseptic technique without trauma to the site or patient;
the site is clean, dry, and intact, without evidence of inflammation
or infection. Comments
1. Bring necessary equipment to the bedside stand or overbedtable.
2. Perform hand hygiene and put on PPE, if indicated.
3. Identify the patient.
4. Close curtains around bed and close the door to the room,if possible. Explain what you are going to do and why youare going to do it to the patient. Encourage the patient toobserve or participate if possible.
5. Adjust bed to comfortable working height, usually elbowheight of the caregiver (VISN 8 Patient Safety Center, 2009).Assist the patient to a supine position. Expose the abdomen,draping the patient’s chest with the bath blanket, exposingonly the catheter site.
6. Put on unsterile gloves. Put on one of the facemasks; havepatient put on the other mask.
7. Gently remove old dressing, noting odor, amount andcolor of drainage, leakage, and condition of skin aroundthe catheter. Discard dressing in appropriate container.
8. Remove gloves and discard. Set up sterile field. Open pack-ages. Using aseptic technique, place two sterile gauzesquares in basin with antimicrobial agent. Leave two ster-ile gauze squares opened on sterile field. Alternately (basedon facility’s policy), place sterile antimicrobial swabs onthe sterile field. Place sterile applicator on field. Squeeze asmall amount of the topical antibiotic on one of the gauzesquares on the sterile field.
9. Put on sterile gloves. Pick up dialysis catheter withnondominant hand. With the antimicrobial-soakedgauze/swab, cleanse the skin around the exit site using acircular motion, starting at the exit site and then slowlygoing outward 3 to 4 inches. Gently remove crusted scabs,if necessary.
Exce
llent
Satis
fact
ory
Nee
ds P
ract
ice
LWBK681-C12_p243-270.qxd 9/6/10 10:21 PM Page 268 Aptara

269
Copyright © 2011 by Wolters Kluwer Health | Lippincott Williams & Wilkins. Skill Checklists for Taylor's Clinical Nursing Skills:
A Nursing Process Approach, 3rd edition, by Pamela Lynn and Marilee LeBon.
SKILL 12-13
Caring for a Peritoneal Dialysis Catheter (Continued)
Comments
10. Continue to hold catheter with nondominant hand. Afterskin has dried, clean the catheter with an antimicrobial-soaked gauze, beginning at exit site, going aroundcatheter, and then moving up to end of catheter. Gentlyremove crusted secretions on the tube, if necessary.
11. Using the sterile applicator, apply the topical antibiotic tothe catheter exit site, if prescribed.
12. Place sterile drain sponge around exit site. Then place a 4 � 4 gauze over exit site. Remove your gloves and secureedges of gauze pad with tape. Some institutions recommendplacing a transparent dressing over the gauze pads insteadof tape. Remove masks.
13. Coil the exposed length of tubing and secure to the dress-ing or the patient’s abdomen with tape.
14. Assist the patient to a comfortable position. Cover thepatient with bed linens. Place the bed in the lowestposition.
15. Put on clean gloves. Remove or discard equipment andassess the patient’s response to the procedure.
16. Remove gloves and additional PPE, if used. Perform handhygiene.
Exce
llent
Satis
fact
ory
Nee
ds P
ract
ice
LWBK681-C12_p243-270.qxd 9/6/10 10:21 PM Page 269 Aptara
270
Copyright © 2011 by Wolters Kluwer Health | Lippincott Williams & Wilkins. Skill Checklists for Taylor's Clinical Nursing Skills:
A Nursing Process Approach, 3rd edition, by Pamela Lynn and Marilee LeBon.
Skill Checklists for Taylor's Clinical Nursing Skills:
A Nursing Process Approach, 3rd edition
Name Date
Unit Position
Instructor/Evaluator: Position
SKILL 12-14
Caring for a Hemodialysis Access (Arteriovenous Fistula or Graft)
Goal: The graft or fistula remains patent; the patient verbalizes
appropriate care measures and observations to be made,
and demonstrates care measures. Comments
1. Perform hand hygiene and put on PPE, if indicated.
2. Identify the patient.
3. Close curtains around bed and close the door to the room,if possible. Explain what you are going to do, and why youare going to do it, to the patient.
4. Inspect area over access site for any redness, warmth,tenderness, or blemishes. Palpate over access site, feelingfor a thrill or vibration. Palpate pulses distal to the site.Auscultate over access site with bell of stethoscope,listening for a bruit or vibration.
5. Ensure that a sign is placed over head of bed informing the healthcare team which arm is affected. Do not measureblood pressure, perform a venipuncture, or start an IV onthe access arm.
6. Instruct the patient not to sleep with the arm with the accesssite under head or body.
7. Instruct patient not to lift heavy objects with, or putpressure on, the arm with the access site. Advise the patientnot to carry heavy bags (including purses) on the shoulderof that arm.
8. Remove PPE, if used. Perform hand hygiene.
Exce
llent
Satis
fact
ory
Nee
ds P
ract
ice
LWBK681-C12_p243-270.qxd 9/6/10 10:21 PM Page 270 Aptara
271
Skill Checklists for Taylor's Clinical Nursing Skills:
A Nursing Process Approach, 3rd edition
Name Date
Unit Position
Instructor/Evaluator: Position
SKILL 13-1
Administering a Large-Volume Cleansing Enema
Goal: The patient expels feces and is free from injury with
minimal discomfort. Comments
1. Verify the order for the enema. Bring necessary equipmentto the bedside stand or overbed table.
2. Perform hand hygiene and put on PPE, if indicated.
3. Identify the patient.
4. Close curtains around the bed and close the door to theroom, if possible. Explain what you are going to do andwhy you are going to do it to the patient. Discuss wherethe patient will defecate. Have a bedpan, commode, ornearby bathroom ready for use.
5. Warm solution in amount ordered, and check temperaturewith a bath thermometer, if available. If bath thermometeris not available, warm to room temperature or slightlyhigher, and test on inner wrist. If tap water is used, adjusttemperature as it flows from faucet.
6. Add enema solution to container. Release clamp and allowfluid to progress through tube before reclamping.
7. Adjust bed to comfortable working height, usually elbowheight of the caregiver (VISN 8 Patient Safety Center,2009). Position the patient on the left side (Sims’ position),as dictated by patient comfort and condition. Fold toplinen back just enough to allow access to the patient’s rec-tal area. Place a waterproof pad under the patient’s hip.
8. Put on nonsterile gloves.
9. Elevate solution so that it is no higher than 18 inches (45 cm) above level of anus. Plan to give the solutionslowly over a period of 5 to 10 minutes. Hang thecontainer on an IV pole or hold it at the proper height.
10. Generously lubricate end of rectal tube 2 to 3 inches (5 to7 cm). A disposable enema set may have a prelubricatedrectal tube.
11. Lift buttock to expose anus. Slowly and gently insert theenema tube 3 to 4 inches (7 to 10 cm) for an adult. Directit at an angle pointing toward the umbilicus, not bladder.Ask patient to take several deep breaths.
Copyright © 2011 by Wolters Kluwer Health | Lippincott Williams & Wilkins. Skill Checklists for Taylor's Clinical Nursing Skills:
A Nursing Process Approach, 3rd edition, by Pamela Lynn and Marilee LeBon.
Exce
llent
Satis
fact
ory
Nee
ds P
ract
ice
LWBK681-C13_p271-285.qxd 9/6/10 10:22 PM Page 271 Aptara
272
Copyright © 2011 by Wolters Kluwer Health | Lippincott Williams & Wilkins. Skill Checklists for Taylor's Clinical Nursing Skills:
A Nursing Process Approach, 3rd edition, by Pamela Lynn and Marilee LeBon.
SKILL 13-1
Administering a Large-Volume Cleansing Enema (Continued)
Comments
12. If resistance is met while inserting tube, permit a smallamount of solution to enter, withdraw tube slightly, andthen continue to insert it. Do not force entry of the tube.Ask patient to take several deep breaths.
13. Introduce solution slowly over a period of 5 to 10 minutes.Hold tubing all the time that solution is being instilled.
14. Clamp tubing or lower container if patient has desire todefecate or cramping occurs. Instruct the patient to takesmall, fast breaths or to pant.
15. After solution has been given, clamp tubing and removetube. Have paper towel ready to receive tube as it is withdrawn.
16. Return the patient to a comfortable position. Encouragethe patient to hold the solution until the urge to defecate is strong, usually in about 5 to 15 minutes. Make sure thelinens under the patient are dry. Remove your gloves andensure that the patient is covered.
17. Raise side rail. Lower bed height and adjust head of bed toa comfortable position.
18. Remove additional PPE, if used. Perform hand hygiene.
19. When patient has a strong urge to defecate, place him orher in a sitting position on a bedpan or assist to commodeor bathroom. Offer toilet tissues, if not in patient’s reach.Stay with patient or have call bell readily accessible.
20. Remind patient not to flush the commode before youinspect results of enema.
21. Put on gloves and assist patient, if necessary, with cleaningof anal area. Offer washcloths, soap, and water for hand-washing. Remove gloves.
22. Leave the patient clean and comfortable. Care forequipment properly.
23. Perform hand hygiene.
Exce
llent
Satis
fact
ory
Nee
ds P
ract
ice
LWBK681-C13_p271-285.qxd 9/6/10 10:22 PM Page 272 Aptara

273
Skill Checklists for Taylor's Clinical Nursing Skills:
A Nursing Process Approach, 3rd edition
Name Date
Unit Position
Instructor/Evaluator: Position
SKILL 13-2
Administering a Small-Volume Cleansing Enema
Goal: The patient expels feces and reports a decrease in pain
and discomfort. Comments
1. Verify the order for the enema. Bring necessary equipmentto the bedside stand or overbed table. Warm the solutionto body temperature in a bowl of warm water.
2. Perform hand hygiene and put on PPE, if indicated.
3. Identify the patient.
4. Close curtains around bed and close the door to the room,if possible. Explain what you are going to do and why youare going to do it to the patient. Discuss where the patientwill defecate. Have a bedpan, commode, or nearbybathroom ready for use.
5. Adjust bed to comfortable working height, usually elbowheight of the caregiver (VISN 8 Patient Safety Center,2009). Position the patient on the left side (Sims’ position),as dictated by patient comfort and condition. Fold toplinen back just enough to allow access to the patient’s rec-tal area. Place a waterproof pad under the patient’s hip.
6. Put on nonsterile gloves.
7. Remove the cap and generously lubricate end of rectal tube2 to 3 inches (5 to 7 cm).
8. Lift buttock to expose anus. Slowly and gently insert therectal tube 3 to 4 inches (7 to 10 cm) for an adult. Directit at an angle pointing toward the umbilicus, not bladder.Do not force entry of the tube. Ask patient to take severaldeep breaths.
9. Compress the container with your hands. Roll the end upon itself, toward the rectal tip. Administer all the solutionin the container.
10. After solution has been given, remove tube, keeping thecontainer compressed. Have paper towel ready to receivetube as it is withdrawn. Encourage the patient to hold thesolution until the urge to defecate is strong, usually inabout 5 to 15 minutes.
11. Remove gloves. Return the patient to a comfortable posi-tion. Make sure the linens under the patient are dry.Ensure that the patient is covered.
Copyright © 2011 by Wolters Kluwer Health | Lippincott Williams & Wilkins. Skill Checklists for Taylor's Clinical Nursing Skills:
A Nursing Process Approach, 3rd edition, by Pamela Lynn and Marilee LeBon.
Exce
llent
Satis
fact
ory
Nee
ds P
ract
ice
LWBK681-C13_p271-285.qxd 9/6/10 10:22 PM Page 273 Aptara
274
Copyright © 2011 by Wolters Kluwer Health | Lippincott Williams & Wilkins. Skill Checklists for Taylor's Clinical Nursing Skills:
A Nursing Process Approach, 3rd edition, by Pamela Lynn and Marilee LeBon.
SKILL 13-2
Administering a Small-Volume Cleansing Enema (Continued)
Comments
12. Raise side rail. Lower bed height and adjust head of bed toa comfortable position.
13. Remove additional PPE, if used. Perform hand hygiene.
14. When patient has a strong urge to defecate, place him orher in a sitting position on a bedpan or assist to commodeor bathroom. Stay with patient or have call bell readilyaccessible.
15. Remind patient not to flush the commode before youinspect the results of the enema.
16. Put on gloves and assist patient, if necessary, with cleaningof anal area. Offer washcloths, soap, and water for hand-washing. Remove gloves.
17. Leave the patient clean and comfortable. Care forequipment properly.
18. Perform hand hygiene.
Exce
llent
Satis
fact
ory
Nee
ds P
ract
ice
LWBK681-C13_p271-285.qxd 9/6/10 10:22 PM Page 274 Aptara

275
Skill Checklists for Taylor's Clinical Nursing Skills:
A Nursing Process Approach, 3rd edition
Name Date
Unit Position
Instructor/Evaluator: Position
SKILL 13-3
Administering a Retention Enema
Goal: The patient retains the solution for the prescribed,
appropriate length of time and experiences the expected
therapeutic effect of the solution. Comments
1. Verify the order for the enema. Bring necessary equipmentto the bedside stand or overbed table. Warm the solutionto body temperature in a bowl of warm water.
2. Perform hand hygiene and put on PPE, if indicated.
3. Identify the patient.
4. Close curtains around bed and close the door to the room,if possible. Explain what you are going to do and why youare going to do it to the patient. Have a bedpan, commode,or nearby bathroom ready for use.
5. Adjust bed to comfortable working height, usually elbowheight of the caregiver (VISN 8 Patient Safety Center, 2009).Position the patient on the left side (Sims’ position), as dic-tated by patient comfort and condition. Fold top linen backjust enough to allow access to the patient’s rectal area. Placea waterproof pad under the patient’s hip.
6. Put on nonsterile gloves.
7. Remove cap of prepackaged enema solution. Apply a gen-erous amount of lubricant to the tube.
8. Lift buttock to expose anus. Slowly and gently insert rectaltube 3 to 4 inches (7 to 10 cm) for an adult. Direct it at anangle pointing toward the umbilicus. Ask patient to takeseveral deep breaths.
9. If resistance is met while inserting the tube, permit a smallamount of solution to enter, withdraw tube slightly, andthen continue to insert it. Do not force entry of tube.
10. Slowly squeeze enema container, emptying entire contents.
11. Remove container while keeping it compressed. Havepaper towel ready to receive tube as it is withdrawn.
12. Instruct patient to retain enema solution for at least30 minutes or as indicated, per manufacturer’s direction.
13. Remove your gloves. Return the patient to a comfortableposition. Make sure the linens under the patient are dryand ensure that the patient is covered.
14. Raise side rail. Lower bed height and adjust head of bed toa comfortable position.
Copyright © 2011 by Wolters Kluwer Health | Lippincott Williams & Wilkins. Skill Checklists for Taylor's Clinical Nursing Skills:
A Nursing Process Approach, 3rd edition, by Pamela Lynn and Marilee LeBon.
Exce
llent
Satis
fact
ory
Nee
ds P
ract
ice
LWBK681-C13_p271-285.qxd 9/6/10 10:22 PM Page 275 Aptara
276
Copyright © 2011 by Wolters Kluwer Health | Lippincott Williams & Wilkins. Skill Checklists for Taylor's Clinical Nursing Skills:
A Nursing Process Approach, 3rd edition, by Pamela Lynn and Marilee LeBon.
SKILL 13-3
Administering a Retention Enema (Continued)
Comments
15. Remove additional PPE, if used. Perform hand hygiene.
16. If the patient has a strong urge to dispel the solution, placehim or her in a sitting position on bedpan or assist to com-mode or bathroom. Stay with patient or have call bellreadily accessible.
17. Remind patient not to flush commode before you inspectresults of enema, if used for bowel evacuation. Recordcharacter of stool, as appropriate, and patient’s reaction to enema.
18. Put on gloves and assist patient, if necessary, with cleaningof anal area. Offer washcloths, soap, and water for hand-washing. Remove gloves.
19. Leave patient clean and comfortable. Care for equipmentproperly.
20. Perform hand hygiene.
Exce
llent
Satis
fact
ory
Nee
ds P
ract
ice
LWBK681-C13_p271-285.qxd 9/6/10 10:22 PM Page 276 Aptara
277
Skill Checklists for Taylor's Clinical Nursing Skills:
A Nursing Process Approach, 3rd edition
Name Date
Unit Position
Instructor/Evaluator: Position
SKILL 13-4
Digital Removal of Stool
Goal: The patient expels feces with assistance and is free
from trauma with minimal patient discomfort. Comments
1. Verify the order. Bring necessary equipment to the bedsidestand or overbed table.
2. Perform hand hygiene and put on PPE, if indicated.
3. Identify the patient.
4. Close curtains around bed and close the door to the room,if possible. Explain what you are going to do and why you are going to do it to the patient. Discuss signs andsymptoms of a slow heart rate. Instruct patient to alert youif any of these symptoms are felt during the procedure.Have a bedpan ready for use.
5. Adjust bed to comfortable working height, usually elbowheight of the caregiver (VISN 8 Patient Safety Center,2009). Position the patient on the left side (Sims’position), as dictated by patient comfort and condition.Fold top linen back just enough to allow access to thepatient’s rectal area. Place a waterproof pad under thepatient’s hip.
6. Put on nonsterile gloves.
7. Generously lubricate index finger with water-soluble lubri-cant and insert finger gently into anal canal, pointingtoward the umbilicus.
8. Gently work the finger around and into the hardened massto break it up and then remove pieces of it. Instruct patientto bear down, if possible, while extracting feces to ease inremoval. Place extracted stool in bedpan.
9. Remove impaction at intervals if it is severe. Instructpatient to alert you if he or she begins to feel lightheadedor nauseated. If patient reports either symptom, stopremoval and assess patient.
10. Put on clean gloves. Assist patient, if necessary, with clean-ing of anal area. Offer washcloths, soap, and water forhandwashing. If patient is able, offer sitz bath.
Copyright © 2011 by Wolters Kluwer Health | Lippincott Williams & Wilkins. Skill Checklists for Taylor's Clinical Nursing Skills:
A Nursing Process Approach, 3rd edition, by Pamela Lynn and Marilee LeBon.
Exce
llent
Satis
fact
ory
Nee
ds P
ract
ice
LWBK681-C13_p271-285.qxd 9/6/10 10:22 PM Page 277 Aptara

278
Copyright © 2011 by Wolters Kluwer Health | Lippincott Williams & Wilkins. Skill Checklists for Taylor's Clinical Nursing Skills:
A Nursing Process Approach, 3rd edition, by Pamela Lynn and Marilee LeBon.
SKILL 13-4
Digital Removal of Stool (Continued)
Comments
11. Remove gloves. Return the patient to a comfortable posi-tion. Make sure the linens under the patient are dry.Ensure that the patient is covered.
12. Raise side rail. Lower bed height and adjust head of bed toa comfortable position.
13. Remove additional PPE, if used. Perform hand hygiene.
Exce
llent
Satis
fact
ory
Nee
ds P
ract
ice
LWBK681-C13_p271-285.qxd 9/6/10 10:22 PM Page 278 Aptara

279
Skill Checklists for Taylor's Clinical Nursing Skills:
A Nursing Process Approach, 3rd edition
Name Date
Unit Position
Instructor/Evaluator: Position
SKILL 13-5
Applying a Fecal Incontinence Pouch
Goal: The patient expels feces into the pouch and maintains
intact perianal skin. Comments
1. Bring necessary equipment to the bedside stand or overbedtable.
2. Perform hand hygiene and put on PPE, if indicated.
3. Identify the patient.
4. Close curtains around bed and close the door to the room,if possible. Explain what you are going to do and why youare going to do it to the patient.
5. Adjust bed to comfortable working height, usually elbowheight of the caregiver (VISN 8 Patient Safety Center,2009). Position the patient on the left side (Sims’ position),as dictated by patient comfort and condition. Fold toplinen back just enough to allow access to the patient’s rec-tal area. Place a waterproof pad under the patient’s hip.
6. Put on nonsterile gloves. Cleanse perianal area. Pat drythoroughly.
7. Trim perianal hair with scissors, if needed.
8. Apply the skin protectant or barrier and allow it to dry.
9. Remove paper backing from adhesive of pouch.
10. With nondominant hand, separate buttocks. Apply fecalpouch to anal area with dominant hand, ensuring thatopening of bag is over anus.
11. Release buttocks. Attach connector of fecal incontinencepouch to urinary drainage bag. Hang drainage bag belowpatient.
12. Remove gloves. Return the patient to a comfortable posi-tion. Make sure the linens under the patient are dry.Ensure that the patient is covered.
13. Raise side rail. Lower bed height and adjust head of bed toa comfortable position.
14. Remove additional PPE, if used. Perform hand hygiene.
Copyright © 2011 by Wolters Kluwer Health | Lippincott Williams & Wilkins. Skill Checklists for Taylor's Clinical Nursing Skills:
A Nursing Process Approach, 3rd edition, by Pamela Lynn and Marilee LeBon.
Exce
llent
Satis
fact
ory
Nee
ds P
ract
ice
LWBK681-C13_p271-285.qxd 9/6/10 10:22 PM Page 279 Aptara

280
Copyright © 2011 by Wolters Kluwer Health | Lippincott Williams & Wilkins. Skill Checklists for Taylor's Clinical Nursing Skills:
A Nursing Process Approach, 3rd edition, by Pamela Lynn and Marilee LeBon.
Skill Checklists for Taylor's Clinical Nursing Skills:
A Nursing Process Approach, 3rd edition
Name Date
Unit Position
Instructor/Evaluator: Position
SKILL 13-6
Changing and Emptying an Ostomy Appliance
Goal: The stoma appliance is applied correctly to the skin to
allow stool to drain freely. Comments
1. Bring necessary equipment to the bedside stand or overbedtable.
2. Perform hand hygiene and put on PPE, if indicated.
3. Identify the patient.
4. Close curtains around bed and close the door to the room,if possible. Explain what you are going to do and why youare going to do it to the patient. Encourage the patient toobserve or participate, if possible.
5. Assist patient to a comfortable sitting or lying position inbed or a standing or sitting position in the bathroom.
Emptying an Appliance
6. Put on disposable gloves. Remove clamp and fold end ofpouch upward like a cuff.
7. Empty contents into bedpan, toilet, or measuring device.
8. Wipe the lower 2 inches of the appliance or pouch withtoilet tissue.
9. Uncuff edge of appliance or pouch and apply clip orclamp, or secure Velcro closure. Ensure the curve of theclamp follows the curve of the patient’s body. Removegloves. Assist patient to a comfortable position.
10. If appliance is not to be changed, remove additional PPE,if used. Perform hand hygiene.
Changing an Appliance
11. Place a disposable pad on the work surface. Set up thewash basin with warm water and the rest of the supplies.Place a trash bag within reach.
12. Put on clean gloves. Place waterproof pad under thepatient at the stoma site. Empty the appliance as describedpreviously.
Exce
llent
Satis
fact
ory
Nee
ds P
ract
ice
LWBK681-C13_p271-285.qxd 9/6/10 10:22 PM Page 280 Aptara
281
Copyright © 2011 by Wolters Kluwer Health | Lippincott Williams & Wilkins. Skill Checklists for Taylor's Clinical Nursing Skills:
A Nursing Process Approach, 3rd edition, by Pamela Lynn and Marilee LeBon.
SKILL 13-6
Changing and Emptying an Ostomy Appliance (Continued)
Comments
13. Gently remove pouch faceplate from skin by pushing skinfrom appliance rather than pulling appliance from skin.Start at the top of the appliance, while keeping the abdom-inal skin taut. Apply a silicone-based adhesive remover byspraying or wiping with the remover wipe.
14. Place the appliance in the trash bag, if disposable. Ifreusable, set aside to wash in lukewarm soap and waterand allow to air dry after the new appliance is in place.
15. Use toilet tissue to remove any excess stool from stoma.Cover stoma with gauze pad. Clean skin around stoma withmild soap and water or a cleansing agent and a washcloth.Remove all old adhesive from skin; use an adhesive remover,as necessary. Do not apply lotion to peristomal area.
16. Gently pat area dry. Make sure skin around stoma is thor-oughly dry. Assess stoma and condition of surroundingskin.
17. Apply skin protectant to a 2-inch (5 cm) radius around thestoma, and allow it to dry completely, which takes about30 seconds.
18. Lift the gauze squares for a moment and measure thestoma opening, using the measurement guide. Replace thegauze. Trace the same-size opening on the back center ofthe appliance. Cut the opening 1/8 inch larger than thestoma size.
19. Remove the backing from the appliance. Quickly removethe gauze squares and ease the appliance over the stoma.Gently press onto the skin while smoothing over thesurface. Apply gentle pressure to appliance for 5 minutes.
20. Close bottom of appliance or pouch by folding the endupward and using the clamp or clip that comes with theproduct, or secure Velcro closure. Ensure the curve of theclamp follows the curve of the patient’s body.
21. Remove gloves. Assist the patient to a comfortableposition. Cover the patient with bed linens. Place the bedin the lowest position.
22. Put on clean gloves. Remove or discard equipment andassess patient’s response to procedure.
23. Remove gloves and additional PPE, if used. Perform handhygiene.
Exce
llent
Satis
fact
ory
Nee
ds P
ract
ice
LWBK681-C13_p271-285.qxd 9/6/10 10:22 PM Page 281 Aptara

282
Copyright © 2011 by Wolters Kluwer Health | Lippincott Williams & Wilkins. Skill Checklists for Taylor's Clinical Nursing Skills:
A Nursing Process Approach, 3rd edition, by Pamela Lynn and Marilee LeBon.
Skill Checklists for Taylor's Clinical Nursing Skills:
A Nursing Process Approach, 3rd edition
Name Date
Unit Position
Instructor/Evaluator: Position
SKILL 13-7
Irrigating a Colostomy
Goal: The patient expels soft, formed stool. Comments
1. Verify the order for the irrigation. Bring necessaryequipment to the bedside stand or overbed table.
2. Perform hand hygiene and put on PPE, if indicated.
3. Identify the patient.
4. Close curtains around bed and close the door to the room,if possible. Explain what you are going to do and why youare going to do it to the patient. Plan where the patient willreceive irrigation. Assist patient onto bedside commode orinto nearby bathroom.
5. Warm solution in amount ordered and check temperaturewith a bath thermometer, if available. If bath thermometeris not available, warm to room temperature or slightlyhigher, and test on inner wrist. If tap water is used, adjusttemperature as it flows from faucet.
6. Add irrigation solution to container. Release clamp andallow fluid to progress through tube before reclamping.
7. Hang container so that bottom of bag will be at patient’sshoulder level when seated.
8. Put on nonsterile gloves.
9. Remove ostomy appliance and attach irrigation sleeve.Place drainage end into toilet bowl or commode.
10. Lubricate end of cone with water-soluble lubricant.
11. Insert the cone into the stoma. Introduce solution slowlyover a period of 5 to 6 minutes. Hold cone and tubing (orif patient is able, allow patient to hold) all the time thatsolution is being instilled. Control rate of flow by closingor opening the clamp.
12. Hold cone in place for an additional 10 seconds after thefluid is infused.
13. Remove cone. Patient should remain seated on toilet orbedside commode.
14. After majority of solution has returned, allow patient toclip (close) bottom of irrigating sleeve and continue withdaily activities.
Exce
llent
Satis
fact
ory
Nee
ds P
ract
ice
LWBK681-C13_p271-285.qxd 9/6/10 10:22 PM Page 282 Aptara
283
Copyright © 2011 by Wolters Kluwer Health | Lippincott Williams & Wilkins. Skill Checklists for Taylor's Clinical Nursing Skills:
A Nursing Process Approach, 3rd edition, by Pamela Lynn and Marilee LeBon.
SKILL 13-7
Irrigating a Colostomy (Continued)
Comments
15. After solution has stopped flowing from stoma, put onclean gloves. Remove irrigating sleeve and cleanse skinaround stoma opening with mild soap and water. Gentlypat peristomal skin dry.
16. Attach new appliance to stoma or stoma cover (see Skill 13-6), as needed.
17. Remove gloves. Return the patient to a comfortable posi-tion. Make sure the linens under the patient are dry, ifappropriate. Ensure that the patient is covered.
18. Raise side rail. Lower bed height and adjust head of bed toa comfortable position, as necessary.
19. Remove gloves and additional PPE, if used. Perform handhygiene.
Exce
llent
Satis
fact
ory
Nee
ds P
ract
ice
LWBK681-C13_p271-285.qxd 9/6/10 10:22 PM Page 283 Aptara
284
Copyright © 2011 by Wolters Kluwer Health | Lippincott Williams & Wilkins. Skill Checklists for Taylor's Clinical Nursing Skills:
A Nursing Process Approach, 3rd edition, by Pamela Lynn and Marilee LeBon.
Skill Checklists for Taylor's Clinical Nursing Skills:
A Nursing Process Approach, 3rd edition
Name Date
Unit Position
Instructor/Evaluator: Position
SKILL 13-8
Irrigating a Nasogastric Tube Connected to Suction
Goal: The tube maintains patency with irrigation and patient
remains free from injury. Comments
1. Assemble equipment. Verify the medical order or facilitypolicy and procedure regarding frequency of irrigation,solution type, and amount of irrigant. Check expirationdates on irrigating solution and irrigation set.
2. Perform hand hygiene and put on PPE, if indicated.
3. Identify the patient.
4. Explain the procedure to the patient and why thisintervention is needed. Answer any questions as needed.Perform key abdominal assessments as described above.
5. Pull the patient’s bedside curtain. Raise bed to a comfortableworking position, usually elbow height of the caregiver(VISN 8 Patient Safety Center, 2009). Assist patient to 30-to 45-degree position, unless this is contraindicated. Pourthe irrigating solution into container.
6. Put on gloves. Check placement of NG tube. (Refer toSkill 11-2.)
7. Draw up 30 mL of saline solution (or amount indicated inthe order or policy) into syringe.
8. Clamp suction tubing near connection site. If needed, dis-connect tube from suction apparatus and lay on disposablepad or towel, or hold both tubes upright in nondominanthand.
9. Place tip of syringe in tube. If Salem sump or double-lumen tube is used, make sure that syringe tip is placed indrainage port and not in blue air vent. Hold syringeupright and gently insert the irrigant (or allow solution toflow in by gravity if agency policy or physician indicates).Do not force solution into tube.
10. If unable to irrigate tube, reposition patient and attemptirrigation again. Inject 10 to 20 mL of air and aspirateagain. Check with physician or follow agency policy, ifrepeated attempts to irrigate tube fail.
Exce
llent
Satis
fact
ory
Nee
ds P
ract
ice
LWBK681-C13_p271-285.qxd 9/6/10 10:22 PM Page 284 Aptara

285
Copyright © 2011 by Wolters Kluwer Health | Lippincott Williams & Wilkins. Skill Checklists for Taylor's Clinical Nursing Skills:
A Nursing Process Approach, 3rd edition, by Pamela Lynn and Marilee LeBon.
SKILL 13-8
Irrigating a Nasogastric Tube Connected to Suction (Continued)
Comments
11. After irrigant has been instilled, hold end of NG tube overirrigation tray or emesis basin. Observe for return flow ofNG drainage into available container. Alternately, you mayreconnect the NG tube to suction and observe the returndrainage as it drains into the suction container.
12. If not already done, reconnect drainage port to suction, ifordered.
13. Inject air into blue air vent after irrigation is complete.Position the blue air vent above the patient’s stomach.
14. Remove gloves. Lower the bed and raise side rails, as nec-essary. Assist the patient to a position of comfort. Performhand hygiene.
15. Put on gloves. Measure returned solution, if collected out-side of suction apparatus. Rinse equipment if it will bereused. Label with the date, patient’s name, room number,and purpose (for NG tube/irrigation).
16. Remove gloves and additional PPE, if used. Perform handhygiene.
Exce
llent
Satis
fact
ory
Nee
ds P
ract
ice
LWBK681-C13_p271-285.qxd 9/6/10 10:22 PM Page 285 Aptara
286
Copyright © 2011 by Wolters Kluwer Health | Lippincott Williams & Wilkins. Skill Checklists for Taylor's Clinical Nursing Skills:
A Nursing Process Approach, 3rd edition, by Pamela Lynn and Marilee LeBon.
Skill Checklists for Taylor's Clinical Nursing Skills:
A Nursing Process Approach, 3rd edition
Name Date
Unit Position
Instructor/Evaluator: Position
SKILL 14-1
Using a Pulse Oximeter
Goal: The patient exhibits arterial blood oxygen saturation
within acceptable parameters, or greater than 95%. Comments
1. Review chart for any health problems that would affect thepatient’s oxygenation status.
2. Bring necessary equipment to the bedside stand or overbedtable.
3. Perform hand hygiene and put on PPE, if indicated.
4. Identify the patient.
5. Close curtains around bed and close the door to the room,if possible. Explain what you are going to do and why youare going to do it to the patient.
6. Select an adequate site for application of the sensor.
a. Use the patient’s index, middle, or ring finger.
b. Check the proximal pulse and capillary refill at thepulse closest to the site.
c. If circulation at the site is inadequate, consider using theearlobe, forehead, or bridge of nose.
d. Use a toe only if lower extremity circulation is notcompromised.
7. Select proper equipment:
a. If one finger is too large for the probe, use a smallerone. A pediatric probe may be used for a small adult.
b. Use probes appropriate for patient’s age and size.
c. Check if patient is allergic to adhesive. A nonadhesivefinger clip or reflectance sensor is available.
8. Prepare the monitoring site. Cleanse the selected areawith the alcohol wipe or disposable cleansing cloth.Allow the area to dry. If necessary, remove nail polishand artificial nails after checking pulse oximeter’s manu-facturer instructions.
9. Apply probe securely to skin. Make sure that the light-emitting sensor and the light-receiving sensor are alignedopposite each other (not necessary to check if placed onforehead or bridge of nose).
Exce
llent
Satis
fact
ory
Nee
ds P
ract
ice
LWBK681-C14_p286-317.qxd 9/6/10 10:22 PM Page 286 Aptara
287
Copyright © 2011 by Wolters Kluwer Health | Lippincott Williams & Wilkins. Skill Checklists for Taylor's Clinical Nursing Skills:
A Nursing Process Approach, 3rd edition, by Pamela Lynn and Marilee LeBon.
SKILL 14-1
Using a Pulse Oximeter (Continued)
Comments
10. Connect the sensor probe to the pulse oximeter, turn theoximeter on, and check operation of the equipment (audi-ble beep, fluctuation of bar of light or waveform on face ofoximeter).
11. Set alarms on pulse oximeter. Check manufacturer’s alarmlimits for high and low pulse rate settings.
12. Check oxygen saturation at regular intervals, as ordered byprimary care provider, nursing assessment, and signaled byalarms. Monitor hemoglobin level.
13. Remove sensor on a regular basis and check for skin irrita-tion or signs of pressure (every 2 hours for spring-tensionsensor or every 4 hours for adhesive finger or toe sensor).
14. Clean nondisposable sensors according to the manufacturer’sdirections. Remove PPE, if used. Perform hand hygiene.
Exce
llent
Satis
fact
ory
Nee
ds P
ract
ice
LWBK681-C14_p286-317.qxd 9/6/10 10:22 PM Page 287 Aptara

288
Copyright © 2011 by Wolters Kluwer Health | Lippincott Williams & Wilkins. Skill Checklists for Taylor's Clinical Nursing Skills:
A Nursing Process Approach, 3rd edition, by Pamela Lynn and Marilee LeBon.
Skill Checklists for Taylor's Clinical Nursing Skills:
A Nursing Process Approach, 3rd edition
Name Date
Unit Position
Instructor/Evaluator: Position
SKILL 14-2
Teaching Patient to Use an Incentive Spirometer
Goal: The patient accurately demonstrates the procedure for
using the spirometer. Comments
1. Review chart for any health problems that would affect thepatient’s oxygenation status.
2. Bring necessary equipment to the bedside stand or overbedtable.
3. Perform hand hygiene and put on PPE, if indicated.
4. Identify the patient.
5. Close curtains around bed and close the door to the room,if possible. Explain what you are going to do and why youare going to do it to the patient.
6. Assist patient to an upright or semi-Fowler’s position, ifpossible. Remove dentures if they fit poorly. Assess thepatient’s level of pain. Administer pain medication, as pre-scribed, if needed. Wait the appropriate amount of time for the medication to take effect. If patient has recentlyundergone abdominal or chest surgery, place a pillow orfolded blanket over a chest or abdominal incision forsplinting.
7. Demonstrate how to steady the device with one hand andhold the mouthpiece with the other hand. If the patientcannot use hands, assist the patient with the incentivespirometer.
8. Instruct the patient to exhale normally and then place lipssecurely around the mouthpiece.
9. Instruct patient to inhale slowly and as deeply as possiblethrough the mouthpiece without using nose (if desired, anose clip may be used).
10. When the patient cannot inhale anymore, the patientshould hold his or her breath and count to three. Checkposition of gauge to determine progress and level attained.If patient begins to cough, splint an abdominal or chestincision.
Exce
llent
Satis
fact
ory
Nee
ds P
ract
ice
LWBK681-C14_p286-317.qxd 9/6/10 10:22 PM Page 288 Aptara
289
Copyright © 2011 by Wolters Kluwer Health | Lippincott Williams & Wilkins. Skill Checklists for Taylor's Clinical Nursing Skills:
A Nursing Process Approach, 3rd edition, by Pamela Lynn and Marilee LeBon.
SKILL 14-2
Teaching Patient to Use an Incentive Spirometer (Continued)
Comments
11. Instruct the patient to remove lips from mouthpiece andexhale normally. If patient becomes light-headed duringthe process, tell him or her to stop and take a few normalbreaths before resuming incentive spirometry.
12. Encourage patient to perform incentive spirometry 5 to 10 times every 1 to 2 hours, if possible.
13. Clean the mouthpiece with water and shake to dry. RemovePPE, if used. Perform hand hygiene.
Exce
llent
Satis
fact
ory
Nee
ds P
ract
ice
LWBK681-C14_p286-317.qxd 9/6/10 10:22 PM Page 289 Aptara

290
Copyright © 2011 by Wolters Kluwer Health | Lippincott Williams & Wilkins. Skill Checklists for Taylor's Clinical Nursing Skills:
A Nursing Process Approach, 3rd edition, by Pamela Lynn and Marilee LeBon.
Skill Checklists for Taylor's Clinical Nursing Skills:
A Nursing Process Approach, 3rd edition
Name Date
Unit Position
Instructor/Evaluator: Position
SKILL 14-3
Administering Oxygen by Nasal Cannula
Goal: The patient exhibits an oxygen saturation level within
acceptable parameters. Comments
1. Bring necessary equipment to the bedside stand or overbedtable.
2. Perform hand hygiene and put on PPE, if indicated.
3. Identify the patient.
4. Close curtains around bed and close the door to the room,if possible.
5. Explain what you are going to do and the reason for doingit to the patient. Review safety precautions necessary whenoxygen is in use. Place “No Smoking” signs in appropriateareas.
6. Connect nasal cannula to oxygen setup with humidification,if one is in use. Adjust flow rate as ordered. Check that oxy-gen is flowing out of prongs.
7. Place prongs in patient’s nostrils. Place tubing over andbehind each ear with adjuster comfortably under chin.Alternately, the tubing may be placed around the patient’shead, with the adjuster at the back or base of the head.Place gauze pads at ear beneath the tubing, as necessary.
8. Adjust the fit of the cannula, as necessary. Tubing shouldbe snug but not tight against the skin.
9. Encourage patient to breathe through the nose, with themouth closed.
10. Reassess patient’s respiratory status, including respiratoryrate, effort, and lung sounds. Note any signs of respiratorydistress, such as tachypnea, nasal flaring, use of accessorymuscles, or dyspnea.
11. Remove PPE, if used. Perform hand hygiene.
12. Put on clean gloves. Remove and clean the cannula andassess nares at least every 8 hours, or according to agencyrecommendations. Check nares for evidence of irritation orbleeding.
Exce
llent
Satis
fact
ory
Nee
ds P
ract
ice
LWBK681-C14_p286-317.qxd 9/6/10 10:22 PM Page 290 Aptara

291
Skill Checklists for Taylor's Clinical Nursing Skills:
A Nursing Process Approach, 3rd edition
Name Date
Unit Position
Instructor/Evaluator: Position
SKILL 14-4
Administering Oxygen by Mask
Goal: The patient exhibits an oxygen saturation level within
acceptable parameters. Comments
1. Bring necessary equipment to the bedside stand or overbedtable.
2. Perform hand hygiene and put on PPE, if indicated.
3. Identify the patient.
4. Close curtains around bed and close the door to the room,if possible.
5. Explain what you are going to do and the reason for doingit to the patient. Review safety precautions necessary whenoxygen is in use. Place “No Smoking” signs in appropriateareas.
6. Attach face mask to oxygen source (with humidification, ifappropriate, for the specific mask). Start the flow of oxygenat the specified rate. For a mask with a reservoir, be sure toallow oxygen to fill the bag before proceeding to the nextstep.
7. Position face mask over the patient’s nose and mouth.Adjust the elastic strap so that the mask fits snugly butcomfortably on the face. Adjust the flow rate to theprescribed rate.
8. If the patient reports irritation or redness is noted, usegauze pads under the elastic strap at pressure points toreduce irritation to ears and scalp.
9. Reassess patient’s respiratory status, including respiratoryrate, effort, and lung sounds. Note any signs of respiratorydistress, such as tachypnea, nasal flaring, use of accessorymuscles, or dyspnea.
10. Remove PPE, if used. Perform hand hygiene.
11. Remove the mask and dry the skin every 2 to 3 hours ifthe oxygen is running continuously. Do not use powderaround the mask.
Copyright © 2011 by Wolters Kluwer Health | Lippincott Williams & Wilkins. Skill Checklists for Taylor's Clinical Nursing Skills:
A Nursing Process Approach, 3rd edition, by Pamela Lynn and Marilee LeBon.
Exce
llent
Satis
fact
ory
Nee
ds P
ract
ice
LWBK681-C14_p286-317.qxd 9/6/10 10:22 PM Page 291 Aptara
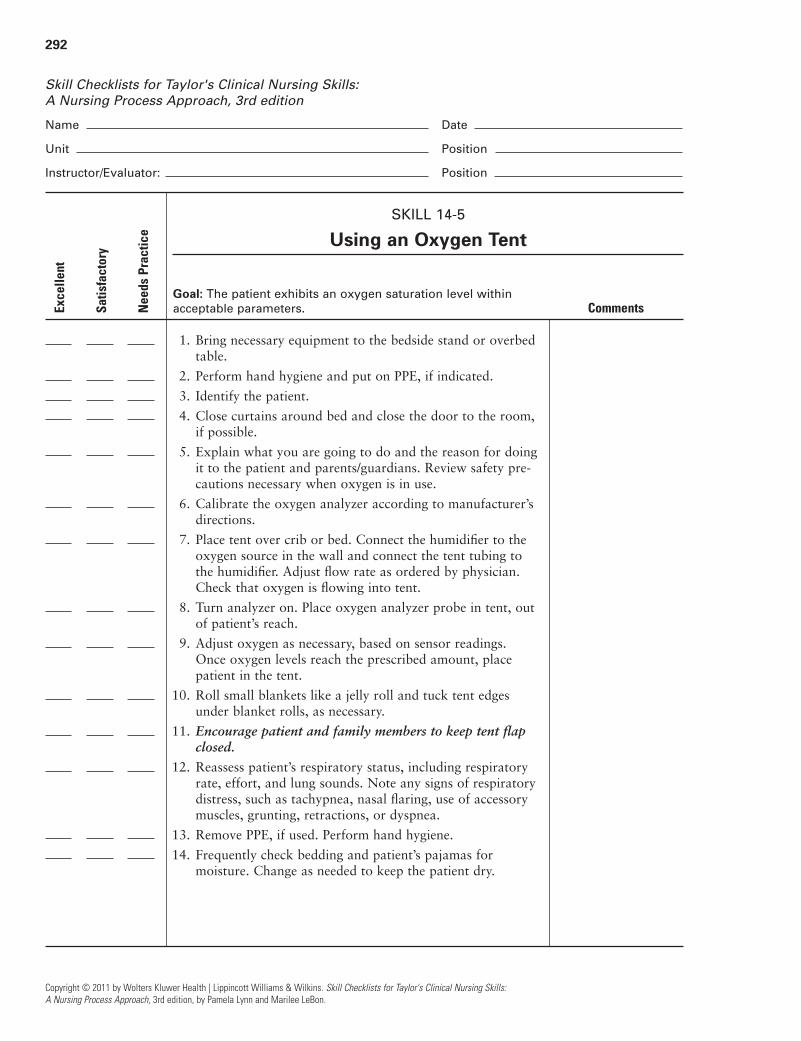
292
Copyright © 2011 by Wolters Kluwer Health | Lippincott Williams & Wilkins. Skill Checklists for Taylor's Clinical Nursing Skills:
A Nursing Process Approach, 3rd edition, by Pamela Lynn and Marilee LeBon.
Skill Checklists for Taylor's Clinical Nursing Skills:
A Nursing Process Approach, 3rd edition
Name Date
Unit Position
Instructor/Evaluator: Position
SKILL 14-5
Using an Oxygen Tent
Goal: The patient exhibits an oxygen saturation level within
acceptable parameters. Comments
1. Bring necessary equipment to the bedside stand or overbedtable.
2. Perform hand hygiene and put on PPE, if indicated.
3. Identify the patient.
4. Close curtains around bed and close the door to the room,if possible.
5. Explain what you are going to do and the reason for doingit to the patient and parents/guardians. Review safety pre-cautions necessary when oxygen is in use.
6. Calibrate the oxygen analyzer according to manufacturer’sdirections.
7. Place tent over crib or bed. Connect the humidifier to theoxygen source in the wall and connect the tent tubing tothe humidifier. Adjust flow rate as ordered by physician.Check that oxygen is flowing into tent.
8. Turn analyzer on. Place oxygen analyzer probe in tent, outof patient’s reach.
9. Adjust oxygen as necessary, based on sensor readings.Once oxygen levels reach the prescribed amount, placepatient in the tent.
10. Roll small blankets like a jelly roll and tuck tent edgesunder blanket rolls, as necessary.
11. Encourage patient and family members to keep tent flapclosed.
12. Reassess patient’s respiratory status, including respiratoryrate, effort, and lung sounds. Note any signs of respiratorydistress, such as tachypnea, nasal flaring, use of accessorymuscles, grunting, retractions, or dyspnea.
13. Remove PPE, if used. Perform hand hygiene.
14. Frequently check bedding and patient’s pajamas formoisture. Change as needed to keep the patient dry.
Exce
llent
Satis
fact
ory
Nee
ds P
ract
ice
LWBK681-C14_p286-317.qxd 9/6/10 10:22 PM Page 292 Aptara
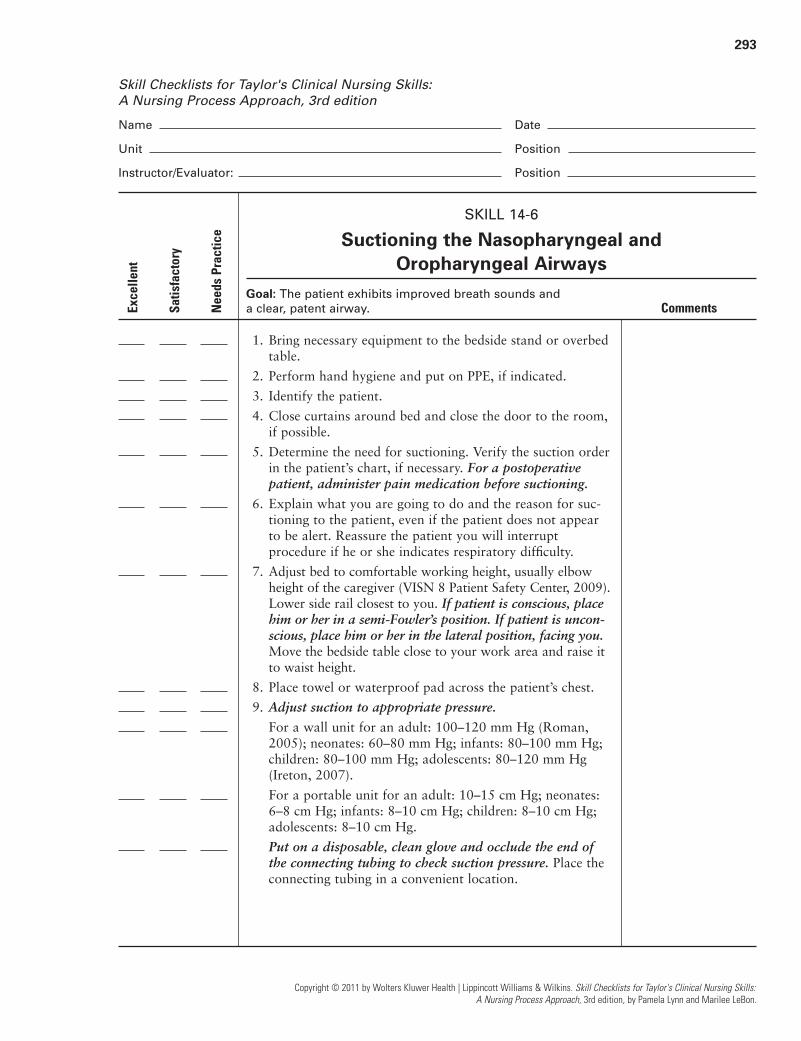
293
Skill Checklists for Taylor's Clinical Nursing Skills:
A Nursing Process Approach, 3rd edition
Name Date
Unit Position
Instructor/Evaluator: Position
SKILL 14-6
Suctioning the Nasopharyngeal and Oropharyngeal Airways
Goal: The patient exhibits improved breath sounds and
a clear, patent airway. Comments
1. Bring necessary equipment to the bedside stand or overbedtable.
2. Perform hand hygiene and put on PPE, if indicated.
3. Identify the patient.
4. Close curtains around bed and close the door to the room,if possible.
5. Determine the need for suctioning. Verify the suction orderin the patient’s chart, if necessary. For a postoperativepatient, administer pain medication before suctioning.
6. Explain what you are going to do and the reason for suc-tioning to the patient, even if the patient does not appearto be alert. Reassure the patient you will interruptprocedure if he or she indicates respiratory difficulty.
7. Adjust bed to comfortable working height, usually elbowheight of the caregiver (VISN 8 Patient Safety Center, 2009).Lower side rail closest to you. If patient is conscious, placehim or her in a semi-Fowler’s position. If patient is uncon-scious, place him or her in the lateral position, facing you.Move the bedside table close to your work area and raise itto waist height.
8. Place towel or waterproof pad across the patient’s chest.
9. Adjust suction to appropriate pressure.
For a wall unit for an adult: 100–120 mm Hg (Roman,2005); neonates: 60–80 mm Hg; infants: 80–100 mm Hg;children: 80–100 mm Hg; adolescents: 80–120 mm Hg (Ireton, 2007).
For a portable unit for an adult: 10–15 cm Hg; neonates:6–8 cm Hg; infants: 8–10 cm Hg; children: 8–10 cm Hg;adolescents: 8–10 cm Hg.
Put on a disposable, clean glove and occlude the end ofthe connecting tubing to check suction pressure. Place theconnecting tubing in a convenient location.
Copyright © 2011 by Wolters Kluwer Health | Lippincott Williams & Wilkins. Skill Checklists for Taylor's Clinical Nursing Skills:
A Nursing Process Approach, 3rd edition, by Pamela Lynn and Marilee LeBon.
Exce
llent
Satis
fact
ory
Nee
ds P
ract
ice
LWBK681-C14_p286-317.qxd 9/6/10 10:22 PM Page 293 Aptara

294
Copyright © 2011 by Wolters Kluwer Health | Lippincott Williams & Wilkins. Skill Checklists for Taylor's Clinical Nursing Skills:
A Nursing Process Approach, 3rd edition, by Pamela Lynn and Marilee LeBon.
SKILL 14-6
Suctioning the Nasopharyngeal and Oropharyngeal Airways (Continued)
Comments
10. Open sterile suction package using aseptic technique. Theopen wrapper or container becomes a sterile field to holdother supplies. Carefully remove the sterile container,touching only the outside surface. Set it up on the worksurface and pour sterile saline into it.
11. Place a small amount of water-soluble lubricant on thesterile field, taking care to avoid touching the sterile fieldwith the lubricant package.
12. Increase the patient’s supplemental oxygen level or applysupplemental oxygen per facility policy or primary careprovider order.
13. Put on face shield or goggles and mask. Put on sterilegloves. The dominant hand will manipulate the catheterand must remain sterile. The nondominant hand isconsidered clean rather than sterile and will control thesuction valve (Y-port) on the catheter.
14. With dominant gloved hand, pick up sterile catheter. Pickup the connecting tubing with the nondominant hand andconnect the tubing and suction catheter.
15. Moisten the catheter by dipping it into the container ofsterile saline. Occlude Y-tube to check suction.
16. Encourage the patient to take several deep breaths.
17. Apply lubricant to the first 2 to 3 inches of the catheter,using the lubricant that was placed on the sterile field.
18. Remove the oxygen delivery device, if appropriate. Do notapply suction as the catheter is inserted. Hold the catheterbetween your thumb and forefinger.
19. Insert the catheter:
a. For nasopharyngeal suctioning, gently insert catheterthrough the naris and along the floor of the nostriltoward the trachea. Roll the catheter between yourfingers to help advance it. Advance the catheter approxi-mately 5� to 6� to reach the pharynx.
b. For oropharyngeal suctioning, insert catheter through themouth, along the side of the mouth toward the trachea.Advance the catheter 3� to 4� to reach the pharynx. (Seethe Skill Variation in your skills book for nasotrachealsuctioning.)
20. Apply suction by intermittently occluding the Y-port onthe catheter with the thumb of your nondominant handand gently rotating the catheter as it is being withdrawn.Do not suction for more than 10 to 15 seconds at a time.
Exce
llent
Satis
fact
ory
Nee
ds P
ract
ice
LWBK681-C14_p286-317.qxd 9/6/10 10:22 PM Page 294 Aptara

295
Copyright © 2011 by Wolters Kluwer Health | Lippincott Williams & Wilkins. Skill Checklists for Taylor's Clinical Nursing Skills:
A Nursing Process Approach, 3rd edition, by Pamela Lynn and Marilee LeBon.
SKILL 14-6
Suctioning the Nasopharyngeal and Oropharyngeal Airways (Continued)
Comments
21. Replace the oxygen delivery device using your nondominanthand, if appropriate, and have the patient take several deepbreaths.
22. Flush catheter with saline. Assess effectiveness of suction-ing and repeat, as needed, and according to patient’s toler-ance. Wrap the suction catheter around your dominanthand between attempts.
23. Allow at least a 30-second to 1-minute interval ifadditional suctioning is needed. No more than three suction passes should be made per suctioning episode.Alternate the nares, unless contraindicated, if repeatedsuctioning is required. Do not force the catheter throughthe nares. Encourage the patient to cough and deepbreathe between suctioning. Suction the oropharynx aftersuctioning the nasopharynx.
24. When suctioning is completed, remove gloves from domi-nant hand over the coiled catheter, pulling them off insideout. Remove glove from nondominant hand and dispose ofgloves, catheter, and container with solution in the appro-priate receptacle. Assist patient to a comfortable position.Raise bed rail and place bed in the lowest position.
25. Turn off suction. Remove supplemental oxygen placed forsuctioning, if appropriate. Remove face shield or gogglesand mask. Perform hand hygiene.
26. Offer oral hygiene after suctioning.
27. Reassess patient’s respiratory status, including respiratoryrate, effort, oxygen saturation, and lung sounds.
28. Remove additional PPE, if used. Perform hand hygiene.
Exce
llent
Satis
fact
ory
Nee
ds P
ract
ice
LWBK681-C14_p286-317.qxd 9/6/10 10:22 PM Page 295 Aptara
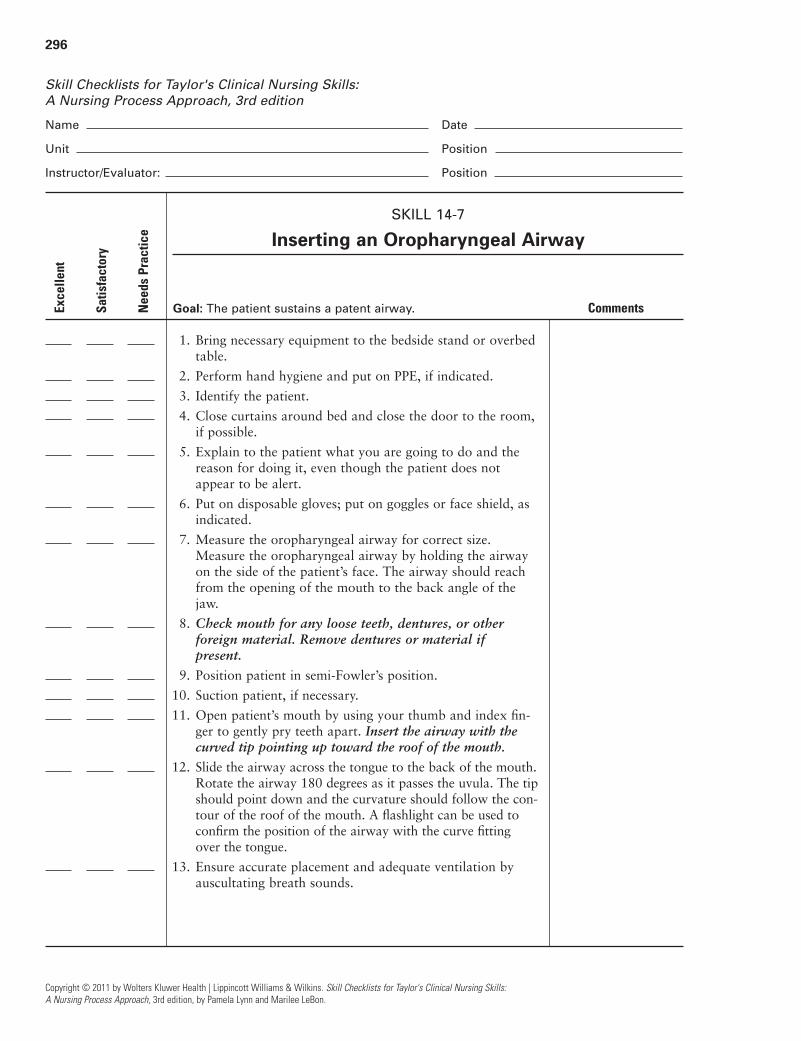
296
Copyright © 2011 by Wolters Kluwer Health | Lippincott Williams & Wilkins. Skill Checklists for Taylor's Clinical Nursing Skills:
A Nursing Process Approach, 3rd edition, by Pamela Lynn and Marilee LeBon.
Skill Checklists for Taylor's Clinical Nursing Skills:
A Nursing Process Approach, 3rd edition
Name Date
Unit Position
Instructor/Evaluator: Position
SKILL 14-7
Inserting an Oropharyngeal Airway
Goal: The patient sustains a patent airway. Comments
1. Bring necessary equipment to the bedside stand or overbedtable.
2. Perform hand hygiene and put on PPE, if indicated.
3. Identify the patient.
4. Close curtains around bed and close the door to the room,if possible.
5. Explain to the patient what you are going to do and thereason for doing it, even though the patient does notappear to be alert.
6. Put on disposable gloves; put on goggles or face shield, asindicated.
7. Measure the oropharyngeal airway for correct size.Measure the oropharyngeal airway by holding the airwayon the side of the patient’s face. The airway should reachfrom the opening of the mouth to the back angle of thejaw.
8. Check mouth for any loose teeth, dentures, or other foreign material. Remove dentures or material if present.
9. Position patient in semi-Fowler’s position.
10. Suction patient, if necessary.
11. Open patient’s mouth by using your thumb and index fin-ger to gently pry teeth apart. Insert the airway with thecurved tip pointing up toward the roof of the mouth.
12. Slide the airway across the tongue to the back of the mouth.Rotate the airway 180 degrees as it passes the uvula. The tipshould point down and the curvature should follow the con-tour of the roof of the mouth. A flashlight can be used toconfirm the position of the airway with the curve fittingover the tongue.
13. Ensure accurate placement and adequate ventilation byauscultating breath sounds.
Exce
llent
Satis
fact
ory
Nee
ds P
ract
ice
LWBK681-C14_p286-317.qxd 9/6/10 10:22 PM Page 296 Aptara
297
Copyright © 2011 by Wolters Kluwer Health | Lippincott Williams & Wilkins. Skill Checklists for Taylor's Clinical Nursing Skills:
A Nursing Process Approach, 3rd edition, by Pamela Lynn and Marilee LeBon.
SKILL 14-7
Inserting an Oropharyngeal Airway (Continued)
Comments
14. Position patient on his or her side when airway is in place.
15. Remove gloves and additional PPE, if used. Perform handhygiene.
16. Remove the airway for a brief period every 4 hours, oraccording to facility policy. Assess mouth, provide mouthcare, and clean the airway according to facility policybefore reinserting it.
Exce
llent
Satis
fact
ory
Nee
ds P
ract
ice
LWBK681-C14_p286-317.qxd 9/6/10 10:22 PM Page 297 Aptara
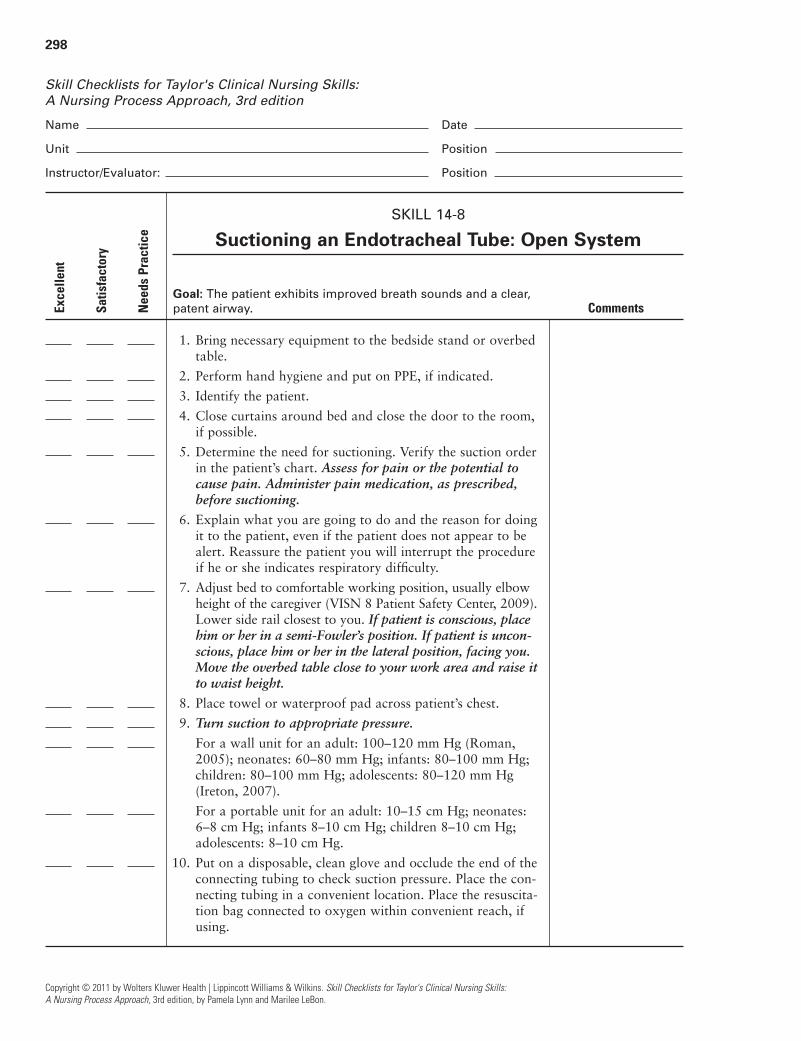
298
Copyright © 2011 by Wolters Kluwer Health | Lippincott Williams & Wilkins. Skill Checklists for Taylor's Clinical Nursing Skills:
A Nursing Process Approach, 3rd edition, by Pamela Lynn and Marilee LeBon.
Skill Checklists for Taylor's Clinical Nursing Skills:
A Nursing Process Approach, 3rd edition
Name Date
Unit Position
Instructor/Evaluator: Position
SKILL 14-8
Suctioning an Endotracheal Tube: Open System
Goal: The patient exhibits improved breath sounds and a clear,
patent airway. Comments
1. Bring necessary equipment to the bedside stand or overbedtable.
2. Perform hand hygiene and put on PPE, if indicated.
3. Identify the patient.
4. Close curtains around bed and close the door to the room,if possible.
5. Determine the need for suctioning. Verify the suction orderin the patient’s chart. Assess for pain or the potential tocause pain. Administer pain medication, as prescribed,before suctioning.
6. Explain what you are going to do and the reason for doingit to the patient, even if the patient does not appear to bealert. Reassure the patient you will interrupt the procedureif he or she indicates respiratory difficulty.
7. Adjust bed to comfortable working position, usually elbowheight of the caregiver (VISN 8 Patient Safety Center, 2009).Lower side rail closest to you. If patient is conscious, placehim or her in a semi-Fowler’s position. If patient is uncon-scious, place him or her in the lateral position, facing you.Move the overbed table close to your work area and raise itto waist height.
8. Place towel or waterproof pad across patient’s chest.
9. Turn suction to appropriate pressure.
For a wall unit for an adult: 100–120 mm Hg (Roman,2005); neonates: 60–80 mm Hg; infants: 80–100 mm Hg;children: 80–100 mm Hg; adolescents: 80–120 mm Hg (Ireton, 2007).
For a portable unit for an adult: 10–15 cm Hg; neonates:6–8 cm Hg; infants 8–10 cm Hg; children 8–10 cm Hg;adolescents: 8–10 cm Hg.
10. Put on a disposable, clean glove and occlude the end of theconnecting tubing to check suction pressure. Place the con-necting tubing in a convenient location. Place the resuscita-tion bag connected to oxygen within convenient reach, ifusing.
Exce
llent
Satis
fact
ory
Nee
ds P
ract
ice
LWBK681-C14_p286-317.qxd 9/6/10 10:22 PM Page 298 Aptara
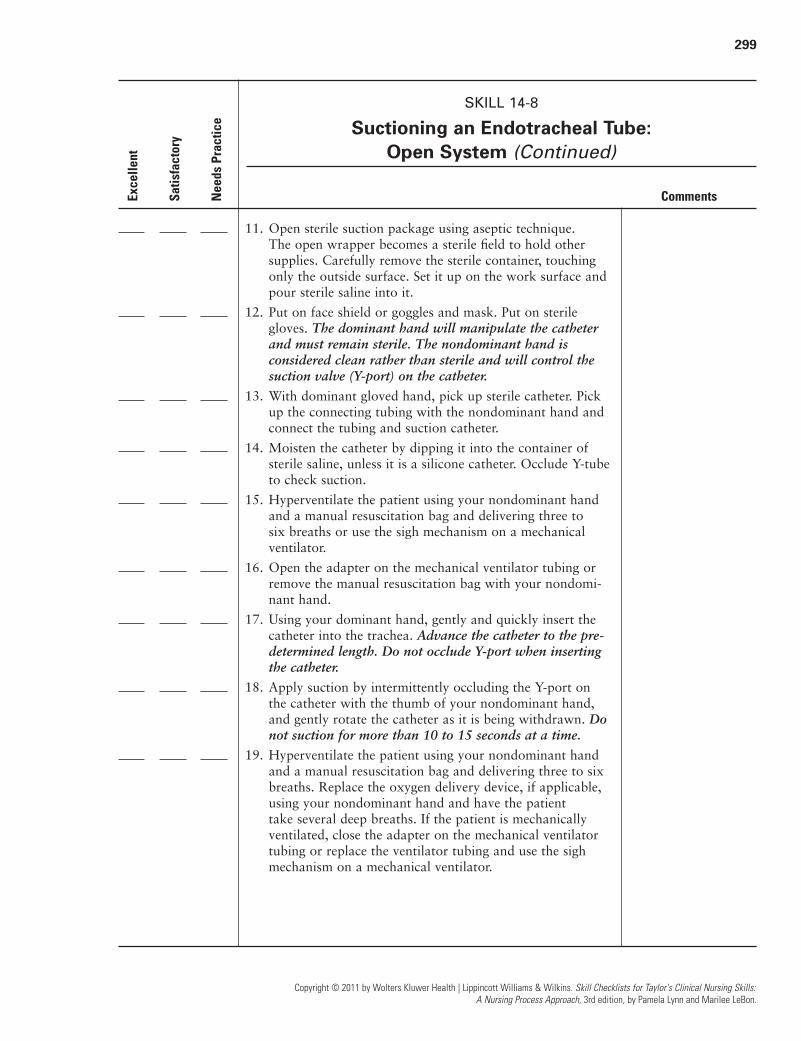
299
Copyright © 2011 by Wolters Kluwer Health | Lippincott Williams & Wilkins. Skill Checklists for Taylor's Clinical Nursing Skills:
A Nursing Process Approach, 3rd edition, by Pamela Lynn and Marilee LeBon.
SKILL 14-8
Suctioning an Endotracheal Tube: Open System (Continued)
Comments
11. Open sterile suction package using aseptic technique. The open wrapper becomes a sterile field to hold othersupplies. Carefully remove the sterile container, touchingonly the outside surface. Set it up on the work surface andpour sterile saline into it.
12. Put on face shield or goggles and mask. Put on sterilegloves. The dominant hand will manipulate the catheterand must remain sterile. The nondominant hand isconsidered clean rather than sterile and will control thesuction valve (Y-port) on the catheter.
13. With dominant gloved hand, pick up sterile catheter. Pickup the connecting tubing with the nondominant hand andconnect the tubing and suction catheter.
14. Moisten the catheter by dipping it into the container ofsterile saline, unless it is a silicone catheter. Occlude Y-tubeto check suction.
15. Hyperventilate the patient using your nondominant handand a manual resuscitation bag and delivering three to six breaths or use the sigh mechanism on a mechanicalventilator.
16. Open the adapter on the mechanical ventilator tubing orremove the manual resuscitation bag with your nondomi-nant hand.
17. Using your dominant hand, gently and quickly insert thecatheter into the trachea. Advance the catheter to the pre-determined length. Do not occlude Y-port when insertingthe catheter.
18. Apply suction by intermittently occluding the Y-port onthe catheter with the thumb of your nondominant hand,and gently rotate the catheter as it is being withdrawn. Donot suction for more than 10 to 15 seconds at a time.
19. Hyperventilate the patient using your nondominant handand a manual resuscitation bag and delivering three to sixbreaths. Replace the oxygen delivery device, if applicable,using your nondominant hand and have the patient take several deep breaths. If the patient is mechanicallyventilated, close the adapter on the mechanical ventilatortubing or replace the ventilator tubing and use the sighmechanism on a mechanical ventilator.
Exce
llent
Satis
fact
ory
Nee
ds P
ract
ice
LWBK681-C14_p286-317.qxd 9/6/10 10:22 PM Page 299 Aptara

300
Copyright © 2011 by Wolters Kluwer Health | Lippincott Williams & Wilkins. Skill Checklists for Taylor's Clinical Nursing Skills:
A Nursing Process Approach, 3rd edition, by Pamela Lynn and Marilee LeBon.
SKILL 14-8
Suctioning an Endotracheal Tube: Open System (Continued)
Comments
20. Flush catheter with saline. Assess the effectiveness ofsuctioning and repeat, as needed, and according topatient’s tolerance.
Wrap the suction catheter around your dominant handbetween attempts.
21. Allow at least a 30-second to 1-minute interval if additionalsuctioning is needed. No more than three suction passesshould be made per suctioning episode. Suction the orophar-ynx after suctioning the trachea. Do not reinsert in the endo-tracheal tube after suctioning the mouth.
22. When suctioning is completed, remove gloves from domi-nant hand over the coiled catheter, pulling it off inside-out.Remove glove from nondominant hand and dispose ofgloves, catheter, and container with solution in the appro-priate receptacle. Assist patient to a comfortable position.Raise bed rail and place bed in the lowest position.
23. Turn off suction. Remove face shield or goggles and mask.Perform hand hygiene.
24. Offer oral hygiene after suctioning.
25. Reassess patient’s respiratory status, including respiratoryrate, effort, oxygen saturation, and lung sounds.
26. Remove additional PPE, if used. Perform hand hygiene.
Exce
llent
Satis
fact
ory
Nee
ds P
ract
ice
LWBK681-C14_p286-317.qxd 9/6/10 10:22 PM Page 300 Aptara

301
Skill Checklists for Taylor's Clinical Nursing Skills:
A Nursing Process Approach, 3rd edition
Name Date
Unit Position
Instructor/Evaluator: Position
SKILL 14-9
Suctioning an Endotracheal Tube: Closed System
Goal: The patient exhibits improved breath sounds and a clear,
patent airway. Comments
1. Bring necessary equipment to the bedside stand or overbedtable.
2. Perform hand hygiene and put on PPE, if indicated.
3. Identify the patient.
4. Close curtains around bed and close the door to the room,if possible.
5. Determine the need for suctioning. Verify the suction orderin the patient’s chart. Assess for pain or the potential tocause pain. Administer pain medication, as prescribed,before suctioning.
6. Explain what you are going to do and the reason for doingit to the patient, even if the patient does not appear to bealert. Reassure the patient you will interrupt the procedureif he or she indicates respiratory difficulty.
7. Adjust bed to comfortable working position, usually elbowheight of the caregiver (VISN 8 Patient Safety Center, 2009).Lower side rail closest to you. If patient is conscious, placehim or her in a semi-Fowler’s position. If patient is uncon-scious, place him or her in the lateral position, facing you.Move the overbed table close to your work area and raiseto waist height.
8. Turn suction to appropriate pressure.
For a wall unit for an adult: 100–120 mm Hg (Roman,2005); neonates: 60–80 mm Hg; infants: 80–100 mm Hg;children: 80–100 mm Hg; adolescents: 80–120 mm Hg (Ireton, 2007).
For a portable unit for an adult: 10–15 cm Hg; neonates:6–8 cm Hg; infants 8–10 cm Hg; children 8–10 cm Hg;adolescents: 8–10 cm Hg.
9. Open the package of the closed suction device using asep-tic technique. Make sure that the device remains sterile.
10. Put on sterile gloves.
Copyright © 2011 by Wolters Kluwer Health | Lippincott Williams & Wilkins. Skill Checklists for Taylor's Clinical Nursing Skills:
A Nursing Process Approach, 3rd edition, by Pamela Lynn and Marilee LeBon.
Exce
llent
Satis
fact
ory
Nee
ds P
ract
ice
LWBK681-C14_p286-317.qxd 9/6/10 10:22 PM Page 301 Aptara
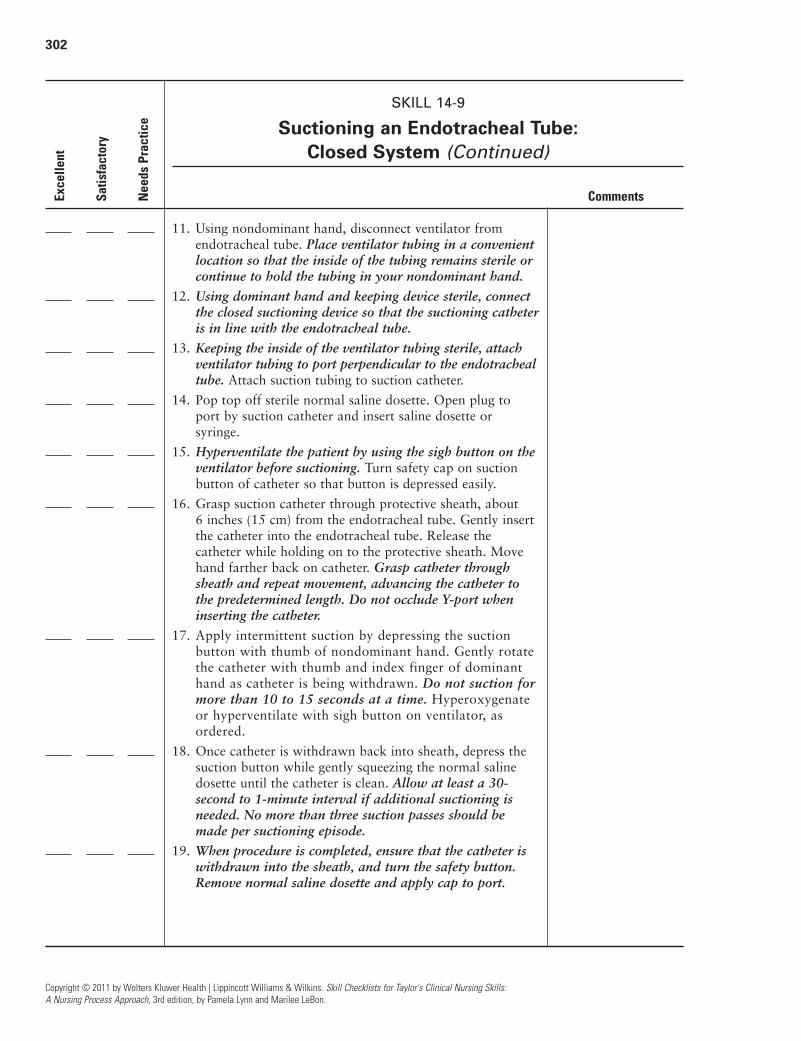
302
Copyright © 2011 by Wolters Kluwer Health | Lippincott Williams & Wilkins. Skill Checklists for Taylor's Clinical Nursing Skills:
A Nursing Process Approach, 3rd edition, by Pamela Lynn and Marilee LeBon.
SKILL 14-9
Suctioning an Endotracheal Tube: Closed System (Continued)
Comments
11. Using nondominant hand, disconnect ventilator fromendotracheal tube. Place ventilator tubing in a convenientlocation so that the inside of the tubing remains sterile orcontinue to hold the tubing in your nondominant hand.
12. Using dominant hand and keeping device sterile, connectthe closed suctioning device so that the suctioning catheteris in line with the endotracheal tube.
13. Keeping the inside of the ventilator tubing sterile, attachventilator tubing to port perpendicular to the endotrachealtube. Attach suction tubing to suction catheter.
14. Pop top off sterile normal saline dosette. Open plug toport by suction catheter and insert saline dosette orsyringe.
15. Hyperventilate the patient by using the sigh button on theventilator before suctioning. Turn safety cap on suctionbutton of catheter so that button is depressed easily.
16. Grasp suction catheter through protective sheath, about6 inches (15 cm) from the endotracheal tube. Gently insertthe catheter into the endotracheal tube. Release thecatheter while holding on to the protective sheath. Movehand farther back on catheter. Grasp catheter throughsheath and repeat movement, advancing the catheter tothe predetermined length. Do not occlude Y-port wheninserting the catheter.
17. Apply intermittent suction by depressing the suctionbutton with thumb of nondominant hand. Gently rotatethe catheter with thumb and index finger of dominanthand as catheter is being withdrawn. Do not suction formore than 10 to 15 seconds at a time. Hyperoxygenateor hyperventilate with sigh button on ventilator, asordered.
18. Once catheter is withdrawn back into sheath, depress thesuction button while gently squeezing the normal salinedosette until the catheter is clean. Allow at least a 30-second to 1-minute interval if additional suctioning isneeded. No more than three suction passes should bemade per suctioning episode.
19. When procedure is completed, ensure that the catheter iswithdrawn into the sheath, and turn the safety button.Remove normal saline dosette and apply cap to port.
Exce
llent
Satis
fact
ory
Nee
ds P
ract
ice
LWBK681-C14_p286-317.qxd 9/6/10 10:22 PM Page 302 Aptara

303
Copyright © 2011 by Wolters Kluwer Health | Lippincott Williams & Wilkins. Skill Checklists for Taylor's Clinical Nursing Skills:
A Nursing Process Approach, 3rd edition, by Pamela Lynn and Marilee LeBon.
SKILL 14-9
Suctioning an Endotracheal Tube: Closed System (Continued)
Comments
20. Suction the oral cavity with a separate single-use, disposablecatheter and perform oral hygiene. Remove gloves. Turn offsuction.
21. Assist patient to a comfortable position. Raise the bed railand place the bed in the lowest position.
22. Reassess patient’s respiratory status, including respiratoryrate, effort, oxygen saturation, and lung sounds.
23. Remove additional PPE, if used. Perform hand hygiene.
Exce
llent
Satis
fact
ory
Nee
ds P
ract
ice
LWBK681-C14_p286-317.qxd 9/6/10 10:22 PM Page 303 Aptara
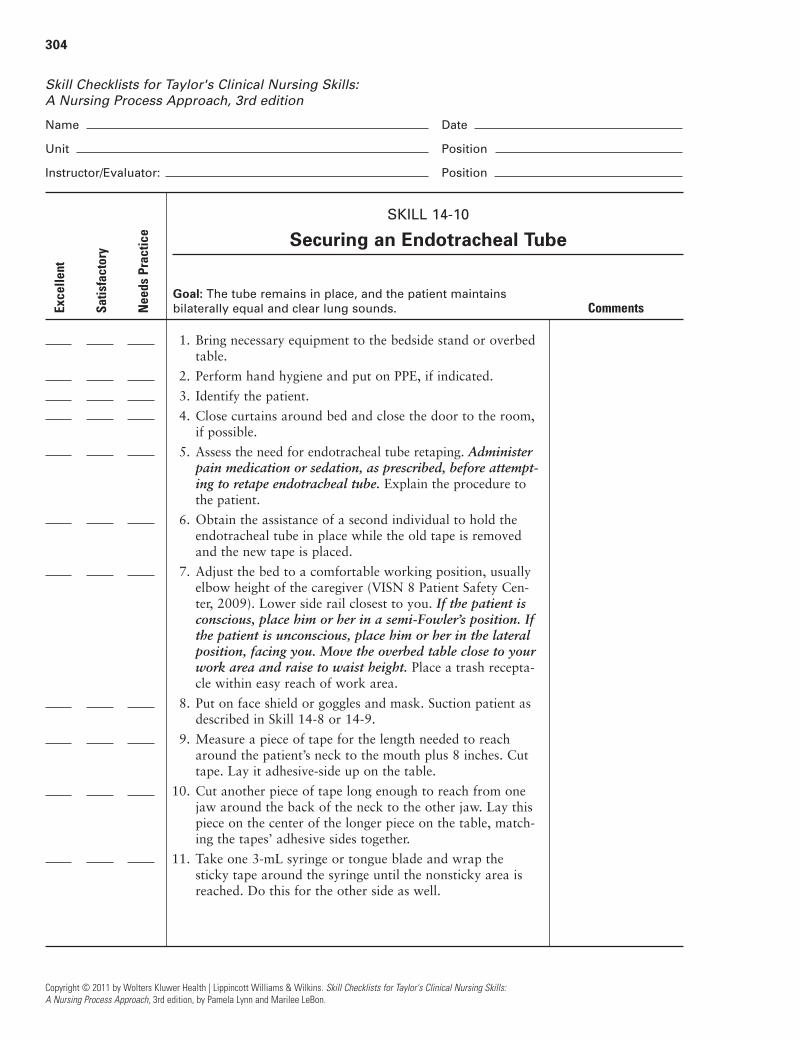
304
Copyright © 2011 by Wolters Kluwer Health | Lippincott Williams & Wilkins. Skill Checklists for Taylor's Clinical Nursing Skills:
A Nursing Process Approach, 3rd edition, by Pamela Lynn and Marilee LeBon.
Skill Checklists for Taylor's Clinical Nursing Skills:
A Nursing Process Approach, 3rd edition
Name Date
Unit Position
Instructor/Evaluator: Position
SKILL 14-10
Securing an Endotracheal Tube
Goal: The tube remains in place, and the patient maintains
bilaterally equal and clear lung sounds. Comments
1. Bring necessary equipment to the bedside stand or overbedtable.
2. Perform hand hygiene and put on PPE, if indicated.
3. Identify the patient.
4. Close curtains around bed and close the door to the room,if possible.
5. Assess the need for endotracheal tube retaping. Administerpain medication or sedation, as prescribed, before attempt-ing to retape endotracheal tube. Explain the procedure tothe patient.
6. Obtain the assistance of a second individual to hold theendotracheal tube in place while the old tape is removedand the new tape is placed.
7. Adjust the bed to a comfortable working position, usuallyelbow height of the caregiver (VISN 8 Patient Safety Cen-ter, 2009). Lower side rail closest to you. If the patient isconscious, place him or her in a semi-Fowler’s position. Ifthe patient is unconscious, place him or her in the lateralposition, facing you. Move the overbed table close to yourwork area and raise to waist height. Place a trash recepta-cle within easy reach of work area.
8. Put on face shield or goggles and mask. Suction patient asdescribed in Skill 14-8 or 14-9.
9. Measure a piece of tape for the length needed to reacharound the patient’s neck to the mouth plus 8 inches. Cuttape. Lay it adhesive-side up on the table.
10. Cut another piece of tape long enough to reach from onejaw around the back of the neck to the other jaw. Lay thispiece on the center of the longer piece on the table, match-ing the tapes’ adhesive sides together.
11. Take one 3-mL syringe or tongue blade and wrap thesticky tape around the syringe until the nonsticky area isreached. Do this for the other side as well.
Exce
llent
Satis
fact
ory
Nee
ds P
ract
ice
LWBK681-C14_p286-317.qxd 9/6/10 10:22 PM Page 304 Aptara

305
Copyright © 2011 by Wolters Kluwer Health | Lippincott Williams & Wilkins. Skill Checklists for Taylor's Clinical Nursing Skills:
A Nursing Process Approach, 3rd edition, by Pamela Lynn and Marilee LeBon.
SKILL 14-10
Securing an Endotracheal Tube (Continued)
Comments
12. Take one of the 3-mL syringes or tongue blades and pass itunder the patient’s neck so that there is a 3-mL syringe oneither side of the patient’s head.
13. Put on disposable gloves. Have the assistant put on glovesas well.
14. Provide oral care, including suctioning the oral cavity.
15. Take note of the ‘cm’ position markings on the tube. Beginto unwrap old tape from around the endotracheal tube.After one side is unwrapped, have assistant hold the endo-tracheal tube as close to the lips or nares as possible tooffer stabilization.
16. Carefully remove the remaining tape from the endotrachealtube. After tape is removed, have assistant gently andslowly move endotracheal tube (if orally intubated) to theother side of the mouth. Assess mouth for any skin break-down. Before applying new tape, make sure that markingson endotracheal tube are at same spot as when retapingbegan.
17. Remove old tape from cheeks and side of face. Useadhesive remover to remove excess adhesive from tape.Clean the face and neck with washcloth and cleanser. Ifpatient has facial hair, consider shaving cheeks. Pat cheeksdry with the towel.
18. Apply the skin barrier to the patient’s face (under nose,cheeks, and lower lip) where the tape will sit. Unroll oneside of the tape. Ensure that nonstick part of tape remainsbehind patient’s neck while pulling firmly on the tape.Place adhesive portion of tape snugly against patient’scheek. Split the tape in half from the end to the corner ofthe mouth.
19. Place the top-half piece of tape under the patient’s nose.Wrap the lower half around the tube in one direction, suchas over and around the tube. Fold over tab on end of tape.
20. Unwrap second side of tape. Split to corner of the mouth.Place the bottom-half piece of tape along the patient’slower lip. Wrap the top half around the tube in the oppo-site direction, such as below and around the tube. Foldover tab on end of tape. Ensure tape is secure.
21. Auscultate lung sounds. Assess for cyanosis, oxygen satu-ration, chest symmetry, and stability of endotracheal tube.Again check to ensure that the tube is at the correct depth.
Exce
llent
Satis
fact
ory
Nee
ds P
ract
ice
LWBK681-C14_p286-317.qxd 9/6/10 10:22 PM Page 305 Aptara

306
Copyright © 2011 by Wolters Kluwer Health | Lippincott Williams & Wilkins. Skill Checklists for Taylor's Clinical Nursing Skills:
A Nursing Process Approach, 3rd edition, by Pamela Lynn and Marilee LeBon.
SKILL 14-10
Securing an Endotracheal Tube (Continued)
Comments
22. If the endotracheal tube is cuffed, check pressure of theballoon by attaching a handheld pressure gauge to thepilot balloon of the endotracheal tube.
23. Assist patient to a comfortable position. Raise the bed railand place the bed in the lowest position.
24. Remove face shield or goggles and mask. Remove additionalPPE, if used. Perform hand hygiene.
Exce
llent
Satis
fact
ory
Nee
ds P
ract
ice
LWBK681-C14_p286-317.qxd 9/6/10 10:22 PM Page 306 Aptara

307
Skill Checklists for Taylor's Clinical Nursing Skills:
A Nursing Process Approach, 3rd edition
Name Date
Unit Position
Instructor/Evaluator: Position
SKILL 14-11
Suctioning the Tracheostomy: Open System
Goal: The patient exhibits improved breath sounds and a
clear, patent airway. Comments
1. Bring necessary equipment to the bedside stand or overbedtable.
2. Perform hand hygiene and put on PPE, if indicated.
3. Identify the patient.
4. Close curtains around bed and close the door to the room,if possible.
5. Determine the need for suctioning. Verify the suction orderin the patient’s chart. Assess for pain or the potential tocause pain. Administer pain medication, as prescribed,before suctioning.
6. Explain to the patient what you are going to do and thereason or doing it, even if the patient does not appear tobe alert. Reassure the patient you will interrupt the proce-dure if he or she indicates respiratory difficulty.
7. Adjust bed to comfortable working position, usually elbowheight of the caregiver (VISN 8 Patient Safety Center, 2009).Lower side rail closest to you. If patient is conscious, placehim or her in a semi-Fowler’s position. If patient is uncon-scious, place him or her in the lateral position, facing you.Move the overbed table close to your work area and raise towaist height.
8. Place towel or waterproof pad across patient’s chest.
9. Turn suction to appropriate pressure.
For a wall unit for an adult: 100–120 mm Hg (Roman,2005); neonates: 60–80 mm Hg; infants: 80–100 mm Hg;children: 80–100 mm Hg; adolescents: 80–120 mm Hg (Ireton, 2007).
For a portable unit for an adult: 10–15 cm Hg; neonates:6–8 cm Hg; infants 8–10 cm Hg; children 8–10 cm Hg;adolescents: 8–10 cm Hg.
Put on a disposable, clean glove and occlude the end ofthe connecting tubing to check suction pressure. Place theconnecting tubing in a convenient location. If using, placeresuscitation bag connected to oxygen within convenientreach.
Copyright © 2011 by Wolters Kluwer Health | Lippincott Williams & Wilkins. Skill Checklists for Taylor's Clinical Nursing Skills:
A Nursing Process Approach, 3rd edition, by Pamela Lynn and Marilee LeBon.
Exce
llent
Satis
fact
ory
Nee
ds P
ract
ice
LWBK681-C14_p286-317.qxd 9/6/10 10:22 PM Page 307 Aptara
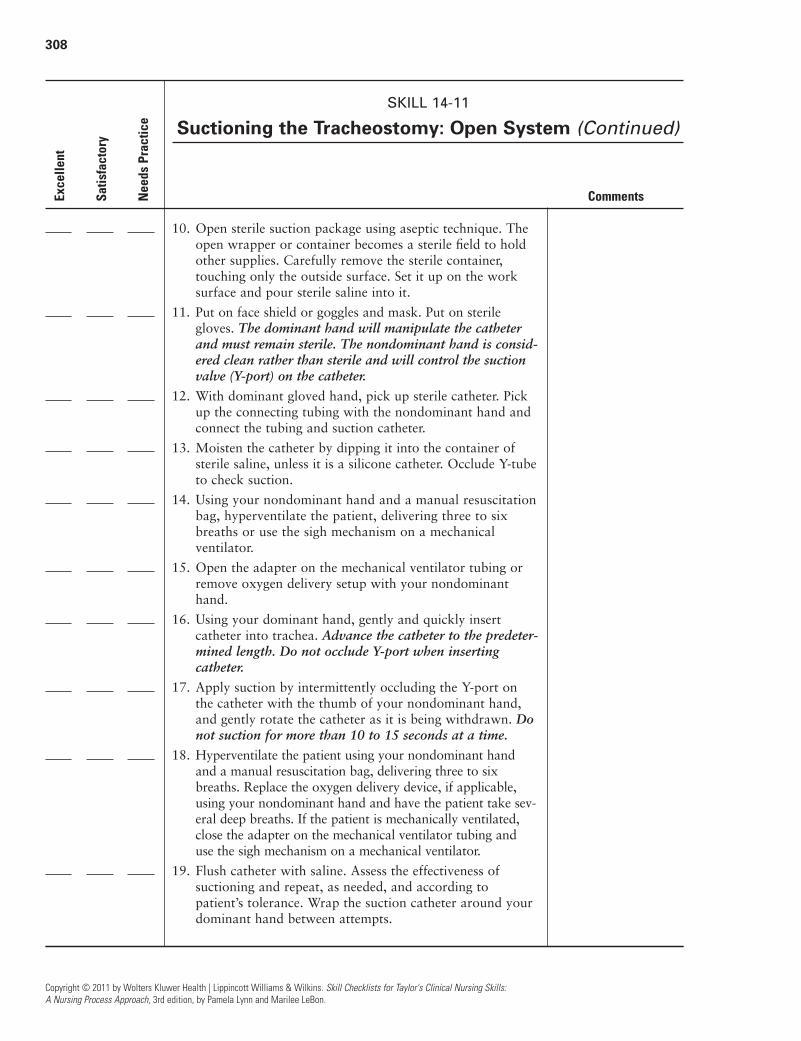
308
Copyright © 2011 by Wolters Kluwer Health | Lippincott Williams & Wilkins. Skill Checklists for Taylor's Clinical Nursing Skills:
A Nursing Process Approach, 3rd edition, by Pamela Lynn and Marilee LeBon.
SKILL 14-11
Suctioning the Tracheostomy: Open System (Continued)
Comments
10. Open sterile suction package using aseptic technique. Theopen wrapper or container becomes a sterile field to holdother supplies. Carefully remove the sterile container,touching only the outside surface. Set it up on the worksurface and pour sterile saline into it.
11. Put on face shield or goggles and mask. Put on sterilegloves. The dominant hand will manipulate the catheterand must remain sterile. The nondominant hand is consid-ered clean rather than sterile and will control the suctionvalve (Y-port) on the catheter.
12. With dominant gloved hand, pick up sterile catheter. Pickup the connecting tubing with the nondominant hand andconnect the tubing and suction catheter.
13. Moisten the catheter by dipping it into the container ofsterile saline, unless it is a silicone catheter. Occlude Y-tubeto check suction.
14. Using your nondominant hand and a manual resuscitationbag, hyperventilate the patient, delivering three to sixbreaths or use the sigh mechanism on a mechanical ventilator.
15. Open the adapter on the mechanical ventilator tubing orremove oxygen delivery setup with your nondominanthand.
16. Using your dominant hand, gently and quickly insertcatheter into trachea. Advance the catheter to the predeter-mined length. Do not occlude Y-port when insertingcatheter.
17. Apply suction by intermittently occluding the Y-port onthe catheter with the thumb of your nondominant hand,and gently rotate the catheter as it is being withdrawn. Donot suction for more than 10 to 15 seconds at a time.
18. Hyperventilate the patient using your nondominant handand a manual resuscitation bag, delivering three to sixbreaths. Replace the oxygen delivery device, if applicable,using your nondominant hand and have the patient take sev-eral deep breaths. If the patient is mechanically ventilated,close the adapter on the mechanical ventilator tubing and use the sigh mechanism on a mechanical ventilator.
19. Flush catheter with saline. Assess the effectiveness ofsuctioning and repeat, as needed, and according topatient’s tolerance. Wrap the suction catheter around yourdominant hand between attempts.
Exce
llent
Satis
fact
ory
Nee
ds P
ract
ice
LWBK681-C14_p286-317.qxd 9/6/10 10:22 PM Page 308 Aptara

309
Copyright © 2011 by Wolters Kluwer Health | Lippincott Williams & Wilkins. Skill Checklists for Taylor's Clinical Nursing Skills:
A Nursing Process Approach, 3rd edition, by Pamela Lynn and Marilee LeBon.
SKILL 14-11
Suctioning the Tracheostomy: Open System (Continued)
Comments
20. Allow at least a 30-second to 1-minute interval if additionalsuctioning is needed. No more than three suction passesshould be made per suctioning episode. Encourage thepatient to cough and deep breathe between suctionings. Suc-tion the oropharynx after suctioning the trachea. Do notreinsert in the tracheostomy after suctioning the mouth.
21. When suctioning is completed, remove gloves from domi-nant hand over the coiled catheter, pulling it off inside out.Remove glove from nondominant hand and dispose ofgloves, catheter, and container with solution in the appro-priate receptacle. Assist patient to a comfortable position.Raise bed rail and place bed in the lowest position.
22. Turn off suction. Remove supplemental oxygen placed forsuctioning, if appropriate. Remove face shield or gogglesand mask. Perform hand hygiene.
23. Offer oral hygiene after suctioning.
24. Reassess patient’s respiratory status, including respiratoryrate, effort, oxygen saturation, and lung sounds.
25. Remove additional PPE, if used. Perform hand hygiene.
Exce
llent
Satis
fact
ory
Nee
ds P
ract
ice
LWBK681-C14_p286-317.qxd 9/6/10 10:22 PM Page 309 Aptara

310
Copyright © 2011 by Wolters Kluwer Health | Lippincott Williams & Wilkins. Skill Checklists for Taylor's Clinical Nursing Skills:
A Nursing Process Approach, 3rd edition, by Pamela Lynn and Marilee LeBon.
Skill Checklists for Taylor's Clinical Nursing Skills:
A Nursing Process Approach, 3rd edition
Name Date
Unit Position
Instructor/Evaluator: Position
SKILL 14-12
Providing Tracheostomy Care
Goal: The patient exhibits a tracheostomy tube and site free
from drainage, secretions, and skin irritation or breakdown. Comments
1. Bring necessary equipment to the bedside stand or overbedtable.
2. Perform hand hygiene and put on PPE, if indicated.
3. Identify the patient.
4. Close curtains around bed and close the door to the room,if possible.
5. Determine the need for tracheostomy care. Assess patient’spain and administer pain medication, if indicated.
6. Explain what you are going to do and the reason to thepatient, even if the patient does not appear to be alert.Reassure the patient you will interrupt procedure if he orshe indicates respiratory difficulty.
7. Adjust bed to comfortable working position, usually elbowheight of the caregiver (VISN 8 Patient Safety Center, 2009).Lower side rail closest to you. If the patient is conscious,place him or her in a semi-Fowler’s position. If patient isunconscious, place him or her in the lateral position, facingyou. Move the overbed table close to your work area andraise to waist height. Place a trash receptacle within easyreach of work area.
8. Put on face shield or goggles and mask. Suctiontracheostomy, if necessary. If tracheostomy has just beensuctioned, remove soiled site dressing and discard beforeremoval of gloves used to perform suctioning.
Cleaning the Tracheostomy: Disposable Inner Cannula
(See the Skill Variation in your skills book for steps for clean-ing a nondisposable inner cannula.)
9. Carefully open the package with the new disposable innercannula, taking care not to contaminate the cannula or theinside of the package. Carefully open the package with thesterile cotton-tipped applicators, taking care not to contam-inate them. Open sterile cup or basin and fill 0.5 inch deepwith saline. Open the plastic disposable bag and placewithin reach on work surface.
Exce
llent
Satis
fact
ory
Nee
ds P
ract
ice
LWBK681-C14_p286-317.qxd 9/6/10 10:22 PM Page 310 Aptara

311
Copyright © 2011 by Wolters Kluwer Health | Lippincott Williams & Wilkins. Skill Checklists for Taylor's Clinical Nursing Skills:
A Nursing Process Approach, 3rd edition, by Pamela Lynn and Marilee LeBon.
SKILL 14-12
Providing Tracheostomy Care (Continued)
Comments
10. Put on disposable gloves.
11. Remove the oxygen source if one is present. Stabilize theouter cannula and faceplate of the tracheostomy with yournondominant hand. Grasp the locking mechanism of theinner cannula with your dominant hand. Press the tabsand release lock. Gently remove inner cannula and place indisposal bag. If not already removed, remove site dressingand dispose of it in the trash.
12. Discard gloves and put on sterile gloves. Pick up the newinner cannula with your dominant hand, stabilize the face-plate with your nondominant hand, and gently insert thenew inner cannula into the outer cannula. Press the tabs toallow the lock to grab the outer cannula. Reapply oxygensource, if needed.
Applying Clean Dressing and Holder
(See the Skill Variations in your skills book for steps for analternate site dressing if a commercially prepared sponge is notavailable and to secure a tracheostomy with a tracheostomyties/tape instead of a collar.)
13. Remove oxygen source, if necessary. Dip cotton-tippedapplicator or gauze sponge in cup or basin with sterilesaline and clean stoma under faceplate. Use each applica-tor or sponge only once, moving from stoma site outward.
14. Pat skin gently with dry 4 � 4 gauze sponge.
15. Slide commercially prepared tracheostomy dressing or pre-folded non-cotton-filled 4 � 4-inch dressing under thefaceplate.
16. Change the tracheostomy holder:
a. Obtain the assistance of a second individual to holdthe tracheostomy tube in place while the old collar isremoved and the new collar is placed.
b. Open the package for the new tracheostomy collar.
c. Both nurses should put on clean gloves.
d. One nurse holds the faceplate while the other pulls upthe Velcro tabs. Gently remove the collar.
e. The first nurse continues to hold the tracheostomy faceplate.
f. The other nurse places the collar around the patient’sneck and inserts first one tab, then the other, into theopenings on the faceplate and secures the Velcro tabs onthe tracheostomy holder.
Exce
llent
Satis
fact
ory
Nee
ds P
ract
ice
LWBK681-C14_p286-317.qxd 9/6/10 10:22 PM Page 311 Aptara
312
Copyright © 2011 by Wolters Kluwer Health | Lippincott Williams & Wilkins. Skill Checklists for Taylor's Clinical Nursing Skills:
A Nursing Process Approach, 3rd edition, by Pamela Lynn and Marilee LeBon.
SKILL 14-12
Providing Tracheostomy Care (Continued)
Comments
g. Check the fit of the tracheostomy collar. You should beable to fit one finger between the neck and the collar.Check to make sure that the patient can flex neck com-fortably. Reapply oxygen source, if necessary.
17. Remove gloves. Assist patient to a comfortable position.Raise the bed rail and place the bed in the lowest position.
18. Remove face shield or goggles and mask. Removeadditional PPE, if used. Perform hand hygiene.
19. Reassess patient’s respiratory status, including respiratoryrate, effort, oxygen saturation, and lung sounds.
Exce
llent
Satis
fact
ory
Nee
ds P
ract
ice
LWBK681-C14_p286-317.qxd 9/6/10 10:22 PM Page 312 Aptara
313
Skill Checklists for Taylor's Clinical Nursing Skills:
A Nursing Process Approach, 3rd edition
Name Date
Unit Position
Instructor/Evaluator: Position
SKILL 14-13
Providing Care of a Chest Drainage System
Goal: The patient does not experience any complications related
to the chest drainage system or respiratory distress. Comments
1. Bring necessary equipment to the bedside stand or overbedtable.
2. Perform hand hygiene and put on PPE, if indicated.
3. Identify the patient.
4. Close curtains around bed and close the door to the room,if possible.
5. Explain what you are going to do and the reason for doingit to the patient.
6. Assess the patient’s level of pain. Administer prescribedmedication, as needed.
7. Put on clean gloves.
Assessing the Drainage System
8. Move the patient’s gown to expose the chest tube insertionsite. Keep the patient covered as much as possible, using abath blanket to drape the patient, if necessary. Observe thedressing around the chest tube insertion site and ensurethat it is dry, intact, and occlusive.
9. Check that all connections are securely taped. Gently pal-pate around the insertion site, feeling for subcutaneousemphysema, a collection of air or gas under the skin. Thismay feel crunchy or spongy, or like “popping” under yourfingers.
10. Check drainage tubing to ensure that there are no depend-ent loops or kinks. Position the drainage collection devicebelow the tube insertion site.
11. If the chest tube is ordered to be suctioned, note the fluidlevel in the suction chamber and check it with the amountof ordered suction. Look for bubbling in the suction cham-ber. Temporarily disconnect the suction to check the levelof water in the chamber. Add sterile water or saline, if nec-essary, to maintain correct amount of suction.
Copyright © 2011 by Wolters Kluwer Health | Lippincott Williams & Wilkins. Skill Checklists for Taylor's Clinical Nursing Skills:
A Nursing Process Approach, 3rd edition, by Pamela Lynn and Marilee LeBon.
Exce
llent
Satis
fact
ory
Nee
ds P
ract
ice
LWBK681-C14_p286-317.qxd 9/6/10 10:22 PM Page 313 Aptara
314
Copyright © 2011 by Wolters Kluwer Health | Lippincott Williams & Wilkins. Skill Checklists for Taylor's Clinical Nursing Skills:
A Nursing Process Approach, 3rd edition, by Pamela Lynn and Marilee LeBon.
SKILL 14-13
Providing Care of a Chest Drainage System (Continued)
Comments
12. Observe the water-seal chamber for fluctuations of thewater level with the patient’s inspiration and expiration(tidaling). If suction is used, temporarily disconnect thesuction to observe for fluctuation. Assess for the presenceof bubbling in the water-seal chamber. Add water, if nec-essary, to maintain the level at the 2-cm mark, or the markrecommended by the manufacturer.
13. Assess the amount and type of fluid drainage. Measuredrainage output at the end of each shift by marking thelevel on the container or placing a small piece of tape atthe drainage level to indicate date and time. The amountshould be a running total, because the drainage system isnever emptied. If the drainage system fills, it is removedand replaced.
14. Remove gloves. Assist patient to a comfortable position.Raise the bed rail and place the bed in the lowest position,as necessary.
15. Remove additional PPE, if used. Perform hand hygiene.
Changing the Drainage System
16. Obtain two padded Kelly clamps, a new drainage system,and a bottle of sterile water. Add water to the water-sealchamber in the new system until it reaches the 2-cm markor the mark recommended by the manufacturer. Followmanufacturer’s directions to add water to suction system ifsuction is ordered.
17. Put on clean gloves and additional PPE, as indicated.
18. Apply Kelly clamps 1.5 to 2.5 inches from insertion siteand 1 inch apart, going in opposite directions.
19. Remove the suction from the current drainage system.Unroll or use scissors to carefully cut away any foam tapeon the connection of the chest tube and drainage system.Using a slight twisting motion, remove the drainagesystem. Do not pull on the chest tube.
20. Keeping the end of the chest tube sterile, insert the end of the new drainage system into the chest tube. RemoveKelly clamps. Reconnect suction, if ordered. Apply plasticbands or foam tape to chest tube/drainage system connec-tion site.
21. Assess the patient and the drainage system as outlined(Steps 5–15).
22. Remove additional PPE, if used. Perform hand hygiene.
Exce
llent
Satis
fact
ory
Nee
ds P
ract
ice
LWBK681-C14_p286-317.qxd 9/6/10 10:22 PM Page 314 Aptara

315
Skill Checklists for Taylor's Clinical Nursing Skills:
A Nursing Process Approach, 3rd edition
Name Date
Unit Position
Instructor/Evaluator: Position
SKILL 14-14
Assisting With Removal of a Chest Tube
Goal: The chest tube is removed with minimal discomfort to
the patient and the patient remains free of respiratory distress. Comments
1. Bring necessary equipment to the bedside stand or overbedtable.
2. Perform hand hygiene and put on PPE, if indicated.
3. Identify the patient.
4. Administer pain medication, as prescribed. Premedicatepatient before the chest tube removal, at a sufficient inter-val to allow for the medication to take effect, based on themedication prescribed.
5. Close curtains around bed and close the door to the room,if possible.
6. Explain what you are going to do and the reason for doingit to the patient. Explain any nonpharmacologic pain inter-ventions the patient may use to decrease discomfort duringtube removal.
7. Put on clean gloves.
8. Provide reassurance to the patient while the physicianremoves the dressing and then the tube.
9. After physician has removed chest tube and secured theocclusive dressing, assess patient’s lung sounds, respiratoryrate, oxygen saturation, and pain level.
10. Anticipate the physician ordering a chest x-ray.
11. Dispose of equipment appropriately.
12. Remove gloves and additional PPE, if used. Perform handhygiene.
Copyright © 2011 by Wolters Kluwer Health | Lippincott Williams & Wilkins. Skill Checklists for Taylor's Clinical Nursing Skills:
A Nursing Process Approach, 3rd edition, by Pamela Lynn and Marilee LeBon.
Exce
llent
Satis
fact
ory
Nee
ds P
ract
ice
LWBK681-C14_p286-317.qxd 9/6/10 10:22 PM Page 315 Aptara

316
Copyright © 2011 by Wolters Kluwer Health | Lippincott Williams & Wilkins. Skill Checklists for Taylor's Clinical Nursing Skills:
A Nursing Process Approach, 3rd edition, by Pamela Lynn and Marilee LeBon.
Skill Checklists for Taylor's Clinical Nursing Skills:
A Nursing Process Approach, 3rd edition
Name Date
Unit Position
Instructor/Evaluator: Position
SKILL 14-15
Using a Handheld Resuscitation Bag and Mask
Goal: The patient exhibits signs and symptoms of adequate
oxygen saturation. Comments
1. If not a crisis situation, perform hand hygiene.
2. Put on PPE, as indicated.
3. If not an emergency, identify the patient.
4. Explain what you are going to do and the reason for doingit to the patient, even if the patient does not appear to bealert.
5. Put on disposable gloves. Put on face shield or goggles andmask.
6. Ensure that the mask is connected to the bag device, theoxygen tubing is connected to the oxygen source, and theoxygen is turned on, at a flow rate of 10 to 15 L perminute. This may be done through visualization or by listening to the open end of the reservoir or tail: if air isheard flowing, the oxygen is attached and on.
7. If possible, get behind head of bed and remove headboard.Slightly hyperextend patient’s neck (unless contraindicated).If unable to hyperextend, use jaw thrust maneuver to openairway.
8. Place mask over patient’s face with opening over oral cav-ity. If mask is teardrop-shaped, the narrow portion shouldbe placed over the bridge of the nose.
9. With dominant hand, place three fingers on the mandible,keeping head slightly hyperextended. Place thumb andone finger in C position around the mask, pressing hardenough to form a seal around the patient’s face.
10. Using nondominant hand, gently and slowly (over 2 to 3 seconds) squeeze the bag, watching chest for symmetricrise. If two people are available, one person should maintain a seal on the mask with two hands while theother squeezes the bag to deliver the ventilation andoxygenation.
Exce
llent
Satis
fact
ory
Nee
ds P
ract
ice
LWBK681-C14_p286-317.qxd 9/6/10 10:22 PM Page 316 Aptara

317
Copyright © 2011 by Wolters Kluwer Health | Lippincott Williams & Wilkins. Skill Checklists for Taylor's Clinical Nursing Skills:
A Nursing Process Approach, 3rd edition, by Pamela Lynn and Marilee LeBon.
SKILL 14-15
Using a Handheld Resuscitation Bag and Mask (Continued)
Comments
11. Deliver the breaths with the patient’s own inspiratory effort, if present. Avoid delivering breaths when the patientexhales. Deliver one breath every 5 seconds, if patient’s ownrespiratory drive is absent. Continue delivering breaths untilpatient’s drive returns or until patient is intubated andattached to mechanical ventilation.
12. Dispose of equipment appropriately.
13. Remove face shield or goggles and mask. Remove glovesand additional PPE, if used. Perform hand hygiene.
Exce
llent
Satis
fact
ory
Nee
ds P
ract
ice
LWBK681-C14_p286-317.qxd 9/6/10 10:22 PM Page 317 Aptara

318
Copyright © 2011 by Wolters Kluwer Health | Lippincott Williams & Wilkins. Skill Checklists for Taylor's Clinical Nursing Skills:
A Nursing Process Approach, 3rd edition, by Pamela Lynn and Marilee LeBon.
Skill Checklists for Taylor's Clinical Nursing Skills:
A Nursing Process Approach, 3rd edition
Name Date
Unit Position
Instructor/Evaluator: Position
SKILL 15-1
Initiating a Peripheral Venous Access IV Infusion
Goal: The access device is inserted on the first attempt, using
sterile technique. Comments
1. Verify the IV solution order on the MAR/CMAR with the medical order. Clarify any inconsistencies. Check thepatient’s chart for allergies. Check for color, leaking, andexpiration date. Know techniques for IV insertion, precau-tions, purpose of the IV administration, and medications ifordered.
2. Gather all equipment and bring to the bedside.
3. Perform hand hygiene and put on PPE, if indicated.
4. Identify the patient.
5. Close curtains around bed and close the door to the room,if possible. Explain what you are going to do and why youare going to do it to the patient. Ask the patient aboutallergies to medications, tape, or skin antiseptics, as appro-priate. If considering using a local anesthetic, inquire aboutallergies for these substances as well.
6. If using a local anesthetic, explain the rationale and proce-dure to the patient. Apply the anesthetic to a few potentialinsertion sites. Allow sufficient time for the anesthetic totake effect.
Prepare the IV Solution and Administration Set
7. Compare the IV container label with the MAR/CMAR.Remove IV bag from outer wrapper, if indicated. Checkexpiration dates. Scan bar code on container, if necessary.Compare on patient identification band with the MAR/CMAR. Alternately, label the solution container with thepatient’s name, solution type, additives, date, and time.Complete a time strip for the infusion and apply to IVcontainer.
8. Maintain aseptic technique when opening sterile packagesand IV solution. Remove administration set from package.Apply label to tubing reflecting the day/date for next setchange, per facility guidelines.
Exce
llent
Satis
fact
ory
Nee
ds P
ract
ice
LWBK681-C15_p318-339.qxd 9/6/10 10:23 PM Page 318 Aptara
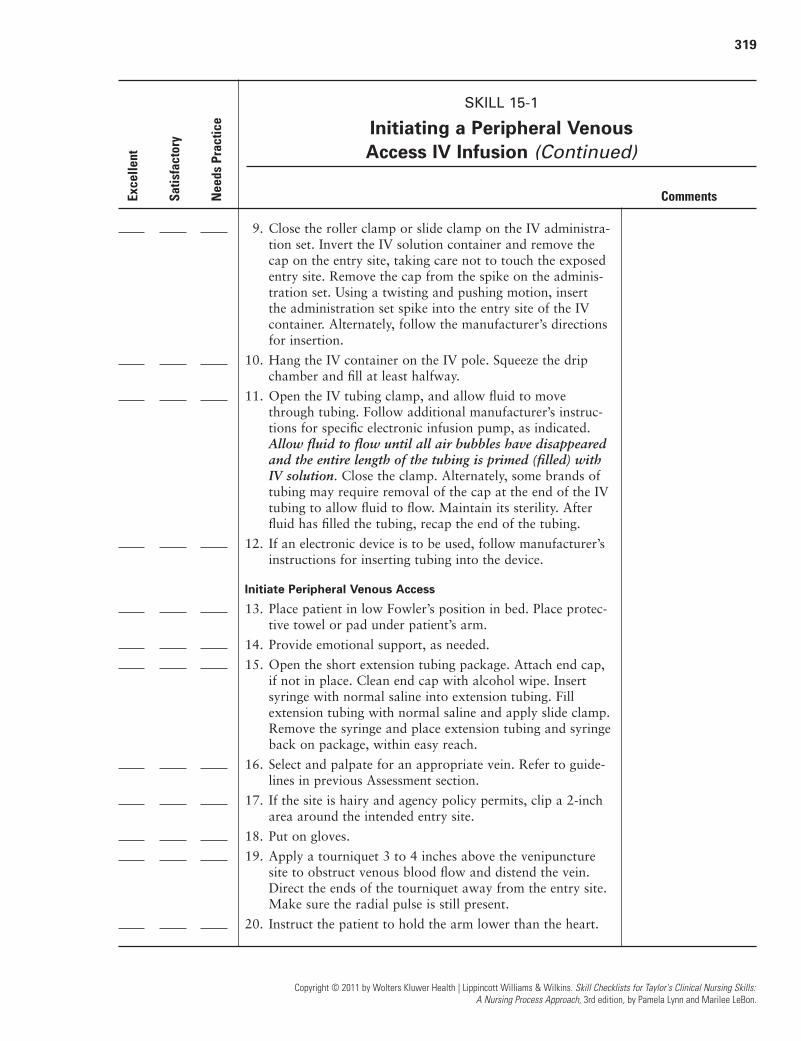
319
Copyright © 2011 by Wolters Kluwer Health | Lippincott Williams & Wilkins. Skill Checklists for Taylor's Clinical Nursing Skills:
A Nursing Process Approach, 3rd edition, by Pamela Lynn and Marilee LeBon.
SKILL 15-1
Initiating a Peripheral Venous Access IV Infusion (Continued)
Comments
9. Close the roller clamp or slide clamp on the IV administra-tion set. Invert the IV solution container and remove thecap on the entry site, taking care not to touch the exposedentry site. Remove the cap from the spike on the adminis-tration set. Using a twisting and pushing motion, insert the administration set spike into the entry site of the IVcontainer. Alternately, follow the manufacturer’s directionsfor insertion.
10. Hang the IV container on the IV pole. Squeeze the dripchamber and fill at least halfway.
11. Open the IV tubing clamp, and allow fluid to movethrough tubing. Follow additional manufacturer’s instruc-tions for specific electronic infusion pump, as indicated.Allow fluid to flow until all air bubbles have disappearedand the entire length of the tubing is primed (filled) withIV solution. Close the clamp. Alternately, some brands oftubing may require removal of the cap at the end of the IVtubing to allow fluid to flow. Maintain its sterility. Afterfluid has filled the tubing, recap the end of the tubing.
12. If an electronic device is to be used, follow manufacturer’sinstructions for inserting tubing into the device.
Initiate Peripheral Venous Access
13. Place patient in low Fowler’s position in bed. Place protec-tive towel or pad under patient’s arm.
14. Provide emotional support, as needed.
15. Open the short extension tubing package. Attach end cap,if not in place. Clean end cap with alcohol wipe. Insertsyringe with normal saline into extension tubing. Fillextension tubing with normal saline and apply slide clamp.Remove the syringe and place extension tubing and syringeback on package, within easy reach.
16. Select and palpate for an appropriate vein. Refer to guide-lines in previous Assessment section.
17. If the site is hairy and agency policy permits, clip a 2-incharea around the intended entry site.
18. Put on gloves.
19. Apply a tourniquet 3 to 4 inches above the venipuncturesite to obstruct venous blood flow and distend the vein.Direct the ends of the tourniquet away from the entry site.Make sure the radial pulse is still present.
20. Instruct the patient to hold the arm lower than the heart.
Exce
llent
Satis
fact
ory
Nee
ds P
ract
ice
LWBK681-C15_p318-339.qxd 9/6/10 10:23 PM Page 319 Aptara

320
Copyright © 2011 by Wolters Kluwer Health | Lippincott Williams & Wilkins. Skill Checklists for Taylor's Clinical Nursing Skills:
A Nursing Process Approach, 3rd edition, by Pamela Lynn and Marilee LeBon.
SKILL 15-1
Initiating a Peripheral Venous Access IV Infusion (Continued)
Comments
21. Ask the patient to open and close the fist. Observe and pal-pate for a suitable vein. Try the following techniques if avein cannot be felt:
a. Massage the patient’s arm from proximal to distal endand gently tap over intended vein.
b. Remove tourniquet and place warm, moist compressesover intended vein for 10 to 15 minutes.
22. Cleanse site with an antiseptic solution such as chlorhexi-dine or according to facility policy. Press applicatoragainst the skin and apply chlorhexidine using a backand forth friction scrub for at least 30 seconds. Do notwipe or blot. Allow to dry completely.
23. Use the nondominant hand, placed about 1 or 2 inchesbelow the entry site, to hold the skin taut against the vein. Avoid touching the prepared site. Ask the patient toremain still while performing the venipuncture.
24. Enter the skin gently, holding the catheter by the hub inyour dominant hand, bevel side up, at a 10- to 15-degreeangle. Insert the catheter from directly over the vein orfrom the side of the vein. While following the course of thevein, advance the needle or catheter into the vein. A sensa-tion of “give” can be felt when the needle enters the vein.
25. When blood returns through the lumen of the needle orthe flashback chamber of the catheter, advance eitherdevice into the vein until the hub is at the venipuncturesite. The exact technique depends on the type of deviceused.
26. Release the tourniquet. Quickly remove the protective capfrom the extension tubing and attach it to the catheter orneedle. Stabilize the catheter or needle with your nondomi-nant hand.
27. Continue to stabilize the catheter or needle and flush gen-tly with the saline, observing the site for infiltration andleaking.
28. Open the skin protectant wipe. Apply the skin protectantto the site, making sure to apply—at minimum—the areato be covered with the dressing. Place sterile transparentdressing or catheter securing/stabilization device overvenipuncture site. Loop the tubing near the site of entry,and anchor with tape (nonallergenic) close to the site.
29. Label the IV dressing with the date, time, site, and typeand size of catheter or needle used for the infusion.
Exce
llent
Satis
fact
ory
Nee
ds P
ract
ice
LWBK681-C15_p318-339.qxd 9/6/10 10:23 PM Page 320 Aptara
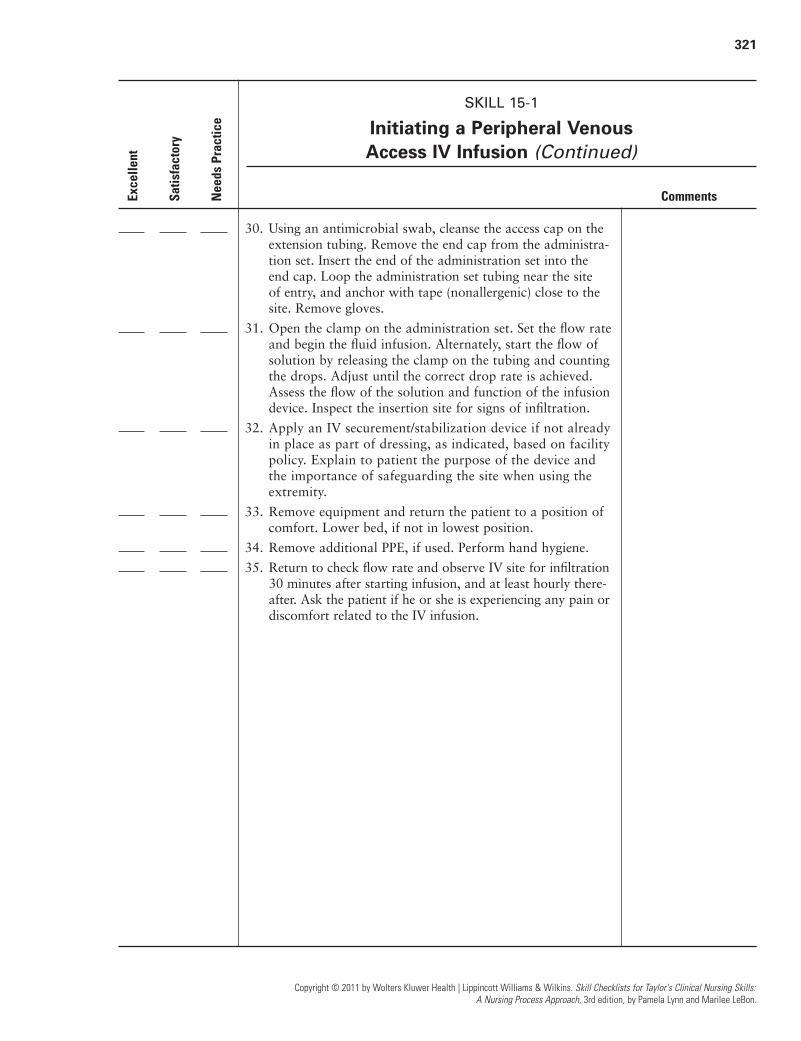
321
Copyright © 2011 by Wolters Kluwer Health | Lippincott Williams & Wilkins. Skill Checklists for Taylor's Clinical Nursing Skills:
A Nursing Process Approach, 3rd edition, by Pamela Lynn and Marilee LeBon.
SKILL 15-1
Initiating a Peripheral Venous Access IV Infusion (Continued)
Comments
30. Using an antimicrobial swab, cleanse the access cap on theextension tubing. Remove the end cap from the administra-tion set. Insert the end of the administration set into theend cap. Loop the administration set tubing near the site of entry, and anchor with tape (nonallergenic) close to thesite. Remove gloves.
31. Open the clamp on the administration set. Set the flow rateand begin the fluid infusion. Alternately, start the flow ofsolution by releasing the clamp on the tubing and countingthe drops. Adjust until the correct drop rate is achieved.Assess the flow of the solution and function of the infusiondevice. Inspect the insertion site for signs of infiltration.
32. Apply an IV securement/stabilization device if not alreadyin place as part of dressing, as indicated, based on facilitypolicy. Explain to patient the purpose of the device andthe importance of safeguarding the site when using theextremity.
33. Remove equipment and return the patient to a position ofcomfort. Lower bed, if not in lowest position.
34. Remove additional PPE, if used. Perform hand hygiene.
35. Return to check flow rate and observe IV site for infiltration30 minutes after starting infusion, and at least hourly there-after. Ask the patient if he or she is experiencing any pain ordiscomfort related to the IV infusion.
Exce
llent
Satis
fact
ory
Nee
ds P
ract
ice
LWBK681-C15_p318-339.qxd 9/6/10 10:23 PM Page 321 Aptara
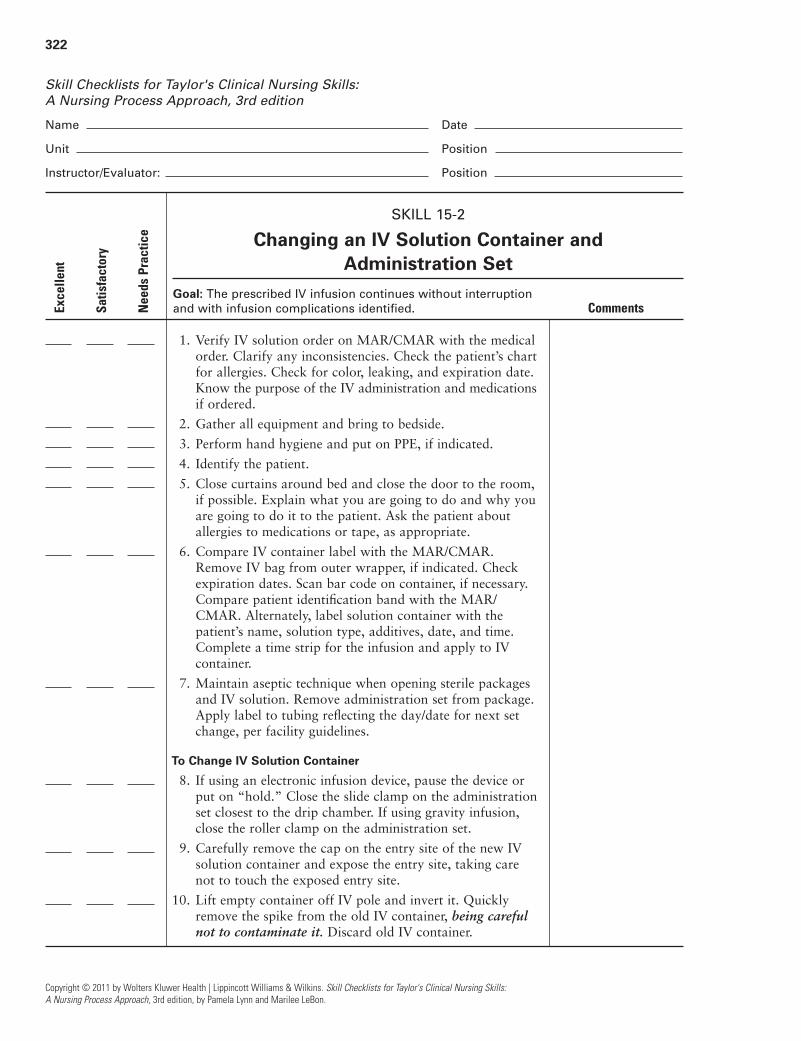
322
Copyright © 2011 by Wolters Kluwer Health | Lippincott Williams & Wilkins. Skill Checklists for Taylor's Clinical Nursing Skills:
A Nursing Process Approach, 3rd edition, by Pamela Lynn and Marilee LeBon.
Skill Checklists for Taylor's Clinical Nursing Skills:
A Nursing Process Approach, 3rd edition
Name Date
Unit Position
Instructor/Evaluator: Position
SKILL 15-2
Changing an IV Solution Container and Administration Set
Goal: The prescribed IV infusion continues without interruption
and with infusion complications identified. Comments
1. Verify IV solution order on MAR/CMAR with the medicalorder. Clarify any inconsistencies. Check the patient’s chartfor allergies. Check for color, leaking, and expiration date.Know the purpose of the IV administration and medicationsif ordered.
2. Gather all equipment and bring to bedside.
3. Perform hand hygiene and put on PPE, if indicated.
4. Identify the patient.
5. Close curtains around bed and close the door to the room,if possible. Explain what you are going to do and why youare going to do it to the patient. Ask the patient aboutallergies to medications or tape, as appropriate.
6. Compare IV container label with the MAR/CMAR.Remove IV bag from outer wrapper, if indicated. Checkexpiration dates. Scan bar code on container, if necessary.Compare patient identification band with the MAR/CMAR. Alternately, label solution container with thepatient’s name, solution type, additives, date, and time.Complete a time strip for the infusion and apply to IVcontainer.
7. Maintain aseptic technique when opening sterile packagesand IV solution. Remove administration set from package.Apply label to tubing reflecting the day/date for next setchange, per facility guidelines.
To Change IV Solution Container
8. If using an electronic infusion device, pause the device orput on “hold.” Close the slide clamp on the administrationset closest to the drip chamber. If using gravity infusion,close the roller clamp on the administration set.
9. Carefully remove the cap on the entry site of the new IVsolution container and expose the entry site, taking carenot to touch the exposed entry site.
10. Lift empty container off IV pole and invert it. Quicklyremove the spike from the old IV container, being carefulnot to contaminate it. Discard old IV container.
Exce
llent
Satis
fact
ory
Nee
ds P
ract
ice
LWBK681-C15_p318-339.qxd 9/6/10 10:23 PM Page 322 Aptara

323
Copyright © 2011 by Wolters Kluwer Health | Lippincott Williams & Wilkins. Skill Checklists for Taylor's Clinical Nursing Skills:
A Nursing Process Approach, 3rd edition, by Pamela Lynn and Marilee LeBon.
SKILL 15-2
Changing an IV Solution Container and Administration Set (Continued)
Comments
11. Using a twisting and pushing motion, insert the administra-tion set spike into the entry site of the IV container. Alter-nately, follow the manufacturer’s directions for insertion.Hang the container on the IV pole.
12. Alternately, hang the new IV fluid container on an openhook on the IV pole. Carefully remove the cap on theentry site of the new IV solution container and expose theentry site, taking care not to touch the exposed entry site.Lift empty container off the IV pole and invert it. Quicklyremove the spike from the old IV container, being carefulnot to contaminate it. Discard old IV container. Using atwisting and pushing motion, insert the administration setspike into the entry port of the new IV container as ithangs on the IV pole.
13. If using an electronic infusion device, open the slide clamp,check the drip chamber of the administration set, verify theflow rate programmed in the infusion device, and turn thedevice to “run” or “infuse.”
14. If using gravity infusion, slowly open the roller clamp onthe administration set and count the drops. Adjust untilthe correct drop rate is achieved.
To Change IV Solution Container and Administration Set
15. Prepare the IV solution and administration set. Refer toSkill 15-1, Steps 7–11.
16. Hang the IV container on an open hook on the IV pole.Close the clamp on the existing IV administration set.Also, close the clamp on the short extension tubingconnected to the IV catheter in the patient’s arm.
17. If using an electronic infusion device, remove the currentadministration set from device. Following manufacturer’sdirections, insert a new administration set into infusiondevice.
18. Put on gloves. Remove the current infusion tubing fromthe access cap on the short extension IV tubing. Using an antimicrobial swab, cleanse access cap on extensiontubing. Remove the end cap from the new administrationset. Insert the end of the administration set into the accesscap. Loop the administration set tubing near the entry site,and anchor with tape (nonallergenic) close to site.
19. Open the clamp on the extension tubing. Open the clampon the administration set.
Exce
llent
Satis
fact
ory
Nee
ds P
ract
ice
LWBK681-C15_p318-339.qxd 9/6/10 10:23 PM Page 323 Aptara
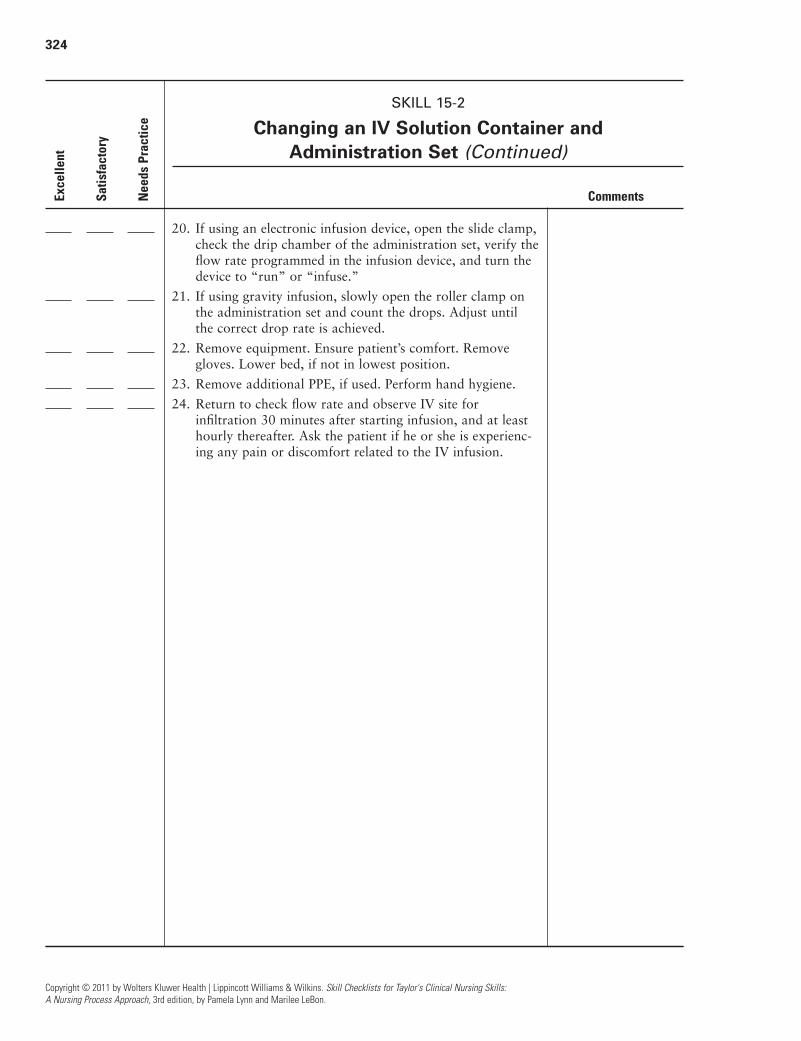
324
Copyright © 2011 by Wolters Kluwer Health | Lippincott Williams & Wilkins. Skill Checklists for Taylor's Clinical Nursing Skills:
A Nursing Process Approach, 3rd edition, by Pamela Lynn and Marilee LeBon.
SKILL 15-2
Changing an IV Solution Container and Administration Set (Continued)
Comments
20. If using an electronic infusion device, open the slide clamp,check the drip chamber of the administration set, verify theflow rate programmed in the infusion device, and turn thedevice to “run” or “infuse.”
21. If using gravity infusion, slowly open the roller clamp onthe administration set and count the drops. Adjust untilthe correct drop rate is achieved.
22. Remove equipment. Ensure patient’s comfort. Removegloves. Lower bed, if not in lowest position.
23. Remove additional PPE, if used. Perform hand hygiene.
24. Return to check flow rate and observe IV site forinfiltration 30 minutes after starting infusion, and at leasthourly thereafter. Ask the patient if he or she is experienc-ing any pain or discomfort related to the IV infusion.
Exce
llent
Satis
fact
ory
Nee
ds P
ract
ice
LWBK681-C15_p318-339.qxd 9/6/10 10:23 PM Page 324 Aptara

325
Skill Checklists for Taylor's Clinical Nursing Skills:
A Nursing Process Approach, 3rd edition
Name Date
Unit Position
Instructor/Evaluator: Position
SKILL 15-3
Monitoring an IV Site and Infusion
Goal: The patient remains free from complications and
demonstrates signs and symptoms of fluid balance. Comments
1. Verify IV solution order on the MAR/CMAR with themedical order. Clarify any inconsistencies. Check thepatient’s chart for allergies. Check for color, leaking, andexpiration date. Know purpose of the IV administrationand medications, if ordered.
2. Monitor IV infusion every hour or per agency policy.More frequent checks may be necessary if medication isbeing infused.
3. Perform hand hygiene and put on PPE, if indicated.
4. Identify the patient.
5. Close curtains around bed and close the door to the room,if possible. Explain what you are going to do to the patient.
6. If an electronic infusion device is being used, check settings,alarm, and indicator lights. Check set infusion rate. Noteposition of fluid in IV container in relation to time tape.Teach patient about the alarm features on the electronicinfusion device.
7. If IV is infusing via gravity, check the drip chamber andtime the drops. Refer to Box 15-1 to review calculation ofIV flow rates for gravity infusion.
8. Check tubing for anything that might interfere with flow.Be sure clamps are in the open position.
9. Observe dressing for leakage of IV solution.
10. Inspect the site for swelling, leakage at the site, coolness,or pallor, which may indicate infiltration. Ask if patient is experiencing any pain or discomfort. If any of thesesymptoms are present, the IV will need to be removed andrestarted at another site. Check facility policy for treatinginfiltration. See Fundamentals Review 15-3 and Box 15-2.
11. Inspect site for redness, swelling, and heat. Palpate forinduration. Ask if patient is experiencing pain. These find-ings may indicate phlebitis. Notify primary care providerif phlebitis is suspected. IV will need to be discontinuedand restarted at another site. Check facility policy fortreatment of phlebitis. Refer to Fundamentals Review 15-3and Box 15-3.
Copyright © 2011 by Wolters Kluwer Health | Lippincott Williams & Wilkins. Skill Checklists for Taylor's Clinical Nursing Skills:
A Nursing Process Approach, 3rd edition, by Pamela Lynn and Marilee LeBon.
Exce
llent
Satis
fact
ory
Nee
ds P
ract
ice
LWBK681-C15_p318-339.qxd 9/6/10 10:23 PM Page 325 Aptara
326
Copyright © 2011 by Wolters Kluwer Health | Lippincott Williams & Wilkins. Skill Checklists for Taylor's Clinical Nursing Skills:
A Nursing Process Approach, 3rd edition, by Pamela Lynn and Marilee LeBon.
SKILL 15-3
Monitoring an IV Site and Infusion (Continued)
Comments
12. Check for local manifestations (redness, pus, warmth,induration, and pain) that may indicate an infection ispresent at the site, or systemic manifestations (chills, fever,tachycardia, hypotension) that may accompany local infec-tion at the site. If signs of infection are present, discontinuethe IV and notify the primary care provider. Be careful notto disconnect IV tubing when putting on patient’s hospitalgown or assisting the patient with movement.
13. Be alert for additional complications of IV therapy.
a. Fluid overload can result in signs of cardiac and/orrespiratory failure. Monitor intake and output andvital signs. Assess for edema and auscultate lungsounds. Ask if patient is experiencing any shortness ofbreath.
b. Check for bleeding at the site.
14. If possible, instruct patient to call for assistance if any dis-comfort is noted at site, solution container is nearly empty,flow has changed in any way, or if the electronic pumpalarm sounds.
Exce
llent
Satis
fact
ory
Nee
ds P
ract
ice
LWBK681-C15_p318-339.qxd 9/6/10 10:23 PM Page 326 Aptara
327
Skill Checklists for Taylor's Clinical Nursing Skills:
A Nursing Process Approach, 3rd edition
Name Date
Unit Position
Instructor/Evaluator: Position
SKILL 15-4
Changing a Peripheral Venous Access Dressing
Goal: The patient exhibits an access site that is clean, dry,
and without evidence of any signs and symptoms of infection,
infiltration, or phlebitis. In addition, the dressing will be clean,
dry, and intact and the patient will not experience injury. Comments
1. Determine the need for a dressing change. Check facilitypolicy. Gather all equipment and bring to bedside.
2. Perform hand hygiene and put on PPE, if indicated.
3. Identify the patient.
4. Close curtains around bed and close the door to the room,if possible. Explain what you are going to do and why youare going to do it to the patient. Ask the patient aboutallergies to tape and skin antiseptics.
5. Put on mask and place a mask on patient, if indicated. Puton gloves. Place towel or disposable pad under the armwith the venous access. If solution is currently infusing,temporarily stop the infusion. Hold the catheter in placewith your nondominant hand and carefully remove olddressing and/or stabilization/securing device. Use adhesiveremover as necessary. Discard dressing.
6. Inspect IV site for presence of phlebitis (inflammation),infection, or infiltration. Discontinue and relocate IV, ifnoted. Refer to Fundamentals Review 15-3, Box 15-2, andBox 15-3.
7. Cleanse site with an antiseptic solution such as chlorhexi-dine or according to facility policy. Press applicatoragainst the skin and apply chlorhexidine using a backand forth friction scrub for at least 30 seconds. Do notwipe or blot. Allow to dry completely.
8. Open the skin protectant wipe. Apply the skin protectantto the site, making sure to cover at minimum the area tobe covered with the dressing. Allow to dry. Place steriletransparent dressing or catheter securing/stabilizationdevice over venipuncture site.
Copyright © 2011 by Wolters Kluwer Health | Lippincott Williams & Wilkins. Skill Checklists for Taylor's Clinical Nursing Skills:
A Nursing Process Approach, 3rd edition, by Pamela Lynn and Marilee LeBon.
Exce
llent
Satis
fact
ory
Nee
ds P
ract
ice
LWBK681-C15_p318-339.qxd 9/6/10 10:23 PM Page 327 Aptara

328
Copyright © 2011 by Wolters Kluwer Health | Lippincott Williams & Wilkins. Skill Checklists for Taylor's Clinical Nursing Skills:
A Nursing Process Approach, 3rd edition, by Pamela Lynn and Marilee LeBon.
SKILL 15-4
Changing a Peripheral Venous Access Dressing (Continued)
Comments
9. Label dressing with date, time of change, and initials.Loop the tubing near the entry site, and anchor with tape(nonallergenic) close to site. Resume fluid infusion, if indi-cated. Check that IV flow is accurate and system is patent.Refer to Skill 15-3.
10. Remove equipment. Ensure patient’s comfort. Removegloves. Lower bed, if not in lowest position.
11. Remove additional PPE, if used. Perform hand hygiene.
Exce
llent
Satis
fact
ory
Nee
ds P
ract
ice
LWBK681-C15_p318-339.qxd 9/6/10 10:23 PM Page 328 Aptara

329
Skill Checklists for Taylor's Clinical Nursing Skills:
A Nursing Process Approach, 3rd edition
Name Date
Unit Position
Instructor/Evaluator: Position
SKILL 15-5
Capping for Intermittent Use and Flushing a Peripheral Venous Access Device
Goal: The patient remains free of injury and any signs and
symptoms of IV complications. Comments
1. Determine the need for conversion to an intermittentaccess. Verify medical order. Check facility policy. Gatherall equipment and bring to bedside.
2. Perform hand hygiene and put on PPE, if indicated.
3. Identify the patient.
4. Close curtains around bed and close the door to the room,if possible. Explain what you are going to do and why youare going to do it to the patient. Ask the patient aboutallergies to tape and skin antiseptics.
5. Assess the IV site. Refer to Skill 15-3.
6. If using an electronic infusion device, stop the device.Close the roller clamp on the administration set. If usinggravity infusion, close the roller clamp on the administra-tion set.
7. Put on gloves. Close the clamp on the short extension tub-ing connected to the IV catheter in the patient’s arm.
8. Remove the administration set tubing from the extensionset. Cleanse the end cap with an antimicrobial swab.
9. Insert the saline flush syringe into the cap on the extensiontubing. Pull back on the syringe to aspirate the catheter forpositive blood return. If positive, instill the solution over 1minute or flush the line according to facility policy. Removesyringe and reclamp the extension tubing.
10. If necessary, loop the extension tubing near the entry siteand anchor it with tape (nonallergenic) close to site.
11. Remove equipment. Ensure patient’s comfort. Removegloves. Lower bed, if not in lowest position.
12. Remove additional PPE, if used. Perform hand hygiene.
Copyright © 2011 by Wolters Kluwer Health | Lippincott Williams & Wilkins. Skill Checklists for Taylor's Clinical Nursing Skills:
A Nursing Process Approach, 3rd edition, by Pamela Lynn and Marilee LeBon.
Exce
llent
Satis
fact
ory
Nee
ds P
ract
ice
LWBK681-C15_p318-339.qxd 9/6/10 10:23 PM Page 329 Aptara

330
Copyright © 2011 by Wolters Kluwer Health | Lippincott Williams & Wilkins. Skill Checklists for Taylor's Clinical Nursing Skills:
A Nursing Process Approach, 3rd edition, by Pamela Lynn and Marilee LeBon.
Skill Checklists for Taylor's Clinical Nursing Skills:
A Nursing Process Approach, 3rd edition
Name Date
Unit Position
Instructor/Evaluator: Position
SKILL 15-6
Administering a Blood Transfusion
Goal: The patient receives the correct blood type and remains
free of injury due to transfusion complications and/or reactions. Comments
1. Verify the medical order for transfusion of a blood product.Verify the completion of informed consent documentation inthe medical record. Verify any medical order for pretransfu-sion medication. If ordered, administer medication at least30 minutes before initiating transfusion.
2. Gather all equipment and bring to bedside.
3. Perform hand hygiene and put on PPE, if indicated.
4. Identify the patient.
5. Close curtains around bed and close the door to theroom, if possible. Explain what you are going to do andwhy you are going to do it to the patient. Ask the patientabout previous experience with transfusion and any reac-tions. Advise patient to report any chills, itching, rash, orunusual symptoms.
6. Prime blood administration set with the normal saline IVfluid. Refer to Skill 15-2.
7. Put on gloves. If patient does not have a venous access inplace, initiate peripheral venous access. (Refer to Skill 15-1.)Connect the administration set to the venous access devicevia the extension tubing. (Refer to Skill 15-1.) Infuse thenormal saline per facility policy.
8. Obtain blood product from blood bank according toagency policy. Scan for bar codes on blood products ifrequired.
9. Two nurses compare and validate the following informationwith the medical record, patient identification band, and thelabel of the blood product:
• Medical order for transfusion of blood product
• Informed consent
• Patient identification number
• Patient name
• Blood group and type
• Expiration date
• Inspection of blood product for clots
Exce
llent
Satis
fact
ory
Nee
ds P
ract
ice
LWBK681-C15_p318-339.qxd 9/6/10 10:23 PM Page 330 Aptara
331
Copyright © 2011 by Wolters Kluwer Health | Lippincott Williams & Wilkins. Skill Checklists for Taylor's Clinical Nursing Skills:
A Nursing Process Approach, 3rd edition, by Pamela Lynn and Marilee LeBon.
SKILL 15-6
Administering a Blood Transfusion (Continued)
Comments
10. Obtain baseline set of vital signs before beginning transfusion.
11. Put on gloves. If using an electronic infusion device, putthe device on “hold.” Close the roller clamp closest to thedrip chamber on the saline side of the administration set.Close the roller clamp on the administration set below theinfusion device. Alternately, if using infusing via gravity,close the roller clamp on the administration set.
12. Close the roller clamp closest to the drip chamber on theblood product side of the administration set. Remove theprotective cap from the access port on the blood container.Remove the cap from the access spike on the administrationset. Using a pushing and twisting motion, insert the spikeinto the access port on the blood container, taking care notto contaminate the spike. Hang blood container on the IVpole. Open the roller clamp on the blood side of the admin-istration set. Squeeze drip chamber until the in-line filter issaturated. Remove gloves.
13. Start administration slowly (no more than 25 to 50 mLfor the first 15 minutes). Stay with the patient for the first5 to 15 minutes of transfusion. Open the roller clamp onthe administration set below the infusion device. Set therate of flow and begin the transfusion. Alternately, startthe flow of solution by releasing the clamp on the tubingand counting the drops. Adjust until the correct drop rateis achieved. Assess the flow of the blood and function ofthe infusion device. Inspect the insertion site for signs ofinfiltration.
14. Observe patient for flushing, dyspnea, itching, hives orrash, or any unusual comments.
15. After the observation period (5 to 15 minutes) increase theinfusion rate to the calculated rate to complete the infusionwithin the prescribed time frame, no more than 4 hours.
16. Reassess vital signs after 15 minutes. Obtain vital signsthereafter according to facility policy and nursingassessment.
17. Maintain the prescribed flow rate as ordered or as deemedappropriate based on the patient’s overall condition, keep-ing in mind the outer limits for safe administration. Ongo-ing monitoring is crucial throughout the entire duration of the blood transfusion for early identification of anyadverse reactions.
Exce
llent
Satis
fact
ory
Nee
ds P
ract
ice
LWBK681-C15_p318-339.qxd 9/6/10 10:23 PM Page 331 Aptara

332
Copyright © 2011 by Wolters Kluwer Health | Lippincott Williams & Wilkins. Skill Checklists for Taylor's Clinical Nursing Skills:
A Nursing Process Approach, 3rd edition, by Pamela Lynn and Marilee LeBon.
SKILL 15-6
Administering a Blood Transfusion (Continued)
Comments
18. During transfusion, assess frequently for transfusionreaction. Stop blood transfusion if you suspect a reaction.Quickly replace the blood tubing with a new administra-tion set primed with normal saline for IV infusion. Initi-ate an infusion of normal saline for IV at an open rate,usually 40 mL/hour. Obtain vital signs. Notify physicianand blood bank.
19. When transfusion is complete, close roller clamp on bloodside of the administration set and open the roller clamp on the normal saline side of the administration set. Initiateinfusion of normal saline. When all of blood has infusedinto the patient, clamp the administration set. Obtain vitalsigns. Put on gloves. Cap access site or resume previous IVinfusion. (Refer to Skill 15-1 and Skill 15-5.) Dispose ofblood-transfusion equipment or return to blood bank,according to facility policy.
20. Remove equipment. Ensure patient’s comfort. Removegloves. Lower bed, if not in lowest position.
21. Remove additional PPE, if used. Perform hand hygiene.
Exce
llent
Satis
fact
ory
Nee
ds P
ract
ice
LWBK681-C15_p318-339.qxd 9/6/10 10:23 PM Page 332 Aptara

333
Skill Checklists for Taylor's Clinical Nursing Skills:
A Nursing Process Approach, 3rd edition
Name Date
Unit Position
Instructor/Evaluator: Position
SKILL 15-7
Changing the Dressing and Flushing Central Venous Access Devices
Goal: The dressing is changed and the CVAD flushed with the
patient remaining free of signs of infection. Comments
1. Verify the medical order and/or facility policy andprocedure. Often, the procedure for CVAD flushing anddressing changes will be a standing protocol. Gather equipment and bring to bedside.
2. Perform hand hygiene and put on PPE, if indicated.
3. Identify the patient.
4. Close curtains around bed and close the door to the room,if possible. Explain what you are going to do and why youare going to do it to the patient. Ask the patient aboutallergies to tape and skin antiseptics.
5. Place a waste receptacle or bag at a convenient location foruse during the procedure.
6. Adjust bed to comfortable working height, usually elbowheight of the caregiver (VISN 8 Patient Safety Center,2009).
7. Assist the patient to a comfortable position that provideseasy access to the CVAD insertion site and dressing. If thepatient has a PICC, position the patient with the armextended from the body below heart level. Use the bathblanket to cover any exposed area other than the site.
8. Apply a mask. Ask patient to turn head away from accesssite. Alternately, have the patient put on a mask. Move theoverbed table to a convenient location within easy reach.Set up a sterile field on the table. Open dressing suppliesand add to sterile field. If IV solution is infusing via CVAD,interrupt and place on hold during dressing change. Applyslide clamp on each lumen of the CVAD.
9. Put on clean gloves. Assess CVAD insertion site (for inflam-mation, redness, and so forth) through old dressing. Notethe status of any sutures that may be present. Remove olddressing by lifting it distally and then working proximally,making sure to stabilize the catheter. Discard dressing intrash receptacle. Remove gloves and discard.
Copyright © 2011 by Wolters Kluwer Health | Lippincott Williams & Wilkins. Skill Checklists for Taylor's Clinical Nursing Skills:
A Nursing Process Approach, 3rd edition, by Pamela Lynn and Marilee LeBon.
Exce
llent
Satis
fact
ory
Nee
ds P
ract
ice
LWBK681-C15_p318-339.qxd 9/6/10 10:23 PM Page 333 Aptara
334
Copyright © 2011 by Wolters Kluwer Health | Lippincott Williams & Wilkins. Skill Checklists for Taylor's Clinical Nursing Skills:
A Nursing Process Approach, 3rd edition, by Pamela Lynn and Marilee LeBon.
SKILL 15-7
Changing the Dressing and Flushing Central Venous Access Devices (Continued)
Comments
10. Put on sterile gloves. Starting at insertion site and continu-ing in a circle, wipe off any old blood or drainage with asterile antimicrobial wipe. Using the chlorhexidine swab,cleanse the site. Cleanse directly over the insertion site bypressing applicator against the skin. Apply chlorhexidineusing a back and forth friction scrub for at least 30seconds. Moving outward from the site, use a scrubbingmotion to continue to clean, covering at least a 2- to 3-inch area. Do not wipe or blot. Allow to dry completely.Apply the skin protectant to the same area, avoiding directapplication to insertion site and allow to dry.
11. Stabilize catheter hub by holding it in place with nondomi-nant hand. Use an alcohol wipe to clean each lumen of thecatheter, starting at the insertion site and move outward.
12. Apply transparent site dressing or securement/stabilizationdevice, centering over insertion site. If patient has PICC inplace, measure the length of the catheter that extends outfrom the insertion site.
13. Working with one lumen at a time, remove end cap. Cleansethe end of the lumen with an alcohol swab and apply newend cap. Repeat for each lumen. Secure catheter lumensand/or tubing that extend outside dressing with tape.
If required, flush each lumen of the CVAD. Amount ofsaline and heparin flushes varies depending on specificCVAD and facility policy.
14. Cleanse end cap with an antimicrobial swab.
15. Insert the saline flush syringe into the cap on the extensiontubing. Pull back on the syringe to aspirate the catheter forpositive blood return. If positive, instill the solution over 1 minute or flush the line according to facility policy.Remove syringe. Insert heparin syringe and instill the vol-ume of solution designated by facility policy over 1 minuteor according to facility policy. Remove syringe andreclamp the lumen. Remove gloves.
16. Label dressing with date, time of change, and initials.Resume fluid infusion, if indicated. Check that IV flow isaccurate and system is patent. (Refer to Skill 15-3.)
17. Remove equipment. Ensure patient’s comfort. Lower bed,if not in lowest position.
18. Remove additional PPE, if used. Perform hand hygiene.
Exce
llent
Satis
fact
ory
Nee
ds P
ract
ice
LWBK681-C15_p318-339.qxd 9/6/10 10:23 PM Page 334 Aptara
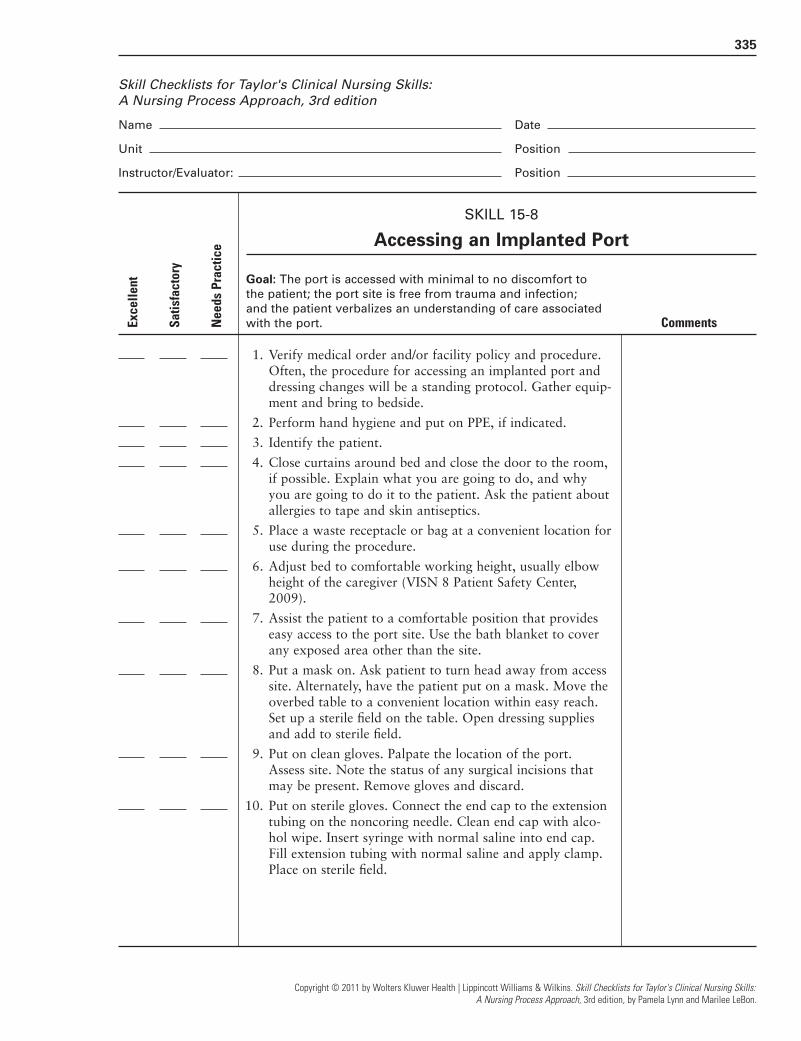
335
Skill Checklists for Taylor's Clinical Nursing Skills:
A Nursing Process Approach, 3rd edition
Name Date
Unit Position
Instructor/Evaluator: Position
SKILL 15-8
Accessing an Implanted Port
Goal: The port is accessed with minimal to no discomfort to
the patient; the port site is free from trauma and infection;
and the patient verbalizes an understanding of care associated
with the port. Comments
1. Verify medical order and/or facility policy and procedure.Often, the procedure for accessing an implanted port anddressing changes will be a standing protocol. Gather equip-ment and bring to bedside.
2. Perform hand hygiene and put on PPE, if indicated.
3. Identify the patient.
4. Close curtains around bed and close the door to the room,if possible. Explain what you are going to do, and whyyou are going to do it to the patient. Ask the patient aboutallergies to tape and skin antiseptics.
5. Place a waste receptacle or bag at a convenient location foruse during the procedure.
6. Adjust bed to comfortable working height, usually elbowheight of the caregiver (VISN 8 Patient Safety Center,2009).
7. Assist the patient to a comfortable position that provideseasy access to the port site. Use the bath blanket to coverany exposed area other than the site.
8. Put a mask on. Ask patient to turn head away from accesssite. Alternately, have the patient put on a mask. Move theoverbed table to a convenient location within easy reach.Set up a sterile field on the table. Open dressing suppliesand add to sterile field.
9. Put on clean gloves. Palpate the location of the port.Assess site. Note the status of any surgical incisions thatmay be present. Remove gloves and discard.
10. Put on sterile gloves. Connect the end cap to the extensiontubing on the noncoring needle. Clean end cap with alco-hol wipe. Insert syringe with normal saline into end cap.Fill extension tubing with normal saline and apply clamp.Place on sterile field.
Copyright © 2011 by Wolters Kluwer Health | Lippincott Williams & Wilkins. Skill Checklists for Taylor's Clinical Nursing Skills:
A Nursing Process Approach, 3rd edition, by Pamela Lynn and Marilee LeBon.
Exce
llent
Satis
fact
ory
Nee
ds P
ract
ice
LWBK681-C15_p318-339.qxd 9/6/10 10:23 PM Page 335 Aptara

336
Copyright © 2011 by Wolters Kluwer Health | Lippincott Williams & Wilkins. Skill Checklists for Taylor's Clinical Nursing Skills:
A Nursing Process Approach, 3rd edition, by Pamela Lynn and Marilee LeBon.
SKILL 15-8
Accessing an Implanted Port (Continued)
Comments
11. Using the chlorhexidine swab, cleanse the port site. Pressthe applicator against the skin. Apply chlorhexidine usinga back and forth friction scrub for at least 30 seconds.Moving outward from the site, use a circular, scrubbingmotion to continue to clean, covering at least a 2- to 3-inch area. Do not wipe or blot. Allow to dry completely.
12. Using the nondominant hand, locate the port. Hold theport stable, keeping the skin taut.
13. Visualize the center of the port. Pick up the needle. Coilextension tubing into palm of hand. Holding needle at a90-degree angle to the skin, insert through the skin intothe port septum until the needle hits the back of the port.
14. Cleanse the end cap on the extension tubing with anantimicrobial swab and insert the syringe with normalsaline. Open the clamp on extension tubing and flushwith 3 to 5 mL of saline, while observing the site for fluid leak or infiltration. It should flush easily, withoutresistance.
15. Pull back on the syringe plunger to aspirate for blood return.Aspirate only a few milliliters of blood; do not allow bloodto enter the syringe. If positive, instill the solution over 1minute or flush the line according to facility policy. Removesyringe. Insert heparin syringe and instill the solution over 1 minute or according to facility policy. Remove syringe andclamp the extension tubing. Alternately, if IV fluid infusion isto be started, do not flush with heparin.
16. If using a “Gripper” needle, remove the gripper portionfrom the needle by squeezing the sides together and liftingoff the needle while holding the needle securely to the portwith the other hand.
17. Apply the skin protectant to the site, avoiding direct appli-cation to needle insertion site. Allow to dry.
18. Apply tape or Steri-Strips in a star-like pattern over theneedle to secure it.
19. Apply transparent site dressing or securement/stabilizationdevice, centering over insertion site.
20. Label dressing with date, time of change, and initials. If IVfluid infusion is ordered, attach administration set to exten-sion tubing and begin administration. Refer to Skill 15-1.
21. Remove equipment. Ensure patient’s comfort. Lower bed,if not in lowest position.
22. Remove additional PPE, if used. Perform hand hygiene.
Exce
llent
Satis
fact
ory
Nee
ds P
ract
ice
LWBK681-C15_p318-339.qxd 9/6/10 10:23 PM Page 336 Aptara

337
Skill Checklists for Taylor's Clinical Nursing Skills:
A Nursing Process Approach, 3rd edition
Name Date
Unit Position
Instructor/Evaluator: Position
SKILL 15-9
Deaccessing an Implanted Port
Goal: The needle is removed with minimal to no discomfort to
the patient; the patient experiences no trauma or infection; and
the patient verbalizes an understanding of port care. Comments
1. Verify medical order and/or facility policy and procedure.Often, the procedure for accessing an implanted port anddressing changes will be a standing protocol. Gather equip-ment and bring to bedside.
2. Perform hand hygiene and put on PPE, if indicated.
3. Identify the patient.
4. Close curtains around bed and close the door to the room,if possible. Explain what you are going to do and why youare going to do it to the patient.
5. Adjust bed to comfortable working height, usually elbowheight of the caregiver (VISN 8 Patient Safety Center,2009).
6. Assist the patient to a comfortable position that provideseasy access to the port site. Use the bath blanket to coverany exposed area other than the site.
7. Put on gloves. Stabilize port needle with nondominanthand. Gently pull back transparent dressing, beginningwith edges and proceeding around the edge of the dressing.Carefully remove all the tape that is securing the needle inplace.
8. Clean the end cap on the extension tubing and insert thesaline-filled syringe. Unclamp the extension tubing andflush with a minimum of 10 mL of normal saline.
9. Remove the syringe and insert the heparin-filled syringe,flushing with 5 mL heparin (100 U/mL or per facilitypolicy). Remove syringe and clamp the extension tubing.
10. Secure the port on either side with the fingers of your non-dominant hand. Grasp the needle/wings with the fingers of dominant hand. Firmly and smoothly, pull the needlestraight up at a 90-degree angle from the skin to remove it from the septum. Engage needle guard, if not automaticon removal.
Copyright © 2011 by Wolters Kluwer Health | Lippincott Williams & Wilkins. Skill Checklists for Taylor's Clinical Nursing Skills:
A Nursing Process Approach, 3rd edition, by Pamela Lynn and Marilee LeBon.
Exce
llent
Satis
fact
ory
Nee
ds P
ract
ice
LWBK681-C15_p318-339.qxd 9/6/10 10:23 PM Page 337 Aptara
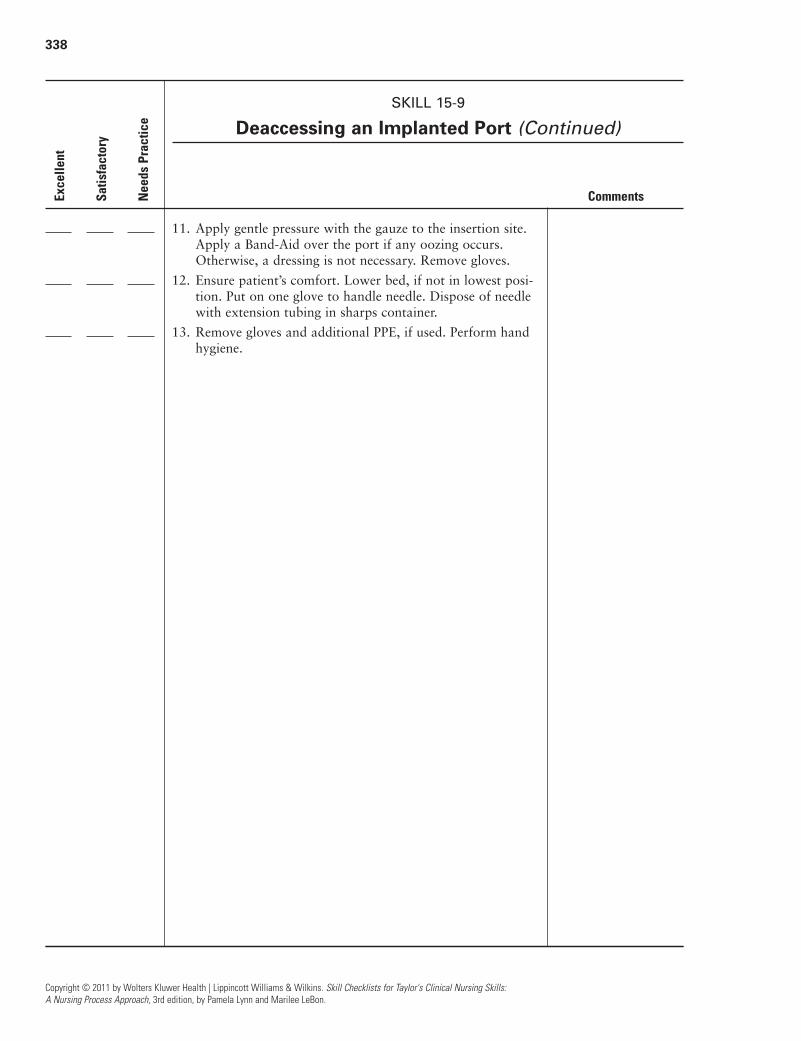
338
Copyright © 2011 by Wolters Kluwer Health | Lippincott Williams & Wilkins. Skill Checklists for Taylor's Clinical Nursing Skills:
A Nursing Process Approach, 3rd edition, by Pamela Lynn and Marilee LeBon.
SKILL 15-9
Deaccessing an Implanted Port (Continued)
Comments
11. Apply gentle pressure with the gauze to the insertion site.Apply a Band-Aid over the port if any oozing occurs. Otherwise, a dressing is not necessary. Remove gloves.
12. Ensure patient’s comfort. Lower bed, if not in lowest posi-tion. Put on one glove to handle needle. Dispose of needlewith extension tubing in sharps container.
13. Remove gloves and additional PPE, if used. Perform handhygiene.
Exce
llent
Satis
fact
ory
Nee
ds P
ract
ice
LWBK681-C15_p318-339.qxd 9/6/10 10:23 PM Page 338 Aptara
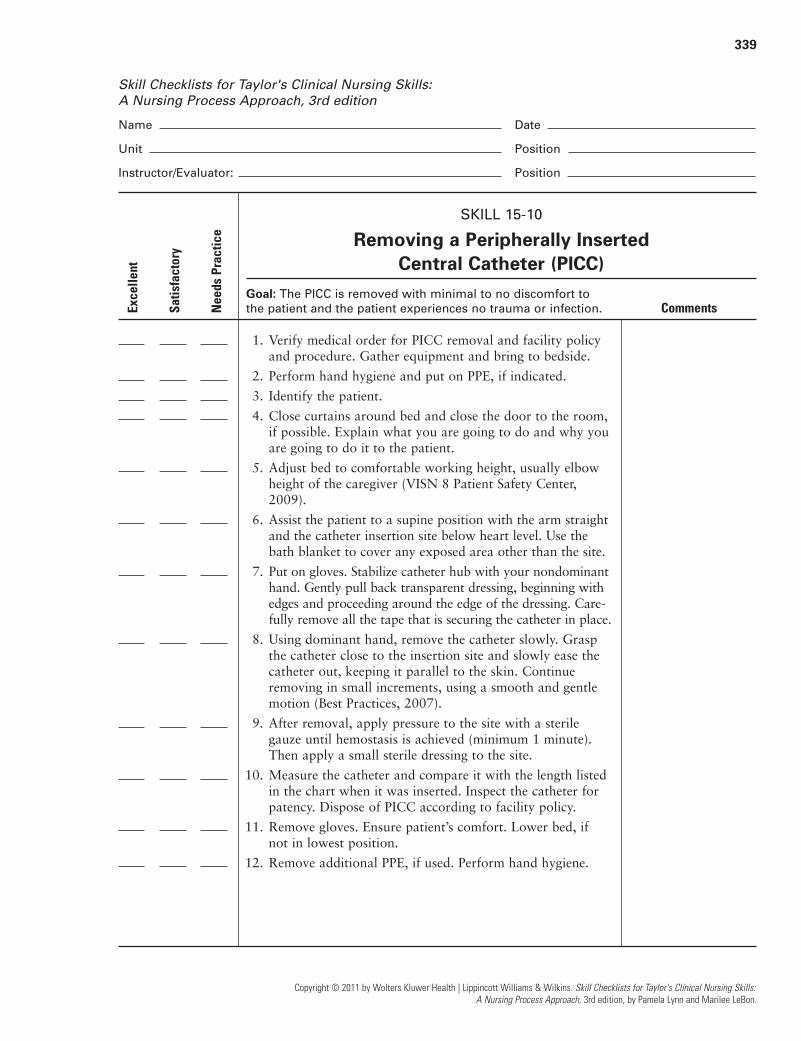
339
Skill Checklists for Taylor's Clinical Nursing Skills:
A Nursing Process Approach, 3rd edition
Name Date
Unit Position
Instructor/Evaluator: Position
SKILL 15-10
Removing a Peripherally Inserted Central Catheter (PICC)
Goal: The PICC is removed with minimal to no discomfort to
the patient and the patient experiences no trauma or infection. Comments
1. Verify medical order for PICC removal and facility policyand procedure. Gather equipment and bring to bedside.
2. Perform hand hygiene and put on PPE, if indicated.
3. Identify the patient.
4. Close curtains around bed and close the door to the room,if possible. Explain what you are going to do and why youare going to do it to the patient.
5. Adjust bed to comfortable working height, usually elbowheight of the caregiver (VISN 8 Patient Safety Center,2009).
6. Assist the patient to a supine position with the arm straightand the catheter insertion site below heart level. Use thebath blanket to cover any exposed area other than the site.
7. Put on gloves. Stabilize catheter hub with your nondominanthand. Gently pull back transparent dressing, beginning withedges and proceeding around the edge of the dressing. Care-fully remove all the tape that is securing the catheter in place.
8. Using dominant hand, remove the catheter slowly. Graspthe catheter close to the insertion site and slowly ease thecatheter out, keeping it parallel to the skin. Continueremoving in small increments, using a smooth and gentlemotion (Best Practices, 2007).
9. After removal, apply pressure to the site with a sterilegauze until hemostasis is achieved (minimum 1 minute).Then apply a small sterile dressing to the site.
10. Measure the catheter and compare it with the length listedin the chart when it was inserted. Inspect the catheter forpatency. Dispose of PICC according to facility policy.
11. Remove gloves. Ensure patient’s comfort. Lower bed, ifnot in lowest position.
12. Remove additional PPE, if used. Perform hand hygiene.
Copyright © 2011 by Wolters Kluwer Health | Lippincott Williams & Wilkins. Skill Checklists for Taylor's Clinical Nursing Skills:
A Nursing Process Approach, 3rd edition, by Pamela Lynn and Marilee LeBon.
Exce
llent
Satis
fact
ory
Nee
ds P
ract
ice
LWBK681-C15_p318-339.qxd 9/6/10 10:23 PM Page 339 Aptara
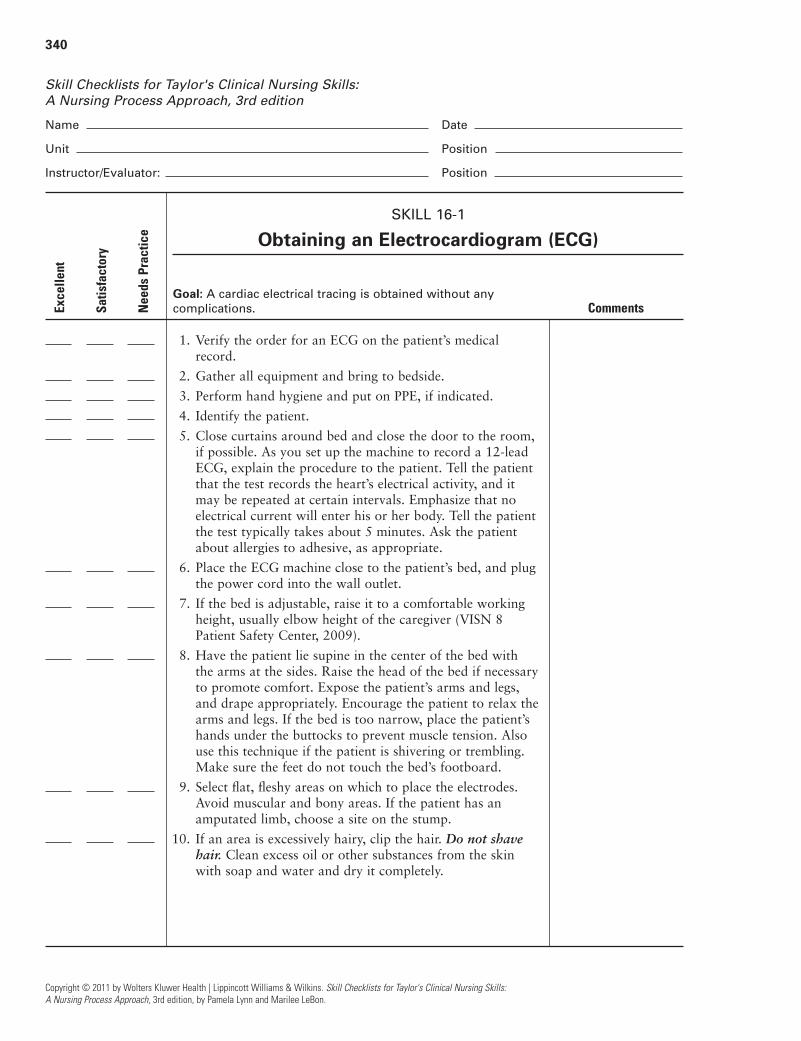
340
Copyright © 2011 by Wolters Kluwer Health | Lippincott Williams & Wilkins. Skill Checklists for Taylor's Clinical Nursing Skills:
A Nursing Process Approach, 3rd edition, by Pamela Lynn and Marilee LeBon.
Skill Checklists for Taylor's Clinical Nursing Skills:
A Nursing Process Approach, 3rd edition
Name Date
Unit Position
Instructor/Evaluator: Position
SKILL 16-1
Obtaining an Electrocardiogram (ECG)
Goal: A cardiac electrical tracing is obtained without any
complications. Comments
1. Verify the order for an ECG on the patient’s medicalrecord.
2. Gather all equipment and bring to bedside.
3. Perform hand hygiene and put on PPE, if indicated.
4. Identify the patient.
5. Close curtains around bed and close the door to the room,if possible. As you set up the machine to record a 12-leadECG, explain the procedure to the patient. Tell the patientthat the test records the heart’s electrical activity, and itmay be repeated at certain intervals. Emphasize that noelectrical current will enter his or her body. Tell the patientthe test typically takes about 5 minutes. Ask the patientabout allergies to adhesive, as appropriate.
6. Place the ECG machine close to the patient’s bed, and plugthe power cord into the wall outlet.
7. If the bed is adjustable, raise it to a comfortable workingheight, usually elbow height of the caregiver (VISN 8Patient Safety Center, 2009).
8. Have the patient lie supine in the center of the bed withthe arms at the sides. Raise the head of the bed if necessaryto promote comfort. Expose the patient’s arms and legs,and drape appropriately. Encourage the patient to relax thearms and legs. If the bed is too narrow, place the patient’shands under the buttocks to prevent muscle tension. Alsouse this technique if the patient is shivering or trembling.Make sure the feet do not touch the bed’s footboard.
9. Select flat, fleshy areas on which to place the electrodes.Avoid muscular and bony areas. If the patient has anamputated limb, choose a site on the stump.
10. If an area is excessively hairy, clip the hair. Do not shavehair. Clean excess oil or other substances from the skinwith soap and water and dry it completely.
Exce
llent
Satis
fact
ory
Nee
ds P
ract
ice
LWBK681-C16_p340-357.qxd 9/6/10 10:23 PM Page 340 Aptara
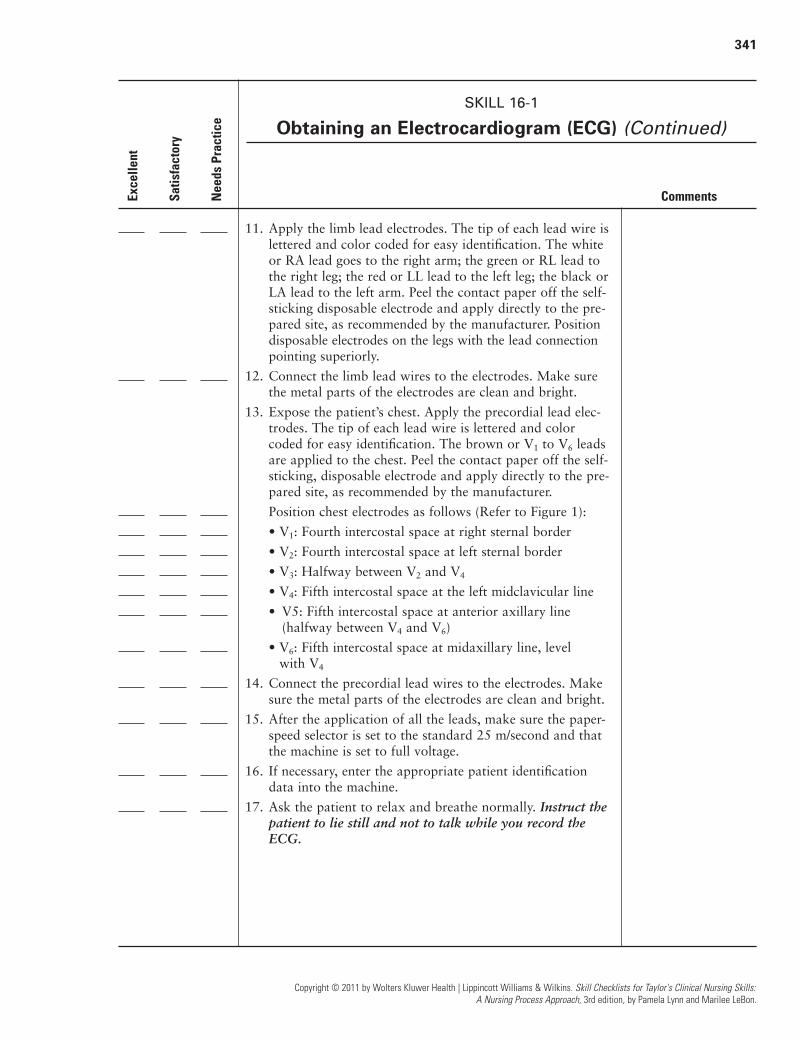
341
Copyright © 2011 by Wolters Kluwer Health | Lippincott Williams & Wilkins. Skill Checklists for Taylor's Clinical Nursing Skills:
A Nursing Process Approach, 3rd edition, by Pamela Lynn and Marilee LeBon.
SKILL 16-1
Obtaining an Electrocardiogram (ECG) (Continued)
Comments
11. Apply the limb lead electrodes. The tip of each lead wire islettered and color coded for easy identification. The whiteor RA lead goes to the right arm; the green or RL lead tothe right leg; the red or LL lead to the left leg; the black orLA lead to the left arm. Peel the contact paper off the self-sticking disposable electrode and apply directly to the pre-pared site, as recommended by the manufacturer. Positiondisposable electrodes on the legs with the lead connectionpointing superiorly.
12. Connect the limb lead wires to the electrodes. Make surethe metal parts of the electrodes are clean and bright.
13. Expose the patient’s chest. Apply the precordial lead elec-trodes. The tip of each lead wire is lettered and colorcoded for easy identification. The brown or V1 to V6 leadsare applied to the chest. Peel the contact paper off the self-sticking, disposable electrode and apply directly to the pre-pared site, as recommended by the manufacturer.
Position chest electrodes as follows (Refer to Figure 1):
• V1: Fourth intercostal space at right sternal border
• V2: Fourth intercostal space at left sternal border
• V3: Halfway between V2 and V4
• V4: Fifth intercostal space at the left midclavicular line
• V5: Fifth intercostal space at anterior axillary line(halfway between V4 and V6)
• V6: Fifth intercostal space at midaxillary line, level with V4
14. Connect the precordial lead wires to the electrodes. Makesure the metal parts of the electrodes are clean and bright.
15. After the application of all the leads, make sure the paper-speed selector is set to the standard 25 m/second and thatthe machine is set to full voltage.
16. If necessary, enter the appropriate patient identificationdata into the machine.
17. Ask the patient to relax and breathe normally. Instruct thepatient to lie still and not to talk while you record theECG.
Exce
llent
Satis
fact
ory
Nee
ds P
ract
ice
LWBK681-C16_p340-357.qxd 9/6/10 10:23 PM Page 341 Aptara

342
Copyright © 2011 by Wolters Kluwer Health | Lippincott Williams & Wilkins. Skill Checklists for Taylor's Clinical Nursing Skills:
A Nursing Process Approach, 3rd edition, by Pamela Lynn and Marilee LeBon.
SKILL 16-1
Obtaining an Electrocardiogram (ECG) (Continued)
Comments
18. Press the AUTO button. Observe the tracing quality. Themachine will record all 12 leads automatically, recording 3 consecutive leads simultaneously. Some machines have adisplay screen so you can preview waveforms before themachine records them on paper. Adjust waveform, if necessary. If any part of the waveform extends beyond the paper when you record the ECG, adjust the normalstandardization to half-standardization and repeat. Notethis adjustment on the ECG strip, because this will need tobe considered in interpreting the results.
19. When the machine finishes recording the 12-lead ECG,remove the electrodes and clean the patient’s skin, if necessary, with adhesive remover for sticky residue.
20. After disconnecting the lead wires from the electrodes, dis-pose of the electrodes. Return the patient to a comfortableposition. Lower bed height and adjust the head of bed to acomfortable position.
21. Clean ECG machine per facility policy. If not done electroni-cally from data entered into the machine, label the ECGwith the patient’s name, date of birth, location, date andtime of recording, and other relevant information, such assymptoms that occurred during the recording (Jevon,2007b).
22. Remove additional PPE, if used. Perform hand hygiene.
Exce
llent
Satis
fact
ory
Nee
ds P
ract
ice
LWBK681-C16_p340-357.qxd 9/6/10 10:23 PM Page 342 Aptara
343
Skill Checklists for Taylor's Clinical Nursing Skills:
A Nursing Process Approach, 3rd edition
Name Date
Unit Position
Instructor/Evaluator: Position
SKILL 16-2
Applying a Cardiac Monitor
Goal: A clear waveform, free from artifact, is displayed on
the cardiac monitor. Comments
1. Verify the order for cardiac monitoring on the patient’smedical record.
2. Gather all equipment and bring to bedside.
3. Perform hand hygiene and put on PPE, if indicated.
4. Identify the patient.
5. Close curtains around bed and close the door to the room,if possible. Explain the procedure to the patient. Tell thepatient that the monitoring records the heart’s electricalactivity. Emphasize that no electrical current will enter hisor her body. Ask the patient about allergies to adhesive, asappropriate.
6. For hardwire monitoring, plug the cardiac monitor into anelectrical outlet and turn it on to warm up the unit whilepreparing the equipment and the patient. For telemetrymonitoring, insert a new battery into the transmitter.Match the poles on the battery with the polar markings onthe transmitter case. Press the button at the top of the unit,test the battery’s charge, and test the unit to ensure thatthe battery is operational.
7. Insert the cable into the appropriate socket in the monitor.
8. Connect the lead wires to the cable. In some systems, the lead wires are permanently secured to the cable. Fortelemetry, if the lead wires are not permanently affixed tothe telemetry unit, attach them securely. If they must beattached individually, connect each one to the correct outlet.
9. Connect an electrode to each of the lead wires, carefullychecking that each lead wire is in its correct outlet.
10. If the bed is adjustable, raise it to a comfortable workingheight, usually elbow height of the caregiver (VISN 8Patient Safety Center, 2009).
Copyright © 2011 by Wolters Kluwer Health | Lippincott Williams & Wilkins. Skill Checklists for Taylor's Clinical Nursing Skills:
A Nursing Process Approach, 3rd edition, by Pamela Lynn and Marilee LeBon.
Exce
llent
Satis
fact
ory
Nee
ds P
ract
ice
LWBK681-C16_p340-357.qxd 9/6/10 10:23 PM Page 343 Aptara

344
Copyright © 2011 by Wolters Kluwer Health | Lippincott Williams & Wilkins. Skill Checklists for Taylor's Clinical Nursing Skills:
A Nursing Process Approach, 3rd edition, by Pamela Lynn and Marilee LeBon.
SKILL 16-2
Applying a Cardiac Monitor (Continued)
Comments
11. Expose the patient’s chest and determine electrode positions,based on which system and leads are being used. If necessary,clip the hair from an area about 10 cm in diameter aroundeach electrode site. Clean the area with soap and water anddry it completely to remove skin secretions that may interferewith electrode function.
12. Remove the backing from the pregelled electrode. Checkthe gel for moistness. If the gel is dry, discard it andreplace it with a fresh electrode. Apply the electrode to thesite and press firmly to ensure a tight seal. Repeat withthe remaining electrodes to complete the three-lead or five-lead system.
13. When all the electrodes are in place, connect the appropri-ate lead wire to each electrode. Check waveform for clarity,position, and size. To verify that the monitor is detectingeach beat, compare the digital heart rate display with anauscultated count of the patient’s heart rate. If necessary,use the gain control to adjust the size of the rhythm tracing,and use the position control to adjust the waveformposition on the monitor.
14. Set the upper and lower limits of the heart rate alarm,based on the patient’s condition or unit policy.
15. For telemetry, place the transmitter in the pouch in the hos-pital gown. If not available in gown, use a portable pouch.Tie the pouch strings around the patient’s neck and waist,making sure that the pouch fits snugly without causing dis-comfort. If no pouch is available, place the transmitter inthe patient’s bathrobe pocket.
16. To obtain a rhythm strip, press the RECORD key either atthe bedside for monitoring or at the central station fortelemetry. Label the strip with the patient’s name and roomnumber, date, time, and rhythm identification. Analyze thestrip, as appropriate. Place the rhythm strip in theappropriate location in the patient’s chart.
17. Return the patient to a comfortable position. Lower bed height and adjust the head of bed to a comfortable position.
18. Remove additional PPE, if used. Perform hand hygiene.
Exce
llent
Satis
fact
ory
Nee
ds P
ract
ice
LWBK681-C16_p340-357.qxd 9/6/10 10:23 PM Page 344 Aptara
345
Skill Checklists for Taylor's Clinical Nursing Skills:
A Nursing Process Approach, 3rd edition
Name Date
Unit Position
Instructor/Evaluator: Position
SKILL 16-3
Obtaining an Arterial Blood Sample From an Arterial Line–Stopcock System
Goal: A specimen is obtained without compromise to the
patency of the arterial line. Comments
1. Verify the order for laboratory testing on the patient’smedical record.
2. Gather all equipment and bring to bedside.
3. Perform hand hygiene and put on PPE, if indicated.
4. Identify the patient.
5. Close curtains around bed and close the door to the room,if possible. Explain the procedure to the patient.
6. Compare specimen label with patient identificationbracelet. Label should include patient’s name and identifi-cation number, time specimen was collected, route of col-lection, identification of the person obtaining sample, andany other information required by agency policy.
7. Put on gloves and goggles or face shield.
8. Turn off or temporarily silence the arterial pressure alarms,depending on facility policy.
9. Locate the stopcock nearest the arterial line insertion site.Use the alcohol swab or chlorhexidine to scrub thesampling port on the stopcock. Allow to air dry.
10. Attach a 5-mL syringe into the sampling port on the stop-cock to obtain the discard volume. Turn off the stopcockto the flush solution. Aspirate slowly until blood enters thesyringe. Stop aspirating. Note the volume in the syringe,which is the dead-space volume. Continue to aspirate untilthe dead-space volume has been withdrawn a total of threetimes. For example, if the dead-space volume is 0.8 mL,aspirate 2.4 mL of blood.
11. Turn the stopcock to the halfway position between theflush solution and the sampling port to close the system inall directions.
12. Remove the discard syringe and dispose of appropriately.
Copyright © 2011 by Wolters Kluwer Health | Lippincott Williams & Wilkins. Skill Checklists for Taylor's Clinical Nursing Skills:
A Nursing Process Approach, 3rd edition, by Pamela Lynn and Marilee LeBon.
Exce
llent
Satis
fact
ory
Nee
ds P
ract
ice
LWBK681-C16_p340-357.qxd 9/6/10 10:23 PM Page 345 Aptara

346
Copyright © 2011 by Wolters Kluwer Health | Lippincott Williams & Wilkins. Skill Checklists for Taylor's Clinical Nursing Skills:
A Nursing Process Approach, 3rd edition, by Pamela Lynn and Marilee LeBon.
SKILL 16-3
Obtaining an Arterial Blood Sample From an Arterial Line–Stopcock System (Continued)
Comments
13. Place the syringe for the laboratory sample or theVacutainer in the sampling port of the stopcock. Turn thestopcock off to the flush solution, and slowly withdraw the required amount of blood. For each additional samplerequired, repeat this procedure. If coagulation tests areincluded in the required tests, obtain blood for this fromthe final sample.
14. Turn the stopcock to the halfway position between theflush solution and the sampling port to close the system in all directions. Remove the syringe or Vacutainer. Applythe rubber cap to the ABG syringe hub, if necessary.
15. Insert a 5-mL syringe into the sampling port of the stopcock.Turn off the stopcock to the patient. Activate the in-lineflushing device. Flush through the sampling port into thesyringe to clear the stopcock and sampling port of anyresidual blood.
16. Turn off the stopcock to the sampling port; remove thesyringe. Remove sampling port cap and replace with newsterile one. Intermittently flush the arterial catheter withthe in-line flushing device until the tubing is clear ofblood.
17. Remove gloves. Reactivate the monitor alarms. Recorddate and time the samples were obtained on the labels, aswell as the required information to identify the personobtaining the samples. If ABG was collected, recordoxygen flow rate (or room air) on label. Apply labels tothe specimens, according to facility policy. Place in biohaz-ard bags; place ABG sample in bag with ice.
18. Check the monitor for return of the arterial waveform andpressure reading.
19. Return the patient to a comfortable position. Lower bedheight, if necessary, and adjust head of bed to a comfortableposition.
20. Remove goggles and additional PPE, if used. Perform handhygiene. Send specimens to the laboratory immediately.
Exce
llent
Satis
fact
ory
Nee
ds P
ract
ice
LWBK681-C16_p340-357.qxd 9/6/10 10:23 PM Page 346 Aptara

347
Skill Checklists for Taylor's Clinical Nursing Skills:
A Nursing Process Approach, 3rd edition
Name Date
Unit Position
Instructor/Evaluator: Position
SKILL 16-4
Removing Arterial and Femoral Lines
Goal: The line is removed intact and without injury to the patient. Comments
1. Verify the order for removal of arterial or femoral line inthe patient’s medical record.
2. Gather all equipment and bring to bedside.
3. Perform hand hygiene and put on PPE, if indicated.
4. Identify the patient.
5. Close curtains around bed and close the door to the room,if possible. Explain the procedure to the patient.
6. Ask the patient to empty his or her bladder. Maintain an IVinfusion of normal saline via another venous access duringthe procedure, as per medical orders or facility guidelines.
7. If the bed is adjustable, raise it to a comfortable workingheight, usually elbow height of the caregiver (VISN 8Patient Safety Center, 2009).
8. Put on clean gloves, goggles, and gown.
9. If the line being removed is in a femoral site, use Dopplerultrasound to locate femoral artery 1 to 2 inches above theentrance site of the femoral line. Mark with ‘X’ usingindelible pen.
10. Turn off the monitor alarms and then turn off the flowclamp to the flush solution. Carefully remove the dressingover the insertion site. Remove any sutures using the sutureremoval kit; make sure all sutures have been removed.
11. Withdraw the catheter using a gentle, steady motion. Keepthe catheter parallel to the blood vessel during withdrawal.Watch for hematoma formation during catheter removalby gently palpating surrounding tissue. If hematoma startsto form, reposition your hands until optimal pressure isobtained to prevent further leakage of blood.
12. Immediately after withdrawing the catheter, apply pressure1 or 2 inches above the site at the previously marked spotwith a sterile 4 � 4 gauze pad. Maintain pressure for atleast 10 minutes, or per facility policy (longer if bleedingor oozing persists). Apply additional pressure to a femoralsite or if the patient has coagulopathy or is receiving anticoagulants.
Copyright © 2011 by Wolters Kluwer Health | Lippincott Williams & Wilkins. Skill Checklists for Taylor's Clinical Nursing Skills:
A Nursing Process Approach, 3rd edition, by Pamela Lynn and Marilee LeBon.
Exce
llent
Satis
fact
ory
Nee
ds P
ract
ice
LWBK681-C16_p340-357.qxd 9/6/10 10:23 PM Page 347 Aptara
348
Copyright © 2011 by Wolters Kluwer Health | Lippincott Williams & Wilkins. Skill Checklists for Taylor's Clinical Nursing Skills:
A Nursing Process Approach, 3rd edition, by Pamela Lynn and Marilee LeBon.
SKILL 16-4
Removing Arterial and Femoral Lines (Continued)
Comments
13. Assess distal pulses every 3 to 5 minutes while pressure isbeing applied. Note: dorsalis pedis and posterior tibialpulses should be markedly weaker from baseline ifsufficient pressure is applied to the femoral artery.
14. Cover the site with an appropriate dressing and secure thedressing with tape. If stipulated by facility policy, make apressure dressing for a femoral site by folding four sterile 4 � 4 gauze pads in half, and then applying the dressing.
15. Cover the dressing with a tight adhesive bandage, per pol-icy, and then cover the femoral bandage with a sandbag.Remove gloves. Maintain the patient on bed rest, with thehead of the bed elevated less than 30º, for 6 hours with the sandbag in place. Lower the bed height. Remind thepatient not to lift his or her head while on bed rest.
16. Remove additional PPE. Perform hand hygiene. Send speci-mens to the laboratory immediately.
17. Observe the site for bleeding. Assess circulation in theextremity distal to the site by evaluating color, pulses, andsensation. Repeat this assessment every 15 minutes for thefirst 1 hour, every 30 minutes for the next 2 hours, hourlyfor the next 2 hours, then every 4 hours, or according tofacility policy. Use log rolling to assist the patient in usingthe bedpan, if needed.
Exce
llent
Satis
fact
ory
Nee
ds P
ract
ice
LWBK681-C16_p340-357.qxd 9/6/10 10:23 PM Page 348 Aptara

349
Skill Checklists for Taylor's Clinical Nursing Skills:
A Nursing Process Approach, 3rd edition
Name Date
Unit Position
Instructor/Evaluator: Position
SKILL 16-5
Performing Cardiopulmonary Resuscitation (CPR)
Goal: CPR is performed effectively without adverse effect
to the patient. Comments
1. Assess responsiveness. If the patient is not responsive, call for help, pull call bell, and call the facility emergencyresponse number. Call for the automated external defibril-lator (AED).
2. Put on gloves, if available. Position the patient supine onhis or her back on a firm, flat surface, with arms alongsidethe body. If the patient is in bed, place a backboard orother rigid surface under the patient (often the footboardof the patient’s bed).
3. Use the head tilt–chin lift maneuver to open the airway.Place one hand on the victim’s forehead and apply firm,backward pressure with the palm to tilt the head back.Place the fingers of the other hand under the bony part of the lower jaw near the chin and lift the jaw upward tobring the chin forward and the teeth almost to occlusion.If trauma to the head or neck is present or suspected, usethe jaw-thrust maneuver to open the airway. Place onehand on each side of the patient’s head. Rest elbows on the flat surface under the patient, grasp the angle of thepatient’s lower jaw, and lift with both hands.
4. Look, listen, and feel for air exchange. Take at least 5 seconds and no more than 10 seconds (AHA, 2006).
5. If the patient resumes breathing or adequate respirationsand signs of circulation are noted, place the patient in therecovery position.
6. If no spontaneous breathing is noted, seal the patient’smouth and nose with the face shield, one-way valve mask,or Ambu-bag (handheld resuscitation bag), if available. If not available, seal the patient’s mouth with rescuer’smouth.
7. Instill two breaths, each lasting 1 second, making the chestrise.
Copyright © 2011 by Wolters Kluwer Health | Lippincott Williams & Wilkins. Skill Checklists for Taylor's Clinical Nursing Skills:
A Nursing Process Approach, 3rd edition, by Pamela Lynn and Marilee LeBon.
Exce
llent
Satis
fact
ory
Nee
ds P
ract
ice
LWBK681-C16_p340-357.qxd 9/6/10 10:23 PM Page 349 Aptara

350
Copyright © 2011 by Wolters Kluwer Health | Lippincott Williams & Wilkins. Skill Checklists for Taylor's Clinical Nursing Skills:
A Nursing Process Approach, 3rd edition, by Pamela Lynn and Marilee LeBon.
SKILL 16-5
Performing Cardiopulmonary Resuscitation (CPR) (Continued)
Comments
8. If you are unable to ventilate or the chest does not rise dur-ing ventilation, reposition the patient’s head and reattemptto ventilate. If still unable to ventilate, begin CPR. Eachsubsequent time the airway is opened to administer breaths,look for an object. If an object is visible in the mouth,remove it. If no object is visible, continue with CPR.
9. Check the carotid pulse, simultaneously evaluating forbreathing, coughing, or movement. This assessment shouldtake at least 5 seconds and no more than 10 seconds. Placethe patient in the recovery position if breathing resumes.
10. If patient has a pulse, but remains without spontaneousbreathing, continue rescue breathing at a rate of one breathevery 5 to 6 seconds, for a rate of 10 to 12 breaths perminute.
11. If the patient is without signs of circulation, position theheel of one hand in the center of the chest between the nip-ples, directly over the lower half of the sternum. Place theother hand directly on top of the first hand. Extend orinterlace fingers to keep fingers above the chest. Straightenarms and position shoulders directly over hands.
12. Perform 30 chest compressions at a rate of 100 per minute,counting “one, two, etc.” up to 30, keeping elbows locked,arms straight, and shoulders directly over the hands. Chestcompressions should depress the sternum 11⁄2 to 2 inches.Push straight down on the patient’s sternum. Allow fullchest recoil (re-expand) after each compression.
13. Give two rescue breaths after each set of 30 compressions.Do five complete cycles of 30 compressions and two ventilations.
14. Defibrillation should be provided at the earliest possiblemoment, as soon as AED becomes available. Refer to Skill16-6: Automated External Defibrillation and Skill 16-7:Manual External Defibrillation.
15. Continue CPR until advanced care providers take over, thepatient starts to move, you are too exhausted to continue,or a physician discontinues CPR. Advanced care providerswill indicate when a pulse check or other therapies areappropriate (AHA, 2006, p. 34).
16. Remove gloves, if used. Perform hand hygiene.
Exce
llent
Satis
fact
ory
Nee
ds P
ract
ice
LWBK681-C16_p340-357.qxd 9/6/10 10:23 PM Page 350 Aptara

351
Skill Checklists for Taylor's Clinical Nursing Skills:
A Nursing Process Approach, 3rd edition
Name Date
Unit Position
Instructor/Evaluator: Position
SKILL 16-6
Performing Emergency Automated External Defibrillation
Goal: The defibrillation is performed correctly without adverse
effect to the patient, and the patient regains signs of circulation,
with organized electrical rhythm and pulse. Comments
1. Assess responsiveness. If the patient is not responsive, callfor help and pull call bell, and call the facility emergencyresponse number. Call for the AED. Put on gloves, if avail-able. Perform cardiopulmonary resuscitation (CPR) until thedefibrillator and other emergency equipment arrive.
2. Prepare the AED. Power on the AED. Push the powerbutton. Some devices will turn on automatically when thelid or case is opened.
3. Attach AED connecting cables to the AED (may be precon-nected). Attach AED cables to the adhesive electrode pads(may be preconnected).
4. Stop chest compressions. Peel away the covering from theelectrode pads to expose the adhesive surface. Attach the elec-trode pads to the patient’s chest. Place one pad on the upperright sternal border, directly below the clavicle. Place the sec-ond pad lateral to the left nipple, with the top margin of thepad a few inches below the axilla.
5. Once the pads are in place and the device is turned on, fol-low the prompts given by the device. Clear the patient andanalyze the rhythm. Ensure no one is touching the patient.Loudly state a “Clear the patient” message. Press ‘Analyze’button to initiate analysis, if necessary. Some devicesautomatically begin analysis when the pads are attached.Avoid all movement affecting the patient during analysis.
6. If ventricular tachycardia or ventricular fibrillation ispresent, the device will announce that a shock is indicatedand begin charging. Once the AED is charged, a messagewill be delivered to shock the patient.
7. Before pressing the ‘Shock’ button, loudly state a “Clear thepatient” message. Visually check that no one is in contactwith the patient. Press the ‘Shock’ button. If the AED isfully automatic, a shock will be delivered automatically.
Copyright © 2011 by Wolters Kluwer Health | Lippincott Williams & Wilkins. Skill Checklists for Taylor's Clinical Nursing Skills:
A Nursing Process Approach, 3rd edition, by Pamela Lynn and Marilee LeBon.
Exce
llent
Satis
fact
ory
Nee
ds P
ract
ice
LWBK681-C16_p340-357.qxd 9/6/10 10:23 PM Page 351 Aptara
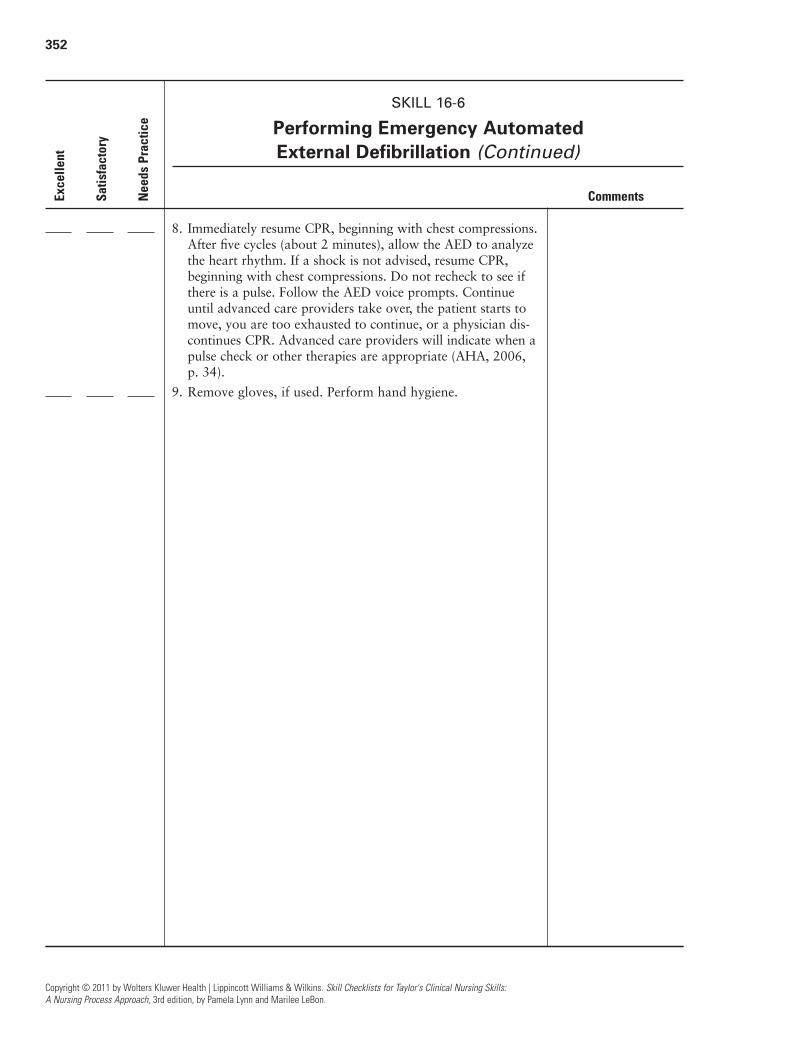
352
Copyright © 2011 by Wolters Kluwer Health | Lippincott Williams & Wilkins. Skill Checklists for Taylor's Clinical Nursing Skills:
A Nursing Process Approach, 3rd edition, by Pamela Lynn and Marilee LeBon.
SKILL 16-6
Performing Emergency Automated External Defibrillation (Continued)
Comments
8. Immediately resume CPR, beginning with chest compressions.After five cycles (about 2 minutes), allow the AED to analyzethe heart rhythm. If a shock is not advised, resume CPR,beginning with chest compressions. Do not recheck to see ifthere is a pulse. Follow the AED voice prompts. Continueuntil advanced care providers take over, the patient starts tomove, you are too exhausted to continue, or a physician dis-continues CPR. Advanced care providers will indicate when apulse check or other therapies are appropriate (AHA, 2006,p. 34).
9. Remove gloves, if used. Perform hand hygiene.
Exce
llent
Satis
fact
ory
Nee
ds P
ract
ice
LWBK681-C16_p340-357.qxd 9/6/10 10:23 PM Page 352 Aptara

353
Skill Checklists for Taylor's Clinical Nursing Skills:
A Nursing Process Approach, 3rd edition
Name Date
Unit Position
Instructor/Evaluator: Position
SKILL 16-7
Performing Emergency Manual External Defibrillation (Asynchronous)
Goal: The procedure is performed correctly without adverse
effect to the patient; and the patient regains signs of circulation. Comments
1. Assess responsiveness. If the patient is not responsive, callfor help and pull call bell, and call the facility emergencyresponse number. Call for the AED. Put on gloves, if avail-able. Perform cardiopulmonary resuscitation (CPR) untilthe defibrillator and other emergency equipment arrive.
2. Turn on the defibrillator.
3. If the defibrillator has “quick-look” capability, place thepaddles on the patient’s chest. Otherwise, connect themonitoring leads of the defibrillator to the patient andassess the cardiac rhythm.
4. Expose the patient’s chest, and apply conductive pads at thepaddle placement positions. For anterolateral placement,place one pad to the right of the upper sternum, just belowthe right clavicle, and the other over the fifth or sixth inter-costal space at the left anterior axillary line. ‘Hands-free’defibrillator pads can be used with the same placement posi-tions, if available. For anteroposterior placement, place theanterior paddle directly over the heart at the precordium, tothe left of the lower sternal border. Place the flat posteriorpaddle under the patient’s body beneath the heart andimmediately below the scapulae (but not on the vertebralcolumn).
5. Set the energy level for 360 J (joules) for an adult patientwhen using a monophasic defibrillator. Use clinicallyappropriate energy levels for biphasic defibrillators, beginning with 150 to 200 J (AHA, 2005b).
6. Charge the paddles by pressing the charge buttons, whichare located either on the machine or on the paddles them-selves.
7. Place the paddles over the conductive pads and pressfirmly against the patient’s chest, using 25 pound (11 kg)of pressure. If using hands-off pads, do not touch the paddles.
8. Reassess the cardiac rhythm.
Copyright © 2011 by Wolters Kluwer Health | Lippincott Williams & Wilkins. Skill Checklists for Taylor's Clinical Nursing Skills:
A Nursing Process Approach, 3rd edition, by Pamela Lynn and Marilee LeBon.
Exce
llent
Satis
fact
ory
Nee
ds P
ract
ice
LWBK681-C16_p340-357.qxd 9/6/10 10:23 PM Page 353 Aptara

354
Copyright © 2011 by Wolters Kluwer Health | Lippincott Williams & Wilkins. Skill Checklists for Taylor's Clinical Nursing Skills:
A Nursing Process Approach, 3rd edition, by Pamela Lynn and Marilee LeBon.
SKILL 16-7
Performing Emergency Manual External Defibrillation (Asynchronous) (Continued)
Comments
9. If the patient remains in VF or pulseless VT, instruct allpersonnel to stand clear of the patient and the bed,including the operator.
10. Discharge the current by pressing both paddle charge but-tons simultaneously. If using remote defibrillator pads,press the discharge or shock button on the machine.
11. After the shock, immediately resume CPR, beginning withchest compressions. After five cycles (about 2 minutes),reassess the cardiac rhythm. Continue until advanced careproviders take over, the patient starts to move, you are tooexhausted to continue, or a physician discontinues CPR.Advanced care providers will indicate when a pulse checkor other therapies are appropriate.
12. If necessary, prepare to defibrillate a second time. Energylevel on the monophasic defibrillator should remain at 360J for subsequent shocks (AHA, 2005b).
13. Announce that you are preparing to defibrillate and followthe procedure described above.
14. If defibrillation restores a normal rhythm:
a. Check for signs of circulation; check the central andperipheral pulses, and obtain a blood pressure reading,heart rate, and respiratory rate.
b. If signs of circulation are present, check breathing. Ifbreathing is inadequate, assist breathing. Start rescuebreathing (one breath every 5 seconds).
c. If breathing is adequate, place the patient in the recov-ery position. Continue to assess the patient.
d. Assess the patient’s level of consciousness, cardiacrhythm, breath sounds, and skin color and temperature.
e. Obtain baseline ABG levels and a 12-lead ECG, ifordered.
f. Provide supplemental oxygen, ventilation, andmedications, as needed.
15. Check the chest for electrical burns and treat them, asordered, with corticosteroid- or lanolin-based creams. Ifusing ‘hands-free’ pads, keep pads on in case of recurrentventricular tachycardia or ventricular fibrillation.
16. Remove gloves, if used. Perform hand hygiene.
17. Prepare the defibrillator for immediate reuse.
Exce
llent
Satis
fact
ory
Nee
ds P
ract
ice
LWBK681-C16_p340-357.qxd 9/6/10 10:23 PM Page 354 Aptara

355
Skill Checklists for Taylor's Clinical Nursing Skills:
A Nursing Process Approach, 3rd edition
Name Date
Unit Position
Instructor/Evaluator: Position
SKILL 16-8
Using an External (Transcutaneous) Pacemaker
Goal: The equipment is applied correctly without adverse effect
to the patient; and the patient regains signs of circulation,
including the capture of at least the minimal set heart rate. Comments
1. Bring necessary equipment to the bedside stand or overbedtable.
2. Perform hand hygiene and put on PPE, if indicated.
3. Identify the patient.
4. If the patient is responsive, explain the procedure to thepatient. Explain that it involves some discomfort and thatyou will administer medication to keep him or her comfort-able and help him or her to relax. Administer analgesia andsedation, as ordered, if not an emergency situation.
5. Close curtains around bed and close the door to the room,if possible.
6. If necessary, clip the hair over the areas of electrode place-ment. Do not shave the area.
7. Attach cardiac monitoring electrodes to the patient in thelead I, II, and III positions. Do this even if the patient isalready on telemetry monitoring. If you select the lead IIposition, adjust the LL (left leg) electrode placement toaccommodate the anterior pacing electrode and thepatient’s anatomy.
8. Attach the patient monitoring electrodes to the ECG cableand into the ECG input connection on the front of thepacing generator. Set the selector switch to the ‘Monitoron’ position.
9. Note the ECG waveform on the monitor. Adjust the R-wave beeper volume to a suitable level and activate thealarm by pressing the ‘Alarm on’ button. Set the alarm for10 to 20 beats lower and 20 to 30 beats higher than theintrinsic rate.
10. Press the ‘Start/Stop’ button for a printout of the waveform.
11. Apply the two pacing electrodes. Make sure the patient’sskin is clean and dry to ensure good skin contact. Pull theprotective strip from the posterior electrode (marked‘Back’) and apply the electrode on the left side of the thoracic spinal column, just below the scapula.
Copyright © 2011 by Wolters Kluwer Health | Lippincott Williams & Wilkins. Skill Checklists for Taylor's Clinical Nursing Skills:
A Nursing Process Approach, 3rd edition, by Pamela Lynn and Marilee LeBon.
Exce
llent
Satis
fact
ory
Nee
ds P
ract
ice
LWBK681-C16_p340-357.qxd 9/6/10 10:23 PM Page 355 Aptara
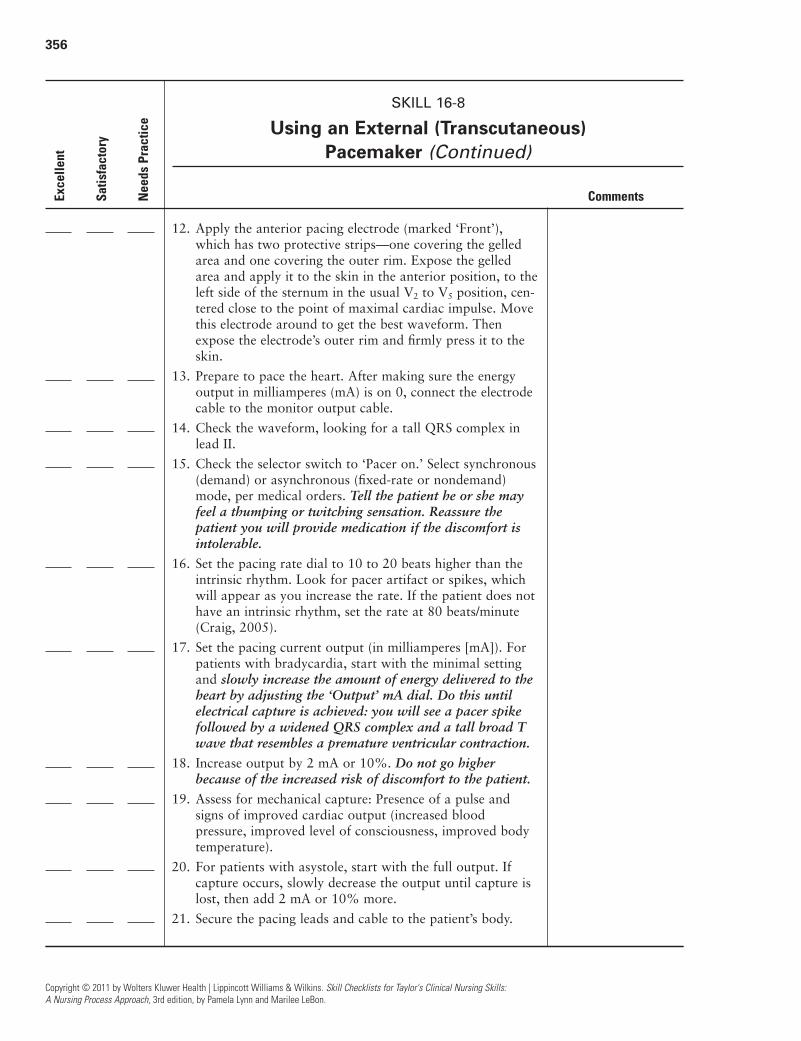
356
Copyright © 2011 by Wolters Kluwer Health | Lippincott Williams & Wilkins. Skill Checklists for Taylor's Clinical Nursing Skills:
A Nursing Process Approach, 3rd edition, by Pamela Lynn and Marilee LeBon.
SKILL 16-8
Using an External (Transcutaneous) Pacemaker (Continued)
Comments
12. Apply the anterior pacing electrode (marked ‘Front’),which has two protective strips—one covering the gelledarea and one covering the outer rim. Expose the gelledarea and apply it to the skin in the anterior position, to theleft side of the sternum in the usual V2 to V5 position, cen-tered close to the point of maximal cardiac impulse. Movethis electrode around to get the best waveform. Thenexpose the electrode’s outer rim and firmly press it to theskin.
13. Prepare to pace the heart. After making sure the energyoutput in milliamperes (mA) is on 0, connect the electrodecable to the monitor output cable.
14. Check the waveform, looking for a tall QRS complex inlead II.
15. Check the selector switch to ‘Pacer on.’ Select synchronous(demand) or asynchronous (fixed-rate or nondemand)mode, per medical orders. Tell the patient he or she mayfeel a thumping or twitching sensation. Reassure thepatient you will provide medication if the discomfort isintolerable.
16. Set the pacing rate dial to 10 to 20 beats higher than theintrinsic rhythm. Look for pacer artifact or spikes, whichwill appear as you increase the rate. If the patient does nothave an intrinsic rhythm, set the rate at 80 beats/minute(Craig, 2005).
17. Set the pacing current output (in milliamperes [mA]). Forpatients with bradycardia, start with the minimal settingand slowly increase the amount of energy delivered to theheart by adjusting the ‘Output’ mA dial. Do this untilelectrical capture is achieved: you will see a pacer spikefollowed by a widened QRS complex and a tall broad Twave that resembles a premature ventricular contraction.
18. Increase output by 2 mA or 10%. Do not go higherbecause of the increased risk of discomfort to the patient.
19. Assess for mechanical capture: Presence of a pulse andsigns of improved cardiac output (increased bloodpressure, improved level of consciousness, improved bodytemperature).
20. For patients with asystole, start with the full output. Ifcapture occurs, slowly decrease the output until capture islost, then add 2 mA or 10% more.
21. Secure the pacing leads and cable to the patient’s body.
Exce
llent
Satis
fact
ory
Nee
ds P
ract
ice
LWBK681-C16_p340-357.qxd 9/6/10 10:23 PM Page 356 Aptara
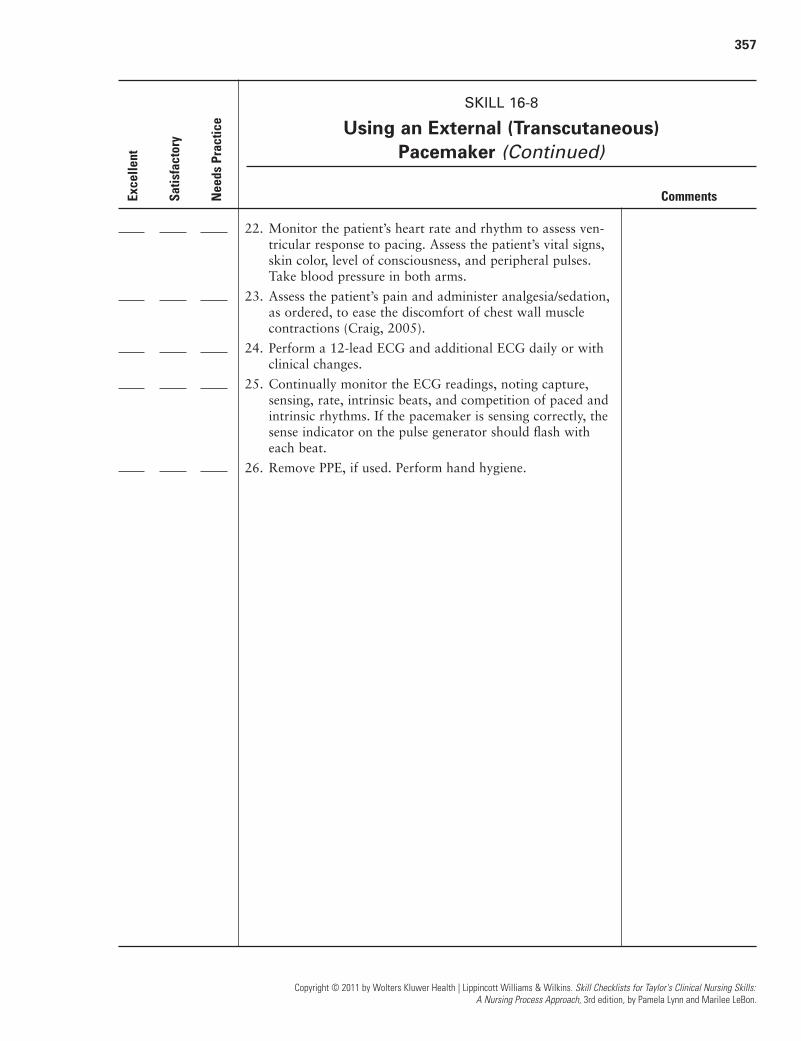
357
Copyright © 2011 by Wolters Kluwer Health | Lippincott Williams & Wilkins. Skill Checklists for Taylor's Clinical Nursing Skills:
A Nursing Process Approach, 3rd edition, by Pamela Lynn and Marilee LeBon.
SKILL 16-8
Using an External (Transcutaneous) Pacemaker (Continued)
Comments
22. Monitor the patient’s heart rate and rhythm to assess ven-tricular response to pacing. Assess the patient’s vital signs,skin color, level of consciousness, and peripheral pulses.Take blood pressure in both arms.
23. Assess the patient’s pain and administer analgesia/sedation,as ordered, to ease the discomfort of chest wall musclecontractions (Craig, 2005).
24. Perform a 12-lead ECG and additional ECG daily or withclinical changes.
25. Continually monitor the ECG readings, noting capture,sensing, rate, intrinsic beats, and competition of paced andintrinsic rhythms. If the pacemaker is sensing correctly, thesense indicator on the pulse generator should flash witheach beat.
26. Remove PPE, if used. Perform hand hygiene.
Exce
llent
Satis
fact
ory
Nee
ds P
ract
ice
LWBK681-C16_p340-357.qxd 9/6/10 10:23 PM Page 357 Aptara
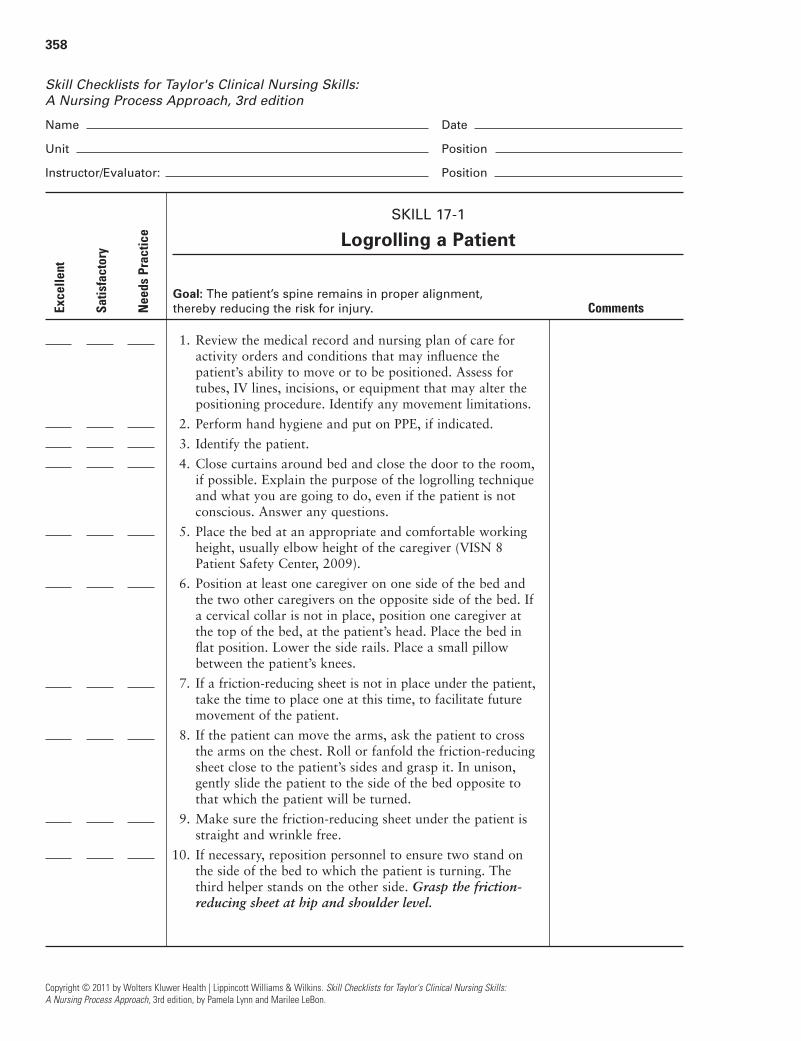
358
Copyright © 2011 by Wolters Kluwer Health | Lippincott Williams & Wilkins. Skill Checklists for Taylor's Clinical Nursing Skills:
A Nursing Process Approach, 3rd edition, by Pamela Lynn and Marilee LeBon.
Skill Checklists for Taylor's Clinical Nursing Skills:
A Nursing Process Approach, 3rd edition
Name Date
Unit Position
Instructor/Evaluator: Position
SKILL 17-1
Logrolling a Patient
Goal: The patient’s spine remains in proper alignment,
thereby reducing the risk for injury. Comments
1. Review the medical record and nursing plan of care foractivity orders and conditions that may influence thepatient’s ability to move or to be positioned. Assess fortubes, IV lines, incisions, or equipment that may alter thepositioning procedure. Identify any movement limitations.
2. Perform hand hygiene and put on PPE, if indicated.
3. Identify the patient.
4. Close curtains around bed and close the door to the room,if possible. Explain the purpose of the logrolling techniqueand what you are going to do, even if the patient is notconscious. Answer any questions.
5. Place the bed at an appropriate and comfortable workingheight, usually elbow height of the caregiver (VISN 8Patient Safety Center, 2009).
6. Position at least one caregiver on one side of the bed andthe two other caregivers on the opposite side of the bed. Ifa cervical collar is not in place, position one caregiver atthe top of the bed, at the patient’s head. Place the bed inflat position. Lower the side rails. Place a small pillowbetween the patient’s knees.
7. If a friction-reducing sheet is not in place under the patient,take the time to place one at this time, to facilitate futuremovement of the patient.
8. If the patient can move the arms, ask the patient to crossthe arms on the chest. Roll or fanfold the friction-reducingsheet close to the patient’s sides and grasp it. In unison,gently slide the patient to the side of the bed opposite tothat which the patient will be turned.
9. Make sure the friction-reducing sheet under the patient isstraight and wrinkle free.
10. If necessary, reposition personnel to ensure two stand onthe side of the bed to which the patient is turning. Thethird helper stands on the other side. Grasp the friction-reducing sheet at hip and shoulder level.
Exce
llent
Satis
fact
ory
Nee
ds P
ract
ice
LWBK681-C17_p358-368.qxd 9/6/10 10:23 PM Page 358 Aptara

359
Copyright © 2011 by Wolters Kluwer Health | Lippincott Williams & Wilkins. Skill Checklists for Taylor's Clinical Nursing Skills:
A Nursing Process Approach, 3rd edition, by Pamela Lynn and Marilee LeBon.
SKILL 17-1
Logrolling a Patient (Continued)
Comments
11. Have everyone face the patient. On a predetermined signal,turn the patient by holding the friction-reducing sheet tautto support the body. The caregiver at the patient’s headshould firmly hold the patient’s head on either side, directlyabove the ears. Turn the patient as a unit in one smoothmotion toward the side of the bed with the two nurses. Thepatient’s head, shoulders, spine, hips, and knees should turnsimultaneously.
12. Once the patient has been turned, use pillows to supportthe patient’s neck, back, buttocks, and legs in straightalignment in a side-lying position. Raise the side rails, as appropriate.
13. Stand at the foot of the bed and assess the spinal column.It should be straight, without any twisting or bending.Place the bed in the lowest position. Ensure that the callbell and telephone are within reach. Replace covers. Lowerbed height.
14. Reassess the patient’s neurologic status and comfort level.
15. Remove PPE, if used. Perform hand hygiene.
Exce
llent
Satis
fact
ory
Nee
ds P
ract
ice
LWBK681-C17_p358-368.qxd 9/6/10 10:23 PM Page 359 Aptara

360
Copyright © 2011 by Wolters Kluwer Health | Lippincott Williams & Wilkins. Skill Checklists for Taylor's Clinical Nursing Skills:
A Nursing Process Approach, 3rd edition, by Pamela Lynn and Marilee LeBon.
Skill Checklists for Taylor's Clinical Nursing Skills:
A Nursing Process Approach, 3rd edition
Name Date
Unit Position
Instructor/Evaluator: Position
SKILL 17-2
Applying a Two-Piece Cervical Collar
Goal: The patient’s cervical spine is immobilized, preventing
further injury to the spinal cord. Comments
1. Review the medical record and nursing plan of care todetermine need for placement of a cervical collar. Identifyany movement limitations.
2. Gather the necessary supplies and bring to the bedsidestand or overbed table.
3. Perform hand hygiene and put on PPE, if indicated.
4. Identify the patient.
5. Close curtains around bed and close the door to the room,if possible. Explain what you are going to do and why youare going to do it to the patient.
6. Assess patient for any changes in neurologic status. (See Chapter 2 for assessment details.)
7. Place the bed at an appropriate and comfortable workingheight, usually elbow height of the caregiver (VISN 8Patient Safety Center, 2009). Lower the side rails as necessary.
8. Gently clean the face and neck with a mild soap and water.If the patient has experienced trauma, inspect the area forbroken glass or other material that could cut the patient orthe nurse. Pat the area dry.
9. Have a second caregiver in position to hold the patient’shead firmly on either side above the ears. Measure fromthe bottom of the chin to the top of the sternum, andmeasure around the neck. Match these height and circum-ference measurements to the manufacturer’s recommendedsize chart.
10. Slide the flattened back portion of the collar under thepatient’s head. The center of the collar should line up withthe center of the patient’s neck. Do not allow the patient’shead to move when passing the collar under the head.
11. Place the front of the collar centered over the chin, whileensuring that the chin area fits snugly in the recess. Be surethat the front half of the collar overlaps the back half.Secure Velcro straps on both sides. Check to see that at leastone finger can be inserted between collar and patient’s neck.
Exce
llent
Satis
fact
ory
Nee
ds P
ract
ice
LWBK681-C17_p358-368.qxd 9/6/10 10:23 PM Page 360 Aptara
361
Copyright © 2011 by Wolters Kluwer Health | Lippincott Williams & Wilkins. Skill Checklists for Taylor's Clinical Nursing Skills:
A Nursing Process Approach, 3rd edition, by Pamela Lynn and Marilee LeBon.
SKILL 17-2
Applying a Two-Piece Cervical Collar (Continued)
Comments
12. Raise the side rails. Place the bed in lowest position. Makesure the call bell is in reach.
13. Reassess the patient’s neurologic status and comfort level.
14. Remove PPE, if used. Perform hand hygiene.
15. Check the skin under the cervical collar at least every 4 hours for any signs of skin breakdown. Remove the tophalf of the collar daily and cleanse the skin under the col-lar. When the collar is removed, have a second personimmobilize the cervical spine.
Exce
llent
Satis
fact
ory
Nee
ds P
ract
ice
LWBK681-C17_p358-368.qxd 9/6/10 10:23 PM Page 361 Aptara

362
Copyright © 2011 by Wolters Kluwer Health | Lippincott Williams & Wilkins. Skill Checklists for Taylor's Clinical Nursing Skills:
A Nursing Process Approach, 3rd edition, by Pamela Lynn and Marilee LeBon.
Skill Checklists for Taylor's Clinical Nursing Skills:
A Nursing Process Approach, 3rd edition
Name Date
Unit Position
Instructor/Evaluator: Position
SKILL 17-3
Employing Seizure Precautions and Seizure Management
Goal: The patient remains free from injury related to seizure
disorder. Comments
1. Review the medical record and nursing plan of care forconditions that would place the patient at risk for seizures.Review the medical orders and the nursing plan of care fororders for seizure precautions.
Seizure Precautions
2. Gather the necessary supplies and bring to the bedsidestand or overbed table.
3. Perform hand hygiene and put on PPE, if indicated.
4. Identify the patient.
5. Close curtains around bed and close the door to the room,if possible. Explain what you are going to do and why youare going to do it to the patient.
6. Place the bed in the lowest position with two to three siderails elevated. Apply padding to side rails.
7. Attach oxygen apparatus to oxygen access in the wall at thehead of the bed. Place nasal cannula or mask equipment ina location where it is easily reached if needed.
8. Attach suction apparatus to vacuum access in the wall atthe head of the bed. Place suction catheter, oral airway,and resuscitation bag in a location where they are easilyreached if needed.
9. Remove PPE, if used. Perform hand hygiene.
Seizure Management
10. For patients with known seizures, be alert for theoccurrence of an aura, if known. If the patient reportsexperiencing an aura, have the patient lie down.
11. Once a seizure begins, close curtains around bed and closethe door to the room, if possible.
12. If the patient is seated, ease the patient to the floor.
13. Remove patient’s eyeglasses. Loosen any constricting cloth-ing. Place something flat and soft, such as a folded blanket,under the head. Push aside furniture or other objects inarea.
Exce
llent
Satis
fact
ory
Nee
ds P
ract
ice
LWBK681-C17_p358-368.qxd 9/6/10 10:23 PM Page 362 Aptara

363
Copyright © 2011 by Wolters Kluwer Health | Lippincott Williams & Wilkins. Skill Checklists for Taylor's Clinical Nursing Skills:
A Nursing Process Approach, 3rd edition, by Pamela Lynn and Marilee LeBon.
SKILL 17-3
Employing Seizure Precautions and Seizure Management (Continued)
Comments
14. If the patient is in bed, remove the pillow and raise siderails.
15. Do not restrain patient. Guide movements, if necessary. Do not try to insert anything in the patient’s mouth oropen jaws.
16. If possible, place patient on the side with the head flexedforward, head of bed elevated 30 degrees. Begin administra-tion of oxygen, based on facility policy. Clear airway usingsuction, as appropriate. (Refer to Skill 14-9, Suctioning thenasopharyngeal and oropharyngeal airways, Chapter 14,Oxygenation.)
17. Provide supervision throughout the seizure.
18. Establish/maintain intravenous access, as necessary.Administer medications, as appropriate, based on medicalorder and facility policy.
19. After the seizure, place the patient in a side-lying position.Clear airway using suction, as appropriate.
20. Monitor vital signs, oxygen saturation, and capillaryglucose as appropriate.
21. Allow the patient to sleep after the seizure. On awakening,orient and reassure the patient.
22. Remove PPE, if used. Perform hand hygiene.
Exce
llent
Satis
fact
ory
Nee
ds P
ract
ice
LWBK681-C17_p358-368.qxd 9/6/10 10:23 PM Page 363 Aptara

364
Copyright © 2011 by Wolters Kluwer Health | Lippincott Williams & Wilkins. Skill Checklists for Taylor's Clinical Nursing Skills:
A Nursing Process Approach, 3rd edition, by Pamela Lynn and Marilee LeBon.
Skill Checklists for Taylor's Clinical Nursing Skills:
A Nursing Process Approach, 3rd edition
Name Date
Unit Position
Instructor/Evaluator: Position
SKILL 17-4
Caring for a Patient in Halo Traction
Goal: The patient maintains cervical alignment. Comments
1. Review the medical record and the nursing plan of care todetermine the type of device being used and prescribedcare.
2. Gather the necessary supplies and bring to the bedsidestand or overbed table.
3. Perform hand hygiene and put on PPE, if indicated.
4. Identify the patient.
5. Close curtains around bed and close the door to the room,if possible. Explain what you are going to do and why youare going to do it to the patient.
6. Assess the patient for possible need for nonpharmacologic,pain-reducing interventions or analgesic medication beforebeginning. Administer appropriate prescribed analgesic.Allow sufficient time for analgesic to achieve its effectivenessbefore beginning the procedure.
7. Place a waste receptacle at a convenient location for useduring the procedure.
8. Adjust bed to comfortable working height, usually elbowheight of the caregiver if the patient will remain in bed(VISN 8 Patient Safety Center, 2009). Alternatively, havethe patient sit up, if appropriate.
9. Assist the patient to a comfortable position that provideseasy access to the head. Place a waterproof pad under thehead if patient is lying down.
10. Monitor vital signs and perform a neurologic assessment,including level of consciousness, motor function, and sen-sation, per facility policy. This is usually at least every 2hours for 24 hours, or possibly every hour for 48 hours.
11. Examine the halo vest unit every 8 hours for stability,secure connections, and positioning. Make sure thepatient’s head is centered in the halo without neck flexionor extension. Check each bolt for loosening.
12. Check the fit of the vest. With the patient in a supine posi-tion, you should be able to insert one or two fingers underthe jacket at the shoulder and chest.
Exce
llent
Satis
fact
ory
Nee
ds P
ract
ice
LWBK681-C17_p358-368.qxd 9/6/10 10:23 PM Page 364 Aptara

365
Copyright © 2011 by Wolters Kluwer Health | Lippincott Williams & Wilkins. Skill Checklists for Taylor's Clinical Nursing Skills:
A Nursing Process Approach, 3rd edition, by Pamela Lynn and Marilee LeBon.
SKILL 17-4
Caring for a Patient in Halo Traction (Continued)
Comments
13. Put on nonsterile gloves, if appropriate. Remove patient’sshirt or gown. Wash the patient’s chest and back daily.Loosen the bottom Velcro straps.
14. Wring out a bath towel soaked in warm water. Pull thetowel back and forth in a drying motion beneath the front.Do not use soap or lotion under the vest.
15. Thoroughly dry the skin in the same manner with a drytowel. Inspect the skin for tender, reddened areas orpressure spots. Lightly dust the skin with a prescribed medicated powder or cornstarch.
16. Turn the patient on his or her side, less than 45 degrees iflying supine, and repeat the process on the back. Close theVelcro straps. Assist the patient with putting on a newshirt, if desired.
17. Perform a respiratory assessment. Check for respiratoryimpairment, such as absence of breath sounds, thepresence of adventitious sounds, reduced inspiratory effort, or shortness of breath.
18. Assess the pin sites for redness, tenting of the skin,prolonged or purulent drainage, swelling, and bowing,bending, or loosening of the pins. Monitor bodytemperature.
19. Perform pin-site care. (See Skills 9-19 and 9-20.)
20. Depending on physician order and facility policy, apply theantimicrobial ointment to pin sites and apply a dressing.
21. Remove gloves and dispose of them appropriately. Raiserails, as appropriate, and place the bed in the lowest posi-tion. Assist patient to a comfortable position.
22. Remove additional PPE, if used. Perform hand hygiene.
Exce
llent
Satis
fact
ory
Nee
ds P
ract
ice
LWBK681-C17_p358-368.qxd 9/6/10 10:23 PM Page 365 Aptara

366
Copyright © 2011 by Wolters Kluwer Health | Lippincott Williams & Wilkins. Skill Checklists for Taylor's Clinical Nursing Skills:
A Nursing Process Approach, 3rd edition, by Pamela Lynn and Marilee LeBon.
Skill Checklists for Taylor's Clinical Nursing Skills:
A Nursing Process Approach, 3rd edition
Name Date
Unit Position
Instructor/Evaluator: Position
SKILL 17-5
Caring for a Patient with an External Ventriculostomy(Intraventricular Catheter–Closed
Fluid-Filled System)Goal: The patient maintains intracranial pressure at less than
10 to 15 mm Hg, and cerebral perfusion pressure at
60 to 90 mm Hg. Comments
1. Review the medical orders for specific information aboutventriculostomy parameters.
2. Gather the necessary supplies and bring to the bedsidestand or overbed table.
3. Perform hand hygiene and put on PPE, if indicated.
4. Identify the patient.
5. Close curtains around bed and close the door to the room,if possible. Explain what you are going to do and why youare going to do it to the patient.
6. Assess patient for any changes in neurologic status. (SeeChapter 2, Health Assessment, for details of assessment.)
7. Assess the height of the ventriculostomy system to ensurethat the stopcock is at the level of midpoint between theouter canthus of the patient’s eye and the tragus of thepatient’s ear or external auditory canal (Littlejohns, 2005),using carpenter level, bubble-line level, or laser level,according to facility policy. Adjust the height of the systemif needed. Move the drip chamber to the ordered height.Assess the amount of CSF in the drip chamber if theventriculostomy is draining.
8. Zero the transducer. Turn stopcock off to the patient.Remove the cap from the transducer, being careful not totouch the end of the cap. Press and hold the calibrationbutton on the monitor until the monitor beeps. Return thecap to the transducer. Turn the stopcock off to the dripchamber to obtain an ICP reading. After obtaining areading, turn the stopcock off to the transducer.
9. Adjust the ventriculostomy height to prevent too muchdrainage, too little drainage, or inaccurate ICP readings.
Exce
llent
Satis
fact
ory
Nee
ds P
ract
ice
LWBK681-C17_p358-368.qxd 9/6/10 10:23 PM Page 366 Aptara

367
Copyright © 2011 by Wolters Kluwer Health | Lippincott Williams & Wilkins. Skill Checklists for Taylor's Clinical Nursing Skills:
A Nursing Process Approach, 3rd edition, by Pamela Lynn and Marilee LeBon.
SKILL 17-5
Caring for a Patient with an External Ventriculostomy(Intraventricular Catheter–Closed Fluid-Filled System) (Continued)
Comments
10. Care for the insertion site according to the institution’spolicy. Assess the site for any signs of infection, such aspurulent drainage, redness, or warmth. Ensure the catheteris secured at site per facility policy.
11. Calculate the CPP, if necessary. Calculate the differencebetween the systemic MAP and the ICP.
12. Remove PPE, if used. Perform hand hygiene.
13. Assess ICP, MAP, and CPP at least hourly.
Exce
llent
Satis
fact
ory
Nee
ds P
ract
ice
LWBK681-C17_p358-368.qxd 9/6/10 10:23 PM Page 367 Aptara

368
Copyright © 2011 by Wolters Kluwer Health | Lippincott Williams & Wilkins. Skill Checklists for Taylor's Clinical Nursing Skills:
A Nursing Process Approach, 3rd edition, by Pamela Lynn and Marilee LeBon.
Skill Checklists for Taylor's Clinical Nursing Skills:
A Nursing Process Approach, 3rd edition
Name Date
Unit Position
Instructor/Evaluator: Position
SKILL 17-6
Caring for a Patient With a Fiber Optic Intracranial Catheter
Goal: The patient maintains ICP less than 10 to 15 mm Hg,
and CPP 60 to 90 mm Hg. Comments
1. Review the medical orders for specific information aboutmonitoring parameters.
2. Gather the necessary supplies and bring to the bedsidestand or overbed table.
3. Perform hand hygiene and put on PPE, if indicated.
4. Identify the patient.
5. Close curtains around bed and close the door to the room,if possible. Explain what you are going to do and why youare going to do it to the patient.
6. Assess patient for any changes in neurologic status. (SeeChapter 2, Health Assessment, for details of assessment.)
7. Assess ICP, MAP, and CPP at least hourly. Note ICP wave-forms as shown on the monitor. Notify the primary careprovider if A or B waves are present.
8. Care for the insertion site according to the institution’spolicy. Assess the site for any signs of infection, such asdrainage, redness, or warmth. Ensure the catheter issecured at site per facility policy.
9. Calculate the CPP, if necessary. Calculate the differencebetween the systemic MAP and the ICP.
10. Remove PPE, if used. Perform hand hygiene.
Exce
llent
Satis
fact
ory
Nee
ds P
ract
ice
LWBK681-C17_p358-368.qxd 9/6/10 10:23 PM Page 368 Aptara

369
Skill Checklists for Taylor's Clinical Nursing Skills:
A Nursing Process Approach, 3rd edition
Name Date
Unit Position
Instructor/Evaluator: Position
SKILL 18-1
Testing Stool for Occult Blood
Goal: An uncontaminated stool sample is obtained, following
collection guidelines, and then transported to the laboratory
within the recommended time frame, without adverse effect. Comments
1. Bring necessary equipment to the bedside stand or overbedtable.
2. Perform hand hygiene and put on PPE, if indicated.
3. Identify the patient. Discuss with the patient the need for astool sample. Explain to the patient the process by whichthe stool will be collected, either from a bedpan, commode,or plastic receptacle in the toilet.
4. If sending the specimen to the laboratory, check specimenlabel with patient identification bracelet. Label shouldinclude patient’s name and identification number, time spec-imen was collected, route of collection, identification of theperson obtaining the sample, and any other informationrequired by agency policy.
5. Close curtains around bed or close the door to the room, ifpossible.
6. Place the plastic collection receptacle in the toilet, if applica-ble. Assist the patient to the bathroom or onto the bedsidecommode, or assist the patient onto the bedpan. Instruct thepatient not to urinate or discard toilet paper with the stool.
7. After the patient defecates, assist the patient out of thebathroom, off the commode, or remove the bedpan.Perform hand hygiene and put on disposable gloves.
8. With wooden applicator, apply a small amount of stoolfrom the center of the bowel movement onto one windowof the Hemoccult testing card. With opposite end ofwooden applicator, obtain another sample of stool fromanother area and apply a small amount of stool onto second window of Hemoccult card.
9. Close flap over stool samples.
10. If sending to the laboratory, label the specimen card perfacility policy. Place in a sealable plastic biohazard bag andsend to the laboratory immediately.
Copyright © 2011 by Wolters Kluwer Health | Lippincott Williams & Wilkins. Skill Checklists for Taylor's Clinical Nursing Skills:
A Nursing Process Approach, 3rd edition, by Pamela Lynn and Marilee LeBon.
Exce
llent
Satis
fact
ory
Nee
ds P
ract
ice
LWBK681-C18_p369-392.qxd 9/3/10 4:39 PM Page 369 Aptara Inc
370
Copyright © 2011 by Wolters Kluwer Health | Lippincott Williams & Wilkins. Skill Checklists for Taylor's Clinical Nursing Skills:
A Nursing Process Approach, 3rd edition, by Pamela Lynn and Marilee LeBon.
SKILL 18-1
Testing Stool for Occult Blood (Continued)
Comments
11. If testing at bedside, open flap on opposite side of card andplace two drops of developer over each window and waitthe time stated in the manufacturer’s instructions.
12. Observe card for any blue areas.
13. Discard Hemoccult testing slide appropriately, according tofacility policy. Remove gloves and any other PPE, if used.Perform hand hygiene.
Exce
llent
Satis
fact
ory
Nee
ds P
ract
ice
LWBK681-C18_p369-392.qxd 9/3/10 4:39 PM Page 370 Aptara Inc

371
Skill Checklists for Taylor's Clinical Nursing Skills:
A Nursing Process Approach, 3rd edition
Name Date
Unit Position
Instructor/Evaluator: Position
SKILL 18-2
Collecting a Stool Specimen for Culture
Goal: An uncontaminated specimen is obtained and sent
to the laboratory promptly. Comments
1. Gather necessary equipment and bring to the bedside.
2. Perform hand hygiene and put on PPE, if indicated.
3. Identify the patient. Discuss with the patient the need for astool sample. Explain to the patient the process by whichthe stool will be collected, either from a bedpan, commode,or plastic receptacle in the toilet to catch stool withouturine. Instruct the patient to void first and not to discardtoilet paper with stool. Tell the patient to call you as soonas a bowel movement is completed.
4. Check specimen label with the patient’s identificationbracelet. Label should include patient’s name and identifi-cation number, time specimen was collected, route of col-lection, identification of the person obtaining the sample,and any other information required by agency policy.
5. After the patient has passed a stool, put on gloves. Use thetongue blades to obtain a sample, free of blood or urine,and place it in the designated clean container.
6. Collect as much of the stool as possible to send to the laboratory.
7. Place lid on container. Dispose of used equipment per facil-ity policy. Remove gloves and perform hand hygiene.
8. Place label on the container per facility policy. Placecontainer in plastic, sealable biohazard bag.
9. Remove other PPE, if used. Perform hand hygiene.
10. Transport the specimen to the laboratory while stool is stillwarm. If immediate transport is impossible, check with lab-oratory personnel or policy manual whether refrigeration iscontraindicated.
Copyright © 2011 by Wolters Kluwer Health | Lippincott Williams & Wilkins. Skill Checklists for Taylor's Clinical Nursing Skills:
A Nursing Process Approach, 3rd edition, by Pamela Lynn and Marilee LeBon.
Exce
llent
Satis
fact
ory
Nee
ds P
ract
ice
LWBK681-C18_p369-392.qxd 9/3/10 4:39 PM Page 371 Aptara Inc

372
Copyright © 2011 by Wolters Kluwer Health | Lippincott Williams & Wilkins. Skill Checklists for Taylor's Clinical Nursing Skills:
A Nursing Process Approach, 3rd edition, by Pamela Lynn and Marilee LeBon.
Skill Checklists for Taylor's Clinical Nursing Skills:
A Nursing Process Approach, 3rd edition
Name Date
Unit Position
Instructor/Evaluator: Position
SKILL 18-3
Obtaining a Capillary Blood Sample for Glucose Testing
Goal: The blood glucose level is measured accurately without
adverse effect. Comments
1. Check the patient’s medical record or nursing plan of carefor monitoring schedule. You may decide that additionaltesting is indicated based on nursing judgment and thepatient’s condition.
2. Gather equipment.
3. Perform hand hygiene and put on PPE, if indicated.
4. Identify the patient. Explain the procedure to the patientand instruct the patient about the need for monitoringblood glucose.
5. Close curtains around bed and close the door to the room,if possible.
6. Turn on the monitor.
7. Enter the patient’s identification number, if required,according to facility policy.
8. Put on nonsterile gloves.
9. Prepare lancet using aseptic technique.
10. Remove test strip from the vial. Recap container immedi-ately. Test strips also come individually wrapped. Checkthat the code number for the strip matches code numberon the monitor screen.
11. Insert the strip into the meter according to directions forthat specific device.
12. For adult, massage side of finger toward puncture site.
13. Have the patient wash hands with soap and warm waterand dry thoroughly. Alternately, cleanse the skin with analcohol swab. Allow skin to dry completely.
14. Hold lancet perpendicular to skin and pierce site withlancet.
15. Wipe away first drop of blood with gauze square or cottonball if recommended by manufacturer of monitor.
Exce
llent
Satis
fact
ory
Nee
ds P
ract
ice
LWBK681-C18_p369-392.qxd 9/3/10 4:39 PM Page 372 Aptara Inc

373
Copyright © 2011 by Wolters Kluwer Health | Lippincott Williams & Wilkins. Skill Checklists for Taylor's Clinical Nursing Skills:
A Nursing Process Approach, 3rd edition, by Pamela Lynn and Marilee LeBon.
SKILL 18-3
Obtaining a Capillary Blood Sample for Glucose Testing (Continued)
Comments
16. Encourage bleeding by lowering the hand, making use ofgravity. Lightly stroke the finger, if necessary, until sufficientamount of blood has formed to cover the sample area onthe strip, based on monitor requirements (check instructionsfor monitor). Take care not to squeeze the finger, not tosqueeze at puncture site, or not to touch puncture site orblood.
17. Gently touch a drop of blood to pad to the test strip with-out smearing it.
18. Press time button if directed by manufacturer.
19. Apply pressure to puncture site with a cotton ball or drygauze. Do not use alcohol wipe.
20. Read blood glucose results and document appropriately atbedside. Inform patient of test result.
21. Turn off meter, remove test strip, and dispose of suppliesappropriately. Place lancet in sharps container.
22. Remove gloves and any other PPE, if used. Perform handhygiene.
Exce
llent
Satis
fact
ory
Nee
ds P
ract
ice
LWBK681-C18_p369-392.qxd 9/3/10 4:39 PM Page 373 Aptara Inc

374
Copyright © 2011 by Wolters Kluwer Health | Lippincott Williams & Wilkins. Skill Checklists for Taylor's Clinical Nursing Skills:
A Nursing Process Approach, 3rd edition, by Pamela Lynn and Marilee LeBon.
Skill Checklists for Taylor's Clinical Nursing Skills:
A Nursing Process Approach, 3rd edition
Name Date
Unit Position
Instructor/Evaluator: Position
SKILL 18-4
Obtaining a Nasal Swab
Goal: An uncontaminated specimen is obtained without injury
to the patient and sent to the laboratory promptly. Comments
1. Bring necessary equipment to the bedside stand oroverbed table. Check the expiration date on the swabpackage.
2. Perform hand hygiene and put on PPE, if indicated.
3. Identify the patient. Discuss with the patient the need for anasal swab. Explain to the patient the process by whichthe specimen will be collected.
4. Check specimen label with patient identification bracelet.Label should include patient’s name and identificationnumber, time specimen was collected, route of collection,identification of the person obtaining the sample, and anyother information required by agency policy.
5. Close curtains around bed or close the door to the room, ifpossible.
6. Put on nonsterile gloves.
7. Ask the patient to tip his or her head back. Assist as necessary.
8. Peel open the swab packaging to expose the swab and col-lection tube. Remove the white plug from the collectiontube and discard. Remove the swab from packaging bygrasping the exposed end. Take care not to contaminatethe swab by touching it to any other surface. Moisten withsterile water, depending on facility policy.
9. Insert swab 2 cm into one naris and rotate against theanterior nasal mucosa for 3 seconds or five rotations,depending on facility policy.
10. Remove the swab and repeat in the second naris, using thesame swab.
11. Insert the swab fully into the collection tube, taking carenot to touch any other surface. The handle end of theswab should fit snugly into the collection tube.
12. Dispose of used equipment per facility policy. Removegloves. Perform hand hygiene.
Exce
llent
Satis
fact
ory
Nee
ds P
ract
ice
LWBK681-C18_p369-392.qxd 9/3/10 4:39 PM Page 374 Aptara Inc

375
Copyright © 2011 by Wolters Kluwer Health | Lippincott Williams & Wilkins. Skill Checklists for Taylor's Clinical Nursing Skills:
A Nursing Process Approach, 3rd edition, by Pamela Lynn and Marilee LeBon.
SKILL 18-4
Obtaining a Nasal Swab (Continued)
Comments
13. Place label on the collection tube per facility policy. Placecontainer in plastic, sealable biohazard bag.
14. Remove other PPE, if used. Perform hand hygiene.
15. Transport specimen to the laboratory immediately. Ifimmediate transport is not possible, check with laboratorypersonnel or policy manual whether refrigeration iscontraindicated.
Exce
llent
Satis
fact
ory
Nee
ds P
ract
ice
LWBK681-C18_p369-392.qxd 9/3/10 4:39 PM Page 375 Aptara Inc

376
Copyright © 2011 by Wolters Kluwer Health | Lippincott Williams & Wilkins. Skill Checklists for Taylor's Clinical Nursing Skills:
A Nursing Process Approach, 3rd edition, by Pamela Lynn and Marilee LeBon.
Skill Checklists for Taylor's Clinical Nursing Skills:
A Nursing Process Approach, 3rd edition
Name Date
Unit Position
Instructor/Evaluator: Position
SKILL 18-5
Obtaining a Nasopharyngeal Swab
Goal: An uncontaminated specimen is obtained without injury
to the patient and sent to the laboratory promptly. Comments
1. Bring necessary equipment to the bedside stand or overbedtable. Check the expiration date on the swab package.
2. Perform hand hygiene and put on PPE, if indicated.
3. Identify the patient. Discuss with patient the need for anasal swab. Explain to patient the process by which thespecimen will be collected.
4. Check the specimen label with the patient’s identificationbracelet. Label should include patient’s name and identifi-cation number, time specimen was collected, route of col-lection, identification of person obtaining the sample, andany other information required by agency policy.
5. Close curtains around bed or close the door to the room, ifpossible.
6. Put on nonsterile gloves.
7. Ask the patient to cough and then to tip his or her headback. Assist, as necessary.
8. Peel open the swab packaging to expose the swab and col-lection tube. Remove the cap from the collection tube anddiscard. Remove the swab from packaging by grasping theexposed end. Take care not to contaminate the swab bytouching it to any other surface.
9. Ask the patient to open the mouth. Inspect the back of thepatient’s throat using the tongue depressor.
10. Continue to observe the nasopharynx and insert the swabapproximately 6 inches (adult) through one naris to thenasopharynx. Rotate the swab. Leave the swab in thenasopharynx for 15 to 30 seconds and remove. Take carenot to touch the swab to the patient’s tongue or sides ofthe nostrils.
11. Insert the swab into the collection tube, taking care not totouch any other surface.
12. Dispose of used equipment per facility policy. Removegloves. Perform hand hygiene.
Exce
llent
Satis
fact
ory
Nee
ds P
ract
ice
LWBK681-C18_p369-392.qxd 9/3/10 4:39 PM Page 376 Aptara Inc

377
Copyright © 2011 by Wolters Kluwer Health | Lippincott Williams & Wilkins. Skill Checklists for Taylor's Clinical Nursing Skills:
A Nursing Process Approach, 3rd edition, by Pamela Lynn and Marilee LeBon.
SKILL 18-5
Obtaining a Nasopharyngeal Swab (Continued)
Comments
13. Place label on the collection tube per facility policy. Placecontainer in plastic, sealable biohazard bag.
14. Remove other PPE, if used. Perform hand hygiene.
15. Transport the specimen to the laboratory immediately. Ifimmediate transport is not possible, check with laboratorypersonnel or policy manual whether refrigeration iscontraindicated.
Exce
llent
Satis
fact
ory
Nee
ds P
ract
ice
LWBK681-C18_p369-392.qxd 9/3/10 4:39 PM Page 377 Aptara Inc

378
Copyright © 2011 by Wolters Kluwer Health | Lippincott Williams & Wilkins. Skill Checklists for Taylor's Clinical Nursing Skills:
A Nursing Process Approach, 3rd edition, by Pamela Lynn and Marilee LeBon.
Skill Checklists for Taylor's Clinical Nursing Skills:
A Nursing Process Approach, 3rd edition
Name Date
Unit Position
Instructor/Evaluator: Position
SKILL 18-6
Collecting a Sputum Specimen for Culture
Goal: The patient produces an adequate sample from the lungs. Comments
1. Bring necessary equipment to the bedside stand or overbedtable.
2. Perform hand hygiene and put on PPE, if indicated.
3. Identify the patient. Explain the procedure to the patient. Ifthe patient might have pain with coughing, administer painmedication, if ordered. If the patient can perform the taskwithout assistance after instruction, leave the container atbedside with instructions to call the nurse as soon as speci-men is produced.
4. Check specimen label with the patient’s identificationbracelet. Label should include patient’s name and identifi-cation number, time specimen was collected, route of col-lection, identification of the person obtaining the sample,and any other information required by agency policy.
5. Close curtains around bed and close the door to the room,if possible.
6. Put on disposable gloves and goggles.
7. Adjust the bed to a comfortable working height, usuallyelbow height of the caregiver (VISN 8 Patient Safety Cen-ter, 2009). Lower side rail closest to you. Place patient insemi-Fowler’s position. Have patient clear nose and throatand rinse mouth with water before beginning procedure.
8. Instruct the patient to inhale deeply two or three timesand cough with exhalation. If the patient has had abdomi-nal surgery, assist the patient to splint abdomen.
9. If the patient produces sputum, open the lid to thecontainer and have the patient expectorate the specimeninto container.
10. If patient believes he or she can produce more of the speci-men, have the patient repeat the procedure.
11. Close lid to container. Offer oral hygiene to the patient.
12. Remove equipment and return the patient to a position ofcomfort. Raise side rail and lower bed.
13. Remove goggles and gloves. Perform hand hygiene.
Exce
llent
Satis
fact
ory
Nee
ds P
ract
ice
LWBK681-C18_p369-392.qxd 9/3/10 4:39 PM Page 378 Aptara Inc

379
Copyright © 2011 by Wolters Kluwer Health | Lippincott Williams & Wilkins. Skill Checklists for Taylor's Clinical Nursing Skills:
A Nursing Process Approach, 3rd edition, by Pamela Lynn and Marilee LeBon.
SKILL 18-6
Collecting a Sputum Specimen for Culture (Continued)
Comments
14. Place label on the container per facility policy. Placecontainer in plastic, sealable biohazard bag.
15. Remove other PPE, if used. Perform hand hygiene.
16. Transport the specimen to the laboratory immediately. Ifimmediate transport is not possible, check with laboratorypersonnel or policy manual whether refrigeration iscontraindicated.
Exce
llent
Satis
fact
ory
Nee
ds P
ract
ice
LWBK681-C18_p369-392.qxd 9/3/10 4:39 PM Page 379 Aptara Inc

380
Copyright © 2011 by Wolters Kluwer Health | Lippincott Williams & Wilkins. Skill Checklists for Taylor's Clinical Nursing Skills:
A Nursing Process Approach, 3rd edition, by Pamela Lynn and Marilee LeBon.
Skill Checklists for Taylor's Clinical Nursing Skills:
A Nursing Process Approach, 3rd edition
Name Date
Unit Position
Instructor/Evaluator: Position
SKILL 18-7
Collecting a Urine Specimen (Clean Catch, Midstream)for Urinalysis and Culture
Goal: An adequate amount of urine is obtained from the
patient without contamination. Comments
1. Bring necessary equipment to the bedside stand or overbedtable.
2. Perform hand hygiene and put on PPE, if indicated.
3. Identify the patient. Explain the procedure to the patient.If the patient can perform the task without assistance afterinstruction, leave the container at bedside with instructionsto call the nurse as soon as a specimen is produced.
4. Have the patient perform hand hygiene, if performing self-collection.
5. Check the specimen label with the patient’s identificationbracelet. Label should include patient’s name and identifi-cation number, time specimen was collected, route of col-lection, identification of the person obtaining sample, andany other information required by agency policy.
6. Close curtains around bed and close the door to the room,if possible.
7. Put on unsterile gloves. Assist the patient to the bathroom,or onto the bedside commode or bedpan. Instruct thepatient not to defecate or discard toilet paper into theurine.
8. Instruct the female patient to separate the labia for clean-ing of the area and during collection of urine. Femalepatients should use the towelettes or wet washcloth toclean each side of the urinary meatus, then the center overthe meatus, from front to back, using a new wipe or aclean area of the washcloth for each stroke. Male patientsshould use a towelette to clean the tip of the penis, wipingin a circular motion away from the urethra. Instruct theuncircumcised male patient to retract the foreskin beforecleaning and during collection.
9. Have patient void a small amount of urine into the toilet,bedpan, or commode. The patient should then stop urinat-ing briefly, then void into collection container. Collectspecimen (10 to 20 mL is sufficient), and then finish void-ing. Do not touch the inside of the container or the lid.
Exce
llent
Satis
fact
ory
Nee
ds P
ract
ice
LWBK681-C18_p369-392.qxd 9/3/10 4:39 PM Page 380 Aptara Inc
381
Copyright © 2011 by Wolters Kluwer Health | Lippincott Williams & Wilkins. Skill Checklists for Taylor's Clinical Nursing Skills:
A Nursing Process Approach, 3rd edition, by Pamela Lynn and Marilee LeBon.
SKILL 18-7
Collecting a Urine Specimen (Clean Catch, Midstream)for Urinalysis and Culture (Continued)
Comments
10. Place lid on container. If necessary, transfer the specimento appropriate containers for ordered test, according tofacility policy.
11. Assist the patient from the bathroom, off the commode, oroff the bedpan. Provide perineal care, if necessary.
12. Remove gloves and perform hand hygiene.
13. Place label on the container per facility policy. Placecontainer in plastic, sealable biohazard bag.
14. Remove other PPE, if used. Perform hand hygiene.
15. Transport the specimen to the laboratory as soon as possi-ble. If unable to take the specimen to the laboratory imme-diately, refrigerate it.
Exce
llent
Satis
fact
ory
Nee
ds P
ract
ice
LWBK681-C18_p369-392.qxd 9/3/10 4:39 PM Page 381 Aptara Inc
382
Copyright © 2011 by Wolters Kluwer Health | Lippincott Williams & Wilkins. Skill Checklists for Taylor's Clinical Nursing Skills:
A Nursing Process Approach, 3rd edition, by Pamela Lynn and Marilee LeBon.
Skill Checklists for Taylor's Clinical Nursing Skills:
A Nursing Process Approach, 3rd edition
Name Date
Unit Position
Instructor/Evaluator: Position
SKILL 18-8
Obtaining a Urine Specimen From an Indwelling Urinary Catheter
Goal: An adequate amount of urine is obtained from the patient
without contamination or adverse effect; the patient experiences
minimal anxiety during the collection process; and the patient
demonstrates an understanding of the reason for the specimen. Comments
1. Bring necessary equipment to the bedside stand or overbedtable.
2. Perform hand hygiene and put on PPE, if indicated.
3. Identify the patient. Explain the procedure to the patient.
4. Check the specimen label with the patient’s identificationbracelet. Label should include patient’s name and identifi-cation number, time specimen was collected, route of col-lection, identification of person obtaining the sample, andany other information required by agency policy.
5. Close curtains around bed and close the door to the room,if possible.
6. Put on unsterile gloves.
7. Clamp the catheter drainage tubing or bend it back on itselfdistal to the port. If an insufficient amount of urine is pres-ent in the tubing, allow the tubing to remain clamped up to30 minutes, to collect a sufficient amount of urine, unlesscontraindicated (Fischbach & Dunning, 2006). Remove lidfrom specimen container, keeping the inside of the containerand lid free from contamination.
8. Cleanse aspiration port with alcohol wipe and allow portto air dry.
9. Insert the needle or blunt-tipped cannula into the port, orattach the syringe to the needleless port. Slowly aspirateenough urine for specimen (usually 10 mL is adequate;check facility requirements). Remove the needle, blunt-tipped cannula, or syringe from the port. Engage theneedle guard. Unclamp the drainage tubing.
10. If a needle or blunt-tipped cannula was used on thesyringe, remove from the syringe before emptying the urinefrom the syringe into the specimen cup. Place the needleinto sharps collection container. Slowly inject urine intospecimen container. Replace lid on container. Dispose ofsyringe appropriately.
Exce
llent
Satis
fact
ory
Nee
ds P
ract
ice
LWBK681-C18_p369-392.qxd 9/3/10 4:39 PM Page 382 Aptara Inc
383
Copyright © 2011 by Wolters Kluwer Health | Lippincott Williams & Wilkins. Skill Checklists for Taylor's Clinical Nursing Skills:
A Nursing Process Approach, 3rd edition, by Pamela Lynn and Marilee LeBon.
SKILL 18-8
Obtaining a Urine Specimen From an Indwelling Urinary Catheter (Continued)
Comments
11. Remove gloves and perform hand hygiene.
12. Place label on the container per facility policy. Placecontainer in plastic sealable biohazard bag.
13. Remove other PPE, if used. Perform hand hygiene.
14. Transport the specimen to the laboratory as soon as possible.If unable to take the specimen to laboratory immediately,refrigerate it.
Exce
llent
Satis
fact
ory
Nee
ds P
ract
ice
LWBK681-C18_p369-392.qxd 9/3/10 4:39 PM Page 383 Aptara Inc

384
Copyright © 2011 by Wolters Kluwer Health | Lippincott Williams & Wilkins. Skill Checklists for Taylor's Clinical Nursing Skills:
A Nursing Process Approach, 3rd edition, by Pamela Lynn and Marilee LeBon.
Skill Checklists for Taylor's Clinical Nursing Skills:
A Nursing Process Approach, 3rd edition
Name Date
Unit Position
Instructor/Evaluator: Position
SKILL 18-9
Using Venipuncture to Collect a Venous Blood Sample for Routine Testing
Goal: An uncontaminated specimen is obtained without
causing anxiety, injury, or infection to the patient Comments
1. Gather the necessary supplies. Check product expirationdates. Identify ordered tests and select the appropriateblood-collection tubes.
2. Bring necessary equipment to the bedside stand or overbedtable.
3. Perform hand hygiene and put on PPE, if indicated.
4. Identify the patient. Explain the procedure. Allow thepatient time to ask questions and verbalize concerns about the venipuncture procedure.
5. Close curtains around bed and close the door to the room,if possible.
6. Check the specimen label with the patient’s identificationbracelet. Label should include the patient’s name and iden-tification number, time specimen was collected, route ofcollection, identification of the person obtaining the sample,and any other information required by agency policy.
7. Provide for good light. Artificial light is recommended.Place a trash receptacle within easy reach.
8. Assist the patient to a comfortable position, either sittingor lying. If the patient is lying in bed, raise the bed to acomfortable working height, usually elbow height of thecaregiver (VISN 8 Patient Safety Center, 2009).
9. Determine the patient’s preferred site for the procedurebased on his or her previous experience. Expose the arm,supporting it in an extended position on a firm surface,such as a tabletop. Position self on the same side of thepatient as the site selected. Apply a tourniquet to the upperarm on the chosen side approximately 3 to 4 inches abovethe potential puncture site. Apply sufficient pressure toimpede venous circulation but not arterial blood flow.
10. Put on gloves. Assess the veins using inspection and palpa-tion to determine the best puncture site. Refer to theAssessment information above.
11. Release the tourniquet. Check that the vein hasdecompressed (Lavery & Ingram, 2005).
Exce
llent
Satis
fact
ory
Nee
ds P
ract
ice
LWBK681-C18_p369-392.qxd 9/3/10 4:39 PM Page 384 Aptara Inc

385
Copyright © 2011 by Wolters Kluwer Health | Lippincott Williams & Wilkins. Skill Checklists for Taylor's Clinical Nursing Skills:
A Nursing Process Approach, 3rd edition, by Pamela Lynn and Marilee LeBon.
SKILL 18-9
Using Venipuncture to Collect a Venous Blood Sample for Routine Testing (Continued)
Comments
12. Attach the needle to the Vacutainer device. Place firstblood-collection tube into the Vacutainer, but not engagedin the puncture device in the Vacutainer.
13. Clean the patient’s skin at the selected puncture site with theantimicrobial swab. If using chlorhexidine, use a back-and-forth motion, applying friction for 30 seconds to the site, or use the procedure recommended by the manufacturer. Ifusing alcohol, wipe in a circular motion spiraling outward.Allow the skin to dry before performing the venipuncture.Alternately, the skin can be dried with a sterile gauze(Fischbach & Dunning, 2009). Check facility policy.
14. Reapply the tourniquet approximately 3 to 4 inches abovethe identified puncture site. Apply sufficient pressure toimpede venous circulation but not arterial blood flow.
15. Hold the patient’s arm in a downward position with yournondominant hand. Align the needle and Vacutainer devicewith the chosen vein, holding the Vacutainer and needle inyour dominant hand. Use the thumb or first finger of yournondominant hand to apply pressure and traction to theskin just below the identified puncture site.
16. Inform the patient that he or she is going to feel a pinch.With the bevel of the needle up, insert the needle into thevein at a 15-degree angle to the skin (Fischbach &Dunning, 2009).
17. Grasp the Vacutainer securely to stabilize it in the veinwith your nondominant hand, and push the first collectiontube into the puncture device in the Vacutainer, until therubber stopper on the collection tube is punctured. Youwill feel the tube push into place on the puncture device.Blood will flow into the tube automatically.
18. Remove the tourniquet as soon as blood flows adequatelyinto the tube.
19. Continue to hold Vacutainer in place in the vein and con-tinue to fill the required tubes, removing one and insertinganother. Gently rotate each tube as you remove it.
20. After you have drawn all required blood samples, removethe last collection tube from the Vacutainer. Place a gauzepad over the puncture site and slowly and gently removethe needle from the vein. Engage needle guard. Do notapply pressure to site until the needle has been fullyremoved.
21. Apply gentle pressure to the puncture site for 2 to 3 minutes or until bleeding stops.
Exce
llent
Satis
fact
ory
Nee
ds P
ract
ice
LWBK681-C18_p369-392.qxd 9/3/10 4:39 PM Page 385 Aptara Inc

386
Copyright © 2011 by Wolters Kluwer Health | Lippincott Williams & Wilkins. Skill Checklists for Taylor's Clinical Nursing Skills:
A Nursing Process Approach, 3rd edition, by Pamela Lynn and Marilee LeBon.
SKILL 18-9
Using Venipuncture to Collect a Venous Blood Sample for Routine Testing (Continued)
Comments
22. After bleeding stops, apply an adhesive bandage.
23. Remove equipment and return the patient to a position ofcomfort. Raise side rail and lower bed.
24. Discard Vacutainer and needle in sharps container.
25. Remove gloves and perform hand hygiene.
26. Place label on the container per facility policy. Placecontainer in plastic, sealable biohazard bag.
27. Check the venipuncture site to see if a hematoma hasdeveloped.
28. Remove other PPE, if used. Perform hand hygiene.
29. Transport the specimen to the laboratory immediately. Ifimmediate transport is not possible, check with laboratorypersonnel or policy manual whether refrigeration iscontraindicated.
Exce
llent
Satis
fact
ory
Nee
ds P
ract
ice
LWBK681-C18_p369-392.qxd 9/3/10 4:39 PM Page 386 Aptara Inc

387
Skill Checklists for Taylor's Clinical Nursing Skills:
A Nursing Process Approach, 3rd edition
Name Date
Unit Position
Instructor/Evaluator: Position
SKILL 18-10
Obtaining a Venous Blood Specimen for Culture and Sensitivity
Goal: An uncontaminated specimen is obtained without
causing anxiety, injury, or infection to the patient. Comments
1. Gather the necessary supplies. Check product expirationdates. Identify ordered number of blood culture sets andselect the appropriate blood-collection bottles (at least oneanaerobic and one aerobic bottle). If tests are ordered inaddition to the blood cultures, collect the blood-culturespecimens before other specimens.
2. Bring necessary equipment to the bedside stand or overbedtable.
3. Perform hand hygiene and put on PPE, if indicated.
4. Identify the patient. Explain the procedure. Allow thepatient time to ask questions and verbalize concerns aboutthe venipuncture procedure.
5. Close curtains around bed and close the door to the room,if possible.
6. Check specimen label with the patient’s identificationbracelet. Label should include patient’s name and identifi-cation number, time specimen was collected, route of col-lection, identification of person obtaining the sample, andany other information required by agency policy.
7. Provide for good light. Artificial light is recommended.Place a trash receptacle within easy reach.
8. Assist the patient to a comfortable position, either sittingor lying. If the patient is lying in bed, raise the bed to acomfortable working height, usually elbow height of thecaregiver (VISN 8 Patient Safety Center, 2009).
9. Determine the patient’s preferred site for the procedurebased on his or her previous experience. Expose the arm,supporting it in an extended position on a firm surface,such as a tabletop. Position self on the same side of thepatient as the site selected. Apply a tourniquet to the upperarm on the chosen side approximately 3 to 4 inches abovethe potential puncture site. Apply sufficient pressure toimpede venous circulation, but not arterial blood flow.
10. Put on unsterile gloves. Assess the veins using inspectionand palpation to determine the best puncture site.
Copyright © 2011 by Wolters Kluwer Health | Lippincott Williams & Wilkins. Skill Checklists for Taylor's Clinical Nursing Skills:
A Nursing Process Approach, 3rd edition, by Pamela Lynn and Marilee LeBon.
Exce
llent
Satis
fact
ory
Nee
ds P
ract
ice
LWBK681-C18_p369-392.qxd 9/3/10 4:39 PM Page 387 Aptara Inc

388
Copyright © 2011 by Wolters Kluwer Health | Lippincott Williams & Wilkins. Skill Checklists for Taylor's Clinical Nursing Skills:
A Nursing Process Approach, 3rd edition, by Pamela Lynn and Marilee LeBon.
SKILL 18-10
Obtaining a Venous Blood Specimen for Culture and Sensitivity (Continued)
Comments
11. Release the tourniquet. Check that the vein hasdecompressed (Lavery & Ingram, 2005).
12. Attach the butterfly needle extension tubing to theVacutainer device.
13. Move collection bottles to a location close to arm, withbottles sitting upright on tabletop.
14. Clean the patient’s skin at the selected puncture site withthe antimicrobial swab, according to facility policy. Ifusing chlorhexidine, use a back-and-forth motion, applyingfriction for 30 seconds to the site, or use the procedurerecommended by the manufacturer. Allow the site to dry.
15. Using a new antimicrobial swab, clean the stoppers of theculture bottles with the appropriate antimicrobial, perfacility policy. Cover bottle top with sterile gauze square,based on facility policy.
16. Reapply the tourniquet approximately 3 to 4 inches abovethe identified puncture site. Apply sufficient pressure toimpede venous circulation, but not arterial blood flow.After disinfection, do not palpate the venipuncture siteunless sterile gloves are worn.
17. Hold the patient’s arm in a downward position with yournondominant hand. Align the butterfly needle with thechosen vein, holding the needle in your dominant hand.Use the thumb or first finger of your nondominant hand toapply pressure and traction to the skin just below the iden-tified puncture site. Do not touch the insertion site.
18. Inform the patient that he or she is going to feel a pinch.With the bevel of the needle up, insert the needle into thevein at a 15-degree angle to the skin (Fischbach & Dunning,2006). You should see a flash of blood in the extension tub-ing close to the needle when the vein is entered.
19. Grasp the butterfly needle securely to stabilize it in the veinwith your nondominant hand, and push the Vacutaineronto the first collection bottle (anaerobic bottle), until therubber stopper on the collection bottle is punctured. Youwill feel the bottle push into place on the puncture device.Blood will flow into the bottle automatically.
20. Remove the tourniquet as soon as blood flows adequatelyinto the bottle.
Exce
llent
Satis
fact
ory
Nee
ds P
ract
ice
LWBK681-C18_p369-392.qxd 9/3/10 4:39 PM Page 388 Aptara Inc
389
Copyright © 2011 by Wolters Kluwer Health | Lippincott Williams & Wilkins. Skill Checklists for Taylor's Clinical Nursing Skills:
A Nursing Process Approach, 3rd edition, by Pamela Lynn and Marilee LeBon.
SKILL 18-10
Obtaining a Venous Blood Specimen for Culture and Sensitivity (Continued)
Comments
21. Continue to hold the butterfly needle in place in the vein.Once first bottle is filled, remove it from the Vacutainerand insert the second bottle. After the blood culture speci-mens are obtained, continue to fill any additional requiredtubes, removing one and inserting another. Gently rotateeach bottle and tube as you remove it.
22. After you have drawn all required blood samples, removethe last collection tube from the Vacutainer. Place a gauzepad over the puncture site and slowly and gently removethe needle from the vein. Engage needle guard. Do notapply pressure to the site until the needle has been fullyremoved.
23. Apply gentle pressure to the puncture site for 2 to 3 minutesor until bleeding stops.
24. After bleeding stops, apply an adhesive bandage.
25. Remove equipment and return patient to a position ofcomfort. Raise side rail and lower bed.
26. Discard Vacutainer and butterfly needle in sharps container.
27. Remove gloves and perform hand hygiene.
28. Place label on the container, per facility policy. Placecontainers in plastic, sealable biohazard bag. Refer to facil-ity policy regarding the need for separate biohazard bagsfor blood culture specimens and other blood specimens.
29. Check the venipuncture site to see if a hematoma hasdeveloped.
30. Remove other PPE, if used. Perform hand hygiene.
31. Transport the specimen to the laboratory immediately. Ifimmediate transport is not possible, check with laboratorypersonnel or policy manual as to appropriate handling.
Exce
llent
Satis
fact
ory
Nee
ds P
ract
ice
LWBK681-C18_p369-392.qxd 9/3/10 4:39 PM Page 389 Aptara Inc

390
Copyright © 2011 by Wolters Kluwer Health | Lippincott Williams & Wilkins. Skill Checklists for Taylor's Clinical Nursing Skills:
A Nursing Process Approach, 3rd edition, by Pamela Lynn and Marilee LeBon.
Skill Checklists for Taylor's Clinical Nursing Skills:
A Nursing Process Approach, 3rd edition
Name Date
Unit Position
Instructor/Evaluator: Position
SKILL 18-11
Obtaining an Arterial Blood Specimen for Blood Gas Analysis
Goal: The blood sample is obtained from the artery without
damage to the artery. Comments
1. Gather the necessary supplies. Check product expirationdates. Identify ordered arterial blood gas analysis. Checkthe chart to make sure the patient has not been suctionedwithin the past 15 minutes. Check facility policy and/orprocedure for guidelines on administering local anesthesiafor arterial punctures. Administer anesthetic and allow sufficient time for full effect before beginning procedure(American Association of Critical Care Nurses [AACN],2005; Hudson, et al., 2006).
2. Bring necessary equipment to the bedside stand or overbedtable.
3. Perform hand hygiene and put on PPE, if indicated.
4. Check the patient’s identification and confirm the patient’sidentity. Tell the patient you need to collect an arterialblood sample, and explain the procedure. Tell the patientthat the needlestick will cause some discomfort but that heor she must remain still during the procedure.
5. Close curtains around bed and close the door to the room,if possible.
6. Check specimen label with the patient’s identificationbracelet. Label should include patient’s name and identifi-cation number, time specimen was collected, route of col-lection, identification of person obtaining the sample,amount of oxygen the patient is receiving, and any otherinformation required by agency policy.
7. Provide for good light. Artificial light is recommended.Place a trash receptacle within easy reach.
8. If the patient is on bed rest, ask him or her to lie in asupine position, with the head slightly elevated and thearms at the sides. Ask the ambulatory patient to sit in achair and support the arm securely on an armrest or atable. Place a waterproof pad under the site and a rolledtowel under the wrist.
Exce
llent
Satis
fact
ory
Nee
ds P
ract
ice
LWBK681-C18_p369-392.qxd 9/3/10 4:39 PM Page 390 Aptara Inc

391
Copyright © 2011 by Wolters Kluwer Health | Lippincott Williams & Wilkins. Skill Checklists for Taylor's Clinical Nursing Skills:
A Nursing Process Approach, 3rd edition, by Pamela Lynn and Marilee LeBon.
SKILL 18-11
Obtaining an Arterial Blood Specimen for Blood Gas Analysis (Continued)
Comments
9. Perform Allen’s test before obtaining a specimen from theradial artery:
a. Have the patient clench the wrist to minimize bloodflow into the hand.
b. Using your index and middle fingers, press on the radialand ulnar arteries. Hold this position for a few seconds.
c. Without removing your fingers from the arteries, askthe patient to unclench the fist and hold the hand in arelaxed position. The palm will be blanched becausepressure from your fingers has impaired the normalblood flow.
d. Release pressure on the ulnar artery. If the handbecomes flushed, which indicates that blood is fillingthe vessels, it is safe to proceed with the radial arterypuncture. This is considered a positive test. If the handdoes not flush, perform the test on the other arm.
10. Put on unsterile gloves. Locate the radial artery and lightlypalpate it for a strong pulse.
11. Clean the site with the antimicrobial swab. If usingchlorhexidine, use a back-and-forth motion, applying fric-tion for 30 seconds to the site, or use the procedure recom-mended by the manufacturer. Allow the site to dry. Afterdisinfection, do not palpate the site unless sterile glovesare worn.
12. Stabilize the hand with the wrist extended over the rolledtowel, palm up. Palpate the artery above the puncture sitewith the index and middle fingers of your nondominanthand while holding the syringe over the puncture site withyour dominant hand. Do not directly touch the area to bepunctured.
13. Hold the needle bevel up at a 45-degree angle at the site ofmaximal pulse impulse, with the shaft parallel to the pathof the artery. (When puncturing the brachial artery, holdthe needle at a 60-degree angle.)
14. Puncture the skin and arterial wall in one motion. Watchfor blood backflow in the syringe. The pulsating blood willflow into the syringe. Do not pull back on the plunger. Fillthe syringe to the 5-mL mark.
Exce
llent
Satis
fact
ory
Nee
ds P
ract
ice
LWBK681-C18_p369-392.qxd 9/3/10 4:39 PM Page 391 Aptara Inc

392
Copyright © 2011 by Wolters Kluwer Health | Lippincott Williams & Wilkins. Skill Checklists for Taylor's Clinical Nursing Skills:
A Nursing Process Approach, 3rd edition, by Pamela Lynn and Marilee LeBon.
SKILL 18-11
Obtaining an Arterial Blood Specimen for Blood Gas Analysis (Continued)
Comments
15. After collecting the sample, withdraw the syringe while yournondominant hand is beginning to place pressure proximalto the insertion site with the 2 � 2 gauze. Press a gauze padfirmly over the puncture site until the bleeding stops—atleast 5 minutes. If the patient is receiving anticoagulanttherapy or has a blood dyscrasia, apply pressure for 10 to15 minutes; if necessary, ask a coworker to hold the gauzepad in place while you prepare the sample for transport tothe laboratory, but do not ask the patient to hold the pad.
16. When the bleeding stops and the appropriate time haslapsed, apply a small adhesive bandage or small pressuredressing (fold a 2 � 2 gauze into fourths and firmly applytape, stretching the skin tight).
17. Once the sample is obtained, check the syringe for air bub-bles. If any appear, remove them by holding the syringeupright and slowly ejecting some of the blood onto a 2 � 2gauze pad.
18. Engage the needle guard and remove the needle. Place theairtight cap on the syringe. Gently rotate the syringe toensure that heparin is well distributed. Do not shake.Insert the syringe into a cup or bag of ice.
19. Place label on the syringe per facility policy. Place icedsyringe in plastic, sealable biohazard bag.
20. Discard the needle in sharps container. Remove gloves andperform hand hygiene.
21. Remove other PPE, if used. Perform hand hygiene.
22. Transport the specimen to the laboratory immediately.
Exce
llent
Satis
fact
ory
Nee
ds P
ract
ice
LWBK681-C18_p369-392.qxd 9/3/10 4:39 PM Page 392 Aptara Inc