CLI Commands - Cisco
870
CLI Commands • CLI Commands, on page 2 CLI Commands 1
-
Upload
khangminh22 -
Category
Documents
-
view
1 -
download
0
Transcript of CLI Commands - Cisco

CLI Commands
• CLI Commands, on page 2
CLI Commands1

CLI CommandsThe Cisco Wireless LAN solution command-line interface (CLI) enables operators to connect an ASCIIconsole to the Cisco Wireless LAN Controller (Cisco WLC) and configure the Cisco WLC and its associatedaccess points.
Show CommandsUse the show commands to display information about your configuration settings.
show 802.11To display basic 802.11a, 802.11b/g, or 802.11h network settings, use the show 802.11 command.
show 802.11{a | b | h}
Syntax Description Specifies the 802.11a network.a
Specifies the 802.11b/g network.b
Specifies the 802.11h network.h
Command Default None.
This example shows to display basic 802.11a network settings:
> show 802.11a802.11a Network.................................. Enabled11nSupport....................................... Enabled
802.11a Low Band........................... Enabled802.11a Mid Band........................... Enabled802.11a High Band.......................... Enabled
802.11a Operational Rates802.11a 6M Rate.............................. Mandatory802.11a 9M Rate.............................. Supported802.11a 12M Rate............................. Mandatory802.11a 18M Rate............................. Supported802.11a 24M Rate............................. Mandatory802.11a 36M Rate............................. Supported802.11a 48M Rate............................. Supported802.11a 54M Rate............................. Supported
802.11n MCS Settings:MCS 0........................................ SupportedMCS 1........................................ SupportedMCS 2........................................ SupportedMCS 3........................................ SupportedMCS 4........................................ SupportedMCS 5........................................ SupportedMCS 6........................................ SupportedMCS 7........................................ SupportedMCS 8........................................ SupportedMCS 9........................................ SupportedMCS 10....................................... SupportedMCS 11....................................... Supported
CLI Commands2
CLI CommandsCLI Commands

MCS 12....................................... SupportedMCS 13....................................... SupportedMCS 14....................................... SupportedMCS 15....................................... Supported
802.11n Status:A-MPDU Tx:
Priority 0............................... EnabledPriority 1............................... DisabledPriority 2............................... DisabledPriority 3............................... DisabledPriority 4............................... DisabledPriority 5............................... DisabledPriority 6............................... DisabledPriority 7............................... Disabled
Beacon Interval.................................. 100CF Pollable mandatory............................ DisabledCF Poll Request mandatory........................ Disabled--More-- or (q)uitCFP Period....................................... 4CFP Maximum Duration............................. 60Default Channel.................................. 36Default Tx Power Level........................... 0DTPC Status..................................... EnabledFragmentation Threshold.......................... 2346TI Threshold..................................... -50Legacy Tx Beamforming setting.................... DisabledTraffic Stream Metrics Status.................... EnabledExpedited BW Request Status...................... DisabledWorld Mode....................................... EnabledEDCA profile type................................ default-wmmVoice MAC optimization status.................... DisabledCall Admission Control (CAC) configurationVoice AC:
Voice AC - Admission control (ACM)............ DisabledVoice max RF bandwidth........................ 75Voice reserved roaming bandwidth.............. 6Voice load-based CAC mode..................... DisabledVoice tspec inactivity timeout................ DisabledVoice Stream-Size............................. 84000Voice Max-Streams............................. 2
Video AC:Video AC - Admission control (ACM)............ DisabledVideo max RF bandwidth........................ InfiniteVideo reserved roaming bandwidth.............. 0
This example shows how to display basic 802.11h network settings:
> show 802.11h802.11h ......................................... powerconstraint : 0802.11h ......................................... channelswitch : Disable802.11h ......................................... channelswitch mode : 0
Related Commands show ap stats
show ap summary
show client summary
show network
show network summary
CLI Commands3
CLI Commandsshow 802.11

show port
show wlan
show 802.11 cleanairTo display the multicast-direct configuration state, use the show 802.11 cleanair command.
show 802.11{a | b | h} cleanair config
Syntax Description Specifies the 802.11a network.a
Specifies the 802.11b/g network.b
Specifies the 802.11h network.h
Displays the network Cleanair configuration.config
Command Default None
Command History ModificationRelease
This commandwas introduced in a release earlier thanRelease 7.6.
7.6
The following example shows how to display the 802.11a cleanair configuration:
(Cisco Controller) > show 802.11a cleanairClean Air Solution............................... EnabledAir Quality Settings:
Air Quality Reporting........................ EnabledAir Quality Reporting Period (min)........... 15Air Quality Alarms........................... EnabledAir Quality Alarm Threshold.................. 35 Interference Device
Settings:Interference Device Reporting................ EnabledInterference Device Types:
TDD Transmitter.......................... DisabledJammer................................... DisabledContinuous Transmitter................... DisabledDECT-like Phone.......................... DisabledVideo Camera............................. DisabledWiFi Inverted............................ DisabledWiFi Invalid Channel..................... DisabledSuperAG.................................. DisabledRadar.................................... DisabledCanopy................................... DisabledWiMax Mobile............................. DisabledWiMax Fixed.............................. Disabled
Interference Device Alarms................... EnabledInterference Device Types Triggering Alarms:
CLI Commands4
CLI Commandsshow 802.11 cleanair

TDD Transmitter.......................... DisabledJammer................................... DisabledContinuous Transmitter................... DisabledDECT-like Phone.......................... DisabledVideo Camera............................. DisabledWiFi Inverted............................ DisabledWiFi Invalid Channel..................... DisabledSuperAG.................................. DisabledRadar.................................... DisabledCanopy................................... DisabledWiMax Mobile............................. DisabledWiMax Fixed.............................. Disabled Additional
Clean Air Settings:CleanAir Event-driven RRM State.............. EnabledCleanAir Driven RRM Sensitivity.............. MediumCleanAir Persistent Devices state............ Disabled
show 802.11 cleanair air-quality summaryTo display the air quality summary information for the 802.11 networks, use the show 802.11 cleanairair-quality summary command.
show 802.11 {a | b | h} cleanair air-quality summary
Syntax Description Specifies the 802.11a network.a
Specifies the 802.11b/g network.b
Specifies the 802.11h network.h
Displays a summary of 802.11 radio band air qualityinformation.
summary
Command Default None
Command History ModificationRelease
This commandwas introduced in a release earlier thanRelease 7.6.
7.6
The following example shows how to display a summary of the air quality information for the 802.11anetwork:
(Cisco Controller) > show 802.11a cleanair air-quality summaryAQ = Air QualityDFS = Dynamic Frequency SelectionAP Name Channel Avg AQ Min AQ Interferers DFS------------------ ------- ------ ------ ----------- ---CISCO_AP3500 36 95 70 0CISCO_AP3500 40 93 75 0
CLI Commands5
CLI Commandsshow 802.11 cleanair air-quality summary
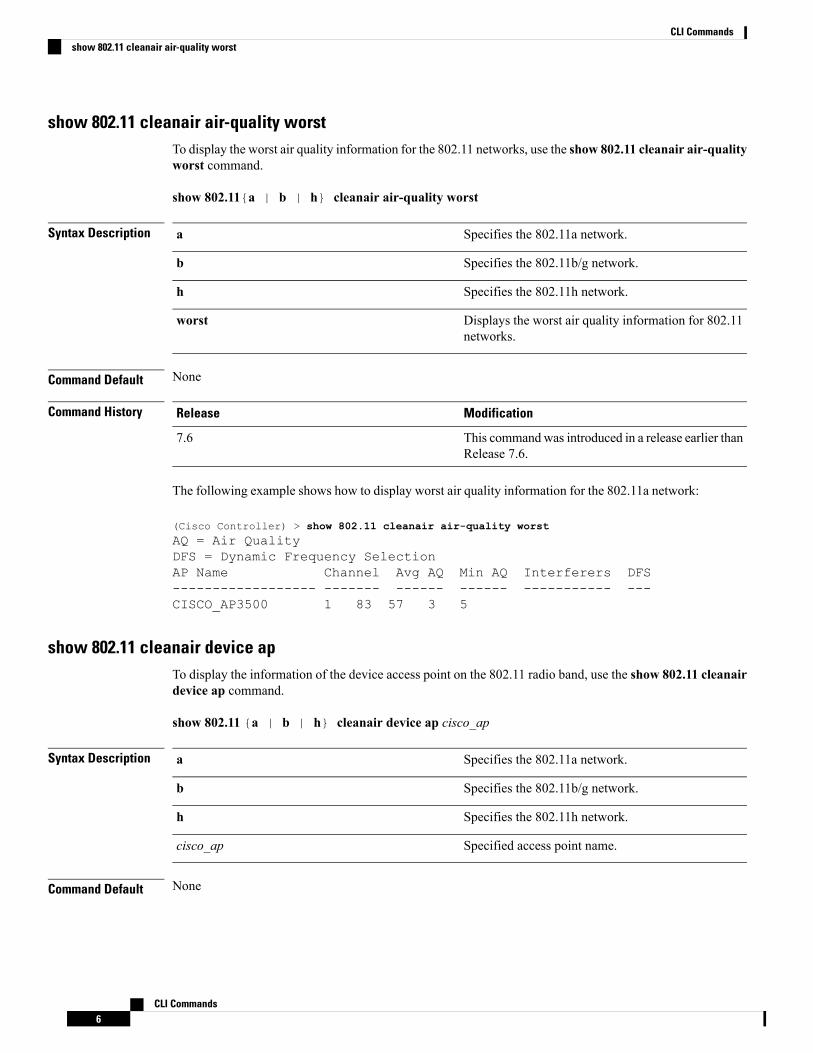
show 802.11 cleanair air-quality worstTo display the worst air quality information for the 802.11 networks, use the show 802.11 cleanair air-qualityworst command.
show 802.11{a | b | h} cleanair air-quality worst
Syntax Description Specifies the 802.11a network.a
Specifies the 802.11b/g network.b
Specifies the 802.11h network.h
Displays the worst air quality information for 802.11networks.
worst
Command Default None
Command History ModificationRelease
This commandwas introduced in a release earlier thanRelease 7.6.
7.6
The following example shows how to display worst air quality information for the 802.11a network:
(Cisco Controller) > show 802.11 cleanair air-quality worstAQ = Air QualityDFS = Dynamic Frequency SelectionAP Name Channel Avg AQ Min AQ Interferers DFS------------------ ------- ------ ------ ----------- ---CISCO_AP3500 1 83 57 3 5
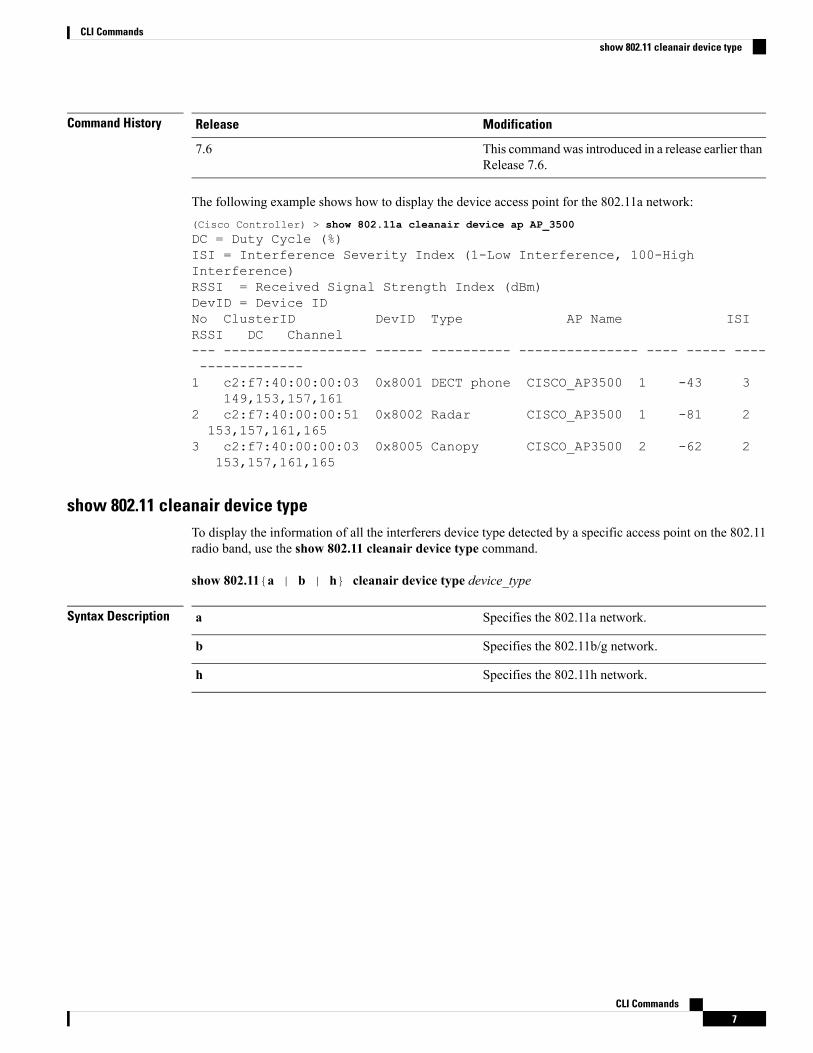
show 802.11 cleanair device apTo display the information of the device access point on the 802.11 radio band, use the show 802.11 cleanairdevice ap command.
show 802.11 {a | b | h} cleanair device ap cisco_ap
Syntax Description Specifies the 802.11a network.a
Specifies the 802.11b/g network.b
Specifies the 802.11h network.h
Specified access point name.cisco_ap
Command Default None
CLI Commands6
CLI Commandsshow 802.11 cleanair air-quality worst
Command History ModificationRelease
This commandwas introduced in a release earlier thanRelease 7.6.
7.6
The following example shows how to display the device access point for the 802.11a network:(Cisco Controller) > show 802.11a cleanair device ap AP_3500DC = Duty Cycle (%)ISI = Interference Severity Index (1-Low Interference, 100-HighInterference)RSSI = Received Signal Strength Index (dBm)DevID = Device IDNo ClusterID DevID Type AP Name ISIRSSI DC Channel--- ------------------ ------ ---------- --------------- ---- ----- -----------------1 c2:f7:40:00:00:03 0x8001 DECT phone CISCO_AP3500 1 -43 3
149,153,157,1612 c2:f7:40:00:00:51 0x8002 Radar CISCO_AP3500 1 -81 2153,157,161,165
3 c2:f7:40:00:00:03 0x8005 Canopy CISCO_AP3500 2 -62 2153,157,161,165
show 802.11 cleanair device typeTo display the information of all the interferers device type detected by a specific access point on the 802.11radio band, use the show 802.11 cleanair device type command.
show 802.11{a | b | h} cleanair device type device_type
Syntax Description Specifies the 802.11a network.a
Specifies the 802.11b/g network.b
Specifies the 802.11h network.h
CLI Commands7
CLI Commandsshow 802.11 cleanair device type
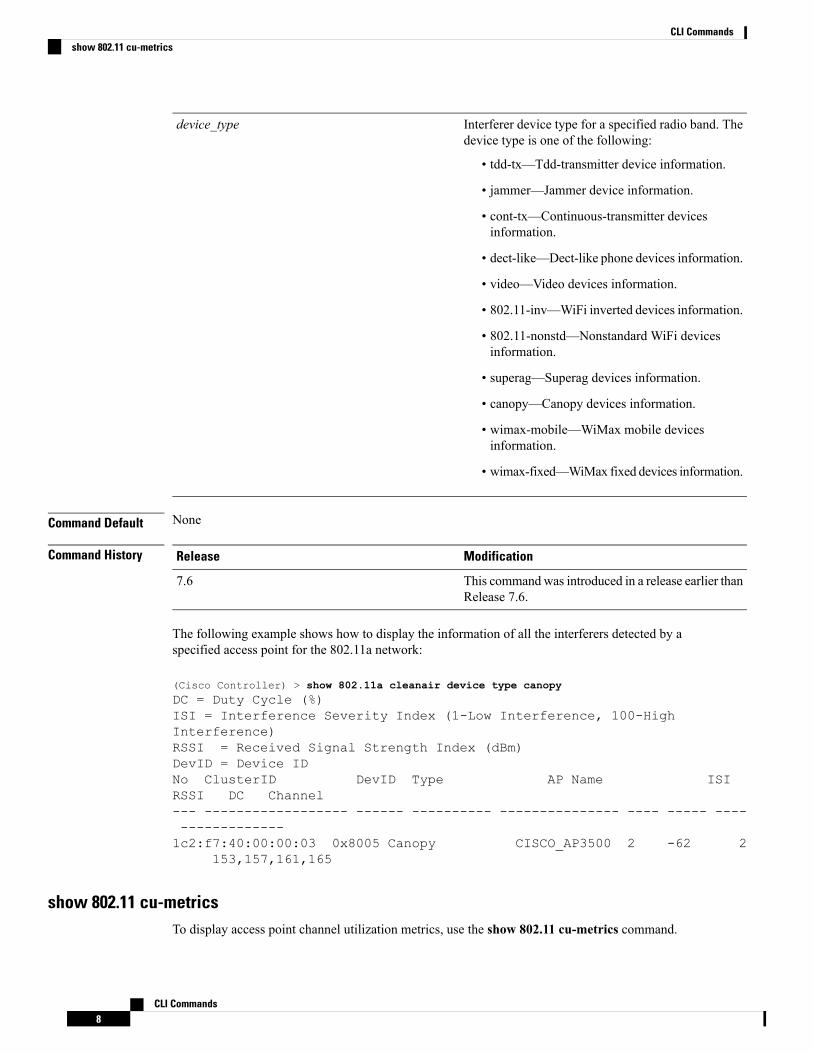
Interferer device type for a specified radio band. Thedevice type is one of the following:
• tdd-tx—Tdd-transmitter device information.
• jammer—Jammer device information.
• cont-tx—Continuous-transmitter devicesinformation.
• dect-like—Dect-like phone devices information.
• video—Video devices information.
• 802.11-inv—WiFi inverted devices information.
• 802.11-nonstd—Nonstandard WiFi devicesinformation.
• superag—Superag devices information.
• canopy—Canopy devices information.
• wimax-mobile—WiMax mobile devicesinformation.
• wimax-fixed—WiMax fixed devices information.
device_type
Command Default None
Command History ModificationRelease
This commandwas introduced in a release earlier thanRelease 7.6.
7.6
The following example shows how to display the information of all the interferers detected by aspecified access point for the 802.11a network:
(Cisco Controller) > show 802.11a cleanair device type canopyDC = Duty Cycle (%)ISI = Interference Severity Index (1-Low Interference, 100-HighInterference)RSSI = Received Signal Strength Index (dBm)DevID = Device IDNo ClusterID DevID Type AP Name ISIRSSI DC Channel--- ------------------ ------ ---------- --------------- ---- ----- -----------------1c2:f7:40:00:00:03 0x8005 Canopy CISCO_AP3500 2 -62 2
153,157,161,165
show 802.11 cu-metricsTo display access point channel utilization metrics, use the show 802.11 cu-metrics command.
CLI Commands8
CLI Commandsshow 802.11 cu-metrics

show 802.11{a | b} cu-metrics cisco_ap
Syntax Description Specifies the 802.11a network.a
Specifies the 802.11b/g network.b
Access point name.cisco_ap
Command Default None
Command History ModificationRelease
This command was introduced in a release earlier than Release 7.6.7.6
The following is a sample output of the show 802.11a cu-metrics command:
(Cisco Controller) > show 802.11a cu-metrics AP1AP Interface Mac: 30:37:a6:c8:8a:50Measurement Duration: 90secTimestamp Thu Jan 27 09:08:48 2011Channel Utilization stats================Picc (50th Percentile)...................... 0Pib (50th Percentile)....................... 76Picc (90th Percentile)...................... 0Pib (90th Percentile)....................... 77
Timestamp Thu Jan 27 09:34:34 2011
show 802.11 extendedTo display access point radio extended configurations, use the show 802.11 extended command.
show 802.11 {a | b} extended
Syntax Description Specifies the 802.11a network.a
Specifies the 802.11b/g network.b
Displays the 802.11a/b radio extended configurations.extended
Command Default None
Command History ModificationRelease
This commandwas introduced in a release earlier thanRelease 7.6.
7.6
The following example shows how to display radio extended configurations:
(Cisco Controller) > show 802.11a extendedDefault 802.11a band radio extended configurations:
beacon period 300, range 60;
CLI Commands9
CLI Commandsshow 802.11 extended

multicast buffer 45, rate 200;RX SOP -80; CCA threshold -90;
AP0022.9090.b618 00:24:97:88:99:60beacon period 300, range 60; multicast buffer 45, rate 200;RX SOP -80; CCA threshold -77
AP0022.9090.bb3e 00:24:97:88:c5:d0beacon period 300, range 0; multicast buffer 0, rate 0;RX SOP -80; CCA threshold -0
ironRap.ddbf 00:17:df:36:dd:b0beacon period 300, range 0; multicast buffer 0, rate 0;RX SOP -80; CCA threshold -0
show 802.11 media-streamTo display the multicast-direct configuration state, use the show 802.11 media-stream command.
show 802.11 {a | b | h} media-stream media_stream_name
Syntax Description Specifies the 802.11a network.a
Specifies the 802.11b/g network.b
Specifies the 802.11h network.h
Specified media stream name.media_stream_name
Command Default None.
Command History ModificationRelease
This commandwas introduced in a release earlier thanRelease 7.6.
7.6
This example shows how to display the media-stream configuration:
> show 802.11a media-stream rrcMulticast-direct................................. EnabledBest Effort...................................... DisabledVideo Re-Direct.................................. EnabledMax Allowed Streams Per Radio.................... AutoMax Allowed Streams Per Client................... AutoMax Video Bandwidth.............................. 0Max Voice Bandwidth.............................. 75Max Media Bandwidth.............................. 85Min PHY Rate..................................... 6000Max Retry Percentage............................. 80
Related Commands show media-stream group summary
Show Advanced CommandsUse the show advanced commands to display more detailed information.
CLI Commands10
CLI Commandsshow 802.11 media-stream

show advanced 802.11 channelTo display the automatic channel assignment configuration and statistics, use the show advanced 802.11channel command.
show advanced 802.11{a | b} channel
Syntax Description Specifies the 802.11a network.a
Specifies the 802.11b/g network.b
Command Default None
Command History ModificationRelease
This commandwas introduced in a release earlier thanRelease 7.6.
7.6
The following example shows how to display the automatic channel assignment configuration andstatistics:
(Cisco Controller) > show advanced 802.11a channelAutomatic Channel AssignmentChannel Assignment Mode........................ AUTOChannel Update Interval........................ 600 seconds [startup]Anchor time (Hour of the day).................. 0Channel Update Contribution.................... SNI.Channel Assignment Leader...................... 00:1a:6d:dd:1e:40Last Run....................................... 129 seconds agoDCA Sensitivity Level: ...................... STARTUP (5 dB)DCA Minimum Energy Limit....................... -95 dBm
Channel Energy LevelsMinimum...................................... unknownAverage...................................... unknownMaximum...................................... unknown
Channel Dwell TimesMinimum...................................... unknownAverage...................................... unknownMaximum...................................... unknown
Auto-RF Allowed Channel List...................36,40,44,48,52,56,60,64,149,
............................................. 153,157,161Auto-RF Unused Channel List....................
100,104,108,112,116,132,136,............................................. 140,165,190,196
DCA Outdoor AP option.......................... Enabled
CLI Commands11
CLI Commandsshow advanced 802.11 channel
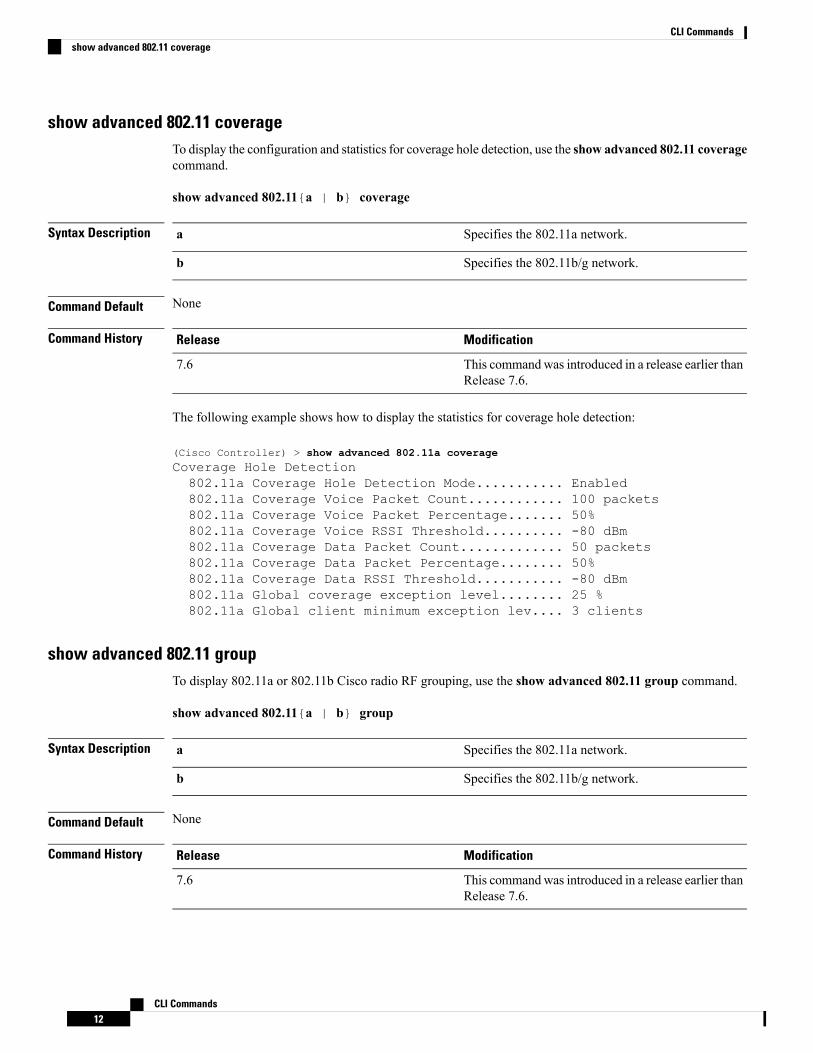
show advanced 802.11 coverageTo display the configuration and statistics for coverage hole detection, use the show advanced 802.11 coveragecommand.
show advanced 802.11{a | b} coverage
Syntax Description Specifies the 802.11a network.a
Specifies the 802.11b/g network.b
Command Default None
Command History ModificationRelease
This commandwas introduced in a release earlier thanRelease 7.6.
7.6
The following example shows how to display the statistics for coverage hole detection:
(Cisco Controller) > show advanced 802.11a coverageCoverage Hole Detection802.11a Coverage Hole Detection Mode........... Enabled802.11a Coverage Voice Packet Count............ 100 packets802.11a Coverage Voice Packet Percentage....... 50%802.11a Coverage Voice RSSI Threshold.......... -80 dBm802.11a Coverage Data Packet Count............. 50 packets802.11a Coverage Data Packet Percentage........ 50%802.11a Coverage Data RSSI Threshold........... -80 dBm802.11a Global coverage exception level........ 25 %802.11a Global client minimum exception lev.... 3 clients
show advanced 802.11 groupTo display 802.11a or 802.11b Cisco radio RF grouping, use the show advanced 802.11 group command.
show advanced 802.11{a | b} group
Syntax Description Specifies the 802.11a network.a
Specifies the 802.11b/g network.b
Command Default None
Command History ModificationRelease
This commandwas introduced in a release earlier thanRelease 7.6.
7.6
CLI Commands12
CLI Commandsshow advanced 802.11 coverage
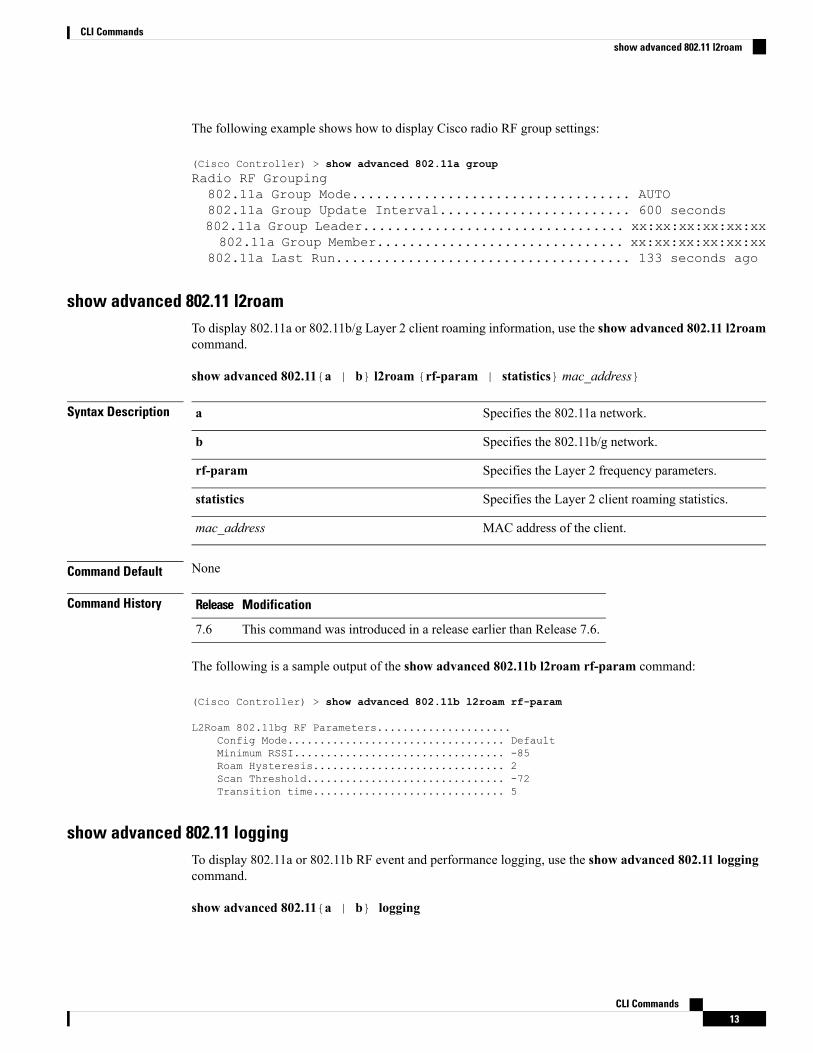
The following example shows how to display Cisco radio RF group settings:
(Cisco Controller) > show advanced 802.11a groupRadio RF Grouping802.11a Group Mode................................... AUTO802.11a Group Update Interval........................ 600 seconds802.11a Group Leader................................. xx:xx:xx:xx:xx:xx802.11a Group Member............................... xx:xx:xx:xx:xx:xx
802.11a Last Run..................................... 133 seconds ago
show advanced 802.11 l2roamTo display 802.11a or 802.11b/g Layer 2 client roaming information, use the show advanced 802.11 l2roamcommand.
show advanced 802.11{a | b} l2roam {rf-param | statistics} mac_address}
Syntax Description Specifies the 802.11a network.a
Specifies the 802.11b/g network.b
Specifies the Layer 2 frequency parameters.rf-param
Specifies the Layer 2 client roaming statistics.statistics
MAC address of the client.mac_address
Command Default None
Command History ModificationRelease
This command was introduced in a release earlier than Release 7.6.7.6
The following is a sample output of the show advanced 802.11b l2roam rf-param command:
(Cisco Controller) > show advanced 802.11b l2roam rf-param
L2Roam 802.11bg RF Parameters.....................Config Mode.................................. DefaultMinimum RSSI................................. -85Roam Hysteresis.............................. 2Scan Threshold............................... -72Transition time.............................. 5
show advanced 802.11 loggingTo display 802.11a or 802.11b RF event and performance logging, use the show advanced 802.11 loggingcommand.
show advanced 802.11{a | b} logging
CLI Commands13
CLI Commandsshow advanced 802.11 l2roam

Syntax Description Specifies the 802.11a network.a
Specifies the 802.11b/g network.b
Command Default None
Command History ModificationRelease
This commandwas introduced in a release earlier thanRelease 7.6.
7.6
The following example shows how to display 802.11b RF event and performance logging:
(Cisco Controller) > show advanced 802.11b loggingRF Event and Performance LoggingChannel Update Logging......................... OffCoverage Profile Logging....................... OffForeign Profile Logging........................ OffLoad Profile Logging........................... OffNoise Profile Logging.......................... OffPerformance Profile Logging.................... OffTxPower Update Logging......................... Off
show advanced 802.11 monitorTo display the 802.11a or 802.11b default Cisco radio monitoring, use the show advanced 802.11 monitorcommand.
show advanced 802.11{a | b} monitor
Syntax Description Specifies the 802.11a network.a
Specifies the 802.11b/g network.b
Command Default None
Command History ModificationRelease
This commandwas introduced in a release earlier thanRelease 7.6.
7.6
The following example shows how to display the radio monitoring for the 802.11b network:
(Cisco Controller) > show advanced 802.11b monitorDefault 802.11b AP monitoring802.11b Monitor Mode........................... enable802.11b Monitor Channels....................... Country channels802.11b RRM Neighbor Discovery Type............ Transparent802.11b AP Coverage Interval................... 180 seconds
CLI Commands14
CLI Commandsshow advanced 802.11 monitor
802.11b AP Load Interval....................... 60 seconds802.11b AP Noise Interval...................... 180 seconds802.11b AP Signal Strength Interval............ 60 seconds
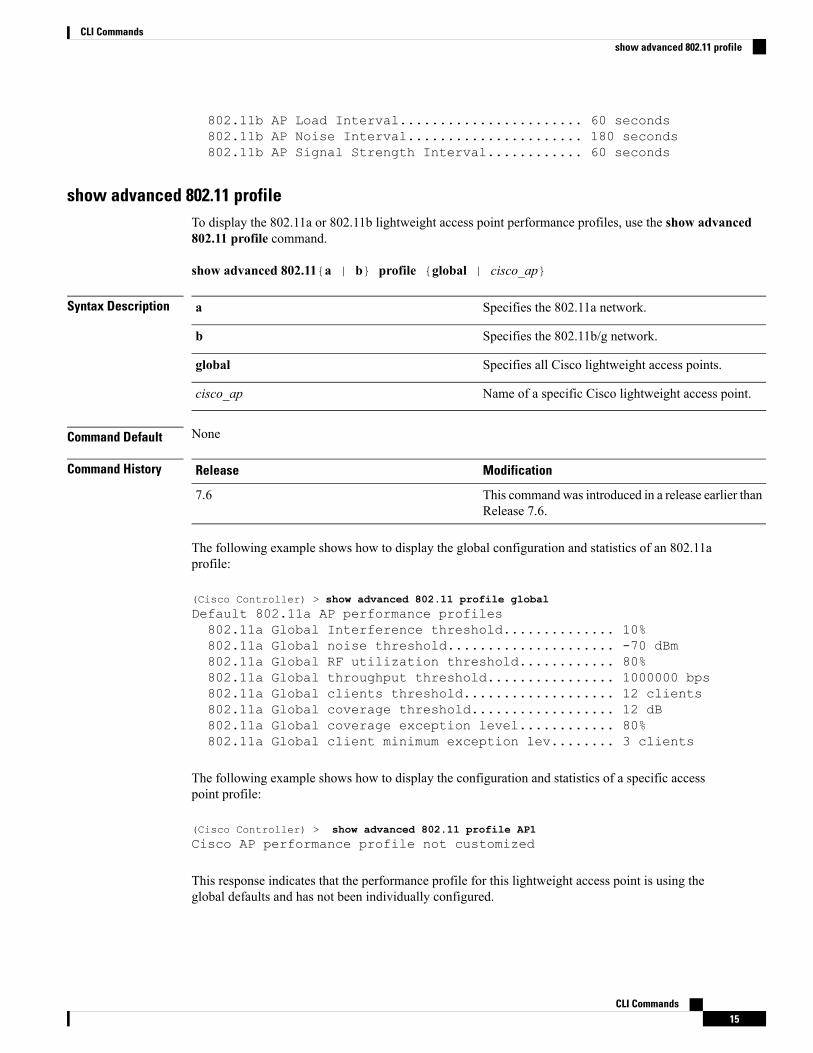
show advanced 802.11 profileTo display the 802.11a or 802.11b lightweight access point performance profiles, use the show advanced802.11 profile command.
show advanced 802.11{a | b} profile {global | cisco_ap}
Syntax Description Specifies the 802.11a network.a
Specifies the 802.11b/g network.b
Specifies all Cisco lightweight access points.global
Name of a specific Cisco lightweight access point.cisco_ap
Command Default None
Command History ModificationRelease
This commandwas introduced in a release earlier thanRelease 7.6.
7.6
The following example shows how to display the global configuration and statistics of an 802.11aprofile:
(Cisco Controller) > show advanced 802.11 profile globalDefault 802.11a AP performance profiles802.11a Global Interference threshold.............. 10%802.11a Global noise threshold..................... -70 dBm802.11a Global RF utilization threshold............ 80%802.11a Global throughput threshold................ 1000000 bps802.11a Global clients threshold................... 12 clients802.11a Global coverage threshold.................. 12 dB802.11a Global coverage exception level............ 80%802.11a Global client minimum exception lev........ 3 clients
The following example shows how to display the configuration and statistics of a specific accesspoint profile:
(Cisco Controller) > show advanced 802.11 profile AP1Cisco AP performance profile not customized
This response indicates that the performance profile for this lightweight access point is using theglobal defaults and has not been individually configured.
CLI Commands15
CLI Commandsshow advanced 802.11 profile

show advanced 802.11 receiverTo display the configuration and statistics of the 802.11a or 802.11b receiver, use the show advanced 802.11receiver command.
show advanced 802.11{a | b} receiver
Syntax Description Specifies the 802.11a network.a
Specifies the 802.11b/g network.b
Command Default None
Command History ModificationRelease
This commandwas introduced in a release earlier thanRelease 7.6.
7.6
The following example shows how to display the configuration and statistics of the 802.11a networksettings:
(Cisco Controller) > show advanced 802.11 receiver802.11a Receiver SettingsRxStart : Signal Threshold........................... 15RxStart : Signal Lamp Threshold...................... 5RxStart : Preamble Power Threshold................... 2RxReStart : Signal Jump Status......................... EnabledRxReStart : Signal Jump Threshold...................... 10TxStomp : Low RSSI Status.............................. EnabledTxStomp : Low RSSI Threshold........................... 30TxStomp : Wrong BSSID Status........................... EnabledTxStomp : Wrong BSSID Data Only Status................. EnabledRxAbort : Raw Power Drop Status........................ DisabledRxAbort : Raw Power Drop Threshold..................... 10RxAbort : Low RSSI Status.............................. DisabledRxAbort : Low RSSI Threshold........................... 0RxAbort : Wrong BSSID Status........................... DisabledRxAbort : Wrong BSSID Data Only Status................. Disabled
show advanced 802.11 summaryTo display the 802.11a or 802.11b Cisco lightweight access point name, channel, and transmit level summary,use the show advanced 802.11 summary command.
show advanced 802.11{a | b} summary
Syntax Description Specifies the 802.11a network.a
Specifies the 802.11b/g network.b
CLI Commands16
CLI Commandsshow advanced 802.11 receiver

Command Default None
Command History ModificationRelease
This commandwas introduced in a release earlier thanRelease 7.6.
7.6
The following example shows how to display a summary of the 802.11b access point settings:
(Cisco Controller) > show advanced 802.11b summaryAP Name MAC Address Admin State Operation State ChannelTxPower------------ ------------------ ------------ ----------------- ---------------CJ-1240 00:21:1b:ea:36:60 ENABLED UP 1611( )CJ-1130 00:1f:ca:cf:b6:60 ENABLED UP 56*1(*)
An asterisk (*) next to a channel number or power level indicates that it is being controlled by theglobal algorithm settings.
Note
show advanced 802.11 txpowerTo display the 802.11a or 802.11b automatic transmit power assignment, use the show advanced 802.11txpower command.
show advanced 802.11{a | b} txpower
Syntax Description Specifies the 802.11a network.a
Specifies the 802.11b/g network.b
Command Default None
Command History ModificationRelease
This commandwas introduced in a release earlier thanRelease 7.6.
7.6
The following example shows how to display the configuration and statistics of the 802.11b transmitpower cost:
(Cisco Controller) > show advanced 802.11b txpowerAutomatic Transmit Power AssignmentTransmit Power Assignment Mode.................. AUTOTransmit Power Update Interval.................. 600 seconds
CLI Commands17
CLI Commandsshow advanced 802.11 txpower

Transmit Power Threshold........................ -65 dBmTransmit Power Neighbor Count................... 3 APsTransmit Power Update Contribution.............. SN.Transmit Power Assignment Leader................ xx:xx:xx:xx:xx:xxLast Run........................................ 384 seconds ago
show advanced backup-controllerTo display a list of primary and secondary backup WLCs, use the show advanced backup-controllercommand.
show advanced backup-controller
Syntax Description This command has no arguments or keywords.
Command Default None
Command History ModificationRelease
This commandwas introduced in a release earlier thanRelease 7.6.
7.6
The following example shows how to display the backup controller information:(Cisco Controller) >show advanced backup-controllerAP primary Backup Controller .................... controller 10.10.10.10AP secondary Backup Controller .................. 0.0.0.0
show advanced client-handoffTo display the number of automatic client handoffs after retries, use the show advanced client-handoffcommand.
show advanced client-handoff
Syntax Description This command has no arguments or keywords.
Command History ModificationRelease
This commandwas introduced in a release earlier thanRelease 7.6.
7.6
The following example shows how to display the client auto handoff mode after excessive retries:
(Cisco Controller) >show advanced client-handoffClient auto handoff after retries................ 130
CLI Commands18
CLI Commandsshow advanced backup-controller

show advanced dot11-paddingTo display the state of over-the-air frame padding on a wireless LAN controller, use the show advanceddot11-padding command.
show advanced dot11-padding
Syntax Description This command has no arguments or keywords.
Command Default None
Command History ModificationRelease
This command was introduced in a release earlier than Release 7.6.7.6
The following example shows how to view the state of over-the-air frame padding:
(Cisco Controller) > show advanced dot11-paddingdot11-padding.................................... Disabled
show advanced eapTo display Extensible Authentication Protocol (EAP) settings, use the show advanced eap command.
show advanced eap
Syntax Description This command has no arguments or keywords.
Command Default None
Command History ModificationRelease
This commandwas introduced in a release earlier thanRelease 7.6.
7.6
The following example shows how to display the EAP settings:
(Cisco Controller) > show advanced eapEAP-Identity-Request Timeout (seconds)........... 1EAP-Identity-Request Max Retries................. 20EAP Key-Index for Dynamic WEP.................... 0EAP Max-Login Ignore Identity Response........... enableEAP-Request Timeout (seconds).................... 1EAP-Request Max Retries.......................... 20EAPOL-Key Timeout (milliseconds)................. 1000EAPOL-Key Max Retries............................ 2
Related Commands config advanced eap
config advanced timers eap-identity-request-delay
CLI Commands19
CLI Commandsshow advanced dot11-padding
config advanced timers eap-timeout
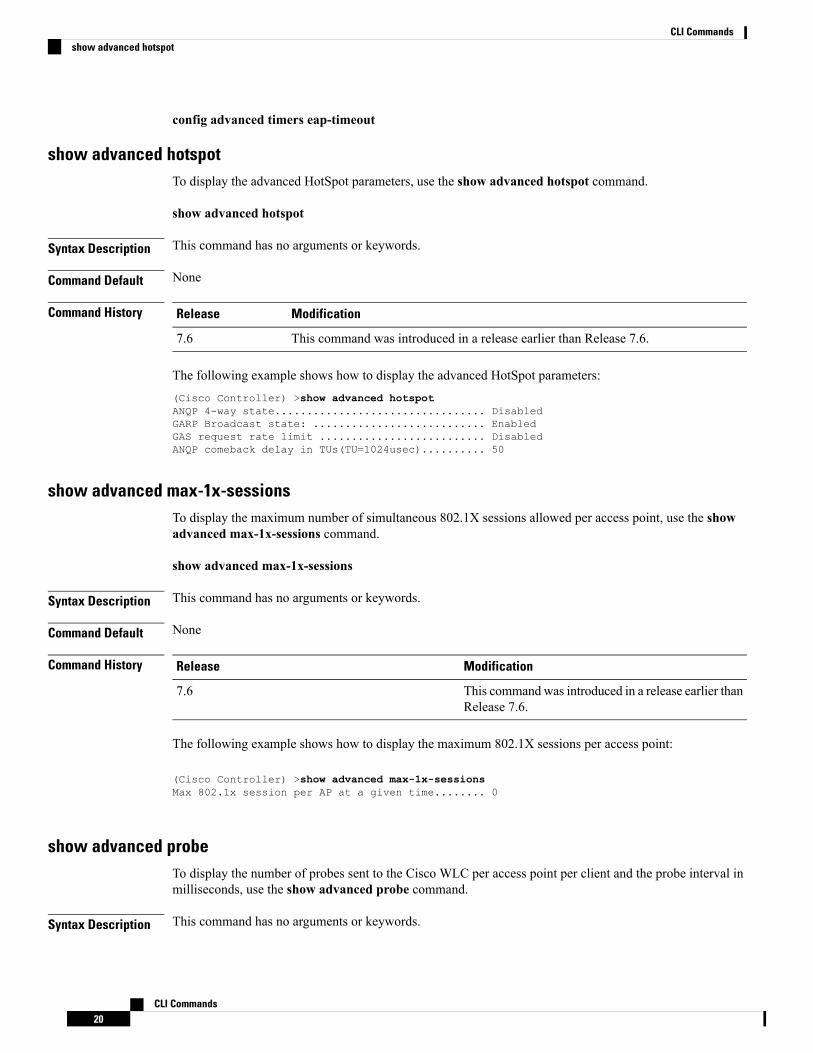
show advanced hotspotTo display the advanced HotSpot parameters, use the show advanced hotspot command.
show advanced hotspot
Syntax Description This command has no arguments or keywords.
Command Default None
Command History ModificationRelease
This command was introduced in a release earlier than Release 7.6.7.6
The following example shows how to display the advanced HotSpot parameters:(Cisco Controller) >show advanced hotspotANQP 4-way state................................. DisabledGARP Broadcast state: ........................... EnabledGAS request rate limit .......................... DisabledANQP comeback delay in TUs(TU=1024usec).......... 50
show advanced max-1x-sessionsTo display the maximum number of simultaneous 802.1X sessions allowed per access point, use the showadvanced max-1x-sessions command.
show advanced max-1x-sessions
Syntax Description This command has no arguments or keywords.
Command Default None
Command History ModificationRelease
This commandwas introduced in a release earlier thanRelease 7.6.
7.6
The following example shows how to display the maximum 802.1X sessions per access point:
(Cisco Controller) >show advanced max-1x-sessionsMax 802.1x session per AP at a given time........ 0
show advanced probeTo display the number of probes sent to the Cisco WLC per access point per client and the probe interval inmilliseconds, use the show advanced probe command.
Syntax Description This command has no arguments or keywords.
CLI Commands20
CLI Commandsshow advanced hotspot

Command Default None
Command History ModificationRelease
This commandwas introduced in a release earlier thanRelease 7.6.
7.6
The following example shows how to display the probe settings for the WLAN controller:
(Cisco Controller) >show advanced probeProbe request filtering.......................... EnabledProbes fwd to controller per client per radio.... 12Probe request rate-limiting interval............. 100 msec
show advanced rateTo display whether control path rate limiting is enabled or disabled, use the show advanced rate command.
show advanced rate
Syntax Description This command has no arguments or keywords.
Command Default None
Command History ModificationRelease
This commandwas introduced in a release earlier thanRelease 7.6.
7.6
The following example shows how to display the switch control path rate limiting mode:
(Cisco Controller) >show advanced rateControl Path Rate Limiting....................... Disabled
show advanced send-disassoc-on-handoffTo display whether the WLAN controller disassociates clients after a handoff, use the show advancedsend-disassoc-on-handoff command.
show advanced send-disassoc-on-handoff
Syntax Description This command has no arguments or keywords.
Command Default None
Command History ModificationRelease
This command was introduced in a release earlier than Release 7.6.7.6
CLI Commands21
CLI Commandsshow advanced rate

The following is a sample output of the show advanced send-disassoc-on-handoff command:
(Cisco Controller) > show advanced send-disassoc-on-handoffSend Disassociate on Handoff..................... Disabled
show advanced sip-preferred-call-noTo display the list of preferred call numbers, use the show advanced sip-preferred-call-no command.
show advanced sip-preferred-call-no
Syntax Description This command has no arguments or keywords.
Command Default None
Command History ModificationRelease
This command was introduced in a release earlier than Release 7.6.7.6
The following is a sample output of the show advanced sip-preferred-call-no command:
(Cisco Controller) > show advanced sip-preferred-call-noPreferred Call Numbers ListCall Index Preferred Call No----------- ------------------1 9112 1003 1014 1025 1036 104
show advanced sip-snooping-portsTo display the port range for call snooping, use the show advanced sip-snooping-ports command.
show advanced sip-snooping-ports
Syntax Description This command has no arguments or keywords.
Command Default None
Command History ModificationRelease
This command was introduced in a release earlier than Release 7.6.7.6
The following is a sample output of the show advanced sip-snooping-ports command:
(Cisco Controller) > show advanced sip-snooping-portsSIP Call Snoop Ports: 1000 - 2000
CLI Commands22
CLI Commandsshow advanced sip-preferred-call-no

show advanced statisticsTo display whether or not the Cisco wireless LAN controller port statistics are enabled or disabled, use theshow advanced statistics command.
show advanced statistics
Syntax Description This command has no arguments or keywords.
Command Default None
Command History ModificationRelease
This commandwas introduced in a release earlier thanRelease 7.6.
7.6
The following example shows how to display switch port statistics mode:
(Cisco Controller) > show advanced statisticsSwitch port statistics........................... Enabled
show advanced timersTo display the mobility anchor, authentication response, and rogue access point entry timers, use the showadvanced timers command.
show advanced timers
Syntax Description This command has no arguments or keywords.
Command Default The defaults are shown in the “Examples” section.
Command History ModificationRelease
This commandwas introduced in a release earlier thanRelease 7.6.
7.6
The following example shows how to display the system timers setting:(Cisco Controller) >show advanced timersAuthentication Response Timeout (seconds)........ 10Rogue Entry Timeout (seconds).................... 1200AP Heart Beat Timeout (seconds).................. 30AP Discovery Timeout (seconds)................... 10AP Local mode Fast Heartbeat (seconds)........... disableAP flexconnect mode Fast Heartbeat (seconds)........... disableAP Primary Discovery Timeout (seconds)........... 120
Show Access Point CommandsUse the show ap commands to see access point settings.
CLI Commands23
CLI Commandsshow advanced statistics

show ap auto-rfTo display the auto-RF settings for a Cisco lightweight access point, use the show ap auto-rf command.
show ap auto-rf 802.11{a | b} cisco_ap
Syntax Description Specifies the 802.11a network.a
Specifies the 802.11b/g network.b
Cisco lightweight access point name.cisco_ap
Command Default None
Command History ModificationRelease
This commandwas introduced in a release earlier thanRelease 7.6.
7.6
The following example shows how to display auto-RF information for an access point:(Cisco Controller) > show ap auto-rf 802.11a AP1Number Of Slots.................................. 2AP Name.......................................... AP03MAC Address...................................... 00:0b:85:01:18:b7Radio Type..................................... RADIO_TYPE_80211aNoise InformationNoise Profile................................ PASSEDChannel 36................................... -88 dBmChannel 40................................... -86 dBmChannel 44................................... -87 dBmChannel 48................................... -85 dBmChannel 52................................... -84 dBmChannel 56................................... -83 dBmChannel 60................................... -84 dBmChannel 64................................... -85 dBm
Interference InformationInterference Profile......................... PASSEDChannel 36................................... -66 dBm @ 1% busyChannel 40................................... -128 dBm @ 0% busyChannel 44................................... -128 dBm @ 0% busyChannel 48................................... -128 dBm @ 0% busyChannel 52................................... -128 dBm @ 0% busyChannel 56................................... -73 dBm @ 1% busyChannel 60................................... -55 dBm @ 1% busyChannel 64................................... -69 dBm @ 1% busy
Rogue Histogram (20/40_ABOVE/40_BELOW)Channel 36................................... 16/ 0/ 0Channel 40................................... 28/ 0/ 0Channel 44................................... 9/ 0/ 0Channel 48................................... 9/ 0/ 0Channel 52................................... 3/ 0/ 0
CLI Commands24
CLI Commandsshow ap auto-rf

Channel 56................................... 4/ 0/ 0Channel 60................................... 7/ 1/ 0Channel 64................................... 2/ 0/ 0
Load InformationLoad Profile................................. PASSEDReceive Utilization.......................... 0%Transmit Utilization......................... 0%Channel Utilization.......................... 1%Attached Clients............................. 1 clients
Coverage InformationCoverage Profile............................. PASSEDFailed Clients............................... 0 clients
Client Signal StrengthsRSSI -100 dBm................................ 0 clientsRSSI -92 dBm................................ 0 clientsRSSI -84 dBm................................ 0 clientsRSSI -76 dBm................................ 0 clientsRSSI -68 dBm................................ 0 clientsRSSI -60 dBm................................ 0 clientsRSSI -52 dBm................................ 0 clients
Client Signal To Noise RatiosSNR 0 dBm................................. 0 clientsSNR 5 dBm................................. 0 clientsSNR 10 dBm................................. 0 clientsSNR 15 dBm................................. 0 clientsSNR 20 dBm................................. 0 clientsSNR 25 dBm................................. 0 clientsSNR 30 dBm................................. 0 clientsSNR 35 dBm................................. 0 clientsSNR 40 dBm................................. 0 clientsSNR 45 dBm................................. 0 clients
Nearby RADsRAD 00:0b:85:01:05:08 slot 0................. -46 dBm on 10.1.30.170RAD 00:0b:85:01:12:65 slot 0................. -24 dBm on 10.1.30.170
Channel Assignment InformationCurrent Channel Average Energy............... -86 dBmPrevious Channel Average Energy.............. -75 dBmChannel Change Count......................... 109Last Channel Change Time..................... Wed Sep 29 12:53e:34
2004Recommended Best Channel..................... 44
RF Parameter RecommendationsPower Level.................................. 1RTS/CTS Threshold............................ 2347Fragmentation Threshold...................... 2346Antenna Pattern.............................. 0
show ap ccx rmTo display an access point’s Cisco Client eXtensions (CCX) radio management status information, use theshow ap ccx rm command.
CLI Commands25
CLI Commandsshow ap ccx rm

show ap ccx rm ap_name status
Syntax Description Specified access point name.ap_name
Displays the CCX radio management statusinformation for an access point.
status
Command Default None
Command History ModificationRelease
This commandwas introduced in a release earlier thanRelease 7.6.
7.6
The following example shows how to display the status of the CCX radio management:(Cisco Controller) >show ap ccx rm AP1240-21ac statusA RadioChannel Load Request ..................... DisabledNoise Histogram Request .................. DisabledBeacon Request ........................... DisabledFrame Request ............................ DisabledInterval ................................. 60Iteration ................................ 10G RadioChannel Load Request ..................... DisabledNoise Histogram Request .................. DisabledBeacon Request ........................... DisabledFrame Request ............................ DisabledInterval ................................. 60Iteration ................................ 10
show ap cdpTo display the Cisco Discovery Protocol (CDP) information for an access point, use the show ap cdp command.
show ap cdp {all | ap-name cisco_ap | neighbors {all | ap-name cisco_ap | detail cisco_ap}}
Syntax Description Displays the CDP status on all access points.all
Displays the CDP status for a specified access point.ap-name
Specified access point name.cisco_ap
Displays neighbors using CDP.neighbors
Displays details about a specific access point neighborusing CDP.
detail
Command Default None
CLI Commands26
CLI Commandsshow ap cdp

Command History ModificationRelease
This commandwas introduced in a release earlier thanRelease 7.6.
7.6
The following example shows how to display the CDP status of all access points:
(Cisco Controller) >show ap cdp allAP CDP StateAP Name AP CDP State------------------ ----------SB_RAP1 enableSB_MAP1 enableSB_MAP2 enableSB_MAP3 enable
The following example shows how to display the CDP status of a specified access point:(Cisco Controller) >show ap cdp ap-name SB_RAP1AP CDP StateAP Name AP CDP State------------------ ----------AP CDP State.......................EnabledAP Interface-Based CDP stateEthernet 0.....................EnabledSlot 0.........................EnabledSlot 1.........................Enabled
The following example shows how to display details about all neighbors using CDP:
(Cisco Controller) >show ap cdp neighbor allAP Name AP IP Neighbor Name Neighbor IP Neighbor Port--------- --------------- ------------------ -------------- -------------SB_RAP1 192.168.102.154 sjc14-41a-sw1 192.168.102.2 GigabitEthernet1/0/13SB_RAP1 192.168.102.154 SB_MAP1 192.168.102.137 Virtual-Dot11Radio0SB_MAP1 192.168.102.137 SB_RAP1 192.168.102.154 Virtual-Dot11Radio0SB_MAP1 192.168.102.137 SB_MAP2 192.168.102.138 Virtual-Dot11Radio0SB_MAP2 192.168.102.138 SB_MAP1 192.168.102.137 Virtual-Dot11Radio1SB_MAP2 192.168.102.138 SB_MAP3 192.168.102.139 Virtual-Dot11Radio0SB_MAP3 192.168.102.139 SB_MAP2 192.168.102.138 Virtual-Dot11Radio1
The following example shows how to display details about a specific neighbor with a specified accesspoint using CDP:(Cisco Controller) >show ap cdp neighbors ap-name SB_MAP2AP Name AP IP Neighbor Name Neighbor IP Neighbor Port----------- --------------- --------------- -------------- -------------SB_MAP2 192.168.102.138 SB_MAP1 192.168.102.137 Virtual-Dot11Radio1SB_MAP2 192.168.102.138 SB_MAP3 192.168.102.139 Virtual-Dot11Radio0
The following example shows how to display details about neighbors using CDP:(Cisco Controller) >show ap cdp neighbors detail SB_MAP2AP Name:SB_MAP2AP IP address:192.168.102.138
CLI Commands27
CLI Commandsshow ap cdp

-------------------------Device ID: SB_MAP1Entry address(es): 192.168.102.137Platform: cisco AIR-LAP1522AG-A-K9 , CapInterface: Virtual-Dot11Radio0, Port ID (outgoing port): Virtual-Dot11Radio1Holdtime : 180 secVersion :Cisco IOS Software, C1520 Software (C1520-K9W8-M), Experimental Version 12.4(20081114:084420) [BLD-v124_18a_ja_throttle.20081114 208] Copyright (c) 1986-2008 byCisco Systems, Inc. Compiled Fri 14-Nov-08 23:08 byadvertisement version: 2-------------------------Device ID: SB_MAP3Entry address(es): 192.168.102.139Platform: cisco AIR-LAP1522AG-A-K9 , Capabilities: Trans-BridgeInterface: Virtual-Dot11Radio1, Port ID (outgoing port): Virtual-Dot11Radio0Holdtime : 180 secVersion :Cisco IOS Software, C1520 Software (C1520-K9W8-M), Experimental Version 12.4(20081114:084420) [BLD-v124_18a_ja_throttle.20081114 208] Copyright (c) 1986-2008 byCisco Systems, Inc. Compiled Fri 14-Nov-08 23:08 byadvertisement version: 2
show ap channelTo display the available channels for a specific mesh access point, use the show ap channel command.
show ap channel ap_name
Syntax Description Name of the mesh access point.ap_name
Command Default None
Command History ModificationRelease
This commandwas introduced in a release earlier thanRelease 7.6.
7.6
The following example shows how to display the available channels for a particular access point:
(Cisco Controller) >show ap channel AP47802.11b/g Current Channel ...........1Allowed Channel List.....................1,2,3,4,5,6,7,8,9,10,11802.11a Current Channel .................161Allowed Channel List.....................36,40,44,48,52,56,60,64,100,.........................................104,108,112,116,132,136,140,.........................................149,153,157,161
show ap configTo display the detailed configuration for a lightweight access point, use the show ap config command.
show ap config 802.11{a | b} [summary] cisco_ap
CLI Commands28
CLI Commandsshow ap channel

Syntax Description Specifies the 802.11a or 802.11b/g network.802.11a
Specifies the 802.11b/g network.802.11b
(Optional) Displays radio summary of all APssummary
Lightweight access point name.cisco_ap
Command Default None
Command History ModificationRelease
This commandwas introduced in a release earlier thanRelease 7.6.
7.6
The following example shows how to display the detailed configuration for an access point:
(Cisco Controller) >show ap config 802.11a AP02Cisco AP Identifier.............................. 0Cisco AP Name.................................... AP02Country code..................................... US - United StatesRegulatory Domain allowed by Country............. 802.11bg:-A 802.11a:-AAP Regulatory Domain............................. UnconfiguredSwitch Port Number .............................. 1MAC Address...................................... 00:0b:85:18:b6:50IP Address Configuration......................... DHCPIP Address....................................... 1.100.49.240IP NetMask....................................... 255.255.255.0Gateway IP Addr.................................. 1.100.49.1CAPWAP Path MTU.................................. 1485Telnet State..................................... DisabledSsh State........................................ DisabledCisco AP Location................................ default-locationCisco AP Group Name.............................. default-groupPrimary Cisco Switch............................. Cisco_32:ab:63Primary Cisco Switch IP Address.................. Not ConfiguredSecondary Cisco Switch...........................Secondary Cisco Switch IP Address................ Not ConfiguredTertiary Cisco Switch............................Tertiary Cisco Switch IP Address................. Not ConfiguredAdministrative State ............................ ADMIN_ENABLEDOperation State ................................. REGISTEREDMirroring Mode .................................. DisabledAP Mode ........................................... SnifferPublic Safety ..................................... Global: Disabled, Local: DisabledAP SubMode ...................................... Not ConfiguredRemote AP Debug ................................. DisabledLogging trap severity level ..................... informationalLogging syslog facility ......................... kernS/W Version .................................... 7.0.110.6Boot Version ................................... 12.4.18.0Mini IOS Version ................................ 3.0.51.0Stats Reporting Period .......................... 180Stats Re--More-- or (q)uitLED State........................................ EnabledPoE Pre-Standard Switch.......................... EnabledPoE Power Injector MAC Addr...................... DisabledPower Type/Mode.................................. Power injector / Normal modeNumber Of Slots.................................. 2
CLI Commands29
CLI Commandsshow ap config
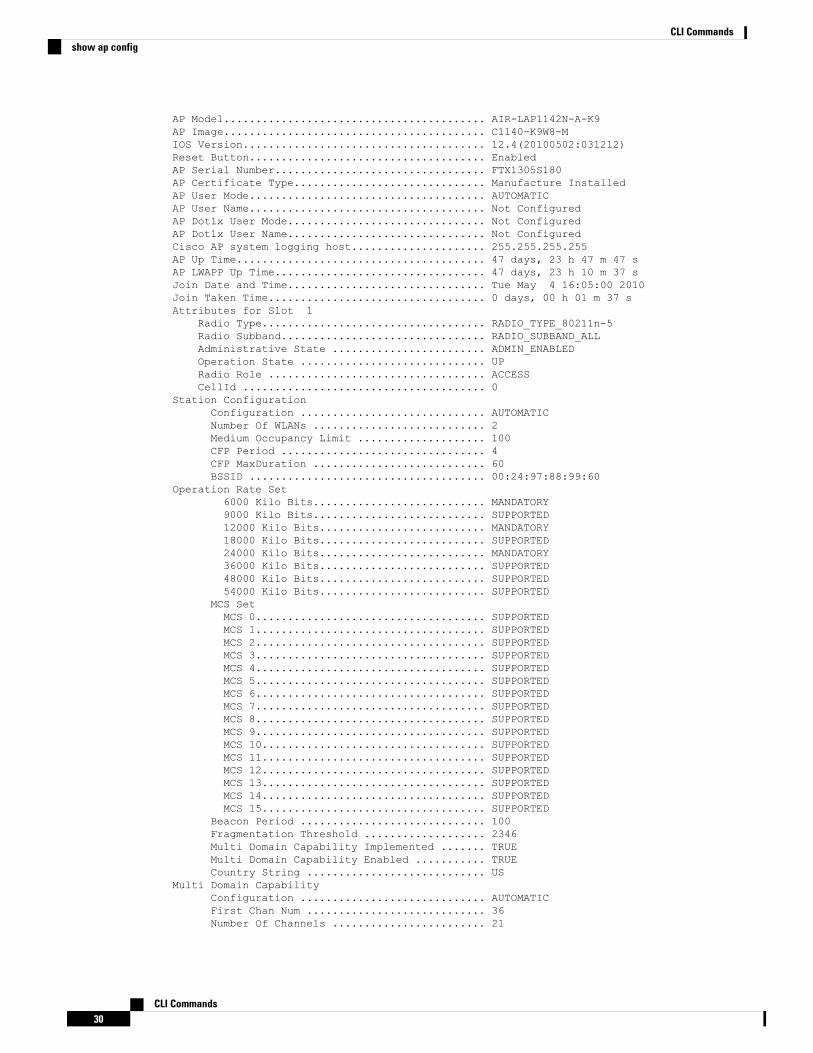
AP Model......................................... AIR-LAP1142N-A-K9AP Image......................................... C1140-K9W8-MIOS Version...................................... 12.4(20100502:031212)Reset Button..................................... EnabledAP Serial Number................................. FTX1305S180AP Certificate Type.............................. Manufacture InstalledAP User Mode..................................... AUTOMATICAP User Name..................................... Not ConfiguredAP Dot1x User Mode............................... Not ConfiguredAP Dot1x User Name............................... Not ConfiguredCisco AP system logging host..................... 255.255.255.255AP Up Time....................................... 47 days, 23 h 47 m 47 sAP LWAPP Up Time................................. 47 days, 23 h 10 m 37 sJoin Date and Time............................... Tue May 4 16:05:00 2010Join Taken Time.................................. 0 days, 00 h 01 m 37 sAttributes for Slot 1
Radio Type................................... RADIO_TYPE_80211n-5Radio Subband................................ RADIO_SUBBAND_ALLAdministrative State ........................ ADMIN_ENABLEDOperation State ............................. UPRadio Role .................................. ACCESSCellId ...................................... 0
Station ConfigurationConfiguration ............................. AUTOMATICNumber Of WLANs ........................... 2Medium Occupancy Limit .................... 100CFP Period ................................ 4CFP MaxDuration ........................... 60BSSID ..................................... 00:24:97:88:99:60
Operation Rate Set6000 Kilo Bits........................... MANDATORY9000 Kilo Bits........................... SUPPORTED12000 Kilo Bits.......................... MANDATORY18000 Kilo Bits.......................... SUPPORTED24000 Kilo Bits.......................... MANDATORY36000 Kilo Bits.......................... SUPPORTED48000 Kilo Bits.......................... SUPPORTED54000 Kilo Bits.......................... SUPPORTED
MCS SetMCS 0.................................... SUPPORTEDMCS 1.................................... SUPPORTEDMCS 2.................................... SUPPORTEDMCS 3.................................... SUPPORTEDMCS 4.................................... SUPPORTEDMCS 5.................................... SUPPORTEDMCS 6.................................... SUPPORTEDMCS 7.................................... SUPPORTEDMCS 8.................................... SUPPORTEDMCS 9.................................... SUPPORTEDMCS 10................................... SUPPORTEDMCS 11................................... SUPPORTEDMCS 12................................... SUPPORTEDMCS 13................................... SUPPORTEDMCS 14................................... SUPPORTEDMCS 15................................... SUPPORTED
Beacon Period ............................. 100Fragmentation Threshold ................... 2346Multi Domain Capability Implemented ....... TRUEMulti Domain Capability Enabled ........... TRUECountry String ............................ US
Multi Domain CapabilityConfiguration ............................. AUTOMATICFirst Chan Num ............................ 36Number Of Channels ........................ 21
CLI Commands30
CLI Commandsshow ap config

MAC Operation ParametersConfiguration ............................. AUTOMATICFragmentation Threshold ................... 2346Packet Retry Limit ........................ 64
Tx PowerNum Of Supported Power Levels ............. 6Tx Power Level 1 .......................... 14 dBmTx Power Level 2 .......................... 11 dBmTx Power Level 3 .......................... 8 dBmTx Power Level 4 .......................... 5 dBmTx Power Level 5 .......................... 2 dBmTx Power Level 6 .......................... -1 dBmTx Power Configuration .................... AUTOMATICCurrent Tx Power Level .................... 0
Phy OFDM parametersConfiguration ............................. AUTOMATICCurrent Channel ........................... 36Extension Channel ......................... NONEChannel Width.............................. 20 MhzAllowed Channel List....................... 36,40,44,48,52,56,60,64,100,......................................... 104,108,112,116,132,136,140,......................................... 149,153,157,161,165
TI Threshold .............................. -50Legacy Tx Beamforming Configuration ....... AUTOMATICLegacy Tx Beamforming ..................... DISABLEDAntenna Type............................... INTERNAL_ANTENNAInternal Antenna Gain (in .5 dBi units).... 6Diversity.................................. DIVERSITY_ENABLED802.11n AntennasTxA....................................... ENABLEDB....................................... ENABLEDRxA....................................... ENABLEDB....................................... ENABLEDC....................................... ENABLED
Performance Profile ParametersConfiguration ............................. AUTOMATICInterference threshold..................... 10 %Noise threshold............................ -70 dBmRF utilization threshold................... 80 %Data-rate threshold........................ 1000000 bpsClient threshold........................... 12 clientsCoverage SNR threshold..................... 16 dBCoverage exception level................... 25 %Client minimum exception level............. 3 clients
Rogue Containment InformationContainment Count............................ 0
CleanAir Management InformationCleanAir Capable......................... No
Radio Extended Configurations:Buffer size ……………………….30Data-rate…………………………..0Beacon strt ………………………..90 msRx-Sensitivity SOP threshold ………….. -80 dBCCA threshold ……………………. -60 dB
The following example shows how to display the detailed configuration for another access point:
(Cisco Controller) >show ap config 802.11b AP02Cisco AP Identifier.............................. 0Cisco AP Name.................................... AP02AP Regulatory Domain............................. Unconfigured
CLI Commands31
CLI Commandsshow ap config
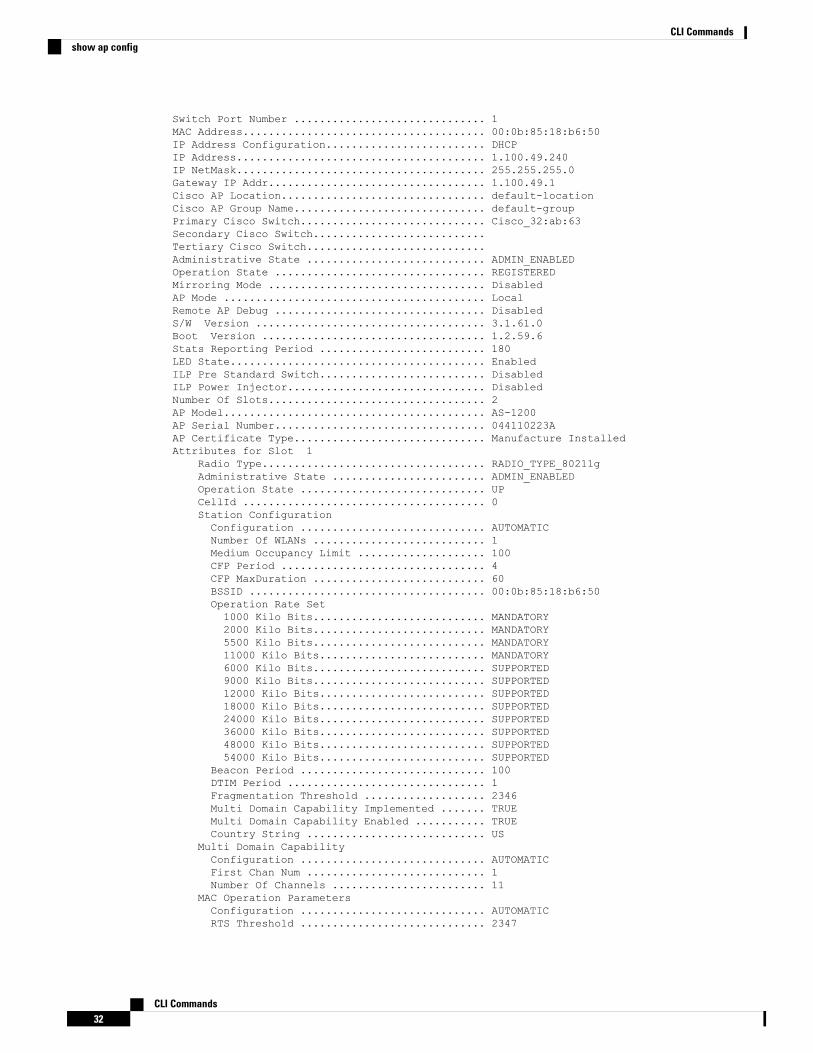
Switch Port Number .............................. 1MAC Address...................................... 00:0b:85:18:b6:50IP Address Configuration......................... DHCPIP Address....................................... 1.100.49.240IP NetMask....................................... 255.255.255.0Gateway IP Addr.................................. 1.100.49.1Cisco AP Location................................ default-locationCisco AP Group Name.............................. default-groupPrimary Cisco Switch............................. Cisco_32:ab:63Secondary Cisco Switch...........................Tertiary Cisco Switch............................Administrative State ............................ ADMIN_ENABLEDOperation State ................................. REGISTEREDMirroring Mode .................................. DisabledAP Mode ......................................... LocalRemote AP Debug ................................. DisabledS/W Version .................................... 3.1.61.0Boot Version ................................... 1.2.59.6Stats Reporting Period .......................... 180LED State........................................ EnabledILP Pre Standard Switch.......................... DisabledILP Power Injector............................... DisabledNumber Of Slots.................................. 2AP Model......................................... AS-1200AP Serial Number................................. 044110223AAP Certificate Type.............................. Manufacture InstalledAttributes for Slot 1
Radio Type................................... RADIO_TYPE_80211gAdministrative State ........................ ADMIN_ENABLEDOperation State ............................. UPCellId ...................................... 0Station ConfigurationConfiguration ............................. AUTOMATICNumber Of WLANs ........................... 1Medium Occupancy Limit .................... 100CFP Period ................................ 4CFP MaxDuration ........................... 60BSSID ..................................... 00:0b:85:18:b6:50Operation Rate Set1000 Kilo Bits........................... MANDATORY2000 Kilo Bits........................... MANDATORY5500 Kilo Bits........................... MANDATORY11000 Kilo Bits.......................... MANDATORY6000 Kilo Bits........................... SUPPORTED9000 Kilo Bits........................... SUPPORTED12000 Kilo Bits.......................... SUPPORTED18000 Kilo Bits.......................... SUPPORTED24000 Kilo Bits.......................... SUPPORTED36000 Kilo Bits.......................... SUPPORTED48000 Kilo Bits.......................... SUPPORTED54000 Kilo Bits.......................... SUPPORTED
Beacon Period ............................. 100DTIM Period ............................... 1Fragmentation Threshold ................... 2346Multi Domain Capability Implemented ....... TRUEMulti Domain Capability Enabled ........... TRUECountry String ............................ US
Multi Domain CapabilityConfiguration ............................. AUTOMATICFirst Chan Num ............................ 1Number Of Channels ........................ 11
MAC Operation ParametersConfiguration ............................. AUTOMATICRTS Threshold ............................. 2347
CLI Commands32
CLI Commandsshow ap config
Short Retry Limit ......................... 7Long Retry Limit .......................... 4Fragmentation Threshold ................... 2346Maximum Tx MSDU Life Time ................. 512Maximum Rx Life Time....................... 512
Tx PowerNum Of Supported Power Levels.............. 5Tx Power Level 1 .......................... 17 dBmTx Power Level 2........................... 14 dBmTx Power Level 3........................... 11 dBmTx Power Level 4........................... 8 dBmTx Power Level 5........................... 5 dBmTx Power Configuration..................... CUSTOMIZEDCurrent Tx Power Level..................... 5
Phy OFDM parametersConfiguration.............................. CUSTOMIZEDCurrent Channel............................ 1TI Threshold............................... -50Legacy Tx Beamforming Configuration ....... CUSTOMIZEDLegacy Tx Beamforming ..................... ENABLEDAntenna Type............................... INTERNAL_ANTENNAInternal Antenna Gain (in5 dBm units)...... 11Diversity.................................. DIVERSITY_ENABLED
Performance Profile ParametersConfiguration.............................. AUTOMATICInterference threshold..................... 10%Noise threshold............................ -70 dBmRF utilization threshold................... 80%Data-rate threshold........................ 1000000 bpsClient threshold........................... 12 clientsCoverage SNR threshold..................... 12 dBCoverage exception level................... 25%Client minimum exception level............. 3 clients
Rogue Containment InformationContainment Count............................ 0
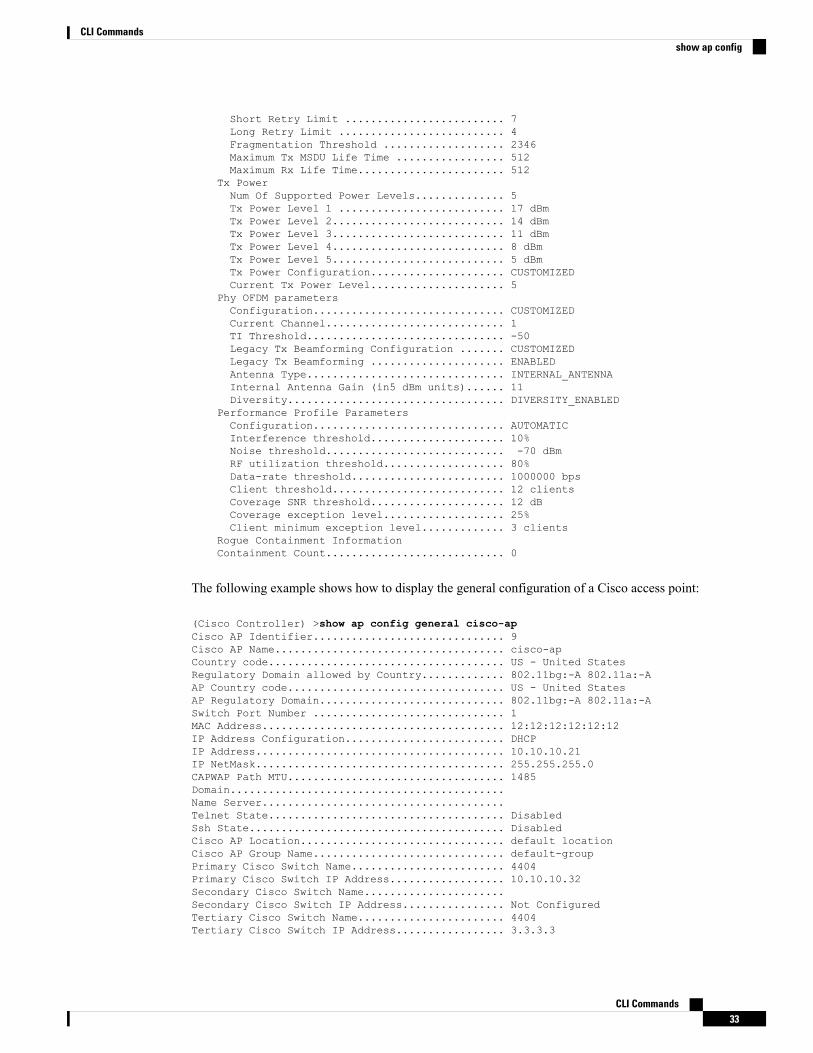
The following example shows how to display the general configuration of a Cisco access point:
(Cisco Controller) >show ap config general cisco-apCisco AP Identifier.............................. 9Cisco AP Name.................................... cisco-apCountry code..................................... US - United StatesRegulatory Domain allowed by Country............. 802.11bg:-A 802.11a:-AAP Country code.................................. US - United StatesAP Regulatory Domain............................. 802.11bg:-A 802.11a:-ASwitch Port Number .............................. 1MAC Address...................................... 12:12:12:12:12:12IP Address Configuration......................... DHCPIP Address....................................... 10.10.10.21IP NetMask....................................... 255.255.255.0CAPWAP Path MTU.................................. 1485Domain...........................................Name Server......................................Telnet State..................................... DisabledSsh State........................................ DisabledCisco AP Location................................ default locationCisco AP Group Name.............................. default-groupPrimary Cisco Switch Name........................ 4404Primary Cisco Switch IP Address.................. 10.10.10.32Secondary Cisco Switch Name......................Secondary Cisco Switch IP Address................ Not ConfiguredTertiary Cisco Switch Name....................... 4404Tertiary Cisco Switch IP Address................. 3.3.3.3
CLI Commands33
CLI Commandsshow ap config
Administrative State ............................ ADMIN_ENABLEDOperation State ................................. REGISTEREDMirroring Mode .................................. DisabledAP Mode ......................................... LocalPublic Safety ................................... Global: Disabled, Local: DisabledAP subMode ...................................... WIPSRemote AP Debug ................................. DisabledS/W Version .................................... 5.1.0.0Boot Version ................................... 12.4.10.0Mini IOS Version ................................ 0.0.0.0Stats Reporting Period .......................... 180LED State........................................ EnabledPoE Pre-Standard Switch.......................... EnabledPoE Power Injector MAC Addr...................... DisabledPower Type/Mode.................................. PoE/Low Power (degraded mode)Number Of Slots.................................. 2AP Model......................................... AIR-LAP1252AG-A-K9IOS Version...................................... 12.4(10:0)Reset Button..................................... EnabledAP Serial Number................................. serial_numberAP Certificate Type.............................. Manufacture InstalledManagement Frame Protection Validation........... Enabled (Global MFP Disabled)AP User Mode..................................... CUSTOMIZEDAP username..................................... mariaAP Dot1x User Mode............................... Not ConfiguredAP Dot1x username............................... Not ConfiguredCisco AP system logging host..................... 255.255.255.255AP Up Time....................................... 4 days, 06 h 17 m 22 sAP LWAPP Up Time................................. 4 days, 06 h 15 m 00 sJoin Date and Time............................... Mon Mar 3 06:19:47 2008Ethernet Port Duplex............................. AutoEthernet Port Speed.............................. AutoAP Link Latency.................................. EnabledCurrent Delay................................... 0 msMaximum Delay................................... 240 msMinimum Delay................................... 0 msLast updated (based on AP Up Time).............. 4 days, 06 h 17 m 20 sRogue Detection.................................. EnabledAP TCP MSS Adjust................................ DisabledMesh preferred parent............................ 00:24:13:0f:92:00
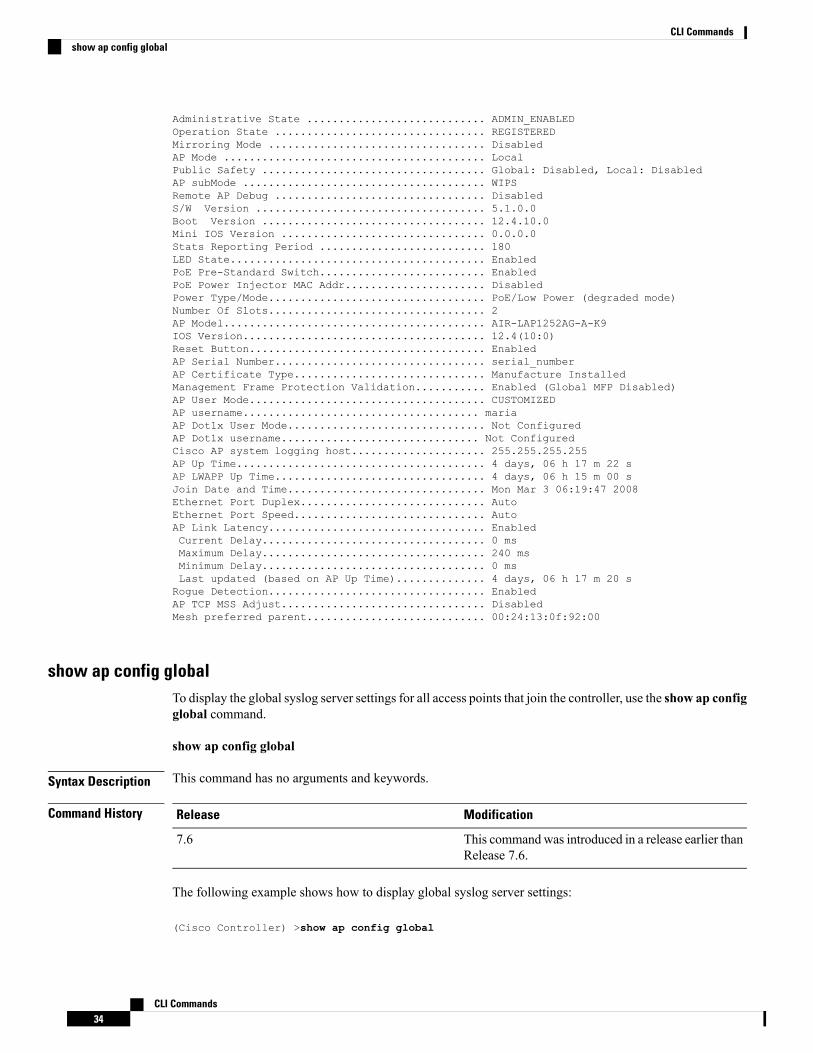
show ap config globalTo display the global syslog server settings for all access points that join the controller, use the show ap configglobal command.
show ap config global
Syntax Description This command has no arguments and keywords.
Command History ModificationRelease
This commandwas introduced in a release earlier thanRelease 7.6.
7.6
The following example shows how to display global syslog server settings:
(Cisco Controller) >show ap config global
CLI Commands34
CLI Commandsshow ap config global
AP global system logging host.............................. 255.255.255.255
show ap core-dumpTo display the memory core dump information for a lightweight access point, use the show ap core-dumpcommand.
show ap core-dump cisco_ap
Syntax Description Cisco lightweight access point name.cisco_ap
Command Default None
Command History ModificationRelease
This commandwas introduced in a release earlier thanRelease 7.6.
7.6
The following example shows how to display memory core dump information:
(Cisco Controller) >show ap core-dump AP02Memory core dump is disabled.
show ap crash-fileTo display the list of both crash and radio core dump files generated by lightweight access points, use theshow ap crash-file command.
show ap crash-file
Syntax Description This command has no arguments or keywords.
Command Default None
Command History ModificationRelease
This commandwas introduced in a release earlier thanRelease 7.6.
7.6
The following example shows how to display the crash file generated by the access point:
(Cisco Controller) >show ap crash-file
show ap data-planeTo display the data plane status for all access points or a specific access point, use the show ap data-planecommand.
CLI Commands35
CLI Commandsshow ap core-dump

show ap data-plane {all | cisco_ap}
Syntax Description Specifies all Cisco lightweight access points.all
Name of a Cisco lightweight access point.cisco_ap
Command Default None
Command History ModificationRelease
This commandwas introduced in a release earlier thanRelease 7.6.
7.6
The following example shows how to display the data plane status of all access points:
(Cisco Controller) >show ap data-plane allMin Data Data Max Data LastAP Name Round Trip Round Trip Round Trip Update------------------ -------------- -------------- -------------- ------1130 0.000s 0.000s 0.002s 18:51:231240 0.000s 0.000s 0.000s 18:50:45
show ap ethernet tagTo display the VLAN tagging information of an Ethernet interface, use the show ap ethernet tag command.
show ap ethernet tag {summary | cisco_ap}
Syntax Description Displays the VLAN tagging information for all access points associated to the controller.summary
Name of the Cisco lightweight access point. Displays the VLAN tagging information for aspecific access point associated to the controller.
cisco_ap
Command Default None
Command History ModificationRelease
This commandwas introduced in a release earlier thanRelease 7.6.
7.6
Usage Guidelines If the access point is unable to route traffic or reach the controller using the specified trunk VLAN, it fallsback to the untagged configuration. If the access point joins the controller using this fallback configuration,the controller sends a trap to a trap server such as the WCS, which indicates the failure of the trunk VLAN.In this scenario, the "Failover to untagged" message appears in show command output.
The following example shows how to display the VLAN tagging information for all access pointsassociated to the controller:(Cisco Controller) >show ap ethernet tag summary
CLI Commands36
CLI Commandsshow ap ethernet tag

AP Name Vlan Tag Configuration------------------ -------AP2 7 (Failover to untagged)charan.AP1140.II disabled
show ap eventlogTo display the contents of the event log file for an access point that is joined to the controller, use the show apeventlog command.
show ap eventlog ap_name
Syntax Description Event log for the specified access point.ap_name
Command Default None
Command History ModificationRelease
This commandwas introduced in a release earlier thanRelease 7.6.
7.6
The following example shows how to display the event log of an access point:
(Cisco Controller) >show ap eventlog ciscoAPAP event log download has been initiatedWaiting for download to completeAP event log download completed.======================= AP Event log Contents =====================*Feb 13 11:54:17.146: %CAPWAP-3-CLIENTEVENTLOG: AP event log has been cleared from thecontoller 'admin'*Feb 13 11:54:32.874: *** Access point reloading. Reason: Reload Command ****Mar 1 00:00:39.134: %CDP_PD-4-POWER_OK: Full power - NEGOTIATED inline power source*Mar 1 00:00:39.174: %LINK-3-UPDOWN: Interface Dot11Radio1, changed state to up*Mar 1 00:00:39.211: %LINK-3-UPDOWN: Interface Dot11Radio0, changed state to up*Mar 1 00:00:49.947: %CAPWAP-3-CLIENTEVENTLOG: Did not get vendor specific options fromDHCP....
show ap imageTo display the detailed information about the predownloaded image for specified access points, use the showap image command.
show ap image {cisco_ap | all}
Syntax Description Name of the lightweight access point.cisco_ap
Specifies all access points.all
CLI Commands37
CLI Commandsshow ap eventlog
If you have an AP that has the name all, it conflicts with the keyword all that specifies all access points. Inthis scenario, the keyword all takes precedence over the AP that is named all.
Note
Command History ModificationRelease
This commandwas introduced in a release earlier thanRelease 7.6.
7.6
show ap inventoryTo display inventory information for an access point, use the show ap inventory command.
show ap inventory {ap-name | all}
Syntax Description Inventory for the specified AP.ap-name
Inventory for all the APs.all
Command Default None
Command History ModificationRelease
This commandwas introduced in a release earlier thanRelease 7.6.
7.6
The following example shows how to display the inventory of an access point:
(Cisco Controller) >show ap inventory test101NAME: "test101" , DESCR: "Cisco Wireless Access Point"PID: AIR-LAP1131AG-A-K9 , VID: V01, SN: FTX1123T2XX
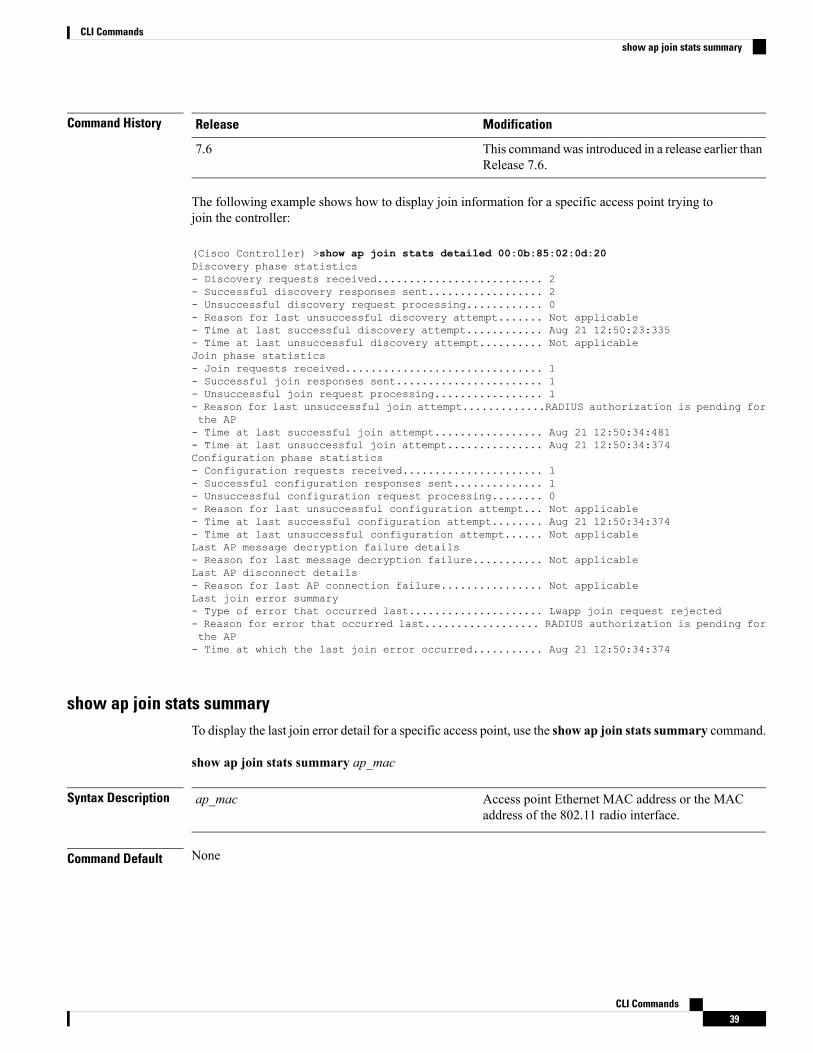
show ap join stats detailedTo display all join-related statistics collected for a specific access point, use the show ap join stats detailedcommand.
show ap join stats detailed ap_mac
Syntax Description Access point Ethernet MAC address or the MACaddress of the 802.11 radio interface.
ap_mac
Command Default None
CLI Commands38
CLI Commandsshow ap inventory
Command History ModificationRelease
This commandwas introduced in a release earlier thanRelease 7.6.
7.6
The following example shows how to display join information for a specific access point trying tojoin the controller:
(Cisco Controller) >show ap join stats detailed 00:0b:85:02:0d:20Discovery phase statistics- Discovery requests received.......................... 2- Successful discovery responses sent.................. 2- Unsuccessful discovery request processing............ 0- Reason for last unsuccessful discovery attempt....... Not applicable- Time at last successful discovery attempt............ Aug 21 12:50:23:335- Time at last unsuccessful discovery attempt.......... Not applicableJoin phase statistics- Join requests received............................... 1- Successful join responses sent....................... 1- Unsuccessful join request processing................. 1- Reason for last unsuccessful join attempt.............RADIUS authorization is pending forthe AP- Time at last successful join attempt................. Aug 21 12:50:34:481- Time at last unsuccessful join attempt............... Aug 21 12:50:34:374Configuration phase statistics- Configuration requests received...................... 1- Successful configuration responses sent.............. 1- Unsuccessful configuration request processing........ 0- Reason for last unsuccessful configuration attempt... Not applicable- Time at last successful configuration attempt........ Aug 21 12:50:34:374- Time at last unsuccessful configuration attempt...... Not applicableLast AP message decryption failure details- Reason for last message decryption failure........... Not applicableLast AP disconnect details- Reason for last AP connection failure................ Not applicableLast join error summary- Type of error that occurred last..................... Lwapp join request rejected- Reason for error that occurred last.................. RADIUS authorization is pending forthe AP- Time at which the last join error occurred........... Aug 21 12:50:34:374
show ap join stats summaryTo display the last join error detail for a specific access point, use the show ap join stats summary command.
show ap join stats summary ap_mac
Syntax Description Access point Ethernet MAC address or the MACaddress of the 802.11 radio interface.
ap_mac
Command Default None
CLI Commands39
CLI Commandsshow ap join stats summary
Command History ModificationRelease
This commandwas introduced in a release earlier thanRelease 7.6.
7.6
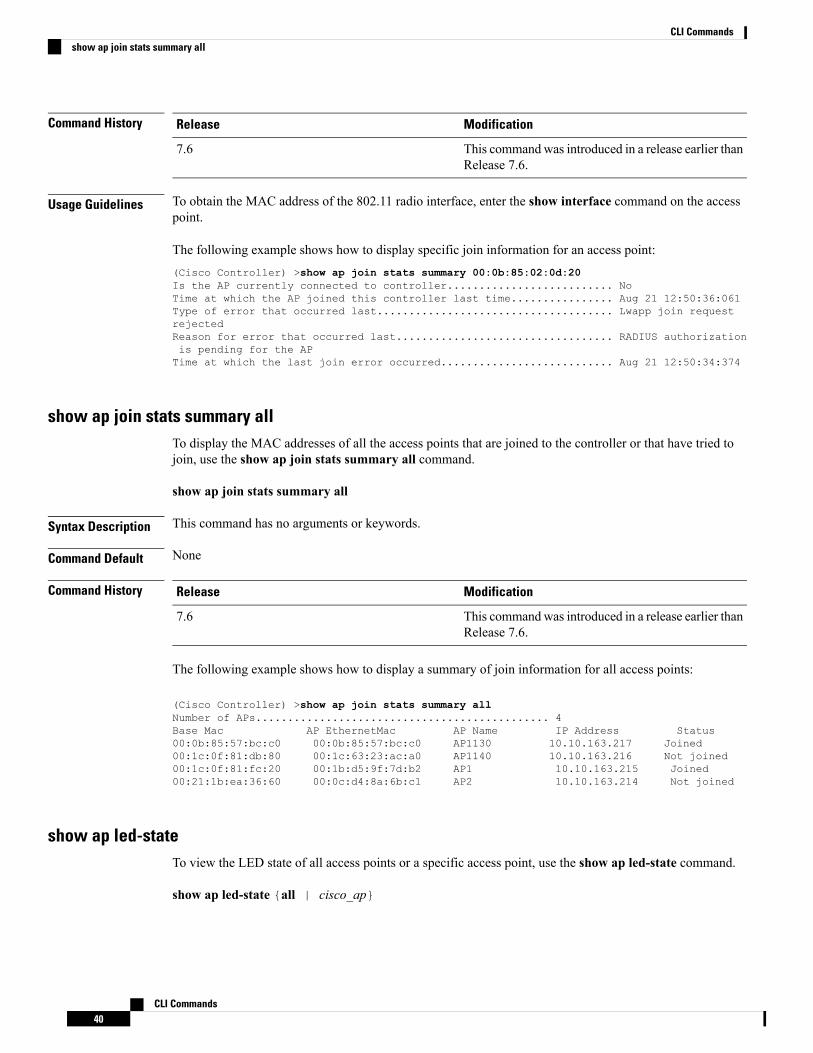
Usage Guidelines To obtain the MAC address of the 802.11 radio interface, enter the show interface command on the accesspoint.
The following example shows how to display specific join information for an access point:(Cisco Controller) >show ap join stats summary 00:0b:85:02:0d:20Is the AP currently connected to controller.......................... NoTime at which the AP joined this controller last time................ Aug 21 12:50:36:061Type of error that occurred last..................................... Lwapp join requestrejectedReason for error that occurred last.................................. RADIUS authorizationis pending for the APTime at which the last join error occurred........................... Aug 21 12:50:34:374
show ap join stats summary allTo display the MAC addresses of all the access points that are joined to the controller or that have tried tojoin, use the show ap join stats summary all command.
show ap join stats summary all
Syntax Description This command has no arguments or keywords.
Command Default None
Command History ModificationRelease
This commandwas introduced in a release earlier thanRelease 7.6.
7.6
The following example shows how to display a summary of join information for all access points:
(Cisco Controller) >show ap join stats summary allNumber of APs.............................................. 4Base Mac AP EthernetMac AP Name IP Address Status00:0b:85:57:bc:c0 00:0b:85:57:bc:c0 AP1130 10.10.163.217 Joined00:1c:0f:81:db:80 00:1c:63:23:ac:a0 AP1140 10.10.163.216 Not joined00:1c:0f:81:fc:20 00:1b:d5:9f:7d:b2 AP1 10.10.163.215 Joined00:21:1b:ea:36:60 00:0c:d4:8a:6b:c1 AP2 10.10.163.214 Not joined
show ap led-stateTo view the LED state of all access points or a specific access point, use the show ap led-state command.
show ap led-state {all | cisco_ap}
CLI Commands40
CLI Commandsshow ap join stats summary all

Syntax Description Shows the LED state for all access points.all
Name of the access point whose LED state is to beshown.
cisco_ap
Command Default The AP LED state is enabled.
Command History ModificationRelease
This commandwas introduced in a release earlier thanRelease 7.6.
7.6
The following example shows how to get the LED state of all access points:
(Cisco Controller) >show ap led-state allGlobal LED State: Enabled (default)
show ap link-encryptionTo display the MAC addresses of all the access points that are joined to the controller or that have tried tojoin, use the show ap link-encryption command.
show ap link-encryption {all | cisco_ap}
Syntax Description Specifies all access points.all
Name of the lightweight access point.cisco_ap
Command Default None
Command History ModificationRelease
This commandwas introduced in a release earlier thanRelease 7.6.
7.6
The following example shows how to display the link encryption status of all access points:
(Cisco Controller) >show ap link-encryption allEncryption Dnstream Upstream Last
AP Name State Count Count Update------------------ --- -------- -------- ------1240 Dis 4406 237553 Never1130 En 2484 276308 19:31
show ap monitor-mode summaryTo display the current channel-optimized monitor mode settings, use the show ap monitor-mode summarycommand.
CLI Commands41
CLI Commandsshow ap link-encryption

show ap monitor-mode summary
Syntax Description This command has no arguments or keywords.
Command Default None
Command History ModificationRelease
This commandwas introduced in a release earlier thanRelease 7.6.
7.6
The following example shows how to display current channel-optimized monitor mode settings:
(Cisco Controller) >show ap monitor-mode summaryAP Name Ethernet MAC Status Scanning Channel List--- ----------------- ---------- ----------------------AP_004 xx:xx:xx:xx:xx:xx Tracking 1, 6, 11, 4
show ap packet-dump statusTo display access point Packet Capture configurations, use the show ap packet-dump status command.
show ap packet-dump status
Syntax Description This command has no arguments or keywords.
Command History ModificationRelease
This commandwas introduced in a release earlier thanRelease 7.6.
7.6
Usage Guidelines Packet Capture does not work during intercontroller roaming.
The controller does not capture packets created in the radio firmware and sent out of the access point, suchas the beacon or probe response. Only packets that flow through the Radio driver in the Tx path are captured.
The following example shows how to display the access point Packet Capture configurations:(Cisco Controller) >show ap packet-dump statusPacket Capture Status............................ StoppedFTP Server IP Address............................ 0.0.0.0FTP Server Path..................................FTP Server Username..............................FTP Server Password.............................. ********Buffer Size for Capture.......................... 2048 KBPacket Capture Time.............................. 45 MinutesPacket Truncate Length........................... UnspecifiedPacket Capture Classifier........................ None
show ap retransmitTo display access point control packet retransmission parameters, use theshow ap retransmit command.
CLI Commands42
CLI Commandsshow ap packet-dump status

show ap retransmit {all | cisco_ap}
Syntax Description Specifies all access points.all
Name of the access point.cisco_ap
Command Default None
Command History ModificationRelease
This commandwas introduced in a release earlier thanRelease 7.6.
7.6
The following example shows how to display the control packet retransmission parameters of allaccess points on a network:
(Cisco Controller) >show ap retransmit allGlobal control packet retransmit interval: 3 (default)Global control packet retransmit count: 5 (default)AP Name Retransmit Interval Retransmit count------------------ ------------------- -------------------AP_004 3 (default) 5 (WLC default),5 (AP default)
show ap statsTo display the statistics for a Cisco lightweight access point, use the show ap stats command.
show ap stats {802.11{a | b} | wlan | ethernet summary} cisco_ap [tsm {client_mac | all}]
Syntax Description Specifies the 802.11a network802.11a
Specifies the 802.11b/g network.802.11b
Specifies WLAN statistics.wlan
Specifies AP ethernet interface statistics.ethernet
Displays ethernet interface summary of all theconnected Cisco access points.
summary
Name of the lightweight access point.cisco_ap
(Optional) Specifies the traffic stream metrics.tsm
(Optional) MAC address of the client.client_mac
(Optional) Specifies all access points.all
Command Default None
CLI Commands43
CLI Commandsshow ap stats

Command History ModificationRelease
This commandwas introduced in a release earlier thanRelease 7.6.
7.6
The following example shows how to display statistics of an access point for the 802.11b network:
(Cisco Controller) >show ap stats 802.11a Ibiza
Number Of Slots.................................. 2AP Name.......................................... IbizaMAC Address...................................... 44:2b:03:9a:8a:73Radio Type....................................... RADIO_TYPE_80211aStats InformationNumber of Users................................ 0TxFragmentCount................................ 84628MulticastTxFrameCnt............................ 84628FailedCount.................................... 0RetryCount..................................... 0MultipleRetryCount............................. 0FrameDuplicateCount............................ 0RtsSuccessCount................................ 1RtsFailureCount................................ 0AckFailureCount................................ 0RxIncompleteFragment........................... 0MulticastRxFrameCnt............................ 0FcsErrorCount.................................. 20348857TxFrameCount................................... 84628WepUndecryptableCount.......................... 19907TxFramesDropped................................ 0
Rate Limiting Stats:Wlan 1:Number of Data Packets Received.............. 592Number of Data Rx Packets Dropped............ 160Number of Data Bytes Received................ 160783Number of Data Rx Bytes Dropped.............. 0Number of Realtime Packets Received.......... 592Number of Realtime Rx Packets Dropped........ 0Number of Realtime Bytes Received............ 160783Number of Realtime Rx Bytes Dropped.......... 0Number of Data Packets Sent.................. 131Number of Data Tx Packets Dropped............ 0Number of Data Bytes Sent.................... 23436Number of Data Tx Bytes Dropped.............. 0Number of Realtime Packets Sent.............. 131Number of Realtime Tx Packets Dropped........ 0Number of Realtime Bytes Sent................ 23436Number of Realtime Tx Bytes Dropped.......... 0
Call Admission Control (CAC) StatsVoice Bandwidth in use(% of config bw)......... 0Voice Roam Bandwidth in use(% of config bw).... 0Total channel MT free........................ 0Total voice MT free.......................... 0Na Direct.................................... 0Na Roam...................................... 0
Video Bandwidth in use(% of config bw)......... 0Video Roam Bandwidth in use(% of config bw).... 0Total BW in use for Voice(%)................... 0Total BW in use for SIP Preferred call(%)...... 0
WMM TSPEC CAC Call Stats
CLI Commands44
CLI Commandsshow ap stats

Total num of voice calls in progress........... 0Num of roaming voice calls in progress......... 0Total Num of voice calls since AP joined....... 0Total Num of roaming calls since AP joined..... 0Total Num of exp bw requests received.......... 0Total Num of exp bw requests admitted.......... 0Num of voice calls rejected since AP joined.... 0Num of roam calls rejected since AP joined..... 0Num of calls rejected due to insufficent bw.... 0Num of calls rejected due to invalid params.... 0Num of calls rejected due to PHY rate.......... 0Num of calls rejected due to QoS policy........ 0
SIP CAC Call StatsTotal Num of calls in progress................. 0Num of roaming calls in progress............... 0Total Num of calls since AP joined............. 0Total Num of roaming calls since AP joined..... 0Total Num of Preferred calls received.......... 0Total Num of Preferred calls accepted.......... 0Total Num of ongoing Preferred calls........... 0Total Num of calls rejected(Insuff BW)......... 0Total Num of roam calls rejected(Insuff BW).... 0
WMM Video TSPEC CAC Call StatsTotal num of video calls in progress........... 0Num of roaming video calls in progress......... 0Total Num of video calls since AP joined....... 0Total Num of video roaming calls since AP j.... 0Num of video calls rejected since AP joined.... 0Num of video roam calls rejected since AP j.... 0Num of video calls rejected due to insuffic.... 0Num of video calls rejected due to invalid .... 0Num of video calls rejected due to PHY rate.... 0Num of video calls rejected due to QoS poli.... 0
SIP Video CAC Call StatsTotal Num of video calls in progress........... 0Num of video roaming calls in progress......... 0Total Num of video calls since AP joined....... 0Total Num of video roaming calls since AP j.... 0Total Num of video calls rejected(Insuff BW.... 0Total Num of video roam calls rejected(Insu.... 0
Band Select StatsNum of dual band client ....................... 0Num of dual band client added.................. 0Num of dual band client expired ............... 0Num of dual band client replaced............... 0Num of dual band client detected .............. 0Num of suppressed client ...................... 0Num of suppressed client expired............... 0Num of suppressed client replaced.............. 0
show ap summaryTo display a summary of all lightweight access points attached to the controller, use the show ap summarycommand.
show ap summary [cisco_ap]
Syntax Description (Optional) Type sequence of characters that make upthe name of a specific AP or a group of APs, or entera wild character search pattern.
cisco_ap
CLI Commands45
CLI Commandsshow ap summary

Command Default None
Command History ModificationRelease
This commandwas introduced in a release earlier thanRelease 7.6.
7.6
Usage Guidelines A list that contains each lightweight access point name, number of slots, manufacturer, MAC address, location,and the controller port number appears. When you specify
The following example shows how to display a summary of all connected access points:
(Cisco Controller) >show ap summaryNumber of APs.................................... 2Global AP username.............................. userGlobal AP Dot1x username........................ Not ConfiguredNumber of APs.................................... 2Global AP username.............................. userGlobal AP Dot1x username........................ Not ConfiguredAP Name Slots AP Model Ethernet MAC Location Port Country Priority-------- ----- ---------------- ----------------- ---------- ---- ------- --------wolverine 2 AIR-LAP1252AG-A-K9 00:1b:d5:13:39:74 Reception 1 US 3ap:1120 1 AIR-LAP1121G-A-K9 00:1b:d5:a9:ad:08 Hall 235 1 US 1
show ap tcp-mss-adjustTo display the Basic Service Set Identifier (BSSID) value for each WLAN defined on an access point, usethe show ap tcp-mss-adjust command.
show ap tcp-mss-adjust {cisco_ap | all}
Syntax Description Specified lightweight access point name.cisco_ap
Specifies all access points.all
If an AP itself is configured with the keyword all, the all access points case takes precedence over the AP thatis with the keyword all.
Note
Command History ModificationRelease
This commandwas introduced in a release earlier thanRelease 7.6.
7.6
The following example shows how to display Transmission Control Protocol (TCP) maximumsegment size (MSS) information of all access points:
(Cisco Controller) >show ap tcp-mss-adjust all
CLI Commands46
CLI Commandsshow ap tcp-mss-adjust
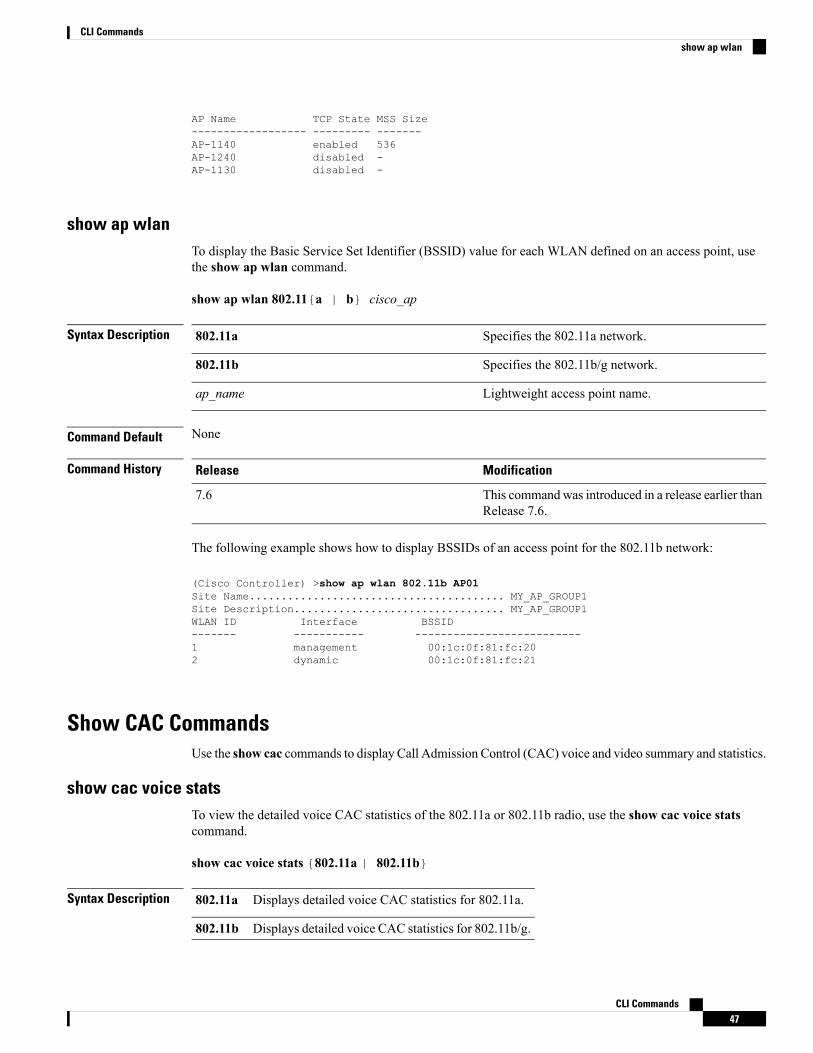
AP Name TCP State MSS Size------------------ --------- -------AP-1140 enabled 536AP-1240 disabled -AP-1130 disabled -
show ap wlanTo display the Basic Service Set Identifier (BSSID) value for each WLAN defined on an access point, usethe show ap wlan command.
show ap wlan 802.11{a | b} cisco_ap
Syntax Description Specifies the 802.11a network.802.11a
Specifies the 802.11b/g network.802.11b
Lightweight access point name.ap_name
Command Default None
Command History ModificationRelease
This commandwas introduced in a release earlier thanRelease 7.6.
7.6
The following example shows how to display BSSIDs of an access point for the 802.11b network:
(Cisco Controller) >show ap wlan 802.11b AP01Site Name........................................ MY_AP_GROUP1Site Description................................. MY_AP_GROUP1WLAN ID Interface BSSID------- ----------- --------------------------1 management 00:1c:0f:81:fc:202 dynamic 00:1c:0f:81:fc:21
Show CAC CommandsUse the show cac commands to display Call Admission Control (CAC) voice and video summary and statistics.
show cac voice statsTo view the detailed voice CAC statistics of the 802.11a or 802.11b radio, use the show cac voice statscommand.
show cac voice stats {802.11a | 802.11b}
Syntax Description Displays detailed voice CAC statistics for 802.11a.802.11a
Displays detailed voice CAC statistics for 802.11b/g.802.11b
CLI Commands47
CLI Commandsshow ap wlan

Command History ModificationRelease
This command was introduced in a release earlier than Release 7.6.7.6
The following is a sample output of the show cac voice stats 802.11b command:(Cisco Controller) > show cac voice stats 802.11b
WLC Voice Call Statistics for 802.11b Radio
WMM TSPEC CAC Call StatsTotal num of Calls in progress................. 0Num of Roam Calls in progress.................. 0Total Num of Calls Admitted.................... 0Total Num of Roam Calls Admitted............... 0Total Num of exp bw requests received.......... 0Total Num of exp bw requests Admitted.......... 0Total Num of Calls Rejected.................... 0Total Num of Roam Calls Rejected............... 0Num of Calls Rejected due to insufficent bw.... 0Num of Calls Rejected due to invalid params.... 0Num of Calls Rejected due to PHY rate.......... 0Num of Calls Rejected due to QoS policy........ 0
SIP CAC Call StatsTotal Num of Calls in progress................. 0Num of Roam Calls in progress.................. 0Total Num of Calls Admitted.................... 0Total Num of Roam Calls Admitted............... 0Total Num of Preferred Calls Received.......... 0Total Num of Preferred Calls Admitted.......... 0Total Num of Ongoing Preferred Calls........... 0Total Num of Calls Rejected(Insuff BW)......... 0Total Num of Roam Calls Rejected(Insuff BW).... 0
KTS based CAC Call StatsTotal Num of Calls in progress................. 0Num of Roam Calls in progress.................. 0Total Num of Calls Admitted.................... 0Total Num of Roam Calls Admitted............... 0Total Num of Calls Rejected(Insuff BW)......... 0Total Num of Roam Calls Rejected(Insuff BW).... 0
show cac voice summaryTo view the list of all APs with brief voice statistics (includes bandwidth used, maximum bandwidth available,and the number of calls information), use the show cac voice summary command.
show cac voice summary
Syntax Description This command has no arguments or keywords.
Command Default None
Command History ModificationRelease
This command was introduced in a release earlier than Release 7.6.7.6
The following is a sample output of the show cac voice summary command:
CLI Commands48
CLI Commandsshow cac voice summary
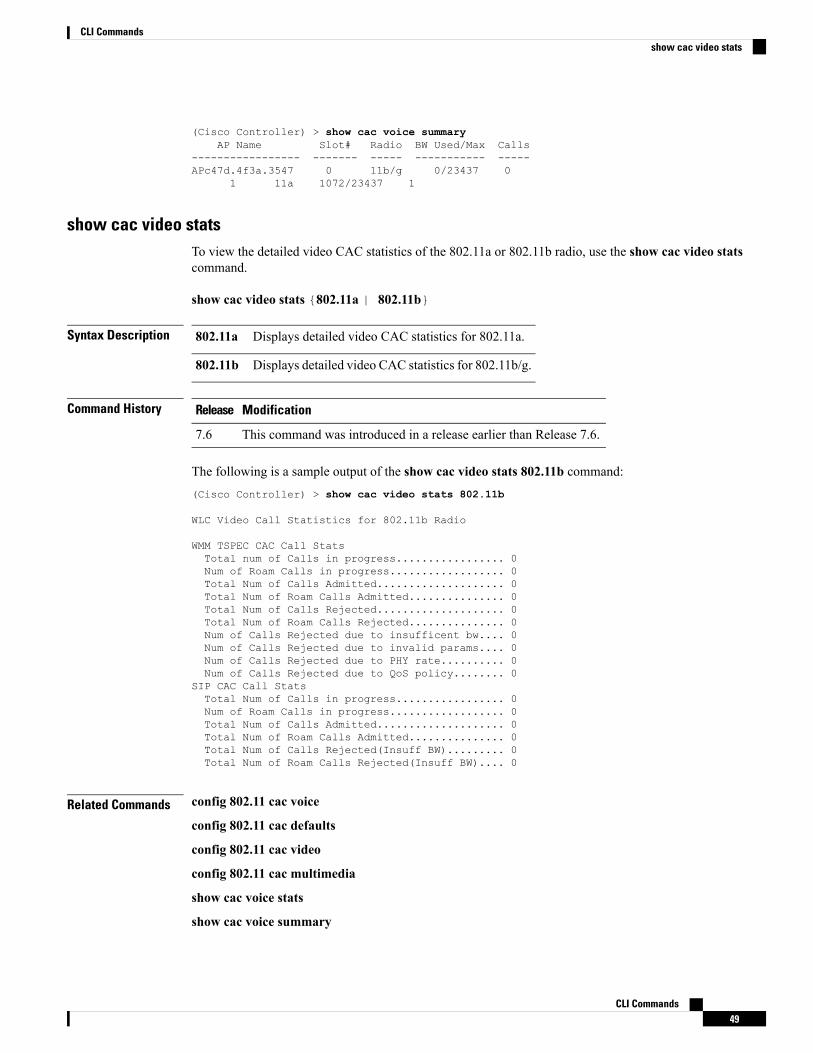
(Cisco Controller) > show cac voice summaryAP Name Slot# Radio BW Used/Max Calls
----------------- ------- ----- ----------- -----APc47d.4f3a.3547 0 11b/g 0/23437 0
1 11a 1072/23437 1
show cac video statsTo view the detailed video CAC statistics of the 802.11a or 802.11b radio, use the show cac video statscommand.
show cac video stats {802.11a | 802.11b}
Syntax Description Displays detailed video CAC statistics for 802.11a.802.11a
Displays detailed video CAC statistics for 802.11b/g.802.11b
Command History ModificationRelease
This command was introduced in a release earlier than Release 7.6.7.6
The following is a sample output of the show cac video stats 802.11b command:(Cisco Controller) > show cac video stats 802.11b
WLC Video Call Statistics for 802.11b Radio
WMM TSPEC CAC Call StatsTotal num of Calls in progress................. 0Num of Roam Calls in progress.................. 0Total Num of Calls Admitted.................... 0Total Num of Roam Calls Admitted............... 0Total Num of Calls Rejected.................... 0Total Num of Roam Calls Rejected............... 0Num of Calls Rejected due to insufficent bw.... 0Num of Calls Rejected due to invalid params.... 0Num of Calls Rejected due to PHY rate.......... 0Num of Calls Rejected due to QoS policy........ 0
SIP CAC Call StatsTotal Num of Calls in progress................. 0Num of Roam Calls in progress.................. 0Total Num of Calls Admitted.................... 0Total Num of Roam Calls Admitted............... 0Total Num of Calls Rejected(Insuff BW)......... 0Total Num of Roam Calls Rejected(Insuff BW).... 0
Related Commands config 802.11 cac voice
config 802.11 cac defaults
config 802.11 cac video
config 802.11 cac multimedia
show cac voice stats
show cac voice summary
CLI Commands49
CLI Commandsshow cac video stats

show cac video stats
show cac video summary
config 802.11 cac video load-based
config 802.11 cac video cac-method
config 802.11 cac video sip
show cac video summaryTo view the list of all access points with brief video statistics (includes bandwidth used, maximum bandwidthavailable, and the number of calls information), use the show cac video summary command.
show cac video summary
Syntax Description This command has no arguments or keywords.
Command History ModificationRelease
This command was introduced in a release earlier than Release 7.6.7.6
The following is a sample output of the show cac video summary command:(Cisco Controller) > show cac video summary
AP Name Slot# Radio BW Used/Max Calls----------------- ------- ----- ----------- -----AP001b.d571.88e0 0 11b/g 0/10937 0
1 11a 0/18750 0AP5_1250 0 11b/g 0/10937 0
1 11a 0/18750 0
Related Commands config 802.11 cac voice
config 802.11 cac defaults
config 802.11 cac video
config 802.11 cac multimedia
show cac voice stats
show cac voice summary
show cac video stats
show cac video summary
config 802.11 cac video load-based
config 802.11 cac video cac-method
config 802.11 cac video sip
CLI Commands50
CLI Commandsshow cac video summary
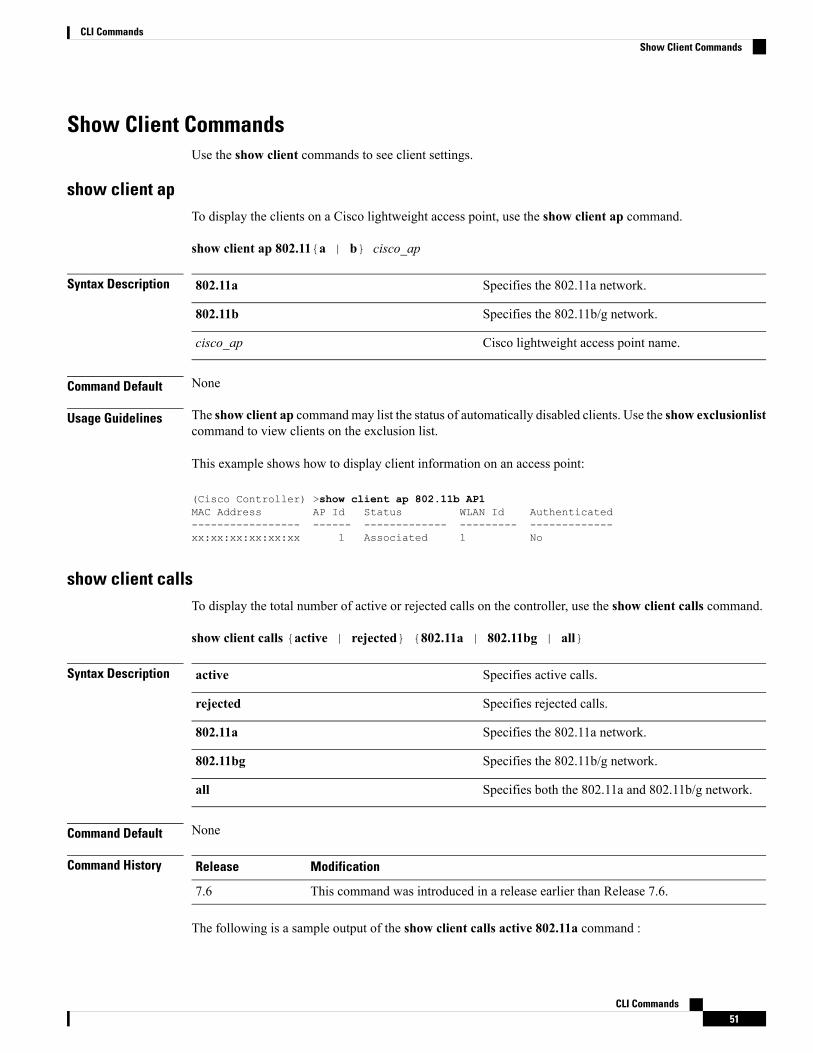
Show Client CommandsUse the show client commands to see client settings.
show client apTo display the clients on a Cisco lightweight access point, use the show client ap command.
show client ap 802.11{a | b} cisco_ap
Syntax Description Specifies the 802.11a network.802.11a
Specifies the 802.11b/g network.802.11b
Cisco lightweight access point name.cisco_ap
Command Default None
Usage Guidelines The show client ap commandmay list the status of automatically disabled clients. Use the show exclusionlistcommand to view clients on the exclusion list.
This example shows how to display client information on an access point:
(Cisco Controller) >show client ap 802.11b AP1MAC Address AP Id Status WLAN Id Authenticated----------------- ------ ------------- --------- -------------xx:xx:xx:xx:xx:xx 1 Associated 1 No
show client callsTo display the total number of active or rejected calls on the controller, use the show client calls command.
show client calls {active | rejected} {802.11a | 802.11bg | all}
Syntax Description Specifies active calls.active
Specifies rejected calls.rejected
Specifies the 802.11a network.802.11a
Specifies the 802.11b/g network.802.11bg
Specifies both the 802.11a and 802.11b/g network.all
Command Default None
Command History ModificationRelease
This command was introduced in a release earlier than Release 7.6.7.6
The following is a sample output of the show client calls active 802.11a command :
CLI Commands51
CLI CommandsShow Client Commands
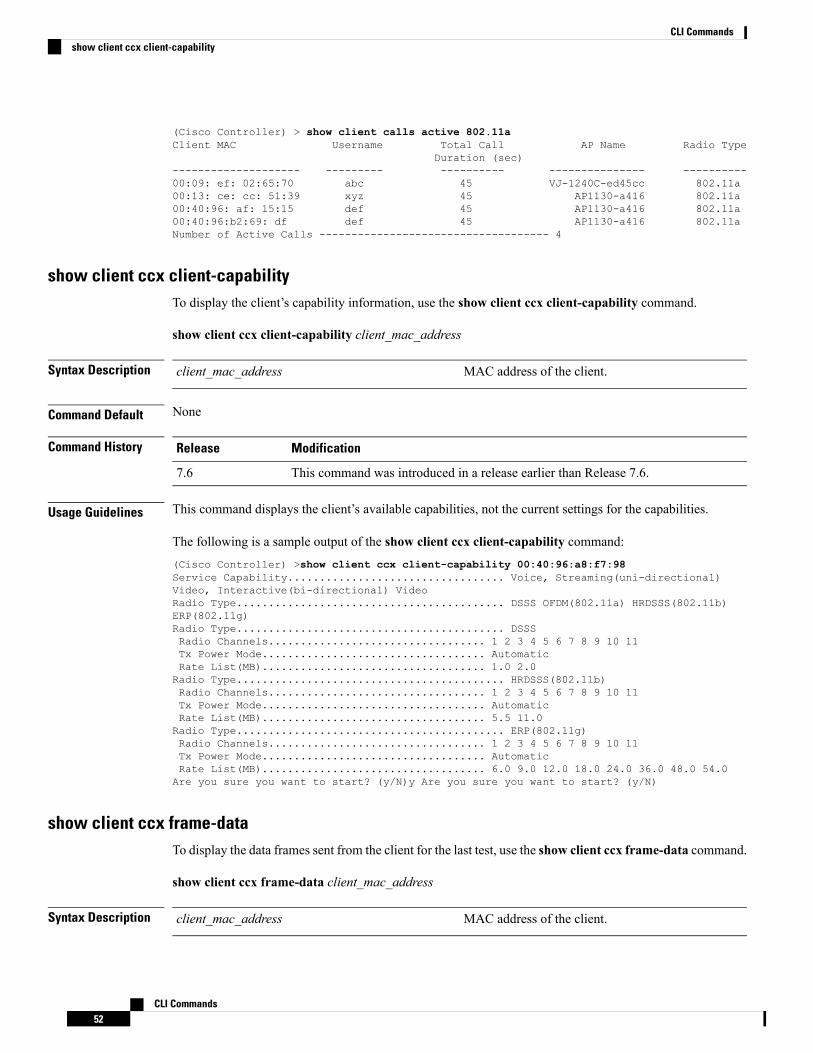
(Cisco Controller) > show client calls active 802.11aClient MAC Username Total Call AP Name Radio Type
Duration (sec)-------------------- --------- ---------- --------------- ----------00:09: ef: 02:65:70 abc 45 VJ-1240C-ed45cc 802.11a00:13: ce: cc: 51:39 xyz 45 AP1130-a416 802.11a00:40:96: af: 15:15 def 45 AP1130-a416 802.11a00:40:96:b2:69: df def 45 AP1130-a416 802.11aNumber of Active Calls ------------------------------------ 4
show client ccx client-capabilityTo display the client’s capability information, use the show client ccx client-capability command.
show client ccx client-capability client_mac_address
Syntax Description MAC address of the client.client_mac_address
Command Default None
Command History ModificationRelease
This command was introduced in a release earlier than Release 7.6.7.6
Usage Guidelines This command displays the client’s available capabilities, not the current settings for the capabilities.
The following is a sample output of the show client ccx client-capability command:(Cisco Controller) >show client ccx client-capability 00:40:96:a8:f7:98Service Capability.................................. Voice, Streaming(uni-directional)Video, Interactive(bi-directional) VideoRadio Type.......................................... DSSS OFDM(802.11a) HRDSSS(802.11b)ERP(802.11g)Radio Type.......................................... DSSSRadio Channels.................................. 1 2 3 4 5 6 7 8 9 10 11Tx Power Mode................................... AutomaticRate List(MB)................................... 1.0 2.0Radio Type.......................................... HRDSSS(802.11b)Radio Channels.................................. 1 2 3 4 5 6 7 8 9 10 11Tx Power Mode................................... AutomaticRate List(MB)................................... 5.5 11.0Radio Type.......................................... ERP(802.11g)Radio Channels.................................. 1 2 3 4 5 6 7 8 9 10 11Tx Power Mode................................... AutomaticRate List(MB)................................... 6.0 9.0 12.0 18.0 24.0 36.0 48.0 54.0Are you sure you want to start? (y/N)y Are you sure you want to start? (y/N)
show client ccx frame-dataTo display the data frames sent from the client for the last test, use the show client ccx frame-data command.
show client ccx frame-data client_mac_address
Syntax Description MAC address of the client.client_mac_address
CLI Commands52
CLI Commandsshow client ccx client-capability

Command Default None
Command History ModificationRelease
This command was introduced in a release earlier than Release 7.6.7.6
The following is a sample output of the show client ccx frame-data command:(Cisco Controller) >show client ccx frame-dataxx:xx:xx:xx:xx:xx
show client ccx last-response-statusTo display the status of the last test response, use the show client ccx last-response-status command.
show client ccx last-response-status client_mac_address
Syntax Description MAC address of the client.client_mac_address
Command Default None
Command History ModificationRelease
This command was introduced in a release earlier than Release 7.6.7.6
The following is a sample output of the show client ccx last-response-status command:(Cisco Controller) >show client ccx last-response-statusTest Status ........................ SuccessResponse Dialog Token.............. 87Response Status.................... SuccessfulResponse Test Type................. 802.1x Authentication TestResponse Time...................... 3476 seconds since system boot
show client ccx last-test-statusTo display the status of the last test, use the show client ccx last-test-status command.
show client ccx last-test-status client_mac_address
Syntax Description MAC address of the client.client_mac_address
Command Default None
Command History ModificationRelease
This command was introduced in a release earlier than Release 7.6.7.6
The following is a sample output of the show client ccx last-test-status command:(Cisco Controller) >show client ccx last-test-status
CLI Commands53
CLI Commandsshow client ccx last-response-status
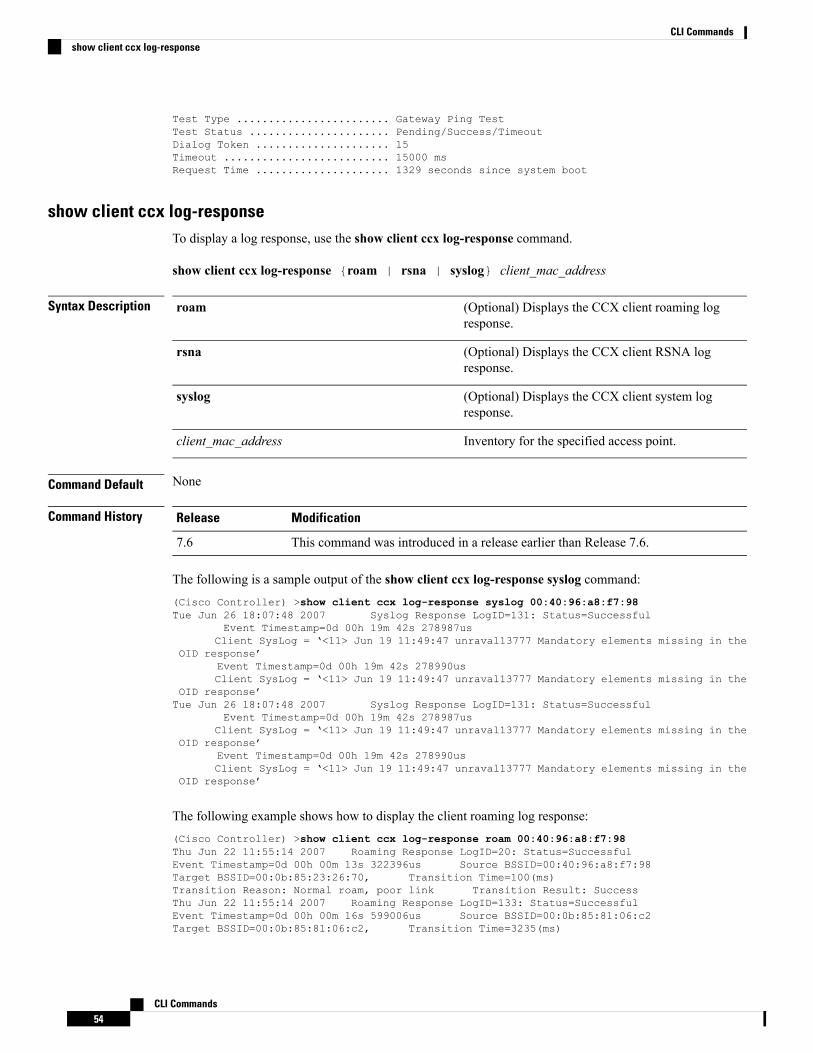
Test Type ........................ Gateway Ping TestTest Status ...................... Pending/Success/TimeoutDialog Token ..................... 15Timeout .......................... 15000 msRequest Time ..................... 1329 seconds since system boot
show client ccx log-responseTo display a log response, use the show client ccx log-response command.
show client ccx log-response {roam | rsna | syslog} client_mac_address
Syntax Description (Optional) Displays the CCX client roaming logresponse.
roam
(Optional) Displays the CCX client RSNA logresponse.
rsna
(Optional) Displays the CCX client system logresponse.
syslog
Inventory for the specified access point.client_mac_address
Command Default None
Command History ModificationRelease
This command was introduced in a release earlier than Release 7.6.7.6
The following is a sample output of the show client ccx log-response syslog command:(Cisco Controller) >show client ccx log-response syslog 00:40:96:a8:f7:98Tue Jun 26 18:07:48 2007 Syslog Response LogID=131: Status=Successful
Event Timestamp=0d 00h 19m 42s 278987usClient SysLog = ‘<11> Jun 19 11:49:47 unraval13777 Mandatory elements missing in the
OID response’Event Timestamp=0d 00h 19m 42s 278990usClient SysLog = ‘<11> Jun 19 11:49:47 unraval13777 Mandatory elements missing in the
OID response’Tue Jun 26 18:07:48 2007 Syslog Response LogID=131: Status=Successful
Event Timestamp=0d 00h 19m 42s 278987usClient SysLog = ‘<11> Jun 19 11:49:47 unraval13777 Mandatory elements missing in the
OID response’Event Timestamp=0d 00h 19m 42s 278990usClient SysLog = ‘<11> Jun 19 11:49:47 unraval13777 Mandatory elements missing in the
OID response’
The following example shows how to display the client roaming log response:(Cisco Controller) >show client ccx log-response roam 00:40:96:a8:f7:98Thu Jun 22 11:55:14 2007 Roaming Response LogID=20: Status=SuccessfulEvent Timestamp=0d 00h 00m 13s 322396us Source BSSID=00:40:96:a8:f7:98Target BSSID=00:0b:85:23:26:70, Transition Time=100(ms)Transition Reason: Normal roam, poor link Transition Result: SuccessThu Jun 22 11:55:14 2007 Roaming Response LogID=133: Status=SuccessfulEvent Timestamp=0d 00h 00m 16s 599006us Source BSSID=00:0b:85:81:06:c2Target BSSID=00:0b:85:81:06:c2, Transition Time=3235(ms)
CLI Commands54
CLI Commandsshow client ccx log-response

Transition Reason: Normal roam, poor link Transition Result: SuccessThu Jun 22 18:28:48 2007 Roaming Response LogID=133: Status=SuccessfulEvent Timestamp=0d 00h 00m 08s 815477us Source BSSID=00:0b:85:81:06:c2Target BSSID=00:0b:85:81:06:d2, Transition Time=3281(ms)Transition Reason: First association to WLAN Transition Result: Success
show client ccx manufacturer-infoTo display the client manufacturing information, use the show client ccx manufacturer-info command.
show client ccx manufacturer-info client_mac_address
Syntax Description MAC address of the client.client_mac_address
Command Default None
Command History ModificationRelease
This command was introduced in a release earlier than Release 7.6.7.6
The following is a sample output of the show client ccx manufacturer-info command:(Cisco Controller) >show client ccx manufacturer-info 00:40:96:a8:f7:98Manufacturer OUI .............................. 00:40:96Manufacturer ID ............................... CiscoManufacturer Model ............................ Cisco Aironet 802.11a/b/g Wireless AdapterManufacturer Serial ........................... FOC1046N3SXMac Address ................................... 00:40:96:b2:8d:5eRadio Type .................................... DSSS OFDM(802.11a) HRDSSS(802.11b)ERP(802.11g)
Antenna Type .................................. Omni-directional diversityAntenna Gain .................................. 2 dBiRx Sensitivity:Radio Type ...................................... DSSSRx Sensitivity .................................. Rate:1.0 Mbps, MinRssi:-95, MaxRss1:-30Rx Sensitivity .................................. Rate:2.0 Mbps, MinRssi:-95, MaxRss1:-30Radio Type ...................................... HRDSSS(802.11b)Rx Sensitivity .................................. Rate:5.5 Mbps, MinRssi:-95, MaxRss1:-30Rx Sensitivity .................................. Rate:11.0 Mbps, MinRssi:-95, MaxRss1:-30Radio Type ...................................... ERP(802.11g)Rx Sensitivity .................................. Rate:6.0 Mbps, MinRssi:-95, MaxRss1:-30Rx Sensitivity .................................. Rate:9.0 Mbps, MinRssi:-95, MaxRss1:-30Rx Sensitivity .................................. Rate:12.0 Mbps, MinRssi:-95, MaxRss1:-30Rx Sensitivity .................................. Rate:18.0 Mbps, MinRss1:-95, MaxRss1:-30
show client ccx operating-parametersTo display the client operating-parameters, use the show client ccx operating-parameters command.
show client ccx operating-parameters client_mac_address
Syntax Description MAC address of the client.client_mac_address
Command Default None
CLI Commands55
CLI Commandsshow client ccx manufacturer-info
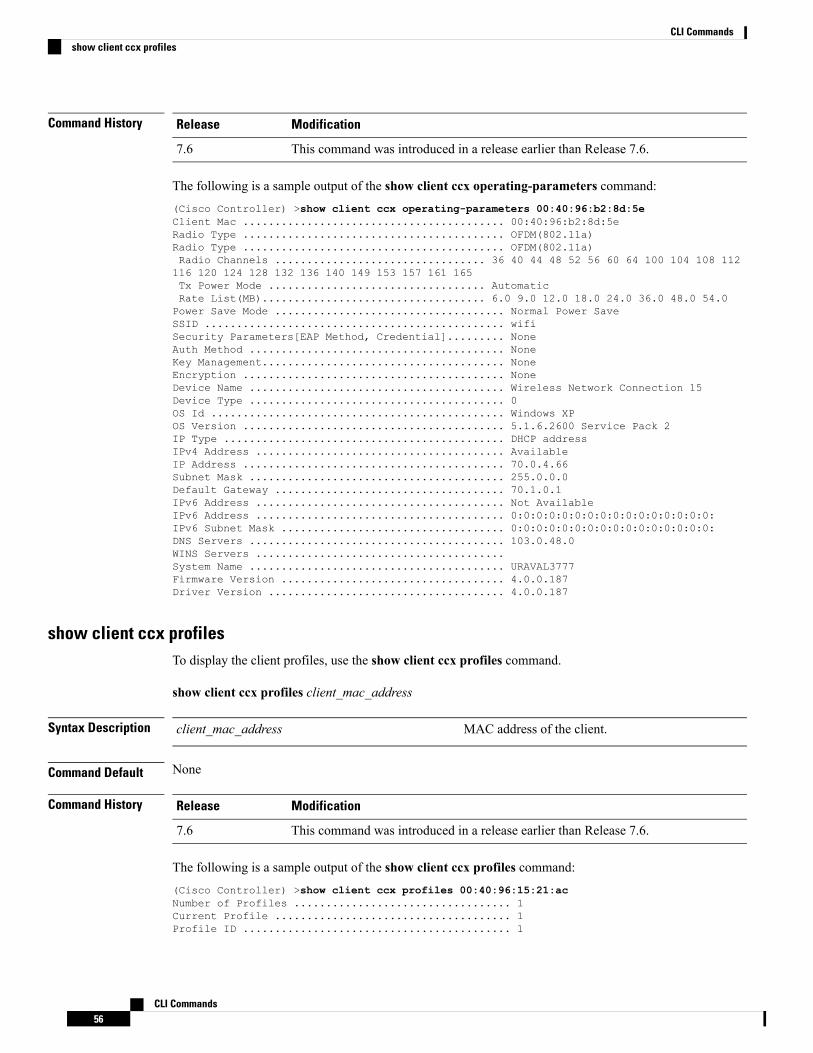
Command History ModificationRelease
This command was introduced in a release earlier than Release 7.6.7.6
The following is a sample output of the show client ccx operating-parameters command:(Cisco Controller) >show client ccx operating-parameters 00:40:96:b2:8d:5eClient Mac ......................................... 00:40:96:b2:8d:5eRadio Type ......................................... OFDM(802.11a)Radio Type ......................................... OFDM(802.11a)Radio Channels ................................. 36 40 44 48 52 56 60 64 100 104 108 112116 120 124 128 132 136 140 149 153 157 161 165Tx Power Mode .................................. AutomaticRate List(MB)................................... 6.0 9.0 12.0 18.0 24.0 36.0 48.0 54.0Power Save Mode .................................... Normal Power SaveSSID ............................................... wifiSecurity Parameters[EAP Method, Credential]......... NoneAuth Method ........................................ NoneKey Management...................................... NoneEncryption ......................................... NoneDevice Name ........................................ Wireless Network Connection 15Device Type ........................................ 0OS Id .............................................. Windows XPOS Version ......................................... 5.1.6.2600 Service Pack 2IP Type ............................................ DHCP addressIPv4 Address ....................................... AvailableIP Address ......................................... 70.0.4.66Subnet Mask ........................................ 255.0.0.0Default Gateway .................................... 70.1.0.1IPv6 Address ....................................... Not AvailableIPv6 Address ....................................... 0:0:0:0:0:0:0:0:0:0:0:0:0:0:0:0:IPv6 Subnet Mask ................................... 0:0:0:0:0:0:0:0:0:0:0:0:0:0:0:0:DNS Servers ........................................ 103.0.48.0WINS Servers .......................................System Name ........................................ URAVAL3777Firmware Version ................................... 4.0.0.187Driver Version ..................................... 4.0.0.187
show client ccx profilesTo display the client profiles, use the show client ccx profiles command.
show client ccx profiles client_mac_address
Syntax Description MAC address of the client.client_mac_address
Command Default None
Command History ModificationRelease
This command was introduced in a release earlier than Release 7.6.7.6
The following is a sample output of the show client ccx profiles command:(Cisco Controller) >show client ccx profiles 00:40:96:15:21:acNumber of Profiles .................................. 1Current Profile ..................................... 1Profile ID .......................................... 1
CLI Commands56
CLI Commandsshow client ccx profiles

Profile Name ........................................ wifiEAPSSID ................................................ wifiEAPSecurity Parameters [EAP Method, Credential]......... EAP-TLS, Host OS Login CredentialsAuth Method ......................................... EAPKey Management ...................................... WPA2+CCKMEncryption .......................................... AES-CCMPPower Save Mode ..................................... Constantly AwakeRadio Configuration:Radio Type........................................... DSSSPreamble Type.................................... Long preambleCCA Method....................................... Energy Detect + CarrierDetect/CorrelationData Retries..................................... 6Fragment Threshold............................... 2342Radio Channels................................... 1 2 3 4 5 6 7 8 9 10 11Tx Power Mode.................................... AutomaticRate List (MB)................................... 1.0 2.0Radio Type........................................... HRDSSS(802.11b)Preamble Type.................................... Long preambleCCA Method....................................... Energy Detect + CarrierDetect/CorrelationData Retries..................................... 6Fragment Threshold............................... 2342Radio Channels................................... 1 2 3 4 5 6 7 8 9 10 11Tx Power Mode.................................... AutomaticRate List(MB).................................... 5.5 11.0Radio Type........................................... ERP(802.11g)Preamble Type.................................... Long preambleCCA Method....................................... Energy Detect + CarrierDetect/CorrelationData Retries..................................... 6Fragment Threshold............................... 2342Radio Channels................................... 1 2 3 4 5 6 7 8 9 10 11Tx Power Mode.................................... AutomaticRate List (MB)................................... 6.0 9.0 12.0 18.0 24.0 36.0 48.0 54.0Radio Type........................................... OFDM(802.11a)Preamble Type.................................... Long preambleCCA Method....................................... Energy Detect + CarrierDetect/CorrelationData Retries..................................... 6Fragment Threshold............................... 2342Radio Channels................................... 36 40 44 48 52 56 60 64 149 153 157 161165Tx Power Mode.................................... AutomaticRate List (MB)................................... 6.0 9.0 12.0 18.0 24.0 36.0 48.0 54.0
show client ccx resultsTo display the results from the last successful diagnostic test, use the show client ccx results command.
show client ccx results client_mac_address
Syntax Description MAC address of the client.client_mac_address
Command Default None
Command History ModificationRelease
This command was introduced in a release earlier than Release 7.6.7.6
CLI Commands57
CLI Commandsshow client ccx results

The following is a sample output of the show client ccx results command:
(Cisco Controller) >show client ccx results xx.xx.xx.xxdot1x Complete....................................... SuccessEAP Method........................................... *1,Host OS Login Credentialsdot1x Status......................................... 255
show client ccx rmTo display Cisco Client eXtension (CCX) client radio management report information, use the show clientccx rm command.
show client ccx rm client_MAC {status | {report {chan-load | noise-hist | frame | beacon |pathloss}}}
Syntax Description Client MAC address.client_MAC
Displays the client CCX radio management statusinformation.
status
Displays the client CCX radio management report.report
Displays radio management channel load reports.chan-load
Displays radio management noise histogram reports.noise-hist
Displays radio management beacon load reports.beacon
Displays radio management frame reports.frame
Displays radio management path loss reports.pathloss
Command Default None
Command History ModificationRelease
This command was introduced in a release earlier than Release 7.6.7.6
The following example shows how to display the client radio management status information:(Cisco Controller) >show client ccx rm 00:40:96:15:21:ac status
Client Mac Address............................... 00:40:96:15:21:acChannel Load Request............................. EnabledNoise Histogram Request.......................... EnabledBeacon Request................................... EnabledFrame Request.................................... EnabledInterval......................................... 30Iteration........................................... 10
The following example shows how to display the client radio management load reports:(Cisco Controller) >show client ccx rm 00:40:96:15:21:ac report chan-load
CLI Commands58
CLI Commandsshow client ccx rm
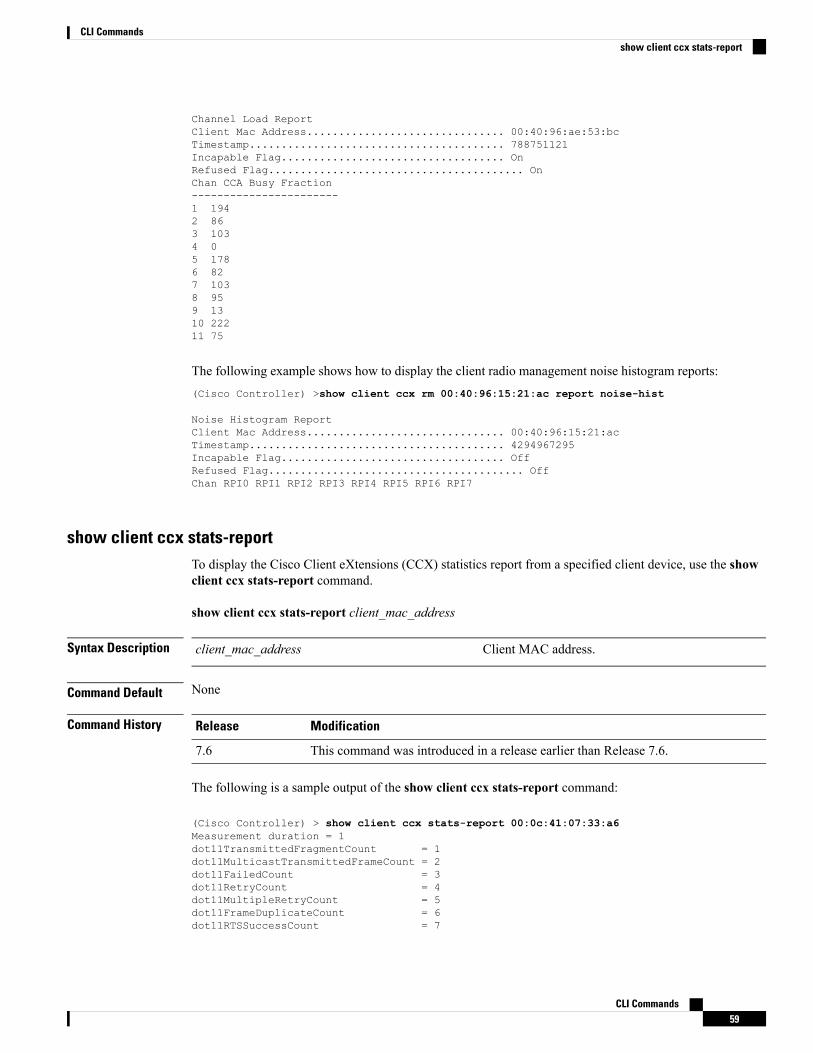
Channel Load ReportClient Mac Address............................... 00:40:96:ae:53:bcTimestamp........................................ 788751121Incapable Flag................................... OnRefused Flag........................................ OnChan CCA Busy Fraction-----------------------1 1942 863 1034 05 1786 827 1038 959 1310 22211 75
The following example shows how to display the client radio management noise histogram reports:(Cisco Controller) >show client ccx rm 00:40:96:15:21:ac report noise-hist
Noise Histogram ReportClient Mac Address............................... 00:40:96:15:21:acTimestamp........................................ 4294967295Incapable Flag................................... OffRefused Flag........................................ OffChan RPI0 RPI1 RPI2 RPI3 RPI4 RPI5 RPI6 RPI7
show client ccx stats-reportTo display the Cisco Client eXtensions (CCX) statistics report from a specified client device, use the showclient ccx stats-report command.
show client ccx stats-report client_mac_address
Syntax Description Client MAC address.client_mac_address
Command Default None
Command History ModificationRelease
This command was introduced in a release earlier than Release 7.6.7.6
The following is a sample output of the show client ccx stats-report command:
(Cisco Controller) > show client ccx stats-report 00:0c:41:07:33:a6Measurement duration = 1dot11TransmittedFragmentCount = 1dot11MulticastTransmittedFrameCount = 2dot11FailedCount = 3dot11RetryCount = 4dot11MultipleRetryCount = 5dot11FrameDuplicateCount = 6dot11RTSSuccessCount = 7
CLI Commands59
CLI Commandsshow client ccx stats-report

dot11RTSFailureCount = 8dot11ACKFailureCount = 9dot11ReceivedFragmentCount = 10dot11MulticastReceivedFrameCount = 11dot11FCSErrorCount = 12dot11TransmittedFrameCount = 13
show client detailTo display detailed information for a client on a Cisco lightweight access point, use the show client detailcommand.
show client detail mac_address
Syntax Description Client MAC address.mac_address
Command Default None
Command History ModificationRelease
This command was introduced in a release earlier than Release 7.6.7.6
Usage Guidelines The show client ap commandmay list the status of automatically disabled clients. Use the show exclusionlistcommand to display clients on the exclusion list.
The following example shows how to display the client detailed information:(Cisco Controller) >show client detail 00:0c:41:07:33:a6Policy Manager State..............................POSTURE_REQDPolicy Manager Rule Created.......................YesClient MAC Address............................... 00:16:36:40:ac:58Client Username.................................. N/AClient State..................................... AssociatedClient NAC OOB State............................. QUARANTINEGuest LAN Id..................................... 1IP Address....................................... UnknownSession Timeout.................................. 0QoS Level........................................ Platinum802.1P Priority Tag.............................. disabledKTS CAC Capability............................... YesWMM Support...................................... EnabledPower Save....................................... ONDiff Serv Code Point (DSPC)...................... disabledMobility State................................... LocalInternal Mobility State.......................... apfMsMmInitialSecurity Policy Completed........................ NoPolicy Manager State............................. WEBAUTH_REQDPolicy Manager Rule Created...................... YesNPU Fast Fast Notified........................... YesLast Policy Manager State........................ WEBAUTH_REQDClient Entry Create Time......................... 460 secondsInterface........................................ wired-guestFlexConnect Authentication....................... LocalFlexConnect Data Switching....................... LocalVLAN............................................. 236Quarantine VLAN.................................. 0Client Statistics:Number of Bytes Received................... 66806
CLI Commands60
CLI Commandsshow client detail
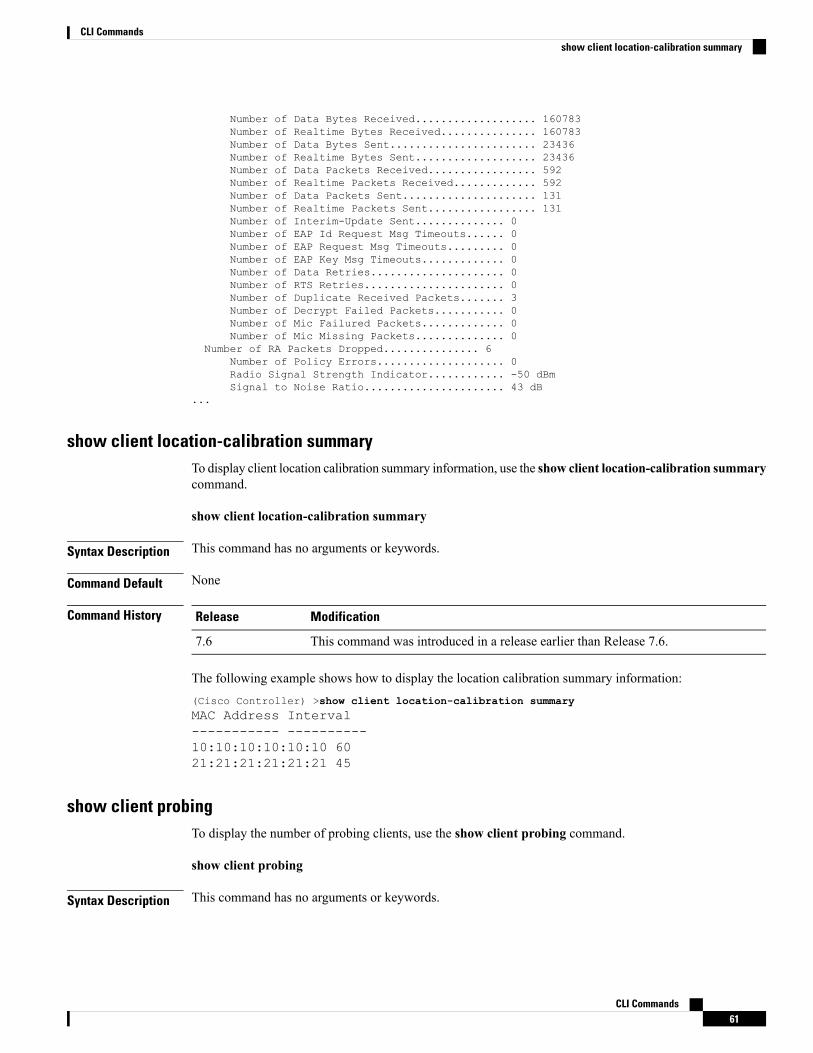
Number of Data Bytes Received................... 160783Number of Realtime Bytes Received............... 160783Number of Data Bytes Sent....................... 23436Number of Realtime Bytes Sent................... 23436Number of Data Packets Received................. 592Number of Realtime Packets Received............. 592Number of Data Packets Sent..................... 131Number of Realtime Packets Sent................. 131Number of Interim-Update Sent.............. 0Number of EAP Id Request Msg Timeouts...... 0Number of EAP Request Msg Timeouts......... 0Number of EAP Key Msg Timeouts............. 0Number of Data Retries..................... 0Number of RTS Retries...................... 0Number of Duplicate Received Packets....... 3Number of Decrypt Failed Packets........... 0Number of Mic Failured Packets............. 0Number of Mic Missing Packets.............. 0
Number of RA Packets Dropped............... 6Number of Policy Errors.................... 0Radio Signal Strength Indicator............ -50 dBmSignal to Noise Ratio...................... 43 dB
...
show client location-calibration summaryTo display client location calibration summary information, use the show client location-calibration summarycommand.
show client location-calibration summary
Syntax Description This command has no arguments or keywords.
Command Default None
Command History ModificationRelease
This command was introduced in a release earlier than Release 7.6.7.6
The following example shows how to display the location calibration summary information:(Cisco Controller) >show client location-calibration summaryMAC Address Interval----------- ----------10:10:10:10:10:10 6021:21:21:21:21:21 45
show client probingTo display the number of probing clients, use the show client probing command.
show client probing
Syntax Description This command has no arguments or keywords.
CLI Commands61
CLI Commandsshow client location-calibration summary

Command Default None
Command History ModificationRelease
This command was introduced in a release earlier than Release 7.6.7.6
The following example shows how to display the number of probing clients:
(Cisco Controller) >show client probingNumber of Probing Clients........................ 0
show client roam-historyTo display the roaming history of a specified client, use the show client roam-history command.
show client roam-history mac_address
Syntax Description Client MAC address.mac_address
Command Default None
Command History ModificationRelease
This command was introduced in a release earlier than Release 7.6.7.6
The following is a sample output of the show client roam-history command:
(Cisco Controller) > show client roam-history 00:14:6c:0a:57:77
show client summaryTo display a summary of clients associated with a Cisco lightweight access point, use the show client summarycommand.
show client summary
Syntax Description This command has no arguments or keywords.
Command Default None
Command History ModificationRelease
This command was introduced in a release earlier than Release 7.6.7.6
Usage Guidelines Use show client ap command to list the status of automatically disabled clients. Use the show exclusionlistcommand to display clients on the exclusion list.
The following example shows how to display a summary of the active clients:
CLI Commands62
CLI Commandsshow client roam-history

(Cisco Controller) > show client summaryNumber of Clients................................ 24Number of PMIPV6 Clients......................... 200MAC Address AP Name Status WLAN/GLAN/RLAN Auth Protocol PortWired PMIPV6----------------- ----------------- ------------- -------------- ---- ---------------- --------- ------
00:00:15:01:00:01 NMSP-TalwarSIM1-2 Associated 1 Yes 802.11a 13No Yes
00:00:15:01:00:02 NMSP-TalwarSIM1-2 Associated 1 Yes 802.11a 13No No
00:00:15:01:00:03 NMSP-TalwarSIM1-2 Associated 1 Yes 802.11a 13No Yes
00:00:15:01:00:04 NMSP-TalwarSIM1-2 Associated 1 Yes 802.11a 13No No
show client summary guest-lanTo display the active wired guest LAN clients, use the show client summary guest-lan command.
show client summary guest-lan
Syntax Description This command has no arguments or keywords.
Command Default None
Command History ModificationRelease
This command was introduced in a release earlier than Release 7.6.7.6
The following is a sample output of the show client summary guest-lan command:
(Cisco Controller) > show client summary guest-lanNumber of Clients................................ 1MAC Address AP Name Status WLAN Auth Protocol Port Wired----------- --------- ---------- ---- ---- -------- ---- -----00:16:36:40:ac:58 N/A Associated 1 No 802.3 1 Yes
Related Commands show client summary
show client tsmTo display the client traffic stream metrics (TSM) statistics, use the show client tsm command.
show client tsm 802.11{a | b} client_mac {ap_mac | all}
Syntax Description Specifies the 802.11a network.802.11a
Specifies the 802.11 b/g network.802.11b
MAC address of the client.client_mac
MAC address of the tsm access point.ap_mac
CLI Commands63
CLI Commandsshow client summary guest-lan
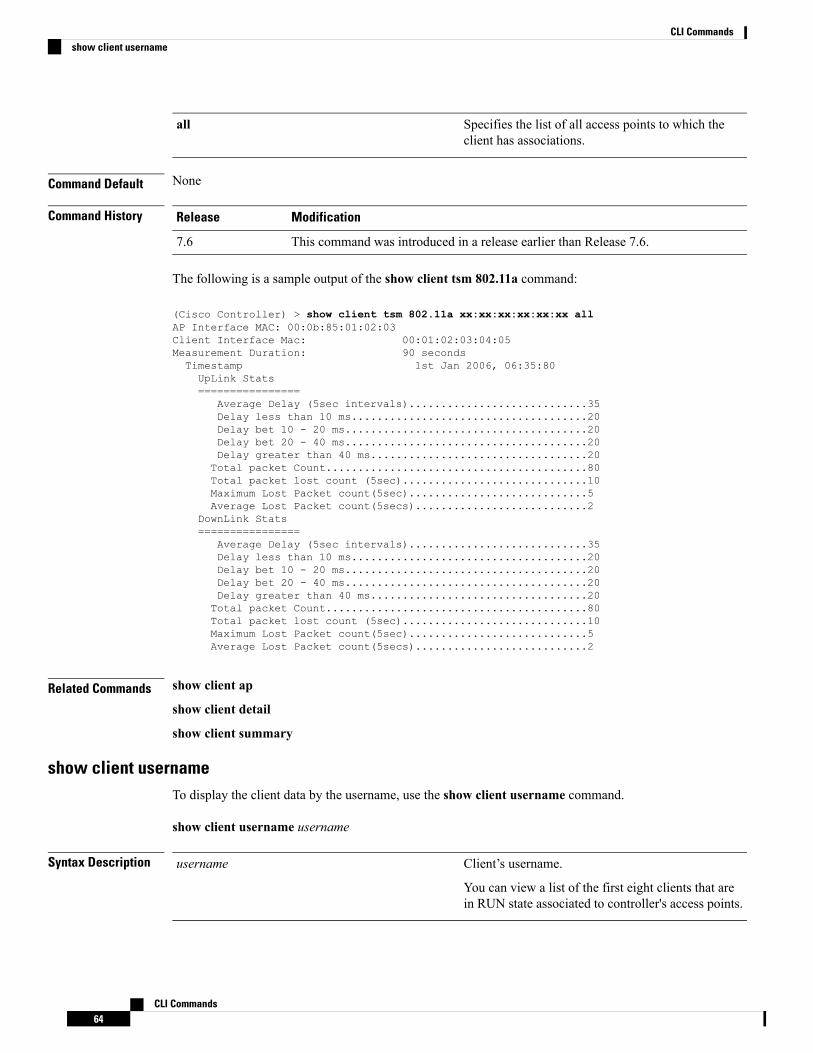
Specifies the list of all access points to which theclient has associations.
all
Command Default None
Command History ModificationRelease
This command was introduced in a release earlier than Release 7.6.7.6
The following is a sample output of the show client tsm 802.11a command:
(Cisco Controller) > show client tsm 802.11a xx:xx:xx:xx:xx:xx allAP Interface MAC: 00:0b:85:01:02:03Client Interface Mac: 00:01:02:03:04:05Measurement Duration: 90 secondsTimestamp 1st Jan 2006, 06:35:80UpLink Stats================
Average Delay (5sec intervals)............................35Delay less than 10 ms.....................................20Delay bet 10 - 20 ms......................................20Delay bet 20 - 40 ms......................................20Delay greater than 40 ms..................................20Total packet Count.........................................80Total packet lost count (5sec).............................10Maximum Lost Packet count(5sec)............................5Average Lost Packet count(5secs)...........................2
DownLink Stats================
Average Delay (5sec intervals)............................35Delay less than 10 ms.....................................20Delay bet 10 - 20 ms......................................20Delay bet 20 - 40 ms......................................20Delay greater than 40 ms..................................20Total packet Count.........................................80Total packet lost count (5sec).............................10Maximum Lost Packet count(5sec)............................5Average Lost Packet count(5secs)...........................2
Related Commands show client ap
show client detail
show client summary
show client usernameTo display the client data by the username, use the show client username command.
show client username username
Syntax Description Client’s username.
You can view a list of the first eight clients that arein RUN state associated to controller's access points.
username
CLI Commands64
CLI Commandsshow client username

Command Default None
Command History ModificationRelease
This command was introduced in a release earlier than Release 7.6.7.6
The following is a sample output of the show client username command:
(Cisco Controller) > show client username local
MAC Address AP Name Status WLAN Auth Protocol PortDevice Type----------------- ----------------- ------------- ---- ---- ---------------- ---------------
12:22:64:64:00:01 WEB-AUTH-AP-1 Associated 1 Yes 802.11g 1Unknown12:22:64:64:00:02 WEB-AUTH-AP-1 Associated 1 Yes 802.11g 1Unknown12:22:64:64:00:03 WEB-AUTH-AP-1 Associated 1 Yes 802.11g 1Unknown12:22:64:64:00:04 WEB-AUTH-AP-1 Associated 1 Yes 802.11g 1Unknown12:22:64:64:00:05 WEB-AUTH-AP-1 Associated 1 Yes 802.11g 1Unknown12:22:64:64:00:06 WEB-AUTH-AP-1 Associated 1 Yes 802.11g 1Unknown12:22:64:64:00:07 WEB-AUTH-AP-1 Associated 1 Yes 802.11g 1Unknown12:22:64:64:00:08 WEB-AUTH-AP-1 Associated 1 Yes 802.11g 1Unknown
show client voice-diagTo display voice diagnostics statistics, use the show client voice-diag command.
show client voice-diag {quos-map | roam-history | rssi | status | tspec}
Syntax Description Displays information about the QoS/DSCP mappingand packet statistics in each of the four queues: VO,VI, BE, BK. The different DSCP values are alsodisplayed.
quos-map
Displays information about history of the last threeroamings. The output contains the timestamp, accesspoint associatedwith the roaming, the roaming reason,and if there is a roaming failure, the reason for theroaming failure.
roam-history
Displays the client’s RSSI values in the last 5 secondswhen voice diagnostics are enabled.
rssi
Displays the status of voice diagnostics for clients.status
Displays TSPEC for the voice diagnostic for clients.tspec
CLI Commands65
CLI Commandsshow client voice-diag

Command Default None
Command History ModificationRelease
This command was introduced in a release earlier than Release 7.6.7.6
The following is a sample output of the show client voice-diag status command:
(Cisco Controller) > show client voice-diag statusVoice Diagnostics Status: FALSE
Related Commands show client ap
show client detail
show client summary
debug voice-diag
Show IPv6 CommandsUse the show ipv6 commands to display the IPv6 settings and information.
show ipv6 aclTo display the IPv6 access control lists (ACLs) that are configured on the controller, use the show ipv6 aclcommand.
show ipv6 acl detailed {acl_name | summary}
Syntax Description IPv6 ACL name. The name can be up to 32alphanumeric characters.
acl_name
Displays detailed information about a specific ACL.detailed
Command Default None
Command History ModificationRelease
This command was introduced in a release earlier than Release 7.6.7.6
The following example shows how to display the detailed information of the access control lists:
(Cisco Controller) >show ipv6 acl detailed acl6Rule Index....................................... 1Direction........................................ AnyIPv6 source prefix............................... ::/0IPv6 destination prefix.......................... ::/0Protocol......................................... AnySource Port Range................................ 0-65535Destination Port Range........................... 0-65535DSCP............................................. AnyFlow label....................................... 0
CLI Commands66
CLI CommandsShow IPv6 Commands
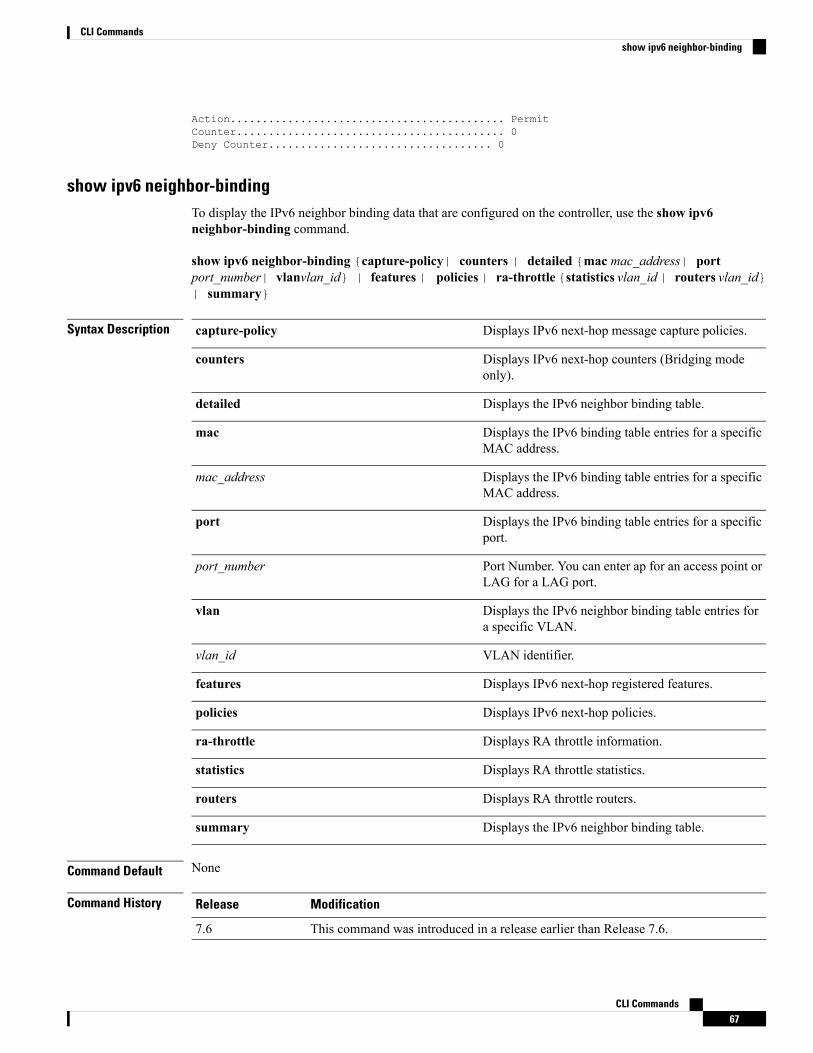
Action........................................... PermitCounter.......................................... 0Deny Counter................................... 0
show ipv6 neighbor-bindingTo display the IPv6 neighbor binding data that are configured on the controller, use the show ipv6neighbor-binding command.
show ipv6 neighbor-binding {capture-policy| counters | detailed {mac mac_address| portport_number| vlanvlan_id} | features | policies | ra-throttle {statistics vlan_id | routers vlan_id}| summary}
Syntax Description Displays IPv6 next-hop message capture policies.capture-policy
Displays IPv6 next-hop counters (Bridging modeonly).
counters
Displays the IPv6 neighbor binding table.detailed
Displays the IPv6 binding table entries for a specificMAC address.
mac
Displays the IPv6 binding table entries for a specificMAC address.
mac_address
Displays the IPv6 binding table entries for a specificport.
port
Port Number. You can enter ap for an access point orLAG for a LAG port.
port_number
Displays the IPv6 neighbor binding table entries fora specific VLAN.
vlan
VLAN identifier.vlan_id
Displays IPv6 next-hop registered features.features
Displays IPv6 next-hop policies.policies
Displays RA throttle information.ra-throttle
Displays RA throttle statistics.statistics
Displays RA throttle routers.routers
Displays the IPv6 neighbor binding table.summary
Command Default None
Command History ModificationRelease
This command was introduced in a release earlier than Release 7.6.7.6
CLI Commands67
CLI Commandsshow ipv6 neighbor-binding

Usage Guidelines DHCPv6 counters are applicable only for IPv6 bridging mode.
The following is the output of the show ipv6 neighbor-binding summary command:
(Cisco Controller) >show ipv6 neighbor-binding summaryBinding Table has 6 entries, 5 dynamicCodes: L - Local, S - Static, ND - Neighbor Discovery, DH - DDCPPreflevel flags (prlvl):0001:MAC and LLA match 0002:Orig trunk 0004:Orig access0008:Orig trusted access 0010:Orig trusted trunk 0020:DHCP assigned0040:Cga authenticated 0080:Cert authenticated 0100:Statically assigned
IPv6 address MAC Address Port VLAN Type prlvl agestate Time left
-- ---------------------------------------- ----------------- ---- ---- -------- --------- --------- ----------ND fe80::216:46ff:fe43:eb01 00:16:46:43:eb:01 1 980 wired 00052 REACHABLE 157ND fe80::9cf9:b009:b1b4:1ed9 70:f1:a1:dd:cb:d4 AP 980 wireless 00052 REACHABLE 157ND fe80::6233:4bff:fe05:25ef 60:33:4b:05:25:ef AP 980 wireless 00052 REACHABLE 203ND fe80::250:56ff:fe8b:4a8f 00:50:56:8b:4a:8f AP 980 wireless 00052 REACHABLE 157ND 2001:410:0:1:51be:2219:56c6:a8ad 70:f1:a1:dd:cb:d4 AP 980 wireless 00055 REACHABLE 157S 2001:410:0:1::9 00:00:00:00:00:08 AP 980 wireless 01001 REACHABLE 205
The following is the output of the show ipv6 neighbor-binding detailed command:(Cisco Controller) >show ipv6 neighbor-binding detailed mac 60:33:4b:05:25:efmacDB has 3 entries for mac 60:33:4b:05:25:ef, 3 dynamicCodes: L - Local, S - Static, ND - Neighbor Discovery, DH - DDCPPreflevel flags (prlvl):0001:MAC and LLA match 0002:Orig trunk 0004:Orig access0008:Orig trusted access 0010:Orig trusted trunk 0020:DHCP assigned0040:Cga authenticated 0080:Cert authenticated 0100:Statically assigned
IPv6 address MAC Address Port VLAN Type prlvl agestate Time left
-- ---------------------------------------- ----------------- ---- ---- -------- --------- --------- ----------ND fe80::6233:4bff:fe05:25ef 60:33:4b:05:25:ef AP 980 wireless 00090 REACHABLE 303ND 2001:420:0:1:6233:4bff:fe05:25ef 60:33:4b:05:25:ef AP 980 wireless 00090 REACHABLE 300ND 2001:410:0:1:6233:4bff:fe05:25ef 60:33:4b:05:25:ef AP 980 wireless 00090 REACHABLE 301
The following is the output of the show ipv6 neighbor-binding counters command:(Cisco Controller) >show ipv6 neighbor-binding countersReceived Messages
NDP Router Solicitation 6NDP Router Advertisement 19NDP Neighbor Solicitation 557NDP Neighbor Advertisement 48NDP Redirect 0NDP Certificate Solicit 0NDP Certificate Advert 0DHCPv6 Solicitation 0
CLI Commands68
CLI Commandsshow ipv6 neighbor-binding

DHCPv6 Advertisement 0DHCPv6 Request 0DHCPv6 Reply 0DHCPv6 Inform 0DHCPv6 Confirm 0DHCPv6 Renew 0DHCPv6 Rebind 0DHCPv6 Release 0DHCPv6 Decline 0DHCPv6 Reconfigure 0DHCPv6 Relay Forward 0DHCPv6 Relay Rep 0
Bridged Messages
NDP Router Solicitation 6NDP Router Advertisement 19NDP Neighbor Solicitation 471NDP Neighbor Advertisement 16NDP Redirect 0NDP Certificate Solicit 0NDP Certificate Advert 0DHCPv6 Solicitation 0DHCPv6 Advertisement 0DHCPv6 Request 0DHCPv6 Reply 0DHCPv6 Inform 0DHCPv6 Confirm 0DHCPv6 Renew 0DHCPv6 Rebind 0DHCPv6 Release 0DHCPv6 Decline 0DHCPv6 Reconfigure 0DHCPv6 Relay Forward 0DHCPv6 Relay Rep 0
NDSUPRRESS Drop counters
total silent ns_in_out ns_dad unicast multicast internal------------------------------------------------------------------------0 0 0 0 0 0 0
SNOOPING Drop counters
Dropped Msgs total silent internal CGA_vfy RSA_vfy limit martian martian_macno_trust not_auth stop
--------------------------------------------------------------------------------------------------------------------NDP RS 0 0 0 0 0 0 0 0
0 0 0NDP RA 0 0 0 0 0 0 0 0
0 0 0NDP NS 0 0 0 0 0 0 0 0
0 0 0NDP NA 0 0 0 0 0 0 0 0
0 0 0NDP Redirect 0 0 0 0 0 0 0 0
0 0 0NDP CERT SOL 0 0 0 0 0 0 0 0
0 0 0NDP CERT ADV 0 0 0 0 0 0 0 0
0 0 0DHCPv6 Sol 0 0 0 0 0 0 0 0
0 0 0DHCPv6 Adv 0 0 0 0 0 0 0 0
CLI Commands69
CLI Commandsshow ipv6 neighbor-binding

0 0 0DHCPv6 Req 0 0 0 0 0 0 0 0
0 0 0DHCPv6 Confirm 0 0 0 0 0 0 0 0
0 0 0DHCPv6 Renew 0 0 0 0 0 0 0 0
0 0 0DHCPv6 Rebind 0 0 0 0 0 0 0 0
0 0 0DHCPv6 Reply 0 0 0 0 0 0 0 0
0 0 0DHCPv6 Release 0 0 0 0 0 0 0 0
0 0 0DHCPv6 Decline 0 0 0 0 0 0 0 0
0 0 0DHCPv6 Recfg 0 0 0 0 0 0 0 0
0 0 0DHCPv6 Infreq 0 0 0 0 0 0 0 0
0 0 0DHCPv6 Relayfwd 0 0 0 0 0 0 0 0
0 0 0DHCPv6 Relayreply 0 0 0 0 0 0 0 0
0 0 0
CacheMiss StatisticsMulticast NS Forwarded
To STA 0To DS 0
Multicast NS DroppedTo STA 467To DS 467
Multicast NA StatisticsMulticast NA Forwarded
To STA 0To DS 0
Multicast NA DroppedTo STA 0To DS 0
(Cisco Controller) > >
show ipv6 ra-guardTo display the RA guard statistics, use the show ipv6 ra-guard command.
show ipv6 ra-guard {ap | wlc} summary
Syntax Description Displays Cisco access point details.ap
Displays Cisco controller details.wlc
Displays RA guard statistics.summary
Command Default None
CLI Commands70
CLI Commandsshow ipv6 ra-guard
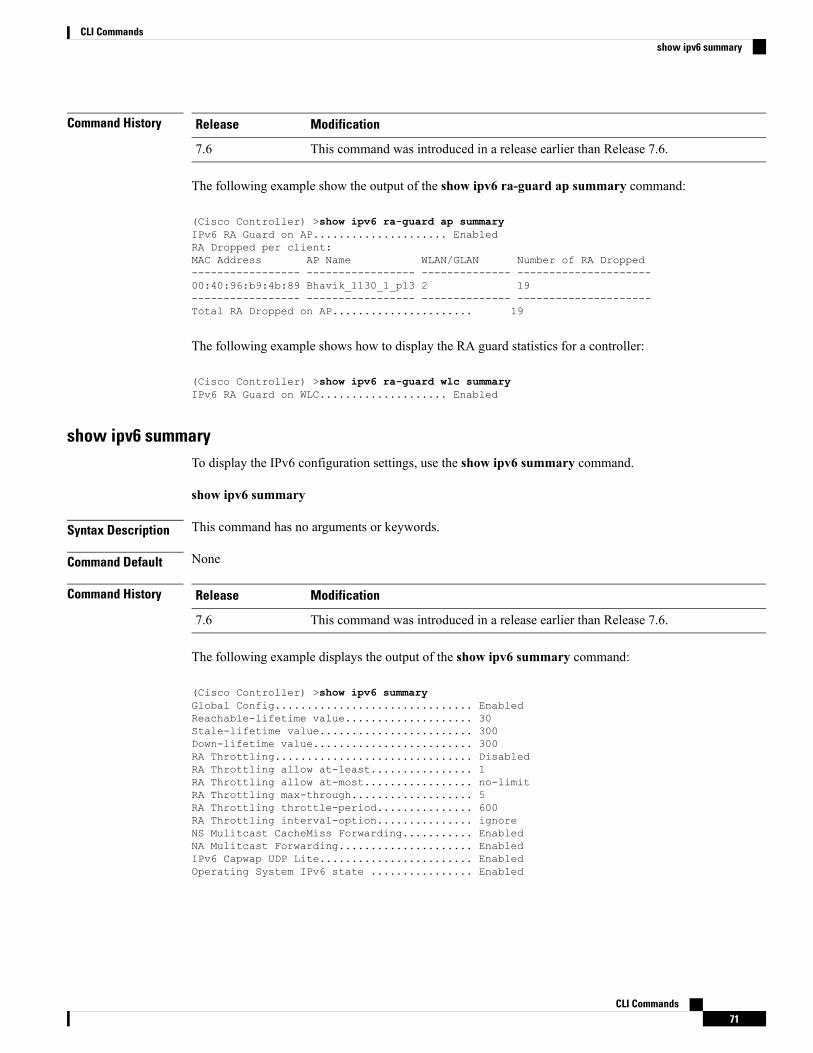
Command History ModificationRelease
This command was introduced in a release earlier than Release 7.6.7.6
The following example show the output of the show ipv6 ra-guard ap summary command:
(Cisco Controller) >show ipv6 ra-guard ap summaryIPv6 RA Guard on AP..................... EnabledRA Dropped per client:MAC Address AP Name WLAN/GLAN Number of RA Dropped----------------- ----------------- -------------- ---------------------00:40:96:b9:4b:89 Bhavik_1130_1_p13 2 19----------------- ----------------- -------------- ---------------------Total RA Dropped on AP...................... 19
The following example shows how to display the RA guard statistics for a controller:
(Cisco Controller) >show ipv6 ra-guard wlc summaryIPv6 RA Guard on WLC.................... Enabled
show ipv6 summaryTo display the IPv6 configuration settings, use the show ipv6 summary command.
show ipv6 summary
Syntax Description This command has no arguments or keywords.
Command Default None
Command History ModificationRelease
This command was introduced in a release earlier than Release 7.6.7.6
The following example displays the output of the show ipv6 summary command:
(Cisco Controller) >show ipv6 summaryGlobal Config............................... EnabledReachable-lifetime value.................... 30Stale-lifetime value........................ 300Down-lifetime value......................... 300RA Throttling............................... DisabledRA Throttling allow at-least................ 1RA Throttling allow at-most................. no-limitRA Throttling max-through................... 5RA Throttling throttle-period............... 600RA Throttling interval-option............... ignoreNS Mulitcast CacheMiss Forwarding........... EnabledNA Mulitcast Forwarding..................... EnabledIPv6 Capwap UDP Lite........................ EnabledOperating System IPv6 state ................ Enabled
CLI Commands71
CLI Commandsshow ipv6 summary

Show Media-Stream CommandsUse the show media-stream commands to see the multicast-direct configuration state.
show media-stream clientTo display the details for a specific media-stream client or a set of clients, use the show media-stream clientcommand.
show media-stream client {media-stream_name | summary}
Syntax Description Name of the media-stream client of which the detailsis to be displayed.
media-stream_name
Displays the details for a set of media-stream clients.summary
Command Default None.
This example shows how to display a summary media-stream clients:
> show media-stream client summaryNumber of Clients................................ 1Client Mac Stream Name Stream Type Radio WLAN QoS Status----------------- ----------- ----------- ---- ---- ------ -------00:1a:73:dd:b1:12 mountainview MC-direct 2.4 2 Video Admitted
Related Commands show media-stream group summary
show media-stream group detailTo display the details for a specific media-stream group, use the showmedia-stream group detail command.
show media-stream group detail media-stream_name
Syntax Description Name of the media-stream group.media-stream_name
Command Default None.
This example shows how to display media-stream group configuration details:
> show media-stream group detail abcMedia Stream Name................................ abcStart IP Address................................. 227.8.8.8End IP Address................................... 227.9.9.9RRC ParametersAvg Packet Size(Bytes).......................... 1200Expected Bandwidth(Kbps)........................ 300Policy.......................................... AdmitRRC re-evaluation............................... periodicQoS............................................. VideoStatus.......................................... Multicast-direct
CLI Commands72
CLI CommandsShow Media-Stream Commands

Usage Priority.................................. 5Violation....................................... drop
Related Commands show media-stream group summary
show media-stream group summaryTo display the summary of the media stream and client information, use the show media-stream groupsummary command.
show media-stream group summary
Syntax Description This command has no arguments or keywords.
Command Default None
Command History ModificationRelease
This commandwas introduced in a release earlier thanRelease 7.6.
7.6
This example shows how to display a summary of the media-stream group:
(Cisco Controller) > show media-stream group summaryStream Name Start IP End IP Operation Status------------- -------------- -------------- ----------------abc 227.8.8.8 227.9.9.9 Multicast-direct
Related Commands show 802.11 media-stream client
show media-stream client
show media-stream group detail
show mesh CommandsUse the show mesh commands to see settings for outdoor and indoor mesh access points.
show mesh apTo display settings for mesh access points, use the show mesh ap command.
show mesh ap {summary | tree}
Syntax Description Displays a summary of mesh access point informationincluding the name, model, bridge virtual interface(BVI) MAC address, United States ComputerEmergency Response Team (US-CERT) MACaddress, hop, and bridge group name.
summary
CLI Commands73
CLI Commandsshow media-stream group summary

Displays a summary of mesh access point informationin a tree configuration, including the name, hopcounter, link signal-to-noise ratio (SNR), and bridgegroup name.
tree
Command Default None
Command History ModificationRelease
This command was introduced in a release earlier than Release 7.6.7.6
The following example shows how to display a summary format:(Cisco Controller) >show mesh ap summaryAP Name AP Model BVI MAC CERT MAC Hop Bridge Group Name------------------ ------------------- ----------------- ------------------ ----- --SB_RAP1 AIR-LAP1522AG-A-K9 00:1d:71:0e:d0:00 00:1d:71:0e:d0:00 0 sboxSB_MAP1 AIR-LAP1522AG-A-K9 00:1d:71:0e:85:00 00:1d:71:0e:85:00 1 sboxSB_MAP2 AIR-LAP1522AG-A-K9 00:1b:d4:a7:8b:00 00:1b:d4:a7:8b:00 2 sboxSB_MAP3 AIR-LAP1522AG-A-K9 00:1d:71:0d:ee:00 00:1d:71:0d:ee:00 3 sboxNumber of Mesh APs............................... 4Number of RAPs................................... 1Number of MAPs................................... 3
The following example shows how to display settings in a hierarchical (tree) format:(Cisco Controller) >show mesh ap tree=======================================================|| AP Name [Hop Counter, Link SNR, Bridge Group Name] ||=======================================================[Sector 1]----------SB_RAP1[0,0,sbox]|-SB_MAP1[1,32,sbox]|-SB_MAP2[2,27,sbox]|-SB_MAP3[3,30,sbox]
----------------------------------------------------Number of Mesh APs............................... 4Number of RAPs................................... 1Number of MAPs................................... 3----------------------------------------------------
show mesh astools statsTo display antistranding statistics for outdoor mesh access points, use the showmesh astools stats command.
show mesh astools stats [cisco_ap]
Syntax Description (Optional) Antistranding feature statistics for adesignated mesh access point.
cisco_ap
Command Default None
CLI Commands74
CLI Commandsshow mesh astools stats

Command History ModificationRelease
This command was introduced in a release earlier than Release 7.6.7.6
The following example shows how to display anti-stranding statistics on all outdoor mesh accesspoints:(Cisco Controller) >show mesh astools statsTotal No of Aps stranded : 0
The following example shows how to display anti-stranding statistics for access point sb_map1:(Cisco Controller) >show mesh astools stats sb_map1Total No of Aps stranded : 0
show mesh backhaulTo check the current backhaul information, use the show mesh backhaul command.
show mesh backhaul cisco_ap
Syntax Description Name of the access point.cisco_ap
Command Default None
Command History ModificationRelease
This command was introduced in a release earlier than Release 7.6.7.6
The following example shows how to display the current backhaul:(Cisco Controller) >show mesh backhaul
If the current backhaul is 5 GHz, the output is as follows:
Basic Basic Attributes for Slot 0Radio Type................................... RADIO_TYPE_80211gRadio Role................................... DOWNLINK ACCESSAdministrative State ........................ ADMIN_ENABLEDOperation State ............................. UPCurrent Tx Power Level .................... 1
If the current backhaul is 2.4 GHz, the output is as follows:Basic Attributes for Slot 1
Radio Type................................... RADIO_TYPE_80211aRadio Subband................................ RADIO_SUBBAND_ALLRadio Role................................... DOWNLINK ACCESSAdministrative State ........................ ADMIN_ENABLEDOperation State ............................. UPCurrent Tx Power Level .................... 1Current Channel ........................... 165Antenna Type............................... EXTERNAL_ANTENNAExternal Antenna Gain (in .5 dBm units).... 0
Current Channel...................................6Antenna Type......................................Externa_ANTENNAExternal Antenna Gain (in .5 dBm units)...........0
CLI Commands75
CLI Commandsshow mesh backhaul

show mesh cacTo display call admission control (CAC) topology and the bandwidth used or available in a mesh network,use the show mesh cac command.
show mesh cac {summary | {bwused {voice | video} | access | callpath | rejected}cisco_ap}
Syntax Description Displays the total number of voice calls and voicebandwidth used for each mesh access point.
summary
Displays the bandwidth for a selected access point ina tree topology.
bwused
Displays the mesh topology and the voice bandwidthused or available.
voice
Displays the mesh topology and the video bandwidthused or available.
video
Displays access voice calls in progress in a treetopology.
access
Displays the call bandwidth distributed across themesh tree.
callpath
Displays voice calls rejected for insufficientbandwidth in a tree topology.
rejected
Mesh access point name.cisco_ap
Command Default None
Command History ModificationRelease
This command was introduced in a release earlier than Release 7.6.7.6
The following example shows how to display a summary of the call admission control settings:(Cisco Controller) >show mesh cac summaryAP Name Slot# Radio BW Used/Max Calls----------------- ------- ----- ----------- -----SB_RAP1 0 11b/g 0/23437 0
1 11a 0/23437 0SB_MAP1 0 11b/g 0/23437 0
1 11a 0/23437 0SB_MAP2 0 11b/g 0/23437 0
1 11a 0/23437 0SB_MAP3 0 11b/g 0/23437 0
1 11a 0/23437 0
The following example shows how to display the mesh topology and the voice bandwidth used oravailable:(Cisco Controller) >show mesh cac bwused voice SB_MAP1AP Name Slot# Radio BW Used/Max
CLI Commands76
CLI Commandsshow mesh cac

------------- ------- ----- -----------SB_RAP1 0 11b/g 0/23437
1 11a 0/23437| SB_MAP1 0 11b/g 0/23437
1 11a 0/23437|| SB_MAP2 0 11b/g 0/23437
1 11a 0/23437||| SB_MAP3 0 11b/g 0/23437
1 11a 0/23437
The following example shows how to display the access voice calls in progress in a tree topology:(Cisco Controller) >show mesh cac access 1524_Map1
AP Name Slot# Radio Calls------------- ------- ----- -----1524_Rap 0 11b/g 0
1 11a 02 11a 0
| 1524_Map1 0 11b/g 01 11a 02 11a 0
|| 1524_Map2 0 11b/g 01 11a 02 11a 0
show mesh client-accessTo display the backhaul client access configuration setting, use the show mesh client-access command.
show mesh client-access
Syntax Description This command has no arguments or keywords.
Command Default None
Command History ModificationRelease
This command was introduced in a release earlier than Release 7.6.7.6
The following example shows how to display backhaul client access configuration settings for amesh access point:(Cisco Controller) >show mesh client-accessBackhaul with client access status: enabledBackhaul with client access extended status(3 radio AP): disabled
show mesh configTo display mesh configuration settings, use the show mesh config command.
show mesh config
Syntax Description This command has no arguments or keywords.
Command Default None
CLI Commands77
CLI Commandsshow mesh client-access
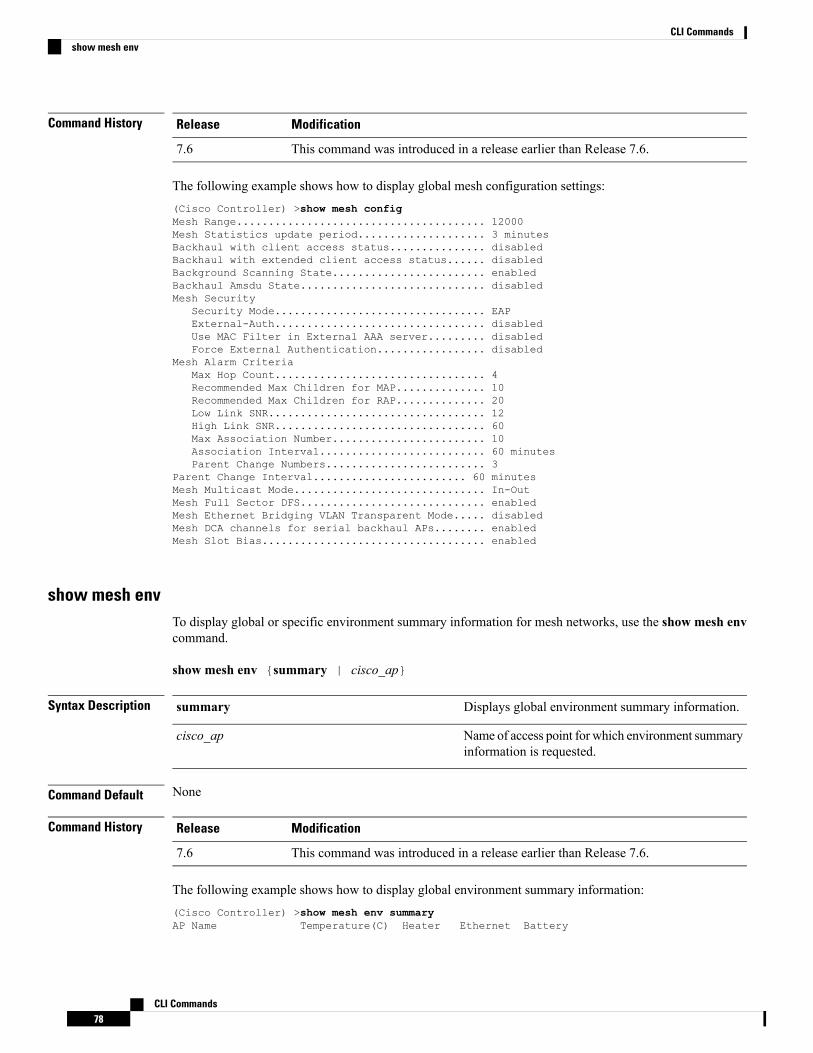
Command History ModificationRelease
This command was introduced in a release earlier than Release 7.6.7.6
The following example shows how to display global mesh configuration settings:(Cisco Controller) >show mesh configMesh Range....................................... 12000Mesh Statistics update period.................... 3 minutesBackhaul with client access status............... disabledBackhaul with extended client access status...... disabledBackground Scanning State........................ enabledBackhaul Amsdu State............................. disabledMesh Security
Security Mode................................. EAPExternal-Auth................................. disabledUse MAC Filter in External AAA server......... disabledForce External Authentication................. disabled
Mesh Alarm CriteriaMax Hop Count................................. 4Recommended Max Children for MAP.............. 10Recommended Max Children for RAP.............. 20Low Link SNR.................................. 12High Link SNR................................. 60Max Association Number........................ 10Association Interval.......................... 60 minutesParent Change Numbers......................... 3
Parent Change Interval........................ 60 minutesMesh Multicast Mode.............................. In-OutMesh Full Sector DFS............................. enabledMesh Ethernet Bridging VLAN Transparent Mode..... disabledMesh DCA channels for serial backhaul APs........ enabledMesh Slot Bias................................... enabled
show mesh envTo display global or specific environment summary information for mesh networks, use the show mesh envcommand.
show mesh env {summary | cisco_ap}
Syntax Description Displays global environment summary information.summary
Name of access point for which environment summaryinformation is requested.
cisco_ap
Command Default None
Command History ModificationRelease
This command was introduced in a release earlier than Release 7.6.7.6
The following example shows how to display global environment summary information:(Cisco Controller) >show mesh env summaryAP Name Temperature(C) Heater Ethernet Battery
CLI Commands78
CLI Commandsshow mesh env
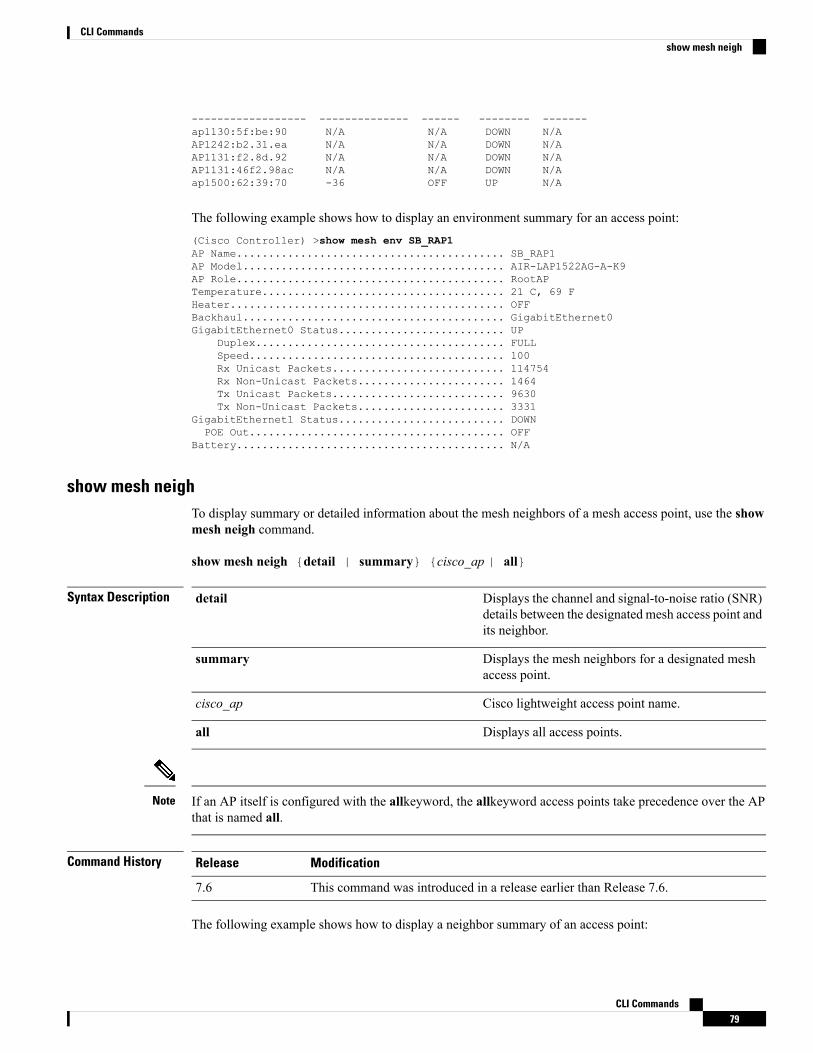
------------------ -------------- ------ -------- -------ap1130:5f:be:90 N/A N/A DOWN N/AAP1242:b2.31.ea N/A N/A DOWN N/AAP1131:f2.8d.92 N/A N/A DOWN N/AAP1131:46f2.98ac N/A N/A DOWN N/Aap1500:62:39:70 -36 OFF UP N/A
The following example shows how to display an environment summary for an access point:(Cisco Controller) >show mesh env SB_RAP1AP Name.......................................... SB_RAP1AP Model......................................... AIR-LAP1522AG-A-K9AP Role.......................................... RootAPTemperature...................................... 21 C, 69 FHeater........................................... OFFBackhaul......................................... GigabitEthernet0GigabitEthernet0 Status.......................... UP
Duplex....................................... FULLSpeed........................................ 100Rx Unicast Packets........................... 114754Rx Non-Unicast Packets....................... 1464Tx Unicast Packets........................... 9630Tx Non-Unicast Packets....................... 3331
GigabitEthernet1 Status.......................... DOWNPOE Out........................................ OFF
Battery.......................................... N/A
show mesh neighTo display summary or detailed information about the mesh neighbors of a mesh access point, use the showmesh neigh command.
show mesh neigh {detail | summary} {cisco_ap | all}
Syntax Description Displays the channel and signal-to-noise ratio (SNR)details between the designated mesh access point andits neighbor.
detail
Displays the mesh neighbors for a designated meshaccess point.
summary
Cisco lightweight access point name.cisco_ap
Displays all access points.all
If an AP itself is configured with the allkeyword, the allkeyword access points take precedence over the APthat is named all.
Note
Command History ModificationRelease
This command was introduced in a release earlier than Release 7.6.7.6
The following example shows how to display a neighbor summary of an access point:
CLI Commands79
CLI Commandsshow mesh neigh
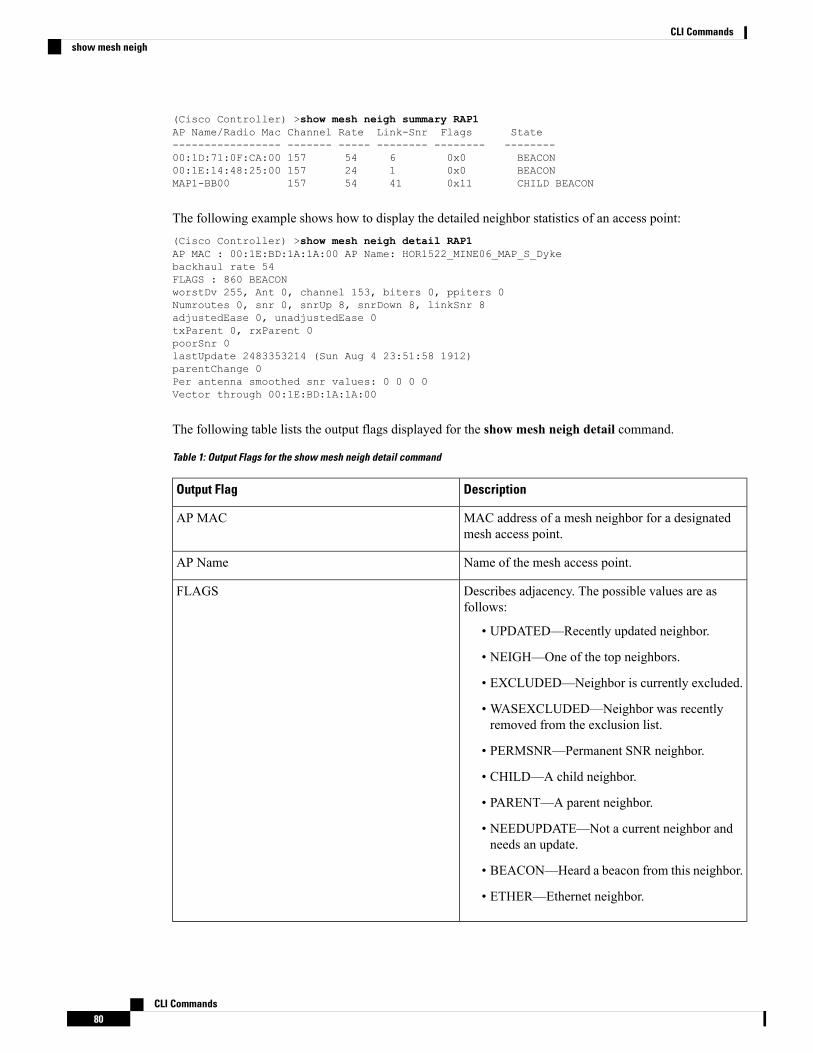
(Cisco Controller) >show mesh neigh summary RAP1AP Name/Radio Mac Channel Rate Link-Snr Flags State----------------- ------- ----- -------- -------- --------00:1D:71:0F:CA:00 157 54 6 0x0 BEACON00:1E:14:48:25:00 157 24 1 0x0 BEACONMAP1-BB00 157 54 41 0x11 CHILD BEACON
The following example shows how to display the detailed neighbor statistics of an access point:(Cisco Controller) >show mesh neigh detail RAP1AP MAC : 00:1E:BD:1A:1A:00 AP Name: HOR1522_MINE06_MAP_S_Dykebackhaul rate 54FLAGS : 860 BEACONworstDv 255, Ant 0, channel 153, biters 0, ppiters 0Numroutes 0, snr 0, snrUp 8, snrDown 8, linkSnr 8adjustedEase 0, unadjustedEase 0txParent 0, rxParent 0poorSnr 0lastUpdate 2483353214 (Sun Aug 4 23:51:58 1912)parentChange 0Per antenna smoothed snr values: 0 0 0 0Vector through 00:1E:BD:1A:1A:00
The following table lists the output flags displayed for the show mesh neigh detail command.
Table 1: Output Flags for the show mesh neigh detail command
DescriptionOutput Flag
MAC address of a mesh neighbor for a designatedmesh access point.
AP MAC
Name of the mesh access point.AP Name
Describes adjacency. The possible values are asfollows:
• UPDATED—Recently updated neighbor.
• NEIGH—One of the top neighbors.
• EXCLUDED—Neighbor is currently excluded.
• WASEXCLUDED—Neighbor was recentlyremoved from the exclusion list.
• PERMSNR—Permanent SNR neighbor.
• CHILD—A child neighbor.
• PARENT—A parent neighbor.
• NEEDUPDATE—Not a current neighbor andneeds an update.
• BEACON—Heard a beacon from this neighbor.
• ETHER—Ethernet neighbor.
FLAGS
CLI Commands80
CLI Commandsshow mesh neigh

DescriptionOutput Flag
Worst distance vector through the neighbor.worstDv
Antenna on which the route was received.Ant
Channel of the neighbor.channel
Number of black list timeouts left.biters
Number of potential parent timeouts left.ppiters
Number of distance routes.Numroutes
Signal to Noise Ratio.snr
SNR of the link to the AP.snrUp
SNR of the link from the AP.snrDown
Calculated SNR of the link.linkSnr
Ease to the root AP through this AP. It is based onthe current SNR and threshold SNR values.
adjustedEase
Ease to the root AP through this AP after applyingcorrect for number of hops.
unadjustedEase
Packets sent to this node while it was a parent.txParent
Packets received from this node while it was a parent.rxparent
Packets with poor SNR received from a node.poorSnr
Timestamp of the last received message for thisneighbor
lastUpdate
When this node last became parent.parentChange
SNR value is populated only for antenna 0.per antenna smoother SNR values
show mesh pathTo display the channel and signal-to-noise ratio (SNR) details for a link between a mesh access point and itsneighbor, use the show mesh path command.
show mesh path cisco_ap
Syntax Description Mesh access point name.cisco_ap
Command Default None
CLI Commands81
CLI Commandsshow mesh path
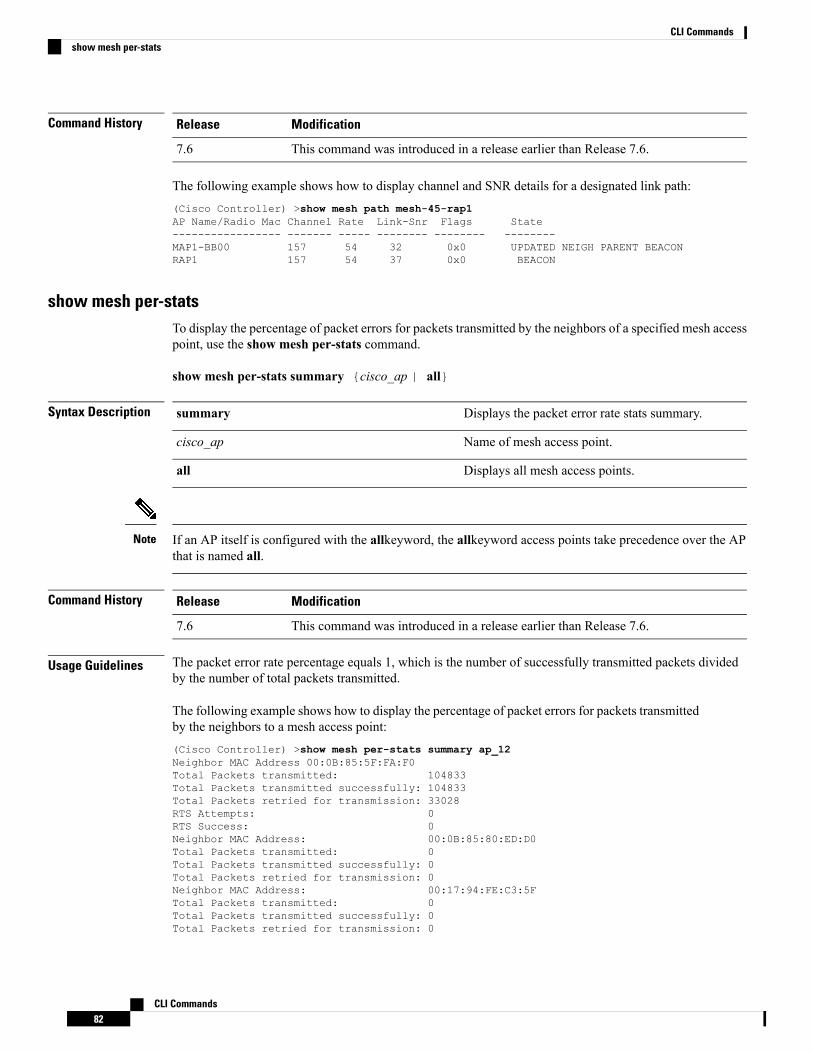
Command History ModificationRelease
This command was introduced in a release earlier than Release 7.6.7.6
The following example shows how to display channel and SNR details for a designated link path:(Cisco Controller) >show mesh path mesh-45-rap1AP Name/Radio Mac Channel Rate Link-Snr Flags State----------------- ------- ----- -------- -------- --------MAP1-BB00 157 54 32 0x0 UPDATED NEIGH PARENT BEACONRAP1 157 54 37 0x0 BEACON
show mesh per-statsTo display the percentage of packet errors for packets transmitted by the neighbors of a specified mesh accesspoint, use the show mesh per-stats command.
show mesh per-stats summary {cisco_ap | all}
Syntax Description Displays the packet error rate stats summary.summary
Name of mesh access point.cisco_ap
Displays all mesh access points.all
If an AP itself is configured with the allkeyword, the allkeyword access points take precedence over the APthat is named all.
Note
Command History ModificationRelease
This command was introduced in a release earlier than Release 7.6.7.6
Usage Guidelines The packet error rate percentage equals 1, which is the number of successfully transmitted packets dividedby the number of total packets transmitted.
The following example shows how to display the percentage of packet errors for packets transmittedby the neighbors to a mesh access point:(Cisco Controller) >show mesh per-stats summary ap_12Neighbor MAC Address 00:0B:85:5F:FA:F0Total Packets transmitted: 104833Total Packets transmitted successfully: 104833Total Packets retried for transmission: 33028RTS Attempts: 0RTS Success: 0Neighbor MAC Address: 00:0B:85:80:ED:D0Total Packets transmitted: 0Total Packets transmitted successfully: 0Total Packets retried for transmission: 0Neighbor MAC Address: 00:17:94:FE:C3:5FTotal Packets transmitted: 0Total Packets transmitted successfully: 0Total Packets retried for transmission: 0
CLI Commands82
CLI Commandsshow mesh per-stats
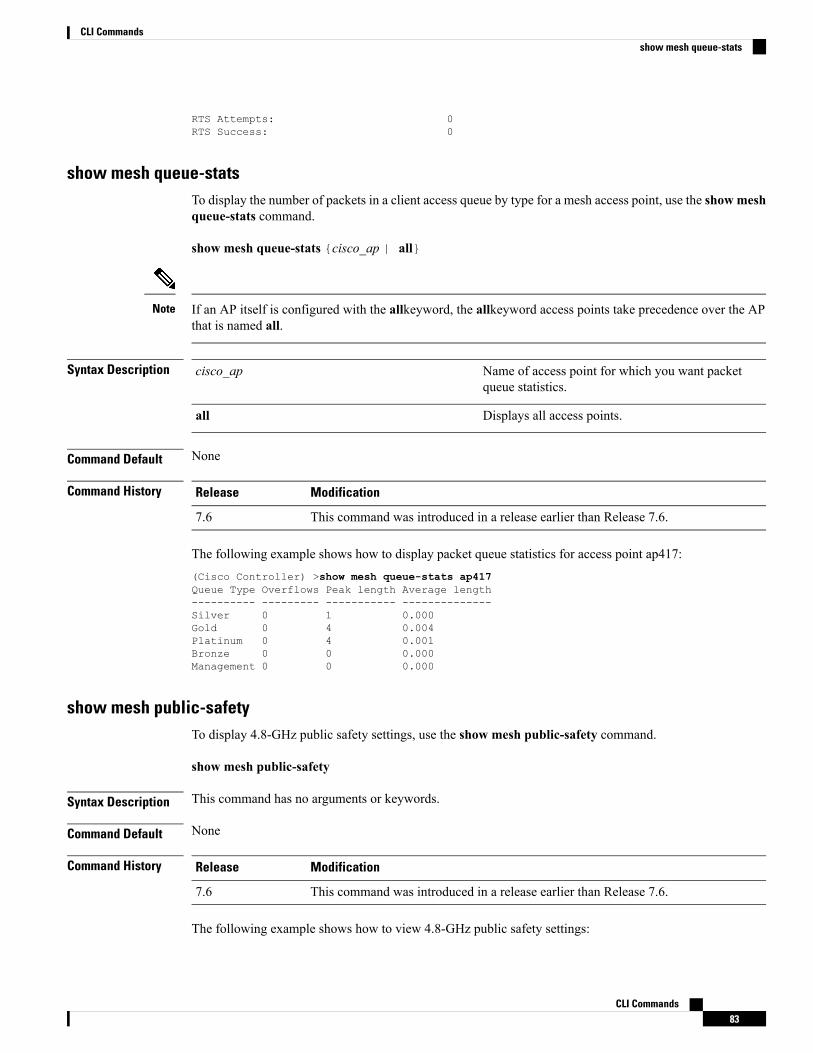
RTS Attempts: 0RTS Success: 0
show mesh queue-statsTo display the number of packets in a client access queue by type for a mesh access point, use the show meshqueue-stats command.
show mesh queue-stats {cisco_ap | all}
If an AP itself is configured with the allkeyword, the allkeyword access points take precedence over the APthat is named all.
Note
Syntax Description Name of access point for which you want packetqueue statistics.
cisco_ap
Displays all access points.all
Command Default None
Command History ModificationRelease
This command was introduced in a release earlier than Release 7.6.7.6
The following example shows how to display packet queue statistics for access point ap417:(Cisco Controller) >show mesh queue-stats ap417Queue Type Overflows Peak length Average length---------- --------- ----------- --------------Silver 0 1 0.000Gold 0 4 0.004Platinum 0 4 0.001Bronze 0 0 0.000Management 0 0 0.000
show mesh public-safetyTo display 4.8-GHz public safety settings, use the show mesh public-safety command.
show mesh public-safety
Syntax Description This command has no arguments or keywords.
Command Default None
Command History ModificationRelease
This command was introduced in a release earlier than Release 7.6.7.6
The following example shows how to view 4.8-GHz public safety settings:
CLI Commands83
CLI Commandsshow mesh queue-stats

(Cisco Controller) >(Cisco Controller) >show mesh public-safetyGlobal Public Safety status: disabled
show mesh security-statsTo display packet error statistics for a specific access point, use the show mesh security-stats command.
show mesh security-stats {cisco_ap | all}
Syntax Description Name of access point for which you want packet errorstatistics.
cisco_ap
Displays all access points.all
If an AP itself is configured with the all keyword, the all keyword access points take precedence over the APthat is named all.
Note
Command Default None
Command History ModificationRelease
This command was introduced in a release earlier than Release 7.6.7.6
Usage Guidelines This command shows packet error statistics and a count of failures, timeouts, and successes with respect toassociations and authentications as well as reassociations and reauthentications for the specified access pointand its child.
The following example shows how to view packet error statistics for access point ap417:(Cisco Controller) >show mesh security-stats ap417AP MAC : 00:0B:85:5F:FA:F0Packet/Error Statistics:-----------------------------x Packets 14, Rx Packets 19, Rx Error Packets 0Parent-Side Statistics:--------------------------Unknown Association Requests 0Invalid Association Requests 0Unknown Re-Authentication Requests 0Invalid Re-Authentication Requests 0Unknown Re-Association Requests 0Invalid Re-Association Requests 0Child-Side Statistics:--------------------------Association Failures 0Association Timeouts 0Association Successes 0Authentication Failures 0Authentication Timeouts 0Authentication Successes 0Re-Association Failures 0Re-Association Timeouts 0Re-Association Successes 0Re-Authentication Failures 0
CLI Commands84
CLI Commandsshow mesh security-stats

Re-Authentication Timeouts 0Re-Authentication Successes 0
show mesh statsTo display the mesh statistics for an access point, use the show mesh stats command.
show mesh stats cisco_ap
Syntax Description Access point name.cisco_ap
Command Default None
Command History ModificationRelease
This command was introduced in a release earlier than Release 7.6.7.6
The following example shows how to display statistics of an access point:(Cisco Controller) >show mesh stats RAP_AP1RAP in state MaintrxNeighReq 759978, rxNeighRsp 568673txNeighReq 115433, txNeighRsp 759978rxNeighUpd 8266447 txNeighUpd 693062tnextchan 0, nextant 0, downAnt 0, downChan 0, curAnts 0tnextNeigh 0, malformedNeighPackets 244, poorNeighSnr 27901blacklistPackets 0, insufficientMemory 0authenticationFailures 0Parent Changes 1, Neighbor Timeouts 16625
Show Mobility CommandsUse the show mobility commands to display mobility settings.
show mobility anchorTo display the wireless LAN anchor export list for the Cisco wireless LAN controller mobility groups or todisplay a list and status of controllers configured as mobility anchors for a specific WLAN or wired guestLAN, use the show mobility anchor command.
show mobility anchor [wlan wlan_id | guest-lan guest_lan_id]
Syntax Description (Optional) Displays wireless LAN mobility groupsettings.
wlan
Wireless LAN identifier from 1 to 512 (inclusive).wlan_id
(Optional) Displays guest LAN mobility groupsettings.
guest-lan
Guest LAN identifier from 1 to 5 (inclusive).guest_lan_id
CLI Commands85
CLI Commandsshow mesh stats

Command Default None
Command History ModificationRelease
This commandwas introduced in a release earlier thanRelease 7.6.
7.6
Usage Guidelines The status field display (see example) shows one of the following values:
• UP—The controller is reachable and able to pass data.
• CNTRL_PATH_DOWN—The mpings failed. The controller cannot be reached through the control pathand is considered failed.
• DATA_PATH_DOWN—The epings failed. The controller cannot be reached and is considered failed.
• CNTRL_DATA_PATH_DOWN—Both the mpings and epings failed. The controller cannot be reachedand is considered failed.
The following example shows how to display a mobility wireless LAN anchor list:
(Cisco Controller) >show mobility anchorMobility Anchor Export ListWLAN ID IP Address Status------- --------------- ------12 192.168.0.15 UPGLAN ID IP Address Status------- --------------- -------1 192.168.0.9 CNTRL_DATA_PATH_DOWN
show mobility ap-listTo display the mobility AP list, use the show mobility ap-list command.
show mobility ap-list
Syntax Description This command has no arguments or keywords.
Command Default None
Command History ModificationRelease
This commandwas introduced in a release earlier thanRelease 7.6.
7.6
The following example shows how to display the mobility AP list:
The AP name is displayed only with New Mobility. With Old Mobility, the AP name is displayedas Unknown.
Note
CLI Commands86
CLI Commandsshow mobility ap-list
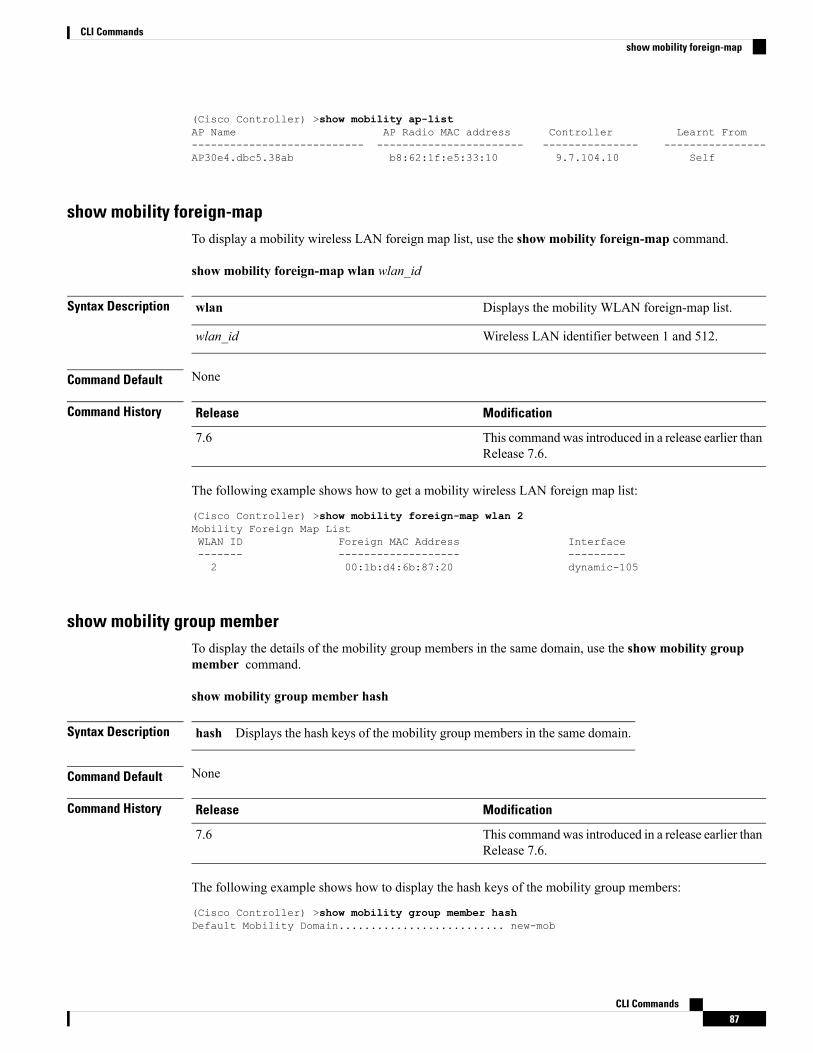
(Cisco Controller) >show mobility ap-listAP Name AP Radio MAC address Controller Learnt From--------------------------- ----------------------- --------------- ----------------AP30e4.dbc5.38ab b8:62:1f:e5:33:10 9.7.104.10 Self
show mobility foreign-mapTo display a mobility wireless LAN foreign map list, use the show mobility foreign-map command.
show mobility foreign-map wlan wlan_id
Syntax Description Displays the mobility WLAN foreign-map list.wlan
Wireless LAN identifier between 1 and 512.wlan_id
Command Default None
Command History ModificationRelease
This commandwas introduced in a release earlier thanRelease 7.6.
7.6
The following example shows how to get a mobility wireless LAN foreign map list:
(Cisco Controller) >show mobility foreign-map wlan 2Mobility Foreign Map ListWLAN ID Foreign MAC Address Interface------- ------------------- ---------2 00:1b:d4:6b:87:20 dynamic-105
show mobility group memberTo display the details of the mobility group members in the same domain, use the show mobility groupmember command.
show mobility group member hash
Syntax Description Displays the hash keys of the mobility group members in the same domain.hash
Command Default None
Command History ModificationRelease
This commandwas introduced in a release earlier thanRelease 7.6.
7.6
The following example shows how to display the hash keys of the mobility group members:
(Cisco Controller) >show mobility group member hashDefault Mobility Domain.......................... new-mob
CLI Commands87
CLI Commandsshow mobility foreign-map

IP Address Hash Key---------------------------------------------------------
9.2.115.68 a819d479dcfeb3e0974421b6e8335582263d9169
9.6.99.10 0974421b6e8335582263d9169a819d479dcfeb3e
9.7.7.7 feb3e0974421b6e8335582263d9169a819d479dc
show mobility statisticsTo display the statistics information for the Cisco wireless LAN controller mobility groups, use the showmobility statistics command.
show mobility statistics
Syntax Description This command has no arguments or keywords.
Command Default None
Command History ModificationRelease
This commandwas introduced in a release earlier thanRelease 7.6.
7.6
The following example shows how to display statistics of the mobility manager:
(Cisco Controller) >show mobility statisticsGlobal Mobility Statistics
Rx Errors..................................... 0Tx Errors..................................... 0Responses Retransmitted....................... 0Handoff Requests Received..................... 0Handoff End Requests Received................. 0State Transitions Disallowed.................. 0Resource Unavailable.......................... 0
Mobility Initiator StatisticsHandoff Requests Sent......................... 0Handoff Replies Received...................... 0Handoff as Local Received..................... 2Handoff as Foreign Received................... 0Handoff Denys Received........................ 0Anchor Request Sent........................... 0Anchor Deny Received.......................... 0Anchor Grant Received......................... 0Anchor Transfer Received...................... 0
Mobility Responder StatisticsHandoff Requests Ignored...................... 0Ping Pong Handoff Requests Dropped............ 0Handoff Requests Dropped...................... 0Handoff Requests Denied....................... 0Client Handoff as Local....................... 0Client Handoff as Foreign ................... 0Client Handoff Inter Group ................... 0Anchor Requests Received...................... 0Anchor Requests Denied........................ 0Anchor Requests Granted....................... 0
CLI Commands88
CLI Commandsshow mobility statistics

Anchor Transferred............................ 0
show mobility summaryTo display the summary information for the Cisco WLC mobility groups, use the show mobility summarycommand.
show mobility summary
Syntax Description This command has no arguments or keywords.
Command Default None
Command History ModificationRelease
This commandwas introduced in a release earlier thanRelease 7.6.
7.6
Usage Guidelines Some WLAN controllers may list no mobility security mode.
The following is a sample output of the show mobility summary command.
(Cisco Controller) >show mobility summary
Symmetric Mobility Tunneling (current) .......... DisabledSymmetric Mobility Tunneling (after reboot) ..... DisabledMobility Protocol Port........................... 16666Mobility Security Mode........................... DisabledDefault Mobility Domain.......................... snmp_guiMulticast Mode .................................. DisabledMobility Domain ID for 802.11r................... 0x66bdMobility Keepalive Interval...................... 10Mobility Keepalive Count......................... 3Mobility Group Members Configured................ 1Mobility Control Message DSCP Value.............. 0Controllers configured in the Mobility GroupMAC Address IP Address Group Name Multicast IP Status00:1b:d4:6b:87:20 1.100.163.70 snmp_gui 0.0.0.0 Up
Show Proxy Mobility IPv6 (PMIPv6) CommandsUse the show pmipv6 commands to display PMIPv6 information of the Mobile Access Gateway (MAG) andthe Local Mobility Anchor (LMA).
show pmipv6 domainTo display the summary information of a PMIPv6 domain, use the show pmipv6 domain command.
show pmipv6 domain domain_name profile profile_name
CLI Commands89
CLI Commandsshow mobility summary
Syntax Description Name of the PMIPv6 domain. The domain name can be upto 127 case-sensitive alphanumeric characters.
domain_name
Specifies the PMIPv6 profile.profile
Name of the profile associated with the PMIPv6 domain.The profile name can be up to 127 case-sensitivealphanumeric characters.
profile_name
Command History ModificationRelease
This commandwas introduced in a release earlier thanRelease 7.6.
7.6
The following example shows how to display the summary information of a PMIPv6 domain:
(Cisco Controller) >show pmipv6 domain floor1 profile profile1NAI: @example.comAPN: ExampleLMA: Examplelma
NAI: *APN: ciscoapnLMA: ciscolma
show pmipv6 mag bindingsTo display the binding information of a Mobile Access Gateway (MAG), use the show pmipv6 mag bindingcommand.
show pmipv6 mag bindings [lma lma_name | nai nai_string]
Syntax Description (Optional) Displays the binding details of the MAG toan Local Mobility Anchor (LMA).
lma
Name of the LMA. The LMA name is case-sensitive andcan be up to 127 alphanumeric characters.
lma_name
(Optional) Displays the binding details of the MAG to aclient.
nai
Network Access Identifier (NAI) of the client. The NAIis case-sensitive and can be up to 127 alphanumericcharacters. You can use all special characters except acolon.
nai_string
Command History ModificationRelease
This commandwas introduced in a release earlier thanRelease 7.6.
7.6
CLI Commands90
CLI Commandsshow pmipv6 mag bindings

The following example shows how to display the MAG bindings:
(Cisco Controller) >show pmipv6 mag binding[Binding][MN]: Domain: D1, Nai: [email protected]
[Binding][MN]: State: ACTIVE[Binding][MN]: Interface: Management[Binding][MN]: Hoa: 0xE0E0E02, att: 3, llid: aabb.cc00.c800[Binding][MN][LMA]: Id: LMA1[Binding][MN][LMA]: lifetime: 3600[Binding][MN][GREKEY]: Upstream: 102, Downstream: 1
show pmipv6 mag globalsTo display the global PMIPv6 parameters of the Mobile Access Gateway (MAG), use the show pmipv6 magglobals command.
show pmipv6 mag globals
Syntax Description This command has no arguments or keywords.
Command History ModificationRelease
This commandwas introduced in a release earlier thanRelease 7.6.
7.6
The following example shows how to display the global PMIPv6 parameters of a MAG:
(Cisco Controller) >show pmipv6 mag globalsDomain : D1
MAG Identifier : M1MAG Interface : ManagementMax Bindings : 10000Registration Lifetime : 3600 (sec)BRI Init-delay time : 1000 (msec)BRI Max-delay time : 2000 (msec)BRI Max retries : 1Refresh time : 300 (sec)Refresh RetxInit time : 1000 (msec)Refresh RetxMax time : 32000 (msec)Timestamp option : EnabledValidity Window : 7Peer#1:
LMA Name: AN-LMA-5K LMA IP: 209.165.201.10Peer#2:
LMA Name: AN-LMA LMA IP: 209.165.201.4Peer#3:
LMA Name: AN-LMA LMA IP: 209.165.201.4
show pmipv6 mag statsTo display the statistics of the Mobile Access Gateway (MAG), use the show pmipv6 mag stats command.
show pmipv6 mag stats [domain domain_name peer lma_name]
CLI Commands91
CLI Commandsshow pmipv6 mag globals

Syntax Description (Optional) Displays theMAG statistics for a LocalMobility Anchor(LMA) in the domain.
domain
Name of the PMIPv6 domain. The domain name is case-sensitiveand can be up to 127 alphanumeric characters.
domain_name
(Optional) Displays the MAG statistics for an LMA.peer
Name of the LMA. The LMA name is case sensitive and can beup to 127 alphanumeric characters.
lma_name
Command History ModificationRelease
This commandwas introduced in a release earlier thanRelease 7.6.
7.6
Usage Guidelines This table lists the descriptions of the LMA statistics.
Table 2: Descriptions of the LMA Statistics:
DescriptionLMA Statistics
Total number of Proxy Binding Updates (PBUs) sent to the LMA by the MAG.
PBU is a request message sent by the MAG to a mobile node’s LMA for establishinga binding between the mobile node’s interface and its current care-of address(Proxy-CoA).
PBU Sent
Total number of Proxy Binding Acknowledgements (PBAs) received by theMAG fromthe LMA.
PBA is a reply message sent by an LMA in response to a PBU message that it receivesfrom a MAG.
PBA Received
Total number of Proxy Binding Revocation Indications (PBRIs) sent by the MAG tothe LMA.
PBRI Sent
Total number of PBRIs received from the LMA by the MAG.PBRI Received
Total number of Proxy Binding Revocation Acknowledgements (PBRAs) sent by theMAG to the LMA.
PBRA Sent
Total number of PBRAs that the MAG receives from the LMA.PBRA Received
Number of handoffs between the MAG and the LMA.Number ofHandoff
The following example shows how to display the LMA statistics:
(Cisco Controller) >show pmipv6 mag stats[M1]: Total Bindings : 1[M1]: PBU Sent : 7[M1]: PBA Rcvd : 4[M1]: PBRI Sent : 0[M1]: PBRI Rcvd : 0[M1]: PBRA Sent : 0
CLI Commands92
CLI Commandsshow pmipv6 mag stats

[M1]: PBRA Rcvd : 0[M1]: No Of handoff : 0
show pmipv6 profile summaryTo display the summary of the PMIPv6 profiles, use the show pmipv6 profile summary command.
show pmipv6 profile summary
Syntax Description This command has no arguments or keywords.
Command Default None
Command History ModificationRelease
This commandwas introduced in a release earlier thanRelease 7.6.
7.6
The following example shows how to display the summary of the PMIPv6 profiles:
(Cisco Controller) >show pmipv6 profile summaryProfile Name WLAN IDS (Mapped)------------ -----------------Group1 6
Show RADIUS CommandsUse the show radius commands to display RADIUS settings.
• show radius acct statistics
• show radius auth statistics
• show radius rfc3576 statistics
• show radius summary
show radius acct statisticsTo display the RADIUS accounting server statistics for the Cisco wireless LAN controller, use the showradius acct statistics command.
show radius acct statistics
Syntax Description This command has no arguments or keywords.
Command Default None
CLI Commands93
CLI Commandsshow pmipv6 profile summary

Command History ModificationRelease
This commandwas introduced in a release earlier thanRelease 7.6.
7.6
The following example shows how to display RADIUS accounting server statistics:
(Cisco Controller) > show radius acct statisticsAccounting Servers:Server Index..................................... 1Server Address................................... 10.1.17.10Msg Round Trip Time.............................. 0 (1/100 second)First Requests................................... 0Retry Requests................................... 0Accounting Responses............................. 0Malformed Msgs................................... 0Bad Authenticator Msgs........................... 0Pending Requests................................. 0Timeout Requests................................. 0Unknowntype Msgs................................. 0Other Drops...................................... 0
Related Commands config radius acct
config radius acct ipsec authentication
config radius acct ipsec disable
config radius acct network
show radius auth statistics
show radius summary
show radius auth statisticsTo display the RADIUS authentication server statistics for the Cisco wireless LAN controller, use the showradius auth statistics command.
show radius auth statistics
This command has no arguments or keyword.
Command Default None
Command History ModificationRelease
This commandwas introduced in a release earlier thanRelease 7.6.
7.6
The following example shows how to display RADIUS authentication server statistics:
(Cisco Controller) > show radius auth statistics
CLI Commands94
CLI Commandsshow radius auth statistics

Authentication Servers:Server Index..................................... 1Server Address................................... 209.165.200.10Msg Round Trip Time.............................. 0 (1/100 second)First Requests................................... 0Retry Requests................................... 0Accept Responses................................. 0Reject Responses................................. 0Challenge Responses.............................. 0Malformed Msgs................................... 0Bad Authenticator Msgs........................... 0Pending Requests................................. 0Timeout Requests................................. 0Unknowntype Msgs................................. 0Other Drops...................................... 0
Related Commands config radius auth
config radius auth management
config radius auth network
show radius summary
show radius rfc3576 statisticsTo display the RADIUS rfc3576 server statistics for the Cisco wireless LAN controller, use the show radiusrfc3576 statistics command.
show radius rfc3576 statistics
Syntax Description This command has no arguments or keywords.
Command Default None
Usage Guidelines RFC 3576, an extension to the RADIUS protocol, allows dynamic changes to a user session, which includessupport for disconnecting users and changing authorizations applicable to a user session; that is, it providessupport for Disconnect and Change-of-Authorization (CoA) messages. Disconnect messages cause a usersession to be terminated immediately. CoA messages modify session authorization attributes such as datafilters.
The following example shows how to display the RADIUS RFC-3576 server statistics:
> show radius rfc3576 statisticsRFC-3576 Servers:Server Index..................................... 1Server Address................................... 10.1.17.10Msg Round Trip Time.............................. 0 (1/100 second)First Requests................................... 0Retry Requests................................... 0Accounting Responses............................. 0Malformed Msgs................................... 0
CLI Commands95
CLI Commandsshow radius rfc3576 statistics
Bad Authenticator Msgs........................... 0Pending Requests................................. 0Timeout Requests................................. 0Unknown type Msgs................................. 0Other Drops...................................... 0
Related Commands config radius auth rfc3576
show radius auth statistics
show radius summary
show radius summaryTo display the RADIUS authentication and accounting server summary, use the show radius summarycommand.
show radius summary
Syntax Description This command has no arguments or keywords.
Command Default None
Command History ModificationRelease
This commandwas introduced in a release earlier thanRelease 7.6.
7.6
The following example shows how to display a RADIUS authentication server summary:
(Cisco Controller) > show radius summaryVendor Id Backward Compatibility................. DisabledCredentials Caching.............................. DisabledCall Station Id Type............................. IP AddressAdministrative Authentication via RADIUS......... EnabledAuthentication ServersIndex Type Server Address Port State Tout RFC-3576 IPsec -AuthMode/Phase1/Group/Lifetime/Auth/Encr----- ---- ---------------- ------ -------- ---- -------- ------------------------------------------------Accounting ServersIndex Type Server Address Port State Tout RFC-3576 IPsec -AuthMode/Phase1/Group/Lifetime/Auth/Encr----- ---- ---------------- ------ -------- ---- -------- ------------------------------------------------
Related Commands show radius auth statistics
show radius acct statistics
CLI Commands96
CLI Commandsshow radius summary
Show Radio Frequency ID CommandsUse the show rfid commands to display radio frequency ID settings.
show rfid clientTo display the radio frequency identification (RFID) tags that are associated to the controller as clients, usethe show rfid client command.
show rfid client
Syntax Description This command has no arguments or keywords.
Command Default None.
Usage Guidelines When the RFID tag is not in client mode, the above fields are blank.
This example shows how to display the RFID tag that is associated to the controller as clients:
> show rfid client------------------ -------- --------- ----------------- ------ ----------------
HeardRFID Mac VENDOR Sec Ago Associated AP Chnl Client State
------------------ -------- --------- ----------------- ------ ----------------00:14:7e:00:0b:b1 Pango 35 AP0019.e75c.fef4 1 Probing
Related Commands config rfid status
config rfid timeout
show rfid config
show rfid detail
show rfid summary
show rfid configTo display the current radio frequency identification (RFID) configuration settings, use the show rfid configcommand.
show rfid config
Syntax Description This command has no arguments or keywords.
Command Default None.
This example shows how to display the current RFID configuration settings:
> show rfid configRFID Tag Data Collection ............................... EnabledRFID Tag Auto-Timeout .................................. Enabled
CLI Commands97
CLI CommandsShow Radio Frequency ID Commands

RFID Client Data Collection ............................ DisabledRFID Data Timeout ...................................... 200 seconds
Related Commands config rfid status
config rfid timeout
show rfid client
show rfid detail
show rfid summary
show rfid detailTo display detailed radio frequency identification (RFID) information for a specified tag, use the show rfiddetail command.
show rfid detail mac_address
Syntax Description MAC address of an RFID tag.mac_address
Command Default None.
This example shows how to display detailed RFID information:
> show rfid detail 00:12:b8:00:20:52RFID address..................................... 00:12:b8:00:20:52Vendor........................................... G2Last Heard....................................... 51 seconds agoPackets Received................................. 2Bytes Received................................... 324Cisco Type.......................................Content Header=================Version.......................................... 0Tx Power......................................... 12 dBmChannel.......................................... 1Reg Class........................................ 12Burst Length..................................... 1CCX Payload===========Last Sequence Control............................ 0Payload length................................... 127Last Sequence Control............................ 0Payload length................................... 127Payload Data Hex Dump01 09 00 00 00 00 0b 85 52 52 52 02 07 4b ff ff7f ff ff ff 03 14 00 12 7b 10 48 53 c1 f7 51 4b50 ba 5b 97 27 80 00 67 00 01 03 05 01 42 34 0000 03 05 02 42 5c 00 00 03 05 03 42 82 00 00 0305 04 42 96 00 00 03 05 05 00 00 00 55 03 05 0642 be 00 00 03 02 07 05 03 12 08 10 00 01 02 0304 05 06 07 08 09 0a 0b 0c 0d 0e 0f 03 0d 09 0308 05 07 a8 02 00 10 00 23 b2 4e 03 02 0a 03Nearby AP Statistics:lap1242-2(slot 0, chan 1) 50 seconds ag.... -76 dBmlap1242(slot 0, chan 1) 50 seconds ago..... -65 dBm
CLI Commands98
CLI Commandsshow rfid detail
Related Commands config rfid status
config rfid timeout
show rfid config
show rfid client
show rfid summary
show rfid summaryTo display a summary of the radio frequency identification (RFID) information for a specified tag, use theshow rfid summary command.
show rfid summary
Syntax Description This command has no arguments or keywords.
Command Default None.
This example shows how to display a summary of RFID information:
> show rfid summaryTotal Number of RFID : 5----------------- -------- ------------------ ------ ---------------------
RFID ID VENDOR Closest AP RSSI Time Since Last Heard----------------- -------- ------------------ ------ ---------------------00:04:f1:00:00:04 Wherenet ap:1120 -51 858 seconds ago00:0c:cc:5c:06:d3 Aerosct ap:1120 -51 68 seconds ago00:0c:cc:5c:08:45 Aerosct AP_1130 -54 477 seconds ago00:0c:cc:5c:08:4b Aerosct wolverine -54 332 seconds ago00:0c:cc:5c:08:52 Aerosct ap:1120 -51 699 seconds ago
Related Commands config rfid status
config rfid timeout
show rfid client
show rfid detail
show rfid config
Show Redundancy CommandsUse the show redundancy commands to display redundancy information of the active and standby controllers.
show redundancy summaryTo display the redundancy summary information, use the show redundancy summary command.
show redundancy summary
Syntax Description This command has no arguments or keywords.
CLI Commands99
CLI Commandsshow rfid summary

Command Default None
Command History ModificationRelease
This commandwas introduced in a release earlier thanRelease 7.6.
7.6
The following example shows how to display the redundancy summary information of the controller:(Cisco Controller) >show redundancy summaryRedundancy Mode = SSO DISABLED
Local State = ACTIVEPeer State = N/A
Unit = PrimaryUnit ID = 88:43:E1:7E:03:80
Redundancy State = N/AMobility MAC = 88:43:E1:7E:03:80
Redundancy Management IP Address................. 9.4.92.12Peer Redundancy Management IP Address............ 9.4.92.14Redundancy Port IP Address....................... 169.254.92.12Peer Redundancy Port IP Address.................. 169.254.92.14
show redundancy latencyTo display the average latency to reach the management gateway and the peer redundancy management IPaddress, use the show redundancy latency command .
show redundancy latency
Syntax Description This command has no arguments or keywords.
Command Default None
Command History ModificationRelease
This commandwas introduced in a release earlier thanRelease 7.6.
7.6
The following example shows how to display the average latency to reach the management gatewayand the peer redundancy management IP address:(Cisco Controller) >show redundancy latency
Network Latencies (RTT) for the Peer Reachability on the Redundancy Port in micro secondsfor the past 10 intervalsPeer Reachability Latency[ 1 ] : 524 usecsPeer Reachability Latency[ 2 ] : 524 usecsPeer Reachability Latency[ 3 ] : 522 usecsPeer Reachability Latency[ 4 ] : 526 usecsPeer Reachability Latency[ 5 ] : 524 usecsPeer Reachability Latency[ 6 ] : 524 usecsPeer Reachability Latency[ 7 ] : 522 usecsPeer Reachability Latency[ 8 ] : 522 usecs
CLI Commands100
CLI Commandsshow redundancy latency

Peer Reachability Latency[ 9 ] : 526 usecsPeer Reachability Latency[ 10 ] : 523 usecs
Network Latencies (RTT) for the Management Gateway Reachability in micro seconds for thepast 10 intervalsGateway Reachability Latency[ 1 ] : 1347 usecsGateway Reachability Latency[ 2 ] : 2427 usecsGateway Reachability Latency[ 3 ] : 1329 usecsGateway Reachability Latency[ 4 ] : 2014 usecsGateway Reachability Latency[ 5 ] : 2675 usecsGateway Reachability Latency[ 6 ] : 731 usecsGateway Reachability Latency[ 7 ] : 1882 usecsGateway Reachability Latency[ 8 ] : 2853 usecsGateway Reachability Latency[ 9 ] : 832 usecsGateway Reachability Latency[ 10 ] : 3708 usecs
show redundancy interfacesTo display details of redundancy and service port IP addresses, use the show redundancy interfacescommand.
show redundancy interfaces
Syntax Description This command has no arguments or keywords.
Command Default None
Command History ModificationRelease
This commandwas introduced in a release earlier thanRelease 7.6.
7.6
The following example shows how to display the redundancy and service port IP addressesinformation:(Cisco Controller) >show redundancy interfaces
Redundancy Management IP Address................. 9.4.120.5Peer Redundancy Management IP Address............ 9.4.120.3Redundancy Port IP Address....................... 169.254.120.5Peer Redundancy Port IP Address.................. 169.254.120.3Peer Service Port IP Address..................... 10.104.175.189
show redundancy mobilitymacTo display the High Availability (HA) mobility MAC address that is used to communicate with the peer, usethe show redundancy mobilitymac command.
show redundancy mobilitymac
Syntax Description This command has no arguments or keywords.
Command Default None
CLI Commands101
CLI Commandsshow redundancy interfaces

Command History ModificationRelease
This commandwas introduced in a release earlier thanRelease 7.6.
7.6
The following example shows how to display the HA mobility MAC address used to communicatewith the peer:(Cisco Controller) >show redundancy mobilitymac
ff:ff:ff:ff:ff:ff
show redundancy peer-route summaryTo display the routes assigned to the standbyWLC, use the show redundancy peer-route summary command.
show redundancy peer-route summary
Syntax Description This command has no arguments or keywords.
Command Default None
Command History ModificationRelease
This commandwas introduced in a release earlier thanRelease 7.6.
7.6
The following example shows how to display all the configured routes of the standby WLC:(Cisco Controller) >show redundancy peer-route summaryNumber of Routes................................. 1
Destination Network Netmask Gateway------------------- ------------------- -------------------xxx.xxx.xxx.xxx 255.255.255.0 xxx.xxx.xxx.xxx
show redundancy statisticsTo display the statistics information of the Redundancy Manager, use the show redundancy statisticscommand.
show redundancy statistics
Syntax Description This command has no arguments or keywords.
Command Default None
Command History ModificationRelease
This commandwas introduced in a release earlier thanRelease 7.6.
7.6
CLI Commands102
CLI Commandsshow redundancy peer-route summary

Usage Guidelines This command displays the statistics of different redundancy counters.
Local Physical Ports - Connectivity status of each physical port of the controller. 1 indicates that the port isup and 0 indicates that the port is down.
Peer Physical Ports - Connectivity status of each physical port of the peer controller. 1 indicates that the portis up and 0 indicates that the port is down.
The following example shows how to display the statistics information of the RedundancyManager:(Cisco Controller) >show redundancy statistics
Redundancy Manager Statistics
Keep Alive Request Send Counter : 16Keep Alive Response Receive Counter : 16
Keep Alive Request Receive Counter : 500322Keep Alive Response Send Counter : 500322
Ping Request to Default GW Counter : 63360Ping Response from Default GW Counter : 63360
Ping Request to Peer Counter : 12Ping Response from Peer Counter : 3
Keep Alive Loss Counter : 0Default GW Loss Counter : 0
Local Physical Ports 1...8 : 10000000Peer Physical Ports 1...8 : 10000000
show redundancy timersTo display details of the Redundancy Manager timers, use the show redundancy timers command.
show redundancy timers
Syntax Description This command has no arguments or keywords.
Command Default None
Command History ModificationRelease
This commandwas introduced in a release earlier thanRelease 7.6.
7.6
The following example shows how to display the details of the Redundancy Manager timers:(Cisco Controller) >show redundancy timers
Keep Alive Timer : 100 msecs
Peer Search Timer : 120 secs
CLI Commands103
CLI Commandsshow redundancy timers

Show RF-Profile CommandsUse the show RF-Profile commands to display RF profiles details.
show rf-profile summaryTo display a summary of RF profiles in the controller, use the show rf-profile summary command.
show rf-profile summary
Syntax Description This command has no arguments or keywords.
Command Default None
Command History ModificationRelease
This command was introduced in a release earlier than Release 7.6.7.6
The following is the output of the show rf-profile summary command:
(Cisco Controller) >show rf-profile summaryNumber of RF Profiles............................ 2Out Of Box State................................. DisabledRF Profile Name Band Description Applied------------------------- ------- ------------------------- -------T1a 5 GHz <none> NoT1b 2.4 GHz <none> No
show rf-profile detailsTo display the RF profile details in the Cisco wireless LAN controller, use the show rf-profile detailscommand.
show rf-profile details rf-profile-name
Syntax Description Name of the RF profile.rf-profile-name
Command Default None
Command History ModificationRelease
This command was introduced in a release earlier than Release 7.6.7.6
The following is the output of the show rf-profile details command::
(Cisco Controller) >show rf-profile details T1aDescription...................................... <none>Radio policy..................................... 5 GHzTransmit Power Threshold v1...................... -70 dBmTransmit Power Threshold v2...................... -67 dBmMin Transmit Power............................... -10 dBmMax Transmit Power............................... 30 dBm
CLI Commands104
CLI CommandsShow RF-Profile Commands

802.11a Operational Rates802.11a 6M Rate.............................. Mandatory802.11a 9M Rate.............................. Supported802.11a 12M Rate............................. Mandatory802.11a 18M Rate............................. Supported802.11a 24M Rate............................. Mandatory802.11a 36M Rate............................. Supported802.11a 48M Rate............................. Supported802.11a 54M Rate............................. Supported
Max Clients...................................... 200Client Trap Threshold............................ 50Multicast Data Rate.............................. 0Rx Sop Threshold................................. 0 dBmCca Threshold.................................... 0 dBmSlot Admin State:................................ EnabledBand Select Probe Response....................... DisabledBand Select Cycle Count.......................... 2 cyclesBand Select Cycle Threshold...................... 200 millisecondsBand Select Expire Suppression................... 20 secondsBand Select Expire Dual Band..................... 60 secondsBand Select Client Rssi.......................... -80 dBmLoad Balancing Denial............................ 3 countLoad Balancing Window............................ 5 clientsCoverage Data.................................... -80 dBmCoverage Voice................................... -80 dBmCoverage Exception............................... 3 clientsCoverage Level................................... 25 %
Show Rogue CommandsUse the show rogue commands to display unverified (rogue) device settings.
show rogue adhoc detailedTo display details of an ad-hoc rogue access point detected by the Cisco wireless LAN controller, use theshow rogue adhoc client detailed command.
show rogue adhoc detailedMAC_address
Syntax Description Adhoc rogue MAC address.MAC_address
Command Default None
Command History ModificationRelease
This commandwas introduced in a release earlier thanRelease 7.6.
7.6
The following example shows how to display detailed ad-hoc rogue MAC address information:
(Cisco Controller) > show rogue adhoc client detailed 02:61:ce:8e:a8:8cAdhoc Rogue MAC address.......................... 02:61:ce:8e:a8:8cAdhoc Rogue BSSID................................ 02:61:ce:8e:a8:8cState............................................ Alert
CLI Commands105
CLI CommandsShow Rogue Commands
First Time Adhoc Rogue was Reported.............. Tue Dec 11 20:45:452007Last Time Adhoc Rogue was Reported............... Tue Dec 11 20:45:452007Reported ByAP 1MAC Address.............................. 00:14:1b:58:4a:e0Name..................................... AP0014.1ced.2a60Radio Type............................... 802.11bSSID..................................... rf4k3apChannel.................................. 3RSSI..................................... -56 dBmSNR...................................... 15 dBEncryption............................... DisabledShortPreamble............................ DisabledWPA Support.............................. DisabledLast reported by this AP............... Tue Dec 11 20:45:45 2007
Related Commands config rogue adhoc
show rogue ignore-list
show rogue rule summary
show rogue rule detailed
config rogue rule
show rogue adhoc summary
show rogue adhoc summaryTo display a summary of the ad-hoc rogue access points detected by the Cisco wireless LAN controller, usethe show rogue adhoc summary command.
show rogue adhoc summary
Syntax Description This command has no arguments or keywords.
Command Default None
Command History ModificationRelease
This commandwas introduced in a release earlier thanRelease 7.6.
7.6
The following example shows how to display a summary of all ad-hoc rogues:
(Cisco Controller) > show rogue adhoc summaryDetect and report Ad-Hoc Networks................ EnabledClient MAC Address Adhoc BSSID State # APs Last Heard------------------ ----------- ----- --- -------xx:xx:xx:xx:xx:xx super Alert 1 Sat Aug 9 21:12:50
CLI Commands106
CLI Commandsshow rogue adhoc summary

2004xx:xx:xx:xx:xx:xx Alert 1 Aug 9 21:12:502003xx:xx:xx:xx:xx:xx Alert 1 Sat Aug 9 21:10:502003
Related Commands config rogue adhoc
show rogue ignore-list
show rogue rule summary
show rogue rule detailed
config rogue rule
show rogue adhoc detailed
show rogue ap clientsTo display details of rogue access point clients detected by the Cisco wireless LAN controller, use the showrogue ap clients command.
show rogue ap clients ap_mac_address
Syntax Description Rogue access point MAC address.ap_mac_address
Command Default None
Command History ModificationRelease
This commandwas introduced in a release earlier thanRelease 7.6.
7.6
The following example shows how to display details of rogue access point clients:
(Cisco Controller) > show rogue ap clients xx:xx:xx:xx:xx:xxMAC Address State # APs Last Heard----------------- ------------------ ----- -------------------------00:bb:cd:12:ab:ff Alert 1 Fri Nov 30 11:26:23 2007
Related Commands config rogue adhoc
config rogue ap classify
config rogue ap friendly
config rogue ap rldp
config rogue ap timeout
config rogue ap valid-client
config rogue client
CLI Commands107
CLI Commandsshow rogue ap clients

config trapflags rogueap
show rogue ap detailed
show rogue ap summary
show rogue ap friendly summary
show rogue ap malicious summary
show rogue ap unclassified summary
show rogue client detailed
show rogue client summary
show rogue ignore-list
show rogue rule detailed
show rogue rule summary
show rogue ap detailedTo display details of a rogue access point detected by the Cisco wireless LAN controller, use the show rogue-apdetailed command.
show rogue ap detailed ap_mac_address
Syntax Description Rogue access point MAC address.ap_mac_address
Command Default None
Command History ModificationRelease
This commandwas introduced in a release earlier thanRelease 7.6.
7.6
The following example shows how to display detailed information of a rogue access point:
(Cisco Controller) > show rogue ap detailed xx:xx:xx:xx:xx:xxRogue BSSID...................................... 00:0b:85:63:d1:94Is Rogue on Wired Network........................ NoClassification................................... UnclassifiedState............................................ AlertFirst Time Rogue was Reported.................... Fri Nov 30 11:24:562007Last Time Rogue was Reported..................... Fri Nov 30 11:24:562007Reported ByAP 1MAC Address.............................. 00:12:44:bb:25:d0Name..................................... flexconnectRadio Type............................... 802.11gSSID..................................... edu-eap
CLI Commands108
CLI Commandsshow rogue ap detailed
Channel.................................. 6RSSI..................................... -61 dBmSNR...................................... -1 dBEncryption............................... EnabledShortPreamble............................ EnabledWPA Support.............................. DisabledLast reported by this AP.............. Fri Nov 30 11:24:56 2007
Related Commands config rogue adhoc
config rogue ap classify
config rogue ap friendly
config rogue ap rldp
config rogue ap timeout
config rogue ap valid-client
config rogue client
config trapflags rogueap
show rogue ap clients
show rogue ap summary
show rogue ap friendly summary
show rogue ap malicious summary
show rogue ap unclassified summary
show rogue client detailed
show rogue client summary
show rogue ignore-list
show rogue rule detailed
show rogue rule summary
show rogue ap summaryTo display a summary of the rogue access points detected by the Cisco wireless LAN controller, use the showrogue-ap summary command.
show rogue ap summary{ssid | channel}
Syntax Description Displays specific user-configured SSID of the rogueaccess point.
ssid
Displays specific user-configured radio type andchannel of the rogue access point.
channel
Command Default None
CLI Commands109
CLI Commandsshow rogue ap summary

Command History ModificationRelease
This commandwas introduced in a release earlier thanRelease 7.6.
7.6
The new keywords SSID and channel are added.8.0
The following example shows how to display a summary of all rogue access points:
(Cisco Controller) > show rogue ap summary
Rogue Location Discovery Protocol................ DisabledRogue ap timeout................................. 1200
MAC Address Classification # APs # Clients Last Heard----------------- ------------------ ----- --------- -----------------------xx:xx:xx:xx:xx:xx friendly 1 0 Thu Aug 4 18:57:11 2005xx:xx:xx:xx:xx:xx malicious 1 0 Thu Aug 4 19:00:11 2005xx:xx:xx:xx:xx:xx malicious 1 0 Thu Aug 4 18:57:11 2005xx:xx:xx:xx:xx:xx malicious 1 0 Thu Aug 4 18:57:11 2005
The following example shows how to display a summary of all rogue access points with SSID asextended parameter.(Cisco Controller) > show rogue ap summary ssid
MAC Address Class State SSID Security--------------------------------------------------------------------------------------
xx:xx:xx:xx:xx:xx Unclassified Alert xxx Openxx:xx:xx:xx:xx:xx Unclassified Alert xxx Openxx:xx:xx:xx:xx:xx Pending Pending xxx Openxx:xx:xx:xx:xx:xx Unclassified Alert xxx WEP/WPA
The following example shows how to display a summary of all rogue access points with channel asextended parameter.(Cisco Controller) > show rogue ap summary channel
MAC Address Class State Det RadioType Channel RSSIlast/Max)--------------------------------------------------------------------------------------------------------------------
xx:xx:xx:xx:xx:xx Unclassified Alert 802.11g 11 -53 / -48xx:xx:xx:xx:xx:xx Unclassified Alert 802.11g 11 -53 / -48xx:xx:xx:xx:xx:xx Unclassified Alert 802.11a 149 -74 / -69xx:xx:xx:xx:xx:xx Unclassified Alert 802.11a 149 -74 / -69xx:xx:xx:xx:xx:xx Unclassified Alert 802.11a 149 -74 / -69
The following example shows how to display a summary of all rogue access points with both SSIDand channel as extended parameters.(Cisco Controller) > show rogue ap summary ssid channel
MAC Address Class State SSID Security Det RadioTypeChannel RSSI(last/Max)-----------------------------------------------------------------------------------------------------------------xx:xx:xx:xx:xx:xx Unclassified Alert dd WEP/WPA 802.11n5G56 -73 / -62xx:xx:xx:xx:xx:xx Unclassified Alert SSID IS HIDDEN Open 802.11a149 -68 / -66xx:xx:xx:xx:xx:xx Unclassified Alert wlan16 WEP/WPA 802.11n5G
CLI Commands110
CLI Commandsshow rogue ap summary
149 -71 / -71xx:xx:xx:xx:xx:xx Unclassified Alert wlan15 WEP/WPA 802.11n5G149 -71 / -71xx:xx:xx:xx:xx:xx Unclassified Alert wlan14 WEP/WPA 802.11n5G149 -71 / -71xx:xx:xx:xx:xx:xx Unclassified Alert wlan13 WEP/WPA 802.11n5G149 -71 / -70xx:xx:xx:xx:xx:xx Unclassified Alert wlan12 WEP/WPA 802.11n5G149 -71 / -71
Related Commands config rogue adhoc
config rogue ap classify
config rogue ap friendly
config rogue ap rldp
config rogue ap timeout
config rogue ap valid-client
config rogue client
config trapflags rogueap
show rogue ap clients
show rogue ap detailed
show rogue ap friendly summary
show rogue ap malicious summary
show rogue ap unclassified summary
show rogue client detailed
show rogue client summary
show rogue ignore-list
show rogue rule detailed
show rogue rule summary
show rogue ap friendly summaryTo display a list of the friendly rogue access points detected by the controller, use the show rogue ap friendlysummary command.
show rogue ap friendly summary
Syntax Description This command has no arguments or keywords.
Command Default None
Command History ModificationRelease
This commandwas introduced in a release earlier thanRelease 7.6.
7.6
CLI Commands111
CLI Commandsshow rogue ap friendly summary

The following example shows how to display a summary of all friendly rogue access points:
(Cisco Controller) > show rogue ap friendly summaryNumber of APs.................................... 1MAC Address State # APs # Clients Last Heard----------------- ------------------ ----- ------------------------------------XX:XX:XX:XX:XX:XX Internal 1 0 Tue Nov 27 13:52:04 2007
Related Commands config rogue adhoc
config rogue ap classify
config rogue ap friendly
config rogue ap rldp
config rogue ap timeout
config rogue ap valid-client
config rogue client
config trapflags rogueap
show rogue ap clients
show rogue ap detailed
show rogue ap summary
show rogue ap malicious summary
show rogue ap unclassified summary
show rogue client detailed
show rogue client summary
show rogue ignore-list
show rogue rule detailed
show rogue rule summary
show rogue ap malicious summaryTo display a list of the malicious rogue access points detected by the controller, use the show rogue apmalicious summary command.
show rogue ap malicious summary
Syntax Description This command has no arguments or keywords.
Command Default None
CLI Commands112
CLI Commandsshow rogue ap malicious summary

Command History ModificationRelease
This commandwas introduced in a release earlier thanRelease 7.6.
7.6
The following example shows how to display a summary of all malicious rogue access points:
(Cisco Controller) > show rogue ap malicious summaryNumber of APs.................................... 2MAC Address State # APs # Clients Last Heard----------------- ------------------ ----- ------------------------------------XX:XX:XX:XX:XX:XX Alert 1 0 Tue Nov 27 13:52:04 2007XX:XX:XX:XX:XX:XX Alert 1 0 Tue Nov 27 13:52:04 2007
Related Commands config rogue adhoc
config rogue ap classify
config rogue ap friendly
config rogue ap rldp
config rogue ap timeout
config rogue ap valid-client
config rogue client
config trapflags rogueap
show rogue ap clients
show rogue ap detailed
show rogue ap summary
show rogue ap friendly summary
show rogue ap unclassified summary
show rogue client detailed
show rogue client summary
show rogue ignore-list
show rogue rule detailed
show rogue rule summary
show rogue ap unclassified summaryTo display a list of the unclassified rogue access points detected by the controller, use the show rogue apunclassified summary command.
show rogue ap unclassified summary
Syntax Description This command has no arguments or keywords.
CLI Commands113
CLI Commandsshow rogue ap unclassified summary
Command Default None
Command History ModificationRelease
This commandwas introduced in a release earlier thanRelease 7.6.
7.6
The following example shows how to display a list of all unclassified rogue access points:
(Cisco Controller) > show rogue ap unclassified summaryNumber of APs.................................... 164MAC Address State # APs # Clients Last Heard----------------- ------------- ----- --------- ---------------XX:XX:XX:XX:XX:XX Alert 1 0 Fri Nov 30 11:12:52 2007XX:XX:XX:XX:XX:XX Alert 1 0 Fri Nov 30 11:29:01 2007XX:XX:XX:XX:XX:XX Alert 1 0 Fri Nov 30 11:26:23 2007XX:XX:XX:XX:XX:XX Alert 1 0 Fri Nov 30 11:26:23 2007
show rogue auto-containTo display information about rogue auto-containment, use the show rogue auto-contain command.
show rogue auto-contain
Syntax Description This command has no arguments or keywords.
Command Default None
Command History ModificationRelease
This commandwas introduced in a release earlier thanRelease 7.6.
7.6
The following example shows how to display information about rogue auto-containment:
(Cisco Controller) > show rogue auto-containContainment Level................................ 3monitor_ap_only.................................. false
Related Commands config rogue adhoc
config rogue auto-contain level
show rogue client detailedTo display details of a rogue client detected by a Cisco wireless LAN controller, use the show rogue clientdetailed command.
show rogue client detailed Rogue_AP MAC_address
Syntax Description Rogue AP address.Rogue_AP
CLI Commands114
CLI Commandsshow rogue auto-contain

Rogue client MAC address.MAC_address
Command Default None
Command History ModificationRelease
This commandwas introduced in a release earlier thanRelease 7.6.
7.6
The Rogue_AP parameter to the show rogue clientdetailed command is added.
8.1
The following example shows how to display detailed information for a rogue client:
(Cisco Controller) > show rogue client detailed xx:xx:xx:xx:xx:xxRogue BSSID...................................... 00:0b:85:23:ea:d1State............................................ AlertFirst Time Rogue was Reported.................... Mon Dec 3 21:50:36 2007Last Time Rogue was Reported..................... Mon Dec 3 21:50:36 2007Rogue Client IP address.......................... Not knownReported ByAP 1MAC Address.............................. 00:15:c7:82:b6:b0Name..................................... AP0016.47b2.31eaRadio Type............................... 802.11aRSSI..................................... -71 dBmSNR...................................... 23 dBChannel.................................. 149Last reported by this AP.............. Mon Dec 3 21:50:36 2007
Related Commands show rogue client summary
show rogue ignore-list
config rogue rule client
config rogue rule
show rogue client summaryTo display a summary of the rogue clients detected by the Cisco wireless LAN controller, use the show rogueclient summary command.
show rogue client summary
Syntax Description This command has no arguments or keywords.
Command Default None
Command History ModificationRelease
This commandwas introduced in a release earlier thanRelease 7.6.
7.6
CLI Commands115
CLI Commandsshow rogue client summary

The following example shows how to display a list of all rogue clients:
(Cisco Controller) > show rogue client summary
MAC Address State # APs Last Heard----------------- ------------------ ----- -----------------------xx:xx:xx:xx:xx:xx Alert 1 Thu Aug 4 19:00:08 2005xx:xx:xx:xx:xx:xx Alert 1 Thu Aug 4 19:00:08 2005xx:xx:xx:xx:xx:xx Alert 1 Thu Aug 4 19:00:08 2005xx:xx:xx:xx:xx:xx Alert 1 Thu Aug 4 19:00:08 2005xx:xx:xx:xx:xx:xx Alert 1 Thu Aug 4 19:00:08 2005xx:xx:xx:xx:xx:xx Alert 1 Thu Aug 4 19:00:08 2005xx:xx:xx:xx:xx:xx Alert 1 Thu Aug 4 19:09:11 2005xx:xx:xx:xx:xx:xx Alert 1 Thu Aug 4 19:03:11 2005xx:xx:xx:xx:xx:xx Alert 1 Thu Aug 4 19:03:11 2005xx:xx:xx:xx:xx:xx Alert 1 Thu Aug 4 19:09:11 2005xx:xx:xx:xx:xx:xx Alert 1 Thu Aug 4 18:57:08 2005xx:xx:xx:xx:xx:xx Alert 1 Thu Aug 4 19:12:08 2005
Related Commands show rogue client detailed
show rogue ignore-list
config rogue client
config rogue rule
show rogue ignore-listTo display a list of rogue access points that are configured to be ignored, use the show rogue ignore-listcommand.
show rogue ignore-list
Syntax Description This command has no arguments or keywords.
Command Default None
Command History ModificationRelease
This commandwas introduced in a release earlier thanRelease 7.6.
7.6
The following example shows how to display a list of all rogue access points that are configured tobe ignored.
(Cisco Controller) > show rogue ignore-list
MAC Address-----------------xx:xx:xx:xx:xx:xx
Related Commands config rogue adhoc
config rogue ap classify
CLI Commands116
CLI Commandsshow rogue ignore-list

config rogue ap friendly
config rogue ap rldp
config rogue ap ssid
config rogue ap timeout
config rogue ap valid-client
config rogue rule
config trapflags rogueap
show rogue client detailed
show rogue ignore-list
show rogue rule summary
show rogue client summary
show rogue ap unclassified summary
show rogue ap malicious summary
show rogue ap friendly summary
config rogue client
show rogue ap summary
show rogue ap clients
show rogue ap detailed
config rogue rule
show rogue rule detailedTo display detailed information for a specific rogue classification rule, use the show rogue rule detailedcommand.
show rogue rule detailed rule_name
Syntax Description Rogue rule name.rule_name
Command Default None
Command History ModificationRelease
This commandwas introduced in a release earlier thanRelease 7.6.
7.6
The following example shows how to display detailed information on a specific rogue classificationrule:
(Cisco Controller) > show rogue rule detailed Rule2Priority......................................... 2Rule Name........................................ Rule2
CLI Commands117
CLI Commandsshow rogue rule detailed

State............................................ EnabledType............................................. Malicious
Match Operation.................................. AnyHit Count........................................ 352Total Conditions................................. 2Condition 1
type......................................... Client-countvalue........................................ 10
Condition 2type......................................... Durationvalue (seconds).............................. 2000
Condition 3type......................................... Managed-ssidvalue........................................ Enabled
Condition 4type......................................... No-encryptionvalue........................................ Enabled
Condition 5type......................................... Rssivalue (dBm).................................. -50
Condition 6type......................................... SsidSSID Count................................... 1SSID 1.................................... test
Related Commands config rogue rule
show rogue ignore-list
show rogue rule summary
show rogue rule summaryTo display the rogue classification rules that are configured on the controller, use the show rogue rulesummary command.
show rogue rule summary
Syntax Description This command has no arguments or keywords.
Command Default None
Command History ModificationRelease
This commandwas introduced in a release earlier thanRelease 7.6.
7.6
The following example shows how to display a list of all rogue rules that are configured on thecontroller:
(Cisco Controller) > show rogue rule summaryPriority Rule Name State Type Match Hit Count-------- ----------------------- -------- ------------- ----- ---------1 mtest Enabled Malicious All 02 asdfasdf Enabled Malicious All 0
CLI Commands118
CLI Commandsshow rogue rule summary

Related Commands config rogue rule
show rogue ignore-list
show rogue rule detailed
Show TACACS CommandsUse the show tacacs commands to display Terminal Access Controller Access Control System (TACACS)protocol settings and statistics.
• show tacacs acct statistics
• show tacacs athr statistics
• show tacacs auth statistics
• show tacacs summary
show tacacs acct statisticsTo display detailed radio frequency identification (RFID) information for a specified tag, use the show tacacsacct statistics command.
show tacacs acct statistics
Syntax Description This command has no arguments or keywords.
Command Default None
Command History ModificationRelease
This commandwas introduced in a release earlier thanRelease 7.6.
7.6
The following example shows how to display detailed RFID information:
(Cisco Controller) > show tacacs acct statisticsAccounting Servers:Server Index..................................... 1Server Address................................... 10.0.0.0Msg Round Trip Time.............................. 0 (1/100 second)First Requests................................... 1Retry Requests................................... 0Accounting Response.............................. 0Accounting Request Success....................... 0Accounting Request Failure....................... 0Malformed Msgs................................... 0Bad Authenticator Msgs........................... 0Pending Requests................................. -1Timeout Requests................................. 1Unknowntype Msgs................................. 0Other Drops...................................... 0
CLI Commands119
CLI CommandsShow TACACS Commands

show tacacs athr statisticsTo display TACACS+ server authorization statistics, use the show tacacs athr statistics command.
show tacacs athr statistics
Syntax Description This command has no arguments or keywords.
Command Default None
Command History ModificationRelease
This commandwas introduced in a release earlier thanRelease 7.6.
7.6
The following example shows how to display TACACS server authorization statistics:
(Cisco Controller) > show tacacs athr statisticsAuthorization Servers:Server Index..................................... 3Server Address................................... 10.0.0.3Msg Round Trip Time.............................. 0 (1/100 second)First Requests................................... 0Retry Requests................................... 0Received Responses............................... 0Authorization Success............................ 0Authorization Failure............................ 0Challenge Responses.............................. 0Malformed Msgs................................... 0Bad Authenticator Msgs........................... 0Pending Requests................................. 0Timeout Requests................................. 0Unknowntype Msgs................................. 0Other Drops...................................... 0
Related Commands config tacacs acct
config tacacs athr
config tacacs auth
show tacacs auth statistics
show tacacs summary
show tacacs auth statisticsTo display TACACS+ server authentication statistics, use the show tacacs auth statistics command.
show tacacs auth statistics
Syntax Description This command has no arguments or keywords.
CLI Commands120
CLI Commandsshow tacacs athr statistics

Command Default None
Command History ModificationRelease
This commandwas introduced in a release earlier thanRelease 7.6.
7.6
The following example shows how to display TACACS server authentication statistics:
(Cisco Controller) > show tacacs auth statisticsAuthentication Servers:Server Index..................................... 2Server Address................................... 10.0.0.2Msg Round Trip Time.............................. 0 (msec)First Requests................................... 0Retry Requests................................... 0Accept Responses................................. 0Reject Responses................................. 0Error Responses.................................. 0Restart Responses................................ 0Follow Responses................................. 0GetData Responses................................ 0Encrypt no secret Responses...................... 0Challenge Responses.............................. 0Malformed Msgs................................... 0Bad Authenticator Msgs........................... 0Pending Requests................................. 0Timeout Requests................................. 0Unknowntype Msgs................................. 0Other Drops...................................... 0
show tacacs summaryTo display TACACS+ server summary information, use the show tacacs summary command.
show tacacs summary
Syntax Description This command has no arguments or keywords.
Command Default None
Command History ModificationRelease
This commandwas introduced in a release earlier thanRelease 7.6.
7.6
The following example shows how to display TACACS server summary information:
(Cisco Controller) > show tacacs summaryAuthentication Servers
CLI Commands121
CLI Commandsshow tacacs summary

Idx Server Address Port State Tout--- ---------------- ------ -------- ----2 10.0.0.1 49 Enabled 30Accounting ServersIdx Server Address Port State Tout--- ---------------- ------ -------- ----1 10.0.0.0 49 Enabled 5Authorization ServersIdx Server Address Port State Tout--- ---------------- ------ -------- ----3 10.0.0.3 49 Enabled 5Idx Server Address Port State Tout--- ---------------- ------ -------- ----4 2001:9:6:40::623 49 Enabled 5...
Related Commands config tacacs acct
config tacacs athr
config tacacs auth
show tacacs summary
show tacacs athr statistics
show tacacs auth statistics
Show WPS CommandsUse the show wps commands to display Wireless Protection System (WPS) settings.
• show wps ap-authentication summary
• show wps cids-sensor
• show wps mfp
• show wps shun-list
• show wps signature detail
• show wps signature events
• show wps signature summary
• show wps summary
• show wps wips statistics
• show wps wips summary
show wps ap-authentication summaryTo display the access point neighbor authentication configuration on the controller, use the show wpsap-authentication summary command.
CLI Commands122
CLI CommandsShow WPS Commands

show wps ap-authentication summary
Syntax Description This command has no arguments or keywords.
Command Default None
Command History ModificationRelease
This commandwas introduced in a release earlier thanRelease 7.6.
7.6
The following example shows how to display a summary of the Wireless Protection System (WPS)access point neighbor authentication:
(Cisco Controller) > show wps ap-authentication summaryAP neighbor authentication is <disabled>.Authentication alarm threshold is 1.RF-Network Name: <B1>
Related Commands config wps ap-authentication
show wps cids-sensorTo display Intrusion Detection System (IDS) sensor summary information or detailed information on a specifiedWireless Protection System (WPS) IDS sensor, use the show wps cids-sensor command.
show wps cids-sensor {summary | detail index}
Syntax Description Displays a summary of sensor settings.summary
Displays all settings for the selected sensor.detail
IDS sensor identifier.index
Command Default None
Command History ModificationRelease
This commandwas introduced in a release earlier thanRelease 7.6.
7.6
The following example shows how to display all settings for the selected sensor:
(Cisco Controller) > show wps cids-sensor detail1IP Address....................................... 10.0.0.51Port............................................. 443Query Interval................................... 60Username......................................... Sensor_user1Cert Fingerprint................................. SHA1:00:00:00:00:00:00:00:00:
CLI Commands123
CLI Commandsshow wps cids-sensor

00:00:00:00:00:00:00:00:00:00:00:00Query State...................................... DisabledLast Query Result................................ UnknownNumber of Queries Sent........................... 0
Related Commands config wps ap-authentication
show wps mfpTo display Management Frame Protection (MFP) information, use the show wps mfp command.
show wps mfp {summary | statistics}
Syntax Description Displays the MFP configuration and status.summary
Displays MFP statistics.statistics
Command Default None
Command History ModificationRelease
This commandwas introduced in a release earlier thanRelease 7.6.
7.6
The following example shows how to display a summary of the MFP configuration and status:
(Cisco Controller) > show wps mfp summaryGlobal Infrastructure MFP state.................. DISABLED (*all infrastructuresettings are overridden)Controller Time Source Valid..................... False
WLAN Infra. ClientWLAN ID WLAN Name Status Protection Protection------- ------------------------- --------- ---------- ----------1 homeap Disabled *Enabled Optional but inactive(WPA2 not configured)2 7921 Enabled *Enabled Optional but inactive(WPA2 not configured)3 open1 Enabled *Enabled Optional but inactive(WPA2 not configured)4 7920 Enabled *Enabled Optional but inactive(WPA2 not configured)
Infra. Operational --Infra. Capability--AP Name Validation Radio State Protection Validation-------------------- ---------- ----- -------------- ---------- ----------AP1252AG-EW *Enabled b/g Down Full Full
a Down Full Full
The following example shows how to display the MFP statistics:
(Cisco Controller) > show wps mfp statisticsBSSID Radio Validator AP Last Source Addr Found Error Type
Count Frame Types----------------- ----- -------------------- ----------------- ------ ----------
CLI Commands124
CLI Commandsshow wps mfp
---- ---------- -----------no errors
Related Commands config wps mfp
show wps shun-listTo display the Intrusion Detection System (IDS) sensor shun list, use the show wps shun-list command.
show wps shun-list
Syntax Description This command has no arguments or keywords.
Command Default None
Command History ModificationRelease
This commandwas introduced in a release earlier thanRelease 7.6.
7.6
The following example shows how to display the IDS system sensor shun list:
(Cisco Controller) > show wps shun-list
Related Commands config wps shun-list re-sync
show wps signature detailTo display installed signatures, use the show wps signature detail command.
show wps signature detail sig-id
Syntax Description Signature ID of an installed signature.sig-id
Command Default None
Command History ModificationRelease
This commandwas introduced in a release earlier thanRelease 7.6.
7.6
This example shows how to display information on the attacks detected by standard signature 1:
(Cisco Controller) > show wps signature detail 1Signature-ID..................................... 1Precedence....................................... 1Signature Name................................... Bcast deauthType............................................. standardFrameType........................................ managementState............................................ enabledAction........................................... report
CLI Commands125
CLI Commandsshow wps shun-list

Tracking......................................... per Signature and MacSignature Frequency.............................. 500 pkts/intervalSignature Mac Frequency.......................... 300 pkts/intervalInterval......................................... 10 secQuiet Time....................................... 300 secDescription...................................... Broadcast Deauthentication FramePatterns:
0(Header):0x0:0x04(Header):0x0:0x0
Related Commands config wps signature
config wps signature frequency
config wps signature mac-frequency
config wps signature interval
config wps signature quiet-time
config wps signature reset
show wps signature events
show wps signature summary
show wps summary
show wps signature eventsTo display more information about the attacks detected by a particular standard or custom signature, use theshow wps signature events command.
show wps signature events {summary | {standard | custom} precedenceID {summary |detailed}
Syntax Description Displays all tracking signature summary information.summary
Displays Standard Intrusion Detection System (IDS)signature settings.
standard
Displays custom IDS signature settings.custom
Signature precedence identification value.precedenceID
Displays tracking source MAC address details.detailed
Command Default None
Command History ModificationRelease
This commandwas introduced in a release earlier thanRelease 7.6.
7.6
The following example shows how to display the number of attacks detected by all enabled signatures:
CLI Commands126
CLI Commandsshow wps signature events
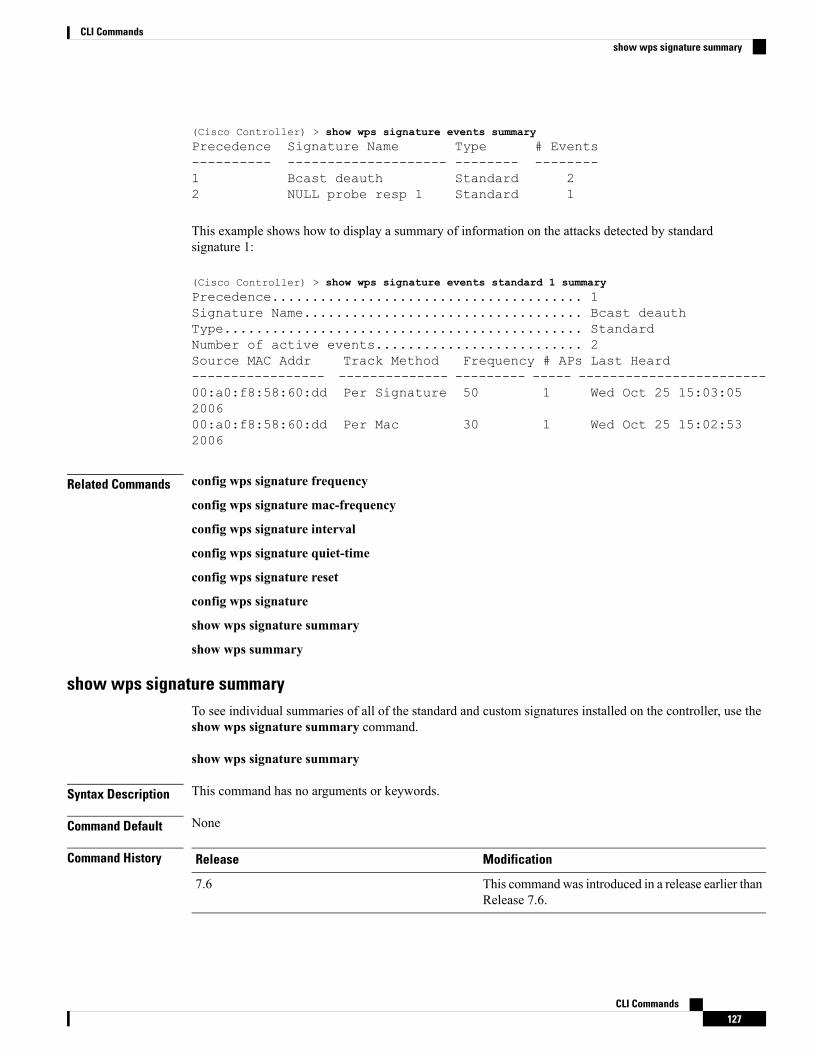
(Cisco Controller) > show wps signature events summaryPrecedence Signature Name Type # Events---------- -------------------- -------- --------1 Bcast deauth Standard 22 NULL probe resp 1 Standard 1
This example shows how to display a summary of information on the attacks detected by standardsignature 1:
(Cisco Controller) > show wps signature events standard 1 summaryPrecedence....................................... 1Signature Name................................... Bcast deauthType............................................. StandardNumber of active events.......................... 2Source MAC Addr Track Method Frequency # APs Last Heard----------------- -------------- --------- ----- ------------------------00:a0:f8:58:60:dd Per Signature 50 1 Wed Oct 25 15:03:05200600:a0:f8:58:60:dd Per Mac 30 1 Wed Oct 25 15:02:532006
Related Commands config wps signature frequency
config wps signature mac-frequency
config wps signature interval
config wps signature quiet-time
config wps signature reset
config wps signature
show wps signature summary
show wps summary
show wps signature summaryTo see individual summaries of all of the standard and custom signatures installed on the controller, use theshow wps signature summary command.
show wps signature summary
Syntax Description This command has no arguments or keywords.
Command Default None
Command History ModificationRelease
This commandwas introduced in a release earlier thanRelease 7.6.
7.6
CLI Commands127
CLI Commandsshow wps signature summary

The following example shows how to display a summary of all of the standard and custom signatures:
(Cisco Controller) > show wps signature summarySignature-ID..................................... 1Precedence....................................... 1Signature Name................................... Bcast deauthType............................................. standardFrameType........................................ managementState............................................ enabledAction........................................... reportTracking......................................... per Signature and MacSignature Frequency.............................. 50 pkts/intervalSignature Mac Frequency.......................... 30 pkts/intervalInterval......................................... 1 secQuiet Time....................................... 300 secDescription...................................... BroadcastDeauthentication FramePatterns:
0(Header):0x00c0:0x00ff4(Header):0x01:0x01
...
Related Commands config wps signature frequency
config wps signature interval
config wps signature quiet-time
config wps signature reset
show wps signature events
show wps summary
config wps signature mac-frequency
config wps signature
show wps summaryTo displayWireless Protection System (WPS) summary information, use the show wps summary command.
show wps summary
Syntax Description This command has no arguments or keywords.
Command Default None
Command History ModificationRelease
This commandwas introduced in a release earlier thanRelease 7.6.
7.6
The following example shows how to display WPS summary information:
CLI Commands128
CLI Commandsshow wps summary

(Cisco Controller) > show wps summaryAuto-ImmuneAuto-Immune.................................... Disabled
Client Exclusion PolicyExcessive 802.11-association failures.......... EnabledExcessive 802.11-authentication failures....... EnabledExcessive 802.1x-authentication................ EnabledIP-theft....................................... EnabledExcessive Web authentication failure........... Enabled
Trusted AP PolicyManagement Frame Protection.................... DisabledMis-configured AP Action....................... Alarm OnlyEnforced encryption policy................... noneEnforced preamble policy..................... noneEnforced radio type policy................... noneValidate SSID................................ Disabled
Alert if Trusted AP is missing................. DisabledTrusted AP timeout............................. 120
Untrusted AP PolicyRogue Location Discovery Protocol.............. DisabledRLDP Action.................................. Alarm Only
Rogue APsRogues AP advertising my SSID................ Alarm OnlyDetect and report Ad-Hoc Networks............ Enabled
Rogue ClientsValidate rogue clients against AAA........... EnabledDetect trusted clients on rogue APs.......... Alarm Only
Rogue AP timeout............................... 1300Signature PolicySignature Processing........................... Enabled
...
Related Commands config wps signature frequency
config wps signature interval
config wps signature quiet-time
config wps signature reset
show wps signature events
show wps signature mac-frequency
show wps summary
config wps signature
config wps signature interval
show wps wips statisticsTo display the current state of the Cisco Wireless Intrusion Prevention System (wIPS) operation on thecontroller, use the show wps wips statistics command.
CLI Commands129
CLI Commandsshow wps wips statistics

show wps wips statistics
Syntax Description This command has no arguments or keywords.
Command Default None
Command History ModificationRelease
This commandwas introduced in a release earlier thanRelease 7.6.
7.6
The following example shows how to display the statistics of the wIPS operation:
(Cisco Controller) > show wps wips statisticsPolicy Assignment Requests............ 1Policy Assignment Responses........... 1Policy Update Requests................ 0Policy Update Responses............... 0Policy Delete Requests................ 0Policy Delete Responses............... 0Alarm Updates......................... 13572Device Updates........................ 8376Device Update Requests................ 0Device Update Responses............... 0Forensic Updates...................... 1001Invalid WIPS Payloads................. 0Invalid Messages Received............. 0NMSP Transmitted Packets.............. 22950NMSP Transmit Packets Dropped......... 0NMSP Largest Packet................... 1377
Related Commands config 802.11 enable
config ap mode
config ap monitor-mode
show ap config
show ap monitor-mode summary
show wps wips summary
show wps wips summaryTo display the adaptive Cisco Wireless Intrusion Prevention System (wIPS) configuration that the WirelessControl System (WCS) forwards to the controller, use the show wps wips summary command.
show wps wips summary
Syntax Description This command has no arguments or keywords.
Command Default None
CLI Commands130
CLI Commandsshow wps wips summary

Command History ModificationRelease
This commandwas introduced in a release earlier thanRelease 7.6.
7.6
The following example shows how to display a summary of the wIPS configuration:
(Cisco Controller) > show wps wips summaryPolicy Name...................................... DefaultPolicy Version................................... 3
Related Commands config 802.11 enable
config ap mode
config ap monitor-mode
show ap config
show ap monitor-mode summary
show wps wips statistics
Other Show Commands
show aaa authTo display the configuration settings for the AAA authentication server database, use the show aaa authcommand.
show aaa auth
Syntax Description This command has no arguments or keywords.
Command Default None
Command History ModificationRelease
This commandwas introduced in a release earlier thanRelease 7.6.
7.6
The following example shows how to display the configuration settings for the AAA authenticationserver database:
(Cisco Controller) > show aaa authManagement authentication server order:
1............................................ local2............................................ tacacs
Related Commands config aaa auth
config aaa auth mgmt
CLI Commands131
CLI CommandsOther Show Commands
show aclTo display the access control lists (ACLs) that are configured on the controller, use the show acl command.
show acl {cpu | detailed acl_name | summary}
Syntax Description Displays the ACLs configured on the Cisco WLC'scentral processing unit (CPU).
cpu
Displays detailed information about a specific ACL.detailed
ACL name. The name can be up to 32 alphanumericcharacters.
acl_name
Displays a summary of all ACLs configured on thecontroller.
summary
Command Default None
Command History ModificationRelease
This commandwas introduced in a release earlier thanRelease 7.6.
7.6
The following example shows how to display the access control lists on the CPU.
(Cisco Controller) >show acl cpu
CPU Acl Name................................Wireless Traffic............................ DisabledWired Traffic............................... DisabledApplied to NPU.............................. No
The following example shows how to display a summary of the access control lists.
(Cisco Controller) > show acl summary
ACL Counter Status Disabled----------------------------------------IPv4 ACL Name Applied-------------------------------- -------acl1 Yesacl2 Yesacl3 Yes----------------------------------------IPv6 ACL Name Applied-------------------------------- -------acl6 No
The following example shows how to display the detailed information of the access control lists.
CLI Commands132
CLI Commandsshow acl

(Cisco Controller) > show acl detailed acl_name
Source Destination Source Port Dest PortI Dir IP Address/Netmask IP Address/Netmask Prot Range Range DSCPAction Counter- --- ------------------ ------------------ ---- --------- --------- ----------- -------1Any 0.0.0.0/0.0.0.0 0.0.0.0/0.0.0.0 Any 0-65535 0-65535 0 Deny 02In 0.0.0.0/0.0.0.0 200.200.200.0/ 6 80-80 0-65535 Any Permit 0
255.255.255.0DenyCounter : 0
The Counter field increments each time a packet matches an ACL rule, and the DenyCounter fieldincrements each time a packet does not match any of the rules.
Note
Related Commands clear acl counters
config acl apply
config acl counter
config acl cpu
config acl create
config acl delete
config interface acl
config acl rule
show acl cpuTo display the access control lists (ACLs) configured on the central processing unit (CPU), use the show aclcpu command.
show acl cpu
Syntax Description This command has no arguments or keywords.
Command Default None
Command History ModificationRelease
This commandwas introduced in a release earlier thanRelease 7.6.
7.6
The following example shows how to display the access control lists on the CPU:
CLI Commands133
CLI Commandsshow acl cpu
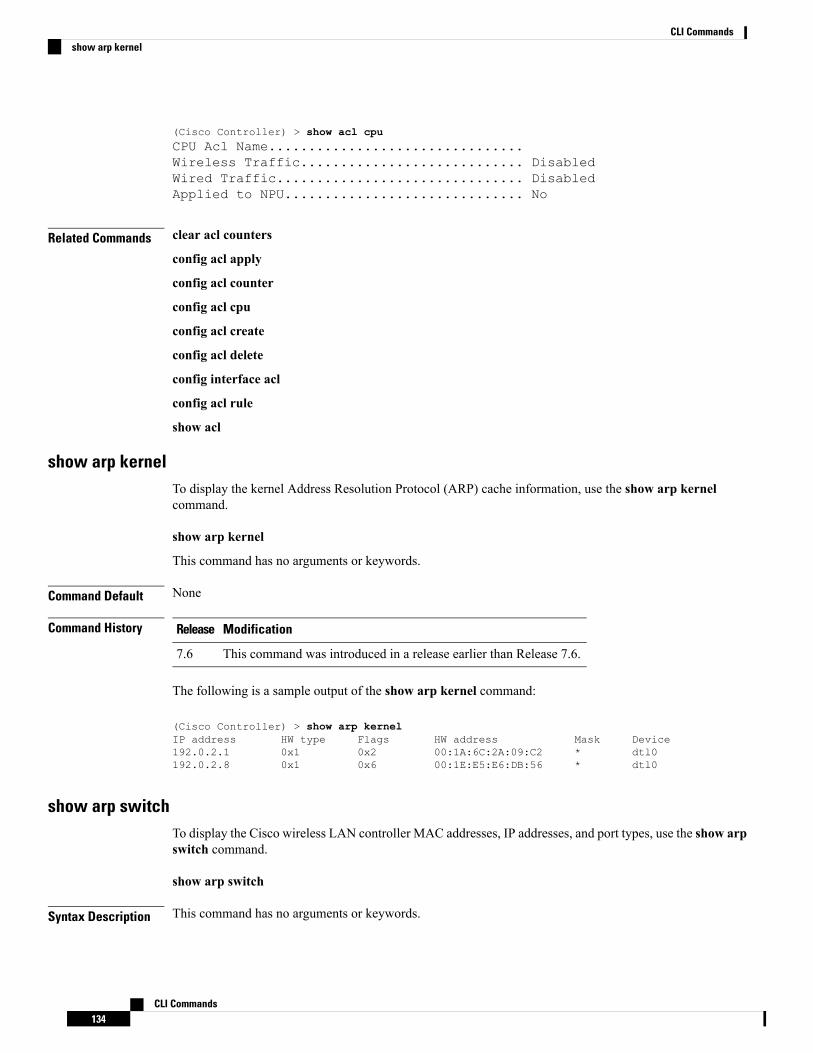
(Cisco Controller) > show acl cpuCPU Acl Name................................Wireless Traffic............................ DisabledWired Traffic............................... DisabledApplied to NPU.............................. No
Related Commands clear acl counters
config acl apply
config acl counter
config acl cpu
config acl create
config acl delete
config interface acl
config acl rule
show acl
show arp kernelTo display the kernel Address Resolution Protocol (ARP) cache information, use the show arp kernelcommand.
show arp kernel
This command has no arguments or keywords.
Command Default None
Command History ModificationRelease
This command was introduced in a release earlier than Release 7.6.7.6
The following is a sample output of the show arp kernel command:
(Cisco Controller) > show arp kernelIP address HW type Flags HW address Mask Device192.0.2.1 0x1 0x2 00:1A:6C:2A:09:C2 * dtl0192.0.2.8 0x1 0x6 00:1E:E5:E6:DB:56 * dtl0
show arp switchTo display the Cisco wireless LAN controller MAC addresses, IP addresses, and port types, use the show arpswitch command.
show arp switch
Syntax Description This command has no arguments or keywords.
CLI Commands134
CLI Commandsshow arp kernel

Command History ModificationRelease
This command was introduced in a release earlier than Release 7.6.7.6
The following is a sample output of the show arp switch command:
(Cisco Controller) > show arp switchMAC Address IP Address Port VLAN Type------------------- ---------------- ------------ ---- -------------------xx:xx:xx:xx:xx:xx xxx.xxx.xxx.xxx service port 1xx:xx:xx:xx:xx:xx xxx.xxx.xxx.xxx service portxx:xx:xx:xx:xx:xx xxx.xxx.xxx.xxx service port
show auth-listTo display the access point authorization list, use the show auth-list command.
show auth-list
Syntax Description This command has no arguments or keywords.
Command History ModificationRelease
This commandwas introduced in a release earlier thanRelease 7.6.
7.6
The following example shows how to display the access point authorization list:
(Cisco Controller) >show auth-listAuthorize APs against AAA...................... disabledAllow APs with Self-signed Certificate (SSC)... disabledMac Addr Cert Type Key Hash----------------------- ---------- ------------------------------------------xx:xx:xx:xx:xx:xx MIC
show bootTo display the primary and backup software build numbers with an indication of which is active, use the showboot command.
show boot
Syntax Description This command has no arguments or keywords.
Command Default None
Command History ModificationRelease
This command was introduced in a release earlier than Release 7.6.7.6
CLI Commands135
CLI Commandsshow auth-list

Usage Guidelines Each Cisco wireless LAN controller retains one primary and one backup operating system software load innonvolatile RAM to allow controllers to boot off the primary load (default) or revert to the backup load whendesired.
The following is a sample output of the show boot command:
(Cisco Controller) > show bootPrimary Boot Image............................... 3.2.13.0 (active)Backup Boot Image................................ 3.2.15.0
Related Commands config boot
show band-selectTo display band selection information, use the show band-select command.
show band-select
Syntax Description This command has no arguments or keywords.
Command Default None
Command History ModificationRelease
This command was introduced in a release earlier than Release 7.6.7.6
The following is a sample output of the show band-select command:(Cisco Controller) > show band-selectBand Select Probe Response....................... per WLAN enabling
Cycle Count................................... 3 cyclesCycle Threshold............................... 200 millisecondsAge Out Suppression........................... 20 secondsAge Out Dual Band............................. 60 secondsClient RSSI................................... -80 dBm
Related Commands config band-select
config wlan band-select
show buffersTo display buffer information of the controller, use the show buffers command.
show buffers
Syntax Description This command has no arguments or keywords.
Command Default None
Command History ModificationRelease
This command was introduced in a release earlier than Release 7.6.7.6
CLI Commands136
CLI Commandsshow band-select

The following is a sample output of the show buffers command:(Cisco Controller) > show buffersPool[00]: 16 byte chunks
chunks in pool: 50000chunks in use: 9196bytes in use: 147136bytes requested: 73218 (73918 overhead bytes)
Pool[01]: 64 byte chunkschunks in pool: 50100chunks in use: 19222bytes in use: 1230208bytes requested: 729199 (501009 overhead bytes)
Pool[02]: 128 byte chunkschunks in pool: 26200chunks in use: 9861bytes in use: 1262208bytes requested: 848732 (413476 overhead bytes)
Pool[03]: 256 byte chunkschunks in pool: 3000chunks in use: 596bytes in use: 152576bytes requested: 93145 (59431 overhead bytes)
Pool[04]: 384 byte chunkschunks in pool: 6000chunks in use: 258bytes in use: 99072bytes requested: 68235 (30837 overhead bytes)
Pool[05]: 512 byte chunkschunks in pool: 18700chunks in use: 18667bytes in use: 9557504bytes requested: 7933814 (1623690 overhead bytes)
Pool[06]: 1024 byte chunkschunks in pool: 3500chunks in use: 94bytes in use: 96256bytes requested: 75598 (20658 overhead bytes)
Pool[07]: 2048 byte chunkschunks in pool: 1000chunks in use: 54bytes in use: 110592bytes requested: 76153 (34439 overhead bytes)
Pool[08]: 4096 byte chunkschunks in pool: 1000chunks in use: 47bytes in use: 192512bytes requested: 128258 (64254 overhead bytes)
Raw Pool:chunks in use: 256bytes requested: 289575125
show cdpTo display the status and details of the Cisco Discovery Protocol (CDP), use the show cdp command.
show cdp {neighbors [detail] | entry all | traffic}
Syntax Description Displays a list of all CDP neighbors on all interfaces.neighbors
CLI Commands137
CLI Commandsshow cdp

(Optional) Displays detailed information of the controller’s CDP neighbors. This commandshows only the CDP neighbors of the controller; it does not show the CDP neighbors of thecontroller’s associated access points.
detail
Displays all CDP entries in the database.entry all
Displays CDP traffic information.traffic
Command Default None
Command History ModificationRelease
This command was introduced in a release earlier than Release 7.6.7.6
The following is a sample output of the show cdp command:
(Cisco Controller) > show cdpCDP counters :Total packets output: 0, Input: 0Chksum error: 0No memory: 0, Invalid packet: 0,
Related Commands config cdp
config ap cdp
show ap cdp
show call-control ap
The show call-control ap command is applicable only for SIP based calls.Note
To see the metrics for successful calls or the traps generated for failed calls, use the show call-control apcommand.
show call-control ap {802.11a | 802.11b} cisco_ap {metrics | traps}
Syntax Description Specifies the 802.11a network802.11a
Specifies the 802.11b/g network.802.11b
Cisco access point name.cisco_ap
Specifies the call metrics information.metrics
Specifies the trap information for call control.traps
Command Default None
CLI Commands138
CLI Commandsshow call-control ap
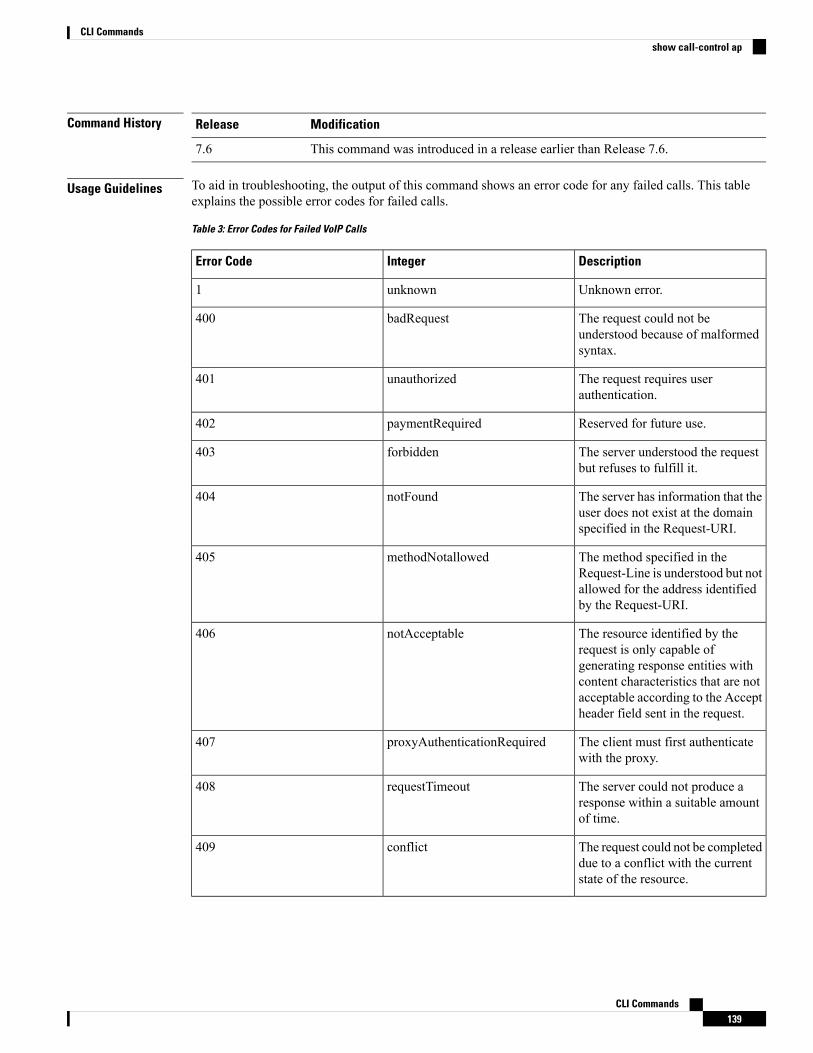
Command History ModificationRelease
This command was introduced in a release earlier than Release 7.6.7.6
Usage Guidelines To aid in troubleshooting, the output of this command shows an error code for any failed calls. This tableexplains the possible error codes for failed calls.
Table 3: Error Codes for Failed VoIP Calls
DescriptionIntegerError Code
Unknown error.unknown1
The request could not beunderstood because of malformedsyntax.
badRequest400
The request requires userauthentication.
unauthorized401
Reserved for future use.paymentRequired402
The server understood the requestbut refuses to fulfill it.
forbidden403
The server has information that theuser does not exist at the domainspecified in the Request-URI.
notFound404
The method specified in theRequest-Line is understood but notallowed for the address identifiedby the Request-URI.
methodNotallowed405
The resource identified by therequest is only capable ofgenerating response entities withcontent characteristics that are notacceptable according to the Acceptheader field sent in the request.
notAcceptable406
The client must first authenticatewith the proxy.
proxyAuthenticationRequired407
The server could not produce aresponse within a suitable amountof time.
requestTimeout408
The request could not be completeddue to a conflict with the currentstate of the resource.
conflict409
CLI Commands139
CLI Commandsshow call-control ap

DescriptionIntegerError Code
The requested resource is no longeravailable at the server, and noforwarding address is known.
gone410
The server is refusing to process arequest because the requestentity-body is larger than the serveris willing or able to process.
lengthRequired411
The server is refusing to process arequest because the requestentity-body is larger than the serveris willing or able to process.
requestEntityTooLarge413
The server is refusing to service therequest because the Request-URIis longer than the server is willingto interpret.
requestURITooLarge414
The server is refusing to service therequest because the message bodyof the request is in a format notsupported by the server for therequested method.
unsupportedMediaType415
The server did not understand theprotocol extension specified in aProxy-Require or Require headerfield.
badExtension420
The callee’s end system wascontacted successfully, but thecallee is currently unavailable.
temporarilyNotAvailable480
The UAS received a request thatdoes not match any existing dialogor transaction.
callLegDoesNotExist481
The server has detected a loop.loopDetected482
The server received a request thatcontains a Max-Forwards headerfield with the value zero.
tooManyHops483
The server received a request witha Request-URI that was incomplete.
addressIncomplete484
The Request-URI was ambiguous.ambiguous485
CLI Commands140
CLI Commandsshow call-control ap

DescriptionIntegerError Code
The callee’s end system wascontacted successfully, but thecallee is currently not willing orable to take additional calls at thisend system.
busy486
The server encountered anunexpected condition thatprevented it from fulfilling therequest.
internalServerError500
The server does not support thefunctionality required to fulfill therequest.
notImplemented501
The server, while acting as agateway or proxy, received aninvalid response from thedownstream server it accessed inattempting to fulfill the request.
badGateway502
The server is temporarily unable toprocess the request because of atemporary overloading ormaintenance of the server.
serviceUnavailable503
The server did not receive a timelyresponse from an external server itaccessed in attempting to processthe request.
serverTimeout504
The server does not support orrefuses to support the SIP protocolversion that was used in the request.
versionNotSupported505
The callee’s end system wascontacted successfully, but thecallee is busy or does not want totake the call at this time.
busyEverywhere600
The callee’s machine was contactedsuccessfully, but the user does notwant to or cannot participate.
decline603
The server has information that theuser indicated in the Request-URIdoes not exist anywhere.
doesNotExistAnywhere604
CLI Commands141
CLI Commandsshow call-control ap
DescriptionIntegerError Code
The user’s agent was contactedsuccessfully, but some aspects ofthe session description (such as therequested media, bandwidth, oraddressing style) were notacceptable.
notAcceptable606
The following is a sample output of the show call-controller ap command that displays successfulcalls generated for an access point:(Cisco Controller) >show call-control ap 802.11a Cisco_AP metricsTotal Call Duration in Seconds................... 120Number of Calls.................................. 10Number of calls for given client is................. 1
The following is a sample output of the show call-control ap command that displays metrics of trapsgenerated for an AP.(Cisco Controller) >show call-control ap 802.11a Cisco_AP trapsNumber of traps sent in one min.................. 2Last SIP error code.............................. 404Last sent trap timestamp...................... Jun 20 10:05:06
show call-control clientTo see call information for a call-aware client when Voice-over-IP (VoIP) snooping is enabled and the callis active, use the show call-control client command
show call-control client callInfo client_MAC_address
Syntax Description Specifies the call-control information.callInfo
Client MAC address.client_MAC_address
Command Default None
Command History ModificationRelease
This command was introduced in a release earlier than Release 7.6.7.6
The following example is a sample output of the show call-controller client command:
(Cisco Controller) > show call-control client callInfo 10.10.10.10.10.10Uplink IP/port................................... 0.0.0.0 / 0Downlink IP/port................................ 9.47.96.107 / 5006UP............................................... 6Calling Party.................................... sip:1021Called Party..................................... sip:1000Call ID.......................................... 38423970c3fca477Call on hold: ................................... FALSENumber of calls for given client is.............. 1
CLI Commands142
CLI Commandsshow call-control client
show capwap client configTo display the list of clients associated with the CAPWAP access point, use the show capwap client command.
show capwap client config
Syntax Description This command has no arguments or keywords.
Command History ModificationRelease
This commandwas introduced in a release earlier thanRelease 7.6.
7.6
The following example shows how to display clients associated with CAPWAP access point:
> show capwap clientconfigMagicMark 0xF1E2D3C4chkSumV2 23845chkSumV1 43434swVer 4.2.37.156adminState ADMIN_ENABLED(1)name AP001b.0cfc.3f80location default locationgroup namemwarName WLC1mwarIPAddress 9.41.80.67mwarNamemwarIPAddress 0.0.0.0mwarNamemwarIPAddress 0.0.0.0ssh status DisabledTelnet status DisablednumOfSlots 2spamRebootOnAssert 1spamStatTimer 180randSeed 0x0transport SPAM_TRANSPORT_L3(2)transportCfg SPAM_TRANSPORT_DEFAULT(0)initialisation SPAM_PRODUCTION_DISCOVERY(1)
show capwap client ip configTo display the CAPWAP static IP configuration, use the show capwap client ip config command.
show capwap client ip config
Syntax Description This command has no arguments or keywords.
Command History ModificationRelease
This commandwas introduced in a release earlier thanRelease 7.6.
7.6
The following example shows how to display the CAPWAP static IP information:
CLI Commands143
CLI Commandsshow capwap client config

> show capwap client ip configLWAPP Static IP ConfigurationPrimary Controller 9.41.80.88
show capwap reap associationTo display the list of clients associated with an access point and their SSIDs, use the show capwap reapassociation command.
show capwap reap association
Syntax Description This command has no arguments or keywords.
Command History ModificationRelease
This command was introduced in a release earlier than Release 7.6.7.6
The following example shows how to display clients associated to an access point and their SSIDs:(Cisco Controller) >show capwap reap association
show capwap reap statusTo display the status of the FlexConnect access point (connected or standalone), use the show capwap reapstatus command.
show capwap reap status
Syntax Description This command has no arguments or keywords.
Command Default None
Command History ModificationRelease
This command was introduced in a release earlier than Release 7.6.7.6
Usage Guidelines The command shows only the VLAN when configured as AP-specific.
The following example shows how to display the status of the FlexConnect access point:(Cisco Controller) >show capwap reap status
show certificate compatibilityTo display whether or not certificates are verified as compatible in the Cisco wireless LAN controller, usethe show certificate compatibility command.
show certificate compatibility
Syntax Description This command has no arguments or keywords.
CLI Commands144
CLI Commandsshow capwap reap association

Command History ModificationRelease
This command was introduced in a release earlier than Release 7.6.7.6
The following is a sample output of the show certificate compatibility command:
(Cisco Controller) > show certificate compatibilityCertificate compatibility mode:................ off
show certificate lscTo verify that the controller has generated a Locally Significant Certificate (LSC), use the show certificatelsc summary command.
show certificate lsc {summary | ap-provision}
Syntax Description Displays a summary of LSC certificate settings andcertificates.
summary
Displays details about the access points that areprovisioned using the LSC.
ap-provision
Command Default None
Command History ModificationRelease
This command was introduced in a release earlier than Release 7.6.7.6
The following is a sample output of the show certificate lsc summary command:
(Cisco Controller) > show certificate lsc summaryLSC Enabled...................................... YesLSC CA-Server.................................... http://10.0.0.1:8080/caserverLSC AP-Provisioning.............................. YesProvision-List............................... Not ConfiguredLSC Revert Count in AP reboots............... 3LSC Params:Country...................................... 4State........................................ caCity......................................... ssOrgn......................................... orgDept......................................... depEmail........................................ [email protected]...................................... 390LSC Certs:CA Cert...................................... Not ConfiguredRA Cert...................................... Not Configured
This example shows how to display the details about the access points that are provisioned using theLSC:
(Cisco Controller) > show certificate lsc ap-provisionLSC AP-Provisioning.............................. Yes
CLI Commands145
CLI Commandsshow certificate lsc

Provision-List................................... PresentIdx Mac Address--- -------------1 00:18:74:c7:c0:90
show certificate sscTo view the Self Signed Device Certificate (SSC) and hash key of the virtual controller, use the show certificatessc command.
show certificate ssc
Syntax Description This command has no arguments or keywords.
Command History ModificationRelease
This command was introduced in a release earlier than Release 7.6.7.6
The following is a sample output of the show certificate ssc command :(Cisco Controller) > show certificate sscSSC Hash validation.............................. Enabled.
SSC Device Certificate details:
Subject Name :C=US, ST=California, L=San Jose, O=Cisco Virtual Wireless LAN Controller,CN=DEVICE-vWLC-AIR-CTVM-K9-000C297F2CF7, [email protected]
Validity :Start : 2012 Jul 23rd, 15:47:53 GMTEnd : 2022 Jun 1st, 15:47:53 GMT
Hash key : 5870ffabb15de2a617132bafcd73
show certificate summaryTo verify that the controller has generated a certificate, use the show certificate summary command.
show certificate summary
Syntax Description This command has no arguments or keywords.
Command History ModificationRelease
This command was introduced in a release earlier than Release 7.6.7.6
The following is a sample output of the show certificate summary command:
(Cisco Controller) > show certificate summaryWeb Administration Certificate................. Locally GeneratedWeb Authentication Certificate................. Locally GeneratedCertificate compatibility mode:................ off
CLI Commands146
CLI Commandsshow certificate ssc

show route kernelTo display the kernel route cache information, use the show route kernel command.
show route kernel
Syntax Description This command has no arguments or keywords.
Command Default None.
This example shows how to display the kernel route cache information:
> show route kernelIface Destination Gateway Flags RefCnt Use Metric Mask MTU Window IRTTdtl0 14010100 00000000 0001 0 0 0 FFFFFF00 0 0 0dtl0 28282800 00000000 0001 0 0 0 FFFFFF00 0 0 0dtl0 34010100 00000000 0001 0 0 0 FFFFFF00 0 0 0eth0 02020200 00000000 0001 0 0 0 FFFFFF00 0 0 0dtl0 33010100 00000000 0001 0 0 0 FFFFFF00 0 0 0dtl0 0A010100 00000000 0001 0 0 0 FFFFFF00 0 0 0dtl0 32010100 00000000 0001 0 0 0 FFFFFF00 0 0 0dtl0 0A000000 0202020A 0003 0 0 0 FF000000 0 0 0lo 7F000000 00000000 0001 0 0 0 FF000000 0 0 0dtl0 00000000 0A010109 0003 0 0 0 00000000 0 0 0
Related Commands clear ap
debug arp
show arp kernel
config route add
config route delete
show countryTo display the configured country and the radio types that are supported, use the show country command.
show country
Syntax Description This command has no arguments or keywords.
Command Default None
Command History ModificationRelease
This commandwas introduced in a release earlier thanRelease 7.6.
7.6
The following example shows how to display the configured countries and supported radio types:
(Cisco Controller) >show countryConfigured Country............................. United StatesConfigured Country Codes
CLI Commands147
CLI Commandsshow route kernel

US - United States............................. 802.11a / 802.11b / 802.11g
show country channelsTo display the radio channels supported in the configured country, use the show country channels command.
show country channels
Syntax Description This command has no arguments or keywords.
Command Default None
Command History ModificationRelease
This commandwas introduced in a release earlier thanRelease 7.6.
7.6
The following example shows how to display the auto-RF channels for the configured countries:
(Cisco Controller) >show country channelsConfigured Country............................. United States
KEY: * = Channel is legal in this country and may be configured manually.Configured Country............................. United States
KEY: * = Channel is legal in this country and may be configured manually.A = Channel is the Auto-RF default in this country.. = Channel is not legal in this country.C = Channel has been configured for use by Auto-RF.x = Channel is available to be configured for use by Auto-RF.
---------:+-+-+-+-+-+-+-+-+-+-+-+-+-+-802.11BG :Channels : 1 1 1 1 1
: 1 2 3 4 5 6 7 8 9 0 1 2 3 4---------:+-+-+-+-+-+-+-+-+-+-+-+-+-+-
US : A * * * * A * * * * A . . .---------:+-+-+-+-+-+-+-+-+-+-+-+-+-+-+-+-+-+-+-+-+-+-+-+-+-+-+-+-802.11A : 1 1 1 1 1 1 1 1 1 1 1 1 1 1 1 1Channels : 3 3 3 4 4 4 4 4 5 5 6 6 0 0 0 1 1 2 2 2 3 3 4 4 5 5 6 6
: 4 6 8 0 2 4 6 8 2 6 0 4 0 4 8 2 6 0 4 8 2 6 0 9 3 7 1 5---------:+-+-+-+-+-+-+-+-+-+-+-+-+-+-+-+-+-+-+-+-+-+-+-+-+-+-+-+-
US : . A . A . A . A A A A A * * * * * . . . * * * A A A A *---------:+-+-+-+-+-+-+-+-+-+-+-+-+-+-+-+-+-+-+-+-+-+-+-+-+-+-+-+-
show country supportedTo display a list of the supported country options, use the show country supported command.
show country supported
Syntax Description This command has no arguments or keywords.
Command Default None
CLI Commands148
CLI Commandsshow country channels

Command History ModificationRelease
This commandwas introduced in a release earlier thanRelease 7.6.
7.6
The following example shows how to display a list of all the supported countries:
(Cisco Controller) >show country supportedConfigured Country............................. United StatesSupported Country CodesAR - Argentina................................. 802.11a / 802.11b / 802.11gAT - Austria................................... 802.11a / 802.11b / 802.11gAU - Australia................................. 802.11a / 802.11b / 802.11gBR - Brazil.................................... 802.11a / 802.11b / 802.11gBE - Belgium................................... 802.11a / 802.11b / 802.11gBG - Bulgaria.................................. 802.11a / 802.11b / 802.11gCA - Canada.................................... 802.11a / 802.11b / 802.11gCH - Switzerland............................... 802.11a / 802.11b / 802.11gCL - Chile..................................... 802.11b / 802.11gCN - China..................................... 802.11a / 802.11b / 802.11gCO - Colombia.................................. 802.11b / 802.11gCY - Cyprus.................................... 802.11a / 802.11b / 802.11gCZ - Czech Republic............................ 802.11a / 802.11bDE - Germany................................... 802.11a / 802.11b / 802.11gDK - Denmark................................... 802.11a / 802.11b / 802.11gEE - Estonia................................... 802.11a / 802.11b / 802.11gES - Spain..................................... 802.11a / 802.11b / 802.11gFI - Finland................................... 802.11a / 802.11b / 802.11gFR - France.................................... 802.11a / 802.11b / 802.11gGB - United Kingdom............................ 802.11a / 802.11b / 802.11gGI - Gibraltar................................. 802.11a / 802.11b / 802.11gGR - Greece.................................... 802.11a / 802.11b / 802.11gHK - Hong Kong................................. 802.11a / 802.11b / 802.11gHU - Hungary................................... 802.11a / 802.11b / 802.11gID - Indonesia................................. 802.11b / 802.11gIE - Ireland................................... 802.11a / 802.11b / 802.11gIN - India..................................... 802.11a / 802.11b / 802.11gIL - Israel.................................... 802.11a / 802.11b / 802.11gILO - Israel (outdoor).......................... 802.11b / 802.11gIS - Iceland................................... 802.11a / 802.11b / 802.11gIT - Italy..................................... 802.11a / 802.11b / 802.11gJP - Japan (J)................................. 802.11a / 802.11b / 802.11gJ2 - Japan 2(P)................................ 802.11a / 802.11b / 802.11gJ3 - Japan 3(U)................................ 802.11a / 802.11b / 802.11gKR - Korea Republic (C)........................ 802.11a / 802.11b / 802.11gKE - Korea Extended (K)........................ 802.11a / 802.11b / 802.11gLI - Liechtenstein............................. 802.11a / 802.11b / 802.11gLT - Lithuania................................. 802.11a / 802.11b / 802.11gLU - Luxembourg................................ 802.11a / 802.11b / 802.11gLV - Latvia.................................... 802.11a / 802.11b / 802.11gMC - Monaco.................................... 802.11a / 802.11b / 802.11gMT - Malta..................................... 802.11a / 802.11b / 802.11gMX - Mexico.................................... 802.11a / 802.11b / 802.11gMY - Malaysia.................................. 802.11a / 802.11b / 802.11gNL - Netherlands............................... 802.11a / 802.11b / 802.11gNZ - New Zealand............................... 802.11a / 802.11b / 802.11gNO - Norway.................................... 802.11a / 802.11b / 802.11gPA - Panama.................................... 802.11b / 802.11gPE - Peru...................................... 802.11b / 802.11gPH - Philippines............................... 802.11a / 802.11b / 802.11gPL - Poland.................................... 802.11a / 802.11b / 802.11gPT - Portugal.................................. 802.11a / 802.11b / 802.11g
CLI Commands149
CLI Commandsshow country supported

RU - Russian Federation........................ 802.11a / 802.11b / 802.11gRO - Romania................................... 802.11a / 802.11b / 802.11gSA - Saudi Arabia.............................. 802.11a / 802.11b / 802.11gSE - Sweden.................................... 802.11a / 802.11b / 802.11gSG - Singapore................................. 802.11a / 802.11b / 802.11gSI - Slovenia.................................. 802.11a / 802.11b / 802.11gSK - Slovak Republic........................... 802.11a / 802.11b / 802.11gTH - Thailand.................................. 802.11b / 802.11gTR - Turkey.................................... 802.11b / 802.11gTW - Taiwan.................................... 802.11a / 802.11b / 802.11gUA - Ukraine................................... 802.11a / 802.11b / 802.11gUS - United States............................. 802.11a / 802.11b / 802.11gUSL - United States (Legacy).................... 802.11a / 802.11b / 802.11gUSX - United States (US + chan165).............. 802.11a / 802.11b / 802.11gVE - Venezuela................................. 802.11b / 802.11gZA - South Africa.............................. 802.11a / 802.11b / 802.11g
show coredump summaryTo display a summary of the controller’s core dump file, use the show coredump summary command.
show coredump summary
Syntax Description This command has no arguments or keywords.
Command Default None
Command History ModificationRelease
This command was introduced in a release earlier than Release 7.6.7.6
The following is a sample output of the show coredump summary command:
(Cisco Controller) > show coredump summaryCore Dump is enabledFTP Server IP.................................... 10.10.10.17FTP Filename..................................... file1FTP Username..................................... ftpuserFTP Password.................................. *********
Related Commands config coredump
config coredump ftp
config coredump username
show cpuTo display current WLAN controller CPU usage information, use the show cpu command.
show cpu
Syntax Description This command has no arguments or keywords.
CLI Commands150
CLI Commandsshow coredump summary
Command History ModificationRelease
This command was introduced in a release earlier than Release 7.6.7.6
The following is a sample output of the show cpu command:
(Cisco Controller) > show cpuCurrent CPU load: 2.50%
show custom-webTo display all the web authentication customization information, use the command.
Syntax Description Display all Web-Auth customization information.all
Display per WLAN Web-Auth customization information.remote-lan
Display per Guest LANWeb-Auth customization information.guest-lan
Display all Web-Auth Sleeping Client entries summary.sleep-client
Display the content of Web-Auth Bundle.webauth-bundle
Display per WLAN Web-Auth customization information.wlan
Command History ModificationRelease
This command was introduced in the release earlier than 7.6.7.6
This command was modified and the all, remote-lan, guest-lan, sleep-client,webauth-bundle, and wlan keywords are added.
8.2
The following is a sample output of the command:
(Cisco Controller) > show custom-web allRadius Authentication Method..................... PAPCisco Logo....................................... EnabledCustomLogo....................................... NoneCustom Title..................................... NoneCustom Message................................... NoneCustom Redirect URL.............................. NoneWeb Authentication Type.......................... Internal DefaultLogout-popup..................................... EnabledExternal Web Authentication URL.................. None
show database summaryTo display the maximum number of entries in the database, use the show database summary command.
show database summary
Syntax Description This command has no arguments or keywords.
CLI Commands151
CLI Commandsshow custom-web

Command Default None
The following is a sample output of the show database summary command:
(Cisco Controller) > show database summaryMaximum Database Entries......................... 2048Maximum Database Entries On Next Reboot.......... 2048Database Contents
MAC Filter Entries........................... 2Exclusion List Entries....................... 0AP Authorization List Entries................ 1Management Users............................. 1Local Network Users.......................... 1
Local Users.............................. 1Guest Users.............................. 0
Total..................................... 5
Related Commands config database size
show debugTo determine if the MAC address and other flag debugging is enabled or disabled, sse the show debugcommand.
show debug [packet]
Syntax Description Displays information about packet debugs.packet
Command Default None.
This example shows how to display if debugging is enabled:
> show debugMAC debugging............................... disabledDebug Flags Enabled:arp error enabled.bcast error enabled.
This example shows how to display if debugging is enabled:
> show debug packetStatus........................................... disabledNumber of packets to display..................... 0Bytes/packet to display.......................... 0Packet display format............................ text2pcap
Driver ACL:[1]: disabled[2]: disabled[3]: disabled[4]: disabled[5]: disabled[6]: disabled
Ethernet ACL:[1]: disabled[2]: disabled[3]: disabled
CLI Commands152
CLI Commandsshow debug

[4]: disabled[5]: disabled[6]: disabled
IP ACL:[1]: disabled[2]: disabled[3]: disabled[4]: disabled[5]: disabled[6]: disabled
EoIP-Ethernet ACL:[1]: disabled[2]: disabled[3]: disabled[4]: disabled[5]: disabled[6]: disabled
EoIP-IP ACL:[1]: disabled[2]: disabled[3]: disabled[4]: disabled[5]: disabled[6]: disabled
LWAPP-Dot11 ACL:[1]: disabled[2]: disabled[3]: disabled[4]: disabled[5]: disabled[6]: disabled
LWAPP-IP ACL:[1]: disabled[2]: disabled[3]: disabled[4]: disabled[5]: disabled[6]: disabled
Related Commands debug mac
show dhcpTo display the internal Dynamic Host Configuration Protocol (DHCP) server configuration, use the showdhcp command.
show dhcp {leases | summary | scope}
Syntax Description Displays allocated DHCP leases.leases
Displays DHCP summary information.summary
Name of a scope to display the DHCP informationfor that scope.
scope
Command Default None
CLI Commands153
CLI Commandsshow dhcp

Command History ModificationRelease
This command was introduced in a release earlier than Release 7.6.7.6
The following example shows how to display the allocated DHCP leases:
(Cisco Controller) >show dhcp leasesNo leases allocated.
The following example shows how to display the DHCP summary information:
(Cisco Controller) >show dhcp summaryScope Name Enabled Address Range003 No 0.0.0.0 -> 0.0.0.0
The following example shows how to display the DHCP information for the scope 003:
(Cisco Controller) >show dhcp 003Enabled....................................... NoLease Time.................................... 0Pool Start.................................... 0.0.0.0Pool End...................................... 0.0.0.0Network....................................... 0.0.0.0Netmask....................................... 0.0.0.0Default Routers............................... 0.0.0.0 0.0.0.0 0.0.0.0DNS Domain....................................DNS........................................... 0.0.0.0 0.0.0.0 0.0.0.0Netbios Name Servers.......................... 0.0.0.0 0.0.0.0 0.0.0.0
show dtls connectionsTo display the Datagram Transport Layer Security (DTLS) server status, use the show dtls connectionscommand.
show dtls connections
Syntax Description This command has no arguments or keywords.
Command Default None
Command History ModificationRelease
This commandwas introduced in a release earlier thanRelease 7.6.
7.6
The following is a sample output of the show dtls connections command.
Device > show dtls connections
AP Name Local Port Peer IP Peer Port Ciphersuite--------------- ------------- --------------- ------------- -----------------------1130 Capwap_Ctrl 1.100.163.210 23678 TLS_RSA _WITH_AES_128_CBC_SHA1130 Capwap_Data 1.100.163.210 23678 TLS_RSA _WITH_AES_128_CBC_SHA
CLI Commands154
CLI Commandsshow dtls connections

1240 Capwap_Ctrl 1.100.163.209 59674 TLS_RSA _WITH_AES_128_CBC_SHA
show dhcp proxyTo display the status of DHCP proxy handling, use the show dhcp proxy command.
show dhcp proxy
Syntax Description This command has no arguments or keywords.
Command Default None
Command History ModificationRelease
This command was introduced in a release earlier than Release 7.6.7.6
The following example shows how to display the status of DHCP proxy information:(Cisco Controller) >show dhcp proxy
DHCP Proxy Behavior: enabled
show dhcp timeoutTo display the DHCP timeout value, use the show dhcp timeout command.
show dhcp timeout
Syntax Description This command has no arguments or keywords.
Command Default None
Command History ModificationRelease
This command was introduced in a release earlier than Release 7.6.7.6
The following example shows how to display the DHCP timeout value:
(Cisco Controller) >show dhcp timeout
DHCP Timeout (seconds)................. 10
show eventlogTo display the event log, use the show eventlog command.
show eventlog
Syntax Description This command has no arguments or keywords.
CLI Commands155
CLI Commandsshow dhcp proxy

Command Default None
Command History ModificationRelease
This command was introduced in a release earlier than Release 7.6.7.6
The following is a sample output of the show eventlog command:
(Cisco Controller) > show eventlogTime
File Line TaskID Code d h m sEVENT> bootos.c 788 125CEBCC AAAAAAAA 0 0 0 6EVENT> bootos.c 788 125CEBCC AAAAAAAA 0 0 0 6EVENT> bootos.c 788 125C597C AAAAAAAA 0 0 0 6EVENT> bootos.c 788 125C597C AAAAAAAA 0 0 0 6EVENT> bootos.c 788 125C597C AAAAAAAA 0 0 0 6EVENT> bootos.c 788 125C597C AAAAAAAA 0 0 0 6EVENT> bootos.c 788 125C597C AAAAAAAA 0 0 0 6EVENT> bootos.c 788 125C597C AAAAAAAA 0 0 0 6EVENT> bootos.c 788 1216C36C AAAAAAAA 0 0 0 6EVENT> bootos.c 788 1216C36C AAAAAAAA 0 0 0 6EVENT> bootos.c 788 1216C36C AAAAAAAA 0 0 0 6EVENT> bootos.c 788 1216C36C AAAAAAAA 0 0 0 11
show exclusionlistTo display a summary of all clients on the manual exclusion list from associating with the controller, use theshow exclusionlist command.
show exclusionlist
Syntax Description This command has no arguments or keywords.
Command Default None
Command History ModificationRelease
This commandwas introduced in a release earlier thanRelease 7.6.
7.6
Usage Guidelines This command displays all manually excluded MAC addresses.
The following example shows how to display the exclusion list:
(Cisco Controller) > show exclusionlistNo manually disabled clients.Dynamically Disabled Clients----------------------------MAC Address Exclusion Reason Time Remaining (in secs)----------- ---------------- ------------------------
00:40:96:b4:82:55 802.1X Failure 51
Related Commands config exclusionlist
CLI Commands156
CLI Commandsshow exclusionlist

show flexconnect acl detailedTo display a detailed summary of FlexConnect access control lists, use the show flexconnect acl detailedcommand.
show flexconnect acl detailed acl-name
Syntax Description Name of the access control list.acl-name
Command Default None
Command History ModificationRelease
This command was introduced in a release earlier than Release 7.6.7.6
The following example shows how to display the FlexConnect detailed ACLs:(Cisco Controller) >show flexconnect acl detailed acl-2
show flexconnect acl summaryTo display a summary of all access control lists on FlexConnect access points, use the show flexconnect aclsummary command.
show flexconnect acl summary
Syntax Description This command has no arguments or keywords.
Command Default None
Command History ModificationRelease
This command was introduced in a release earlier than Release 7.6.7.6
The following example shows how to display the FlexConnect ACL summary:(Cisco Controller) >show flexconnect acl summaryACL Name Status-------------------------------- -------acl1 Modifiedacl10 Modifiedacl100 Modifiedacl101 Modifiedacl102 Modifiedacl103 Modifiedacl104 Modifiedacl105 Modifiedacl106 Modified
CLI Commands157
CLI Commandsshow flexconnect acl detailed
show guest-lanTo display the configuration of a specific wired guest LAN, use the show guest-lan command.
show guest-lan guest_lan_id
Syntax Description ID of the selected wired guest LAN.guest_lan_id
Command Default None
Command History ModificationRelease
This command was introduced in a release earlier than Release 7.6.7.6
Usage Guidelines To display all wired guest LANs configured on the controller, use the show guest-lan summary command.
The following is a sample output of the show guest-lan guest_lan_id command:
(Cisco Controller) >show guest-lan 2Guest LAN Identifier........................... 1Profile Name................................... guestlanNetwork Name (SSID)............................ guestlanStatus......................................... EnabledAAA Policy Override............................ DisabledNumber of Active Clients....................... 1Exclusionlist Timeout.......................... 60 secondsSession Timeout................................ InfinityInterface...................................... wiredIngress Interface.............................. wired-guestWLAN ACL....................................... unconfiguredDHCP Server.................................... 10.20.236.90DHCP Address Assignment Required............... DisabledQuality of Service............................. Silver (best effort)SecurityWeb Based Authentication................... EnabledACL........................................ UnconfiguredWeb-Passthrough............................ DisabledConditional Web Redirect................... DisabledAuto Anchor................................ DisabledMobility Anchor ListGLAN ID IP Address Status
show flexconnect group detailTo display details of a FlexConnect group, use the show flexconnect group detail command.
show flexconnect group detail group_name
Syntax Description Name of the FlexConnect group.group_name
Command History ModificationRelease
This command was introduced in a release earlier than Release 7.6.7.6
CLI Commands158
CLI Commandsshow guest-lan

ModificationRelease
Themodule-vlan and aps parameters were added.8.1
The following example shows how to display the detailed information for a specific FlexConnectgroup:(Cisco Controller) >show flexconnect group detail myflexgroupNumber of Ap’s in Group: 100:0a:b8:3b:0b:c2 AP1200 JoinedGroup Radius Auth Servers:Primary Server Index ..................... DisabledSecondary Server Index ................... Disabled
show flexconnect group summaryTo display the current list of FlexConnect groups, use the show flexconnect group summary command.
show flexconnect group summary
Syntax Description This command has no arguments or keywords.
Command Default None
Command History ModificationRelease
This command was introduced in a release earlier than Release 7.6.7.6
The following example shows how to display the current list of FlexConnect groups:(Cisco Controller) >show flexconnect group summaryflexconnect Group Summary: Count 1Group Name # APsGroup 1 1
show flexconnect office-extendTo view information about OfficeExtend access points that in FlexConnect mode, use the show flexconnectoffice-extend command.
show flexconnect office-extend {summary | latency}
Syntax Description Displays a list of all OfficeExtend access points.summary
Displays the link delay for OfficeExtend access points.latency
Command Default None
Command History ModificationRelease
This command was introduced in a release earlier than Release 7.6.7.6
CLI Commands159
CLI Commandsshow flexconnect group summary

The following example shows how to display information about the list of FlexConnect OfficeExtendaccess points:(Cisco Controller) >show flexconnect office-extend summarySummary of OfficeExtend APAP Name Ethernet MAC Encryption Join-Mode Join-Time------------------ ----------------- ---------- ----------- ----------AP1130 00:22:90:e3:37:70 Enabled Latency Sun Jan 4 21:46:07 2009AP1140 01:40:91:b5:31:70 Enabled Latency Sat Jan 3 19:30:25 2009
The following example shows how to display the FlexConnect OfficeExtend access point’s linkdelay:(Cisco Controller) >show flexconnect office-extend latencySummary of OfficeExtend AP link latencyAP Name Status Current Maximum Minimum--------------------------------------------------------------------------AP1130 Enabled 15 ms 45 ms 12 msAP1140 Enabled 14 ms 179 ms 12 ms
show ikeTo display active Internet Key Exchange (IKE) security associations (SAs), use the show ike command.
show ike {brief | detailed} IP_or_MAC_address
Syntax Description Displays a brief summary of all active IKE SAs.brief
Displays a detailed summary of all active IKE SAs.detailed
IP or MAC address of active IKE SA.IP_or_MAC_address
Command Default None
Command History ModificationRelease
This commandwas introduced in a release earlier thanRelease 7.6.
7.6
The following example shows how to display the active Internet Key Exchange security associations:
(Cisco Controller) > show ike brief 209.165.200.254
show interface detailedTo display details of the system interfaces, use the show interface command.
show interfacedetailed{interface_name| management| redundancy-management| redundancy-port| service-port | virtual}
Syntax Description Displays detailed interface information.detailed
CLI Commands160
CLI Commandsshow ike
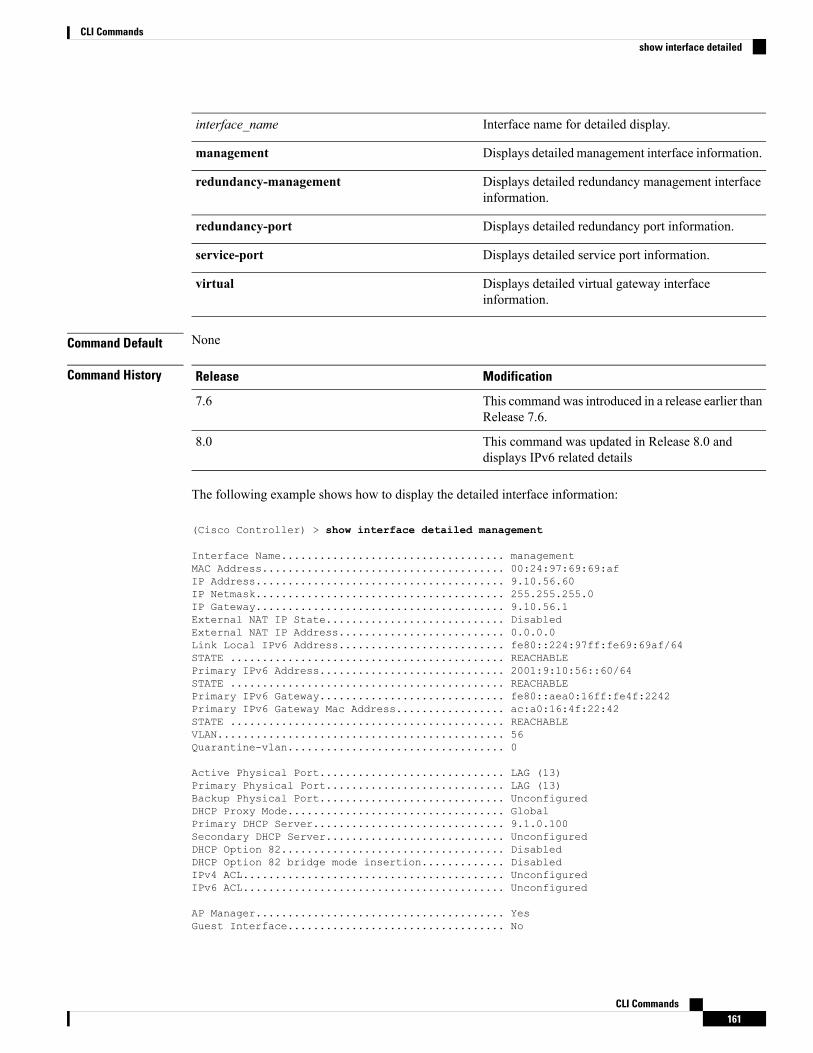
Interface name for detailed display.interface_name
Displays detailed management interface information.management
Displays detailed redundancy management interfaceinformation.
redundancy-management
Displays detailed redundancy port information.redundancy-port
Displays detailed service port information.service-port
Displays detailed virtual gateway interfaceinformation.
virtual
Command Default None
Command History ModificationRelease
This commandwas introduced in a release earlier thanRelease 7.6.
7.6
This command was updated in Release 8.0 anddisplays IPv6 related details
8.0
The following example shows how to display the detailed interface information:
(Cisco Controller) > show interface detailed management
Interface Name................................... managementMAC Address...................................... 00:24:97:69:69:afIP Address....................................... 9.10.56.60IP Netmask....................................... 255.255.255.0IP Gateway....................................... 9.10.56.1External NAT IP State............................ DisabledExternal NAT IP Address.......................... 0.0.0.0Link Local IPv6 Address.......................... fe80::224:97ff:fe69:69af/64STATE ........................................... REACHABLEPrimary IPv6 Address............................. 2001:9:10:56::60/64STATE ........................................... REACHABLEPrimary IPv6 Gateway............................. fe80::aea0:16ff:fe4f:2242Primary IPv6 Gateway Mac Address................. ac:a0:16:4f:22:42STATE ........................................... REACHABLEVLAN............................................. 56Quarantine-vlan.................................. 0
Active Physical Port............................. LAG (13)Primary Physical Port............................ LAG (13)Backup Physical Port............................. UnconfiguredDHCP Proxy Mode.................................. GlobalPrimary DHCP Server.............................. 9.1.0.100Secondary DHCP Server............................ UnconfiguredDHCP Option 82................................... DisabledDHCP Option 82 bridge mode insertion............. DisabledIPv4 ACL......................................... UnconfiguredIPv6 ACL......................................... Unconfigured
AP Manager....................................... YesGuest Interface.................................. No
CLI Commands161
CLI Commandsshow interface detailed
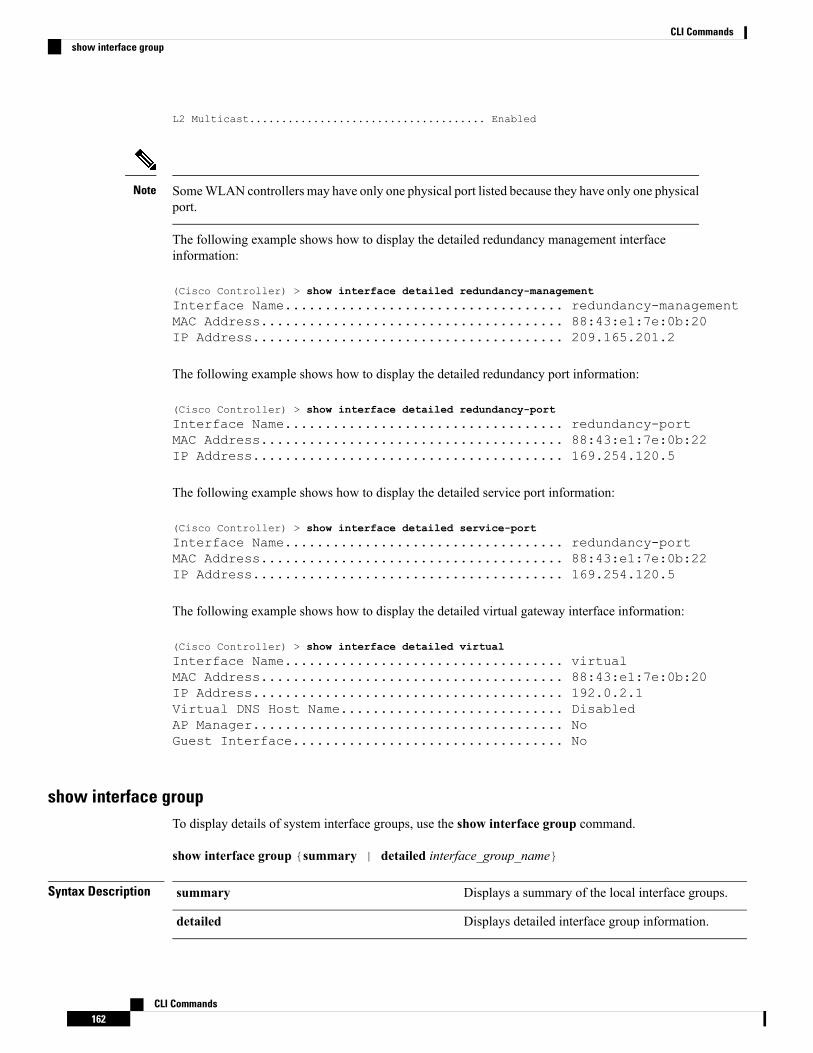
L2 Multicast..................................... Enabled
SomeWLAN controllers may have only one physical port listed because they have only one physicalport.
Note
The following example shows how to display the detailed redundancy management interfaceinformation:
(Cisco Controller) > show interface detailed redundancy-managementInterface Name................................... redundancy-managementMAC Address...................................... 88:43:e1:7e:0b:20IP Address....................................... 209.165.201.2
The following example shows how to display the detailed redundancy port information:
(Cisco Controller) > show interface detailed redundancy-portInterface Name................................... redundancy-portMAC Address...................................... 88:43:e1:7e:0b:22IP Address....................................... 169.254.120.5
The following example shows how to display the detailed service port information:
(Cisco Controller) > show interface detailed service-portInterface Name................................... redundancy-portMAC Address...................................... 88:43:e1:7e:0b:22IP Address....................................... 169.254.120.5
The following example shows how to display the detailed virtual gateway interface information:
(Cisco Controller) > show interface detailed virtualInterface Name................................... virtualMAC Address...................................... 88:43:e1:7e:0b:20IP Address....................................... 192.0.2.1Virtual DNS Host Name............................ DisabledAP Manager....................................... NoGuest Interface.................................. No
show interface groupTo display details of system interface groups, use the show interface group command.
show interface group {summary | detailed interface_group_name}
Syntax Description Displays a summary of the local interface groups.summary
Displays detailed interface group information.detailed
CLI Commands162
CLI Commandsshow interface group
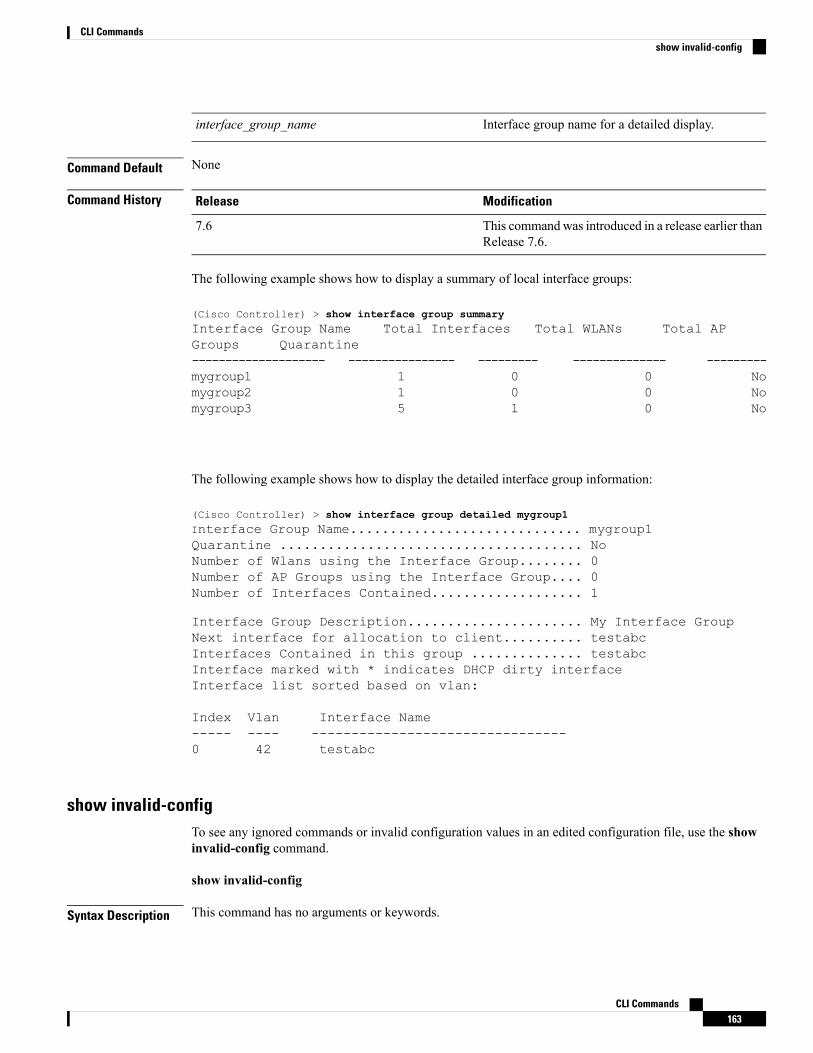
Interface group name for a detailed display.interface_group_name
Command Default None
Command History ModificationRelease
This commandwas introduced in a release earlier thanRelease 7.6.
7.6
The following example shows how to display a summary of local interface groups:
(Cisco Controller) > show interface group summaryInterface Group Name Total Interfaces Total WLANs Total APGroups Quarantine-------------------- ---------------- --------- -------------- ---------mygroup1 1 0 0 Nomygroup2 1 0 0 Nomygroup3 5 1 0 No
The following example shows how to display the detailed interface group information:
(Cisco Controller) > show interface group detailed mygroup1Interface Group Name............................. mygroup1Quarantine ...................................... NoNumber of Wlans using the Interface Group........ 0Number of AP Groups using the Interface Group.... 0Number of Interfaces Contained................... 1
Interface Group Description...................... My Interface GroupNext interface for allocation to client.......... testabcInterfaces Contained in this group .............. testabcInterface marked with * indicates DHCP dirty interfaceInterface list sorted based on vlan:
Index Vlan Interface Name----- ---- --------------------------------0 42 testabc
show invalid-configTo see any ignored commands or invalid configuration values in an edited configuration file, use the showinvalid-config command.
show invalid-config
Syntax Description This command has no arguments or keywords.
CLI Commands163
CLI Commandsshow invalid-config
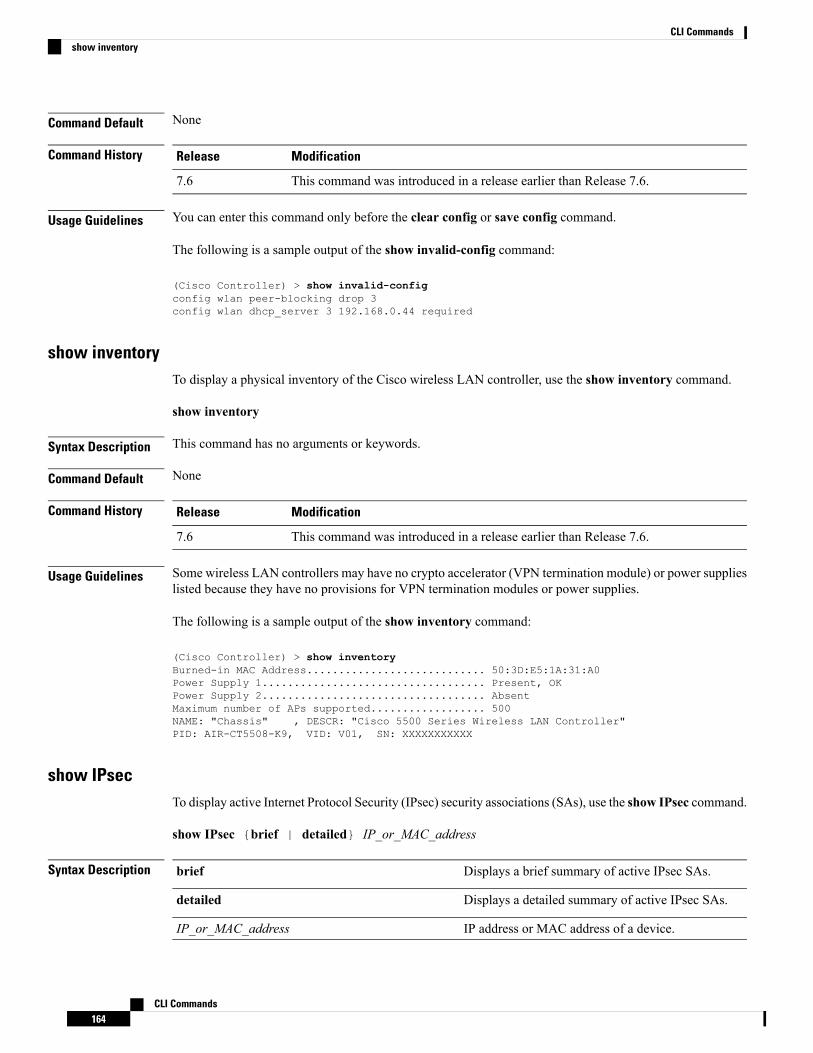
Command Default None
Command History ModificationRelease
This command was introduced in a release earlier than Release 7.6.7.6
Usage Guidelines You can enter this command only before the clear config or save config command.
The following is a sample output of the show invalid-config command:
(Cisco Controller) > show invalid-configconfig wlan peer-blocking drop 3config wlan dhcp_server 3 192.168.0.44 required
show inventoryTo display a physical inventory of the Cisco wireless LAN controller, use the show inventory command.
show inventory
Syntax Description This command has no arguments or keywords.
Command Default None
Command History ModificationRelease
This command was introduced in a release earlier than Release 7.6.7.6
Usage Guidelines Some wireless LAN controllers may have no crypto accelerator (VPN termination module) or power supplieslisted because they have no provisions for VPN termination modules or power supplies.
The following is a sample output of the show inventory command:
(Cisco Controller) > show inventoryBurned-in MAC Address............................ 50:3D:E5:1A:31:A0Power Supply 1................................... Present, OKPower Supply 2................................... AbsentMaximum number of APs supported.................. 500NAME: "Chassis" , DESCR: "Cisco 5500 Series Wireless LAN Controller"PID: AIR-CT5508-K9, VID: V01, SN: XXXXXXXXXXX
show IPsecTo display active Internet Protocol Security (IPsec) security associations (SAs), use the show IPsec command.
show IPsec {brief | detailed} IP_or_MAC_address
Syntax Description Displays a brief summary of active IPsec SAs.brief
Displays a detailed summary of active IPsec SAs.detailed
IP address or MAC address of a device.IP_or_MAC_address
CLI Commands164
CLI Commandsshow inventory

Command Default None
Command History ModificationRelease
This commandwas introduced in a release earlier thanRelease 7.6.
7.6
The following example shows how to display brief information about the active Internet ProtocolSecurity (IPsec) security associations (SAs):
(Cisco Controller) > show IPsec brief 209.165.200.254
Related Commands config radius acct ipsec authentication
config radius acct ipsec disable
config radius acct ipsec enable
config radius acct ipsec encryption
config radius auth IPsec encryption
config radius auth IPsec authentication
config radius auth IPsec disable
config radius auth IPsec encryption
config radius auth IPsec ike
config trapflags IPsec
config wlan security IPsec disable
config wlan security IPsec enable
config wlan security IPsec authentication
config wlan security IPsec encryption
config wlan security IPsec config
config wlan security IPsec ike authentication
config wlan security IPsec ike dh-group
config wlan security IPsec ike lifetime
config wlan security IPsec ike phase1
config wlan security IPsec ike contivity
show known apTo display known Cisco lightweight access point information, use the show known ap command.
show known ap {summary | detailedMAC}
Syntax Description Displays a list of all known access points.summary
CLI Commands165
CLI Commandsshow known ap

Provides detailed information for all known accesspoints.
detailed
MAC address of the known AP.MAC
Command Default None
Command History ModificationRelease
This commandwas introduced in a release earlier thanRelease 7.6.
7.6
The following example shows how to display a summary of all known access points:
(Cisco Controller) >show known ap summaryMAC Address State # APs # Clients Last Heard----------- ----------- ----- -------- -----------------
show l2tpTo display Layer 2 Tunneling Protocol (L2TP) sessions, use the show l2tp command.
show l2tp {summary | ip_address}
Syntax Description Displays all L2TP sessions.summary
IP address.ip_address
Command Default None
Command History ModificationRelease
This commandwas introduced in a release earlier thanRelease 7.6.
7.6
The following example shows how to display a summary of all L2TP sessions:
(Cisco Controller) > show l2tp summaryLAC_IPaddr LTid LSid RTid RSid ATid ASid State---------- ---- ---- ---- ---- ---- ---- -----
show lag eth-port-hashTo display the physical port used for specific MAC addresses, use the show lag eth-port-hash command.
show lag eth-port-hash dest_MAC [source_MAC]
CLI Commands166
CLI Commandsshow l2tp

Syntax Description MAC address to determine output port for non-IPpackets.
dest_MAC
(Optional) MAC address to determine output port fornon-IP packets.
source_MAC
Command Default None
Command History ModificationRelease
This commandwas introduced in a release earlier thanRelease 7.6.
7.6
The following example shows how to display the physical port used for a specific MAC address:(Cisco Controller) > show lag eth-port-hash 11:11:11:11:11:11Destination MAC 11:11:11:11:11:11 currently maps to port 1
show lag ip-port-hashTo display the physical port used for specific IP addresses, use the show lag ip-port-hash command.
show lag ip-port-hash dest_IP [source_IP]
Syntax Description IP address to determine the output port for IP packets.dest_IP
(Optional) IP address to determine the output port forIP packets.
source_IP
Command Default None
Command History ModificationRelease
This commandwas introduced in a release earlier thanRelease 7.6.
7.6
Usage Guidelines For CAPWAP packets, enter the IP address of the access points. For EOIP packets, enter the IP address ofthe controller. For WIRED_GUEST packets, enter its IP address. For non tunneled IP packets from WLC,enter the destination IP address. For other non tunneled IP packets, enter both destination and source IPaddresses.
The following example shows how to display the physical port used for a specific IP address:(Cisco Controller) > show lag ip-port-hash 192.168.102.138Destination IP 192.168.102.138 currently maps to port 1
show lag summaryTo display the current link aggregation (LAG) status, use the show lag summary command.
CLI Commands167
CLI Commandsshow lag ip-port-hash

show lag summary
Syntax Description This command has no arguments or keywords.
Command Default None
Command History ModificationRelease
This commandwas introduced in a release earlier thanRelease 7.6.
7.6
The following example shows how to display the current status of the LAG configuration:
(Cisco Controller) > show lag summaryLAG Enabled
show ldapTo display the Lightweight Directory Access Protocol (LDAP) server information for a particular LDAPserver, use the show ldap command.
show ldap index
Syntax Description LDAP server index. Valid values are from 1 to 17.index
Command Default None
Command History ModificationRelease
This commandwas introduced in a release earlier thanRelease 7.6.
7.6
The following example shows how to display the detailed LDAP server information:
(Cisco Controller) > show ldap 1Server Index..................................... 1Address.......................................... 2.3.1.4Port............................................. 389Enabled.......................................... YesUser DN.......................................... name1User Attribute................................... attr1User Type........................................ username1Retransmit Timeout............................... 3 secondsBind Method ..................................... Anonymous
Related Commands config ldap
config ldap add
config ldap simple-bind
CLI Commands168
CLI Commandsshow ldap
show ldap statistics
show ldap summary
show ldap statisticsTo display all Lightweight Directory Access Protocol (LDAP) server information, use the show ldap statisticscommand.
show ldap statistics
Syntax Description This command has no arguments or keywords.
Command History ModificationRelease
This commandwas introduced in a release earlier thanRelease 7.6.
7.6
The following example shows how to display the LDAP server statistics:
(Cisco Controller) > show ldap statisticsServer Index..................................... 1Server statistics:Initialized OK................................. 0Initialization failed.......................... 0Initialization retries......................... 0Closed OK...................................... 0
Request statistics:Received....................................... 0Sent........................................... 0OK............................................. 0Success........................................ 0Authentication failed.......................... 0Server not found............................... 0No received attributes......................... 0No passed username............................. 0Not connected to server........................ 0Internal error................................. 0Retries........................................ 0
Server Index..................................... 2...
Related Commands config ldap
config ldap add
config ldap simple-bind
show ldap
show ldap summary
CLI Commands169
CLI Commandsshow ldap statistics
show ldap summaryTo display the current Lightweight Directory Access Protocol (LDAP) server status, use the show ldapsummary command.
show ldap summary
Syntax Description This command has no arguments or keywords.
Command Default None
Command History ModificationRelease
This commandwas introduced in a release earlier thanRelease 7.6.
7.6
The following example shows how to display a summary of configured LDAP servers:
(Cisco Controller) > show ldap summaryIdx Server Address Port Enabled--- --------------- ---- -------1 2.3.1.4 389 Yes2 10.10.20.22 389 Yes
Related Commands config ldap
config ldap add
config ldap simple-bind
show ldap statistics
show ldap
show license agentTo display the license agent counter and session information on the Cisco 5500 Series Controller, use theshow license agent command.
show license agent {counters | sessions}
Syntax Description Displays license agent counter information.counters
Displays session information.sessions
Command Default None
Command History ModificationRelease
This command was introduced in a release earlier than Release 7.6.7.6
The following is a sample output of the show license agent counters command:
CLI Commands170
CLI Commandsshow ldap summary
(Cisco Controller) > show license agent countersLicense Agent CountersRequest Messages Received:0: Messages with Errors:0Request Operations Received:0: Operations with Errors:0Notification Messages Sent:0: Transmission Errors:0: Soap Errors:0
The following is a sample output of the show license agent sessions command:
(Cisco Controller) > show license agent sessionsLicense Agent Sessions: 0 open, maximum is 9
Related Commands config license agent
clear license agent
show license all
show license detail
show license feature
show license image-level
show license summary
show license allTo display information for all licenses on the Cisco WLCs, use the show license all command.
show license all
Syntax Description This command has no arguments or keywords.
Command Default None.
This example shows how to display all the licenses:
> show license allLicense Store: Primary License StorageStoreIndex: 0 Feature: wplus-ap-count Version: 1.0
License Type: PermanentLicense State: InactiveLicense Count: 12/0/0License Priority: Medium
StoreIndex: 1 Feature: base Version: 1.0License Type: PermanentLicense State: Active, Not in UseLicense Count: Non-CountedLicense Priority: Medium
StoreIndex: 2 Feature: wplus Version: 1.0License Type: PermanentLicense State: Active, In UseLicense Count: Non-CountedLicense Priority: Medium
License Store: Evaluation License StorageStoreIndex: 0 Feature: wplus Version: 1.0
License Type: Evaluation
CLI Commands171
CLI Commandsshow license all

License State: InactiveEvaluation total period: 8 weeks 4 daysEvaluation period left: 6 weeks 6 days
License Count: Non-CountedLicense Priority: Low
StoreIndex: 1 Feature: wplus-ap-count Version: 1.0License Type: EvaluationLicense State: Active, In Use
Evaluation total period: 8 weeks 4 daysEvaluation period left: 2 weeks 3 daysExpiry date: Thu Jun 25 18:09:43 2009
License Count: 250/250/0License Priority: High
StoreIndex: 2 Feature: base Version: 1.0License Type: EvaluationLicense State: Inactive
Evaluation total period: 8 weeks 4 daysEvaluation period left: 8 weeks 4 days
License Count: Non-CountedLicense Priority: Low
StoreIndex: 3 Feature: base-ap-count Version: 1.0License Type: EvaluationLicense State: Active, Not in Use, EULA accepted
Evaluation total period: 8 weeks 4 daysEvaluation period left: 8 weeks 3 days
License Count: 250/0/0License Priority: Low
show license capacityTo display the maximum number of access points allowed for this license on the Cisco 5500 Series Controller,the number of access points currently joined to the controller, and the number of access points that can stilljoin the controller, use the show license capacity command.
show license capacity
Syntax Description This command has no arguments or keywords.
Command Default None.
This example shows how to display the license capacity:
> show license capacityLicensed Feature Max Count Current Count Remaining Count-----------------------------------------------------------------------AP Count 250 47 203
Related Commands license install
show license all
show license detail
show license feature
show license image-level
show license summary
CLI Commands172
CLI Commandsshow license capacity
license modify priority
show license evaluation
show license detailTo display details of a specific license on the Cisco 5500 Series Controller, use the show license detailcommand.
show license detail license-name
Syntax Description Name of a specific license.license-name
Command Default None.
This example shows how to display the license details:
> show license detail wplusFeature: wplus Period left: Life timeIndex: 1 Feature: wplus Version: 1.0
License Type: PermanentLicense State: Active, In UseLicense Count: Non-CountedLicense Priority: MediumStore Index: 2Store Name: Primary License Storage
Index: 2 Feature: wplus Version: 1.0License Type: EvaluationLicense State: Inactive
Evaluation total period: 8 weeks 4 daysEvaluation period left: 6 weeks 6 days
License Count: Non-CountedLicense Priority: LowStore Index: 0
Related Commands license install
show license agent
show license all
show license feature
show license image-level
show license summary
license modify priority
show license expiringTo display details of expiring licenses on the Cisco 5500 Series Controller, use the show license expiringcommand.
show license expiring
Syntax Description This command has no arguments or keywords.
CLI Commands173
CLI Commandsshow license detail

Command Default None.
This example shows how to display the details of the expiring licenses:
> show license expiringStoreIndex: 0 Feature: wplus Version: 1.0
License Type: EvaluationLicense State: Inactive
Evaluation total period: 8 weeks 4 daysEvaluation period left: 6 weeks 6 days
License Count: Non-CountedLicense Priority: Low
StoreIndex: 1 Feature: wplus-ap-count Version: 1.0License Type: EvaluationLicense State: Active, In Use
Evaluation total period: 8 weeks 4 daysEvaluation period left: 2 weeks 3 daysExpiry date: Thu Jun 25 18:09:43 2009
License Count: 250/250/0License Priority: High
StoreIndex: 2 Feature: base Version: 1.0License Type: EvaluationLicense State: Inactive
Evaluation total period: 8 weeks 4 daysEvaluation period left: 8 weeks 4 days
License Count: Non-CountedLicense Priority: Low
StoreIndex: 3 Feature: base-ap-count Version: 1.0License Type: EvaluationLicense State: Active, Not in Use, EULA accepted
Evaluation total period: 8 weeks 4 daysEvaluation period left: 8 weeks 3 days
License Count: 250/0/0License Priority: Low
Related Commands license install
show license all
show license detail
show license in-use
show license summary
license modify priority
show license evaluation
show license evaluationTo display details of evaluation licenses on the Cisco 5500 Series Controller, use the show license evaluationcommand.
show license evaluation
Syntax Description This command has no arguments or keywords.
Command Default None.
CLI Commands174
CLI Commandsshow license evaluation

This example shows how to display the details of the evaluation licenses:
> show license evaluationStoreIndex: 0 Feature: wplus Version: 1.0
License Type: EvaluationLicense State: Inactive
Evaluation total period: 8 weeks 4 daysEvaluation period left: 6 weeks 6 days
License Count: Non-CountedLicense Priority: Low
StoreIndex: 1 Feature: wplus-ap-count Version: 1.0License Type: EvaluationLicense State: Active, In Use
Evaluation total period: 8 weeks 4 daysEvaluation period left: 2 weeks 3 daysExpiry date: Thu Jun 25 18:09:43 2009
License Count: 250/250/0License Priority: High
StoreIndex: 2 Feature: base Version: 1.0License Type: EvaluationLicense State: Inactive
Evaluation total period: 8 weeks 4 daysEvaluation period left: 8 weeks 4 days
License Count: Non-CountedLicense Priority: Low
StoreIndex: 3 Feature: base-ap-count Version: 1.0License Type: EvaluationLicense State: Active, Not in Use, EULA accepted
Evaluation total period: 8 weeks 4 daysEvaluation period left: 8 weeks 3 days
License Count: 250/0/0License Priority: Low
Related Commands license install
show license all
show license detail
show license expiring
show license in-use
show license summary
license modify priority
show license featureTo display a summary of license-enabled features on the Cisco 5500 Series Controller, use the show licensefeature command.
show license feature
Syntax Description This command has no arguments or keywords.
Command Default None.
This example shows how to display the license-enabled features:
CLI Commands175
CLI Commandsshow license feature

> show license featureFeature name Enforcement Evaluation Clear Allowed Enabled
wplus yes yes yes yeswplus-ap-count yes yes yes yes
base no yes yes nobase-ap-count yes yes yes no
Related Commands license install
show license all
show license detail
show license expiring
show license image-level
show license in-use
show license summary
show license modify priority
show license evaluation
show license fileTo display a summary of license-enabled features on the Cisco 5500 Series Controller, use the show licensefile command.
show license file
Syntax Description This command has no arguments or keywords.
This example shows how to display the license files:
> show license fileLicense Store: Primary License StorageStore Index: 0License: 11 wplus-ap-count 1.0 LONG NORMAL STANDALONE EXCL 12_KEYS INFINIT
E_KEYS NEVER NEVER NiL SLM_CODE CL_ND_LCK NiL *1AR5NS7M5AD8PPU400NiL NiL NiL 5_MINS <UDI><PID>AIR-CT5508-K9</PID><SN>RFD000P2D27</SN></UDI> Pe0L7tv8KDUqo:zlPe423S5wasgM8G,tTs0i,7zLyA3VfxhnIe5aJam63lR5l8JM3DPkr4O2DI43iLlKn7jomo3RFl1LjMRqLkKhiLJ2tOyuftQSq2bCAO6nR3wIb38xKi3t$<WLC>AQEBIQAB//++mCzRUbOhw28vz0czAY0iAm7ocDLUMb9ER0+BD3w2PhNEYwsBN/T3xXBqJqfC+oKRqwInXo3s+nsLU7rOtdOxoIxYZAo3LYmUJ+MFzsqlhKoJVlPyEvQ8H21MNUjVbhoN0gyIWsyiJaM8AQIkVBQFzhr10GYolVzdzfJfEPQIx6tZ++/Vtc/q3SF/5Ko8XCY=</WLC>
Comment:Hash: iOGjuLlXgLhcTB113ohIzxVioHA=
. . .
Related Commands license install
show license all
show license detail
show license expiring
CLI Commands176
CLI Commandsshow license file
show license feature
show license image-level
show license in-use
show license summary
show license evaluation
show license handleTo display the license handles on the Cisco 5500 Series Controller, use the show license handle command.
show license handle
Syntax Description This command has no arguments or keywords.
Command Default None.
This example shows how to display the license handles:
> show license handleFeature: wplus , Handle Count: 1
Units: 01( 0), ID: 0x5e000001, NotifyPC: 0x1001e8f4 LS-Handle (0x00000001),Units: ( 1)
Registered clients: 1Context 0x1051b610, epID 0x10029378
Feature: base , Handle Count: 0Registered clients: 1
Context 0x1053ace0, epID 0x10029378Feature: wplus-ap-count , Handle Count: 1
Units: 250( 0), ID: 0xd4000002, NotifyPC: 0x1001e8f4 LS-Handle (0x00000002), Units: (250)
Registered clients: NoneFeature: base-ap-count , Handle Count: 0
Registered clients: NoneGlobal Registered clients: 2
Context 0x10546270, epID 0x100294ccContext 0x1053bae8, epID 0x100294cc
Related Commands license install
show license all
show license detail
show license expiring
show license feature
show license image-level
show license in-use
show license summary
CLI Commands177
CLI Commandsshow license handle
show license image-levelTo display the license image level that is in use on the Cisco 5500 Series Controller, use the show licenseimage-level command.
show license image-level
Syntax Description This command has no arguments or keywords.
Command Default None.
This example shows how to display the image level license settings:
> show license image-levelModule name Image level Priority Configured Valid licensewnbu wplus 1 YES wplus
base 2 NONOTE: wplus includes two additional features: Office Extend AP, Mesh AP.
Related Commands license install
show license all
show license detail
show license expiring
show license feature
license modify priority
show license in-use
show license summary
show license in-useTo display the licenses that are in use on the Cisco 5500 Series Controller, use the show license in-usecommand.
show license in-use
Syntax Description This command has no arguments or keywords.
Command Default None.
This example shows how to display the licenses that are in use:
> show license in-useStoreIndex: 2 Feature: wplus Version: 1.0
License Type: PermanentLicense State: Active, In UseLicense Count: Non-CountedLicense Priority: Medium
StoreIndex: 1 Feature: wplus-ap-count Version: 1.0License Type: EvaluationLicense State: Active, In Use
CLI Commands178
CLI Commandsshow license image-level
Evaluation total period: 8 weeks 4 daysEvaluation period left: 2 weeks 3 daysExpiry date: Thu Jun 25 18:09:43 2009
License Count: 250/250/0License Priority: High
Related Commands license install
show license all
show license detail
show license expiring
show license feature
show license image-level
show license modify priority
show license summary
show license permanent
show license evaluation
show license permanentTo display the permanent licenses on the Cisco 5500 Series Controller, use the show license permanentcommand.
show license permanent
Syntax Description This command has no arguments or keywords.
Command Default None.
This example shows how to display the permanent license’s information:
> show license permanentStoreIndex: 0 Feature: wplus-ap-count Version: 1.0
License Type: PermanentLicense State: InactiveLicense Count: 12/0/0License Priority: Medium
StoreIndex: 1 Feature: base Version: 1.0License Type: PermanentLicense State: Active, Not in UseLicense Count: Non-CountedLicense Priority: Medium
StoreIndex: 2 Feature: wplus Version: 1.0License Type: PermanentLicense State: Active, In UseLicense Count: Non-CountedLicense Priority: Medium
Related Commands license install
show license all
CLI Commands179
CLI Commandsshow license permanent

show license detail
show license expiring
show license feature
show license image-level
show license in-use
show license summary
license modify priority
show license evaluation
show license statusTo display the license status on the Cisco Wireless Controller, use the show license status command.
show license status
Syntax Description This command has no arguments or keywords.
Command Default None.
This example shows how to view the license status on the RTU license mechanism:
> show license statusLicense Type Supported
permanent Non-expiring node locked licenseextension Expiring node locked licenseevaluation Expiring non node locked license
License Operation Supportedinstall Install licenseclear Clear licenseannotate Comment licensesave Save licenserevoke Revoke license
Device statusDevice Credential type: DEVICEDevice Credential Verification: PASSRehost Type: DC_OR_IC
show license statisticsTo display license statistics on the Cisco 5500 Series Controller, use the show license statistics command.
show license statistics
Syntax Description This command has no arguments or keywords.
Command Default None.
This example shows how to display the license statistics:
> show license statistics
CLI Commands180
CLI Commandsshow license status

Administrative statisticsInstall success count: 0Install failure count: 0Install duplicate count: 0Comment add count: 0Comment delete count: 0Clear count: 0
c Save count: 0Save cred count: 0
Client statusRequest success count 2Request failure count 0Release count 0Global Notify count 0
Related Commands license install
show license all
show license detail
show license expiring
show license feature
show license image-level
show license in-use
show license summary
license modify priority
show license evaluation
show license summaryTo display a brief summary of all licenses on the Cisco WLCs, use the show license summary command.
show license summary
Syntax Description This command has no arguments or keywords.
Command Default None.
This example shows how to display a brief summary of all licenses:
> show license summaryIndex 1 Feature: wplus
Period left: Life timeLicense Type: PermanentLicense State: Active, In UseLicense Count: Non-CountedLicense Priority: Medium
Index 2 Feature: wplus-ap-countPeriod left: 2 weeks 3 daysLicense Type: EvaluationLicense State: Active, In UseLicense Count: 250/250/0License Priority: High
Index 3 Feature: base
CLI Commands181
CLI Commandsshow license summary

Period left: Life timeLicense Type: PermanentLicense State: Active, Not in UseLicense Count: Non-CountedLicense Priority: Medium
Index 4 Feature: base-ap-countPeriod left: 8 weeks 3 daysLicense Type: EvaluationLicense State: Active, Not in Use, EULA acceptedLicense Count: 250/0/0License Priority: Low
show license udiTo display unique device identifier (UDI) values for licenses on the Cisco WLCs, use the show license udicommand.
show license udi
Syntax Description This command has no arguments or keywords.
Command Default None.
This example shows how to view the UDI values for licenses on the RTU license mechanism:
(Cisco Controller) > show license udiDevice# PID SN UDI-------------------------------------------------------------------------------------*0 AIR-CT5508-K9 RFD000P2D27 AIR-CT5508-K9:RFD000P2D27
show load-balancingTo display the status of the load-balancing feature, use the show load-balancing command.
show load-balancing
Syntax Description This command has no arguments or keywords.
Command Default None.
This example shows how to display the load-balancing status:
> show load-balancingAggressive Load Balancing........................ EnabledAggressive Load Balancing Window................. 0 clientsAggressive Load Balancing Denial Count........... 3StatisticsTotal Denied Count............................... 10 clientsTotal Denial Sent................................ 20 messagesExceeded Denial Max Limit Count.................. 0 timesNone 5G Candidate Count.......................... 0 timesNone 2.4G Candidate Count..................... 0 times
Related Commands config load-balancing
CLI Commands182
CLI Commandsshow license udi
show local-auth certificatesTo display local authentication certificate information, use the show local-auth certificates command:
show local-auth certificates
Syntax Description This command has no arguments or keywords.
Command Default None
Command History ModificationRelease
This commandwas introduced in a release earlier thanRelease 7.6.
7.6
The following example shows how to display the authentication certificate information stored locally:(Cisco Controller) > show local-auth certificates
Related Commands clear stats local-auth
config local-auth active-timeout
config local-auth eap-profile
config local-auth method fast
config local-auth user-credentials
debug aaa local-auth
show local-auth config
show local-auth statistics
show local-auth configTo display local authentication configuration information, use the show local-auth config command.
show local-auth config
Syntax Description This command has no arguments or keywords.
Command Default None
Command History ModificationRelease
This commandwas introduced in a release earlier thanRelease 7.6.
7.6
The following example shows how to display the local authentication configuration information:
(Cisco Controller) > show local-auth configUser credentials database search order:Primary ................................... Local DB
CLI Commands183
CLI Commandsshow local-auth certificates
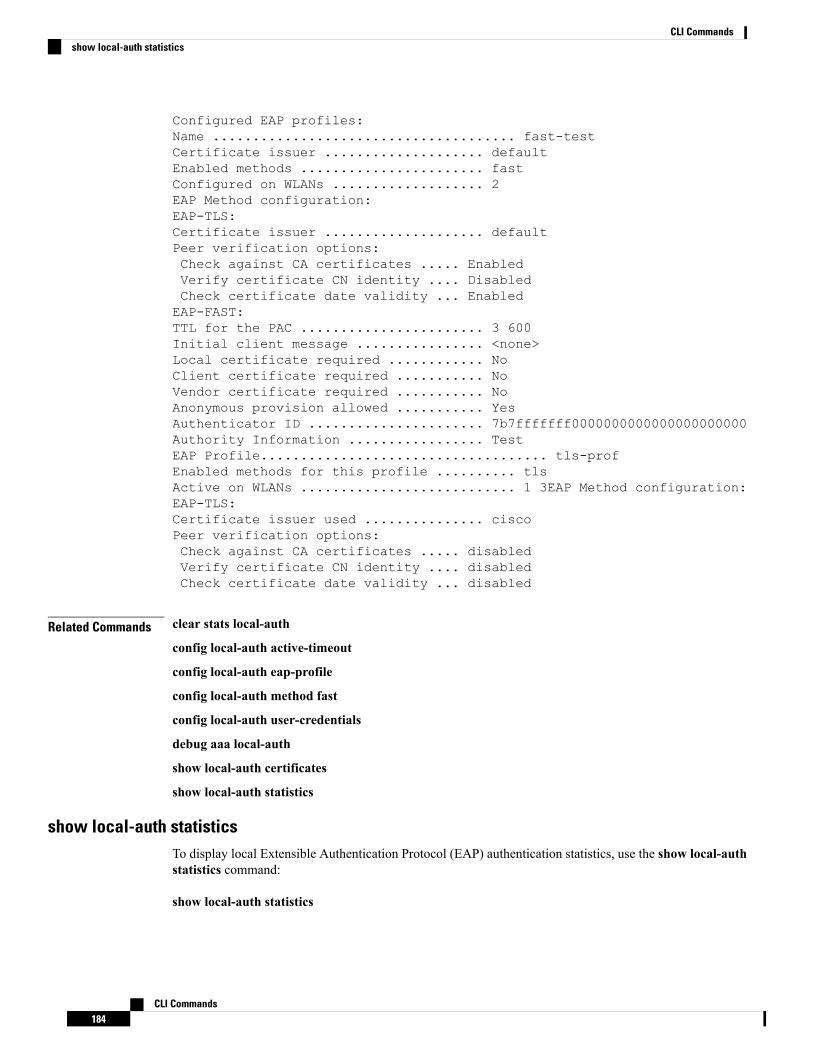
Configured EAP profiles:Name ...................................... fast-testCertificate issuer .................... defaultEnabled methods ....................... fastConfigured on WLANs ................... 2EAP Method configuration:EAP-TLS:Certificate issuer .................... defaultPeer verification options:Check against CA certificates ..... EnabledVerify certificate CN identity .... DisabledCheck certificate date validity ... EnabledEAP-FAST:TTL for the PAC ....................... 3 600Initial client message ................ <none>Local certificate required ............ NoClient certificate required ........... NoVendor certificate required ........... NoAnonymous provision allowed ........... YesAuthenticator ID ...................... 7b7fffffff0000000000000000000000Authority Information ................. TestEAP Profile.................................... tls-profEnabled methods for this profile .......... tlsActive on WLANs ........................... 1 3EAP Method configuration:EAP-TLS:Certificate issuer used ............... ciscoPeer verification options:Check against CA certificates ..... disabledVerify certificate CN identity .... disabledCheck certificate date validity ... disabled
Related Commands clear stats local-auth
config local-auth active-timeout
config local-auth eap-profile
config local-auth method fast
config local-auth user-credentials
debug aaa local-auth
show local-auth certificates
show local-auth statistics
show local-auth statisticsTo display local Extensible Authentication Protocol (EAP) authentication statistics, use the show local-authstatistics command:
show local-auth statistics
CLI Commands184
CLI Commandsshow local-auth statistics
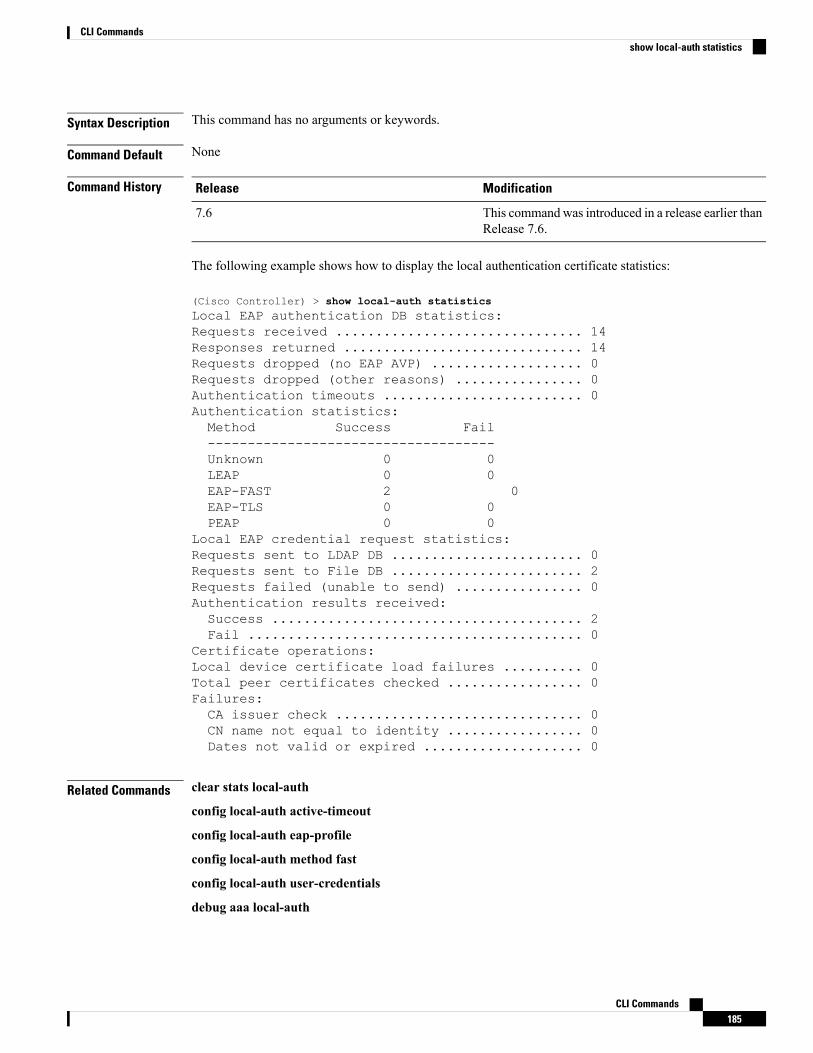
Syntax Description This command has no arguments or keywords.
Command Default None
Command History ModificationRelease
This commandwas introduced in a release earlier thanRelease 7.6.
7.6
The following example shows how to display the local authentication certificate statistics:
(Cisco Controller) > show local-auth statisticsLocal EAP authentication DB statistics:Requests received ............................... 14Responses returned .............................. 14Requests dropped (no EAP AVP) ................... 0Requests dropped (other reasons) ................ 0Authentication timeouts ......................... 0Authentication statistics:Method Success Fail------------------------------------Unknown 0 0LEAP 0 0EAP-FAST 2 0EAP-TLS 0 0PEAP 0 0
Local EAP credential request statistics:Requests sent to LDAP DB ........................ 0Requests sent to File DB ........................ 2Requests failed (unable to send) ................ 0Authentication results received:Success ....................................... 2Fail .......................................... 0
Certificate operations:Local device certificate load failures .......... 0Total peer certificates checked ................. 0Failures:CA issuer check ............................... 0CN name not equal to identity ................. 0Dates not valid or expired .................... 0
Related Commands clear stats local-auth
config local-auth active-timeout
config local-auth eap-profile
config local-auth method fast
config local-auth user-credentials
debug aaa local-auth
CLI Commands185
CLI Commandsshow local-auth statistics
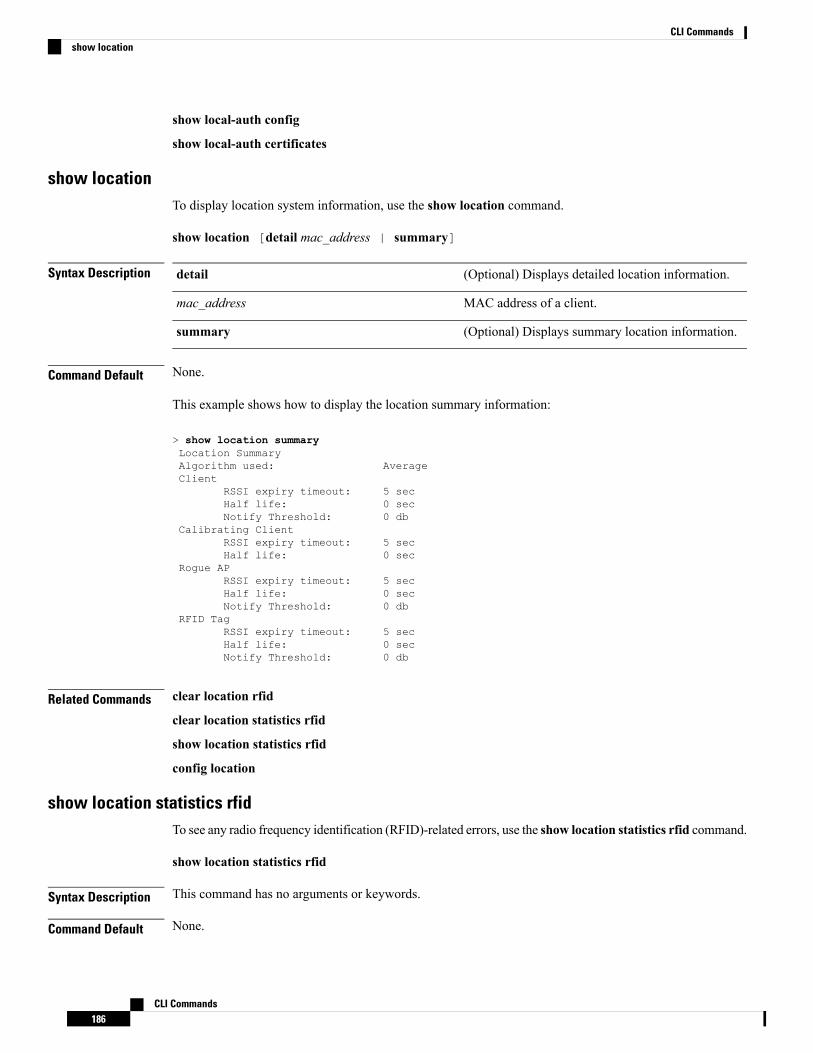
show local-auth config
show local-auth certificates
show locationTo display location system information, use the show location command.
show location [detail mac_address | summary]
Syntax Description (Optional) Displays detailed location information.detail
MAC address of a client.mac_address
(Optional) Displays summary location information.summary
Command Default None.
This example shows how to display the location summary information:
> show location summaryLocation SummaryAlgorithm used: AverageClient
RSSI expiry timeout: 5 secHalf life: 0 secNotify Threshold: 0 db
Calibrating ClientRSSI expiry timeout: 5 secHalf life: 0 sec
Rogue APRSSI expiry timeout: 5 secHalf life: 0 secNotify Threshold: 0 db
RFID TagRSSI expiry timeout: 5 secHalf life: 0 secNotify Threshold: 0 db
Related Commands clear location rfid
clear location statistics rfid
show location statistics rfid
config location
show location statistics rfidTo see any radio frequency identification (RFID)-related errors, use the show location statistics rfid command.
show location statistics rfid
Syntax Description This command has no arguments or keywords.
Command Default None.
CLI Commands186
CLI Commandsshow location

This example shows how to display the detailed location RFID statistics:
> show location statistics rfidRFID StatisticsDatabase Full : 0 Failed Delete: 0Null Bufhandle: 0 Bad Packet: 0Bad LWAPP Data: 0 Bad LWAPP Encap: 0Off Channel: 0 Bad CCX Version: 0Bad AP Info : 0Above Max RSSI: 0 Below Max RSSI: 0Invalid RSSI: 0 Add RSSI Failed: 0Oldest Expired RSSI: 0 Smallest Overwrite: 0
Related Commands clear location rfid
clear location statistics rfid
show location
config location
show loggingTo display the syslog facility logging parameters and buffer contents, use the show logging command.
show logging
Syntax Description This command has no arguments or keywords.
Command Default None
Command History ModificationRelease
This commandwas introduced in a release earlier thanRelease 7.6.
7.6
The following example shows how to display the current settings and buffer content details:
(Cisco Controller) >show logging
(Cisco Controller) > config logging syslog host 10.92.125.52System logs will be sent to 10.92.125.52 from now on
(Cisco Controller) > config logging syslog host 2001:9:6:40::623System logs will be sent to 2001:9:6:40::623 from now on
(Cisco Controller) > show loggingLogging to buffer :- Logging of system messages to buffer :- Logging filter level.......................... errors- Number of system messages logged.............. 1316- Number of system messages dropped............. 6892- Logging of debug messages to buffer ........... Disabled- Number of debug messages logged............... 0- Number of debug messages dropped.............. 0- Cache of logging ............................. Disabled- Cache of logging time(mins) ................... 10080- Number of over cache time log dropped ........ 0
CLI Commands187
CLI Commandsshow logging

Logging to console :- Logging of system messages to console :- Logging filter level.......................... disabled- Number of system messages logged.............. 0- Number of system messages dropped............. 8243- Logging of debug messages to console .......... Enabled- Number of debug messages logged............... 0- Number of debug messages dropped.............. 0Logging to syslog :- Syslog facility................................ local0- Logging of system messages to console :- Logging filter level.......................... disabled- Number of system messages logged.............. 0- Number of system messages dropped............. 8208- Logging of debug messages to console .......... Enabled- Number of debug messages logged............... 0- Number of debug messages dropped.............. 0- Logging of system messages to syslog :- Logging filter level.......................... errors- Number of system messages logged.............. 1316- Number of system messages dropped............. 6892- Logging of debug messages to syslog ........... Disabled- Number of debug messages logged............... 0- Number of debug messages dropped.............. 0- Number of remote syslog hosts.................. 2- syslog over tls................................ Disabled- Host 0....................................... 10.92.125.52- Host 1....................................... 2001:9:6:40::623- Host 2.......................................
Logging of RFC 5424.............................. DisabledLogging of Debug messages to file :- Logging of Debug messages to file.............. Disabled- Number of debug messages logged................ 0- Number of debug messages dropped............... 0Logging of traceback............................. Enabled
show loginsessionTo display the existing sessions, use the show loginsession command.
show loginsession
Syntax Description This command has no arguments or keywords.
Command Default None.
This example shows how to display the current session details:
> show loginsessionID username Connection From Idle Time Session Time-- --------------- --------------- ------------ ------------00 admin EIA-232 00:00:00 00:19:04
Related Commands config loginsession close
show macfilterTo display the MAC filter parameters, use the show macfilter command.
CLI Commands188
CLI Commandsshow loginsession

show macfilter {summary | detailMAC | mesh | {wlan wlan-id}}
Syntax Description Displays a summary of all MAC filter entries.summary
Displays details of a MAC filter entry.detailMAC
Display a summary of all MESH AP MAC filterentries.
mesh
Command Default None
Command History ModificationRelease
This command was introduced in a release earlier than Release 7.6.7.6
Usage Guidelines The MAC delimiter (none, colon, or hyphen) for MAC addresses sent to RADIUS servers is displayed. TheMAC filter table lists the clients that are always allowed to associate with a wireless LAN.
The following example shows how to display the detailed display of a MAC filter entry:
(Cisco Controller) >show macfilter detail xx:xx:xx:xx:xx:xxMAC Address...................................... xx:xx:xx:xx:xx:xxWLAN Identifier.................................. AnyInterface Name................................... managementDescription...................................... RAP
The following example shows how to display a summary of the MAC filter parameters:(Cisco Controller) > show macfilter summaryMAC Filter RADIUS Compatibility mode............. Cisco ACSMAC Filter Delimiter............................. NoneLocal Mac Filter TableMAC Address WLAN Id Description----------------------- -------------- --------------------------------xx:xx:xx:xx:xx:xx Any RAPxx:xx:xx:xx:xx:xx Any PAP2 (2nd hop)xx:xx:xx:xx:xx:xx Any PAP1 (1st hop)
show memory monitorTo display a summary of memory analysis settings and any discovered memory issues, use the showmemorymonitor command.
show memory monitor [detail]
Syntax Description (Optional) Displays details of any memory leaks orcorruption.
detail
Command Default None
CLI Commands189
CLI Commandsshow memory monitor
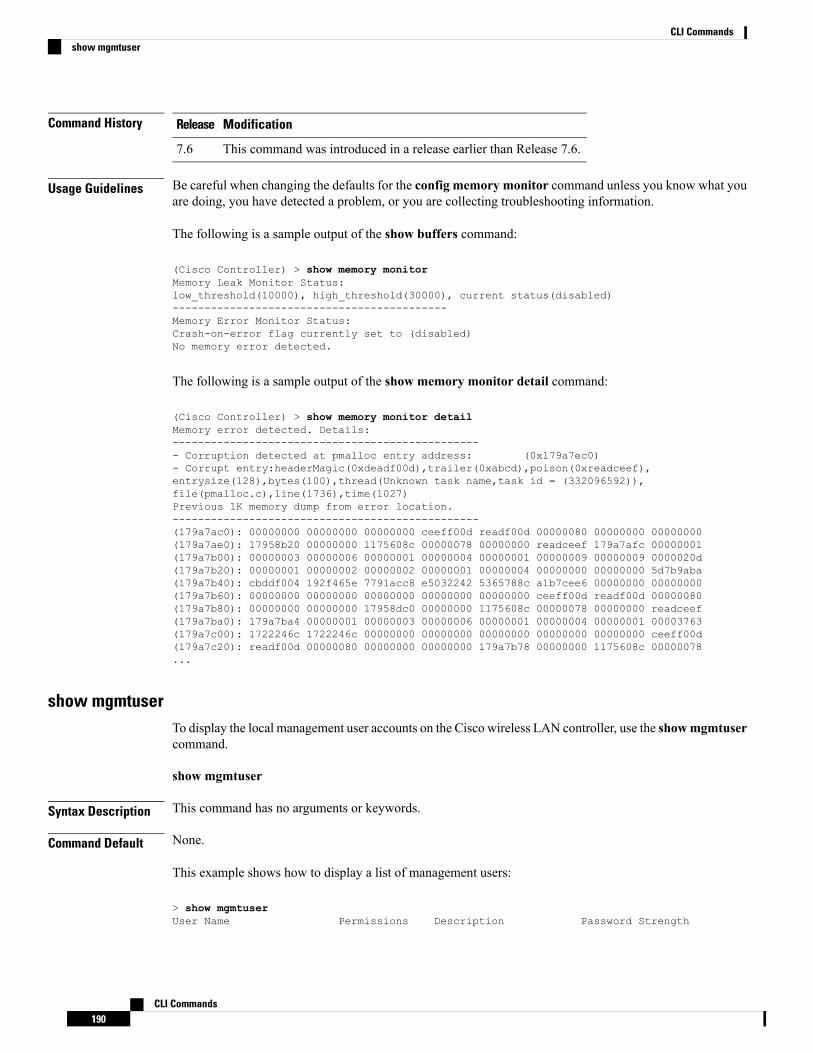
Command History ModificationRelease
This command was introduced in a release earlier than Release 7.6.7.6
Usage Guidelines Be careful when changing the defaults for the config memory monitor command unless you know what youare doing, you have detected a problem, or you are collecting troubleshooting information.
The following is a sample output of the show buffers command:
(Cisco Controller) > show memory monitorMemory Leak Monitor Status:low_threshold(10000), high_threshold(30000), current status(disabled)-------------------------------------------Memory Error Monitor Status:Crash-on-error flag currently set to (disabled)No memory error detected.
The following is a sample output of the show memory monitor detail command:
(Cisco Controller) > show memory monitor detailMemory error detected. Details:------------------------------------------------- Corruption detected at pmalloc entry address: (0x179a7ec0)- Corrupt entry:headerMagic(0xdeadf00d),trailer(0xabcd),poison(0xreadceef),entrysize(128),bytes(100),thread(Unknown task name,task id = (332096592)),file(pmalloc.c),line(1736),time(1027)Previous 1K memory dump from error location.------------------------------------------------(179a7ac0): 00000000 00000000 00000000 ceeff00d readf00d 00000080 00000000 00000000(179a7ae0): 17958b20 00000000 1175608c 00000078 00000000 readceef 179a7afc 00000001(179a7b00): 00000003 00000006 00000001 00000004 00000001 00000009 00000009 0000020d(179a7b20): 00000001 00000002 00000002 00000001 00000004 00000000 00000000 5d7b9aba(179a7b40): cbddf004 192f465e 7791acc8 e5032242 5365788c a1b7cee6 00000000 00000000(179a7b60): 00000000 00000000 00000000 00000000 00000000 ceeff00d readf00d 00000080(179a7b80): 00000000 00000000 17958dc0 00000000 1175608c 00000078 00000000 readceef(179a7ba0): 179a7ba4 00000001 00000003 00000006 00000001 00000004 00000001 00003763(179a7c00): 1722246c 1722246c 00000000 00000000 00000000 00000000 00000000 ceeff00d(179a7c20): readf00d 00000080 00000000 00000000 179a7b78 00000000 1175608c 00000078...
show mgmtuserTo display the local management user accounts on the Cisco wireless LAN controller, use the showmgmtusercommand.
show mgmtuser
Syntax Description This command has no arguments or keywords.
Command Default None.
This example shows how to display a list of management users:
> show mgmtuserUser Name Permissions Description Password Strength
CLI Commands190
CLI Commandsshow mgmtuser
----------------------- ------------ -------------- ------------------admin read-write Weak
Related Commands config mgmtuser add
config mgmtuser delete
config mgmtuser description
config mgmtuser password
show msglogTo display the message logs written to the Cisco WLC database, use the show msglog command.
show msglog
Syntax Description This command has no arguments or keywords.
Command Default None
Command History ModificationRelease
This commandwas introduced in a release earlier thanRelease 7.6.
7.6
Usage Guidelines If there are more that 15 entries, you are prompted to display the messages shown in the example.
The following example shows how to display message logs:
(Cisco Controller) >show msglogMessage Log Severity Level..................... ERRORThu Aug 4 14:30:08 2005 [ERROR] spam_lrad.c 1540: AP 00:0b:85:18:b6:50 associated. LastAP failure was due to Link FailureThu Aug 4 14:30:08 2005 [ERROR] spam_lrad.c 13840: Updating IP info for AP 00:0b:85:18:b6:50 -- static 0, 1.100.49.240/255.255.255.0, gtw 1.100.49.1Thu Aug 4 14:29:32 2005 [ERROR] dhcpd.c 78: dhcp server: binding to 0.0.0.0Thu Aug 4 14:29:32 2005 [ERROR] rrmgroup.c 733: Airewave Director: 802.11a switch groupresetThu Aug 4 14:29:32 2005 [ERROR] rrmgroup.c 733: Airewave Director: 802.11bg switch group resetThu Aug 4 14:29:22 2005 [ERROR] sim.c 2841: Unable to get link state for primary port 0of interface ap-managerThu Aug 4 14:29:22 2005 [ERROR] dtl_l2_dot1q.c 767: Unable to get USPThu Aug 4 14:29:22 2005 Previous message occurred 2 timesThu Aug 4 14:29:14 2005 [CRITICAL] osapi_sem.c 794: Error! osapiMutexTake called withNULL pointer: osapi_bsntime.c:927Thu Aug 4 14:29:14 2005 [CRITICAL] osapi_sem.c 794: Error! osapiMutexTake called withNULL pointer: osapi_bsntime.c:919Thu Aug 4 14:29:14 2005 [CRITICAL] hwutils.c 1861: Security Module not foundThu Aug 4 14:29:13 2005 [CRITICAL] bootos.c 791: Starting code...
CLI Commands191
CLI Commandsshow msglog

show nac statisticsTo display detailed Network Access Control (NAC) information about a Cisco wireless LAN controller, usethe show nac statistics command.
show nac statistics
Syntax Description This command has no arguments or keywords.
Command Default None
Command History ModificationRelease
This commandwas introduced in a release earlier thanRelease 7.6.
7.6
The following example shows how to display detailed statistics of network access control settings:
(Cisco Controller) > show nac statisticsServer Index....................................................... 1Server Address.....................................................xxx.xxx.xxx.xxxNumber of requests sent............................................ 0Number of retransmissions.......................................... 0Number of requests received........................................ 0Number of malformed requests received.............................. 0Number of bad auth requests received............................... 0Number of pending requests......................................... 0Number of timed out requests....................................... 0Number of misc dropped request received............................ 0Number of requests sent............................................ 0
Related Commands show nac summary
config guest-lan nac
config wlan nac
debug nac
show nac summaryTo display NAC summary information for a Cisco wireless LAN controller, use the show nac summarycommand.
show nac summary
Syntax Description This command has no arguments or keywords.
Command Default None
CLI Commands192
CLI Commandsshow nac statistics
Command History ModificationRelease
This commandwas introduced in a release earlier thanRelease 7.6.
7.6
The following example shows how to display a summary information of network access controlsettings:
(Cisco Controller) > show nac summaryNAC ACL Name ...............................................Index Server Address Port State----- ---------------------------------------- ---- -----1 xxx.xxx.xxx.xxx 13336 Enabled
Related Commands show nac statistics
config guest-lan nac
config wlan nac
debug nac
show netuserTo display the configuration of a particular user in the local user database, use the show netuser command.
show netuser {detail user_name | guest-roles | summary}
Syntax Description Displays detailed information about the specifiednetwork user.
detail
Network user.user_name
Displays configured roles for guest users.guest_roles
Displays a summary of all users in the local userdatabase.
summary
Command Default None
Command History ModificationRelease
This command was introduced in a release earlier than Release 7.6.7.6
The following is a sample output of the show netuser summary command:
(Cisco Controller) > show netuser summaryMaximum logins allowed for a given username ........Unlimited
The following is a sample output of the show netuser detail command:
CLI Commands193
CLI Commandsshow netuser

(Cisco Controller) > show netuser detail john10username........................................... abcWLAN Id............................................. AnyLifetime............................................ PermanentDescription......................................... test user
Related Commands config netuser add
config netuser delete
config netuser description
config netuser guest-role apply
config netuser wlan-id
config netuser guest-roles
show netuser guest-rolesTo display a list of the current quality of service (QoS) roles and their bandwidth parameters, use the shownetuser guest-roles command.
show netuser guest-roles
Syntax Description This command has no arguments or keywords.
Command Default None
Command History ModificationRelease
This commandwas introduced in a release earlier thanRelease 7.6.
7.6
This example shows how to display a QoS role for the guest network user:
(Cisco Controller) > show netuser guest-rolesRole Name.............................. ContractorAverage Data Rate.................. 10Burst Data Rate.................... 10Average Realtime Rate.............. 100Burst Realtime Rate................ 100Role Name.............................. VendorAverage Data Rate.................. unconfiguredBurst Data Rate.................... unconfiguredAverage Realtime Rate.............. unconfiguredBurst Realtime Rate................ unconfigured
Related Commands config netuser add
config netuser delete
config netuser description
config netuser guest-role apply
config netuser wlan-id
CLI Commands194
CLI Commandsshow netuser guest-roles

show netuser guest-roles
show netuser
show networkTo display the current status of 802.3 bridging for all WLANs, use the show network command.
show network
Syntax Description This command has no arguments or keywords.
Command Default None.
This example shows how to display the network details:
(Cisco Controller) > show network
Related Commands config network
show network summary
show network multicast mgid detail
show network multicast mgid summary
show network summaryTo display the network configuration of the Cisco wireless LAN controller, use the show network summarycommand.
show network summary
Syntax Description This command has no arguments or keywords.
Command Default None.
This example shows how to display a summary configuration:
(Cisco Controller) >show network summaryRF-Network Name............................. RFWeb Mode.................................... DisableSecure Web Mode............................. EnableSecure Web Mode Cipher-Option High.......... DisableSecure Web Mode Cipher-Option SSLv2......... DisableSecure Web Mode RC4 Cipher Preference....... DisableOCSP........................................ DisabledOCSP responder URL..........................Secure Shell (ssh).......................... EnableTelnet...................................... EnableEthernet Multicast Mode..................... Disable Mode: UcastEthernet Broadcast Mode..................... DisableEthernet Multicast Forwarding............... DisableEthernet Broadcast Forwarding............... DisableAP Multicast/Broadcast Mode................. UnicastIGMP snooping............................... Disabled
CLI Commands195
CLI Commandsshow network

IGMP timeout................................ 60 secondsIGMP Query Interval......................... 20 secondsMLD snooping................................ DisabledMLD timeout................................. 60 secondsMLD query interval.......................... 20 secondsUser Idle Timeout........................... 300 secondsAP Join Priority............................ DisableARP Idle Timeout............................ 300 secondsARP Unicast Mode............................ DisabledCisco AP Default Master..................... DisableMgmt Via Wireless Interface................. DisableMgmt Via Dynamic Interface.................. DisableBridge MAC filter Config.................... EnableBridge Security Mode........................ EAPOver The Air Provisioning of AP's........... EnableApple Talk ................................. DisableMesh Full Sector DFS........................ EnableAP Fallback ................................ DisableWeb Auth CMCC Support ...................... DisabledWeb Auth Redirect Ports .................... 80Web Auth Proxy Redirect ................... DisableWeb Auth Captive-Bypass .................. DisableWeb Auth Secure Web ....................... EnableFast SSID Change ........................... DisabledAP Discovery - NAT IP Only ................. EnabledIP/MAC Addr Binding Check .................. EnabledCCX-lite status ............................ Disableoeap-600 dual-rlan-ports ................... Disableoeap-600 local-network ..................... Enable
Web Color Theme............................. DefaultCAPWAP Prefer Mode.......................... IPv4
show network multicast mgid detailTo display all the clients joined to the multicast group in a specific multicast group identification (MGID),use the show network multicast mgid detail command.
show network multicast mgid detail mgid_value
Syntax Description Number between 550 and 4095.mgid_value
Command Default None.
This example shows how to display details of the multicast database:
> show network multicast mgid detailMgid ............................... 550Multicast Group Address ............ 239.255.255.250Vlan ............................... 0Rx Packet Count .................... 807399588No of clients ...................... 1Client List ........................Client MAC Expire TIme (mm:ss)00:13:02:23:82:ad 0:20
CLI Commands196
CLI Commandsshow network multicast mgid detail
Related Commands show network summary
show network multicast mgid detail
show network
show network multicast mgid summaryTo display all the multicast groups and their corresponding multicast group identifications (MGIDs), use theshow network multicast mgid summary command.
show network multicast mgid summary
Syntax Description This command has no arguments or keywords.
Command Default None.
This example shows how to display a summary of multicast groups and their MGIDs:
> show network multicast mgid summaryLayer2 MGID Mapping:-------------------InterfaceName vlanId MGID----------------------------- ------ -----management 0 0test 0 9wired 20 8Layer3 MGID Mapping:-------------------Number of Layer3 MGIDs ................ 1Group address Vlan MGID------------------ ----- ------239.255.255.250 0 550
Related Commands show network summary
show network multicast mgid detail
show network
show nmsp notify-interval summaryTo display the Network Mobility Services Protocol (NMSP) configuration settings, use the show nmspnotify-interval summary command.
show nmsp notify-interval summary
Syntax Description This command has no arguments or keywords.
Command Default None.
This example shows how to display NMSP configuration settings:
> show nmsp notify-interval summaryNMSP Notification Interval SummaryClient
CLI Commands197
CLI Commandsshow network multicast mgid summary

Measurement interval: 2 secRFID
Measurement interval: 8 secRogue AP
Measurement interval: 2 secRogue Client
Measurement interval: 2 sec
Related Commands clear locp statistics
clear nmsp statistics
config nmsp notify-interval measurement
show nmsp statistics
show nmsp status
show nmsp statisticsTo display Network Mobility Services Protocol (NMSP) counters, use the show nmsp statistics command.
show nmsp statistics {summary | connection all}
Syntax Description Displays common NMSP counters.summary
Displays all connection-specific counters.connection all
Command Default None.
This example shows how to display a summary of common NMSP counters:
> show nmsp statistics summarySend RSSI with no entry: 0Send too big msg: 0Failed SSL write: 0Partial SSL write: 0SSL write attempts to want write:Transmit Q full:0Max Measure Notify Msg: 0Max Info Notify Msg: 0Max Tx Q Size: 2Max Rx Size: 1Max Info Notify Q Size: 0Max Client Info Notify Delay: 0Max Rogue AP Info Notify Delay: 0Max Rogue Client Info Notify Delay: 0Max Client Measure Notify Delay: 0Max Tag Measure Notify Delay: 0Max Rogue AP Measure Notify Delay: 0Max Rogue Client Measure Notify Delay: 0Max Client Stats Notify Delay: 0Max Tag Stats Notify Delay: 0RFID Measurement Periodic : 0RFID Measurement Immediate : 0Reconnect Before Conn Timeout: 0
This example shows how to display all the connection-specific NMSP counters:
CLI Commands198
CLI Commandsshow nmsp statistics

> show nmsp statistics connection allNMSP Connection CountersConnection 1 :Connection status: UPFreed Connection: 0Nmsp Subscr Req: 0 NMSP Subscr Resp: 0Info Req: 1 Info Resp: 1Measure Req: 2 Measure Resp: 2Stats Req: 2 Stats Resp: 2Info Notify: 0 Measure Notify: 0Loc Capability: 2Location Req: 0 Location Rsp: 0Loc Subscr Req: 0 Loc Subscr Rsp: 0Loc Notif: 0Loc Unsubscr Req: 0 Loc Unsubscr Rsp: 0IDS Get Req: 0 IDS Get Resp: 0IDS Notif: 0IDS Set Req: 0 IDS Set Resp: 0
Related Commands show nmsp notify-interval summary
clear nmsp statistics
config nmsp notify-interval measurement
show nmsp status
show nmsp statusTo display the status of active Network Mobility Services Protocol (NMSP) connections, use the show nmspstatus command.
show nmsp status
Syntax Description This command has no arguments or keywords.
Command Default None.
This example shows how to display the status of the active NMSP connections:
> show nmsp statusLocServer IP TxEchoResp RxEchoReq TxData RxData-------------- ----------- --------- ------- -------171.71.132.158 21642 21642 51278 21253
Related Commands show nmsp notify-interval summary
clear nmsp statistics
config nmsp notify-interval measurement
show nmsp status
clear locp statistics
show nmsp statistics
CLI Commands199
CLI Commandsshow nmsp status
show nmsp subscriptionTo display the Network Mobility Services Protocol (NMSP) services that are active on the controller, use theshow nmsp subscription command.
show nmsp subscription {summary | detail ip-addr}
Syntax Description Displays all of the NMSP services to which thecontroller is subscribed.
summary
Displays details for all of the NMSP services to whichthe controller is subscribed.
detail
Details only for the NMSP services subscribed to bya specific IPv4 or IPv6 address.
ip-addr
Command Default None
Command History ModificationRelease
This command was introduced in a release earlier than Release 7.6.7.6
This command supports both IPv4 and IPv6 address formats.8.0
This example shows how to display a summary of all the NMSP services to which the controller issubscribed:
> show nmsp subscription summaryMobility Services Subscribed:Server IP Services--------- --------10.10.10.31 RSSI, Info, Statistics
This example shows how to display details of all the NMSP services:
> show nmsp subscription detail 10.10.10.31Mobility Services Subscribed by 10.10.10.31Services Sub-services-------- ------------RSSI Mobile Station, Tags,Info Mobile Station,Statistics Mobile Station, Tags,
> show nmsp subscription detail 2001:9:6:40::623Mobility Services Subscribed by 2001:9:6:40::623Services Sub-services-------- ------------RSSI Mobile Station, Tags,Info Mobile Station,Statistics Mobile Station, Tags,
CLI Commands200
CLI Commandsshow nmsp subscription

show ntp-keysTo display network time protocol authentication key details, use the show ntp-keys command.
show ntp-keys
Syntax Description This command has no arguments or keywords.
Command Default None
Command History ModificationRelease
This commandwas introduced in a release earlier thanRelease 7.6.
7.6
This example shows how to display NTP authentication key details:
(Cisco Controller) > show ntp-keysNtp Authentication Key Details...................
Key Index-----------
13
Related Commands config time ntp
show pmk-cacheTo display information about the pairwise master key (PMK) cache, use the show pmk-cache command.
show pmk-cache {all | MAC}
Syntax Description Displays information about all entries in the PMKcache.
all
Information about a single entry in the PMK cache.MAC
Command Default None
Command History ModificationRelease
This command was introduced in a release earlier than Release 7.6.7.6
The following example shows how to display information about a single entry in the PMK cache:
(Cisco Controller) >show pmk-cache xx:xx:xx:xx:xx:xx
The following example shows how to display information about all entries in the PMK cache:
(Cisco Controller) >show pmk-cache allPMK Cache
CLI Commands201
CLI Commandsshow ntp-keys
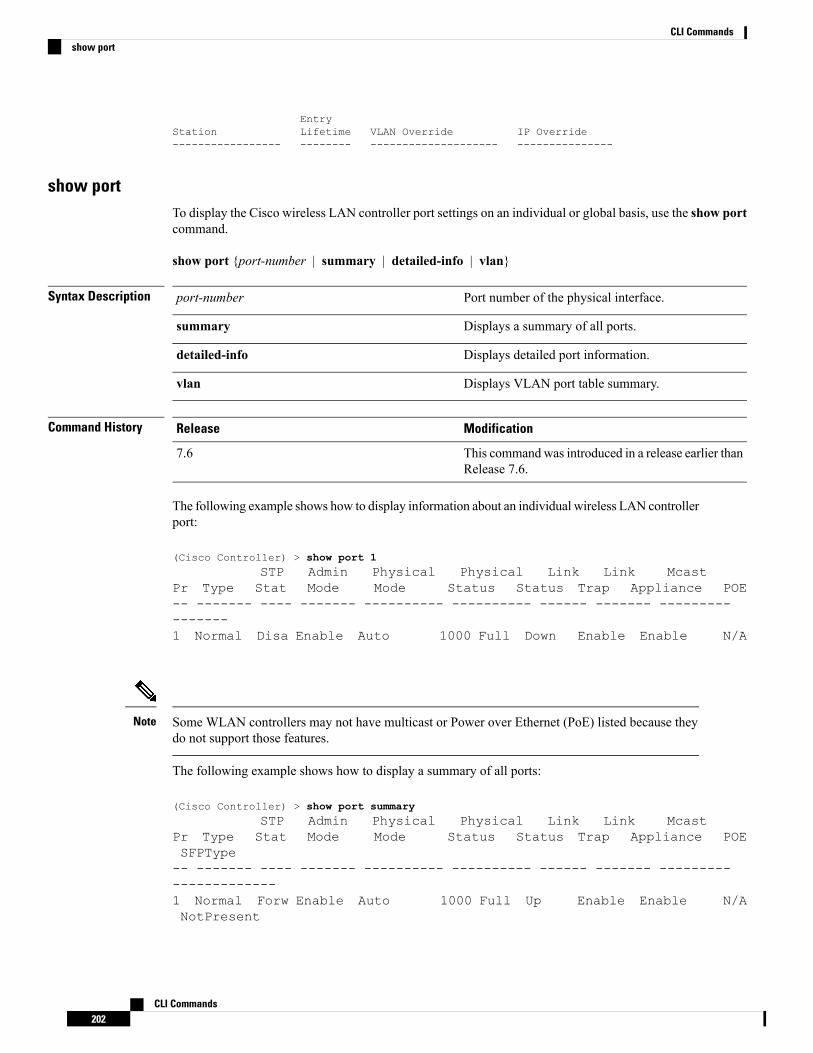
EntryStation Lifetime VLAN Override IP Override----------------- -------- -------------------- ---------------
show portTo display the Cisco wireless LAN controller port settings on an individual or global basis, use the show portcommand.
show port {port-number | summary | detailed-info | vlan}
Syntax Description Port number of the physical interface.port-number
Displays a summary of all ports.summary
Displays detailed port information.detailed-info
Displays VLAN port table summary.vlan
Command History ModificationRelease
This commandwas introduced in a release earlier thanRelease 7.6.
7.6
The following example shows how to display information about an individual wireless LAN controllerport:
(Cisco Controller) > show port 1STP Admin Physical Physical Link Link Mcast
Pr Type Stat Mode Mode Status Status Trap Appliance POE-- ------- ---- ------- ---------- ---------- ------ ------- ----------------1 Normal Disa Enable Auto 1000 Full Down Enable Enable N/A
Some WLAN controllers may not have multicast or Power over Ethernet (PoE) listed because theydo not support those features.
Note
The following example shows how to display a summary of all ports:
(Cisco Controller) > show port summarySTP Admin Physical Physical Link Link Mcast
Pr Type Stat Mode Mode Status Status Trap Appliance POESFPType-- ------- ---- ------- ---------- ---------- ------ ------- ----------------------1 Normal Forw Enable Auto 1000 Full Up Enable Enable N/ANotPresent
CLI Commands202
CLI Commandsshow port

2 Normal Disa Enable Auto 1000 Full Down Enable Enable N/ANotPresent3 Normal Disa Enable Auto 1000 Full Down Enable Enable N/ANotPresent4 Normal Disa Enable Auto 1000 Full Down Enable Enable N/ANotPresent
Some WLAN controllers may have only one port listed because they have only one physical port.Note
show processTo display how various processes in the system are using the CPU at that instant in time, use the show processcommand.
show process {cpu | memory}
Syntax Description Displays how various system tasks are using the CPUat that moment.
cpu
Displays the allocation and deallocation of memoryfrom various processes in the system at that moment.
memory
Command Default None.
Usage Guidelines This command is helpful in understanding if any single task is monopolizing the CPU and preventing othertasks from being performed.
This example shows how to display various tasks in the system that are using the CPU at a givenmoment:
> show process cpuName Priority CPU Use ReaperreaperWatcher ( 3/124) 0 % ( 0/ 0)% IosapiReaper (10/121) 0 % ( 0/ 0)% ITempStatus (255/ 1) 0 % ( 0/ 0)% IemWeb (255/ 1) 0 % ( 0/ 0)% T 300cliWebTask (255/ 1) 0 % ( 0/ 0)% IUtilTask (255/ 1) 0 % ( 0/ 0)% T 300
This example shows how to display the allocation and deallocation of memory from various processesat a given moment:
> show process memoryName Priority BytesinUse ReaperreaperWatcher ( 3/124) 0 ( 0/ 0)% IosapiReaper (10/121) 0 ( 0/ 0)% ITempStatus (255/ 1) 308 ( 0/ 0)% IemWeb (255/ 1) 294440 ( 0/ 0)% T 300cliWebTask (255/ 1) 738 ( 0/ 0)% IUtilTask (255/ 1) 308 ( 0/ 0)% T 300
CLI Commands203
CLI Commandsshow process

Related Commands debug memory
transfer upload datatype
show qosTo display quality of service (QoS) information, use the show qos command.
show qos {bronze | gold | platinum | silver}
Syntax Description Displays QoS information for the bronze profile ofthe WLAN.
bronze
Displays QoS information for the gold profile of theWLAN.
gold
Displays QoS information for the platinum profile ofthe WLAN.
platinum
Displays QoS information for the silver profile of theWLAN.
silver
Command Default None.
This example shows how to display QoS information for the gold profile:
> show qos goldDescription...................................... For Video ApplicationsMaximum Priority................................. videoUnicast Default Priority......................... videoMulticast Default Priority....................... videoPer-SSID Rate Limits............................. UpstreamDownstreamAverage Data Rate................................ 0 0Average Realtime Data Rate....................... 0 0Burst Data Rate.................................. 0 0Burst Realtime Data Rate......................... 0 0Per-Client Rate Limits........................... UpstreamDownstreamAverage Data Rate................................ 0 0Average Realtime Data Rate....................... 0 0Burst Data Rate.................................. 0 0Burst Realtime Data Rate......................... 0 0protocol......................................... none
802.11a Customized EDCA Settings:ecwmin....................................... 3ecwmax....................................... 4aifs......................................... 7txop......................................... 94
802.11a Customized packet parameter Settings:Packet retry time............................ 3Not retrying threshold....................... 100Disassociating threshold..................... 500Time out value............................... 35
CLI Commands204
CLI Commandsshow qos

Related Commands config qos protocol-type
show resetTo display the scheduled system reset parameters, use the show reset command.
show reset
Syntax Description This command has no arguments or keywords.
Command Default None.
This example shows how to display the scheduled system reset parameters:
> show resetSystem reset is scheduled for Mar 27 01 :01 :01 2010Current local time and date is Mar 24 02:57:44 2010A trap will be generated 10 minutes before each scheduled system reset.Use ‘reset system cancel’ to cancel the reset.Configuration will be saved before the system reset.
Related Commands reset system at
reset system in
reset system cancel
reset system notify-time
show remote-lanTo display information about remote LAN configuration, use the show remote-lan command.
show remote-lan { summary | remote-lan-id }
Syntax Description Displays a summary of all remote LANs.summary
Remote LAN identifier.remote-lan-id
Command Default None
Command History ModificationRelease
This command was introduced in a release earlier than Release 7.6.7.6
The following example shows how to display a summary of all remote LANs:
(Cisco Controller) >show remote-lan summaryNumber of Remote LANS............................ 2RLAN ID RLAN Profile Name Status Interface Name------- ------------------------------------- -------- --------------------2 remote Disabled management8 test Disabled management
CLI Commands205
CLI Commandsshow reset
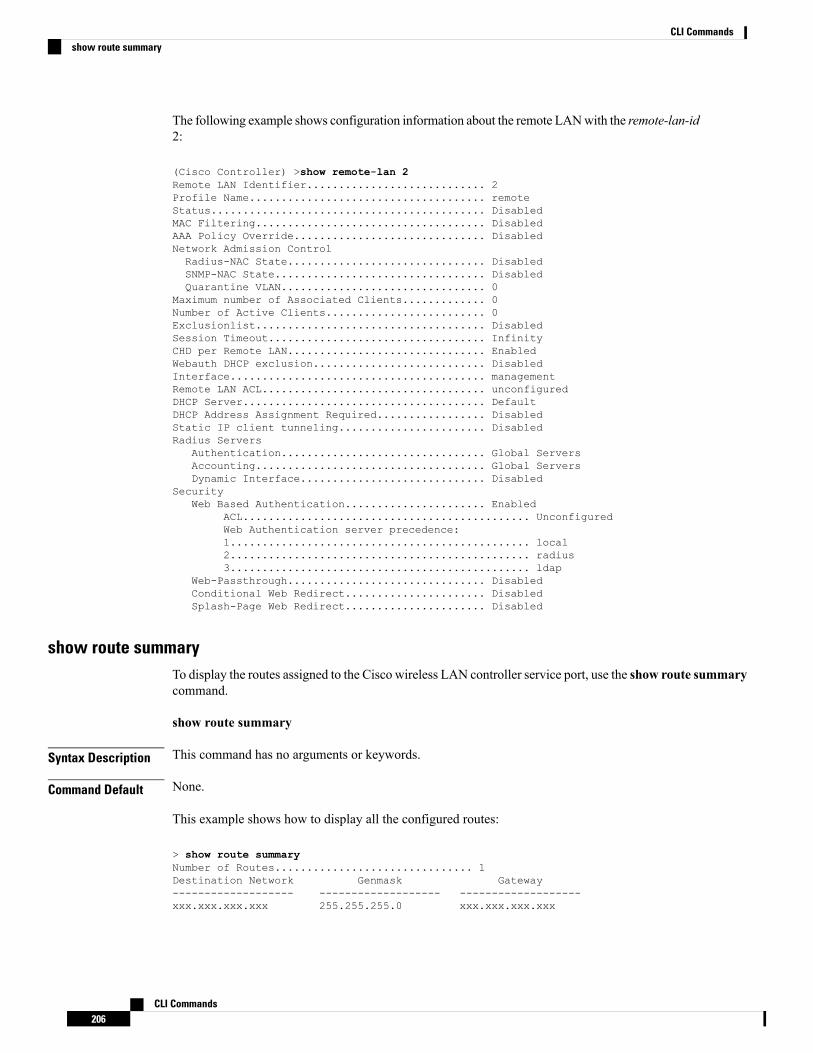
The following example shows configuration information about the remote LANwith the remote-lan-id2:
(Cisco Controller) >show remote-lan 2Remote LAN Identifier............................ 2Profile Name..................................... remoteStatus........................................... DisabledMAC Filtering.................................... DisabledAAA Policy Override.............................. DisabledNetwork Admission ControlRadius-NAC State............................... DisabledSNMP-NAC State................................. DisabledQuarantine VLAN................................ 0
Maximum number of Associated Clients............. 0Number of Active Clients......................... 0Exclusionlist.................................... DisabledSession Timeout.................................. InfinityCHD per Remote LAN............................... EnabledWebauth DHCP exclusion........................... DisabledInterface........................................ managementRemote LAN ACL................................... unconfiguredDHCP Server...................................... DefaultDHCP Address Assignment Required................. DisabledStatic IP client tunneling....................... DisabledRadius Servers
Authentication................................ Global ServersAccounting.................................... Global ServersDynamic Interface............................. Disabled
SecurityWeb Based Authentication...................... Enabled
ACL............................................. UnconfiguredWeb Authentication server precedence:1............................................... local2............................................... radius3............................................... ldap
Web-Passthrough............................... DisabledConditional Web Redirect...................... DisabledSplash-Page Web Redirect...................... Disabled
show route summaryTo display the routes assigned to the Cisco wireless LAN controller service port, use the show route summarycommand.
show route summary
Syntax Description This command has no arguments or keywords.
Command Default None.
This example shows how to display all the configured routes:
> show route summaryNumber of Routes............................... 1Destination Network Genmask Gateway------------------- ------------------- -------------------xxx.xxx.xxx.xxx 255.255.255.0 xxx.xxx.xxx.xxx
CLI Commands206
CLI Commandsshow route summary

Related Commands config route
show rulesTo display the active internal firewall rules, use the show rules command.
show rules
Syntax Description This command has no arguments or keywords.
Command Default None
Command History ModificationRelease
This commandwas introduced in a release earlier thanRelease 7.6.
7.6
The following example shows how to display active internal firewall rules:
(Cisco Controller) > show rules--------------------------------------------------------Rule ID.............: 3Ref count...........: 0Precedence..........: 99999999Flags...............: 00000001 ( PASS )Source IP range:
(Local stack)Destination IP range:
(Local stack)--------------------------------------------------------Rule ID.............: 25Ref count...........: 0Precedence..........: 99999999Flags...............: 00000001 ( PASS )Service Info
Service name........: GDBProtocol............: 6Source port low.....: 0Source port high....: 0Dest port low.......: 1000Dest port high......: 1000
Source IP range:IP High............: 0.0.0.0
Interface..........: ANYDestination IP range:
(Local stack)--------------------------------------------------------
show run-configTo display a comprehensive view of the current Ciscowireless LAN controller configuration, use the command.
CLI Commands207
CLI Commandsshow rules

Syntax Description Shows all the commands under the show run-config.all
(Optional) Excludes access point configurationsettings.
no-ap
(Optional) Displays a list of user-configuredcommands on the controller.
commands
Command Default None
Command History ModificationRelease
This command was introduced in a release earlier than Release 7.6.7.6
This command was introduced .8.2
Usage Guidelines These commands have replaced the show running-config command.
SomeWLAN controllers may have no Crypto Accelerator (VPN terminationmodule) or power supplies listedbecause they have no provisions for VPN termination modules or power supplies.
The show run-config all command shows only values configured by the user. It does not showsystem-configured default values.
The following is a sample output of the command:
(Cisco Controller) > show run-config allPress Enter to continue...System InventorySwitch Description............................... Cisco ControllerMachine Model....................................Serial Number.................................... FLS0923003BBurned-in MAC Address............................ xx:xx:xx:xx:xx:xxCrypto Accelerator 1............................. AbsentCrypto Accelerator 2............................. AbsentPower Supply 1................................... AbsentPower Supply 2................................... Present, OKPress Enter to continue Or <Ctl Z> to abort...
show serialTo display the serial (console) port configuration, use the show serial command.
show serial
Syntax Description This command has no arguments or keywords.
Command Default The default values for Baud rate, Character, Flow Control, Stop Bits, Parity type of the port configuration are9600, 8, off, 1, none.
Command History ModificationRelease
This commandwas introduced in a release earlier thanRelease 7.6.
7.6
CLI Commands208
CLI Commandsshow serial

The following example shows how to display EIA-232 parameters and the serial port inactivitytimeout:
(Cisco Controller) > show serialSerial Port Login Timeout (minutes)......... 45Baud Rate................................... 9600Character Size.............................. 8Flow Control:............................... DisableStop Bits................................... 1Parity Type:................................ none
show sessionsTo display the console port login timeout and maximum number of simultaneous command-line interface(CLI) sessions, use the show sessions command.
show sessions
Syntax Description This command has no arguments or keywords.
Command Default 5 minutes, 5 sessions.
This example shows how to display the CLI session configuration setting:
> show sessionsCLI Login Timeout (minutes)............ 0Maximum Number of CLI Sessions......... 5
The response indicates that the CLI sessions never time out and that the Cisco wireless LAN controllercan host up to five simultaneous CLI sessions.
Related Commands config sessions maxsessions
config sessions timeout
show snmpcommunityTo display Simple NetworkManagement Protocol (SNMP) community entries, use the show snmpcommunitycommand.
show snmpcommunity
Syntax Description This command has no arguments or keywords.
Command Default None.
This example shows how to display SNMP community entries:
> show snmpcommunity
CLI Commands209
CLI Commandsshow sessions

SNMP Community Name Client IP Address Client IP Mask Access Mode Status------------------- ----------------- ----------------- ----------- --------public 0.0.0.0 0.0.0.0 Read Only Enable********** 0.0.0.0 0.0.0.0 Read/Write Enable
Related Commands config snmp community accessmode
config snmp community create
config snmp community delete
config snmp community ipaddr
config snmp community mode
config snmp syscontact
show snmpengineIDTo display the SNMP engine ID, use the show snmpengineID command.
show snmpengineID
Syntax Description This command has no arguments or keywords.
Command Default None.
This example shows how to display the SNMP engine ID:
> show snmpengineIDSNMP EngineId... ffffffffffff
Related Commands config snmp engineID
show snmptrapTo display Cisco wireless LAN controller Simple Network Management Protocol (SNMP) trap receivers andtheir status, use the show snmptrap command.
show snmptrap
Syntax Description This command has no arguments or keywords.
Command Default None.
This example shows how to display SNMP trap receivers and their status:
> show snmptrapSNMP Trap Receiver Name IP Address Status------------------------ ----------------- --------xxx.xxx.xxx.xxx xxx.xxx.xxx.xxx Enable
CLI Commands210
CLI Commandsshow snmpengineID

show snmpv3userTo display Simple NetworkManagement Protocol (SNMP) version 3 configuration, use the show snmpv3usercommand.
show snmpv3user
Syntax Description This command has no arguments or keywords.
Command Default None.
This example shows how to display SNMP version 3 configuration information:
> show snmpv3userSNMP v3 username AccessMode Authentication Encryption-------------------- ----------- -------------- ----------default Read/Write HMAC-SHA CFB-AES
Related Commands config snmp v3user create
config snmp v3user delete
show snmpversionTo display which versions of Simple NetworkManagement Protocol (SNMP) are enabled or disabled on yourcontroller, use the show snmpversion command.
show snmpversion
Syntax Description This command has no arguments or keywords.
Command Default Enable.
This example shows how to display the SNMP v1/v2/v3 status:
> show snmpversionSNMP v1 Mode.................................. DisableSNMP v2c Mode.................................. EnableSNMP v3 Mode.................................. Enable
Related Commands config snmp version
show spanningtree portTo display the Cisco wireless LAN controller spanning tree port configuration, use the show spanningtreeport command.
show spanningtree port port
CLI Commands211
CLI Commandsshow snmpv3user

Syntax Description Physical port number:
• 1 through 4 on Cisco 2100 Series Wireless LANController.
• 1 or 2 on Cisco 4402 Series Wireless LANController.
• 1 through 4 on Cisco 4404 Series Wireless LANController.
port
Command Default The default SPT configuration output values are 800C, Disabled, 802.1D, 128, 100, Auto.
Command History ModificationRelease
This commandwas introduced in a release earlier thanRelease 7.6.
7.6
Usage Guidelines When the a Cisco 4400 Series wireless LAN controller is configured for port redundancy, the Spanning TreeProtocol (STP) must be disabled for all ports on the Cisco 4400 Series Wireless LAN Controller. STP canremain enabled on the switch connected to the Cisco 4400 Series Wireless LAN Controller.
Some WLAN controllers do not support the spanning tree function.Note
The following example shows how to display spanning tree values on a per port basis:
(Cisco Controller) > show spanningtree port 3STP Port ID................................. 800CSTP Port State.............................. DisabledSTP Port Administrative Mode................ 802.1DSTP Port Priority........................... 128STP Port Path Cost.......................... 100STP Port Path Cost Mode..................... Auto
show spanningtree switchTo display the Cisco wireless LAN controller network (DS port) spanning tree configuration, use the showspanningtree switch command.
show spanningtree switch
Syntax Description This command has no arguments or keywords.
Command Default None
CLI Commands212
CLI Commandsshow spanningtree switch

Command History ModificationRelease
This commandwas introduced in a release earlier thanRelease 7.6.
7.6
Usage Guidelines Some WLAN controllers do not support the spanning tree function.
The following example shows how to display spanning tree values on a per switch basis:
(Cisco Controller) > show spanningtree switchSTP Specification...................... IEEE 802.1DSTP Base MAC Address................... 00:0B:85:02:0D:20Spanning Tree Algorithm................ DisableSTP Bridge Priority.................... 32768STP Bridge Max. Age (seconds).......... 20STP Bridge Hello Time (seconds)........ 2STP Bridge Forward Delay (seconds)..... 15
show stats portTo display physical port receive and transmit statistics, use the show stats port command.
show stats port {detailed port | summary port}
Syntax Description Displays detailed port statistics.detailed
Displays port summary statistics.summary
Physical port number:
• 1 through 4 on Cisco 2100 Series Wireless LANControllers.
• 1 or 2 on Cisco 4402 Series Wireless LANControllers.
• 1 through 4 on Cisco 4404 Series Wireless LANControllers.
• 1 on Cisco WLCM Series Wireless LANControllers.
port
Command Default None
Command History ModificationRelease
This commandwas introduced in a release earlier thanRelease 7.6.
7.6
The following example shows how to display the port summary information:
CLI Commands213
CLI Commandsshow stats port

(Cisco Controller) > show stats port summaryPackets Received Without Error................. 399958Packets Received With Error.................... 0Broadcast Packets Received..................... 8350Packets Transmitted Without Error.............. 106060Transmit Packets Errors........................ 0Collisions Frames.............................. 0Time Since Counters Last Cleared............... 2 day 11 hr 16 min 23 sec
The following example shows how to display the detailed port information:
(Cisco Controller) > show stats port detailed 1PACKETS RECEIVED (OCTETS)Total Bytes...................................... 26779988164 byte pkts :91828165-127 byte pkts :354016 128-255 byte pkts :1283092256-511 byte pkts :8406 512-1023 byte pkts :30061024-1518 byte pkts :1184 1519-1530 byte pkts :0> 1530 byte pkts :2PACKETS RECEIVED SUCCESSFULLYTotal............................................ 2567987Unicast Pkts :2547844 Multicast Pkts:0 Broadcast Pkts:20143PACKETS RECEIVED WITH MAC ERRORSTotal............................................ 0Jabbers :0 Undersize :0 Alignment :0FCS Errors:0 Overruns :0RECEIVED PACKETS NOT FORWARDEDTotal............................................ 0Local Traffic Frames:0 RX Pause Frames :0Unacceptable Frames :0 VLAN Membership :0VLAN Viable Discards:0 MulticastTree Viable:0ReserveAddr Discards:0CFI Discards :0 Upstream Threshold :0PACKETS TRANSMITTED (OCTETS)Total Bytes...................................... 35383164 byte pkts :0 65-127 byte pkts :0128-255 byte pkts :0 256-511 byte pkts :0512-1023 byte pkts :0 1024-1518 byte pkts :21519-1530 byte pkts :0 Max Info :1522PACKETS TRANSMITTED SUCCESSFULLYTotal............................................ 5875Unicast Pkts :5868 Multicast Pkts:0 Broadcast Pkts:7TRANSMIT ERRORSTotal Errors..................................... 0FCS Error :0 TX Oversized :0 Underrun Error:0TRANSMIT DISCARDSTotal Discards................................... 0Single Coll Frames :0 Multiple Coll Frames:0Excessive Coll Frame:0 Port Membership :0
CLI Commands214
CLI Commandsshow stats port
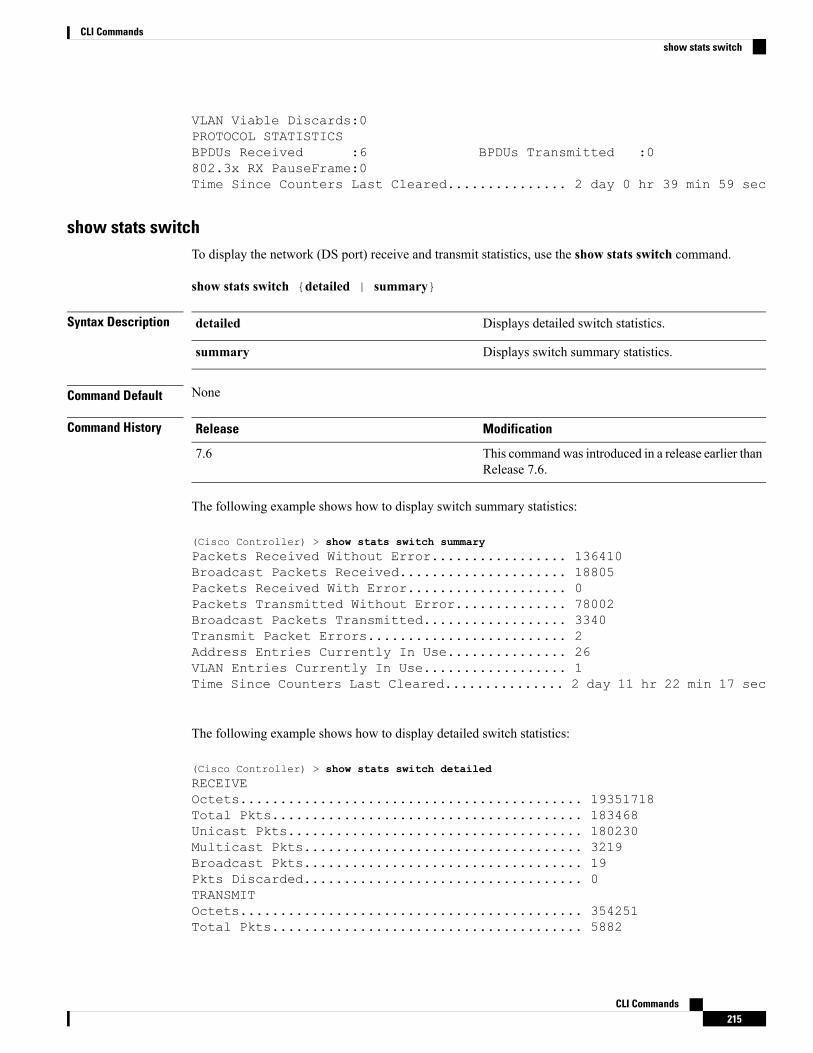
VLAN Viable Discards:0PROTOCOL STATISTICSBPDUs Received :6 BPDUs Transmitted :0802.3x RX PauseFrame:0Time Since Counters Last Cleared............... 2 day 0 hr 39 min 59 sec
show stats switchTo display the network (DS port) receive and transmit statistics, use the show stats switch command.
show stats switch {detailed | summary}
Syntax Description Displays detailed switch statistics.detailed
Displays switch summary statistics.summary
Command Default None
Command History ModificationRelease
This commandwas introduced in a release earlier thanRelease 7.6.
7.6
The following example shows how to display switch summary statistics:
(Cisco Controller) > show stats switch summaryPackets Received Without Error................. 136410Broadcast Packets Received..................... 18805Packets Received With Error.................... 0Packets Transmitted Without Error.............. 78002Broadcast Packets Transmitted.................. 3340Transmit Packet Errors......................... 2Address Entries Currently In Use............... 26VLAN Entries Currently In Use.................. 1Time Since Counters Last Cleared............... 2 day 11 hr 22 min 17 sec
The following example shows how to display detailed switch statistics:
(Cisco Controller) > show stats switch detailedRECEIVEOctets........................................... 19351718Total Pkts....................................... 183468Unicast Pkts..................................... 180230Multicast Pkts................................... 3219Broadcast Pkts................................... 19Pkts Discarded................................... 0TRANSMITOctets........................................... 354251Total Pkts....................................... 5882
CLI Commands215
CLI Commandsshow stats switch
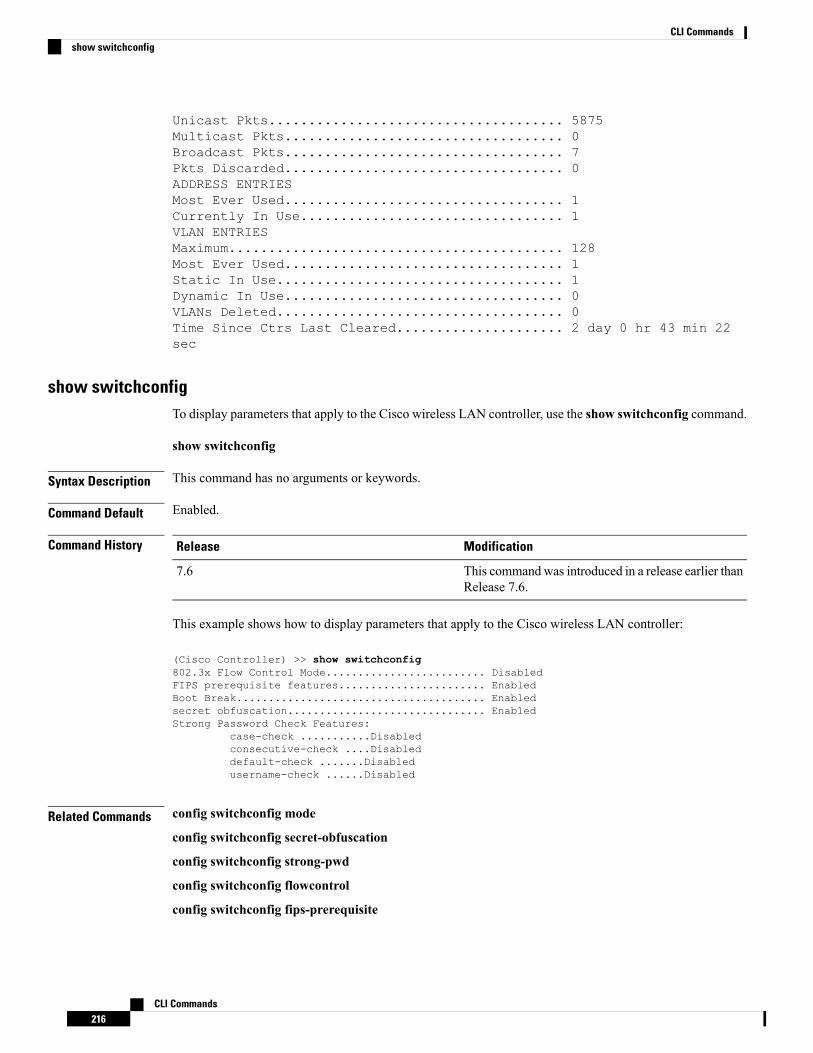
Unicast Pkts..................................... 5875Multicast Pkts................................... 0Broadcast Pkts................................... 7Pkts Discarded................................... 0ADDRESS ENTRIESMost Ever Used................................... 1Currently In Use................................. 1VLAN ENTRIESMaximum.......................................... 128Most Ever Used................................... 1Static In Use.................................... 1Dynamic In Use................................... 0VLANs Deleted.................................... 0Time Since Ctrs Last Cleared..................... 2 day 0 hr 43 min 22sec
show switchconfigTo display parameters that apply to the Cisco wireless LAN controller, use the show switchconfig command.
show switchconfig
Syntax Description This command has no arguments or keywords.
Command Default Enabled.
Command History ModificationRelease
This commandwas introduced in a release earlier thanRelease 7.6.
7.6
This example shows how to display parameters that apply to the Cisco wireless LAN controller:
(Cisco Controller) >> show switchconfig802.3x Flow Control Mode......................... DisabledFIPS prerequisite features....................... EnabledBoot Break....................................... Enabledsecret obfuscation............................... EnabledStrong Password Check Features:
case-check ...........Disabledconsecutive-check ....Disableddefault-check .......Disabledusername-check ......Disabled
Related Commands config switchconfig mode
config switchconfig secret-obfuscation
config switchconfig strong-pwd
config switchconfig flowcontrol
config switchconfig fips-prerequisite
CLI Commands216
CLI Commandsshow switchconfig
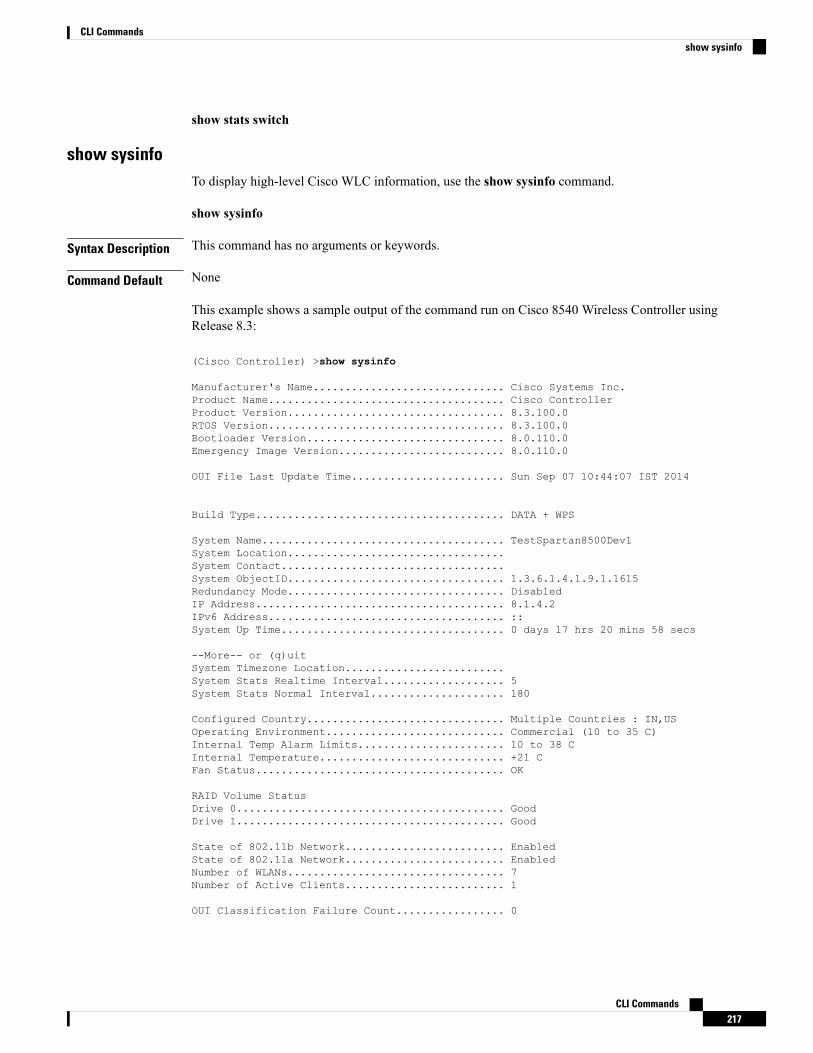
show stats switch
show sysinfoTo display high-level Cisco WLC information, use the show sysinfo command.
show sysinfo
Syntax Description This command has no arguments or keywords.
Command Default None
This example shows a sample output of the command run on Cisco 8540 Wireless Controller usingRelease 8.3:
(Cisco Controller) >show sysinfo
Manufacturer's Name.............................. Cisco Systems Inc.Product Name..................................... Cisco ControllerProduct Version.................................. 8.3.100.0RTOS Version..................................... 8.3.100.0Bootloader Version............................... 8.0.110.0Emergency Image Version.......................... 8.0.110.0
OUI File Last Update Time........................ Sun Sep 07 10:44:07 IST 2014
Build Type....................................... DATA + WPS
System Name...................................... TestSpartan8500Dev1System Location..................................System Contact...................................System ObjectID.................................. 1.3.6.1.4.1.9.1.1615Redundancy Mode.................................. DisabledIP Address....................................... 8.1.4.2IPv6 Address..................................... ::System Up Time................................... 0 days 17 hrs 20 mins 58 secs
--More-- or (q)uitSystem Timezone Location.........................System Stats Realtime Interval................... 5System Stats Normal Interval..................... 180
Configured Country............................... Multiple Countries : IN,USOperating Environment............................ Commercial (10 to 35 C)Internal Temp Alarm Limits....................... 10 to 38 CInternal Temperature............................. +21 CFan Status....................................... OK
RAID Volume StatusDrive 0.......................................... GoodDrive 1.......................................... Good
State of 802.11b Network......................... EnabledState of 802.11a Network......................... EnabledNumber of WLANs.................................. 7Number of Active Clients......................... 1
OUI Classification Failure Count................. 0
CLI Commands217
CLI Commandsshow sysinfo

Burned-in MAC Address............................ F4:CF:E2:0A:27:00Power Supply 1................................... Present, OK
--More-- or (q)uitPower Supply 2................................... Present, OKMaximum number of APs supported.................. 6000System Nas-Id....................................WLC MIC Certificate Types........................ SHA1/SHA2Licensing Type................................... RTU
show tech-supportTo display Cisco wireless LAN controller variables frequently requested by Cisco Technical Assistance Center(TAC), use the show tech-support command.
show tech-support
Syntax Description This command has no arguments or keywords.
Command Default None.
This example shows how to display system resource information:
> show tech-supportCurrent CPU Load................................. 0%System Buffers
Max Free Buffers.............................. 4608Free Buffers.................................. 4604Buffers In Use................................ 4
Web Server ResourcesDescriptors Allocated......................... 152Descriptors Used.............................. 3Segments Allocated............................ 152Segments Used................................. 3
System ResourcesUptime........................................ 747040 SecsTotal Ram..................................... 127552 KbytesFree Ram...................................... 19540 KbytesShared Ram.................................... 0 KbytesBuffer Ram.................................... 460 Kbytes
show timeTo display the Cisco wireless LAN controller time and date, use the show time command.
show time
Syntax Description This command has no arguments or keywords.
Command Default None.
This example shows how to display the controller time and date when authentication is not enabled:
> show time
CLI Commands218
CLI Commandsshow tech-support

Time............................................. Wed Apr 13 09:29:15 2011Timezone delta................................... 0:0Timezone location........................ (GMT +5:30) Colombo, New Delhi, Chennai, KolkataNTP Servers
NTP Polling Interval......................... 3600Index NTP Key Index NTP Server NTP Msg Auth Status------- ---------------------------------------------------------------
1 0 9.2.60.60 AUTH DISABLED
This example shows successful authentication of NTP Message results in the AUTH Success:
> show timeTime............................................. Thu Apr 7 13:56:37 2011Timezone delta................................... 0:0Timezone location........................ (GMT +5:30) Colombo, New Delhi, Chennai, KolkataNTP Servers
NTP Polling Interval......................... 3600Index NTP Key Index NTP Server NTP Msg Auth Status------- ---------------------------------------------------------------
1 1 9.2.60.60 AUTH SUCCESS
This example shows that if the packet received has errors, then the NTP Msg Auth status will showAUTH Failure:
> show timeTime............................................. Thu Apr 7 13:56:37 2011Timezone delta................................... 0:0Timezone location........................ (GMT +5:30) Colombo, New Delhi, Chennai, KolkataNTP Servers
NTP Polling Interval......................... 3600Index NTP Key Index NTP Server NTP Msg Auth Status------- ---------------------------------------------------------------
1 10 9.2.60.60 AUTH FAILURE
This example shows that if there is no response from NTP server for the packets, the NTPMsg Authstatus will be blank:
> show timeTime............................................. Thu Apr 7 13:56:37 2011Timezone delta................................... 0:0Timezone location................................ (GMT +5:30) Colombo, New Delhi, Chennai,KolkataNTP Servers
NTP Polling Interval......................... 3600Index NTP Key Index NTP Server NTP Msg Auth Status------- ---------------------------------------------------------------
1 11 9.2.60.60
Related Commands config time manual
config time ntp
config time timezone
config time timezone location
CLI Commands219
CLI Commandsshow time

show trapflagsTo display the Cisco wireless LAN controller Simple Network Management Protocol (SNMP) trap flags, usethe show trapflags command.
show trapflags
Syntax Description This command has no arguments or keywords.
Command Default None.
This example shows how to display controller SNMP trap flags:
> show trapflagsAuthentication Flag............................ EnableLink Up/Down Flag.............................. EnableMultiple Users Flag............................ EnableSpanning Tree Flag............................. EnableClient Related Traps
802.11 Disassociation......................... Disable802.11 Association.............................Disabled802.11 Deauthenticate......................... Disable802.11 Authenticate Failure................... Disable802.11 Association Failure.................... DisableAuthentication.................................DisabledExcluded...................................... Disable
802.11 Security related trapsWEP Decrypt Error............................. Enable
Cisco APRegister...................................... EnableInterfaceUp................................... Enable
Auto-RF ProfilesLoad.......................................... EnableNoise......................................... EnableInterference.................................. EnableCoverage...................................... Enable
Auto-RF Thresholdstx-power...................................... Enablechannel....................................... Enableantenna....................................... Enable
AAAauth.......................................... Enableservers....................................... Enable
rogueap........................................ Enableadjchannel-rogueap............................... Disabledwps............................................ Enableconfigsave..................................... EnableIP Security
esp-auth...................................... Enableesp-replay.................................... EnableinvalidSPI.................................... Enableike-neg....................................... Enablesuite-neg..................................... Enableinvalid-cookie................................ Enable
Meshauth failure.................................... Enabledchild excluded parent........................... Enabled
CLI Commands220
CLI Commandsshow trapflags
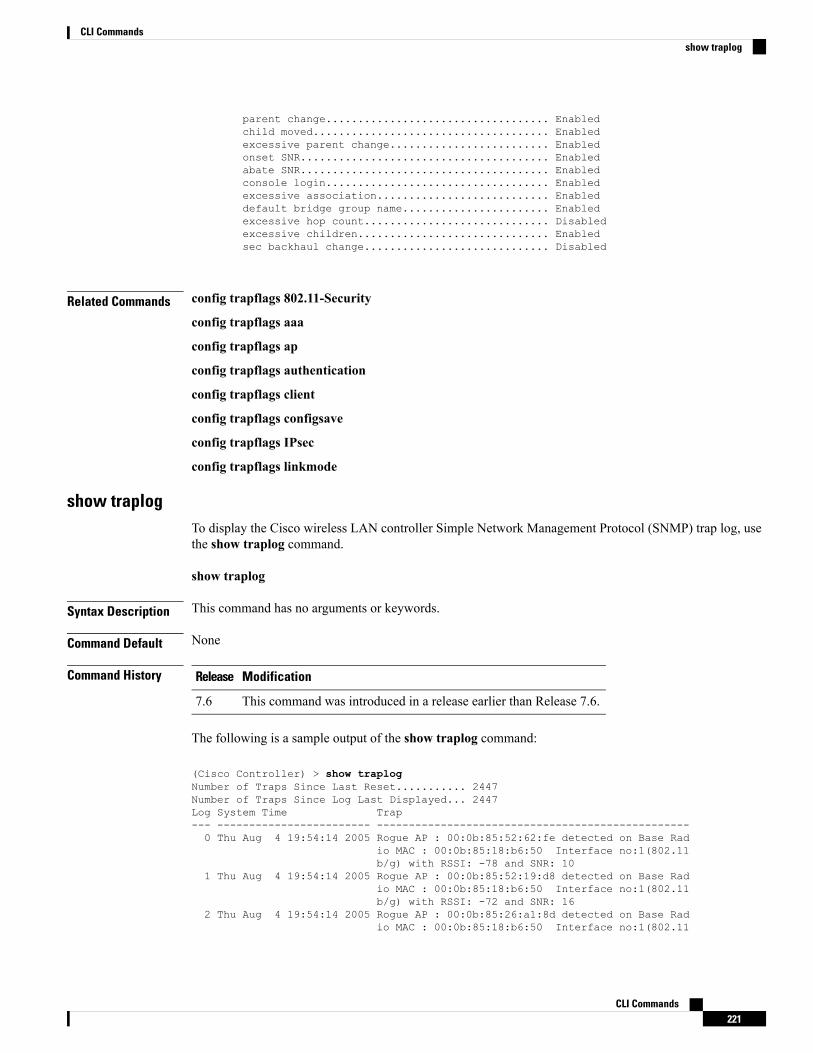
parent change................................... Enabledchild moved..................................... Enabledexcessive parent change......................... Enabledonset SNR....................................... Enabledabate SNR....................................... Enabledconsole login................................... Enabledexcessive association........................... Enableddefault bridge group name....................... Enabledexcessive hop count............................. Disabledexcessive children.............................. Enabledsec backhaul change............................. Disabled
Related Commands config trapflags 802.11-Security
config trapflags aaa
config trapflags ap
config trapflags authentication
config trapflags client
config trapflags configsave
config trapflags IPsec
config trapflags linkmode
show traplogTo display the Cisco wireless LAN controller Simple Network Management Protocol (SNMP) trap log, usethe show traplog command.
show traplog
Syntax Description This command has no arguments or keywords.
Command Default None
Command History ModificationRelease
This command was introduced in a release earlier than Release 7.6.7.6
The following is a sample output of the show traplog command:
(Cisco Controller) > show traplogNumber of Traps Since Last Reset........... 2447Number of Traps Since Log Last Displayed... 2447Log System Time Trap--- ------------------------ -------------------------------------------------0 Thu Aug 4 19:54:14 2005 Rogue AP : 00:0b:85:52:62:fe detected on Base Rad
io MAC : 00:0b:85:18:b6:50 Interface no:1(802.11b/g) with RSSI: -78 and SNR: 10
1 Thu Aug 4 19:54:14 2005 Rogue AP : 00:0b:85:52:19:d8 detected on Base Radio MAC : 00:0b:85:18:b6:50 Interface no:1(802.11b/g) with RSSI: -72 and SNR: 16
2 Thu Aug 4 19:54:14 2005 Rogue AP : 00:0b:85:26:a1:8d detected on Base Radio MAC : 00:0b:85:18:b6:50 Interface no:1(802.11
CLI Commands221
CLI Commandsshow traplog

b/g) with RSSI: -82 and SNR: 63 Thu Aug 4 19:54:14 2005 Rogue AP : 00:0b:85:14:b3:4f detected on Base Rad
io MAC : 00:0b:85:18:b6:50 Interface no:1(802.11b/g) with RSSI: -56 and SNR: 30
Would you like to display more entries? (y/n)
show versionTo display access point’s software information, use the show version command.
show version
Syntax Description This command has no arguments or keywords.
Command Default None
Command History ModificationRelease
This commandwas introduced in a release earlier thanRelease 7.6.
7.6
Usage Guidelines You can only use this command from the access point console port when not connected to a controller.
The following example shows how to display the access point version number:
AP# show version
show watchlistTo display the client watchlist, use the show watchlist command.
show watchlist
Syntax Description This command has no arguments or keywords.
Command Default None
Command History ModificationRelease
This commandwas introduced in a release earlier thanRelease 7.6.
7.6
The following example shows how to display the client watchlist information:
(Cisco Controller) >show watchlistclient watchlist state is disabled
CLI Commands222
CLI Commandsshow version

show wlanTo display configuration information for a specified wireless LAN or a foreign access point, or to displaywireless LAN summary information, use the show wlan command.
show wlan { apgroups | summary | wlan_id | foreignAp | lobby-admin-access}
Syntax Description Displays access point group information.apgroups
Displays a summary of all wireless LANs.summary
Displays the configuration of aWLAN. TheWirelessLAN identifier range is from 1 to 512.
wlan_id
Displays the configuration for support of foreignaccess points.
foreignAp
Command Default None
Usage Guidelines For 802.1X client security type, which creates the PMK cache, the maximum session timeout that can be setis 86400 seconds when the session timeout is disabled. For other client security such as open, WebAuth, andPSK for which the PMK cache is not created, the session timeout value is shown as infinite when sessiontimeout is disabled.
Command History ModificationRelease
This command was introduced in a release earlier than Release 7.6.7.6
The following example shows how to display a summary of wireless LANs for wlan_id 1:
(Cisco Controller) >show wlan 1WLAN Identifier.................................. 1Profile Name..................................... aichaNetwork Name (SSID).............................. aichaStatus........................................... EnabledMAC Filtering.................................... DisabledBroadcast SSID................................... EnabledAAA Policy Override.............................. DisabledNetwork Admission Control
RADIUS Profiling Status ...................... DisabledDHCP ......................................... DisabledHTTP ......................................... Disabled
Client Profiling Status ...................... DisabledDHCP ......................................... DisabledHTTP ......................................... DisabledRadius-NAC State.............................. EnabledSNMP-NAC State................................ Enabled
Quarantine VLAN................................ 0Maximum number of Associated Clients............. 0Maximum number of Clients per AP Radio........... 200Number of Active Clients......................... 0Exclusionlist Timeout............................ 60 secondsSession Timeout.................................. 1800 secondsUser Idle Timeout................................ 300 secondsUser Idle Threshold.............................. 0 BytesNAS-identifier................................... Talwar1
CLI Commands223
CLI Commandsshow wlan
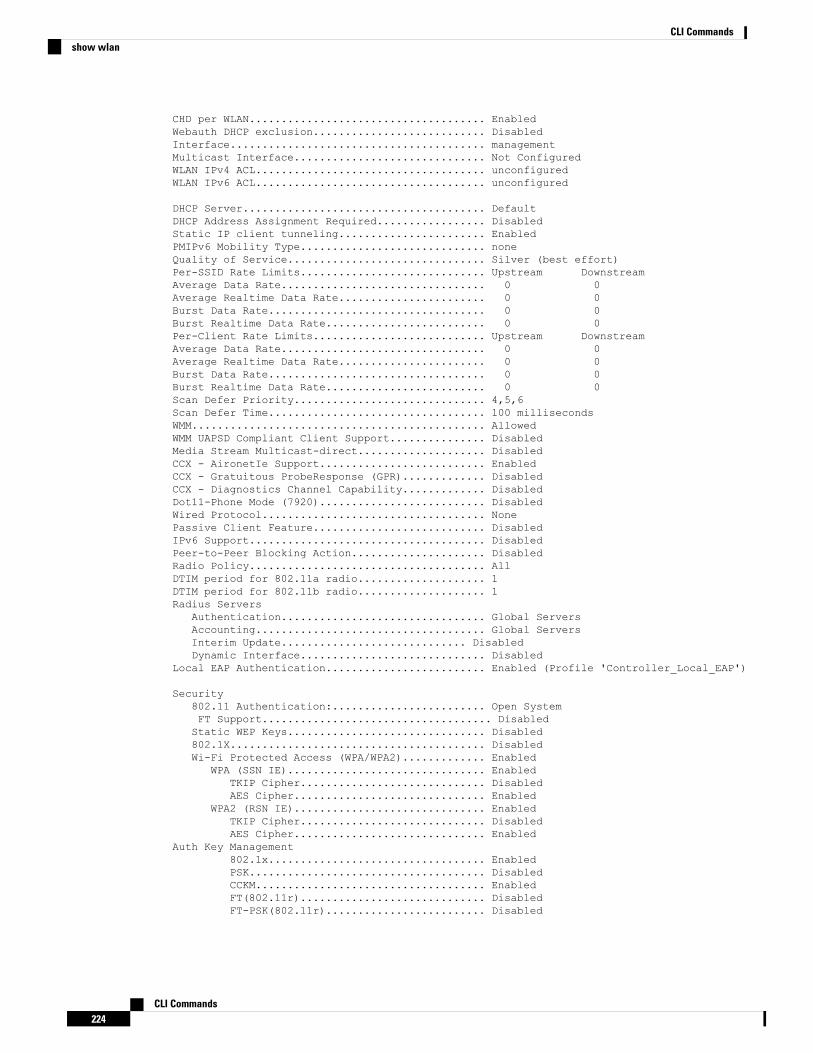
CHD per WLAN..................................... EnabledWebauth DHCP exclusion........................... DisabledInterface........................................ managementMulticast Interface.............................. Not ConfiguredWLAN IPv4 ACL.................................... unconfiguredWLAN IPv6 ACL.................................... unconfigured
DHCP Server...................................... DefaultDHCP Address Assignment Required................. DisabledStatic IP client tunneling....................... EnabledPMIPv6 Mobility Type............................. noneQuality of Service............................... Silver (best effort)Per-SSID Rate Limits............................. Upstream DownstreamAverage Data Rate................................ 0 0Average Realtime Data Rate....................... 0 0Burst Data Rate.................................. 0 0Burst Realtime Data Rate......................... 0 0Per-Client Rate Limits........................... Upstream DownstreamAverage Data Rate................................ 0 0Average Realtime Data Rate....................... 0 0Burst Data Rate.................................. 0 0Burst Realtime Data Rate......................... 0 0Scan Defer Priority.............................. 4,5,6Scan Defer Time.................................. 100 millisecondsWMM.............................................. AllowedWMM UAPSD Compliant Client Support............... DisabledMedia Stream Multicast-direct.................... DisabledCCX - AironetIe Support.......................... EnabledCCX - Gratuitous ProbeResponse (GPR)............. DisabledCCX - Diagnostics Channel Capability............. DisabledDot11-Phone Mode (7920).......................... DisabledWired Protocol................................... NonePassive Client Feature........................... DisabledIPv6 Support..................................... DisabledPeer-to-Peer Blocking Action..................... DisabledRadio Policy..................................... AllDTIM period for 802.11a radio.................... 1DTIM period for 802.11b radio.................... 1Radius Servers
Authentication................................ Global ServersAccounting.................................... Global ServersInterim Update............................. DisabledDynamic Interface............................. Disabled
Local EAP Authentication......................... Enabled (Profile 'Controller_Local_EAP')
Security802.11 Authentication:........................ Open SystemFT Support.................................... DisabledStatic WEP Keys............................... Disabled802.1X........................................ DisabledWi-Fi Protected Access (WPA/WPA2)............. Enabled
WPA (SSN IE)............................... EnabledTKIP Cipher............................. DisabledAES Cipher.............................. Enabled
WPA2 (RSN IE).............................. EnabledTKIP Cipher............................. DisabledAES Cipher.............................. Enabled
Auth Key Management802.1x.................................. EnabledPSK..................................... DisabledCCKM.................................... EnabledFT(802.11r)............................. DisabledFT-PSK(802.11r)......................... Disabled
CLI Commands224
CLI Commandsshow wlan

FT Reassociation Timeout......................... 20FT Over-The-Air mode............................. EnabledFT Over-The-Ds mode.............................. Enabled
GTK Randomization.......................... DisabledSKC Cache Support.......................... DisabledCCKM TSF Tolerance......................... 1000
Wi-Fi Direct policy configured................ DisabledEAP-Passthrough............................... Disabled
CKIP ......................................... DisabledIP Security................................... DisabledIP Security Passthru.......................... DisabledWeb Based Authentication...................... DisabledWeb-Passthrough............................... DisabledConditional Web Redirect...................... DisabledSplash-Page Web Redirect...................... DisabledAuto Anchor................................... DisabledFlexConnect Local Switching................... Enabledflexconnect Central Dhcp Flag................. Disabledflexconnect nat-pat Flag...................... Disabledflexconnect Dns Override Flag................. DisabledFlexConnect Vlan based Central Switching ..... DisabledFlexConnect Local Authentication.............. DisabledFlexConnect Learn IP Address.................. EnabledClient MFP.................................... Optional
Tkip MIC Countermeasure Hold-down Timer....... 60Call Snooping.................................... DisabledRoamed Call Re-Anchor Policy..................... DisabledSIP CAC Fail Send-486-Busy Policy................ EnabledSIP CAC Fail Send Dis-Association Policy......... DisabledKTS based CAC Policy............................. DisabledBand Select...................................... DisabledLoad Balancing................................... DisabledMobility Anchor ListWLAN ID IP Address Status------- --------------- ------802.11u........................................ EnabledNetwork Access type............................ Chargeable Public NetworkInternet service............................... EnabledNetwork Authentication type.................... Not ApplicableHESSID......................................... 00:00:00:00:00:00IP Address Type ConfigurationIPv4 Address type............................ AvailableIPv6 Address type............................ Not Known
Roaming Consortium ListIndex OUI List In Beacon----- -------------- ---------1 313131 Yes2 DDBBCC No3 DDDDDD Yes
Realm configuration summaryRealm index.................................. 1Realm name................................... jobinEAP index.................................. 1EAP method................................. Unsupported
Index Inner Authentication Authentication Method----- -------------------- ---------------------
1 Credential Type SIM2 Tunneled Eap Credential Type SIM3 Credential Type SIM4 Credential Type USIM5 Credential Type Hardware Token6 Credential Type SoftToken
CLI Commands225
CLI Commandsshow wlan

Domain name configuration summaryIndex Domain name-------------------
1 rom32 ram3 rom1
Hotspot 2.0.................................... Enabled
Operator name configuration summaryIndex Language Operator name----- -------- -------------
1 ros Robin
Port config summaryIndex IP protocol Port number Status
----- ----------- ----------- -------1 1 0 Closed2 1 0 Closed3 1 0 Closed4 1 0 Closed5 1 0 Closed6 1 0 Closed7 1 0 Closed
WAN Metrics InfoLink status.................................. UpSymmetric Link............................... NoDownlink speed............................... 4 kbpsUplink speed................................. 4 kbps
MSAP Services.................................. Disabled
The following example shows how to display a summary of all WLANs:
(Cisco Controller) >show wlan summaryNumber of WLANs.................................. 1
WLAN ID WLAN Profile Name / SSID Status Interface Name PMIPv6Mobility------- ------------------------------------- -------- -----------------------------------1 apsso / apsso Disabled management none
The following example shows how to display the configuration for support of foreign access points:
(Cisco Controller) >show wlan foreignapForeign AP support is not enabled.
The following example shows how to display the AP groups:
(Cisco Controller) >show wlan apgroupsTotal Number of AP Groups........................ 1Site Name........................................ APuserSite Description................................. <none>Venue Name....................................... Not configuredVenue Group Code..................................UnspecifiedVenue Type Code...................................UnspecifiedLanguage Code.................................... Not configuredAP Operating Class............................... 83,84,112,113,115,116,117,118,123
CLI Commands226
CLI Commandsshow wlan

RF Profile----------2.4 GHz band..................................... <none>5 GHz band....................................... <none>WLAN ID Interface Network Admission Control Radio Policy------- ----------- -------------------------- ------------14 int_4 Disabled AllAP Name Slots AP Model Ethernet MAC Location PortCountry Priority------------------ ----- ------------------- ----------------- ---------------- ----------- --------Ibiza 2 AIR-CAP2602I-A-K9 44:2b:03:9a:8a:73 default location 1US 1Larch 2 AIR-CAP3502E-A-K9 f8:66:f2:ab:23:95 default location 1US 1
Zest 2 AIR-CAP3502I-A-K9 00:22:90:91:6d:b6 ren 1US 1
Number of Clients................................ 1
Config 802.11-a Commands
config 802.11-aTo enable or disable the 4.9-GHz and 5.8-GHz public safety channels on an access point, use the config802.11-a command.
config {802.11-a49 | 802.11-a58} {enable | disable} cisco_ap
Syntax Description Specifies the 4.9-GHz public safety channel.802.11-a49
Specifies the 5.8-GHz public safety channel.802.11-a58
Enables the use of this frequency on the designatedaccess point.
enable
Disables the use of this frequency on the designatedaccess point.
disable
Name of the access point to which the commandapplies.
cisco_ap
Command Default The default 4.9-GHz and 5.8-GHz public safety channels on an access point is disabled.
Command History ModificationRelease
This commandwas introduced in a release earlier thanRelease 7.6.
7.6
CLI Commands227
CLI CommandsConfig 802.11-a Commands

The following example shows how to enable the 4.9-GHz public safety channel on ap_24 accesspoint:
(Cisco Controller) > config 802.11-a
config 802.11-a antenna extAntGainTo configure the external antenna gain for the 4.9-GHz and 5.8-GHz public safety channels on an accesspoint, use the config 802.11-a antenna extAntGain commands.
config {802.11-a49 | 802.11-a58} antenna extAntGain ant_gain cisco_ap {global | channel_no}
Syntax Description Specifies the 4.9-GHz public safety channel.802.11-a49
Specifies the 5.8-GHz public safety channel.802.11-a58
Value in .5-dBi units (for instance, 2.5 dBi = 5).ant_gain
Name of the access point to which the commandapplies.
cisco_ap
Specifies the antenna gain value to all channels.global
Antenna gain value for a specific channel.channel_no
Command Default Channel properties are disabled.
Command History ModificationRelease
This command was introduced in a release earlier than Release 7.6.7.6
Usage Guidelines Before you enter the config 802.11-a antenna extAntGain command, disable the 802.11 Cisco radio withthe config 802.11-a disable command.
After you configure the external antenna gain, use the config 802.11-a enable command to reenable the 802.11Cisco radio.
The following example shows how to configure an 802.11-a49 external antenna gain of 10 dBi forAP1:(Cisco Controller) >config 802.11-a antenna extAntGain 10 AP1
config 802.11-a channel apTo configure the channel properties for the 4.9-GHz and 5.8-GHz public safety channels on an access point,use the config 802.11-a channel ap command.
config {802.11-a49 | 802.11-a58} channel ap cisco_ap {global | channel_no}
Syntax Description Specifies the 4.9-GHz public safety channel.802.11-a49
CLI Commands228
CLI Commandsconfig 802.11-a antenna extAntGain
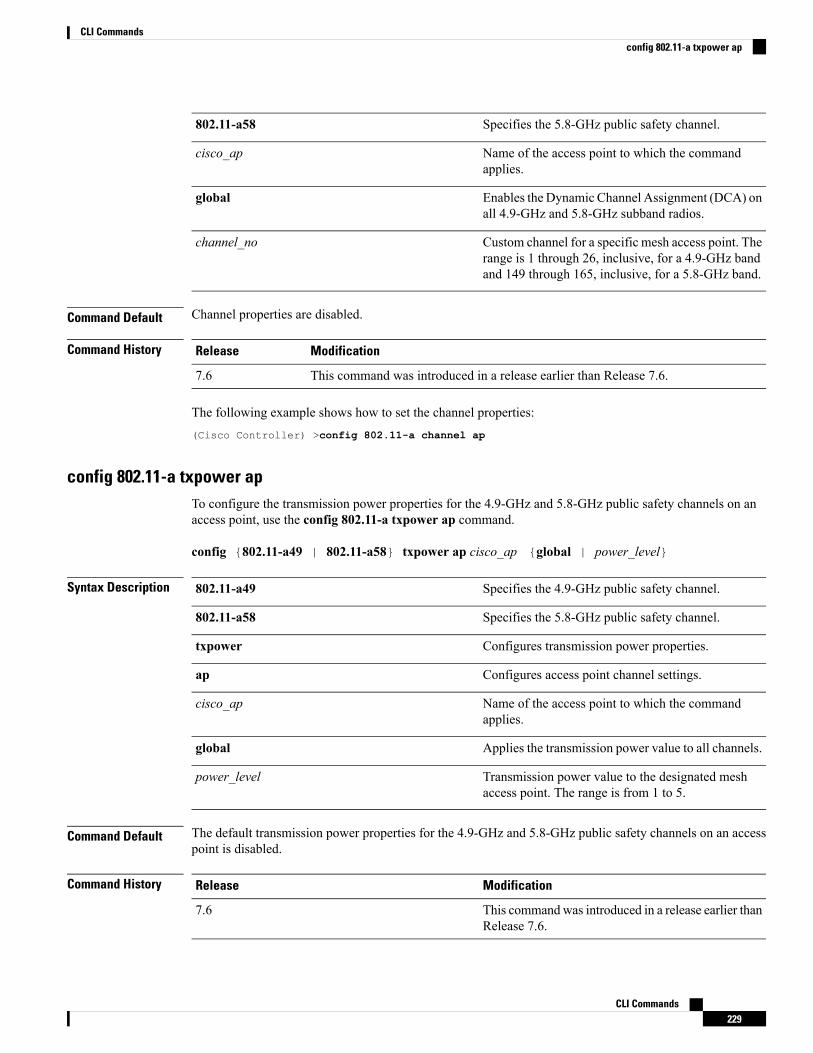
Specifies the 5.8-GHz public safety channel.802.11-a58
Name of the access point to which the commandapplies.
cisco_ap
Enables the Dynamic Channel Assignment (DCA) onall 4.9-GHz and 5.8-GHz subband radios.
global
Custom channel for a specific mesh access point. Therange is 1 through 26, inclusive, for a 4.9-GHz bandand 149 through 165, inclusive, for a 5.8-GHz band.
channel_no
Command Default Channel properties are disabled.
Command History ModificationRelease
This command was introduced in a release earlier than Release 7.6.7.6
The following example shows how to set the channel properties:(Cisco Controller) >config 802.11-a channel ap
config 802.11-a txpower apTo configure the transmission power properties for the 4.9-GHz and 5.8-GHz public safety channels on anaccess point, use the config 802.11-a txpower ap command.
config {802.11-a49 | 802.11-a58} txpower ap cisco_ap {global | power_level}
Syntax Description Specifies the 4.9-GHz public safety channel.802.11-a49
Specifies the 5.8-GHz public safety channel.802.11-a58
Configures transmission power properties.txpower
Configures access point channel settings.ap
Name of the access point to which the commandapplies.
cisco_ap
Applies the transmission power value to all channels.global
Transmission power value to the designated meshaccess point. The range is from 1 to 5.
power_level
Command Default The default transmission power properties for the 4.9-GHz and 5.8-GHz public safety channels on an accesspoint is disabled.
Command History ModificationRelease
This commandwas introduced in a release earlier thanRelease 7.6.
7.6
CLI Commands229
CLI Commandsconfig 802.11-a txpower ap

The following example shows how to configure an 802.11-a49 transmission power level of 4 forAP1:
(Cisco Controller) >config 802.11-a txpower ap 4 AP1
Configure 802.11b CommandsUse the config 802.11b commands to configure settings specifically for an 802.11b/g network.
config 802.11b 11gSupportTo enable or disable the Cisco wireless LAN solution 802.11g network, use the config 802.11b 11gSupportcommand.
config 802.11b 11gSupport {enable | disable}
Syntax Description Enables the 802.11g network.enable
Disables the 802.11g network.disable
Command Default The default network for Cisco wireless LAN solution 802.11g is enabled.
Command History ModificationRelease
This commandwas introduced in a release earlier thanRelease 7.6.
7.6
Usage Guidelines Before you enter the config 802.11b 11gSupport {enable | disable} command, disable the 802.11 Ciscoradio with the config 802.11 disable command.
After you configure the support for the 802.11g network, use the config 802.11 enable command to enablethe 802.11 radio.
To disable an 802.11a, 802.11b and/or 802.11g network for an individual wireless LAN, use the config wlanradio command.
Note
The following example shows how to enable the 802.11g network:
(Cisco Controller) > config 802.11b 11gSupport enableChanging the 11gSupport will cause all the APs to reboot when you enable802.11b network.Are you sure you want to continue? (y/n) n11gSupport not changed!
CLI Commands230
CLI CommandsConfigure 802.11b Commands
config 802.11b preambleTo change the 802.11b preamble as defined in subclause 18.2.2.2 to long (slower, but more reliable) or short(faster, but less reliable), use the config 802.11b preamble command.
config 802.11b preamble {long | short}
Syntax Description Specifies the long 802.11b preamble.long
Specifies the short 802.11b preamble.short
Command Default The default 802.11b preamble value is short.
Command History ModificationRelease
This commandwas introduced in a release earlier thanRelease 7.6.
7.6
Usage Guidelines
You must reboot the Cisco Wireless LAN Controller (reset system) with save to implement this command.Note
This parameter must be set to long to optimize this Cisco wireless LAN controller for some clients, includingSpectraLink NetLink telephones.
This command can be used any time that the CLI interface is active.
The following example shows how to change the 802.11b preamble to short:(Cisco Controller) >config 802.11b preamble short(Cisco Controller) >(reset system with save)
Configure 802.11h CommandsUse the config 802.11h commands to configure settings specifically for an 802.11h network.
config 802.11h channelswitchTo configure an 802.11h channel switch announcement, use the config 802.11h channelswitch command.
config 802.11h channelswitch {enable {loud | quiet} | disable}
Syntax Description Enables the 802.11h channel switch announcement.enable
Disables the 802.11h channel switch announcement.disable
Command Default None
CLI Commands231
CLI Commandsconfig 802.11b preamble

Command History ModificationRelease
• This commandwas introduced in a release earlier than Release7.6.
• The loud and quiet parameters were introduced.
7.6
The following example shows how to disable an 802.11h switch announcement:
(Cisco Controller) >config 802.11h channelswitch disable
config 802.11h powerconstraintTo configure the 802.11h power constraint value, use the config 802.11h powerconstraint command.
config 802.11h powerconstraint value
Syntax Description 802.11h power constraint value.value
Command Default None
Command History ModificationRelease
This command was introduced in a release earlier than Release 7.6.7.6
The following example shows how to configure the 802.11h power constraint to 5:
(Cisco Controller) >config 802.11h powerconstraint 5
config 802.11h setchannelTo configure a new channel using 802.11h channel announcement, use the config 802.11h setchannelcommand.
config 802.11h setchannel cisco_ap
Syntax Description Cisco lightweight access point name.cisco_ap
Command Default None
Command History ModificationRelease
This command was introduced in a release earlier than Release 7.6.7.6
The following example shows how to configure a new channel using the 802.11h channel:
(Cisco Controller) >config 802.11h setchannel ap02
CLI Commands232
CLI Commandsconfig 802.11h powerconstraint

Configure 802.11 11n Support CommandsUse the config 802.11 11nsupport commands to configure settings for an 802.11n network.
config 802.11 11nsupportTo enable 802.11n support on the network, use the config 802.11 11nsupport command.
config 802.11{a | b} 11nsupport {enable | disable}
Syntax Description Specifies the 802.11a network settings.a
Specifies the 802.11b/g network settings.b
Enables the 802.11n support.enable
Disables the 802.11n support.disable
Command Default None
Command History ModificationRelease
This command was introduced in a release earlier than Release 7.6.7.6
The following example shows how to enable the 802.11n support on an 802.11a network:
(Cisco Controller) >config 802.11a 11nsupport enable
config 802.11 11nsupport a-mpdu tx priorityTo specify the aggregation method used for 802.11n packets, use the config 802.11 11nsupport a-mpdu txpriority command.
config 802.11{a | b} 11nsupport a-mpdu tx priority {0-7 | all} {enable | disable}
Syntax Description Specifies the 802.11a network.a
Specifies the 802.11b/g network.b
Specifies the aggregated MAC protocol data unitpriority level between 0 through 7.
0-7
Configures all of the priority levels at once.all
Specifies the traffic associated with the priority leveluses A-MPDU transmission.
enable
Specifies the traffic associated with the priority leveluses A-MSDU transmission.
disable
CLI Commands233
CLI CommandsConfigure 802.11 11n Support Commands
Command Default Priority 0 is enabled.
Usage Guidelines Aggregation is the process of grouping packet data frames together rather than transmitting them separately.Two aggregation methods are available: Aggregated MAC Protocol Data Unit (A-MPDU) and AggregatedMAC Service Data Unit (A-MSDU). A-MPDU is performed in the software whereas A-MSDU is performedin the hardware.
Aggregated MAC Protocol Data Unit priority levels assigned per traffic type are as follows:
• 1—Background
• 2—Spare
• 0—Best effort
• 3—Excellent effort
• 4—Controlled load
• 5—Video, less than 100-ms latency and jitter
• 6—Voice, less than 10-ms latency and jitter
• 7—Network control
• all—Configure all of the priority levels at once.
Configure the priority levels to match the aggregation method used by the clients.Note
Command History ModificationRelease
This command was introduced in a release earlier than Release 7.6.7.6
The following example shows how to configure all the priority levels at once so that the trafficassociated with the priority level uses A-MSDU transmission:
(Cisco Controller) >config 802.11a 11nsupport a-mpdu tx priority all enable
config 802.11 11nsupport a-mpdu tx schedulerTo configure the 802.11n-5 GHz A-MPDU transmit aggregation scheduler, use the config 802.11 11nsupporta-mpdu tx scheduler command.
config 802.11{a | b} 11nsupport a-mpdu tx scheduler {enable | disable| timeout rt timeout-value}
Syntax Description Enables the 802.11n-5 GHz A-MPDU transmitaggregation scheduler.
enable
Disables the 802.11n-5 GHz A-MPDU transmitaggregation scheduler.
disable
CLI Commands234
CLI Commandsconfig 802.11 11nsupport a-mpdu tx scheduler

Configures the A-MPDU transmit aggregationscheduler realtime traffic timeout.
timeout rt
Timeout value in milliseconds. The valid range isbetween 1 millisecond to 1000 milliseconds.
timeout-value
Command Default None
Usage Guidelines Ensure that the 802.11 network is disabled before you enter this command.
Command History ModificationRelease
This command was introduced in a release earlier than Release 7.6.7.6
The following example shows how to configure the A-MPDU transmit aggregation scheduler realtimetraffic timeout of 100 milliseconds:
(Cisco Controller) >config 802.11 11nsupport a-mpdu tx scheduler timeout rt 100
config 802.11 11nsupport antennaTo configure an access point to use a specific antenna, use the config 802.11 11nsupport antenna command.
config 802.11{a | b} 11nsupport antenna cisco_ap {A | B | C | D} {enable | disable}
Syntax Description Specifies the 802.11a/n network.a
Specifies the 802.11b/g/n network.b
Access point.cisco_ap
Specifies an antenna port.A/B/C/D
Enables the configuration.enable
Disables the configuration.disable
Command Default None
Command History ModificationRelease
This command was introduced in a release earlier than Release 7.6.7.6
The following example shows how to configure transmission to a single antenna for legacy orthogonalfrequency-division multiplexing:
(Cisco Controller) >config 802.11 11nsupport antenna AP1 C enable
CLI Commands235
CLI Commandsconfig 802.11 11nsupport antenna

config 802.11 11nsupport guard-intervalTo configure the guard interval, use the config 802.11 11nsupport guard-interval command.
config 802.11 {a | b} 11nsupport guard-interval {any | long}
Syntax Description Enables either a short or a long guard interval.any
Enables only a long guard interval.long
Command Default None
Command History ModificationRelease
This command was introduced in a release earlier than Release 7.6.7.6
The following example shows how to configure a long guard interval:
(Cisco Controller) >config 802.11 11nsupport guard-interval long
config 802.11 11nsupport mcs txTo specify the modulation and coding scheme (MCS) rates at which data can be transmitted between theaccess point and the client, use the config 802.11 11nsupport mcs tx command.
config 802.11{a | b} 11nsupport mcs tx {0-15} {enable | disable}
Syntax Description Specifies the 802.11a network.a
Specifies the 802.11b/g network.b
Specifies support for 802.11n devices.11nsupport
CLI Commands236
CLI Commandsconfig 802.11 11nsupport guard-interval
Specifies themodulation and coding scheme data ratesas follows:
• 0 (7 Mbps)
• 1 (14 Mbps)
• 2 (21 Mbps)
• 3 (29 Mbps)
• 4 (43 Mbps)
• 5 (58 Mbps)
• 6 (65 Mbps)
• 7 (72 Mbps)
• 8 (14 Mbps)
• 9 (29 Mbps)
• 10 (43 Mbps)
• 11 (58 Mbps)
• 12 (87 Mbps)
• 13 (116 Mbps)
• 14 (130 Mbps)
• 15 (144 Mbps)
mcs tx
Enables this configuration.enable
Disables this configuration.disable
Command Default None
Command History ModificationRelease
This command was introduced in a release earlier than Release 7.6.7.6
The following example shows how to specify MCS rates:
(Cisco Controller) >config 802.11a 11nsupport mcs tx 5 enable
config 802.11 11nsupport rifsTo configure the Reduced Interframe Space (RIFS) between data frames and its acknowledgment, use theconfig 802.11 11nsupport rifs command.
config 802.11{a | b} 11nsupport rifs {enable | disable}
CLI Commands237
CLI Commandsconfig 802.11 11nsupport rifs
Syntax Description Enables RIFS for the 802.11 network.enable
Disables RIFS for the 802.11 network.disable
Command Default None
Command History ModificationRelease
This command was introduced in a release earlier than Release 7.6.7.6
This example shows how to enable RIFS:
(Cisco Controller) >config 802.11a 11nsupport rifs enable
Configure 802.11 Antenna CommandsUse the config 802.11 antenna commands to configure radio antenna settings for Cisco lightweight accesspoints on different 802.11 networks.
config 802.11 antenna diversityTo configure the diversity option for 802.11 antennas, use the config 802.11 antenna diversity command.
config 802.11{a | b} antenna diversity {enable | sideA | sideB} cisco_ap
Syntax Description Specifies the 802.11a network.a
Specifies the 802.11b/g network.b
Enables the diversity.enable
Specifies the diversity between the internal antennasand an external antenna connected to the Ciscolightweight access point left port.
sideA
Specifies the diversity between the internal antennasand an external antenna connected to the Ciscolightweight access point right port.
sideB
Cisco lightweight access point name.cisco_ap
Command Default None
Command History ModificationRelease
This command was introduced in a release earlier than Release 7.6.7.6
The following example shows how to enable antenna diversity for AP01 on an 802.11b network:
CLI Commands238
CLI CommandsConfigure 802.11 Antenna Commands
(Cisco Controller) >config 802.11a antenna diversity enable AP01
The following example shows how to enable diversity for AP01 on an 802.11a network, using anexternal antenna connected to the Cisco lightweight access point left port (sideA):(Cisco Controller) >config 802.11a antenna diversity sideA AP01
config 802.11 antenna extAntGainTo configure external antenna gain for an 802.11 network, use the config 802.11 antenna extAntGaincommand.
config 802.11{a | b} antenna extAntGain antenna_gain cisco_ap
Syntax Description Specifies the 802.11a network.a
Specifies the 802.11b/g network.b
Antenna gain in 0.5 dBm units (for example, 2.5 dBm= 5).
antenna_gain
Cisco lightweight access point name.cisco_ap
Command Default None
Command History ModificationRelease
This command was introduced in a release earlier than Release 7.6.7.6
Usage Guidelines Before you enter the config 802.11 antenna extAntGain command, disable the 802.11 Cisco radio with theconfig 802.11 disable command.
After you configure the external antenna gain, use the config 802.11 enable command to enable the 802.11Cisco radio.
The following example shows how to configure an 802.11a external antenna gain of 0.5 dBm forAP1:(Cisco Controller) >config 802.11 antenna extAntGain 1 AP1
config 802.11 antenna modeTo configure the Cisco lightweight access point to use one internal antenna for an 802.11 sectorized 180-degreecoverage pattern or both internal antennas for an 802.11 360-degree omnidirectional pattern, use the config802.11 antenna mode command.
config 802.11{a | b} antenna mode {omni | sectorA | sectorB} cisco_ap
Syntax Description Specifies the 802.11a network.a
Specifies the 802.11b/g network.b
CLI Commands239
CLI Commandsconfig 802.11 antenna extAntGain

Specifies to use both internal antennas.omni
Specifies to use only the side A internal antenna.sectorA
Specifies to use only the side B internal antenna.sectorB
Cisco lightweight access point name.cisco_ap
Command Default None
Command History ModificationRelease
This commandwas introduced in a release earlier thanRelease 7.6.
7.6
The following example shows how to configure access point AP01 antennas for a 360-degreeomnidirectional pattern on an 802.11b network:
(Cisco Controller) >config 802.11 antenna mode omni AP01
config 802.11 antenna selectionTo select the internal or external antenna selection for a Cisco lightweight access point on an 802.11 network,use the config 802.11 antenna selection command.
config 802.11{a | b} antenna selection {internal | external} cisco_ap
Syntax Description Specifies the 802.11a network.a
Specifies the 802.11b/g network.b
Specifies the internal antenna.internal
Specifies the external antenna.external
Cisco lightweight access point name.cisco_ap
Command Default None
Command History ModificationRelease
This commandwas introduced in a release earlier thanRelease 7.6.
7.6
The following example shows how to configure access point AP02 on an 802.11b network to usethe internal antenna:
(Cisco Controller) >config 802.11a antenna selection internal AP02
CLI Commands240
CLI Commandsconfig 802.11 antenna selection

Configure 802.11 CleanAir CommandsUse the config 802.11 cleanair commands to configure cleanair settings on different 802.11 networks.
config 802.11 cleanairTo enable or disable CleanAir for the 802.11 a or 802.11 b/g network, use the config 802.11 cleanair command.
config 802.11{a | b} cleanair {alarm {air-quality {disable | enable | threshold alarm_threshold} | device {disable device_type | enable device_type | reporting {disable | enable} |unclassified {disable | enable | threshold alarm_threshold }} | device {disable device_type |enable device_type | reporting {disable | enable} | disable {network | cisco_ap} | enable{network | cisco_ap}}
Syntax Description Specifies the 802.11a network.a
Specifies the 802.11b/g network.b
Configure 5-GHz cleanair alarms.alarm
Configures the 5-GHz air quality alarm.air-quality
Enables the CleanAir settings.enable
Disables the CleanAir settings.disable
Configure the 5-GHz air quality alarm threshold.threshold
Air quality alarm threshold (1 is bad air quality, and100 is good air quality).
alarm_threshold
Configures the 5-GHz cleanair interference devicesalarm.
device
CLI Commands241
CLI CommandsConfigure 802.11 CleanAir Commands

Device types. The device types are as follows:
• 802.11-nonstd—Devices using nonstandardWi-Fi channels.
• 802.11-inv—Devices using spectrally invertedWi-Fi signals.
• superag—802.11 SuperAG devices.
• all —All interference device types.
• cont-tx—Continuous Transmitter.
• dect-like—Digital Enhanced CordlessCommunication (DECT) like phone.
• tdd-tx—TDD Transmitter.
• jammer—Jammer.
• canopy—Canopy devices.
• video—Video cameras.
• wimax-mobile—WiMax Mobile.
• wimax-fixed—WiMax Fixed.
device_type
Configures the 5-GHz CleanAir interference devicesalarm reporting.
reporting
Configures the 5-GHz air quality alarm on exceedingunclassified category severity.
unclassified
5-GHz Cisco APs.network
Name of the access point to which the commandapplies.
cisco_ap
Command Default The default CleanAir settings for the 802.11 a or 802.11 b/g network is disabled.
Command History ModificationRelease
This commandwas introduced in a release earlier thanRelease 7.6.
7.6
The following example shows how to enable the CleanAir settings on access point ap_24:
(Cisco Controller) > config 802.11a cleanair enable ap_24
config 802.11 cleanair deviceTo configure CleanAir interference device types, use the config 802.11 cleanair device command.
CLI Commands242
CLI Commandsconfig 802.11 cleanair device

config 802.11{a | b} cleanair device {enable | disable | reporting {enable | disable}}device_type
Syntax Description Specifies the 802.11a network.a
Specifies the 802.11b/g network.b
Enables the CleanAir reporting for the interferencedevice type.
enable
Disables the CleanAir reporting for the interferencedevice type.
disable
Configures CleanAir interference device reporting.reporting
Enables the 5-GHz Cleanair interference devicesreporting.
enable
Disables the 5-GHz Cleanair interference devicesreporting.
disable
Interference device type. The device type are asfollows:
• 802.11-nonstd—Devices using nonstandardWiFichannels.
• 802.11-inv—Devices using spectrally invertedWiFi signals.
• superag—802.11 SuperAG devices.
• all —All interference device types.
• cont-tx—Continuous Transmitter.
• dect-like—Digital Enhanced CordlessCommunication (DECT) like phone.
• tdd-tx—TDD Transmitter.
• jammer—Jammer.
• canopy—Canopy devices.
• video—Video cameras.
• wimax-mobile—WiMax Mobile.
• wimax-fixed—WiMax Fixed.
device_type
Command Default The default setting CleanAir reporting for the interference device type is disabled.
CLI Commands243
CLI Commandsconfig 802.11 cleanair device

Command History ModificationRelease
This commandwas introduced in a release earlier thanRelease 7.6.
7.6
The following example shows how to enable the CleanAir reporting for the device type jammer:
(Cisco Controller) > config 802.11a cleanair device enable jammer
The following example shows how to disable the CleanAir reporting for the device type video:
(Cisco Controller) > config 802.11a cleanair device disable video
The following example shows how to enable the CleanAir interference device reporting:
(Cisco Controller) > config 802.11a cleanair device reporting enable
config 802.11 cleanair alarmTo configure the triggering of the air quality alarms, use the config 802.11 cleanair alarm command.
config 802.11{a | b} cleanair alarm {air-quality {disable | enable | threshold alarm_threshold }| device {disable device_type | enable device_type| reporting {disable | enable } | unclassified{disable | enable | threshold alarm_threshold }}
Syntax Description Specifies the 802.11a network.a
Specifies the 802.11b/g network.b
Configures the 5-GHz air quality alarm.air-quality
Disables the 5-GHz air quality alarm.disable
Enables the 5-GHz air quality alarm.enable
Configures the 5-GHz air quality alarm threshold.threshold
Air quality alarm threshold (1 is bad air quality, and100 is good air quality).
alarm_threshold
Configures the 5-GHz cleanair interference devicesalarm.
device
Configures all the device types at once.all
Configures the 5-GHz CleanAir interference devicesalarm reporting.
reporting
Configures the 5-GHz air quality alarm on exceedingunclassified category severity.
unclassified
CLI Commands244
CLI Commandsconfig 802.11 cleanair alarm

Device types. The device types are as follows:
• 802.11-nonstd—Devices using nonstandardWi-Fi channels.
• 802.11-inv—Devices using spectrally invertedWi-Fi signals.
• superag—802.11 SuperAG devices.
• all —All interference device types.
• cont-tx—Continuous Transmitter.
• dect-like—Digital Enhanced CordlessCommunication (DECT) like phone.
• tdd-tx—TDD Transmitter.
• jammer—Jammer.
• canopy—Canopy devices.
• video—Video cameras.
• wimax-mobile—WiMax Mobile.
• wimax-fixed—WiMax Fixed.
device_type
Command Default The default setting for 5-GHz air quality alarm is enabled.
Command History ModificationRelease
This commandwas introduced in a release earlier thanRelease 7.6.
7.6
The following example shows how to enable the CleanAir alarm to monitor the air quality:
(Cisco Controller) > config 802.11a cleanair alarm air-quality enable
The following example shows how to enable the CleanAir alarm for the device type video:
(Cisco Controller) > config 802.11a cleanair alarm device enable video
The following example shows how to enable alarm reporting for the CleanAir interference devices:
(Cisco Controller) > config 802.11a cleanair alarm device reporting enable
Configure 802.11 CAC CommandsUse the config 802.11 cac commands to configure Call Admission Control (CAC) protocol settings.
CLI Commands245
CLI CommandsConfigure 802.11 CAC Commands

config 802.11 cac defaultsTo configure the default Call Admission Control (CAC) parameters for the 802.11a and 802.11b/g network,use the config 802.11 cac defaults command.
config 802.11 {a | b} cac defaults
Syntax Description Specifies the 802.11a network.a
Specifies the 802.11b/g network.b
Usage Guidelines CAC commands for video applications on the 802.11a or 802.11b/g network require that the WLAN you areplanning to modify is configured for the Wi-Fi Multimedia (WMM) protocol and the quality of service (QoS)level be set to Gold.
Before you can configure CAC parameters on a network, you must complete the following prerequisites:
• Disable all WLANs with WMM enabled by entering the config wlan disable wlan_id command.
• Disable the radio network you want to configure by entering the config 802.11{a | b} disable networkcommand.
• Save the new configuration by entering the save config command.
• Enable voice or video CAC for the network you want to configure by entering the config 802.11{a |b} cac voice acm enable or config 802.11{a | b} cac video acm enable command.
For complete instructions, see the “Configuring Voice and Video Parameters” section in the “ConfiguringController Settings” chapter of the Cisco Wireless LAN Controller Configuration Guide for your release.
Command History ModificationRelease
This command was introduced in a release earlier than Release 7.6.7.6
This example shows how to configure the default CAC parameters for the 802.11a network:(Cisco Controller) > config 802.11 cac defaults
Related Commands show cac voice stats
show cac voice summary
show cac video stats
show cac video summary
config 802.11 cac video tspec-inactivity-timeout
config 802.11 cac video max-bandwidth
config 802.11 cac video acm
config 802.11 cac video sip
config 802.11 cac video roam-bandwidth
config 802.11 cac load-based
CLI Commands246
CLI Commandsconfig 802.11 cac defaults

config 802.11 cac media-stream
config 802.11 cac multimedia
config 802.11 cac video cac-method
debug cac
config 802.11 cac video acmTo enable or disable video Call Admission Control (CAC) for the 802.11a or 802.11b/g network, use theconfig 802.11 cac video acm command.
config 802.11{a | b} cac video acm {enable | disable}
Syntax Description Specifies the 802.11a network.a
Specifies the 802.11b/g network.b
Enables video CAC settings.enable
Disables video CAC settings.disable
Command Default The default video CAC settings for the 802.11a or 802.11b/g network is disabled.
Usage Guidelines CAC commands require that the WLAN you are planning to modify is configured for the Wi-Fi Multimedia(WMM) protocol and the quality of service (QoS) level be set to Platinum.
Before you can configure CAC parameters on a network, you must complete the following prerequisites:
• Disable all WLANs with WMM enabled by entering the config wlan disable wlan_id command.
• Disable the radio network you want to configure by entering the config 802.11{a | b} disable networkcommand.
• Save the new configuration by entering the save config command.
• Enable voice or video CAC for the network you want to configure by entering the config 802.11{a |b} cac voice acm enable, or config 802.11{a | b} cac video acm enable commands.
For complete instructions, see the “Configuring Voice and Video Parameters” section in the “ConfiguringController Settings” chapter of the Cisco Wireless LAN Controller Configuration Guide for your release.
Command History ModificationRelease
This command was introduced in a release earlier than Release 7.6.7.6
The following example shows how to enable the video CAC for the 802.11a network:
(Cisco Controller) > config 802.11 cac video acm enable
The following example shows how to disable the video CAC for the 802.11b network:
(Cisco Controller) > config 802.11 cac video acm disable
CLI Commands247
CLI Commandsconfig 802.11 cac video acm
Related Commands config 802.11 cac video max-bandwidth
config 802.11 cac video roam-bandwidth
config 802.11 cac video tspec-inactivity-timeout
config 802.11 cac video cac-methodTo configure the Call Admission Control (CAC) method for video applications on the 802.11a or 802.11b/gnetwork, use the config 802.11 cac video cac-method command.
config 802.11 {a | b} cac video cac-method {static | load-based}
Syntax Description Specifies the 802.11a network.a
Specifies the 802.11b/g network.b
Enables the static CAC method for video applications on the 802.11aor 802.11b/g network.
Static or bandwidth-based CAC enables the client to specify howmuchbandwidth or shared medium time is required to accept a new videorequest and in turn enables the access point to determine whether it iscapable of accommodating the request.
static
Enables the load-based CAC method for video applications on the802.11a or 802.11b/g network.
Load-based or dynamic CAC incorporates a measurement scheme thattakes into account the bandwidth consumed by all traffic types fromitself, from co-channel access points, and by collocated channelinterference. Load-based CAC also covers the additional bandwidthconsumption results from PHY and channel impairment. The accesspoint admits a new call only if the channel has enough unusedbandwidth to support that call.
Load-based CAC is not supported if SIP-CAC is enabled.
load-based
Command Default Static.
Usage Guidelines CAC commands for video applications on the 802.11a or 802.11b/g network require that the WLAN you areplanning to modify is configured for the Wi-Fi Multimedia (WMM) protocol and the quality of service (QoS)level be set to Gold.
Before you can configure CAC parameters on a network, you must complete the following prerequisites:
• Disable all WLANs with WMM enabled by entering the config wlan disable wlan_id command.
• Disable the radio network you want to configure by entering the config 802.11{a | b} disable networkcommand.
• Save the new configuration by entering the save config command.
• Enable voice or video CAC for the network you want to configure by entering the config 802.11{a |b} cac voice acm enable or config 802.11{a | b} cac video acm enable command.
CLI Commands248
CLI Commandsconfig 802.11 cac video cac-method

For complete instructions, see the “Configuring Voice and Video Parameters” section in the “ConfiguringController Settings” chapter of the Cisco Wireless LAN Controller Configuration Guide for your release.
Video CAC consists of two parts: Unicast Video-CAC andMC2UCCAC. If you need only Unicast Video-CAC,youmust configure only static mode. If you need onlyMC2UCCAC, youmust configure Static or Load-basedCAC. Load-based CAC is not supported if SIP-CAC is enabled.
Command History ModificationRelease
This command was introduced in a release earlier than Release 7.6.7.6
This example shows how to enable the static CAC method for video applications on the 802.11anetwork:(Cisco Controller) > config 802.11 cac video cac-method static
Related Commands show cac voice stats
show cac voice summary
show cac video stats
show cac video summary
config 802.11 cac video tspec-inactivity-timeout
config 802.11 cac video max-bandwidth
config 802.11 cac video acm
config 802.11 cac video sip
config 802.11 cac video roam-bandwidth
config 802.11 cac load-based
config 802.11 cac defaults
config 802.11 cac media-stream
config 802.11 cac multimedia
debug cac
config 802.11 cac video load-basedTo enable or disable load-based Call Admission Control (CAC) for video applications on the 802.11a or802.11b/g network, use the config 802.11 cac video load-based command.
config 802.11 {a | b} cac video load-based {enable | disable}
Syntax Description Specifies the 802.11a network.a
Specifies the 802.11b/g network.b
CLI Commands249
CLI Commandsconfig 802.11 cac video load-based

Enables load-based CAC for video applications on the 802.11a or802.11b/g network.
Load-based or dynamic CAC incorporates a measurement scheme thattakes into account the bandwidth consumed by all traffic types fromitself, from co-channel access points, and by collocated channelinterference. Load-based CAC also covers the additional bandwidthconsumption results from PHY and channel impairment. The accesspoint admits a new call only if the channel has enough unusedbandwidth to support that call.
enable
Disables load-based CACmethod for video applications on the 802.11aor 802.11b/g network.
disable
Command Default Disabled.
Usage Guidelines CAC commands for video applications on the 802.11a or 802.11b/g network require that the WLAN you areplanning to modify is configured for the Wi-Fi Multimedia (WMM) protocol and the quality of service (QoS)level be set to Gold.
Before you can configure CAC parameters on a network, you must complete the following prerequisites:
• Disable all WLANs with WMM enabled by entering the config wlan disable wlan_id command.
• Disable the radio network you want to configure by entering the config 802.11{a | b} disable networkcommand.
• Save the new configuration by entering the save config command.
• Enable voice or video CAC for the network you want to configure by entering the config 802.11{a |b} cac voice acm enable or config 802.11{a | b} cac video acm enable command.
For complete instructions, see the “Configuring Voice and Video Parameters” section in the “ConfiguringController Settings” chapter of the Cisco Wireless LAN Controller Configuration Guide for your release.
Video CAC consists of two parts: Unicast Video-CAC andMC2UCCAC. If you need only Unicast Video-CAC,youmust configure only static mode. If you need onlyMC2UCCAC, youmust configure Static or Load-basedCAC. Load-based CAC is not supported if SIP-CAC is enabled.
Load-based CAC is not supported if SIP-CAC is enabled.Note
Command History ModificationRelease
This command was introduced in a release earlier than Release 7.6.7.6
This example shows how to enable load-based CAC method for video applications on the 802.11anetwork:(Cisco Controller) > config 802.11 cac video load-based enable
Related Commands show cac voice stats
CLI Commands250
CLI Commandsconfig 802.11 cac video load-based

show cac voice summary
show cac video stats
show cac video summary
config 802.11 cac video tspec-inactivity-timeout
config 802.11 cac video max-bandwidth
config 802.11 cac video acm
config 802.11 cac video sip
config 802.11 cac video roam-bandwidth
config 802.11 cac load-based
config 802.11 cac defaults
config 802.11 cac media-stream
config 802.11 cac multimedia
config 802.11 cac video cac-method
debug cac
config 802.11 cac video max-bandwidthTo set the percentage of the maximum bandwidth allocated to clients for video applications on the 802.11aor 802.11b/g network, use the config 802.11 cac video max-bandwidth command.
config 802.11{a | b} cac video max-bandwidth bandwidth
Syntax Description Specifies the 802.11a network.a
Specifies the 802.11b/g network.b
Bandwidth percentage value from 5 to 85%.bandwidth
Command Default The default maximum bandwidth allocated to clients for video applications on the 802.11a or 802.11b/gnetwork is 0%.
Usage Guidelines The maximum radio frequency (RF) bandwidth cannot exceed 85% for voice and video. Once the clientreaches the value specified, the access point rejects new calls on this network.
If this parameter is set to zero (0), the controller assumes that you do not want to allocate any bandwidth andallows all bandwidth requests.
Note
Call Admission Control (CAC) commands require that the WLAN you are planning to modify is configuredfor the Wi-Fi Multimedia (WMM) protocol and the quality of service (QoS) level be set to Platinum.
Before you can configure CAC parameters on a network, you must complete the following prerequisites:
• Disable all WLANs with WMM enabled by entering the config wlan disable wlan_id command.
CLI Commands251
CLI Commandsconfig 802.11 cac video max-bandwidth

• Disable the radio network you want to configure by entering the config 802.11{a | b} disable networkcommand.
• Save the new configuration by entering the save config command.
• Enable voice or video CAC for the network you want to configure by entering the config 802.11{a |b} cac voice acm enable, or config 802.11{a | b} cac video acm enable commands.
For complete instructions, see the “Configuring Voice and Video Parameters” section in the “ConfiguringController Settings” chapter of the Cisco Wireless LAN Controller Configuration Guide for your release.
Command History ModificationRelease
This command was introduced in a release earlier than Release 7.6.7.6
The following example shows how to specify the percentage of the maximum allocated bandwidthfor video applications on the selected radio band:
(Cisco Controller) > config 802.11 cac video max-bandwidth 50
Related Commands config 802.11 cac video acm
config 802.11 cac video roam-bandwidth
config 802.11 cac voice stream-size
config 802.11 cac voice roam-bandwidth
config 802.11 cac media-streamTo configure media stream Call Admission Control (CAC) voice and video quality parameters for 802.11aand 802.11b networks, use the config 802.11 cac media-stream command.
config 802.11 {a | b} cac media-stream multicast-direct {max-retry-percent retry-percentage |min-client-rate dot11-rate}
Syntax Description Specifies the 802.11a network.a
Specifies the 802.11b/g network.b
Configures CAC parameters for multicast-direct media streams.multicast-direct
Configures the percentage of maximum retries that are allowedfor multicast-direct media streams.
max-retry-percent
Percentage of maximum retries that are allowed formulticast-direct media streams.
retry-percentage
Configures the minimum transmission data rate to the clientfor multicast-direct media streams.
min-client-rate
CLI Commands252
CLI Commandsconfig 802.11 cac media-stream

Minimum transmission data rate to the client for multicast-directmedia streams. Rate in kbps at which the client can operate.
If the transmission data rate is below this rate, either the videowill not start or the client may be classified as a bad client. Thebad client video can be demoted for better effort QoS or subjectto denial. The available data rates are 6000, 9000, 12000, 18000,24000, 36000, 48000, 54000, and 11n rates.
dot11-rate
Command Default The default value for the maximum retry percent is 80. If it exceeds 80, either the video will not start or theclient might be classified as a bad client. The bad client video will be demoted for better effort QoS or issubject to denial.
Usage Guidelines CAC commands for video applications on the 802.11a or 802.11b/g network require that the WLAN you areplanning to modify is configured for Wi-Fi Multimedia (WMM) protocol and the quality of service (QoS)level be set to Gold.
Before you can configure CAC parameters on a network, you must complete the following prerequisites:
• Disable all WLANs with WMM enabled by entering the config wlan disable wlan_id command.
• Disable the radio network you want to configure by entering the config 802.11{a | b} disable networkcommand.
• Save the new configuration by entering the save config command.
• Enable voice or video CAC for the network you want to configure by entering the config 802.11{a |b} cac voice acm enable or config 802.11{a | b} cac video acm enable command.
For complete instructions, see the “Configuring Voice and Video Parameters” section in the “ConfiguringController Settings” chapter of the Cisco Wireless LAN Controller Configuration Guide for your release.
Command History ModificationRelease
This command was introduced in a release earlier than Release 7.6.7.6
The following example shows how to configure the maximum retry percent for multicast-directmedia streams as 90 on a 802.11a network:(Cisco Controller) > config 802.11 cac media-stream multicast-direct max-retry-percent 90
Related Commands show cac voice stats
show cac voice summary
show cac video stats
show cac video summary
config 802.11 cac video tspec-inactivity-timeout
config 802.11 cac video max-bandwidth
config 802.11 cac video acm
config 802.11 cac video sip
CLI Commands253
CLI Commandsconfig 802.11 cac media-stream
config 802.11 cac video roam-bandwidth
config 802.11 cac load-based
config 802.11 cac defaults
config 802.11 cac multimedia
debug cac
config 802.11 cac multimediaTo configure the CAC media voice and video quality parameters for 802.11a and 802.11b networks, use theconfig 802.11 cac multimedia command.
config 802.11 {a | b} cac multimedia max-bandwidth bandwidth
Syntax Description Specifies the 802.11a network.a
Specifies the 802.11b/g network.b
Configures the percentage ofmaximumbandwidthallocated toWi-FiMultimedia (WMM) clients forvoice and video applications on the 802.11a or802.11b/g network.
max-bandwidth
Percentage of the maximum bandwidth allocatedto WMM clients for voice and video applicationson the 802.11a or 802.11b/g network. Once theclient reaches the specified value, the access pointrejects new calls on this radio band. The range isfrom 5 to 85%.
bandwidth
Command Default The default maximumbandwidth allocated toWi-FiMultimedia (WMM) clients for voice and video applicationson the 802.11a or 802.11b/g network is 85%.
Usage Guidelines Call Admission Control (CAC) commands for video applications on the 802.11a or 802.11b/g network requirethat the WLAN you are planning to modify is configured for Wi-Fi Multimedia (WMM) protocol and thequality of service (QoS) level be set to Gold.
Before you can configure CAC parameters on a network, you must complete the following prerequisites:
• Disable all WLANs with WMM enabled by entering the config wlan disable wlan_id command.
• Disable the radio network you want to configure by entering the config 802.11{a | b} disable networkcommand.
• Save the new configuration by entering the save config command.
• Enable voice or video CAC for the network you want to configure by entering the config 802.11{a |b} cac voice acm enable or config 802.11{a | b} cac video acm enable command.
For complete instructions, see the “Configuring Voice and Video Parameters” section in the “ConfiguringController Settings” chapter of the Cisco Wireless LAN Controller Configuration Guide for your release.
CLI Commands254
CLI Commandsconfig 802.11 cac multimedia
Command History ModificationRelease
This command was introduced in a release earlier than Release 7.6.7.6
The following example shows how to configure the percentage of the maximum bandwidth allocatedto WMM clients for voice and video applications on the 802.11a network:(Cisco Controller) > config 802.11 cac multimedia max-bandwidth 80
Related Commands show cac voice stats
show cac voice summary
show cac video stats
show cac video summary
config 802.11 cac video tspec-inactivity-timeout
config 802.11 cac video max-bandwidth
config 802.11 cac video acm
config 802.11 cac video sip
config 802.11 cac video roam-bandwidth
config 802.11 cac load-based
config 802.11 cac defaults
debug cac
config 802.11 cac video roam-bandwidthTo configure the percentage of the maximum allocated bandwidth reserved for roaming video clients on the802.11a or 802.11b/g network, use the config 802.11 cac video roam-bandwidth command.
config 802.11{a | b} cac video roam-bandwidth bandwidth
Syntax Description Specifies the 802.11a network.a
Specifies the 802.11b/g network.b
Bandwidth percentage value from 5 to 85%.bandwidth
Command Default The maximum allocated bandwidth reserved for roaming video clients on the 802.11a or 802.11b/g networkis 0%.
Command History ModificationRelease
This commandwas introduced in a release earlier thanRelease 7.6.
7.6
Usage Guidelines The controller reserves the specified bandwidth from the maximum allocated bandwidth for roaming videoclients.
CLI Commands255
CLI Commandsconfig 802.11 cac video roam-bandwidth

If this parameter is set to zero (0), the controller assumes that you do not want to do any bandwidth allocationand, therefore, allows all bandwidth requests.
Note
CAC commands require that the WLAN you are planning to modify is configured for the Wi-Fi Multimedia(WMM) protocol and the quality of service (QoS) level be set to Platinum.
Before you can configure CAC parameters on a network, you must complete the following prerequisites:
• Disable all WLANs with WMM enabled by entering the config wlan disable wlan_id command.
• Disable the radio network you want to configure by entering the config 802.11 {a | b} disable networkcommand.
• Save the new configuration by entering the save config command.
• Enable voice or video CAC for the network you want to configure by entering the config 802.11 {a |b} cac voice acm enable or config 802.11 {a | b} cac video acm enable command.
For complete instructions, see the “Configuring Voice and Video Parameters” section in the “ConfiguringController Settings” chapter of the Cisco Wireless LAN Controller Configuration Guide for your release.
The following example shows how to specify the percentage of the maximum allocated bandwidthreserved for roaming video clients on the selected radio band:
(Cisco Controller) > config 802.11 cac video roam-bandwidth 10
Related Commands config 802.11 cac video tspec-inactivity-timeout
config 802.11 cac video max-bandwidth
config 802.11 cac video acm
config 802.11 cac video cac-method
config 802.11 cac video sip
config 802.11 cac video load-based
config 802.11 cac video sipTo enable or disable video Call Admission Control (CAC) for nontraffic specifications (TSPEC) SIP clientsusing video applications on the 802.11a or 802.11b/g network, use the config 802.11 cac video sip command.
config 802.11 {a | b} cac video sip {enable | disable}
Syntax Description Specifies the 802.11a network.a
Specifies the 802.11b/g network.b
CLI Commands256
CLI Commandsconfig 802.11 cac video sip
Enables video CAC for non-TSPECSIP clients using video applicationson the 802.11a or 802.11b/g network.
When you enable video CAC for non-TSPEC SIP clients, you can useapplications like Facetime and CIUS video calls.
enable
Disables video CAC for non-TSPEC SIP clients using videoapplications on the 802.11a or 802.11b/g network.
disable
Command Default None
Usage Guidelines CAC commands for video applications on the 802.11a or 802.11b/g network require that the WLAN you areplanning to modify is configured for the Wi-Fi Multimedia (WMM) protocol and the quality of service (QoS)level be set to Gold.
Before you can configure CAC parameters on a network, you must complete the following prerequisites:
• Disable all WLANs with WMM enabled by entering the config wlan disable wlan_id command.
• Disable the radio network you want to configure by entering the config 802.11 {a | b} disable networkcommand.
• Save the new configuration by entering the save config command.
• Enable voice or video CAC for the network you want to configure by entering the config 802.11{a |b} cac voice acm enable or config 802.11{a | b} cac video acm enable command.
For complete instructions, see the “Configuring Voice and Video Parameters” section in the “ConfiguringController Settings” chapter of the Cisco Wireless LAN Controller Configuration Guide for your release.
• Enable call snooping on the WLAN on which the SIP client is present by entering the config wlancall-snoop enable wlan_id command.
The following example shows how to enable video CAC for non-TSPEC SIP clients using videoapplications on the 802.11a network:
(Cisco Controller) > config 802.11 cac video sip enable
Related Commands config 802.11 cac video tspec-inactivity-timeout
config 802.11 cac video max-bandwidth
config 802.11 cac video acm
config 802.11 cac video cac-method
config 802.11 cac video load-based
config 802.11 cac video roam-bandwidth
config 802.11 cac video tspec-inactivity-timeoutTo process or ignore the Call Admission Control (CAC) Wi-Fi Multimedia (WMM) traffic specifications(TSPEC) inactivity timeout received from an access point, use the config 802.11 cac videotspec-inactivity-timeout command.
CLI Commands257
CLI Commandsconfig 802.11 cac video tspec-inactivity-timeout
config 802.11{a | b} cac video tspec-inactivity-timeout {enable | ignore}
Syntax Description Specifies the 802.11a network.a
Specifies the 802.11b/g network.ab
Processes the TSPEC inactivity timeout messages.enable
Ignores the TSPEC inactivity timeout messages.ignore
Command Default The default CAC WMM TSPEC inactivity timeout received from an access point is disabled (ignore).
Usage Guidelines CAC commands require that the WLAN you are planning to modify is configured for the Wi-Fi Multimedia(WMM) protocol and the quality of service (QoS) level be set to Platinum.
Before you can configure CAC parameters on a network, you must complete the following prerequisites:
• Disable all WLANs with WMM enabled by entering the config wlan disable wlan_id command.
• Disable the radio network you want to configure by entering the config 802.11{a | b} disable networkcommand.
• Save the new configuration by entering the save config command.
• Enable voice or video CAC for the network you want to configure by entering the config 802.11{a |b} cac voice acm enable or config 802.11{a | b} cac video acm enable commands.
For complete instructions, see the “Configuring Voice and Video Parameters” section in the “ConfiguringController Settings” chapter of the Cisco Wireless LAN Controller Configuration Guide for your release.
This example shows how to process the response to TSPEC inactivity timeout messages receivedfrom an access point:
(Cisco Controller) > config 802.11a cac video tspec-inactivity-timeout enable
This example shows how to ignore the response to TSPEC inactivity timeout messages receivedfrom an access point:
(Cisco Controller) > config 802.11a cac video tspec-inactivity-timeout ignore
Related Commands config 802.11 cac video acm
config 802.11 cac video max-bandwidth
config 802.11 cac video roam-bandwidth
config 802.11 cac voice acmTo enable or disable bandwidth-based voice Call Admission Control (CAC) for the 802.11a or 802.11b/gnetwork, use the config 802.11 cac voice acm command.
config 802.11{a | b} cac voice acm {enable | disable}
CLI Commands258
CLI Commandsconfig 802.11 cac voice acm
Syntax Description Specifies the 802.11a network.a
Specifies the 802.11b/g network.b
Enables the bandwidth-based CAC.enable
Disables the bandwidth-based CAC.disable
Command Default The default bandwidth-based voice CAC for the 802.11a or 802.11b/g network id disabled.
Usage Guidelines CAC commands require that the WLAN you are planning to modify is configured for the Wi-Fi Multimedia(WMM) protocol and the quality of service (QoS) level be set to Platinum.
Before you can configure CAC parameters on a network, you must complete the following prerequisites:
• Disable all WLANs with WMM enabled by entering the config wlan disable wlan_id command.
• Disable the radio network you want to configure by entering the config 802.11{a | b} disable networkcommand.
• Save the new configuration by entering the save config command.
• Enable voice or video CAC for the network you want to configure by entering the config 802.11{a |b} cac voice acm enable or config 802.11{a | b} cac video acm enable commands.
For complete instructions, see the “Configuring Voice and Video Parameters” section in the “ConfiguringController Settings” chapter of the Cisco Wireless LAN Controller Configuration Guide for your release.
This example shows how to enable the bandwidth-based CAC:
(Cisco Controller) > config 802.11c cac voice acm enable
This example shows how to disable the bandwidth-based CAC:
(Cisco Controller) > config 802.11b cac voice acm disable
Related Commands config 802.11 cac video acm
config 802.11 cac voice max-bandwidthTo set the percentage of the maximum bandwidth allocated to clients for voice applications on the 802.11aor 802.11b/g network, use the config 802.11 cac voice max-bandwidth command.
config 802.11{a | b} cac voice max-bandwidth bandwidth
Syntax Description Specifies the 802.11a network.a
Specifies the 802.11b/g network.b
Bandwidth percentage value from 5 to 85%.bandwidth
CLI Commands259
CLI Commandsconfig 802.11 cac voice max-bandwidth

Command Default The default maximum bandwidth allocated to clients for voice applications on the 802.11a or 802.11b/gnetwork is 0%.
Usage Guidelines The maximum radio frequency (RF) bandwidth cannot exceed 85% for voice and video. Once the clientreaches the value specified, the access point rejects new calls on this network.
CAC commands require that the WLAN you are planning to modify is configured for the Wi-Fi Multimedia(WMM) protocol and the quality of service (QoS) level be set to Platinum.
Before you can configure CAC parameters on a network, you must complete the following prerequisites:
• Disable all WLANs with WMM enabled by entering the config wlan disable wlan_id command.
• Disable the radio network you want to configure by entering the config 802.11{a | b} disable networkcommand.
• Save the new configuration by entering the save config command.
• Enable voice or video CAC for the network you want to configure by entering the config 802.11{a |b} cac voice acm enable or config 802.11{a | b} cac video acm enable commands.
For complete instructions, see the “Configuring Voice and Video Parameters” section in the “ConfiguringController Settings” chapter of the Cisco Wireless LAN Controller Configuration Guide for your release.
Command History ModificationRelease
This command was introduced in a release earlier than Release 7.6.7.6
The following example shows how to specify the percentage of the maximum allocated bandwidthfor voice applications on the selected radio band:
(Cisco Controller) > config 802.11a cac voice max-bandwidth 50
Related Commands config 802.11 cac voice roam-bandwidth
config 802.11 cac voice stream-size
config 802.11 exp-bwreq
config 802.11 tsm
config wlan save
show wlan
show wlan summary
config 802.11 cac voice tspec-inactivity-timeout
config 802.11 cac voice load-based
config 802.11 cac video acm
CLI Commands260
CLI Commandsconfig 802.11 cac voice max-bandwidth

config 802.11 cac voice roam-bandwidthTo configure the percentage of the Call Admission Control (CAC) maximum allocated bandwidth reservedfor roaming voice clients on the 802.11a or 802.11b/g network, use the config 802.11 cac voiceroam-bandwidth command.
config 802.11{a | b} cac voice roam-bandwidth bandwidth
Syntax Description Specifies the 802.11a network.a
Specifies the 802.11b/g network.b
Bandwidth percentage value from 0 to 85%.bandwidth
Command Default The default CACmaximum allocated bandwidth reserved for roaming voice clients on the 802.11a or 802.11b/gnetwork is 85%.
Usage Guidelines Themaximum radio frequency (RF) bandwidth cannot exceed 85% for voice and video. The controller reservesthe specified bandwidth from the maximum allocated bandwidth for roaming voice clients.
If this parameter is set to zero (0), the controller assumes you do not want to allocate any bandwidth andtherefore allows all bandwidth requests.
Note
CAC commands require that the WLAN you are planning to modify is configured for the Wi-Fi Multimedia(WMM) protocol and the quality of service (QoS) level be set to Platinum.
Before you can configure CAC parameters on a network, you must complete the following prerequisites:
• Disable all WLANs with WMM enabled by entering the config wlan disable wlan_id command.
• Disable the radio network you want to configure by entering the config 802.11{a | b} disable networkcommand.
• Save the new configuration by entering the save config command.
• Enable voice or video CAC for the network you want to configure by entering the config 802.11{a |b} cac voice acm enable or config 802.11{a | b} cac video acm enable commands.
For complete instructions, see the “Configuring Voice and Video Parameters” section in the “ConfiguringController Settings” chapter of the Cisco Wireless LAN Controller Configuration Guide for your release.
Command History ModificationRelease
This command was introduced in a release earlier than Release 7.6.7.6
The following example shows how to configure the percentage of the maximum allocated bandwidthreserved for roaming voice clients on the selected radio band:
(Cisco Controller) > config 802.11 cac voice roam-bandwidth 10
CLI Commands261
CLI Commandsconfig 802.11 cac voice roam-bandwidth
Related Commands config 802.11 cac voice acm
config 802.11cac voice max-bandwidth
config 802.11 cac voice stream-size
config 802.11 cac voice tspec-inactivity-timeoutTo process or ignore theWi-FiMultimedia (WMM) traffic specifications (TSPEC) inactivity timeout receivedfrom an access point, use the config 802.11 cac voice tspec-inactivity-timeout command.
config 802.11{a | b} cac voice tspec-inactivity-timeout {enable | ignore}
Syntax Description Specifies the 802.11a network.a
Specifies the 802.11b/g network.b
Processes the TSPEC inactivity timeout messages.enable
Ignores the TSPEC inactivity timeout messages.ignore
Command Default The default WMM TSPEC inactivity timeout received from an access point is disabled (ignore).
Usage Guidelines Call Admission Control (CAC) commands require that the WLAN you are planning to modify is configuredfor Wi-Fi Multimedia (WMM) protocol and the quality of service (QoS) level be set to Platinum.
Before you can configure CAC parameters on a network, you must complete the following prerequisites:
• Disable all WLANs with WMM enabled by entering the config wlan disable wlan_id command.
• Disable the radio network you want to configure by entering the config 802.11{a | b} disable networkcommand.
• Save the new configuration by entering the save config command.
• Enable voice or video CAC for the network you want to configure by entering the config 802.11{a |b} cac voice acm enable or config 802.11{a | b} cac video acm enable commands.
For complete instructions, see the “Configuring Voice and Video Parameters” section in the “ConfiguringController Settings” chapter of the Cisco Wireless LAN Controller Configuration Guide for your release.
Command History ModificationRelease
This command was introduced in a release earlier than Release 7.6.7.6
The following example shows how to enable the voice TSPEC inactivity timeout messages receivedfrom an access point:
(Cisco Controller) > config 802.11 cac voice tspec-inactivity-timeout enable
Related Commands config 802.11 cac voice load-based
CLI Commands262
CLI Commandsconfig 802.11 cac voice tspec-inactivity-timeout

config 802.11 cac voice roam-bandwidth
config 802.11 cac voice acm
config 802.11cac voice max-bandwidth
config 802.11 cac voice stream-size
config 802.11 cac voice load-basedTo enable or disable load-based Call Admission Control (CAC) for the 802.11a or 802.11b/g network, usethe config 802.11 cac voice load-based command.
config 802.11{a | b} cac voice load-based {enable | disable}
Syntax Description Specifies the 802.11a network.a
Specifies the 802.11b/g network.b
Enables load-based CAC.enable
Disables load-based CAC.disable
Command Default The default load-based CAC for the 802.11a or 802.11b/g network is disabled.
Usage Guidelines CAC commands require that the WLAN you are planning to modify is configured for the Wi-Fi Multimedia(WMM) protocol and the quality of service (QoS) level be set to Platinum.
Before you can configure CAC parameters on a network, you must complete the following prerequisites:
• Disable all WLANs with WMM enabled by entering the config wlan disable wlan_id command.
• Disable the radio network you want to configure by entering the config 802.11{a | b} disable networkcommand.
• Save the new configuration by entering the save config command.
• Enable voice or video CAC for the network you want to configure by entering the config 802.11{a |b} cac voice acm enable or config 802.11{a | b} cac video acm enable commands.
For complete instructions, see the “Configuring Voice and Video Parameters” section in the “ConfiguringController Settings” chapter of the Cisco Wireless LAN Controller Configuration Guide for your release.
Command History ModificationRelease
This command was introduced in a release earlier than Release 7.6.7.6
The following example shows how to enable the voice load-based CAC parameters:
(Cisco Controller) > config 802.11a cac voice load-based enable
The following example shows how to disable the voice load-based CAC parameters:
(Cisco Controller) > config 802.11a cac voice load-based disable
CLI Commands263
CLI Commandsconfig 802.11 cac voice load-based
Related Commands config 802.11 cac voice tspec-inactivity-timeout
config 802.11 cac video max-bandwidth
config 802.11 cac video acm
config 802.11 cac voice stream-size
config 802.11 cac voice max-calls
Do not use the config 802.11 cac voice max-calls command if the SIP call snooping feature is disabled andif the SIP based Call Admission Control (CAC) requirements are not met.
Note
To configure the maximum number of voice call supported by the radio, use the config 802.11 cac voicemax-calls command.
config 802.11{a | b} cac voice max-calls number
Syntax Description Specifies the 802.11a network.a
Specifies the 802.11b/g network.b
Number of calls to be allowed per radio.number
Command Default The default maximum number of voice call supported by the radio is 0, whichmeans that there is nomaximumlimit check for the number of calls.
Usage Guidelines CAC commands require that the WLAN you are planning to modify is configured for the Wi-Fi Multimedia(WMM) protocol and the quality of service (QoS) level be set to Platinum.
Before you can configure CAC parameters on a network, you must complete the following prerequisites:
• Disable all WLANs with WMM enabled by entering the config wlan disable wlan_id command.
• Disable the radio network you want to configure by entering the config 802.11{a | b} disable networkcommand.
• Save the new configuration by entering the save config command.
• Enable voice or video CAC for the network you want to configure by entering the config 802.11{a |b} cac voice acm enable or config 802.11{a | b} cac video acm enable commands.
For complete instructions, see the “Configuring Voice and Video Parameters” section in the “ConfiguringController Settings” chapter of the Cisco Wireless LAN Controller Configuration Guide for your release.
Command History ModificationRelease
This command was introduced in a release earlier than Release 7.6.7.6
The following example shows how to configure the maximum number of voice calls supported byradio:
CLI Commands264
CLI Commandsconfig 802.11 cac voice max-calls

(Cisco Controller) > config 802.11 cac voice max-calls 10
Related Commands config 802.11 cac voice roam-bandwidth
config 802.11 cac voice stream-size
config 802.11 exp-bwreq
config 802.11 cac voice tspec-inactivity-timeout
config 802.11 cac voice load-based
config 802.11 cac video acm
config 802.11 cac voice sip bandwidth
SIP bandwidth and sample intervals are used to compute per call bandwidth for the SIP-based Call AdmissionControl (CAC).
Note
To configure the bandwidth that is required per call for the 802.11a or 802.11b/g network, use the config802.11 cac voice sip bandwidth command.
config 802.11{a | b} cac voice sip bandwidth bw_kbps sample-interval number_msecs
Syntax Description Specifies the 802.11a network.a
Specifies the 802.11b/g network.b
Bandwidth in kbps.bw_kbps
Specifies the packetization interval for SIP codec.sample-interval
Packetization sample interval in msecs. The sampleinterval for SIP codec is 20 seconds.
number_msecs
Command Default None
Usage Guidelines CAC commands require that the WLAN you are planning to modify is configured for the Wi-Fi Multimedia(WMM) protocol and the quality of service (QoS) level be set to Platinum.
Before you can configure CAC parameters on a network, you must complete the following prerequisites:
• Disable all WLANs with WMM enabled by entering the config wlan disable wlan_id command.
• Disable the radio network you want to configure by entering the config 802.11{a | b} disable networkcommand.
• Save the new configuration by entering the save config command.
• Enable voice or video CAC for the network you want to configure by entering the config 802.11{a |b} cac voice acm enable or config 802.11{a | b} cac video acm enable commands.
CLI Commands265
CLI Commandsconfig 802.11 cac voice sip bandwidth

For complete instructions, see the “Configuring Voice and Video Parameters” section in the “ConfiguringController Settings” chapter of the Cisco Wireless LAN Controller Configuration Guide for your release.
Command History ModificationRelease
This command was introduced in a release earlier than Release 7.6.7.6
The following example shows how to configure the bandwidth and voice packetization interval fora SIP codec:
(Cisco Controller) > config 802.11 cac voice sip bandwidth 10 sample-interval 40
Related Commands config 802.11 cac voice acm
config 802.11 cac voice load-based
config 802.11 cac voice max-bandwidth
config 802.11 cac voice roam-bandwidth
config 802.11 cac voice tspec-inactivity-timeout
config 802.11 exp-bwreq
config 802.11 cac voice sip codecTo configure the Call Admission Control (CAC) codec name and sample interval as parameters and to calculatethe required bandwidth per call for the 802.11a or 802.11b/g network, use the config 802.11 cac voice sipcodec command.
config 802.11{a | b} cac voice sip codec {g711 | g729} sample-interval number_msecs
Syntax Description Specifies the 802.11a network.a
Specifies the 802.11b/g network.b
Specifies CAC parameters for the SIP G711 codec.g711
Specifies CAC parameters for the SIP G729 codec.g729
Specifies the packetization interval for SIP codec.sample-interval
Packetization interval in msecs. The sample intervalfor SIP codec value is 20 seconds.
number_msecs
Command Default The default CAC codec parameter is g711.
Usage Guidelines CAC commands require that the WLAN you are planning to modify is configured for the Wi-Fi Multimedia(WMM) protocol and the quality of service (QoS) level be set to Platinum.
Before you can configure CAC parameters on a network, you must complete the following prerequisites:
• Disable all WLANs with WMM enabled by entering the config wlan disable wlan_id command.
CLI Commands266
CLI Commandsconfig 802.11 cac voice sip codec

• Disable the radio network you want to configure by entering the config 802.11{a | b} disable networkcommand.
• Save the new configuration by entering the save config command.
• Enable voice or video CAC for the network you want to configure by entering the config 802.11{a |b} cac voice acm enable or config 802.11{a | b} cac video acm enable commands.
For complete instructions, see the “Configuring Voice and Video Parameters” section in the “ConfiguringController Settings” chapter of the Cisco Wireless LAN Controller Configuration Guide for your release.
Command History ModificationRelease
This command was introduced in a release earlier than Release 7.6.7.6
The following example shows how to configure the codec name and sample interval as parametersfor SIP G711 codec:
(Cisco Controller) > config 802.11a cac voice sip codec g711 sample-interval 40
This example shows how to configure the codec name and sample interval as parameters for SIPG729 codec:
(Cisco Controller) > config 802.11a cac voice sip codec g729 sample-interval 40
Related Commands config 802.11 cac voice acm
config 802.11 cac voice load-based
config 802.11 cac voice max-bandwidth
config 802.11 cac voice roam-bandwidth
config 802.11 cac voice tspec-inactivity-timeout
config 802.11 exp-bwreq
config 802.11 cac voice stream-sizeTo configure the number of aggregated voiceWi-FiMultimedia (WMM) traffic specification (TSPEC) streamsat a specified data rate for the 802.11a or 802.11b/g network, use the config 802.11 cac voice stream-sizecommand.
config 802.11{a | b} cac voice stream-size stream_size numbermean_datarate max-streamsmean_datarate
Syntax Description Specifies the 802.11a network.a
Specifies the 802.11b/g network.b
Configures the maximum data rate for the stream.stream-size
Range of stream size is between 84000 and 92100.stream_size
CLI Commands267
CLI Commandsconfig 802.11 cac voice stream-size

Number (1 to 5) of voice streams.number
Configures the mean data rate.mean_datarate
Configures the mean data rate of a voice stream.max-streams
Mean data rate (84 to 91.2 kbps) of a voice stream.mean_datarate
Command Default The default number of streams is 2 and the mean data rate of a stream is 84 kbps.
Usage Guidelines Call Admission Control (CAC) commands require that the WLAN you are planning to modify is configuredfor the Wi-Fi Multimedia (WMM) protocol and the quality of service (QoS) level be set to Platinum.
Before you can configure CAC parameters on a network, you must complete the following prerequisites:
• Disable all WLANs with WMM enabled by entering the config wlan disable wlan_id command.
• Disable the radio network you want to configure by entering the config 802.11{a | b} disable networkcommand.
• Save the new configuration by entering the save config command.
• Enable voice or video CAC for the network you want to configure by entering the config 802.11{a |b} cac voice acm enable or config 802.11{a | b} cac video acm enable commands.
For complete instructions, see the “Configuring Voice and Video Parameters” section in the “ConfiguringController Settings” chapter of the Cisco Wireless LAN Controller Configuration Guide for your release.
Command History ModificationRelease
This command was introduced in a release earlier than Release 7.6.7.6
The following example shows how to configure the number of aggregated voice traffic specificationsstream with the stream size 5 and the mean data rate of 85000 kbps:
(Cisco Controller) > config 802.11 cac voice stream-size 5 max-streams size 85
Related Commands config 802.11 cac voice acm
config 802.11 cac voice load-based
config 802.11 cac voice max-bandwidth
config 802.11 cac voice roam-bandwidth
config 802.11 cac voice tspec-inactivity-timeout
config 802.11 exp-bwreq
Config 802.11 CommandsUse the config 802.11 commands to configure settings for an 802.11 network.
CLI Commands268
CLI CommandsConfig 802.11 Commands

config 802.11 beacon periodTo change the beacon period globally for an 802.11a, 802.11b, or other supported 802.11 network, use theconfig 802.11 beacon period command.
config 802.11{a | b} beacon period time_units
Disable the 802.11 network before using this command. See the “Usage Guidelines” section.Note
Syntax Description Specifies the 802.11a network.a
Specifies the 802.11b/g network.b
Beacon interval in time units (TU). One TU is 1024microseconds.
time_units
Command Default None
Usage Guidelines In Cisco wireless LAN solution 802.11 networks, all Cisco lightweight access point wireless LANs broadcasta beacon at regular intervals. This beacon notifies clients that the 802.11a service is available and allows theclients to synchronize with the lightweight access point.
Before you change the beacon period, make sure that you have disabled the 802.11 network by using theconfig 802.11 disable command. After changing the beacon period, enable the 802.11 network by using theconfig 802.11 enable command.
Command History ModificationRelease
This command was introduced in a release earlier than Release 7.6.7.6
This example shows how to configure an 802.11a network for a beacon period of 120 time units:
(Cisco Controller) > config 802.11 beacon period 120
Related Commands show 802.11a
config 802.11b beaconperiod
config 802.11a disable
config 802.11a enable
config 802.11 beamformingTo enable or disable Beamforming (ClientLink) on the network or on individual radios, enter the config 802.11beamforming command.
config 802.11{a | b} beamforming {global | ap ap_name} {enable | disable}
CLI Commands269
CLI Commandsconfig 802.11 beacon period

Syntax Description Specifies the 802.11a network.a
Specifies the 802.11b/g network.b
Specifies all lightweight access points.global
Specifies the Cisco access point name.ap ap_name
Enables beamforming.enable
Disables beamforming.disable
Command Default None
Command History ModificationRelease
This command was introduced in a release earlier than Release 7.6.7.6
Usage Guidelines When you enable Beamforming on the network, it is automatically enabled for all the radios applicable tothat network type.
Follow these guidelines for using Beamforming:
• Beamforming is supported only for legacy orthogonal frequency-division multiplexing (OFDM) datarates (6, 9, 12, 18, 24, 36, 48, and 54 mbps).
Beamforming is not supported for complementary-code keying (CCK) data rates(1, 2, 5.5, and 11 Mbps).
Note
• Beamforming is supported only on access points that support 802.11n (AP1250 and AP1140).
• Two or more antennas must be enabled for transmission.
• All three antennas must be enabled for reception.
• OFDM rates must be enabled.
If the antenna configuration restricts operation to a single transmit antenna, or if OFDM rates are disabled,Beamforming is not used.
The following example shows how to enable Beamforming on the 802.11a network:(Cisco Controller) >config 802.11 beamforming global enable
config 802.11 channelTo configure an 802.11 network or a single access point for automatic or manual channel selection, use theconfig 802.11 channel command.
config 802.11{a | b} channel {global [auto | once | off | restart]} | ap {ap_name [global| channel]}
CLI Commands270
CLI Commandsconfig 802.11 channel
Syntax Description Specifies the 802.11a network.a
Specifies the 802.11b/g network.b
Specifies the 802.11a operating channel that isautomatically set by RRM and overrides the existingconfiguration setting.
global
(Optional) Specifies that the channel is automaticallyset by Radio Resource Management (RRM) for the802.11a radio.
auto
(Optional) Specifies that the channel is automaticallyset once by RRM.
once
(Optional) Specifies that the automatic channelselection by RRM is disabled.
off
(Optional) Restarts the aggressive DCA cycle.restarts
Access point name.ap_name
Manual channel number to be used by the accesspoint. The supported channels depend on the specificaccess point used and the regulatory region.
channel
Command Default None
Command History ModificationRelease
This command was introduced in a release earlier than Release 7.6.7.6
Usage Guidelines When configuring 802.11 channels for a single lightweight access point, enter the config 802.11 disablecommand to disable the 802.11 network. Enter the config 802.11 channel command to set automatic channelselection by Radio Resource Management (RRM) or manually set the channel for the 802.11 radio, and enterthe config 802.11 enable command to enable the 802.11 network.
See the Channels and Maximum Power Settings for Cisco Aironet Lightweight Access Points document forthe channels supported by your access point. The power levels and available channels are defined by thecountry code setting and are regulated on a country-by-country basis.
Note
The following example shows how to have RRM automatically configure the 802.11a channels forautomatic channel configuration based on the availability and interference:(Cisco Controller) >config 802.11a channel global auto
The following example shows how to configure the 802.11b channels one time based on the availabilityand interference:(Cisco Controller) >config 802.11b channel global once
CLI Commands271
CLI Commandsconfig 802.11 channel
The following example shows how to turn 802.11a automatic channel configuration off:(Cisco Controller) >config 802.11a channel global off
The following example shows how to configure the 802.11b channels in access point AP01 forautomatic channel configuration:(Cisco Controller) >config 802.11b AP01 channel global
The following example shows how to configure the 802.11a channel 36 in access point AP01 as thedefault channel:(Cisco Controller) >config 802.11a channel AP01 36
config 802.11 channel apTo set the operating radio channel for an access point, use the config 802.11 channel ap command.
config 802.11{a | b} channel ap cisco_ap {global | channel_no}
Syntax Description Specifies the 802.11a network.a
Specifies the 802.11b/g network.b
Name of the Cisco access point.cisco_ap
Enables auto-RF on the designated access point.global
Default channel from 1 to 26, inclusive.channel_no
Command Default None
Command History ModificationRelease
This command was introduced in a release earlier than Release 7.6.7.6
The following example shows how to enable auto-RF for access point AP01 on an 802.11b network:(Cisco Controller) >config 802.11b channel ap AP01 global
config 802.11 chan_widthTo configure the channel width for a particular access point, use the config 802.11 chan_width command.
config 802.11{a | b} chan_width cisco_ap {20 | 40 | 160 | best}
Syntax Description Configures the 802.11a radioa
Specifies the 802.11b/g radio.b
Access point.cisco_ap
CLI Commands272
CLI Commandsconfig 802.11 channel ap
Allows the radio to communicate using only 20-MHzchannels.
Choose this option for legacy 802.11a radios, 20-MHz802.11n radios, or 40-MHz 802.11n radios that youwant to operate using only 20-MHz channels.
20
Allows 40-MHz 802.11n radios to communicate usingtwo adjacent 20-MHz channels bonded together.
40
Allows 160-MHz 802.11ac radios to communicate.160
In this mode, the device selects the optimumbandwidth channel.
best
Command Default The default channel width is 20.
Command History ModificationRelease
This commandwas introduced in a release earlier thanRelease 7.6.
7.6
This command was enhanced in this release with theinclusion of 160 MHz and best channel bandwidthmodes.
8.3
Usage Guidelines This parameter can be configured only if the primary channel is statically assigned.
We recommend that you do not configure 40-MHz channels in the 2.4-GHz radio band because severeco-channel interference can occur.
Caution
Statically configuring an access point’s radio for 20-MHz or 40-MHz mode overrides the globally configuredDCA channel width setting (configured by using the config advanced 802.11 channel dca chan-widthcommand). If you change the static configuration back to global on the access point radio, the global DCAconfiguration overrides the channel width configuration that the access point was previously using.
The following example shows how to configure the channel width for access point AP01 on an802.11 network using 40-MHz channels:
(Cisco Controller) >config 802.11a chan_width AP01 40
config 802.11 disableTo disable radio transmission for an entire 802.11 network or for an individual Cisco radio, use theconfig 802.11 disable command.
config 802.11{a | b} disable {network | cisco_ap}
Syntax Description Configures the 802.11a radio.a
CLI Commands273
CLI Commandsconfig 802.11 disable

Specifies the 802.11b/g network.b
Disables transmission for the entire 802.11a network.network
Individual Cisco lightweight access point radio.cisco_ap
Command Default The transmission is enabled for the entire network by default.
Command History ModificationRelease
This command was introduced in a release earlier than Release 7.6.7.6
Usage Guidelines • You must use this command to disable the network before using many config 802.11 commands.• This command can be used any time that the CLI interface is active.
The following example shows how to disable the entire 802.11a network:(Cisco Controller) >config 802.11a disable network
The following example shows how to disable access point AP01 802.11b transmissions:(Cisco Controller) >config 802.11b disable AP01
config 802.11 dtpcTo enable or disable the Dynamic Transmit Power Control (DTPC) setting for an 802.11 network, use theconfig 802.11 dtpc command.
config 802.11{a | b} dtpc {enable | disable}
Syntax Description Specifies the 802.11a network.a
Specifies the 802.11b/g network.b
Enables the support for this command.enable
Disables the support for this command.disable
Command Default The default DTPC setting for an 802.11 network is enabled.
Command History ModificationRelease
This command was introduced in a release earlier than Release 7.6.7.6
The following example shows how to disable DTPC for an 802.11a network:
(Cisco Controller) > config 802.11a dtpc disable
CLI Commands274
CLI Commandsconfig 802.11 dtpc

config 802.11 enableTo enable radio transmission for an entire 802.11 network or for an individual Cisco radio, use the config 802.11enable command.
config 802.11{a | b} enable {network | cisco_ap}
Syntax Description Configures the 802.11a radioa
Specifies the 802.11b/g network.b
Disables transmission for the entire 802.11a network.network
Individual Cisco lightweight access point radio.cisco_ap
Command Default The transmission is enabled for the entire network by default.
Usage Guidelines Use this command with the config 802.11 disable command when configuring 802.11 settings.
This command can be used any time that the CLI interface is active.
Command History ModificationRelease
This command was introduced in a release earlier than Release 7.6.7.6
The following example shows how to enable radio transmission for the entire 802.11a network:
(Cisco Controller) > config 802.11a enable network
The following example shows how to enable radio transmission for AP1 on an 802.11b network:
(Cisco Controller) > config 802.11b enable AP1
Related Commands show sysinfo show 802.11a
config wlan radio
config 802.11a disable
config 802.11b disable
config 802.11b enable
config 802.11b 11gSupport enable
config 802.11b 11gSupport disable
config 802.11 exp-bwreqTo enable or disable the Cisco Client eXtension (CCX) version 5 expedited bandwidth request feature for an802.11 radio, use the config 802.11 exp-bwreq command.
config 802.11{a | b} exp-bwreq {enable | disable}
CLI Commands275
CLI Commandsconfig 802.11 enable

Syntax Description Specifies the 802.11a network.a
Specifies the 802.11b/g network.b
Enables the expedited bandwidth request feature.enable
Disables the expedited bandwidth request feature.disable
Command Default The expedited bandwidth request feature is disabled by default.
Usage Guidelines When this command is enabled, the controller configures all joining access points for this feature.
Command History ModificationRelease
This command was introduced in a release earlier than Release 7.6.7.6
The following example shows how to enable the CCX expedited bandwidth settings:
(Cisco Controller) > config 802.11a exp-bwreq enableCannot change Exp Bw Req mode while 802.11a network is operational.
The following example shows how to disable the CCX expedited bandwidth settings:
(Cisco Controller) > config 802.11a exp-bwreq disable
Related Commands show 802.11a
show ap stats 802.11a
config 802.11 fragmentationTo configure the fragmentation threshold on an 802.11 network, use the config 802.11 fragmentationcommand.
config 802.11{a | b} fragmentation threshold
This command can only be used when the network is disabled using the config 802.11 disable command.Note
Syntax Description Specifies the 802.11a network.a
Specifies the 802.11b/g network.b
Number between 256 and 2346 bytes (inclusive).threshold
Command Default None.
CLI Commands276
CLI Commandsconfig 802.11 fragmentation
Command History ModificationRelease
This command was introduced in a release earlier than Release 7.6.7.6
This example shows how to configure the fragmentation threshold on an 802.11a network with thethreshold number of 6500 bytes:
(Cisco Controller) > config 802.11a fragmentation 6500
Related Commands config 802.11b fragmentation
show 802.11b
show ap auto-rtf
config 802.11 l2roam rf-paramsTo configure 802.11a or 802.11b/g Layer 2 client roaming parameters, use the config 802.11 l2roam rf-paramscommand.
config 802.11{a | b} l2roam rf-params{default | custommin_rssi roam_hyst scan_thresh trans_time}
Syntax Description Specifies the 802.11a network.a
Specifies the 802.11b/g network.b
Restores Layer 2 client roaming RF parameters todefault values.
default
Configures custom Layer 2 client roaming RFparameters.
custom
Minimum received signal strength indicator (RSSI)that is required for the client to associate to the accesspoint. If the client’s average received signal powerdips below this threshold, reliable communication isusually impossible. Clients must already have foundand roamed to another access point with a strongersignal before the minimum RSSI value is reached.The valid range is –80 to –90 dBm, and the defaultvalue is –85 dBm.
min_rssi
Howmuch greater the signal strength of a neighboringaccess point must be in order for the client to roam toit. This parameter is intended to reduce the amountof roaming between access points if the client isphysically located on or near the border between thetwo access points. The valid range is 2 to 4 dB, andthe default value is 2 dB.
roam_hyst
CLI Commands277
CLI Commandsconfig 802.11 l2roam rf-params
Minimum RSSI that is allowed before the clientshould roam to a better access point. When the RSSIdrops below the specified value, the client must beable to roam to a better access point within thespecified transition time. This parameter also providesa power-save method to minimize the time that theclient spends in active or passive scanning. Forexample, the client can scan slowly when the RSSI isabove the threshold and scan more rapidly when theRSSI is below the threshold. The valid range is –70to –77 dBm, and the default value is –72 dBm.
scan_thresh
Maximum time allowed for the client to detect asuitable neighboring access point to roam to and tocomplete the roam, whenever the RSSI from theclient’s associated access point is below the scanthreshold. The valid range is 1 to 10 seconds, and thedefault value is 5 seconds.
For high-speed client roaming applicationsin outdoor mesh environments, werecommend that you set the transition timeto 1 second.
Note
trans_time
Command Default The default minimum RSSI is -85 dBm. The default signal strength of a neighboring access point is 2 dB.The default scan threshold value is -72 dBm. The default time allowed for the client to detect a suitableneighboring access point to roam to and to complete the roam is 5 seconds.
Usage Guidelines For high-speed client roaming applications in outdoor mesh environments, we recommend that you set thetrans_time to 1 second.
Command History ModificationRelease
This command was introduced in a release earlier than Release 7.6.7.6
The following example shows how to configure custom Layer 2 client roaming parameters on an802.11a network:
(Cisco Controller) > config 802.11 l2roam rf-params custom –80 2 –70 7
Related Commands show advanced 802.11 l2roam
show l2tp
config 802.11 max-clientsTo configure the maximum number of clients per access point, use the config 802.11 max-clients command.
config 802.11{a | b}max-clients max-clients
CLI Commands278
CLI Commandsconfig 802.11 max-clients
Syntax Description Specifies the 802.11a network.a
Specifies the 802.11b/g network.b
Configures the maximum number of clientconnections per access point.
max-clients
Maximum number of client connections per accesspoint. The range is from 1 to 200.
max-clients
Command Default None
Command History ModificationRelease
This command was introduced in a release earlier than Release 7.6.7.6
The following example shows how to set the maximum number of clients at 22:
(Cisco Controller) > config 802.11 max-clients 22
Related Commands show ap config 802.11a
config 802.11b rate
config 802.11 multicast data-rateTo configure the minimum multicast data rate, use the config 802.11 multicast data-rate command.
config 802.11{a | b}multicast data-rate data_rate [ap ap_name | default]
Syntax Description Minimum multicast data rates. The options are 6, 9,12, 18, 24, 36, 48, 54. Enter 0 to specify that APs willdynamically adjust the number of the buffer allocatedfor multicast.
data_rate
Specific AP radio in this data rate.ap_name
Configures all APs radio in this data rate.default
Command Default The default is 0 where the configuration is disabled and the multicast rate is the lowest mandatory data rateand unicast client data rate.
Usage Guidelines When you configure the data rate without the AP name or default keyword, you globally reset all the APs tothe new value and update the controller global default with this new data rate value. If you configure the datarate with default keyword, you only update the controller global default value and do not reset the value ofthe APs that are already joined to the controller. The APs that join the controller after the new data rate valueis set receives the new data rate value.
CLI Commands279
CLI Commandsconfig 802.11 multicast data-rate

Command History ModificationRelease
This command was introduced in a release earlier than Release 7.6.7.6
The following example shows how to configure minimum multicast data rate settings:
(Cisco Controller) > config 802.11 multicast data-rate 12
config 802.11 rateTo set mandatory and supported operational data rates for an 802.11 network, use the config 802.11 ratecommand.
config 802.11{a | b} rate {disabled | mandatory | supported} rate
Syntax Description Specifies the 802.11a network.a
Specifies the 802.11b/g network.b
Disables a specific data rate.disabled
Specifies that a client supports the data rate in orderto use the network.
mandatory
Specifies to allow any associated client that supportsthe data rate to use the network.
supported
Rate value of 6, 9, 12, 18, 24, 36, 48, or 54 Mbps.rate
Command Default None
Usage Guidelines The data rates set with this command are negotiated between the client and the Cisco wireless LAN controller.If the data rate is set tomandatory, the client must support it in order to use the network. If a data rate is setas supported by the Cisco wireless LAN controller, any associated client that also supports that rate maycommunicate with the Cisco lightweight access point using that rate. It is not required that a client is able touse all the rates marked supported in order to associate.
Command History ModificationRelease
This command was introduced in a release earlier than Release 7.6.7.6
The following example shows how to set the 802.11b transmission at a mandatory rate at 12 Mbps:
(Cisco Controller) > config 802.11b rate mandatory 12
Related Commands show ap config 802.11a
config 802.11b rate
CLI Commands280
CLI Commandsconfig 802.11 rate

config 802.11 tsmTo enable or disable the video Traffic Stream Metric (TSM) option for the 802.11a or 802.11b/g network,use the config 802.11 tsm command.
config 802.11{a | b} tsm {enable | disable}
Syntax Description Specifies the 802.11a network.a
Specifies the 802.11b/g network.b
Enables the video TSM settings.enable
Disables the video TSM settings.disable
Command Default By default, the TSM for the 802.11a or 802.11b/g network is disabled.
Command History ModificationRelease
This command was introduced in a release earlier than Release 7.6.7.6
The following example shows how to enable the video TSM option for the 802.11b/g network:
(Cisco Controller) > config 802.11b tsm enable
The following example shows how to disable the video TSM option for the 802.11b/g network:
(Cisco Controller) > config 802.11b tsm disable
Related Commands show ap stats
show client tsm
config 802.11 txPowerTo configure the transmit power level for all access points or a single access point in an 802.11 network, usethe config 802.11 txPower command.
config 802.11{a | b} txPower {global {power_level | auto | max | min | once } | ap cisco_ap}
Syntax Description Specifies the 802.11a network.a
Specifies the 802.11b/g network.b
Configures the 802.11 transmit power level for alllightweight access points.
global
(Optional) Specifies the power level is automaticallyset by Radio Resource Management (RRM) for the802.11 Cisco radio.
auto
CLI Commands281
CLI Commandsconfig 802.11 tsm

(Optional) Specifies the power level is automaticallyset once by RRM.
once
(Optional) Manual Transmit power level number forthe access point.
power_level
Configures the 802.11 transmit power level for aspecified lightweight access point.
ap
Access point name.ap_name
Command Default The command default (global, auto) is for automatic configuration by RRM.
Command History ModificationRelease
This commandwas introduced in a release earlier thanRelease 7.6.
7.6
Usage Guidelines The supported power levels depends on the specific access point used and the regulatory region. For example,the 1240 series access point supports eight levels and the 1200 series access point supports six levels. See theChannels and Maximum Power Settings for Cisco Aironet Lightweight Access Points document for themaximum transmit power limits for your access point. The power levels and available channels are definedby the country code setting and are regulated on a country-by-country basis.
The following example shows how to automatically set the 802.11a radio transmit power level in alllightweight access points:
(Cisco Controller) > config 802.11a txPower auto
The following example shows how to manually set the 802.11b radio transmit power to level 5 forall lightweight access points:
(Cisco Controller) > config 802.11b txPower global 5
The following example shows how to automatically set the 802.11b radio transmit power for accesspoint AP1:
(Cisco Controller) > config 802.11b txPower AP1 global
The following example shows how to manually set the 802.11a radio transmit power to power level2 for access point AP1:
(Cisco Controller) > config 802.11b txPower AP1 2
Related Commands show ap config 802.11a
config 802.11b txPower
CLI Commands282
CLI Commandsconfig 802.11 txPower
Configure Advanced 802.11 CommandsUse the config advanced 802.11 commands to configure advanced settings and devices on 802.11a, 802.11b/g,or other supported 802.11 networks.
config advanced 802.11 7920VSIEConfigTo configure the Cisco unified wireless IP phone 7920 VISE parameters, use the config advanced 802.117920VSIEConfig command.
config advanced 802.11{a | b} 7920VSIEConfig {call-admission-limit limit | G711-CU-Quantumquantum}
Syntax Description Specifies the 802.11a network.a
Specifies the 802.11b/g network.b
Configures the call admission limit for the 7920s.call-admission-limit
Configures the value supplied by the infrastructureindicating the current number of channel utilizationunits that would be used by a single G.711-20ms call.
G711-CU-Quantum
Call admission limit (from 0 to 255). The default valueis 105.
limit
G711 quantum value. The default value is 15.quantum
Command Default None
Command History ModificationRelease
This command was introduced in a release earlier than Release 7.6.7.6
This example shows how to configure the call admission limit for 7920 VISE parameters:
(Cisco Controller) >config advanced 802.11 7920VSIEConfig call-admission-limit 4
Configure Advanced 802.11 Channel CommandsUse the config advanced 802.11 channel commands to configure Dynamic Channel Assignment (DCA)settings on supported 802.11 networks.
config advanced 802.11 channel addTo add channel to the 802.11 networks auto RF channel list, use the config advanced 802.11 channel addcommand.
config advanced 802.11{a | b} channel add channel_number
CLI Commands283
CLI CommandsConfigure Advanced 802.11 Commands

Syntax Description Specifies the 802.11a network.a
Specifies the 802.11b/g network.b
Adds a channel to the 802.11 network auto RF channellist.
add
Channel number to add to the 802.11 network autoRF channel list.
channel_number
Command Default None
Command History ModificationRelease
This command was introduced in a release earlier than Release 7.6.7.6
The following example shows how to add a channel to the 802.11a network auto RF channel list:(Cisco Controller) >config advanced 802.11 channel add 132
config advanced 802.11 channel cleanair-eventTo configure CleanAir event driven Radio Resource Management (RRM) parameters for all 802.11 Ciscolightweight access points, use the config advanced 802.11 channel cleanair-event command.
config advanced 802.11{a | b} channel cleanair-event {enable | disable | sensitivity [low |medium | high] | custom threshold threshold_value}
Syntax Description Specifies the 802.11a network.a
Specifies the 802.11b/g network.b
Enables the CleanAir event-driven RRM parameters.enable
Disables the CleanAir event-driven RRMparameters.disable
Sets the sensitivity for CleanAir event-driven RRM.sensitivity
(Optional) Specifies low sensitivity.low
(Optional) Specifies medium sensitivitymedium
(Optional) Specifies high sensitivityhigh
Specifies custom sensitivity.custom
Specifies the EDRRM AQ threshold value.threshold
Number of custom threshold.threshold_value
Command Default None
CLI Commands284
CLI Commandsconfig advanced 802.11 channel cleanair-event

Command History ModificationRelease
This commandwas introduced in a release earlier thanRelease 7.6.
7.6
The following example shows how to enable the CleanAir event-driven RRM parameters:(Cisco Controller) > config advanced 802.11 channel cleanair-event enable
The following example shows how to configure high sensitivity for CleanAir event-driven RRM:(Cisco Controller) > config advanced 802.11 channel cleanair-event sensitivity high
config advanced 802.11 channel dca anchor-timeTo specify the time of day when the Dynamic Channel Assignment (DCA) algorithm is to start, use the configadvanced 802.11 channel dca anchor-time command.
config advanced 802.11{a | b} channel dca anchor-time value
Syntax Description Specifies the 802.11a network.a
Specifies the 802.11b/g network.b
Hour of the time between 0 and 23. These valuesrepresent the hour from 12:00 a.m. to 11:00 p.m.
value
Command Default None
Command History ModificationRelease
This commandwas introduced in a release earlier thanRelease 7.6.
7.6
The following example shows how to configure the time of delay when the DCA algorithm starts:
(Cisco Controller) > config advanced 802.11 channel dca anchor-time 17
Related Commands config advanced 802.11 channel dca interval
config advanced 802.11 channel dca sensitivity
config advanced 802.11 channel
config advanced 802.11 channel dca chan-width-11nTo configure the Dynamic Channel Assignment (DCA) channel width for all 802.11n radios in the 5-GHzband, use the config advanced 802.11 channel dca chan-width-11n command.
config advanced 802.11{a | b} channel dca chan-width-11n {20 | 40}
CLI Commands285
CLI Commandsconfig advanced 802.11 channel dca anchor-time

Syntax Description Specifies the 802.11a network.a
Specifies the 802.11b/g network.b
Sets the channel width for 802.11n radios to 20MHz.20
Sets the channel width for 802.11n radios to 40MHz.40
Command Default The default channel width is 20.
Command History ModificationRelease
This commandwas introduced in a release earlier thanRelease 7.6.
7.6
Usage Guidelines If you choose 40, be sure to set at least two adjacent channels in the config advanced 802.11 channel {add| delete} channel_number command (for example, a primary channel of 36 and an extension channel of 40).If you set only one channel, that channel is not used for the 40-MHz channel width.
To override the globally configured DCA channel width setting, you can statically configure an access point’sradio for 20- or 40-MHz mode using the config 802.11 chan_width command. If you then change the staticconfiguration to global on the access point radio, the global DCA configuration overrides the channel widthconfiguration that the access point was previously using.
The following example shows how to add a channel to the 802.11a network auto channel list:
(Cisco Controller) >config advanced 802.11a channel dca chan-width-11n 40
config advanced 802.11 channel dca intervalTo specify how often the Dynamic Channel Assignment (DCA) is allowed to run, use the config advanced802.11 channel dca interval command.
config advanced 802.11{a | b} channel dca interval value
Syntax Description Specifies the 802.11a network.a
Specifies the 802.11b/g network.b
Valid values are 0, 1, 2, 3, 4, 6, 8, 12, or 24 hours. 0is 10 minutes (600 seconds).
value
Command Default The default DCA channel interval is 10 (10 minutes).
Command History ModificationRelease
This commandwas introduced in a release earlier thanRelease 7.6.
7.6
CLI Commands286
CLI Commandsconfig advanced 802.11 channel dca interval
Usage Guidelines If your controller supports only OfficeExtend access points, we recommend that you set the DCA interval to6 hours for optimal performance. For deployments with a combination of OfficeExtend access points andlocal access points, the range of 10 minutes to 24 hours can be used.
The following example shows how often the DCA algorithm is allowed to run:
(Cisco Controller) > config advanced 802.11 channel dca interval 8
Related Commands config advanced 802.11 dca anchor-time
config advanced 802.11 dca sensitivity
show advanced 802.11 channel
config advanced 802.11 channel dca min-metricTo configure the 5-GHz minimum RSSI energy metric for DCA, use the config advanced 802.11 channeldca min-metric command.
config advanced 802.11{a | b} channel dca RSSI_value
Syntax Description Specifies the 802.11a network.a
Specifies the 802.11b/g network.b
Minimum received signal strength indicator (RSSI)that is required for the DCA to trigger a channelchange. The range is from –100 to –60 dBm.
RSSI_value
Command Default The default minimum RSSI energy metric for DCA is –95 dBm.
Command History ModificationRelease
This commandwas introduced in a release earlier thanRelease 7.6.
7.6
The following example shows how to configure the minimum 5-GHz RSSI energy metric for DCA:(Cisco Controller) > config advanced 802.11a channel dca min-metric –80
In the above example, the RRM must detect an interference energy of at least -80 dBm in RSSI forthe DCA to trigger a channel change.
Related Commands config advanced 802.11 dca interval
config advanced 802.11 dca anchor-time
show advanced 802.11 channel
CLI Commands287
CLI Commandsconfig advanced 802.11 channel dca min-metric

config advanced 802.11 channel dca sensitivityTo specify how sensitive the Dynamic Channel Assignment (DCA) algorithm is to environmental changes(for example, signal, load, noise, and interference) when determining whether or not to change channels, usethe config advanced 802.11 channel dca sensitivity command.
config advanced 802.11{a | b} channel dcasensitivity {low | medium | high}
Syntax Description Specifies the 802.11a network.a
Specifies the 802.11b/g network.b
Specifies the DCA algorithm is not particularlysensitive to environmental changes. See the “UsageGuidelines” section for more information.
low
Specifies the DCA algorithm is moderately sensitiveto environmental changes. See the “UsageGuidelines”section for more information.
medium
Specifies the DCA algorithm is highly sensitive toenvironmental changes. See the “Usage Guidelines”section for more information.
high
Command Default None
Command History ModificationRelease
This commandwas introduced in a release earlier thanRelease 7.6.
7.6
Usage Guidelines The DCA sensitivity thresholds vary by radio band as shown in the table below.
To aid in troubleshooting, the output of this command shows an error code for any failed calls. This tableexplains the possible error codes for failed calls.
Table 4: DCA Sensitivity Thresholds
5-GHz DCA Sensitivity Threshold2.4-GHz DCA Sensitivity ThresholdSensitivity
5 dB5 dBHigh
20 dB15 dBMedium
35 dB30 dBLow
The following example shows how to configure the value of DCA algorithm’s sensitivity to low:
(Cisco Controller) > config advanced 802.11 channel dca sensitivity low
Related Commands config advanced 802.11 dca interval
CLI Commands288
CLI Commandsconfig advanced 802.11 channel dca sensitivity

config advanced 802.11 dca anchor-time
show advanced 802.11 channel
config advanced 802.11 channel foreignTo have Radio Resource Management (RRM) consider or ignore foreign 802.11a interference avoidance inmaking channel selection updates for all 802.11a Cisco lightweight access points, use the config advanced802.11 channel foreign command.
config advanced 802.11{a | b} channel foreign {enable | disable}
Syntax Description Specifies the 802.11a network.a
Specifies the 802.11b/g network.b
Enables the foreign access point 802.11a interferenceavoidance in the channel assignment.
enable
Disables the foreign access point 802.11a interferenceavoidance in the channel assignment.
disable
Command Default The default value for the foreign access point 802.11a interference avoidance in the channel assignment isenabled.
Command History ModificationRelease
This commandwas introduced in a release earlier thanRelease 7.6.
7.6
The following example shows how to have RRM consider foreign 802.11a interference whenmakingchannel selection updates for all 802.11a Cisco lightweight access points:
(Cisco Controller) > config advanced 802.11a channel foreign enable
Related Commands show advanced 802.11a channel
config advanced 802.11b channel foreign
config advanced 802.11 channel loadTo have Radio Resource Management (RRM) consider or ignore the traffic load in making channel selectionupdates for all 802.11a Cisco lightweight access points, use the config advanced 802.11 channel loadcommand.
config advanced 802.11{a | b} channel load {enable | disable}
Syntax Description Specifies the 802.11a network.a
Specifies the 802.11b/g network.b
CLI Commands289
CLI Commandsconfig advanced 802.11 channel foreign

Enables the Cisco lightweight access point 802.11aload avoidance in the channel assignment.
enable
Disables the Cisco lightweight access point 802.11aload avoidance in the channel assignment.
disable
Command Default The default value for Cisco lightweight access point 802.11a load avoidance in the channel assignment isdisabled.
Command History ModificationRelease
This commandwas introduced in a release earlier thanRelease 7.6.
7.6
The following example shows how to have RRM consider the traffic load when making channelselection updates for all 802.11a Cisco lightweight access points:
(Cisco Controller) > config advanced 802.11 channel load enable
Related Commands show advanced 802.11a channel
config advanced 802.11b channel load
config advanced 802.11 channel noiseTo have Radio Resource Management (RRM) consider or ignore non-802.11a noise in making channelselection updates for all 802.11a Cisco lightweight access points, use the config advanced 802.11 channelnoise command.
config advanced 802.11{a | b} channel noise {enable | disable}
Syntax Description Specifies the 802.11a network.a
Specifies the 802.11b/g network.b
Enables non-802.11a noise avoidance in the channelassignment. or ignore.
enable
Disables the non-802.11a noise avoidance in thechannel assignment.
disable
Command Default The default value for non-802.11a noise avoidance in the channel assignment is disabled.
Command History ModificationRelease
This commandwas introduced in a release earlier thanRelease 7.6.
7.6
The following example shows how to have RRM consider non-802.11a noise when making channelselection updates for all 802.11a Cisco lightweight access points:
CLI Commands290
CLI Commandsconfig advanced 802.11 channel noise
(Cisco Controller) > config advanced 802.11 channel noise enable
Related Commands show advanced 802.11a channel
config advanced 802.11b channel noise
config advanced 802.11 channel outdoor-ap-dcaTo enable or disable the controller to avoid checking the non-Dynamic Frequency Selection (DFS) channels,use the config advanced 802.11 channel outdoor-ap-dca command.
config advanced 802.11{a | b} channel outdoor-ap-dca {enable | disable}
Syntax Description Specifies the 802.11a network.a
Specifies the 802.11b/g network.b
Enables 802.11 network DCA list option for outdooraccess point.
enable
Disables 802.11 network DCA list option for outdooraccess point.
disable
Command Default The default value for 802.11 network DCA list option for outdoor access point is disabled.
Command History ModificationRelease
This commandwas introduced in a release earlier thanRelease 7.6.
7.6
Usage Guidelines The config advanced 802.11{a | b} channel outdoor-ap-dca {enable | disable} command is applicable onlyfor deployments having outdoor access points such as 1522 and 1524.
The following example shows how to enable the 802.11a DCA list option for outdoor access point:(Cisco Controller) > config advanced 802.11a channel outdoor-ap-dca enable
Related Commands show advanced 802.11a channel
config advanced 802.11b channel noise
config advanced 802.11 channel pda-propTo enable or disable propagation of persistent devices, use the config advanced 802.11 channel pda-propcommand.
config advanced 802.11{a | b} channel pda-prop {enable | disable}
Syntax Description Specifies the 802.11a network.a
Specifies the 802.11b/g network.b
CLI Commands291
CLI Commandsconfig advanced 802.11 channel outdoor-ap-dca
Enables the 802.11 network DCA list option for theoutdoor access point.
enable
Disables the 802.11 network DCA list option for theoutdoor access point.
disable
Command Default The default 802.11 network DCA list option for the outdoor access point is disabled.
Command History ModificationRelease
This commandwas introduced in a release earlier thanRelease 7.6.
7.6
The following example shows how to enable or disable propagation of persistent devices:
(Cisco Controller) > config advanced 802.11 channel pda-prop enable
config advanced 802.11 channel updateTo have Radio Resource Management (RRM) initiate a channel selection update for all 802.11a Ciscolightweight access points, use the config advanced 802.11 channel update command.
config advanced 802.11{a | b} channel update
Syntax Description Specifies the 802.11a network.a
Specifies the 802.11b/g network.b
Command Default None
Command History ModificationRelease
This commandwas introduced in a release earlier thanRelease 7.6.
7.6
The following example shows how to initiate a channel selection update for all 802.11a networkaccess points:
(Cisco Controller) > config advanced 802.11a channel update
Configure Advanced 802.11 Coverage CommandsUse the config advanced 802.11 coverage commands to configure coverage hole detection settings onsupported 802.11 networks.
config advanced 802.11 coverageTo enable or disable coverage hole detection, use the config advanced 802.11 coverage command.
CLI Commands292
CLI Commandsconfig advanced 802.11 channel update
config advanced 802.11{a | b} coverage {enable | disable}
Syntax Description Specifies the 802.11a network.a
Specifies the 802.11b/g network.b
Enables the coverage hole detection.enable
Disables the coverage hole detection.disable
Command Default The default coverage hole detection value is enabled.
Command History ModificationRelease
This commandwas introduced in a release earlier thanRelease 7.6.
7.6
Usage Guidelines If you enable coverage hole detection, the CiscoWLC automatically determines, based on data that is receivedfrom the access points, whether any access points have clients that are potentially located in areas with poorcoverage.
If both the number and percentage of failed packets exceed the values that you entered in the config advanced802.11 coverage packet-count and config advanced 802.11 coverage fail-rate commands for a 5-secondperiod, the client is considered to be in a pre-alarm condition. The controller uses this information to distinguishbetween real and false coverage holes and excludes clients with poor roaming logic. A coverage hole isdetected if both the number and percentage of failed clients meet or exceed the values entered in the configadvanced 802.11 coverage level global and config advanced 802.11 coverage exception global commandsover a 90-second period. The Cisco WLC determines whether the coverage hole can be corrected and, ifappropriate, mitigates the coverage hole by increasing the transmit power level for that specific access point.
The following example shows how to enable coverage hole detection on an 802.11a network:
(Cisco Controller) > config advanced 802.11a coverage enable
Related Commands config advanced 802.11 coverage exception global
config advanced 802.11 coverage fail-rate
config advanced 802.11 coverage level global
config advanced 802.11 coverage packet-count
config advanced 802.11 coverage rssi-threshold
config advanced 802.11 coverage exception globalTo specify the percentage of clients on an access point that are experiencing a low signal level but cannotroam to another access point, use the config advanced 802.11 coverage exception global command.
config advanced 802.11{a | b} coverage exception global percent
Syntax Description Specifies the 802.11a network.a
CLI Commands293
CLI Commandsconfig advanced 802.11 coverage exception global

Specifies the 802.11b/g network.b
Percentage of clients. Valid values are from 0 to100%.
percent
Command Default The default percentage value for clients on an access point is 25%.
Command History ModificationRelease
This commandwas introduced in a release earlier thanRelease 7.6.
7.6
Usage Guidelines If both the number and percentage of failed packets exceed the values that you entered in the config advanced802.11 coverage packet-count and config advanced 802.11 coverage fail-rate commands for a 5-secondperiod, the client is considered to be in a pre-alarm condition. The controller uses this information to distinguishbetween real and false coverage holes and excludes clients with poor roaming logic. A coverage hole isdetected if both the number and percentage of failed clients meet or exceed the values entered in theconfigadvanced 802.11 coverage level global and config advanced 802.11 coverage exception global commandsover a 90-second period. The controller determines whether the coverage hole can be corrected and, ifappropriate, mitigates the coverage hole by increasing the transmit power level for that specific access point.
The following example shows how to specify the percentage of clients for all 802.11a access pointsthat are experiencing a low signal level:
(Cisco Controller) > config advanced 802.11 coverage exception global 50
Related Commands config advanced 802.11 coverage exception global
config advanced 802.11 coverage fail-rate
config advanced 802.11 coverage level global
config advanced 802.11 coverage packet-count
config advanced 802.11 coverage rssi-threshold
config advanced 802.11 coverage
config advanced 802.11 coverage fail-rateTo specify the failure rate threshold for uplink data or voice packets, use the config advanced 802.11 coveragefail-rate command.
config advanced 802.11{a | b} coverage {data | voice} fail-rate percent
Syntax Description Specifies the 802.11a network.a
Specifies the 802.11b/g network.b
Specifies the threshold for data packets.data
Specifies the threshold for voice packets.voice
CLI Commands294
CLI Commandsconfig advanced 802.11 coverage fail-rate

Failure rate as a percentage. Valid values are from 1to 100 percent.
percent
Command Default The default failure rate threshold uplink coverage fail-rate value is 20%.
Command History ModificationRelease
This commandwas introduced in a release earlier thanRelease 7.6.
7.6
Usage Guidelines If both the number and percentage of failed packets exceed the values that you entered in theconfig advanced802.11 coverage packet-count and config advanced 802.11 coverage fail-rate commands for a 5-secondperiod, the client is considered to be in a pre-alarm condition. The controller uses this information to distinguishbetween real and false coverage holes and excludes clients with poor roaming logic. A coverage hole isdetected if both the number and percentage of failed clients meet or exceed the values entered in the configadvanced 802.11 coverage level global and config advanced 802.11 coverage exception global commandsover a 90-second period. The controller determines whether the coverage hole can be corrected and, ifappropriate, mitigates the coverage hole by increasing the transmit power level for that specific access point.
The following example shows how to configure the threshold count for minimum uplink failures fordata packets:
(Cisco Controller) > config advanced 802.11 coverage fail-rate 80
Related Commands config advanced 802.11 coverage exception global
config advanced 802.11 coverage level global
config advanced 802.11 coverage packet-count
config advanced 802.11 coverage rssi-threshold
config advanced 802.11 coverage
config advanced 802.11 coverage level globalTo specify the minimum number of clients on an access point with an received signal strength indication(RSSI) value at or below the data or voice RSSI threshold, use the config advanced 802.11 coverage levelglobal command.
config advanced 802.11{a | b} coverage level global clients
Syntax Description Specifies the 802.11a network.a
Specifies the 802.11b/g network.b
Minimum number of clients. Valid values are from 1to 75.
clients
Command Default The default minimum number of clients on an access point is 3.
CLI Commands295
CLI Commandsconfig advanced 802.11 coverage level global

Command History ModificationRelease
This commandwas introduced in a release earlier thanRelease 7.6.
7.6
Usage Guidelines If both the number and percentage of failed packets exceed the values that you entered in the config advanced802.11 coverage packet-count and config advanced 802.11 coverage fail-rate commands for a 5-secondperiod, the client is considered to be in a pre-alarm condition. The controller uses this information to distinguishbetween real and false coverage holes and excludes clients with poor roaming logic. A coverage hole isdetected if both the number and percentage of failed clients meet or exceed the values entered in the configadvanced 802.11 coverage level global and config advanced 802.11 coverage exception global commandsover a 90-second period. The controller determines whether the coverage hole can be corrected and, ifappropriate, mitigates the coverage hole by increasing the transmit power level for that specific access point.
The following example shows how to specify the minimum number of clients on all 802.11a accesspoints with an RSSI value at or below the RSSI threshold:
(Cisco Controller) > config advanced 802.11 coverage level global 60
Related Commands config advanced 802.11 coverage exception global
config advanced 802.11 coverage fail-rate
config advanced 802.11 coverage packet-count
config advanced 802.11 coverage rssi-threshold
config advanced 802.11 coverage
config advanced 802.11 coverage packet-countTo specify the minimum failure count threshold for uplink data or voice packets, use the config advanced802.11 coverage packet-count command.
config advanced 802.11{a | b} coverage {data | voice} packet-count packets
Syntax Description Specifies the 802.11a network.a
Specifies the 802.11b/g network.b
Specifies the threshold for data packets.data
Specifies the threshold for voice packets.voice
Minimum number of packets. Valid values are from1 to 255 packets.
packets
Command Default The default failure count threshold for uplink data or voice packets is10.
Command History ModificationRelease
This commandwas introduced in a release earlier thanRelease 7.6.
7.6
CLI Commands296
CLI Commandsconfig advanced 802.11 coverage packet-count
Usage Guidelines If both the number and percentage of failed packets exceed the values that you entered in the config advanced802.11 coverage packet-count and config advanced 802.11 coverage fail-rate commands for a 5-secondperiod, the client is considered to be in a pre-alarm condition. The controller uses this information to distinguishbetween real and false coverage holes and excludes clients with poor roaming logic. A coverage hole isdetected if both the number and percentage of failed clients meet or exceed the values entered in the configadvanced 802.11 coverage level global and config advanced 802.11 coverage exception global commandsover a 90-second period. The controller determines whether the coverage hole can be corrected and, ifappropriate, mitigates the coverage hole by increasing the transmit power level for that specific access point.
The following example shows how to configure the failure count threshold for uplink data packets:(Cisco Controller) > config advanced 802.11 coverage packet-count 100
Related Commands config advanced 802.11 coverage exception global
config advanced 802.11 coverage fail-rate
config advanced 802.11 coverage level global
config advanced 802.11 coverage rssi-threshold
config advanced 802.11 coverage
config advanced 802.11 coverage rssi-thresholdTo specify the minimum receive signal strength indication (RSSI) value for packets that are received by anaccess point, use the config advanced 802.11 coverage rssi-threshold command.
config advanced 802.11{a | b} coverage {data | voice} rssi-threshold rssi
Syntax Description Specifies the 802.11a network.a
Specifies the 802.11b/g network.b
Specifies the threshold for data packets.data
Specifies the threshold for voice packets.voice
Valid values are from –60 to –90 dBm.rssi
Command Default • The default RSSI value for data packets is –80 dBm.
• The default RSSI value for voice packets is –75 dBm.
Command History ModificationRelease
This commandwas introduced in a release earlier thanRelease 7.6.
7.6
Usage Guidelines The rssi value that you enter is used to identify coverage holes (or areas of poor coverage) within your network.If the access point receives a packet in the data or voice queue with an RSSI value that is below the value thatyou enter, a potential coverage hole has been detected.
CLI Commands297
CLI Commandsconfig advanced 802.11 coverage rssi-threshold
The access point takes RSSI measurements every 5 seconds and reports them to the controller in 90-secondintervals.
If both the number and percentage of failed packets exceed the values that you entered in the config advanced802.11 coverage packet-count and config advanced 802.11 coverage fail-rate commands for a 5-secondperiod, the client is considered to be in a pre-alarm condition. The controller uses this information to distinguishbetween real and false coverage holes and excludes clients with poor roaming logic. A coverage hole isdetected if both the number and percentage of failed clients meet or exceed the values entered in the configadvanced 802.11 coverage level global and config advanced 802.11 coverage exception global commandsover a 90-second period. The controller determines whether the coverage hole can be corrected and, ifappropriate, mitigates the coverage hole by increasing the transmit power level for that specific access point.
The following example shows how to configure the minimum receive signal strength indicationthreshold value for data packets that are received by an 802.11a access point:
(Cisco Controller) > config advanced 802.11a coverage rssi-threshold -60
Related Commands config advanced 802.11 coverage exception global
config advanced 802.11 coverage fail-rate
config advanced 802.11 coverage level global
config advanced 802.11 coverage packet-count
config advanced 802.11 coverage
Configure Advanced 802.11 Logging CommandsUse the config advanced 802.11 logging commands to configure report log settings on supported 802.11networks.
config advanced 802.11 logging channelTo turn the channel change loggingmode on or off, use the config advanced 802.11 logging channel command.
config advanced 802.11{a | b} logging channel {on | off}
Syntax Description Specifies the 802.11a network.a
Specifies the 802.11b/g network.b
Logs channel changes.logging channel
Enables the 802.11 channel logging.on
Disables 802.11 channel logging.off
Command Default The default channel change logging mode is Off (disabled).
CLI Commands298
CLI CommandsConfigure Advanced 802.11 Logging Commands
Command History ModificationRelease
This commandwas introduced in a release earlier thanRelease 7.6.
7.6
The following example shows how to turn the 802.11a logging channel selection mode on:
(Cisco Controller) > config advanced 802.11a logging channel on
Related Commands show advanced 802.11a logging
config advanced 802.11b logging channel
config advanced 802.11 logging coverageTo turn the coverage profile logging mode on or off, use the config advanced 802.11 logging coveragecommand.
config advanced 802.11{a | b} logging coverage {on | off}
Syntax Description Specifies the 802.11a network.a
Specifies the 802.11b/g network.b
Enables the 802.11 coverage profile violation logging.on
Disables the 802.11 coverage profile violation logging.off
Command Default The default coverage profile logging mode is Off (disabled).
Command History ModificationRelease
This commandwas introduced in a release earlier thanRelease 7.6.
7.6
The following example shows how to turn the 802.11a coverage profile violation logging selectionmode on:
(Cisco Controller) > config advanced 802.11a logging coverage on
Related Commands show advanced 802.11a logging
config advanced 802.11b logging coverage
config advanced 802.11 logging foreignTo turn the foreign interference profile logging mode on or off, use the config advanced 802.11 loggingforeign command.
config advanced 802.11{a | b} logging foreign {on | off}
CLI Commands299
CLI Commandsconfig advanced 802.11 logging coverage
Syntax Description Specifies the 802.11a network.a
Specifies the 802.11b/g network.b
Enables the 802.11 foreign interference profileviolation logging.
on
Disables the 802.11 foreign interference profileviolation logging.
off
Command Default The default foreign interference profile logging mode is Off (disabled).
Command History ModificationRelease
This commandwas introduced in a release earlier thanRelease 7.6.
7.6
The following example shows how to turn the 802.11a foreign interference profile violation loggingselection mode on:
(Cisco Controller) > config advanced 802.11a logging foreign on
Related Commands show advanced 802.11a logging
config advanced 802.11b logging foreign
config advanced 802.11 logging loadTo turn the 802.11a load profile logging mode on or off, use the config advanced 802.11 logging loadcommand.
config advanced 802.11{a | b} logging load {on | off}
Syntax Description Specifies the 802.11a network.a
Specifies the 802.11b/g network.b
Enables the 802.11 load profile violation logging.on
Disables the 802.11 load profile violation logging.off
Command Default The default 802.11a load profile logging mode is Off (disabled).
Command History ModificationRelease
This commandwas introduced in a release earlier thanRelease 7.6.
7.6
The following example shows how to turn the 802.11a load profile logging mode on:
CLI Commands300
CLI Commandsconfig advanced 802.11 logging load

(Cisco Controller) > config advanced 802.11 logging load on
Related Commands show advanced 802.11a logging
config advanced 802.11b logging load
config advanced 802.11 logging noiseTo turn the 802.11a noise profile logging mode on or off, use the config advanced 802.11 logging noisecommand.
config advanced 802.11{a | b} logging noise {on | off}
Syntax Description Specifies the 802.11a network.a
Specifies the 802.11b/g network.b
Enables the 802.11 noise profile violation logging.on
Disables the 802.11 noise profile violation logging.off
Command Default The default 802.11a noise profile logging mode is off (disabled).
Command History ModificationRelease
This commandwas introduced in a release earlier thanRelease 7.6.
7.6
The following example shows how to turn the 802.11a noise profile logging mode on:
(Cisco Controller) > config advanced 802.11a logging noise on
Related Commands show advanced 802.11a logging
config advanced 802.11b logging noise
config advanced 802.11 logging performanceTo turn the 802.11a performance profile logging mode on or off, use the config advanced 802.11 loggingperformance command.
config advanced 802.11{a | b} logging performance {on | off}
Syntax Description Specifies the 802.11a network.a
Specifies the 802.11b/g network.b
Enables the 802.11 performance profile violationlogging.
on
CLI Commands301
CLI Commandsconfig advanced 802.11 logging noise

Disables the 802.11 performance profile violationlogging.
off
Command Default The default 802.11a performance profile logging mode is off (disabled).
Command History ModificationRelease
This commandwas introduced in a release earlier thanRelease 7.6.
7.6
The following example shows how to turn the 802.11a performance profile logging mode on:
(Cisco Controller) > config advanced 802.11a logging performance on
Related Commands show advanced 802.11a logging
config advanced 802.11b logging performance
config advanced 802.11 logging txpowerTo turn the 802.11a transmit power change logging mode on or off, use the config advanced 802.11 loggingtxpower command.
config advanced 802.11{a | b} logging txpower {on | off}
Syntax Description Specifies the 802.11a network.a
Specifies the 802.11b/g network.b
Enables the 802.11 transmit power change logging.on
Disables the 802.11 transmit power change logging.off
Command Default The default 802.11a transmit power change logging mode is off (disabled).
Command History ModificationRelease
This commandwas introduced in a release earlier thanRelease 7.6.
7.6
The following example shows how to turn the 802.11a transmit power change mode on:
(Cisco Controller) > config advanced 802.11 logging txpower off
Related Commands show advanced 802.11 logging
config advanced 802.11b logging power
CLI Commands302
CLI Commandsconfig advanced 802.11 logging txpower
Configure Advanced 802.11 Monitor CommandsUse the config advanced 802.11 monitor commands to configure monitor settings on supported 802.11networks.
config advanced 802.11 monitor channel-listTo set the 802.11a noise, interference, and rogue monitoring channel list, use the config advanced 802.11monitor channel-list command.
config advanced 802.11{a | b} monitor channel-list {all | country | dca}
Syntax Description Specifies the 802.11a network.a
Specifies the 802.11b/g network.b
Monitors all channels.all
Monitors the channels used in the configured countrycode.
country
Monitors the channels used by the automatic channelassignment.
dca
Command Default The default 802.11a noise, interference, and rogue monitoring channel list is country.
Command History ModificationRelease
This commandwas introduced in a release earlier thanRelease 7.6.
7.6
The following example shows how to monitor the channels used in the configured country:
(Cisco Controller) > config advanced 802.11 monitor channel-list country
Related Commands show advanced 802.11a monitor coverage
config advanced 802.11 monitor coverageTo set the coverage measurement interval between 60 and 3600 seconds, use the config advanced 802.11monitor coverage command.
config advanced 802.11{a | b} monitor coverage seconds
Syntax Description Specifies the 802.11a network.a
Specifies the 802.11b/g network.b
Coverage measurement interval between 60 and 3600seconds.
seconds
CLI Commands303
CLI CommandsConfigure Advanced 802.11 Monitor Commands
Command Default The default coverage measurement interval is180 seconds.
Command History ModificationRelease
This commandwas introduced in a release earlier thanRelease 7.6.
7.6
The following example shows how to set the coverage measurement interval to 60 seconds:
(Cisco Controller) > config advanced 802.11 monitor coverage 60
Related Commands show advanced 802.11a monitor
config advanced 802.11b monitor coverage
config advanced 802.11 monitor loadTo set the load measurement interval between 60 and 3600 seconds, use the config advanced 802.11 monitorload command.
config advanced 802.11{a | b} monitor load seconds
Syntax Description Specifies the 802.11a network.a
Specifies the 802.11b/g network.b
Load measurement interval between 60 and 3600seconds.
seconds
Command Default The default load measurement interval is 60 seconds.
Command History ModificationRelease
This commandwas introduced in a release earlier thanRelease 7.6.
7.6
The following example shows how to set the load measurement interval to 60 seconds:
(Cisco Controller) > config advanced 802.11 monitor load 60
Related Commands show advanced 802.11a monitor
config advanced 802.11b monitor load
config advanced 802.11 monitor modeTo enable or disable 802.11a access point monitoring, use the config advanced 802.11 monitor modecommand.
config advanced 802.11{a | b} monitor mode {enable | disable}
CLI Commands304
CLI Commandsconfig advanced 802.11 monitor load

Syntax Description Specifies the 802.11a network.a
Specifies the 802.11b/g network.b
Enables the 802.11 access point monitoring.enable
Disables the 802.11 access point monitoring.disable
Command Default The default 802.11a access point monitoring is enabled.
Command History ModificationRelease
This commandwas introduced in a release earlier thanRelease 7.6.
7.6
The following example shows how to enable the 802.11a access point monitoring:
(Cisco Controller) > config advanced 802.11a monitor mode enable
Related Commands show advanced 802.11a monitor
config advanced 802.11b monitor mode
config advanced 802.11 monitor ndp-typeTo configure the 802.11 access point radio resource management (RRM)Neighbor Discovery Protocol (NDP)type, use the config advanced 802.11 monitor ndp-type command:
config advanced 802.11{a | b} monitor ndp-type {protected | transparent}
Syntax Description Specifies the 802.11a network.a
Specifies the 802.11b/g network.b
Specifies the Tx RRM protected NDP.protected
Specifies the Tx RRM transparent NDP.transparent
Command Default None
Command History ModificationRelease
This commandwas introduced in a release earlier thanRelease 7.6.
7.6
Usage Guidelines Before you configure the 802.11 access point RRM NDP type, ensure that you have disabled the network byentering the config 802.11 disable network command.
The following example shows how to enable the 802.11a access point RRM NDP type as protected:
CLI Commands305
CLI Commandsconfig advanced 802.11 monitor ndp-type
(Cisco Controller) > config advanced 802.11 monitor ndp-type protected
Related Commands config advanced 802.11 monitor
config advanced 802.11 monitor mode
config advanced 802.11 disable
config advanced 802.11 monitor noiseTo set the 802.11a noise measurement interval between 60 and 3600 seconds, use the config advanced 802.11monitor noise command.
config advanced 802.11{a | b} monitor noise seconds
Syntax Description Specifies the 802.11a network.a
Specifies the 802.11b/g network.b
Noise measurement interval between 60 and 3600seconds.
seconds
Command Default The default 802.11a noise measurement interval is 80 seconds.
Command History ModificationRelease
This commandwas introduced in a release earlier thanRelease 7.6.
7.6
The following example shows how to set the noise measurement interval to 120 seconds:
(Cisco Controller) > config advanced 802.11 monitor noise 120
Related Commands show advanced 802.11a monitor
config advanced 802.11b monitor noise
config advanced 802.11 monitor signalTo set the signal measurement interval between 60 and 3600 seconds, use the config advanced 802.11monitorsignal command.
config advanced 802.11{a | b} monitor signal seconds
Syntax Description Specifies the 802.11a network.a
Specifies the 802.11b/g network.b
Signal measurement interval between 60 and 3600seconds.
seconds
CLI Commands306
CLI Commandsconfig advanced 802.11 monitor noise
Command Default The default signal measurement interval is 60 seconds.
Command History ModificationRelease
This commandwas introduced in a release earlier thanRelease 7.6.
7.6
The following example shows how to set the signal measurement interval to 120 seconds:
(Cisco Controller) > config advanced 802.11 monitor signal 120
Related Commands show advanced 802.11a monitor
config advanced 802.11b monitor signal
Configure Advanced 802.11 Profile CommandsUse the config advanced 802.11 profile commands to configure Cisco lightweight access point profile settingson supported 802.11 networks.
config advanced 802.11 profile clientsTo set the Cisco lightweight access point clients threshold between 1 and 75 clients, use the config advanced802.11 profile clients command.
config advanced 802.11{a | b} profile clients {global | cisco_ap} clients
Syntax Description Specifies the 802.11a network.a
Specifies the 802.11b/g network.b
Configures all 802.11a Cisco lightweight accesspoints.
global
Cisco lightweight access point name.cisco_ap
802.11a Cisco lightweight access point clientthreshold between 1 and 75 clients.
clients
Command Default The default Cisco lightweight access point clients threshold is 12 clients.
Command History ModificationRelease
This commandwas introduced in a release earlier thanRelease 7.6.
7.6
The following example shows how to set all Cisco lightweight access point clients thresholds to 25clients:
(Cisco Controller) >config advanced 802.11 profile clients global 25Global client count profile set.
CLI Commands307
CLI CommandsConfigure Advanced 802.11 Profile Commands
The following example shows how to set the AP1 clients threshold to 75 clients:
(Cisco Controller) >config advanced 802.11 profile clients AP1 75Global client count profile set.
config advanced 802.11 profile customizeTo turn customizing on or off for an 802.11a Cisco lightweight access point performance profile, use theconfig advanced 802.11 profile customize command.
config advanced 802.11{a | b} profile customize cisco_ap {on | off}
Syntax Description Specifies the 802.11a/n network.a
Specifies the 802.11b/g/n network.b
Cisco lightweight access point.cisco_ap
Customizes performance profiles for this Ciscolightweight access point.
on
Uses global default performance profiles for this Ciscolightweight access point.
off
Command Default The default state of performance profile customization is Off.
Command History ModificationRelease
This commandwas introduced in a release earlier thanRelease 7.6.
7.6
The following example shows how to turn performance profile customization on for 802.11a Ciscolightweight access point AP1:
(Cisco Controller) >config advanced 802.11 profile customize AP1 on
config advanced 802.11 profile foreignTo set the foreign 802.11a transmitter interference threshold between 0 and 100 percent, use the configadvanced 802.11 profile foreign command.
config advanced 802.11{a | b} profile foreign {global | cisco_ap} percent
Syntax Description Specifies the 802.11a network.a
Specifies the 802.11b/g network.b
Configures all 802.11a Cisco lightweight accesspoints.
global
Cisco lightweight access point name.cisco_ap
CLI Commands308
CLI Commandsconfig advanced 802.11 profile customize

802.11a foreign 802.11a interference thresholdbetween 0 and 100 percent.
percent
Command Default The default foreign 802.11a transmitter interference threshold value is 10.
Command History ModificationRelease
This commandwas introduced in a release earlier thanRelease 7.6.
7.6
The following example shows how to set the foreign 802.11a transmitter interference threshold forall Cisco lightweight access points to 50 percent:
(Cisco Controller) >config advanced 802.11a profile foreign global 50
The following example shows how to set the foreign 802.11a transmitter interference threshold forAP1 to 0 percent:
(Cisco Controller) >config advanced 802.11 profile foreign AP1 0
config advanced 802.11 profile noiseTo set the 802.11a foreign noise threshold between –127 and 0 dBm, use the config advanced 802.11 profilenoise command.
config advanced 802.11{a | b} profile noise {global | cisco_ap} dBm
Syntax Description Specifies the 802.11a/n network.a
Specifies the 802.11b/g/n network.b
Configures all 802.11a Cisco lightweight access pointspecific profiles.
global
Cisco lightweight access point name.cisco_ap
802.11a foreign noise threshold between –127 and 0dBm.
dBm
Command Default The default foreign noise threshold value is –70 dBm.
Command History ModificationRelease
This commandwas introduced in a release earlier thanRelease 7.6.
7.6
The following example shows how to set the 802.11a foreign noise threshold for all Cisco lightweightaccess points to –127 dBm:
(Cisco Controller) >config advanced 802.11a profile noise global -127
CLI Commands309
CLI Commandsconfig advanced 802.11 profile noise

The following example shows how to set the 802.11a foreign noise threshold for AP1 to 0 dBm:
(Cisco Controller) >config advanced 802.11a profile noise AP1 0
config advanced 802.11 profile throughputTo set the Cisco lightweight access point data-rate throughput threshold between 1000 and 10000000 bytesper second, use the config advanced 802.11 profile throughput command.
config advanced 802.11{a | b} profile throughput {global | cisco_ap} value
Syntax Description Specifies the 802.11a network.a
Specifies the 802.11b/g network.b
Configures all 802.11a Cisco lightweight access pointspecific profiles.
global
Cisco lightweight access point name.cisco_ap
802.11a Cisco lightweight access point throughputthreshold between 1000 and 10000000 bytes persecond.
value
Command Default The default Cisco lightweight access point data-rate throughput threshold value is 1,000,000 bytes per second.
Command History ModificationRelease
This commandwas introduced in a release earlier thanRelease 7.6.
7.6
The following example shows how to set all Cisco lightweight access point data-rate thresholds to1000 bytes per second:
(Cisco Controller) >config advanced 802.11 profile throughput global 1000
The following example shows how to set the AP1 data-rate threshold to 10000000 bytes per second:
(Cisco Controller) >config advanced 802.11 profile throughput AP1 10000000
config advanced 802.11 profile utilizationTo set the RF utilization threshold between 0 and 100 percent, use the config advanced 802.11 profileutilization command. The operating system generates a trap when this threshold is exceeded.
config advanced 802.11{a | b} profile utilization {global | cisco_ap} percent
Syntax Description Specifies the 802.11a network.a
Specifies the 802.11b/g network.b
CLI Commands310
CLI Commandsconfig advanced 802.11 profile throughput

Configures a global Cisco lightweight access pointspecific profile.
global
Cisco lightweight access point name.cisco_ap
802.11a RF utilization threshold between 0 and 100percent.
percent
Command Default The default RF utilization threshold value is 80 percent.
Command History ModificationRelease
This commandwas introduced in a release earlier thanRelease 7.6.
7.6
The following example shows how to set the RF utilization threshold for all Cisco lightweight accesspoints to 0 percent:
(Cisco Controller) >config advanced 802.11 profile utilization global 0
The following example shows how to set the RF utilization threshold for AP1 to 100 percent:
(Cisco Controller) >config advanced 802.11 profile utilization AP1 100
Other Config Advanced Commands
config advanced 802.11 receiverTo set the advanced receiver configuration settings, use the config advanced 802.11 receiver command.
config advanced 802.11{a | b} receiver {default | rxstart jumpThreshold value}
Syntax Description Specifies the 802.11a network.a
Specifies the 802.11b/g network.b
Specifies the receiver configuration.receiver
Specifies the default advanced receiver configuration.default
Specifies the receiver start signal.
We recommend that you do not use thisoption as it is for Cisco internal use only.
Note
rxstart jumpThreshold
Jump threshold configuration value between 0 and127.
value
Command Default None
CLI Commands311
CLI CommandsOther Config Advanced Commands

Usage Guidelines • Before you change the 802.11 receiver configuration, you must disable the 802.11 network.
• We recommend that you do not use the rxstart jumpThreshold value option as it is for Cisco internaluse only.
Command History ModificationRelease
This commandwas introduced in a release earlier thanRelease 7.6.
7.6
The following example shows how to prevent changes to receiver parameters while the network isenabled:
(Cisco Controller) > config advanced 802.11 receiver default
config advanced 802.11 edca-parametersTo enable a specific Enhanced Distributed Channel Access (EDCA) profile on a 802.11a network, use theconfig advanced 802.11 edca-parameters command.
config advanced 802.11{a | b} edca-parameters {wmm-default | svp-voice | optimized-voice |optimized-video-voice | custom-voice | | custom-set { QoS Profile Name } { aifsAP-value(0-16 ) Client value (0-16) | ecwmax AP-Value (0-10) Client value (0-10) | ecwmin AP-Value (0-10)Client value (0-10) | txop AP-Value (0-255) Client value (0-255) } }
Syntax Description Specifies the 802.11a network.a
Specifies the 802.11b/g network.b
Enables the Wi-Fi Multimedia (WMM) defaultparameters. Choose this option if voice or videoservices are not deployed on your network.
wmm-default
Enables Spectralink voice-priority parameters. Choosethis option if Spectralink phones are deployed on yournetwork to improve the quality of calls.
svp-voice
Enables EDCA voice-optimized profile parameters.Choose this option if voice services other thanSpectralink are deployed on your network.
optimized-voice
Enables EDCA voice-optimized and video-optimizedprofile parameters. Choose this option when bothvoice and video services are deployed on yournetwork.
If you deploy video services, admissioncontrol must be disabled.
Note
optimized-video-voice
CLI Commands312
CLI Commandsconfig advanced 802.11 edca-parameters
Enables custom voice EDCA parameters for 802.11a.The EDCA parameters under this option also matchthe 6.0 WMM EDCA parameters when this profile isapplied.
custom-voice
Enables customization of EDCA parameters
• aifs—Configures the Arbitration Inter-FrameSpace.
AP Value (0-16) Client value (0-16)
• ecwmax—Configures the maximumContention Window.
AP Value(0-10) Client Value (0-10)
• ecwmin—Configures the minimumContention Window.
AP Value(0-10) Client Value(0-10)
• txop—Configures the ArbitrationTransmission Opportunity Limit.
AP Value(0-255) Client Value(0-255)
QoS Profile Name - Enter the QoS profile name:
• bronze
• silver
• gold
• platinum
custom-set
Command Default The default EDCA parameter is wmm-default.
Command History ModificationRelease
This command was introduced in a release earlier than Release 7.6.7.6
In this release, custom-set keyword was added to edca-parameters command.8.2.110.0
Examples
The following example shows how to enable Spectralink voice-priority parameters:
(Cisco Controller) > config advanced 802.11 edca-parameters svp-voice
Related Commands Enables a specific Enhanced Distributed ChannelAccess (EDCA) profile on the 802.11a network.
config advanced 802.11b edca-parameters
CLI Commands313
CLI Commandsconfig advanced 802.11 edca-parameters

Displays basic 802.11a network settings.show 802.11a
config advanced 802.11 factoryTo reset 802.11a advanced settings back to the factory defaults, use the config advanced 802.11 factorycommand.
config advanced 802.11{a | b} factory
Syntax Description Specifies the 802.11a network.a
Specifies the 802.11b/g network.b
Command Default None
Command History ModificationRelease
This commandwas introduced in a release earlier thanRelease 7.6.
7.6
The following example shows how to return all the 802.11a advanced settings to their factory defaults:
(Cisco Controller) > config advanced 802.11a factory
Related Commands show advanced 802.11a channel
config advanced 802.11 group-memberTo configure members in 802.11 static RF group, use the config advanced 802.11 group-member command.
config advanced 802.11{a | b} group-member {add | remove} controller controller-ip-address
Syntax Description Specifies the 802.11a network.a
Specifies the 802.11b/g network.b
Adds a controller to the static RF group.add
Removes a controller from the static RF group.remove
Name of the controller to be added.controller
IP address of the controller to be added.controller-ip-address
Command Default None
Command History ModificationRelease
This commandwas introduced in a release earlier thanRelease 7.6.
7.6
CLI Commands314
CLI Commandsconfig advanced 802.11 factory

The following example shows how to add a controller in the 802.11a automatic RF group:(Cisco Controller) > config advanced 802.11a group-member add cisco-controller 209.165.200.225
Related Commands show advanced 802.11a group
config advanced 802.11 group-mode
config advanced 802.11 group-modeTo set the 802.11a automatic RF group selection mode on or off, use the config advanced 802.11 group-modecommand.
config advanced 802.11{a | b} group-mode {auto | leader | off | restart}
Syntax Description Specifies the 802.11a network.a
Specifies the 802.11b/g network.b
Sets the 802.11a RF group selection to automaticupdate mode.
auto
Sets the 802.11a RF group selection to static mode,and sets this controller as the group leader.
leader
Sets the 802.11a RF group selection to off.off
Restarts the 802.11a RF group selection.restart
Command Default The default 802.11a automatic RF group selection mode is auto.
Command History ModificationRelease
This commandwas introduced in a release earlier thanRelease 7.6.
7.6
The following example shows how to configure the 802.11a automatic RF group selection mode on:
(Cisco Controller) > config advanced 802.11a group-mode auto
The following example shows how to configure the 802.11a automatic RF group selection mode off:
(Cisco Controller) > config advanced 802.11a group-mode off
Related Commands show advanced 802.11a group
config advanced 802.11 group-member
CLI Commands315
CLI Commandsconfig advanced 802.11 group-mode

config advanced 802.11 tpc-versionTo configure the Transmit Power Control (TPC) version for a radio, use the config advanced 802.11tpc-version command.
config advanced 802.11{a | b} tpc-version {1 | 2}
Syntax Description Specifies the TPC version 1 that offers strong signalcoverage and stability.
1
Specifies TPC version 2 is for scenarios where voicecalls are extensively used. The Tx power isdynamically adjusted with the goal of minimuminterference. It is suitable for dense networks. In thismode, there could be higher roaming delays andcoverage hole incidents.
2
Command Default The default TPC version for a radio is 1.
Command History ModificationRelease
This commandwas introduced in a release earlier thanRelease 7.6.
7.6
The following example shows how to configure the TPC version as 1 for the 802.11a radio:
(Cisco Controller) > config advanced 802.11a tpc-version 1
Related Commands config advanced 802.11 tpcv1-thresh
config advanced 802.11 tpcv1-threshTo configure the threshold for Transmit Power Control (TPC) version 1 of a radio, use the config advanced802.11 tpcv1-thresh command.
config advanced 802.11{a | b} tpcv1-thresh threshold
Syntax Description Specifies the 802.11a network.a
Specifies the 802.11b/g/n network.b
Threshold value between –50 dBm to –80 dBm.threshold
Command History ModificationRelease
This commandwas introduced in a release earlier thanRelease 7.6.
7.6
The following example shows how to configure the threshold as –60 dBm for TPC version 1 of the802.11a radio:
CLI Commands316
CLI Commandsconfig advanced 802.11 tpc-version

(Cisco Controller) > config advanced 802.11 tpcv1-thresh -60
Related Commands config advanced 802.11 tpc-thresh
config advanced 802.11 tpcv2-thresh
config advanced 802.11 tpcv2-intenseTo configure the computational intensity for Transmit Power Control (TPC) version 2 of a radio, use theconfig advanced 802.11 tpcv2-intense command.
config advanced 802.11{a | b} tpcv2-intense intensity
Syntax Description Specifies the 802.11a network.a
Specifies the 802.11b/g/n network.b
Computational intensity value between 1 to 100.intensity
Command History ModificationRelease
This commandwas introduced in a release earlier thanRelease 7.6.
7.6
The following example shows how to configure the computational intensity as 50 for TPC version2 of the 802.11a radio:
(Cisco Controller) > config advanced 802.11 tpcv2-intense 50
Related Commands config advanced 802.11 tpc-thresh
config advanced 802.11 tpcv2-thresh
config advanced 802.11 tpcv2-per-chan
config advanced 802.11 tpcv2-per-chanTo configure the Transmit Power Control Version 2 on a per-channel basis, use the config advanced 802.11tpcv2-per-chan command.
config advanced 802.11{a | b} tpcv2-per-chan {enable | disable}
Syntax Description Enables the configuration of TPC version 2 on aper-channel basis.
enable
Disables the configuration of TPC version 2 on aper-channel basis.
disable
CLI Commands317
CLI Commandsconfig advanced 802.11 tpcv2-intense
Command History ModificationRelease
This commandwas introduced in a release earlier thanRelease 7.6.
7.6
The following example shows how to enable TPC version 2 on a per-channel basis for the 802.11aradio:
(Cisco Controller) > config advanced 802.11 tpcv2-per-chan enable
Related Commands config advanced 802.11 tpc-thresh
config advanced 802.11 tpcv2-thresh
config advanced 802.11 tpcv2-intense
config advanced 802.11 tpcv2-threshTo configure the threshold for Transmit Power Control (TPC) version 2 of a radio, use the config advanced802.11 tpcv2-thresh command.
config advanced 802.11{a | b} tpcv2-thresh threshold
Syntax Description Specifies the 802.11a network.a
Specifies the 802.11b/g network.b
Threshold value between –50 dBm to –80 dBm.threshold
Command History ModificationRelease
This commandwas introduced in a release earlier thanRelease 7.6.
7.6
The following example shows how to configure the threshold as –60 dBm for TPC version 2 of the802.11a radio:
(Cisco Controller) > config advanced 802.11a tpcv2-thresh -60
Related Commands config advanced 802.11 tpc-thresh
config advanced 802.11 tpcv1-thresh
config advanced 802.11 tpcv2-per-chan
config advanced 802.11 txpower-updateTo initiate updates of the 802.11a transmit power for every Cisco lightweight access point, use the configadvanced 802.11 txpower-update command.
config advanced 802.11{a | b} txpower-update
CLI Commands318
CLI Commandsconfig advanced 802.11 tpcv2-thresh
Syntax Description Specifies the 802.11a network.a
Specifies the 802.11b/g network.b
Command Default None
Command History ModificationRelease
This commandwas introduced in a release earlier thanRelease 7.6.
7.6
The following example shows how to initiate updates of 802.11a transmit power for an 802.11aaccess point:
(Cisco Controller) > config advanced 802.11 txpower-update
Related Commands config advance 802.11b txpower-update
config advanced backup-controller primaryTo configure a primary backup controller, use the config advanced backup-controller primary command.
config advanced backup-controller primary system name IP addr
Syntax Description Configures primary|secondary backup controller.system name
IP address of the backup controller.IP addr
Command Default None
Command History ModificationRelease
This command was introduced in a release earlier than Release 7.6.7.6
Usage Guidelines To delete a primary backup controller entry (IPv6 or IPv4), enter 0.0.0.0 for the controller IP address.
The following example shows how to configure the IPv4 primary backup controller:(Cisco Controller) >config advanced backup-controller primary Controller_1 10.10.10.10
The following example shows how to remove the IPv4 primary backup controller:(Cisco Controller) >config advanced backup-controller primary Controller_1 10.10.10.10
Related Commands show advanced back-up controller
config advanced backup-controller secondaryTo configure a secondary backup controller, use the config advanced backup-controller secondary command.
config advanced backup-controller secondary system name IP addr
CLI Commands319
CLI Commandsconfig advanced backup-controller primary
Syntax Description Configures primary|secondary backup controller.system name
IP address of the backup controller.IP addr
Command Default None
Command History ModificationRelease
This command was introduced in a release earlier than Release 7.6.7.6
Usage Guidelines To delete a secondary backup controller entry (IPv4 or IPv6), enter 0.0.0.0 for the controller IP address.
The following example shows how to configure an IPv4 secondary backup controller:(Cisco Controller) >config advanced backup-controller secondary Controller_2 10.10.10.10
The following example shows how to configure an IPv6 secondary backup controller:(Cisco Controller) >config advanced backup-controller secondary Controller_2 2001:9:6:40::623
The following example shows how to remove an IPv4 secondary backup controller:(Cisco Controller) >config advanced backup-controller secondary Controller_2 0.0.0.0
The following example shows how to remove an IPv6 secondary backup controller:(Cisco Controller) >config advanced backup-controller secondary Controller_2 0.0.0.0
Related Commands show advanced back-up controller
config advanced client-handoffTo set the client handoff to occur after a selected number of 802.11 data packet excessive retries, use theconfig advanced client-handoff command.
config advanced client-handoff num_of_retries
Syntax Description Number of excessive retries before client handoff(from 0 to 255).
num_of_retries
Command Default The default value for the number of 802.11 data packet excessive retries is 0.
Command History ModificationRelease
This command was introduced in a release earlier than Release 7.6.7.6
Usage Guidelines This command is supported only for the 1000/1510 series access points.
This example shows how to set the client handoff to 100 excessive retries:
(Cisco Controller) >config advanced client-handoff 100
CLI Commands320
CLI Commandsconfig advanced client-handoff

config advanced dot11-paddingTo enable or disable over-the-air frame padding, use the config advanced dot11-padding command.
config advanced dot11-padding {enable | disable}
Syntax Description Enables the over-the-air frame padding.enable
Disables the over-the-air frame padding.disable
Command Default The default over-the-air frame padding is disabled.
Command History ModificationRelease
This commandwas introduced in a release earlier thanRelease 7.6.
7.6
The following example shows how to enable over-the-air frame padding:
(Cisco Controller) > config advanced dot11-padding enable
Related Commands debug dot11
debug dot11 mgmt interface
debug dot11 mgmt msg
debug dot11 mgmt ssid
debug dot11 mgmt state-machine
debug dot11 mgmt station
show advanced dot11-padding
config advanced assoc-limitTo configure the rate at which access point radios send association and authentication requests to the controller,use the config advanced assoc-limit command.
config advanced assoc-limit {enable [number of associations per interval | interval ] | disable}
Syntax Description Enables the configuration of the association requestsper access point.
enable
Disables the configuration of the association requestsper access point.
disable
(Optional) Number of association request per accesspoint slot in a given interval. The range is from 1 to100.
number of associations per interval
CLI Commands321
CLI Commandsconfig advanced dot11-padding

(Optional) Association request limit interval. Therange is from 100 to 10000 milliseconds.
interval
Command Default The default state of the command is disabled state.
Command History ModificationRelease
This commandwas introduced in a release earlier thanRelease 7.6.
7.6
Usage Guidelines When 200 or more wireless clients try to associate to a controller at the same time, the clients no longer becomestuck in the DHCP_REQD state when you use the config advanced assoc-limit command to limit associationrequests from access points.
The following example shows how to configure the number of association requests per access pointslot in a given interval of 20 with the association request limit interval of 250:
(Cisco Controller) >config advanced assoc-limit enable 20 250
config advanced eapTo configure advanced extensible authentication protocol (EAP) settings, use the config advanced eapcommand.
config advanced eap {bcast-key-interval seconds | eapol-key-timeout timeout | eapol-key-retriesretries | identity-request-timeout timeout | identity-request-retries retries | key-index index |max-login-ignore-identity-response {enable | disable} request-timeout timeout | request-retriesretries} }
Syntax Description Specifies the EAP-broadcast key renew interval timein seconds.
The range is from 120 to 86400 seconds.
bcast-key-interval seconds
Specifies the amount of time (200 to 5000milliseconds) that the controller waits beforeretransmitting an EAPOL (WPA) key message to awireless client using EAP or WPA/WPA-2 PSK.
The default value is 1000 milliseconds.
eapol-key-timeout timeout
Specifies the maximum number of times (0 to 4retries) that the controller retransmits an EAPOL(WPA) key message to a wireless client.
The default value is 2.
eapol-key-retries retries
Specifies the amount of time (1 to 120 seconds) thatthe controller waits before retransmitting an EAPIdentity Request message to a wireless client.
The default value is 30 seconds.
identity-request- timeout timeout
CLI Commands322
CLI Commandsconfig advanced eap
Specifies the maximum number of times (0 to 4retries) that the controller retransmits an EAPOL(WPA) key message to a wireless client.
The default value is 2.
identity-request- retries
Specifies the key index (0 or 3) used for dynamicwired equivalent privacy (WEP).
key-index index
When enabled, this command ignores the limit set forthe number of devices that can be connected to thecontroller with the same username using802.1xauthentication. When disabled, this commandlimits the number of devices that can be connected tothe controller with the same username. This option isnot applicable for Web auth user.
Use the command config netuser maxUserLogin toset the limit of maximum number of devices per sameusername
max-login-ignore- identity-response
Ignores the same username reaching the maximumEAP identity response.
enable
Checks the same username reaching the maximumEAP identity response.
disable
For EAP messages other than Identity Requests orEAPOL (WPA) key messages, specifies the amountof time (1 to 120 seconds) that the controller waitsbefore retransmitting the message to a wireless client.
The default value is 30 seconds.
request-timeout
(Optional) For EAP messages other than IdentityRequests or EAPOL (WPA) key messages, specifiesthe maximum number of times (0 to 20 retries) thatthe controller retransmits the message to a wirelessclient.
The default value is 2.
request-retries
Command Default None
Command History ModificationRelease
This commandwas introduced in a release earlier thanRelease 7.6.
7.6
The following example shows how to configure the key index used for dynamic wired equivalentprivacy (WEP):
(Cisco Controller) > config advanced eap key-index 0
CLI Commands323
CLI Commandsconfig advanced eap

config advanced fastpath fastcacheTo configure the fastpath fast cache control, use the config advanced fastpath fastcache command.
config advanced fastpath fastcache {enable | disable}
Syntax Description Enables the fastpath fast cache control.enable
Disables the fastpath fast cache control.disable
Command Default None
Command History ModificationRelease
This command was introduced in a release earlier than Release 7.6.7.6
The following example shows how to enable the fastpath fast cache control:
(Cisco Controller) > config advanced fastpath fastcache enable
Related Commands config advanced fastpath pkt-capture
config advanced fastpath pkt-captureTo configure the fastpath packet capture, use the config advanced fastpath pkt-capture command.
config advanced fastpath pkt-capture {enable | disable}
Syntax Description Enables the fastpath packet capture.enable
Disables the fastpath packet capture.disable
Command Default None
Command History ModificationRelease
This command was introduced in a release earlier than Release 7.6.7.6
The following example shows how to enable the fastpath packet capture:
(Cisco Controller) > config advanced fastpath pkt-capture enable
Related Commands config advanced fastpath fastcache
config advanced hotspotTo configure advanced hotspot configurations, use the config advanced hotspot command.
CLI Commands324
CLI Commandsconfig advanced fastpath fastcache

config advanced hotspot {anqp-4way {disable | enable | threshold value } | cmbk-delay value |garp {disable | enable } | gas-limit {disable | enable }}
Syntax Description Enables, disables, or, configures the Access Network Query Protocol (ANQP) four wayfragment threshold.
anqp-4way
Disables the ANQP four way message.disable
Enables the ANQP four way message.enable
Configures the ANQP fourway fragment threshold.threshold
ANQP four way fragment threshold value in bytes. The range is from 10 to 1500. The defaultvalue is 1500.
value
Configures the ANQP comeback delay in Time Units (TUs).cmbk-delay
ANQP comeback delay in Time Units (TUs). 1 TU is defined by 802.11 as 1024 usec. Therange is from 1 milliseconds to 30 seconds.
value
Disables or enables the Gratuitous ARP (GARP) forwarding to wireless network.garp
Disables the Gratuitous ARP (GARP) forwarding to wireless network.disable
Enables the Gratuitous ARP (GARP) forwarding to wireless network.enable
Limits the number of Generic Advertisement Service (GAS) request action frames sent tothe switch by an access point in a given interval.
gas-limit
Disables the GAS request action frame limit on access points.disable
Enables the GAS request action frame limit on access points.enable
Command Default None
Command History ModificationRelease
This command was introduced in a release earlier than Release 7.6.7.6
The following example shows how to configure the ANQP four way fragment threshold value:(Cisco Controller) >config advanced hotspot anqp-4way threshold 200
config advanced max-1x-sessionsTo configure the maximum number of simultaneous 802.1X sessions allowed per access point, use the configadvanced max-1x-sessions command.
config advanced max-1x-sessions no_of_sessions
Syntax Description Number of maximum 802.1x session initiation perAP at a time. The range is from 0 to 255, where 0indicates unlimited.
no_of_sessions
CLI Commands325
CLI Commandsconfig advanced max-1x-sessions

Command Default None
Command History ModificationRelease
This commandwas introduced in a release earlier thanRelease 7.6.
7.6
The following example shows how to configure the maximum number of simultaneous 802.1Xsessions:
(Cisco Controller) >config advanced max-1x-sessions 200
config advanced rateTo configure switch control path rate limiting, use the config advanced rate command.
config advanced rate {enable | disable}
Syntax Description Enables the switch control path rate limiting feature.enable
Disables the switch control path rate limiting feature.disable
Command Default None
Command History ModificationRelease
This commandwas introduced in a release earlier thanRelease 7.6.
7.6
The following example shows how to enable switch control path rate limiting:
(Cisco Controller) >config advanced rate enable
config advanced sip-preferred-call-noTo configure voice prioritization, use the config advanced sip-preferred-call-no command.
config advanced sip-preferred-call-no call_index {call_number | none}
Syntax Description Call index with valid values between 1 and 6.call_index
Preferred call number that can contain up to 27characters.
call_number
Deletes the preferred call set for the specified index.none
Command Default None
Usage Guidelines Before you configure voice prioritization, you must complete the following prerequisites:
• Set the voice to the platinum QoS level by entering the config wlan qos wlan-id platinum command.
CLI Commands326
CLI Commandsconfig advanced rate

• Enable the admission control (ACM) to this radio by entering the config 802.11 {a | b} cac {voice |video} acm enable command.
• Enable the call-snooping feature for a particular WLAN by entering the config wlan call-snoop enablewlan-id command.
To view statistics about preferred calls, enter the show ap stats {802.11{a | b} |wlan} cisco_ap command.
Command History ModificationRelease
This command was introduced in a release earlier than Release 7.6.7.6
The following example shows how to add a new preferred call for index 2:
(Cisco Controller) > config advanced sip-preferred-call-no 2 0123456789
Related Commands config wlan qos
config 802.11 cac video acm
config 802.11 cac voice acm
config wlan call-snoop
show ap stats
config advanced sip-snooping-portsTo configure call snooping ports, use the config advanced sip-snooping-ports command.
config advanced sip-snooping-ports start_port end_port
Syntax Description Starting port for call snooping. The range is from 0 to 65535.start_port
Ending port for call snooping. The range is from 0 to 65535.end_port
Usage Guidelines If you need only a single port for call snooping, configure the start and end port with the same number.
The port used by the CIUS tablet is 5060 and the port range used by Facetime is from 16384 to16402.
Command History ModificationRelease
This command was introduced in a release earlier than Release 7.6.7.6
The following example shows how to configure the call snooping ports:
(Cisco Controller) > config advanced sip-snooping-ports 4000 4500
Related Commands show cac voice stats
show cac voice summary
show cac video stats
CLI Commands327
CLI Commandsconfig advanced sip-snooping-ports

show cac video summary
config 802.11 cac video sip
config 802.11 cac voice sip
show advanced sip-preferred-call-no
show advanced sip-snooping-ports
debug cac
config advanced statisticsTo enable or disable the Cisco wireless LAN controller port statistics collection, use the config advancedstatistics command.
config advanced statistics {enable | disable}
Syntax Description Enables the switch port statistics collection.enable
Disables the switch port statistics collection.disable
Command Default The default switch port statistics collection value is enable.
Command History ModificationRelease
This commandwas introduced in a release earlier thanRelease 7.6.
7.6
The following example shows how to disable the switch port statistics collection settings:
(Cisco Controller) > config advanced statistics disable
config advanced probe filterTo configure the filtering of probe requests forwarded from an access point to the controller, use the configadvanced probe filter command.
config advanced probe filter {enable | disable}
Syntax Description Enables the filtering of probe requests.enable
Disables the filtering of probe requests.disable
Command Default None
Command History ModificationRelease
This commandwas introduced in a release earlier thanRelease 7.6.
7.6
CLI Commands328
CLI Commandsconfig advanced statistics

The following example shows how to enable the filtering of probe requests forwarded from an accesspoint to the controller:
(Cisco Controller) >config advanced probe filter enable
config advanced probe limitTo limit the number of probes sent to the WLAN controller per access point per client in a given interval, usethe config advanced probe limit command.
config advanced probe limit num_probes interval
Syntax Description Number of probe requests (from 1 to 100) forwardedto the controller per client per access point radio in agiven interval.
num_probes
Probe limit interval (from 100 to 10000milliseconds).interval
Command Default The default number of probe requests is 2. The default interval is 500 milliseconds.
Command History ModificationRelease
This commandwas introduced in a release earlier thanRelease 7.6.
7.6
This example shows how to set the number of probes per access point per client to 5 and the probeinterval to 800 milliseconds:
(Cisco Controller) >config advanced probe limit 5 800
Configure Advanced Timers CommandsUser the advanced timers commands to configure advanced 802.11a settings.
config advanced timersTo configure an advanced system timer, use the config advanced timers command.
config advanced timers {ap-coverage-report seconds | ap-discovery-timeout discovery-timeout |ap-fast-heartbeat {local | flexconnect | all} {enable | disable} fast_heartbeat_seconds |ap-heartbeat-timeout heartbeat_seconds | ap-primary-discovery-timeout primary_discovery_timeout| ap-primed-join-timeout primed_join_timeout | auth-timeout auth_timeout | pkt-fwd-watchdog{enable | disable} {watchdog_timer | default} | eap-identity-request-delayeap_identity_request_delay | eap-timeout eap_timeout}
Syntax Description Configures RRM coverage report interval for all APs.ap-coverage-report
CLI Commands329
CLI Commandsconfig advanced probe limit

Configures the ap coverage report interval in seconds.The range is between 60 and 90 seconds. Default is90 seconds.
seconds
Configures the Cisco lightweight access pointdiscovery timeout value.
ap-discovery-timeout
Cisco lightweight access point discovery timeoutvalue, in seconds. The range is from 1 to 10.
discovery-timeout
Configures the fast heartbeat timer, which reduces theamount of time it takes to detect a controller failurein access points.
ap-fast-heartbeat
Configures the fast heartbeat interval for access pointsin local mode.
local
Configures the fast heartbeat interval for access pointsin FlexConnect mode.
flexconnect
Configures the fast heartbeat interval for all the accesspoints.
all
Enables the fast heartbeat interval.enable
Disables the fast heartbeat interval.disable
Small heartbeat interval, which reduces the amountof time it takes to detect a controller failure, inseconds. The range is from 1 to 10.
fast_heartbeat_seconds
Configures Cisco lightweight access point heartbeattimeout value.
ap-heartbeat-timeout
Cisco the Cisco lightweight access point heartbeattimeout value, in seconds. The range is from 1 to 30.This value should be at least three times larger thanthe fast heartbeat timer.
heartbeat_seconds
Configures the access point primary discovery requesttimer.
ap-primary-discovery-timeout
Access point primary discovery request time, inseconds. The range is from 30 to 3600.
primary_discovery_timeout
Configures the access point primed discovery timeoutvalue.
ap-primed-join-timeout
Access point primed discovery timeout value, inseconds. The range is from 120 to 43200.
primed_join_timeout
Configures the authentication timeout.auth-timeout
Authentication response timeout value, in seconds.The range is from 10 to 600.
auth_timeout
CLI Commands330
CLI Commandsconfig advanced timers
Configures the packet forwarding watchdog timer toprotect from fastpath deadlock.
pkt-fwd-watchdog
Packet forwarding watchdog timer, in seconds. Therange is from 60 to 300.
watchdog_timer
Configures the watchdog timer to the default valueof 240 seconds.
default
Configures the advanced Extensible AuthenticationProtocol (EAP) identity request delay, in seconds.
eap-identity-request-delay
Advanced EAP identity request delay, in seconds.The range is from 0 to 10.
eap_identity_request_delay
Configures the EAP expiration timeout.eap-timeout
EAP timeout value, in seconds. The range is from 8to 120.
eap_timeout
Command Default • The default access point discovery timeout is 10 seconds.
• The default access point heartbeat timeout is 30 seconds.
• The default access point primary discovery request timer is 120 seconds.
• The default authentication timeout is 10 seconds.
• The default packet forwarding watchdog timer is 240 seconds.
Command History ModificationRelease
This commandwas introduced in a release earlier thanRelease 7.6.
7.6
This command was enhanced.8.3
Usage Guidelines The Cisco lightweight access point discovery timeout indicates how often a Cisco WLC attempts to discoverunconnected Cisco lightweight access points.
The Cisco lightweight access point heartbeat timeout controls how often the Cisco lightweight access pointsends a heartbeat keepalive signal to the Cisco Wireless LAN Controller.
The following example shows how to configure an access point discovery timeout with a timeoutvalue of 20:
(Cisco Controller) >config advanced timers ap-discovery-timeout 20
The following example shows how to enable the fast heartbeat interval for an access point inFlexConnect mode:
(Cisco Controller) >config advanced timers ap-fast-heartbeat flexconnect enable 8
The following example shows how to configure the authentication timeout to 20 seconds:
CLI Commands331
CLI Commandsconfig advanced timers

(Cisco Controller) >config advanced timers auth-timeout 20
config advanced timers ap-fast-heartbeatTo configure the fast heartbeat timer which reduces the amount of time it takes to detect a controller failurefor local, FlexConnect, or all access points, use the config advanced timers ap-fast-heartbeat command.
config advanced timers ap-fast-heartbeat {local | flexconnect | all} {enable | disable } interval
Syntax Description Configures the fast heartbeat interval for access pointsin local mode only.
local
Configures the fast heartbeat interval for access pointsin FlexConnect mode only.
flexconnect
Configures the fast heartbeat interval for all accesspoints.
all
Enables the fast heartbeat interval.enable
Disables the fast heartbeat interval.disable
Small heartbeat interval (between 1 and 10 seconds,inclusive), which reduces the amount of time it takesto detect a controller failure.
interval
Command Default The default state of the command is disabled state.
Command History ModificationRelease
This commandwas introduced in a release earlier thanRelease 7.6.
7.6
The following example shows how to enable the fast heartbeat interval for access point in local mode:
(Cisco Controller) >config advanced timers ap-fast-heartbeat local enable 5
The following example shows how to enable the fast heartbeat interval for access point in FlexConnectmode:
(Cisco Controller) >config advanced timers ap-fast-heartbeat flexconnect enable 8
The following example shows how to enable the fast heartbeat interval for all access points:
(Cisco Controller) >config advanced timers ap-fast-heartbeat all enable 6
The following example shows how to disable the fast heartbeat interval for all access point:
(Cisco Controller) >config advanced timers ap-fast-heartbeat all disable
CLI Commands332
CLI Commandsconfig advanced timers ap-fast-heartbeat

config advanced timers ap-heartbeat-timeoutTo configure the Cisco lightweight access point heartbeat timeout, use the config advanced timersap-heartbeat-timeout command.
config advanced timers ap-heartbeat-timeout seconds
Syntax Description Cisco lightweight access point heartbeat timeout valuebetween 1 and 30 seconds.
seconds
Command Default The default Cisco lightweight access point heartbeat timeout value is 30 seconds.
Command History ModificationRelease
This commandwas introduced in a release earlier thanRelease 7.6.
7.6
Usage Guidelines The Cisco lightweight access point heartbeat timeout controls how often the Cisco lightweight access pointsends a heartbeat keep-alive signal to the Cisco wireless LAN controller.
This seconds value should be at least three times larger than the fast heartbeat timer.
The following example shows how to configure an access point heartbeat timeout to 20:
(Cisco Controller) >config advanced timers ap-heartbeat-timeout 20
config advanced timers ap-primary-discovery-timeoutTo configure the access point primary discovery request timer, use the config advanced timersap-primary-discovery-timeout command.
config advanced timers ap-primary-discovery-timeout interval
Syntax Description Access point primary discovery request timer between30 and 3600 seconds.
interval
Command Default The default access point primary discovery request timer value is 120 seconds.
Command History ModificationRelease
This commandwas introduced in a release earlier thanRelease 7.6.
7.6
This example shows how to configure the access point primary discovery request timer to 1200seconds:
(Cisco Controller) >config advanced timers ap-primary-discovery-timeout 1200
CLI Commands333
CLI Commandsconfig advanced timers ap-heartbeat-timeout
config advanced timers auth-timeoutTo configure the authentication timeout, use the config advanced timers auth-timeout command.
config advanced timers auth-timeout seconds
Syntax Description Authentication response timeout value in secondsbetween 10 and 600.
seconds
Command Default The default authentication timeout value is 10 seconds.
Command History ModificationRelease
This commandwas introduced in a release earlier thanRelease 7.6.
7.6
The following example shows how to configure the authentication timeout to 20 seconds:
(Cisco Controller) >config advanced timers auth-timeout 20
config advanced timers eap-timeoutTo configure the Extensible Authentication Protocol (EAP) expiration timeout, use the config advancedtimers eap-timeout command.
config advanced timers eap-timeout seconds
Syntax Description EAP timeout value in seconds between 8 and 120.seconds
Command Default None
Command History ModificationRelease
This commandwas introduced in a release earlier thanRelease 7.6.
7.6
The following example shows how to configure the EAP expiration timeout to 10 seconds:
(Cisco Controller) >config advanced timers eap-timeout 10
config advanced timers eap-identity-request-delayTo configure the advanced Extensible Authentication Protocol (EAP) identity request delay in seconds, usethe config advanced timers eap-identity-request-delay command.
config advanced timers eap-identity-request-delay seconds
Syntax Description Advanced EAP identity request delay in number ofseconds between 0 and 10.
seconds
CLI Commands334
CLI Commandsconfig advanced timers auth-timeout

Command Default None
Command History ModificationRelease
This commandwas introduced in a release earlier thanRelease 7.6.
7.6
The following example shows how to configure the advanced EAP identity request delay to 8 seconds:
(Cisco Controller) >config advanced timers eap-identity-request-delay 8
Configure Access Point CommandsUse the config ap commands to configure access point settings.
config apTo configure a Cisco lightweight access point or to add or delete a third-party (foreign) access point, use theconfig ap command.
config ap {{enable | disable} cisco_ap | {add | delete} MAC port {enable | disable}IP_address}
Syntax Description Enables the Cisco lightweight access point.enable
Disables the Cisco lightweight access point.disable
Name of the Cisco lightweight access point.cisco_ap
Adds foreign access points.add
Deletes foreign access points.delete
MAC address of a foreign access point.MAC
Port number through which the foreign access pointcan be reached.
port
IP address of the foreign access point.IP_address
Command Default None
Command History ModificationRelease
This commandwas introduced in a release earlier thanRelease 7.6.
7.6
The following example shows how to disable lightweight access point AP1:
(Cisco Controller) >config ap disable AP1
CLI Commands335
CLI CommandsConfigure Access Point Commands
The following example shows how to add a foreign access point withMAC address 12:12:12:12:12:12and IP address 192.12.12.1 from port 2033:
(Cisco Controller) >config ap add 12:12:12:12:12:12 2033 enable 192.12.12.1
config ap bhrateTo configure the Cisco bridge backhaul Tx rate, use the config ap bhrate command.
config ap bhrate {rate | auto} cisco_ap
Syntax Description Cisco bridge backhaul Tx rate in kbps. The validvalues are 6000, 12000, 18000, 24000, 36000, 48000,and 54000.
rate
Configures the auto data rate.auto
Name of a Cisco lightweight access point.cisco_ap
Command Default The default status of the command is set to Auto.
Command History ModificationRelease
This commandwas introduced in a release earlier thanRelease 7.6.
7.6
Usage Guidelines In previous software releases, the default value for the bridge data rate was 24000 (24 Mbps). In Cisco WLCRelease 6.0, the default value for the bridge data rate is auto. If you configured the default bridge data ratevalue (24000) in a previous Cisco WLC release, the bridge data rate is configured with the new default value(auto) when you upgrade to Cisco WLC Release 6.0. However, if you configured a non default value (forexample, 18000) in a previous Cisco WLC software release, that configuration setting is preserved when youupgrade to software release 6.0.
When the bridge data rate is set to auto, the mesh backhaul chooses the highest rate where the next higherrate cannot be used due to unsuitable conditions for that specific rate (and not because of conditions that affectall rates).
The following example shows how to configure the Cisco bridge backhaul Tx rate to 54000 kbps:
(Cisco Controller) >config ap bhrate 54000 AP1
config ap autoconvertTo automatically convert all access points to FlexConnect mode or Monitor mode upon associating with theCisco WLC, use the config ap autoconvert command.
config ap autoconvert {flexconnect | monitor | disable}
Syntax Description Configures all the access points automatically toFlexConnect mode.
flexconnect
CLI Commands336
CLI Commandsconfig ap bhrate
Configures all the access points automatically tomonitor mode.
monitor
Disables the autoconvert option on the access points.disable
Command Default None
Command History ModificationRelease
This commandwas introduced in a release earlier thanRelease 7.6.
7.6
Usage Guidelines When access points in local mode connect to a Cisco 7500 Series Wireless Controller, they do not serveclients. The access point details are available in the controller. To enable access points to serve clients orperform monitoring related tasks when connected to the Cisco 7500 Series Wireless Controller, the accesspoints must be in FlexConnect mode or Monitor mode.
The command can also be used for conversion of AP modes in Cisco 5520, 8540, and 8510 Series WirelessController platforms.
The following example shows how to automatically convert all access points to the FlexConnectmode:
(Cisco Controller) >config ap autoconvert flexconnect
The following example shows how to disable the autoconvert option on the APs:
(Cisco Controller) >config ap autoconvert disable
config ap bhrateTo configure the Cisco bridge backhaul Tx rate, use the config ap bhrate command.
config ap bhrate {rate | auto} cisco_ap
Syntax Description Cisco bridge backhaul Tx rate in kbps. The validvalues are 6000, 12000, 18000, 24000, 36000, 48000,and 54000.
rate
Configures the auto data rate.auto
Name of a Cisco lightweight access point.cisco_ap
Command Default The default status of the command is set to Auto.
Command History ModificationRelease
This command was introduced in a release earlier than Release 7.6.7.6
Usage Guidelines In previous software releases, the default value for the bridge data rate was 24000 (24 Mbps). In controllersoftware release 6.0, the default value for the bridge data rate is auto. If you configured the default bridge
CLI Commands337
CLI Commandsconfig ap bhrate

data rate value (24000) in a previous controller software release, the bridge data rate is configured with thenew default value (auto) when you upgrade to controller software release 6.0. However, if you configured anon default value (for example, 18000) in a previous controller software release, that configuration setting ispreserved when you upgrade to Cisco WLC Release 6.0.
When the bridge data rate is set to auto, the mesh backhaul chooses the highest rate where the next higherrate cannot be used due to unsuitable conditions for that specific rate (and not because of conditions that affectall rates).
The following example shows how to configure the Cisco bridge backhaul Tx rate to 54000 kbps:
(Cisco Controller) >config ap bhrate 54000 AP01
config ap bridgegroupnameTo set or delete a bridge group name on a Cisco lightweight access point, use the config ap bridgegroupnamecommand.
config ap bridgegroupname {set groupname | delete | {strict-matching {enable |disable}}}cisco_ap
Syntax Description Sets a Cisco lightweight access point’s bridge groupname.
set
Bridge group name.groupname
Deletes a Cisco lightweight access point’s bridgegroup name.
delete
Name of a Cisco lightweight access point.cisco_ap
Restricts the possible parent list, if the MAP has anon-default BGN, and the potential parent has adifferent BGN
strict-matching
Enables a Cisco lightweight access point's groupname.
enable
Disables a Cisco lightweight access point's groupname.
disable
Command Default None
Command History ModificationRelease
This commandwas introduced in a release earlier thanRelease 7.6.
7.6
The strict-matching parameter was added.8.0
Usage Guidelines Only access points with the same bridge group name can connect to each other. Changing the APbridgegroupname may strand the bridge AP.
CLI Commands338
CLI Commandsconfig ap bridgegroupname

The following example shows how to delete a bridge group name on Cisco access point’s bridgegroup name AP02:
(Cisco Controller) >config ap bridgegroupname delete AP02Changing the AP's bridgegroupname may strand the bridge AP. Please continue with caution.Changing the AP's bridgegroupname will also cause the AP to reboot.Are you sure you want to continue? (y/n)
config ap bridgingTo configure Ethernet-to-Ethernet bridging on a Cisco lightweight access point, use the config ap bridgingcommand.
config ap bridging {enable | disable} cisco_ap
Syntax Description Enables the Ethernet-to-Ethernet bridging on a Ciscolightweight access point.
enable
Disables Ethernet-to-Ethernet bridging.disable
Name of a Cisco lightweight access point.cisco_ap
Command Default None
Command History ModificationRelease
This commandwas introduced in a release earlier thanRelease 7.6.
7.6
The following example shows how to enable bridging on an access point:
(Cisco Controller) >config ap bridging enable nyc04-44-1240
The following example shows hot to disable bridging on an access point:
(Cisco Controller) >config ap bridging disable nyc04-44-1240
config ap cdpTo configure the Cisco Discovery Protocol (CDP) on a Cisco lightweight access point, use the config ap cdpcommand.
config ap cdp {enable | disable | interface {ethernet interface_number | slot slot_id}} {cisco_ap| all}
Syntax Description Enables CDP on an access point.enable
Disables CDP on an access point.disable
Configures CDP in a specific interface.interface
CLI Commands339
CLI Commandsconfig ap bridging

Configures CDP for an ethernet interface.ethernet
Ethernet interface number between 0 and 3.interface_number
Configures CDP for a radio interface.slot
Slot number between 0 and 3.slot_id
Name of a Cisco lightweight access point.cisco_ap
Specifies all access points.all
If an AP itself is configured with the keyword all, the all access points case takes precedence over the AP thatis with the keyword all.
Note
Command Default Enabled on radio interfaces of mesh APs and disabled on radio interfaces of non-mesh APs. Enabled onEthernet interfaces of all APs.
Command History ModificationRelease
This commandwas introduced in a release earlier thanRelease 7.6.
7.6
Usage Guidelines The config ap cdp disable all command disables CDP on all access points that are joined to the controllerand all access points that join in the future. CDP remains disabled on both current and future access pointseven after the controller or access point reboots. To enable CDP, enter the config ap cdp enable all command.
CDP over Ethernet/radio interfaces is available only when CDP is enabled. After you enable CDP on all accesspoints joined to the controller, you may disable and then reenable CDP on individual access points using theconfig ap cdp {enable | disable} cisco_ap command. After you disable CDP on all access points joined tothe controller, you may not enable and then disable CDP on individual access points.
Note
The following example shows how to enable CDP on all access points:
(Cisco Controller) >config ap cdp enable all
The following example shows how to disable CDP on ap02 access point:
(Cisco Controller) >config ap cdp disable ap02
The following example shows how to enable CDP for Ethernet interface number 2 on all accesspoints:
(Cisco Controller) >config ap cdp ethernet 2 enable all
CLI Commands340
CLI Commandsconfig ap cdp
config ap core-dumpTo configure a Cisco lightweight access point’s memory core dump, use the config ap core-dump command.
config ap core-dump {disable | enable tftp_server_ipaddress filename {compress | uncompress}{cisco_ap | all}
Syntax Description Enables the Cisco lightweight access point’s memorycore dump setting.
enable
Disables the Cisco lightweight access point’s memorycore dump setting.
disable
IP address of the TFTP server to which the accesspoint sends core dump files.
tftp_server_ipaddress
Name that the access point uses to label the core file.filename
Compresses the core dump file.compress
Uncompresses the core dump file.uncompress
Name of a Cisco lightweight access point.cisco_ap
Specifies all access points.all
If an AP itself is configured with the name ‘all’, then the ‘all access points’ case takes precedence over theAP that is named ‘all’.
Note
Command Default None
Command History ModificationRelease
This commandwas introduced in a release earlier thanRelease 7.6.
7.6
Usage Guidelines The access point must be able to reach the TFTP server.
The following example shows how to configure and compress the core dump file:
(Cisco Controller) >config ap core-dump enable 209.165.200.225 log compress AP02
config ap crash-file clear-allTo delete all crash and radio core dump files, use the config ap crash-file clear-all command.
config ap crash-file clear-all
Syntax Description This command has no arguments or keywords.
CLI Commands341
CLI Commandsconfig ap core-dump
Command Default None
Command History ModificationRelease
This commandwas introduced in a release earlier thanRelease 7.6.
7.6
The following example shows how to delete all crash files:
(Cisco Controller) >config ap crash-file clear-all
config ap crash-file deleteTo delete a single crash or radio core dump file, use the config ap crash-file delete command.
config ap crash-file delete filename
Syntax Description Name of the file to delete.filename
Command Default None
Command History ModificationRelease
This commandwas introduced in a release earlier thanRelease 7.6.
7.6
The following example shows how to delete crash file 1:
(Cisco Controller) >config ap crash-file delete crash_file_1
config ap crash-file get-crash-fileTo collect the latest crash data for a Cisco lightweight access point, use the config ap crash-file get-crash-filecommand.
config ap crash-file get-crash-file cisco_ap
Syntax Description Name of the Cisco lightweight access point.cisco_ap
Command Default None
Command History ModificationRelease
This commandwas introduced in a release earlier thanRelease 7.6.
7.6
Usage Guidelines Use the transfer upload datatype command to transfer the collected data to the Cisco wireless LAN controller.
The following example shows how to collect the latest crash data for access point AP3:
CLI Commands342
CLI Commandsconfig ap crash-file delete

(Cisco Controller) >config ap crash-file get-crash-file AP3
config ap crash-file get-radio-core-dumpTo get a Cisco lightweight access point’s radio core dump, use the config ap crash-file get-radio-core-dumpcommand.
config ap crash-file get-radio-core-dump slot_id cisco_ap
Syntax Description Slot ID (either 0 or 1).slot_id
Name of a Cisco lightweight access point.cisco_ap
Command Default None
Command History ModificationRelease
This commandwas introduced in a release earlier thanRelease 7.6.
7.6
The following example shows how to collect the radio core dump for access point AP02 and slot 0:
(Cisco Controller) >config ap crash-file get-radio-core-dump 0 AP02
config ap 802.1XuserTo configure the global authentication username and password for all access points currently associated withthe controller as well as any access points that associate with the controller in the future, use the config ap802.1Xuser command.
config ap 802.1Xuser add username ap-username password ap-password {all | cisco_ap}
Syntax Description Specifies to add a username.add username
Username on the Cisco AP.ap-username
Specifies to add a password.password
Password.ap-password
Specific access point.cisco_ap
Specifies all access points.all
Command Default None
Command History ModificationRelease
This commandwas introduced in a release earlier thanRelease 7.6.
7.6
CLI Commands343
CLI Commandsconfig ap crash-file get-radio-core-dump

Usage Guidelines You must enter a strong password. Strong passwords have the following characteristics:
• They are at least eight characters long.
• They contain a combination of uppercase and lowercase letters, numbers, and symbols.
• They are not a word in any language.
You can set the values for a specific access point.
This example shows how to configure the global authentication username and password for all accesspoints:
(Cisco Controller) >config ap 802.1Xuser add username cisco123 password cisco2020 all
config ap 802.1Xuser deleteTo force a specific access point to use the controller’s global authentication settings, use the config ap802.1Xuser delete command.
config ap 802.1Xuser delete cisco_ap
Syntax Description Access point.cisco_ap
Command Default None
Command History ModificationRelease
This commandwas introduced in a release earlier thanRelease 7.6.
7.6
The following example shows how to delete access point AP01 to use the controller’s globalauthentication settings:
(Cisco Controller) >config ap 802.1Xuser delete AP01
config ap 802.1Xuser disableTo disable authentication for all access points or for a specific access point, use the config ap 802.1Xuserdisable command.
config ap 802.1Xuser disable {all | cisco_ap}
Syntax Description Disables authentication.disable
Specifies all access points.all
Access point.cisco_ap
Command Default None
CLI Commands344
CLI Commandsconfig ap 802.1Xuser delete
Command History ModificationRelease
This commandwas introduced in a release earlier thanRelease 7.6.
7.6
Usage Guidelines You can disable 802.1X authentication for a specific access point only if global 802.1X authentication is notenabled. If global 802.1X authentication is enabled, you can disable 802.1X for all access points only.
The following example shows how to disable the authentication for access point cisco_ap1:
(Cisco Controller) >config ap 802.1Xuser disable
config ap ethernet duplexTo configure the Ethernet port duplex and speed settings of the lightweight access points, use the config apethernet duplex command.
config ap ethernet duplex [auto | half | full] speed [auto | 10 | 100 | 1000] { all | cisco_ap}
Syntax Description (Optional) Specifies the Ethernet port duplex autosettings.
auto
(Optional) Specifies the Ethernet port duplex halfsettings.
half
(Optional) Specifies the Ethernet port duplex fullsettings.
full
Specifies the Ethernet port speed settings.speed
(Optional) Specifies the Ethernet port speed to auto.auto
(Optional) Specifies the Ethernet port speed to 10Mbps.
10
(Optional) Specifies the Ethernet port speed to 100Mbps.
100
(Optional) Specifies the Ethernet port speed to 1000Mbps.
1000
Specifies the Ethernet port setting for all connectedaccess points.
all
Cisco access point.cisco_ap
Command Default None
Command History ModificationRelease
This commandwas introduced in a release earlier thanRelease 7.6.
7.6
CLI Commands345
CLI Commandsconfig ap ethernet duplex

The following example shows how to configure the Ethernet port duplex half settings as 10 Mbpsfor all access points:
(Cisco Controller) >config ap ethernet duplex half speed 10 all
config ap ethernet duplexTo configure the Ethernet port duplex and speed settings of the lightweight access points, use the config apethernet duplex command.
config ap ethernet duplex [auto | half | full] speed [auto | 10 | 100 | 1000] { all | cisco_ap}
Syntax Description (Optional) Specifies the Ethernet port duplex autosettings.
auto
(Optional) Specifies the Ethernet port duplex halfsettings.
half
(Optional) Specifies the Ethernet port duplex fullsettings.
full
Specifies the Ethernet port speed settings.speed
(Optional) Specifies the Ethernet port speed to auto.auto
(Optional) Specifies the Ethernet port speed to 10Mbps.
10
(Optional) Specifies the Ethernet port speed to 100Mbps.
100
(Optional) Specifies the Ethernet port speed to 1000Mbps.
1000
Specifies the Ethernet port setting for all connectedaccess points.
all
Cisco access point.cisco_ap
Command Default None
Command History ModificationRelease
This commandwas introduced in a release earlier thanRelease 7.6.
7.6
The following example shows how to configure the Ethernet port duplex half settings as 10 Mbpsfor all access points:
(Cisco Controller) >config ap ethernet duplex half speed 10 all
CLI Commands346
CLI Commandsconfig ap ethernet duplex
config ap group-nameTo specify a descriptive group name for a Cisco lightweight access point, use the config ap group-namecommand.
config ap group-name groupname cisco_ap
Syntax Description Descriptive name for the access point group.groupname
Name of the Cisco lightweight access point.cisco_ap
Command Default None
Command History ModificationRelease
This commandwas introduced in a release earlier thanRelease 7.6.
7.6
Usage Guidelines The Cisco lightweight access point must be disabled before changing this parameter.
The following example shows how to configure a descriptive name for access point AP01:
(Cisco Controller) >config ap group-name superusers AP01
config ap flexconnect central-dhcpTo enable central-DHCP on a FlexConnect access point in a WLAN, use the config ap flexconnectcentral-dhcp command.
config ap flexconnect central-dhcpwlan_id cisco_ap [add | delete] {enable | disable} override dns{enable | disable} nat-pat {enable | disable}
Syntax Description Wireless LAN identifier from 1 to 512.wlan_id
Name of the Cisco lightweight access point.cisco_ap
(Optional) Adds a new WLAN DHCP mapping.add
(Optional) Deletes a WLAN DHCP mapping.delete
Enables central-DHCP on a FlexConnect access point. When you enable this feature, theDHCP packets received from the access point are centrally switched to the controller andthen forwarded to the corresponding VLAN based on the AP and the SSID.
enable
Disables central-DHCP on a FlexConnect access point.disable
Overrides the DNS server address on the interface assigned by the controller. When youoverride DNS in centrally switched WLANs, the clients get their DNS server IP addressfrom the AP and not from the controller.
override dns
Enables the Override DNS feature on a FlexConnect access point.enable
CLI Commands347
CLI Commandsconfig ap group-name

Disables the Override DNS feature on a FlexConnect access point.disable
Network Address Translation (NAT) and Port Address Translation (PAT) that you can enableor disable.
nat-pat
Enables NAT-PAT on a FlexConnect access point.enable
Deletes NAT-PAT on a FlexConnect access point.disable
Command Default None
Command History ModificationRelease
This command was introduced in a release earlier than Release 7.6.7.6
The following example shows how to enable central-DHCP, Override DNS, and NAT-PAT on aFlexConnect access point:(Cisco Controller) >config ap flexconnect central-dhcp 1 ap1250 enable override dns enablenat-pat enable
config ap flexconnect local-splitTo configure a local-split tunnel on a FlexConnect access point, use the config ap flexconnect local-splitcommand.
config ap flexconnect local-split wlan_id cisco_ap {enable | disable} acl acl_name
Syntax Description Wireless LAN identifier between 1 and 512.wlan_id
Name of the FlexConnect access point.cisco_ap
Enables local-split tunnel on a FlexConnect access point.enable
Disables local-split tunnel feature on a FlexConnect access point.disable
Configures a FlexConnect local-split access control list.acl
Name of the FlexConnect access control list.acl_name
Command Default None
Command History ModificationRelease
This commandwas introduced in a release earlier thanRelease 7.6.
7.6
Usage Guidelines This command allows you to configure a local-split tunnel in a centrally switchedWLAN using a FlexConnectACL. A local split tunnel supports only for unicast Layer 4 IP traffic as NAT/PAT does not support multicastIP traffic.
CLI Commands348
CLI Commandsconfig ap flexconnect local-split
The following example shows how to configure a local-split tunnel using a FlexConnect ACL:(Cisco Controller) >config ap flexconnect local-split 6 AP2 enable acl flex6
config ap flexconnect radius auth setTo configure a primary or secondary RADIUS server for a specific FlexConnect access point, use the configap flexconnect radius auth set command.
config ap flexconnect radius auth set {primary | secondary} ip_address auth_port secret
Syntax Description Specifies the primary RADIUS server for a specificFlexConnect access point
primary
Specifies the secondary RADIUS server for a specificFlexConnect AP
secondary
IP address of the RADIUS serverip_address
Name of the portauth_port secret
RADIUS server secretsecret
Command Default None
Command History ModificationRelease
This commandwas introduced in a release earlier thanRelease 7.6.
7.6
The following example shows how to configure a primary RADIUS server for a specific access point:(Cisco Controller) >config ap flexconnect radius auth set primary 192.12.12.1
config ap flexconnect vlanTo enable or disable VLAN tagging for a FlexConnect access, use the config ap flexconnect vlan command.
config ap flexconnect vlan {enable | disable} cisco_ap
Syntax Description Enables the access point’s VLAN tagging.enable
Disables the access point’s VLAN tagging.disable
Name of the Cisco lightweight access point.cisco_ap
Command Default Disabled. Once enabled, WLANs enabled for local switching inherit the VLAN assigned at the Cisco WLC.
CLI Commands349
CLI Commandsconfig ap flexconnect radius auth set

Command History ModificationRelease
This commandwas introduced in a release earlier thanRelease 7.6.
7.6
This example shows how to enable the access point’s VLAN tagging for a FlexConnect access:(Cisco Controller) >config ap flexconnect vlan enable AP02
config ap flexconnect vlan addTo add a VLAN to a FlexConnect access point, use the config ap flexconnect vlan add command.
config ap flexconnect vlan add vlan-id acl in-acl out-acl cisco_ap
Syntax Description VLAN identifier.vlan-id
ACL name that contains up to 32 alphanumericcharacters.
acl
Inbound ACL name that contains up to 32alphanumeric characters.
in-acl
Outbound ACL name that contains up to 32alphanumeric characters.
out-acl
Name of the Cisco lightweight access point.cisco_ap
Command Default None
Command History ModificationRelease
This commandwas introduced in a release earlier thanRelease 7.6.
7.6
The following example shows how to configure the FlexConnect access point:(Cisco Controller) >config ap flexconnect vlan add 21 acl inacl1 outacl1 ap1
config ap flexconnect vlan nativeTo configure a native VLAN for a FlexConnect access point, use the config ap flexconnect vlan nativecommand.
config ap flexconnect vlan native vlan-id cisco_ap
Syntax Description VLAN identifier.vlan-id
Name of the Cisco lightweight access point.cisco_ap
Command Default None
CLI Commands350
CLI Commandsconfig ap flexconnect vlan add
Command History ModificationRelease
This command was introduced in a release earlier than Release 7.6.7.6
The following example shows how to configure a native VLAN for a FlexConnect access pointmode:(Cisco Controller) >config ap flexconnect vlan native 6 AP02
config ap flexconnect vlan wlanTo assign a VLAN ID to a FlexConnect access point, use the config ap flexconnect vlan wlan command.
config ap flexconnect vlan wlan wlan-id vlan-id cisco_ap
Syntax Description WLAN identifierwlan-id
VLAN identifier (1 - 4094).vlan-id
Name of the Cisco lightweight access point.cisco_ap
Command Default VLAN ID associated to the WLAN.
Command History ModificationRelease
This command was introduced in a release earlier than Release 7.6.7.6
The following example shows how to assign a VLAN ID to a FlexConnect access point:(Cisco Controller) >config ap flexconnect vlan wlan 192.12.12.1 6 AP02
config ap flexconnect web-authTo configure a FlexConnect ACL for external web authentication in locally switchedWLANs, use the configap flexconnect web-auth command.
config ap flexconnect web-auth wlan wlan_id cisco_ap acl_name { enable | disable }
Syntax Description Specifies the wireless LAN to be configured with a FlexConnect ACL.wlan
Wireless LAN identifier between 1 and 512 (inclusive).wlan_id
Name of the FlexConnect access point.cisco_ap
Name of the FlexConnect ACL.acl_name
Enables the FlexConnect ACL on the locally switched wireless LAN.enable
Disables the FlexConnect ACL on the locally switched wireless LAN.disable
Command Default FlexConnect ACL for external web authentication in locally switched WLANs is disabled.
CLI Commands351
CLI Commandsconfig ap flexconnect vlan wlan
Command History ModificationRelease
This command was introduced in a release earlier than Release 7.6.7.6
Usage Guidelines The FlexConnect ACLs that are specific to an AP have the highest priority. The FlexConnect ACLs that arespecific to WLANs have the lowest priority.
The following example shows how to enable FlexConnect ACL for external web authentication onWLAN 6:(Cisco Controller) >config ap flexconnect web-auth wlan 6 AP2 flexacl2 enable
config ap flexconnect web-policy aclTo configure a Web Policy FlexConnect ACL on an access point, use the config ap flexconnect web-policyacl command.
config ap flexconnect web-policy acl {add | delete} acl_name
Syntax Description Adds a Web Policy FlexConnect ACL on an access point.add
Deletes Web Policy FlexConnect ACL on an access point.delete
Name of the Web Policy FlexConnect ACL.acl_name
Command Default None
Command History ModificationRelease
This command was introduced in a release earlier than Release 7.6.7.6
The following example shows how to add a Web Policy FlexConnect ACL on an access point:(Cisco Controller) >config ap flexconnect web-policy acl add flexacl2
config ap hotspotTo configure hotspot parameters on an access point, use the config ap hotspot command.
config ap hotspot venue {type group_code type_code | name {add language_code venue_name |delete}} cisco_ap
Syntax Description Configures venue information for given AP group.venue
Configures the type of venue for given AP group.type
CLI Commands352
CLI Commandsconfig ap flexconnect web-policy acl

Venue group information for given AP group.
The following options are available:
• 0—UNSPECIFIED
• 1—ASSEMBLY
• 2—BUSINESS
• 3—EDUCATIONAL
• 4—FACTORY-INDUSTRIAL
• 5—INSTITUTIONAL
• 6—MERCANTILE
• 7—RESIDENTIAL
• 8—STORAGE
• 9—UTILITY-MISC
• 10—VEHICULAR
• 11—OUTDOOR
group_code
CLI Commands353
CLI Commandsconfig ap hotspot

type_code
CLI Commands354
CLI Commandsconfig ap hotspot
Venue type information for the AP group.
For venue group 1 (ASSEMBLY), the following options are available:
• 0—UNSPECIFIED ASSEMBLY
• 1—ARENA
• 2—STADIUM
• 3—PASSENGER TERMINAL
• 4—AMPHITHEATER
• 5—AMUSEMENT PARK
• 6—PLACE OF WORSHIP
• 7—CONVENTION CENTER
• 8—LIBRARY
• 9—MUSEUM
• 10—RESTAURANT
• 11—THEATER
• 12—BAR
• 13—COFFEE SHOP
• 14—ZOO OR AQUARIUM
• 15—EMERGENCY COORDINATION CENTER
For venue group 2 (BUSINESS), the following options are available:
• 0—UNSPECIFIED BUSINESS
• 1—DOCTOR OR DENTIST OFFICE
• 2—BANK
• 3—FIRE STATION
• 4—POLICE STATION
• 6—POST OFFICE
• 7—PROFESSIONAL OFFICE
• 8—RESEARCH AND DEVELOPMENT FACILITY
• 9—ATTORNEY OFFICE
For venue group 3 (EDUCATIONAL), the following options are available:
• 0—UNSPECIFIED EDUCATIONAL
• 1—PRIMARY SCHOOL
• 2—SECONDARY SCHOOL
CLI Commands355
CLI Commandsconfig ap hotspot

3—UNIVERSITY OR COLLEGE•
For venue group 4 (FACTORY-INDUSTRIAL), the following options are available:
• 0—UNSPECIFIED FACTORY AND INDUSTRIAL
• 1—FACTORY
For venue group 5 (INSTITUTIONAL), the following options are available:
• 0—UNSPECIFIED INSTITUTIONAL
• 1—HOSPITAL
• 2—LONG-TERM CARE FACILITY
• 3—ALCOHOL AND DRUG RE-HABILITATION CENTER
• 4—GROUP HOME
• 5 :PRISON OR JAIL
CLI Commands356
CLI Commandsconfig ap hotspot

type_code
CLI Commands357
CLI Commandsconfig ap hotspot

For venue group 6 (MERCANTILE), the following options are available:
• 0—UNSPECIFIED MERCANTILE
• 1—RETAIL STORE
• 2—GROCERY MARKET
• 3—AUTOMOTIVE SERVICE STATION
• 4—SHOPPING MALL
• 5—GAS STATION
For venue group 7 (RESIDENTIAL), the following options are available:
• 0—UNSPECIFIED RESIDENTIAL
• 1—PRIVATE RESIDENCE
• 2—HOTEL OR MOTEL
• 3—DORMITORY
• 4—BOARDING HOUSE
For venue group 8 (STORAGE), the option is:
• 0—UNSPECIFIED STORAGE
For venue group 9 (UTILITY-MISC), the option is:
• 0—UNSPECIFIED UTILITY AND MISCELLANEOUS
For venue group 10 (VEHICULAR), the following options are available:
• 0—UNSPECIFIED VEHICULAR
• 1—AUTOMOBILE OR TRUCK
• 2—AIRPLANE
• 3—BUS
• 4—FERRY
• 5—SHIP OR BOAT
• 6—TRAIN
• 7—MOTOR BIKE
For venue group 11 (OUTDOOR), the following options are available:
• 0—UNSPECIFIED OUTDOOR
• 1—MINI-MESH NETWORK
• 2—CITY PARK
• 3—REST AREA
CLI Commands358
CLI Commandsconfig ap hotspot
• 4—TRAFFIC CONTROL
• 5—BUS STOP
• 6—KIOSK
Configures the name of venue for this access point.name
ISO-639 encoded string defining the language used at the venue. This string is athree-character language code. For example, you can enter ENG for English.
language_code
Venue name for this access point. This name is associated with the basic service set (BSS)and is used in cases where the SSID does not provide enough information about the venue.The venue name is case sensitive and can be up to 252 alphanumeric characters.
venue_name
Adds the HotSpot venue name for this access point.add
Deletes the HotSpot venue name for this access point.delete
Name of the Cisco access point.cisco_ap
Command Default None
Command History ModificationRelease
This commandwas introduced in a release earlier thanRelease 7.6.
7.6
The following example shows how to configure the venue group as educational and venue type asuniversity:
(Cisco Controller) >config ap hotspot venue type 3 3
config ap image predownloadTo configure an image on a specified access point, use the config ap image predownload command.
config ap image predownload {abort | primary | backup} {cisco_ap | all}
Syntax Description Terminates the predownload image process.abort
Predownloads an image to a Cisco access point fromthe controller's primary image.
primary
Name of a Cisco lightweight access point.cisco_ap
Specifies all access points to predownload an image.all
(Cisco Controller) >
CLI Commands359
CLI Commandsconfig ap image predownload
If an AP itself is configured with the keyword all, the all access points case takes precedence over the AP thatis with the keyword all.
Note
Command Default None
Command History ModificationRelease
This commandwas introduced in a release earlier thanRelease 7.6.
7.6
The following example shows how to predownload an image to an access point from the primaryimage:
(Cisco Controller) >config ap image predownload primary all
config ap image swapTo swap an access point’s primary and backup images, use the config ap image swap command.
config ap image swap {cisco_ap | all}
Syntax Description Name of a Cisco lightweight access point.cisco_ap
Specifies all access points to interchange the bootimages.
all
If an AP itself is configured with the keyword all, the all access points case takes precedence over the AP thatis with the keyword all.
Note
Command Default None
Command History ModificationRelease
This commandwas introduced in a release earlier thanRelease 7.6.
7.6
The following example shows how to swap an access point’s primary and secondary images:
(Cisco Controller) >config ap image swap all
config ap led-stateTo configure the LED state of an access point, use the config ap led-state command.
config ap led-state {enable | disable} {cisco_ap | all}
CLI Commands360
CLI Commandsconfig ap image swap

Syntax Description Enables the LED state of an access point.enable
Disables the LED state of an access point.disable
Name of a Cisco lightweight access point.cisco_ap
Usage Guidelines
If an AP itself is configured with the keyword all, the all access points case takes precedence over the AP thatis with the keyword all.
Note
Command Default None
Command History ModificationRelease
This commandwas introduced in a release earlier thanRelease 7.6.
7.6
The following example shows how to enable the LED state for an access point:
(Cisco Controller) >config ap led-state enable AP02
config ap link-encryptionTo configure the Datagram Transport Layer Security (DTLS) data encryption for access points on the5500 series controller, use the config ap link-encryption command.
If an AP itself is configured with the keyword all, the all access points case takes precedence over the AP thatis with the keyword all.
Note
config ap link-encryption {enable | disable} {cisco_ap | all}
Syntax Description Enables the DTLS data encryption for access points.enable
Disables the DTLS data encryption for access points.disable
Name of a Cisco lightweight access point.cisco_ap
Specifies all access points.all
Command Default DTLS data encryption is enabled automatically for OfficeExtend access points but disabled by default for allother access points.
CLI Commands361
CLI Commandsconfig ap link-encryption
Command History ModificationRelease
This commandwas introduced in a release earlier thanRelease 7.6.
7.6
Usage Guidelines Only Cisco 5500 Series Controllers support DTLS data encryption. This feature is not available on othercontroller platforms. If an access point with data encryption enabled tries to join any other controller, theaccess point joins the controller, but data packets are sent unencrypted.
Only Cisco 1130, 1140, 1240, and 1250 series access points support DTLS data encryption, and data-encryptedaccess points can join a Cisco 5500 Series Controller only if the wplus license is installed on the controller.If the wplus license is not installed, the access points cannot join the controller.
The following example shows how to enable the data encryption for an access point:(Cisco Controller) >config ap link-encryption enable AP02
config ap link-latencyTo configure link latency for a specific access point or for all access points currently associated to the controller,use the config ap link-latency command:
If an AP itself is configured with the keyword all, the all access points case takes precedence over the AP thatis with the keyword all.
Note
config ap link-latency {enable | disable | reset} {cisco_ap | all}
Syntax Description Enables the link latency for an access point.enable
Disables the link latency for an access point.disable
Resets all link latency for all access points.reset
Name of the Cisco lightweight access point.cisco_ap
Specifies all access points.all
Command Default By default, link latency is in disabled state.
Command History ModificationRelease
This commandwas introduced in a release earlier thanRelease 7.6.
7.6
Usage Guidelines This command enables or disables link latency only for access points that are currently joined to the controller.It does not apply to access points that join in the future.
The following example shows how to enable the link latency for all access points:(Cisco Controller) >config ap link-latency enable all
CLI Commands362
CLI Commandsconfig ap link-latency

config ap locationTo modify the descriptive location of a Cisco lightweight access point, use the config ap location command.
config ap location location cisco_ap
Syntax Description Location name of the access point (enclosed by doublequotation marks).
location
Name of the Cisco lightweight access point.cisco_ap
Command Default None
Command History ModificationRelease
This commandwas introduced in a release earlier thanRelease 7.6.
7.6
Usage Guidelines The Cisco lightweight access point must be disabled before changing this parameter.
The following example shows how to configure the descriptive location for access point AP1:(Cisco Controller) >config ap location “Building 1” AP1
config ap logging syslog levelTo set the severity level for filtering syslog messages for a particular access point or for all access points, usethe config ap logging syslog level command.
config ap logging syslog level severity_level {cisco_ap | all}
Syntax Description Severity levels are as follows:
• emergencies—Severity level 0
• alerts—Severity level 1
• critical—Severity level 2
• errors—Severity level 3
• warnings—Severity level 4
• notifications—Severity level 5
• informational—Severity level 6
• debugging—Severity level 7
severity_level
Cisco access point.cisco_ap
Specifies all access points.all
CLI Commands363
CLI Commandsconfig ap location
If an AP itself is configured with the keyword all, the all access points case takes precedence over the AP thatis with the keyword all.
Note
Command Default None
Command History ModificationRelease
This commandwas introduced in a release earlier thanRelease 7.6.
7.6
Usage Guidelines If you set a syslog level, only those messages whose severity is equal to or less than that level are sent to theaccess point. For example, if you set the syslog level to Warnings (severity level 4), only those messageswhose severity is between 0 and 4 are sent to the access point.
This example shows how to set the severity for filtering syslog messages to 3:(Cisco Controller) >config ap logging syslog level 3
config ap mgmtuser addTo configure username, password, and secret password for AP management, use the config ap mgmtuseradd command.
config apmgmtuser add usernameAP_username passwordAP_password secret secret{all | cisco_ap}
Syntax Description Configures the username for AP management.username
Management username.AP_username
Configures the password for AP management.password
AP management password.AP_password
Configures the secret password for privileged APmanagement.
secret
AP managemetn secret password.secret
Applies configuration to every AP that does not havea specific username.
all
Cisco access point.cisco_ap
Command Default None
Command History ModificationRelease
This commandwas introduced in a release earlier thanRelease 7.6.
7.6
CLI Commands364
CLI Commandsconfig ap mgmtuser add

Usage Guidelines The following requirements are enforced on the password:
• The password should contain characters from at least three of the following classes: lowercase letters,uppercase letters, digits, and special characters.
• No character in the password can be repeated more than three times consecutively.
• The password sould not contain management username or reverse of usename.
• The password should not contain words like Cisco, oscic, admin, nimda or any variant obtained bychanging the capitalization of letters by substituting 1, |, or ! or substituting 0 for o or substituting $ fors.
The following requirement is enforced on the secret password:
• The secret password should contain characters from at least three of the following classes: lowercaseletters, uppercase letters, digits, or special characters.
The following example shows how to add a username, password, and secret password for APmanagement:(Cisco Controller) > config ap mgmtuser add username acd password Arc_1234 secret Mid_45all
config ap mgmtuser deleteTo force a specific access point to use the controller’s global credentials, use the config ap mgmtuser deletecommand.
config ap mgmtuser delete cisco_ap
Syntax Description Access point.cisco_ap
Command Default None
Command History ModificationRelease
This commandwas introduced in a release earlier thanRelease 7.6.
7.6
The following example shows how to delete the credentials of an access point:
(Cisco Controller) > config ap mgmtuser delete cisco_ap1
config ap modeTo change a Cisco WLC communication option for an individual Cisco lightweight access point, use theconfig ap mode command.
config ap mode {bridge | flexconnect submode {none | wips} | local submode {none |wips} | reap | rogue | sniffer | se-connect | monitor submode {none | wips} |}cisco_ap
CLI Commands365
CLI Commandsconfig ap mgmtuser delete

Syntax Description Converts from a lightweight access point to a meshaccess point (bridge mode).
bridge
Enables FlexConnect mode on an access point.flexconnect
Converts from an indoor mesh access point (MAP orRAP) to a nonmesh lightweight access point (localmode).
local
Enables remote edge access point mode on an accesspoint.
reap
Enables wired rogue detector mode on an access point.rogue
Enables wireless sniffer mode on an access point.sniffer
Enables flex+bridge mode on an access point.se-connect
Enables spectrum expert mode on an access point.flex+bridge
(Optional) Configures wIPS submode on an accesspoint.
submode
Disables the wIPS on an access point.none
Enables the wIPS submode on an access point.wips
Name of the Cisco lightweight access point.cisco_ap
Command Default Local
Command History ModificationRelease
This commandwas introduced in a release earlier thanRelease 7.6.
7.6
Usage Guidelines The sniffer mode captures and forwards all the packets from the clients on that channel to a remote machinethat runs AiroPeek or other supported packet analyzer software. It includes information on the timestamp,signal strength, packet size and so on.
The following example shows how to set the controller to communicate with access point AP91 inbridge mode:
(Cisco Controller) > config ap mode bridge AP91
The following example shows how to set the controller to communicate with access point AP01 inlocal mode:
(Cisco Controller) > config ap mode local AP01
The following example shows how to set the controller to communicate with access point AP91 inremote office (REAP) mode:
CLI Commands366
CLI Commandsconfig ap mode

(Cisco Controller) > config ap mode flexconnect AP91
The following example shows how to set the controller to communicate with access point AP91 ina wired rogue access point detector mode:
(Cisco Controller) > config ap mode rogue AP91
The following example shows how to set the controller to communicate with access point AP02 inwireless sniffer mode:(Cisco Controller) > config ap mode sniffer AP02
config ap monitor-modeTo configure Cisco lightweight access point channel optimization, use the config apmonitor-mode command.
config apmonitor-mode {802.11b fast-channel | no-optimization | tracking-opt | wips-optimized}cisco_ap
Syntax Description Configures 802.11b scanning channels for amonitor-mode access point.
802.11b fast-channel
Specifies no channel scanning optimization for theaccess point.
no-optimization
Enables tracking optimized channel scanning for theaccess point.
tracking-opt
Enables wIPS optimized channel scanning for theaccess point.
wips-optimized
Name of the Cisco lightweight access point.cisco_ap
Command Default None
Command History ModificationRelease
This commandwas introduced in a release earlier thanRelease 7.6.
7.6
The following example shows how to configure a Cisco wireless intrusion prevention system (wIPS)monitor mode on access point AP01:(Cisco Controller) > config ap monitor-mode wips-optimized AP01
config ap nameTo modify the name of a Cisco lightweight access point, use the config ap name command.
config ap name new_name old_name
Syntax Description Desired Cisco lightweight access point name.new_name
CLI Commands367
CLI Commandsconfig ap monitor-mode
Current Cisco lightweight access point name.old_name
Command Default None
Command History ModificationRelease
This commandwas introduced in a release earlier thanRelease 7.6.
7.6
The following example shows how to modify the name of access point AP1 to AP2:
(Cisco Controller) > config ap name AP1 AP2
config ap packet-dumpTo configure the Packet Capture parameters on access points, use the config ap packet-dump command.
config ap packet-dump {buffer-size Size _in_KB| capture-time Time_in_Min| ftp serverip IP_addrpath path username usernamepassword password | startMAC_address Cisco_AP | stop | truncateLength_in_Bytes}config ap packet-dump classifier {{arp | broadcast | control | data | dot1x | iapp | ip |management | multicast } {enable | disable} | tcp {enable | disable | port TCP_Port {enable| disable}} | udp {enable | disable | port UDP_Port {enable | disable}}}
Syntax Description Configures the buffer size forPacket Capture in the access point.
buffer-size
Size of the buffer. The range isfrom 1024 to 4096 KB.
Size _in_KB
Configures the timer value forPacket Capture.
capture-time
Timer value for Packet Capture.The range is from 1 to 60 minutes.
Time_in_Min
Configures FTP parameters forPacket Capture.
ftp
Configures the FTP server.serverip
IP address of the FTP server.IP_addr
Configures FTP server path.path path
Configures the username for theFTP server.
username user_ID
Configures the password for theFTP server.
password password
CLI Commands368
CLI Commandsconfig ap packet-dump

Starts Packet Capture from theaccess point.
start
Client MAC Address for PacketCapture.
MAC_address
Name of the Cisco access point.Cisco_AP
Stops Packet Capture from theaccess point.
stop
Truncates the packet to thespecified length during PacketCapture.
truncate
Length of the packet aftertruncation. The range is from 20 to1500.
Length_in_Bytes
Configures the classifierinformation for Packet Capture.You can specify the type of packetsthat needs to be captured.
classifier
Captures ARP packets.arp
Enables capture of ARP, broadcast,802.11 control, 802.11 data, dot1x,Inter Access Point Protocol (IAPP),IP, 802.11 management, ormulticast packets.
enable
Disables capture of ARP, broadcast,802.11 control, 802.11 data, dot1x,IAPP, IP, 802.11management, ormulticast packets.
disable
Captures broadcast packets.broadcast
Captures 802.11 control packets.control
Captures 802.11 data packets.data
Captures dot1x packets.dot1x
Captures IAPP packets.iapp
Captures IP packets.ip
Captures 802.11 managementpackets.
management
Captures multicast packets.multicast
Captures TCP packets.tcp
CLI Commands369
CLI Commandsconfig ap packet-dump

TCP port number. The range isfrom 1 to 65535.
TCP_Port
Captures TCP packets.udp
UDP port number. The range isfrom 1 to 65535.
UDP_Port
Configures FTP parameters forPacket Capture.
ftp
FTP server IP address.server_ip
Command Default The default buffer size is 2 MB. The default capture time is 10 minutes.
Command History ModificationRelease
This commandwas introduced in a release earlier thanRelease 7.6.
7.6
This command is not supported for Cisco Wave 2APs. For more information, see CSCvj19314.
8.8
Usage Guidelines Packet Capture does not work during intercontroller roaming.
The controller does not capture packets created in the radio firmware and sent out of the access point, suchas a beacon or probe response. Only packets that flow through the Radio driver in the Tx path will be captured.
Use the command config ap packet-dump start to start the Packet Capture from the access point. When youstart Packet Capture, the controller sends a Control and Provisioning of Wireless Access Points protocol(CAPWAP) message to the access point to which the client is associated and captures packets. You mustconfigure the FTP server and ensure that the client is associated to the access point before you start PacketCapture. If the client is not associated to the access point, you must specify the name of the access point.
The following example shows how to start Packet Capture from an access point:
(Cisco Controller) >config ap packet-dump start 00:0d:28:f4:c0:45 AP1
The following example shows how to capture 802.11 control packets from an access point:
(Cisco Controller) >config ap packet-dump classifier control enable
config ap portTo configure the port for a foreign access point, use the config ap port command.
config ap portMAC port
Syntax Description Foreign access point MAC address.MAC
Port number for accessing the foreign access point.port
CLI Commands370
CLI Commandsconfig ap port
Command Default None
Command History ModificationRelease
This commandwas introduced in a release earlier thanRelease 7.6.
7.6
The following example shows how to configure the port for a foreign access point MAC address:(Cisco Controller) > config ap port 12:12:12:12:12:12 20
config ap power injectorTo configure the power injector state for an access point, use the config ap power injector command.
config ap power injector {enable | disable} {cisco_ap | all} {installed | override |switch_MAC}
Syntax Description Enables the power injector state for an access point.enable
Disables the power injector state for an access point.disable
Name of the Cisco lightweight access point.cisco_ap
Specifies all Cisco lightweight access points connectedto the controller.
all
Detects the MAC address of the current switch portthat has a power injector.
installed
Overrides the safety checks and assumes a powerinjector is always installed.
override
MAC address of the switch port with an installedpower injector.
switch_MAC
If an AP itself is configured with the keyword all, the all access points case takes precedence over the AP thatis with the keyword all.
Note
Command Default None
Command History ModificationRelease
This commandwas introduced in a release earlier thanRelease 7.6.
7.6
The following example shows how to enable the power injector state for all access points:(Cisco Controller) > config ap power injector enable all 12:12:12:12:12:12
CLI Commands371
CLI Commandsconfig ap power injector

config ap power pre-standardTo enable or disable the inline power Cisco pre-standard switch state for an access point, use the config appower pre-standard command.
config ap power pre-standard {enable | disable} cisco_ap
Syntax Description Enables the inline power Cisco pre-standard switchstate for an access point.
enable
Disables the inline power Cisco pre-standard switchstate for an access point.
disable
Name of the Cisco lightweight access point.cisco_ap
Command Default Disabled.
Command History ModificationRelease
This commandwas introduced in a release earlier thanRelease 7.6.
7.6
The following example shows how to enable the inline power Cisco pre-standard switch state foraccess point AP02:
(Cisco Controller) > config ap power pre-standard enable AP02
config ap primary-baseTo set the Cisco lightweight access point primary Cisco WLC, use the config ap primary-base command.
config ap primary-base controller_name Cisco_AP[controller_ip_address]
Syntax Description Name of the Cisco WLC.controller_name
Cisco lightweight access point name.Cisco_AP
(Optional) If the backup controller is outside themobility group to which the access point is connected,then you need to provide the IP address of the primary,secondary, or tertiary controller.
For OfficeExtend access points, you mustenter both the name and IP address of thecontroller. Otherwise, the access pointcannot join this controller.
Note
controller_ip_address
Command Default None
CLI Commands372
CLI Commandsconfig ap power pre-standard
Command History ModificationRelease
This commandwas introduced in a release earlier thanRelease 7.6.
7.6
Usage Guidelines The Cisco lightweight access point associates with this CiscoWLC for all network operations and in the eventof a hardware reset.
OfficeExtend access points do not use the generic broadcast or over-the air (OTAP) discovery process to finda controller. You must configure one or more controllers because OfficeExtend access points try to connectonly to their configured controllers.
The following example shows how to set an access point primary Cisco WLC IPv4 address for anCisco AP:
(Cisco Controller) > config ap primary-base SW_1 AP2 10.0.0.0
Related Commands show ap config general
config ap priorityTo assign a priority designation to an access point that allows it to reauthenticate after a controller failure bypriority rather than on a first-come-until-full basis, use the config ap priority command.
config ap priority {1 | 2 | 3 | 4} cisco_ap
Syntax Description Specifies low priority.1
Specifies medium priority.2
Specifies high priority.3
Specifies the highest (critical) priority.4
Cisco lightweight access point name.cisco_ap
Command Default 1 - Low priority.
Command History ModificationRelease
This commandwas introduced in a release earlier thanRelease 7.6.
7.6
Usage Guidelines In a failover situation, if the backup controller does not have enough ports to allow all the access points inthe affected area to reauthenticate, it gives priority to higher-priority access points over lower-priority ones,even if it means replacing lower-priority access points.
The following example shows how to assign a priority designation to access point AP02 that allowsit to reauthenticate after a controller failure by assigning a reauthentication priority 3:
(Cisco Controller) > config ap priority 3 AP02
CLI Commands373
CLI Commandsconfig ap priority
config ap reporting-periodTo reset a Cisco lightweight access point, use the config ap reporting-period command.
config ap reporting-period period
Syntax Description Time period in seconds between 10 and 120.period
Command Default None
Command History ModificationRelease
This commandwas introduced in a release earlier thanRelease 7.6.
7.6
The following example shows how to reset an access point reporting period to 120 seconds:
> config ap reporting-period 120
config ap resetTo reset a Cisco lightweight access point, use the config ap reset command.
config ap reset cisco_ap
Syntax Description Cisco lightweight access point name.cisco_ap
Command Default None
Command History ModificationRelease
This commandwas introduced in a release earlier thanRelease 7.6.
7.6
The following example shows how to reset an access point:
(Cisco Controller) > config ap reset AP2
config ap retransmit intervalTo configure the access point control packet retransmission interval, use the config ap retransmit intervalcommand.
config ap retransmit interval seconds {all | cisco_ap}
Syntax Description AP control packet retransmission timeout between 2and 5 seconds.
seconds
CLI Commands374
CLI Commandsconfig ap reporting-period
Specifies all access points.all
Cisco lightweight access point name.cisco_ap
Command Default None
Command History ModificationRelease
This commandwas introduced in a release earlier thanRelease 7.6.
7.6
The following example shows how to configure the retransmission interval for all access pointsglobally:
(Cisco Controller) > config ap retransmit interval 4 all
config ap retransmit countTo configure the access point control packet retransmission count, use the config ap retransmit countcommand.
config ap retransmit count count {all | cisco_ap}
Syntax Description Number of times control packet will be retransmitted.The range is from 3 to 8.
count
Specifies all access points.all
Cisco lightweight access point name.cisco_ap
Command Default None
Command History ModificationRelease
This commandwas introduced in a release earlier thanRelease 7.6.
7.6
The following example shows how to configure the retransmission retry count for a specific accesspoint:
(Cisco Controller) > config ap retransmit count 6 cisco_ap
config ap roleTo specify the role of an access point in a mesh network, use the config ap role command.
config ap role {rootAP | meshAP} cisco_ap
CLI Commands375
CLI Commandsconfig ap retransmit count

Syntax Description Designates the mesh access point as a root accesspoint (RAP).
rootAP
Designates the mesh access point as a mesh accesspoint (MAP).
meshAP
Name of the Cisco lightweight access point.cisco_ap
Command Default meshAP.
Command History ModificationRelease
This commandwas introduced in a release earlier thanRelease 7.6.
7.6
Usage Guidelines Use themeshAP keyword if the access point has a wireless connection to the controller, or use the rootAPkeyword if the access point has a wired connection to the controller. If you change the role of the AP, the APwill be rebooted.
The following example shows how to designate mesh access point AP02 as a root access point:
(Cisco Controller) > config ap role rootAP AP02Changing the AP's role will cause the AP to reboot.Are you sure you want to continue? (y/n)
config ap rst-buttonTo configure the Reset button for an access point, use the config ap rst-button command.
config ap rst-button {enable | disable} cisco_ap
Syntax Description Enables the Reset button for an access point.enable
Disables the Reset button for an access point.disable
Name of the Cisco lightweight access point.cisco_ap
Command Default None
Command History ModificationRelease
This commandwas introduced in a release earlier thanRelease 7.6.
7.6
The following example shows how to configure the Reset button for access point AP03:
(Cisco Controller) > config ap rst-button enable AP03
CLI Commands376
CLI Commandsconfig ap rst-button

config ap secondary-baseTo set the Cisco lightweight access point secondary CiscoWLC, use the config ap secondary-base command.
config ap secondary-base Controller_name Cisco_AP [Controller_IP_address]
Syntax Description Name of the Cisco WLC.controller_name
Cisco lightweight access point name.Cisco_AP
(Optional). If the backup Cisco WLC is outside themobility group to which the access point is connected,then you need to provide the IP address of the primary,secondary, or tertiary Cisco WLC.
For OfficeExtend access points, you mustenter both the name and IP address of theCisco WLC. Otherwise, the access pointcannot join this Cisco WLC.
Note
Controller_IP_address
Command Default None
Command History ModificationRelease
This commandwas introduced in a release earlier thanRelease 7.6.
7.6
Usage Guidelines The Cisco lightweight access point associates with this CiscoWLC for all network operations and in the eventof a hardware reset.
OfficeExtend access points do not use the generic broadcast or over-the air (OTAP) discovery process to finda CiscoWLC. Youmust configure one or more CiscoWLCs because OfficeExtend access points try to connectonly to their configured Cisco WLCs.
The following example shows how to set an access point secondary Cisco WLC:
(Cisco Controller) > config ap secondary-base SW_1 AP2 10.0.0.0
Related Commands show ap config general
config ap sniffTo enable or disable sniffing on an access point, use the config ap sniff command.
config ap sniff {802.11a | 802.11b} {enable channel server_ip | disable} cisco_ap
Syntax Description Specifies the 802.11a network.802.11a
Specifies the 802.11b network.802.11b
CLI Commands377
CLI Commandsconfig ap secondary-base
Enables sniffing on an access point.enable
Channel to be sniffed.channel
IP address of the remote machine running Omnipeek,Airopeek,AirMagnet, or Wireshark software.
server_ip
Disables sniffing on an access point.disable
Access point configured as the sniffer.cisco_ap
Command Default Channel 36.
Command History ModificationRelease
This commandwas introduced in a release earlier thanRelease 7.6.
7.6
Usage Guidelines When the sniffer feature is enabled on an access point, it starts sniffing the signal on the given channel. Itcaptures and forwards all the packets to the remote computer that runs Omnipeek, Airopeek, AirMagnet, orWireshark software. It includes information on the timestamp, signal strength, packet size and so on.
Before an access point can act as a sniffer, a remote computer that runs one of the listed packet analyzers mustbe set up so that it can receive packets sent by the access point. After the Airopeek installation, copy thefollowing .dll files to the location where airopeek is installed:
• socket.dll file to the Plug-ins folder (for example, C:\Program Files\WildPackets\AiroPeek\Plugins)
• socketres.dll file to the PluginRes folder (for example, C:\Program Files\WildPackets\AiroPeek\1033\PluginRes)
The following example shows how to enable the sniffing on the 802.11a an access point from theprimary Cisco WLC:
(Cisco Controller) > config ap sniff 80211a enable 23 11.22.44.55 AP01
config ap sshTo enable Secure Shell (SSH) connectivity on an access point, use the config ap ssh command.
config ap ssh {enable | disable} cisco_ap
Syntax Description Enables the SSH connectivity on an access point.enable
Disables the SSH connectivity on an access point.disable
Cisco access point name.cisco_ap
Command Default None
CLI Commands378
CLI Commandsconfig ap ssh

Command History ModificationRelease
This commandwas introduced in a release earlier thanRelease 7.6.
7.6
Usage Guidelines The Cisco lightweight access point associates with this Cisco wireless LAN controller for all network operationand in the event of a hardware reset.
The following example shows how to enable SSH connectivity on access point Cisco_ap2:
> config ap ssh enable cisco_ap2
config ap static-ipTo configure Static IP address settings on Cisco lightweight access point , use the config ap static-ip command.
config ap static-ip {enable Cisco_AP AP_IP_addr IP_netmask /prefix_length gateway | disableCisco_AP| add {domain {Cisco_AP | all} domain_name | nameserver {Cisco_AP | all}nameserver-ip} | delete {domain | nameserver} {Cisco_AP | all}}
Syntax Description Enables the Cisco lightweight access point static IPaddress.
enable
Disables the Cisco lightweight access point static IPaddress. The access point uses DHCP to get the IPaddress.
disable
Cisco lightweight access point name.Cisco_AP
Cisco lightweight access point IP addressAP_IP_addr
Cisco lightweight access point network mask.IP_netmask/prefix_length
IP address of the Cisco lightweight access pointgateway.
gateway
Adds a domain or DNS server.add
Specifies the domain to which a specific access pointor all access points belong.
domain
Specifies all access points.all
Specifies a domain name.domain_name
Specifies a DNS server so that a specific access pointor all access points can discover the controller usingDNS resolution.
nameserver
DNS server IP address.nameserver-ip
Deletes a domain or DNS server.delete
CLI Commands379
CLI Commandsconfig ap static-ip
If an AP itself is configured with the keyword all, the all access points case takes precedence over the AP thatis with the keyword all.
Note
Command Default None
Command History ModificationRelease
This commandwas introduced in a release earlier thanRelease 7.6.
7.6
Usage Guidelines An access point cannot discover the controller using Domain Name System (DNS) resolution if a static IPaddress is configured for the access point, unless you specify a DNS server and the domain to which the accesspoint belongs.
After you enter the IP, netmask, and gateway addresses, save your configuration to restart the CAPWAPtunnel. After the access point rejoins the controller, you can enter the domain and DNS server information.
The following example shows how to configure static IP address on an access point:
(Cisco Controller) >config ap static-ip enable AP2 209.165.200.225 255.255.255.0209.165.200.254
Related Commands show ap config general
config ap stats-timerTo set the time in seconds that the Cisco lightweight access point sends its DOT11 statistics to the Ciscowireless LAN controller, use the config ap stats-timer command.
config ap stats-timer period cisco_ap
Syntax Description Time in seconds from 0 to 65535. A zero valuedisables the timer.
period
Cisco lightweight access point name.cisco_ap
Command Default The default value is 0 (disabled state).
Command History ModificationRelease
This commandwas introduced in a release earlier thanRelease 7.6.
7.6
Usage Guidelines A value of 0 (zero) means that the Cisco lightweight access point does not send any DOT11 statistics. Theacceptable range for the timer is from 0 to 65535 seconds, and the Cisco lightweight access point must bedisabled to set this value.
The following example shows how to set the stats timer to 600 seconds for access point AP2:
CLI Commands380
CLI Commandsconfig ap stats-timer

(Cisco Controller) > config ap stats-timer 600 AP2
config ap syslog host globalTo configure a global syslog server for all access points that join the controller, use the config ap syslog hostglobal command.
config ap syslog host global ip_address
Syntax Description IPv4/IPv6 address of the syslog server.ip_address
Command Default The default value of the IPv4 address of the syslog server is 255.255.255.255.
Command History ModificationRelease
This commandwas introduced in a release earlier thanRelease 7.6.
7.6
Usage Guidelines By default, the global syslog server IP address for all access points is 255.255.255.255. Make sure that theaccess points can reach the subnet on which the syslog server resides before configuring the syslog server onthe controller. If the access points cannot reach this subnet, the access points are unable to send out syslogmessages.
The following example shows how to configure a global syslog server, using IPv4 address, for allaccess points:
(Cisco Controller) > config ap syslog host global 255.255.255.255
The following example shows how to configure a global syslog server, using IPv6 address, for allaccess points:
(Cisco Controller) > config ap syslog host global 2001:9:10:56::100
config ap syslog host specificTo configure a syslog server for a specific access point, use the config ap syslog host specific command.
config ap syslog host specific ap_nameip_address
Syntax Description Cisco lightweight access point.ap_name
IPv4/IPv6 address of the syslog server.ip_address
Command Default The default value of the syslog server IP address is 0.0.0.0.
CLI Commands381
CLI Commandsconfig ap syslog host global

Command History ModificationRelease
This commandwas introduced in a release earlier thanRelease 7.6.
7.6
Usage Guidelines By default, the syslog server IP address for each access point is 0.0.0.0, indicating that it is not yet set. Whenthe default value is used, the global access point syslog server IP address is pushed to the access point.
The following example shows how to configure a syslog server:
(Cisco Controller) >config ap syslog host specific 0.0.0.0
The following example shows how to configure a syslog server for a specific AP, using IPv6 address:
(Cisco Controller) > config ap syslog host specific AP3600 2001:9:10:56::100
config ap tcp-mss-adjustTo enable or disable the TCP maximum segment size (MSS) on a particular access point or on all accesspoints, use the config ap tcp-mss-adjust command.
config ap tcp-mss-adjust {enable | disable} {cisco_ap | all} size
Syntax Description Enables the TCPmaximum segment size on an accesspoint.
enable
Disables the TCPmaximum segment size on an accesspoint.
disable
Cisco access point name.cisco_ap
Specifies all access points.all
Maximum segment size.
• IPv4—Specify a value between 536 and 1363.• IPv6—Specify a value between 1220 and 1331.
Any TCP MSS value that is below1220 and above 1331 will not beeffective for CAPWAP v6 AP.
Note
size
If an AP itself is configured with the keyword all, the all access points case takes precedence over the AP thatis with the keyword all.
Note
Command Default None
CLI Commands382
CLI Commandsconfig ap tcp-mss-adjust

Command History ModificationRelease
This commandwas introduced in a release earlier thanRelease 7.6.
7.6
This command supports only IPv6.8.0
Usage Guidelines When you enable this feature, the access point checks for TCP packets to and from wireless clients in its datapath. If the MSS of these packets is greater than the value that you configured or greater than the default valuefor the CAPWAP tunnel, the access point changes the MSS to the new configured value.
This example shows how to enable the TCP MSS on access point cisco_ap1 with a segment size of1200 bytes:
(Cisco Controller) > config ap tcp-mss-adjust enable cisco_ap1 1200
config ap telnetTo enable Telnet connectivity on an access point, use the config ap telnet command.
config ap telnet {enable | disable} cisco_ap
Syntax Description Enables the Telnet connectivity on an access point.enable
Disables the Telnet connectivity on an access point.disable
Cisco access point name.cisco_ap
Command Default None
Command History ModificationRelease
This commandwas introduced in a release earlier thanRelease 7.6.
7.6
Usage Guidelines • The Cisco lightweight access point associates with this Cisco WLC for all network operation and in theevent of a hardware reset.
• Telnet is not supported on Cisco Aironet 1810 OEAP, 1810W, 1830, 1850, 2800, and 3800 Series APs.
The following example shows how to enable Telnet connectivity on access point cisco_ap1:
(Cisco Controller) >config ap telnet enable cisco_ap1
The following example shows how to disable Telnet connectivity on access point cisco_ap1:
(Cisco Controller) > config ap telnet disable cisco_ap1
CLI Commands383
CLI Commandsconfig ap telnet

config ap tertiary-baseTo set the Cisco lightweight access point tertiary Cisco WLC, use the config ap tertiary-base command.
config ap tertiary-base controller_name Cisco_AP [controller_ip_address]
Syntax Description Name of the Cisco WLC.controller_name
Cisco lightweight access point name.Cisco_AP
(Optional) If the backup controller is outside themobility group to which the access point is connected,then you need to provide the IP address of the primary,secondary, or tertiary Cisco WLC.
For OfficeExtend access points, you mustenter both the name and IP address of theCisco WLC. Otherwise, the access pointcannot join this Cisco WLC.
Note
controller_ip_address
Command Default None
Command History ModificationRelease
This commandwas introduced in a release earlier thanRelease 7.6.
7.6
Usage Guidelines OfficeExtend access points do not use the generic broadcast or over-the air (OTAP) discovery process to finda Cisco WLC. You must configure one or more controllers because OfficeExtend access points try to connectonly to their configured Cisco WLCs.
The Cisco lightweight access point associates with this CiscoWLC for all network operations and in the eventof a hardware reset.
This example shows how to set the access point tertiary Cisco WLC:
(Cisco Controller) > config ap tertiary-base SW_1 AP02 10.0.0.0
Related Commands show ap config general
config ap tftp-downgradeTo configure the settings used for downgrading a lightweight access point to an autonomous access point,use the config ap ftp-downgrade command.
config ap tftp-downgrade tftp_ip_addressfilename Cisco_AP
Syntax Description IP address of the TFTP server.tftp_ip_address
Filename of the access point image file on the TFTPserver.
filename
CLI Commands384
CLI Commandsconfig ap tertiary-base
Access point name.Cisco_AP
Command Default None
Command History ModificationRelease
This commandwas introduced in a release earlier thanRelease 7.6.
7.6
The following example shows how to configure the settings for downgrading access pointap1240_102301:
(Cisco Controller) >config ap ftp-downgrade 209.165.200.224 1238.tar ap1240_102301
config ap usernameTo assign a username and password to access either a specific access point or all access points, use the configap username command.
config ap username user_id password passwd [all | ap_name]
Syntax Description Administrator username.user_id
Administrator password.passwd
(Optional) Specifies all access points.all
Name of a specific access point.ap_name
Command Default None
Command History ModificationRelease
This commandwas introduced in a release earlier thanRelease 7.6.
7.6
The following example shows how to assign a username and password to a specific access point:
(Cisco Controller) > config ap username jack password blue la204
The following example shows how to assign the same username and password to a all access points:
(Cisco Controller) > config ap username jack password blue all
config ap venueTo configure the venue information for 802.11u network on an access point, use the config ap venue command.
CLI Commands385
CLI Commandsconfig ap username
config ap venue {addvenue_name venue-group venue-type lang-code cisco-ap | delete}
Syntax Description Adds venue information.add
Venue name.venue_name
Venue group category. See the table below for detailson venue group mappings.
venue_group
Venue type. This value depends on the venue-groupspecified. See the table below for venue groupmappings.
venue_type
Language used. An ISO-14962-1997 encoded stringthat defines the language. This string is a threecharacter language code. Enter the first three lettersof the language in English (for example, eng forEnglish).
lang_code
Name of the access point.cisco_ap
Deletes venue information.deletes
Command Default None
Command History ModificationRelease
This commandwas introduced in a release earlier thanRelease 7.6.
7.6
The following example shows how to set the venue details for an access point named cisco-ap1:(Cisco Controller) > config ap venue add test 11 34 eng cisco-ap1
This table lists the different venue types for each venue group.
Table 5: Venue Group Mapping
Venue Type for GroupValueVenue Group Name
0UNSPECIFIED
CLI Commands386
CLI Commandsconfig ap venue

Venue Type for GroupValueVenue Group Name
• 0—UNSPECIFIEDASSEMBLY
• 1—ARENA
• 2—STADIUM
• 3—PASSENGERTERMINAL (E.G.,AIRPORT, BUS, FERRY,TRAIN STATION)
• 4—AMPHITHEATER
• 5—AMUSEMENT PARK
• 6—PLACE OF WORSHIP
• 7—CONVENTIONCENTER
• 8—LIBRARY
• 9—MUSEUM
• 10—RESTAURANT
• 11—THEATER
• 12—BAR
• 13—COFFEE SHOP
• 14—ZOO OR AQUARIUM
• 15—EMERGENCYCOORDINATION CENTER
1ASSEMBLY
CLI Commands387
CLI Commandsconfig ap venue
Venue Type for GroupValueVenue Group Name
• 0—UNSPECIFIEDBUSINESS
• 1—DOCTOR OR DENTISTOFFICE
• 2—BANK
• 3—FIRE STATION
• 4—POLICE STATION
• 6—POST OFFICE
• 7—PROFESSIONALOFFICE
• 8—RESEARCH ANDDEVELOPMENTFACILITY
• 9—ATTORNEY OFFICE
2BUSINESS
• 0—UNSPECIFIEDEDUCATIONAL
• 1—SCHOOL, PRIMARY
• 2—SCHOOL,SECONDARY
• 3—UNIVERSITY ORCOLLEGE
3EDUCATIONAL
• 0—UNSPECIFIEDFACTORY ANDINDUSTRIAL
• 1—FACTORY
4FACTORY-INDUSTRIAL
• 0—UNSPECIFIEDINSTITUTIONAL
• 1—HOSPITAL
• 2—LONG-TERM CAREFACILITY (E.G., NURSINGHOME, HOSPICE, ETC.)
• 3—ALCOHOL AND DRUGRE-HABILITATIONCENTER
• 4—GROUP HOME
• 5—PRISON OR JAIL
5INSTITUTIONAL
CLI Commands388
CLI Commandsconfig ap venue
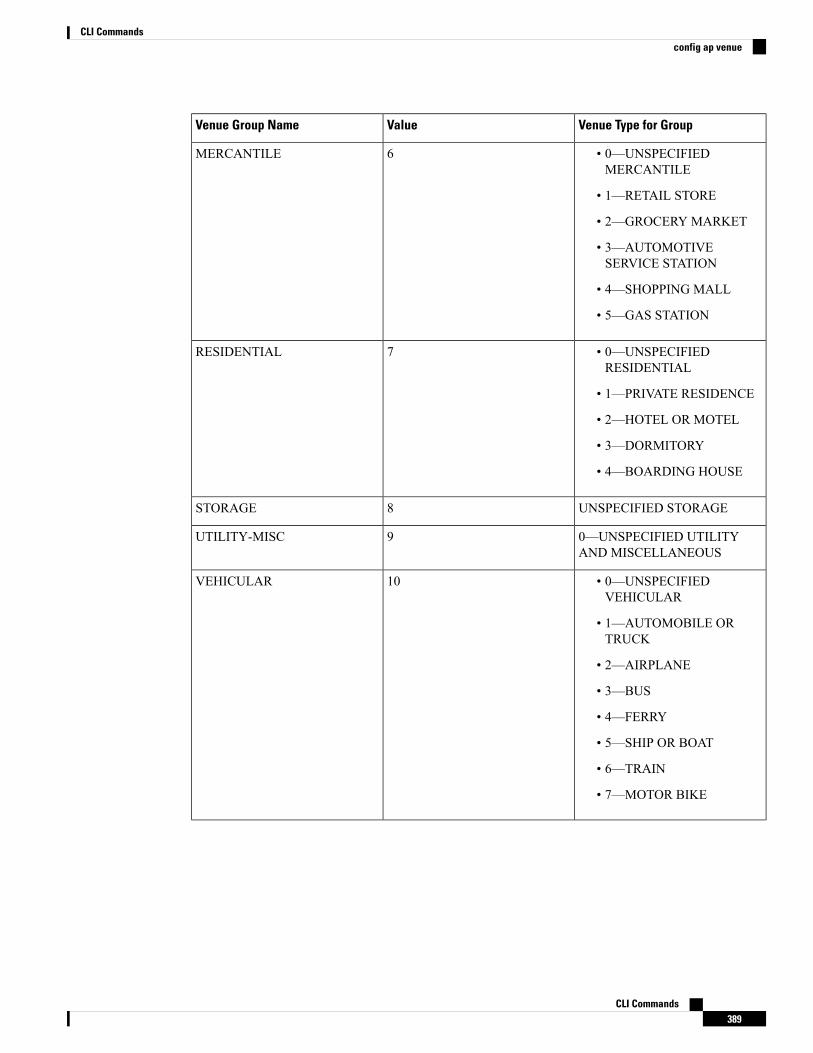
Venue Type for GroupValueVenue Group Name
• 0—UNSPECIFIEDMERCANTILE
• 1—RETAIL STORE
• 2—GROCERY MARKET
• 3—AUTOMOTIVESERVICE STATION
• 4—SHOPPING MALL
• 5—GAS STATION
6MERCANTILE
• 0—UNSPECIFIEDRESIDENTIAL
• 1—PRIVATE RESIDENCE
• 2—HOTEL OR MOTEL
• 3—DORMITORY
• 4—BOARDING HOUSE
7RESIDENTIAL
UNSPECIFIED STORAGE8STORAGE
0—UNSPECIFIED UTILITYAND MISCELLANEOUS
9UTILITY-MISC
• 0—UNSPECIFIEDVEHICULAR
• 1—AUTOMOBILE ORTRUCK
• 2—AIRPLANE
• 3—BUS
• 4—FERRY
• 5—SHIP OR BOAT
• 6—TRAIN
• 7—MOTOR BIKE
10VEHICULAR
CLI Commands389
CLI Commandsconfig ap venue

Venue Type for GroupValueVenue Group Name
• 0—UNSPECIFIEDOUTDOOR
• 1—MUNI-MESHNETWORK
• 2—CITY PARK
• 3—REST AREA
• 4—TRAFFIC CONTROL
• 5—BUS STOP
• 6—KIOSK
11OUTDOOR
config ap wlanTo enable or disable wireless LAN override for a Cisco lightweight access point radio, use the config ap wlancommand.
config ap wlan {enable | disable} {802.11a | 802.11b} wlan_id cisco_ap
Syntax Description Enables the wireless LAN override on an access point.enable
Disables the wireless LAN override on an accesspoint.
disable
Specifies the 802.11a network.802.11a
Specifies the 802.11b network.802.11b
Cisco wireless LAN controller ID assigned to awireless LAN.
wlan_id
Cisco lightweight access point name.cisco_ap
Command Default None
Command History ModificationRelease
This commandwas introduced in a release earlier thanRelease 7.6.
7.6
The following example shows how to enable wireless LAN override on the AP03 802.11a radio:
(Cisco Controller) > config ap wlan 802.11a AP03
CLI Commands390
CLI Commandsconfig ap wlan

Configure Band-Select CommandsUse the config band-select command to configure the band selection feature on the controller.
config band-select cycle-countTo set the band select probe cycle count, use the config band-select cycle-count command.
config band-select cycle-count count
Syntax Description Value for the cycle count between 1 to 10.count
Command Default None
Command History ModificationRelease
This command was introduced in a release earlier than Release 7.6.7.6
The following example shows how to set the probe cycle count for band select to 8:
(Cisco Controller) > config band-select cycle-count 8
Related Commands config band-select cycle-threshold
config band-select expire
config band-select client-rssi
config band-select cycle-thresholdTo set the time threshold for a new scanning cycle, use the config band-select cycle-threshold command.
config band-select cycle-threshold threshold
Syntax Description Value for the cycle threshold between 1 and 1000milliseconds.
threshold
Command Default None
Command History ModificationRelease
This command was introduced in a release earlier than Release 7.6.7.6
The following example shows how to set the time threshold for a new scanning cycle with thresholdvalue of 700 milliseconds:
(Cisco Controller) > config band-select cycle-threshold 700
CLI Commands391
CLI CommandsConfigure Band-Select Commands
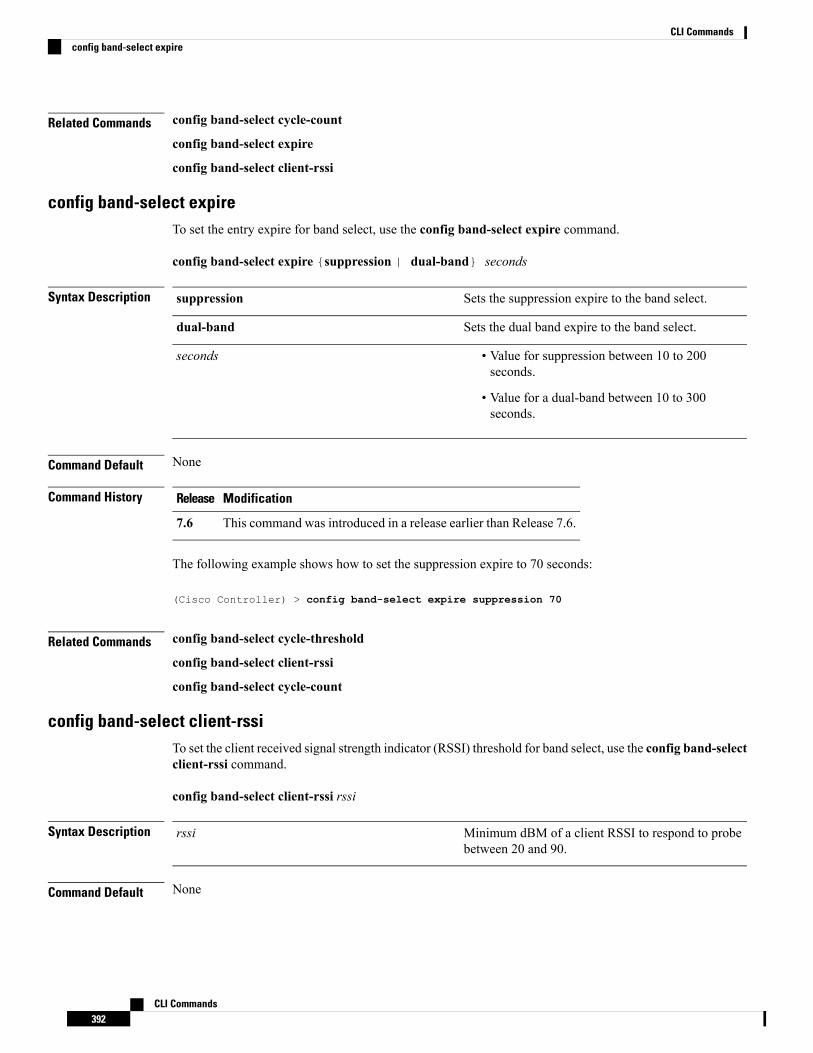
Related Commands config band-select cycle-count
config band-select expire
config band-select client-rssi
config band-select expireTo set the entry expire for band select, use the config band-select expire command.
config band-select expire {suppression | dual-band} seconds
Syntax Description Sets the suppression expire to the band select.suppression
Sets the dual band expire to the band select.dual-band
• Value for suppression between 10 to 200seconds.
• Value for a dual-band between 10 to 300seconds.
seconds
Command Default None
Command History ModificationRelease
This command was introduced in a release earlier than Release 7.6.7.6
The following example shows how to set the suppression expire to 70 seconds:
(Cisco Controller) > config band-select expire suppression 70
Related Commands config band-select cycle-threshold
config band-select client-rssi
config band-select cycle-count
config band-select client-rssiTo set the client received signal strength indicator (RSSI) threshold for band select, use the config band-selectclient-rssi command.
config band-select client-rssi rssi
Syntax Description Minimum dBM of a client RSSI to respond to probebetween 20 and 90.
rssi
Command Default None
CLI Commands392
CLI Commandsconfig band-select expire
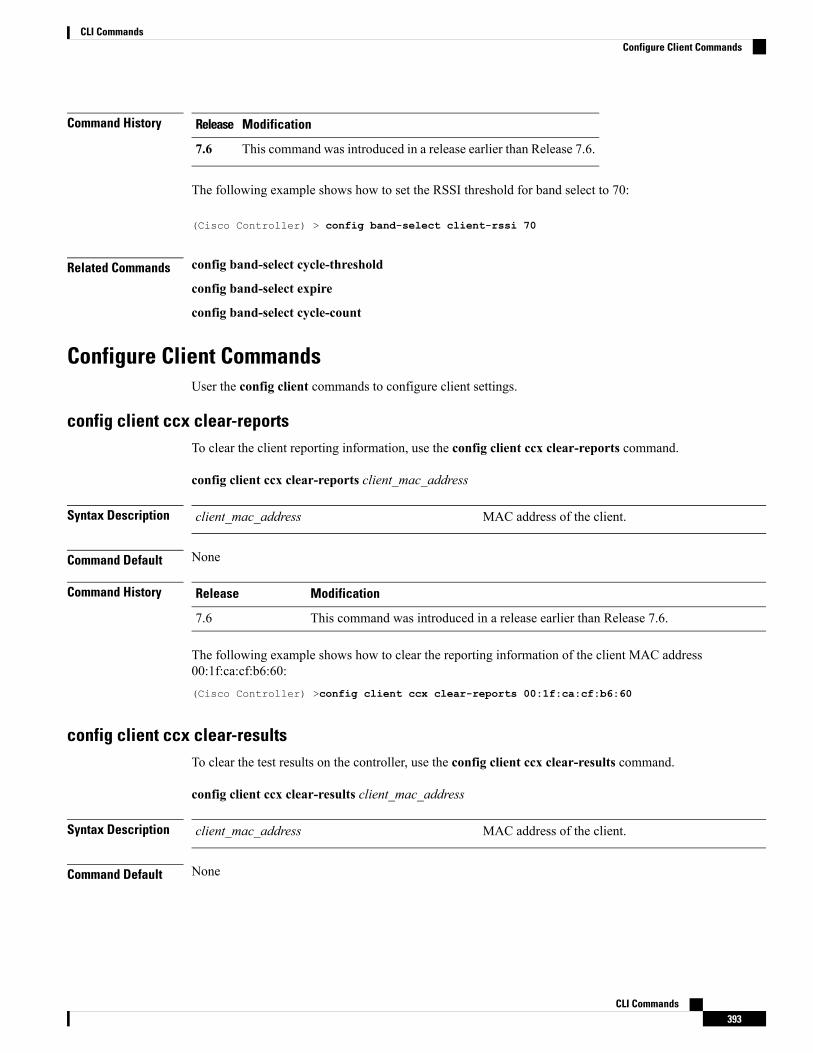
Command History ModificationRelease
This command was introduced in a release earlier than Release 7.6.7.6
The following example shows how to set the RSSI threshold for band select to 70:
(Cisco Controller) > config band-select client-rssi 70
Related Commands config band-select cycle-threshold
config band-select expire
config band-select cycle-count
Configure Client CommandsUser the config client commands to configure client settings.
config client ccx clear-reportsTo clear the client reporting information, use the config client ccx clear-reports command.
config client ccx clear-reports client_mac_address
Syntax Description MAC address of the client.client_mac_address
Command Default None
Command History ModificationRelease
This command was introduced in a release earlier than Release 7.6.7.6
The following example shows how to clear the reporting information of the client MAC address00:1f:ca:cf:b6:60:(Cisco Controller) >config client ccx clear-reports 00:1f:ca:cf:b6:60
config client ccx clear-resultsTo clear the test results on the controller, use the config client ccx clear-results command.
config client ccx clear-results client_mac_address
Syntax Description MAC address of the client.client_mac_address
Command Default None
CLI Commands393
CLI CommandsConfigure Client Commands
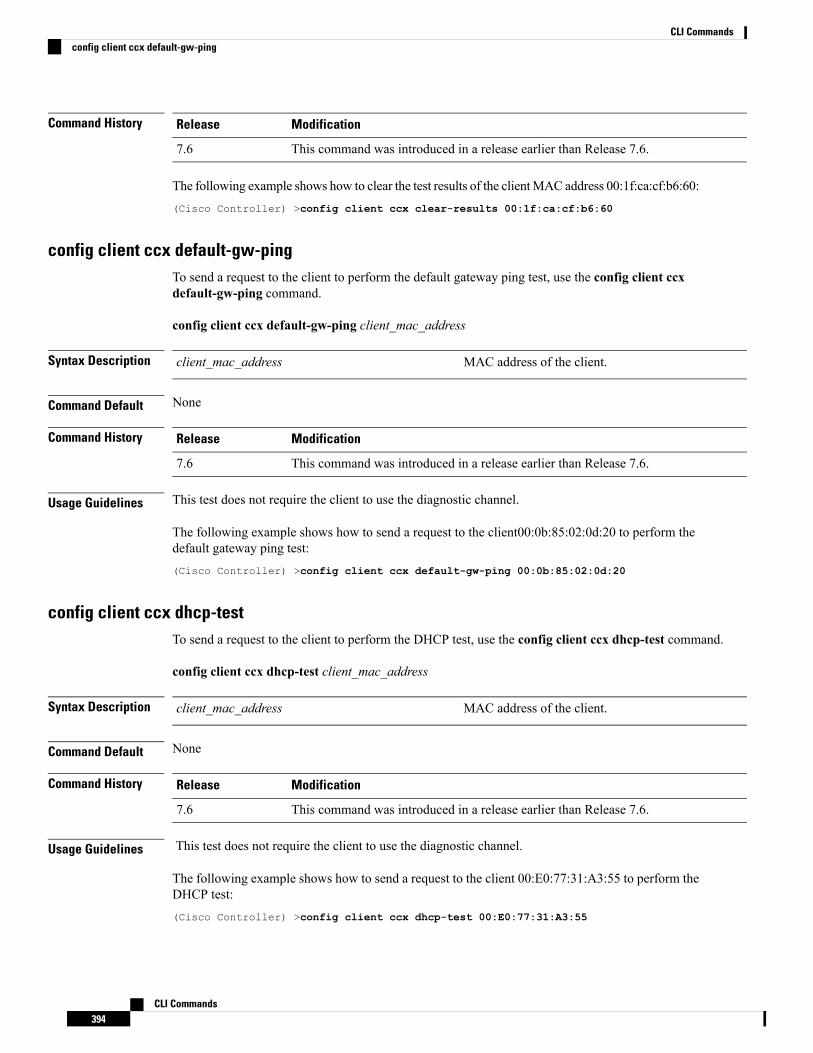
Command History ModificationRelease
This command was introduced in a release earlier than Release 7.6.7.6
The following example shows how to clear the test results of the clientMAC address 00:1f:ca:cf:b6:60:(Cisco Controller) >config client ccx clear-results 00:1f:ca:cf:b6:60
config client ccx default-gw-pingTo send a request to the client to perform the default gateway ping test, use the config client ccxdefault-gw-ping command.
config client ccx default-gw-ping client_mac_address
Syntax Description MAC address of the client.client_mac_address
Command Default None
Command History ModificationRelease
This command was introduced in a release earlier than Release 7.6.7.6
Usage Guidelines This test does not require the client to use the diagnostic channel.
The following example shows how to send a request to the client00:0b:85:02:0d:20 to perform thedefault gateway ping test:(Cisco Controller) >config client ccx default-gw-ping 00:0b:85:02:0d:20
config client ccx dhcp-testTo send a request to the client to perform the DHCP test, use the config client ccx dhcp-test command.
config client ccx dhcp-test client_mac_address
Syntax Description MAC address of the client.client_mac_address
Command Default None
Command History ModificationRelease
This command was introduced in a release earlier than Release 7.6.7.6
Usage Guidelines This test does not require the client to use the diagnostic channel.
The following example shows how to send a request to the client 00:E0:77:31:A3:55 to perform theDHCP test:(Cisco Controller) >config client ccx dhcp-test 00:E0:77:31:A3:55
CLI Commands394
CLI Commandsconfig client ccx default-gw-ping
config client ccx dns-pingTo send a request to the client to perform the Domain Name System (DNS) server IP address ping test, usethe config client ccx dns-ping command.
config client ccx dns-ping client_mac_address
Syntax Description MAC address of the client.client_mac_address
Command Default None
Command History ModificationRelease
This command was introduced in a release earlier than Release 7.6.7.6
Usage Guidelines This test does not require the client to use the diagnostic channel.
The following example shows how to send a request to a client to perform the DNS server IP addressping test:(Cisco Controller) >config client ccx dns-ping 00:E0:77:31:A3:55
config client ccx dns-resolveTo send a request to the client to perform the Domain Name System (DNS) resolution test to the specifiedhostname, use the config client ccx dns-resolve command.
config client ccx dns-resolve client_mac_address host_name
Syntax Description MAC address of the client.client_mac_address
Hostname of the client.host_name
Command Default None
Command History ModificationRelease
This command was introduced in a release earlier than Release 7.6.7.6
Usage Guidelines This test does not require the client to use the diagnostic channel.
The following example shows how to send a request to the client 00:E0:77:31:A3:55 to perform theDNS name resolution test to the specified hostname:(Cisco Controller) >config client ccx dns-resolve 00:E0:77:31:A3:55 host_name
config client ccx get-client-capabilityTo send a request to the client to send its capability information, use the config client ccx get-client-capabilitycommand.
CLI Commands395
CLI Commandsconfig client ccx dns-ping

config client ccx get-client-capability client_mac_address
Syntax Description MAC address of the client.client_mac_address
Command Default None
Command History ModificationRelease
This command was introduced in a release earlier than Release 7.6.7.6
The following example shows how to send a request to the client 172.19.28.40 to send its capabilityinformation:(Cisco Controller) >config client ccx get-client-capability 172.19.28.40
config client ccx get-manufacturer-infoTo send a request to the client to send the manufacturer’s information, use the config client ccxget-manufacturer-info command.
config client ccx get-manufacturer-info client_mac_address
Syntax Description MAC address of the client.client_mac_address
Command Default None
Command History ModificationRelease
This command was introduced in a release earlier than Release 7.6.7.6
The following example shows how to send a request to the client 172.19.28.40 to send themanufacturer’s information:(Cisco Controller) >config client ccx get-manufacturer-info 172.19.28.40
config client ccx get-operating-parametersTo send a request to the client to send its current operating parameters, use the config client ccxget-operating-parameters command.
config client ccx get-operating-parameters client_mac_address
Syntax Description MAC address of the client.client_mac_address
Command Default None
Command History ModificationRelease
This command was introduced in a release earlier than Release 7.6.7.6
CLI Commands396
CLI Commandsconfig client ccx get-manufacturer-info
The following example shows how to send a request to the client 172.19.28.40 to send its currentoperating parameters:(Cisco Controller) >config client ccx get-operating-parameters 172.19.28.40
config client ccx get-profilesTo send a request to the client to send its profiles, use the config client ccx get-profiles command.
config client ccx get-profiles client_mac_address
Syntax Description MAC address of the client.client_mac_address
Command Default None
Command History ModificationRelease
This command was introduced in a release earlier than Release 7.6.7.6
The following example shows how to send a request to the client 172.19.28.40 to send its profiledetails:(Cisco Controller) >config client ccx get-profiles 172.19.28.40
config client ccx log-requestTo configure a Cisco client eXtension (CCX) log request for a specified client device, use the config clientccx log-request command.
config client ccx log-request {roam | rsna | syslog} client_mac_address
Syntax Description (Optional) Specifies the request to specify the clientCCX roaming log.
roam
(Optional) Specifies the request to specify the clientCCX RSNA log.
rsna
(Optional) Specifies the request to specify the clientCCX system log.
syslog
MAC address of the client.client_mac_address
Command Default None
Command History ModificationRelease
This command was introduced in a release earlier than Release 7.6.7.6
The following example shows how to specify the request to specify the client CCS system log:
CLI Commands397
CLI Commandsconfig client ccx get-profiles

(Cisco Controller) >config client ccx log-request syslog 00:40:96:a8:f7:98Tue Oct 05 13:05:21 2006SysLog Response LogID=1: Status=SuccessfulEvent Timestamp=121212121212Client SysLog = 'This is a test syslog 2'Event Timestamp=121212121212Client SysLog = 'This is a test syslog 1'Tue Oct 05 13:04:04 2006SysLog Request LogID=1
The following example shows how to specify the client CCX roaming log:(Cisco Controller) >config client ccx log-request roam 00:40:96:a8:f7:98Thu Jun 22 11:55:14 2006Roaming Response LogID=20: Status=SuccessfulEvent Timestamp=121212121212Source BSSID=00:40:96:a8:f7:98, Target BSSID=00:0b:85:23:26:70,Transition Time=100(ms)Transition Reason: Unspecified Transition Result: SuccessThu Jun 22 11:55:04 2006Roaming Request LogID=20Thu Jun 22 11:54:54 2006Roaming Response LogID=19: Status=SuccessfulEvent Timestamp=121212121212Source BSSID=00:40:96:a8:f7:98, Target BSSID=00:0b:85:23:26:70,Transition Time=100(ms)Transition Reason: Unspecified Transition Result: SuccessThu Jun 22 11:54:33 2006 Roaming Request LogID=19
The following example shows how to specify the client CCX RSNA log:(Cisco Controller) >config client ccx log-request rsna 00:40:96:a8:f7:98Tue Oct 05 11:06:48 2006RSNA Response LogID=2: Status=SuccessfulEvent Timestamp=242424242424Target BSSID=00:0b:85:23:26:70RSNA Version=1Group Cipher Suite=00-x0f-ac-01Pairwise Cipher Suite Count = 2Pairwise Cipher Suite 0 = 00-0f-ac-02Pairwise Cipher Suite 1 = 00-0f-ac-04AKM Suite Count = 2KM Suite 0 = 00-0f-ac-01KM Suite 1 = 00-0f-ac-02SN Capability = 0x1PMKID Count = 2PMKID 0 = 01 02 03 04 05 06 07 08 09 10 11 12 13 14 15 16PMKID 1 = 0a 0b 0c 0d 0e 0f 17 18 19 20 1a 1b 1c 1d 1e 1f802.11i Auth Type: EAP_FASTRSNA Result: Success
config client ccx send-messageTo send a message to the client, use the config client ccx send-message command.
config client ccx send-message client_mac_address message_id
Syntax Description MAC address of the client.client_mac_address
CLI Commands398
CLI Commandsconfig client ccx send-message

message_id
CLI Commands399
CLI Commandsconfig client ccx send-message
Message type that involves one of the following:
• 1—The SSID is invalid.
• 2—The network settings are invalid.
• 3—There is a WLAN credibility mismatch.
• 4—The user credentials are incorrect.
• 5—Please call support.
• 6—The problem is resolved.
• 7—The problem has not been resolved.
• 8—Please try again later.
• 9—Please correct the indicated problem.
• 10—Troubleshooting is refused by the network.
• 11—Retrieving client reports.
• 12—Retrieving client logs.
• 13—Retrieval complete.
• 14—Beginning association test.
• 15—Beginning DHCP test.
• 16—Beginning network connectivity test.
• 17—Beginning DNS ping test.
• 18—Beginning name resolution test.
• 19—Beginning 802.1X authentication test.
• 20—Redirecting client to a specific profile.
• 21—Test complete.
• 22—Test passed.
• 23—Test failed.
• 24—Cancel diagnostic channel operation orselect a WLAN profile to resume normaloperation.
• 25—Log retrieval refused by the client.
• 26—Client report retrieval refused by the client.
• 27—Test request refused by the client.
• 28—Invalid network (IP) setting.
• 29—There is a known outage or problem withthe network.
CLI Commands400
CLI Commandsconfig client ccx send-message

30—Scheduled maintenance period.•
(continued on next page)
• 31—The WLAN security method is not correct.
• 32—The WLAN encryption method is notcorrect.
• 33—The WLAN authentication method is notcorrect.
message_type (cont.)
Command Default None
Command History ModificationRelease
This command was introduced in a release earlier than Release 7.6.7.6
The following example shows how to send a message to the client MAC address 172.19.28.40 withthe message user-action-required:(Cisco Controller) >config client ccx send-message 172.19.28.40 user-action-required
config client ccx stats-requestTo send a request for statistics, use the config client ccx stats-request command.
config client ccx stats-request measurement_duration {dot11 | security} client_mac_address
Syntax Description Measurement duration in seconds.measurement_duration
(Optional) Specifies dot11 counters.dot11
(Optional) Specifies security counters.security
MAC address of the client.client_mac_address
Command Default None
Command History ModificationRelease
This command was introduced in a release earlier than Release 7.6.7.6
The following example shows how to specify dot11 counter settings:(Cisco Controller) >config client ccx stats-request 1 dot11 00:40:96:a8:f7:98Measurement duration = 1dot11TransmittedFragmentCount = 1dot11MulticastTransmittedFrameCount = 2dot11FailedCount = 3dot11RetryCount = 4dot11MultipleRetryCount = 5dot11FrameDuplicateCount = 6
CLI Commands401
CLI Commandsconfig client ccx stats-request
dot11RTSSuccessCount = 7dot11RTSFailureCount = 8dot11ACKFailureCount = 9dot11ReceivedFragmentCount = 10dot11MulticastReceivedFrameCount = 11dot11FCSErrorCount = 12dot11TransmittedFrameCount = 13
config client ccx test-abortTo send a request to the client to terminate the current test, use the config client ccx test-abort command.
config client ccx test-abort client_mac_address
Syntax Description MAC address of the client.client_mac_address
Command Default None
Command History ModificationRelease
This command was introduced in a release earlier than Release 7.6.7.6
Usage Guidelines Only one test can be pending at a time.
The following example shows how to send a request to a client to terminate the correct test settings:(Cisco Controller) >config client ccx test-abort 11:11:11:11:11:11
config client ccx test-associationTo send a request to the client to perform the association test, use the config client ccx test-associationcommand.
config client ccx test-association client_mac_address ssid bssid 802.11{a | b | g} channel
Syntax Description MAC address of the client.client_mac_address
Network name.ssid
Basic SSID.bssid
Specifies the 802.11a network.802.11a
Specifies the 802.11b network.802.11b
Specifies the 802.11g network.802.11g
Channel number.channel
Command Default None
CLI Commands402
CLI Commandsconfig client ccx test-abort
Command History ModificationRelease
This command was introduced in a release earlier than Release 7.6.7.6
The following example shows how to send a request to the client MAC address 00:0E:77:31:A3:55to perform the basic SSID association test:(Cisco Controller) >config client ccx test-association 00:E0:77:31:A3:55 ssid bssid 802.11a
config client ccx test-dot1xTo send a request to the client to perform the 802.1x test, use the config client ccx test-dot1x command.
config client ccx test-dot1x client_mac_address profile_id bssid 802.11 {a | b | g} channel
Syntax Description MAC address of the client.client_mac_address
Test profile name.profile_id
Basic SSID.bssid
Specifies the 802.11a network.802.11a
Specifies the 802.11b network.802.11b
Specifies the 802.11g network.802.11g
Channel number.channel
Command Default None
Command History ModificationRelease
This command was introduced in a release earlier than Release 7.6.7.6
The following example shows how to send a request to the client to perform the 802.11b test withthe profile name profile_01:(Cisco Controller) >config client ccx test-dot1x 172.19.28.40 profile_01 bssid 802.11b
config client ccx test-profileTo send a request to the client to perform the profile redirect test, use the config client ccx test-profilecommand.
config client ccx test-profile client_mac_address profile_id
Syntax Description MAC address of the client.client_mac_address
CLI Commands403
CLI Commandsconfig client ccx test-dot1x

Test profile name.
The profile_id should be from one of theclient profiles for which client reporting isenabled.
Note
profile_id
Command Default None
Command History ModificationRelease
This command was introduced in a release earlier than Release 7.6.7.6
The following example shows how to send a request to the client to perform the profile redirect testwith the profile name profile_01:(Cisco Controller) >config client ccx test-profile 11:11:11:11:11:11 profile_01
config client deauthenticateTo disconnect a client, use the config client deauthenticate command.
config client deauthenticateMAC
Syntax Description Client MAC address.MAC
Command Default None
Command History ModificationRelease
This command was introduced in a release earlier than Release 7.6.7.6
The following example shows how to deauthenticate a client using its MAC address:
(Cisco Controller) >config client deauthenticate 11:11:11:11:11
config client location-calibrationTo configure link aggregation, use the config client location-calibration command.
config client location-calibration {enable mac_address interval | disable mac_address}
Syntax Description (Optional) Specifies that client location calibration isenabled.
enable
MAC address of the client.mac_address
Measurement interval in seconds.interval
CLI Commands404
CLI Commandsconfig client deauthenticate

(Optional) Specifies that client location calibration isdisabled.
disable
Command Default None
Command History ModificationRelease
This command was introduced in a release earlier than Release 7.6.7.6
The following example shows how to enable the client location calibration for the client 37:15:85:2awith a measurement interval of 45 seconds:(Cisco Controller) >config client location-calibration enable 37:15:86:2a:Bc:cf 45
Configure Guest-LAN CommandsUse the config guest-lan commands to create, delete, enable, and disable the wireless LAN commands.
config guest-lanTo create, delete, enable or disable a wireless LAN, use the config guest-lan command.
config guest-lan {create | delete} guest_lan_id interface_name | {enable | disable} guest_lan_id
Syntax Description Creates a wired LAN settings.create
Deletes a wired LAN settings:delete
LAN identifier between 1 and 5 (inclusive).guest_lan_id
Interface name up to 32 alphanumeric characters.interface_name
Enables a wireless LAN.enable
Disables a wireless LAN.disable
Command Default None
Command History ModificationRelease
This command was introduced in a release earlier than Release 7.6.7.6
The following example shows how to enable a wireless LAN with the LAN ID 16:
(Cisco Controller) > config guest-lan enable 16
Related Commands show wlan
CLI Commands405
CLI CommandsConfigure Guest-LAN Commands

config guest-lan custom-web ext-webauth-urlTo redirect guest users to an external server before accessing the web login page, use the config guest-lancustom-web ext-webauth-url command.
config guest-lan custom-web ext-webauth-url ext_web_url guest_lan_id
Syntax Description URL for the external server.ext_web_url
Guest LAN identifier between 1 and 5 (inclusive).guest_lan_id
Command Default None
Command History ModificationRelease
This command was introduced in a release earlier than Release 7.6.7.6
The following example shows how to enable a wireless LAN with the LAN ID 16:
(Cisco Controller) > config guest-lan custom-web ext-webauth-urlhttp://www.AuthorizationURL.com/ 1
Related Commands config guest-lan
config guest-lan create
config guest-lan custom-web login_page
config guest-lan custom-web global disableTo use a guest-LAN specific custom web configuration rather than a global custom web configuration, usethe config guest-lan custom-web global disable command.
config guest-lan custom-web global disable guest_lan_id
Syntax Description Guest LAN identifier between 1 and 5 (inclusive).guest_lan_id
Command Default None
Command History ModificationRelease
This command was introduced in a release earlier than Release 7.6.7.6
Usage Guidelines If you enter the config guest-lan custom-web global enable guest_lan_id command, the custom webauthentication configuration at the global level is used.
The following example shows how to disable the global web configuration for guest LAN ID 1:
(Cisco Controller) > config guest-lan custom-web global disable 1
CLI Commands406
CLI Commandsconfig guest-lan custom-web ext-webauth-url
Related Commands config guest-lan
config guest-lan create
config guest-lan custom-web ext-webauth-url
config guest-lan custom-web login_page
config guest-lan custom-web webauth-type
config guest-lan custom-web login_pageTo enable wired guest users to log into a customized web login page, use the config guest-lan custom-weblogin_page command.
config guest-lan custom-web login_page page_name guest_lan_id
Syntax Description Name of the customized web login page.page_name
Guest LAN identifier between 1 and 5 (inclusive).guest_lan_id
Command Default None
Command History ModificationRelease
This command was introduced in a release earlier than Release 7.6.7.6
The following example shows how to customize a web login page custompage1 for guest LAN ID1:
(Cisco Controller) > config guest-lan custom-web login_page custompage1 1
Related Commands config guest-lan
config guest-lan create
config guest-lan custom-web ext-webauth-url
config guest-lan custom-web webauth-typeTo define the web login page for wired guest users, use the config guest-lan custom-web webauth-typecommand.
config guest-lan custom-web webauth-type {internal | customized | external} guest_lan_id
Syntax Description Displays the default web login page for the controller.This is the default value.
internal
Displays the custom web login page that waspreviously configured.
customized
Redirects users to the URL that was previouslyconfigured.
external
CLI Commands407
CLI Commandsconfig guest-lan custom-web login_page

Guest LAN identifier between 1 and 5 (inclusive).guest_lan_id
Command Default The default web login page for the controller is internal.
Command History ModificationRelease
This command was introduced in a release earlier than Release 7.6.7.6
The following example shows how to configure the guest LAN with the webauth-type as internalfor guest LAN ID 1:
(Cisco Controller) > config guest-lan custom-web webauth-type internal 1
Related Commands config guest-lan
config guest-lan create
config guest-lan custom-web ext-webauth-url
config guest-lan ingress-interfaceTo configure the wired guest VLAN’s ingress interface that provides a path between the wired guest clientand the controller through the Layer 2 access switch, use the config guest-lan ingress-interface command.
config guest-lan ingress-interface guest_lan_id interface_name
Syntax Description Guest LAN identifier from 1 to 5 (inclusive).guest_lan_id
Interface name.interface_name
Command Default None
Command History ModificationRelease
This command was introduced in a release earlier than Release 7.6.7.6
The following example shows how to provide a path between the wired guest client and the controllerwith guest LAN ID 1 and the interface name guest01:
(Cisco Controller) > config guest-lan ingress-interface 1 guest01
Related Commands config interface guest-lan
config guest-lan create
config guest-lan interfaceTo configure an egress interface to transmit wired guest traffic out of the controller, use the config guest-laninterface command.
CLI Commands408
CLI Commandsconfig guest-lan ingress-interface

config guest-lan interface guest_lan_id interface_name
Syntax Description Guest LAN identifier between 1 and 5 (inclusive).guest_lan_id
Interface name.interface_name
Command Default None
Command History ModificationRelease
This command was introduced in a release earlier than Release 7.6.7.6
The following example shows how to configure an egress interface to transmit guest traffic out ofthe controller for guest LAN ID 1 and interface name guest01:
(Cisco Controller) > config guest-lan interface 1 guest01
Related Commands config ingress-interface guest-lan
config guest-lan create
config guest-lan mobility anchorTo add or delete mobility anchor, use the config guest-lan mobility anchor command.
config guest-lan mobility anchor {add | delete} Guest LAN Id IP addr
Syntax Description Adds a mobility anchor to a WLAN.add
Deletes a mobility anchor from a WLAN.delete
Guest LAN identifier between 1 and 5.Guest LAN Id
Member switch IPv4 or IPv6 address to anchorWLAN.
IP addr
Command Default None
Command History ModificationRelease
This command was introduced in a release earlier than Release 7.6.7.6
This command supports both IPv4 and IPv6 address formats.8.0
The following example shows how to delete a mobility anchor for WAN ID 4 and the anchor IP192.168.0.14:
(Cisco Controller) > config guest-lan mobility anchor delete 4 192.168.0.14
CLI Commands409
CLI Commandsconfig guest-lan mobility anchor

config guest-lan nacTo enable or disable Network Admission Control (NAC) out-of-band support for a guest LAN, use the configguest-lan nac command:
config guest-lan nac {enable | disable} guest_lan_id
Syntax Description Enables the NAC out-of-band support.enable
Disables the NAC out-of-band support.disable
Guest LAN identifier between 1 and 5 (inclusive).guest_lan_id
Command Default None
Command History ModificationRelease
This command was introduced in a release earlier than Release 7.6.7.6
The following example shows how to enable the NAC out-of-band support for guest LAN ID 3:
(Cisco Controller) > config guest-lan nac enable 3
Related Commands show nac statistics
show nac summary
config wlan nac
debug nac
config guest-lan securityTo configure the security policy for the wired guest LAN, use the config guest-lan security command.
config guest-lan security {web-auth {enable | disable | acl | server-precedence} guest_lan_id |web-passthrough {acl | email-input | disable | enable} guest_lan_id}
Syntax Description Specifies web authentication.web-auth
Enables the web authentication settings.enable
Disables the web authentication settings.disable
Configures an access control list.acl
Configures the authentication server precedence orderfor web authentication users.
server-precedence
LAN identifier between 1 and 5 (inclusive).guest_lan_id
CLI Commands410
CLI Commandsconfig guest-lan nac

Specifies the web captive portal with no authenticationrequired.
web-passthrough
Configures the web captive portal using an e-mailaddress.
email-input
Command Default The default security policy for the wired guest LAN is web authentication.
Command History ModificationRelease
This command was introduced in a release earlier than Release 7.6.7.6
The following example shows how to configure the security web authentication policy for guestLAN ID 1:
(Cisco Controller) > config guest-lan security web-auth enable 1
Related Commands config ingress-interface guest-lan
config guest-lan create
config interface guest-lan
Configure IPv6 CommandsUse the config ipv6 commands to configure IPv6 settings.
config ipv6 disableTo disable IPv6 globally on the Cisco WLC, use the config ipv6 disable command .
config ipv6 disable
Syntax Description This command has no arguments or keywords.
Command Default None
Command History ModificationRelease
This command was introduced in a release earlier than Release 7.6.7.6
Usage Guidelines When you use this command, the controller drops all IPv6 packets and the clients will not receive any IPv6address.
The following example shows how to disable IPv6 on the controller:(Cisco Controller) >config ipv6 disable
CLI Commands411
CLI CommandsConfigure IPv6 Commands
config ipv6 enableTo enable IPv6 globally on the Cisco WLC, use the config ipv6 enable command.
config ipv6 enable
Syntax Description This command has no arguments or keywords.
Command Default None
Command History ModificationRelease
This command was introduced in a release earlier than Release 7.6.7.6
The following example shows how to enable IPv6 on the Cisco WLC:(Cisco Controller) >config ipv6 enable
config ipv6 aclTo create or delete an IPv6 ACL on the Cisco wireless LAN controller, apply ACL to data path, and configurerules in the IPv6 ACL, use the config ipv6 acl command.
config ipv6 acl [apply | cpu | create | delete | rule]config ipv6 acl apply nameconfig ipv6 acl cpu {name | none}config ipv6 acl create nameconfig ipv6 acl delete nameconfig ipv6 acl rule [action | add | change | delete | destination | direction | dscp | protocol| source | swap ]config ipv6 acl rule action name index {permit | deny}config ipv6 acl rule add name indexconfig ipv6 acl rule change index name old_index new_indexconfig ipv6 acl rule delete name indexconfig ipv6 acl rule destination {address name index ip_address prefix-len | port range name index }config ipv6 acl rule direction name index {in | out | any}config ipv6 acl rule dscp name dscpconfig ipv6 acl rule protocol name index protocolconfig ipv6 acl rule source {address name index ip_address prefix-len | port range name indexstart_port end_port}config ipv6 acl rule swap index name index_1index_2
Syntax Description Applies an IPv6 ACL. An IPv6 ACL can contain up to 32 alphanumericcharacters.
apply name
Applies the IPv6 ACL to the CPU.cpu name
Configure none if you wish not to have a IPV6 ACL.cpu none
Creates an IPv6 ACL.create
Deletes an IPv6 ACL.delete
CLI Commands412
CLI Commandsconfig ipv6 enable

Configures rules in the IPv6 ACL to either permit or deny access. IPv6 ACLname can contains up to 32 alphanumeric characters and IPv6 ACL ruleindex can be between 1 and 32.
rule (action) (name)(index)
Permit or deny the IPv6 rule action.{permit|deny}
Adds a new rule and rule index.add name index
Changes a rule’s index.change name old_indexnew_index
Deletes a rule and rule index.delete name index
Configures a rule’s destination IP address and prefix length (between 0 and128).
destination address nameindex ip_addr prefix-len
Configure a rule's destination port range. Enter IPv6 ACL name and set anrule index for it.
destination port name index
Configures a rule’s direction to in, out, or any.direction name index{in|out|any}
Configures a rule’s DSCP. For rule index of DSCP, select a number between0 and 63, or any.
dscp name index dscp
Configures a rule’s protocol. Enter a name and set an index between 0 and255 or any
protocol name index protocol
Configures a rule’s source IP address and netmask.source address name indexip_address prefix-len
Configures a rule’s source port range.source port range name indexstart_port end_port
Swap’s two rules’ indices.swap index name index_1index_2
Command Default After adding an ACL, the config ipv6 acl cpu is by default configured as enabled.
Command History ModificationRelease
This command was introduced in a release earlier than Release 7.6..7.6
This commandwas updated by adding cpu and none keywords and the ipv6_acl_namevariable.
8.0
Usage Guidelines For a Cisco 2100 SeriesWireless LANController, you must configure a preauthentication ACL on the wirelessLAN for the external web server. This ACL should then be set as a wireless LAN preauthentication ACLunder Web Policy. However, you do not need to configure any preauthentication ACL for Cisco 4400 SeriesWireless LAN Controllers.
The following example shows how to configure an IPv6 ACL to permit access:(Cisco Controller) >config ipv6 acl rule action lab1 4 permit
CLI Commands413
CLI Commandsconfig ipv6 acl

The following example shows how to configure an interface ACL:(Cisco Controller) > config ipv6 interface acl management IPv6-Acl
Related Commands show ipv6 acl detailed
show ipv6 acl cpu
config ipv6 neighbor-bindingTo configure the Neighbor Binding table on the Cisco wireless LAN controller, use the config ipv6neighbor-binding command.
config ipv6 neighbor-binding {timers {down-lifetime down_time | reachable-lifetime reachable_time| stale-lifetime stale_time } | { ra-throttle {allow at-least at_least_value} | enable | disable |interval-option { ignore | passthrough | throttle } | max-through {no_mcast_RA | no-limit}| throttle-period throttle_period}}
Syntax Description Configures the neighbor binding table timeout timers.timers
Configures the down lifetime.down-lifetime
Down lifetime in seconds. The range is from 0 to86400. The default is 30 seconds.
down_time
Configures the reachable lifetime.reachable-lifetime
Reachable lifetime in seconds. The range is from 0 to86400. The default is 300 seconds.
reachable_time
Configures the stale lifetime.stale-lifetime
Stale lifetime in seconds. The range is from 0 to86400. The default is 86400 seconds.
stale_time
Configures IPv6 RA throttling options.ra-throttle
Specifies the number of multicast RAs per router perthrottle period.
allow
Number of multicast RAs from router beforethrottling. The range is from 0 to 32. The default is 1.
at_least_value
Enables IPv6 RA throttling.enable
Disables IPv6 RA throttling.disable
Adjusts the behavior on RA with RFC3775 intervaloption.
interval-option
Indicates interval option has no influence on throttling.ignore
Indicates all RAs with RFC3775 interval option willbe forwarded (default).
passthrough
CLI Commands414
CLI Commandsconfig ipv6 neighbor-binding

Indicates all RAs with RFC3775 interval option willbe throttled.
throttle
Specifies unthrottled multicast RAs per VLAN perthrottle period.
max-through
Number of multicast RAs on VLAN by whichthrottling is enforced. The default multicast RAs onvlan is 10.
no_mcast_RA
Configures no upper bound at the VLAN level.no-limit
Configures the throttle period.throttle-period
Duration of the throttle period in seconds. The rangeis from 10 to 86400 seconds. The default is 600seconds.
throttle_period
Command Default This command is disabled by default.
Command History ModificationRelease
This command was introduced in a release earlier than Release 7.6.7.6
The following example shows how to configure the Neighbor Binding table:(Cisco Controller) >config ipv6 neighbor-binding ra-throttle enable
Related Commands show ipv6 neighbor-binding
config ipv6 ns-mcast-fwdTo configure the nonstop multicast cache miss forwarding, use the config ipv6 ns-mcast-fwd command.
config ipv6 ns-mcast-fwd {enable | disable}
Syntax Description Enables nonstopmulticast forwarding on a cachemiss.enable
Disables nonstop multicast forwarding on a cachemiss.
disable
Command Default None
Command History ModificationRelease
This command was introduced in a release earlier than Release 7.6.7.6
The following example shows how to configure an nonstop multicast forwarding:(Cisco Controller) >config ipv6 ns-mcast-fwd enable
CLI Commands415
CLI Commandsconfig ipv6 ns-mcast-fwd

config ipv6 ra-guardTo configure the filter for Router Advertisement (RA) packets that originate from a client on an AP, use theconfig ipv6 ra-guard command.
config ipv6 ra-guard ap {enable | disable}
Syntax Description Enables RA guard on an AP.enable
Disables RA guard on an AP.disable
Command Default None
Command History ModificationRelease
This command was introduced in a release earlier than Release 7.6.7.6
The following example shows how to enable IPv6 RA guard:
(Cisco Controller) >config ipv6 ra-guard enable
Related Commands show ipv6 ra-guard
Configure Interface Group CommandsUse the config interface group to create and delete an interface group.
config interface groupTo add an interface to the existing interface group, use the config interface group command.
config interface group {create interface-group-name interface-group-description} | {deleteinterface-group-name} | {interface {add | delete} interface-group-name interface-name} |{description interface-group-name interface-group-description}
Syntax Description Adds a new interface group.create
Interface group’s name.interface-group-name
Interface group’s description to be entered withindouble quotation marks. You can enter up to 32characters.
interface-group-description
Deletes an interface group.delete
Edits the list of interface represented by the interfacegroup.
interface
Adds a new interface to the interface group.add
CLI Commands416
CLI Commandsconfig ipv6 ra-guard
Deletes an interface from the interface group.delete
Configures the description for an interface group.description
Command Default None
Command History ModificationRelease
This commandwas introduced in a release earlier thanRelease 7.6.
7.6
The following example shows how to configure a new interface group with the name int-grp-10:(Cisco Controller) > config interface group create int-grp-10 “for wlan1”
Configure Macfilter CommandsUse the config macfilter commands to configure macfilter settings.
config macfilterTo create or delete a MAC filter entry on the Cisco wireless LAN controller, use the config macfilter {add|delete}command.
config macfilter {add client_MAC wlan_id [interface_name] [description] [macfilter_IP] | deleteclient_MAC}
Syntax Description Adds a MAC filter entry on the controller.add
Deletes a MAC filter entry on the controller.delete
Client MAC address.MAC_addr
Wireless LAN identifier with which the MAC filterentry should associate. A zero value associates theentry with any wireless LAN.
wlan_id
(Optional) Name of the interface. Enter 0 to specifyno interface.
interface_name
(Optional) Short description of the interface (up to 32characters) in double quotes.
A description is mandatory if macfilterIPis specified.
Note
description
(Optional) IPv4 address of the local MAC filterdatabase.
IP Address
Command Default None
CLI Commands417
CLI CommandsConfigure Macfilter Commands
Command History ModificationRelease
This commandwas introduced in a release earlier thanRelease 7.6.
7.6
Usage Guidelines Use the config macfilter add command to add a client locally to a wireless LAN on the Cisco wireless LANcontroller. This filter bypasses the RADIUS authentication process.
As on release 7.6, the optional macfilter_IP supports only IPv4 address.
The following example shows how to add a MAC filter entry 00:E0:77:31:A3:55 with the wirelessLAN ID 1, interface name labconnect, and MAC filter IP 10.92.125.51 on the controller:(Cisco Controller) > config macfilter add 00:E0:77:31:A3:55 1 lab02 “labconnect” 10.92.125.51
Related Commands show macfilter
config macfilter ip-address
config macfilter descriptionTo add a description to a MAC filter, use the config macfilter description command.
config macfilter descriptionMAC addrdescription
Syntax Description Client MAC address.MAC addr
(Optional) Description within double quotes (up to32 characters).
description
Command Default None
Command History ModificationRelease
This commandwas introduced in a release earlier thanRelease 7.6.
7.6
The following example shows how to configure the description MAC filter 01 to MAC address11:11:11:11:11:11:(Cisco Controller) > config macfilter description 11:11:11:11:11:11 “MAC Filter 01”
Related Commands show macfilter
config macfilter interfaceTo create a MAC filter client interface, use the config macfilter interface command.
config macfilter interfaceMAC_addr interface
Syntax Description Client MAC address.MAC addr
CLI Commands418
CLI Commandsconfig macfilter description

Interface name. A value of zero is equivalent to noname.
interface
Command Default None
Command History ModificationRelease
This commandwas introduced in a release earlier thanRelease 7.6.
7.6
The following example shows how to configure a MAC filer interface Lab01 on client11:11:11:11:11:11:
(Cisco Controller) > config macfilter interface 11:11:11:11:11:11 Lab01
Related Commands show macfilter
config macfilter ip-addressTo assign an IP address to an existing MAC filter entry if one was not assigned using the config macfilteradd command, use the config macfilter ip-address command.
config macfilter ip-addressMAC_address IP_address
Syntax Description Client MAC address.MAC_address
IPv4 address for a specific MAC address in the localMAC filter database.
IP_address
Command Default None
Usage Guidelines As on release 7.6, IP_address supports only IPv4 addresses.
Command History ModificationRelease
This commandwas introduced in a release earlier thanRelease 7.6.
7.6
This command supports only IPv4 address format.8.0
The following example shows how to configure IP address 10.92.125.51 for a MAC00:E0:77:31:A3:55 in the local MAC filter database:(Cisco Controller) > config macfilter ip-address 00:E0:77:31:A3:55 10.92.125.51
Related Commands show macfilter
config macfilter
CLI Commands419
CLI Commandsconfig macfilter ip-address

config macfilter mac-delimiterTo set the MAC delimiter (colon, hyphen, none, and single-hyphen) for MAC addresses sent to RADIUSservers, use the config macfilter mac-delimiter command.
config macfilter mac-delimiter {none | colon | hyphen | single-hyphen}
Syntax Description Disables the delimiters (for example, xxxxxxxxxx).none
Sets the delimiter to a colon (for example,xx:xx:xx:xx:xx:xx).
colon
Sets the delimiter to a hyphen (for example,xx-xx-xx-xx-xx-xx).
hyphen
Sets the delimiter to a single hyphen (for example,xxxxxx-xxxxxx).
single-hyphen
Command Default The default delimiter is hyphen.
Command History ModificationRelease
This commandwas introduced in a release earlier thanRelease 7.6.
7.6
The following example shows how to have the operating system sendMAC addresses to the RADIUSserver in the form aa:bb:cc:dd:ee:ff:(Cisco Controller) > config macfilter mac-delimiter colon
The following example shows how to have the operating system sendMAC addresses to the RADIUSserver in the form aa-bb-cc-dd-ee-ff:(Cisco Controller) > config macfilter mac-delimiter hyphen
The following example shows how to have the operating system sendMAC addresses to the RADIUSserver in the form aabbccddeeff:(Cisco Controller) > config macfilter mac-delimiter none
Related Commands show macfilter
config macfilter radius-compatTo configure the Cisco wireless LAN controller for compatibility with selected RADIUS servers, use theconfig macfilter radius-compat command.
config macfilter radius-compat {cisco | free | other}
Syntax Description Configures the Cisco ACS compatibility mode(password is the MAC address of the server).
cisco
CLI Commands420
CLI Commandsconfig macfilter mac-delimiter

Configures the Free RADIUS server compatibilitymode (password is secret).
free
Configures for other server behaviors (no passwordis necessary).
other
Command Default Other
Command History ModificationRelease
This commandwas introduced in a release earlier thanRelease 7.6.
7.6
The following example shows how to configure the Cisco ACS compatibility mode to “other”:
(Cisco Controller) > config macfilter radius-compat other
Related Commands show macfilter
config macfilter wlan-idTo modify a wireless LAN ID for a MAC filter, use the config macfilter wlan-id command.
config macfilter wlan-idMAC_addr WLAN_id
Syntax Description Client MAC address.MAC addr
Wireless LAN identifier to associate with. A value ofzero is not allowed.
WLAN_id
Command Default None
Command History ModificationRelease
This commandwas introduced in a release earlier thanRelease 7.6.
7.6
The following example shows how to modify client wireless LAN ID 2 for a MAC filter11:11:11:11:11:11:
(Cisco Controller) > config macfilter wlan-id 11:11:11:11:11:11 2
Related Commands show macfilter
show wlan
config macfilter wlan-idTo modify a wireless LAN ID for a MAC filter, use the config macfilter wlan-id command.
CLI Commands421
CLI Commandsconfig macfilter wlan-id
config macfilter wlan-idMAC wlan_id
Syntax Description Client MAC address.MAC
Wireless LAN identifier to associate with. A value ofzero is not allowed.
wlan_id
Command Default None
Command History ModificationRelease
This commandwas introduced in a release earlier thanRelease 7.6.
7.6
The following example shows how to modify client wireless LAN ID 2 for a MAC filer11:11:11:11:11:11:
(Cisco Controller) > config macfilter wlan-id 11:11:11:11:11:11 2
Related Commands show macfilter
show wlan
Config Remote LAN CommandsUse the config remote-lan commands to configure remote LANs.
config remote-lanTo configure a remote LAN, use the config remote-lan command.
config remote-lan {enable | disable} {remote-lan-id | all}
Syntax Description Enables a remote LAN.enable
Disables a remote LAN.disable
Remote LAN identifier. Valid values are between 1and 512.
remote-lan-id
Configures all wireless LANs.all
Command Default None
Command History ModificationRelease
This command was introduced in a release earlier than Release 7.6.7.6
The following example shows how to enable a remote LAN with ID 2:
CLI Commands422
CLI CommandsConfig Remote LAN Commands
(Cisco Controller) >config remote-lan enable 2
config remote-lan aaa-overrideTo configure user policy override through AAA on a remote LAN, use the config remote-lan aaa-overridecommand.
config remote-lan aaa-override {enable | disable} remote-lan-id
Syntax Description Enables user policy override through AAA on aremote LAN.
enable
Disables user policy override through AAA on aremote LAN.
disable
Remote LAN identifier. Valid values are between 1and 512.
remote-lan-id
Command Default None
Command History ModificationRelease
This command was introduced in a release earlier than Release 7.6.7.6
The following example shows how to enable user policy override through AAA on a remote LANwhere the remote LAN ID is 2:(Cisco Controller) >config remote-lan aaa-override enable 2
config remote-lan aclTo specify an access control list (ACL) for a remote LAN, use the config remote-lan acl command.
config remote-lan acl remote-lan-id acl_name
Syntax Description Remote LAN identifier. Valid values are between 1and 512.
remote-lan-id
ACL name.
Use the show acl summary command toknow the ACLs available.
Note
acl_name
Command Default None
Command History ModificationRelease
This command was introduced in a release earlier than Release 7.6.7.6
The following example shows how to specify ACL1 for a remote LAN whose ID is 2:
CLI Commands423
CLI Commandsconfig remote-lan aaa-override
(Cisco Controller) >config remote-lan acl 2 ACL1
config remote-lan createTo configure a new remote LAN connection, use the config remote-lan create command.
config remote-lan create remote-lan-id name
Syntax Description Remote LAN identifier. Valid values are between 1and 512.
remote-lan-id
Remote LAN name. Valid values are up to 32alphanumeric characters.
name
Command Default None
Command History ModificationRelease
This command was introduced in a release earlier than Release 7.6.7.6
The following example shows how to configure a new remote LAN, MyRemoteLAN, with the LANID as 3:(Cisco Controller) >config remote-lan create 3 MyRemoteLAN
config remote-lan custom-webTo configure web authentication for a remote LAN, use the config remote-lan custom-web command.
config remote-lan custom-web {ext-webauth-url URL } | global {enable | disable} | login-pagepage-name | loginfailure-page {page-name | none} | logout-page {page-name | none} |webauth-type {internal |customized | external}} remote-lan-id
Syntax Description Configures an external web authentication URL.ext-webauth-url
Web authentication URL for the Login page.URL
Configures the global status for the remote LAN.global
Enables the global status for the remote LAN.enable
Disables the global status for the remote LAN.disable
Configures a login page.login-page
Login page name.page-name
Configures no login page.none
Configures a logout page.logout-page
Configures no logout page.none
CLI Commands424
CLI Commandsconfig remote-lan create

Configures the web authentication type for the remoteLAN.
webauth-type
Displays the default login page.internal
Displays a downloaded login page.customized
Displays a login page that is on an external server.external
Remote LAN name. Valid values are up to 32alphanumeric characters.
name
Remote LAN identifier. Valid values are from 1 to512.
remote-lan-id
Command Default None
Command History ModificationRelease
This command was introduced in a release earlier than Release 7.6.7.6
Usage Guidelines Follow these guidelines when you use the config remote-lan custom-web command:
• When you configure the external Web-Auth URL, do the following:
• Ensure that Web-Auth or Web-Passthrough Security is in enabled state. To enable Web-Auth, usethe config remote-lan security web-auth enable command. To enable Web-Passthrough, use theconfig remote-lan security web-passthrough enable command.
• Ensure that the global status of the remote LAN is in disabled state. To enable the global status ofthe remote LAN, use the config remote-lan custom-web global disable command.
• Ensure that the remote LAN is in disabled state. To disable a remote LAN, use the config remote-landisable command.
• When you configure the Web-Auth type for the remote LAN, do the following:
• When you configure a customized login page, ensure that you have a login page configured. Toconfigure a login page, use the config remote-lan custom-web login-page command.
• When you configure an external login page, ensure that you have configured preauthentication ACLfor external web authentication to function.
The following example shows how to configure an external web authentication URL for a remoteLAN with ID 3:
(Cisco Controller) >config remote-lan custom-web ext-webauth-urlhttp://www.AuthorizationURL.com/ 3
The following example shows how to enable the global status of a remote LAN with ID 3:
(Cisco Controller) >config remote-lan custom-web global enable 3
CLI Commands425
CLI Commandsconfig remote-lan custom-web
The following example shows how to configure the login page for a remote LAN with ID 3:
(Cisco Controller) >config remote-lan custom-web login-page custompage1 3
The following example shows how to configure a web authentication type with the default loginpage for a remote LAN with ID 3:
(Cisco Controller) >config remote-lan custom-web webauth-type internal 3
config remote-lan deleteTo delete a remote LAN connection, use the config remote-lan delete command.
config remote-lan delete remote-lan-id
Syntax Description Remote LAN identifier. Valid values are between 1and 512.
remote-lan-id
Command Default None
Command History ModificationRelease
This command was introduced in a release earlier than Release 7.6.7.6
The following example shows how to delete a remote LAN with ID 3:(Cisco Controller) >config remote-lan delete 3
config remote-lan dhcp_serverTo configure a dynamic host configuration protocol (DHCP) server for a remote LAN, use the configremote-lan dhcp_server command.
config remote-lan dhcp_server remote-lan-id ip_address
Syntax Description Remote LAN identifier. Valid values are between 1and 512.
remote-lan-id
IPv4 address of the override DHCP server.ip_addr
Command Default 0.0.0.0 is set as the default interface value.
Command History ModificationRelease
This command was introduced in a release earlier than Release 7.6.7.6
This command supports only IPv4 address format.8.0
The following example shows how to configure a DHCP server for a remote LAN with ID 3:(Cisco Controller) >config remote-lan dhcp_server 3 209.165.200.225
CLI Commands426
CLI Commandsconfig remote-lan delete

Related Commands show remote-lan
config remote-lan exclusionlistTo configure the exclusion list timeout on a remote LAN, use the config remote-lan exclusionlist command.
config remote-lan exclusionlist remote-lan-id {seconds | disabled | enabled}
Syntax Description Remote LAN identifier. Valid values are between 1and 512.
remote-lan-id
Exclusion list timeout in seconds. A value of 0requires an administrator override.
seconds
Disables exclusion listing.disabled
Enables exclusion listing.enabled
Command Default None
Command History ModificationRelease
This command was introduced in a release earlier than Release 7.6.7.6
The following example shows how to configure the exclusion list timeout to 20 seconds on a remoteLAN with ID 3:(Cisco Controller) >config remote-lan exclusionlist 3 20
config remote-lan interfaceTo configure an interface for a remote LAN, use the config remote-lan interface command.
config remote-lan interface remote-lan-id interface_name
Syntax Description Remote LAN identifier. Valid values are between 1and 512.
remote-lan-id
Interface name.
Interface name should not be in upper casecharacters.
Note
interface_name
Command Default None
Command History ModificationRelease
This command was introduced in a release earlier than Release 7.6.7.6
The following example shows how to configure an interface myinterface for a remote LAN with ID3:
CLI Commands427
CLI Commandsconfig remote-lan exclusionlist

(Cisco Controller) >config remote-lan interface 3 myinterface
config remote-lan ldapTo configure a remote LAN’s LDAP servers, use the config remote-lan ldap command.
config remote-lan ldap {add | delete} remote-lan-id index
Syntax Description Adds a link to a configured LDAP server (maximumof three).
add
Deletes a link to a configured LDAP server.delete
Remote LAN identifier. Valid values are between 1and 512.
remote-lan-id
LDAP server index.index
Command Default None
Command History ModificationRelease
This command was introduced in a release earlier than Release 7.6.7.6
The following example shows how to add an LDAP server with the index number 10 for a remoteLAN with ID 3:
(Cisco Controller) >config remote-lan ldap add 3 10
config remote-lan mac-filteringTo configure MAC filtering on a remote LAN, use the config remote-lan mac-filtering command.
config remote-lan mac-filtering {enable | disable} remote-lan-id
Syntax Description Enables MAC filtering on a remote LAN.enable
Disables MAC filtering on a remote LAN.disable
Remote LAN identifier. Valid values are between 1and 512.
remote-lan-id
Command Default MAC filtering on a remote LAN is enabled.
Command History ModificationRelease
This command was introduced in a release earlier than Release 7.6.7.6
The following example shows how to disable MAC filtering on a remote LAN with ID 3:
CLI Commands428
CLI Commandsconfig remote-lan ldap

(Cisco Controller) >config remote-lan mac-filtering disable 3
config remote-lan max-associated-clientsTo configure the maximum number of client connections on a remote LAN, use the config remote-lanmax-associated-clients command.
config remote-lan max-associated-clients remote-lan-id max-clients
Syntax Description Remote LAN identifier. Valid values are between 1and 512.
remote-lan-id
Configures the maximum number of clientconnections on a remote LAN.
max-clients
Command Default None
Command History ModificationRelease
This command was introduced in a release earlier than Release 7.6.7.6
The following example shows how to configure 10 client connections on a remote LAN with ID 3:(Cisco Controller) >config remote-lan max-associated-clients 3 10
config remote-lan radius_serverTo configure the RADIUS servers on a remote LAN, use the config remote-lan radius_server command.
config remote-lan radius_server {acct {{add | delete} server-index | {enable | disable} |interim-update {interval | enable | disable}} | auth {{add | delete} server-index | {enable| disable }} | overwrite-interface {enable | disable}} remote-lan-id
Syntax Description Configures a RADIUS accounting server.acct
Adds a link to a configured RADIUS server.add
Deletes a link to a configured RADIUS server.delete
Remote LAN identifier. Valid values are between 1and 512.
remote-lan-id
RADIUS server index.server-index
Enables RADIUS accounting for this remote LAN.enable
Disables RADIUS accounting for this remote LAN.disable
Enables RADIUS accounting for this remote LAN.interim-update
Accounting interim interval. The range is from 180to 3600 seconds.
interval
CLI Commands429
CLI Commandsconfig remote-lan max-associated-clients

Enables accounting interim update.enable
Disables accounting interim update.disable
Configures a RADIUS authentication server.auth
Enables RADIUS authentication for this remote LAN.enable
Disables RADIUS authentication for this remote LAN.disable
Configures a RADIUS dynamic interface for theremote LAN.
overwrite-interface
Enables a RADIUS dynamic interface for the remoteLAN.
enable
Disables a RADIUS dynamic interface for the remoteLAN.
disable
Command Default The interim update interval is set to 600 seconds.
Command History ModificationRelease
This command was introduced in a release earlier than Release 7.6.7.6
The following example shows how to enable RADIUS accounting for a remote LAN with ID 3:(Cisco Controller) >config remote-lan radius_server acct enable 3
config remote-lan securityTo configure security policy for a remote LAN, use the config remote-lan security command.
config remote-lan security {{web-auth {enable | disable | acl | server-precedence} remote-lan-id| {web-passthrough {enable | disable | acl | email-input} remote-lan-id}}
Syntax Description Specifies web authentication.web-auth
Enables the web authentication settings.enable
Disables the web authentication settings.disable
Configures an access control list.acl
Configures the authentication server precedence orderfor web authentication users.
server-precedence
Remote LAN identifier. Valid values are between 1and 512.
remote-lan-id
Configures the web captive portal using an e-mailaddress.
email-input
CLI Commands430
CLI Commandsconfig remote-lan security

Specifies the web captive portal with no authenticationrequired.
web-passthrough
Command Default None
Command History ModificationRelease
This command was introduced in a release earlier than Release 7.6.7.6
The 802.1X keyword was added.8.4
The following example shows how to configure the security web authentication policy for remoteLAN ID 1:(Cisco Controller) >config remote-lan security web-auth enable 1
config remote-lan session-timeoutTo configure client session timeout, use the config remote-lan session-timeout command.
config remote-lan session-timeout remote-lan-id seconds
Syntax Description Remote LAN identifier. Valid values are between 1and 512.
remote-lan-id
Timeout or session duration in seconds. A value ofzero is equivalent to no timeout.
seconds
Command Default None
Command History ModificationRelease
This command was introduced in a release earlier than Release 7.6.7.6
The following example shows how to configure the client session timeout to 6000 seconds for aremote LAN with ID 1:(Cisco Controller) >config remote-lan session-timeout 1 6000
config remote-lan webauth-excludeTo configure web authentication exclusion on a remote LAN, use the config remote-lan webauth-excludecommand.
config remote-lan webauth-exclude remote-lan-id {enable | disable}
Syntax Description Remote LAN identifier. Valid values are between 1and 512.
remote-lan-id
CLI Commands431
CLI Commandsconfig remote-lan session-timeout

Enables web authentication exclusion on the remoteLAN.
enable
Disables web authentication exclusion on the remoteLAN.
disable
Command Default None
Command History ModificationRelease
This command was introduced in a release earlier than Release 7.6.7.6
The following example shows how to enable web authentication exclusion on a remote LAN withID 1:
(Cisco Controller) >config remote-lan webauth-exclude 1 enable
Configure Memory Monitor CommandsTo troubleshoot hard-to-solve or hard-to-reproduce memory problems, use the config memory monitorcommands.
The commands in this section can be disruptive to your system and should be run only when you are advisedto do so by the Cisco Technical Assistance Center (TAC).
Note
config memory monitor errorsTo enable or disable monitoring for memory errors and leaks, use the config memory monitor errorscommand.
config memory monitor errors {enable | disable}
The config memory monitor commands can be disruptive to your system and should be run only when youare advised to do so by the Cisco TAC.
Caution
Syntax Description Enables the monitoring for memory settings.enable
Disables the monitoring for memory settings.disable
Command Default Monitoring for memory errors and leaks is disabled by default.
Command History ModificationRelease
This command was introduced in a release earlier than Release 7.6.7.6
CLI Commands432
CLI CommandsConfigure Memory Monitor Commands

Usage Guidelines Be cautious about changing the defaults for the config memory monitor command unless you know whatyou are doing, you have detected a problem, or you are collecting troubleshooting information.
The following example shows how to enable monitoring for memory errors and leaks for a controller:
(Cisco Controller) > config memory monitor errors enable
Related Commands config memory monitor leaks
debug memory
show memory monitor
config memory monitor leaksTo configure the controller to perform an auto-leak analysis between two memory thresholds, use the configmemory monitor leaks command.
config memory monitor leaks low_thresh high_thresh
The config memory monitor commands can be disruptive to your system and should be run only when youare advised to do so by the Cisco TAC.
Caution
Syntax Description Value below which free memory cannot fall withoutcrashing. This value cannot be set lower than 10000KB.
low_thresh
Value below which the controller entersauto-leak-analysis mode. See the “Usage Guidelines”section.
high_thresh
Command Default The default value for low_thresh is 10000 KB; the default value for high_thresh is 30000 KB.
Command History ModificationRelease
This command was introduced in a release earlier than Release 7.6.7.6
Usage Guidelines
Be cautious about changing the defaults for the config memory monitor command unless you know whatyou are doing, you have detected a problem, or you are collecting troubleshooting information.
Note
Use this command if you suspect that a memory leak has occurred.
If the free memory is lower than the low_thresh threshold, the system crashes, generating a crash file. Thedefault value for this parameter is 10000 KB, and you cannot set it below this value.
CLI Commands433
CLI Commandsconfig memory monitor leaks

Set the high_thresh threshold to the current free memory level or higher so that the system entersauto-leak-analysis mode. After the free memory reaches a level lower than the specified high_thresh threshold,the process of tracking and freeing memory allocation begins. As a result, the debug memory events enablecommand shows all allocations and frees, and the show memory monitor detail command starts to detectany suspected memory leaks.
The following example shows how to set the threshold values for auto-leak-analysis mode to 12000KB for the low threshold and 35000 KB for the high threshold:
(Cisco Controller) > config memory monitor leaks 12000 35000
Related Commands config memory monitor leaks
debug memory
show memory monitor
Configure Mesh CommandsUse the configure mesh commands to set mesh access point settings.
config mesh alarmTo configure alarm settings for outdoor mesh access points, use the config mesh alarm command.
configmesh alarm {max-hop | max-children | low-snr | high-snr | association | parent-changecount} value
Syntax Description Sets the maximum number of hops before triggeringan alarm for traffic over the mesh network. The validvalues are 1 to 16 (inclusive).
max-hop
Sets the maximum number of mesh access points(MAPs) that can be assigned to a mesh router accesspoint (RAP) before triggering an alarm. The validvalues are 1to 16 (inclusive).
max-children
Sets the low-end signal-to-noise ratio (SNR) valuebefore triggering an alarm. The valid values are 1 to30 (inclusive).
low-snr
Sets the high-end SNR value before triggering analarm. The valid values are 1 to 30 (inclusive).
high-snr
Sets the mesh alarm association count value beforetriggering an alarm. The valid values are 1 to 30(inclusive).
association
Sets the number of times a MAP can change its RAPassociation before triggering an alarm. The validvalues are 1 to 30 (inclusive).
parent-change count
CLI Commands434
CLI CommandsConfigure Mesh Commands

Value above or below which an alarm is generated.The valid values vary for each command.
value
Command Default See the “Syntax Description” section for command and argument value ranges.
Command History ModificationRelease
This command was introduced in a release earlier than Release 7.6.7.6
The following example shows how to set the maximum hops threshold to 8:(Cisco Controller) >config mesh alarm max-hop 8
The following example shows how to set the upper SNR threshold to 25:
(Cisco Controller) >config mesh alarm high-snr 25
config mesh astoolsTo globally enable or disable the anti-stranding feature for outdoor mesh access points, use the config meshastools command.
config mesh astools {enable | disable}
Syntax Description Enables this feature for all outdoor mesh access points.enable
Disables this feature for all outdoor mesh accesspoints.
disable
Command Default None
Command History ModificationRelease
This command was introduced in a release earlier than Release 7.6.7.6
The following example shows how to enable anti-stranding on all outdoor mesh access points:(Cisco Controller) >config mesh astools enable
config mesh backhaul rate-adaptTo globally configure the backhaul Tx rate adaptation (universal access) settings for indoor and outdoor meshaccess points, use the config mesh backhaul rate-adapt command.
configmesh backhaul rate-adapt [all | bronze | silver | gold | platinum] {enable | disable}
Syntax Description (Optional) Grants universal access privileges on meshaccess points.
all
CLI Commands435
CLI Commandsconfig mesh astools
(Optional) Grants background-level client accessprivileges on mesh access points.
bronze
(Optional) Grants best effort-level client accessprivileges on mesh access points.
silver
(Optional) Grants video-level client access privilegeson mesh access points.
gold
(Optional) Grants voice-level client access privilegeson mesh access points.
platinum
Enables this backhaul access level for mesh accesspoints.
enable
Disables this backhaul access level for mesh accesspoints.
disable
Command Default Backhaul access level for mesh access points is disabled.
Command History ModificationRelease
This command was introduced in a release earlier than Release 7.6.7.6
Usage Guidelines To use this command, mesh backhaul with client access must be enabled by using the configmesh client-accesscommand.
After this feature is enabled, all mesh access points reboot.Note
The following example shows how to set the backhaul client access to the best-effort level:(Cisco Controller) >config mesh backhaul rate-adapt silver
config mesh backhaul slotTo configure the slot radio as a downlink backhaul, use the config mesh backhaul slot command.
config mesh backhaul slot slot_id {enable | disable} cisco_ap
Syntax Description Slot number between 0 and 2.slot_id
Enables the entered slot radio as a downlink backhaul.enable
Disables the entered slot radio as a downlink backhaul.disable
Name of the Root AP of the sector on which thebackhaul needs to be enabled or disabled.
cisco_ap
Command Default The entered slot radio as a downlink backhaul is disabled.
CLI Commands436
CLI Commandsconfig mesh backhaul slot
Command History ModificationRelease
This command was introduced in a release earlier than Release 7.6.7.6
Usage Guidelines For 2.4 GHz, only slot 0 and 1 are valid. If slot 0 is enabled, slot 1 is automatically be disabled. If slot 0 isdisabled, slot 1 is automatically enabled.
The following example shows how to enable slot 1 as the preferred backhaul for the root APmyrootap1:(Cisco Controller) >config mesh backhaul slot 1 enable myrootap1
config mesh battery-stateTo configure the battery state for Cisco mesh access points, use the config mesh battery-state command.
config mesh battery-state disable {all | cisco_ap}
Syntax Description Disables the battery-state for mesh access points.disable
Applies this command to all mesh access points.all
Specific mesh access point.cisco_ap
Command Default Battery state is disabled.
Command History ModificationRelease
This command was introduced in a release earlier than Release 7.6.7.6
The following example shows how to disable battery state for all mesh APs:(Cisco Controller) >config mesh battery-state disable all
config mesh client-accessTo enable or disable client access to the mesh backhaul on indoor and outdoor mesh access points, use theconfig mesh client-access command.
config mesh client-access {enable [extended] | disable}
Syntax Description Allows wireless client association over the meshaccess point backhaul 802.11a radio.
enable
(Optional) Enables client access over both thebackhaul radios for backhaul access points.
extended
Restricts the 802.11a radio to backhaul traffic, andallows client association only over the 802.11b/gradio.
disable
CLI Commands437
CLI Commandsconfig mesh battery-state
Command Default Client access is disabled.
Command History ModificationRelease
This command was introduced in a release earlier than Release 7.6.7.6
Usage Guidelines Backhaul interfaces (802.11a radios) act as primary Ethernet interfaces. Backhauls function as trunks in thenetwork and carry all VLAN traffic between the wireless and wired network. No configuration of primaryEthernet interfaces is required.
When this feature is enabled, the mesh access points allow wireless client association over the 802.11a radio,which implies that a 152x mesh access point can carry both backhaul traffic and 802.11a client traffic overthe same 802.11a radio.
When this feature is disabled, the mesh access points carry backhaul traffic over the 802.11a radio and allowsclient association only over the 802.11b/g radio.
The following example shows how to enable client access extended to allow a wireless clientassociation over the 802.11a radio:(Cisco Controller) >config mesh client-access enable extendedEnabling client access on both backhaul slotsSame BSSIDs will be used on both slotsAll Mesh AP will be rebootedAre you sure you want to start? (y/N)Y
The following example shows how to restrict a wireless client association to the 802.11b/g radio:(Cisco Controller) >config mesh client-access disableAll Mesh AP will be rebootedAre you sure you want to start? (Y/N) YBackhaul with client access is canceled.
config mesh ethernet-bridging vlan-transparentTo configure how a mesh access point handles VLAN tags for Ethernet bridged traffic, use the config meshethernet-bridging vlan-transparent command.
config mesh ethernet-bridging vlan-transparent {enable | disable}
Syntax Description Bridges packets as if they are untagged.enable
Drops all tagged packets.disable
Command Default Bridges packets as if they are untagged.
Command History ModificationRelease
This command was introduced in a release earlier than Release 7.6.7.6
The following example shows how to configure Ethernet packets as untagged:
CLI Commands438
CLI Commandsconfig mesh ethernet-bridging vlan-transparent
(Cisco Controller) >config mesh ethernet-bridging vlan-transparent enable
The following example shows how to drop tagged Ethernet packets:(Cisco Controller) >config mesh ethernet-bridging vlan-transparent disable
config mesh full-sector-dfsTo globally enable or disable full-sector Dynamic Frequency Selection (DFS) on mesh access points, use theconfig mesh full-sector-dfs command.
config mesh full-sector-dfs {enable | disable}
Syntax Description Enables DFS for mesh access points.enable
Disables DFS for mesh access points.disable
Command Default None
Command History ModificationRelease
This command was introduced in a release earlier than Release 7.6.7.6
Usage Guidelines This command instructs the mesh sector to make a coordinated channel change on the detection of a radarsignal. For example, if a mesh access point (MAP) detects a radar signal, the MAP will notify the root accesspoint (RAP), and the RAP will initiate a sector change.
All MAPs and the RAP that belong to that sector go to a new channel, which lowers the probability of MAPsstranding when radar is detected on the current backhaul channel, and no other valid parent is available asbackup.
Each sector change causes the network to be silent for 60 seconds (as dictated by the DFS standard).
It is expected that after a half hour, the RAP will go back to the previously configured channel, which meansthat if radar is frequently observed on a RAP's channel, it is important that you configure a different channelfor that RAP to exclude the radar affected channel at the controller.
This example shows to enable full-sector DFS on mesh access points:(Cisco Controller) >config mesh full-sector-dfs enable
config mesh linkdataTo enable external MAC filtering of access points, use the config mesh linkdata command.
config mesh linkdata destination_ap_name
Syntax Description Destination access point name for MAC addressfiltering.
destination_ap_name
Command Default External MAC filtering is disabled.
CLI Commands439
CLI Commandsconfig mesh full-sector-dfs

Usage Guidelines
The config mesh linktest and config mesh linkdata commands are designed to be used together to verifyinformation between a source and a destination access point. To get this information, first execute the configmesh linktest command with the access point that you want link data from in the dest_ap argument. Whenthe command completes, enter the config mesh linkdata command and list the same destination access point,to display the link data will display (see example).
Note
MAC filtering uses the local MAC filter on the controller by default.
When external MAC filter authorization is enabled, if the MAC address is not found in the local MAC filter,then the MAC address in the external RADIUS server is used.
MAC filtering protects your network against rogue mesh access points by preventing access points that arenot defined on the external server from joining.
Before employing external authentication within the mesh network, the following configuration is required:
• The RADUIS server to be used as an AAA server must be configured on the controller.
• The controller must also be configured on the RADIUS server.
• The mesh access point configured for external authorization and authentication must be added to the userlist of the RADIUS server.
The following example shows how to enable external MAC address filtering on access pointAP001d.710d.e300:(Cisco Controller) >config mesh linkdata MAP2-1-1522.7400 AP001d.710d.e300 18 100 1000 30LinkTest started on source AP, test ID: 0[00:1D:71:0E:74:00]->[00:1D:71:0D:E3:0F]Test config: 1000 byte packets at 100 pps for 30 seconds, a-link rate 18 Mb/sIn progress: | || || || || || || || || || || || || |LinkTest completeResults=======txPkts: 2977txBuffAllocErr: 0txQFullErrs: 0Total rx pkts heard at destination: 2977rx pkts decoded correctly: 2977err pkts: Total 0 (PHY 0 + CRC 0 + Unknown 0), TooBig 0, TooSmall 0rx lost packets: 0 (incr for each pkt seq missed or out of order)rx dup pkts: 0rx out of order: 0
avgSNR: 30, high: 33, low: 3SNR profile [0dB...60dB]
0 6 0 0 00 0 1 2 77
2888 3 0 0 00 0 0 0 0
(>60dB) 0avgNf: -95, high: -67, low: -97Noise Floor profile [-100dB...-40dB]
0 2948 19 3 10 0 0 0 03 3 0 0 00 0 0 0 0
(>-40dB) 0
CLI Commands440
CLI Commandsconfig mesh linkdata
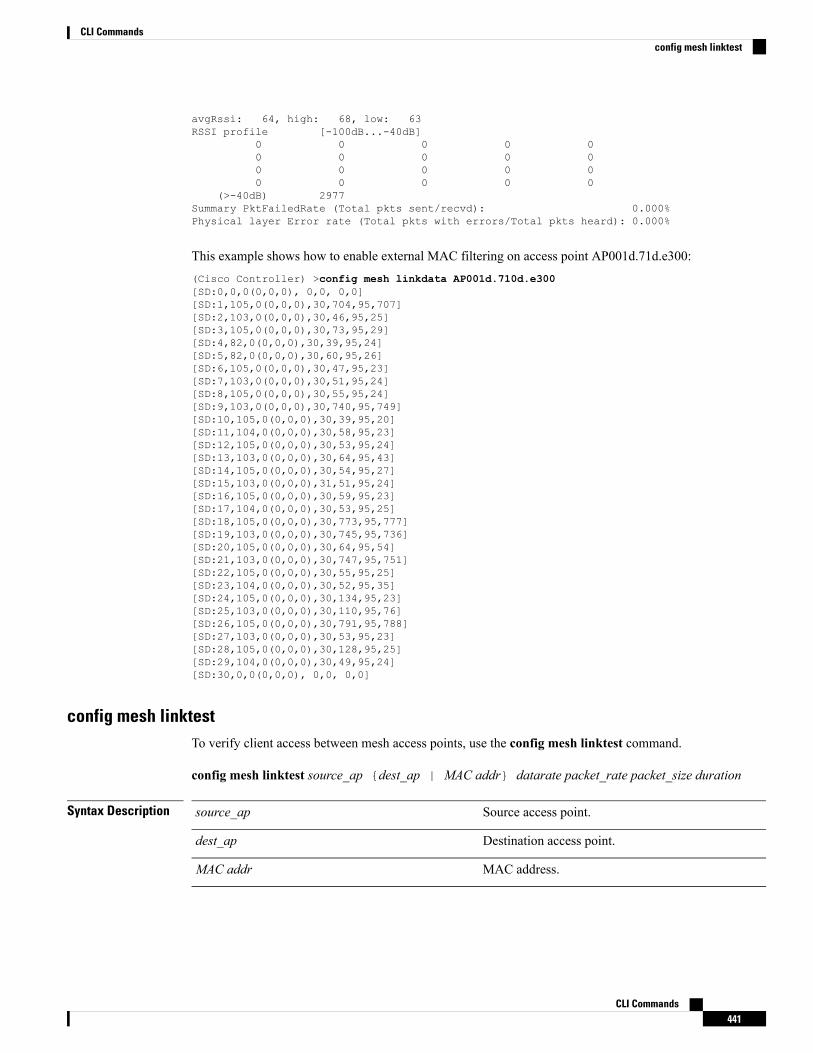
avgRssi: 64, high: 68, low: 63RSSI profile [-100dB...-40dB]
0 0 0 0 00 0 0 0 00 0 0 0 00 0 0 0 0
(>-40dB) 2977Summary PktFailedRate (Total pkts sent/recvd): 0.000%Physical layer Error rate (Total pkts with errors/Total pkts heard): 0.000%
This example shows how to enable external MAC filtering on access point AP001d.71d.e300:(Cisco Controller) >config mesh linkdata AP001d.710d.e300[SD:0,0,0(0,0,0), 0,0, 0,0][SD:1,105,0(0,0,0),30,704,95,707][SD:2,103,0(0,0,0),30,46,95,25][SD:3,105,0(0,0,0),30,73,95,29][SD:4,82,0(0,0,0),30,39,95,24][SD:5,82,0(0,0,0),30,60,95,26][SD:6,105,0(0,0,0),30,47,95,23][SD:7,103,0(0,0,0),30,51,95,24][SD:8,105,0(0,0,0),30,55,95,24][SD:9,103,0(0,0,0),30,740,95,749][SD:10,105,0(0,0,0),30,39,95,20][SD:11,104,0(0,0,0),30,58,95,23][SD:12,105,0(0,0,0),30,53,95,24][SD:13,103,0(0,0,0),30,64,95,43][SD:14,105,0(0,0,0),30,54,95,27][SD:15,103,0(0,0,0),31,51,95,24][SD:16,105,0(0,0,0),30,59,95,23][SD:17,104,0(0,0,0),30,53,95,25][SD:18,105,0(0,0,0),30,773,95,777][SD:19,103,0(0,0,0),30,745,95,736][SD:20,105,0(0,0,0),30,64,95,54][SD:21,103,0(0,0,0),30,747,95,751][SD:22,105,0(0,0,0),30,55,95,25][SD:23,104,0(0,0,0),30,52,95,35][SD:24,105,0(0,0,0),30,134,95,23][SD:25,103,0(0,0,0),30,110,95,76][SD:26,105,0(0,0,0),30,791,95,788][SD:27,103,0(0,0,0),30,53,95,23][SD:28,105,0(0,0,0),30,128,95,25][SD:29,104,0(0,0,0),30,49,95,24][SD:30,0,0(0,0,0), 0,0, 0,0]
config mesh linktestTo verify client access between mesh access points, use the config mesh linktest command.
config mesh linktest source_ap {dest_ap | MAC addr} datarate packet_rate packet_size duration
Syntax Description Source access point.source_ap
Destination access point.dest_ap
MAC address.MAC addr
CLI Commands441
CLI Commandsconfig mesh linktest

• Data rate for 802.11a radios. Valid values are 6,9, 11, 12, 18, 24, 36, 48 and 54 Mbps.
• Data rate for 802.11b radios. Valid values are 6,12, 18, 24, 36, 54, or 100 Mbps.
• Data rate for 802.11n radios. Valid values areMCS rates between m0 to m15.
datarate
Number of packets per second. Valid range is 1through 3000, but the recommended default is 100.
packet_rate
(Optional) Packet size in bytes. If not specified, packetsize defaults to 1500 bytes.
packet_size
(Optional) Duration of the test in seconds. Validvalues are 10-300 seconds, inclusive. If not specified,duration defaults to 30 seconds.
duration
Command Default 100 packets per second, 1500 bytes, 30-second duration.
Command History ModificationRelease
This command was introduced in a release earlier than Release 7.6.7.6
Usage Guidelines The config mesh linktest and config mesh linkdata commands are designed to be used together to verifyinformation between a source and a destination access point. To get this information, first enter the configmesh linktest command with the access point that you want link data from in the dest_ap argument. Whenthe command completes, enter the config mesh linkdata command and list the same destination access point,to display the link data.
The following warning message appears when you run a linktest that might oversubscribe the link:
Warning! Data Rate (100 Mbps) is not enough to perform this link test onpacket size (2000bytes) and (1000) packets per second. This may cause APto disconnect or reboot. Are you sure you want to continue?
The following example shows how to verify client access between mesh access points SB_MAP1and SB_RAP2 at 36 Mbps, 20 fps, 100 frame size, and 15-second duration:(Cisco Controller) >config mesh linktest SB_MAP1 SB_RAP1 36 20 100 15LinkTest started on source AP, test ID: 0[00:1D:71:0E:85:00]->[00:1D:71:0E:D0:0F]Test config: 100 byte packets at 20 pps for 15 seconds, a-link rate 36 Mb/sIn progress: | || || || || || |LinkTest completeResults=======txPkts: 290txBuffAllocErr: 0txQFullErrs: 0Total rx pkts heard at destination: 290rx pkts decoded correctly:err pkts: Total 0 (PHY 0 + CRC 0 + Unknown 0), TooBig 0, TooSmall 0rx lost packets: 0 (incr for each pkt seq missed or out of order)rx dup pkts: 0
CLI Commands442
CLI Commandsconfig mesh linktest

rx out of order: 0avgSNR: 37, high: 40, low: 5SNR profile [0dB...60dB]
0 1 0 0 13 0 1 0 28 27 243 4 00 0 0 0 0
(>60dB) 0avgNf: -89, high: -58, low: -90Noise Floor profile [-100dB...-40dB]
0 0 0 145 12611 2 0 1 03 0 1 0 10 0 0 0 0
(>-40dB) 0avgRssi: 51, high: 53, low: 50RSSI profile [-100dB...-40dB]
0 0 0 0 00 0 0 0 00 0 0 0 00 7 283 0 0
(>-40dB) 0Summary PktFailedRate (Total pkts sent/recvd): 0.000%Physical layer Error rate (Total pkts with errors/Total pkts heard): 0.000%
The following table lists the output flags displayed for the config mesh linktest command.
Table 6: Output Flags for the Config Mesh Linktest Command
DescriptionOutput Flag
Number of packets sent by the source.txPkts
Number of linktest buffer allocation errors at thesource (expected to be zero).
txBuffAllocErr
Number of linktest queue full errors at the source(expected to be zero).
txQFullErrs
Number of linktest packets received at the destination(expected to be same as or close to the txPkts).
Total rx pkts heard at destination
Number of linktest packets received and decodedcorrectly at the destination (expected to be same asclose to txPkts).
rx pkts decoded correctly
Packet error statistics for linktest packets with errors.err pkts: Total
Total number of linktest packets not received at thedestination.
rx lost packets
Total number of duplicate linktest packets receivedat the destination.
rx dup pkts
Total number of linktest packets received out of orderat the destination.
rx out of order
CLI Commands443
CLI Commandsconfig mesh linktest

DescriptionOutput Flag
Average noise floor.avgNF
Noise floor profile in dB and are negative numbers.Noise Floor profile
Average SNR values.avgSNR
Histogram samples received between 0 to 60 dB. Thedifferent colums in the SNR profile is the number ofpackets falling under the bucket 0-3, 3-6, 6-9, up to57-60.
SNR profile [odb...60dB]
Average RSSI values. The average high and lowRSSIvalues are positive numbers.
avgRSSI
The RSSI profile in dB and are negative numbers.RSSI profile [-100dB...-40dB]
config mesh lscTo configure a locally significant certificate (LSC) on mesh access points, use the config mesh lsc command.
config mesh lsc {enable | disable}
Syntax Description Enables an LSC on mesh access points.enable
Disables an LSC on mesh access points.disable
Command Default None
Command History ModificationRelease
This command was introduced in a release earlier than Release 7.6.7.6
The following example shows how to enable LSC on mesh access points:(Cisco Controller) >config mesh lsc enable
config mesh multicastTo configure multicast mode settings to manage multicast transmissions within the mesh network, use theconfig mesh multicast command.
config mesh multicast {regular | in | in-out}
Syntax Description Multicasts the video across the entire mesh networkand all its segments by bridging-enabled root accesspoints (RAPs) and mesh access points (MAPs).
regular
CLI Commands444
CLI Commandsconfig mesh lsc

Forwards the multicast video received from theEthernet by a MAP to the RAP’s Ethernet network.No additional forwarding occurs, which ensures thatnon-LWAPP multicasts received by the RAP are notsent back to the MAP Ethernet networks within themesh network (their point of origin), andMAP-to-MAP multicasts do not occur because theyare filtered out
in
Configures the RAP and MAP to multicast, but eachin a different manner:
If multicast packets are received at a MAP overEthernet, they are sent to the RAP; however, they arenot sent to other MAP Ethernets, and theMAP-to-MAP packets are filtered out of themulticast.
If multicast packets are received at a RAP overEthernet, they are sent to all the MAPs and theirrespective Ethernet networks. See the UsageGuidelines section for more information.
in-out
Command Default In-out mode
Command History ModificationRelease
This command was introduced in a release earlier than Release 7.6.7.6
Usage Guidelines Multicast for mesh networks cannot be enabled using the controller GUI.
Mesh multicast modes determine how bridging-enabled access points mesh access points (MAPs) and rootaccess points (RAPs) send multicasts among Ethernet LANs within a mesh network. Mesh multicast modesmanage non-LWAPP multicast traffic only. LWAPP multicast traffic is governed by a different mechanism.
You can use the controller CLI to configure three mesh multicast modes to manage video camera broadcastson all mesh access points. When enabled, these modes reduce unnecessary multicast transmissions within themesh network and conserve backhaul bandwidth.
When using in-out mode, it is important to properly partition your network to ensure that a multicast sent byone RAP is not received by another RAP on the same Ethernet segment and then sent back into the network.
If 802.11b clients need to receive CAPWAP multicasts, then multicast must be enabled globally on thecontroller as well as on the mesh network (by using the config network multicast global command). Ifmulticast does not need to extend to 802.11b clients beyond the mesh network, you should disable the globalmulticast parameter.
Note
The following example shows how to multicast video across the entire mesh network and all itssegments by bridging-enabled RAPs and MAPs:(Cisco Controller) >config mesh multicast regular
CLI Commands445
CLI Commandsconfig mesh multicast

config mesh parent preferredTo configure a preferred parent for a mesh access point, use the config mesh parent preferred command.
config mesh parent preferred cisco_ap {mac_address | none}
Syntax Description Name of the child access point.cisco_ap
MAC address of the preferred parent.mac_address
Clears the configured parent.none
Command Default None
Command History ModificationRelease
This command was introduced in a release earlier than Release 7.6.7.6
Usage Guidelines A child AP selects the preferred parent based on the following conditions:
• The preferred parent is the best parent.
• The preferred parent has a link SNR of at least 20 dB (other parents, however good, are ignored).
• The preferred parent has a link SNR in the range of 12 dB and 20 dB, but no other parent is significantlybetter (that is, the SNR is more than 20 percent better). For an SNR lower than 12 dB, the configurationis ignored.
• The preferred parent is not in a blocked list.
• The preferred parent is not in silent mode because of dynamic frequency selection (DFS).
• The preferred parent is in the same bridge group name (BGN). If the configured preferred parent is notin the same BGN and no other parent is available, the child joins the parent AP using the default BGN.
The following example shows how to configure a preferred parent with the MAC address00:21:1b:ea:36:60 for a mesh access point myap1:(Cisco Controller) >config mesh parent preferred myap1 00:21:1b:ea:36:60
The following example shows how to clear a preferred parent with theMAC address 00:21:1b:ea:36:60for a mesh access point myap1, by using the keyword none:(Cisco Controller) >config mesh parent preferred myap1 00:21:1b:ea:36:60 none
config mesh public-safetyTo enable or disable the 4.9-GHz public safety band for mesh access points, use the config mesh public-safetycommand.
config mesh public-safety {enable | disable} {all | cisco_ap}
Syntax Description Enables the 4.9-GHz public safety band.enable
CLI Commands446
CLI Commandsconfig mesh parent preferred

Disables the 4.9-GHz public safety band.disable
Applies the command to all mesh access points.all
Specific mesh access point.cisco_ap
Command Default The 4.9-GHz public safety band is disabled.
Command History ModificationRelease
This command was introduced in a release earlier than Release 7.6.7.6
Usage Guidelines 4.9 GHz is a licensed frequency band restricted to public-safety personnel.
The following example shows how to enable the 4.9-GHz public safety band for all mesh accesspoints:(Cisco Controller) >config mesh public-safety enable all4.9GHz is a licensed frequency band in -A domain for public-safety usageAre you sure you want to continue? (y/N) y
config mesh radius-serverTo enable or disable external authentication for mesh access points, use the config mesh radius-servercommand.
config mesh radius-server index {enable | disable}
Syntax Description RADIUS authentication method. Options are asfollows:
• Enter eap to designate Extensible AuthenticationProtocol (EAP) for the mesh RADIUS serversetting.
• Enter psk to designate Preshared Keys (PSKs)for the mesh RADIUS server setting.
index
Enables the external authentication for mesh accesspoints.
enable
Disables the external authentication for mesh accesspoints.
disable
Command Default EAP is enabled.
Command History ModificationRelease
This command was introduced in a release earlier than Release 7.6.7.6
The following example shows how to enable external authentication for mesh access points:
CLI Commands447
CLI Commandsconfig mesh radius-server

(Cisco Controller) >config mesh radius-server eap enable
config mesh rangeTo globally set the maximum range between outdoor root access points (RAPs) and mesh access points(MAPs), use the config mesh range command.
config mesh range [distance]
Syntax Description (Optional)Maximum operating range (150 to 132000ft) of the mesh access point.
distance
Command Default 12,000 feet.
Command History ModificationRelease
This command was introduced in a release earlier than Release 7.6.7.6
Usage Guidelines After this command is enabled, all outdoor mesh access points reboot. This command does not affect indooraccess points.
The following example shows how to set the range between an outdoor mesh RAP and a MAP:(Cisco Controller) >config mesh range 300Command not applicable for indoor mesh. All outdoor Mesh APs will be rebootedAre you sure you want to start? (y/N) y
config mesh secondary-backhaulTo configure a secondary backhaul on the mesh network, use the configmesh secondary-backhaul command.
configmesh secondary-backhaul {enable [force-same-secondary-channel] | disable [rll-retransmit| rll-transmit]}
Syntax Description Enables the secondary backhaul configuration.enable
(Optional) Enables secondary-backhaul meshcapability. Forces all access points rooted at the firsthop node to have the same secondary channel andignores the automatic or manual channel assignmentsfor the mesh access points (MAPs) at the second hopand beyond.
force-same-secondary- channel
Specifies the secondary backhaul configuration isdisabled.
disable
(Optional) Uses reliable link layer (RLL) at the secondhop and beyond.
rll-transmit
(Optional) Extends the number of RLL retry attemptsin an effort to improve reliability.
rll-retransmit
CLI Commands448
CLI Commandsconfig mesh range
Command Default None
Command History ModificationRelease
This command was introduced in a release earlier than Release 7.6.7.6
Usage Guidelines This command uses a secondary backhaul radio as a temporary path for traffic that cannot be sent on theprimary backhaul due to intermittent interference.
The following example shows ho to enable a secondary backhaul radio and force all access pointsrooted at the first hop node to have the same secondary channel:(Cisco Controller) >config mesh secondary-backhaul enable force-same-secondary-channel
config mesh securityTo configure the security settings for mesh networks, use the config mesh security command.
config mesh security {{rad-mac-filter | force-ext-auth } {enable | disable}} | {{eap | psk provisioning |provisioning window} | {enable | disable}} | {delete_psk | key}
Syntax Description Enables a RemoteAuthenticationDial-In User Service(RADIUS) MAC address filter for the mesh securitysetting.
rad-mac-filter
Disables forced external authentication for the meshsecurity setting.
force-ext-auth
Enables Locally Significant Certificate onlyauthentication for the mesh security setting.
lsc-only-auth
Enables the mesh security setting.enable
Disables the mesh security setting.disable
Designates the Extensible Authentication Protocol(EAP) for the mesh security setting by default.
eap
Designates a preshared key(PSK) for the meshsecurity setting.
psk
Encrypts provisioning for the PSK in Cisco WirelessController (WLC).
provisioning
Encrypts provisioning window for the PSK in CiscoWLC.
provisioning window
Enables provisioning of the PSK.enable
Disables provisioning of the PSK.disable
Specifies the key for the PSK.key
CLI Commands449
CLI Commandsconfig mesh security
Command Default The EAP is designated as default for the mesh security.
Command History ModificationRelease
This command was introduced in a release earlier than Release 7.6.7.6
This command was modified, the psk provisioning and psk provisioning keywords areadded.
8.2
The following example shows how to configure EAP as the security option for all mesh access points:(Cisco Controller) config mesh security eap
The following example shows how to configure PSK as the security option for all mesh access points:(Cisco Controller) config mesh security psk
The following example shows how to enable PSK provisioning as the security option for all meshaccess points:(Cisco Controller)> config mesh security psk provisioning enable
The following example shows how to configure a PSK provisioning key as the security option forall mesh access points:(Cisco Controller)> config mesh security psk provisioning key 5
The following example shows how to enable a PSK provisioning window as the security option forall mesh access points:(Cisco Controller)> config mesh security psk provisioning window enable
The following example shows how to delete the PSK provisioning for Cisco WLC :(Cisco Controller)> config mesh security psk provisioning delete_psk wlc
The following example shows how to delete the PSK provisioning for all mesh access points:(Cisco Controller)> config mesh security psk provisioning delete_psk ap
The following example shows how to delete PSK provisioning for all configurations in Cisco WLC:(Cisco Controller)> config mesh security psk provisioning delete_psk wlc all
config mesh slot-biasTo enable or disable slot bias for serial backhaul mesh access points, use the config mesh slot-bias command.
config mesh slot-bias {enable | disable}
Syntax Description Enables slot bias for serial backhaul mesh APs.enable
Disables slot bias for serial backhaul mesh APs.disable
Command Default By default, slot bias is in enabled state.
CLI Commands450
CLI Commandsconfig mesh slot-bias

Command History ModificationRelease
This command was introduced in a release earlier than Release 7.6.7.6
Usage Guidelines Follow these guidelines when using this command:
• The config mesh slot-bias command is a global command and therefore applicable to all 1524SB APsassociated with the same controller.
• Slot bias is applicable only when both slot 1 and slot 2 are available. If a slot radio does not have a channelthat is available because of dynamic frequency selection (DFS), the other slot takes up both the uplinkand downlink roles.
• If slot 2 is not available because of hardware issues, slot bias functions normally. Corrective action shouldbe taken by disabling the slot bias or fixing the antenna.
The following example shows how to disable slot bias for serial backhaul mesh APs:(Cisco Controller) >config mesh slot-bias disable
Configure Management-User CommandsUse the config mgmtuser commands to configure management user settings.
config mgmtuser addTo add a local management user to the controller, use the config mgmtuser add command.
config mgmtuser add username password {lobby-admin | read-write | read-only} [description]
Syntax Description Account username. The username can be up to 24alphanumeric characters.
username
Account password. The password can be up to 24alphanumeric characters.
password
Creates a management user with read-write access.read-write
Creates a management user with read-only access.read-only
(Optional) Description of the account. The descriptioncan be up to 32 alphanumeric characters within doublequotes.
description
Command Default None
Command History ModificationRelease
This command was introduced in a release earlier than Release 7.6.7.6
The following example shows how to create a management user account with read-write access.
CLI Commands451
CLI CommandsConfigure Management-User Commands

(Cisco Controller) > config mgmtuser add admin admin read-write “Main account“
Related Commands show mgmtuser
config mgmtuser deleteTo delete a management user from the controller, use the config mgmtuser delete command.
config mgmtuser delete username
Syntax Description Account username. The username can be up to 24alphanumeric characters.
username
Command Default The management user is not deleted by default.
Command History ModificationRelease
This command was introduced in a release earlier than Release 7.6.7.6
The following example shows how to delete a management user account admin from the controller.
(Cisco Controller) > config mgmtuser delete admin
Deleted user admin
Related Commands show mgmtuser
config mgmtuser descriptionTo add a description to an existing management user login to the controller, use the config mgmtuserdescription command.
config mgmtuser description username description
Syntax Description Account username. The username can be up to 24alphanumeric characters.
username
Description of the account. The description can be upto 32 alphanumeric characters within double quotes.
description
Command Default No description is added to the management user.
Command History ModificationRelease
This command was introduced in a release earlier than Release 7.6.7.6
The following example shows how to add a description “primary-user” to the management user“admin”:
CLI Commands452
CLI Commandsconfig mgmtuser delete

(Cisco Controller) > config mgmtuser description admin "primary-user"
Related Commands config mgmtuser add
config mgmtuser delete
config mgmtuser password
show mgmtuser
config mgmtuser passwordTo configure a management user password, use the config mgmtuser password command.
config mgmtuser password username password
Syntax Description Account username. The username can be up to 24alphanumeric characters.
username
Account password. The password can be up to 24alphanumeric characters.
password
Command Default None
Command History ModificationRelease
This command was introduced in a release earlier than Release 7.6.7.6
The following example shows how to change the password of the management user “admin” withthe new password 5rTfm:
(Cisco Controller) > config mgmtuser password admin 5rTfm
Related Commands show mgmtuser
Configure Mobility CommandsUse the config mobility commands to configure mobility (roaming) settings.
config mobility dscpTo configure the mobility intercontroller DSCP value, use the config mobility dscp command.
config mobility dscp dscp_value
Syntax Description DSCP value ranging from 0 to 63.dscp_value
Command Default None
CLI Commands453
CLI Commandsconfig mgmtuser password
Command History ModificationRelease
This commandwas introduced in a release earlier thanRelease 7.6.
7.6
The following example shows how to configure the mobility intercontroller DSCP value to 40:(Cisco Controller) >config mobility dscp 40
config mobility group anchorTo create a new mobility anchor for the WLAN or wired guest LAN, enter, use the config mobility groupanchor command.
config mobility group anchor {add | delete} {wlan wlan_id | guest-lan guest_lan_id} anchor_ip
Syntax Description Adds or changes a mobility anchor to a wireless LAN.add
Deletes a mobility anchor from a wireless LAN.delete
Specifies the wireless LAN anchor settings.wlan
Wireless LAN identifier between 1 and 512(inclusive).
wlan_id
Specifies the guest LAN anchor settings.guest-lan
Guest LAN identifier between 1 and 5 (inclusive).guest_lan_id
IP address of the anchor controller.anchor_ip
Command Default None
Command History ModificationRelease
This commandwas introduced in a release earlier thanRelease 7.6.
7.6
Usage Guidelines The wlan_id or guest_lan_id must exist and be disabled.
Auto-anchor mobility is enabled for the WLAN or wired guest LAN when you configure the first mobilityanchor. Deleting the last anchor disables the auto-anchor mobility feature and resumes normal mobility fornew associations.
The following example shows how to add a mobility anchor with the IP address 192.12.1.5 to awireless LAN ID 2:(Cisco Controller) >config mobility group anchor add wlan 2 192.12.1.5
The following example shows how to delete a mobility anchor with the IP address 193.13.1.15 froma wireless LAN:(Cisco Controller) >config mobility group anchor delete wlan 5 193.13.1.5
CLI Commands454
CLI Commandsconfig mobility group anchor
config mobility group domainTo configure the mobility domain name, use the config mobility group domain command.
config mobility group domain domain_name
Syntax Description Domain name. The domain name can be up to 31case-sensitive characters.
domain_name
Command Default None
Command History ModificationRelease
This commandwas introduced in a release earlier thanRelease 7.6.
7.6
The following example shows how to configure a mobility domain name lab1:(Cisco Controller) >config mobility group domain lab1
config mobility group keepalive countTo configure the Cisco WLC to detect failed mobility group members (including anchor Cisco WLCs), usethe config mobility group keepalive count command.
config mobility group keepalive count count
Syntax Description Number of times that a ping request is sent to amobility group member before the member isconsidered unreachable. The range is from 3 to 20.The default is 3.
count
Command Default The default number of times that a ping request is sent to a mobility group member is 3.
Command History ModificationRelease
This commandwas introduced in a release earlier thanRelease 7.6.
7.6
The following example shows how to specify the number of times a ping request is sent to a mobilitygroup member before the member is considered unreachable to three counts:(Cisco Controller) >config mobility group keepalive count 3
config mobility group keepalive intervalTo configure the controller to detect failed mobility group members (including anchor controllers), use theconfig mobility group keepalive command.
config mobility group keepalive interval
CLI Commands455
CLI Commandsconfig mobility group domain

Syntax Description Interval of time between each ping request sent to amobility group member. The range is from 1 to 30seconds. The default value is 10 seconds.
interval
Command Default The default interval of time between each ping request is 10 seconds.
Command History ModificationRelease
This commandwas introduced in a release earlier thanRelease 7.6.
7.6
The following example shows how to specify the amount of time between each ping request sent toa mobility group member to 10 seconds:
(Cisco Controller) >config mobility group keepalive 10
config mobility group memberTo add or delete users from the mobility groupmember list, use the configmobility groupmember command.
config mobility group member {addMAC-addr IP-addr [group_name] [encrypt{enable | disable]| [data-dtls mac-addr {enable | disable} | deleteMAC-addr | hash IP-addr {key | none}}
Syntax Description Adds or changes a mobility group member to the list.add
Member switch MAC address.MAC-addr
Member switch IP address.IP-addr
(Optional) Member switch group name (if differentfrom the default group name).
group_name
(Optional) Deletes a mobility group member from thelist.
delete
Configures the hash key for authorization. You canconfigure the hash key only if the member is a virtualcontroller in the same domain.
hash
Hash key of the virtual controller. For example,a819d479dcfeb3e0974421b6e8335582263d9169
key
Clears the previous hash key of the virtual controller.none
Command Default None
Command History ModificationRelease
This commandwas introduced in a release earlier thanRelease 7.6.
7.6
CLI Commands456
CLI Commandsconfig mobility group member
ModificationRelease
This command supports both IPv4 and IPv6 addressformats.
8.0
This command was updated by adding encrypt ,data-dtls keywords to support IRCM functionality.
8.8.111.0
The following example shows how to add a mobility group member with an IPv4 address to the list:
(Cisco Controller) >config mobility group member add 11:11:11:11:11:11 209.165.200.225
The following example shows how to configure the hash key of a virtual controller in the samedomain:
(Cisco Controller) >config mobility group member hash 209.165.201.1a819d479dcfeb3e0974421b6e8335582263d9169
config mobility group multicast-addressTo configure the multicast group IP address for nonlocal groups within the mobility list, use the configmobilitygroup multicast-address command.
config mobility group multicast-address group_name ip_address
Syntax Description Member switch group name (if different from thedefault group name).
group_name
Member switch IP address.ip_address
Command Default None
Command History ModificationRelease
This commandwas introduced in a release earlier thanRelease 7.6.
7.6
This command supports both IPv4 and IPv6 addressformats.
8.0
The following example shows how to configure the multicast group IP address 10.10.10.1 for a groupnamed test:
(Cisco Controller) >config mobility group multicast-address test 10.10.10.1
config mobility multicast-modeTo enable or disable mobility multicast mode, use the config mobility multicast-mode command.
config mobility multicast-mode {enable | disable} local_group_multicast_address
CLI Commands457
CLI Commandsconfig mobility group multicast-address

Syntax Description Enables the multicast mode; the controller usesmulticast mode to send Mobile Announce messagesto the local group.
enable
Disables the multicast mode; the controller usesunicast mode to send theMobile Announce messagesto the local group.
disable
IP address for the local mobility group.local_group_multicast_address
Command Default The mobility multicast mode is disabled.
Command History ModificationRelease
This commandwas introduced in a release earlier thanRelease 7.6.
7.6
The following example shows how to enable the multicast mobility mode for the local mobility groupIP address 157.168.20.0:
(Cisco Controller) >config mobility multicast-mode enable 157.168.20.0
config mobility secure-modeTo configure the secure mode for mobility messages between Cisco WLCs, use the config mobilitysecure-mode command.
config mobility secure-mode {enable | disable}
Syntax Description Enables the mobility group message security.enable
Disables mobility group message security.disable
Command Default None
Command History ModificationRelease
This commandwas introduced in a release earlier thanRelease 7.6.
7.6
The following example shows how to enable the secure mode for mobility messages:(Cisco Controller) >config mobility secure-mode enable
config mobility statistics resetTo reset the mobility statistics, use the config mobility statistics reset command.
config mobility statistics reset
CLI Commands458
CLI Commandsconfig mobility secure-mode
Syntax Description This command has no arguments or keywords.
Command Default None
Command History ModificationRelease
This commandwas introduced in a release earlier thanRelease 7.6.
7.6
This example shows how to reset the mobility group statistics:(Cisco Controller) >config mobility statistics reset
Configure Message Log Level CommandsUse the config msglog commands to configure msglog level settings.
config msglog level criticalTo reset the message log so that it collects and displays only critical (highest-level) messages, use the configmsglog level critical command.
config msglog level critical
Syntax Description This command has no arguments or keywords.
Command Default None
Command History ModificationRelease
This command was introduced in a release earlier than Release 7.6.7.6
Usage Guidelines The message log always collects and displays critical messages, regardless of the message log level setting.
The following example shows how to configure the message log severity level and display criticalmessages:
(Cisco Controller) > config msglog level critical
Related Commands show msglog
config msglog level errorTo reset the message log so that it collects and displays both critical (highest-level) and error (second-highest)messages, use the config msglog level error command.
config msglog level error
Syntax Description This command has no arguments or keywords.
CLI Commands459
CLI CommandsConfigure Message Log Level Commands
Command Default None
Command History ModificationRelease
This command was introduced in a release earlier than Release 7.6.7.6
The following example shows how to reset the message log to collect and display critical andnoncritical error messages:
(Cisco Controller) > config msglog level error
Related Commands show msglog
config msglog level securityTo reset the message log so that it collects and displays critical (highest-level), error (second-highest), andsecurity (third-highest) messages, use the config msglog level security command.
config msglog level security
Syntax Description This command has no arguments or keywords.
Command Default None
Command History ModificationRelease
This command was introduced in a release earlier than Release 7.6.7.6
The following example shows how to reset the message log so that it collects and display critical,noncritical, and authentication or security-related errors:
(Cisco Controller) > config msglog level security
Related Commands show msglog
config msglog level verboseTo reset the message log so that it collects and displays all messages, use the config msglog level verbosecommand.
config msglog level verbose
Syntax Description This command has no arguments or keywords.
Command Default None
Command History ModificationRelease
This command was introduced in a release earlier than Release 7.6.7.6
CLI Commands460
CLI Commandsconfig msglog level security

The following example shows how to reset the message logs so that it collects and display allmessages:
(Cisco Controller) > config msglog level verbose
Related Commands show msglog
config msglog level warningTo reset the message log so that it collects and displays critical (highest-level), error (second-highest), security(third-highest), and warning (fourth-highest) messages, use the config msglog level warning command.
config msglog level warning
Syntax Description This command has no arguments or keywords.
Command Default None
Command History ModificationRelease
This command was introduced in a release earlier than Release 7.6.7.6
The following example shows how to reset the message log so that it collects and displays warningmessages in addition to critical, noncritical, and authentication or security-related errors:
(Cisco Controller) > config msglog level warning
Related Commands show msglog
Configure Media-Stream CommandsUse the config media-stream commands to configure media stream settings.
config 802.11 media-stream multicast-directTo configure the media stream multicast-direct parameters for the 802.11 networks, use the config 802.11media-stream multicast-direct command.
config 802.11{a | b} media-stream multicast-direct {admission-besteffort {enable | disable} |{client-maximum | radio-maximum} {value | no-limit } | enable | disable}
Syntax Description Specifies the 802.11a network.802.11a
Specifies the 802.11b/g network.802.11b
Admits media stream to best-effort queue.admission-besteffort
Enables multicast-direct on a 2.4-GHz or a 5-GHzband.
enable
CLI Commands461
CLI Commandsconfig msglog level warning
Disables multicast-direct on a 2.4-GHz or a 5-GHzband.
disable
Specifies the maximum number of streams allowedon a client.
client-maximum
Specifies the maximum number of streams allowedon a 2.4-GHz or a 5-GHz band.
radio-maximum
Number of streams allowed on a client or on a2.4-GHz or a 5-GHz band, between 1 to 20.
value
Specifies the unlimited number of streams allowedon a client or on a 2.4-GHz or a 5-GHz band.
no-limit
Command Default None
Command History ModificationRelease
This commandwas introduced in a release earlier thanRelease 7.6.
7.6
Usage Guidelines Before you configure the media stream multicast-direct parameters on a 802.11 network, ensure that thenetwork is nonoperational.
This example shows how to enable a media stream multicast-direct settings on an 802.11a network:
> config 802.11a media-stream multicast-direct enable
This example shows how to admit the media stream to the best-effort queue:
> config 802.11a media-stream multicast-direct admission-besteffort enable
This example shows how to set the maximum number of streams allowed on a client:
> config 802.11a media-stream multicast-direct client-maximum 10
Related Commands config 802.11 media-stream video-redirect
show 802.11a media-stream name
show media-stream group summary
show media-stream group detail
config 802.11 media-stream video-redirectTo configure the media stream video-redirect for the 802.11 networks, use the config 802.11 media-streamvideo-redirect command.
config 802.11{a | b}media-stream video-redirect {enable | disable}
CLI Commands462
CLI Commandsconfig 802.11 media-stream video-redirect

Syntax Description Specifies the 802.11a network.802.11a
Specifies the 802.11b/g network.802.11b
Enables traffic redirection.enable
Disables traffic redirection.disable
Command Default None.
Usage Guidelines Before you configure the media stream video-redirect on a 802.11 network, ensure that the network isnonoperational.
This example shows how to enable media stream traffic redirection on an 802.11a network:
> config 802.11a media-stream video-redirect enable
Related Commands config 802.11 media-stream multicast-redirect
show 802.11a media-stream name
show media-stream group summary
show media-stream group detail
config media-stream multicast-directTo configure the media-stream multicast direct, use the config media-stream multicast direct command.
config media-stream multicast-direct {enable | disable}
Syntax Description Enables a media stream.enable
Disables a media stream.disable
Command Default None.
Usage Guidelines Media-stream multicast-direct requires load based Call Admission Control (CAC) to run.
This example shows how to enable media-stream multicast-direct settings:
> config media-stream multicast-direct enable
This example shows how to disable media-stream multicast-direct settings:
> config media-stream multicast-direct disable
Related Commands config 802.11 media-stream video-redirect
show 802.11a media-stream name
CLI Commands463
CLI Commandsconfig media-stream multicast-direct
show media-stream group summary
show media-stream group detail
config media-stream messageTo configure various parameters of message configuration, use the config media-streammessage command.
config media-stream message {state [enable | disable] | url url | email email | phonephone_number |note note}
Syntax Description Specifies the media stream message state.state
(Optional) Enables the session announcementmessagestate.
enable
(Optional) Disables the session announcementmessage state.
disable
Configures the URL.url
Session announcement URL.url
Configures the email ID.email
Specifies the session announcement e-mail.email
Configures the phone number.phone
Session announcement phone number.phone_number
Configures the notes.note
Session announcement notes.note
Command Default Disabled.
Usage Guidelines Media-stream multicast-direct requires load-based Call Admission Control (CAC) to run.
This example shows how to enable the session announcement message state:
> config media-stream message state enable
This example shows how to configure the session announcement e-mail address:
> config media-stream message mail [email protected]
Related Commands config media-stream
show 802.11a media-stream name
show media-stream group summary
show media-stream group detail
CLI Commands464
CLI Commandsconfig media-stream message

config media-stream addTo configure the various global media-stream configurations, use the config media-stream add command.
config media-stream add multicast-direct media_stream_name start-IP end-IP [template {very coarse| coarse | ordinary | low-resolution | med-resolution | high-resolution} | detail {bandwidthpacket-size {periodic| initial}} qos priority {drop | fallback}
Syntax Description Specifies the media stream for the multicast-directsetting.
multicast-direct
Media-stream name.media_stream_name
IP multicast destination start address.start-IP
IP multicast destination end address.end-IP
(Optional) Configures the media stream fromtemplates.
template
Applies a very-coarse template.very coarse
Applies a coarse template.coarse
Applies an ordinary template.ordinary
Applies a low-resolution template.low-resolution
Applies a medium-resolution template.med-resolution
Applies a high-resolution template.high-resolution
Configures themedia streamwith specific parameters.detail
Maximum expected stream bandwidth.bandwidth
Average packet size.packet-size
Specifies the periodic admission evaluation.periodic
Specifies the Initial admission evaluation.initial
AIR QoS class (video only).qos
Media-stream priority.priority
Specifies that the stream is dropped on a periodicreevaluation.
drop
Specifies if the stream is demoted to the best-effortclass on a periodic reevaluation.
fallback
Command Default None
CLI Commands465
CLI Commandsconfig media-stream add

Command History ModificationRelease
This commandwas introduced in a release earlier thanRelease 7.6.
7.6
Usage Guidelines Media-stream multicast-direct requires load-based Call Admission Control (CAC) to run.
This example shows how to configure a new media stream:> config media-stream add multicast-direct abc 227.8.8.8 227.9.9.9 detail 2 150 periodicvideo 1 drop
Related Commands show 802.11a media-stream name
show media-stream group summary
show media-stream group detail
config media-stream admitTo allow traffic for a media stream group, use the config media-stream admit command.
config media-stream admit media_stream_name
Syntax Description Media-stream group name.media_stream_name
Command Default None
Command History ModificationRelease
This commandwas introduced in a release earlier thanRelease 7.6.
7.6
Usage Guidelines When you try to allow traffic for the media stream group, you will be prompted that IGMP snooping will bedisabled and enabled again, and all clients might observe a glitch on the multicast traffic.
This example shows how to allow traffic for a media stream group:
(Cisco Controller) > config media-stream admit MymediaStream
Related Commands show 802.11a media-stream name
show media-stream group summary
show media-stream group detail
config media-stream denyTo block traffic for a media stream group, use the config media-stream deny command.
Syntax Description Media-stream group name.media_stream_name
CLI Commands466
CLI Commandsconfig media-stream admit

config media-stream deny media_stream_name
Command Default None
Command History ModificationRelease
This commandwas introduced in a release earlier thanRelease 7.6.
7.6
Usage Guidelines When you try to block traffic for the media stream group, you will be prompted that IGMP snooping will bedisabled and enabled again, and all clients might observe a glitch on the multicast traffic.
This example shows how to block traffic for a media stream group:
(Cisco Controller) > config media-stream deny MymediaStream
Related Commands show 802.11a media-stream name
show media-stream group summary
show media-stream group detail
config media-stream deleteTo configure the various global media-stream configurations, use the config media-stream delete command.
config media-stream delete media_stream_name
Syntax Description Media-stream name.media_stream_name
Command Default None
Command History ModificationRelease
This commandwas introduced in a release earlier thanRelease 7.6.
7.6
Usage Guidelines Media-stream multicast-direct requires load-based Call Admission Control (CAC) to run.
This example shows how to delete the media stream named abc:
(Cisco Controller) > config media-stream delete abc
Related Commands show 802.11a media-stream name
show media-stream group summary
show media-stream group detail
CLI Commands467
CLI Commandsconfig media-stream delete

Configure Net User CommandsUse the config netuser commands to configure netuser settings.
config netuser addTo add a guest user on a WLAN or wired guest LAN to the local user database on the controller, use theconfig netuser add command.
config netuser add username password {wlanwlan_id | guestlan guestlan_id} userType guest lifetimelifetime description description
Syntax Description Guest username. The username can be up to 50alphanumeric characters.
username
User password. The password can be up to 24alphanumeric characters.
password
Specifies the wireless LAN identifier to associate withor zero for any wireless LAN.
wlan
Wireless LAN identifier assigned to the user. A zerovalue associates the user with any wireless LAN.
wlan_id
Specifies the guest LAN identifier to associate withor zero for any wireless LAN.
guestlan
Guest LAN ID.guestlan_id
Specifies the user type.userType
Specifies the guest for the guest user.guest
Specifies the lifetime.lifetime
Lifetime value (60 to 259200 or 0) in seconds for theguest user.
A value of 0 indicates an unlimitedlifetime.
Note
lifetime
Short description of user. The description can be upto 32 characters enclosed in double-quotes.
description
Command Default None
Command History ModificationRelease
This command was introduced in a release earlier than Release 7.6.7.6
Usage Guidelines Local network usernames must be unique because they are stored in the same database.
CLI Commands468
CLI CommandsConfigure Net User Commands

The following example shows how to add a permanent username Jane to the wireless network for 1hour:
(Cisco Controller) > config netuser add jane able2 1 wlan_id 1 userType permanent
The following example shows how to add a guest username George to the wireless network for 1hour:
(Cisco Controller) > config netuser add george able1 guestlan 1 3600
Related Commands show netuser
config netuser delete
config netuser deleteTo delete an existing user from the local network, use the config netuser delete command.
config netuser delete username
Syntax Description Network username. The username can be up to 24alphanumeric characters.
username
Command Default None
Command History ModificationRelease
This command was introduced in a release earlier than Release 7.6.7.6
Usage Guidelines Local network usernames must be unique because they are stored in the same database.
The following example shows how to delete an existing username named able1 from the network:
(Cisco Controller) > config netuser delete able1Deleted user able1
Related Commands show netuser
config netuser descriptionTo add a description to an existing net user, use the config netuser description command.
config netuser description username description
Syntax Description Network username. The username can contain up to24 alphanumeric characters.
username
CLI Commands469
CLI Commandsconfig netuser delete
(Optional) User description. The description can beup to 32 alphanumeric characters enclosed in doublequotes.
description
Command Default None
Command History ModificationRelease
This command was introduced in a release earlier than Release 7.6.7.6
The following example shows how to add a user description “HQ1 Contact” to an existing networkuser named able 1:
(Cisco Controller) > config netuser description able1 “HQ1 Contact”
Related Commands show netuser
config netuser guest-lan-idTo configure a wired guest LAN ID for a network user, use the config netuser guest-lan-id command.
config netuser guest-lan-id username lan_id
Syntax Description Network username. The username can be 24alphanumeric characters.
username
Wired guest LAN identifier to associate with the user.A zero value associates the user with any wired LAN.
lan_id
Command Default None
Command History ModificationRelease
This command was introduced in a release earlier than Release 7.6.7.6
The following example shows how to configure a wired LAN ID 2 to associate with the user namedaire1:
(Cisco Controller) > config netuser guest- lan-id aire1 2
Related Commands show netuser
show wlan summary
config netuser guest-role applyTo apply a quality of service (QoS) role to a guest user, use the config netuser guest-role apply command.
config netuser guest-role apply username role_name
CLI Commands470
CLI Commandsconfig netuser guest-lan-id

Syntax Description Name of the user.username
QoS guest role name.role_name
Command Default None
Command History ModificationRelease
This command was introduced in a release earlier than Release 7.6.7.6
Usage Guidelines If you do not assign a QoS role to a guest user, the Role field in the User Details shows the role as default.The bandwidth contracts for this user are defined in the QoS profile for the WLAN.
If you want to unassign a QoS role from a guest user, use the config netuser guest-role apply usernamedefault. This user now uses the bandwidth contracts defined in the QoS profile for the WLAN.
The following example shows how to apply a QoS role to a guest user jsmith with the QoS guestrole named Contractor:
(Cisco Controller) > config netuser guest-role apply jsmith Contractor
Related Commands config netuser guest-role create
config netuser guest-role delete
config netuser guest-role createTo create a quality of service (QoS) role for a guest user, use the config netuser guest-role create command.
config netuser guest-role create role_name
Syntax Description QoS guest role name.role name
Command Default None
Command History ModificationRelease
This command was introduced in a release earlier than Release 7.6.7.6
Usage Guidelines To delete a QoS role, use the config netuser guest-role delete role-name .
The following example shows how to create a QoS role for the guest user named guestuser1:
(Cisco Controller) > config netuser guest-role create guestuser1
Related Commands config netuser guest-role delete
CLI Commands471
CLI Commandsconfig netuser guest-role create

config netuser guest-role deleteTo delete a quality of service (QoS) role for a guest user, use the config netuser guest-role delete command.
config netuser guest-role delete role_name
Syntax Description Quality of service (QoS) guest role name.role name
Command Default None
Command History ModificationRelease
This command was introduced in a release earlier than Release 7.6.7.6
The following example shows how to delete a quality of service (QoS) role for guestuser1:
(Cisco Controller) > config netuser guest-role delete guestuser1
Related Commands config netuser guest-role create
config netuser guest-role qos data-rate average-data-rateTo configure the average data rate for TCP traffic on a per user basis, use the config netuser guest-role qosdata-rate average-data-rate command.
config netuser guest-role qos data-rate average-data-rate role_name rate
Syntax Description Quality of service (QoS) guest role name.role_name
Rate for TCP traffic on a per user basis.rate
Command Default None
Usage Guidelines For the role_name parameter in each of these commands, enter a name for the new QoS role. The nameuniquely identifies the role of the QoS user (such as contractor, vendor, and so on.). For the rate parameter,you can enter a value between 0 and 60,000 Kbps (inclusive). A value of 0 imposes no bandwidth restrictionon the QoS role.
The following example shows how to configure an average rate for the QoS guest named guestuser1:
(Cisco Controller) > config netuser guest-role qos data-rate average-data-rate guestuser10
Related Commands config netuser guest-role create
config netuser guest-role delete
config netuser guest-role qos data-rate burst-data-rate
CLI Commands472
CLI Commandsconfig netuser guest-role delete

config netuser guest-role qos data-rate average-realtime-rateTo configure the average data rate for TCP traffic on a per user basis, use the config netuser guest-role qosdata-rate average-realtime-rate command.
config netuser guest-role qos data-rate average-realtime-rate role_name rate
Syntax Description Quality of service (QoS) guest role name.role_name
Rate for TCP traffic on a per user basis.rate
Command Default None
Usage Guidelines For the role_name parameter in each of these commands, enter a name for the new QoS role. The nameuniquely identifies the role of the QoS user (such as contractor, vendor, and so on.). For the rate parameter,you can enter a value between 0 and 60,000 Kbps (inclusive). A value of 0 imposes no bandwidth restrictionon the QoS role.
The following example shows how to configure an average data rate for the QoS guest user namedguestuser1 with the rate for TCP traffic of 0 Kbps:
(Cisco Controller) > config netuser guest-role qos data-rate average-realtime-rate guestuser10
Related Commands config netuser guest-role
config netuser guest-role qos data-rate average-data-rate
config netuser guest-role qos data-rate burst-data-rateTo configure the peak data rate for TCP traffic on a per user basis, use the config netuser guest-role qosdata-rate burst-data-rate command.
config netuser guest-role qos data-rate burst-data-rate role_name rate
Syntax Description Quality of service (QoS) guest role name.role_name
Rate for TCP traffic on a per user basis.rate
Command Default None
Command History ModificationRelease
This command was introduced in a release earlier than Release 7.6.7.6
Usage Guidelines The burst data rate should be greater than or equal to the average data rate. Otherwise, the QoS policy mayblock traffic to and from the wireless client.
For the role_name parameter in each of these commands, enter a name for the new QoS role. The nameuniquely identifies the role of the QoS user (such as contractor, vendor, and so on.). For the rate parameter,
CLI Commands473
CLI Commandsconfig netuser guest-role qos data-rate average-realtime-rate
you can enter a value between 0 and 60,000 Kbps (inclusive). A value of 0 imposes no bandwidth restrictionon the QoS role.
The following example shows how to configure the peak data rate for the QoS guest named guestuser1with the rate for TCP traffic of 0 Kbps:
(Cisco Controller) > config netuser guest-role qos data-rate burst-data-rate guestuser1 0
Related Commands config netuser guest-role create
config netuser guest-role delete
config netuser guest-role qos data-rate average-data-rate
config netuser guest-role qos data-rate burst-realtime-rateTo configure the burst real-time data rate for UDP traffic on a per user basis, use the config netuser guest-roleqos data-rate burst-realtime-rate command.
config netuser guest-role qos data-rate burst-realtime-rate role_name rate
Syntax Description Quality of service (QoS) guest role name.role_name
Rate for TCP traffic on a per user basis.rate
Command Default None
Command History ModificationRelease
This command was introduced in a release earlier than Release 7.6.7.6
Usage Guidelines The burst real-time rate should be greater than or equal to the average real-time rate. Otherwise, the qualityof service (QoS) policy may block traffic to and from the wireless client.
For the role_name parameter in each of these commands, enter a name for the new QoS role. The nameuniquely identifies the role of the QoS user (such as contractor, vendor, and so on.). For the rate parameter,you can enter a value between 0 and 60,000 Kbps (inclusive). A value of 0 imposes no bandwidth restrictionon the QoS role.
The following example shows how to configure a burst real-time rate for the QoS guest user namedguestuser1 with the rate for TCP traffic of 0 Kbps:
(Cisco Controller) > config netuser guest-role qos data-rate burst-realtime-rate guestuser10
Related Commands config netuser guest-role
config netuser guest-role qos data-rate average-data-rate
config netuser guest-role qos data-rate burst-data-rate
CLI Commands474
CLI Commandsconfig netuser guest-role qos data-rate burst-realtime-rate

config netuser lifetimeTo configure the lifetime for a guest network user, use the config netuser lifetime command.
config netuser lifetime username time
Syntax Description Network username. The username can be up to 50alphanumeric characters.
username
Llifetime between 60 to 31536000 seconds or 0 forno limit.
time
Command Default None
Command History ModificationRelease
This command was introduced in a release earlier than Release 7.6.7.6
The following example shows how to configure lifetime for a guest network user:
(Cisco Controller) > config netuser lifetime guestuser1 22450
Related Commands show netuser
show wlan summary
config netuser maxUserLoginTo configure the maximum number of login sessions allowed for a network user, use the config netusermaxUserLogin command.
config netuser maxUserLogin count
Syntax Description Maximum number of login sessions for a single user.The allowed values are from 0 (unlimited) to 8.
count
Command Default By default, the maximum number of login sessions for a single user is 0 (unlimited).
Command History ModificationRelease
This command was introduced in a release earlier than Release 7.6.7.6
The following example shows how to configure the maximum number of login sessions for a singleuser to 8:
(Cisco Controller) > config netuser maxUserLogin 8
Related Commands show netuser
CLI Commands475
CLI Commandsconfig netuser lifetime
config netuser passwordTo change a local network user password, use the config netuser password command.
config netuser password username password
Syntax Description Network username. The username can be up to 24alphanumeric characters.
username
Network user password. The password can containup to 24 alphanumeric characters.
password
Command Default None
Command History ModificationRelease
This command was introduced in a release earlier than Release 7.6.7.6
The following example shows how to change the network user password from aire1 to aire2:
(Cisco Controller) > config netuser password aire1 aire2
Related Commands show netuser
config netuser wlan-idTo configure a wireless LAN ID for a network user, use the config netuser wlan-id command.
config netuser wlan-id username wlan_id
Syntax Description Network username. The username can be 24alphanumeric characters.
username
Wireless LAN identifier to associate with the user. Azero value associates the user with any wireless LAN.
wlan_id
Command Default None
Command History ModificationRelease
This command was introduced in a release earlier than Release 7.6.7.6
Examples
The following example shows how to configure a wireless LAN ID 2 to associate with the user namedaire1:
(Cisco Controller) > config netuser wlan-id aire1 2
CLI Commands476
CLI Commandsconfig netuser password

Related Commands show netuser
show wlan summary
Configure Network CommandsUse the config network commands to configure network settings.
config network 802.3-bridgingTo enable or disable 802.3 bridging on a controller, use the config network 802.3-bridging command.
config network 802.3-bridging {enable | disable}
Syntax Description Enables the 802.3 bridging.enable
Disables the 802.3 bridging.disable
Command Default By default, 802.3 bridging on the controller is disabled.
Command History ModificationRelease
This command was introduced in a release earlier than Release 7.6.7.6
Usage Guidelines In controller software release 5.2, the software-based forwarding architecture for Cisco 2100 Series Controllersis being replaced with a new forwarding plane architecture. As a result, Cisco 2100 Series Controllers andthe Cisco wireless LAN controller NetworkModule for Cisco Integrated Services Routers bridge 802.3 packetsby default. Therefore, 802.3 bridging can now be disabled only on Cisco 4400 Series Controllers, the CiscoWiSM, and the Catalyst 3750G Wireless LAN Controller Switch.
To determine the status of 802.3 bridging, enter the show netuser guest-roles command.
The following example shows how to enable the 802.3 bridging:
(Cisco Controller) > config network 802.3-bridging enable
Related Commands show netuser guest-roles
show network
config network allow-old-bridge-apsTo configure an old bridge access point’s ability to associate with a switch, use the config networkallow-old-bridge-aps command.
config network allow-old-bridge-aps {enable | disable}
Syntax Description Enables the switch association.enable
Disables the switch association.disable
CLI Commands477
CLI CommandsConfigure Network Commands

Command Default Switch association is enabled.
Command History ModificationRelease
This commandwas introduced in a release earlier thanRelease 7.6.
7.6
The following example shows how to configure an old bridge access point to associate with theswitch:
(Cisco Controller) > config network allow-old-bridge-aps enable
config network ap-discoveryTo enable or disable NAT IP in an AP discovery response, use the config network ap-discovery command.
config network ap-discovery nat-ip-only {enable | disable}
Syntax Description Enables use of NAT IP only in discovery response.enable
Enables use of both NAT IP and non NAT IP indiscovery response.
disable
Command Default The use of NAT IP only in discovery response is enabled.
Command History ModificationRelease
This commandwas introduced in a release earlier thanRelease 7.6.
7.6
Usage Guidelines • If the config interface nat-address management command is set, this command controls whichaddress(es) are sent in the CAPWAP discovery responses.
• If all APs are on the outside of the NAT gateway of the controller, enter the config network ap-discoverynat-ip-only enable command, and only the management NAT address is sent.
• If the controller has both APs on the outside and the inside of its NAT gateway, enter the config networkap-discovery nat-ip-only disable command, and both themanagement NAT address and themanagementinside address are sent. Ensure that you have entered the config ap link-latency disable all commandto avoid stranding APs.
• If you disable nat-ip-only, the controller sends all active AP-Manager interfaces with their non-NAT IPin discovery response to APs.
If you enable nat-ip-only, the controller sends all active AP-Manager interfaces with NAT IP if configuredfor the interface, else non-NAT IP.
We recommend that you configure the interface as AP-Manager interface with NAT IP or non-NAT IPkeeping these scenarios in mind because the AP chooses the least loaded AP-Manager interface receivedin the discovery response.
CLI Commands478
CLI Commandsconfig network ap-discovery
The following example shows how to enable NAT IP in an AP discovery response:
(Cisco Controller) > config network ap-discovery nat-ip-only enable
config network ap-fallbackTo configure Cisco lightweight access point fallback, use the config network ap-fallback command.
config network ap-fallback {enable | disable}
Syntax Description Enables the Cisco lightweight access point fallback.enable
Disables the Cisco lightweight access point fallback.disable
Command Default The Cisco lightweight access point fallback is enabled.
Command History ModificationRelease
This commandwas introduced in a release earlier thanRelease 7.6.
7.6
The following example shows how to enable the Cisco lightweight access point fallback:
(Cisco Controller) > config network ap-fallback enable
config network ap-priorityTo enable or disable the option to prioritize lightweight access points so that after a controller failure theyreauthenticate by priority rather than on a first-come-until-full basis, use the config network ap-prioritycommand.
config network ap-priority {enable | disable}
Syntax Description Enables the lightweight access point priorityreauthentication.
enable
Disables the lightweight access point priorityreauthentication.
disable
Command Default The lightweight access point priority reauthentication is disabled.
Command History ModificationRelease
This commandwas introduced in a release earlier thanRelease 7.6.
7.6
The following example shows how to enable the lightweight access point priority reauthorization:
CLI Commands479
CLI Commandsconfig network ap-fallback

(Cisco Controller) > config network ap-priority enable
config network apple-talkTo configure AppleTalk bridging, use the config network apple-talk command.
config network apple-talk {enable | disable}
Syntax Description Enables the AppleTalk bridging.enable
Disables the AppleTalk bridging.disable
Command Default None
Command History ModificationRelease
This commandwas introduced in a release earlier thanRelease 7.6.
7.6
The following example shows how to configure AppleTalk bridging:
(Cisco Controller) > config network apple-talk enable
config network arptimeoutTo set the Address Resolution Protocol (ARP) entry timeout value, use the config network arptimeoutcommand.
config network arptimeout seconds
Syntax Description Timeout in seconds. The minimum value is 10seconds. The default value is 300 seconds.
seconds
Command Default The default ARP entry timeout value is 300 seconds.
Command History ModificationRelease
This command was introduced in a release earlier than Release 7.6.7.6
This example shows how to set the ARP entry timeout value to 240 seconds:
(Cisco Controller) > config network arptimeout 240
Related Commands show network summary
CLI Commands480
CLI Commandsconfig network apple-talk
config network bridging-shared-secretTo configure the bridging shared secret, use the config network bridging-shared-secret command.
config network bridging-shared-secret shared_secret
Syntax Description Bridging shared secret string. The string can containup to 10 bytes.
shared_secret
Command Default The bridging shared secret is enabled by default.
Command History ModificationRelease
This command was introduced in a release earlier than Release 7.6.7.6
Usage Guidelines This command creates a secret that encrypts backhaul user data for the mesh access points that connect to theswitch.
The zero-touch configuration must be enabled for this command to work.
The following example shows how to configure the bridging shared secret string “shhh1”:
(Cisco Controller) > config network bridging-shared-secret shhh1
Related Commands show network summary
config network broadcastTo enable or disable broadcast packet forwarding, use the config network broadcast command.
config network broadcast {enable | disable}
Syntax Description Enables the broadcast packet forwarding.enable
Disables the broadcast packet forwarding.disable
Command Default The broadcast packet forwarding is disabled by default.
Command History ModificationRelease
This command was introduced in a release earlier than Release 7.6.7.6
Usage Guidelines This command allows you to enable or disable broadcasting. You must enable multicast mode before enablingbroadcast forwarding. Use the config network multicast mode command to configure multicast mode onthe controller.
CLI Commands481
CLI Commandsconfig network bridging-shared-secret

The default multicast mode is unicast in case of all controllers except for Cisco 2106 Controllers. The broadcastpackets and multicast packets can be independently controlled. If multicast is off and broadcast is on, broadcastpackets still reach the access points, based on the configured multicast mode.
Note
The following example shows how to enable broadcast packet forwarding:
(Cisco Controller) > config network broadcast enable
Related Commands show network summary
config network multicast global
config network multicast mode
config network fast-ssid-changeTo enable or disable fast Service Set Identifier (SSID) changing for mobile stations, use the config networkfast-ssid-change command.
config network fast-ssid-change {enable | disable}
Syntax Description Enables the fast SSID changing for mobile stationsenable
Disables the fast SSID changing for mobile stations.disable
Command Default None
Command History ModificationRelease
This command was introduced in a release earlier than Release 7.6.7.6
Usage Guidelines When you enable the Fast SSID Change feature, the controller allows clients to move between SSIDs. Whenthe client sends a new association for a different SSID, the client entry in the controller connection table iscleared before the client is added to the new SSID.
When you disable the FastSSID Change feature, the controller enforces a delay before clients are allowed tomove to a new SSID.
The following example shows how to enable the fast SSID changing for mobile stations:
(Cisco Controller) > config network fast-ssid-change enable
Related Commands show network summary
config network ip-mac-bindingTo validate the source IP address and MAC address binding within client packets, use the config networkip-mac-binding command.
CLI Commands482
CLI Commandsconfig network fast-ssid-change

config network ip-network-binding {enable | disable}
Syntax Description Enables the validation of the source IP address toMAC address binding in clients packets.
enable
Disables the validation of the source IP address toMAC address binding in clients packets.
disable
Command Default The validation of the source IP address to MAC address binding in clients packets is enabled by default.
Command History ModificationRelease
This command was introduced in a release earlier than Release 7.6.7.6
Usage Guidelines In controller software release 5.2, the controller enforces strict IP address-to-MAC address binding in clientpackets. The controller checks the IP address and MAC address in a packet, compares them to the addressesthat are registered with the controller, and forwards the packet only if they both match. In previous releases,the controller checks only the MAC address of the client and ignores the IP address.
You might want to disable this binding check if you have a routed network behind a workgroup bridge (WGB).Note
The following example shows how to validate the source IP and MAC address within client packets:
(Cisco Controller) > config network ip-mac-binding enable
config network master-baseTo enable or disable the Cisco wireless LAN controller as an access point default primary, use the confignetwork master-base command.
config network master-base {enable | disable}
Syntax Description Enables the Cisco wireless LAN controller acting asa Cisco lightweight access point default primary.
enable
Disables the Cisco wireless LAN controller acting asa Cisco lightweight access point default primary.
disable
Command Default None
Command History ModificationRelease
This command was introduced in a release earlier than Release 7.6.7.6
CLI Commands483
CLI Commandsconfig network master-base
Usage Guidelines This setting is only used upon network installation and should be disabled after the initial network configuration.Because the primary Cisco wireless LAN controller is normally not used in a deployed network, the primaryCisco wireless LAN controller setting can be saved from 6.0.199.0 or later releases.
The following example shows how to enable the Cisco wireless LAN controller as a default primary:
(Cisco Controller) > config network master-base enable
config network mgmt-via-wirelessTo enable Cisco wireless LAN controller management from an associated wireless client, use the confignetwork mgmt-via-wireless command.
config network mgmt-via-wireless {enable | disable}
Syntax Description Enables the switch management from a wirelessinterface.
enable
Disables the switch management from a wirelessinterface.
disable
Command Default The switch management from a wireless interface is disabled by default.
Command History ModificationRelease
This command was introduced in a release earlier than Release 7.6.7.6
Usage Guidelines This feature allows wireless clients to manage only the Cisco wireless LAN controller associated with theclient and the associated Cisco lightweight access point. That is, clients cannot manage another Cisco wirelessLAN controller with which they are not associated.
This example shows how to configure switch management from a wireless interface:
(Cisco Controller) > config network mgmt-via-wireless enable
Related Commands show network summary
config network multicast globalTo enable or disable multicasting on the controller, use the config network multicast global command.
config network multicast global {enable | disable}
Syntax Description Enables the multicast global support.enable
Disables the multicast global support.disable
Command Default Multicasting on the controller is disabled by default.
CLI Commands484
CLI Commandsconfig network mgmt-via-wireless
Command History ModificationRelease
This command was introduced in a release earlier than Release 7.6.7.6
Usage Guidelines The config network broadcast {enable | disable} command allows you to enable or disable broadcastingwithout enabling or disabling multicasting as well. This command uses the multicast mode configured on thecontroller (by using the config network multicast mode command) to operate.
The following example shows how to enable the global multicast support:
(Cisco Controller) > config network multicast global enable
Related Commands show network summary
config network broadcast
config network multicast mode
config network multicast igmp query intervalTo configure the IGMP query interval, use the config network multicast igmp query interval command.
config network multicast igmp query interval value
Syntax Description Frequency at which controller sends IGMP querymessages. The range is from 15 to 2400 seconds.
value
Command Default The default IGMP query interval is 20 seconds.
Command History ModificationRelease
This command was introduced in a release earlier than Release 7.6.7.6
Usage Guidelines To configure IGMP query interval, ensure that you do the following:
• Enable the global multicast by entering the config network multicast global enable command.
• Enable IGMP snooping by entering the config network multicast igmp snooping enable command.
The following example shows how to configure the IGMP query interval at 20 seconds:
(Cisco Controller) > config network multicast igmp query interval 20
Related Commands config network multicast global
config network multicast igmp snooping
config network multicast igmp timeout
CLI Commands485
CLI Commandsconfig network multicast igmp query interval
config network multicast igmp snoopingTo enable or disable IGMP snooping, use the config network multicast igmp snooping command.
config network multicast igmp snooping {enable | disable}
Syntax Description Enables IGMP snooping.enable
Disables IGMP snooping.disable
Command Default None
Command History ModificationRelease
This command was introduced in a release earlier than Release 7.6.7.6
The following example shows how to enable internet IGMP snooping settings:
(Cisco Controller) > config network multicast igmp snooping enable
Related Commands config network multicast global
config network multicast igmp query interval
config network multicast igmp timeout
config network multicast igmp timeoutTo set the IGMP timeout value, use the config network multicast igmp timeout command.
config network multicast igmp timeout value
Syntax Description Timeout range from 30 to 7200 seconds.value
Command Default None
Command History ModificationRelease
This command was introduced in a release earlier than Release 7.6.7.6
Usage Guidelines You can enter a timeout value between 30 and 7200 seconds. The controller sends three queries in one timeoutvalue at an interval of timeout/3 to see if any clients exist for a particular multicast group. If the controllerdoes not receive a response through an IGMP report from the client, the controller times out the client entryfrom the MGID table. When no clients are left for a particular multicast group, the controller waits for theIGMP timeout value to expire and then deletes the MGID entry from the controller. The controller alwaysgenerates a general IGMP query (to destination address 224.0.0.1) and sends it on all WLANs with an MGIDvalue of 1.
The following example shows how to configure the timeout value 50 for IGMP network settings:
CLI Commands486
CLI Commandsconfig network multicast igmp snooping

(Cisco Controller) > config network multicast igmp timeout 50
Related Commands config network multicast global
config network igmp snooping
config network multicast igmp query interval
config network multicast l2mcastTo configure the Layer 2 multicast on an interface or all interfaces, use the config networkmulticast l2mcastcommand.
config network multicast l2mcast {enable| disable {all | interface-name}
Syntax Description Enables Layer 2 multicast.enable
Disables Layer 2 multicast.disable
Applies to all interfaces.all
Interface name for which the Layer 2 multicast is toenabled or disabled.
interface-name
Command Default None
Command History ModificationRelease
This command was introduced in a release earlier than Release 7.6.7.6
The following example shows how to enable Layer 2 multicast for all interfaces:
(Cisco Controller) > config network multicast l2mcast enable all
Related Commands config network multicast global
config network multicast igmp snooping
config network multicast igmp query interval
config network multicast mld
config network multicast mldTo configure the Multicast Listener Discovery (MLD) parameters, use the config network multicast mldcommand.
config network multicast mld {query interval interval-value | snooping {enable | disable} |timeout timeout-value}
CLI Commands487
CLI Commandsconfig network multicast l2mcast
Syntax Description Configures query interval to send MLD querymessages.
query interval
Query interval in seconds. The range is from 15 to2400 seconds.
interval-value
Configures MLD snooping.snooping
Enables MLD snooping.enable
Disables MLD snooping.disable
Configures MLD timeout.timeout
Timeout value in seconds. The range is from 30seconds to 7200 seconds.
timeout-value
Command Default None
Command History ModificationRelease
This command was introduced in a release earlier than Release 7.6.7.6
The following example shows how to set a query interval of 20 seconds for MLD query messages:
(Cisco Controller) > config network multicast mld query interval 20
Related Commands config network multicast global
config network multicast igmp snooping
config network multicast igmp query interval
config network multicast l2mcast
config network multicast mode multicastTo configure the controller to use the multicast method to send broadcast or multicast packets to an accesspoint, use the config network multicast mode multicast command.
config network multicast mode multicast
Syntax Description This command has no arguments or keywords.
Command Default None
Command History ModificationRelease
This command was introduced in a release earlier than Release 7.6.7.6
The following example shows how to configure the multicast mode to send a single copy of data tomultiple receivers:
CLI Commands488
CLI Commandsconfig network multicast mode multicast
(Cisco Controller) > config network multicast mode multicast
Related Commands config network multicast global
config network broadcast
config network multicast mode unicast
config network multicast mode unicastTo configure the controller to use the unicast method to send broadcast or multicast packets to an access point,use the config network multicast mode unicast command.
config network multicast mode unicast
Syntax Description This command has no arguments or keywords.
Command Default None
Command History ModificationRelease
This command was introduced in a release earlier than Release 7.6.7.6
The following example shows how to configure the controller to use the unicast mode:
(Cisco Controller) > config network multicast mode unicast
Related Commands config network multicast global
config network broadcast
config network multicast mode multicast
config network oeap-600 dual-rlan-portsTo configure the Ethernet port 3 of Cisco OfficeExtend 600 Series access points to operate as a remote LANport in addition to port 4, use the config network oeap-600 dual-rlan-ports command.
config network oeap-600 dual-rlan-ports {enable | disable}
Syntax Description Enables Ethernet port 3 of Cisco OfficeExtend 600Series access points to operate as a remote LAN portin addition to port 4.
enable
Resets the Ethernet port 3 Cisco OfficeExtend 600Series access points to function as a local LAN port.
disable
Command Default The Ethernet port 3 Cisco 600 Series OEAP is reset.
CLI Commands489
CLI Commandsconfig network multicast mode unicast

Command History ModificationRelease
This commandwas introduced in a release earlier thanRelease 7.6.
7.6
The following example shows how to enable the Ethernet port 3 of Cisco OfficeExtend 600 Seriesaccess points to operate as a remote LAN port:
(Cisco Controller) > config network oeap-600 dual-rlan-ports enable
config network oeap-600 local-networkTo configure access to the local network for the Cisco 600 Series OfficeExtend access points, use the confignetwork oeap-600 local-network command.
config network oeap-600 local-network {enable | disable}
Syntax Description Enables access to the local network for the Cisco 600Series OfficeExtend access points.
enable
Disables access to the local network for the Cisco 600Series OfficeExtend access points.
disable
Command Default Access to the local network for the Cisco 600 Series OEAPs is disabled.
Command History ModificationRelease
This commandwas introduced in a release earlier thanRelease 7.6.
7.6
The following example shows how to enable access to the local network for the Cisco 600 SeriesOfficeExtend access points:
(Cisco Controller) > config network oeap-600 local-network enable
config network otap-modeTo enable or disable over-the-air provisioning (OTAP) of Cisco lightweight access points, use the confignetwork otap-mode command.
config network otap-mode {enable | disable}
Syntax Description Enables the OTAP provisioning.enable
Disables the OTAP provisioning.disable
Command Default The OTAP provisioning is enabled.
CLI Commands490
CLI Commandsconfig network oeap-600 local-network

Command History ModificationRelease
This commandwas introduced in a release earlier thanRelease 7.6.
7.6
The following example shows how to disable the OTAP provisioning:
(Cisco Controller) >config network otap-mode disable
config network rf-network-nameTo set the RF-Network name, use the config network rf-network-name command.
config network rf-network-name name
Syntax Description RF-Network name. The name can contain up to 19characters.
name
Command Default None
Command History ModificationRelease
This commandwas introduced in a release earlier thanRelease 7.6.
7.6
The following example shows how to set the RF-network name to travelers:
(Cisco Controller) > config network rf-network-name travelers
Related Commands show network summary
config network securewebTo change the state of the secure web (https is http and SSL) interface for management users, use the confignetwork secureweb command.
config network secureweb {enable | disable}
Syntax Description Enables the secure web interface for managementusers.
enable
Disables the secure web interface for managementusers.
disable
Command Default The secure web interface for management users is enabled by default.
Command History ModificationRelease
This command was introduced in a release earlier than Release 7.6.7.6
CLI Commands491
CLI Commandsconfig network rf-network-name
Usage Guidelines This command allows management users to access the controller GUI using an http://ip-address. Web modeis not a secure connection.
The following example shows how to enable the secure web interface settings for management users:
(Cisco Controller) > config network secureweb enableYou must reboot for the change to take effect.
Related Commands config network secureweb cipher-option
show network summary
config network secureweb cipher-optionTo enable or disable secure web mode with increased security, or to enable or disable Secure Sockets Layer(SSL v2) for web administration and web authentication, use the config network secureweb cipher-optioncommand.
config network secureweb cipher-option {high | sslv2 | rc4-preference} {enable | disable}
Syntax Description Configures whether or not 128-bit ciphers are requiredfor web administration and web authentication.
high
Configures SSLv2 for both web administration andweb authentication.
sslv2
Configures preference for RC4-SHA (Rivest Cipher4-Secure Hash Algorithm) cipher suites (over CBCcipher suites) for web authentication and webadministration.
rc4-preference
Enables the secure web interface.enable
Disables the secure web interface.disable
Command Default The default is disable for secure web mode with increased security and enable for SSL v2.
Command History ModificationRelease
This command was introduced in a release earlier than Release 7.6.7.6
Usage Guidelines
The config network secureweb cipher-option command allows users to access the controller GUI using anhttp://ip-address but only from browsers that support 128-bit (or larger) ciphers.
Note
When cipher-option sslv2 is disabled, users cannot connect using a browser configured with SSLv2 only.They must use a browser that is configured to use a more secure protocol such as SSLv3 or later.
In RC4-SHA based cipher suites, RC4 is used for encryption and SHA is used for message authentication.
CLI Commands492
CLI Commandsconfig network secureweb cipher-option
The following example shows how to enable secure web mode with increased security:
(Cisco Controller) > config network secureweb cipher-option
The following example shows how to disable SSL v2:
(Cisco Controller) > config network secureweb cipher-option sslv2 disable
Related Commands config network secureweb
show network summary
config network sshTo allow or disallow new Secure Shell (SSH) sessions, use the config network ssh command.
config network ssh {enable | disable}
Syntax Description Allows the new SSH sessions.enable
Disallows the new SSH sessions.disable
Command Default The default value for the new SSH session is disable.
The following example shows how to enable the new SSH session:
(Cisco Controller) > config network ssh enable
Related Commands show network summary
config network telnetTo allow or disallow new Telnet sessions, use the config network telnet command.
config network telnet {enable | disable}
Syntax Description Allows new Telnet sessions.enable
Disallows new Telnet sessions.disable
Command Default By default, the new Telnet session is disallowed and the value is disable.
Usage Guidelines Telnet is not supported on Cisco Aironet 1830 and 1850 Series Access Points.
Command History ModificationRelease
This command was introduced in a release earlier than Release 7.6.7.6
CLI Commands493
CLI Commandsconfig network ssh

The following example shows how to configure the new Telnet sessions:
(Cisco Controller) > config network telnet enable
Related Commands config ap telnet
show network summary
config network usertimeoutTo change the timeout for idle client sessions, use the config network usertimeout command.
config network usertimeout seconds
Syntax Description Timeout duration in seconds. The minimum value is90 seconds. The default value is 300 seconds.
seconds
Command Default The default timeout value for idle client session is 300 seconds.
Usage Guidelines Use this command to set the idle client session duration on the Cisco wireless LAN controller. The minimumduration is 90 seconds.
The following example shows how to configure the idle session timeout to 1200 seconds:
(Cisco Controller) > config network usertimeout 1200
Related Commands show network summary
config network web-auth captive-bypassTo configure the controller to support bypass of captive portals at the network level, use the config networkweb-auth captive-bypass command.
config network web-auth captive-bypass {enable | disable}
Syntax Description Allows the controller to support bypass of captiveportals.
enable
Disallows the controller to support bypass of captiveportals.
disable
Command Default None
The following example shows how to configure the controller to support bypass of captive portals:
(Cisco Controller) > config network web-auth captive-bypass enable
Related Commands show network summary
CLI Commands494
CLI Commandsconfig network usertimeout
config network web-auth cmcc-support
config network web-auth cmcc-supportTo configure eWalk on the controller, use the config network web-auth cmcc-support command.
config network web-auth cmcc-support {enable | disable}
Syntax Description Enables eWalk on the controller.enable
Disables eWalk on the controller.disable
Command Default None
The following example shows how to enable eWalk on the controller:
(Cisco Controller) > config network web-auth cmcc-support enable
Related Commands show network summary
config network web-auth captive-bypass
config network web-auth portTo configure an additional port to be redirected for web authentication at the network level, use the confignetwork web-auth port command.
config network web-auth port port
Syntax Description Port number. The valid range is from 0 to 65535.port
Command Default None
Command History ModificationRelease
This commandwas introduced in a release earlier thanRelease 7.6.
7.6
The following example shows how to configure an additional port number 1200 to be redirected forweb authentication:
(Cisco Controller) > config network web-auth port 1200
Related Commands show network summary
config network web-auth proxy-redirectTo configure proxy redirect support for web authentication clients, use the config network web-authproxy-redirect command.
CLI Commands495
CLI Commandsconfig network web-auth cmcc-support

config network web-auth proxy-redirect {enable | disable}
Syntax Description Allows proxy redirect support for web authenticationclients.
enable
Disallows proxy redirect support for webauthentication clients.
disable
Command Default None
Command History ModificationRelease
This commandwas introduced in a release earlier thanRelease 7.6.
7.6
The following example shows how to enable proxy redirect support for web authentication clients:
(Cisco Controller) > config network web-auth proxy-redirect enable
Related Commands show network summary
config network web-auth securewebTo configure the secure web (https) authentication for clients, use the config network web-auth securewebcommand.
config network web-auth secureweb {enable | disable}
Syntax Description Allows secure web (https) authentication for clients.enable
Disallows secure web (https) authentication for clients.Enables http web authentication for clients.
disable
Command Default The default secure web (https) authentication for clients is enabled.
Command History ModificationRelease
This commandwas introduced in a release earlier thanRelease 7.6.
7.6
Usage Guidelines If you configure the secure web (https) authentication for clients using the config networkweb-auth securewebdisable command, then you must reboot the Cisco WLC to implement the change.
The following example shows how to enable the secure web (https) authentication for clients:
(Cisco Controller) > config network web-auth secureweb enable
Related Commands show network summary
CLI Commands496
CLI Commandsconfig network web-auth secureweb

config network webmodeTo enable or disable the web mode, use the config network webmode command.
config network webmode {enable | disable}
Syntax Description Enables the web interface.enable
Disables the web interface.disable
Command Default The default value for the web mode is enable.
Command History ModificationRelease
This command was introduced in a release earlier than Release 7.6.7.6
The following example shows how to disable the web interface mode:
(Cisco Controller) > config network webmode disable
Related Commands show network summary
config network web-authTo configure the network-level web authentication options, use the config network web-auth command.
config network web-auth {port port-number} | {proxy-redirect {enable | disable}}
Syntax Description Configures additional ports for web authenticationredirection.
port
Port number (between 0 and 65535).port-number
Configures proxy redirect support for webauthentication clients.
proxy-redirect
Enables proxy redirect support for web authenticationclients.
Web-auth proxy redirectionwill be enabledfor ports 80, 8080, and 3128, along withuser defined port 345.
Note
enable
Disables proxy redirect support for web authenticationclients.
disable
Command Default The default network-level web authentication value is disabled.
CLI Commands497
CLI Commandsconfig network webmode

Command History ModificationRelease
This commandwas introduced in a release earlier thanRelease 7.6.
7.6
Usage Guidelines You must reset the system for the configuration to take effect.
The following example shows how to enable proxy redirect support for web authentication clients:
(Cisco Controller) > config network web-auth proxy-redirect enable
Related Commands show network summary
show run-config
config qos protocol-type
config network zero-configTo configure bridge access point ZeroConfig support, use the config network zero-config command.
config network zero-config {enable | disable}
Syntax Description Enables the bridge access point ZeroConfig support.enable
Disables the bridge access point ZeroConfig support.disable
Command Default The bridge access point ZeroConfig support is enabled.
Command History ModificationRelease
This commandwas introduced in a release earlier thanRelease 7.6.
7.6
The following example shows how to enable the bridge access point ZeroConfig support:
(Cisco Controller) >config network zero-config enable
Configure Port CommandsUse the config port commands to configure port settings.
config port adminmodeTo enable or disable the administrative mode for a specific controller port or for all ports, use the config portadminmode command.
config port adminmode {all | port} {enable | disable}
CLI Commands498
CLI Commandsconfig network zero-config

Syntax Description Configures all ports.all
Number of the port.port
Enables the specified ports.enable
Disables the specified ports.disable
Command Default Enabled
Command History ModificationRelease
This commandwas introduced in a release earlier thanRelease 7.6.
7.6
The following example shows how to disable port 8:
(Cisco Controller) > config port adminmode 8 disable
The following example shows how to enable all ports:
(Cisco Controller) > config port adminmode all enable
config port autonegTo configure 10/100BASE-T Ethernet ports for physical port autonegotiation, use the config port autonegcommand.
config port autoneg {all | port} {enable | disable}
Syntax Description Configures all ports.all
Number of the port.port
Enables the specified ports.enable
Disables the specified ports.disable
Command Default The default for all ports is that auto-negotiation is enabled.
Command History ModificationRelease
This commandwas introduced in a release earlier thanRelease 7.6.
7.6
Example
The following example shows how to turn on physical port autonegotiation for all front-panel Ethernetports:
CLI Commands499
CLI Commandsconfig port autoneg
(Cisco Controller) > config port autoneg all enable
The following example shows how to disable physical port autonegotiation for front-panel Ethernetport 19:
(Cisco Controller) > config port autoneg 19 disable
config port linktrapTo enable or disable the up and down link traps for a specific controller port or for all ports, use the configport linktrap command.
config port linktrap {all | port} {enable | disable}
Syntax Description Configures all ports.all
Number of the port.port
Enables the specified ports.enable
Disables the specified ports.disable
Command Default The default value for down link traps for a specific controller port or for all ports is enabled.
Command History ModificationRelease
This commandwas introduced in a release earlier thanRelease 7.6.
7.6
The following example shows how to disable port 8 traps:
(Cisco Controller) > config port linktrap 8 disable
The following example shows how to enable all port traps:
(Cisco Controller) > config port linktrap all enable
config port multicast applianceTo enable or disable the multicast appliance service for a specific controller port or for all ports, use the configport multicast appliance commands.
config port multicast appliance {all | port} {enable | disable}
Syntax Description Configures all ports.all
Number of the port.port
Enables the specified ports.enable
CLI Commands500
CLI Commandsconfig port linktrap

Disables the specified ports.disable
Command Default The default multicast appliance service for a specific controller port or for all ports is enabled.
Command History ModificationRelease
This commandwas introduced in a release earlier thanRelease 7.6.
7.6
The following example shows how to enable multicast appliance service on all ports:
(Cisco Controller) > config port multicast appliance all enable
The following example shows how to disable multicast appliance service on port 8:
(Cisco Controller) > config port multicast appliance 8 disable
config port powerTo enable or disable Power over Ethernet (PoE) for a specific controller port or for all ports, use the configport power command.
config port power {all | port} {enable | disable}
Syntax Description Configures all ports.all
Port number.port
Enables the specified ports.enable
Disables the specified ports.disable
Command Default Enabled
Command History ModificationRelease
This commandwas introduced in a release earlier thanRelease 7.6.
7.6
The following example shows how to enable PoE on all ports:
(Cisco Controller) > config port power all enable
The following example shows how to disable PoE on port 8:
(Cisco Controller) > config port power 8 disable
CLI Commands501
CLI Commandsconfig port power

Configure PMIPv6 CommandsUse the config pmipv6 commands to configure PMIPv6 parameters on the Mobile Access Gateway (MAG)module of the controller. To enable theMAGmodule on the controller and to configure the PMIPv6 commands,you must configure the following prerequisite commands:
• config pmipv6 domain—EnablesMAG functionality on the controller and configures a PMIPv6 domain.• config pmipv6 mag lma—Configures a Local Mobility Anchor (LMA) with the MAG.• config pmipv6 add profile—Creates a PMIPv6 profile. This command is a prerequisite only when openauthentication is used.
config pmipv6 domainTo configure PMIPv6 and to enable Mobile Access Gateway (MAG) functionality on Cisco WLC, use theconfig pmipv6 domain command.
config pmipv6 domain domain_name
Syntax Description Name of the PMIPv6 domain. The domain name can be up to 127 case-sensitive,alphanumeric characters.
domain_name
Command Default None
Command History ModificationRelease
This commandwas introduced in a release earlier thanRelease 7.6.
7.6
The following example shows how to configure a domain name for a PMIPv6 WLAN:(Cisco Controller) >config pmipv6 domain floor1
config pmipv6 add profileTo create a ProxyMobility IPv6 (PMIPv6) profile for theWLAN, use the config pmipv6 add profile command.You can configure PMIPv6 profiles based on a realm or a service set identifier (SSID).
config pmipv6 add profile profile_name nai {user@realm | @realm | *} lma lma_name apn apn_name
Syntax Description Name of the profile. The profile name is case sensitive and can be up to 127 alphanumericcharacters.
profile_name
Specifies the Network Access Identifier of the client.nai
Network Access Identifier of the client in the format user@realm. The NAI name is casesensitive and can be up to 127 alphanumeric characters.
user@realm
Network Access Identifier of the client in the format @realm.@realm
All Network Access Identifiers. You can have profiles based on an SSID for all users.*
CLI Commands502
CLI CommandsConfigure PMIPv6 Commands

Specifies the Local Mobility Anchor (LMA).lma
Name of LMA. The LMA name is case sensitive and can be up to 127 alphanumericcharacters.
lma_name
Specifies the access point.apn
Name of the access point. The access point name is case sensitive and can be up to 127alphanumeric characters.
ap_name
Command Default None
Command History ModificationRelease
This commandwas introduced in a release earlier thanRelease 7.6.
7.6
Usage Guidelines This command is a prerequisite for using PMIPv6 configuration commands if the controller uses openauthentication.
The following example shows how to create a PMIPv6 profile:(Cisco Controller) >config pmipv6 add profile profile1 nai @vodfone.com lma vodfonelma apnvodafoneapn
config pmipv6 deleteTo delete a Proxy Mobility IPv6 (PMIPv6) profile, domain, or Local Mobility Anchor (LMA), use the configpmipv6 delete command.
config pmipv6 delete {profile profile_name nai { nai_id | all } | domain domain_name | lmalma_name}
Syntax Description Specifies the PMIPv6 profile.profile
Name of the PMIPv6 profile. The profile name is case sensitive and can be up to 127alphanumeric characters.
profile_name
Specifies the Network Access Identifier (NAI) of a mobile client.nai
Network Access Identifier of a mobile client. The NAI is case sensitive and can be up to127 alphanumeric characters.
nai_id
Specifies all NAIs. When you delete all NAIs, the profile is deleted.all
Specifies the PMIPv6 domain.domain
Name of the PMIPv6 domain. The domain name is case sensitive and can be up to 127alphanumeric characters.
domain_name
Specifies the LMA.lma
CLI Commands503
CLI Commandsconfig pmipv6 delete
Name of the LMA. The LMA name is case sensitive and can be up to 127 alphanumericcharacters.
lma_name
Command Default None
Command History ModificationRelease
This commandwas introduced in a release earlier thanRelease 7.6.
7.6
The following example shows how to delete a domain:(Cisco Controller) >config pmipv6 delete lab1
config pmipv6 mag binding init-retx-timeTo configure the initial timeout between the proxy binding updates (PBUs) when the Mobile Access Gateway(MAG) does not receive the proxy binding acknowledgements (PBAs), use the config pmipv6 mag bindinginit-retx-time command.
config pmipv6 mag binding init-retx-time units
Syntax Description Initial timeout between the PBUs when the MAG does not receive the PBAs. The range is from 100to 65535 seconds.
units
Command Default The default initial timeout is 1000 seconds.
Command History ModificationRelease
This commandwas introduced in a release earlier thanRelease 7.6.
7.6
The following example shows how to configure the initial timeout between the PBUswhen theMAGdoes not receive the PBAs:(Cisco Controller) >config pmipv6 mag binding init-retx-time 500
config pmipv6 mag binding lifetimeTo configure the lifetime of the binding entries in theMobile Access Gateway (MAG), use the config pmipv6mag binding lifetime command.
config pmipv6 mag binding lifetime units
Syntax Description Lifetime of the binding entries in the MAG. The binding lifetime must be a multiple of 4 seconds.The range is from 10 to 65535 seconds.
units
CLI Commands504
CLI Commandsconfig pmipv6 mag binding init-retx-time

Command Default The default lifetime of the binding entries is 65535 seconds.
Command History ModificationRelease
This command was introduced in a release earlier than Release 7.6.7.6
Usage Guidelines You must configure a ProxyMobility IPv6 (PMIPv6) domain before you configure the lifetime of the bindingentries in the controller.
The following example shows how to configure the lifetime of the binding entries in the controller:
(Cisco Controller) >config pmipv6 mag binding lifetime 5000
config pmipv6 mag binding max-retx-timeTo configure the maximum timeout between the proxy binding updates (PBUs) when the Mobility AccessGateway (MAG) does not receive the proxy binding acknowledgments (PBAs), use the config pmipv6 magbinding max-retx-time command.
config pmipv6 mag binding max-retx-time units
Syntax Description Maximum timeout between the PBUs when the MAG does not receive the PBAs. The range is from100 to 65535 seconds.
units
Command Default The default maximum timeout is 32000 seconds.
Command History ModificationRelease
This command was introduced in a release earlier than Release 7.6.7.6
The following example shows how to configure the maximum timeout between the PBUs when theMAG does not receive the PBAs:
(Cisco Controller) >config pmipv6 mag binding max-retx-time 50
config pmipv6 mag binding maximumTo configure the maximum number of binding entries in the Mobile Access Gateway (MAG), use the configpmipv6 mag binding maximum command.
config pmipv6 mag binding maximum units
Syntax Description Maximum number of binding entries in the MAG. This number indicates the maximum number ofusers connected to the MAG. The range is from 0 to 40000.
units
Command Default The default maximum number of binding entries in the MAG is 10000.
CLI Commands505
CLI Commandsconfig pmipv6 mag binding max-retx-time
Command History ModificationRelease
This commandwas introduced in a release earlier thanRelease 7.6.
7.6
Usage Guidelines You must configure a Proxy Mobility IPv6 (PMIPv6) domain before you configure the maximum number ofbinding entries in the MAG.
The following example shows how to configure the maximum number of binding entries in theMAG:
(Cisco Controller) >config pmipv6 mag binding maximum 20000
config pmipv6 mag binding refresh-timeTo configure the refresh time of the binding entries in the MAG, use the config pmipv6 mag bindingrefresh-time command.
config pmipv6 mag binding refresh-time units
Syntax Description Refresh time of the binding entries in the MAG. The binding refresh time must be a multiple of 4.The range is from 4 to 65535 seconds.
units
Command Default The default refresh time of the binding entries in the MAG is 300 seconds.
Usage Guidelines You must configure a PMIPv6 domain before you configure the refresh time of the binding entries in theMAG.
The following example shows how to configure the refresh time of the binding entries in the MAG:(Cisco Controller) >config pmipv6 mag binding refresh-time 500
config pmipv6 mag bri delayTo configure the maximum or minimum amount of time that the MAG waits before retransmitting a BindingRevocation Indication (BRI) message, use the config pmipv6 mag bri delay command.
config pmipv6 mag bri delay {min | max} time
Syntax Description Specifies the minimum amount of time that the MAG waits before retransmitting a BRI message.min
Specifies the maximum amount of time that the MAG waits before retransmitting a BRI message.max
Maximum orminimum amount of time that the CiscoWLCwaits before retransmitting a BRImessage.The range is from 500 to 65535 milliseconds.
time
Command Default The default value of the maximum amount of time that the MAG waits before retransmitting a BRI messageis 2 seconds.
The default value of the minimum amount of time that the MAG waits before retransmitting a BRI messageis 1 second.
CLI Commands506
CLI Commandsconfig pmipv6 mag binding refresh-time

Command History ModificationRelease
This commandwas introduced in a release earlier thanRelease 7.6.
7.6
The following example shows how to configure the minimum amount of time that the MAG waitsbefore retransmitting a BRI message:(Cisco Controller) >config pmipv6 mag bri delay min 500
config pmipv6 mag bri retriesTo configure the maximum number of times that the MAG retransmits the Binding Revocation Indication(BRI) message before receiving the Binding Revocation Acknowledgment (BRA) message, use the configpmipv6 mag bri retries command.
config pmipv6 mag bri retries retries
Syntax Description Maximum number of times that the MAG retransmits the BRI message before receiving the BRAmessage. The range is from 1 to 10 retries.
retries
Command Default The default is 1 retry.
The following example shows how to configure the maximum number of times that theMAG retries:(Cisco Controller) >config pmipv6 mag bri retries 5
config pmipv6 mag lmaTo configure a local mobility anchor (LMA) with the mobile access gateway (MAG), use the config pmipv6mag lma command.
config pmipv6 mag lma lma_name ipv4-address address
Syntax Description Name of the LMA. The LMA name can be a NAI or a string thatuniquely identifies the LMA.
lma_name
Specifies the IP address of the LMA.ipv4-address
IP address of the LMA.address
Command Default None
Command History ModificationRelease
This commandwas introduced in a release earlier thanRelease 7.6.
7.6
Usage Guidelines This command is a prerequisite to configure PMIPv6 parameters on the MAG.
CLI Commands507
CLI Commandsconfig pmipv6 mag bri retries

The following example shows how to configure an LMA with the MAG:(Cisco Controller) >config pmipv6 mag lma vodafonelma ipv4-address 209.165.200.254
config pmipv6 mag replay-protectionTo configure the maximum amount of time difference between the timestamp in the received proxy bindingacknowledgment (PBA) and the current time of the day for replay protection, use the config pmipv6 magreplay-protection command.
config pmipv6 mag replay-protection { timestamp window time | sequence-no sequence |mobile-node-timestamp mobile_node_timestamp }
Syntax Description Specifies the time stamp of the PBA message.timestamp
Specifies the maximum time difference between the time stamp inthe received PBA message and the current time of day.
window
Maximum time difference between the time stamp in the receivedPBA message and the current time of day. The range is from 1 to300 milliseconds.
time
(Optional) Specifies the sequence number in a ProxyBindingUpdatemessage.
sequence-no
(Optional) Sequence number in the Proxy Binding Update message.sequence
(Optional) Specifies the time stamp of the mobile node.mobile_node_timestamp
(Optional) Time stamp of the mobile node.mobile_node_timestamp
Command Default The default maximum time difference is 300 milliseconds.
Usage Guidelines Only the timestamp option is supported.
The following example shows how to configure the maximum amount of time difference inmilliseconds between the time stamp in the received PBA message and the current time of day:(Cisco Controller) >config pmipv6 mag replay-protection timestamp window 200
Configure QoS CommandsUse the config qos commands to configure Quality of Service (QoS) settings.
config qos average-data-rateTo define the average data rate in Kbps for TCP traffic per user or per service set identifier (SSID), use theconfig qos average-data-rate command.
config qos average-data-rate {bronze | silver | gold | platinum} {per-ssid | per-client}{downstream | upstream} rate
CLI Commands508
CLI Commandsconfig pmipv6 mag replay-protection

Syntax Description Specifies the average data rate for the queue bronze.bronze
Specifies the average data rate for the queue silver.silver
Specifies the average data rate for the queue gold.gold
Specifies the average data rate for the queue platinum.platinum
Configures the rate limit for an SSID per radio. Thecombined traffic of all clients will not exceed thislimit.
per-ssid
Configures the rate limit for each client associatedwith the SSID.
per-client
Configures the rate limit for downstream traffic.downstream
Configures the rate limit for upstream traffic.upstream
Average data rate for TCP traffic per user. A valuebetween 0 and 51,2000 Kbps (inclusive). A value of0 imposes no bandwidth restriction on the QoS profile.
rate
Command Default None
Command History ModificationRelease
This command was introduced in a release earlier than Release 7.6.7.6
The following example shows how to configure the average data rate 0 Kbps for the queue gold perSSID:
(Cisco Controller) > config qos average-data-rate gold per ssid downstream 0
Related Commands config qos burst-data-rate
config qos average-realtime-rate
config qos burst-realtime-rate
config wlan override-rate-limit
config qos average-realtime-rateTo define the average real-time data rate in Kbps for UDP traffic per user or per service set identifier (SSID),use the config qos average-realtime-rate command.
config qos average-realtime-rate {bronze | silver | gold | platinum} {per-ssid | per-client}{downstream | upstream} rate
Syntax Description Specifies the average real-time data rate for the queuebronze.
bronze
CLI Commands509
CLI Commandsconfig qos average-realtime-rate
Specifies the average real-time data rate for the queuesilver.
silver
Specifies the average real-time data rate for the queuegold.
gold
Specifies the average real-time data rate for the queueplatinum.
platinum
Configures the rate limit for an SSID per radio. Thecombined traffic of all clients will not exceed thislimit.
per-ssid
Configures the rate limit for each client associatedwith the SSID.
per-client
Configures the rate limit for downstream traffic.downstream
Configures the rate limit for upstream traffic.upstream
Average real-time data rate for UDP traffic per user.A value between 0 and 51,2000 Kbps (inclusive). Avalue of 0 imposes no bandwidth restriction on theQoS profile.
rate
Command Default None
Command History ModificationRelease
This command was introduced in a release earlier than Release 7.6.7.6
The following example shows how to configure the average real-time actual rate for queue gold:
(Cisco Controller) > config qos average-realtime-rate gold per ssid downstream 10
Related Commands config qos average-data-rate
config qos burst-data-rate
config qos burst-realtime-rate
config wlan override-rate-limit
config qos burst-data-rateTo define the peak data rate in Kbps for TCP traffic per user or per service set identifier (SSID), use the configqos burst-data-rate command.
config qos burst-data-rate {bronze | silver | gold | platinum} {per-ssid | per-client}{downstream | upstream} rate
Syntax Description Specifies the peak data rate for the queue bronze.bronze
CLI Commands510
CLI Commandsconfig qos burst-data-rate
Specifies the peak data rate for the queue silver.silver
Specifies the peak data rate for the queue gold.gold
Specifies the peak data rate for the queue platinum.platinum
Configures the rate limit for an SSID per radio. Thecombined traffic of all clients will not exceed thislimit.
per-ssid
Configures the rate limit for each client associatedwith the SSID.
per-client
Configures the rate limit for downstream traffic.downstream
Configures the rate limit for upstream traffic.upstream
Peak data rate for TCP traffic per user. A valuebetween 0 and 51,2000 Kbps (inclusive). A value of0 imposes no bandwidth restriction on the QoS profile.
rate
Command Default None
Command History ModificationRelease
This command was introduced in a release earlier than Release 7.6.7.6
The following example shows how to configure the peak rate 30000 Kbps for the queue gold:
(Cisco Controller) > config qos burst-data-rate gold per ssid downstream 30000
Related Commands config qos average-data-rate
config qos average-realtime-rate
config qos burst-realtime-rate
config wlan override-rate-limit
config qos burst-realtime-rateTo define the burst real-time data rate in Kbps for UDP traffic per user or per service set identifier (SSID),use the config qos burst-realtime-rate command.
config qos burst-realtime-rate {bronze | silver | gold | platinum} { per-ssid | per-client }{ downstream | upstream } rate
Syntax Description Specifies the burst real-time data rate for the queuebronze.
bronze
Specifies the burst real-time data rate for the queuesilver.
silver
CLI Commands511
CLI Commandsconfig qos burst-realtime-rate
Specifies the burst real-time data rate for the queuegold.
gold
Specifies the burst real-time data rate for the queueplatinum.
platinum
Configures the rate limit for an SSID per radio. Thecombined traffic of all clients will not exceed thislimit.
per-ssid
Configures the rate limit for each client associatedwith the SSID.
per-client
Configures the rate limit for downstream traffic.downstream
Configures the rate limit for upstream traffic.upstream
Burst real-time data rate for UDP traffic per user. Avalue between 0 and 51,2000 Kbps (inclusive). Avalue of 0 imposes no bandwidth restriction on theQoS profile.
rate
Command Default None
Command History ModificationRelease
This command was introduced in a release earlier than Release 7.6.7.6
The following example shows how to configure the burst real-time actual rate 2000 Kbps for thequeue gold:
(Cisco Controller) > config qos burst-realtime-rate gold per ssid downstream 2000
Related Commands config qos average-data-rate
config qos burst-data-rate
config qos average-realtime-rate
config wlan override-rate-limit
config qos descriptionTo change the profile description, use the config qos description command.
config qos description {bronze | silver | gold | platinum} description
Syntax Description Specifies the QoS profile description for the queuebronze.
bronze
Specifies the QoS profile description for the queuesilver.
silver
CLI Commands512
CLI Commandsconfig qos description

Specifies the QoS profile description for the queuegold.
gold
Specifies the QoS profile description for the queueplatinum.
platinum
QoS profile description.description
Command Default None
Command History ModificationRelease
This command was introduced in a release earlier than Release 7.6.7.6
The following example shows how to configure the QoS profile description “description” for thequeue gold:
(Cisco Controller) > config qos description gold abc
Related Commands show qos average-data-rate
config qos burst-data-rate
config qos average-realtime-rate
config qos burst-realtime-rate
config qos max-rf-usage
config qos max-rf-usageTo specify the maximum percentage of RF usage per access point, use the config qosmax-rf-usage command.
config qos max-rf-usage {bronze | silver | gold | platinum} usage_percentage
Syntax Description Specifies the maximum percentage of RF usage forthe queue bronze.
bronze
Specifies the maximum percentage of RF usage forthe queue silver.
silver
Specifies the maximum percentage of RF usage forthe queue gold.
gold
Specifies the maximum percentage of RF usage forthe queue platinum.
platinum
Maximum percentage of RF usage.usage-percentage
Command Default None
CLI Commands513
CLI Commandsconfig qos max-rf-usage

Command History ModificationRelease
This command was introduced in a release earlier than Release 7.6.7.6
The following example shows how to specify the maximum percentage of RF usage for the queuegold:
(Cisco Controller) > config qos max-rf-usage gold 20
Related Commands show qos description
config qos average-data-rate
config qos burst-data-rate
config qos average-realtime-rate
config qos burst-realtime-rate
config qos dot1p-tagTo define the maximum value (0 to 7) for the priority tag associated with packets that fall within the profile,use the config qos dot1p-tag command.
config qos dot1p-tag {bronze | silver | gold | platinum} dot1p_tag
Syntax Description Specifies the QoS 802.1p tag for the queue bronze.bronze
Specifies the QoS 802.1p tag for the queue silver.silver
Specifies the QoS 802.1p tag for the queue gold.gold
Specifies the QoS 802.1p tag for the queue platinum.platinum
Dot1p tag value between 1 and 7.dot1p_tag
Command Default None
Command History ModificationRelease
This command was introduced in a release earlier than Release 7.6.7.6
The following example shows how to configure the a QoS 802.1p tag for the queue gold with thedot1p tag value of 5:
(Cisco Controller) > config qos dot1p-tag gold 5
Related Commands show qos queue_length all
config qos protocol-type
CLI Commands514
CLI Commandsconfig qos dot1p-tag
config qos priorityTo define the maximum and default QoS levels for unicast and multicast traffic when you assign a QoS profileto a WLAN, use the config qos priority command.
config qos priority {bronze | silver | gold | platinum} {maximum-priority |default-unicast-priority | default-multicast-priority}
Syntax Description Specifies a Bronze profile of the WLAN.bronze
Specifies a Silver profile of the WLAN.silver
Specifies a Gold profile of the WLAN.gold
Specifies a Platinum profile of the WLAN.platinum
Maximum QoS priority as one of the following:
• besteffort
• background
• video
• voice
maximum-priority
Default unicast priority as one of the following:
• besteffort
• background
• video
• voice
default-unicast-priority
Default multicast priority as one of the following:
• besteffort
• background
• video
• voice
default-multicast-priority
Command History ModificationRelease
This command was introduced in a release earlier than Release 7.6.7.6
Usage Guidelines The maximum priority level should not be lower than the default unicast and multicast priority levels.
The following example shows how to configure the QoS priority for a gold profile of the WLANwith voice as the maximum priority, video as the default unicast priority, and besteffort as the defaultmulticast priority.
CLI Commands515
CLI Commandsconfig qos priority
(Cisco Controller) > config qos priority gold voice video besteffort
Related Commands config qos protocol-type
config qos protocol-typeTo define the maximum value (0 to 7) for the priority tag associated with packets that fall within the profile,use the config qos protocol-type command.
config qos protocol-type {bronze | silver | gold | platinum} {none | dot1p}
Syntax Description Specifies the QoS 802.1p tag for the queue bronze.bronze
Specifies the QoS 802.1p tag for the queue silver.silver
Specifies the QoS 802.1p tag for the queue gold.gold
Specifies the QoS 802.1p tag for the queue platinum.platinum
Specifies when no specific protocol is assigned.none
Specifies when dot1p type protocol is assigned.dot1p
Command Default None
Command History ModificationRelease
This command was introduced in a release earlier than Release 7.6.7.6
The following example shows how to configure the QoS protocol type silver:
(Cisco Controller) > config qos protocol-type silver dot1p
Related Commands show qos queue_length all
config qos dot1p-tag
config qos queue_lengthTo specify the maximum number of packets that access points keep in their queues, use the config qosqueue_length command.
config qos queue_length {bronze | silver | gold | platinum} queue_length
Syntax Description Specifies the QoS length for the queue bronze.bronze
Specifies the QoS length for the queue silver.silver
Specifies the QoS length for the queue gold.gold
CLI Commands516
CLI Commandsconfig qos protocol-type

Specifies the QoS length for the queue platinum.platinum
Maximum queue length values (10 to 255).queue_length
Command Default None
Command History ModificationRelease
This command was introduced in a release earlier than Release 7.6.7.6
The following example shows how to configure the QoS length for the queue “gold” with themaximum queue length value as 12:
(Cisco Controller) > config qos queue_length gold 12
Related Commands show qos
Configure RADIUS Account CommandsUse the config radius acct commands to configure RADIUS account server settings.
config radius acctTo configure settings for a RADIUS accounting server for the Cisco wireless LAN controller, use the configradius acct command.
config radius acct{ {add index IP addr port {ascii | hex} secret} | delete index | disable index| enable index | ipsec {authentication {hmac-md5 index | hmac-sha1 index } | disable index| enable index | encryption {256-aes | 3des | aes | des} index | ike {auth-mode{pre-shared-key index type shared_secret_key | certificate index } | dh-group { 2048bit-group-14| group-1 | group-2 | group-5} index | lifetime seconds index | phase1 {aggressive | main}index } } | {mac-delimiter {colon | hyphen | none | single-hyphen}} | {network index{disable | enable}} | {region {group | none | provincial}} | retransmit-timeout indexseconds | realm {add | delete} index realm-string}
Syntax Description Adds a RADIUS accounting server (IPv4 or IPv6).add
RADIUS server index (1 to 17).index
RADIUS server IP address (IPv4 or IPv6).IP addr
RADIUS server’s UDP port number for the interfaceprotocols.
port
Specifies the RADIUS server’s secret type: ascii.ascii
Specifies the RADIUS server’s secret type: hex.hex
RADIUS server’s secret.secret
CLI Commands517
CLI CommandsConfigure RADIUS Account Commands
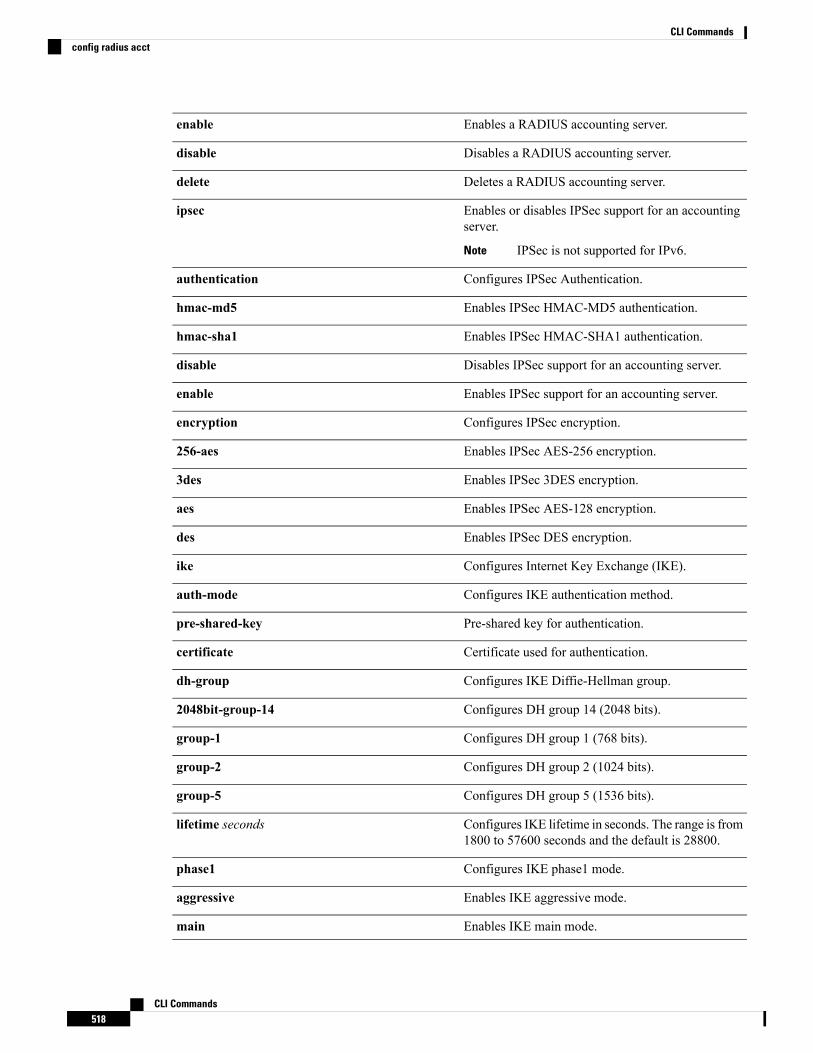
Enables a RADIUS accounting server.enable
Disables a RADIUS accounting server.disable
Deletes a RADIUS accounting server.delete
Enables or disables IPSec support for an accountingserver.
IPSec is not supported for IPv6.Note
ipsec
Configures IPSec Authentication.authentication
Enables IPSec HMAC-MD5 authentication.hmac-md5
Enables IPSec HMAC-SHA1 authentication.hmac-sha1
Disables IPSec support for an accounting server.disable
Enables IPSec support for an accounting server.enable
Configures IPSec encryption.encryption
Enables IPSec AES-256 encryption.256-aes
Enables IPSec 3DES encryption.3des
Enables IPSec AES-128 encryption.aes
Enables IPSec DES encryption.des
Configures Internet Key Exchange (IKE).ike
Configures IKE authentication method.auth-mode
Pre-shared key for authentication.pre-shared-key
Certificate used for authentication.certificate
Configures IKE Diffie-Hellman group.dh-group
Configures DH group 14 (2048 bits).2048bit-group-14
Configures DH group 1 (768 bits).group-1
Configures DH group 2 (1024 bits).group-2
Configures DH group 5 (1536 bits).group-5
Configures IKE lifetime in seconds. The range is from1800 to 57600 seconds and the default is 28800.
lifetime seconds
Configures IKE phase1 mode.phase1
Enables IKE aggressive mode.aggressive
Enables IKE main mode.main
CLI Commands518
CLI Commandsconfig radius acct

Configures MAC delimiter for caller station ID andcalling station ID.
mac-delimiter
Sets the delimiter to colon (For example:xx:xx:xx:xx:xx:xx).
colon
Sets the delimiter to hyphen (For example:xx-xx-xx-xx-xx-xx).
hyphen
Disables delimiters (For example: xxxxxxxxxx).none
Sets the delimiters to single hyphen (For example:xxxxxx-xxxxxx).
single-hyphen
Configures a default RADIUS server for networkusers.
network
Specifies RADIUS server type group.group
Specifies RADIUS server type none.none
Specifies RADIUS server type provincial.provincial
Changes the default retransmit timeout for the server.retransmit-timeout
The number of seconds between retransmissions.seconds
Specifies radius acct realm.realm
Adds radius acct realm.add
Deletes radius acct realm.delete
Command Default When adding a RADIUS server, the port number defaults to 1813 and the state is enabled.
Usage Guidelines IPSec is not supported for IPv6.
Command History ModificationRelease
This commandwas introduced in a release earlier thanRelease 7.6.
7.6
The following example shows how to configure a priority 1 RADIUS accounting server at 10.10.10.10using port 1813 with a login password of admin:
(Cisco Controller) > config radius acct add 1 10.10.10.10 1813 ascii admin
The following example shows how to configure a priority 1 RADIUS accounting server at2001:9:6:40::623 using port 1813 with a login password of admin:
(Cisco Controller) > config radius acct add 1 2001:9:6:40::623 1813 ascii admin
CLI Commands519
CLI Commandsconfig radius acct

config radius acct ipsec authenticationTo configure IPsec authentication for the Cisco wireless LAN controller, use the config radius acct ipsecauthentication command.
config radius acct ipsec authentication {hmac-md5 | hmac-sha1} index
Syntax Description Enables IPsec HMAC-MD5 authentication.hmac-md5
Enables IPsec HMAC-SHA1 authentication.hmac-sha1
RADIUS server index.index
Command Default None
Command History ModificationRelease
This commandwas introduced in a release earlier thanRelease 7.6.
7.6
The following example shows how to configure the IPsec hmac-md5 authentication service on theRADIUS accounting server index 1:
(Cisco Controller) > config radius acct ipsec authentication hmac-md5 1
Related Commands show radius acct statistics
config radius acct ipsec disableTo disable IPsec support for an accounting server for the Cisco wireless LAN controller, use the config radiusacct ipsec disable command.
config radius acct ipsec disable index
Syntax Description RADIUS server index.index
Command Default None
Command History ModificationRelease
This commandwas introduced in a release earlier thanRelease 7.6.
7.6
The following example shows how to disable the IPsec support for RADIUS accounting server index1:
(Cisco Controller) > config radius acct ipsec disable 1
Related Commands show radius acct statistics
CLI Commands520
CLI Commandsconfig radius acct ipsec authentication
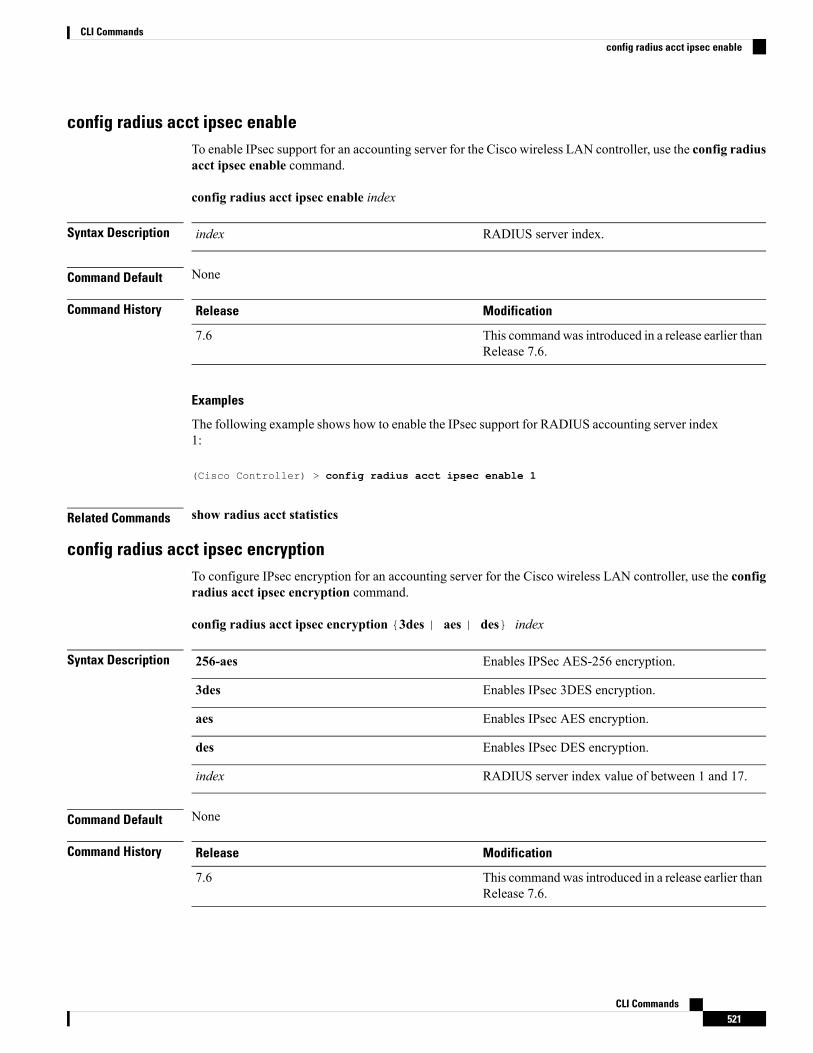
config radius acct ipsec enableTo enable IPsec support for an accounting server for the Cisco wireless LAN controller, use the config radiusacct ipsec enable command.
config radius acct ipsec enable index
Syntax Description RADIUS server index.index
Command Default None
Command History ModificationRelease
This commandwas introduced in a release earlier thanRelease 7.6.
7.6
Examples
The following example shows how to enable the IPsec support for RADIUS accounting server index1:
(Cisco Controller) > config radius acct ipsec enable 1
Related Commands show radius acct statistics
config radius acct ipsec encryptionTo configure IPsec encryption for an accounting server for the Cisco wireless LAN controller, use the configradius acct ipsec encryption command.
config radius acct ipsec encryption {3des | aes | des} index
Syntax Description Enables IPSec AES-256 encryption.256-aes
Enables IPsec 3DES encryption.3des
Enables IPsec AES encryption.aes
Enables IPsec DES encryption.des
RADIUS server index value of between 1 and 17.index
Command Default None
Command History ModificationRelease
This commandwas introduced in a release earlier thanRelease 7.6.
7.6
CLI Commands521
CLI Commandsconfig radius acct ipsec enable

The following example shows how to configure the IPsec 3DES encryption for RADIUS serverindex value 3:
(Cisco Controller) > config radius acct ipsec encryption 3des 3
config radius acct ipsec ikeTo configure Internet Key Exchange (IKE) for the CiscoWLC, use the config radius acct ipsec ike command.
config radius acct ipsec ike dh-group {group-1 | group-2 | group-5} | lifetime seconds | phase1{aggressive | main}} index
Syntax Description Specifies the Dixie-Hellman (DH) group.dh-group
Configures the DH Group 1 (768 bits).group-1
Configures the DH Group 2 (1024 bits).group-2
Configures the DH Group 5 (1024 bits).group-5
Configures the IKE lifetime.lifetime
IKE lifetime in seconds.seconds
Configures the IKE phase1 node.phase1
Enables the aggressive mode.aggressive
Enables the main mode.main
RADIUS server index.index
Command Default None
Command History ModificationRelease
This commandwas introduced in a release earlier thanRelease 7.6.
7.6
The following example shows how to configure an IKE lifetime of 23 seconds for RADIUS serverindex 1:
(Cisco Controller) > config radius acct ipsec ike lifetime 23 1
Related Commands show radius acct statistics
config radius acct mac-delimiterTo specify the delimiter to be used in the MAC addresses that are sent to the RADIUS accounting server, usethe config radius acct mac-delimiter command.
CLI Commands522
CLI Commandsconfig radius acct ipsec ike

config radius acct mac-delimiter {colon | hyphen | single-hyphen | none}
Syntax Description Sets the delimiter to a colon (for example,xx:xx:xx:xx:xx:xx).
colon
Sets the delimiter to a hyphen (for example,xx-xx-xx-xx-xx-xx).
hyphen
Sets the delimiter to a single hyphen (for example,xxxxxx-xxxxxx).
single-hyphen
Disables the delimiter (for example, xxxxxxxxxxxx).none
Command Default The default delimiter is a hyphen.
Command History ModificationRelease
This commandwas introduced in a release earlier thanRelease 7.6.
7.6
The following example shows how to set the delimiter hyphen to be used in the MAC addresses thatare sent to the RADIUS accounting server for the network users:
(Cisco Controller) > config radius acct mac-delimiter hyphen
Related Commands show radius acct statistics
config radius acct networkTo configure a default RADIUS server for network users, use the config radius acct network command.
config radius acct network index {enable | disable}
Syntax Description RADIUS server index.index
Enables the server as a network user’s defaultRADIUS server.
enable
Disables the server as a network user’s defaultRADIUS server.
disable
Command Default None
Command History ModificationRelease
This commandwas introduced in a release earlier thanRelease 7.6.
7.6
The following example shows how to configure a default RADIUS accounting server for the networkusers with RADIUS server index1:
CLI Commands523
CLI Commandsconfig radius acct network

(Cisco Controller) > config radius acct network 1 enable
Related Commands show radius acct statistics
config radius acct retransmit-timeoutTo change the default transmission timeout for a RADIUS accounting server for the Cisco wireless LANcontroller, use the config radius acct retransmit-timeout command.
config radius acct retransmit-timeout index timeout
Syntax Description RADIUS server index.index
Number of seconds (from 2 to 30) betweenretransmissions.
timeout
Command Default None
Command History ModificationRelease
This commandwas introduced in a release earlier thanRelease 7.6.
7.6
The following example shows how to configure retransmission timeout value 5 seconds between theretransmission:
(Cisco Controller) > config radius acct retransmit-timeout 5
Related Commands show radius acct statistics
Configure RADIUS Authentication Server CommandsUse the config radius auth commands to configure RADIUS authentication server settings.
config radius authTo configure settings for a RADIUS authentication server for the Cisco wireless LAN controller, use theconfig radius auth command.
config radius auth {add index IP addr portascii/hexsecret} | | delete index | disable index |enable index | framed-mtu mtu | { ipsec {authentication {hmac-md5 index | hmac-sha1 index} | disable index | enable index | encryption {256-aes | 3des | aes | des} index | ike{auth-mode {pre-shared-key index ascii/hex shared_secret | certificate index } | dh-group {2048bit-group-14 | group-1 | group-2 | group-5} index | lifetime seconds index | phase1{aggressive | main} index } } | { { keywrap{add ascii/hex kek mack index } | delete index| disable | enable} } | {mac-delimiter {colon | hyphen | none | single-hyphen}} |{{management index {enable | disable}} | {mgmt-retransmit-timeout index Retransmit Timeout} | { network index {enable | disable}} | {realm {add | delete} radius-index realm-string}
CLI Commands524
CLI Commandsconfig radius acct retransmit-timeout

} | {region {group | none | provincial}} | {retransmit-timeout index Retransmit Timeout}| { rfc3576 {enable | disable} index }
Syntax Description Enables a RADIUS authentication server.enable
Disables a RADIUS authentication server.disable
Deletes a RADIUS authentication server.delete
RADIUS server index. The controller begins thesearch with 1. The server index range is from 1 to 17.
index
Adds a RADIUS authentication server. See the“Defaults” section.
add
IP address (IPv4 or IPv6) of the RADIUS server.IP addr
RADIUS server’s UDP port number for the interfaceprotocols.
port
Specifies RADIUS server’s secret type: ascii or hex.ascii/hex
RADIUS server’s secret.secret
Configures Called Station Id information sent inRADIUS authentication messages.
callStationIdType
Configures the Framed-MTU for all the RADIUSservers. The framed-mtu range is from 64 to 1300bytes.
framed-mtu
Enables or disables IPSEC support for anauthentication server.
IPSec is not supported for IPv6.Note
ipsec
Configures RADIUS keywrap.keywrap
Specifies the input format of the keywrap keys.ascii/hex
Enters the 16-byte key-encryption-key.kek
Enters the 20-byte message-authenticator-code-key.mack
Configures MAC delimiter for caller station ID andcalling station ID.
mac-delimiter
Configures a RADIUS Server for management users.management
Changes the default management login retransmissiontimeout for the server.
mgmt-retransmit-timeout
Configures a default RADIUS server for networkusers.
network
Configures radius auth realm.realm
CLI Commands525
CLI Commandsconfig radius auth
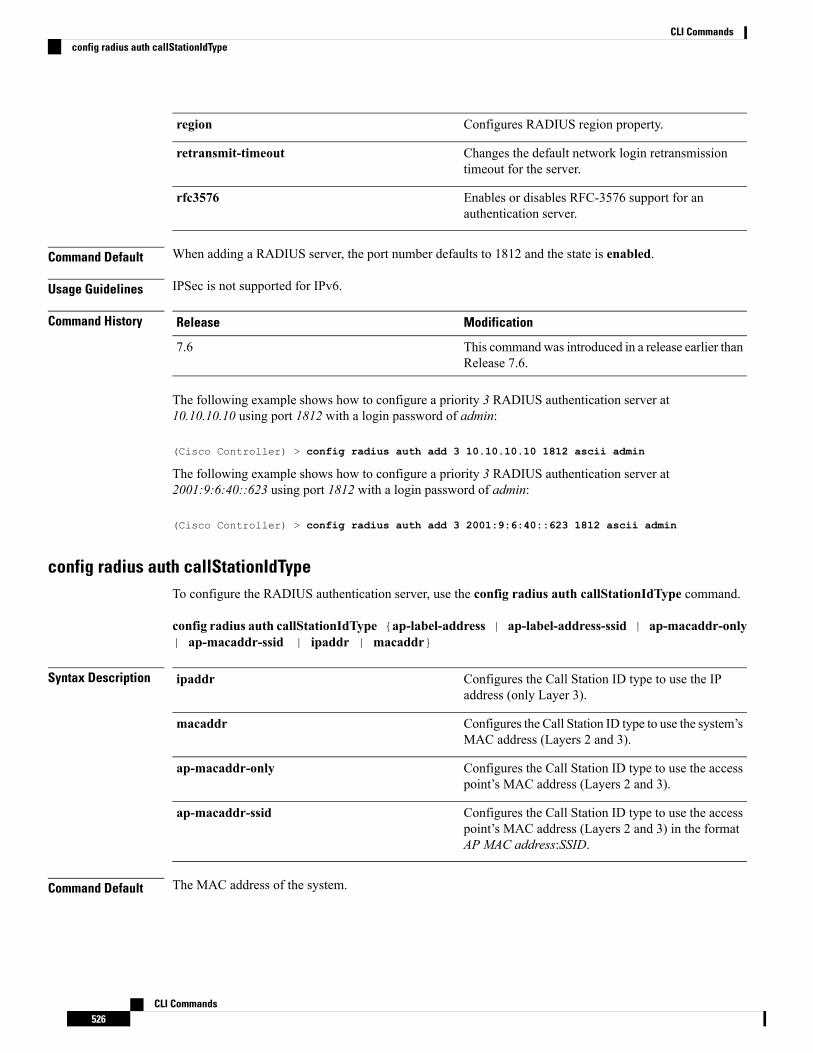
Configures RADIUS region property.region
Changes the default network login retransmissiontimeout for the server.
retransmit-timeout
Enables or disables RFC-3576 support for anauthentication server.
rfc3576
Command Default When adding a RADIUS server, the port number defaults to 1812 and the state is enabled.
Usage Guidelines IPSec is not supported for IPv6.
Command History ModificationRelease
This commandwas introduced in a release earlier thanRelease 7.6.
7.6
The following example shows how to configure a priority 3 RADIUS authentication server at10.10.10.10 using port 1812 with a login password of admin:
(Cisco Controller) > config radius auth add 3 10.10.10.10 1812 ascii admin
The following example shows how to configure a priority 3 RADIUS authentication server at2001:9:6:40::623 using port 1812 with a login password of admin:
(Cisco Controller) > config radius auth add 3 2001:9:6:40::623 1812 ascii admin
config radius auth callStationIdTypeTo configure the RADIUS authentication server, use the config radius auth callStationIdType command.
config radius auth callStationIdType {ap-label-address | ap-label-address-ssid | ap-macaddr-only| ap-macaddr-ssid | ipaddr | macaddr}
Syntax Description Configures the Call Station ID type to use the IPaddress (only Layer 3).
ipaddr
Configures the Call Station ID type to use the system’sMAC address (Layers 2 and 3).
macaddr
Configures the Call Station ID type to use the accesspoint’s MAC address (Layers 2 and 3).
ap-macaddr-only
Configures the Call Station ID type to use the accesspoint’s MAC address (Layers 2 and 3) in the formatAP MAC address:SSID.
ap-macaddr-ssid
Command Default The MAC address of the system.
CLI Commands526
CLI Commandsconfig radius auth callStationIdType

Usage Guidelines The controller sends the Called Station ID attribute to the RADIUS server in all authentication and accountingpackets. The Called Station ID attribute can be used to classify users to different groups based on the attributevalue. The command is applicable only for the Called Station and not for the Calling Station.
You cannot send only the SSID as the Called-Station-ID, you can only combine the SSID with either theaccess point MAC address or the access point name.
Command History ModificationRelease
This commandwas introduced in a release earlier thanRelease 7.6.
7.6
The ap-ethmac-only and ap-ethmac-ssid keywordswere added to support the access point’s EthernetMAC address.
The ap-label-address and ap-label-address-ssidkeywords were added.
7.6
This command supports both IPv4 and IPv6 addressformats.
8.0
The following example shows how to configure the call station ID type to use the IP address:
(Cisco Controller) > config radius auth callStationIdType ipAddr
The following example shows how to configure the call station ID type to use the system’s MACaddress:
(Cisco Controller) > config radius auth callStationIdType macAddr
The following example shows how to configure the call station ID type to use the access point’sMAC address:
(Cisco Controller) > config radius auth callStationIdType ap-macAddr
config radius auth IPsec authenticationTo configure IPsec support for an authentication server for the Cisco wireless LAN controller, use the configradius auth IPsec authentication command.
config radius auth IPsec authentication {hmac-md5 | hmac-sha1} index
Syntax Description Enables IPsec HMAC-MD5 authentication.hmac-md5
Enables IPsec HMAC-SHA1 authentication.hmac-shal
RADIUS server index.index
Command Default None
CLI Commands527
CLI Commandsconfig radius auth IPsec authentication

Command History ModificationRelease
This commandwas introduced in a release earlier thanRelease 7.6.
7.6
The following example shows how to configure the IPsec hmac-md5 support for RADIUSauthentication server index 1:
(Cisco Controller) > config radius auth IPsec authentication hmac-md5 1
Related Commands show radius acct statistics
config radius auth ipsec disableTo disable IPsec support for an authentication server for the Cisco wireless LAN controller, use the configradius auth IPsec disable command.
config radius auth ipsec {enable | disable} index
Syntax Description Enables the IPsec support for an authentication server.enable
Disables the IPsec support for an authentication server.disable
RADIUS server index.index
Command Default None
Command History ModificationRelease
This commandwas introduced in a release earlier thanRelease 7.6.
7.6
This example shows how to enable the IPsec support for RADIUS authentication server index 1:
(Cisco Controller) > config radius auth ipsec enable 1
This example shows how to disable the IPsec support for RADIUS authentication server index 1:
(Cisco Controller) > config radius auth ipsec disable 1
Related Commands show radius acct statistics
config radius auth ipsec encryptionTo configure IPsec encryption support for an authentication server for the Cisco wireless LAN controller, usethe config radius auth ipsec encryption command.
config radius auth IPsec encryption {3des | aes | des} index
CLI Commands528
CLI Commandsconfig radius auth ipsec disable

Syntax Description Enables the IPsec 3DES encryption.3des
Enables the IPsec AES encryption.aes
Enables the IPsec DES encryption.des
RADIUS server index.index
Command Default None
Command History ModificationRelease
This commandwas introduced in a release earlier thanRelease 7.6.
7.6
The following example shows how to configure IPsec 3dec encryption RADIUS authentication serverindex 3:
(Cisco Controller) > config radius auth ipsec encryption 3des 3
Related Commands show radius acct statistics
config radius auth ipsec ikeTo configure Internet Key Exchange (IKE) for the Cisco wireless LAN controller, use the config radius authIPsec ike command.
config radius auth ipsec ike {auth-mode {pre-shared-keyindex {ascii | hex shared-secret} |certificate index } dh-group {2048bit-group-14 | group-1 | group-2 | group-5} | lifetimeseconds | phase1 {aggressive | main}} index
Syntax Description Configures the IKE authentication method.auth-mode
Configures the preshared key for IKE authenticationmethod.
pre-shared-key
RADIUS server index between 1 and 17.index
Configures RADIUS IPsec IKE secret in an ASCIIformat.
ascii
Configures RADIUS IPsec IKE secret in ahexadecimal format.
hex
Configures the shared RADIUS IPsec secret.shared-secret
Configures the certificate for IKE authentication.certificate
Configures the IKE Diffe-Hellman group.dh-group
Configures the DH Group14 (2048 bits).2048bit-group-14
CLI Commands529
CLI Commandsconfig radius auth ipsec ike

Configures the DH Group 1 (768 bits).group-1
Configures the DH Group 2 (1024 bits).group-2
Configures the DH Group 2 (1024 bits).group-5
Configures the IKE lifetime.lifetime
IKE lifetime in seconds. The range is from 1800 to57600 seconds.
seconds
Configures the IKE phase1 mode.phase1
Enables the aggressive mode.aggressive
Enables the main mode.main
RADIUS server index.index
Command Default By default, preshared key is used for IPsec sessions and IKE lifetime is 28800 seconds.
Command History ModificationRelease
This commandwas introduced in a release earlier thanRelease 7.6.
7.6
The following example shows how to configure IKE lifetime of 23 seconds for RADIUS authenticationserver index 1:
(Cisco Controller) > config radius auth ipsec ike lifetime 23 1
Related Commands show radius acct statistics
config radius auth keywrapTo enable and configure Advanced Encryption Standard (AES) key wrap, which makes the shared secretbetween the controller and the RADIUS server more secure, use the config radius auth keywrap command.
config radius auth keywrap {enable | disable | add {ascii | hex} kek mack | delete} index
Syntax Description Enables AES key wrap.enable
Disables AES key wrap.disable
Configures AES key wrap attributes.add
Configures key wrap in an ASCII format.ascii
Configures key wrap in a hexadecimal format.hex
16-byte Key Encryption Key (KEK).kek
CLI Commands530
CLI Commandsconfig radius auth keywrap

20-byteMessage Authentication Code Key (MACK).mack
Deletes AES key wrap attributes.delete
Index of the RADIUS authentication server on whichto configure the AES key wrap.
index
Command Default None
Command History ModificationRelease
This commandwas introduced in a release earlier thanRelease 7.6.
7.6
The following example shows how to enable the AES key wrap for a RADIUS authentication server:
(Cisco Controller) > config radius auth keywrap enable
Related Commands show radius auth statistics
config radius auth mac-delimiterTo specify a delimiter to be used in the MAC addresses that are sent to the RADIUS authentication server,use the config radius auth mac-delimiter command.
config radius auth mac-delimiter {colon | hyphen | single-hyphen | none}
Syntax Description Sets a delimiter to a colon (for example,xx:xx:xx:xx:xx:xx).
colon
Sets a delimiter to a hyphen (for example,xx-xx-xx-xx-xx-xx).
hyphen
Sets a delimiter to a single hyphen (for example,xxxxxx-xxxxxx).
single-hyphen
Disables the delimiter (for example, xxxxxxxxxxxx).none
Command Default The default delimiter is a hyphen.
Command History ModificationRelease
This commandwas introduced in a release earlier thanRelease 7.6.
7.6
The following example shows how to specify a delimiter hyphen to be used for a RADIUSauthentication server:
(Cisco Controller) > config radius auth mac-delimiter hyphen
CLI Commands531
CLI Commandsconfig radius auth mac-delimiter

Related Commands show radius auth statistics
config radius auth managementTo configure a default RADIUS server for management users, use the config radius auth managementcommand.
config radius auth management index {enable | disable}
Syntax Description RADIUS server index.index
Enables the server as a management user’s defaultRADIUS server.
enable
Disables the server as a management user’s defaultRADIUS server.
disable
Command Default None
Command History ModificationRelease
This commandwas introduced in a release earlier thanRelease 7.6.
7.6
The following example shows how to configure a RADIUS server for management users:
(Cisco Controller) > config radius auth management 1 enable
Related Commands show radius acct statistics
config radius acct network
config radius auth mgmt-retransmit-timeout
config radius auth mgmt-retransmit-timeoutTo configure a default RADIUS server retransmission timeout for management users, use the config radiusauth mgmt-retransmit-timeout command.
config radius auth mgmt-retransmit-timeout index retransmit-timeout
Syntax Description RADIUS server index.index
Timeout value. The range is from 1 to 30 seconds.retransmit-timeout
Command Default None
Command History ModificationRelease
This commandwas introduced in a release earlier thanRelease 7.6.
7.6
CLI Commands532
CLI Commandsconfig radius auth management

The following example shows how to configure a default RADIUS server retransmission timeoutfor management users:
(Cisco Controller) > config radius auth mgmt-retransmit-timeout 1 10
Related Commands config radius auth management
config radius auth networkTo configure a default RADIUS server for network users, use the config radius auth network command.
config radius auth network index {enable | disable}
Syntax Description RADIUS server index.index
Enables the server as a network user default RADIUSserver.
enable
Disables the server as a network user default RADIUSserver.
disable
Command Default None
Command History ModificationRelease
This commandwas introduced in a release earlier thanRelease 7.6.
7.6
The following example shows how to configure a default RADIUS server for network users:
(Cisco Controller) > config radius auth network 1 enable
Related Commands show radius acct statistics
config radius acct network
config radius auth retransmit-timeoutTo change a default transmission timeout for a RADIUS authentication server for the Cisco wireless LANcontroller, use the config radius auth retransmit-timeout command.
config radius auth retransmit-timeout index timeout
Syntax Description RADIUS server index.index
Number of seconds (from 2 to 30) betweenretransmissions.
timeout
Command Default None
CLI Commands533
CLI Commandsconfig radius auth network

Command History ModificationRelease
This commandwas introduced in a release earlier thanRelease 7.6.
7.6
The following example shows how to configure a retransmission timeout of 5 seconds for a RADIUSauthentication server:
(Cisco Controller) > config radius auth retransmit-timeout 5
Related Commands show radius auth statistics
config radius auth rfc3576To configure RADIUS RFC-3576 support for the authentication server for the Cisco WLC, use the configradius auth rfc3576 command.
config radius auth rfc3576 {enable | disable} index
Syntax Description Enables RFC-3576 support for an authenticationserver.
enable
Disables RFC-3576 support for an authenticationserver.
disable
RADIUS server index.index
Command Default Disabled
Command History ModificationRelease
This commandwas introduced in a release earlier thanRelease 7.6.
7.6
Usage Guidelines RFC 3576, which is an extension to the RADIUS protocol, allows dynamic changes to a user session. RFC3576 includes support for disconnecting users and changing authorizations applicable to a user session.Disconnect messages cause a user session to be terminated immediately; CoA messages modify sessionauthorization attributes such as data filters.
The following example shows how to enable the RADIUS RFC-3576 support for a RADIUSauthentication server:
(Cisco Controller) > config radius auth rfc3576 enable 2
Related Commands show radius auth statistics
show radius summary
show radius rfc3576
CLI Commands534
CLI Commandsconfig radius auth rfc3576
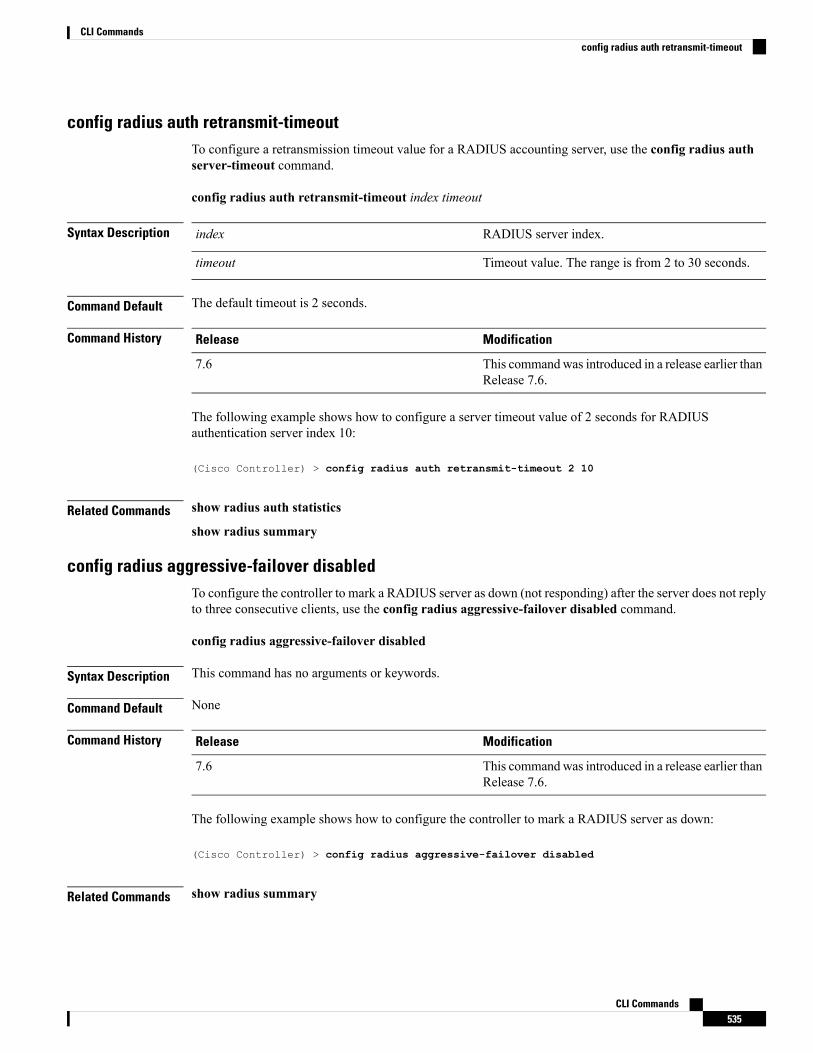
config radius auth retransmit-timeoutTo configure a retransmission timeout value for a RADIUS accounting server, use the config radius authserver-timeout command.
config radius auth retransmit-timeout index timeout
Syntax Description RADIUS server index.index
Timeout value. The range is from 2 to 30 seconds.timeout
Command Default The default timeout is 2 seconds.
Command History ModificationRelease
This commandwas introduced in a release earlier thanRelease 7.6.
7.6
The following example shows how to configure a server timeout value of 2 seconds for RADIUSauthentication server index 10:
(Cisco Controller) > config radius auth retransmit-timeout 2 10
Related Commands show radius auth statistics
show radius summary
config radius aggressive-failover disabledTo configure the controller to mark a RADIUS server as down (not responding) after the server does not replyto three consecutive clients, use the config radius aggressive-failover disabled command.
config radius aggressive-failover disabled
Syntax Description This command has no arguments or keywords.
Command Default None
Command History ModificationRelease
This commandwas introduced in a release earlier thanRelease 7.6.
7.6
The following example shows how to configure the controller to mark a RADIUS server as down:
(Cisco Controller) > config radius aggressive-failover disabled
Related Commands show radius summary
CLI Commands535
CLI Commandsconfig radius auth retransmit-timeout
config radius backward compatibilityTo configure RADIUS backward compatibility for the Cisco wireless LAN controller, use the config radiusbackward compatibility command.
config radius backward compatibility {enable | disable}
Syntax Description Enables RADIUS vendor ID backward compatibility.enable
Disables RADIUS vendor ID backward compatibility.disable
Command Default Enabled.
Command History ModificationRelease
This commandwas introduced in a release earlier thanRelease 7.6.
7.6
The following example shows how to enable the RADIUS backward compatibility settings:
(Cisco Controller) > config radius backward compatibility disable
Related Commands show radius summary
config radius callStationIdCaseTo configure callStationIdCase information sent in RADIUS messages for the Cisco WLC, use the configradius callStationIdCase command.
config radius callStationIdCase {legacy | lower | upper}
Syntax Description Configures Call Station IDs for Layer 2 authenticationto RADIUS in uppercase.
legacy
Configures all Call Station IDs to RADIUS inlowercase.
lower
Configures all Call Station IDs to RADIUS inuppercase.
upper
Command Default Enabled.
Command History ModificationRelease
This commandwas introduced in a release earlier thanRelease 7.6.
7.6
The following example shows how to send the call station ID in lowercase:
CLI Commands536
CLI Commandsconfig radius backward compatibility
(Cisco Controller) > config radius callStationIdCase lower
Related Commands show radius summary
config radius callStationIdTypeTo configure the Called Station ID type information sent in RADIUS accounting messages for the Ciscowireless LAN controller, use the config radius callStationIdType command.
config radius callStationIdType { | ap-label-address | ap-label-address-ssid | ap-macaddr-only| ap-macaddr-ssid | ipaddr | macaddr}
Syntax Description Configures the Call Station ID type to use the IPaddress (only Layer 3).
ipaddr
Configures the Call Station ID type to use the system’sMAC address (Layers 2 and 3).
macaddr
Configures the Call Station ID type to use the accesspoint’s MAC address (Layers 2 and 3).
ap-macaddr-only
Configures the Call Station ID type to use the accesspoint’s MAC address (Layers 2 and 3) in the formatAP MAC address:SSID.
ap-macaddr-ssid
Command Default The IP address of the system.
Usage Guidelines The controller sends the Called Station ID attribute to the RADIUS server in all authentication and accountingpackets. The Called Station ID attribute can be used to classify users to different groups based on the attributevalue. The command is applicable only for the Called Station and not for the Calling Station.
You cannot send only the SSID as the Called-Station-ID, you can only combine the SSID with either theaccess point MAC address or the access point name.
Command History ModificationRelease
This commandwas introduced in a release earlier thanRelease 7.6.
7.6
The ap-ethmac-only and ap-ethmac-ssid keywordswere added to support the access point’s EthernetMAC address.
The ap-label-address and ap-label-address-ssidkeywords were added.
7.6
This command supports both IPv4 and IPv6 addressformats.
8.0
The following example shows how to configure the call station ID type to use the IP address:
CLI Commands537
CLI Commandsconfig radius callStationIdType

(Cisco Controller) > config radius callStationIdType ipaddr
The following example shows how to configure the call station ID type to use the system’s MACaddress:
(Cisco Controller) > config radius callStationIdType macaddr
The following example shows how to configure the call station ID type to use the access point’sMAC address:
(Cisco Controller) > config radius callStationIdType ap-macaddr-only
config radius fallback-testTo configure the RADIUS server fallback behavior, use the config radius fallback-test command.
config radius fallback-test mode {off | passive | active} | username username} | {intervalinterval}
Syntax Description Specifies the mode.mode
Disables RADIUS server fallback.off
Causes the controller to revert to a preferable server(with a lower server index) from the available backupservers without using extraneous probemessages. Thecontroller ignores all inactive servers for a time periodand retries later when a RADIUS message needs tobe sent.
passive
Causes the controller to revert to a preferable server(with a lower server index) from the available backupservers by using RADIUS probe messages toproactively determine whether a server that has beenmarked inactive is back online. The controller ignoresall inactive servers for all active RADIUS requests.
active
Specifies the username.username
Username. The username can be up to 16alphanumeric characters.
username
Specifies the probe interval value.interval
Probe interval. The range is 180 to 3600.interval
Command Default The default probe interval is 300.
CLI Commands538
CLI Commandsconfig radius fallback-test
Command History ModificationRelease
This commandwas introduced in a release earlier thanRelease 7.6.
7.6
The following example shows how to disable the RADIUS accounting server fallback behavior:
(Cisco Controller) > config radius fallback-test mode off
The following example shows how to configure the controller to revert to a preferable server fromthe available backup servers without using the extraneous probe messages:
(Cisco Controller) > config radius fallback-test mode passive
The following example shows how to configure the controller to revert to a preferable server fromthe available backup servers by using RADIUS probe messages:
(Cisco Controller) > config radius fallback-test mode active
Related Commands config advanced probe filter
config advanced probe limit
show advanced probe
show radius acct statistics
Configure Redundancy CommandsUse the config redundancy commands to configure High Availability parameters on the Active and Standbycontrollers.
config redundancy interface address peer-service-portTo configure the service port IP and netmask of the peer or standby controller, use the config redundancyinterface address peer-service-port command.
config redundancy interface address peer-service-port ip_address netmask
Syntax Description IP address of the peer service port.ip_address
Netmask of the peer service port.netmask
Command Default None
Command History ModificationRelease
This commandwas introduced in a release earlier thanRelease 7.6.
7.6
CLI Commands539
CLI CommandsConfigure Redundancy Commands

Usage Guidelines You can configure this command only from the Active controller. For the HA feature, the service portconfigurations are made per controller. You will loose these configurations if you change the mode from HAto non-HA and vice-versa.
The following example shows how to configure the service port IP and netmask of the peer or standbycontroller:
(Cisco Controller) >config redundancy interface address peer-service-port 11.22.44.55
config redundancy mobilitymacTo configure the HA mobility MAC address to be used as an identifier, use the config redundancymobilitymac command.
config redundancy mobilitymac mac_address
Syntax Description MAC address that is an identifier for the active and standby controller pair.mac_address
Command Default None
Command History ModificationRelease
This commandwas introduced in a release earlier thanRelease 7.6.
7.6
Usage Guidelines If you upgrade from Release 8.0.110.0 to a later release, the command's setting is removed. Youmust manuallyreconfigure the mobility MAC address after the upgrade.
The following example shows how to configure the HA mobility MAC address:(Cisco Controller) >config redundancy mobilitymac ff:ff:ff:ff:ff:ff
config redundancy modeTo enable or disable redundancy or High Availability (HA), use the config redundancy mode command.
config redundancy mode {sso | nonedisable}
Syntax Description Enables a stateful switch over (SSO) or hot standby redundancy mode.sso
Disables redundancy mode.nonedisable
Command Default None
Command History ModificationRelease
This commandwas introduced in a release earlier thanRelease 7.6.
7.6
Usage Guidelines You must configure local and peer redundancy management IP addresses before you configure redundancy.
CLI Commands540
CLI Commandsconfig redundancy mobilitymac
The following example shows how to enable redundancy:
(Cisco Controller) >config redundancy mode sso
config redundancy peer-routeTo configure the route configurations of the peer or standby controller, use the config redundancy peer-routecommand.
config redundancy peer-route {add | delete} network_ip_address netmask gateway
Syntax Description Adds a network route.add
Deletes a network route specific to standby controller.delete
Network IP address.network_ip_address
Subnet mask of the network.netmask
IP address of the gateway for the route network.gateway
Command Default None
Command History ModificationRelease
This commandwas introduced in a release earlier thanRelease 7.6.
7.6
Usage Guidelines You can configure this command only from the Active controller. For the HA feature, the service portconfigurations are made per controller. You will lose these configurations if you change the mode from HAto non-HA and vice-versa.
The following example shows how to configure route configurations of a peer or standby controller.(Cisco Controller) >config redundancy peer-route add 10.1.1.0 255.255.255.0 10.1.1.1
config redundancy timer keep-alive-timerTo configure the keep-alive timeout value, use the config redundancy timer keep-alive-timer command.
config redundancy timer keep-alive-timer milliseconds
Syntax Description Keep-alive timeout value in milliseconds. The range is from 100 to 400 milliseconds.milliseconds
Command Default The default keep-alive timeout value is 100 milliseconds.
Command History ModificationRelease
This commandwas introduced in a release earlier thanRelease 7.6.
7.6
CLI Commands541
CLI Commandsconfig redundancy peer-route

The following example shows how to configure the keep-alive timeout value:
(Cisco Controller) >config redundancy timer keep-alive-timer 200
config redundancy timer peer-search-timerTo configure the peer search timer, use the config redundancy timer peer-search-timer command.
config redundancy timer peer-search-timer seconds
Syntax Description Value of the peer search timer in seconds. The range is from 60 to 180 secs.seconds
Command Default The default value of the peer search timer is 120 seconds.
Command History ModificationRelease
This commandwas introduced in a release earlier thanRelease 7.6.
7.6
Usage Guidelines You can use this command to configure the boot up role negotiation timeout value in seconds.
The following example shows how to configure the redundancy peer search timer:
(Cisco Controller) >config redundancy timer peer-search-timer 100
config redundancy unitTo configure a Cisco WLC as a primary or secondary WLC, use the config redundancy unit command.
config redundancy unit {primary | secondary}
Syntax Description Configures the Cisco WLC as the primary WLC.primary
Configures the CiscoWLC as the secondaryWLC.secondary
Command Default The default state is as the primary WLC.
Command History ModificationRelease
This commandwas introduced in a release earlier thanRelease 7.6.
7.6
Usage Guidelines When you configure a Cisco WLC as the secondary WLC, it becomes the HA Stakable Unit (SKU) withoutany valid AP licenses.
The following example shows how to configure a Cisco WLC as the primary WLC:
(Cisco Controller) >config redundancy unit primary
CLI Commands542
CLI Commandsconfig redundancy timer peer-search-timer

redundancy force-switchoverTo trigger a manual switch over on the active Cisco WLC, use the redundancy force-switchover command.
redundancy force-switchover
Syntax Description This command has no arguments or keywords.
Command Default None
Command History ModificationRelease
This commandwas introduced in a release earlier thanRelease 7.6.
7.6
Usage Guidelines When a manual switchover occurs, the active Cisco WLC reboots and the standby Cisco WLC takes over thenetwork. A stateful switchover of access points (AP SSO) is supported. AP SSO ensures that the AP sessionsare maintained after the standby Cisco WLC takes over and the APs switch over to the standby Cisco WLC.The clients on the active Cisco WLC deauthenticate and join the new active Cisco WLC.
The following example shows how to trigger a forceful switchover on the Cisco WLC:
(Cisco Controller) >redundancy force-switchover
config interface address redundancy-managementTo configure the management interface IP address of active and standby controllers, use the config interfaceaddress redundancy-management command.
config interface address redundancy-management IP_address1peer-redundancy-management IP_address2
Syntax Description Management interface IP address of the activecontroller.
IP_address
Specifies the management interface IP address of thepeer controller.
peer-redundancy-management
Management interface IP address of the peercontroller.
IP_address2
Command Default None
Command History ModificationRelease
This commandwas introduced in a release earlier thanRelease 7.6.
7.6
Usage Guidelines You can use this command to check the Active-Standby reachability when the keep-alive fails and to configurean alias IP for the management port of the controller. Both the IP addresses must be in the same subnet.
CLI Commands543
CLI Commandsredundancy force-switchover
The following example shows how to configure the management IP addresses of the active andstandby controllers:
(Cisco Controller) > config interface address redundancy-management 209.165.201.30peer-redundancy-management 209.165.201.31
Related Commands config redundancy mobilitymac
config redundancy interface address peer-service-port
config redundancy peer-route
config redundancy unit
config redundancy timer
show redundancy timers
show redundancy summary
debug rmgr
debug rsyncmgr
Configure RF-Profile commandsUse the configure rf-profile commands to configure RF profiles.
config rf-profile band-selectTo configure the RF profile band selection parameters, use the config rf-profile band-select command.
config rf-profile band-select {client-rssi rssi | cycle-count cycles | cycle-threshold value | expire{dual-band value | suppression value} | probe-response {enable | disable}} profile_name
Syntax Description Configures the client Received Signal Strength Indicator (RSSI) threshold for the RFprofile.
client-rssi
Minimum RSSI for a client to respond to a probe. The range is from -20 to -90 dBm.rssi
Configures the probe cycle count for the RF profile. The cycle count sets the number ofsuppression cycles for a new client.
cycle-count
Value of the cycle count. The range is from 1 to 10.cycles
Configures the time threshold for a new scanning RF Profile band select cycle period.This setting determines the time threshold during which new probe requests from a clientcome in a new scanning cycle.
cycle-threshold
Value of the cycle threshold for the RF profile. The range is from 1 to 1000 milliseconds.value
Configures the expiration time of clients for band select.expire
CLI Commands544
CLI CommandsConfigure RF-Profile commands

Configures the expiration time for pruning previously known dual-band clients. Afterthis time elapses, clients become new and are subject to probe response suppression.
dual-band
Value for a dual band. The range is from 10 to 300 seconds.value
Configures the expiration time for pruning previously known 802.11b/g clients. Afterthis time elapses, clients become new and are subject to probe response suppression.
suppression
Value for suppression. The range is from 10 to 200 seconds.value
Configures the probe response for a RF profile.probe-response
Enables probe response suppression on clients operating in the 2.4-GHz band for a RFprofile.
enable
Disables probe response suppression on clients operating in the 2.4-GHz band for a RFprofile.
disable
Name of the RF profile. The profile name can be up to 32 case-sensitive, alphanumericcharacters.
profile name
Command Default The default value for client RSSI is –80 dBm.
The default cycle count is 2.
The default cycle threshold is 200 milliseconds.
The default value for dual-band expiration is 60 seconds.
The default value for suppression expiration is 20 seconds.
Command History ModificationRelease
This command was introduced in a release earlier than Release 7.6.7.6
Usage Guidelines When you enable band select on a WLAN, the access point suppresses client probes on 2.4-GHz and movesthe dual band clients to the 5-Ghz spectrum. The band-selection algorithm directs dual-band clients only fromthe 2.4-GHz radio to the 5-GHz radio of the same access point, and it only runs on an access point when boththe 2.4-GHz and 5-GHz radios are up and running. Band selection can be used only with Cisco Aironet 1040,1140, and 1250 Series and the 3500 series access points.
The following example shows how to configure the client RSSI:(Cisco Controller) >config rf-profile band-select client-rssi -70
config rf-profile client-trap-thresholdTo configure the threshold value of the number of clients that associate with an access point, after which anSNMP trap is sent to the controller, use the config rf-profile client-trap-threshold command.
config rf-profile client-trap-threshold threshold profile_name
CLI Commands545
CLI Commandsconfig rf-profile client-trap-threshold
Syntax Description Threshold value of the number of clients that associate with an access point, after which anSNMP trap is sent to the controller. The range is from 0 to 200. Traps are disabled if thethreshold value is configured as zero.
threshold
Name of the RF profile. The profile name can be up to 32 case-sensitive, alphanumericcharacters.
profile_name
Command Default None
Command History ModificationRelease
This command was introduced in a release earlier than Release 7.6.7.6
The following example shows how to configure the threshold value of the number of clients thatassociate with an access point:(Cisco Controller) >config rf-profile client-trap-threshold 150
config rf-profile createTo create a RF profile, use the config rf-profile create command.
config rf-profile create {802.11a | 802.11b/g} profile-name
Syntax Description Configures the RF profile for the 2.4GHz band.802.11a
Configures the RF profile for the 5GHz band.802.11b/g
Name of the RF profile.profile-name
Command Default None
Command History ModificationRelease
This command was introduced in a release earlier than Release 7.6.7.6
The following example shows how to create a new RF profile:(Cisco Controller) >config rf-profile create 802.11a RFtestgroup1
config rf-profile fra client-awareTo configure the RF profile client-aware FRA feature, use the config rf-profile fra client-aware command.
config rf-profile fra client-aware{client-reset percent rf-profile-name| client-select percent rf-profile-name| disable rf-profile-name | enable rf-profile-name}
Syntax Description Configures the RF profile AP utilization threshold for radio to switch back to Monitor mode.client-reset
Utilization percentage value ranges from 0 to 100. The default is 5%.percent
CLI Commands546
CLI Commandsconfig rf-profile create

Name of the RF Profile.rf-profile-name
Configures the RF profile utilization threshold for radio to switch to 5GHz.client-select
Utilization percentage value ranges from 0 to 100. The default is 50%.percent
Disables the RF profile client-aware FRA feature.disable
Enables the RF profile client-aware FRA feature.enable
Command Default The default percent value for client-select and client-reset is 50% and 5% respectively.
Command History ModificationRelease
This command was introduced.8.5
The following example shows how to configure the RF profile utilization threshold for redundantdual-band radios to switch back from 5GHz client-serving role to Monitor mode:(Cisco Controller) >config rf-profile fra client-aware client-reset 15 profile1
The following example shows how to configure the RF profile utilization threshold for redundantdual-band radios to switch from Monitor mode to 5GHz client-serving role:(Cisco Controller) >config rf-profile fra client-aware client-select 20 profile1
The following example shows how to disable the RF profile client-aware FRA feature:(Cisco Controller) >config rf-profile fra client-aware disable profile1
The following example shows how to enable the RF profile client-aware FRA feature:(Cisco Controller) >config rf-profile fra client-aware enable profile1
config rf-profile data-ratesTo configure the data rate on a RF profile, use the config rf-profile data-rates command.
config rf-profile data-rates {802.11a |802.11b } {disabled | mandatory | supported} data-rateprofile-name
Syntax Description Specifies 802.11a as the radio policy of the RF profile.802.11a
Specifies 802.11b as the radio policy of the RF profile.802.11b
Disables a rate.disabled
Sets a rate to mandatory.mandatory
Sets a rate to supported.supported
802.11 operational rates, which are 1*, 2*, 5.5*, 6, 9,11*, 12, 18, 24, 36, 48 and 54, where * denotes802.11b only rates.
data-rate
CLI Commands547
CLI Commandsconfig rf-profile data-rates

Name of the RF profile.profile-name
Command Default Default data rates for RF profiles are derived from the controller system defaults, the global data rateconfigurations. For example, if the RF profile's radio policy is mapped to 802.11a then the global 802.11adata rates are copied into the RF profiles at the time of creation.
The data rates set with this command are negotiated between the client and the Cisco wireless LAN controller.If the data rate is set to mandatory, the client must support it in order to use the network. If a data rate is setas supported by the Cisco wireless LAN controller, any associated client that also supports that rate maycommunicate with the Cisco lightweight access point using that rate. It is not required that a client is able touse all the rates marked supported in order to associate.
Command History ModificationRelease
This command was introduced in a release earlier than Release 7.6.7.6
The following example shows how to set the 802.11b transmission of an RF profile at a mandatoryrate at 12 Mbps:(Cisco Controller) >config rf-profile 802.11b data-rates mandatory 12 RFGroup1
config rf-profile deleteTo delete a RF profile, use the config rf-profile delete command.
config rf-profile delete profile-name
Syntax Description Name of the RF profile.profile-name
Command Default None
Command History ModificationRelease
This command was introduced in a release earlier than Release 7.6.7.6
The following example shows how to delete a RF profile:
(Cisco Controller) >config rf-profile delete RFGroup1
config rf-profile descriptionTo provide a description to a RF profile, use the config rf-profile description command.
config rf-profile description description profile-name
Syntax Description Description of the RF profile.description
Name of the RF profile.profile-name
CLI Commands548
CLI Commandsconfig rf-profile delete

Command Default None
Command History ModificationRelease
This command was introduced in a release earlier than Release 7.6.7.6
The following example shows how to add a description to a RF profile:(Cisco Controller) >config rf-profile description This is a demo desciption RFGroup1
config rf-profile load-balancingTo configure load balancing on an RF profile, use the config rf-profile load-balancing command.
config rf-profile load-balancing {window clients | denial value} profile_name
Syntax Description Configures the client window for load balancing of an RF profile.window
Client window size that limits the number of client associations with an access point. Therange is from 0 to 20. The default value is 5.
The window size is part of the algorithm that determines whether an access point is tooheavily loaded to accept more client associations:
load-balancing window + client associations on AP with lightest load = load-balancingthreshold
Access points with more client associations than this threshold are considered busy, andclients can associate only to access points with client counts lower than the threshold. Thiswindow also helps to disassociate sticky clients.
clients
Configures the client denial count for load balancing of an RF profile.denial
Maximum number of association denials during load balancing. The range is from 1 to 10.The default value is 3.
When a client tries to associate on a wireless network, it sends an association request to theaccess point. If the access point is overloaded and load balancing is enabled on the controller,the access point sends a denial to the association request. If there are no other access pointsin the range of the client, the client tries to associate the same access point again. After themaximum denial count is reached, the client is able to associate. Association attempts on anaccess point from any client before associating any AP is called a sequence of association.The default is 3.
value
Name of the RF profile. The profile name can be up to 32 case-sensitive, alphanumericcharacters.
profile_name
Command Default None
Command History ModificationRelease
This command was introduced in a release earlier than Release 7.6.7.6
The following example shows how to configure the client window size for an RF profile:
CLI Commands549
CLI Commandsconfig rf-profile load-balancing

(Cisco Controller) >config rf-profile load-balancing window 15
config rf-profile max-clientsTo configure the maximum number of client connections per access point of an RF profile, use the configrf-profile max-clients commands.
config rf-profile max-clients clients
Syntax Description Maximum number of client connections per access point of an RF profile. The range is from 1 to200.
clients
Command Default None
Command History ModificationRelease
This command was introduced in a release earlier than Release 7.6.7.6
Usage Guidelines You can use this command to configure the maximum number of clients on access points that are in clientdense areas, or serving high bandwidth video or mission critical voice applications.
The following example shows how to set the maximum number of clients at 50:(Cisco Controller) >config rf-profile max-clients 50
config rf-profile multicast data-rateTo configure the minimum RF profile multicast data rate, use the config rf-profile multicast data-ratecommand.
config rf-profile multicast data-rate value profile_name
Syntax Description Minimum RF profile multicast data rate. The options are 6, 9, 12, 18, 24, 36, 48, 54. Enter0 to specify that access points will dynamically adjust the data rate.
value
Name of the RF profile. The profile name can be up to 32 case-sensitive, alphanumericcharacters.
profile_name
Command Default The minimum RF profile multicast data rate is 0.
Command History ModificationRelease
This command was introduced in a release earlier than Release 7.6.7.6
The following example shows how to set the multicast data rate for an RF profile:(Cisco Controller) >config rf-profile multicast data-rate 24
CLI Commands550
CLI Commandsconfig rf-profile max-clients

config rf-profile out-of-boxTo create an out-of-box AP group consisting of newly installed access points, use the config rf-profileout-of-box command.
config rf-profile out-of-box {enable | disable}
Syntax Description Enables the creation of an out-of-box AP group. When you enable this command, the followingoccurs:
• Newly installed access points that are part of the default AP group will be part of the out-of-boxAP group and their radios will be switched off, which eliminates any RF instability causedby the new access points.
• All access points that do not have a group name become part of the out-of-box AP group.
• Special RF profiles are created per 802.11 band. These RF profiles have default-settings forall the existing RF parameters and additional new configurations.
enable
Disables the out-of-box AP group. When you disable this feature, only the subscription of newAPs to the out-of-box AP group stops. All APs that are subscribed to the out-of-box AP groupremain in this AP group. You can move APs to the default group or a custom AP group uponnetwork convergence.
disable
Command Default None
Command History ModificationRelease
This command was introduced in a release earlier than Release 7.6.7.6
Usage Guidelines When an out-of-box AP associates with the controller for the first time, it will be redirected to a special APgroup and the RF profiles applicable to this AP Group will control the radio admin state configuration of theAP. You can move APs to the default group or a custom group upon network convergence.
The following example shows how to enable the creation of an out-of-box AP group:(Cisco Controller) >config rf-profile out-of-box enable
config rf-profile tx-power-control-thresh-v1To configure Transmit Power Control version1 (TPCv1) to an RF profile, use the config rf-profiletx-power-control-thresh-v1 command.
config rf-profile tx-power-control-thresh-v1 tpc-threshold profile_name
Syntax Description TPC threshold.tpc-threshold
Name of the RF profile.profile-name
Command Default None
CLI Commands551
CLI Commandsconfig rf-profile out-of-box

Command History ModificationRelease
This command was introduced in a release earlier than Release 7.6.7.6
The following example shows how to configure TPCv1 on an RF profile:(Cisco Controller) >config rf-profile tx-power-control-thresh-v1 RFGroup1
config rf-profile tx-power-control-thresh-v2To configure Transmit Power Control version 2 (TPCv2) to an RF profile, use the config rf-profiletx-power-control-thresh-v2 command.
config rf-profile tx-power-control-thresh-v2 tpc-threshold profile-name
Syntax Description TPC threshold.tpc-threshold
Name of the RF profile.profile-name
Command Default None
Command History ModificationRelease
This command was introduced in a release earlier than Release 7.6.7.6
The following example shows how to configure TPCv2 on an RF profile:(Cisco Controller) >config rf-profile tx-power-control-thresh-v2 RFGroup1
config rf-profile tx-power-maxTo configure maximum auto-rf to an RF profile, use the config rf-profile tx-power-max command.
config rf-profile tx-power-max profile-name
Syntax Description Maximum auto-rf tx power.tx-power-max
Name of the RF profile.profile-name
Command Default None
Command History ModificationRelease
This command was introduced in a release earlier than Release 7.6.7.6
The following example shows how to configure tx-power-max on an RF profile:(Cisco Controller) >config rf-profile tx-power-max RFGroup1
CLI Commands552
CLI Commandsconfig rf-profile tx-power-control-thresh-v2

config rf-profile tx-power-minTo configure minimum auto-rf to an RF profile, use the config rf-profile tx-power-min command.
config rf-profile tx-power-min tx-power-min profile-name
Syntax Description Minimum auto-rf tx power.tx-power-min
Name of the RF profile.profile-name
Command Default None
Command History ModificationRelease
This command was introduced in a release earlier than Release 7.6.7.6
The following example shows how to configure tx-power-min on an RF profile:
(Cisco Controller) >config rf-profile tx-power-min RFGroup1
Configure Rogue CommandsUse the configure rogue commands to configure policy settings for unidentified (rogue) clients.
config rogue adhocTo globally or individually configure the status of an Independent Basic Service Set (IBSS or ad-hoc) rogueaccess point, use the config rogue adhoc command.
config rogue adhoc {enable | disable | external rogue_MAC | alert {rogue_MAC | all} |auto-contain [monitor_ap] | contain rogue_MAC 1234_aps| }
Syntax Description Globally enables detection and reporting of ad-hocrogues.
enable
Globally disables detection and reporting of ad-hocrogues.
disable
Configure external state on the rogue access point thatis outside the network and poses no threat to WLANsecurity. The controller acknowledges the presenceof this rogue access point.
external
MAC address of the ad-hoc rogue access point.rogue_MAC
Generates an SMNP trap upon detection of the ad-hocrogue, and generates an immediate alert to the systemadministrator for further action.
alert
Enables alerts for all ad-hoc rogue access points.all
CLI Commands553
CLI Commandsconfig rf-profile tx-power-min

Contains all wired ad-hoc rogues detected by thecontroller.
auto-contain
(Optional) IP address of the ad-hoc rogue access point.monitor_ap
Contains the offending device so that its signals nolonger interfere with authorized clients.
contain
Maximum number of Cisco access points assigned toactively contain the ad-hoc rogue access point (1through 4, inclusive).
1234_aps
Command Default The default for this command is enabled and is set to alert. The default for auto-containment is disabled.
Command History ModificationRelease
This commandwas introduced in a release earlier thanRelease 7.6.
7.6
Usage Guidelines The controller continuously monitors all nearby access points and automatically discovers and collectsinformation on rogue access points and clients. When the controller discovers a rogue access point, it usesRLDP to determine if the rogue is attached to your wired network.
RLDP is not supported for use with Cisco autonomous rogue access points. These access points drop theDHCP Discover request sent by the RLDP client. Also, RLDP is not supported if the rogue access pointchannel requires dynamic frequency selection (DFS).
Note
When you enter any of the containment commands, the following warning appears:
Using this feature may have legal consequences. Do you want to continue? (y/n) :
The 2.4- and 5-GHz frequencies in the Industrial, Scientific, and Medical (ISM) band are open to the publicand can be used without a license. As such, containing devices on another party’s network could have legalconsequences.
Enter the auto-contain command with the monitor_ap argument to monitor the rogue access point withoutcontaining it. Enter the auto-contain command without the optional monitor_ap to automatically contain allwired ad-hoc rogues detected by the controller.
The following example shows how to enable the detection and reporting of ad-hoc rogues:
(Cisco Controller) > config rogue adhoc enable
The following example shows how to enable alerts for all ad-hoc rogue access points:
CLI Commands554
CLI Commandsconfig rogue adhoc

(Cisco Controller) > config rogue adhoc alert all
Related Commands config rogue auto-contain level
show rogue ignore-list
show rogue rule detailed
show rogue rule summary
config rogue ap classifyTo classify the status of a rogue access point, use the config rogue ap classify command.
config rogue ap classify {friendly state {internal | external} ap_mac }
config rogue ap classify {malicious | unclassified} state {alert | contain} ap_mac
Syntax Description Classifies a rogue access point as friendly.friendly
Specifies a response to classification.state
Configures the controller to trust this rogue accesspoint.
internal
Configures the controller to acknowledge the presenceof this access point.
external
MAC address of the rogue access point.ap_mac
Classifies a rogue access point as potentiallymalicious.
malicious
Classifies a rogue access point as unknown.unclassified
Configures the controller to forward an immediatealert to the system administrator for further action.
alert
Configures the controller to contain the offendingdevice so that its signals no longer interfere withauthorized clients.
contain
Command Default These commands are disabled by default. Therefore, all unknown access points are categorized as unclassifiedby default.
Command History ModificationRelease
This commandwas introduced in a release earlier thanRelease 7.6.
7.6
Usage Guidelines A rogue access point cannot be moved to the unclassified class if its current state is contain.
CLI Commands555
CLI Commandsconfig rogue ap classify

When you enter any of the containment commands, the following warning appears: “Using this feature mayhave legal consequences. Do you want to continue?” The 2.4- and 5-GHz frequencies in the Industrial,Scientific, andMedical (ISM) band are open to the public and can be used without a license. As such, containingdevices on another party’s network could have legal consequences.
The following example shows how to classify a rogue access point as friendly and can be trusted:
(Cisco Controller) > config rogue ap classify friendly state internal 11:11:11:11:11:11
The following example shows how to classify a rogue access point as malicious and to send an alert:
(Cisco Controller) > config rogue ap classify malicious state alert 11:11:11:11:11:11
The following example shows how to classify a rogue access point as unclassified and to contain it:
(Cisco Controller) > config rogue ap classify unclassified state contain 11:11:11:11:11:11
Related Commands config rogue adhoc
config rogue ap friendly
config rogue ap rldp
config rogue ap ssid
config rogue ap timeout
config rogue ap valid-client
config rogue client
config trapflags rogueap
show rogue ap clients
show rogue ap detailed
show rogue ap summary
show rogue ap friendly summary
show rogue ap malicious summary
show rogue ap unclassified summary
show rogue client detailed
show rogue client summary
show rogue ignore-list
show rogue rule detailed
show rogue rule summary
config rogue ap friendlyTo add a new friendly access point entry to the friendly MAC address list, or delete an existing friendly accesspoint entry from the list, use the config rogue ap friendly command.
CLI Commands556
CLI Commandsconfig rogue ap friendly
config rogue ap friendly {add | delete} ap_mac
Syntax Description Adds this rogue access point from the friendly MACaddress list.
add
Deletes this rogue access point from the friendlyMACaddress list.
delete
MAC address of the rogue access point that you wantto add or delete.
ap_mac
Command Default None
Command History ModificationRelease
This commandwas introduced in a release earlier thanRelease 7.6.
7.6
The following example shows how to add a new friendly access point with MAC address11:11:11:11:11:11 to the friendly MAC address list.
(Cisco Controller) > config rogue ap friendly add 11:11:11:11:11:11
Related Commands config rogue adhoc
config rogue ap classify
config rogue ap rldp
config rogue ap ssid
config rogue ap timeout
config rogue ap valid-client
config rogue client
config trapflags rogueap
show rogue ap clients
show rogue ap detailed
show rogue ap summary
show rogue ap friendly summary
show rogue ap malicious summary
show rogue ap unclassified summary
show rogue client detailed
show rogue client summary
show rogue ignore-list
show rogue rule detailed
CLI Commands557
CLI Commandsconfig rogue ap friendly
show rogue rule summary
config rogue ap rldpTo enable, disable, or initiate the Rogue Location Discovery Protocol (RLDP), use the config rogue ap rldpcommand.
config rogue ap rldp enable {alarm-only | auto-contain} [monitor_ap_only]
config rogue ap rldp initiate rogue_mac_address
config rogue ap rldp disable
Syntax Description When entered without the optional argumentmonitor_ap_only, enables RLDP on all access points.
alarm-only
When entered without the optional argumentmonitor_ap_only, automatically contains all rogueaccess points.
auto-contain
(Optional) RLDP is enabled (when used withalarm-only keyword), or automatically contained(when used with auto-contain keyword) is enabledonly on the designated monitor access point.
monitor_ap_only
Initiates RLDP on a specific rogue access point.initiate
MAC address of specific rogue access point.rogue_mac_address
Disables RLDP on all access points.disable
Command Default None
Command History ModificationRelease
This commandwas introduced in a release earlier thanRelease 7.6.
7.6
Usage Guidelines When you enter any of the containment commands, the following warning appears: “Using this feature mayhave legal consequences. Do you want to continue?” The 2.4- and 5-GHz frequencies in the Industrial,Scientific, andMedical (ISM) band are open to the public and can be used without a license. As such, containingdevices on another party’s network could have legal consequences.
The following example shows how to enable RLDP on all access points:
(Cisco Controller) > config rogue ap rldp enable alarm-only
The following example shows how to enable RLDP on monitor-mode access point ap_1:
(Cisco Controller) > config rogue ap rldp enable alarm-only ap_1
CLI Commands558
CLI Commandsconfig rogue ap rldp
The following example shows how to start RLDP on the rogue access point with MAC address123.456.789.000:
(Cisco Controller) > config rogue ap rldp initiate 123.456.789.000
The following example shows how to disable RLDP on all access points:
(Cisco Controller) > config rogue ap rldp disable
Related Commands config rogue adhoc
config rogue ap classify
config rogue ap friendly
config rogue ap ssid
config rogue ap timeout
config rogue ap valid-client
config rogue client
config trapflags rogueap
show rogue ap clients
show rogue ap detailed
show rogue ap summary
show rogue ap friendly summary
show rogue ap malicious summary
show rogue ap unclassified summary
show rogue client detailed
show rogue client summary
show rogue ignore-list
show rogue rule detailed
show rogue rule summary
config rogue ap ssidTo generate an alarm only, or to automatically contain a rogue access point that is advertising your network’sservice set identifier (SSID), use the config rogue ap ssid command.
config rogue ap ssid {alarm | auto-contain}
Syntax Description Generates only an alarm when a rogue access pointis discovered to be advertising your network’s SSID.
alarm
Automatically contains the rogue access point that isadvertising your network’s SSID.
auto-contain
CLI Commands559
CLI Commandsconfig rogue ap ssid
Command Default None
Command History ModificationRelease
This commandwas introduced in a release earlier thanRelease 7.6.
7.6
Usage Guidelines When you enter any of the containment commands, the following warning appears: “Using this feature mayhave legal consequences. Do you want to continue?” The 2.4- and 5-GHz frequencies in the Industrial,Scientific, andMedical (ISM) band are open to the public and can be used without a license. As such, containingdevices on another party’s network could have legal consequences.
The following example shows how to automatically contain a rogue access point that is advertisingyour network’s SSID:
(Cisco Controller) > config rogue ap ssid auto-contain
Related Commands config rogue adhoc
config rogue ap classify
config rogue ap friendly
config rogue ap rldp
config rogue ap timeout
config rogue ap valid-client
config rogue client
config trapflags rogueap
show rogue ap clients
show rogue ap detailed
show rogue ap summary
show rogue ap friendly summary
show rogue ap malicious summary
show rogue ap unclassified summary
show rogue client detailed
show rogue client summary
show rogue ignore-list
show rogue rule detailed
show rogue rule summary
config rogue ap timeoutTo specify the number of seconds after which the rogue access point and client entries expire and are removedfrom the list, use the config rogue ap timeout command.
CLI Commands560
CLI Commandsconfig rogue ap timeout

config rogue ap timeout seconds
Syntax Description Value of 240 to 3600 seconds (inclusive), with adefault value of 1200 seconds.
seconds
Command Default The default number of seconds after which the rogue access point and client entries expire is 1200 seconds.
Command History ModificationRelease
This commandwas introduced in a release earlier thanRelease 7.6.
7.6
The following example shows how to set an expiration time for entries in the rogue access point andclient list to 2400 seconds:
(Cisco Controller) > config rogue ap timeout 2400
Related Commands config rogue ap classify
config rogue ap friendly
config rogue ap rldp
config rogue ap ssid
config rogue rule
config trapflags rogueap
show rogue ap clients
show rogue ap detailed
show rogue ap summary
show rogue ap friendly summary
show rogue ap malicious summary
show rogue ap unclassified summary
show rogue ignore-list
show rogue rule detailed
show rogue rule summary
config rogue auto-contain levelTo configure rogue the auto-containment level, use the config rogue auto-contain level command.
config rogue auto-contain level level [monitor_ap_only]
CLI Commands561
CLI Commandsconfig rogue auto-contain level

Syntax Description Rogue auto-containment level in the range of 1 to 4.
Up to four APs can be used to auto-containwhen a rogue AP is moved to containedstate through any of the auto-containmentpolicies.
Note
level
(Optional) Configures auto-containment using onlymonitor AP mode.
monitor_ap_only
Command Default The default auto-containment level is 1.
Command History ModificationRelease
This commandwas introduced in a release earlier thanRelease 7.6.
7.6
Usage Guidelines The controller continuously monitors all nearby access points and automatically discovers and collectsinformation on rogue access points and clients. When the controller discovers a rogue access point, it usesany of the configured auto-containment policies to start autocontainment. The policies for initiatingautocontainment are rogue on wire (detected through RLDP or rogue detector AP), rogue using managedSSID, Valid client on Rogue AP, and AdHoc Rogue.
RLDP is not supported for use with Cisco autonomous rogue access points. These access points drop theDHCP Discover request sent by the RLDP client. Also, RLDP is not supported if the rogue access pointchannel requires dynamic frequency selection (DFS).
Note
When you enter any of the containment commands, the following warning appears:
Using this feature may have legal consequences. Do you want to continue? (y/n) :
The 2.4-GHz and 5-GHz frequencies in the Industrial, Scientific, and Medical (ISM) band are open to thepublic and can be used without a license. As such, containing devices on another party’s network could havelegal consequences.
The following example shows how to configure the auto-contain level to 3:
(Cisco Controller) > config rogue auto-contain level 3
Related Commands config rogue adhoc
show rogue adhoc summary
show rogue client summary
show rogue ignore-list
show rogue rule summary
CLI Commands562
CLI Commandsconfig rogue auto-contain level

config rogue ap valid-clientTo generate an alarm only, or to automatically contain a rogue access point to which a trusted client isassociated, use the config rogue ap valid-client command.
config rogue ap valid-client {alarm | auto-contain}
Syntax Description Generates only an alarm when a rogue access pointis discovered to be associated with a valid client.
alarm
Automatically contains a rogue access point to whicha trusted client is associated.
auto-contain
Command Default None
Command History ModificationRelease
This commandwas introduced in a release earlier thanRelease 7.6.
7.6
Usage Guidelines When you enter any of the containment commands, the following warning appears: “Using this feature mayhave legal consequences. Do you want to continue?” The 2.4- and 5-GHz frequencies in the Industrial,Scientific, andMedical (ISM) band are open to the public and can be used without a license. As such, containingdevices on another party’s network could have legal consequences.
The following example shows how to automatically contain a rogue access point that is associatedwith a valid client:
(Cisco Controller) > config rogue ap valid-client auto-contain
Related Commands config rogue ap classify
config rogue ap friendly
config rogue ap rldp
config rogue ap timeout
config rogue ap ssid
config rogue rule
config trapflags rogueap
show rogue ap clients
show rogue ap detailed
show rogue ap summary
show rogue ap friendly summary
show rogue ap malicious summary
show rogue ap unclassified summary
CLI Commands563
CLI Commandsconfig rogue ap valid-client

show rogue ignore-list
show rogue rule detailed
show rogue rule summary
config rogue clientTo configure rogue clients, use the config rogue client command.
config rogue client {aaa {enable | disable} | alert ap_mac | contain client_mac}
Syntax Description Configures AAA server or local database to validatewhether rogue clients are valid clients. The default isdisabled.
aaa
Enables the AAA server or local database to checkrogue client MAC addresses for validity.
enable
Disables the AAA server or local database to checkrogue client MAC addresses for validity.
disable
Configures the controller to forward an immediatealert to the system administrator for further action.
alert
Access point MAC address.ap_mac
Configures the controller to contain the offendingdevice so that its signals no longer interfere withauthorized clients.
contain
MAC address of the rogue client.client_mac
Command Default None
Command History ModificationRelease
This commandwas introduced in a release earlier thanRelease 7.6.
7.6
The following example shows how to enable the AAA server or local database to check MACaddresses:
(Cisco Controller) > config rogue client aaa enable
The following example shows how to disable the AAA server or local database from checkingMACaddresses:
(Cisco Controller) > config rogue client aaa disable
CLI Commands564
CLI Commandsconfig rogue client

Related Commands config rogue rule
config trapflags rogueap
show rogue ap clients
show rogue ap detailed
show rogue client summary
show rogue ignore-list
show rogue rule detailed
show rogue rule summary
config rogue detectionTo enable or disable rogue detection, use the config rogue detection command.
If an AP itself is configured with the keyword all, the all access points case takes precedence over the APthat is with the keyword all.
Note
config rogue detection {enable | disable} {cisco_ap | all}
Syntax Description Enables rogue detection on this access point.enable
Disables rogue detection on this access point.disable
Cisco access point.cisco_ap
Specifies all access points.all
Command Default The default rogue detection value is enabled.
Command History ModificationRelease
This commandwas introduced in a release earlier thanRelease 7.6.
7.6
Usage Guidelines Rogue detection is enabled by default for all access points joined to the controller except for OfficeExtendaccess points. OfficeExtend access points are deployed in a home environment and are likely to detect a largenumber of rogue devices.
The following example shows how to enable rogue detection on the access point Cisco_AP:
(Cisco Controller) > config rogue detection enable Cisco_AP
Related Commands config rogue rule
config trapflags rogueap
CLI Commands565
CLI Commandsconfig rogue detection

show rogue client detailed
show rogue client summary
show rogue ignore-list
show rogue rule detailed
show rogue rule summary
config rogue detection min-rssiTo configure the minimum Received Signal Strength Indicator (RSSI) value at which APs can detect roguesand create a rogue entry in the controller, use the config rogue detection min-rssi command.
config rogue detection min-rssi rssi-in-dBm
Syntax Description Minimum RSSI value. The valid range is from –70dBm to –128 dBm, and the default value is –128 dBm.
rssi-in-dBm
Command Default The default RSSI value to detect rogues in APs is -128 dBm.
Command History ModificationRelease
This commandwas introduced in a release earlier thanRelease 7.6.
7.6
Usage Guidelines This feature is applicable to all the AP modes.
There can be many rogues with very weak RSSI values that do not provide any valuable information in rogueanalysis. Therefore, you can use this option to filter rogues by specifying the minimum RSSI value at whichAPs should detect rogues.
The following example shows how to configure the minimum RSSI value:
(Cisco Controller) > config rogue detection min-rssi –80
Related Commands config rogue detection
show rogue ap clients
config rogue rule
config trapflags rogueap
show rogue client detailed
show rogue client summary
show rogue ignore-list
show rogue rule detailed
show rogue rule summary
CLI Commands566
CLI Commandsconfig rogue detection min-rssi

config rogue detection monitor-apTo configure the rogue report interval for all monitor mode Cisco APs, use the config rogue detectionmonitor-ap command.
config rogue detection monitor-ap {report-interval | transient-rogue-interval} time-in-seconds
Syntax Description Specifies the interval at which rogue reports are sent.report-interval
Specifies the interval at which rogues are consistentlyscanned for by APs after the first time the rogues arescanned.
transient-rogue-interval
Time in seconds. The valid range is as follows:
• 10 to 300 for report-interval
• 120 to 1800 for transient-rogue-interval
time-in-seconds
Command History ModificationRelease
This commandwas introduced in a release earlier thanRelease 7.6.
7.6
Usage Guidelines This feature is applicable to APs that are in monitor mode only.
Using the transient interval values, you can control the time interval at which APs should scan for rogues.APs can also filter the rogues based on their transient interval values.
This feature has the following advantages:
• Rogue reports from APs to the controller are shorter.
• Transient rogue entries are avoided in the controller.
• Unnecessary memory allocation for transient rogues are avoided.
The following example shows how to configure the rogue report interval to 60 seconds:
(Cisco Controller) > config rogue detection monitor-ap report-interval 60
The following example shows how to configure the transient rogue interval to 300 seconds:
(Cisco Controller) > config rogue detection monitor-ap transient-rogue-interval 300
Related Commands config rogue detection
config rogue detection min-rssi
config rogue rule
config trapflags rogueap
show rogue ap clients
CLI Commands567
CLI Commandsconfig rogue detection monitor-ap
show rogue client detailed
show rogue client summary
show rogue ignore-list
show rogue rule detailed
show rogue rule summary
config rogue ruleTo add and configure rogue classification rules, use the config rogue rule command.
config rogue rule {add ap priority priority classify { friendly | malicious} rule_name | classify{friendly | malicious} rule_name | condition ap {set | delete} condition_type condition_valuerule_name | {enable | delete | disable} {all | rule_name} | match {all | any} | prioritypriorityrule_name}
Syntax Description Adds a rule with match any criteria and the prioritythat you specify.
add ap priority
Priority of this rule within the list of rules.priority
Specifies the classification of a rule.classify
Classifies a rule as friendly.friendly
Classifies a rule as malicious.malicious
Rule to which the command applies, or the name ofa new rule.
rule_name
Specifies the conditions for a rule that the rogue accesspoint must meet.
condition ap
Adds conditions to a rule that the rogue access pointmust meet.
set
Removes conditions to a rule that the rogue accesspoint must meet.
delete
CLI Commands568
CLI Commandsconfig rogue rule

Type of the condition to be configured. The conditiontypes are listed below:
• client-count—Requires that a minimum numberof clients be associated to a rogue access point.The valid range is 1 to 10 (inclusive).
• duration—Requires that a rogue access point bedetected for a minimum period of time. The validrange is 0 to 3600 seconds (inclusive).
• managed-ssid—Requires that a rogue accesspoint’s SSID be known to the controller.
• no-encryption—Requires that a rogue accesspoint’s advertised WLAN does not haveencryption enabled.
• rssi—Requires that a rogue access point have aminimum RSSI value. The range is from –95 to–50 dBm (inclusive).
• ssid—Requires that a rogue access point have aspecific SSID.
condition_type
Value of the condition. This value is dependent uponthe condition_type. For instance, if the condition typeis ssid, then the condition value is either the SSIDname or all.
condition_value
Enables all rules or a single specific rule.enable
Deletes all rules or a single specific rule.delete
Deletes all rules or a single specific rule.disable
Specifies whether a detected rogue access point mustmeet all or any of the conditions specified by the rulein order for the rule to be matched and the rogueaccess point to adopt the classification type of therule.
match
Specifies all rules defined.all
Specifies any rule meeting certain criteria.any
Changes the priority of a specific rule and shifts othersin the list accordingly.
priority
Command Default No rogue rules are configured.
CLI Commands569
CLI Commandsconfig rogue rule
Command History ModificationRelease
This commandwas introduced in a release earlier thanRelease 7.6.
7.6
Usage Guidelines For your changes to be effective, you must enable the rule. You can configure up to 64 rules.
The following example shows how to create a rule called rule_1 with a priority of 1 and a classificationas friendly.
(Cisco Controller) > config rogue rule add ap priority 1 classify friendly rule_1
The following example shows how to enable rule_1.
(Cisco Controller) > config rogue rule enable rule_1
The following example shows how to change the priority of the last command.
(Cisco Controller) > config rogue rule priority 2 rule_1
The following example shows how to change the classification of the last command.
(Cisco Controller) > config rogue rule classify malicious rule_1
The following example shows how to disable the last command.
(Cisco Controller) > config rogue rule disable rule_1
The following example shows how to delete SSID_2 from the user-configured SSID list in rule-5.
(Cisco Controller) > config rogue rule condition ap delete ssid ssid_2 rule-5
Configure SNMP CommandsUse the config snmp commands to configure Simple Network Management Protocol (SNMP) settings.
config snmp community accessmodeTomodify the access mode (read only or read/write) of an SNMP community, use the config snmp communityaccessmode command.
config snmp community accessmode {ro | rw} name
Syntax Description Specifies a read-only mode.ro
Specifies a read/write mode.rw
CLI Commands570
CLI CommandsConfigure SNMP Commands

SNMP community name.name
Command Default Two communities are provided by default with the following settings:
SNMP Community Name Client IP Address Client IP Mask Access Mode Status------------------- ----------------- ---------------- ----------- ------public 0.0.0.0 0.0.0.0 Read Only Enableprivate 0.0.0.0 0.0.0.0 Read/Write Enable
Command History ModificationRelease
This command was introduced in a release earlier than Release 7.6.7.6
The following example shows how to configure read/write access mode for SNMP community:
(Cisco Controller) > config snmp community accessmode rw private
Related Commands show snmp community
config snmp community mode
config snmp community create
config snmp community delete
config snmp community ipaddr
config snmp community createTo create a new SNMP community, use the config snmp community create command.
config snmp community create name
Syntax Description SNMP community name of up to 16 characters.name
Command Default None
Command History ModificationRelease
This command was introduced in a release earlier than Release 7.6.7.6
Usage Guidelines Use this command to create a new community with the default configuration.
The following example shows how to create a new SNMP community named test:
(Cisco Controller) > config snmp community create test
Related Commands show snmp community
config snmp community mode
CLI Commands571
CLI Commandsconfig snmp community create
config snmp community accessmode
config snmp community delete
config snmp community ipaddr
config snmp community deleteTo delete an SNMP community, use the config snmp community delete command.
config snmp community delete name
Syntax Description SNMP community name.name
Command Default None
Command History ModificationRelease
This command was introduced in a release earlier than Release 7.6.7.6
The following example shows how to delete an SNMP community named test:
(Cisco Controller) > config snmp community delete test
Related Commands show snmp community
config snmp community mode
config snmp community accessmode
config snmp community create
config snmp community ipaddr
config snmp community ipaddrTo configure the IPv4 or IPv6 address of an SNMP community, use the config snmp community ipaddrcommand.
config snmp community ipaddr IP addr IPv4 mask/IPv6 Prefix lengthname
Syntax Description SNMP community IPv4 or IPv6 address.IP addr
SNMP community IPmask (IPv4mask or IPv6 Prefixlength). The IPv6 prefix length is from 0 to 128.
IPv4 mask/IPv6 Prefix length
SNMP community name.name
Command Default None
CLI Commands572
CLI Commandsconfig snmp community delete

Command History ModificationRelease
This command was introduced in a release earlier than Release 7.6.7.6
This command supports both IPv4 and IPv6 address formats.8.0
Usage Guidelines • This command is applicable for both IPv4 and IPv6 addresses.
• This command is not applicable for default SNMP community (public, private).
The following example shows how to configure an SNMP community with the IPv4 address10.10.10.10, IPv4 mask 255.255.255.0, and SNMP community named comaccess:
(Cisco Controller) > config snmp community ipaddr 10.10.10.10 255.255.255.0 comaccess
The following example shows how to configure an SNMP community with the IPv6 address2001:9:2:16::1, IPv6 prefix length 64, and SNMP community named comaccess:
(Cisco Controller) > config snmp community ipaddr 2001:9:2:16::1 64 comaccess
config snmp community modeTo enable or disable an SNMP community, use the config snmp community mode command.
config snmp community mode {enable | disable} name
Syntax Description Enables the community.enable
Disables the community.disable
SNMP community name.name
Command Default None
Command History ModificationRelease
This command was introduced in a release earlier than Release 7.6.7.6
The following example shows how to enable the SNMP community named public:
(Cisco Controller) > config snmp community mode disable public
Related Commands show snmp community
config snmp community delete
config snmp community accessmode
config snmp community create
config snmp community ipaddr
CLI Commands573
CLI Commandsconfig snmp community mode
config snmp engineIDTo configure the SNMP engine ID, use the config snmp engineID command.
config snmp engineID {engine_id | default}
Syntax Description Engine ID in hexadecimal characters (a minimum of10 and a maximum of 24 characters are allowed).
engine_id
Restores the default engine ID.default
Command Default None
Command History ModificationRelease
This command was introduced in a release earlier than Release 7.6.7.6
Usage Guidelines The SNMP engine ID is a unique string used to identify the device for administration purposes. You do needto specify an engine ID for the device because a default string is automatically generated using Cisco’senterprise number and the MAC address of the first interface on the device.
If you change the engine ID, then a reboot is required for the change to take effect.
Caution If you change the value of the SNMP engine ID, then the password of the user entered on the commandline is converted to an MD5 (Message-Digest algorithm 5) or SHA (Secure Hash Algorithm) security digest.This digest is based on both the password and the local engine ID. The command line password is then deleted.Because of this deletion, if the local value of the engine ID changes, the security digests of the SNMP userswill become invalid, and the users will have to be reconfigured.
The following example shows how to configure the SNMP engine ID with the value fffffffffff:
(Cisco Controller) > config snmp engineID fffffffffff
Related Commands show snmpengineID
config snmp syscontactTo set the SNMP system contact name, use the config snmp syscontact command.
config snmp syscontact contact
Syntax Description SNMP system contact name. Valid value can be upto 255 printable characters.
contact
Command Default None
Command History ModificationRelease
This command was introduced in a release earlier than Release 7.6.7.6
CLI Commands574
CLI Commandsconfig snmp engineID
The following example shows how to set the SMNP system contact named Cisco WLANSolution_administrator:
(Cisco Controller) > config snmp syscontact Cisco WLAN Solution_administrator
config snmp syslocationTo configure the SNMP system location name, use the config snmp syslocation command.
config snmp syslocation location
Syntax Description SNMP system location name. Valid value can be upto 255 printable characters.
location
Command Default None
Command History ModificationRelease
This command was introduced in a release earlier than Release 7.6.7.6
The following example shows how to configure the SNMP system location name to Building_2a:
(Cisco Controller) > config snmp syslocation Building_2a
config snmp trapreceiver createTo configure a server to receive SNMP traps, use the config snmp trapreceiver create command.
config snmp trapreceiver create name IP addr
Syntax Description SNMP community name. The name contain up to 31characters.
name
Configure the IPv4 or IPv6 address of where to sendSNMP traps.
IP addr
Command Default None
Command History ModificationRelease
This command was introduced in a release earlier than Release 7.6.7.6
This command supports both IPv4 and IPv6 address formats.8.0
Usage Guidelines The IPv4 or IPv6 address must be valid for the command to add the new server.
The following example shows how to add a new SNMP trap receiver with the SNMP trap receivernamed test and IP address 10.1.1.1:
CLI Commands575
CLI Commandsconfig snmp syslocation
(Cisco Controller) > config snmp trapreceiver create test 10.1.1.1
The following example shows how to add a new SNMP trap receiver with the SNMP trap receivernamed test and IP address 2001:10:1:1::1:
(Cisco Controller) > config snmp trapreceiver create test 2001:10:1:1::1
config snmp trapreceiver deleteTo delete a server from the trap receiver list, use the config snmp trapreceiver delete command.
config snmp trapreceiver delete name
Syntax Description SNMP community name. The name can contain upto 16 characters.
name
Command Default None
Command History ModificationRelease
This command was introduced in a release earlier than Release 7.6.7.6
The following example shows how to delete a server named test from the SNMP trap receiver list:
(Cisco Controller) > config snmp trapreceiver delete test
Related Commands show snmp trap
config snmp trapreceiver modeTo send or disable sending traps to a selected server, use the config snmp trapreceiver mode command.
config snmp trapreceiver mode {enable | disable} name
Syntax Description Enables an SNMP trap receiver.enable
Disables an SNMP trap receiver.disable
SNMP community name.name
Command Default None
Command History ModificationRelease
This command was introduced in a release earlier than Release 7.6.7.6
Usage Guidelines This command enables or disables the Cisco wireless LAN controller from sending the traps to the selectedserver.
CLI Commands576
CLI Commandsconfig snmp trapreceiver delete

The following example shows how to disable an SNMP trap receiver from sending traps to a servernamed server1:
(Cisco Controller) > config snmp trapreceiver mode disable server1
Related Commands show snmp trap
config snmp v3user createTo create a version 3 SNMP user, use the config snmp v3user create command.
config snmp v3user create username {ro | rw} {none | hmacmd5 | hmacsha} {none | des| aescfb128} [auth_key] [encrypt_key]
Syntax Description Version 3 SNMP username.username
Specifies a read-only user privilege.ro
Specifies a read-write user privilege.rw
Specifies if no authentication is required.none
Specifies Hashed Message Authentication CodingMessage Digest 5 (HMAC-MD5) for authentication.
hmacmd5
Specifies Hashed Message AuthenticationCoding-Secure Hashing Algorithm (HMAC-SHA)for authentication.
hmacsha
Specifies if no encryption is required.none
Specifies to use Cipher Block Chaining-DigitalEncryption Standard (CBC-DES) encryption.
des
Specifies to use Cipher Feedback Mode-AdvancedEncryption Standard-128 (CFB-AES-128) encryption.
aescfb128
(Optional) Authentication key for the HMAC-MD5or HMAC-SHA authentication protocol.
auth_key
(Optional) Encryption key for the CBC-DES orCFB-AES-128 encryption protocol.
encrypt_key
Command Default SNMP v3 username AccessMode Authentication Encryption
-------------------- ------------- -------------- -----------default Read/Write HMAC-SHA CFB-AES
Command History ModificationRelease
This command was introduced in a release earlier than Release 7.6.7.6
CLI Commands577
CLI Commandsconfig snmp v3user create
The following example shows how to add an SNMP username named test with read-only privilegesand no encryption or authentication:
(Cisco Controller) > config snmp v3user create test ro none none
Related Commands show snmpv3user
config snmp v3user deleteTo delete a version 3 SNMP user, use the config snmp v3user delete command.
config snmp v3user delete username
Syntax Description Username to delete.username
Command Default None
Command History ModificationRelease
This command was introduced in a release earlier than Release 7.6.7.6
The following example shows how to remove an SNMP user named test:
(Cisco Controller) > config snmp v3user delete test
Related Commands show snmp v3user
config snmp versionTo enable or disable selected SNMP versions, use the config snmp version command.
config snmp version {v1 | v2 | v3} {enable | disable}
Syntax Description Specifies an SNMP version to enable or disable.v1
Specifies an SNMP version to enable or disable.v2
Specifies an SNMP version to enable or disable.v3
Enables a specified version.enable
Disables a specified version.disable
Command Default By default, all the SNMP versions are enabled.
Command History ModificationRelease
This command was introduced in a release earlier than Release 7.6.7.6
CLI Commands578
CLI Commandsconfig snmp v3user delete

The following example shows how to enable SNMP version v1:
(Cisco Controller) > config snmp version v1 enable
Related Commands show snmpversion
Configure Spanning Tree Protocol CommandsUse the config spanningtree commands to configure Spanning Tree Protocol settings.
config spanningtree port modeTo turn fast or 802.1D Spanning Tree Protocol (STP) on or off for one or all Cisco wireless LAN controllerports, use the config spanningtree port mode command.
config spanningtree port mode {off | 802.1d | fast} {port | all}
Syntax Description Disables STP for the specified ports.off
Specifies a supported port mode as 802.1D.802.1d
Specifies a supported port mode as fast.fast
Port number (1 through 12 or 1 through 24).port
Configures all ports.all
Command Default The default is that port STP is off.
Command History ModificationRelease
This commandwas introduced in a release earlier thanRelease 7.6.
7.6
Usage Guidelines When the Cisco 4400 SeriesWireless LANController is configured for port redundancy, STPmust be disabledfor all ports on the controller. STP can remain enabled on the switch connected to the controller.
Entering this command allows the controller to set up STP, detect logical network loops, place redundantports on standby, and build a network with the most efficient pathways.
The following example shows how to disable STP for all Ethernet ports:
(Cisco Controller) > config spanningtree port mode off all
The following example shows how to turn on STP 802.1D mode for Ethernet port 24:
(Cisco Controller) > config spanningtree port mode 802.1d 24
The following example shows how to turn on fast STP mode for Ethernet port 2:
CLI Commands579
CLI CommandsConfigure Spanning Tree Protocol Commands

(Cisco Controller) > config spanningtree port mode fast 2
config spanningtree port pathcostTo set the Spanning Tree Protocol (STP) path cost for an Ethernet port, use the config spanningtree portpathcost command.
config spanningtree port pathcost {cost | auto} {port | all}
Syntax Description Cost in decimal as determined by the network planner.cost
Specifies the default cost.auto
Port number (1 through 12 or 1 through 24), or all toconfigure all ports.
port
Specifies to configure all ports.all
Command Default The default STP path cost for an Ethernet port is auto.
Command History ModificationRelease
This commandwas introduced in a release earlier thanRelease 7.6.
7.6
Usage Guidelines When the Cisco 4400 SeriesWireless LANController is configured for port redundancy, STPmust be disabledfor all ports on the controller. STP can remain enabled on the switch that is connected to the controller.
The following example shows how to have the STP algorithm automatically assign a path cost forall ports:
(Cisco Controller) > config spanningtree port pathcost auto all
The following example shows how to have the STP algorithm use a port cost of 200 for port 22:
(Cisco Controller) > config spanningtree port pathcost 200 22
config spanningtree port priorityTo configure the Spanning Tree Protocol (STP) port priority, use the config spanningtree port prioritycommand.
config spanningtree port priority priority_num port
Syntax Description Priority number from 0 to 255.priority_num
Port number (1 through 12 or 1 through 24).port
CLI Commands580
CLI Commandsconfig spanningtree port pathcost
Command Default The default STP priority value is 128.
Command History ModificationRelease
This commandwas introduced in a release earlier thanRelease 7.6.
7.6
Usage Guidelines When the Cisco 4400 SeriesWireless LANController is configured for port redundancy, STPmust be disabledfor all ports on the controller. STP can remain enabled on the switch connected to the controller.
The following example shows how to set Ethernet port 2 to STP priority 100:
(Cisco Controller) > config spanningtree port priority 100 2
config spanningtree switch bridgepriorityTo set the bridge ID, use the config spanningtree switch bridgepriority command.
config spanningtree switch bridgepriority priority_num
Syntax Description Priority number between 0 and 65535.priority_num
Command Default The default priority number value to set the bridge ID is 32768.
Command History ModificationRelease
This commandwas introduced in a release earlier thanRelease 7.6.
7.6
Usage Guidelines
When the Cisco 4400 SeriesWireless LANController is configured for port redundancy, STPmust be disabledfor all ports on the controller. STP can remain enabled on the switch connected to the controller.
Note
The value of the writable portion of the Bridge ID, that is, the first two octets of the (8 octet long) Bridge ID.The other (last) 6 octets of the Bridge ID are given by the value of Bridge MAC address. The value may bespecified as a number between 0 and 65535.
The following example shows how to configure spanning tree values on a per switch basis with thebridge priority 40230:
(Cisco Controller) > config spanningtree switch bridgepriority 40230
config spanningtree switch forwarddelayTo set the bridge timeout, use the config spanningtree switch forwarddelay command.
config spanningtree switch forwarddelay seconds
CLI Commands581
CLI Commandsconfig spanningtree switch bridgepriority

Syntax Description Timeout in seconds (between 4 and 30).seconds
Command Default The default value to set a bridge timeout is 15 seconds.
Command History ModificationRelease
This commandwas introduced in a release earlier thanRelease 7.6.
7.6
Usage Guidelines The value that all bridges use for forward delay when this bridge is acting as the root. 802.1D-1990 specifiesthat the range for this setting is related to the value of the STP bridge maximum age. The granularity of thistimer is specified by 802.1D-1990 to be 1 second. An agent may return a badValue error if a set is attemptedto a value that is not a whole number of seconds. The default is 15. Valid values are 4 through 30 seconds.
The following example shows how to configure spanning tree values on a per switch basis with thebridge timeout as 20 seconds:
(Cisco Controller) > config spanningtree switch forwarddelay 20
config spanningtree switch hellotimeTo set the hello time, use the config spanningtree switch hellotime command.
config spanningtree switch hellotime seconds
Syntax Description STP hello time in seconds.seconds
Command Default The default hello time value is 15.
Command History ModificationRelease
This commandwas introduced in a release earlier thanRelease 7.6.
7.6
Usage Guidelines All bridges use this value for HelloTime when this bridge is acting as the root. The granularity of this timeris specified by 802.1D- 1990 to be 1 second. Valid values are 1 through 10 seconds.
The following example shows how to configure the STP hello time to 4 seconds:
(Cisco Controller) > config spanningtree switch hellotime 4
Related Commands show spanningtree switch
show spanningtree switch bridgepriority
config spanningtree switch forwarddelay
config spanningtree switch maxage
config spanningtree switch mode
CLI Commands582
CLI Commandsconfig spanningtree switch hellotime

config spanningtree switch maxageTo set the maximum age, use the config spanningtree switch maxage command.
config spanningtree switch maxage seconds
Syntax Description STP bridge maximum age in seconds.seconds
Command Default The default value for maximum age is 20.
Command History ModificationRelease
This commandwas introduced in a release earlier thanRelease 7.6.
7.6
Usage Guidelines All bridges use this value for MaxAge when this bridge is acting as the root. 802.1D-1990 specifies that therange for this parameter is related to the value of Stp Bridge Hello Time. The granularity of this timer isspecified by 802.1D-1990 to be 1 second. Valid values are 6 through 40 seconds.
The following example shows how to configure the STP bridge maximum age to 30 seconds:
(Cisco Controller) > config spanningtree switch maxage 30
config spanningtree switch modeTo turn the Cisco wireless LAN controller Spanning Tree Protocol (STP) on or off, use the config spanningtreeswitch mode command.
config spanningtree switch mode {enable | disable}
Syntax Description Enables STP on the switch.enable
Disables STP on the switch.disable
Command Default The default is that STP is disabled.
Command History ModificationRelease
This commandwas introduced in a release earlier thanRelease 7.6.
7.6
Usage Guidelines Using this command allows the controller to set up STP, detect logical network loops, place redundant portson standby, and build a network with the most efficient pathways.
The following example shows how to support STP on all Cisco wireless LAN controller ports:
(Cisco Controller) > config spanningtree switch mode enable
CLI Commands583
CLI Commandsconfig spanningtree switch maxage
Configure TACACS CommandsUse the config tacacs commands to configure TACACS+ settings.
config tacacs acctTo configure TACACS+ accounting server settings, use the config tacacs acct command.
config tacacs acct {add1-3 IP addr port ascii/hex secret | delete 1-3 | disable 1-3 | enable 1-3 |server-timeout 1-3 seconds}
Syntax Description Adds a new TACACS+ accounting server.add
Specifies TACACS+ accounting server index from 1to 3.
1-3
Specifies IPv4 or IPv6 address of the TACACS+accounting server.
IP addr
Specifies TACACS+ Server's TCP port.port
Specifies type of TACACS+ server's secret being used(ASCII or HEX).
ascii/hex
Specifies secret key in ASCII or hexadecimalcharacters.
secret
Deletes a TACACS+ server.delete
Disables a TACACS+ server.disable
Enables a TACACS+ server.enable
Changes the default server timeout for the TACACS+server.
server-timeout
Specifies the number of seconds before the TACACS+server times out. The server timeout range is from 5to 30 seconds.
seconds
Command Default None
Command History ModificationRelease
This commandwas introduced in a release earlier thanRelease 7.6.
7.6
This command supports both IPv4 and IPv6 addressformats.
8.0
The following example shows how to add a new TACACS+ accounting server index 1 with the IPv4address 10.0.0.0, port number 49, and secret key 12345678 in ASCII:
CLI Commands584
CLI CommandsConfigure TACACS Commands

(Cisco Controller) > config tacacs acct add 1 10.0.0.0 10 ascii 12345678
The following example shows how to add a new TACACS+ accounting server index 1 with the IPv6address 2001:9:6:40::623, port number 49, and secret key 12345678 in ASCII:
(Cisco Controller) > config tacacs acct add 1 2001:9:6:40::623 10 ascii 12345678
The following example shows how to configure the server timeout of 5 seconds for the TACACS+accounting server:
(Cisco Controller) > config tacacs acct server-timeout 1 5
config tacacs athrTo configure TACACS+ authorization server settings, use the config tacacs athr command.
config tacacs athr {add1-3 IP addr port ascii/hex secret | delete 1-3 | disable 1-3 | enable 1-3|mgmt-server-timeout 1-3 seconds | server-timeout 1-3 seconds}
Syntax Description Adds a new TACACS+ authorization server (IPv4 orIPv6).
add
TACACS+ server index from 1 to 3.1-3
TACACS+ authorization server IP address (IPv4 orIPv6).
IP addr
TACACS+ server TCP port.port
Type of secret key being used (ASCII or HEX).ascii/hex
Secret key in ASCII or hexadecimal characters.secret
Deletes a TACACS+ server.delete
Disables a TACACS+ server.disable
Enables a TACACS+ server.enable
Changes the default management login server timeoutfor the server. The number of seconds before servertimes out is from 1 to 30 seconds.
mgmt-server-timeout 1-3seconds
Changes the default network login server timeout forthe server. The number of seconds before server timesout is from 5 to 30 seconds.
server-timeout 1-3 seconds
Command Default None
CLI Commands585
CLI Commandsconfig tacacs athr
Command History ModificationRelease
This commandwas introduced in a release earlier thanRelease 7.6.
7.6
This command supports both IPv4 and IPv6 addressformats.
8.0
The following example shows how to add a new TACACS+ authorization server index 1 with theIPv4 address 10.0.0.0, port number 49, and secret key 12345678 in ASCII:
(Cisco Controller) > config tacacs athr add 1 10.0.0.0 49 ascii 12345678
The following example shows how to add a new TACACS+ authorization server index 1 with theIPv6 address 2001:9:6:40::623, port number 49, and secret key 12345678 in ASCII:
(Cisco Controller) > config tacacs athr add 1 2001:9:6:40::623 49 ascii 12345678
The following example shows how to configure the retransmit timeout of 5 seconds for the TACACS+authorization server:
(Cisco Controller) > config tacacs athr server-timeout 1 5
config tacacs athr mgmt-server-timeoutTo configure a default TACACS+ authorization server timeout for management users, use the config tacacsathr mgmt-server-timeout command.
config tacacs athr mgmt-server-timeout index timeout
Syntax Description TACACS+ authorization server index.index
Timeout value. The range is 1 to 30 seconds.timeout
Command Default None
Command History ModificationRelease
This commandwas introduced in a release earlier thanRelease 7.6.
7.6
The following example shows how to configure a default TACACS+ authorization server timeoutfor management users:
(Cisco Controller) > config tacacs athr mgmt-server-timeout 1 10
config tacacs authTo configure TACACS+ authentication server settings, use the config tacacs auth command.
CLI Commands586
CLI Commandsconfig tacacs athr mgmt-server-timeout

config tacacs auth{ add1-3 IP addr port ascii/hex secret | delete 1-3 | disable 1-3 | enable 1-3|mgmt-server-timeout 1-3 seconds | server-timeout 1-3seconds}
Syntax Description Adds a new TACACS+ accounting server.add
TACACS+ accounting server index from 1 to 3.1-3
IP address for the TACACS+ accounting server.IP addr
Controller port used for the TACACS+ accountingserver.
port
Type of secret key being used (ASCII or HEX).ascii/hex
Secret key in ASCII or hexadecimal characters.secret
Deletes a TACACS+ server.delete
Disables a TACACS+ server.disable
Enables a TACACS+ server.enable
Changes the default management login server timeoutfor the server. The number of seconds before servertimes out is from 1 to 30 seconds.
mgmt-server-timeout 1-3 seconds
Changes the default network login server timeout forthe server. The number of seconds before server timesout is from 5 to 30 seconds.
server-timeout 1-3 seconds
Command Default None
Command History ModificationRelease
This commandwas introduced in a release earlier thanRelease 7.6.
7.6
This command supports both IPv4 and IPv6 addressformats.
8.0
The following example shows how to add a new TACACS+ authentication server index 1 with theIPv4 address 10.0.0.3, port number 49, and secret key 12345678 in ASCII:
(Cisco Controller) > config tacacs auth add 1 10.0.0.3 49 ascii 12345678
The following example shows how to add a new TACACS+ authentication server index 1 with theIPv6 address 2001:9:6:40::623, port number 49, and secret key 12345678 in ASCII:
(Cisco Controller) > config tacacs auth add 1 2001:9:6:40::623 49 ascii 12345678
The following example shows how to configure the server timeout for TACACS+ authenticationserver:
CLI Commands587
CLI Commandsconfig tacacs auth
(Cisco Controller) > config tacacs auth server-timeout 1 5
config tacacs auth mgmt-server-timeoutTo configure a default TACACS+ authentication server timeout for management users, use the config tacacsauth mgmt-server-timeout command.
config tacacs auth mgmt-server-timeout index timeout
Syntax Description TACACS+ authentication server index.index
Timeout value. The range is 1 to 30 seconds.timeout
Command Default None
Command History ModificationRelease
This commandwas introduced in a release earlier thanRelease 7.6.
7.6
The following example shows how to configure a default TACACS+ authentication server timeoutfor management users:
(Cisco Controller) > config tacacs auth mgmt-server-timeout 1 10
Related Commands config tacacs auth
Configure Trap Flag CommandsUse the config trapflags commands to configure trap flags settings.
config trapflags 802.11-SecurityTo enable or disable sending 802.11 security-related traps, use the config trapflags 802.11-Security command.
config trapflags 802.11-Security wepDecryptError {enable | disable}
Syntax Description Enables sending 802.11 security-related traps.enable
Disables sending 802.11 security-related traps.disable
Command Default By default, sending the 802.11 security-related traps is enabled.
Command History ModificationRelease
This command was introduced in a release earlier than Release 7.6.7.6
CLI Commands588
CLI Commandsconfig tacacs auth mgmt-server-timeout

The following example shows how to disable the 802.11 security related traps:
(Cisco Controller) > config trapflags 802.11-Security wepDecryptError disable
Related Commands show trapflags
config trapflags aaaTo enable or disable the sending of AAA server-related traps, use the config trapflags aaa command.
config trapflags aaa {auth | servers} {enable | disable}
Syntax Description Enables trap sending when an AAA authenticationfailure occurs for management user, net user, or MACfilter.
auth
Enables trap sending when no RADIUS servers areresponding.
servers
Enables the sending of AAA server-related traps.enable
Disables the sending of AAA server-related traps.disable
Command Default By default, the sending of AAA server-related traps is enabled.
Command History ModificationRelease
This command was introduced in a release earlier than Release 7.6.7.6
The following example shows how to enable the sending of AAA server-related traps:
(Cisco Controller) > config trapflags aaa auth enable
Related Commands show watchlist
config trapflags apTo enable or disable the sending of Cisco lightweight access point traps, use the config trapflags ap command.
config trapflags ap {register | interfaceUp} {enable | disable}
Syntax Description Enables sending a trap when a Cisco lightweightaccess point registers with Cisco switch.
register
Enables sending a trap when a Cisco lightweightaccess point interface (A or B) comes up.
interfaceUp
Enables sending access point-related traps.enable
CLI Commands589
CLI Commandsconfig trapflags aaa

Disables sending access point-related traps.disable
Command Default By default, the sending of Cisco lightweight access point traps is enabled.
Command History ModificationRelease
This command was introduced in a release earlier than Release 7.6.7.6
The following example shows how to prevent traps from sending access point-related traps:
(Cisco Controller) > config trapflags ap register disable
Related Commands show trapflags
config trapflags authenticationTo enable or disable sending traps with invalid SNMP access, use the config trapflags authenticationcommand.
config trapflags authentication {enable | disable}
Syntax Description Enables sending traps with invalid SNMP access.enable
Disables sending traps with invalid SNMP access.disable
Command Default By default, the sending traps with invalid SNMP access is enabled.
Command History ModificationRelease
This command was introduced in a release earlier than Release 7.6.7.6
The following example shows how to prevent sending traps on invalid SNMP access:
(Cisco Controller) > config trapflags authentication disable
Related Commands show trapflags
config trapflags clientTo enable or disable the sending of client-related DOT11 traps, use the config trapflags client command.
config trapflags client {802.11-associate 802.11-disassociate | 802.11-deauthenticate | 802.11-authfail| 802.11-assocfail | authentication | excluded} {enable | disable}
Syntax Description Enables the sending of Dot11 association traps toclients.
802.11-associate
CLI Commands590
CLI Commandsconfig trapflags authentication
Enables the sending of Dot11 disassociation traps toclients.
802.11-disassociate
Enables the sending of Dot11 deauthentication trapsto clients.
802.11-deauthenticate
Enables the sending of Dot11 authentication fail trapsto clients.
802.11-authfail
Enables the sending of Dot11 association fail traps toclients.
802.11-assocfail
Enables the sending of authentication success trapsto clients.
authentication
Enables the sending of excluded trap to clients.excluded
Enables sending of client-related DOT11 traps.enable
Disables sending of client-related DOT11 traps.disable
Command Default By default, the sending of client-related DOT11 traps is disabled.
Command History ModificationRelease
This command was introduced in a release earlier than Release 7.6.7.6
The following example shows how to enable the sending of Dot11 disassociation trap to clients:
(Cisco Controller) > config trapflags client 802.11-disassociate enable
Related Commands show trapflags
config trapflags configsaveTo enable or disable the sending of configuration-saved traps, use the config trapflags configsave command.
config trapflags configsave {enable | disable}
Syntax Description Enables sending of configuration-saved traps.enable
Disables the sending of configuration-saved traps.disable
Command Default By default, the sending of configuration-saved traps is enabled.
Command History ModificationRelease
This command was introduced in a release earlier than Release 7.6.7.6
The following example shows how to enable the sending of configuration-saved traps:
CLI Commands591
CLI Commandsconfig trapflags configsave

(Cisco Controller) > config trapflags configsave enable
Related Commands show trapflags
config trapflags IPsecTo enable or disable the sending of IPsec traps, use the config trapflags IPsec command.
config trapflags IPsec {esp-auth | esp-reply | invalidSPI | ike-neg | suite-neg | invalid-cookie}{enable | disable}
Syntax Description Enables the sending of IPsec traps when an ESPauthentication failure occurs.
esp-auth
Enables the sending of IPsec traps when an ESP replayfailure occurs.
esp-reply
Enables the sending of IPsec traps when an ESPinvalid SPI is detected.
invalidSPI
Enables the sending of IPsec traps when an IKEnegotiation failure occurs.
ike-neg
Enables the sending of IPsec traps when a suitenegotiation failure occurs.
suite-neg
Enables the sending of IPsec traps when a Isakampinvalid cookie is detected.
invalid-cookie
Enables sending of IPsec traps.enable
Disables sending of IPsec traps.disable
Command Default By default, the sending of IPsec traps is enabled.
Command History ModificationRelease
This command was introduced in a release earlier than Release 7.6.7.6
The following example shows how to enable the sending of IPsec traps when ESP authenticationfailure occurs:
(Cisco Controller) > config trapflags IPsec esp-auth enable
Related Commands show trapflags
config trapflags linkmodeTo enable or disable Cisco wireless LAN controller level link up/down trap flags, use the config trapflagslinkmode command.
CLI Commands592
CLI Commandsconfig trapflags IPsec

config trapflags linkmode {enable | disable}
Syntax Description Enables Cisco wireless LAN controller level linkup/down trap flags.
enable
Disables Cisco wireless LAN controller level linkup/down trap flags.
disable
Command Default By default, the Cisco WLC level link up/down trap flags are enabled.
Command History ModificationRelease
This command was introduced in a release earlier than Release 7.6.7.6
The following example shows how to enable the Cisco wireless LAN controller level link up/downtrap:
(Cisco Controller) > config trapflags linkmode disable
Related Commands show trapflags
config trapflags multiusersTo enable or disable the sending of traps when multiple logins are active, use the config trapflags multiuserscommand.
config trapflags multiusers {enable | disable}
Syntax Description Enables the sending of traps when multiple logins areactive.
enable
Disables the sending of traps when multiple loginsare active.
disable
Command Default By default, the sending of traps when multiple logins are active is enabled.
Command History ModificationRelease
This command was introduced in a release earlier than Release 7.6.7.6
The following example shows how to disable the sending of traps when multiple logins are active:
(Cisco Controller) > config trapflags multiusers disable
Related Commands show trapflags
CLI Commands593
CLI Commandsconfig trapflags multiusers
config trapflags rogueapTo enable or disable sending rogue access point detection traps, use the config trapflags rogueap command.
config trapflags rogueap {enable | disable}
Syntax Description Enables the sending of rogue access point detectiontraps.
enable
Disables the sending of rogue access point detectiontraps.
disable
Command Default By default, the sending of rogue access point detection traps is enabled.
Command History ModificationRelease
This command was introduced in a release earlier than Release 7.6.7.6
The following example shows how to disable the sending of rogue access point detection traps:
(Cisco Controller) > config trapflags rogueap disable
Related Commands config rogue ap classify
config rogue ap friendly
config rogue ap rldp
config rogue ap ssid
config rogue ap timeout
config rogue ap valid-client
show rogue ap clients
show rogue ap detailed
show rogue ap summary
show rogue ap friendly summary
show rogue ap malicious summary
show rogue ap unclassified summary
show trapflags
config trapflags rrm-paramsTo enable or disable the sending of Radio Resource Management (RRM) parameters traps, use the configtrapflags rrm-params command.
config trapflags rrm-params {tx-power | channel | antenna} {enable | disable}
CLI Commands594
CLI Commandsconfig trapflags rogueap

Syntax Description Enables trap sending when the RF managerautomatically changes the tx-power level for the Ciscolightweight access point interface.
tx-power
Enables trap sending when the RF managerautomatically changes the channel for the Ciscolightweight access point interface.
channel
Enables trap sending when the RF managerautomatically changes the antenna for the Ciscolightweight access point interface.
antenna
Enables the sending of RRM parameter-related traps.enable
Disables the sending of RRMparameter-related traps.disable
Command Default By default, the sending of RRM parameters traps is enabled.
Command History ModificationRelease
This command was introduced in a release earlier than Release 7.6.7.6
The following example shows how to enable the sending of RRM parameter-related traps:
(Cisco Controller) > config trapflags rrm-params tx-power enable
Related Commands show trapflags
config trapflags rrm-profileTo enable or disable the sending of Radio Resource Management (RRM) profile-related traps, use the configtrapflags rrm-profile command.
config trapflags rrm-profile {load | noise | interference | coverage} {enable | disable}
Syntax Description Enables trap sending when the load profile maintainedby the RF manager fails.
load
Enables trap sending when the noise profilemaintained by the RF manager fails.
noise
Enables trap sending when the interference profilemaintained by the RF manager fails.
interference
Enables trap sending when the coverage profilemaintained by the RF manager fails.
coverage
Enables the sending of RRM profile-related traps.enable
Disables the sending of RRM profile-related traps.disable
CLI Commands595
CLI Commandsconfig trapflags rrm-profile

Command Default By default, the sending of RRM profile-related traps is enabled.
Command History ModificationRelease
This command was introduced in a release earlier than Release 7.6.7.6
The following example shows how to disable the sending of RRM profile-related traps:
(Cisco Controller) > config trapflags rrm-profile load disable
Related Commands show trapflags
config trapflags stpmodeTo enable or disable the sending of spanning tree traps, use the config trapflags stpmode command.
config trapflags stpmode {enable | disable}
Syntax Description Enables the sending of spanning tree traps.enable
Disables the sending of spanning tree traps.disable
Command Default By default, the sending of spanning tree traps is enabled.
Command History ModificationRelease
This command was introduced in a release earlier than Release 7.6.7.6
The following example shows how to disable the sending of spanning tree traps:
(Cisco Controller) > config trapflags stpmode disable
Related Commands show trapflags
config trapflags wpsTo enable or disableWireless Protection System (WPS) trap sending, use the config trapflags wps command.
config trapflags wps {enable | disable}
Syntax Description Enables WPS trap sending.enable
Disables WPS trap sending.disable
Command Default By default, the WPS trap sending is enabled.
CLI Commands596
CLI Commandsconfig trapflags stpmode
Command History ModificationRelease
This command was introduced in a release earlier than Release 7.6.7.6
The following example shows how to disable the WPS traps sending:
(Cisco Controller) > config trapflags wps disable
Related Commands show trapflags
Configure Watchlist CommandsUse the config watchlist commands to configure watchlist settings.
config watchlist addTo add a watchlist entry for a wireless LAN, use the config watchlist add command.
config watchlist add {macMAC | username username}
Syntax Description Specifies the MAC address of the wireless LAN.macMAC
Specifies the name of the user to watch.username username
Command Default None
Command History ModificationRelease
This command was introduced in a release earlier than Release 7.6.7.6
The following example shows how to add a watchlist entry for the MAC address a5:6b:ac:10:01:6b:
(Cisco Controller) >config watchlist add mac a5:6b:ac:10:01:6b
config watchlist deleteTo delete a watchlist entry for a wireless LAN, use the config watchlist delete command.
config watchlist delete {macMAC | username username}
Syntax Description Specifies the MAC address of the wireless LAN todelete from the list.
macMAC
Specifies the name of the user to delete from the list.username username
Command Default None
CLI Commands597
CLI CommandsConfigure Watchlist Commands

Command History ModificationRelease
This command was introduced in a release earlier than Release 7.6.7.6
The following example shows how to delete a watchlist entry for theMAC address a5:6b:ac:10:01:6b:
(Cisco Controller) >config watchlist delete mac a5:6b:ac:10:01:6b
config watchlist disableTo disable the client watchlist, use the config watchlist disable command.
config watchlist disable
Syntax Description This command has no arguments or keywords.
Command Default None
Command History ModificationRelease
This command was introduced in a release earlier than Release 7.6.7.6
The following example shows how to disable the client watchlist:
(Cisco Controller) >config watchlist disable
config watchlist enableTo enable a watchlist entry for a wireless LAN, use the config watchlist enable command.
config watchlist enable
Syntax Description This command has no arguments or keywords.
Command Default None
Command History ModificationRelease
This command was introduced in a release earlier than Release 7.6.7.6
The following example shows how to enable a watchlist entry:
(Cisco Controller) >config watchlist enable
Configure Wireless LAN CommandsUse the config wlan commands to configure wireless LAN command settings.
CLI Commands598
CLI Commandsconfig watchlist disable

config wlanTo create, delete, enable, or disable a wireless LAN, use the config wlan command.
config wlan {enable | disable | create | delete} wlan_id [name | foreignAp name ssid | all]
Syntax Description Enables a wireless LAN.enable
Disables a wireless LAN.disable
Creates a wireless LAN.create
Deletes a wireless LAN.delete
Wireless LAN identifier between 1 and 512.wlan_id
(Optional)WLANprofile name up to 32 alphanumericcharacters.
name
(Optional) Specifies the third-party access pointsettings.
foreignAp
SSID (network name) up to 32 alphanumericcharacters.
ssid
(Optional) Specifies all wireless LANs.all
Command Default None
Command History ModificationRelease
This command was introduced in a release earlier than Release 7.6.7.6
Usage Guidelines When you create a newWLAN using the config wlan create command, it is created in disabled mode. Leaveit disabled until you have finished configuring it.
If you do not specify an SSID, the profile name parameter is used for both the profile name and the SSID.
If the management and AP-manager interfaces are mapped to the same port and are members of the sameVLAN, you must disable the WLAN before making a port-mapping change to either interface. If themanagement and AP-manager interfaces are assigned to different VLANs, you do not need to disable theWLAN.
An error message appears if you try to delete aWLAN that is assigned to an access point group. If you proceed,the WLAN is removed from the access point group and from the access point’s radio.
The following example shows how to enable wireless LAN identifier 16:(Cisco Controller) >config wlan enable 16
config wlan 7920-supportTo configure support for phones, use the config wlan 7920-support command.
CLI Commands599
CLI Commandsconfig wlan
config wlan 7920-support {client-cac-limit | ap-cac-limit} {enable | disable} wlan_id
Syntax Description Supports phones that require client-controlled CallAdmission Control (CAC) that expect the Ciscovendor-specific information element (IE).
ap-cac-limit
Supports phones that require access point-controlledCAC that expect the IEEE 802.11e Draft 6QBSS-load.
client-cac-limit
Enables phone support.enable
Disables phone support.disable
Wireless LAN identifier between 1 and 512.wlan_id
Command Default None
Command History ModificationRelease
This command was introduced in a release earlier than Release 7.6.7.6
Usage Guidelines You cannot enable both WMM mode and client-controlled CAC mode on the same WLAN.
The following example shows how to enable the phone support that requires client-controlled CACwith wireless LAN ID 8:(Cisco Controller) >config wlan 7920-support ap-cac-limit enable 8
config wlan 802.11eTo configure 802.11e support on a wireless LAN, use the config wlan 802.11e command.
config wlan 802.11e {allow | disable | require} wlan_id
Syntax Description Allows 802.11e-enabled clients on the wireless LAN.allow
Disables 802.11e on the wireless LAN.disable
Requires 802.11e-enabled clients on the wirelessLAN.
require
Wireless LAN identifier between 1 and 512.wlan_id
Command Default None
Command History ModificationRelease
This command was introduced in a release earlier than Release 7.6.7.6
CLI Commands600
CLI Commandsconfig wlan 802.11e
Usage Guidelines 802.11e provides quality of service (QoS) support for LAN applications, which are critical for delay sensitiveapplications such as Voice over Wireless IP (VoWIP).
802.11e enhances the 802.11 Media Access Control layer (MAC layer) with a coordinated time divisionmultiple access (TDMA) construct, and adds error-correcting mechanisms for delay sensitive applicationssuch as voice and video. The 802.11e specification provides seamless interoperability and is especially wellsuited for use in networks that include a multimedia capability.
The following example shows how to allow 802.11e on the wireless LAN with LAN ID 1:(Cisco Controller) >config wlan 802.11e allow 1
config wlan aaa-overrideTo configure a user policy override via AAA on a wireless LAN, use the config wlan aaa-override command.
config wlan aaa-override {enable | disable} {wlan_id | foreignAp}
Syntax Description Enables a policy override.enable
Disables a policy override.disable
Wireless LAN identifier between 1 and 512.wlan_id
Specifies third-party access points.foreignAp
Command Default AAA is disabled.
Command History ModificationRelease
This command was introduced in a release earlier than Release 7.6.7.6
Usage Guidelines When AAA override is enabled and a client has conflicting AAA and Cisco wireless LAN controller wirelessLAN authentication parameters, client authentication is performed by the AAA server. As part of thisauthentication, the operating systemwill move clients from the default Cisco wireless LANVLAN to a VLANreturned by the AAA server and predefined in the controller interface configuration (only when configuredfor MAC filtering, 802.1X, and/or WPA operation). In all cases, the operating system will also use QoS,DSCP, 802.1p priority tag values, and ACLs provided by the AAA server, as long as they are predefined inthe controller interface configuration. (This VLAN switching by AAA override is also referred to as IdentityNetworking.)
If the corporate wireless LAN uses a management interface assigned to VLAN 2, and if AAA override returnsa redirect to VLAN 100, the operating system redirects all client transmissions to VLAN 100, regardless ofthe physical port to which VLAN 100 is assigned.
When AAA override is disabled, all client authentication defaults to the controller authentication parametersettings, and authentication is performed by the AAA server if the controller wireless LAN does not containany client-specific authentication parameters.
The AAA override values might come from a RADIUS server.
The following example shows how to configure user policy override via AAA on WLAN ID 1:
CLI Commands601
CLI Commandsconfig wlan aaa-override

(Cisco Controller) >config wlan aaa-override enable 1
config wlan aclTo configure a wireless LAN access control list (ACL), use the config wlan acl command.
config wlan acl [acl_name | none]
Syntax Description Wireless LAN identifier (1 to 512).wlan_id
(Optional) ACL name.acl_name
(Optional) Clears the ACL settings for the specifiedwireless LAN.
none
Command Default None
Command History ModificationRelease
This command was introduced in a release earlier than Release 7.6.7.6
The following example shows how to configure a WLAN access control list with WLAN ID 1 andACL named office_1:(Cisco Controller) >config wlan acl 1 office_1
config wlan apgroupTo manage access point group VLAN features, use the config wlan apgroup command.
config wlan apgroup {add apgroup_name [description] | delete apgroup_name | descriptionapgroup_name description| interface-mapping {add | delete} apgroup_name wlan_id interface_name| nac-snmp {enable | disable} apgroup_name wlan_id | profile-mapping {add | delete}apgroup_name profile_name | wlan-radio-policy apgroup_name wlan-id {802.11a-only | 802.11bg |802.11g-only| all} | hotspot{venue{type apgroup_name group_codetype_code| name apgroup_namelanguage_codevenue_name} | operating-class{add| delete} apgroup_name operating_class_value}}
Syntax Description Creates a new access point group (AP group).add
Access point group name.apgroup_name
Wireless LAN identifier from 1 to 512.wlan_id
Removes a wireless LAN from an AP group.delete
Describes an AP group.description
Description of the AP group.description
(Optional) Assigns or removes a Wireless LAN froman AP group.
interface-mapping
CLI Commands602
CLI Commandsconfig wlan acl

(Optional) Interface to which you want to map an APgroup.
interface_name
Configures NAC SNMP functionality on given APgroup. Enables or disables Network AdmissionControl (NAC) out-of-band support on an access pointgroup.
nac-snmp
Enables NAC out-of-band support on an AP group.enable
Disables NAC out-of-band support on an AP group.disable
Configures RF profile mapping on an AP group.profile-mapping
RF profile name for a specified AP group.profile_name
Configures WLAN radio policy on an AP group.wlan-radio-policy
Configures WLAN radio policy on an AP group.802.11a-only
Configures WLAN radio policy on an AP group.802.11bg
Configures WLAN radio policy on an AP group.802.11g-only
Configures WLAN radio policy on an AP group.all
Configures a HotSpot on an AP group.hotspot
Configures venue information for an AP group.venue
Configures the type of venue for an AP group.type
Venue group information for an AP group.
The following options are available:
• 0 : UNSPECIFIED
• 1 : ASSEMBLY
• 2 : BUSINESS
• 3 : EDUCATIONAL
• 4 : FACTORY-INDUSTRIAL
• 5 : INSTITUTIONAL
• 6 : MERCANTILE
• 7 : RESIDENTIAL
• 8 : STORAGE
• 9 : UTILITY-MISC
• 10 : VEHICULAR
• 11 : OUTDOOR
group_code
CLI Commands603
CLI Commandsconfig wlan apgroup

type_code
CLI Commands604
CLI Commandsconfig wlan apgroup

Venue type information for an AP group.
For venue group 1 (ASSEMBLY), the followingoptions are available:
• 0 : UNSPECIFIED ASSEMBLY
• 1 : ARENA
• 2 : STADIUM
• 3 : PASSENGER TERMINAL
• 4 : AMPHITHEATER
• 5 : AMUSEMENT PARK
• 6 : PLACE OF WORSHIP
• 7 : CONVENTION CENTER
• 8 : LIBRARY
• 9 : MUSEUM
• 10 : RESTAURANT
• 11 : THEATER
• 12 : BAR
• 13 : COFFEE SHOP
• 14 : ZOO OR AQUARIUM
• 15 : EMERGENCY COORDINATIONCENTER
For venue group 2 (BUSINESS), the following optionsare available:
• 0 : UNSPECIFIED BUSINESS
• 1 : DOCTOR OR DENTIST OFFICE
• 2 : BANK
• 3 : FIRE STATION
• 4 : POLICE STATION
• 6 : POST OFFICE
• 7 : PROFESSIONAL OFFICE
• 8 : RESEARCH AND DEVELOPMENTFACILITY
• 9 : ATTORNEY OFFICE
For venue group 3 (EDUCATIONAL), the following
CLI Commands605
CLI Commandsconfig wlan apgroup

options are available:
• 0 : UNSPECIFIED EDUCATIONAL
• 1 : PRIMARY SCHOOL
• 2 : SECONDARY SCHOOL
• 3 : UNIVERSITY OR COLLEGE
For venue group 4 (FACTORY-INDUSTRIAL), thefollowing options are available:
• 0 : UNSPECIFIED FACTORY ANDINDUSTRIAL
• 1 : FACTORY
For venue group 5 (INSTITUTIONAL), the followingoptions are available:
• 0 : UNSPECIFIED INSTITUTIONAL
• 1 : HOSPITAL
• 2 : LONG-TERM CARE FACILITY
• 3 : ALCOHOL AND DRUGRE-HABILITATION CENTER
• 4 :GROUP HOME
• 5 :PRISON OR JAIL
For venue group 6 (MERCANTILE), the followingoptions are available:
• 0 : UNSPECIFIED MERCANTILE
• 1 : RETAIL STORE
• 2 : GROCERY MARKET
• 3 : AUTOMOTIVE SERVICE STATION
• 4 : SHOPPING MALL
• 5 : GAS STATION
CLI Commands606
CLI Commandsconfig wlan apgroup

For venue group 7 (RESIDENTIAL), the followingoptions are available:
• 0 : UNSPECIFIED RESIDENTIAL
• 1 : PRIVATE RESIDENCE
• 2 : HOTEL OR MOTEL
• 3 : DORMITORY
• 4 : BOARDING HOUSE
For venue group 8 (STORAGE), the following optionsare available:
• 0 : UNSPECIFIED STORAGE
For venue group 9 (UTILITY-MISC), the followingoptions are available:
• 0 : UNSPECIFIED UTILITY ANDMISCELLANEOUS
For venue group 10 (VEHICULAR), the followingoptions are available:
• 0 : UNSPECIFIED VEHICULAR
• 1 : AUTOMOBILE OR TRUCK
• 2 : AIRPLANE
• 3 : BUS
• 4 : FERRY
• 5 : SHIP OR BOAT
• 6 : TRAIN
• 7 : MOTOR BIKE
For venue group 11 (OUTDOOR), the followingoptions are available:
• 0 : UNSPECIFIED OUTDOOR
• 1 : MINI-MESH NETWORK
• 2 : CITY PARK
• 3 : REST AREA
• 4 : TRAFFIC CONTROL
• 5 : BUS STOP
• 6 : KIOSK
CLI Commands607
CLI Commandsconfig wlan apgroup

Configures the name of venue for an AP group.name
An ISO-639 encoded string defining the languageused at the venue. This string is a three characterlanguage code. For example, you can enter ENG forEnglish.
language_code
Venue name for this AP group. This name isassociated with the basic service set (BSS) and is usedin cases where the SSID does not provide enoughinformation about the venue. The venue name iscase-sensitive and can be up to 252 alphanumericcharacters.
venue_name
Adds an operating class for an AP group.add
Deletes an operating class for an AP group.delete
Operating class for an AP group. The availableoperating classes are 81, 83, 84, 112, 113, 115, 116,117, 118, 119, 120, 121, 122, 123, 124, 125, 126, 127.
operating_class_value
Command Default AP Group VLAN is disabled.
Command History ModificationRelease
This command was introduced in a release earlier than Release 7.6.7.6
Usage Guidelines An error message appears if you try to delete an access point group that is used by at least one access point.Before you can delete an AP group in controller software release 6.0, move all APs in this group to anothergroup. The access points are not moved to the default-group access point group as in previous releases. Tosee the APs, enter the show wlan apgroups command. To move APs, enter the config ap group-namegroupname cisco_ap command.
The following example shows how to enable the NAC out-of band support on access point group 4:(Cisco Controller) >config wlan apgroup nac enable apgroup 4
config wlan band-select allowTo configure band selection on a WLAN, use the config wlan band-select allow command.
config wlan band-select allow {enable | disable} wlan_id
Syntax Description Enables band selection on a WLAN.enable
Disables band selection on a WLAN.disable
Wireless LAN identifier between 1 and 512.wlan_id
Command Default None
CLI Commands608
CLI Commandsconfig wlan band-select allow
Command History ModificationRelease
This command was introduced in a release earlier than Release 7.6.7.6
Usage Guidelines When you enable band select on a WLAN, the access point suppresses client probes on 2.4-GHz and movesthe dual band clients to the 5-Ghz spectrum. The band-selection algorithm directs dual-band clients only fromthe 2.4-GHz radio to the 5-GHz radio of the same access point, and it only runs on an access point when boththe 2.4-GHz and 5-GHz radios are up and running. Band selection can be used only with Cisco Aironet 1040,1140, and 1250 Series and the 3500 series access points.
The following example shows how to enable band selection on a WLAN:(Cisco Controller) >config wlan band-select allow enable 6
config wlan broadcast-ssidTo configure an Service Set Identifier (SSID) broadcast on a wireless LAN, use the config wlan broadcast-ssidcommand.
config wlan broadcast-ssid {enable | disable} wlan_id
Syntax Description Enables SSID broadcasts on a wireless LAN.enable
Disables SSID broadcasts on a wireless LAN.disable
Wireless LAN identifier between 1 and 512.wlan_id
Command Default Broadcasting of SSID is disabled.
Command History ModificationRelease
This command was introduced in a release earlier than Release 7.6.7.6
The following example shows how to configure an SSID broadcast on wireless LAN ID 1:(Cisco Controller) >config wlan broadcast-ssid enable 1
config wlan call-snoopTo enable or disable Voice-over-IP (VoIP) snooping for a particular WLAN, use the config wlan call-snoopcommand.
config wlan call-snoop {enable | disable} wlan_id
Syntax Description Enables VoIP snooping on a wireless LAN.enable
Disables VoIP snooping on a wireless LAN.disable
Wireless LAN identifier between 1 and 512.wlan_id
Command Default None
CLI Commands609
CLI Commandsconfig wlan broadcast-ssid

Command History ModificationRelease
This command was introduced in a release earlier than Release 7.6.7.6
Usage Guidelines WLAN should be with Platinum QoS and it needs to be disabled while invoking this CLI
The following example shows how to enable VoIP snooping for WLAN 3:(Cisco Controller) >config wlan call-snoop 3 enable
config wlan chdTo enable or disable Coverage Hole Detection (CHD) for a wireless LAN, use the config wlan chd command.
config wlan chd wlan_id {enable | disable}
Syntax Description Wireless LAN identifier between 1 and 512.wlan_id
Enables SSID broadcasts on a wireless LAN.enable
Disables SSID broadcasts on a wireless LAN.disable
Command Default None
Command History ModificationRelease
This command was introduced in a release earlier than Release 7.6.7.6
The following example shows how to enable CHD for WLAN 3:
(Cisco Controller) >config wlan chd 3 enable
config wlan ccx aironet-ieTo enable or disable Aironet information elements (IEs) for a WLAN, use the config wlan ccx aironet-iecommand.
config wlan ccx aironet-ie {enable | disable}
Syntax Description Enables the Aironet information elements.enable
Disables the Aironet information elements.disable
Command Default None
Command History ModificationRelease
This command was introduced in a release earlier than Release 7.6.7.6
The following example shows how to enable Aironet information elements for a WLAN:
CLI Commands610
CLI Commandsconfig wlan chd
(Cisco Controller) >config wlan ccx aironet-ie enable
config wlan channel-scan defer-priorityTo configure the controller to defer priority markings for packets that can defer off channel scanning, use theconfig wlan channel-scan defer-priority command.
config wlan channel-scan defer-priority priority [enable | disable] wlan_id
Syntax Description User priority value (0 to 7).priority
(Optional) Enables packet at given priority to deferoff channel scanning.
enable
(Optional) Disables packet at gven priority to deferoff channel scanning.
disable
Wireless LAN identifier (1 to 512).wlan_id
Command Default None
Command History ModificationRelease
This command was introduced in a release earlier than Release 7.6.7.6
Usage Guidelines The priority value should be set to 6 on the client and on the WLAN.
The following example shows how to enable the controller to defer priority markings that can deferoff channel scanning with user priority value 6 and WLAN id 30:(Cisco Controller) >config wlan channel-scan defer-priority 6 enable 30
config wlan channel-scan defer-timeTo assign the channel scan defer time in milliseconds, use the config wlan channel-scan defer-time command.
config wlan channel-scan defer-time msecs wlan_id
Syntax Description Deferral time in milliseconds (0 to 60000milliseconds).
msecs
Wireless LAN identifier from 1 to 512.wlan_id
Command Default None
Command History ModificationRelease
This command was introduced in a release earlier than Release 7.6.7.6
Usage Guidelines The time value in milliseconds should match the requirements of the equipment on your WLAN.
CLI Commands611
CLI Commandsconfig wlan channel-scan defer-priority
The following example shows how to assign the scan defer time to 40 milliseconds for WLAN withID 50:
(Cisco Controller) >config wlan channel-scan defer-time 40 50
config wlan dhcp_serverTo configure the internal DHCP server for a wireless LAN, use the config wlan dhcp_server command.
config wlan dhcp_server {wlan_id | foreignAp} ip_address [required]
Syntax Description Wireless LAN identifier between 1 and 512.wlan_id
Specifies third-party access points.foreignAp
IP address of the internal DHCP server (this parameteris required).
ip_address
(Optional) Specifies whether DHCP addressassignment is required.
required
Command Default None
Command History ModificationRelease
This command was introduced in a release earlier than Release 7.6.7.6
Usage Guidelines The preferred method for configuring DHCP is to use the primary DHCP address assigned to a particularinterface instead of the DHCP server override. If you enable the override, you can use the showwlan commandto verify that the DHCP server has been assigned to the WLAN.
The following example shows how to configure an IP address 10.10.2.1 of the internal DHCP serverfor wireless LAN ID 16:
(Cisco Controller) >config wlan dhcp_server 16 10.10.2.1
config wlan diag-channelTo enable the diagnostic channel troubleshooting on a particular WLAN, use the config wlan diag-channelcommand.
config wlan diag-channel [enable | disable] wlan_id
Syntax Description (Optional) Enables the wireless LAN diagnosticchannel.
enable
(Optional) Disables the wireless LAN diagnosticchannel.
disable
CLI Commands612
CLI Commandsconfig wlan dhcp_server

Wireless LAN identifier (1 to 512).wlan_id
Command Default None
Command History ModificationRelease
This command was introduced in a release earlier than Release 7.6.7.6
The following example shows how to enable the wireless LAN diagnostic channel for WLAN ID 1:
(Cisco Controller) >config wlan diag-channel enable 1
config wlan dtimTo configure a Delivery Traffic Indicator Message (DTIM) for 802.11 radio network config wlan dtimcommand.
config wlan dtim {802.11a | 802.11b} dtim wlan_id
Syntax Description Configures DTIM for the 802.11a radio network.802.11a
Configures DTIM for the 802.11b radio network.802.11b
Value for DTIM (between 1 to 255 inclusive).dtim
Number of the WLAN to be configured.wlan_id
Command Default The default is DTIM 1.
Command History ModificationRelease
This command was introduced in a release earlier than Release 7.6.7.6
The following example shows how to configure DTIM for 802.11a radio network with DTIM value128 and WLAN ID 1:
(Cisco Controller) >config wlan dtim 802.11a 128 1
config wlan exclusionlistTo configure the wireless LAN exclusion list, use the config wlan exclusionlist command.
config wlan exclusionlist {wlan_id [enabled | disabled | time] | foreignAp [enabled | disabled| time]}
Syntax Description Wireless LAN identifier (1 to 512).wlan_id
(Optional) Enables the exclusion list for the specifiedwireless LAN or foreign access point.
enabled
CLI Commands613
CLI Commandsconfig wlan dtim
(Optional) Disables the exclusion list for the specifiedwireless LAN or a foreign access point.
disabled
(Optional) Exclusion list timeout in seconds. A valueof zero (0) specifies infinite time.
time
Specifies a third-party access point.foreignAp
Command Default None
Command History ModificationRelease
This command was introduced in a release earlier than Release 7.6.7.6
Usage Guidelines This command replaces the config wlan blacklist command.
The following example shows how to enable the exclusion list for WLAN ID 1:
(Cisco Controller) >config wlan exclusionlist 1 enabled
config wlan flexconnect ap-authTo configure local authentication of clients associated with FlexConnect on a locally switched WLAN, usethe config wlan flexconnect ap-auth command.
config wlan flexconnect ap-auth wlan_id {enable | disable}
Syntax Description Configures local authentication of clients associatedwith an FlexConnect on a locally switched WLAN.
ap-auth
Wireless LAN identifier between 1 and 512.wlan_id
Enables AP authentication on a WLAN.enable
Disables AP authentication on a WLAN.disable
Command Default None
Command History ModificationRelease
This command was introduced in a release earlier than Release 7.6.7.6
Usage Guidelines Local switching must be enabled on the WLAN where you want to configure local authentication of clientsassociated with FlexConnect.
The following example shows how to enable authentication of clients associated with FlexConnecton a specified WLAN:
(Cisco Controller) >config wlan flexconnect ap-auth 6 enable
CLI Commands614
CLI Commandsconfig wlan flexconnect ap-auth

config wlan flexconnect learn-ipaddrTo enable or disable client IP address learning for the CiscoWLAN controller, use the config wlan flexconnectlearn-ipaddr command.
config wlan flexconnect learn-ipaddr wlan_id {enable | disable}
Syntax Description Wireless LAN identifier between 1 and 512.wlan_id
Enables client IPv4 address learning on a wirelessLAN.
enable
Disables client IPv4 address learning on a wirelessLAN.
disable
Command Default Disabled when the config wlan flexconnect local-switching command is disabled. Enabled when the configwlan flexconnect local-switching command is enabled.
Command History ModificationRelease
This command was introduced in a release earlier than Release 7.6.7.6
This command supports only IPv4 address format.8.0
Usage Guidelines If the client is configured with Layer 2 encryption, the controller cannot learn the client IP address, and thecontroller will periodically drop the client. Disable this option to keep the client connection without waitingto learn the client IP address.
This command is valid only for IPv4.Note
The ability to disable IP address learning is not supported with FlexConnect central switching.Note
The following example shows how to disable client IP address learning for WLAN 6:
(Cisco Controller) >config wlan flexconnect learn-ipaddr disable 6
Related Commands show wlan
config wlan flexconnect local-switchingTo configure local switching, central DHCP, NAT-PAT, or the override DNS option on a FlexConnectWLAN,use the config wlan flexconnect local switching command.
config wlan flexconnect local-switching wlan_id {enable | disable} { {central-dhcp {enable |disable} nat-pat {enable | disable} } | {override option dns { enable | disable} } }
CLI Commands615
CLI Commandsconfig wlan flexconnect learn-ipaddr
Syntax Description Wireless LAN identifier from 1 to 512.wlan_id
Enables local switching on a FlexConnect WLAN.enable
Disables local switching on a FlexConnect WLAN.disable
Configures central switching of DHCP packets on thelocal switching FlexConnect WLAN. When youenable this feature, the DHCP packets received fromthe AP are centrally switched to the controller andforwarded to the corresponding VLAN based on theAP and the SSID.
central-dhcp
Enables central DHCP on a FlexConnect WLAN.enable
Disables central DHCP on a FlexConnect WLAN.disable
Configures Network Address Translation (NAT) andPort Address Translation (PAT) on the local switchingFlexConnect WLAN.
nat-pat
Enables NAT-PAT on the FlexConnect WLAN.enable
Disables NAT-PAT on the FlexConnect WLAN.disable
Specifies the DHCP override options on theFlexConnect WLAN.
override
Specifies the override DNS option on the FlexConnectWLAN. When you override this option, the clientsget their DNS server IP address from the AP, not fromthe controller.
option dns
Enables the override DNS option on the FlexConnectWLAN.
enable
Disables the override DNS option on the FlexConnectWLAN.
disable
Command Default This feature is disabled.
Command History ModificationRelease
This command was introduced in a release earlier than Release 7.6.7.6
This command supports only IPv4 address format.8.0
Usage Guidelines When you enable the config wlan flexconnect local-switching command, the config wlan flexconnectlearn-ipaddr command is enabled by default.
This command is valid only for IPv4.Note
CLI Commands616
CLI Commandsconfig wlan flexconnect local-switching

The ability to disable IP address learning is not supported with FlexConnect central switching.Note
The following example shows how to enable WLAN 6 for local switching and enable central DHCPand NAT-PAT:
(Cisco Controller) >config wlan flexconnect local-switching 6 enable central-dhcp enablenat-pat enable
The following example shows how to enable the override DNS option on WLAN 6:
(Cisco Controller) >config wlan flexconnect local-switching 6 override option dns enable
config wlan flexconnect vlan-central-switchingTo configure central switching on a locally switched WLAN, use the config wlan flexconnectvlan-central-switching command.
config wlan flexconnect vlan-central-switching wlan_id { enable | disable }
Syntax Description Wireless LAN identifier between 1 and 512.wlan_id
Enables central switching on a locally switchedwireless LAN.
enable
Disables central switching on a locally switchedwireless LAN.
disable
Command Default Central switching is disabled.
Command History ModificationRelease
This command was introduced in a release earlier than Release 7.6.7.6
Usage Guidelines You must enable Flexconnect local switching to enable VLAN central switching. When you enable WLANcentral switching, the access point bridges the traffic locally if the WLAN is configured on the local IEEE802.1Q link. If the VLAN is not configured on the access point, the AP tunnels the traffic back to the controllerand the controller bridges the traffic to the corresponding VLAN.
WLAN central switching does not support:
• FlexConnect local authentication.
• Layer 3 roaming of local switching client.
The following example shows how to enable WLAN 6 for central switching:(Cisco Controller) >config wlan flexconnect vlan-central-switching 6 enable
CLI Commands617
CLI Commandsconfig wlan flexconnect vlan-central-switching
config wlan override-rate-limitTo override the bandwidth limits for upstream and downstream traffic per user and per service set identifier(SSID) defined in the QoS profile, use the config wlan override-rate-limit command.
config wlan override-rate-limitwlan_id { average-data-rate| average-realtime-rate| burst-data-rate| burst-realtime-rate } { per-ssid | per-client } { downstream | upstream } rate
Syntax Description Wireless LAN identifier between 1 and 512.wlan_id
Specifies the average data rate for TCP traffic per user orper SSID. The range is from 0 to 51,2000 Kbps.
average-data-rate
Specifies the average real-time data rate for UDP trafficper user or per SSID. The range is from 0 to 51,2000 Kbps.
average-realtime-rate
Specifies the peak data rate for TCP traffic per user or perSSID. The range is from 0 to 51,2000 Kbps.
burst-data-rate
Specifies the peak real-time data rate for UDP traffic peruser or per SSID. The range is from 0 to 51,2000 Kbps.
burst-realtime-rate
Configures the rate limit for an SSID per radio. Thecombined traffic of all clients will not exceed this limit.
per-ssid
Configures the rate limit for each client associated with theSSID.
per-client
Configures the rate limit for downstream traffic.downstream
Configures the rate limit for upstream traffic.upstream
Data rate for TCP or UDP traffic per user or per SSID. Therange is form 0 to 51,2000 Kbps. A value of 0 imposes nobandwidth restriction on the QoS profile.
rate
Command Default None
Command History ModificationRelease
This command was introduced in a release earlier than Release 7.6.7.6
Usage Guidelines The rate limits are enforced by the controller and the AP. For central switching, the controller handles thedownstream enforcement of per-client rate limit and the AP handles the enforcement of the upstream trafficand per-SSID rate limit for downstream traffic.When the AP enters standalonemode it handles the downstreamenforcement of per-client rate limits too.
In FlexConnect local switching and standalone modes, per-client and per-SSID rate limiting is done by theAP for downstream and upstream traffic. However, in FlexConnect standalone mode, the configuration is notsaved on the AP, so when the AP reloads, the configuration is lost and rate limiting does not happen afterreboot.
CLI Commands618
CLI Commandsconfig wlan override-rate-limit

For roaming clients, if the client roams between the APs on the same controller, same rate limit parametersare applied on the client. However, if the client roams from an anchor to a foreign controller, the per-clientdownstream rate limiting uses the parameters configured on the anchor controller while upstream rate limitinguses the parameters of the foreign controller.
The following example shows how to configure the burst real-time actual rate 2000 Kbps for theupstream traffic per SSID:(Cisco Controller) >config wlan override-rate-limit 2 burst-realtime-rate per-ssid upstream2000
config wlan interfaceTo configure a wireless LAN interface or an interface group, use the config wlan interface command.
config wlan interface {wlan_id | foreignAp} {interface-name | interface-group-name}
Syntax Description (Optional) Wireless LAN identifier (1 to 512).wlan_id
Specifies third-party access points.foreignAp
Interface name.interface-name
Interface group name.interface-group-name
Command Default None
Command History ModificationRelease
This command was introduced in a release earlier than Release 7.6.7.6
The following example shows how to configure an interface named VLAN901:
(Cisco Controller) >config wlan interface 16 VLAN901
config wlan ipv6 aclTo configure IPv6 access control list (ACL) on a wireless LAN, use the config wlan ipv6 acl command.
config wlan ipv6 acl wlan_id acl_name
Syntax Description Wireless LAN identifier between 1 and 512.wlan_id
IPv6 ACL name.acl_name
Command Default None
Command History ModificationRelease
This command was introduced in a release earlier than Release 7.6.7.6
CLI Commands619
CLI Commandsconfig wlan interface

The following example shows how to configure an IPv6 ACL for local switching:
(Cisco Controller) >config wlan ipv6 acl 22 acl_sample
config wlan kts-cacTo configure the Key Telephone System-based CAC policy for a WLAN, use the config wlan kts-caccommand.
config wlan kts-cac {enable | disable} wlan_id
Syntax Description Enables the KTS-based CAC policy.enable
Disables the KTS-based CAC policy.disable
Wireless LAN identifier between 1 and 512.wlan_id
Command Default None
Command History ModificationRelease
This command was introduced in a release earlier than Release 7.6.7.6
Usage Guidelines To enable the KTS-based CAC policy for a WLAN, ensure that you do the following:
• Configure the QoS profile for the WLAN to Platinum by entering the following command:
config wlan qos wlan-id platinum
• Disable the WLAN by entering the following command:
config wlan disable wlan-id
• Disable FlexConnect local switching for the WLAN by entering the following command:
config wlan flexconnect local-switching wlan-id disable
The following example shows how to enable the KTS-based CAC policy for a WLAN with the ID4:
(Cisco Controller) >config wlan kts-cac enable 4
config wlan ldapTo add or delete a link to a configured Lightweight Directory Access Protocol (LDAP) server, use the configwlan ldap command.
config wlan ldap {add wlan_id server_id | delete wlan_id {all | server_id}}
Syntax Description Adds a link to a configured LDAP server.add
CLI Commands620
CLI Commandsconfig wlan kts-cac
Wireless LAN identifier between 1 and 512.wlan_id
LDAP server index.server_id
Removes the link to a configured LDAP server.delete
Specifies all LDAP servers.all
Command Default None
Command History ModificationRelease
This command was introduced in a release earlier than Release 7.6.7.6
Usage Guidelines Use this command to specify the LDAP server priority for the WLAN.
To specify the LDAP server priority, one of the following must be configured and enabled:
• 802.1X authentication and Local EAP
• Web authentication and LDAP
Local EAP was introduced in controller software release 4.1; LDAP support onWeb authentication was introduced in controller software release 4.2.
Note
The following example shows how to add a link to a configured LDAP server with the WLAN ID100 and server ID 4:
(Cisco Controller) >config wlan ldap add 100 4
config wlan load-balanceTo override the global load balance configuration and enable or disable load balancing on a particularWLAN,use the config wlan load-balance command.
config wlan load-balance allow {enable | disable} wlan_id
Syntax Description Enables band selection on a wireless LAN.enable
Disables band selection on a wireless LAN.disable
Wireless LAN identifier between 1 and 512.wlan_id
Command Default Load balancing is enabled by default.
Command History ModificationRelease
This command was introduced in a release earlier than Release 7.6.7.6
CLI Commands621
CLI Commandsconfig wlan load-balance
The following example shows how to enable band selection on a wireless LAN with WLAN ID 3:
(Cisco Controller) >config wlan load-balance allow enable 3
config wlan mac-filteringTo change the state of MAC filtering on a wireless LAN, use the config wlan mac-filtering command.
config wlan mac-filtering {enable | disable} {wlan_id | foreignAp}
Syntax Description Enables MAC filtering on a wireless LAN.enable
Disables MAC filtering on a wireless LAN.disable
Wireless LAN identifier from 1 to 512.wlan_id
Specifies third-party access points.foreignAp
Command Default None
Command History ModificationRelease
This command was introduced in a release earlier than Release 7.6.7.6
The following example shows how to enable the MAC filtering on WLAN ID 1:
(Cisco Controller) >config wlan mac-filtering enable 1
config wlan max-associated-clientsTo configure the maximum number of client connections on a wireless LAN, guest LAN, or remote LAN,use the config wlan max-associated-clients command.
config wlan max-associated-clients max_clients wlan_id
Syntax Description Maximum number of client connections to beaccepted.
max_clients
Wireless LAN identifier between 1 and 512.wlan_id
Command Default None
Command History ModificationRelease
This command was introduced in a release earlier than Release 7.6.7.6
The following example shows how to specify the maximum number of client connections onWLANID 2:
CLI Commands622
CLI Commandsconfig wlan mac-filtering

(Cisco Controller) >config wlan max-associated-clients 25 2
config wlan max-radio-clientsTo configure the maximum number of WLAN client per access point, use the config wlan max-radio-clientscommand.
config wlan max-radio-clients max_radio_clients wlan_id
Syntax Description Maximumnumber of client connections to be acceptedper access point radio. The valid range is from 1 to200.
max_radio_clients
Wireless LAN identifier between 1 and 512.wlan_id
Command Default None
Command History ModificationRelease
This command was introduced in a release earlier than Release 7.6.7.6
The following example shows how to specify the maximum number of client connections per accesspoint radio on WLAN ID 2:
(Cisco Controller) >config wlan max-radio-clients 25 2
config wlan media-streamTo configure multicast-direct for a wireless LANmedia stream, use the config wlanmedia-stream command.
config wlan media-stream multicast-direct {wlan_id | all} {enable | disable}
Syntax Description Configures multicast-direct for a wireless LANmediastream.
multicast-direct
Wireless LAN identifier between 1 and 512.wlan_id
Configures the wireless LAN on all media streams.all
Enables global multicast to unicast conversion.enable
Disables global multicast to unicast conversion.disable
Command Default None
Command History ModificationRelease
This command was introduced in a release earlier than Release 7.6.7.6
CLI Commands623
CLI Commandsconfig wlan max-radio-clients
Usage Guidelines Media stream multicast-direct requires load based Call Admission Control (CAC) to run. WLAN quality ofservice (QoS) needs to be set to either gold or platinum.
The following example shows how to enable the global multicast-direct media stream with WLANID 2:
(Cisco Controller) >config wlan media-stream multicast-direct 2 enable
config wlan mfpTo configure management frame protection (MFP) options for the wireless LAN, use the config wlan mfpcommand.
config wlanmfp {client[enable | disable]wlan_id | infrastructure protection[enable | disable]wlan_id}
Syntax Description Configures client MFP for the wireless LAN.client
(Optional) Enables the feature.enable
(Optional) Disables the feature.disable
Wireless LAN identifier (1 to 512).wlan_id
(Optional) Configures the infrastructure MFP for thewireless LAN.
infrastructure protection
Command Default None
Command History ModificationRelease
This command was introduced in a release earlier than Release 7.6.7.6
The following example shows how to configure client management frame protection for WLAN ID1:
(Cisco Controller) >config wlan mfp client enable 1
config wlan mobility anchorTo change the state of MAC filtering on a wireless LAN, use the config wlan mobility anchor command.
config wlan mobility anchor {add | delete} wlan_id ip_addr priority priority-number
Syntax Description Enables MAC filtering on a wireless LAN.add
Disables MAC filtering on a wireless LAN.delete
Wireless LAN identifier between 1 and 512.wlan_id
CLI Commands624
CLI Commandsconfig wlan mfp
Member switch IPv4 address for anchoring thewireless LAN.
ip_addr
Sets priority to the anchored wireless LAN IP address.priority
Range between 1 to 3.priority-number
Command Default None
Command History ModificationRelease
This command was introduced in a release earlier than Release 7.6.7.6
This command supports only IPv4 address format.8.0
prioritypriority number parameter introduced.8.1
The following example shows how to configure and set priority to the mobility wireless LAN anchorlist with WLAN ID 4 and IPv4 address 192.168.0.14
(Cisco Controller) >config wlan mobility anchor add 4 192.168.0.14 priority 1
Related Commands show wlan
config wlan mobility foreign-mapTo configure interfaces or interface groups for foreign CiscoWLCs, use the config wlanmobility foreign-mapcommand.
config wlan mobility foreign-map {add | delete} wlan_id foreign_mac_address {interface_name |interface_group_name}
Syntax Description Adds an interface or interface group to the map offoreign controllers.
add
Deletes an interface or interface group from the mapof foreign controllers.
delete
Wireless LAN identifier from 1 to 512.wlan_id
Foreign switch MAC address on a WLAN.foreign_mac_address
Interface name up to 32 alphanumeric characters.interface_name
Interface group name up to 32 alphanumericcharacters.
interface_group_name
Command Default None
CLI Commands625
CLI Commandsconfig wlan mobility foreign-map

Command History ModificationRelease
This command was introduced in a release earlier than Release 7.6.7.6
The following example shows how to add an interface group for foreign Cisco WLCs with WLANID 4 and a foreign switch MAC address on WLAN 00:21:1b:ea:36:60:
(Cisco Controller) >config wlan mobility foreign-map add 4 00:21:1b:ea:36:60 mygroup1
config wlan multicast bufferTo configure the radio multicast packet buffer size, use the config wlan multicast buffer command.
config wlan multicast buffer {enable | disable} buffer-size
Syntax Description Enables the multicast interface feature for a wirelessLAN.
enable
Disables the multicast interface feature on a wirelessLAN.
disable
Radio multicast packet buffer size. The range is from30 to 60. Enter 0 to indicate APs will dynamicallyadjust the number of buffers allocated for multicast.
buffer-size
Wireless LAN identifier between 1 and 512.wlan_id
Command Default The default buffer size is 30
Command History ModificationRelease
This command was introduced in a release earlier than Release 7.6.7.6
The following example shows how to configure radio multicast buffer settings:
(Cisco Controller) >config wlan multicast buffer enable 45 222
config wlan multicast interfaceTo configure a multicast interface for a wireless LAN, use the config wlan multicast interface command.
config wlan multicast interface wlan_id {enable | disable} interface_name
Syntax Description Wireless LAN identifier between 1 and 512.wlan_id
Enablesmulticast interface feature for a wireless LAN.enable
Disables multicast interface feature on a wirelessLAN.
delete
CLI Commands626
CLI Commandsconfig wlan multicast buffer
Interface name.
The interface name can only be specifiedin lower case characters.
Note
interface_name
Command Default Multicast is disabled.
Command History ModificationRelease
This command was introduced in a release earlier than Release 7.6.7.6
The following example shows how to enable the multicast interface feature for a wireless LAN withWLAN ID 4 and interface name myinterface1:
(Cisco Controller) >config wlan multicast interface 4 enable myinterface1
config wlan nacTo enable or disable Network Admission Control (NAC) out-of-band support for a WLAN, use the configwlan nac command.
config wlan nac {snmp | radius} {enable | disable} wlan_id
Syntax Description Configures SNMP NAC support.snmp
Configures RADIUS NAC support.radius
Enables NAC for the WLAN.enable
Disables NAC for the WLAN.disable
WLAN identifier from 1 to 512.wlan_id
Command Default None
Command History ModificationRelease
This command was introduced in a release earlier than Release 7.6.7.6
Usage Guidelines You should enable AAA override before you enable the RADIUS NAC state. You also should disableFlexConnect local switching before you enable the RADIUS NAC state.
The following example shows how to configure SNMP NAC support for WLAN 13:(Cisco Controller) >config wlan nac snmp enable 13
The following example shows how to configure RADIUS NAC support for WLAN 34:
(Cisco Controller) >config wlan nac radius enable 20
CLI Commands627
CLI Commandsconfig wlan nac
config wlan passive-clientTo configure passive-client feature on a wireless LAN, use the config wlan passive-client command.
config wlan passive-client {enable | disable} wlan_id
Syntax Description Enables the passive-client feature on a WLAN.enable
Disables the passive-client feature on a WLAN.disable
WLAN identifier between 1 and 512.wlan_id
Command Default None
Command History ModificationRelease
This command was introduced in a release earlier than Release 7.6.7.6
Usage Guidelines You need to enable the global multicast mode and multicast-multicast mode by using the config networkmulticast global and config network multicast mode commands before entering this command.
You should configure the multicast in multicast-multicast mode only not in unicast mode. The passive clientfeature does not work with multicast-unicast mode in this release.
Note
The following example shows how to configure the passive client on wireless LAN ID 2:
(Cisco Controller) >config wlan passive-client enable 2
config wlan peer-blockingTo configure peer-to-peer blocking on a WLAN, use the config wlan peer-blocking command.
config wlan peer-blocking {disable | drop | forward-upstream} wlan_id
Syntax Description Disables peer-to-peer blocking and bridge trafficlocally within the controller whenever possible.
disable
Causes the controller to discard the packets.drop
Causes the packets to be forwarded on the upstreamVLAN. The device above the controller decides whataction to take regarding the packets.
forward-upstream
WLAN identifier between 1 and 512.wlan_id
Command Default None
CLI Commands628
CLI Commandsconfig wlan passive-client

Command History ModificationRelease
This command was introduced in a release earlier than Release 7.6.7.6
The following example shows how to disable the peer-to-peer blocking for WLAN ID 1:
(Cisco Controller) >config wlan peer-blocking disable 1
config wlan profilingTo configure client profiling on a WLAN, use the config wlan profiling command.
config wlan profiling {local | radius} {all | dhcp | http} {enable | disable} wlan_id
Syntax Description Configures client profiling in Local mode for a WLAN.local
Configures client profiling in RADIUS mode on a WLAN.radius
Configures DHCP and HTTP client profiling in a WLAN.all
Configures DHCP client profiling alone in a WLAN.dhcp
Configures HTTP client profiling in a WLAN.http
Enables the specific type of client profiling in a WLAN.
When you enable HTTP profiling, the Cisco WLC collectsthe HTTP attributes of clients for profiling.
When you enable DHCP profiling, the Cisco WLC collectsthe DHCP attributes of clients for profiling.
enable
Disables the specific type of client profiling in a WLAN.disable
Wireless LAN identifier from 1 to 512.wlan_id
Usage Guidelines Ensure that you have disabled the WLAN before configuring client profiling on the WLAN.
Command Default Client profiling is disabled.
Command History ModificationRelease
This command was introduced in a release earlier than Release 7.6.7.6
Usage Guidelines Only clients connected to port 80 for HTTP can be profiled. IPv6 only clients are not profiled.
If a session timeout is configured for a WLAN, clients must send the HTTP traffic before the configuredtimeout to get profiled.
This feature is not supported on the following:
• FlexConnect Standalone mode
• FlexConnect Local Authentication
CLI Commands629
CLI Commandsconfig wlan profiling

The following example shows how to enable both DHCP and HTTP profiling on a WLAN:(Cisco Controller) >config wlan profiling radius all enable 6
HTTP Profiling successfully enabled.DHCP Profiling successfully enabled.
config wlan qosTo change the quality of service (QoS) for a wireless LAN, use the config wlan qos command.
config wlan qos wlan_id {bronze | silver | gold | platinum}config wlan qos foreignAp {bronze | silver | gold | platinum}
Syntax Description Wireless LAN identifier between 1 and 512.wlan_id
Specifies the bronze QoS policy.bronze
Specifies the silver QoS policy.silver
Specifies the gold QoS policy.gold
Specifies the platinum QoS policy.platinum
Specifies third-party access points.foreignAp
Command Default The default QoS policy is silver.
Command History ModificationRelease
This command was introduced in a release earlier than Release 7.6.7.6
The following example shows how to set the highest level of service on wireless LAN 1:
(Cisco Controller) >config wlan qos 1 gold
config wlan radioTo set the Cisco radio policy on a wireless LAN, use the config wlan radio command.
config wlan radio wlan_id {all | 802.11a | 802.11bg | 802.11g | 802.11ag}
Syntax Description Wireless LAN identifier between 1 and 512.wlan_id
Configures the wireless LAN on all radio bands.all
Configures the wireless LAN on only 802.11a.802.11a
Configures the wireless LAN on only 802.11b/g (only802.11b if 802.11g is disabled).
802.11bg
Configures the wireless LAN on 802.11g only.802.11g
CLI Commands630
CLI Commandsconfig wlan qos

Command Default None
Command History ModificationRelease
This command was introduced in a release earlier than Release 7.6.7.6
The following example shows how to configure the wireless LAN on all radio bands:
(Cisco Controller) >config wlan radio 1 all
config wlan radius_server acctTo configure RADIUS accounting servers of a WLAN, use the config wlan radius_server acct command.
config wlan radius_server acct {enable | disable} wlan_id | addwlan_id server_id | deletewlan_id{all | server_id} }
Syntax Description Enables RADIUS accounting for the WLAN.enable
Disables RADIUS accounting for the WLAN.disable
Wireless LAN identifier from 1 to 512.wlan_id
Adds a link to a configured RADIUS accountingserver.
add
RADIUS server index.server_id
Deletes a link to a configured RADIUS accountingserver.
delete
Command Default None
Command History ModificationRelease
This command was introduced in a release earlier than Release 7.6.7.6
The following example shows how to enable RADIUS accounting for the WLAN 2:
(Cisco Controller) >config wlan radius_server acct enable 2
The following example shows how to add a link to a configured RADIUS accounting server:
(Cisco Controller) > config wlan radius_server acct add 2 5
config wlan radius_server acct interim-updateTo configure the interim update of a RADIUS accounting server of a WLAN, use the config wlanradius_server acct interim-update command.
CLI Commands631
CLI Commandsconfig wlan radius_server acct

config wlan radius_server acct interim-update {enable | disable | interval } wlan_id
Syntax Description Configures the interim update of the RADIUSaccounting server.
interim-update
Enables interim update of the RADIUS accountingserver for the WLAN.
enable
Disables interim update of the RADIUS accountingserver for the WLAN.
disable
Interim update interval that you specify. The validrange is 180 seconds to 3600 seconds.
interval
Wireless LAN identifier between 1 and 512.wlan_id
Command Default Interim update of a RADIUS accounting sever is set at 600 seconds.
Command History ModificationRelease
This command was introduced in a release earlier than Release 7.6.7.6
The following example shows how to specify an interim update of 200 seconds to a RADIUSaccounting server of WLAN 2:
(Cisco Controller) >config wlan radius_server acct interim-update 200 2
config wlan radius_server authTo configure RADIUS authentication servers of aWLAN, use the config wlan radius_server auth command.
config wlan radius_server auth {enable wlan_id | disable wlan_id} {add wlan_id server_id | deletewlan_id {all | server_id}}
Syntax Description Configures a RADIUS authenticationauth
Enables RADIUS authentication for this WLAN.enable
Wireless LAN identifier from 1 to 512.wlan_id
Disables RADIUS authentication for this WLAN.disable
Adds a link to a configured RADIUS server.add
RADIUS server index.server_id
Deletes a link to a configured RADIUS server.delete
Deletes all links to configured RADIUS servers.all
Command Default None
CLI Commands632
CLI Commandsconfig wlan radius_server auth

Command History ModificationRelease
This command was introduced in a release earlier than Release 7.6.7.6
The following example shows how to add a link to a configured RADIUS authentication server withWLAN ID 1 and Server ID 1:
(Cisco Controller) >config wlan radius_server auth add 1 1
config wlan radius_server overwrite-interfaceTo configure a wireless LAN’s RADIUS dynamic interface, use the config wlan radius_serveroverwrite-interface command.
config wlan radius_server overwrite-interface {enable | disable} wlan_id
Syntax Description Enables RADIUS dynamic interface for this WLAN.enable
Disables RADIUS dynamic interface for thisWLAN.disable
Wireless LAN identifier between 1 and 512.wlan_id
Command Default None
Command History ModificationRelease
This command was introduced in a release earlier than Release 7.6.7.6
Usage Guidelines The controller uses the management interface as identity. If the RADIUS server is on a directly connecteddynamic interface, the traffic is sourced from the dynamic interface. Otherwise, the management IP addressis used.
If the feature is enabled, controller uses the interface specified on the WLAN configuration as identity andsource for all RADIUS related traffic on the WLAN.
The following example shows how to enable RADIUS dynamic interface for a WLAN with an ID1:
(Cisco Controller) >config wlan radius_server overwrite-interface enable 1
config wlan roamed-voice-client re-anchorTo configure a roamed voice client’s reanchor policy, use the config wlan roamed-voice-client re-anchorcommand.
config wlan roamed-voice-client re-anchor {enable | disable} wlan_id
Syntax Description Enables the roamed client’s reanchor policy.enable
Disables the roamed client’s reanchor policy.disable
CLI Commands633
CLI Commandsconfig wlan radius_server overwrite-interface

Wireless LAN identifier between 1 and 512.wlan_id
Command Default The roamed client reanchor policy is disabled.
Command History ModificationRelease
This command was introduced in a release earlier than Release 7.6.7.6
The following example shows how to enable a roamed voice client’s reanchor policy where WLANID is 1:
(Cisco Controller) >config wlan roamed-voice-client re-anchor enable 1
config wlan sip-cac disassoc-clientTo enable client disassociation in case of session initiation protocol (SIP) call admission control (CAC) failure,use the config wlan sip-cac disassoc-client command.
config wlan sip-cac disassoc-client {enable | disable} wlan_id
Syntax Description Enables a client disassociation on a SIP CAC failure.enable
Disables a client disassociation on a SIP CAC failure.disable
Wireless LAN identifier between 1 and 512.wlan_id
Command Default Client disassociation for SIP CAC is disabled.
Command History ModificationRelease
This command was introduced in a release earlier than Release 7.6.7.6
The following example shows how to enable a client disassociation on a SIP CAC failure where theWLAN ID is 1:
(Cisco Controller) >config wlan sip-cac disassoc-client enable 1
config wlan sip-cac send-486busyTo configure sending session initiation protocol (SIP) 486 busymessage if a SIP call admission control (CAC)failure occurs, use the config wlan sip-cac send-486busy command:
config wlan sip-cac send-486busy {enable | disable} wlan_id
Syntax Description Enables sending a SIP 486 busy message upon a SIPCAC failure.
enable
Disables sending a SIP 486 busy message upon a SIPCAC failure.
disable
CLI Commands634
CLI Commandsconfig wlan sip-cac disassoc-client

Wireless LAN identifier between 1 and 512.wlan_id
Command Default Session initiation protocol is enabled by default.
Command History ModificationRelease
This command was introduced in a release earlier than Release 7.6.7.6
The following example shows how to enable sending a SIP 486 busy message upon a SIP CACfailure where the WLAN ID is 1:(Cisco Controller) >config wlan sip-cac send-busy486 enable 1
config wlan static-ip tunnelingTo configure static IP client tunneling support on aWLAN, use the config wlan static-ip tunneling command.
config wlan static-ip tunneling {enable | disable} wlan_id
Syntax Description Configures static IP client tunneling support on aWLAN.
tunneling
Enables static IP client tunneling support on aWLAN.enable
Disables static IP client tunneling support on aWLAN.
disable
Wireless LAN identifier from 1 to 512.wlan_id
Command Default None
Command History ModificationRelease
This command was introduced in a release earlier than Release 7.6.7.6
The following example shows how to enable static IP client tunneling support for WLAN ID 3:
(Cisco Controller) >config wlan static-ip tunneling enable 34
config wlan session-timeoutTo change the timeout of wireless LAN clients, use the config wlan session-timeout command.
config wlan session-timeout {wlan_id | foreignAp} seconds
Syntax Description Wireless LAN identifier between 1 and 512.wlan_id
Specifies third-party access points.foreignAp
CLI Commands635
CLI Commandsconfig wlan static-ip tunneling
Timeout or session duration in seconds. A value of zero is equivalent to no timeout.
The range of session timeout depends on the security type:Note
• Open system: 0-65535 (sec)
• 802.1x: 300-86400 (sec)
• static wep: 0-65535 (sec)
• cranite: 0-65535 (sec)
• fortress: 0-65535 (sec)
• CKIP: 0-65535 (sec)
• open+web auth: 0-65535 (sec)
• web pass-thru: 0-65535 (sec)
• wpa-psk: 0-65535 (sec)
• disable: To disable reauth/session-timeout timers.
seconds
Command Default None
Usage Guidelines For 802.1X client security type, which creates the PMK cache, the maximum session timeout that can be setis 86400 seconds when the session timeout is disabled. For other client security such as open, WebAuth, andPSK for which the PMK cache is not created, the session timeout value is shown as infinite when sessiontimeout is disabled.
Command History ModificationRelease
This command was introduced in a release earlier than Release 7.6.7.6
The following example shows how to configure the client timeout to 6000 seconds for WLAN ID1:
(Cisco Controller) >config wlan session-timeout 1 6000
config wlan user-idle-thresholdTo configure the threshold data sent by the client during the idle timeout for client sessions for a WLAN, usethe config wlan user-idle-threshold command.
config wlan user-idle-threshold bytes wlan_id
Syntax Description Threshold data sent by the client during the idle timeout for the client session for a WLAN. If theclient send traffic less than the defined threshold, the client is removed on timeout. The range isfrom 0 to 10000000 bytes.
bytes
Wireless LAN identifier between 1 and 512.wlan_id
CLI Commands636
CLI Commandsconfig wlan user-idle-threshold

Command Default The default timeout for threshold data sent by client during the idle timeout is 0 bytes.
Command History ModificationRelease
This command was introduced in a release earlier than Release 7.6.7.6
The following example shows how to configure the threshold data sent by the client during the idletimeout for client sessions for a WLAN:(Cisco Controller) >config wlan user-idle-threshold 100 1
config wlan usertimeoutTo configure the timeout for idle client sessions for a WLAN, use the config wlan usertimeout command.
config wlan usertimeout timeout wlan_id
Syntax Description Timeout for idle client sessions for a WLAN. If the client sends traffic less than the threshold,the client is removed on timeout. The range is from 15 to 100000 seconds.
timeout
Wireless LAN identifier between 1 and 512.wlan_id
Command Default The default client session idle timeout is 300 seconds.
Command History ModificationRelease
This command was introduced in a release earlier than Release 7.6.7.6
Usage Guidelines The timeout value that you configure here overrides the global timeout that you define using the commandconfig network usertimeout.
The following example shows how to configure the idle client sessions for a WLAN:(Cisco Controller) >config wlan usertimeout 100 1
config wlan webauth-excludeTo release the guest user IP address when the web authentication policy time expires and exclude the guestuser from acquiring an IP address for three minutes, use the config wlan webauth-exclude command.
config wlan webauth-exclude wlan_id {enable | disable}
Syntax Description Wireless LAN identifier (1 to 512).wlan_id
Enables web authentication exclusion.enable
Disables web authentication exclusion.disable
Command Default Disabled.
CLI Commands637
CLI Commandsconfig wlan usertimeout

Command History ModificationRelease
This command was introduced in a release earlier than Release 7.6.7.6
Usage Guidelines You can use this command for guest WLANs that are configured with web authentication.
This command is applicable when you configure the internal DHCP scope on the controller.
By default, when the web authentication timer expires for a guest user, the guest user can immediatelyreassociate with the same IP address before another guest user can acquire the IP address. If there are manyguest users or limited IP address in the DHCP pool, some guest users might not be able to acquire an IPaddress.
When you enable this feature on the guest WLAN, the guest user’s IP address is released when the webauthentication policy time expires and the guest user is excluded from acquiring an IP address for three minutes.The IP address is available for another guest user to use. After three minutes, the excluded guest user canreassociate and acquire an IP address, if available.
The following example shows how to enable the web authentication exclusion for WLAN ID 5:
(Cisco Controller) >config wlan webauth-exclude 5 enable
config wlan wmmTo configure Wi-Fi Multimedia (WMM) mode on a wireless LAN, use the config wlan wmm command.
config wlan wmm {allow | disable | require} wlan_id
Syntax Description Allows WMM on the wireless LAN.allow
Disables WMM on the wireless LAN.disable
Specifies that clients use WMM on the specifiedwireless LAN.
require
Wireless LAN identifier (1 to 512).wlan_id
Command Default None
Command History ModificationRelease
This command was introduced in a release earlier than Release 7.6.7.6
Usage Guidelines When the controller is in Layer 2 mode and WMM is enabled, you must put the access points on a trunk portin order to allow them to join the controller.
The following example shows how to configure wireless LAN ID 1 to allow WMM:
(Cisco Controller) >config wlan wmm allow 1
The following example shows how to configure wireless LAN ID 1 to specify that clients useWMM:
CLI Commands638
CLI Commandsconfig wlan wmm

(Cisco Controller) >config wlan wmm require 1
Configure Wireless LAN HotSpot CommandsUse the config wlan hotspot commands to configure HotSpot and 802.11u parameters on a WLAN.
config wlan hotspotTo configure a HotSpot on a WLAN, use the config wlan hotspot command.
config wlan hotspot {clear-all wlan_id | dot11u | hs2 | msap}
Syntax Description Clears the HotSpot configurations on a WLAN.clear-all
Wireless LAN identifier from 1 to 512.wlan_id
Configures an 802.11u HotSpot on a WLAN.dot11u
Configures HotSpot2 on a WLAN.hs2
Configures theMobility Services Advertisement Protocol (MSAP) on aWLAN.msap
Command Default None
Command History ModificationRelease
This command was introduced in a release earlier than Release 7.6.7.6
Usage Guidelines You can configure up to 32 HotSpot WLANs.
The following example shows how to configure HotSpot2 for a WLAN:(Cisco Controller) >config wlan hotspot hs2 enable 2
config wlan hotspot dot11uTo configure an 802.11u HotSpot on a WLAN, use the config wlan hotspot dot11u command.
config wlan hotspot dot11u {3gpp-info | auth-type | enable | disable | domain | hessid |ipaddr-type | nai-realm | network-type | roam-oi}
Syntax Description Configures 3GPP cellular network information.3gpp-info
Configures the network authentication type.auth-type
Disables 802.11u on the HotSpot profile.disable
Configures a domain.domain
CLI Commands639
CLI CommandsConfigure Wireless LAN HotSpot Commands

Enables 802.11u on the HotSpot profile. IEEE 802.11u enables automatic WLAN offloadfor 802.1X devices at the HotSpot of mobile or roaming partners.
enable
Configures the Homogenous Extended Service Set Identifier (HESSID). The HESSID is a6-octet MAC address that uniquely identifies the network.
hessid
Configures the IPv4 address availability type.ipaddr-type
Configures a realm for 802.11u enabled WLANs.nai-realm
Configures the 802.11u network type and Internet access.network-type
Configures the roaming consortium Organizational Identifier (OI) list.roam-oi
Command Default None.
Command History ModificationRelease
This command was introduced in a release earlier than Release 7.6.7.6
This command supports only IPv4 address format.8.0
The following example shows how to enable 802.11u on a HotSpot profile:(Cisco Controller) >config wlan hotspot dot11u enable 6
config wlan hotspot dot11u 3gpp-infoTo configure 3GPP cellular network information on an 802.11u HotSpotWLAN, use the config wlan hotspotdot11u 3gpp-info command.
config wlan hotspot dot11u 3gpp-info {add | delete} index country_code network_code wlan_id
Syntax Description Adds mobile cellular network information.add
Deletes mobile cellular network information.delete
Cellular index. The range is from 1 to 32.index
Mobile Country Code (MCC) in Binary Coded Decimal (BCD) format. The country codecan be up to 3 characters. For example, the MCC for USA is 310.
country_code
Mobile Network Code (MNC) in BCD format. An MNC is used in combination with aMobile Country Code (MCC) to uniquely identify a mobile phone operator or carrier. Thenetwork code can be up to 3 characters. For example, the MNC for T- Mobile is 026.
network_code
Wireless LAN identifier between 1 and 512.wlan_id
Command Default None
CLI Commands640
CLI Commandsconfig wlan hotspot dot11u 3gpp-info
Command History ModificationRelease
This command was introduced in a release earlier than Release 7.6.7.6
Usage Guidelines Number of mobile network codes supported is 32 per WLAN.
The following example shows how to configure 3GPP cellular network information on a WLAN:(Cisco Controller) >config wlan hotspot dot11u 3gpp-info add
config wlan hotspot dot11u auth-typeTo configure the network authentication type on an 802.11u HotSpot WLAN, use the config wlan hotspotdot11u auth-type command.
config wlan hotspot dot11u auth-type network-auth wlan_id
Syntax Description Network authentication that you would like to configure on theWLAN. The available valuesare as follows:
• 0—Acceptance of terms and conditions
• 1—On-line enrollment
• 2—HTTP/HTTPS redirection
• 3—DNS Redirection
• 4—Not Applicable
network-auth
Wireless LAN identifier between 1 and 512.wlan_id
Command Default None
Command History ModificationRelease
This command was introduced in a release earlier than Release 7.6.7.6
Usage Guidelines The DNS redirection option is not supported in Release 7.3.
The following example shows how to configure HTTP/HTTPS redirection as the networkauthentication type on an 802.11u HotSpot WLAN:(Cisco Controller) >config wlan hotspot dot11u auth-type 2 1
config wlan hotspot dot11u disableTo disable an 802.11u HotSpot on a WLAN, use the config wlan hotspot dot11u disable command.
config wlan hotspot dot11u disable wlan_id
Syntax Description Wireless LAN identifier between 1 and 512.wlan_id
CLI Commands641
CLI Commandsconfig wlan hotspot dot11u auth-type

Command Default None
Command History ModificationRelease
This command was introduced in a release earlier than Release 7.6.7.6
The following example shows how to disable an 802.11u HotSpot on a WLAN:(Cisco Controller) >config wlan hotspot dot11u disable 6
config wlan hotspot dot11u domainTo configure a domain operating in the 802.11 access network, use the config wlan hotspot dot11u domaincommand.
config wlan hotspot dot11u domain {add wlan_id domain-index domain_name | delete wlan_iddomain-index | modify wlan_id domain-index domain_name}
Syntax Description Adds a domain.add
Wireless LAN identifier between 1 and 512.wlan_id
Domain index in the range 1 to 32.domain-index
Domain name. The domain name is case sensitive and can be up to 255 alphanumericcharacters.
domain_name
Deletes a domain.delete
Modifies a domain.modify
Command Default None
Command History ModificationRelease
This command was introduced in a release earlier than Release 7.6.7.6
The following example shows how to add a domain in the 802.11 access network:(Cisco Controller) >config wlan hotspot dot11u domain add 6 30 domain1
config wlan hotspot dot11u enableTo enable an 802.11u HotSpot on a WLAN, use the config wlan hotspot dot11u enable command.
config wlan hotspot dot11u enable wlan_id
Syntax Description Wireless LAN identifier between 1 and 512.wlan_id
Command Default None
CLI Commands642
CLI Commandsconfig wlan hotspot dot11u domain
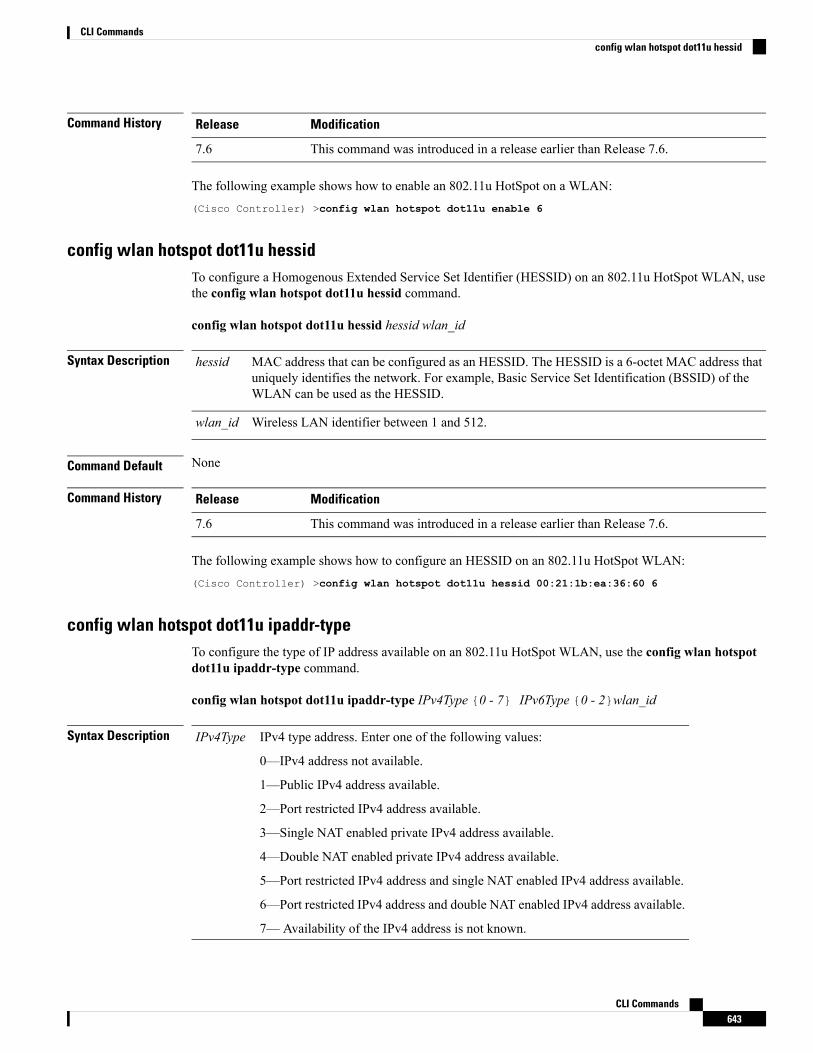
Command History ModificationRelease
This command was introduced in a release earlier than Release 7.6.7.6
The following example shows how to enable an 802.11u HotSpot on a WLAN:(Cisco Controller) >config wlan hotspot dot11u enable 6
config wlan hotspot dot11u hessidTo configure a Homogenous Extended Service Set Identifier (HESSID) on an 802.11u HotSpot WLAN, usethe config wlan hotspot dot11u hessid command.
config wlan hotspot dot11u hessid hessid wlan_id
Syntax Description MAC address that can be configured as an HESSID. The HESSID is a 6-octet MAC address thatuniquely identifies the network. For example, Basic Service Set Identification (BSSID) of theWLAN can be used as the HESSID.
hessid
Wireless LAN identifier between 1 and 512.wlan_id
Command Default None
Command History ModificationRelease
This command was introduced in a release earlier than Release 7.6.7.6
The following example shows how to configure an HESSID on an 802.11u HotSpot WLAN:(Cisco Controller) >config wlan hotspot dot11u hessid 00:21:1b:ea:36:60 6
config wlan hotspot dot11u ipaddr-typeTo configure the type of IP address available on an 802.11u HotSpot WLAN, use the config wlan hotspotdot11u ipaddr-type command.
config wlan hotspot dot11u ipaddr-type IPv4Type {0 - 7} IPv6Type {0 - 2}wlan_id
Syntax Description IPv4 type address. Enter one of the following values:
0—IPv4 address not available.
1—Public IPv4 address available.
2—Port restricted IPv4 address available.
3—Single NAT enabled private IPv4 address available.
4—Double NAT enabled private IPv4 address available.
5—Port restricted IPv4 address and single NAT enabled IPv4 address available.
6—Port restricted IPv4 address and double NAT enabled IPv4 address available.
7— Availability of the IPv4 address is not known.
IPv4Type
CLI Commands643
CLI Commandsconfig wlan hotspot dot11u hessid
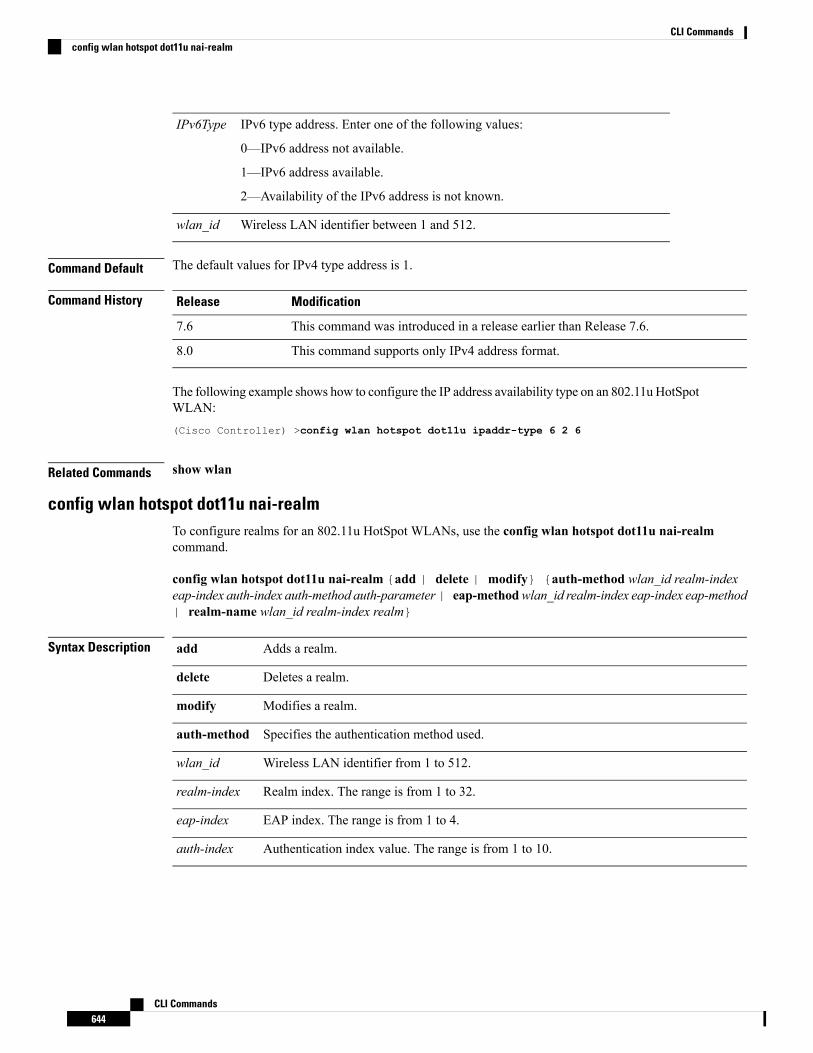
IPv6 type address. Enter one of the following values:
0—IPv6 address not available.
1—IPv6 address available.
2—Availability of the IPv6 address is not known.
IPv6Type
Wireless LAN identifier between 1 and 512.wlan_id
Command Default The default values for IPv4 type address is 1.
Command History ModificationRelease
This command was introduced in a release earlier than Release 7.6.7.6
This command supports only IPv4 address format.8.0
The following example shows how to configure the IP address availability type on an 802.11u HotSpotWLAN:(Cisco Controller) >config wlan hotspot dot11u ipaddr-type 6 2 6
Related Commands show wlan
config wlan hotspot dot11u nai-realmTo configure realms for an 802.11u HotSpot WLANs, use the config wlan hotspot dot11u nai-realmcommand.
config wlan hotspot dot11u nai-realm {add | delete | modify} {auth-method wlan_id realm-indexeap-index auth-index auth-method auth-parameter| eap-methodwlan_id realm-index eap-index eap-method| realm-name wlan_id realm-index realm}
Syntax Description Adds a realm.add
Deletes a realm.delete
Modifies a realm.modify
Specifies the authentication method used.auth-method
Wireless LAN identifier from 1 to 512.wlan_id
Realm index. The range is from 1 to 32.realm-index
EAP index. The range is from 1 to 4.eap-index
Authentication index value. The range is from 1 to 10.auth-index
CLI Commands644
CLI Commandsconfig wlan hotspot dot11u nai-realm
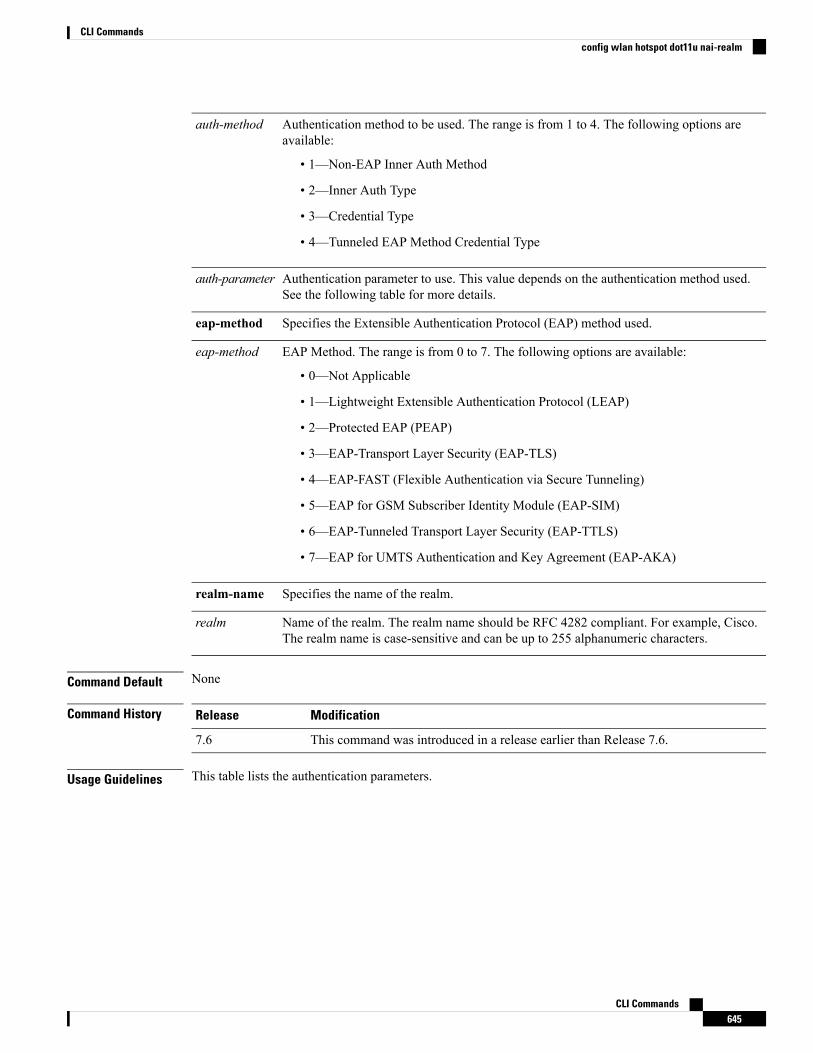
Authentication method to be used. The range is from 1 to 4. The following options areavailable:
• 1—Non-EAP Inner Auth Method
• 2—Inner Auth Type
• 3—Credential Type
• 4—Tunneled EAP Method Credential Type
auth-method
Authentication parameter to use. This value depends on the authentication method used.See the following table for more details.
auth-parameter
Specifies the Extensible Authentication Protocol (EAP) method used.eap-method
EAP Method. The range is from 0 to 7. The following options are available:
• 0—Not Applicable
• 1—Lightweight Extensible Authentication Protocol (LEAP)
• 2—Protected EAP (PEAP)
• 3—EAP-Transport Layer Security (EAP-TLS)
• 4—EAP-FAST (Flexible Authentication via Secure Tunneling)
• 5—EAP for GSM Subscriber Identity Module (EAP-SIM)
• 6—EAP-Tunneled Transport Layer Security (EAP-TTLS)
• 7—EAP for UMTS Authentication and Key Agreement (EAP-AKA)
eap-method
Specifies the name of the realm.realm-name
Name of the realm. The realm name should be RFC 4282 compliant. For example, Cisco.The realm name is case-sensitive and can be up to 255 alphanumeric characters.
realm
Command Default None
Command History ModificationRelease
This command was introduced in a release earlier than Release 7.6.7.6
Usage Guidelines This table lists the authentication parameters.
CLI Commands645
CLI Commandsconfig wlan hotspot dot11u nai-realm

Table 7: Authentication Parameters
Credential Type(3)/Tunneled EAPCredential Type(4)
Inner Authentication EAP MethodType(2)
Non-EAP Inner Method(1)
1—SIM
2—USIM
3—NFC Secure Element
4—Hardware Token
5—Soft Token
6—Certificate
7—Username/Password
8—Reserver
9—Anonymous
10—Vendor Specific
1—LEAP
2—PEAP
3—EAP-TLS
4—EAP-FAST
5—EAP-SIM
6—EAP-TTLS
7—EAP-AKA
0—Reserved
1—Password authenticationprotocol (PAP)
2—Challenge-HandshakeAuthentication Protocol (CHAP)
3—Microsoft ChallengeHandshakeAuthentication Protocol(MS-CHAP)
4—MSCHAPV2
The following example shows how to add the Tunneled EAP Method Credential authenticationmethod on WLAN 4:(Cisco Controller) >config wlan hotspot dot11u nai-realm add auth-method 4 10 3 5 4 6
config wlan hotspot dot11u network-typeTo configure the network type and internet availability on an 802.11u HotSpot WLAN, use the config wlanhotspot dot11u network-type command.
config wlan hotspot dot11u network-type wlan_id network-type internet-access
Syntax Description Wireless LAN identifier from 1 to 512.wlan_id
Network type. The available options are as follows:
• 0—Private Network
• 1—Private Network with Guest Access
• 2—Chargeable Public Network
• 3—Free Public Network
• 4—Personal Device Network
• 5—Emergency Services Only Network
• 14—Test or Experimental
• 15—Wildcard
network-type
Internet availability status. A value of zero indicates no Internet availability and 1 indicatesInternet availability.
internet-access
CLI Commands646
CLI Commandsconfig wlan hotspot dot11u network-type

Command Default None
Command History ModificationRelease
This command was introduced in a release earlier than Release 7.6.7.6
The following example shows how to configure the network type and Internet availability on an802.11u HotSpot WLAN:(Cisco Controller) >config wlan hotspot dot11u network-type 2 1
config wlan hotspot dot11u roam-oiTo configure a roaming consortium Organizational Identifier (OI) list on a 802.11u HotSpot WLAN, use theconfig wlan hotspot dot11u roam-oi command.
config wlan hotspot dot11u roam-oi {add wlan_id oi-index oi is-beacon | modify wlan_id oi-index oiis-beacon | delete wlan_id oi-index}
Syntax Description Adds an OI.add
Wireless LAN identifier from 1 to 512.wlan-id
Index in the range 1 to 32.oi-index
Number that must be a valid 6 digit hexadecimal number and 6 bytes in length. For example,004096 or AABBDF.
oi
Beacon flag used to add an OI to the beacon. 0 indicates disable and 1 indicates enable. Youcan add a maximum of 3 OIs for a WLAN with this flag set.
is-beacon
Modifies an OI.modify
Deletes an OI.delete
Command Default None.
Command History ModificationRelease
This command was introduced in a release earlier than Release 7.6.7.6
The following example shows how to configure the roaming consortium OI list:(Cisco Controller) >config wlan hotspot dot11u roam-oi add 4 10 004096 1
config wlan hotspot hs2To configure the HotSpot2 parameters, use the config wlan hotspot hs2 command.
config wlan hotspot hs2 {disable wlan_id | enable wlan_id | operator-name {add wlan_id indexoperator_name language-code | delete wlan_id index | modify wlan_id index operator-namelanguage-code} | port-config {addwlan_id port_config_index ip-protocol port-number status | delete
CLI Commands647
CLI Commandsconfig wlan hotspot dot11u roam-oi

wlan_id port-config-index | modify wlan_id port-config-index ip-protocol port-number status} |wan-metrics wlan_id link-status symet-link downlink-speed uplink-speed }
Syntax Description Disables HotSpot2.disable
Wireless LAN identifier from 1 to 512.wlan-id
Enables HotSpot2.enable
Specifies the name of the 802.11 operator.operator-name
Adds the operator name, port configuration, or WANmetrics parameters to the WLAN configuration.
add
Index of the operator. The range is from 1 to 32.index
Name of the operator.operator-name
Language used. An ISO-14962-1997 encoded stringthat defines the language. This string is a threecharacter language code. Enter the first three lettersof the language in English. For example, eng forEnglish.
language-code
Deletes the operator name, port configuration, orWAN metrics parameters from the WLAN.
delete
Modifies the operator name, port configuration, orWAN metrics parameters of the WLAN.
modify
Configures the port configuration values.port-config
Port configuration index. The range is from 1 to 32.The default value is 1.
port_config_index
Protocol to use. This parameter provides informationon the connection status of the most commonly usedcommunication protocols and ports. The followingoptions are available:
1—ICMP
6—FTP/SSH/TLS/PPTP-VPN/VoIP
17—IKEv2 (IPSec-VPN/VoIP/ESP)
50—ESP (IPSec-VPN)
ip-protocol
CLI Commands648
CLI Commandsconfig wlan hotspot hs2
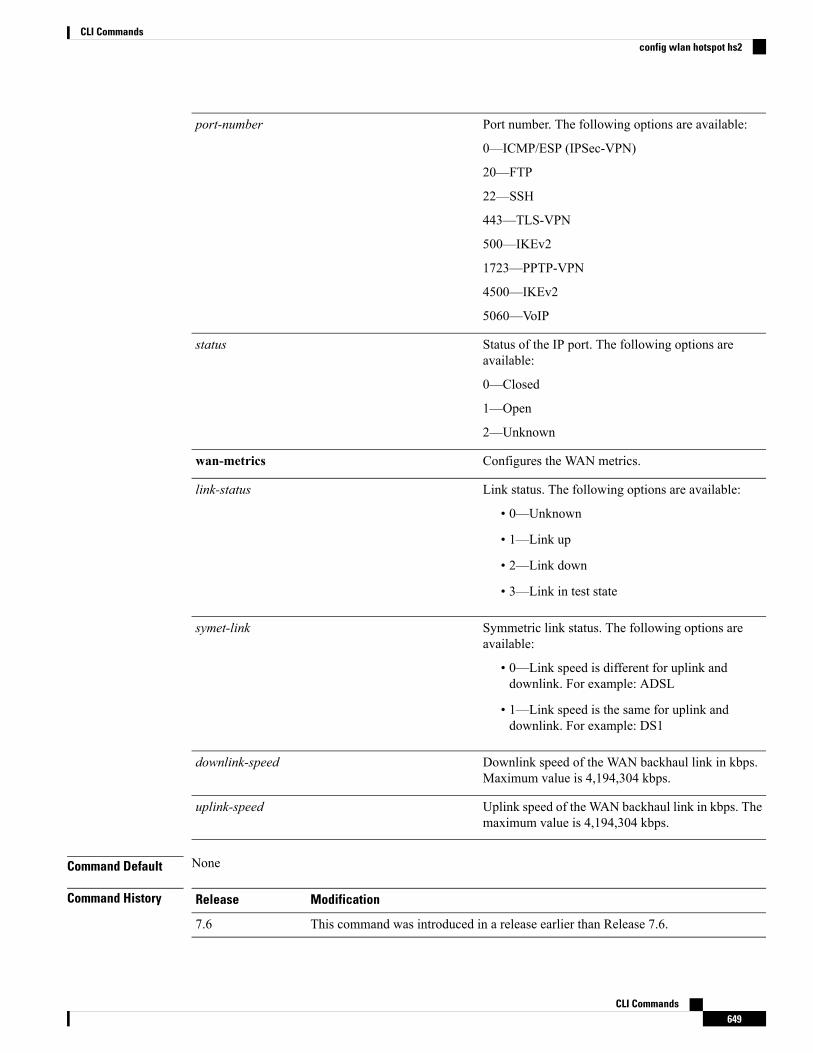
Port number. The following options are available:
0—ICMP/ESP (IPSec-VPN)
20—FTP
22—SSH
443—TLS-VPN
500—IKEv2
1723—PPTP-VPN
4500—IKEv2
5060—VoIP
port-number
Status of the IP port. The following options areavailable:
0—Closed
1—Open
2—Unknown
status
Configures the WAN metrics.wan-metrics
Link status. The following options are available:
• 0—Unknown
• 1—Link up
• 2—Link down
• 3—Link in test state
link-status
Symmetric link status. The following options areavailable:
• 0—Link speed is different for uplink anddownlink. For example: ADSL
• 1—Link speed is the same for uplink anddownlink. For example: DS1
symet-link
Downlink speed of the WAN backhaul link in kbps.Maximum value is 4,194,304 kbps.
downlink-speed
Uplink speed of the WAN backhaul link in kbps. Themaximum value is 4,194,304 kbps.
uplink-speed
Command Default None
Command History ModificationRelease
This command was introduced in a release earlier than Release 7.6.7.6
CLI Commands649
CLI Commandsconfig wlan hotspot hs2

The following example shows how to configure the WAN metrics parameters:(Cisco Controller) >config wlan hotspot hs2 wan-metrics add 345 1 0 3333
config wlan hotspot msapTo configure the Mobility Service Advertisement Protocol (MSAP) parameters on a WLAN, use the configwlan hotspot msap command.
config wlan hotspot msap {enable | disable | server-id server_id} wlan_id
Syntax Description Enables MSAP on the WLAN.enable
Disables MSAP on the WLAN.disable
Specifies the MSAP server id.server-id
MSAP server ID. The range is from 1 to 10.server_id
Wireless LAN identifier from 1 to 512.wlan_id
Command Default None
Command History ModificationRelease
This command was introduced in a release earlier than Release 7.6.7.6
The following example shows how to enable MSAP on a WLAN:(Cisco Controller) >config wlan hotspot msap enable 4
Configure Wireless LAN Security CommandsUse the config wlan security commands to configure wireless LAN security settings.
config wlan security 802.1XTo change the state of 802.1X security on the wireless LANCisco radios, use the config wlan security 802.1Xcommand.
config wlan security 802.1X {enable {wlan_id | foreignAp} | disable {wlan_id | foreignAp}| encryption {wlan_id | foreignAp} {0 | 40 | 104} | on-macfilter-failure{enable| disable}}
Syntax Description Enables the 802.1X settings.enable
Wireless LAN identifier between 1 and 512.wlan_id
Specifies third-party access points.foreignAp
Disables the 802.1X settings.disable
CLI Commands650
CLI Commandsconfig wlan hotspot msap
Specifies the static WEP keys and indexes.encryption
Specifies a WEP key size of 0 (no encryption) bits.The default value is 104.
All keys within a wireless LAN must bethe same size.
Note
0
Specifies aWEP key size of 40 bits. The default valueis 104.
All keys within a wireless LAN must bethe same size.
Note
40
Specifies a WEP key size of 104 bits. The defaultvalue is 104.
All keys within a wireless LAN must bethe same size.
Note
104
Configures 802.1X on MAC filter failure.on-macfilter-failure
Enables 802.1X authentication onMAC filter failure.enable
Disables 802.1X authentication onMAC filter failure.disable
Command Default None
Command History ModificationRelease
This command was introduced in a release earlier than Release 7.6.7.6
Usage Guidelines To change the encryption level of 802.1X security on the wireless LAN Cisco radios, use the following keysizes:
• 0—no 802.1X encryption.
• 40—40/64-bit encryption.
• 104—104/128-bit encryption. (This is the default encryption setting.)
The following example shows how to configure 802.1X security on WLAN ID 16.
(Cisco Controller) >config wlan security 802.1X enable 16
config wlan security ckipTo configure Cisco Key Integrity Protocol (CKIP) security options for the wireless LAN, use the config wlansecurity ckip command.
CLI Commands651
CLI Commandsconfig wlan security ckip

config wlan security ckip {enable | disable} wlan_id [akm psk set-key {hex | ascii} {40 |104} key key_index wlan_id | mmh-mic {enable | disable} wlan_id | kp {enable | disable}wlan_id]
Syntax Description Enables CKIP security.enable
Disables CKIP security.disable
Wireless LAN identifier from 1 to 512.wlan_id
(Optional) Configures encryption key managementfor the CKIP wireless LAN.
akm psk set-key
Specifies a hexadecimal encryption key.hex
Specifies an ASCII encryption key.ascii
Sets the static encryption key length to 40 bits for theCKIPWLAN. 40-bit keys must contain 5 ASCII textcharacters or 10 hexadecimal characters.
40
Sets the static encryption key length to 104 bits forthe CKIPWLAN. 104-bit keysmust contain 13ASCIItext characters or 26 hexadecimal characters.
104
Specifies the CKIP WLAN key settings.key
Configured PSK key index.key_index
(Optional) Configures multi-modular hash messageintegrity check (MMHMIC) validation for the CKIPwireless LAN.
mmh-mic
(Optional) Configures key-permutation for the CKIPwireless LAN.
kp
Command Default None
Command History ModificationRelease
This command was introduced in a release earlier than Release 7.6.7.6
The following example shows how to configure a CKIP WLAN encryption key of 104 bits (26hexadecimal characters) for PSK key index 2 on WLAN 03:
(Cisco Controller) >config wlan security ckip akm psk set-key hex 104 key 2 03
config wlan security cond-web-redirTo enable or disable conditional web redirect, use the config wlan security cond-web-redir command.
config wlan security cond-web-redir {enable | disable} wlan_id
CLI Commands652
CLI Commandsconfig wlan security cond-web-redir

Syntax Description Enables conditional web redirect.enable
Disables conditional web redirect.disable
Wireless LAN identifier between 1 and 512.wlan_id
Command Default None
Command History ModificationRelease
This command was introduced in a release earlier than Release 7.6.7.6
The following example shows how to enable the conditional web direct on WLAN ID 2:
(Cisco Controller) >config wlan security cond-web-redir enable 2
config wlan security eap-passthruTo configure the 802.1X frames pass through on to the external authenticator, use the config wlan securityeap-passthru command.
config wlan security eap-passthru {enable | disable} wlan_id
Syntax Description Enables 802.1X frames pass through to externalauthenticator.
enable
Disables 802.1X frames pass through to externalauthenticator.
disable
Wireless LAN identifier between 1 and 512.wlan_id
Command Default None
Command History ModificationRelease
This command was introduced in a release earlier than Release 7.6.7.6
The following example shows how to enable the 802.1X frames pass through to external authenticatoron WLAN ID 2:
(Cisco Controller) >config wlan security eap-passthru enable 2
config wlan security ftTo configure 802.11r Fast Transition Roaming parameters, use the config wlan security ft command.
config wlan security ft {enable | disable | reassociation-timeout timeout-in-seconds} wlan_id
Syntax Description
CLI Commands653
CLI Commandsconfig wlan security eap-passthru

Enables 802.11r Fast Transition Roaming support.enable
Disables 802.11r Fast Transition Roaming support.disable
Configures reassociation deadline interval.reassociation-timeout
Reassociation timeout value, in seconds. The validrange is 1 to 100 seconds.
timeout-in-seconds
Wireless LAN identifier between 1 and 512.wlan_id
Command Default None
Command History ModificationRelease
This command was introduced in a release earlier than Release 7.6.7.6
Usage Guidelines Ensure that you have disabled the WLAN before you proceed.
The following example shows how to enable 802.11r Fast Transition Roaming support on WLAN2:
(Cisco Controller) >config wlan security ft enable 2
The following example shows how to set a reassociation timeout value of 20 seconds for 802.11rFast Transition Roaming support on WLAN 2:
(Cisco Controller) >config wlan security ft reassociation-timeout 20 2
config wlan security ft over-the-dsTo configure 802.11r fast transition parameters over a distributed system, use the config wlan security ftover-the-ds command.
config wlan security ft over-the-ds {enable | disable} wlan_id
Syntax Description Enables 802.11r fast transition roaming support overa distributed system.
enable
Disables 802.11r fast transition roaming support overa distributed system.
disable
Wireless LAN identifier between 1 and 512.wlan_id
Command Default Enabled.
Command History ModificationRelease
This command was introduced in a release earlier than Release 7.6.7.6
CLI Commands654
CLI Commandsconfig wlan security ft over-the-ds
Usage Guidelines Ensure that you have disabled the WLAN before you proceed.
Ensure that 802.11r fast transition is enabled on the WLAN.
The following example shows how to enable 802.11r fast transition roaming support over a distributedsystem on WLAN ID 2:
(Cisco Controller) >config wlan security ft over-the-ds enable 2
config wlan security IPsec disableTo disable IPsec security, use the config wlan security IPsec disable command.
config wlan security IPsec disable {wlan_id | foreignAp}
Syntax Description Wireless LAN identifier between 1 and 512.wlan_id
Specifies third-party access points.foreignAp
Command Default None
Command History ModificationRelease
This command was introduced in a release earlier than Release 7.6.7.6
The following example shows how to disable the IPsec for WLAN ID 16:
(Cisco Controller) >config wlan security IPsec disable 16
config wlan security IPsec enableTo enable IPsec security, use the config wlan security IPsec enable command.
config wlan security IPsec enable {wlan_id | foreignAp}
Syntax Description Wireless LAN identifier between 1 and 512.wlan_id
Specifies third-party access points.foreignAp
Command Default None
Command History ModificationRelease
This command was introduced in a release earlier than Release 7.6.7.6
The following example shows how to enable the IPsec for WLAN ID 16:
(Cisco Controller) >config wlan security IPsec enable 16
CLI Commands655
CLI Commandsconfig wlan security IPsec disable
config wlan security IPsec authenticationTo modify the IPsec security authentication protocol used on the wireless LAN, use the config wlan securityIPsec authentication command.
config wlan security IPsec authentication {hmac-md5 | hmac-sha-1} {wlan_id | foreignAp}
Syntax Description Specifies the IPsec HMAC-MD5 authenticationprotocol.
hmac-md5
Specifies the IPsec HMAC-SHA-1 authenticationprotocol.
hmac-sha-1
Wireless LAN identifier between 1 and 512.wlan_id
Specifies third-party access points.foreignAp
Command Default None
Command History ModificationRelease
This command was introduced in a release earlier than Release 7.6.7.6
The following example shows how to configure the IPsec HMAC-SHA-1 security authenticationparameter for WLAN ID 1:
(Cisco Controller) >config wlan security IPsec authentication hmac-sha-1 1
config wlan security IPsec encryptionTo modify the IPsec security encryption protocol used on the wireless LAN, use the config wlan securityIPsec encryption command.
config wlan security IPsec encryption {3des | aes | des} {wlan_id | foreignAp}
Syntax Description Enables IPsec 3DES encryption.3des
Enables IPsec AES 128-bit encryption.aes
Enables IPsec DES encryption.des
Wireless LAN identifier between 1 and 512.wlan_id
Specifies third-party access points.foreignAp
Command Default None
Command History ModificationRelease
This command was introduced in a release earlier than Release 7.6.7.6
CLI Commands656
CLI Commandsconfig wlan security IPsec authentication
The following example shows how to configure the IPsec AES encryption:
(Cisco Controller) >config wlan security IPsec encryption aes 1
config wlan security IPsec configTo configure the proprietary Internet Key Exchange (IKE) CFG-Mode parameters used on the wireless LAN,use the config wlan security IPsec config command.
config wlan security IPsec config qotd ip_address {wlan_id | foreignAp}
Syntax Description Configures the quote-of-the day server IP forcfg-mode.
qotd
Quote-of-the-day server IP for cfg-mode.ip_address
Wireless LAN identifier between 1 and 512.wlan_id
Specifies third-party access points.foreignAp
Command Default None
Command History ModificationRelease
This command was introduced in a release earlier than Release 7.6.7.6
Usage Guidelines IKE is used as a method of distributing the session keys (encryption and authentication), as well as providinga way for the VPN endpoints to agree on how the data should be protected. IKE keeps track of connectionsby assigning a bundle of Security Associations (SAs), to each connection.
The following example shows how to configure the quote-of-the-day server IP 44.55.66.77 forcfg-mode for WLAN 1:
(Cisco Controller) >config wlan security IPsec config qotd 44.55.66.77 1
config wlan security IPsec ike authenticationTo modify the IPsec Internet Key Exchange (IKE) authentication protocol used on the wireless LAN, use theconfig wlan security IPsec ike authentication command.
config wlan security IPsec ike authentication {certificates {wlan_id | foreignAp} | pre-share-key{wlan_id | foreignAp} key | xauth-psk {wlan_id | foreignAp} key}
Syntax Description Enables the IKE certificate mode.certificates
Wireless LAN identifier between 1 and 512.wlan_id
Specifies third-party access points.foreignAp
Enables the IKE Xauth with preshared keys.pre-share-key
CLI Commands657
CLI Commandsconfig wlan security IPsec config

Enables the IKE preshared key.xauth-psk
Key required for preshare and xauth-psk.key
Command Default None
Command History ModificationRelease
This command was introduced in a release earlier than Release 7.6.7.6
The following example shows how to configure the IKE certification mode:
(Cisco Controller) >config wlan security IPsec ike authentication certificates 16
config wlan security IPsec ike dh-groupTo modify the IPsec Internet Key Exchange (IKE) Diffie Hellman group used on the wireless LAN, use theconfig wlan security IPsec ike dh-group command.
config wlan security IPsec ike dh-group {wlan_id | foreignAp} {group-1 | group-2 | group-5}
Syntax Description Wireless LAN identifier between 1 and 512.wlan_id
Specifies third-party access points.foreignAp
Specifies DH group 1 (768 bits).group-1
Specifies DH group 2 (1024 bits).group-2
Specifies DH group 5 (1536 bits).group-5
Command Default None
Command History ModificationRelease
This command was introduced in a release earlier than Release 7.6.7.6
The following example shows how to configure the Diffe Hellman group parameter for group-1:(Cisco Controller) >config wlan security IPsec ike dh-group 1 group-1
config wlan security IPsec ike lifetimeTo modify the IPsec Internet Key Exchange (IKE) lifetime used on the wireless LAN, use the config wlansecurity IPsec ike lifetime command.
config wlan security IPsec ike lifetime {wlan_id | foreignAp} seconds
Syntax Description Wireless LAN identifier between 1 and 512.wlan_id
CLI Commands658
CLI Commandsconfig wlan security IPsec ike dh-group

Specifies third-party access points.foreignAp
IKE lifetime in seconds, between 1800 and 345600.seconds
Command Default None
Command History ModificationRelease
This command was introduced in a release earlier than Release 7.6.7.6
The following example shows how to configure the IPsec IKE lifetime use on the wireless LAN:
(Cisco Controller) >config wlan security IPsec ike lifetime 1 1900
config wlan security IPsec ike phase1Tomodify IPsec Internet Key Exchange (IKE) Phase 1 used on the wireless LAN, use the config wlan securityIPsec ike phase1 command.
config wlan security IPsec ike phase1 {aggressive | main} {wlan_id | foreignAp}
Syntax Description Enables the IKE aggressive mode.aggressive
Enables the IKE main mode.main
Wireless LAN identifier between 1 and 512.wlan_id
Specifies third-party access points.foreignAp
Command Default None
Command History ModificationRelease
This command was introduced in a release earlier than Release 7.6.7.6
The following example shows how to modify IPsec IKE Phase 1:
(Cisco Controller) >config wlan security IPsec ike phase1 aggressive 16
config wlan security IPsec ike contivityTo modify Nortel’s Contivity VPN client support on the wireless LAN, use the config wlan security IPsecike contivity command.
config wlan security IPsec ike contivity {enable | disable} {wlan_id | foreignAp}
Syntax Description Enables contivity support for this WLAN.enable
Disables contivity support for this WLAN.disable
CLI Commands659
CLI Commandsconfig wlan security IPsec ike phase1

Wireless LAN identifier between 1 and 512.wlan_id
Specifies third-party access points.foreignAp
Command Default None
Command History ModificationRelease
This command was introduced in a release earlier than Release 7.6.7.6
The following example shows how to modify Contivity VPN client support:(Cisco Controller) >config wlan security IPsec ike contivity enable 14
config wlan security passthruTomodify the IPsec pass-through used on the wireless LAN, use the config wlan security passthru command.
config wlan security passthru {enable | disable} {wlan_id | foreignAp} [ip_address]
Syntax Description Enables IPsec pass-through.enable
Disables IPsec pass-through.disable
Wireless LAN identifier between 1 and 512.wlan_id
Specifies third-party access points.foreignAp
(Optional) IP address of the IPsec gateway (router)that is terminating the VPN tunnel.
ip_address
Command Default None
Command History ModificationRelease
This command was introduced in a release earlier than Release 7.6.7.6
The following example shows how to modify IPsec pass-through used on the wireless LAN:
(Cisco Controller) >config wlan security passthru enable 3 192.12.1.1
config wlan security splash-page-web-redirTo enable or disable splash page web redirect, use the config wlan security splash-page-web-redir command.
config wlan security splash-page-web-redir {enable | disable} wlan_id
Syntax Description Enables splash page web redirect.enable
Disables splash page web redirect.disable
CLI Commands660
CLI Commandsconfig wlan security passthru

Wireless LAN identifier between 1 and 512.wlan_id
Command Default Splash page web redirect is disabled.
Command History ModificationRelease
This command was introduced in a release earlier than Release 7.6.7.6
The following example shows how to enable spash page web redirect:(Cisco Controller) >config wlan security splash-page-web-redir enable 2
config wlan security static-wep-key authenticationTo configure static Wired Equivalent Privacy (WEP) key 802.11 authentication on a wireless LAN, use theconfig wlan security static-wep-key authentication command.
config wlan security static-wep-key authentication {shared-key | open} wlan_id
Syntax Description Enables shared key authentication.shared-key
Enables open system authentication.open
Wireless LAN identifier between 1 and 512.wlan_id
Command Default None
Command History ModificationRelease
This command was introduced in a release earlier than Release 7.6.7.6
The following example shows how to enable the static WEP shared key authentication for WLANID 1:
(Cisco Controller) >config wlan security static-wep-key authentication shared-key 1
config wlan security static-wep-key disableTo disable the use of staticWired Equivalent Privacy (WEP) keys, use the config wlan security static-wep-keydisable command.
config wlan security static-wep-key disable wlan_id
Syntax Description Wireless LAN identifier between 1 and 512.wlan_id
Command Default None
CLI Commands661
CLI Commandsconfig wlan security static-wep-key authentication
Command History ModificationRelease
This command was introduced in a release earlier than Release 7.6.7.6
The following example shows how to disable the static WEP keys for WLAN ID 1:
(Cisco Controller) >config wlan security static-wep-key disable 1
config wlan security static-wep-key enableTo enable the use of staticWired Equivalent Privacy (WEP) keys, use the config wlan security static-wep-keyenable command.
config wlan security static-wep-key enable wlan_id
Syntax Description Wireless LAN identifier between 1 and 512.wlan_id
Command Default None
Command History ModificationRelease
This command was introduced in a release earlier than Release 7.6.7.6
The following example shows how to enable the use of static WEK keys for WLAN ID 1:
(Cisco Controller) >config wlan security static-wep-key enable 1
config wlan security static-wep-key encryptionTo configure the static Wired Equivalent Privacy (WEP) keys and indexes, use the config wlan securitystatic-wep-key encryption command.
config wlan security static-wep-key encryption wlan_id {40 | 104} {hex | ascii} key key-index
Syntax Description Wireless LAN identifier from 1 to 512.wlan_id
Specifies the encryption level of 40.40
Specifies the encryption level of 104.104
Specifies to use hexadecimal characters to enter key.hex
Specifies whether to use ASCII characters to enterkey.
ascii
WEP key in ASCII.key
Key index (1 to 4).key-index
CLI Commands662
CLI Commandsconfig wlan security static-wep-key enable
Command Default None
Command History ModificationRelease
This command was introduced in a release earlier than Release 7.6.7.6
Usage Guidelines One unique WEP key index can be applied to each wireless LAN. Because there are only four WEP keyindexes, only four wireless LANs can be configured for static WEP Layer 2 encryption.
Make sure to disable 802.1X before using this command.
The following example shows how to configure the static WEP keys for WLAN ID 1 that useshexadecimal character 0201702001 and key index 2:
(Cisco Controller) >config wlan security static-wep-key encryption 1 40 hex 0201702001 2
config wlan security web-authTo change the status of web authentication used on a wireless LAN, use the config wlan security web-authcommand.
config wlan security web-auth {{acl | enable | disable} {wlan_id | foreignAp} [acl_name |none]} | {on-macfilter-failurewlan_id} | {server-precedencewlan_id | local | ldap | radius}| {flexacl wlan_id [ipv4_acl_name | none]} | {ipv6 acl wlan_id [ipv6_acl_name | none]} |{mac-auth-server {ip_address wlan_id }} | {timeout {value_in_seconds wlan_id }} |{web-portal-server {ip_address wlan_id }}
Syntax Description Configures the access control list.acl
Enables web authentication.enable
Disables web authentication.disable
Wireless LAN identifier from 1 to 512.wlan_id
Specifies third-party access points.foreignAp
(Optional) ACL name (up to 32 alphanumericcharacters).
acl_name
(Optional) Specifies no ACL name.none
Enables web authentication on MAC filter failure.on-macfilter-failure
Configures the authentication server precedence orderfor Web-Auth users.
server-precendence
Specifies the server type.local
Specifies the server type.ldap
Specifies the server type.radius
CLI Commands663
CLI Commandsconfig wlan security web-auth

Configures Flexconnect Access Control List.flexacl
(Optional) IPv4 ACL name. You can enter up to 32alphanumeric characters.
ipv4_acl_name
(Optional) IPv6 ACL name. You can enter up to 32alphanumeric characters.
ipv6_acl_name
Configures IPv6 related parameters.ipv6
ConfiguresMAC authentication server for theWLAN.mac-auth-server
Configures Local Web authentication Timeout.
The CWA session timeout is fixed to 600seconds.
Note
timeout
Timeout value in seconds; valid range is between 300and 14400 seconds.
value_in_seconds
Configures CMCC web portal server for the WLAN.web-portal-server
Command Default None
Command History ModificationRelease
This command was introduced in a release earlier than Release 7.6.7.6
The following example shows how to configure the security policy for WLAN ID 1 and an ACLnamed ACL03:
(Cisco Controller) >config wlan security web-auth acl 1 ACL03
config wlan security web-passthrough aclTo add an access control list (ACL) to the wireless LAN definition, use the config wlan securityweb-passthrough acl command.
config wlan security web-passthrough acl {wlan_id | foreignAp} {acl_name | none}
Syntax Description Wireless LAN identifier between 1 and 512.wlan_id
Specifies third-party access points.foreignAp
ACL name (up to 32 alphanumeric characters).acl_name
Specifies that there is no ACL.none
Command Default None
CLI Commands664
CLI Commandsconfig wlan security web-passthrough acl

Command History ModificationRelease
This command was introduced in a release earlier than Release 7.6.7.6
The following example shows how to add an ACL to the wireless LAN definition:
(Cisco Controller) >config wlan security web-passthrough acl 1 ACL03
config wlan security web-passthrough disableTo disable a web captive portal with no authentication required on a wireless LAN, use the config wlansecurity web-passthrough disable command.
config wlan security web-passthrough disable {wlan_id | foreignAp}
Syntax Description Wireless LAN identifier between 1 and 512.wlan_id
Specifies third-party access points.foreignAp
Command Default None
Command History ModificationRelease
This command was introduced in a release earlier than Release 7.6.7.6
The following example shows how to disable a web captive portal with no authentication requiredon wireless LAN ID 1:
(Cisco Controller) >config wlan security web-passthrough disable 1
config wlan security web-passthrough email-inputTo configure a web captive portal using an e-mail address, use the config wlan security web-passthroughemail-input command.
config wlan security web-passthrough email-input {enable | disable} {wlan_id | foreignAp}
Syntax Description Configures a web captive portal using an e-mailaddress.
email-input
Enables a web captive portal using an e-mail address.enable
Disables a web captive portal using an e-mail address.disable
Wireless LAN identifier between 1 and 512.wlan_id
Specifies third-party access points.foreignAp
Command Default None
CLI Commands665
CLI Commandsconfig wlan security web-passthrough disable

Command History ModificationRelease
This command was introduced in a release earlier than Release 7.6.7.6
The following example shows how to configure a web captive portal using an e-mail address:
(Cisco Controller) >config wlan security web-passthrough email-input enable 1
config wlan security web-passthrough enableTo enable a web captive portal with no authentication required on the wireless LAN, use the config wlansecurity web-passthrough enable command.
config wlan security web-passthrough enable {wlan_id | foreignAp}
Syntax Description Wireless LAN identifier between 1 and 512.wlan_id
Specifies third-party access points.foreignAp
Command Default None
Command History ModificationRelease
This command was introduced in a release earlier than Release 7.6.7.6
The following example shows how to enable a web captive portal with no authentication requiredon wireless LAN ID 1:
(Cisco Controller) >config wlan security web-passthrough enable 1
config wlan security wpa akm 802.1xTo configure authentication key-management (AKM) using 802.1X, use the config wlan security wpa akm802.1x command.
config wlan security wpa akm 802.1x {enable | disable} wlan_id
Syntax Description Enables the 802.1X support.enable
Disables the 802.1X support.disable
Wireless LAN identifier from 1 to 512.wlan_id
Command Default None
Command History ModificationRelease
This command was introduced in a release earlier than Release 7.6.7.6
CLI Commands666
CLI Commandsconfig wlan security web-passthrough enable

The following example shows how to configure authentication using 802.1X.
(Cisco Controller) >config wlan security wpa akm 802.1x enable 1
config wlan security wpa akm cckmTo configure authentication key-management using Cisco Centralized Key Management (CCKM), use theconfig wlan security wpa akm cckm command.
config wlan security wpa akm cckm {enable wlan_id | disable wlan_id | timestamp-tolerance }
Syntax Description Enables CCKM support.enable
Disables CCKM support.disable
Wireless LAN identifier between 1 and 512.wlan_id
CCKM IE time-stamp tolerance. The range is between1000 to 5000 milliseconds; the default is 1000milliseconds.
timestamp-tolerance
Command Default None
Command History ModificationRelease
This command was introduced in a release earlier than Release 7.6.7.6
The following example shows how to configure authentication key-management using CCKM.
(Cisco Controller) >config wlan security wpa akm cckm 1500
config wlan security wpa akm ftTo configure authentication key-management using 802.11r fast transition 802.1X, use the config wlansecurity wpa akm ft command.
configwlan securitywpa akm ft[over-the-air | over-the-ds| psk | [reassociation-timeout seconds]]{enable | disable} wlan_id
Syntax Description (Optional) Configures 802.11r fast transition roamingover-the-air support.
over-the-air
(Optional) Configures 802.11r fast transition roamingDS support.
over-the-ds
(Optional) Configures 802.11r fast transition PSKsupport.
psk
CLI Commands667
CLI Commandsconfig wlan security wpa akm cckm

(Optional) Configures the reassociation deadlineinterval.
The valid range is between 1 to 100 seconds. Thedefault value is 20 seconds.
reassociation-timeout
Reassociation deadline interval in seconds.seconds
Enables 802.11r fast transition 802.1X support.enable
Disables 802.11r fast transition 802.1X support.disable
Wireless LAN identifier between 1 and 512.wlan_id
Command Default None
Command History ModificationRelease
This command was introduced in a release earlier than Release 7.6.7.6
The following example shows how to configure authentication key-management using 802.11r fasttransition:
(Cisco Controller) >config wlan security wpa akm ft reassociation-timeout 25 1
config wlan security wpa akm pskTo configure the Wi-Fi protected access (WPA) preshared key mode, use the config wlan security wpa akmpsk command.
config wlan security wpa akm psk {enable | disable | set-key key-format key} wlan_id
Syntax Description Enables WPA-PSK.enable
Disables WPA-PSK.disable
Configures a preshared key.set-key
Specifies key format. Either ASCII or hexadecimal.key-format
WPA preshared key.key
Wireless LAN identifier between 1 and 512.wlan_id
Command Default None
Command History ModificationRelease
This command was introduced in a release earlier than Release 7.6.7.6
The following example shows how to configure the WPA preshared key mode:
CLI Commands668
CLI Commandsconfig wlan security wpa akm psk

(Cisco Controller) >config wlan security wpa akm psk disable 1
config wlan security wpa disableTo disable WPA1, use the config wlan security wpa disable command.
config wlan security wpa disable wlan_id
Syntax Description Wireless LAN identifier between 1 and 512.wlan_id
Command Default None
Command History ModificationRelease
This command was introduced in a release earlier than Release 7.6.7.6
The following example shows how to disable WPA:
(Cisco Controller) >config wlan security wpa disable 1
config wlan security wpa enableTo enable WPA1, use the config wlan security wpa enable command.
config wlan security wpa enable wlan_id
Syntax Description Wireless LAN identifier between 1 and 512.wlan_id
Command Default None
Command History ModificationRelease
This command was introduced in a release earlier than Release 7.6.7.6
The following example shows how to configure the WPA on WLAN ID 1:
(Cisco Controller) >config wlan security wpa enable 1
config wlan security wpa ciphersTo configure the Wi-Fi protected authentication (WPA1) or Wi-Fi protected authentication (WPA2), use theconfig wlan security wpa ciphers command.
config wlan security wpa {wpa1 | wpa2} ciphers {aes | tkip} {enable | disable} wlan_id
Syntax Description Configures WPA1 support.wpa1
CLI Commands669
CLI Commandsconfig wlan security wpa disable

Configures WPA2 support.wpa2
Configures WPA ciphers.ciphers
Configures AES encryption support.aes
Configures TKIP encryption support.tkip
Enables WPA AES/TKIP mode.enable
Disables WPA AES/TKIP mode.disable
Wireless LAN identifier between 1 and 512.wlan_id
Command Default None
Command History ModificationRelease
This command was introduced in a release earlier than Release 7.6.7.6
Usage Guidelines If you are not specifying the WPA versions, it implies the following:
• If the cipher enabled is AES, you are configuring WPA2/AES.
• If the ciphers enabled is AES+TKIP, you are configuring WPA/TKIP, WPA2/AES,or WPA/TKIP.
• If the cipher enabled is TKIP, you are configuring WPA/TKIP or WPA2/TKIP.
The following example shows how to encrypt the WPA:
(Cisco Controller) >config wlan security wpa wpa1 ciphers aes enable 1
config wlan security wpa gtk-randomTo enable the randomization of group temporal keys (GTK) between access points and clients on a WLAN,use the config wlan security wpa gtk-random command.
config wlan security wpa gtk-random {enable | disable} wlan_id
Syntax Description Enables the randomization of GTK keys between the access point and clients.enable
Disables the randomization of GTK keys between the access point and clients.disable
WLAN identifier between 1 and 512.wlan_id
Command Default None
Command History ModificationRelease
This command was introduced in a release earlier than Release 7.6.7.6
CLI Commands670
CLI Commandsconfig wlan security wpa gtk-random
Usage Guidelines When you enable this command, the clients in the Basic Service Set (BSS) get a unique GTK key. The clientsdo not receive multicast or broadcast traffic.
The following example shows how to enable the GTK randomization for each client associated ona WLAN:(Cisco Controller) >config wlan security wpa gtk-random enable 3
config wlan security wpa wpa1 disableTo disable WPA1, use the config wlan security wpa wpa1 disable command.
config wlan security wpa wpa1 disable wlan_id
Syntax Description Wireless LAN identifier between 1 and 512.wlan_id
Command Default None
Command History ModificationRelease
This command was introduced in a release earlier than Release 7.6.7.6
The following example shows how to disable WPA1:
(Cisco Controller) >config wlan security wpa wpa1 disable 1
config wlan security wpa wpa1 enableTo enable WPA1, use the config wlan security wpa wpa1 enable command.
config wlan security wpa wpa1 enable wlan_id
Syntax Description Wireless LAN identifier between 1 and 512.wlan_id
Command Default None
Command History ModificationRelease
This command was introduced in a release earlier than Release 7.6.7.6
The following example shows how to enable WPA1:
(Cisco Controller) >config wlan security wpa wpa1 enable 1
config wlan security wpa wpa2 disableTo disable WPA2, use the config wlan security wpa wpa2 disable command.
config wlan security wpa wpa2 disable wlan_id
CLI Commands671
CLI Commandsconfig wlan security wpa wpa1 disable

Syntax Description Wireless LAN identifier between 1 and 512.wlan_id
Command Default None
Command History ModificationRelease
This command was introduced in a release earlier than Release 7.6.7.6
The following example shows how to disable WPA2:
(Cisco Controller) >config wlan security wpa wpa2 disable 1
config wlan security wpa wpa2 enableTo enable WPA2, use the config wlan security wpa wpa2 enable command.
config wlan security wpa wpa2 enable wlan_id
Syntax Description Wireless LAN identifier between 1 and 512.wlan_id
Command Default None
Command History ModificationRelease
This command was introduced in a release earlier than Release 7.6.7.6
The following example shows how to enable WPA2:
(Cisco Controller) >config wlan security wpa wpa2 enable 1
config wlan security wpa wpa2 cache stickyTo configure Sticky PMKID Caching (SKC) on a WLAN, use the config wlan security wpa wpa2 cachesticky command.
config wlan security wpa wpa2 cache sticky {enable |disable} wlan_id
Syntax Description Enables SKC on a WLAN.enable
Disables SKC on a WLAN.disable
Wireless LAN identifier between 1 and 512 (inclusive).wlan_id
Command Default Stkcky PMKID Caching is disabled.
Command History ModificationRelease
This command was introduced in a release earlier than Release 7.6.7.6
CLI Commands672
CLI Commandsconfig wlan security wpa wpa2 enable

Usage Guidelines Beginning in Release 7.2 and later releases, the controller supports Sticky PMKID Caching (SKC). Withsticky PMKID caching, the client receives and stores a different PMKID for every AP it associates with. TheAPs also maintain a database of the PMKID issued to the client. In SKC also known as PKC (Pro Active Keycaching), the client stores each Pairwise Master Key (PMK) ID (PMKID) against a Pairwise Master KeySecurity Association (PMKSA). When a client finds an AP for which it has the PMKSA, it sends the PMKIDin the association request to the AP. If the PMKSA is alive in the AP, the AP provides support for fast roaming.In SKC, full authentication is done on each new AP to which the client associates and the client must keepthe PMKSA associated with all APs. For SKC, PMKSA is a per AP cache that the client stores and PMKSAis precalculated based on the BSSID of the new AP.
• You cannot use SKC for large scale deployments as the controller supports SKC only up to eight APs.• SKC does not work across controllers in a mobility group.• SKC works only on WPA2-enabled WLANs.• SKC works only on local mode APs.
The following example shows how to enable Sticky PMKID Caching on WLAN 5:(Cisco Controller) >config wlan security wpa wpa2 cache sticky enable 5
Configure Wireless LAN Proxy Mobility IPv6 (PMIPv6) CommandsUse the config wlan pmipv6 commands to configure PMIPv6 on WLANs.
config wlan pmipv6 default-realmTo configure a default realm for a PMIPv6 WLAN, use the config wlan pmipv6 default-realm command.
config wlan pmipv6 default-realm { default-realm-name | none } wlan_id
Syntax Description Default realm name for the WLAN.default-realm-name
Clears the realm name for the WLAN.none
Wireless LAN identifier between 1 and 512.wlan_id
Command Default None.
Command History ModificationRelease
This command was introduced in a release earlier than Release 7.6.7.6
The following example shows how to configure a default realm name on a PMIPv6 WLAN:(Cisco Controller) >config wlan pmipv6 default-realm XYZ 6
config wlan pmipv6 mobility-typeTo configure the mobility type on a WLAN, use the config wlan pmipv6 mobility-type command.
config wlan pmipv6 mobility-type {none | pmipv6 } { wlan_id | all }
CLI Commands673
CLI CommandsConfigure Wireless LAN Proxy Mobility IPv6 (PMIPv6) Commands

Syntax Description Configures a WLAN with Simple IP mobility.none
Configures a WLAN with PMIPv6 mobility.pmipv6
Enables the specified type of mobility for all WLANs.all
WLAN identifier between 1 and 512.wlan_id
Command Default None
Command History ModificationRelease
This command was introduced in a release earlier than Release 7.6.7.6
Usage Guidelines You must disable the WLAN when you configure the mobility type.
The following example shows how to configure the mobility type as PMIPv6 on a WLAN:(Cisco Controller) >config wlan pmipv6 mobility-type pmipv6 16
config wlan pmipv6 profile_nameTo configure a profile name for the PMIPv6 WLAN, use the config wlan pmipv6 profile_name command.
config wlan pmipv6 profile_name profile_name wlan_id
Syntax Description Profile name for the PMIPv6 WLAN.profile_name
Wireless LAN identifier from 1 to 512.wlan_id
Command Default None
Command History ModificationRelease
This command was introduced in a release earlier than Release 7.6.7.6
Usage Guidelines This command binds a profile name to the PMIPv6 WLAN or SSID. Each time that a mobile node associateswith the controller, it uses the profile name and NAI in the trigger to the PMIPV6 module. The PMIPV6module extracts all the profile specific parameters such as LMA IP, APN, and NAI and sends the PBU to theASR5K.
The following example shows how to create a profile named ABC01 on a PMIPv6 WLAN:(Cisco Controller) >config wlan pmipv6 profile_name ABC01 16
Configure WPS CommandsUse the config wps commands to configure Wireless Protection System (WPS) settings.
CLI Commands674
CLI Commandsconfig wlan pmipv6 profile_name
config wps ap-authenticationTo configure access point neighbor authentication, use the config wps ap-authentication command.
config wps ap-authentication [enable | disable threshold threshold_value]
Syntax Description (Optional) Enables WMM on the wireless LAN.enable
(Optional) Disables WMM on the wireless LAN.disable
(Optional) Specifies that WMM-enabled clients areon the wireless LAN.
threshold
Threshold value (1 to 255).threshold_value
Command Default None
Command History ModificationRelease
This commandwas introduced in a release earlier thanRelease 7.6.
7.6
The following example shows how to configure the access point neighbor authentication:
(Cisco Controller) > config wps ap-authentication threshold 25
Related Commands show wps ap-authentication summary
config wps auto-immuneTo enable or disable protection from Denial of Service (DoS) attacks, use the config wps auto-immunecommand.
config wps auto-immune {enable | disable | stop}
Syntax Description Enables the auto-immune feature.enable
Disables the auto-immune feature.disable
Stops dynamic auto-immune feature.stop
Command Default Disabled
Command History ModificationRelease
This commandwas introduced in a release earlier thanRelease 7.6.
7.6
Usage Guidelines A potential attacker can use specially crafted packets to mislead the Intrusion Detection System (IDS) intotreating a legitimate client as an attacker. It causes the controller to disconnect this legitimate client and launch
CLI Commands675
CLI Commandsconfig wps ap-authentication
a DoS attack. The auto-immune feature, when enabled, is designed to protect against such attacks. However,conversations using Cisco 792x phones might be interrupted intermittently when the auto-immune feature isenabled. If you experience frequent disruptions when using 792x phones, you might want to disable thisfeature.
The following example shows how to configure the auto-immune mode:
(Cisco Controller) > config wps auto-immune enable
The following example shows how to stop the auto-immune mode:
(Cisco Controller) > config wps auto-immune stopDynamic Auto Immune by WIPS is stopped
Related Commands show wps summary
config wps cids-sensorTo configure Intrusion Detection System (IDS) sensors for the Wireless Protection System (WPS), use theconfig wps cids-sensor command.
config wps cids-sensor { [add index ip_address username password] | [delete index] | [enableindex] | [disable index] | [port index port] | [interval index query_interval] | [fingerprintsha1 fingerprint] }
Syntax Description (Optional) Configures a new IDS sensor.add
IDS sensor internal index.index
IDS sensor IP address.ip_address
IDS sensor username.username
IDS sensor password.password
(Optional) Deletes an IDS sensor.delete
(Optional) Enables an IDS sensor.enable
(Optional) Disables an IDS sensor.disable
(Optional) Configures the IDS sensor’s port number.port
Port number.port
(Optional) Specifies the IDS sensor’s query interval.interval
Query interval setting.query_interval
(Optional) Specifies the IDS sensor’s TLS fingerprint.fingerprint
(Optional) Specifies the TLS fingerprint.sha1
CLI Commands676
CLI Commandsconfig wps cids-sensor

TLS fingerprint.fingerprint
Command Default Command defaults are listed below as follows:
443Port
60Query interval
00:00:00:00:00:00:00:00:00:00:00:00:00:00:00:00:00:00:00:00Certification fingerprint
DisabledQuery state
Command History ModificationRelease
This commandwas introduced in a release earlier thanRelease 7.6.
7.6
The following example shows how to configure the intrusion detection system with the IDS index1, IDS sensor IP address 10.0.0.51, IDS username Sensor_user0doc1, and IDS password passowrd01:
(Cisco Controller) > config wps cids-sensor add 1 10.0.0.51 Sensor_user0doc1 password01
Related Commands show wps cids-sensor detail
config wps client-exclusionTo configure client exclusion policies, use the config wps client-exclusion command.
config wps client-exclusion {802.11-assoc | 802.11-auth | 802.11x-auth | ip-theft | web-auth| all} {enable | disable}
Syntax Description Specifies that the controller excludes clients on thesixth 802.11 association attempt, after five consecutivefailures.
802.11-assoc
Specifies that the controller excludes clients on thesixth 802.11 authentication attempt, after fiveconsecutive failures.
802.11-auth
Specifies that the controller excludes clients on thesixth 802.11X authentication attempt, after fiveconsecutive failures.
802.1x-auth
Specifies that the control excludes clients if the IPaddress is already assigned to another device.
ip-theft
Specifies that the controller excludes clients on thefourth web authentication attempt, after threeconsecutive failures.
web-auth
CLI Commands677
CLI Commandsconfig wps client-exclusion
Specifies that the controller excludes clients for all ofthe above reasons.
all
Enables client exclusion policies.enable
Disables client exclusion policies.disable
Command Default All policies are enabled.
Command History ModificationRelease
This commandwas introduced in a release earlier thanRelease 7.6.
7.6
The following example shows how to disable clients on the 802.11 association attempt after fiveconsecutive failures:
(Cisco Controller) > config wps client-exclusion 802.11-assoc disable
Related Commands show wps summary
config wps client-exclusion 802.1x-authTo configure client exclusion policies, use the config wps client-exclusion 802.1x-auth command.
config wps client-exclusion 802.11x-auth {enable | disable|max-1x-aaa-fail-attempts}
Syntax Description Specifies that the controller excludes clients on thefourth 802.11X authentication attempt, after five threefailures.
802.1x-auth
Enables client exclusion policies.enable
Disables client exclusion policies.disable
Specifies the controller to exclude clients that reachesthe maximum failure 802.1X authentication attemptwith the RADIUS server.
The maximum failure 802.1X authentication attemptis from 1 to 3 and the default value is 3.
max-1x-aaa-fail-attempts
Command Default All policies are enabled.
Command History ModificationRelease
This commandwas introduced in a release earlier thanRelease 7.6.
7.6
CLI Commands678
CLI Commandsconfig wps client-exclusion 802.1x-auth

The following example shows how to disable clients on the 802.11 association attempt after fiveconsecutive failures:
(Cisco Controller) > config wps client-exclusion 802.1x-auth max-1x-aaa-fail-attempts 2
Related Commands show wps summary
config wps mfpTo configure Management Frame Protection (MFP), use the config wps mfp command.
config wps mfp {infrastructure| ap-impersonation} {enable | disable}
Syntax Description Configures the MFP infrastructure.infrastructure
Configures ap impersonation detection by MFP.ap-impersonation
Enables the MFP feature.enable
Disables the MFP feature.disable
Command Default None
Command History ModificationRelease
This commandwas introduced in a release earlier thanRelease 7.6.
7.6
The following example shows how to enable the infrastructure MFP:
(Cisco Controller) > config wps mfp infrastructure enable
Related Commands show wps mfp
config wps shun-list re-syncTo force the controller to synchronization with other controllers in the mobility group for the shun list, usethe config wps shun-list re-sync command.
config wps shun-list re-sync
Syntax Description This command has no arguments or keywords.
Command Default None
Command History ModificationRelease
This commandwas introduced in a release earlier thanRelease 7.6.
7.6
CLI Commands679
CLI Commandsconfig wps mfp

The following example shows how to configure the controller to synchronize with other controllersfor the shun list:
(Cisco Controller) > config wps shun-list re-sync
Related Commands show wps shun-list
config wps signatureTo enable or disable Intrusion Detection System (IDS) signature processing, or to enable or disable a specificIDS signature, use the config wps signature command.
config wps signature {standard | custom} state signature_id {enable | disable}
Syntax Description Configures a standard IDS signature.standard
Configures a standard IDS signature.custom
Specifies the state of the IDS signature.state
Identifier for the signature to be enabled or disabled.signature_id
Enables the IDS signature processing or a specificIDS signature.
enable
Disables IDS signature processing or a specific IDSsignature.
disable
Command Default IDS signature processing is enabled by default.
Command History ModificationRelease
This commandwas introduced in a release earlier thanRelease 7.6.
7.6
Usage Guidelines If IDS signature processing is disabled, all signatures are disabled, regardless of the state configured forindividual signatures.
The following example shows how to enable IDS signature processing, which enables the processingof all IDS signatures:
(Cisco Controller) >config wps signature enable
The following example shows how to disable a standard individual IDS signature:
(Cisco Controller) > config wps signature standard state 15 disable
Related Commands config wps signature frequency
config wps signature interval
CLI Commands680
CLI Commandsconfig wps signature
config wps signature mac-frequency
config wps signature quiet-time
config wps signature reset
show wps signature events
show wps signature summary
show wps summary
config wps signature frequencyTo specify the number of matching packets per interval that must be identified at the individual access pointlevel before an attack is detected, use the config wps signature frequency command.
config wps signature frequency signature_id frequency
Syntax Description Identifier for the signature to be configured.signature_id
Number of matching packets per interval that mustbe at the individual access point level before an attackis detected. The range is 1 to 32,000 packets perinterval.
frequency
Command Default The frequency default value varies per signature.
Command History ModificationRelease
This commandwas introduced in a release earlier thanRelease 7.6.
7.6
Usage Guidelines If IDS signature processing is disabled, all signatures are disabled, regardless of the state configured forindividual signatures.
The following example shows how to set the number of matching packets per interval per accesspoint before an attack is detected to 1800 for signature ID 4:
(Cisco Controller) > config wps signature frequency 4 1800
Related Commands config wps signature frequency
config wps signature interval
config wps signature quiet-time
config wps signature reset
show wps signature events
show wps signature summary
show wps summary
CLI Commands681
CLI Commandsconfig wps signature frequency

config wps signature intervalTo specify the number of seconds that must elapse before the signature frequency threshold is reached withinthe configured interval, use the config wps signature interval command.
config wps signature interval signature_id interval
Syntax Description Identifier for the signature to be configured.signature_id
Number of seconds that must elapse before thesignature frequency threshold is reached. The rangeis 1 to 3,600 seconds.
interval
Command Default The default value of interval varies per signature.
Command History ModificationRelease
This commandwas introduced in a release earlier thanRelease 7.6.
7.6
Usage Guidelines If IDS signature processing is disabled, all signatures are disabled, regardless of the state configured forindividual signatures.
The following example shows how to set the number of seconds to elapse before reaching the signaturefrequency threshold to 200 for signature ID 1:
(Cisco Controller) > config wps signature interval 1 200
Related Commands config wps signature frequency
config wps signature
config wps signature mac-frequency
config wps signature quiet-time
config wps signature reset
show wps signature events
show wps signature summary
show wps summary
config wps signature mac-frequencyTo specify the number of matching packets per interval that must be identified per client per access pointbefore an attack is detected, use the config wps signature mac-frequency command.
config wps signature mac-frequency signature_id mac_frequency
Syntax Description Identifier for the signature to be configured.signature_id
CLI Commands682
CLI Commandsconfig wps signature interval

Number of matching packets per interval that mustbe identified per client per access point before anattack is detected. The range is 1 to 32,000 packetsper interval.
mac_frequency
Command Default The mac_frequency default value varies per signature.
Command History ModificationRelease
This commandwas introduced in a release earlier thanRelease 7.6.
7.6
Usage Guidelines If IDS signature processing is disabled, all signatures are disabled, regardless of the state configured forindividual signatures.
The following example shows how to set the number of matching packets per interval per clientbefore an attack is detected to 50 for signature ID 3:
(Cisco Controller) > config wps signature mac-frequency 3 50
Related Commands config wps signature frequency
config wps signature interval
config wps signature
config wps signature quiet-time
config wps signature reset
show wps signature events
show wps signature summary
show wps summary
config wps signature quiet-timeTo specify the length of time after which no attacks have been detected at the individual access point leveland the alarm can stop, use the config wps signature quiet-time command.
config wps signature quiet-time signature_id quiet_time
Syntax Description Identifier for the signature to be configured.signature_id
Length of time after which no attacks have beendetected at the individual access point level and thealarm can stop. The range is 60 to 32,000 seconds.
quiet_time
Command Default The default value of quiet_time varies per signature.
CLI Commands683
CLI Commandsconfig wps signature quiet-time

Command History ModificationRelease
This commandwas introduced in a release earlier thanRelease 7.6.
7.6
Usage Guidelines If IDS signature processing is disabled, all signatures are disabled, regardless of the state configured forindividual signatures.
The following example shows how to set the number of seconds after which no attacks have beendetected per access point to 60 for signature ID 1:
(Cisco Controller) > config wps signature quiet-time 1 60
Related Commands config wps signature
config wps signature frequency
config wps signature interval
config wps signature mac-frequency
config wps signature reset
show wps signature events
show wps signature summary
show wps summary
config wps signature resetTo reset a specific Intrusion Detection System (IDS) signature or all IDS signatures to default values, use theconfig wps signature reset command.
config wps signature reset {signature_id | all}
Syntax Description Identifier for the specific IDS signature to be reset.signature_id
Resets all IDS signatures.all
Command Default None
Command History ModificationRelease
This commandwas introduced in a release earlier thanRelease 7.6.
7.6
Usage Guidelines If IDS signature processing is disabled, all signatures are disabled, regardless of the state configured forindividual signatures.
The following example shows how to reset the IDS signature 1 to default values:
(Cisco Controller) > config wps signature reset 1
CLI Commands684
CLI Commandsconfig wps signature reset
Related Commands config wps signature
config wps signature frequency
config wps signature interval
config wps signature mac-frequency
config wps signature quiet-time
show wps signature events
show wps signature summary
show wps summary
Other Config CommandsThis section lists the other config commands to configure the controller settings.
config aaa authTo configure the AAA authentication search order for management users, use the config aaa auth command.
config aaa auth mgmt [aaa_server_type1 | aaa_server_type2]
Syntax Description Configures the AAA authentication search order forcontroller management users by specifying up to threeAAA authentication server types. The order that theserver types are entered specifies the AAAauthentication search order.
mgmt
(Optional) AAA authentication server type (local,radius, or tacacs). The local setting specifies the localdatabase, the radius setting specifies the RADIUSserver, and the tacacs setting specifies the TACACS+server.
aaa_server_type
Command Default None
Command History ModificationRelease
This commandwas introduced in a release earlier thanRelease 7.6.
7.6
Usage Guidelines You can enter two AAA server types as long as one of the server types is local. You cannot enter radius andtacacs together.
The following example shows how to configure the AAA authentication search order for controllermanagement users by the authentication server type local:(Cisco Controller) > config aaa auth radius local
CLI Commands685
CLI CommandsOther Config Commands
Related Commands show aaa auth
config aaa auth mgmtTo configure the order of authentication when multiple databases are configured, use the config aaa authmgmt command.
config aaa auth mgmt [radius | tacacs]
Syntax Description (Optional) Configures the order of authentication forRADIUS servers.
radius
(Optional) Configures the order of authentication forTACACS servers.
tacacs
Command Default None
Command History ModificationRelease
This commandwas introduced in a release earlier thanRelease 7.6.
7.6
The following example shows how to configure the order of authentication for the RADIUS server:(Cisco Controller) > config aaa auth mgmt radius
The following example shows how to configure the order of authentication for the TACACS server:(Cisco Controller) > config aaa auth mgmt tacacs
Related Commands show aaa auth order
config acl applyTo apply an access control list (ACL) to the data path, use the config acl apply command.
config acl apply rule_name
Syntax Description ACL name that contains up to 32 alphanumericcharacters.
rule_name
Command Default None
Command History ModificationRelease
This commandwas introduced in a release earlier thanRelease 7.6.
7.6
CLI Commands686
CLI Commandsconfig aaa auth mgmt

Example
The following example shows how to apply an ACL to the data path:
(Cisco Controller) > config acl apply acl01
config acl counterTo see if packets are hitting any of the access control lists (ACLs) configured on your controller, use theconfig acl counter command.
config acl counter {start | stop}
Syntax Description Enables ACL counters on your controller.start
Disables ACL counters on your controller.stop
Command Default None
Command History ModificationRelease
This commandwas introduced in a release earlier thanRelease 7.6.
7.6
Usage Guidelines ACL counters are available only on the following controllers: 4400 series, Cisco WiSM, and Catalyst 3750GIntegrated Wireless LAN Controller Switch.
The following example shows how to enable ACL counters on your controller:
(Cisco Controller) > config acl counter start
Related Commands clear acl counters
show acl detailed
config acl createTo create a new access control list (ACL), use the config acl create command.
config acl create rule_name
Syntax Description ACL name that contains up to 32 alphanumericcharacters.
rule_name
Command Default None
CLI Commands687
CLI Commandsconfig acl counter
Command History ModificationRelease
This commandwas introduced in a release earlier thanRelease 7.6.
7.6
Usage Guidelines For a Cisco 2100 SeriesWireless LANController, you must configure a preauthentication ACL on the wirelessLAN for the external web server. This ACL should then be set as a wireless LAN preauthentication ACLunder Web Policy. However, you do not need to configure any preauthentication ACL for Cisco 4400 SeriesWireless LAN Controllers.
The following example shows how to create a new ACL:
(Cisco Controller) > config acl create acl01
Related Commands show acl
config acl cpuTo create a new access control list (ACL) rule that restricts the traffic reaching the CPU, use the config aclcpu command.
config acl cpu rule_name {wired | wireless | both}
Syntax Description Specifies the ACL name.rule_name
Specifies an ACL on wired traffic.wired
Specifies an ACL on wireless traffic.wireless
Specifies an ACL on both wired and wireless traffic.both
Command Default None
Command History ModificationRelease
This commandwas introduced in a release earlier thanRelease 7.6.
7.6
Usage Guidelines This command allows you to control the type of packets reaching the CPU.
The following example shows how to create an ACL named acl101 on the CPU and apply it to wiredtraffic:(Cisco Controller) > config acl cpu acl01 wired
Related Commands show acl cpu
config acl deleteTo delete an access control list (ACL), use the config acl delete command.
CLI Commands688
CLI Commandsconfig acl cpu

config acl delete rule_name
Syntax Description ACL name that contains up to 32 alphanumericcharacters.
rule_name
Command Default None
Command History ModificationRelease
This commandwas introduced in a release earlier thanRelease 7.6.
7.6
Usage Guidelines For a Cisco 2100 SeriesWireless LANController, you must configure a preauthentication ACL on the wirelessLAN for the external web server. This ACL should then be set as a wireless LAN preauthentication ACLunder Web Policy. However, you do not need to configure any preauthentication ACL for Cisco 4400 SeriesWireless LAN Controllers.
The following example shows how to delete an ACL named acl101 on the CPU:(Cisco Controller) > config acl delete acl01
Related Commands show acl
config acl ruleTo configure ACL rules, use the config acl rule command.
config acl rule {action rule_name rule_index {permit | deny} | add rule_name rule_index |change index rule_name old_index new_index | delete rule_name rule_index | destination addressrule_name rule_index ip_address netmask | destination port range rule_name rule_index start_portend_port | direction rule_name rule_index {in | out | any} | dscp rule_name rule_index dscp| protocol rule_name rule_index protocol | source address rule_name rule_index ip_address netmask| source port range rule_name rule_index start_port end_port | swap index rule_name index_1 index_2}
Syntax Description Configures whether to permit or deny access.action
ACL name that contains up to 32 alphanumericcharacters.
rule_name
Rule index between 1 and 32.rule_index
Permits the rule action.permit
Denies the rule action.deny
Adds a new rule.add
Changes a rule’s index.change
Specifies a rule index.index
Deletes a rule.delete
CLI Commands689
CLI Commandsconfig acl rule
Configures a rule’s destination IP address andnetmask.
destination address
Configure a rule's destination port range.destination port range
IP address of the rule.ip_address
Netmask of the rule.netmask
Start port number (between 0 and 65535).start_port
End port number (between 0 and 65535).end_port
Configures a rule’s direction to in, out, or any.direction
Configures a rule’s direction to in.in
Configures a rule’s direction to out.out
Configures a rule’s direction to any.any
Configures a rule’s DSCP.dscp
Number between 0 and 63, or any.dscp
Configures a rule’s DSCP.protocol
Number between 0 and 255, or any.protocol
Configures a rule’s source IP address and netmask.source address
Configures a rule’s source port range.source port range
Swaps two rules’ indices.swap
Command Default None
Command History ModificationRelease
This commandwas introduced in a release earlier thanRelease 7.6.
7.6
Usage Guidelines For a Cisco 2100 SeriesWireless LANController, you must configure a preauthentication ACL on the wirelessLAN for the external web server. This ACL should then be set as a wireless LAN pre-authentication ACLunder Web Policy. However, you do not need to configure any preauthentication ACL for Cisco 4400 SeriesWireless LAN Controllers.
The following example shows how to configure an ACL to permit access:(Cisco Controller) > config acl rule action lab1 4 permit
Related Commands show acl
CLI Commands690
CLI Commandsconfig acl rule

config auth-list addTo create an authorized access point entry, use the config auth-list add command.
config auth-list add {mic | ssc} AP_MAC [AP_key]
Syntax Description Specifies that the access point has amanufacture-installed certificate.
mic
Specifies that the access point has a self-signedcertificate.
ssc
MAC address of a Cisco lightweight access point.AP_MAC
(Optional) Key hash value that is equal to 20 bytes or40 digits.
AP_key
Command Default None
Command History ModificationRelease
This commandwas introduced in a release earlier thanRelease 7.6.
7.6
The following example shows how to create an authorized access point entry with amanufacturer-installed certificate on MAC address 00:0b:85:02:0d:20:
(Cisco Controller) > config auth-list add 00:0b:85:02:0d:20
Related Commands config auth-list delete
config auth-list ap-policy
config auth-list ap-policyTo configure an access point authorization policy, use the config auth-list ap-policy command.
config auth-list ap-policy {authorize-ap {enable | disable} | ssc {enable | disable}}
Syntax Description Enables the authorization policy.authorize-ap enable
Disables the AP authorization policy.authorize-ap disable
Allows the APs with self-signed certificates toconnect.
ssc enable
Disallows the APs with self-signed certificates toconnect.
ssc disable
Command Default None
CLI Commands691
CLI Commandsconfig auth-list add

Command History ModificationRelease
This commandwas introduced in a release earlier thanRelease 7.6.
7.6
The following example shows how to enable an access point authorization policy:
(Cisco Controller) > config auth-list ap-policy authorize-ap enable
The following example shows how to enable an access point with a self-signed certificate to connect:
(Cisco Controller) > config auth-list ap-policy ssc disable
Related Commands config auth-list delete
config auth-list add
config auth-list deleteTo delete an access point entry, use the config auth-list delete command.
config auth-list delete AP_MAC
Syntax Description MAC address of a Cisco lightweight access point.AP_MAC
Command Default None
Command History ModificationRelease
This commandwas introduced in a release earlier thanRelease 7.6.
7.6
The following example shows how to delete an access point entry forMAC address 00:1f:ca:cf:b6:60:
(Cisco Controller) > config auth-list delete 00:1f:ca:cf:b6:60
Related Commands config auth-list delete
config auth-list add
config auth-list ap-policy
config bootTo change a Cisco wireless LAN controller boot option, use the config boot command.
config boot {primary | backup}
Syntax Description Sets the primary image as active.primary
CLI Commands692
CLI Commandsconfig auth-list delete
Sets the backup image as active.backup
Command Default The default boot option is primary.
Command History ModificationRelease
This command was introduced in a release earlier than Release 7.6.7.6
Usage Guidelines Each Cisco wireless LAN controller can boot off the primary, last-loaded operating system image (OS) orboot off the backup, earlier-loaded OS image.
The following example shows how to set the primary image as active so that the LAN controller canboot off the primary, last loaded image:
(Cisco Controller) > config boot primary
The following example shows how to set the backup image as active so that the LAN controller canboot off the backup, earlier loaded OS image:
(Cisco Controller) > config boot backup
Related Commands show boot
config cdpTo configure the Cisco Discovery Protocol (CDP) on the controller, use the config cdp command.
config cdp {enable | disable | advertise-v2 {enable | disable} | timerseconds | holdtimeholdtime_interval}
Syntax Description Enables CDP on the controller.enable
Disables CDP on the controller.disable
Configures CDP version 2 advertisements.advertise-v2
Configures the interval at which CDP messages areto be generated.
timer
Time interval at which CDP messages are to begenerated. The range is from 5 to 254 seconds.
seconds
Configures the amount of time to be advertised as thetime-to-live value in generated CDP packets.
holdtime
Maximum hold timer value. The range is from 10 to255 seconds.
holdtime_interval
Command Default The default value for CDP timer is 60 seconds.
CLI Commands693
CLI Commandsconfig cdp
The default value for CDP holdtime is 180 seconds.
Command History ModificationRelease
This command was introduced in a release earlier than Release 7.6.7.6
The following example shows how to configure the CDP maximum hold timer to 150 seconds:
(Cisco Controller) > config cdp timer 150
Related Commands config ap cdp
show cdp
show ap cdp
config certificateTo configure Secure Sockets Layer (SSL) certificates, use the config certificate command.
config certificate {generate {webadmin | webauth} | compatibility {on | off}}
Syntax Description Specifies authentication certificate generation settings.generate
Generates a new web administration certificate.webadmin
Generates a new web authentication certificate.webauth
Specifies the compatibility mode for inter-Ciscowireless LAN controller IPsec settings.
compatibility
Enables the compatibility mode.on
Disables the compatibility mode.off
Command Default None
Command History ModificationRelease
This command was introduced in a release earlier than Release 7.6.7.6
The following example shows how to generate a new web administration SSL certificate:
(Cisco Controller) > config certificate generate webadminCreating a certificate may take some time. Do you wish to continue? (y/n)
The following example shows how to configure the compatibility mode for inter-Cisco wireless LANcontroller IPsec settings:
(Cisco Controller) > config certificate compatibility
CLI Commands694
CLI Commandsconfig certificate

Related Commands config certificate lsc
show certificate compatibility
show certificate lsc
show certificate summary
show local-auth certificates
config certificate lscTo configure Locally Significant Certificate (LSC) certificates, use the config certificate lsc command.
config certificate lsc {enable | disable | ca-server http://url:port/path | ca-cert {add | delete}| subject-params country state city orgn dept email | other-params keysize} | ap-provision {auth-list{add | delete} ap_mac | revert-cert retries}
Syntax Description Enables LSC certificates on the controller.enable
Disables LSC certificates on the controller.disable
Specifies the Certificate Authority (CA) serversettings.
ca-server
Domain name or IP address of the CA server.http://url:port/path
Specifies CA certificate database settings.ca-cert
Obtains a CA certificate from the CA server and addsit to the controller’s certificate database.
add
Deletes a CA certificate from the controller’scertificate database.
delete
Specifies the device certificate settings.subject-params
Country, state, city, organization, department, andemail of the certificate authority.
The common name (CN) is generatedautomatically on the access point using thecurrentMIC/SSC formatCxxxx-MacAddr,where xxxx is the product number.
Note
country state city orgn dept email
Specifies the device certificate key size settings.other-params
Value from 384 to 2048 (in bits); the default value is2048.
keysize
Specifies the access point provision list settings.ap-provision
Specifies the provision list authorization settings.auth-list
MAC address of access point to be added or deletedfrom the provision list.
ap_mac
CLI Commands695
CLI Commandsconfig certificate lsc

Specifies the number of times the access pointattempts to join the controller using an LSC beforereverting to the default certificate.
revert-cert
Value from 0 to 255; the default value is 3.
If you set the number of retries to 0 andthe access point fails to join the controllerusing an LSC, the access point does notattempt to join the controller using thedefault certificate. If you are configuringLSC for the first time, we recommend thatyou configure a nonzero value.
Note
retries
Command Default The default value of keysize is 2048 bits. The default value of retries is 3.
Command History ModificationRelease
This command was introduced in a release earlier than Release 7.6.7.6
Usage Guidelines You can configure only one CA server. To configure a different CA server, delete the configured CA serverby using the config certificate lsc ca-server delete command, and then configure a different CA server.
If you configure an access point provision list, only the access points in the provision list are provisionedwhen you enable AP provisioning (in Step 8). If you do not configure an access point provision list, all accesspoints with an MIC or SSC certificate that join the controller are LSC provisioned.
The following example shows how to enable the LSC settings:(Cisco Controller) >config certificate lsc enable
This example shows how to enable the LSC settings for Certificate Authority (CA) server settings:(Cisco Controller) >config certificate lsc ca-server http://10.0.0.1:8080/caserver
The following example shows how to add a CA certificate from the CA server and add it to thecontroller’s certificate database:(Cisco Controller) >config certificate lsc ca-cert add
The following example shows how to configure an LSC certificate with the keysize of 2048 bits:(Cisco Controller) >config certificate lsc keysize 2048
config certificate sscTo configure Self Signed Certificates (SSC) certificates, use the config certificate ssc command.
config certificate ssc hash validation {enable | disable}
Syntax Description Configures the SSC hash key.hash
CLI Commands696
CLI Commandsconfig certificate ssc

Configures hash validation of the SSC certificate.validation
Enables hash validation of the SSC certificate.enable
Disables hash validation of the SSC certificate.disable
Command Default The SSC certificate is enabled by default..
Command History ModificationRelease
This command was introduced in a release earlier than Release 7.6.7.6
Usage Guidelines When you enable the SSC hash validation, an AP validates the SSC certificate of the virtual controller. Whenan AP validates the SSC certificate, it checks if the hash key of the virtual controller matches the hash keystored in its flash. If a match is found, the validation passes and the AP moves to the Run state. If a match isnot found, the validation fails and the AP disconnects from the controller and restarts the discovery process.By default, hash validation is enabled. Hence, an AP must have the virtual controller hash key in its flashbefore associating with the virtual controller. If you disable hash validation of the SSC certificate, the APbypasses the hash validation and directly moves to the Run state.
APs can associate with a physical controller, download the hash keys and then associate with a virtual controller.If the AP is associated to a physical controller and if hash validation is disabled, it joins any virtual controllerwithout hash validation.
The following example shows how to enable hash validation of the SSC certificate:
(Cisco Controller) > config certificate ssc hash validation enable
Related Commands show certificate ssc
show mobility group member
config mobility group member hash
config certificate
show certificate compatibility
show certificate lsc
show certificate summary
show local-auth certificates
config certificate use-device-certificate webadminTo use a device certificate for web administration, use the config certificate use-device-certificate webadmincommand.
config certificate use-device-certificate webadmin
Syntax Description This command has no arguments or keywords.
Command Default None
CLI Commands697
CLI Commandsconfig certificate use-device-certificate webadmin

Command History ModificationRelease
This command was introduced in a release earlier than Release 7.6.7.6
The following example shows how to use a device certificate for web administration:
(Cisco Controller) > config certificate use-device-certificate webadminUse device certificate for web administration. Do you wish to continue? (y/n) yUsing device certificate for web administration.Save configuration and restart controller to use new certificate.
Related Commands config certificate
show certificate compatibility
show certificate lsc
show certificate ssc
show certificate summary
show local-auth certificates
config coredumpTo enable or disable the controller to generate a core dump file following a crash, use the config cordumpcommand.
config coredump {enable | disable}
Syntax Description Enables the controller to generate a core dump file.enable
Disables the controller to generate a core dump file.disable
Command Default None
Command History ModificationRelease
This command was introduced in a release earlier than Release 7.6.7.6
The following example shows how to enable the controller to generate a core dump file following acrash:
(Cisco Controller) > config coredump enable
Related Commands config coredump ftp
config coredump username
show coredump summary
CLI Commands698
CLI Commandsconfig coredump

config coredump ftpTo automatically upload a controller core dump file to an FTP server after experiencing a crash, use the configcoredump ftp command.
config coredump ftp server_ip_address filename
Syntax Description IP address of the FTP server to which the controllersends its core dump file.
server_ip_address
Name given to the controller core dump file.filename
Command Default None
Command History ModificationRelease
This command was introduced in a release earlier than Release 7.6.7.6
This command supports only IPv4 address format.8.0
Usage Guidelines The controller must be able to reach the FTP server to use this command.
The following example shows how to configure the controller to upload a core dump file namedcore_dump_controller to an FTP server at network address 192.168.0.13:
(Cisco Controller) > config coredump ftp 192.168.0.13 core_dump_controller
Related Commands config coredump
config coredump username
show coredump summary
config coredump usernameTo specify the FTP server username and passwordwhen uploading a controller core dump file after experiencinga crash, use the config coredump username command.
config coredump username ftp_username password ftp_password
Syntax Description FTP server login username.ftp_username
FTP server login password.ftp_password
Command Default None
Command History ModificationRelease
This command was introduced in a release earlier than Release 7.6.7.6
CLI Commands699
CLI Commandsconfig coredump ftp

Usage Guidelines The controller must be able to reach the FTP server to use this command.
The following example shows how to specify a FTP server username of admin and passwordadminpassword for the core dump file upload:
(Cisco Controller) > config coredump username admin password adminpassword
Related Commands config coredump ftp
config coredump
show coredump summary
config countryTo configure the controller’s country code, use the config country command.
config country country_code
Syntax Description Two-letter or three-letter country code.country_code
Command Default us (country code of the United States of America).
Command History ModificationRelease
This commandwas introduced in a release earlier thanRelease 7.6.
7.6
Usage Guidelines Cisco WLCs must be installed by a network administrator or qualified IT professional and the installer mustselect the proper country code. Following installation, access to the unit should be password protected by theinstaller to maintain compliance with regulatory requirements and to ensure proper unit functionality. See therelated product guide for the most recent country codes and regulatory domains.
You can use the show country command to display a list of supported countries.
The following example shows how to configure the controller’s country code to DE:
(Cisco Controller) >config country DE
config cts sxpTo configure Cisco TrustSec SXP (CTS) connections on the controller, use the config cts sxp command.
config cts sxp {enable | disable | connection {delete | peer} | default password password |retry period time-in-seconds}
Syntax Description Enables CTS connections on the controller.enable
Disables CTS connections on the controller.disable
Configures CTS connection on the controller.connection
CLI Commands700
CLI Commandsconfig country

Deletes the CTS connection on the controller.delete
Configures the next hop switch with which thecontroller is connected.
peer
Only IPv4 address of the peer.ip-address
Configures the default password for MD5authentication of SXP messages.
default password
Default password for MD5 Authentication of SXPmessages. The password should contain a minimumof six characters.
password
Configures the SXP retry period.retry period
Time after which a CTS connection should be againtried for after a failure to connect.
time-in-seconds
Command Default None
Command History ModificationRelease
This commandwas introduced in a release earlier thanRelease 7.6.
7.6
Usage Guidelines For release 8.0, only IPv4 is supported for TrustSec SXP configuration.
The following example shows how to enable CTS on the controller:
(Cisco Controller) > config cts sxp enable
The following example shows how to configure a peer for a CTS connection:> config cts sxp connection peer 209.165.200.224
Related Commands debug cts sxp
config cts sxp connectionTo configure a Cisco TrustSec SXP (CTS) connection on the controller, use the config cts sxp connectioncommand.
config cts sxp connection {delete | peer} ip-address
Syntax Description Deletes the CTS connection on the controller.delete
Configures the next hop switch with which thecontroller is connected.
peer
IPv4 address of the peer.ip-address
CLI Commands701
CLI Commandsconfig cts sxp connection

Command Default None.
Usage Guidelines Default password should be configured before adding CTS connections.
This example shows how to configure a peer for a CTS connection:> config cts sxp connection peer 209.165.200.224
Related Commands config cts sxp
config cts sxp default password
config cts sxp retry period
Other Config CommandsThis section lists the other config commands to configure the controller settings.
config cts sxp default passwordTo configure the default password for MD5 Authentication of SXP messages, use the config cts sxp defaultpassword command.
config cts sxp default password password
Syntax Description Default password for MD5 Authentication of SXPmessages. The password should contain a minimumof six characters.
password
Command Default None.
This example shows how to configure the default password forMD5Authentication of SXPmessages:
> config cts sxp default password controller
Related Commands config cts sxp
config cts sxp connection
config cts sxp retry periodTo configure the SXP retry period, use the config cts sxp retry period command.
config cts sxp retry period time-in-seconds
Syntax Description Time after which a CTS connection should be againtried for after a failure to connect.
time-in-seconds
Command Default None.
CLI Commands702
CLI CommandsOther Config Commands
This example shows how to configure the SXP retry period as 20 seconds:
> config cts sxp retry period 20
Related Commands config cts sxp connection
config cts sxp default password
config cts sxp
config custom-web ext-webauth-modeTo configure external URL web-based client authorization for the custom-web authentication page, use theconfig custom-web ext-webauth-mode command.
config custom-web ext-webauth-mode {enable | disable}
Syntax Description Enables the external URL web-based clientauthorization.
enable
Disables the external URL we-based clientauthentication.
disable
Command Default None
Command History ModificationRelease
This command was introduced in a release earlier than Release 7.6.7.6
The following example shows how to enable the external URL web-based client authorization:
(Cisco Controller) > config custom-web ext-webauth-mode enable
Related Commands config custom-web redirectUrl
config custom-web weblogo
config custom-web webmessage
config custom-web webtitle
config custom-web ext-webauth-url show custom-web
config custom-web ext-webauth-urlTo configure the complete external web authentication URL for the custom-web authentication page, use theconfig custom-web ext-webauth-url command.
config custom-web ext-webauth-url URL
Syntax Description URL used for web-based client authorization.URL
CLI Commands703
CLI Commandsconfig custom-web ext-webauth-mode
Command Default None
Command History ModificationRelease
This command was introduced in a release earlier than Release 7.6.7.6
The following example shows how to configure the complete external web authentication URLhttp://www.AuthorizationURL.com/ for the web-based client authorization:
(Cisco Controller) > config custom-web ext-webauth-url http://www.AuthorizationURL.com/
Related Commands config custom-web redirectUrl
config custom-web weblogo
config custom-web webmessage
config custom-web webtitle
config custom-web ext-webauth-mode show custom-web
config custom-web ext-webserverTo configure an external web server, use the config custom-web ext-webserver command.
config custom-web ext-webserver {add index IP_address | delete index}
Syntax Description Adds an external web server.add
Index of the external web server in the list of externalweb server. The index must be a number between 1and 20.
index
IP address of the external web server.IP_address
Deletes an external web server.delete
Command Default None
Command History ModificationRelease
This command was introduced in a release earlier than Release 7.6.7.6
This command supports only IPv4 address format.8.0
The following example shows how to add the index of the external web server 2 to the IP addressof the external web server 192.23.32.19:
(Cisco Controller) > config custom-web ext-webserver add 2 192.23.32.19
Related Commands config custom-web redirectUrl
CLI Commands704
CLI Commandsconfig custom-web ext-webserver

config custom-web weblogo
config custom-web webmessage
config custom-web webtitle
config custom-web ext-webauth-mode
config custom-web ext-webauth-url
show custom-web
config custom-web logout-popupTo enable or disable the custom web authentication logout popup, use the config custom-web logout-popupcommand.
config custom-web logout-popup {enable| disable}
Syntax Description Enables the custom web authentication logout popup. This page appears after a successful loginor a redirect of the custom web authentication page.
enable
Disables the custom web authentication logout popup.disable
Command Default None
Command History ModificationRelease
This command was introduced in a release earlier than Release 7.6.7.6
The following example shows how to disable the custom web authentication logout popup:
(Cisco Controller) > config custom-web logout-popup disable
Related Commands config custom-web redirectUrl
config custom-web weblogo
config custom-web webmessage
config custom-web webtitle
config custom-web ext-webauth-url show custom-web
config custom-web redirectUrlTo configure the redirect URL for the custom-web authentication page, use the config custom-web redirectUrlcommand.
config custom-web redirectUrl URL
Syntax Description URL that is redirected to the specified address.URL
CLI Commands705
CLI Commandsconfig custom-web logout-popup

Command Default None
Command History ModificationRelease
This command was introduced in a release earlier than Release 7.6.7.6
The following example shows how to configure the URL that is redirected to abc.com:
(Cisco Controller) > config custom-web redirectUrl abc.com
Related Commands config custom-web weblogo
config custom-web webmessage
config custom-web webtitle
config custom-web ext-webauth-mode
config custom-web ext-webauth-url
show custom-web
config custom-web webauth-typeTo configure the type of web authentication, use the config custom-web webauth-type command.
config custom-web webauth-type {internal | customized | external}
Syntax Description Configures the web authentication type to internal.internal
Configures the web authentication type to customized.customized
Configures the web authentication type to external.external
Command Default The default web authentication type is internal.
Command History ModificationRelease
This command was introduced in a release earlier than Release 7.6.7.6
The following example shows how to configure the type of the web authentication type to internal:
(Cisco Controller) > config custom-web webauth-type internal
Related Commands config custom-web redirectUrl
config custom-web webmessage
config custom-web webtitle
config custom-web ext-webauth-mode
config custom-web ext-webauth-url
CLI Commands706
CLI Commandsconfig custom-web webauth-type

show custom-web
config custom-web weblogoTo configure the web authentication logo for the custom-web authentication page, use the config custom-webweblogo command.
config custom-web weblogo {enable | disable}
Syntax Description Enables the web authentication logo settings.enable
Enable or disable the web authentication logo settings.disable
Command Default None
Command History ModificationRelease
This command was introduced in a release earlier than Release 7.6.7.6
The following example shows how to enable the web authentication logo:
(Cisco Controller) > config custom-web weblogo enable
Related Commands config custom-web redirectUrl
config custom-web webmessage
config custom-web webtitle
config custom-web ext-webauth-mode
config custom-web ext-webauth-url
show custom-web
config custom-web webmessageTo configure the custom web authentication message text for the custom-web authentication page, use theconfig custom-web webmessage command.
config custom-web webmessage message
Syntax Description Message text for web authentication.message
Command Default None
Command History ModificationRelease
This command was introduced in a release earlier than Release 7.6.7.6
The following example shows how to configure themessage text Thisistheplace for webauthentication:
CLI Commands707
CLI Commandsconfig custom-web weblogo

(Cisco Controller) > config custom-web webmessage Thisistheplace
Related Commands config custom-web redirectUrl
config custom-web weblogo
config custom-web webtitle
config custom-web ext-webauth-mode
config custom-web ext-webauth-url
show custom-web
config custom-web webtitleTo configure the web authentication title text for the custom-web authentication page, use the configcustom-web webtitle command.
config custom-web webtitle title
Syntax Description Custom title text for web authentication.title
Command Default None
Command History ModificationRelease
This command was introduced in a release earlier than Release 7.6.7.6
The following example shows how to set the custom title text Helpdesk for web authentication:
(Cisco Controller) > config custom-web webtitle Helpdesk
Related Commands config custom-web redirectUrl
config custom-web weblogo
config custom-web webmessage
config custom-web ext-webauth-mode
config custom-web ext-webauth-url
show custom-web
config database sizeTo configure the local database, use the config database size command.
config database size count
Syntax Description Database size value between 512 and 2040count
CLI Commands708
CLI Commandsconfig custom-web webtitle

Command Default None
Command History ModificationRelease
This commandwas introduced in a release earlier thanRelease 7.6.
7.6
Usage Guidelines Use the show database command to display local database configuration.
The following example shows how to configure the size of the local database:
(Cisco Controller) > config database size 1024
Related Commands show database
config dhcpTo configure the internal DHCP, use the config dhcp command.
config dhcp {address-pool scope start end | create-scope scope | default-router scope router_1[router_2] [router_3] | delete-scope scope | disable scope | dns-servers scope dns1 [dns2][dns3] | domain scope domain | enable scope | lease scope lease_duration | netbios-name-serverscope wins1 [wins2] [wins3] | networkscope network netmask}
config dhcpopt-82 remote-id {ap_mac | ap_mac:ssid | ap-ethmac}
Syntax Description Configures an address range to allocate. You mustspecify the scope name and the first and last addressesof the address range.
address-pool scope start end
Creates a new DHCP scope. You must specify thescope name.
create-scope name
Configures the default routers for the specified scopeand specify the IP address of a router. Optionally, youcan specify the IP addresses of secondary and tertiaryrouters.
default-router scope router_1 [router_2] [router_3]
Deletes the specified DHCP scope.delete-scope scope
Disables the specified DHCP scope.disable scope
Configures the name servers for the given scope. Youmust also specify at least one name server. Optionally,you can specify secondary and tertiary name servers.
dns-servers scope dns1 [dns2] [dns3]
Configures the DNS domain name. You must specifythe scope and domain names.
domain scope domain
Enables the specified dhcp scope.enable scope
CLI Commands709
CLI Commandsconfig dhcp

Configures the lease duration (in seconds) for thespecified scope.
lease scope lease_duration
Configures the netbios name servers. You mustspecify the scope name and the IP address of a nameserver. Optionally, you can specify the IP addressesof secondary and tertiary name servers.
netbios-name-server scope wins1 [wins2] [wins3]
Configures the network and netmask. You mustspecify the scope name, the network address, and thenetwork mask.
network scope network netmask
Configures the DHCP option 82 remote ID fieldformat.
DHCP option 82 provides additional security whenDHCP is used to allocate network addresses. Thecontroller acts as a DHCP relay agent to preventDHCP client requests from untrusted sources. Thecontroller adds option 82 information to DHCPrequests from clients before forwarding the requeststo the DHCP server.
opt-82 remote-id
MAC address of the access point to the DHCP option82 payload.
ap_mac
MAC address and SSID of the access point to theDHCP option 82 payload.
ap_mac:ssid
Remote ID format as AP Ethernet MAC address.ap-ethmac
Command History ModificationRelease
This command was introduced in a release earlier than Release 7.6.7.6
Usage Guidelines Use the show dhcp command to display the internal DHCP configuration.
The following example shows how to configure the DHCP lease for the scope 003:
(Cisco Controller) >config dhcp lease 003
config dhcp proxyTo specify the level at which DHCP packets are modified, use the config dhcp proxy command.
config dhcp proxy {enable | disable {bootp-broadcast [enable | disable]}
Syntax Description Allows the controller to modify the DHCP packetswithout a limit.
enable
CLI Commands710
CLI Commandsconfig dhcp proxy

Reduces the DHCP packet modification to the levelof a relay.
disable
Configures DHCP BootP broadcast option.bootp-broadcast
Command Default DHCP is enabled.
Command History ModificationRelease
This command was introduced in a release earlier than Release 7.6.7.6
Usage Guidelines Use the show dhcp proxy command to display the status of DHCP proxy handling.
To enable third-partyWGB support, you must enable the passive-client feature on the wirless LAN by enteringthe config wlan passive-client enable command.
The following example shows how to disable the DHCP packet modification:
(Cisco Controller) >config dhcp proxy disable
The following example shows how to enable the DHCP BootP broadcast option:(Cisco Controller) >config dhcp proxy disable bootp-broadcast enable
config dhcp timeoutTo configure a DHCP timeout value, use the config dhcp timeout command. If you have configured aWLANto be in DHCP required state, this timer controls how long the WLC will wait for a client to get a DHCP leasethrough DHCP.
config dhcp timeout timeout-value
Syntax Description Timeout value in the range of 5 to 120 seconds.timeout-value
Command Default The default timeout value is 120 seconds.
Command History ModificationRelease
This command was introduced in a release earlier than Release 7.6.7.6
The following example shows how to set the DHCP timeout to 10 seconds:(Cisco Controller) >config dhcp timeout 10
config exclusionlistTo create or delete an exclusion list entry, use the config exclusionlist command.
config exclusionlist {addMAC [description] | deleteMAC | descriptionMAC [description]}
CLI Commands711
CLI Commandsconfig dhcp timeout

Syntax Description Configures the exclusion list.config exclusionlist
Creates a local exclusion-list entry.add
Deletes a local exclusion-list entrydelete
Specifies the description for an exclusion-list entry.description
MAC address of the local Excluded entry.MAC
(Optional) Description, up to 32 characters, for anexcluded entry.
description
Command Default None
Command History ModificationRelease
This commandwas introduced in a release earlier thanRelease 7.6.
7.6
The following example shows how to create a local exclusion list entry for the MAC addressxx:xx:xx:xx:xx:xx:(Cisco Controller) > config exclusionlist add xx:xx:xx:xx:xx:xx lab
The following example shows how to delete a local exclusion list entry for the MAC addressxx:xx:xx:xx:xx:xx:(Cisco Controller) > config exclusionlist delete xx:xx:xx:xx:xx:xx lab
Related Commands show exclusionlist
config flexconnect [ipv6] aclTo apply access control lists that are configured on a FlexConnect access point, use the config flexconnect[ipv6] acl command. Use the ipv6 keyword to configure IPv6 FlexConnect ACLs .
config flexconnect [ipv6] acl {apply | create | delete} acl_name
Syntax Description Use this option to configure IPv6 FlexConnect ACLs.If you don't use this option, then IPv4 FlexConnectACLs will be configured.
ipv6
Applies an ACL to the data path.apply
Creates an ACL.create
Deletes an ACL.delete
ACL name that contains up to 32 alphanumericcharacters.
acl_name
CLI Commands712
CLI Commandsconfig flexconnect [ipv6] acl
Command History ModificationRelease
This command was introduced in a release earlier than Release 7.6.7.6
IPv6 ACL option was introduced.8.8
The following example shows how to apply the IPv4 ACL configured on a FlexConnect access point:(Cisco Controller) >config flexconnect acl apply acl1
config flexconnect [ipv6] acl ruleTo configure access control list (ACL) rules on a FlexConnect access point, use the config flexconnect [ipv6]acl rule command.
config flexconnect [ipv6] acl rule {action rule_name rule_index {permit | deny} | add rule_namerule_index | change index rule_name old_index new_index | delete rule_name rule_index | destinationaddress rule_name rule_index ip_address netmask | destination port range rule_name rule_index start_portend_port | direction rule_name rule_index {in | out | any} | dscp rule_name rule_index dscp| protocol rule_name rule_index protocol | source address rule_name rule_index ip_address netmask| source port range rule_name rule_index start_port end_port | swap index rule_name index_1 index_2}
Syntax Description Use this option to configure IPv6 FlexConnect ACLrules. If you don't use this option, then IPv4FlexConnect ACL rules will be configured.
ipv6
Configures whether to permit or deny access.action
ACL name that contains up to 32 alphanumericcharacters.
rule_name
Rule index between 1 and 32.rule_index
Permits the rule action.permit
Denies the rule action.deny
Adds a new rule.add
Changes a rule’s index.change
Specifies a rule index.index
Deletes a rule.delete
Configures a rule’s destination IP address andnetmask.
destination address
IP address of the rule.ip_address
Netmask of the rule.netmask
Start port number (between 0 and 65535).start_port
CLI Commands713
CLI Commandsconfig flexconnect [ipv6] acl rule
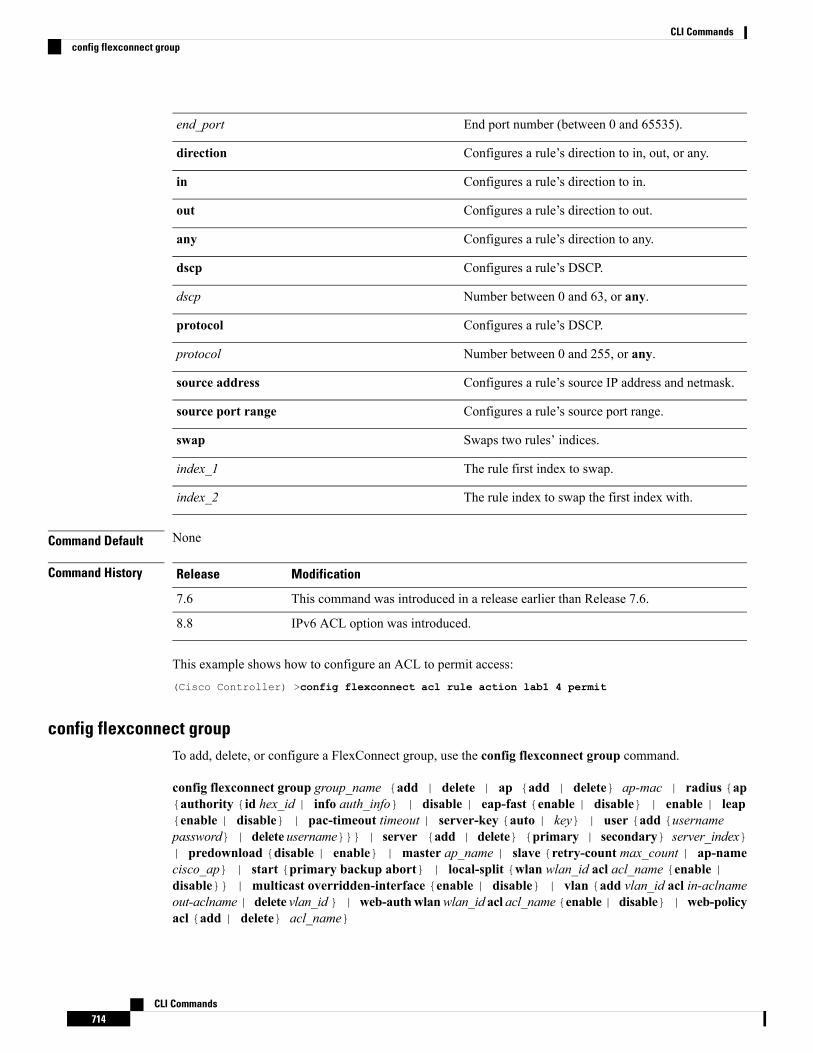
End port number (between 0 and 65535).end_port
Configures a rule’s direction to in, out, or any.direction
Configures a rule’s direction to in.in
Configures a rule’s direction to out.out
Configures a rule’s direction to any.any
Configures a rule’s DSCP.dscp
Number between 0 and 63, or any.dscp
Configures a rule’s DSCP.protocol
Number between 0 and 255, or any.protocol
Configures a rule’s source IP address and netmask.source address
Configures a rule’s source port range.source port range
Swaps two rules’ indices.swap
The rule first index to swap.index_1
The rule index to swap the first index with.index_2
Command Default None
Command History ModificationRelease
This command was introduced in a release earlier than Release 7.6.7.6
IPv6 ACL option was introduced.8.8
This example shows how to configure an ACL to permit access:(Cisco Controller) >config flexconnect acl rule action lab1 4 permit
config flexconnect groupTo add, delete, or configure a FlexConnect group, use the config flexconnect group command.
config flexconnect group group_name {add | delete | ap {add | delete} ap-mac | radius {ap{authority {id hex_id | info auth_info} | disable | eap-fast {enable | disable} | enable | leap{enable | disable} | pac-timeout timeout | server-key {auto | key} | user {add {usernamepassword} | delete username}}} | server {add | delete} {primary | secondary} server_index}| predownload {disable | enable} | master ap_name | slave {retry-count max_count | ap-namecisco_ap} | start {primary backup abort} | local-split {wlan wlan_id acl acl_name {enable |disable}} | multicast overridden-interface {enable | disable} | vlan {add vlan_id acl in-aclnameout-aclname| delete vlan_id} | web-authwlanwlan_id acl acl_name{enable| disable} | web-policyacl {add | delete} acl_name}
CLI Commands714
CLI Commandsconfig flexconnect group

Syntax Description Group name.group_name
Adds a FlexConnect group.add
Deletes a FlexConnect group.delete
Adds or deletes an access point to a FlexConnectgroup.
ap
Adds an access point to a FlexConnect group.add
Deletes an access point to a FlexConnect group.delete
MAC address of the access point.ap_mac
Configures the RADIUS server for clientauthentication for a FlexConnect group.
radius
Configures an access point based RADIUS server forclient authentication for a FlexConnect group.
ap
Configures the Extensible AuthenticationProtocol-FlexibleAuthentication via Secure Tunneling(EAP-FAST) authority parameters.
authority
Configures the authority identifier of the localEAP-FAST server.
id
Authority identifier of the local EAP-FAST server inhexadecimal characters. You can enter up to 32hexadecimal even number of characters.
hex_id
Configures the authority identifier of the localEAP-FAST server in text format.
info
Authority identifier of the local EAP-FAST server intext format.
auth_info
Disables an AP based RADIUS server.disable
Enables or disables Extensible AuthenticationProtocol-FlexibleAuthentication via Secure Tunneling(EAP-FAST) authentication.
eap-fast
Enables EAP-FAST authentication.enable
Disables EAP-FAST authentication.disable
Enables AP based RADIUS Server.enable
Enables or disables Lightweight ExtensibleAuthentication Protocol (LEAP) authentication.
leap
Disables LEAP authentication.disable
CLI Commands715
CLI Commandsconfig flexconnect group
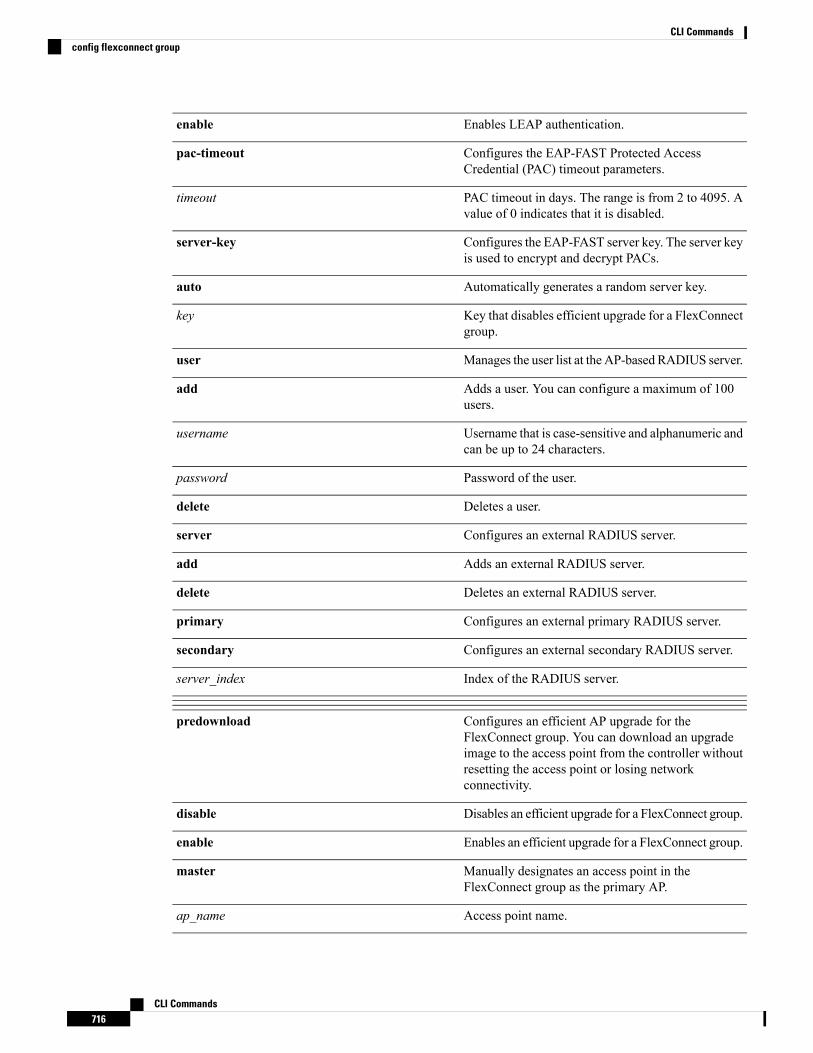
Enables LEAP authentication.enable
Configures the EAP-FAST Protected AccessCredential (PAC) timeout parameters.
pac-timeout
PAC timeout in days. The range is from 2 to 4095. Avalue of 0 indicates that it is disabled.
timeout
Configures the EAP-FAST server key. The server keyis used to encrypt and decrypt PACs.
server-key
Automatically generates a random server key.auto
Key that disables efficient upgrade for a FlexConnectgroup.
key
Manages the user list at the AP-based RADIUS server.user
Adds a user. You can configure a maximum of 100users.
add
Username that is case-sensitive and alphanumeric andcan be up to 24 characters.
username
Password of the user.password
Deletes a user.delete
Configures an external RADIUS server.server
Adds an external RADIUS server.add
Deletes an external RADIUS server.delete
Configures an external primary RADIUS server.primary
Configures an external secondary RADIUS server.secondary
Index of the RADIUS server.server_index
Configures an efficient AP upgrade for theFlexConnect group. You can download an upgradeimage to the access point from the controller withoutresetting the access point or losing networkconnectivity.
predownload
Disables an efficient upgrade for a FlexConnect group.disable
Enables an efficient upgrade for a FlexConnect group.enable
Manually designates an access point in theFlexConnect group as the primary AP.
master
Access point name.ap_name
CLI Commands716
CLI Commandsconfig flexconnect group
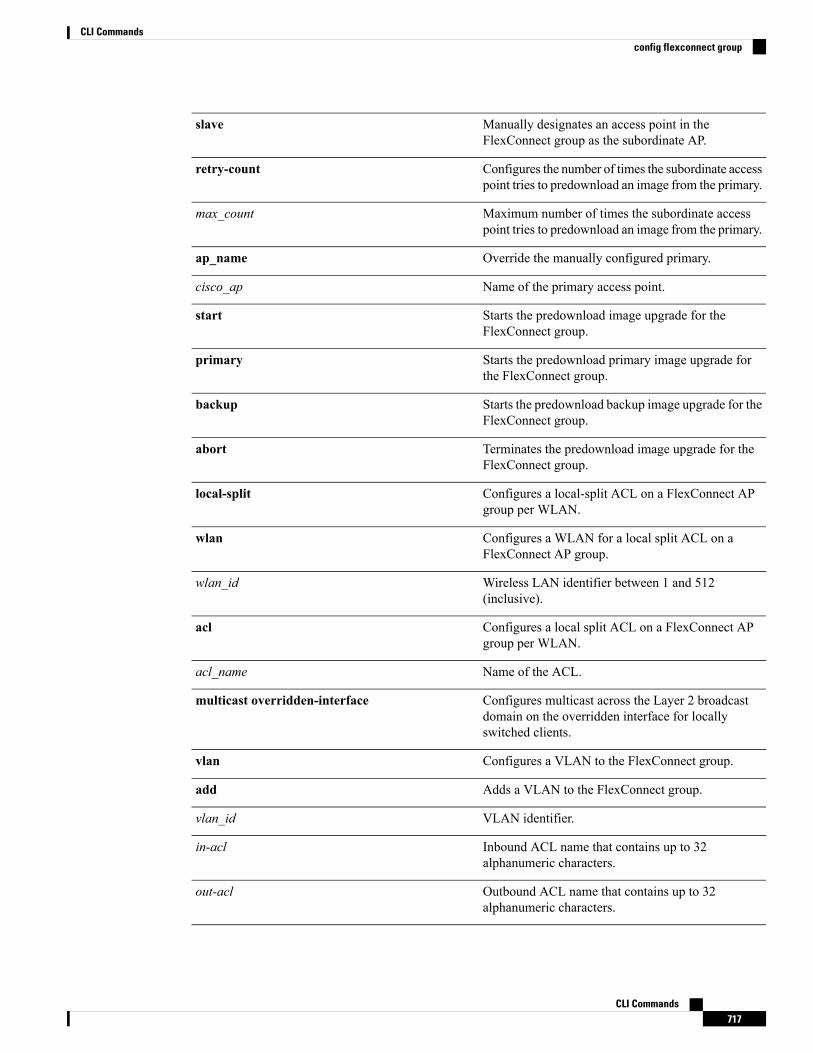
Manually designates an access point in theFlexConnect group as the subordinate AP.
slave
Configures the number of times the subordinate accesspoint tries to predownload an image from the primary.
retry-count
Maximum number of times the subordinate accesspoint tries to predownload an image from the primary.
max_count
Override the manually configured primary.ap_name
Name of the primary access point.cisco_ap
Starts the predownload image upgrade for theFlexConnect group.
start
Starts the predownload primary image upgrade forthe FlexConnect group.
primary
Starts the predownload backup image upgrade for theFlexConnect group.
backup
Terminates the predownload image upgrade for theFlexConnect group.
abort
Configures a local-split ACL on a FlexConnect APgroup per WLAN.
local-split
Configures a WLAN for a local split ACL on aFlexConnect AP group.
wlan
Wireless LAN identifier between 1 and 512(inclusive).
wlan_id
Configures a local split ACL on a FlexConnect APgroup per WLAN.
acl
Name of the ACL.acl_name
Configures multicast across the Layer 2 broadcastdomain on the overridden interface for locallyswitched clients.
multicast overridden-interface
Configures a VLAN to the FlexConnect group.vlan
Adds a VLAN to the FlexConnect group.add
VLAN identifier.vlan_id
Inbound ACL name that contains up to 32alphanumeric characters.
in-acl
Outbound ACL name that contains up to 32alphanumeric characters.
out-acl
CLI Commands717
CLI Commandsconfig flexconnect group
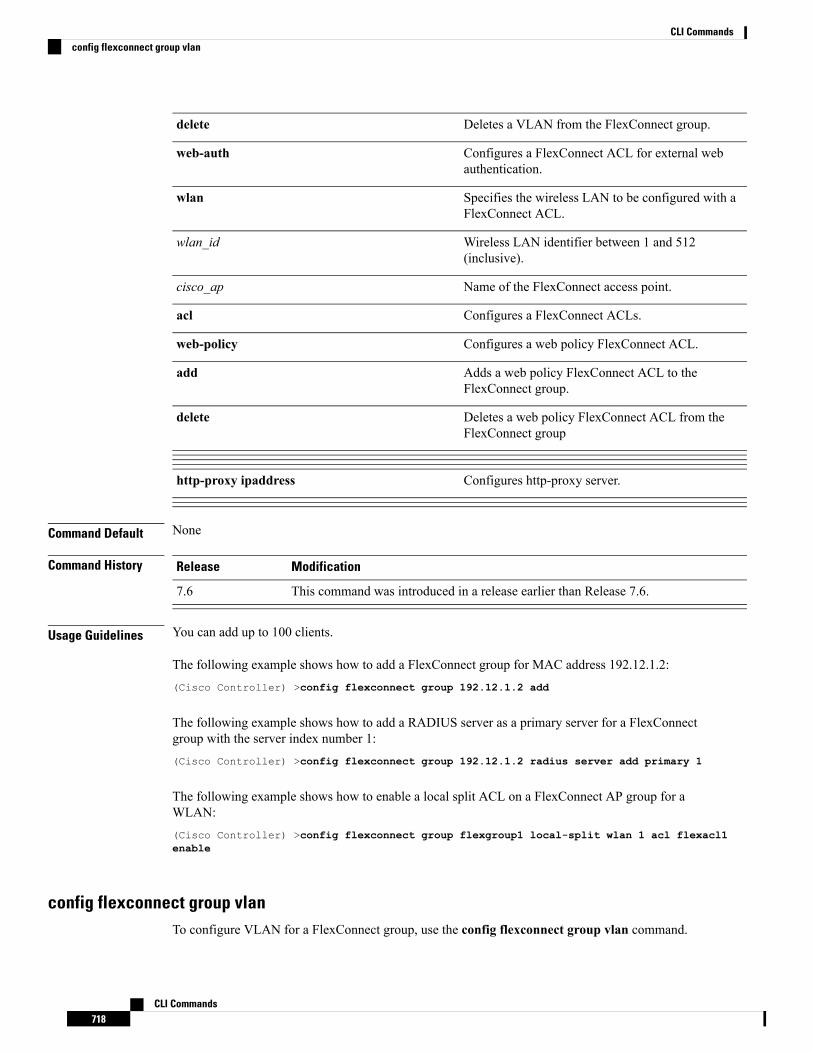
Deletes a VLAN from the FlexConnect group.delete
Configures a FlexConnect ACL for external webauthentication.
web-auth
Specifies the wireless LAN to be configured with aFlexConnect ACL.
wlan
Wireless LAN identifier between 1 and 512(inclusive).
wlan_id
Name of the FlexConnect access point.cisco_ap
Configures a FlexConnect ACLs.acl
Configures a web policy FlexConnect ACL.web-policy
Adds a web policy FlexConnect ACL to theFlexConnect group.
add
Deletes a web policy FlexConnect ACL from theFlexConnect group
delete
Configures http-proxy server.http-proxy ipaddress
Command Default None
Command History ModificationRelease
This command was introduced in a release earlier than Release 7.6.7.6
Usage Guidelines You can add up to 100 clients.
The following example shows how to add a FlexConnect group for MAC address 192.12.1.2:(Cisco Controller) >config flexconnect group 192.12.1.2 add
The following example shows how to add a RADIUS server as a primary server for a FlexConnectgroup with the server index number 1:(Cisco Controller) >config flexconnect group 192.12.1.2 radius server add primary 1
The following example shows how to enable a local split ACL on a FlexConnect AP group for aWLAN:(Cisco Controller) >config flexconnect group flexgroup1 local-split wlan 1 acl flexacl1enable
config flexconnect group vlanTo configure VLAN for a FlexConnect group, use the config flexconnect group vlan command.
CLI Commands718
CLI Commandsconfig flexconnect group vlan

config flexconnect group group_name vlan {add vlan-id acl in-aclname out-aclname | delete vlan-id}
Syntax Description FlexConnect group name.group_name
Adds a VLAN for the FlexConnect group.add
VLAN ID.vlan-id
Specifies an access control list.acl
In-bound ACL name.in-aclname
Out-bound ACL name.out-aclname
Deletes a VLAN from the FlexConnect group.delete
Command History ModificationRelease
This command was introduced in a release earlier than Release 7.6.7.6
The following example shows how to add VLAN ID 1 for the FlexConnect group myflexacl wherethe in-bound ACL name is in-acl and the out-bound ACL is out-acl:(Cisco Controller) >config flexconnect group vlan myflexacl vlan add 1 acl in-acl out-acl
config flexconnect group web-authTo configureWeb-Auth ACL for a FlexConnect group, use the config flexconnect groupweb-auth command.
config flexconnect group group_name web-auth wlan wlan-id acl acl-name {enable | disable}
Syntax Description FlexConnect group name.group_name
WLAN ID.wlan-id
ACL name.acl-name
Enables theWeb-Auth ACL for a FlexConnect group.enable
Disables theWeb-AuthACL for a FlexConnect group.disable
Command History ModificationRelease
This command was introduced in a release earlier than Release 7.6.7.6
The following example shows how to enableWeb-Auth ACL webauthacl for the FlexConnect groupmyflexacl on WLAN ID 1:(Cisco Controller) >config flexconnect group myflexacl web-auth wlan 1 acl webauthacl enable
CLI Commands719
CLI Commandsconfig flexconnect group web-auth
config flexconnect group web-policyTo configure Web Policy ACL for a FlexConnect group, use the config flexconnect group web-policycommand.
config flexconnect group group_name web-policy acl {add | delete} acl-name
Syntax Description FlexConnect group name.group_name
Adds the Web Policy ACL.add
Deletes the Web Policy ACL.delete
Name of the Web Policy ACL.acl-name
Command History ModificationRelease
This command was introduced in a release earlier than Release 7.6.7.6
The following example shows how to add the Web Policy ACL mywebpolicyacl to the FlexConnectgroup myflexacl:(Cisco Controller) >config flexconnect group myflexacl web-policy acl add mywebpolicyacl
config flexconnect join min-latencyTo enable or disable the access point to choose the controller with the least latency when joining, use theconfig flexconnect join min-latency command.
config flexconnect join min-latency {enable | disable} cisco_ap
Syntax Description Enables the access point to choose the controller withthe least latency when joining.
enable
Disables the access point to choose the controller withthe least latency when joining.
disable
Cisco lightweight access point.cisco_ap
Command Default The access point cannot choose the controller with the least latency when joining.
Command History ModificationRelease
This command was introduced in a release earlier than Release 7.6.7.6
Usage Guidelines When you enable this feature, the access point calculates the time between the discovery request and discoveryresponse and joins the controller that responds first. This command is supported only on the following controllerreleases:
• Cisco 2500 Series Controller
• Cisco 5500 Series Controller
CLI Commands720
CLI Commandsconfig flexconnect group web-policy

• Cisco Flex 7500 Series Controllers
• Cisco 8500 Series Controllers
• Cisco Wireless Services Module 2
This configuration overrides the HA setting on the controller, and is applicable only for OEAP access points.
The following example shows how to enable the access point to choose the controller with the leastlatency when joining:(Cisco Controller) >config flexconnect join min-latency enable CISCO_AP
config flexconnect office-extendTo configure FlexConnect mode for an OfficeExtend access point, use the config flexconnect office-extendcommand.
config flexconnect office-extend {{enable | disable} cisco_ap | clear-personalssid-config cisco_ap}
Syntax Description Enables the OfficeExtend mode for an access point.enable
Disables the OfficeExtend mode for an access point.disable
Clears only the access point’s personal SSID.clear-personalssid-config
Cisco lightweight access point.cisco_ap
Command Default OfficeExtend mode is enabled automatically when you enable FlexConnect mode on the access point.
Command History ModificationRelease
This command was introduced in a release earlier than Release 7.6.7.6
Usage Guidelines Currently, only Cisco Aironet 1130 series and 1140 series access points that are joined to a Cisco 5500 SeriesController with a WPlus license can be configured to operate as OfficeExtend access points.
Rogue detection is disabled automatically when you enable the OfficeExtend mode for an access point.OfficeExtend access points, which are deployed in a home environment, are likely to detect a large numberof rogue devices. You can enable or disable rogue detection for a specific access point or for all access pointsby using the config rogue detection command.
DTLS data encryption is enabled automatically when you enable the OfficeExtend mode for an access point.However, you can enable or disable DTLS data encryption for a specific access point or for all access pointsby using the config ap link-encryption command.
Telnet and SSH access are disabled automatically when you enable the OfficeExtend mode for an accesspoint. However, you can enable or disable Telnet or SSH access for a specific access point by using the configap telnet or config ap ssh command.
Link latency is enabled automatically when you enable the OfficeExtend mode for an access point. However,you can enable or disable link latency for a specific access point or for all access points currently associatedto the controller by using the config ap link-latency command.
CLI Commands721
CLI Commandsconfig flexconnect office-extend

The following example shows how to enable the office-extend mode for the access point Cisco_ap:(Cisco Controller) >config flexconnect office-extend enable Cisco_ap
The following example shows how to clear only the access point’s personal SSID for the access pointCisco_ap:(Cisco Controller) >config flexconnect office-extend clear-personalssid-config Cisco_ap
config interface aclTo configure access control list of an interface, use the config interface acl command.
config interface acl {ap-manager | management | interface_name} {ACL | none}
Syntax Description Configures the access point manager interface.ap-manager
Configures the management interface.management
Interface name.interface_name
ACL name up to 32 alphanumeric characters.ACL
Specifies none.none
Command Default None
Command History ModificationRelease
This commandwas introduced in a release earlier thanRelease 7.6.
7.6
Usage Guidelines For a Cisco 2100 SeriesWireless LANController, you must configure a preauthentication ACL on the wirelessLAN for the external web server. This ACL should then be set as a wireless LAN preauthentication ACLunder Web Policy. However, you do not need to configure any preauthentication ACL for Cisco 4400 SeriesWireless LAN Controllers.
The following example shows how to configure an access control list with a value None:
(Cisco Controller) > config interface acl management none
config interface addressTo configure address information for an interface, use the config interface address command.
config interface address {ap-manager IP_address netmask gateway | management IP_address netmaskgateway | service-port IP_address netmask | virtual IP_address | dynamic-interface IP_addressdynamic_interface netmask gateway| redundancy-management IP_addresspeer-redundancy-managementIP_address }
CLI Commands722
CLI Commandsconfig interface acl
Syntax Description Specifies the access point manager interface.ap-manager
IP address— IPv4 only.IP_address
Network mask.netmask
IP address of the gateway.gateway
Specifies the management interface.management
Specifies the out-of-band service port interface.service-port
Specifies the virtual gateway interface.virtual
Specifies the interface identified by the interface-nameparameter.
interface-name
Interface name.interface-name
Configures redundancy management interface IPaddress.
redundancy-management
Configures the peer redundancymanagement interfaceIP address.
peer-redundancy-management
Command Default None
Command History ModificationRelease
This commandwas introduced in a release earlier thanRelease 7.6.
7.6
Usage Guidelines For Cisco 5500 Series Controllers, you are not required to configure an AP-manager interface. Themanagementinterface acts like an AP-manager interface by default.
This command is applicable for IPv4 addresses only.
Ensure that the management interfaces of both controllers are in the same subnet. Ensure that the RedundantManagement IP address for both controllers is the same. Likewise, ensure that the Peer RedundantManagementIP address for both the controllers is the same.
The following example shows how to configure an access point manager interface with IP address209.165.201.31, network mask 255.255.0.0, and gateway address 209.165.201.30:(Cisco Controller) > config interface address ap-manager 209.165.201.31 255.255.0.0209.165.201.30
The following example shows how to configure a redundancymanagement interface on the controller:(Cisco Controller) > config interface address redundancy-management 209.4.120.5peer-redundancy-management 209.4.120.6
The following example shows how to configure a virtual interface:
CLI Commands723
CLI Commandsconfig interface address

(Cisco Controller) > config interface address virtual 192.0.2.1
Related Commands show interface
config interface ap-managerTo enable or disable access point manager features on the management or dynamic interface, use the configinterface ap-manager command.
config interface ap-manager {management | interface_name} {enable | disable}
Syntax Description Specifies the management interface.management
Dynamic interface name.interface_name
Enables access point manager features on a dynamicinterface.
enable
Disables access point manager features on a dynamicinterface.
disable
Command Default None
Command History ModificationRelease
This commandwas introduced in a release earlier thanRelease 7.6.
7.6
Usage Guidelines Use themanagement option to enable or disable dynamic AP management for the management interface.For Cisco 5500 Series Controllers, the management interface acts like an AP-manager interface by default.If desired, you can disable the management interface as an AP-manager interface and create another dynamicinterface as an AP manager.
When you enable this feature for a dynamic interface, the dynamic interface is configured as an AP-managerinterface (only one AP-manager interface is allowed per physical port). A dynamic interface that is markedas an AP-manager interface cannot be used as a WLAN interface.
The following example shows how to disable an access point manager myinterface:
(Cisco Controller) > config interface ap-manager myinterface disable
config interface createTo create a dynamic interface (VLAN) for wired guest user access, use the config interface create command.
config interface create interface_name vlan-id
Syntax Description Interface name.interface_name
VLAN identifier.vlan-id
CLI Commands724
CLI Commandsconfig interface ap-manager

Command Default None
Command History ModificationRelease
This commandwas introduced in a release earlier thanRelease 7.6.
7.6
The following example shows how to create a dynamic interface with the interface named lab2 andVLAN ID 6:
(Cisco Controller) > config interface create lab2 6
config interface deleteTo delete a dynamic interface, use the config interface delete command.
config interface delete interface-name
Syntax Description interface-nameInterface name.interface-name
Command Default None
Command History ModificationRelease
This commandwas introduced in a release earlier thanRelease 7.6.
7.6
The following example shows how to delete a dynamic interface named VLAN501:
(Cisco Controller) > config interface delete VLAN501
config interface dhcp managementTo configure DHCP options on amangament interface, use the config interface dhcpmanagement command.
config interface dhcp management {option-82 {bridge-mode-insertion {enable | disable} |enable | disable | linksel {enable | disable | relaysrc interface-name} | vpnsel {enable |disable | vpnid vpn-id | vrfname vrf-name}} | primary primary-dhcp_server [ secondarysecondary-dhcp_server ] | proxy-mode {enable | disable | global} }
Syntax Description Configures DHCP Option 82 on the interface.option-82
Configures DHCP option 82 insertion in bridgemode.bridge-mode-insertion
Disables the feature.disable
Enables the feature.enable
CLI Commands725
CLI Commandsconfig interface delete

Specifies the primary DHCP server.primary
IP address of the server.primary-dhcp-server
(Optional) Specifies the secondary DHCP server.secondary
IP address of the server.secondary-dhcp-server
Configures the DHCP proxy mode on the interface.proxy-mode
Uses the global DHCP proxy mode on the interface.global
(Optional) Disables the DHCP proxy mode on theinterface.
disable
(Optional) Uses the global DHCP proxy mode on theinterface.
global
Command Default None
Command History ModificationRelease
This commandwas introduced in a release earlier thanRelease 7.6.
7.6
This command supports IPv6 from this release.
The following example shows how to configure option 82 on a management interface.
(Cisco Controller) > config interface dhcp management option-82 enable
Related Commands config dhcp
config dhcp proxy
config interface dhcp
config wlan dhcp_server
debug dhcp
debug dhcp service-port
debug disable-all
show dhcp
show dhcp proxy
show interface
config interface addressTo configure interface addresses, use the config interface address command.
CLI Commands726
CLI Commandsconfig interface address
config interface address {dynamic-interface dynamic_interface netmask gateway | management |redundancy-management IP_address peer-redundancy-management| service-port netmask| virtual}IP_address
Syntax Description Configures the dynamic interface of the controller.dynamic-interface
Dynamic interface of the controller.dynamic_interface
IP address of the interface.IP_address
Netmask of the interface.netmask
Gateway of the interface.gateway
Configures the management interface IP address.management
Configures redundancy management interface IPaddress.
redundancy-management
Configures the peer redundancymanagement interfaceIP address.
peer-redundancy-management
Configures the out-of-band service port.service-port
Configures the virtual gateway interface.virtual
Command Default None
Command History ModificationRelease
This commandwas introduced in a release earlier thanRelease 7.6.
7.6
Usage Guidelines Ensure that the management interfaces of both controllers are in the same subnet. Ensure that the redundantmanagement IP address for both controllers is the same and that the peer redundant management IP addressfor both the controllers is the same.
The following example shows how to configure a redundancymanagement interface on the controller:(Cisco Controller) >config interface address redundancy-management 209.4.120.5peer-redundancy-management 209.4.120.6
The following example shows how to configure a virtual interface:(Cisco Controller) > config interface address virtual 1.1.1.1
Related Commands show interface group summary
show interface summary
config interface guest-lanTo enable or disable the guest LAN VLAN, use the config interface guest-lan command.
CLI Commands727
CLI Commandsconfig interface guest-lan

config interface guest-lan interface_name {enable | disable}
Syntax Description Interface name.interface_name
Enables the guest LAN.enable
Disables the guest LAN.disable
Command Default None
Command History ModificationRelease
This commandwas introduced in a release earlier thanRelease 7.6.
7.6
The following example shows how to enable the guest LAN feature on the interface namedmyinterface:
(Cisco Controller) > config interface guest-lan myinterface enable
Related Commands config guest-lan create
config interface hostnameTo configure the Domain Name System (DNS) hostname of the virtual gateway interface, use the configinterface hostname command.
config interface hostname virtual DNS_host
Syntax Description Specifies the virtual gateway interface to use thespecified virtual address of the fully qualified DNSname.
The virtual gateway IP address is any fictitious,unassigned IP address, such as 192.0.2.1, to be usedby Layer 3 security and mobility managers.
virtual
DNS hostname.DNS_host
Command Default None
Command History ModificationRelease
This commandwas introduced in a release earlier thanRelease 7.6.
7.6
The following example shows how to configure virtual gateway interface to use the specified virtualaddress of the fully qualified DNS hostname DNS_Host:
(Cisco Controller) > config interface hostname virtual DNS_Host
CLI Commands728
CLI Commandsconfig interface hostname

config interface nat-addressTo deploy your Cisco 5500 Series Controller behind a router or other gateway device that is using one-to-onemapping network address translation (NAT), use the config interface nat-address command.
config interface nat-address {management | dynamic-interface interface_name} {{enable |disable} | {set public_IP_address}}
Syntax Description Specifies the management interface.management
Specifies the dynamic interface name.dynamic-interface interface_name
Enables one-to-one mapping NAT on the interface.enable
Disables one-to-one mapping NAT on the interface.disable
External NAT IP address.public_IP_address
Command Default None
Command History ModificationRelease
This commandwas introduced in a release earlier thanRelease 7.6.
7.6
Usage Guidelines These NAT commands can be used only on Cisco 5500 Series Controllers and only if the management interfaceis configured for dynamic AP management.
These commands are supported for use only with one-to-one-mapping NAT, where each private client has adirect and fixed mapping to a global address. They do not support one-to-many NAT, which uses source portmapping to enable a group of clients to be represented by a single IP address.
The following example shows how to enable one-to-one mapping NAT on the management interface:
(Cisco Controller) > config interface nat-address management enable
The following example shows how to set the external NAP IP address 10.10.10.10 on themanagementinterface:
(Cisco Controller) > config interface nat-address management set 10.10.10.10
config interface portTo map a physical port to the interface (if a link aggregation trunk is not configured), use the config interfaceport command.
config interface port {management | interface_name | redundancy-management} primary_port[secondary_port]
Syntax Description Specifies the management interface.management
CLI Commands729
CLI Commandsconfig interface nat-address

Interface name.interface_name
Specifies the redundancy management interface.redundancy-management
Primary physical port number.primary_port
(Optional) Secondary physical port number.secondary_port
Command Default None
Command History ModificationRelease
This commandwas introduced in a release earlier thanRelease 7.6.
7.6
Usage Guidelines You can use themanagement option for all controllers except the Cisco 5500 Series Controllers.
The following example shows how to configure the primary port number of the LAb02 interface to3:
(Cisco Controller) > config interface port lab02 3
config interface quarantine vlanTo configure a quarantine VLAN on any dynamic interface, use the config interface quarantine vlancommand.
config interface quarantine vlan interface-name vlan_id
Syntax Description Interface’s name.interface-name
VLAN identifier.
Enter 0 to disable quarantine processing.Note
vlan_id
Command Default None
Command History ModificationRelease
This commandwas introduced in a release earlier thanRelease 7.6.
7.6
The following example shows how to configure a quarantine VLAN on the quarantine interface withthe VLAN ID 10:
(Cisco Controller) > config interface quarantine vlan quarantine 10
CLI Commands730
CLI Commandsconfig interface quarantine vlan

config interface vlanTo configure an interface VLAN identifier, use the config interface vlan command.
config interface vlan {ap-manager | management | interface-name} vlan
Syntax Description Configures the access point manager interface.ap-manager
Configures the management interface.management
Interface name.interface_name
VLAN identifier.vlan
Command Default None
Command History ModificationRelease
This commandwas introduced in a release earlier thanRelease 7.6.
7.6
The following example shows how to configure VLAN ID 10 on the management interface:
(Cisco Controller) > config interface vlan management 10
config known apTo configure a known Cisco lightweight access point, use the config known ap command.
config known ap {add | alert | delete} MAC
Syntax Description Adds a new known access point entry.add
Generates a trap upon detection of the access point.alert
Deletes an existing known access point entry.delete
MAC address of the known Cisco lightweight accesspoint.
MAC
Command Default None
Command History ModificationRelease
This commandwas introduced in a release earlier thanRelease 7.6.
7.6
The following example shows how to add a new access point entry ac:10:02:72:2f:bf on a knownaccess point:
CLI Commands731
CLI Commandsconfig interface vlan

(Cisco Controller) >config known ap add ac:10:02:72:2f:bf 12
config lagTo enable or disable link aggregation (LAG), use the config lag command.
config lag {enable | disable}
Syntax Description Enables the link aggregation (LAG) settings.enable
Disables the link aggregation (LAG) settings.disable
Command Default None
Command History ModificationRelease
This commandwas introduced in a release earlier thanRelease 7.6.
7.6
The following example shows how to enable LAG settings:
(Cisco Controller) > config lag enableEnabling LAG will map your current interfaces setting to LAG interface,All dynamic AP Manager interfaces and Untagged interfaces will be deletedAll WLANs will be disabled and mapped to Mgmt interfaceAre you sure you want to continue? (y/n)You must now reboot for the settings to take effect.
The following example shows how to disable LAG settings:
(Cisco Controller) > config lag disableDisabling LAG will map all existing interfaces to port 1.Are you sure you want to continue? (y/n)You must now reboot for the settings to take effect.
config ldapTo configure the Lightweight Directory Access Protocol (LDAP) server settings, use the config ldap command.
config ldap {add | delete | enable | disable | retransmit-timeout | retry | user |simple-bind} index
config ldap add index server_ip_address port user_base user_attr user_type[]
config ldap retransmit-timeout index retransmit-timeout
config ldap retry attempts
CLI Commands732
CLI Commandsconfig lag

config ldap user {attr index user-attr | base index user-base | typeindex user-type}
config ldap simple-bind {anonymous index | authenticated index username password}
Syntax Description Specifies that an LDAP server is being added.add
Specifies that an LDAP server is being deleted.delete
Specifies that an LDAP serve is enabled.enable
Specifies that an LDAP server is disabled.disable
Changes the default retransmit timeout for an LDAPserver.
retransmit-timeout
Configures the retry attempts for an LDAP server.retry
Configures the user search parameters.user
Configures the local authentication bind method.simple-bind
Allows anonymous access to the LDAP server.anonymous
Specifies that a username and password be entered tosecure access to the LDAP server.
authenticated
LDAP server index. The range is from 1 to 17.index
IP address of the LDAP server.server_ip_address
Port number.port
Distinguished name for the subtree that contains allof the users.
user_base
Attribute that contains the username.user_attr
ObjectType that identifies the user.user_type
Retransmit timeout for an LDAP server. The range isfrom 2 to 30.
retransmit-timeout
Number of attempts that each LDAP server is retried.attempts
Configures the attribute that contains the username.attr
Configures the distinguished name of the subtree thatcontains all the users.
base
Configures the user type.type
Username for the authenticated bind method.username
Password for the authenticated bind method.password
CLI Commands733
CLI Commandsconfig ldap
Command Default None
Command History ModificationRelease
This commandwas introduced in a release earlier thanRelease 7.6.
7.6
The following example shows how to enable LDAP server index 10:
(Cisco Controller) > config ldap enable 10
Related Commands config ldap add
config ldap simple-bind
show ldap summary
config ldap addTo configure a Lightweight Directory Access Protocol (LDAP) server, use the config ldap add command.
config lap add index server_ip_address port user_base user_attr user_type
Syntax Description LDAP server index.index
IP address of the LDAP server.server_ip_address
Port number.port
Distinguished name for the subtree that contains allof the users.
user_base
Attribute that contains the username.user_attr
ObjectType that identifies the user.user_type
Command Default None
Command History ModificationRelease
This commandwas introduced in a release earlier thanRelease 7.6.
7.6
The secure keyword was added to support secureLDAP.
7.6
The following example shows how to configure a LDAP server with the index10, server IP address209.165.201.30, port number 2:
(Cisco Controller) > config ldap add 10 209.165.201.30 2 base_name attr_name type_name
CLI Commands734
CLI Commandsconfig ldap add

Related Commands config ldap
config ldap simple-bind
show ldap summary
config ldap simple-bindTo configure the local authentication bind method for the Lightweight Directory Access Protocol (LDAP)server, use the config ldap simple-bind command.
config ldap simple-bind {anonymous index | authenticated index username password}
Syntax Description Allows anonymous access to the LDAP server.anonymous
LDAP server index.index
Specifies that a username and password be entered tosecure access to the LDAP server.
authenticated
Username for the authenticated bind method.username
Password for the authenticated bind method.password
Command Default The default bind method is anonymous.
Command History ModificationRelease
This commandwas introduced in a release earlier thanRelease 7.6.
7.6
The following example shows how to configure the local authentication bind method that allowsanonymous access to the LDAP server:
(Cisco Controller) > config ldap simple-bind anonymous
Related Commands config ldap add
config ldap
show ldap summary
config license agentTo configure the license agent on the Cisco 5500 Series Controller, use the config license agent command.
config license agent {default {disable | authenticate [none]}} {listener http {disable | {plaintext| encrypt} url authenticate [acl acl_name] {max-message size [none]}} {max-session sessions}{notify {disable | url} username password}
Syntax Description Specifies the default license agent.default
Disables the feature.disable
CLI Commands735
CLI Commandsconfig ldap simple-bind

Enables authentication.authenticate
(Optional) Disables authentication.none
Configures the license agent to receive licenserequests from the Cisco License Manager (CLM).
listener http
Disables encryption (HTTP).plaintext
Enables encryption (HTTPS).encrypt
URL where the license agent receives the requests.url
(Optional) Specifies the access control list.acl
Specifies the access control list for license requests.acl_name
Specifies the maximum message size for licenserequests.
max-message
Maximum message size for license request is from 0to 65535.
size
Specifies the maximum number of sessions allowed.max-session
Maximum number of sessions allowed for the licenseagent is from 1 to 25.
sessions
Configures the license agent to send licensenotifications to the CLM.
notify
Username used in license agent notification.username
Password used in license agent notification.password
Command Default The license agent is disabled by default.
The listener is disabled by default.
Notify is disabled by default.
The default maximum number of sessions is 9.
The default maximum message size is 0.
Command History ModificationRelease
This command was introduced in a release earlier than Release 7.6.7.6
Usage Guidelines If your network contains various Cisco licensed devices, you might consider using the CLM to manage all ofthe licenses using a single application. CLM is a secure client/server application that manages Cisco softwarelicenses network wide.
The license agent is an interface module that runs on the controller and mediates between CLM and thecontroller’s licensing infrastructure. CLM can communicate with the controller using various channels, such
CLI Commands736
CLI Commandsconfig license agent
as HTTP, Telnet, and so on. If you want to use HTTP as the communication method, you must enable thelicense agent on the controller.
The license agent receives requests from the CLM and translates them into license commands. It also sendsnotifications to the CLM. It uses XML messages over HTTP or HTTPS to receive the requests and send thenotifications. For example, if the CLM sends a license clear command, the agent notifies the CLM after thelicense expires.
You can download the CLM software and access user documentation at this URL:http://www.cisco.com/c/en/us/products/cloud-systems-management/license-manager/index.html
Note
The following example shows how to authenticate the default license agent settings:
(Cisco Controller) > config license agent default authenticate
The following example shows how to configure the license agent with the number of maximumsessions allowed as 5:
(Cisco Controller) > config license agent max-session 5
Related Commands license install
show license agent
clear license agent
config license bootTo specify the license level to be used on the next reboot of the Cisco 5500 Series Controller, use the configlicense boot command.
config license boot {base | wplus | auto}
Syntax Description Specifies the base boot level.base
Specifies the wplus boot level.wplus
Specifies the auto boot level.auto
Command Default None
Command History ModificationRelease
This command was introduced in a release earlier than Release 7.6.7.6
Usage Guidelines If you enter auto, the licensing software automatically chooses the license level to use on the next reboot. Itgenerally chooses permanent licenses over evaluation licenses and wplus licenses over base licenses.
CLI Commands737
CLI Commandsconfig license boot

If you are considering upgrading from a base license to a wplus license, you can try an evaluation wpluslicense before upgrading to a permanent wplus license. To activate the evaluation license, you need to set theimage level to wplus in order for the controller to use the wplus evaluation license instead of the base permanentlicense.
Note
To prevent disruptions in operation, the controller does not switch licenses when an evaluation license expires.You must reboot the controller in order to return to a permanent license. Following a reboot, the controllerdefaults to the same feature set level as the expired evaluation license. If no permanent license at the samefeature set level is installed, the controller uses a permanent license at another level or an unexpired evaluationlicense.
Note
The following example shows how to set the license boot settings to wplus:
(Cisco Controller) > config license boot wplus
Related Commands license install
show license in-use
license modify priority
config load-balancingTo globally configure aggressive load balancing on the controller, use the config load-balancing command.
config load-balancing {window client_count | status {enable | disable} | denial denial_count}
Syntax Description Specifies the aggressive load balancing client window.window
Aggressive load balancing client window with thenumber of clients from 1 to 20.
client_count
Sets the load balancing status.status
Enables load balancing feature.enable
Disables load balancing feature.disable
Specifies the number of association denials duringload balancing.
denial
Maximum number of association denials during loadbalancing. from 0 to 10.
denial_count
Command Default By default, the aggressive load balancing is disabled.
CLI Commands738
CLI Commandsconfig load-balancing
Command History ModificationRelease
This command was introduced in a release earlier than Release 7.6.7.6
Usage Guidelines Load-balancing-enabled WLANs do not support time-sensitive applications like voice and video because ofroaming delays.
When you use Cisco 7921 and 7920 Wireless IP Phones with controllers, make sure that aggressive loadbalancing is disabled on the voice WLANs for each controller. Otherwise, the initial roam attempt by thephone might fail, causing a disruption in the audio path.
The following example shows how to enable the aggressive load-balancing settings:
(Cisco Controller) > config load-balancing aggressive enable
Related Commands show load-balancing
config wlan load-balance
config local-auth active-timeoutTo specify the amount of time in which the controller attempts to authenticate wireless clients using localExtensible Authentication Protocol (EAP) after any pair of configured RADIUS servers fails, use the configlocal-auth active-timeout command.
config local-auth active-timeout timeout
Syntax Description Timeout measured in seconds. The range is from 1 to3600.
timeout
Command Default The default timeout value is 100 seconds.
Command History ModificationRelease
This commandwas introduced in a release earlier thanRelease 7.6.
7.6
The following example shows how to specify the active timeout to authenticate wireless clients usingEAP to 500 seconds:
(Cisco Controller) > config local-auth active-timeout 500
Related Commands clear stats local-auth
config local-auth eap-profile
config local-auth method fast
config local-auth user-credentials
debug aaa local-auth
CLI Commands739
CLI Commandsconfig local-auth active-timeout

show local-auth certificates
show local-auth config
show local-auth statistics
config local-auth eap-profileTo configure local Extensible Authentication Protocol (EAP) authentication profiles, use the config local-autheap-profile command.
config local-auth eap-profile {[add | delete] profile_name | cert-issuer {cisco | vendor} |method method local-cert {enable | disable} profile_name | method method client-cert {enable |disable} profile_name | methodmethod peer-verify ca-issuer{enable| disable} | methodmethodpeer-verify cn-verify{enable | disable} | methodmethod peer-verify date-valid {enable | disable}
Syntax Description (Optional) Specifies that an EAP profile or method isbeing added.
add
(Optional) Specifies that an EAP profile or method isbeing deleted.
delete
EAP profile name (up to 63 alphanumeric characters).Do not include spaces within a profile name.
profile_name
(For use with EAP-TLS, PEAP, or EAP-FAST withcertificates) Specifies the issuer of the certificates thatwill be sent to the client. The supported certificateissuers are Cisco or a third-party vendor.
cert-issuer
Specifies the Cisco certificate issuer.cisco
Specifies the third-party vendor.vendor
Configures an EAP profile method.method
EAP profile method name. The supported methodsare leap, fast, tls, and peap.
method
(For use with EAP-FAST) Specifies whether thedevice certificate on the controller is required forauthentication.
local-cert
Specifies that the parameter is enabled.enable
Specifies that the parameter is disabled.disable
(For use with EAP-FAST) Specifies whether wirelessclients are required to send their device certificates tothe controller in order to authenticate.
client-cert
Configures the peer certificate verification options.peer-verify
CLI Commands740
CLI Commandsconfig local-auth eap-profile

(For use with EAP-TLS or EAP-FAST withcertificates) Specifies whether the incoming certificatefrom the client is to be validated against the CertificateAuthority (CA) certificates on the controller.
ca-issuer
(For use with EAP-TLS or EAP-FAST withcertificates) Specifies whether the common name (CN)in the incoming certificate is to be validated againstthe CA certificates’ CN on the controller.
cn-verify
(For use with EAP-TLS or EAP-FAST withcertificates) Specifies whether the controller is toverify that the incoming device certificate is still validand has not expired.
date-valid
Command Default None
Command History ModificationRelease
This commandwas introduced in a release earlier thanRelease 7.6.
7.6
The following example shows how to create a local EAP profile named FAST01:
(Cisco Controller) > config local-auth eap-profile add FAST01
The following example shows how to add the EAP-FAST method to a local EAP profile:(Cisco Controller) > config local-auth eap-profile method add fast FAST01
The following example shows how to specify Cisco as the issuer of the certificates that will be sentto the client for an EAP-FAST profile:(Cisco Controller) > config local-auth eap-profile method fast cert-issuer cisco
The following example shows how to specify that the incoming certificate from the client be validatedagainst the CA certificates on the controller:(Cisco Controller) > config local-auth eap-profile method fast peer-verify ca-issuer enable
Related Commands config local-auth active-timeout
config local-auth method fast
config local-auth user-credentials
debug aaa local-auth
show local-auth certificates
show local-auth config
show local-auth statistics
CLI Commands741
CLI Commandsconfig local-auth eap-profile
config local-auth method fastTo configure an EAP-FAST profile, use the config local-auth method fast command.
config local-auth method fast {anon-prov [enable | disable] | authority-id auth_id pac-ttl days| server-key key_value}
Syntax Description Configures the controller to allow anonymousprovisioning, which allows PACs to be sentautomatically to clients that do not have one duringProtected Access Credentials (PAC) provisioning.
anon-prov
(Optional) Specifies that the parameter is enabled.enable
(Optional) Specifies that the parameter is disabled.disable
Configures the authority identifier of the localEAP-FAST server.
authority-id
Authority identifier of the local EAP-FAST server (2to 32 hexadecimal digits).
auth_id
Configures the number of days for the ProtectedAccess Credentials (PAC) to remain viable (alsoknown as the time-to-live [TTL] value).
pac-ttl
Time-to-live value (TTL) value (1 to 1000 days).days
Configures the server key to encrypt or decrypt PACs.server-key
Encryption key value (2 to 32 hexadecimal digits).key_value
Command Default None
Command History ModificationRelease
This commandwas introduced in a release earlier thanRelease 7.6.
7.6
The following example shows how to disable the controller to allows anonymous provisioning:(Cisco Controller) > config local-auth method fast anon-prov disable
The following example shows how to configure the authority identifier 0125631177 of the localEAP-FAST server:(Cisco Controller) > config local-auth method fast authority-id 0125631177
The following example shows how to configure the number of days to 10 for the PAC to remainviable:(Cisco Controller) > config local-auth method fast pac-ttl 10
CLI Commands742
CLI Commandsconfig local-auth method fast

Related Commands clear stats local-auth
config local-auth eap-profile
config local-auth active-timeout
config local-auth user-credentials
debug aaa local-auth
show local-auth certificates
show local-auth config
show local-auth statistics
config local-auth user-credentialsTo configure the local Extensible Authentication Protocol (EAP) authentication database search order for usercredentials, use the config local-auth user credentials command.
config local-auth user-credentials {local [ldap] | ldap [local] }
Syntax Description Specifies that the local database is searched for theuser credentials.
local
(Optional) Specifies that the Lightweight DirectoryAccess Protocol (LDAP) database is searched for theuser credentials.
ldap
Command Default None
Command History ModificationRelease
This commandwas introduced in a release earlier thanRelease 7.6.
7.6
Usage Guidelines The order of the specified database parameters indicate the database search order.
The following example shows how to specify the order in which the local EAP authentication databaseis searched:(Cisco Controller) > config local-auth user credentials local lda
In the above example, the local database is searched first and then the LDAP database.
Related Commands clear stats local-auth
config local-auth eap-profile
config local-auth method fast
config local-auth active-timeout
debug aaa local-auth
CLI Commands743
CLI Commandsconfig local-auth user-credentials

show local-auth certificates
show local-auth config
show local-auth statistics
config locationTo configure a location-based system, use the config location command.
config location {algorithm {simple | rssi-average} | {rssi-half-life | expiry} [client |calibrating-client | tags | rogue-aps] seconds | notify-threshold [client | tags | rogue-aps]threshold | interface-mapping {add | delete} location wlan_id interface_name | plm {client{enable | disable} burst_interval | calibrating {enable | disable} {uniband | multiband}}}
Syntax Description We recommend that you do not use ormodify the config location algorithmcommand. It is set to optimal defaultvalues.
Note
Configures the algorithm used to average RSSI andSNR values.
algorithm
Specifies a faster algorithm that requires low CPUoverhead but provides less accuracy.
simple
Specifies a more accurate algorithm but requires moreCPU overhead.
rssi-average
We recommend that you do not use ormodify the config location rssi-half-lifecommand. It is set to optimal defaultvalues.
Note
Configures the half-life when averaging two RSSIreadings.
rssi-half-life
We recommend that you do not use ormodify the config location expirycommand. It is set to optimal defaultvalues.
Note
Configures the timeout for RSSI values.
expiry
(Optional) Specifies the parameter applies to clientdevices.
client
(Optional) Specifies the parameter is used forcalibrating client devices.
calibrating-client
(Optional) Specifies the parameter applies to radiofrequency identification (RFID) tags.
tags
CLI Commands744
CLI Commandsconfig location

(Optional) Specifies the parameter applies to rogueaccess points.
rogue-aps
Time value (0, 1, 2, 5, 10, 20, 30, 60, 90, 120, 180,300 seconds).
seconds
We recommend that you do not use ormodify the config locationnotify-threshold command. It is set tooptimal default values.
Note
Specifies the NMSP notification threshold for RSSImeasurements.
notify-threshold
Threshold parameter. The range is 0 to 10 dB, and thedefault value is 0 dB.
threshold
Adds or deletes a new location, wireless LAN, orinterface mapping element.
interface-mapping
WLAN identification name.wlan_id
Name of interface to which mapping element applies.interface_name
Specifies the path loss measurement (S60) request fornormal clients or calibrating clients.
plm
Specifies normal, noncalibrating clients.client
Burst interval. The range is from 1 to 3600 seconds,and the default value is 60 seconds.
burst_interval
Specifies calibrating clients.calibrating
Specifies the associated 802.11a or 802.11b/g radio(uniband).
uniband
Specifies the associated 802.11a/b/g radio (multiband).multiband
Command Default See the “Syntax Description” section for default values of individual arguments and keywords.
Command History ModificationRelease
This command was introduced in a release earlier than Release 7.6.7.6
The following example shows how to specify the simple algorithm for averaging RSSI and SNRvalues on a location-based controller:
(Cisco Controller) > config location algorithm simple
Related Commands config location info rogue
CLI Commands745
CLI Commandsconfig location

clear location rfid
clear location statistics rfid
show location
show location statistics rfid
config logging bufferedTo set the severity level for logging messages to the controller buffer, use the config logging bufferedcommand.
config logging buffered security_level
Syntax Description Security level. Choose one of the following:
• emergencies—Severity level 0
• alerts—Severity level 1
• critical—Severity level 2
• errors—Severity level 3
• warnings—Severity level 4
• notifications—Severity level 5
• informational—Severity level 6
• debugging—Severity level 7
security_level
Command Default None
Command History ModificationRelease
This command was introduced in a release earlier than Release 7.6.7.6
The following example shows how to set the controller buffer severity level for logging messagesto 4:
(Cisco Controller) > config logging buffered 4
Related Commands config logging syslog facility
config logging syslog level
show logging
config logging consoleTo set the severity level for logging messages to the controller console, use the config logging consolecommand.
CLI Commands746
CLI Commandsconfig logging buffered

config logging console security_level
Syntax Description Severity level. Choose one of the following:
• emergencies—Severity level 0
• alerts—Severity level 1
• critical—Severity level 2
• errors—Severity level 3
• warnings—Severity level 4
• notifications—Severity level 5
• informational—Severity level 6
• debugging—Severity level 7
security_level
Command Default None
Command History ModificationRelease
This command was introduced in a release earlier than Release 7.6.7.6
The following example shows how to set the controller console severity level for logging messagesto 3:
(Cisco Controller) > config logging console 3
Related Commands config logging syslog facility
config logging syslog level
show logging
config logging debugTo save debug messages to the controller buffer, the controller console, or a syslog server, use the configlogging debug command.
config logging debug {buffered | console | syslog} {enable | disable}
Syntax Description Saves debug messages to the controller buffer.buffered
Saves debug messages to the controller console.console
Saves debug messages to the syslog server.syslog
Enables logging of debug messages.enable
Disables logging of debug messages.disable
CLI Commands747
CLI Commandsconfig logging debug

Command Default The console command is enabled and the buffered and syslog commands are disabled by default.
Command History ModificationRelease
This command was introduced in a release earlier than Release 7.6.7.6
The following example shows how to save the debug messages to the controller console:
(Cisco Controller) > config logging debug console enable
Related Commands show logging
config logging fileinfoTo cause the controller to include information about the source file in the message logs or to prevent thecontroller from displaying this information, use the config logging fileinfo command.
config logging fileinfo {enable | disable}
Syntax Description Includes information about the source file in themessage logs.
enable
Prevents the controller from displaying informationabout the source file in the message logs.
disable
Command Default None
Command History ModificationRelease
This command was introduced in a release earlier than Release 7.6.7.6
The following example shows how to enable the controller to include information about the sourcefile in the message logs:
(Cisco Controller) > config logging fileinfo enable
Related Commands show logging
config logging procinfoTo cause the controller to include process information in the message logs or to prevent the controller fromdisplaying this information, use the config logging procinfo command.
config logging procinfo {enable | disable}
Syntax Description Includes process information in the message logs.enable
Prevents the controller from displaying processinformation in the message logs.
disable
CLI Commands748
CLI Commandsconfig logging fileinfo

Command Default None
Command History ModificationRelease
This command was introduced in a release earlier than Release 7.6.7.6
The following example shows how to enable the controller to include the process information in themessage logs:
(Cisco Controller) > config logging procinfo enable
Related Commands show logging
config logging traceinfoTo cause the controller to include traceback information in the message logs or to prevent the controller fromdisplaying this information, use the config logging traceinfo command.
config logging traceinfo {enable | disable}
Syntax Description Includes traceback information in the message logs.enable
Prevents the controller from displaying tracebackinformation in the message logs.
disable
Command Default None
Command History ModificationRelease
This command was introduced in a release earlier than Release 7.6.7.6
The following example shows how to disable the controller to include the traceback information inthe message logs:
(Cisco Controller) > config logging traceinfo disable
Related Commands show logging
config logging syslog hostTo configure a remote host for sending syslog messages, use the config logging syslog host command.
config logging syslog host ip_addr
Syntax Description IP address for the remote host.ip_addr
Command Default None
CLI Commands749
CLI Commandsconfig logging traceinfo

Command History ModificationRelease
This command was introduced in a release earlier than Release 7.6.7.6
This command supports both IPv4 and IPv6 address formats.8.0
Usage Guidelines • To configure a remote host for sending syslog messages, use the config logging syslog host ip_addrcommand.
• To remove a remote host that was configured for sending syslog messages, use the config logging sysloghost ip_addr delete command.
• To display the configured syslog servers on the controller, use the show logging command.
The following example shows how to configure two remote hosts 10.92.125.52 and 2001:9:6:40::623for sending the syslog messages and displaying the configured syslog servers on the controller:
(Cisco Controller) > config logging syslog host 10.92.125.52System logs will be sent to 10.92.125.52 from now on
(Cisco Controller) > config logging syslog host 2001:9:6:40::623System logs will be sent to 2001:9:6:40::623 from now on
(Cisco Controller) > show loggingLogging to buffer :- Logging of system messages to buffer :- Logging filter level.......................... errors- Number of system messages logged.............. 1316- Number of system messages dropped............. 6892- Logging of debug messages to buffer ........... Disabled- Number of debug messages logged............... 0- Number of debug messages dropped.............. 0- Cache of logging ............................. Disabled- Cache of logging time(mins) ................... 10080- Number of over cache time log dropped ........ 0Logging to console :- Logging of system messages to console :- Logging filter level.......................... disabled- Number of system messages logged.............. 0- Number of system messages dropped............. 8243- Logging of debug messages to console .......... Enabled- Number of debug messages logged............... 0- Number of debug messages dropped.............. 0Logging to syslog :- Syslog facility................................ local0- Logging of system messages to console :- Logging filter level.......................... disabled- Number of system messages logged.............. 0- Number of system messages dropped............. 8208- Logging of debug messages to console .......... Enabled- Number of debug messages logged............... 0- Number of debug messages dropped.............. 0- Logging of system messages to syslog :- Logging filter level.......................... errors- Number of system messages logged.............. 1316- Number of system messages dropped............. 6892- Logging of debug messages to syslog ........... Disabled- Number of debug messages logged............... 0- Number of debug messages dropped.............. 0- Number of remote syslog hosts.................. 2
CLI Commands750
CLI Commandsconfig logging syslog host

- syslog over tls................................ Disabled- Host 0....................................... 10.92.125.52- Host 1....................................... 2001:9:6:40::623- Host 2.......................................
Logging of RFC 5424.............................. DisabledLogging of Debug messages to file :- Logging of Debug messages to file.............. Disabled- Number of debug messages logged................ 0- Number of debug messages dropped............... 0Logging of traceback............................. Enabled
The following example shows how to remove two remote hosts 10.92.125.52 and 2001:9:6:40::623that were configured for sending syslog messages and displaying that the configured syslog serverswere removed from the controller:
(Cisco Controller) > config logging syslog host 10.92.125.52 deleteSystem logs will not be sent to 10.92.125.52 anymore
(Cisco Controller) > config logging syslog host 2001:9:6:40::623 deleteSystem logs will not be sent to 2001:9:6:40::623 anymore
(Cisco Controller) > show logging
Logging to buffer :- Logging of system messages to buffer :- Logging filter level.......................... errors- Number of system messages logged.............. 1316- Number of system messages dropped............. 6895- Logging of debug messages to buffer ........... Disabled- Number of debug messages logged............... 0- Number of debug messages dropped.............. 0- Cache of logging ............................. Disabled- Cache of logging time(mins) ................... 10080- Number of over cache time log dropped ........ 0Logging to console :- Logging of system messages to console :- Logging filter level.......................... disabled- Number of system messages logged.............. 0- Number of system messages dropped............. 8211- Logging of debug messages to console .......... Enabled- Number of debug messages logged............... 0- Number of debug messages dropped.............. 0Logging to syslog :- Syslog facility................................ local0- Logging of system messages to syslog :- Logging filter level.......................... errors- Number of system messages logged.............. 1316- Number of system messages dropped............. 6895- Logging of debug messages to syslog ........... Disabled- Number of debug messages logged............... 0- Number of debug messages dropped.............. 0- Number of remote syslog hosts.................. 0- syslog over tls................................ Disabled- Host 0.......................................- Host 1.......................................- Host 2.......................................
Logging of RFC 5424.............................. DisabledLogging of Debug messages to file :- Logging of Debug messages to file.............. Disabled- Number of debug messages logged................ 0- Number of debug messages dropped............... 0Logging of traceback............................. Enabled- Traceback logging level........................ errors
CLI Commands751
CLI Commandsconfig logging syslog host

Logging of source file informational............. EnabledTimestamping of messages.........................- Timestamping of system messages................ Enabled- Timestamp format.............................. Date and Time
config logging syslog facilityTo set the facility for outgoing syslog messages to the remote host, use the config logging syslog facilitycommand.
config logging syslog facility facility_code
CLI Commands752
CLI Commandsconfig logging syslog facility

Syntax Description Facility code. Choose one of the following:
• authorization—Authorization system. Facilitylevel—4.
• auth-private—Authorization system (private).Facility level—10.
• cron—Cron/at facility. Facility level—9.
• daemon—System daemons. Facility level—3.
• ftp—FTP daemon. Facility level—11.
• kern—Kernel. Facility level—0.
• local0—Local use. Facility level—16.
• local1—Local use. Facility level—17.
• local2—Local use. Facility level—18.
• local3—Local use. Facility level—19.
• local4—Local use. Facility level—20.
• local5—Local use. Facility level—21.
• local6—Local use. Facility level—22.
• local7—Local use. Facility level—23.
• lpr—Line printer system. Facility level—6.
• mail—Mail system. Facility level—2.
• news—USENET news. Facility level—7.
• sys12—System use. Facility level—12.
• sys13—System use. Facility level—13.
• sys14—System use. Facility level—14.
• sys15—System use. Facility level—15.
• syslog—The syslog itself. Facility level—5.
• user—User process. Facility level—1.
• uucp—UNIX-to-UNIX copy system. Facilitylevel—8.
facility_code
Command Default None
Command History ModificationRelease
This command was introduced in a release earlier than Release 7.6.7.6
CLI Commands753
CLI Commandsconfig logging syslog facility

The following example shows how to set the facility for outgoing syslog messages to authorization:
(Cisco Controller) > config logging syslog facility authorization
Related Commands config logging syslog host
config logging syslog level
show logging
config logging syslog levelTo set the severity level for filtering syslog messages to the remote host, use the config logging syslog levelcommand.
config logging syslog level severity_level
Syntax Description Severity level. Choose one of the following:
• emergencies—Severity level 0
• alerts—Severity level 1
• critical—Severity level 2
• errors—Severity level 3
• warnings—Severity level 4
• notifications—Severity level 5
• informational—Severity level 6
• debugging—Severity level 7
severity_level
Command Default None
Command History ModificationRelease
This command was introduced in a release earlier than Release 7.6.7.6
The following example shows how to set the severity level for syslog messages to 3:
(Cisco Controller) > config logging syslog level 3
Related Commands config logging syslog host
config logging syslog facility
show logging
CLI Commands754
CLI Commandsconfig logging syslog level
config loginsession closeTo close all active Telnet sessions, use the config loginsession close command.
config loginsession close {session_id | all}
Syntax Description ID of the session to close.session_id
Closes all Telnet sessions.all
Command Default None
Command History ModificationRelease
This command was introduced in a release earlier than Release 7.6.7.6
The following example shows how to close all active Telnet sessions:
(Cisco Controller) > config loginsession close all
Related Commands show loginsession
config lsc meshTo enable the locally significant certificate (LSC) on mesh access points, use the config lsc mesh command.
config lsc mesh {enable | disable}
Syntax Description Enables LSC on mesh access points.enable
Disabes LSC on mesh access points.disable
Command Default None
Command History ModificationRelease
This command was introduced in a release earlier than Release 7.6.7.6
The following example shows how to enable LSC on mesh access point:(Cisco Controller) >config lsc mesh enable
config nmsp notify-interval measurementTo modify the Network Mobility Services Protocol (NMSP) notification interval value on the controller toaddress latency in the network, use the config nmsp notify-interval measurement command.
config nmsp notify-interval measurement {client | rfid | rogue} interval
CLI Commands755
CLI Commandsconfig loginsession close

Syntax Description Modifies the interval for clients.client
Modifies the interval for active radio frequencyidentification (RFID) tags.
rfid
Modifies the interval for rogue access points and rogueclients.
rogue
Time interval. The range is from 1 to 30 seconds.interval
Command Default None
Command History ModificationRelease
This command was introduced in a release earlier than Release 7.6.7.6
Usage Guidelines The TCP port (16113) that the controller and location appliance communicate over must be open (not blocked)on any firewall that exists between the controller and the location appliance for NMSP to function.
The following example shows how to modify the NMSP notification interval for the active RFIDtags to 25 seconds:
(Cisco Controller) > config nmsp notify-interval measurement rfid 25
Related Commands clear locp statistics
clear nmsp statistics
show nmsp notify-interval summary
show nmsp statistics
show nmsp status
config pagingTo enable or disable scrolling of the page, use the config paging command.
config paging {enable | disable}
Syntax Description Enables the scrolling of the page.enable
Disables the scrolling of the page.disable
Command Default By default, scrolling of the page is enabled.
Usage Guidelines Commands that produce a huge number of lines of output with the scrolling of the page disabled might resultin the termination of SSH/Telnet connection or user session on the console.
The following example shows how to enable scrolling of the page:
CLI Commands756
CLI Commandsconfig paging

(Cisco Controller) > config paging enable
Related Commands show run-config
config passwd-cleartextTo enable or disable temporary display of passwords in plain text, use the config passwd-cleartext command.
config passwd-cleartext {enable | disable}
Syntax Description Enables the display of passwords in plain text.enable
Disables the display of passwords in plain text.disable
Command Default By default, temporary display of passwords in plain text is disabled.
Command History ModificationRelease
This command was introduced in a release earlier than Release 7.6.7.6
Usage Guidelines This command must be enabled if you want to see user-assigned passwords displayed in clear text when usingthe show run-config command.
To execute this command, you must enter an admin password. This command is valid only for this particularsession. It is not saved following a reboot.
The following example shows how to enable display of passwords in plain text:
(Cisco Controller) > config passwd-cleartext enableThe way you see your passwds will be changedYou are being warned.Enter admin password:
Related Commands show run-config
config promptTo change the CLI system prompt, use the config prompt command.
config prompt prompt
Syntax Description New CLI system prompt enclosed in double quotes.The prompt can be up to 31 alphanumeric charactersand is case sensitive.
prompt
Command Default The system prompt is configured using the startup wizard.
CLI Commands757
CLI Commandsconfig passwd-cleartext

Command History ModificationRelease
This command was introduced in a release earlier than Release 7.6.7.6
Usage Guidelines Because the system prompt is a user-defined variable, it is omitted from the rest of this documentation.
The following example shows how to change the CLI system prompt to Cisco 4400:
(Cisco Controller) > config prompt “Cisco 4400”
config rfid auto-timeoutTo configure an automatic timeout of radio frequency identification (RFID) tags, use the config rfidauto-timeout command.
config rfid auto-timeout {enable | disable}
Syntax Description Enables an automatic timeout.enable
Disables an automatic timeout.disable
Command Default None
Command History ModificationRelease
This command was introduced in a release earlier than Release 7.6.7.6
The following example shows how to enable an automatic timeout of RFID tags:
(Cisco Controller) > config rfid auto-timeout enable
Related Commands show rfid summary
config rfid status
config rfid timeout
config rfid statusTo configure radio frequency identification (RFID) tag data tracking, use the config rfid status command.
config rfid status {enable | disable}
Syntax Description Enables RFID tag tracking.enable
Enables RFID tag tracking.disable
Command Default None
CLI Commands758
CLI Commandsconfig rfid auto-timeout
Command History ModificationRelease
This command was introduced in a release earlier than Release 7.6.7.6
The following example shows how to configure RFID tag tracking settings:
(Cisco Controller) > config rfid status enable
Related Commands show rfid summary
config rfid auto-timeout
config rfid timeout
config rfid timeoutTo configure a static radio frequency identification (RFID) tag data timeout, use the config rfid timeoutcommand.
config rfid timeout seconds
Syntax Description Timeout in seconds (from 60 to 7200).seconds
Command Default None
Command History ModificationRelease
This command was introduced in a release earlier than Release 7.6.7.6
The following example shows how to configure a static RFID tag data timeout of 60 seconds:
(Cisco Controller) > config rfid timeout 60
Related Commands show rfid summary
config rfid statistics
config route addTo configure a network route from the service port to a dedicated workstation IP address range, use the configroute add command.
config route add ip_address netmask gateway
Syntax Description Network IP address.ip_address
Subnet mask for the network.netmask
IP address of the gateway for the route network.gateway
CLI Commands759
CLI Commandsconfig rfid timeout

Command Default None
Usage Guidelines As on release 7.6, IP_address supports only IPv4 addresses.
Command History ModificationRelease
This commandwas introduced in a release earlier thanRelease 7.6.
This command supports only IPv4 address format.
7.6
The following example shows how to configure a network route to a dedicated workstation IP address10.1.1.0, subnet mask 255.255.255.0, and gateway 10.1.1.1:
(Cisco Controller) > config route add 10.1.1.0 255.255.255.0 10.1.1.1
config route deleteTo remove a network route from the service port, use the config route delete command.
config route delete ip_address
Syntax Description Network IP address.ip_address
Command Default None
Usage Guidelines As on release 7.6, IP_address supports only IPv4 addresses.
Command History ModificationRelease
This commandwas introduced in a release earlier thanRelease 7.6.
7.6
The following example shows how to delete a route from the network IP address 10.1.1.0:
(Cisco Controller) > config route delete 10.1.1.0
config serial baudrateTo set the serial port baud rate, use the config serial baudrate command.
config serial baudrate {1200 | 2400 | 4800 | 9600 | 19200 | 38400 | 57600}
Syntax Description Specifies the supported connection speeds to 1200.1200
Specifies the supported connection speeds to 2400.2400
Specifies the supported connection speeds to 4800.4800
Specifies the supported connection speeds to 9600.9600
CLI Commands760
CLI Commandsconfig route delete

Specifies the supported connection speeds to 19200.19200
Specifies the supported connection speeds to 38400.38400
Specifies the supported connection speeds to 57600.57600
Command Default The default serial port baud rate is 9600.
Command History ModificationRelease
This commandwas introduced in a release earlier thanRelease 7.6.
7.6
The following example shows how to configure a serial baud rate with the default connection speedof 9600:
(Cisco Controller) > config serial baudrate 9600
config serial timeoutTo set the timeout of a serial port session, use the config serial timeout command.
config serial timeout minutes
Syntax Description Timeout in minutes from 0 to 160. A value of 0indicates no timeout.
minutes
Command Default 0 (no timeout)
Command History ModificationRelease
This commandwas introduced in a release earlier thanRelease 7.6.
7.6
Usage Guidelines Use this command to set the timeout for a serial connection to the front of the Cisco wireless LAN controllerfrom 0 to 160 minutes where 0 is no timeout.
The following example shows how to configure the timeout of a serial port session to 10 minutes:
(Cisco Controller) > config serial timeout 10
config service timestampsTo enable or disable time stamps in message logs, use the config service timestamps command.
config service timestamps {debug | log} {datetime | disable}
Syntax Description Configures time stamps in debug messages.debug
CLI Commands761
CLI Commandsconfig serial timeout
Configures time stamps in log messages.log
Specifies to time-stamp message logs with thestandard date and time.
datetime
Specifies to prevent message logs being time-stamped.disable
Command Default By default, the time stamps in message logs are disabled.
Command History ModificationRelease
This command was introduced in a release earlier than Release 7.6.7.6
The following example shows how to configure time-stamp message logs with the standard date andtime:
(Cisco Controller) > config service timestamps log datetime
The following example shows how to prevent message logs being time-stamped:
(Cisco Controller) > config service timestamps debug disable
Related Commands show logging
config sessions maxsessionsTo configure the number of Telnet CLI sessions allowed by the Cisco wireless LAN controller, use the configsessions maxsessions command.
config sessions maxsessions session_num
Syntax Description Number of sessions from 0 to 5.session_num
Command Default The default number of Telnet CLI sessions allowed by the Cisco WLC is 5.
Command History ModificationRelease
This command was introduced in a release earlier than Release 7.6.7.6
Usage Guidelines Up to five sessions are possible while a setting of zero prohibits any Telnet CLI sessions.
The following example shows how to configure the number of allowed CLI sessions to 2:
(Cisco Controller) > config sessions maxsessions 2
Related Commands show sessions
CLI Commands762
CLI Commandsconfig sessions maxsessions
config sessions timeoutTo configure the inactivity timeout for Telnet CLI sessions, use the config sessions timeout command.
config sessions timeout timeout
Syntax Description Timeout of Telnet session in minutes (from 0 to 160).A value of 0 indicates no timeout.
timeout
Command Default The default inactivity timeout for Telnet CLI sessions is 5 minutes.
Command History ModificationRelease
This command was introduced in a release earlier than Release 7.6.7.6
The following example shows how to configure the inactivity timeout for Telnet sessions to 20minutes:
(Cisco Controller) > config sessions timeout 20
Related Commands show sessions
config slotTo configure various slot parameters, use the config slot command.
config slot slot_id {enable | disable | channel ap | chan_width | txpower ap | antennaextAntGain antenna_gain | rts} cisco_ap
Syntax Description Slot downlink radio to which the channel is assigned.slot_id
Enables the slot.enable
Disables the slot.disable
Configures the channel for the slot.channel
Configures one 802.11a Cisco access point.ap
Configures channel width for the slot.chan_width
Configures Tx power for the slot.txpower
Configures the 802.11a antenna.antenna
Configures the 802.11a external antenna gain.extAntGain
External antenna gain value in .5 dBi units (such as2.5 dBi = 5).
antenna_gain
Configures RTS/CTS for an access point.rts
CLI Commands763
CLI Commandsconfig sessions timeout

Name of the Cisco access point on which the channelis configured.
cisco_ap
Command Default None
Command History ModificationRelease
This command was introduced in a release earlier than Release 7.6.7.6
The following example shows how to enable slot 3 for the access point abc:(Cisco Controller) >config slot 3 enable abc
The following example shows how to configure RTS for the access point abc:(Cisco Controller) >config slot 2 rts abc
config switchconfig boot-breakTo enable or disable the breaking into boot prompt by pressing the Esc key at system startup, use the configswitchconfig boot-break command.
config switchconfig boot-break {enable | disable}
Syntax Description Enables the breaking into boot prompt by pressingthe Esc key at system startup.
enable
Disables the breaking into boot prompt by pressingthe Esc key at system startup.
disable
Command Default By default, the breaking into boot prompt by pressing the Esc key at system startup is disabled.
Usage Guidelines You must enable the features that are prerequisites for the Federal Information Processing Standard (FIPS)mode before enabling or disabling the breaking into boot prompt.
The following example shows how to enable the breaking into boot prompt by pressing the Esc keyat system startup:
(Cisco Controller) > config switchconfig boot-break enable
Related Commands show switchconfig
config switchconfig flowcontrol
config switchconfig mode
config switchconfig secret-obfuscation
config switchconfig fips-prerequisite
config switchconfig strong-pwd
CLI Commands764
CLI Commandsconfig switchconfig boot-break

config switchconfig fips-prerequisiteTo enable or disable the features that are prerequisites for the Federal Information Processing Standard (FIPS)mode, use the config switchconfig fips-prerequisite command.
config switchconfig fips-prerequisite {enable | disable}
Syntax Description Enables the features that are prerequisites for the FIPSmode.
enable
Disables the features that are prerequisites for theFIPS mode.
disable
Command Default By default, the features that are prerequisites for the FIPS mode are disabled.
Usage Guidelines You must configure the FIPS authorization secret before you can enable or disable the FIPS prerequisitefeatures.
The following example shows how to enable the features that are prerequisites for the FIPS mode:
(Cisco Controller) > config switchconfig fips-prerequisite enable
Related Commands show switchconfig
config switchconfig flowcontrol
config switchconfig mode
config switchconfig secret-obfuscation
config switchconfig boot-break
config switchconfig strong-pwd
config switchconfig strong-pwdTo enable or disable your controller to check the strength of newly created passwords, use the configswitchconfig strong-pwd command.
config switchconfig strong-pwd {case-check | consecutive-check | default-check | username-check| all-checks} {enable | disable}
Syntax Description Checks at least three combinations: lowercasecharacters, uppercase characters, digits, or specialcharacters.
case-check
Checks the occurrence of the same character threetimes.
consecutive-check
Checks for default values or use of their variants.default-check
Checks whether the username is specified or not.username-check
CLI Commands765
CLI Commandsconfig switchconfig fips-prerequisite
Checks all the cases.all-checks
Enables a strong password check for the access pointand Cisco WLC.
enable
Disables a strong password check for the access pointand Cisco WLC.
disable
Command Default None
Command History ModificationRelease
This command was introduced in a release earlier than Release 7.6.7.6
The following example shows how to enable the Strong Password Check feature:
(Cisco Controller) > config switchconfig strong-pwd case-check enable
Related Commands show switchconfig
config switchconfig flowcontrol
config switchconfig mode
config switchconfig secret-obfuscation
config switchconfig fips-prerequisite
config switchconfig boot-break
config switchconfig flowcontrolTo enable or disable 802.3x flow control, use the config switchconfig flowcontrol command.
config switchconfig flowcontrol {enable | disable}
Syntax Description Enables 802.3x flow control.enable
Disables 802.3x flow control.disable
Command Default By default, 802.3x flow control is disabled.
The following example shows how to enable 802.3x flow control on Cisco wireless LAN controllerparameters:
(Cisco Controller) > config switchconfig flowcontrol enable
Related Commands show switchconfig
CLI Commands766
CLI Commandsconfig switchconfig flowcontrol

config switchconfig modeTo configure Lightweight Access Port Protocol (LWAPP) transport mode for Layer 2 or Layer 3, use theconfig switchconfig mode command.
config switchconfig mode {L2 | L3}
Syntax Description Specifies Layer 2 as the transport mode.L2
Specifies Layer 3 as the transport mode.L3
Command Default The default transport mode is L3.
Command History ModificationRelease
This command was introduced in a release earlier than Release 7.6.7.6
The following example shows how to configure LWAPP transport mode to Layer 3:
(Cisco Controller) > config switchconfig mode L3
Related Commands show switchconfig
config switchconfig secret-obfuscationTo enable or disable secret obfuscation, use the config switchconfig secret-obfuscation command.
config switchconfig secret-obfuscation {enable | disable}
Syntax Description Enables secret obfuscation.enable
Disables secret obfuscation.disable
Command Default Secrets and user passwords are obfuscated in the exported XML configuration file.
Command History ModificationRelease
This command was introduced in a release earlier than Release 7.6.7.6
Usage Guidelines To keep the secret contents of your configuration file secure, do not disable secret obfuscation. To furtherenhance the security of the configuration file, enable configuration file encryption.
The following example shows how to enable secret obfuscation:
(Cisco Controller) > config switchconfig secret-obfuscation enable
Related Commands show switchconfig
CLI Commands767
CLI Commandsconfig switchconfig mode

config sysnameTo set the Cisco wireless LAN controller system name, use the config sysname command.
config sysname name
Syntax Description System name. The name can contain up to 24alphanumeric characters.
name
Command Default None
Command History ModificationRelease
This command was introduced in a release earlier than Release 7.6.7.6
The following example shows how to configure the system named Ent_01:
(Cisco Controller) > config sysname Ent_01
Related Commands show sysinfo
config time manualTo set the system time, use the config time manual command.
config time manualMM |DD | YY HH:MM:SS
Syntax Description Date.MM/DD/YY
Time.HH:MM:SS
Command Default None
Command History ModificationRelease
This command was introduced in a release earlier than Release 7.6.7.6
The following example shows how to configure the system date to 04/04/2010 and time to 15:29:00:
(Cisco Controller) > config time manual 04/04/2010 15:29:00
Related Commands show time
config time ntpTo set the Network Time Protocol (NTP), use the config time ntp command.
CLI Commands768
CLI Commandsconfig sysname
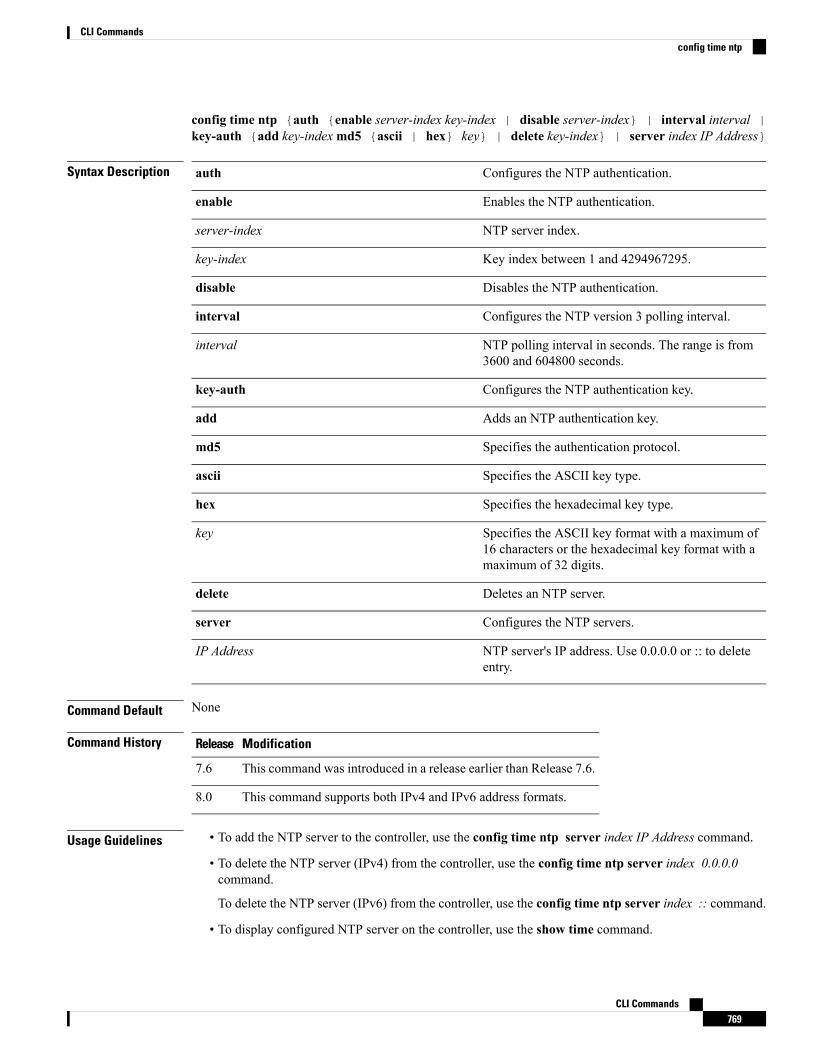
config time ntp {auth {enable server-index key-index | disable server-index} | interval interval |key-auth {add key-indexmd5 {ascii | hex} key} | delete key-index} | server index IP Address}
Syntax Description Configures the NTP authentication.auth
Enables the NTP authentication.enable
NTP server index.server-index
Key index between 1 and 4294967295.key-index
Disables the NTP authentication.disable
Configures the NTP version 3 polling interval.interval
NTP polling interval in seconds. The range is from3600 and 604800 seconds.
interval
Configures the NTP authentication key.key-auth
Adds an NTP authentication key.add
Specifies the authentication protocol.md5
Specifies the ASCII key type.ascii
Specifies the hexadecimal key type.hex
Specifies the ASCII key format with a maximum of16 characters or the hexadecimal key format with amaximum of 32 digits.
key
Deletes an NTP server.delete
Configures the NTP servers.server
NTP server's IP address. Use 0.0.0.0 or :: to deleteentry.
IP Address
Command Default None
Command History ModificationRelease
This command was introduced in a release earlier than Release 7.6.7.6
This command supports both IPv4 and IPv6 address formats.8.0
Usage Guidelines • To add the NTP server to the controller, use the config time ntp server index IP Address command.
• To delete the NTP server (IPv4) from the controller, use the config time ntp server index 0.0.0.0command.
To delete the NTP server (IPv6) from the controller, use the config time ntp server index :: command.
• To display configured NTP server on the controller, use the show time command.
CLI Commands769
CLI Commandsconfig time ntp

The following example shows how to configure the NTP polling interval to 7000 seconds:
(Cisco Controller) > config time ntp interval 7000
The following example shows how to enable NTP authentication where the server index is 4 and thekey index is 1:
(Cisco Controller) > config time ntp auth enable 4 1
The following example shows how to add an NTP authentication key of value ff where the key formatis in hexadecimal characters and the key index is 1:
(Cisco Controller) > config time ntp key-auth add 1 md5 hex ff
The following example shows how to add an NTP authentication key of value ff where the key formatis in ASCII characters and the key index is 1:
(Cisco Controller) > config time ntp key-auth add 1 md5 ascii ciscokey
The following example shows how to add NTP servers and display the servers configured tocontrollers:
(Cisco Controller) > config time ntp server 1 10.92.125.52(Cisco Controller) > config time ntp server 2 2001:9:6:40::623(Cisco Controller) > show timeTime............................................. Fri May 23 12:04:18 2014
Timezone delta................................... 0:0Timezone location................................ (GMT +5:30) Colombo, New Delhi, Chennai,Kolkata
NTP ServersNTP Polling Interval......................... 3600
Index NTP Key Index NTP Server NTP Msg Auth Status------- --------------------------------------------------1 1 10.92.125.52 AUTH SUCCESS2 1 2001:9:6:40::623 AUTH SUCCESS
The following example shows how to delete NTP servers and verify that the servers are deletedremoved from the NTP server list:
(Cisco Controller) > config time ntp server 1 0.0.0.0(Cisco Controller) > config time ntp server 2 ::(Cisco Controller) > show timeTime............................................. Fri May 23 12:04:18 2014
Timezone delta................................... 0:0Timezone location................................ (GMT +5:30) Colombo, New Delhi, Chennai,Kolkata
NTP ServersNTP Polling Interval......................... 3600
CLI Commands770
CLI Commandsconfig time ntp

Index NTP Key Index NTP Server NTP Msg Auth Status------- --------------------------------------------------
config time timezoneTo configure the system time zone, use the config time timezone command.
config time timezone {enable | disable} delta_hours delta_mins
Syntax Description Enables daylight saving time.enable
Disables daylight saving time.disable
Local hour difference from the Universal CoordinatedTime (UCT).
delta_hours
Local minute difference from UCT.delta_mins
Command Default None
Command History ModificationRelease
This command was introduced in a release earlier than Release 7.6.7.6
The following example shows how to enable the daylight saving time:
(Cisco Controller) > config time timezone enable 2 0
Related Commands show time
config time timezone locationTo set the location of the time zone in order to have daylight saving time set automatically when it occurs,use the config time timezone location command.
config time timezone location location_index
CLI Commands771
CLI Commandsconfig time timezone

Syntax Description location_index
CLI Commands772
CLI Commandsconfig time timezone location
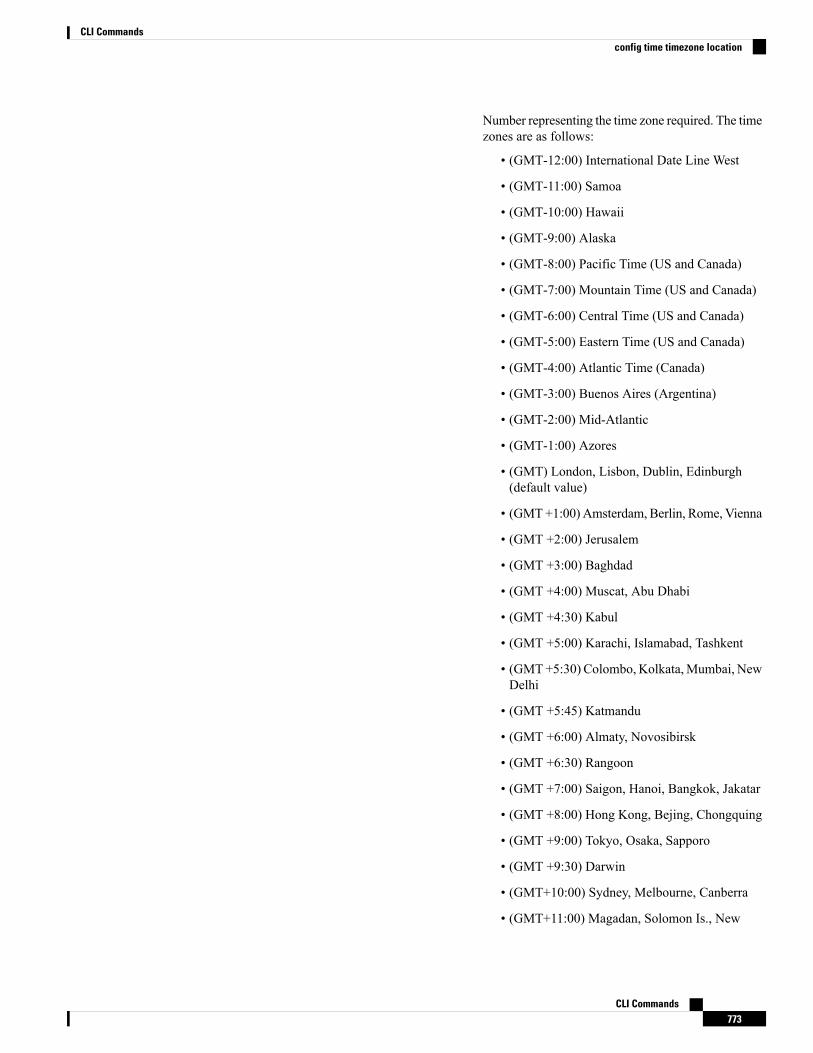
Number representing the time zone required. The timezones are as follows:
• (GMT-12:00) International Date Line West
• (GMT-11:00) Samoa
• (GMT-10:00) Hawaii
• (GMT-9:00) Alaska
• (GMT-8:00) Pacific Time (US and Canada)
• (GMT-7:00) Mountain Time (US and Canada)
• (GMT-6:00) Central Time (US and Canada)
• (GMT-5:00) Eastern Time (US and Canada)
• (GMT-4:00) Atlantic Time (Canada)
• (GMT-3:00) Buenos Aires (Argentina)
• (GMT-2:00) Mid-Atlantic
• (GMT-1:00) Azores
• (GMT) London, Lisbon, Dublin, Edinburgh(default value)
• (GMT+1:00) Amsterdam, Berlin, Rome, Vienna
• (GMT +2:00) Jerusalem
• (GMT +3:00) Baghdad
• (GMT +4:00) Muscat, Abu Dhabi
• (GMT +4:30) Kabul
• (GMT +5:00) Karachi, Islamabad, Tashkent
• (GMT+5:30) Colombo, Kolkata,Mumbai, NewDelhi
• (GMT +5:45) Katmandu
• (GMT +6:00) Almaty, Novosibirsk
• (GMT +6:30) Rangoon
• (GMT +7:00) Saigon, Hanoi, Bangkok, Jakatar
• (GMT +8:00) Hong Kong, Bejing, Chongquing
• (GMT +9:00) Tokyo, Osaka, Sapporo
• (GMT +9:30) Darwin
• (GMT+10:00) Sydney, Melbourne, Canberra
• (GMT+11:00) Magadan, Solomon Is., New
CLI Commands773
CLI Commandsconfig time timezone location
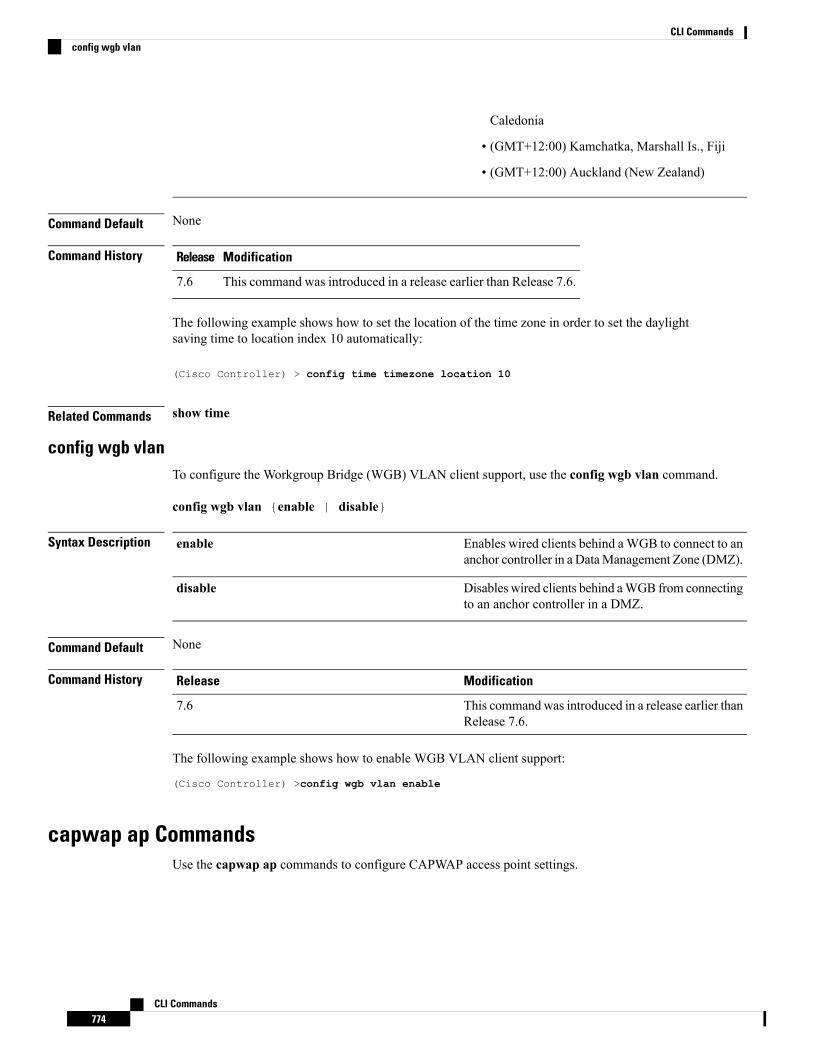
Caledonia
• (GMT+12:00) Kamchatka, Marshall Is., Fiji
• (GMT+12:00) Auckland (New Zealand)
Command Default None
Command History ModificationRelease
This command was introduced in a release earlier than Release 7.6.7.6
The following example shows how to set the location of the time zone in order to set the daylightsaving time to location index 10 automatically:
(Cisco Controller) > config time timezone location 10
Related Commands show time
config wgb vlanTo configure the Workgroup Bridge (WGB) VLAN client support, use the config wgb vlan command.
config wgb vlan {enable | disable}
Syntax Description Enables wired clients behind aWGB to connect to ananchor controller in a DataManagement Zone (DMZ).
enable
Disables wired clients behind aWGB from connectingto an anchor controller in a DMZ.
disable
Command Default None
Command History ModificationRelease
This commandwas introduced in a release earlier thanRelease 7.6.
7.6
The following example shows how to enable WGB VLAN client support:
(Cisco Controller) >config wgb vlan enable
capwap ap CommandsUse the capwap ap commands to configure CAPWAP access point settings.
CLI Commands774
CLI Commandsconfig wgb vlan

capwap ap controller ip addressTo configure the controller IP address into the CAPWAP access point from the access point’s console port,use the capwap ap controller ip address command.
capwap ap controller ip address A.B.C.D
Syntax Description IP address of the controller.A.B.C.D
Command Default None
Command History ModificationRelease
This commandwas introduced in a release earlier thanRelease 7.6.
7.6
Usage Guidelines This command must be entered from an access point’s console port.
The access point must be running Cisco IOS Release 12.3(11)JX1 or later releases.Note
The following example shows how to configure the controller IP address 10.23.90.81 into theCAPWAP access point:
ap_console >capwap ap controller ip address 10.23.90.81
capwap ap dot1xTo configure the dot1x username and password into the CAPWAP access point from the access point’s consoleport, use the capwap ap dot1x command.
capwap ap dot1x username user_name password password
Syntax Description Dot1x username.user_name
Dot1x password.password
Command Default None
Command History ModificationRelease
This commandwas introduced in a release earlier thanRelease 7.6.
7.6
Usage Guidelines This command must be entered from an access point’s console port.
CLI Commands775
CLI Commandscapwap ap controller ip address

The access point must be running Cisco Access Point IOS Release 12.3(11)JX1 or later releases.Note
This example shows how to configure the dot1x username ABC and password pass01:
ap_console >capwap ap dot1x username ABC password pass01
capwap ap hostnameTo configure the access point host name from the access point’s console port, use the capwap ap hostnamecommand.
capwap ap hostname host_name
Syntax Description Hostname of the access point.host_name
Command Default None
Command History ModificationRelease
This commandwas introduced in a release earlier thanRelease 7.6.
7.6
Usage Guidelines This command must be entered from an access point’s console port.
The access point must be running Cisco IOS Release 12.3(11)JX1 or later releases. This command is availableonly for the Cisco Lightweight AP IOS Software recovery image (rcvk9w8) without any private-config. Youcan remove the private-config by using the clear capwap private-config command.
Note
This example shows how to configure the hostname WLC into the capwap access point:
ap_console >capwap ap hostname WLC
capwap ap ip addressTo configure the IP address into the CAPWAP access point from the access point’s console port, use thecapwap ap ip address command.
capwap ap ip address A.B.C.D
Syntax Description IP address.A.B.C.D
Command Default None
CLI Commands776
CLI Commandscapwap ap hostname

Command History ModificationRelease
This commandwas introduced in a release earlier thanRelease 7.6.
7.6
Usage Guidelines This command must be entered from an access point’s console port.
The access point must be running Cisco Access Point IOS Release 12.3(11)JX1 or later releases.Note
This example shows how to configure the IP address 10.0.0.1 into CAPWAP access point:
ap_console >capwap ap ip address 10.0.0.1
capwap ap ip default-gatewayTo configure the default gateway from the access point’s console port, use the capwap ap ip default-gatewaycommand.
capwap ap ip default-gateway A.B.C.D
Syntax Description Default gateway address of the capwap access point.A.B.C.D
Command Default None
Command History ModificationRelease
This commandwas introduced in a release earlier thanRelease 7.6.
7.6
Usage Guidelines This command must be entered from an access point’s console port.
The access point must be running Cisco Access Point IOS Release 12.3(11)JX1 or later releases.Note
This example shows how to configure the CAPWAP access point with the default gateway address10.0.0.1:
ap_console >capwap ap ip default-gateway 10.0.0.1
capwap ap log-serverTo configure the system log server to log all the CAPWAP errors, use the capwap ap log-server command.
capwap ap log-server A.B.C.D
Syntax Description IP address of the syslog server.A.B.C.D
CLI Commands777
CLI Commandscapwap ap ip default-gateway
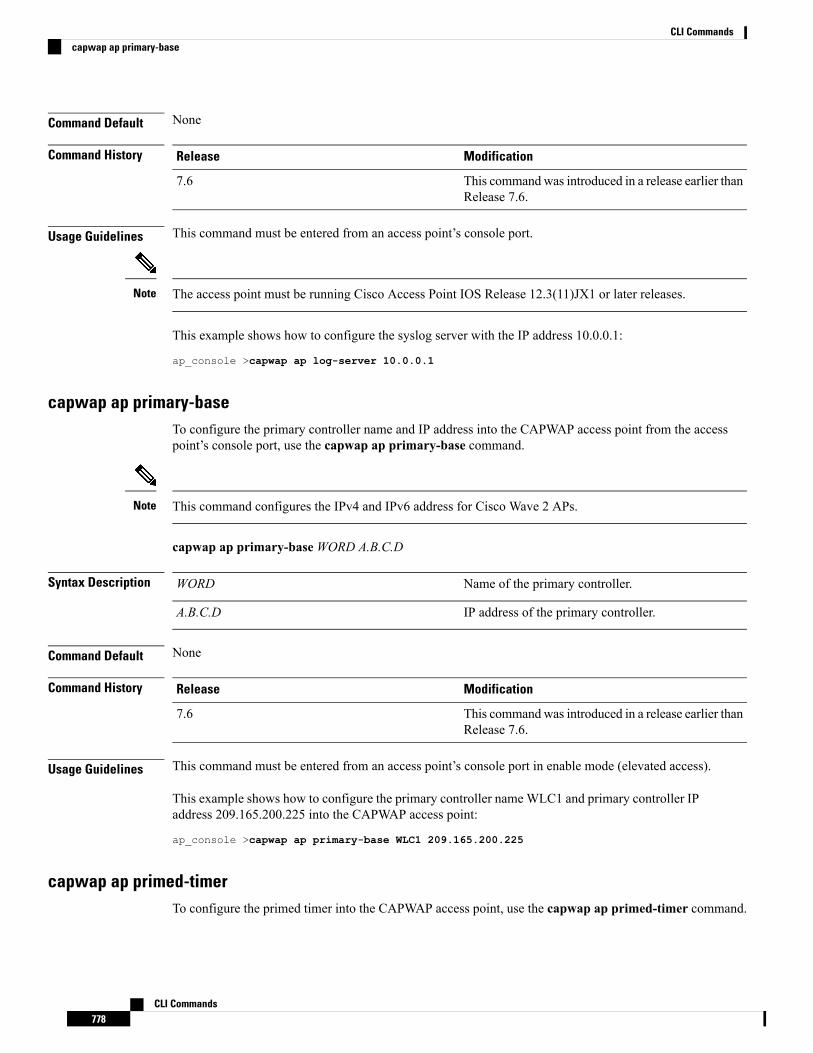
Command Default None
Command History ModificationRelease
This commandwas introduced in a release earlier thanRelease 7.6.
7.6
Usage Guidelines This command must be entered from an access point’s console port.
The access point must be running Cisco Access Point IOS Release 12.3(11)JX1 or later releases.Note
This example shows how to configure the syslog server with the IP address 10.0.0.1:
ap_console >capwap ap log-server 10.0.0.1
capwap ap primary-baseTo configure the primary controller name and IP address into the CAPWAP access point from the accesspoint’s console port, use the capwap ap primary-base command.
This command configures the IPv4 and IPv6 address for Cisco Wave 2 APs.Note
capwap ap primary-baseWORD A.B.C.D
Syntax Description Name of the primary controller.WORD
IP address of the primary controller.A.B.C.D
Command Default None
Command History ModificationRelease
This commandwas introduced in a release earlier thanRelease 7.6.
7.6
Usage Guidelines This command must be entered from an access point’s console port in enable mode (elevated access).
This example shows how to configure the primary controller nameWLC1 and primary controller IPaddress 209.165.200.225 into the CAPWAP access point:
ap_console >capwap ap primary-base WLC1 209.165.200.225
capwap ap primed-timerTo configure the primed timer into the CAPWAP access point, use the capwap ap primed-timer command.
CLI Commands778
CLI Commandscapwap ap primary-base
capwap ap primed-timer {enable | disable}
Syntax Description Enables the primed timer settingsenable
Disables the primed timer settings.disable
Command Default None
Command History ModificationRelease
This commandwas introduced in a release earlier thanRelease 7.6.
7.6
Usage Guidelines This command must be entered from an access point’s console port.
The access point must be running Cisco Access Point IOS Release 12.3(11)JX1 or later releases.Note
This example shows how to enable the primed-timer settings:
ap_console >capwap ap primed-timer enable
capwap ap secondary-baseTo configure the name and IP address of the secondary Cisco WLC into the CAPWAP access point from theaccess point’s console port, use the capwap ap secondary-base command.
capwap ap secondary-base controller_name controller_ip_address
Syntax Description Name of the secondary Cisco WLC.controller_name
IP address of the secondary Cisco WLC.controller_ip_address
Command Default None
Command History ModificationRelease
This commandwas introduced in a release earlier thanRelease 7.6.
7.6
Usage Guidelines This command must be entered from an access point’s console port.
The access point must be running Cisco Access Point IOS Release 12.3(11)JX1 or later releases.Note
This example shows how to configure the secondary Cisco WLC name as WLC2 and secondaryCisco WLC IP address 209.165.200.226 into the CAPWAP access point:
CLI Commands779
CLI Commandscapwap ap secondary-base

ap_console >capwap ap secondary-base WLC2 209.165.200.226
capwap ap tertiary-baseTo configure the name and IP address of the tertiary Cisco WLC into the CAPWAP access point from theaccess point’s console port, use the capwap ap tertiary-base command.
capwap ap tertiary-baseWORDA.B.C.D
Syntax Description Name of the tertiary Cisco WLC.WORD
IP address of the tertiary Cisco WLC.A.B.C.D
Command Default None
Command History ModificationRelease
This commandwas introduced in a release earlier thanRelease 7.6.
7.6
Usage Guidelines This command must be entered from an access point’s console port.
The access point must be running Cisco IOS Release 12.3(11)JX1 or later releases.Note
This example shows how to configure the tertiary Cisco WLC with the name WLC3 and secondaryCisco WLC IP address 209.165.200.227 into the CAPWAP access point:
ap_console >capwap ap tertiary-base WLC3 209.165.200.227
lwapp ap controller ip addressTo configure the Cisco WLC IP address into the FlexConnect access point from the access point’s consoleport, use the lwapp ap controller ip address command.
lwapp ap controller ip address A.B.C.D
Syntax Description IP address of the controller.A.B.C.D
Command Default None
Command History ModificationRelease
This commandwas introduced in a release earlier thanRelease 7.6.
7.6
Usage Guidelines This command must be entered from an access point’s console port.
CLI Commands780
CLI Commandscapwap ap tertiary-base

Prior to changing the FlexConnect configuration on an access point using the access point’s console port, theaccess point must be in standalone mode (not connected to a controller) and you must remove the currentLWAPP private configuration by using the clear lwapp private-config command.
The access point must be running Cisco IOS Release 12.3(11)JX1 or higher releases.Note
The following example shows how to configure the controller IP address 10.92.109.1 into theFlexConnect access point:
ap_console > lwapp ap controller ip address 10.92.109.1
Saving ConfigurationsUse the save config command before you log out of the CLI to save all previous configuration changes.
save configTo save the controller configurations, use the save config command.
save config
Syntax Description This command has no arguments or keywords.
Command Default None
Command History ModificationRelease
This command was introduced in a release earlier than Release 7.6.7.6
The following example shows how to save the controller settings:
(Cisco Controller) > save configAre you sure you want to save? (y/n) yConfiguration Saved!
Clearing Configurations, Log files, and Other ActionsUse the clear command to clear existing configurations, log files, and other functions.
clear acl countersTo clear the current counters for an Access Control List (ACL), use the clear acl counters command.
clear acl counters acl_name
Syntax Description ACL name.acl_name
CLI Commands781
CLI CommandsSaving Configurations

Command Default None
Command History ModificationRelease
This commandwas introduced in a release earlier thanRelease 7.6.
7.6
The following example shows how to clear the current counters for acl1:
(Cisco Controller) >clear acl counters acl1
clear ap configTo clear (reset to the default values) a lightweight access point’s configuration settings, use the clear ap configcommand.
clear ap config ap_name
Syntax Description Access point name.ap_name
Command Default None
Command History ModificationRelease
This commandwas introduced in a release earlier thanRelease 7.6.
7.6
Usage Guidelines Entering this command does not clear the static IP address of the access point.
The following example shows how to clear the access point’s configuration settings for the accesspoint named ap1240_322115:
(Cisco Controller) >clear ap config ap1240_322115Clear ap-config will clear ap config and reboot the AP. Are you sure you want continue?(y/n)
clear ap eventlogTo delete the existing event log and create an empty event log file for a specific access point or for all accesspoints joined to the controller, use the clear ap eventlog command.
clear ap eventlog {specific ap_name | all}
Syntax Description Specifies a specific access point log file.specific
Name of the access point for which the event log fileis emptied.
ap_name
Deletes the event log for all access points joined tothe controller.
all
CLI Commands782
CLI Commandsclear ap config

Command Default None
Command History ModificationRelease
This commandwas introduced in a release earlier thanRelease 7.6.
7.6
The following example shows how to delete the event log for all access points:
(Cisco Controller) >clear ap eventlog allThis will clear event log contents for all APs. Do you want continue? (y/n) :yAll AP event log contents have been successfully cleared.
clear ap join statsTo clear the join statistics for all access points or for a specific access point, use the clear ap join statscommand.
clear ap join stats {all | ap_mac}
Syntax Description Specifies all access points.all
Access point MAC address.ap_mac
Command Default None
Command History ModificationRelease
This commandwas introduced in a release earlier thanRelease 7.6.
7.6
The following example shows how to clear the join statistics of all the access points:
(Cisco Controller) >clear ap join stats all
clear arpTo clear the Address Resolution Protocol (ARP) table, use the clear arp command.
clear arp
Syntax Description This command has no arguments or keywords.
Command Default None
Command History ModificationRelease
This command was introduced in a release earlier than Release 7.6.7.6
The following example shows how to clear the ARP table:
CLI Commands783
CLI Commandsclear ap join stats

(Cisco Controller) >clear arpAre you sure you want to clear the ARP cache? (y/n)
Related Commands clear transfer
clear download datatype
clear download filename
clear download mode
clear download serverip
clear download start
clear upload datatype
clear upload filename
clear upload mode
clear upload path
clear upload serverip
clear upload start
clear stats port
clear client tsmTo clear the Traffic Stream Metrics (TSM) statistics for a particular access point or all the access points towhich this client is associated, use the clear client tsm command.
clear client tsm {802.11a | 802.11b} client_mac {ap_mac | all}
Syntax Description Specifies the 802.11a network.802.11a
Specifies the 802.11b network.802.11b
MAC address of the client.client_mac
MAC address of a Cisco lightweight access point.ap_mac
Specifies all access points.all
Command Default None
Command History ModificationRelease
This command was introduced in a release earlier than Release 7.6.7.6
The following example shows how to clear the TSM for the MAC address 00:40:96:a8:f7:98:
(Cisco Controller) >clear client tsm 802.11a 00:40:96:a8:f7:98 all
CLI Commands784
CLI Commandsclear client tsm
Related Commands clear upload start
clear configTo reset configuration data to factory defaults, use the clear config command.
clear config
Syntax Description This command has no arguments or keywords.
Command Default None
Command History ModificationRelease
This command was introduced in a release earlier than Release 7.6.7.6
The following example shows how to reset the configuration data to factory defaults:
(Cisco Controller) >clear configAre you sure you want to clear the configuration? (y/n)nConfiguration not cleared!
Related Commands clear transfer
clear download datatype
clear download filename
clear download mode
clear download serverip
clear download start
clear upload datatype
clear upload filename
clear upload mode
clear upload path
clear upload serverip
clear upload start
clear stats port
clear ext-webauth-urlTo clear the external web authentication URL, use the clear ext-webauth-url command.
clear ext-webauth-url
Syntax Description This command has no arguments or keywords.
CLI Commands785
CLI Commandsclear config

Command Default None
Command History ModificationRelease
This command was introduced in a release earlier than Release 7.6.7.6
The following example shows how to clear the external web authentication URL:
(Cisco Controller) >clear ext-webauth-urlURL cleared.
Related Commands clear transfer
clear download datatype
clear download filename
clear download mode
clear download serverip
clear download start
clear upload datatype
clear upload filename
clear upload mode
clear upload path
clear upload serverip
clear upload start
clear stats port
clear license agentTo clear the license agent’s counter or session statistics, use the clear license agent command.
clear license agent {counters | sessions}
Syntax Description Clears the counter statistics.counters
Clears the session statistics.sessions
Command Default None
Command History ModificationRelease
This command was introduced in a release earlier than Release 7.6.7.6
The following example shows how to clear the license agent’s counter settings:
CLI Commands786
CLI Commandsclear license agent

(Cisco Controller) > clear license agent counters
Related Commands config license agent
show license agent
license install
clear location rfidTo clear a specific Radio Frequency Identification (RFID) tag or all of the RFID tags in the entire database,use the clear location rfid command.
clear location rfid {mac_address | all}
Syntax Description MAC address of a specific RFID tag.mac_address
Specifies all the RFID tags in the database.all
Command Default None
Command History ModificationRelease
This command was introduced in a release earlier than Release 7.6.7.6
The following example shows how to clear all the RFID tags in the database:
(Cisco Controller) >clear location rfid all
Related Commands clear location statistics rfid
config location
show location
show location statistics rfid
clear location statistics rfidTo clear Radio Frequency Identification (RFID) statistics, use the clear location statistics rfid command.
clear location statistics rfid
Syntax Description This command has no arguments or keywords.
Command Default None
Command History ModificationRelease
This command was introduced in a release earlier than Release 7.6.7.6
CLI Commands787
CLI Commandsclear location rfid

The following example shows how to clear RFID statistics:
(Cisco Controller) >clear location statistics rfid
Related Commands config location
show location
show location statistics rfid
clear locp statisticsTo clear the Location Protocol (LOCP) statistics, use the clear locp statistics command.
clear locp statistics
Syntax Description This command has no arguments or keywords.
Command Default None
Command History ModificationRelease
This command was introduced in a release earlier than Release 7.6.7.6
The following example shows how to clear the statistics related to LOCP:
(Cisco Controller) >clear locp statistics
Related Commands clear nmsp statistics
config nmsp notify-interval measurement
show nmsp notify-interval summary
show nmsp statistics
show nmsp status
clear login-bannerTo remove the login banner file from the controller, use the clear login-banner command.
clear login-banner
Syntax Description This command has no arguments or keywords.
Command Default None
Command History ModificationRelease
This command was introduced in a release earlier than Release 7.6.7.6
CLI Commands788
CLI Commandsclear locp statistics

The following example shows how to clear the login banner file:
(Cisco Controller) >clear login-banner
Related Commands transfer download datatype
clear lwapp private-configTo clear (reset to default values) an access point’s current Lightweight Access Point Protocol (LWAPP) privateconfiguration, which contains static IP addressing and controller IP address configurations, use the clearlwapp private-config command.
clear lwapp private-config
Syntax Description This command has no arguments or keywords.
Command Default None
Command History ModificationRelease
This commandwas introduced in a release earlier thanRelease 7.6.
7.6
Usage Guidelines Enter the command on the access point console port.
Prior to changing the FlexConnect configuration on an access point using the access point’s console port, theaccess point must be in standalone mode (not connected to a Cisco WLC) and you must remove the currentLWAPP private configuration by using the clear lwapp private-config command.
The access point must be running Cisco Access Point IOS Release 12.3(11)JX1 or later releases.Note
The following example shows how to clear an access point’s current LWAPP private configuration:
ap_console >clear lwapp private-configremoving the reap config file flash:/lwapp_reap.cfg
clear nmsp statisticsTo clear the Network Mobility Services Protocol (NMSP) statistics, use the clear nmsp statistics command.
clear nmsp statistics
Syntax Description This command has no arguments or keywords.
Command Default None
Command History ModificationRelease
This command was introduced in a release earlier than Release 7.6.7.6
CLI Commands789
CLI Commandsclear lwapp private-config
The following example shows how to delete the NMSP statistics log file:
(Cisco Controller) >clear nmsp statistics
Related Commands clear locp statistics
config nmsp notify-interval measurement
show nmsp notify-interval summary
show nmsp status
clear radius acct statisticsTo clear the RADIUS accounting statistics on the controller, use the clear radius acc statistics command.
clear radius acct statistics [index | all]
Syntax Description (Optional) Specifies the index of the RADIUSaccounting server.
index
(Optional) Specifies all RADIUS accounting servers.all
Command Default None
Command History ModificationRelease
This commandwas introduced in a release earlier thanRelease 7.6.
7.6
The following example shows how to clear the RADIUS accounting statistics:
(Cisco Controller) >clear radius acc statistics
Related Commands show radius acct statistics
clear tacacs auth statisticsTo clear the RADIUS authentication server statistics in the controller, use the clear tacacs auth statisticscommand.
clear tacacs auth statistics [index | all]
Syntax Description (Optional) Specifies the index of the RADIUSauthentication server.
index
(Optional) Specifies all RADIUS authenticationservers.
all
CLI Commands790
CLI Commandsclear radius acct statistics

Command Default None
Command History ModificationRelease
This commandwas introduced in a release earlier thanRelease 7.6.
7.6
The following example shows how to clear the RADIUS authentication server statistics:
(Cisco Controller) >clear tacacs auth statistics
Related Commands show tacacs auth statistics
show tacacs summary
config tacacs auth
clear redirect-urlTo clear the custom web authentication redirect URL on the Cisco Wireless LAN Controller, use the clearredirect-url command.
clear redirect-url
Syntax Description This command has no arguments or keywords.
Command Default None
Command History ModificationRelease
This command was introduced in a release earlier than Release 7.6.7.6
The following example shows how to clear the custom web authentication redirect URL:
(Cisco Controller) >clear redirect-urlURL cleared.
Related Commands clear transfer
clear download datatype
clear download filename
clear download mode
clear download path
clear download start
clear upload datatype
clear upload filename
clear upload mode
CLI Commands791
CLI Commandsclear redirect-url

clear upload path
clear upload serverip
clear upload start
clear stats ap wlanTo clear the WLAN statistics, use the clear stats ap wlan command.
clear stats ap wlan cisco_ap
Syntax Description Selected configuration elements.cisco_ap
Command Default None
Command History ModificationRelease
This command was introduced in a release earlier than Release 7.6.7.6
The following example shows how to clear the WLAN configuration elements of the access pointcisco_ap:(Cisco Controller) >clear stats ap wlan cisco_apWLAN statistics cleared.
clear stats local-authTo clear the local Extensible Authentication Protocol (EAP) statistics, use the clear stats local-auth command.
clear stats local-auth
Syntax Description This command has no arguments or keywords.
Command Default None
Command History ModificationRelease
This commandwas introduced in a release earlier thanRelease 7.6.
7.6
The following example shows how to clear the local EAP statistics:
(Cisco Controller) >clear stats local-authLocal EAP Authentication Stats Cleared.
Related Commands config local-auth active-timeout
config local-auth eap-profile
config local-auth method fast
config local-auth user-credentials
CLI Commands792
CLI Commandsclear stats ap wlan

debug aaa local-auth
show local-auth certificates
show local-auth config
show local-auth statistics
clear stats mobilityTo clear mobility manager statistics, use the clear stats mobility command.
clear stats mobility
Syntax Description This command has no arguments or keywords.
Command Default None
Command History ModificationRelease
This commandwas introduced in a release earlier thanRelease 7.6.
7.6
The following example shows how to clear mobility manager statistics:
(Cisco Controller) >clear stats mobility
Mobility stats cleared.
clear stats portTo clear statistics counters for a specific port, use the clear stats port command.
clear stats port port
Syntax Description Physical interface port number.port
Command Default None
Command History ModificationRelease
This commandwas introduced in a release earlier thanRelease 7.6.
7.6
The following example shows how to clear the statistics counters for port 9:
(Cisco Controller) >clear stats port 9
Related Commands clear transfer
clear download datatype
CLI Commands793
CLI Commandsclear stats mobility
clear download datatype
clear download filename
clear download mode
clear download serverip
clear download start
clear upload datatype
clear upload filename
clear upload mode
clear upload path
clear upload serverip
clear upload start
clear stats port
clear stats radiusTo clear the statistics for one or more RADIUS servers, use the clear stats radius command.
clear stats radius {auth | acct} {index | all}
Syntax Description Clears statistics regarding authentication.auth
Clears statistics regarding accounting.acct
Specifies the index number of the RADIUS server tobe cleared.
index
Clears statistics for all RADIUS servers.all
Command Default None
Command History ModificationRelease
This commandwas introduced in a release earlier thanRelease 7.6.
7.6
The following example shows how to clear the statistics for all RADIUS authentication servers:
(Cisco Controller) >clear stats radius auth all
Related Commands clear transfer
clear download datatype
clear download filename
clear download mode
CLI Commands794
CLI Commandsclear stats radius

clear download serverip
clear download start
clear upload datatype
clear upload filename
clear upload mode
clear upload path
clear upload serverip
clear upload start
clear stats port
clear stats switchTo clear all switch statistics counters on a Cisco wireless LAN controller, use the clear stats switch command.
clear stats switch
Syntax Description This command has no arguments or keywords.
Command Default None
Command History ModificationRelease
This command was introduced in a release earlier than Release 7.6.7.6
The following example shows how to clear all switch statistics counters:
(Cisco Controller) >clear stats switch
Related Commands clear transfer
clear download datatype
clear download filename
clear download mode
clear download path
clear download start
clear upload datatype
clear upload filename
clear upload mode
clear upload path
clear upload serverip
clear upload start
CLI Commands795
CLI Commandsclear stats switch

clear stats tacacsTo clear the TACACS+ server statistics on the controller, use the clear stats tacacs command.
clear stats tacacs [auth | athr | acct] [index | all]
Syntax Description (Optional) Clears the TACACS+ authentication serverstatistics.
auth
(Optional) Clears the TACACS+ authorization serverstatistics.
athr
(Optional) Clears the TACACS+ accounting serverstatistics.
acct
(Optional) Specifies index of the TACACS+ server.index
(Optional) Specifies all TACACS+ servers.all
Command Default None
Command History ModificationRelease
This commandwas introduced in a release earlier thanRelease 7.6.
7.6
The following example shows how to clear the TACACS+ accounting server statistics for index 1:
(Cisco Controller) >clear stats tacacs acct 1
Related Commands show tacacs summary
clear transferTo clear the transfer information, use the clear transfer command.
clear transfer
Syntax Description This command has no arguments or keywords.
Command Default None
Command History ModificationRelease
This command was introduced in a release earlier than Release 7.6.7.6
The following example shows how to clear the transfer information:
(Cisco Controller) >clear transferAre you sure you want to clear the transfer information? (y/n) yTransfer Information Cleared.
CLI Commands796
CLI Commandsclear stats tacacs
Related Commands transfer upload datatype
transfer upload pac
transfer upload password
transfer upload port
transfer upload path
transfer upload username
transfer upload datatype
transfer upload serverip
transfer upload start
clear traplogTo clear the trap log, use the clear traplog command.
clear traplog
Syntax Description This command has no arguments or keywords.
Command Default None
Command History ModificationRelease
This command was introduced in a release earlier than Release 7.6.7.6
The following example shows how to clear the trap log:
(Cisco Controller) >clear traplogAre you sure you want to clear the trap log? (y/n) yTrap Log Cleared.
Related Commands clear transfer
clear download datatype
clear download filename
clear download mode
clear download path
clear download serverip
clear download start
clear upload filename
clear upload mode
clear upload path
clear upload serverip
CLI Commands797
CLI Commandsclear traplog

clear upload start
clear webimageTo clear the custom web authentication image, use the clear webimage command.
clear webimage
Syntax Description This command has no arguments or keywords.
Command Default None
Command History ModificationRelease
This command was introduced in a release earlier than Release 7.6.7.6
The following example shows how to clear the custom web authentication image:
(Cisco Controller) >clear webimage
Related Commands clear transfer
clear download datatype
clear download filename
clear download mode
clear download path
clear download serverip
clear download start
clear upload filename
clear upload mode
clear upload path
clear upload serverip
clear upload start
clear webmessageTo clear the custom web authentication message, use the clear webmessage command.
clear webmessage
Syntax Description This command has no arguments or keywords.
Command Default None
CLI Commands798
CLI Commandsclear webimage

Command History ModificationRelease
This command was introduced in a release earlier than Release 7.6.7.6
The following example shows how to clear the custom web authentication message:
(Cisco Controller) >clear webmessageMessage cleared.
Related Commands clear transfer
clear download datatype
clear download filename
clear download mode
clear download path
clear download serverip
clear download start
clear upload filename
clear upload mode
clear upload path
clear upload serverip
clear upload start
clear webtitleTo clear the custom web authentication title, use the clear webtitle command.
clear webtitle
Syntax Description This command has no arguments or keywords.
Command Default None
Command History ModificationRelease
This command was introduced in a release earlier than Release 7.6.7.6
The following example shows how to clear the custom web authentication title:
(Cisco Controller) >clear webtitleTitle cleared.
Related Commands clear transfer
clear download datatype
CLI Commands799
CLI Commandsclear webtitle
clear download filename
clear download mode
clear download path
clear download serverip
clear download start
clear upload filename
clear upload mode
clear upload path
clear upload serverip
clear upload start
Resetting the System Reboot TimeUse the reset command to schedule a reboot of the controller and access points.
reset system atTo reset the system at a specified time, use the reset system at command.
reset system at YYYY-MM-DD HH:MM:SS image {no-swap|swap} reset-aps [save-config]
Syntax Description Specifies the date.YYYY-MM-DD
Specifies the time in a 24-hour format.HH: MM: SS
Configures the image to be rebooted.image
Changes the active boot image; boots the non-activeimage and sets the default flag on it on the next reboot.
swap
Boots from the active image.no-swap
Resets all access points during the system reset.reset-aps
(Optional) Saves the configuration before the systemreset.
save-config
Command Default None
Command History ModificationRelease
This command was introduced in a release earlier than Release 7.6.7.6
The following example shows how to reset the system at 2010-03-29 and 12:01:01 time:
(Cisco Controller) > reset system at 2010-03-29 12:01:01 image swap reset-aps save-config
CLI Commands800
CLI CommandsResetting the System Reboot Time

reset system inTo specify the amount of time delay before the devices reboot, use the reset system in command.
reset system in HH:MM:SS image {swap | no-swap} reset-aps save-config
Syntax Description Specifies a delay in duration.HH :MM :SS
Configures the image to be rebooted.image
Changes the active boot image; boots the non-activeimage and sets the default flag on it on the next reboot.
swap
Boots from the active image.no-swap
Resets all access points during the system reset.reset-aps
Saves the configuration before the system reset.save-config
Command Default None
Command History ModificationRelease
This command was introduced in a release earlier than Release 7.6.7.6
The following example shows how to reset the system after a delay of 00:01:01:
(Cisco Controller) > reset system in 00:01:01 image swap reset-aps save-config
reset system cancelTo cancel a scheduled reset, use the reset system cancel command.
reset system cancel
Syntax Description This command has no arguments or keywords.
Command Default None
Command History ModificationRelease
This command was introduced in a release earlier than Release 7.6.7.6
The following example shows how to cancel a scheduled reset:
(Cisco Controller) > reset system cancel
reset system notify-timeTo configure the trap generation prior to scheduled resets, use the reset system notify-time command.
CLI Commands801
CLI Commandsreset system in

reset system notify-time minutes
Syntax Description Number of minutes before each scheduled reset atwhich to generate a trap.
minutes
Command Default The default time period to configure the trap generation prior to scheduled resets is 10 minutes.
Command History ModificationRelease
This command was introduced in a release earlier than Release 7.6.7.6
The following example shows how to configure the trap generation to 10minutes before the scheduledresets:
(Cisco Controller) > reset system notify-time 55
reset peer-systemTo reset the peer controller, use the reset peer-system command.
reset peer-system
Syntax Description This command has no arguments or keywords.
Command Default None
Command History ModificationRelease
This commandwas introduced in a release earlier thanRelease 7.6.
7.6
The following example shows how to reset the peer controller:> reset peer-system
test pmk-cache deleteTo delete an entry in the Pairwise Master Key (PMK) cache from all Cisco wireless LAN controllers in themobility group, use the test pmk-cache delete command.
test pmk-cache delete [all | mac_address] {local | global}
Syntax Description Deletes PMK cache entries from all Cisco wirelessLAN controllers.
all
MAC address of the Cisco wireless LAN controllerfrom which PMK cache entries have to be deleted.
mac_address
Deletes PMK cache entries only on thisWLC (default)local
CLI Commands802
CLI Commandsreset peer-system
Deletes PMK cache entries, for clients currentlyconnected to this WLC, across the mobility group
global
Command Default None
Command History ModificationRelease
This command was introduced in a release earlier than Release 7.6.7.6
The following example shows how to delete all entries in the PMK cache:(Cisco Controller) >test pmk-cache delete all
Uploading and Downloading Files and ConfigurationsUse the transfer command to transfer files to or from the Cisco Wireless LAN controller.
transfer download certpassworTo set the password for the .PEM file so that the operating system can decrypt the web administration SSLkey and certificate, use the transfer download certpassword command.
transfer download certpassword private_key_password
Syntax Description Certificate’s private key password.private_key_password
Command Default None
Command History ModificationRelease
This command was introduced in a release earlier than Release 7.6.7.6
The following example shows how to transfer a file to the switch with the certificate’s private keypassword certpassword:
(Cisco Controller) > transfer download certpasswordClearing password
transfer download datatypeTo set the download file type, use the transfer download datatype command.
transfer download datatype {code | config | eapdevcert | eapcacert | icon | image |ipseccacert | ipsecdevcert| login-banner | |signature | webadmincert | webauthbundle |webauthcert}
Syntax Description Downloads an executable image to the system.code
CLI Commands803
CLI CommandsUploading and Downloading Files and Configurations

Downloads the configuration file.config
Downloads an EAP ca certificate to the system.eapcacert
Downloads an EAP dev certificate to the system.eapdevcert
Downloads an executable image to the system.icon
Downloads a web page login to the system.image
Downloads an IPSec Certificate Authority (CA)certificate to the system.
ipseccacert
Downloads an IPSec dev certificate to the system.ipsecdevcert
Downloads the controller login banner. Only text fileis supported with a maximum of 1500 bytes.
login-banner
Downloads a signature file to the system.signature
Downloads a certificate for web administration to thesystem.
webadmincert
Downloads a custom webauth bundle to the system.webauthbundle
Downloads a web certificate for the web portal to thesystem.
webauthcert
Command Default None
Command History ModificationRelease
This command was introduced in a release earlier than Release 7.6.7.6
The following example shows how to download an executable image to the system:
(Cisco Controller) > transfer download datatype code
transfer download filenameTo download a specific file, use the transfer download filename command.
transfer download filename filename
Syntax Description Filename that contains up to 512 alphanumericcharacters.
filename
Command Default None
CLI Commands804
CLI Commandstransfer download filename

Command History ModificationRelease
This command was introduced in a release earlier than Release 7.6.7.6
Usage Guidelines You cannot use special characters such as \ : * ? " < > | for the filename.
The following example shows how to transfer a file named build603:
(Cisco Controller) > transfer download filename build603
transfer download modeTo set the transfer mode, use the transfer download mode command.
transfer upload mode {ftp | tftp}
Syntax Description Sets the transfer mode to FTP.ftp
Sets the transfer mode to TFTP.tftp
Command Default None
Command History ModificationRelease
This command was introduced in a release earlier than Release 7.6.7.6
The following example shows how to transfer a file using the TFTP mode:
(Cisco Controller) > transfer download mode tftp
transfer download passwordTo set the password for an FTP transfer, use the transfer download password command.
transfer download password password
Syntax Description Password.password
Command Default None
Command History ModificationRelease
This command was introduced in a release earlier than Release 7.6.7.6
The following example shows how to set the password for FTP transfer to pass01:
(Cisco Controller) > transfer download password pass01
CLI Commands805
CLI Commandstransfer download mode
transfer download pathTo set a specific FTP or TFTP path, use the transfer download path command.
transfer download path path
Syntax Description Directory path.
Path names on a TFTP or FTP server arerelative to the server’s default or rootdirectory. For example, in the case of theSolarwinds TFTP server, the path is “/”.
Note
path
Command Default None
Command History ModificationRelease
This command was introduced in a release earlier than Release 7.6.7.6
Usage Guidelines You cannot use special characters such as \ : * ? " < > | for the file path.
The following example shows how to transfer a file to the path c:\install\version2:(Cisco Controller) > transfer download path c:\install\version2
transfer download portTo specify the FTP port, use the transfer download port command.
transfer download port port
Syntax Description FTP port.port
Command Default The default FTP port is 21.
Command History ModificationRelease
This command was introduced in a release earlier than Release 7.6.7.6
ch
The following example shows how to specify FTP port number 23:
(Cisco Controller) > transfer download port 23
transfer download serveripTo configure the IPv4 or IPv6 address of the TFTP server from which to download information, use thetransfer download serverip command.
CLI Commands806
CLI Commandstransfer download path

transfer download serverip IP addr
Syntax Description TFTP server IPv4 or IPv6 address.IP addr
Command Default None
Command History ModificationRelease
This command was introduced in a release earlier than Release 7.6.7.6
This command supports both IPv4 and IPv6 address formats.8.0
The following example shows how to configure the IPv4 address of the TFTP server:
(Cisco Controller) > transfer download serverip 175.34.56.78
The following example shows how to configure the IPv6 address of the TFTP server:
(Cisco Controller) > transfer download serverip 2001:10:1:1::1
transfer download startTo initiate a download, use the transfer download start command.
transfer download start
Syntax Description This command has no arguments or keywords.
Command Default None
Command History ModificationRelease
This command was introduced in a release earlier than Release 7.6.7.6
The following example shows how to initiate a download:
(Cisco Controller) > transfer download startMode........................................... TFTPData Type...................................... Site CertTFTP Server IP................................. 172.16.16.78TFTP Path...................................... directory pathTFTP Filename.................................. webadmincert_nameThis may take some time.Are you sure you want to start? (y/n) YTFTP Webadmin cert transfer starting.Certificate installed.Please restart the switch (reset system) to use the new certificate.
transfer download tftpPktTimeoutTo specify the TFTP packet timeout, use the transfer download tftpPktTimeout command.
CLI Commands807
CLI Commandstransfer download start
transfer download tftpPktTimeout timeout
Syntax Description Timeout in seconds between 1 and 254.timeout
Command Default None
Command History ModificationRelease
This command was introduced in a release earlier than Release 7.6.7.6
The following example shows how to transfer a file with the TFTP packet timeout of 55 seconds:
(Cisco Controller) > transfer download tftpPktTimeout 55
transfer download tftpMaxRetriesTo specify the number of allowed TFTP packet retries, use the transfer download tftpMaxRetries command.
transfer download tftpMaxRetries retries
Syntax Description Number of allowed TFTP packet retries between 1and 254 seconds.
retries
Command Default None
Command History ModificationRelease
This command was introduced in a release earlier than Release 7.6.7.6
The following example shows how to set the number of allowed TFTP packet retries to 55:
(Cisco Controller) > transfer download tftpMaxRetries 55
transfer download usernameTo specify the FTP username, use the transfer download username command.
transfer download username username
Syntax Description Username.username
Command Default None
Command History ModificationRelease
This command was introduced in a release earlier than Release 7.6.7.6
CLI Commands808
CLI Commandstransfer download tftpMaxRetries

The following example shows how to set the FTP username to ftp_username:
(Cisco Controller) > transfer download username ftp_username
transfer encryptTo configure encryption for configuration file transfers, use the transfer encrypt command.
transfer encrypt {enable | disable | set-key key}
Syntax Description Enables the encryption settings.enable
Disables the encryption settings.disable
Specifies the encryption key for configuration filetransfers.
set-key
Encryption key for config file transfers.key
Command Default None
Command History ModificationRelease
This command was introduced in a release earlier than Release 7.6.7.6
The following example shows how to enable the encryption settings:
(Cisco Controller) > transfer encrypt enable
transfer upload datatypeTo set the controller to upload specified log and crash files, use the transfer upload datatype command.
transfer upload datatype {ap-crash-data | config | coredump | crashfile | debug-file |eapcacert | eapdevcert | errorlog | invalid-config | pac | packet-capture | panic-crash-file| radio-core-dump | | rrm-log | run-config | signature | systemtrace | traplog |watchdog-crash-filewebadmincert | webauthbundle | webauthcert}
Syntax Description Uploads the AP crash files.ap-crash-data
Uploads the system configuration file.config
Uploads the core-dump file.coredump
Uploads the system crash file.crashfile
Uploads the system's debug log file.debug-file
Uploads an EAP CA certificate.eapcacert
CLI Commands809
CLI Commandstransfer encrypt
Uploads an EAP Dev certificate.eapdevcert
Uploads the system error log file.errorlog
Uploads the system invalid-config file.invalid-config
Uploads a Protected Access Credential (PAC).pac
Uploads a packet capture file.packet-capture
Uploads the kernel panic information file.panic-crash-file
Uploads the system error log.radio-core-dump
Uploads the system's trap log.rrm-log
Upload the WLC's running configurationrun-config
Uploads the system signature file.signature
Uploads the system trace file.systemtrace
Uploads the system trap log.traplog
Uploads a console dump file resulting from asoftware-watchdog-initiated controller rebootfollowing a crash.
watchdog-crash-file
Uploads Web Admin certificate.webadmincert
Uploads a Web Auth bundle.webauthbundle
Upload a web certificatewebauthcert
Command Default None
Command History ModificationRelease
This command was introduced in a release earlier than Release 7.6.7.6
The following example shows how to upload the system error log file:
(Cisco Controller) > transfer upload datatype errorlog
transfer upload filenameTo upload a specific file, use the transfer upload filename command.
transfer upload filename filename
Syntax Description Filename that contains up to 16 alphanumericcharacters.
filename
CLI Commands810
CLI Commandstransfer upload filename

Command Default None
Command History ModificationRelease
This command was introduced in a release earlier than Release 7.6.7.6
Usage Guidelines You cannot use special characters such as \ : * ? " < > | for the filename.
The following example shows how to upload a file build603:
(Cisco Controller) > transfer upload filename build603
transfer upload modeTo configure the transfer mode, use the transfer upload mode command.
transfer upload mode {ftp | tftp}
Syntax Description Sets the transfer mode to FTP.ftp
Sets the transfer mode to TFTP.tftp
Command Default None
Command History ModificationRelease
This command was introduced in a release earlier than Release 7.6.7.6
The following example shows how to set the transfer mode to TFTP:
(Cisco Controller) > transfer upload mode tftp
transfer upload pacTo load a Protected Access Credential (PAC) to support the local authentication feature and allow a client toimport the PAC, use the transfer upload pac command.
transfer upload pac username validity password
Syntax Description User identity of the PAC.username
Validity period (days) of the PAC.validity
Password to protect the PAC.password
Command Default None
CLI Commands811
CLI Commandstransfer upload mode
Command History ModificationRelease
This command was introduced in a release earlier than Release 7.6.7.6
Usage Guidelines The client upload process uses a TFTP or FTP server.
The following example shows how to upload a PAC with the username user1, validity period 53,and password pass01:
(Cisco Controller) > transfer upload pac user1 53 pass01
transfer upload passwordTo configure the password for FTP transfer, use the transfer upload password command.
Syntax Description Password needed to access the FTP server.password
transfer upload password password
Command Default None
Command History ModificationRelease
This command was introduced in a release earlier than Release 7.6.7.6
The following example shows how to configure the password for the FTP transfer to pass01:
(Cisco Controller) > transfer upload password pass01
transfer upload pathTo set a specific upload path, use the transfer upload path command.
transfer upload path path
Syntax Description Server path to file.path
Command Default None
Command History ModificationRelease
This command was introduced in a release earlier than Release 7.6.7.6
Usage Guidelines You cannot use special characters such as \ : * ? " < > | for the file path.
The following example shows how to set the upload path to c:\install\version2:
(Cisco Controller) > transfer upload path c:\install\version2
CLI Commands812
CLI Commandstransfer upload password
transfer upload peer-startTo upload a file to the peer WLC, use the transfer upload peer-start command.
transfer upload peer-start
Syntax Description This command has no arguments or keywords.
Command Default None
Command History ModificationRelease
This commandwas introduced in a release earlier thanRelease 7.6.
7.6
The following example shows how to start uploading a file to the peer controller:(Cisco Controller) >transfer upload peer-startMode............................................. FTPFTP Server IP.................................... 209.165.201.1FTP Server Port.................................. 21FTP Path......................................... /builds/nimm/FTP Filename..................................... AS_5500_7_4_1_20.aesFTP Username..................................... wnbuFTP Password..................................... *********Data Type........................................ Error Log
Are you sure you want to start upload from standby? (y/N) n
Transfer Canceled
transfer upload portTo specify the FTP port, use the transfer upload port command.
transfer upload port port
Syntax Description Port number.port
Command Default The default FTP port is 21.
Command History ModificationRelease
This command was introduced in a release earlier than Release 7.6.7.6
The following example shows how to specify FTP port 23:
(Cisco Controller) > transfer upload port 23
transfer upload serveripTo configure the IPv4 or IPv6 address of the TFTP server to upload files to, use the transfer upload serveripcommand.
CLI Commands813
CLI Commandstransfer upload peer-start
transfer upload serverip IP addr
Syntax Description TFTP Server IPv4 or IPv6 address.IP addr
Command Default None
Command History ModificationRelease
This command was introduced in a release earlier than Release 7.6.7.6
This command supports both IPv4 and IPv6 address formats.8.0
The following example shows how to set the IPv4 address of the TFTP server to 175.31.56.78:
(Cisco Controller) > transfer upload serverip 175.31.56.78
The following example shows how to set the IPv6 address of the TFTP server to 175.31.56.78:
(Cisco Controller) > transfer upload serverip 2001:10:1:1::1
transfer upload startTo initiate an upload, use the transfer upload start command.
transfer upload start
Syntax Description This command has no arguments or keywords.
Command Default None
Command History ModificationRelease
This command was introduced in a release earlier than Release 7.6.7.6
The following example shows how to initiate an upload of a file:
(Cisco Controller) > transfer upload startMode........................................... TFTPTFTP Server IP................................. 172.16.16.78TFTP Path...................................... c:\find\off/TFTP Filename.................................. wps_2_0_75_0.aesData Type...................................... CodeAre you sure you want to start? (y/n) nTransfer Cancelled
transfer upload usernameTo specify the FTP username, use the transfer upload username command.
transfer upload username
CLI Commands814
CLI Commandstransfer upload start
Syntax Description Username required to access the FTP server. Theusername can contain up to 31 characters.
username
Command Default None
Command History ModificationRelease
This command was introduced in a release earlier than Release 7.6.7.6
The following example shows how to set the FTP username to ftp_username:
(Cisco Controller) > transfer upload username ftp_username
Installing and Modifying Licenses on Cisco 5500 Series ControllersUse the license commands to install, remove, modify, or rehost licenses.
Some license commands are available only on the Cisco 5500 Series Controller. Right to Use (RTU) licensingis not supported on Cisco 5500 Series Controllers.
Note
For detailed information on installing and rehosting licenses on the Cisco 5500 Series Controller, see the“Installing and Configuring Licenses” section in Chapter 4 of theCiscoWireless LANController ConfigurationGuide.
Note
license clearTo remove a license from the Cisco 5500 Series Controller, use the license clear command.
license clear license_name
Syntax Description Name of the license.license_name
Command Default None
Command History ModificationRelease
This command was introduced in a release earlier than Release 7.6.7.6
Usage Guidelines You can delete an expired evaluation license or any unused license. You cannot delete unexpired evaluationlicenses, the permanent base image license, or licenses that are in use by the controller.
The following example shows how to remove the license settings of the license namedwplus-ap-count:
CLI Commands815
CLI CommandsInstalling and Modifying Licenses on Cisco 5500 Series Controllers
(Cisco Controller) > license clear wplus-ap-count
license commentTo add comments to a license or delete comments from a license on the Cisco 5500 Series Controller, use thelicense comment command.
license comment {add | delete} license_name comment_string
Syntax Description Adds a comment.add
Deletes a comment.delete
Name of the license.license_name
License comment.comment_string
Command Default None
Command History ModificationRelease
This command was introduced in a release earlier than Release 7.6.7.6
The following example shows how to add a comment “wplus ap count license” to the license namewplus-ap-count:
(Cisco Controller) > license comment add wplus-ap-count Comment for wplus ap count license
license installTo install a license on the Cisco 5500 Series Controller, use the license install command.
license install url
Syntax Description URL of the TFTP server(tftp://server_ip/path/filename).
url
Command Default None
Command History ModificationRelease
This command was introduced in a release earlier than Release 7.6.7.6
Usage Guidelines We recommend that the access point count be the same for the base-ap-count and wplus-ap-count licensesinstalled on your controller. If your controller has a base-ap-count license of 100 and you install awplus-ap-count license of 12, the controller supports up to 100 access points when the base license is in usebut only a maximum of 12 access points when the wplus license is in use.
CLI Commands816
CLI Commandslicense comment

You cannot install a wplus license that has an access point count greater than the controller's base license. Forexample, you cannot apply a wplus-ap-count 100 license to a controller with an existing base-ap-count 12license. If you attempt to register for such a license, an error message appears indicating that the licenseregistration has failed. Before upgrading to a wplus-ap-count 100 license, you would first have to upgradethe controller to a base-ap-count 100 or 250 license.
The following example shows how to install a license on the controller from the URLtftp://10.10.10.10/path/license.lic:
(Cisco Controller) > license install tftp://10.10.10.10/path/license.lic
license modify priorityTo raise or lower the priority of the base-ap-count or wplus-ap-count evaluation license on a Cisco 5500 SeriesController, use the license modify priority command.
license modify priority license_name {high | low}
Syntax Description Ap-count evaluation license.license_name
Modifies the priority of an ap-count evaluation license.high
Modifies the priority of an ap-count evaluation license.low
Command Default None
Command History ModificationRelease
This command was introduced in a release earlier than Release 7.6.7.6
Usage Guidelines If you are considering upgrading to a license with a higher access point count, you can try an evaluation licensebefore upgrading to a permanent version of the license. For example, if you are using a permanent licensewith a 50 access point count and want to try an evaluation license with a 100 access point count, you can tryout the evaluation license for 60 days.
AP-count evaluation licenses are set to low priority by default so that the controller uses the ap-count permanentlicense. If you want to try an evaluation license with an increased access point count, you must change itspriority to high. If you no longer want to have this higher capacity, you can lower the priority of the ap-countevaluation license, which forces the controller to use the permanent license.
You can set the priority only for ap-count evaluation licenses. AP-count permanent licenses always have amedium priority, which cannot be configured.
Note
If the ap-count evaluation license is a wplus license and the ap-count permanent license is a base license, youmust also change the feature set to wplus.
Note
CLI Commands817
CLI Commandslicense modify priority
To prevent disruptions in operation, the controller does not switch licenses when an evaluation license expires.You must reboot the controller in order to return to a permanent license. Following a reboot, the controllerdefaults to the same feature set level as the expired evaluation license. If no permanent license at the samefeature set level is installed, the controller uses a permanent license at another level or an unexpired evaluationlicense.
Note
The following example shows how to set the priority of the wplus-ap-count to high:
(Cisco Controller) > license modify priority wplus-ap-count high
license revokeTo rehost a license on a Cisco 5500 Series WLC, use the license revoke command.
license revoke {permission_ticket_url | rehost rehost_ticket_url}
Syntax Description URL of the TFTP server(tftp://server_ip/path/filename) where you saved thepermission ticket.
permission_ticket_url
Specifies the rehost license settings.rehost
URL of the TFTP server(tftp://server_ip/path/filename) where you saved therehost ticket.
rehost_ticket_url
Command Default None
Command History ModificationRelease
This command was introduced in a release earlier than Release 7.6.7.6
Usage Guidelines Before you revoke a license, save the device credentials by using the license save credential url command.
You can rehost all permanent licenses except the permanent base image license. Evaluation licenses and thepermanent base image license cannot be rehosted.
In order to rehost a license, you must generate credential information from the controller and use it to obtaina permission ticket to revoke the license from the Cisco licensing site, https://tools.cisco.com/SWIFT/LicensingUI/Quickstart. Next, you must obtain a rehost ticket and use it to obtain a license installation filefor the controller on which you want to install the license.
For detailed information on rehosting licenses, see the “Installing and Configuring Licenses” section in theCisco Wireless LAN Controller Configuration Guide.
The following example shows how to revoke the license settings from the saved permission ticketURL tftp://10.10.10.10/path/permit_ticket.lic:
CLI Commands818
CLI Commandslicense revoke

(Cisco Controller) > license revoke tftp://10.10.10.10/path/permit_ticket.lic
The following example shows how to revoke the license settings from the saved rehost ticket URLtftp://10.10.10.10/path/rehost_ticket.lic:
(Cisco Controller) > license revoke rehost tftp://10.10.10.10/path/rehost_ticket.lic
license saveTo save a backup copy of all installed licenses or license credentials on the Cisco 5500 Series Controller, usethe license save command.
license save credential url
Syntax Description Device credential information.credential
URL of the TFTP server (tftp://server_ip/path/filename).url
Command Default None
Command History ModificationRelease
This command was introduced in a release earlier than Release 7.6.7.6
Usage Guidelines Save the device credentials before you revoke the license by using the license revoke command.
The following example shows how to save a backup copy of all installed licenses or license credentialson tftp://10.10.10.10/path/cred.lic:
(Cisco Controller) > license save credential tftp://10.10.10.10/path/cred.lic
Right to Use Licensing CommandsUse the license commands to configure Right to Use (RTU) licensing on Cisco Flex 7500 Series and 8500Series controllers. This feature allows you to enable an AP license count on the controller without using anyexternal tools after accepting an End User License Agreement (EULA).
license activate ap-count evalTo activate an evaluation access point license on the Cisco Flex 7500 Series and Cisco 8500 Series WirelessLAN Controllers, use the license activate ap-count eval command.
license activate ap-count eval
Syntax Description This command has no arguments or keywords.
Command Default By default, in release 7.3 Cisco Flex 7500 Series Controllers and Cisco 8500 SeriesWireless LANControllerssupport 6000 APs.
CLI Commands819
CLI Commandslicense save

Command History ModificationRelease
This command was introduced in a release earlier than Release 7.6.7.6
Usage Guidelines When you activate this license, the controller prompts you to accept or reject the End User License Agreement(EULA) for the given license. If you activate a license that supports a smaller number of APs than the currentnumber of APs connected to the controller, the activation command fails.
The following example shows how to activate an evaluation AP-count license on a Cisco Flex 7500Series controller:
(Cisco Controller) > license activate ap-count eval
license activate featureTo activate a feature license on Cisco Flex 7500 Series and Cisco 8500 Series Wireless LAN Controllers, usethe license activate feature command.
license activate feature license_name
Syntax Description Name of the feature license. The license name can be up to 50 case-sensitive characters.license_name
Command Default None
Command History ModificationRelease
This command was introduced in a release earlier than Release 7.6.7.6
The following example shows how to activate a data DTLS feature license on a Cisco Flex 7500Series controller:
(Cisco Controller) > license activate feature data-DTLS
license add ap-countTo configure the number of access points (APs) that an AP license can support on Cisco Flex 7500 and 8500Series Wireless LAN controllers, use the license add ap-count command.
license add ap-count count
Syntax Description Number of APs that the AP license supports. The range is from 1 to the maximum number of APsthat the controller can support. The count must be a multiple of 5.
count
Command Default None
Command History ModificationRelease
This command was introduced in a release earlier than Release 7.6.7.6
CLI Commands820
CLI Commandslicense activate feature

Usage Guidelines Right to Use (RTU) licensing allows you to enable a desired AP license count on the controller after acceptingthe End User License Agreement (EULA). You can now easily add AP counts on a controller without usingexternal tools. RTU licensing is available only on Cisco Flex 7500 and 8500 series Wireless LAN controllers.
You can use this command to increase the count of an existing AP license. When you activate a license thatsupports a smaller number of APs than the current number of APs connected to the controller, the activationcommand fails.
The following example shows how to configure the count of an AP license on a Cisco Flex 7500Series controller:
(Cisco Controller) > license add ap-count 5000
license add featureTo add a license for a feature on the Cisco 5520 WLC, Cisco Flex 7510 WLC, Cisco 8510 WLC, Cisco 8540WLC, and Cisco Virtual Controller, use the license add feature command.
license add feature license_name
Syntax Description Name of the feature license. The license name can be up to 50 case-sensitive characters. Forexample, data_encryption.
license_name
Command Default None
Command History ModificationRelease
This command was introduced in a release earlier than Release 7.6.
This command is applicable to Cisco Flex 7510 WLC and Cisco 8510 WLC.
7.6
This command is applicable to Cisco 5520 WLC, Cisco Flex 7510 WLC, Cisco 8510 WLC, Cisco8540 WLC, and Cisco vWLC.
8.1
The following example shows how to add a data_encryption feature license:
(Cisco Controller) > license add feature data_encryption
license deactivate ap-count evalTo deactivate an evaluation access point license on the Cisco Flex 7500 Series and Cisco 8500 SeriesWirelessLAN Controllers, use the license deactivate ap-count eval command.
license deactivate ap-count eval
Syntax Description This command has no arguments or keywords.
Command Default None
CLI Commands821
CLI Commandslicense add feature
Command History ModificationRelease
This command was introduced in a release earlier than Release 7.6.7.6
The following example shows how to deactivate an evaluation AP license on a Cisco Flex 7500Series controller:
(Cisco Controller) > license deactivate ap-count eval
license deactivate featureTo deactivate a feature license on Cisco Flex 7500 Series and Cisco 8500 Series Wireless LAN controllers,use the license deactivate feature command.
license deactivate feature license_name
Syntax Description Name of the feature license. The license name can be up to 50 case-sensitive characters.license_name
Command Default None
Command History ModificationRelease
This command was introduced in a release earlier than Release 7.6.7.6
The following example shows how to deactivate a data DTLS feature license on a Cisco Flex 7500Series controller:
(Cisco Controller) > license deactivate feature data_DTLS
license delete ap-countTo delete an access point (AP) count license on the Cisco Flex 7500 Series and Cisco 8500 Series WirelessLAN Controllers, use the license delete ap-count command.
license delete ap-count count
Syntax Description Number of APs that the AP license supports. The range is from 1 to the maximum number of APsthat the controller can support. The count must be a multiple of 5.
count
Command Default None
Command History ModificationRelease
This command was introduced in a release earlier than Release 7.6.7.6
The following example shows how to delete an AP count license on a Cisco Flex 7500 Seriescontroller:
CLI Commands822
CLI Commandslicense deactivate feature
(Cisco Controller) > license delete ap-count 5000
license delete featureTo delete a license for a feature on Cisco Flex 7500 Series and Cisco 8500 Series Wireless LAN controllers,use the license delete feature command.
license delete feature license_name
Syntax Description Name of the feature license.license_name
Command Default None
Command History ModificationRelease
This command was introduced in a release earlier than Release 7.6.7.6
The following example shows how to delete the High Availability feature license on a Cisco Flex7500 Series controller:
(Cisco Controller) > license delete feature high_availability
Integrated Management Module Commands in Cisco Flex 7500 SeriesControllers
Use the imm commands to manage the Integrated Management Module (IMM) in the Cisco Flex 7500 SeriesControllers.
imm addressTo configure the static IP address of the IMM, use the imm address command.
imm address ip-addr netmask gateway
Syntax Description IP address of the IMMip-addr
Netmask of the IMMnetmask
Gateway of the IMMgateway
Command Default None
Command History ModificationRelease
This command was introduced in a release earlier than Release 7.6.7.6
This command supports only IPv4 address format.8.0
CLI Commands823
CLI Commandslicense delete feature

The following example shows how to set the static IP address of an IMM:(Cisco Controller) >imm address 209.165.200.225 255.255.255.224 10.1.1.1
imm dhcpTo configure DHCP for the IMM, use the imm dhcp command.
imm dhcp {enable | disable | fallback}
Syntax Description Enables DHCP for the IMMenable
Disables DHCP for the IMMdisable
Enables DHCP for the IMM, but if it fails, then usesstatic IP of the IMM
fallback
Command Default DHCP for IMM is enabled.
Command History ModificationRelease
This command was introduced in a release earlier than Release 7.6.7.6
The following example shows how to enable DHCP for the IMM:(Cisco Controller) >imm dhcp enable
imm modeTo configure the IMM mode, use the imm mode command.
imm mode {shared | dedicated}
Syntax Description Sets IMM in shared modeshared
Sets IMM in dedicated modededicated
Command Default Dedicated
Command History ModificationRelease
This command was introduced in a release earlier than Release 7.6.7.6
The following example shows how to set the IMM in shared mode:(Cisco Controller) >imm mode
imm restartTo restart the IMM, use the imm restart command.
CLI Commands824
CLI Commandsimm dhcp

imm restart
Syntax Description Saves your settings and restarts the IMMrestart
Command Default None
Command History ModificationRelease
This command was introduced in a release earlier than Release 7.6.7.6
imm summaryTo view the IMM parameters, use the imm summary command.
imm summary
Syntax Description Lists the IMM parameterssummary
Command Default None
Command History ModificationRelease
This command was introduced in a release earlier than Release 7.6.7.6
The following example shows a typical summary of the IMM:(Cisco Controller) >imm summaryUser ID..........................................username1Mode............................................. SharedDHCP............................................. EnabledIP Address....................................... 209.165.200.225Subnet Mask...................................... 255.255.255.224Gateway.......................................... 10.1.1.1
imm usernameTo configure the logon credentials for an IMM user, use the imm username command.
imm username username password
Syntax Description Username for the userusername
Password for the userpassword
Command Default None
Command History ModificationRelease
This command was introduced in a release earlier than Release 7.6.7.6
CLI Commands825
CLI Commandsimm summary
The following example shows how to set the logon credentials of an IMM user:(Cisco Controller) >imm username username1 password1
Troubleshooting CommandsUse the debug commands to manage system debugging.
Caution Debug commands are reserved for use only under direction of Cisco personnel. Do not use thesecommands without direction from Cisco-certified staff.
Enabling all debug commands on a system with many clients authenticating may result in some debugs beinglost.
Note
debug aaaTo configure the debugging of AAA settings, use the debug aaa command.
debug aaa {[all | avp-xml | detail | events | packet | ldap | local-auth | tacacs] [enable| disable]}
Syntax Description (Optional) Configures the debugging of all AAAmessages.
all
(Optional) Configures debug of AAAAvp xml events.avp-xml
(Optional) Configures the debugging of AAA errors.detail
(Optional) Configures the debugging of AAA events.events
(Optional) Configures the debugging of AAA packets.packet
(Optional) Configures the debugging of the AAALightweight Directory Access Protocol (LDAP)events.
ldap
(Optional) Configures the debugging of the AAA localExtensible Authentication Protocol (EAP) events.
local-auth
(Optional) Configures the debugging of the AAATACACS+ events.
tacacs
(Optional) Enables the debugging.enable
(Optional) Disables the debugging.disable
Command Default None
CLI Commands826
CLI CommandsTroubleshooting Commands

Command History ModificationRelease
This commandwas introduced in a release earlier thanRelease 7.6.
7.6
The following example shows how to enable the debugging of AAA LDAP events:
(Cisco Controller) > debug aaa ldap enable
Related Commands debug aaa local-auth eap
show running-config
debug aaa local-authTo configure the debugging of AAA local authentication on the Cisco WLC, use the debug aaa local-authcommand.
debug aaa local-auth {db | shim | eap {framework | method} {all | errors | events |packets | sm}} {enable | disable}
Syntax Description Configures the debugging of the AAA localauthentication back-end messages and events.
db
Configures the debugging of the AAA localauthentication shim layer events.
shim
Configures the debugging of theAAA local ExtensibleAuthentication Protocol (EAP) authentication.
eap
Configures the debugging of the local EAPframework.
framework
Configures the debugging of local EAP methods.method
Configures the debugging of local EAP messages.all
Configures the debugging of local EAP errors.errors
Configures the debugging of local EAP events.events
Configures the debugging of local EAP packets.packets
Configures the debugging of the local EAP statemachine.
sm
Starts the debugging.enable
Stops the debugging.disable
Command Default None
CLI Commands827
CLI Commandsdebug aaa local-auth

Command History ModificationRelease
This commandwas introduced in a release earlier thanRelease 7.6.
7.6
The following example shows how to enable the debugging of the AAA local EAP authentication:
(Cisco Controller) > debug aaa local-auth eap method all enable
Related Commands clear stats local-auth
config local-auth active-timeout
config local-auth eap-profile
config local-auth method fast
config local-auth user-credentials
show local-auth certificates
show local-auth config
show local-auth statistics
debug airewave-directorTo configure the debugging of Airewave Director software, use the debug airwave-director command.
debug airewave-director {all | channel | detail | error | group | manager | message |packet | power | profile | radar | rf-change} {enable | disable}
Syntax Description Configures the debugging of all Airewave Directorlogs.
all
Configures the debugging of the Airewave Directorchannel assignment protocol.
channel
Configures the debugging of the Airewave Directordetail logs.
detail
Configures the debugging of the Airewave Directorerror logs.
error
Configures the debugging of the Airewave Directorgrouping protocol.
group
Configures the debugging of the Airewave Directormanager.
manager
Configures the debugging of the Airewave Directormessages.
message
Configures the debugging of the Airewave Directorpackets.
packet
CLI Commands828
CLI Commandsdebug airewave-director

Configures the debugging of the Airewave Directorpower assignment protocol and coverage holedetection.
power
Configures the debugging of the Airewave Directorprofile events.
profile
Configures the debugging of the Airewave Directorradar detection/avoidance protocol.
radar
Configures the debugging of the Airewave Directorrf changes.
rf-change
Enables the Airewave Director debugging.enable
Disables the Airewave Director debugging.disable
Command Default None
Command History ModificationRelease
This commandwas introduced in a release earlier thanRelease 7.6.
7.6
The following example shows how to enable the debugging of Airewave Director profile events:
(Cisco Controller) > debug airewave-director profile enable
Related Commands debug disable-all
show sysinfo
debug apTo configure the remote debugging of Cisco lightweight access points or to remotely execute a command ona lightweight access point, use the debug ap command.
debug ap {enable | disable | command cmd} cisco_ap
Syntax Description Enables the debugging on a lightweight access point.
The debugging information is displayedonly to the controller console and does notsend output to a controller Telnet/SSHCLIsession.
Note
enable
Disables the debugging on a lightweight access point.
The debugging information is displayedonly to the controller console and does notsend output to a controller Telnet/SSHCLIsession.
Note
disable
CLI Commands829
CLI Commandsdebug ap

Specifies that a CLI command is to be executed onthe access point.
command
Command to be executed.
The command to be executed must beenclosed in double quotes, such as debugap command “led flash 30” AP03.
The output of the command displays onlyto the controller console and does not sendoutput to a controller Telnet/SSH CLIsession.
Note
cmd
Name of a Cisco lightweight access point.cisco_ap
Command Default The remote debugging of Cisco lightweight access points is disabled.
Command History ModificationRelease
This commandwas introduced in a release earlier thanRelease 7.6.
7.6
The following example shows how to enable the remote debugging on access point AP01:
(Cisco Controller) >debug ap enable AP01
The following example shows how to execute the config ap location command on access pointAP02:
(Cisco Controller) >debug ap command “config ap location "Building 1" AP02”
The following example shows how to execute the flash LED command on access point AP03:
(Cisco Controller) >debug ap command “led flash 30” AP03
debug ap enableTo configure the remote debugging of Cisco lightweight access points or to remotely execute a command ona lightweight access point, use the debug ap enable command.
debug ap {enable | disable | command cmd} cisco_ap
Syntax Description Enables the remote debugging.
The debugging information is displayedonly to the controller console and does notsend output to a controller Telnet/SSHCLIsession.
Note
enable
CLI Commands830
CLI Commandsdebug ap enable

Disables the remote debugging.disable
Specifies that a CLI command is to be executed onthe access point.
command
Command to be executed.
The command to be executed must beenclosed in double quotes, such as debugap command “led flash 30” AP03.
The output of the command displays onlyto the controller console and does not sendoutput to a controller Telnet/SSH CLIsession.
Note
cmd
Cisco lightweight access point name.cisco_ap
Command Default None
Command History ModificationRelease
This commandwas introduced in a release earlier thanRelease 7.6.
7.6
The following example shows how to enable the remote debugging on access point AP01:
(Cisco Controller) >debug ap enable AP01
The following example shows how to disable the remote debugging on access point AP02:
(Cisco Controller) >debug ap disable AP02
The following example shows how to execute the flash LED command on access point AP03:
(Cisco Controller) >debug ap command “led flash 30” AP03
debug ap packet-dumpTo configure the debugging of Packet Capture, use the debug ap packet-dump command.
debug ap packet-dump {enable | disable}
Syntax Description Enables the debugging of Packet Capture of an access point.enable
Disables the debugging of Packet Capture of an access point.disable
Command Default Debugging of Packet Capture is disabled.
CLI Commands831
CLI Commandsdebug ap packet-dump

Command History ModificationRelease
This commandwas introduced in a release earlier thanRelease 7.6.
7.6
Usage Guidelines Packet Capture does not work during inter-Cisco WLC roaming.
The Cisco WLC does not capture packets created in the radio firmware and sent out of the access point, suchas beacon or probe response. Only packets that flow through the radio driver in the Tx path will be captured.
The following example shows how to enable the debugging of Packet Capture from an access point:(Cisco Controller) >debug ap packet-dump enable
debug ap show statsTo debug video messages and statistics of Cisco lightweight access points, use the debug ap show statscommand.
debug ap show stats {802.11a | 802.11b} cisco_ap {tx-queue | packet | load | multicast |client {client_MAC | video | all} | video metrics}
debug ap show stats video cisco_ap{multicastmgidmgid_database_number | admission | bandwidth}
Syntax Description Specifies the 802.11a network.802.11a
Specifies the 802.11b/g network.802.11b
Cisco lightweight access point name.cisco_ap
Displays the transmit queue traffic statistics of theAP.
tx-queue
Displays the packet statistics of the AP.packet
Displays the QoS Basic Service Set (QBSS) and otherstatistics of the AP.
load
Displays the multicast supported rate statistics of theAP.
multicast
Displays the specified client metric statistics.client
MAC address of the client.client_MAC
Displays video statistics of all clients on the AP.video
Displays statistics of all clients on the AP.all
Displays the video metric statistics.video metrics
Displays detailed multicast information for a singlemulticast group ID (MGID).
mgid
CLI Commands832
CLI Commandsdebug ap show stats
Layer 2 MGID database number.mgid_database_number
Displays video admission control on the AP.admission
Displays video bandwidth on the AP.bandwidth
Command Default None
Command History ModificationRelease
This commandwas introduced in a release earlier thanRelease 7.6.
7.6
The following example shows how to troubleshoot the access point AP01’s transmit queue trafficon an 802.11a network:
(Cisco Controller) >debug ap show stats 802.11a AP01 tx-queue
The following example shows how to troubleshoot the access point AP02’s multicast supported rateson an 802.11b/g network:
(Cisco Controller) >debug ap show stats 802.11b AP02 multicast
The following example shows how to troubleshoot the metrics of a client identified by its MACaddress, associated with the access point AP01 on an 802.11a network:
(Cisco Controller) >debug ap show stats 802.11a AP01 client 00:40:96:a8:f7:98
The following example shows how to troubleshoot the metrics of all clients associated with the accesspoint AP01 on an 802.11a network:
(Cisco Controller) >debug ap show stats 802.11a AP01 client all
debug ap show stats videoTo configure the debugging of video messages and statistics of Cisco lightweight access points, use the debugap show stats video command.
debug ap show stats video cisco_ap {multicast mgid mgid_value | admission | bandwidth}
Syntax Description Cisco lightweight access point name.cisco_ap
Displays multicast database related information forthe specified MGID of an access point.
multicast mgid
Layer 2 MGID database number from 1 to 4095.mgid_value
Displays the video admission control.admission
CLI Commands833
CLI Commandsdebug ap show stats video
Displays the video bandwidth.bandwidth
Command Default None
Command History ModificationRelease
This commandwas introduced in a release earlier thanRelease 7.6.
7.6
The following example shows how to configure the debugging of an access point AP01’s multicastgroup that is identified by the group’s Layer 2 MGID database number:
(Cisco Controller) >debug ap show stats video AP01 multicast mgid 50
This example shows how to configure the debugging of an access point AP01’s video bandwidth:
(Cisco Controller) >debug ap show stats video AP01 bandwidth
debug arpTo configure the debugging of Address Resolution Protocol (ARP) options, use the debug arp command.
debug arp {all | detail | events | message} {enable | disable}
Syntax Description Configures the debugging of all ARP logs.all
Configures the debugging of ARP detail messages.detail
Configures the debugging of ARP errors.error
Configures the debugging of ARP messages.message
Enables the ARP debugging.enable
Disables the ARP debugging.disable
Command Default None
Command History ModificationRelease
This command was introduced in a release earlier than Release 7.6.7.6
The following example shows how to enable ARP debug settings:
(Cisco Controller) > debug arp error enable
The following example shows how to disable ARP debug settings:
(Cisco Controller) > debug arp error disable
CLI Commands834
CLI Commandsdebug arp
Related Commands debug disable-all
show sysinfo
debug bcastTo configure the debugging of broadcast options, use the debug bcast command.
debug bcast {all | error | message | igmp | detail} {enable | disable}
Syntax Description Configures the debugging of all broadcast logs.all
Configures the debugging of broadcast errors.error
Configures the debugging of broadcast messages.message
Configures the debugging of broadcast IGMPmessages.
igmp
Configures the debugging of broadcast detailedmessages.
detail
Enables the broadcast debugging.enable
Disables the broadcast debugging.disable
Command Default None
Command History ModificationRelease
This commandwas introduced in a release earlier thanRelease 7.6.
7.6
The following example shows how to enable the debugging of broadcast messages:
(Cisco Controller) > debug bcast message enable
The following example shows how to disable the debugging of broadcast mesages:
(Cisco Controller) > debug bcast message disable
Related Commands debug disable-all
show sysinfo
debug cacTo configure the debugging of Call Admission Control (CAC) options, use the debug cac command.
debug cac {all | event | packet} {enable | disable}
CLI Commands835
CLI Commandsdebug bcast

Syntax Description Configures the debugging options for all CACmessages.
all
Configures the debugging options for CAC events.event
Configures the debugging options for selected CACpackets.
packet
Configures the debugging options for KTS-basedCAC messages.
kts
Enables the debugging of CAC settings.enable
Disables the debugging of CAC settings.disable
Command Default By default, the debugging of CAC options is disabled.
Command History ModificationRelease
This command was introduced in a release earlier than Release 7.6.7.6
The following example shows how to enable debugging of CAC settings:
(Cisco Controller) > debug cac event enable
(Cisco Controller) > debug cac packet enable
Related Commands config 802.11 cac video acm
config 802.11 cac video max-bandwidth
config 802.11 video roam-bandwidth
config 802.11 cac video tspec-inactivity-timeout
config 802.11 cac voice load-based
config 802.11 cac voice roam-bandwidth
config 802.11cac voice stream-size
config 802.11cac voice tspec-inactivity-timeout
debug call-controlTo configure the debugging of the SIP call control settings, use the debug call-control command.
debug call-control {all | event} {enable | disable}
Syntax Description Configures the debugging options for all SIP callcontrol messages.
all
Configures the debugging options for SIP call controlevents.
event
CLI Commands836
CLI Commandsdebug call-control

Enables the debugging of SIP call control messagesor events.
enable
Disables the debugging of SIP call control messagesor events.
disable
Command Default Disabled.
Command History ModificationRelease
This command was introduced in a release earlier than Release 7.6.7.6
The following example shows how to enable the debugging of all SIP call control messages:(Cisco Controller) >debug call-control all enable
debug capwapTo configure the debugging of Control and Provisioning of Wireless Access Points (CAPWAP) settings, usethe debug capwap command.
debug capwap {detail | dtls-keepalive | errors | events | hexdump | info | packet |payload | mfp} {enable | disable}
Syntax Description Configures the debugging for CAPWAP detailsettings.
detail
Configures the debugging for CAPWAP DTLS datakeepalive packets settings.
dtls-keepalive
Configures the debugging for CAPWAP error settings.errors
Configures the debugging for CAPWAP eventssettings.
events
Configures the debugging for CAPWAP hexadecimaldump settings.
hexdump
Configures the debugging for CAPWAP info settings.info
Configures the debugging for CAPWAP packetsettings.
packet
Configures the debugging for CAPWAP payloadsettings.
payload
Configures the debugging for CAPWAPmfp settings.mfp
Enables the debugging of the CAPWAP command.enable
Disables the debugging of the CAPWAP command.disable
CLI Commands837
CLI Commandsdebug capwap

Command Default None
Command History ModificationRelease
This commandwas introduced in a release earlier thanRelease 7.6.
7.6
The following example shows how to enable the debugging of CAPWAP details:
(Cisco Controller) >debug capwap detail enable
debug capwap reapTo configure the debugging of Control and Provisioning of Wireless Access Points (CAPWAP) settings ona FlexConnect access point, use the debug capwap reap command.
debug capwap reap [mgmt | load]
Syntax Description (Optional) Configures the debugging for clientauthentication and association messages.
mgmt
(Optional) Configures the debugging for payloadactivities, which is useful when the FlexConnectaccess point boots up in standalone mode.
load
Command Default None
Command History ModificationRelease
This command was introduced in a release earlier than Release 7.6.7.6
The following example shows how to configure the debugging of FlexConnect client authenticationand association messages:(Cisco Controller) >debug capwap reap mgmt
debug clientTo configure the debugging of a passive client that is associated correctly with the access point, use the debugclient command.
debug client mac_address
Syntax Description MAC address of the client.mac_address
Command Default None
The following example shows how to debug a passive client with MAC address 00:0d:28:f4:c0:45:(Cisco Controller) >debug client 00:0d:28:f4:c0:45
CLI Commands838
CLI Commandsdebug capwap reap

debug cryptoTo configure the debugging of the hardware cryptographic options, use the debug crypto command.
debug crypto {all | sessions | trace | warning} {enable | disable}
Syntax Description Configures the debugging of all hardware cryptomessages.
all
Configures the debugging of hardware crypto sessions.sessions
Configures the debugging of hardware crypto sessions.trace
Configures the debugging of hardware crypto sessions.warning
Enables the debugging of hardware cryptographicsessions.
enable
Disables the debugging of hardware cryptographicsessions.
disable
Command Default None
Command History ModificationRelease
This command was introduced in a release earlier than Release 7.6.7.6
The following example shows how to enable the debugging of hardware crypto sessions:
(Cisco Controller) > debug crypto sessions enable
Related Commands debug disable-all
show sysinfo
debug dhcpTo configure the debugging of DHCP, use the debug dhcp command.
debug dhcp {message | packet} {enable | disable}
Syntax Description Configures the debugging of DHCP error messages.message
Configures the debugging of DHCP packets.packet
Enables the debugging DHCP messages or packets.enable
Disables the debugging of DHCPmessages or packets.disable
Command Default None
CLI Commands839
CLI Commandsdebug crypto

The following example shows how to enable the debugging of DHCP messages:(Cisco Controller) >debug dhcp message enable
debug dhcp service-portTo enable or disable debugging of the Dynamic Host Configuration Protocol (DHCP) packets on the serviceport, use the debug dhcp service-port command.
debug dhcp service-port {enable | disable}
Syntax Description Enables the debugging of DHCP packets on theservice port.
enable
Disables the debugging of DHCP packets on theservice port.
disable
Command Default None
Command History ModificationRelease
This command was introduced in a release earlier than Release 7.6.7.6
The following example shows how to enable the debugging of DHCP packets on a service port:(Cisco Controller) >debug dhcp service-port enable
debug disable-allTo disable all debug messages, use the debug disable-all command.
debug disable-all
Syntax Description This command has no arguments or keywords.
Command Default Disabled.
Command History ModificationRelease
This command was introduced in a release earlier than Release 7.6.7.6
The following example shows how to disable all debug messages:
(Cisco Controller) > debug disable-all
debug dot11To configure the debugging of 802.11 events, use the debug dot11 command.
CLI Commands840
CLI Commandsdebug dhcp service-port

debug dot11 {all | load-balancing | management | mobile | nmsp | probe | rldp | rogue| state} {enable | disable}
Syntax Description Configures the debugging of all 802.11 messages.all
Configures the debugging of 802.11 load balancingevents.
load-balancing
Configures the debugging of 802.11 MACmanagement messages.
management
Configures the debugging of 802.11 mobile events.mobile
Configures the debugging of the 802.11 NMSPinterface events.
nmsp
Configures the debugging of probe.probe
Configures the debugging of 802.11 Rogue LocationDiscovery.
rldp
Configures the debugging of 802.11 rogue events.rogue
Configures the debugging of 802.11 mobile statetransitions.
state
Enables the 802.11 debugging.enable
Disables the 802.11 debugging.disable
Command Default None
Command History ModificationRelease
This commandwas introduced in a release earlier thanRelease 7.6.
7.6
The following example shows how to enable the debugging of 802.11 settings:
(Cisco Controller) > debug dot11 state enable(Cisco Controller) > debug dot11 mobile enable
debug dot11 mgmt interfaceTo configure debugging of 802.11 management interface events, use the debug dot11 mgmt interfacecommand.
debug dot11 mgmt interface
Syntax Description This command has no arguments or keywords.
Command Default None
CLI Commands841
CLI Commandsdebug dot11 mgmt interface

Command History ModificationRelease
This command was introduced in a release earlier than Release 7.6.7.6
The following example shows how to debug 802.11 management interface events:(Cisco Controller) >debug dot11 mgmt interface
debug dot11 mgmt msgTo configure debugging of 802.11 management messages, use the debug dot11 mgmt msg command.
debug dot11 mgmt msg
Syntax Description This command has no arguments or keywords.
Command Default None
Command History ModificationRelease
This command was introduced in a release earlier than Release 7.6.7.6
This example shows how to debug dot11 management messages:(Cisco Controller) >debug dot11 mgmt msg
debug dot11 mgmt ssidTo configure debugging of 802.11 SSID management events, use the debug dot11 mgmt ssid command.
debug dot11 mgmt ssid
Syntax Description This command has no arguments or keywords.
Command Default None
Command History ModificationRelease
This command was introduced in a release earlier than Release 7.6.7.6
The following example shows how to configure the debugging of 802.11 SSID management events:(Cisco Controller) >debug dot11 mgmt ssid
debug dot11 mgmt state-machineTo configure debugging of the 802.11 state machine, use the debug dot11 mgmt state-machine command.
debug dot11 mgmt state-machine
Syntax Description This command has no arguments or keywords.
CLI Commands842
CLI Commandsdebug dot11 mgmt msg

Command Default None
Command History ModificationRelease
This command was introduced in a release earlier than Release 7.6.7.6
The following example shows how to configure the debugging of 802.11 state machine:(Cisco Controller) >debug dot11 mgmt state-machine
debug dot11 mgmt stationTo configure the debugging of the management station settings, use the debug dot11mgmt station command.
debug dot11 mgmt station
Syntax Description This command has no arguments or keywords.
Command Default None
Command History ModificationRelease
This command was introduced in a release earlier than Release 7.6.7.6
The following example shows how to configure the debugging of the management station settings:(Cisco Controller) >debug dot11 mgmt station
debug dot1xTo configure the debugging of 802.1X, use the debug dot1x command.
debug dot1x {aaa | all | events | packet | states} {enable | disable}
Syntax Description Configures the debugging of 802.1X AAAinteractions.
aaa
Configures the debugging of all 802.1X messages.all
Configures the debugging of 802.1X events.events
Configures the debugging of 802.1X mobile statetransitions.
packet
Configures the debugging of 802.1X mobile statetransitions.
states
Enables the 802.1X debugging.enable
Disables the 802.1X debugging.disable
Command Default None
CLI Commands843
CLI Commandsdebug dot11 mgmt station

Command History ModificationRelease
This command was introduced in a release earlier than Release 7.6.7.6
This example shows how to enable the debugging of 802.1X mobile state transitions:(Cisco Controller) >debug dot1x states enable
This example shows how to disable the debugging of all 802.1X interactions:
> debug dot1x all disable
Related Commands debug disable-all
debug dot11
debug dot11 mgmt interface
debug dot11 mgmt msg
debug dot11 mgmt ssid
debug dot11 mgmt state-machine
debug dot11 mgmt station
debug groupTo configure the debugging of access point groups, use the debug group command.
debug group {enable | disable}
Syntax Description Enables the debugging of access point groups.enable
Disables the debugging of access point groups.disable
Command Default None
Command History ModificationRelease
This commandwas introduced in a release earlier thanRelease 7.6.
7.6
The following example shows how to enable the debugging of access point groups:
(Cisco Controller) >debug group enable
debug flexconnect aaaTo configure debugging of FlexConnect backup RADIUS server events or errors, use the debug flexconnectaaa command.
debug flexconnect aaa {event | error} {enable | disable}
CLI Commands844
CLI Commandsdebug group

Syntax Description Configures the debugging for FlexConnect RADIUSserver events.
event
Configures the debugging for FlexConnect RADIUSserver errors.
error
Enables the debugging of FlexConnect RADIUSserver settings.
enable
Disables the debugging of FlexConnect RADIUSserver settings.
disable
Command Default None
Command History ModificationRelease
This command was introduced in a release earlier than Release 7.6.7.6
The following example shows how to enable the debugging of FlexConnect RADIUS server events:(Cisco Controller) >debug flexconnect aaa event enable
debug flexconnect aclConfigures debugging of FlexConnect access control lists (ACLs), use the debug flexconnect acl command.
debug flexconnect acl {enable | disable}
Syntax Description Enables the debugging of FlexConnect ACLs.enable
Disables the debugging of FlexConnect ACLs.disable
Command Default None
Command History ModificationRelease
This command was introduced in a release earlier than Release 7.6.7.6
The following example shows how to enable the debugging of FlexConnect ACLs:(Cisco Controller) >debug flexconnect acl enable
debug flexconnect cckmConfigure debugging of FlexConnect Cisco Centralized Key Management (CCKM) fast roaming, use thedebug flexconnect cckm command.
debug flexconnect cckm {enable | disable}
CLI Commands845
CLI Commandsdebug flexconnect acl

Syntax Description Enables the debugging of FlexConnect CCKM fastroaming settings.
enable
Disables the debugging of FlexConnect CCKM fastroaming settings.
disable
Command Default None
Command History ModificationRelease
This command was introduced in a release earlier than Release 7.6.7.6
The following example shows how to enable the debugging of FlexConnect CCKM fast roamingevents:(Cisco Controller) >debug flexconnect cckm event enable
debug flexconnect groupTo configure debugging of FlexConnect access point groups, use the debug flexconnect group command.
debug flexconnect group {enable | disable}
Syntax Description Enables the debugging of FlexConnect access pointgroups.
enable
Disables the debugging of FlexConnect access pointgroups.
disable
Command Default None
Command History ModificationRelease
This command was introduced in a release earlier than Release 7.6.7.6
The following example shows how to enable the debugging of FlexConnect access point groups:(Cisco Controller) >debug flexconnect group enable
debug hotspotTo configure debugging of HotSpot events or packets, use the debug hotspot command.
debug hotspot {events | packets} {enable | disable} {enable | disable}
Syntax Description Configures debugging of HotSpot events.events
Configures debugging of HotSpot packets.packets
Enables the debugging of HotSpot options.enable
CLI Commands846
CLI Commandsdebug flexconnect group
Disables the debugging of HotSpot options.disable
Command Default None
Command History ModificationRelease
This command was introduced in a release earlier than Release 7.6.7.6
The following example shows how to enable debugging of hotspot events:(Cisco Controller) >debug hotspot events enable
debug hotspot packetsTo configure the debugging of HotSpot packets, use the debug hotspot packets command.
debug hotspot packets {enable | disable}
Syntax Description Enables the debugging of HotSpot packets.enable
Disables the debugging of HotSpot packets.disable
Command Default None
Command History ModificationRelease
This command was introduced in a release earlier than Release 7.6.7.6
The following example shows how to enable the debugging of HotSpot packets:(Cisco Controller) >debug hotspot packets enable
debug l2ageTo configure the debugging of Layer 2 age timeout messages, use the debug l2age command.
debug l2age {enable | disable}
Syntax Description Enables the debugging of Layer2 age settings.enable
Disables the debugging Layer2 age settings.disable
Command Default None
Command History ModificationRelease
This command was introduced in a release earlier than Release 7.6.7.6
The following example shows how to enable the debugging of Layer2 age settings:
CLI Commands847
CLI Commandsdebug hotspot packets
(Cisco Controller) > debug l2age enable
Related Commands debug disable-all
debug lwapp console cliTo configure the debugging of the access point console CLI, use the debug lwapp console cli command fromthe access point console port.
debug lwapp console cli
Syntax Description This command has no arguments or keywords.
Command Default None
Command History ModificationRelease
This commandwas introduced in a release earlier thanRelease 7.6.
7.6
Usage Guidelines This access point CLI command must be entered from the access point console port.
The following example shows how to configure the debugging of the access point console:
AP# debug lwapp console cliLWAPP console CLI allow/disallow debugging is on
debug macTo configure the debugging of the client MAC address, use the debug mac command.
debug mac {disable | addrMAC}
Syntax Description Disables the debugging of the client using the MACaddress.
disable
Configures the debugging of the client using theMACaddress.
addr
MAC address of the client.MAC
Command Default None
Command History ModificationRelease
This command was introduced in a release earlier than Release 7.6.7.6
The following example shows how to configure the debugging of the client using the MAC address:
CLI Commands848
CLI Commandsdebug lwapp console cli

(Cisco Controller) > debug mac addr 00.0c.41.07.33.a6
Related Commands debug disable-all
debug media-streamTo configure the debugging of media stream, use the debug media-stream command.
debugmedia-stream{admission | config | errors | event | history | rrc} {enable | disable}
Syntax Description Configures the debugging of the media streamadmission.
admission
Configures the debugging of the media streamconfiguration.
config
Configures the debugging of the media stream errors.errors
Configures the debugging of the media stream events.event
Configures the debugging of the media stream history.history
Configures the debugging of the media stream radioresource management.
rrc
Enables the debugging of the media stream.enable
Disables the debugging of the media stream.disable
Command Default None.
This example shows how to enable the debugging of the media stream history:
> debug media-stream history enable
Related Commands show media-stream group summary
config media-stream multicast direct
debug memoryTo enable or disable the debugging of errors or events during the memory allocation of the Cisco WLC, usethe debug memory command.
debug memory {errors | events} {enable | disable}
Syntax Description Configures the debugging of memory leak errors.errors
Configures debugging of memory leak events.events
Enables the debugging of memory leak events.enable
CLI Commands849
CLI Commandsdebug media-stream
Disables the debugging of memory leak events.disable
Command Default By default, the debugging of errors or events during the memory allocation of the Cisco WLC is disabled.
Command History ModificationRelease
This command was introduced in a release earlier than Release 7.6.7.6
The following example shows how to enable the debugging of memory leak events:
(Cisco Controller) > debug memory events enable
Related Commands config memory monitor errors
show memory monitor
config memory monitor leaks
debug mesh securityTo configure the debugging of mesh security issues, use the debug mesh security command.
debug mesh security {all | events | errors} {enable | disable}
Syntax Description Configures the debugging of all mesh securitymessages.
all
Configures the debugging of mesh security eventmessages.
events
Configures the debugging of mesh security errormessages.
errors
Enables the debugging of mesh security errormessages.
enable
Disables the debugging of mesh security errormessages.
disable
Command Default None
Command History ModificationRelease
This command was introduced in a release earlier than Release 7.6.7.6
The following example shows how to enable the debugging of mesh security error messages:(Cisco Controller) >debug mesh security errors enable
CLI Commands850
CLI Commandsdebug mesh security

debug mobilityTo configure the debugging of wireless mobility, use the debug mobility command.
debug mobility {ap-list | config | directory | dtls | handoff | keep-alive | multicast |packet | peer-ip IP-address | pmk | pmtu-discovery | redha} {enable | disable}
Syntax Description Configures the debugging of wireless mobility accesspoint list.
ap-list
Configures the debugging of wireless mobilityconfiguration.
config
Configures the debugging of wireless mobility errormessages.
directory
Configures the debugging of wireless mobilityDatagram Transport Layer Security (DTLS) options.
dtls
Configures the debugging of wirelessmobility handoffmessages.
handoff
Configures the debugging of wireless mobilityCAPWAP data DTLS keep-alive packets.
keep-alive
Configures the debugging of multicast mobilitypackets.
multicast
Configures the debugging of wireless mobilitypackets.
packet
Configures IP address of the mobility peer for whichincoming and outgoing mobility messages should bedisplayed.
peer-ip
IP address of the mobility peer for which incomingand outgoing mobility messages should be displayed.
IP-address
Configures the debugging of wireless mobilitypairwise master key (PMK).
pmk
Configures the debugging of the wireless mobilitypath MTU discovery.
pmtu-discovery
Configures the debugging of the multicast mobilityhigh availability.
redha
Enables the debugging of the wireless mobilityfeature.
enable
Disables the debugging of the wireless mobilityfeature.
disable
CLI Commands851
CLI Commandsdebug mobility
Command Default None
Command History ModificationRelease
This commandwas introduced in a release earlier thanRelease 7.6.
7.6
This command supports both IPv4 and IPv6 addressformats.
8.0
The following example shows how to enable the debugging of wireless mobility packets.
(Cisco Controller) >debug mobility handoff enable
debug nacTo configure the debugging of Network Access Control (NAC), use the debug nac command.
debug nac {events | packet} {enable | disable}
Syntax Description Configures the debugging of NAC events.events
Configures the debugging of NAC packets.packet
Enables the NAC debugging.enable
Disables the NAC debugging.disable
Command Default None
Command History ModificationRelease
This commandwas introduced in a release earlier thanRelease 7.6.
7.6
The following example shows how to enable the debugging of NAC settings:
(Cisco Controller) > debug nac events enable
Related Commands show nac statistics
show nac summary
config guest-lan nac
config wlan nac
debug nmspTo configure the debugging of theNetworkMobility Services Protocol (NMSP), use the debug nmsp command.
CLI Commands852
CLI Commandsdebug nac
debug nmsp {all | connection | detail | error | event | message | packet}
Syntax Description Configures the debugging for all NMSP messages.all
Configures the debugging for NMSP connectionevents.
connection
Configures the debugging for NMSP events in detail.detail
Configures the debugging for NMSP error messages.error
Configures the debugging for NMSP events.event
Configures the debugging for NMSP transmit andreceive messages.
message
Configures the debugging for NMSP packet events.packet
Command Default None
Command History ModificationRelease
This command was introduced in a release earlier than Release 7.6.7.6
The following example shows how to configure the debugging of NMSP connection events:
(Cisco Controller) > debug nmsp connection
Related Commands clear nmsp statistics
debug disable-all
config nmsp notify-interval measurement
debug ntpTo configure the debugging of the Network Time Protocol (NTP), use the debug ntp command.
debug ntp {detail | low | packet} {enable | disable}
Syntax Description Configures the debugging of detailed NTPmessages.detail
Configures the debugging of NTP messages.low
Configures the debugging of NTP packets.packet
Enables the NTP debugging.enable
Disables the NTP debugging.disable
Command Default None
CLI Commands853
CLI Commandsdebug ntp

Command History ModificationRelease
This command was introduced in a release earlier than Release 7.6.7.6
The following example shows how to enable the debugging of NTP settings:
(Cisco Controller) > debug ntp packet enable
Related Commands debug disable-all
debug packet errorTo configure debugging of the packets sent to the CiscoWireless LANController (WLC) CPU , use the debugpacket error command.
debug packet error {enable | disable}
Syntax Description Enables debugging of the packets sent to the Cisco WLC CPU.enable
Disables debugging of the packets sent to the Cisco WLC CPU.disable
Command Default None
Command History ModificationRelease
This command was introduced in a release earlier than Release 7.6.7.6
The following example shows how to enable the debugging of the packets sent to the Cisco WLCCPU:
(Cisco Controller) > debug packet error enable
debug packet loggingTo configure logging of the packets sent to the Cisco Wireless LAN Controller CPU, use the debug packetlogging command.
debug packet logging {acl | disable | enable {rx | tx | all} packet_count display_size |format {hex2pcap | text2pcap}}
debug packet logging acl {clear-all | driver rule_index action npu_encap port | eoip-eth rule_indexaction dst src type vlan | eoip-ip rule_index action src dst proto src_port dst_port | eth rule_index actiondst src type vlan | ip rule_index action src dst proto src_port dst_port | lwapp-dot11rule_index actiondst src bssid type | lwapp-ip rule_index action src dst proto src_port dst_port}
Syntax Description Filters the displayed packets according to a rule.acl
Disables logging of all the packets.disable
CLI Commands854
CLI Commandsdebug packet error

Enables logging of all the packets.enable
Displays all the received packets.rx
Displays all the transmitted packets.tx
Displays both the transmitted and the received packets.all
Maximum number of packets to be logged. The range is from 1 to65535. The default value is 25.
packet_count
Number of bytes to be displayed when printing a packet. By default,the entire packet is displayed.
display_size
Configures the format of the debug output.format
Configures the output format to be compatible with the hex2pcapformat. The standard format used by Cisco IOS supports the useof hex2pcap and can be decoded using an HTML front end.
hex2pcap
Configures the output format to be compatible with the text2pcapformat. In this format, the sequence of packets can be decoded fromthe same console log file. .
text2pcap
Clears all the existing rules pertaining to the packets.clear-all
Filters the packets based on an incoming port or a NetworkProcessing Unit (NPU) encapsulation type.
driver
Index of the rule that is a value between 1 and 6 (inclusive).rule_index
Action for the rule, which can be permit, deny, or disable.action
NPU encapsulation type that determines how the packets arefiltered. The possible values are dhcp, dot11-mgmt, dot11-probe,dot1x, eoip-ping, iapp, ip, lwapp, multicast, orphan-from-sta,orphan-to-sta, rbcp, wired-guest, or any.
npu_encap
Physical port for packet transmission or reception.port
Filters packets based on the Ethernet II header in the Ethernet overIP (EoIP) payload.
eoip-eth
Destination MAC address.dst
Source MAC address.src
Two-byte type code, such as 0x800 for IP, 0x806 for AddressResolution Protocol (ARP). You can also enter a few commonstring values such as ip (for 0x800) or arp (for 0x806).
type
Two-byte VLAN identifier.vlan
Filters packets based on the IP header in the EoIP payload.eoip-ip
CLI Commands855
CLI Commandsdebug packet logging

Protocol. Valide values are: ip, icmp, igmp, ggp, ipencap, st, tcp,egp, pup, udp, hmp, xns-idp, rdp, iso-tp4, xtp, ddp, idpr-cmtp, rspf,vmtp, ospf, ipip, and encap.
proto
User Datagram Protocol or Transmission Control Protocol (UDPor TCP) two-byte source port, such as telnet, 23 , or any. The CiscoWLC supports the following strings: tcpmux, echo, discard, systat,daytime, netstat, qotd, msp, chargen, ftp-data, ftp, fsp, ssh, telnet,smtp, time, rlp, nameserver, whois, re-mail-ck, domain, mtp, bootps,bootpc, tftp, gopher, rje, finger, www, link, kerberos, supdup,hostnames, iso-tsap, csnet-ns, 3com-tsmux, rtelnet, pop-2, pop-3,sunrpc, auth, sftp, uucp-path, nntp, ntp, netbios-ns, netbios-dgm,netbios-ssn, imap2, snmp, snmp-trap, cmip-man, cmip-agent, xdmcp,nextstep, bgp, prospero, irc, smux, at-rtmp, at-nbp, at-echo, at-zis,qmtp, z3950, ipx, imap3, ulistserv, https, snpp, saft, npmp-local,npmp-gui, and hmmp-ind.
src_port
UDP or TCP two-byte destination port, such as telnet, 23, or any.The CiscoWLC supports the same strings as those for the src_port.
dst_port
Filters packets based on the values in the Ethernet II header.eth
Filters packets based on the values in the IP header.ip
Filters packets based on the 802.11 header in the LightweightAccess Point Protocol (LWAPP) payload.
lwapp-dot11
Basic Service Set Identifier of the VLAN.bssid
Filters packets based on the IP header in the LWAPP payload.lwapp-ip
Command Default None
Command History ModificationRelease
This command was introduced in a release earlier than Release 7.6.7.6
The following example shows how to enable logging of a packet:
(Cisco Controller) > debug packet logging enable
debug pemTo configure debugging of the access policy manager, use the debug pem command.
debug pem {events | state} {enable | disable}
Syntax Description Configures the debugging of the policy managerevents.
events
CLI Commands856
CLI Commandsdebug pem

Configures the debugging of the policy manager statemachine.
state
Enables the debugging of the access policy manager.enable
Disables the debugging of the access policy manager.disable
Command Default None
Command History ModificationRelease
This command was introduced in a release earlier than Release 7.6.7.6
The following example shows how to enable the debugging of the access policy manager:(Cisco Controller) >debug pem state enable
debug pmTo configure the debugging of the security policy manager module, use the debug pm command.
debug pm {all disable | {config | hwcrypto | ikemsg | init | list | message | pki | rng| rules | sa-export | sa-import | ssh-l2tp | ssh-appgw | ssh-engine | ssh-int | ssh-pmgr| ssh-ppp | ssh-tcp} {enable | disable}}
Syntax Description Disables all debugging in the policy manager module.all disable
Configures the debugging of the policy managerconfiguration.
config
Configures the debugging of hardware offload events.hwcrypto
Configures the debugging of Internet Key Exchange(IKE) messages.
ikemsg
Configures the debugging of policy managerinitialization events.
init
Configures the debugging of policy manager listmgmt.
list
Configures the debugging of policy manager messagequeue events.
message
Configures the debugging of Public Key Infrastructure(PKI) related events.
pki
Configures the debugging of random numbergeneration.
rng
Configures the debugging of Layer 3 policy events.rules
Configures the debugging of SA export (mobility).sa-export
CLI Commands857
CLI Commandsdebug pm
Configures the debugging of SA import (mobility).sa-import
Configures the debugging of policy manager Layer 2Tunneling Protocol (l2TP) handling.
ssh-l2tp
Configures the debugging of application gateways.ssh-appgw
Configures the debugging of the policy managerengine.
ssh-engine
Configures the debugging of the policy managerintercepter.
ssh-int
Configures the debugging of the policy manager.ssh-pmgr
Configures the debugging of policy manager PointTo Point Protocol (PPP) handling.
ssh-ppp
Configures the debugging of policy manager TCPhandling.
ssh-tcp
Enables the debugging.enable
Disables the debugging.disable
Command Default None
Command History ModificationRelease
This commandwas introduced in a release earlier thanRelease 7.6.
7.6
The following example shows how to configure the debugging of PKI-related events:
(Cisco Controller) > debug pm pki enable
Related Commands debug disable-all
debug poeTo configure the debugging of Power over Ethernet (PoE), use the debug poe command.
debug poe {detail | message | error} {enable | disable}
Syntax Description Configures the debugging of PoE detail logs.detail
Configures the debugging of PoE error logs.error
Configures the debugging of PoE messages.message
Enables the debugging of PoE logs.enable
CLI Commands858
CLI Commandsdebug poe

Disables the debugging of PoE logs.disable
Command Default None
Command History ModificationRelease
This command was introduced in a release earlier than Release 7.6.7.6
The following example shows how to enable the PoE debugging:
(Cisco Controller) > debug poe message enable
Related Commands debug disable-all
debug profilingTo configure the debugging of client profiling, use the debug profiling command.
debug profiling {enable | disable}
Syntax Description Enables the debugging of client profiling (HTTP and DHCP profiling).enable
Disables the debugging of client profiling (HTTP and DHCP profiling).disable
Command Default Disabled.
Command History ModificationRelease
This command was introduced in a release earlier than Release 7.6.7.6
The following example shows how to enable the debugging of client profiling:(Cisco Controller) >debug profiling enable
debug rbcpTo configure Router Blade Control (RBCP) debug options, use the debug rbcp command.
debug rbcp {all | detail | errors | packet} {enable | disable}
Syntax Description Configures the debugging of RBCP.all
Configures the debugging of RBCP detail.detail
Configures the debugging of RBCP errors.errors
Configures the debugging of RBCP packet trace.packet
Enables the RBCP debugging.enable
CLI Commands859
CLI Commandsdebug profiling

Disables the RBCP debugging.disable
Command Default None
The following example shows how to enable the debugging of RBCP settings:
(Cisco Controller) > debug rbcp packet enable
Related Commands debug disable-all
debug rfacTo configure the debugging of the Redundancy Framework (RFAC), use the debug rfac command.
debug rfac {[packet | events | errors | detail] [enable | disable]}
Syntax Description Configures the debugging of Redundancy Framework packets.packet
Configures the debugging of Redundancy Framework events.events
Configures the debugging of Redundancy Framework errors.errors
Configures the debugging of Redundancy Framework details.detail
(Optional) Enables the debugging of Redundancy Framework.enable
(Optional) Disables the debugging of Redundancy Framework.disable
Command Default None
Command History ModificationRelease
This commandwas introduced in a release earlier thanRelease 7.6.
7.6
The following example shows how to enable the debugging of Redundancy Framework packets:(Cisco Controller) >debug rfac packet enable
debug rfidTo configure radio frequency identification (RFID) debug options, use the debug rfid command.
debug rfid {all | detail | errors | nmsp | receive} {enable | disable}
Syntax Description Configures the debugging of all RFID.all
Configures the debugging of RFID detail.detail
Configures the debugging of RFID error messages.errors
CLI Commands860
CLI Commandsdebug rfac

Configures the debugging of RFIDNetworkMobilityServices Protocol (NMSP) messages.
nmsp
Configures the debugging of incoming RFID tagmessages.
receive
Enables the RFID debugging.enable
Disables the RFID debugging.disable
Command Default None
The following example shows how to enable the debugging of RFID error messages:
(Cisco Controller) > debug rfid errors enable
Related Commands debug disable-all
debug rmgrTo configure the debugging of Redundancy Manager (RMGR), use the debug rmgr command.
debug rmgr {packet | events | errors | detail} {enable | disable}
Syntax Description Configures the debugging of RedundancyManager packets.packet
Configures the debugging of Redundancy Manager events.events
Configures the debugging of Redundancy Manager errors.errors
Configures the debugging of Redundancy Manager details.detail
Enables the debugging of Redundancy Manager.enable
Disables the debugging of Redundancy Manager.disable
Command Default None
Command History ModificationRelease
This commandwas introduced in a release earlier thanRelease 7.6.
7.6
Usage Guidelines Redundancy Manager determines the role of the Cisco WLCs, maintains the keepalive messages between thepeers, and initiates the switchover.
The following example shows how to enable the debugging of Redundancy Manager packets:(Cisco Controller) >debug rmgr packet enable
CLI Commands861
CLI Commandsdebug rmgr

debug rsyncmgrTo configure the debugging of the Redundancy Sync Manager (RSYNCMGR), use the debug rsyncmgrcommand.
debug rsyncmgr {packet | events | errors | detail} {enable | disable}}
Syntax Description Configures the debugging of Redundancy Sync Managerpackets.
packet
Configures the debugging of Redundancy Sync Managerevents.
events
Configures the debugging of Redundancy Sync Managererrors.
errors
Configures the debugging of Redundancy Sync Managerdetails.
detail
Enables the debugging of Redundancy Sync Manager.enable
Stops the debugging Redundancy Sync Manager.disable
Command Default None
Command History ModificationRelease
This commandwas introduced in a release earlier thanRelease 7.6.
7.6
Usage Guidelines Redundancy SynchronizationManager synchronizes the configurations of the active and standby CiscoWLCs.
The following example shows how to enable the debugging of Redundancy Sync Manager packets:(Cisco Controller) >debug rsyncmgr packet enable
debug service ap-monitorTo debug the access point monitor service, use the debug service ap-monitor command.
debug service ap-monitor {all | error | event | nmsp | packet} {enable | disable}
Syntax Description Configures the debugging of all access point statusmessages.
all
Configures the debugging of access point monitorerror events.
error
Configures the debugging of access point monitorevents.
event
CLI Commands862
CLI Commandsdebug rsyncmgr

Configures the debugging of access point monitorNetwork Mobility Services Protocol (NMSP) events.
nmsp
Configures the debugging of access point monitorpackets.
packet
Enables the debugging for access point monitorservice.
enable
Disables the debugging for access point monitorservice.
disable
Command Default None
Command History ModificationRelease
This commandwas introduced in a release earlier thanRelease 7.6.
7.6
The following example shows how to configure the debugging of access point monitor NMSP events:
(Cisco Controller) >debug service ap-monitor events
debug snmpTo configure SNMP debug options, use the debug snmp command.
debug snmp {agent | all | mib | trap} {enable | disable}
Syntax Description Configures the debugging of the SNMP agent.agent
Configures the debugging of all SNMP messages.all
Configures the debugging of the SNMP MIB.mib
Configures the debugging of SNMP traps.trap
Enables the SNMP debugging.enable
Disables the SNMP debugging.disable
Command Default None
The following example shows how to enable the SNMP debugging:
(Cisco Controller) > debug snmp trap enable
Related Commands debug disable-all
CLI Commands863
CLI Commandsdebug snmp
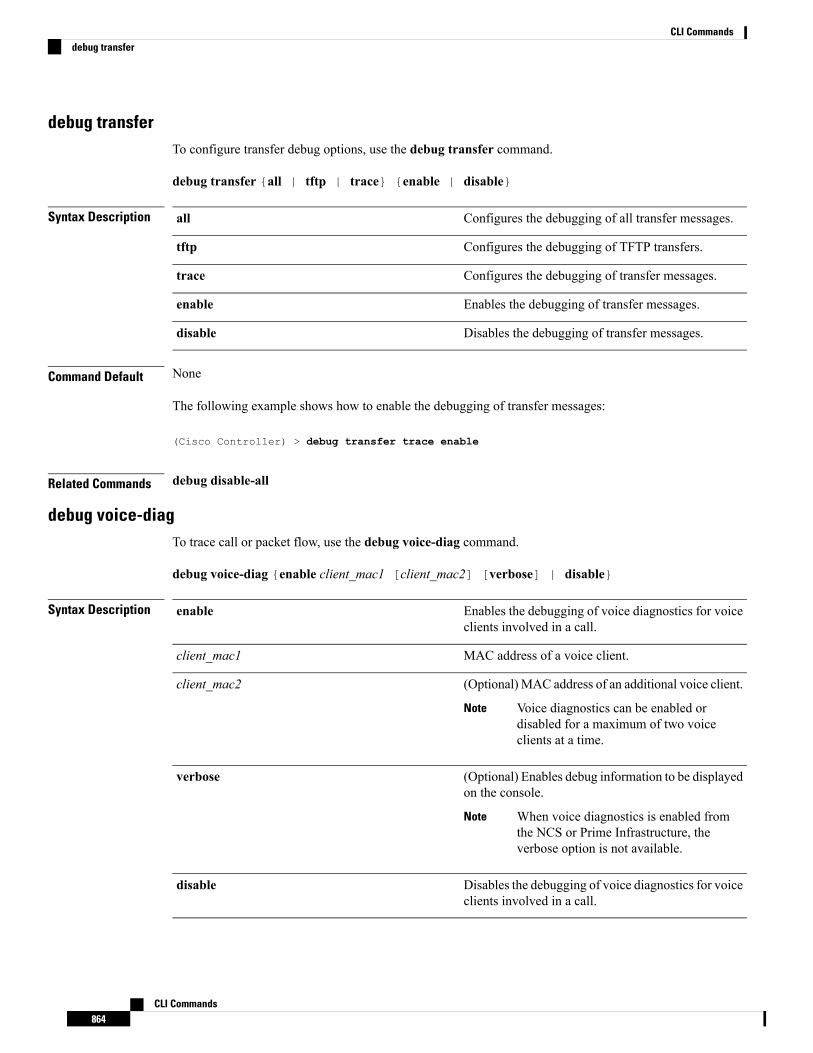
debug transferTo configure transfer debug options, use the debug transfer command.
debug transfer {all | tftp | trace} {enable | disable}
Syntax Description Configures the debugging of all transfer messages.all
Configures the debugging of TFTP transfers.tftp
Configures the debugging of transfer messages.trace
Enables the debugging of transfer messages.enable
Disables the debugging of transfer messages.disable
Command Default None
The following example shows how to enable the debugging of transfer messages:
(Cisco Controller) > debug transfer trace enable
Related Commands debug disable-all
debug voice-diagTo trace call or packet flow, use the debug voice-diag command.
debug voice-diag {enable client_mac1 [client_mac2] [verbose] | disable}
Syntax Description Enables the debugging of voice diagnostics for voiceclients involved in a call.
enable
MAC address of a voice client.client_mac1
(Optional) MAC address of an additional voice client.
Voice diagnostics can be enabled ordisabled for a maximum of two voiceclients at a time.
Note
client_mac2
(Optional) Enables debug information to be displayedon the console.
When voice diagnostics is enabled fromthe NCS or Prime Infrastructure, theverbose option is not available.
Note
verbose
Disables the debugging of voice diagnostics for voiceclients involved in a call.
disable
CLI Commands864
CLI Commandsdebug transfer

Command Default None
Usage Guidelines Follow these guidelines when you use the debug voice-diag command:
• When the command is entered, the validity of the clients is not checked.
• A few output messages of the command are sent to the NCS or Prime Infrastructure.
• The command expires automatically after 60 minutes.
• The command provides the details of the call flow between a pair of client MACs involved in an activecall.
Voice diagnostics can be enabled for a maximum of two voice clients at a time.Note
The following example shows how to enable transfer/upgrade settings:
(Cisco Controller) > debug voice-diag enable 00:1a:a1:92:b9:5c 00:1a:a1:92:b5:9c verbose
Related Commands show client voice-diag
show client calls
debug web-authTo configure debugging of web-authenticated clients, use the debug web-auth command.
debug web-auth {redirect{ enable mac mac_address | disable} | webportal-server {enable |disable}}
Syntax Description Configures debugging of web-authenticated and redirectedclients.
redirect
Enables the debugging of web-authenticated clients.enable
Configures the MAC address of the web-authenticated client.mac
MAC address of the web-authenticated client.mac_address
Disables the debugging of web-authenticated clients.disable
Configures the debugging of portal authentication of clients.webportal-server
Command Default None
Command History ModificationRelease
This commandwas introduced in a release earlier thanRelease 7.6.
7.6
CLI Commands865
CLI Commandsdebug web-auth

The following example shows how to enable the debugging of a web authenticated and redirectedclient:(Cisco Controller) > debug web-auth redirect enable mac xx:xx:xx:xx:xx:xx
debug wcpTo configure the debugging of WLAN Control Protocol (WCP), use the debug wcp command.
debug wcp {events | packet} {enable | disable}
Syntax Description Configures the debugging of WCP events.events
Configures the debugging of WCP packets.packet
Enables the debugging of WCP settings.enable
Disables the debugging of WCP settings.disable
Command Default None
Command History ModificationRelease
This command was introduced in a release earlier than Release 7.6.7.6
The following example shows how to enable the debugging of WCP settings:(Cisco Controller) >debug wcp packet enable
debug wps sigTo configure the debugging of Wireless Provisioning Service (WPS) signature settings, use the debug wpssig command.
debug wps sig {enable | disable}
Syntax Description Enables the debugging for WPS settings.enable
Disables the debugging for WPS settings.disable
Command Default None
Command History ModificationRelease
This commandwas introduced in a release earlier thanRelease 7.6.
7.6
The following example shows how to enable the debugging of WPS signature settings:
(Cisco Controller) > debug wps sig enable
CLI Commands866
CLI Commandsdebug wcp

Related Commands debug wps mfp
debug disable-all
debug wps mfpTo configure the debugging of WPS Management Frame Protection (MFP) settings, use the debug wps mfpcommand.
debug wps mfp {client | capwap | detail | report | mm} {enable | disable}
Syntax Description Configures the debugging for client MFP messages.client
Configures the debugging forMFPmessages betweenthe controller and access points.
capwap
Configures the detailed debugging forMFPmessages.detail
Configures the debugging for MFP reporting.report
Configures the debugging for MFP mobility(inter-Cisco WLC) messages.
mm
Enables the debugging for WPS MFP settings.enable
Disables the debugging for WPS MFP settings.disable
Command Default None
Command History ModificationRelease
This commandwas introduced in a release earlier thanRelease 7.6.
7.6
The following example shows how to enable the debugging of WPS MFP settings:
(Cisco Controller) > debug wps mfp detail enable
Related Commands debug disable-all
debug wps sig
epingTo test the mobility Ethernet over IP (EoIP) data packet communication between two Cisco WLCs, use theeping command.
eping mobility_peer_IP_address
Syntax Description IP address of a controller that belongs to a mobilitygroup.
mobility_peer_IP_address
CLI Commands867
CLI Commandsdebug wps mfp

Command Default None
Command History ModificationRelease
This commandwas introduced in a release earlier thanRelease 7.6.
7.6
This command supports only IPv4 address format.8.0
Usage Guidelines This command tests the mobility data traffic over the management interface.
This ping test is not Internet Control Message Protocol (ICMP) based. The term “ping” is used to indicate anecho request and an echo reply message.
Note
The following example shows how to test EoIP data packets and to set the IP address of a controllerthat belongs to a mobility group to 172.12.35.31:
(Cisco Controller) >eping 172.12.35.31
mpingTo test mobility UDP control packet communication between two Cisco WLCs, use themping command.
mping mobility_peer_IP_address
Syntax Description IP address of a controller that belongs to a mobilitygroup.
mobility_peer_IP_address
Command Default None
Command History ModificationRelease
This commandwas introduced in a release earlier thanRelease 7.6.
7.6
This command supports both IPv4 and IPv6 addressformats.
8.0
Usage Guidelines This test runs over mobility UDP port 16666. It tests whether the mobility control packet can be reached overthe management interface.
This ping test is not Internet Control Message Protocol (ICMP) based. The term “ping” is used to indicate anecho request and an echo reply message.
Note
CLI Commands868
CLI Commandsmping

The following example shows how to test mobility UDP control packet communications and to setthe IP address of a Cisco WLC that belongs to a mobility group to 172.12.35.31:
(Cisco Controller) >mping 172.12.35.31
CLI Commands869
CLI Commandsmping

CLI Commands870
CLI Commandsmping